
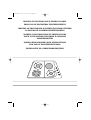
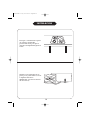
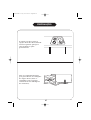
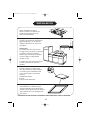
MANUAL DE INSTALACION E INSTRUCCIONES
PARA USO DE ENCIMERAS INDEPENDIENTES
MANUAL DE INSTALAÇÃO E INSTRUÇÕES PARA UTILIZAR
AS PLACAS DE COZINHA INDEPENDENTES
MANUEL D’INSTALLATION ET INSTRUCTIONS
POUR L’UTILISATION DE TABLES À CUISSSON
INDÉPENDANTES
INSTALLATION MANUAL AND INSTRUCTIONS
FOR USE OF INDEPENDENT HOBS
INSTALLATIE EN GEBRUIKSAANWIJZING
C60T052A1 13/1/04 14:27 Página 1
Pagina wordt geladen...

APUESTE CON NOSOTROS POR LA ECOLOGÍA. RECICLE EL EMBALAJE.
Colaboramos en la defensa del Medio Ambiente. Por esta razón, nuestros
embalajes:
• Son 100% reciclables.
• Tienen la menor cantidad de piezas y material posible para facilitar
así el reciclado.
PARIEZ AVEC NOUS POUR L’ECOLOGIE. RECYCLEZ L’EMBALLAGE.
Nous travaillons en faveur de l’Environnement. C’est pour ça, que nos
emballages:
• Sont 100% recyclables.
• Ont la moindre quantité de pièces et du matèriel pour rendre plus facile
leur recyclage.
BET WITH US ON ECOLOGY. RECYCLE THE PACKAGING.
We contribute in the defence of the Environment. Thus our packagins:
• Are 100% recyclable.
• Contain the smaller quantity of parts and possible material to facilitate
thus the recycling.
APOSTE CONNOSCO PELA ECOLOGIA. RECICLE A EMBALAGEM.
Colaboramos na defensa do Meio Ambiente. Por esse motivo, as nossas
embalagens:
• São 100% reciclavels.
• Têm a menor quantidade de peças e material possivel para facilitar a
reciclagem.
HELP MEE OM SAMEN MET ONS HET MILIEU TE BESCHERMEN.
RECYCLE DE VERPAKKING
Wij maken ons sterk voor het Milieu. Om deze reden zijn onze verpakkingen:
• 100% recycleerbaar
• Vervaardigd met zo min mogelijk onderdelen en materialen waardoor die
beter en makkelijker gerycled kunnen worden.
C60T052A1 13/1/04 14:27 Página 3

ESPAÑOL
Manual de INSTRUCCIONES ..............................................Pág 3
PORTUGUES
Manual de instruções ...................................................... Pag 17
FRANCAIS
Manuel d´instructions .................................................... Page 28
ENGLISH
Operating instructions .................................................. Page 39
NEDERLANDS
Gebruiksaanwijzing.........................................................Pag 50
C60T052A1 13/1/04 14:27 Página 4
Pagina wordt geladen...

4
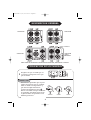
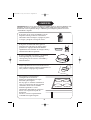
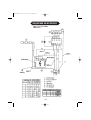
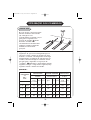
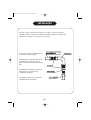
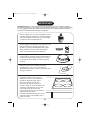
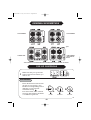
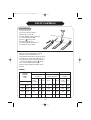
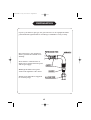
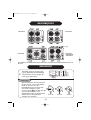
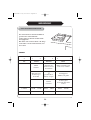
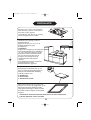
DESCRIPCION GENERAL
UTILIZACION DE LOS MANDOS
Asegúrese de que el mando que va
a accionar, corresponde al foco que
quiera utilizar.
4 FOCOS GAS
CERRADO MAXIMO MINIMO
4 FOCOS GAS
5 FOCOS GAS 3 FOCOS GAS
1 FOCO
ELECTRICO
Seleccione el quemador que mejor se
adapte al recipiente que va a utilizar.
Púlse el mando correspondiente y
gire hacia la izquierda hasta la
posición de máxima potencia .
Para su encendido acerque una cerilla
al quemador. A su discrección puede
regular la llama del quemador a sus
distintas posiciones.
1
FOCOS GAS
en Cristal
ESTA GAMA DE ENCIMERAS PUEDEN SER EN INOXIDABLE, ESMALTADA O CRISTAL
C60T052A1 13/1/04 14:27 Página 6

5
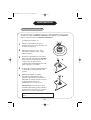
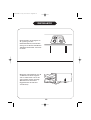
UTILIZACION DE LOS MANDOS
Si su encimera dispone de
encendido automático (A), pulse el
mando correspondiente y gire
hacia la izquierda hasta la posición
de encendido , en ese momento
se encenderá automaticamente. A
su discreción podrá regular la llama
del quemador a sus distintas
posiciones.
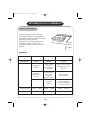
FOCOS GAS
TABLA 1
Algunas encimeras llevan incorporado un
sistema de seguridad “B”, dicho sistema
tiene la ventaja, que si en algún momento la
llama se apaga sin cerrar el mando, corta
automáticamente el paso del gas. Para su
encendido pulse el mando y gire hacia la
izquierda hasta la posición de encendido
mantenga unos segundos hasta que el
termopar de seguridad mantenga
la llama en el quemador.
POTENCIA
QUEMADORES
en kW
s/Hs
GAS NATURAL
Presión
20 mbar
Max. Min.
1/h
15ºC
1013 mbar
Iny
1/h
15ºC
1013 mbar
Iny
By-pass
gr/h
Iny
By-pass
1,00 0,30 95 72
97
115
135
167
286
343
39
48
62
90
73 50
65
85
96
128
219
262
227 145
165
260
290
397
680
817
27
31
42
60
1,75 0,44
3,00 0,75
3,60 1,50
Presión
8 mbar
Presión
28-30/37 mbar
BUTANO-PROPANO GAS CIUDAD
C60T052A1 13/1/04 14:27 Página 7

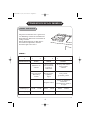
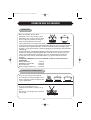
UTILIZACION DE LOS MANDOS
TABLA 2
6
FOCOS ELECTRICOS
012345 6
DESCONECTADO SUAVE
Mantener en
caliente
135 W 165 W1.500 W.p. rojo
2.000 W.p. rojo
175 W 220 W
Preparar salsas
delicadas y
cremas
MEDIO
Cocer y asar
carnes blancas,
pescados,
embutidos
250 W 165 W
300 W 220 W
Hervir patatas,
legumbre,
sopas
Preparar salsas
FUERTE
Cocer y asar carnes
rojas, picadas,
tortillas
750 W 1500 W
1150 W 2000 W
Freir patatas,
pescados, pastas
Poner en ebullición
cantidades
relativamente grandes
de agua
MINIMO MAXIMO
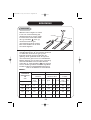
Las placas eléctricas tienen 6 posiciones,
con distintas potencias de calentamiento.
En la tabla 2 le damos una orientación de
estas potencias.
Para su funcionamiento, podrá girar el
botón hacia la izquierda, o hacia la
derecha según como desee.
C60T052A1 13/1/04 14:27 Página 8
Pagina wordt geladen...
Pagina wordt geladen...
Pagina wordt geladen...
Pagina wordt geladen...

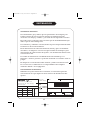
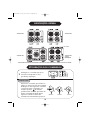
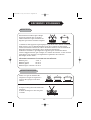
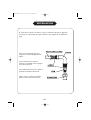
ACOMETIDA ELECTRICA
Las encimeras de gas y mixtas, que van provistas de una mangera para
realizar a través de ésta la conexión eléctrica, la instalación puede
efectuarse con clavija y enchufe, o por medio de una regleta de conexión.
En los dos casos, es preciso tener en cuenta que la intensidad mínima que
debe soportar es de 10 Amperios.
Los elementos y cables de conexión, deben soportar temperaturas de 80ºC
sin deterioro de sus características.
En las instalaciones de todas las encimeras, mixtas y gas con encendido
automático, es obligatorio colocar en lugar accesible un interruptor para
desconexión de todas las fases del aparato, con una distancia mínima entre
contactos de 3 mm.
Si el cable de alimentación está dañado debe ser sustituido por el
fabricante o servicio posventa o personal autorizado con el fin de evitar un
peligro.
Es obligatorio la conexión del cable amarillo y verde a una buena tierra.
De no hacer esto, el fabricante no se responsabiliza ente cualquier
accidente debido a esta negligencia.
CARACTERISTICAS TECNICAS
Adherida en la parte inferior de la encimera, se encuentra la placa de
características en la que figura los datos técnicos de identificación del
aparato.
11
INSTALACION
CAT II 2H3+ (ES, PT), CAT II 1a2H (ES)
CAT II 2E+3+ (FR)
FAGOR
TIPO
kW kW MAX.
220-240V
˜
50 Hz
V
Made in EU
Nº CODIGO Nº SERIE
DENOMIN
COMERC MODEL
GAS
Bº SAN ANDRES S/N APDO. 49 E-20500
B/P
GN
GN (FR)
PRES. (mbar)
28-30/37
20
20/25
Qn POT MAX
637
g/h
l/h
l/h
l/h
Hs
kW
833
833
GN (ES) 8 1934
C60T052A1 13/1/04 14:27 Página 13
Pagina wordt geladen...

13
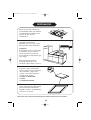
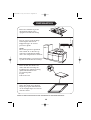
INSTALACION
Coloque a continuación la placa
en el hueco del mueble,
presionando bien para que la
junta de estanquidad haga buen
cierre.
Amarre los 4 enganches de la
placa por la parte inferior, en las
4 esquinas del hueco.
(Enganches y tuercas en bolsas
de accesorios).
C60T052A1 13/1/04 14:27 Página 15

14
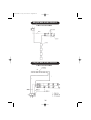
ESQUEMA ELECTRICO
3 Gas con encendido
1 Eléctrico
C60T052A1 13/1/04 14:27 Página 16

15
ESQUEMA ELECTRICO
3 Gas sin encendido
1 Eléctrico
C60T052A1 13/1/04 14:27 Página 17

16
ESQUEMA ELECTRICO
ESQUEMA ELECTRICO
4 Gas con encendido
5 Gas con encendido
C60T052A1 13/1/04 14:27 Página 18
Pagina wordt geladen...

18
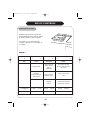
DESCRIÇÃO GERAL
UTILIZAÇÃO DOS COMANDOS
Verifique se o comando que V. vai
accionar corresponde ao foco
que deseja empregar.
4 FOCOS GÁS
CERRADO MÁXIMO MINIMO
4 FOCOS GÁS
5 FOCOS GÁS 3 FOCOS GÁS
1 FOCO
ELÉCTRICO
Seleccione a fornalha que melhor se
adapte ao recipiente que V. vai utilizar.
Carregue no seu respectivo comando
e faça girar para a esquerda, até
atingir a posição de máxima
potência. Para acender, aproxime um
fósforo à fornalha. Poderá depois
regular à vontade a chama da
fornalha, nas suas diversas posições.
1
FOCOS GÁS
ESTA GAMA DE PLACAS SUPERIORES PODE SER DE AÇO INOXIDAVEL, ESMALTADA OU DE VIDRO.
de vidrio
C60T052A1 13/1/04 14:27 Página 20

19
UTILIZAÇÃO DOS COMANDOS
No caso de que a sua placa tenha
sistema automático de acender
(A), carregue no seu
correspondente comando e faça-o
girar para a esquerda, até à
posição de acender. Nesse
momento acender-se-à
automàticamente. Poderá então
regular à vontade a chama da
fornalha, nas suas várias
posições.
FOCOS GÁS
QUADRO 1
Algumas placas incluem um sistema de
segurança “B”, que tem a vantágem de que, se
em certa ocasião a chama se apagar sem estar
fechado o comando, esse dispositivo interrompe
imediatamente a passágem do gás. Para que se
acenda,V. deverá carregar no comando e fazer
que gire para a esquerda, até à posição de
“acender”. Mantenha-o assim durante alguns
segundos, até que o temporar de segurança seja
capaz de manter a chama na fornalha.
POTÊNCIA
FORNALHAS
em
KW –
S/HS
GAS NATURAL
Pressão
20 mbar
Max. Min.
1/h
15ºC
1013 mbar
Iny
1/h
15ºC
1013 mbar
Iny
By-pass
gr/h
Iny
By-pass
1,00 0,30 95 72
97
115
135
167
286
343
39
48
62
90
73 50
65
85
96
128
219
262
227 145
165
260
290
397
680
817
27
31
42
60
1,75 0,44
3,00 0,75
3,60 1,50
Pressão
8 mbar
Pressão
28-30/37 mbar
BUTANO-PROPANO GAS CIDADE
C60T052A1 13/1/04 14:27 Página 21

UTILIZAÇÃO DOS COMANDOS
QUADRO 2
20
FOCOS ELÉCTRICOS
012345 6
DESLIGADO SUAVE
Conservar
Quente
135 W 165 W
175 W 220 W
2.000 W.p.Verm
1.500 W.p.Verm
Preparar
molhos finos e
crèmes
MEDIO
Cozer e assar
carnes
brancas, peixe
e enchidos
250 W 500 W
300 W 850 W
Cozer batatas,
grão, feijão,
lentilhas;
preparar sopas
Preparar
molhos
FOERTE
Cozer e assar carnes
vermelhas, picadas e
omelettes
750 W 1500 W
1150 W 2000 W
Fritar batatas,
peixe e pastas
Levar a ebulição
porções relativamente
elevadas de água
MINIMO MÁXIMO
As placas eléctricas têm 6 posições,
com várias potências de aquecimento.
No quadro 2 oferecemos una orientação
referente a estas potências.
Para que entre em funcionamento,V.
poderá fazer girar o botão para a
esquerda ou para a direita, conforme
desejar.
C60T052A1 13/1/04 14:27 Página 22

21
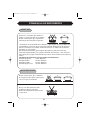
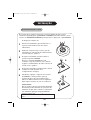
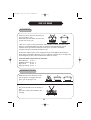
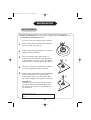
UTILIZAÇãO DE RECIPIENTES
FOCOS GÁS
Preste atenção para que o diâmetro
do recipiente seja igual ou maior que
o do foco que V. vai utilizar.
“A utilização de un aparelho de cozimento a gás implica que se produza calor
e humidade no local em que se encontre instalado. Assegure-se de que haja
uma boa ventilação na cozinha, mantenha abertos os orifícios de ventilação
mecânica, se esta existir”.
Una utilización intensiva y prolongada del aparato puede necesitar una
iareación suplementaria, por ejemplo abriendo una ventana, o una aireación
más eficaz, por ejemplo aumentando la potencia de la ventilación mecánica, si
existe”.
RECIPIENTES MÍNIMOS A UTILIZAR SOBRE AS FORNALHAS
Fornalha pequena 9 cms. diâmetro
Fornalha média 12 cms. diâmetro
Fornalha grande 14 cms. diâmetro
Fornalha tripla coroa 18 cms. diâmetro
O foco não deve funcionar sem
nenhum recipiente em cima.
A base do recipiente deverá ser lisa
e estar seca.
FOCOS ELÉCTRICOS
Seleccione a fornalha que melhor se
adapte ao recipiente que V. vai utilizar.
Preste atenção para que a chama não
sobressaia das arestas do recipiente.
C60T052A1 13/1/04 14:27 Página 23
Pagina wordt geladen...
Pagina wordt geladen...
Pagina wordt geladen...

CONEXÃO ELÉCTRICA
As placas de gás e as mixtas estão equipadas com uma manga, para que
através desta se efectúe a conexão eléctrica. A instalação poderá efectuar-
se com cavilha e tomada de corrente, ou com uma regleta de conexão.
Em ambos os casos, é necessário ter em conta que a intensidade mínima
que deve suportar é de 10 Ampères.
Os elementos e os cabos de conexão devem suportar temperaturas de 80
ºC, sem que as suas características se deteriorem.
Nas instalações de todas as placas mixtas e a gás com sistema de acender
automático, é obligatório que se situe num lugar acessível um interruptor
de desconexão de todas as fases do aparelho, com a distância mínima de 3
mm. entre os contactos.
Com o fim de evitar um perigo, no caso de que o cabo de alimentação se
encontre danificado, deverá este ser substituído pelo fabricante, pelo
serviço de post-venda ou por pessoal autorizado.
É obrigatório ligar o cabo amarelho e verde a uma tomada de terra.
Caso contrario, o fabricante não assumiria qualquier responsabilidade
quanto a qualquier acidente produzido por tal negligência.
CARACTERÍSTICAS TÉCNICAS
Fixada na zona inferior da placa, acha-se a placa de características, na qual
se encontram os dados técnicos de identificação do aparelho.
25
INSTALAÇÃO
CAT II 2H3+ (ES, PT), CAT II 1a2H (ES)
CAT II 2E+3+ (FR)
FAGOR
TIPO
kW kW MAX
220-240V
˜
50 Hz
V
Made in EU
Nº CODIGO Nº SERIE
DENOMIN
COMERC MODEL
GAS
Bº SAN ANDRES S/N APDO. 49 E-20500
B/P
GN
GN (FR)
PRES. (mbar)
28-30/37
20
20/25
Qn POT MAX
637
g/h
l/h
l/h
l/h
Hs
kW
833
833
GN (ES) 8 1934
C60T052A1 13/1/04 14:27 Página 27
Pagina wordt geladen...

27
INSTALAÇÃO
A seguir, coloque a placa no
espaço aberto do móvel, fazendo
uma forte pressão, para que a
junta isolante se ajuste
perfeitamente.
Fixe os 4 enganches da placa
pela parte interna, nos 4 ângulos
do espaço aberto (tanto os
enganches, como as porcas
encontram-se nas embalágens
de acessórios).
C60T052A1 13/1/04 14:27 Página 29
Pagina wordt geladen...

29
DESCRIPTION GÉNÉRALE
UTILISATION DES COMMANDES
Assurez-vous que la commande que
vous allez actionner correspond bien
au foyer que vous voulez utiliser.
4 FOYERS GAZ
5 FOYERS GAZ
4 FOYERS GAZ
FERMÉ
MÁXIMUM MINIMUM
3 FOYERS GAZ
1FOYER
ÉLECTRIQUE
Sélectionnez le brûleur le mieux
adapté au récipient que vous allez
utiliser. Poussez la commande
correspondante et tournez-la à
gauche jusqu’à la position de
maximum. Pour l’allumage
rapprochez une allumette au brûleur.
Vous pouvez régler á volonté la
flamme du brûleur
aux différentes positions.
1
FOYER À GAZ
en verre
CETTE GAMME DE PLANS DE TRAVAIL PEUT ETRE EN INOX, EMAILLE OU EN VERRE.
C60T052A1 13/1/04 14:27 Página 31

30
UTILISATION DES COMMANDES
Si votre table à cuisson a une
allumage automatique, (A)
poussez la commande
correspondante et tournez-la à
gauche jusqu’à la position
d’allumage. En ce moment-là, elle
s’allumera automatiquement.
Vous pouvez régler á volonté la
flamme du brûleur aux positions
différentes.
FOYER À GAZ
TABLE 1
Quelques tables sont munies avec un système
de sécurité “B”. L’avantage de ce système est
que si jamais la flamme s’éteind sans que la
commande soit fermée, il coupe le passage
du gaz. Pour l’allumage, poussez la
commande et tournez-la à gauche jusqu’à la
position d’allumage. Veillez la maintenir
pendant quelques secondes jusque le
thermocouple de sécurité retienne la flamme
dans le brûleur.
PUISSANCE
BRÛLEURS
KW –
S/HS
GAZ NATUREL
Pression
20 mbar
Max. Min.
1/h
15ºC
1013 mbar
Iny
1/h
15ºC
1013 mbar
Iny
By-pass
gr/h
Iny
By-pass
1,00 0,30 95 72
97
115
135
167
286
343
39
48
62
90
73 50
65
85
96
128
219
262
227 145
165
260
290
397
680
817
27
31
42
60
1,75 0,44
3,00 0,75
3,60 1,50
Pression
8 mbar
Pression
28-30/37 mbar
BUTANE-PROPANE GAZ VILLE
C60T052A1 13/1/04 14:27 Página 32

UTILISATION DES COMMANDES
TABLE 2
31
FOYERS ÉLECTRIQUES
012345 6
ARRÊTÉ DOUX
Garder au
chaud
135 W 165 W
175 W 220 W
1.500W.p.rouge
2.000W.p.rouge
Préparer des
sauces des
crèmes
MOYEN
Cuire ou rôtir
viandes,
blanches,
poissons,
charcuterie.
250 W 500 W
300 W 850 W
Bouillir des
pommes de
terre, légumes,
soupes
Préparer des
sauces
FORT
Cuire et rôtir viandes
rouges hachées,
omelettes
750 W 1500 W
1150 W 2000 W
Frire des pommes de
terre poissons, cuire
de pâtes.
Porter en ébullition
des quantités
relativement grandes
d’eau
MINIMUM MÁXIMUM
Les plaques électriques ont 6
positions avec des différentes
puissances de chauffage.Vous
pouvez trouver ci-dessous le
tableau 2 avec un guide de ces
puissances.
Pour la mettre en marche, tournez la
commande à gauche ou à droite,
comme vous désirez.
C60T052A1 13/1/04 14:27 Página 33
Pagina wordt geladen...
Pagina wordt geladen...
Pagina wordt geladen...
Pagina wordt geladen...

BRANCHEMENT AU RÉSEAU
Les tables à cuisson mixtes et de gaz qui sont munis avec un câble pour
faire la connexion électrique. On peut faire l’installation à l’aide du
cheville/fiche et une prise, ou en utilisant une réglette de connexion.
Dans les deux cas, il faut tenir compte que l’ intensité minimale à supporter
est de 10 ampères.
Les élements et câbles de connexion doivent supporter températures du 80º
sans que ses caractéristiques soient endommagées.
Dans les installations de toutes les plaques, mixtes et gaz avec d’allumage
automatique, est obligatoire d’installer un interrupteur dans un endroit
accessible pour pouvoir déconnecter toutes les phases de l’appareil, avec
une distance minimale de 3 mm entre les contacts.
Si le cable d’alimentation est endommage, il doit être remplacé par le
constructeur, le service aprés-vente ou le personnel agrée afin d’éviter tout
danger.
Il est obligatoire la connexion du câble jaune et vert à une bonne prise de
terre.
Dans le cas oú ces instructions ne seraient pas suivies, le fabricant décline
toute responsabilité en cas d’accident en raison de néglicence.
CARACTÉRISTIQUES TECHNIQUES
La plaque de caractéristiques avec tous les données techniques
d’identification de l’appareil est adhérée sur la partie inférieure de la
tables à cuisson.
36
INSTALLATION
CAT II 2H3+ (ES, PT), CAT II 1a2H (ES)
CAT II 2E+3+ (FR)
FAGOR
TIPO
kW kW MAX
220-240V
˜
50 Hz
V
Made in EU
Nº CODIGO Nº SERIE
DENOMIN
COMERC MODEL
GAS
Bº SAN ANDRES S/N APDO. 49 E-20500
B/P
GN
GN (FR)
PRES. (mbar)
28/30/37
20
20/25
Qn POT MAX
637
g/h
l/h
l/h
l/h
Hs
kW
833
833
GN (ES) 8 1934
C60T052A1 13/1/04 14:27 Página 38
Pagina wordt geladen...
Pagina wordt geladen...
Pagina wordt geladen...

40
GENERAL DESCRIPTION
USE OF CONTROLS
Make sure that you operate the
right control for the burner you
wish to use
4 GAS BURNERS 4 GAS BURNERS
5 FOYERS GAZ
CLOSED
MÁXIMUM MINIMUM
3 GAS BURNERS
1 ELECTRICAL
PLATE
Select the burner that best suits
the pan you are going to use.
Press the corresponding control
and turn it to the left until
maximum setting.
To lit the burner, close a match.
You may then regulate the flame
to its different positions.
1
GAS BURNERS
glass
THIS RANGE OF COUNTERTOPS MAY BE STAINLESS STEEL, ENAMEL OR GLASS.
C60T052A1 13/1/04 14:27 Página 42

41
USE OF CONTROLS
If your top has automatic
ignition (A), press the
corresponding control and turn
it to the left until the ON
position. Then, it will
automatically turn on.
You may regulate the flame of
the burners as you wish.
GAS BURNERS
TABLE 1
Some tops have a built-in safety
system “B”. The advantage of such
system is that if the flame ever
extinguishes without the control being
closed, it cuts off the gas passage. To
lit it again, press the control and turn it
to the left until ON position. Keep
for a few seconds until safety
thermocouple holds the flame in the
burner.
POWER
BURNERS
in KW –
S/HS
NATURAL GAS
Pressure
20 mbar
Max. Min.
1/h
15ºC
1013 mbar
Iny
1/h
15ºC
1013 mbar
Iny
By-pass
gr/h
Iny
By-pass
1,00 0,30 95 72
97
115
135
167
286
343
39
48
62
90
73 50
65
85
96
128
219
262
227 145
165
260
290
397
680
817
27
31
42
60
1,75 0,44
3,00 0,75
3,60 1,50
Pressure
8 mbar
Pressure
28-30/37 mbar
BUTANE-PROPANE TOWN’S GAS
C60T052A1 13/1/04 14:27 Página 43

USE OF CONTROLS
TABLE 2
42
ELECTRICAL PLATES
012345 6
OFF LOW
Keep warm
135 W 165 W
175 W 220 W
2.000W.p.Hot
1.500W.p.Hot
Prepare
delicate sauces
and cremes
MEDIUM
Boil and roast
white meats,
fish or
puddings.
250 W 500 W
300 W 850 W
Boil potatoes,
pulses, soups
Prepare
sauces
HIGH
Boil and roast red
meats, minced meat,
omelettes.
750 W 1500 W
1150 W 2000 W
Fry potatoes, fish,
pasta.
Boil relatively large
quantities of water
MINIMUM MÁXIMUM
Electrical plates have 6 positions
giving different heat outputs. Table
2, gives a guide to these outputs.
To operate it, you may turn the
control to the left or to the right, as
you wish.
C60T052A1 13/1/04 14:27 Página 44
Pagina wordt geladen...
Pagina wordt geladen...
Pagina wordt geladen...
Pagina wordt geladen...

SERVICE WIRES
The installation in mixed and gas tops provided with a sleeve which is used
to perform the electrical connection can be done with pins and plugs, or by
means of a connecting strip.
In both cases, it should be taken into account that the minimum current it
must bear is 10 amperes.
Connecting elements and wires must bear temperatures of 80ºC without
their features being worn down.
In all mixed and gas top installations with automatic ignition, we advise to
place a switch in an accessible spot to isolate all equipment’s phases, with at
least 3 mm clearence between contacts.
If the power feed wire is damaged, it must be replaced by the manufacturer,
by the after-sales service or by.
There must be a good grounding connection of the red and yellow wires.
Otherwise, the makers will no accpet responsibility for possible accidents
as a result of carelessness.
TECHNICAL FEATURES
The characteristics plate is attached to the bottom of the top, where we can
find all identification technical data of the equipment.
47
INSTALLATION
CAT II 2H3+ (ES, PT), CAT II 1a2H (ES)
CAT II 2E+3+ (FR)
FAGOR
TIPO
kW kW MAX
220-240V
˜
50 Hz
V
Made in EU
Nº CODIGO Nº SERIE
DENOMIN
COMERC MODEL
GAS
Bº SAN ANDRES S/N APDO. 49 E-20500
B/P
GN
GN (FR)
PRES. (mbar)
28-30-37
20
20/25
Qn POT MAX
637
g/h
l/h
l/h
l/h
Hs
kW
833
833
GN (ES) 8 1934
C60T052A1 13/1/04 14:27 Página 49
Pagina wordt geladen...

49
INSTALLATION
Then, place the hob in the cavity
in the woktop. Press down tightly
so that sealing joint is perfectly
closed.
Fix the 4 clamps underneath the
hob to the corresponding 4
corners of the cavity. (Clamps
and nuts are supplied in the
accessory bag).
C60T052A1 13/1/04 14:27 Página 51

INHOUDSOPGAVE
Beschrijving van het product ..................................... 51
Bedieningstoetsen.......................................................52
Gebruik van de pannen ..............................................54
Reiniging ................................................................... 55
Installatie ................................................................... 56
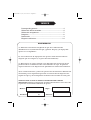
WAARSCHUWING
Merk: Type:
50
a) "Verzeker u er voor de installatie van het apparaat van dat de plaatselijke
distributie (gassoort en gasdruk) compatibel is met de insteldruk van het
apparaat".
b) "De insteldruk van dit apparaat wordt vermeld op het bijgeleverde
eitket (of op de gegevensplaat)".
c) "Dit apparaat is niet aangesloten op een afvoerleiding voor
verbrandingsprodukten. Dat moet gebeuren volgens de geldende
regelgeving. Er wordt daarbij speciaal gelet op de richtlijnen inzake
ventilatie.
d) De elektrische aansluiting en alle handelingen die ten behoeve van de
installatie verricht worden, moeten worden uitgevoerd door een erkende
monteur die op de hoogte is van de geldende wettelijke bepalingen, en van
de normen die in de landen heersen.
APPARAAT TYPE ‘X’VOOR DE BESCHERMINGSGRAAD TEGEN BRAND.Vul
de volgende ... van de handleiding in met de gegevens op de plaat die aan
het apparaat is gehecht.
w
Spanning:
Max.
vermogen
C60T052A1 13/1/04 14:27 Página 52

51
BESCHRIJVING
BEDIENING
Verzeker U ervan dat knop die
u gaat gebruiken daadwerkelijk
overeenstemt met de gaspit die
u wilt gaan gebruiken.
4 GASPITTEN
GESLOTEN MAXIMUM MINIMUM
4 GASPITTEN
5 GASPITTEN 3 GASPITTEN
1 ELECTRISCHE
KOOKPLAAT
Kies de brander die het best past
bij de pan die u gaat gebruiken.
Druk op de toets van de
betreffende gaspit en draai die
naar links totdat die op de
hoogste stand staat. Om dat gas
aan te steken houdt u een
brandende lucifer bij de brander.
U kunt daarna de gewenste
vlamgrootte instellen.
1
GASPITTEN
in glas
DIT GAMMA AAN KOOKPLATEN WORDT GELEVERD IN ROESTVRIJ EN GEEMAILLEERD STAAL, OF
IN GLAS.
C60T052A1 13/1/04 14:27 Página 53

Sommige kookplaten zijn voorzien van een
veiligheidssysteem "B", dat systeem heeft het
voordeel dat, wanneer het gas op een
bepaald moment uitgaat zonder dat de
gasknop dicht gedraaid werd, dit systeem
automatisch de gastoevoer zal onderbreken.
Om dit systeem aan te zetten moet u de knop
daarvan indrukken en naar links draaien
totdat die op vonkontsteking staat, daarna
moet u die knop enkele seconden ingedrukt
houden totdat het veiligheidsthermokoppel
vlam in de brander in stand houdt.
52
BEDIENING
Wanneer uw kookplaat voorzien
is van een vonkontsteking (A),
druk dan de knop van de gaspit
in en draai die naar links totdat
die op ontsteken staat, op
dat moment zal het gas
automatisch aangaan. Daarna
kunt u de sterkte van de vlam
naar wens regelen.
GASPITTEN
TABEL 1
VERMOGEN
BRANDERS IN
kW
s/Hs
AARDGAS
Druk
20 mbar
Max. Min.
1/h
15ºC
1013 mbar
Iny
1/h
15ºC
1013 mbar
Iny
By-pass
gr/h
Iny
By-pass
1,00 0,30 95 72
97
115
135
167
286
343
39
48
62
90
73 50
65
85
96
128
219
262
227 145
165
260
290
397
680
817
27
31
42
60
1,75 0,44
3,00 0,75
3,60 1,50
Druk
8 mbar
Druk
28-30/37 mbar
BUTAAN-PROPAAN STADSGAS
C60T052A1 13/1/04 14:27 Página 54

BEDIENING
TABEL 2
53
ELECTRISCHE KOOKPLATEN
012345 6
UIT ZACHT
Warm
houden
135 W 165 W
175 W 220 W
2.000 W.
1.500 W.
Om sauzen en
cremesoep te
bereiden
MIDDEN
Koken en
branden van
wit vlees,vis en
vleeswaren
250 W 500 W
300 W 850 W
Aardappelen
en
peulvruchten
koken, soepen
Sauzen
bereiden
HARD
Koken en braden van
rood vlees, tortilla’s
750 W 1500 W
1150 W 2000 W
Aardappelen
bakken, vis, pasta
Relatief grote
hoeveelheden water
koken
MINIMUM MAXIMUM
De electrische kookzones hebben 6
posities met verschillende
vermogens. In tabel 2 worden deze
weergegeven.
Om deze aan te zetten kunt u de knop
naar links of naar rechts draaien, net
wat u wilt.
C60T052A1 13/1/04 14:27 Página 55

54
GEBRUIK VAN DE PANNEN
Kies de brander die het best
geschikt is voor de pan die u gaat
gebruiken. Let goed op dat de vlam
niet voorbij de omtrek van de pan
komt en de zijkanten verwarmt.
GASPITTEN
U moet er goed op letten dat de
doorsnede van de pan gelijk is aan
de doorsnede van de kookplaat die
u gaat gebruiken.
"Het gebruik van een gasfornuis leidt tot de produktie van warmte en
vocht in de ruimte waar die geïnstalleerd is. Daarom moet u erop letten dat
de keuken goed geventileerd is, en de natuurlijke luchtopeningen open
houden, of een mechanisch ontluchtingsapparaat installeren (mechanische
afzuigkap).
Bij een intensief, langdurig gebruik van het apparaat kan extra ventilatie
nodig zijn, die bijvoorbeeld verkregen wordt door het openen van een
raam, of een efficiëntere ventilatie, door de mechanische ontluchting,
mocht die in de ruimte geïnstalleerd zijn, op grotere kracht te laten
werken.
MINIMUM DOORSNEDE VAN DE PANNEN VOOR DE VERSCHILLENDE
BRANDERS.
Kleine brander: 9 cm Ø
Middelgrote brander: 12 cm Ø
Grote brander: 14 cm Ø
Drievoudige vlamkroon: 18 cm Ø
U moet de kookplaat nooit
aanzetten wanneer er geen pan op
staat.
De bodem van de pan moet vlak en
droog zijn.
ELEKTRISCHE KOOKPLATEN
C60T052A1 13/1/04 14:27 Página 56

55
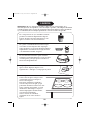
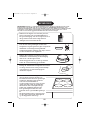
REINIGING
AGUA + JABON
METAL
ARENA
Indien uw kookplaat van roestvrij staal is,
zijn er speciale schoonmaakmiddelen te
koop. Na reiniging van de kookplaat moet u
die goed met ruim water afspoelen en
afdrogen met een zachte doek.
Indien de kookplaat geëmailleerd is, dan
kan die het best gereinigd worden met
zeepwater. In geen geval mogen er bijtende
middelen of schuursponsen gebruikt
worden.Verwijder aanslag met azijn, citroen
en zure stoffen in het algemeen.
Indien de kookplaat voorzien is van een
elektrische vokontsteking en beveiliging
dan moet u de bougies en de
thermokoppels schoon en droog houden
zodat de vonkontsteking goed werkt.
Reinig de elektrische kookplaten met water
en zeep. Daarna moet u de plaat lichtelijk
opwarmen en er met krantenpapier
overheen wrijven.
ESPECIAL
INOX
Om de branders te reinigen moet u
die van de kookplaat afhalen. De
branders kunnen het best gereinigd
worden in kokend water waaraan
een schoonmaakmiddel is
toegevoegd. Zorg ervoor dat er zich
geen vuil afzet rond de gasbuizen,
die kunnen dan namelijk verstopt
raken. De gasbuizen kunnen het
best gereinigd worden met een
penseel dat in oplosmiddel gedoopt
is.
Zet de branders weer op hun plaats
en doe dat zoals wordt aangegeven
op de bijgaande tekening.
WATER+ZEEP
MEETAL
ZAND
BELANGRIJK: Indien u een glazen kookplaat heeft en de plaat is gebroken of un neemt
barsten in het oppervlak waar, moet u het apparaat onmiddellijk uitschakelen en de
technische diens bellen, onder geen beding moet u het schoonmaken of gebruiken. In het
geval dat u een kookplaat van plaatijzer of geëmailleerd staal heeft moet u eerst de
stroomtoevoer naar het apparaat uitschekelen alvorens dat reinigen.
C60T052A1 13/1/04 14:27 Página 57

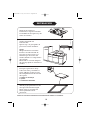
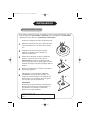
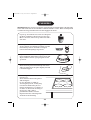
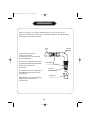
INSTALLATIE
56
Indien u een gas- en electrocombinatie heeft, moet het gas op het
apparaat aangesloten worden met een harde installatie overeenkomstig
de wetgeving in diverse landen.
De gasaansluiting moet
uitgevoerd worden
zoals hiernaast in de tekening
staat aangegeven.
Er moet een afsluitkraan worden
aangebracnt binnen handbereik,
tussen de kookplaat en
het gasnet.
De lasnaden moeten sterk zijn en
de lekdichtheid van het circuit
garanderen.
(Mondstuk, moer en afslutringen
bijgeleverd in de zak met
accessoires)
BUIS
AFSLUITRINGEN
MONDSTUK
KOPEREN BUIS
KNIESTUK
C60T052A1 13/1/04 14:27 Página 58

57
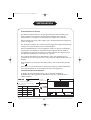
INSTALLATIE
1
2
3
4
5
Indien de door u aangeschafte kookplaat drie, of meer gasbranders
heeft en deze alleen geschikt zijn voor BUTAAN- EN PROPAANGAS,
kunnen deze omgezet worden naar AARDGAS, neem daartoe contact
op met onze TECHNISCHE DIENST.
De omzetting gaat als volgt:
Verwijder de gasbranders, en schroef de
gasbuizen los met een sleutel nummer 7.
Vervang de injecteuren door andere die
geschikt zijn voor aardgas, zoals
aangegeven staat in tabel 1.
Zet de branders weer op hun plaats. steek
de vlam aan zet die op de laagste stand.
Verstel de positie van de stelschroef van
de By-Pass (A of B, afhankelijk van het
type gaskraan) om de minimum
gastoevoer van alle in Tabel 1
gespecificeerde gaskranen te regelen.
Wanneer de omzetting klaar is moet de
lekdichtheid van ieder apparaat
afzonderlijk gecontroleerd worden.
Ten slotte moet het zelfklevende etiket
(C39L0045) zo dicht mogelijk bij de
gegevensplaat worden aangebracht.
Hierop moeten de gegevens van de
nieuwe instelling worden weergegeven.
Dit etiket wordt bij de accessoires
geleverd.
BELANGRIJK: Denk eraan dat
alleen een Erkend Monteur deze
omzetting naar aardgas mag uitvoeren.
Indien dat niet het geval is, stelt de
fabrikant zich niet aansprakelijk voor
eventuele schade.
APPARAAT AANGEPAST AAN......................... GAS p.............................
DATUM.....................................................
OMZETTING VAN HET GAS
C60T052A1 13/1/04 14:27 Página 59

58
INSTALLATIE
ELEKTRISCHE AANSLUITING
De gas- en electrocombinaties die voorzien zijn van een
kabel waarmee de elektrische verbinding van het apparaat kan worden
verricht, de installatie kan gedaan worden met een stekker en een
stopcontact of
met een aansluitblok.
In beide gevallen moet men rekening houden met het feit dat de
minimumspanning die benodigd is 10 ampère bedraagt.
De elementen en de verbindingskabels moeten zonder problemen
temperaturen tot 80ºC kunnen verdragen.
Bij de installatie van alle gaskookplaten en gas- en electrocombinaties,
met een vonkonsteking, raden wij aan binnen handbereik een
schakelaar aan te brengen waarmee het apparaat in alle fasen
uitgeschakeld kan worden, en daarbij een minimumafstand tussen de
contacten van 3 mm in acht te houden.
Indien de voedingskabel beschadigd is moet die om gevaren te
vermijden door de fabrikant, de klantenservice of door bevoegd
personeel vervangen worden.
De gele en de groene kabels moeten een goede aarding hebben .
Wanneer dat niet het geval stelt de fabrikant zich niet aansprakelijk
voor schade die het gevolg is van deze nalatigheid.
TECHNISCHE GEGEVENS
Aan de binnenkant van de kookplaat bevindt zich de gegevensplaat met
daarop alle technische gegevens van het apparaat.
CAT II 2H3+ (ES, PT), CAT II 1a2H (ES)
CAT II 2E+3+ (FR)
FAGOR
TYPE
kW kW MAX
220-240V
˜
50 Hz
V
Made in EU
CODENUMMER SERIENUMMER
NAAM
MODEL
GAS
Bº SAN ANDRES S/N APDO. 49 E-20500
B/P
GN
GN (FR)
PRES. (mbar)
28-30/37
20
20/25
Qn POT MAX
637
g/h
l/h
l/h
l/h
Hs
kW
833
833
GN (ES) 8 1934
C60T052A1 13/1/04 14:27 Página 60

59
INSTALLATIE
Alvorens over te gaan tot de installatie,
verzoeken wij u goed te controleren of
de maten van het apparaat
overeenkomen met die van de opening
waarin dat geplaatst zal worden.
Breng daarna overeenkomstig de
instructies een opening aan in het
keukenmeubilair.
Apparaat van het soort "X" voor de
beschermingsgraad tegen
brandgevaar.
OPMERKING:
Volgens de normgeving is menverplicht
in het keukenmeubilair een afdekplaat
"A" aan te brengen zodat men aan de
binnenkant van het keukenmeubilair
niet in contact kan komen met de
kookplaat, dit vanwege de hoge
temperaturen die daar kunnen
ontstaan.
Deze dekplaten worden aangebracht
nadat de kookplaat in het
keukenmeubilair is geplaatst.
Plaats de plaat ondersteboven op een
tafel. en verwijder het plakstrippen en
breng dan de luchtdichte afsluitstrip
rond de kookplaat aan.
A:WERKTAFEL
B: AFSLUITSTRIP
C: ONDERKANT DEKSEL
Indien de kookplaat niet voorzien is van
een lijst moet u eerst de strippen die op de
hiernaast geplaatste tekening worden
aangegeven aanbrengen, daarna worden
de rechte randen vastgezet met diezelfde
strippen.
150 Máx.
•
•
OPMERKING: GEEN MATERIALEN GEBRUIKEN DIE NIET VERWIJDERD
KUNNEN WORDEN, ZOALS SILICONE.
C60T052A1 13/1/04 14:27 Página 61

60
INSTALLATIE
Plaats daarna de kookplaat in
de opening van het
keukenmeubilair, en druk die
stevig aan zodat de luchtdichte
afsluiting hermetisch vast komt
te zitten.
Breng de vier klemmen aan de
onderkant van de kookplaat
aan en schroef die vast in de
vier hoeken van de opening.
(Klemmen en schroeven
bijgeleverd in de zak met
accessoires)
C60T052A1 13/1/04 14:27 Página 62
Pagina wordt geladen...

1-04 C60T052A1
Impreso en papel reciclado.
Imprasso em papel reciclado
Imprimé sur papier recyclé.
Printed on recycled paper.
Gedrukt op kringlooppapier
C60T052A1 14/1/04 18:34 Página 64
-
 1
1
-
 2
2
-
 3
3
-
 4
4
-
 5
5
-
 6
6
-
 7
7
-
 8
8
-
 9
9
-
 10
10
-
 11
11
-
 12
12
-
 13
13
-
 14
14
-
 15
15
-
 16
16
-
 17
17
-
 18
18
-
 19
19
-
 20
20
-
 21
21
-
 22
22
-
 23
23
-
 24
24
-
 25
25
-
 26
26
-
 27
27
-
 28
28
-
 29
29
-
 30
30
-
 31
31
-
 32
32
-
 33
33
-
 34
34
-
 35
35
-
 36
36
-
 37
37
-
 38
38
-
 39
39
-
 40
40
-
 41
41
-
 42
42
-
 43
43
-
 44
44
-
 45
45
-
 46
46
-
 47
47
-
 48
48
-
 49
49
-
 50
50
-
 51
51
-
 52
52
-
 53
53
-
 54
54
-
 55
55
-
 56
56
-
 57
57
-
 58
58
-
 59
59
-
 60
60
-
 61
61
-
 62
62
-
 63
63
-
 64
64


Fagor 3CFIE-4GLBLA de handleiding
- Type
- de handleiding
- Deze handleiding is ook geschikt voor
in andere talen
- English: Fagor 3CFIE-4GLBLA Owner's manual
- français: Fagor 3CFIE-4GLBLA Le manuel du propriétaire
- español: Fagor 3CFIE-4GLBLA El manual del propietario
- português: Fagor 3CFIE-4GLBLA Manual do proprietário

