
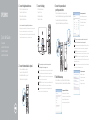
Connect the keyboard and mouse
Sluit het toetsenbord en de muis aan
Connectez le clavier et la souris
Tastatur und Maus anschließen
Collegare la tastiera e il mouse
Connect the network cable—optional
Sluit de netwerkkabel aan - optioneel
Connectez le câble réseau (facultatif)
Netzwerkkabel anschließen – optional
Collegare il cavo di rete (opzionale)
Connect the display
Sluit het beeldscherm aan
Connectez l’écran
Bildschirm anschließen
Collegare lo schermo
1
2
4
3
Snelstartgids
Guide d’information rapide
Schnellstart-Handbuch
Guida introduttiva rapida
NOTE: If you ordered your computer with a discrete graphics card,
connectthe display to the discrete graphics card.
N.B.: Als u uw computer inclusief een discrete grafische kaart heeft gekocht,
sluit u het beeldscherm aan met behulp van de discrete grafische kaart.
REMARQUE : si vous avez acheté votre ordinateur avec une carte graphique
distincte, connectez l’écran à cette dernière.
ANMERKUNG: Wenn Sie einen Computer mit separater Grafikkarte bestellt
haben, schließen Sie den Bildschirm über die separate Grafikkarte an.
N.B.: Se è stato ordinato un computer con una scheda grafica discreta,
connettere lo schermo alla scheda grafica discreta.
See the documentation that shipped with the keyboard and mouse.
Raadpleeg de documentatie die bij het toetsenbord en de muis is meegeleverd.
Reportez-vous à la documentation fournie avec le clavier et la souris.
Weitere Informationen finden Sie in der Dokumentation Ihrer Tastatur und Maus.
Consultare la documentazione fornita con la tastiera e il mouse.
Connect the power cable and
press the power button
Sluit de stroomkabel aan en druk op de aan-uitknop
Connectez le câble d’alimentation et appuyez sur le bouton d’alimentation
Stromkabel anschließen und Betriebsschalter drücken
Collegare il cavo di alimentazione e premere l’Accensione
Quick Start Guide
XPS 8900
Finish Windows setup
Voltooi de Windows-setup | Terminez l’installation de Windows
Windows-Setup abschließen | Terminare l’installazione di Windows
5
Set up password for Windows
Stel wachtwoord voor Windows in
Configurez un mot de passe pour Windows
Kennwort für Windows einrichten
Impostare una password per Windows
Connect to your network
Maak verbinding met uw netwerk
Connectez-vous à votre réseau
Mit dem Netzwerk verbinden
Connettere alla rete
NOTE: If you are connecting to a secured wireless network, enter the
password for the wireless network access when prompted.
N.B.: Als u verbinding maakt met een beveiligd draadloos netwerk, vul dan
het wachtwoord voor het netwerk in wanneer daar om gevraagd wordt.
REMARQUE : si vous vous connectez à un réseau sans fil sécurisé,
saisissez le mot de passe d’accès au réseau sans fil lorsque vous y êtes invité.
ANMERKUNG: Wenn Sie sich mit einem geschützten Wireless-Netzwerk
verbinden, geben Sie das Kennwort für das Wireless-Netzwerk ein, wenn Sie
dazu aufgefordert werden.
N.B.: Se ci si sta connettendo a una rete wireless protetta, inserire la password
di accesso alla rete wireless quando richiesto.
Protect your computer
Beveilig de computer
Protégez votre ordinateur
Computer schützen
Proteggere il computer

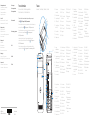
Features
Kenmerken | Caractéristiques | Funktionen | Funzioni
2015-05
1. Media-card
readerlight
2. Media-card reader
3. Optical-drive bays (2)
4. USB 3.0 ports (2)
5. Optical-drive eject
buttons (2)
6. Power button
7. Accessory tray
8. Headphone port
9. Microphone port
10. USB 2.0 port
11. USB 2.0 port with
PowerShare
12. Power port
13. Network port
14. USB 2.0 ports (2)
15. Display port
16. HDMI port
17. USB 3.0 ports (4)
18. Audio ports (6)
19. Expansion-card
slots (4)
20. Security-cable slot
21. Padlock rings
22. Service Tag label
1. Medienkarten-
lesegerät-Anzeige
2. Medienkartenleser
3. Laufwerkschächte
für optisches
Laufwerk (2)
4. USB 3.0-
Anschlüsse (2)
5. Auswurftasten
für das optische
Laufwerk (2)
6. Betriebsschalter
7. Zubehörfach
8. Kopfhöreranschluss
9. Mikrofonanschluss
10. USB 2.0-Anschluss
11. USB 2.0-Anschluss
mit PowerShare
12. Stromanschluss
13. Netzwerkanschluss
14. USB 2.0-
Anschlüsse (2)
15. Bildschirmanschluss
16. HDMI-Anschluss
17. USB 3.0-
Anschlüsse (4)
18. Audioanschlüsse (6)
19. Erweiterungskarten-
steckplätze (4)
20. Sicherheitskabel-
einschub
21. Ringe für
Vorhängeschloss
22. Service-Tag-Etikett
1. Lampje
mediakaartlezer
2. Mediakaartlezer
3. Compartimenten van
optische stations (2)
4. USB 3.0-poorten (2)
5. Uitwerpknoppen
optische stations (2)
6. Aan-/uitknop
7. Accessoirevakje
8. Hoofdtelefoonpoort
9. Microfoonpoort
10. USB 2.0-poort
11. USB 2.0-poort met
PowerShare
12. Netstroompoort
13. Netwerkpoort
14. USB 2.0-poorten (2)
15. Beeldschermpoort
16. HDMI-poort
17. USB 3.0-poorten (4)
18. Audiopoorten (6)
19. Sleuven voor
uitbreidingskaarten (4)
20. Sleuf voor
beveiligingskabel
21. Beugels van hangslot
22. Servicetag
1. Indicatore lettore di
schede multimediali
2. Lettore di schede
multimediali
3. Alloggiamenti
dell’unità ottica (2)
4. Porte USB 3.0 (2)
5. Pulsanti di espulsione
cassetto dell’unità
ottica (2)
6. Accensione
7. Vassoio accessori
8. Porta cuffia
9. Porta microfono
10. Porta USB 2.0
11. Porta USB 2.0 con
PowerShare
12. Porta di alimentazione
13. Porta di rete
14. Porte USB 2.0 (2)
15. Porta dello schermo
16. Porta HDMI
17. Porte USB 3.0 (4)
18. Porte audio (6)
19. Slot delle schede di
espansione (4)
20. Slot cavo di protezione
21. Anelli del lucchetto
22. Etichetta Numero
diservizio
1. Voyant du lecteur
decarte
2. Lecteur de carte
mémoire
3. Baies de lecteur
optique (2)
4. Ports USB 3.0 (2)
5. Boutons d’éjection
de lecteur optique (2)
6. Bouton d’alimentation
7. Plateau accessoire
8. Port écouteurs
9. Port microphone
10. Port USB 2.0
11. Port USB 2.0 avec
PowerShare
12. Port d’alimentation
13. Port réseau
14. Ports USB 2.0 (2)
15. Port d’affichage
16. Port HDMI
17. Ports USB 3.0 (4)
18. Ports audio (6)
19. Logements carte
d’extension (4)
20. Emplacement pour
câble de sécurité
21. Anneaux pour
cadenas
22. Étiquette de numéro
de série
1
2
3
4
9
6
7
8
10
11
5
12
13
14
15
16
17
18
19
20
21
22
Printed in China.
Product support and manuals
Productondersteuning en handleidingen
Support produits et manuels
Produktsupport und Handbücher
Supporto prodotto e manuali
Dell.com/support
Dell.com/support/manuals
Dell.com/support/windows
Contact Dell
Neem contact op met Dell | Contacter Dell
Kontaktaufnahme mit Dell | Contattare Dell
Dell.com/contactdell
Regulatory and safety
Regelgeving en veiligheid
Réglementations et sécurité
Sicherheitshinweise und Zulassungsinformationen
Normative e sicurezza
Dell.com/regulatory_compliance
Regulatory model
Wettelijk model
Modèle réglementaire
Muster-Modellnummer
Modello di conformità alle normative
D14M
Regulatory type
Wettelijk type | Type réglementaire
Muster-Typnummer | Tipo di conformità alle normative
D14M002
Computer model
Computermodel | Modèle de l’ordinateur
Computermodell | Modello del computer
XPS 8900
© 2015 Dell Inc.
© 2015 Microsoft Corporation.
To learn about the features and advanced options available on your computer,
click Start
→ All Programs→ Dell Help Documentation.
Als u meer wilt weten over de functies en geavanceerde opties die beschikbaar zijn op
uw desktop, klikt u op Start
→ Alle programma’s→ Dell Help documentatie.
Pour plus d’informations sur les fonctionnalités et les options avancées disponibles
survotre ordinateur, cliquez sur Démarrer
→ Tous les programmes→
Dell Help Documentation.
Informationen über die auf Ihrem Computer verfügbaren Funktionen und
erweitertenOptionen erhalten Sie durch Klicken auf Start
→ Alle Programme→
Dell Hilfe-Dokumentation.
Per ulteriori informazioni sulle funzioni e sulle opzioni avanzate disponibili sul
computer, fare clic su Start
→ Tutti i programmi→ Documentazione guida Dell.
For more information
Voor meer informatie | Informations supplémentaires
Weitere Informationen | Per ulteriori informazioni
-
 1
1
-
 2
2


in andere talen
- italiano: Dell XPS 8900 Guida Rapida
- français: Dell XPS 8900 Guide de démarrage rapide
- Deutsch: Dell XPS 8900 Schnellstartanleitung