
1
Thank you for your purchase of the Yamaha PX10, PX8, PX5 or PX3 power amplifier. Please read through
this manual carefully before using for the first time, in order to take full advantage of your PX power ampli-
fier’s superlative features and enjoy trouble-free operation for years to come.
After you have read the manual, keep it in a safe, convenient place for reference when needed.
• Please read the PRECAUTIONS on the reverse side of this manual before use.
• The illustrations as shown in this manual are for instructional purposes only.
• The company names and product names used in this manual are the trademarks or registered trademarks
of their respective companies.
• In this manual, the PX10, PX8, PX5 and PX3 power amplifier models are referred to collectively as “PX
amplifier.”
• Unless specified otherwise, the example illustrations used in this manual are taken from the PX10.
• The PX amplifier provides two setting methods: Basic mode and Advanced mode. This manual explains
operations in the Basic mode. Operate in the Advanced mode for detailed settings. For information on the
Advanced mode, refer to the PX10/PX8/ PX5/PX3 Reference Manual.
Features
• Maximum output of 1,000W out of lightweight chassis (PX10)
• Yamaha’s proprietary Class-D and processing technologies provide superb sound quality and high reliability
• Speaker presets that allow you to get the best possible performance from Yamaha speakers
• A wide variety of DSP functions, including D-CONTOUR processing
• CONFIG WIZARD that provides the optimal configuration for any speaker
• Broad range of input/output connectors
Included accessories
•AC power cord
• Owner’s Manual (this leaflet)
• Technical Specifications (English)
• AC plug clamp
•USB cap
The PX amplifier can be used as a normal amplifier by simply setting the volume knobs properly. The fol-
lowing settings enhance the performance of speakers.
The PX10/PX8/ PX5/PX3 Reference Manual is an electronic file in PDF format. You can read this book
on a computer. Use Adobe
®
Reader
®
to read this book on screen, search for words very quickly, print
specific pages, or click links to display sections of special interest. The ability to search for words, or to
follow links directly to relevant sections in the document, are helpful attributes of this electronic file for-
mat. We encourage you to take advantage of these benefits. You can download the latest Adobe Reader
application from the website listed below.
http://www.adobe.com/
In this manual, methods of operations are explained with the following marks.
[(item name)]: Rotate the main knob to select [(item name)].
: Press the Main knob.
: Press the [MENU] key.
: Press the [ ] (back) key.
: Operate A, and then operate B.
A solid arrow ( ) between steps indicates a basic operation procedure, and a dotted arrow ( ) indi-
cates an operation returning to the previous screen.
EN
ZQ41390
Owner’s Manual
CAUTION
Please keep the USB cap out of reach of children,
to keep them from accidentally swallowing it.
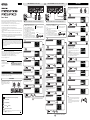
Setup
Pre-installation
Mount PX amplifiers in a rack as required.
Make sure that the power is turned off, and
turn both the two volume knobs all the way
to the left.
CAUTION
Please carry out “Pre-installation” surely. Do not connect any cables while the power is on.
Stereo connection (using two full-range speakers)
Mixer
Full-range speaker
for R channel
Full-range speaker
for L channel
R channel
L channel
1. Connect the full-range speaker for L channel to the
[SPEAKERS] A terminal and the full-range speaker for
R channel to the [SPEAKERS] B terminal.
2. Connect the output from sources (such as a mixer) to
the [INPUT] A/B connectors. Connect the L channel
source to the [INPUT] A connector, and the R channel
source to the [INPUT] B connector.
3. Connect the AC power cord and turn on. First connect the
AC power cord to the connector on the unit, and then plug
it into an appropriate AC power outlet.
4. Secure the AC power cord with the AC plug clamp to pre-
vent accidental disconnection from the connector. Refer to
the “Rear panel” section on the reverse side for instructions on installation.
NOTE
Refer to the “Wiring” section on the reverse
side for instructions on making connections.
AC IN connector
AC power cord
To outlet
HOME screen
MENU screen (top screen)
SP TYPE screen
Speaker selection
Select a speaker to be connected from the shown list.
If the speaker is not in the list, select “GENERIC.”
HPF screen
Select a cutoff frequency of the high pass filter. If
the high pass filter is not used, select “OFF.”
CONFIRMATION screen
[CONFIG WIZARD]
[FULL+FULL]
[(Speaker name)]
[(Cutoff frequency)]
[APPLY]
(Applies the set value)
Go on to the “Tone control” instructions.
CAUTION
Please carry out “Pre-installation” surely. Do not connect any cables while the power is on.
Cross-over connection (using a full-range speaker and a subwoofer)
Mixer
Full-range
speaker
Subwoofer
1. Connect the subwoofer to the [SPEAKERS] A terminal
and the full-range speaker to the [SPEAKERS] B ter-
minal.
2. Connect the output from source (such as mixer) to the
[INPUT] A connector.
3. Connect the AC power cord and turn on. First connect
the AC power cord to the connector on the unit, and then
plug it into an appropriate AC power outlet.
4. Secure the AC power cord with the AC plug clamp to pre-
vent accidental disconnection from the connector. Refer to
“Rear panel” section on the reverse side for instructions on the installation.
NOTE
Refer to “Wiring” section on the reverse side
for instructions on making connections.
AC IN connector
AC power cord
To outlet
HOME screen
MENU screen (top screen)
[CONFIG WIZARD]
SP TYPE screen
[FULL+SUB]
Speaker selection (A)
Select a subwoofer to be connected from the shown
list. If the subwoofer is not in the list, select
“GENERIC.”
[(Speaker name)]
HPF screen
Select a cutoff frequency of the high pass filter of
the subwoofer. If the high pass filter is not used,
select “OFF.”
[(Cutoff frequency)]
Speaker selection (B)
Select a full-range speaker to be connected from the
shown list. If the speaker is not in the list, select
“GENERIC.”
[(Speaker name)]
X-OVER screen
Select a crossover frequency.
[(Crossover frequency)]
CONFIRMATION screen
[APPLY]
(Applies the set value)
Go on to the “Tone control” instructions.
NOTE
• To mute channel A, push the [A] key and the main knob simulta-
neously. To cancel muting, push the [A] key and the main knob
simultaneously again.
• To mute channel B, push the [B] key and the main knob simulta-
neously. To cancel muting, push the [B] key and the main knob
simultaneously again.
Tone Control
Input signal from the source, confirm that the sound is
being output from the speakers, and adjust the volume
appropriately.
MENU screen (top screen)
[TUNING]
TUNING screen
[D-CONTOUR]
D-CONTOUR screen
[MODE]
MODE Selection screen
Select one of the following three modes.
• OFF: Turns off D-CONTOUR.
• FOH/MAIN: Boosts the high and low frequency compo-
nents so that the frequency response is suitable for main
speaker use.
• MONITOR: Reduces the low frequency range, which could
otherwise tend to be boomy if the speaker is set directly on
the floor. This enables you to hear mid and high frequency
ranges clearly when using as a floor monitor.
[(MODE)]
D-CONTOUR screen
[DEPTH]
DEPTH Selection screen
Set over a range from 1 to 10.
The larger the value, the deeper the effect.
MENU screen (top screen)
HOME screen

2
Controls and Functions
Front panel
r
t
y
w u
!2 !2
e
y
u
!5!5 i t
!3q !4 !4!1o !0
q Power button
Turns the power to the unit on or off.
w [POWER] indicator
Turns on when the power is on.
e [ALERT] indicator
Lights when a problem in the device is detected.
Lights until the cause of the problem is solved.
r [USB] indicator
Lights when a compatible USB memory device is
inserted into the [USB] terminal.
Flashes when the USB device is being accessed.
t [CLIP/LIMIT] indicators
Lights when the limiter is operating to protect the
amplifier and the speaker, or the input signal over-
flows in the digital circuit or clips at the amplifier out-
put.
y [SIGNAL] indicators
Lights when the output is larger than -60 dB of maxi-
mum output level (8 ohms).
u [PROTECT] indicators
Lights when the protection circuit is operating.
i Display
Displays condition of the PX amplifier and setting
menus.
o [MENU] key
Press the key to move to the top MENU screen.
!0 [ ] (Back) key
Press this key to move up to the immediately higher
menu level or previous display. Press and briefly hold
the key to return the HOME screen.
!1 Main knob
Rotate the knob to change the values of parameters
and move the position of cursor. Press the knob to
actually enter the set value or enable the selected item.
!2 [A]/[B] keys
Press the key to switch the channel (A or B) for oper-
ating the corresponding parameters.
!3 [USB] terminal
Insert a USB memory device to read/load the data
from/to the PX amplifier.
!4 Volume knob
Adjust the level from -∞ dB to 0 dB.
!5 Intake ports
Air intakes for the cooling fan. Make sure to not block
the air intakes.
NOTE
Details of the problem are shown on the display (i).
Selecting the icon on the HOME screen with the
main knob calls up the operating log.
NOTICE
Do not unplug the USB device while the [USB] indi-
cator is flashing. Data in the USB memory may be
corrupted or lost.
icon
NOTE
Press the main knob and [A] key to change the mute
status of channel A. Press the main knob and [B] key
to change the mute status of channel B.
NOTICE
When the terminal is not used, attach the supplied
USB cap to protect the terminal.
NOTE
• The settings can be changed so that the display and
indicators turn off automatically when panel is not
operated (Black-out mode). Refer to PX10/PX8/PX5/
PX3 Reference Manual for instructions on the Black-
out mode.
• For the protection of the display, even if the Black-out
mode is not active, the display automatically turns off if
the PX amplifier has not been operated for 20 min-
utes. To turn on the display again, simply press any
key on the front panel or rotate the main knob.
Rear panel
!6 !7 !8
!9
!6 [INPUT] A/B connectors
The following two type input connectors are provided
for both channels A and B.
• XLR input jack
• Phones input jack
!7 [SPEAKERS] A/B terminals
Output terminals to speakers. The following three
types are available:
• Neutrik NL4MD SpeakON output connector
• Binding post output connector
• Phones output jack
Wiring
Binding post connector
• No plugs
Remove about 15 mm of
insulation from the end of
each speaker cable, pass the
bare wire through the holes
in the appropriate speaker
terminals, and tighten the
terminals to securely clamp
the wires. Make sure that the bare wire ends do not jut
out from the terminals and touch the chassis.
• Y-plugs
From above, insert the Y-plugs all the way into the
opening, and tighten the terminals.
SpeakON connector
Insert the SpeakON cable
plug (Neutrik NL4) into the
connector, and turn it to the
right to lock it.
!8 AC IN connector
Connect the supplied AC power cord. First connect the
AC power cord to the connector on the amplifier, and
then plug it into an appropriate AC power outlet.
Secure the AC power cord with the AC plug clamp to
prevent accidental disconnection from the connector.
!9 Exhaust ports
Exhaust vents for the cooling fan.
Make sure to not block the exhaust vents.
NOTE
Each XLR input jack and phones input jack are con-
nected in parallel. Only one of the jacks can be used
as an input jack at one time; the signals from the
jacks cannot be mixed.
CAUTION
Do not touch the terminals or metal parts
of cords connected to the terminal.
NOTICE
• If connecting speakers to multiple connectors of a
same channel results in a parallel connection,
make sure that the total impedance of the speakers
to be connected is not excessively low.
• The PX amplifier adopts BTL (Balanced Trans-
former Less) amplifier circuits. Connecting both ter-
minals of channels A and B and contact between
the terminal and the chassis may cause a failure or
malfunction. Be careful to not connect or contact
the two by mistake.
15 mm
0.25"
(6.3 mm)
≤0.51" (12.9 mm)
1+
1–
2–
2+
Channel A
Neutrik
NL4
PX amplifier
1+ A+
1– A–
2+ B+
2– B–
Channel B
Neutrik
NL4
PX amplifier
1+ B+
1– B–
2+ (not connected)
2– (not connected)
qwe
Installing the AC plug clamp
The Yamaha Pro Audio website provides a FAQ (a list of frequently asked questions, with answers).
http://www.yamahaproaudio.com/
* Refer also to the section “Troubleshooting” in the PX10/PX8/PX5/PX3 Reference Manual.
* If any specific problem should persist, please contact your Yamaha dealer.
Symptom Possible causes Possible solution
[PROTECT] indicator lights
and an “OUTPUT CUR-
RENT OVER” message
appears on the display.
There is a short at the speaker terminal, ampli-
fier terminal or wire, and the circuit is protected.
Turn off and check for a short at thre speaker ter-
minal or amplifier, wire, etc., and turn on again.
Since the impedance of the connected speaker
is too low and the amplifier is overloaded, circuit
protection is engaged.
Check that the speaker has not been damaged
and that total impedance is not excessively
low, and review the speaker connection.
[PROTECT] indicator
lights and a “AMP TEMP
TOO HIGH” message
appears on the display.
Because the internal temperature is too high,
thermal protection is engaged to protect the cir-
cuit.
Check the amplifier ventilation conditions and
take appropriate measures to improve the air-
flow around the amplifier. Leave the amplifier
off until the internal temperature goes down,
and then turn on again.
[CLIP/LIMIT] indicator
lights.
Because the input signal is excessive or the
output exceeds the rated voltage, the signal is
clipped or the limiter is engaged to protect the
circuit.
Lower the output level of the device connected
to the input connector, or lower the volume of
the amplifier.
Power does not turn on.
The power supply voltage of the connected out-
let is significantly different from the rated range.
Check the source voltage.
Because the internal temperature is too high,
thermal protection is engaged to protect the cir-
cuit.
Check the amplifier ventilation conditions and
take appropriate measures to improve the air-
flow around the amplifier. Leave the amplifier
off until the internal temperature goes down,
and then turn on again.
Sound from speakers is
distorted.
The input level exceeds the setting of the input
sensitivity.
Adjust the input sensitivity to match the input
level.
The sound is muffled. No
high-frequency sound.
The sound is filtered. The filter condition can be
checked in the HOME screen.
Change the setting of the filters in the MENU
screen (TUNING screen).
No sound from speakers.
Cables are not connected appropriately.
Connect input connectors and output connec-
tors properly. Refer to the “Setup” section on
the front side for connection instructions.
Level has declined with the volume. Adjust the volume.
The mute is on. When the mute is on, “MUTE”
appears in the HOME screen.
Turn off the mute.
The protection circuit is engaged and the output
is muted. When the protection circuit is
engaged, the [PROTECTION] indicator lights.
Identify what is causing the protection circuit to
engage and solve it.
The panel controls cannot
be operated.
The panel lock is turned on.
Turn off the panel lock. Refer to PX10/PX8/
PX5/PX3 Reference Manual for instructions on
turning off the panel lock.
Troubleshooting
PRECAUTIONS
PLEASE READ CAREFULLY BEFORE
PROCEEDING
Please keep this manual in a safe
place for future reference.
WARNING
Always follow the basic precautions listed below
to avoid the possibility of serious injury or even
death from electrical shock, short-circuiting,
damages, fire or other hazards. These precautions
include, but are not limited to, the following:
Power supply/power cord
• Do not place the power cord near heat sources such as
heaters or radiators, and do not excessively bend or
otherwise damage the cord, place heavy objects on it, or
place it in a position where anyone could walk on, trip
over, or roll anything over it.
• Only use the voltage specified as correct for the device.
The required voltage is printed on the name plate of the
device.
• Use only the supplied power cord/plug.
• Check the electric plug periodically and remove any dirt
or dust which may have accumulated on it.
• When setting up the device, make sure that the AC outlet
you are using is easily accessible. If some trouble or
malfunction occurs, immediately turn off the power switch
and disconnect the plug from the outlet. Even when the
power switch is turned off, as long as the power cord is
not unplugged from the wall AC outlet, the device will not
be disconnected from the power source.
• Remove the electric plug from the outlet when the device
is not to be used for extended periods of time, or during
electrical storms.
• Be sure to connect to an appropriate outlet with a
protective grounding connection.
Do not open
• This device contains no user-serviceable parts. Do not
open the device or attempt to disassemble the internal
parts or modify them in any way. If it should appear to be
malfunctioning, discontinue use immediately and have it
inspected by qualified Yamaha service personnel.
Water warning
• Do not expose the device to rain, use it near water or in
damp or wet conditions, or place on it any containers
(such as vases, bottles or glasses) containing liquids
which might spill into any openings. If any liquid such as
water seeps into the device, turn off the power
immediately and unplug the power cord from the AC
outlet. Then have the device inspected by qualified
Yamaha service personnel.
• Never insert or remove an electric plug with wet hands.
Hearing loss
• Do not use speakers for a long period of time at a high or
uncomfortable volume level, since this can cause
permanent hearing loss. If you experience any hearing
loss or ringing in the ears, consult a physician.
• When turning on the AC power in your audio system,
always turn on the device LAST, to avoid hearing loss and
speaker damage. When turning the power off, the device
should be turned off FIRST for the same reason.
Fire warning
• Do not place any burning items or open flames near the
device, since they may cause a fire.
If you notice any abnormality
• If any of the following problems occur, immediately turn
off the power switch and disconnect the electric plug from
the outlet.
- The power cord or plug becomes frayed or damaged.
- Unusual smells or smoke are emitted.
- Some object has been dropped into the device.
- There is a sudden loss of sound during use of the
device.
- Cracks or other visible damage appear on the device.
Then have the device inspected or repaired by qualified
Yamaha service personnel.
• If this device should be dropped or damaged,
immediately turn off the power switch, disconnect the
electric plug from the outlet, and have the device
inspected by qualified Yamaha service personnel.
CAUTION
Always follow the basic precautions listed below
to avoid the possibility of physical injury to you or
others, or damage to the device or other property.
These precautions include, but are not limited to,
the following:
Power supply/power cord
• When removing the electric plug from the device or an
outlet, always hold the plug itself and not the cord. Pulling
by the cord can damage it.
Location
• Do not place the device in an unstable position where it
might accidentally fall over and cause injuries.
• Do not block the vents. This device has ventilation holes
at the front/rear to prevent the internal temperature from
becoming too high. In particular, do not place the device
on its side or upside down. Inadequate ventilation can
result in overheating, possibly causing damage to the
device(s), or even fire.
• When installing the device:
- Do not cover it with any cloth.
- Do not install it on a carpet or rug.
- Make sure the top surface faces up; do not install on its
sides or upside down.
- Do not use the device in a confined, poorly-ventilated
location.
Inadequate ventilation can result in overheating, possibly
causing damage to the device(s), or even fire. Make sure
that there is adequate space around the device: at least
40 cm above, 10 cm at the sides and 10 cm behind.
• Do not place the device in a location where it may come
into contact with corrosive gases or salt air. Doing so may
result in malfunction.
• Keep the device out of reach of children, to keep them
from putting their fingers into openings on the equipment
and accidentally being injured.
• Before moving the device, remove all connected cables.
• If the device is mounted in an EIA standard rack, carefully
read the section “Rack Mounting” in the PX10/PX8/PX5/
PX3 Reference Manual. Inadequate ventilation can result
in overheating, possibly causing damage to the
device(s), malfunction, or even fire.
Connections
• Before connecting the device to other devices, turn off the
power for all devices. Also, before turning the power of all
devices on or off, make sure that all volume levels are set
to the minimum. Failing to do so may result in electric
shock, hearing loss, or equipment damage.
• Use only speaker cables for connecting speakers to the
speaker jacks. Use of other types of cables may result in
fire.
Maintenance
• Remove the power plug from the AC outlet when cleaning
the device.
Handling caution
• Do not insert your fingers or hands in any gaps or
openings on the device (vents).
• Avoid inserting or dropping foreign objects (paper,
plastic, metal, etc.) into any gaps or openings on the
device (vents). If this happens, immediately turn off the
power unplug the power cord from the AC outlet, and
have the device inspected by qualified Yamaha service
personnel.
• Do not rest your weight on the device or place heavy
objects on it, and avoid use excessive force on the
buttons, switches or connectors to prevent injuries.
PA_en_7
NOTICE
To avoid the possibility of malfunction/ damage to the prod-
uct, damage to data, or damage to other property, follow
the notices below.
Handling and maintenance
• Do not use the device in the vicinity of a TV, radio, AV
equipment, mobile phone, or other electric devices. Oth-
erwise, the device, TV, or radio may generate noise.
• Do not expose the device to excessive dust or vibration,
or extreme cold or heat (such as in direct sunlight, near a
heater, or in a car during the day), in order to prevent the
possibility of panel disfiguration, unstable operation, or
damage to the internal components.
• Do not place vinyl, plastic or rubber objects on the
device, since this might discolor the panel.
• The amplifier uses forced-air cooling fans that draw air in
from the front and exhaust it through the rear. Please be
sure that you do not block the air intakes or exhaust vents.
• When cleaning the device, use a dry and soft cloth. Do
not use paint thinners, solvents, cleaning fluids, or chemi-
cal-impregnated wiping cloths.
• Condensation can occur in the device due to rapid, dras-
tic changes in ambient temperature—when the device is
moved from one location to another, or air conditioning is
turned on or off, for example. Using the device while con-
densation is present can cause damage. If there is reason
to believe that condensation might have occurred, leave
the device for several hours without turning on the power
until the condensation has completely dried out.
• Do not use this device for any purpose other than driving
loudspeakers.
• Always turn the power off when the device is not in use.
• Rapidly turning the unit on and off in succession can
cause it to malfunction. After turning the unit off, wait for
more than five seconds before turning it on again.
Connectors
• XLR-type connectors are wired as follows (IEC60268
standard): pin 1: ground, pin 2: hot (+), and pin 3: cold (-).
• Use only Neutrik NL4FC plugs for connecting Speakon
connectors.
Information
About functions/data bundled with the device
• The bitmap fonts used in this instrument have been pro-
vided by and are the property of Ricoh Co., Ltd.
About this manual
• The illustrations and LCD screens as shown in this manual
are for instructional purposes only.
• The company names and product names in this manual
are the trademarks or registered trademarks of their
respective companies.
• Software may be revised and updated without prior
notice.
• The Yamaha Pro Audio website provides a FAQ (a list of
frequently asked questions, with answers).
http://www.yamahaproaudio.com/
• European models
Purchaser/User Information specified in EN55103-2:2009.
Conforms to Environments: E1, E2, E3 and E4
(class I hokuo)
Yamaha cannot be held responsible for damage caused
by improper use or modifications to the device, or data
that is lost or destroyed.
In Finland: Laite on liitettävä suojamaadoituskoskettimilla
varustettuun pistorasiaan.
In Norway: Apparatet må tilkoples jordet stikkontakt.
In Sweden: Apparaten skall anslutas till jordat uttag.
(3 wires)
(weee_eu_en_01)
IMPORTANT NOTICE FOR THE UNITED KINGDOM
Connecting the Plug and Cord
WARNING: THIS APPARATUS MUST BE EARTHED IMPORTANT. The wires in this mains lead are coloured in accor-
dance with the following code:
GREEN-AND-YELLOW : EARTH
BLUE : NEUTRAL
BROWN : LIVE
As the colours of the wires in the mains lead of this apparatus may not correspond with the coloured markings identifying
the terminals in your plug proceed as follows:
The wire which is coloured GREEN-and-YELLOW must be connected to the terminal in the plug which is marked by the
letter E or by the safety earth symbol or colored GREEN or GREEN-and-YELLOW.
The wire which is coloured BLUE must be connected to the terminal which is marked with the letter N or coloured BLACK.
The wire which is coloured BROWN must be connected to the terminal which is marked with the letter L or coloured RED.
Information for Users on Collection and Disposal of Old Equipment
This symbol on the products, packaging, and/or accompanying documents means that used electrical
and electronic products should not be mixed with general household waste.
For proper treatment, recovery and recycling of old products, please take them to applicable collection
points, in accordance with your national legislation and the Directives 2002/96/EC.
By disposing of these products correctly, you will help to save valuable resources and prevent any
potential negative effects on human health and the environment which could otherwise arise from
inappropriate waste handling.
For more information about collection and recycling of old products, please contact your local munici-
pality, your waste disposal service or the point of sale where you purchased the items.
[For business users in the European Union]
If you wish to discard electrical and electronic equipment, please contact your dealer or supplier for further information.
[Information on Disposal in other Countries outside the European Union]
This symbol is only valid in the European Union. If you wish to discard these items, please contact your local authorities or
dealer and ask for the correct method of disposal.
ADDRESS LIST
HEAD OFFICE Yamaha Corporation, Audio Products Sales and Marketing Division
10-1, Nakazawa-cho, Naka-ku, Hamamatsu, Japan 430-8650
CANADA
Yamaha Canada Music Ltd.
135 Milner Avenue, Toronto, Ontario,
M1S 3R1, Canada
Tel: +1-416-298-1311
U.S.A.
Yamaha Corporation of America
6600 Orangethorpe Avenue, Buena Park,
CA 90620, U.S.A.
Tel: +1-714-522-9011
MEXICO
Yamaha de México, S.A. de C.V.
Av. Insurgentes Sur 1647 Piso 9, Col. San
José Insurgentes, Delegación Benito
Juárez, México, D.F., C.P. 03900
Tel: +52-55-5804-0600
BRAZIL
Yamaha Musical do Brasil Ltda.
Rua Fidêncio Ramos, 302 – Cj 52 e 54 –
Torre B – Vila Olímpia – CEP 04551-010 –
São Paulo/SP, Brazil
Tel: +55-11-3704-1377
ARGENTINA
Yamaha Music Latin America, S.A.,
Sucursal Argentina
Olga Cossettini 1553, Piso 4 Norte,
Madero Este-C1107CEK,
Buenos Aires, Argentina
Tel: +54-11-4119-7000
VENEZUELA
Yamaha Musical de Venezuela, C.A.
AV. Manzanares, C.C. Manzanares Plaza,
Piso 4, Oficina 0401, Baruta, Caracas,
Venezuela
Tel: +58-212-943-1877
PANAMA AND OTHER LATIN
AMERICAN COUNTRIES/
CARIBBEAN COUNTRIES
Yamaha Music Latin America, S.A.
Edif. Torre Banco General, Piso 7,
Urbanización Marbella, Calle 47 y
Aquilino de la Guardia,
Ciudad de Panamá, República de Panamá
Tel: +507-269-5311
THE UNITED KINGDOM/
IRELAND
Yamaha Music Europe GmbH (UK)
Sherbourne Drive, Tilbrook, Milton
Keynes,
MK7 8BL, U.K.
Tel: +44-1908-366700
GERMANY
Yamaha Music Europe GmbH
Siemensstrasse 22-34, 25462 Rellingen,
Germany
Tel: +49-4101-303-0
SWITZERLAND/LIECHTENSTEIN
Yamaha Music Europe GmbH,
Rellingen,
Branch Switzerland in Zürich
Seefeldstrasse 94, 8008 Zürich,
Switzerland
Tel: +41-44-3878080
AUSTRIA/BULGARIA
Yamaha Music Europe GmbH Branch
Austria
Schleiergasse 20, 1100 Wien, Austria
Tel: +43-1-60203900
CZECH REPUBLIC/HUNGARY/
ROMANIA/SLOVAKIA/SLOVENIA
Yamaha Music Europe GmbH
Branch Austria
Schleiergasse 20, 1100 Wien, Austria
Tel: +43-1-60203900
POLAND/LITHUANIA/LATVIA/
ESTONIA
Yamaha Music Europe GmbH
Sp.z o.o. Oddzial w Polsce
ul. Wrotkowa 14, 02-553 Warsaw, Poland
Tel: +48-22-880-08-88
MALTA
Olimpus Music Ltd.
Valletta Road, Mosta MST9010, Malta
Tel: +356-2133-2093
NETHERLANDS/BELGIUM/
LUXEMBOURG
Yamaha Music Europe Branch Benelux
Clarissenhof 5b, 4133 AB Vianen,
The Netherlands
Tel: +31-347-358040
FRANCE
Yamaha Music Europe
7 rue Ambroise Croizat, Zone d'activités
de Pariest, 77183 Croissy-Beaubourg,
France
Tel: +33-1-6461-4000
ITALY
Yamaha Music Europe GmbH, Branch
Italy
Viale Italia 88, 20020, Lainate (Milano),
Italy
Tel: +39-02-93577-1
SPAIN/PORTUGAL
Yamaha Music Europe GmbH Ibérica,
Sucursal en España
Ctra. de la Coruna km. 17,200, 28231
Las Rozas de Madrid, Spain
Tel: +34-91-639-88-88
GREECE
Philippos Nakas S.A. The Music House
19th klm. Leof. Lavriou 190 02
Peania – Attiki, Greece
Tel: +30-210-6686168
SWEDEN/FINLAND/ICELAND
Yamaha Music Europe GmbH
Germany filial
Scandinavia
JA Wettergrensgata 1, 400 43 Göteborg,
Sweden
Tel: +46-31-89-34-00
DENMARK
Yamaha Music Denmark,
Fillial of Yamaha Music Europe
GmbH, Tyskland
Generatorvej 8C, ST. TH. , 2860 Søborg,
Denmark
Tel: +45-44-92-49-00
NORWAY
Yamaha Music Europe GmbH
Germany -
Norwegian Branch
Grini Næringspark 1, 1332 Østerås,
Norway
Tel: +47-6716-7800
RUSSIA
Yamaha Music (Russia) LLC.
Room 37, entrance 7, bld. 7, Kievskaya
street, Moscow, 121059, Russia
Tel: +7-495-626-5005
OTHER EUROPEAN COUNTRIES
Yamaha Music Europe GmbH
Siemensstrasse 22-34, 25462 Rellingen,
Germany
Tel: +49-4101-3030
Yamaha Music Gulf FZE
JAFZA-16, Office 512, P.O.Box 17328,
Jebel Ali FZE, Dubai, UAE
Tel: +971-4-801-1500
TURKEY
Yamaha Music Europe GmbH
Merkezi Almanya Türkiye İstanbul
Şubesi
Maslak Meydan Sodak, Spring Giz Plaza
Bagimsiz Böl. No:3, Sariyer Istanbul,
Turkey
Tel: +90-212-999-8010
CYPRUS
Yamaha Music Europe GmbH
Siemensstrasse 22-34, 25462 Rellingen,
Germany
Tel: +49-4101-303-0
OTHER COUNTRIES
Yamaha Music Gulf FZE
JAFZA-16, Office 512, P.O.Box 17328,
Jebel Ali FZE, Dubai, UAE
Tel: +971-4-801-1500
THE PEOPLE’S REPUBLIC OF
CHINA
Yamaha Music & Electronics (China)
Co.,Ltd.
2F, Yunhedasha, 1818 Xinzha-lu,
Jingan-qu, Shanghai, China
Tel: +86-400-051-7700
INDIA
Yamaha Music India Private Limited
Spazedge Building, Ground Floor,
Tower A, Sector-47, Gurgaon- Sohna
Road, Gurgaon-122002, Haryana, India
Tel: +91-124-485-3300
INDONESIA
PT. Yamaha Musik Indonesia
(Distributor)
Yamaha Music Center Bldg. Jalan Jend.
Gatot Subroto Kav. 4, Jakarta 12930,
Indonesia
Tel: +62-21-520-2577
KOREA
Yamaha Music Korea Ltd.
8F, Dongsung Bldg. 21,
Teheran-ro 87-gil, Gangnam-gu, Seoul,
135-880, Korea
Tel: +82-2-3467-3300
MALAYSIA
Yamaha Music (Malaysia) Sdn. Bhd.
No.8, Jalan Perbandaran, Kelana Jaya,
47301
Petaling Jaya, Selangor, Malaysia
Tel: +60-3-78030900
SINGAPORE
Yamaha Music (Asia) Private Limited
Block 202 Hougang Street 21, #02-00,
Singapore 530202, Singapore
Tel: +65-6740-9200
TAIWAN
Yamaha Music & Electronics Taiwan
Co.,Ltd.
2F., No.1, Yuandong Rd. Banqiao Dist.
New Taipei City 22063, Taiwan, R.O.C.
Tel: +886-2-7741-8888
THAILAND
Siam Music Yamaha Co., Ltd.
3, 4, 15, 16th Fl., Siam Motors Building,
891/1 Rama 1 Road, Wangmai,
Pathumwan, Bangkok 10330, Thailand
Tel: +66-2215-2622
VIETNAM
Yamaha Music Vietnam Company
Limited
15th Floor, Nam A Bank Tower, 201-203
Cach Mang Thang Tam St., Ward 4,
Dist.3,
Ho Chi Minh City, Vietnam
Tel: +84-8-3818-1122
OTHER ASIAN COUNTRIES
Yamaha Corporation
Sales & Marketing Division
10-1, Nakazawa-cho, Naka-ku,
Hamamatsu,
Japan 430-8650
Tel: +81-53-460-2312
AUSTRALIA
Yamaha Music Australia Pty. Ltd.
Level 1, 99 Queensbridge Street,
Southbank,
VIC 3006, Australia
Tel: +61-3-9693-5111
COUNTRIES AND TRUST
TERRITORIES IN PACIFIC
OCEAN
Yamaha Corporation
Sales & Marketing Division
10-1, Nakazawa-cho, Naka-ku,
Hamamatsu, Japan 430-8650
Tel: +81-53-460-2312
NORTH AMERICA
CENTRAL & SOUTH AMERICA
EUROPE
AFRICA
MIDDLE EAST
ASIA
OCEANIA
PA4 2
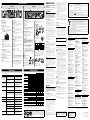
*1 Device operation has been confirmed within +/- 10% of the rated power supply voltage.
* The contents of this manual apply to the latest specifications as of the printing date. To obtain the latest manual, access the
Yamaha website then download the manual file.
PX10 PX8 PX5 PX3
Output Power
120 V 60 Hz, 220 V-240 V 50 Hz/60 Hz
1 kHz, non-clip,
20 msec burst,
both channels driven
8Ω 1000 W × 2 800 W × 2 500 W × 2 300 W × 2
4Ω 1200 W × 2 1050 W × 2 800 W × 2 500 W × 2
2Ω 700 W × 2 600 W × 2 500 W × 2 300 W × 2
1 kHz, non-clip,
20 msec burst
8Ω/Power Boost mode — — 800 W × 1 600 W × 1
4Ω/Power Boost mode — — 1400 W × 1 1000 W × 1
Output Power
100 V 50 Hz/60 Hz
1 kHz, non-clip,
20 msec burst,
both channels driven
8Ω 1000 W × 2 800 W × 2 500 W × 2 300 W × 2
4Ω 1200 W × 2 1050 W × 2 800 W × 2 500 W × 2
2Ω 700 W × 2 600 W × 2 500 W × 2 300 W × 2
1 kHz, non-clip,
20 msec burst
8Ω/Power Boost mode — — 800 W × 1 600 W × 1
4Ω/Power Boost mode — — 1200 W × 1 1000 W × 1
Amplifier Type (Output Circuitry) Class D, balanced output circuit (BTL)
THD+N
1 kHz, 10 W 0.1%
1 kHz, half power 0.3%
Frequency Response
1 W, 8Ω, 20 Hz to 20 kHz ±1.0 dB
Crosstalk
Half power, 8Ω, 1 kHz, vol. max., input 150Ω shunt
-60 dB
S/N Ratio A-weighted, 8Ω, gain setting = +14 dBu 101 dB 101 dB 100 dB 100 dB
Maximum Input Voltage +24 dBu
Input Impedance 20 kΩ (Balanced), 10 kΩ (Unbalanced)
AC Power Requirement
Depending on area of purchase;
100 V 50 Hz/60 Hz, 120 V 60Hz,
220 V-240 V 50 Hz/60 Hz
*1
Power
Consumption
1/8 MAX power, 4Ω, pink noise at all channels 310 W 280 W 230 W 160 W
Idle, 4Ω 60 W 60 W 55 W 55 W
Operating Temperature 0°C to +40°C
Storage Temperature -20°C to +60°C
Dimensions (W × H × D)
480 × 88 × 388 mm
(18.90 × 3.46 × 15.28 inch)
Net Weight
7. 4 k g
(16.31 lbs)
7. 2 k g
(15.87 lbs)
6.9 kg
(15.21 lbs)
6.9 kg
(15.21 lbs)
This mark indicates a dangerous electrically live terminal. When
connecting an external wire to this terminal, it is necessary either to
have “a person who have received appropriate guidance on handling”
make the connection or to use leads or a cord that have been manufac-
tured in such a way that the connection can be made simply and with-
out problem.
Main Specifications
<
=
Manual Development Group
© 2016 Yamaha Corporation
Published 04/2016 POHD-B0
Printed in China
Yamaha Pro Audio global website
http://www.yamahaproaudio.com/
Yamaha Downloads
http://download.yamaha.com/
Documenttranscriptie
ZQ41390 Stereo connection (using two full-range speakers) EN Tone Control Cross-over connection (using a full-range speaker and a subwoofer) Full-range speaker Input signal from the source, confirm that the sound is being output from the speakers, and adjust the volume appropriately. Mixer Mixer R channel Owner’s Manual L channel Thank you for your purchase of the Yamaha PX10, PX8, PX5 or PX3 power amplifier. Please read through this manual carefully before using for the first time, in order to take full advantage of your PX power amplifier’s superlative features and enjoy trouble-free operation for years to come. After you have read the manual, keep it in a safe, convenient place for reference when needed. Full-range speaker for R channel CAUTION The PX10/PX8/ PX5/PX3 Reference Manual is an electronic file in PDF format. You can read this book on a computer. Use Adobe® Reader® to read this book on screen, search for words very quickly, print specific pages, or click links to display sections of special interest. The ability to search for words, or to follow links directly to relevant sections in the document, are helpful attributes of this electronic file format. We encourage you to take advantage of these benefits. You can download the latest Adobe Reader application from the website listed below. http://www.adobe.com/ [SPEAKERS] A terminal and the full-range speaker for Refer to the “Wiring” section on the reverse R channel to the [SPEAKERS] B terminal. side for instructions on making connections. 2. Connect the output from sources (such as a mixer) to the [INPUT] A/B connectors. Connect the L channel source to the [INPUT] A connector, and the R channel source to the [INPUT] B connector. 3. Connect the AC power cord and turn on. First connect the AC IN connector AC power cord to the connector on the unit, and then plug AC power cord To outlet it into an appropriate AC power outlet. 4. Secure the AC power cord with the AC plug clamp to prevent accidental disconnection from the connector. Refer to the “Rear panel” section on the reverse side for instructions on installation. 1. Connect the subwoofer to the [SPEAKERS] A terminal NOTE and the full-range speaker to the [SPEAKERS] B terRefer to “Wiring” section on the reverse side minal. for instructions on making connections. 2. Connect the output from source (such as mixer) to the [INPUT] A connector. 3. Connect the AC power cord and turn on. First connect AC IN connector the AC power cord to the connector on the unit, and then AC power cord To outlet plug it into an appropriate AC power outlet. 4. Secure the AC power cord with the AC plug clamp to prevent accidental disconnection from the connector. Refer to “Rear panel” section on the reverse side for instructions on the installation. Maximum output of 1,000W out of lightweight chassis (PX10) Yamaha’s proprietary Class-D and processing technologies provide superb sound quality and high reliability Speaker presets that allow you to get the best possible performance from Yamaha speakers A wide variety of DSP functions, including D-CONTOUR processing CONFIG WIZARD that provides the optimal configuration for any speaker Broad range of input/output connectors TUNING screen [D-CONTOUR] D-CONTOUR screen HOME screen HOME screen [MODE] MODE Selection screen Select one of the following three modes. • OFF: Turns off D-CONTOUR. • FOH/MAIN: Boosts the high and low frequency components so that the frequency response is suitable for main speaker use. • MONITOR: Reduces the low frequency range, which could otherwise tend to be boomy if the speaker is set directly on the floor. This enables you to hear mid and high frequency ranges clearly when using as a floor monitor. MENU screen (top screen) Included accessories • • • • • Please carry out “Pre-installation” surely. Do not connect any cables while the power is on. [TUNING] NOTE Features • • • • • • MENU screen (top screen) CAUTION Please carry out “Pre-installation” surely. Do not connect any cables while the power is on. 1. Connect the full-range speaker for L channel to the • Please read the PRECAUTIONS on the reverse side of this manual before use. • The illustrations as shown in this manual are for instructional purposes only. • The company names and product names used in this manual are the trademarks or registered trademarks of their respective companies. • In this manual, the PX10, PX8, PX5 and PX3 power amplifier models are referred to collectively as “PX amplifier.” • Unless specified otherwise, the example illustrations used in this manual are taken from the PX10. • The PX amplifier provides two setting methods: Basic mode and Advanced mode. This manual explains operations in the Basic mode. Operate in the Advanced mode for detailed settings. For information on the Advanced mode, refer to the PX10/PX8/ PX5/PX3 Reference Manual. Subwoofer Full-range speaker for L channel MENU screen (top screen) [CONFIG WIZARD] [CONFIG WIZARD] SP TYPE screen [(MODE)] SP TYPE screen D-CONTOUR screen AC power cord Owner’s Manual (this leaflet) Technical Specifications (English) AC plug clamp USB cap CAUTION Please keep the USB cap out of reach of children, to keep them from accidentally swallowing it. [FULL+SUB] [FULL+FULL] Speaker selection (A) Speaker selection Select a speaker to be connected from the shown list. If the speaker is not in the list, select “GENERIC.” Setup Set over a range from 1 to 10. The larger the value, the deeper the effect. [(Speaker name)] HPF screen Select a cutoff frequency of the high pass filter of the subwoofer. If the high pass filter is not used, select “OFF.” HPF screen Select a cutoff frequency of the high pass filter. If the high pass filter is not used, select “OFF.” Mount PX amplifiers in a rack as required. Make sure that the power is turned off, and turn both the two volume knobs all the way to the left. DEPTH Selection screen [(Speaker name)] The PX amplifier can be used as a normal amplifier by simply setting the volume knobs properly. The following settings enhance the performance of speakers. Pre-installation [DEPTH] Select a subwoofer to be connected from the shown list. If the subwoofer is not in the list, select “GENERIC.” MENU screen (top screen) [(Cutoff frequency)] [(Cutoff frequency)] Speaker selection (B) Select a full-range speaker to be connected from the shown list. If the speaker is not in the list, select “GENERIC.” CONFIRMATION screen HOME screen [(Speaker name)] [APPLY] In this manual, methods of operations are explained with the following marks. [(item name)]: Rotate the main knob to select [(item name)]. X-OVER screen NOTE Select a crossover frequency. (Applies the set value) • To mute channel A, push the [A] key and the main knob simultaneously. To cancel muting, push the [A] key and the main knob simultaneously again. Go on to the “Tone control” instructions. : Press the Main knob. • To mute channel B, push the [B] key and the main knob simultaneously. To cancel muting, push the [B] key and the main knob simultaneously again. [(Crossover frequency)] : Press the [MENU] key. CONFIRMATION screen : Press the [ ] (back) key. : Operate A, and then operate B. A solid arrow ( ) between steps indicates a basic operation procedure, and a dotted arrow ( cates an operation returning to the previous screen. ) indi- [APPLY] (Applies the set value) Go on to the “Tone control” instructions. 1 PRECAUTIONS Controls and Functions Front panel !5 ew tu r q !3 tu i y !2 !4 PLEASE READ CAREFULLY BEFORE PROCEEDING Rear panel Please keep this manual in a safe place for future reference. !9 !5 WARNING y !2 o !0 !1 !6 !4 !7 Always follow the basic precautions listed below to avoid the possibility of serious injury or even death from electrical shock, short-circuiting, damages, fire or other hazards. These precautions include, but are not limited to, the following: !8 Power supply/power cord q Power button o [MENU] key Turns the power to the unit on or off. !6 [INPUT] A/B connectors Press the key to move to the top MENU screen. w [POWER] indicator !0 [ Turns on when the power is on. Press this key to move up to the immediately higher menu level or previous display. Press and briefly hold the key to return the HOME screen. e [ALERT] indicator Lights when a problem in the device is detected. Lights until the cause of the problem is solved. !1 Main knob Rotate the knob to change the values of parameters and move the position of cursor. Press the knob to actually enter the set value or enable the selected item. NOTE Details of the problem are shown on the display (i). Selecting the icon on the HOME screen with the main knob calls up the operating log. ] (Back) key !2 [A]/[B] keys icon The following two type input connectors are provided for both channels A and B. • XLR input jack • Phones input jack NOTE Each XLR input jack and phones input jack are connected in parallel. Only one of the jacks can be used as an input jack at one time; the signals from the jacks cannot be mixed. Press the key to switch the channel (A or B) for operating the corresponding parameters. Output terminals to speakers. The following three types are available: NOTE • Neutrik NL4MD SpeakON output connector • Binding post output connector • Phones output jack !3 [USB] terminal CAUTION Do not touch the terminals or metal parts of cords connected to the terminal. Lights when a compatible USB memory device is inserted into the [USB] terminal. Flashes when the USB device is being accessed. Insert a USB memory device to read/load the data from/to the PX amplifier. NOTICE NOTICE NOTICE When the terminal is not used, attach the supplied USB cap to protect the terminal. • If connecting speakers to multiple connectors of a same channel results in a parallel connection, make sure that the total impedance of the speakers to be connected is not excessively low. Do not unplug the USB device while the [USB] indicator is flashing. Data in the USB memory may be corrupted or lost. t [CLIP/LIMIT] indicators !4 Volume knob Adjust the level from -∞ dB to 0 dB. !5 Intake ports Lights when the limiter is operating to protect the amplifier and the speaker, or the input signal overflows in the digital circuit or clips at the amplifier output. Air intakes for the cooling fan. Make sure to not block the air intakes. NOTE y [SIGNAL] indicators Lights when the output is larger than -60 dB of maximum output level (8 ohms). u [PROTECT] indicators Lights when the protection circuit is operating. i Display Displays condition of the PX amplifier and setting menus. 0.25" (6.3 mm) !7 [SPEAKERS] A/B terminals Press the main knob and [A] key to change the mute status of channel A. Press the main knob and [B] key to change the mute status of channel B. r [USB] indicator • Y-plugs From above, insert the Y-plugs all the way into the opening, and tighten the terminals. • The settings can be changed so that the display and indicators turn off automatically when panel is not operated (Black-out mode). Refer to PX10/PX8/PX5/ PX3 Reference Manual for instructions on the Blackout mode. • For the protection of the display, even if the Black-out mode is not active, the display automatically turns off if the PX amplifier has not been operated for 20 minutes. To turn on the display again, simply press any key on the front panel or rotate the main knob. • The PX amplifier adopts BTL (Balanced Transformer Less) amplifier circuits. Connecting both terminals of channels A and B and contact between the terminal and the chassis may cause a failure or malfunction. Be careful to not connect or contact the two by mistake. ≤0.51" (12.9 mm) SpeakON connector Insert the SpeakON cable plug (Neutrik NL4) into the connector, and turn it to the right to lock it. Channel A Neutrik NL4 1+ 1– 2+ 2– 2– 2+ 1+ 1– Channel B PX amplifier A+ A– B+ B– Neutrik PX amplifier NL4 1+ B+ 1– B– 2+ (not connected) 2– (not connected) !8 AC IN connector Connect the supplied AC power cord. First connect the AC power cord to the connector on the amplifier, and then plug it into an appropriate AC power outlet. Secure the AC power cord with the AC plug clamp to prevent accidental disconnection from the connector. Wiring Binding post connector Installing the AC plug clamp • No plugs 15 mm Remove about 15 mm of insulation from the end of each speaker cable, pass the bare wire through the holes in the appropriate speaker terminals, and tighten the terminals to securely clamp the wires. Make sure that the bare wire ends do not jut out from the terminals and touch the chassis. q w e !9 Exhaust ports Exhaust vents for the cooling fan. Make sure to not block the exhaust vents. • Do not place the power cord near heat sources such as heaters or radiators, and do not excessively bend or otherwise damage the cord, place heavy objects on it, or place it in a position where anyone could walk on, trip over, or roll anything over it. • Only use the voltage specified as correct for the device. The required voltage is printed on the name plate of the device. • Use only the supplied power cord/plug. • Check the electric plug periodically and remove any dirt or dust which may have accumulated on it. • When setting up the device, make sure that the AC outlet you are using is easily accessible. If some trouble or malfunction occurs, immediately turn off the power switch and disconnect the plug from the outlet. Even when the power switch is turned off, as long as the power cord is not unplugged from the wall AC outlet, the device will not be disconnected from the power source. • Remove the electric plug from the outlet when the device is not to be used for extended periods of time, or during electrical storms. • Be sure to connect to an appropriate outlet with a protective grounding connection. Main Specifications The Yamaha Pro Audio website provides a FAQ (a list of frequently asked questions, with answers). http://www.yamahaproaudio.com/ Symptom Possible causes Possible solution There is a short at the speaker terminal, amplifier terminal or wire, and the circuit is protected. Turn off and check for a short at thre speaker terminal or amplifier, wire, etc., and turn on again. Since the impedance of the connected speaker is too low and the amplifier is overloaded, circuit protection is engaged. Check that the speaker has not been damaged and that total impedance is not excessively low, and review the speaker connection. [PROTECT] indicator lights and a “AMP TEMP TOO HIGH” message appears on the display. Because the internal temperature is too high, thermal protection is engaged to protect the circuit. Check the amplifier ventilation conditions and take appropriate measures to improve the airflow around the amplifier. Leave the amplifier off until the internal temperature goes down, and then turn on again. [CLIP/LIMIT] indicator lights. Because the input signal is excessive or the output exceeds the rated voltage, the signal is clipped or the limiter is engaged to protect the circuit. [PROTECT] indicator lights and an “OUTPUT CURRENT OVER” message appears on the display. Lower the output level of the device connected to the input connector, or lower the volume of the amplifier. The power supply voltage of the connected outCheck the source voltage. let is significantly different from the rated range. Power does not turn on. Because the internal temperature is too high, thermal protection is engaged to protect the circuit. Check the amplifier ventilation conditions and take appropriate measures to improve the airflow around the amplifier. Leave the amplifier off until the internal temperature goes down, and then turn on again. Sound from speakers is distorted. The input level exceeds the setting of the input sensitivity. Adjust the input sensitivity to match the input level. The sound is muffled. No high-frequency sound. The sound is filtered. The filter condition can be checked in the HOME screen. Change the setting of the filters in the MENU screen (TUNING screen). Cables are not connected appropriately. Connect input connectors and output connectors properly. Refer to the “Setup” section on the front side for connection instructions. No sound from speakers. The panel controls cannot be operated. Level has declined with the volume. Adjust the volume. The mute is on. When the mute is on, “MUTE” appears in the HOME screen. Turn off the mute. The protection circuit is engaged and the output is muted. When the protection circuit is engaged, the [PROTECTION] indicator lights. Identify what is causing the protection circuit to engage and solve it. The panel lock is turned on. Turn off the panel lock. Refer to PX10/PX8/ PX5/PX3 Reference Manual for instructions on turning off the panel lock. * Refer also to the section “Troubleshooting” in the PX10/PX8/PX5/PX3 Reference Manual. * If any specific problem should persist, please contact your Yamaha dealer. 2 PX10 PX8 PX5 PX3 120 V 60 Hz, 220 V-240 V 50 Hz/60 Hz Output Power 1 kHz, non-clip, 8Ω 1000 W × 2 800 W × 2 500 W × 2 300 W × 2 20 msec burst, 4Ω 1200 W × 2 1050 W × 2 800 W × 2 500 W × 2 both channels driven 2Ω 700 W × 2 600 W × 2 500 W × 2 300 W × 2 8Ω/Power Boost mode — — 800 W × 1 600 W × 1 1 kHz, non-clip, 20 msec burst 4Ω/Power Boost mode — — 1400 W × 1 1000 W × 1 100 V 50 Hz/60 Hz Output Power 1 kHz, non-clip, 8Ω 1000 W × 2 800 W × 2 500 W × 2 300 W × 2 20 msec burst, 4Ω 1200 W × 2 1050 W × 2 800 W × 2 500 W × 2 both channels driven 2Ω 700 W × 2 600 W × 2 500 W × 2 300 W × 2 8Ω/Power Boost mode — — 800 W × 1 600 W × 1 1 kHz, non-clip, 20 msec burst 4Ω/Power Boost mode — — 1200 W × 1 1000 W × 1 Amplifier Type (Output Circuitry) Class D, balanced output circuit (BTL) 1 kHz, 10 W 0.1% THD+N 1 kHz, half power 0.3% Frequency Response 1 W, 8Ω, 20 Hz to 20 kHz ±1.0 dB < -60 dB Crosstalk Half power, 8Ω, 1 kHz, vol. max., input 150Ω shunt = S/N Ratio A-weighted, 8Ω, gain setting = +14 dBu 101 dB 101 dB 100 dB 100 dB Maximum Input Voltage +24 dBu Input Impedance 20 kΩ (Balanced), 10 kΩ (Unbalanced) Depending on area of purchase; 100 V 50 Hz/60 Hz, 120 V 60Hz, AC Power Requirement 220 V-240 V 50 Hz/60 Hz *1 1/8 MAX power, 4Ω, pink noise at all channels 310 W 280 W 230 W 160 W Power Consumption Idle, 4Ω 60 W 60 W 55 W 55 W Operating Temperature 0°C to +40°C Storage Temperature -20°C to +60°C 480 × 88 × 388 mm Dimensions (W × H × D) (18.90 × 3.46 × 15.28 inch) 7.4 kg 7.2 kg 6.9 kg 6.9 kg Net Weight (16.31 lbs) (15.87 lbs) (15.21 lbs) (15.21 lbs) *1 Device operation has been confirmed within +/- 10% of the rated power supply voltage. * The contents of this manual apply to the latest specifications as of the printing date. To obtain the latest manual, access the Yamaha website then download the manual file. This mark indicates a dangerous electrically live terminal. When connecting an external wire to this terminal, it is necessary either to have “a person who have received appropriate guidance on handling” make the connection or to use leads or a cord that have been manufactured in such a way that the connection can be made simply and without problem. Connections • Before connecting the device to other devices, turn off the power for all devices. Also, before turning the power of all devices on or off, make sure that all volume levels are set to the minimum. Failing to do so may result in electric shock, hearing loss, or equipment damage. • Use only speaker cables for connecting speakers to the speaker jacks. Use of other types of cables may result in fire. • This device contains no user-serviceable parts. Do not open the device or attempt to disassemble the internal parts or modify them in any way. If it should appear to be malfunctioning, discontinue use immediately and have it inspected by qualified Yamaha service personnel. Water warning • Do not expose the device to rain, use it near water or in damp or wet conditions, or place on it any containers (such as vases, bottles or glasses) containing liquids which might spill into any openings. If any liquid such as water seeps into the device, turn off the power immediately and unplug the power cord from the AC outlet. Then have the device inspected by qualified Yamaha service personnel. • Never insert or remove an electric plug with wet hands. Hearing loss • Do not use speakers for a long period of time at a high or uncomfortable volume level, since this can cause permanent hearing loss. If you experience any hearing loss or ringing in the ears, consult a physician. • When turning on the AC power in your audio system, always turn on the device LAST, to avoid hearing loss and speaker damage. When turning the power off, the device should be turned off FIRST for the same reason. Fire warning If you notice any abnormality • If any of the following problems occur, immediately turn off the power switch and disconnect the electric plug from the outlet. - The power cord or plug becomes frayed or damaged. - Unusual smells or smoke are emitted. - Some object has been dropped into the device. - There is a sudden loss of sound during use of the device. - Cracks or other visible damage appear on the device. Then have the device inspected or repaired by qualified Yamaha service personnel. • If this device should be dropped or damaged, immediately turn off the power switch, disconnect the electric plug from the outlet, and have the device inspected by qualified Yamaha service personnel. CAUTION Always follow the basic precautions listed below to avoid the possibility of physical injury to you or others, or damage to the device or other property. These precautions include, but are not limited to, the following: Power supply/power cord • When removing the electric plug from the device or an outlet, always hold the plug itself and not the cord. Pulling by the cord can damage it. Location • Do not place the device in an unstable position where it might accidentally fall over and cause injuries. • Do not block the vents. This device has ventilation holes at the front/rear to prevent the internal temperature from becoming too high. In particular, do not place the device on its side or upside down. Inadequate ventilation can result in overheating, possibly causing damage to the device(s), or even fire. • When installing the device: - Do not cover it with any cloth. - Do not install it on a carpet or rug. - Make sure the top surface faces up; do not install on its sides or upside down. - Do not use the device in a confined, poorly-ventilated location. Inadequate ventilation can result in overheating, possibly causing damage to the device(s), or even fire. Make sure that there is adequate space around the device: at least 40 cm above, 10 cm at the sides and 10 cm behind. IMPORTANT NOTICE FOR THE UNITED KINGDOM Connecting the Plug and Cord WARNING: THIS APPARATUS MUST BE EARTHED IMPORTANT. The wires in this mains lead are coloured in accordance with the following code: GREEN-AND-YELLOW : EARTH BLUE : NEUTRAL BROWN : LIVE As the colours of the wires in the mains lead of this apparatus may not correspond with the coloured markings identifying the terminals in your plug proceed as follows: The wire which is coloured GREEN-and-YELLOW must be connected to the terminal in the plug which is marked by the letter E or by the safety earth symbol or colored GREEN or GREEN-and-YELLOW. The wire which is coloured BLUE must be connected to the terminal which is marked with the letter N or coloured BLACK. The wire which is coloured BROWN must be connected to the terminal which is marked with the letter L or coloured RED. (3 wires) Information for Users on Collection and Disposal of Old Equipment This symbol on the products, packaging, and/or accompanying documents means that used electrical and electronic products should not be mixed with general household waste. For proper treatment, recovery and recycling of old products, please take them to applicable collection points, in accordance with your national legislation and the Directives 2002/96/EC. Maintenance • Remove the power plug from the AC outlet when cleaning the device. By disposing of these products correctly, you will help to save valuable resources and prevent any potential negative effects on human health and the environment which could otherwise arise from inappropriate waste handling. Handling caution • Do not insert your fingers or hands in any gaps or openings on the device (vents). • Avoid inserting or dropping foreign objects (paper, plastic, metal, etc.) into any gaps or openings on the device (vents). If this happens, immediately turn off the power unplug the power cord from the AC outlet, and have the device inspected by qualified Yamaha service personnel. • Do not rest your weight on the device or place heavy objects on it, and avoid use excessive force on the buttons, switches or connectors to prevent injuries. Yamaha cannot be held responsible for damage caused by improper use or modifications to the device, or data that is lost or destroyed. Do not open • Do not place any burning items or open flames near the device, since they may cause a fire. Troubleshooting • Do not place the device in a location where it may come into contact with corrosive gases or salt air. Doing so may result in malfunction. • Keep the device out of reach of children, to keep them from putting their fingers into openings on the equipment and accidentally being injured. • Before moving the device, remove all connected cables. • If the device is mounted in an EIA standard rack, carefully read the section “Rack Mounting” in the PX10/PX8/PX5/ PX3 Reference Manual. Inadequate ventilation can result in overheating, possibly causing damage to the device(s), malfunction, or even fire. PA_en_7 For more information about collection and recycling of old products, please contact your local municipality, your waste disposal service or the point of sale where you purchased the items. [For business users in the European Union] If you wish to discard electrical and electronic equipment, please contact your dealer or supplier for further information. [Information on Disposal in other Countries outside the European Union] This symbol is only valid in the European Union. If you wish to discard these items, please contact your local authorities or dealer and ask for the correct method of disposal. (weee_eu_en_01) ADDRESS LIST NORTH AMERICA CANADA Yamaha Canada Music Ltd. 135 Milner Avenue, Toronto, Ontario, M1S 3R1, Canada Tel: +1-416-298-1311 U.S.A. NOTICE To avoid the possibility of malfunction/ damage to the product, damage to data, or damage to other property, follow the notices below. Handling and maintenance • Do not use the device in the vicinity of a TV, radio, AV equipment, mobile phone, or other electric devices. Otherwise, the device, TV, or radio may generate noise. • Do not expose the device to excessive dust or vibration, or extreme cold or heat (such as in direct sunlight, near a heater, or in a car during the day), in order to prevent the possibility of panel disfiguration, unstable operation, or damage to the internal components. • Do not place vinyl, plastic or rubber objects on the device, since this might discolor the panel. • The amplifier uses forced-air cooling fans that draw air in from the front and exhaust it through the rear. Please be sure that you do not block the air intakes or exhaust vents. • When cleaning the device, use a dry and soft cloth. Do not use paint thinners, solvents, cleaning fluids, or chemical-impregnated wiping cloths. • Condensation can occur in the device due to rapid, drastic changes in ambient temperature—when the device is moved from one location to another, or air conditioning is turned on or off, for example. Using the device while condensation is present can cause damage. If there is reason to believe that condensation might have occurred, leave the device for several hours without turning on the power until the condensation has completely dried out. • Do not use this device for any purpose other than driving loudspeakers. • Always turn the power off when the device is not in use. • Rapidly turning the unit on and off in succession can cause it to malfunction. After turning the unit off, wait for more than five seconds before turning it on again. Yamaha Corporation of America 6600 Orangethorpe Avenue, Buena Park, CA 90620, U.S.A. Tel: +1-714-522-9011 CENTRAL & SOUTH AMERICA MEXICO Yamaha de México, S.A. de C.V. Av. Insurgentes Sur 1647 Piso 9, Col. San José Insurgentes, Delegación Benito Juárez, México, D.F., C.P. 03900 Tel: +52-55-5804-0600 BRAZIL Yamaha Musical do Brasil Ltda. Rua Fidêncio Ramos, 302 – Cj 52 e 54 – Torre B – Vila Olímpia – CEP 04551-010 – São Paulo/SP, Brazil Tel: +55-11-3704-1377 ARGENTINA Yamaha Music Latin America, S.A., Sucursal Argentina Olga Cossettini 1553, Piso 4 Norte, Madero Este-C1107CEK, Buenos Aires, Argentina Tel: +54-11-4119-7000 VENEZUELA Yamaha Musical de Venezuela, C.A. AV. Manzanares, C.C. Manzanares Plaza, Piso 4, Oficina 0401, Baruta, Caracas, Venezuela Tel: +58-212-943-1877 PANAMA AND OTHER LATIN AMERICAN COUNTRIES/ CARIBBEAN COUNTRIES Yamaha Music Latin America, S.A. Edif. Torre Banco General, Piso 7, Urbanización Marbella, Calle 47 y Aquilino de la Guardia, Ciudad de Panamá, República de Panamá Tel: +507-269-5311 Connectors EUROPE • XLR-type connectors are wired as follows (IEC60268 standard): pin 1: ground, pin 2: hot (+), and pin 3: cold (-). • Use only Neutrik NL4FC plugs for connecting Speakon connectors. Information About functions/data bundled with the device • The bitmap fonts used in this instrument have been provided by and are the property of Ricoh Co., Ltd. About this manual • The illustrations and LCD screens as shown in this manual are for instructional purposes only. • The company names and product names in this manual are the trademarks or registered trademarks of their respective companies. • Software may be revised and updated without prior notice. • The Yamaha Pro Audio website provides a FAQ (a list of frequently asked questions, with answers). http://www.yamahaproaudio.com/ • European models Purchaser/User Information specified in EN55103-2:2009. Conforms to Environments: E1, E2, E3 and E4 THE UNITED KINGDOM/ IRELAND Yamaha Music Europe GmbH (UK) Sherbourne Drive, Tilbrook, Milton Keynes, MK7 8BL, U.K. Tel: +44-1908-366700 GERMANY Yamaha Music Europe GmbH Siemensstrasse 22-34, 25462 Rellingen, Germany Tel: +49-4101-303-0 SWITZERLAND/LIECHTENSTEIN Yamaha Music Europe GmbH, Rellingen, Branch Switzerland in Zürich Seefeldstrasse 94, 8008 Zürich, Switzerland Tel: +41-44-3878080 AUSTRIA/BULGARIA Yamaha Music Europe GmbH Branch Austria Schleiergasse 20, 1100 Wien, Austria Tel: +43-1-60203900 CZECH REPUBLIC/HUNGARY/ ROMANIA/SLOVAKIA/SLOVENIA Yamaha Music Europe GmbH Branch Austria Schleiergasse 20, 1100 Wien, Austria Tel: +43-1-60203900 POLAND/LITHUANIA/LATVIA/ ESTONIA Yamaha Music Europe GmbH Sp.z o.o. Oddzial w Polsce ul. Wrotkowa 14, 02-553 Warsaw, Poland Tel: +48-22-880-08-88 PA42 MALTA Olimpus Music Ltd. Valletta Road, Mosta MST9010, Malta Tel: +356-2133-2093 NETHERLANDS/BELGIUM/ LUXEMBOURG Yamaha Music Europe Branch Benelux Clarissenhof 5b, 4133 AB Vianen, The Netherlands Tel: +31-347-358040 FRANCE Yamaha Music Europe 7 rue Ambroise Croizat, Zone d'activités de Pariest, 77183 Croissy-Beaubourg, France Tel: +33-1-6461-4000 ITALY Yamaha Music Europe GmbH, Branch Italy Viale Italia 88, 20020, Lainate (Milano), Italy Tel: +39-02-93577-1 SPAIN/PORTUGAL Yamaha Music Europe GmbH Ibérica, Sucursal en España Ctra. de la Coruna km. 17,200, 28231 Las Rozas de Madrid, Spain Tel: +34-91-639-88-88 GREECE Philippos Nakas S.A. The Music House 19th klm. Leof. Lavriou 190 02 Peania – Attiki, Greece Tel: +30-210-6686168 SWEDEN/FINLAND/ICELAND Yamaha Music Europe GmbH Germany filial Scandinavia JA Wettergrensgata 1, 400 43 Göteborg, Sweden Tel: +46-31-89-34-00 DENMARK Yamaha Music Denmark, Fillial of Yamaha Music Europe GmbH, Tyskland Generatorvej 8C, ST. TH. , 2860 Søborg, Denmark Tel: +45-44-92-49-00 NORWAY Yamaha Music Europe GmbH Germany Norwegian Branch Grini Næringspark 1, 1332 Østerås, Norway Tel: +47-6716-7800 RUSSIA Yamaha Music (Russia) LLC. Room 37, entrance 7, bld. 7, Kievskaya street, Moscow, 121059, Russia Tel: +7-495-626-5005 OTHER EUROPEAN COUNTRIES Yamaha Music Europe GmbH Siemensstrasse 22-34, 25462 Rellingen, Germany Tel: +49-4101-3030 AFRICA Yamaha Music Gulf FZE JAFZA-16, Office 512, P.O.Box 17328, Jebel Ali FZE, Dubai, UAE Tel: +971-4-801-1500 MIDDLE EAST OTHER COUNTRIES Yamaha Music Gulf FZE JAFZA-16, Office 512, P.O.Box 17328, Jebel Ali FZE, Dubai, UAE Tel: +971-4-801-1500 ASIA THE PEOPLE’S REPUBLIC OF CHINA Yamaha Music & Electronics (China) Co.,Ltd. 2F, Yunhedasha, 1818 Xinzha-lu, Jingan-qu, Shanghai, China Tel: +86-400-051-7700 INDIA Yamaha Music India Private Limited Spazedge Building, Ground Floor, Tower A, Sector-47, Gurgaon- Sohna Road, Gurgaon-122002, Haryana, India Tel: +91-124-485-3300 INDONESIA PT. Yamaha Musik Indonesia (Distributor) Yamaha Music Center Bldg. Jalan Jend. Gatot Subroto Kav. 4, Jakarta 12930, Indonesia Tel: +62-21-520-2577 KOREA Yamaha Music Korea Ltd. 8F, Dongsung Bldg. 21, Teheran-ro 87-gil, Gangnam-gu, Seoul, 135-880, Korea Tel: +82-2-3467-3300 MALAYSIA Yamaha Music (Malaysia) Sdn. Bhd. No.8, Jalan Perbandaran, Kelana Jaya, 47301 Petaling Jaya, Selangor, Malaysia Tel: +60-3-78030900 SINGAPORE Yamaha Music (Asia) Private Limited Block 202 Hougang Street 21, #02-00, Singapore 530202, Singapore Tel: +65-6740-9200 TAIWAN Yamaha Music & Electronics Taiwan Co.,Ltd. 2F., No.1, Yuandong Rd. Banqiao Dist. New Taipei City 22063, Taiwan, R.O.C. Tel: +886-2-7741-8888 THAILAND Siam Music Yamaha Co., Ltd. 3, 4, 15, 16th Fl., Siam Motors Building, 891/1 Rama 1 Road, Wangmai, Pathumwan, Bangkok 10330, Thailand Tel: +66-2215-2622 VIETNAM Yamaha Music Vietnam Company Limited 15th Floor, Nam A Bank Tower, 201-203 Cach Mang Thang Tam St., Ward 4, Dist.3, Ho Chi Minh City, Vietnam Tel: +84-8-3818-1122 OTHER ASIAN COUNTRIES Yamaha Corporation Sales & Marketing Division 10-1, Nakazawa-cho, Naka-ku, Hamamatsu, Japan 430-8650 Tel: +81-53-460-2312 OCEANIA TURKEY AUSTRALIA CYPRUS COUNTRIES AND TRUST TERRITORIES IN PACIFIC OCEAN Yamaha Music Europe GmbH Merkezi Almanya Türkiye İstanbul Şubesi Maslak Meydan Sodak, Spring Giz Plaza Bagimsiz Böl. No:3, Sariyer Istanbul, Turkey Tel: +90-212-999-8010 Yamaha Music Europe GmbH Siemensstrasse 22-34, 25462 Rellingen, Germany Tel: +49-4101-303-0 Yamaha Music Australia Pty. Ltd. Level 1, 99 Queensbridge Street, Southbank, VIC 3006, Australia Tel: +61-3-9693-5111 Yamaha Corporation Sales & Marketing Division 10-1, Nakazawa-cho, Naka-ku, Hamamatsu, Japan 430-8650 Tel: +81-53-460-2312 HEAD OFFICE Yamaha Corporation, Audio Products Sales and Marketing Division 10-1, Nakazawa-cho, Naka-ku, Hamamatsu, Japan 430-8650 In Finland: Laite on liitettävä suojamaadoituskoskettimilla varustettuun pistorasiaan. In Norway: Apparatet må tilkoples jordet stikkontakt. In Sweden: Apparaten skall anslutas till jordat uttag. (class I hokuo) Yamaha Pro Audio global website http://www.yamahaproaudio.com/ Yamaha Downloads http://download.yamaha.com/ Manual Development Group © 2016 Yamaha Corporation Published 04/2016 POHD-B0 Printed in China-
 1
1
-
 2
2


Yamaha PX10 de handleiding
- Categorie
- Audio versterkers
- Type
- de handleiding
in andere talen
- English: Yamaha PX10 Owner's manual
- italiano: Yamaha PX10 Manuale del proprietario
- русский: Yamaha PX10 Инструкция по применению
- français: Yamaha PX10 Le manuel du propriétaire
- español: Yamaha PX10 El manual del propietario
- Deutsch: Yamaha PX10 Bedienungsanleitung
- português: Yamaha PX10 Manual do proprietário
- dansk: Yamaha PX10 Brugervejledning
- suomi: Yamaha PX10 Omistajan opas
- čeština: Yamaha PX10 Návod k obsluze
- svenska: Yamaha PX10 Bruksanvisning
- Türkçe: Yamaha PX10 El kitabı
- polski: Yamaha PX10 Instrukcja obsługi
- română: Yamaha PX10 Manualul proprietarului