Artwizz ScratchStopper f/ iPhone 3G Handleiding
- Categorie
- Schermbeschermers
- Type
- Handleiding

ScratchStopper - Instruction Manual
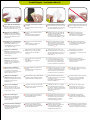
How to Apply the ScratchStopper:
Note: The actual protection lm can
be found in between two carrier lms,
which are marked with stickers
➀
&
➁
.
Thoroughly clean the surface you wish
to protect.
Do not use liquid or any other cleaning
products.
Please make sure all dust and dirt have
been removed and the surface is absolu-
tely clean. Pull o the corner of the rst
carrier lm, marked with sticker
➀
.
Please do not touch the static underside
of the ScratchStopper protection lm as
this might aect its adherence.
Auftragen des ScratchStopper:
Hinweis: Die eigentliche Schutzfolie
bendet sich zwischen zwei Trägerfo-
lien, die mit den Aufklebern
➀
&
➁
markiert sind.
Reinigen Sie die zu schützende Fläche
gründlich.
Benutzen Sie dabei keine üssigen
oder anderen Reinigungsmittel.
Vergewissern Sie sich, dass Staub und
Schmutz vollständig entfernt sind, die
Oberäche also absolut rein ist.
Ziehen Sie die Ecke der ersten Trägerfo-
lie, markiert mit dem Aufkleber
➀
ab.
Berühren Sie nicht die statische
Unterseite der ScratchStopper
Schutzfolie, da diese sonst möglicher-
weise nicht mehr richtig haftet.
Aanbrengen van de ScratchStopper:
Aanwijzing: De eigenlijke bescherm-
folie bevindt zicht tussen twee
verpakkingsfolies, die met de stickers
➀
&
➁
gemarkeerd zijn.
Maak de beschermende folie grondig
schoon.
Gebruik daarbij geen vloeibare of
andere reinigingsmiddelen.
Verzeker U ervan dat stof en vuil volle-
dig zijn verwijderd, het oppervlak dus
absoluut schoon is. Trek de hoek van
de eerste verpakkingsfolie, gemarkeerd
met de sticker
➀
af.
Raak de statische onderkant van de
ScratchStopper beschermfolie niet aan,
aangezien deze anders wellicht niet
meer goed vastplakt.
Appliquer le ScratchStopper:
Remarques: Le lm de protection se
trouve entre les deux lms porteurs qui
sont marqués avec les auto-
collants
➀
&
➁
.
Nettoyez bien la surface à protéger.
N‘utilisez pas pour cela de produits
liquides ou tout autre produit de
nettoyage.
Assurez vous que la poussière a été
complètement éliminée. La surface doit
être absolument propre. Tirez sur le coin
du premier lm porteur, marqué avec
l‘autocollant
➀
.
Ne touchez pas au côté inférieur
statique du lm de protection
ScratchStopper, car ce dernier pourrait
ne plus coller.
Applicare la ScratchStopper:
Indicazioni: L‘originale pellicola
protettiva si trova tra due pellicole
portanti, che sono evidenziate con
etichetta
➀
&
➁
.
Pulire accuratamente la supercie da
proteggere.
Non utilizzare nessun detergente
liquido o altro.
Si assicuri che la polvere e lo sporco
siano stati eliminati del tutto, le super-
cie devono essere completamente
pulite. Tirare l‘angolo del primo foglio
portante, evidenziato con l‘etichetta
➀
.
Non muovere la parte inferiore
statica della pellicola ScratchStopper,
altrimenti non aderiranno più
nel modo corretto.
Aplicación del ScratchStopper:
Nota: La lámina de protección propia
se encuentra entre dos láminas
portadoras que están marcadas con las
etiquetas adhesivas
➀
&
➁
.
Limpie profundamente la supercie a
proteger.
No utilice productos de limpieza líqui-
dos o de otro tipo.
Asegúrese de que el polvo y la suciedad
se eliminen completamente, o sea que
la supercie esté absolutamente limpia.
Retire la esquina de la primer lámina
portadora, marcada con la etiqueta
➀
.
No toque el lado inferior estático del
ScratchStopper, ya que de lo contrario
ya no se adherirá bien.
Nakładanie ScratchStoppera:
Wskazówka: Właściwa folia ochronna
znajduje się pomiędzy dwiema foliami
nośnymi, które są zaznaczone
naklejkami
➀
i
➁
.
Należy dokładnie oczyścić powierzchnię.
Nie należy w tym celu używać żadnych
płynnych lub innych środków czystości.
Należy się upewnić, że kurz i brud są
całkowicie usunięte, tak że powierzchnia
jest całkowicie czysta.
Nalezy zdjac róg pierwszej folii nosnej,
zaznaczona naklejka
➀
.
Nie należy dotykać statycznej spodniej
strony folii ochronnej ScratchStop-
pera może ona w tym przypadku
niedokładnie przylegać.
Aplicação do ScratchStopper:
Aviso: A verdadeira película de
protecção encontra-se entre as duas
películas de suporte, marcadas com
os autocolantes
➀
&
➁
.
Limpe bem a superfície a ser protegida.
Não utilize para o efeito nenhum produ-
to líquido ou de limpeza.
Certique-se de que o pó e a sujidade
foram completamente removidos, ou
seja, de que a superfície está totalmente
limpa. Puxe o canto da primeira película
de suporte, marcada com o
autocolante
➀
.
Não toque no lado estático inferior
da película de protecção Scratch-
Stopper, dado que caso contrário ela
poderá já não aderir devidamente.
Yapıştırılan Scratch Stopper
Bilgi: Asıl koruyucu kılıfı iki değişik
destek folyeler arasında bulunan
➀
ve
➁
numaralı işaretlenmiş
yapıştırma bulunur.
Koruyucu yüzeyini iyice temizleyin. Sıvı
ve herhangi diğer kimyasal maddeler
kullanmadan temizleyin.
Kanaat getirip tozun ve kirin tamamen
silindiğinden emin olun ve üst yüzeyin
temiz olmasını sağlayın. köşedeki ilk
destekliyen folyeyi (
➀
numara ile
işaretlenmiş yapıştırmayı) çekin.
ScratchStopper koruyucu kılıfın
elektriklenmiş alt taraftaki yüzeyine
değmeyiniz yoksa yapışmama imkânı
olabilir.
1 2
3
4
Нанесение пленки ScratchStopper:
Замечание: Сама защитная пленка
находится между двумя пленками-
подложками, маркированные
стикерами
➀
и
➁
.
Тщательно очистите поверхность,
которую должна защищать пленка.
Не используйте при этом жидкие или
другие чистящие средства.
Убедитесь, что пыль и грязь
полностью удалены, и поверхность
абсолютно чистая. Стяните
угол первой пленки-подложки,
маркированной стикером
➀
.
Не прикасайтесь к статичной нижней
стороне защитной пленки ScratchStop-
per, поскольку пленка после этого,
возможно, не будет плотно прилегать.

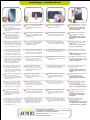
ScratchStopper - Instruction Manual
Position the open corner of the lm on
the surface of the iPhone 3G/3GS and
align it along the edge.
The ScratchStopper can be pulled o
and realigned should the lm not t at
rst attempt.
Pull o the rst carrier lm, marked with
sticker
➀
, completely and rub down
the ScratchStopper protection lm at
the same time.
In the case of air bubbles simply wipe
them towards the edge using the
BubbleCard or a credit card.
Subsequently pull o the second carrier
lm, marked with sticker
➁
. Finished.
Attention: Please be careful not to
remove the ScratchStopper along
with the packaging foil.
Die freie Ecke auf der Oberäche des
iPhone 3G/ 3GS positionieren und
entlang der Kante ausrichten.
Falls die Folie nicht auf Anhieb sitzt,
können Sie den ScratchStopper
nochmal abziehen und ausrichten.
Die erste Trägerfolie, markiert mit dem
Aufkleber
➀
, komplett abziehen und
gleichzeitig die ScratchStopper Schutz-
folie feststreichen.
Eventuell auftretende Luftblasen einfach
mit der BubbleCard oder einer Kredit-
karte zu den Rändern wegstreichen.
Anschließend noch die zweite Träger-
folie, markiert mit dem Aufkleber
➁
abziehen. Fertig.
Achtung: Geben Sie dabei darauf
Acht, den ScratchStopper nicht mit
abzuziehen.
De vrije hoek aan het oppervlak van de
iPhone 3G/ 3GS positioneren en langs
de kant uitrichten. Indien de folie niet
direct juist zit, kunt U de ScratchStopper
nog een keer aftrekken en uitrichten.
De eerste verpakkingsfolie, gemarkeerd
met de sticker
➀
, compleet aftrekken
en gelijkertijd de ScratchStopper
beschermfolie vastwrijven.
Eventueel optredende luchtblaasjes
eenvoudig met de BubbleCard of een
creditcard naar de randen wegwrijven.
Aansluitend nog de tweede verpakkings-
folie, gemarkeerd met de sticker
➁
,
aftrekken. Klaar.
Attentie: Let erop, dat u de Scratch-
Stopper er niet bij verwijdert.
Positioner le coin restant sur la surface
de iPhone 3G/ 3GS placer le long du
coin. Si le lm ne se place pas bien du
premier coup, vous pouvez retirer le
ScratchStopper et le remettre en place.
Le premier lm porteur, marqué avec
l‘autocollant
➀
, doit être complète-
ment enlevé et aplatir en même temps
le lm de protection ScratchStopper.
Les éventuelles bulles d‘air doivent être
retirées à l‘aide de la BubbleCard ou tout
simplement d‘une carte de crédit.
Puis retirer par la suite la second lm
porteur, marqué avec l‘autocollant
➁
.
Et voilà.
Attention: Veillez à ne pas également
retirer le ScratchStopper.
Posizionare gli angoli liberi sulla super-
cie del iPhone 3G/ 3GS e indirizzare gli
angoli. Nel caso in cui al primo tentativo
la pellicola non si posiziona corretta-
mente, la ScratchStopper può essere
tolta e nuovamente posizionata.
Il primo foglio portante, evidenziato con
l‘etichetta
➀
, va tirato completamente
e allo stesso tempo la pellicola
ScratchStopper deve essere ssata bene.
Eventuali bolle d‘aria si possono togliere
semplicemente con la BubbleCard o una
carta di credito.
Tirare inne la seconda pellicola portan-
te (evidenziata con l‘etichetta
➁
. Finito.
Attenzione: Prestate attenzione a non
slare lo ScratchStopper.
Posicionar la esquina libre en la super-
cie del iPhone 3G/ 3GS y orientar a
lo largo del borde. Si la lámina no se
adhiere correctamente la primera vez
puede volver a retirar el ScratchStopper
y orientar correctamente.
Retirar completamente la primera
lámina portadora, marcada con la
etiqueta adhesiva
➀
, y a la vez pasar la
mano jándo la lámina de protección
ScratchStopper.
Posibles burbujas se pueden quitar sim-
plemente pasando la BubbleCard o una
tarjeta de crédito hacia los bordes.
Luego retire la segunda lámina porta-
dora, marcada con la etiqueta
adhesiva
➁
. Listo.
¡Atención! Tenga cuidado en esto de
no retirar la lámina ScratchStopper
también.
Wolny róg umocować na powierzchni
iPhone 3G/ 3GS a i wzdłuż rogu
wyrównać. Jeśli folia nie dopasuje się od
razu, można ScratchStopper jeszcze raz
odkleić i wyrównać.
Pierwszą folię nośną,zaznaczoną
naklejką
➀
, całkowicie usunąć i
równocześnie wyrównać folię ochronną
ScratchStoppera.
Powstałe bąbelki powietrza wystarczy
przy pomocy BubbleCard lub karty
kredytowej wyrównać w kierunku
brzegów.
Następnie drugą folię nośną, zaznaczoną
naklejką
➁
, odkleić. Gotowe.
Uwaga: Należy uważać, aby nie
zerwać folii ochronnej ScratchStop-
per.
Posicionar o canto livre na superfície
do iPhone 3G/ 3GS e ajustar a película
ao longo das extremidades. Se a pelí-
cula não assentar bem, pode puxar o
ScratchStopper e ajustá lo novamente.
Remover completamente a primeira
película de suporte, marcada com o
autocolante
➀
, e ao mesmo tempo ap-
licar rmemente a película de protecção
ScratchStopper.
Eliminar as eventuais bolhas de ar
que possam surgir com o BubbleCard
ou com um cartão de crédito.
Por m, remover também a segunda
película de suporte, marcada com o
autocolante
➁
. E pronto!
Atenção: Tenha cuidado, para não re-
mover o ScratchStopper juntamente.
Boş olan kenarı iPhone 3G/ 3GS
yüzeyinin üzerine denkleştirin.İlk
hamlede folye yapışmaz ise tekrardan
ScratchStopper´i çıkartıp yeniden
yapıştırabilirsiniz.
İlk folyeyi,
➀
numara ile işaretlenmiş
yapıştırmayı, komple çıkartıp aynı anda
ScratchStopper koruyucu kılıfı düzeltin.
Muhtemel hava kabarcığı BubbleCard
veya herhangi bir kredikartı türleri ile
kenarlara doğru üstünden geçerek
düzeltin.
Sonradan ikinci folye,
➁
numara ile
işaretlenmiş yapıştırmayı, çıkartın.
Tamamdır.
Uyarı: Paketleme lmini ayırırken,
Scratchstopper‘ı da çıkarmamaya
dikkat ediniz.
Did you find this instruction manual helpful?
In case of questions or suggestions, please do not hesitate to contact us by phone
+49 (0)30 81 82 149 - 0 or via e-mail: look@artwizz.com
Check out our video tutorial on: http://www.artwizz.com/support_download
We look forward to hearing from you!
5 6 7 8
Свободный от пленки-подложки угол
точно приложите к соответствующему
углу поверхности iPhone 3G/3GS.
Если угол пленки не сразу лег ровно,
ScratchStopper можно без опасения
снять и нанести снова.
Полностью снимите первую пленку-
подложку, маркированную стикером
➀
,
и одновременно плотно разгладьте
защитную пленку ScratchStopper по
поверхности iPhone 3G / 3GS.
В случае возникновения воздушных
пузырей, просто выдавите их к краям
с помощью BubbleCard или кредитной
карты.
Затем, снимите вторую пленку-
подложку, маркированную
стикером
➁
. Готово.
Внимание: При этом удостоверьтесь,
что защитная пленка ScratchStopper
не стягивается вместе с подложкой.
Documenttranscriptie
ScratchStopper - Instruction Manual 1 How to Apply the ScratchStopper: Note: The actual protection film can be found in between two carrier films, which are marked with stickers ➀ & ➁ . Auftragen des ScratchStopper: Hinweis: Die eigentliche Schutzfolie befindet sich zwischen zwei Trägerfolien, die mit den Aufklebern ➀ & ➁ markiert sind. Aanbrengen van de ScratchStopper: Aanwijzing: De eigenlijke beschermfolie bevindt zicht tussen twee verpakkingsfolies, die met de stickers ➀ & ➁ gemarkeerd zijn. Appliquer le ScratchStopper: Remarques: Le film de protection se trouve entre les deux films porteurs qui sont marqués avec les autocollants ➀ & ➁. Applicare la ScratchStopper: Indicazioni: L‘originale pellicola protettiva si trova tra due pellicole portanti, che sono evidenziate con etichetta ➀ & ➁. Aplicación del ScratchStopper: Nota: La lámina de protección propia se encuentra entre dos láminas portadoras que están marcadas con las etiquetas adhesivas ➀ & ➁. Nakładanie ScratchStoppera: Wskazówka: Właściwa folia ochronna znajduje się pomiędzy dwiema foliami nośnymi, które są zaznaczone naklejkami ➀ i ➁. Aplicação do ScratchStopper: Aviso: A verdadeira película de protecção encontra-se entre as duas películas de suporte, marcadas com os autocolantes ➀ & ➁. Yapıştırılan Scratch Stopper Bilgi: Asıl koruyucu kılıfı iki değişik destek folyeler arasında bulunan ➀ ve ➁ numaralı işaretlenmiş yapıştırma bulunur. Нанесение пленки ScratchStopper: Замечание: Сама защитная пленка находится между двумя пленкамиподложками, маркированные стикерами ➀ и ➁. 2 3 4 Thoroughly clean the surface you wish to protect. Do not use liquid or any other cleaning products. Please make sure all dust and dirt have been removed and the surface is absolutely clean. Pull off the corner of the first carrier film, marked with sticker ➀ . Please do not touch the static underside of the ScratchStopper protection film as this might affect its adherence. Reinigen Sie die zu schützende Fläche gründlich. Benutzen Sie dabei keine flüssigen oder anderen Reinigungsmittel. Vergewissern Sie sich, dass Staub und Schmutz vollständig entfernt sind, die Oberfläche also absolut rein ist. Ziehen Sie die Ecke der ersten Trägerfolie, markiert mit dem Aufkleber ➀ ab. Berühren Sie nicht die statische Unterseite der ScratchStopper Schutzfolie, da diese sonst möglicherweise nicht mehr richtig haftet. Maak de beschermende folie grondig schoon. Gebruik daarbij geen vloeibare of andere reinigingsmiddelen. Verzeker U ervan dat stof en vuil volledig zijn verwijderd, het oppervlak dus absoluut schoon is. Trek de hoek van de eerste verpakkingsfolie, gemarkeerd met de sticker ➀ af. Raak de statische onderkant van de ScratchStopper beschermfolie niet aan, aangezien deze anders wellicht niet meer goed vastplakt. Nettoyez bien la surface à protéger. N‘utilisez pas pour cela de produits liquides ou tout autre produit de nettoyage. Assurez vous que la poussière a été complètement éliminée. La surface doit être absolument propre. Tirez sur le coin du premier film porteur, marqué avec l‘autocollant ➀ . Ne touchez pas au côté inférieur statique du film de protection ScratchStopper, car ce dernier pourrait ne plus coller. Pulire accuratamente la superficie da proteggere. Non utilizzare nessun detergente liquido o altro. Si assicuri che la polvere e lo sporco siano stati eliminati del tutto, le superficie devono essere completamente pulite. Tirare l‘angolo del primo foglio portante, evidenziato con l‘etichetta ➀ . Non muovere la parte inferiore statica della pellicola ScratchStopper, altrimenti non aderiranno più nel modo corretto. Limpie profundamente la superficie a proteger. No utilice productos de limpieza líquidos o de otro tipo. Asegúrese de que el polvo y la suciedad se eliminen completamente, o sea que la superficie esté absolutamente limpia. Retire la esquina de la primer lámina portadora, marcada con la etiqueta ➀ . No toque el lado inferior estático del ScratchStopper, ya que de lo contrario ya no se adherirá bien. Należy dokładnie oczyścić powierzchnię. Nie należy w tym celu używać żadnych płynnych lub innych środków czystości. Należy się upewnić, że kurz i brud są całkowicie usunięte, tak że powierzchnia jest całkowicie czysta. Nalezy zdjac róg pierwszej folii nosnej, zaznaczona naklejka ➀ . Nie należy dotykać statycznej spodniej strony folii ochronnej ScratchStoppera może ona w tym przypadku niedokładnie przylegać. Limpe bem a superfície a ser protegida. Não utilize para o efeito nenhum produto líquido ou de limpeza. Certifique-se de que o pó e a sujidade foram completamente removidos, ou seja, de que a superfície está totalmente limpa. Puxe o canto da primeira película de suporte, marcada com o autocolante ➀ . Não toque no lado estático inferior da película de protecção ScratchStopper, dado que caso contrário ela poderá já não aderir devidamente. Koruyucu yüzeyini iyice temizleyin. Sıvı ve herhangi diğer kimyasal maddeler kullanmadan temizleyin. Kanaat getirip tozun ve kirin tamamen silindiğinden emin olun ve üst yüzeyin temiz olmasını sağlayın. köşedeki ilk destekliyen folyeyi (➀ numara ile işaretlenmiş yapıştırmayı) çekin. ScratchStopper koruyucu kılıfın elektriklenmiş alt taraftaki yüzeyine değmeyiniz yoksa yapışmama imkânı olabilir. Тщательно очистите поверхность, которую должна защищать пленка. Не используйте при этом жидкие или другие чистящие средства. Убедитесь, что пыль и грязь полностью удалены, и поверхность абсолютно чистая. Стяните угол первой пленки-подложки, маркированной стикером ➀ . Не прикасайтесь к статичной нижней стороне защитной пленки ScratchStopper, поскольку пленка после этого, возможно, не будет плотно прилегать. ScratchStopper - Instruction Manual 5 6 7 8 Position the open corner of the film on the surface of the iPhone 3G/ 3GS and align it along the edge. The ScratchStopper can be pulled off and realigned should the film not fit at first attempt. Pull off the first carrier film, marked with sticker ➀ , completely and rub down the ScratchStopper protection film at the same time. In the case of air bubbles simply wipe them towards the edge using the BubbleCard or a credit card. Subsequently pull off the second carrier film, marked with sticker ➁. Finished. Attention: Please be careful not to remove the ScratchStopper along with the packaging foil. Die freie Ecke auf der Oberfläche des iPhone 3G/ 3GS positionieren und entlang der Kante ausrichten. Falls die Folie nicht auf Anhieb sitzt, können Sie den ScratchStopper nochmal abziehen und ausrichten. Die erste Trägerfolie, markiert mit dem Aufkleber ➀ , komplett abziehen und gleichzeitig die ScratchStopper Schutzfolie feststreichen. Eventuell auftretende Luftblasen einfach mit der BubbleCard oder einer Kreditkarte zu den Rändern wegstreichen. Anschließend noch die zweite Trägerfolie, markiert mit dem Aufkleber ➁ abziehen. Fertig. Achtung: Geben Sie dabei darauf Acht, den ScratchStopper nicht mit abzuziehen. De vrije hoek aan het oppervlak van de iPhone 3G/ 3GS positioneren en langs de kant uitrichten. Indien de folie niet direct juist zit, kunt U de ScratchStopper nog een keer aftrekken en uitrichten. De eerste verpakkingsfolie, gemarkeerd met de sticker ➀ , compleet aftrekken en gelijkertijd de ScratchStopper beschermfolie vastwrijven. Eventueel optredende luchtblaasjes eenvoudig met de BubbleCard of een creditcard naar de randen wegwrijven. Aansluitend nog de tweede verpakkingsfolie, gemarkeerd met de sticker ➁, aftrekken. Klaar. Attentie: Let erop, dat u de ScratchStopper er niet bij verwijdert. Positioner le coin restant sur la surface de iPhone 3G/ 3GS placer le long du coin. Si le film ne se place pas bien du premier coup, vous pouvez retirer le ScratchStopper et le remettre en place. Le premier film porteur, marqué avec l‘autocollant ➀ , doit être complètement enlevé et aplatir en même temps le film de protection ScratchStopper. Les éventuelles bulles d‘air doivent être retirées à l‘aide de la BubbleCard ou tout simplement d‘une carte de crédit. Puis retirer par la suite la second film porteur, marqué avec l‘autocollant ➁. Et voilà. Attention: Veillez à ne pas également retirer le ScratchStopper. Posizionare gli angoli liberi sulla superficie del iPhone 3G/ 3GS e indirizzare gli angoli. Nel caso in cui al primo tentativo la pellicola non si posiziona correttamente, la ScratchStopper può essere tolta e nuovamente posizionata. Il primo foglio portante, evidenziato con l‘etichetta ➀ , va tirato completamente e allo stesso tempo la pellicola ScratchStopper deve essere fissata bene. Eventuali bolle d‘aria si possono togliere semplicemente con la BubbleCard o una carta di credito. Tirare infine la seconda pellicola portante (evidenziata con l‘etichetta ➁. Finito. Attenzione: Prestate attenzione a non sfilare lo ScratchStopper. Posicionar la esquina libre en la superficie del iPhone 3G/ 3GS y orientar a lo largo del borde. Si la lámina no se adhiere correctamente la primera vez puede volver a retirar el ScratchStopper y orientar correctamente. Retirar completamente la primera lámina portadora, marcada con la etiqueta adhesiva ➀ , y a la vez pasar la mano fijándo la lámina de protección ScratchStopper. Posibles burbujas se pueden quitar simplemente pasando la BubbleCard o una tarjeta de crédito hacia los bordes. Luego retire la segunda lámina portadora, marcada con la etiqueta adhesiva ➁. Listo. ¡Atención! Tenga cuidado en esto de no retirar la lámina ScratchStopper también. Wolny róg umocować na powierzchni iPhone 3G/ 3GS a i wzdłuż rogu wyrównać. Jeśli folia nie dopasuje się od razu, można ScratchStopper jeszcze raz odkleić i wyrównać. Pierwszą folię nośną,zaznaczoną naklejką ➀ , całkowicie usunąć i równocześnie wyrównać folię ochronną ScratchStoppera. Powstałe bąbelki powietrza wystarczy przy pomocy BubbleCard lub karty kredytowej wyrównać w kierunku brzegów. Następnie drugą folię nośną, zaznaczoną naklejką ➁, odkleić. Gotowe. Uwaga: Należy uważać, aby nie zerwać folii ochronnej ScratchStopper. Posicionar o canto livre na superfície do iPhone 3G/ 3GS e ajustar a película ao longo das extremidades. Se a película não assentar bem, pode puxar o ScratchStopper e ajustá lo novamente. Remover completamente a primeira película de suporte, marcada com o autocolante ➀ , e ao mesmo tempo aplicar firmemente a película de protecção ScratchStopper. Eliminar as eventuais bolhas de ar que possam surgir com o BubbleCard ou com um cartão de crédito. Por fim, remover também a segunda película de suporte, marcada com o autocolante ➁. E pronto! Atenção: Tenha cuidado, para não remover o ScratchStopper juntamente. Boş olan kenarı iPhone 3G/ 3GS yüzeyinin üzerine denkleştirin.İlk hamlede folye yapışmaz ise tekrardan ScratchStopper´i çıkartıp yeniden yapıştırabilirsiniz. Свободный от пленки-подложки угол точно приложите к соответствующему углу поверхности iPhone 3G/ 3GS. Если угол пленки не сразу лег ровно, ScratchStopper можно без опасения снять и нанести снова. İlk folyeyi, ➀ numara ile işaretlenmiş yapıştırmayı, komple çıkartıp aynı anda ScratchStopper koruyucu kılıfı düzeltin. Полностью снимите первую пленкуподложку, маркированную стикером ➀ , и одновременно плотно разгладьте защитную пленку ScratchStopper по поверхности iPhone 3G / 3GS. Muhtemel hava kabarcığı BubbleCard veya herhangi bir kredikartı türleri ile kenarlara doğru üstünden geçerek düzeltin. В случае возникновения воздушных пузырей, просто выдавите их к краям с помощью BubbleCard или кредитной карты. Did you find this instruction manual helpful? In case of questions or suggestions, please do not hesitate to contact us by phone +49 (0)30 81 82 149 - 0 or via e-mail: [email protected] Check out our video tutorial on: http://www.artwizz.com/support_download We look forward to hearing from you! Sonradan ikinci folye, ➁ numara ile işaretlenmiş yapıştırmayı, çıkartın. Tamamdır. Uyarı: Paketleme filmini ayırırken, Scratchstopper‘ı da çıkarmamaya dikkat ediniz. Затем, снимите вторую пленкуподложку, маркированную стикером ➁. Готово. Внимание: При этом удостоверьтесь, что защитная пленка ScratchStopper не стягивается вместе с подложкой.-
 1
1
-
 2
2


Artwizz ScratchStopper f/ iPhone 3G Handleiding
- Categorie
- Schermbeschermers
- Type
- Handleiding
in andere talen
- English: Artwizz ScratchStopper f/ iPhone 3G User manual
- italiano: Artwizz ScratchStopper f/ iPhone 3G Manuale utente
- русский: Artwizz ScratchStopper f/ iPhone 3G Руководство пользователя
- français: Artwizz ScratchStopper f/ iPhone 3G Manuel utilisateur
- español: Artwizz ScratchStopper f/ iPhone 3G Manual de usuario
- Deutsch: Artwizz ScratchStopper f/ iPhone 3G Benutzerhandbuch
- português: Artwizz ScratchStopper f/ iPhone 3G Manual do usuário
- Türkçe: Artwizz ScratchStopper f/ iPhone 3G Kullanım kılavuzu
- polski: Artwizz ScratchStopper f/ iPhone 3G Instrukcja obsługi