LTC Audio ATM8000BT de handleiding
- Categorie
- Auto media-ontvangers
- Type
- de handleiding

©Copyright LOTRONIC 2018 ATM8000BT 1
HIFI STEREO AMPLIFIER WITH BLUETOOTH FUNCTION
AMPLIFICATEUR HIFI STEREO AVEC FONCTION BLUETOOTH
HIFI STEREOVERSTÄRKER MIT BLUETOOTH FUNCTION
HIFI STEREOVERSTERKER MET BLUETOOTH FUNCTIE
AMPLIFICADOR HIFI STEREO COM A FUNÇÃO BLUETOOTH
HIFI STEREO OJAČEVALEC Z BLUETOOTH FUNKCIJO
AMPLIFICATOR DE PUTERE PROFESIONAL CU FUNCTIE BLUETOOTH
ATM8000BT
GB -USER
MANUAL
F - MANUEL D’UTILISATION
D - BEDIENUNGSANLEITUNG
NL – HANDLEIDING
E – MANUAL DE USO
P - MANUAL DE INSTRUÇÕES
SLO - NAVODILA ZA UPORABO
RO - MANUAL DE UTILIZARE
Imported from China by
LOTRONIC SA
Avenue Zénobe Gramme, 9
1480 SAINTES
Belgium

©Copyright LOTRONIC 2018 ATM8000BT 2
SAFETY RECOMMENDATIONS
• Before using the device, please check it for any possible damages. In case of damage do not operate it.
• Unplug the UNIT if you do not use it for a certain time.
• Do not expose the unit to mechanical stress and humidity.
• Ensure sufficient ventilation around the unit. Do not cover the device and protect it from direct solar radiation.
• Clean the device with a dry and soft cloth only.
• Caution! Should the device itself get damaged, please let the repair to the manufacturer or to a qualified service
agent.
• The unit must be connected to an earthed mains outlet only.
• Keep out of the reach of children
• DISCONNECT DEVICE
Where the MAINS plug or an appliance coupler is used as the disconnect device, the disconnect device shall remain
readily operable.
Features
• FM Tuner
• USB/SD/MP3 input
• Bluetooth function
• VFD to display track title, track no & elapsed time
• 2 microphone inputs with Echo & volume control, bass & treble control
• Optical input
• Headphone output
• Subwoofer output & surround output
Front panel
POWER: Press this button to power ON or OFF the unit
Play/Pause & RECORD: Press this button to play the signal from USB/SD, Bluetooth. Press again to pause. When the
input selected is TUNER/MP3/DVD/CD/VCD and there is an USB flash drive or SD card inserted into their respective slot,
pressing and holding this button will activate the recording function. Press this button and hold for several seconds and
the word “REC” will display on the screen. The unit will create a new file in the connected USB flash drive or SD card and
get ready to make a recording. At this point there is no actual recording yet. Press the button again and the unit will
start recording onto the USB flash drive or SD Card and the elapsed time and “REC” will display on the screen. Press the
button a third time to pause the recording and the word “REC” and the elapsed time displayed on the screen will start
flashing. Press again to continue the recording. Press and hold this button for several seconds to save the file and end
GB

©Copyright LOTRONIC 2018 ATM8000BT 3
the recording and exit. If both USB flash drive and SD card are connected, the unit will begin recording onto the USB
flash drive. If the USB flash drive is full, remove it and then press the record button again to start another recording. The
unit will also be able to record the signal from microphone onto the USB flash drive or SD Card. When the recording
function is activated and there is a microphone connected and have it turned on, the unit will mix the signal from Tuner,
MP3 or DVD with the microphone’s into one track. If two microphone are connected and turned on, both signals from
them will be recorded and mixed into one track with the signal from Tuner, MP3 or DVD.
THE RECORDING FILE FORMAT IS .WAV.
THERE IS NO RECORDING FUNCTION WHEN INPUT SELECTED IS USB/SD/BLUETOOTH.
Previous: Press this button to go back to the beginning of the current track or move to the previous track.
Next: Press this button to move to the next track.
Repeat/Random: Press this button to select the repeat mode between REPEAT ONE, REPEAT ALL, RANDOM. The default
setting is repeat all.
Input: Press this button to cycle through the various inputs.
USB: Connect your USB flash drive here
SD: Connect your SD card here
MP3 input: Connect your MP3 here
EQ MODE: Press this button to cycle through the pre-set equalizer modes.
Audio Function: Press this button to switch the control mode between bass, treble & master volume
MIC1 & MIC2: Connect your microphones here
MIC VOL: Use this knob to adjust the microphone volume
MIC ECHO: Use this knob to adjust the echo of microphone.
MIC Bass: Use this knob to adjust the bass of microphone
MIC Treble: Use this knob to adjust the treble of microphone
Headphone Output: Connect your headphone here
Sub Output: Use this knob to adjust the sub output volume
Pre Output: Use this knob to adjust the pre output volume
Master Volume: Use this knob to control the master volume
REMOTE CONTROL
MUTE: Mutes the sound output
: Play/pause button
: Stop button
INPUT: Press this button to cycle through the various inputs.
: Press this button to go back to the beginning of the current track or move to the
previous track
: Press this button to move to the next track
: Fast rewind
: Fast forward
TRE-/TRE+: Master Treble control
BAS-/BAS+: Master Bass control
VOL+/VOL-: Increase/reduce the volume
ENTER: Confirm the selection
EQ MODE: Press this button to cycle through the pre-set equalizer modes
REC: Press to start recording. Press again to stop recording
Number buttons: Direct selection of a track
10-/10+: To select a file number above 10. E.g. to select file no. 27, press twice 10+

©Copyright LOTRONIC 2018 ATM8000BT 4
and then 7.
: Press this button to select the repeat mode between REPEAT ONE, REPEAT ALL
: RANDOM play button
AM/FM: Toggles between AM & FM radio reception
SCAN: Press to search for available radio stations
1 2 3 LED MODE buttons: No function
A/B: Press once to select speaker output A, press twice to select speaker output B, press a third time to select A & B
speaker outputs
OPERATION
Select a central location for the amplifier.
Connect the speaker wires (red & black) to the + and – terminals on the rear panel of the amplifier.
Connect the audio signal to the relevant sockets with the correct polarity.
Plug the mains lead in and switch the amplifier on once you have checked all connections.
Switch the audio sources on and adjust the master volume to the required level.
Karaoke: Plug a mic into MIC1 or MIC2 socket on the front panel. Before you use the mic, make sure that it is switched
off and the MIC volume button is set to the minimum. Connect the microphone, switch it on and adjust slowly the
volume and the echo.
If you don’t use the unit any longer, switch the amplifier off and disconnect it from the mains.
Signal Sources and their Connections:
• Connect an audio source to the relevant input terminals or a data storage unit to the USB-interface or insert a
SD-memory card in the suitable slot or activate the Bluetooth function on your smartphone.
• Select the active signal source by pressing the INPUT button until the desired input source is displayed.
• Use the MP3 CONTROL-function for controlling the files on a connected data storage unit.
• If you wish to use the karaoke function of this device, insert one or two microphones into MIC1 and MIC2. Their
signals are going to the signal output too.
Bluetooth Connection
The ATM8000BT is only discoverable when the input selected is Bluetooth. After selecting Bluetooth input mode on the
ATM8000BT, turn on the Bluetooth function on the cell phone and search the ATM8000BT. Its Bluetooth device name is
“ATM8000BT”. Pair and connect after search. There is no pairing code.
Rear Panel:
Power supply: Connect the unit to the power outlet.
Main Speakers Outputs: Connect your speakers here to receive the signal from the ATM8000BT
Surround Speaker Outputs: Connect your surround speakers here. Surround only works when all surround speakers are
connected.
Sub Outputs: Connect your subwoofer here.

©Copyright LOTRONIC 2018 ATM8000BT 5
Pre Output: Connect your preamplifier here.
Record Output: Connect your recorder here.
DVD Input: Connect your DVD or CD or any other passive signal here.
VCD/CD Input: Connect your DVD or CD or any other passive signal here.
Optical input: Connect your optical signal source here.
FM Antenna: Connect your FM antenna here.
Specifications:
Output Power: ............................................................................. 4 x 75 W + 3 x 20W
Power supply: ..................................................................... AC 220-240 V ~ 50/60 Hz
Frequency Response: ........................................................................... 20 – 20000 Hz
Input Sensitivity: ............................................................................................. 450 mV
Signal-Noise-Ratio (S/N): ................................................................................ ≥ 76 dB
Impedance: ........................................................................................................... 8 Ω
Microphone Input Sensitivity: .......................................................................... 20 mV
Dimensions ......................................................................................... 430×305×80mm
Net weight ........................................................................................................... 6.2kg
Gross weight ........................................................................................................ 7.0kg
Electric products must not be put into household waste. Please bring them to a recycling centre. Ask your
local authorities or your dealer about the way to proceed.

©Copyright LOTRONIC 2018 ATM8000BT 6
PRECAUTIONS D’EMPLOI
• Placez l’amplificateur à un endroit bien ventilé à une certaine distance du mur afin de ne pas bloquer les fentes de
ventilation.
• Ne pas placer l’appareil à proximité d’une flamme ou un gaz inflammable.
• Ne pas laisser de liquides pénétrer dans l’appareil.
• Ne pas couper le cordon électrique.
• Si l’appareil dégage de la fumée ou une odeur particulière, éteignez l’appareil immédiatement, débranchez-le du
secteur et contactez votre revendeur.
• Ne jamais ouvrir le boîtier. Risque de choc électrique.
• Ne pas utiliser un liquide volatile pour nettoyer le boîtier tel que l’alcool, un diluant, de l’essence ou autre produit
similaire. Utiliser uniquement un chiffon sec et propre.
• Cet appareil doit impérativement être branché sur une prise secteur avec terre délivrant une tension de
220-240Vac 50/60Hz.
• Dispositif de coupure du secteur
Si l’appareil est coupé du secteur par une fiche secteur, la prise doit être facilement accessible.
Features
• Tuner FM
• Entrée USB/SD/MP3
• Fonction Bluetooth
• Ecran qui affiche le titre, le numéro du titre et le temps écoulé
• 2 entrées de microphone avec contrôles d’écho & de volume, contrôle des graves et des aigus
• Entrée optique
• Sortie casque
• Sortie Subwoofer & Surround
Façade
POWER: Interrupteur M/A
& RECORD: Appuyez pour lire le signal de l’entrée USB, SD ou Bluetooth. Appuyez à nouveau pour mettre en pause.
Lorsque l’entrée sélectionnées est TUNER/MP3/DVD/CD/VCD et qu’une clé USB ou une carte SD est insérée dans son
port respectif, le maintien de cette touche active la fonction d’enregistrement. Maintenez cette touche appuyée
pendant plusieurs secondes jusqu’à ce que le message “REC” s’affiche sur l’écran. L’amplificateur crée un nouveau fichier
dans la clé USB ou la carte SD et se prépare à l’enregistrement.
A ce stade, l’enregistrement n’a pas encore commencé.
Appuyez à nouveau sur cette touche et l’enregistrement sur la clé USB ou la carte SD va commencer. Le temps écoulé et
« REC » s’affichent sur l’écran. Appuyez une troisième fois sur la touche pour mettre l’enregistrement en pause. Le mot
« REC » et le temps écoulé clignotent sur l’afficheur. Appuyez à nouveau pour reprendre l’enregistrement. Maintenez la
touche appuyée pendant plusieurs secondes pour enregistrer le fichier, terminer l’enregistrement et quitter la fonction.
Si aussi bien une clé USB qu’une carte SD sont branchées, l’amplificateur enregistre par défaut sur la clé USB. Si la clé
USB est pleine, retirez-la et appuyez sur la touche REC pour commencer un autre enregistrement. L’amplificateur peut
F

©Copyright LOTRONIC 2018 ATM8000BT 7
également enregistrer le signal d’un microphone sur la clé USB ou la carte SD. Lorsque la fonction d’enregistrement est
active et qu’un microphone est connecté et sous tension, l’amplificateur mixera le signal du tuner, lecteur MP3 ou DVD
avec celui du microphone sur une seule piste. Si deux microphones sont connectés et sous tension, les deux signaux
seront enregistrés et mixés sur une seule piste avec le signal du tuner, lecteur MP3 ou DVD.
LE FORMAT D’ENREGISTEMENT EST .WAV.
L’ENREGISTREMENT N’EST PAS POSSIBLE LORSQUE L’ENTRÉE SELECTIONNEE EST USB/SD/BLUETOOTH.
: Appuyez pour revenir au début du titre en cours ou reculer au titre précédent.
: Appuyez pour avancer au titre suivant.
/ Appuyez sur cette touche pour sélectionner la répétition unique, générale ou la lecture aléatoire. Le réglage
par défaut et la répétition générale.
Input: Appuyez pour passer en revue les différentes entrées.
USB: Branchez votre clé USB sur cette entrée.
SD: Branchez votre carte SD
Entrée MP3 : Branchez votre lecteur MP3
EQ MODE: Appuyez pour passer en revue les différents modes d’égalisation préprogrammés.
Audio Function: Appuyez pour basculer entre les modes de réglage des graves, aigus et volume général.
MIC1 & MIC2: Branchez vos microphones ici
MIC VOL: Réglage de volume des microphones
ECHO: Réglage de l’écho des microphones.
MIC Bass: Réglage des basses du microphone
MIC Treble: Réglage des aigus du microphone
: Branchez votre casque ici
Sub Output: Réglage de volume de la sortie subwoofer
Pre Output: Réglage de volume de la sortie PRE OUT au dos de l’amplificateur
Master Volume: Réglage du volume général
TELECOMMANDE
MUTE: Coupe le son
: Lecture/pause
: Arrêt
INPUT: Appuyez pour passer en revue les différentes entrées.
: Appuyez pour revenir au début du titre en cours ou reculer au titre précédent
: Appuyez pour avancer au titre suivant
: Retour rapide
: Avance rapide
TRE-/TRE+: Contrôle général des aigus
BAS-/BAS+: Contrôle général des graves
VOL+/VOL-: Augmente/réduit le volume
ENTER: Confirme la sélection
EQ MODE: Appuyez pour passer en revue les différents modes d’égalisation
préprogrammés
REC: Appuyez pour commencer l'enregistrement. Appuyez à nouveau pour l'arrêter.
Touches numériques: Sélection directe d'un titre
10-/10 + : Pour sélectionner un numéro de fichier supérieur à 10. Pour sélectionner le

©Copyright LOTRONIC 2018 ATM8000BT 8
fichier n° 27; appuyez 2x sur 10+ et puis sur 7.
: Appuyez pour sélectionner le mode de répétition entre répéter le titre en cours, répéter tous les titres, arrêter la
répétition.
: Lecture aléatoire des titres
AM/FM: Bascule entre la radio AM et FM
SCAN: Recherche des stations radio disponibles
1 2 3 LED MODE: Aucune fonction
A/B: Appuyez une fois pour sélectionner la sortie haut-parleurs A, deux fois pour sélectionner la sortie B et trois fois
pour sélectionner A & B.
FONCTIONNEMENT
Choisissez un emplacement central pour l’amplificateur.
Branchez les fils des haut-parleurs (rouge et noir) sur les bornes + et – au dos de l’appareil.
Branchez le signal audio sur les fiches correspondantes en respectant la gauche et la droite.
Branchez le cordon secteur et mettez l’amplificateur sous tension après avoir vérifié tous les branchements.
Mettez les sources audio sous tension et réglez le volume principal.
Karaoké : Branchez le microphone sur la fiche MIC1 et/ou MIC2 en façade. Avant utilisation, vérifiez que le microphone
est éteint et le volume réglé au plus bas. Branchez le microphone, mettez-le sous tension et réglez lentement le
volume, et l’écho.
Après utilisation, éteignez l’amplificateur et débranchez-le du secteur.
Sources de signal et leur Branchement:
• Branchez un lecteur DVD ou CD sur la fiche AUDIO INPUT ou un dispositif de stockage de donnée sur le port USB ou
SD ou bien activez la fonction Bluetooth sur votre smartphone.
• Sélectionnez la source de signal active en appuyant sur la touche INPUT jusqu’à ce que la source d’entrée désirée
s’affiche.
• Utilisez les touches de commande MP3 pour piloter les fichiers sur le dispositif de stockage de données.
• Si vous souhaitez utiliser la fonction Karaoké de cet amplificateur, branchez 1 ou 2 microphones sur les fiches MIC1
et MIC2. Leur signaux sont également envoyés à la sortie signal.
Appairage Bluetooth
Le ATM8000BT n’est visible que lorsque l’entrée Bluetooth a été sélectionnée. Après avoir sélectionné le mode d’entrée
Bluetooth sur l’ATM8000BT, activez la fonction Bluetooth sur votre smartphone et lancez la recherche. Le nom de
l’amplificateur est “ATM8000BT”. Sélectionnez-le. Il n’y a pas de code à saisir.
Panneau Arrière:

©Copyright LOTRONIC 2018 ATM8000BT 9
Alimentation: Branchez l’amplificateur sur une prise secteur.
SPEAKER OUTPUTS A & B: C’est la sortie principale pour les haut-parleurs.
SURROUND OUTPUTS: Branchez toutes vos enceintes Surround ici. La fonction Surround ne fonctionne que lorsque
tous les haut-parleurs Surround ont connectés.
Sub Outputs: Branchement du Subwoofer.
Pre Output: Branchement d’un pré-amplificateur.
Record Output: Branchement d’un enregistreur.
Entrée DVD: Branchez votre lecteur DVD ou CD ou tout autre signal passif ici.
VCD/CD Input: Branchez votre lecteur DVD ou CD ou tout autre signal passif ici.
Entrée optique: Branchement de la source de signal optique.
Antenne FM: Branchement de l’antenne FM.
Caractéristiques techniques:
Puissance de sortie: ..................................................................... 4 x 75 W + 3 x 20W
Alimentation: ...................................................................... AC 220-240 V ~ 50/60 Hz
Bande passante: .................................................................................. 20 – 20000 Hz
Sensibilité d’entrée: ........................................................................................ 450 mV
Rapport signal/bruit (S/N): ............................................................................. ≥ 76 dB
Impédance: ........................................................................................................... 8 Ω
Sensibilité d’entrée Microphone: ..................................................................... 20 mV
Dimensions ......................................................................................... 430×305×80mm
Poids net .............................................................................................................. 6.2kg
Poids brut ............................................................................................................. 7.0kg
NOTE IMPORTANTE : Les produits électriques ne doivent pas être mis au rebut avec les ordures ménagères.
Veuillez les faire recycler là où il existe des centres pour cela. Consultez les autorités locales ou votre
revendeur sur la façon de les recycler.

©Copyright LOTRONIC 2018 ATM8000BT 10
VORSICHTSMASSNAHMEN
• Stellen Sie den Verstärker an einer gut belüfteten Stelle in einem bestimmten Abstand zur Wand auf, um die
Belüftungsschlitze nicht zu verstopfen.
• Das Gerät nicht in der Nähe von offenem Feuer oder brennbaren Materialien aufstellen.
• Keine Flüssigkeiten ins Gerät dringen lassen.
• Nicht das Netzkabel durchschneiden.
• Wenn das Gerät Rauch oder einen besonderen Geruch abgibt, sofort abschalten und vom Netz trennen.
Benachrichtigen Sie dann Ihren Fachhändler.
• Niemals das Gehäuse öffnen. Stromschlaggefahr !
• Keine flüchtigen Flüssigkeiten wie Alkohol, Lösungsmittel, Benzin oder Ähnliches zum Reinigen des Gehäuses
benutzen. Nur mit einem trockenen, sauberen Tuch abwischen.
• Das Gerät darf nur an eine geerdete Netzsteckdose mit einer Spannung von 230Vac 503Hz angeschlossen werden.
• Netztrennungsvorrichtungen
Wenn das Gerät über den Netzstecker ausgeschaltet wird, muss die Steckdose jederzeit leicht zugänglich bleiben
Features
• FM Tuner
• USB/SD/MP3 Eingang
• Bluetooth Funktion
• Display mit Anzeige von Titelname, -nummer und abgelaufener Spielzeit
• 2 Mikrofoneingänge mit Echo & Lautstärkeregler
• Optischer Eingang
• Kopfhörerausgang
• REC, Vorverstärker-, Subwoofer- & Surround Ausgang
Frontansicht
POWER: Schaltet das Gerät ein und aus
& RECORD: Spielt das Signal vom USD, SD und Bluetooth Eingang ab. Erneut drücken, um auf Pause zu schalten.
Wenn ein USB Stick oder eine SD Karte angeschlossen ist und TUNER/MP3/DVD/CD/VCD als Eingangsquelle gewählt
wurde, löst das Drücken dieser Taste den Aufnahmevorgang aus. Halten Sie die Taste mehrere Sekunden lang gedrückt
bis “REC” auf dem Display erscheint. Der Verstärker erstellt nun eine neue Datei im USB Stick oder der SD Karte und
bereitet die Aufnahme vor. Zu diesem Zeitpunkt hat die Aufnahme noch nicht begonnen. Drücken Sie erneut auf die
Taste und die Aufnahme beginnt auf dem USB Stick oder der SD Karte. Die Aufnahmedauer und „REC“ erscheinen auf
dem Display. Drücken Sie die Taste ein drittes Mal und die Nachricht “REC” sowie die Aufnahmedauer blinken. Erneut
drücken, um die Aufnahme fortzusetzen. Die Taste mehrere Sekunden lang gedrückt halten, um die Datei zu speichern,
die Aufnahme zu beenden und die Funktion zu verlassen. Wenn sowohl ein USB Stick als auch eine SD Karte
angeschlossen sind, wird zuerst auf dem USB Stick gespeichert. Wenn der Speicher voll ist, entkoppeln Sie die Karte und
D

©Copyright LOTRONIC 2018 ATM8000BT 11
drücken Sie erneut auf die Taste, um eine neue Aufnahme zu starten. Das Gerät kann auch das Signal der Mikrofone auf
dem USB Stick oder der SD Karte aufnehmen. Wenn die Aufnahmefunktion aktiviert ist und ein Mikrofon angeschlossen
und eingeschaltet ist, mischt das Gerät das Signal des Tuners, MP3 oder DVD Spielers mit dem des Mikrofons in einer
Datei. Wenn zwei Mikrofone angeschlossen und eingeschaltet sind, werden beide Signale aufgenommen und zu einem
Titel mit dem Signal des Tuners, MP3 oder DVD Spielers gemischt.
DIE AUFGENOMMENE DATEI IST IM FORMAT .WAV.
DIE AUFNAHMEFUNKTION IST NICHT MÖGLICH, WENN USB/SD/BLUETOOTH ALS EINGANGSQUELLE GEWÄHLT SIND.
: Zurück zum Titelanfang oder zum Anfang des vorigen Titels.
: Weiter zum nächsten Titel.
: Wählt die Wiederholfunktion zwischen EINMAL WIEDERHOLEN, ALLES WIEDERHOLEN und
ZUFALLSGENERATOR. Ab Werk ist das Gerät auf ALLES WIEDERHOLEN eingestellt.
Input: Bei jedem Druck erscheint einer der Signaleingänge.
USB: Anschluss des USB Sticks
SD: Anschluss der SD Karte
MP3 Eingang: Anschluss des MP3 Spielers
EQ MODE: Bei jedem Druck erscheint einer der vorprogrammierten Equalizermodes.
Audio Function: Wählt zwischen Bass, Treble und Master Lautstärke.
MIC1 & MIC2: Zum Anschluss der Mikrofone
MIC VOL: Stellt die Mikrofonlautstärke ein
MIC Bass: Einstellen der Bässe des Mikrofons
MIC Treble: Einstellen der Höhen des Mikrofons
: Anschluss der Kopfhörer
Sub Output: Einstellen der Lautstärke des Subwoofer Ausgangs
Pre Output: Einstellen der Lautstärke des Vorverstärkerausgangs (PRE OUT)
Master Volume: Einstellen der Master Lautstärke
FERNBEDIENUNG
MUTE: Tonstopp
: Abspiel-/Pause Taste
: Stopp Taste
INPUT: Bei jedem Druck erscheint einer der Signaleingänge.
: Zurück zum Titelanfang oder zum Anfang des vorigen Titels
: Weiter zum nächsten Titel.
: Schneller Rücklauf
: Schneller Vorlauf
TRE-/TRE+: Treble Regler
BAS-/BAS+: Bass Regler
VOL+/VOL-: Erhöht/verringert die Lautstärke
ENTER: Bestätigung der Wahl
EQ MODE: Bei jedem Druck erscheint einer der vorprogrammierten Equalizermodes
REC: Startet und stoppt die Aufnahme
Nummerntasten: Direkteingabe einer Titelnummer
10-/10 + : Zur Wahl einer Titelnummer von über 10. Z.B. um Titelnummer 27 zu
wählen, zweimal 10+ und dann 7 drücken.

©Copyright LOTRONIC 2018 ATM8000BT 12
: Wählt die Wiederholfunktion zwischen EINMAL WIEDERHOLEN, ALLES WIEDERHOLEN und nicht mehr
wiederholen
: Zufallsgenerator
AM/FM: Schaltet zwischen AM und FM Band um
SCAN: Sucht nach Radiosendern
1 2 3 LED MODE Tasten: Keine Funktion
A/B: Einmal drücken, um Lautsprecherausgang A zu wählen, zweimal drücken, um Ausgang B zu wählen und dreimal
drücken, um beide Ausgänge gleichzeitig zu wählen.
BETRIEB
Wählen Sie einen zentralen Aufstellungsplatz für den Verstärker.
Schließen Sie die Lautsprecherdrähte (rot und schwarz) an die jeweilige + und – Klemme an der Rückseite an.
Schließen Sie das Audiosignal an die entsprechenden Buchsen an.
Schließen Sie das Netzkabel an und schalten Sie den Verstärker ein, nachdem alle Anschlüsse nochmals überprüft
worden sind.
Schalten Sie die Audioquellen an und stellen Sie die Master Lautstärke auf den gewünschten Pegel ein.
Karaoke: Schließen Sie ein Mikrofon an die MIC1 oder MIC2 Buchse an der Frontseite an. Vor Inbetriebnahme prüfen
Sie, dass das Mikrofon ausgeschaltet und die Lautstärke ganz heruntergefahren ist. Schließen Sie das Mikrofon an,
schalten Sie es ein und stellen Sie allmählich die Lautstärke und das Echo ein.
Nach Gebrauch den Verstärker ausschalten und vom Netz trennen.
Signalquellen und ihre Anschlüsse:
• Einen DVD oder CD Spieler an die AUDIO INPUT Buchse bzw. einen USB Stick oder eine SD Karte in den
entsprechenden Verbinder stecken bzw. die Bluetooth Funktion auf Ihrem Smartphone aktivieren.
• Die aktive Eingangsquelle mit der INPUT Taste wählen. Solange drücken, bis die gewünschte Eingangsquelle
angezeigt wird.
• Mit den MP3 Bedienelementen die Dateien auf den angeschlossenen Medien steuern.
• Wenn Sie die Karaoke Funktion benutzen möchten, schließen Sie ein oder zwei Mikrofone an die Buchsen MIC1 und
MIC2 an. Ihre Signale werden auch zum Signalausgang geleitet.
Bluetooth Verbindung
Der ATM8000BT ist nur sichtbar, wenn der Bluetooth Eingang gewählt ist. Nach Wahl des Bluetooth Betriebs am
ATM8000BT, aktivieren Sie die Bluetooth Funktion auf Ihrem Smartphone und suchen Sie nach “ATM8000BT”. Verbinden
Sie die beiden Geräte. Es wird kein Verbindungscode benötigt.
Rückseite:

©Copyright LOTRONIC 2018 ATM8000BT 13
Power: Zum Anschluss an eine Netzsteckdose.
Main Speakers Outputs: Anschlussbuchsen der Lautsprecher.
Surround Speaker Outputs: Schließen Sie Ihre Surround Lautsprecher an diese Buchsen an. Bitte beachten Sie dass der
Surround Betrieb nur funktioniert, wenn alle Buchsen belegt sind.
Sub Outputs: Zum Anschluss eines Subwoofers.
Pre Output: Zum Anschluss eines Vorverstärkers.
Record Output: Zum Anschluss eines Aufnahmegeräts
DVD Input: Schließen Sie Ihren DVD oder CD Spieler oder ein anderes passives Signal hier an.
VCD/CD Input: Schließen Sie Ihren DVD oder CD Spieler oder ein anderes passives Signal hier an.
Optical input: Zum Anschluss einer optischen Signalquelle.
FM Antenna: Zum Anschluss der FM Antenne.
Technische Daten:
Ausgangsleistung: ........................................................................ 4 x 75 W + 3 x 20W
Versorgung: ........................................................................ AC 220-240 V ~ 50/60 Hz
Frequenzbereich: ................................................................................. 20 – 20000 Hz
Eingangsempfindlichkeit: ................................................................................ 450 mV
Signal-/Rauschabstand (S/N): ......................................................................... ≥ 76 dB
Impedanz: ............................................................................................................. 8 Ω
Mikrofoneingangsempfindlichkeit: ................................................................... 20 mV
Abmessungen ..................................................................................... 430×305×80mm
Nettogewicht ....................................................................................................... 6.2kg
Bruttogewicht ...................................................................................................... 7.0kg
WICHTIGER HINWEIS: Elektrogeräte gehören nicht in den Hausmüll. Sie müssen in speziellen Betrieben
recycelt werden. Bringen Sie sie zu einer speziellen Entsorgungsstelle für Elektrokleingeräte (Wertstoffhof).

©Copyright LOTRONIC 2018 ATM8000BT 14
VEILIGHEIDSINSTRUCTIES
• Alvorens U het toestel gebruikt wees zeker dat het geen beschadigingen laat zien. In geval van beschadiging
gebruik het toestel niet.
• Stopcontact uittrekken indien het toestel voor een langere tijd niet wordt gebruikt.
• Bescherm het toestel tegen schokken en vochtigheid.
• Zorg voor voldoende luchtcirculatie. Dek het toestel niet af. Uit de buurt van directe zon houden.
• Alleen met een zacht droog doek reinigen.
• Let op! Laat alle reparaties van een vakman uitvoeren.
• Verpakkingsmaterialen en toestel uit de buurt van kinderen houden.
• Sluit het toestel alleen op een stopcontactdoos met randaarde aan die een spanning levert van 230Vac 50Hz
Ontkoppeling van het net
Indien het toestel via het stopcontact wordt uitgeschakeld, moet de contactdoos altijd makkelijk bereikbaar zijn
Features
• FM tuner
• USB/SD/MP3 ingang
• Bluetooth functie
• Display vertoont de titel, nummer en afgelopen speeltijd
• 2 microfoon ingangen met echo & volume controle, bas & treble controle
• Optische ingang
• Hoofdtelefoon uitgang
• Subwoofer & surround uitgang
Front paneel
POWER: Toestel aan en uit schakelen
& RECORD: Druk deze knop om naar het signaal van de USB/SD, Bluetooth ingang te luisteren. Druk opnieuw om
te pauzeren. Als een USB flash drive op een SD kaartje aangesloten is en de ingang TUNER/MP3/DVD/CD/VCD gekozen is,
houd deze toets ingedrukt om de opname functie te activeren. Houd de toets gedurende meerdere seconden ingedrukt
en “REC” verschijnt op de display. De versterker zet een nieuw bestand op de aangesloten USB/SD media op en bereid
de opname voor. Op dit moment heeft de opname nog niet begonnen. Druk opnieuw op de toets en de opname begint
op de USB stick of het SD kaartje.
“REC” en de afgelopen speeltijd verschijnen op de display. Druk een deerde keer op de
toets om de opname te pauzeren. “REC” en de afgelopen opnametijd flitsen. Druk opnieuw om de opname voort te
zetten. Houd de toets gedurende meerdere seconden ingedrukt om het bestand op te slaan, de opname te beëindigen
en de functie te verlaten. Als een USB stick en een SD kaartje tegelijkertijd aangesloten zijn, start de opname op de USB
stick. Als de USB stick vol is, verwijder de stick en druk opnieuw op de REC toets om een nieuwe opname te starten. De
versterker kan ook het signaal van de microfoon op de USB stick of het SD kaartje opnemen. Als de opname functie
geactiveerd is en een microfoon aangesloten en aangeschakeld is, wordt het signaal van de micro met het signaal van de
tuner, MP3 of DVD speler gemengd in één track. Als twee microfoon aangesloten en aangeschakeld zijn, worden beide
signalen met de signalen van de tuner, MP3 of DVD speler in één track gemengd.
NL

©Copyright LOTRONIC 2018 ATM8000BT 15
HET OPNAME FORMAAT IS .WAV.
DE OPNAME IS NIET MOGELIJK ALS DE INGANGSBRON OP USB/SD/BLUETOOTH INGESTELD IS.
: Terug naar het begin van de lopende track of van de vorige track.
: Verder naar de volgende track.
: Druk deze toets om te kiezen tussen de herhaal modi REPEAT ONE, REPEAT ALL, RANDOM. De default
instelling is REPEAT ALL.
Input: Drukken om door de verschillende ingangen te lopen.
USB: Sluit hier uw USB flash drive aan
SD: Sluit hier uw SD kaartje aan
MP3 ingang: Sluit hier uw MP3 speler aan
EQ MODE: Drukken om door de verschillende voorgeprogrammeerde equalizer modi te lopen.
Audio Function: Drukken om tussen de controle modi bas, treble & master volume om te schakelen
MIC1 & MIC2: Aansluiting van de microfoons
MIC VOL: Instelling van het microfoonvolume
MIC ECHO: Instelling van de microfoon echo.
MIC Bass: Instelling van de lage tonen van de microfoon
MIC Treble: Instelling van de hoge tonen van de microfoon
Headphone Output: Sluit uw hoofdtelefoon hier aan
Sub Output: Gebruik deze knop om het uitgangsvolume van de subwoofer in te stellen
Pre Output: Gebruik deze knop om het volume van de voorversterker uitgang (PRE OUT) in te stellen
Master Volume: Instelling van het master volume
AFSTANDSBEDIENING
MUTE: Geluidsonderbreking
: Play/pauze toets
: Stop toets
INPUT: Drukken om door de verschillende ingangen te lopen.
: Terug naar het begin van de lopende track of van de vorige track
: Verder naar de volgende track
: Snel achteruit
: Snel vooruit
TRE-/TRE+: Master Treble controle
BAS-/BAS+: Master Bass controle
VOL+/VOL-: Volume verhogen/minderen
ENTER: Bevestigen
EQ MODE: Drukken om door de verschillende voorgeprogrammeerde equalizer modi
te lopen
REC: Drukken om de opname te starten en te stoppen
Cijfertoetsen: Onmiddellijke keuze van een track
10-/10 + : Keuze van een tracknummer boven 10. Bv. Om tracknummer 27 te kiezen,
druk twee keer op 10+ en daarna op7
: Druk deze toets om te kiezen tussen de herhaal modi REPEAT ONE, REPEAT ALL
: Toeval volgorde
AM/FM: Omschakelen tussen Am & FM radio ontvangst
SCAN: Zoeken naar radio stations
1 2 3 LED MODE toetsen: Geen functie

©Copyright LOTRONIC 2018 ATM8000BT 16
A/B: Druk één keer om luidspreker uitgang A te kiezen, twee keer voor luidspreker uitgang B en, drie keer om beide
uitgangen te kiezen.
WERKING
Kies een centrale plaats voor de versterker.
Sluit de luidsprekerkabels (rood & zwart) op de + en – terminals op de achter paneel van de versterker aan.
Sluit het audio signaal op de juiste contra’s met de juiste polariteit aan.
Sluit de lichtnetkabel aan en schakel de versterker aan.
Schakel de audiobronnen aan en stel het master volume en de toon controles op het gewenste niveau in.
Karaoke: Sluit een microfoon op de MIC1 of MIC2 contra’s op het frontpaneel aan. Alvorens u de microfoon gebruikt,
wees zeker dat de microfoon uitgeschakeld is en het volume op het minimum ingesteld is. Schakel de microfoon aan en
stel langzaam het volume en de echo in.
Indien u de unit niet langer gebruikt, schakel de versterker uit en ontkoppel het systeem van het lichtnet.
Signaalbronnen en haar aansluitingen:
• Sluit een DVD of CD player op de AUDIO INPUT terminal of een data storage unit op de USB-interface aan of stek een
SD-memory card in de juiste slot of activeer de Bluetooth functie op uw smartphone.
• Kies de actieve signaalbron d.m.v. de INPUT toets totdat de gewenste ingangsbron op de display verschijnt.
• Bestuur de bestanden op een aangesloten data storage unit via de MP3 CONTROL-functie.
• Indien u de karaoke functie van de unit wilt gebruiken, sluit een of twee microfoons op de MIC1 en MIC2 ingangen
aan. Hun signalen gaan ook naar de signaaluitgang.
Bluetooth verbinding
De ATM8000BT is alléén zichtbaar indien de ingangsbron Bluetooth gekozen is. Kies de Bluetooth ingangsmodus op de
ATM8000BT, schakel de Bluetooth functie op uw smartphone aan en zoek naar de ATM8000BT. Zijn Bluetooth device
naam is “ATM8000BT”. Verbindt de twee toestellen. Er is geen code nodig.
Achterpaneel:
Power: Sluit de unit op een stopcontactdoos aan.
Main Speakers Outputs: Sluit uw hoofdluidsprekers op deze connectoren aan.
Surround Speaker Outputs: Sluit uw surround luidsprekers op deze connectoren aan. De surround sound is alléén
mogelijk als alle surrond connectoren aangesloten zijn.
Sub Outputs: Sluit uw subwoofer hier aan.
Pre Output: Sluit uw voorversterker hier aan.
Record Output: Sluit uw recorder hier aan.
DVD Input: Sluit uw DVD of CD speler of elk andere passieve signaal hier aan.
VCD/CD Input: Sluit uw DVD of CD speler of elk andere passieve signaal hier aan.
Optical input: Sluit uw optische signaal bron hier aan.
FM Antenne: Sluit uw FM antenne hier aan.

©Copyright LOTRONIC 2018 ATM8000BT 17
Specificaties:
Uitgangsvermogen: ...................................................................... 4 x 75 W + 3 x 20W
Voeding: .............................................................................. AC 220-240 V ~ 50/60 Hz
Frequentiebereik: ................................................................................ 20 – 20000 Hz
Ingangsgevoeligheid: ...................................................................................... 450 mV
Signaal-Ruis-verhouding (S/N): ....................................................................... ≥ 76 dB
Impedantie: .......................................................................................................... 8 Ω
Microfoon ingangsgevoeligheid: ...................................................................... 20 mV
Afmetingen ......................................................................................... 430×305×80mm
Nettogewicht ....................................................................................................... 6.2kg
Brutogewicht ....................................................................................................... 7.0kg
BELANGRIJK: De elektrische producten mogen niet bij het huisvuil gegooid worden. Gelieve deze te laten
recycleren daar waar er centra’s hiervoor voorzien is. Raadpleeg de plaatselijke autoriteiten of uw verkoper
ivm de manier van recycleren.

©Copyright LOTRONIC 2018 ATM8000BT 18
PRECAUCIONES DE EMPLEO
1. Coloque el amplificador en un lugar bien ventilado a cierta distancia de la pared o cualquier obstáculo que pudiera
bloquear las rejillas de ventilación.
2. No coloque el equipo cerca de una llama o de gas inflamable.
3. No deje que penetre ningún líquido en el interior del equipo.
4. No corte el cable eléctrico.
5. Si el equipo desprende humo o un olor particular, apáguelo y desenchúfelo inmediatamente y contacte con su
vendedor.
6. Jamás abra la carcasa. Riego de descarga eléctrica.
7. No utilice ningún líquido volátil para limpiar el equipo tal como por ejemplo el alcohol, disolvente o productos
similares. Utilice únicamente un paño seco y limpio.
8. Este equipo ha de enchufarse necesariamente a un enchufe que ofrezca una corriente de 220-240Vac 50/60Hz.
9. Dispositivo de corte de corriente
Si el equipo se desconecta por medio del enchufe, este ha de permanecer siempre accesible.
Características
• Sintonizador FM
• Entrada USB/SD/MP3
• Función Bluetooth
• Display que indica el título, el número y tiempo pasado
• Display que indica el título, el número y tiempo pasado
• Entrada óptica
• Salida de auriculares
• Salida Subwoofer & Surround
Frontal
POWER: Interruptor ON/OFF
& RECORD: Apriete para leer la señal de la entrada USB, SD o Bluetooth. Apriete de nuevo para ponerlo en pausa.
Cuando la entrada seleccionada es TUNER/MP3/DVD/CD/VCD y un PEN USB o tarjeta SD está insertada en su puerto
respectivo, manteniendo esta tecla se activa la función de grabación. Mantenga esta tecla apretada durante unos
segundos hasta que el mensaje “REC” se visualice en el display. El amplificador crea un nuevo fichero en el PEN USB o
en la tarjeta SD y se prepara para la grabación. En este momento, la grabación, todavía no ha comenzado. Apriete de
nuevo esta tecla y la grabación en el PEN USB o la tarjeta SD comenzará. El tiempo transcurrido y « REC » se visualizan
en el display. Apriete una tercera vez para poner la grabación en pausa. La palabra « REC » y el tiempo transcurrido
parpadeara en el display. Apriete de nuevo para reanudar la grabación. Mantenga apretada durante unos segundos para
grabar el fichero, termina la grabación y se quita la función. Si un PEN USB y una tarjeta SD están conectadas a la vez, el
ES

©Copyright LOTRONIC 2018 ATM8000BT 19
amplificador granará por defecto en el PEN USB. Si el PEN USB está lleno, retírelo y apriete en la tecla REC para
comenzar otra grabación. El amplificador puede igualmente grabar la señal de un micrófono en el PEN USB o en la
tarjeta SD. Cuando la función de grabación está activada y un micrófono está conectado y encendido, el amplificador
mezclara la señal del tuner, lector MP3 o DVD con el micrófono, en una sola pista. Si dos micrófonos están conectados y
encendidos, las dos señales serán mezcladas en una sola pista con la señal del tuner, lector MP3 o DVD.
EL FORMATO DE GRABACIÓN ES .WAV.
LA GRABACIÓN, NO ES POSIBLE CUANDO LA ENTRADA SELECCIONADA, ES USB/SD/BLUETOOTH.
: Apriete para volver al comienzo del título en curso o volver al título anterior..
: Apriete para avanzar al título siguiente.
/ Apriete esta tecla para seleccionar la repetición única, general o la lectura aleatoria. El ajuste por defecto es
repetición general.
Input: Apriete para pasar de una entrada a otra.
USB: Conecte un PEN USB en esta entrada.
SD: Conecte su tarjeta SD
Entrada MP3: Conecte su lector MP3
EQ MODE: Apriete para pasar de un modo de ecualización pre programado a otro.
Audio Función: Apriete para cambiar los modos de ajuste de los graves, agudos y volumen general.
MIC1 & MIC2: Conecte sus micrófonos aquí
MIC VOL: Ajuste del volumen de los micrófonos
ECHO: Ajuste del eco de los micrófonos
MIC Bass: Ajuste de los graves de los micrófonos
MIC Treble: Ajuste de los agudos de los micrófonos
: Conecte sus auriculares aquí
Sub Output: Ajuste del volumen de la salida subwoofer
Pre Output: Ajuste del volumen de la salida PRE OUT de la parte trasera del amplificador
Master Volumen: Ajuste del volumen general
Master Volume: Réglage du volume général
MANDO A DISTANCIA
MUDO: Silencia la salida de sonido
: Botón reproducir / pausar
: Botón Detener
ENTRADA: Presione este botón para recorrer las diversas entradas.
: Presione este botón para regresar al comienzo de la pista actual o mover a la pista
anterior
: Presione este botón para pasar a la siguiente pista
: Rebobinado rápido
: Avance rápido
TRE- / TRE+: Control Master Treble
BAS- / BAS: Control Master Bass
VOL / VOL-: Aumenta / reduce el volumen
ENTRAR: Confirma la selección

©Copyright LOTRONIC 2018 ATM8000BT 20
MODO EQ: Presione este botón para recorrer los modos de ecualizador preestablecidos
REC: Presione para comenzar a grabar. Presione nuevamente para detener la grabación
Botones numéricos: Selección directa de una pista
10- / 10: Para seleccionar un número de archivo por encima de 10. Por ejemplo, para seleccionar el archivo n. 27,
presione dos veces 10 y luego 7.
: Presione este botón para seleccionar el modo de repetición entre REPEAT ONE, REPEAT ALL
: Botón de reproducción RANDOM
AM / FM: Alterna entre la recepción de radio AM & FM
ESCANEAR: Presione para buscar emisoras de radio disponibles
1 2 3 botones LED MODE: Sin función
A / B: Presione una vez para seleccionar la salida de altavoz A, presione dos veces para seleccionar la salida de altavoz B,
presione una tercera vez para seleccionar las salidas de altavoz A y B
FUNCIONAMIENTO
Seleccione un emplazamiento central para el amplificador.
Conecte los cables de los altavoces (rojo y negro) en los bornes + y – de la parte trasera del amplificador.
Conecte la señal de audio en las clavijas correspondientes, respetando derecha e izquierda.
Conecte el cable de corriente y encienda el amplificador después de haber verificado que todas las conexiones, son
correctas.
Encienda las fuentes de audio y ajuste el volumen principal.
Karaoke: Conecte el micrófono en la clavija MIC1 y/o MIC2 en el frontal. Antes de conectarlo, verifique que el
micrófono está apagado y el volumen del amplificador bajado a cero. Conecte el micrófono, enciéndalo y ajuste el
volumen y el eco, poco a poco.
Después de su uso, apague el amplificador y desenchúfelo de la corriente.
Fuentes de señal y sus conexiones:
• Conecte un lector DVD o CD en la clavija AUDIO INPUT o un dispositivo de almacenaje de MP3 en el puerto USB o SD
o bien active la función Bluetooth de su Smartphone.
• Seleccione la fuente apretando la tecla INPUT hasta que la fuente deseada aparezca en el display.
• Utilice las teclas de control MP3 para controlar los ficheros de su dispositivo.
• Si desea utilizar la función Karaoke de su amplificador, conecte 1 o 2 micrófonos en las clavijas MIC1 y MIC2. Las
señales, son enviada igualmente a la salida de señal.
Emparejamiento Bluetooth
El ATM8000BT no es visible hasta que la entrada Bluetooth sea seleccionada. Después de haber seleccionado el modo
de entrada Bluetooth en el ATM8000BT, active la función Bluetooth de su Smartphone y comience la búsqueda, el
nombre del equipo es “ATM8000BT”. Selecciónelo y confírmelo.

©Copyright LOTRONIC 2018 ATM8000BT 21
Panel trasero:
Alimentación: Conecte el amplificador a un enchufe de corriente.
SPEAKER OUTPUTS A & B: Es la salida principal para los altavoces.
SURROUND OUTPUTS: Conecte todos los altavoces Surround aquí. La función Surround solo funciona cuando todos los
altavoces Surround están conectados.
Sub Outputs: Conexionado para el Subwoofer.
Pre Output: Conexionado de preamplificador.
Record Output: Salida de grabación.
Entrada DVD: Conecte su lector DVD o CD o cualquier equipo con salida de línea aquí.
VCD/CD Input: Conecte su lector DVD o CD o cualquier equipo con salida de línea aquí.
Entrada óptica: Conecte una fuente con salida digital óptica.
Antena FM: Conecte su antena FM aquí.
Características técnicas:
Potencia de salida: ....................................................................... 4 x 75 W + 3 x 20W
Alimentación: ........................................................................ AC 220-240 V ~ 50/60 Hz
Banda pasante: ...................................................................................... 20 – 20000 Hz
Sensibilidad de entrada: ................................................................................. 450 mV
Relación señal/ruido (S/N): ............................................................................... ≥ 76 dB
Impedancia: ............................................................................................................ 8 Ω
Sensibilidad de entrada Micrófono: ................................................................... 20 mV
Dimensiones ....................................................................................... 430×305×80mm
Peso neto ............................................................................................................. 6.2kg
Peso bruto ............................................................................................................ 7.0kg
NOTA IMPORTANTE : Los productos eléctricos, no deben ser tirados a la basura domestica.
Hágalos reciclar en un lugar destinado a ello. Pregunte a las autoridades locales por el punto más
cercano a su domicílio.

©Copyright LOTRONIC 2018 ATM8000BT 22
RECOMENDAÇÕES DE SEGURANÇA
• Antes de usar o aparelho, por favor, verifique se há eventuais danos. Em caso de dano não deverá utilizá-lo.
• Desligue a unidade se não for utilizada durante um grande período de tempo.
• Não exponha o aparelho e a sua mecânica em ambientes de stress e humidade.
• Assegurar uma ventilação suficiente em torno da unidade. Não cubra o dispositivo e deverá protegê-lo da radiação
solar direta.
• Limpe o aparelho apenas com um pano seco e macio.
• Cuidado! Caso o aparelho fique danificado, por favor deixe a reparação ao ao cuidado fabricante ou a um agente
de serviço qualificado.
• A unidade deve ser conectada a apenas uma tomada com ligação à terra.
• Manter fora do alcance das crianças
• DISPOSITIVO PARA DESLIGAR
Quando a ficha de alimentação ou um acoplador de aparelhos é usado como o dispositivo de desconexão, o dispositivo
de desconexão deve estar sempre acessível.
Características
• Sintonizador FM
• Entradas USB / SD Card / MP3
• Função Bluetooth
• VFD para exibição do título da faixa e acompanhar o tempo decorrido
• 2 entradas de microfone com Eco e controlo de volume, controlo de graves e agudos
• Entrada óptica
• Saída para auscultadores
• Saída do subwoofer e saída surround
Painel frontal
INICIAR: Pressione este botão para ligar ou desligar o aparelho
Play / Pause e register: Pressione este botão para reproduzir o sinal do USB / SD, Bluetooth. Pressione novamente para
pausar. Quando a entrada selecionada é TUNER / MP3 / DVD / CD / VCD e há um cartão de unidade flash USB ou SD
inserido na respectiva ranhura, pressione e mantenha este botão para activar a função de gravação. Pressione este
botão e segure por alguns segundos na tecla "REC" e será exibido na tela. A unidade irá criar um novo arquivo na
unidade flash USB ou cartão SD e prepare-se para fazer uma gravação. Neste momento não há nenhuma gravação real
ainda. Pressione o botão novamente e a unidade irá iniciar a gravação para a unidade flash USB ou cartão SD e o tempo
decorrido e "REC" será exibido na tela. Pressione o botão uma terceira vez para pausar a gravação e a palavra "REC" e o
tempo decorrido exibido na tela começa a piscar. Pressione novamente para continuar a gravação. Pressione e
mantenha o botão por alguns segundos para salvar o arquivo e terminar a gravação e sair. Se ambas as unidade flash
USB e cartão SD estiverem conectadas, a unidade começará a gravar para a unidade flash USB. Se a unidade flash USB
estiver cheia, remova-a e, em seguida, pressione o botão de gravação novamente para iniciar outra gravação. A unidade
PT

©Copyright LOTRONIC 2018 ATM8000BT 23
também será capaz de gravar o sinal do microfone para a unidade flash USB ou cartão SD. Quando a função de gravação
está ativada e existir um microfone ligado, a unidade irá misturar o sinal do sintonizados, MP3 ou DVD com o microfone
em uma faixa. Se dois microfone estiverem conectados e ligados, ambos os sinais a partir deles será gravado e
misturado em uma faixa com o sinal de sintonizador, MP3 ou DVD.
O formato de gravação do arquivo é .WAV.
Não há nenhuma função de gravação quando de entrada selecionada é USB / SD / BLUETOOTH.
Previous: Pressione este botão para voltar para o início da faixa atual ou mudar para a faixa anterior.
Next: Pressione este botão para passar para a próxima faixa.
Repetir / Random: Pressione este botão para selecionar o modo de repetição entre repete um, repete todos, aleatório.
A configuração padrão é repetir tudo.
Entrada: Pressione este botão para alternar entre as várias entradas.
USB: Conecte a sua pen drive USB aqui
SD: Conecte o seu cartão SD aqui
Entrada MP3: Conecte seu MP3 aqui
MODO EQ: Pressione este botão para alternar entre os modos de equalizador pré-definido.
Função Áudio: Pressione este botão para alternar entre o modo de controlo de graves, agúdos e volume principal
MIC1 e MIC2: Ligue os microfones aqui
VOL MIC: Utilize este botão para ajustar o volume do microfone
MIC ECHO: Utilize este botão para ajustar o eco do microfone.
MIC Baixo: Utilize este botão para ajustar os graves de microfone
Treble MIC: Utilize este botão para ajustar os agudos do microfone
Saída de Auscultadores: Conecte os seus auscultadores aqui
Sub saída: Utilize este botão para ajustar o volume de saída sub
Pré saída: Utilize este botão para ajustar o volume de saída pre
Volume Master: Utilize este botão para controlar o volume principal
Master Volume: Use this knob to control the master volume
CONTROLO REMOTO
MUTE: Silencia o áudio
: Botão PLAY/PAUSE
: Botão STOP
ENTRADA: prima este botão para alternar entre as entradas.
: Prima este botão para regressar ao início da faixa ou regressar à faixa anterior
: Prima este botão para avançar à próxima faixa
: Retrocesso rápido
: Avanço rápido
TRE-/TRE+: controlo geral dos agudos
BAS-/BAS+: controlo geral dos graves
VOL+/VOL-: Aumenta e diminui o volume
ENTER: confirma a seleção.
EQ: prima este botão para alternar entre os modos de equalização
REC: prima para iniciar a gravação. Prima novamente para interromper a gravação
BOTÕES NUMÉRICOS: seleção direta da faixa
10-/10 + : para selecionar um ficheiro com uma numeração igual ou superior a 10.
Exemplo: para escolher o ficheiro número 27, prima duas vezes 10+ e 7.

©Copyright LOTRONIC 2018 ATM8000BT 24
: Prima este botão para escolher o modo de repetição entre repetir um, repetir todos
: Botão de reprodução aleatória
AM/FM: alterna entre a receção de rádio AM/FM
PESQUISA: prima para pesquisar as estações de rádio disponíveis
1 2 3 LED MODE: sem função
A/B: prima uma vez para escolher a saída A, duas vezes para escolher a saída B e três vezes para escolher as saídas A e B
OPERAÇÃO
Selecione um local central para o amplificador.
Conecte os cabos das colunas (vermelho e preto) para a terminais + e - no painel traseiro do amplificador.
Conecte o sinal de áudio para as tomadas relevantes com a polaridade correta.
Conecte o cabo de alimentação e ligue o amplificador depois de ter verificado todas as conexões.
Alterne as fontes de áudio e ajustar o volume principal para o nível requerido.
Karaoke: Conecte um microfone em MIC1 ou MIC2 tomada no painel frontal. Antes de usar o microfone, certifique-se
de que está desligado e o botão de volume MIC está definido para o mínimo. Ligue o microfone e ajuste lentamente o
volume e o eco.
Se você não utilizar o aparelho por mais tempo, desligue o amplificador e desligue-o da tomada.
Fontes de Sinais e suas Conexões:
• Conecte uma fonte de áudio aos terminais de entrada relevantes ou uma unidade de armazenamento de dados
para a interface USB ou insira um cartão de memória SD no compartimento adequado ou ativar a função Bluetooth
no seu smartphone.
• Selecione a fonte de sinal ativo, pressionando o botão de entrada até que a fonte de entrada desejada seja exibida.
• Use o controle de função MP3 para controlar os arquivos numa unidade de armazenamento de dados conectada.
• Se vdeseja usar a função de karaoke deste dispositivo, insira um ou dois microfones em MIC1 e MIC2. Os sinais
estão indo para a saída de sinal também.
Conexão Bluetooth
O ATM8000BT só é detectável quando a entrada é selecionado Bluetooth. Depois de selecionar o modo de entrada
Bluetooth no ATM8000BT, ligue a função Bluetooth no smartphone e pesquise na ATM8000BT. O nome de dispositivo
Bluetooth é "ATM8000BT". Emparelhar e ligar depois de pesquisa. Não existe um código de emparelhamento.
Painel traseiro:
Fonte de energia: Ligue o aparelho na tomada eléctrica.
Principais saídas: Ligue as suas colunas aqui para receber o sinal do ATM8000BT
Saídas de altifalante Surround: Ligue as suas colunas de surround aqui. Surround só funciona quando tudos os
altifalantes surround estiverem conectados.
Sub Saídas: Conecte o seu subwoofer aqui.
Pré saída: Conecte o seu pré-amplificador aqui.

©Copyright LOTRONIC 2018 ATM8000BT 25
Saída Record: Ligue o seu gravador aqui.
Input DVD: Conecte seu DVD ou CD ou qualquer outro sinal passiva aqui.
VCD / CD Entrada: Conecte seu DVD ou CD ou qualquer outro sinal passivo aqui.
Entrada óptica: Conecte sua fonte de sinal óptico aqui.
FM Antena: Ligue a antena FM aqui.
Especificações:
Potência de saída: ........................................................................ 4 x 75 W + 3 x 20W
Fonte de energia: ................................................................ AC 220-240 V ~ 50/60 Hz
Resposta de Frequência: ........................................................................ 20-20.000 Hz
Sensibilidade de entrada: ............................................................................... 450 mV
Relação de Ruído (S / N): ................................................................................ ≥ 76 dB
Impedância: .......................................................................................................... 8 Ω
Microfone Sensibilidade de entrada: ................................................................ 20 mV
Dimensões .......................................................................... 430 × 305 × 80 milímetros
Peso líquido ......................................................................................................... 6.2kg
Peso bruto ............................................................................................................... 7kg
Produtos elétricos não devem ser colocados no lixo doméstico. Por favor, traga-os para um centro de
reciclagem. Peça as autoridades locais ou o seu revendedor sobre a maneira de proceder.

©Copyright LOTRONIC 2018 ATM8000BT 26
VARNOSTNA PRIPOROČILA
• Pred uporabo naprave, vas prosimo, da preverite za morebitne poškodbe. V primeru poškodbe ga ne uporabljajte.
• Izklopite napravo, če jo ne uporabljate za nekaj časa.
• Ne izpostavljajte videokamere mehanskim obremenitvam in vlago.
• Poskrbite za zadostno prezračevanje okoli naprave. Ne pokrivajo napravo in jo zaščitite pred neposrednim sončnim
sevanjem.
• Napravo očistite samo s suho in mehko krpo.
• Pozor! Če se naprava poškoduje, vas prosimo, da jo pošljete na popravilo proizvajalcu ali pooblaščenemu serviserju.
• Naprava mora biti priključena samo na ozemljeno električno vtičnico.
• Hraniti izven dosega otrok.
• ODKLOP NAPRAVE
Kje se kot pripomoček za odklop uporablja vtikač ali sponka, ta mora biti preprosto dostopen zaradi odklopa naprave.
Lastnosti
• FM Sprejemnik
• USB/SD/MP3 vhod
• Bluetooth funkcija
• VFD za prikaz naslova skladbe, številko skladbe in pretečeni čas
• 2 mikrofonska vhoda z Echo in kontrolo za bas, treble in glasnost
• Optični vhod
• Izhod za slušalke
• Subwoofer izhod in surround izhod
Sprednja plošča
POWER: Pritisnite ta gumb za VKLOP ali IZKLOP enote
Play/Pause & RECORD: Pritisnite ta gumb za predvajanje signala iz USB/SD, Bluetooth. Pritisnite še enkrat za pavzo. Ko
je izbran vhod TUNER / MP3 / DVD / CD / VCD in v USB ali SD vrata vstavite ključ ali kartico, pritisnete in držite ta gumb,
boste aktivirali funkcijo snemanja. Pritisnite ta gumb in zadržite nekaj sekund in se bo na zaslonu prikazalo "REC". Enota
bo ustvarila novo datoteko v priključenem USB ključu ali SD kartici in ste pripravljeni narediti posnetek. Na tej točki še ne
začne snemanje. Ponovno pritisnite na gumb in enota bo začela snemanje na USB ključ ali SD kartico in pretečenim
časom in "REC" se bo prikazal na zaslonu. Pritisnite gumb trtič za pavzo snemanja in "REC" in čas snemanja prikazan na
SLO

©Copyright LOTRONIC 2018 ATM8000BT 27
taslonu bosta začela utripati. Ponovno pritisnite za nadaljevanje snemanja. Pritisnite in držite ta gumb za nekaj sekund,
da shranite posneto datoteko ter končanje in izhod. Če sta priključena oba, USB ključ in SD kartica, bo enota začela
snemanje na USB ključ. Če je USB ključ poln, ga odstranite in nato ponovno pritisnite gumb za snemanje, da začnete
novo snemanje. Enota je tudi sposoben snemati signal iz mikrofona na USB ključ ali SD kartico. Ko je funkcija snemanja
aktivirana in mikrofon priključen in vklopljen, bo enota mix signala iz sprejemnika, MP3 ali DVD z mikrofonom posnela v
eno skladbo. Če sta dva mikrofon priključena in vklopljena, bo oba signala iz njih zapisala kot mix v eno skladbo s
signalom iz sprejemnika, MP3 ali DVD.
SNEMANJE DATOTEK JE FORMAT .WAV.
SNEMANJE NE DELUJE ČE JE IZBRANA FUNKCIJA USB/SD/BLUETOOTH.
Previous: Pritisnite ta gumb, da se vrnete na začetek trenutnega posnetka ali premaknete na prejšnjo skladbo.
Next: Pritisnite ta gumb, da se premaknete na naslednjo skladbo.
Repeat/Random: Pritisnite ta gumb za izbiro načina ponavljanja med Ponovi enega, Ponovi vse, Naključno.Privzeta
nastavitev je ponovi vse.
Input: Pritisnite ta gumb za cikel skozi različne vhode.
USB: Vstavite vaš USB ključ tukaj
SD: Vstavite vašo SD kartico tukaj
MP3 vhod: Povežite vaš MP3 tukaj
EQ MODE: Pritisnite ta gumb za cikel prednastavljenih EQ načinov.
Audio Function: Pritisnite ta gumb, da preklopite način delovanja med bass, treble in master glasnost
MIC1 & MIC2: Povežite vaše mikrofone tukaj
MIC VOL: Uporabite ta gumb za nastavitev glasnosti mikrofonov
MIC ECHO: Uporabite ta gumb za nastavitev Echo mikrofona.
MIC Bass: Uporabite ta gumb za nastavitev bass mikrofona
MIC Treble: Uporabite ta gumb za nastavitev treble mikrofona
Izhod za slušalke: Povežite vase slušalke tukaj
Sub Output: Uporabite ta gumb za nastavitev glasnosti subwooferja
Pre Output: Uporabite ta gumb za nastavitev glasnosti Predojačevalca
Master Volume: Uporabite ta gumb za nastavitev glasnosti glavnega izhoda
DALJINEC
MUTE: Izklopi zvok
: Gumb za predvajanje / premor
: Stop gumb
Vhod: Pritisnite ta gumb, da preklopite skozi različne vhode.
: Pritisnite ta gumb, da se vrnete na začetek trenutne skladbe ali se premaknete
na prejšnjo skladbo
: Pritisnite ta gumb, da se premaknete na naslednjo skladbo
: Hitro previj nazaj
: Hitro naprej
TRE- / TRE+: Glavni nadzor Treble
BAS- / BAS: Master Bass kontrola
VOL / VOL-: Povečajte / zmanjšajte glasnost
ENTER: Potrdite izbor
EQ MODE: Pritisnite ta gumb, da preklopite skozi vnaprej nastavljene načine
izenačevalnika
REC: Pritisnite, da začnete snemati. Znova pritisnite, da ustavite snemanje

©Copyright LOTRONIC 2018 ATM8000BT 28
Številčni gumbi: Neposredna izbira skladbe
10- / 10: Izbira številke datoteke nad 10. Npr. Za izbiro datoteke št. 27, pritisnite dvakrat 10 in nato 7.
: Pritisnite ta gumb, da izberete način ponavljanja med REPEAT ONE in REPEAT ALL
: RANDOM gumb za predvajanje
AM / FM: Preklopi med AM in FM radijskim sprejemom
SCAN: Pritisnite, da poiščete razpoložljive radijske postaje
1 2 3 Gumbi za LED: Ni funkcije
A / B: Pritisnite enkrat za izbiro izhoda zvočnikov A, dvakrat pritisnite, da izberete izhod B zvočnika, nato pa še tretjič, da
izberete A & B izhod zvočnikov
DELOVANJE
Izberite osrednje mesto za ojačevalec.
Povežite zvočnike (rdeče in črne) + in - pol na zadnji plošči ojačevalca.
Povežite avdio signal na ustrezne vtičnice s pravo polarnostjo.
Priključite omrežni kabel in preklopite ojačevalec ko ste še enkrat preverili vse priključke.
Preklopite na ustrezni avdio vir in nastavite glasnost master na zahtevano raven.
Karaoke: Priključite mikrofon v MIC1 ali MIC2 vtičnice na sprednji plošči. Preden uporabite mikrofon, se prepričajte, da
je izklopljen in tipka MIC glasnost nastavljena na minimum. Priključite mikrofon, ga vklopite in nastavite glasnost počasi
in Echo.
Če ne boste enote ne uporabljate več, izklopite ojačevalec in ga izključite iz električnega omrežja.
Viri signala in njihove povezave:
• Priključite DVD-predvajalnik ali CD-predvajalnik na avdio vhod ali enoto za shranjevanje podatkov na
USB-vmesniku ali vstavite SD-pomnilniško kartico v primerno režo ali vključite funkcijo Bluetooth na vašem
pametnem telefonu.
• Izberite aktivno izvor signala, dokler se ne prikaže želeni vhodni vir pritiskom na gumb INPUT.
• Uporabite kontrolno funkcijo, MP3 za kontrolo datotek na priklopljeni enoti za shranjevanje podatkov.
• Če želite uporabljati funkcijo karaoke te naprave, vstavite eno ali dve mikrofoni v MIC1 in MIC2. Njihovi signali
gredo na izhod signala preveč.
Bluetooth Povezava
ATM8000BT je le opazen, ko je izbran Bluetooth vhod. Ko izberete način vhoda Bluetooth na ATM8000BT, vklopite
funkcijo Bluetooth na mobilnem telefonu in iskanje ATM8000BT. Njegovo Bluetooth ime je "ATM8000BT". Seznanite in
povežite po iskanju. Ni kode seznanjanja.
Zadnja plošča:

©Copyright LOTRONIC 2018 ATM8000BT 29
Power supply: Priključite enoto na električno vtičnico.
Main Speakers Outputs: Povežite tukaj zvočnike za sprejem signala iz ATM8000BT
Surround Speaker Outputs: Povežite Surround zvočnike tukaj. Surround deluje le, če so vsi Surround zvočniki
priključeni.
Sub Outputs: Povežite vaš subwoofer tukaj.
Pre Output: Povežite vaš preojačevalec tukaj.
Record Output: Priključite vaš snemalnik tukaj.
DVD Input: Priključite vaš DVD ali CD ali kakšen drug pasivni signal tukaj.
VCD/CD Input: Priključite vaš DVD ali CD ali kakšen drug pasivni signal tukaj.
Optical input: Priključite vaš optični vir signala tukaj.
FM Antenna: Priključite vašo FM antenna tukaj.
Tehnični podatki:
Izhodna moč: ............................................................................... 4 x 75 W + 3 x 20W
Napajanje: ........................................................................... AC 220-240 V ~ 50/60 Hz
Frekvenčni razpon: .............................................................................. 20 – 20000 Hz
Vhodna občutljivost: ....................................................................................... 450 mV
Razmerje Signal / Šum: ................................................................................... ≥ 76 dB
Impedanca: ........................................................................................................... 8 Ω
Vhodna občutljivost mikrofona: ....................................................................... 20 mV
Dimenzije ............................................................................................ 430×305×80mm
Neto teža ............................................................................................................. 6.2kg
Bruto teža ............................................................................................................ 7.0kg
Električni izdelki se ne smejo odlagati v gospodinjske odpadke. Prosimo, da jih pripeljete do centra za
recikliranje. Vprašajte svoje lokalne oblasti ali svojega prodajalca o tem kako se nadaljuje.

©Copyright LOTRONIC 2018 ATM8000BT 30
RECOMANDARI PRIVIND SIGURANTA
• Inainte de utilizarea produsului, verificati daca nu exista deteriorari sau defectiuni. In cazul existentei acestora, nu
utilizati aparatul.
• Deconectati aparatul de la priza de alimentare daca acesta nu este utilizat o anumita perioada de timp.
• Nu expuneti unitatea la socuri mecanice sau in medii umede.
• Asigurati o ventilatie corespunzatoare in jurul aparatului. Nu acoperiti aparatul si nu-l expuneti la lumina directa a
soarelui.
• Curatati aparatul utilizand un material textil moale si uscat.
• Atentie! In cazul defectarii aparatului, apelati la un service autorizat pentru repararea acestuia.
• Aparatul se va conecta doar la o priza de perete prevazuta cu pamantare de protectie.
• Nu lasati aparatul la indemana copiilor.
• DECONECTAREA IN CAZ DE URGENTA
In cazul in care aparatul trebuie deconectat de urgenta de la priza de perete, aceasta trebuie sa ramana intotdeauna
usor accesibila.
Caracteristici
• Tuner FM
• Intrare USB/SD/MP3
• Functie Bluetooth
• Afisare titlu melodie, numar melodie si durata redata
• 2 intrari microfon cu functie ecou si control volum, bass & inalte
• Intrare optica
• Iesire casti
• Iesire subwoofer si iesire surround
Panou frontal
POWER: Apasati acest buton pentru a porni/opri aparatul.
Play/Pause & RECORD: Apasati acest buton pentru pentru redarea semnalelor de pe USB/SD, Bluetooth. Apasati din
nou pentru pauza. Cand intrarea selectata este TUNER/MP3/DVD/CD/VCD si exista introdus in aparat un dispozitiv USB
sau card SD in sloturile respective, daca apasati si tineti apasat acest buton se activeaza functia de inregistrare. Apasati si
tineti apasat acest buton pentru cateva secunde si pe ecran va apare afisat “REC”. Unitatea va crea un fisier nou pe
dispozitivul USB sau cardul SD. In acest moment unitatea inca NU inregistreaza. Apasati din nou pe buton si unitatea va
incepe sa inregistreze pe USB/cardul SD iar timpul scurs si “REC” va aparea pe ecran. Apasati butonul pentru a treia
oara pentru a face pauza la inregistrare iar pe ecran vor palpi timpul scurs si cuvantul “REC”. Apasati din nou pentru a
continua inregistrarea. Apasati si tineti apasat cateva secunde pentru a salva fisierul si a iesi din modul de inregistrare.
Daca sunt introduse in aparat simultan un dispozitiv USB si un card SD, se va inregistra pe dispozitivul flash.USB. Daca
RO

©Copyright LOTRONIC 2018 ATM8000BT 31
dispozitivul USB este plin, scoateti-l afara si apasati din nou acest buton pentru a incepe o noua inregistrare. Aparatul
poate sa inregistreze si de la microfon pe dispozitivul USB sau cardul SD. Cand functia de inregistrare este activata si
exista un microfon conectat si acesta este pornit, unitatea va mixa semnalul de la Tuner, MP3 sau DVD cu semnalul de la
microfon. Daca 2 microfoane sunt conectate si sunt pornite, se va mixa semnalul acstora cu semnalul de la Tuner, MP3
sau DVD.
FORMATUL DE INREGISTRARE ESTE .WAV
FUNCTIA DE INREGISTRARE NU ESTE ACTIVA DACA INTRAREA SELECTATA ESTE USB/SD/BLUETOOTH.
Previous: Apasati acest buton pentru a merge inapoi la inceputul melodiei curente sau pentru a merge la melodia
anterioara.
Next: Apasati acest buton pentru a merge la melodia urmatoare.
Repeat/Random: Apasati acest buton pentru a selecta modul de repetare intre REPEAT ONE (repeta o melodie), REPEAT
ALL (repeta tot), RANDOM (repetare aleatoare). Implicit este repeat all (repeta tot).
Input: Apasati acest buton pentru a selecta ciclic intre diverse semnale de intrare.
USB: intrare USB.
SD: intrare SD
MP3 input: intrare MP3
EQ MODE: Apasati acest buton pentru a defila ciclic intre diverse moduri presetate de egalizare.
Audio Function: Apasati acest buton pentru a comuta modul de control intre bass, inalte si volum general.
MIC1 & MIC2: intrari microfon
MIC VOL: utilizati acest buton pentru a regla volumul intrarii microfon
MIC ECHO: utilizati acest buton pentru a regla ecoul microfonului
MIC Bass: utilizati acest buton pentru a regla frecventele joase la microfon
MIC Treble: utilizati acest buton pentru a regla frecventele inalte la microfon
Headphone Output: iesire pentru casti
Sub Output: utilizati acest buton pentru a regla volumul iesirii subwoofer
Pre Output: utilizati acest buton pentru a regla volumul iesirii preamplificator
Master Volume: reglaj general pentru volum (master)
TELECOMANDĂ
MUTE: Dezactivează toate sunetele.
: Buton redare/pauză
: Buton stop
INPUT: Apăsați acest buton pentru a comuta între diferite intrări.
: Apăsați acest buton pentru a merge la începutul piesei curente sau pentru a
merge la piesa anterioară.
: Apăsați acest buton pentru a merge la piesa următoare.
: Derulare rapidă înapoi
: Derulare rapidă înainte
TRE-/TRE+: Control Master Treble
BAS-/BAS+: Control Master Bass
VOL+/VOL-: Creșteți/reduceți volumul
ENTER: Confirmați selecția
EQ MODE: Apăsați acest buton pentru a comuta între modurile de egalizare
prestabilite ale egalizatorului.
REC: Apăsați pentru a începe înregistrarea. Apăsați încă o dată pentru a opri
înregistrarea.

©Copyright LOTRONIC 2018 ATM8000BT 32
Number buttons: Selectarea directă a unei piese.
10-/10 + : Pentru a selecta un fișier cu numărul mai mare de 10. Ex.: pentru a selecta fișierul numărul 27, apăsați de două
ori butonul 10+ apoi 7.
: Apăsați acest buton pentru a selecta modul de repetare: REPETĂ O DATĂ, REPETĂ TOATE.
: Buton redare ALEATORIE
AM/FM: Comută între recepția radio AM & FM
SCAN: Apăsați pentru a căuta posturile radio disponibile
1 2 3 LED MODE buttons: Nicio funcție
A/B: Apăsați o dată pentru a selecta ieșirea difuzorului A, apăsați de două ori pentru a selecta ieșirea difuzorului B,
apăsați de trei opri pentru a selecta ieșirile difuzoarelor A & B.
OPERARE
Selectati o locatie centrala pentru amplasarea amplificatorului. Conectati cablurile difuzoarelor (rosu si negru) la
terminalele + respectiv – din partea din spate a amplificatorului, respectand polaritatea corecta.
Conectati sursa de semnal la amplificator. Introduceti stecherul de alimentare in priza, reglati volumul general la minim,
verificati conexiunile si porniti amplificatorul. Reglati volumului la nivelul dorit.
Pentru karaoke: introduceti un microfon la intrarea MIC1 sau MIC2 de pe panoul frontal. Inainte de utilizarea
microfonului, verificati ca acesta sa fie oprit si volumul acestuia sa fie la minim. Conectati microfonul, porniti-l si
reglati incet volumul si ecoul microfonului.
Daca nu utilizati unitatea o anumita perioada de timp, opriti amplificatorul si deconectati-l de la priza de perete.
Sursele de semnal si conexinile acestora
• Conectati o sursa de semnal audio la terminalele de intrare corespunzatoare sau introduceti un flash USB sau card
SD sau activati functia Bluetooth de pe smartphone.
• Selectati sursa de semnal de intrare prin apasarea pe butonul INPUT p[ana cand pe ecran va apara sursa de semnal
dorita
• Utilizati functia de control MP3 CONTROL pentru a selecta fisierul dorit de pe flash USB sau cardul SD.
• Daca doriti sa utilizati functia karaoke la acest dispozitiv, introduceti unul sau doua microfoane in intrarile MIC1,
MIC2 (semnalul de la microfoane va fi mixat cu semnalul de intrare)
Conectare Bluetooth
Dispozitivul ATM8000BT va putea fi gasit doar daca intrarea selectata este Bluetooth. Dupa selectarea Bluetooth ca si
intrare, porniti functia Bluetooth de pe telefonul dvs. si cautati ATM8000BT. Asociati telefonul cu amplificatorul – nu
este necesar nici un cod pentru asociere.
Panoul din spate:
Power supply: pentru conectarea la reteaua de alimentare
Main Speakers Outputs: iesiri pentru conectarea difuzoarelor.
Surround Speaker Outputs: iesire pentru conectarea difuzoarelor surround. Functia surround va fi functionala numai

©Copyright LOTRONIC 2018 ATM8000BT 33
daca sunt conectate toate difuzoarele surround.
Sub Outputs: iesire pentru sunwoofer.
Pre Output: iesire pentru preamplificator
Record Output: iesire pentru inregistrare.
DVD Input: intrare DVD sau CD (sau alt semnal)
VCD/CD Input: intrare DVD sau CD (sau alt semnal)
Optical input: intrare semnal optic
FM Antenna: conectati antena FM
Specificatii:
Putere iesire: ................................................................................................. 4 x 75 W
Tensiune de alimentare: ..................................................... AC 220-240 V ~ 50/60 Hz
Raspuns in frecventa: .......................................................................... 20 – 20000 Hz
Sensibilitate intrare: ....................................................................................... 450 mV
Raport semnal / zgomot (S/N): ....................................................................... ≥ 76 dB
Impedanta: ........................................................................................................... 8 Ω
Sensibilitate intrare microfon: .......................................................................... 20 mV
Dimensiuni ......................................................................................... 430×305×80 mm
Greutate neta ..................................................................................................... 6.2 kg
Greutate bruta .................................................................................................... 7.0 kg
NOTA IMPORTANTA: Produsele electrice nu trebuie reciclate impreuna cu gunoiul menajer. Va rugam sa le
transportati la un centru de reciclare. Adresati-va autoritatilor locale sau furnizorului local despre procedura.

EU Declaration of Conformity
Hereby we, LOTRONIC SA
Avenue Zénobe Gramme, 9
1480 SAINTES
Belgium
+32.2.390.91.91
Certify and declare under our sole responsibility that the following product:
Trade name: LTC AUDIO
Product name: DIGITAL AMPLIFIER WITH USB – BLUETOOTH - FM
Type or model: ATM2000USB-BT - ATM6000BT – ATM6500BT – ATM7000BT –
ATM8000BT
conforms with the essential requirements of the:
LVD 2014/35/EU - RED 2014/53/EU - EMC 2014/30/EU
based on the following specifications applied:
EN60065 : 2014
EN55013: 2013
EN55020: 2007 + A11: 2011
EN61000-3-2: 2006 + A1: 2009 + A2 : 2009 / EN61000-3-3: 2008
EN62479 : 2010
EN301 489-1 V1.9.2 / EN301 489-17 V2.2.1
EN300 328-1 V1.8.1
Place and date of issue: Saintes (Belgium), on 7/04/2017
AKBAR Guive
Technical Manager

Déclaration UE de Conformité
Nous, LOTRONIC SA
Avenue Zénobe Gramme, 9
1480 SAINTES
Belgique
+32.2.390.91.91
Certifions et déclarons sous notre seule responsabilité que les produits suivants:
Marque: LTC AUDIO
Désignation commerciale: AMPLIFICATEUR DIGITAL AVEC FM, USB & BLUETOOTH
Type ou modèle: ATM2000USB-BT - ATM6000BT – ATM6500BT – ATM7000BT –
ATM8000BT
Auxquels se réfère cette déclaration sont conformes aux exigences essentielles et aux autres
dispositions pertinentes des directives
LVD 2014/35/EU - RED 2014/53/EU - EMC 2014/30/EU
Les produits sont en conformité avec les normes et/ou autres documents normatifs suivants :
Standards appliqués: EN60065 : 2014
EN55013 : 2013
EN55020 : 2007 + A11 : 2011
EN61000-3-2 : 2006 + A1 : 2009 + A2 : 2009 / EN61000-3-3 : 2008
EN62479 : 2010
EN301 489-1 V1.9.2 / EN301 489-17 V2.2.1
EN300 328-1 V1.8.1
IEC62321 : 2008
Fait à Saintes (Belgique), le 7/04/2017
AKBAR Guive
Responsable technique
-
 1
1
-
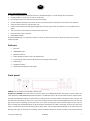 2
2
-
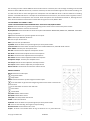 3
3
-
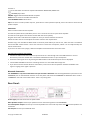 4
4
-
 5
5
-
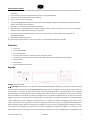 6
6
-
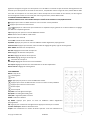 7
7
-
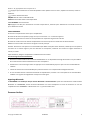 8
8
-
 9
9
-
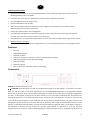 10
10
-
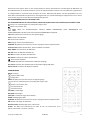 11
11
-
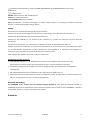 12
12
-
 13
13
-
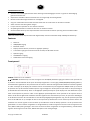 14
14
-
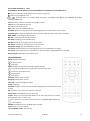 15
15
-
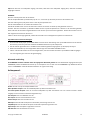 16
16
-
 17
17
-
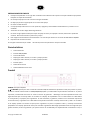 18
18
-
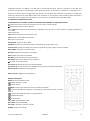 19
19
-
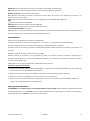 20
20
-
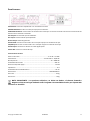 21
21
-
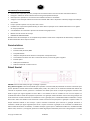 22
22
-
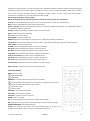 23
23
-
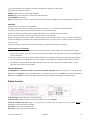 24
24
-
 25
25
-
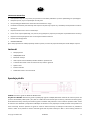 26
26
-
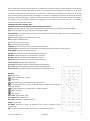 27
27
-
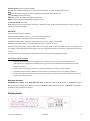 28
28
-
 29
29
-
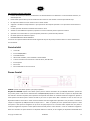 30
30
-
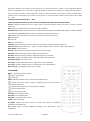 31
31
-
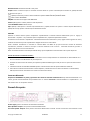 32
32
-
 33
33
-
 34
34
-
 35
35


LTC Audio ATM8000BT de handleiding
- Categorie
- Auto media-ontvangers
- Type
- de handleiding
in andere talen
Gerelateerde papieren
-
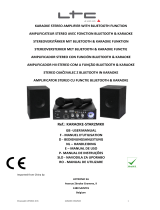 LTC Audio KARAOKE-STAR2MKII de handleiding
-
 LTC Audio MFA1200USB-BT-BL de handleiding
-
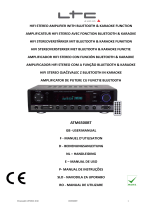 LTC Audio ATM6500BT de handleiding
-
 LTC Audio ATM2000USB-BT de handleiding
-
 LTC Audio ATM7000USB-BT de handleiding
-
 LTC Audio 10-7026 de handleiding
-
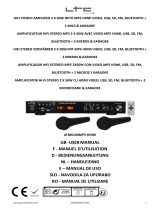 LTC Audio ATM6100MP5-HDMI de handleiding
-
LTC Audio ATM6000BT Handleiding
-
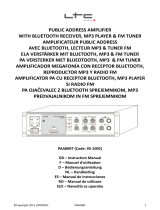 LTC Audio PAA80BT de handleiding
-
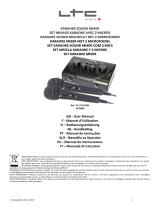 LTC Audio TV-STATION de handleiding


