
6
Documentazione
Tecnica
T38
rev. 0.1
06/2004
©
CAME
CANCELLI
AUTOMATICI
G02802
119RT38
SERIE R| R SERIES | SÉRIE R | BAUREIHE R | SERIE R | SERIE R
SUPPORTO FOTOCELLULA DIR
DIR PHOTOELECTRIC CELL SUPPORT
SUPPORT PHOTOCELLULE DIR
HALTERUNG FÜR PHOTOZELLE DIR
SOPORTE FOTOCÉLULA DIR
STEUN FOTOCEL DIR
ZL38
3
1
2
3
4
ESPANOL
Procedimiento de montaje
1) Quite los tapones para cubrir los
agujeros y je la base utilizando los
tornillos Ø3,9 x 13 suministrados,
Nota: antes de jar la base, pase el hilo
de conexión por el agujero central.
2) Taladre con una broca de Ø3 y je el
fondo de la fotocélula.
3) Fije la fotocélula DIR en el alojamiento
correspondiente y realice la conexión
eléctrica.
4) Coloque y je la tapa con el tornillo.
Base - Base - Base
Grund äche - Base - Basis
Coperchio - Cover - Couvercle
Deckel - Tapa - Deksel
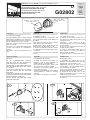
ITALIANO
Procedura di montaggio
1) Togliere i tappi copri foro e ssare la base
utilizzando le viti Ø3,9 x 13 in dotazione,
Nota: prima di ssare la base, passare il
lo di collegamento nel foro centrale.
2) Forare con punta Ø3 e ssare il fondo
della fotocellula.
3) Fissare la focellula DIR nell’apposita
nicchia ed eseguire il collegamento
elettrico.
4) Inserire e ssare il coperchio con la
vite.
ENGLISH
Assembly procedure
1) Remove the hole-covering caps and
secure the base using screws Ø3.9 x 13
provided,
Note: before securing the base, pass the
cable wire into the central hole.
2) Drill a hole with a Ø3 bit and secure
the bottom of the photoelectric cell.
3) Secure the DIR photoelectric cell into
the dedicated slot and make the electric
connection.
4) Insert and secure the cover with the
screws.
NEDERLAND
Montageprocedure
1) Verwijder de doppen die het gat
afdekken en bevestig de basis met de
bijgeleverde schroeven Ø3,9 x 13,
Opmerking: alvorens de basis vast te
maken dient u de aansluitingsdraad in
het centrale gat te steken.
2) Boor een gat met een punt van Ø3 en
maak de bodem van de fotocel vast.
3) Maak de fotocel DIR vast op de
daartoe bestemde gleuf en steek de
stekker in het stopcontact.
4) Plaats de deksel en maak het vast met
de schroef.
FRANCOIS
Procédure de montage
1) Enlever les bouchons cache trou et
xer la base à l’aide des vis Ø3,9 x 13
fournies de série,
Remarque : faire passer le l de
branchement dans le trou central avant
de xer la base.
2) Percer avec une mèche Ø3 et xer le
fond de la photocellule.
3) Fixer la photocellule DIR dans la
niche prévue à cet effet et procéder au
branchement électrique.
4) Placer et xer le couvercle avec la vis.
DEUTSCHLAND
Montage
1) Die Lochabdeckungen entfernen
und die Basis mit den mitgelieferten
Schrauben Ø3,9 x 13 befestigen;
Anmerkung: vor Befestigung der Basis,
das Anschlusskabel durch das mittlere
Loch führen.
2) Mit einer Spitze Ø3 ein Loch bohren
und den unteren Teil der Photozelle
befestigen.
3) Die Photozelle DIR in der eigens dafür
vorgesehenen Nische anbringen und den
Elektroanschluss vornehmen;
4) Den Deckel anbringen und mit der
Schraube befestigen.
Documenttranscriptie
SERIE R| R SERIES | SÉRIE R | BAUREIHE R | SERIE R | SERIE R Documentazione Tecnica SUPPORTO FOTOCELLULA DIR DIR PHOTOELECTRIC CELL SUPPORT T38 SUPPORT PHOTOCELLULE DIR G02802 HALTERUNG FÜR PHOTOZELLE DIR SOPORTE FOTOCÉLULA DIR STEUN FOTOCEL DIR Coperchio - Cover - Couvercle Deckel - Tapa - Deksel 6 rev. 0.1 06/2004 © CAME CANCELLI AUTOMATICI 119RT38 Base - Base - Base Grundfläche - Base - Basis ITALIANO ENGLISH FRANCOIS Procedura di montaggio 1) Togliere i tappi copri foro e fissare la base utilizzando le viti Ø3,9 x 13 in dotazione, Nota: prima di fissare la base, passare il filo di collegamento nel foro centrale. 2) Forare con punta Ø3 e fissare il fondo della fotocellula. 3) Fissare la focellula DIR nell’apposita nicchia ed eseguire il collegamento elettrico. 4) Inserire e fissare il coperchio con la vite. Assembly procedure 1) Remove the hole-covering caps and secure the base using screws Ø3.9 x 13 provided, Note: before securing the base, pass the cable wire into the central hole. 2) Drill a hole with a Ø3 bit and secure the bottom of the photoelectric cell. 3) Secure the DIR photoelectric cell into the dedicated slot and make the electric connection. 4) Insert and secure the cover with the screws. Procédure de montage 1) Enlever les bouchons cache trou et fixer la base à l’aide des vis Ø3,9 x 13 fournies de série, Remarque : faire passer le fil de branchement dans le trou central avant de fixer la base. 2) Percer avec une mèche Ø3 et fixer le fond de la photocellule. 3) Fixer la photocellule DIR dans la niche prévue à cet effet et procéder au branchement électrique. 4) Placer et fixer le couvercle avec la vis. DEUTSCHLAND ESPANOL NEDERLAND Montage 1) Die Lochabdeckungen entfernen und die Basis mit den mitgelieferten Schrauben Ø3,9 x 13 befestigen; Anmerkung: vor Befestigung der Basis, das Anschlusskabel durch das mittlere Loch führen. 2) Mit einer Spitze Ø3 ein Loch bohren und den unteren Teil der Photozelle befestigen. 3) Die Photozelle DIR in der eigens dafür vorgesehenen Nische anbringen und den Elektroanschluss vornehmen; 4) Den Deckel anbringen und mit der Schraube befestigen. Procedimiento de montaje 1) Quite los tapones para cubrir los agujeros y fije la base utilizando los tornillos Ø3,9 x 13 suministrados, Nota: antes de fijar la base, pase el hilo de conexión por el agujero central. 2) Taladre con una broca de Ø3 y fije el fondo de la fotocélula. 3) Fije la fotocélula DIR en el alojamiento correspondiente y realice la conexión eléctrica. 4) Coloque y fije la tapa con el tornillo. Montageprocedure 1) Verwijder de doppen die het gat afdekken en bevestig de basis met de bijgeleverde schroeven Ø3,9 x 13, Opmerking: alvorens de basis vast te maken dient u de aansluitingsdraad in het centrale gat te steken. 2) Boor een gat met een punt van Ø3 en maak de bodem van de fotocel vast. 3) Maak de fotocel DIR vast op de daartoe bestemde gleuf en steek de stekker in het stopcontact. 4) Plaats de deksel en maak het vast met de schroef. 3 1 8 3 ZL 4 2 3-
 1
1

in andere talen
- English: CAME G02802 Owner's manual
- italiano: CAME G02802 Manuale del proprietario
- français: CAME G02802 Le manuel du propriétaire
- español: CAME G02802 El manual del propietario
- Deutsch: CAME G02802 Bedienungsanleitung


