Sony MEX-DV1500U de handleiding
- Categorie
- Dvd spelers
- Type
- de handleiding

masterpage:RightD:\Documents and Settings\takashi-shimomura\Desktop\DTP\848220S MEX-
DV1500U(EUR)\4120899211_MEX-DV1500U_ML\01GB+00COV-E.fm
MEX-DV1500U
4-120-899-21 (1)
Multi Disc Player
Operating Instructions
Bedienungsanleitung
Mode d’emploi
Istruzioni per l’uso
Gebruiksaanwijzing
©2008 Sony Corporation
4-120-899-21 (1)
MEX-DV1500U
GB
DE
FR
NL
IT
Multi Disc Player

2
D:\Documents and Settings\takashi-shimomura\Desktop\DTP\848220S MEX-
DV1500U(EUR)\4120899211_MEX-DV1500U_ML\01GB01INT-E.fm
masterpage:Left
MEX-DV1500U
4-120-899-21 (1)
Warning
To prevent fire or shock hazard, do not
expose the unit to rain or moisture.
To avoid electrical shock, do not open the
cabinet. Refer servicing to qualified
personnel only.
CAUTION
The use of optical instruments with this product
will increase eye hazard. As the laser beam used
in this CD/DVD player is harmful to eyes, do not
attempt to disassemble the cabinet.
Refer servicing to qualified personnel only.
CAUTION
RADIATION WHEN OPEN AND INTERLOCKS DEFEATED.
DO NOT VIEW DIRECTLY WITH OPTICAL INSTRUMENTS.
:
CLASS 1M VISIBLE/INVISIBLE LASER
This label is located on the bottom of the
chassis.
This label is located on the drive unit’s internal
chassis.
Notice for customers: the following
information is only applicable to
equipment sold in countries applying
EU Directives
The manufacturer of this product is Sony
Corporation, 1-7-1 Konan, Minato-ku, Tokyo,
Japan. The Authorized Representative for EMC
and product safety is Sony Deutschland GmbH,
Hedelfinger Strasse 61, 70327 Stuttgart,
Germany. For any service or guarantee matters
please refer to the addresses given in separate
service or guarantee documents.
Disposal of Old Electrical &
Electronic Equipment (Applicable in
the European Union and other
European countries with separate
collection systems)
This symbol on the product or on its
packaging indicates that this product shall not be treated
as household waste. Instead it shall be handed over to the
applicable collection point for the recycling of electrical
and electronic equipment. By ensuring this product is
disposed of correctly, you will help prevent potential
negative consequences for the environment and human
health, which could otherwise be caused by inappropriate
waste handling of this product. The recycling of materials
will help to conserve natural resources. For more detailed
information about recycling of this product, please contact
your local Civic Office, your household waste disposal
service or the shop where you purchased the product.
Applicable accessory: Remote commander
Disposal of waste batteries
(applicable in the European Union
and other European countries with
separate collection systems)
This symbol on the battery or on the packaging indicates
that the battery provided with this product shall not be
treated as household waste. By ensuring these batteries are
disposed of correctly, you will help prevent potentially
negative consequences for the environment and human
health which could otherwise be caused by inappropriate
waste handling of the battery. The recycling of the
materials will help to conserve natural resources. In case
of products that for safety, performance or data integrity
reasons require a permanent connection with an
incorporated battery, this battery should be replaced by
qualified service staff only. To ensure that the battery will
be treated properly, hand over the product at end-of-life to
the applicable collection point for the recycling of
electrical and electronic equipment. For all other batteries,
please view the section on how to remove the battery from
the product safely. Hand the battery over to the applicable
collection point for the recycling of waste batteries. For
more detailed information about recycling of this product
or battery, please contact your local Civic Office, your
household waste disposal service or the shop where you
purchased the product.

3
D:\Documents and Settings\takashi-shimomura\Desktop\DTP\848220S MEX-
DV1500U(EUR)\4120899211_MEX-DV1500U_ML\01GB01INT-E.fm
masterpage:Right
MEX-DV1500U
4-120-899-21 (1)
On safety
• Comply with the traffic laws in your country.
• For your safety, the monitor connected to the
VIDEO OUT turns off automatically when the
parking brake is not applied.
Warning if your car’s ignition has no
ACC position
Be sure to set the Auto Off function
(page 43).
The unit will shut off completely and
automatically in the set time after the unit is
turned off, which prevents battery drain.
If you do not set the Auto Off function, press
and hold (OFF) until the display disappears
each time you turn the ignition off.
To cancel the demonstration (DEMO) display,
see page 43.
Preventing an accident
Pictures appear only after you park the car
and set the parking brake.
If the car starts moving during video
playback, pictures from the VIDEO OUT
automatically disappear after displaying the
following caution.
The pictures on the screen are turned off, but
audio source can be heard.
Do not operate the unit or watch the monitor
while driving.
Video blocked for your
safety.

4
D:\Documents and Settings\takashi-shimomura\Desktop\DTP\848220S MEX-
DV1500U(EUR)\4120899211_MEX-DV1500U_ML\01GB+00COV-ETOC.fm
masterpage:Right
Table of Contents
MEX-DV1500U
4-120-899-21 (1)
Welcome ! . . . . . . . . . . . . . . . . . . . . . . . . . . . . .6
Copyrights . . . . . . . . . . . . . . . . . . . . . . . . . . .7
Playable discs and symbols used in this
manual . . . . . . . . . . . . . . . . . . . . . . . . . . . . . . . .8
Location and function of controls . . . . . . . . . .10
Main unit . . . . . . . . . . . . . . . . . . . . . . . . . . .10
Card remote commander RM-X168 . . . . . .12
Getting Started
Installing the unit and the optional
monitor . . . . . . . . . . . . . . . . . . . . . . . . . . 14
Resetting the unit. . . . . . . . . . . . . . . . . . 14
Preparing the card remote
commander. . . . . . . . . . . . . . . . . . . . . . . 14
Detaching the front panel . . . . . . . . . . . 15
Attaching the front panel. . . . . . . . . . . . . . .15
Basic Operations
Playing video discs . . . . . . . . . . . . . . . . 16
Playing audio discs . . . . . . . . . . . . . . . . 18
Playing back a USB device . . . . . . . . . . 20
Display items. . . . . . . . . . . . . . . . . . . . . . . .21
Repeat and shuffle play . . . . . . . . . . . . . . . .21
Listening to the radio. . . . . . . . . . . . . . . 22
Advanced Operations — Discs
Playing DivX
®
/MPEG-4/JPEG files . . . . . . . .23
DivX
®
/MPEG-4 video playback. . . . . . . . .23
JPEG image playback . . . . . . . . . . . . . . . . .23
Using PBC functions — Playback control. . . .24
Using play mode menu. . . . . . . . . . . . . . . . . . .24
Viewing time/text information of the disc . . . .26
Configuring audio settings . . . . . . . . . . . . . . . .26
Changing the audio language/format. . . . . .27
Checking the program format . . . . . . . . . . .27
Adjusting the audio output level
— DVD level. . . . . . . . . . . . . . . . . . . . . . . .28
Magnifying pictures . . . . . . . . . . . . . . . . . . . . .28
Adjusting the picture quality
— Picture EQ . . . . . . . . . . . . . . . . . . . . . . . . . .29
Customizing the picture quality. . . . . . . . . .29
Locking discs — Parental control . . . . . . . . . . 30
Activating parental control . . . . . . . . . . . . . 30
Changing the area and its movie rating
level. . . . . . . . . . . . . . . . . . . . . . . . . . . . . . . 30
Repeat and shuffle play . . . . . . . . . . . . . . . . . . 31
Direct search play . . . . . . . . . . . . . . . . . . . . . . 32
Listing up tracks/images/video files
— Quick-BrowZer. . . . . . . . . . . . . . . . . . . . . . 33
Selecting a track/image/video file. . . . . . . . 33
Selecting a file type. . . . . . . . . . . . . . . . . . . 33
Viewing audio disc information . . . . . . . . . . . 34
Advanced Operations — Radio
Storing and receiving stations . . . . . . . . . . . . . 34
Storing automatically — BTM . . . . . . . . . . 34
Storing manually. . . . . . . . . . . . . . . . . . . . . 34
Receiving stored stations . . . . . . . . . . . . . . 35
RDS . . . . . . . . . . . . . . . . . . . . . . . . . . . . . . . . . 35
Overview. . . . . . . . . . . . . . . . . . . . . . . . . . . 35
Setting AF and TA . . . . . . . . . . . . . . . . . . . 35
Selecting PTY. . . . . . . . . . . . . . . . . . . . . . . 36
Setting CT. . . . . . . . . . . . . . . . . . . . . . . . . . 36
Sound Adjustment
Adjusting the sound characteristics. . . . . . . . . 37
Customizing the equalizer curve
— EQ3 . . . . . . . . . . . . . . . . . . . . . . . . . . . . 37
Settings
Visual setup . . . . . . . . . . . . . . . . . . . . . . . . . . . 38
Basic operation of visual setup . . . . . . . . . . 38
Language setup for display or
soundtrack. . . . . . . . . . . . . . . . . . . . . . . . . . 39
Display setup. . . . . . . . . . . . . . . . . . . . . . . . 39
Custom setup. . . . . . . . . . . . . . . . . . . . . . . . 40
Audio setup. . . . . . . . . . . . . . . . . . . . . . . . . 41
Resetting all settings . . . . . . . . . . . . . . . . . . 41
System setup . . . . . . . . . . . . . . . . . . . . . . . . . . 42
Basic operation of system setup . . . . . . . . . 42
Setting the clock . . . . . . . . . . . . . . . . . . . . . 46
Using Optional Equipment
Auxiliary equipment . . . . . . . . . . . . . . . . . . . . 46

For installation and connections, see the
supplied installation/connections manual.
5
D:\Documents and Settings\takashi-shimomura\Desktop\DTP\848220S MEX-
DV1500U(EUR)\4120899211_MEX-DV1500U_ML\01GB+00COV-ETOC.fm
masterpage:Right
MEX-DV1500U
4-120-899-21 (1)
Support site
If you have any questions or for the latest support information on this
product, please visit the web site below:
http://support.sony-europe.com
Provides information on:
• Models and manufacturers of compatible digital audio players
• Supported MP3/WMA/AAC files
Additional Information
Precautions . . . . . . . . . . . . . . . . . . . . . . . . . . . 47
Notes on discs . . . . . . . . . . . . . . . . . . . . . . . 47
Playback order of MP3/WMA/AAC/JPEG/
DivX
®
/MPEG-4 files . . . . . . . . . . . . . . . . . 48
About MP3 files . . . . . . . . . . . . . . . . . . . . . 48
About WMA files . . . . . . . . . . . . . . . . . . . . 48
About AAC files . . . . . . . . . . . . . . . . . . . . . 48
About JPEG files . . . . . . . . . . . . . . . . . . . . 48
About DivX
®
files . . . . . . . . . . . . . . . . . . . 48
About MPEG-4 files . . . . . . . . . . . . . . . . . . 49
Maintenance . . . . . . . . . . . . . . . . . . . . . . . . . . 49
Removing the unit . . . . . . . . . . . . . . . . . . . . . . 50
Specifications . . . . . . . . . . . . . . . . . . . . . . . . . 50
Troubleshooting. . . . . . . . . . . . . . . . . . . . . . . . 51
Error displays/Messages . . . . . . . . . . . . . . . 53
Glossary. . . . . . . . . . . . . . . . . . . . . . . . . . . . . . 54
Language code/area code list. . . . . . . . . . . . . . 56
Index . . . . . . . . . . . . . . . . . . . . . . . . . . . . . . . . 57

6
D:\Documents and Settings\takashi-shimomura\Desktop\DTP\848220S MEX-
DV1500U(EUR)\4120899211_MEX-DV1500U_ML\01GB02CD-E.fm
masterpage:Left
MEX-DV1500U
4-120-899-21 (1)
Welcome !
Thank you for purchasing this Sony Multi Disc
Player. Before operating this unit, read this
manual thoroughly and retain it for future
reference.
Features
Follow the page reference for details.
* Depending on track length and recorded sampling
rate.
DVD, VCD, CD playback
t page 8
Compatible with various disc formats.
2000MP3, 2000WMA, 2000AAC
Can play up to 2,000 tracks* recorded on a disc
in MP3/WMA/AAC format.
Multi-disc resume playback
t page 40
Stores the point where playback is stopped for
up to 5 discs and can resume DVD VIDEO/
VCD/DivX/MPEG-4 playback even after the
disc is ejected.
t page 37
7 preset equalizer curves, which can be further
customized by tuning 3 different bands.
t page 29
Picture tone selectable from preset settings
according to the car’s interior/ambient light.
t page 46
Allows connection of a portable audio device
(analog connection).
t page 46
The AUX AUDIO IN terminals on the rear
allow connection and audio output of an
auxiliary device, such as portable audio device
(analog connection), hideaway navigation
device, TV tuner box, etc.

7
D:\Documents and Settings\takashi-shimomura\Desktop\DTP\848220S MEX-
DV1500U(EUR)\4120899211_MEX-DV1500U_ML\01GB02CD-E.fm
masterpage:RightD:\Documents and Settings\takashi-shimomura\Desktop\DTP\848220S MEX-
DV1500U(EUR)\4120899211_MEX-DV1500U_ML\01GB02CD-E.fm
masterpage:Right
MEX-DV1500U
4-120-899-21 (1)
Copyrights
This product incorporates copyright protection
technology that is protected by method claims of
certain U.S. patents, other intellectual property
rights owned by Macrovision Corporation, and
other rights owners. Use of this copyright
protection technology must be authorized by
Macrovision Corporation, and is intended for
home and other limited viewing uses only unless
otherwise authorized by Macrovision
Corporation. Reverse engineering or disassembly
is prohibited.
“DVD VIDEO,” “DVD-R,” “DVD-RW,”
“DVD+R,” and “DVD+RW” are trademarks.
“DivX” and “DivX Certified” are
registered trademarks or trademarks
of DivX, Inc.
THIS PRODUCT IS LICENSED UNDER THE
MPEG-4 VISUAL PATENT PORTFOLIO
LICENSE FOR THE PERSONAL AND NON-
COMMERCIAL USE OF A CONSUMER FOR
DECODING MPEG-4 VIDEO THAT WAS
ENCODED BY A CONSUMER ENGAGED IN
A PERSONAL AND NON-COMMERCIAL
ACTIVITY AND/OR WAS OBTAINED FROM
A VIDEO PROVIDER LICENSED BY MPEG
LA TO PROVIDE MPEG-4 VIDEO. NO
LICENSE IS GRANTED OR SHALL BE
IMPLIED FOR ANY OTHER USE.
ADDITIONAL INFORMATION INCLUDING
THAT RELATING TO PROMOTIONAL,
INTERNAL AND COMMERCIAL USES AND
LICENSING MAY BE OBTAINED FROM
MPEG LA, LLC. SEE
HTTP://WWW.MPEGLA.COM
Manufactured under license
from Dolby Laboratories.
“Dolby” and the double-D
symbol are trademarks of Dolby Laboratories.
Windows Media, and the
Windows logo are trademarks
or registered trademarks of
Microsoft Corporation in the
United States and/or other countries.

8
D:\Documents and Settings\takashi-shimomura\Desktop\DTP\848220S MEX-
DV1500U(EUR)\4120899211_MEX-DV1500U_ML\01GB02CD-E.fm
masterpage:Left
MEX-DV1500U
4-120-899-21 (1)
Playable discs and symbols used in this manual
This unit can play various video/audio discs.
The following chart helps you to check if a disc is supported by this unit, as well as what functions are
available for a given disc type.
*1 Audio files can also be stored. For details, see page 9.
*2 Video/image files can also be stored. For details, see page 9.
Note
“DVD” may be used in this manual as a general term for DVD VIDEOs, DVD-Rs/DVD-RWs, and DVD+Rs/
DVD+RWs.
Disc symbol in manual Disc format Disc logo
VIDEO
DVD VIDEO
DVD-R*
1
DVD-R DL*
1
(Video mode/VR mode)
DVD-RW*
1
(Video mode/VR mode)
DVD+R*
1
DVD+R DL*
1
DVD+RW*
1
Video CD
(Ver. 1.0/1.1/2.0)
AUDIO
Audio CD
CD-ROM*
2
CD-R*
2
CD-RW*
2

9
D:\Documents and Settings\takashi-shimomura\Desktop\DTP\848220S MEX-
DV1500U(EUR)\4120899211_MEX-DV1500U_ML\01GB02CD-E.fm
masterpage:RightD:\Documents and Settings\takashi-shimomura\Desktop\DTP\848220S MEX-
DV1500U(EUR)\4120899211_MEX-DV1500U_ML\01GB02CD-E.fm
masterpage:Right
MEX-DV1500U
4-120-899-21 (1)
The following chart shows the supported compression formats, their file types, and the disc types on
which those files can be stored.
Available functions differ depending on the format, regardless of disc type. The format symbols below
appear next to the description of functions available for that format.
Tip
For details on compression formats, see page 48.
Unsupported discs
The following discs cannot be played on this unit.
•8 cm (3
1
/4 in) discs
• 12 cm (4
3
/4 in) discs utilizing only the inner 8 cm (3
1
/4 in) data portion (the rest is transparent)
• CD-ROM containing files other than MP3/WMA/AAC/JPEG/DivX/MPEG-4
•SA-CD
•CD-G
•Photo-CD
• VSD (Video Single Disc)
• DVD-ROM containing files other than MP3/WMA/AAC/JPEG/DivX/MPEG-4
•DVD-RAM
•DVD-Audio
• Active-Audio (Data)
• SVCD (Super Video CD)
•CDV
• Discs created in Packet Write format
• Discs in DTS format
Note
Even compatible discs may not be playable on this unit, depending on their recorded condition.
Region code
The region system is used to protect software copyrights.
The region code is located on the bottom of the unit, and only DVDs
labeled with an identical region code can be played on this unit.
DVDs labeled can also be played.
If you try to play any other DVD, the message “Playback prohibited
by region code.” will appear on the monitor screen. Depending on
the DVD, no region code may be labeled even though playing the
DVD is prohibited by area restrictions.
Format symbol in manual File type Storable disc type
MP3 audio file
DATA DVDs
DVD-ROM
DVD-R
DVD-R DL
DVD-RW
DVD+R
DVD+R DL
DVD+RW
DATA CDs
CD-ROM
CD-R
CD-RW
WMA audio file
AAC audio file
JPEG image file
DivX
®
video file
MPEG-4 video file
MPEG-4
Region code
ALL

10
D:\Documents and Settings\takashi-shimomura\Desktop\DTP\848220S MEX-
DV1500U(EUR)\4120899211_MEX-DV1500U_ML\01GB02CD-E.fm
masterpage:Left
MEX-DV1500U
4-120-899-21 (1)
Location and function of controls
Main unit
Refer to the pages listed for details.
Instructions in this manual generally describe the
controls on the card remote commander. You can
also use the controls on the main unit if they have
the same or similar names to those on the card
remote commander.
A OFF button page 15, 16, 18, 20, 24
To power off/stop the source (press); shut off
completely (press and hold).
B (Back) button page 33, 37
To return to the previous display.
C SOURCE button page 20, 22, 34, 47
To power on; change the source (Radio/Disc/
USB/AUX).
D (Browse) button page 33
To enter the Quick-BrowZer mode.*
1
E Control dial/SOUND/ENTER button
page 28, 33, 34, 36, 37, 42, 46, 47
To adjust the volume/adjust a setting (rotate);
open the sound menu/apply a setting (press).
F Disc slot page 16, 18
To insert the disc.
G Display window
H Z (eject) button page 16, 18
To eject the disc.
I USB terminal page 20
To connect to the USB device.
J SEEK +/– buttons page 17, 19, 22, 23
Disc/USB:
To skip a chapter/track/scene/file (press);
reverse/fast-forward disc (press and hold
momentarily); reverse/fast-forward track
(press and hold).*
2
Radio:
To tune in stations automatically (press); find
a station manually (press and hold).
K (front panel release) button
page 15
L MODE button page 22, 34, 47
To select the radio band (FM/MW/LW);
select an auxiliary device connected to the
AUX input jack (front) or AUX IN jack
(rear).
M Receptor for the card remote
commander
N RESET button page 14
ALBM ARTIST TRACK SHUF ZAP
+
DM
LOUDDISCREGTPTAAF
AUX
SETUP
REPPTY SHUF
OFF
1 2 3 4 5 6
ALBM
SOURCE
MODE
SEEK
SE
EK
PUSH SOUND
/
ENTER
DSPLAF/TA
qkqh
12 4 657839
qsqaq; qd qlqj
qfqg

11
D:\Documents and Settings\takashi-shimomura\Desktop\DTP\848220S MEX-
DV1500U(EUR)\4120899211_MEX-DV1500U_ML\01GB02CD-E.fm
masterpage:RightD:\Documents and Settings\takashi-shimomura\Desktop\DTP\848220S MEX-
DV1500U(EUR)\4120899211_MEX-DV1500U_ML\01GB02CD-E.fm
masterpage:Right
MEX-DV1500U
4-120-899-21 (1)
O SETUP button page 28, 34, 42, 46, 47
To open the system setup menu.
P AF (Alternative Frequencies)/
TA (Traffic Announcement)/
PTY (Program Type) button page 35,
36
To set AF and TA (press); select PTY (press
and hold) in RDS.
Q Number buttons
Disc/USB:
(1): b REP page 16, 17, 21, 31
(2): SHUF B page 16, 17, 21, 31
(3)/(4): ALBM –/+ (V/v) page 16, 17,
19, 23
To skip an album or folder/move the
cursor (press); skip albums or folders
continuously (press and hold).
(6): u (play/pause) page 16, 17, 18,
19, 23
To start/pause playback.
Radio:
To receive stored stations (press); store
stations (press and hold).
R DSPL (Display) button page 21, 26,
35, 46
To change the display item.
S AUX input jack page 46
To connect a portable audio device.
*1 When a CD/MP3/WMA/AAC/JPEG/DivX/MPEG-4
is played.
*2 Operation differs depending on the disc (page 17,
19).
About USB cap
When not using the USB terminal I, use the supplied
USB cap to prevent dust or dirt entering. Keep the
USB cap out of the reach of children to prevent
accidental swallowing.

12
D:\Documents and Settings\takashi-shimomura\Desktop\DTP\848220S MEX-
DV1500U(EUR)\4120899211_MEX-DV1500U_ML\01GB02CD-E.fm
masterpage:Left
MEX-DV1500U
4-120-899-21 (1)
Card remote commander RM-X168
Refer to the pages listed for details.
Remove the insulation film before use (page 14).
A OFF button page 16, 18, 20, 24
To power off/stop the source (press); shut off
completely (press and hold).
B SOUND button page 37
To open the sound menu.
C VISUAL SETUP button page 24, 27,
28, 29, 30, 32, 33, 38
To open the play mode/visual setup menu.
D SYSTEM SETUP button page 28, 34,
42, 46, 47
To open the system setup menu.
E (Back)/O button page 24, 25, 30,
31, 33, 37, 38
To return to the previous display; return to
the menu on a VCD*
1
.
qs
1
2
3
4
5
6
7
8
qd
qf
qg
qj
qh
9
0
qa

13
D:\Documents and Settings\takashi-shimomura\Desktop\DTP\848220S MEX-
DV1500U(EUR)\4120899211_MEX-DV1500U_ML\01GB02CD-E.fm
masterpage:RightD:\Documents and Settings\takashi-shimomura\Desktop\DTP\848220S MEX-
DV1500U(EUR)\4120899211_MEX-DV1500U_ML\01GB02CD-E.fm
masterpage:Right
MEX-DV1500U
4-120-899-21 (1)
F Number buttons page 16, 17, 24, 25,
30, 31, 32, 33, 34
Disc:
To locate a title/chapter/track.
Radio:
To receive stored stations (press); store
stations (press and hold).
G CLEAR button page 30, 33
To delete an entered number.
H DSPL (Display) button page 21, 26,
35, 46
To change display items.
I ATT (Attenuate) button
To attenuate the sound (to cancel, press
again).
J u (Play/Pause) button page 16, 17,
18, 19, 23
To start/pause playback.
K .m/M> buttons page 17, 19,
22, 23
Disc/USB:
To skip a chapter/track/scene/file (press);
reverse/fast-forward disc (press and hold
momentarily); reverse/fast-forward track
(press and hold).*
2
Radio:
To tune in stations automatically (press); find
a station manually (press and hold).
L DVD playback setting buttons
(AUDIO): page 17, 27
To change the audio language/format.
(For VCD/CD/MP3/WMA/AAC, to
change the audio channel.)
(SUBTITLE): page 17
To change the subtitle language.
(ANGLE): page 17
To change the viewing angle.
(TOP MENU): page 17
To open the top menu on a DVD.
(MENU): page 17
To open the menu on a disc.
M (Browse) button page 33
To enter the Quick-BrowZer mode.*
3
N </M/m/, (Cursor)/ENTER buttons
To move the cursor and apply a setting.
O SRC (Source) button page 20, 22, 34,
47
To power on; change the source (Radio/Disc/
USB/AUX).
P MODE button page 22, 34, 47
To select the radio band (FM/MW/LW);
select an auxiliary device connected to the
AUX input jack (front) or AUX IN jack
(rear).
Q VOL (Volume) +/– buttons
To adjust the volume.
*1 When playing with PBC function.
*2 Operation differs depending on the disc (page 17,
19).
*3 When a CD/MP3/WMA/AAC/JPEG/DivX/MPEG-4
is played.
Note
If the unit is turned off and the display disappears, it
cannot be operated with the card remote commander
unless (SOURCE) on the main unit is pressed, or a
disc is inserted to activate the unit first.

14
D:\Documents and Settings\takashi-shimomura\Desktop\DTP\848220S MEX-
DV1500U(EUR)\4120899211_MEX-DV1500U_ML\01GB02CD-E.fm
masterpage:Left
MEX-DV1500U
4-120-899-21 (1)
Getting Started
Installing the unit and the
optional monitor
Firstly, install and connect the unit and the
optional monitor.
This unit can be operated using the displays that
appear on the unit and/or the optional monitor.
Note that this manual includes instructions
concerning displays on both unit and/or optional
monitor.
For details, see the supplied installation/
connections manual.
Note
Be sure to install the optional monitor safely, and in a
place where it does not obstruct the driver’s view.
Resetting the unit
Before operating the unit for the first time, or
after replacing the car battery or changing the
connections, you must reset the unit.
Detach the front panel (page 15) and press the
RESET button (page 10) with a pointed object,
such as a ball-point pen.
Note
Pressing the RESET button will erase the clock setting
and some stored contents.
Preparing the card remote
commander
Remove the insulation film.
Tip
For how to replace the battery, see page 49.
Unit
Optional monitor

15
D:\Documents and Settings\takashi-shimomura\Desktop\DTP\848220S MEX-
DV1500U(EUR)\4120899211_MEX-DV1500U_ML\01GB02CD-E.fm
masterpage:RightD:\Documents and Settings\takashi-shimomura\Desktop\DTP\848220S MEX-
DV1500U(EUR)\4120899211_MEX-DV1500U_ML\01GB02CD-E.fm
masterpage:Right
MEX-DV1500U
4-120-899-21 (1)
Detaching the front panel
You can detach the front panel of this unit to
prevent theft.
Caution alarm
If you turn the ignition switch to the OFF
position without detaching the front panel, the
caution alarm will sound for a few seconds.
The alarm will only sound if the built-in
amplifier is used.
1 Press (OFF).
The unit is turned off.
2 Press , then pull it off towards you.
Notes
• Do not drop or put excessive pressure on the front
panel and display window.
• Do not subject the front panel to heat/high
temperature or moisture. Avoid leaving it in a parked
car or on a dashboard/rear tray.
• Do not detach the front panel during playback of the
USB device, otherwise USB data may be damaged.
Attaching the front panel
Engage part A of the front panel with part B of
the unit, as illustrated, and push the left side into
position until it clicks.
Note
Do not put anything on the inner surface of the front
panel.
OFF
B
A

16
D:\Documents and Settings\takashi-shimomura\Desktop\DTP\848220S MEX-
DV1500U(EUR)\4120899211_MEX-DV1500U_ML\01GB02CD-E.fm
masterpage:Left
MEX-DV1500U
4-120-899-21 (1)
Basic Operations
Playing video discs
Depending on the disc, some operations may be different or restricted.
Refer to the operating instructions supplied with your disc.
To stop playback
Press (OFF).
Note
Discs in DTS format are not supported. The sound is not output if the DTS format is selected.
1
Turn on your monitor, then select the input source on your monitor
corresponding to this unit.
2
Insert the disc (label side up).
Playback starts automatically.
If playback does not start automatically, press u.
3
If the DVD menu appears, press (1)(b)/(2)(B)/(3)(V)/(4)(v) to move
the cursor, then press (6) (u) to confirm.
With the card remote commander, press the </M/m/,/number buttons to move the cursor,
then press (ENTER) to confirm.
To eject the disc
Press Z.
</M/m/,
ENTER
u
OFF
b/B/V/v u
OFF
Z
Number
buttons

17
D:\Documents and Settings\takashi-shimomura\Desktop\DTP\848220S MEX-
DV1500U(EUR)\4120899211_MEX-DV1500U_ML\01GB02CD-E.fm
masterpage:RightD:\Documents and Settings\takashi-shimomura\Desktop\DTP\848220S MEX-
DV1500U(EUR)\4120899211_MEX-DV1500U_ML\01GB02CD-E.fm
masterpage:Right
MEX-DV1500U
4-120-899-21 (1)
About the DVD menu
A DVD is divided into several sections, which make up a picture or music feature. These sections are
called “titles.” When you play a DVD that contains several titles, you can select a desired title using the
DVD’s top menu. For DVDs that allow you to select items such as subtitle/sound language(s), select
these items using the DVD menu.
Other playback operations
*1 Unavailable depending on the disc.
*2 When the 4-digit input prompt appears, input the language code (page 56) for the desired language.
To Press
pause/resume play after pause u
skip a chapter/track/scene/file .m/M>
reverse/fast-forward disc and hold .m/M> momentarily; and then
repeatedly to switch the speed (× 2 t × 12 t × 120 t
× 2…)
cancel reverse/fast-forward u
show the DVD menu*
1
Remote: (TOP MENU) or (MENU)
select items in the DVD menu*
1
Main unit: (1)(b)/(2)(B)/(3)(V)/(4)(v) to move the
cursor, then press (6) (u) to confirm
Remote: </M/m/,/number buttons to move the cursor,
then press (ENTER) to confirm
change audio language/format/channel
(page 27)*
1
Remote: (AUDIO) repeatedly until the desired item appears
turn off/change the subtitle language*
1
Remote: (SUBTITLE) repeatedly until the desired item
appears*
2
change the viewing angle*
1
Remote: (ANGLE) repeatedly until the desired angle number
appears
.m/M>
u
SUBTITLE
ANGLE
MENU
</M/m/,
ENTER
AUDIO
TOP MENU
b/B/V/v u.m/M>
Number
buttons

18
D:\Documents and Settings\takashi-shimomura\Desktop\DTP\848220S MEX-
DV1500U(EUR)\4120899211_MEX-DV1500U_ML\01GB02CD-E.fm
masterpage:Left
MEX-DV1500U
4-120-899-21 (1)
Playing audio discs
Depending on the disc, some operations may be different or restricted.
Refer to the operating instructions supplied with your disc.
To stop playback
Press (OFF).
Note
Discs in DTS format are not supported. The sound is not output if the DTS format is selected.
1
Insert the disc (label side up).
Playback starts automatically.
If playback does not start automatically, press u.
To eject the disc
Press Z.
u
OFF
u
OFF
Z

19
D:\Documents and Settings\takashi-shimomura\Desktop\DTP\848220S MEX-
DV1500U(EUR)\4120899211_MEX-DV1500U_ML\01GB02CD-E.fm
masterpage:RightD:\Documents and Settings\takashi-shimomura\Desktop\DTP\848220S MEX-
DV1500U(EUR)\4120899211_MEX-DV1500U_ML\01GB02CD-E.fm
masterpage:Right
MEX-DV1500U
4-120-899-21 (1)
Other playback operations
* When an MP3/WMA/AAC is played.
To Press
pause/resume play after pause u
skip a track .m (<)/M> (,)
reverse/fast-forward track and hold .m/M>
skip an album* Main unit: (3) (ALBM –)/(4) (ALBM +)
Remote: M/m
skip albums continuously* Main unit: and hold (3) (ALBM –)/(4) (ALBM +)
Remote: and hold M/m
</M/m/,
.m/M>
u
u.m/M> ALBM

20
D:\Documents and Settings\takashi-shimomura\Desktop\DTP\848220S MEX-
DV1500U(EUR)\4120899211_MEX-DV1500U_ML\01GB02CD-E.fm
masterpage:Left
MEX-DV1500U
4-120-899-21 (1)
Playing back a USB device
For details on the compatibility of your USB device, visit the support site.
• MSC (Mass Storage Class) type USB devices compliant with the USB standard can be used.
• Corresponding codec is MP3 (.mp3), WMA (.wma), AAC (.m4a) and JPEG (.jpg).
• Backup of data in a USB device is recommended.
Note
Connect the USB device after starting the engine.
Depending on the USB device, malfunction or damage may occur if it is connected before starting the engine.
To stop play back
Press (OFF).
Note
Be sure to use the USB cable supplied with the device if a cable is needed when making USB connection.
1
Connect the USB device to the USB
terminal.
Playback starts automatically.
If a USB device is already connected, to start playback,
press (SOURCE) repeatedly until “USB” appears.
Support site
http://support.sony-europe.com
SRC
OFF
DSPL
SOURCE
(USB)
OFF
SHUFREP DSPL

21
D:\Documents and Settings\takashi-shimomura\Desktop\DTP\848220S MEX-
DV1500U(EUR)\4120899211_MEX-DV1500U_ML\01GB02CD-E.fm
masterpage:RightD:\Documents and Settings\takashi-shimomura\Desktop\DTP\848220S MEX-
DV1500U(EUR)\4120899211_MEX-DV1500U_ML\01GB02CD-E.fm
masterpage:Right
MEX-DV1500U
4-120-899-21 (1)
Removing the USB device
1 Stop the USB device playback.
2 Remove the USB device.
If you remove your USB device during
playback, data in the USB device may be
damaged.
Notes
• Do not use USB devices so large or heavy that they
may fall down due to vibration, or cause a loose
connection.
• Do not detach the front panel during playback of the
USB device, otherwise USB data may be damaged.
• This unit cannot recognize USB devices via a USB
hub.
Display items
A Source
B Track name, Artist name, Album number*,
Album name, Track number/Elapsed playing
time, Clock
* Album number is displayed only when the album is
changed.
To change display items B, press (DSPL).
Notes
• Displayed items will differ, depending on the USB
device, recorded format and settings. For details,
visit the support site.
• The maximum number of displayable data is as
follows.
– folders (albums): 256
– files (tracks): 2,000
• Do not leave a USB device in a parked car, as
malfunction may result.
• It may take time for playback to begin, depending on
the amount of recorded data.
• During playback or fast-forward/reverse of a VBR
(Variable Bit Rate) MP3/WMA/AAC file, elapsed
playing time may not display accurately.
• Playback of a lossless compression file is not
supported.
Displaying the sleeve image (Jacket
Picture)
During audio playback, you can check the
content information or display the sleeve image
(Jacket Picture)* of MP3/WMA/AAC file in the
USB device on the monitor.
* The recommended size is from 240 × 240 to 960 ×
960 pixels.
Repeat and shuffle play
1 During playback, press (1) (REP) or
(2) (SHUF) repeatedly until the
desired setting appears.
* When two or more drives are created on the USB
device.
To return to normal play mode, select “REP-
OFF” or “SHUF-OFF.”
Select To play
REP-TRACK track repeatedly.
REP-ALBUM album repeatedly.
SHUF-ALBUM album in random order.
REP-DRIVE* drive repeatedly.

22
D:\Documents and Settings\takashi-shimomura\Desktop\DTP\848220S MEX-
DV1500U(EUR)\4120899211_MEX-DV1500U_ML\01GB02CD-E.fm
masterpage:Left
MEX-DV1500U
4-120-899-21 (1)
Listening to the radio
Tip
For details on other radio functions, see “Advanced Operations — Radio” on page 34.
With the card remote commander
Use (SRC) instead of (SOURCE), and .m/M> instead of (SEEK) –/+.
1
Press (SOURCE) repeatedly until “TUNER” appears.
2
Press (MODE) repeatedly until the desired band (FM1, FM2, FM3, MW
or LW) appears.
3
Perform tuning.
To tune automatically
Press (SEEK) +
/–.
Scanning stops when the unit receives a station. Repeat this procedure until the desired station
is received.
To tune manually
Press and hold (SEEK) +
/– to locate the approximate frequency, then press (SEEK) +/–
repeatedly to fine adjust to the desired frequency.
.m/M>
MODE
SRC
SEEK MODE
SOURCE
B
A
A Radio band/Function
B Frequency*
* While receiving an RDS station, program service
name appears. For details, see “RDS” on page 35.

23
D:\Documents and Settings\takashi-shimomura\Desktop\DTP\848220S MEX-
DV1500U(EUR)\4120899211_MEX-DV1500U_ML\01GB02CD-E.fm
masterpage:RightD:\Documents and Settings\takashi-shimomura\Desktop\DTP\848220S MEX-
DV1500U(EUR)\4120899211_MEX-DV1500U_ML\01GB02CD-E.fm
masterpage:Right
MEX-DV1500U
4-120-899-21 (1)
Advanced Operations — Discs
This chapter consists of the following sections.
• Video-specific operations*
t page 23 to 31
• Video*/audio common operations
t page 31 to 34
• Audio-specific operations
t page 34
* Including JPEG operations.
Playing DivX
®
/MPEG-4/JPEG
files
Note
If the disc contains multiple file types, only the
selected file type (audio/video/image) can be played.
To play DivX/MPEG-4 video files or JPEG image files
of such a disc, press during playback, select the
desired file type (video/image) to list up, then select
the desired file (page 33).
DivX
®
/MPEG-4 video playback
You can control the DivX/MPEG-4 playback in
the same way as other video discs (page 16), as
well as some audio playback control features.
Tip
You can also select a file to play using a list (Quick-
BrowZer) (page 33).
JPEG image playback
You can enjoy a slide show of JPEG files on this
unit. The slide show starts automatically when
you insert a disc or press u. For details on how
to start playback, follow step 1 to 4 of “Playing
video discs” on page 16.
Other playback operations
Notes
• If a large-sized image is rotated, it may take longer
to display.
• Progressive JPEG files cannot be displayed.
Tip
You can also select a file to play using a list (Quick-
BrowZer) (page 33).
MPEG-4
u
.m/M>
ALBM
</,
.m/M>
u
To Press
skip an album
(folder)
Main unit:
(3) (ALBM –)/
(4) (ALBM +)
skip albums (folders)
continuously
Main unit:
and hold (3) (ALBM –)/
(4) (ALBM +)
To Press
rotate the image Remote:
</, (rotates every 90º)
skip an image .m/M>
skip an album Main unit:
(3) (ALBM –)/
(4) (ALBM +)
skip albums
continuously
Main unit:
and hold (3) (ALBM –)/
(4) (ALBM +)

24
D:\Documents and Settings\takashi-shimomura\Desktop\DTP\848220S MEX-
DV1500U(EUR)\4120899211_MEX-DV1500U_ML\01GB02CD-E.fm
masterpage:Left
MEX-DV1500U
4-120-899-21 (1)
Using PBC functions
— Playback control
The PBC menu assists your operation
interactively while a PBC compatible VCD is
played.
1 Start playing a PBC compatible VCD.
The PBC menu appears.
2 Press the number buttons to select the
desired item, then press (ENTER).
3 Follow the instructions in the menu for
interactive operations.
To return to the previous display, press O.
Playing without the PBC function
1 During playback, press (OFF).
Playback stops.
2 Press the number buttons to select the
desired item, then press (ENTER).
“Play without PBC.” appears and playback
starts. The PBC menu does not appear during
playback.
Notes
• The items on the menu, and operation procedures
differ depending on the disc.
• During PBC playback, the track number, playback
item, etc., do not appear in the play mode menu
(page 24).
• Resume playback is unavailable during playback
without PBC.
Tip
To resume PBC playback, stop playback by pressing
(OFF), then press u.
Using play mode menu
You can use the play mode menu on this unit to
control playback or configure playback settings.
To show the play mode menu, press
(VISUAL SETUP) during playback.
To hide, press (VISUAL SETUP) again.
Notes
• During audio disc playback, (VISUAL SETUP) is
inactive.
• During JPEG playback, (VISUAL SETUP) is active
only when an image is fully displayed.
Tip
If you press (VISUAL SETUP) while the playback is
stopped, the visual setup menu (by the monitor)
appears where you can configure various settings,
such as display language, audio adjustment, etc.
(page 38).
E.g., when playing a DVD
A Play mode menu items
For details, see “List of play mode menu
items” on page 25.
B DVD: Title number/Total
VCD: Track number/Total*
1
JPEG: Album number/Total
DivX/MPEG-4: Album (folder) number/Total
C DVD: Chapter number/Total
JPEG: Image number/Total
DivX/MPEG-4: File number/Total
D Elapsed playback time*
2
ENTER
OFF
O
Number
buttons
MPEG-4
</M/m/,
ENTER
VISUAL
SETUP
O
Number
buttons
12
(
67
)
018
(
034
)
T 1:35:55
1:ENGLISH
OFF
1:ENGLISH
2:FRENCH
3:SPANISH
PLAY
DVD VIDEO
SUBTITLE
Select :
ENTER
G
BCD
F
E
H
A
IJ

25
D:\Documents and Settings\takashi-shimomura\Desktop\DTP\848220S MEX-
DV1500U(EUR)\4120899211_MEX-DV1500U_ML\01GB02CD-E.fm
masterpage:RightD:\Documents and Settings\takashi-shimomura\Desktop\DTP\848220S MEX-
DV1500U(EUR)\4120899211_MEX-DV1500U_ML\01GB02CD-E.fm
masterpage:Right
MEX-DV1500U
4-120-899-21 (1)
E Format
F Playback status (PLAY N, PAUSE X, etc.)
G Current setting
H Options
I Selected item
J Selected item name and/or operation assist
messages
*1 When playing a VCD with the PBC function
(page 24), no indication appears.
*2 During JPEG playback, no indication appears.
List of play mode menu items
Press </M/m/,/number buttons to select an
item, then press (ENTER).
To return to the previous display, press O.
Refer to the pages listed for details.
* Excluding DVD-R/DVD-R DL/DVD-RW in VR mode.
Tip
When “SHUFFLE” or “REPEAT” is activated or
“ANGLE” is available, its check-box lights up in green
(e.g., t ). However, you may not be
able to change the angle depending on the scene,
even if the check-box is lit in green.
TITLE, TRACK 32
To select a title, scene or track to play.
ALBUM 32
To select an album or folder to display.
CHAPTER 32
To select a chapter to play.
IMAGE 32
To select an image to display.
FILE 32
To select a video file to play.
TIME 32
To check the elapsed playback time; input time
code.
AUDIO 17, 27
To change the audio language/format/channel;
check the program format.
SUBTITLE 17
To turn subtitles on or off/change the subtitle
language.
ANGLE 17
To change the angle.
*
MPEG-4
MPEG-4
MPEG-4
MPEG-4
CENTER ZOOM 28
To magnify an image.
REPEAT 32
To play a title/chapter/track/album/image/video
file repeatedly.
SHUFFLE 32
To play chapters/tracks/images/video files in
random order.
*
PICTURE EQ 29
To adjust picture quality.
MPEG-4
MPEG-4
MPEG-4
MPEG-4

26
D:\Documents and Settings\takashi-shimomura\Desktop\DTP\848220S MEX-
DV1500U(EUR)\4120899211_MEX-DV1500U_ML\01GB02CD-E.fm
masterpage:Left
MEX-DV1500U
4-120-899-21 (1)
Viewing time/text information
of the disc
Checking time information
The playback time and remaining time of the
current title, chapter, track, etc., can be checked
during video/image playback.
1 During playback, press (DSPL).
The current playback information appears.
2 Press (DSPL) repeatedly to switch the
time information.
Time information differs depending on the disc/
format as follows.
DVD playback
• T **:**:**
Elapsed playback time of the current title
• T-**:**:**
Remaining time of the current title
• C **:**:**
Elapsed playback time of the current chapter
• C-**:**:**
Remaining time of the current chapter
VCD playback
(Only when playing version 1.0/1.1, or version
2.0 without PBC function.)
• T **:**
Elapsed playback time of the current track
• T-**:**
Remaining time of the current track
• D **:**
Elapsed playback time of the current disc
• D-**:**
Remaining time of the current disc
JPEG playback
• Album number/Total
• Image number/Total
DivX/MPEG-4 playback
• Album (folder) number/Total
• File number/Total
•T **:**
Elapsed playback time of the current file
Checking text information
The text information (album name, image name,
etc.) of JPEG/DivX/MPEG-4 files can be
checked.
* “NO TEXT” appears it there is no text information.
Text information differs depending on the format
as follows.
JPEG playback
• Album name (when the album number is
displayed)
• Image name (when the image number is
displayed)
DivX/MPEG-4 playback
• Album (folder) name (when the album (folder)
number is displayed)
• File name (when the file number is displayed)
Configuring audio settings
MPEG-4
DSPL
T 1:01:57
Time information
037(325)
Image name
Album/image/folder/file number
Text information*
M/m
ENTER
AUDIO
SYSTEM
SETUP
VISUAL
SETUP

27
D:\Documents and Settings\takashi-shimomura\Desktop\DTP\848220S MEX-
DV1500U(EUR)\4120899211_MEX-DV1500U_ML\01GB02CD-E.fm
masterpage:RightD:\Documents and Settings\takashi-shimomura\Desktop\DTP\848220S MEX-
DV1500U(EUR)\4120899211_MEX-DV1500U_ML\01GB02CD-E.fm
masterpage:Right
MEX-DV1500U
4-120-899-21 (1)
Note
Discs in DTS format are not supported. The sound is
not output if the DTS format is selected.
Changing the audio language/
format
For DVD, the audio language can be changed if
the disc is recorded with multilingual tracks. For
DVD/DivX, you can change the audio format
when playing a disc recorded in multiple audio
formats (e.g., Dolby Digital).
1 During playback, press (AUDIO)
repeatedly until the desired audio
language/format appears.
* When playing DivX, audio format/channel (e.g.,
“MP3”) appears.
The audio language switches among the
available languages.
When the 4-digit input prompt appears, input
the language code (page 56) for the desired
language.
When the same language is displayed two or
more times, the disc is recorded in multiple
audio formats.
Changing the audio channel
When playing VCD/CD/MP3/WMA/AAC, you
can select the right or left channel sound to listen
through both right and left speakers.
The options are indicated below.
STEREO (ST): Standard stereo sound (default)
1/L (L): Left channel sound (monaural)
2/R (R): Right channel sound (monaural)
1 During playback, press (AUDIO)
repeatedly until the desired audio
channel appears.
E.g., when playing an MP3
Note
You may not be able to change the audio setting
depending on the disc.
Tip
You can also change the settings of video discs by
selecting “AUDIO” in the play mode menu (page 24).
Checking the program format
You can check the number of channels and
component position on the DVD VIDEO being
played.
1 During playback, press
(VISUAL SETUP).
The play mode menu appears.
2 Press M/m to select (AUDIO).
The program format appears.
* “PCM,” “DOLBY DIGITAL,” etc., appears depending
on the disc.
The letters in the program format display
represent the following sound components and
its position.
: Front (left)
: Front (right)
: Center
: Rear (left)
: Rear (right)
: Rear (monaural): The rear component of
the Dolby Surround processed signal and
the Dolby Digital signal
: Low Frequency Effect signal
The program format name and channel numbers
appear as follow.
Example: Dolby Digital 5.1 ch
To hide the play mode menu, press
(VISUAL SETUP).
1:ENGLISH Dolby D
Audio language/format*
TRACK NAME
ALBUM NAME
ARTIST NAME
MP3
0003/1000 ST
3:17
SHUF
Audio channel
PLAY
DVD VIDEO
L C
LFE
LS
R
RS
12
(
67
)
018
(
034
)
T 1:35:55
1:ENGLISH Dolby D
PROGRAM FORMAT
DOLBY DIGITAL
3/2.1
Current program format
Current audio format*
DOLBY DIGITAL
3 / 2 . 1
Rear component × 2
Front component × 2 +
Center component × 1
LFE component × 1

28
D:\Documents and Settings\takashi-shimomura\Desktop\DTP\848220S MEX-
DV1500U(EUR)\4120899211_MEX-DV1500U_ML\01GB02CD-E.fm
masterpage:Left
MEX-DV1500U
4-120-899-21 (1)
Adjusting the audio output level
— DVD level
You can adjust the audio output level for a DVD
recorded in Dolby Digital format, to reduce the
volume level differences between disc and
source.
1 During playback, press
(SYSTEM SETUP).
The system setup item appears on the main
unit.
2 Press M/m to select “DVD-LEVEL,”
then press (ENTER).
3 Press m to set to “ADJST-ON,” then
press (ENTER).
4 Press M/m to select “DOLBY-ADJ,”
then press (ENTER).
5 Press M/m to adjust the output level.
The output level is adjustable in single steps,
between –10 and +10.
6 Press (ENTER).
The setting is complete.
To hide the system setup display, press
(SYSTEM SETUP).
With the main unit
Press (SETUP) instead of (SYSTEM SETUP), rotate
the control dial instead of pressing M/m, press the
control dial instead of (ENTER).
Magnifying pictures
You can magnify pictures.
1 During playback, press
(VISUAL SETUP).
The play mode menu appears.
2 Press M/m to select (CENTER
ZOOM), then press (ENTER).
The current option appears.
3 Press M/m to select the desired option
(×1, ×1.6*), then press (ENTER).
* The picture may become grainy.
The picture is magnified.
To hide the play mode menu, press
(VISUAL SETUP).
To scroll the picture, press </M/m/,.
To restore the original scale, select “×1” in step
3.
Notes
• Depending on the disc, you may not be able to
change the magnification.
• When you resume playback, the picture returns to its
original scale.
• If you return to a disc’s menu/top menu,
magnification will be canceled.
MPEG-4
</M/m/,
ENTER
VISUAL
SETUP
12
(
67
)
018
(
034
)
T 1:35:55
x1
x1
x1.6
PLAY
DVD VIDEO

29
D:\Documents and Settings\takashi-shimomura\Desktop\DTP\848220S MEX-
DV1500U(EUR)\4120899211_MEX-DV1500U_ML\01GB02CD-E.fm
masterpage:RightD:\Documents and Settings\takashi-shimomura\Desktop\DTP\848220S MEX-
DV1500U(EUR)\4120899211_MEX-DV1500U_ML\01GB02CD-E.fm
masterpage:Right
MEX-DV1500U
4-120-899-21 (1)
Adjusting the picture quality
— Picture EQ
You can select a picture quality suitable for the
interior brightness of the car.
1 During playback, press
(VISUAL SETUP).
The play mode menu appears.
2 Press M/m to select (PICTURE
EQ), then press (ENTER).
The current option appears.
3 Press M/m to select the desired option,
then press (ENTER).
Options differ depending on the setting in visual
setup (page 41).
In visual setup, the settings of “PICTURE EQ” in
“CUSTOM SETUP” switch the options as
follows.
AUTO: Switches the night time/day time use
options automatically according to the dimmer
setting in system setup (page 43).
LIGHT OFF: Shows the day time use options.
LIGHT ON: Shows the night time use options.
The options for each setting are indicated below.
For all settings
When set to “LIGHT OFF”/“AUTO” (with
“DIM-OFF”)
When set to “LIGHT ON”/“AUTO” (with
“DIM-ON”)
Customizing the picture quality
The option “CUSTOM” allows you to make your
own picture quality setting by adjusting picture
tones. You can store adjustments for both
“LIGHT OFF’ and “LIGHT ON” settings.
1 During playback, press
(VISUAL SETUP).
The play mode menu appears.
2 Press M/m to select (PICTURE
EQ), then press (ENTER).
The current option appears.
3 Press M/m to select “CUSTOM,” then
press (ENTER).
4 Press M/m to select the picture tone,
then press </, to adjust the level.
5 Press (ENTER).
To hide the play mode menu, press
(VISUAL SETUP).
NORMAL: Normal picture quality.
CUSTOM: User-adjustable settings (page 29).
MPEG-4
</M/m/,
ENTER
VISUAL
SETUP
12
(
67
)
018
(
034
)
T 1:35:55
DAYTIME
SUNSET
SHINE
CUSTOM
NORMAL
NORMAL
PLAY
DVD VIDEO
DAYTIME: Suitable in a bright place.
SUNSET: Suitable when it gets little dark.
SHINE: Suitable in a very bright place (e.g.,
when sunlight reflects on the monitor).
NIGHT: Darkens the monitor to not distract
your driving at night.
MIDNIGHT: Darkens the monitor more than the
“NIGHT” setting.
THEATER: Brightens the monitor; suitable
when you want to enjoy a bright monitor at
night.
RETURN
Cancel :
Select : Set :
USER CUSTOM SETUP
COLOR 0
BRIGHT 0
SHARPNESS 0

30
D:\Documents and Settings\takashi-shimomura\Desktop\DTP\848220S MEX-
DV1500U(EUR)\4120899211_MEX-DV1500U_ML\01GB02CD-E.fm
masterpage:Left
MEX-DV1500U
4-120-899-21 (1)
Locking discs — Parental
control
*
* Excluding DVD-R/DVD-R DL/DVD-RW in VR mode.
You can lock a disc, or set playback restrictions
according to a predetermined level such as
viewer age. Restricted scenes can be blocked or
replaced with different scenes when a parental
control compatible DVD is played.
Activating parental control
1 Press (VISUAL SETUP) while the unit is
off.
The visual setup menu appears.
2 Press M/m to select (CUSTOM
SETUP), then press (ENTER).
The custom setup items appear.
3 Press M/m to select “PARENTAL
CONTROL,” then press (ENTER).
The options appear.
4 Press M/m to select “ON t,” th en
press (ENTER).
The password setting display appears.
5 Press the number buttons to enter
your password, then press (ENTER).
The confirmation display appears.
6 To confirm, press the number buttons
to reenter your password, then press
(ENTER).
The setting is complete.
To delete an entered number, press (CLEAR).
To return to the previous display, press O.
To hide the visual setup menu, press
(VISUAL SETUP).
Deactivating parental control
Select “OFF t” in step 4 above, then enter your
password.
If parental control is deactivated, “Parental
control canceled” appears.
Changing the password
Select “PASSWORD t” in step 4 above, enter
your current password, enter your new password,
then reenter to confirm.
Changing the area and its movie
rating level
The restriction levels can be set depending on the
area and its movie ratings.
1 Press (VISUAL SETUP) while the unit is
off.
The visual setup menu appears.
2 Press M/m to select (CUSTOM
SETUP), then press (ENTER).
The custom setup items appear.
3 Press M/m to select “PARENTAL
CONTROL,” then press (ENTER).
The options appear.
4 Press M/m to select “PLAYER t,” the n
press (ENTER).
When parental control is already activated,
the display to enter your password appears.
To change the setting, enter your password,
then press (ENTER).
5 Press M/m to select “STANDARD,”
then press (ENTER).
The options appear.
CLEAR
VISUAL
SETUP
O
M/m
ENTER
Number
buttons
CUSTOM SETUP
PARENTAL CONTROL :
DivX VOD :
SLIDE SHOW TIME :
MULTI-DISC RESUME :
PLAY LIST PLAY :
PICTURE EQ :
OFF
OFF
ONt
PLAYERt
PASSWORDt
AUTO
PARENTAL CONTROL
Enter a new 4-digit password,
then press .
ENTER
CUSTOM SETUP
PARENTAL CONTROL:
LEVEL :
STANDARD :
USA
USA
OTHERSt
8:
CUSTOM SETUP

31
D:\Documents and Settings\takashi-shimomura\Desktop\DTP\848220S MEX-
DV1500U(EUR)\4120899211_MEX-DV1500U_ML\01GB02CD-E.fm
masterpage:RightD:\Documents and Settings\takashi-shimomura\Desktop\DTP\848220S MEX-
DV1500U(EUR)\4120899211_MEX-DV1500U_ML\01GB02CD-E.fm
masterpage:Right
MEX-DV1500U
4-120-899-21 (1)
6 Press M/m to select the desired area to
apply its movie ratings, then press
(ENTER).
The area is selected.
When you select “OTHERS t,” enter the
area code selecting from “Area code list” on
page 56, using the number buttons.
7 Press M/m to select “LEVEL,” then
press (ENTER).
The options appear.
The lower the number, the stricter the
restriction level.
8 Press M/m to select the desired rating,
then press (ENTER).
The setting is complete.
To return to the previous display, press O.
To hide the visual setup menu, press
(VISUAL SETUP).
Repeat and shuffle play
1 During playback, press (1) (REP) or
(2) (SHUF) on the main unit
repeatedly until the desired option
appears.
Repeat or shuffle play starts.
The repeat options and switching order of each
disc/format are indicated below.
The shuffle options and switching order of each
disc/format are indicated below.
*1 Available only when playing version 1.0/1.1 VCD,
or version 2.0 VCD without PBC function.
*2 Excluding DVD-R/DVD-R DL/DVD-RW in VR
mode.
To return to normal play mode, select “OFF.”
PARENTAL CONTROL:
LEVEL :
STANDARD :
8:
1:
2:
3:
4:
5:
G
PG
PG-13
CUSTOM SETUP
MPEG-4
SHUFREP
Disc/format Options
OFF
CHAPTER: Repeats the
current chapter.
TITLE: Repeats the current
title.
*
1
OFF
TRACK: Repeats the current
track.
OFF
TRACK: Repeats the current
track.
ALBUM: Repeats the current
album.
OFF
IMAGE: Repeats the current
image.
ALBUM: Repeats the current
album.
OFF
FILE: Repeats the current video
file.
ALBUM: Repeats the current
album (folder).
Disc/format Options
*
2
OFF
TITLE: Plays chapters in
current title in random order.
*
1
OFF
DISC: Plays tracks in current
disc in random order.
OFF
ALBUM: Plays tracks/images/
video files in current album
(folder) in random order.
continue to next page t
MPEG-4
MPEG-4

32
D:\Documents and Settings\takashi-shimomura\Desktop\DTP\848220S MEX-
DV1500U(EUR)\4120899211_MEX-DV1500U_ML\01GB02CD-E.fm
masterpage:Left
MEX-DV1500U
4-120-899-21 (1)
Notes
• If you return to a disc’s menu/top menu, repeat/
shuffle play will be canceled.
• Repeat/shuffle play cannot be set in the disc’s menu/
top menu.
Setting from the play mode menu
1 During playback, press
(VISUAL SETUP).
The play mode menu appears.
2 Press M/m to select or ,
then press (ENTER).
3 Press M/m to select the desired option,
then press (ENTER).
Repeat or shuffle play starts.
Press (VISUAL SETUP) to hide the play mode
menu.
Note
The selected play mode is canceled when the disc
being played is ejected.
Direct search play
You can directly locate a desired point by
specifying the title number, chapter number, etc.
1 During playback, press the number
buttons to enter an item (track, title,
etc.) number, then press (ENTER).
Playback starts from the beginning of the
selected point.
Setting from the play mode menu
Search items differ depending on the disc/format
as follows.
MPEG-4
M/m
ENTER
VISUAL
SETUP
PLAY
DVD VIDEO
12
(
67
)
018
(
034
)
T 1:35:55
OFF
CHAPTER
TITLE
OFF
Disc/Format Items
TITLE
Starts playing from a selected
title.
CHAPTER
Starts playing from a selected
chapter.
TIME
Starts playing from the point
determined by the input time
code.
*
TRACK
Starts playing from a selected
track.
ALBUM
Starts playing from a selected
album.
IMAGE
Starts playing from a selected
image.
MPEG-4
CLEAR
VISUAL
SETUP
M/m
ENTER
Number
buttons
MPEG-4

33
D:\Documents and Settings\takashi-shimomura\Desktop\DTP\848220S MEX-
DV1500U(EUR)\4120899211_MEX-DV1500U_ML\01GB02CD-E.fm
masterpage:RightD:\Documents and Settings\takashi-shimomura\Desktop\DTP\848220S MEX-
DV1500U(EUR)\4120899211_MEX-DV1500U_ML\01GB02CD-E.fm
masterpage:Right
MEX-DV1500U
4-120-899-21 (1)
* Available only when playing VCD without PBC
function.
1 During playback, press
(VISUAL SETUP).
The play mode menu appears.
2 Press M/m to select the desired item,
then press (ENTER).
The number in parentheses indicates the total
number of selected item.
3 Press the number buttons to enter an
item number or time code.
For example, to locate 2 hours, 10 minutes,
and 20 seconds, just enter “21020.”
To clear numbers already input, press
(CLEAR).
4 Press (ENTER).
Playback starts from the selected point.
Press (VISUAL SETUP) to hide the play mode
menu.
Listing up tracks/images/video
files — Quick-BrowZer
Selecting a track/image/video file
You can list up albums/folders/tracks/images/
video files on the monitor, and select a desired
one to play.
This function is convenient especially for the
disc in MP3/WMA/AAC/JPEG/DivX/MPEG-4
format containing many albums/tracks, etc.
1 During playback, press .
The list of tracks/images/video files in the
current disc/album*/folder* appears.
To return/proceed to the previous/next page,
press </,.
To move to upper level, press .*
To select the desired folder, press M/m, then
(ENTER).*
* Only when playing MP3/WMA/AAC/JPEG/DivX/
MPEG-4.
2 Press M/m to select the desired track/
image/video file, then press (ENTER).
Playback of the selected track/image/video
file starts.
With the main unit
Rotate the control dial instead of pressing M/m, press
(SEEK) –/+ instead of </,, press the control dial
instead of (ENTER).
Selecting a file type
If the disc contains multiple file types, only the
selected file type (audio/video/image) can be
played. The playback priority order of file type is
initially set to audio, video, then image (e.g., if
the disc contains video files and image files, only
video files are played). You can select the file
type to list up, then select the desired file to play.
1 During playback, press .
ALBUM
Starts playing from a selected
album (folder).
FILE
Starts playing from a selected
file.
MPEG-4
PLAY
DVD VIDEO
- -
(
67
)
018
(
034
)
T 1:35:55
</M/m/,
ENTER
continue to next page t
MPEG-4
TRACK NAME
ALBUM NAME
ARTIST NAME
LIST UP VIDEO FILES
LIST UP IMAGE FILES
MP3
0003/1000 ST
3:17
ROOT
MUSIC FOLDER
01 TRACK 01
02 TRACK 02
03 TRACK 03
04 TRACK 04
05 TRACK 05
MPEG-4

34
D:\Documents and Settings\takashi-shimomura\Desktop\DTP\848220S MEX-
DV1500U(EUR)\4120899211_MEX-DV1500U_ML\01GB02CD-E.fm
masterpage:Left
MEX-DV1500U
4-120-899-21 (1)
2 Press M/m to select the file type to list
up, then press (ENTER).
To list up MP3, WMA and AAC files, select
“LIST UP AUDIO FILES.”
To list up DivX/MPEG-4 files, select “LIST
UP VIDEO FILES.”
To list up JPEG files, select “LIST UP
IMAGE FILES.”
3 Press M/m to select the desired file,
then press (ENTER).
Playback of the selected file starts.
With the main unit
Rotate the control dial instead of pressing M/m, press
the control dial instead of (ENTER).
Viewing audio disc information
During audio playback, you can check the disc
information or display the sleeve image (Jacket
Picture)* of MP3/WMA/AAC file on the
monitor.
* The recommended size is from 240 × 240 to 960 ×
960 pixels.
E.g., when playing an MP3
A Track number or track name
Disc name/Album name
Artist name
B Format
C Playback status (N, X, etc.)
D Current audio channel
When playing CD/MP3/WMA/AAC, the
audio channel can be changed. For details, see
“Changing the audio channel” on page 27.
E Track number/Total
F Elapsed playback time
G Current play mode
H Operation assist messages
Tip
You can select a track to play using a list (Quick-
BrowZer) (page 33).
Advanced Operations — Radio
Storing and receiving stations
Caution
When tuning in stations while driving, use Best
Tuning Memory (BTM) to prevent an accident.
Storing automatically — BTM
1 Press (SRC) repeatedly until “TUNER”
appears on the main unit.
To change the band, press (MODE)
repeatedly. You can select from FM1, FM2,
FM3, MW or LW.
2 Press (SYSTEM SETUP).
The system setup item appears.
3 Press M/m to select “BTM,” then press
(ENTER).
The unit stores stations in order of frequency
on the number buttons ((1) to (6)).
A beep sounds when the setting is stored.
With the main unit
Press (SOURCE) instead of (SRC), press (SETUP)
instead of (SYSTEM SETUP), rotate the control dial
instead of pressing M/m, press the control dial instead
of (ENTER).
Storing manually
1 While receiving the station that you
want to store, press and hold a
number button ((1) to (6)) until
“MEM” appears on the main unit.
The number button indication appears on the
main unit.
Note
If you try to store another station on the same number
button, the previously stored station will be replaced.
Tip
When an RDS station is stored, the AF/TA setting is
also stored (page 35).
TRACK NAME
ALBUM NAME
ARTIST NAME
MP3
0003/1000 ST
3:17
SHUF
To list up, press .
BROWSE
B
E
H
CD
F
A
G
M/m
ENTER
SRC
MODE
SYSTEM
SETUP
Number
buttons

35
D:\Documents and Settings\takashi-shimomura\Desktop\DTP\848220S MEX-
DV1500U(EUR)\4120899211_MEX-DV1500U_ML\01GB02CD-E.fm
masterpage:RightD:\Documents and Settings\takashi-shimomura\Desktop\DTP\848220S MEX-
DV1500U(EUR)\4120899211_MEX-DV1500U_ML\01GB02CD-E.fm
masterpage:Right
MEX-DV1500U
4-120-899-21 (1)
Receiving stored stations
1 Select the band, then press a number
button ((1) to (6)).
RDS
Overview
FM stations with Radio Data System (RDS)
service send inaudible digital information along
with the regular radio program signal.
Display items
A Radio band, Function
B TA/TP*
1
C Frequency*
2
(Program service name), Preset
number, Clock, RDS data
*1 “TA” flashes during traffic information. “TP” lights
up while such a station is received.
*2 While receiving the RDS station, “ *” is displayed
on the left of the frequency indication.
To change display items C, press (DSPL).
RDS services
This unit automatically provides RDS services as
follows:
Notes
• Depending on the country/region, not all RDS
functions may be available.
• RDS will not work if the signal strength is too weak,
or if the station you are tuned to is not transmitting
RDS data.
Setting AF and TA
The AF/TA settings and switching order are
indicated below.
AF-ON: Activates AF and deactivates TA.
TA-ON: Activates TA and deactivates AF.
AF, TA-ON: Activates both AF and TA.
AF, TA-OFF: Deactivates both AF and TA.
1 Press (AF/TA) repeatedly until the
desired setting appears.
Storing RDS stations with the AF and
TA setting
You can preset RDS stations along with the AF/
TA setting. If you use the BTM function, only
RDS stations are stored with the same AF/TA
setting.
If you preset manually, you can preset both RDS
and non-RDS stations with the AF/TA setting for
each.
1 Set AF/TA, then store the station with BTM or
manually.
AF/TA
(PTY)
DSPL
Control dial
Number
buttons
B
C
A
AF (Alternative Frequencies)
Selects and retunes the station with the
strongest signal in a network. By using this
function, you can continuously listen to the
same program during a long-distance drive
without having to retune the same station
manually.
TA (Traffic Announcement)/TP (Traffic
Program)
Provides current traffic information/programs.
Any information/program received, will
interrupt the currently selected source.
PTY (Program Types)
Displays the currently received program type.
Also searches your selected program type.
CT (Clock Time)
The CT data from the RDS transmission sets
the clock.
continue to next page t

36
D:\Documents and Settings\takashi-shimomura\Desktop\DTP\848220S MEX-
DV1500U(EUR)\4120899211_MEX-DV1500U_ML\01GB02CD-E.fm
masterpage:Left
MEX-DV1500U
4-120-899-21 (1)
Receiving emergency
announcements
With AF or TA on, the emergency
announcements will automatically interrupt the
currently selected source.
Tip
If you adjust the volume level during a traffic
announcement, that level will be stored into memory
for subsequent traffic announcements, independently
from the regular volume level.
Staying with one regional program
— REG
When the AF function is on: this unit’s factory
setting restricts reception to a specific region, so
you will not be switched to another regional
station with a stronger frequency.
If you leave this regional program’s reception
area, set “REG-OFF” in system setup during FM
reception (page 44).
Note
This function does not work in the UK and in some
other areas.
Local Link function (UK only)
This function enables you to select other local
stations in the area, even if they are not stored on
your number buttons.
1 During FM reception, press a number button
((1) to (6)) on which a local station is stored.
2 Within 5 seconds, press again a number button
of the local station.
Repeat this procedure until the local station is
received.
Selecting PTY
1 Press and hold (AF/TA) (PTY) during
FM reception.
The current program type name appears if the
station is transmitting PTY data.
2 Rotate the control dial to select the
program type.
3 Press the control dial.
The unit searches for a station broadcasting
the selected program type.
Type of programs
Note
You cannot use this function in countries/regions
where no PTY data is available.
Setting CT
1 Set “CT-ON” in system setup
(page 43).
Notes
• The CT function may not work even though an RDS
station is being received.
• There might be a difference between the time set by
the CT function and the actual time.
NEWS (News), AFFAIRS (Current Affairs),
INFO (Information), SPORT (Sports),
EDUCATE (Education), DRAMA (Drama),
CULTURE (Culture), SCIENCE (Science),
VARIED (Varied), POP M (Popular Music),
ROCK M (Rock Music), EASY M (Easy
Listening), LIGHT M (Light Classical),
CLASSICS (Classical), OTHER M (Other
Music Type), WEATHER (Weather),
FINANCE (Finance), CHILDREN (Children’s
Programs), SOCIAL A (Social Affairs),
RELIGION (Religion), PHONE IN (Phone In),
TRAVEL (Travel), LEISURE (Leisure), JAZZ
(Jazz Music), COUNTRY (Country Music),
NATION M (National Music), OLDIES (Oldies
Music), FOLK M (Folk Music), DOCUMENT
(Documentary)

37
D:\Documents and Settings\takashi-shimomura\Desktop\DTP\848220S MEX-
DV1500U(EUR)\4120899211_MEX-DV1500U_ML\01GB02CD-E.fm
masterpage:RightD:\Documents and Settings\takashi-shimomura\Desktop\DTP\848220S MEX-
DV1500U(EUR)\4120899211_MEX-DV1500U_ML\01GB02CD-E.fm
masterpage:Right
MEX-DV1500U
4-120-899-21 (1)
Sound Adjustment
Adjusting the sound
characteristics
You can adjust the sound characteristics
according to your preference.
The setting items in the sound menu and
switching order are indicated below.
EQ3: Selects an equalizer curve from 7 music
types.
LOW, MID, HI*
1
: Adjusts the volume level of
the selected band for EQ3 custom setting.
BAL (Balance): Adjusts the sound balance
between the left and right speakers.
FAD (Fader): Adjusts the relative level between
the front and rear speakers.
SUB (Subwoofer volume)*
2
: Adjusts the
subwoofer volume. (“ATT” is the lowest setting.)
*1 Appears only when EQ3 is activated.
*2 When the audio output is set to “SUB-OUT”
(page 43).
1 During playback/reception, press
(SOUND) repeatedly until the desired
setting item appears on the main unit.
2 Press M/m to adjust the level or select
the desired option.
3 Press .
The setting is complete and the display
returns to normal play/reception mode.
With the main unit
Press the control dial instead of (SOUND), rotate the
control dial instead of pressing M/m.
Customizing the equalizer curve
— EQ3
“CUSTOM” of EQ3 allows you to make your
own equalizer settings. You can adjust the level
of 3 different bands: “LOW,” “MID,” and “HI.”
1 During playback/reception, press
(SOUND) repeatedly until “EQ3”
appears.
2 Press M/m to select “CUSTOM.”
3 Press (SOUND) repeatedly until
“LOW,” “MID,” or “HI” appears.
4 Press M/m to adjust the level of the
selected item.
The level is adjustable in single steps,
between –10 and +10.
To restore the factory-set equalizer curve,
press and hold (SOUND).
5 Press .
The setting is complete and the display
returns to normal play/reception mode.
Tip
Other equalizer types are also adjustable.
With the main unit
Press the control dial instead of (SOUND), rotate the
control dial instead of pressing M/m.
SOUND
M/m

38
D:\Documents and Settings\takashi-shimomura\Desktop\DTP\848220S MEX-
DV1500U(EUR)\4120899211_MEX-DV1500U_ML\01GB02CD-E.fm
masterpage:Left
MEX-DV1500U
4-120-899-21 (1)
Settings
Various settings are configurable from the
following two setup menus.
• Visual setup menu (page 38)
Allows configuration of visual-related items
(by the monitor).
• System setup menu (page 42)
Allows configuration of system-related items
(by the main unit).
Visual setup
The visual setup menu includes the following
categories.
LANGUAGE SETUP (page 39)
Sets the menu, subtitle language, etc.
DISPLAY SETUP (page 39)
Adjusts the settings of the connected
monitor.
CUSTOM SETUP (page 40)
Customizes the playback of discs.
AUDIO SETUP (page 41)
Adjusts the sound settings according to the
disc.
RESET (page 41)
Resets all setting items.
Basic operation of visual setup
You can set items in the menu by the following
procedure.
E.g., when setting the aspect ratio to “4:3 PAN
SCAN.”
1 Press (VISUAL SETUP) while the unit is
off.
The visual setup menu appears.
2 Press M/m to select (DISPLAY
SETUP), then press (ENTER).
The display setup items appear.
3 Press M/m to select “MONITOR TYPE,”
then press (ENTER).
The options appear.
4 Press M/m to select “4:3 PAN SCAN,”
then press (ENTER).
The setting is complete.
To return to the previous display, press O.
To hide the visual setup menu, press
(VISUAL SETUP).
VISUAL
SETUP
O
M/m
ENTER
LANGUAGE SETUP
MENU :
AUDIO :
SUBTITLE :
ENGLISH
ENGLISH
ENGLISH
DISPLAY SETUP
MONITOR TYPE :
WALLPAPER :
16:9
WALLPAPER 1
DISPLAY SETUP
MONITOR TYPE :
WALLPAPER :
16:9
16:9
4:3 LETTER BOX
4:3 PAN SCAN

39
D:\Documents and Settings\takashi-shimomura\Desktop\DTP\848220S MEX-
DV1500U(EUR)\4120899211_MEX-DV1500U_ML\01GB02CD-E.fm
masterpage:RightD:\Documents and Settings\takashi-shimomura\Desktop\DTP\848220S MEX-
DV1500U(EUR)\4120899211_MEX-DV1500U_ML\01GB02CD-E.fm
masterpage:Right
MEX-DV1500U
4-120-899-21 (1)
Language setup for display or soundtrack
Select (LANGUAGE SETUP), then select the desired item and option below, using M/m and
(ENTER). For details on this procedure, see “Basic operation of visual setup” on page 38.
Display setup
Select (DISPLAY SETUP), then select the desired item and option below, using M/m and (ENTER).
For details on this procedure, see “Basic operation of visual setup” on page 38.
“z” indicates the default setting.
Note
Depending on the disc, “4:3 LETTER BOX” may be selected automatically instead of “4:3 PAN SCAN,” and vice
versa.
Item Purpose
MENU To change the disc’s menu language.
AUDIO To change the soundtrack language.
SUBTITLE To change the subtitle language recorded on the disc.
Item Option Purpose
MONITOR TYPE
Selects an aspect ratio suitable for
the connected monitor.
16:9 (z)
To display the wide picture.
Suitable when connecting to a
wide-screen monitor or a monitor
with a wide mode function.
4:3 LETTER BOX
To display a wide picture with
bands on the upper and lower
positions of the screen.
Suitable when connecting to a 4:3
screen monitor.
4:3 PAN SCAN
To display a wide picture on the
entire screen and automatically cut
off the portions that do not fit.
WALLPAPER
WALLPAPER 1 (z), 2, 3
To select the design of wallpaper.

40
D:\Documents and Settings\takashi-shimomura\Desktop\DTP\848220S MEX-
DV1500U(EUR)\4120899211_MEX-DV1500U_ML\01GB02CD-E.fm
masterpage:Left
MEX-DV1500U
4-120-899-21 (1)
Custom setup
Select (CUSTOM SETUP), then select the desired item and option below, using M/m and
(ENTER). For details on this procedure, see “Basic operation of visual setup” on page 38.
Follow the page reference for details. “z” indicates the default setting.
Item Option Purpose
PARENTAL CONTROL
(page 30) *
1
Sets the playback restrictions to
not play inappropriate discs or
scenes.
OFF t (z)
To deactivate parental control.
ON t
To activate parental control.
PLAYER t
To set the restriction standard and
its level.
PASSWORD t
To set a new 4-digit password.
DivX VOD
Displays the registration code for
this unit. For more information,
visit the website below:
http://www.divx.com/vod
Done
To close the display.
SLIDE SHOW TIME
5 sec. (z), 10 sec.,
20 sec., 40 sec., 60 sec.
To select the slide show interval.
FIXED
To deactivate the slide show.
MULTI-DISC RESUME
*
2
ON (z)
To store the resume settings in
memory for up to 5 discs. (The
settings remain in memory even if
you set to “OFF.”)
OFF
To not store the resume settings in
memory.
Resume playback is available only
for the current disc in the unit.
USB RESUME
ON (z)
To store the resume settings in
memory. (The settings remain in
memory even if you set to “OFF.”)
OFF
To not store the resume settings in
memory.
MPEG-4

41
D:\Documents and Settings\takashi-shimomura\Desktop\DTP\848220S MEX-
DV1500U(EUR)\4120899211_MEX-DV1500U_ML\01GB02CD-E.fm
masterpage:RightD:\Documents and Settings\takashi-shimomura\Desktop\DTP\848220S MEX-
DV1500U(EUR)\4120899211_MEX-DV1500U_ML\01GB02CD-E.fm
masterpage:Right
MEX-DV1500U
4-120-899-21 (1)
*1 Excluding DVD-R/DVD-R DL/DVD-RW in VR mode.
*2 DVD VIDEO only.
Note
If parental control is applied, the resume playback will not work. In this case, playback starts from the beginning of
the disc when it is inserted.
Audio setup
Select (AUDIO SETUP), then select the desired item and option below, using M/m and (ENTER).
For details on this procedure, see “Basic operation of visual setup” on page 38.
Follow the page reference for details. “z” indicates the default setting.
* Excluding DVD-R/DVD-R DL/DVD-RW in VR mode.
Resetting all settings
All settings (excluding parental control setting) in visual setup can be reset.
Select (RESET), then “RESET ALL SETTINGS,” “YES” using M/m and (ENTER).
For details on this procedure, see “Basic operation of visual setup” on page 38.
Note
Do not power off the unit while resetting, as it takes a few seconds to complete.
PLAY LIST PLAY
(For DVD-R/DVD-R DL/DVD-RW
in VR mode only)
ORIGINAL (z)
To play originally recorded titles.
PLAY LIST
To play edited play list.
PICTURE EQ (page 29)
Selects the setting option to show
in the play mode menu.
AUTO (z)
To switch the night time/day time
use options automatically according
to the dimmer setting in system
setup (page 43).
LIGHT OFF
To show the day time use options.
LIGHT ON
To show the night time use options.
Item Option Purpose
AUDIO DRC *
Makes the sound clear when the
volume is low. Only for a DVD
conforming to Audio DRC
(Dynamic Range Control).
STANDARD (z)
To select the standard setting.
WIDE RANGE
To obtain the feeling of being at a
live performance.
MPEG-4

42
D:\Documents and Settings\takashi-shimomura\Desktop\DTP\848220S MEX-
DV1500U(EUR)\4120899211_MEX-DV1500U_ML\01GB02CD-E.fm
masterpage:Left
MEX-DV1500U
4-120-899-21 (1)
System setup
The system setup menu includes the following
categories.
• SET: General settings (page 43)
• DSPL: Display settings (page 43)
• R/M: Receive mode settings (page 44)
• SND: Sound settings (page 45)
Basic operation of system setup
You can set items in the menu by the following
procedure.
E.g., when setting the demonstration.
1 Press (SYSTEM SETUP) while the unit is
off.
The system setup item appears on the main
unit.
2 Press M/m to select “DEMO,” then
press (ENTER).
The option appears.
3 Press M/m to select “ON” or “OFF,”
then (ENTER).
The setting is complete.
To hide the system setup display, press
(SYSTEM SETUP).
With the main unit
Press (SETUP) instead of (SYSTEM SETUP), rotate
the control dial instead of pressing M/m, press the
control dial instead of (ENTER).
M/m
ENTER
SYSTEM
SETUP

43
D:\Documents and Settings\takashi-shimomura\Desktop\DTP\848220S MEX-
DV1500U(EUR)\4120899211_MEX-DV1500U_ML\01GB02CD-E.fm
masterpage:RightD:\Documents and Settings\takashi-shimomura\Desktop\DTP\848220S MEX-
DV1500U(EUR)\4120899211_MEX-DV1500U_ML\01GB02CD-E.fm
masterpage:Right
MEX-DV1500U
4-120-899-21 (1)
Follow the page reference for details. “z” indicates the default setting.
SET (Setup)
DSPL (Display)
Item Option Purpose Unit status
CLOCK-ADJ (Clock Adjust)
(page 46)
–
–
Any status.
CT (Clock Time) (page 35, 36)
ON
To activate the CT function.
OFF (z)
To deactivate the CT
function.
BEEP
ON (z)
To activate the operation
sound.
OFF
To deactivate the operation
sound.
COLOR-SYS (Color System)
Changes the video output
signal according to the
connected monitor.
PAL (z)
To set to PAL.
Unit off.
NTSC
To set to NTSC.
AUTO-OFF
Shuts off automatically after a
desired time when the unit is
off.
NO (z)
To deactivate the Auto Off
function.
Any status.
30S, 30M, 60M
To select the desired time.
REAR/SUB
Switches the audio output.
REAR-OUT To set to the power
amplifier.
Unit off.
SUB-OUT (z) To set to the subwoofer.
Item Option Purpose Unit status
M.DSPL (Motion Display)
Selects the Motion Display
mode.
SA (z)
To show moving patterns
and spectrum analyzer.
During playback/
radio reception.
OFF
To deactivate the Motion
Display.
DEMO (Demonstration)
ON (z)
To activate the
demonstration.
Unit off.
OFF
To deactivate the
demonstration.
DIMMER
Changes the display
brightness.
ON
To dim the display.
Any status.
OFF (z)
To deactivate the dimmer.
AUTO-SCRL (Auto Scroll)
Scrolls long items
automatically.
ON (z)
To scroll.
During disc
playback.
OFF
To not scroll.
continue to next page t

44
D:\Documents and Settings\takashi-shimomura\Desktop\DTP\848220S MEX-
DV1500U(EUR)\4120899211_MEX-DV1500U_ML\01GB02CD-E.fm
masterpage:Left
MEX-DV1500U
4-120-899-21 (1)
R/M (Receive mode)
Item Option Purpose Unit status
LOCAL (Local Seek Mode)
ON
To only tune into stations
with stronger signals.
During radio
reception.
OFF (z)
To tune normal reception.
MONO (Monaural Mode)
Selects monaural reception
mode to improve poor FM
reception.
ON
To hear stereo broadcast in
monaural.
During FM
reception.
OFF (z)
To hear stereo broadcast in
stereo.
REGIONAL (page 36)
ON (z)
To stay with one regional
program.
OFF
To deactivate when leaving
the program’s reception
area.
BTM (Best Tuning Memory)
(page 34)
–
– During radio
reception.

45
D:\Documents and Settings\takashi-shimomura\Desktop\DTP\848220S MEX-
DV1500U(EUR)\4120899211_MEX-DV1500U_ML\01GB02CD-E.fm
masterpage:RightD:\Documents and Settings\takashi-shimomura\Desktop\DTP\848220S MEX-
DV1500U(EUR)\4120899211_MEX-DV1500U_ML\01GB02CD-E.fm
masterpage:Right
MEX-DV1500U
4-120-899-21 (1)
SND (Sound)
*1 When the audio output is set to “SUB-OUT.”
*2 Appears and available only when “DVD-LEVEL” is set to “ADJST-ON.”
Item Option Purpose Unit status
HPF (High Pass Filter)
Selects the front/rear speaker
cut-off frequency.
OFF (z) To not cut out the
frequency.
During playback/
radio reception.
80HZ,100HZ,
120HZ,140HZ,
160HZ
To select the frequency.
LPF (Low Pass Filter)*
1
Selects the subwoofer cut-off
frequency.
OFF (z) To not cut out the
frequency.
80HZ,100HZ,
120HZ,140HZ,
160HZ
To select the frequency.
LPF-PHASE (Low Pass Filter
Phase)*
1
Selects the phase when the
LPF is on.
NORM (z) To apply the normal pahse
to the LPF.
REV To apply the reverse pahse
to the LPF.
LOUD (Loudness)
Makes the sound clear when
the volume is low.
OFF (z)
To not reinforce bass and
treble.
ON
To reinforce bass and
treble.
AUX-LEVEL (page 47)
(–8 ~ +18)
z: 0
To select the level. During AUX
playback.
DVD-LEVEL (page 28)
ADJST-ON
To allow for adjusting the
output level of Dolby
Digital format.
During disc
playback.
ADJST-OFF
(z)
To deactivate the level
adjustment.
DOLBY-ADJ (Dolby Level
Adjust) (page 28)*
2
(–10 ~ +10)
z: +8
To select the level.

46
D:\Documents and Settings\takashi-shimomura\Desktop\DTP\848220S MEX-
DV1500U(EUR)\4120899211_MEX-DV1500U_ML\01GB02CD-E.fm
masterpage:Left
MEX-DV1500U
4-120-899-21 (1)
Setting the clock
The clock uses a 24-hour indication.
1 Press (SYSTEM SETUP).
The system setup item appears on the main
unit.
2 Press M/m to select “CLOCK-ADJ,”
then press (ENTER).
The hour indication flashes.
3 Press M/m to set the hour and minute.
To move the digital indication, press </,.
4 Press (ENTER).
The setting is complete.
To hide the system setup display, press
(SYSTEM SETUP).
To show the clock during playback, press
(DSPL) repeatedly until it appears.
With the main unit
Press (SETUP) instead of (SYSTEM SETUP), rotate
the control dial instead of pressing M/m, press the
.m/M> instead of </,, press the control
dial instead of (ENTER).
Using Optional Equipment
Auxiliary equipment
You can connect auxiliary devices to the unit,
and listen on your car speakers.
Up to 2 devices can be connected, one to the
AUX input jack (stereo mini jack) on the front,
and the other to the AUX AUDIO IN terminals
on the rear. The volume level is adjustable for
any difference between the unit and the auxiliary
device.
Connecting an auxiliary device
1 Turn off the auxiliary device.
2 Turn down the volume on the unit.
3 Connect to the unit.
On the front
Connect to the AUX input jack.
* Be sure to use a straight type plug.
On the rear
Connect to the AUX AUDIO IN terminals.
</M/m/,
ENTER
DSPL
SYSTEM
SETUP
M/m
ENTER
SRC
MODE
SYSTEM
SETUP
AUX
AUX
Connecting cord*
(not supplied)

47
D:\Documents and Settings\takashi-shimomura\Desktop\DTP\848220S MEX-
DV1500U(EUR)\4120899211_MEX-DV1500U_ML\01GB02CD-E.fm
masterpage:RightD:\Documents and Settings\takashi-shimomura\Desktop\DTP\848220S MEX-
DV1500U(EUR)\4120899211_MEX-DV1500U_ML\01GB02CD-E.fm
masterpage:Right
MEX-DV1500U
4-120-899-21 (1)
Selecting an auxiliary device
1 Press (SRC) repeatedly until “AUX” appears
on the main unit.
2 Press (MODE) to select “FRONT-IN” or
“REAR-IN.”
Operate by the auxiliary device itself.
Adjusting the volume level
Be sure to adjust the volume of each connected
device before playback.
1 Turn down the volume on the unit.
2 Press (SRC) repeatedly until “AUX” appears
on the main unit.
If two auxiliary devices are connected, select
the device to adjust its volume by pressing
(MODE).
3 Start playback of the auxiliary device at a
moderate volume.
4 Set your usual listening volume on the unit.
5 Press (SYSTEM SETUP).
6 Press M/m to select “AUX-LEVEL,” then
press (ENTER).
7 Press M/m to adjust the input level.
The input level is adjustable in single steps,
between –8 and +18.
8 Press (ENTER).
The setting is complete.
To hide the system setup display, press
(SYSTEM SETUP).
With the main unit
Press (SOURCE) instead of (SRC), press (SETUP)
instead of (SYSTEM SETUP), rotate the control dial
instead of pressing M/m, press the control dial instead
of (ENTER).
Additional Information
Precautions
• Cool off the unit beforehand if your car has been
parked in direct sunlight.
• Power antenna (aerial) extends automatically.
Moisture condensation
Should moisture condensation occur inside the unit,
remove the disc and wait for about an hour for it to
dry out; otherwise the unit will not operate properly.
To maintain high sound quality
Do not splash liquid onto the unit or discs.
Notes on discs
• Do not expose discs to direct sunlight or heat
sources such as hot air ducts, nor leave it in a car
parked in direct sunlight.
• Before playing, wipe the discs
with a cleaning cloth from the
center out. Do not use solvents
such as benzine, thinner,
commercially available
cleaners.
• This unit is designed to
playback discs that conform to
the Compact Disc (CD)
standard. DualDiscs and some of the music discs
encoded with copyright protection technologies do
not conform to the Compact Disc (CD) standard,
therefore, these discs may not be playable by this
unit.
• Discs that this unit CANNOT play
– Discs with labels, stickers, or sticky tape or
paper attached. Doing so may cause a
malfunction, or may ruin the disc.
– Discs with non-standard shapes (e.g., heart,
square, star). Attempting to do so may damage
the unit.
–8 cm (3
1
/4 in) discs.
Note on playback operations of DVDs
and VCDs
Some playback operations of DVDs and VCDs may
be intentionally set by software producers. Since
this unit plays DVDs and VCDs according to the
disc contents the software producers designed, some
playback features may not be available. Also, refer
to the instructions supplied with the DVDs or
VCDs.
continue to next page t

48
D:\Documents and Settings\takashi-shimomura\Desktop\DTP\848220S MEX-
DV1500U(EUR)\4120899211_MEX-DV1500U_ML\01GB02CD-E.fm
masterpage:Left
MEX-DV1500U
4-120-899-21 (1)
Notes on DATA CDs and DATA DVDs
• Some DATA CDs/DATA DVDs (depending on the
equipment used for its recording, or the disc
condition) may not play on this unit.
• Finalization is required for some discs (page 48).
• The unit is compatible with the following
standards.
For DATA CDs
– ISO 9660 level 1/level 2 format, Joliet/Romeo in
the expansion format
– Multi Session
For DATA DVDs
– UDF Bridge format (combined UDF and ISO
9660)
–Multi Border
• The maximum number of:
– folders (albums): 256 (including root and empty
folders).
– files (tracks/images/videos) and folders
contained in a disc: 2,000 (if a folder/file names
contain many characters, this number may
become less than 2,000).
– displayable characters for a folder/file name: 64
(Joliet/Romeo).
Notes on finalizing discs
The following discs are required to be finalized to
play on this unit.
• DVD-R/DVD-R DL (in video mode/VR mode)
• DVD-RW in video mode
• DVD+R/DVD+R DL
•CD-R
•CD-RW
The following discs can be played without
finalization.
• DVD+RW – automatically finalized.
• DVD-RW in VR mode – finalization not required.
For details, see the manual supplied with the disc.
Notes on Multi Session CDs/Multi
Border DVDs
This unit can play Multi Session CDs/Multi Border
DVDs under the following conditions. Note that the
session must be closed and the disc must be
finalized.
• When CD-DA (Compact Disc Digital Audio) is
recorded in the first session:
The unit recognizes the disc as CD-DA and only
CD-DA of the first session is played, even if an
other format (e.g., MP3) is recorded in other
sessions.
• When CD-DA is recorded other than in the first
session:
The unit recognizes the disc as a DATA CD or
DATA DVD, and all CD-DA sessions are skipped.
• When an MP3/WMA/AAC/JPEG/DivX/MPEG-4
is recorded:
Only the sessions containing the selected file type
(audio/video/image)* are played (if CD-DA or
other data exists in other sessions, they are
skipped).
* For details on how to select the file type, see
page 33.
Playback order of MP3/WMA/AAC/
JPEG/DivX
®
/MPEG-4 files
About MP3 files
• ID3 tag versions 1.0, 1.1, 2.2, 2.3 and 2.4 apply to
MP3 only. ID3 tag is 15/30 characters (1.0 and
1.1), or 63/126 characters (2.2, 2.3 and 2.4).
• When naming an MP3 file, be sure to add the file
extension “.mp3” to the file name.
Note on MP3
If you play a high-bit-rate MP3, such as 384 kbps,
sound may be intermittent.
About WMA files
• WMA tag is 63 characters.
• When naming a WMA file, be sure to add the file
extension “.wma” to the file name.
About AAC files
• AAC tag is 126 characters.
• When naming an AAC file, be sure to add the file
extension “.m4a” to the file name.
About JPEG files
• JPEG, which stands for Joint Photographic
Experts Group, is an image file compression
format standard. It compresses still images
approximately 1/10 to 1/100 of original size.
• When naming a JPEG file, be sure to add the file
extension “.jpg” to the file name.
Note on JPEG
Playback of progressive JPEG files is not supported.
About DivX
®
files
DivX
®
, which stands for Digital Video Express, is a
digital video file compression format standard
developed by DivX, Inc. This product is an official
DivX
®
Certified product and can play all versions of
DivX
®
video (including DivX
®
6) with standard
playback of DivX
®
media files.
Folder
(album)
MP3/WMA/AAC/
JPEG/DivX/
MPEG-4 file
(track/image/
video)
MP3/WMA/AAC/
JPEG/DivX/
MPEG-4

49
D:\Documents and Settings\takashi-shimomura\Desktop\DTP\848220S MEX-
DV1500U(EUR)\4120899211_MEX-DV1500U_ML\01GB02CD-E.fm
masterpage:RightD:\Documents and Settings\takashi-shimomura\Desktop\DTP\848220S MEX-
DV1500U(EUR)\4120899211_MEX-DV1500U_ML\01GB02CD-E.fm
masterpage:Right
MEX-DV1500U
4-120-899-21 (1)
About MPEG-4 files
MPEG-4 files on a disc meeting the following
requirements can be played. Playback is not be
guaranteed for all MPEG-4 files meeting the
requirements.
• Profile: MPEG-4 Simple profile
• Bit rate: Max. 25,000 kbps
• Frame rate: Max. 30 fps
• Image size: Max. 320 × 240 pixels
• Audio: Max. 320 kbps (AAC-LC)
• File extension: .mp4
Maintenance
Replacing the lithium battery of the
card remote commander
Under normal conditions, the battery will last
approximately 1 year. (The service life may be
shorter, depending on the conditions of use.)
When the battery becomes weak, the range of the
card remote commander becomes shorter. Replace
the battery with a new CR2025 lithium battery. Use
of any other battery may present a risk of fire or
explosion.
Notes on the lithium battery
• Keep the lithium battery out of the reach of children.
Should the battery be swallowed, immediately
consult a doctor.
• Wipe the battery with a dry cloth to assure a good
contact.
• Be sure to observe the correct polarity when
installing the battery.
• Do not hold the battery with metallic tweezers,
otherwise a short-circuit may occur.
Fuse replacement
When replacing the fuse, be
sure to use one matching the
amperage rating stated on the
original fuse. If the fuse blows,
check the power connection and
replace the fuse. If the fuse
blows again after replacement,
there may be an internal
malfunction. In such a case,
consult your nearest Sony
dealer.
Cleaning the connectors
The unit may not function properly if the connectors
between the unit and the front panel are not clean. In
order to prevent this, detach the front panel
(page 15) and clean the connectors with a cotton
swab. Do not apply too much force. Otherwise, the
connectors may be damaged.
Notes
• For safety, turn off the ignition before cleaning the
connectors, and remove the key from the ignition
switch.
• Never touch the connectors directly with your fingers
or with any metal device.
c
+ side up
WARNING
Battery may explode if mistreated.
Do not recharge, disassemble, or dispose of
in fire.
Fuse (10 A)
Main unit Back of the front
panel

50
D:\Documents and Settings\takashi-shimomura\Desktop\DTP\848220S MEX-
DV1500U(EUR)\4120899211_MEX-DV1500U_ML\01GB02CD-E.fm
masterpage:Left
MEX-DV1500U
4-120-899-21 (1)
Removing the unit
1 Remove the protection collar.
1Detach the front panel (page 15).
2Pinch both edges of the protection collar,
then pull it out.
2 Remove the unit.
1Insert both release keys simultaneously
until they click.
2Pull the release keys to unseat the unit.
3Slide the unit out of the mounting.
Specifications
System
Laser: Semiconductor laser
Signal format system: PAL/NTSC switchable
DVD/CD Player section
Signal-to-noise ratio: 120 dB
Frequency response: 10 – 20,000 Hz
Wow and flutter: Below measurable limit
Harmonic distortion: 0.01 %
Tuner section
FM
Tuning range: 87.5 – 108.0 MHz
Antenna (aerial) terminal:
External antenna (aerial) connector
Intermediate frequency: 10.7 MHz/450 kHz
Usable sensitivity: 9 dBf
Selectivity: 75 dB at 400 kHz
Signal-to-noise ratio: 67 dB (stereo), 69 dB (mono)
Harmonic distortion at 1 kHz: 0.5 % (stereo),
0.3 % (mono)
Separation: 35 dB at 1 kHz
Frequency response: 30 – 15,000 Hz
MW/LW
Tuning range:
MW: 531 – 1,602 kHz
LW: 153 – 279 kHz
Antenna (aerial) terminal:
External antenna (aerial) connector
Intermediate frequency: 10.7 MHz/450 kHz
Sensitivity: MW: 30 µV, LW: 40 µV
USB Player section
Interface: USB (Full-speed)
Maximum current: 500mA
Power amplifier section
Outputs: Speaker outputs (sure seal connectors)
Speaker impedance: 4 – 8 ohms
Maximum power output: 52 W × 4 (at 4 ohms)
General
Outputs:
Video output terminal
Rear audio output terminals
Power antenna (aerial) relay control terminal
Power amplifier control terminal
Inputs:
AUX audio input terminals
Antenna (aerial) input terminal
Parking break control terminal
AUX input jack (stereo mini jack)
USB signal input terminal
Tone controls:
Low: ±10 dB at 60 Hz
Mid: ±10 dB at 1 kHz
Hi: ±10 dB at 10 kHz
Power requirements: 12 V DC car battery
(negative ground (earth))
Dimensions: Approx. 178 × 50 × 179 mm
(7
1
/8 × 2 × 7
1
/8 in) (w/h/d)
x
Hook facing
inwards.

51
D:\Documents and Settings\takashi-shimomura\Desktop\DTP\848220S MEX-
DV1500U(EUR)\4120899211_MEX-DV1500U_ML\01GB02CD-E.fm
masterpage:RightD:\Documents and Settings\takashi-shimomura\Desktop\DTP\848220S MEX-
DV1500U(EUR)\4120899211_MEX-DV1500U_ML\01GB02CD-E.fm
masterpage:Right
MEX-DV1500U
4-120-899-21 (1)
Mounting dimensions: Approx. 182 × 53 × 163 mm
(7
1
/4 × 2
1
/8 × 6
1
/2 in) (w/h/d)
Mass: Approx. 1.4 kg (3 lb 2 oz)
Supplied accessories:
Card remote commander: RM-X168
Parts for installation and connections (1 set)
Your dealer may not handle some of the above listed
accessories. Please ask the dealer for detailed
information.
DivX, DivX Certified, and associated logos are
trademarks of DivX, Inc. and are used under license.
Design and specifications are subject to change
without notice.
Troubleshooting
The following checklist will help you remedy
problems you may encounter with your unit.
Before going through the checklist below, check the
connection and operating procedures.
If the problem is not solved, visit the following
support site.
US and foreign patents licensed from Dolby
Laboratories.
MPEG Layer-3 audio coding technology and
patents licensed from Fraunhofer IIS and Thomson.
This product is protected by certain intellectual
property rights of Microsoft Corporation. Use or
distribution of such technology outside of this
product is prohibited without a license from
Microsoft or an authorized Microsoft subsidiary.
• Halogenated flame retardants are not used in the
certain printed wiring boards.
• Halogenated flame retardants are not used in
cabinets.
• Packaging cushions are made from paper.
Depending on the connected monitor, the unit
may take a few seconds to turn off after turning
the ignition off. This is not a malfunction.
General
No power is being supplied to the unit.
• Check the connection or fuse.
• If the unit is turned off and the display disappears, it
cannot be operated with the remote commander.
t Turn on the unit.
The power antenna (aerial) does not extend.
The power antenna (aerial) does not have a relay box.
No beep sound.
• The beep sound is canceled (page 43).
• An optional power amplifier is connected and you are
not using the built-in amplifier.
The contents of the memory have been erased.
• The RESET button has been pressed.
t Store again into the memory.
• The power supply lead or battery has been
disconnected or it is not connected properly.
Stored stations and correct time are erased.
The fuse has blown.
Makes noise when the position of the ignition
is switched.
The leads are not matched correctly with the car’s
accessory power connector.
The display disappears from/does not appear
in the display window.
• The dimmer is set “DIM-ON” (page 43).
• The display disappears if you press and hold (OFF).
t Press and hold (OFF) on the unit until the
display appears.
• The connectors are dirty (page 49).
The Auto Off function does not operate.
The unit is turned on. The Auto Off function activates
after turning off the unit.
tTurn off the unit.
continue to next page t
Support site
http://support.sony-europe.com

52
D:\Documents and Settings\takashi-shimomura\Desktop\DTP\848220S MEX-
DV1500U(EUR)\4120899211_MEX-DV1500U_ML\01GB02CD-E.fm
masterpage:Left
MEX-DV1500U
4-120-899-21 (1)
Picture
There is no picture/picture noise occurs.
• A connection has not been made correctly.
• Check the connection to the connected equipment,
and set the input selector of the equipment to the
source corresponding to this unit.
• Defective or dirty disc.
• Installation is not correct.
t Install the unit at an angle of less than 45° in a
sturdy part of the car.
• The monitor is connected to the AUDIO/VIDEO
OUT, and the parking cord (light green) is not
connected to the parking brake switch cord, or the
parking brake is not applied.
• The color system setting is incorrect.
t Set the color system to “PAL” or “NTSC”
according to the connected monitor (page 43).
Picture does not fit in the screen.
The aspect ratio is fixed on the DVD.
Sound
There is no sound/sound skips/sound cracks.
• A connection has not been made correctly.
• Check the connection to the connected equipment,
and set the input selector of the equipment to the
source corresponding to this unit.
• Defective or dirty disc.
• Installation is not correct.
t Install the unit at an angle of less than 45° in a
sturdy part of the car.
• The MP3 file sampling rate is not 16, 22.05, 24, 32,
44.1, or 48 kHz.
• The WMA file sampling rate is not 32, 44.1, or
48 kHz.
• The AAC file sampling rate is not 44.1, or 48 kHz.
• The MP3 file bit rate is not 8 to 384 kbps.
• The WMA file bit rate is not 32 to 384 kbps.
• The AAC file bit rate is not 16 to 320 kbps.
• The unit is in pause/reverse/fast-forward mode.
• The settings for the outputs are not made correctly.
• The DVD output level is too low (page 28).
• The volume is too low.
• The ATT function is activated.
• The position of the fader control “FAD” is not set for
a 2-speaker system.
• Unsupported format (such as DTS).
t Check if the format is supported by this unit
(page 8).
Sound is noisy.
Keep cords and cables away from each other.
Disc operation
The disc cannot be loaded.
• Another disc is already loaded.
• The disc has been forcibly inserted upside down or in
the wrong way.
The disc does not play back.
• Defective or dirty disc.
• The disc is not applicable.
• The DVD is not applicable due to the region code.
• The disc is not finalized (page 48).
• The disc format and file version are incompatible
with this unit (page 8, 48).
•Press Z to remove the disc.
MP3/WMA/AAC/JPEG/DivX/MPEG-4 files do
not play back.
• Recording was not performed according to the ISO
9660 level 1 or level 2, the Joliet or Romeo in the
expansion format (DATA CD), or the UDF Bridge
format (DATA DVD) (page 48).
• The file extension is incorrect (page 48).
• Files are not stored in MP3/WMA/AAC/JPEG/DivX/
MPEG-4 format.
• If the disc contains multiple file types, only the
selected file type (audio/video/image) can be played.
tSelect the appropriate file type using the list
(page 33).
MP3/WMA/AAC/JPEG/DivX/MPEG-4 files take
longer to play back than others.
The following discs take a longer time to start
playback.
– a disc recorded with a complicated tree structure.
– a disc recorded in Multi Session/Multi Border.
– a disc to which data can be added.
The disc does not start playing from the
beginning.
Resume playback or multi-disc resume playback
(page 40) has taken effect.
Certain functions cannot be performed.
Depending on the disc, you may not be able to perform
operations such as stop, search, or repeat/shuffle play.
For details, see the manual supplied with the disc.
The soundtrack/subtitle language or angle
cannot be changed.
• Use the DVD menu instead of the direct selection
button on the card remote commander (page 17).
• Multilingual tracks, multilingual subtitles, or multi-
angles are not recorded on the DVD.
• The DVD prohibits changing.
The display items do not scroll.
• For discs with very many characters, those may not
scroll.
• “AUTO-SCRL” is set to “OFF.”
tSet “A.SCRL-ON” (page 43).
The operation buttons do not function.
The disc will not eject.
Press the RESET button (page 14).
You forgot the password for parental control.
Enter “5776” in the password input display to unlock
(page 30).

53
D:\Documents and Settings\takashi-shimomura\Desktop\DTP\848220S MEX-
DV1500U(EUR)\4120899211_MEX-DV1500U_ML\01GB02CD-E.fm
masterpage:RightD:\Documents and Settings\takashi-shimomura\Desktop\DTP\848220S MEX-
DV1500U(EUR)\4120899211_MEX-DV1500U_ML\01GB02CD-E.fm
masterpage:Right
MEX-DV1500U
4-120-899-21 (1)
Error displays/Messages
Radio reception
The stations cannot be received.
The sound is hampered by noises.
• The connection is not correct.
t Connect a power antenna (aerial) control lead
(blue) or accessory power supply lead (red) to the
power supply lead of a car’s antenna (aerial)
booster (only when your car has built-in FM/
MW/LW antenna (aerial) in the rear/side glass).
t Check the connection of the car antenna (aerial).
t If the auto antenna (aerial) will not go up, check
the connection of the power antenna (aerial)
control lead.
Preset tuning is not possible.
• Store the correct frequency in the memory.
• The broadcast signal is too weak.
Automatic tuning is not possible.
• Setting of the local seek mode is not correct.
t Tuning stops too frequently:
Set “LOCAL-ON” (page 44).
t Tuning does not stop at a station:
Set “MONO-ON” (page 44).
• The broadcast signal is too weak.
t Perform manual tuning.
During FM reception, the “ST” indication
flashes.
• Tune in the frequency accurately.
• The broadcast signal is too weak.
t Set “MONO-ON” (page 44).
An FM program broadcast in stereo is heard in
monaural.
The unit is in monaural reception mode.
t Set “MONO-OFF” (page 44).
RDS
The SEEK starts after a few seconds of
listening.
The station is non-TP or has weak signal.
t Deactivate TA (page 35).
No traffic announcements.
• Activate TA (page 35).
• The station does not broadcast any traffic
announcements despite being TP.
t Tune in another station.
PTY displays “- - - - - - - -.”
• The current station is not an RDS station.
• RDS data has not been received.
• The station does not specify the program type.
USB playback
You cannot play back items via a USB hub.
This unit cannot recognize USB devices via a USB
hub.
Cannot play back items.
A USB device does not work.
t Reconnect it.
The USB device takes longer to play back.
The USB device contains files with a complicated tree
structure.
A beep sounds.
During playback, the USB device has been
disconnected.
tBefore disconnecting a USB device, make sure to
stop playback first for data protection.
The sound is intermittent.
The sound may be intermittent at a high-bit-rate of
more than 320 kbps.
On the main unit
ERROR
• The disc is dirty or inserted upside down.
t Clean or insert the disc correctly.
• A blank disc has been inserted.
• The disc cannot play due to a problem.
t Insert another disc.
• The disc is not compatible with this unit.
t Insert a compatible disc.
• USB device was not automatically recognized.
t Reconnect it again.
• Press Z to remove the disc.
FAILURE
The connection of speakers/amplifiers is incorrect.
tSee the supplied installation/connections manual to
check the connection.
L. SEEK +/–
The local seek mode is on during automatic tuning.
NO AF
There is no alternative frequency for the current
station.
tPress .m/M> while the program service
name is flashing. The unit starts searching for
another frequency with the same PI (Program
Identification) data (“PI SEEK” appears).
NO DATA
The disc or USB device does not contain a music file.
tInsert a music CD in this unit.
tConnect a USB device with a music file in it.
NO DEV (No Device)
“USB” is selected as the source without a USB device
connected. A USB device or a USB cable has been
disconnected during playback.
tBe sure to connect a USB device and USB cable.
NO NAME
A disc/album/folder/track/image/video name is not
written in the file.
NO TP
The unit will continue searching for available TP
stations.
continue to next page t

54
D:\Documents and Settings\takashi-shimomura\Desktop\DTP\848220S MEX-
DV1500U(EUR)\4120899211_MEX-DV1500U_ML\01GB02CD-E.fm
masterpage:Left
MEX-DV1500U
4-120-899-21 (1)
If these solutions do not help improve the situation,
consult your nearest Sony dealer.
If you take the unit to be repaired because of disc
playback trouble, bring the disc that was used at the
time the problem began.
Glossary
Album
Section of a music piece or an image on a DATA
CD/DVD containing MP3/WMA/AAC audio tracks
or JPEG files.
Chapter
Subdivision of a title on a DVD. A title is composed
of several chapters.
DivX
®
Digital video technology created by DivX, Inc.
Videos encoded with DivX technology are among
the highest quality with a relatively small file size.
Dolby Digital
Digital audio compression technology developed by
Dolby Laboratories. This technology conforms to
5.1-channel surround sound. The rear channel is
stereo and there is a discrete subwoofer channel in
this format. Dolby Digital provides the same 5.1
discrete channels of high quality digital audio found
in Dolby Digital cinema audio systems. Good
channel separation is realized because all of the
channel data are recorded discretely and little
deterioration is realized because all channel data
processing is digital.
DVD
A disc that contains up to 8 hours of moving
pictures even though its diameter is the same as a
CD.
The data capacity of a single-layer and single-sided
DVD is 4.7 GB (Giga Byte), which is 7 times that of
a CD. The data capacity of a double-layer and
single-sided DVD is 8.5 GB, a single-layer and
double-sided DVD is 9.4 GB, and double-layer and
double-sided DVD is 17 GB.
The picture data uses the MPEG 2 format, one of the
worldwide standards of digital compression
technology. The picture data is compressed to about
1/40 (average) of its original size. The DVD also
uses a variable rate coding technology that changes
the data to be allocated according to the status of the
picture. Audio information is recorded in a multi-
channel format, such as Dolby Digital, allowing you
to enjoy a more real audio presence.
Furthermore, various advanced functions such as the
multi-angle, multilingual, and Parental Control
functions are provided with the DVD.
DVD-RW
A DVD-RW is a recordable and rewritable disc that
is the same size as a DVD VIDEO. The DVD-RW
has two different modes: VR mode and video mode.
DVD-RWs created in video mode have the same
format as a DVD VIDEO, while discs created in VR
(Video Recording) mode allow the contents to be
programmed or edited.
OFFSET
There may be an internal malfunction.
t Check the connection. If the error indication
remains on in the display, consult your nearest
Sony dealer.
OVERLOAD
USB device is overloaded.
t Disconnect the USB device, then change the source
by pressing (SOURCE).
t Indicates that the USB device is out of order, or an
unsupported device is connected.
READ
The unit is reading all file/album (folder) information
on the disc.
t Wait until reading is complete and playback starts
automatically. Depending on the disc structure, it
may take more than a minute.
USB NO SUPRT (USB Not Support)
The connected USB device is not supported.
t For details on the compatibility of your USB
device, visit the support site.
“” or “”
During reverse or fast-forward, you have reached the
beginning or the end of the disc and you cannot go any
further.
“”
The character cannot be displayed with the unit.
On the monitor
Playback prohibited by region code.
The DVD playback is prohibited due to the different
region code.
Cannot play this disc.
• The disc is incompatible with this unit.
• The disc is not finalized.
No playable data.
The disc does not contain playable data.
Please press RESET.
The unit cannot operate due to some problem.
t Press the RESET button (page 14).

55
D:\Documents and Settings\takashi-shimomura\Desktop\DTP\848220S MEX-
DV1500U(EUR)\4120899211_MEX-DV1500U_ML\01GB02CD-E.fm
masterpage:RightD:\Documents and Settings\takashi-shimomura\Desktop\DTP\848220S MEX-
DV1500U(EUR)\4120899211_MEX-DV1500U_ML\01GB02CD-E.fm
masterpage:Right
MEX-DV1500U
4-120-899-21 (1)
DVD+RW
A DVD+RW (plus RW) is a recordable and
rewritable disc. DVD+RWs use a recording format
that is comparable to the DVD VIDEO format.
File
• An MP3/WMA/AAC track or JPEG image on a
DATA CD/DATA DVD/USB device.
• An MP3/WMA/AAC track, JPEG image, or a
DivX/MPEG-4 video on a DATA CD/DATA
DVD.
(“File” is an exclusive definition for this unit.) A
single file consists of a single track, image, or
movie.
Film based software, Video based software
DVDs can be classified as Film based or Video
based software. Film based DVDs contain the same
images (24 frames per second) that are shown at
movie theaters. Video based DVDs, such as
television dramas or sit-coms, displays images at 30
frames (or 60 fields) per second.
Scene
On a VIDEO CD with PBC (playback control)
functions, the menu screens, moving pictures and
still pictures are divided into sections called
“scenes.”
Title
The longest section of a picture or music feature on
a DVD, movie, etc., in video software, or the entire
album in audio software.
Track
Section of a picture or a music piece on a VIDEO
CD, CD, or MP3/WMA/AAC. An album is
composed of several tracks (MP3/WMA/AAC
only).
VIDEO CD
A compact disc that contains moving pictures.
The picture data uses the MPEG 1 format, one of a
worldwide standard of digital compression
technology. The picture data is compressed to about
1/140 of its original size. Consequently, a 12 cm
VIDEO CD can contain up to 74 minutes of moving
pictures.
VIDEO CDs also contain compact audio data.
Sounds outside the range of human hearing are
compressed while sounds we can hear are not
compressed. VIDEO CDs can hold 6 times the
audio information of conventional audio CDs.
There are 3 versions of VIDEO CDs.
• Version 1.0, 1.1: You can play only moving
pictures and sound.
• Version 2.0: You can play high-resolution still
pictures and enjoy PBC functions.
This unit conforms to all 3 versions above.

56
D:\Documents and Settings\takashi-shimomura\Desktop\DTP\848220S MEX-
DV1500U(EUR)\4120899211_MEX-DV1500U_ML\01GB02CD-E.fm
masterpage:Left
MEX-DV1500U
4-120-899-21 (1)
Language code/area code list
Language code list
The language spellings conform to the ISO 639: 1988 (E/F) standard.
Area code list
Code Language Code Language Code Language Code Language
1027 Afar
1028 Abkhazian
1032 Afrikaans
1039 Amharic
1044 Arabic
1045 Assamese
1051 Aymara
1052 Azerbaijani
1053 Bashkir
1057 Byelorussian
1059 Bulgarian
1060 Bihari
1061 Bislama
1066 Bengali;
Bangla
1067 Tibetan
1070 Breton
1079 Catalan
1093 Corsican
1097 Czech
1103 Welsh
1105 Danish
1109 German
1130 Bhutani
1142 Greek
1144 English
1145 Esperanto
1149 Spanish
1150 Estonian
1151 Basque
1157 Persian
1165 Finnish
1166 Fiji
1171 Faroese
1174 French
1181 Frisian
1183 Irish
1186 Scots Gaelic
1194 Galician
1196 Guarani
1203 Gujarati
1209 Hausa
1217 Hindi
1226 Croatian
1229 Hungarian
1233 Armenian
1235 Interlingua
1239 Interlingue
1245 Inupiak
1248 Indonesian
1253 Icelandic
1254 Italian
1257 Hebrew
1261 Japanese
1269 Yiddish
1283 Javanese
1287 Georgian
1297 Kazakh
1298 Greenlandic
1299 Cambodian
1300 Kannada
1301 Korean
1305 Kashmiri
1307 Kurdish
1311 Kirghiz
1313 Latin
1326 Lingala
1327 Laothian
1332 Lithuanian
1334 Latvian;
Lettish
1345 Malagasy
1347 Maori
1349 Macedonian
1350 Malayalam
1352 Mongolian
1353 Moldavian
1356 Marathi
1357 Malay
1358 Maltese
1363 Burmese
1365 Nauru
1369 Nepali
1376 Dutch
1379 Norwegian
1393 Occitan
1403 (Afan)Oromo
1408 Oriya
1417 Punjabi
1428 Polish
1435 Pashto;
Pushto
1436 Portuguese
1463 Quechua
1481 Rhaeto-
Romance
1482 Kirundi
1483 Romanian
1489 Russian
1491 Kinyarwanda
1495 Sanskrit
1498 Sindhi
1501 Sangho
1502 Serbo-
Croatian
1503 Singhalese
1505 Slovak
1506 Slovenian
1507 Samoan
1508 Shona
1509 Somali
1511 Albanian
1512 Serbian
1513 Siswati
1514 Sesotho
1515 Sundanese
1516 Swedish
1517 Swahili
1521 Tamil
1525 Telugu
1527 Tajik
1528 Thai
1529 Tigrinya
1531 Turkmen
1532 Tagalog
1534 Setswana
1535 Tonga
1538 Turkish
1539 Tsonga
1540 Tatar
1543 Twi
1557 Ukrainian
1564 Urdu
1572 Uzbek
1581 Vietnamese
1587 Volapük
1613 Wolof
1632 Xhosa
1665 Yoruba
1684 Chinese
1697 Zulu
1703 Not specified
Code Area Code Area Code Area Code Area
2044 Argentina
2047 Australia
2046 Austria
2057 Belgium
2070 Brazil
2079 Canada
2090 Chile
2092 China
2115 Denmark
2165 Finland
2174 France
2109 Germany
2248 India
2238 Indonesia
2254 Italy
2276 Japan
2304 Korea
2363 Malaysia
2362 Mexico
2376 Netherlands
2390 New Zealand
2379 Norway
2427 Pakistan
2424 Philippines
2436 Portugal
2489 Russia
2501 Singapore
2149 Spain
2499 Sweden
2086 Switzerland
2528 Thailand
2184 United
Kingdom

57
01GB+00COV-EIX.fm masterpage:Right
MEX-DV1500U
4-120-899-21 (1)
continue to next page t
Index
Numerics
16:9 39
2000MP3 6
2000WMA 6
4:3 LETTER BOX 39
4:3 PAN SCAN 39
A
AAC 9, 48
Album (ALBUM) 32
Alternative Frequencies
(AF) 35
Angle (ANGLE) 17
Area code 56
Audio (AUDIO)
Channel 27
Format 27
Language 27, 39
Audio DRC (AUDIO DRC) 41
Audio setup
(AUDIO SETUP) 41
Auto Off (AUTO-OFF) 43
Auto Scroll (AUTO-SCRL) 43
Auxiliary equipment 46
Auxiliary Level
(AUX-LEVEL) 45, 47
B
Balance (BAL) 37
Beep sound (BEEP) 43
Best Tuning Memory
(BTM) 34
C
Card remote commander
12, 14, 49
Chapter (CHAPTER) 32
Clock Adjust
(CLOCK-ADJ) 46
Clock Time (CT) 35, 36, 43
Color System
(COLOR-SYS) 43
Custom setup
(CUSTOM SETUP) 40
D
Demonstration (DEMO) 43
Dimmer (DIMMER) 43
Direct search play 32
Discs 8
Display setup
(DISPLAY SETUP) 39
DivX VOD 40
DivX® 9, 23, 48
Dolby Digital 27, 28
Dolby Level Adjust
(DOLBY-ADJ) 45
DVD Level
(DVD-LEVEL) 28, 45
DVD menu 17
DVD’s top menu 17
Dynamic Range Control
(DRC) 41
E
EQ3 37
Equalizer
Picture
(PICTURE EQ) 29, 41
Sound (EQ3) 37
F
Fader (FAD) 37
File (FILE) 33
Folder (ALBUM) 33
Formats 9
Front AUX 46
Fuse 49
I
Image (IMAGE) 32
J
JPEG 9, 23, 48
L
Language code 56
Language setup
(LANGUAGE SETUP) 39
List up 33
Lithium battery 49
Local Seek Mode (LOCAL) 44
Loudness (LOUD) 45
M
Menu language (MENU) 39
Monaural Mode (MONO) 44
Monitor type
(MONITOR TYPE) 39
Motion Display (M.DSPL) 43
MP3 9, 48
MPEG-4 9, 49
Multi Border DVD 48
Multi Session CD 48
Multi-disc resume playback
(MULTI-DISC RESUME)
6, 40
N
NTSC 43
P
PAL 43
Parental control (PARENTAL
CONTROL) 30, 40
Picture EQ
(PICTURE EQ) 29, 41
Play list play
(PLAY LIST PLAY) 41
Play mode menu 24
Playable discs 8
Playback control (PBC) 24
Program format 27
Program Types (PTY) 35, 36
Q
Quick-BrowZer 33
R
Radio Data System (RDS) 35
Region code 9
Regional (REGIONAL) 36, 44
Repeat play (REP) 21, 31
Reset (RESET) 14, 41
Resume play 17, 19

58
01GB+00COV-EIX.fm masterpage:Left
MEX-DV1500U
4-120-899-21 (1)
S
Setup menu
System setup 42
Visual setup 38
Shuffle play (SHUF) 21, 31
Slide show interval
(SLIDE SHOW TIME) 40
Soundtrack language
(AUDIO) 27, 39
Subtitle language
(SUBTITLE) 17, 39
System setup 42
T
Time/text information
(TIME) 26, 32
Title (TITLE) 32
Track (TRACK) 32
Traffic Announcement (TA) 35
Traffic Program (TP) 35
U
USB device 20
V
Visual setup 38
Volume 10
W
Wallpaper (WALLPAPER) 39
WMA 9, 48
Z
Zoom (CENTER ZOOM) 28

01GB+00COV-EIX.fm masterpage:Right
MEX-DV1500U
4-120-899-21 (1)

2
D:\Documents and Settings\takashi-shimomura\Desktop\DTP\848220S MEX-
DV1500U(EUR)\4120899211_MEX-DV1500U_ML\02DE01INT-E.fm
masterpage:Left
MEX-DV1500U
4-120-899-21 (1)
Achtung
Um Feuergefahr und die Gefahr eines
elektrischen Schlags zu vermeiden,
setzen Sie das Gerät weder Regen noch
sonstiger Feuchtigkeit aus.
Um einen elektrischen Schlag zu
vermeiden, öffnen Sie das Gehäuse
nicht. Überlassen Sie Wartungsarbeiten
stets qualifiziertem Fachpersonal.
VORSICHT
Die Verwendung optischer Instrumente
zusammen mit diesem Produkt stellt ein
Gesundheitsrisiko für die Augen dar. Der Laser-
Strahl, den dieser CD/DVD-Player generiert,
kann die Augen schädigen. Versuchen Sie daher
nicht, das Gerät zu zerlegen.
Überlassen Sie Wartungsarbeiten stets
qualifiziertem Fachpersonal.
Wichtig!
Bitte nehmen Sie sich etwas Zeit, um
den Geräte-Pass vollständig
auszufüllen. Dieser befindet sich auf
der hinteren Umschlagseite dieser
Bedienungsanleitung.
Dieses Etikett befindet sich an der Unterseite
des Gehäuses.
Dieses Etikett befindet sich am internen Chassis
der Laufwerkseinheit.
CAUTION
RADIATION WHEN OPEN AND INTERLOCKS DEFEATED.
DO NOT VIEW DIRECTLY WITH OPTICAL INSTRUMENTS.
:
CLASS 1M VISIBLE/INVISIBLE LASER
Hinweis für Kunden: Die folgenden
Informationen gelten nur für Geräte, die
in Ländern verkauft werden, in denen
EU-Richtlinien gelten
Der Hersteller dieses Produkts ist Sony
Corporation, 1-7-1 Konan, Minato-ku, Tokio,
Japan. Autorisierter Vertreter für EMV und
Produktsicherheit ist Sony Deutschland GmbH,
Hedelfinger Straße 61, 70327 Stuttgart,
Deutschland. Kontaktadressen für Kundendienst
oder Garantieanspruche finden Sie in den
separaten Kundendienst- oder
Garantiedokumenten.
Entsorgung von gebrauchten
elektrischen und elektronischen
Geräten (anzuwenden in den
Ländern der Europäischen Union
und anderen europäischen Ländern
mit einem separaten Sammelsystem
für diese Geräte)
Das Symbol auf dem Produkt oder seiner Verpackung
weist darauf hin, dass dieses Produkt nicht als normaler
Haushaltsabfall zu behandeln ist, sondern an einer
Annahmestelle für das Recycling von elektrischen und
elektronischen Geräten abgegeben werden muss. Durch
Ihren Beitrag zum korrekten Entsorgen dieses Produkts
schützen Sie die Umwelt und die Gesundheit Ihrer
Mitmenschen. Umwelt und Gesundheit werden durch
falsches Entsorgen gefährdet. Materialrecycling hilft, den
Verbrauch von Rohstoffen zu verringern. Weitere
Informationen über das Recycling dieses Produkts
erhalten Sie von Ihrer Gemeinde, den kommunalen
Entsorgungsbetrieben oder dem Geschäft, in dem Sie das
Produkt gekauft haben.
Geeignetes Zubehör: Fernbedienung
Entsorgung von gebrauchten
Batterien und Akkus (anzuwenden in
den Ländern der Europäischen
Union und anderen europäischen
Ländern mit einem separaten
Sammelsystem für diese Produkte)
Das Symbol auf der Batterie/dem Akku oder der
Verpackung weist darauf hin, dass diese nicht als normaler
Haushaltsabfall zu behandeln sind. Durch Ihren Beitrag
zum korrekten Entsorgen dieser Batterien/Akkus schützen
Sie die Umwelt und die Gesundheit Ihrer Mitmenschen.
Umwelt und Gesundheit werden durch falsches Entsorgen
gefährdet. Materialrecycling hilft, den Verbrauch von
Rohstoffen zu verringern.
Bei Produkten, die auf Grund ihrer Sicherheit, der
Funktionalität oder als Sicherung vor Datenverlust eine
ständige Verbindung zur eingebauten Batterie benötigen,
sollte die Batterie nur durch qualifiziertes Servicepersonal
ausgetauscht werden.
Um sicherzustellen, dass die Batterie korrekt entsorgt
wird, geben Sie das Produkt zwecks Entsorgung an einer
Annahmestelle für das Recycling von elektrischen und
elektronischen Geräten ab.
Für alle anderen Batterien entnehmen Sie die Batterie
bitte entsprechend dem Kapitel über die sichere
Entfernung der Batterie. Geben Sie die Batterie an einer
Annahmestelle für das Recycling von Batterien/Akkus ab.
Weitere Informationen über das Recycling dieses Produkts
oder der Batterie erhalten Sie von Ihrer Gemeinde, den
kommunalen Entsorgungsbetrieben oder dem Geschäft, in
dem Sie das Produkt gekauft haben.

3
D:\Documents and Settings\takashi-shimomura\Desktop\DTP\848220S MEX-
DV1500U(EUR)\4120899211_MEX-DV1500U_ML\02DE01INT-E.fm
masterpage:Right
MEX-DV1500U
4-120-899-21 (1)
Sicherheit
• Beachten Sie bitte die Straßenverkehrsordnung
in Ihrem Land bzw. Gebiet.
• Aus Sicherheitsgründen schaltet sich der an
VIDEO OUT angeschlossene Monitor
automatisch aus, wenn die Parkbremse gelöst
wird.
Warnhinweis, wenn die Zündung Ihres
Fahrzeugs nicht über eine
Zubehörposition (ACC oder I) verfügt
Schalten Sie unbedingt die
Ausschaltautomatik ein (Seite 45).
Nach dem Ausschalten wird das Gerät dann
nach der voreingestellten Zeit automatisch
vollständig abgeschaltet, so dass der
Autobatterie kein Strom mehr entzogen wird.
Wenn Sie die Ausschaltautomatik nicht
aktivieren, müssen Sie jedes Mal, wenn Sie
die Zündung ausschalten, die Taste (OFF)
gedrückt halten, bis die Anzeige ausgeblendet
wird.
Erläuterungen zum Beenden des Demo-
Modus (DEMO) finden Sie auf Seite 45.
Unfallverhütung
Das Bild erscheint erst, nachdem Sie das
Fahrzeug geparkt und die Parkbremse betätigt
haben.
Wenn das Fahrzeug während der
Videowiedergabe zu fahren beginnt, erscheint
die folgende Warnmeldung und die Bilder
von VIDEO OUT werden automatisch
ausgeblendet.
Die Bilder auf dem Bildschirm werden zwar
ausgeblendet, aber der Ton wird weiterhin
wiedergegeben.
Bedienen Sie das Gerät während des Fahrens
nicht und schauen Sie auch nicht auf den
Monitor.
Video blocked for your
safety.

4
D:\Documents and Settings\takashi-shimomura\Desktop\DTP\848220S MEX-
DV1500U(EUR)\4120899211_MEX-DV1500U_ML\02DE+00COV-ETOC.fm
masterpage:Right
Inhalt
MEX-DV1500U
4-120-899-21 (1)
Willkommen! . . . . . . . . . . . . . . . . . . . . . . . . . . .6
Urheberrechte . . . . . . . . . . . . . . . . . . . . . . . .7
Geeignete Discs und in dieser Anleitung
verwendete Symbole . . . . . . . . . . . . . . . . . . . . .8
Lage und Funktion der Teile und
Bedienelemente . . . . . . . . . . . . . . . . . . . . . . . .10
Hauptgerät . . . . . . . . . . . . . . . . . . . . . . . . . .10
Kartenfernbedienung RM-X168 . . . . . . . . .12
Vorbereitungen
Installieren des Geräts und des
gesondert erhältlichen Monitors. . . . . . 14
Zurücksetzen des Geräts. . . . . . . . . . . . 14
Vorbereiten der
Kartenfernbedienung . . . . . . . . . . . . . . . 14
Abnehmen der Frontplatte . . . . . . . . . . 15
Anbringen der Frontplatte . . . . . . . . . . . . . .15
Grundfunktionen
Wiedergeben von Video-Discs . . . . . . . 16
Wiedergeben von Audio-Discs . . . . . . . 18
Wiedergabe mit einem USB-Gerät . . . . 20
Informationen im Display . . . . . . . . . . . . . .21
Repeat und Shuffle Play . . . . . . . . . . . . . . .21
Radioempfang . . . . . . . . . . . . . . . . . . . . 22
Weitere Funktionen — Discs
Wiedergeben von DivX
®
-/MPEG-4-/JPEG-
Dateien . . . . . . . . . . . . . . . . . . . . . . . . . . . . . . .23
DivX
®
-/MPEG-4-Videowiedergabe . . . . . .23
JPEG-Bildwiedergabe . . . . . . . . . . . . . . . . .23
Verwenden der PBC-Funktionen
— Wiedergabesteuerung . . . . . . . . . . . . . . . . .24
Verwenden des Wiedergabemodusmenüs . . . .24
Anzeigen der Zeitangaben/Textinformationen
einer Disc . . . . . . . . . . . . . . . . . . . . . . . . . . . . .26
Konfigurieren der Audioeinstellungen. . . . . . .27
Wechseln von Audiosprache/-format . . . . .27
Anzeigen des Programmformats . . . . . . . . .27
Einstellen des Audioausgangspegels
— DVD-Pegel . . . . . . . . . . . . . . . . . . . . . . .28
Vergrößern von Bildern . . . . . . . . . . . . . . . . . .29
Einstellen der Bildqualität — Bild-EQ . . . . . . 29
Anpassen der Bildqualität. . . . . . . . . . . . . . 30
Sperren von Discs — Kindersicherung . . . . . 30
Aktivieren der Kindersicherung . . . . . . . . . 30
Wechseln des Gebiets und der
Altersfreigabestufe . . . . . . . . . . . . . . . . . . . 31
Repeat und Shuffle Play . . . . . . . . . . . . . . . . . 32
Direktsuche . . . . . . . . . . . . . . . . . . . . . . . . . . . 33
Auflisten von Stücken/Bildern/Videodateien
— Quick-BrowZer. . . . . . . . . . . . . . . . . . . . . . 34
Auswählen eines Stücks/Bildes/einer
Videodatei. . . . . . . . . . . . . . . . . . . . . . . . . . 34
Auswählen eines Dateityps. . . . . . . . . . . . . 35
Anzeigen von Audio-Disc-Informationen. . . . 35
Weitere Funktionen — Radio
Speichern und Empfangen von Sendern . . . . . 36
Automatisches Speichern von Sendern
— BTM. . . . . . . . . . . . . . . . . . . . . . . . . . . . 36
Manuelles Speichern von Sendern . . . . . . . 36
Empfangen gespeicherter Sender . . . . . . . . 36
RDS . . . . . . . . . . . . . . . . . . . . . . . . . . . . . . . . . 36
Übersicht. . . . . . . . . . . . . . . . . . . . . . . . . . . 36
Einstellen von AF und TA . . . . . . . . . . . . . 37
Auswählen des Programmtyps (PTY) . . . . 38
Einstellen der Uhrzeit (CT). . . . . . . . . . . . . 38
Klangeinstellungen
Einstellen der Klangeigenschaften . . . . . . . . . 38
Individuelles Einstellen der Equalizer-Kurve
— EQ3 . . . . . . . . . . . . . . . . . . . . . . . . . . . . 39
Einstellungen
Wiedergabekonfiguration . . . . . . . . . . . . . . . . 39
Grundlegende Funktionsweise der
Wiedergabekonfiguration . . . . . . . . . . . . . . 39
Spracheinstellungen für Anzeige oder
Tonspur . . . . . . . . . . . . . . . . . . . . . . . . . . . . 41
Bildschirmkonfiguration. . . . . . . . . . . . . . . 41
Benutzereinstellungen. . . . . . . . . . . . . . . . . 42
Tonkonfiguration . . . . . . . . . . . . . . . . . . . . 43
Zurücksetzen aller Einstellungen . . . . . . . . 43
Systemkonfiguration . . . . . . . . . . . . . . . . . . . . 44
Grundlegende Funktionsweise der
Systemkonfiguration. . . . . . . . . . . . . . . . . . 44
Einstellen der Uhr . . . . . . . . . . . . . . . . . . . . 48

Zur Installation und zum Anschluss siehe die
mitgelieferte Installations-/Anschlussanleitung.
5
D:\Documents and Settings\takashi-shimomura\Desktop\DTP\848220S MEX-
DV1500U(EUR)\4120899211_MEX-DV1500U_ML\02DE+00COV-ETOC.fm
masterpage:Right
MEX-DV1500U
4-120-899-21 (1)
Support-Website
Wenn Sie Fragen haben oder die neuesten Support-Informationen zu
diesem Produkt abrufen möchten, rufen Sie bitte folgende Website auf:
http://support.sony-europe.com
Hier finden Sie folgende Informationen:
• Modelle und Hersteller kompatibler digitaler Audioplayer
• Unterstützte MP3-/WMA-/AAC-Dateien
Verwenden gesondert erhältlicher
Geräte
Zusätzliche Geräte . . . . . . . . . . . . . . . . . . . . . . 48
Weitere Informationen
Sicherheitsmaßnahmen . . . . . . . . . . . . . . . . . . 49
Hinweise zu Discs. . . . . . . . . . . . . . . . . . . . 49
Wiedergabereihenfolge von MP3-/WMA-/
AAC-/JPEG-/DivX
®
-/
MPEG-4-Dateien . . . . . . . . . . . . . . . . . . . . 50
Hinweise zu MP3-Dateien . . . . . . . . . . . . . 50
Hinweise zu WMA-Dateien . . . . . . . . . . . . 51
Hinweise zu AAC-Dateien . . . . . . . . . . . . . 51
Hinweise zu JPEG-Dateien. . . . . . . . . . . . . 51
Hinweise zu DivX
®
-Dateien. . . . . . . . . . . . 51
Hinweise zu MPEG-4-Dateien . . . . . . . . . . 51
Wartung . . . . . . . . . . . . . . . . . . . . . . . . . . . . . . 51
Ausbauen des Geräts . . . . . . . . . . . . . . . . . . . . 52
Technische Daten . . . . . . . . . . . . . . . . . . . . . . 53
Störungsbehebung . . . . . . . . . . . . . . . . . . . . . . 54
Fehleranzeigen/Meldungen. . . . . . . . . . . . . 57
Glossar. . . . . . . . . . . . . . . . . . . . . . . . . . . . . . . 58
Sprachcode-/Gebietscodeliste . . . . . . . . . . . . . 60
Index . . . . . . . . . . . . . . . . . . . . . . . . . . . . . . . . 61

6
D:\Documents and Settings\takashi-shimomura\Desktop\DTP\848220S MEX-
DV1500U(EUR)\4120899211_MEX-DV1500U_ML\02DE02CD-E.fm
masterpage:Left
MEX-DV1500U
4-120-899-21 (1)
Willkommen!
Danke, dass Sie sich für diesen Multi-Disc-
Player von Sony entschieden haben. Lesen Sie
diese Anleitung vor Inbetriebnahme des Geräts
bitte genau durch und bewahren Sie sie zum
späteren Nachschlagen sorgfältig auf.
Merkmale und Funktionen
Nähere Erläuterungen finden Sie auf den
angegebenen Seiten.
* Je nach Länge der Stücke und Abtastfrequenz der
Aufnahme.
DVD-, VCD-, CD-Wiedergabe
t Seite 8
Das Gerät ist mit verschiedenen Disc-Formaten
kompatibel.
2000MP3, 2000WMA, 2000AAC
Bis zu 2.000 Stücke* auf einer Disc im MP3/
WMA/AAC-Format können wiedergegeben
werden.
Wiedergabefortsetzung für mehrere
Discs
t Seite 42
Das Gerät speichert für bis zu 5 DVD VIDEOs,
VCDs, DivX- und MPEG-4-Discs die Stelle, an
der Sie die Wiedergabe gestoppt haben, und
setzt die Wiedergabe an dieser Stelle fort, auch
wenn die wiedergegebene Disc
zwischenzeitlich ausgeworfen wurde.
t Seite 38
Es gibt 7 voreingestellte Equalizer-Kurven, die
sich für 3 verschiedene Frequenzbereiche
individuell anpassen lassen.
t Seite 29
Sie können aus gespeicherten Voreinstellungen
je nach Fahrzeuginnenraum bzw.
Umgebungslicht die gewünschten
Bildeinstellungen auswählen.
t Seite 48
Ein tragbares Audiogerät kann angeschlossen
werden (Analogverbindung).
t Seite 48
An die Anschlüsse AUX AUDIO IN an der
Rückseite können Sie ein zusätzliches Gerät
wie ein tragbares Audiogerät
(Analogverbindung), ein verstecktes
Navigationsgerät, einen Fernsehtuner usw.
anschließen. Der Ton vom angeschlossenen
Gerät wird dann über dieses Gerät ausgegeben.

7
D:\Documents and Settings\takashi-shimomura\Desktop\DTP\848220S MEX-
DV1500U(EUR)\4120899211_MEX-DV1500U_ML\02DE02CD-E.fm
masterpage:RightD:\Documents and Settings\takashi-shimomura\Desktop\DTP\848220S MEX-
DV1500U(EUR)\4120899211_MEX-DV1500U_ML\02DE02CD-E.fm
masterpage:Right
MEX-DV1500U
4-120-899-21 (1)
Urheberrechte
Dieses Produkt ist mit einer
Urheberrechtsschutztechnologie ausgestattet, die
durch Verfahrensansprüche bestimmter
US-Patente und sonstige Rechte zum Schutz
geistigen Eigentums geschützt ist. Diese
Technologie ist Eigentum der Macrovision
Corporation und anderer Rechtseigentümer. Die
Nutzung dieser Technologie im Rahmen des
Urheberrechtsschutzes muss von der
Macrovision Corporation genehmigt werden und
gilt nur für den privaten oder anderen
eingeschränkten Gebrauch, es sei denn, es liegt
eine spezielle Genehmigung der Macrovision
Corporation vor. Die Nachentwicklung oder
Disassemblierung ist verboten.
„DVD VIDEO“, „DVD-R“, „DVD-RW“,
„DVD+R“ und „DVD+RW“ sind
Markenzeichen.
„DivX“ und „DivX Certified“ sind
eingetragene Markenzeichen oder
Markenzeichen der DivX, Inc.
DIESES PRODUKT WIRD UNTER DER
MPEG-4 VISUAL PATENT PORTFOLIO-
LIZENZ FÜR DEN PRIVATEN UND NICHT
KOMMERZIELLEN GEBRAUCH DURCH
DEN BENUTZER LIZENZIERT, UND ZWAR
FÜR DAS DECODIEREN VON MPEG-4-
VIDEODATEN, DIE VON EINEM BENUTZER
IM PRIVATEN, NICHT KOMMERZIELLEN
RAHMEN CODIERT WURDEN UND/ODER
VON EINEM VIDEO-ANBIETER STAMMEN,
DER ÜBER EINE LIZENZ VON MPEG LA
ZUM ANBIETEN VON MPEG-4-VIDEOS
VERFÜGT. FÜR EINEN ANDEREN ZWECK
WIRD KEINE LIZENZ ERTEILT ODER
IMPLIZIT GEWÄHRT. WEITERE
INFORMATIONEN, AUCH ZU WERBE-,
INTERNEN UND KOMMERZIELLEN
ZWECKEN, UND LIZENZEN, SIND BEI
MPEG LA, LLC, ERHÄLTLICH. SIEHE
HTTP://WWW.MPEGLA.COM
Hergestellt unter Lizenz von
Dolby Laboratories.
„Dolby“ und das Doppel-D-
Symbol sind Warenzeichen von Dolby
Laboratories.
Windows Media und das
Windows-Logo sind
Markenzeichen oder
eingetragene Markenzeichen
der Microsoft Corporation in den USA und/oder
anderen Ländern.

8
D:\Documents and Settings\takashi-shimomura\Desktop\DTP\848220S MEX-
DV1500U(EUR)\4120899211_MEX-DV1500U_ML\02DE02CD-E.fm
masterpage:Left
MEX-DV1500U
4-120-899-21 (1)
Geeignete Discs und in dieser Anleitung verwendete Symbole
Auf diesem Gerät können verschiedene Video-/Audio-Discs wiedergegeben werden.
In der folgenden Tabelle sind die Discs aufgelistet, die von diesem Gerät unterstützt werden, sowie die
Funktionen, die bei den einzelnen Disc-Typen zur Verfügung stehen.
*1 Auch Audiodateien können gespeichert werden. Näheres finden Sie auf Seite 9.
*2 Auch Video-/Bilddateien können gespeichert werden. Näheres finden Sie auf Seite 9.
Hinweis
„DVD“ wird als allgemeine Bezeichnung für DVD VIDEOs, DVD-Rs/DVD-RWs und DVD+Rs/DVD+RWs verwendet.
Disc-Symbol in dieser
Anleitung
Disc-Format Disc-Logo
VIDEO
DVD VIDEO
DVD-R*
1
DVD-R DL*
1
(Videomodus/VR-Modus)
DVD-RW*
1
(Videomodus/VR-Modus)
DVD+R*
1
DVD+R DL*
1
DVD+RW*
1
Video-CD
(Version 1.0/1.1/2.0)
AUDIO
Audio-CD
CD-ROM*
2
CD-R*
2
CD-RW*
2

9
D:\Documents and Settings\takashi-shimomura\Desktop\DTP\848220S MEX-
DV1500U(EUR)\4120899211_MEX-DV1500U_ML\02DE02CD-E.fm
masterpage:RightD:\Documents and Settings\takashi-shimomura\Desktop\DTP\848220S MEX-
DV1500U(EUR)\4120899211_MEX-DV1500U_ML\02DE02CD-E.fm
masterpage:Right
MEX-DV1500U
4-120-899-21 (1)
In der folgenden Tabelle sehen Sie die unterstützten Komprimierungsformate mit den entsprechenden
Dateitypen und den Disc-Typen, auf denen diese Dateien gespeichert werden können.
Die verfügbaren Funktionen sind unabhängig vom Disc-Typ. Sie hängen vom Format ab. Die
Formatsymbole unten erscheinen neben der Beschreibung der Funktionen, die in dem betreffenden
Format zur Verfügung stehen.
Tipp
Erläuterungen zu den Komprimierungsformaten finden Sie auf Seite 50.
Nicht unterstützte Discs
Die folgenden Disc-Typen können mit diesem Gerät nicht wiedergegeben werden:
•8-cm-Discs
• 12-cm-Disc, bei der nur die inneren 8 cm Daten enthalten (der Rest ist transparent)
• CD-ROM mit anderen als MP3/WMA/AAC/JPEG/DivX/MPEG-4-Dateien
•SA-CD
•CD-G
•Foto-CD
• VSD (Video-Single-Disc)
• DVD-ROM mit anderen als MP3/WMA/AAC/JPEG/DivX/MPEG-4-Dateien
•DVD-RAM
•DVD-Audio
• Active-Audio (Daten)
• SVCD (Super-Video-CD)
•CDV
• Disc, die im Format Packet Write erstellt wurde
• Discs im DTS-Format
Hinweis
Je nach Zustand der Aufnahme können auch kompatible Discs auf diesem Gerät nicht unbedingt wiedergegeben
werden.
Regionalcode
Das Regionalcodesystem dient dem Urheberrechtsschutz von
Software.
Der Regionalcode befindet sich an der Geräteunterseite. Nur DVDs,
die mit dem gleichen Regionalcode wie das Gerät gekennzeichnet
sind, können mit diesem Gerät wiedergegeben werden.
DVDs mit dem Regionalcode können ebenfalls
wiedergegeben werden.
Wenn Sie versuchen, eine andere DVD wiederzugeben, erscheint die
Meldung „Playback prohibited by region code.“ auf dem Monitorschirm. Einige DVDs sind
möglicherweise nicht mit einem Regionalcode gekennzeichnet, können aber trotzdem nicht auf allen
Playern wiedergegeben werden.
Formatsymbol in dieser
Anleitung
Dateityp Zum Speichern verwendbarer Disc-Typ
MP3-Audiodatei
DATA-DVDs
DVD-ROM
DVD-R
DVD-R DL
DVD-RW
DVD+R
DVD+R DL
DVD+RW
DATA-CDs
CD-ROM
CD-R
CD-RW
WMA-Audiodatei
AAC-Audiodatei
JPEG-Bilddatei
DivX
®
-Videodatei
MPEG-4-Videodatei
MPEG-4
Regionalcode
ALL

10
D:\Documents and Settings\takashi-shimomura\Desktop\DTP\848220S MEX-
DV1500U(EUR)\4120899211_MEX-DV1500U_ML\02DE02CD-E.fm
masterpage:Left
MEX-DV1500U
4-120-899-21 (1)
Lage und Funktion der Teile und Bedienelemente
Hauptgerät
Näheres finden Sie auf den angegebenen Seiten.
Die Anweisungen in dieser Anleitung beziehen
sich im Allgemeinen auf die Bedienelemente auf
der Kartenfernbedienung. Sie können jedoch
auch die Bedienelemente am Hauptgerät
verwenden, sofern sie die gleiche oder eine
ähnliche Bezeichnung tragen wie die
Bedienelemente auf der Kartenfernbedienung.
A Taste OFF Seite 15, 16, 18, 20, 24
Ausschalten/Stoppen der Tonquelle
(drücken), vollständiges Ausschalten
(gedrückt halten).
B Taste (Zurück) Seite 34, 39
Zurückschalten zur vorherigen Anzeige.
C Taste SOURCE Seite 20, 22, 36, 49
Einschalten, Wechseln der Tonquelle
(Radio/Disc/USB/AUX).
D Taste (Durchsuchen) Seite 34
Aktivieren des Quick-BrowZer-Modus.*
1
E Steuerregler/Taste SOUND/ENTER
Seite 28, 35, 36, 38, 39, 44, 48, 49
Einstellen der Lautstärke/Vornehmen einer
Einstellung (drehen), Aufrufen des
Klangmenüs/Bestätigen einer Einstellung
(drücken).
F Disc-Einschub Seite 16, 18
Einlegen einer Disc.
G Display
H Taste Z (Auswerfen) Seite 16, 18
Auswerfen der Disc.
I USB-Anschluss Seite 20
Anschließen eines USB-Geräts.
J Tasten SEEK +/– Seite 17, 19, 22, 23
Disc/USB:
Überspringen von Kapiteln/Stücken/Szenen/
Dateien (drücken), Vorwärts-/
Rückwärtssuchen auf einer Disc (kurz
gedrückt halten), Vorwärts-/
Rückwärtssuchen in einem Stück (gedrückt
halten).*
2
Radio:
Automatisches Einstellen von Sendern
(drücken), manuelle Sendersuche (gedrückt
halten).
K Taste (Lösen der Frontplatte)
Seite 15
ALBM ARTIST TRACK SHUF ZAP
+
DM
LOUDDISCREGTPTAAF
AUX
SETUP
REPPTY SHUF
OFF
1 2 3 4 5 6
ALBM
SOURCE
MODE
SEEK
SE
EK
PUSH SOUND
/
ENTER
DSPLAF/TA
qkqh
12 4 657839
qsqaq; qd qlqj
qfqg

11
D:\Documents and Settings\takashi-shimomura\Desktop\DTP\848220S MEX-
DV1500U(EUR)\4120899211_MEX-DV1500U_ML\02DE02CD-E.fm
masterpage:RightD:\Documents and Settings\takashi-shimomura\Desktop\DTP\848220S MEX-
DV1500U(EUR)\4120899211_MEX-DV1500U_ML\02DE02CD-E.fm
masterpage:Right
MEX-DV1500U
4-120-899-21 (1)
L Taste MODE Seite 22, 36, 49
Auswählen des Radiofrequenzbereichs
(FM (UKW)/MW/LW); Auswählen eines an
die AUX-Eingangsbuchse (Vorderseite) oder
die Buchse AUX IN (Rückseite)
angeschlossenen zusätzlichen Geräts.
M Empfänger für die
Kartenfernbedienung
N Taste RESET Seite 14
O Taste SETUP Seite 28, 36, 44, 48, 49
Aufrufen des Systemkonfigurationsmenüs.
P Taste AF (Alternativfrequenzen)/
TA (Verkehrsdurchsagen)/
PTY (Programmtypauswahl) Seite 37,
38
Einstellen von AF und TA (drücken),
Auswählen des Programmtyps (PTY) bei
einem RDS-Sender (gedrückt halten).
Q Zahlentasten
Disc/USB:
(1): b REP Seite 16, 17, 21, 32
(2): SHUF B Seite 16, 17, 21, 32
(3)/(4): ALBM –/+ (V/v) Seite 16, 17,
19, 23
Überspringen eines Albums oder
Ordners/Bewegen des Cursors
(drücken), Überspringen mehrerer
Alben oder Ordner hintereinander
(gedrückt halten).
(6): u (Wiedergabe/Pause) Seite 16, 17,
18, 19, 23
Starten/Anhalten der Wiedergabe.
Radio:
Einstellen gespeicherter Sender (drücken),
Speichern von Sendern (gedrückt halten).
R Taste DSPL (Anzeige) Seite 21, 26, 37,
48
Wechseln der Informationen im Display.
S AUX-Eingangsbuchse Seite 48
Anschließen eines tragbaren Audiogeräts.
*1 Bei der CD-/MP3-/WMA-/AAC-/JPEG-/DivX-/
MPEG-4-Wiedergabe.
*2 Die Vorgehensweise variiert je nach Disc (Seite 17,
19).
Hinweis zur USB-Kappe
Wenn der USB-Anschluss I nicht verwendet wird,
schützen Sie ihn mit der mitgelieferten USB-Kappe
vor Staub und Schmutz. Bewahren Sie die USB-
Kappe außerhalb der Reichweite von kleinen Kindern
auf, damit diese sie nicht aus Versehen verschlucken.

12
D:\Documents and Settings\takashi-shimomura\Desktop\DTP\848220S MEX-
DV1500U(EUR)\4120899211_MEX-DV1500U_ML\02DE02CD-E.fm
masterpage:Left
MEX-DV1500U
4-120-899-21 (1)
Kartenfernbedienung RM-X168
Näheres finden Sie auf den angegebenen Seiten.
Entfernen Sie vor Gebrauch die Isolierfolie
(Seite 14).
A Taste OFF Seite 16, 18, 20, 24
Ausschalten/Stoppen der Tonquelle
(drücken), vollständiges Ausschalten
(gedrückt halten).
B Taste SOUND Seite 38
Aufrufen des Klangmenüs.
C Taste VISUAL SETUP Seite 24, 27, 29,
30, 30, 33, 34, 40
Aufrufen des Wiedergabemodus-/
Wiedergabekonfigurationsmenüs.
D Taste SYSTEM SETUP Seite 28, 36,
44, 48, 49
Aufrufen des Systemkonfigurationsmenüs.
E Taste (Zurück)/O Seite 24, 25, 31,
32, 34, 39, 40
Wechseln zur vorherigen Anzeige, Wechseln
zum Menü auf einer VCD*
1
.
qs
1
2
3
4
5
6
7
8
qd
qf
qg
qj
qh
9
0
qa

13
D:\Documents and Settings\takashi-shimomura\Desktop\DTP\848220S MEX-
DV1500U(EUR)\4120899211_MEX-DV1500U_ML\02DE02CD-E.fm
masterpage:RightD:\Documents and Settings\takashi-shimomura\Desktop\DTP\848220S MEX-
DV1500U(EUR)\4120899211_MEX-DV1500U_ML\02DE02CD-E.fm
masterpage:Right
MEX-DV1500U
4-120-899-21 (1)
F Zahlentasten Seite 16, 17, 24, 25, 31,
31, 33, 34, 36
Disc:
Ansteuern von Titel/Kapitel/Stück.
Radio:
Einstellen gespeicherter Sender (drücken),
Speichern von Sendern (gedrückt halten).
G Taste CLEAR Seite 31, 34
Löschen einer eingegebenen Zahl.
H Taste DSPL (Anzeige) Seite 21, 26, 37,
48
Wechseln der Informationen im Display.
I Taste ATT (Dämpfen des Tons)
Dämpfen des Tons. Zum Beenden der
Funktion drücken Sie die Taste erneut.
J Taste u (Wiedergabe/Pause)
Seite 16, 17, 18, 19, 23
Starten/Anhalten der Wiedergabe.
K Tasten .m/M> Seite 17, 19,
22, 23
Disc/USB:
Überspringen von Kapiteln/Stücken/Szenen/
Dateien (drücken), Vorwärts-/
Rückwärtssuchen auf einer Disc (kurz
gedrückt halten), Vorwärts-/
Rückwärtssuchen in einem Stück (gedrückt
halten).*
2
Radio:
Automatisches Einstellen von Sendern
(drücken), manuelle Sendersuche (gedrückt
halten).
L Einstelltasten für die
DVD-Wiedergabe
(AUDIO): Seite 17, 27
Wechseln von Audiosprache/-format.
Bei VCD/CD/MP3/WMA/AAC Wechseln
des Audiokanals.
(SUBTITLE): Seite 17
Auswählen der Untertitelsprache.
(ANGLE): Seite 17
Wechseln des Blickwinkels.
(TOP MENU): Seite 17
Aufrufen des Hauptmenüs auf einer DVD.
(MENU): Seite 17
Aufrufen des Menüs auf einer Disc.
M Taste (Durchsuchen) Seite 34
Aktivieren des Quick-BrowZer-Modus.*
3
N Tasten </M/m/, (Cursor)/ENTER
Bewegen des Cursors und Bestätigen einer
Einstellung.
O Taste SRC (Quelle) Seite 20, 22, 36, 49
Einschalten, Wechseln der Tonquelle
(Radio/Disc/USB/AUX).
P Taste MODE Seite 22, 36, 49
Auswählen des Radiofrequenzbereichs
(FM (UKW)/MW/LW); Auswählen eines an
die AUX-Eingangsbuchse (Vorderseite) oder
die Buchse AUX IN (Rückseite)
angeschlossenen zusätzlichen Geräts.
Q Tasten VOL (Lautstärke) +/–
Einstellen der Lautstärke.
*1 Bei der Wiedergabe mit PBC-Funktionen.
*2 Die Vorgehensweise variiert je nach Disc (Seite 17,
19).
*3 Bei der CD-/MP3-/WMA-/AAC-/JPEG-/DivX-/
MPEG-4-Wiedergabe.
Hinweis
Wenn Sie das Gerät ausschalten und die Anzeige
ausgeblendet ist, können Sie es nicht mit der
Kartenfernbedienung bedienen. Drücken Sie zunächst
(SOURCE) am Hauptgerät oder legen Sie eine Disc
ein, um das Gerät zu aktivieren.

14
D:\Documents and Settings\takashi-shimomura\Desktop\DTP\848220S MEX-
DV1500U(EUR)\4120899211_MEX-DV1500U_ML\02DE02CD-E.fm
masterpage:Left
MEX-DV1500U
4-120-899-21 (1)
Vorbereitungen
Installieren des Geräts und des
gesondert erhältlichen
Monitors
Installieren Sie zunächst das Gerät und den
gesondert erhältlichen Monitor und schließen Sie
beides an.
Dieses Gerät kann über die Anzeigen am Gerät
selbst und/oder am gesondert erhältlichen
Monitor bedient werden.
Die Anweisungen in dieser Anleitung beziehen
sich auf die Anzeigen am Gerät und/oder am
gesondert erhältlichen Monitor.
Erläuterungen dazu finden Sie in der
mitgelieferten Installations-/Anschlussanleitung.
Hinweis
Achten Sie bei der Installation des gesondert
erhältlichen Monitors darauf, dass dieser sicher
eingebaut ist und sich an einer Stelle befindet, an der
er die Sicht des Fahrers nicht behindert.
Zurücksetzen des Geräts
Bevor Sie das Gerät zum ersten Mal benutzen
oder wenn Sie die Autobatterie ausgetauscht
oder die Verbindungen gewechselt haben,
müssen Sie das Gerät zurücksetzen.
Nehmen Sie die Frontplatte ab (Seite 15) und
drücken Sie die Taste RESET (Seite 11) mit
einem spitzen Gegenstand, wie z. B. einem
Kugelschreiber.
Hinweis
Wenn Sie die Taste RESET drücken, werden die
eingestellte Uhrzeit und einige weitere gespeicherte
Einstellungen gelöscht.
Vorbereiten der
Kartenfernbedienung
Entfernen Sie die Isolierfolie.
Tipp
Erläuterungen zum Austauschen der Batterie finden
Sie auf Seite 51.
Gerät
Gesondert
erhältlicher Monitor

15
D:\Documents and Settings\takashi-shimomura\Desktop\DTP\848220S MEX-
DV1500U(EUR)\4120899211_MEX-DV1500U_ML\02DE02CD-E.fm
masterpage:RightD:\Documents and Settings\takashi-shimomura\Desktop\DTP\848220S MEX-
DV1500U(EUR)\4120899211_MEX-DV1500U_ML\02DE02CD-E.fm
masterpage:Right
MEX-DV1500U
4-120-899-21 (1)
Abnehmen der Frontplatte
Um zu verhindern, dass das Gerät gestohlen
wird, können Sie die Frontplatte abnehmen.
Warnton
Wenn Sie den Zündschlüssel in die Position OFF
stellen, ohne die Frontplatte abzunehmen, ertönt
einige Sekunden lang ein Warnton.
Der Warnton wird nur ausgegeben, wenn der
integrierte Verstärker verwendet wird.
1 Drücken Sie (OFF).
Das Gerät schaltet sich aus.
2 Drücken Sie und ziehen Sie die
Frontplatte auf sich zu und heraus.
Hinweise
• Lassen Sie die Frontplatte nicht fallen und drücken
Sie nicht zu stark auf die Frontplatte und das
Display.
• Schützen Sie die Frontplatte vor Hitze bzw. hohen
Temperaturen und vor Feuchtigkeit. Lassen Sie sie
nicht in geparkten Autos, auf dem Armaturenbrett
oder auf der Hutablage liegen.
• Nehmen Sie die Frontplatte nicht ab, während die
Wiedergabe am USB-Gerät läuft. Andernfalls
können die USB-Daten beschädigt werden.
Anbringen der Frontplatte
Setzen Sie Teil A der Frontplatte wie abgebildet
an Teil B am Gerät an und drücken Sie dann die
linke Seite hinein, bis sie mit einem Klicken
einrastet.
Hinweis
Legen Sie auf der Innenseite der Frontplatte nichts ab.
OFF
B
A

16
D:\Documents and Settings\takashi-shimomura\Desktop\DTP\848220S MEX-
DV1500U(EUR)\4120899211_MEX-DV1500U_ML\02DE02CD-E.fm
masterpage:Left
MEX-DV1500U
4-120-899-21 (1)
Grundfunktionen
Wiedergeben von Video-Discs
Bei bestimmten Discs sind bestimmte Funktionen unter Umständen anders oder eingeschränkt.
Schlagen Sie bitte in den mit der Disc gelieferten Anweisungen nach.
So stoppen Sie die Wiedergabe
Drücken Sie (OFF).
Hinweis
Discs im DTS-Format werden nicht unterstützt. Wenn Sie das DTS-Format auswählen, wird kein Ton ausgegeben.
1
Schalten Sie den Monitor ein und wählen Sie am Monitor die
Eingangsquelle aus, die diesem Gerät entspricht.
2
Legen Sie eine Disc mit der
beschrifteten Seite nach oben ein.
Die Wiedergabe beginnt automatisch.
Wenn die Wiedergabe nicht automatisch startet,
drücken Sie u.
3
Wenn das DVD-Menü angezeigt wird, bewegen Sie mit (1)(b)/
(2)(B)/(3)(V)/(4)(v) den Cursor und bestätigen Sie dann mit
(6) (u).
Bewegen Sie bei der Kartenfernbedienung mit </M/m/,/Zahlentasten den Cursor und
bestätigen Sie dann mit (ENTER).
So lassen Sie die Disc auswerfen
Drücken Sie Z.
</M/m/,
ENTER
u
OFF
b/B/V/v u
OFF
Z
Zahlen-
tasten

17
D:\Documents and Settings\takashi-shimomura\Desktop\DTP\848220S MEX-
DV1500U(EUR)\4120899211_MEX-DV1500U_ML\02DE02CD-E.fm
masterpage:RightD:\Documents and Settings\takashi-shimomura\Desktop\DTP\848220S MEX-
DV1500U(EUR)\4120899211_MEX-DV1500U_ML\02DE02CD-E.fm
masterpage:Right
MEX-DV1500U
4-120-899-21 (1)
Hinweis zum DVD-Menü
Eine DVD enthält Film- oder Tonaufnahmen, die in mehrere Abschnitte eingeteilt sind. Diese
Abschnitte nennt man „Titel“. Wenn Sie eine DVD abspielen, die mehrere Titel enthält, können Sie den
gewünschten Titel im DVD-Hauptmenü auswählen. Wenn Sie DVDs abspielen, bei denen Sie Optionen
wie die Sprache(n) für Ton und Untertitel auswählen können, wählen Sie diese Optionen im DVD-
Menü aus.
Weitere Wiedergabefunktionen
*1 Nicht bei allen Discs verfügbar.
*2 Wenn die 4-stellige Eingabeaufforderung erscheint, geben Sie den Sprachcode (Seite 60) der gewünschten
Sprache ein.
Funktion Drücken Sie
Pause/Wiedergabefortsetzung nach einer
Pause
u
Überspringen von Kapiteln/Stücken/
Szenen/Dateien
.m/M>
Vorwärts-/Rückwärtssuchen auf einer
Disc
.m/M> und halten Sie die Taste kurz gedrückt,
drücken Sie die Taste dann mehrmals, um die
Geschwindigkeit zu wechseln (× 2 t × 12 t × 120 t
× 2…)
Beenden des Vorwärts-/
Rückwärtssuchens
u
Aufrufen des DVD-Menüs*
1
Fernbedienung: (TOP MENU) oder (MENU)
Auswählen von Optionen im
DVD-Menü*
1
Hauptgerät: (1)(b)/(2)(B)/(3)(V)/(4)(v) zum Bewegen
des Cursors und bestätigen Sie dann mit (6) (u)
Fernbedienung: </M /m/,/Zahlentasten zum Bewegen
des Cursors und bestätigen Sie dann mit (ENTER)
Wechseln von Audiosprache/-format/
-kanal (Seite 27)*
1
Fernbedienung: (AUDIO) so oft, bis die gewünschte Option
angezeigt wird
Ausschalten der Untertitel/Wechseln der
Untertitelsprache*
1
Fernbedienung: (SUBTITLE) so oft, bis die gewünschte
Option angezeigt wird*
2
Ändern des Blickwinkels*
1
Fernbedienung: (ANGLE) so oft, bis die gewünschte
Blickwinkelnummer angezeigt wird
.m/M>
u
SUBTITLE
ANGLE
MENU
</M/m/,
ENTER
AUDIO
TOP MENU
b/B/V/v u.m/M>
Zahlen-
tasten

18
D:\Documents and Settings\takashi-shimomura\Desktop\DTP\848220S MEX-
DV1500U(EUR)\4120899211_MEX-DV1500U_ML\02DE02CD-E.fm
masterpage:Left
MEX-DV1500U
4-120-899-21 (1)
Wiedergeben von Audio-Discs
Bei bestimmten Discs sind bestimmte Funktionen unter Umständen anders oder eingeschränkt.
Schlagen Sie bitte in den mit der Disc gelieferten Anweisungen nach.
So stoppen Sie die Wiedergabe
Drücken Sie (OFF).
Hinweis
Discs im DTS-Format werden nicht unterstützt. Wenn Sie das DTS-Format auswählen, wird kein Ton ausgegeben.
1
Legen Sie eine Disc mit der
beschrifteten Seite nach oben ein.
Die Wiedergabe beginnt automatisch.
Wenn die Wiedergabe nicht automatisch startet,
drücken Sie u.
So lassen Sie die Disc auswerfen
Drücken Sie Z.
u
OFF
u
OFF
Z

19
D:\Documents and Settings\takashi-shimomura\Desktop\DTP\848220S MEX-
DV1500U(EUR)\4120899211_MEX-DV1500U_ML\02DE02CD-E.fm
masterpage:RightD:\Documents and Settings\takashi-shimomura\Desktop\DTP\848220S MEX-
DV1500U(EUR)\4120899211_MEX-DV1500U_ML\02DE02CD-E.fm
masterpage:Right
MEX-DV1500U
4-120-899-21 (1)
Weitere Wiedergabefunktionen
* Bei Wiedergabe einer MP3-/WMA-/AAC-Datei.
Funktion Drücken Sie
Pause/Wiedergabefortsetzung nach einer
Pause
u
Überspringen eines Stücks .m (<)/M> (,)
Vorwärts-/Rückwärtssuchen in einem
Stück
.m/M> und halten Sie die Taste gedrückt
Überspringen eines Albums* Hauptgerät: (3) (ALBM –)/(4) (ALBM +)
Fernbedienung: M/m
Überspringen mehrerer Alben
hintereinander*
Hauptgerät: (3) (ALBM –)/(4) (ALBM +) und halten Sie
die Taste gedrückt
Fernbedienung: M/m und halten Sie die Taste gedrückt
</M/m/,
.m/M>
u
u.m/M> ALBM

20
D:\Documents and Settings\takashi-shimomura\Desktop\DTP\848220S MEX-
DV1500U(EUR)\4120899211_MEX-DV1500U_ML\02DE02CD-E.fm
masterpage:Left
MEX-DV1500U
4-120-899-21 (1)
Wiedergabe mit einem USB-Gerät
Einzelheiten zur Kompatibilität Ihres USB-Geräts finden Sie auf der Support-Website.
• Sie können USB-Geräte des Typs MSC (Massenspeicherklasse) verwenden, die dem USB-Standard
entsprechen.
• Der entsprechende Codec ist MP3 (.mp3), WMA (.wma), AAC (.m4a) und JPEG (.jpg).
• Es empfiehlt sich, eine Sicherungskopie der Daten auf dem USB-Gerät zu erstellen.
Hinweis
Lassen Sie den Motor an, bevor Sie das USB-Gerät anschließen.
Bei manchen USB-Geräten kann es zu Fehlfunktionen und Beschädigungen kommen, wenn Sie zuerst das Gerät
anschließen und dann den Motor anlassen.
So stoppen Sie die Wiedergabe
Drücken Sie (OFF).
Hinweis
Verwenden Sie unbedingt das mit dem Gerät gelieferte USB-Kabel, wenn zum Herstellen einer USB-Verbindung
ein Kabel benötigt wird.
1
Schließen Sie das USB-Gerät an den
USB-Anschluss an.
Die Wiedergabe beginnt automatisch.
Wenn bereits ein USB-Gerät angeschlossen ist, drücken
Sie zum Starten der Wiedergabe (SOURCE) so oft, bis
„USB“ erscheint.
Support-Website
http://support.sony-europe.com
SRC
OFF
DSPL
SOURCE
(USB)
OFF
SHUFREP DSPL

21
D:\Documents and Settings\takashi-shimomura\Desktop\DTP\848220S MEX-
DV1500U(EUR)\4120899211_MEX-DV1500U_ML\02DE02CD-E.fm
masterpage:RightD:\Documents and Settings\takashi-shimomura\Desktop\DTP\848220S MEX-
DV1500U(EUR)\4120899211_MEX-DV1500U_ML\02DE02CD-E.fm
masterpage:Right
MEX-DV1500U
4-120-899-21 (1)
Lösen des USB-Geräts
1 Stoppen Sie die Wiedergabe am USB-Gerät.
2 Trennen Sie das USB-Gerät von diesem Gerät.
Wenn Sie das USB-Gerät während der
Wiedergabe vom Gerät trennen, können die
Daten auf dem USB-Gerät beschädigt werden.
Hinweise
• Verwenden Sie keine USB-Geräte, die so groß oder
schwer sind, dass sich bei einer Erschütterung die
Verbindung lösen bzw. das Gerät herunterfallen
kann.
• Nehmen Sie die Frontplatte nicht ab, während die
Wiedergabe am USB-Gerät läuft. Andernfalls
können die USB-Daten beschädigt werden.
• Dieses Gerät kann keine USB-Geräte erkennen, die
über einen USB-Hub angeschlossen sind.
Informationen im Display
A Tonquelle
B Stückname, Interpretenname,
Albumnummer*, Albumname,
Stücknummer/Verstrichene Spieldauer,
Uhrzeit
* Die Albumnummer wird nur beim Wechseln des
Albums angezeigt.
Zum Wechseln der angezeigten Informationen
B drücken Sie (DSPL).
Hinweise
• Je nach USB-Gerät, Aufnahmeformat und
Einstellungen werden unterschiedliche
Informationen angezeigt. Einzelheiten dazu finden
Sie auf der Support-Website.
• Im Folgenden wird die Höchstzahl an anzeigbaren
Daten angegeben.
– Ordner (Alben): 256
– Dateien (Stücke): 2.000
• Lassen Sie das USB-Gerät nicht in einem geparkten
Fahrzeug liegen, denn andernfalls kann es zu
Fehlfunktionen kommen.
• Je nach Menge der aufgezeichneten Daten kann es
etwas dauern, bis die Wiedergabe beginnt.
• Bei der Wiedergabe einer VBR-MP3/WMA/AAC-
Datei (variable Bitrate) bzw. beim Vorwärts-/
Rückwärtssuchen darin wird die verstrichene
Spieldauer möglicherweise nicht richtig angezeigt.
• Die Wiedergabe verlustfrei komprimierter Dateien
wird nicht unterstützt.
Anzeigen des Covers (Inhaltsbildes)
Während der Audiowiedergabe können Sie
Informationen zum Inhalt oder die Cover
(Inhaltsbilder)* der auf dem USB-Gerät
gespeicherten MP3-/WMA-/AAC-Dateien auf
dem Monitor anzeigen.
* Die empfohlene Größe beträgt zwischen 240 × 240
und 960 × 960 Pixel.
Repeat und Shuffle Play
1 Drücken Sie während der Wiedergabe
(1) (REP) oder (2) (SHUF) so oft, bis
die gewünschte Einstellung erscheint.
* Wenn auf dem USB-Gerät zwei oder mehr
Laufwerke angelegt wurden.
Wenn Sie wieder in den normalen
Wiedergabemodus schalten möchten, wählen Sie
„REP-OFF“ oder „SHUF-OFF“.
Auswahl Funktion
REP-TRACK Wiederholtes
Wiedergeben eines
Stücks.
REP-ALBUM Wiederholtes
Wiedergeben eines
Albums.
SHUF-ALBUM Wiedergeben eines
Albums in willkürlicher
Reihenfolge.
REP-DRIVE* Wiederholtes
Wiedergeben des Inhalts
eines Laufwerks.

22
D:\Documents and Settings\takashi-shimomura\Desktop\DTP\848220S MEX-
DV1500U(EUR)\4120899211_MEX-DV1500U_ML\02DE02CD-E.fm
masterpage:Left
MEX-DV1500U
4-120-899-21 (1)
Radioempfang
Tipp
Erläuterungen zu weiteren Radiofunktionen finden Sie unter „Weitere Funktionen — Radio“ auf Seite 36.
Mit der Kartenfernbedienung
Verwenden Sie (SRC) anstelle von (SOURCE) und .m/M> anstelle von (SEEK) –/+.
1
Drücken Sie (SOURCE) so oft, bis „TUNER“ erscheint.
2
Drücken Sie (MODE) so oft, bis der gewünschte Frequenzbereich
(FM1 (UKW1), FM2 (UKW2), FM3 (UKW3), MW oder LW) angezeigt
wird.
3
Stellen Sie einen Sender ein.
So führen Sie einen automatischen Sendersuchlauf aus
Drücken Sie (SEEK) +
/–.
Der Suchlauf stoppt, wenn ein Sender empfangen wird. Wiederholen Sie diesen Vorgang, bis
das Gerät den gewünschten Sender empfängt.
So führen Sie einen manuellen Sendersuchlauf aus
Halten Sie (SEEK) +
/– gedrückt, bis die Frequenz in etwa erreicht ist, und drücken Sie dann
(SEEK) +
/– so oft, bis die gewünschte Frequenz genau eingestellt ist.
.m/M>
MODE
SRC
SEEK MODE
SOURCE
B
A
A Radiofrequenzbereich/Funktion
B Frequenz*
* Wenn das Gerät einen RDS-Sender empfängt,
erscheint der Programmdienstname. Näheres dazu
finden Sie unter „RDS“ auf Seite 36.

23
D:\Documents and Settings\takashi-shimomura\Desktop\DTP\848220S MEX-
DV1500U(EUR)\4120899211_MEX-DV1500U_ML\02DE02CD-E.fm
masterpage:RightD:\Documents and Settings\takashi-shimomura\Desktop\DTP\848220S MEX-
DV1500U(EUR)\4120899211_MEX-DV1500U_ML\02DE02CD-E.fm
masterpage:Right
MEX-DV1500U
4-120-899-21 (1)
Weitere Funktionen — Discs
Dieses Kapitel besteht aus folgenden
Abschnitten.
• Videospezifische Funktionen*
t Seite 23 bis 32
• Video*- und Audiofunktionen
t Seite 32 bis 35
• Audiospezifische Funktionen
t Seite 35
* Einschließlich JPEG-Funktionen.
Wiedergeben von DivX
®
-/
MPEG-4-/JPEG-Dateien
Hinweis
Wenn eine Disc mehrere Dateitypen enthält, kann nur
der ausgewählte Dateityp (Audio/Video/Bild)
wiedergegeben werden. Wenn Sie bei einer solchen
Disc DivX-/MPEG-4-Videodateien oder JPEG-
Bilddateien wiedergeben wollen, drücken Sie während
der Wiedergabe , wählen Sie den gewünschten
Dateityp (Video/Bild) aus, so dass die entsprechende
Liste angezeigt wird, und wählen Sie dann die
gewünschte Datei aus (Seite 35).
DivX
®
-/MPEG-4-Videowiedergabe
Sie können die DivX-/MPEG-4-Wiedergabe in
der gleichen Weise steuern wie die Wiedergabe
anderer Video-Discs (Seite 16) und es stehen
auch einige Steuerfunktionen für die
Audiowiedergabe zur Verfügung.
Tipp
Sie können eine Datei zur Wiedergabe auch mithilfe
einer Liste (Quick-BrowZer) auswählen (Seite 34).
JPEG-Bildwiedergabe
Sie können mit diesem Gerät JPEG-Dateien als
Bildpräsentation wiedergeben lassen. Die
Bildpräsentation startet automatisch, wenn Sie
eine Disc einlegen oder u drücken.
Erläuterungen zum Starten der Wiedergabe
finden Sie in Schritt 1 bis 4 unter „Wiedergeben
von Video-Discs“ auf Seite 16.
Weitere Wiedergabefunktionen
Hinweise
• Wenn ein großes Bild gedreht wird, dauert es
länger, bis es angezeigt wird.
• Progressive JPEG-Dateien können nicht angezeigt
werden.
Tipp
Sie können eine Datei zur Wiedergabe auch mithilfe
einer Liste (Quick-BrowZer) auswählen (Seite 34).
MPEG-4
u
.m/M>
ALBM
</,
.m/M>
u
Funktion Drücken Sie
Überspringen eines
Albums (Ordners)
Hauptgerät:
(3) (ALBM –)/
(4) (ALBM +)
Überspringen
mehrerer Alben
(Ordner)
hintereinander
Hauptgerät:
(3) (ALBM –)/(4)
(ALBM +) und halten Sie
die Taste gedrückt
Funktion Drücken Sie
Drehen des Bildes Fernbedienung:
</, (Drehung um
jeweils 90º)
Überspringen eines
Bildes
.m/M>
Überspringen eines
Albums
Hauptgerät:
(3) (ALBM –)/
(4) (ALBM +)
Überspringen
mehrerer Alben
hintereinander
Hauptgerät:
(3) (ALBM –)/(4)
(ALBM +) und halten Sie
die Taste gedrückt

24
D:\Documents and Settings\takashi-shimomura\Desktop\DTP\848220S MEX-
DV1500U(EUR)\4120899211_MEX-DV1500U_ML\02DE02CD-E.fm
masterpage:Left
MEX-DV1500U
4-120-899-21 (1)
Verwenden der PBC-Funktionen
— Wiedergabesteuerung
Bei der Wiedergabe einer PBC-kompatiblen
VCD können Sie Funktionen über das PBC-
Menü interaktiv ausführen.
1 Starten Sie die Wiedergabe einer
PBC-kompatiblen VCD.
Das PBC-Menü wird angezeigt.
2 Wählen Sie mit den Zahlentasten die
gewünschte Option aus und drücken
Sie dann (ENTER).
3 Gehen Sie bei den interaktiven
Funktionen wie im Menü erläutert vor.
Um zur vorherigen Anzeige zurückzuschalten,
drücken Sie O.
Wiedergabe ohne PBC-Funktionen
1 Drücken Sie während der Wiedergabe
(OFF).
Die Wiedergabe stoppt.
2 Wählen Sie mit den Zahlentasten die
gewünschte Option aus und drücken
Sie dann (ENTER).
„Play without PBC.“ erscheint und die
Wiedergabe wird gestartet. Das PBC-Menü
erscheint während der Wiedergabe nicht.
Hinweise
• Die Menüoptionen und die Vorgehensweise
variieren je nach Disc.
• Während der PBC-Wiedergabe werden
Stücknummer, Wiedergabeelement usw. im
Wiedergabemodusmenü nicht angezeigt (Seite 24).
• Eine Wiedergabefortsetzung ist bei der Wiedergabe
ohne PBC nicht möglich.
Tipp
Wenn Sie die PBC-Wiedergabe fortsetzen wollen,
stoppen Sie die Wiedergabe mit (OFF) und drücken
dann u.
Verwenden des
Wiedergabemodusmenüs
Über das Wiedergabemodusmenü an diesem
Gerät können Sie die Wiedergabe steuern oder
Wiedergabeeinstellungen konfigurieren.
Zum Einblenden des Wiedergabemodusmenüs
drücken Sie während der Wiedergabe
(VISUAL SETUP).
Zum Ausblenden des Menüs drücken Sie
nochmals (VISUAL SETUP).
Hinweise
• Bei der Wiedergabe einer Audio-Disc ist
(VISUAL SETUP) deaktiviert.
• Bei der JPEG-Wiedergabe ist (VISUAL SETUP) nur
dann aktiviert, wenn ein Bild vollständig angezeigt
wird.
Tipp
Wenn Sie (VISUAL SETUP) drücken, während die
Wiedergabe gestoppt ist, erscheint das
Wiedergabekonfigurationsmenü (am Monitor). In
diesem Menü können Sie verschiedene Einstellungen
konfigurieren, zum Beispiel die Sprache für die
Anzeigen, die Audioeinstellungen usw. (Seite 39).
Beispiel: Bei der Wiedergabe einer DVD
A Optionen im Wiedergabemodusmenü
Näheres dazu finden Sie unter „Liste der
Optionen im Wiedergabemodusmenü“ auf
Seite 25.
ENTER
OFF
O
Zahlen-
tasten
MPEG-4
</M/m/,
ENTER
VISUAL
SETUP
O
Zahlen-
tasten
12
(
67
)
018
(
034
)
T 1:35:55
1:ENGLISH
OFF
1:ENGLISH
2:FRENCH
3:SPANISH
PLAY
DVD VIDEO
SUBTITLE
Select :
ENTER
G
BCD
F
E
H
A
IJ

25
D:\Documents and Settings\takashi-shimomura\Desktop\DTP\848220S MEX-
DV1500U(EUR)\4120899211_MEX-DV1500U_ML\02DE02CD-E.fm
masterpage:RightD:\Documents and Settings\takashi-shimomura\Desktop\DTP\848220S MEX-
DV1500U(EUR)\4120899211_MEX-DV1500U_ML\02DE02CD-E.fm
masterpage:Right
MEX-DV1500U
4-120-899-21 (1)
B DVD: Titelnummer/Gesamtzahl der Titel
VCD: Stücknummer/Gesamtzahl der
Stücke*
1
JPEG: Albumnummer/Gesamtzahl der Alben
DivX/MPEG-4: Albumnummer
(Ordnernummer)/Gesamtzahl der Alben
(Ordner)
C DVD: Kapitelnummer/Gesamtzahl der
Kapitel
JPEG: Bildnummer/Gesamtzahl der Bilder
DivX/MPEG-4: Dateinummer/Gesamtzahl
der Dateien
D Verstrichene Spieldauer*
2
E Format
F Wiedergabestatus (PLAY N, PAUSE X
usw.)
G Aktuelle Einstellung
H Optionen
I Ausgewählte Option
J Name der ausgewählten Option und/oder
Bedienungsanweisungen
*1 Bei der Wiedergabe von VCDs mit PBC-
Funktionen (Seite 24) erscheint keine Anzeige.
*2 Bei der JPEG-Wiedergabe erscheint keine
Anzeige.
Liste der Optionen im
Wiedergabemodusmenü
Wählen Sie mit </M/m/,/Zahlentasten eine
Option aus und drücken Sie dann (ENTER).
Um zur vorherigen Anzeige zurückzuschalten,
drücken Sie O.
Näheres finden Sie auf den angegebenen Seiten.
* Außer bei einer DVD-R/DVD-R DL/DVD-RW im
VR-Modus.
Tipp
Wenn „SHUFFLE“ oder „REPEAT“ aktiviert ist oder
„ANGLE“ zur Verfügung steht, leuchtet das jeweilige
Kontrollkästchen grün (Beispiel: t
). Bei manchen Szenen können Sie den
Blickwinkel jedoch möglicherweise nicht wechseln,
auch wenn das Kontrollkästchen grün leuchtet.
TITLE, TRACK 33
Auswählen eines Titels, einer Szene oder eines
Stücks zur Wiedergabe.
ALBUM 33
Auswählen eines Albums oder Ordners zum
Anzeigen.
CHAPTER 33
Auswählen eines Kapitels zur Wiedergabe.
IMAGE 33
Auswählen eines Bildes zum Anzeigen.
FILE 33
Auswählen einer Videodatei zur Wiedergabe.
MPEG-4
MPEG-4
TIME 33
Anzeigen der verstrichenen Spieldauer,
Eingeben des Zeitcodes.
AUDIO 17, 27
Wechseln von Audiosprache/-format/-kanal,
Überprüfen des Programmformats.
SUBTITLE 17
Ein- und Ausschalten der Untertitel/Wechseln
der Untertitelsprache.
ANGLE 17
Wechseln des Blickwinkels.
*
CENTER ZOOM 29
Vergrößern eines Bildes.
REPEAT 33
Wiederholtes Wiedergeben eines Titels/
Kapitels/Stücks/Albums/Bildes/einer
Videodatei.
SHUFFLE 33
Wiedergeben von Kapiteln/Stücken/Bildern/
Videodateien in willkürlicher Reihenfolge.
*
PICTURE EQ 29
Einstellen der Bildqualität.
MPEG-4
MPEG-4
MPEG-4
MPEG-4
MPEG-4
MPEG-4

26
D:\Documents and Settings\takashi-shimomura\Desktop\DTP\848220S MEX-
DV1500U(EUR)\4120899211_MEX-DV1500U_ML\02DE02CD-E.fm
masterpage:Left
MEX-DV1500U
4-120-899-21 (1)
Anzeigen der Zeitangaben/
Textinformationen einer Disc
Anzeigen der Zeitangaben
Spieldauer und Restspieldauer des aktuellen
Titels, Kapitels, Stücks usw. können während der
Video-/Bildwiedergabe angezeigt werden.
1 Drücken Sie während der Wiedergabe
(DSPL).
Die aktuellen Wiedergabeinformationen
werden angezeigt.
2 Drücken Sie wiederholt (DSPL), um die
Zeitangaben zu wechseln.
Die Zeitangaben unterscheiden sich je nach
Disc/Format wie folgt:
DVD-Wiedergabe
• T **:**:**
Verstrichene Spieldauer des aktuellen Titels
• T-**:**:**
Restspieldauer des aktuellen Titels
• C **:**:**
Verstrichene Spieldauer des aktuellen Kapitels
• C-**:**:**
Restspieldauer des aktuellen Kapitels
VCD-Wiedergabe
Steht nur bei der Wiedergabe von Discs der
Version 1.0/1.1 oder von Discs der Version
2.0 ohne PBC-Funktionen zur Verfügung.
• T **:**
Verstrichene Spieldauer des aktuellen Stücks
• T-**:**
Restspieldauer des aktuellen Stücks
•D **:**
Verstrichene Spieldauer der aktuellen Disc
•D-**:**
Restspieldauer der aktuellen Disc
JPEG-Wiedergabe
• Albumnummer/Gesamtzahl der Alben
• Bildnummer/Gesamtzahl der Bilder
DivX-/MPEG-4-Wiedergabe
• Albumnummer (Ordnernummer)/Gesamtzahl
der Alben (Ordner)
• Dateinummer/Gesamtzahl der Dateien
•T **:**
Verstrichene Spieldauer der aktuellen Datei
Anzeigen der Textinformationen
Die Textinformationen (Albumname, Bildname
usw.) von JPEG-/DivX-/MPEG-4-Dateien
können angezeigt werden.
* „NO TEXT“ wird angezeigt, wenn keine
Textinformationen vorhanden sind.
Die Textinformationen unterscheiden sich je
nach Format wie folgt:
JPEG-Wiedergabe
• Albumname (wenn die Albumnummer
angezeigt wird)
• Bildname (wenn die Bildnummer angezeigt
wird)
DivX-/MPEG-4-Wiedergabe
• Albumname (Ordnername), wenn die
Albumnummer (Ordnernummer) angezeigt
wird
• Dateiname (wenn die Dateinummer angezeigt
wird)
MPEG-4
DSPL
T 1:01:57
Zeitangaben
037(325)
Image name
Album-/Bild-/Ordner-/Dateinummer
Textinformationen*

27
D:\Documents and Settings\takashi-shimomura\Desktop\DTP\848220S MEX-
DV1500U(EUR)\4120899211_MEX-DV1500U_ML\02DE02CD-E.fm
masterpage:RightD:\Documents and Settings\takashi-shimomura\Desktop\DTP\848220S MEX-
DV1500U(EUR)\4120899211_MEX-DV1500U_ML\02DE02CD-E.fm
masterpage:Right
MEX-DV1500U
4-120-899-21 (1)
Konfigurieren der
Audioeinstellungen
Hinweis
Discs im DTS-Format werden nicht unterstützt. Wenn
Sie das DTS-Format auswählen, wird kein Ton
ausgegeben.
Wechseln von Audiosprache/
-format
Bei einer DVD können Sie die Audiosprache
wechseln, wenn auf der Disc Tonspuren in
mehreren Sprachen aufgezeichnet sind. Bei einer
DVD/DivX-Disc können Sie das Audioformat
wechseln, wenn auf der Disc mehrere
Audioformate aufgezeichnet sind (z. B. Dolby
Digital).
1 Drücken Sie während der Wiedergabe
(AUDIO) so oft, bis die gewünschte
Audiosprache bzw. das gewünschte
Audioformat erscheint.
* Bei der DivX-Wiedergabe werden Audioformat
und -kanäle (z. B. „MP3“) angezeigt.
Sie können für den Ton eine der verfügbaren
Sprachen einstellen.
Wenn die 4-stellige Eingabeaufforderung
erscheint, geben Sie den Sprachcode
(Seite 60) der gewünschten Sprache ein.
Wenn dieselbe Sprache mehrmals angezeigt
wird, sind auf der Disc mehrere
Audioformate aufgezeichnet.
Wechseln des Audiokanals
Bei der VCD-/CD-/MP3-/WMA-/AAC-
Wiedergabe können Sie auswählen, welche
Tonkanäle (rechts oder links) über die
Lautsprecher rechts und links ausgegeben
werden sollen.
Die Optionen sind im Folgenden angegeben.
STEREO (ST): Standardstereoton
(Standardeinstellung)
1/L (L): Ton des linken Kanals (monaural)
2/R (R): Ton des rechten Kanals (monaural)
1 Drücken Sie während der Wiedergabe
(AUDIO) so oft, bis der gewünschte
Audiokanal erscheint.
Beispiel: Bei der MP3-Wiedergabe
Hinweis
Bei manchen Discs lassen sich die Audioeinstellungen
unter Umständen nicht ändern.
Tipp
Sie können die Einstellungen für Video-Discs auch
ändern, indem Sie „AUDIO“ im
Wiedergabemodusmenü auswählen (Seite 24).
Anzeigen des Programmformats
Sie können die Anzahl der Kanäle und die
Position der Komponenten auf der
wiedergegebenen DVD VIDEO anzeigen lassen.
1 Drücken Sie während der Wiedergabe
(VISUAL SETUP).
Das Wiedergabemodusmenü erscheint.
M/m
ENTER
AUDIO
SYSTEM
SETUP
VISUAL
SETUP
1:ENGLISH Dolby D
Audiosprache/-format*
Fortsetzung auf der nächsten Seite t
TRACK NAME
ALBUM NAME
ARTIST NAME
MP3
0003/1000 ST
3:17
SHUF
Audiokanal

28
D:\Documents and Settings\takashi-shimomura\Desktop\DTP\848220S MEX-
DV1500U(EUR)\4120899211_MEX-DV1500U_ML\02DE02CD-E.fm
masterpage:Left
MEX-DV1500U
4-120-899-21 (1)
2 Wählen Sie mit M/m die Option
(AUDIO) aus.
Das Programmformat erscheint.
* „PCM“, „DOLBY DIGITAL“ usw. wird je nach Disc
angezeigt.
Die Buchstaben in der Anzeige mit dem
Programmformat stehen für die folgenden
Klangkomponenten und deren Position:
: Vorne (links)
: Vorne (rechts)
: Mitte
: Hinten (links)
: Hinten (rechts)
: Hinten (monaural): Die hintere
Komponente des mit Dolby Surround
verarbeiteten Signals und des Dolby
Digital-Signals
: LFE-Signal (Low Frequency Effect)
Der Name des Programmformats und die
Kanalanzahl werden folgendermaßen angezeigt.
Beispiel: Dolby Digital-5.1-Kanal-Format
Zum Ausblenden des Wiedergabemodusmenüs
drücken Sie (VISUAL SETUP).
Einstellen des
Audioausgangspegels
— DVD-Pegel
Sie können den Audioausgangspegel einer im
Dolby Digital-Format bespielten DVD einstellen,
um den Lautstärkeunterschied zwischen Disc
und Signalquelle zu verringern.
1 Drücken Sie während der Wiedergabe
(SYSTEM SETUP).
Eine Systemkonfigurationsoption erscheint
am Hauptgerät.
2 Wählen Sie mit M/m die Option
„DVD-LEVEL“ und drücken Sie dann
(ENTER).
3 Wählen Sie mit m die Einstellung
„ADJST-ON“ aus und drücken Sie
dann (ENTER).
4 Wählen Sie mit M/m die Option
„DOLBY-ADJ“ aus und drücken Sie
(ENTER).
5 Stellen Sie mit M/m den gewünschten
Ausgangspegel ein.
Der Ausgangspegel lässt sich schrittweise auf
einen Wert zwischen –10 und +10 einstellen.
6 Drücken Sie (ENTER).
Die Einstellung ist damit abgeschlossen.
Zum Ausblenden des
Systemkonfigurationsmenüs drücken Sie
(SYSTEM SETUP).
Am Hauptgerät
Drücken Sie (SETUP) anstelle von (SYSTEM SETUP),
drehen Sie den Steuerregler, statt M/m zu drücken,
und drücken Sie den Steuerregler anstelle von
(ENTER).
PLAY
DVD VIDEO
L C
LFE
LS
R
RS
12
(
67
)
018
(
034
)
T 1:35:55
1:ENGLISH Dolby D
PROGRAM FORMAT
DOLBY DIGITAL
3/2.1
Format des aktuellen Programms
Aktuelles Audioformat*
DOLBY DIGITAL
3 / 2 . 1
Hintere Komponente × 2
Vordere Komponente × 2 +
Mittlere Komponente × 1
LFE-Komponente × 1

29
D:\Documents and Settings\takashi-shimomura\Desktop\DTP\848220S MEX-
DV1500U(EUR)\4120899211_MEX-DV1500U_ML\02DE02CD-E.fm
masterpage:RightD:\Documents and Settings\takashi-shimomura\Desktop\DTP\848220S MEX-
DV1500U(EUR)\4120899211_MEX-DV1500U_ML\02DE02CD-E.fm
masterpage:Right
MEX-DV1500U
4-120-899-21 (1)
Vergrößern von Bildern
Sie können Bilder vergrößert anzeigen lassen.
1 Drücken Sie während der Wiedergabe
(VISUAL SETUP).
Das Wiedergabemodusmenü erscheint.
2 Wählen Sie mit M/m die Option
(CENTER ZOOM) aus und drücken Sie
(ENTER).
Die aktuelle Einstellung wird angezeigt.
3 Wählen Sie mit M/m die gewünschte
Option aus (×1, ×1.6*) und drücken Sie
(ENTER).
* Das Bild wirkt unter Umständen grobkörnig.
Das Bild wird vergrößert angezeigt.
Zum Ausblenden des Wiedergabemodusmenüs
drücken Sie (VISUAL SETUP).
Um das Bild in der Anzeige zu verschieben,
drücken Sie </M/m/,.
Um das Bild wieder in der ursprünglichen Größe
anzeigen zu lassen, wählen Sie in Schritt 3 die
Option „×1“.
Hinweise
• Bei manchen Discs können Sie die Vergrößerung
nicht ändern.
• Wenn Sie die Wiedergabe fortsetzen, wird das Bild
wieder in der ursprünglichen Größe angezeigt.
• Wenn Sie zum Disc-Menü bzw. zum Hauptmenü
zurückschalten, wird die Vergrößerung beendet.
Einstellen der Bildqualität
— Bild-EQ
Sie können die Bildqualität auswählen, die für
die Helligkeit im Fahrzeuginnenraum geeignet
ist.
1 Drücken Sie während der Wiedergabe
(VISUAL SETUP).
Das Wiedergabemodusmenü erscheint.
2 Wählen Sie mit M/m die Option
(PICTURE EQ) aus und drücken Sie
(ENTER).
Die aktuelle Einstellung wird angezeigt.
3 Wählen Sie mit M/m die gewünschte
Option aus und drücken Sie (ENTER).
Die Optionen hängen von den Einstellungen in
der Wiedergabekonfiguration ab (Seite 43).
In der Wiedergabekonfiguration wechseln die
Einstellungen von „PICTURE EQ“ unter
„CUSTOM SETUP“ folgendermaßen.
AUTO: Schaltet je nach der Dimmereinstellung
in der Systemkonfiguration automatisch
zwischen den Optionen für die Nacht/den Tag
um (Seite 45).
LIGHT OFF: Zeigt die Optionen für den Tag an.
LIGHT ON: Zeigt die Optionen für die Nacht an.
Die Optionen für die einzelnen Einstellungen
sind im Folgenden angegeben.
MPEG-4
</M/m/,
ENTER
VISUAL
SETUP
12
(
67
)
018
(
034
)
T 1:35:55
x1
x1
x1.6
PLAY
DVD VIDEO
Fortsetzung auf der nächsten Seite t
MPEG-4
</M/m/,
ENTER
VISUAL
SETUP
12
(
67
)
018
(
034
)
T 1:35:55
DAYTIME
SUNSET
SHINE
CUSTOM
NORMAL
NORMAL
PLAY
DVD VIDEO

30
D:\Documents and Settings\takashi-shimomura\Desktop\DTP\848220S MEX-
DV1500U(EUR)\4120899211_MEX-DV1500U_ML\02DE02CD-E.fm
masterpage:Left
MEX-DV1500U
4-120-899-21 (1)
Für alle Einstellungen
Bei der Einstellung „LIGHT OFF“/„AUTO“
(mit „DIM-OFF“)
Bei der Einstellung „LIGHT ON“/„AUTO“
(mit „DIM-ON“)
Anpassen der Bildqualität
Über die Option „CUSTOM“ können Sie die
Bildqualität einstellen, indem Sie die
Bildeinstellungen anpassen. Dabei können Sie
Einstellungen für „LIGHT OFF“ und „LIGHT
ON“ vornehmen.
1 Drücken Sie während der Wiedergabe
(VISUAL SETUP).
Das Wiedergabemodusmenü erscheint.
2 Wählen Sie mit M/m die Option
(PICTURE EQ) aus und drücken Sie
(ENTER).
Die aktuelle Einstellung wird angezeigt.
3 Wählen Sie mit M/m die Option
„CUSTOM“ aus und drücken Sie
(ENTER).
4 Wählen Sie mit M/m die Bildeinstellung
aus und stellen Sie dann mit </,
den Pegel ein.
5 Drücken Sie (ENTER).
Zum Ausblenden des Wiedergabemodusmenüs
drücken Sie (VISUAL SETUP).
Sperren von Discs
— Kindersicherung
*
* Außer bei einer DVD-R/DVD-R DL/DVD-RW im
VR-Modus.
Sie können eine Disc sperren oder mithilfe von
vordefinierten Kindersicherungsstufen
Wiedergabeeinschränkungen festlegen, so dass
beispielsweise Kinder keine Discs ansehen
können, die für ihr Alter nicht geeignet sind. Bei
der Wiedergabe einer auf diese Weise mit einer
Kindersicherung versehenen DVD werden
bestimmte Szenen gesperrt oder durch andere
Szenen ersetzt.
Aktivieren der Kindersicherung
1 Drücken Sie bei ausgeschaltetem
Gerät die Taste (VISUAL SETUP).
Das Wiedergabekonfigurationsmenü
erscheint.
2 Wählen Sie mit M/m die Option
(CUSTOM SETUP) aus und drücken
Sie (ENTER).
Die Benutzereinstellungsoptionen werden
angezeigt.
NORMAL: Normale Bildqualität.
CUSTOM: Benutzerdefinierbare Einstellungen
(Seite 30).
DAYTIME: Für eine helle Umgebung geeignet.
SUNSET: Bei Dämmerlicht geeignet.
SHINE: In einer sehr hellen Umgebung
geeignet (wenn sich beispielsweise die Sonne im
Monitor spiegelt).
NIGHT: Der Monitor wird dunkler, um Sie bei
Nacht nicht vom Fahren abzulenken.
MIDNIGHT: Der Monitor wird noch dunkler als
mit der Einstellung „NIGHT“.
THEATER: Der Monitor wird heller, wenn Sie
beispielsweise nachts ein helles Bild sehen
möchten.
RETURN
Cancel :
Select : Set :
USER CUSTOM SETUP
COLOR 0
BRIGHT 0
SHARPNESS 0
CLEAR
VISUAL
SETUP
O
M/m
ENTER
Zahlen-
tasten

31
D:\Documents and Settings\takashi-shimomura\Desktop\DTP\848220S MEX-
DV1500U(EUR)\4120899211_MEX-DV1500U_ML\02DE02CD-E.fm
masterpage:RightD:\Documents and Settings\takashi-shimomura\Desktop\DTP\848220S MEX-
DV1500U(EUR)\4120899211_MEX-DV1500U_ML\02DE02CD-E.fm
masterpage:Right
MEX-DV1500U
4-120-899-21 (1)
3 Wählen Sie mit M/m die Option
„PARENTAL CONTROL“ und drücken
Sie (ENTER).
Die Optionen erscheinen.
4 Wählen Sie mit M/m die Option
„ON t“ und drücken Sie (ENTER).
Die Anzeige zum Definieren des Kennworts
erscheint.
5 Geben Sie mit den Zahlentasten das
Kennwort ein und drücken Sie
(ENTER).
Eine Bestätigungsanzeige erscheint.
6 Geben Sie das Kennwort zum
Bestätigen erneut mit den
Zahlentasten ein und drücken Sie
(ENTER).
Die Einstellung ist damit abgeschlossen.
Zum Löschen einer eingegebenen Zahl drücken
Sie (CLEAR).
Um zur vorherigen Anzeige zurückzuschalten,
drücken Sie O.
Zum Ausblenden des
Wiedergabekonfigurationsmenüs drücken Sie
(VISUAL SETUP).
Deaktivieren der Kindersicherung
Wählen Sie in Schritt 4 oben die Option
„OFF t“ und geben Sie dann das Kennwort ein.
Wenn die Kindersicherung deaktiviert ist, wird
„Parental control canceled“ angezeigt.
Ändern des Kennworts
Wählen Sie in Schritt 4 oben die Option
„PASSWORD t“, geben Sie das aktuelle
Kennwort ein, geben Sie das neue Kennwort ein
und geben Sie es dann zur Bestätigung erneut
ein.
Wechseln des Gebiets und der
Altersfreigabestufe
Sie können die Kindersicherungsstufe je nach
Gebiet und Altersfreigabe einstellen.
1 Drücken Sie bei ausgeschaltetem
Gerät die Taste (VISUAL SETUP).
Das Wiedergabekonfigurationsmenü
erscheint.
2 Wählen Sie mit M/m die Option
(CUSTOM SETUP) aus und drücken
Sie (ENTER).
Die Benutzereinstellungsoptionen werden
angezeigt.
3 Wählen Sie mit M/m die Option
„PARENTAL CONTROL“ und drücken
Sie (ENTER).
Die Optionen erscheinen.
4 Wählen Sie mit M/m die Option
„PLAYER t“ und drücken Sie
(ENTER).
Wenn die Kindersicherung bereits aktiviert
ist, erscheint die Anzeige zum Eingeben des
Kennworts. Geben Sie zum Ändern der
Einstellung Ihr Kennwort ein und drücken Sie
(ENTER).
5 Wählen Sie mit M/m die Option
„STANDARD“ und drücken Sie
(ENTER).
Die Optionen erscheinen.
6 Wählen Sie mit M/m das gewünschte
Gebiet aus, um dessen
Altersfreigabestufen zu übernehmen,
und drücken Sie (ENTER).
Das Gebiet ist ausgewählt.
Wenn Sie „OTHERS t“ auswählen, wählen
Sie anschließend mit den Zahlentasten den
Gebietscode in der „Gebietscodeliste“ auf
Seite 60.
CUSTOM SETUP
PARENTAL CONTROL :
DivX VOD :
SLIDE SHOW TIME :
MULTI-DISC RESUME :
PLAY LIST PLAY :
PICTURE EQ :
OFF
OFF
ONt
PLAYERt
PASSWORDt
AUTO
PARENTAL CONTROL
Enter a new 4-digit password,
then press .
ENTER
CUSTOM SETUP
Fortsetzung auf der nächsten Seite t
PARENTAL CONTROL:
LEVEL :
STANDARD :
USA
USA
OTHERSt
8:
CUSTOM SETUP

32
D:\Documents and Settings\takashi-shimomura\Desktop\DTP\848220S MEX-
DV1500U(EUR)\4120899211_MEX-DV1500U_ML\02DE02CD-E.fm
masterpage:Left
MEX-DV1500U
4-120-899-21 (1)
7 Wählen Sie mit M/m die Option
„LEVEL“ und drücken Sie (ENTER).
Die Optionen erscheinen.
Je niedriger der Wert, um so strenger ist die
Kindersicherungsstufe.
8 Wählen Sie mit M/m die gewünschte
Stufe aus und drücken Sie (ENTER).
Die Einstellung ist damit abgeschlossen.
Um zur vorherigen Anzeige zurückzuschalten,
drücken Sie O.
Zum Ausblenden des
Wiedergabekonfigurationsmenüs drücken Sie
(VISUAL SETUP).
Repeat und Shuffle Play
1 Drücken Sie während der Wiedergabe
(1) (REP) oder (2) (SHUF) am
Hauptgerät so oft, bis die gewünschte
Option erscheint.
Repeat oder Shuffle Play beginnt.
Im Folgenden sind die Wiederholoptionen und
die Umschaltreihenfolge bei Repeat Play für alle
Discs und Formate aufgelistet.
Im Folgenden sind die
Zufallswiedergabeoptionen und die
Umschaltreihenfolge bei Shuffle Play für alle
Discs und Formate aufgelistet.
PARENTAL CONTROL:
LEVEL :
STANDARD :
8:
1:
2:
3:
4:
5:
G
PG
PG-13
CUSTOM SETUP
MPEG-4
SHUFREP
Disc/Format Optionen
OFF
CHAPTER: Das aktuelle
Kapitel wird wiederholt
wiedergegeben.
TITLE: Der aktuelle Titel wird
wiederholt wiedergegeben.
*
1
OFF
TRACK: Das aktuelle Stück
wird wiederholt wiedergegeben.
OFF
TRACK: Das aktuelle Stück
wird wiederholt wiedergegeben.
ALBUM: Das aktuelle Album
wird wiederholt wiedergegeben.
OFF
IMAGE: Das aktuelle Bild wird
wiederholt wiedergegeben.
ALBUM: Das aktuelle Album
wird wiederholt wiedergegeben.
OFF
FILE: Die aktuelle Videodatei
wird wiederholt wiedergegeben.
ALBUM: Das aktuelle Album
(Ordner) wird wiederholt
wiedergegeben.
Disc/Format Optionen
*
2
OFF
TITLE: Die Kapitel im
aktuellen Titel werden in
willkürlicher Reihenfolge
wiedergegeben.
*
1
OFF
DISC: Die Stücke auf der
aktuellen Disc werden in
willkürlicher Reihenfolge
wiedergegeben.
OFF
ALBUM: Die Stücke/Bilder/
Videodateien im aktuellen
Album (Ordner) werden in
willkürlicher Reihenfolge
wiedergegeben.
MPEG-4
MPEG-4

33
D:\Documents and Settings\takashi-shimomura\Desktop\DTP\848220S MEX-
DV1500U(EUR)\4120899211_MEX-DV1500U_ML\02DE02CD-E.fm
masterpage:RightD:\Documents and Settings\takashi-shimomura\Desktop\DTP\848220S MEX-
DV1500U(EUR)\4120899211_MEX-DV1500U_ML\02DE02CD-E.fm
masterpage:Right
MEX-DV1500U
4-120-899-21 (1)
*1 Steht nur bei der Wiedergabe von VCDs der
Version 1.0/1.1 oder von VCDs der Version
2.0 ohne PBC-Funktionen zur Verfügung.
*2 Außer bei einer DVD-R/DVD-R DL/DVD-RW im
VR-Modus.
Wenn Sie wieder in den normalen
Wiedergabemodus schalten möchten, wählen Sie
„OFF“.
Hinweise
• Wenn Sie zum Disc-Menü bzw. zum Hauptmenü
zurückschalten, wird Repeat bzw. Shuffle Play
beendet.
• Im Disc-Menü bzw. Hauptmenü können Sie Repeat
und Shuffle Play nicht einstellen.
Einstellen über das
Wiedergabemodusmenü
1 Drücken Sie während der Wiedergabe
(VISUAL SETUP).
Das Wiedergabemodusmenü erscheint.
2 Wählen Sie mit M/m die Option
oder aus und drücken Sie
(ENTER).
3 Wählen Sie mit M/m die gewünschte
Option aus und drücken Sie (ENTER).
Repeat oder Shuffle Play beginnt.
Blenden Sie das Wiedergabemodusmenü mit
(VISUAL SETUP) aus.
Hinweis
Der ausgewählte Wiedergabemodus wird deaktiviert,
wenn die wiedergegebene Disc ausgeworfen wird.
Direktsuche
Sie können eine bestimmte Stelle direkt
ansteuern, indem Sie die Titelnummer, die
Kapitelnummer usw. angeben.
1 Geben Sie während der Wiedergabe
mit den Zahlentasten die Nummer
eines Elements (Stück, Titel usw.) ein
und drücken Sie dann (ENTER).
Die Wiedergabe startet an der ausgewählten
Stelle.
Einstellen über das
Wiedergabemodusmenü
Die Elemente, nach denen gesucht werden kann,
unterscheiden sich je nach Disc/Format wie
folgt:
MPEG-4
M/m
ENTER
VISUAL
SETUP
PLAY
DVD VIDEO
12
(
67
)
018
(
034
)
T 1:35:55
OFF
CHAPTER
TITLE
OFF
Disc/Format Elemente
TITLE
Die Wiedergabe beginnt ab dem
ausgewählten Titel.
CHAPTER
Die Wiedergabe beginnt ab dem
ausgewählten Kapitel.
TIME
Die Wiedergabe beginnt ab der
Stelle, die Sie durch Eingabe
des Zeitcodes angegeben haben.
*
TRACK
Die Wiedergabe beginnt ab dem
ausgewählten Stück.
Fortsetzung auf der nächsten Seite
t
MPEG-4
CLEAR
VISUAL
SETUP
M/m
ENTER
Zahlen-
tasten
MPEG-4

34
D:\Documents and Settings\takashi-shimomura\Desktop\DTP\848220S MEX-
DV1500U(EUR)\4120899211_MEX-DV1500U_ML\02DE02CD-E.fm
masterpage:Left
MEX-DV1500U
4-120-899-21 (1)
* Steht nur bei der Wiedergabe von VCDs ohne
PBC-Funktionen zur Verfügung.
1 Drücken Sie während der Wiedergabe
(VISUAL SETUP).
Das Wiedergabemodusmenü erscheint.
2 Wählen Sie mit M/m das gewünschte
Element aus und drücken Sie
(ENTER).
Die Zahl in Klammern gibt jeweils die
Gesamtzahl der ausgewählten Elemente an.
3 Geben Sie mit den Zahlentasten die
Nummer oder den Zeitcode eines
Elements ein.
Wenn Sie beispielsweise eine Stelle suchen,
die sich 2 Stunden, 10 Minuten und
20 Sekunden nach dem Anfang befindet,
geben Sie einfach „21020“ ein.
Wenn Sie bereits eingegebene Zahlen löschen
wollen, drücken Sie (CLEAR).
4 Drücken Sie (ENTER).
Die Wiedergabe startet an der ausgewählten
Stelle.
Blenden Sie das Wiedergabemodusmenü mit
(VISUAL SETUP) aus.
Auflisten von Stücken/Bildern/
Videodateien — Quick-BrowZer
Auswählen eines Stücks/Bildes/
einer Videodatei
Sie können Alben/Ordner/Stücke/Bilder/
Videodateien als Liste am Monitor anzeigen
lassen und das gewünschte Element zur
Wiedergabe auswählen.
Diese Funktion eignet sich besonders bei Discs
im MP3-/WMA-/AAC-/JPEG-/DivX-/MPEG-4-
Format mit zahlreichen Alben/Stücken usw.
1 Drücken Sie während der Wiedergabe
.
Die Liste der Stücke/Bilder/Videodateien auf
der aktuellen Disc bzw. im aktuellen Album*/
Ordner* erscheint.
Um zur vorherigen/nächsten Seite zurück-/
weiterzuschalten, drücken Sie </,.
Wenn Sie um eine Ebene nach oben wechseln
wollen, drücken Sie .*
Um den gewünschten Ordner auszuwählen,
drücken Sie M/m und dann (ENTER).*
* Nur bei der MP3-/WMA-/AAC-/JPEG-/DivX-/
MPEG-4-Wiedergabe.
ALBUM
Die Wiedergabe beginnt ab dem
ausgewählten Album.
IMAGE
Die Wiedergabe beginnt ab dem
ausgewählten Bild.
ALBUM
Die Wiedergabe beginnt ab dem
ausgewählten Album (Ordner).
FILE
Die Wiedergabe beginnt ab der
ausgewählten Datei.
MPEG-4
PLAY
DVD VIDEO
- -
(
67
)
018
(
034
)
T 1:35:55
</M/m/,
ENTER
MPEG-4
TRACK NAME
ALBUM NAME
ARTIST NAME
LIST UP VIDEO FILES
LIST UP IMAGE FILES
MP3
0003/1000 ST
3:17
ROOT
MUSIC FOLDER
01 TRACK 01
02 TRACK 02
03 TRACK 03
04 TRACK 04
05 TRACK 05

35
D:\Documents and Settings\takashi-shimomura\Desktop\DTP\848220S MEX-
DV1500U(EUR)\4120899211_MEX-DV1500U_ML\02DE02CD-E.fm
masterpage:RightD:\Documents and Settings\takashi-shimomura\Desktop\DTP\848220S MEX-
DV1500U(EUR)\4120899211_MEX-DV1500U_ML\02DE02CD-E.fm
masterpage:Right
MEX-DV1500U
4-120-899-21 (1)
2 Wählen Sie mit M/m das gewünschte
Element (Stück/Bild/Videodatei) aus
und drücken Sie (ENTER).
Die Wiedergabe des gewünschten Elements
(Stück/Bild/Videodatei) beginnt.
Am Hauptgerät
Drehen Sie den Steuerregler, statt M/m zu drücken,
drücken Sie (SEEK) –/+ anstelle von </, und
drücken Sie den Steuerregler anstelle von (ENTER).
Auswählen eines Dateityps
Wenn eine Disc mehrere Dateitypen enthält,
kann nur der ausgewählte Dateityp (Audio/
Video/Bild) wiedergegeben werden. Die
Wiedergabereihenfolge der verschiedenen
Dateitypen ist werkseitig auf Audio-, Video- und
zuletzt Bilddateien festgelegt. Enthält eine Disc
beispielsweise Videodateien und Bilddateien,
werden nur die Videodateien wiedergegeben. Sie
können den gewünschten Dateityp auswählen, so
dass die entsprechende Liste angezeigt wird, und
wählen Sie dann die gewünschte Datei aus.
1 Drücken Sie während der Wiedergabe
.
2 Wählen Sie mit M/m den Dateityp aus,
der aufgelistet werden soll, und
drücken Sie dann (ENTER).
Wählen Sie zum Auflisten von MP3-, WMA-
und AAC-Dateien die Option „LIST UP
AUDIO FILES“.
Wählen Sie zum Auflisten von DivX-/
MPEG-4-Dateien die Option „LIST UP
VIDEO FILES“.
Wählen Sie zum Auflisten von JPEG-Dateien
die Option „LIST UP IMAGE FILES“.
3 Wählen Sie mit M/m die gewünschte
Datei aus und drücken Sie (ENTER).
Die Wiedergabe der ausgewählten Datei
beginnt.
Am Hauptgerät
Drehen Sie den Steuerregler, statt M/m zu drücken,
und drücken Sie den Steuerregler anstelle von
(ENTER).
Anzeigen von Audio-Disc-
Informationen
Während der Audiowiedergabe können Sie
Informationen zur Disc oder die Cover
(Inhaltsbilder)* der MP3-/WMA-/AAC-Dateien
auf dem Monitor anzeigen.
* Die empfohlene Größe beträgt zwischen 240 × 240
und 960 × 960 Pixel.
Beispiel: Bei der MP3-Wiedergabe
A Stücknummer oder Stückname
Disc-Name/Albumname
Interpretenname
B Format
C Wiedergabestatus (N, X, usw.)
D Aktueller Audiokanal
Bei der CD-/MP3-/WMA-/AAC-Wiedergabe
kann der Audiokanal gewechselt werden.
Näheres dazu finden Sie unter „Wechseln des
Audiokanals“ auf Seite 27.
E Stücknummer/Gesamtzahl der Stücke
F Verstrichene Spieldauer
G Aktueller Wiedergabemodus
H Bedienungsanweisungen
Tipp
Sie können ein Stück zur Wiedergabe auch mithilfe
einer Liste (Quick-BrowZer) auswählen (Seite 34).
MPEG-4
TRACK NAME
ALBUM NAME
ARTIST NAME
MP3
0003/1000 ST
3:17
SHUF
To list up, press .
BROWSE
B
E
H
CD
F
A
G

36
D:\Documents and Settings\takashi-shimomura\Desktop\DTP\848220S MEX-
DV1500U(EUR)\4120899211_MEX-DV1500U_ML\02DE02CD-E.fm
masterpage:Left
MEX-DV1500U
4-120-899-21 (1)
Weitere Funktionen — Radio
Speichern und Empfangen von
Sendern
Achtung
Wenn Sie während der Fahrt Sender einstellen,
sollten Sie die BTM-Funktion
(Speicherbelegungsautomatik) verwenden.
Andernfalls besteht Unfallgefahr.
Automatisches Speichern von
Sendern — BTM
1 Drücken Sie (SRC) so oft, bis am
Hauptgerät „TUNER“ erscheint.
Zum Wechseln des Frequenzbereichs drücken
Sie mehrmals (MODE). Sie können zwischen
FM1 (UKW1), FM2 (UKW2),
FM3 (UKW3), MW und LW wählen.
2 Drücken Sie (SYSTEM SETUP).
Eine Systemkonfigurationsoption wird
angezeigt.
3 Wählen Sie mit M/m die Option „BTM“
und drücken Sie (ENTER).
Das Gerät speichert die Sender in der
Reihenfolge der Frequenzen auf den
Zahlentasten ((1) bis (6)).
Ein Signalton ist zu hören und die Einstellung
wird gespeichert.
Am Hauptgerät
Drücken Sie (SOURCE) anstelle von (SRC), drücken
Sie (SETUP) anstelle von (SYSTEM SETUP), drehen
Sie den Steuerregler, statt M/m zu drücken, und
drücken Sie den Steuerregler anstelle von (ENTER).
Manuelles Speichern von Sendern
1 Während der zu speichernde Sender
empfangen wird, halten Sie eine
Zahlentaste ((1) bis (6)) gedrückt, bis
am Hauptgerät „MEM“ erscheint.
Die Zahlentastenanzeige erscheint am
Hauptgerät.
Hinweis
Wenn Sie auf der gleichen Zahlentaste einen anderen
Sender speichern, wird der zuvor gespeicherte
Sender ersetzt.
Tipp
Wenn ein RDS-Sender gespeichert wird, wird auch
die AF/TA-Einstellung gespeichert (Seite 37).
Empfangen gespeicherter Sender
1 Wählen Sie den Frequenzbereich aus
und drücken Sie eine Zahlentaste ((1)
bis (6)).
RDS
Übersicht
UKW-Sender, die RDS (Radiodatensystem)
unterstützen, strahlen zusammen mit den
normalen Radioprogrammsignalen nicht hörbare,
digitale Informationen aus.
Informationen im Display
A Radiofrequenzbereich, Funktion
B TA/ TP*
1
C Frequenz*
2
(Programmdienstname),
Speichernummer, Uhrzeit, RDS-Daten
M/m
ENTER
SRC
MODE
SYSTEM
SETUP
Zahlen-
tasten
AF/TA
(PTY)
DSPL
Steuerregler
Zahlentasten
B
C
A

37
D:\Documents and Settings\takashi-shimomura\Desktop\DTP\848220S MEX-
DV1500U(EUR)\4120899211_MEX-DV1500U_ML\02DE02CD-E.fm
masterpage:RightD:\Documents and Settings\takashi-shimomura\Desktop\DTP\848220S MEX-
DV1500U(EUR)\4120899211_MEX-DV1500U_ML\02DE02CD-E.fm
masterpage:Right
MEX-DV1500U
4-120-899-21 (1)
*1 „TA“ blinkt während einer Verkehrsdurchsage. „TP“
leuchtet, wenn ein Sender mit Verkehrsdurchsagen
empfangen wird.
*2 Beim Empfang eines RDS-Senders wird „*“ links
neben der Frequenz angezeigt.
Zum Wechseln der angezeigten Informationen
C drücken Sie (DSPL).
RDS-Funktionen
Mit diesem Gerät stehen folgende
RDS-Funktionen automatisch zur Verfügung:
Hinweise
• Je nach Land bzw. Region stehen möglicherweise
nicht alle RDS-Funktionen zur Verfügung.
• Die RDS-Funktion arbeitet möglicherweise nicht,
wenn die Sendesignale zu schwach sind oder wenn
der eingestellte Sender keine RDS-Daten ausstrahlt.
Einstellen von AF und TA
Die AF/TA-Einstellungen und die
Umschaltreihenfolge sind unten aufgelistet.
AF-ON: AF wird aktiviert, TA deaktiviert.
TA-ON: TA wird aktiviert, AF deaktiviert.
AF, TA-ON: AF und TA werden beide aktiviert.
AF, TA-OFF: AF und TA werden beide
deaktiviert.
1 Drücken Sie (AF/TA) so oft, bis die
gewünschte Einstellung angezeigt
wird.
Speichern von RDS-Sendern
zusammen mit der AF- und
TA-Einstellung
Sie können zusammen mit den RDS-Sendern die
AF/TA-Einstellung speichern. Mit der BTM-
Funktion werden nur RDS-Sender mit derselben
AF/TA-Einstellung gespeichert.
Beim manuellen Speichern von Sendern können
Sie RDS- und Nicht-RDS-Sender mit
unterschiedlicher AF/TA-Einstellung speichern.
1 Stellen Sie AF/TA ein und speichern Sie die
Sender dann mit BTM oder manuell ab.
Empfangen von
Katastrophenwarnungen
Wenn AF oder TA aktiviert ist, unterbrechen
Katastrophenwarnungen automatisch die
ausgewählte Tonquelle.
Tipp
Wenn Sie die Lautstärke während einer
Verkehrsdurchsage einstellen, wird der eingestellte
Pegel für spätere Verkehrsdurchsagen gespeichert,
und zwar unabhängig von der sonst eingestellten
Lautstärke.
Unveränderter Empfang eines
Regionalsenders — REG
Wenn die AF-Funktion aktiviert ist, wird der
Empfang dieses Geräts werkseitig auf eine
bestimmte Region beschränkt, so dass nicht zu
einem anderen Regionalsender mit einer
stärkeren Frequenz gewechselt wird.
Wenn Sie den Empfangsbereich des betreffenden
Regionalsenders verlassen, stellen Sie während
des Empfangs eines UKW-Senders in der
Systemkonfiguration „REG-OFF“ ein (Seite 46).
Hinweis
Diese Funktion steht in Großbritannien und in einigen
anderen Regionen nicht zur Verfügung.
Lokalsenderfunktion
(nur Großbritannien)
Mithilfe dieser Funktion können Sie andere
Lokalsender auswählen, auch wenn diese zuvor
nicht unter einer Zahlentaste gespeichert wurden.
1 Drücken Sie während des UKW-Empfangs
eine Zahlentaste ((1) bis (6)), unter der ein
Lokalsender gespeichert ist.
2 Drücken Sie innerhalb von 5 Sekunden erneut
die Zahlentaste des Lokalsenders.
Wiederholen Sie diesen Vorgang, bis das Gerät
den Lokalsender empfängt.
AF (Alternativfrequenzen)
In einem Netzwerk wird der Sender mit den
stärksten Signalen ausgewählt und neu
eingestellt. So können Sie auch bei einer langen
Fahrt über eine große Entfernung hinweg
ununterbrochen denselben Sender empfangen,
ohne ihn manuell neu einstellen zu müssen.
TA (Verkehrsdurchsagen)/
TP (Verkehrsfunksender)
Aktuelle Verkehrsinformationen bzw.
Verkehrsfunksender werden empfangen. Wenn
solche Informationen bzw. Sendungen
empfangen werden, wird die gerade
ausgewählte Tonquelle unterbrochen.
PTY (Programmtypauswahl)
Der gerade empfangene Programmtyp wird
angezeigt. Außerdem kann nach dem
ausgewählten Programmtyp gesucht werden.
CT (Uhrzeit)
Mit den CT-Daten (Uhrzeitdaten), die von
RDS-Sendern ausgestrahlt werden, lässt sich
die Uhr einstellen.

38
D:\Documents and Settings\takashi-shimomura\Desktop\DTP\848220S MEX-
DV1500U(EUR)\4120899211_MEX-DV1500U_ML\02DE02CD-E.fm
masterpage:Left
MEX-DV1500U
4-120-899-21 (1)
Auswählen des Programmtyps
(PTY)
1 Halten Sie während des UKW-
Empfangs (AF/TA) (PTY) gedrückt.
Der Name des aktuellen Programmtyps
erscheint, wenn der Sender PTY-Daten
ausstrahlt.
2 Wählen Sie durch Drehen des
Steuerreglers den Programmtyp aus.
3 Drücken Sie den Steuerregler.
Das Gerät sucht nach einem Sender, der den
ausgewählten Programmtyp ausstrahlt.
Programmtypen
Hinweis
Sie können diese Funktion in Ländern/Regionen, in
denen keine PTY-Daten zur Verfügung stehen, nicht
verwenden.
Einstellen der Uhrzeit (CT)
1 Stellen Sie in der Systemkonfiguration
„CT-ON“ ein (Seite 45).
Hinweise
• Die CT-Funktion steht möglicherweise nicht zur
Verfügung, auch wenn ein RDS-Sender empfangen
wird.
• Die mit der CT-Funktion eingestellte Uhrzeit ist nicht
immer korrekt.
Klangeinstellungen
Einstellen der
Klangeigenschaften
Sie können die Klangeigenschaften nach
Geschmack festlegen.
Die Einstelloptionen im Klangmenü und die
Umschaltreihenfolge sind unten aufgelistet.
EQ3: Sie können für 7 Musiktypen eine
spezielle Equalizer-Kurve auswählen.
LOW, MID, HI*
1
: Sie können den
Lautstärkepegel für den ausgewählten
Frequenzbereich einstellen, wenn Sie
individuelle EQ3-Einstellungen vornehmen
wollen.
BAL (Balance): Sie können die Tonbalance
zwischen den Lautsprechern links und rechts
einstellen.
FAD (Fader): Sie können den relativen
Lautstärkepegel der Lautsprecher vorn und
hinten einstellen.
SUB (Lautstärke des Tiefsttonlautsprechers)*
2
:
Stellen Sie hier die Lautstärke des
Tiefsttonlautsprechers ein. („ATT“ ist die
niedrigste Einstellung.)
*1 Erscheint nur, wenn EQ3 aktiviert ist.
*2 Wenn als Audioausgang „SUB-OUT“ eingestellt ist
(Seite 45).
1 Drücken Sie während der Wiedergabe/
des Empfangs (SOUND) so oft, bis die
gewünschte Einstelloption am
Hauptgerät angezeigt wird.
2 Stellen Sie mit M/m den Pegel ein oder
wählen Sie die gewünschte Option.
NEWS (Nachrichten), AFFAIRS (Aktuelles
Zeitgeschehen), INFO (Informationen),
SPORT (Sport), EDUCATE (Erziehung und
Bildung), DRAMA (Hörspiele), CULTURE
(Kultur), SCIENCE (Wissenschaft), VARIED
(Verschiedenes), POP M (Pop-Musik),
ROCK M (Rock-Musik), EASY M
(Unterhaltungsmusik), LIGHT M (Leichte
Klassik), CLASSICS (Klassik), OTHER M
(Sonstige Musik), WEATHER (Wetter),
FINANCE (Finanzberichte), CHILDREN
(Kinderprogramme), SOCIAL A
(Magazinsendungen), RELIGION (Religion),
PHONE IN (Hörertelefon), TRAVEL
(Reiseinformationen), LEISURE
(Freizeitprogramm), JAZZ (Jazz), COUNTRY
(Country-Musik), NATION M (Volksmusik),
OLDIES (Oldies), FOLK M (Folk-Musik),
DOCUMENT (Dokumentarbeiträge)
SOUND
M/m

39
D:\Documents and Settings\takashi-shimomura\Desktop\DTP\848220S MEX-
DV1500U(EUR)\4120899211_MEX-DV1500U_ML\02DE02CD-E.fm
masterpage:RightD:\Documents and Settings\takashi-shimomura\Desktop\DTP\848220S MEX-
DV1500U(EUR)\4120899211_MEX-DV1500U_ML\02DE02CD-E.fm
masterpage:Right
MEX-DV1500U
4-120-899-21 (1)
3 Drücken Sie .
Die Einstellung ist abgeschlossen und im
Display erscheint wieder die Anzeige für den
normalen Wiedergabemodus bzw.
Empfangsmodus.
Am Hauptgerät
Drücken Sie den Steuerregler anstelle von (SOUND)
und drehen Sie den Steuerregler, statt M/m zu
drücken.
Individuelles Einstellen der
Equalizer-Kurve — EQ3
Mit „CUSTOM“ unter EQ3 können Sie Ihre
individuellen Equalizer-Einstellungen
vornehmen. Sie können den Pegel für 3
verschiedene Frequenzbereiche einstellen:
„LOW“, „MID“ und „HI“.
1 Drücken Sie während der Wiedergabe/
des Empfangs (SOUND) so oft, bis
„EQ3“ erscheint.
2 Wählen Sie mit M/m die Option
„CUSTOM“ aus.
3 Drücken Sie (SOUND) so oft, bis
„LOW“, „MID“ oder „HI“ erscheint.
4 Stellen Sie mit M/m den Pegel der
ausgewählten Option ein.
Der Pegel lässt sich schrittweise auf einen
Wert zwischen –10 und +10 einstellen.
Wenn Sie die werkseitig eingestellte
Equalizer-Kurve wiederherstellen wollen,
halten Sie (SOUND) gedrückt.
5 Drücken Sie .
Die Einstellung ist abgeschlossen und im
Display erscheint wieder die Anzeige für den
normalen Wiedergabemodus bzw.
Empfangsmodus.
Tipp
Andere Equalizer-Typen lassen sich ebenfalls
einstellen.
Am Hauptgerät
Drücken Sie den Steuerregler anstelle von (SOUND)
und drehen Sie den Steuerregler, statt M/m zu
drücken.
Einstellungen
Es gibt zwei Konfigurationsmenüs, über die Sie
verschiedene Einstellungen konfigurieren
können.
• Wiedergabekonfigurationsmenü
(Seite 39)
Hier können Sie Optionen im Zusammenhang
mit der Wiedergabe konfigurieren (über den
Monitor).
• Systemkonfigurationsmenü (Seite 44)
Hier können Sie Optionen im Zusammenhang
mit dem System konfigurieren (über das
Hauptgerät).
Wiedergabekonfiguration
Das Wiedergabekonfigurationsmenü besteht aus
folgenden Kategorien.
LANGUAGE SETUP (Seite 41)
Einstellen von Menüsprache,
Untertitelsprache usw.
DISPLAY SETUP (Seite 41)
Einstellen des angeschlossenen Monitors.
CUSTOM SETUP (Seite 42)
Anpassen der Disc-Wiedergabe.
AUDIO SETUP (Seite 43)
Anpassen der Klangeinstellungen an die
Disc.
RESET (Seite 43)
Zurücksetzen aller Einstelloptionen.
Grundlegende Funktionsweise der
Wiedergabekonfiguration
Im Folgenden wird das Verfahren zum Einstellen
der Optionen im Menü erläutert.
Fortsetzung auf der nächsten Seite t
VISUAL
SETUP
O
M/m
ENTER

40
D:\Documents and Settings\takashi-shimomura\Desktop\DTP\848220S MEX-
DV1500U(EUR)\4120899211_MEX-DV1500U_ML\02DE02CD-E.fm
masterpage:Left
MEX-DV1500U
4-120-899-21 (1)
Beispiel: Einstellen des Bildseitenverhältnisses
auf „4:3 PAN SCAN“.
1 Drücken Sie bei ausgeschaltetem
Gerät die Taste (VISUAL SETUP).
Das Wiedergabekonfigurationsmenü
erscheint.
2 Wählen Sie mit M/m die Option
(DISPLAY SETUP) aus und drücken
Sie (ENTER).
Die Bildschirmkonfigurationsoptionen
werden angezeigt.
3 Wählen Sie mit M/m die Option
„MONITOR TYPE“ aus und drücken
Sie (ENTER).
Die Optionen erscheinen.
4 Wählen Sie mit M/m die Option „4:3
PAN SCAN“ aus und drücken Sie
(ENTER).
Die Einstellung ist damit abgeschlossen.
Um zur vorherigen Anzeige zurückzuschalten,
drücken Sie O.
Zum Ausblenden des
Wiedergabekonfigurationsmenüs drücken Sie
(VISUAL SETUP).
LANGUAGE SETUP
MENU :
AUDIO :
SUBTITLE :
ENGLISH
ENGLISH
ENGLISH
DISPLAY SETUP
MONITOR TYPE :
WALLPAPER :
16:9
WALLPAPER 1
DISPLAY SETUP
MONITOR TYPE :
WALLPAPER :
16:9
16:9
4:3 LETTER BOX
4:3 PAN SCAN

41
D:\Documents and Settings\takashi-shimomura\Desktop\DTP\848220S MEX-
DV1500U(EUR)\4120899211_MEX-DV1500U_ML\02DE02CD-E.fm
masterpage:RightD:\Documents and Settings\takashi-shimomura\Desktop\DTP\848220S MEX-
DV1500U(EUR)\4120899211_MEX-DV1500U_ML\02DE02CD-E.fm
masterpage:Right
MEX-DV1500U
4-120-899-21 (1)
Spracheinstellungen für Anzeige oder Tonspur
Wählen Sie (LANGUAGE SETUP) und wählen Sie dann mit M/m und (ENTER) unter den unten
genannten Einstellungen und Optionen die gewünschte aus. Erläuterungen zum Vorgehen dabei finden
Sie unter „Grundlegende Funktionsweise der Wiedergabekonfiguration“ auf Seite 39.
Bildschirmkonfiguration
Wählen Sie (DISPLAY SETUP) und wählen Sie dann mit M/m und (ENTER) unter den unten
genannten Einstellungen und Optionen die gewünschte aus. Erläuterungen zum Vorgehen dabei finden
Sie unter „Grundlegende Funktionsweise der Wiedergabekonfiguration“ auf Seite 39.
„z“ gibt die Standardeinstellung an.
Hinweis
Bei manchen Discs wird unter Umständen automatisch „4:3 LETTER BOX“ statt „4:3 PAN SCAN“ und umgekehrt
ausgewählt.
Einstellung Zweck
MENU Hier wechseln Sie die Menüsprache der Disc.
AUDIO Hier wechseln Sie die Tonspursprache.
SUBTITLE Hier wechseln Sie die Sprache der auf der Disc aufgezeichneten
Untertitel.
Einstellung Option Zweck
MONITOR TYPE
Stellt ein passendes
Bildseitenverhältnis für den
angeschlossenen Monitor ein.
16:9 (z)
Das Bild wird im Breitbildformat
angezeigt.
Diese Option ist geeignet, wenn Sie
einen Breitbildmonitor oder einen
Monitor mit Breitbildmodus
anschließen.
4:3 LETTER BOX
Bilder im Breitbildformat werden
mit Balken am oberen und unteren
Bildschirmrand angezeigt.
Diese Option ist geeignet, wenn Sie
einen 4:3-Monitor anschließen.
4:3 PAN SCAN
Bilder im Breitbildformat werden
so angezeigt, dass sie den
Bildschirm füllen. Bereiche, die
nicht auf den Bildschirm passen,
werden automatisch abgeschnitten.
WALLPAPER
WALLPAPER 1 (z), 2, 3
Hier wählen Sie ein
Hintergrundbild aus.

42
D:\Documents and Settings\takashi-shimomura\Desktop\DTP\848220S MEX-
DV1500U(EUR)\4120899211_MEX-DV1500U_ML\02DE02CD-E.fm
masterpage:Left
MEX-DV1500U
4-120-899-21 (1)
Benutzereinstellungen
Wählen Sie (CUSTOM SETUP) und wählen Sie dann mit M/m und (ENTER) unter den unten
genannten Einstellungen und Optionen die gewünschte aus. Erläuterungen zum Vorgehen dabei finden
Sie unter „Grundlegende Funktionsweise der Wiedergabekonfiguration“ auf Seite 39.
Nähere Erläuterungen finden Sie auf den angegebenen Seiten. „z“ gibt die Standardeinstellung an.
Einstellung Option Zweck
PARENTAL CONTROL
(Seite 30) *
1
Legt Wiedergabeeinschränkungen
fest, so dass ungeeignete Discs
oder Szenen nicht wiedergegeben
werden.
OFF t (z)
Die Kindersicherung ist deaktiviert.
ON t
Die Kindersicherung ist aktiviert.
PLAYER t
Hier legen Sie den
Einschränkungsstandard und die
Altersfreigabestufe fest.
PASSWORD t
Hier definieren Sie ein neues
4-stelliges Kennwort.
DivX VOD
Zeigt den Registriercode für diesen
Player an. Weitere Informationen
finden Sie auf folgender Website:
http://www.divx.com/vod
Done
Die Anzeige wird ausgeblendet.
SLIDE SHOW TIME
5 sec. (z), 10 sec.,
20 sec., 40 sec., 60 sec.
Das Anzeigeintervall für
Bildpräsentationen wird festgelegt.
FIXED
Bildpräsentationen werden
deaktiviert.
MULTI-DISC RESUME
*
2
ON (z)
Die Stellen für die
Wiedergabefortsetzung werden für
bis zu 5 Discs gespeichert. Diese
Einstellungen bleiben gespeichert,
auch wenn Sie „OFF“ auswählen.
OFF
Die Stellen für die
Wiedergabefortsetzung werden
nicht gespeichert.
Eine Wiedergabefortsetzung ist nur
bei der zurzeit eingelegten Disc
möglich.
USB RESUME
ON (z)
Die Stellen für die
Wiedergabefortsetzung werden
gespeichert. Diese Einstellungen
bleiben gespeichert, auch wenn Sie
„OFF“ auswählen.
OFF
Die Stellen für die
Wiedergabefortsetzung werden
nicht gespeichert.
MPEG-4

43
D:\Documents and Settings\takashi-shimomura\Desktop\DTP\848220S MEX-
DV1500U(EUR)\4120899211_MEX-DV1500U_ML\02DE02CD-E.fm
masterpage:RightD:\Documents and Settings\takashi-shimomura\Desktop\DTP\848220S MEX-
DV1500U(EUR)\4120899211_MEX-DV1500U_ML\02DE02CD-E.fm
masterpage:Right
MEX-DV1500U
4-120-899-21 (1)
*1 Außer bei einer DVD-R/DVD-R DL/DVD-RW im VR-Modus.
*2 Nur bei DVD VIDEO.
Hinweis
Wenn die Kindersicherung aktiviert ist, funktioniert die Wiedergabefortsetzung nicht. In diesem Fall startet die
Wiedergabe nach dem Einlegen der Disc am Anfang.
Tonkonfiguration
Wählen Sie (AUDIO SETUP) und wählen Sie dann mit M/m und (ENTER) unter den unten
genannten Einstellungen und Optionen die gewünschte aus. Erläuterungen zum Vorgehen dabei finden
Sie unter „Grundlegende Funktionsweise der Wiedergabekonfiguration“ auf Seite 39.
Nähere Erläuterungen finden Sie auf den angegebenen Seiten. „z“ gibt die Standardeinstellung an.
* Außer bei einer DVD-R/DVD-R DL/DVD-RW im VR-Modus.
Zurücksetzen aller Einstellungen
Alle Einstellungen (mit Ausnahme der Kindersicherungseinstellungen) können in der
Wiedergabekonfiguration zurückgesetzt werden.
Wählen Sie mit M/m und (ENTER) die Option (RESET) und dann „RESET ALL SETTINGS“ und
„YES“.
Erläuterungen zum Vorgehen dabei finden Sie unter „Grundlegende Funktionsweise der
Wiedergabekonfiguration“ auf Seite 39.
Hinweis
Schalten Sie das Gerät während des Zurücksetzens nicht aus. Dieser Vorgang kann einige Sekunden dauern.
PLAY LIST PLAY
(nur bei einer DVD-R/DVD-R DL/
DVD-RW im VR-Modus)
ORIGINAL (z)
Originaltitel werden
wiedergegeben.
PLAY LIST
Eine bearbeitete Play-List wird
wiedergegeben.
PICTURE EQ (Seite 29)
Auswählen der Einstelloption, die
im Wiedergabemodusmenü
angezeigt werden soll.
AUTO (z)
Die Optionen für die Nacht/den Tag
werden je nach der
Dimmereinstellung in der
Systemkonfiguration automatisch
umgeschaltet (Seite 45).
LIGHT OFF
Die Optionen für den Tag werden
angezeigt.
LIGHT ON
Die Optionen für die Nacht werden
angezeigt.
Einstellung Option Zweck
AUDIO DRC *
Sorgt für hohe Tonqualität auch bei
geringer Lautstärke. Nur bei DVDs
mit Dynamikkontrolle (AUDIO
DRC).
STANDARD (z)
Es gilt die Standardeinstellung.
WIDE RANGE
Sie erhalten den Eindruck, sich live
in einer Veranstaltung zu befinden.
MPEG-4

44
D:\Documents and Settings\takashi-shimomura\Desktop\DTP\848220S MEX-
DV1500U(EUR)\4120899211_MEX-DV1500U_ML\02DE02CD-E.fm
masterpage:Left
MEX-DV1500U
4-120-899-21 (1)
Systemkonfiguration
Das Systemkonfigurationsmenü besteht aus
folgenden Kategorien.
• SET: Allgemeine Einstellungen (Seite 45)
• DSPL: Anzeigeeinstellungen (Seite 45)
• R/M: Empfangsmoduseinstellungen (Seite 46)
• SND: Klangeinstellungen (Seite 47)
Grundlegende Funktionsweise der
Systemkonfiguration
Im Folgenden wird das Verfahren zum Einstellen
der Optionen im Menü erläutert.
Beispiel: Einstellen des Demo-Modus
1 Drücken Sie bei ausgeschaltetem
Gerät die Taste (SYSTEM SETUP).
Eine Systemkonfigurationsoption erscheint
am Hauptgerät.
2 Wählen Sie mit M/m die Option
„DEMO“ und drücken Sie (ENTER).
Die Option erscheint.
3 Wählen Sie mit M/m die Option „ON“
oder „OFF“ und drücken Sie (ENTER).
Die Einstellung ist damit abgeschlossen.
Zum Ausblenden des
Systemkonfigurationsmenüs drücken Sie
(SYSTEM SETUP).
Am Hauptgerät
Drücken Sie (SETUP) anstelle von (SYSTEM SETUP),
drehen Sie den Steuerregler, statt M/m zu drücken,
und drücken Sie den Steuerregler anstelle von
(ENTER).
M/m
ENTER
SYSTEM
SETUP

45
D:\Documents and Settings\takashi-shimomura\Desktop\DTP\848220S MEX-
DV1500U(EUR)\4120899211_MEX-DV1500U_ML\02DE02CD-E.fm
masterpage:RightD:\Documents and Settings\takashi-shimomura\Desktop\DTP\848220S MEX-
DV1500U(EUR)\4120899211_MEX-DV1500U_ML\02DE02CD-E.fm
masterpage:Right
MEX-DV1500U
4-120-899-21 (1)
Nähere Erläuterungen finden Sie auf den angegebenen Seiten. „z“ gibt die Standardeinstellung an.
SET (Konfiguration)
DSPL (Display)
Einstellung Option Zweck Gerätestatus
CLOCK-ADJ (Uhr einstellen)
(Seite 48)
–
–
Jeder Status.
CT (Uhrzeit) (Seite 37, 38)
ON
Die Uhrzeitfunktion (CT)
wird aktiviert.
OFF (z)
Die Uhrzeitfunktion (CT)
wird deaktiviert.
BEEP
ON (z)
Der Signalton wird
aktiviert.
OFF
Der Signalton wird
deaktiviert.
COLOR-SYS (Farbsystem)
Hier können Sie das
ausgegebene Videosignal auf
den angeschlossenen Monitor
einstellen.
PAL (z)
PAL wird eingestellt.
Ausgeschaltet.
NTSC
NTSC wird eingestellt.
AUTO-OFF
Schaltet das ausgeschaltete
Gerät nach einer vorgegebenen
Zeit automatisch vollständig
ab.
NO (z)
Die Ausschaltautomatik
wird deaktiviert.
Jeder Status.
30S, 30M, 60M
Hier wählen Sie die Zeit bis
zum Ausschalten.
REAR/SUB
Hier können Sie den
Audioausgang wechseln.
REAR-OUT Der Endverstärker ist
eingestellt.
Ausgeschaltet.
SUB-OUT (z) Der Tiefsttonlautsprecher
ist eingestellt.
Einstellung Option Zweck Gerätestatus
M.DSPL (Bewegte Anzeige)
Wählt den Modus der
bewegten Anzeige aus.
SA (z)
Bewegte Muster und ein
Spektrumanalysator
werden angezeigt.
Bei Wiedergabe/
Radioempfang.
OFF
Die bewegte Anzeige wird
deaktiviert.
DEMO (Demo-Modus)
ON (z)
Der Demo-Modus wird
aktiviert.
Ausgeschaltet.
OFF
Der Demo-Modus wird
deaktiviert.
DIMMER
Dient zum Ändern der
Display-Helligkeit.
ON
Das Display wird dunkler.
Jeder Status.
OFF (z)
Der Dimmer wird
deaktiviert.
AUTO-SCRL (Automatischer
Bildlauf)
Bewirkt, dass lange Anzeigen
automatisch im Display
durchlaufen.
ON (z)
Die Informationen laufen
im Display durch.
Bei der Disc-
Wiedergabe.
OFF
Die Informationen laufen
nicht im Display durch.
Fortsetzung auf der nächsten Seite
t

46
D:\Documents and Settings\takashi-shimomura\Desktop\DTP\848220S MEX-
DV1500U(EUR)\4120899211_MEX-DV1500U_ML\02DE02CD-E.fm
masterpage:Left
MEX-DV1500U
4-120-899-21 (1)
R/M (Empfangsmodus)
Einstellung Option Zweck Gerätestatus
LOCAL (Lokaler Suchmodus)
ON
Es werden nur Sender mit
starken Signalen
eingestellt.
Beim
Radioempfang.
OFF (z)
Es werden auch Sender mit
normal starken Signalen
eingestellt.
MONO (Monauraler Modus)
Einstellen des monauralen
Empfangsmodus, um den
Empfang von UKW-Sendern
zu verbessern.
ON
Stereosender werden
monaural wiedergegeben.
Beim UKW-
Empfang.
OFF (z)
Stereosender werden in
stereo wiedergegeben.
REGIONAL (Regionalsender)
(Seite 37)
ON (z)
Ein und derselbe
Regionalsender wird
empfangen.
OFF
Dient zum Deaktivieren der
Funktion, wenn man den
Empfangsbereich des
betreffenden
Regionalsenders verlässt.
BTM
(Speicherbelegungsautomatik)
(Seite 36)
–
–
Beim
Radioempfang.

47
D:\Documents and Settings\takashi-shimomura\Desktop\DTP\848220S MEX-
DV1500U(EUR)\4120899211_MEX-DV1500U_ML\02DE02CD-E.fm
masterpage:RightD:\Documents and Settings\takashi-shimomura\Desktop\DTP\848220S MEX-
DV1500U(EUR)\4120899211_MEX-DV1500U_ML\02DE02CD-E.fm
masterpage:Right
MEX-DV1500U
4-120-899-21 (1)
SND (Klang)
*1 Wenn als Audioausgang „SUB-OUT“ eingestellt ist.
*2 Wird nur angezeigt und steht nur zur Verfügung, wenn „DVD-LEVEL“ auf „ADJST-ON“ gesetzt ist.
Einstellung Option Zweck Gerätestatus
HPF (Hochpassfilter)
Zum Auswählen der
Grenzfrequenz der Front-/
Hecklautsprecher.
OFF (z) Es werden keine
Frequenzen gedämpft.
Bei Wiedergabe/
Radioempfang.
80HZ, 100HZ,
120HZ,
140HZ,
160HZ
Hier wählen Sie die
Frequenz aus.
LPF (Niedrigpassfilter)*
1
Zum Auswählen der
Grenzfrequenz des
Tiefsttonlautsprechers.
OFF (z) Es werden keine
Frequenzen gedämpft.
80HZ, 100HZ,
120HZ,
140HZ,
160HZ
Hier wählen Sie die
Frequenz aus.
LPF-PHASE (Phase des
Niedrigpassfilters)*
1
Zum Auswählen der Phase bei
aktiviertem LPF.
NORM (z) Für den LPF gilt die
normale Phase.
REV Für den LPF gilt die
umgekehrte Phase.
LOUD (Loudness)
Sorgt für hohe Tonqualität
auch bei geringer Lautstärke.
OFF (z)
Bässe und Höhen werden
nicht angehoben.
ON
Bässe und Höhen werden
angehoben.
AUX-LEVEL (Pegel
zusätzlicher Geräte) (Seite 49)
(–8 ~ +18)
z: 0
Hier wählen Sie den Pegel
aus.
Bei der
Wiedergabe über
zusätzliche
Geräte (AUX).
DVD-LEVEL (DVD-Pegel)
(Seite 28)
ADJST-ON
Hier können Sie den
Ausgangspegel für das
Dolby Digital-Format
einstellen.
Bei der Disc-
Wiedergabe.
ADJST-OFF
(z)
Die Pegeleinstellung wird
deaktiviert.
DOLBY-ADJ (Einstellen des
Dolby-Pegels) (Seite 28)*
2
(–10 ~ +10)
z: +8
Hier wählen Sie den Pegel
aus.

48
D:\Documents and Settings\takashi-shimomura\Desktop\DTP\848220S MEX-
DV1500U(EUR)\4120899211_MEX-DV1500U_ML\02DE02CD-E.fm
masterpage:Left
MEX-DV1500U
4-120-899-21 (1)
Einstellen der Uhr
Die Uhr zeigt die Uhrzeit im 24-Stunden-Format
an.
1 Drücken Sie (SYSTEM SETUP).
Eine Systemkonfigurationsoption erscheint
am Hauptgerät.
2 Wählen Sie mit M/m die Option
„CLOCK-ADJ“ aus und drücken Sie
(ENTER).
Die Stundenanzeige blinkt.
3 Stellen Sie mit M/m die Stunden und
Minuten ein.
Wechseln Sie mit </, zum nächsten
Zeichen in der Digitalanzeige.
4 Drücken Sie (ENTER).
Die Einstellung ist damit abgeschlossen.
Zum Ausblenden des
Systemkonfigurationsmenüs drücken Sie
(SYSTEM SETUP).
Wenn Sie während der Wiedergabe die Uhrzeit
anzeigen wollen, drücken Sie (DSPL) so oft, bis
die Uhrzeit erscheint.
Am Hauptgerät
Drücken Sie (SETUP) anstelle von (SYSTEM SETUP),
drehen Sie den Steuerregler, statt M/m zu drücken,
drücken Sie .m/M> anstelle von </, und
drücken Sie den Steuerregler anstelle von (ENTER).
Verwenden gesondert erhältlicher
Geräte
Zusätzliche Geräte
Sie können zusätzliche Geräte an das Gerät
anschließen und den Ton von diesen Geräten
über die Lautsprecher des Fahrzeugs
wiedergeben lassen.
Bis zu 2 Geräte können angeschlossen werden,
eins an die AUX-Eingangsbuchse
(Stereominibuchse) an der Vorderseite und ein
zweites an die Anschlüsse AUX AUDIO IN an
der Rückseite. Unterschiede im Lautstärkepegel
zwischen diesem Gerät und dem zusätzlichen
Gerät können korrigiert werden.
Anschließen eines zusätzlichen
Geräts
1 Schalten Sie das zusätzliche Gerät aus.
2 Drehen Sie die Lautstärke an diesem Gerät
herunter.
3 Schließen Sie das zusätzliche Gerät an dieses
Gerät an.
An der Vorderseite
Schließen Sie das Gerät an die
AUX-Eingangsbuchse an.
* Verwenden Sie unbedingt einen geraden Stecker.
</M/m/,
ENTER
DSPL
SYSTEM
SETUP
M/m
ENTER
SRC
MODE
SYSTEM
SETUP
AUX
AUX
Verbindungskabel*
(nicht mitgeliefert)

49
D:\Documents and Settings\takashi-shimomura\Desktop\DTP\848220S MEX-
DV1500U(EUR)\4120899211_MEX-DV1500U_ML\02DE02CD-E.fm
masterpage:RightD:\Documents and Settings\takashi-shimomura\Desktop\DTP\848220S MEX-
DV1500U(EUR)\4120899211_MEX-DV1500U_ML\02DE02CD-E.fm
masterpage:Right
MEX-DV1500U
4-120-899-21 (1)
An der Rückseite
Schließen Sie das Gerät an die Anschlüsse
AUX AUDIO IN an.
Auswählen eines zusätzlichen
Geräts
1 Drücken Sie (SRC) so oft, bis am Hauptgerät
„AUX“ erscheint.
2 Wählen Sie mit (MODE) die Option
„FRONT-IN“ oder „REAR-IN“ aus.
Bedienen Sie das zusätzliche Gerät.
Einstellen des Lautstärkepegels
Stellen Sie unbedingt vor der Wiedergabe die
Lautstärke der einzelnen angeschlossenen Geräte
ein.
1 Drehen Sie die Lautstärke an diesem Gerät
herunter.
2 Drücken Sie (SRC) so oft, bis am Hauptgerät
„AUX“ erscheint.
Wenn zwei zusätzliche Geräte angeschlossen
sind, wählen Sie das Gerät, dessen Lautstärke
eingestellt werden soll, mit (MODE) aus.
3 Starten Sie die Wiedergabe am zusätzlichen
Gerät mit gemäßigter Lautstärke.
4 Stellen Sie die gewohnte Hörlautstärke an
diesem Gerät ein.
5 Drücken Sie (SYSTEM SETUP).
6 Wählen Sie mit M/m die Option „AUX-
LEVEL“ und drücken Sie (ENTER).
7 Stellen Sie mit M/m den gewünschten
Eingangspegel ein.
Der Eingangspegel lässt sich schrittweise auf
einen Wert zwischen –8 und +18 einstellen.
8 Drücken Sie (ENTER).
Die Einstellung ist damit abgeschlossen.
Zum Ausblenden des
Systemkonfigurationsmenüs drücken Sie
(SYSTEM SETUP).
Am Hauptgerät
Drücken Sie (SOURCE) anstelle von (SRC), drücken
Sie (SETUP) anstelle von (SYSTEM SETUP), drehen
Sie den Steuerregler, statt M/m zu drücken, und
drücken Sie den Steuerregler anstelle von (ENTER).
Weitere Informationen
Sicherheitsmaßnahmen
• Wenn das Fahrzeug längere Zeit in direktem
Sonnenlicht geparkt war, lassen Sie das Gerät
zunächst etwas abkühlen.
• Motorantennen werden automatisch ausgefahren.
Feuchtigkeitskondensation
Wenn sich im Inneren des Geräts Feuchtigkeit
niedergeschlagen hat, nehmen Sie die Disc heraus
und warten Sie etwa eine Stunde, bis die
Feuchtigkeit verdunstet ist, denn andernfalls
funktioniert das Gerät nicht ordnungsgemäß.
So bewahren Sie die hohe
Tonqualität
Achten Sie darauf, dass keine Flüssigkeiten auf das
Gerät oder die Discs gelangen.
Hinweise zu Discs
• Setzen Sie Discs weder direktem Sonnenlicht
noch Wärmequellen wie zum Beispiel
Warmluftauslässen aus. Lassen Sie sie auch nicht
in einem in der Sonne geparkten Auto liegen.
• Reinigen Sie Discs vor dem
Abspielen mit einem
Reinigungstuch. Wischen Sie
dabei von der Mitte nach außen.
Verwenden Sie keine
Lösungsmittel wie Benzin,
Verdünner oder andere
handelsübliche
Reinigungsmittel.
• Dieses Gerät ist auf die Wiedergabe von Discs
ausgelegt, die dem Compact Disc-Standard (CD)
entsprechen. DualDiscs und manche Musik-CDs
mit Urheberrechtsschutzcodierung entsprechen
nicht dem Compact Disc-Standard (CD) und
können daher mit diesem Gerät nicht
wiedergegeben werden.
• Auf diesem Gerät NICHT abspielbare
Discs
– Discs mit Etiketten, Aufklebern oder
aufgeklebtem Band oder Papier. Wenn Sie
solche Discs verwenden, kann es zu einer
Fehlfunktion kommen oder die Disc kann
beschädigt werden.
– Discs mit außergewöhnlichen Formen (z. B.
herzförmige, quadratische oder sternförmige
Discs). Falls Sie es doch versuchen, kann das
Gerät beschädigt werden.
– 8-cm-Discs.
Fortsetzung auf der nächsten Seite t

50
D:\Documents and Settings\takashi-shimomura\Desktop\DTP\848220S MEX-
DV1500U(EUR)\4120899211_MEX-DV1500U_ML\02DE02CD-E.fm
masterpage:Left
MEX-DV1500U
4-120-899-21 (1)
Hinweis zu Wiedergabefunktionen
bei DVDs und VCDs
Einige Wiedergabefunktionen von DVDs und VCDs
können von den Software-Herstellern absichtlich
eingeschränkt werden. Dieses Gerät gibt DVDs und
VCDs so wieder, wie es von den Software-
Herstellern vorgesehen ist. Deshalb stehen
möglicherweise einige Wiedergabefunktionen nicht
zur Verfügung. Lesen Sie dazu bitte auch die
Anweisungen, die mit den DVDs oder VCDs
geliefert wurden.
Hinweise zu DATA-CDs und DATA-
DVDs
• Je nach dem Gerät, mit dem DATA-CDs/DATA-
DVDs bespielt wurden, oder dem Zustand der
DATA-CDs/DATA-DVDs selbst ist eine
Wiedergabe mit diesem Gerät nicht in jedem Fall
möglich.
• Bestimmte Discs müssen abgeschlossen werden
(Seite 50).
• Das Gerät unterstützt folgende Standards.
Für DATA-CDs
– Format ISO 9660, Stufe 1/Stufe 2, erweitertes
Joliet/Romeo-Format
– Multisession
Für DATA-DVDs
– Format UDF Bridge (UDF und ISO 9660
kombiniert)
– Multi-Border
• Höchstzahl an:
– Ordnern (Alben): 256 (einschließlich
Stammordner und leerer Ordner).
– Dateien (Stücken/Bildern/Videos) und Ordnern
auf einer Disc: 2.000. Wenn die Ordner-/
Dateinamen viele Zeichen enthalten, ist die
maximale Anzahl möglicherweise geringer als
2.000.
– Anzeigbaren Zeichen für einen Ordner-/
Dateinamen: 64 (Joliet/Romeo).
Hinweise zum Abschließen von
Discs
Folgende Disc-Typen müssen abgeschlossen
werden, bevor sie auf diesem Gerät wiedergegeben
werden können.
• DVD-R/DVD-R DL (im Videomodus/VR-Modus)
• DVD-RW im Videomodus
• DVD+R/DVD+R DL
•CD-R
•CD-RW
Folgende Disc-Typen können wiedergegeben
werden, ohne abgeschlossen zu sein.
• DVD+RW – automatisch abgeschlossen
• DVD-RW im VR-Modus – Abschließen nicht
erforderlich
Näheres dazu schlagen Sie bitte in den mit der Disc
gelieferten Anweisungen nach.
Hinweise zu Multisession-CDs/Multi-
Border-DVDs
Unter folgenden Voraussetzungen können mit
diesem Gerät Multisession-CDs/Multi-Border-
DVDs wiedergegeben werden. Dazu muss die
Session geschlossen und die Disc abgeschlossen
sein.
• Wenn die erste Session CD-DA-Aufnahmen
(digitales CD-Audiosystem) enthält:
Das Gerät erkennt die Disc als CD-DA-Disc und
gibt ausschließlich die CD-DA-Aufnahmen in der
ersten Session wieder, selbst wenn in anderen
Sessions Aufnahmen in anderen Formaten
(z. B. MP3) enthalten sind.
• Wenn andere Sessions als die erste CD-DA-
Aufnahmen enthalten:
Das Gerät erkennt die Disc als DATA-CD oder
DATA-DVD und alle CD-DA-Sessions werden
übersprungen.
• Wenn MP3-/WMA-/AAC-/JPEG-/DivX-/MPEG-
4-Aufnahmen vorhanden sind:
Nur die Sessions mit dem ausgewählten Dateityp
(Audio/Video/Bild)* werden wiedergegeben.
Wenn andere Sessions CD-DA- oder andere Daten
enthalten, werden diese übersprungen.
* Erläuterungen zum Auswählen des Dateityps finden
Sie auf Seite 35.
Wiedergabereihenfolge von MP3-/
WMA-/AAC-/JPEG-/DivX
®
-/MPEG-4-
Dateien
Hinweise zu MP3-Dateien
• ID3-Tags der Versionen 1.0, 1.1, 2.2, 2.3 und
2.4 stehen nur bei MP3 zur Verfügung. Ein ID3-
Tag besteht aus 15/30 Zeichen (1.0 und 1.1) bzw.
63/126 Zeichen (2.2, 2.3 und 2.4).
• Fügen Sie beim Benennen einer MP3-Datei
unbedingt die Dateierweiterung „.mp3“ zum
Dateinamen hinzu.
Hinweis zu MP3
Wenn Sie eine MP3-Datei mit einer hohen Bitrate, wie
z. B. 384 Kbps, wiedergeben, kommt es
möglicherweise zu Tonaussetzern.
Ordner
(Album)
MP3-/WMA-/
AAC-/JPEG-/
DivX-/MPEG-4-
Datei (Stück/
Bild/Video)
MP3/WMA/AAC/
JPEG/DivX/
MPEG-4

51
D:\Documents and Settings\takashi-shimomura\Desktop\DTP\848220S MEX-
DV1500U(EUR)\4120899211_MEX-DV1500U_ML\02DE02CD-E.fm
masterpage:RightD:\Documents and Settings\takashi-shimomura\Desktop\DTP\848220S MEX-
DV1500U(EUR)\4120899211_MEX-DV1500U_ML\02DE02CD-E.fm
masterpage:Right
MEX-DV1500U
4-120-899-21 (1)
Hinweise zu WMA-Dateien
• WMA-Tags bestehen aus 63 Zeichen.
• Fügen Sie beim Benennen einer WMA-Datei
unbedingt die Dateierweiterung „.wma“ zum
Dateinamen hinzu.
Hinweise zu AAC-Dateien
• AAC-Tags bestehen aus 126 Zeichen.
• Fügen Sie beim Benennen einer AAC-Datei
unbedingt die Dateierweiterung „.m4a“ zum
Dateinamen hinzu.
Hinweise zu JPEG-Dateien
• JPEG steht für „Joint Photographic Experts
Group“ und bezeichnet einen Formatstandard zum
Komprimieren von Bilddateien. Die Standbilder
werden auf etwa 1/10 bis 1/100 der Originalgröße
komprimiert.
• Fügen Sie beim Benennen einer JPEG-Datei
unbedingt die Dateierweiterung „.jpg“ zum
Dateinamen hinzu.
Hinweis zu JPEG
Die Wiedergabe progressiver JPEG-Dateien wird
nicht unterstützt.
Hinweise zu DivX
®
-Dateien
DivX
®
steht für „Digital Video Express“ und
bezeichnet einen von der DivX, Inc., entwickelten
Formatstandard zum Komprimieren von digitalen
Videodateien.
Dieses Produkt ist ein offizielles
DivX
®
Certified-Produkt, geeignet zur
Wiedergabe von DivX
®
-Videodateien jeder
Version (einschließlich DivX
®
6) mit den
Standardwiedergabefunktionen von DivX
®
-
Mediendateien.
Hinweise zu MPEG-4-Dateien
MPEG-4-Dateien auf einer Disc können
wiedergegeben werden, sofern sie den folgenden
Anforderungen entsprechen. Die Wiedergabe kann
jedoch nicht bei allen MPEG-4-Dateien garantiert
werden, auch wenn sie den Anforderungen
entsprechen.
• Profil: MPEG-4 Simple Profile
• Bitrate: max. 25.000 Kbps
• Bildrate: max. 30 fps (Bilder pro Sekunde)
• Bildgröße: max. 320 × 240 Pixel
• Audio: max. 320 Kbps (AAC-LC)
• Dateierweiterung: .mp4
Wartung
Austauschen der Lithiumbatterie der
Kartenfernbedienung
Unter normalen Bedingungen hält die Batterie etwa
1 Jahr. Die Lebensdauer der Batterie kann je nach
Gebrauch des Geräts jedoch auch kürzer sein.
Wenn die Batterie schwächer wird, verkürzt sich die
Reichweite der Kartenfernbedienung. Tauschen Sie
die Batterie gegen eine neue CR2025-
Lithiumbatterie aus. Bei Verwendung einer anderen
Batterie besteht Feuer- oder Explosionsgefahr.
Hinweise zur Lithiumbatterie
• Bewahren Sie die Lithiumbatterie außerhalb der
Reichweite von Kindern auf. Sollte eine
Lithiumbatterie verschluckt werden, ist umgehend
ein Arzt aufzusuchen.
• Wischen Sie die Batterie mit einem trockenen Tuch
ab, um einen guten Kontakt zwischen den
Batteriepolen und -anschlüssen sicherzustellen.
• Achten Sie beim Einlegen der Batterie auf die
richtige Polarität.
• Halten Sie die Batterie nicht mit einer Metallpinzette.
Dies könnte zu einem Kurzschluss führen.
Fortsetzung auf der nächsten Seite t
c
Mit der Seite +
nach oben
VORSICHT
Die Batterie kann bei falscher Handhabung
explodieren!
Auf keinen Fall darf sie aufgeladen,
auseinandergenommen oder ins Feuer
geworfen werden.
Entsorgungshinweis: Bitte werfen Sie nur
entladene Batterien in die Sammelboxen beim
Handel oder den Kommunen. Entladen sind
Batterien in der Regel dann, wenn das Gerät
abschaltet und „Batterie leer“ signalisiert oder
nach längerer Gebrauchsdauer der Batterien
nicht mehr einwandfrei funktioniert.
Um sicherzugehen, kleben Sie die Batteriepole
z. B. mit einem Klebestreifen ab oder geben Sie
die Batterien einzeln in einen Plastikbeutel.

52
D:\Documents and Settings\takashi-shimomura\Desktop\DTP\848220S MEX-
DV1500U(EUR)\4120899211_MEX-DV1500U_ML\02DE02CD-E.fm
masterpage:Left
MEX-DV1500U
4-120-899-21 (1)
Austauschen der
Sicherung
Wenn Sie eine Sicherung
austauschen, achten Sie darauf,
eine Ersatzsicherung mit dem
gleichen Ampere-Wert wie die
Originalsicherung zu
verwenden. Dieser ist auf der
Originalsicherung angegeben.
Wenn die Sicherung
durchbrennt, überprüfen Sie
den Stromanschluss und
tauschen die Sicherung aus. Brennt die neue
Sicherung ebenfalls durch, kann eine interne
Fehlfunktion vorliegen. Wenden Sie sich in einem
solchen Fall an Ihren Sony-Händler.
Reinigen der Anschlüsse
Das Gerät funktioniert möglicherweise nicht
ordnungsgemäß, wenn die Anschlüsse zwischen
dem Gerät und der Frontplatte verschmutzt sind.
Um dies zu vermeiden, nehmen Sie die Frontplatte
ab (Seite 15) und reinigen Sie die Anschlüsse mit
einem Wattestäbchen. Drücken Sie dabei nicht zu
fest auf die Anschlüsse. Andernfalls können sie
beschädigt werden.
Hinweise
• Schalten Sie aus Sicherheitsgründen vor dem
Reinigen der Anschlüsse die Zündung aus und
ziehen Sie den Schlüssel aus dem Zündschloss.
• Berühren Sie die Anschlüsse unter keinen
Umständen direkt mit den Händen oder einem
Metallgegenstand.
Ausbauen des Geräts
1 Entfernen Sie die Schutzumrandung.
1 Nehmen Sie die Frontplatte ab (Seite 15).
2 Fassen Sie die Schutzumrandung mit den
Fingern an den Seitenkanten und ziehen
Sie sie heraus.
2 Nehmen Sie das Gerät heraus.
1 Setzen Sie beide Löseschlüssel
gleichzeitig so ein, dass sie mit einem
Klicken einrasten.
2 Ziehen Sie an den Löseschlüsseln, um das
Gerät zu lösen.
3 Ziehen Sie das Gerät aus der Halterung.
Sicherung (10 A)
Hauptgerät
Rückseite der
Frontplatte
x
Der Haken
muss nach
innen weisen.

53
D:\Documents and Settings\takashi-shimomura\Desktop\DTP\848220S MEX-
DV1500U(EUR)\4120899211_MEX-DV1500U_ML\02DE02CD-E.fm
masterpage:RightD:\Documents and Settings\takashi-shimomura\Desktop\DTP\848220S MEX-
DV1500U(EUR)\4120899211_MEX-DV1500U_ML\02DE02CD-E.fm
masterpage:Right
MEX-DV1500U
4-120-899-21 (1)
Technische Daten
System
Laser: Halbleiter-Laser
Signalformat: PAL/NTSC, umschaltbar
DVD/CD-Player
Signal-Rauschabstand: 120 dB
Frequenzgang: 10 – 20.000 Hz
Gleichlaufschwankungen: Unterhalb der Messgrenze
Harmonische Verzerrung: 0,01 %
Tuner
FM (UKW)
Empfangsbereich: 87,5 – 108,0 MHz
Antennenanschluss:
Anschluss für Außenantenne
Zwischenfrequenz: 10,7 MHz/450 kHz
Nutzbare Empfindlichkeit: 9 dBf
Trennschärfe: 75 dB bei 400 kHz
Signal-Rauschabstand: 67 dB (stereo), 69 dB (mono)
Harmonische Verzerrung bei 1 kHz: 0,5 % (stereo),
0,3 % (mono)
Kanaltrennung: 35 dB bei 1 kHz
Frequenzgang: 30 – 15.000 Hz
MW/LW
Empfangsbereich:
MW: 531 – 1.602 kHz
LW: 153 – 279 kHz
Antennenanschluss:
Anschluss für Außenantenne
Zwischenfrequenz: 10,7 MHz/450 kHz
Empfindlichkeit: MW: 30 µV, LW: 40 µV
USB-Player
Schnittstelle: USB (Full-Speed)
Maximale Stromstärke: 500 mA
Endverstärker
Ausgänge: Lautsprecherausgänge (versiegelte
Anschlüsse)
Lautsprecherimpedanz: 4 – 8 Ohm
Maximale Ausgangsleistung: 52 W × 4 (an 4 Ohm)
Allgemeines
Ausgänge:
Videoausgang
Audioausgänge hinten
Motorantennen-Steueranschluss
Steueranschluss für Endverstärker
Eingänge:
AUX-Audioeingänge
Antenneneingang
Steueranschluss für Parkbremse
AUX-Eingangsbuchse (Stereominibuchse)
USB-Signaleingang
Klangregler:
Bässe: ±10 dB bei 60 Hz
Mitten: ±10 dB bei 1 kHz
Höhen: ±10 dB bei 10 kHz
Betriebsspannung: 12 V Gleichstrom, Autobatterie
(negative Erdung)
Abmessungen: ca. 178 × 50 × 179 mm (B/H/T)
Einbaumaße: ca. 182 × 53 × 163 mm (B/H/T)
Gewicht: ca. 1,4 kg
Mitgeliefertes Zubehör:
Kartenfernbedienung RM-X168
Montageteile und Anschlusszubehör (1 Satz)
Ihr Händler führt unter Umständen nicht alle der
oben genannten Zubehörteile. Fragen Sie Ihren
Händler nach ausführlichen Informationen.
DivX, DivX Certified und die zugehörigen Logos
sind Markenzeichen von DivX, Inc., und werden in
Lizenz verwendet.
Änderungen, die dem technischen Fortschritt dienen,
bleiben vorbehalten.
US-amerikanische Patente und Patente anderer
Länder lizenziert von Dolby Laboratories.
MPEG Layer-3 Audiocodiertechnologie und
Patente lizenziert von Fraunhofer IIS und Thomson.
Dieses Produkt ist durch bestimmte gewerbliche
Schutz- und Urheberrechte der Microsoft
Corporation geschützt. Die Verwendung oder der
Vertrieb derartiger Technologie außerhalb dieses
Produkts ohne eine Lizenz von Microsoft oder
einer autorisierten Microsoft-Niederlassung ist
untersagt.
• In bestimmten Leiterplatten werden keine
halogenierten Flammschutzmittel verwendet.
• Im Gehäuse werden keine halogenierten
Flammschutzmittel verwendet.
• Papier wird als Verpackungsfüllmaterial verwendet.

54
D:\Documents and Settings\takashi-shimomura\Desktop\DTP\848220S MEX-
DV1500U(EUR)\4120899211_MEX-DV1500U_ML\02DE02CD-E.fm
masterpage:Left
MEX-DV1500U
4-120-899-21 (1)
Störungsbehebung
Anhand der folgenden Checkliste können Sie die
meisten Probleme, die möglicherweise an Ihrem
Gerät auftreten, selbst beheben.
Bevor Sie die folgende Checkliste durchgehen,
überprüfen Sie bitte zunächst, ob Sie das Gerät
richtig angeschlossen und bedient haben.
Wenn sich das Problem nicht beheben lässt,
besuchen Sie folgende Support-Website.
Je nach angeschlossenem Monitor kann es ein
paar Sekunden dauern, bis sich das Gerät nach
dem Ausschalten der Zündung ausschaltet. Dies
ist keine Fehlfunktion.
Allgemeines
Das Gerät wird nicht mit Strom versorgt.
• Prüfen Sie die Verbindung oder Sicherung.
• Wenn Sie das Gerät ausschalten und die Anzeige
ausgeblendet ist, können Sie es nicht mit der
Kartenfernbedienung bedienen.
t Schalten Sie das Gerät ein.
Die Motorantenne wird nicht ausgefahren.
Die Motorantenne hat kein Relaiskästchen.
Kein Signalton ertönt.
• Der Signalton ist deaktiviert (Seite 45).
• Ein gesondert erhältlicher Endverstärker ist
angeschlossen und Sie verwenden nicht den
integrierten Verstärker.
Der Speicherinhalt wurde gelöscht.
• Die Taste RESET wurde gedrückt.
t Speichern Sie die Einstellungen erneut.
• Das Stromversorgungskabel wurde gelöst, die
Verbindung zur Batterie besteht nicht mehr oder das
Kabel bzw. die Batterie ist falsch angeschlossen.
Gespeicherte Sender und die korrekte Uhrzeit
werden gelöscht.
Die Sicherung ist durchgebrannt.
Störgeräusche sind zu hören, wenn der
Zündschlüssel gedreht wird.
Die Leitungen sind nicht korrekt an den
Stromanschluss für Zubehörgeräte im Auto
angeschlossen.
Die Anzeige wird ausgeblendet bzw. erscheint
nicht im Display.
• Der Dimmer ist auf „DIM-ON“ eingestellt (Seite 45).
• Die Anzeige wird ausgeblendet, wenn Sie (OFF)
gedrückt halten.
t Halten Sie (OFF) am Gerät erneut gedrückt, bis
die Anzeige eingeblendet wird.
• Die Anschlüsse sind verschmutzt (Seite 52).
Support-Website
http://support.sony-europe.com
Die Ausschaltautomatik funktioniert nicht.
Das Gerät ist noch eingeschaltet. Die
Ausschaltautomatik funktioniert erst bei
ausgeschaltetem Gerät.
t Schalten Sie das Gerät aus.
Bild
Es ist kein Bild zu sehen/das Bild ist
verrauscht.
• Eine Verbindung wurde nicht richtig vorgenommen.
• Überprüfen Sie die Verbindung zum angeschlossenen
Gerät und stellen Sie den Eingangswählschalter am
anderen Gerät auf die Signale von diesem Gerät ein.
• Die Disc ist beschädigt oder verschmutzt.
• Das Gerät ist nicht richtig installiert.
tInstallieren Sie das Gerät in einem Winkel von
unter 45° an einem stabilen Teil des Fahrzeugs.
• Der Monitor ist an AUDIO/VIDEO OUT
angeschlossen und die Parkleitung (hellgrün) ist nicht
mit der Parkbremsenschaltleitung verbunden oder die
Parkbremse wurde nicht betätigt.
• Das falsche Farbsystem ist eingestellt.
tStellen Sie je nach angeschlossenem Monitor als
Farbsystem „PAL“ oder „NTSC“ ein (Seite 45).
Das Bild passt nicht auf den Bildschirm.
Das Bildseitenverhältnis lässt sich bei dieser DVD
nicht ändern.

55
D:\Documents and Settings\takashi-shimomura\Desktop\DTP\848220S MEX-
DV1500U(EUR)\4120899211_MEX-DV1500U_ML\02DE02CD-E.fm
masterpage:RightD:\Documents and Settings\takashi-shimomura\Desktop\DTP\848220S MEX-
DV1500U(EUR)\4120899211_MEX-DV1500U_ML\02DE02CD-E.fm
masterpage:Right
MEX-DV1500U
4-120-899-21 (1)
Ton
Es ist kein Ton zu hören/Ton setzt aus/Ton ist
gestört.
• Eine Verbindung wurde nicht richtig vorgenommen.
• Überprüfen Sie die Verbindung zum angeschlossenen
Gerät und stellen Sie den Eingangswählschalter am
anderen Gerät auf die Signale von diesem Gerät ein.
• Die Disc ist beschädigt oder verschmutzt.
• Das Gerät ist nicht richtig installiert.
t Installieren Sie das Gerät in einem Winkel von
unter 45° an einem stabilen Teil des Fahrzeugs.
• Die Abtastfrequenz der MP3-Datei beträgt nicht 16,
22,05, 24, 32, 44,1 oder 48 kHz.
• Die Abtastfrequenz der WMA-Datei beträgt nicht 32,
44,1 oder 48 kHz.
• Die Abtastfrequenz der AAC-Datei beträgt nicht 44,1
oder 48 kHz.
• Die Bitrate der MP3-Datei beträgt nicht 8 bis
384 Kbps.
• Die Bitrate der WMA-Datei beträgt nicht 32 bis
384 Kbps.
• Die Bitrate der AAC-Datei beträgt nicht 16 bis
320 Kbps.
• Das Gerät befindet sich im Pausemodus oder im
Modus zum Vorwärts-/Rückwärtssuchen.
• Die Einstellungen für die Ausgänge wurden nicht
korrekt vorgenommen.
• Der DVD-Ausgangspegel ist zu niedrig (Seite 28).
• Die Lautstärke ist zu niedrig.
• Die Stummschaltfunktion ist aktiviert.
• Der Fader-Regler „FAD“ ist nicht für ein
2-Lautsprecher-System eingestellt.
• Das Format wird nicht unterstützt (z. B. DTS).
t Sehen Sie nach, ob das Format von diesem Gerät
unterstützt wird (Seite 8).
Der Ton ist gestört.
Halten Sie die verschiedenen Kabel voneinander fern.
Disc-Funktionen
Es lässt sich keine Disc einlegen.
• Es ist bereits eine andere Disc eingelegt.
• Die Disc wurde mit Gewalt falsch herum oder falsch
eingelegt.
Die Disc lässt sich nicht abspielen.
• Die Disc ist beschädigt oder verschmutzt.
• Die Disc ist nicht geeignet.
• Die DVD kann aufgrund des Regionalcodes nicht
wiedergegeben werden.
• Die Disc ist nicht abgeschlossen (Seite 50).
• Das Disc-Format und die Dateiversion sind nicht mit
diesem Gerät kompatibel (Seite 8, 50).
• Drücken Sie Z und nehmen Sie die Disc heraus.
MP3-/WMA-/AAC-/JPEG-/DivX-/MPEG-4-
Dateien lassen sich nicht wiedergeben.
• Die Aufnahme erfolgte nicht im Format ISO 9660,
Stufe 1 oder 2, bzw. im erweiterten Joliet- oder
Romeo-Format (DATA-CD) oder im Format UDF
Bridge (DATA-DVD) (Seite 50).
• Die Dateierweiterung ist falsch (Seite 50).
• Die Dateien wurden nicht im MP3-/WMA-/AAC-/
JPEG-/DivX-/MPEG-4-Format gespeichert.
• Wenn eine Disc mehrere Dateitypen enthält, kann nur
der ausgewählte Dateityp (Audio/Video/Bild)
wiedergegeben werden.
t Wählen Sie den passenden Dateityp aus der Liste
aus (Seite 35).
Es dauert länger, bis die Wiedergabe von
MP3-/WMA-/AAC-/JPEG-/DivX-/MPEG-4-
Dateien beginnt.
Bei folgenden Discs dauert es länger, bis die
Wiedergabe beginnt:
– Discs mit einer komplizierten Datei-/Ordnerstruktur.
– Multisession-/Multi-Border-Discs.
– Discs, zu denen noch Daten hinzugefügt werden
können.
Die Disc wird nicht von vorne wiedergegeben.
Die Wiedergabefortsetzung oder die
Wiedergabefortsetzung für mehrere Discs (Seite 42) ist
aktiviert.
Bestimmte Funktionen lassen sich nicht
ausführen.
Bei manchen Discs lassen sich Funktionen wie Stopp,
Suchen, Repeat oder Shuffle Play nicht ausführen.
Näheres dazu schlagen Sie bitte in den mit der Disc
gelieferten Anweisungen nach.
Die Sprache für die Tonspur/Untertitel oder der
Blickwinkel lässt sich nicht ändern.
• Versuchen Sie es über das Menü der DVD statt mit
der Direktwahltaste auf der Kartenfernbedienung
(Seite 17).
• Auf der betreffenden DVD sind Tonspur oder
Untertitel nicht in mehreren Sprachen vorhanden
bzw. es gibt nicht mehrere Blickwinkel.
• Bei der DVD ist ein Wechsel nicht zulässig.
Im Display angezeigte Informationen laufen
nicht automatisch durch.
• Bei Discs mit sehr viel Textinformationen laufen
diese im Display möglicherweise nicht durch.
• „AUTO-SCRL“ ist auf „OFF“ gesetzt.
t Stellen Sie „A.SCRL-ON“ ein (Seite 45).
Die Funktionstasten funktionieren nicht.
Die Disc lässt sich nicht auswerfen.
Drücken Sie die Taste RESET (Seite 14).
Sie haben das Kennwort für die
Kindersicherung vergessen.
Geben Sie in der Kennworteingabeanzeige die Zahl
„5776“ ein, um die Kindersicherung zu deaktivieren
(Seite 30).
Fortsetzung auf der nächsten Seite t

56
D:\Documents and Settings\takashi-shimomura\Desktop\DTP\848220S MEX-
DV1500U(EUR)\4120899211_MEX-DV1500U_ML\02DE02CD-E.fm
masterpage:Left
MEX-DV1500U
4-120-899-21 (1)
Fehleranzeigen/Meldungen
Radioempfang
Sender lassen sich nicht empfangen.
Der Ton ist stark gestört.
• Die Verbindung wurde nicht richtig hergestellt.
t Schließen Sie eine Motorantennen-Steuerleitung
(blau) oder eine Stromversorgungsleitung für
Zubehörgeräte (rot) an die
Stromversorgungsleitung für den
Antennenverstärker des Fahrzeugs an (nur, wenn
das Fahrzeug mit einer in der Heck-/
Seitenfensterscheibe integrierten FM (UKW)/
MW/LW-Antenne ausgestattet ist).
t Prüfen Sie die Verbindung der Autoantenne.
t Wenn die Motorantenne nicht automatisch
ausgefahren wird, prüfen Sie die Verbindung der
Motorantennen-Steuerleitung.
Gespeicherte Sender lassen sich nicht
einstellen.
• Speichern Sie den/die Sender unter der korrekten
Frequenz ab.
• Das Sendesignal ist zu schwach.
Der automatische Sendersuchlauf funktioniert
nicht.
• Die Einstellung für den lokalen Suchmodus ist nicht
korrekt.
t Der automatische Sendersuchlauf stoppt zu oft:
Stellen Sie „LOCAL-ON“ ein (Seite 46).
t Der automatische Sendersuchlauf hält bei keinem
Sender an:
Stellen Sie „MONO-ON“ ein (Seite 46).
• Das Sendesignal ist zu schwach.
t Stellen Sie die Sender manuell ein.
Während des UKW-Empfangs blinkt die
Anzeige „ST“.
• Stellen Sie die Frequenz genau ein.
• Das Sendesignal ist zu schwach.
t Stellen Sie „MONO-ON“ ein (Seite 46).
Eine UKW-Stereosendung ist nur monaural zu
hören.
Das Gerät ist in den monauralen Empfangsmodus
geschaltet.
t Stellen Sie „MONO-OFF“ ein (Seite 46).
RDS
Der Sendersuchlauf (SEEK) startet nach ein
paar Sekunden Radioempfang.
Der Sender ist kein Verkehrsfunksender (TP) oder die
Sendesignale sind zu schwach.
t Deaktivieren Sie TA (Seite 37).
Es sind keine Verkehrsdurchsagen zu hören.
• Aktivieren Sie TA (Seite 37).
• Der Sender sendet keine Verkehrsdurchsagen,
obwohl es sich um einen Verkehrsfunksender (TP)
handelt.
t Stellen Sie einen anderen Sender ein.
Bei der PTY-Funktion wird „- - - - - - - -“
angezeigt.
• Der aktuelle Sender ist kein RDS-Sender.
• Es wurden keine RDS-Daten empfangen.
• Der Sender gibt den Programmtyp nicht an.
USB-Wiedergabe
Sie können über einen USB-Hub nichts
wiedergeben lassen.
Dieses Gerät kann keine USB-Geräte erkennen, die
über einen USB-Hub angeschlossen sind.
Die Wiedergabe ist nicht möglich.
Das USB-Gerät funktioniert nicht.
t Schließen Sie das Gerät nochmals an.
Es dauert länger, bis am USB-Gerät die
Wiedergabe beginnt.
Die Dateien auf dem USB-Gerät befinden sich in einer
komplizierten Datei-/Ordnerstruktur.
Ein Signalton ist zu hören.
Das USB-Gerät wurde während der Wiedergabe von
diesem Gerät getrennt.
t Vor dem Trennen eines USB-Geräts müssen Sie
zuerst die Wiedergabe stoppen, um die Daten zu
schützen.
Der Ton setzt aus.
Bei einer hohen Bitrate von über 320 Kbps kommt es
möglicherweise zu Tonaussetzern.
Am Hauptgerät
ERROR
• Die Disc ist verschmutzt oder falsch herum eingelegt.
tReinigen Sie die Disc bzw. legen Sie sie korrekt
ein.
• Eine leere Disc wurde eingelegt.
• Die Disc kann aufgrund eines Problems nicht
wiedergegeben werden.
tLegen Sie eine andere Disc ein.
• Die Disc ist mit diesem Gerät nicht kompatibel.
tLegen Sie eine kompatible Disc ein.
• Das USB-Gerät wurde nicht automatisch erkannt.
tSchließen Sie das Gerät nochmals an.
• Drücken Sie Z und nehmen Sie die Disc heraus.
FAILURE
Die Lautsprecher-/Verstärkeranschlüsse sind nicht
korrekt.
t Überprüfen Sie die Verbindungen anhand der
mitgelieferten Installations-/Anschlussanleitung.
L. SEEK +/–
Beim automatischen Sendersuchlauf ist der lokale
Suchmodus aktiviert.
NO AF
Für den aktuellen Sender gibt es keine
Alternativfrequenz.
t Drücken Sie .m/M>, während der
Programmdienstname blinkt. Das Gerät beginnt
dann mit der Suche nach einer Frequenz mit
denselben PI-Daten (Programmkennung).
„PI SEEK“ wird angezeigt.

57
D:\Documents and Settings\takashi-shimomura\Desktop\DTP\848220S MEX-
DV1500U(EUR)\4120899211_MEX-DV1500U_ML\02DE02CD-E.fm
masterpage:RightD:\Documents and Settings\takashi-shimomura\Desktop\DTP\848220S MEX-
DV1500U(EUR)\4120899211_MEX-DV1500U_ML\02DE02CD-E.fm
masterpage:Right
MEX-DV1500U
4-120-899-21 (1)
Wenn sich das Problem mit diesen
Abhilfemaßnahmen nicht beheben lässt, wenden Sie
sich an einen Sony-Händler.
Wenn Sie das Gerät aufgrund einer Störung bei der
Disc-Wiedergabe zur Reparatur bringen, bringen Sie
bitte auch die Disc mit, die eingelegt war, als das
Problem zum ersten Mal auftrat.
NO DATA
Die Disc bzw. das USB-Gerät enthält keine
Musikdateien.
t Legen Sie eine Musik-CD in dieses Gerät ein.
t Schließen Sie ein USB-Gerät an, das Musikdateien
enthält.
NO DEV (Kein Gerät)
„USB“ ist als Tonquelle ausgewählt, aber es ist kein
USB-Gerät angeschlossen. Ein USB-Gerät oder ein
USB-Kabel wurde während der Wiedergabe von
diesem Gerät getrennt.
t Schließen Sie unbedingt USB-Gerät und USB-
Kabel an.
NO NAME
Die Datei enthält keinen Disc-/Album-/Ordner-/Stück-
/Bild-/Videonamen.
NO TP
Das Gerät sucht weiter nach verfügbaren
Verkehrsfunksendern (TP).
OFFSET
Es liegt möglicherweise eine interne Fehlfunktion vor.
t Überprüfen Sie die Verbindungen. Wenn die
Fehleranzeige weiterhin im Display angezeigt wird,
wenden Sie sich an einen Sony-Händler.
OVERLOAD
Das USB-Gerät ist überlastet.
t Trennen Sie das USB-Gerät von diesem Gerät und
wechseln Sie mit (SOURCE) die Tonquelle.
t Zeigt an, dass das USB-Gerät nicht einwandfrei
funktioniert oder dass ein nicht unterstütztes Gerät
angeschlossen ist.
READ
Das Gerät liest gerade alle Datei-/Albuminformationen
(Ordnerinformationen) von der Disc ein.
t Bitte warten Sie, bis das Einlesen abgeschlossen ist.
Die Wiedergabe beginnt danach automatisch. Je
nach Disc-Struktur kann das Einlesen länger als
eine Minute dauern.
USB NO SUPRT (USB nicht unterstützt)
Das angeschlossene USB-Gerät wird nicht unterstützt.
t Einzelheiten zur Kompatibilität Ihres USB-Geräts
finden Sie auf der Support-Website.
„ “ oder „ “
Sie sind beim Vorwärts- oder Rückwärtssuchen am
Anfang bzw. Ende der Disc angelangt und können
nicht weitersuchen.
„“
Das Zeichen kann mit diesem Gerät nicht angezeigt
werden.
Am Monitor
Playback prohibited by region code.
Die Wiedergabe der DVD ist aufgrund des
unterschiedlichen Regionalcodes nicht zulässig.
Cannot play this disc.
• Die Disc ist mit diesem Gerät nicht kompatibel.
• Die Disc ist nicht abgeschlossen.
No playable data.
Die Disc enthält keine abspielbaren Daten.
Please press RESET.
Das Gerät funktioniert aufgrund einer Störung nicht.
tDrücken Sie die Taste RESET (Seite 14).

58
D:\Documents and Settings\takashi-shimomura\Desktop\DTP\848220S MEX-
DV1500U(EUR)\4120899211_MEX-DV1500U_ML\02DE02CD-E.fm
masterpage:Left
MEX-DV1500U
4-120-899-21 (1)
Glossar
Album
Zusammenstellung von Musikstücken in Form von
MP3-/WMA-/AAC-Audiostücken oder Bildern in
Form von JPEG-Dateien auf einer DATA-CD/DVD.
Datei
• Ein MP3-/WMA-/AAC-Stück oder ein JPEG-Bild
auf einer DATA-CD, DATA-DVD oder einem
USB-Gerät.
• Ein MP3-/WMA-/AAC-Stück, ein JPEG-Bild
oder ein DivX-/MPEG-4-Video auf einer DATA-
CD/DATA-DVD.
(„Datei“ wird bei diesem Gerät in einer speziellen
Bedeutung verwendet.) Eine einzelne Datei besteht
aus einem einzelnen Stück, Bild oder Video.
DivX
®
Digitale, von DivX, Inc., entwickelte
Videotechnologie. Mit DivX-Technologie codierte
Videos bieten im Vergleich zu anderen
Videoformaten mit die höchste Qualität bei einer
relativ geringen Dateigröße.
Dolby Digital
Digitale Komprimierungstechnologie für Tondaten,
entwickelt von den Dolby Laboratories. Die
Technologie entspricht dem 5.1-Kanal-Raumklang.
Bei diesem Format ist der hintere Kanal in Stereo
und es gibt einen separaten
Tiefsttonlautsprecherkanal. Dolby Digital bietet ein
5.1-Kanalformat mit guter Kanaltrennung, wie es
auch in Dolby Digital-Tonsystemen für Kinos
eingesetzt wird. Die hervorragende Kanaltrennung
ist darauf zurückzuführen, dass alle Kanaldaten
getrennt aufgezeichnet werden, und die
Qualitätseinbußen sind minimal, da alle Kanaldaten
digital verarbeitet werden.
DVD
Eine Disc, auf der bis zu 8 Stunden Filmaufnahmen
gespeichert werden können, obwohl ihr
Durchmesser nicht größer ist als der einer CD.
Die Datenkapazität einer DVD mit einer bespielten
Seite und einer Daten tragenden Schicht (einseitig
bespielt, einschichtig) beträgt 4,7 GB (Gigabyte) -
das ist das 7-Fache der Datenkapazität einer CD.
Die Datenkapazität einer DVD mit einer bespielten
Seite und doppelter Schicht (einseitig bespielt,
zweischichtig) beträgt 8,5 GB, die einer DVD mit
zwei bespielten Seiten und einer Schicht (zweiseitig
bespielt, einschichtig) 9,4 GB und die einer DVD
mit zwei bespielten Seiten und doppelter Schicht
(zweiseitig bespielt, zweischichtig) 17 GB.
Die Bilddaten werden im MPEG 2-Format
aufgezeichnet, einem weltweit gültigen Standard für
die digitale Datenkomprimierung. Dabei werden die
Bilddaten auf etwa 1/40 (im Durchschnitt) ihrer
ursprünglichen Größe komprimiert. Darüber hinaus
nutzt die DVD auch eine variable
Codiertechnologie, die je nach Status des Bildes die
zuzuweisenden Daten variiert. Audiodaten werden
in einem Mehrkanalformat wie z. B. Dolby Digital
aufgezeichnet, was eine äußerst realitätsnahe
Tonqualität ermöglicht.
Darüber hinaus stehen auf einer DVD auch
verschiedene weitere Funktionen zur Verfügung,
zum Beispiel die Möglichkeit, einen von mehreren
Blickwinkeln oder eine von mehreren Sprachen
auszuwählen oder die Kindersicherung zu
aktivieren.
DVD-RW
Eine DVD-RW ist ein beschreibbarer und
wiederbeschreibbarer Datenträger mit derselben
Größe wie eine DVD VIDEO. Die DVD-RW kann
in zwei verschiedenen Modi beschrieben werden:
im VR-Modus und im Videomodus. Im
Videomodus erstellte DVD-RWs weisen dasselbe
Format wie DVD VIDEOs auf. Im VR-Modus
(Videoaufnahme) erstellte DVD-RWs bieten
dagegen verschiedene Programmier- und
Bearbeitungsfunktionen.
DVD+RW
Eine DVD+RW (plus RW) ist ein beschreibbarer
und wiederbeschreibbarer Datenträger. DVD+RWs
verwenden ein dem DVD VIDEO-Format
vergleichbares Aufnahmeformat.
Filmbasierte und videobasierte Software
Die Aufzeichnungsformate von DVDs lassen sich in
zwei Kategorien einteilen: filmbasiert und
videobasiert. Filmbasierte DVDs enthalten
Aufnahmen im gleichen Format wie Kinofilme
(24 Vollbilder pro Sekunde). Videobasierte DVDs,
zum Beispiel Fernsehspiele oder Sitcoms, werden
mit 30 Vollbildern bzw. 60 Halbbildern pro Sekunde
angezeigt.
Kapitel
Teil eines Titels auf einer DVD. Ein Titel besteht
aus mehreren Kapiteln.

59
D:\Documents and Settings\takashi-shimomura\Desktop\DTP\848220S MEX-
DV1500U(EUR)\4120899211_MEX-DV1500U_ML\02DE02CD-E.fm
masterpage:RightD:\Documents and Settings\takashi-shimomura\Desktop\DTP\848220S MEX-
DV1500U(EUR)\4120899211_MEX-DV1500U_ML\02DE02CD-E.fm
masterpage:Right
MEX-DV1500U
4-120-899-21 (1)
Szene
Auf einer VIDEO-CD mit PBC-Funktionen
(Wiedergabesteuerung) sind die Menüanzeigen,
Videos und Standbilder in so genannte „Szenen“
unterteilt.
Stück
Untereinheiten einer Bild- oder Tonaufnahme auf
einer VIDEO-CD, CD oder MP3-/WMA-/AAC-
Disc. Ein Album enthält mehrere Stücke (nur MP3/
WMA/AAC).
Titel
Die größten Einheiten von Bild- oder
Tonaufnahmen auf einer DVD, ein ganzer Film usw.
bei einer Video-Software oder ein ganzes Album bei
einer Audio-Software.
VIDEO-CD
Eine CD mit Filmen.
Die Bilddaten werden im MPEG 1-Format
aufgezeichnet, einem weltweit gültigen Standard für
die digitale Datenkomprimierung. Dabei werden die
Bilddaten auf etwa 1/140 ihrer ursprünglichen
Größe komprimiert. Dadurch passen auf eine
VIDEO-CD mit 12 cm Durchmesser
Filmaufnahmen von bis zu 74 Minuten.
VIDEO-CDs enthalten darüber hinaus auch
Audiodaten (Tonaufnahmen) in einem kompakten
Format. Töne, die für das menschliche Ohr nicht
hörbar sind, werden unterdrückt, während Töne, die
für das menschliche Ohr hörbar sind, aufgezeichnet
werden. Eine VIDEO-CD kann das 6-Fache an
Audiodaten aufnehmen wie eine herkömmliche
Audio-CD.
Es gibt 3 Versionen von VIDEO-CDs.
• Version 1.0, 1.1: Es können nur Filmaufnahmen
mit Ton wiedergegeben werden.
• Version 2.0: Es können auch Standbilder in hoher
Auflösung wiedergegeben werden und es stehen
PBC-Funktionen zur Verfügung.
Dieses Gerät entspricht allen 3 oben genannten
Versionen.

60
D:\Documents and Settings\takashi-shimomura\Desktop\DTP\848220S MEX-
DV1500U(EUR)\4120899211_MEX-DV1500U_ML\02DE02CD-E.fm
masterpage:Left
MEX-DV1500U
4-120-899-21 (1)
Sprachcode-/Gebietscodeliste
Liste der Sprachcodes
Die Schreibung der einzelnen Sprachen entspricht der ISO-Norm 639: 1988 (E/F).
Gebietscodeliste
Code Sprache Code Sprache Code Sprache Code Sprache
1027 Afar
1028 Abkhazian
1032 Afrikaans
1039 Amharic
1044 Arabic
1045 Assamese
1051 Aymara
1052 Azerbaijani
1053 Bashkir
1057 Byelorussian
1059 Bulgarian
1060 Bihari
1061 Bislama
1066 Bengali;
Bangla
1067 Tibetan
1070 Breton
1079 Catalan
1093 Corsican
1097 Czech
1103 Welsh
1105 Danish
1109 German
1130 Bhutani
1142 Greek
1144 English
1145 Esperanto
1149 Spanish
1150 Estonian
1151 Basque
1157 Persian
1165 Finnish
1166 Fiji
1171 Faroese
1174 French
1181 Frisian
1183 Irish
1186 Scots Gaelic
1194 Galician
1196 Guarani
1203 Gujarati
1209 Hausa
1217 Hindi
1226 Croatian
1229 Hungarian
1233 Armenian
1235 Interlingua
1239 Interlingue
1245 Inupiak
1248 Indonesian
1253 Icelandic
1254 Italian
1257 Hebrew
1261 Japanese
1269 Yiddish
1283 Javanese
1287 Georgian
1297 Kazakh
1298 Greenlandic
1299 Cambodian
1300 Kannada
1301 Korean
1305 Kashmiri
1307 Kurdish
1311 Kirghiz
1313 Latin
1326 Lingala
1327 Laothian
1332 Lithuanian
1334 Latvian;
Lettish
1345 Malagasy
1347 Maori
1349 Macedonian
1350 Malayalam
1352 Mongolian
1353 Moldavian
1356 Marathi
1357 Malay
1358 Maltese
1363 Burmese
1365 Nauru
1369 Nepali
1376 Dutch
1379 Norwegian
1393 Occitan
1403 (Afan)Oromo
1408 Oriya
1417 Punjabi
1428 Polish
1435 Pashto;
Pushto
1436 Portuguese
1463 Quechua
1481 Rhaeto-
Romance
1482 Kirundi
1483 Romanian
1489 Russian
1491 Kinyarwanda
1495 Sanskrit
1498 Sindhi
1501 Sangho
1502 Serbo-
Croatian
1503 Singhalese
1505 Slovak
1506 Slovenian
1507 Samoan
1508 Shona
1509 Somali
1511 Albanian
1512 Serbian
1513 Siswati
1514 Sesotho
1515 Sundanese
1516 Swedish
1517 Swahili
1521 Tamil
1525 Telugu
1527 Tajik
1528 Thai
1529 Tigrinya
1531 Turkmen
1532 Tagalog
1534 Setswana
1535 Tonga
1538 Turkish
1539 Tsonga
1540 Tatar
1543 Twi
1557 Ukrainian
1564 Urdu
1572 Uzbek
1581 Vietnamese
1587 Volapük
1613 Wolof
1632 Xhosa
1665 Yoruba
1684 Chinese
1697 Zulu
1703 Nicht
angegeben
Code Gebiet Code Gebiet Code Gebiet Code Gebiet
2044 Argentinien
2047 Australien
2057 Belgien
2070 Brasilien
2090 Chile
2092 China
2115 Dänemark
2109 Deutschland
2165 Finnland
2174 Frankreich
2184 Groß-
britannien
2248 Indien
2238 Indonesien
2254 Italien
2276 Japan
2079 Kanada
2304 Korea
2363 Malaysia
2362 Mexiko
2390 Neuseeland
2376 Niederlande
2379 Norwegen
2046 Österreich
2427 Pakistan
2424 Philippinen
2436 Portugal
2489 Russland
2499 Schweden
2086 Schweiz
2501 Singapur
2149 Spanien
2528 Thailand

61
02DE+00COV-EIX.fm masterpage:Right
MEX-DV1500U
4-120-899-21 (1)
Index
Numerics
16:9 41
2000MP3 6
2000WMA 6
4:3 LETTER BOX 41
4:3 PAN SCAN 41
A
AAC 9, 51
Album (ALBUM) 34
Alternativfrequenzen (AF) 37
Auflisten 34
Ausschaltautomatik (AUTO-
OFF) 45
Automatischer Bildlauf
(AUTO-SCRL) 45
AUX-Eingang vorn 48
B
Balance (BAL) 38
Benutzereinstellungen
(CUSTOM SETUP) 42
Bewegte Anzeige (M.DSPL)
45
Bild (IMAGE) 34
Bild-EQ (PICTURE EQ) 29,
43
Bildschirmkonfiguration
(DISPLAY SETUP) 41
Blickwinkel (ANGLE) 17
D
Datei (FILE) 34
Demo-Modus (DEMO) 45
Dimmer (DIMMER) 45
Direktsuche 33
Discs 8
DivX VOD 42
DivX® 9, 23, 51
Dolby Digital 27, 28
DVD-Hauptmenü 17
DVD-Menü 17
DVD-Pegel (DVD-LEVEL) 28,
47
Dynamikkontrolle (AUDIO
DRC) 43
Dynamikkontrolle (DRC) 43
E
Einstellen des Dolby-Pegels
(DOLBY-ADJ) 47
EQ3 38, 39
Equalizer
Bild (PICTURE EQ) 29,
43
Klang (EQ3) 38, 39
F
Fader (FAD) 38
Farbsystem (COLOR-SYS)
45
Formate 9
G
Gebietscode 60
Geeignete Discs 8
H
Hintergrundbild
(WALLPAPER) 41
I
Intervall für
Bildpräsentationen (SLIDE
SHOW TIME) 42
J
JPEG 9, 23, 51
K
Kapitel (CHAPTER) 33
Kartenfernbedienung 12, 14,
51
Kindersicherung (PARENTAL
CONTROL) 30, 42
Konfigurationsmenüs
Systemkonfiguration 44
Wiedergabekonfiguration
39
L
Lautstärke 10
Lithiumbatterie 51
Lokaler Suchmodus (LOCAL)
46
Loudness (LOUD) 47
M
Menüsprache (MENU) 41
Monauraler Modus (MONO)
46
Monitortyp (MONITOR TYPE)
41
MP3 9, 50
MPEG-4 9, 51
Multi-Border-DVD 50
Multisession-CD 50
N
NTSC 45
O
Ordner (ALBUM) 34
P
PAL 45
Pegel zusätzlicher Geräte
(AUX-LEVEL) 47, 49
Play-List-Wiedergabe (PLAY
LIST PLAY) 43
Programmformat 27
Programmtypauswahl (PTY)
37, 38
Q
Quick-BrowZer 34
R
Radiodatensystem (RDS) 36
Regionalcode 9
Regionalsender (REGIONAL)
37, 46
Repeat Play (REP) 21, 32
S
Shuffle Play (SHUF) 21, 32
Sicherung 52
Signalton (BEEP) 45
Speicherbelegungsautomatik
(BTM) 36
Sprachcode 60
Spracheinstellungen
(LANGUAGE SETUP) 41
Stück (TRACK) 33
Systemkonfiguration 44
Fortsetzung auf der nächsten Seite t

62
02DE+00COV-EIX.fm masterpage:Left
MEX-DV1500U
4-120-899-21 (1)
T
Titel (TITLE) 33
Ton (AUDIO)
Format 27
Kanal 27
Sprache 27, 41
Tonkonfiguration (AUDIO
SETUP) 43
Tonspursprache (AUDIO) 27,
41
U
Uhr einstellen (CLOCK-ADJ)
48
Uhrzeit (CT) 37, 38, 45
Untertitelsprache
(SUBTITLE) 17, 41
USB-Gerät 20
V
Verkehrsdurchsagen (TA) 37
Verkehrsfunksender (TP) 37
W
Wiedergabefortsetzung 17,
19
Wiedergabefortsetzung für
mehrere Discs (MULTI-DISC
RESUME) 6, 42
Wiedergabekonfiguration 39
Wiedergabemodusmenü 24
Wiedergabesteuerung (PBC)
24
WMA 9, 51
Z
Zeitangaben/
Textinformationen (TIME) 26,
33
Zoom (CENTER ZOOM) 29
Zurücksetzen (RESET) 14, 43
Zusätzliche Geräte 48

02DE+00COV-EIX.fm masterpage:Right
MEX-DV1500U
4-120-899-21 (1)

2
D:\Documents and Settings\takashi-shimomura\Desktop\DTP\848220S MEX-
DV1500U(EUR)\4120899211_MEX-DV1500U_ML\03FR01INT-E.fm
masterpage:Left
MEX-DV1500U
4-120-899-21 (1)
Avertissement
Pour prévenir les risques d’incendie ou
d’électrocution, tenir cet appareil à l’abri
de la pluie ou de l’humidité.
Pour prévenir les risques d’électrocution,
ne pas ouvrir le boîtier. Confier les
réparations de l’appareil à un technicien
qualifié uniquement.
ATTENTION
L’utilisation d’instruments optiques avec ce
produit peut augmenter les risques oculaires. Ne
pas démonter le boîtier car le faisceau laser de ce
lecteur CD/DVD constitue un danger pour les
yeux.
Confier les réparations de l’appareil à un
technicien qualifié uniquement.
CAUTION
RADIATION WHEN OPEN AND INTERLOCKS DEFEATED.
DO NOT VIEW DIRECTLY WITH OPTICAL INSTRUMENTS.
:
CLASS 1M VISIBLE/INVISIBLE LASER
Cette étiquette est située sur la partie inférieure
du châssis.
Cette étiquette est située sur le châssis interne
de l’unité du lecteur.
Avis à l’intention des clients : les
informations suivantes s’appliquent
uniquement aux appareils vendus dans
des pays qui appliquent les directives
de l’Union Européenne
Le fabriquant de ce produit est Sony
Corporation, 1-7-1 Konan, Minato-ku, Tokyo,
Japon. Le représentant agréé en matière de
normes CEM et de sécurité des produits est
Sony Deutschland GmbH, Hedelfinger Strasse
61, 70327 Stuttgart, Allemagne. Pour toute
demande d’entretien ou de garantie, veuillez
écrire aux adresses spécifiées dans les
documents d’entretien ou de garantie séparés.
Traitement des appareils électriques
et électroniques en fin de vie
(Applicable dans les pays de l’Union
Européenne et aux autres pays
européens disposant de systèmes
de collecte sélective)
Ce symbole, apposé sur le produit ou sur son emballage,
indique que ce produit ne doit pas être traité avec les
déchets ménagers. Il doit être remis à un point de collecte
approprié pour le recyclage des équipements électriques et
électroniques. En s’assurant que ce produit est bien mis au
rebut de manière appropriée, vous aiderez à prévenir les
conséquences négatives potentielles pour l’environnement
et la santé humaine. Le recyclage des matériaux aidera à
préserver les ressources naturelles. Pour toute information
supplémentaire au sujet du recyclage de ce produit, vous
pouvez contacter votre municipalité, votre déchetterie ou
le magasin où vous avez acheté le produit.
Accessoire compatible : Télécommande
Elimination des piles et accumulateurs
usagés (Applicable dans les pays de
l
’
Union Européenne et aux autres pays
européens disposant de systèmes de
collecte sélective)
Ce symbole, apposé sur les piles et accumulateurs ou sur
les emballages, indique que les piles et accumulateurs
fournis avec ce produit ne doivent pas être traités comme
de simples déchets ménagers. En vous assurant que ces
piles et accumulateurs sont mis au rebut de façon
appropriée, vous participez activement à la prévention des
conséquences négatives que leur mauvais traitement
pourrait provoquer sur l’environnement et sur la santé
humaine. Le recyclage des matériaux contribue par ailleurs
à la préservation des ressources naturelles.
Pour les produits qui pour des raisons de sécurité, de
performance ou d’intégrité de données nécessitent une
connexion permanente à une pile ou à un accumulateur, il
conviendra de vous rapprocher d’un service technique
qualifié pour effectuer son remplacement. En rapportant
votre appareil électrique en fin de vie à un point de collecte
approprié vous vous assurez que la pile ou l’accumulateur
incorporé sera traitée correctement.
Pour tous les autres cas de figure et afin d’enlever les piles
ou accumulateurs en toute sécurité de votre appareil,
reportez-vous au manuel d’utilisation. Rapporter les piles
ou accumulateurs usagés au point de collecte approprié
pour le recyclage.
Pour toute information complémentaire au sujet du
recyclage de ce produit ou des piles et accumulateurs, vous
pouvez contacter votre municipalité, votre déchetterie
locale ou le point de vente où vous avez acheté ce produit.

3
D:\Documents and Settings\takashi-shimomura\Desktop\DTP\848220S MEX-
DV1500U(EUR)\4120899211_MEX-DV1500U_ML\03FR01INT-E.fm
masterpage:Right
MEX-DV1500U
4-120-899-21 (1)
Sécurité
• Vous devez vous conformer aux lois relatives
au radioguidage en vigueur dans votre pays.
• Pour votre sécurité, le moniteur raccordé à
VIDEO OUT est automatiquement mis hors
tension lorsque le frein à main n’est pas serré.
Avertissement au cas où le contact de
votre voiture ne dispose pas d’une
position ACC
Veillez à activer la fonction de mise hors
tension automatique (page 45).
Une fois l’appareil mis hors tension, il s’éteint
complètement et automatiquement après le
laps de temps choisi, afin d’éviter que la
batterie ne se décharge.
Si vous ne réglez pas la fonction de mise hors
tension automatique, appuyez sur la touche
(OFF) et maintenez-la enfoncée jusqu’à ce
que l’affichage disparaisse chaque fois que
vous coupez le contact.
Pour annuler la démonstration (DEMO),
reportez-vous à la page 45.
Prévention des accidents
Les images apparaissent uniquement une fois
le véhicule garé et le frein à main serré.
Si la voiture commence à rouler pendant une
lecture de vidéo, l’affichage des images
provenant de VIDEO OUT est désactivé
automatiquement après affichage de
l’avertissement suivant.
Les images disparaissent de l’écran, mais la
source audio peut être écoutée.
N’utilisez pas l’appareil et ne regardez pas le
moniteur lorsque vous conduisez.
Video blocked for your
safety.

4
D:\Documents and Settings\takashi-shimomura\Desktop\DTP\848220S MEX-
DV1500U(EUR)\4120899211_MEX-DV1500U_ML\03FR+00COV-ETOC.fm
masterpage:Right
Table des matières
MEX-DV1500U
4-120-899-21 (1)
Félicitations ! . . . . . . . . . . . . . . . . . . . . . . . . . . .6
Droits d’auteur. . . . . . . . . . . . . . . . . . . . . . . .7
Disques pouvant être lus et symboles utilisés
dans ce manuel . . . . . . . . . . . . . . . . . . . . . . . . . .8
Emplacement et fonction des commandes . . . .10
Appareil principal . . . . . . . . . . . . . . . . . . . .10
Mini-télécommande RM-X168 . . . . . . . . . .12
Préparation
Installation de l’appareil et du moniteur
en option . . . . . . . . . . . . . . . . . . . . . . . . . 14
Réinitialisation de l’appareil . . . . . . . . . 14
Préparation de la
mini-télécommande . . . . . . . . . . . . . . . . 14
Retrait de la façade . . . . . . . . . . . . . . . . 15
Installation de la façade. . . . . . . . . . . . . . . .15
Opérations de base
Lecture de disques vidéo . . . . . . . . . . . 16
Lecture de disques audio . . . . . . . . . . . 18
Lecture d’un périphérique USB . . . . . . 20
Rubriques d’affichage . . . . . . . . . . . . . . . . .21
Lecture répétée et aléatoire . . . . . . . . . . . . .21
Ecoute de la radio . . . . . . . . . . . . . . . . . 22
Opérations avancées — Disques
Lecture de fichiers DivX
®
/MPEG-4/JPEG . . .23
Lecture de vidéos DivX
®
/MPEG-4. . . . . . .23
Lecture d’une image JPEG . . . . . . . . . . . . .23
Utilisation des fonctions PBC
— Contrôle de lecture . . . . . . . . . . . . . . . . . . .24
Utilisation du menu mode de lecture . . . . . . . .24
Visualisation des informations temporelles/
textuelles du disque . . . . . . . . . . . . . . . . . . . . .26
Configuration des paramètres audio. . . . . . . . .27
Modification de la langue/du format du
son . . . . . . . . . . . . . . . . . . . . . . . . . . . . . . . .27
Vérification du format du programme . . . .27
Réglage du niveau de sortie audio
— Niveau DVD. . . . . . . . . . . . . . . . . . . . . .28
Agrandissement d’images . . . . . . . . . . . . . . . .29
Réglage de la qualité d’image
— Picture EQ . . . . . . . . . . . . . . . . . . . . . . . . . 29
Personnalisation de la qualité d’image . . . . 30
Verrouillage des disques
— Contrôle parental . . . . . . . . . . . . . . . . . . . . 30
Activation du contrôle parental. . . . . . . . . . 30
Modification de la zone et du niveau
d’évaluation des films. . . . . . . . . . . . . . . . . 31
Lecture répétée et aléatoire . . . . . . . . . . . . . . . 32
Recherche directe . . . . . . . . . . . . . . . . . . . . . . 33
Affichage par liste de plages/d’images/de
fichiers vidéo — Quick-BrowZer . . . . . . . . . . 34
Sélection d’une plage/d’une image/d’un
fichier vidéo . . . . . . . . . . . . . . . . . . . . . . . . 34
Sélection d’un type de fichier . . . . . . . . . . . 35
Visualisation des informations relatives au
disque audio. . . . . . . . . . . . . . . . . . . . . . . . . . . 35
Opérations avancées — Radio
Mémorisation et réception des stations . . . . . . 36
Mémorisation automatique — BTM. . . . . . 36
Mémorisation manuelle . . . . . . . . . . . . . . . 36
Réception des stations mémorisées. . . . . . . 36
Fonction RDS . . . . . . . . . . . . . . . . . . . . . . . . . 36
Aperçu. . . . . . . . . . . . . . . . . . . . . . . . . . . . . 36
Réglages AF et TA . . . . . . . . . . . . . . . . . . . 37
Sélection de PTY . . . . . . . . . . . . . . . . . . . . 38
Réglage de CT . . . . . . . . . . . . . . . . . . . . . . 38
Réglage du son
Réglage des caractéristiques du son . . . . . . . . 38
Personnalisation de la courbe de l’égaliseur
— EQ3 . . . . . . . . . . . . . . . . . . . . . . . . . . . . 39
Paramètres
Configuration visuelle . . . . . . . . . . . . . . . . . . . 39
Opération de base de la configuration
visuelle . . . . . . . . . . . . . . . . . . . . . . . . . . . . 39
Configuration de la langue à l’écran ou de
la bande son . . . . . . . . . . . . . . . . . . . . . . . . 41
Configuration de l’affichage. . . . . . . . . . . . 41
Configuration personnalisée . . . . . . . . . . . . 42
Configuration audio . . . . . . . . . . . . . . . . . . 43
Réinitialisation de tous les paramètres . . . . 43

En ce qui concerne l’installation et les
connexions, consulter le manuel
d’installation/raccordement fourni.
5
D:\Documents and Settings\takashi-shimomura\Desktop\DTP\848220S MEX-
DV1500U(EUR)\4120899211_MEX-DV1500U_ML\03FR+00COV-ETOC.fm
masterpage:Right
MEX-DV1500U
4-120-899-21 (1)
Site d’assistance
Si vous avez des questions ou si vous souhaitez consulter les toutes dernières
informations techniques sur ce produit, rendez-vous sur le site Web suivant :
http://support.sony-europe.com
Fournit des informations relatives aux :
• modèles et fabricants de lecteurs audio numériques compatibles ;
• fichiers MP3/WMA/AAC pris en charge.
Configuration système. . . . . . . . . . . . . . . . . . . 44
Opération de base de la configuration
système . . . . . . . . . . . . . . . . . . . . . . . . . . . . 44
Réglage de l’horloge. . . . . . . . . . . . . . . . . . 48
Utilisation d’un appareil en option
Appareil auxiliaire. . . . . . . . . . . . . . . . . . . . . . 48
Informations complémentaires
Précautions . . . . . . . . . . . . . . . . . . . . . . . . . . . 49
Remarques sur les disques . . . . . . . . . . . . . 49
Ordre de lecture des fichiers MP3/WMA/
AAC/JPEG/DivX
®
/MPEG-4 . . . . . . . . . . . 50
A propos des fichiers MP3 . . . . . . . . . . . . . 50
A propos des fichiers WMA . . . . . . . . . . . . 51
A propos des fichiers AAC. . . . . . . . . . . . . 51
A propos des fichiers JPEG . . . . . . . . . . . . 51
A propos des fichiers DivX
®
. . . . . . . . . . . 51
A propos des fichiers MPEG-4. . . . . . . . . . 51
Entretien . . . . . . . . . . . . . . . . . . . . . . . . . . . . . 51
Retrait de l’appareil . . . . . . . . . . . . . . . . . . . . . 52
Spécifications . . . . . . . . . . . . . . . . . . . . . . . . . 53
Dépannage . . . . . . . . . . . . . . . . . . . . . . . . . . . . 54
Affichage des erreurs et messages . . . . . . . 56
Glossaire . . . . . . . . . . . . . . . . . . . . . . . . . . . . . 58
Liste des codes de langue/codes de zone. . . . . 60
Index . . . . . . . . . . . . . . . . . . . . . . . . . . . . . . . . 61

6
D:\Documents and Settings\takashi-shimomura\Desktop\DTP\848220S MEX-
DV1500U(EUR)\4120899211_MEX-DV1500U_ML\03FR02CD-E.fm
masterpage:Left
MEX-DV1500U
4-120-899-21 (1)
Félicitations !
Nous vous remercions d’avoir fait l’acquisition
de ce lecteur multi-disques Sony. Avant d’utiliser
cet appareil, veuillez lire ce manuel
attentivement et conservez-le pour toute
référence ultérieure.
Caractéristiques
Pour plus de détails, reportez-vous aux numéros
de pages indiqués.
* Selon la longueur d’une plage et le taux
d’échantillonnage enregistré.
Lecture de DVD, VCD, CD
t page 8
Compatible avec plusieurs formats de disque.
2000MP3, 2000WMA, 2000AAC
Possibilité de lire jusqu’à 2 000 plages*
enregistrées sur un disque au format MP3/
WMA/AAC.
Reprise de la lecture multi-disques
t page 42
Mémorise l’endroit où la lecture s’est arrêtée
pour 5 disques au maximum et peut reprendre
la lecture d’un DVD VIDEO/VCD/DivX/
MPEG-4 même si le disque a été éjecté.
t page 38
7 courbes d’égaliseur présélectionnées, pouvant
être personnalisées en réglant 3 bandes
différentes.
t page 29
Possibilité de sélectionner la tonalité de l’image
à partir de réglages présélectionnés, selon la
lumière ambiante/l’habitacle du véhicule.
t page 48
Permet le raccordement d’un appareil audio
portatif (connexion analogique).
t page 48
Les bornes AUX AUDIO IN situées à l’arrière
permettent le raccordement et la sortie audio
d’un appareil auxiliaire comme un appareil
audio portatif (connexion analogique), un
appareil de navigation dissimulé, un tuner TV,
etc.

7
D:\Documents and Settings\takashi-shimomura\Desktop\DTP\848220S MEX-
DV1500U(EUR)\4120899211_MEX-DV1500U_ML\03FR02CD-E.fm
masterpage:RightD:\Documents and Settings\takashi-shimomura\Desktop\DTP\848220S MEX-
DV1500U(EUR)\4120899211_MEX-DV1500U_ML\03FR02CD-E.fm
masterpage:Right
MEX-DV1500U
4-120-899-21 (1)
Droits d’auteur
Ce produit intègre une technologie de protection
des droits d’auteur couverte par des brevets
américains, ainsi que par d’autres droits relatifs à
la propriété intellectuelle détenus par
Macrovision Corporation et autres. L’utilisation
de cette technologie de protection des droits
d’auteur doit faire l’objet d’une autorisation de
Macrovision Corporation et est destinée
exclusivement à une utilisation dans le cercle
familial et d’autres systèmes de visualisation
limités, sauf autorisation contraire de
Macrovision Corporation. Toute étude technique
inverse ou démontage sont interdits.
« DVD VIDEO », « DVD-R », « DVD-RW »,
« DVD+R » et « DVD+RW » sont des marques
commerciales.
« DivX » et « DivX Certified » sont
des marques déposées ou des
marques commerciales de DivX,
Inc.
CE PRODUIT EST COMMERCIALISE SOUS
LA LICENCE DU PORTEFEUILLE DE
BREVETS MPEG-4 VISUAL ET EST
DESTINE A L’UTILISATION PERSONNELLE
ET NON COMMERCIALE D’UN
UTILISATEUR A DES FINS DE DECODAGE
DE VIDEOS MPEG-4 ENCODEES PAR UN
UTILISATEUR DANS LE CADRE D’UNE
ACTIVITE PERSONNELLE ET NON
COMMERCIALE ET/OU OBTENUES
AUPRES D’UN FOURNISSEUR VIDEO
AGREE PAR MPEG LA POUR FOURNIR DES
VIDEOS MPEG-4. AUCUNE LICENCE N’EST
AUTORISEE OU IMPLICITE POUR TOUTE
AUTRE UTILISATION. TOUTE
INFORMATION COMPLEMENTAIRE, Y
COMPRIS LES INFORMATIONS RELATIVES
A DES UTILISATIONS
PROMOTIONNELLES, INTERNES ET
COMMERCIALES ET A LA LICENCE PEUT
ETRE OBTENUE AUPRES DE MPEG LA,
LLC.CONSULTEZ LE SITE
HTTP://WWW.MPEGLA.COM.
Fabriqué sous licence de Dolby
Laboratories.
Le terme « Dolby » et le sigle
double D sont des marques commerciales de
Dolby Laboratories.
Windows Media et le logo
Windows sont des marques
de commerce ou des marques
déposées de Microsoft
Corporation aux Etats-Unis et/ou dans d’autres
pays.

8
D:\Documents and Settings\takashi-shimomura\Desktop\DTP\848220S MEX-
DV1500U(EUR)\4120899211_MEX-DV1500U_ML\03FR02CD-E.fm
masterpage:Left
MEX-DV1500U
4-120-899-21 (1)
Disques pouvant être lus et symboles utilisés dans ce manuel
Cet appareil peut lire différents disques vidéo/audio.
Le tableau suivant vous permet de vérifier si un disque est pris en charge par cet appareil, ainsi que les
fonctions disponibles pour un type de disque donné.
*1 Les fichiers audio peuvent également être enregistrés. Pour plus de détails, reportez-vous à la page 9.
*2 Les fichiers image/vidéo peuvent également être enregistrés. Pour plus de détails, reportez-vous à la page 9.
Remarque
Le terme « DVD » peut être utilisé dans ce manuel comme terme générique pour les DVD VIDEO, DVD-R/DVD
RW et DVD+R/DVD+RW.
Symbole du disque dans
le manuel
Format du disque Logo du disque
VIDEO
DVD VIDEO
DVD-R*
1
DVD-R DL*
1
(Mode vidéo/mode VR)
DVD-RW*
1
(Mode vidéo/mode VR)
DVD+R*
1
DVD+R DL*
1
DVD+RW*
1
CD vidéo
(Ver. 1.0/1.1/2.0)
AUDIO
CD audio
CD-ROM*
2
CD-R*
2
CD-RW*
2

9
D:\Documents and Settings\takashi-shimomura\Desktop\DTP\848220S MEX-
DV1500U(EUR)\4120899211_MEX-DV1500U_ML\03FR02CD-E.fm
masterpage:RightD:\Documents and Settings\takashi-shimomura\Desktop\DTP\848220S MEX-
DV1500U(EUR)\4120899211_MEX-DV1500U_ML\03FR02CD-E.fm
masterpage:Right
MEX-DV1500U
4-120-899-21 (1)
Le tableau suivant montre les formats de compression pris en charge, leurs types de fichiers et les types
de disque sur lesquels ces fichiers peuvent être enregistrés.
Les fonctions disponibles varient en fonction du format, quel que soit le type de disque. Les symboles
de format ci-dessous apparaissent à côté de la description de fonctions disponibles pour ce format.
Conseil
Pour plus de détails sur les formats de compression, reportez-vous à la page 50.
Disques non pris en charge
Les disques suivants ne peuvent pas être lus sur cet appareil :
• Disques de 8 cm
• Disques de 12 cm utilisant uniquement la partie de données intérieure de 8 cm (le reste est
transparent)
• CD-ROM contenant des fichiers autres que des MP3/WMA/AAC/JPEG/DivX/MPEG-4
•SA-CD
•CD-G
•Photo-CD
• VSD (Video Single Disc)
• DVD-ROM contenant des fichiers autres que des MP3/WMA/AAC/JPEG/DivX/MPEG-4
•DVD-RAM
•DVD-Audio
• Active-Audio (données)
• SVCD (Super Video CD)
•CDV
• Disques créés au format Packet Write
• Disques au format DTS
Remarque
Selon leur état d’enregistrement, il est possible que des disques compatibles ne puissent pas être lus sur cet
appareil.
Code local
Ce système vise à protéger les droits d’auteur sur les logiciels.
Le code local est situé sous l’appareil et seuls les DVD identifiés par
le même code local peuvent être lus sur cet appareil.
Les DVD identifiés par le logo peuvent également être lus.
Si vous essayez de lire un autre DVD, le message « Playback
prohibited by region code. » (lecture interdite par le code local)
apparaît sur le moniteur. Suivant le DVD, il se peut qu’aucune
indication de code local ne soit indiquée même si la lecture du DVD
est soumise à des restrictions de zone.
Symbole du format dans
le manuel
Type de fichier Type de disque pouvant être enregistré
Fichier audio MP3
DATA DVD
DVD-ROM
DVD-R
DVD-R DL
DVD-RW
DVD+R
DVD+R DL
DVD+RW
DATA CD
CD-ROM
CD-R
CD-RW
Fichier audio WMA
Fichier audio AAC
Fichier d’image
JPEG
Fichier vidéo DivX
®
Fichier vidéo
MPEG-4
MPEG-4
Code local
ALL

10
D:\Documents and Settings\takashi-shimomura\Desktop\DTP\848220S MEX-
DV1500U(EUR)\4120899211_MEX-DV1500U_ML\03FR02CD-E.fm
masterpage:Left
MEX-DV1500U
4-120-899-21 (1)
Emplacement et fonction des commandes
Appareil principal
Pour plus de détails, reportez-vous aux numéros
de pages indiqués.
Les instructions de ce mode d’emploi décrivent
en principe les commandes de la mini-
télécommande.Vous pouvez également utiliser
les commandes de l’appareil principal si elles
portent un nom identique ou similaire à celles de
la mini-télécommande.
A Touche OFF page 15, 16, 18, 20, 24
Permet de mettre l’appareil hors tension/
d’arrêter la source (appuyez) ; de l’éteindre
complètement (appuyez sur la touche et
maintenez-la enfoncée).
B Touche (Retour) page 34, 39
Permet de revenir à l’écran précédent.
C Touche SOURCE page 20, 22, 36, 49
Permet de mettre l’appareil sous tension ; de
changer la source (Radio/Disque/USB/
AUX).
D Touche (Parcourir) page 34
Permet de passer en mode Quick-BrowZer.*
1
E Molette de réglage/touche SOUND/
ENTER page 28, 35, 36, 38, 39, 44, 48,
49
Permet de régler le volume/de faire un
réglage (tournez) ; d’ouvrir le menu de
réglage du son/d’appliquer un réglage
(appuyez).
F Fente d’insertion des disques
page 16, 18
Permet d’insérer le disque.
G Fenêtre d’affichage
H Touche Z (éjecter) page 16, 18
Permet d’éjecter le disque.
I Borne USB page 20
Permet de raccorder le périphérique USB.
ALBM ARTIST TRACK SHUF ZAP
+
DM
LOUDDISCREGTPTAAF
AUX
SETUP
REPPTY SHUF
OFF
1 2 3 4 5 6
ALBM
SOURCE
MODE
SEEK
SE
EK
PUSH SOUND
/
ENTER
DSPLAF/TA
qkqh
12 4 657839
qsqaq; qd qlqj
qfqg

11
D:\Documents and Settings\takashi-shimomura\Desktop\DTP\848220S MEX-
DV1500U(EUR)\4120899211_MEX-DV1500U_ML\03FR02CD-E.fm
masterpage:RightD:\Documents and Settings\takashi-shimomura\Desktop\DTP\848220S MEX-
DV1500U(EUR)\4120899211_MEX-DV1500U_ML\03FR02CD-E.fm
masterpage:Right
MEX-DV1500U
4-120-899-21 (1)
J Touches SEEK +/– page 17, 19, 22, 23
Disque/USB :
Permettent de sauter un chapitre/une plage/
une scène/un fichier (appuyez) ; d’avancer/
reculer rapidement dans un disque (appuyez
et maintenez brièvement la touche
enfoncée) ; d’avancer/reculer rapidement
dans une plage (appuyez sur la touche et
maintenez-la enfoncée).*
2
Radio :
Permettent de régler des stations
automatiquement (appuyez) ; de rechercher
une station manuellement (appuyez sur la
touche et maintenez-la enfoncée).
K Touche (déverrouillage de la
façade) page 15
L Touche MODE page 22, 36, 49
Permet de sélectionner la bande radio (FM/
MW (PO)/LW (GO)) ; de sélectionner un
appareil auxiliaire raccordé à la prise
d’entrée AUX (avant) ou à la borne AUX IN
(arrière).
M Récepteur de la mini-télécommande
N Touche RESET page 14
O Touche SETUP page 28, 36, 44, 48, 49
Permet d’ouvrir le menu de configuration
système.
P Touche AF (Fréquences alternatives)/
TA (Messages de radioguidage)/
PTY (Type d’émission) page 37, 38
Permet de régler AF et TA (appuyez) ; de
sélectionner PTY (appuyez sur la touche et
maintenez-la enfoncée) en RDS.
Q Touches numériques
Disque/USB :
(1) : b REP page 16, 17, 21, 32
(2) : SHUF B page 16, 17, 21, 32
(3)/(4) : ALBM –/+ (V/v) page 16, 17,
19, 23
Permettent de sauter un album ou un
dossier/de déplacer le curseur
(appuyez) ; de sauter des albums ou des
dossiers successifs (appuyez sur la
touche et maintenez-la enfoncée).
(6) : u (lecture/pause) page 16, 17, 18,
19, 23
Permet de démarrer/d’interrompre la
lecture.
Radio :
Permettent de capter les stations enregistrées
(appuyez) ; de mémoriser des stations
(appuyez sur la touche et maintenez-la
enfoncée).
R Touche DSPL (Affichage) page 21, 26,
37, 48
Permet de modifier la rubrique d’affichage.
S Prise d’entrée AUX page 48
Permet de raccorder un appareil audio
portatif.
*1 Lors de la lecture d’un CD/MP3/WMA/AAC/JPEG/
DivX/MPEG-4.
*2 Le fonctionnement diffère selon le disque
(page 17, 19).
A propos du capuchon USB
Lorsque vous n’utilisez pas la borne USB I, utilisez
le capuchon de protection fourni afin d’éviter que de la
poussière ou des salissures n’entrent dans la borne.
Afin d’éviter que les enfants ne l’avalent, tenez ce
capuchon de protection hors de leur portée.

12
D:\Documents and Settings\takashi-shimomura\Desktop\DTP\848220S MEX-
DV1500U(EUR)\4120899211_MEX-DV1500U_ML\03FR02CD-E.fm
masterpage:Left
MEX-DV1500U
4-120-899-21 (1)
Mini-télécommande RM-X168
Pour plus de détails, reportez-vous aux numéros
de pages indiqués.
Retirez le film isolant avant l’utilisation
(page 14).
A Touche OFF page 16, 18, 20, 24
Permet de mettre l’appareil hors tension/
d’arrêter la source (appuyez) ; de l’éteindre
complètement (appuyez sur la touche et
maintenez-la enfoncée).
B Touche SOUND page 38
Permet d’ouvrir le menu de réglage du son.
C Touche VISUAL SETUP page 24, 27,
29, 30, 30, 33, 34, 40
Permet d’ouvrir le mode de lecture/le menu
de configuration visuelle.
D Touche SYSTEM SETUP page 28, 36,
44, 48, 49
Permet d’ouvrir le menu de configuration
système.
E Touche (retour)/O page 24, 25,
31, 32, 34, 39, 40
Permet de revenir à l’affichage précédent ; de
revenir au menu sur un VCD*
1
.
qs
1
2
3
4
5
6
7
8
qd
qf
qg
qj
qh
9
0
qa

13
D:\Documents and Settings\takashi-shimomura\Desktop\DTP\848220S MEX-
DV1500U(EUR)\4120899211_MEX-DV1500U_ML\03FR02CD-E.fm
masterpage:RightD:\Documents and Settings\takashi-shimomura\Desktop\DTP\848220S MEX-
DV1500U(EUR)\4120899211_MEX-DV1500U_ML\03FR02CD-E.fm
masterpage:Right
MEX-DV1500U
4-120-899-21 (1)
F Touches numériques page 16, 17, 24,
25, 31, 31, 33, 34, 36
Disque :
Permettent de localiser un titre/un chapitre/
une plage.
Radio :
Permettent de capter les stations enregistrées
(appuyez) ; de mémoriser des stations
(appuyez sur la touche et maintenez-la
enfoncée).
G Touche CLEAR page 31, 34
Permet de supprimer un numéro saisi.
H Touche DSPL (affichage) page 21, 26,
37, 48
Permet de modifier les rubriques d’affichage.
I Touche ATT (atténuation du son)
Permet d’atténuer le son (pour annuler,
appuyez de nouveau sur cette touche).
J Touche u (lecture/pause) page 16,
17, 18, 19, 23
Permet de démarrer/d’interrompre la lecture.
K Touches .m/M> page 17, 19,
22, 23
Disque/USB :
Permettent de sauter un chapitre/une plage/
une scène/un fichier (appuyez) ; d’avancer/
reculer rapidement dans un disque (appuyez
et maintenez brièvement la touche
enfoncée) ; d’avancer/reculer rapidement
dans une plage (appuyez sur la touche et
maintenez-la enfoncée).*
2
Radio :
Permettent de régler des stations
automatiquement (appuyez) ; de rechercher
une station manuellement (appuyez sur la
touche et maintenez-la enfoncée).
L Touches de réglage de la lecture des
DVD
(AUDIO) : page 17, 27
Permet de changer la langue/le format du
son.
(Permet de changer le canal audio pour les
VCD/CD/MP3/WMA/AAC.)
(SUBTITLE) : page 17
Permet de changer la langue des sous-
titres.
(ANGLE) : page 17
Permet de changer l’angle de vision.
(TOP MENU) : page 17
Permet d’ouvrir le menu principal d’un
DVD.
(MENU) : page 17
Permet d’ouvrir le menu d’un disque.
M Touche (parcourir) page 34
Permet de passer en mode Quick-BrowZer.*
3
N Touches </M/m/, (curseur)/ENTER
Permettent de déplacer le curseur et
d’appliquer un réglage.
O Touche SRC (source) page 20, 22, 36,
49
Permet de mettre l’appareil sous tension ; de
changer la source (Radio/Disque/USB/
AUX).
P Touche MODE page 22, 36, 49
Permet de sélectionner la bande radio (FM/
MW (PO)/LW (GO)) ; de sélectionner un
appareil auxiliaire raccordé à la prise
d’entrée AUX (avant) ou à la borne AUX IN
(arrière).
Q Touches VOL (volume) +/–
Permettent de régler le volume.
*1 Lors de la lecture avec la fonction PBC.
*2 Le fonctionnement diffère selon le disque
(page 17, 19).
*3 Lors de la lecture d’un CD/MP3/WMA/AAC/JPEG/
DivX/MPEG-4.
Remarque
Si vous mettez l’appareil hors tension et que
l’affichage est désactivé, il ne peut plus être utilisé
avec la mini-télécommande sauf si la touche
(SOURCE) de l’appareil principal est enfoncée ou si
un disque est inséré dans le lecteur pour l’activer.

14
D:\Documents and Settings\takashi-shimomura\Desktop\DTP\848220S MEX-
DV1500U(EUR)\4120899211_MEX-DV1500U_ML\03FR02CD-E.fm
masterpage:Left
MEX-DV1500U
4-120-899-21 (1)
Préparation
Installation de l’appareil et du
moniteur en option
Commencez par installer et raccorder l’appareil
ainsi que le moniteur en option.
Cet appareil peut être piloté à l’aide des écrans
qui s’affichent sur l’appareil et/ou sur le
moniteur en option.
Notez que ce manuel inclut des instructions
concernant les écrans qui s’affichent sur
l’appareil et/ou sur le moniteur en option.
Pour plus de détails, reportez-vous au manuel
d’installation/de raccordement fourni.
Remarque
Veillez à installer le moniteur en option de façon fiable
et dans un endroit où il ne gêne pas la vision du
conducteur.
Réinitialisation de l’appareil
Avant la première mise en service de l’appareil,
après avoir remplacé la batterie du véhicule ou
modifié les raccordements, vous devez
réinitialiser l’appareil.
Retirez la façade (page 15) et appuyez sur la
touche RESET (page 11) avec un objet pointu,
comme un stylo à bille.
Remarque
Une pression sur la touche RESET remet l’heure à
zéro et efface certaines informations mémorisées.
Préparation de la mini-
télécommande
Retirez le film isolant.
Conseil
Pour obtenir des informations sur la façon de
remplacer la pile, reportez-vous à la page 51.
Appareil
Moniteur en option

15
D:\Documents and Settings\takashi-shimomura\Desktop\DTP\848220S MEX-
DV1500U(EUR)\4120899211_MEX-DV1500U_ML\03FR02CD-E.fm
masterpage:RightD:\Documents and Settings\takashi-shimomura\Desktop\DTP\848220S MEX-
DV1500U(EUR)\4120899211_MEX-DV1500U_ML\03FR02CD-E.fm
masterpage:Right
MEX-DV1500U
4-120-899-21 (1)
Retrait de la façade
Vous pouvez retirer la façade de cet appareil pour
le protéger du vol.
Alarme d’avertissement
Si vous mettez la clé de contact en position OFF
sans retirer la façade, l’alarme d’avertissement
retentit pendant quelques secondes.
L’alarme est émise uniquement lorsque
l’amplificateur intégré est utilisé.
1 Appuyez sur (OFF).
L’appareil est mis hors tension.
2 Appuyez sur , puis tirez vers vous.
Remarques
• N’exercez pas de pression excessive sur la façade
ni sur la fenêtre d’affichage et ne la laissez pas
tomber.
• N’exposez pas la façade à des températures
élevées ou à l’humidité. Evitez de la laisser dans un
véhicule en stationnement, sur le tableau de bord ou
la plage arrière.
• Ne retirez pas la façade pendant la lecture du
périphérique USB, sinon les données USB risquent
d’être endommagées.
Installation de la façade
Insérez la partie A de la façade dans la partie B
de l’appareil, comme illustré, puis poussez sur le
côté gauche pour l’enclencher jusqu’au déclic.
Remarque
Ne posez rien sur la face interne de la façade.
OFF
B
A

16
D:\Documents and Settings\takashi-shimomura\Desktop\DTP\848220S MEX-
DV1500U(EUR)\4120899211_MEX-DV1500U_ML\03FR02CD-E.fm
masterpage:Left
MEX-DV1500U
4-120-899-21 (1)
Opérations de base
Lecture de disques vidéo
Selon le disque, il est possible que certaines opérations soient différentes ou limitées.
Reportez-vous au mode d’emploi fourni avec votre disque.
Pour interrompre la lecture
Appuyez sur (OFF).
Remarque
Les disques au format DTS ne sont pas pris en charge. Aucun son n’est émis si le format DTS est sélectionné.
1
Mettez votre moniteur sous tension, puis sélectionnez la source
d’entrée correspondant à cet appareil sur votre moniteur.
2
Insérez le disque (côté imprimé vers le
haut).
La lecture commence automatiquement.
Si la lecture ne commence pas automatiquement,
appuyez sur u.
3
Si le menu DVD apparaît, appuyez sur (1)(b)/(2)(B)/(3)(V)/(4)(v)
pour déplacer le curseur, puis appuyez sur (6) (u) pour valider.
Appuyez sur </M/m/,/les touches numériques de la mini-télécommande pour déplacer le
curseur, puis appuyez sur (ENTER) pour valider.
Pour éjecter le disque
Appuyez sur Z.
</M/m/,
ENTER
u
OFF
b/B/V/v u
OFF
Z
Touches
numériques

17
D:\Documents and Settings\takashi-shimomura\Desktop\DTP\848220S MEX-
DV1500U(EUR)\4120899211_MEX-DV1500U_ML\03FR02CD-E.fm
masterpage:RightD:\Documents and Settings\takashi-shimomura\Desktop\DTP\848220S MEX-
DV1500U(EUR)\4120899211_MEX-DV1500U_ML\03FR02CD-E.fm
masterpage:Right
MEX-DV1500U
4-120-899-21 (1)
A propos du menu DVD
Un DVD se divise en plusieurs sections qui possèdent des caractéristiques d’image ou de musique. Ces
sections sont appelées « titres ». Lorsque vous lisez un DVD contenant plusieurs titres, vous pouvez
sélectionner le titre de votre choix à l’aide du menu principal du DVD. Dans le cas des DVD permettant
de sélectionner des rubriques, telles que les sous-titres ou la langue de la bande son, sélectionnez ces
rubriques à l’aide du menu du DVD.
Autres opérations de lecture
*1 Non disponible suivant le disque.
*2 Lorsqu’un message vous invitant à saisir un code à 4 chiffres apparaît, saisissez le code de la langue (page 60)
souhaitée.
Pour Appuyez sur
faire une pause/reprendre la lecture après
une pause
u
sauter un chapitre/une plage/une scène/
un fichier
.m/M>
reculer ou avancer rapidement dans un
disque
.m/M> et maintenez brièvement la touche
enfoncée, puis appuyez à plusieurs reprises pour changer la
vitesse (× 2 t × 12 t × 120 t × 2…)
annuler le recul/l’avance rapide u
afficher le menu DVD*
1
Télécommande : (TOP MENU) ou (MENU)
sélectionner des rubriques dans le menu
DVD*
1
Appareil principal : (1)(b)/(2)(B)/(3)(V)/(4)(v) pour
déplacer le curseur, puis appuyez sur (6) (u) pour valider
Télécommande : < /M/m/,/touches numériques pour
déplacer le curseur, puis appuyez sur (ENTER) pour valider
changer la langue/le format/le canal du
son (page 27)*
1
Télécommande : (AUDIO) jusqu’à ce que la rubrique
souhaitée apparaisse
désactiver les sous-titres/modifier la
langue des sous-titres*
1
Télécommande : (SUBTITLE) jusqu’à ce que la rubrique
souhaitée apparaisse*
2
changer l’angle de vision*
1
Télécommande : (ANGLE) jusqu’à ce que le numéro
d’angle souhaité apparaisse
.m/M>
u
SUBTITLE
ANGLE
MENU
</M/m/,
ENTER
AUDIO
TOP MENU
b/B/V/v u.m/M>
Touches
numériques

18
D:\Documents and Settings\takashi-shimomura\Desktop\DTP\848220S MEX-
DV1500U(EUR)\4120899211_MEX-DV1500U_ML\03FR02CD-E.fm
masterpage:Left
MEX-DV1500U
4-120-899-21 (1)
Lecture de disques audio
Selon le disque, il est possible que certaines opérations soient différentes ou limitées.
Reportez-vous au mode d’emploi fourni avec votre disque.
Pour interrompre la lecture
Appuyez sur (OFF).
Remarque
Les disques au format DTS ne sont pas pris en charge. Aucun son n’est émis si le format DTS est sélectionné.
1
Insérez le disque (côté imprimé vers le
haut).
La lecture commence automatiquement.
Si la lecture ne commence pas automatiquement,
appuyez sur u.
Pour éjecter le disque
Appuyez sur Z.
u
OFF
u
OFF
Z

19
D:\Documents and Settings\takashi-shimomura\Desktop\DTP\848220S MEX-
DV1500U(EUR)\4120899211_MEX-DV1500U_ML\03FR02CD-E.fm
masterpage:RightD:\Documents and Settings\takashi-shimomura\Desktop\DTP\848220S MEX-
DV1500U(EUR)\4120899211_MEX-DV1500U_ML\03FR02CD-E.fm
masterpage:Right
MEX-DV1500U
4-120-899-21 (1)
Autres opérations de lecture
* Lors de la lecture d’un fichier MP3/WMA/AAC.
Pour Appuyez sur
faire une pause/reprendre la lecture après
une pause
u
sauter une plage .m (<)/M> (,)
avancer/reculer rapidement et maintenez enfoncée .m/M>
sauter un album* Appareil principal : (3) (ALBM –)/(4) (ALBM +)
Télécommande : M/m
sauter plusieurs albums de suite* Appareil principal : (3) (ALBM –)/(4) (ALBM +) et
maintenez la touche enfoncée
Télécommande : M/m et maintenez les touches enfoncées
</M/m/,
.m/M>
u
u.m/M> ALBM

20
D:\Documents and Settings\takashi-shimomura\Desktop\DTP\848220S MEX-
DV1500U(EUR)\4120899211_MEX-DV1500U_ML\03FR02CD-E.fm
masterpage:Left
MEX-DV1500U
4-120-899-21 (1)
Lecture d’un périphérique USB
Pour plus de détails sur la compatibilité de votre périphérique USB, visitez le site d’assistance.
• Les périphériques USB de type MSC (périphériques de stockage de masse) compatibles avec la norme
USB peuvent être utilisés.
• Le codec correspondant est MP3 (.mp3), WMA (.wma), AAC (.m4a) et JPEG (.jpg).
• Il est recommandé d’effectuer des copies de sauvegarde des données contenues dans le périphérique
USB.
Remarque
Raccordez le périphérique USB après avoir démarré le moteur.
Selon le type de périphérique USB, un dysfonctionnement ou des dommages peuvent être causés si ce
périphérique a été raccordé avant de démarrer le moteur.
Pour arrêter la lecture
Appuyez sur (OFF).
Remarque
Veillez à utiliser le câble USB fourni avec l’appareil si un câble est nécessaire lors du raccordement USB.
1
Raccordez le périphérique USB à la
borne USB.
La lecture commence automatiquement.
Si un périphérique USB est déjà raccordé, appuyez
plusieurs fois sur (SOURCE) jusqu’à ce que
l’indication « USB » apparaisse pour démarrer la
lecture.
Site d’assistance
http://support.sony-europe.com
SRC
OFF
DSPL
SOURCE
(USB)
OFF
SHUFREP DSPL

21
D:\Documents and Settings\takashi-shimomura\Desktop\DTP\848220S MEX-
DV1500U(EUR)\4120899211_MEX-DV1500U_ML\03FR02CD-E.fm
masterpage:RightD:\Documents and Settings\takashi-shimomura\Desktop\DTP\848220S MEX-
DV1500U(EUR)\4120899211_MEX-DV1500U_ML\03FR02CD-E.fm
masterpage:Right
MEX-DV1500U
4-120-899-21 (1)
Retrait du périphérique USB
1 Arrêtez la lecture du périphérique USB.
2 Retirez le périphérique USB.
Si vous retirez le périphérique USB lors de la
lecture, les données du périphérique risquent
d’être endommagées.
Remarques
• N’utilisez pas de périphériques USB de grande taille
ou lourds, qui risquent de tomber à cause des
vibrations ou d’entraîner un raccordement peu
fiable.
• Ne retirez pas la façade pendant la lecture du
périphérique USB, sinon les données du
périphérique risquent d’être endommagées.
• Cet appareil ne peut pas reconnaître les
périphériques USB via un concentrateur USB.
Rubriques d’affichage
A Source
B Nom de la plage, nom d’artiste, numéro
d’album*, nom d’album, numéro de la plage/
temps de lecture écoulé, horloge
* Le numéro de l’album s’affiche uniquement lorsque
l’album est modifié.
Pour modifier les rubriques d’affichage B,
appuyez sur (DSPL).
Remarques
• Les paramètres affichés peuvent varier selon le type
de périphérique USB, le format d’enregistrement et
les réglages. Pour plus de détails, visitez le site
d’assistance.
• Le nombre maximum de données affichables est le
suivant :
– dossiers (albums) : 256
– fichiers (plages) : 2 000
• Ne laissez pas de périphérique USB dans un
véhicule en stationnement car cela peut entraîner
des problèmes de fonctionnement.
• Le démarrage de la lecture peut prendre un certain
temps, selon la quantité de données enregistrées.
• Lors de la lecture d’un fichier MP3/WMA/AAC VBR
(Débit variable) ou pendant l’avance ou le retour
rapide, le temps de lecture écoulé qui s’affiche peut
être inexact.
• La lecture d’un fichier comprimé sans perte n’est
pas prise en charge.
Affichage de l’image de la pochette
Pendant la lecture audio, vous pouvez vérifier les
informations du contenu ou afficher l’image de la
pochette* d’un fichier MP3/WMA/AAC du
périphérique USB sur le moniteur.
* La taille recommandée est de 240 × 240 à 960 × 960
pixels.
Lecture répétée et aléatoire
1 En cours de lecture, appuyez
plusieurs fois sur (1) (REP) ou
(2) (SHUF) jusqu’à ce que l’option
souhaitée apparaisse.
* Si plus de deux lecteurs sont créés sur le
périphérique USB.
Pour revenir en mode de lecture normal,
sélectionnez « REP-OFF » ou « SHUF-OFF ».
Sélectionnez Pour lire
REP-TRACK une plage en boucle.
REP-ALBUM un album en boucle.
SHUF-ALBUM un album dans un ordre
aléatoire.
REP-DRIVE* un lecteur en boucle.

22
D:\Documents and Settings\takashi-shimomura\Desktop\DTP\848220S MEX-
DV1500U(EUR)\4120899211_MEX-DV1500U_ML\03FR02CD-E.fm
masterpage:Left
MEX-DV1500U
4-120-899-21 (1)
Ecoute de la radio
Conseil
Pour obtenir des informations détaillées sur les autres fonctions de la radio, reportez-vous à la section
« Opérations avancées — Radio » à la page 36.
Avec la mini-télécommande
Utilisez (SRC) au lieu de (SOURCE) et .m/M> au lieu de (SEEK) –/+.
1
Appuyez plusieurs fois sur (SOURCE) jusqu’à ce que l’indication
« TUNER » apparaisse.
2
Appuyez plusieurs fois sur (MODE) jusqu’à ce que la bande
souhaitée (FM1, FM2, FM3, MW (PO) ou LW (GO)) s’affiche.
3
Réglez la fréquence.
Pour régler automatiquement la fréquence
Appuyez sur (SEEK) +
/–.
Le balayage s’interrompt lorsque l’appareil capte une station. Répétez cette procédure jusqu’à
ce que vous captiez la station souhaitée.
Pour régler manuellement la fréquence
Appuyez sur la touche (SEEK) +
/– et maintenez-la enfoncée pour obtenir la fréquence
approximative, puis appuyez plusieurs fois sur (SEEK) +
/– pour régler la fréquence souhaitée
avec précision.
.m/M>
MODE
SRC
SEEK MODE
SOURCE
B
A
A Bande radio/fonctionnement
B Fréquence*
* Le nom du service de l’émission s’affiche lorsqu’une
station RDS est captée. Pour plus de détails,
reportez-vous à la section « Fonction RDS » à la
page 36.

23
D:\Documents and Settings\takashi-shimomura\Desktop\DTP\848220S MEX-
DV1500U(EUR)\4120899211_MEX-DV1500U_ML\03FR02CD-E.fm
masterpage:RightD:\Documents and Settings\takashi-shimomura\Desktop\DTP\848220S MEX-
DV1500U(EUR)\4120899211_MEX-DV1500U_ML\03FR02CD-E.fm
masterpage:Right
MEX-DV1500U
4-120-899-21 (1)
Opérations avancées — Disques
Ce chapitre se compose des sections suivantes :
• Opérations vidéo spécifiques*
t page 23 à 32
• Opérations vidéo*/audio communes
t page 32 à 35
• Opérations audio spécifiques
t page 35
* Opérations incluant la fonction JPEG.
Lecture de fichiers DivX
®
/
MPEG-4/JPEG
Remarque
Si le disque contient plusieurs types de fichiers, seul le
type de fichier sélectionné (audio/vidéo/image) peut
être lu. Pour lire les fichiers vidéo DivX/MPEG-4 ou les
fichiers d’image JPEG d’un tel disque, appuyez sur
en cours de lecture, sélectionnez le type de fichier
souhaité (vidéo/image) à afficher sous forme de liste,
puis sélectionnez le fichier souhaité (page 35).
Lecture de vidéos DivX
®
/MPEG-4
Vous pouvez contrôler la lecture des DivX/
MPEG-4 de la même manière que les autres
disques vidéo (page 16), ainsi que certaines
fonctions de contrôle de lecture audio.
Conseil
Vous pouvez également sélectionner un fichier à lire à
l’aide d’une liste (Quick-BrowZer) (page 34).
Lecture d’une image JPEG
Vous pouvez visualiser un diaporama de fichiers
JPEG sur cet appareil. Le diaporama démarre
automatiquement lorsque vous insérez un disque
ou que vous appuyez sur u. Pour obtenir des
informations détaillées sur le démarrage de la
lecture, suivez les étapes 1 à 4 de la section
« Lecture de disques vidéo » à la page 16.
Autres opérations de lecture
Remarques
• Si vous faites pivoter une image de grande taille,
l’affichage risque d’être plus long.
• Impossible d’afficher les fichiers JPEG progressifs.
Conseil
Vous pouvez également sélectionner un fichier à lire à
l’aide d’une liste (Quick-BrowZer) (page 34).
MPEG-4
u
.m/M>
ALBM
</,
.m/M>
u
Pour Appuyez sur
sauter un album
(dossier)
Appareil principal :
(3) (ALBM –)/
(4) (ALBM +)
sauter plusieurs
albums (dossiers) de
suite
Appareil principal :
(3) (ALBM –)/
(4) (ALBM +) et
maintenez enfoncée
Pour Appuyez sur
pivoter l’image Télécommande :
</, (pivote de 90º à
chaque fois)
sauter une image .m/M>
sauter un album Appareil principal :
(3) (ALBM –)/
(4) (ALBM +)
sauter plusieurs
albums de suite
Appareil principal :
(3) (ALBM –)/
(4) (ALBM +) et
maintenez enfoncée

24
D:\Documents and Settings\takashi-shimomura\Desktop\DTP\848220S MEX-
DV1500U(EUR)\4120899211_MEX-DV1500U_ML\03FR02CD-E.fm
masterpage:Left
MEX-DV1500U
4-120-899-21 (1)
Utilisation des fonctions PBC
— Contrôle de lecture
Le menu PBC vous aide interactivement
lorsqu’un VCD compatible PBC est lu.
1 Démarrez la lecture d’un VCD
compatible PBC.
Le menu PBC apparaît.
2 Appuyez sur les touches numériques
pour sélectionner la rubrique
souhaitée, puis appuyez sur (ENTER).
3 Suivez les instructions du menu
concernant les opérations
interactives.
Pour revenir à l’écran précédent, appuyez sur
O.
Lecture sans la fonction PBC
1 En cours de lecture, appuyez sur
(OFF).
La lecture s’arrête.
2 Appuyez sur les touches numériques
pour sélectionner la rubrique
souhaitée, puis appuyez sur (ENTER).
Le message « Play without PBC. » (Lecture
sans fonctions PBC.) apparaît et la lecture
démarre. Le menu PBC ne s’affiche pas
pendant la lecture.
Remarques
• Les rubriques affichées dans le menu et les
procédures de fonctionnement diffèrent selon le
disque.
• Pendant la lecture PBC, le numéro de plage, la
rubrique de lecture, etc., n’apparaissent pas dans le
menu mode de lecture (page 24).
• La fonction de reprise de la lecture est inopérante
lors de la lecture sans les fonctions PBC.
Conseil
Pour reprendre une lecture PBC, arrêtez la lecture en
appuyant sur (OFF), puis appuyez sur u.
Utilisation du menu mode de
lecture
Vous pouvez utiliser le menu mode de lecture de
cet appareil pour contrôler la lecture ou
configurer des réglages de lecture.
Pour afficher le menu mode de lecture, appuyez
sur (VISUAL SETUP) en cours de lecture.
Pour le masquer, appuyez de nouveau sur
(VISUAL SETUP).
Remarques
• Pendant la lecture d’un disque audio, la touche
(VISUAL SETUP) est inactive.
• Pendant la lecture d’un JPEG, (VISUAL SETUP) est
active uniquement si une image est affichée en plein
écran.
Conseil
Si vous appuyez sur (VISUAL SETUP) lorsque la
lecture est arrêtée, le menu de configuration visuelle
(par le moniteur) apparaît là où vous pouvez
configurer différents paramètres, tels que la langue
d’affichage, les réglages audio, etc. (page 39).
Par exemple, lors de la lecture d’un DVD
A Rubriques du menu mode de lecture
Pour plus de détails, reportez-vous à la
section « Liste des paramètres du menu mode
de lecture » à la page 25.
ENTER
OFF
O
Touches
numériques
MPEG-4
</M/m/,
ENTER
VISUAL
SETUP
O
Touches
numériques
12
(
67
)
018
(
034
)
T 1:35:55
1:ENGLISH
OFF
1:ENGLISH
2:FRENCH
3:SPANISH
PLAY
DVD VIDEO
SUBTITLE
Select :
ENTER
G
BCD
F
E
H
A
IJ

25
D:\Documents and Settings\takashi-shimomura\Desktop\DTP\848220S MEX-
DV1500U(EUR)\4120899211_MEX-DV1500U_ML\03FR02CD-E.fm
masterpage:RightD:\Documents and Settings\takashi-shimomura\Desktop\DTP\848220S MEX-
DV1500U(EUR)\4120899211_MEX-DV1500U_ML\03FR02CD-E.fm
masterpage:Right
MEX-DV1500U
4-120-899-21 (1)
B DVD : Numéro du titre/Total
VCD : Numéro de la plage/Total*
1
JPEG : Numéro de l’album/Total
DivX/MPEG-4 : Numéro de l’album
(dossier)/Total
C DVD : Numéro du chapitre/Total
JPEG : Numéro de l’image/Total
DivX/MPEG-4 : Numéro du fichier/Total
D Temps de lecture écoulé*
2
E Format
F Statut de lecture (PLAY N, PAUSE X, etc.)
G Réglage actuel
H Options
I Paramètre sélectionné
J Nom du paramètre sélectionné et/ou
messages d’aide
*1 Lors de la lecture d’un VCD doté de la fonction
PBC (page 24), aucune indication ne s’affiche.
*2 En cours de lecture JPEG, aucune indication ne
s’affiche.
Liste des paramètres du menu mode
de lecture
Appuyez sur </M/m/,/les touches
numériques pour sélectionner un paramètre, puis
appuyez sur (ENTER).
Pour revenir à l’écran précédent, appuyez sur
O.
Pour plus de détails, reportez-vous aux numéros
de pages indiqués.
* Sauf pour les DVD-R/DVD-R DL/DVD-RW en mode
VR.
Conseil
Lorsque « SHUFFLE » ou « REPEAT » est activé ou si
« ANGLE » est disponible, leurs cases à cocher
s’allument en vert (par exemple, t
). Cependant, il est possible que vous ne
puissiez pas changer l’angle selon la scène, même si
la case à cocher est allumée en vert.
TITLE, TRACK 33
Pour sélectionner un titre, une scène ou une
plage à lire.
ALBUM 33
Pour sélectionner un album ou un dossier à
afficher.
CHAPTER 33
Pour sélectionner un chapitre à lire.
IMAGE 33
Pour sélectionner une image à afficher.
FILE 33
Pour sélectionner un fichier vidéo à lire.
MPEG-4
MPEG-4
TIME 33
Pour vérifier le temps de lecture écoulé ; saisir
le code temporel.
AUDIO 17, 27
Pour changer la langue/le format/le canal du
son ; vérifier le format du programme.
SUBTITLE 17
Pour activer ou désactiver les sous-titres/
changer la langue des sous-titres.
ANGLE 17
Pour changer l’angle.
*
CENTER ZOOM 29
Pour agrandir une image.
REPEAT 33
Pour lire un titre/un chapitre/une plage/un
album/une image/un fichier vidéo en boucle.
SHUFFLE 33
Pour lire des chapitres/plages/images/fichiers
vidéo dans un ordre aléatoire.
*
PICTURE EQ 29
Pour régler la qualité d’image.
MPEG-4
MPEG-4
MPEG-4
MPEG-4
MPEG-4
MPEG-4

26
D:\Documents and Settings\takashi-shimomura\Desktop\DTP\848220S MEX-
DV1500U(EUR)\4120899211_MEX-DV1500U_ML\03FR02CD-E.fm
masterpage:Left
MEX-DV1500U
4-120-899-21 (1)
Visualisation des informations
temporelles/textuelles du
disque
Vérification des informations
temporelles
Le temps de lecture et le temps restant du titre,
du chapitre, de la plage, etc. en cours de lecture
peut être vérifié pendant la lecture d’image ou de
vidéo.
1 En cours de lecture, appuyez sur
(DSPL).
Les informations relatives à la lecture actuelle
s’affichent.
2 Appuyez plusieurs fois sur (DSPL)
pour changer les informations
temporelles.
Les informations temporelles diffèrent selon le
disque ou le format, comme suit.
Lecture DVD
• T **:**:**
Temps de lecture écoulé du titre actuel
• T-**:**:**
Temps restant du titre actuel
• C **:**:**
Temps de lecture écoulé du chapitre actuel
• C-**:**:**
Temps restant du chapitre actuel
Lecture VCD
(Uniquement lors de la lecture d’un VCD version
1.0/1.1 ou version 2.0 sans fonction PBC.)
• T **:**
Temps de lecture écoulé de la plage actuelle
• T-**:**
Temps restant de la plage actuelle
•D **:**
Temps de lecture écoulé du disque actuel
•D-**:**
Temps restant du disque actuel
Lecture JPEG
• Numéro de l’album/Total
• Numéro de l’image/Total
Lecture de DivX/MPEG-4
• Numéro de l’album (dossier)/Total
• Numéro du fichier/Total
•T **:**
Temps de lecture écoulé du fichier actuel
Vérification des informations
textuelles
Vous pouvez vérifier les informations textuelles
(nom de l’album, nom de l’image, etc.) des
fichiers JPEG/DivX/MPEG-4.
* L’indication « NO TEXT » s’affiche lorsqu’il n’y a pas
d’informations textuelles.
Les informations textuelles diffèrent selon le
format, comme suit.
Lecture JPEG
• Nom de l’album (lorsque le numéro de l’album
est affiché)
• Nom de l’image (lorsque le numéro de l’image
est affiché)
Lecture de DivX/MPEG-4
• Nom d’album (dossier) (lorsque le numéro
d’album (dossier) est affiché)
• Nom du fichier (lorsque le numéro du fichier
est affiché)
MPEG-4
DSPL
T 1:01:57
Informations temporelles
037(325)
Image name
Numéro d’album/d’image/de dossier/de fichier
Informations textuelles*

27
D:\Documents and Settings\takashi-shimomura\Desktop\DTP\848220S MEX-
DV1500U(EUR)\4120899211_MEX-DV1500U_ML\03FR02CD-E.fm
masterpage:RightD:\Documents and Settings\takashi-shimomura\Desktop\DTP\848220S MEX-
DV1500U(EUR)\4120899211_MEX-DV1500U_ML\03FR02CD-E.fm
masterpage:Right
MEX-DV1500U
4-120-899-21 (1)
Configuration des paramètres
audio
Remarque
Les disques au format DTS ne sont pas pris en
charge. Aucun son n’est émis si le format DTS est
sélectionné.
Modification de la langue/du format
du son
Pour les DVD, la langue du son peut être
modifiée si le disque est enregistré avec des
plages multilingues. Pour les DVD/DivX, vous
pouvez modifier le format du son lors de la
lecture d’un disque enregistré avec plusieurs
formats du son (par exemple, Dolby Digital).
1 En cours de lecture, appuyez
plusieurs fois sur (AUDIO) jusqu’à ce
que la langue/le format du son
souhaité apparaisse.
* Lors de la lecture d’un DivX, le format/canal du
son (par exemple « MP3 ») s’affiche.
La langue du son bascule entre les différentes
langues disponibles.
Lorsqu’un message vous invitant à saisir un
code à 4 chiffres apparaît, saisissez le code de
la langue (page 60) souhaitée.
Lorsque la même langue est affichée plus de
deux fois, le disque est enregistré avec
plusieurs formats audio.
Modification du canal audio
Lors de la lecture d’un VCD/CD/MP3/WMA/
AAC, vous pouvez sélectionner le son du canal
droit ou gauche à écouter via les haut-parleurs
droit et gauche.
Les options sont indiquées ci-dessous.
STEREO (ST) : son stéréo standard (par défaut)
1/L (L) : son du canal gauche (monaural)
2/R (R) : son du canal droit (monaural)
1 En cours de lecture, appuyez
plusieurs fois sur (AUDIO) jusqu’à ce
que le canal audio souhaité
apparaisse.
Par exemple, lors de la lecture d’un MP3
Remarque
Il est possible que vous ne puissiez pas changer les
réglages audio selon le disque.
Conseil
Vous pouvez également modifier les paramètres des
disques vidéo en sélectionnant « AUDIO » dans le
menu mode de lecture (page 24).
Vérification du format du
programme
Vous pouvez vérifier le nombre de canaux et la
position des composants sur le DVD VIDEO en
cours de lecture.
1 En cours de lecture, appuyez sur
(VISUAL SETUP).
Le menu mode de lecture apparaît.
M/m
ENTER
AUDIO
SYSTEM
SETUP
VISUAL
SETUP
1:ENGLISH Dolby D
Langue/format du son*
suite à la page suivante t
TRACK NAME
ALBUM NAME
ARTIST NAME
MP3
0003/1000 ST
3:17
SHUF
Canal audio

28
D:\Documents and Settings\takashi-shimomura\Desktop\DTP\848220S MEX-
DV1500U(EUR)\4120899211_MEX-DV1500U_ML\03FR02CD-E.fm
masterpage:Left
MEX-DV1500U
4-120-899-21 (1)
2 Appuyez sur M/m pour sélectionner
(AUDIO).
Le format du programme s’affiche.
* « PCM », « DOLBY DIGITAL », etc., s’affichent
selon le disque.
Les lettres dans l’affichage du format du
programme représentent les composants sonores
suivants et leurs positions.
: Avant (gauche)
: Avant (droit)
: Centre
: Arrière (gauche)
: Arrière (droit)
: Arrière (monaural) : composant arrière du
signal traité par Dolby Surround et du
signal Dolby Digital
: Signal Effets basses fréquences
Le nom du format du programme et les numéros
de canaux apparaissent de la façon suivante.
Exemple : Dolby Digital 5.1 canaux
Pour masquer le menu mode de lecture, appuyez
sur (VISUAL SETUP).
Réglage du niveau de sortie audio
— Niveau DVD
Vous pouvez régler le niveau de sortie audio pour
un DVD enregistré au format Dolby Digital, afin
de réduire les différences de niveau de volume
entre le disque et la source.
1 En cours de lecture, appuyez sur
(SYSTEM SETUP).
La rubrique de configuration système apparaît
sur l’appareil principal.
2 Appuyez sur M/m pour sélectionner
« DVD-LEVEL », puis appuyez sur
(ENTER).
3 Appuyez sur m pour régler sur
« ADJST-ON », puis appuyez sur
(ENTER).
4 Appuyez sur M/m pour sélectionner
« DOLBY-ADJ », puis appuyez sur
(ENTER).
5 Appuyez sur M/m pour régler le niveau
de sortie.
Le niveau de sortie peut être réglé par
incréments uniques, entre –10 et +10.
6 Appuyez sur (ENTER).
La configuration est terminée.
Pour masquer l’écran de configuration système,
appuyez sur (SYSTEM SETUP).
Avec l’appareil principal
Appuyez sur (SETUP) au lieu de (SYSTEM SETUP),
tournez la molette de réglage au lieu d’appuyer sur
M/m, appuyez sur la molette de réglage au lieu de
(ENTER).
PLAY
DVD VIDEO
L C
LFE
LS
R
RS
12
(
67
)
018
(
034
)
T 1:35:55
1:ENGLISH Dolby D
PROGRAM FORMAT
DOLBY DIGITAL
3/2.1
Format du programme actuel
Format audio actuel*
DOLBY DIGITAL
3 / 2 . 1
Composant arrière × 2
Composant avant × 2 +
Composant central × 1
Composant LFE × 1

29
D:\Documents and Settings\takashi-shimomura\Desktop\DTP\848220S MEX-
DV1500U(EUR)\4120899211_MEX-DV1500U_ML\03FR02CD-E.fm
masterpage:RightD:\Documents and Settings\takashi-shimomura\Desktop\DTP\848220S MEX-
DV1500U(EUR)\4120899211_MEX-DV1500U_ML\03FR02CD-E.fm
masterpage:Right
MEX-DV1500U
4-120-899-21 (1)
Agrandissement d’images
Vous pouvez agrandir des images.
1 En cours de lecture, appuyez sur
(VISUAL SETUP).
Le menu mode de lecture apparaît.
2 Appuyez sur M/m pour sélectionner
(CENTER ZOOM), puis
appuyez sur (ENTER).
L’option actuelle apparaît.
3 Appuyez sur M/m pour sélectionner
l’option souhaitée (×1, ×1,6*), puis
appuyez sur (ENTER).
* Il est possible que le grain de l’image
apparaisse.
L’image est agrandie.
Pour masquer le menu mode de lecture, appuyez
sur (VISUAL SETUP).
Pour faire défiler l’image, appuyez sur
</M/m/,.
Pour restaurer la taille originale, sélectionnez
«×1» à l’étape3.
Remarques
• Selon le disque, il est possible que vous ne puissiez
pas changer le taux d’agrandissement.
• Lorsque vous reprenez la lecture, l’image revient à
sa taille originale.
• Si vous retournez à un menu du disque/au menu
principal, l’agrandissement est annulé.
Réglage de la qualité d’image
— Picture EQ
Vous pouvez sélectionner une qualité d’image
adaptée à la luminosité intérieure de la voiture.
1 En cours de lecture, appuyez sur
(VISUAL SETUP).
Le menu mode de lecture apparaît.
2 Appuyez sur M/m pour sélectionner
(PICTURE EQ), puis appuyez
sur (ENTER).
L’option actuelle apparaît.
3 Appuyez sur M/m pour sélectionner
l’option souhaitée, puis appuyez sur
(ENTER).
Les options diffèrent selon le réglage de la
configuration visuelle (page 43).
Dans la configuration visuelle, les réglages de
« PICTURE EQ » dans « CUSTOM SETUP »
changent les options comme suit.
AUTO : permet de basculer automatiquement
entre les options d’utilisation pendant la nuit/la
journée en fonction du réglage du régulateur de
luminosité dans la configuration système
(page 46).
LIGHT OFF : permet d’afficher les options
d’utilisation pendant la journée.
LIGHT ON : permet d’afficher les options
d’utilisation pendant la nuit.
MPEG-4
</M/m/,
ENTER
VISUAL
SETUP
12
(
67
)
018
(
034
)
T 1:35:55
x1
x1
x1.6
PLAY
DVD VIDEO
suite à la page suivante t
MPEG-4
</M/m/,
ENTER
VISUAL
SETUP
12
(
67
)
018
(
034
)
T 1:35:55
DAYTIME
SUNSET
SHINE
CUSTOM
NORMAL
NORMAL
PLAY
DVD VIDEO

30
D:\Documents and Settings\takashi-shimomura\Desktop\DTP\848220S MEX-
DV1500U(EUR)\4120899211_MEX-DV1500U_ML\03FR02CD-E.fm
masterpage:Left
MEX-DV1500U
4-120-899-21 (1)
Les options pour chaque paramètre sont
indiquées ci-dessous.
Pour tous les paramètres
Lorsque « LIGHT OFF »/« AUTO » (avec
« DIM-OFF ») est sélectionné
Lorsque « LIGHT ON »/« AUTO » (avec
« DIM-ON ») est sélectionné
Personnalisation de la qualité
d’image
L’option « CUSTOM » vous permet de définir
votre propre paramètre de qualité d’image en
réglant les tonalités de l’image. Vous pouvez
mémoriser les paramètres pour « LIGHT OFF »
et « LIGHT ON ».
1 En cours de lecture, appuyez sur
(VISUAL SETUP).
Le menu mode de lecture apparaît.
2 Appuyez sur M/m pour sélectionner
(PICTURE EQ), puis appuyez
sur (ENTER).
L’option actuelle apparaît.
3 Appuyez sur M/m pour sélectionner
« CUSTOM », puis appuyez sur
(ENTER).
4 Appuyez sur M/m pour sélectionner la
tonalité de l’image, puis appuyez sur
</, pour régler le niveau.
5 Appuyez sur (ENTER).
Pour masquer le menu mode de lecture, appuyez
sur (VISUAL SETUP).
Verrouillage des disques
— Contrôle parental
*
* Sauf pour les DVD-R/DVD-R DL/DVD-RW en mode
VR.
Vous pouvez verrouiller un disque ou définir des
restrictions de lecture selon un niveau
prédéterminé, tel que l’âge du spectateur. Les
scènes qui font l’objet de limitations peuvent être
bloquées ou remplacées par des scènes
différentes lors de la lecture d’un DVD
compatible avec le contrôle parental.
Activation du contrôle parental
1 Appuyez sur (VISUAL SETUP) lorsque
l’appareil est hors tension.
Le menu de configuration visuelle apparaît.
NORMAL : qualité d’image normale.
CUSTOM : paramètres réglables par
l’utilisateur (page 30).
DAYTIME : adapté à un endroit lumineux.
SUNSET : adapté lorsqu’il fait un peu sombre.
SHINE : adapté dans un endroit très clair (par
exemple lorsque le soleil se reflète sur le
moniteur).
NIGHT : assombrit le moniteur pour ne pas vous
distraire lors de trajets nocturnes.
MIDNIGHT : assombrit le moniteur davantage
qu’avec le paramètre « NIGHT ».
THEATER : éclaire le moniteur ; adapté si vous
souhaitez bénéficier d’un moniteur illuminé la
nuit.
RETURN
Cancel :
Select : Set :
USER CUSTOM SETUP
COLOR 0
BRIGHT 0
SHARPNESS 0
CLEAR
VISUAL
SETUP
O
M/m
ENTER
Touches
numériques

31
D:\Documents and Settings\takashi-shimomura\Desktop\DTP\848220S MEX-
DV1500U(EUR)\4120899211_MEX-DV1500U_ML\03FR02CD-E.fm
masterpage:RightD:\Documents and Settings\takashi-shimomura\Desktop\DTP\848220S MEX-
DV1500U(EUR)\4120899211_MEX-DV1500U_ML\03FR02CD-E.fm
masterpage:Right
MEX-DV1500U
4-120-899-21 (1)
2 Appuyez sur M/m pour sélectionner
(CUSTOM SETUP), puis appuyez
sur (ENTER).
Les rubriques de configuration
personnalisables apparaissent.
3 Appuyez sur M/m pour sélectionner
« PARENTAL CONTROL », puis
appuyez sur (ENTER).
Les options apparaissent.
4 Appuyez sur M/m pour sélectionner
«ON t », puis appuyez sur (ENTER).
L’écran de réglage du mot de passe apparaît.
5 Appuyez sur les touches numériques
pour saisir votre mot de passe, puis
appuyez sur (ENTER).
La boîte de dialogue de confirmation
s’affiche.
6 Pour valider, appuyez sur les touches
numériques pour saisir à nouveau
votre mot de passe, puis appuyez sur
(ENTER).
La configuration est terminée.
Pour supprimer un numéro saisi, appuyez sur
(CLEAR).
Pour revenir à l’écran précédent, appuyez sur
O.
Pour masquer le menu de configuration visuelle,
appuyez sur (VISUAL SETUP).
Désactivation du contrôle parental
Sélectionnez « OFF t » à l’étape 4 ci-dessus,
puis saisissez votre mot de passe.
Si le contrôle parental est désactivé, le message
« Parental control canceled » (Contrôle parental
annulé) s’affiche.
Modification du mot de passe
Sélectionnez « PASSWORD t » à l’étape
4 ci-dessus, saisissez votre mot de passe actuel,
saisissez votre nouveau mot de passe, puis
saisissez-le de nouveau pour confirmer.
Modification de la zone et du
niveau d’évaluation des films
Les niveaux de restriction peuvent être réglés
selon la zone et les niveaux d’évaluation.
1 Appuyez sur (VISUAL SETUP) lorsque
l’appareil est hors tension.
Le menu de configuration visuelle apparaît.
2 Appuyez sur M/m pour sélectionner
(CUSTOM SETUP), puis appuyez
sur (ENTER).
Les rubriques de configuration
personnalisables apparaissent.
3 Appuyez sur M/m pour sélectionner
« PARENTAL CONTROL », puis
appuyez sur (ENTER).
Les options apparaissent.
4 Appuyez sur M/m pour sélectionner
« PLAYER t », puis appuyez sur
(ENTER).
Lorsque le contrôle parental est déjà activé,
l’écran de saisie du mot de passe s’affiche.
Pour modifier le réglage, saisissez votre mot
de passe, puis appuyez sur (ENTER).
5 Appuyez sur M/m pour sélectionner
« STANDARD », puis appuyez sur
(ENTER).
Les options apparaissent.
6 Appuyez sur M/m pour sélectionner la
zone de votre choix dont vous
souhaitez appliquer les niveaux
d’évaluation de films, puis appuyez
sur (ENTER).
La zone est sélectionnée.
Si vous sélectionnez « OTHERS t »,
saisissez le code de zone en vous reportant à
la « Liste des codes de zone » à la page 60 à
l’aide des touches numériques.
CUSTOM SETUP
PARENTAL CONTROL :
DivX VOD :
SLIDE SHOW TIME :
MULTI-DISC RESUME :
PLAY LIST PLAY :
PICTURE EQ :
OFF
OFF
ONt
PLAYERt
PASSWORDt
AUTO
PARENTAL CONTROL
Enter a new 4-digit password,
then press .
ENTER
CUSTOM SETUP
suite à la page suivante t
PARENTAL CONTROL:
LEVEL :
STANDARD :
USA
USA
OTHERSt
8:
CUSTOM SETUP

32
D:\Documents and Settings\takashi-shimomura\Desktop\DTP\848220S MEX-
DV1500U(EUR)\4120899211_MEX-DV1500U_ML\03FR02CD-E.fm
masterpage:Left
MEX-DV1500U
4-120-899-21 (1)
7 Appuyez sur M/m pour sélectionner
« LEVEL », puis appuyez sur (ENTER).
Les options apparaissent.
Plus la valeur est faible, plus le niveau de
restriction est élevé.
8 Appuyez sur M/m pour sélectionner le
niveau souhaité, puis appuyez sur
(ENTER).
La configuration est terminée.
Pour revenir à l’écran précédent, appuyez sur
O.
Pour masquer le menu de configuration visuelle,
appuyez sur (VISUAL SETUP).
Lecture répétée et aléatoire
1 En cours de lecture, appuyez
plusieurs fois sur (1) (REP) ou
(2) (SHUF) sur l’appareil principal
jusqu’à ce que l’option souhaitée
apparaisse.
La lecture répétée ou aléatoire commence.
Les options de répétition et l’ordre de
changement de chaque disque/format sont
indiqués ci-dessous.
Les options de lecture aléatoire et l’ordre de
changement de chaque disque/format sont
indiqués ci-dessous.
PARENTAL CONTROL:
LEVEL :
STANDARD :
8:
1:
2:
3:
4:
5:
G
PG
PG-13
CUSTOM SETUP
MPEG-4
SHUFREP
Disque/
format
Options
OFF
CHAPTER : répète le chapitre
en cours.
TITLE : répète le titre en cours.
*
1
OFF
TRACK : répète la plage en
cours.
OFF
TRACK : répète la plage en
cours.
ALBUM : répète l’album en
cours.
OFF
IMAGE : répète l’image en
cours.
ALBUM : répète l’album en
cours.
OFF
FILE : répète le fichier vidéo en
cours.
ALBUM : répète l’album
(dossier) en cours.
Disque/
format
Options
*
2
OFF
TITLE : lit les chapitres du titre
en cours dans un ordre
aléatoire.
*
1
OFF
DISC : lit les plages du disque
en cours dans un ordre
aléatoire.
OFF
ALBUM : lit les plages/images/
fichiers vidéo de l’album
(dossier) en cours dans un ordre
aléatoire.
MPEG-4
MPEG-4

33
D:\Documents and Settings\takashi-shimomura\Desktop\DTP\848220S MEX-
DV1500U(EUR)\4120899211_MEX-DV1500U_ML\03FR02CD-E.fm
masterpage:RightD:\Documents and Settings\takashi-shimomura\Desktop\DTP\848220S MEX-
DV1500U(EUR)\4120899211_MEX-DV1500U_ML\03FR02CD-E.fm
masterpage:Right
MEX-DV1500U
4-120-899-21 (1)
*1 Disponible uniquement lors de la lecture d’un
disque VCD version 1.0/1.1 ou 2.0 sans fonction
PBC.
*2 Sauf pour les DVD-R/DVD-R DL/DVD-RW en mode
VR.
Pour revenir en mode de lecture normal,
sélectionnez « OFF ».
Remarques
• Si vous retournez à un menu du disque/au menu
principal, la lecture répétée/aléatoire est annulée.
• La lecture répétée/aléatoire ne peut pas être réglée
dans le menu du disque/menu principal.
Configuration à partir du menu mode
de lecture
1 En cours de lecture, appuyez sur
(VISUAL SETUP).
Le menu mode de lecture apparaît.
2 Appuyez sur M/m pour sélectionner
ou , puis appuyez sur
(ENTER).
3 Appuyez sur M/m pour sélectionner
l’option souhaitée, puis appuyez sur
(ENTER).
La lecture répétée ou aléatoire commence.
Appuyez sur (VISUAL SETUP) pour masquer le
menu mode de lecture.
Remarque
Le mode de lecture sélectionné est annulé lorsque le
disque en cours de lecture est éjecté.
Recherche directe
Vous pouvez localiser directement un point de
votre choix en précisant le numéro du titre, du
chapitre, etc.
1 En cours de lecture, appuyez sur les
touches numériques pour saisir un
numéro de rubrique (plage, titre, etc.),
puis appuyez sur (ENTER).
La lecture commence au début du point
sélectionné.
Configuration à partir du menu mode
de lecture
Les rubriques de recherche diffèrent selon le
disque ou le format, comme suit.
MPEG-4
M/m
ENTER
VISUAL
SETUP
PLAY
DVD VIDEO
12
(
67
)
018
(
034
)
T 1:35:55
OFF
CHAPTER
TITLE
OFF
Disque/
format
Rubriques
TITLE
Commence la lecture à partir
d’un titre sélectionné.
CHAPTER
Commence la lecture à partir
d’un chapitre sélectionné.
TIME
Commence la lecture au point
déterminé par le code temporel
saisi.
*
TRACK
Commence la lecture à partir
d’une plage sélectionnée.
suite à la page suivante
t
MPEG-4
CLEAR
VISUAL
SETUP
M/m
ENTER
Touches
numériques
MPEG-4

34
D:\Documents and Settings\takashi-shimomura\Desktop\DTP\848220S MEX-
DV1500U(EUR)\4120899211_MEX-DV1500U_ML\03FR02CD-E.fm
masterpage:Left
MEX-DV1500U
4-120-899-21 (1)
* Disponible uniquement lors de la lecture de VCD
sans fonction PBC.
1 En cours de lecture, appuyez sur
(VISUAL SETUP).
Le menu mode de lecture apparaît.
2 Appuyez sur M/m pour sélectionner la
rubrique souhaitée, puis appuyez sur
(ENTER).
Le numéro entre parenthèses indique le
nombre total d’éléments de la rubrique
sélectionnée.
3 Appuyez sur les touches numériques
pour saisir un numéro de rubrique ou
un code temporel.
Par exemple, pour trouver le point situé à
2 heures, 10 minutes et 20 secondes, saisissez
simplement « 21020 ».
Pour supprimer les numéros déjà saisis,
appuyez sur (CLEAR).
4 Appuyez sur (ENTER).
La lecture commence au point sélectionné.
Appuyez sur (VISUAL SETUP) pour masquer le
menu mode de lecture.
Affichage par liste de plages/
d’images/de fichiers vidéo
— Quick-BrowZer
Sélection d’une plage/d’une image/
d’un fichier vidéo
Vous pouvez afficher automatiquement des
albums/dossiers/plages/images/fichiers vidéo sur
le moniteur et en sélectionner un de votre choix
pour le lire.
Cette fonction est très pratique, surtout pour les
disques au format MP3/WMA/AAC/JPEG/
DivX/MPEG-4 qui contiennent de nombreux
albums/nombreuses plages, etc.
1 En cours de lecture, appuyez sur .
La liste des plages/images/fichiers vidéo du
disque/de l’album*/du dossier* en cours
s’affiche.
Pour revenir en arrière/passer à la page
précédente/suivante, appuyez sur </,.
Pour passer au niveau supérieur, appuyez sur
.*
Pour sélectionner le dossier souhaité, appuyez
sur M/m, puis (ENTER).*
* Uniquement lors de la lecture de MP3/WMA/
AAC/JPEG/DivX/MPEG-4.
ALBUM
Commence la lecture à partir
d’un album sélectionné.
IMAGE
Commence la lecture à partir
d’une image sélectionnée.
ALBUM
Commence la lecture à partir
d’un album (dossier)
sélectionné.
FILE
Commence la lecture à partir
d’un fichier sélectionné.
MPEG-4
PLAY
DVD VIDEO
- -
(
67
)
018
(
034
)
T 1:35:55
</M/m/,
ENTER
MPEG-4
TRACK NAME
ALBUM NAME
ARTIST NAME
LIST UP VIDEO FILES
LIST UP IMAGE FILES
MP3
0003/1000 ST
3:17
ROOT
MUSIC FOLDER
01 TRACK 01
02 TRACK 02
03 TRACK 03
04 TRACK 04
05 TRACK 05

35
D:\Documents and Settings\takashi-shimomura\Desktop\DTP\848220S MEX-
DV1500U(EUR)\4120899211_MEX-DV1500U_ML\03FR02CD-E.fm
masterpage:RightD:\Documents and Settings\takashi-shimomura\Desktop\DTP\848220S MEX-
DV1500U(EUR)\4120899211_MEX-DV1500U_ML\03FR02CD-E.fm
masterpage:Right
MEX-DV1500U
4-120-899-21 (1)
2 Appuyez sur M/m pour sélectionner la
plage/l’image/le fichier vidéo de votre
choix, puis appuyez sur (ENTER).
La lecture de la plage, de l’image ou du
fichier vidéo sélectionné commence.
Avec l’appareil principal
Tournez la molette de réglage au lieu d’appuyer sur
M/m, appuyez sur (SEEK) –/+ au lieu de </,,
appuyez sur la molette de réglage au lieu de
(ENTER).
Sélection d’un type de fichier
Si le disque contient plusieurs types de fichiers,
seul le type de fichier sélectionné (audio/vidéo/
image) peut être lu. L’ordre de priorité de lecture
du type de fichier est initialement le suivant :
audio, vidéo, puis image (par exemple, si le
disque contient des fichiers vidéo et des fichiers
d’image, seuls les fichiers vidéo sont lus). Vous
pouvez sélectionner le type de fichier à afficher
dans la liste, puis sélectionner le fichier que vous
souhaitez lire.
1 En cours de lecture, appuyez sur .
2 Appuyez sur M/m pour sélectionner le
type de fichier à afficher dans la liste,
puis appuyez sur (ENTER).
Pour afficher une liste des fichiers MP3,
WMA et AAC, sélectionnez « LIST UP
AUDIO FILES ».
Pour afficher une liste des fichiers DivX/
MPEG-4, sélectionnez « LIST UP VIDEO
FILES ».
Pour afficher une liste des fichiers JPEG,
sélectionnez « LIST UP IMAGE FILES ».
3 Appuyez sur M/m pour sélectionner le
fichier souhaité, puis appuyez sur
(ENTER).
La lecture du fichier sélectionné commence.
Avec l’appareil principal
Tournez la molette de réglage du volume au lieu
d’appuyer sur M/m, appuyez sur la molette de réglage
au lieu de (ENTER).
Visualisation des informations
relatives au disque audio
Pendant la lecture audio, vous pouvez vérifier les
informations du disque ou afficher l’image de la
pochette* d’un fichier MP3/WMA/AAC sur le
moniteur.
* La taille recommandée est de 240 × 240 à 960 × 960
pixels.
Par exemple, lors de la lecture d’un MP3
A Numéro de plage ou nom de plage
Nom du disque/Nom de l’album
Nom de l’artiste
B Format
C Statut de lecture (N, X, etc.)
D Canal audio actuel
Lors de la lecture d’un fichier CD/MP3/
WMA/AAC, le canal audio peut être modifié.
Pour plus de détails, reportez-vous à la
section « Modification du canal audio » à la
page 27.
E Numéro de la plage/Total
F Temps de lecture écoulé
G Mode de lecture actuel
H Messages d’aide
Conseil
Vous pouvez également sélectionner une plage à lire
à l’aide d’une liste (Quick-BrowZer) (page 34).
MPEG-4
TRACK NAME
ALBUM NAME
ARTIST NAME
MP3
0003/1000 ST
3:17
SHUF
To list up, press .
BROWSE
B
E
H
CD
F
A
G

36
D:\Documents and Settings\takashi-shimomura\Desktop\DTP\848220S MEX-
DV1500U(EUR)\4120899211_MEX-DV1500U_ML\03FR02CD-E.fm
masterpage:Left
MEX-DV1500U
4-120-899-21 (1)
Opérations avancées — Radio
Mémorisation et réception des
stations
Attention
Pour syntoniser des stations pendant que vous
conduisez, utilisez la fonction de mémorisation
des meilleurs accords (BTM) afin d’éviter les
accidents.
Mémorisation automatique — BTM
1 Appuyez plusieurs fois sur (SRC)
jusqu’à ce que l’indication « TUNER »
apparaisse sur l’appareil principal.
Pour changer de bande, appuyez plusieurs
fois sur (MODE). Vous pouvez sélectionner
FM1, FM2, FM3, MW (PO) ou LW (GO).
2 Appuyez sur (SYSTEM SETUP).
La rubrique de configuration système
apparaît.
3 Appuyez sur M/m pour sélectionner
« BTM », puis appuyez sur (ENTER).
L’appareil enregistre les stations sur les
touches numériques dans l’ordre des
fréquences ((1) à (6)).
Un bip retentit lorsque le réglage est
mémorisé.
Avec l’appareil principal
Appuyez sur (SOURCE) au lieu de (SRC), appuyez
(SETUP) au lieu de (SYSTEM SETUP), tournez la
molette de réglage du volume au lieu d’appuyer sur
M/m, appuyez sur la molette de réglage au lieu de
(ENTER).
Mémorisation manuelle
1 Lorsque vous recevez la station que
vous souhaitez mémoriser, appuyez
sur une touche numérique et
maintenez-la enfoncée ((1) à (6))
jusqu’à ce que l’indication « MEM »
apparaisse sur l’appareil principal.
Le numéro de la touche apparaît sur l’appareil
principal.
Remarque
Si vous essayez de mémoriser une autre station sur la
même touche numérique, la station mémorisée
précédemment est effacée.
Conseil
Lorsqu’une station RDS est mémorisée, le réglage
AF/TA est également mémorisé (page 37).
Réception des stations
mémorisées
1 Sélectionnez la bande, puis appuyez
sur une touche numérique ((1) à (6)).
Fonction RDS
Aperçu
Les stations FM disposant du système RDS
(Système de radiocommunication de données)
transmettent des informations numériques
inaudibles en même temps que le signal normal
de leurs émissions radio.
Rubriques d’affichage
A Bande radio, fonctionnement
B TA/ TP*
1
C Fréquence*
2
(Nom du service de l’émission),
Numéro de présélection, Horloge, Données
RDS
*1 « TA » clignote pendant les messages de
radioguidage. L’indication « TP » s’allume
lorsqu’une de ces stations est captée.
*2 Lorsque vous captez la station RDS, « * » est
affiché à gauche de l’indication de la fréquence.
M/m
ENTER
SRC
MODE
SYSTEM
SETUP
Touches
numériques
AF/TA
(PTY)
DSPL
Molette de réglage
Touches
numériques
B
C
A

37
D:\Documents and Settings\takashi-shimomura\Desktop\DTP\848220S MEX-
DV1500U(EUR)\4120899211_MEX-DV1500U_ML\03FR02CD-E.fm
masterpage:RightD:\Documents and Settings\takashi-shimomura\Desktop\DTP\848220S MEX-
DV1500U(EUR)\4120899211_MEX-DV1500U_ML\03FR02CD-E.fm
masterpage:Right
MEX-DV1500U
4-120-899-21 (1)
Pour modifier les rubriques d’affichage C,
appuyez sur (DSPL).
Services RDS
Cet appareil propose automatiquement les
services RDS, comme suit :
Remarques
• Selon le pays ou la région où vous vous trouvez, il
est possible que les services RDS ne soient pas
tous disponibles.
• La fonction RDS ne fonctionne pas correctement si
le signal de retransmission est faible ou si la station
syntonisée ne transmet pas de données RDS.
Réglages AF et TA
Les réglages AF/TA et leur ordre de changement
sont indiqués ci-dessous.
AF-ON : active AF et désactive TA.
TA-ON : active TA et désactive AF.
AF, TA-ON : active AF et TA.
AF, TA-OFF : désactive AF et TA.
1 Appuyez plusieurs fois sur (AF/TA)
jusqu’à ce que le réglage souhaité
apparaisse.
Mémorisation des stations RDS avec
les réglages AF et TA
Vous pouvez présélectionner les stations RDS
avec les réglages AF/TA. Si vous utilisez la
fonction BTM, seules les stations RDS sont
mémorisées avec les mêmes réglages AF/TA.
Si vous effectuez une présélection manuelle,
vous pouvez présélectionner à la fois des stations
RDS et non-RDS, avec leurs réglages AF/TA
respectifs.
1 Réglez AF/TA, puis mémorisez la station à
l’aide de la fonction BTM ou manuellement.
Réception de messages d’urgence
Lorsque la fonction AF ou TA est activée, les
messages d’urgence interrompent
automatiquement la source sélectionnée en cours
de diffusion.
Conseil
Si vous réglez le niveau de volume pendant la
diffusion d’un message de radioguidage, ce niveau
sera enregistré dans la mémoire pour les messages
de radioguidage suivants, indépendamment du niveau
de volume normal.
Ecoute continue d’une émission
régionale — REG
La fonction AF est activée : ce réglage par défaut
restreint la réception à une région spécifique, afin
que la syntonisation ne passe pas
automatiquement à une autre station régionale
dont les signaux sont plus puissants.
Si vous quittez la zone de réception de cette
émission régionale, choisissez « REG-OFF »
dans la configuration système en cours de
réception FM (page 46).
Remarque
Cette fonction est inopérante au Royaume-Uni et dans
certaines autres régions.
Fonction de liaison locale (Royaume-
Uni uniquement)
Cette fonction vous permet de sélectionner
d’autres stations locales de la région, même si
elles ne sont pas associées à vos touches
numériques.
1 En cours de réception FM, appuyez sur une
touche numérique ((1) à (6)) sur laquelle
une station locale est mémorisée.
2 Dans les 5 secondes qui suivent, appuyez de
nouveau sur la touche numérique de la station
locale.
Répétez cette procédure jusqu’à ce que vous
captiez la station locale souhaitée.
AF (Fréquences alternatives)
Permet de sélectionner et de régler de nouveau
la station ayant le signal le plus fort sur un
réseau. Cette fonction vous permet d’écouter la
même émission en continu pendant un voyage
longue distance sans avoir à régler de nouveau
cette station manuellement.
TA (Messages de radioguidage)/
TP (Programme de radioguidage)
Propose les messages et les programmes de
radioguidage disponibles à cet instant. Tout
message/programme reçu interrompt la source
sélectionnée en cours de diffusion.
PTY (Types d’émission)
Permet d’afficher le type d’émission en cours
de réception et de rechercher votre type
d’émission sélectionné.
CT (Heure)
Les données CT accompagnant la transmission
RDS assurent un réglage de l’horloge.

38
D:\Documents and Settings\takashi-shimomura\Desktop\DTP\848220S MEX-
DV1500U(EUR)\4120899211_MEX-DV1500U_ML\03FR02CD-E.fm
masterpage:Left
MEX-DV1500U
4-120-899-21 (1)
Sélection de PTY
1 Appuyez sur la touche (AF/TA) (PTY)
en cours de réception FM et
maintenez-la enfoncée.
Le nom du type d’émission diffusé apparaît si
la station transmet des données PTY.
2 Tournez la molette de réglage du
volume pour sélectionner le type
d’émission.
3 Appuyez sur la molette de réglage.
L’appareil recherche une station diffusant le
type d’émission sélectionné.
Types d’émissions
Remarque
Cette fonction est inopérante dans certains pays ou
régions où les données PTY ne sont pas disponibles.
Réglage de CT
1 Réglez « CT-ON » dans la
configuration système (page 45).
Remarques
• Il est possible que la fonction CT ne fonctionne pas,
même si une station RDS est captée.
• Il peut y avoir une différence entre l’heure réglée par
la fonction CT et l’heure réelle.
Réglage du son
Réglage des caractéristiques
du son
Vous pouvez régler les caractéristiques du son à
votre convenance.
Les rubriques de réglage du menu son et l’ordre
dans lequel elles s’affichent sont indiqués
ci-dessous.
EQ3 : permet de sélectionner une courbe de
l’égaliseur entre 7 types de musique.
LOW, MID, HI*
1
: règle le niveau de volume de
la bande sélectionnée pour le réglage
personnalisé EQ3.
BAL (Balance) : règle la balance du son entre les
haut-parleurs gauche et droit.
FAD (Equilibre avant-arrière) : règle le niveau
relatif entre les haut-parleurs avant et arrière.
SUB (Volume du caisson de graves)*
2
: permet
de régler le volume du caisson de graves.
(« ATT » est le réglage inférieur.)
*1 Apparaît uniquement lorsque EQ3 est activé.
*2 Lorsque la sortie audio est réglée sur « SUB-
OUT » (page 45).
1 En cours de lecture ou de réception,
appuyez plusieurs fois sur (SOUND)
jusqu’à ce que la rubrique de réglage
souhaitée apparaisse sur l’appareil
principal.
2 Appuyez sur M/m pour régler le niveau
ou sélectionner l’option souhaitée.
3 Appuyez sur .
Le réglage est terminé et la fenêtre
d’affichage revient au mode de lecture/
réception normal.
NEWS (nouvelles), AFFAIRS (dossiers
d’actualité), INFO (informations), SPORT
(sport), EDUCATE (education), DRAMA
(théâtre), CULTURE (culture), SCIENCE
(science), VARIED (divers), POP M (musique
pop), ROCK M (rock), EASY M (musique
légère), LIGHT M (musique classique légère),
CLASSICS (musique classique), OTHER M
(autres styles de musique), WEATHER (météo),
FINANCE (finance), CHILDREN (émissions
pour les enfants), SOCIAL A (affaires sociales),
RELIGION (religion), PHONE IN (émissions
ligne ouverte), TRAVEL (voyage), LEISURE
(loisirs), JAZZ (jazz), COUNTRY (musique
country), NATION M (musique nationale),
OLDIES (musique d’autrefois), FOLK M
(musique folk), DOCUMENT (documentaires)
SOUND
M/m

39
D:\Documents and Settings\takashi-shimomura\Desktop\DTP\848220S MEX-
DV1500U(EUR)\4120899211_MEX-DV1500U_ML\03FR02CD-E.fm
masterpage:RightD:\Documents and Settings\takashi-shimomura\Desktop\DTP\848220S MEX-
DV1500U(EUR)\4120899211_MEX-DV1500U_ML\03FR02CD-E.fm
masterpage:Right
MEX-DV1500U
4-120-899-21 (1)
Avec l’appareil principal
Appuyez sur la molette de réglage au lieu de
(SOUND), tournez la molette de réglage au lieu
d’appuyer sur M/m.
Personnalisation de la courbe de
l’égaliseur — EQ3
« CUSTOM » de EQ3 vous permet de définir vos
propres réglages de l’égaliseur. Vous pouvez
régler le niveau de 3 bandes différentes :
« LOW », « MID » et « HI ».
1 En cours de lecture ou de réception,
appuyez plusieurs fois sur (SOUND)
jusqu’à ce que « EQ3 » apparaisse.
2 Appuyez sur M/m pour sélectionner
«CUSTOM».
3 Appuyez plusieurs fois sur (SOUND)
jusqu’à ce que « LOW », « MID » ou
« HI » apparaisse.
4 Appuyez sur M/m pour régler le niveau
du paramètre sélectionné.
Le niveau peut être réglé par incréments
uniques, entre –10 et +10.
Pour restaurer la courbe par défaut de
l’égaliseur, appuyez sur la touche (SOUND)
et maintenez-la enfoncée.
5 Appuyez sur .
Le réglage est terminé et la fenêtre
d’affichage revient au mode de lecture/
réception normal.
Conseil
D’autres types d’égaliseur peuvent aussi être réglés.
Avec l’appareil principal
Appuyez sur la molette de réglage au lieu de
(SOUND), tournez la molette de réglage au lieu
d’appuyer sur M/m.
Paramètres
Vous pouvez configurer plusieurs paramètres
dans les deux menus de configuration suivants.
• Menu de configuration visuelle
(page 39)
Permet de configurer toutes les rubriques
visuelles (via le moniteur).
• Menu de configuration système
(page 44)
Permet de configurer toutes les rubriques liées
au système (via l’appareil principal).
Configuration visuelle
Le menu de configuration visuelle comprend les
catégories suivantes.
LANGUAGE SETUP (page 41)
Permet de régler la langue du menu, des
sous-titres, etc.
DISPLAY SETUP (page 41)
Permet de régler les paramètres du
moniteur raccordé.
CUSTOM SETUP (page 42)
Permet de personnaliser la lecture des
disques.
AUDIO SETUP (page 43)
Permet de régler les paramètres du son
selon le disque.
RESET (page 43)
Permet de réinitialiser toutes les rubriques
de configuration.
Opération de base de la
configuration visuelle
Vous pouvez configurer les rubriques du menu en
suivant la procédure suivante.
suite à la page suivante t
VISUAL
SETUP
O
M/m
ENTER

40
D:\Documents and Settings\takashi-shimomura\Desktop\DTP\848220S MEX-
DV1500U(EUR)\4120899211_MEX-DV1500U_ML\03FR02CD-E.fm
masterpage:Left
MEX-DV1500U
4-120-899-21 (1)
Par exemple, pour régler le format sur « 4:3 PAN
SCAN ».
1 Appuyez sur (VISUAL SETUP) lorsque
l’appareil est hors tension.
Le menu de configuration visuelle apparaît.
2 Appuyez sur M/m pour sélectionner
(DISPLAY SETUP), puis appuyez
sur (ENTER).
Les rubriques de configuration de l’affichage
apparaissent.
3 Appuyez sur M/m pour sélectionner
« MONITOR TYPE », puis appuyez sur
(ENTER).
Les options apparaissent.
4 Appuyez sur M/m pour sélectionner
« 4:3 PAN SCAN », puis appuyez sur
(ENTER).
La configuration est terminée.
Pour revenir à l’écran précédent, appuyez sur
O.
Pour masquer le menu de configuration visuelle,
appuyez sur (VISUAL SETUP).
LANGUAGE SETUP
MENU :
AUDIO :
SUBTITLE :
ENGLISH
ENGLISH
ENGLISH
DISPLAY SETUP
MONITOR TYPE :
WALLPAPER :
16:9
WALLPAPER 1
DISPLAY SETUP
MONITOR TYPE :
WALLPAPER :
16:9
16:9
4:3 LETTER BOX
4:3 PAN SCAN

41
D:\Documents and Settings\takashi-shimomura\Desktop\DTP\848220S MEX-
DV1500U(EUR)\4120899211_MEX-DV1500U_ML\03FR02CD-E.fm
masterpage:RightD:\Documents and Settings\takashi-shimomura\Desktop\DTP\848220S MEX-
DV1500U(EUR)\4120899211_MEX-DV1500U_ML\03FR02CD-E.fm
masterpage:Right
MEX-DV1500U
4-120-899-21 (1)
Configuration de la langue à l’écran ou de la bande son
Sélectionnez (LANGUAGE SETUP), puis sélectionnez la rubrique et l’option souhaitées ci-dessous
à l’aide de M/m et (ENTER). Pour plus de détails sur cette procédure, reportez-vous à la section
« Opération de base de la configuration visuelle » à la page 39.
Configuration de l’affichage
Sélectionnez (DISPLAY SETUP), puis sélectionnez la rubrique et l’option souhaitées ci-dessous à
l’aide de M/m et (ENTER). Pour plus de détails sur cette procédure, reportez-vous à la section
« Opération de base de la configuration visuelle » à la page 39.
« z » indique le réglage par défaut.
Remarque
Selon le disque, « 4:3 LETTER BOX » peut être sélectionné automatiquement à la place de « 4:3 PAN SCAN », et
vice-versa.
Rubrique Objet
MENU Permet de changer la langue du menu du disque.
AUDIO Permet de changer la langue de la bande son.
SUBTITLE Permet de changer la langue des sous-titres enregistrés sur le
disque.
Rubrique Option Objet
MONITOR TYPE
Sélectionne le format adapté au
moniteur raccordé.
16:9 (z)
Permet d’afficher une image grand
écran.
Adapté lors du raccordement à un
moniteur grand écran ou un
moniteur doté d’une fonction mode
grand écran.
4:3 LETTER BOX
Permet d’afficher une image grand
écran avec des bandes sur les
parties supérieure et inférieure de
l’écran.
Adapté lors du raccordement à un
moniteur avec un écran 4:3.
4:3 PAN SCAN
Permet d’afficher une image grand
écran sur l’écran entier et de couper
automatiquement les parties qui
dépassent.
WALLPAPER
WALLPAPER 1 (z), 2, 3
Permet de sélectionner le papier
peint.

42
D:\Documents and Settings\takashi-shimomura\Desktop\DTP\848220S MEX-
DV1500U(EUR)\4120899211_MEX-DV1500U_ML\03FR02CD-E.fm
masterpage:Left
MEX-DV1500U
4-120-899-21 (1)
Configuration personnalisée
Sélectionnez (CUSTOM SETUP), puis sélectionnez la rubrique et l’option souhaitées ci-dessous à
l’aide de M/m et (ENTER). Pour plus de détails sur cette procédure, reportez-vous à la section
« Opération de base de la configuration visuelle » à la page 39.
Pour plus de détails, reportez-vous aux numéros de page indiqués. « z » indique le réglage par défaut.
Rubrique Option Objet
PARENTAL CONTROL
(page 30) *
1
Permet de régler les restrictions de
lecture afin de ne pas lire de scènes
ou de disques inadaptés.
OFF t (z)
Permet de désactiver le contrôle
parental.
ON t
Permet d’activer le contrôle
parental.
PLAYER t
Permet de fixer la norme de
restriction et son niveau.
PASSWORD t
Permet de choisir un nouveau mot
de passe à 4 chiffres.
DivX VOD
Affiche le code d’enregistrement
de cet appareil. Pour de plus
amples informations, visitez le site
Web suivant :
http://www.divx.com/vod
Done
Permet de désactiver l’affichage.
SLIDE SHOW TIME
5 sec. (z), 10 sec.,
20 sec., 40 sec., 60 sec.
Permet de sélectionner l’intervalle
de diaporama.
FIXED
Permet de désactiver le diaporama.
MULTI-DISC RESUME
*
2
ON (z)
Permet d’enregistrer les réglages de
reprise dans la mémoire pour
5 disques au maximum. (Les
réglages restent dans la mémoire
même lorsque vous réglez sur
« OFF ».)
OFF
Permet de ne pas enregistrer les
réglages de reprise dans la
mémoire.
La fonction de reprise de la lecture
est disponible uniquement pour le
disque actuellement inséré dans
l’appareil.
USB RESUME
ON (z)
Permet d’enregistrer les réglages de
reprise dans la mémoire. (Les
réglages restent dans la mémoire
même lorsque vous réglez sur
« OFF ».)
OFF
Permet de ne pas enregistrer les
réglages de reprise dans la
mémoire.
MPEG-4

43
D:\Documents and Settings\takashi-shimomura\Desktop\DTP\848220S MEX-
DV1500U(EUR)\4120899211_MEX-DV1500U_ML\03FR02CD-E.fm
masterpage:RightD:\Documents and Settings\takashi-shimomura\Desktop\DTP\848220S MEX-
DV1500U(EUR)\4120899211_MEX-DV1500U_ML\03FR02CD-E.fm
masterpage:Right
MEX-DV1500U
4-120-899-21 (1)
*1 Sauf pour les DVD-R/DVD-R DL/DVD-RW en mode VR.
*2 DVD VIDEO uniquement.
Remarque
Si le contrôle parental est activé, la fonction de reprise de la lecture ne fonctionne pas. Dans ce cas, la lecture
reprend au début du disque lors de son insertion.
Configuration audio
Sélectionnez (AUDIO SETUP), puis sélectionnez la rubrique et l’option souhaitées ci-dessous à
l’aide de M/m et (ENTER). Pour plus de détails sur cette procédure, reportez-vous à la section
« Opération de base de la configuration visuelle » à la page 39.
Pour plus de détails, reportez-vous aux numéros de page indiqués. « z » indique le réglage par défaut.
* Sauf pour les DVD-R/DVD-R DL/DVD-RW en mode VR.
Réinitialisation de tous les paramètres
Tous les paramètres (à l’exception du paramètre de contrôle parental) de la configuration visuelle
peuvent être réinitialisés.
Sélectionnez (RESET), puis « RESET ALL SETTINGS », « YES » à l’aide de M/m et (ENTER).
Pour obtenir des informations détaillées sur cette procédure, reportez-vous à la section « Opération de
base de la configuration visuelle » à la page 39.
Remarque
Ne mettez pas l’appareil hors tension en cours de réinitialisation, étant donné que cette opération prend quelques
secondes.
PLAY LIST PLAY
(Pour les DVD-R/DVD-R DL/
DVD-RW en mode VR
uniquement)
ORIGINAL (z)
Permet de lire les titres originaux
enregistrés.
PLAY LIST
Permet de lire la liste de lecture
éditée.
PICTURE EQ (page 29)
Sélectionne l’option de
configuration à afficher dans le
menu du mode de lecture.
AUTO (z)
Permet de basculer
automatiquement entre les options
d’utilisation pendant la nuit/la
journée en fonction du réglage du
régulateur de luminosité dans la
configuration système (page 46).
LIGHT OFF
Permet d’afficher les options
d’utilisation pendant la journée.
LIGHT ON
Permet d’afficher les options
d’utilisation pendant la nuit.
Rubrique Option Objet
AUDIO DRC *
Permet d’avoir un son clair lorsque
le volume est faible. Disponible
uniquement pour un DVD
conforme à Audio DRC (Contrôle
de plage dynamique).
STANDARD (z)
Permet de sélectionner le réglage
standard.
WIDE RANGE
Permet d’obtenir la sensation
d’assister à un spectacle.
MPEG-4

44
D:\Documents and Settings\takashi-shimomura\Desktop\DTP\848220S MEX-
DV1500U(EUR)\4120899211_MEX-DV1500U_ML\03FR02CD-E.fm
masterpage:Left
MEX-DV1500U
4-120-899-21 (1)
Configuration système
Le menu de configuration système comprend les
catégories suivantes.
• SET : paramètres généraux (page 45)
• DSPL : paramètres d’affichage (page 45)
• R/M : paramètres du mode de réception
(page 46)
• SND : paramètres du son (page 47)
Opération de base de la
configuration système
Vous pouvez configurer les rubriques du menu en
suivant la procédure suivante.
Par exemple, pour régler la démonstration.
1 Appuyez sur (SYSTEM SETUP) lorsque
l’appareil est hors tension.
La rubrique de configuration système apparaît
sur l’appareil principal.
2 Appuyez sur M/m pour sélectionner
« DEMO », puis appuyez sur (ENTER).
L’option apparaît.
3 Appuyez sur M/m pour sélectionner
« ON » ou « OFF », puis appuyez sur
(ENTER).
La configuration est terminée.
Pour masquer l’écran de configuration système,
appuyez sur (SYSTEM SETUP).
Avec l’appareil principal
Appuyez sur (SETUP) au lieu de (SYSTEM SETUP),
tournez la molette de réglage au lieu d’appuyer sur
M/m, appuyez sur la molette de réglage au lieu de
(ENTER).
M/m
ENTER
SYSTEM
SETUP

45
D:\Documents and Settings\takashi-shimomura\Desktop\DTP\848220S MEX-
DV1500U(EUR)\4120899211_MEX-DV1500U_ML\03FR02CD-E.fm
masterpage:RightD:\Documents and Settings\takashi-shimomura\Desktop\DTP\848220S MEX-
DV1500U(EUR)\4120899211_MEX-DV1500U_ML\03FR02CD-E.fm
masterpage:Right
MEX-DV1500U
4-120-899-21 (1)
Pour plus de détails, reportez-vous aux numéros de page indiqués. « z » indique le réglage par défaut.
SET (Configuration)
DSPL (Affichage)
Rubrique Option Objet
Etat de
l’appareil
CLOCK-ADJ (Réglage de
l’horloge) (page 48)
–
–
Tous les états.
CT (Heure) (page 37, 38)
ON
Permet d’activer la fonction
CT.
OFF (z)
Permet de désactiver la
fonction CT.
BEEP
ON (z)
Permet d’activer le son de
fonctionnement.
OFF
Permet de désactiver le son
de fonctionnement.
COLOR-SYS (Système de
couleurs)
Permet de modifier le signal de
sortie vidéo en fonction du
moniteur raccordé.
PAL (z)
Permet de sélectionner
PAL.
Appareil hors
tension.
NTSC
Permet de sélectionner
NTSC.
AUTO-OFF
S’éteint automatiquement
après un délai souhaité lorsque
l’appareil est hors tension.
NO (z)
Permet de désactiver la
fonction de mise hors
tension automatique.
Tous les états.
30S, 30M, 60M
Permet de sélectionner le
délai souhaité.
REAR/SUB
Permet de commuter la sortie
audio.
REAR-OUT Permet de régler sur
l’amplificateur de
puissance.
Appareil hors
tension.
SUB-OUT (z) Permet de régler sur le
caisson de graves.
Rubrique Option Objet
Etat de
l’appareil
M.DSPL (Affichage animé)
Sélectionne le mode
d’affichage animé.
SA (z)
Permet d’afficher les motifs
animés ainsi que
l’analyseur de spectre.
En cours de
lecture/de
réception radio.
OFF
Permet de désactiver le
mode d’affichage animé.
DEMO (Démonstration)
ON (z)
Permet d’activer la
démonstration.
Appareil hors
tension.
OFF
Permet de désactiver la
démonstration.
suite à la page suivante t

46
D:\Documents and Settings\takashi-shimomura\Desktop\DTP\848220S MEX-
DV1500U(EUR)\4120899211_MEX-DV1500U_ML\03FR02CD-E.fm
masterpage:Left
MEX-DV1500U
4-120-899-21 (1)
R/M (Mode de réception)
DIMMER
Change la luminosité de
l’affichage.
ON
Permet de réduire la
luminosité de l’affichage.
Tous les états.
OFF (z)
Permet de désactiver le
régulateur de luminosité.
AUTO-SCRL (Défilement
automatique)
Permet de faire défiler
automatiquement des longues
rubriques.
ON (z)
Permet de faire défiler.
En cours de
lecture du
disque.
OFF
Permet de ne pas faire
défiler.
Rubrique Option Objet
Etat de
l’appareil
LOCAL (Mode de recherche
locale)
ON
Permet de syntoniser
uniquement les stations
dont les signaux captés sont
les plus puissants.
En cours de
réception radio.
OFF (z)
Permet de syntoniser en
réception normale.
MONO (Mode monaural)
Sélectionne le mode de
réception monaurale pour
améliorer une réception FM
faible.
ON
Permet d’écouter des
émissions stéréo en mode
mono.
En cours de
réception FM.
OFF (z)
Permet d’écouter les
émissions stéréo en stéréo.
REGIONAL (page 37)
ON (z)
Permet d’écouter une
émission régionale en
continu.
OFF
Permet de désactiver la
fonction lorsque vous
quittez la zone de réception
de l’émission.
BTM (Mémorisation des
meilleurs accords) (page 36)
–
– En cours de
réception radio.

47
D:\Documents and Settings\takashi-shimomura\Desktop\DTP\848220S MEX-
DV1500U(EUR)\4120899211_MEX-DV1500U_ML\03FR02CD-E.fm
masterpage:RightD:\Documents and Settings\takashi-shimomura\Desktop\DTP\848220S MEX-
DV1500U(EUR)\4120899211_MEX-DV1500U_ML\03FR02CD-E.fm
masterpage:Right
MEX-DV1500U
4-120-899-21 (1)
SND (Son)
*1 Lorsque la sortie audio est réglée sur « SUB-OUT ».
*2 Apparaît et est disponible uniquement lorsque « DVD-LEVEL » est réglé sur « ADJST-ON ».
Rubrique Option Objet
Etat de
l’appareil
HPF (Filtre passe-haut)
Permet de sélectionner la
fréquence de coupure des
haut-parleurs avant/arrière.
OFF (z) Permet de ne pas couper la
fréquence.
En cours de
lecture/de
réception radio.
80HZ,100HZ,
120HZ,140HZ,
160HZ
Permet de sélectionner la
fréquence.
LPF (Filtre passe-bas)*
1
Permet de sélectionner la
fréquence de coupure du
caisson de graves.
OFF (z) Permet de ne pas couper la
fréquence.
80HZ,100HZ,
120HZ,140HZ,
160HZ
Permet de sélectionner la
fréquence.
LPF-PHASE (Phase du filtre
passe-bas)*
1
Permet de sélectionner la
phase lorsque la fonction LPF
est activée.
NORM (z) Permet d’appliquer la
phase normale au LPF.
REV Permet d’appliquer la
phase inversée au LPF.
LOUD (Intensité sonore)
Permet d’avoir un son clair
lorsque le volume est faible.
OFF (z)
Permet de ne pas amplifier
les graves et les aigus.
ON
Permet d’amplifier les
graves et les aigus.
AUX-LEVEL (page 49)
(–8 ~ +18)
z : 0
Permet de sélectionner le
niveau.
En cours de
lecture AUX.
DVD-LEVEL (page 28)
ADJST-ON
Permet d’ajuster le niveau
de sortie du format Dolby
Digital.
En cours de
lecture du
disque.
ADJST-OFF (z)
Permet de désactiver le
réglage du niveau.
DOLBY-ADJ (Réglage du
niveau Dolby) (page 28)*
2
(–10 ~ +10)
z : +8
Permet de sélectionner le
niveau.

48
D:\Documents and Settings\takashi-shimomura\Desktop\DTP\848220S MEX-
DV1500U(EUR)\4120899211_MEX-DV1500U_ML\03FR02CD-E.fm
masterpage:Left
MEX-DV1500U
4-120-899-21 (1)
Réglage de l’horloge
L’horloge fonctionne suivant un cycle de
24 heures.
1 Appuyez sur (SYSTEM SETUP).
La rubrique de configuration système apparaît
sur l’appareil principal.
2 Appuyez sur M/m pour sélectionner
« CLOCK-ADJ », puis appuyez sur
(ENTER).
L’indication des heures clignote.
3 Appuyez sur M/m pour régler l’heure et
les minutes.
Appuyez sur </, pour déplacer
l’indication numérique.
4 Appuyez sur (ENTER).
La configuration est terminée.
Pour masquer l’écran de configuration système,
appuyez sur (SYSTEM SETUP).
Pour afficher l’horloge en cours de lecture,
appuyez plusieurs fois sur (DSPL) jusqu’à ce
qu’elle s’affiche.
Avec l’appareil principal
Appuyez sur (SETUP) au lieu de (SYSTEM SETUP),
tournez la molette de réglage au lieu d’appuyer sur
M/m, appuyez sur .m/M> au lieu de </,,
appuyez sur la molette de réglage au lieu de
(ENTER).
Utilisation d’un appareil en option
Appareil auxiliaire
Vous pouvez raccorder des appareils auxiliaires à
l’appareil et les écouter par l’intermédiaire des
haut-parleurs du véhicule.
Vous pouvez raccorder 2 appareils au maximum,
un à la prise d’entrée AUX (mini-prise stéréo) à
l’avant et l’autre aux bornes AUX AUDIO IN à
l’arrière. Le niveau de volume peut être réglé
pour corriger toutes les différences entre
l’appareil et le périphérique auxiliaire.
Raccordement d’un appareil
auxiliaire
1 Mettez l’appareil auxiliaire hors tension.
2 Diminuez le volume de l’appareil.
3 Effectuez le raccordement à l’appareil.
A l’avant
Raccordez l’appareil à la prise d’entrée AUX.
* Veillez à utiliser une fiche de type droit.
A l’arrière
Raccordez l’appareil aux bornes AUX AUDIO
IN.
</M/m/,
ENTER
DSPL
SYSTEM
SETUP
M/m
ENTER
SRC
MODE
SYSTEM
SETUP
AUX
AUX
Cordon de
raccordement*
(non fourni)

49
D:\Documents and Settings\takashi-shimomura\Desktop\DTP\848220S MEX-
DV1500U(EUR)\4120899211_MEX-DV1500U_ML\03FR02CD-E.fm
masterpage:RightD:\Documents and Settings\takashi-shimomura\Desktop\DTP\848220S MEX-
DV1500U(EUR)\4120899211_MEX-DV1500U_ML\03FR02CD-E.fm
masterpage:Right
MEX-DV1500U
4-120-899-21 (1)
Sélection d’un appareil auxiliaire
1 Appuyez plusieurs fois sur (SRC) jusqu’à ce
que l’indication « AUX » apparaisse sur
l’appareil principal.
2 Appuyez sur (MODE) pour sélectionner
«FRONT-IN» ou «REAR-IN».
Utilisez l’appareil auxiliaire directement.
Réglage du niveau de volume
Avant de commencer la lecture, n’oubliez pas de
régler le volume de chaque appareil raccordé.
1 Diminuez le volume de l’appareil.
2 Appuyez plusieurs fois sur (SRC) jusqu’à ce
que l’indication « AUX » apparaisse sur
l’appareil principal.
Si deux appareils auxiliaires sont raccordés,
sélectionnez l’appareil pour régler son volume
en appuyant sur (MODE).
3 Démarrez la lecture sur l’appareil auxiliaire, à
un niveau de volume modéré.
4 Réglez votre appareil sur le volume d’écoute
habituel.
5 Appuyez sur (SYSTEM SETUP).
6 Appuyez sur M/m pour sélectionner « AUX-
LEVEL », puis appuyez sur (ENTER).
7 Appuyez sur M/m pour régler le niveau
d’entrée.
Le niveau d’entrée peut être réglé par
incréments uniques, entre –8 et +18.
8 Appuyez sur (ENTER).
La configuration est terminée.
Pour masquer l’écran de configuration système,
appuyez sur (SYSTEM SETUP).
Avec l’appareil principal
Appuyez sur (SOURCE) au lieu de (SRC), appuyez
(SETUP) au lieu de (SYSTEM SETUP), tournez la
molette de réglage du volume au lieu d’appuyer sur
M/m, appuyez sur la molette de réglage au lieu de
(ENTER).
Informations complémentaires
Précautions
• Laissez l’appareil refroidir avant de l’utiliser si
votre véhicule est resté garé en plein soleil.
• L’antenne électrique se déploie automatiquement.
Condensation
Si de l’humidité se forme dans l’appareil, retirez le
disque et attendez environ une heure pour qu’il
sèche, sinon il ne fonctionnera pas correctement.
Pour conserver un son de haute
qualité
Ne renversez pas de liquide sur l’appareil ou les
disques.
Remarques sur les disques
• N’exposez pas les disques aux rayons directs du
soleil ni à des sources de chaleur telles que des
conduits d’air chaud et ne les laissez pas dans une
voiture garée en plein soleil.
• Avant de lire les disques,
essuyez-les avec un chiffon de
nettoyage en partant du centre.
N’utilisez pas de solvants
comme de l’essence, du
dissolvant ou des nettoyants
disponibles dans le commerce.
• Cet appareil est conçu pour la
lecture des disques conformes à
la norme Compact Disc (CD). Les DualDiscs et
certains disques de musique encodés par des
technologies de protection des droits d’auteur ne
sont pas conformes à la norme Compact Disc
(CD), par conséquent, il est possible que ces
disques ne puissent pas être lus sur cet appareil.
• Disques NE POUVANT PAS être lus sur cet
appareil
– Les disques sur lesquels sont collés des
étiquettes, des autocollants, du ruban adhésif ou
du papier. L’utilisation de tels disques peut
entraîner des problèmes de fonctionnement ou
les endommager.
– Les disques de forme non standard (notamment
en forme de cœur, de carré ou d’étoile) ne
peuvent pas être lus avec cet appareil. Vous
risquez d’endommager votre appareil si vous
essayez de le faire.
– Les disques de 8 cm.
suite à la page suivante t

50
D:\Documents and Settings\takashi-shimomura\Desktop\DTP\848220S MEX-
DV1500U(EUR)\4120899211_MEX-DV1500U_ML\03FR02CD-E.fm
masterpage:Left
MEX-DV1500U
4-120-899-21 (1)
Remarque sur les opérations de
lecture des DVD et des VCD
Certaines opérations de lecture des DVD et VCD
peuvent être intentionnellement réglées par les
éditeurs de logiciels. Etant donné que cet appareil lit
les DVD et les VCD selon le contenu du disque
conçu par les éditeurs de logiciels, certaines
fonctions de lecture risquent de ne pas être
disponibles. Reportez-vous au mode d’emploi
fourni avec votre disque.
Remarques sur les DATA CD et DATA
DVD
• Certains DATA CD/DATA DVD (selon l’appareil
utilisé pour l’enregistrement ou selon l’état du
disque) risquent de ne pas être lus sur cet appareil.
• La finalisation est requise pour certains disques
(page 50).
• Cet appareil est compatible avec les normes
suivantes.
Pour les DATA CD
– Format ISO 9660 niveau 1/2, format d’extension
Joliet/Romeo
– Multisession
Pour les DATA DVD
– Format UDF Bridge (hybride UDF et ISO 9660)
–Multi Border
• Nombre maximal de :
– dossiers (albums) : 256 (y compris le répertoire
racine et les dossiers vides).
– fichiers (plages/images/vidéos) et dossiers
contenus sur un disque : 2 000 (lorsqu’un nom
de dossier/fichier contient un grand nombre de
caractères, ce nombre peut être inférieur à
2 000).
– caractères affichables pour un nom de dossier/
fichier : 64 (Joliet/Romeo).
Remarques sur la finalisation des
disques
Les disques suivants doivent être finalisés pour
pouvoir être lus sur cet appareil.
• DVD-R/DVD-R DL (en mode vidéo/mode VR)
• DVD-RW en mode vidéo
• DVD+R/DVD+R DL
•CD-R
•CD-RW
Les disques suivants peuvent être lus sans
finalisation.
• DVD+RW – finalisé automatiquement.
• DVD-RW en mode VR – la finalisation n’est pas
nécessaire.
Pour plus de détails, reportez-vous au mode
d’emploi fourni avec le disque.
Remarques sur les CD multisession/
DVD Multi Border
Cet appareil peut lire les CD multisession/DVD
Multi Border dans les conditions suivantes. Notez
que la session doit être fermée et le disque finalisé.
• Lorsqu’un CD-DA (CD audio numérique) est
enregistré dans la première session :
L’appareil reconnaît le disque comme un CD-DA
et seul le CD-DA de la première session est lu,
même si un autre format (par exemple MP3) est
enregistré dans d’autres sessions.
• Lorsqu’un CD-DA est enregistré dans une session
autre que la première :
L’appareil reconnaît le disque comme un DATA
CD ou un DATA DVD et toutes les sessions
CD-DA sont ignorées.
• Lorsqu’un fichier MP3/WMA/AAC/JPEG/DivX/
MPEG-4 est enregistré :
Seules les sessions contenant le type de fichier
sélectionné (audio/vidéo/image)* sont lues (si un
CD-DA ou d’autres données sont enregistrés dans
d’autres sessions, ils sont ignorées).
* Pour plus de détails sur la sélection du type de
fichier, reportez-vous à la page 35.
Ordre de lecture des fichiers MP3/
WMA/AAC/JPEG/DivX
®
/MPEG-4
A propos des fichiers MP3
• Versions 1.0, 1.1, 2.2, 2.3 et 2.4 des étiquettes ID3
applicables aux fichiers MP3 uniquement.
L’étiquette ID3 compte 15/30 caractères (1.0 et
1.1) ou 63/126 caractères (2.2, 2.3 et 2.4).
• Lors de l’identification d’un fichier MP3, veillez à
ajouter l’extension « .mp3 » au nom de chaque
fichier.
Remarque sur le MP3
Il est possible que le son soit intermittent lors de la
lecture d’un fichier MP3 à haut débit binaire (par
exemple 384 kbit/s).
Dossier
(album)
Fichier MP3/
WMA/AAC/
JPEG/DivX/
MPEG-4 (plage/
image/vidéo)
MP3/WMA/AAC/
JPEG/DivX/
MPEG-4

51
D:\Documents and Settings\takashi-shimomura\Desktop\DTP\848220S MEX-
DV1500U(EUR)\4120899211_MEX-DV1500U_ML\03FR02CD-E.fm
masterpage:RightD:\Documents and Settings\takashi-shimomura\Desktop\DTP\848220S MEX-
DV1500U(EUR)\4120899211_MEX-DV1500U_ML\03FR02CD-E.fm
masterpage:Right
MEX-DV1500U
4-120-899-21 (1)
A propos des fichiers WMA
• L’étiquette WMA compte 63 caractères.
• Lors de l’identification d’un fichier WMA, veillez
à ajouter l’extension « .wma » au nom de chaque
fichier.
A propos des fichiers AAC
• L’étiquette AAC compte 126 caractères.
• Lors de l’identification d’un fichier AAC, veillez à
ajouter l’extension « .m4a » au nom de chaque
fichier.
A propos des fichiers JPEG
• JPEG, qui est l’abréviation de Joint Photographic
Experts Group, est un format standard de
compression des fichiers d’image. Il comprime les
images fixes à environ un 1/10e à 1/100e de leur
taille initiale.
• Lors de l’identification d’un fichier JPEG, veillez
à ajouter l’extension « .jpg » au nom de chaque
fichier.
Remarque sur le JPEG
La lecture des fichiers JPEG progressifs n’est pas
prise en charge.
A propos des fichiers DivX
®
DivX
®
, qui est l’abréviation de Digital Video
Express, est un format standard de compression des
fichiers vidéo numériques développé par DivX, Inc.
Ce produit est un produit DivX
®
Certified officiel et
peut lire toutes les versions de vidéos DivX
®
(y compris les DivX
®
6) avec une lecture standard
de tous les fichiers DivX
®
.
A propos des fichiers MPEG-4
Les fichiers MPEG-4 conformes aux exigences
suivantes peuvent être lus. La lecture n’est pas
garantie pour tous les fichiers MPEG-4 qui ne sont
pas conformes.
• Profil : profil simple MPEG-4
• Débit binaire : 25 000 kbit/s maximum
• Débit d’images : 30 ips maximum
• Taille de l’image : 320 × 240 pixels maximum
• Fichiers Audio : 320 kbit/s (AAC-LC) maximum
• Extension de fichier : .mp4
Entretien
Remplacement de la pile au lithium
de la mini-télécommande
Dans des conditions d’utilisation normales, la pile
dure environ 1 an. (En fonction des conditions
d’utilisation, sa durée de vie peut être plus courte.)
Lorsque la pile est faible, la portée de la mini-
télécommande diminue. Remplacez la pile par une
pile au lithium CR2025 neuve. L’utilisation de tout
autre type de pile présente un risque d’incendie ou
d’explosion.
Remarques sur la pile au lithium
• Tenez la pile au lithium hors de la portée des
enfants. En cas d’ingestion de la pile, consultez
immédiatement un médecin.
• Essuyez la pile avec un chiffon sec pour assurer un
bon contact.
• Veillez à respecter la polarité lors de l’installation de
la pile.
• Ne tenez pas la pile avec des pinces métalliques,
car cela pourrait entraîner un court-circuit.
Remplacement du
fusible
Lorsque vous remplacez le
fusible, veillez à utiliser un
fusible dont l’intensité, en
ampères, correspond à la valeur
indiquée sur le fusible usagé. Si
le fusible saute, vérifiez le
branchement de l’alimentation
et remplacez-le. Si le nouveau
fusible saute également, il est
possible que l’appareil soit
défectueux. Dans ce cas, consultez votre revendeur
Sony le plus proche.
suite à la page suivante t
c
Pôle + vers
le haut
ATTENTION
Utilisée de façon incorrecte, la pile peut
exploser. Ne pas la recharger, la démonter ni
la jeter au feu.
Fusible (10 A)

52
D:\Documents and Settings\takashi-shimomura\Desktop\DTP\848220S MEX-
DV1500U(EUR)\4120899211_MEX-DV1500U_ML\03FR02CD-E.fm
masterpage:Left
MEX-DV1500U
4-120-899-21 (1)
Nettoyage des connecteurs
L’appareil peut ne pas fonctionner correctement si
les connecteurs entre l’appareil et la façade sont
souillés. Pour éviter cette situation, retirez la façade
(page 15) et nettoyez les connecteurs à l’aide d’un
coton-tige. N’exercez pas une pression trop forte,
sinon les connecteurs peuvent être endommagés.
Remarques
• Pour plus de sécurité, coupez le moteur avant de
nettoyer les connecteurs et retirez la clé du contact.
• Ne touchez jamais les connecteurs directement
avec les doigts ou avec un objet métallique.
Retrait de l’appareil
1 Retirez le tour de protection.
1 Retirez la façade (page 15).
2 Tirez sur les côtés du tour de protection,
puis tirez-le pour le sortir.
2 Retirez l’appareil.
1 Insérez simultanément les deux clés de
déblocage jusqu’à ce qu’elles émettent un
déclic.
2 Tirez sur les clés de déblocage pour
extraire l’appareil.
3 Faites glisser l’appareil en dehors de son
support.
Appareil principal Arrière de la
façade
x
Tournez le
crochet vers
l’intérieur.

53
D:\Documents and Settings\takashi-shimomura\Desktop\DTP\848220S MEX-
DV1500U(EUR)\4120899211_MEX-DV1500U_ML\03FR02CD-E.fm
masterpage:RightD:\Documents and Settings\takashi-shimomura\Desktop\DTP\848220S MEX-
DV1500U(EUR)\4120899211_MEX-DV1500U_ML\03FR02CD-E.fm
masterpage:Right
MEX-DV1500U
4-120-899-21 (1)
Spécifications
Système
Laser : laser semi-conducteur
Format de signal : possibilité de basculer entre PAL et
NTSC
Lecteur DVD/CD
Rapport signal/bruit : 120 dB
Réponse en fréquence : 10 à 20 000 Hz
Pleurage et scintillement : en dessous du seuil
mesurable
Distorsion harmonique : 0,01 %
Radio
FM
Plage de syntonisation : 87,5 à 108,0 MHz
Borne d’antenne : connecteur d’antenne externe
Moyenne fréquence : 10,7 MHz/450 kHz
Sensibilité utile : 9 dBf
Sélectivité : 75 dB à 400 kHz
Rapport signal/bruit : 67 dB (stéréo), 69 dB (mono)
Distorsion harmonique à 1 kHz : 0,5 % (stéréo),
0,3 % (mono)
Séparation : 35 dB à 1 kHz
Réponse en fréquence : 30 à 15 000 Hz
MW (PO)/LW (GO)
Plage de syntonisation :
MW : 531 à 1 602 kHz
LW : 153 à 279 kHz
Borne d’antenne : connecteur d’antenne externe
Moyenne fréquence : 10,7 MHz/450 kHz
Sensibilité : MW (PO) : 30 µV, LW (GO) : 40 µV
Lecteur USB
Interface : USB (Haute vitesse)
Courant maximal : 500 mA
Amplificateur de puissance
Sorties : sorties haut-parleurs (connecteurs de sécurité)
Impédance des haut-parleurs : 4 à 8 ohms
Puissance de sortie maximale : 52 W × 4 (à 4 ohms)
Généralités
Sorties :
Borne de sortie vidéo
Bornes de sortie audio arrière
Borne de commande de relais d’antenne électrique
Borne de commande d’amplificateur de puissance
Entrées :
Bornes d’entrée audio AUX
Borne d’entrée d’antenne
Borne de commande de frein à main
Prise d’entrée AUX (mini-prise stéréo)
Borne d’entrée du signal USB
Commandes de tonalité :
Basse : ±10 dB à 60 Hz
Médiane : ±10 dB à 1 kHz
Haute : ±10 dB à 10 kHz
Alimentation requise : batterie de véhicule 12 V CC
(masse négative)
Dimensions : environ 178 × 50 × 179 mm (l/h/p)
Dimensions du support : environ 182 × 53 × 163 mm
(l/h/p)
Poids : environ 1,4 kg
Accessoires fournis :
Mini-télécommande : RM-X168
Composants destinés à l’installation et aux
raccordements (1 jeu)
Il est possible que votre revendeur ne dispose pas de
certains accessoires décrits ci-dessus. Veuillez vous
adresser à lui pour tout renseignement
complémentaire.
DivX, DivX Certified et les logos associés sont des
marques commerciales de DivX, Inc., et sont
utilisées sous licence.
La conception et les spécifications sont sujettes à
modification sans préavis.
Brevets américains et internationaux sous licence
de Dolby Laboratories.
Licence de la technologie de codage audio MPEG
Layer-3 et des brevets obtenue de Fraunhofer IIS et
Thomson.
Ce produit est protégé par des droits de propriété
intellectuelle de Microsoft Corporation. Toute
utilisation ou diffusion de la technologie décrite
sortant du cadre de l’utilisation de ce produit est
interdite sans licence accordée par Microsoft ou
une filiale autorisée de Microsoft.
• Aucun retardateur de flamme halogéné n’est utilisé
dans certaines cartes à circuits imprimés.
• Aucun retardateur de flamme halogéné n’est utilisé
dans la composition des coques.
• Du papier est utilisé pour les cales d’emballage.

54
D:\Documents and Settings\takashi-shimomura\Desktop\DTP\848220S MEX-
DV1500U(EUR)\4120899211_MEX-DV1500U_ML\03FR02CD-E.fm
masterpage:Left
MEX-DV1500U
4-120-899-21 (1)
Dépannage
La liste de contrôles suivante vous aidera à remédier
aux problèmes que vous pourriez rencontrer avec cet
appareil.
Avant de passer en revue la liste de contrôles
ci-dessous, vérifiez les procédures de raccordement
et d’utilisation.
Si le problème persiste, consultez le site
d’assistance suivant.
Selon le moniteur raccordé, lorsque vous
éteignez le moteur, la mise hors tension de
l’appareil peut prendre quelques secondes.
Généralités
L’appareil n’est pas alimenté.
• Vérifiez le raccordement ou le fusible.
• Si vous mettez l’appareil hors tension et que
l’affichage disparaît, vous ne pouvez pas le
commander avec la mini-télécommande.
t Mettez l’appareil sous tension.
L’antenne électrique ne se déploie pas.
L’antenne électrique ne dispose pas de relais.
Aucun bip n’est émis.
• Le bip est désactivé (page 45).
• Un amplificateur de puissance en option est raccordé
et vous n’utilisez pas l’amplificateur intégré.
Le contenu de la mémoire a été effacé.
• La touche RESET a été enfoncée.
t Recommencez la procédure d’enregistrement
dans la mémoire.
• Le câble d’alimentation ou la batterie a été
déconnecté ou n’est pas raccordé correctement.
Les stations mémorisées et l’heure sont
effacées.
Le fusible a sauté.
Emission de bruit lorsque la position de la clé
de contact est modifiée.
Les câbles ne sont pas raccordés correctement au
connecteur d’alimentation du véhicule destiné aux
accessoires.
L’affichage disparaît de la fenêtre d’affichage
ou il ne s’affiche pas.
• Le régulateur de luminosité est réglé sur « DIM-
ON » (page 46).
• L’affichage est désactivé si vous maintenez la touche
(OFF) enfoncée.
t Maintenez de nouveau la touche (OFF) de
l’appareil enfoncée jusqu’à ce que l’affichage
apparaisse.
• Les connecteurs sont sales (page 52).
Site d’assistance
http://support.sony-europe.com
La fonction de mise hors tension automatique
est inopérante.
L’appareil est mis sous tension. La fonction arrêt
automatique s’active après la mise hors tension de
l’appareil.
t Mettez l’appareil hors tension.
Image
Aucune image/des parasites apparaissent sur
l’image.
• Un raccordement est incorrect.
• Vérifiez le raccordement de l’appareil raccordé et
réglez le sélecteur d’entrée de l’appareil raccordé sur
la source correspondant à cet appareil.
• Le disque est défectueux ou sale.
• L’installation est incorrecte.
tInstallez l’appareil suivant un angle de moins de
45°, dans un endroit stable du véhicule.
• Le moniteur est raccordé à la prise AUDIO/VIDEO
OUT et le cordon du frein (vert clair) n’est pas
raccordé au cordon du capteur du frein à main ou le
frein à main n’est pas serré.
• Le réglage du système de couleurs est incorrect.
tRéglez le système de couleurs sur « PAL » ou
« NTSC » en fonction du moniteur raccordé
(page 45).
L’image ne tient pas sur l’écran.
Le format est fixé sur le DVD.

55
D:\Documents and Settings\takashi-shimomura\Desktop\DTP\848220S MEX-
DV1500U(EUR)\4120899211_MEX-DV1500U_ML\03FR02CD-E.fm
masterpage:RightD:\Documents and Settings\takashi-shimomura\Desktop\DTP\848220S MEX-
DV1500U(EUR)\4120899211_MEX-DV1500U_ML\03FR02CD-E.fm
masterpage:Right
MEX-DV1500U
4-120-899-21 (1)
Son
Aucun son/le son saute/le son grésille.
• Un raccordement est incorrect.
• Vérifiez le raccordement de l’appareil raccordé et
réglez le sélecteur d’entrée de l’appareil raccordé sur
la source correspondant à cet appareil.
• Le disque est défectueux ou sale.
• L’installation est incorrecte.
t Installez l’appareil suivant un angle de moins de
45°, dans un endroit stable du véhicule.
• Le taux d’échantillonnage des fichiers MP3 n’est pas
16, 22,05, 24, 32, 44,1 ou 48 kHz.
• Le taux d’échantillonnage des fichiers WMA n’est
pas 32, 44,1 ou 48 kHz.
• Le taux d’échantillonnage des fichiers AAC n’est pas
44,1 ou 48 kHz.
• Le débit binaire des fichiers MP3 n’est pas 8 à
384 kbit/s.
• Le débit binaire des fichiers WMA n’est pas 32 à
384 kbit/s.
• Le débit binaire des fichiers AAC n’est pas compris
entre 16 à 320 kbit/s.
• L’appareil est en mode de pause/d’avance rapide/de
retour rapide.
• Les réglages de sorties sont incorrects.
• Le niveau de sortie DVD est trop faible (page 28).
• Le volume est trop faible.
• La fonction ATT est activée.
• La position de la commande d’équilibre « FAD »
n’est pas réglée pour un système à 2 enceintes.
• Le format n’est pas pris en charge (comme le format
DTS).
t Vérifiez si le format est pris en charge par cet
appareil (page 8).
Le son comporte des parasites.
Eloignez les cordons et les câbles.
Disque
Impossible d’introduire le disque.
• Un autre disque est déjà en place.
• Le disque a été introduit de force à l’envers ou dans le
mauvais sens.
La lecture du disque ne commence pas.
• Le disque est défectueux ou sale.
• Le disque n’est pas compatible.
• Le DVD n’est pas compatible en raison du code
local.
• Le disque n’est pas finalisé (page 50).
• Le format du disque et la version du fichier ne sont
pas compatibles avec cet appareil (page 8, 50).
• Appuyez sur Z pour retirer le disque.
Impossible de lire les fichiers MP3/WMA/AAC/
JPEG/DivX/MPEG-4.
• L’enregistrement n’a pas été réalisé conformément à
la norme ISO 9660 niveau 1 ou 2, au format
d’extension Joliet ou Romeo (DATA CD) ou au
format UDF Bridge (DATA DVD) (page 50).
• L’extension de fichier est incorrecte (page 50).
• Les fichiers ne sont pas sauvegardés au format MP3/
WMA/AAC/JPEG/DivX/MPEG-4.
• Si le disque contient plusieurs types de fichiers, seul
le type de fichier sélectionné (audio/vidéo/image)
peut être lu.
t Sélectionnez le type de fichier approprié à l’aide
de la liste (page 35).
Certains fichiers MP3/WMA/AAC/JPEG/DivX/
MPEG-4 exigent un délai plus long que
d’autres avant le début de la lecture.
La lecture des types de disques suivants exige un délai
de démarrage plus long.
– disques comportant une hiérarchie de dossiers
complexe ;
– disques enregistrés en multisession/Multi Border ;
– disques auxquels il est possible d’ajouter des
données.
La lecture du disque ne commence pas au
début.
La reprise de la lecture ou la reprise de la lecture multi-
disques (page 42) est activée.
Certaines fonctions sont inopérantes.
Selon le disque, il est possible que vous ne puissiez pas
effectuer des opérations telles que l’arrêt, la recherche,
ou la lecture répétée ou aléatoire. Pour plus de détails,
reportez-vous au mode d’emploi fourni avec le disque.
Impossible de changer la langue de la bande
son/des sous-titres ou l’angle.
• Utilisez le menu DVD au lieu de la touche de
sélection directe de la mini-télécommande (page 17).
• Il n’y a pas de plages multilingues, de sous-titres
multilingues ou d’angles multiples enregistrés sur le
DVD.
• Le DVD ne permet pas de changer.
Les rubriques d’affichage ne défilent pas.
• Pour les disques contenant un grand nombre de
caractères, le défilement peut être inopérant.
• « AUTO-SCRL » est réglé sur « OFF ».
t Réglez « A.SCRL-ON » (page 46).
Les touches de commande sont inopérantes.
Le disque ne s’éjecte pas.
Appuyez sur la touche RESET (page 14).
Vous avez oublié le mot de passe pour le
contrôle parental.
Saisissez « 5776 » dans l’écran de saisie du mot de
passe pour déverrouiller (page 30).
suite à la page suivante t

56
D:\Documents and Settings\takashi-shimomura\Desktop\DTP\848220S MEX-
DV1500U(EUR)\4120899211_MEX-DV1500U_ML\03FR02CD-E.fm
masterpage:Left
MEX-DV1500U
4-120-899-21 (1)
Affichage des erreurs et messages
Réception radio
Impossible de capter des stations.
Le son comporte des parasites.
• Le raccordement est incorrect.
t Raccordez un câble de commande d’antenne
électrique (bleu) ou un câble d’alimentation
d’accessoires (rouge) au câble d’alimentation de
l’amplificateur d’antenne du véhicule
(uniquement si votre véhicule est équipé d’une
antenne FM/MW (PO)/LW (GO) intégrée dans la
vitre arrière/latérale).
t Vérifiez le raccordement de l’antenne du
véhicule.
t Si l’antenne automatique ne se déploie pas,
vérifiez le raccordement du câble de commande
de l’antenne électrique.
Impossible de capter une présélection.
• Enregistrez la fréquence correcte dans la mémoire.
• Le signal capté est trop faible.
Le réglage automatique des stations est
impossible.
• Le réglage du mode de recherche locale est incorrect.
t La recherche de fréquences s’arrête trop souvent :
sélectionnez « LOCAL-ON » (page 46).
t La recherche de fréquences ne s’arrête sur aucune
station :
sélectionnez « MONO-ON » (page 46).
• Le signal capté est trop faible.
t Effectuez une syntonisation manuelle.
En cours de réception FM, l’indication « ST »
clignote.
• Réglez la fréquence correctement.
• Le signal capté est trop faible.
t Sélectionnez « MONO-ON » (page 46).
Un programme FM émis en stéréo est entendu
en mono.
L’appareil est en mode de réception mono.
t Sélectionnez « MONO-OFF » (page 46).
Fonction RDS
Une recherche (SEEK) commence après
quelques secondes d’écoute.
La station ne diffuse pas de programmes de
radioguidage (fonction TP désactivée) ou le signal
capté est faible.
t Désactivez TA (page 37).
Aucun message de radioguidage.
• Activez TA (page 37).
• La station n’émet pas de messages de radioguidage,
malgré l’indication TP.
t Réglez la fréquence pour capter une autre station.
PTY affiche « - - - - - - - - ».
• La station actuellement captée n’est pas une station
RDS.
• Les données RDS n’ont pas été reçues.
• La station ne spécifie pas le type d’émission.
Lecture USB
Cet appareil ne permet pas la lecture
d’éléments via un concentrateur USB.
Cet appareil ne peut pas reconnaître les périphériques
USB via un concentrateur USB.
Impossible de lire des éléments.
Un périphérique USB ne fonctionne pas.
t Raccordez-le de nouveau.
Le périphérique USB exige un délai plus long
avant le début de la lecture.
Le périphérique USB contient des fichiers comportant
une hiérarchie de dossiers complexe.
Un bip retentit.
Le périphérique USB a été débranché pendant la
lecture.
t Veillez à arrêter la lecture avant de débrancher un
périphérique USB afin de protéger les données.
Le son est intermittent.
Il est possible que le son soit intermittent à un haut
débit binaire supérieur à 320 kbit/s.
Sur l’appareil principal
ERROR
• Le disque est sale ou inséré à l’envers.
tNettoyez le disque ou insérez-le correctement.
• Un disque vierge a été inséré.
• Le disque ne peut pas être lu en raison d’un
problème.
tInsérez-en un autre.
• Le disque n’est pas compatible avec cet appareil.
tInsérez un disque compatible.
• Le périphérique USB n’a pas été reconnu
automatiquement.
tRaccordez-le de nouveau.
• Appuyez sur Z pour retirer le disque.
FAILURE
Les haut-parleurs ou les amplificateurs ne sont pas
raccordés correctement.
t Reportez-vous au manuel d’installation/de
raccordement fourni avec cet appareil et vérifiez les
raccordements.
L. SEEK +/–
Le mode de recherche locale est activé en cours de
recherche automatique des fréquences.
NO AF
Il n’existe aucune fréquence alternative pour la station
actuelle.
t Appuyez sur .m/M> pendant que le
nom du service de programme clignote. L’appareil
commence à rechercher une autre fréquence avec
les mêmes données d’identification de programme
(PI) (l’indication « PI SEEK » apparaît).

57
D:\Documents and Settings\takashi-shimomura\Desktop\DTP\848220S MEX-
DV1500U(EUR)\4120899211_MEX-DV1500U_ML\03FR02CD-E.fm
masterpage:RightD:\Documents and Settings\takashi-shimomura\Desktop\DTP\848220S MEX-
DV1500U(EUR)\4120899211_MEX-DV1500U_ML\03FR02CD-E.fm
masterpage:Right
MEX-DV1500U
4-120-899-21 (1)
Si ces solutions ne permettent pas d’améliorer la
situation, contactez votre revendeur Sony le plus
proche.
Si vous portez l’appareil à réparer en raison d’un
problème de lecture de disque, apportez le disque
utilisé au moment où le problème s’est produit.
NO DATA
Le disque ou le périphérique USB ne contient pas de
fichier de musique.
t Insérez un CD audio dans cet appareil.
t Raccordez un périphérique USB comprenant un
fichier audio.
NO DEV (aucun périphérique)
« USB » est sélectionné comme source alors qu’aucun
périphérique USB n’est raccordé. Un périphérique
USB ou un câble USB a été débranché pendant la
lecture.
t Veillez à brancher un périphérique et un câble USB.
NO NAME
Aucun nom de disque/d’album/de dossier/de plage/
d’image/de vidéo n’est écrit dans le fichier.
NO TP
L’appareil continue à rechercher les stations diffusant
des programmes de radioguidage.
OFFSET
Il est possible qu’il y ait un problème de
fonctionnement.
t Vérifiez le raccordement. Si le message d’erreur
reste affiché, contactez votre revendeur Sony le
plus proche.
OVERLOAD
Le périphérique USB est saturé.
t Débranchez le périphérique USB, puis modifiez la
source en appuyant sur (SOURCE).
t Indique que le périphérique USB ne fonctionne
plus ou qu’un périphérique non pris en charge est
raccordé.
READ
L’appareil lit toutes les informations de fichier/album
(dossier) sur le disque.
t Attendez que la lecture soit terminée et la lecture
commence automatiquement. Selon la structure du
disque, cette opération peut prendre plus d’une
minute.
USB NO SUPRT (USB non pris en charge)
Le périphérique USB raccordé n’est pas pris en charge.
t Pour plus de détails sur la compatibilité de votre
périphérique USB, visitez le site d’assistance.
« » ou « »
Pendant le retour ou l’avance rapide, vous avez atteint
le début ou la fin du disque et vous ne pouvez pas aller
plus loin.
« »
Le caractère ne peut pas être affiché.
Sur le moniteur
Playback prohibited by region code.
La lecture du DVD est impossible car le code local est
différent.
Cannot play this disc.
• Le disque est incompatible avec cet appareil.
• Le disque n’est pas finalisé.
No playable data.
Le disque ne contient pas de données lisibles.
Please press RESET.
L’appareil ne peut pas fonctionner en raison d’un
problème.
tAppuyez sur la touche RESET (page 14).

58
D:\Documents and Settings\takashi-shimomura\Desktop\DTP\848220S MEX-
DV1500U(EUR)\4120899211_MEX-DV1500U_ML\03FR02CD-E.fm
masterpage:Left
MEX-DV1500U
4-120-899-21 (1)
Glossaire
Album
Section d’un morceau de musique ou d’une image
sur un DATA CD/DVD contenant des plages audio
MP3/WMA/AAC ou des fichiers JPEG.
Chapitre
Sous-division d’un titre dans un DVD. Un titre est
composé de plusieurs chapitres.
DivX
®
Technologie vidéo numérique créée par DivX, Inc.
Les vidéos encodées avec la technologie DivX font
partie des vidéos avec la qualité la plus élevée pour
une taille de fichier relativement restreinte.
Dolby Digital
Technologie de compression audio numérique
développée par Dolby Laboratories. Cette
technologie prend en charge le son surround
5.1 canaux. Le canal arrière est stéréo et, dans ce
format, il existe un canal de caisson de graves
discret. Dolby Digital fournit les mêmes 5.1 canaux
discrets d’une qualité audio numérique élevée que
les systèmes audio cinéma Dolby Digital. La
séparation des canaux est efficace car tous les
canaux sont enregistrés séparément, et il y a peu de
détérioration car le traitement des données de tous
les canaux est effectué de manière numérique.
DVD
Disque pouvant contenir jusqu’à 8 heures d’images
animées, même si son diamètre est le même qu’un
CD.
La capacité de données d’un DVD simple couche,
simple face est de 4,7 Go, ce qui correspond à 7 fois
la capacité d’un CD. La capacité de données d’un
DVD double couche, simple face est de 8,5 Go,
celle d’un DVD simple couche, double face de
9,4 Go et celle d’un DVD double couche, double
face de 17 Go.
Les données d’image utilisent le format MPEG 2,
une des normes universelles de technologie de
compression numérique. Les données d’image sont
compressées à environ 1/40e (en moyenne) de leur
taille initiale. Le DVD utilise également une
technologie d’encodage à débit variable qui modifie
les données à affecter selon le statut de l’image. Les
informations audio sont enregistrées dans un format
multi-canaux, tel que Dolby Digital, ce qui vous
permet de profiter d’un son plus réel.
En outre, plusieurs fonctions avancées telles que les
fonctions multiangle, multilingue et contrôle
parental sont disponibles avec le DVD.
DVD-RW
Un DVD-RW est un disque enregistrable
réinscriptible de la même taille qu’un DVD VIDEO.
Le DVD-RW comporte deux modes différents :
mode VR et mode vidéo. Les DVD-RW créés en
mode vidéo ont le même format que les DVD
VIDEO, tandis que les disques créés en mode VR
(enregistrement vidéo) permettent de programmer
ou d’éditer le contenu.
DVD+RW
Un DVD+RW (plus RW) est un disque enregistrable
réinscriptible. Les DVD+RW utilisent un format
d’enregistrement comparable au format DVD
VIDEO.
Fichier
• Plage MP3/WMA/AAC ou image JPEG sur un
DATA CD/DATA DVD/périphérique USB.
• Une plage MP3/WMA/AAC, une image JPEG ou
une vidéo DivX/MPEG-4 sur un DATA CD/
DATA DVD.
(« Fichier » est une définition réservée
exclusivement à cet appareil.) Un fichier simple est
constitué d’une seule plage, image ou d’un seul
film.
Logiciel de film, logiciel de vidéo
Les DVD peuvent être classés comme logiciels de
film ou logiciels de vidéo. Les DVD de film
contiennent les mêmes images (24 images par
seconde) que les films projetés dans les cinémas.
Les DVD de vidéo, tels que les téléfilms ou les
séries télé, affichent les images à hauteur de
30 images (ou 60 champs) par seconde.
Plage
Section d’une image ou d’une plage musicale d’un
VIDEO CD, CD ou MP3/WMA. Un album est
composé de plusieurs plages (MP3, WMA
uniquement).
Scène
Dans un VIDEO CD doté de la fonction PBC
(contrôle de lecture), les écrans de menu, les images
animées et les images fixes sont divisés en sections
appelées « scènes ».
Titre
Section la plus longue d’un fichier image ou d’une
plage musicale d’un DVD, film, etc., dans un
logiciel vidéo ou l’album entier dans un logiciel
audio.

59
D:\Documents and Settings\takashi-shimomura\Desktop\DTP\848220S MEX-
DV1500U(EUR)\4120899211_MEX-DV1500U_ML\03FR02CD-E.fm
masterpage:RightD:\Documents and Settings\takashi-shimomura\Desktop\DTP\848220S MEX-
DV1500U(EUR)\4120899211_MEX-DV1500U_ML\03FR02CD-E.fm
masterpage:Right
MEX-DV1500U
4-120-899-21 (1)
VIDEO CD
Disque compact qui contient des images animées.
Les données d’image utilisent le format MPEG 1,
une des normes universelles de technologie de
compression numérique. Il comprime les données
d’images à environ 1/140e de leur taille initiale. Par
conséquent, un VIDEO CD de 12 cm peut contenir
jusqu’à 74 minutes d’images animées.
Les VIDEO CD contiennent également des données
audio compactes. Les sons qui ne sont pas perçus
par l’oreille humaine sont comprimés, alors que les
sons audibles ne le sont pas. Les VIDEO CD
peuvent contenir 6 fois plus d’informations audio
que les CD conventionnels.
Il existe 3 versions de VIDEO CD.
• Version 1.0, 1.1 : vous pouvez lire uniquement des
images animées et du son.
• Version 2.0 : vous pouvez lire des images fixes
haute résolution et profiter des fonctions PBC.
Cet appareil est compatible avec les 3 versions
ci-dessus.

60
D:\Documents and Settings\takashi-shimomura\Desktop\DTP\848220S MEX-
DV1500U(EUR)\4120899211_MEX-DV1500U_ML\03FR02CD-E.fm
masterpage:Left
MEX-DV1500U
4-120-899-21 (1)
Liste des codes de langue/codes de zone
Liste des codes de langue
L’orthographe des langues est conforme à la norme ISO 639 : 1988 (E/F).
Liste des codes de zone
Code Langue Code Langue Code Langue Code Langue
1027 Afar
1028 Abkhazian
1032 Afrikaans
1039 Amharic
1044 Arabic
1045 Assamese
1051 Aymara
1052 Azerbaijani
1053 Bashkir
1057 Byelorussian
1059 Bulgarian
1060 Bihari
1061 Bislama
1066 Bengali;
Bangla
1067 Tibetan
1070 Breton
1079 Catalan
1093 Corsican
1097 Czech
1103 Welsh
1105 Danish
1109 German
1130 Bhutani
1142 Greek
1144 English
1145 Esperanto
1149 Spanish
1150 Estonian
1151 Basque
1157 Persian
1165 Finnish
1166 Fiji
1171 Faroese
1174 French
1181 Frisian
1183 Irish
1186 Scots Gaelic
1194 Galician
1196 Guarani
1203 Gujarati
1209 Hausa
1217 Hindi
1226 Croatian
1229 Hungarian
1233 Armenian
1235 Interlingua
1239 Interlingue
1245 Inupiak
1248 Indonesian
1253 Icelandic
1254 Italian
1257 Hebrew
1261 Japanese
1269 Yiddish
1283 Javanese
1287 Georgian
1297 Kazakh
1298 Greenlandic
1299 Cambodian
1300 Kannada
1301 Korean
1305 Kashmiri
1307 Kurdish
1311 Kirghiz
1313 Latin
1326 Lingala
1327 Laothian
1332 Lithuanian
1334 Latvian;
Lettish
1345 Malagasy
1347 Maori
1349 Macedonian
1350 Malayalam
1352 Mongolian
1353 Moldavian
1356 Marathi
1357 Malay
1358 Maltese
1363 Burmese
1365 Nauru
1369 Nepali
1376 Dutch
1379 Norwegian
1393 Occitan
1403 (Afan)Oromo
1408 Oriya
1417 Punjabi
1428 Polish
1435 Pashto;
Pushto
1436 Portuguese
1463 Quechua
1481 Rhaeto-
Romance
1482 Kirundi
1483 Romanian
1489 Russian
1491 Kinyarwanda
1495 Sanskrit
1498 Sindhi
1501 Sangho
1502 Serbo-
Croatian
1503 Singhalese
1505 Slovak
1506 Slovenian
1507 Samoan
1508 Shona
1509 Somali
1511 Albanian
1512 Serbian
1513 Siswati
1514 Sesotho
1515 Sundanese
1516 Swedish
1517 Swahili
1521 Tamil
1525 Telugu
1527 Tajik
1528 Thai
1529 Tigrinya
1531 Turkmen
1532 Tagalog
1534 Setswana
1535 Tonga
1538 Turkish
1539 Tsonga
1540 Tatar
1543 Twi
1557 Ukrainian
1564 Urdu
1572 Uzbek
1581 Vietnamese
1587 Volapük
1613 Wolof
1632 Xhosa
1665 Yoruba
1684 Chinese
1697 Zulu
1703 Non spécifié
Code Zone Code Zone Code Zone Code Zone
2109 Allemagne
2044 Argentine
2047 Australie
2046 Autriche
2057 Belgique
2070 Brésil
2079 Canada
2090 Chili
2092 Chine
2304 Corée
2115 Danemark
2149 Espagne
2165 Finlande
2174 France
2248 Inde
2238 Indonésie
2254 Italie
2276 Japon
2363 Malaisie
2362 Mexique
2390 Nouvelle
Zélande
2379 Norvège
2376 Pays-Bas
2427 Pakistan
2424 Philippines
2436 Portugal
2184 Royaume-Uni
2489 Russie
2501 Singapour
2499 Suède
2086 Suisse
2528 Thaïlande

61
03FR+00COV-EIX.fm masterpage:Right
MEX-DV1500U
4-120-899-21 (1)
Index
Numerics
16:9 41
2000MP3 6
2000WMA 6
4:3 LETTER BOX 41
4:3 PAN SCAN 41
A
AAC 9, 51
Affichage animé (M.DSPL) 45
Affichage automatique par
liste 34
Album (ALBUM) 34
Angle (ANGLE) 17
Appareil auxiliaire 48
Audio (AUDIO)
Canal 27
Format 27
Langue 27, 41
Audio DRC (AUDIO DRC) 43
AUX avant 48
B
Balance (BAL) 38
C
CD multisession 50
Chapitre (CHAPTER) 33
Code de zone 60
Code local 9
Codes de langue 60
Configuration audio (AUDIO
SETUP) 43
Configuration de l’affichage
(DISPLAY SETUP) 41
Configuration de la langue
(LANGUAGE SETUP) 41
Configuration personnalisée
(CUSTOM SETUP) 42
Configuration système 44
Configuration visuelle 39
Contrôle de la lecture (PBC)
24
Contrôle de plage dynamique
(DRC) 43
Contrôle parental
(PARENTAL CONTROL) 30,
42
D
Défilement automatique
(AUTO-SCRL) 46
Démonstration (DEMO) 45
Disques 8
Disques pouvant être lus 8
DivX VOD 42
DivX® 9, 23, 51
Dolby Digital 27, 28
Dossier (ALBUM) 34
DVD Multi Border 50
E
Egaliseur
Image (PICTURE EQ)
29, 43
Son (EQ3) 38, 39
EQ3 38, 39
Equilibre avant-arrière (FAD)
38
F
Fichier (FILE) 34
Format du moniteur
(MONITOR TYPE) 41
Format du programme 27
Formats 9
Fréquences alternatives (AF)
37
Fusible 51
H
Heure (CT) 37, 38, 45
I
Image (IMAGE) 34
Informations temporelles/
textuelles (TIME) 26, 33
Intensité sonore (LOUD) 47
Intervalle de diaporama
(SLIDE SHOW TIME) 42
J
JPEG 9, 23, 51
L
Langue de la bande son
(AUDIO) 27, 41
Langue des sous-titres
(SUBTITLE) 17, 41
Langue du menu (MENU) 41
Lecture aléatoire (SHUF) 21,
32
Lecture de la liste de lecture
(PLAY LIST PLAY) 43
Lecture répétée (REP) 21, 32
M
Mémorisation des meilleurs
accords (BTM) 36
Menu de configuration
Configuration système
44
Configuration visuelle 39
Menu DVD 17
Menu mode de lecture 24
Menu principal du DVD 17
Messages de radioguidage
(TA) 37
Mini-télécommande 12, 14,
51
Mise hors tension
automatique (AUTO-OFF) 45
Mode de recherche locale
(LOCAL) 46
Mode monaural (MONO) 46
MP3 9, 50
MPEG-4 9, 51
N
Niveau auxiliaire
(AUX-LEVEL) 47, 49
Niveau DVD (DVD-LEVEL)
28, 47
NTSC 45
P
PAL 45
Papier peint (WALLPAPER)
41
Périphérique USB 20
Picture EQ (PICTURE EQ)
29, 43
Pile au lithium 51
Plage (TRACK) 33
Programme de radioguidage
(TP) 37
suite à la page suivante t

62
03FR+00COV-EIX.fm masterpage:Left
MEX-DV1500U
4-120-899-21 (1)
Q
Quick-BrowZer 34
R
Recherche directe 33
Régional (REGIONAL) 37, 46
Réglage de l’horloge
(CLOCK-ADJ) 48
Réglage du niveau Dolby
(DOLBY-ADJ) 47
Régulateur de luminosité
(DIMMER) 46
Réinitialisation (RESET) 14,
43
Reprise de la lecture 17, 19
Reprise de la lecture
multi-disques (MULTI-DISC
RESUME) 6, 42
S
Son de bip (BEEP) 45
Système de couleurs
(COLOR-SYS) 45
Système de
radiocommunication de
données (RDS) 36
T
Titre (TITLE) 33
Types d’émission (PTY) 37,
38
V
Volume 10
W
WMA 9, 51
Z
Zoom (CENTER ZOOM) 29

03FR+00COV-EIX.fm masterpage:Right
MEX-DV1500U
4-120-899-21 (1)

2
D:\Documents and Settings\takashi-shimomura\Desktop\DTP\848220S MEX-
DV1500U(EUR)\4120899211_MEX-DV1500U_ML\04IT01INT-E.fm
masterpage:Left
MEX-DV1500U
4-120-899-21 (1)
Avvertenza
Per evitare il rischio di incendi o scosse
elettriche, non esporre l’apparecchio alla
pioggia o all’umidità.
Per evitare scosse elettriche, non aprire
l’apparecchio. Per le riparazioni,
rivolgersi esclusivamente a personale
qualificato.
ATTENZIONE
L’uso di strumenti ottici con il presente
apparecchio può causare problemi agli occhi.
Poiché il raggio laser utilizzato nel presente
lettore CD/DVD è pericoloso per gli occhi, non
tentare di smontare l’apparecchio.
Per le riparazioni, rivolgersi esclusivamente a
personale qualificato.
Si dichiara che l’apparecchio è stato fabbricato in
conformità all’art.2, Comma l del D.M.28.08.1995
n.548.
CAUTION
RADIATION WHEN OPEN AND INTERLOCKS DEFEATED.
DO NOT VIEW DIRECTLY WITH OPTICAL INSTRUMENTS.
:
CLASS 1M VISIBLE/INVISIBLE LASER
Questa etichetta è posta nella parte inferiore
esterna.
Questa etichetta si trova nel rivestimento interno
dell’unità.
Avviso per i clienti: le seguenti
informazioni riguardano esclusivamente
gli apparecchi venduti in paesi in cui
sono applicate le direttive UE
Il presente prodotto è fabbricato da Sony
Corporation, 1-7-1 Konan, Minato-ku, Tokyo,
Giappone. Il Rappresentante autorizzato per la
direttiva EMC e la sicurezza del prodotto è
Sony Deutschland GmbH, Hedelfinger Strasse
61, 70327 Stuttgart, Germania. Per qualsiasi
questione riguardante l’assistenza o la garanzia,
rivolgersi agli indirizzi che si trovano nei
documenti di assistenza o di garanzia.
Trattamento del dispositivo elettrico
od elettronico a fine vita
(applicabile in tutti i paesi
dell’Unione Europea e in altri paesi
europei con sistema di raccolta
differenziata)
Questo simbolo sul prodotto o sulla confezione indica che
il prodotto non deve essere considerato come un normale
rifiuto domestico, ma deve invece essere consegnato ad un
punto di raccolta appropriato per il riciclo di apparecchi
elettrici ed elettronici. Assicurandovi che questo prodotto
sia smaltito correttamente, voi contribuirete a prevenire
potenziali conseguenze negative per l’ambiente e per la
salute che potrebbero altrimenti essere causate dal suo
smaltimento inadeguato. Il riciclaggio dei materiali aiuta a
conservare le risorse naturali. Per informazioni più
dettagliate circa il riciclaggio di questo prodotto, potete
contattare l’ufficio comunale, il servizio locale di
smaltimento rifiuti oppure il negozio dove l’avete
acquistato.
Accessorio utilizzabile: Telecomando
Trattamento delle pile esauste
(applicabile in tutti i paesi
dell’Unione Europea e in altri paesi
Europei con sistema di raccolta
differenziata)
Questo simbolo sul prodotto o sulla confezione indica che
la pila non deve essere considerata un normale rifiuto
domestico. Assicurandovi che le pile siano smaltite
correttamente, contribuirete a prevenire potenziali
conseguenze negative per l’ambiente e per la salute che
potrebbero altrimenti essere causate dal loro inadeguato
smaltimento. Il riciclaggio dei materiali aiuta a conservare
le risorse naturali.
In caso di prodotti che per motivi di sicurezza, prestazione
o protezione dei dati richiedano un collegamento fisso ad
una pila interna, la stessa dovrà essere sostituita solo da
personale di assistenza qualificato. Consegnare il prodotto
a fine vita al punto di raccolta idoneo allo smaltimento di
apparecchiature elettriche ed elettroniche; questo assicura
che anche la pila al suo interno venga trattata
correttamente.
Per le altre pile consultate la sezione relativa alla
rimozione sicura delle pile. Conferire le pile esauste
presso i punti di raccolta indicati per il riciclo.
Per informazioni più dettagliate circa lo smaltimento della
pila esausta o del prodotto, potete contattare il Comune, il
servizio locale di smaltimento rifiuti oppure il negozio
dove l’avete ac
q
uistato.
’’

3
D:\Documents and Settings\takashi-shimomura\Desktop\DTP\848220S MEX-
DV1500U(EUR)\4120899211_MEX-DV1500U_ML\04IT01INT-E.fm
masterpage:Right
MEX-DV1500U
4-120-899-21 (1)
Sicurezza
• Osservare le leggi sul traffico vigenti nel
proprio paese.
• Per motivi di sicurezza, il monitor collegato
all’uscita VIDEO OUT si disattiva
automaticamente quando il freno a mano non è
azionato.
Avvertenza relativa all’installazione su
un’auto sprovvista della posizione
ACC (accessoria) sul blocchetto di
accensione
Accertarsi di impostare la funzione di
spegnimento automatico (pagina 45).
In seguito allo spegnimento, l’apparecchio si
spegne completamente e automaticamente
all’ora impostata, onde evitare di scaricare la
batteria.
Se la funzione di spegnimento automatico
non viene impostata, ogni volta che il motore
viene spento tenere premuto (OFF) finché il
display non scompare.
Per annullare la dimostrazione (DEMO),
vedere a pagina 46.
Per evitare incidenti
Le immagini vengono visualizzate soltanto
dopo che l’auto è stata parcheggiata e che il
freno a mano è stato azionato.
Se durante la riproduzione video si aziona
l’auto, viene visualizzato il seguente
avvertimento e le immagini provenienti
dall’uscita VIDEO OUT scompaiono
automaticamente.
La visualizzazione delle immagini viene
disattivata, mentre la sorgente audio continua
a funzionare.
Non utilizzare l’apparecchio o il monitor
durante la guida.
Video blocked for your
safety.

4
D:\Documents and Settings\takashi-shimomura\Desktop\DTP\848220S MEX-
DV1500U(EUR)\4120899211_MEX-DV1500U_ML\04IT+00COV-ETOC.fm
masterpage:Right
Indice
MEX-DV1500U
4-120-899-21 (1)
Congratulazioni!. . . . . . . . . . . . . . . . . . . . . . . . .6
Diritti d’autore. . . . . . . . . . . . . . . . . . . . . . . .7
Dischi riproducibili e simboli utilizzati nel
presente manuale . . . . . . . . . . . . . . . . . . . . . . . .8
Posizione e funzione dei comandi . . . . . . . . . .10
Unità principale . . . . . . . . . . . . . . . . . . . . . .10
Telecomando a scheda RM-X168 . . . . . . . .12
Operazioni preliminari
Installazione dell’apparecchio e del
monitor opzionale . . . . . . . . . . . . . . . . . 14
Azzeramento dell’apparecchio . . . . . . . 14
Preparazione del telecomando a
scheda. . . . . . . . . . . . . . . . . . . . . . . . . . . 14
Rimozione del pannello anteriore. . . . . 15
Installazione del pannello anteriore. . . . . . .15
Operazioni di base
Riproduzione dei dischi video . . . . . . . 16
Riproduzione di dischi audio . . . . . . . . 18
Riproduzione di un dispositivo
USB . . . . . . . . . . . . . . . . . . . . . . . . . . . . . 20
Voci del display. . . . . . . . . . . . . . . . . . . . . .21
Riproduzione ripetuta e in ordine
casuale . . . . . . . . . . . . . . . . . . . . . . . . . . . . .21
Ascolto della radio . . . . . . . . . . . . . . . . . 22
Operazioni avanzate — Dischi
Riproduzione di file DivX
®
/MPEG-4/
JPEG. . . . . . . . . . . . . . . . . . . . . . . . . . . . . . . . .23
Riproduzione di video DivX
®
/MPEG-4 . . .23
Riproduzione di immagini JPEG. . . . . . . . .23
Uso delle funzioni PBC
— Controllo della riproduzione . . . . . . . . . . . .24
Uso del menu del modo di riproduzione . . . . .25
Visualizzazione delle informazioni sulla durata/
informazioni di testo del disco . . . . . . . . . . . . .26
Configurazione delle impostazioni audio. . . . .27
Modifica della lingua/del formato audio . . .27
Controllo del formato di programma . . . . .28
Regolazione del livello di uscita audio
— Livello DVD . . . . . . . . . . . . . . . . . . . . .29
Ingrandimento delle immagini . . . . . . . . . . . . 29
Regolazione della qualità dell’immagine
— Picture EQ . . . . . . . . . . . . . . . . . . . . . . . . . 30
Personalizzazione della qualità
dell’immagine . . . . . . . . . . . . . . . . . . . . . . . 30
Blocco dei dischi — Protezione . . . . . . . . . . . 31
Attivazione della funzione di
protezione . . . . . . . . . . . . . . . . . . . . . . . . . . 31
Modifica dell’area e delle relative
classificazioni dei film . . . . . . . . . . . . . . . . 32
Riproduzione ripetuta e in ordine casuale . . . . 32
Riproduzione con ricerca diretta . . . . . . . . . . . 34
Visualizzazione di un elenco di brani/immagini/
file video — Quick-BrowZer . . . . . . . . . . . . . 35
Selezione di un brano/un’immagine/un file
video . . . . . . . . . . . . . . . . . . . . . . . . . . . . . . 35
Selezione di un tipo di file . . . . . . . . . . . . . 35
Visualizzazione delle informazioni sul disco
audio . . . . . . . . . . . . . . . . . . . . . . . . . . . . . . . . 36
Operazioni avanzate — Radio
Memorizzazione e ricezione delle stazioni . . . 36
Memorizzazione automatica — BTM . . . . 36
Memorizzazione manuale. . . . . . . . . . . . . . 37
Ricezione delle stazioni memorizzate. . . . . 37
RDS . . . . . . . . . . . . . . . . . . . . . . . . . . . . . . . . . 37
Panoramica . . . . . . . . . . . . . . . . . . . . . . . . . 37
Impostazione dei modi AF e TA. . . . . . . . . 37
Selezione di PTY . . . . . . . . . . . . . . . . . . . . 38
Impostazione di CT. . . . . . . . . . . . . . . . . . . 38
Regolazione dell’audio
Regolazione delle caratteristiche
dell’audio. . . . . . . . . . . . . . . . . . . . . . . . . . . . . 39
Personalizzazione della curva
dell’equalizzatore — EQ3 . . . . . . . . . . . . . 39
Impostazioni
Impostazioni video . . . . . . . . . . . . . . . . . . . . . 40
Operazioni di base del menu delle
impostazioni video . . . . . . . . . . . . . . . . . . . 40
Impostazione della lingua di visualizzazione o
dell’audio . . . . . . . . . . . . . . . . . . . . . . . . . . 41
Impostazioni di visualizzazione . . . . . . . . . 41
Impostazioni personalizzate . . . . . . . . . . . . 42
Impostazioni audio . . . . . . . . . . . . . . . . . . . 43

Per l’installazione e i collegamenti, fare
riferimento al manuale di istruzioni per
l’installazione e i collegamenti in dotazione.
5
D:\Documents and Settings\takashi-shimomura\Desktop\DTP\848220S MEX-
DV1500U(EUR)\4120899211_MEX-DV1500U_ML\04IT+00COV-ETOC.fm
masterpage:Right
MEX-DV1500U
4-120-899-21 (1)
Sito di assistenza clienti
In caso di domande o per le informazioni più aggiornate sul presente
prodotto, visitare il seguente sito Web:
http://support.sony-europe.com
Nel sito sono fornite informazioni relative a:
• Modelli e produttori di lettori audio digitali compatibili
• File MP3/WMA/AAC supportati
Azzeramento di tutte le impostazioni . . . . . 43
Impostazioni di sistema . . . . . . . . . . . . . . . . . . 44
Operazioni di base del menu delle
impostazioni di sistema. . . . . . . . . . . . . . . . 44
Impostazione dell’orologio. . . . . . . . . . . . . 48
Uso di apparecchi opzionali
Apparecchi opzionali. . . . . . . . . . . . . . . . . . . . 48
Informazioni aggiuntive
Precauzioni . . . . . . . . . . . . . . . . . . . . . . . . . . . 49
Note sui dischi . . . . . . . . . . . . . . . . . . . . . . 49
Ordine di riproduzione dei file MP3/WMA/
AAC/JPEG/DivX
®
/MPEG-4 . . . . . . . . . . . 50
Informazioni sui file MP3. . . . . . . . . . . . . . 50
Informazioni sui file WMA . . . . . . . . . . . . 50
Informazioni sui file AAC . . . . . . . . . . . . . 50
Informazioni sui file JPEG . . . . . . . . . . . . . 51
Informazioni sui file DivX
®
. . . . . . . . . . . . 51
Informazioni sui file MPEG-4 . . . . . . . . . . 51
Manutenzione . . . . . . . . . . . . . . . . . . . . . . . . . 51
Rimozione dell’apparecchio . . . . . . . . . . . . . . 52
Caratteristiche tecniche . . . . . . . . . . . . . . . . . . 52
Guida alla soluzione dei problemi. . . . . . . . . . 53
Messaggi e indicazioni di errore. . . . . . . . . 56
Glossario . . . . . . . . . . . . . . . . . . . . . . . . . . . . . 57
Elenco dei codici della lingua/di zona. . . . . . . 59
Indice analitico . . . . . . . . . . . . . . . . . . . . . . . . 60

6
D:\Documents and Settings\takashi-shimomura\Desktop\DTP\848220S MEX-
DV1500U(EUR)\4120899211_MEX-DV1500U_ML\04IT02CD-E.fm
masterpage:Left
MEX-DV1500U
4-120-899-21 (1)
Congratulazioni!
Complimenti per l’acquisto del presente lettore
Multi Disc Sony. Prima di utilizzare il presente
apparecchio, leggere attentamente questo
manuale e conservarlo per eventuali riferimenti
futuri.
Funzioni
Per ulteriori informazioni, consultare la pagina di
riferimento.
* In base alla durata dei brani e alla velocità di
campionamento registrata.
Riproduzione di DVD, VCD, CD
t pagina 8
Compatibile con vari formati di disco.
2000MP3, 2000WMA, 2000AAC
Riproduzione di un massimo di 2.000 brani*
registrati su un disco nel formato MP3/WMA/
AAC.
Ripristino della riproduzione multidisco
t pagina 42
Mediante questa funzione, viene memorizzato
il punto di arresto della riproduzione per un
massimo di 5 dischi e la riproduzione di DVD
VIDEO/VCD/DivX/MPEG-4 viene ripristinata
anche in seguito all’espulsione del disco.
t pagina 39
7 curve dell’equalizzatore preimpostate,
ulteriormente personalizzabili sintonizzando
3 bande diverse.
t pagina 30
Tonalità delle immagini selezionabile tra le
opzioni preimpostate, in base alla luminosità
dell’ambiente/all’interno dell’auto.
t pagina 48
Possibilità di collegare un dispositivo audio
portatile (collegamento analogico).
t pagina 48
I terminali AUX AUDIO IN sulla parte
posteriore consentono il collegamento e l’uscita
audio di un dispositivo ausiliare, come un
dispositivo audio portatile (collegamento
analogico), un dispositivo di navigazione
“hideaway”, un sintonizzatore TV e così via.

7
D:\Documents and Settings\takashi-shimomura\Desktop\DTP\848220S MEX-
DV1500U(EUR)\4120899211_MEX-DV1500U_ML\04IT02CD-E.fm
masterpage:RightD:\Documents and Settings\takashi-shimomura\Desktop\DTP\848220S MEX-
DV1500U(EUR)\4120899211_MEX-DV1500U_ML\04IT02CD-E.fm
masterpage:Right
MEX-DV1500U
4-120-899-21 (1)
Diritti d’autore
Nel presente prodotto è incorporata una
tecnologia di protezione dei diritti d’autore
vincolata da brevetti statunitensi e da altri diritti
di proprietà intellettuale di Macrovision
Corporation e di altri proprietari. L’uso di tale
tecnologia di protezione dei diritti d’autore deve
essere autorizzato da Macrovision ed è inteso
solo per l’uso domestico e per altri usi di visione
limitata, salvo quanto diversamente autorizzato
da Macrovision. Non è consentito lo smontaggio
o la manomissione.
“DVD VIDEO”, “DVD-R”, “DVD-RW”,
“DVD+R”, e “DVD+RW” sono marchi di
fabbrica.
“DivX” e “DivX Certified” sono
marchi di fabbrica registrati o
marchi di fabbrica di DivX, Inc.
IL PRESENTE PRODOTTO È CONCESSO IN
LICENZA IN BASE AL PORTAFOGLIO DEI
BREVETTI MPEG-4 VISUAL PER L’USO
PERSONALE E NON COMMERCIALE DI UN
UTENTE PER LA DECODIFICA DI UN
VIDEO MPEG-4 CODIFICATO DA UN
UTENTE PER FINI PRIVATI E NON
COMMERCIALI E/O OTTENUTO DA UN
FORNITORE VIDEO AUTORIZZATO DA
MPEG LA PER LA DISTRIBUZIONE DI
VIDEO MPEG-4. NON VIENE GARANTITA
ALCUNA LICENZA PER ALTRI TIPI DI USO.
INFORMAZIONI AGGIUNTIVE, INCLUSE
QUELLE RELATIVE A LICENZE E UTILIZZI
PROMOZIONALI, INTERNI E
COMMERCIALI, SONO DISPONIBILI
PRESSO MPEG LA, LLC. VISITARE IL SITO
WEB ALL’INDIRIZZO
HTTP://WWW.MPEGLA.COM
Prodotto su licenza dei Dolby
Laboratories.
“Dolby” e il simbolo della
doppia D sono marchi dei Dolby Laboratories.
Windows Media e il loro
Windows sono marchi di
fabbrica o marchi registrati di
Microsoft Corporation negli
Stati Uniti e/o in altri paesi.

8
D:\Documents and Settings\takashi-shimomura\Desktop\DTP\848220S MEX-
DV1500U(EUR)\4120899211_MEX-DV1500U_ML\04IT02CD-E.fm
masterpage:Left
MEX-DV1500U
4-120-899-21 (1)
Dischi riproducibili e simboli utilizzati nel presente manuale
Il presente apparecchio può riprodurre vari dischi video/audio.
Nella seguente tabella sono indicati i dischi supportati dall’apparecchio, nonché le funzioni disponibili
per determinati tipi di disco.
*1 I file audio possono inoltre essere memorizzati. Per ulteriori informazioni, vedere a pagina 9.
*2 I file video/di immagini possono inoltre essere memorizzati. Per ulteriori informazioni, vedere a pagina 9.
Nota
Nel presente manuale, è possibile che la dicitura “DVD” venga utilizzata come termine generale per i dischi DVD
VIDEO, DVD-R/DVD-RW e DVD+R/DVD+RW.
Simbolo del disco nel
manuale
Formato del disco Logo del disco
VIDEO
DVD VIDEO
DVD-R*
1
DVD-R DL*
1
(modo video/modo VR)
DVD-RW*
1
(modo video/modo VR)
DVD+R*
1
DVD+R DL*
1
DVD+RW*
1
Video CD
(ver. 1.0/1.1/2.0)
AUDIO
CD Audio
CD-ROM*
2
CD-R*
2
CD-RW*
2

9
D:\Documents and Settings\takashi-shimomura\Desktop\DTP\848220S MEX-
DV1500U(EUR)\4120899211_MEX-DV1500U_ML\04IT02CD-E.fm
masterpage:RightD:\Documents and Settings\takashi-shimomura\Desktop\DTP\848220S MEX-
DV1500U(EUR)\4120899211_MEX-DV1500U_ML\04IT02CD-E.fm
masterpage:Right
MEX-DV1500U
4-120-899-21 (1)
Nella seguente tabella sono indicati i formati di compressione supportati, i relativi tipi di file e i tipi di
disco che è possibile utilizzare per memorizzarli.
Le funzioni disponibili variano in base al formato, indipendentemente dal tipo di disco. I simboli dei
formati indicati di seguito sono riportati accanto alla descrizione delle funzioni disponibili per gli
specifici formati.
Suggerimento
Per ulteriori informazioni sui formati di compressione, vedere a pagina 50.
Tipi di disco non supportati
I tipi di disco riportati di seguito non possono essere riprodotti mediante il presente apparecchio:
• Dischi da 8 cm
• Dischi da 12 cm che impiegano soltanto la porzione di dati più interna da 8 cm (la parte restante è
trasparente)
• CD-ROM contenenti file diversi da MP3/WMA/AAC/JPEG/DivX/MPEG-4
•SA-CD
•CD-G
•Photo-CD
• VSD (Video Single Disc)
• DVD-ROM contenenti file diversi da MP3/WMA/AAC/JPEG/DivX/MPEG-4
•DVD-RAM
•DVD-Audio
• Active-Audio (dati)
• SVCD (Super Video CD)
•CDV
• Dischi creati nel formato Packet Write
• Dischi in formato DTS
Nota
Anche se compatibili, a seconda delle condizioni di registrazione potrebbe non essere possibile riprodurre i dischi
con il presente apparecchio.
Codice di zona
Il sistema di zona viene utilizzato per garantire la protezione dei
diritti d’autore.
Il codice di zona è riportato nella parte inferiore dell’apparecchio,
con il quale è possibile riprodurre solo DVD aventi lo stesso codice
di zona indicato sull’etichetta.
È inoltre possibile riprodurre i DVD che riportano l’etichetta .
Se si tenta di riprodurre un altro DVD, sullo schermo del monitor
viene visualizzato il messaggio “Playback prohibited by region
code.” (Riproduzione non consentita dal codice di zona). A seconda del DVD, è possibile che non venga
riportato alcun codice di zona, anche se è vietato riprodurre tale DVD a causa di restrizioni di zona.
Simbolo del formato nel
manuale
Tipo di file
Tipo di disco utilizzabile per la
memorizzazione
File audio MP3
DATA DVD
DVD-ROM
DVD-R
DVD-R DL
DVD-RW
DVD+R
DVD+R DL
DVD+RW
DATA CD
CD-ROM
CD-R
CD-RW
File audio WMA
File audio AAC
File di immagini
JPEG
File video DivX
®
File video MPEG-4
MPEG-4
Codice di zona
ALL

10
D:\Documents and Settings\takashi-shimomura\Desktop\DTP\848220S MEX-
DV1500U(EUR)\4120899211_MEX-DV1500U_ML\04IT02CD-E.fm
masterpage:Left
MEX-DV1500U
4-120-899-21 (1)
Posizione e funzione dei comandi
Unità principale
Per ulteriori informazioni, fare riferimento alle
pagine indicate.
Le istruzioni contenute nel presente manuale si
riferiscono generalmente ai comandi del
telecomando a scheda. È inoltre possibile
utilizzare i comandi dell’unità principale, se
dispongono di nomi uguali o simili a quelli del
telecomando a scheda.
A Tasto OFF pagina 15, 16, 18, 20, 24
Per spegnere/arrestare la sorgente (premere);
per spegnere completamente (tenere
premuto).
B Tasto (Back) pagina 35, 39
Per tornare alla schermata precedente.
C Tasto SOURCE pagina 20, 22, 36, 49
Per attivare l’alimentazione; per cambiare la
sorgente (radio/disco/USB/AUX).
D Tasto (Browse) pagina 35
Per attivare il modo Quick-BrowZer.*
1
E Manopola di controllo/tasto SOUND/
ENTER pagina 29, 35, 36, 38, 39, 44,
48, 49
Per regolare il volume/un’impostazione
(ruotare), per accedere al menu audio/
applicare un’impostazione (premere).
F Alloggiamento del disco pagina 16,
18
Per inserire il disco.
G Finestra del display
H Tasto Z (espulsione) pagina 16, 18
Per estrarre il disco.
I Terminale USB pagina 20
Per il collegamento al dispositivo USB.
J Tasti SEEK +/– pagina 17, 19, 22, 23
Disco/USB:
Per saltare un capitolo/un brano/una scena/
un file (premere); per ricercare rapidamente
all’indietro/in avanti nel disco (tenere
premuto per un istante); per ricercare
rapidamente all’indietro/in avanti in un
brano (tenere premuto).*
2
Radio:
Per sintonizzare le stazioni in modo
automatico (premere); per ricercare una
stazione manualmente (tenere premuto).
K Tasto (rilascio pannello anteriore)
pagina 15
ALBM ARTIST TRACK SHUF ZAP
+
DM
LOUDDISCREGTPTAAF
AUX
SETUP
REPPTY SHUF
OFF
1 2 3 4 5 6
ALBM
SOURCE
MODE
SEEK
SE
EK
PUSH SOUND
/
ENTER
DSPLAF/TA
qkqh
12 4 657839
qsqaq; qd qlqj
qfqg

11
D:\Documents and Settings\takashi-shimomura\Desktop\DTP\848220S MEX-
DV1500U(EUR)\4120899211_MEX-DV1500U_ML\04IT02CD-E.fm
masterpage:RightD:\Documents and Settings\takashi-shimomura\Desktop\DTP\848220S MEX-
DV1500U(EUR)\4120899211_MEX-DV1500U_ML\04IT02CD-E.fm
masterpage:Right
MEX-DV1500U
4-120-899-21 (1)
L Tasto MODE pagina 22, 36, 49
Per selezionare la banda radio (FM/MW/
LW); per selezionare un dispositivo ausiliare
collegato alla presa di ingresso AUX
(anteriore) o alla presa AUX IN (posteriore).
M Ricettore del telecomando a scheda
N Tasto RESET pagina 14
O Tasto SETUP pagina 29, 36, 44, 48, 49
Per accedere al menu delle impostazioni di
sistema.
P Tasto AF (frequenza alternative)/
TA (notiziari sul traffico)/
PTY (tipo di programma) pagina 37,
38
Per impostare AF e TA (premere); per
selezionare PTY nel modo RDS (tenere
premuto).
Q Tasti numerici
Disco/USB:
(1): b REP pagina 16, 17, 21, 32
(2): SHUF B pagina 16, 17, 21, 32
(3)/(4): ALBM –/+ (V/v) pagina 16,
17, 19, 23
Per saltare un album o una cartella/
spostare il cursore (premere); per
saltare gli album o le cartelle in modo
continuo (tenere premuto).
(6): u (riproduzione/pausa) pagina 16,
17, 18, 19, 23
Per avviare/mettere in pausa la
riproduzione.
Radio:
Per ricevere le stazioni memorizzate
(premere); per memorizzare le stazioni
(tenere premuto).
R Tasto DSPL (display) pagina 21, 26,
37, 48
Per cambiare la voce del display.
S Presa di ingresso AUX pagina 48
Per collegare un dispositivo audio portatile.
*1 Durante la riproduzione di un CD/MP3/WMA/AAC/
JPEG/DivX/MPEG-4.
*2 Il funzionamento varia in base al disco (pagina 17,
19).
Informazioni sul cappuccio USB
Quando il terminale USB I non viene utilizzato,
applicare il cappuccio USB in dotazione onde evitare
che al relativo interno penetrino polvere o sporcizia.
Tenere il cappuccio USB fuori dalla portata dei
bambini onde evitare che venga ingerito
accidentalmente.

12
D:\Documents and Settings\takashi-shimomura\Desktop\DTP\848220S MEX-
DV1500U(EUR)\4120899211_MEX-DV1500U_ML\04IT02CD-E.fm
masterpage:Left
MEX-DV1500U
4-120-899-21 (1)
Telecomando a scheda RM-X168
Per ulteriori informazioni, fare riferimento alle
pagine indicate.
Prima dell’uso, rimuovere la pellicola protettiva
(pagina 14).
A Tasto OFF pagina 16, 18, 20, 24
Per spegnere/arrestare la sorgente (premere);
per spegnere completamente (tenere
premuto).
B Tasto SOUND pagina 39
Per accedere al menu audio.
C Tasto VISUAL SETUP pagina 25, 28,
29, 30, 31, 33, 34, 40
Per accedere al menu del modo di
riproduzione/al menu delle impostazioni
video.
D Tasto SYSTEM SETUP pagina 29, 36,
44, 48, 49
Per accedere al menu delle impostazioni di
sistema.
qs
1
2
3
4
5
6
7
8
qd
qf
qg
qj
qh
9
0
qa

13
D:\Documents and Settings\takashi-shimomura\Desktop\DTP\848220S MEX-
DV1500U(EUR)\4120899211_MEX-DV1500U_ML\04IT02CD-E.fm
masterpage:RightD:\Documents and Settings\takashi-shimomura\Desktop\DTP\848220S MEX-
DV1500U(EUR)\4120899211_MEX-DV1500U_ML\04IT02CD-E.fm
masterpage:Right
MEX-DV1500U
4-120-899-21 (1)
E Tasto (Indietro)/O pagina 24, 25,
31, 32, 35, 39, 40
Per tornare alla schermata precedente; per
tornare al menu in un VCD*
1
.
F Tasti numerici pagina 16, 17, 24, 25,
31, 32, 34, 34, 36
Disco:
Per individuare un titolo/capitolo/brano.
Radio:
Per ricevere le stazioni memorizzate
(premere); per memorizzare le stazioni
(tenere premuto).
G Tasto CLEAR pagina 31, 34
Per cancellare un numero immesso.
H Tasto DSPL (display) pagina 21, 26,
37, 48
Per cambiare le voci del display.
I Tasto ATT (attenuazione audio)
Per attenuare l’audio (per annullare, premere
di nuovo).
J Tasto u (riproduzione/pausa)
pagina 16, 17, 18, 19, 23
Per avviare/mettere in pausa la riproduzione.
K Tasti .m/M> pagina 17, 19,
22, 23
Disco/USB:
Per saltare un capitolo/un brano/una scena/
un file (premere); per ricercare rapidamente
all’indietro/in avanti nel disco (tenere
premuto per un istante); per ricercare
rapidamente all’indietro/in avanti in un
brano (tenere premuto).*
2
Radio:
Per sintonizzare le stazioni in modo
automatico (premere); per ricercare una
stazione manualmente (tenere premuto).
L Tasti di impostazione della
riproduzione DVD
(AUDIO): pagina 17, 27
Per modificare il formato/la lingua
dell’audio.
(formati VCD/CD/MP3/WMA/AAC: per
modificare il canale audio)
(SUBTITLE): pagina 17
Per cambiare la lingua dei sottotitoli.
(ANGLE): pagina 17
Per modificare l’angolo di visualizzazione.
(TOP MENU): pagina 17
Per accedere al menu principale di un
DVD.
(MENU): pagina 17
Per accedere al menu di un disco.
M Tasto (Sfoglia) pagina 35
Per attivare il modo Quick-BrowZer.*
3
N Tasti </M/m/, (cursore)/ENTER
Per spostare il cursore e applicare
un’impostazione.
O Tasto SRC (sorgente) pagina 20, 22,
36, 49
Per attivare l’alimentazione; per cambiare la
sorgente (radio/disco/USB/AUX).
P Tasto MODE pagina 22, 36, 49
Per selezionare la banda radio (FM/MW/
LW); per selezionare un dispositivo ausiliare
collegato alla presa di ingresso AUX
(anteriore) o alla presa AUX IN (posteriore).
Q Tasti VOL (volume) +/–
Per regolare il volume.
*1 Durante la riproduzione con la funzione PBC.
*2 Il funzionamento varia in base al disco (pagina 17,
19).
*3 Durante la riproduzione di un CD/MP3/WMA/AAC/
JPEG/DivX/MPEG-4.
Nota
Se l’apparecchio viene spento e il display disattivato,
non è possibile controllarlo mediante il telecomando a
scheda a meno che non venga premuto (SOURCE)
sull’apparecchio o che non venga inserito un disco per
accendere l’apparecchio stesso.

14
D:\Documents and Settings\takashi-shimomura\Desktop\DTP\848220S MEX-
DV1500U(EUR)\4120899211_MEX-DV1500U_ML\04IT02CD-E.fm
masterpage:Left
MEX-DV1500U
4-120-899-21 (1)
Operazioni preliminari
Installazione dell’apparecchio
e del monitor opzionale
Innanzitutto, installare e collegare l’apparecchio
e il monitor opzionale.
Il presente apparecchio può essere utilizzato
tramite le indicazioni visualizzate
sull’apparecchio stesso e/o su un monitor
opzionale.
Nel presente manuale sono incluse istruzioni
relative alle indicazioni visualizzate su entrambi
l’apparecchio e/o un monitor opzionale.
Per ulteriori informazioni, consultare il manuale
di installazione/dei collegamenti in dotazione.
Nota
Accertarsi di installare in modo sicuro il monitor
opzionale, in una posizione che non ostacoli la visuale
del conducente.
Azzeramento dell’apparecchio
Prima di utilizzare l’apparecchio per la prima
volta, dopo la sostituzione della batteria dell’auto
o dopo avere effettuato modifiche ai
collegamenti, è necessario azzerare l’apparecchio
stesso.
Rimuovere il pannello anteriore (pagina 15),
quindi premere il tasto RESET (pagina 11)
utilizzando un oggetto appuntito, quale una
penna a sfera.
Nota
Premendo il tasto RESET verranno cancellate le
impostazioni dell’orologio e alcune funzioni
memorizzate.
Preparazione del telecomando
a scheda
Rimuovere la pellicola protettiva.
Suggerimento
Per ulteriori informazioni sulle modalità di sostituzione
della batteria, vedere a pagina 51.
Apparecchio
Monitor opzionale

15
D:\Documents and Settings\takashi-shimomura\Desktop\DTP\848220S MEX-
DV1500U(EUR)\4120899211_MEX-DV1500U_ML\04IT02CD-E.fm
masterpage:RightD:\Documents and Settings\takashi-shimomura\Desktop\DTP\848220S MEX-
DV1500U(EUR)\4120899211_MEX-DV1500U_ML\04IT02CD-E.fm
masterpage:Right
MEX-DV1500U
4-120-899-21 (1)
Rimozione del pannello
anteriore
Per evitare il furto dell’apparecchio, è possibile
estrarne il pannello anteriore.
Segnale di avvertimento
Se la chiave di accensione viene impostata sulla
posizione OFF senza che il pannello anteriore sia
stato rimosso, viene emesso per alcuni secondi
un segnale acustico di avvertimento.
Tale segnale viene emesso solo se è in uso
l’amplificatore incorporato.
1 Premere (OFF).
L’apparecchio si spegne.
2 Premere , quindi estrarre il pannello
tirando verso di sé.
Note
• Non fare cadere il pannello anteriore né esercitare
eccessiva pressione su quest’ultimo e sulla finestra
del display.
• Non esporre il pannello anteriore a calore,
temperature elevate o umidità. Evitare di lasciarlo
all’interno di auto parcheggiate oppure su cruscotti e
ripiani posteriori.
• Non rimuovere il pannello anteriore durante la
riproduzione sul dispositivo USB, onde evitare di
danneggiare i dati USB.
Installazione del pannello anteriore
Inserire la parte A del pannello anteriore nella
parte B dell’apparecchio, come illustrato, quindi
premere il lato sinistro fino a farlo scattare in
posizione.
Nota
Non collocare alcun oggetto sulla superficie interna
del pannello anteriore.
OFF
B
A

16
D:\Documents and Settings\takashi-shimomura\Desktop\DTP\848220S MEX-
DV1500U(EUR)\4120899211_MEX-DV1500U_ML\04IT02CD-E.fm
masterpage:Left
MEX-DV1500U
4-120-899-21 (1)
Operazioni di base
Riproduzione dei dischi video
A seconda del disco, alcune operazioni potrebbero risultare differenti o limitate.
Consultare le istruzioni per l’uso in dotazione con il disco.
Per arrestare la riproduzione
Premere (OFF).
Nota
I dischi in formato DTS non sono supportati. Se è selezionato il formato DTS, l’audio non viene emesso.
1
Accendere il monitor, quindi selezionare su quest’ultimo la sorgente
di ingresso corrispondente alla presente unità.
2
Inserire il disco (con il lato
dell’etichetta verso l’alto).
La riproduzione viene avviata automaticamente.
Se la riproduzione non viene avviata automaticamente,
premere u.
3
Se viene visualizzato il menu DVD, premere (1)(b)/(2)(B)/(3)(V)/
(4)(v) per spostare il cursore, quindi premere (6) (u) per
confermare.
Con il telecomando a scheda, premere i tasti </M/m/,/numerici per spostare il cursore,
quindi premere (ENTER) per confermare.
Per estrarre il disco
Premere Z.
</M/m/,
ENTER
u
OFF
b/B/V/v u
OFF
Z
Tasti
numerici

17
D:\Documents and Settings\takashi-shimomura\Desktop\DTP\848220S MEX-
DV1500U(EUR)\4120899211_MEX-DV1500U_ML\04IT02CD-E.fm
masterpage:RightD:\Documents and Settings\takashi-shimomura\Desktop\DTP\848220S MEX-
DV1500U(EUR)\4120899211_MEX-DV1500U_ML\04IT02CD-E.fm
masterpage:Right
MEX-DV1500U
4-120-899-21 (1)
Informazioni sul menu DVD
I DVD sono suddivisi in diverse sezioni, che compongono un’immagine o una porzione musicale.
Queste sezioni vengono denominate “titoli”. Se viene riprodotto un DVD contenente diversi titoli, è
possibile selezionare il titolo desiderato utilizzando il menu principale del DVD stesso. Per i DVD che
consentono di selezionare voci quali lingue dei sottotitoli/dell’audio, procedere alla selezione
utilizzando il menu DVD.
Altre funzioni di riproduzione
*1 Non disponibile a seconda del disco.
*2 Quando viene visualizzato il prompt di immissione a 4 cifre, immettere il codice della lingua (pagina 59)
desiderata.
Per Premere
effettuare una pausa/ripristinare la
riproduzione dopo una pausa
u
saltare un capitolo/un brano/una scena/
un file
.m/M>
ricercare rapidamente all’indietro/in
avanti nel disco
e tenere premuto brevemente .m/M>; quindi, più
volte per cambiare velocità (× 2 t × 12 t × 120 t × 2…)
arrestare la ricerca rapida all’indietro/in
avanti
u
visualizzare il menu DVD*
1
Telecomando: (TOP MENU) o (MENU)
selezionare le voci nel menu DVD*
1
Unità principale: (1)(b)/(2)(B)/(3)(V)/(4)(v) per
spostare il cursore, quindi premere (6) (u) per confermare
Telecomando: tasti </M /m/,/numerici per spostare il
cursore, quindi premere (ENTER) per confermare
cambiare la lingua dell’audio/il formato/
il canale (pagina 27)*
1
Tele co m ando: più volte (AUDIO) finché non viene
visualizzata la voce desiderata
disattivare/cambiare la lingua dei
sottotitoli*
1
Tele co m ando: più volte (SUBTITLE) finché non viene
visualizzata la voce desiderata*
2
cambiare l’angolo di visualizzazione*
1
Tele co m ando: più volte (ANGLE) finché non viene
visualizzato il numero di angolo desiderato
.m/M>
u
SUBTITLE
ANGLE
MENU
</M/m/,
ENTER
AUDIO
TOP MENU
b/B/V/v u.m/M>
Tasti
numerici

18
D:\Documents and Settings\takashi-shimomura\Desktop\DTP\848220S MEX-
DV1500U(EUR)\4120899211_MEX-DV1500U_ML\04IT02CD-E.fm
masterpage:Left
MEX-DV1500U
4-120-899-21 (1)
Riproduzione di dischi audio
A seconda del disco, alcune operazioni potrebbero risultare differenti o limitate.
Consultare le istruzioni per l’uso in dotazione con il disco.
Per arrestare la riproduzione
Premere (OFF).
Nota
I dischi in formato DTS non sono supportati. Se è selezionato il formato DTS, l’audio non viene emesso.
1
Inserire il disco (con il lato dell’etichetta
verso l’alto).
La riproduzione viene avviata automaticamente.
Se la riproduzione non viene avviata automaticamente,
premere u.
Per estrarre il disco
Premere Z.
u
OFF
u
OFF
Z

19
D:\Documents and Settings\takashi-shimomura\Desktop\DTP\848220S MEX-
DV1500U(EUR)\4120899211_MEX-DV1500U_ML\04IT02CD-E.fm
masterpage:RightD:\Documents and Settings\takashi-shimomura\Desktop\DTP\848220S MEX-
DV1500U(EUR)\4120899211_MEX-DV1500U_ML\04IT02CD-E.fm
masterpage:Right
MEX-DV1500U
4-120-899-21 (1)
Altre funzioni di riproduzione
* Se viene riprodotto un file MP3/WMA/AAC.
Per Premere
effettuare una pausa/ripristinare la
riproduzione dopo una pausa
u
saltare un brano .m (<)/M> (,)
ricercare rapidamente all’indietro/in
avanti nel brano
e tenere premuto .m/M>
saltare un album* Unità principale: (3) (ALBM –)/(4) (ALBM +)
Telecomando: M/m
saltare gli album in modo continuo* Unità principale: e tenere premuto (3) (ALBM –)/
(4) (ALBM +)
Tele co m ando: e tenere premuto M/m
</M/m/,
.m/M>
u
u.m/M> ALBM

20
D:\Documents and Settings\takashi-shimomura\Desktop\DTP\848220S MEX-
DV1500U(EUR)\4120899211_MEX-DV1500U_ML\04IT02CD-E.fm
masterpage:Left
MEX-DV1500U
4-120-899-21 (1)
Riproduzione di un dispositivo USB
Per ulteriori informazioni sulla compatibilità del dispositivo USB in uso, visitare il sito Web relativo
all’assistenza.
• È possibile utilizzare dispositivi USB di tipo MSC (Mass Storage Class) compatibili con lo standard
USB.
• I codec corrispondenti sono MP3 (.mp3), WMA (.wma), AAC (.m4a) e JPEG (.jpg).
• Si consiglia di eseguire il backup dei dati contenuti in un dispositivo USB.
Nota
Collegare il dispositivo USB dopo avere acceso il motore dell’auto.
A seconda del dispositivo USB utilizzato, potrebbero verificarsi problemi di funzionamento o danni nel caso in cui il
dispositivo stesso venga collegato prima dell’accensione del motore.
Per arrestare la riproduzione
Premere (OFF).
Nota
Assicurarsi di utilizzare il cavo USB in dotazione con l’apparecchio qualora sia necessario un cavo durante il
collegamento USB.
1
Collegare il dispositivo USB al
terminale USB.
La riproduzione viene avviata automaticamente.
Se è già collegato un dispositivo USB, per avviare la
riproduzione premere più volte (SOURCE) fino a
visualizzare “USB”.
Sito di assistenza clienti
http://support.sony-europe.com
SRC
OFF
DSPL
SOURCE
(USB)
OFF
SHUFREP DSPL

21
D:\Documents and Settings\takashi-shimomura\Desktop\DTP\848220S MEX-
DV1500U(EUR)\4120899211_MEX-DV1500U_ML\04IT02CD-E.fm
masterpage:RightD:\Documents and Settings\takashi-shimomura\Desktop\DTP\848220S MEX-
DV1500U(EUR)\4120899211_MEX-DV1500U_ML\04IT02CD-E.fm
masterpage:Right
MEX-DV1500U
4-120-899-21 (1)
Rimozione del dispositivo USB
1 Arrestare la riproduzione sul dispositivo USB.
2 Rimuovere il dispositivo USB.
Se il dispositivo USB viene rimosso durante la
riproduzione, è possibile che i dati contenuti
nel dispositivo USB stesso vengano
danneggiati.
Note
• Non utilizzare dispositivi USB di dimensioni o peso
eccessivi, onde evitare che cadano a causa delle
vibrazioni oppure che causino la perdita della
connessione.
• Non rimuovere il pannello anteriore durante la
riproduzione sul dispositivo USB, onde evitare di
danneggiare i dati USB.
• Il presente apparecchio non è in grado di
riconoscere i dispositivi USB attraverso un hub USB.
Voci del display
A Sorgente
B Nome del brano, nome dell’artista, numero
dell’album*, nome dell’album, numero del
brano/tempo di riproduzione trascorso,
orologio
* Il numero dell’album viene visualizzato solo quando
si cambia album.
Per cambiare le voci del display B, premere
(DSPL).
Note
• Le voci del display variano a seconda del dispositivo
USB utilizzato, del formato di registrazione e delle
impostazioni. Per ulteriori informazioni, visitare il sito
Web relativo all’assistenza.
• Di seguito è riportato il numero massimo di dati
visualizzabili:
– cartelle (album): 256
– file (brani): 2.000
• Non lasciare un dispositivo USB in un’auto
parcheggiata, onde evitare problemi di
funzionamento.
• A seconda della quantità di dati registrati, è possibile
che l’avvio della riproduzione richieda del tempo.
• Durante la riproduzione o la ricerca rapida in avanti/
all’indietro di un file MP3/WMA/AAC VBR (velocità di
trasmissione variabile), è possibile che il tempo di
riproduzione trascorso non venga visualizzato
correttamente.
• Non è supportata la riproduzione di file con
compressione senza perdita di dati.
Visualizzazione dell’immagine di
copertina
Durante la riproduzione audio, sul monitor è
possibile controllare le informazioni relative al
contenuto o visualizzare l’immagine di
copertina* del file MP3/WMA/AAC
memorizzato sul dispositivo USB.
* Le dimensioni consigliate sono comprese tra
240 × 240 e 960 × 960 pixel.
Riproduzione ripetuta e in ordine
casuale
1 Durante la riproduzione, premere più
volte (1) (REP) o (2) (SHUF) sull’unità
principale fino a visualizzare
l’impostazione desiderata.
* Se nel dispositivo USB in uso sono state create due
o più unità.
Per tornare al modo di riproduzione normale,
selezionare “REP-OFF” o “SHUF-OFF”.
Selezionare Per riprodurre
REP-TRACK un brano in modo
ripetuto.
REP-ALBUM un album in modo
ripetuto.
SHUF-ALBUM un album in ordine
casuale.
REP-DRIVE* il contenuto di un’unità
in modo ripetuto.

22
D:\Documents and Settings\takashi-shimomura\Desktop\DTP\848220S MEX-
DV1500U(EUR)\4120899211_MEX-DV1500U_ML\04IT02CD-E.fm
masterpage:Left
MEX-DV1500U
4-120-899-21 (1)
Ascolto della radio
Suggerimento
Per ulteriori informazioni su altre funzioni della radio, vedere “Operazioni avanzate — Radio” a pagina 36.
Con il telecomando a scheda
Utilizzare (SRC) anziché (SOURCE), e .m/M> anziché (SEEK) –/+.
1
Premere più volte (SOURCE) fino a visualizzare “TUNER”.
2
Premere più volte (MODE) finché non viene visualizzata la banda
desiderata (FM1, FM2, FM3, MW o LW).
3
Eseguire la sintonizzazione.
Per eseguire automaticamente la sintonizzazione
Premere (SEEK) +
/–.
La ricerca si arresta non appena l’apparecchio riceve una stazione. Ripetere questa procedura
fino alla ricezione della stazione desiderata.
Per eseguire manualmente la sintonizzazione
Tenere premuto (SEEK) +
/– per individuare la frequenza approssimativa, quindi premere più
volte (SEEK) +
/– per effettuare la regolazione fine della frequenza desiderata.
.m/M>
MODE
SRC
SEEK MODE
SOURCE
B
A
A Banda radio/Funzione
B Frequenza*
* Durante la ricezione di una stazione RDS, viene
visualizzato il nome del servizio dei programmi. Per
ulteriori informazioni, vedere “RDS” a pagina 37.

23
D:\Documents and Settings\takashi-shimomura\Desktop\DTP\848220S MEX-
DV1500U(EUR)\4120899211_MEX-DV1500U_ML\04IT02CD-E.fm
masterpage:RightD:\Documents and Settings\takashi-shimomura\Desktop\DTP\848220S MEX-
DV1500U(EUR)\4120899211_MEX-DV1500U_ML\04IT02CD-E.fm
masterpage:Right
MEX-DV1500U
4-120-899-21 (1)
Operazioni avanzate — Dischi
Nel presente capitolo sono incluse le seguenti
sezioni.
• Operazioni specifiche dei video*
t pagina 23 a 32
• Operazioni comuni video*/audio
t pagina 32 a 35
• Operazioni specifiche dell’audio
t pagina 36
* Incluse le operazioni relative ai file JPEG.
Riproduzione di file DivX
®
/
MPEG-4/JPEG
Nota
Se il disco contiene più tipi di file, è possibile
riprodurre solo il tipo di file selezionato (audio/video/
immagine). Per riprodurre i file video DivX/MPEG-4 o i
file di immagini JPEG di tale disco, premere
durante la riproduzione, quindi selezionare il tipo di file
(video/immagine) che si desidera visualizzare
nell’elenco, infine selezionare il file desiderato
(pagina 35).
Riproduzione di video DivX
®
/
MPEG-4
È possibile controllare la riproduzione DivX/
MPEG-4, nonché alcune funzioni di controllo
della riproduzione audio, seguendo la stessa
procedura utilizzata per gli altri dischi video
(pagina 16).
Suggerimento
È inoltre possibile selezionare un file da riprodurre
utilizzando un elenco (modo Quick-BrowZer)
(pagina 35).
Riproduzione di immagini JPEG
Con il presente apparecchio, è possibile
riprodurre una visualizzazione in serie di file
JPEG. Inserendo un disco o premendo u, la
visualizzazione in serie viene avviata
automaticamente. Per ulteriori informazioni sulle
modalità di avvio della riproduzione, seguire la
procedura riportata ai punti da 1 a 4 di
“Riproduzione dei dischi video” a pagina 16.
Altre funzioni di riproduzione
MPEG-4
u
.m/M>
ALBM
</,
.m/M>
u
Per Premere
saltare un album
(cartella)
Unità principale:
(3) (ALBM –)/
(4) (ALBM +)
saltare album
(cartelle) in modo
continuo
Unità principale:
e tenere premuto
(3) (ALBM –)/
(4) (ALBM +)
Per Premere
ruotare l’immagine Telecomando:
</, (ruota in
incrementi di 90º)
saltare un’immagine .m/M>
saltare un album Unità principale:
(3) (ALBM –)/
(4) (ALBM +)
saltare gli album in
modo continuo
Unità principale:
e tenere premuto
(3) (ALBM –)/
(4) (ALBM +)
continua alla pagina successiva t

24
D:\Documents and Settings\takashi-shimomura\Desktop\DTP\848220S MEX-
DV1500U(EUR)\4120899211_MEX-DV1500U_ML\04IT02CD-E.fm
masterpage:Left
MEX-DV1500U
4-120-899-21 (1)
Note
• Se viene ruotata un’immagine di grandi dimensioni,
per la relativa visualizzazione potrebbe occorrere
una quantità maggiore di tempo.
• Non è possibile visualizzare i file JPEG in formato
progressivo.
Suggerimento
È inoltre possibile selezionare un file da riprodurre
utilizzando un elenco (modo Quick-BrowZer)
(pagina 35).
Uso delle funzioni PBC
— Controllo della riproduzione
Il menu PBC consente di effettuare operazioni in
modo interattivo durante la riproduzione di un
VCD compatibile con le funzioni PBC.
1 Avviare la riproduzione di un VCD
compatibile con le funzioni PBC.
Viene visualizzato il menu PBC.
2 Premere i tasti numerici per
selezionare la voce desiderata, quindi
premere (ENTER).
3 Per le operazioni interattive, attenersi
alle istruzioni dei menu.
Per tornare al display precedente, premere O.
Riproduzione senza la funzione PBC
1 Durante la riproduzione, premere
(OFF).
La riproduzione si arresta.
2 Premere i tasti numerici per
selezionare la voce desiderata, quindi
premere (ENTER).
Il messaggio “Play without PBC.”
(Riproduzione senza PBC) viene visualizzato
e la riproduzione avviata. Il menu PBC non
viene visualizzato durante la riproduzione.
Note
• Le voci del menu e le procedure di funzionamento
variano in base al disco.
• Durante la riproduzione PBC, il numero del brano, il
tempo di riproduzione e così via non vengono
visualizzati nel menu del modo di riproduzione
(pagina 25).
• La funzione di ripristino della riproduzione non è
disponibile durante il modo di riproduzione senza
PBC.
Suggerimento
Per riavviare la riproduzione PBC, arrestare la
riproduzione premendo (OFF), quindi premere u.
ENTER
OFF
O
Tasti
numerici

25
D:\Documents and Settings\takashi-shimomura\Desktop\DTP\848220S MEX-
DV1500U(EUR)\4120899211_MEX-DV1500U_ML\04IT02CD-E.fm
masterpage:RightD:\Documents and Settings\takashi-shimomura\Desktop\DTP\848220S MEX-
DV1500U(EUR)\4120899211_MEX-DV1500U_ML\04IT02CD-E.fm
masterpage:Right
MEX-DV1500U
4-120-899-21 (1)
Uso del menu del modo di
riproduzione
È possibile utilizzare il menu del modo di
riproduzione dell’apparecchio per controllare la
riproduzione o configurare le impostazioni di
riproduzione.
Per visualizzare il menu del modo di
riproduzione, premere (VISUAL SETUP) durante
la riproduzione.
Per nascondere il menu, premere di nuovo
(VISUAL SETUP).
Note
• Durante la riproduzione del disco audio,
(VISUAL SETUP) non è attivo.
• Durante la riproduzione JPEG, (VISUAL SETUP) è
attivo solo quando un’immagine è visualizzata a
schermo intero.
Suggerimento
Premendo (VISUAL SETUP) durante il modo di arresto
della riproduzione, viene visualizzato il menu delle
impostazioni video (sul monitor) in cui è possibile
configurare varie impostazioni, quali la lingua delle
indicazioni a schermo, la regolazione dell’audio e così
via (pagina 40).
Esempio: durante la riproduzione di un
DVD
A Voci del menu del modo di riproduzione
Per ulteriori informazioni, vedere “Elenco
delle voci del menu del modo di
riproduzione” a pagina 25.
B DVD: numero del titolo/totale
VCD: numero del brano/totale*
1
JPEG: numero dell’album/totale
DivX/MPEG-4: numero dell’album (cartella)/
totale
C DVD: numero del capitolo/totale
JPEG: numero dell’immagine/totale
DivX/MPEG-4: numero del file/totale
D Tempo di riproduzione trascorso*
2
E Formato
F Stato della riproduzione (PLAY N,
PAUSE X, e così via)
G Impostazione corrente
H Opzioni
I Voce selezionata
J Nome della voce selezionata e/o i messaggi di
supporto alle operazioni
*1 Durante la riproduzione di VCD con la funzione
PBC (pagina 24), non viene visualizzata alcuna
indicazione.
*2 Durante la riproduzione JPEG, non viene
visualizzata alcuna indicazione.
Elenco delle voci del menu del modo
di riproduzione
Premere </M/m/,/i tasti numerici per
selezionare una voce, quindi premere (ENTER).
Per tornare al display precedente, premere O.
Per ulteriori informazioni, fare riferimento alle
pagine indicate.
MPEG-4
</M/m/,
ENTER
VISUAL
SETUP
O
Tasti
numerici
12
(
67
)
018
(
034
)
T 1:35:55
1:ENGLISH
OFF
1:ENGLISH
2:FRENCH
3:SPANISH
PLAY
DVD VIDEO
SUBTITLE
Select :
ENTER
G
BCD
F
E
H
A
IJ
TITLE, TRACK 34
Per selezionare un titolo, una scena o un brano
da riprodurre.
ALBUM 34
Per selezionare un album o una cartella da
visualizzare.
CHAPTER 34
Per selezionare un capitolo da riprodurre.
IMAGE 34
Per selezionare un’immagine da visualizzare.
continua alla pagina successiva t
MPEG-4

26
D:\Documents and Settings\takashi-shimomura\Desktop\DTP\848220S MEX-
DV1500U(EUR)\4120899211_MEX-DV1500U_ML\04IT02CD-E.fm
masterpage:Left
MEX-DV1500U
4-120-899-21 (1)
* Ad eccezione dei DVD-R/DVD-R DL/DVD-RW nel
modo VR.
Suggerimento
Se “SHUFFLE” o “REPEAT” è attivato oppure se
“ANGLE” è disponibile, la relativa casella di controllo
si illumina in verde (ad esempio, t
). A seconda della scena, potrebbe tuttavia
non essere possibile cambiare angolo anche se la
casella è illuminata in verde.
Visualizzazione delle
informazioni sulla durata/
informazioni di testo del disco
Verifica delle informazioni sulla
durata
Durante la riproduzione di un video/di
un’immagine, è possibile controllare il tempo di
riproduzione e il tempo residuo del titolo,
capitolo, brano corrente e così via.
1 Durante la riproduzione, premere
(DSPL).
Vengono visualizzate le informazioni sulla
riproduzione correnti.
2 Premere più volte (DSPL) per
visualizzare le informazioni sulla
durata.
Le informazioni sulla durata variano in base al
disco/formato nel modo riportato di seguito.
Riproduzione DVD
• T **:**:**
Tempo di riproduzione trascorso del titolo
corrente
• T-**:**:**
Tempo residuo del titolo corrente
• C **:**:**
Tempo di riproduzione trascorso del capitolo
corrente
• C-**:**:**
Tempo residuo del capitolo corrente
FILE 34
Per selezionare un file video da riprodurre.
TIME 34
Per controllare il tempo di riproduzione
trascorso; per immettere il codice temporale.
AUDIO 17, 27
Per modificare la lingua/il formato/il canale
audio; per controllare il formato del
programma.
SUBTITLE 17
Per attivare o disattivare i sottotitoli/modificare
la lingua dei sottotitoli.
ANGLE 17
Per cambiare l’angolo.
*
CENTER ZOOM 29
Per ingrandire un’immagine.
REPEAT 33
Per riprodurre un titolo/capitolo/brano/album/
immagine/file video in modo ripetuto.
SHUFFLE 33
Per riprodurre i capitoli/brani/immagine/file
video in ordine casuale.
*
PICTURE EQ 30
Per regolare la qualità delle immagini.
MPEG-4
MPEG-4
MPEG-4
MPEG-4
MPEG-4
MPEG-4
MPEG-4
MPEG-4
DSPL
T 1:01:57
Informazioni sulla durata

27
D:\Documents and Settings\takashi-shimomura\Desktop\DTP\848220S MEX-
DV1500U(EUR)\4120899211_MEX-DV1500U_ML\04IT02CD-E.fm
masterpage:RightD:\Documents and Settings\takashi-shimomura\Desktop\DTP\848220S MEX-
DV1500U(EUR)\4120899211_MEX-DV1500U_ML\04IT02CD-E.fm
masterpage:Right
MEX-DV1500U
4-120-899-21 (1)
Riproduzione VCD
(solo durante la riproduzione della versione
1.0/1.1 o 2.0 privi di funzione PBC.)
• T **:**
Tempo di riproduzione trascorso del brano
corrente
• T-**:**
Tempo residuo del brano corrente
• D **:**
Tempo di riproduzione trascorso del disco
corrente
• D-**:**
Tempo residuo del disco corrente
Riproduzione JPEG
• Numero dell’album/totale
• Numero dell’immagine/totale
Riproduzione DivX/MPEG-4
• Numero dell’album (cartella)/totale
• Numero del file/totale
• T **:**
Tempo di riproduzione trascorso del file
corrente
Verifica delle informazioni di testo
È possibile controllare le informazioni di testo
(nome dell’album, dell’immagine e così via) dei
file JPEG/DivX/MPEG-4.
* Se non sono disponibili informazioni di testo, viene
visualizzato “NO TEXT”.
Le informazioni di testo variano in base al
formato nel modo riportato di seguito.
Riproduzione JPEG
• Nome dell’album (quando è visualizzato il
numero di album)
• Nome dell’immagine (quando è visualizzato il
numero di immagine)
Riproduzione DivX/MPEG-4
• Nome dell’album (cartella) (quando è
visualizzato il numero di album (cartella))
• Nome del file (quando è visualizzato il numero
di file)
Configurazione delle
impostazioni audio
Nota
I dischi in formato DTS non sono supportati. Se è
selezionato il formato DTS, l’audio non viene emesso.
Modifica della lingua/del formato
audio
È possibile modificare la lingua audio dei DVD,
nel caso in cui sul disco siano registrati brani
multilingue. È possibile modificare il formato
audio di DVD/DivX durante la riproduzione di
un disco registrato in più formati audio (ad
esempio, Dolby Digital).
1 Durante la riproduzione, premere più
volte (AUDIO) fino a visualizzare la
lingua/il formato audio desiderato.
* Durante la riproduzione DivX, viene visualizzato
il formato/canale audio (ad esempio, “MP3”).
La lingua per l’audio viene selezionata tra
quelle disponibili.
Quando viene visualizzato il prompt di
immissione a 4 cifre, immettere il codice
della lingua (pagina 59) desiderata.
Se la stessa lingua viene visualizzata due o
più volte, significa che il disco è registrato in
più formati audio.
037(325)
Image name
Numero di album/immagine/cartella/file
Informazioni di testo*
continua alla pagina successiva t
M/m
ENTER
AUDIO
SYSTEM
SETUP
VISUAL
SETUP
1:ENGLISH Dolby D
Lingua/formato audio*

28
D:\Documents and Settings\takashi-shimomura\Desktop\DTP\848220S MEX-
DV1500U(EUR)\4120899211_MEX-DV1500U_ML\04IT02CD-E.fm
masterpage:Left
MEX-DV1500U
4-120-899-21 (1)
Modifica del canale audio
Durante la riproduzione di VCD/CD/MP3/
WMA/AAC, è possibile selezionare l’audio del
canale destro o sinistro per l’ascolto tramite i
diffusori destro e sinistro.
Di seguito sono indicate le opzioni disponibili.
STEREO (ST): audio stereo standard
(predefinito)
1/L (L): audio del canale sinistro (monofonico)
2/R (R): audio del canale destro (monofonico)
1 Durante la riproduzione, premere più
volte (AUDIO) fino a visualizzare il
canale audio desiderato.
Esempio: durante la riproduzione di un MP3
Nota
A seconda del disco, potrebbe non essere possibile
modificare l’impostazione audio.
Suggerimento
È inoltre possibile cambiare le impostazioni dei dischi
video selezionando “AUDIO” nel menu del modo di
riproduzione (pagina 25).
Controllo del formato di
programma
È possibile controllare il numero di canali e la
posizione dei componenti audio sul DVD
VIDEO in fase di riproduzione.
1 Durante la riproduzione, premere
(VISUAL SETUP).
Viene visualizzato il menu del modo di
riproduzione.
2 Premere M/m per selezionare
(AUDIO).
Viene visualizzato il formato di programma.
* A seconda del disco, viene visualizzata l’indicazione
“PCM”, “DOLBY DIGITAL”, e così via.
Le lettere visualizzate nel display del formato di
programma rappresentano i seguenti componenti
audio e le relative posizioni.
: anteriore (sinistro)
: anteriore (destro)
: centrale
: posteriore (sinistro)
: posteriore (destro)
: posteriore (monofonico): il componente
posteriore del segnale elaborato mediante
Dolby Surround e del segnale Dolby
Digital
: segnale con effetto a bassa frequenza
Il nome del formato di programma e i numeri dei
canali vengono visualizzati nel modo riportato di
seguito.
Esempio: Dolby Digital 5.1 canali
Per nascondere il menu del modo di
riproduzione, premere (VISUAL SETUP).
TRACK NAME
ALBUM NAME
ARTIST NAME
MP3
0003/1000 ST
3:17
SHUF
Canale audio
PLAY
DVD VIDEO
L C
LFE
LS
R
RS
12
(
67
)
018
(
034
)
T 1:35:55
1:ENGLISH Dolby D
PROGRAM FORMAT
DOLBY DIGITAL
3/2.1
Formato di programma corrente
Formato audio corrente*
DOLBY DIGITAL
3 / 2 . 1
Componente posteriore × 2
Componente anteriore × 2 +
Componente centrale × 1
Componente LFE × 1

29
D:\Documents and Settings\takashi-shimomura\Desktop\DTP\848220S MEX-
DV1500U(EUR)\4120899211_MEX-DV1500U_ML\04IT02CD-E.fm
masterpage:RightD:\Documents and Settings\takashi-shimomura\Desktop\DTP\848220S MEX-
DV1500U(EUR)\4120899211_MEX-DV1500U_ML\04IT02CD-E.fm
masterpage:Right
MEX-DV1500U
4-120-899-21 (1)
Regolazione del livello di uscita
audio — Livello DVD
È possibile regolare il livello di uscita audio di un
DVD registrato nel formato Dolby Digital per
ridurre le differenze di volume tra il disco e la
sorgente.
1 Durante la riproduzione, premere
(SYSTEM SETUP).
La voce delle impostazioni di sistema viene
visualizzata sull’unità principale.
2 Premere M/m per selezionare
“DVD-LEVEL”, quindi premere
(ENTER).
3 Premere m per impostare
“ADJST-ON”, quindi premere (ENTER).
4 Premere M/m per selezionare
“DOLBY-ADJ”, quindi premere
(ENTER).
5 Premere M/m per regolare il livello di
uscita desiderato.
Il livello di uscita può essere regolato in
incrementi singoli, compresi tra –10 e +10.
6 Premere (ENTER).
L’impostazione è completata.
Per nascondere il menu delle impostazioni di
sistema, premere (SYSTEM SETUP).
Mediante l’unità principale
Premere (SETUP) anziché (SYSTEM SETUP), ruotare
la manopola di controllo anziché premere M/m, infine
premere la manopola di controllo anziché (ENTER).
Ingrandimento delle immagini
È possibile ingrandire le immagini.
1 Durante la riproduzione, premere
(VISUAL SETUP).
Viene visualizzato il menu del modo di
riproduzione.
2 Premere M/m per selezionare
(CENTER ZOOM), quindi
premere (ENTER).
Viene visualizzata l’opzione corrente.
3 Premere M/m per selezionare l’opzione
desiderata (×1, ×1.6*), quindi premere
(ENTER).
* L’immagine potrebbe apparire sgranata.
L’immagine viene ingrandita.
Per nascondere il menu del modo di
riproduzione, premere (VISUAL SETUP).
Per fare scorrere l’immagine, premere
</M/m/,.
Per ripristinare le dimensioni originali,
selezionare “×1” al punto 3.
Note
• A seconda del disco, potrebbe non essere possibile
cambiare l’ingrandimento.
• Quando la riproduzione viene riavviata, l’immagine
torna alle dimensioni originali.
• Se si torna al menu del disco/menu principale,
l’ingrandimento viene annullato.
MPEG-4
</M/m/,
ENTER
VISUAL
SETUP
12
(
67
)
018
(
034
)
T 1:35:55
x1
x1
x1.6
PLAY
DVD VIDEO

30
D:\Documents and Settings\takashi-shimomura\Desktop\DTP\848220S MEX-
DV1500U(EUR)\4120899211_MEX-DV1500U_ML\04IT02CD-E.fm
masterpage:Left
MEX-DV1500U
4-120-899-21 (1)
Regolazione della qualità
dell’immagine — Picture EQ
È possibile selezionare la qualità dell’immagine
più appropriata per la luminosità all’interno
dell’auto.
1 Durante la riproduzione, premere
(VISUAL SETUP).
Viene visualizzato il menu del modo di
riproduzione.
2 Premere M/m per selezionare
(PICTURE EQ), quindi
premere (ENTER).
Viene visualizzata l’opzione corrente.
3 Premere M/m per selezionare l’opzione
desiderata, quindi premere (ENTER).
Le opzioni variano in base all’impostazione del
menu delle impostazioni video (pagina 43).
Nel menu delle impostazioni video, per la voce
“PICTURE EQ” in “CUSTOM SETUP”
vengono attivate le opzioni riportate di seguito.
AUTO: consente di selezionare automaticamente
le opzioni per uso notturno/diurno in base
all’impostazione dell’attenuatore di luminosità
nel menu delle impostazioni di sistema
(pagina 46).
LIGHT OFF: consente di visualizzare le opzioni
per l’uso diurno.
LIGHT ON: consente di visualizzare le opzioni
per l’uso notturno.
Di seguito sono riportate le opzioni di ciascuna
impostazione.
Per tutte le impostazioni
Se viene impostato su “LIGHT OFF”/
“AUTO” (con “DIM-OFF”)
Se viene impostato su “LIGHT ON”/
“AUTO” (con “DIM-ON”)
Personalizzazione della qualità
dell’immagine
L’opzione “CUSTOM” consente di
personalizzare l’impostazione relativa alla
qualità delle immagini regolando le tonalità. È
possibile memorizzare le regolazioni effettuate
per le impostazioni “LIGHT OFF” e “LIGHT
ON”.
1 Durante la riproduzione, premere
(VISUAL SETUP).
Viene visualizzato il menu del modo di
riproduzione.
2 Premere M/m per selezionare
(PICTURE EQ), quindi
premere (ENTER).
Viene visualizzata l’opzione corrente.
MPEG-4
</M/m/,
ENTER
VISUAL
SETUP
12
(
67
)
018
(
034
)
T 1:35:55
DAYTIME
SUNSET
SHINE
CUSTOM
NORMAL
NORMAL
PLAY
DVD VIDEO
NORMAL: qualità delle immagini standard.
CUSTOM: impostazioni regolabili dall’utente
(pagina 30).
DAYTIME: opzione adatta per luoghi illuminati.
SUNSET: opzione adatta in luoghi scarsamente
illuminati.
SHINE: opzione adatta in luoghi con
illuminazione molto intensa (ad esempio,
quando la luce solare si riflette sul monitor).
NIGHT: l’illuminazione del monitor viene
ridotta per non distrarre l’utente durante la guida
di notte.
MIDNIGHT: l’illuminazione del monitor viene
ridotta ulteriormente rispetto all’impostazione
“NIGHT”.
THEATER: consente di aumentare
l’illuminazione del monitor; questa opzione è
particolarmente adatta se si desidera vedere
chiaramente il monitor di notte.

31
D:\Documents and Settings\takashi-shimomura\Desktop\DTP\848220S MEX-
DV1500U(EUR)\4120899211_MEX-DV1500U_ML\04IT02CD-E.fm
masterpage:RightD:\Documents and Settings\takashi-shimomura\Desktop\DTP\848220S MEX-
DV1500U(EUR)\4120899211_MEX-DV1500U_ML\04IT02CD-E.fm
masterpage:Right
MEX-DV1500U
4-120-899-21 (1)
3 Premere M/m per selezionare
“CUSTOM”, quindi premere (ENTER).
4 Premere M/m per selezionare la
tonalità dell’immagine, quindi premere
</, per regolare il livello.
5 Premere (ENTER).
Per nascondere il menu del modo di
riproduzione, premere (VISUAL SETUP).
Blocco dei dischi — Protezione
*
* Ad eccezione dei DVD-R/DVD-R DL/DVD-RW nel
modo VR.
È possibile bloccare un disco oppure impostare
delle limitazioni per la riproduzione in base a un
livello predeterminato, ad esempio l’età
dell’utente. Durante la riproduzione di un DVD
compatibile con la funzione di protezione, le
scene per le quali sono state impostate
limitazioni per la riproduzione vengono bloccate
o sostituite da altre scene.
Attivazione della funzione di
protezione
1 Premere (VISUAL SETUP) mentre
l’apparecchio è spento.
Viene visualizzato il menu delle impostazioni
video.
2 Premere M/m per selezionare
(CUSTOM SETUP), quindi premere
(ENTER).
Vengono visualizzate le voci del menu delle
impostazioni personalizzate.
3 Premere M/m per selezionare
“PARENTAL CONTROL”, quindi
premere (ENTER).
Vengono visualizzate le opzioni.
4 Premere M/m per selezionare “ON t”,
quindi premere (ENTER).
Viene visualizzato il display di impostazione
della password.
5 Premere i tasti numerici per immettere
la password, quindi premere (ENTER).
Viene visualizzato il display di conferma.
6 Per confermare la password, premere i
tasti numerici per immettere una
seconda volta la password, quindi
premere (ENTER).
L’impostazione è completata.
Per cancellare un numero immesso, premere
(CLEAR).
Per tornare al display precedente, premere O.
Per nascondere il menu del modo di
riproduzione, premere (VISUAL SETUP).
Disattivazione della funzione di
protezione
Selezionare “OFF t” al punto 4 di cui sopra,
quindi immettere la password.
Se la funzione di protezione è disattivata, viene
visualizzato il messaggio “Parental control
canceled”.
RETURN
Cancel :
Select : Set :
USER CUSTOM SETUP
COLOR 0
BRIGHT 0
SHARPNESS 0
CLEAR
VISUAL
SETUP
O
M/m
ENTER
Tasti
numerici
continua alla pagina successiva t
CUSTOM SETUP
PARENTAL CONTROL :
DivX VOD :
SLIDE SHOW TIME :
MULTI-DISC RESUME :
PLAY LIST PLAY :
PICTURE EQ :
OFF
OFF
ONt
PLAYERt
PASSWORDt
AUTO
PARENTAL CONTROL
Enter a new 4-digit password,
then press .
ENTER
CUSTOM SETUP

32
D:\Documents and Settings\takashi-shimomura\Desktop\DTP\848220S MEX-
DV1500U(EUR)\4120899211_MEX-DV1500U_ML\04IT02CD-E.fm
masterpage:Left
MEX-DV1500U
4-120-899-21 (1)
Modifica della password
Selezionare “PASSWORD t” al punto 4 di cui
sopra, immettere la password corrente, quindi la
nuova password, infine immettere di nuovo la
nuova password per confermare.
Modifica dell’area e delle relative
classificazioni dei film
È possibile impostare i livelli di limitazione in
base all’area e alle relative classificazioni dei
film.
1 Premere (VISUAL SETUP) mentre
l’apparecchio è spento.
Viene visualizzato il menu delle impostazioni
video.
2 Premere M/m per selezionare
(CUSTOM SETUP), quindi premere
(ENTER).
Vengono visualizzate le voci del menu delle
impostazioni personalizzate.
3 Premere M/m per selezionare
“PARENTAL CONTROL”, quindi
premere (ENTER).
Vengono visualizzate le opzioni disponibili.
4 Premere M/m per selezionare
“PLAYER t”, quindi premere
(ENTER).
Se la funzione di protezione è già stata
attivata, viene visualizzato il display per
l’immissione della password. Per cambiare
l’impostazione, immettere la password,
quindi premere (ENTER).
5 Premere M/m per selezionare
“STANDARD”, quindi premere
(ENTER).
Vengono visualizzate le opzioni.
6 Premere M/m per selezionare l’area
desiderata per applicare le relative
classificazioni dei film, quindi premere
(ENTER).
L’area viene selezionata.
Se si seleziona “OTHERS t”, immettere il
codice di zona selezionandolo nella sezione
“Elenco dei codici di zona” a pagina 59,
utilizzando i tasti numerici.
7 Premere M/m per selezionare “LEVEL”,
quindi premere (ENTER).
Vengono visualizzate le opzioni.
Minore è il numero, più rigido è il livello di
limitazione.
8 Premere M/m per selezionare la
classificazione desiderata, quindi
premere (ENTER).
L’impostazione è completata.
Per tornare al display precedente, premere O.
Per nascondere il menu del modo impostazione
della visualizzazione, premere
(VISUAL SETUP).
Riproduzione ripetuta e in
ordine casuale
1 Durante la riproduzione, premere più
volte (1) (REP) o (2) (SHUF) sull’unità
principale fino a visualizzare l’opzione
desiderata.
Viene avviata la riproduzione ripetuta o in
ordine casuale.
PARENTAL CONTROL:
LEVEL :
STANDARD :
USA
USA
OTHERSt
8:
CUSTOM SETUP
PARENTAL CONTROL:
LEVEL :
STANDARD :
8:
1:
2:
3:
4:
5:
G
PG
PG-13
CUSTOM SETUP
MPEG-4
SHUFREP

33
D:\Documents and Settings\takashi-shimomura\Desktop\DTP\848220S MEX-
DV1500U(EUR)\4120899211_MEX-DV1500U_ML\04IT02CD-E.fm
masterpage:RightD:\Documents and Settings\takashi-shimomura\Desktop\DTP\848220S MEX-
DV1500U(EUR)\4120899211_MEX-DV1500U_ML\04IT02CD-E.fm
masterpage:Right
MEX-DV1500U
4-120-899-21 (1)
Di seguito sono riportati le opzioni di ripetizione
e l’ordine di attivazione di ogni disco/formato.
Di seguito sono riportati le opzioni di
riproduzione casuale e l’ordine di attivazione di
ogni disco/formato.
*1 Disponibile solo durante la riproduzione di VCD
versione 1.0/1.1 o 2.0 privi di funzione PBC.
*2 Ad eccezione dei DVD-R/DVD-R DL/DVD-RW nel
modo VR.
Per tornare al modo di riproduzione normale,
selezionare “OFF”.
Note
• Se si torna al menu del disco/menu principale, la
riproduzione ripetuta/in ordine casuale viene
annullata.
• Non è possibile impostare la riproduzione ripetuta/in
ordine casuale nel menu del disco/menu principale.
Impostazione nel menu del modo di
riproduzione
1 Durante la riproduzione, premere
(VISUAL SETUP).
Viene visualizzato il menu del modo di
riproduzione.
2 Premere M/m per selezionare o
, quindi premere (ENTER).
3 Premere M/m per selezionare l’opzione
desiderata, quindi premere (ENTER).
Viene avviata la riproduzione ripetuta o in
ordine casuale.
Premere (VISUAL SETUP) per nascondere il
menu del modo di riproduzione.
Nota
Il modo di riproduzione selezionato viene disattivato
se il disco in fase di riproduzione viene estratto.
Disco/
formato
Opzioni
OFF
CHAPTER: consente di
ripetere il capitolo corrente.
TITLE: consente di ripetere il
titolo corrente.
*
1
OFF
TRACK: consente di ripetere il
brano corrente.
OFF
TRACK: consente di ripetere il
brano corrente.
ALBUM: consente di ripetere
l’album corrente.
OFF
IMAGE: consente di ripetere
l’immagine corrente.
ALBUM: consente di ripetere
l’album corrente.
OFF
FILE: consente di ripetere il file
video corrente.
ALBUM: consente di ripetere
l’album (cartella) corrente.
Disco/
formato
Opzioni
*
2
OFF
TITLE: consente di riprodurre
in ordine casuale i capitoli
inclusi nel titolo corrente.
*
1
OFF
DISC: consente di riprodurre in
ordine casuale i brani inclusi nel
disco corrente.
OFF
ALBUM: consente di
riprodurre in ordine casuale i
brani/le immagini/i file video
inclusi nell’album (cartella)
corrente.
MPEG-4
MPEG-4
MPEG-4
M/m
ENTER
VISUAL
SETUP
PLAY
DVD VIDEO
12
(
67
)
018
(
034
)
T 1:35:55
OFF
CHAPTER
TITLE
OFF

34
D:\Documents and Settings\takashi-shimomura\Desktop\DTP\848220S MEX-
DV1500U(EUR)\4120899211_MEX-DV1500U_ML\04IT02CD-E.fm
masterpage:Left
MEX-DV1500U
4-120-899-21 (1)
Riproduzione con ricerca
diretta
È possibile individuare direttamente un punto
desiderato specificando il numero del titolo, del
capitolo e così via.
1 Durante la riproduzione, premere i
tasti numerici per immettere il numero
di una voce (brano, titolo e così via),
quindi premere (ENTER).
La riproduzione viene avviata a partire dal
punto selezionato.
Impostazione nel menu del modo di
riproduzione
Le voci per la ricerca variano in base al disco/
formato nel modo riportato di seguito.
* Disponibile solo durante la riproduzione di VCD privi
di funzione PBC.
1 Durante la riproduzione, premere
(VISUAL SETUP).
Viene visualizzato il menu del modo di
riproduzione.
2 Premere M/m per selezionare la voce
desiderata, quindi premere (ENTER).
Il numero tra parentesi indica il numero totale
di voci selezionate.
3 Premere i tasti numerici per immettere
il numero di una voce o il codice
temporale.
Ad esempio, per individuare il punto
corrispondente a 2 ore, 10 minuti e
20 secondi, è sufficiente immettere “21020”.
Per cancellare i numeri immessi, premere
(CLEAR).
4 Premere (ENTER).
La riproduzione viene avviata a partire dal
punto selezionato.
Premere (VISUAL SETUP) per nascondere il
menu del modo di riproduzione.
Disco/
formato
Voci
TITLE
Consente di avviare la
riproduzione a partire da un
titolo selezionato.
CHAPTER
Consente di avviare la
riproduzione a partire da un
capitolo selezionato.
TIME
Consente di avviare la
riproduzione a partire dal punto
indicato dal codice temporale
immesso.
*
TRACK
Consente di avviare la
riproduzione a partire da un
brano selezionato.
MPEG-4
CLEAR
VISUAL
SETUP
M/m
ENTER
Tasti
numerici
MPEG-4
ALBUM
Consente di avviare la
riproduzione a partire da un
album selezionato.
IMAGE
Consente di avviare la
riproduzione a partire da
un’immagine selezionata.
ALBUM
Consente di avviare la
riproduzione a partire da un
album (cartella) selezionato.
FILE
Consente di avviare la
riproduzione a partire da un file
selezionato.
MPEG-4
PLAY
DVD VIDEO
- -
(
67
)
018
(
034
)
T 1:35:55

35
D:\Documents and Settings\takashi-shimomura\Desktop\DTP\848220S MEX-
DV1500U(EUR)\4120899211_MEX-DV1500U_ML\04IT02CD-E.fm
masterpage:RightD:\Documents and Settings\takashi-shimomura\Desktop\DTP\848220S MEX-
DV1500U(EUR)\4120899211_MEX-DV1500U_ML\04IT02CD-E.fm
masterpage:Right
MEX-DV1500U
4-120-899-21 (1)
Visualizzazione di un elenco di
brani/immagini/file video
— Quick-BrowZer
Selezione di un brano/
un’immagine/un file video
È possibile visualizzare l’elenco di album/
cartelle/brani/immagini/file video sul monitor,
quindi selezionare quello che si desidera
riprodurre.
Questa funzione è particolarmente utile qualora
vengano utilizzati dischi registrati nel formato
MP3/WMA/AAC/JPEG/DivX/MPEG-4
contenenti più album/brani e così via.
1 Durante la riproduzione, premere .
Viene visualizzato l’elenco di brani/
immagini/file video contenuti nel disco/
nell’album*/nella cartella* corrente.
Per tornare/passare alla pagina precedente/
successiva, premere </,.
Per passare al livello superiore, premere .*
Per selezionare la cartella desiderata, premere
M/m, quindi (ENTER).*
* Disponibile solo durante la riproduzione di dischi
in formato MP3/WMA/AAC/JPEG/DivX/MPEG-4.
2 Premere M/m per selezionare il brano/
l’immagine/il file video desiderati,
quindi premere (ENTER).
Viene avviata la riproduzione del brano/
dell’immagine/del file video selezionato.
Mediante l’unità principale
Ruotare la manopola di controllo anziché premere
M/m, premere (SEEK) –/+ anziché </,, premere la
manopola di controllo anziché (ENTER).
Selezione di un tipo di file
Se il disco contiene più tipi di file, è possibile
riprodurre solo il tipo di file selezionato (audio/
video/immagine). L’ordine di priorità di
riproduzione dei tipi di file è inizialmente
impostato su audio, video, infine immagine (ad
esempio, se il disco contiene file video e file di
immagine, vengono riprodotti solo i file video).
È possibile selezionare il tipo di file da
visualizzare nell’elenco, quindi selezionare il file
che si desidera riprodurre.
1 Durante la riproduzione, premere .
2 Premere M/m per selezionare il tipo di
file da visualizzare nell’elenco, quindi
premere (ENTER).
Per visualizzare nell’elenco i file MP3, WMA
e AAC, selezionare “LIST UP AUDIO
FILES”.
Per visualizzare nell’elenco i file DivX/
MPEG-4, selezionare “LIST UP VIDEO
FILES”.
Per visualizzare nell’elenco i file JPEG,
selezionare “LIST UP IMAGE FILES”.
3 Premere M/m per selezionare il file
desiderato, quindi premere (ENTER).
Viene avviata la riproduzione del file
selezionato.
Mediante l’unità principale
Ruotare la manopola di controllo anziché premere
M/m, premere la manopola di controllo anziché
(ENTER).
</M/m/,
ENTER
MPEG-4
TRACK NAME
ALBUM NAME
ARTIST NAME
LIST UP VIDEO FILES
LIST UP IMAGE FILES
MP3
0003/1000 ST
3:17
ROOT
MUSIC FOLDER
01 TRACK 01
02 TRACK 02
03 TRACK 03
04 TRACK 04
05 TRACK 05
MPEG-4

36
D:\Documents and Settings\takashi-shimomura\Desktop\DTP\848220S MEX-
DV1500U(EUR)\4120899211_MEX-DV1500U_ML\04IT02CD-E.fm
masterpage:Left
MEX-DV1500U
4-120-899-21 (1)
Visualizzazione delle
informazioni sul disco audio
Durante la riproduzione audio, sul monitor è
possibile controllare le informazioni sul disco o
visualizzare l’immagine di copertina* del file
MP3/WMA/AAC.
* Le dimensioni consigliate sono comprese tra
240 × 240 e 960 × 960 pixel.
Esempio: durante la riproduzione di un
MP3
A Numero o nome del brano
Nome del disco/nome dell’album
Nome dell’artista
B Formato
C Stato della riproduzione (N, X e così via)
D Canale audio corrente
Durante la riproduzione di CD/MP3/WMA/
AAC, è possibile modificare il canale audio.
Per ulteriori informazioni, vedere “Modifica
del canale audio” a pagina 28.
E Numero del brano/totale
F Tempo di riproduzione trascorso
G Modo di riproduzione corrente
H Messaggi di supporto alle operazioni
Suggerimento
È possibile selezionare un brano da riprodurre
utilizzando un elenco (modo Quick-BrowZer)
(pagina 35).
Operazioni avanzate — Radio
Memorizzazione e ricezione
delle stazioni
Attenzione
Per la sintonizzazione delle stazioni durante la
guida, utilizzare la funzione BTM
(memorizzazione automatica delle emittenti con
sintonia migliore) per evitare incidenti.
Memorizzazione automatica
— BTM
1 Premere più volte (SRC) fino a
visualizzare “TUNER” sull’unità
principale.
Per cambiare la banda, premere più volte
(MODE). È possibile selezionare FM1, FM2,
FM3, MW o LW.
2 Premere (SYSTEM SETUP).
Vengono visualizzate le voci del menu delle
impostazioni di sistema.
3 Premere M/m per selezionare “BTM”,
quindi premere (ENTER).
L’apparecchio memorizza le stazioni in
corrispondenza dei tasti numerici in base
all’ordine delle frequenze (da (1) a (6)).
Quando l’impostazione è stata memorizzata,
viene emesso un segnale acustico.
Mediante l’unità principale
Premere (SOURCE) anziché (SRC), premere
(SETUP) anziché (SYSTEM SETUP), ruotare la
manopola di controllo anziché premere M/m, premere
la manopola di controllo anziché (ENTER).
TRACK NAME
ALBUM NAME
ARTIST NAME
MP3
0003/1000 ST
3:17
SHUF
To list up, press .
BROWSE
B
E
H
CD
F
A
G
M/m
ENTER
SRC
MODE
SYSTEM
SETUP
Tasti
numerici

37
D:\Documents and Settings\takashi-shimomura\Desktop\DTP\848220S MEX-
DV1500U(EUR)\4120899211_MEX-DV1500U_ML\04IT02CD-E.fm
masterpage:RightD:\Documents and Settings\takashi-shimomura\Desktop\DTP\848220S MEX-
DV1500U(EUR)\4120899211_MEX-DV1500U_ML\04IT02CD-E.fm
masterpage:Right
MEX-DV1500U
4-120-899-21 (1)
Memorizzazione manuale
1 Durante la ricezione della stazione che
si desidera memorizzare, tenere
premuto un tasto numerico (da (1) a
(6)) fino a visualizzare “MEM”
sull’unità principale.
Sull’unità principale viene visualizzata
l’indicazione del tasto numerico.
Nota
Se un’altra stazione viene memorizzata in
corrispondenza dello stesso tasto numerico, la
stazione memorizzata in precedenza viene sostituita.
Suggerimento
Quando si memorizza una stazione RDS, viene inoltre
memorizzata l’impostazione AF/TA (pagina 37).
Ricezione delle stazioni
memorizzate
1 Selezionare la banda, quindi premere
un tasto numerico (da (1) a (6)).
RDS
Panoramica
RDS (sistema dati radio) è un servizio che
consente alle stazioni radio FM di trasmettere
informazioni digitali aggiuntive oltre al normale
segnale in radiofrequenza.
Voci del display
A Banda radio, funzione
B TA/TP*
1
C Frequenza*
2
(nome del servizio programmi),
numero di preselezione, orologio, dati RDS
*1 “TA” lampeggia durante la ricezione di notiziari sul
traffico. “TP” si illumina durante la ricezione di una
stazione che trasmette programmi sul traffico.
*2 Durante la ricezione della stazione RDS, “ *” è
visualizzato a sinistra dell’indicazione della
frequenza.
Per cambiare le voci del display C, premere
(DSPL).
Servizi RDS
Il presente apparecchio fornisce i servizi RDS in
modo automatico come segue:
Note
• È possibile che non tutte le funzioni RDS siano
disponibili, a seconda del paese o della regione.
• La funzione RDS non è disponibile quando il
segnale è troppo debole o se la stazione
sintonizzata non trasmette dati RDS.
Impostazione dei modi AF e TA
Di seguito sono riportati le impostazioni AF/TA
e l’ordine di attivazione.
AF-ON: consente di attivare la funzione AF e di
disattivare la funzione TA.
TA-ON: consente di attivare la funzione TA e di
disattivare la funzione AF.
AF, TA-ON: consente di attivare entrambe le
funzioni AF e TA.
AF, TA-OFF: consente di disattivare entrambe le
funzioni AF e TA.
1 Premere più volte (AF/TA) fino a
visualizzare l’impostazione desiderata.
AF/TA
(PTY)
DSPL
Manopola di controllo
Tasti
numerici
B
C
A
AF (frequenze alternative)
Consente di selezionare e sintonizzare di nuovo
la stazione con il segnale più potente.
Utilizzando questa funzione, è possibile
riprodurre in modo continuo lo stesso
programma durante un viaggio di lunga durata,
senza la necessità di sintonizzare di nuovo la
stessa stazione manualmente.
TA (notiziari sul traffico)/TP (programma sul
traffico)
Fornisce le informazioni o i programmi correnti
relativi al traffico. Qualsiasi informazione o
programma ricevuto interrompe la riproduzione
della sorgente selezionata.
PTY (tipo di programma)
Consente di visualizzare il tipo di programma
in fase di ricezione, nonché di ricercare il tipo
di programma selezionato.
CT (ora)
L’orologio viene regolato mediante i dati CT
della trasmissione RDS.
continua alla pagina successiva t

38
D:\Documents and Settings\takashi-shimomura\Desktop\DTP\848220S MEX-
DV1500U(EUR)\4120899211_MEX-DV1500U_ML\04IT02CD-E.fm
masterpage:Left
MEX-DV1500U
4-120-899-21 (1)
Memorizzazione di stazioni RDS con
impostazione AF e TA
È possibile preselezionare le stazioni RDS
insieme all’impostazione AF/TA. Se viene
utilizzata la funzione BTM, vengono
memorizzate solo le stazioni RDS con la stessa
impostazione AF/TA.
Se si utilizza il modo di preselezione manuale, è
possibile preselezionare le stazioni RDS e non
RDS con impostazioni AF/TA distinte.
1 Impostare AF/TA, quindi memorizzare la
stazione mediante la funzione BTM o
manualmente.
Ricezione dei notiziari di emergenza
Se è attivato il modo AF o TA, gli annunci di
emergenza interrompono automaticamente la
riproduzione della sorgente selezionata.
Suggerimento
Se si regola il livello del volume durante un notiziario
sul traffico, tale livello viene memorizzato per i
successivi notiziari sul traffico, indipendentemente dal
normale livello del volume.
Mantenimento di un programma
regionale — REG
Quando la funzione AF è attiva: le impostazioni
predefinite dell’apparecchio limitano la ricezione
a una regione specifica, in modo tale che la
stazione sintonizzata non venga sostituita da una
stazione regionale dal segnale più potente.
Se si intende lasciare tale area di ricezione
regionale, impostare “REG-OFF” nelle
impostazioni di sistema durante la ricezione FM
(pagina 46).
Nota
Questa funzione non è disponibile nel Regno Unito e
in altre aree.
Funzione Local Link (solo per il
Regno Unito)
Questa funzione consente di selezionare altre
stazioni locali della stessa area, anche se non
sono memorizzate in corrispondenza dei tasti
numerici.
1 Durante la ricezione FM, premere un tasto
numerico (da (1) a (6)) in corrispondenza
del quale è memorizzata una stazione locale.
2 Entro 5 secondi, premere nuovamente il tasto
numerico della stazione locale.
Ripetere questa procedura fino alla ricezione
della stazione locale.
Selezione di PTY
1 Tenere premuto (AF/TA) (PTY) durante
la ricezione FM.
Se la stazione sta trasmettendo dati PTY,
viene visualizzato il nome del tipo di
programma corrente.
2 Ruotare la manopola di controllo per
selezionare il tipo di programma.
3 Premere la manopola di controllo.
L’apparecchio avvia la ricerca di una stazione
che trasmette il tipo di programma
selezionato.
Tipi di programmi
Nota
Non è possibile utilizzare questa funzione in paesi/
regioni in cui non sono disponibili i dati PTY.
Impostazione di CT
1 Impostare “CT-ON” nel menu delle
impostazioni di sistema (pagina 45).
Note
• La funzione CT potrebbe non essere disponibile
anche durante la ricezione di una stazione RDS.
• L’ora impostata mediante la funzione CT e l’ora
corrente potrebbero non corrispondere.
NEWS (Notiziario), AFFAIRS (Attualità),
INFO (Informazioni), SPORT (Sport),
EDUCATE (Educazione), DRAMA (Teatro),
CULTURE (Cultura), SCIENCE (Scienza),
VARIED (Vari), POP M (Musica pop),
ROCK M (Musica rock), EASY M (Musica
leggera), LIGHT M (Classica leggera),
CLASSICS (Classica), OTHER M (Altri tipi di
musica), WEATHER (Meteo),
FINANCE (Finanza), CHILDREN (Programmi
per bambini), SOCIAL A (Sociale),
RELIGION (Religione), PHONE IN (Chat
show), TRAVEL (Viaggi), LEISURE
(Divertimento e tempo libero), JAZZ (Musica
jazz), COUNTRY (Musica country),
NATION M (Musica nazionale),
OLDIES (Musica anni 50/60),
FOLK M (Musica folk),
DOCUMENT (Documentari)

39
D:\Documents and Settings\takashi-shimomura\Desktop\DTP\848220S MEX-
DV1500U(EUR)\4120899211_MEX-DV1500U_ML\04IT02CD-E.fm
masterpage:RightD:\Documents and Settings\takashi-shimomura\Desktop\DTP\848220S MEX-
DV1500U(EUR)\4120899211_MEX-DV1500U_ML\04IT02CD-E.fm
masterpage:Right
MEX-DV1500U
4-120-899-21 (1)
Regolazione dell’audio
Regolazione delle
caratteristiche dell’audio
È possibile regolare le caratteristiche dell’audio
come desiderato.
Di seguito sono riportati le voci di impostazione
del menu audio e l’ordine di attivazione.
EQ3: consente di selezionare una curva
dell’equalizzatore per 7 tipi di musica.
LOW, MID, HI*
1
: consente di regolare il livello
di volume della banda selezionata per
l’impostazione di personalizzazione EQ3.
BAL (bilanciamento): consente di regolare il
bilanciamento dell’audio proveniente dai
diffusori sinistro e destro.
FAD (attenuatore): consente di regolare il livello
relativo tra i diffusori anteriore e posteriore.
SUB (volume subwoofer)*
2
: consente di
regolare il volume del subwoofer (“ATT” è
l’impostazione più bassa).
*1 Visualizzato solo se EQ3 è attivo.
*2 Se l’uscita audio è impostata su “SUB-OUT”
(pagina 45).
1 Durante la riproduzione/ricezione,
premere più volte (SOUND) fino a
visualizzare la voce di impostazione
desiderata sull’unità principale.
2 Premere M/m per regolare il livello o
selezionare l’opzione desiderata.
3 Premere .
L’impostazione è completata e il display torna
al modo di riproduzione/ricezione normale.
Mediante l’unità principale
Premere la manopola di controllo anziché (SOUND),
ruotare la manopola di controllo anziché premere
M/m.
Personalizzazione della curva
dell’equalizzatore — EQ3
L’impostazione “CUSTOM” di EQ3 consente di
personalizzare le impostazioni
dell’equalizzatore. È possibile regolare il livello
di 3 bande diverse: “LOW”, “MID” e “HI”.
1 Durante la riproduzione/ricezione,
premere più volte (SOUND) fino a
visualizzare “EQ3”.
2 Premere M/m per selezionare
“CUSTOM”.
3 Premere più volte (SOUND) fino a
visualizzare “LOW”, “MID” o “HI”.
4 Premere M/m per regolare il livello
della voce desiderata.
Il livello può essere regolato in incrementi
singoli, compresi tra –10 e +10.
Per ripristinare l’impostazione di fabbrica
della curva dell’equalizzatore, tenere premuto
(SOUND).
5 Premere .
L’impostazione è completata e il display torna
al modo di riproduzione/ricezione normale.
Suggerimento
È possibile regolare anche altri tipi di equalizzatore.
Mediante l’unità principale
Premere la manopola di controllo anziché (SOUND),
ruotare la manopola di controllo anziché premere
M/m.
SOUND
M/m

40
D:\Documents and Settings\takashi-shimomura\Desktop\DTP\848220S MEX-
DV1500U(EUR)\4120899211_MEX-DV1500U_ML\04IT02CD-E.fm
masterpage:Left
MEX-DV1500U
4-120-899-21 (1)
Impostazioni
Tramite i due seguenti menu di impostazione, è
possibile configurare varie impostazioni.
• Menu delle impostazioni video
(pagina 40)
Consente di configurare le voci relative alla
visualizzazione (sul monitor).
• Menu di impostazione del sistema
(pagina 44)
Consente di configurare le voci relative al
sistema (sull’unità principale).
Impostazioni video
Il menu delle impostazioni video include le
categorie seguenti.
LANGUAGE SETUP (pagina 41)
Consente di impostare la lingua dei menu,
dei sottotitoli e così via.
DISPLAY SETUP (pagina 41)
Consente di regolare le impostazioni del
monitor collegato.
CUSTOM SETUP (pagina 42)
Consente di personalizzare la riproduzione
dei dischi.
AUDIO SETUP (pagina 43)
Consente di regolare le impostazioni audio
in base al disco.
RESET (pagina 43)
Consente di azzerare tutte le voci di
impostazione.
Operazioni di base del menu delle
impostazioni video
Per impostare le voci del menu, attenersi alla
seguente procedura.
Ad esempio, per impostare il rapporto di formato
su “4:3 PAN SCAN”.
1 Premere (VISUAL SETUP) mentre
l’apparecchio è spento.
Viene visualizzato il menu delle impostazioni
video.
2 Premere M/m per selezionare
(DISPLAY SETUP), quindi premere
(ENTER).
Vengono visualizzate le voci di impostazione
relative alla visualizzazione.
3 Premere M/m per selezionare
“MONITOR TYPE”, quindi premere
(ENTER).
Vengono visualizzate le opzioni.
4 Premere M/m per selezionare “4:3 PAN
SCAN”, quindi premere (ENTER).
L’impostazione è completata.
Per tornare al display precedente, premere O.
Per nascondere il menu del modo di
riproduzione, premere (VISUAL SETUP).
VISUAL
SETUP
O
M/m
ENTER
LANGUAGE SETUP
MENU :
AUDIO :
SUBTITLE :
ENGLISH
ENGLISH
ENGLISH
DISPLAY SETUP
MONITOR TYPE :
WALLPAPER :
16:9
WALLPAPER 1
DISPLAY SETUP
MONITOR TYPE :
WALLPAPER :
16:9
16:9
4:3 LETTER BOX
4:3 PAN SCAN

41
D:\Documents and Settings\takashi-shimomura\Desktop\DTP\848220S MEX-
DV1500U(EUR)\4120899211_MEX-DV1500U_ML\04IT02CD-E.fm
masterpage:RightD:\Documents and Settings\takashi-shimomura\Desktop\DTP\848220S MEX-
DV1500U(EUR)\4120899211_MEX-DV1500U_ML\04IT02CD-E.fm
masterpage:Right
MEX-DV1500U
4-120-899-21 (1)
Impostazione della lingua di visualizzazione o dell’audio
Selezionare (LANGUAGE SETUP), la voce e l’opzione desiderate indicate di seguito mediante
M/m, quindi premere (ENTER). Per ulteriori informazioni sulla procedura, vedere “Operazioni di base
del menu delle impostazioni video” a pagina 40.
Impostazioni di visualizzazione
Selezionare (DISPLAY SETUP), la voce e l’opzione desiderate indicate di seguito mediante M/m,
quindi premere (ENTER). Per ulteriori informazioni sulla procedura, vedere “Operazioni di base del
menu delle impostazioni video” a pagina 40.
“z” indica l’impostazione predefinita.
Nota
A seconda del disco, è possibile che l’opzione “4:3 LETTER BOX” venga selezionata automaticamente al posto di
“4:3 PAN SCAN” e viceversa.
Voce Descrizione
MENU Consente di modificare la lingua per il menu del disco.
AUDIO Consente di modificare la lingua dell’audio.
SUBTITLE Consente di modificare la lingua per i sottotitoli registrata sul
disco.
Voce Opzione Descrizione
MONITOR TYPE
Consente di selezionare il rapporto
di formato adatto al monitor
collegato.
16:9 (z)
Consente di visualizzare
un’immagine ampia.
Adatta per il collegamento di un
monitor a schermo ampio o un
monitor dotato della funzione di
modo ampio.
4:3 LETTER BOX
Consente di visualizzare
un’immagine ampia con bande
nelle parti superiore e inferiore
dello schermo.
Adatta per il collegamento di un
monitor con rapporto di formato
dello schermo 4:3.
4:3 PAN SCAN
Consente di visualizzare
un’immagine ampia su tutto lo
schermo eliminando
automaticamente le parti che non
rientrano nelle dimensioni dello
schermo.
WALLPAPER
WALLPAPER 1 (z), 2, 3
Consente di selezionare il tipo di
sfondo.

42
D:\Documents and Settings\takashi-shimomura\Desktop\DTP\848220S MEX-
DV1500U(EUR)\4120899211_MEX-DV1500U_ML\04IT02CD-E.fm
masterpage:Left
MEX-DV1500U
4-120-899-21 (1)
Impostazioni personalizzate
Selezionare (CUSTOM SETUP), la voce e l’opzione desiderate indicate di seguito mediante M/m,
quindi premere (ENTER). Per ulteriori informazioni sulla procedura, vedere “Operazioni di base del
menu delle impostazioni video” a pagina 40.
Per ulteriori informazioni, consultare la pagina di riferimento. “z” indica l’impostazione predefinita.
Voce Opzione Descrizione
PARENTAL CONTROL
(pagina 31) *
1
Consente di impostare delle
limitazioni per la riproduzione di
dischi o scene inappropriati.
OFF t (z)
Consente di disattivare la
protezione.
ON t
Consente di attivare la protezione.
PLAYER t
Consente di impostare lo standard
di limitazione e i relativi livelli.
PASSWORD t
Consente di impostare una nuova
password a 4 cifre.
DivX VOD
Consente di visualizzare il codice
di registrazione dell’apparecchio.
Per ulteriori informazioni,
consultare il sito Web indicato di
seguito:
http://www.divx.com/vod
Done
Per chiudere la schermata.
SLIDE SHOW TIME
5 sec. (z), 10 sec.,
20 sec., 40 sec., 60 sec.
Consente di selezionare l’intervallo
temporale della visualizzazione in
serie.
FIXED
Consente di disattivare la
visualizzazione in serie.
MULTI-DISC RESUME
*
2
ON (z)
Consente di memorizzare le
impostazioni di ripristino per un
massimo di 5 dischi. Le
impostazioni rimangono
memorizzate anche se viene
impostato “OFF”.
OFF
Consente di non memorizzare le
impostazioni di ripristino.
La funzione di ripristino della
riproduzione è disponibile solo per
il disco correntemente inserito
nell’apparecchio.
USB RESUME
ON (z)
Consente di memorizzare le
impostazioni di ripristino. Le
impostazioni rimangono
memorizzate anche se viene
impostato “OFF”.
OFF
Consente di non memorizzare le
impostazioni di ripristino.
MPEG-4

43
D:\Documents and Settings\takashi-shimomura\Desktop\DTP\848220S MEX-
DV1500U(EUR)\4120899211_MEX-DV1500U_ML\04IT02CD-E.fm
masterpage:RightD:\Documents and Settings\takashi-shimomura\Desktop\DTP\848220S MEX-
DV1500U(EUR)\4120899211_MEX-DV1500U_ML\04IT02CD-E.fm
masterpage:Right
MEX-DV1500U
4-120-899-21 (1)
*1 Ad eccezione dei DVD-R/DVD-R DL/DVD-RW nel modo VR.
*2 Solo DVD VIDEO.
Nota
Se è attivata al protezione, la funzione di ripristino della riproduzione non è disponibile. In tal caso, la riproduzione
viene avviata dall’inizio del disco quando quest’ultimo viene inserito.
Impostazioni audio
Selezionare (AUDIO SETUP), la voce e l’opzione desiderate indicate di seguito mediante M/m,
quindi premere (ENTER). Per ulteriori informazioni sulla procedura, vedere “Operazioni di base del
menu delle impostazioni video” a pagina 40.
Per ulteriori informazioni, consultare la pagina di riferimento. “z” indica l’impostazione predefinita.
* Ad eccezione dei DVD-R/DVD-R DL/DVD-RW nel modo VR.
Azzeramento di tutte le impostazioni
Tutte le impostazioni (esclusa l’impostazione di protezione) del menu delle impostazioni video possono
essere azzerate.
Selezionare (RESET), quindi “RESET ALL SETTINGS”, “YES” mediante M/m, quindi premere
(ENTER).
Per ulteriori informazioni sulla procedura, vedere “Operazioni di base del menu delle impostazioni
video” a pagina 40.
Nota
Non spegnere l’apparecchio durante l’azzeramento, poiché tale operazione richiede alcuni secondi.
PLAY LIST PLAY
(solo per DVD-R/DVD-R DL/
DVD-RW nel modo VR)
ORIGINAL (z)
Consente di riprodurre i titoli
registrati originariamente.
PLAY LIST
Consente di riprodurre la playlist
modificata.
PICTURE EQ (pagina 30)
Consente di selezionare l’opzione
di impostazione da visualizzare nel
menu del modo di riproduzione.
AUTO (z)
Consente di selezionare
automaticamente le opzioni per uso
notturno/diurno in base
all’impostazione dell’attenuatore di
luminosità nel menu delle
impostazioni di sistema
(pagina 46).
LIGHT OFF
Consente di visualizzare le opzioni
per l’uso diurno.
LIGHT ON
Consente di visualizzare le opzioni
per l’uso notturno.
Voce Opzione Descrizione
AUDIO DRC *
Consente di rendere chiaro l’audio
quando il volume è basso. Solo per
i DVD conformi ad Audio DRC
(controllo della gamma dinamica).
STANDARD (z)
Consente di selezionare
l’impostazione standard.
WIDE RANGE
Consente di ricreare l’atmosfera di
un’esibizione dal vivo.
MPEG-4

44
D:\Documents and Settings\takashi-shimomura\Desktop\DTP\848220S MEX-
DV1500U(EUR)\4120899211_MEX-DV1500U_ML\04IT02CD-E.fm
masterpage:Left
MEX-DV1500U
4-120-899-21 (1)
Impostazioni di sistema
Il menu delle impostazioni di sistema include le
seguenti categorie.
• SET: impostazioni generali (pagina 45)
• DSPL: impostazioni di visualizzazione
(pagina 45)
• R/M: impostazioni del modo di ricezione
(pagina 46)
• SND: impostazioni audio (pagina 47)
Operazioni di base del menu delle
impostazioni di sistema
Per impostare le voci del menu, attenersi alla
seguente procedura.
Ad esempio, per impostare il modo di
dimostrazione:
1 Premere (SYSTEM SETUP) mentre
l’apparecchio è spento.
La voce delle impostazioni di sistema viene
visualizzata sull’unità principale.
2 Premere M/m per selezionare “DEMO”,
quindi premere (ENTER).
Viene visualizzata l’opzione.
3 Premere M/m per selezionare “ON” o
“OFF”, quindi premere (ENTER).
L’impostazione è completata.
Per nascondere il menu delle impostazioni di
sistema, premere (SYSTEM SETUP).
Mediante l’unità principale
Premere (SETUP) anziché (SYSTEM SETUP), ruotare
la manopola di controllo anziché premere M/m, infine
premere la manopola di controllo anziché (ENTER).
M/m
ENTER
SYSTEM
SETUP

45
D:\Documents and Settings\takashi-shimomura\Desktop\DTP\848220S MEX-
DV1500U(EUR)\4120899211_MEX-DV1500U_ML\04IT02CD-E.fm
masterpage:RightD:\Documents and Settings\takashi-shimomura\Desktop\DTP\848220S MEX-
DV1500U(EUR)\4120899211_MEX-DV1500U_ML\04IT02CD-E.fm
masterpage:Right
MEX-DV1500U
4-120-899-21 (1)
Per ulteriori informazioni, consultare la pagina di riferimento. “z” indica l’impostazione predefinita.
SET (Impostazione)
DSPL (Display)
Voce Opzione Descrizione
Stato
dell’apparecchio
CLOCK-ADJ (Impostazione
dell’orologio) (pagina 48)
–
–
Qualsiasi stato.
CT (Ora) (pagina 37, 38)
ON
Consente di attivare la
funzione CT.
OFF (z)
Consente di disattivare la
funzione CT.
BEEP
ON (z)
Consente di attivare il
segnale acustico relativo
alle operazioni.
OFF
Consente di disattivare il
segnale acustico relativo
alle operazioni.
COLOR-SYS (Sistema colore)
Consente di modificare il
segnale di uscita video in base
al monitor collegato.
PAL (z)
Per impostare l’opzione
PAL.
Apparecchio
spento.
NTSC
Per impostare l’opzione
NTSC.
AUTO-OFF
Consente di spegnere
automaticamente allo scadere
dell’intervallo temporale
desiderato quando
l’apparecchio è spento.
NO (z)
Consente di disattivare la
funzione di spegnimento
automatico.
Qualsiasi stato.
30S, 30M, 60M
Consente di selezionare
l’intervallo temporale
desiderato.
REAR/SUB
Consente di commutare
l’uscita audio.
REAR-OUT Consente di impostare
l’amplificatore di potenza.
Apparecchio
spento.
SUB-OUT (z) Consente di impostare il
subwoofer.
Voce Opzione Descrizione
Stato
dell’apparecchio
M.DSPL (Display in
movimento)
Consente di selezionare il
modo del display in
movimento.
SA (z)
Consente di visualizzare i
modelli animati e
l’analizzatore spettrale.
Durante la
riproduzione/
ricezione radio.
OFF
Consente di disattivare il
display in movimento.
continua alla pagina successiva
t

46
D:\Documents and Settings\takashi-shimomura\Desktop\DTP\848220S MEX-
DV1500U(EUR)\4120899211_MEX-DV1500U_ML\04IT02CD-E.fm
masterpage:Left
MEX-DV1500U
4-120-899-21 (1)
R/M (Modo di ricezione)
DEMO (Dimostrazione)
ON (z)
Consente di attivare la
dimostrazione.
Apparecchio
spento.
OFF
Consente di disattivare la
dimostrazione.
DIMMER
Consente di modificare la
luminosità del display.
ON
Consente di attenuare la
luminosità del display.
Qualsiasi stato.
OFF (z)
Consente di disattivare
l’attenuatore di
luminosità.
AUTO-SCRL (Scorrimento
automatico)
Consente di attivare lo
scorrimento automatico delle
voci.
ON (z)
Consente di attivare lo
scorrimento. Durante la
riproduzione di un
disco.
OFF
Consente di disattivare lo
scorrimento.
Voce Opzione Descrizione
Stato
dell’apparecchio
LOCAL (Modo di ricerca
locale)
ON
Consente di sintonizzare
solo le stazioni con segnali
più forti.
Durante la
ricezione radio.
OFF (z)
Consente di sintonizzare le
stazioni con ricezione
normale.
MONO (Modo monofonico)
Consente di selezionare il
modo di ricezione monofonico
per migliorare la ricezione FM
di qualità scadente.
ON
Consente di ascoltare le
trasmissioni stereo in
monofonia.
Durante la
ricezione FM.
OFF (z)
Consente di ascoltare le
trasmissioni stereo in
stereofonia.
REGIONAL (pagina 38)
ON (z)
Consente di mantenere la
sintonizzazione su un
programma regionale.
OFF
Consente di disattivare la
sintonizzazione regionale
quando si lascia l’area di
ricezione del programma.
BTM (Memorizzazione
automatica delle emittenti con
sintonia migliore) (pagina 36)
–
–
Durante la
ricezione radio.

47
D:\Documents and Settings\takashi-shimomura\Desktop\DTP\848220S MEX-
DV1500U(EUR)\4120899211_MEX-DV1500U_ML\04IT02CD-E.fm
masterpage:RightD:\Documents and Settings\takashi-shimomura\Desktop\DTP\848220S MEX-
DV1500U(EUR)\4120899211_MEX-DV1500U_ML\04IT02CD-E.fm
masterpage:Right
MEX-DV1500U
4-120-899-21 (1)
SND(Audio)
*1 Se l’uscita audio è impostata su “SUB-OUT”.
*2 Visualizzato e disponibile solo se “DVD-LEVEL” è impostato su “ADJST-ON”.
Voce Opzione Descrizione
Stato
dell’apparecchio
HPF (Filtro passa alto)
Consente di selezionare la
frequenza di taglio dei
diffusori anteriore/posteriore.
OFF (z) Consente di non impostare
la frequenza di taglio.
Durante la
riproduzione/
ricezione radio.
80HZ, 100HZ,
120HZ,
140HZ,
160HZ
Consente di selezionare la
frequenza.
LPF (Filtro passa basso)*
1
Consente di selezionare la
frequenza di taglio del
subwoofer.
OFF (z) Consente di non impostare
la frequenza di taglio.
80HZ, 100HZ,
120HZ,
140HZ,
160HZ
Consente di selezionare la
frequenza.
LPF-PHASE (Fase filtro passa
basso)*
1
Consente di selezionare la fase
quando il filtro passa basso è
attivato.
NORM (z) Consente di applicare la
fase normale al filtro passa
basso.
REV Consente di applicare la
fase inversa al filtro passa
basso.
LOUD (Enfasi dei bassi)
Consente di rendere chiaro
l’audio quando il volume è
basso.
OFF (z)
Consente di non
enfatizzare i bassi e gli
acuti.
ON
Consente di enfatizzare i
bassi e gli acuti.
AUX-LEVEL (pagina 49)
(–8 ~ +18)
z: 0
Consente di selezionare il
livello.
Durante la
riproduzione
AUX.
DVD-LEVEL (pagina 29)
ADJST-ON
Consente di regolare il
livello di uscita del
formato Dolby Digital.
Durante la
riproduzione di un
disco.
ADJST-OFF
(z)
Consente di disattivare la
regolazione del livello.
DOLBY-ADJ (Regolazione
del livello Dolby) (pagina 29)*
2
(–10 ~ +10)
z: +8
Consente di selezionare il
livello.

48
D:\Documents and Settings\takashi-shimomura\Desktop\DTP\848220S MEX-
DV1500U(EUR)\4120899211_MEX-DV1500U_ML\04IT02CD-E.fm
masterpage:Left
MEX-DV1500U
4-120-899-21 (1)
Impostazione dell’orologio
L’orologio mostra l’indicazione dell’ora in base
al sistema delle 24 ore.
1 Premere (SYSTEM SETUP).
La voce delle impostazioni di sistema viene
visualizzata sull’unità principale.
2 Premere M/m per selezionare “CLOCK-
ADJ”, quindi premere (ENTER).
L’indicazione dell’ora lampeggia.
3 Premere M/m per impostare l’ora e i
minuti.
Per passare da una cifra all’altra
dell’indicazione digitale, premere </,.
4 Premere (ENTER).
L’impostazione è completata.
Per nascondere il menu delle impostazioni di
sistema, premere (SYSTEM SETUP).
Per visualizzare l’orologio durante la
riproduzione, premere più volte (DSPL) finché
non viene visualizzato.
Mediante l’unità principale
Premere (SETUP) anziché (SYSTEM SETUP), ruotare
la manopola di controllo anziché premere M/m, quindi
premere .m/M> anziché </,, quindi
premere la manopola di controllo anziché (ENTER).
Uso di apparecchi opzionali
Apparecchi opzionali
È possibile collegare un dispositivo ausiliare al
presente apparecchio e ascoltare l’audio
mediante i diffusori dell’auto.
È possibile collegare fino a 2 dispositivi, uno alla
presa di ingresso AUX (minipresa stereo) sulla
parte anteriore e l’altro ai terminali AUX AUDIO
IN sulla parte posteriore. Il livello del volume è
regolabile per intervenire su eventuali differenze
tra l’apparecchio e il dispositivo ausiliare.
Collegamento di un dispositivo
ausiliare
1 Spegnere il dispositivo ausiliare.
2 Abbassare il volume sull’apparecchio.
3 Collegare all’apparecchio.
Sulla parte anteriore
Collegare alla presa di ingresso AUX.
* Utilizzare una spina diritta.
Sulla parte posteriore
Collegare ai terminali AUX AUDIO IN.
</M/m/,
ENTER
DSPL
SYSTEM
SETUP
M/m
ENTER
SRC
MODE
SYSTEM
SETUP
AUX
AUX
Cavo di collegamento*
(non in dotazione)

49
D:\Documents and Settings\takashi-shimomura\Desktop\DTP\848220S MEX-
DV1500U(EUR)\4120899211_MEX-DV1500U_ML\04IT02CD-E.fm
masterpage:RightD:\Documents and Settings\takashi-shimomura\Desktop\DTP\848220S MEX-
DV1500U(EUR)\4120899211_MEX-DV1500U_ML\04IT02CD-E.fm
masterpage:Right
MEX-DV1500U
4-120-899-21 (1)
Selezione di un dispositivo ausiliare
1 Premere più volte (SRC) fino a visualizzare
“AUX” sull’unità principale.
2 Premere (MODE) per selezionare “FRONT-
IN” o “REAR-IN”.
Utilizzare il dispositivo ausiliare mediante i
relativi comandi.
Regolazione del livello del volume
Regolare il volume di ogni dispositivo collegato
prima della riproduzione.
1 Abbassare il volume sull’apparecchio.
2 Premere più volte (SRC) fino a visualizzare
“AUX” sull’unità principale.
Se sono collegati due dispositivi ausiliari,
selezionare quello per cui si desidera regolare
il volume premendo (MODE).
3 Avviare la riproduzione del dispositivo
ausiliare ad un volume moderato.
4 Impostare sull’apparecchio il consueto volume
di ascolto.
5 Premere (SYSTEM SETUP).
6 Premere M/m per selezionare “AUX-LEVEL”,
quindi premere (ENTER).
7 Premere M/m per regolare il livello di
ingresso.
Il livello di ingresso è regolabile in singoli
incrementi, da –8 a +18.
8 Premere (ENTER).
L’impostazione è completata.
Per nascondere il menu delle impostazioni di
sistema, premere (SYSTEM SETUP).
Mediante l’unità principale
Premere (SOURCE) anziché (SRC), premere
(SETUP) anziché (SYSTEM SETUP), ruotare la
manopola di controllo anziché premere M/m, premere
la manopola di controllo anziché (ENTER).
Informazioni aggiuntive
Precauzioni
• Se l’auto è stata parcheggiata in un luogo esposto
a luce solare diretta, attendere che l’apparecchio si
raffreddi.
• L’antenna elettrica si estende automaticamente.
Formazione di condensa
Se si forma della condensa all’interno
dell’apparecchio, rimuovere il disco e attendere per
circa un’ora fino a quando non sia evaporata
completamente; diversamente l’apparecchio
potrebbe non funzionare correttamente.
Per mantenere una qualità audio
elevata
Non versare sostanze liquide sull’apparecchio o sui
dischi.
Note sui dischi
• Non esporre i dischi a luce solare diretta o a fonti
di calore, ad esempio condotti dell’aria. Evitare di
lasciarli all’interno di auto parcheggiate al sole.
• Prima della riproduzione, pulire
i dischi con un panno apposito
procedendo dal centro verso
l’esterno. Non utilizzare
solventi quali benzene,
acquaragia o detergenti
disponibili in commercio.
• Questo apparecchio è stato
progettato per la riproduzione
di dischi conformi allo standard CD (Compact
Disc). I dischi in formato DualDisc e alcuni dischi
codificati mediante tecnologie di protezione dei
diritti d’autore non sono conformi allo standard
CD (Compact Disc), pertanto potrebbe non essere
possibile riprodurli sul presente apparecchio.
• Dischi NON riproducibili sull’apparecchio
– Dischi su cui sono applicati etichette, adesivi,
nastro adesivo o carta, onde evitare di causare
problemi di funzionamento o rovinare il disco.
– Non riprodurre dischi dalla forma irregolare (ad
esempio a forma di cuore, quadrato o stella),
onde evitare problemi di funzionamento
all’apparecchio stesso.
– Dischi da 8 cm.
continua alla pagina successiva t

50
D:\Documents and Settings\takashi-shimomura\Desktop\DTP\848220S MEX-
DV1500U(EUR)\4120899211_MEX-DV1500U_ML\04IT02CD-E.fm
masterpage:Left
MEX-DV1500U
4-120-899-21 (1)
Nota sulle operazioni di riproduzione
di DVD e VCD
È possibile che alcune operazioni di riproduzione di
DVD e VCD siano state intenzionalmente impostate
dai produttori del software. Poiché il presente
apparecchio riproduce i DVD e i VCD in base al
contenuto del disco creato dai produttori del
software, è possibile che alcune funzioni di
riproduzione non siano disponibili. Consultare le
istruzioni in dotazione con i DVD o i VCD.
Note sui DATA CD e DATA DVD
• Mediante il presente apparecchio, potrebbe non
essere possibile riprodurre alcuni DATA CD/
DATA DVD (a seconda dell’apparecchio utilizzato
per la registrazione o delle condizioni del disco).
• Per alcuni dischi, è necessario procedere alla
finalizzazione (pagina 50).
• Il presente apparecchio è compatibile con i
seguenti standard.
Per DATA CD
– Formato ISO 9660 livello 1/livello 2, Joliet/
Romeo nel formato di espansione
– Multisessione
Per DATA DVD
– Formato UDF Bridge (UDF combinato e ISO
9660)
– Multiborder
• Numero massimo di:
– Cartelle (album): 256 (incluse la cartella radice e
le cartelle vuote).
– File (brani/immagini/video) e cartelle contenuti
in un disco: 2.000 (se il nome di una cartella/di
un file contiene molti caratteri, è possibile che
tale numero sia inferiore a 2.000).
– Caratteri visualizzabili per il nome di una
cartella/un file: 64 (Joliet/Romeo).
Note sulla finalizzazione dei dischi
Per riprodurre sul presente apparecchio i dischi
riportati di seguito, occorre procedere alla
finalizzazione.
• DVD-R/DVD-R DL (nel modo video/modo VR)
• DVD-RW nel modo video
• DVD+R/DVD+R DL
•CD-R
•CD-RW
I seguenti dischi possono essere riprodotti senza
essere prima finalizzati.
• DVD+RW – finalizzato automaticamente.
• DVD-RW nel modo VR – finalizzazione non
richiesta.
Per ulteriori informazioni, vedere le istruzioni per
l’uso fornite con il disco.
Note su CD multisessione/DVD
Multiborder
Con il presente apparecchio, è possibile riprodurre
CD multisessione/DVD Multiborder nelle seguenti
condizioni. Si noti che la sessione deve essere
chiusa e che il disco deve essere finalizzato.
• Se un CD-DA (CD audio digitale) viene registrato
nella prima sessione:
L’unità riconosce il disco come un CD-DA e solo
il CD-DA della prima sessione viene riprodotto,
anche se un altro formato (ad esempio, MP3)
viene registrato in altre sessioni.
• Se il CD-DA viene registrato in una sessione
diversa dalla prima:
L’unità riconosce il disco come un DATA CD o un
DATA DVD e tutte le sessioni CD-DA vengono
saltare.
• Se un MP3/WMA/AAC/JPEG/DivX/MPEG-4
viene registrato:
Vengono riprodotte solo le sessioni contenenti il
tipo di file selezionato (audio/video/immagine)*
(qualora dati CD-DA o altri dati siano presenti in
altre sessioni, queste vengono saltate).
* Per ulteriori informazioni sulle modalità di selezione
del tipo di file, vedere a pagina 35.
Ordine di riproduzione dei file MP3/
WMA/AAC/JPEG/DivX
®
/MPEG-4
Informazioni sui file MP3
• I tag ID3 versioni 1.0, 1.1, 2.2, 2.3 e 2.4 sono
relativi solo ai file MP3. I tag ID3 possono
contenere 15/30 caratteri (1.0 e 1.1) o 63/126
caratteri (2.2, 2.3 e 2.4).
• Durante l’assegnazione di un nome a un file MP3,
assicurarsi di aggiungere l’estensione “.mp3”.
Nota sui file MP3
Se viene riprodotto un file MP3 ad alta velocità di
trasmissione, ad esempio 384 kbps, è possibile che
l’audio sia soggetto a interruzioni.
Informazioni sui file WMA
• I tag WMA possono contenere 63 caratteri.
• Durante l’assegnazione di un nome a un file
WMA, assicurarsi di aggiungere l’estensione
“.wma”.
Informazioni sui file AAC
• I tag AAC possono contenere 126 caratteri.
• Durante l’assegnazione di un nome a un file AAC,
assicurarsi di aggiungere l’estensione “.m4a”.
Cartella
(album)
File MP3/WMA/
AAC/JPEG/
DivX/MPEG-4
(brano/
immagine/
video)
MP3/WMA/AAC/
JPEG/DivX/
MPEG-4

51
D:\Documents and Settings\takashi-shimomura\Desktop\DTP\848220S MEX-
DV1500U(EUR)\4120899211_MEX-DV1500U_ML\04IT02CD-E.fm
masterpage:RightD:\Documents and Settings\takashi-shimomura\Desktop\DTP\848220S MEX-
DV1500U(EUR)\4120899211_MEX-DV1500U_ML\04IT02CD-E.fm
masterpage:Right
MEX-DV1500U
4-120-899-21 (1)
Informazioni sui file JPEG
• JPEG, acronimo di Joint Photographic Experts
Group, è un formato standard di compressione dei
file di immagini. I fermi immagine vengono
compressi approssimativamente da 1/10 a 1/100
delle dimensioni originali.
• Durante l’assegnazione di un nome a un file JPEG,
assicurarsi di aggiungere l’estensione “.jpg”.
Nota sui file JPEG
La riproduzione dei file JPEG in formato progressivo
non è supportata.
Informazioni sui file DivX
®
DivX
®
, acronimo di Digital Video Express, è un
formato standard di compressione di file video
digitali sviluppato da DivX, Inc.
Il presente
apparecchio è un prodotto DivX
®
Certified
ufficiale ed è in grado di riprodurre tutte le
versioni video DivX
®
(incluso il formato DivX
®
6) con la riproduzione standard di file
multimediali DivX
®
.
Informazioni sui file MPEG-4
È possibile riprodurre i file MPEG-4 contenuti nei
dischi che rispondono ai seguenti requisiti. La
riproduzione non può essere garantita per tutti i file
MPEG-4 compatibili.
• Profilo: MPEG-4 Simple Profile
• Velocità di trasmissione: max. 25.000 kbps
• Frequenza fotogrammi: max. 30 fps
• Dimensioni immagine: max. 320 × 240 pixel
• Audio: max. 320 kbps (AAC-LC)
• Estensione file: .mp4
Manutenzione
Sostituzione della batteria al litio del
telecomando a scheda
In condizioni normali, la batteria dura circa 1 anno
(il ciclo di vita può risultare più breve in funzione
delle condizioni di utilizzo).
Quando la batteria si scarica, il raggio d’azione del
telecomando a scheda risulta ridotto. Sostituire la
batteria con una batteria al litio CR2025 nuova.
L’uso di pile diverse potrebbe comportare il rischio
di incendi o esplosioni.
Note sulla batteria al litio
• Tenere la batteria al litio fuori dalla portata dei
bambini. Se la batteria viene ingerita, consultare
immediatamente un medico.
• Pulire la batteria con un panno asciutto per
assicurare un perfetto contatto.
• Assicurarsi di rispettare la corretta polarità durante
l’inserimento della batteria.
• Non afferrare la batteria con pinze di metallo, in
quanto potrebbe verificarsi un corto circuito.
Sostituzione del
fusibile
Per la sostituzione del fusibile,
assicurarsi di utilizzare un
fusibile dello stesso
amperaggio di quello indicato
sull’originale. Se il fusibile si
brucia, controllare i
collegamenti
dell’alimentazione e sostituire
il fusibile. Se dopo la
sostituzione il fusibile si brucia
di nuovo, è possibile che si tratti di un problema
interno. In tal caso, rivolgersi al più vicino
rivenditore Sony.
Pulizia dei connettori
Se i connettori tra l’apparecchio e il pannello
anteriore sono sporchi, l’apparecchio potrebbe non
funzionare correttamente. Per evitare questo
problema, rimuovere il pannello anteriore
(pagina 15), quindi pulire i connettori con un
bastoncino di cotone. Non esercitare forza
eccessiva. Diversamente, i connettori potrebbero
venire danneggiati.
Note
• Per motivi di sicurezza, spegnere il motore prima di
pulire i connettori e rimuovere la chiave dal
blocchetto di accensione.
• Non toccare mai direttamente i connettori con le dita
o con oggetti di metallo.
c
Lato + verso l’alto
AVVERTENZA
La batteria può esplodere se usata
scorrettamente. Pertanto, non deve essere
ricaricata, smontata o gettata nel fuoco.
Fusibile (10 A)
Unità principale
Parte posteriore del
pannello anteriore

52
D:\Documents and Settings\takashi-shimomura\Desktop\DTP\848220S MEX-
DV1500U(EUR)\4120899211_MEX-DV1500U_ML\04IT02CD-E.fm
masterpage:Left
MEX-DV1500U
4-120-899-21 (1)
Rimozione dell’apparecchio
1 Rimuovere la cornice protettiva.
1Rimuovere il pannello anteriore
(pagina 15).
2Afferrare entrambi i bordi della cornice
protettiva, quindi estrarla.
2 Rimuovere l’apparecchio.
1Inserire contemporaneamente entrambe le
chiavi di rilascio fino a farle scattare in
posizione.
2Estrarre le chiavi di rilascio per sbloccare
l’apparecchio.
3Rimuovere l’apparecchio dalla struttura
facendolo scorrere.
Caratteristiche tecniche
Sistema
Laser: laser semiconduttore
Sistema di formato del segnale: selezionabile tra
PAL/ NTSC
Lettore DVD/CD
Rapporto segnale-rumore: 120 dB
Risposta in frequenza: 10 – 20.000 Hz
Wow e flutter: al di sotto del limite misurabile
Distorsione armonica: 0,01 %
Sintonizzatore*
FM
Gamma di frequenze: 87,5 – 108,0 MHz
Terminale dell’antenna:
Connettore dell’antenna esterna
Frequenza intermedia: 10,7 MHz/450 kHz
Sensibilità utilizzabile: 9 dBf
Selettività: 75 dB a 400 kHz
Rapporto segnale-rumore: 67 dB (stereo),
69 dB (mono)
Distorsione armonica a 1 kHz: 0,5 % (stereo),
0,3 % (mono)
Separazione: 35 dB a 1 kHz
Risposta in frequenza: 30 – 15.000 Hz
MW/LW
Gamma di frequenze:
MW: 531 – 1.602 kHz
LW: 153 – 279 kHz
Terminale dell’antenna:
Connettore dell’antenna esterna
Frequenza intermedia: 10,7 MHz/450 kHz
Sensibilità: MW: 30 µV, LW: 40 µV
Lettore USB
Interfaccia: USB (Full Speed)
Corrente massima: 500 mA
Amplificatore di potenza
Uscite: uscite diffusori (connettori a tenuta)
Impedenza diffusori: 4 – 8 ohm
Uscita di potenza massima: 52 W × 4 (a 4 ohm)
Generali
Uscite:
Terminale di uscita video
Terminali di uscita audio posteriori
Terminale di controllo del relè dell’antenna
elettrica
Terminale di controllo dell’amplificatore di
potenza
x
Gancio rivolto
verso l’interno.
*
di cui al par. 3 dell’Allegato A al D.M. 25/06/85 e al
par. 3 dell’Allegato 1 al D.M. 27/08/87

53
D:\Documents and Settings\takashi-shimomura\Desktop\DTP\848220S MEX-
DV1500U(EUR)\4120899211_MEX-DV1500U_ML\04IT02CD-E.fm
masterpage:RightD:\Documents and Settings\takashi-shimomura\Desktop\DTP\848220S MEX-
DV1500U(EUR)\4120899211_MEX-DV1500U_ML\04IT02CD-E.fm
masterpage:Right
MEX-DV1500U
4-120-899-21 (1)
Ingressi:
Terminali di ingresso audio AUX
Terminale di ingresso dell’antenna
Terminale di controllo freno a mano
Presa di ingresso AUX (minipresa stereo)
Terminale di ingresso del segnale USB
Comandi dei toni:
Bassi: ±10 dB a 60 Hz
Medi: ±10 dB a 1 kHz
Alti: ±10 dB a 10 kHz
Requisiti di alimentazione: batteria auto da 12 V CC
(massa negativa)
Dimensioni: circa 178 × 50 × 179 mm (l/a/p)
Dimensioni di montaggio: circa 182 × 53 × 163 mm
(l/a/p)
Peso: circa 1,4 kg
Accessori in dotazione:
Telecomando a scheda: RM-X168
Elementi per l’installazione e i collegamenti (1 set)
Il rivenditore potrebbe non disporre di alcuni degli
accessori elencati. Richiedere ulteriori informazioni
al rivenditore.
DivX, DivX Certified e i loghi associati sono marchi
di fabbrica di DivX, Inc. e sono utilizzati su licenza.
Il design e le caratteristiche tecniche sono soggetti a
modifiche senza preavviso.
Guida alla soluzione dei
problemi
Fare riferimento alla seguente lista di verifica per
risolvere la maggior parte dei problemi che si
potrebbero verificare durante l’uso di questo
apparecchio.
Prima di esaminare l’elenco che segue, verificare le
procedure di collegamento e d’uso dell’apparecchio.
Se il problema persiste, visitare il sito Web relativo
all’assistenza al seguente indirizzo.
Brevetti degli Stati Uniti d’America e di altri Paesi
concessi su licenza dai Dolby Laboratories.
Tecnologia di codifica audio MPEG Layer-3 e
brevetti su licenza del Fraunhofer IIS e della
Thomson.
Questo prodotto è tutelato da specifici diritti di
proprietà intellettuale di Microsoft Corporation.
L’uso o la distribuzione della tecnologia in
questione al di fuori del presente prodotto sono
vietati senza apposita licenza concessa da
Microsoft o da una filiale Microsoft autorizzata.
• Determinati circuiti stampati non contengono
ritardanti alla fiamma alogenati.
• Le parti estetiche non contengono ritardanti alla
fiamma alogenati.
• Come materiale di riempimento per l’imballaggio
viene utilizzata carta.
A seconda del monitor collegato, l’apparecchio
potrebbe impiegare alcuni secondi prima di
spegnersi in seguito allo spegnimento del
motore. Non si tratta di un problema di
funzionamento.
Generali
L’apparecchio non riceve alimentazione.
• Verificare il collegamento o il fusibile.
• Se l’apparecchio viene spento e il display disattivato,
non è possibile utilizzarlo mediante il telecomando.
t Accendere l’apparecchio.
L’antenna elettrica non si estende.
L’antenna elettrica non dispone di una scatola a relè.
Non viene emesso alcun segnale acustico.
• Il segnale acustico è disattivato (pagina 45).
• Un amplificatore di potenza opzionale è collegato e
l’amplificatore incorporato non viene utilizzato.
Il contenuto della memoria è stato cancellato.
• È stato premuto il tasto RESET.
t Reinserire i dati in memoria.
• Il cavo di alimentazione o la batteria è stato
scollegato o non è collegato correttamente.
Le stazioni memorizzate e l’ora esatta sono
cancellate.
Si è bruciato il fusibile.
Quando si cambia la posizione del blocchetto
di accensione, viene emesso un disturbo.
I cavi non sono collegati correttamente al connettore di
alimentazione accessoria dell’auto.
Il display viene disattivato/non viene
visualizzato nella relativa finestra.
• L’attenuatore di luminosità è impostato su “DIM-
ON” (pagina 46).
• Il display scompare tenendo premuto (OFF).
t Tenere premuto (OFF) sull’apparecchio fino a
visualizzare il display.
• I connettori sono sporchi (pagina 51).
continua alla pagina successiva t
Sito di assistenza clienti
http://support.sony-europe.com

54
D:\Documents and Settings\takashi-shimomura\Desktop\DTP\848220S MEX-
DV1500U(EUR)\4120899211_MEX-DV1500U_ML\04IT02CD-E.fm
masterpage:Left
MEX-DV1500U
4-120-899-21 (1)
La funzione di spegnimento automatico non è
disponibile.
L’apparecchio è acceso. La funzione di spegnimento
automatico si attiva dopo avere spento l’apparecchio.
t Spegnere l’apparecchio.
Immagine
Non viene visualizzata alcuna immagine/
l’immagine è disturbata.
• Uno dei collegamenti non è stato effettuato in modo
corretto.
• Verificare il collegamento all’apparecchio collegato e
impostare il selettore di ingresso di tale apparecchio
sulla sorgente corrispondente alla presente unità.
• Il disco è difettoso o sporco.
• L’installazione non è corretta.
t Installare l’apparecchio con un’angolazione
inferiore a 45° in una parte stabile dell’auto.
• Il monitor è collegato all’uscita AUDIO/VIDEO
OUT e il cavo del freno a mano (verde chiaro) non è
collegato al cavo di commutazione del freno a mano
oppure il freno a mano non è stato azionato.
• L’impostazione del sistema colore non è corretta.
t Impostare il sistema colore su “PAL” o “NTSC”
in base al monitor collegato (pagina 45).
L’immagine non si adatta perfettamente allo
schermo.
Il rapporto di formato è fisso sul DVD.
Audio
Non viene riprodotto alcun suono/l’audio salta/
l’audio si interrompe.
• Uno dei collegamenti non è stato effettuato in modo
corretto.
• Verificare il collegamento all’apparecchio collegato e
impostare il selettore di ingresso di tale apparecchio
sulla sorgente corrispondente alla presente unità.
• Il disco è difettoso o sporco.
• L’installazione non è corretta.
tInstallare l’apparecchio con un’angolazione
inferiore a 45° in una parte stabile dell’auto.
• La frequenza di campionamento del file MP3 non è
pari a 16, 22,05, 24, 32, 44,1 o 48 kHz.
• La frequenza di campionamento del file WMA non è
pari a 32, 44,1 o 48 kHz.
• La frequenza di campionamento del file AAC non è
pari a 44,1 o 48 kHz.
• La velocità di trasmissione del file MP3 non è
compresa tra 8 e 384 kbps.
• La velocità di trasmissione del file WMA non è
compresa tra 32 e 384 kbps.
• La velocità di trasmissione del file AAC non è
compresa tra 16 e 320 kbps.
• L’apparecchio si trova nel modo di pausa/ricerca
rapida all’indietro/in avanti.
• Le impostazioni per le uscite non sono state effettuate
in modo corretto.
• Il livello di uscita per i DVD è troppo basso
(pagina 29).
• Il volume è troppo basso.
• È stata attivata la funzione ATT.
• La posizione del comando dell’attenuatore “FAD”
non è appropriata per un sistema a 2 diffusori.
• Formato non supportato (ad esempio DTS).
tVerificare che il formato sia supportato dalla
presente unità (pagina 8).
L’audio è disturbato.
Allontanare i cavi e i fili gli uni dagli altri.

55
D:\Documents and Settings\takashi-shimomura\Desktop\DTP\848220S MEX-
DV1500U(EUR)\4120899211_MEX-DV1500U_ML\04IT02CD-E.fm
masterpage:RightD:\Documents and Settings\takashi-shimomura\Desktop\DTP\848220S MEX-
DV1500U(EUR)\4120899211_MEX-DV1500U_ML\04IT02CD-E.fm
masterpage:Right
MEX-DV1500U
4-120-899-21 (1)
Dischi
Non è possibile inserire un disco.
• Nell’alloggiamento è presente un altro disco.
• Il disco è stato inserito forzatamente in senso
contrario o nel modo sbagliato.
Il disco non viene riprodotto.
• Il disco è difettoso o sporco.
• Il disco non è supportato dall’apparecchio.
• Il DVD non è supportato dall’apparecchio a causa del
codice di zona.
• Il disco non è finalizzato (pagina 50).
• Il formato del disco e la versione del file non sono
compatibili con il presente apparecchio (pagina 8,
50).
•Premere Z per rimuovere il disco.
I file MP3/WMA/AAC/JPEG/DivX/MPEG-4 non
vengono riprodotti.
• La registrazione non è stata eseguita in base al
formato ISO 9660 livello 1 o livello 2, Joliet o Romeo
nel formato di espansione (DATA CD) oppure nel
formato UDF Bridge (DATA DVD) (pagina 50).
• L’estensione del file non è corretta (pagina 50).
• I file non sono memorizzati nel formato MP3/WMA/
AAC/JPEG/DivX/MPEG-4.
• Se il disco contiene più tipi di file, è possibile
riprodurre solo il tipo di file selezionato (audio/video/
immagine).
t Selezionare il tipo di file appropriato mediante
l’elenco (pagina 35).
I file MP3/WMA/AAC/JPEG/DivX/MPEG-4
necessitano di un tempo maggiore prima di
poter essere riprodotti.
Per i dischi indicati di seguito, l’avvio della
riproduzione necessita di un tempo maggiore:
– dischi registrati con una struttura ad albero
complessa.
– dischi registrati in multisessione/Multiborder.
– dischi ai quali è possibile aggiungere dati.
Il disco non viene riprodotto dall’inizio.
Sono stati attivati il ripristino della riproduzione o il
ripristino della riproduzione multidisco (pagina 42).
Non è possibile utilizzare alcune funzioni.
A seconda del disco, è possibile che alcune funzioni,
quali ad esempio il modo di arresto, di ricerca, di
riproduzione ripetuta o di riproduzione in ordine
casuale non siano disponibili. Per ulteriori
informazioni, vedere le istruzioni per l’uso fornite con
il disco.
La lingua dell’audio/dei sottotitoli o l’angolo
non possono essere modificati.
• Utilizzare il menu DVD anziché i tasti per la
selezione diretta sul telecomando a scheda
(pagina 17).
• Sul DVD non sono registrati brani o sottotitoli
multilingue o più angoli.
• Il DVD non consente la modifica.
Le voci del display non scorrono.
• Per i dischi che presentano molti caratteri, tali voci
potrebbero non scorrere.
• “AUTO-SCRL” è impostato su “OFF”.
t Impostare “A.SCRL-ON” (pagina 46).
I tasti per le operazioni non funzionano.
Il disco non viene espulso.
Premere il tasto RESET (pagina 14).
La password per la protezione è stata
dimenticata.
Digitare “5776” nella schermata di immissione della
password per disattivare la protezione (pagina 31).
Ricezione radiofonica
Non è possibile ricevere le stazioni.
L’audio è disturbato.
• Il collegamento non è corretto.
t Collegare il cavo di controllo (blu) dell’antenna
elettrica o il cavo di alimentazione accessoria
(rosso) al cavo di alimentazione di un
preamplificatore di antenne per auto (solo se
l’auto dispone di antenna FM/MW/LW
incorporata sul vetro posteriore/laterale).
t Verificare il collegamento dell’antenna dell’auto.
t Se l’antenna dell’auto non si estende, verificare il
collegamento del cavo di controllo dell’antenna
elettrica.
Non è possibile effettuare la sintonizzazione
preselezionata.
• Memorizzare la frequenza corretta.
• Il segnale di trasmissione è eccessivamente debole.
Non è possibile effettuare la sintonizzazione
automatica.
• L’impostazione del modo di ricerca locale non è stata
effettuata correttamente.
t La sintonizzazione si arresta di frequente:
Impostare “LOCAL-ON” (pagina 46).
t La sintonizzazione non si arresta in
corrispondenza di una stazione:
Impostare “MONO-ON” (pagina 46).
• Il segnale di trasmissione è eccessivamente debole.
t Eseguire la sintonizzazione manuale.
Durante la ricezione FM, lampeggia
l’indicazione “ST”.
• Sintonizzare la frequenza in modo corretto.
• Il segnale di trasmissione è eccessivamente debole.
t Impostare “MONO-ON” (pagina 46).
Un programma FM trasmesso in stereofonia
viene ricevuto in monofonia.
L’apparecchio è impostato sul modo di ricezione
monofonico.
tImpostare “MONO-OFF” (pagina 46).
RDS
Dopo alcuni secondi di ascolto, si avvia la
funzione SEEK.
La stazione non è TP oppure il segnale è debole.
tDisattivare il modo TA (pagina 37).
continua alla pagina successiva t

56
D:\Documents and Settings\takashi-shimomura\Desktop\DTP\848220S MEX-
DV1500U(EUR)\4120899211_MEX-DV1500U_ML\04IT02CD-E.fm
masterpage:Left
MEX-DV1500U
4-120-899-21 (1)
Messaggi e indicazioni di errore
Non viene trasmesso alcun notiziario sul
traffico.
• Attivare il modo TA (pagina 37).
• La stazione non trasmette notiziari sul traffico pur
essendo una stazione TP.
t Sintonizzarsi su un’altra stazione.
Il modo PTY visualizza “- - - - - - - -”.
• La stazione corrente non è una stazione RDS.
• I dati RDS non vengono ricevuti.
• La stazione non specifica il tipo di programma.
Riproduzione USB
Non è possibile riprodurre le voci tramite un
hub USB.
Il presente apparecchio non è in grado di riconoscere i
dispositivi USB attraverso un hub USB.
Non è possibile riprodurre le voci.
Un dispositivo USB non funziona.
t Ricollegarlo.
L’avvio della riproduzione sul dispositivo USB
richiede più tempo.
Il dispositivo USB contiene file con una struttura ad
albero complessa.
Viene emesso un segnale acustico.
Durante la riproduzione, il dispositivo USB è stato
scollegato.
t Prima di scollegare un dispositivo USB, accertarsi
di arrestare la riproduzione per proteggere i dati.
L’audio è intermittente.
È possibile che l’audio risulti intermittente a velocità
di trasmissione elevate, superiori a 320 kbps.
Sull’unità principale
ERROR
• Il disco è sporco o è stato inserito in senso contrario.
t Pulire il disco o inserirlo correttamente.
• È stato inserito un disco vuoto.
• Non è possibile riprodurre il disco a causa di un
problema.
t Inserire un altro disco.
• Il disco non è compatibile con il presente
apparecchio.
t Inserire un disco compatibile.
• Il dispositivo USB non è stato riconosciuto
automaticamente.
t Ricollegarlo.
• Premere Z per rimuovere il disco.
FAILURE
I collegamenti di diffusori/amplificatori non sono
corretti.
t Per verificare il collegamento, consultare il
manuale di installazione/dei collegamenti in
dotazione.
L. SEEK +/–
Il modo di ricerca locale è attivato durante la
sintonizzazione automatica.
NO AF
Non esiste alcuna frequenza alternativa per la stazione
corrente.
t Premere .m/M> durante il
lampeggiamento del nome del servizio dei
programmi. L’apparecchio avvia la ricerca di
un’altra frequenza con gli stessi dati PI
(identificativo programma) (viene visualizzata
l’indicazione “PI SEEK”).
NO DATA
Il disco o il dispositivo USB non contiene file audio.
t Inserire un CD audio nell’unità.
t Collegare un dispositivo USB contenente file
audio.
NO DEV (nessun dispositivo)
“USB” è stato selezionato come sorgente, ma non vi è
alcun dispositivo USB collegato. Un dispositivo USB o
un cavo USB è stato scollegato durante la
riproduzione.
t Accertarsi di collegare un dispositivo USB e un
cavo USB.
NO NAME
Il file non contiene il nome del disco/dell’album/della
cartella/del brano/dell’immagine/del video.
NO TP
L’apparecchio continua la ricerca di stazioni TP
disponibili.
OFFSET
Potrebbe essersi verificato un problema interno.
t Verificare i collegamenti. Se l’indicazione di errore
rimane visualizzata, rivolgersi al più vicino
rivenditore Sony.
OVERLOAD
Il dispositivo USB è sovraccarico.
t Scollegare il dispositivo USB, quindi cambiare
sorgente premendo (SOURCE).
t Indica che il dispositivo USB non funziona oppure
che è stato collegato un dispositivo non supportato.
READ
È in corso la lettura di tutte le informazioni relative ai
file/album (cartella) del disco.
t Una volta terminata l’operazione, la riproduzione
viene avviata automaticamente. Potrebbe essere
necessario attendere alcuni minuti, a seconda della
struttura del disco.
USB NO SUPRT (USB non supportato)
Il dispositivo USB collegato non è supportato.
t Per ulteriori informazioni sulla compatibilità del
dispositivo USB in uso, visitare il sito Web relativo
all’assistenza.
“” o “”
Mentre si procede rapidamente in avanti/all’indietro,
sono stati raggiunti l’inizio o la fine del disco e non è
possibile andare oltre.
“”
L’apparecchio non supporta la visualizzazione di un
determinato carattere.

57
D:\Documents and Settings\takashi-shimomura\Desktop\DTP\848220S MEX-
DV1500U(EUR)\4120899211_MEX-DV1500U_ML\04IT02CD-E.fm
masterpage:RightD:\Documents and Settings\takashi-shimomura\Desktop\DTP\848220S MEX-
DV1500U(EUR)\4120899211_MEX-DV1500U_ML\04IT02CD-E.fm
masterpage:Right
MEX-DV1500U
4-120-899-21 (1)
Se le soluzioni riportate non risolvono il problema,
rivolgersi al più vicino rivenditore Sony.
Se l’apparecchio viene portato in un centro di
assistenza a causa di un problema relativo alla
riproduzione di un disco, assicurarsi di portare
anche il disco utilizzato al momento in cui si è
verificato il problema.
Glossario
Album
Sezione di un pezzo musicale o di un’immagine su
un DATA CD/DVD che contiene brani audio MP3/
WMA/AAC o file JPEG.
Capitolo
Suddivisione di un titolo in un DVD. Un titolo è
composto da più capitoli.
DivX
®
Tecnologia video digitale creata da DivX, Inc. Il
materiale video codificato con la tecnologia DivX è
caratterizzato da una delle più elevate qualità con
dimensioni di file relativamente ridotte.
Dolby Digital
Tecnologia di compressione audio digitale
sviluppata da Dolby Laboratories. Questa tecnologia
è conforme all’audio surround a 5.1 canali. Il canale
posteriore è stereo e in questo formato esiste un
canale subwoofer distinto. La tecnologia Dolby
Digital fornisce gli stessi 5.1 canali distinti di audio
digitale di qualità elevata dei sistemi audio utilizzati
nel cinema Dolby Digital. La corretta separazione
dei canali è resa possibile dalla registrazione
separata di tutti i dati di canale, con un
deterioramento minimo grazie all’elaborazione
digitale di tali dati.
DVD
Disco che può contenere fino a 8 ore di immagini in
movimento sebbene il relativo diametro sia identico
a quello di un CD.
La capacità di dati di un DVD a strato singolo e a un
lato è di 4,7 GB (gigabyte), ossia 7 volte superiore
rispetto a quella di un CD. La capacità di dati di un
DVD a doppio strato e a lato singolo è di 8,5 GB, la
capacità di un DVD a strato singolo e due lati è di
9,4 GB, mentre la capacità di un DVD a doppio
strato e due lati è di 17 GB.
I dati di immagine utilizzano il formato MPEG 2,
uno dei formati standard della tecnologia di
compressione digitale più diffusi. I dati di immagine
vengono compressi a circa 1/40 (mediamente) delle
dimensioni originali. I DVD impiegano inoltre una
tecnologia di codifica con un tasso variabile che
modifica i dati da assegnare in base alle condizioni
dell’immagine. I dati audio vengono registrati in un
formato a più canali, quale ad esempio Dolby
Digital, consentendo di ottenere una qualità audio
più realistica.
Inoltre, i DVD sono dotati di varie funzioni
avanzate, quali le funzioni multiangolo, multilingue
e di protezione.
Sul monitor
Playback prohibited by region code.
Non è possibile riprodurre il DVD a causa di un codice
di zona diverso.
Cannot play this disc.
• Il disco non è compatibile con il presente
apparecchio.
• Il disco non è finalizzato.
No playable data.
Il disco non contiene dati riproducibili.
Please press RESET.
L’apparecchio non funziona a causa di un problema
non specificato.
t Premere il tasto RESET (pagina 14).
continua alla pagina successiva t

58
D:\Documents and Settings\takashi-shimomura\Desktop\DTP\848220S MEX-
DV1500U(EUR)\4120899211_MEX-DV1500U_ML\04IT02CD-E.fm
masterpage:Left
MEX-DV1500U
4-120-899-21 (1)
DVD-RW
Un DVD-RW è un disco su cui è possibile registrare
e scrivere con le stesse dimensioni di un DVD
VIDEO. Un DVD-RW è dotato di due diversi modi:
VR e video. I DVD-RW creati nel modo video
hanno lo stesso formato dei DVD VIDEO, mentre i
dischi creati nel modo VR (registrazione video)
consentono la programmazione o la modifica dei
contenuti.
DVD+RW
Un DVD+RW (più RW) è un disco su cui è possibile
registrare e scrivere. I DVD+RW utilizzano un
formato di registrazione simile a quello dei DVD
VIDEO.
File
• Un brano MP3/WMA/AAC o un’immagine JPEG
su un DATA CD/DATA DVD/dispositivo USB.
• Un brano MP3/WMA/AAC, un’immagine JPEG o
un video DivX/MPEG-4 su un DATA CD/ DATA
DVD.
(“File” è una definizione esclusiva per il presente
apparecchio.) Un file singolo consiste in un brano,
un’immagine o filmato singolo.
Software basato su pellicola e software
basato su video
I DVD possono essere classificati come software
basato su pellicola o software basato su video. I
DVD basati su pellicola contengono le stesse
immagini (24 fotogrammi al secondo) mostrate nei
cinema. I DVD basati su video, ad esempio le
commedie televisive, visualizzano immagini a
30 fotogrammi (o 60 campi) al secondo.
Scena
In un VIDEO CD con funzioni PBC (controllo della
riproduzione), le schermate dei menu, le immagini
in movimento e i fermi immagine vengono suddivisi
in sezioni denominate “scene”.
Titolo
Sezione più lunga di una parte di immagine o di
audio in un DVD, un film o altro nei software video
oppure un intero album nei software audio.
Brano
Sezione di un’immagine o di un brano musicale su
un VIDEO CD, CD o MP3/WMA/AAC. Un album
è composto da diversi brani (solo MP3/WMA/
AAC).
VIDEO CD
Un CD contenente immagini in movimento.
I dati di immagine utilizzano il formato MPEG 1,
uno dei formati standard della tecnologia di
compressione digitale più diffusi. I dati di immagine
vengono compressi a circa 1/140 delle dimensioni
originali. Di conseguenza, un VIDEO CD da 12 cm
può contenere fino a 74 minuti di immagini in
movimento.
I VIDEO CD contengono inoltre dati audio
compatti; la compressione viene applicata ai suoni
al di fuori della gamma udibile, ma non a quelli
udibili. I VIDEO CD possono contenere una
quantità di informazioni 6 volte superiore rispetto ai
CD audio convenzionali.
Esistono 3 versioni di VIDEO CD.
• Versione 1.0, 1.1: è possibile riprodurre solo
immagini in movimento e audio.
• Versione 2.0: è possibile riprodurre fermi
immagine ad alta risoluzione e utilizzare le
funzioni PBC.
Il presente apparecchio è conforme a tutte e 3 le
versioni sopra descritte.

59
D:\Documents and Settings\takashi-shimomura\Desktop\DTP\848220S MEX-
DV1500U(EUR)\4120899211_MEX-DV1500U_ML\04IT02CD-E.fm
masterpage:RightD:\Documents and Settings\takashi-shimomura\Desktop\DTP\848220S MEX-
DV1500U(EUR)\4120899211_MEX-DV1500U_ML\04IT02CD-E.fm
masterpage:Right
MEX-DV1500U
4-120-899-21 (1)
Elenco dei codici della lingua/di zona
Elenco dei codici della lingua
Codici della lingua La redazione delle lingue è conforme allo standard ISO 639: 1988 (E/F).
Elenco dei codici di zona
Codice Lingua Codice Lingua Codice Lingua Codice Lingua
1027 Afar
1028 Abkhazian
1032 Afrikaans
1039 Amharic
1044 Arabic
1045 Assamese
1051 Aymara
1052 Azerbaijani
1053 Bashkir
1057 Byelorussian
1059 Bulgarian
1060 Bihari
1061 Bislama
1066 Bengali;
Bangla
1067 Tibetan
1070 Breton
1079 Catalan
1093 Corsican
1097 Czech
1103 Welsh
1105 Danish
1109 German
1130 Bhutani
1142 Greek
1144 English
1145 Esperanto
1149 Spanish
1150 Estonian
1151 Basque
1157 Persian
1165 Finnish
1166 Fiji
1171 Faroese
1174 French
1181 Frisian
1183 Irish
1186 Scots Gaelic
1194 Galician
1196 Guarani
1203 Gujarati
1209 Hausa
1217 Hindi
1226 Croatian
1229 Hungarian
1233 Armenian
1235 Interlingua
1239 Interlingue
1245 Inupiak
1248 Indonesian
1253 Icelandic
1254 Italian
1257 Hebrew
1261 Japanese
1269 Yiddish
1283 Javanese
1287 Georgian
1297 Kazakh
1298 Greenlandic
1299 Cambodian
1300 Kannada
1301 Korean
1305 Kashmiri
1307 Kurdish
1311 Kirghiz
1313 Latin
1326 Lingala
1327 Laothian
1332 Lithuanian
1334 Latvian;
Lettish
1345 Malagasy
1347 Maori
1349 Macedonian
1350 Malayalam
1352 Mongolian
1353 Moldavian
1356 Marathi
1357 Malay
1358 Maltese
1363 Burmese
1365 Nauru
1369 Nepali
1376 Dutch
1379 Norwegian
1393 Occitan
1403 (Afan)Oromo
1408 Oriya
1417 Punjabi
1428 Polish
1435 Pashto;
Pushto
1436 Portuguese
1463 Quechua
1481 Rhaeto-
Romance
1482 Kirundi
1483 Romanian
1489 Russian
1491 Kinyarwanda
1495 Sanskrit
1498 Sindhi
1501 Sangho
1502 Serbo-
Croatian
1503 Singhalese
1505 Slovak
1506 Slovenian
1507 Samoan
1508 Shona
1509 Somali
1511 Albanian
1512 Serbian
1513 Siswati
1514 Sesotho
1515 Sundanese
1516 Swedish
1517 Swahili
1521 Tamil
1525 Telugu
1527 Tajik
1528 Thai
1529 Tigrinya
1531 Turkmen
1532 Tagalog
1534 Setswana
1535 Tonga
1538 Turkish
1539 Tsonga
1540 Tatar
1543 Twi
1557 Ukrainian
1564 Urdu
1572 Uzbek
1581 Vietnamese
1587 Volapük
1613 Wolof
1632 Xhosa
1665 Yoruba
1684 Chinese
1697 Zulu
1703 Non specificata
Codice Zona Codice Zona Codice Zona Codice Zona
2044 Argentina
2047 Australia
2046 Austria
2057 Belgio
2070 Brazile
2079 Canada
2090 Cile
2092 Cina
2304 Corea
2115 Danimarca
2424 Filippine
2165 Finlandia
2174 Francia
2109 Germania
2276 Giappone
2248 India
2238 Indonesia
2254 Italia
2363 Malesia
2362 Messico
2390 Nuova Zelanda
2379 Norvegia
2376 Paesi Bassi
2427 Pakistan
2436 Portogallo
2184 Regno Unito
2489 Russia
2501 Singapore
2149 Spagna
2499 Svezia
2086 Svizzera
2528 Tailandia

60
04IT+00COV-EIX.fm masterpage:Left
MEX-DV1500U
4-120-899-21 (1)
Indice analitico
Numerics
16:9 41
2000MP3 6
2000WMA 6
4:3 LETTER BOX 41
4:3 PAN SCAN 41
A
AAC 9, 50
Album (ALBUM) 34
Angolo (ANGLE) 17
Apparecchi opzionali 48
Attenuatore (FAD) 39
Attenuatore di luminosità
(DIMMER) 46
Audio (AUDIO)
canale 28
formato 27
lingua 27, 41
Audio DRC (AUDIO DRC) 43
AUX anteriore 48
Azzeramento (RESET) 14, 43
B
Batteria al litio 51
Bilanciamento (BAL) 39
Brano (TRACK) 34
C
Capitolo (CHAPTER) 34
Cartella (ALBUM) 34
CD multisessione 50
Codice di zona 9
Codice lingua 59
Codici di zona 59
Controllo della gamma
dinamica (DRC) 43
Controllo della riproduzione
(PBC) 24
D
Dimostrazione (DEMO) 46
Dischi 8
Dischi riproducibili 8
Display in movimento
(M.DSPL) 45
Dispositivo USB 20
DivX VOD 42
DivX® 9, 23, 51
Dolby Digital 27, 29
DVD Multiborder 50
E
Enfasi dei bassi (LOUD) 47
EQ3 39
Equalizzatore
audio (EQ3) 39
immagine (PICTURE
EQ) 30, 43
F
File (FILE) 34
Formati 9
Formato di programma 28
Frequenze alternative (AF) 37
Fusibile 51
I
Immagine (IMAGE) 34
Impostazione dell’orologio
(CLOCK-ADJ) 48
Impostazione lingua
(LANGUAGE SETUP) 41
Impostazioni audio (AUDIO
SETUP) 43
Impostazioni di sistema 44
Impostazioni di
visualizzazione (DISPLAY
SETUP) 41
Impostazioni personalizzate
(CUSTOM SETUP) 42
Impostazioni video 40
Informazioni sulla durata/
Informazioni di testo (TIME)
26, 34
Intervallo temporale della
visualizzazione in serie
(SLIDE SHOW TIME) 42
J
JPEG 9, 23, 51
L
Lingua dei sottotitoli
(SUBTITLE) 17, 41
Lingua del menu (MENU) 41
Lingua dell’audio (AUDIO) 27,
41
Livello apparecchio ausiliare
(AUX-LEVEL) 47, 49
Livello DVD (DVD-LEVEL) 29,
47
M
Memorizzazione automatica
delle emittenti con sintonia
migliore (BTM) 36
Menu del modo di
riproduzione 25
Menu di impostazione
impostazioni di sistema
44
impostazioni video 40
Menu DVD 17
Menu principale del DVD 17
Modo di ricerca locale
(LOCAL) 46
Modo monofonico (MONO)
46
MP3 9, 50
MPEG-4 9, 51
N
Notiziari sul traffico (TA) 37
NTSC 45
O
Ora (CT) 37, 38, 45
P
PAL 45
Picture EQ (PICTURE EQ)
30, 43
Programma sul traffico (TP)
37
Protezione (PARENTAL
CONTROL) 31, 42
Q
Quick-BrowZer 35
R
Regionale (REGIONAL) 38,
46
Regolazione del livello Dolby
(DOLBY-ADJ) 47
Ripristino della riproduzione
17, 19
Ripristino della riproduzione
multidisco (MULTI-DISC
RESUME) 6, 42
Riproduzione con ricerca
diretta 34
Riproduzione in ordine
casuale (SHUF) 21, 32
Riproduzione playlist (PLAY
LIST PLAY) 43

61
04IT+00COV-EIX.fm masterpage:Right
MEX-DV1500U
4-120-899-21 (1)
Riproduzione ripetuta (REP)
21, 32
S
Scorrimento automatico
(AUTO-SCRL) 46
Segnale acustico (BEEP) 45
Sfondo (WALLPAPER) 41
Sistema colore (COLOR-
SYS) 45
Sistema dati radio (RDS) 37
Spegnimento automatico
(AUTO-OFF) 45
T
Telecomando a scheda 12,
14, 51
Tipo di monitor (MONITOR
TYPE) 41
Tipo di programma (PTY) 37,
38
Titolo (TITLE) 34
V
Visualizzazione di un elenco
35
Volume 10
W
WMA 9, 50
Z
Zoom (CENTER ZOOM) 29

2
D:\Documents and Settings\takashi-shimomura\Desktop\DTP\848220S MEX-
DV1500U(EUR)\4120899211_MEX-DV1500U_ML\05NL01INT-E.fm
masterpage:Left
MEX-DV1500U
4-120-899-21 (1)
Waarschuwing
Stel het apparaat niet bloot aan regen of
vocht. Dit kan brand of elektrische
schokken tot gevolg hebben.
Open de behuizing niet. Dit kan
elektrische schokken tot gevolg hebben.
Laat het apparaat alleen nakijken door
bevoegde servicetechnici.
LET OP
De optische instrumenten in dit product
vergroten het risico op oogletsel. De laserstraal
van deze CD/DVD-speler is schadelijk voor de
ogen, dus u mag de behuizing niet openen.
Laat het apparaat alleen nakijken door bevoegde
servicetechnici.
Dit label bevindt zich aan de onderkant van het
apparaat.
Dit label bevindt zich op het chassis van de
aandri
j
feenheid.
CAUTION
RADIATION WHEN OPEN AND INTERLOCKS DEFEATED.
DO NOT VIEW DIRECTLY WITH OPTICAL INSTRUMENTS.
:
CLASS 1M VISIBLE/INVISIBLE LASER
Opmerking voor klanten: de volgende
informatie is enkel van toepassing voor
apparaten die verkocht worden in landen
die de EU-richtlijnen in acht nemen
De fabrikant van dit apparaat is Sony
Corporation, 1-7-1 Konan, Minato-ku, Tokio,
Japan. De geautoriseerde vertegenwoordiger
voor EMC en productveiligheid is Sony
Deutschland GmbH, Hedelfinger Strasse 61,
70327 Stuttgart, Duitsland. Voor onderhouds- of
garantiekwesties kunt u de adressen gebruiken
die in de afzonderlijke onderhouds- of
garantiedocumenten worden vermeld.
Verwijdering van oude elektrische
en elektronische apparaten
(Toepasbaar in de Europese Unie en
andere Europese landen met
gescheiden ophaalsystemen)
Het symbool op het product of op de
verpakking wijst erop dat dit product niet als
huishoudelijk afval mag worden behandeld. Het moet
echter naar een plaats worden gebracht waar elektrische
en elektronische apparatuur wordt gerecycled. Als u
ervoor zorgt dat dit product op de correcte manier wordt
verwijderd, voorkomt u voor mens en milieu negatieve
gevolgen die zich zouden kunnen voordoen in geval van
verkeerde afvalbehandeling. De recycling van materialen
draagt bij tot het vrijwaren van natuurlijke bronnen. Voor
meer details in verband met het recyclen van dit product,
neemt u contact op met de gemeentelijke instanties, het
bedrijf of de dienst belast met de verwijdering van
huishoudafval of de winkel waar u het product hebt
gekocht.
Accessoire waarop dit van toepassing is:
Afstandsbediening
Verwijdering van oude batterijen (in
de Europese Unie en andere
Europese landen met afzonderlijke
inzamelingssystemen)
Dit symbool op de batterij of verpakking wijst erop dat de
meegeleverde batterij van dit product niet als
huishoudelijk afval behandeld mag worden. Door deze
batterijen op juiste wijze af te voeren, voorkomt u voor
mens en milieu negatieve gevolgen die zich zouden
kunnen voordoen in geval van verkeerde
afvalbehandeling. Het recycleren van materialen draagt bij
tot het vrijwaren van natuurlijke bronnen.
In het geval dat de producten om redenen van veiligheid,
prestaties dan wel in verband met data-integriteit een
permanente verbinding met batterij vereisen, dient deze
batterij enkel door gekwalificeerd servicepersoneel
vervangen te worden. Om ervoor te zorgen dat de batterij
op een juiste wijze zal worden behandeld, dient het
product aan het eind van zijn levenscyclus overhandigd te
worden aan het desbetreffende inzamelingspunt voor de
recyclage van elektrisch en elektronisch materiaal.
Voor alle andere batterijen verwijzen we u naar het
gedeelte over hoe de batterij veilig uit het product te
verwijderen. Overhandig de batterij bij het desbetreffende
inzamelingspunt voor de recyclage van batterijen.
Voor meer details in verband met het recyclen van dit
product of batterij, neemt u contact op met de
gemeentelijke instanties, het bedrijf of de dienst belast
met de verwijdering van huishoudafval of de winkel waar
u het product hebt gekocht.

3
D:\Documents and Settings\takashi-shimomura\Desktop\DTP\848220S MEX-
DV1500U(EUR)\4120899211_MEX-DV1500U_ML\05NL01INT-E.fm
masterpage:Right
MEX-DV1500U
4-120-899-21 (1)
Veiligheid
• Houd u aan de verkeersregels die in uw land
gelden.
• Voor uw veiligheid wordt de monitor die is
aangesloten op de VIDEO OUT-aansluiting,
automatisch uitgeschakeld als de handrem niet
wordt gebruikt.
Waarschuwing als het contactslot van
de auto geen ACC-positie heeft
Stel de functie voor automatisch uitschakelen
in (pagina 45).
Hiermee wordt het apparaat na de ingestelde
tijdsduur automatisch volledig uitgeschakeld
nadat u het apparaat hebt uitgeschakeld. Zo
voorkomt u dat de accu leegraakt.
Als u de functie voor automatisch
uitschakelen niet instelt, houdt u (OFF)
ingedrukt totdat het scherm verdwijnt
wanneer u het contactslot op uit zet.
Om de demonstratie (DEMO) te annuleren,
zie pagina 45.
Ongelukken voorkomen
Beelden worden pas weergegeven als u de
auto hebt geparkeerd en de handrem gebruikt.
Wanneer de auto beweegt tijdens het afspelen
van video, verdwijnen de beelden die
afkomstig zijn van de VIDEO OUT-
aansluiting, automatisch nadat de volgende
waarschuwing is weergegeven.
De beelden op het scherm worden
uitgeschakeld, maar de audiobron kan nog
wel worden gehoord.
U moet tijdens het rijden het apparaat niet
bedienen of naar de monitor kijken.
Video blocked for your
safety.

4
D:\Documents and Settings\takashi-shimomura\Desktop\DTP\848220S MEX-
DV1500U(EUR)\4120899211_MEX-DV1500U_ML\05NL+00COV-ETOC.fm
masterpage:Right
Inhoudsopgave
MEX-DV1500U
4-120-899-21 (1)
Welkom!. . . . . . . . . . . . . . . . . . . . . . . . . . . . . . .6
Auteursrechten. . . . . . . . . . . . . . . . . . . . . . . .7
Afspeelbare discs en symbolen die in deze
handleiding worden gebruikt . . . . . . . . . . . . . . .8
Locatie en functie van de
bedieningselementen . . . . . . . . . . . . . . . . . . . .10
Hoofdeenheid . . . . . . . . . . . . . . . . . . . . . . .10
Kaartafstandsbediening RM-X168 . . . . . . .12
Aan de slag
Het apparaat en de optionele monitor
installeren . . . . . . . . . . . . . . . . . . . . . . . . 14
Het apparaat opnieuw instellen . . . . . . 14
De kaartafstandsbediening
voorbereiden. . . . . . . . . . . . . . . . . . . . . . 14
Het voorpaneel verwijderen . . . . . . . . . 15
Het voorpaneel bevestigen . . . . . . . . . . . . .15
Basishandelingen
Videodiscs afspelen. . . . . . . . . . . . . . . . 16
Audiodiscs afspelen . . . . . . . . . . . . . . . 18
Een USB-apparaat afspelen . . . . . . . . . 20
Schermitems . . . . . . . . . . . . . . . . . . . . . . . .21
Herhaaldelijk en willekeurig afspelen. . . . .21
Naar de radio luisteren . . . . . . . . . . . . . 22
Geavanceerde handelingen
— Discs
DivX
®
-/MPEG-4-/
JPEG-bestanden afspelen. . . . . . . . . . . . . . . . .23
DivX-
®
/MPEG-4-video afspelen . . . . . . . .23
JPEG-beeld weergeven . . . . . . . . . . . . . . . .23
PBC-functies gebruiken
— Playback control . . . . . . . . . . . . . . . . . . . . .24
Het weergavestandmenu gebruiken . . . . . . . . .24
Tijd/tekstinformatie van de disc bekijken . . . .26
Audio-instellingen configureren . . . . . . . . . . .27
De audiotaal/-indeling wijzigen . . . . . . . . .27
De programma-indeling bekijken . . . . . . . .27
Het audio-uitvoerniveau aanpassen
— DVD-niveau . . . . . . . . . . . . . . . . . . . . . .28
Beelden vergroten . . . . . . . . . . . . . . . . . . . . . .29
De beeldkwaliteit aanpassen
— Picture EQ . . . . . . . . . . . . . . . . . . . . . . . . . 29
De beeldkwaliteit aanpassen. . . . . . . . . . . . 30
Discs vergrendelen — Kinderbeveiliging . . . . 30
Kinderbeveiliging inschakelen . . . . . . . . . . 30
Regio en bijbehorend filmbeperkingsniveau
wijzigen. . . . . . . . . . . . . . . . . . . . . . . . . . . . 31
Herhaaldelijk en willekeurig afspelen. . . . . . . 32
Rechtstreeks afspelen . . . . . . . . . . . . . . . . . . . 33
Lijst met tracks/beelden/videobestanden
weergeven — Quick-BrowZer . . . . . . . . . . . . 34
Een track/beeld/videobestand
selecteren . . . . . . . . . . . . . . . . . . . . . . . . . . 34
Een bestandstype selecteren . . . . . . . . . . . . 35
Informatie van een audiodisc bekijken . . . . . . 35
Geavanceerde handelingen
— Radio
Zenders opslaan en ontvangen. . . . . . . . . . . . . 36
Automatisch opslaan — BTM . . . . . . . . . . 36
Handmatig opslaan . . . . . . . . . . . . . . . . . . . 36
Opgeslagen zenders ontvangen. . . . . . . . . . 36
RDS . . . . . . . . . . . . . . . . . . . . . . . . . . . . . . . . . 36
Overzicht. . . . . . . . . . . . . . . . . . . . . . . . . . . 36
AF en TA instellen . . . . . . . . . . . . . . . . . . . 37
PTY selecteren . . . . . . . . . . . . . . . . . . . . . . 38
CT instellen. . . . . . . . . . . . . . . . . . . . . . . . . 38
Geluidsaanpassing
De geluidskenmerken aanpassen. . . . . . . . . . . 38
De equalizercurve aanpassen — EQ3. . . . . 39
Instellingen
Beeldinstellingen . . . . . . . . . . . . . . . . . . . . . . . 39
Basisbediening van beeldinstellingen. . . . . 39
Taalinstelling voor het scherm of de
soundtrack. . . . . . . . . . . . . . . . . . . . . . . . . . 41
Scherm instellen . . . . . . . . . . . . . . . . . . . . . 41
Aangepaste instellingen . . . . . . . . . . . . . . . 42
Audio-instellingen . . . . . . . . . . . . . . . . . . . 43
Alle instellingen herstellen . . . . . . . . . . . . . 43
Systeeminstellingen. . . . . . . . . . . . . . . . . . . . . 44
Basisbediening van
systeeminstellingen. . . . . . . . . . . . . . . . . . . 44
De klok instellen . . . . . . . . . . . . . . . . . . . . . 48

Zie voor het monteren en aansluiten van het
apparaat de bijgeleverde handleiding
"Installatie en aansluitingen".
5
D:\Documents and Settings\takashi-shimomura\Desktop\DTP\848220S MEX-
DV1500U(EUR)\4120899211_MEX-DV1500U_ML\05NL+00COV-ETOC.fm
masterpage:Right
MEX-DV1500U
4-120-899-21 (1)
Ondersteuningssite
Als u vragen hebt of de recentste ondersteuningsinformatie over dit
product wilt hebben, gaat u naar de onderstaande website:
http://support.sony-europe.com
Levert informatie over:
• Modellen en fabrikanten van compatibele digitale audiospelers
• Ondersteunde MP3-/WMA-/AAC-bestanden
Optionele apparaten gebruiken
Randapparatuur . . . . . . . . . . . . . . . . . . . . . . . . 48
Aanvullende informatie
Voorzorgsmaatregelen. . . . . . . . . . . . . . . . . . . 49
Opmerkingen over discs . . . . . . . . . . . . . . . 49
Afspeelvolgorde van MP3-/WMA-/AAC-/
JPEG-/DivX
®
-/MPEG-4-bestanden . . . . . . 50
Over MP3-bestanden . . . . . . . . . . . . . . . . . 50
Over WMA-bestanden . . . . . . . . . . . . . . . . 50
Over AAC-bestanden . . . . . . . . . . . . . . . . . 50
Over JPEG-bestanden . . . . . . . . . . . . . . . . . 51
Over DivX
®
-bestanden. . . . . . . . . . . . . . . . 51
Over MPEG-4-bestanden . . . . . . . . . . . . . . 51
Onderhoud . . . . . . . . . . . . . . . . . . . . . . . . . . . . 51
Het apparaat verwijderen. . . . . . . . . . . . . . . . . 52
Technische gegevens. . . . . . . . . . . . . . . . . . . . 52
Problemen oplossen. . . . . . . . . . . . . . . . . . . . . 53
Foutmeldingen/berichten . . . . . . . . . . . . . . 55
Woordenlijst . . . . . . . . . . . . . . . . . . . . . . . . . . 57
Lijst met taal-/regiocodes . . . . . . . . . . . . . . . . 59
Index . . . . . . . . . . . . . . . . . . . . . . . . . . . . . . . . 60

6
D:\Documents and Settings\takashi-shimomura\Desktop\DTP\848220S MEX-
DV1500U(EUR)\4120899211_MEX-DV1500U_ML\05NL02CD-E.fm
masterpage:Left
MEX-DV1500U
4-120-899-21 (1)
Welkom!
Dank u voor de aankoop van deze Sony Multi
Disc Player. Lees deze handleiding zorgvuldig
door voordat u dit apparaat gebruikt en bewaar
de handleiding voor later gebruik.
Functies
Volg de paginaverwijzing voor meer informatie.
* Afhankelijk van de tracklengte en opgenomen
bemonsteringssnelheid.
DVD's, VCD's en CD's afspelen
t pagina 8
Compatibel met verschillende discindelingen.
2000MP3, 2000WMA, 2000AAC
Kan maximaal 2.000 tracks* afspelen die op
een disc zijn opgenomen in MP3-/WMA-/
AAC-indeling.
Afspelen hervatten voor Multi-disc
t pagina 42
Bewaart het punt waar het afspelen is gestopt
voor maximaal 5 discs en kan het afspelen
hervatten van DVD VIDEO/VCD/DivX/
MPEG-4, zelfs wanneer de disc is uitgeworpen.
t pagina 38
7 ingestelde equalizercurves, die verder kunnen
worden aangepast door 3 verschillende banden
in te stellen.
t pagina 29
Kleurtoon die u kunt selecteren bij de vooraf
ingestelde instellingen volgens het licht in de
auto of het licht in de omgeving.
t pagina 48
Hier kunt u een draagbaar audioapparaat op
aansluiten (analoge aansluiting).
t pagina 48
Via de AUX AUDIO IN-aansluitingen aan de
achterkant kunt u een randapparaat, zoals een
draagbaar audioapparaat (analoge aansluiting),
verborgen navigatieapparaat, televisietuner,
enzovoort, aansluiten en de audio van het
betreffende apparaat uitvoeren.

7
D:\Documents and Settings\takashi-shimomura\Desktop\DTP\848220S MEX-
DV1500U(EUR)\4120899211_MEX-DV1500U_ML\05NL02CD-E.fm
masterpage:RightD:\Documents and Settings\takashi-shimomura\Desktop\DTP\848220S MEX-
DV1500U(EUR)\4120899211_MEX-DV1500U_ML\05NL02CD-E.fm
masterpage:Right
MEX-DV1500U
4-120-899-21 (1)
Auteursrechten
Dit product is voorzien van
copyrightbeveiligingstechnologie die wordt
beschermd door Amerikaanse patenten en andere
intellectuele-eigendomsrechten die eigendom
zijn van Macrovision Corporation en andere
rechtenhouders. Het gebruik van deze
copyrightbeveiligingstechnologie moet zijn
goedgekeurd door Macrovision Corporation, en
is alleen bedoeld voor gebruik in huis en
beperkte kring, tenzij Macrovision Corporation
uitdrukkelijk toestemming heeft verleend voor
ander gebruik. Aanpassing of demontage is
verboden.
"DVD VIDEO", "DVD-R", "DVD-RW",
"DVD+R" en "DVD+RW" zijn handelsmerken.
"DivX" en "DivX Certified" zijn
gedeponeerde handelsmerken of
handelsmerken van DivX, Inc.
VOOR DIT PRODUCT WORDT EEN
LICENTIE VERLEEND ONDER DE MPEG-4
VISUAL PATENT PORTFOLIO LICENSE
VOOR PERSOONLIJK EN NIET-
COMMERCIEEL GEBRUIK DOOR EEN
KLANT VOOR HET DECODEREN VAN
MPEG-4-VIDEO DIE IS GECODEERD DOOR
EEN KLANT VOOR PERSOONLIJK EN
NIET-COMMERCIEEL GEBRUIK EN/OF IS
VERKREGEN VAN EEN
VIDEOLEVERANCIER DIE EEN LICENTIE
VOOR MPEG-4-VIDEO HEEFT
VERKREGEN VAN MPEG LA. ER WORDT
GEEN LICENTIE VERLEEND OF
GEÏMPLICEERD VOOR ENIG ANDER
GEBRUIK. AANVULLENDE INFORMATIE,
WAARONDER INFORMATIE OVER
PROMOTIONEEL, INTERN EN
COMMERCIEEL GEBRUIK EN LICENTIES
VOOR DERGELIJK GEBRUIK, KUNT U
VERKRIJGEN BIJ MPEG LA, LLC. GA NAAR
HTTP://WWW.MPEGLA.COM
Gefabriceerd onder licentie van
Dolby Laboratories.
"Dolby" en het symbool double-
D zijn handelsmerken van Dolby Laboratories.
Windows Media en het
Windows-logo zijn
geregistreerde handelsmerken
van Microsoft Corporation in
de VS en/of andere landen.

8
D:\Documents and Settings\takashi-shimomura\Desktop\DTP\848220S MEX-
DV1500U(EUR)\4120899211_MEX-DV1500U_ML\05NL02CD-E.fm
masterpage:Left
MEX-DV1500U
4-120-899-21 (1)
Afspeelbare discs en symbolen die in deze handleiding worden
gebruikt
Op dit apparaat kunnen verschillende video-/audiodiscs worden afgespeeld.
Aan de hand van de volgende tabel kunt u controleren of een disc door dit apparaat wordt ondersteund.
Daarnaast kunt u controleren welke functies beschikbaar zijn voor een bepaald type disc.
*1 Audiobestanden kunnen ook worden opgeslagen. Zie pagina 9 voor meer informatie.
*2 Video-/beeldbestanden kunnen ook worden opgeslagen. Zie pagina 9 voor meer informatie.
Opmerking
"DVD" wordt in deze handleiding gebruikt als een algemene term voor DVD VIDEO's, DVD-R's/DVD-RW's en
DVD+R's/DVD+RW's.
Discsymbool in de
handleiding
Discindeling Disclogo
VIDEO
DVD VIDEO
DVD-R*
1
DVD-R DL*
1
(Videostand/VR-stand)
DVD-RW*
1
(Videostand/VR-stand)
DVD+R*
1
DVD+R DL*
1
DVD+RW*
1
Video-CD
(Ver. 1.0/1.1/2.0)
AUDIO
Audio-CD
CD-ROM*
2
CD-R*
2
CD-RW*
2

9
D:\Documents and Settings\takashi-shimomura\Desktop\DTP\848220S MEX-
DV1500U(EUR)\4120899211_MEX-DV1500U_ML\05NL02CD-E.fm
masterpage:RightD:\Documents and Settings\takashi-shimomura\Desktop\DTP\848220S MEX-
DV1500U(EUR)\4120899211_MEX-DV1500U_ML\05NL02CD-E.fm
masterpage:Right
MEX-DV1500U
4-120-899-21 (1)
In de volgende tabel kunt u zien welke compressie-indelingen worden ondersteund, welke
bestandstypen hierbij horen en op welke discs deze bestanden kunnen worden opgeslagen.
Welke functies beschikbaar zijn, is afhankelijk van de indeling, ongeacht het type disc. De onderstaande
symbolen voor de indelingen worden weergegeven naast de beschrijving van de beschikbare functies
voor de betreffende indeling.
Tip
Zie pagina 50 voor meer informatie over compressie-indelingen.
Niet-ondersteunde discs
De volgende discs kunnen niet op dit apparaat worden afgespeeld.
•8-cm discs
• 12-cm discs waarbij alleen de binnenste 8 cm wordt gebruikt voor het opslaan van gegevens (de rest is
transparant)
• CD-ROM die andere bestanden bevat dan MP3-/WMA-/AAC-/JPEG-/DivX-/MPEG-4-bestanden
•SA-CD
•CD-G
•Photo-CD
• VSD (Video Single Disc)
• DVD-ROM die andere bestanden bevat dan MP3-/WMA-/AAC-/JPEG-/DivX-/MPEG-4-bestanden
•DVD-RAM
•DVD-Audio
• Active-Audio (gegevens)
• SVCD (Super Video CD)
•CDV
• Discs die zijn gemaakt in de Packet Write-indeling
• Discs in DTS-indeling
Opmerking
Als een disc slecht is opgenomen, is het zelfs mogelijk dat ook een compatibele disc niet kan worden afgespeeld.
Regiocode
Het regiosysteem wordt gebruikt om de software met auteursrechten
te beveiligen.
De regiocode vindt u aan de onderkant van het apparaat en u kunt
alleen DVD's met een identieke regiocode op dit apparaat afspelen.
DVD's met het label kunnen ook worden afgespeeld.
Als u een andere DVD probeert af te spelen, wordt het bericht
"Playback prohibited by region code." op de monitor weergegeven.
Ondanks dat een DVD in bepaalde regio's niet kan worden
afgespeeld, wordt er mogelijk helemaal geen label op de DVD
weergegeven. Dit is afhankelijk van de DVD.
Discsymbool in de
handleiding
Bestandstype Type opslagdisc
MP3-audiobestand
DATA DVD's
DVD-ROM
DVD-R
DVD-R DL
DVD-RW
DVD+R
DVD+R DL
DVD+RW
DATA CD's
CD-ROM
CD-R
CD-RW
WMA-audiobestand
AAC-audiobestand
JPEG-beeldbestand
DivX
®
-videobestand
MPEG-4-
videobestand
MPEG-4
Regiocode
ALL

10
D:\Documents and Settings\takashi-shimomura\Desktop\DTP\848220S MEX-
DV1500U(EUR)\4120899211_MEX-DV1500U_ML\05NL02CD-E.fm
masterpage:Left
MEX-DV1500U
4-120-899-21 (1)
Locatie en functie van de bedieningselementen
Hoofdeenheid
Zie de vermelde pagina's voor meer informatie.
In de instructies in deze handleiding worden over
het algemeen de bedieningselementen van de
kaartafstandsbediening beschreven. U kunt ook
de bedieningselementen op de hoofdeenheid
gebruiken als deze dezelfde of vergelijkbare
namen hebben als die op de
kaartafstandsbediening.
A OFF toets pagina 15,16, 18, 20, 24
De bron uitschakelen/stoppen (indrukken);
volledig uitschakelen (ingedrukt houden).
B (terug) toets pagina 34, 39
Terugkeren naar het vorige scherm.
C SOURCE toets pagina 20, 22, 36, 49
De bron inschakelen; de bron wijzigen
(radio/disc/USB/AUX).
D (browse) toets pagina 34
De Quick-BrowZer-stand openen.*
1
E Regelknop/SOUND/ENTER toets
pagina 28, 34, 35, 36, 38, 39, 44, 48, 49
Het volume aanpassen/een instelling
aanpassen (draaien); het geluidsmenu
openen/een instelling toepassing
(indrukken).
F Discsleuf pagina 16, 18
De disc plaatsen.
G Display
H Z (uitwerpen) toets pagina 16, 18
De disc uitwerpen.
I USB-aansluiting pagina 20
Hierop kunt u het USB-apparaat aansluiten.
J SEEK +/– toetsen pagina 17, 19, 22,
23
Disc/USB:
Een hoofdstuk/track/scène/bestand overslaan
(indrukken); vorige/volgende disc (kort
ingedrukt houden); track terug-/
vooruitspoelen (ingedrukt houden).*
2
Radio:
Automatisch afstemmen op zenders
(indrukken); handmatig zoeken naar zenders
(ingedrukt houden).
K (voorpaneel loslaten) toets
pagina 15
L MODE toets pagina 22, 36, 49
De radioband selecteren (FM/MW/LW); een
randapparaat selecteren dat is aangesloten op
de AUX-ingang (voorkant) of de AUX IN-
aansluiting (achterkant).
M Ontvanger voor de
kaartafstandsbediening
ALBM ARTIST TRACK SHUF ZAP
+
DM
LOUDDISCREGTPTAAF
AUX
SETUP
REPPTY SHUF
OFF
1 2 3 4 5 6
ALBM
SOURCE
MODE
SEEK
SE
EK
PUSH SOUND
/
ENTER
DSPLAF/TA
qkqh
12 4 657839
qsqaq; qd qlqj
qfqg

11
D:\Documents and Settings\takashi-shimomura\Desktop\DTP\848220S MEX-
DV1500U(EUR)\4120899211_MEX-DV1500U_ML\05NL02CD-E.fm
masterpage:RightD:\Documents and Settings\takashi-shimomura\Desktop\DTP\848220S MEX-
DV1500U(EUR)\4120899211_MEX-DV1500U_ML\05NL02CD-E.fm
masterpage:Right
MEX-DV1500U
4-120-899-21 (1)
N RESET toets pagina 14
O SETUP toets pagina 28, 36, 44, 48, 49
Het menu met systeeminstellingen openen.
P AF (alternatieve frequenties)/
TA (verkeersinformatie)/
PTY (programmatype) toets
pagina 37, 38
AF en TA instellen (indrukken); PTY
selecteren (ingedrukt houden) in RDS.
Q Cijfertoetsen
Disc/USB:
(1): b REP pagina 16, 17, 21, 32
(2): SHUF B pagina 16, 17, 21, 32
(3)/(4): ALBM –/+ (V/v) pagina 16,
17, 19, 23
Een album of map overslaan/de cursor
verplaatsen (indrukken); albums of
mappen blijven overslaan (ingedrukt
houden).
(6): u (afspelen/onderbreken)
pagina 16, 17, 18, 19, 23
Afspelen starten/onderbreken.
Radio:
De opgeslagen zenders ontvangen
(indrukken); zenders opslaan (ingedrukt
houden).
R DSPL (scherm) toets pagina 21, 26,
36, 48
Het schermitem wijzigen.
S AUX-ingang pagina 48
Een draagbaar audioapparaat aansluiten.
*1 Wanneer een CD/MP3/WMA/AAC/JPEG/DivX/
MPEG-4 wordt afgespeeld.
*2 De bediening is afhankelijk van de disc (pagina 17,
19).
Informatie over de USB-afdekplug
Wanneer u de USB-aansluiting I niet gebruikt, moet
u de bijgeleverde USB-afdekplug gebruiken om te
voorkomen dat stof en vuil in de aansluiting
terechtkomen. Houd de USB-afdekplug buiten het
bereik van kinderen om te voorkomen dat deze per
ongeluk wordt ingeslikt.

12
D:\Documents and Settings\takashi-shimomura\Desktop\DTP\848220S MEX-
DV1500U(EUR)\4120899211_MEX-DV1500U_ML\05NL02CD-E.fm
masterpage:Left
MEX-DV1500U
4-120-899-21 (1)
Kaartafstandsbediening RM-X168
Zie de vermelde pagina's voor meer informatie.
Verwijder vóór gebruik het plastic
beschermlaagje (pagina 14).
A OFF toets pagina 16, 18, 20, 24
De bron uitschakelen/stoppen (indrukken);
volledig uitschakelen (ingedrukt houden).
B SOUND toets pagina 38
Het geluidsmenu openen.
C VISUAL SETUP toets pagina 24, 27,
29, 30, 30, 32, 33, 40
Het weergavestandmenu/menu met
beeldinstellingen openen.
D SYSTEM SETUP toets pagina 28, 36,
44, 48, 49
Het menu met systeeminstellingen openen.
E (terug)/O toets pagina 24, 25, 31,
31, 34, 39, 40
Het vorige scherm weergeven; terugkeren
naar een menu op een VCD*
1
.
qs
1
2
3
4
5
6
7
8
qd
qf
qg
qj
qh
9
0
qa

13
D:\Documents and Settings\takashi-shimomura\Desktop\DTP\848220S MEX-
DV1500U(EUR)\4120899211_MEX-DV1500U_ML\05NL02CD-E.fm
masterpage:RightD:\Documents and Settings\takashi-shimomura\Desktop\DTP\848220S MEX-
DV1500U(EUR)\4120899211_MEX-DV1500U_ML\05NL02CD-E.fm
masterpage:Right
MEX-DV1500U
4-120-899-21 (1)
F Cijfertoetsen pagina 16, 17, 24, 25, 31,
31, 33, 34, 36
Disc:
Een titel/hoofdstuk/track zoeken.
Radio:
De opgeslagen zenders ontvangen
(indrukken); zenders opslaan (ingedrukt
houden).
G CLEAR toets pagina 31, 34
Een opgegeven nummer verwijderen.
H DSPL (scherm) toets pagina 21, 26,
36, 48
De schermitems wijzigen.
I ATT (dempen) toets
Het geluid dempen (druk nogmaals om te
annuleren).
J u (afspelen/onderbreken) toets
pagina 16, 17, 18, 19, 23
Afspelen starten/onderbreken.
K .m/M> toetsen pagina 17,
19, 22, 23
Disc/USB:
Een hoofdstuk/track/scène/bestand overslaan
(indrukken); vorige/volgende disc (kort
ingedrukt houden); track terug-/
vooruitspoelen (ingedrukt houden).*
2
Radio:
Automatisch afstemmen op zenders
(indrukken); handmatig zoeken naar zenders
(ingedrukt houden).
L Toetsen voor de afspeelinstellingen
voor de DVD
(AUDIO): pagina 17, 27
De audiotaal/-indeling wijzigen.
(Voor VCD/CD/MP3/WMA/AAC, het
audiokanaal wijzigen.)
(SUBTITLE): pagina 17
De taal voor de ondertiteling wijzigen.
(ANGLE): pagina 17
De weergavehoek wijzigen.
(TOP MENU): pagina 17
Het hoofdmenu op een DVD openen.
(MENU): pagina 17
Het menu op een disc openen.
M (browse) toets pagina 34
De Quick-BrowZer-stand openen.*
3
N </M/m/, (cursor)/ENTER toetsen
De cursor verplaatsen en een instelling
opgeven.
O SRC (bron) toets pagina 20, 22, 36, 49
De bron inschakelen; de bron wijzigen
(radio/disc/USB/AUX).
P MODE toets pagina 22, 36, 49
De radioband selecteren (FM/MW/LW); een
randapparaat selecteren dat is aangesloten op
de AUX-ingang (voorkant) of de AUX IN-
aansluiting (achterkant).
Q VOL (volume) +/– toetsen
Het volume aanpassen.
*1 Wanneer met een PBC-functie wordt afgespeeld.
*2 De bediening is afhankelijk van de disc (pagina 17,
19).
*3 Wanneer een CD/MP3/WMA/AAC/JPEG/DivX/
MPEG-4 wordt afgespeeld.
Opmerking
Als het apparaat wordt uitgeschakeld en het scherm
verdwijnt, kan het apparaat niet worden bediend met
de kaartafstandsbediening, tenzij op (SOURCE) op de
hoofdeenheid wordt gedrukt of er een disc wordt
geplaatst om het apparaat te activeren.

14
D:\Documents and Settings\takashi-shimomura\Desktop\DTP\848220S MEX-
DV1500U(EUR)\4120899211_MEX-DV1500U_ML\05NL02CD-E.fm
masterpage:Left
MEX-DV1500U
4-120-899-21 (1)
Aan de slag
Het apparaat en de optionele
monitor installeren
Installeer eerst het apparaat en de optionele
monitor en sluit deze aan.
Dit apparaat kan worden bediend met de
schermen die op het apparaat en/of de optionele
monitor worden weergegeven.
Houd er rekening mee dat deze handleiding
instructies bevat voor schermen op zowel het
apparaat en/of de optionele monitor.
Raadpleeg de bijgeleverde handleiding voor het
installeren/aansluiten van de monitor voor meer
informatie.
Opmerking
Zorg dat u de optionele monitor veilig installeert en
zodanig plaatst dat het zicht van de bestuurder niet
wordt belemmerd.
Het apparaat opnieuw instellen
Voordat u het apparaat voor het eerst gebruikt of
na het vervangen van de accu of het wijzigen van
de aansluitingen, moet u het apparaat opnieuw
instellen.
Verwijder het voorpaneel (pagina 15) en druk de
RESET toets (pagina 11) in met een puntig
voorwerp, zoals een balpen.
Opmerking
Als u op de RESET toets drukt, worden de
klokinstelling en bepaalde opgeslagen gegevens
gewist.
De kaartafstandsbediening
voorbereiden
Verwijder het plastic beschermlaagje.
Tip
Zie pagina 51 voor meer informatie over het
vervangen van de batterij.
Apparaat
Optionele monitor

15
D:\Documents and Settings\takashi-shimomura\Desktop\DTP\848220S MEX-
DV1500U(EUR)\4120899211_MEX-DV1500U_ML\05NL02CD-E.fm
masterpage:RightD:\Documents and Settings\takashi-shimomura\Desktop\DTP\848220S MEX-
DV1500U(EUR)\4120899211_MEX-DV1500U_ML\05NL02CD-E.fm
masterpage:Right
MEX-DV1500U
4-120-899-21 (1)
Het voorpaneel verwijderen
U kunt het voorpaneel van het apparaat
verwijderen om diefstal te voorkomen.
Waarschuwingstoon
Wanneer u het contact in de stand OFF zet
zonder het voorpaneel te verwijderen, hoort u
gedurende enkele seconden de
waarschuwingstoon.
U hoort de waarschuwingstoon alleen als de
ingebouwde versterker wordt gebruikt.
1 Druk op (OFF).
Het apparaat is uitgeschakeld.
2 Druk op en trek het voorpaneel
naar u toe.
Opmerkingen
• Laat het voorpaneel niet vallen en druk niet te hard
op het voorpaneel en het display.
• Stel het voorpaneel niet bloot aan hitte/hoge
temperaturen of vocht. Laat het voorpaneel niet
achter in een geparkeerde auto of op het
dashboard/de hoedenplank.
• Verwijder het voorpaneel niet als er wordt
afgespeeld op het USB-apparaat, omdat de USB-
gegevens anders kunnen worden beschadigd.
Het voorpaneel bevestigen
Plaats deel A van het voorpaneel op deel B van
het apparaat, zoals wordt weergegeven, en druk
de linkerzijde vast tot deze vastklikt.
Opmerking
Plaats niets op de binnenkant van het voorpaneel.
OFF
B
A

16
D:\Documents and Settings\takashi-shimomura\Desktop\DTP\848220S MEX-
DV1500U(EUR)\4120899211_MEX-DV1500U_ML\05NL02CD-E.fm
masterpage:Left
MEX-DV1500U
4-120-899-21 (1)
Basishandelingen
Videodiscs afspelen
Mogelijk zijn bepaalde handelingen niet beschikbaar of beperkt beschikbaar. Dit is afhankelijk van de
disc.
Raadpleeg de gebruiksaanwijzing die bij de disc is geleverd.
De weergave stoppen
Druk op (OFF).
Opmerking
Discs in DTS-indeling worden niet ondersteund. Er wordt geen geluid weergegeven als de DTS-indeling is
geselecteerd.
1
Schakel de monitor in en selecteer de invoerbron op uw monitor die
overeenkomt met dit apparaat.
2
Plaats de disc (met het label naar
boven).
Het afspelen wordt automatisch gestart.
Als de disc niet automatisch wordt afgespeeld, drukt u
op u.
3
Als het DVD-menu wordt weergegeven, drukt u op (1)(b)/(2)(B)/
(3)(V)/(4)(v) om de cursor te verplaatsen. Druk vervolgens op
(6) (u) om te bevestigen.
Met de kaartafstandsbediening drukt u op de </M/m/,/cijfertoetsen om de cursor te
verplaatsen en vervolgens drukt u op (ENTER) om te bevestigen.
De disc uitwerpen
Druk op Z.
</M/m/,
ENTER
u
OFF
b/B/V/v u
OFF
Z
Cijfertoetsen

17
D:\Documents and Settings\takashi-shimomura\Desktop\DTP\848220S MEX-
DV1500U(EUR)\4120899211_MEX-DV1500U_ML\05NL02CD-E.fm
masterpage:RightD:\Documents and Settings\takashi-shimomura\Desktop\DTP\848220S MEX-
DV1500U(EUR)\4120899211_MEX-DV1500U_ML\05NL02CD-E.fm
masterpage:Right
MEX-DV1500U
4-120-899-21 (1)
Informatie over het DVD-menu
Een film of muziekstuk op een DVD wordt onderverdeeld in verschillende delen. Deze delen worden
"titels" genoemd. Wanneer u een DVD afspeelt die meerdere titels bevat, kunt u de gewenste titel
selecteren in het hoofdmenu van de DVD. Wanneer u op een DVD bijvoorbeeld verschillende talen voor
de ondertiteling/het geluid kunt selecteren, kunt u deze selecteren in het DVD-menu.
Overige handelingen voor afspelen
*1 Niet beschikbaar afhankelijk van de disc.
*2 Wanneer het invoerveld van 4 tekens verschijnt, voert u de taalcode in (pagina 59) voor de gewenste taal.
Actie Druk op
Afspelen onderbreken/afspelen hervatten u
Een hoofdstuk/track/scène/bestand
overslaan
.m/M>
Disc terug-/vooruitspoelen .m/M> en houd de toets kort ingedrukt; druk
vervolgens herhaaldelijk om de snelheid aan te passen
(× 2 t × 12 t × 120 t × 2…)
Vooruit-/terugspoelen annuleren u
Het DVD-menu weergeven*
1
Afstandsbediening: (TOP MENU) of (MENU)
Items in het DVD-menu weergeven*
1
Hoofdeenheid: druk op (1)(b)/(2)(B)/(3)(V)/(4)(v) om
de cursor te verplaatsen en druk vervolgens op (6) (u) om
te bevestigen.
Afstandsbediening: druk op </M/m/,/cijfertoetsen om
de cursor te verplaatsen en druk vervolgens op (ENTER) om
te bevestigen.
Audiotaal/-indeling/-kanaal wijzigen
(pagina 27)*
1
Afstandsbediening: druk herhaaldelijk op (AUDIO) tot het
gewenste item wordt weergegeven
Ondertiteling uitschakelen/taal
ondertiteling wijzigen*
1
Afstandsbediening: druk herhaaldelijk op (SUBTITLE) tot
het gewenste item wordt weergegeven*
2
De weergavehoek wijzigen*
1
Afstandsbediening: druk herhaaldelijk op (ANGLE) tot de
gewenste weergavehoek wordt weergegeven
.m/M>
u
SUBTITLE
ANGLE
MENU
</M/m/,
ENTER
AUDIO
TOP MENU
b/B/V/v u.m/M>
Cijfertoetsen

18
D:\Documents and Settings\takashi-shimomura\Desktop\DTP\848220S MEX-
DV1500U(EUR)\4120899211_MEX-DV1500U_ML\05NL02CD-E.fm
masterpage:Left
MEX-DV1500U
4-120-899-21 (1)
Audiodiscs afspelen
Mogelijk zijn bepaalde handelingen niet beschikbaar of beperkt beschikbaar. Dit is afhankelijk van de
disc.
Raadpleeg de gebruiksaanwijzing die bij de disc is geleverd.
De weergave stoppen
Druk op (OFF).
Opmerking
Discs in DTS-indeling worden niet ondersteund. Er wordt geen geluid weergegeven als de DTS-indeling is
geselecteerd.
1
Plaats de disc (met het label naar
boven).
Het afspelen wordt automatisch gestart.
Als de disc niet automatisch wordt afgespeeld, drukt u
op u.
De disc uitwerpen
Druk op Z.
u
OFF
u
OFF
Z

19
D:\Documents and Settings\takashi-shimomura\Desktop\DTP\848220S MEX-
DV1500U(EUR)\4120899211_MEX-DV1500U_ML\05NL02CD-E.fm
masterpage:RightD:\Documents and Settings\takashi-shimomura\Desktop\DTP\848220S MEX-
DV1500U(EUR)\4120899211_MEX-DV1500U_ML\05NL02CD-E.fm
masterpage:Right
MEX-DV1500U
4-120-899-21 (1)
Overige handelingen voor afspelen
* Bij het afspelen van een MP3-/WMA-/AAC-bestand.
Actie Druk op
Afspelen onderbreken/afspelen hervatten u
Een track overslaan .m (<)/M> (,)
Track terug-/vooruitspoelen en houd .m/M> ingedrukt
Een album overslaan* Hoofdeenheid: (3) (ALBM –)/(4) (ALBM +)
Afstandsbediening: M/m
Albums blijven overslaan* Hoofdeenheid: en houd (3) (ALBM –)/(4) (ALBM +)
ingedrukt
Afstandsbediening: en houd M/m ingedrukt
</M/m/,
.m/M>
u
u.m/M> ALBM

20
D:\Documents and Settings\takashi-shimomura\Desktop\DTP\848220S MEX-
DV1500U(EUR)\4120899211_MEX-DV1500U_ML\05NL02CD-E.fm
masterpage:Left
MEX-DV1500U
4-120-899-21 (1)
Een USB-apparaat afspelen
Ga naar de ondersteuningssite voor meer informatie over de compatibiliteit van het USB-apparaat.
• USB-apparaten van het type MSC (Mass Storage Class; massaopslag) die voldoen aan de
USB-standaard, kunnen worden gebruikt.
• De bijbehorende codecs zijn MP3 (.mp3), WMA (.wma), AAC (.m4a) en JPEG (.jpg).
• U kunt het beste een reservekopie van de gegevens op een USB-apparaat maken.
Opmerking
Sluit het USB-apparaat aan nadat u de motor hebt gestart.
Afhankelijk van het USB-apparaat kan storing of schade ontstaan wanneer het apparaat wordt aangesloten
voordat de motor wordt gestart.
Het afspelen stoppen
Druk op (OFF).
Opmerking
Gebruik de USB-kabel die bij het apparaat is geleverd als er een kabel moet worden gebruikt voor de USB-
verbinding.
1
Sluit het USB-apparaat aan op de
USB-aansluiting.
Het afspelen wordt automatisch gestart.
Als er al een USB-apparaat is aangesloten, kunt u het
afspelen starten door herhaaldelijk op (SOURCE) te
drukken tot "USB" wordt weergegeven.
Ondersteuningssite
http://support.sony-europe.com
SRC
OFF
DSPL
SOURCE
(USB)
OFF
SHUFREP DSPL

21
D:\Documents and Settings\takashi-shimomura\Desktop\DTP\848220S MEX-
DV1500U(EUR)\4120899211_MEX-DV1500U_ML\05NL02CD-E.fm
masterpage:RightD:\Documents and Settings\takashi-shimomura\Desktop\DTP\848220S MEX-
DV1500U(EUR)\4120899211_MEX-DV1500U_ML\05NL02CD-E.fm
masterpage:Right
MEX-DV1500U
4-120-899-21 (1)
Het USB-apparaat verwijderen
1 Stop het afspelen van het USB-apparaat.
2 Verwijder het USB-apparaat.
Als u het USB-apparaat verwijdert tijdens het
afspelen, kunnen de gegevens op het
USB-apparaat worden beschadigd.
Opmerkingen
• Gebruik geen USB-apparaten die zo groot of zwaar
zijn dat ze kunnen vallen als ze worden blootgesteld
aan trillingen of een losse aansluiting kunnen
veroorzaken.
• Verwijder het voorpaneel niet als er wordt
afgespeeld op het USB-apparaat, omdat de
USB-gegevens anders kunnen worden beschadigd.
• Dit apparaat kan geen USB-apparaten via een
USB-hub herkennen.
Schermitems
A Bron
B Tracknaam, artiestennaam, albumnummer*,
albumnaam, tracknummer/verstreken
speelduur, klok
* Het albumnummer wordt alleen weergegeven als
het album wordt gewijzigd.
Als u schermitems B wilt wijzigen, drukt u op
(DSPL).
Opmerkingen
• De weergegeven items zijn afhankelijk van het
USB-apparaat, de opname-indeling en de
instellingen. Ga naar de ondersteuningssite voor
meer informatie.
• Het maximum aantal gegevens dat kan worden
weergegeven, is als volgt.
– mappen (albums): 256
– bestanden (tracks): 2.000
• Laat een USB-apparaat niet in een geparkeerde
auto achter, omdat dit een storing tot gevolg kan
hebben.
• Het kan enige tijd duren voordat het afspelen wordt
gestart, afhankelijk van het aantal opgenomen
gegevens.
• Als u een MP3-/WMA-/AAC-bestand met VBR
(variabele bitsnelheid) afspeelt of snel vooruit-/
terugspoelt, wordt de verstreken speelduur wellicht
niet nauwkeurig weergegeven.
• Het afspelen van bestanden die zonder
gegevensverlies zijn gecomprimeerd, wordt niet
ondersteund.
De hoesafbeelding weergeven
(Hoesafbeelding)
Tijdens het afspelen van audio kunt u de
inhoudsinformatie controleren of de
hoesafbeelding (Hoesafbeelding)* van een
MP3-/WMA-/AAC-bestand op het USB-
apparaat weergeven op de monitor.
* De aanbevolen grootte is tussen 240 × 240 en
960 × 960 pixels.
Herhaaldelijk en willekeurig
afspelen
1 Druk tijdens het afspelen herhaaldelijk
op (1) (REP) of (2) (SHUF) tot de
gewenste instelling wordt
weergegeven.
* Wanneer twee of meer stations zijn gemaakt op het
USB-apparaat.
Als u wilt terugkeren naar de normale
weergavestand, selecteert u "REP-OFF" of
"SHUF-OFF".
Selecteer Actie
REP-TRACK Track herhaaldelijk
afspelen.
REP-ALBUM Album herhaaldelijk
afspelen.
SHUF-ALBUM Album in willekeurige
volgorde afspelen.
REP-DRIVE* Station herhaaldelijk
afspelen.

22
D:\Documents and Settings\takashi-shimomura\Desktop\DTP\848220S MEX-
DV1500U(EUR)\4120899211_MEX-DV1500U_ML\05NL02CD-E.fm
masterpage:Left
MEX-DV1500U
4-120-899-21 (1)
Naar de radio luisteren
Tip
Zie "Geavanceerde handelingen — Radio" op pagina 36 voor meer informatie over andere radiofuncties.
Met de kaartafstandsbediening
Druk op (SRC) in plaats van op (SOURCE) en op .m/M> in plaats van op (SEEK) –/+.
1
Druk herhaaldelijk op (SOURCE) tot "TUNER" wordt weergegeven.
2
Druk herhaaldelijk op (MODE) tot de gewenste band (FM1, FM2, FM3,
MW of LW) wordt weergegeven.
3
Stem af op de gewenste zender.
Automatisch afstemmen
Druk op (SEEK) +
/–.
Het zoeken stopt zodra een zender wordt ontvangen. Herhaal deze procedure tot de gewenste
zender wordt ontvangen.
Handmatig afstemmen
Houd (SEEK) +
/– ingedrukt tot de gewenste frequentie ongeveer is bereikt en druk vervolgens
herhaaldelijk op (SEEK) +
/– om nauwkeurig af te stemmen op de gewenste frequentie.
.m/M>
MODE
SRC
SEEK MODE
SOURCE
B
A
A Radioband/Functie
B Frequentie*
* Tijdens ontvangst van een RDS-zender wordt de
programmaservicenaam weergegeven. Zie "RDS"
op pagina 36 voor meer informatie.

23
D:\Documents and Settings\takashi-shimomura\Desktop\DTP\848220S MEX-
DV1500U(EUR)\4120899211_MEX-DV1500U_ML\05NL02CD-E.fm
masterpage:RightD:\Documents and Settings\takashi-shimomura\Desktop\DTP\848220S MEX-
DV1500U(EUR)\4120899211_MEX-DV1500U_ML\05NL02CD-E.fm
masterpage:Right
MEX-DV1500U
4-120-899-21 (1)
Geavanceerde handelingen — Discs
Dit hoofdstuk bevat de volgende gedeelten.
• Videospecifieke handelingen*
t pagina 23 tot en met 31
• Algemene handelingen voor video*/
audio
t pagina 32 tot en met 35
• Audiospecifieke handelingen
t pagina 35
* Met inbegrip van handelingen ten behoeve van
JPEG.
DivX
®
-/MPEG-4-/JPEG-
bestanden afspelen
Opmerking
Als de disc meerdere bestandstypen bevat, kan alleen
het geselecteerde bestandstype (audio/video/beeld)
worden afgespeeld. Als u DivX-/MPEG-4-
videobestanden of JPEG-beeldbestanden van een
dergelijke disc wilt afspelen, drukt u op tijdens het
afspelen, selecteert u het gewenste bestandstype
(video/beeld) om een lijst weer te geven en selecteert
u het gewenste bestand (pagina 35).
DivX-
®
/MPEG-4-video afspelen
U kunt het afspelen van DivX/MPEG-4 op
dezelfde manier regelen als andere videodiscs
(pagina 16), evenals bepaalde functies voor
audioweergave.
Tip
U kunt ook een bestand selecteren om af te spelen
met een lijst (Quick-BrowZer) (pagina 34).
JPEG-beeld weergeven
U kunt op dit apparaat een diavoorstelling van
JPEG-bestanden weergeven. De diavoorstelling
begint automatisch wanneer u een disc plaatst of
op u drukt. Volg stap 1 tot en met 4 van
"Videodiscs afspelen" op pagina 16 voor meer
informatie over het starten van de weergave.
Overige handelingen voor afspelen
Opmerkingen
• Als een groot beeld wordt gedraaid, kan het even
duren voordat deze wordt weergegeven.
• Progressive JPEG-bestanden kunnen niet worden
weergegeven.
Tip
U kunt ook een bestand selecteren om af te spelen
met een lijst (Quick-BrowZer) (pagina 34).
MPEG-4
u
.m/M>
ALBM
</,
.m/M>
u
Actie Druk op
Album (map)
overslaan
Hoofdeenheid:
(3) (ALBM –)/
(4) (ALBM +)
Albums (mappen)
blijven overslaan
Hoofdeenheid:
en houd (3) (ALBM –)/
(4) (ALBM +) ingedrukt
Actie Druk op
Het beeld draaien Afstandsbediening:
</, (draait telkens 90º)
Een beeld overslaan .m/M>
Een album
overslaan
Hoofdeenheid:
(3) (ALBM –)/
(4) (ALBM +)
Albums blijven
overslaan
Hoofdeenheid:
en houd (3) (ALBM –)/
(4) (ALBM +) ingedrukt

24
D:\Documents and Settings\takashi-shimomura\Desktop\DTP\848220S MEX-
DV1500U(EUR)\4120899211_MEX-DV1500U_ML\05NL02CD-E.fm
masterpage:Left
MEX-DV1500U
4-120-899-21 (1)
PBC-functies gebruiken
— Playback control
Het PBC-menu assisteert u bij de interactieve
bediening wanneer een PBC-compatibele VCD
wordt afgespeeld.
1 Start het afspelen van een PBC-
compatibele VCD.
Het PBC-menu wordt weergegeven.
2 Druk op de cijfertoetsen om het
gewenste item te selecteren en druk
op (ENTER).
3 Volg de instructies in het menu voor
interactieve handelingen.
Als u wilt terugkeren naar het vorige scherm,
drukt u op O.
Afspelen zonder de PBC-functie
1 Druk tijdens het afspelen op (OFF).
Het afspelen stopt.
2 Druk op de cijfertoetsen om het
gewenste item te selecteren en druk
op (ENTER).
"Play without PBC." wordt weergegeven en
het afspelen begint. Het PBC-menu wordt
niet weergegeven tijdens het afspelen.
Opmerkingen
• De menu-items en bedieningsprocedures
verschillen afhankelijk van de disc.
• Tijdens afspelen met PBC worden het tracknummer,
het weergave-item, enzovoort niet weergegeven in
het weergavestandmenu (pagina 24).
• Afspelen hervatten is niet beschikbaar tijdens
afspelen zonder PBC.
Tip
Als u afspelen met PBC wilt hervatten, stopt u het
afspelen door op (OFF) en vervolgens op u te
drukken.
Het weergavestandmenu
gebruiken
U kunt het weergavestandmenu op dit apparaat
gebruiken om het afspelen te regelen of de
instellingen voor het afspelen te configureren.
Als u het weergavestandmenu wilt weergeven,
drukt u op (VISUAL SETUP) tijdens het afspelen.
Als u het menu wilt verbergen, drukt u nogmaals
op (VISUAL SETUP).
Opmerkingen
• Tijdens het afspelen van een audiodisc is
(VISUAL SETUP) niet actief.
• Tijdens het afspelen van JPEG is (VISUAL SETUP)
alleen actief wanneer het beeld volledig wordt
weergegeven.
Tip
Als u op (VISUAL SETUP) drukt terwijl het afspelen is
gestopt, wordt het menu met beeldinstellingen (via de
monitor) weergegeven. U kunt daarin verschillende
instellingen configureren, bijvoorbeeld de schermtaal,
audioregeling, enzovoort (pagina 39).
Bijvoorbeeld tijdens het afspelen van een
DVD
A Items van het weergavestandmenu
Zie "Lijst met items van het
weergavestandmenu" op pagina 25 voor meer
informatie.
ENTER
OFF
O
Cijfertoetsen
MPEG-4
</M/m/,
ENTER
VISUAL
SETUP
O
Cijfertoetsen
12
(
67
)
018
(
034
)
T 1:35:55
1:ENGLISH
OFF
1:ENGLISH
2:FRENCH
3:SPANISH
PLAY
DVD VIDEO
SUBTITLE
Select :
ENTER
G
BCD
F
E
H
A
IJ

25
D:\Documents and Settings\takashi-shimomura\Desktop\DTP\848220S MEX-
DV1500U(EUR)\4120899211_MEX-DV1500U_ML\05NL02CD-E.fm
masterpage:RightD:\Documents and Settings\takashi-shimomura\Desktop\DTP\848220S MEX-
DV1500U(EUR)\4120899211_MEX-DV1500U_ML\05NL02CD-E.fm
masterpage:Right
MEX-DV1500U
4-120-899-21 (1)
B DVD: titelnummer/totaal
VCD: tracknummer/totaal*
1
JPEG: albumnummer/totaal
DivX/MPEG-4: albumnummer (map)/totaal
C DVD: hoofdstuknummer/totaal
JPEG: beeldnummer/totaal
DivX/MPEG-4: bestandsnummer/totaal
D Verstreken speelduur*
2
E Indeling
F Weergavestatus (PLAY N, PAUSE X,
enzovoort.)
G Huidige instelling
H Opties
I Geselecteerd item
J Naam van het geselecteerde item en/of
bedieningstips
*1 Tijdens het afspelen van een VCD met de
PBC-functie (pagina 24) wordt geen aanduiding
weergegeven.
*2 Tijdens JPEG-weergave wordt geen aanduiding
weergegeven.
Lijst met items van het
weergavestandmenu
Druk op </M/m/,/cijfertoetsen om een item
te selecteren en druk op (ENTER).
Als u wilt terugkeren naar het vorige scherm,
drukt u op O.
Zie de vermelde pagina's voor meer informatie.
* Met uitzondering van DVD-R/DVD-R DL/DVD-RW in
VR-stand.
Tip
Wanneer "SHUFFLE" of "REPEAT" is ingeschakeld of
"ANGLE" beschikbaar is, brandt het bijbehorende
selectievakje groen (bijvoorbeeld t
). Maar afhankelijk van de scène kunt u de
hoek mogelijk niet wijzigen, zelfs als het selectievakje
groen brandt.
TITLE, TRACK 33
Een af te spelen titel, scène of track selecteren.
ALBUM 33
Een af te spelen album of map selecteren.
CHAPTER 33
Een af te spelen hoofdstuk selecteren.
IMAGE 33
Een weer te geven beeld selecteren.
FILE 33
Een af te spelen videobestand selecteren.
TIME 33
De verstreken speelduur controleren; tijdcode
invoeren.
MPEG-4
MPEG-4
MPEG-4
AUDIO 17, 27
Audiotaal/-indeling/-kanaal wijzigen,
programma-indeling weergeven.
SUBTITLE 17
Ondertitels in- of uitschakelen, taal voor de
ondertitels instellen.
ANGLE 17
De hoek wijzigen.
*
CENTER ZOOM 29
Een beeld vergroten.
REPEAT 32
Titel/hoofdstuk/track/album/beeld/video
herhaaldelijk afspelen.
SHUFFLE 32
Hoofdstukken/tracks/beelden/videobestanden
in willekeurige volgorde afspelen.
*
PICTURE EQ 29
De beeldkwaliteit aanpassen.
MPEG-4
MPEG-4
MPEG-4
MPEG-4
MPEG-4

26
D:\Documents and Settings\takashi-shimomura\Desktop\DTP\848220S MEX-
DV1500U(EUR)\4120899211_MEX-DV1500U_ML\05NL02CD-E.fm
masterpage:Left
MEX-DV1500U
4-120-899-21 (1)
Tijd/tekstinformatie van de disc
bekijken
Tijdinformatie bekijken
De verstreken afspeeltijd en de resterende tijd
van de huidige titel, track, het huidige hoofdstuk,
enzovoort, kan worden bekeken tijdens de
weergave van video/beelden.
1 Druk tijdens het afspelen op (DSPL).
De huidige afspeelinformatie wordt
weergegeven.
2 Druk herhaaldelijk op (DSPL) om de
tijdinformatie om te schakelen.
Afhankelijk van de disc en de indeling verschilt
de tijdinformatie als volgt.
DVD-weergave
• T **:**:**
Verstreken afspeeltijd van de huidige titel
• T-**:**:**
Resterende afspeeltijd van de huidige titel
• C **:**:**
Verstreken afspeeltijd van het huidige
hoofdstuk
• C-**:**:**
Resterende afspeeltijd van het huidige
hoofdstuk
VCD-weergave
(Alleen bij het afspelen met versie 1.0/1.1 of
versie 2.0 zonder PBC-functie.)
• T **:**
Verstreken afspeeltijd van de huidige track
• T-**:**
Resterende afspeeltijd van de huidige track
•D **:**
Verstreken afspeeltijd van de huidige disc
•D-**:**
Resterende afspeeltijd van de huidige disc
JPEG-weergave
• Albumnummer/Totaal
• Beeldnummer/Totaal
DivX/MPEG-4 afspelen
• Albumnummer (map)/Totaal
• Bestandsnummer/Totaal
•T **:**
Verstreken afspeeltijd van het huidige bestand
Tekstinformatie bekijken
U kunt de tekstinformatie (albumnaam,
beeldnaam, enzovoort) van JPEG-/DivX-/
MPEG-4-bestanden bekijken.
* Als geen tekstinformatie beschikbaar is, wordt "NO
TEXT" weergegeven.
Afhankelijk van de disc en de indeling verschilt
de tekstinformatie als volgt.
JPEG-weergave
• Albumnaam (wanneer het albumnummer wordt
weergegeven)
• Beeldnaam (wanneer het beeldnummer wordt
weergegeven)
DivX/MPEG-4 afspelen
• Albumnaam (map) (wanneer het albumnummer
(map) wordt weergegeven)
• Bestandsnaam (wanneer het bestandsnummer
wordt weergegeven)
MPEG-4
DSPL
T 1:01:57
Tijdinformatie
037(325)
Image name
Album/beeld/map/bestandsnummer
Tekstinformatie*

27
D:\Documents and Settings\takashi-shimomura\Desktop\DTP\848220S MEX-
DV1500U(EUR)\4120899211_MEX-DV1500U_ML\05NL02CD-E.fm
masterpage:RightD:\Documents and Settings\takashi-shimomura\Desktop\DTP\848220S MEX-
DV1500U(EUR)\4120899211_MEX-DV1500U_ML\05NL02CD-E.fm
masterpage:Right
MEX-DV1500U
4-120-899-21 (1)
Audio-instellingen configureren
Opmerking
Discs in DTS-indeling worden niet ondersteund. Er
wordt geen geluid weergegeven als de DTS-indeling is
geselecteerd.
De audiotaal/-indeling
wijzigen
Voor DVD kan de audiotaal worden gewijzigd
als op de disc sporen met meer talen zijn
opgenomen. Voor DVD/DivX kunt u de audio-
indeling wijzigen wanneer een af te spelen disc is
opgenomen in meer dan één audio-indeling
(bijvoorbeeld Dolby Digital).
1 Druk tijdens het afspelen herhaaldelijk
op (AUDIO) tot de gewenste audiotaal/
indeling wordt weergegeven.
* Bij het afspelen van DivX wordt informatie
weergegeven over audio-indeling/audiokanalen
(bijvoorbeeld "MP3").
Voor de audiotaal worden de beschikbare
talen afwisselend weergegeven.
Wanneer het invoerveld van 4 tekens
verschijnt, voert u de taalcode in (pagina 59)
voor de gewenste taal.
Wanneer dezelfde taal meer dan eens wordt
weergegeven, is de disc opgenomen in
meerdere audio-indelingen.
Het audiokanaal wijzigen
Wanneer u VCD/CD/MP3/WMA/AAC afspeelt,
kunt u het rechter- of linkerkanaal selecteren om
dit te beluisteren via zowel de rechter- als de
linkerluidspreker.
Onderstaand vindt u de opties.
STEREO (ST): standaardstereogeluid
(standaardinstelling)
1/L (L): geluid linkerkanaal (mono)
2/R (R): geluid rechterkanaal (mono)
1 Druk tijdens het afspelen herhaaldelijk
op (AUDIO) tot het gewenste
audiokanaal wordt weergegeven.
Bijvoorbeeld tijdens het afspelen van een
MP3
Opmerking
Afhankelijk van de disc is het soms niet mogelijk de
audio-instelling te wijzigen.
Tip
U kunt tevens de instelling voor videodiscs wijzigen
door "AUDIO" te selecteren in het
weergavestandmenu (pagina 24).
De programma-indeling bekijken
U kunt het aantal kanalen bekijken en de positie
van de weergavecomponenten voor de DVD
VIDEO die wordt afgespeeld.
1 Druk tijdens het afspelen op
(VISUAL SETUP).
Het weergavestandmenu wordt weergegeven.
M/m
ENTER
AUDIO
SYSTEM
SETUP
VISUAL
SETUP
1:ENGLISH Dolby D
Audiotaal/-indeling*
vervolg op volgende pagina t
TRACK NAME
ALBUM NAME
ARTIST NAME
MP3
0003/1000 ST
3:17
SHUF
Audiokanaal

28
D:\Documents and Settings\takashi-shimomura\Desktop\DTP\848220S MEX-
DV1500U(EUR)\4120899211_MEX-DV1500U_ML\05NL02CD-E.fm
masterpage:Left
MEX-DV1500U
4-120-899-21 (1)
2 Druk op M/m om (AUDIO) te
selecteren.
De programma-indeling wordt weergegeven.
* Afhankelijk van de disc wordt "PCM", "DOLBY
DIGITAL", enzovoort weergegeven.
De letters in het scherm programma-indeling
staan voor de volgende geluidscomponenten en
hun positie.
: voor (links)
: voor (rechts)
: midden
: achter (links)
: achter (rechts)
: achter (mono): de achtercomponent van
het met Dolby Surround bewerkte signaal
en het Dolby Digital-signaal
: LFE-signaal (lage frequentie-effecten)
De naam van de programma-indeling en de
kanaalnummers worden als volgt weergegeven.
Voorbeeld: Dolby Digital 5.1 ch
Als u het weergavestandmenu wilt verbergen,
drukt u op (VISUAL SETUP).
Het audio-uitvoerniveau
aanpassen — DVD-niveau
U kunt het audio-uitvoerniveau aanpassen van
een DVD opgenomen in Dolby Digital-indeling
om de verschillen in volumeniveau te reduceren
tussen disc en bron.
1 Druk tijdens het afspelen op
(SYSTEM SETUP).
Het systeeminstelitem wordt weergegeven op
de hoofdeenheid.
2 Druk op M/m om "DVD-LEVEL" te
selecteren en druk op (ENTER).
3 Druk op m om "ADJST-ON" in te
stellen en druk op (ENTER).
4 Druk op M/m om "DOLBY-ADJ" te
selecteren en druk op (ENTER).
5 Druk op M/m om het uitvoerniveau te
regelen.
U kunt het uitvoerniveau in stappen
aanpassen tussen –10 en +10.
6 Druk op (ENTER).
De instelling is voltooid.
Als u het scherm met systeeminstellingen wilt
verbergen, drukt u op (SYSTEM SETUP).
Met de hoofdeenheid
Druk op (SETUP) in plaats van op (SYSTEM SETUP),
draai de regelknop in plaats van op M/m te drukken,
druk op de regelknop in plaats van op (ENTER).
PLAY
DVD VIDEO
L C
LFE
LS
R
RS
12
(
67
)
018
(
034
)
T 1:35:55
1:ENGLISH Dolby D
PROGRAM FORMAT
DOLBY DIGITAL
3/2.1
Huidige programma-indeling
Huidige audio-indeling*
DOLBY DIGITAL
3 / 2 . 1
Achtercomponent × 2
Voorcomponent × 2 +
Middencomponent × 1
LFE-component × 1

29
D:\Documents and Settings\takashi-shimomura\Desktop\DTP\848220S MEX-
DV1500U(EUR)\4120899211_MEX-DV1500U_ML\05NL02CD-E.fm
masterpage:RightD:\Documents and Settings\takashi-shimomura\Desktop\DTP\848220S MEX-
DV1500U(EUR)\4120899211_MEX-DV1500U_ML\05NL02CD-E.fm
masterpage:Right
MEX-DV1500U
4-120-899-21 (1)
Beelden vergroten
U kunt beelden vergroten.
1 Druk tijdens het afspelen op
(VISUAL SETUP).
Het weergavestandmenu wordt weergegeven.
2 Druk op M/m om (CENTER
ZOOM) te selecteren en druk op
(ENTER).
De huidige optie wordt weergegeven.
3 Druk op M/m om de gewenste optie te
selecteren (×1, ×1.6*) en druk op
(ENTER).
* Het beeld kan korrelig worden.
Het beeld is vergroot.
Als u het weergavestandmenu wilt verbergen,
drukt u op (VISUAL SETUP).
Druk op </M/m/, om het beeld te
verschuiven.
Als u de oorspronkelijke schaal wilt herstellen,
selecteert u "×1" in stap 3.
Opmerkingen
• Afhankelijk van de disc is het soms niet mogelijk de
vergroting te wijzigen.
• Wanneer u het afspelen hervat, wordt het beeld
weergegeven op de oorspronkelijk schaal.
• Als u terugkeert naar het menu/hoofdmenu van een
disc, wordt de vergroting geannuleerd.
De beeldkwaliteit aanpassen
— Picture EQ
U kunt de beeldkwaliteit aanpassen aan de
helderheid in de auto.
1 Druk tijdens het afspelen op
(VISUAL SETUP).
Het weergavestandmenu wordt weergegeven.
2 Druk op M/m om (PICTURE
EQ) te selecteren en druk op (ENTER).
De huidige optie wordt weergegeven.
3 Druk op M/m om de gewenste optie te
selecteren en druk op (ENTER).
De opties verschillen afhankelijk van de
instelling bij beeldinstellingen (pagina 43).
Bij beeldinstellingen worden de instellingen van
"PICTURE EQ" in "CUSTOM SETUP" de
opties als volgt overgeschakeld.
AUTO: schakelt automatisch tussen de opties
voor gebruik bij avond/daglicht volgens de
dimmerinstellingen bij de systeeminstellingen
(pagina 46).
LIGHT OFF: geeft de opties weer voor gebruik
bij daglicht.
LIGHT ON: geeft de opties weer voor gebruik
bij avond.
Onderstaand vindt u de opties voor elk van de
instellingen.
MPEG-4
</M/m/,
ENTER
VISUAL
SETUP
12
(
67
)
018
(
034
)
T 1:35:55
x1
x1
x1.6
PLAY
DVD VIDEO
vervolg op volgende pagina t
MPEG-4
</M/m/,
ENTER
VISUAL
SETUP
12
(
67
)
018
(
034
)
T 1:35:55
DAYTIME
SUNSET
SHINE
CUSTOM
NORMAL
NORMAL
PLAY
DVD VIDEO

30
D:\Documents and Settings\takashi-shimomura\Desktop\DTP\848220S MEX-
DV1500U(EUR)\4120899211_MEX-DV1500U_ML\05NL02CD-E.fm
masterpage:Left
MEX-DV1500U
4-120-899-21 (1)
Voor alle instellingen
Ingesteld op "LIGHT OFF"/"AUTO" (met
"DIM-OFF")
Ingesteld op "LIGHT ON"/"AUTO" (met
"DIM-ON")
De beeldkwaliteit aanpassen
Met de optie "CUSTOM" kunt u eigen
instellingen opgeven voor de beeldkwaliteit door
de kleurtonen aan te passen. U kunt de
gewijzigde instellingen opslaan, zowel voor
"LIGHT OFF" als voor "LIGHT ON".
1 Druk tijdens het afspelen op
(VISUAL SETUP).
Het weergavestandmenu wordt weergegeven.
2 Druk op M/m om (PICTURE
EQ) te selecteren en druk op (ENTER).
De huidige optie wordt weergegeven.
3 Druk op M/m om "CUSTOM" te
selecteren en druk op (ENTER).
4 Druk op M/m om de gewenste
kleurtoon te selecteren en druk op
</, om het niveau aan te passen.
5 Druk op (ENTER).
Als u het weergavestandmenu wilt verbergen,
drukt u op (VISUAL SETUP).
Discs vergrendelen —
Kinderbeveiliging
*
* Met uitzondering van DVD-R/DVD-R DL/DVD-RW in
VR-stand.
U kunt een disc vergrendelen of
afspeelbeperkingen instellen volgens een vooraf
ingesteld niveau, zoals de leeftijd van de kijker.
Beperkte scènes worden vergrendeld of
vervangen door andere scènes wanneer een DVD
die compatibel is met kinderbeveiliging, wordt
afgespeeld.
Kinderbeveiliging inschakelen
1 Druk op (VISUAL SETUP) terwijl het
apparaat is uitgeschakeld.
Het menu met beeldinstellingen wordt
weergegeven.
2 Druk op M/m om (CUSTOM SETUP)
te selecteren en druk op (ENTER).
De bijbehorende items worden weergegeven.
3 Druk op M/m om "PARENTAL
CONTROL" te selecteren en druk op
(ENTER).
De opties worden weergegeven.
NORMAL: normale beeldkwaliteit.
CUSTOM: door de gebruiker aan te passen
instellingen (pagina 30).
DAYTIME: geschikt voor een heldere
omgeving.
SUNSET: geschikt voor de schemering.
SHINE: geschikt voor een zeer heldere
omgeving (bijvoorbeeld wanneer zonlicht op de
monitor valt).
NIGHT: de helderheid van de monitor wordt
verminderd zodat u tijdens het rijden 's avonds
niet wordt afgeleid.
MIDNIGHT: de helderheid van de monitor
wordt sterker verminderd dan bij de instelling
"NIGHT".
THEATER: maakt de monitor helderder,
geschikt wanneer u 's avonds naar een heldere
monitor wilt kijken.
RETURN
Cancel :
Select : Set :
USER CUSTOM SETUP
COLOR 0
BRIGHT 0
SHARPNESS 0
CLEAR
VISUAL
SETUP
O
M/m
ENTER
Cijfertoetsen
CUSTOM SETUP
PARENTAL CONTROL :
DivX VOD :
SLIDE SHOW TIME :
MULTI-DISC RESUME :
PLAY LIST PLAY :
PICTURE EQ :
OFF
OFF
ONt
PLAYERt
PASSWORDt
AUTO

31
D:\Documents and Settings\takashi-shimomura\Desktop\DTP\848220S MEX-
DV1500U(EUR)\4120899211_MEX-DV1500U_ML\05NL02CD-E.fm
masterpage:RightD:\Documents and Settings\takashi-shimomura\Desktop\DTP\848220S MEX-
DV1500U(EUR)\4120899211_MEX-DV1500U_ML\05NL02CD-E.fm
masterpage:Right
MEX-DV1500U
4-120-899-21 (1)
4 Druk op M/m om "ON t" te selecteren
en druk op (ENTER).
Het invoerscherm voor het wachtwoord wordt
weergegeven.
5 Druk op de cijfertoetsen om een
wachtwoord in te voeren en druk op
(ENTER).
Het bevestigingsscherm wordt weergegeven.
6 Voer ter bevestiging nogmaals het
wachtwoord in met de cijfertoetsen en
druk op (ENTER).
De instelling is voltooid.
Als u een ingevoerd cijfer wilt wissen, drukt u op
(CLEAR).
Als u wilt terugkeren naar het vorige scherm,
drukt u op O.
Als u het menu met beeldinstellingen wilt
verbergen, drukt u op (VISUAL SETUP).
Kinderbeveiliging uitschakelen
Selecteer "OFF t" in stap 4 hierboven en voer
het wachtwoord in.
Als kinderbeveiliging wordt uitgeschakeld,
wordt "Parental control canceled" weergegeven.
Het wachtwoord wijzigen
Selecteer "PASSWORD t" in stap 4 hierboven,
voer het huidige wachtwoord in, voer een nieuw
wachtwoord in en voer het nogmaals in ter
bevestiging.
Regio en bijbehorend
filmbeperkingsniveau wijzigen
De beperkingsniveaus kunnen worden ingesteld
aan de hand van de regio en het bijbehorende
filmbeperkingsniveau.
1 Druk op (VISUAL SETUP) terwijl het
apparaat is uitgeschakeld.
Het menu met beeldinstellingen wordt
weergegeven.
2 Druk op M/m om (CUSTOM SETUP)
te selecteren en druk op (ENTER).
De bijbehorende items worden weergegeven.
3 Druk op M/m om "PARENTAL
CONTROL" te selecteren en druk op
(ENTER).
De opties worden weergegeven.
4 Druk op M/m om "PLAYER t " te
selecteren en druk op (ENTER).
Als de kinderbeveiliging al is ingeschakeld,
verschijnt het scherm voor het invoeren van
het wachtwoord. Als u de instelling wilt
wijzigen, voert u het wachtwoord in en drukt
u op (ENTER).
5 Druk op M/m om "STANDARD" te
selecteren en druk op (ENTER).
De opties worden weergegeven.
6 Druk op M/m om de gewenste regio te
selecteren en de bijbehorende
filmclassificatie toe te passen en druk
op (ENTER).
De regio wordt geselecteerd.
Wanneer u "OTHERS t" selecteert, voert u
met de cijfertoetsen de regiocode in uit de
"Lijst met regiocodes" op pagina 59.
7 Druk op M/m om "LEVEL" te
selecteren en druk op (ENTER).
De opties worden weergegeven.
Hoe lager het getal, hoe strenger het
beperkingsniveau.
8 Druk op M/m om de gewenste
classificatie te selecteren en druk op
(ENTER).
De instelling is voltooid.
Als u wilt terugkeren naar het vorige scherm,
drukt u op O.
Als u het menu met beeldinstellingen wilt
verbergen, drukt u op (VISUAL SETUP).
PARENTAL CONTROL
Enter a new 4-digit password,
then press .
ENTER
CUSTOM SETUP
PARENTAL CONTROL:
LEVEL :
STANDARD :
USA
USA
OTHERSt
8:
CUSTOM SETUP
PARENTAL CONTROL:
LEVEL :
STANDARD :
8:
1:
2:
3:
4:
5:
G
PG
PG-13
CUSTOM SETUP

32
D:\Documents and Settings\takashi-shimomura\Desktop\DTP\848220S MEX-
DV1500U(EUR)\4120899211_MEX-DV1500U_ML\05NL02CD-E.fm
masterpage:Left
MEX-DV1500U
4-120-899-21 (1)
Herhaaldelijk en willekeurig
afspelen
1 Druk tijdens het afspelen herhaaldelijk
op (1) (REP) of (2) (SHUF) op de
hoofdeenheid tot de gewenste optie
wordt weergegeven.
Herhaaldelijk of willekeurig afspelen wordt
gestart.
Onderstaand vindt u de opties voor herhalen en
de inschakelvolgorde voor elke disc en indeling.
Onderstaand vindt u de opties voor willekeurig
afspelen en de inschakelvolgorde voor elke disc
en indeling.
*1 Alleen beschikbaar bij het afspelen van een versie
1.0/1.1-VCD of een versie 2.0-VCD zonder
PBC-functie.
*2 Met uitzondering van DVD-R/DVD-R DL/DVD-RW
in VR-stand.
Als u wilt terugkeren naar de normale
weergavestand, selecteert u "OFF".
Opmerkingen
• Als u terugkeert naar het menu/hoofdmenu van een
disc, wordt herhaaldelijk/willekeurig afspelen
geannuleerd.
• Herhaaldelijk/willekeurig afspelen kan niet worden
ingesteld in het menu/hoofdmenu van de disc.
Instellen vanuit het
weergavestandmenu
1 Druk tijdens het afspelen op
(VISUAL SETUP).
Het weergavestandmenu wordt weergegeven.
Disc/indeling Opties
OFF
CHAPTER: het huidige
hoofdstuk herhalen.
TITLE: de huidige titel
herhalen.
*
1
OFF
TRACK: de huidige track
herhalen.
OFF
TRACK: de huidige track
herhalen.
ALBUM: het huidige album
herhalen.
OFF
IMAGE: het huidige beeld
herhalen.
ALBUM: het huidige album
herhalen.
OFF
FILE: het huidige videobestand
herhalen.
ALBUM: het huidige album
(map) herhalen.
MPEG-4
SHUFREP
MPEG-4
Disc/indeling Opties
*
2
OFF
TITLE: de hoofdstukken van de
huidige titel in willekeurige
volgorde afspelen.
*
1
OFF
DISC: de tracks op de huidige
disc in willekeurige volgorde
afspelen.
OFF
ALBUM: de tracks/beelden/
videobestanden in het huidige
album (map) in willekeurige
volgorde afspelen.
MPEG-4
MPEG-4
M/m
ENTER
VISUAL
SETUP

33
D:\Documents and Settings\takashi-shimomura\Desktop\DTP\848220S MEX-
DV1500U(EUR)\4120899211_MEX-DV1500U_ML\05NL02CD-E.fm
masterpage:RightD:\Documents and Settings\takashi-shimomura\Desktop\DTP\848220S MEX-
DV1500U(EUR)\4120899211_MEX-DV1500U_ML\05NL02CD-E.fm
masterpage:Right
MEX-DV1500U
4-120-899-21 (1)
2 Druk op M/m om of te
selecteren en druk op (ENTER).
3 Druk op M/m om de gewenste optie te
selecteren en druk op (ENTER).
Herhaaldelijk of willekeurig afspelen wordt
gestart.
Druk op (VISUAL SETUP) om het
weergavestandmenu te verbergen.
Opmerking
De geselecteerde weergavestand wordt geannuleerd
wanneer de disc die wordt afgespeeld, wordt
uitgeworpen.
Rechtstreeks afspelen
U kunt een bepaald punt rechtstreeks vinden
door het titelnummer, hoofdstuknummer,
enzovoort op te geven.
1 Druk tijdens het afspelen op de
cijfertoetsen om een item (track, titel,
enzovoort) in te voeren en druk op
(ENTER).
Het afspelen wordt gestart vanaf het begin
van het geselecteerde punt.
Instellen vanuit het
weergavestandmenu
Afhankelijk van de disc en de indeling
verschillen rechtstreeks af te spelen items als
volgt.
* Alleen beschikbaar bij het afspelen van een VCD
zonder PBC-functie.
1 Druk tijdens het afspelen op
(VISUAL SETUP).
Het weergavestandmenu wordt weergegeven.
PLAY
DVD VIDEO
12
(
67
)
018
(
034
)
T 1:35:55
OFF
CHAPTER
TITLE
OFF
MPEG-4
CLEAR
VISUAL
SETUP
M/m
ENTER
Cijfertoetsen
Disc/indeling Items
TITLE
Het afspelen wordt gestart vanaf
de geselecteerde titel.
CHAPTER
Het afspelen wordt gestart vanaf
het geselecteerde hoofdstuk.
TIME
Het afspelen wordt gestart op
het punt dat wordt bepaald door
de ingevoerde tijdcode.
*
TRACK
Het afspelen wordt gestart vanaf
de geselecteerde track.
ALBUM
Het afspelen wordt gestart vanaf
het geselecteerde album.
IMAGE
Het afspelen wordt gestart vanaf
de geselecteerde beeld.
ALBUM
Het afspelen wordt gestart vanaf
het geselecteerde album (map).
FILE
Het afspelen wordt gestart vanaf
het geselecteerde bestand.
vervolg op volgende pagina t
MPEG-4
MPEG-4

34
D:\Documents and Settings\takashi-shimomura\Desktop\DTP\848220S MEX-
DV1500U(EUR)\4120899211_MEX-DV1500U_ML\05NL02CD-E.fm
masterpage:Left
MEX-DV1500U
4-120-899-21 (1)
2 Druk op M/m om het gewenste item te
selecteren en druk op (ENTER).
Het getal tussen haakjes geeft het totale aantal
geselecteerde items weer.
3 Druk op de cijfertoetsen om een
itemnummer of tijdcode in te voeren.
Als u bijvoorbeeld rechtstreeks naar 2 uur,
10 minuten en 20 seconden wilt gaan, voert u
"21020" in.
Als u een ingevoerd cijfer wilt wissen, drukt u
op (CLEAR).
4 Druk op (ENTER).
Het afspelen wordt gestart vanaf het
geselecteerde punt.
Druk op (VISUAL SETUP) om het
weergavestandmenu te verbergen.
Lijst met tracks/beelden/
videobestanden weergeven
— Quick-BrowZer
Een track/beeld/videobestand
selecteren
U kunt een lijst met albums/mappen/tracks/
beelden/videobestanden op de monitor
weergeven en een item uit de lijst kiezen om het
af te spelen.
Deze functie is met name handig voor een disc in
MP3-/WMA-/AAC-/JPEG-/DivX-/MPEG-4-
indeling die veel albums/tracks/enzovoort bevat.
1 Druk tijdens het afspelen op .
De lijst met tracks/beelden/videobestanden
van de huidige disc/album*/map* wordt
weergegeven.
Als u wilt terugkeren/doorgaan naar de
vorige/volgende pagina, drukt u op </,.
Als u een niveau omhoog wilt gaan, drukt u
op .*
Druk op M/m om de gewenste map te
selecteren en druk op (ENTER).*
* Alleen bij het afspelen van MP3/WMA/AAC/
JPEG/DivX/MPEG-4.
2 Druk op M/m om de gewenste track/
beeld/videobestand te selecteren en
druk op (ENTER).
Het afspelen van de geselecteerde track/
beeld/videobestand wordt gestart.
Met de hoofdeenheid
Draai de regelknop in plaats van op M/m te drukken,
druk op (SEEK) –/+ in plaats van op </,, druk op
de regelknop in plaats van op (ENTER).
PLAY
DVD VIDEO
- -
(
67
)
018
(
034
)
T 1:35:55
</M/m/,
ENTER
MPEG-4
TRACK NAME
ALBUM NAME
ARTIST NAME
LIST UP VIDEO FILES
LIST UP IMAGE FILES
MP3
0003/1000 ST
3:17
ROOT
MUSIC FOLDER
01 TRACK 01
02 TRACK 02
03 TRACK 03
04 TRACK 04
05 TRACK 05

35
D:\Documents and Settings\takashi-shimomura\Desktop\DTP\848220S MEX-
DV1500U(EUR)\4120899211_MEX-DV1500U_ML\05NL02CD-E.fm
masterpage:RightD:\Documents and Settings\takashi-shimomura\Desktop\DTP\848220S MEX-
DV1500U(EUR)\4120899211_MEX-DV1500U_ML\05NL02CD-E.fm
masterpage:Right
MEX-DV1500U
4-120-899-21 (1)
Een bestandstype selecteren
Als de disc meerdere bestandstypen bevat, kan
alleen het geselecteerde bestandstype (audio/
video/beeld) worden afgespeeld. De
afspeelvolgorde van bestandstypen is ingesteld
op audio, video en vervolgens beeld (als de disc
bijvoorbeeld videobestanden en beeldbestanden
bevat, worden alleen videobestanden
afgespeeld). U kunt het bestandstype selecteren
waarvan u een lijst wilt weergeven en vervolgens
het bestand selecteren dat u wilt afspelen.
1 Druk tijdens het afspelen op .
2 Druk op M/m om het bestandstype te
selecteren waarvan u een lijst wilt
weergeven en druk op (ENTER).
Als u een lijst met MP3-, WMA- en AAC-
bestanden wilt weergeven, selecteert u "LIST
UP AUDIO FILES".
Als u een lijst met DivX-/MPEG-4-bestanden
wilt weergeven, selecteert u "LIST UP
VIDEO FILES".
Als u een lijst met JPEG-bestanden wilt
weergeven, selecteert u "LIST UP IMAGE
FILES".
3 Druk op M/m om het gewenste bestand
te selecteren en druk op (ENTER).
Het geselecteerde bestand wordt afgespeeld.
Met de hoofdeenheid
Draai de regelknop in plaats van op M/m te drukken,
druk op de regelknop in plaats van op (ENTER).
Informatie van een audiodisc
bekijken
Tijdens het afspelen van audio kunt u de
discinformatie controleren of de hoesafbeelding
(Hoesafbeelding)* van een MP3-/WMA-/AAC-
bestand weergeven op de monitor.
* De aanbevolen grootte is tussen 240 × 240 en 960 ×
960 pixels.
Bijvoorbeeld tijdens het afspelen van een
MP3
A Tracknummer of tracknaam
Discnaam/Albumnaam
Naam van de artiest
B Indeling
C Weergavestatus (N, X, enzovoort.)
D Huidig audiokanaal
Tijdens het afspelen van CD/MP3/WMA/
AAC kan het audiokanaal worden gewijzigd.
Zie "Het audiokanaal wijzigen" op pagina 27
voor meer informatie.
E Tracknummer/Totaal
F Verstreken weergavetijd
G Huidige weergavestand
H Bedieningstips
Tip
Met een lijst (Quick-BrowZer) kunt u een track
selecteren om af te spelen (pagina 34).
MPEG-4
TRACK NAME
ALBUM NAME
ARTIST NAME
MP3
0003/1000 ST
3:17
SHUF
To list up, press .
BROWSE
B
E
H
CD
F
A
G

36
D:\Documents and Settings\takashi-shimomura\Desktop\DTP\848220S MEX-
DV1500U(EUR)\4120899211_MEX-DV1500U_ML\05NL02CD-E.fm
masterpage:Left
MEX-DV1500U
4-120-899-21 (1)
Geavanceerde handelingen — Radio
Zenders opslaan en ontvangen
Let op
Als u afstemt op zenders tijdens het rijden, moet
u de BTM-functie (geheugen voor beste
afstemming) gebruiken om ongelukken te
vermijden.
Automatisch opslaan — BTM
1 Druk herhaaldelijk op (SRC) tot
"TUNER" wordt weergegeven op de
hoofdeenheid.
Druk herhaaldelijk op (MODE) om de band
te wijzigen. U kunt FM1, FM2, FM3, MW of
LW selecteren.
2 Druk op (SYSTEM SETUP).
De systeeminstelitems worden weergegeven.
3 Druk op M/m om "BTM" te selecteren
en druk op (ENTER).
Het apparaat slaat de zenders op volgorde van
frequentie op onder de cijfertoetsen ((1) tot
en met (6)).
Er klinkt een pieptoon wanneer de instelling
is opgeslagen.
Met de hoofdeenheid
Druk op (SOURCE) in plaats van op (SRC), druk op
(SETUP) in plaats van op (SYSTEM SETUP), draai de
regelknop in plaats van op M/m te drukken, druk op de
regelknop in plaats van op (ENTER).
Handmatig opslaan
1 Als u de zender ontvangt die u wilt
opslaan, houdt u een cijfertoets
((1) tot en met (6)) ingedrukt tot
"MEM" wordt weergegeven op de
hoofdeenheid.
De aanduiding voor de cijfertoets verschijnt
op de hoofdeenheid.
Opmerking
Als u een andere zender opslaat onder dezelfde
cijfertoets, wordt de eerder opgeslagen zender
vervangen.
Tip
Als een RDS-zender wordt opgeslagen, wordt de AF-/
TA-instelling ook opgeslagen (pagina 37).
Opgeslagen zenders ontvangen
1 Selecteer de band en druk vervolgens
op een cijfertoets ((1) tot en met (6)).
RDS
Overzicht
FM-zenders met de RDS-dienst
(radiogegevenssysteem) sturen onhoorbare
digitale informatie mee met het gewone
radioprogrammasignaal.
Schermitems
A Radioband, functie
B TA/ TP*
1
C Frequentie*
2
(programmaservicenaam),
voorinstelnummer, klok, RDS-gegevens
*1 "TA" knippert tijdens de verkeersinformatie. "TP"
gaat branden zodra een dergelijke zender wordt
ontvangen.
*2 Als u de RDS-zender ontvangt, wordt " *" links van
de frequentieaanduiding weergegeven.
Als u schermitems C wilt wijzigen, drukt u op
(DSPL).
M/m
ENTER
SRC
MODE
SYSTEM
SETUP
Cijfertoetsen
AF/TA
(PTY)
DSPL
Regelknop
Cijfertoetsen
B
C
A

37
D:\Documents and Settings\takashi-shimomura\Desktop\DTP\848220S MEX-
DV1500U(EUR)\4120899211_MEX-DV1500U_ML\05NL02CD-E.fm
masterpage:RightD:\Documents and Settings\takashi-shimomura\Desktop\DTP\848220S MEX-
DV1500U(EUR)\4120899211_MEX-DV1500U_ML\05NL02CD-E.fm
masterpage:Right
MEX-DV1500U
4-120-899-21 (1)
RDS-diensten
Dit apparaat biedt automatisch RDS-diensten op
de volgende manier:
Opmerkingen
• In bepaalde landen/regio's zijn wellicht niet alle
RDS-functies beschikbaar.
• RDS functioneert niet als het ontvangstsignaal te
zwak is of als de zender waarop u hebt afgestemd,
geen RDS-gegevens verzendt.
AF en TA instellen
Onderstaand vindt u de AF-/TA-instellingen en
de inschakelvolgorde.
AF-ON: AF inschakelen en TA uitschakelen.
TA-ON: TA inschakelen en AF uitschakelen.
AF, TA-ON: AF en TA inschakelen.
AF, TA-OFF: AF en TA uitschakelen.
1 Druk herhaaldelijk op (AF/TA) tot de
gewenste instelling wordt
weergegeven.
RDS-zenders opslaan met de AF- en
TA-instelling
U kunt RDS-zenders vooraf instellen met de
AF-/TA-instelling. Als u de BTM-functie
gebruikt, worden alleen RDS-zenders met
dezelfde AF-/TA-instelling opgeslagen.
Als u handmatig vooraf instelt, kunt u zowel
RDS- als niet-RDS-zenders instellen, elk met
hun AF-/TA-instelling.
1 Stel AF/TA in en sla de zender vervolgens op
met BTM of handmatig.
Noodberichten ontvangen
Als AF of TA is ingeschakeld, wordt de
geselecteerde bron automatisch onderbroken
door de noodberichten.
Tip
Als u het volume aanpast tijdens een verkeersbericht,
wordt dat volume opgeslagen in het geheugen voor
volgende verkeersberichten, onafhankelijk van het
normale volume.
Een regionaal programma blijven
beluisteren — REG
Als de AF-functie is ingeschakeld: de
fabrieksinstelling van het apparaat beperkt de
ontvangst tot een bepaalde regio, zodat er niet
wordt overgeschakeld naar een andere regionale
zender met een sterkere frequentie.
Wanneer u het ontvangstgebied van het regionale
programma verlaat, stelt u tijdens FM-ontvangst
"REG-OFF" in bij de systeeminstellingen
(pagina 46).
Opmerking
Deze functie werkt niet in het Verenigd Koninkrijk en
bepaalde andere gebieden.
Local Link-functie (alleen voor het
Verenigd Koninkrijk)
Met deze functie kunt u andere lokale zenders in
het gebied selecteren, ook als deze niet zijn
opgeslagen onder de cijfertoetsen.
1 Druk tijdens FM-ontvangst op een cijfertoets
((1) tot en met (6)) waaronder een lokale
zender is opgeslagen.
2 Druk binnen 5 seconden nogmaals op een
cijfertoets van de lokale zender.
Herhaal dit tot de lokale zender wordt
ontvangen.
AF (alternatieve frequenties)
Hiermee wordt de zender met het sterkste
signaal in een netwerk geselecteerd en wordt
opnieuw op deze zender afgestemd. Als u deze
functie gebruikt, kunt u onafgebroken naar
hetzelfde programma luisteren tijdens een lange
rit zonder dat u steeds handmatig op dezelfde
zender hoeft af te stemmen.
TA (verkeersinformatie)/
TP (verkeersprogramma)
Hiermee ontvangt u de huidige
verkeersinformatie/-programma's. De huidige
bron wordt onderbroken door eventuele
verkeersinformatie/-programma's.
PTY (programmatypen)
Hiermee geeft u het ontvangen programmatype
weer. Hiermee zoekt u ook naar het
geselecteerde programmatype.
CT (kloktijd)
Met de CT-gegevens van de RDS-uitzending
wordt de klok ingesteld.

38
D:\Documents and Settings\takashi-shimomura\Desktop\DTP\848220S MEX-
DV1500U(EUR)\4120899211_MEX-DV1500U_ML\05NL02CD-E.fm
masterpage:Left
MEX-DV1500U
4-120-899-21 (1)
PTY selecteren
1 Houd (AF/TA) (PTY) ingedrukt tijdens
FM-ontvangst.
De naam van het huidige programmatype
verschijnt als de zender PTY-gegevens
uitzendt.
2 Draai de regelknop om het
programmatype te selecteren.
3 Druk op de regelknop.
Het apparaat zoekt een zender die het
geselecteerde programmatype uitzendt.
Programmatypen
Opmerking
U kunt deze functie niet gebruiken in bepaalde landen/
regio's waar geen PTY-gegevens beschikbaar zijn.
CT instellen
1 Stel "CT-ON" in bij de
systeeminstellingen (pagina 45).
Opmerkingen
• Het is mogelijk dat de CT-functie niet werkt, ook al
wordt er wel een RDS-zender ontvangen.
• Er kan een verschil zijn tussen de tijd van de
CT-functie en de werkelijke tijd.
Geluidsaanpassing
De geluidskenmerken
aanpassen
U kunt de geluidskenmerken regelen volgens uw
eigen voorkeur.
Onderstaand vindt u de in te stellen items en de
inschakelvolgorde.
EQ3: u kunt een equalizercurve kiezen uit
7 muzieksoorten.
LOW, MID, HI*
1
: regelt het volumeniveau van
de geselecteerde band voor de aangepaste
EQ3-instelling.
BAL (balans): regelt de geluidsbalans tussen de
linker- en rechterluidsprekers.
FAD (fader): regelt het relatieve niveau tussen de
voor- en achterluidsprekers.
SUB (subwoofervolume)*
2
: regelt het volume
van de subwoofer. ("ATT" is de laagste
instelling.)
*1 Wordt alleen weergegeven wanneer EQ3 is
ingeschakeld.
*2 Als de audio-uitvoer is ingesteld op "SUB-OUT"
(pagina 45).
1 Druk tijdens het afspelen/de radio-
ontvangst herhaaldelijk op (SOUND)
tot de gewenste instelling op de
hoofdeenheid wordt weergegeven.
2 Druk op M/m om het niveau aan te
passen of de gewenste optie te
selecteren.
3 Druk op .
Het instellen is voltooid en het scherm keert
terug naar de normale weergave-/
ontvangststand.
Met de hoofdeenheid
Druk op de regelknop in plaats van op (SOUND), draai
de regelknop in plaats van op M/m te drukken.
NEWS (Nieuws), AFFAIRS (Actualiteiten),
INFO (Informatie), SPORT (Sport),
EDUCATE (Educatieve programma's),
DRAMA (Toneel), CULTURE (Cultuur),
SCIENCE (Wetenschap), VARIED (Diversen),
POP M (Populaire muziek), ROCK M (Rock-
muziek), EASY M (Easy Listening), LIGHT M
(Licht klassiek), CLASSICS (Klassiek),
OTHER M (Ander type muziek), WEATHER
(Weerberichten), FINANCE (Financiën),
CHILDREN (Kinderprogramma's), SOCIAL A
(Sociale zaken), RELIGION (Religie),
PHONE IN (Phone In), TRAVEL (Reizen),
LEISURE (Ontspanning), JAZZ (Jazz-muziek),
COUNTRY (Country-muziek), NATION M
(Nationale muziek), OLDIES (Oldies),
FOLK M (Folk-muziek), DOCUMENT
(Documentaires)
SOUND
M/m

39
D:\Documents and Settings\takashi-shimomura\Desktop\DTP\848220S MEX-
DV1500U(EUR)\4120899211_MEX-DV1500U_ML\05NL02CD-E.fm
masterpage:RightD:\Documents and Settings\takashi-shimomura\Desktop\DTP\848220S MEX-
DV1500U(EUR)\4120899211_MEX-DV1500U_ML\05NL02CD-E.fm
masterpage:Right
MEX-DV1500U
4-120-899-21 (1)
De equalizercurve aanpassen
— EQ3
Met "CUSTOM" van EQ3 kunt u uw eigen
equalizerinstellingen bepalen. U kunt het niveau
van 3 verschillende banden instellen: "LOW",
"MID" en "HI".
1 Druk tijdens het afspelen/de radio-
ontvangst herhaaldelijk op (SOUND)
tot "EQ3" wordt weergegeven.
2 Druk op M/m om "CUSTOM" te
selecteren.
3 Druk herhaaldelijk op (SOUND) tot
"LOW", "MID" of "HI" wordt
weergegeven.
4 Druk op M/m om het niveau van het
geselecteerde item aan te passen.
U kunt het niveau aanpassen in afzonderlijke
stappen, tussen –10 en +10.
Als u de in de fabriek ingestelde
equalizercurve wilt herstellen, houdt u
(SOUND) ingedrukt.
5 Druk op .
Het instellen is voltooid en het scherm keert
terug naar de normale weergave-/
ontvangststand.
Tip
Andere equalizertypen kunnen eveneens worden
aangepast.
Met de hoofdeenheid
Druk op de regelknop in plaats van op (SOUND), draai
de regelknop in plaats van op M/m te drukken.
Instellingen
Vanuit de volgende twee menu's kunnen
verschillende instellingen worden
geconfigureerd.
• Menu met beeldinstellingen (pagina 39)
Maakt configuratie mogelijk van
beeldgerelateerde items (via de monitor).
• Menu met systeeminstellingen
(pagina 44)
Maakt configuratie mogelijk van
systeemgerelateerde items (via de
hoofdeenheid).
Beeldinstellingen
Het menu met beeldinstellingen bevat de
volgende categorieën.
LANGUAGE SETUP (pagina 41)
Instellen van het menu, de taal voor de
ondertitels, enzovoort.
DISPLAY SETUP (pagina 41)
De instellingen aanpassen van de
aangesloten monitor.
CUSTOM SETUP (pagina 42)
Aanpassen van het afspelen van discs.
AUDIO SETUP (pagina 43)
Aanpassen van de geluidsinstellingen in
overeenstemming met de disc.
RESET (pagina 43)
Alle instellingen herstellen.
Basisbediening van
beeldinstellingen
U kunt items instellen in het menu met de
volgende procedure.
vervolg op volgende pagina t
VISUAL
SETUP
O
M/m
ENTER

40
D:\Documents and Settings\takashi-shimomura\Desktop\DTP\848220S MEX-
DV1500U(EUR)\4120899211_MEX-DV1500U_ML\05NL02CD-E.fm
masterpage:Left
MEX-DV1500U
4-120-899-21 (1)
Bijvoorbeeld voor het instellen van de breedte-/
hoogteverhouding op "4:3 PAN SCAN".
1 Druk op (VISUAL SETUP) terwijl het
apparaat is uitgeschakeld.
Het menu met beeldinstellingen wordt
weergegeven.
2 Druk op M/m om (DISPLAY SETUP)
te selecteren en druk op (ENTER).
De bijbehorende items worden weergegeven.
3 Druk op M/m om "MONITOR TYPE" te
selecteren en druk op (ENTER).
De opties worden weergegeven.
4 Druk op M/m om "4:3 PAN SCAN" te
selecteren en druk op (ENTER).
De instelling is voltooid.
Als u wilt terugkeren naar het vorige scherm,
drukt u op O.
Als u het menu met beeldinstellingen wilt
verbergen, drukt u op (VISUAL SETUP).
LANGUAGE SETUP
MENU :
AUDIO :
SUBTITLE :
ENGLISH
ENGLISH
ENGLISH
DISPLAY SETUP
MONITOR TYPE :
WALLPAPER :
16:9
WALLPAPER 1
DISPLAY SETUP
MONITOR TYPE :
WALLPAPER :
16:9
16:9
4:3 LETTER BOX
4:3 PAN SCAN

41
D:\Documents and Settings\takashi-shimomura\Desktop\DTP\848220S MEX-
DV1500U(EUR)\4120899211_MEX-DV1500U_ML\05NL02CD-E.fm
masterpage:RightD:\Documents and Settings\takashi-shimomura\Desktop\DTP\848220S MEX-
DV1500U(EUR)\4120899211_MEX-DV1500U_ML\05NL02CD-E.fm
masterpage:Right
MEX-DV1500U
4-120-899-21 (1)
Taalinstelling voor het scherm of de soundtrack
Selecteer (LANGUAGE SETUP) en selecteer vervolgens het gewenste item en de gewenste optie
met M/m en (ENTER). Zie "Basisbediening van beeldinstellingen" op pagina 39 voor meer informatie
over deze procedure.
Scherm instellen
Selecteer (DISPLAY SETUP) en selecteer vervolgens het gewenste item en de gewenste optie met
M/m en (ENTER). Zie "Basisbediening van beeldinstellingen" op pagina 39 voor meer informatie over
deze procedure.
"z" geeft de standaardinstellingen aan.
Opmerking
Afhankelijk van de disc kan automatisch "4:3 LETTER BOX" worden geselecteerd in plaats van "4:3 PAN SCAN"
en andersom.
Item Doel
MENU De taalinstelling voor het menu van de disc wijzigen.
AUDIO De taalinstelling voor de soundtrack wijzigen.
SUBTITLE De taalinstelling wijzigen van de op de disc opgenomen
ondertitels.
Item Optie Doel
MONITOR TYPE
Een breedte-/hoogteverhouding
selecteren die geschikt is voor de
aangesloten monitor.
16:9 (z)
Breedbeeld weergeven.
Geschikt voor het aansluiten van
een breedbeeldmonitor of een
monitor met een breedbeeldfunctie.
4:3 LETTER BOX
Breedbeeld weergeven met zwarte
stroken aan de boven- en onderkant
van het scherm.
Geschikt wanneer een 4:3-monitor
is aangesloten.
4:3 PAN SCAN
Breedbeeld weergeven op het
volledige scherm waarbij de
gedeelten die niet passen
automatisch worden bijgesneden.
WALLPAPER
WALLPAPER 1 (z), 2, 3
Het motief van de achtergrond
selecteren.

42
D:\Documents and Settings\takashi-shimomura\Desktop\DTP\848220S MEX-
DV1500U(EUR)\4120899211_MEX-DV1500U_ML\05NL02CD-E.fm
masterpage:Left
MEX-DV1500U
4-120-899-21 (1)
Aangepaste instellingen
Selecteer (CUSTOM SETUP) en selecteer vervolgens het gewenste item en de gewenste optie met
M/m en (ENTER). Zie "Basisbediening van beeldinstellingen" op pagina 39 voor meer informatie over
deze procedure.
Volg de paginaverwijzing voor meer informatie. "z" geeft de standaardinstellingen aan.
Item Optie Doel
PARENTAL CONTROL
(pagina 30) *
1
Hiermee kunt u
afspeelbeperkingen instellen zodat
ongeschikte discs of scènes niet
worden afgespeeld.
OFF t (z)
Kinderbeveiliging uitschakelen.
ON t
Kinderbeveiliging inschakelen.
PLAYER t
De beperkingsstandaard en het
bijbehorende niveau instellen.
PASSWORD t
Een nieuw 4-cijferig wachtwoord
instellen.
DivX VOD
De registratiecode van dit apparaat
weergeven. Ga naar de
onderstaande website voor meer
informatie:
http://www.divx.com/vod
Done
Het scherm sluiten.
SLIDE SHOW TIME
5 sec. (z), 10 sec.,
20 sec., 40 sec., 60 sec.
De tijd voor het wisselen van dia's
selecteren.
FIXED
De diavoorstelling stoppen.
MULTI-DISC RESUME
*
2
ON (z)
De instellingen voor het hervatten
van het afspelen in het geheugen
opslaan voor maximaal 5 discs. (De
instellingen blijven in het geheugen
bewaard, zelfs als u "OFF" instelt.)
OFF
De instellingen voor het hervatten
van het afspelen worden niet
opgeslagen in het geheugen.
Afspelen hervatten is alleen
beschikbaar voor de huidige disc in
het apparaat.
USB RESUME
ON (z)
De instellingen voor het hervatten
van het afspelen worden opgeslagen
in het geheugen. (De instellingen
blijven in het geheugen bewaard,
zelfs als u "OFF" instelt.)
OFF
De instellingen voor het hervatten
van het afspelen worden niet
opgeslagen in het geheugen.
MPEG-4

43
D:\Documents and Settings\takashi-shimomura\Desktop\DTP\848220S MEX-
DV1500U(EUR)\4120899211_MEX-DV1500U_ML\05NL02CD-E.fm
masterpage:RightD:\Documents and Settings\takashi-shimomura\Desktop\DTP\848220S MEX-
DV1500U(EUR)\4120899211_MEX-DV1500U_ML\05NL02CD-E.fm
masterpage:Right
MEX-DV1500U
4-120-899-21 (1)
*1 Met uitzondering van DVD-R/DVD-R DL/DVD-RW in VR-stand.
*2 Alleen DVD VIDEO.
Opmerking
Als kinderbeveiliging is ingeschakeld, werkt de functie voor afspelen hervatten niet. In dat geval wordt na het
plaatsen van de disc met afspelen begonnen aan het begin van de disc.
Audio-instellingen
Selecteer (AUDIO SETUP) en selecteer vervolgens het gewenste item en de gewenste optie met
M/m en (ENTER). Zie "Basisbediening van beeldinstellingen" op pagina 39 voor meer informatie over
deze procedure.
Volg de paginaverwijzing voor meer informatie. "z" geeft de standaardinstellingen aan.
* Met uitzondering van DVD-R/DVD-R DL/DVD-RW in VR-stand.
Alle instellingen herstellen
Alle instellingen bij beeldinstellingen (met uitzondering van kinderbeveiliging) kunnen worden
hersteld.
Selecteer (RESET) en selecteer vervolgens "RESET ALL SETTINGS" en "YES" met M/m en
(ENTER).
Zie "Basisbediening van beeldinstellingen" op pagina 39 voor meer informatie over deze procedure.
Opmerking
Schakel tijdens het herstellen het apparaat niet uit. Het duurt enkele seconden voordat het herstellen is voltooid.
PLAY LIST PLAY
(Alleen voor DVD-R/DVD-R DL/
DVD-RW in VR-stand)
ORIGINAL (z)
De oorspronkelijk opgenomen titels
afspelen.
PLAY LIST
De bewerkte afspeellijst afspelen.
PICTURE EQ (pagina 29)
Hiermee wordt de instellingsoptie
geselecteerd die in het
weergavestandmenu wordt
weergegeven.
AUTO (z)
Automatisch schakelen tussen de
opties voor gebruik bij avond/
daglicht volgens de
dimmerinstellingen bij de
systeeminstellingen (pagina 46).
LIGHT OFF
Opties voor gebruik bij daglicht
weergeven.
LIGHT ON
Opties voor gebruik bij avond
weergeven.
Item Optie Doel
AUDIO DRC *
Zorgt voor een helder geluid bij
weergave met een laag volume.
Alleen voor DVD's die voldoen
aan Audio DRC (Dynamic Range
Control).
STANDARD (z)
De standaardinstelling selecteren.
WIDE RANGE
Geeft u het gevoel van een live
optreden.
MPEG-4

44
D:\Documents and Settings\takashi-shimomura\Desktop\DTP\848220S MEX-
DV1500U(EUR)\4120899211_MEX-DV1500U_ML\05NL02CD-E.fm
masterpage:Left
MEX-DV1500U
4-120-899-21 (1)
Systeeminstellingen
Het menu met systeeminstellingen bevat de
volgende categorieën.
• SET: algemene instellingen (pagina 45)
• DSPL: scherminstellingen (pagina 45)
• R/M: ontvangststandinstellingen (pagina 46)
• SND: geluidsinstellingen (pagina 47)
Basisbediening van
systeeminstellingen
U kunt items instellen in het menu met de
volgende procedure.
Bijvoorbeeld om de demonstratie in te stellen.
1 Druk op (SYSTEM SETUP) terwijl het
apparaat is uitgeschakeld.
Het systeeminstelitem wordt weergegeven op
de hoofdeenheid.
2 Druk op M/m om "DEMO" te selecteren
en druk op (ENTER).
De optie worden weergegeven.
3 Druk op M/m om "ON" of "OFF" te
selecteren en druk op (ENTER).
De instelling is voltooid.
Als u het scherm met systeeminstellingen wilt
verbergen, drukt u op (SYSTEM SETUP).
Met de hoofdeenheid
Druk op (SETUP) in plaats van op (SYSTEM SETUP),
draai de regelknop in plaats van op M/m te drukken,
druk op de regelknop in plaats van op (ENTER).
M/m
ENTER
SYSTEM
SETUP

45
D:\Documents and Settings\takashi-shimomura\Desktop\DTP\848220S MEX-
DV1500U(EUR)\4120899211_MEX-DV1500U_ML\05NL02CD-E.fm
masterpage:RightD:\Documents and Settings\takashi-shimomura\Desktop\DTP\848220S MEX-
DV1500U(EUR)\4120899211_MEX-DV1500U_ML\05NL02CD-E.fm
masterpage:Right
MEX-DV1500U
4-120-899-21 (1)
Volg de paginaverwijzing voor meer informatie. "z" geeft de standaardinstellingen aan.
SET (instellen)
DSPL (scherm)
Item Optie Doel
Status van het
apparaat
CLOCK-ADJ (klok
aanpassen) (pagina 48)
–
–
Willekeurige
status.
CT (kloktijd) (pagina 37, 38)
ON
De CT-functie inschakelen.
OFF (z)
De CT-functie
uitschakelen.
BEEP
ON (z)
Het bedieningsgeluid
inschakelen.
OFF
Het bedieningsgeluid
uitschakelen.
COLOR-SYS (kleursysteem)
Wijzigt het video-
uitvoersignaal op basis van de
aangesloten monitor.
PAL (z)
Instellen op PAL.
Het apparaat is
uitgeschakeld.
NTSC
Instellen op NTSC.
AUTO-OFF
Automatisch uitschakelen na
een gewenste tijd wanneer het
apparaat uit is.
NO (z)
De functie voor
automatisch uitschakelen
uitschakelen.
Willekeurige
status.
30S, 30M, 60M
De gewenste tijd
selecteren.
REAR/SUB
De audio-uitvoer wijzigen.
REAR-OUT Het geluid via een
versterker weergeven.
Het apparaat is
uitgeschakeld.
SUB-OUT (z) Het geluid via een
subwoofer weergeven.
Item Optie Doel
Status van het
apparaat
M.DSPL (beweging scherm)
De stand voor de beweging
van het scherm selecteren.
SA (z)
Bewegende patronen en de
spectrum analyzer
weergeven.
Tijdens afspelen/
radio-ontvangst.
OFF
De beweging van het
scherm uitschakelen.
DEMO (demonstratie)
ON (z)
De demonstratie
inschakelen.
Het apparaat is
uitgeschakeld.
OFF
De demonstratie
uitschakelen.
vervolg op volgende pagina t

46
D:\Documents and Settings\takashi-shimomura\Desktop\DTP\848220S MEX-
DV1500U(EUR)\4120899211_MEX-DV1500U_ML\05NL02CD-E.fm
masterpage:Left
MEX-DV1500U
4-120-899-21 (1)
R/M (ontvangststand)
DIMMER
De helderheid van het scherm
wijzigen.
ON
Het scherm dimmen.
Willekeurige
status.
OFF (z)
De dimmer uitschakelen.
AUTO-SCRL (automatisch
rollen)
Lange items automatisch over
het scherm rollen.
ON (z)
Lange items rollen.
Tijdens het
afspelen van een
disc.
OFF
Lange items niet rollen.
Item Optie Doel
Status van het
apparaat
LOCAL (lokale zoekfunctie)
ON
Alleen afstemmen op
krachtige zenders.
Tijdens radio-
ontvangst.
OFF (z)
Afstemmen met normale
ontvangst.
MONO (monostand)
Selecteer de mono-
ontvangststand als u slechte
FM-ontvangst wilt verbeteren.
ON
Stereo-uitzendingen in
mono beluisteren.
Tijdens FM-
ontvangst.
OFF (z)
Stereo-uitzendingen in
stereo beluisteren.
REGIONAL (pagina 37)
ON (z)
Een bepaald regionaal
programma blijven
beluisteren.
OFF
Uitschakelen bij het
verlaten van het
ontvangstgebied van het
programma.
BTM (geheugen voor beste
afstemming) (pagina 36)
–
– Tijdens radio-
ontvangst.

47
D:\Documents and Settings\takashi-shimomura\Desktop\DTP\848220S MEX-
DV1500U(EUR)\4120899211_MEX-DV1500U_ML\05NL02CD-E.fm
masterpage:RightD:\Documents and Settings\takashi-shimomura\Desktop\DTP\848220S MEX-
DV1500U(EUR)\4120899211_MEX-DV1500U_ML\05NL02CD-E.fm
masterpage:Right
MEX-DV1500U
4-120-899-21 (1)
SND (geluid)
*1 Als de audio-uitvoer is ingesteld op "SUB-OUT".
*2 Wordt alleen weergegeven en is alleen beschikbaar wanneer "DVD-LEVEL" is ingesteld op "ADJST-ON".
Item Optie Doel
Status van het
apparaat
HPF (hoogdoorlaatfilter)
De kantelfrequentie van de
voor-/achterluidspreker
selecteren.
OFF (z) Geen kantelfrequentie
instellen.
Tijdens afspelen/
radio-ontvangst.
80HZ,100HZ,
120HZ,140HZ,
160HZ
De frequentie selecteren.
LPF (laagdoorlaatfilter)*
1
De kantelfrequentie van de
subwoofer selecteren.
OFF (z) Geen kantelfrequentie
instellen.
80HZ,100HZ,
120HZ,140HZ,
160HZ
De frequentie selecteren.
LPF-PHASE (fase van
laagdoorlaatfilter)*
1
De fase selecteren wanneer het
LPF is ingeschakeld.
NORM (z) De normale fase op het
LPF toepassen.
REV De omgekeerde fase op het
LPF toepassen.
LOUD (loudness)
Zorgt voor een helder geluid
bij weergave met een laag
volume.
OFF (z)
Lage en hoge tonen worden
niet versterkt.
ON
Lage en hoge tonen worden
versterkt.
AUX-LEVEL (pagina 49)
(–8 ~ +18)
z: 0
Het niveau selecteren. Tijdens afspelen
van een AUX-
bron.
DVD-LEVEL (pagina 28)
ADJST-ON
Het aanpassen van het
uitvoerniveau van de Dolby
Digital-indeling toestaan.
Tijdens het
afspelen van een
disc.
ADJST-OFF
(z)
Het aanpassen van het
niveau uitschakelen.
DOLBY-ADJ (Dolby-sterkte
aanpassen) (pagina 28)*
2
(–10 ~ +10)
z: +8
Het niveau selecteren.

48
D:\Documents and Settings\takashi-shimomura\Desktop\DTP\848220S MEX-
DV1500U(EUR)\4120899211_MEX-DV1500U_ML\05NL02CD-E.fm
masterpage:Left
MEX-DV1500U
4-120-899-21 (1)
De klok instellen
De klok werkt met het 24-uurs systeem.
1 Druk op (SYSTEM SETUP).
Het systeeminstelitem wordt weergegeven op
de hoofdeenheid.
2 Druk op M/m om "CLOCK-ADJ" te
selecteren en druk op (ENTER).
De aanduiding voor de uren gaat knipperen.
3 Druk op M/m om de uren en minuten in
te stellen.
Als u de digitale aanduiding wilt verplaatsen,
drukt u op </,.
4 Druk op (ENTER).
De instelling is voltooid.
Als u het scherm met systeeminstellingen wilt
verbergen, drukt u op (SYSTEM SETUP).
Als u de klok tijdens het afspelen wilt
weergeven, drukt u herhaaldelijk op (DSPL) tot
de klok wordt weergegeven.
Met de hoofdeenheid
Druk op (SETUP) in plaats van op (SYSTEM SETUP),
draai de regelknop in plaats van op M/m te drukken,
druk op .m/M> in plaats van op </,, druk
op de regelknop in plaats van op (ENTER).
Optionele apparaten gebruiken
Randapparatuur
U kunt randapparaten aansluiten op het apparaat
en deze beluisteren via de autoluidsprekers.
Er kunnen maximaal 2 apparaten worden
aangesloten, één op de AUX-ingang (stereo
mini-aansluiting) aan de voorkant en de andere
op de AUX AUDIO IN-aansluitingen aan de
achterkant. Het volume kan worden aangepast
voor elk verschil tussen het apparaat en het
randapparaat.
Een randapparaat aansluiten
1 Schakel het randapparaat uit.
2 Verlaag het volume op het apparaat.
3 Sluit het randapparaat aan.
Aan de voorkant
Sluit het randapparaat aan op de AUX-ingang.
* Gebruik een rechte stekker.
Aan de achterkant
Sluit het randapparaat aan op de AUX AUDIO
IN-aansluitingen.
</M/m/,
ENTER
DSPL
SYSTEM
SETUP
M/m
ENTER
SRC
MODE
SYSTEM
SETUP
AUX
AUX
Aansluitkabel*
(niet bijgeleverd)

49
D:\Documents and Settings\takashi-shimomura\Desktop\DTP\848220S MEX-
DV1500U(EUR)\4120899211_MEX-DV1500U_ML\05NL02CD-E.fm
masterpage:RightD:\Documents and Settings\takashi-shimomura\Desktop\DTP\848220S MEX-
DV1500U(EUR)\4120899211_MEX-DV1500U_ML\05NL02CD-E.fm
masterpage:Right
MEX-DV1500U
4-120-899-21 (1)
Een randapparaat selecteren
1 Druk herhaaldelijk op (SRC) tot "AUX"
wordt weergegeven op de hoofdeenheid.
2 Druk op (MODE) om "FRONT-IN" of
"REAR-IN" te selecteren.
Gebruik de bedieningselementen op het
randapparaat om dit te bedienen.
Het volume aanpassen
Pas vóór het afspelen het volume van elk
aangesloten apparaat aan.
1 Verlaag het volume op het apparaat.
2 Druk herhaaldelijk op (SRC) tot "AUX"
wordt weergegeven op de hoofdeenheid.
Als er twee randapparaten zijn aangesloten,
drukt u op (MODE) om het apparaat te
selecteren waarvoor u het volume wilt
aanpassen.
3 Start het afspelen op het randapparaat met een
normaal volume.
4 Stel uw gebruikelijke luistervolume in op het
apparaat.
5 Druk op (SYSTEM SETUP).
6 Druk op M/m om "AUX-LEVEL" te
selecteren en druk op (ENTER).
7 Druk op M/m om het ingangsniveau aan te
passen.
Het ingangsniveau kan stapsgewijs worden
aangepast van –8 tot +18.
8 Druk op (ENTER).
De instelling is voltooid.
Als u het scherm met systeeminstellingen wilt
verbergen, drukt u op (SYSTEM SETUP).
Met de hoofdeenheid
Druk op (SOURCE) in plaats van op (SRC), druk op
(SETUP) in plaats van op (SYSTEM SETUP), draai de
regelknop in plaats van op M/m te drukken, druk op de
regelknop in plaats van op (ENTER).
Aanvullende informatie
Voorzorgsmaatregelen
• Laat het apparaat eerst afkoelen als uw auto
geparkeerd stond in direct zonlicht.
• De elektrische antenne wordt automatisch
uitgeschoven.
Condensvorming
Als er condensvorming optreedt in het apparaat,
verwijdert u de disc en wacht u ongeveer een uur om
dit te laten drogen. Als u dit niet doet, werkt het
apparaat wellicht niet correct.
Optimale geluidskwaliteit behouden
Mors geen vloeistof op het apparaat of de discs.
Opmerkingen over discs
• Stel een disc niet bloot aan direct zonlicht of
warmtebronnen, zoals heteluchtkanalen, en laat
deze niet achter in een auto die in de volle zon
geparkeerd staat.
• Veeg een disc van binnen naar
buiten schoon met een doekje
voordat u deze afspeelt.
Gebruik geen oplosmiddelen
zoals benzine, thinner en in de
handel verkrijgbare
reinigingsmiddelen.
• Dit apparaat is ontworpen om
discs af te spelen die voldoen
aan de CD-norm (Compact Disc). DualDiscs en
sommige muziekdiscs die zijn gecodeerd met
copyrightbeveiligingstechnologieën voldoen niet
aan de CD-norm (Compact Disc) en kunnen
daarom mogelijk niet worden afgespeeld met dit
apparaat.
• Discs die NIET kunnen worden afgespeeld
met dit apparaat
– Discs waarop labels, stickers, tape of papier zijn
geplakt. Hierdoor kan de werking worden
verstoord of de disc worden beschadigd.
– Discs met afwijkende vormen (bijvoorbeeld hart,
vierkant, ster). Als u dit toch probeert, kan het
apparaat worden beschadigd.
– 8-cm discs.
Opmerking over het afspelen van
DVD's en VCD's
Bepaalde afspeelbewerkingen van DVD's en VCD's
zijn mogelijk bewust ingesteld door de
softwareproducent. Afhankelijk van de inhoud die
de softwareproducent op de disc heeft geplaatst, is
het mogelijk dat bepaalde afspeelfuncties van
DVD's en VCD's niet beschikbaar zijn voor dit
apparaat. Raadpleeg ook de instructies die bij de
DVD's of VCD's zijn geleverd.
vervolg op volgende pagina t

50
D:\Documents and Settings\takashi-shimomura\Desktop\DTP\848220S MEX-
DV1500U(EUR)\4120899211_MEX-DV1500U_ML\05NL02CD-E.fm
masterpage:Left
MEX-DV1500U
4-120-899-21 (1)
Opmerkingen over DATA CD's en
DATA DVD's
• Bepaalde DATA CD's/DATA DVD's (afhankelijk
van de opnameapparatuur of de staat van de disc)
kunnen niet met dit apparaat worden afgespeeld.
• Bepaalde discs moeten worden gefinaliseerd
(pagina 50).
• Dit apparaat is compatibel met de volgende
standaards.
Vo or DATA C D 's
– ISO 9660 Level 1/Level 2, Joliet/Romeo in
expansie-indeling
– Multi Session
Voor DATA DVD's
– UDF Bridge-indeling (combinatie van UDF en
ISO 9660)
–Multi Border
• Maximumaantal:
– mappen (albums): 256 (inclusief hoofdmap en
lege mappen).
– bestanden (tracks/beelden/video's) en mappen
die op een disc passen: 2.000 (als de naam van
een map/bestand veel tekens bevat, kan dit aantal
minder dan 2.000 zijn).
– tekens dat kan worden weergegeven voor de
naam van een map/bestand: 64 (Joliet/Romeo).
Opmerkingen over het finaliseren
van discs
De volgende discs moeten worden gefinaliseerd
voor u ze op dit apparaat kunt afspelen.
• DVD-R/DVD-R DL (in videostand/VR-stand)
• DVD-RW in videostand
• DVD+R/DVD+R DL
•CD-R
•CD-RW
De volgende discs kunt u afspelen zonder de discs te
finaliseren.
• DVD+RW – automatisch gefinaliseerd.
• DVD-RW in VR-stand – geen finalisering vereist.
Raadpleeg de handleiding die bij de disc is geleverd
voor meer informatie.
Opmerkingen over Multi Session-
CD's/Multi Border-DVD's
Op dit apparaat kunnen in de volgende gevallen
Multi Session-CD's/Multi Border-DVD's worden
afgespeeld. Houd er rekening mee dat de sessie
moet zijn afgesloten en dat de disc moet zijn
gefinaliseerd.
• Wanneer CD-DA (digitale audio voor cd's) is
opgenomen tijdens de eerste sessie:
Het apparaat herkent de disc als CD-DA en alleen
CD-DA uit de eerste sessie wordt afgespeeld, zelfs
als er tijdens een andere sessie nog een andere
indeling (bijvoorbeeld MP3) is opgenomen.
• Wanneer CD-DA niet tijdens de eerste sessie is
opgenomen:
Het apparaat herkent de disc als een DATA CD of
DATA DVD en alle CD-DA-sessies worden
overgeslagen.
• Wanneer er MP3/WMA/AAC/JPEG/DivX/
MPEG-4 is opgenomen:
Alleen de sessies met het geselecteerde
bestandstype (audio/video/beeld)* worden
afgespeeld (als CD-DA of andere gegevens
voorkomen in andere sessies, worden deze
overgeslagen).
* Zie pagina 35 voor informatie over het selecteren
van het bestandtype.
Afspeelvolgorde van MP3-/WMA-/
AAC-/JPEG-/DivX
®
-/MPEG-4-
bestanden
Over MP3-bestanden
• ID3-tag versies 1.0, 1.1, 2.2, 2.3 en 2.4 gelden
alleen voor MP3. ID3-tag is 15/30 tekens (1.0 en
1.1) of 63/126 tekens (2.2, 2.3 en 2.4).
• Wanneer u een MP3-bestand een naam geeft, moet
u altijd de extensie ".mp3" aan de bestandsnaam
toevoegen.
Opmerking over MP3
Als u een MP3-bestand met een hoge bitsnelheid
afspeelt, zoals 384 kbps, wordt het geluid mogelijk
onderbroken.
Over WMA-bestanden
• WMA-tag is 63 tekens.
• Wanneer u een WMA-bestand een naam geeft,
moet u altijd de extensie ".wma" aan de
bestandsnaam toevoegen.
Over AAC-bestanden
• AAC-tag is 126 tekens.
• Wanneer u een AAC-bestand een naam geeft,
moet u altijd de extensie ".m4a" aan de
bestandsnaam toevoegen.
Map
(album)
MP3-/WMA-/
AAC-/JPEG-/
DivX-/MPEG-4-
bestand (track/
beeld/video)
MP3/WMA/AAC/
JPEG/DivX/
MPEG-4

51
D:\Documents and Settings\takashi-shimomura\Desktop\DTP\848220S MEX-
DV1500U(EUR)\4120899211_MEX-DV1500U_ML\05NL02CD-E.fm
masterpage:RightD:\Documents and Settings\takashi-shimomura\Desktop\DTP\848220S MEX-
DV1500U(EUR)\4120899211_MEX-DV1500U_ML\05NL02CD-E.fm
masterpage:Right
MEX-DV1500U
4-120-899-21 (1)
Over JPEG-bestanden
• JPEG (Joint Photographic Experts Group) is een
compressie-indeling voor beeldbestanden.
Stilstaande beelden worden gecomprimeerd tot
ongeveer 1/10e tot 1/100e van de oorspronkelijke
grootte.
• Wanneer u een JPEG-bestand een naam geeft,
moet u altijd de extensie ".jpg" aan de
bestandsnaam toevoegen.
Opmerking over JPEG
Het afspelen van Progressive JPEG-bestanden wordt
niet ondersteund.
Over DivX
®
-bestanden
DivX
®
(Digital Video Express) is een compressie-
indeling voor digitale-videobestanden die is
ontwikkeld door DivX, Inc.
Dit product is een
officieel gecertificeerd DivX
®
-product en kan
alle versies van DivX
®
-video afspelen (met
inbegrip van DivX
®
6) met standaardweergave
van DivX
®
-mediabestanden.
Over MPEG-4-bestanden
MPEG-4-bestanden op een disc die voldoen aan de
volgende vereisten, kunnen worden afgespeeld. Het
kan niet worden gegarandeerd dat alle MPEG-4-
bestanden die voldoen aan de vereisten, kunnen
worden afgespeeld.
• Profiel: MPEG-4 Simple Profile
• Bitsnelheid: Max. 25.000 kbps
• Framesnelheid: Max. 30 fps
• Beeldformaat: Max. 320 × 240 pixels
• Audio: Max. 320 kbps (AAC-LC)
• Bestandsextensie: .mp4
Onderhoud
De lithiumbatterij van de
kaartafstandsbediening vervangen
Onder normale omstandigheden gaat de batterij
ongeveer 1 jaar mee. (Afhankelijk van de
gebruiksomstandigheden kan de levensduur korter
zijn.)
Wanneer de batterij verzwakt, wordt het bereik van
de kaartafstandsbediening kleiner. Vervang de
batterij door een nieuwe CR2025-lithiumbatterij.
Bij een andere batterij bestaat er brand- of
explosiegevaar.
Opmerkingen over de lithiumbatterij
• Houd de lithiumbatterij buiten het bereik van
kinderen. Raadpleeg meteen een arts wanneer een
batterij wordt ingeslikt.
• Veeg de batterij schoon met een droge doek voor
een goed contact.
• Houd bij het plaatsen van de batterij rekening met
de juiste polariteit.
• Houd de batterij niet vast met een metalen tang, om
kortsluiting te voorkomen.
Zekeringen vervangen
Vervang een zekering altijd
door een identiek exemplaar.
Als de zekering doorbrandt,
moet u de voedingsaansluiting
controleren en de zekering
vervangen. Brandt de zekering
vervolgens nogmaals door, dan
kan er sprake zijn van een
defect in het apparaat.
Raadpleeg in dat geval de
dichtstbijzijnde Sony-
handelaar.
Aansluitingen schoonmaken
De werking van het apparaat kan worden verstoord
als de aansluitingen tussen het apparaat en het
voorpaneel niet schoon zijn. U kunt dit voorkomen
door het voorpaneel (pagina 15) los te maken en de
aansluitingen te reinigen met een wattenstaafje.
Gebruik hierbij niet teveel kracht. Anders kunnen de
aansluitingen worden beschadigd.
Opmerkingen
• Uit veiligheidsoverwegingen moet u de motor
uitschakelen en de sleutel uit het contactslot halen
voordat u de aansluitingen reinigt.
• Raak de aansluitingen nooit rechtstreeks aan met
uw vingers of een metalen voorwerp.
c
+ zijde omhoog
WAARSCHUWING
Bij oneigenlijk gebruik kan de batterij
ontploffen.
Probeer niet de batterij op te laden of te
openen; werp ook een lege batterij nooit in
het vuur.
Zekering (10 A)
Hoofdeenheid Achterkant van
het voorpaneel

52
D:\Documents and Settings\takashi-shimomura\Desktop\DTP\848220S MEX-
DV1500U(EUR)\4120899211_MEX-DV1500U_ML\05NL02CD-E.fm
masterpage:Left
MEX-DV1500U
4-120-899-21 (1)
Het apparaat verwijderen
1 Verwijder de beschermende rand.
1Maak het voorpaneel los (pagina 15).
2Duw de zijkanten van de beschermende
rand naar binnen en trek de beschermende
rand naar buiten.
2 Verwijder het apparaat.
1Plaats beide ontgrendelingssleutels
tegelijkertijd en duw hierop tot deze
vastklikken.
2Trek de ontgrendelingssleutels naar u toe
om het apparaat los te maken.
3Schuif het apparaat uit de houder.
Technische gegevens
Systeem
Laser: Halfgeleiderlaser
Signaalsysteem: Te schakelen tussen PAL/NTSC
DVD/CD-speler
Signaal/ruis-afstand: 120 dB
Frequentiebereik: 10 – 20.000 Hz
Snelheidsfluctuaties: Minder dan meetbare waarden
Harmonische vervorming: 0,01 %
Tuner
FM
Afstembereik: 87,5 – 108,0 MHz
Antenne-aansluiting: Externe antenne-aansluiting
Tussenfrequentie: 10,7 MHz/450 kHz
Bruikbare gevoeligheid: 9 dBf
Selectiviteit: 75 dB bij 400 kHz
Signaal/ruis-afstand: 67 dB (stereo), 69 dB (mono)
Harmonische vervorming bij 1 kHz: 0,5 % (stereo),
0,3 % (mono)
Scheiding: 35 dB bij 1 kHz
Frequentiebereik: 30 – 15.000 Hz
MW/LW
Afstembereik:
MW: 531 – 1.602 kHz
LW: 153 – 279 kHz
Antenne-aansluiting: Externe antenne-aansluiting
Tussenfrequentie: 10,7 MHz/450 kHz
Gevoeligheid: MW: 30 µV, LW: 40 µV
USB-speler
Interface: USB (volledige snelheid)
Maximale stroomsterkte: 500 mA
Versterker
Uitgangen: Luidsprekeruitgangen (sure seal)
Luidsprekerimpedantie: 4 – 8 ohm
Maximaal uitgangsvermogen: 52 W × 4 (bij 4 ohm)
Algemeen
Uitgangen:
Video-uitgang
Audio-uitgangen (achter)
Relaisaansluiting elektrische antenne
Aansluiting versterker
Ingangen:
AUX-audio-ingangen
Antenne-ingang
Bedieningsaansluiting voor handrem
AUX-ingang (stereo mini-aansluiting)
USB-signaalingang
Toonregelingen:
Laag: ±10 dB bij 60 Hz
Midden: ±10 dB bij 1 kHz
Hoog: ±10 dB bij 10 kHz
Voe di ng : 12 V gelijkstroom accu (negatieve aarde)
Afmetingen: Ongeveer 178 × 50 × 179 mm (b/h/d)
Montageafmetingen: Ongeveer 182 × 53 × 163 mm
(b/h/d)
Gewicht: Ongeveer 1,4 kg
x
Haakje wijst
naar binnen.

53
D:\Documents and Settings\takashi-shimomura\Desktop\DTP\848220S MEX-
DV1500U(EUR)\4120899211_MEX-DV1500U_ML\05NL02CD-E.fm
masterpage:RightD:\Documents and Settings\takashi-shimomura\Desktop\DTP\848220S MEX-
DV1500U(EUR)\4120899211_MEX-DV1500U_ML\05NL02CD-E.fm
masterpage:Right
MEX-DV1500U
4-120-899-21 (1)
Bijgeleverde accessoires:
Kaartafstandsbediening: RM-X168
Onderdelen voor installatie en aansluitingen (1 set)
Het is mogelijk dat uw handelaar niet beschikt over
sommige van de hierboven vermelde accessoires.
Vraag uw handelaar om meer informatie.
DivX, DivX Certified en de bijbehorende logo's zijn
handelsmerken van DivX, Inc. en worden gebruikt
onder licentie.
Wijzigingen in ontwerp en technische gegevens
voorbehouden zonder voorafgaande kennisgeving.
Problemen oplossen
De onderstaande controlelijst kan u helpen bij het
oplossen van problemen die zich met het apparaat
kunnen voordoen.
Voordat u de onderstaande controlelijst doorneemt,
moet u eerst de aanwijzingen voor aansluiting en
gebruik controleren.
Als het probleem niet is opgelost, gaat u naar de
volgende ondersteuningssite.
Octrooien in de Verenigde Staten en in andere
landen vallen onder de licentie van Dolby
Laboratories.
MPEG Layer-3 audio-codeertechnologie en
-patenten gebruikt onder licentie van Fraunhofer
IIS en Thomson.
Dit product wordt beschermd door bepaalde
intellectuele eigendomsrechten van Microsoft
Corporation. Het gebruik of de verspreiding van
dergelijke technologie buiten dit product om is
verboden zonder een licentie van Microsoft of een
erkend dochterbedrijf van Microsoft.
• Er werden geen halogene brandvertragende
producten gebruikt in de betreffende
printplaat/printplaten.
• In het omhulsel werden geen halogeen bevattende
brandvertragende producten gebruikt.
• Als beschermings- en opvulmateriaal werd er
papier gebruikt.
Ondersteuningssite
http://support.sony-europe.com
Afhankelijk van de aangesloten monitor, kan het
even duren voordat het apparaat wordt
uitgeschakeld nadat u het contactslot op uit hebt
gezet. Dit duidt niet op een storing.
Algemeen
Het apparaat wordt niet van stroom voorzien.
• Controleer de aansluiting of de zekering.
• Als het apparaat wordt uitgeschakeld en het scherm
verdwijnt, kan het apparaat niet worden bediend met
de afstandsbediening.
t Schakel het apparaat in.
De elektrische antenne schuift niet uit.
De elektrische antenne heeft geen relaisdoos.
Geen pieptoon.
• De pieptoon is uitgeschakeld (pagina 45).
• Er is een optionele versterker aangesloten en u
gebruikt de ingebouwde versterker niet.
De geheugeninhoud is gewist.
• Er is op de RESET toets gedrukt.
t Sla opnieuw op in het geheugen.
• De voedingskabel of de accu is losgekoppeld of niet
juist aangesloten.
Opgeslagen zenders en tijd zijn gewist.
De zekering is doorgebrand.
Maakt geluid wanneer de positie van het
contactslot wordt gewijzigd.
De kabels zijn niet goed verbonden met de
voedingsaansluiting voor accessoires van de auto.
Het scherm verdwijnt van/verschijnt niet in het
display.
• De dimmer is ingesteld op "DIM-ON" (pagina 46).
• Het scherm verdwijnt als u op (OFF) drukt en deze
toets ingedrukt houdt.
t Druk op (OFF) op het apparaat en houd deze
toets ingedrukt tot het scherm verschijnt.
• De aansluitingen zijn vuil (pagina 51).
De functie voor automatisch uitschakelen
werkt niet.
Het apparaat is ingeschakeld. De functie voor het
automatisch uitschakelen wordt geactiveerd nadat het
apparaat is uitgeschakeld.
tSchakel het apparaat uit.
vervolg op volgende pagina t

54
D:\Documents and Settings\takashi-shimomura\Desktop\DTP\848220S MEX-
DV1500U(EUR)\4120899211_MEX-DV1500U_ML\05NL02CD-E.fm
masterpage:Left
MEX-DV1500U
4-120-899-21 (1)
Beeld
Er wordt geen beeld of een onduidelijk beeld
weergegeven.
• Het apparaat is niet goed aangesloten.
• Controleer de aansluiting van het aangesloten
apparaat en stel de bronkeuzeschakelaar in op dit
apparaat.
• Disc defect of vuil.
• Het apparaat is niet goed geïnstalleerd.
t Installeer het apparaat onder een hoek van minder
dan 45° op een stabiele plaats in de auto.
• De monitor is aangesloten op de AUDIO/VIDEO
OUT-ingang en de parkeerkabel (lichtgroen) is niet
aangesloten op de schakelkabel van de handrem, of
de handrem wordt niet gebruikt.
• De instelling voor het kleursysteem is onjuist.
t Stel het kleursysteem in op "PAL" of "NTSC" op
basis van de aangesloten monitor (pagina 45).
Het beeld past niet op het scherm.
Er wordt een vaste breedte-/hoogteverhouding op de
DVD gebruikt.
Geluid
Er is geen geluid/het geluid verspringt/het
geluid kraakt.
• Het apparaat is niet goed aangesloten.
• Controleer de aansluiting van het aangesloten
apparaat en stel de bronkeuzeschakelaar in op dit
apparaat.
• Disc defect of vuil.
• Het apparaat is niet goed geïnstalleerd.
t Installeer het apparaat onder een hoek van minder
dan 45° op een stabiele plaats in de auto.
• De bemonsteringsfrequentie van het MP3-bestand is
niet 16, 22,05, 24, 32, 44,1 of 48 kHz.
• De bemonsteringsfrequentie van het WMA-bestand
is niet 32, 44,1 of 48 kHz.
• De bemonsteringsfrequentie van het AAC-bestand is
niet 44,1 of 48 kHz.
• De bitsnelheid van het MP3-bestand ligt niet tussen 8
en 384 kbps.
• De bitsnelheid van het WMA-bestand ligt niet tussen
32 en 384 kbps.
• De bitsnelheid van het AAC-bestand ligt niet tussen
16 en 320 kbps.
• Het apparaat staat in de pauzestand of er wordt
terug-/vooruitgespoeld.
• De instellingen voor de uitvoer zijn niet juist.
• Het DVD-uitvoerniveau is te laag (pagina 28).
• Het volume is te laag.
• De ATT-functie is ingeschakeld.
• De positie van de faderregelaar "FAD" is niet
ingesteld op een systeem met 2 luidsprekers.
• Niet-ondersteunde indeling (zoals DTS).
t Controleer of de indeling wordt ondersteund door
dit apparaat (pagina 8).
Het geluid bevat ruis.
Houd de kabels bij elkaar uit de buurt.
Discbediening
De disc kan niet worden geplaatst.
• Er zit al een disc in het apparaat.
• De disc is met kracht omgekeerd of in de verkeerde
richting geplaatst.
De disc wordt niet afgespeeld.
• Disc defect of vuil.
• De disc is niet geschikt.
• De DVD is niet geschikt vanwege de regiocode.
• De disc is niet gefinaliseerd (pagina 50).
• De discindeling en de bestandsversie zijn niet
compatibel met dit apparaat (pagina 8, 50).
• Druk op Z om de disc te verwijderen.
MP3-/WMA-/AAC-/JPEG-/DivX-/MPEG-4-
bestanden worden niet afgespeeld.
• De opname is niet uitgevoerd conform ISO 9660
Level 1 of Level 2 of de indeling Joliet of Romeo in
expansie-indeling (DATA CD) of de UDF Bridge-
indeling (DATA DVD) (pagina 50).
• De bestandsextensie is onjuist (pagina 50).
• Bestanden zijn niet opgeslagen in MP3-/WMA-/
AAC-/JPEG-/DivX-/MPEG-4-indeling.
• Als de disc meerdere bestandstypen bevat, kan alleen
het geselecteerde bestandstype (audio/video/beeld)
worden afgespeeld.
tSelecteer het gewenste bestandstype in de lijst
(pagina 35).
MP3-/WMA-/AAC-/JPEG-/DivX-/MPEG-4-
bestanden worden minder snel afgespeeld dan
andere bestanden.
Bij de volgende discs duurt het langer voordat het
afspelen wordt gestart:
– discs opgenomen met een ingewikkelde structuur;
– discs die in Multi Session/Multi Border zijn
opgenomen;
– discs waaraan gegevens kunnen worden toegevoegd.
De disc wordt niet vanaf het begin afgespeeld.
Het afspelen van een of meer discs (pagina 42) is
hervat.
Bepaalde functies kunnen niet worden
gebruikt.
Mogelijk zijn bepaalde handelingen niet beschikbaar,
zoals stoppen, zoeken, herhaaldelijk/willekeurig
afspelen. Dit is afhankelijk van de disc. Raadpleeg de
handleiding die bij de disc is geleverd voor meer
informatie.
De soundtrack/taal van ondertiteling of de
hoek kan niet worden gewijzigd.
• Gebruik het DVD-menu in plaats van de selectietoets
op de kaartafstandsbediening (pagina 17).
• Er zijn geen meertalige tracks, meertalige ondertitels
of meerdere hoeken opgenomen op de DVD.
• De instellingen van de DVD kunnen niet worden
gewijzigd.

55
D:\Documents and Settings\takashi-shimomura\Desktop\DTP\848220S MEX-
DV1500U(EUR)\4120899211_MEX-DV1500U_ML\05NL02CD-E.fm
masterpage:RightD:\Documents and Settings\takashi-shimomura\Desktop\DTP\848220S MEX-
DV1500U(EUR)\4120899211_MEX-DV1500U_ML\05NL02CD-E.fm
masterpage:Right
MEX-DV1500U
4-120-899-21 (1)
Foutmeldingen/berichten
De schermitems rollen niet.
• Bij sommige discs met heel veel tekens kunnen de
tekens niet rollen.
• "AUTO-SCRL" is ingesteld op "OFF".
t Stel "A.SCRL-ON" in (pagina 46).
De bedieningstoetsen werken niet.
De disc wordt niet uitgeworpen.
Druk op de RESET toets (pagina 14).
U bent het wachtwoord voor het kinderslot
vergeten.
Geef in het scherm voor het invoeren van het
wachtwoord "5776" op om het apparaat te
ontgrendelen (pagina 30).
Radio-ontvangst
De zenders kunnen niet worden ontvangen.
Het geluid is gestoord.
• De aansluiting is niet juist.
t Sluit de bedieningskabel van de elektrische
antenne (blauw) of voedingskabel voor
accessoires (rood) aan op de voedingskabel van
de auto-antenneversterker (alleen als uw auto is
uitgerust met een FM/MW/LW-antenne in de
achter- of zijruit).
t Controleer de aansluiting van de auto-antenne.
t Als de automatische antenne niet uitschuift,
controleert u de aansluiting van de
bedieningskabel van de elektrische antenne.
Er kan niet worden afgestemd op
voorkeurzenders.
• Sla de juiste frequentie op in het geheugen.
• Het ontvangstsignaal is te zwak.
Er kan niet automatisch worden afgestemd op
zenders.
• De lokale zoekfunctie is niet correct ingesteld.
t Het afstemmen wordt te vaak onderbroken:
Stel "LOCAL-ON" in (pagina 46).
t Het afstemmen stopt niet bij een zender:
Stel "MONO-ON" in (pagina 46).
• Het ontvangstsignaal is te zwak.
t Stem handmatig af.
Tijdens FM-ontvangst knippert de aanduiding
"ST".
• Stem nauwkeurig af op de frequentie.
• Het ontvangstsignaal is te zwak.
t Stel "MONO-ON" in (pagina 46).
Een stereo-uitzending van een FM-programma
wordt in mono weergegeven.
Het apparaat staat in de mono-ontvangststand.
t Stel "MONO-OFF" in (pagina 46).
RDS
SEEK begint na enkele seconden weergave.
De zender is geen TP-zender of heeft een zwak
signaal.
tSchakel TA uit (pagina 37).
Geen verkeersinformatie.
• Schakel TA in (pagina 37).
• De zender is een TP-zender, maar zendt toch geen
verkeersinformatie uit.
t Stem af op een andere zender.
PTY geeft "- - - - - - - -" weer.
• De huidige zender is geen RDS-zender.
• Er zijn geen RDS-gegevens ontvangen.
• De zender geeft het programmatype niet door.
USB afspelen
U kunt items niet via een USB-hub afspelen.
Dit apparaat kan geen USB-apparaten via een USB-
hub herkennen.
Er kunnen geen items worden afgespeeld.
Een USB-apparaat functioneert niet.
tSluit het apparaat opnieuw aan.
Het duurt langer om af te spelen op het USB-
apparaat.
Het USB-apparaat bevat bestanden met een
ingewikkelde structuur.
U hoort een pieptoon.
Tijdens het afspelen is het USB-apparaat
losgekoppeld.
tVoordat u een USB-apparaat loskoppelt, moet u
eerst het afspelen stoppen ter bescherming van de
gegevens.
Het geluid wordt onderbroken.
Het geluid kan worden onderbroken bij een hoge
bitsnelheid van meer dan 320 kbps.
Voor de hoofdeenheid
ERROR
• De disc is vuil of is omgekeerd geplaatst.
t Reinig de disc of plaats deze op de juiste manier.
• Er is een lege disc in het apparaat geplaatst.
• De disc kan niet worden afgespeeld wegens een
probleem.
t Plaats een andere disc.
• De disc is niet compatibel met dit apparaat.
t Plaats een compatibele disc in het apparaat.
• Het USB-apparaat is niet automatisch herkend.
t Sluit het apparaat opnieuw aan.
• Druk op Z om de disc te verwijderen.
vervolg op volgende pagina t

56
D:\Documents and Settings\takashi-shimomura\Desktop\DTP\848220S MEX-
DV1500U(EUR)\4120899211_MEX-DV1500U_ML\05NL02CD-E.fm
masterpage:Left
MEX-DV1500U
4-120-899-21 (1)
Als deze oplossingen niet helpen, moet u de
dichtstbijzijnde Sony-handelaar raadplegen.
Als u het apparaat ter reparatie wegbrengt omdat
discs niet goed worden afgespeeld, kunt u het beste
de disc meenemen waarmee het probleem is
begonnen.
FAILURE
De luidsprekers of versterkers zijn niet correct
aangesloten.
t Raadpleeg de bijgeleverde gebruiksaanwijzing voor
installatie/aansluitingen om de aansluiting te
controleren.
L. SEEK +/–
De lokale zoekfunctie is ingeschakeld tijdens
automatisch afstemmen.
NO AF
Er is geen alternatieve frequentie voor de huidige
zender.
t Druk op .m/M> terwijl de
programmaservicenaam knippert. Het apparaat gaat
zoeken naar een andere frequentie met dezelfde
PI-gegevens (programma-identificatie). ("PI
SEEK" wordt weergegeven.)
NO DATA
De disc of het USB-apparaat bevat geen
muziekbestanden.
t Plaats een muziek-CD in dit apparaat.
t Sluit een USB-apparaat met muziekbestanden aan.
NO DEV (geen apparaat)
"USB" is geselecteerd als bron, maar er is geen
USB-apparaat aangesloten. Een USB-apparaat of
USB-kabel is losgekoppeld tijdens het afspelen.
t Sluit een USB-apparaat en USB-kabel aan.
NO NAME
Er is geen naam voor een disc/album/map/track/beeld/
video naar het bestand geschreven.
NO TP
Het apparaat blijft zoeken naar beschikbare
TP-zenders.
OFFSET
Er is wellicht een interne storing.
t Controleer de aansluiting. Als de foutmelding in
het scherm blijft staan, moet u de dichtstbijzijnde
Sony-handelaar raadplegen.
OVERLOAD
Het USB-apparaat is overbelast.
t Koppel het USB-apparaat los en wijzig de bron
door op (SOURCE) te drukken.
t Dit geeft aan dat het USB-apparaat buiten gebruik
is of dat een apparaat is aangesloten dat niet wordt
ondersteund.
READ
Het apparaat leest alle bestands-/albumgegevens (map)
op de disc.
t Wacht totdat het lezen is voltooid en het afspelen
automatisch wordt gestart. Afhankelijk van de
discstructuur kan dit meer dan een minuut in beslag
nemen.
USB NO SUPRT (geen USB-ondersteuning)
Het aangesloten USB-apparaat wordt niet ondersteund.
t Ga naar de ondersteuningssite voor meer informatie
over de compatibiliteit van het USB-apparaat.
"" of ""
Tijdens het snel terug- of vooruitspoelen hebt u het
begin of het einde van de disc bereikt en kunt u niet
verder.
""
Het teken kan niet worden weergegeven met het
apparaat.
Voor de monitor
Playback prohibited by region code.
De DVD kan niet worden afgespeeld vanwege een
andere regiocode.
Cannot play this disc.
• De disc is niet compatibel met dit apparaat.
• De disc is niet gefinaliseerd.
No playable data.
De disc bevat geen inhoud die kan worden afgespeeld.
Please press RESET.
Het apparaat kan niet worden bediend vanwege een
probleem.
t Druk op de RESET toets (pagina 14).

57
D:\Documents and Settings\takashi-shimomura\Desktop\DTP\848220S MEX-
DV1500U(EUR)\4120899211_MEX-DV1500U_ML\05NL02CD-E.fm
masterpage:RightD:\Documents and Settings\takashi-shimomura\Desktop\DTP\848220S MEX-
DV1500U(EUR)\4120899211_MEX-DV1500U_ML\05NL02CD-E.fm
masterpage:Right
MEX-DV1500U
4-120-899-21 (1)
Woordenlijst
Album
Gedeelte van een muziekstuk of een beeld op een
DATA CD/DVD dat de MP3-/WMA-/AAC-
audiotracks of JPEG-bestanden bevat.
Bestand
• Een MP3-/WMA-/AAC-track of JPEG-beeld op
een DATA CD/DATA DVD/USB-apparaat.
• Een MP3-/WMA-/AAC-track, JPEG-beeld of
DivX-/MPEG-4-video op een DATA CD/DATA
DVD.
("Bestand" is een exclusieve definitie voor dit
apparaat.) Eén bestand bestaat uit één track, beeld of
film.
DivX
®
Een technologie voor digitale video die is
ontwikkeld door DivX, Inc. Video's die zijn
gecodeerd met DivX-technologie, hebben een zeer
hoge kwaliteit en een relatief kleine
bestandsgrootte.
Dolby Digital
Compressietechnologie voor digitale audio die is
ontwikkeld door Dolby Laboratories. Deze
technologie is compatibel met 5.1-kanaals surround
sound. Het achterkanaal is stereo en er wordt voor
deze indeling gebruikgemaakt van een afzonderlijk
subwooferkanaal. Dolby Digital levert dezelfde
afzonderlijke 5.1-kanalen met digitale audio van
hoge kwaliteit als de Dolby Digital-audiosystemen
die worden gebruikt in de bioscoop. De kanalen zijn
goed gescheiden omdat alle kanaalgegevens
afzonderlijk worden opgenomen. Tevens treedt er
zeer weinig vervorming op omdat alle
kanaalgegevens digitaal worden verwerkt.
DVD
Een disc die tot 8 uur aan filmmateriaal kan
bevatten, ondanks dat de diameter hetzelfde is als
voor een CD.
De gegevenscapaciteit van een enkelzijdige DVD
met één laag is 4,7 GB (Gigabyte). Dit is meer dan
7 keer de capaciteit van een CD. Een enkelzijdige
DVD met twee lagen heeft een gegevenscapacitieit
van 8,5 GB, een dubbelzijdige DVD met één laag
een gegevenscapaciteit van 9,4 GB en een
dubbelzijdige DVD met twee lagen een
gegevenscapaciteit van 17 GB.
Voor de beeldgegevens wordt gebruikgemaakt van
de MPEG 2-indeling, een van de wereldwijde
normen voor digitale compressietechnologie. De
beeldgegevens worden gecomprimeerd tot ongeveer
1/40e van de oorspronkelijke grootte. Voor een
DVD wordt tevens gebruikgemaakt van
coderingstechnologie met een variabele bitsnelheid
zodat de toewijzing van de gegevens kan worden
gewijzigd overeenkomstig de status van de beelden.
De audiogegevens worden opgenomen met een
meerkanaalse indeling, zoals Dolby Digital, zodat u
kunt genieten van een zeer realistische
geluidsweergave.
Bovendien bevat de DVD verschillende
geavanceerde functies, bijvoorbeeld voor meerdere
hoeken, talen en een kinderslot.
DVD-RW
Een DVD-RW is een opneembare en herschrijfbare
disc met dezelfde indeling als een DVD VIDEO. De
DVD-RW heeft twee modi: VR- en videostand.
DVD-RW's die in de videostand worden gemaakt,
hebben dezelfde indeling als een DVD VIDEO,
terwijl de inhoud van discs die in de VR-stand
(Video Recording) zijn gemaakt, kan worden
geprogrammeerd of bewerkt.
DVD+RW
Een DVD+RW (plus RW) is een opneembare en
herschrijfbare disc. Voor DVD+RW's wordt
gebruikgemaakt van een opname-indeling die
vergelijkbaar is met de DVD VIDEO-indeling.
Filmsoftware, videosoftware
DVD's kunnen worden geclassificeerd als
filmsoftware of videosoftware. Een film-DVD bevat
hetzelfde aantal beelden (24 frames per seconde) als
een film in een bioscoop. Een video-DVD, zoals een
tv-serie, geeft 30 frames (of 60 velden) per seconde
weer.
Hoofdstuk
Onderverdeling van een titel op een DVD. Een titel
bestaat uit meerdere hoofdstukken.
Scène
Op een VIDEO CD met PBC-functies (Playback
Control) worden de menuschermen en de
bewegende en stilstaande beelden opgedeeld in
zogenaamde "scènes".
Titel
Het langste gedeelte van een film of muziek op een
DVD, film, enzovoort, in videosoftware of het hele
album in audiosoftware.
Track
Een gedeelte van een beeld of muziekstuk op een
VIDEO CD, CD of MP3/WMA/AAC. Een album
bestaat uit verschillende tracks (alleen MP3/WMA/
AAC).
vervolg op volgende pagina t

58
D:\Documents and Settings\takashi-shimomura\Desktop\DTP\848220S MEX-
DV1500U(EUR)\4120899211_MEX-DV1500U_ML\05NL02CD-E.fm
masterpage:Left
MEX-DV1500U
4-120-899-21 (1)
VIDEO CD
Een CD met bewegende beelden.
Voor de beeldgegevens wordt gebruikgemaakt van
de MPEG 1-indeling, een van de wereldwijde
normen voor digitale compressietechnologie. De
beeldgegevens worden gecomprimeerd tot ongeveer
1/140e van de oorspronkelijke grootte. Een VIDEO
CD van 12 cm kan daarom 74 minuten aan
bewegende beelden bevatten.
VIDEO CD's bevatten ook compacte
audiogegevens. Geluiden buiten het hoorbare bereik
worden gecomprimeerd terwijl geluiden die de
mens wel kan horen, niet worden gecomprimeerd.
VIDEO CD's kunnen tot 6 keer zoveel
audiogegevens bevatten als gewone audio-CD's.
Er zijn 3 versies VIDEO CD's.
• Versie 1.0, 1.1: u kunt alleen bewegende beelden
en geluid afspelen.
• Versie 2.0: u kunt stilstaande afbeeldingen met een
hoge resolutie weergeven en genieten van PBC-
functies.
Dit apparaat is compatibel met alle 3 bovenstaande
versies.

59
D:\Documents and Settings\takashi-shimomura\Desktop\DTP\848220S MEX-
DV1500U(EUR)\4120899211_MEX-DV1500U_ML\05NL02CD-E.fm
masterpage:RightD:\Documents and Settings\takashi-shimomura\Desktop\DTP\848220S MEX-
DV1500U(EUR)\4120899211_MEX-DV1500U_ML\05NL02CD-E.fm
masterpage:Right
MEX-DV1500U
4-120-899-21 (1)
Lijst met taal-/regiocodes
Lijst met taalcodes
Taalspelling conform ISO 639: 1988 (E/F).
Lijst met regiocodes
Code Taal Code Taal Code Taal Code Taal
1027 Afar
1028 Abkhazian
1032 Afrikaans
1039 Amharic
1044 Arabic
1045 Assamese
1051 Aymara
1052 Azerbaijani
1053 Bashkir
1057 Byelorussian
1059 Bulgarian
1060 Bihari
1061 Bislama
1066 Bengali;
Bangla
1067 Tibetan
1070 Breton
1079 Catalan
1093 Corsican
1097 Czech
1103 Welsh
1105 Danish
1109 German
1130 Bhutani
1142 Greek
1144 English
1145 Esperanto
1149 Spanish
1150 Estonian
1151 Basque
1157 Persian
1165 Finnish
1166 Fiji
1171 Faroese
1174 French
1181 Frisian
1183 Irish
1186 Scots Gaelic
1194 Galician
1196 Guarani
1203 Gujarati
1209 Hausa
1217 Hindi
1226 Croatian
1229 Hungarian
1233 Armenian
1235 Interlingua
1239 Interlingue
1245 Inupiak
1248 Indonesian
1253 Icelandic
1254 Italian
1257 Hebrew
1261 Japanese
1269 Yiddish
1283 Javanese
1287 Georgian
1297 Kazakh
1298 Greenlandic
1299 Cambodian
1300 Kannada
1301 Korean
1305 Kashmiri
1307 Kurdish
1311 Kirghiz
1313 Latin
1326 Lingala
1327 Laothian
1332 Lithuanian
1334 Latvian;
Lettish
1345 Malagasy
1347 Maori
1349 Macedonian
1350 Malayalam
1352 Mongolian
1353 Moldavian
1356 Marathi
1357 Malay
1358 Maltese
1363 Burmese
1365 Nauru
1369 Nepali
1376 Dutch
1379 Norwegian
1393 Occitan
1403 (Afan)Oromo
1408 Oriya
1417 Punjabi
1428 Polish
1435 Pashto;
Pushto
1436 Portuguese
1463 Quechua
1481 Rhaeto-
Romance
1482 Kirundi
1483 Romanian
1489 Russian
1491 Kinyarwanda
1495 Sanskrit
1498 Sindhi
1501 Sangho
1502 Serbo-
Croatian
1503 Singhalese
1505 Slovak
1506 Slovenian
1507 Samoan
1508 Shona
1509 Somali
1511 Albanian
1512 Serbian
1513 Siswati
1514 Sesotho
1515 Sundanese
1516 Swedish
1517 Swahili
1521 Tamil
1525 Telugu
1527 Tajik
1528 Thai
1529 Tigrinya
1531 Turkmen
1532 Tagalog
1534 Setswana
1535 Tonga
1538 Turkish
1539 Tsonga
1540 Tatar
1543 Twi
1557 Ukrainian
1564 Urdu
1572 Uzbek
1581 Vietnamese
1587 Volapük
1613 Wolof
1632 Xhosa
1665 Yoruba
1684 Chinese
1697 Zulu
1703 Niet vermeld
Code Regio Code Regio Code Regio Code Regio
2044 Argentinië
2047 Australië
2057 België
2070 Brazilië
2079 Canada
2090 Chili
2092 China
2115 Denemarken
2109 Duitsland
2424 Filippijnen
2165 Finland
2174 Frankrijk
2248 India
2238 Indonesië
2254 Italië
2276 Japan
2304 Korea
2363 Maleisië
2362 Mexico
2376 Nederland
2390 Nieuw-Zeeland
2379 Noorwegen
2046 Oostenrijk
2427 Pakistan
2436 Portugal
2489 Rusland
2501 Singapore
2149 Spanje
2528 Thailand
2184 Verenigd
Koninkrijk
2499 Zweden
2086 Zwitserland

60
masterpage:Left
MEX-DV1500U
4-120-899-21 (1)
D:\Documents and Settings\takashi-shimomura\Desktop\DTP\848220S MEX-
DV1500U(EUR)\4120899211_MEX-DV1500U_ML\05NL+00COV-EIX.fm
Index
Cijfers
16:9 41
2000MP3 6
2000WMA 6
4:3 LETTER BOX 41
4:3 PAN SCAN 41
A
AAC 9, 50
Aangepaste instellingen
(CUSTOM SETUP) 42
Achtergrond (WALLPAPER)
41
Afspeelbare discs 8
Afspeellijst afspelen (PLAY
LIST PLAY) 43
Afspelen hervatten 17, 19
Afspelen hervatten voor
Multi-disc (MULTI-DISC
RESUME) 6, 42
Album (ALBUM) 33
Alternatieve frequenties (AF)
37
Audio (AUDIO)
Indeling 27
Kanaal 27
Taal 27, 41
Audio DRC (AUDIO DRC) 43
Audio-instellingen (AUDIO
SETUP) 43
Automatisch rollen
(AUTO-SCRL) 46
Automatisch uitschakelen
(AUTO-OFF) 45
AUX (voorkant) 48
AUX-niveau (AUX-LEVEL)
47, 49
B
Balans (BAL) 38
Beeld (IMAGE) 33
Beeldinstellingen 39
Bestand (FILE) 33
Beweging scherm (M.DSPL)
45
D
Demonstratie (DEMO) 45
Dimmer (DIMMER) 46
Discs 8
DivX VOD 42
DivX® 9, 23, 51
Dolby Digital 27, 28
Dolby-sterkte aanpassen
(DOLBY-ADJ) 47
DVD-menu 17
DVD-niveau (DVD-LEVEL)
28, 47
Dynamic Range Control
(DRC) 43
E
EQ3 38, 39
Equalizer
Beeld (PICTURE EQ) 29,
43
Geluid (EQ3) 38, 39
F
Fader (FAD) 38
G
Geheugen voor beste
afstemming (BTM) 36
H
Herhaaldelijk afspelen (REP)
21, 32
Herstellen (RESET) 14, 43
Hoek (ANGLE) 17
Hoofdmenu van de DVD 17
Hoofdstuk (CHAPTER) 33
I
Indelingen 9
Instelmenu
Beeldinstellingen 39
Systeeminstellingen 44
J
JPEG 9, 23, 51
K
Kaartafstandsbediening 12,
14, 51
Kinderbeveiliging (PARENTAL
CONTROL) 30, 42
Kleursysteem (COLOR-SYS)
45
Klok aanpassen (CLOCK-
ADJ) 48
Kloktijd (CT) 37, 38, 45
L
Lijst weergeven 34
Lithiumbatterij 51
Lokale zoekfunctie (LOCAL)
46
Loudness (LOUD) 47
M
Map (ALBUM) 33
Monitortype (MONITOR
TYPE) 41
Monostand (MONO) 46
MP3 9, 50
MPEG-4 9, 51
Multi Border-DVD 50
Multi Session-CD 50
N
NTSC 45
P
PAL 45
Picture EQ (PICTURE EQ)
29, 43
Pieptoon (BEEP) 45
Playback control (PBC) 24
Programma-indeling 27
Programmatypen (PTY) 37,
38
Q
Quick-BrowZer 34
R
Radiogegevenssysteem
(RDS) 36
Randapparatuur 48
Rechtstreeks afspelen 33
Regiocode 9, 59
Regionaal (REGIONAL) 37,
46
S
Scherm instellen (DISPLAY
SETUP) 41
Systeeminstellingen 44

61
masterpage:Right
MEX-DV1500U
4-120-899-21 (1)
D:\Documents and Settings\takashi-shimomura\Desktop\DTP\848220S MEX-
DV1500U(EUR)\4120899211_MEX-DV1500U_ML\05NL+00COV-EIX.fm
T
Taalcode 59
Taalinstelling (LANGUAGE
SETUP) 41
Taalinstelling (MENU) 41
Taalinstelling ondertiteling
(SUBTITLE) 17, 41
Taalinstelling soundtrack
(AUDIO) 27, 41
Tijd diavoorstelling (SLIDE
SHOW TIME) 42
Tijd/tekstinformatie (TIME)
26, 33
Titel (TITLE) 33
Track (TRACK) 33
U
USB-apparaat 20
V
Verkeersinformatie (TA) 37
Verkeersprogramma (TP) 37
Volume 10
W
Weergavestandmenu 24
Willekeurig afspelen (SHUF)
21, 32
WMA 9, 50
Z
Zekering 51
Zoomen (CENTER ZOOM)
29

Sony Corporation
Printed in Thailand
http://www.sony.net/
06GB+03BCO-E.fm masterpage:Right
MEX-DV1500U
4-120-899-21 (1)
Tragen Sie die Seriennummer (SERIAL NO.) in dem
reservierten Feld ein. Sie finden diese auf einem
Aufkleber, der auf dem Gerätegehäuse angebracht ist.
Nehmen Sie den ausgefüllten Geräte-Pass
anschließend unbedingt aus der Bedienungsanleitung
heraus, falls Sie diese im Fahrzeug aufbewahren
möchten. Bitte bewahren Sie den Geräte-Pass an
einem sicheren Ort auf. Er kann im Falle eines
Diebstahls zur ldentifikation lhres Eigentums dienen.
caraudio
Geräte-Pass
Dieser Geräte-Pass dient als Eigentumsnachweis
für Ihr caraudio-Gerät im Falle eines Diebstahls.
Wir empfehlen, den Geräte-Pass nicht im
Fahrzeug aufzubewahren, um Missbrauch zu
verhindern.
Modellbezeichnung
MEX-DV1500U
Seriennummer (SERIAL NO.)
Documenttranscriptie
D:\Documents and Settings\takashi-shimomura\Desktop\DTP\848220S MEXDV1500U(EUR)\4120899211_MEX-DV1500U_ML\01GB+00COV-E.fm masterpage:Right 4-120-899-21 (1) Multi Disc Player Multi Disc Player Operating Instructions GB Bedienungsanleitung DE Mode d’emploi FR Istruzioni per l’uso IT Gebruiksaanwijzing NL MEX-DV1500U ©2008 Sony Corporation MEX-DV1500U 4-120-899-21 (1) D:\Documents and Settings\takashi-shimomura\Desktop\DTP\848220S MEXDV1500U(EUR)\4120899211_MEX-DV1500U_ML\01GB01INT-E.fm Warning To prevent fire or shock hazard, do not expose the unit to rain or moisture. To avoid electrical shock, do not open the cabinet. Refer servicing to qualified personnel only. CAUTION The use of optical instruments with this product will increase eye hazard. As the laser beam used in this CD/DVD player is harmful to eyes, do not attempt to disassemble the cabinet. Refer servicing to qualified personnel only. masterpage:Left Disposal of Old Electrical & Electronic Equipment (Applicable in the European Union and other European countries with separate collection systems) This symbol on the product or on its packaging indicates that this product shall not be treated as household waste. Instead it shall be handed over to the applicable collection point for the recycling of electrical and electronic equipment. By ensuring this product is disposed of correctly, you will help prevent potential negative consequences for the environment and human health, which could otherwise be caused by inappropriate waste handling of this product. The recycling of materials will help to conserve natural resources. For more detailed information about recycling of this product, please contact your local Civic Office, your household waste disposal service or the shop where you purchased the product. Applicable accessory: Remote commander This label is located on the bottom of the chassis. CAUTION : CLASS 1M VISIBLE/INVISIBLE LASER RADIATION WHEN OPEN AND INTERLOCKS DEFEATED. DO NOT VIEW DIRECTLY WITH OPTICAL INSTRUMENTS. This label is located on the drive unit’s internal chassis. Notice for customers: the following information is only applicable to equipment sold in countries applying EU Directives The manufacturer of this product is Sony Corporation, 1-7-1 Konan, Minato-ku, Tokyo, Japan. The Authorized Representative for EMC and product safety is Sony Deutschland GmbH, Hedelfinger Strasse 61, 70327 Stuttgart, Germany. For any service or guarantee matters please refer to the addresses given in separate service or guarantee documents. Disposal of waste batteries (applicable in the European Union and other European countries with separate collection systems) This symbol on the battery or on the packaging indicates that the battery provided with this product shall not be treated as household waste. By ensuring these batteries are disposed of correctly, you will help prevent potentially negative consequences for the environment and human health which could otherwise be caused by inappropriate waste handling of the battery. The recycling of the materials will help to conserve natural resources. In case of products that for safety, performance or data integrity reasons require a permanent connection with an incorporated battery, this battery should be replaced by qualified service staff only. To ensure that the battery will be treated properly, hand over the product at end-of-life to the applicable collection point for the recycling of electrical and electronic equipment. For all other batteries, please view the section on how to remove the battery from the product safely. Hand the battery over to the applicable collection point for the recycling of waste batteries. For more detailed information about recycling of this product or battery, please contact your local Civic Office, your household waste disposal service or the shop where you purchased the product. 2 MEX-DV1500U 4-120-899-21 (1) D:\Documents and Settings\takashi-shimomura\Desktop\DTP\848220S MEXDV1500U(EUR)\4120899211_MEX-DV1500U_ML\01GB01INT-E.fm masterpage:Right Warning if your car’s ignition has no ACC position Be sure to set the Auto Off function (page 43). The unit will shut off completely and automatically in the set time after the unit is turned off, which prevents battery drain. If you do not set the Auto Off function, press and hold (OFF) until the display disappears each time you turn the ignition off. To cancel the demonstration (DEMO) display, see page 43. On safety • Comply with the traffic laws in your country. • For your safety, the monitor connected to the VIDEO OUT turns off automatically when the parking brake is not applied. Preventing an accident Pictures appear only after you park the car and set the parking brake. If the car starts moving during video playback, pictures from the VIDEO OUT automatically disappear after displaying the following caution. The pictures on the screen are turned off, but audio source can be heard. Video blocked for your safety. Do not operate the unit or watch the monitor while driving. 3 MEX-DV1500U 4-120-899-21 (1) D:\Documents and Settings\takashi-shimomura\Desktop\DTP\848220S MEXDV1500U(EUR)\4120899211_MEX-DV1500U_ML\01GB+00COV-ETOC.fm masterpage:Right Table of Contents Welcome ! . . . . . . . . . . . . . . . . . . . . . . . . . . . . . 6 Copyrights . . . . . . . . . . . . . . . . . . . . . . . . . . . 7 Playable discs and symbols used in this manual . . . . . . . . . . . . . . . . . . . . . . . . . . . . . . . . 8 Location and function of controls . . . . . . . . . . 10 Main unit . . . . . . . . . . . . . . . . . . . . . . . . . . .10 Card remote commander RM-X168 . . . . . .12 Locking discs — Parental control . . . . . . . . . . 30 Activating parental control . . . . . . . . . . . . . 30 Changing the area and its movie rating level. . . . . . . . . . . . . . . . . . . . . . . . . . . . . . . 30 Repeat and shuffle play . . . . . . . . . . . . . . . . . . 31 Direct search play . . . . . . . . . . . . . . . . . . . . . . 32 Getting Started Listing up tracks/images/video files — Quick-BrowZer. . . . . . . . . . . . . . . . . . . . . . 33 Selecting a track/image/video file. . . . . . . . 33 Selecting a file type. . . . . . . . . . . . . . . . . . . 33 Installing the unit and the optional monitor . . . . . . . . . . . . . . . . . . . . . . . . . . 14 Viewing audio disc information . . . . . . . . . . . 34 Resetting the unit . . . . . . . . . . . . . . . . . . 14 Advanced Operations — Radio Preparing the card remote commander . . . . . . . . . . . . . . . . . . . . . . . 14 Detaching the front panel . . . . . . . . . . . 15 Attaching the front panel . . . . . . . . . . . . . . .15 Basic Operations Playing video discs . . . . . . . . . . . . . . . . 16 Playing audio discs . . . . . . . . . . . . . . . . 18 Playing back a USB device . . . . . . . . . . 20 Display items . . . . . . . . . . . . . . . . . . . . . . . .21 Repeat and shuffle play . . . . . . . . . . . . . . . . 21 Listening to the radio. . . . . . . . . . . . . . . 22 Advanced Operations — Discs Playing DivX®/MPEG-4/JPEG files . . . . . . . .23 DivX®/MPEG-4 video playback . . . . . . . . . 23 JPEG image playback . . . . . . . . . . . . . . . . . 23 Using PBC functions — Playback control. . . . 24 Using play mode menu. . . . . . . . . . . . . . . . . . . 24 Viewing time/text information of the disc . . . . 26 Configuring audio settings . . . . . . . . . . . . . . . . 26 Changing the audio language/format. . . . . .27 Checking the program format . . . . . . . . . . .27 Adjusting the audio output level — DVD level. . . . . . . . . . . . . . . . . . . . . . . .28 Storing and receiving stations . . . . . . . . . . . . . 34 Storing automatically — BTM . . . . . . . . . . 34 Storing manually. . . . . . . . . . . . . . . . . . . . . 34 Receiving stored stations . . . . . . . . . . . . . . 35 RDS . . . . . . . . . . . . . . . . . . . . . . . . . . . . . . . . . 35 Overview. . . . . . . . . . . . . . . . . . . . . . . . . . . 35 Setting AF and TA . . . . . . . . . . . . . . . . . . . 35 Selecting PTY . . . . . . . . . . . . . . . . . . . . . . . 36 Setting CT . . . . . . . . . . . . . . . . . . . . . . . . . . 36 Sound Adjustment Adjusting the sound characteristics . . . . . . . . . 37 Customizing the equalizer curve — EQ3 . . . . . . . . . . . . . . . . . . . . . . . . . . . . 37 Settings Visual setup . . . . . . . . . . . . . . . . . . . . . . . . . . . 38 Basic operation of visual setup . . . . . . . . . . 38 Language setup for display or soundtrack . . . . . . . . . . . . . . . . . . . . . . . . . . 39 Display setup. . . . . . . . . . . . . . . . . . . . . . . . 39 Custom setup. . . . . . . . . . . . . . . . . . . . . . . . 40 Audio setup . . . . . . . . . . . . . . . . . . . . . . . . . 41 Resetting all settings . . . . . . . . . . . . . . . . . . 41 System setup . . . . . . . . . . . . . . . . . . . . . . . . . . 42 Basic operation of system setup . . . . . . . . . 42 Setting the clock . . . . . . . . . . . . . . . . . . . . . 46 Magnifying pictures . . . . . . . . . . . . . . . . . . . . . 28 Using Optional Equipment Adjusting the picture quality — Picture EQ . . . . . . . . . . . . . . . . . . . . . . . . . . 29 Customizing the picture quality. . . . . . . . . .29 Auxiliary equipment . . . . . . . . . . . . . . . . . . . . 46 4 MEX-DV1500U 4-120-899-21 (1) D:\Documents and Settings\takashi-shimomura\Desktop\DTP\848220S MEXDV1500U(EUR)\4120899211_MEX-DV1500U_ML\01GB+00COV-ETOC.fm Additional Information Precautions . . . . . . . . . . . . . . . . . . . . . . . . . . . 47 Notes on discs . . . . . . . . . . . . . . . . . . . . . . . 47 Playback order of MP3/WMA/AAC/JPEG/ DivX®/MPEG-4 files . . . . . . . . . . . . . . . . . 48 About MP3 files . . . . . . . . . . . . . . . . . . . . . 48 About WMA files . . . . . . . . . . . . . . . . . . . . 48 About AAC files . . . . . . . . . . . . . . . . . . . . . 48 About JPEG files . . . . . . . . . . . . . . . . . . . . 48 About DivX® files . . . . . . . . . . . . . . . . . . . 48 About MPEG-4 files . . . . . . . . . . . . . . . . . . 49 masterpage:Right For installation and connections, see the supplied installation/connections manual. Maintenance . . . . . . . . . . . . . . . . . . . . . . . . . . 49 Removing the unit . . . . . . . . . . . . . . . . . . . . . . 50 Specifications . . . . . . . . . . . . . . . . . . . . . . . . . 50 Troubleshooting. . . . . . . . . . . . . . . . . . . . . . . . 51 Error displays/Messages . . . . . . . . . . . . . . . 53 Glossary . . . . . . . . . . . . . . . . . . . . . . . . . . . . . . 54 Language code/area code list. . . . . . . . . . . . . . 56 Index . . . . . . . . . . . . . . . . . . . . . . . . . . . . . . . . 57 Support site If you have any questions or for the latest support information on this product, please visit the web site below: http://support.sony-europe.com Provides information on: • Models and manufacturers of compatible digital audio players • Supported MP3/WMA/AAC files 5 MEX-DV1500U 4-120-899-21 (1) D:\Documents and Settings\takashi-shimomura\Desktop\DTP\848220S MEXDV1500U(EUR)\4120899211_MEX-DV1500U_ML\01GB02CD-E.fm Welcome ! Thank you for purchasing this Sony Multi Disc Player. Before operating this unit, read this manual thoroughly and retain it for future reference. masterpage:Left t page 46 The AUX AUDIO IN terminals on the rear allow connection and audio output of an auxiliary device, such as portable audio device (analog connection), hideaway navigation device, TV tuner box, etc. Features Follow the page reference for details. DVD, VCD, CD playback t page 8 * Depending on track length and recorded sampling rate. Compatible with various disc formats. 2000MP3, 2000WMA, 2000AAC Can play up to 2,000 tracks* recorded on a disc in MP3/WMA/AAC format. Multi-disc resume playback t page 40 Stores the point where playback is stopped for up to 5 discs and can resume DVD VIDEO/ VCD/DivX/MPEG-4 playback even after the disc is ejected. t page 37 7 preset equalizer curves, which can be further customized by tuning 3 different bands. t page 29 Picture tone selectable from preset settings according to the car’s interior/ambient light. t page 46 Allows connection of a portable audio device (analog connection). 6 MEX-DV1500U 4-120-899-21 (1) D:\Documents and Settings\takashi-shimomura\Desktop\DTP\848220S MEXDV1500U(EUR)\4120899211_MEX-DV1500U_ML\01GB02CD-E.fm masterpage:Right Copyrights This product incorporates copyright protection technology that is protected by method claims of certain U.S. patents, other intellectual property rights owned by Macrovision Corporation, and other rights owners. Use of this copyright protection technology must be authorized by Macrovision Corporation, and is intended for home and other limited viewing uses only unless otherwise authorized by Macrovision Corporation. Reverse engineering or disassembly is prohibited. Manufactured under license from Dolby Laboratories. “Dolby” and the double-D symbol are trademarks of Dolby Laboratories. Windows Media, and the Windows logo are trademarks or registered trademarks of Microsoft Corporation in the United States and/or other countries. “DVD VIDEO,” “DVD-R,” “DVD-RW,” “DVD+R,” and “DVD+RW” are trademarks. “DivX” and “DivX Certified” are registered trademarks or trademarks of DivX, Inc. THIS PRODUCT IS LICENSED UNDER THE MPEG-4 VISUAL PATENT PORTFOLIO LICENSE FOR THE PERSONAL AND NONCOMMERCIAL USE OF A CONSUMER FOR DECODING MPEG-4 VIDEO THAT WAS ENCODED BY A CONSUMER ENGAGED IN A PERSONAL AND NON-COMMERCIAL ACTIVITY AND/OR WAS OBTAINED FROM A VIDEO PROVIDER LICENSED BY MPEG LA TO PROVIDE MPEG-4 VIDEO. NO LICENSE IS GRANTED OR SHALL BE IMPLIED FOR ANY OTHER USE. ADDITIONAL INFORMATION INCLUDING THAT RELATING TO PROMOTIONAL, INTERNAL AND COMMERCIAL USES AND LICENSING MAY BE OBTAINED FROM MPEG LA, LLC. SEE HTTP://WWW.MPEGLA.COM 7 MEX-DV1500U 4-120-899-21 (1) D:\Documents and Settings\takashi-shimomura\Desktop\DTP\848220S MEXDV1500U(EUR)\4120899211_MEX-DV1500U_ML\01GB02CD-E.fm masterpage:Left Playable discs and symbols used in this manual This unit can play various video/audio discs. The following chart helps you to check if a disc is supported by this unit, as well as what functions are available for a given disc type. Disc symbol in manual Disc format Disc logo DVD VIDEO DVD-R*1 DVD-R DL*1 (Video mode/VR mode) VIDEO DVD-RW*1 (Video mode/VR mode) DVD+R*1 DVD+R DL*1 DVD+RW*1 Video CD (Ver. 1.0/1.1/2.0) AUDIO Audio CD CD-ROM*2 CD-R*2 CD-RW*2 *1 Audio files can also be stored. For details, see page 9. *2 Video/image files can also be stored. For details, see page 9. Note “DVD” may be used in this manual as a general term for DVD VIDEOs, DVD-Rs/DVD-RWs, and DVD+Rs/ DVD+RWs. 8 MEX-DV1500U 4-120-899-21 (1) D:\Documents and Settings\takashi-shimomura\Desktop\DTP\848220S MEXDV1500U(EUR)\4120899211_MEX-DV1500U_ML\01GB02CD-E.fm masterpage:Right The following chart shows the supported compression formats, their file types, and the disc types on which those files can be stored. Available functions differ depending on the format, regardless of disc type. The format symbols below appear next to the description of functions available for that format. Format symbol in manual File type Storable disc type MP3 audio file WMA audio file AAC audio file JPEG image file DivX® video file DATA DVDs DVD-ROM DVD-R DVD-R DL DVD-RW DVD+R DVD+R DL DVD+RW DATA CDs CD-ROM CD-R CD-RW MPEG-4 video file MPEG-4 Tip For details on compression formats, see page 48. Unsupported discs The following discs cannot be played on this unit. • 8 cm (3 1/4 in) discs • 12 cm (4 3/4 in) discs utilizing only the inner 8 cm (3 1/4 in) data portion (the rest is transparent) • CD-ROM containing files other than MP3/WMA/AAC/JPEG/DivX/MPEG-4 • SA-CD • CD-G • Photo-CD • VSD (Video Single Disc) • DVD-ROM containing files other than MP3/WMA/AAC/JPEG/DivX/MPEG-4 • DVD-RAM • DVD-Audio • Active-Audio (Data) • SVCD (Super Video CD) • CDV • Discs created in Packet Write format • Discs in DTS format Note Even compatible discs may not be playable on this unit, depending on their recorded condition. Region code Region code The region system is used to protect software copyrights. The region code is located on the bottom of the unit, and only DVDs labeled with an identical region code can be played on this unit. DVDs labeled ALL can also be played. If you try to play any other DVD, the message “Playback prohibited by region code.” will appear on the monitor screen. Depending on the DVD, no region code may be labeled even though playing the DVD is prohibited by area restrictions. 9 MEX-DV1500U 4-120-899-21 (1) D:\Documents and Settings\takashi-shimomura\Desktop\DTP\848220S MEXDV1500U(EUR)\4120899211_MEX-DV1500U_ML\01GB02CD-E.fm masterpage:Left Location and function of controls Main unit 1 2345 6 7 8 9 OFF SEEK SOURCE AF TA TP REG DISC ALBM ARTIST TRACK MODE SEEK SETUP PTY REP SHUF AF/TA 1 2 SHUF ZAP DM+ LOUD AUX ALBM 3 4 5 6 DSPL PUSH SOUND / ENTER q; qa qs qd qfqg qh qj qk ql Refer to the pages listed for details. Instructions in this manual generally describe the controls on the card remote commander. You can also use the controls on the main unit if they have the same or similar names to those on the card remote commander. H Z (eject) button page 16, 18 To eject the disc. A OFF button page 15, 16, 18, 20, 24 To power off/stop the source (press); shut off completely (press and hold). J SEEK +/– buttons page 17, 19, 22, 23 Disc/USB: To skip a chapter/track/scene/file (press); reverse/fast-forward disc (press and hold momentarily); reverse/fast-forward track (press and hold).*2 Radio: To tune in stations automatically (press); find a station manually (press and hold). B (Back) button page 33, 37 To return to the previous display. C SOURCE button page 20, 22, 34, 47 To power on; change the source (Radio/Disc/ USB/AUX). D (Browse) button page 33 To enter the Quick-BrowZer mode.*1 E Control dial/SOUND/ENTER button page 28, 33, 34, 36, 37, 42, 46, 47 To adjust the volume/adjust a setting (rotate); open the sound menu/apply a setting (press). F Disc slot page 16, 18 To insert the disc. I USB terminal page 20 To connect to the USB device. K (front panel release) button page 15 L MODE button page 22, 34, 47 To select the radio band (FM/MW/LW); select an auxiliary device connected to the AUX input jack (front) or AUX IN jack (rear). M Receptor for the card remote commander N RESET button page 14 10 G Display window MEX-DV1500U 4-120-899-21 (1) D:\Documents and Settings\takashi-shimomura\Desktop\DTP\848220S MEXDV1500U(EUR)\4120899211_MEX-DV1500U_ML\01GB02CD-E.fm masterpage:Right O SETUP button page 28, 34, 42, 46, 47 To open the system setup menu. P AF (Alternative Frequencies)/ TA (Traffic Announcement)/ PTY (Program Type) button page 35, 36 To set AF and TA (press); select PTY (press and hold) in RDS. Q Number buttons Disc/USB: (1): b REP page 16, 17, 21, 31 (2): SHUF B page 16, 17, 21, 31 (3)/(4): ALBM –/+ (V/v) page 16, 17, 19, 23 To skip an album or folder/move the cursor (press); skip albums or folders continuously (press and hold). (6): u (play/pause) page 16, 17, 18, 19, 23 To start/pause playback. Radio: To receive stored stations (press); store stations (press and hold). R DSPL (Display) button page 21, 26, 35, 46 To change the display item. S AUX input jack page 46 To connect a portable audio device. *1 When a CD/MP3/WMA/AAC/JPEG/DivX/MPEG-4 is played. *2 Operation differs depending on the disc (page 17, 19). About USB cap When not using the USB terminal I, use the supplied USB cap to prevent dust or dirt entering. Keep the USB cap out of the reach of children to prevent accidental swallowing. 11 MEX-DV1500U 4-120-899-21 (1) D:\Documents and Settings\takashi-shimomura\Desktop\DTP\848220S MEXDV1500U(EUR)\4120899211_MEX-DV1500U_ML\01GB02CD-E.fm masterpage:Left Card remote commander RM-X168 9 1 0 2 qa 3 qs 4 qd 5 qf qg 6 qh 7 qj 8 Refer to the pages listed for details. Remove the insulation film before use (page 14). A OFF button page 16, 18, 20, 24 To power off/stop the source (press); shut off completely (press and hold). B SOUND button page 37 To open the sound menu. D SYSTEM SETUP button page 28, 34, 42, 46, 47 To open the system setup menu. E (Back)/O button page 24, 25, 30, 31, 33, 37, 38 To return to the previous display; return to the menu on a VCD*1. C VISUAL SETUP button page 24, 27, 28, 29, 30, 32, 33, 38 To open the play mode/visual setup menu. 12 MEX-DV1500U 4-120-899-21 (1) D:\Documents and Settings\takashi-shimomura\Desktop\DTP\848220S MEXDV1500U(EUR)\4120899211_MEX-DV1500U_ML\01GB02CD-E.fm F Number buttons page 16, 17, 24, 25, 30, 31, 32, 33, 34 Disc: To locate a title/chapter/track. Radio: To receive stored stations (press); store stations (press and hold). G CLEAR button page 30, 33 To delete an entered number. H DSPL (Display) button page 21, 26, 35, 46 To change display items. I ATT (Attenuate) button To attenuate the sound (to cancel, press again). J u (Play/Pause) button page 16, 17, 18, 19, 23 To start/pause playback. masterpage:Right To power on; change the source (Radio/Disc/ USB/AUX). P MODE button page 22, 34, 47 To select the radio band (FM/MW/LW); select an auxiliary device connected to the AUX input jack (front) or AUX IN jack (rear). Q VOL (Volume) +/– buttons To adjust the volume. *1 When playing with PBC function. *2 Operation differs depending on the disc (page 17, 19). *3 When a CD/MP3/WMA/AAC/JPEG/DivX/MPEG-4 is played. Note If the unit is turned off and the display disappears, it cannot be operated with the card remote commander unless (SOURCE) on the main unit is pressed, or a disc is inserted to activate the unit first. K .m/M> buttons page 17, 19, 22, 23 Disc/USB: To skip a chapter/track/scene/file (press); reverse/fast-forward disc (press and hold momentarily); reverse/fast-forward track (press and hold).*2 Radio: To tune in stations automatically (press); find a station manually (press and hold). L DVD playback setting buttons (AUDIO): page 17, 27 To change the audio language/format. (For VCD/CD/MP3/WMA/AAC, to change the audio channel.) (SUBTITLE): page 17 To change the subtitle language. (ANGLE): page 17 To change the viewing angle. (TOP MENU): page 17 To open the top menu on a DVD. (MENU): page 17 To open the menu on a disc. M (Browse) button page 33 To enter the Quick-BrowZer mode.*3 N </M/m/, (Cursor)/ENTER buttons To move the cursor and apply a setting. O SRC (Source) button page 20, 22, 34, 47 13 MEX-DV1500U 4-120-899-21 (1) D:\Documents and Settings\takashi-shimomura\Desktop\DTP\848220S MEXDV1500U(EUR)\4120899211_MEX-DV1500U_ML\01GB02CD-E.fm masterpage:Left Resetting the unit Getting Started Installing the unit and the optional monitor Firstly, install and connect the unit and the optional monitor. This unit can be operated using the displays that appear on the unit and/or the optional monitor. Note that this manual includes instructions concerning displays on both unit and/or optional monitor. Unit Optional monitor Before operating the unit for the first time, or after replacing the car battery or changing the connections, you must reset the unit. Detach the front panel (page 15) and press the RESET button (page 10) with a pointed object, such as a ball-point pen. Note Pressing the RESET button will erase the clock setting and some stored contents. Preparing the card remote commander Remove the insulation film. Tip For how to replace the battery, see page 49. For details, see the supplied installation/ connections manual. Note Be sure to install the optional monitor safely, and in a place where it does not obstruct the driver’s view. 14 MEX-DV1500U 4-120-899-21 (1) D:\Documents and Settings\takashi-shimomura\Desktop\DTP\848220S MEXDV1500U(EUR)\4120899211_MEX-DV1500U_ML\01GB02CD-E.fm Detaching the front panel masterpage:Right Attaching the front panel Engage part A of the front panel with part B of the unit, as illustrated, and push the left side into position until it clicks. OFF You can detach the front panel of this unit to prevent theft. Caution alarm If you turn the ignition switch to the OFF position without detaching the front panel, the caution alarm will sound for a few seconds. The alarm will only sound if the built-in amplifier is used. 1 Press (OFF). The unit is turned off. 2 Press A B Note Do not put anything on the inner surface of the front panel. , then pull it off towards you. Notes • Do not drop or put excessive pressure on the front panel and display window. • Do not subject the front panel to heat/high temperature or moisture. Avoid leaving it in a parked car or on a dashboard/rear tray. • Do not detach the front panel during playback of the USB device, otherwise USB data may be damaged. 15 MEX-DV1500U 4-120-899-21 (1) D:\Documents and Settings\takashi-shimomura\Desktop\DTP\848220S MEXDV1500U(EUR)\4120899211_MEX-DV1500U_ML\01GB02CD-E.fm masterpage:Left Basic Operations Playing video discs Depending on the disc, some operations may be different or restricted. Refer to the operating instructions supplied with your disc. Z OFF u OFF </M/m/, ENTER Number buttons b/B/V/v u 1 Turn on your monitor, then select the input source on your monitor corresponding to this unit. 2 Insert the disc (label side up). Playback starts automatically. If playback does not start automatically, press u. 3 If the DVD menu appears, press (1)(b)/(2)(B)/(3)(V)/(4)(v) to move the cursor, then press (6) (u) to confirm. With the card remote commander, press the </M/m/,/number buttons to move the cursor, then press (ENTER) to confirm. To stop playback Press (OFF). Note Discs in DTS format are not supported. The sound is not output if the DTS format is selected. To eject the disc Press Z. 16 MEX-DV1500U 4-120-899-21 (1) D:\Documents and Settings\takashi-shimomura\Desktop\DTP\848220S MEXDV1500U(EUR)\4120899211_MEX-DV1500U_ML\01GB02CD-E.fm masterpage:Right About the DVD menu A DVD is divided into several sections, which make up a picture or music feature. These sections are called “titles.” When you play a DVD that contains several titles, you can select a desired title using the DVD’s top menu. For DVDs that allow you to select items such as subtitle/sound language(s), select these items using the DVD menu. Other playback operations u AUDIO TOP MENU .m/M> b/B/V/v Number buttons u To .m/M> SUBTITLE ANGLE MENU </M/m/, ENTER Press pause/resume play after pause u skip a chapter/track/scene/file .m/M> reverse/fast-forward disc and hold .m/M> momentarily; and then repeatedly to switch the speed (× 2 t × 12 t × 120 t × 2…) cancel reverse/fast-forward u show the DVD menu*1 Remote: (TOP MENU) or (MENU) select items in the DVD menu*1 Main unit: (1)(b)/(2)(B)/(3)(V)/(4)(v) to move the cursor, then press (6) (u) to confirm Remote: </M/m/,/number buttons to move the cursor, then press (ENTER) to confirm change audio language/format/channel (page 27)*1 Remote: (AUDIO) repeatedly until the desired item appears turn off/change the subtitle language*1 Remote: (SUBTITLE) repeatedly until the desired item appears*2 change the viewing angle*1 Remote: (ANGLE) repeatedly until the desired angle number appears *1 Unavailable depending on the disc. *2 When the 4-digit input prompt appears, input the language code (page 56) for the desired language. 17 MEX-DV1500U 4-120-899-21 (1) D:\Documents and Settings\takashi-shimomura\Desktop\DTP\848220S MEXDV1500U(EUR)\4120899211_MEX-DV1500U_ML\01GB02CD-E.fm masterpage:Left Playing audio discs Depending on the disc, some operations may be different or restricted. Refer to the operating instructions supplied with your disc. Z OFF u OFF u 1 Insert the disc (label side up). Playback starts automatically. If playback does not start automatically, press u. To stop playback Press (OFF). Note Discs in DTS format are not supported. The sound is not output if the DTS format is selected. To eject the disc Press Z. 18 MEX-DV1500U 4-120-899-21 (1) D:\Documents and Settings\takashi-shimomura\Desktop\DTP\848220S MEXDV1500U(EUR)\4120899211_MEX-DV1500U_ML\01GB02CD-E.fm masterpage:Right Other playback operations .m/M> u </M/m/, .m/M> ALBM To u Press pause/resume play after pause u skip a track .m (<)/M> (,) reverse/fast-forward track and hold .m/M> skip an album* Main unit: (3) (ALBM –)/(4) (ALBM +) Remote: M/m skip albums continuously* Main unit: and hold (3) (ALBM –)/(4) (ALBM +) Remote: and hold M/m * When an MP3/WMA/AAC is played. 19 MEX-DV1500U 4-120-899-21 (1) D:\Documents and Settings\takashi-shimomura\Desktop\DTP\848220S MEXDV1500U(EUR)\4120899211_MEX-DV1500U_ML\01GB02CD-E.fm masterpage:Left Playing back a USB device For details on the compatibility of your USB device, visit the support site. Support site http://support.sony-europe.com • MSC (Mass Storage Class) type USB devices compliant with the USB standard can be used. • Corresponding codec is MP3 (.mp3), WMA (.wma), AAC (.m4a) and JPEG (.jpg). • Backup of data in a USB device is recommended. Note Connect the USB device after starting the engine. Depending on the USB device, malfunction or damage may occur if it is connected before starting the engine. OFF SOURCE (USB) OFF SRC REP SHUF 1 DSPL DSPL Connect the USB device to the USB terminal. Playback starts automatically. If a USB device is already connected, to start playback, press (SOURCE) repeatedly until “USB” appears. To stop play back Press (OFF). Note Be sure to use the USB cable supplied with the device if a cable is needed when making USB connection. 20 MEX-DV1500U 4-120-899-21 (1) D:\Documents and Settings\takashi-shimomura\Desktop\DTP\848220S MEXDV1500U(EUR)\4120899211_MEX-DV1500U_ML\01GB02CD-E.fm Removing the USB device 1 Stop the USB device playback. 2 Remove the USB device. If you remove your USB device during playback, data in the USB device may be damaged. Notes • Do not use USB devices so large or heavy that they may fall down due to vibration, or cause a loose connection. • Do not detach the front panel during playback of the USB device, otherwise USB data may be damaged. • This unit cannot recognize USB devices via a USB hub. Display items masterpage:Right Repeat and shuffle play 1 During playback, press (1) (REP) or (2) (SHUF) repeatedly until the desired setting appears. Select To play REP-TRACK track repeatedly. REP-ALBUM album repeatedly. SHUF-ALBUM album in random order. REP-DRIVE* drive repeatedly. * When two or more drives are created on the USB device. To return to normal play mode, select “REPOFF” or “SHUF-OFF.” A Source B Track name, Artist name, Album number*, Album name, Track number/Elapsed playing time, Clock * Album number is displayed only when the album is changed. To change display items B, press (DSPL). Notes • Displayed items will differ, depending on the USB device, recorded format and settings. For details, visit the support site. • The maximum number of displayable data is as follows. – folders (albums): 256 – files (tracks): 2,000 • Do not leave a USB device in a parked car, as malfunction may result. • It may take time for playback to begin, depending on the amount of recorded data. • During playback or fast-forward/reverse of a VBR (Variable Bit Rate) MP3/WMA/AAC file, elapsed playing time may not display accurately. • Playback of a lossless compression file is not supported. Displaying the sleeve image (Jacket Picture) During audio playback, you can check the content information or display the sleeve image (Jacket Picture)* of MP3/WMA/AAC file in the USB device on the monitor. * The recommended size is from 240 × 240 to 960 × 960 pixels. 21 MEX-DV1500U 4-120-899-21 (1) D:\Documents and Settings\takashi-shimomura\Desktop\DTP\848220S MEXDV1500U(EUR)\4120899211_MEX-DV1500U_ML\01GB02CD-E.fm masterpage:Left Listening to the radio .m/M> SOURCE SRC MODE SEEK MODE 1 Press (SOURCE) repeatedly until “TUNER” appears. 2 Press (MODE) repeatedly until the desired band (FM1, FM2, FM3, MW or LW) appears. A B A Radio band/Function B Frequency* * While receiving an RDS station, program service name appears. For details, see “RDS” on page 35. 3 Perform tuning. To tune automatically Press (SEEK) +/–. Scanning stops when the unit receives a station. Repeat this procedure until the desired station is received. To tune manually Press and hold (SEEK) +/– to locate the approximate frequency, then press (SEEK) +/– repeatedly to fine adjust to the desired frequency. Tip For details on other radio functions, see “Advanced Operations — Radio” on page 34. With the card remote commander Use (SRC) instead of (SOURCE), and .m/M> instead of (SEEK) –/+. 22 MEX-DV1500U 4-120-899-21 (1) D:\Documents and Settings\takashi-shimomura\Desktop\DTP\848220S MEXDV1500U(EUR)\4120899211_MEX-DV1500U_ML\01GB02CD-E.fm Advanced Operations — Discs This chapter consists of the following sections. • Video-specific operations* t page 23 to 31 • Video*/audio common operations t page 31 to 34 • Audio-specific operations t page 34 masterpage:Right DivX®/MPEG-4 video playback You can control the DivX/MPEG-4 playback in the same way as other video discs (page 16), as well as some audio playback control features. To Press skip an album (folder) Main unit: (3) (ALBM –)/ (4) (ALBM +) skip albums (folders) Main unit: continuously and hold (3) (ALBM –)/ (4) (ALBM +) * Including JPEG operations. Playing DivX®/MPEG-4/JPEG files MPEG-4 Tip You can also select a file to play using a list (QuickBrowZer) (page 33). JPEG image playback You can enjoy a slide show of JPEG files on this unit. The slide show starts automatically when you insert a disc or press u. For details on how to start playback, follow step 1 to 4 of “Playing video discs” on page 16. .m/M> ALBM u Other playback operations .m/M> u </, Note If the disc contains multiple file types, only the selected file type (audio/video/image) can be played. To play DivX/MPEG-4 video files or JPEG image files of such a disc, press during playback, select the desired file type (video/image) to list up, then select the desired file (page 33). To Press rotate the image Remote: </, (rotates every 90º) skip an image .m/M> skip an album Main unit: (3) (ALBM –)/ (4) (ALBM +) skip albums continuously Main unit: and hold (3) (ALBM –)/ (4) (ALBM +) Notes • If a large-sized image is rotated, it may take longer to display. • Progressive JPEG files cannot be displayed. Tip You can also select a file to play using a list (QuickBrowZer) (page 33). 23 MEX-DV1500U 4-120-899-21 (1) D:\Documents and Settings\takashi-shimomura\Desktop\DTP\848220S MEXDV1500U(EUR)\4120899211_MEX-DV1500U_ML\01GB02CD-E.fm masterpage:Left Using play mode menu Using PBC functions — Playback control MPEG-4 VISUAL SETUP OFF O </M/m/, ENTER O ENTER Number buttons Number buttons The PBC menu assists your operation interactively while a PBC compatible VCD is played. 1 Start playing a PBC compatible VCD. The PBC menu appears. 2 Press the number buttons to select the desired item, then press (ENTER). 3 Follow the instructions in the menu for interactive operations. To show the play mode menu, press (VISUAL SETUP) during playback. To hide, press (VISUAL SETUP) again. Notes • During audio disc playback, (VISUAL SETUP) is inactive. • During JPEG playback, (VISUAL SETUP) is active only when an image is fully displayed. Playing without the PBC function Tip If you press (VISUAL SETUP) while the playback is stopped, the visual setup menu (by the monitor) appears where you can configure various settings, such as display language, audio adjustment, etc. (page 38). 1 During playback, press (OFF). Playback stops. E.g., when playing a DVD 2 Press the number buttons to select the desired item, then press (ENTER). “Play without PBC.” appears and playback starts. The PBC menu does not appear during playback. To return to the previous display, press O. Notes • The items on the menu, and operation procedures differ depending on the disc. • During PBC playback, the track number, playback item, etc., do not appear in the play mode menu (page 24). • Resume playback is unavailable during playback without PBC. Tip To resume PBC playback, stop playback by pressing (OFF), then press u. 24 You can use the play mode menu on this unit to control playback or configure playback settings. B C D EF A 12(67) 018(034) T 1:35:55 PLAY DVD VIDEO G 1:ENGLISH OFF 1:ENGLISH 2:FRENCH 3:SPANISH SUBTITLE Select : I H ENTER J A Play mode menu items For details, see “List of play mode menu items” on page 25. B DVD: Title number/Total VCD: Track number/Total*1 JPEG: Album number/Total DivX/MPEG-4: Album (folder) number/Total C DVD: Chapter number/Total JPEG: Image number/Total DivX/MPEG-4: File number/Total D Elapsed playback time*2 MEX-DV1500U 4-120-899-21 (1) D:\Documents and Settings\takashi-shimomura\Desktop\DTP\848220S MEXDV1500U(EUR)\4120899211_MEX-DV1500U_ML\01GB02CD-E.fm E Format F Playback status (PLAY N, PAUSE X, etc.) G Current setting H Options I Selected item J Selected item name and/or operation assist messages *1 When playing a VCD with the PBC function (page 24), no indication appears. *2 During JPEG playback, no indication appears. masterpage:Right CENTER ZOOM 28 To magnify an image. MPEG-4 REPEAT 32 To play a title/chapter/track/album/image/video file repeatedly. MPEG-4 SHUFFLE 32 To play chapters/tracks/images/video files in random order. MPEG-4 * List of play mode menu items Press </M/m/,/number buttons to select an item, then press (ENTER). To return to the previous display, press O. Refer to the pages listed for details. PICTURE EQ 29 To adjust picture quality. TITLE, TRACK 32 To select a title, scene or track to play. MPEG-4 * Excluding DVD-R/DVD-R DL/DVD-RW in VR mode. ALBUM 32 To select an album or folder to display. MPEG-4 CHAPTER 32 To select a chapter to play. Tip When “SHUFFLE” or “REPEAT” is activated or “ANGLE” is available, its check-box lights up in green (e.g., t ). However, you may not be able to change the angle depending on the scene, even if the check-box is lit in green. IMAGE 32 To select an image to display. FILE 32 To select a video file to play. MPEG-4 TIME 32 To check the elapsed playback time; input time code. MPEG-4 AUDIO 17, 27 To change the audio language/format/channel; check the program format. MPEG-4 SUBTITLE 17 To turn subtitles on or off/change the subtitle language. ANGLE 17 To change the angle. * 25 MEX-DV1500U 4-120-899-21 (1) D:\Documents and Settings\takashi-shimomura\Desktop\DTP\848220S MEXDV1500U(EUR)\4120899211_MEX-DV1500U_ML\01GB02CD-E.fm Viewing time/text information of the disc MPEG-4 masterpage:Left JPEG playback • Album number/Total • Image number/Total DivX/MPEG-4 playback • Album (folder) number/Total • File number/Total • T **:** Elapsed playback time of the current file Checking text information The text information (album name, image name, etc.) of JPEG/DivX/MPEG-4 files can be checked. Album/image/folder/file number DSPL 037(325) Checking time information The playback time and remaining time of the current title, chapter, track, etc., can be checked during video/image playback. 1 During playback, press (DSPL). The current playback information appears. Time information T 1:01:57 Image name Text information* * “NO TEXT” appears it there is no text information. Text information differs depending on the format as follows. 2 Press (DSPL) repeatedly to switch the time information. Time information differs depending on the disc/ format as follows. DVD playback • T **:**:** Elapsed playback time of the current title • T-**:**:** Remaining time of the current title • C **:**:** Elapsed playback time of the current chapter • C-**:**:** Remaining time of the current chapter 26 VCD playback (Only when playing version 1.0/1.1, or version 2.0 without PBC function.) • T **:** Elapsed playback time of the current track • T-**:** Remaining time of the current track • D **:** Elapsed playback time of the current disc • D-**:** Remaining time of the current disc JPEG playback • Album name (when the album number is displayed) • Image name (when the image number is displayed) DivX/MPEG-4 playback • Album (folder) name (when the album (folder) number is displayed) • File name (when the file number is displayed) Configuring audio settings VISUAL SETUP AUDIO SYSTEM SETUP ENTER M/m MEX-DV1500U 4-120-899-21 (1) D:\Documents and Settings\takashi-shimomura\Desktop\DTP\848220S MEXDV1500U(EUR)\4120899211_MEX-DV1500U_ML\01GB02CD-E.fm masterpage:Right Note Discs in DTS format are not supported. The sound is not output if the DTS format is selected. Tip You can also change the settings of video discs by selecting “AUDIO” in the play mode menu (page 24). Changing the audio language/ format Checking the program format For DVD, the audio language can be changed if the disc is recorded with multilingual tracks. For DVD/DivX, you can change the audio format when playing a disc recorded in multiple audio formats (e.g., Dolby Digital). You can check the number of channels and component position on the DVD VIDEO being played. 1 During playback, press (AUDIO) repeatedly until the desired audio language/format appears. Audio language/format* 1 During playback, press (VISUAL SETUP). The play mode menu appears. 2 Press M/m to select The program format appears. (AUDIO). Current audio format* 1:ENGLISH Dolby D 12(67) 018(034) T 1:35:55 1:ENGLISH Dolby D * When playing DivX, audio format/channel (e.g., “MP3”) appears. The audio language switches among the available languages. When the 4-digit input prompt appears, input the language code (page 56) for the desired language. When the same language is displayed two or more times, the disc is recorded in multiple audio formats. Changing the audio channel When playing VCD/CD/MP3/WMA/AAC, you can select the right or left channel sound to listen through both right and left speakers. The options are indicated below. STEREO (ST): Standard stereo sound (default) 1/L (L): Left channel sound (monaural) 2/R (R): Right channel sound (monaural) 1 During playback, press (AUDIO) repeatedly until the desired audio channel appears. E.g., when playing an MP3 MP3 0003/1000 3:17 Note You may not be able to change the audio setting depending on the disc. PROGRAM FORMAT DOLBY DIGITAL 3/2.1 L C LFE LS R RS Current program format * “PCM,” “DOLBY DIGITAL,” etc., appears depending on the disc. The letters in the program format display represent the following sound components and its position. : Front (left) : Front (right) : Center : Rear (left) : Rear (right) : Rear (monaural): The rear component of the Dolby Surround processed signal and the Dolby Digital signal : Low Frequency Effect signal The program format name and channel numbers appear as follow. Example: Dolby Digital 5.1 ch Rear component × 2 Audio channel TRACK NAME ALBUM NAME ARTIST NAME PLAY DVD VIDEO ST SHUF DOLBY DIGITAL 3 / 2 . 1 Front component × 2 + Center component × 1 LFE component × 1 To hide the play mode menu, press (VISUAL SETUP). 27 MEX-DV1500U 4-120-899-21 (1) D:\Documents and Settings\takashi-shimomura\Desktop\DTP\848220S MEXDV1500U(EUR)\4120899211_MEX-DV1500U_ML\01GB02CD-E.fm Adjusting the audio output level — DVD level masterpage:Left Magnifying pictures MPEG-4 You can adjust the audio output level for a DVD recorded in Dolby Digital format, to reduce the volume level differences between disc and source. 1 During playback, press (SYSTEM SETUP). The system setup item appears on the main unit. 2 Press M/m to select “DVD-LEVEL,” then press (ENTER). 3 Press m to set to “ADJST-ON,” then press (ENTER). 4 Press M/m to select “DOLBY-ADJ,” then press (ENTER). 5 Press M/m to adjust the output level. The output level is adjustable in single steps, between –10 and +10. 6 VISUAL SETUP </M/m/, ENTER You can magnify pictures. 1 During playback, press (VISUAL SETUP). The play mode menu appears. 2 Press M/m to select (CENTER ZOOM), then press (ENTER). The current option appears. 12(67) 018(034) T 1:35:55 Press (ENTER). The setting is complete. To hide the system setup display, press (SYSTEM SETUP). With the main unit Press (SETUP) instead of (SYSTEM SETUP), rotate the control dial instead of pressing M/m, press the control dial instead of (ENTER). PLAY DVD VIDEO x1 x1 x1.6 3 Press M/m to select the desired option (×1, ×1.6*), then press (ENTER). * The picture may become grainy. The picture is magnified. To hide the play mode menu, press (VISUAL SETUP). To scroll the picture, press </M/m/,. To restore the original scale, select “×1” in step 3. Notes • Depending on the disc, you may not be able to change the magnification. • When you resume playback, the picture returns to its original scale. • If you return to a disc’s menu/top menu, magnification will be canceled. 28 MEX-DV1500U 4-120-899-21 (1) D:\Documents and Settings\takashi-shimomura\Desktop\DTP\848220S MEXDV1500U(EUR)\4120899211_MEX-DV1500U_ML\01GB02CD-E.fm Adjusting the picture quality — Picture EQ MPEG-4 masterpage:Right When set to “LIGHT OFF”/“AUTO” (with “DIM-OFF”) DAYTIME: Suitable in a bright place. SUNSET: Suitable when it gets little dark. SHINE: Suitable in a very bright place (e.g., when sunlight reflects on the monitor). VISUAL SETUP </M/m/, ENTER When set to “LIGHT ON”/“AUTO” (with “DIM-ON”) NIGHT: Darkens the monitor to not distract your driving at night. MIDNIGHT: Darkens the monitor more than the “NIGHT” setting. You can select a picture quality suitable for the interior brightness of the car. 1 During playback, press (VISUAL SETUP). The play mode menu appears. 2 Press M/m to select EQ), then press (ENTER). The current option appears. 12(67) 018(034) T 1:35:55 Customizing the picture quality (PICTURE PLAY DVD VIDEO DAYTIME SUNSET SHINE CUSTOM NORMAL NORMAL 3 THEATER: Brightens the monitor; suitable when you want to enjoy a bright monitor at night. The option “CUSTOM” allows you to make your own picture quality setting by adjusting picture tones. You can store adjustments for both “LIGHT OFF’ and “LIGHT ON” settings. 1 During playback, press (VISUAL SETUP). The play mode menu appears. 2 Press M/m to select EQ), then press (ENTER). The current option appears. 3 Press M/m to select “CUSTOM,” then press (ENTER). (PICTURE Press M/m to select the desired option, then press (ENTER). Options differ depending on the setting in visual setup (page 41). In visual setup, the settings of “PICTURE EQ” in “CUSTOM SETUP” switch the options as follows. AUTO: Switches the night time/day time use options automatically according to the dimmer setting in system setup (page 43). LIGHT OFF: Shows the day time use options. LIGHT ON: Shows the night time use options. USER CUSTOM SETUP COLOR BRIGHT SHARPNESS Select : Cancel : 0 0 0 Set : RETURN 4 Press M/m to select the picture tone, then press </, to adjust the level. The options for each setting are indicated below. 5 Press (ENTER). For all settings To hide the play mode menu, press (VISUAL SETUP). NORMAL: Normal picture quality. CUSTOM: User-adjustable settings (page 29). 29 MEX-DV1500U 4-120-899-21 (1) D:\Documents and Settings\takashi-shimomura\Desktop\DTP\848220S MEXDV1500U(EUR)\4120899211_MEX-DV1500U_ML\01GB02CD-E.fm Locking discs — Parental control 5 Press the number buttons to enter your password, then press (ENTER). The confirmation display appears. 6 To confirm, press the number buttons to reenter your password, then press (ENTER). The setting is complete. * * Excluding DVD-R/DVD-R DL/DVD-RW in VR mode. To delete an entered number, press (CLEAR). To return to the previous display, press O. To hide the visual setup menu, press (VISUAL SETUP). VISUAL SETUP O ENTER M/m CLEAR You can lock a disc, or set playback restrictions according to a predetermined level such as viewer age. Restricted scenes can be blocked or replaced with different scenes when a parental control compatible DVD is played. Activating parental control 1 Press (VISUAL SETUP) while the unit is off. The visual setup menu appears. 2 Press M/m to select (CUSTOM SETUP), then press (ENTER). The custom setup items appear. 3 Press M/m to select “PARENTAL CONTROL,” then press (ENTER). The options appear. 4 Deactivating parental control Select “OFF t” in step 4 above, then enter your password. If parental control is deactivated, “Parental control canceled” appears. Number buttons CUSTOM SETUP PARENTAL CONTROL : DivX VOD : SLIDE SHOW TIME : MULTI-DISC RESUME : PLAY LIST PLAY : PICTURE EQ : masterpage:Left OFF OFF ONt PLAYERt PASSWORDt AUTO Press M/m to select “ON t,” then press (ENTER). The password setting display appears. Changing the password Select “PASSWORD t” in step 4 above, enter your current password, enter your new password, then reenter to confirm. Changing the area and its movie rating level The restriction levels can be set depending on the area and its movie ratings. 1 Press (VISUAL SETUP) while the unit is off. The visual setup menu appears. 2 Press M/m to select (CUSTOM SETUP), then press (ENTER). The custom setup items appear. 3 Press M/m to select “PARENTAL CONTROL,” then press (ENTER). The options appear. 4 Press M/m to select “PLAYER t,” then press (ENTER). When parental control is already activated, the display to enter your password appears. To change the setting, enter your password, then press (ENTER). 5 Press M/m to select “STANDARD,” then press (ENTER). The options appear. CUSTOM SETUP CUSTOM SETUP PARENTAL CONTROL Enter a new 4-digit password, then press ENTER . PARENTAL CONTROL: LEVEL : STANDARD : 8: USA USA OTHERSt 30 MEX-DV1500U 4-120-899-21 (1) D:\Documents and Settings\takashi-shimomura\Desktop\DTP\848220S MEXDV1500U(EUR)\4120899211_MEX-DV1500U_ML\01GB02CD-E.fm 6 7 Press M/m to select the desired area to apply its movie ratings, then press (ENTER). The area is selected. When you select “OTHERS t,” enter the area code selecting from “Area code list” on page 56, using the number buttons. The repeat options and switching order of each disc/format are indicated below. Disc/format *1 CUSTOM SETUP OFF IMAGE: Repeats the current image. ALBUM: Repeats the current album. Press M/m to select the desired rating, then press (ENTER). The setting is complete. To return to the previous display, press O. To hide the visual setup menu, press (VISUAL SETUP). Repeat and shuffle play OFF FILE: Repeats the current video file. ALBUM: Repeats the current album (folder). MPEG-4 The shuffle options and switching order of each disc/format are indicated below. Disc/format MPEG-4 *2 *1 Options OFF TITLE: Plays chapters in current title in random order. OFF DISC: Plays tracks in current disc in random order. OFF ALBUM: Plays tracks/images/ video files in current album (folder) in random order. REP SHUF 1 OFF TRACK: Repeats the current track. OFF TRACK: Repeats the current track. ALBUM: Repeats the current album. 8: 1: G 2: 3: PG 4: PG-13 5: The lower the number, the stricter the restriction level. 8 Options OFF CHAPTER: Repeats the current chapter. TITLE: Repeats the current title. Press M/m to select “LEVEL,” then press (ENTER). The options appear. PARENTAL CONTROL: LEVEL : STANDARD : masterpage:Right During playback, press (1) (REP) or (2) (SHUF) on the main unit repeatedly until the desired option appears. MPEG-4 Repeat or shuffle play starts. *1 Available only when playing version 1.0/1.1 VCD, or version 2.0 VCD without PBC function. *2 Excluding DVD-R/DVD-R DL/DVD-RW in VR mode. To return to normal play mode, select “OFF.” continue to next page t 31 MEX-DV1500U 4-120-899-21 (1) D:\Documents and Settings\takashi-shimomura\Desktop\DTP\848220S MEXDV1500U(EUR)\4120899211_MEX-DV1500U_ML\01GB02CD-E.fm Notes • If you return to a disc’s menu/top menu, repeat/ shuffle play will be canceled. • Repeat/shuffle play cannot be set in the disc’s menu/ top menu. masterpage:Left Direct search play MPEG-4 Setting from the play mode menu MPEG-4 VISUAL SETUP ENTER VISUAL SETUP M/m Number buttons ENTER M/m CLEAR You can directly locate a desired point by specifying the title number, chapter number, etc. 1 During playback, press (VISUAL SETUP). The play mode menu appears. 2 Press M/m to select then press (ENTER). 12(67) 018(034) T 1:35:55 1 or , PLAY DVD VIDEO OFF CHAPTER TITLE OFF 3 During playback, press the number buttons to enter an item (track, title, etc.) number, then press (ENTER). Playback starts from the beginning of the selected point. Setting from the play mode menu MPEG-4 Search items differ depending on the disc/format as follows. Disc/Format Items TITLE Starts playing from a selected title. CHAPTER Starts playing from a selected chapter. TIME Starts playing from the point determined by the input time code. Press M/m to select the desired option, then press (ENTER). Repeat or shuffle play starts. Press (VISUAL SETUP) to hide the play mode menu. Note The selected play mode is canceled when the disc being played is ejected. * TRACK Starts playing from a selected track. ALBUM Starts playing from a selected album. IMAGE Starts playing from a selected image. 32 MEX-DV1500U 4-120-899-21 (1) D:\Documents and Settings\takashi-shimomura\Desktop\DTP\848220S MEXDV1500U(EUR)\4120899211_MEX-DV1500U_ML\01GB02CD-E.fm MPEG-4 ALBUM Starts playing from a selected album (folder). FILE Starts playing from a selected file. * Available only when playing VCD without PBC function. 1 2 During playback, press (VISUAL SETUP). The play mode menu appears. Selecting a track/image/video file MPEG-4 You can list up albums/folders/tracks/images/ video files on the monitor, and select a desired one to play. This function is convenient especially for the disc in MP3/WMA/AAC/JPEG/DivX/MPEG-4 format containing many albums/tracks, etc. 1 Press M/m to select the desired item, then press (ENTER). - - (67) 018(034) T 1:35:55 4 During playback, press . The list of tracks/images/video files in the current disc/album*/folder* appears. MP3 0003/1000 3:17 TRACK NAME ALBUM NAME ARTIST NAME PLAY DVD VIDEO ST LIST UP VIDEO FILES LIST UP IMAGE FILES ROOT MUSIC FOLDER 01 TRACK 01 02 TRACK 02 03 TRACK 03 04 TRACK 04 05 TRACK 05 The number in parentheses indicates the total number of selected item. 3 masterpage:Right Press the number buttons to enter an item number or time code. For example, to locate 2 hours, 10 minutes, and 20 seconds, just enter “21020.” To clear numbers already input, press (CLEAR). To return/proceed to the previous/next page, press </,. To move to upper level, press .* To select the desired folder, press M/m, then (ENTER).* * Only when playing MP3/WMA/AAC/JPEG/DivX/ MPEG-4. 2 Press (ENTER). Playback starts from the selected point. Press (VISUAL SETUP) to hide the play mode menu. Listing up tracks/images/video files — Quick-BrowZer Press M/m to select the desired track/ image/video file, then press (ENTER). Playback of the selected track/image/video file starts. With the main unit Rotate the control dial instead of pressing M/m, press (SEEK) –/+ instead of </,, press the control dial instead of (ENTER). Selecting a file type MPEG-4 </M/m/, ENTER If the disc contains multiple file types, only the selected file type (audio/video/image) can be played. The playback priority order of file type is initially set to audio, video, then image (e.g., if the disc contains video files and image files, only video files are played). You can select the file type to list up, then select the desired file to play. 1 During playback, press . continue to next page t 33 MEX-DV1500U 4-120-899-21 (1) D:\Documents and Settings\takashi-shimomura\Desktop\DTP\848220S MEXDV1500U(EUR)\4120899211_MEX-DV1500U_ML\01GB02CD-E.fm 2 3 Press M/m to select the file type to list up, then press (ENTER). To list up MP3, WMA and AAC files, select “LIST UP AUDIO FILES.” To list up DivX/MPEG-4 files, select “LIST UP VIDEO FILES.” To list up JPEG files, select “LIST UP IMAGE FILES.” masterpage:Left Advanced Operations — Radio Storing and receiving stations SYSTEM SETUP Press M/m to select the desired file, then press (ENTER). Playback of the selected file starts. ENTER M/m With the main unit Rotate the control dial instead of pressing M/m, press the control dial instead of (ENTER). SRC MODE Number buttons Viewing audio disc information Caution During audio playback, you can check the disc information or display the sleeve image (Jacket Picture)* of MP3/WMA/AAC file on the monitor. * The recommended size is from 240 × 240 to 960 × 960 pixels. When tuning in stations while driving, use Best Tuning Memory (BTM) to prevent an accident. Storing automatically — BTM 1 Press (SRC) repeatedly until “TUNER” appears on the main unit. To change the band, press (MODE) repeatedly. You can select from FM1, FM2, FM3, MW or LW. 2 Press (SYSTEM SETUP). The system setup item appears. 3 Press M/m to select “BTM,” then press (ENTER). The unit stores stations in order of frequency on the number buttons ((1) to (6)). A beep sounds when the setting is stored. E.g., when playing an MP3 A TRACK NAME ALBUM NAME ARTIST NAME MP3 0003/1000 3:17 E To list up, press BROWSE C B F D ST SHUF G . H A Track number or track name Disc name/Album name Artist name B Format C Playback status (N, X, etc.) D Current audio channel When playing CD/MP3/WMA/AAC, the audio channel can be changed. For details, see “Changing the audio channel” on page 27. E Track number/Total F Elapsed playback time G Current play mode H Operation assist messages Tip You can select a track to play using a list (QuickBrowZer) (page 33). With the main unit Press (SOURCE) instead of (SRC), press (SETUP) instead of (SYSTEM SETUP), rotate the control dial instead of pressing M/m, press the control dial instead of (ENTER). Storing manually 1 While receiving the station that you want to store, press and hold a number button ((1) to (6)) until “MEM” appears on the main unit. The number button indication appears on the main unit. Note If you try to store another station on the same number button, the previously stored station will be replaced. Tip When an RDS station is stored, the AF/TA setting is also stored (page 35). 34 MEX-DV1500U 4-120-899-21 (1) D:\Documents and Settings\takashi-shimomura\Desktop\DTP\848220S MEXDV1500U(EUR)\4120899211_MEX-DV1500U_ML\01GB02CD-E.fm RDS services Receiving stored stations 1 Select the band, then press a number button ((1) to (6)). RDS Control dial DSPL This unit automatically provides RDS services as follows: AF (Alternative Frequencies) Selects and retunes the station with the strongest signal in a network. By using this function, you can continuously listen to the same program during a long-distance drive without having to retune the same station manually. TA (Traffic Announcement)/TP (Traffic Program) Provides current traffic information/programs. Any information/program received, will interrupt the currently selected source. AF/TA Number (PTY) buttons PTY (Program Types) Displays the currently received program type. Also searches your selected program type. Overview FM stations with Radio Data System (RDS) service send inaudible digital information along with the regular radio program signal. Display items A masterpage:Right B CT (Clock Time) The CT data from the RDS transmission sets the clock. Notes • Depending on the country/region, not all RDS functions may be available. • RDS will not work if the signal strength is too weak, or if the station you are tuned to is not transmitting RDS data. Setting AF and TA C The AF/TA settings and switching order are indicated below. A Radio band, Function B TA/TP*1 C Frequency*2 (Program service name), Preset number, Clock, RDS data AF-ON: Activates AF and deactivates TA. TA-ON: Activates TA and deactivates AF. AF, TA-ON: Activates both AF and TA. AF, TA-OFF: Deactivates both AF and TA. *1 “TA” flashes during traffic information. “TP” lights up while such a station is received. *2 While receiving the RDS station, “ *” is displayed on the left of the frequency indication. 1 To change display items C, press (DSPL). Press (AF/TA) repeatedly until the desired setting appears. Storing RDS stations with the AF and TA setting You can preset RDS stations along with the AF/ TA setting. If you use the BTM function, only RDS stations are stored with the same AF/TA setting. If you preset manually, you can preset both RDS and non-RDS stations with the AF/TA setting for each. 1 Set AF/TA, then store the station with BTM or manually. continue to next page t 35 MEX-DV1500U 4-120-899-21 (1) D:\Documents and Settings\takashi-shimomura\Desktop\DTP\848220S MEXDV1500U(EUR)\4120899211_MEX-DV1500U_ML\01GB02CD-E.fm Receiving emergency announcements With AF or TA on, the emergency announcements will automatically interrupt the currently selected source. masterpage:Left Selecting PTY 1 Tip If you adjust the volume level during a traffic announcement, that level will be stored into memory for subsequent traffic announcements, independently from the regular volume level. Press and hold (AF/TA) (PTY) during FM reception. The current program type name appears if the station is transmitting PTY data. Staying with one regional program — REG 2 Rotate the control dial to select the program type. When the AF function is on: this unit’s factory setting restricts reception to a specific region, so you will not be switched to another regional station with a stronger frequency. 3 Press the control dial. The unit searches for a station broadcasting the selected program type. If you leave this regional program’s reception area, set “REG-OFF” in system setup during FM reception (page 44). Type of programs Note This function does not work in the UK and in some other areas. Local Link function (UK only) This function enables you to select other local stations in the area, even if they are not stored on your number buttons. 1 During FM reception, press a number button ((1) to (6)) on which a local station is stored. 2 Within 5 seconds, press again a number button of the local station. Repeat this procedure until the local station is received. NEWS (News), AFFAIRS (Current Affairs), INFO (Information), SPORT (Sports), EDUCATE (Education), DRAMA (Drama), CULTURE (Culture), SCIENCE (Science), VARIED (Varied), POP M (Popular Music), ROCK M (Rock Music), EASY M (Easy Listening), LIGHT M (Light Classical), CLASSICS (Classical), OTHER M (Other Music Type), WEATHER (Weather), FINANCE (Finance), CHILDREN (Children’s Programs), SOCIAL A (Social Affairs), RELIGION (Religion), PHONE IN (Phone In), TRAVEL (Travel), LEISURE (Leisure), JAZZ (Jazz Music), COUNTRY (Country Music), NATION M (National Music), OLDIES (Oldies Music), FOLK M (Folk Music), DOCUMENT (Documentary) Note You cannot use this function in countries/regions where no PTY data is available. Setting CT 1 Set “CT-ON” in system setup (page 43). Notes • The CT function may not work even though an RDS station is being received. • There might be a difference between the time set by the CT function and the actual time. 36 MEX-DV1500U 4-120-899-21 (1) D:\Documents and Settings\takashi-shimomura\Desktop\DTP\848220S MEXDV1500U(EUR)\4120899211_MEX-DV1500U_ML\01GB02CD-E.fm masterpage:Right Customizing the equalizer curve — EQ3 Sound Adjustment Adjusting the sound characteristics “CUSTOM” of EQ3 allows you to make your own equalizer settings. You can adjust the level of 3 different bands: “LOW,” “MID,” and “HI.” 1 During playback/reception, press (SOUND) repeatedly until “EQ3” appears. 2 3 Press M/m to select “CUSTOM.” 4 Press M/m to adjust the level of the selected item. The level is adjustable in single steps, between –10 and +10. SOUND M/m Press (SOUND) repeatedly until “LOW,” “MID,” or “HI” appears. You can adjust the sound characteristics according to your preference. The setting items in the sound menu and switching order are indicated below. EQ3: Selects an equalizer curve from 7 music types. LOW, MID, HI*1: Adjusts the volume level of the selected band for EQ3 custom setting. BAL (Balance): Adjusts the sound balance between the left and right speakers. FAD (Fader): Adjusts the relative level between the front and rear speakers. SUB (Subwoofer volume)*2: Adjusts the subwoofer volume. (“ATT” is the lowest setting.) To restore the factory-set equalizer curve, press and hold (SOUND). 5 Press . The setting is complete and the display returns to normal play/reception mode. Tip Other equalizer types are also adjustable. With the main unit Press the control dial instead of (SOUND), rotate the control dial instead of pressing M/m. *1 Appears only when EQ3 is activated. *2 When the audio output is set to “SUB-OUT” (page 43). 1 During playback/reception, press (SOUND) repeatedly until the desired setting item appears on the main unit. 2 Press M/m to adjust the level or select the desired option. 3 Press . The setting is complete and the display returns to normal play/reception mode. With the main unit Press the control dial instead of (SOUND), rotate the control dial instead of pressing M/m. 37 MEX-DV1500U 4-120-899-21 (1) D:\Documents and Settings\takashi-shimomura\Desktop\DTP\848220S MEXDV1500U(EUR)\4120899211_MEX-DV1500U_ML\01GB02CD-E.fm masterpage:Left E.g., when setting the aspect ratio to “4:3 PAN SCAN.” Settings Various settings are configurable from the following two setup menus. 1 • Visual setup menu (page 38) Allows configuration of visual-related items (by the monitor). Press (VISUAL SETUP) while the unit is off. The visual setup menu appears. LANGUAGE SETUP MENU : AUDIO : SUBTITLE : • System setup menu (page 42) Allows configuration of system-related items (by the main unit). ENGLISH ENGLISH ENGLISH Visual setup The visual setup menu includes the following categories. 2 LANGUAGE SETUP (page 39) Sets the menu, subtitle language, etc. Press M/m to select (DISPLAY SETUP), then press (ENTER). The display setup items appear. DISPLAY SETUP MONITOR TYPE : WALLPAPER : DISPLAY SETUP (page 39) Adjusts the settings of the connected monitor. 16:9 WALLPAPER 1 CUSTOM SETUP (page 40) Customizes the playback of discs. AUDIO SETUP (page 41) Adjusts the sound settings according to the disc. RESET (page 41) Resets all setting items. 3 Basic operation of visual setup Press M/m to select “MONITOR TYPE,” then press (ENTER). The options appear. DISPLAY SETUP MONITOR TYPE : WALLPAPER : 16:9 16:9 4:3 LETTER BOX 4:3 PAN SCAN VISUAL SETUP O ENTER M/m You can set items in the menu by the following procedure. 4 Press M/m to select “4:3 PAN SCAN,” then press (ENTER). The setting is complete. To return to the previous display, press O. To hide the visual setup menu, press (VISUAL SETUP). 38 MEX-DV1500U 4-120-899-21 (1) D:\Documents and Settings\takashi-shimomura\Desktop\DTP\848220S MEXDV1500U(EUR)\4120899211_MEX-DV1500U_ML\01GB02CD-E.fm masterpage:Right Language setup for display or soundtrack Select (LANGUAGE SETUP), then select the desired item and option below, using M/m and (ENTER). For details on this procedure, see “Basic operation of visual setup” on page 38. Item Purpose MENU To change the disc’s menu language. AUDIO To change the soundtrack language. SUBTITLE To change the subtitle language recorded on the disc. Display setup Select (DISPLAY SETUP), then select the desired item and option below, using M/m and (ENTER). For details on this procedure, see “Basic operation of visual setup” on page 38. “z” indicates the default setting. Item MONITOR TYPE Selects an aspect ratio suitable for the connected monitor. WALLPAPER Option Purpose 16:9 (z) To display the wide picture. Suitable when connecting to a wide-screen monitor or a monitor with a wide mode function. 4:3 LETTER BOX To display a wide picture with bands on the upper and lower positions of the screen. Suitable when connecting to a 4:3 screen monitor. 4:3 PAN SCAN To display a wide picture on the entire screen and automatically cut off the portions that do not fit. WALLPAPER 1 (z), 2, 3 To select the design of wallpaper. Note Depending on the disc, “4:3 LETTER BOX” may be selected automatically instead of “4:3 PAN SCAN,” and vice versa. 39 MEX-DV1500U 4-120-899-21 (1) D:\Documents and Settings\takashi-shimomura\Desktop\DTP\848220S MEXDV1500U(EUR)\4120899211_MEX-DV1500U_ML\01GB02CD-E.fm masterpage:Left Custom setup Select (CUSTOM SETUP), then select the desired item and option below, using M/m and (ENTER). For details on this procedure, see “Basic operation of visual setup” on page 38. Follow the page reference for details. “z” indicates the default setting. Item Option Purpose OFF t (z) To deactivate parental control. ON t To activate parental control. PLAYER t To set the restriction standard and its level. PASSWORD t To set a new 4-digit password. DivX VOD Displays the registration code for this unit. For more information, visit the website below: http://www.divx.com/vod Done To close the display. SLIDE SHOW TIME 5 sec. (z), 10 sec., To select the slide show interval. 20 sec., 40 sec., 60 sec. PARENTAL CONTROL (page 30) *1 Sets the playback restrictions to not play inappropriate discs or scenes. MULTI-DISC RESUME *2 FIXED To deactivate the slide show. ON (z) To store the resume settings in memory for up to 5 discs. (The settings remain in memory even if you set to “OFF.”) OFF To not store the resume settings in memory. Resume playback is available only for the current disc in the unit. ON (z) To store the resume settings in memory. (The settings remain in memory even if you set to “OFF.”) OFF To not store the resume settings in memory. MPEG-4 USB RESUME 40 MEX-DV1500U 4-120-899-21 (1) D:\Documents and Settings\takashi-shimomura\Desktop\DTP\848220S MEXDV1500U(EUR)\4120899211_MEX-DV1500U_ML\01GB02CD-E.fm ORIGINAL (z) PLAY LIST PLAY (For DVD-R/DVD-R DL/DVD-RW PLAY LIST in VR mode only) PICTURE EQ (page 29) To play originally recorded titles. To play edited play list. AUTO (z) To switch the night time/day time use options automatically according to the dimmer setting in system setup (page 43). LIGHT OFF To show the day time use options. LIGHT ON To show the night time use options. MPEG-4 Selects the setting option to show in the play mode menu. masterpage:Right *1 Excluding DVD-R/DVD-R DL/DVD-RW in VR mode. *2 DVD VIDEO only. Note If parental control is applied, the resume playback will not work. In this case, playback starts from the beginning of the disc when it is inserted. Audio setup Select (AUDIO SETUP), then select the desired item and option below, using M/m and (ENTER). For details on this procedure, see “Basic operation of visual setup” on page 38. Follow the page reference for details. “z” indicates the default setting. Item Option AUDIO DRC * Makes the sound clear when the volume is low. Only for a DVD conforming to Audio DRC (Dynamic Range Control). Purpose STANDARD (z) To select the standard setting. WIDE RANGE To obtain the feeling of being at a live performance. * Excluding DVD-R/DVD-R DL/DVD-RW in VR mode. Resetting all settings All settings (excluding parental control setting) in visual setup can be reset. Select (RESET), then “RESET ALL SETTINGS,” “YES” using M/m and (ENTER). For details on this procedure, see “Basic operation of visual setup” on page 38. Note Do not power off the unit while resetting, as it takes a few seconds to complete. 41 MEX-DV1500U 4-120-899-21 (1) D:\Documents and Settings\takashi-shimomura\Desktop\DTP\848220S MEXDV1500U(EUR)\4120899211_MEX-DV1500U_ML\01GB02CD-E.fm You can set items in the menu by the following procedure. System setup The system setup menu includes the following categories. • • • • SET: General settings (page 43) DSPL: Display settings (page 43) R/M: Receive mode settings (page 44) SND: Sound settings (page 45) E.g., when setting the demonstration. 1 Press (SYSTEM SETUP) while the unit is off. The system setup item appears on the main unit. 2 Press M/m to select “DEMO,” then press (ENTER). The option appears. 3 Press M/m to select “ON” or “OFF,” then (ENTER). The setting is complete. Basic operation of system setup SYSTEM SETUP ENTER M/m masterpage:Left To hide the system setup display, press (SYSTEM SETUP). With the main unit Press (SETUP) instead of (SYSTEM SETUP), rotate the control dial instead of pressing M/m, press the control dial instead of (ENTER). 42 MEX-DV1500U 4-120-899-21 (1) D:\Documents and Settings\takashi-shimomura\Desktop\DTP\848220S MEXDV1500U(EUR)\4120899211_MEX-DV1500U_ML\01GB02CD-E.fm masterpage:Right Follow the page reference for details. “z” indicates the default setting. SET (Setup) Item CLOCK-ADJ (Clock Adjust) (page 46) Option – CT (Clock Time) (page 35, 36) ON OFF (z) BEEP COLOR-SYS (Color System) Changes the video output signal according to the connected monitor. Purpose Unit status – To activate the CT function. To deactivate the CT function. Any status. ON (z) To activate the operation sound. OFF To deactivate the operation sound. PAL (z) To set to PAL. NTSC To set to NTSC. Unit off. NO (z) To deactivate the Auto Off AUTO-OFF function. Shuts off automatically after a desired time when the unit is 30S, 30M, 60M To select the desired time. off. REAR/SUB Switches the audio output. REAR-OUT To set to the power amplifier. Any status. Unit off. SUB-OUT (z) To set to the subwoofer. DSPL (Display) Item Option Purpose Unit status M.DSPL (Motion Display) Selects the Motion Display mode. SA (z) To show moving patterns and spectrum analyzer. OFF To deactivate the Motion Display. DEMO (Demonstration) ON (z) To activate the demonstration. OFF To deactivate the demonstration. DIMMER Changes the display brightness. ON To dim the display. OFF (z) To deactivate the dimmer. AUTO-SCRL (Auto Scroll) Scrolls long items automatically. ON (z) To scroll. OFF To not scroll. During playback/ radio reception. Unit off. Any status. During disc playback. continue to next page t 43 MEX-DV1500U 4-120-899-21 (1) D:\Documents and Settings\takashi-shimomura\Desktop\DTP\848220S MEXDV1500U(EUR)\4120899211_MEX-DV1500U_ML\01GB02CD-E.fm masterpage:Left R/M (Receive mode) Item LOCAL (Local Seek Mode) Option ON Purpose To only tune into stations with stronger signals. OFF (z) To tune normal reception. MONO (Monaural Mode) Selects monaural reception mode to improve poor FM reception. ON To hear stereo broadcast in monaural. OFF (z) To hear stereo broadcast in stereo. REGIONAL (page 36) ON (z) To stay with one regional program. OFF To deactivate when leaving the program’s reception area. – – BTM (Best Tuning Memory) (page 34) Unit status During radio reception. During FM reception. During radio reception. 44 MEX-DV1500U 4-120-899-21 (1) D:\Documents and Settings\takashi-shimomura\Desktop\DTP\848220S MEXDV1500U(EUR)\4120899211_MEX-DV1500U_ML\01GB02CD-E.fm masterpage:Right SND (Sound) Item Option HPF (High Pass Filter) Selects the front/rear speaker cut-off frequency. OFF (z) LPF (Low Pass Filter)*1 Selects the subwoofer cut-off frequency. OFF (z) Purpose To not cut out the frequency. 80HZ,100HZ, To select the frequency. 120HZ,140HZ, 160HZ To not cut out the frequency. 80HZ,100HZ, To select the frequency. 120HZ,140HZ, 160HZ LPF-PHASE (Low Pass Filter NORM (z) Phase)*1 Selects the phase when the REV LPF is on. To apply the normal pahse to the LPF. LOUD (Loudness) Makes the sound clear when the volume is low. OFF (z) To not reinforce bass and treble. ON To reinforce bass and treble. AUX-LEVEL (page 47) (–8 ~ +18) z: 0 To select the level. DVD-LEVEL (page 28) ADJST-ON To allow for adjusting the output level of Dolby Digital format. ADJST-OFF (z) To deactivate the level adjustment. (–10 ~ +10) z: +8 To select the level. DOLBY-ADJ (Dolby Level Adjust) (page 28)*2 Unit status During playback/ radio reception. To apply the reverse pahse to the LPF. During AUX playback. During disc playback. *1 When the audio output is set to “SUB-OUT.” *2 Appears and available only when “DVD-LEVEL” is set to “ADJST-ON.” 45 MEX-DV1500U 4-120-899-21 (1) D:\Documents and Settings\takashi-shimomura\Desktop\DTP\848220S MEXDV1500U(EUR)\4120899211_MEX-DV1500U_ML\01GB02CD-E.fm Setting the clock masterpage:Left Using Optional Equipment Auxiliary equipment SYSTEM SETUP </M/m/, ENTER SYSTEM SETUP ENTER M/m SRC MODE DSPL The clock uses a 24-hour indication. 1 Press (SYSTEM SETUP). The system setup item appears on the main unit. 2 Press M/m to select “CLOCK-ADJ,” then press (ENTER). The hour indication flashes. 3 Press M/m to set the hour and minute. To move the digital indication, press </,. 4 Press (ENTER). The setting is complete. You can connect auxiliary devices to the unit, and listen on your car speakers. Up to 2 devices can be connected, one to the AUX input jack (stereo mini jack) on the front, and the other to the AUX AUDIO IN terminals on the rear. The volume level is adjustable for any difference between the unit and the auxiliary device. Connecting an auxiliary device To hide the system setup display, press (SYSTEM SETUP). 1 Turn off the auxiliary device. 2 Turn down the volume on the unit. 3 Connect to the unit. On the front Connect to the AUX input jack. To show the clock during playback, press (DSPL) repeatedly until it appears. With the main unit Press (SETUP) instead of (SYSTEM SETUP), rotate the control dial instead of pressing M/m, press the .m/M> instead of </,, press the control dial instead of (ENTER). AUX AUX Connecting cord* (not supplied) * Be sure to use a straight type plug. On the rear Connect to the AUX AUDIO IN terminals. 46 MEX-DV1500U 4-120-899-21 (1) D:\Documents and Settings\takashi-shimomura\Desktop\DTP\848220S MEXDV1500U(EUR)\4120899211_MEX-DV1500U_ML\01GB02CD-E.fm Selecting an auxiliary device 1 Press (SRC) repeatedly until “AUX” appears on the main unit. 2 Press (MODE) to select “FRONT-IN” or “REAR-IN.” Operate by the auxiliary device itself. Adjusting the volume level Be sure to adjust the volume of each connected device before playback. 1 Turn down the volume on the unit. 2 Press (SRC) repeatedly until “AUX” appears on the main unit. If two auxiliary devices are connected, select the device to adjust its volume by pressing (MODE). 3 Start playback of the auxiliary device at a moderate volume. 4 Set your usual listening volume on the unit. 5 Press (SYSTEM SETUP). 6 Press M/m to select “AUX-LEVEL,” then press (ENTER). 7 Press M/m to adjust the input level. The input level is adjustable in single steps, between –8 and +18. 8 Press (ENTER). The setting is complete. To hide the system setup display, press (SYSTEM SETUP). With the main unit Press (SOURCE) instead of (SRC), press (SETUP) instead of (SYSTEM SETUP), rotate the control dial instead of pressing M/m, press the control dial instead of (ENTER). masterpage:Right Additional Information Precautions • Cool off the unit beforehand if your car has been parked in direct sunlight. • Power antenna (aerial) extends automatically. Moisture condensation Should moisture condensation occur inside the unit, remove the disc and wait for about an hour for it to dry out; otherwise the unit will not operate properly. To maintain high sound quality Do not splash liquid onto the unit or discs. Notes on discs • Do not expose discs to direct sunlight or heat sources such as hot air ducts, nor leave it in a car parked in direct sunlight. • Before playing, wipe the discs with a cleaning cloth from the center out. Do not use solvents such as benzine, thinner, commercially available cleaners. • This unit is designed to playback discs that conform to the Compact Disc (CD) standard. DualDiscs and some of the music discs encoded with copyright protection technologies do not conform to the Compact Disc (CD) standard, therefore, these discs may not be playable by this unit. • Discs that this unit CANNOT play – Discs with labels, stickers, or sticky tape or paper attached. Doing so may cause a malfunction, or may ruin the disc. – Discs with non-standard shapes (e.g., heart, square, star). Attempting to do so may damage the unit. – 8 cm (3 1/4 in) discs. Note on playback operations of DVDs and VCDs Some playback operations of DVDs and VCDs may be intentionally set by software producers. Since this unit plays DVDs and VCDs according to the disc contents the software producers designed, some playback features may not be available. Also, refer to the instructions supplied with the DVDs or VCDs. continue to next page t 47 MEX-DV1500U 4-120-899-21 (1) D:\Documents and Settings\takashi-shimomura\Desktop\DTP\848220S MEXDV1500U(EUR)\4120899211_MEX-DV1500U_ML\01GB02CD-E.fm Notes on DATA CDs and DATA DVDs • Some DATA CDs/DATA DVDs (depending on the equipment used for its recording, or the disc condition) may not play on this unit. • Finalization is required for some discs (page 48). • The unit is compatible with the following standards. For DATA CDs – ISO 9660 level 1/level 2 format, Joliet/Romeo in the expansion format – Multi Session For DATA DVDs – UDF Bridge format (combined UDF and ISO 9660) – Multi Border • The maximum number of: – folders (albums): 256 (including root and empty folders). – files (tracks/images/videos) and folders contained in a disc: 2,000 (if a folder/file names contain many characters, this number may become less than 2,000). – displayable characters for a folder/file name: 64 (Joliet/Romeo). Notes on finalizing discs The following discs are required to be finalized to play on this unit. • DVD-R/DVD-R DL (in video mode/VR mode) • DVD-RW in video mode • DVD+R/DVD+R DL • CD-R • CD-RW The following discs can be played without finalization. • DVD+RW – automatically finalized. • DVD-RW in VR mode – finalization not required. For details, see the manual supplied with the disc. Notes on Multi Session CDs/Multi Border DVDs This unit can play Multi Session CDs/Multi Border DVDs under the following conditions. Note that the session must be closed and the disc must be finalized. • When CD-DA (Compact Disc Digital Audio) is recorded in the first session: The unit recognizes the disc as CD-DA and only CD-DA of the first session is played, even if an other format (e.g., MP3) is recorded in other sessions. • When CD-DA is recorded other than in the first session: The unit recognizes the disc as a DATA CD or DATA DVD, and all CD-DA sessions are skipped. • When an MP3/WMA/AAC/JPEG/DivX/MPEG-4 is recorded: Only the sessions containing the selected file type (audio/video/image)* are played (if CD-DA or other data exists in other sessions, they are skipped). 48 masterpage:Left * For details on how to select the file type, see page 33. Playback order of MP3/WMA/AAC/ JPEG/DivX®/MPEG-4 files MP3/WMA/AAC/ JPEG/DivX/ MPEG-4 Folder (album) MP3/WMA/AAC/ JPEG/DivX/ MPEG-4 file (track/image/ video) About MP3 files • ID3 tag versions 1.0, 1.1, 2.2, 2.3 and 2.4 apply to MP3 only. ID3 tag is 15/30 characters (1.0 and 1.1), or 63/126 characters (2.2, 2.3 and 2.4). • When naming an MP3 file, be sure to add the file extension “.mp3” to the file name. Note on MP3 If you play a high-bit-rate MP3, such as 384 kbps, sound may be intermittent. About WMA files • WMA tag is 63 characters. • When naming a WMA file, be sure to add the file extension “.wma” to the file name. About AAC files • AAC tag is 126 characters. • When naming an AAC file, be sure to add the file extension “.m4a” to the file name. About JPEG files • JPEG, which stands for Joint Photographic Experts Group, is an image file compression format standard. It compresses still images approximately 1/10 to 1/100 of original size. • When naming a JPEG file, be sure to add the file extension “.jpg” to the file name. Note on JPEG Playback of progressive JPEG files is not supported. About DivX® files DivX®, which stands for Digital Video Express, is a digital video file compression format standard developed by DivX, Inc. This product is an official DivX® Certified product and can play all versions of DivX® video (including DivX® 6) with standard playback of DivX® media files. MEX-DV1500U 4-120-899-21 (1) D:\Documents and Settings\takashi-shimomura\Desktop\DTP\848220S MEXDV1500U(EUR)\4120899211_MEX-DV1500U_ML\01GB02CD-E.fm masterpage:Right Cleaning the connectors About MPEG-4 files MPEG-4 files on a disc meeting the following requirements can be played. Playback is not be guaranteed for all MPEG-4 files meeting the requirements. • Profile: MPEG-4 Simple profile • Bit rate: Max. 25,000 kbps • Frame rate: Max. 30 fps • Image size: Max. 320 × 240 pixels • Audio: Max. 320 kbps (AAC-LC) • File extension: .mp4 Maintenance The unit may not function properly if the connectors between the unit and the front panel are not clean. In order to prevent this, detach the front panel (page 15) and clean the connectors with a cotton swab. Do not apply too much force. Otherwise, the connectors may be damaged. Main unit Replacing the lithium battery of the card remote commander Under normal conditions, the battery will last approximately 1 year. (The service life may be shorter, depending on the conditions of use.) When the battery becomes weak, the range of the card remote commander becomes shorter. Replace the battery with a new CR2025 lithium battery. Use of any other battery may present a risk of fire or explosion. Back of the front panel Notes • For safety, turn off the ignition before cleaning the connectors, and remove the key from the ignition switch. • Never touch the connectors directly with your fingers or with any metal device. + side up c Notes on the lithium battery • Keep the lithium battery out of the reach of children. Should the battery be swallowed, immediately consult a doctor. • Wipe the battery with a dry cloth to assure a good contact. • Be sure to observe the correct polarity when installing the battery. • Do not hold the battery with metallic tweezers, otherwise a short-circuit may occur. WARNING Battery may explode if mistreated. Do not recharge, disassemble, or dispose of in fire. Fuse replacement When replacing the fuse, be sure to use one matching the amperage rating stated on the original fuse. If the fuse blows, check the power connection and replace the fuse. If the fuse blows again after replacement, there may be an internal malfunction. In such a case, consult your nearest Sony dealer. Fuse (10 A) 49 MEX-DV1500U 4-120-899-21 (1) D:\Documents and Settings\takashi-shimomura\Desktop\DTP\848220S MEXDV1500U(EUR)\4120899211_MEX-DV1500U_ML\01GB02CD-E.fm Removing the unit 1 masterpage:Left Specifications Remove the protection collar. System 1 Detach the front panel (page 15). Laser: Semiconductor laser Signal format system: PAL/NTSC switchable 2 Pinch both edges of the protection collar, then pull it out. DVD/CD Player section Signal-to-noise ratio: 120 dB Frequency response: 10 – 20,000 Hz Wow and flutter: Below measurable limit Harmonic distortion: 0.01 % Tuner section FM Tuning range: 87.5 – 108.0 MHz Antenna (aerial) terminal: External antenna (aerial) connector Intermediate frequency: 10.7 MHz/450 kHz Usable sensitivity: 9 dBf Selectivity: 75 dB at 400 kHz Signal-to-noise ratio: 67 dB (stereo), 69 dB (mono) Harmonic distortion at 1 kHz: 0.5 % (stereo), 0.3 % (mono) Separation: 35 dB at 1 kHz Frequency response: 30 – 15,000 Hz x 2 MW/LW Remove the unit. 1 Insert both release keys simultaneously until they click. Hook facing inwards. Tuning range: MW: 531 – 1,602 kHz LW: 153 – 279 kHz Antenna (aerial) terminal: External antenna (aerial) connector Intermediate frequency: 10.7 MHz/450 kHz Sensitivity: MW: 30 µV, LW: 40 µV USB Player section Interface: USB (Full-speed) Maximum current: 500mA Power amplifier section 2 Pull the release keys to unseat the unit. Outputs: Speaker outputs (sure seal connectors) Speaker impedance: 4 – 8 ohms Maximum power output: 52 W × 4 (at 4 ohms) General 3 Slide the unit out of the mounting. 50 Outputs: Video output terminal Rear audio output terminals Power antenna (aerial) relay control terminal Power amplifier control terminal Inputs: AUX audio input terminals Antenna (aerial) input terminal Parking break control terminal AUX input jack (stereo mini jack) USB signal input terminal Tone controls: Low: ±10 dB at 60 Hz Mid: ±10 dB at 1 kHz Hi: ±10 dB at 10 kHz Power requirements: 12 V DC car battery (negative ground (earth)) Dimensions: Approx. 178 × 50 × 179 mm (7 1/8 × 2 × 7 1/8 in) (w/h/d) MEX-DV1500U 4-120-899-21 (1) D:\Documents and Settings\takashi-shimomura\Desktop\DTP\848220S MEXDV1500U(EUR)\4120899211_MEX-DV1500U_ML\01GB02CD-E.fm Mounting dimensions: Approx. 182 × 53 × 163 mm (7 1/4 × 2 1/8 × 6 1/2 in) (w/h/d) Mass: Approx. 1.4 kg (3 lb 2 oz) Supplied accessories: Card remote commander: RM-X168 Parts for installation and connections (1 set) Your dealer may not handle some of the above listed accessories. Please ask the dealer for detailed information. US and foreign patents licensed from Dolby Laboratories. masterpage:Right Troubleshooting The following checklist will help you remedy problems you may encounter with your unit. Before going through the checklist below, check the connection and operating procedures. If the problem is not solved, visit the following support site. Support site http://support.sony-europe.com MPEG Layer-3 audio coding technology and patents licensed from Fraunhofer IIS and Thomson. DivX, DivX Certified, and associated logos are trademarks of DivX, Inc. and are used under license. This product is protected by certain intellectual property rights of Microsoft Corporation. Use or distribution of such technology outside of this product is prohibited without a license from Microsoft or an authorized Microsoft subsidiary. Design and specifications are subject to change without notice. • Halogenated flame retardants are not used in the certain printed wiring boards. • Halogenated flame retardants are not used in cabinets. • Packaging cushions are made from paper. Depending on the connected monitor, the unit may take a few seconds to turn off after turning the ignition off. This is not a malfunction. General No power is being supplied to the unit. • Check the connection or fuse. • If the unit is turned off and the display disappears, it cannot be operated with the remote commander. t Turn on the unit. The power antenna (aerial) does not extend. The power antenna (aerial) does not have a relay box. No beep sound. • The beep sound is canceled (page 43). • An optional power amplifier is connected and you are not using the built-in amplifier. The contents of the memory have been erased. • The RESET button has been pressed. t Store again into the memory. • The power supply lead or battery has been disconnected or it is not connected properly. Stored stations and correct time are erased. The fuse has blown. Makes noise when the position of the ignition is switched. The leads are not matched correctly with the car’s accessory power connector. The display disappears from/does not appear in the display window. • The dimmer is set “DIM-ON” (page 43). • The display disappears if you press and hold (OFF). t Press and hold (OFF) on the unit until the display appears. • The connectors are dirty (page 49). The Auto Off function does not operate. The unit is turned on. The Auto Off function activates after turning off the unit. t Turn off the unit. continue to next page t 51 MEX-DV1500U 4-120-899-21 (1) D:\Documents and Settings\takashi-shimomura\Desktop\DTP\848220S MEXDV1500U(EUR)\4120899211_MEX-DV1500U_ML\01GB02CD-E.fm Picture There is no picture/picture noise occurs. • A connection has not been made correctly. • Check the connection to the connected equipment, and set the input selector of the equipment to the source corresponding to this unit. • Defective or dirty disc. • Installation is not correct. t Install the unit at an angle of less than 45° in a sturdy part of the car. • The monitor is connected to the AUDIO/VIDEO OUT, and the parking cord (light green) is not connected to the parking brake switch cord, or the parking brake is not applied. • The color system setting is incorrect. t Set the color system to “PAL” or “NTSC” according to the connected monitor (page 43). Picture does not fit in the screen. The aspect ratio is fixed on the DVD. Sound There is no sound/sound skips/sound cracks. • A connection has not been made correctly. • Check the connection to the connected equipment, and set the input selector of the equipment to the source corresponding to this unit. • Defective or dirty disc. • Installation is not correct. t Install the unit at an angle of less than 45° in a sturdy part of the car. • The MP3 file sampling rate is not 16, 22.05, 24, 32, 44.1, or 48 kHz. • The WMA file sampling rate is not 32, 44.1, or 48 kHz. • The AAC file sampling rate is not 44.1, or 48 kHz. • The MP3 file bit rate is not 8 to 384 kbps. • The WMA file bit rate is not 32 to 384 kbps. • The AAC file bit rate is not 16 to 320 kbps. • The unit is in pause/reverse/fast-forward mode. • The settings for the outputs are not made correctly. • The DVD output level is too low (page 28). • The volume is too low. • The ATT function is activated. • The position of the fader control “FAD” is not set for a 2-speaker system. • Unsupported format (such as DTS). t Check if the format is supported by this unit (page 8). Sound is noisy. Keep cords and cables away from each other. masterpage:Left Disc operation The disc cannot be loaded. • Another disc is already loaded. • The disc has been forcibly inserted upside down or in the wrong way. The disc does not play back. • Defective or dirty disc. • The disc is not applicable. • The DVD is not applicable due to the region code. • The disc is not finalized (page 48). • The disc format and file version are incompatible with this unit (page 8, 48). • Press Z to remove the disc. MP3/WMA/AAC/JPEG/DivX/MPEG-4 files do not play back. • Recording was not performed according to the ISO 9660 level 1 or level 2, the Joliet or Romeo in the expansion format (DATA CD), or the UDF Bridge format (DATA DVD) (page 48). • The file extension is incorrect (page 48). • Files are not stored in MP3/WMA/AAC/JPEG/DivX/ MPEG-4 format. • If the disc contains multiple file types, only the selected file type (audio/video/image) can be played. t Select the appropriate file type using the list (page 33). MP3/WMA/AAC/JPEG/DivX/MPEG-4 files take longer to play back than others. The following discs take a longer time to start playback. – a disc recorded with a complicated tree structure. – a disc recorded in Multi Session/Multi Border. – a disc to which data can be added. The disc does not start playing from the beginning. Resume playback or multi-disc resume playback (page 40) has taken effect. Certain functions cannot be performed. Depending on the disc, you may not be able to perform operations such as stop, search, or repeat/shuffle play. For details, see the manual supplied with the disc. The soundtrack/subtitle language or angle cannot be changed. • Use the DVD menu instead of the direct selection button on the card remote commander (page 17). • Multilingual tracks, multilingual subtitles, or multiangles are not recorded on the DVD. • The DVD prohibits changing. The display items do not scroll. • For discs with very many characters, those may not scroll. • “AUTO-SCRL” is set to “OFF.” t Set “A.SCRL-ON” (page 43). The operation buttons do not function. The disc will not eject. Press the RESET button (page 14). You forgot the password for parental control. Enter “5776” in the password input display to unlock (page 30). 52 MEX-DV1500U 4-120-899-21 (1) D:\Documents and Settings\takashi-shimomura\Desktop\DTP\848220S MEXDV1500U(EUR)\4120899211_MEX-DV1500U_ML\01GB02CD-E.fm Radio reception The stations cannot be received. The sound is hampered by noises. • The connection is not correct. t Connect a power antenna (aerial) control lead (blue) or accessory power supply lead (red) to the power supply lead of a car’s antenna (aerial) booster (only when your car has built-in FM/ MW/LW antenna (aerial) in the rear/side glass). t Check the connection of the car antenna (aerial). t If the auto antenna (aerial) will not go up, check the connection of the power antenna (aerial) control lead. Preset tuning is not possible. • Store the correct frequency in the memory. • The broadcast signal is too weak. Automatic tuning is not possible. • Setting of the local seek mode is not correct. t Tuning stops too frequently: Set “LOCAL-ON” (page 44). t Tuning does not stop at a station: Set “MONO-ON” (page 44). • The broadcast signal is too weak. t Perform manual tuning. During FM reception, the “ST” indication flashes. • Tune in the frequency accurately. • The broadcast signal is too weak. t Set “MONO-ON” (page 44). An FM program broadcast in stereo is heard in monaural. The unit is in monaural reception mode. t Set “MONO-OFF” (page 44). RDS The SEEK starts after a few seconds of listening. The station is non-TP or has weak signal. t Deactivate TA (page 35). No traffic announcements. • Activate TA (page 35). • The station does not broadcast any traffic announcements despite being TP. t Tune in another station. PTY displays “- - - - - - - -.” • The current station is not an RDS station. • RDS data has not been received. • The station does not specify the program type. USB playback You cannot play back items via a USB hub. This unit cannot recognize USB devices via a USB hub. Cannot play back items. A USB device does not work. t Reconnect it. masterpage:Right The USB device takes longer to play back. The USB device contains files with a complicated tree structure. A beep sounds. During playback, the USB device has been disconnected. t Before disconnecting a USB device, make sure to stop playback first for data protection. The sound is intermittent. The sound may be intermittent at a high-bit-rate of more than 320 kbps. Error displays/Messages On the main unit ERROR • The disc is dirty or inserted upside down. t Clean or insert the disc correctly. • A blank disc has been inserted. • The disc cannot play due to a problem. t Insert another disc. • The disc is not compatible with this unit. t Insert a compatible disc. • USB device was not automatically recognized. t Reconnect it again. • Press Z to remove the disc. FAILURE The connection of speakers/amplifiers is incorrect. t See the supplied installation/connections manual to check the connection. L. SEEK +/– The local seek mode is on during automatic tuning. NO AF There is no alternative frequency for the current station. t Press .m/M> while the program service name is flashing. The unit starts searching for another frequency with the same PI (Program Identification) data (“PI SEEK” appears). NO DATA The disc or USB device does not contain a music file. t Insert a music CD in this unit. t Connect a USB device with a music file in it. NO DEV (No Device) “USB” is selected as the source without a USB device connected. A USB device or a USB cable has been disconnected during playback. t Be sure to connect a USB device and USB cable. NO NAME A disc/album/folder/track/image/video name is not written in the file. NO TP The unit will continue searching for available TP stations. continue to next page t 53 MEX-DV1500U 4-120-899-21 (1) D:\Documents and Settings\takashi-shimomura\Desktop\DTP\848220S MEXDV1500U(EUR)\4120899211_MEX-DV1500U_ML\01GB02CD-E.fm OFFSET There may be an internal malfunction. t Check the connection. If the error indication remains on in the display, consult your nearest Sony dealer. OVERLOAD USB device is overloaded. t Disconnect the USB device, then change the source by pressing (SOURCE). t Indicates that the USB device is out of order, or an unsupported device is connected. READ The unit is reading all file/album (folder) information on the disc. t Wait until reading is complete and playback starts automatically. Depending on the disc structure, it may take more than a minute. USB NO SUPRT (USB Not Support) The connected USB device is not supported. t For details on the compatibility of your USB device, visit the support site. “ ” or “ ” During reverse or fast-forward, you have reached the beginning or the end of the disc and you cannot go any further. “ ” The character cannot be displayed with the unit. On the monitor Playback prohibited by region code. The DVD playback is prohibited due to the different region code. Cannot play this disc. • The disc is incompatible with this unit. • The disc is not finalized. No playable data. The disc does not contain playable data. Please press RESET. The unit cannot operate due to some problem. t Press the RESET button (page 14). If these solutions do not help improve the situation, consult your nearest Sony dealer. If you take the unit to be repaired because of disc playback trouble, bring the disc that was used at the time the problem began. masterpage:Left Glossary Album Section of a music piece or an image on a DATA CD/DVD containing MP3/WMA/AAC audio tracks or JPEG files. Chapter Subdivision of a title on a DVD. A title is composed of several chapters. DivX® Digital video technology created by DivX, Inc. Videos encoded with DivX technology are among the highest quality with a relatively small file size. Dolby Digital Digital audio compression technology developed by Dolby Laboratories. This technology conforms to 5.1-channel surround sound. The rear channel is stereo and there is a discrete subwoofer channel in this format. Dolby Digital provides the same 5.1 discrete channels of high quality digital audio found in Dolby Digital cinema audio systems. Good channel separation is realized because all of the channel data are recorded discretely and little deterioration is realized because all channel data processing is digital. DVD A disc that contains up to 8 hours of moving pictures even though its diameter is the same as a CD. The data capacity of a single-layer and single-sided DVD is 4.7 GB (Giga Byte), which is 7 times that of a CD. The data capacity of a double-layer and single-sided DVD is 8.5 GB, a single-layer and double-sided DVD is 9.4 GB, and double-layer and double-sided DVD is 17 GB. The picture data uses the MPEG 2 format, one of the worldwide standards of digital compression technology. The picture data is compressed to about 1/40 (average) of its original size. The DVD also uses a variable rate coding technology that changes the data to be allocated according to the status of the picture. Audio information is recorded in a multichannel format, such as Dolby Digital, allowing you to enjoy a more real audio presence. Furthermore, various advanced functions such as the multi-angle, multilingual, and Parental Control functions are provided with the DVD. DVD-RW A DVD-RW is a recordable and rewritable disc that is the same size as a DVD VIDEO. The DVD-RW has two different modes: VR mode and video mode. DVD-RWs created in video mode have the same format as a DVD VIDEO, while discs created in VR (Video Recording) mode allow the contents to be programmed or edited. 54 MEX-DV1500U 4-120-899-21 (1) D:\Documents and Settings\takashi-shimomura\Desktop\DTP\848220S MEXDV1500U(EUR)\4120899211_MEX-DV1500U_ML\01GB02CD-E.fm masterpage:Right DVD+RW A DVD+RW (plus RW) is a recordable and rewritable disc. DVD+RWs use a recording format that is comparable to the DVD VIDEO format. File • An MP3/WMA/AAC track or JPEG image on a DATA CD/DATA DVD/USB device. • An MP3/WMA/AAC track, JPEG image, or a DivX/MPEG-4 video on a DATA CD/DATA DVD. (“File” is an exclusive definition for this unit.) A single file consists of a single track, image, or movie. Film based software, Video based software DVDs can be classified as Film based or Video based software. Film based DVDs contain the same images (24 frames per second) that are shown at movie theaters. Video based DVDs, such as television dramas or sit-coms, displays images at 30 frames (or 60 fields) per second. Scene On a VIDEO CD with PBC (playback control) functions, the menu screens, moving pictures and still pictures are divided into sections called “scenes.” Title The longest section of a picture or music feature on a DVD, movie, etc., in video software, or the entire album in audio software. Track Section of a picture or a music piece on a VIDEO CD, CD, or MP3/WMA/AAC. An album is composed of several tracks (MP3/WMA/AAC only). VIDEO CD A compact disc that contains moving pictures. The picture data uses the MPEG 1 format, one of a worldwide standard of digital compression technology. The picture data is compressed to about 1/140 of its original size. Consequently, a 12 cm VIDEO CD can contain up to 74 minutes of moving pictures. VIDEO CDs also contain compact audio data. Sounds outside the range of human hearing are compressed while sounds we can hear are not compressed. VIDEO CDs can hold 6 times the audio information of conventional audio CDs. There are 3 versions of VIDEO CDs. • Version 1.0, 1.1: You can play only moving pictures and sound. • Version 2.0: You can play high-resolution still pictures and enjoy PBC functions. This unit conforms to all 3 versions above. 55 MEX-DV1500U 4-120-899-21 (1) D:\Documents and Settings\takashi-shimomura\Desktop\DTP\848220S MEXDV1500U(EUR)\4120899211_MEX-DV1500U_ML\01GB02CD-E.fm masterpage:Left Language code/area code list Language code list The language spellings conform to the ISO 639: 1988 (E/F) standard. Code Language Code Language Code Language Code Language 1027 1028 1032 1039 1044 1045 1051 1052 1053 1057 1059 1060 1061 1066 Afar Abkhazian Afrikaans Amharic Arabic Assamese Aymara Azerbaijani Bashkir Byelorussian Bulgarian Bihari Bislama Bengali; Bangla Tibetan Breton Catalan Corsican Czech Welsh Danish German Bhutani Greek English Esperanto Spanish Estonian Basque Persian Finnish Fiji Faroese French Frisian 1183 1186 1194 1196 1203 1209 1217 1226 1229 1233 1235 1239 1245 1248 1253 1254 1257 1261 1269 1283 1287 1297 1298 1299 1300 1301 1305 1307 1311 1313 1326 1327 1332 1334 1347 1349 1350 1352 1353 1356 1357 1358 1363 1365 1369 1376 1379 1393 1403 1408 1417 1428 1435 Samoan Shona Somali Albanian Serbian Siswati Sesotho Sundanese Swedish Swahili Tamil Telugu Tajik Thai Tigrinya Turkmen Tagalog Setswana Tonga Turkish Tsonga Tatar Twi Ukrainian Urdu Uzbek Vietnamese Volapük Wolof Xhosa Yoruba Chinese Zulu 1503 1505 1506 Maori Macedonian Malayalam Mongolian Moldavian Marathi Malay Maltese Burmese Nauru Nepali Dutch Norwegian Occitan (Afan)Oromo Oriya Punjabi Polish Pashto; Pushto Portuguese Quechua RhaetoRomance Kirundi Romanian Russian Kinyarwanda Sanskrit Sindhi Sangho SerboCroatian Singhalese Slovak Slovenian 1507 1508 1509 1511 1512 1513 1514 1515 1516 1517 1521 1525 1527 1528 1529 1531 1532 1534 1535 1538 1539 1540 1543 1557 1564 1572 1581 1587 1613 1632 1665 1684 1697 1345 Irish Scots Gaelic Galician Guarani Gujarati Hausa Hindi Croatian Hungarian Armenian Interlingua Interlingue Inupiak Indonesian Icelandic Italian Hebrew Japanese Yiddish Javanese Georgian Kazakh Greenlandic Cambodian Kannada Korean Kashmiri Kurdish Kirghiz Latin Lingala Laothian Lithuanian Latvian; Lettish Malagasy 1703 Not specified 1067 1070 1079 1093 1097 1103 1105 1109 1130 1142 1144 1145 1149 1150 1151 1157 1165 1166 1171 1174 1181 1436 1463 1481 1482 1483 1489 1491 1495 1498 1501 1502 Area code list 56 Code Area Code Area Code Area Code Area 2044 2047 2046 2057 2070 2079 2090 2092 2115 Argentina Australia Austria Belgium Brazil Canada Chile China Denmark 2165 2174 2109 2248 2238 2254 2276 2304 2363 Finland France Germany India Indonesia Italy Japan Korea Malaysia 2362 2376 2390 2379 2427 2424 2436 2489 2501 Mexico Netherlands New Zealand Norway Pakistan Philippines Portugal Russia Singapore 2149 2499 2086 2528 2184 Spain Sweden Switzerland Thailand United Kingdom MEX-DV1500U 4-120-899-21 (1) 01GB+00COV-EIX.fm masterpage:Right Index Numerics D M 16:9 39 2000MP3 6 2000WMA 6 4:3 LETTER BOX 39 4:3 PAN SCAN 39 Demonstration (DEMO) 43 Dimmer (DIMMER) 43 Direct search play 32 Discs 8 Display setup (DISPLAY SETUP) 39 DivX VOD 40 DivX® 9, 23, 48 Dolby Digital 27, 28 Dolby Level Adjust (DOLBY-ADJ) 45 DVD Level (DVD-LEVEL) 28, 45 DVD menu 17 DVD’s top menu 17 Dynamic Range Control (DRC) 41 Menu language (MENU) 39 Monaural Mode (MONO) 44 Monitor type (MONITOR TYPE) 39 Motion Display (M.DSPL) 43 MP3 9, 48 MPEG-4 9, 49 Multi Border DVD 48 Multi Session CD 48 Multi-disc resume playback (MULTI-DISC RESUME) 6, 40 E PAL 43 Parental control (PARENTAL CONTROL) 30, 40 Picture EQ (PICTURE EQ) 29, 41 Play list play (PLAY LIST PLAY) 41 Play mode menu 24 Playable discs 8 Playback control (PBC) 24 Program format 27 Program Types (PTY) 35, 36 A AAC 9, 48 Album (ALBUM) 32 Alternative Frequencies (AF) 35 Angle (ANGLE) 17 Area code 56 Audio (AUDIO) Channel 27 Format 27 Language 27, 39 Audio DRC (AUDIO DRC) 41 Audio setup (AUDIO SETUP) 41 Auto Off (AUTO-OFF) 43 Auto Scroll (AUTO-SCRL) 43 Auxiliary equipment 46 Auxiliary Level (AUX-LEVEL) 45, 47 B Balance (BAL) 37 Beep sound (BEEP) 43 Best Tuning Memory (BTM) 34 C Card remote commander 12, 14, 49 Chapter (CHAPTER) 32 Clock Adjust (CLOCK-ADJ) 46 Clock Time (CT) 35, 36, 43 Color System (COLOR-SYS) 43 Custom setup (CUSTOM SETUP) 40 EQ3 37 Equalizer Picture (PICTURE EQ) 29, 41 Sound (EQ3) 37 F Fader (FAD) 37 File (FILE) 33 Folder (ALBUM) 33 Formats 9 Front AUX 46 Fuse 49 N NTSC 43 P Q Quick-BrowZer 33 I R Image (IMAGE) 32 Radio Data System (RDS) 35 Region code 9 Regional (REGIONAL) 36, 44 Repeat play (REP) 21, 31 Reset (RESET) 14, 41 Resume play 17, 19 J JPEG 9, 23, 48 L Language code 56 Language setup (LANGUAGE SETUP) 39 List up 33 Lithium battery 49 Local Seek Mode (LOCAL) 44 Loudness (LOUD) 45 continue to next page t 57 MEX-DV1500U 4-120-899-21 (1) 01GB+00COV-EIX.fm masterpage:Left S Setup menu System setup 42 Visual setup 38 Shuffle play (SHUF) 21, 31 Slide show interval (SLIDE SHOW TIME) 40 Soundtrack language (AUDIO) 27, 39 Subtitle language (SUBTITLE) 17, 39 System setup 42 T Time/text information (TIME) 26, 32 Title (TITLE) 32 Track (TRACK) 32 Traffic Announcement (TA) 35 Traffic Program (TP) 35 U USB device 20 V Visual setup 38 Volume 10 W Wallpaper (WALLPAPER) 39 WMA 9, 48 Z Zoom (CENTER ZOOM) 28 58 MEX-DV1500U 4-120-899-21 (1) 01GB+00COV-EIX.fm masterpage:Right MEX-DV1500U 4-120-899-21 (1) D:\Documents and Settings\takashi-shimomura\Desktop\DTP\848220S MEXDV1500U(EUR)\4120899211_MEX-DV1500U_ML\02DE01INT-E.fm Wichtig! Bitte nehmen Sie sich etwas Zeit, um den Geräte-Pass vollständig auszufüllen. Dieser befindet sich auf der hinteren Umschlagseite dieser Bedienungsanleitung. Achtung Um Feuergefahr und die Gefahr eines elektrischen Schlags zu vermeiden, setzen Sie das Gerät weder Regen noch sonstiger Feuchtigkeit aus. Um einen elektrischen Schlag zu vermeiden, öffnen Sie das Gehäuse nicht. Überlassen Sie Wartungsarbeiten stets qualifiziertem Fachpersonal. Entsorgung von gebrauchten elektrischen und elektronischen Geräten (anzuwenden in den Ländern der Europäischen Union und anderen europäischen Ländern mit einem separaten Sammelsystem für diese Geräte) Das Symbol auf dem Produkt oder seiner Verpackung weist darauf hin, dass dieses Produkt nicht als normaler Haushaltsabfall zu behandeln ist, sondern an einer Annahmestelle für das Recycling von elektrischen und elektronischen Geräten abgegeben werden muss. Durch Ihren Beitrag zum korrekten Entsorgen dieses Produkts schützen Sie die Umwelt und die Gesundheit Ihrer Mitmenschen. Umwelt und Gesundheit werden durch falsches Entsorgen gefährdet. Materialrecycling hilft, den Verbrauch von Rohstoffen zu verringern. Weitere Informationen über das Recycling dieses Produkts erhalten Sie von Ihrer Gemeinde, den kommunalen Entsorgungsbetrieben oder dem Geschäft, in dem Sie das Produkt gekauft haben. VORSICHT Geeignetes Zubehör: Fernbedienung Die Verwendung optischer Instrumente zusammen mit diesem Produkt stellt ein Gesundheitsrisiko für die Augen dar. Der LaserStrahl, den dieser CD/DVD-Player generiert, kann die Augen schädigen. Versuchen Sie daher nicht, das Gerät zu zerlegen. Überlassen Sie Wartungsarbeiten stets qualifiziertem Fachpersonal. Entsorgung von gebrauchten Batterien und Akkus (anzuwenden in den Ländern der Europäischen Union und anderen europäischen Ländern mit einem separaten Sammelsystem für diese Produkte) Dieses Etikett befindet sich an der Unterseite des Gehäuses. CAUTION : CLASS 1M VISIBLE/INVISIBLE LASER RADIATION WHEN OPEN AND INTERLOCKS DEFEATED. DO NOT VIEW DIRECTLY WITH OPTICAL INSTRUMENTS. Dieses Etikett befindet sich am internen Chassis der Laufwerkseinheit. 2 masterpage:Left Hinweis für Kunden: Die folgenden Informationen gelten nur für Geräte, die in Ländern verkauft werden, in denen EU-Richtlinien gelten Der Hersteller dieses Produkts ist Sony Corporation, 1-7-1 Konan, Minato-ku, Tokio, Japan. Autorisierter Vertreter für EMV und Produktsicherheit ist Sony Deutschland GmbH, Hedelfinger Straße 61, 70327 Stuttgart, Deutschland. Kontaktadressen für Kundendienst oder Garantieanspruche finden Sie in den separaten Kundendienst- oder Garantiedokumenten. Das Symbol auf der Batterie/dem Akku oder der Verpackung weist darauf hin, dass diese nicht als normaler Haushaltsabfall zu behandeln sind. Durch Ihren Beitrag zum korrekten Entsorgen dieser Batterien/Akkus schützen Sie die Umwelt und die Gesundheit Ihrer Mitmenschen. Umwelt und Gesundheit werden durch falsches Entsorgen gefährdet. Materialrecycling hilft, den Verbrauch von Rohstoffen zu verringern. Bei Produkten, die auf Grund ihrer Sicherheit, der Funktionalität oder als Sicherung vor Datenverlust eine ständige Verbindung zur eingebauten Batterie benötigen, sollte die Batterie nur durch qualifiziertes Servicepersonal ausgetauscht werden. Um sicherzustellen, dass die Batterie korrekt entsorgt wird, geben Sie das Produkt zwecks Entsorgung an einer Annahmestelle für das Recycling von elektrischen und elektronischen Geräten ab. Für alle anderen Batterien entnehmen Sie die Batterie bitte entsprechend dem Kapitel über die sichere Entfernung der Batterie. Geben Sie die Batterie an einer Annahmestelle für das Recycling von Batterien/Akkus ab. Weitere Informationen über das Recycling dieses Produkts oder der Batterie erhalten Sie von Ihrer Gemeinde, den kommunalen Entsorgungsbetrieben oder dem Geschäft, in dem Sie das Produkt gekauft haben. MEX-DV1500U 4-120-899-21 (1) D:\Documents and Settings\takashi-shimomura\Desktop\DTP\848220S MEXDV1500U(EUR)\4120899211_MEX-DV1500U_ML\02DE01INT-E.fm masterpage:Right Warnhinweis, wenn die Zündung Ihres Fahrzeugs nicht über eine Zubehörposition (ACC oder I) verfügt Schalten Sie unbedingt die Ausschaltautomatik ein (Seite 45). Nach dem Ausschalten wird das Gerät dann nach der voreingestellten Zeit automatisch vollständig abgeschaltet, so dass der Autobatterie kein Strom mehr entzogen wird. Wenn Sie die Ausschaltautomatik nicht aktivieren, müssen Sie jedes Mal, wenn Sie die Zündung ausschalten, die Taste (OFF) gedrückt halten, bis die Anzeige ausgeblendet wird. Erläuterungen zum Beenden des DemoModus (DEMO) finden Sie auf Seite 45. Sicherheit • Beachten Sie bitte die Straßenverkehrsordnung in Ihrem Land bzw. Gebiet. • Aus Sicherheitsgründen schaltet sich der an VIDEO OUT angeschlossene Monitor automatisch aus, wenn die Parkbremse gelöst wird. Unfallverhütung Das Bild erscheint erst, nachdem Sie das Fahrzeug geparkt und die Parkbremse betätigt haben. Wenn das Fahrzeug während der Videowiedergabe zu fahren beginnt, erscheint die folgende Warnmeldung und die Bilder von VIDEO OUT werden automatisch ausgeblendet. Die Bilder auf dem Bildschirm werden zwar ausgeblendet, aber der Ton wird weiterhin wiedergegeben. Video blocked for your safety. Bedienen Sie das Gerät während des Fahrens nicht und schauen Sie auch nicht auf den Monitor. 3 MEX-DV1500U 4-120-899-21 (1) D:\Documents and Settings\takashi-shimomura\Desktop\DTP\848220S MEXDV1500U(EUR)\4120899211_MEX-DV1500U_ML\02DE+00COV-ETOC.fm masterpage:Right Inhalt Willkommen! . . . . . . . . . . . . . . . . . . . . . . . . . . . 6 Urheberrechte . . . . . . . . . . . . . . . . . . . . . . . . 7 Einstellen der Bildqualität — Bild-EQ . . . . . . 29 Anpassen der Bildqualität . . . . . . . . . . . . . . 30 Geeignete Discs und in dieser Anleitung verwendete Symbole . . . . . . . . . . . . . . . . . . . . . 8 Sperren von Discs — Kindersicherung . . . . . 30 Aktivieren der Kindersicherung . . . . . . . . . 30 Wechseln des Gebiets und der Altersfreigabestufe . . . . . . . . . . . . . . . . . . . 31 Lage und Funktion der Teile und Bedienelemente . . . . . . . . . . . . . . . . . . . . . . . . 10 Hauptgerät . . . . . . . . . . . . . . . . . . . . . . . . . . 10 Kartenfernbedienung RM-X168 . . . . . . . . .12 Vorbereitungen Installieren des Geräts und des gesondert erhältlichen Monitors. . . . . . 14 Zurücksetzen des Geräts. . . . . . . . . . . . 14 Vorbereiten der Kartenfernbedienung . . . . . . . . . . . . . . . 14 Abnehmen der Frontplatte . . . . . . . . . . 15 Anbringen der Frontplatte . . . . . . . . . . . . . . 15 Grundfunktionen Wiedergeben von Video-Discs . . . . . . . 16 Wiedergeben von Audio-Discs . . . . . . . 18 Wiedergabe mit einem USB-Gerät . . . . 20 Informationen im Display . . . . . . . . . . . . . .21 Repeat und Shuffle Play . . . . . . . . . . . . . . .21 Direktsuche . . . . . . . . . . . . . . . . . . . . . . . . . . . 33 Auflisten von Stücken/Bildern/Videodateien — Quick-BrowZer. . . . . . . . . . . . . . . . . . . . . . 34 Auswählen eines Stücks/Bildes/einer Videodatei . . . . . . . . . . . . . . . . . . . . . . . . . . 34 Auswählen eines Dateityps . . . . . . . . . . . . . 35 Anzeigen von Audio-Disc-Informationen. . . . 35 Weitere Funktionen — Radio Speichern und Empfangen von Sendern . . . . . 36 Automatisches Speichern von Sendern — BTM. . . . . . . . . . . . . . . . . . . . . . . . . . . . 36 Manuelles Speichern von Sendern . . . . . . . 36 Empfangen gespeicherter Sender . . . . . . . . 36 RDS . . . . . . . . . . . . . . . . . . . . . . . . . . . . . . . . . 36 Übersicht . . . . . . . . . . . . . . . . . . . . . . . . . . . 36 Einstellen von AF und TA . . . . . . . . . . . . . 37 Auswählen des Programmtyps (PTY) . . . . 38 Einstellen der Uhrzeit (CT). . . . . . . . . . . . . 38 Radioempfang . . . . . . . . . . . . . . . . . . . . 22 Klangeinstellungen Weitere Funktionen — Discs Einstellen der Klangeigenschaften . . . . . . . . . 38 Individuelles Einstellen der Equalizer-Kurve — EQ3 . . . . . . . . . . . . . . . . . . . . . . . . . . . . 39 Wiedergeben von DivX®-/MPEG-4-/JPEGDateien . . . . . . . . . . . . . . . . . . . . . . . . . . . . . . . 23 DivX®-/MPEG-4-Videowiedergabe . . . . . .23 JPEG-Bildwiedergabe . . . . . . . . . . . . . . . . .23 Verwenden der PBC-Funktionen — Wiedergabesteuerung . . . . . . . . . . . . . . . . . 24 Verwenden des Wiedergabemodusmenüs . . . .24 Anzeigen der Zeitangaben/Textinformationen einer Disc . . . . . . . . . . . . . . . . . . . . . . . . . . . . .26 Konfigurieren der Audioeinstellungen. . . . . . . 27 Wechseln von Audiosprache/-format . . . . . 27 Anzeigen des Programmformats . . . . . . . . . 27 Einstellen des Audioausgangspegels — DVD-Pegel . . . . . . . . . . . . . . . . . . . . . . .28 4 Repeat und Shuffle Play . . . . . . . . . . . . . . . . . 32 Vergrößern von Bildern . . . . . . . . . . . . . . . . . .29 Einstellungen Wiedergabekonfiguration . . . . . . . . . . . . . . . . 39 Grundlegende Funktionsweise der Wiedergabekonfiguration . . . . . . . . . . . . . . 39 Spracheinstellungen für Anzeige oder Tonspur . . . . . . . . . . . . . . . . . . . . . . . . . . . . 41 Bildschirmkonfiguration . . . . . . . . . . . . . . . 41 Benutzereinstellungen. . . . . . . . . . . . . . . . . 42 Tonkonfiguration . . . . . . . . . . . . . . . . . . . . 43 Zurücksetzen aller Einstellungen . . . . . . . . 43 Systemkonfiguration . . . . . . . . . . . . . . . . . . . . 44 Grundlegende Funktionsweise der Systemkonfiguration. . . . . . . . . . . . . . . . . . 44 Einstellen der Uhr . . . . . . . . . . . . . . . . . . . . 48 MEX-DV1500U 4-120-899-21 (1) D:\Documents and Settings\takashi-shimomura\Desktop\DTP\848220S MEXDV1500U(EUR)\4120899211_MEX-DV1500U_ML\02DE+00COV-ETOC.fm Verwenden gesondert erhältlicher Geräte masterpage:Right Zur Installation und zum Anschluss siehe die mitgelieferte Installations-/Anschlussanleitung. Zusätzliche Geräte . . . . . . . . . . . . . . . . . . . . . . 48 Weitere Informationen Sicherheitsmaßnahmen . . . . . . . . . . . . . . . . . . 49 Hinweise zu Discs. . . . . . . . . . . . . . . . . . . . 49 Wiedergabereihenfolge von MP3-/WMA-/ AAC-/JPEG-/DivX®-/ MPEG-4-Dateien . . . . . . . . . . . . . . . . . . . . 50 Hinweise zu MP3-Dateien . . . . . . . . . . . . . 50 Hinweise zu WMA-Dateien . . . . . . . . . . . . 51 Hinweise zu AAC-Dateien . . . . . . . . . . . . . 51 Hinweise zu JPEG-Dateien. . . . . . . . . . . . . 51 Hinweise zu DivX®-Dateien. . . . . . . . . . . . 51 Hinweise zu MPEG-4-Dateien . . . . . . . . . . 51 Wartung . . . . . . . . . . . . . . . . . . . . . . . . . . . . . . 51 Ausbauen des Geräts . . . . . . . . . . . . . . . . . . . . 52 Technische Daten . . . . . . . . . . . . . . . . . . . . . . 53 Störungsbehebung . . . . . . . . . . . . . . . . . . . . . . 54 Fehleranzeigen/Meldungen. . . . . . . . . . . . . 57 Glossar . . . . . . . . . . . . . . . . . . . . . . . . . . . . . . . 58 Sprachcode-/Gebietscodeliste . . . . . . . . . . . . . 60 Index . . . . . . . . . . . . . . . . . . . . . . . . . . . . . . . . 61 Support-Website Wenn Sie Fragen haben oder die neuesten Support-Informationen zu diesem Produkt abrufen möchten, rufen Sie bitte folgende Website auf: http://support.sony-europe.com Hier finden Sie folgende Informationen: • Modelle und Hersteller kompatibler digitaler Audioplayer • Unterstützte MP3-/WMA-/AAC-Dateien 5 MEX-DV1500U 4-120-899-21 (1) D:\Documents and Settings\takashi-shimomura\Desktop\DTP\848220S MEXDV1500U(EUR)\4120899211_MEX-DV1500U_ML\02DE02CD-E.fm Willkommen! Danke, dass Sie sich für diesen Multi-DiscPlayer von Sony entschieden haben. Lesen Sie diese Anleitung vor Inbetriebnahme des Geräts bitte genau durch und bewahren Sie sie zum späteren Nachschlagen sorgfältig auf. Merkmale und Funktionen Nähere Erläuterungen finden Sie auf den angegebenen Seiten. DVD-, VCD-, CD-Wiedergabe t Seite 8 Das Gerät ist mit verschiedenen Disc-Formaten kompatibel. 2000MP3, 2000WMA, 2000AAC masterpage:Left t Seite 48 Ein tragbares Audiogerät kann angeschlossen werden (Analogverbindung). t Seite 48 An die Anschlüsse AUX AUDIO IN an der Rückseite können Sie ein zusätzliches Gerät wie ein tragbares Audiogerät (Analogverbindung), ein verstecktes Navigationsgerät, einen Fernsehtuner usw. anschließen. Der Ton vom angeschlossenen Gerät wird dann über dieses Gerät ausgegeben. * Je nach Länge der Stücke und Abtastfrequenz der Aufnahme. Bis zu 2.000 Stücke* auf einer Disc im MP3/ WMA/AAC-Format können wiedergegeben werden. Wiedergabefortsetzung für mehrere Discs t Seite 42 Das Gerät speichert für bis zu 5 DVD VIDEOs, VCDs, DivX- und MPEG-4-Discs die Stelle, an der Sie die Wiedergabe gestoppt haben, und setzt die Wiedergabe an dieser Stelle fort, auch wenn die wiedergegebene Disc zwischenzeitlich ausgeworfen wurde. t Seite 38 Es gibt 7 voreingestellte Equalizer-Kurven, die sich für 3 verschiedene Frequenzbereiche individuell anpassen lassen. t Seite 29 Sie können aus gespeicherten Voreinstellungen je nach Fahrzeuginnenraum bzw. Umgebungslicht die gewünschten Bildeinstellungen auswählen. 6 MEX-DV1500U 4-120-899-21 (1) D:\Documents and Settings\takashi-shimomura\Desktop\DTP\848220S MEXDV1500U(EUR)\4120899211_MEX-DV1500U_ML\02DE02CD-E.fm masterpage:Right Urheberrechte Dieses Produkt ist mit einer Urheberrechtsschutztechnologie ausgestattet, die durch Verfahrensansprüche bestimmter US-Patente und sonstige Rechte zum Schutz geistigen Eigentums geschützt ist. Diese Technologie ist Eigentum der Macrovision Corporation und anderer Rechtseigentümer. Die Nutzung dieser Technologie im Rahmen des Urheberrechtsschutzes muss von der Macrovision Corporation genehmigt werden und gilt nur für den privaten oder anderen eingeschränkten Gebrauch, es sei denn, es liegt eine spezielle Genehmigung der Macrovision Corporation vor. Die Nachentwicklung oder Disassemblierung ist verboten. Hergestellt unter Lizenz von Dolby Laboratories. „Dolby“ und das Doppel-DSymbol sind Warenzeichen von Dolby Laboratories. Windows Media und das Windows-Logo sind Markenzeichen oder eingetragene Markenzeichen der Microsoft Corporation in den USA und/oder anderen Ländern. „DVD VIDEO“, „DVD-R“, „DVD-RW“, „DVD+R“ und „DVD+RW“ sind Markenzeichen. „DivX“ und „DivX Certified“ sind eingetragene Markenzeichen oder Markenzeichen der DivX, Inc. DIESES PRODUKT WIRD UNTER DER MPEG-4 VISUAL PATENT PORTFOLIOLIZENZ FÜR DEN PRIVATEN UND NICHT KOMMERZIELLEN GEBRAUCH DURCH DEN BENUTZER LIZENZIERT, UND ZWAR FÜR DAS DECODIEREN VON MPEG-4VIDEODATEN, DIE VON EINEM BENUTZER IM PRIVATEN, NICHT KOMMERZIELLEN RAHMEN CODIERT WURDEN UND/ODER VON EINEM VIDEO-ANBIETER STAMMEN, DER ÜBER EINE LIZENZ VON MPEG LA ZUM ANBIETEN VON MPEG-4-VIDEOS VERFÜGT. FÜR EINEN ANDEREN ZWECK WIRD KEINE LIZENZ ERTEILT ODER IMPLIZIT GEWÄHRT. WEITERE INFORMATIONEN, AUCH ZU WERBE-, INTERNEN UND KOMMERZIELLEN ZWECKEN, UND LIZENZEN, SIND BEI MPEG LA, LLC, ERHÄLTLICH. SIEHE HTTP://WWW.MPEGLA.COM 7 MEX-DV1500U 4-120-899-21 (1) D:\Documents and Settings\takashi-shimomura\Desktop\DTP\848220S MEXDV1500U(EUR)\4120899211_MEX-DV1500U_ML\02DE02CD-E.fm masterpage:Left Geeignete Discs und in dieser Anleitung verwendete Symbole Auf diesem Gerät können verschiedene Video-/Audio-Discs wiedergegeben werden. In der folgenden Tabelle sind die Discs aufgelistet, die von diesem Gerät unterstützt werden, sowie die Funktionen, die bei den einzelnen Disc-Typen zur Verfügung stehen. Disc-Symbol in dieser Anleitung Disc-Format Disc-Logo DVD VIDEO DVD-R*1 DVD-R DL*1 (Videomodus/VR-Modus) VIDEO DVD-RW*1 (Videomodus/VR-Modus) DVD+R*1 DVD+R DL*1 DVD+RW*1 Video-CD (Version 1.0/1.1/2.0) AUDIO Audio-CD CD-ROM*2 CD-R*2 CD-RW*2 *1 Auch Audiodateien können gespeichert werden. Näheres finden Sie auf Seite 9. *2 Auch Video-/Bilddateien können gespeichert werden. Näheres finden Sie auf Seite 9. Hinweis „DVD“ wird als allgemeine Bezeichnung für DVD VIDEOs, DVD-Rs/DVD-RWs und DVD+Rs/DVD+RWs verwendet. 8 MEX-DV1500U 4-120-899-21 (1) D:\Documents and Settings\takashi-shimomura\Desktop\DTP\848220S MEXDV1500U(EUR)\4120899211_MEX-DV1500U_ML\02DE02CD-E.fm masterpage:Right In der folgenden Tabelle sehen Sie die unterstützten Komprimierungsformate mit den entsprechenden Dateitypen und den Disc-Typen, auf denen diese Dateien gespeichert werden können. Die verfügbaren Funktionen sind unabhängig vom Disc-Typ. Sie hängen vom Format ab. Die Formatsymbole unten erscheinen neben der Beschreibung der Funktionen, die in dem betreffenden Format zur Verfügung stehen. Formatsymbol in dieser Anleitung Dateityp Zum Speichern verwendbarer Disc-Typ MP3-Audiodatei WMA-Audiodatei AAC-Audiodatei JPEG-Bilddatei DivX®-Videodatei DATA-DVDs DVD-ROM DVD-R DVD-R DL DVD-RW DVD+R DVD+R DL DVD+RW DATA-CDs CD-ROM CD-R CD-RW MPEG-4-Videodatei MPEG-4 Tipp Erläuterungen zu den Komprimierungsformaten finden Sie auf Seite 50. Nicht unterstützte Discs Die folgenden Disc-Typen können mit diesem Gerät nicht wiedergegeben werden: • 8-cm-Discs • 12-cm-Disc, bei der nur die inneren 8 cm Daten enthalten (der Rest ist transparent) • CD-ROM mit anderen als MP3/WMA/AAC/JPEG/DivX/MPEG-4-Dateien • SA-CD • CD-G • Foto-CD • VSD (Video-Single-Disc) • DVD-ROM mit anderen als MP3/WMA/AAC/JPEG/DivX/MPEG-4-Dateien • DVD-RAM • DVD-Audio • Active-Audio (Daten) • SVCD (Super-Video-CD) • CDV • Disc, die im Format Packet Write erstellt wurde • Discs im DTS-Format Hinweis Je nach Zustand der Aufnahme können auch kompatible Discs auf diesem Gerät nicht unbedingt wiedergegeben werden. Regionalcode Regionalcode Das Regionalcodesystem dient dem Urheberrechtsschutz von Software. Der Regionalcode befindet sich an der Geräteunterseite. Nur DVDs, die mit dem gleichen Regionalcode wie das Gerät gekennzeichnet sind, können mit diesem Gerät wiedergegeben werden. DVDs mit dem Regionalcode wiedergegeben werden. ALL können ebenfalls Wenn Sie versuchen, eine andere DVD wiederzugeben, erscheint die Meldung „Playback prohibited by region code.“ auf dem Monitorschirm. Einige DVDs sind möglicherweise nicht mit einem Regionalcode gekennzeichnet, können aber trotzdem nicht auf allen Playern wiedergegeben werden. 9 MEX-DV1500U 4-120-899-21 (1) D:\Documents and Settings\takashi-shimomura\Desktop\DTP\848220S MEXDV1500U(EUR)\4120899211_MEX-DV1500U_ML\02DE02CD-E.fm masterpage:Left Lage und Funktion der Teile und Bedienelemente Hauptgerät 1 2345 6 7 8 9 OFF SEEK SOURCE AF TA TP REG DISC ALBM ARTIST TRACK PTY REP SHUF AF/TA 1 2 MODE SEEK SETUP SHUF ZAP DM+ LOUD AUX ALBM 3 4 5 6 DSPL PUSH SOUND / ENTER q; qa qs qd qfqg qh qj qk ql Näheres finden Sie auf den angegebenen Seiten. Die Anweisungen in dieser Anleitung beziehen sich im Allgemeinen auf die Bedienelemente auf der Kartenfernbedienung. Sie können jedoch auch die Bedienelemente am Hauptgerät verwenden, sofern sie die gleiche oder eine ähnliche Bezeichnung tragen wie die Bedienelemente auf der Kartenfernbedienung. F Disc-Einschub Seite 16, 18 Einlegen einer Disc. A Taste OFF Seite 15, 16, 18, 20, 24 Ausschalten/Stoppen der Tonquelle (drücken), vollständiges Ausschalten (gedrückt halten). I USB-Anschluss Seite 20 Anschließen eines USB-Geräts. B Taste (Zurück) Seite 34, 39 Zurückschalten zur vorherigen Anzeige. C Taste SOURCE Seite 20, 22, 36, 49 Einschalten, Wechseln der Tonquelle (Radio/Disc/USB/AUX). D Taste (Durchsuchen) Seite 34 Aktivieren des Quick-BrowZer-Modus.*1 E Steuerregler/Taste SOUND/ENTER Seite 28, 35, 36, 38, 39, 44, 48, 49 Einstellen der Lautstärke/Vornehmen einer Einstellung (drehen), Aufrufen des Klangmenüs/Bestätigen einer Einstellung (drücken). G Display H Taste Z (Auswerfen) Seite 16, 18 Auswerfen der Disc. J Tasten SEEK +/– Seite 17, 19, 22, 23 Disc/USB: Überspringen von Kapiteln/Stücken/Szenen/ Dateien (drücken), Vorwärts-/ Rückwärtssuchen auf einer Disc (kurz gedrückt halten), Vorwärts-/ Rückwärtssuchen in einem Stück (gedrückt halten).*2 Radio: Automatisches Einstellen von Sendern (drücken), manuelle Sendersuche (gedrückt halten). K Taste (Lösen der Frontplatte) Seite 15 10 MEX-DV1500U 4-120-899-21 (1) D:\Documents and Settings\takashi-shimomura\Desktop\DTP\848220S MEXDV1500U(EUR)\4120899211_MEX-DV1500U_ML\02DE02CD-E.fm L Taste MODE Seite 22, 36, 49 Auswählen des Radiofrequenzbereichs (FM (UKW)/MW/LW); Auswählen eines an die AUX-Eingangsbuchse (Vorderseite) oder die Buchse AUX IN (Rückseite) angeschlossenen zusätzlichen Geräts. M Empfänger für die Kartenfernbedienung masterpage:Right *1 Bei der CD-/MP3-/WMA-/AAC-/JPEG-/DivX-/ MPEG-4-Wiedergabe. *2 Die Vorgehensweise variiert je nach Disc (Seite 17, 19). Hinweis zur USB-Kappe Wenn der USB-Anschluss I nicht verwendet wird, schützen Sie ihn mit der mitgelieferten USB-Kappe vor Staub und Schmutz. Bewahren Sie die USBKappe außerhalb der Reichweite von kleinen Kindern auf, damit diese sie nicht aus Versehen verschlucken. N Taste RESET Seite 14 O Taste SETUP Seite 28, 36, 44, 48, 49 Aufrufen des Systemkonfigurationsmenüs. P Taste AF (Alternativfrequenzen)/ TA (Verkehrsdurchsagen)/ PTY (Programmtypauswahl) Seite 37, 38 Einstellen von AF und TA (drücken), Auswählen des Programmtyps (PTY) bei einem RDS-Sender (gedrückt halten). Q Zahlentasten Disc/USB: (1): b REP Seite 16, 17, 21, 32 (2): SHUF B Seite 16, 17, 21, 32 (3)/(4): ALBM –/+ (V/v) Seite 16, 17, 19, 23 Überspringen eines Albums oder Ordners/Bewegen des Cursors (drücken), Überspringen mehrerer Alben oder Ordner hintereinander (gedrückt halten). (6): u (Wiedergabe/Pause) Seite 16, 17, 18, 19, 23 Starten/Anhalten der Wiedergabe. Radio: Einstellen gespeicherter Sender (drücken), Speichern von Sendern (gedrückt halten). R Taste DSPL (Anzeige) Seite 21, 26, 37, 48 Wechseln der Informationen im Display. S AUX-Eingangsbuchse Seite 48 Anschließen eines tragbaren Audiogeräts. 11 MEX-DV1500U 4-120-899-21 (1) D:\Documents and Settings\takashi-shimomura\Desktop\DTP\848220S MEXDV1500U(EUR)\4120899211_MEX-DV1500U_ML\02DE02CD-E.fm masterpage:Left Kartenfernbedienung RM-X168 9 1 0 2 qa 3 qs 4 5 qd qf qg 6 qh 7 qj 8 Näheres finden Sie auf den angegebenen Seiten. Entfernen Sie vor Gebrauch die Isolierfolie (Seite 14). A Taste OFF Seite 16, 18, 20, 24 Ausschalten/Stoppen der Tonquelle (drücken), vollständiges Ausschalten (gedrückt halten). B Taste SOUND Seite 38 Aufrufen des Klangmenüs. C Taste VISUAL SETUP Seite 24, 27, 29, 30, 30, 33, 34, 40 Aufrufen des Wiedergabemodus-/ Wiedergabekonfigurationsmenüs. D Taste SYSTEM SETUP Seite 28, 36, 44, 48, 49 Aufrufen des Systemkonfigurationsmenüs. E Taste (Zurück)/O Seite 24, 25, 31, 32, 34, 39, 40 Wechseln zur vorherigen Anzeige, Wechseln zum Menü auf einer VCD*1. 12 MEX-DV1500U 4-120-899-21 (1) D:\Documents and Settings\takashi-shimomura\Desktop\DTP\848220S MEXDV1500U(EUR)\4120899211_MEX-DV1500U_ML\02DE02CD-E.fm masterpage:Right F Zahlentasten Seite 16, 17, 24, 25, 31, 31, 33, 34, 36 Disc: Ansteuern von Titel/Kapitel/Stück. Radio: Einstellen gespeicherter Sender (drücken), Speichern von Sendern (gedrückt halten). N Tasten </M/m/, (Cursor)/ENTER Bewegen des Cursors und Bestätigen einer Einstellung. G Taste CLEAR Seite 31, 34 Löschen einer eingegebenen Zahl. P Taste MODE Seite 22, 36, 49 Auswählen des Radiofrequenzbereichs (FM (UKW)/MW/LW); Auswählen eines an die AUX-Eingangsbuchse (Vorderseite) oder die Buchse AUX IN (Rückseite) angeschlossenen zusätzlichen Geräts. H Taste DSPL (Anzeige) Seite 21, 26, 37, 48 Wechseln der Informationen im Display. I Taste ATT (Dämpfen des Tons) Dämpfen des Tons. Zum Beenden der Funktion drücken Sie die Taste erneut. J Taste u (Wiedergabe/Pause) Seite 16, 17, 18, 19, 23 Starten/Anhalten der Wiedergabe. K Tasten .m/M> Seite 17, 19, 22, 23 Disc/USB: Überspringen von Kapiteln/Stücken/Szenen/ Dateien (drücken), Vorwärts-/ Rückwärtssuchen auf einer Disc (kurz gedrückt halten), Vorwärts-/ Rückwärtssuchen in einem Stück (gedrückt halten).*2 Radio: Automatisches Einstellen von Sendern (drücken), manuelle Sendersuche (gedrückt halten). O Taste SRC (Quelle) Seite 20, 22, 36, 49 Einschalten, Wechseln der Tonquelle (Radio/Disc/USB/AUX). Q Tasten VOL (Lautstärke) +/– Einstellen der Lautstärke. *1 Bei der Wiedergabe mit PBC-Funktionen. *2 Die Vorgehensweise variiert je nach Disc (Seite 17, 19). *3 Bei der CD-/MP3-/WMA-/AAC-/JPEG-/DivX-/ MPEG-4-Wiedergabe. Hinweis Wenn Sie das Gerät ausschalten und die Anzeige ausgeblendet ist, können Sie es nicht mit der Kartenfernbedienung bedienen. Drücken Sie zunächst (SOURCE) am Hauptgerät oder legen Sie eine Disc ein, um das Gerät zu aktivieren. L Einstelltasten für die DVD-Wiedergabe (AUDIO): Seite 17, 27 Wechseln von Audiosprache/-format. Bei VCD/CD/MP3/WMA/AAC Wechseln des Audiokanals. (SUBTITLE): Seite 17 Auswählen der Untertitelsprache. (ANGLE): Seite 17 Wechseln des Blickwinkels. (TOP MENU): Seite 17 Aufrufen des Hauptmenüs auf einer DVD. (MENU): Seite 17 Aufrufen des Menüs auf einer Disc. M Taste (Durchsuchen) Seite 34 Aktivieren des Quick-BrowZer-Modus.*3 13 MEX-DV1500U 4-120-899-21 (1) D:\Documents and Settings\takashi-shimomura\Desktop\DTP\848220S MEXDV1500U(EUR)\4120899211_MEX-DV1500U_ML\02DE02CD-E.fm masterpage:Left Zurücksetzen des Geräts Vorbereitungen Installieren des Geräts und des gesondert erhältlichen Monitors Installieren Sie zunächst das Gerät und den gesondert erhältlichen Monitor und schließen Sie beides an. Dieses Gerät kann über die Anzeigen am Gerät selbst und/oder am gesondert erhältlichen Monitor bedient werden. Die Anweisungen in dieser Anleitung beziehen sich auf die Anzeigen am Gerät und/oder am gesondert erhältlichen Monitor. Gerät Gesondert erhältlicher Monitor Bevor Sie das Gerät zum ersten Mal benutzen oder wenn Sie die Autobatterie ausgetauscht oder die Verbindungen gewechselt haben, müssen Sie das Gerät zurücksetzen. Nehmen Sie die Frontplatte ab (Seite 15) und drücken Sie die Taste RESET (Seite 11) mit einem spitzen Gegenstand, wie z. B. einem Kugelschreiber. Hinweis Wenn Sie die Taste RESET drücken, werden die eingestellte Uhrzeit und einige weitere gespeicherte Einstellungen gelöscht. Vorbereiten der Kartenfernbedienung Entfernen Sie die Isolierfolie. Tipp Erläuterungen zum Austauschen der Batterie finden Sie auf Seite 51. Erläuterungen dazu finden Sie in der mitgelieferten Installations-/Anschlussanleitung. Hinweis Achten Sie bei der Installation des gesondert erhältlichen Monitors darauf, dass dieser sicher eingebaut ist und sich an einer Stelle befindet, an der er die Sicht des Fahrers nicht behindert. 14 MEX-DV1500U 4-120-899-21 (1) D:\Documents and Settings\takashi-shimomura\Desktop\DTP\848220S MEXDV1500U(EUR)\4120899211_MEX-DV1500U_ML\02DE02CD-E.fm Abnehmen der Frontplatte OFF masterpage:Right Anbringen der Frontplatte Setzen Sie Teil A der Frontplatte wie abgebildet an Teil B am Gerät an und drücken Sie dann die linke Seite hinein, bis sie mit einem Klicken einrastet. Um zu verhindern, dass das Gerät gestohlen wird, können Sie die Frontplatte abnehmen. A Warnton Wenn Sie den Zündschlüssel in die Position OFF stellen, ohne die Frontplatte abzunehmen, ertönt einige Sekunden lang ein Warnton. Der Warnton wird nur ausgegeben, wenn der integrierte Verstärker verwendet wird. 1 Drücken Sie (OFF). Das Gerät schaltet sich aus. 2 Drücken Sie und ziehen Sie die Frontplatte auf sich zu und heraus. B Hinweis Legen Sie auf der Innenseite der Frontplatte nichts ab. Hinweise • Lassen Sie die Frontplatte nicht fallen und drücken Sie nicht zu stark auf die Frontplatte und das Display. • Schützen Sie die Frontplatte vor Hitze bzw. hohen Temperaturen und vor Feuchtigkeit. Lassen Sie sie nicht in geparkten Autos, auf dem Armaturenbrett oder auf der Hutablage liegen. • Nehmen Sie die Frontplatte nicht ab, während die Wiedergabe am USB-Gerät läuft. Andernfalls können die USB-Daten beschädigt werden. 15 MEX-DV1500U 4-120-899-21 (1) D:\Documents and Settings\takashi-shimomura\Desktop\DTP\848220S MEXDV1500U(EUR)\4120899211_MEX-DV1500U_ML\02DE02CD-E.fm masterpage:Left Grundfunktionen Wiedergeben von Video-Discs Bei bestimmten Discs sind bestimmte Funktionen unter Umständen anders oder eingeschränkt. Schlagen Sie bitte in den mit der Disc gelieferten Anweisungen nach. Z OFF OFF u </M/m/, ENTER Zahlentasten b/B/V/v u 1 Schalten Sie den Monitor ein und wählen Sie am Monitor die Eingangsquelle aus, die diesem Gerät entspricht. 2 Legen Sie eine Disc mit der beschrifteten Seite nach oben ein. Die Wiedergabe beginnt automatisch. Wenn die Wiedergabe nicht automatisch startet, drücken Sie u. 3 Wenn das DVD-Menü angezeigt wird, bewegen Sie mit (1)(b)/ (2)(B)/(3)(V)/(4)(v) den Cursor und bestätigen Sie dann mit (6) (u). Bewegen Sie bei der Kartenfernbedienung mit </M/m/,/Zahlentasten den Cursor und bestätigen Sie dann mit (ENTER). So stoppen Sie die Wiedergabe Drücken Sie (OFF). Hinweis Discs im DTS-Format werden nicht unterstützt. Wenn Sie das DTS-Format auswählen, wird kein Ton ausgegeben. So lassen Sie die Disc auswerfen Drücken Sie Z. 16 MEX-DV1500U 4-120-899-21 (1) D:\Documents and Settings\takashi-shimomura\Desktop\DTP\848220S MEXDV1500U(EUR)\4120899211_MEX-DV1500U_ML\02DE02CD-E.fm masterpage:Right Hinweis zum DVD-Menü Eine DVD enthält Film- oder Tonaufnahmen, die in mehrere Abschnitte eingeteilt sind. Diese Abschnitte nennt man „Titel“. Wenn Sie eine DVD abspielen, die mehrere Titel enthält, können Sie den gewünschten Titel im DVD-Hauptmenü auswählen. Wenn Sie DVDs abspielen, bei denen Sie Optionen wie die Sprache(n) für Ton und Untertitel auswählen können, wählen Sie diese Optionen im DVDMenü aus. Weitere Wiedergabefunktionen u AUDIO TOP MENU .m/M> b/B/V/v Zahlentasten u Funktion .m/M> SUBTITLE ANGLE MENU </M/m/, ENTER Drücken Sie Pause/Wiedergabefortsetzung nach einer u Pause Überspringen von Kapiteln/Stücken/ Szenen/Dateien .m/M> Vorwärts-/Rückwärtssuchen auf einer Disc .m/M> und halten Sie die Taste kurz gedrückt, drücken Sie die Taste dann mehrmals, um die Geschwindigkeit zu wechseln (× 2 t × 12 t × 120 t × 2…) Beenden des Vorwärts-/ Rückwärtssuchens u Aufrufen des DVD-Menüs*1 Fernbedienung: (TOP MENU) oder (MENU) Auswählen von Optionen im DVD-Menü*1 Hauptgerät: (1)(b)/(2)(B)/(3)(V)/(4)(v) zum Bewegen des Cursors und bestätigen Sie dann mit (6) (u) Fernbedienung: </M/m/,/Zahlentasten zum Bewegen des Cursors und bestätigen Sie dann mit (ENTER) Wechseln von Audiosprache/-format/ -kanal (Seite 27)*1 Fernbedienung: (AUDIO) so oft, bis die gewünschte Option angezeigt wird Ausschalten der Untertitel/Wechseln der Fernbedienung: (SUBTITLE) so oft, bis die gewünschte Untertitelsprache*1 Option angezeigt wird*2 Ändern des Blickwinkels*1 Fernbedienung: (ANGLE) so oft, bis die gewünschte Blickwinkelnummer angezeigt wird *1 Nicht bei allen Discs verfügbar. *2 Wenn die 4-stellige Eingabeaufforderung erscheint, geben Sie den Sprachcode (Seite 60) der gewünschten Sprache ein. 17 MEX-DV1500U 4-120-899-21 (1) D:\Documents and Settings\takashi-shimomura\Desktop\DTP\848220S MEXDV1500U(EUR)\4120899211_MEX-DV1500U_ML\02DE02CD-E.fm masterpage:Left Wiedergeben von Audio-Discs Bei bestimmten Discs sind bestimmte Funktionen unter Umständen anders oder eingeschränkt. Schlagen Sie bitte in den mit der Disc gelieferten Anweisungen nach. Z OFF OFF u u 1 Legen Sie eine Disc mit der beschrifteten Seite nach oben ein. Die Wiedergabe beginnt automatisch. Wenn die Wiedergabe nicht automatisch startet, drücken Sie u. So stoppen Sie die Wiedergabe Drücken Sie (OFF). Hinweis Discs im DTS-Format werden nicht unterstützt. Wenn Sie das DTS-Format auswählen, wird kein Ton ausgegeben. So lassen Sie die Disc auswerfen Drücken Sie Z. 18 MEX-DV1500U 4-120-899-21 (1) D:\Documents and Settings\takashi-shimomura\Desktop\DTP\848220S MEXDV1500U(EUR)\4120899211_MEX-DV1500U_ML\02DE02CD-E.fm masterpage:Right Weitere Wiedergabefunktionen .m/M> u </M/m/, .m/M> ALBM Funktion u Drücken Sie Pause/Wiedergabefortsetzung nach einer u Pause Überspringen eines Stücks .m (<)/M> (,) Vorwärts-/Rückwärtssuchen in einem Stück .m/M> und halten Sie die Taste gedrückt Überspringen eines Albums* Hauptgerät: (3) (ALBM –)/(4) (ALBM +) Fernbedienung: M/m Überspringen mehrerer Alben hintereinander* Hauptgerät: (3) (ALBM –)/(4) (ALBM +) und halten Sie die Taste gedrückt Fernbedienung: M/m und halten Sie die Taste gedrückt * Bei Wiedergabe einer MP3-/WMA-/AAC-Datei. 19 MEX-DV1500U 4-120-899-21 (1) D:\Documents and Settings\takashi-shimomura\Desktop\DTP\848220S MEXDV1500U(EUR)\4120899211_MEX-DV1500U_ML\02DE02CD-E.fm masterpage:Left Wiedergabe mit einem USB-Gerät Einzelheiten zur Kompatibilität Ihres USB-Geräts finden Sie auf der Support-Website. Support-Website http://support.sony-europe.com • Sie können USB-Geräte des Typs MSC (Massenspeicherklasse) verwenden, die dem USB-Standard entsprechen. • Der entsprechende Codec ist MP3 (.mp3), WMA (.wma), AAC (.m4a) und JPEG (.jpg). • Es empfiehlt sich, eine Sicherungskopie der Daten auf dem USB-Gerät zu erstellen. Hinweis Lassen Sie den Motor an, bevor Sie das USB-Gerät anschließen. Bei manchen USB-Geräten kann es zu Fehlfunktionen und Beschädigungen kommen, wenn Sie zuerst das Gerät anschließen und dann den Motor anlassen. OFF SOURCE (USB) OFF SRC REP SHUF 1 DSPL DSPL Schließen Sie das USB-Gerät an den USB-Anschluss an. Die Wiedergabe beginnt automatisch. Wenn bereits ein USB-Gerät angeschlossen ist, drücken Sie zum Starten der Wiedergabe (SOURCE) so oft, bis „USB“ erscheint. So stoppen Sie die Wiedergabe Drücken Sie (OFF). Hinweis Verwenden Sie unbedingt das mit dem Gerät gelieferte USB-Kabel, wenn zum Herstellen einer USB-Verbindung ein Kabel benötigt wird. 20 MEX-DV1500U 4-120-899-21 (1) D:\Documents and Settings\takashi-shimomura\Desktop\DTP\848220S MEXDV1500U(EUR)\4120899211_MEX-DV1500U_ML\02DE02CD-E.fm masterpage:Right Lösen des USB-Geräts Anzeigen des Covers (Inhaltsbildes) 1 Stoppen Sie die Wiedergabe am USB-Gerät. 2 Trennen Sie das USB-Gerät von diesem Gerät. Wenn Sie das USB-Gerät während der Wiedergabe vom Gerät trennen, können die Daten auf dem USB-Gerät beschädigt werden. Während der Audiowiedergabe können Sie Informationen zum Inhalt oder die Cover (Inhaltsbilder)* der auf dem USB-Gerät gespeicherten MP3-/WMA-/AAC-Dateien auf dem Monitor anzeigen. Hinweise • Verwenden Sie keine USB-Geräte, die so groß oder schwer sind, dass sich bei einer Erschütterung die Verbindung lösen bzw. das Gerät herunterfallen kann. • Nehmen Sie die Frontplatte nicht ab, während die Wiedergabe am USB-Gerät läuft. Andernfalls können die USB-Daten beschädigt werden. • Dieses Gerät kann keine USB-Geräte erkennen, die über einen USB-Hub angeschlossen sind. Informationen im Display A Tonquelle B Stückname, Interpretenname, Albumnummer*, Albumname, Stücknummer/Verstrichene Spieldauer, Uhrzeit * Die Albumnummer wird nur beim Wechseln des Albums angezeigt. Zum Wechseln der angezeigten Informationen B drücken Sie (DSPL). Hinweise • Je nach USB-Gerät, Aufnahmeformat und Einstellungen werden unterschiedliche Informationen angezeigt. Einzelheiten dazu finden Sie auf der Support-Website. • Im Folgenden wird die Höchstzahl an anzeigbaren Daten angegeben. – Ordner (Alben): 256 – Dateien (Stücke): 2.000 • Lassen Sie das USB-Gerät nicht in einem geparkten Fahrzeug liegen, denn andernfalls kann es zu Fehlfunktionen kommen. • Je nach Menge der aufgezeichneten Daten kann es etwas dauern, bis die Wiedergabe beginnt. • Bei der Wiedergabe einer VBR-MP3/WMA/AACDatei (variable Bitrate) bzw. beim Vorwärts-/ Rückwärtssuchen darin wird die verstrichene Spieldauer möglicherweise nicht richtig angezeigt. • Die Wiedergabe verlustfrei komprimierter Dateien wird nicht unterstützt. * Die empfohlene Größe beträgt zwischen 240 × 240 und 960 × 960 Pixel. Repeat und Shuffle Play 1 Drücken Sie während der Wiedergabe (1) (REP) oder (2) (SHUF) so oft, bis die gewünschte Einstellung erscheint. Auswahl Funktion REP-TRACK Wiederholtes Wiedergeben eines Stücks. REP-ALBUM Wiederholtes Wiedergeben eines Albums. SHUF-ALBUM Wiedergeben eines Albums in willkürlicher Reihenfolge. REP-DRIVE* Wiederholtes Wiedergeben des Inhalts eines Laufwerks. * Wenn auf dem USB-Gerät zwei oder mehr Laufwerke angelegt wurden. Wenn Sie wieder in den normalen Wiedergabemodus schalten möchten, wählen Sie „REP-OFF“ oder „SHUF-OFF“. 21 MEX-DV1500U 4-120-899-21 (1) D:\Documents and Settings\takashi-shimomura\Desktop\DTP\848220S MEXDV1500U(EUR)\4120899211_MEX-DV1500U_ML\02DE02CD-E.fm masterpage:Left Radioempfang .m/M> SOURCE SRC MODE SEEK MODE 1 Drücken Sie (SOURCE) so oft, bis „TUNER“ erscheint. 2 Drücken Sie (MODE) so oft, bis der gewünschte Frequenzbereich (FM1 (UKW1), FM2 (UKW2), FM3 (UKW3), MW oder LW) angezeigt wird. A B A Radiofrequenzbereich/Funktion B Frequenz* * Wenn das Gerät einen RDS-Sender empfängt, erscheint der Programmdienstname. Näheres dazu finden Sie unter „RDS“ auf Seite 36. 3 Stellen Sie einen Sender ein. So führen Sie einen automatischen Sendersuchlauf aus Drücken Sie (SEEK) +/–. Der Suchlauf stoppt, wenn ein Sender empfangen wird. Wiederholen Sie diesen Vorgang, bis das Gerät den gewünschten Sender empfängt. So führen Sie einen manuellen Sendersuchlauf aus Halten Sie (SEEK) +/– gedrückt, bis die Frequenz in etwa erreicht ist, und drücken Sie dann (SEEK) +/– so oft, bis die gewünschte Frequenz genau eingestellt ist. Tipp Erläuterungen zu weiteren Radiofunktionen finden Sie unter „Weitere Funktionen — Radio“ auf Seite 36. Mit der Kartenfernbedienung Verwenden Sie (SRC) anstelle von (SOURCE) und .m/M> anstelle von (SEEK) –/+. 22 MEX-DV1500U 4-120-899-21 (1) D:\Documents and Settings\takashi-shimomura\Desktop\DTP\848220S MEXDV1500U(EUR)\4120899211_MEX-DV1500U_ML\02DE02CD-E.fm masterpage:Right Weitere Funktionen — Discs DivX®-/MPEG-4-Videowiedergabe Dieses Kapitel besteht aus folgenden Abschnitten. Sie können die DivX-/MPEG-4-Wiedergabe in der gleichen Weise steuern wie die Wiedergabe anderer Video-Discs (Seite 16) und es stehen auch einige Steuerfunktionen für die Audiowiedergabe zur Verfügung. • Videospezifische Funktionen* t Seite 23 bis 32 • Video*- und Audiofunktionen t Seite 32 bis 35 • Audiospezifische Funktionen t Seite 35 * Einschließlich JPEG-Funktionen. Wiedergeben von DivX®-/ MPEG-4-/JPEG-Dateien MPEG-4 Funktion Drücken Sie Überspringen eines Hauptgerät: Albums (Ordners) (3) (ALBM –)/ (4) (ALBM +) Überspringen mehrerer Alben (Ordner) hintereinander Hauptgerät: (3) (ALBM –)/(4) (ALBM +) und halten Sie die Taste gedrückt Tipp Sie können eine Datei zur Wiedergabe auch mithilfe einer Liste (Quick-BrowZer) auswählen (Seite 34). JPEG-Bildwiedergabe .m/M> ALBM u .m/M> Sie können mit diesem Gerät JPEG-Dateien als Bildpräsentation wiedergeben lassen. Die Bildpräsentation startet automatisch, wenn Sie eine Disc einlegen oder u drücken. Erläuterungen zum Starten der Wiedergabe finden Sie in Schritt 1 bis 4 unter „Wiedergeben von Video-Discs“ auf Seite 16. u Weitere Wiedergabefunktionen </, Funktion Drücken Sie Drehen des Bildes Fernbedienung: </, (Drehung um jeweils 90º) Überspringen eines .m/M> Bildes Hinweis Wenn eine Disc mehrere Dateitypen enthält, kann nur der ausgewählte Dateityp (Audio/Video/Bild) wiedergegeben werden. Wenn Sie bei einer solchen Disc DivX-/MPEG-4-Videodateien oder JPEGBilddateien wiedergeben wollen, drücken Sie während der Wiedergabe , wählen Sie den gewünschten Dateityp (Video/Bild) aus, so dass die entsprechende Liste angezeigt wird, und wählen Sie dann die gewünschte Datei aus (Seite 35). Überspringen eines Hauptgerät: Albums (3) (ALBM –)/ (4) (ALBM +) Überspringen mehrerer Alben hintereinander Hauptgerät: (3) (ALBM –)/(4) (ALBM +) und halten Sie die Taste gedrückt Hinweise • Wenn ein großes Bild gedreht wird, dauert es länger, bis es angezeigt wird. • Progressive JPEG-Dateien können nicht angezeigt werden. Tipp Sie können eine Datei zur Wiedergabe auch mithilfe einer Liste (Quick-BrowZer) auswählen (Seite 34). 23 MEX-DV1500U 4-120-899-21 (1) D:\Documents and Settings\takashi-shimomura\Desktop\DTP\848220S MEXDV1500U(EUR)\4120899211_MEX-DV1500U_ML\02DE02CD-E.fm Verwenden der PBC-Funktionen — Wiedergabesteuerung masterpage:Left Verwenden des Wiedergabemodusmenüs MPEG-4 OFF VISUAL SETUP O O </M/m/, ENTER ENTER Zahlentasten Zahlentasten Bei der Wiedergabe einer PBC-kompatiblen VCD können Sie Funktionen über das PBCMenü interaktiv ausführen. Über das Wiedergabemodusmenü an diesem Gerät können Sie die Wiedergabe steuern oder Wiedergabeeinstellungen konfigurieren. 1 Starten Sie die Wiedergabe einer PBC-kompatiblen VCD. Das PBC-Menü wird angezeigt. 2 Wählen Sie mit den Zahlentasten die gewünschte Option aus und drücken Sie dann (ENTER). Zum Einblenden des Wiedergabemodusmenüs drücken Sie während der Wiedergabe (VISUAL SETUP). Zum Ausblenden des Menüs drücken Sie nochmals (VISUAL SETUP). 3 Gehen Sie bei den interaktiven Funktionen wie im Menü erläutert vor. Um zur vorherigen Anzeige zurückzuschalten, drücken Sie O. Wiedergabe ohne PBC-Funktionen 1 Drücken Sie während der Wiedergabe (OFF). Die Wiedergabe stoppt. 2 Wählen Sie mit den Zahlentasten die gewünschte Option aus und drücken Sie dann (ENTER). „Play without PBC.“ erscheint und die Wiedergabe wird gestartet. Das PBC-Menü erscheint während der Wiedergabe nicht. Hinweise • Bei der Wiedergabe einer Audio-Disc ist (VISUAL SETUP) deaktiviert. • Bei der JPEG-Wiedergabe ist (VISUAL SETUP) nur dann aktiviert, wenn ein Bild vollständig angezeigt wird. Tipp Wenn Sie (VISUAL SETUP) drücken, während die Wiedergabe gestoppt ist, erscheint das Wiedergabekonfigurationsmenü (am Monitor). In diesem Menü können Sie verschiedene Einstellungen konfigurieren, zum Beispiel die Sprache für die Anzeigen, die Audioeinstellungen usw. (Seite 39). Beispiel: Bei der Wiedergabe einer DVD 12(67) 018(034) T 1:35:55 Hinweise • Die Menüoptionen und die Vorgehensweise variieren je nach Disc. • Während der PBC-Wiedergabe werden Stücknummer, Wiedergabeelement usw. im Wiedergabemodusmenü nicht angezeigt (Seite 24). • Eine Wiedergabefortsetzung ist bei der Wiedergabe ohne PBC nicht möglich. Tipp Wenn Sie die PBC-Wiedergabe fortsetzen wollen, stoppen Sie die Wiedergabe mit (OFF) und drücken dann u. 24 B C D EF A PLAY DVD VIDEO G 1:ENGLISH OFF 1:ENGLISH 2:FRENCH 3:SPANISH SUBTITLE Select : I H ENTER J A Optionen im Wiedergabemodusmenü Näheres dazu finden Sie unter „Liste der Optionen im Wiedergabemodusmenü“ auf Seite 25. MEX-DV1500U 4-120-899-21 (1) D:\Documents and Settings\takashi-shimomura\Desktop\DTP\848220S MEXDV1500U(EUR)\4120899211_MEX-DV1500U_ML\02DE02CD-E.fm B DVD: Titelnummer/Gesamtzahl der Titel VCD: Stücknummer/Gesamtzahl der Stücke*1 JPEG: Albumnummer/Gesamtzahl der Alben DivX/MPEG-4: Albumnummer (Ordnernummer)/Gesamtzahl der Alben (Ordner) C DVD: Kapitelnummer/Gesamtzahl der Kapitel JPEG: Bildnummer/Gesamtzahl der Bilder DivX/MPEG-4: Dateinummer/Gesamtzahl der Dateien D Verstrichene Spieldauer*2 E Format F Wiedergabestatus (PLAY N, PAUSE X usw.) G Aktuelle Einstellung H Optionen I Ausgewählte Option J Name der ausgewählten Option und/oder Bedienungsanweisungen masterpage:Right TIME 33 Anzeigen der verstrichenen Spieldauer, Eingeben des Zeitcodes. MPEG-4 AUDIO 17, 27 Wechseln von Audiosprache/-format/-kanal, Überprüfen des Programmformats. MPEG-4 SUBTITLE 17 Ein- und Ausschalten der Untertitel/Wechseln der Untertitelsprache. ANGLE 17 Wechseln des Blickwinkels. * *1 Bei der Wiedergabe von VCDs mit PBCFunktionen (Seite 24) erscheint keine Anzeige. *2 Bei der JPEG-Wiedergabe erscheint keine Anzeige. CENTER ZOOM 29 Vergrößern eines Bildes. Liste der Optionen im Wiedergabemodusmenü REPEAT 33 Wiederholtes Wiedergeben eines Titels/ Kapitels/Stücks/Albums/Bildes/einer Videodatei. Wählen Sie mit </M/m/,/Zahlentasten eine Option aus und drücken Sie dann (ENTER). Um zur vorherigen Anzeige zurückzuschalten, drücken Sie O. Näheres finden Sie auf den angegebenen Seiten. TITLE, TRACK 33 Auswählen eines Titels, einer Szene oder eines Stücks zur Wiedergabe. ALBUM 33 Auswählen eines Albums oder Ordners zum Anzeigen. MPEG-4 CHAPTER 33 Auswählen eines Kapitels zur Wiedergabe. IMAGE 33 Auswählen eines Bildes zum Anzeigen. MPEG-4 MPEG-4 SHUFFLE 33 Wiedergeben von Kapiteln/Stücken/Bildern/ Videodateien in willkürlicher Reihenfolge. MPEG-4 * PICTURE EQ 29 Einstellen der Bildqualität. MPEG-4 * Außer bei einer DVD-R/DVD-R DL/DVD-RW im VR-Modus. Tipp Wenn „SHUFFLE“ oder „REPEAT“ aktiviert ist oder „ANGLE“ zur Verfügung steht, leuchtet das jeweilige Kontrollkästchen grün (Beispiel: t ). Bei manchen Szenen können Sie den Blickwinkel jedoch möglicherweise nicht wechseln, auch wenn das Kontrollkästchen grün leuchtet. FILE 33 Auswählen einer Videodatei zur Wiedergabe. MPEG-4 25 MEX-DV1500U 4-120-899-21 (1) D:\Documents and Settings\takashi-shimomura\Desktop\DTP\848220S MEXDV1500U(EUR)\4120899211_MEX-DV1500U_ML\02DE02CD-E.fm Anzeigen der Zeitangaben/ Textinformationen einer Disc MPEG-4 masterpage:Left • T-**:** Restspieldauer des aktuellen Stücks • D **:** Verstrichene Spieldauer der aktuellen Disc • D-**:** Restspieldauer der aktuellen Disc JPEG-Wiedergabe • Albumnummer/Gesamtzahl der Alben • Bildnummer/Gesamtzahl der Bilder DSPL DivX-/MPEG-4-Wiedergabe • Albumnummer (Ordnernummer)/Gesamtzahl der Alben (Ordner) • Dateinummer/Gesamtzahl der Dateien • T **:** Verstrichene Spieldauer der aktuellen Datei Anzeigen der Textinformationen Anzeigen der Zeitangaben Spieldauer und Restspieldauer des aktuellen Titels, Kapitels, Stücks usw. können während der Video-/Bildwiedergabe angezeigt werden. 1 Drücken Sie während der Wiedergabe (DSPL). Die aktuellen Wiedergabeinformationen werden angezeigt. Die Textinformationen (Albumname, Bildname usw.) von JPEG-/DivX-/MPEG-4-Dateien können angezeigt werden. Album-/Bild-/Ordner-/Dateinummer 037(325) Zeitangaben T 1:01:57 Image name Textinformationen* 2 Drücken Sie wiederholt (DSPL), um die Zeitangaben zu wechseln. * „NO TEXT“ wird angezeigt, wenn keine Textinformationen vorhanden sind. Die Zeitangaben unterscheiden sich je nach Disc/Format wie folgt: Die Textinformationen unterscheiden sich je nach Format wie folgt: DVD-Wiedergabe • T **:**:** Verstrichene Spieldauer des aktuellen Titels • T-**:**:** Restspieldauer des aktuellen Titels • C **:**:** Verstrichene Spieldauer des aktuellen Kapitels • C-**:**:** Restspieldauer des aktuellen Kapitels JPEG-Wiedergabe • Albumname (wenn die Albumnummer angezeigt wird) • Bildname (wenn die Bildnummer angezeigt wird) VCD-Wiedergabe Steht nur bei der Wiedergabe von Discs der Version 1.0/1.1 oder von Discs der Version 2.0 ohne PBC-Funktionen zur Verfügung. • T **:** Verstrichene Spieldauer des aktuellen Stücks DivX-/MPEG-4-Wiedergabe • Albumname (Ordnername), wenn die Albumnummer (Ordnernummer) angezeigt wird • Dateiname (wenn die Dateinummer angezeigt wird) 26 MEX-DV1500U 4-120-899-21 (1) D:\Documents and Settings\takashi-shimomura\Desktop\DTP\848220S MEXDV1500U(EUR)\4120899211_MEX-DV1500U_ML\02DE02CD-E.fm Wechseln des Audiokanals Konfigurieren der Audioeinstellungen VISUAL SETUP AUDIO SYSTEM SETUP ENTER M/m Bei der VCD-/CD-/MP3-/WMA-/AACWiedergabe können Sie auswählen, welche Tonkanäle (rechts oder links) über die Lautsprecher rechts und links ausgegeben werden sollen. Die Optionen sind im Folgenden angegeben. STEREO (ST): Standardstereoton (Standardeinstellung) 1/L (L): Ton des linken Kanals (monaural) 2/R (R): Ton des rechten Kanals (monaural) 1 Hinweis Discs im DTS-Format werden nicht unterstützt. Wenn Sie das DTS-Format auswählen, wird kein Ton ausgegeben. Bei einer DVD können Sie die Audiosprache wechseln, wenn auf der Disc Tonspuren in mehreren Sprachen aufgezeichnet sind. Bei einer DVD/DivX-Disc können Sie das Audioformat wechseln, wenn auf der Disc mehrere Audioformate aufgezeichnet sind (z. B. Dolby Digital). Drücken Sie während der Wiedergabe (AUDIO) so oft, bis die gewünschte Audiosprache bzw. das gewünschte Audioformat erscheint. Drücken Sie während der Wiedergabe (AUDIO) so oft, bis der gewünschte Audiokanal erscheint. Beispiel: Bei der MP3-Wiedergabe Audiokanal TRACK NAME ALBUM NAME ARTIST NAME Wechseln von Audiosprache/ -format 1 masterpage:Right MP3 0003/1000 3:17 ST SHUF Hinweis Bei manchen Discs lassen sich die Audioeinstellungen unter Umständen nicht ändern. Tipp Sie können die Einstellungen für Video-Discs auch ändern, indem Sie „AUDIO“ im Wiedergabemodusmenü auswählen (Seite 24). Anzeigen des Programmformats Audiosprache/-format* 1:ENGLISH Dolby D Sie können die Anzahl der Kanäle und die Position der Komponenten auf der wiedergegebenen DVD VIDEO anzeigen lassen. 1 * Bei der DivX-Wiedergabe werden Audioformat und -kanäle (z. B. „MP3“) angezeigt. Sie können für den Ton eine der verfügbaren Sprachen einstellen. Wenn die 4-stellige Eingabeaufforderung erscheint, geben Sie den Sprachcode (Seite 60) der gewünschten Sprache ein. Wenn dieselbe Sprache mehrmals angezeigt wird, sind auf der Disc mehrere Audioformate aufgezeichnet. Drücken Sie während der Wiedergabe (VISUAL SETUP). Das Wiedergabemodusmenü erscheint. Fortsetzung auf der nächsten Seite t 27 MEX-DV1500U 4-120-899-21 (1) D:\Documents and Settings\takashi-shimomura\Desktop\DTP\848220S MEXDV1500U(EUR)\4120899211_MEX-DV1500U_ML\02DE02CD-E.fm 2 Wählen Sie mit M/m die Option (AUDIO) aus. Das Programmformat erscheint. Einstellen des Audioausgangspegels — DVD-Pegel Aktuelles Audioformat* 12(67) 018(034) T 1:35:55 1:ENGLISH Dolby D PLAY DVD VIDEO PROGRAM FORMAT DOLBY DIGITAL 3/2.1 L LS C LFE masterpage:Left R Sie können den Audioausgangspegel einer im Dolby Digital-Format bespielten DVD einstellen, um den Lautstärkeunterschied zwischen Disc und Signalquelle zu verringern. 1 Drücken Sie während der Wiedergabe (SYSTEM SETUP). Eine Systemkonfigurationsoption erscheint am Hauptgerät. 2 Wählen Sie mit M/m die Option „DVD-LEVEL“ und drücken Sie dann (ENTER). 3 Wählen Sie mit m die Einstellung „ADJST-ON“ aus und drücken Sie dann (ENTER). 4 Wählen Sie mit M/m die Option „DOLBY-ADJ“ aus und drücken Sie (ENTER). 5 Stellen Sie mit M/m den gewünschten Ausgangspegel ein. Der Ausgangspegel lässt sich schrittweise auf einen Wert zwischen –10 und +10 einstellen. 6 Drücken Sie (ENTER). Die Einstellung ist damit abgeschlossen. RS Format des aktuellen Programms * „PCM“, „DOLBY DIGITAL“ usw. wird je nach Disc angezeigt. Die Buchstaben in der Anzeige mit dem Programmformat stehen für die folgenden Klangkomponenten und deren Position: : Vorne (links) : Vorne (rechts) : Mitte : Hinten (links) : Hinten (rechts) : Hinten (monaural): Die hintere Komponente des mit Dolby Surround verarbeiteten Signals und des Dolby Digital-Signals : LFE-Signal (Low Frequency Effect) Der Name des Programmformats und die Kanalanzahl werden folgendermaßen angezeigt. Beispiel: Dolby Digital-5.1-Kanal-Format Hintere Komponente × 2 DOLBY DIGITAL 3 / 2 . 1 Vordere Komponente × 2 + LFE-Komponente × 1 Mittlere Komponente × 1 Zum Ausblenden des Wiedergabemodusmenüs drücken Sie (VISUAL SETUP). Zum Ausblenden des Systemkonfigurationsmenüs drücken Sie (SYSTEM SETUP). Am Hauptgerät Drücken Sie (SETUP) anstelle von (SYSTEM SETUP), drehen Sie den Steuerregler, statt M/m zu drücken, und drücken Sie den Steuerregler anstelle von (ENTER). 28 MEX-DV1500U 4-120-899-21 (1) D:\Documents and Settings\takashi-shimomura\Desktop\DTP\848220S MEXDV1500U(EUR)\4120899211_MEX-DV1500U_ML\02DE02CD-E.fm Vergrößern von Bildern masterpage:Right Einstellen der Bildqualität — Bild-EQ MPEG-4 MPEG-4 VISUAL SETUP VISUAL SETUP </M/m/, ENTER </M/m/, ENTER Sie können Bilder vergrößert anzeigen lassen. 1 Drücken Sie während der Wiedergabe (VISUAL SETUP). Das Wiedergabemodusmenü erscheint. Sie können die Bildqualität auswählen, die für die Helligkeit im Fahrzeuginnenraum geeignet ist. 2 Wählen Sie mit M/m die Option (CENTER ZOOM) aus und drücken Sie (ENTER). Die aktuelle Einstellung wird angezeigt. 1 Drücken Sie während der Wiedergabe (VISUAL SETUP). Das Wiedergabemodusmenü erscheint. 2 Wählen Sie mit M/m die Option (PICTURE EQ) aus und drücken Sie (ENTER). Die aktuelle Einstellung wird angezeigt. 12(67) 018(034) T 1:35:55 PLAY DVD VIDEO 12(67) 018(034) T 1:35:55 x1 x1 x1.6 3 DAYTIME SUNSET SHINE CUSTOM NORMAL NORMAL Wählen Sie mit M/m die gewünschte Option aus (×1, ×1.6*) und drücken Sie (ENTER). * Das Bild wirkt unter Umständen grobkörnig. Das Bild wird vergrößert angezeigt. Zum Ausblenden des Wiedergabemodusmenüs drücken Sie (VISUAL SETUP). Um das Bild in der Anzeige zu verschieben, drücken Sie </M/m/,. Um das Bild wieder in der ursprünglichen Größe anzeigen zu lassen, wählen Sie in Schritt 3 die Option „×1“. Hinweise • Bei manchen Discs können Sie die Vergrößerung nicht ändern. • Wenn Sie die Wiedergabe fortsetzen, wird das Bild wieder in der ursprünglichen Größe angezeigt. • Wenn Sie zum Disc-Menü bzw. zum Hauptmenü zurückschalten, wird die Vergrößerung beendet. PLAY DVD VIDEO 3 Wählen Sie mit M/m die gewünschte Option aus und drücken Sie (ENTER). Die Optionen hängen von den Einstellungen in der Wiedergabekonfiguration ab (Seite 43). In der Wiedergabekonfiguration wechseln die Einstellungen von „PICTURE EQ“ unter „CUSTOM SETUP“ folgendermaßen. AUTO: Schaltet je nach der Dimmereinstellung in der Systemkonfiguration automatisch zwischen den Optionen für die Nacht/den Tag um (Seite 45). LIGHT OFF: Zeigt die Optionen für den Tag an. LIGHT ON: Zeigt die Optionen für die Nacht an. Die Optionen für die einzelnen Einstellungen sind im Folgenden angegeben. Fortsetzung auf der nächsten Seite t 29 MEX-DV1500U 4-120-899-21 (1) D:\Documents and Settings\takashi-shimomura\Desktop\DTP\848220S MEXDV1500U(EUR)\4120899211_MEX-DV1500U_ML\02DE02CD-E.fm Für alle Einstellungen NORMAL: Normale Bildqualität. CUSTOM: Benutzerdefinierbare Einstellungen (Seite 30). masterpage:Left 4 Wählen Sie mit M/m die Bildeinstellung aus und stellen Sie dann mit </, den Pegel ein. 5 Drücken Sie (ENTER). Zum Ausblenden des Wiedergabemodusmenüs drücken Sie (VISUAL SETUP). Bei der Einstellung „LIGHT OFF“/„AUTO“ (mit „DIM-OFF“) DAYTIME: Für eine helle Umgebung geeignet. SUNSET: Bei Dämmerlicht geeignet. SHINE: In einer sehr hellen Umgebung geeignet (wenn sich beispielsweise die Sonne im Monitor spiegelt). Sperren von Discs — Kindersicherung * * Außer bei einer DVD-R/DVD-R DL/DVD-RW im VR-Modus. Bei der Einstellung „LIGHT ON“/„AUTO“ (mit „DIM-ON“) NIGHT: Der Monitor wird dunkler, um Sie bei Nacht nicht vom Fahren abzulenken. VISUAL SETUP O ENTER MIDNIGHT: Der Monitor wird noch dunkler als mit der Einstellung „NIGHT“. THEATER: Der Monitor wird heller, wenn Sie beispielsweise nachts ein helles Bild sehen möchten. Anpassen der Bildqualität Über die Option „CUSTOM“ können Sie die Bildqualität einstellen, indem Sie die Bildeinstellungen anpassen. Dabei können Sie Einstellungen für „LIGHT OFF“ und „LIGHT ON“ vornehmen. 1 Drücken Sie während der Wiedergabe (VISUAL SETUP). Das Wiedergabemodusmenü erscheint. 2 Wählen Sie mit M/m die Option (PICTURE EQ) aus und drücken Sie (ENTER). Die aktuelle Einstellung wird angezeigt. 3 Wählen Sie mit M/m die Option „CUSTOM“ aus und drücken Sie (ENTER). USER CUSTOM SETUP COLOR BRIGHT SHARPNESS Select : Cancel : M/m Zahlentasten CLEAR Sie können eine Disc sperren oder mithilfe von vordefinierten Kindersicherungsstufen Wiedergabeeinschränkungen festlegen, so dass beispielsweise Kinder keine Discs ansehen können, die für ihr Alter nicht geeignet sind. Bei der Wiedergabe einer auf diese Weise mit einer Kindersicherung versehenen DVD werden bestimmte Szenen gesperrt oder durch andere Szenen ersetzt. Aktivieren der Kindersicherung 1 Drücken Sie bei ausgeschaltetem Gerät die Taste (VISUAL SETUP). Das Wiedergabekonfigurationsmenü erscheint. 2 Wählen Sie mit M/m die Option (CUSTOM SETUP) aus und drücken Sie (ENTER). Die Benutzereinstellungsoptionen werden angezeigt. 0 0 0 Set : RETURN 30 MEX-DV1500U 4-120-899-21 (1) D:\Documents and Settings\takashi-shimomura\Desktop\DTP\848220S MEXDV1500U(EUR)\4120899211_MEX-DV1500U_ML\02DE02CD-E.fm 3 Wählen Sie mit M/m die Option „PARENTAL CONTROL“ und drücken Sie (ENTER). Die Optionen erscheinen. CUSTOM SETUP PARENTAL CONTROL : DivX VOD : SLIDE SHOW TIME : MULTI-DISC RESUME : PLAY LIST PLAY : PICTURE EQ : 4 OFF OFF ONt PLAYERt PASSWORDt AUTO Wählen Sie mit M/m die Option „ON t“ und drücken Sie (ENTER). Die Anzeige zum Definieren des Kennworts erscheint. CUSTOM SETUP PARENTAL CONTROL Enter a new 4-digit password, then press ENTER . 5 Geben Sie mit den Zahlentasten das Kennwort ein und drücken Sie (ENTER). Eine Bestätigungsanzeige erscheint. 6 Geben Sie das Kennwort zum Bestätigen erneut mit den Zahlentasten ein und drücken Sie (ENTER). Die Einstellung ist damit abgeschlossen. Zum Löschen einer eingegebenen Zahl drücken Sie (CLEAR). Um zur vorherigen Anzeige zurückzuschalten, drücken Sie O. Zum Ausblenden des Wiedergabekonfigurationsmenüs drücken Sie (VISUAL SETUP). Deaktivieren der Kindersicherung Wählen Sie in Schritt 4 oben die Option „OFF t“ und geben Sie dann das Kennwort ein. Wenn die Kindersicherung deaktiviert ist, wird „Parental control canceled“ angezeigt. Ändern des Kennworts Wählen Sie in Schritt 4 oben die Option „PASSWORD t“, geben Sie das aktuelle Kennwort ein, geben Sie das neue Kennwort ein und geben Sie es dann zur Bestätigung erneut ein. masterpage:Right Wechseln des Gebiets und der Altersfreigabestufe Sie können die Kindersicherungsstufe je nach Gebiet und Altersfreigabe einstellen. 1 Drücken Sie bei ausgeschaltetem Gerät die Taste (VISUAL SETUP). Das Wiedergabekonfigurationsmenü erscheint. 2 Wählen Sie mit M/m die Option (CUSTOM SETUP) aus und drücken Sie (ENTER). Die Benutzereinstellungsoptionen werden angezeigt. 3 Wählen Sie mit M/m die Option „PARENTAL CONTROL“ und drücken Sie (ENTER). Die Optionen erscheinen. 4 Wählen Sie mit M/m die Option „PLAYER t“ und drücken Sie (ENTER). Wenn die Kindersicherung bereits aktiviert ist, erscheint die Anzeige zum Eingeben des Kennworts. Geben Sie zum Ändern der Einstellung Ihr Kennwort ein und drücken Sie (ENTER). 5 Wählen Sie mit M/m die Option „STANDARD“ und drücken Sie (ENTER). Die Optionen erscheinen. CUSTOM SETUP PARENTAL CONTROL: LEVEL : STANDARD : 6 8: USA USA OTHERSt Wählen Sie mit M/m das gewünschte Gebiet aus, um dessen Altersfreigabestufen zu übernehmen, und drücken Sie (ENTER). Das Gebiet ist ausgewählt. Wenn Sie „OTHERS t“ auswählen, wählen Sie anschließend mit den Zahlentasten den Gebietscode in der „Gebietscodeliste“ auf Seite 60. Fortsetzung auf der nächsten Seite t 31 MEX-DV1500U 4-120-899-21 (1) D:\Documents and Settings\takashi-shimomura\Desktop\DTP\848220S MEXDV1500U(EUR)\4120899211_MEX-DV1500U_ML\02DE02CD-E.fm 7 Wählen Sie mit M/m die Option „LEVEL“ und drücken Sie (ENTER). Die Optionen erscheinen. masterpage:Left Im Folgenden sind die Wiederholoptionen und die Umschaltreihenfolge bei Repeat Play für alle Discs und Formate aufgelistet. Disc/Format Optionen CUSTOM SETUP PARENTAL CONTROL: LEVEL : STANDARD : OFF CHAPTER: Das aktuelle Kapitel wird wiederholt wiedergegeben. TITLE: Der aktuelle Titel wird wiederholt wiedergegeben. 8: 1: G 2: 3: PG 4: PG-13 5: *1 Je niedriger der Wert, um so strenger ist die Kindersicherungsstufe. 8 OFF TRACK: Das aktuelle Stück wird wiederholt wiedergegeben. ALBUM: Das aktuelle Album wird wiederholt wiedergegeben. Wählen Sie mit M/m die gewünschte Stufe aus und drücken Sie (ENTER). Die Einstellung ist damit abgeschlossen. Um zur vorherigen Anzeige zurückzuschalten, drücken Sie O. Zum Ausblenden des Wiedergabekonfigurationsmenüs drücken Sie (VISUAL SETUP). OFF IMAGE: Das aktuelle Bild wird wiederholt wiedergegeben. ALBUM: Das aktuelle Album wird wiederholt wiedergegeben. Repeat und Shuffle Play OFF FILE: Die aktuelle Videodatei wird wiederholt wiedergegeben. ALBUM: Das aktuelle Album (Ordner) wird wiederholt wiedergegeben. MPEG-4 MPEG-4 REP SHUF 1 Drücken Sie während der Wiedergabe (1) (REP) oder (2) (SHUF) am Hauptgerät so oft, bis die gewünschte Option erscheint. OFF TRACK: Das aktuelle Stück wird wiederholt wiedergegeben. Im Folgenden sind die Zufallswiedergabeoptionen und die Umschaltreihenfolge bei Shuffle Play für alle Discs und Formate aufgelistet. Disc/Format Optionen 2 * *1 Repeat oder Shuffle Play beginnt. OFF TITLE: Die Kapitel im aktuellen Titel werden in willkürlicher Reihenfolge wiedergegeben. OFF DISC: Die Stücke auf der aktuellen Disc werden in willkürlicher Reihenfolge wiedergegeben. OFF ALBUM: Die Stücke/Bilder/ Videodateien im aktuellen Album (Ordner) werden in willkürlicher Reihenfolge wiedergegeben. 32 MPEG-4 MEX-DV1500U 4-120-899-21 (1) D:\Documents and Settings\takashi-shimomura\Desktop\DTP\848220S MEXDV1500U(EUR)\4120899211_MEX-DV1500U_ML\02DE02CD-E.fm *1 Steht nur bei der Wiedergabe von VCDs der Version 1.0/1.1 oder von VCDs der Version 2.0 ohne PBC-Funktionen zur Verfügung. *2 Außer bei einer DVD-R/DVD-R DL/DVD-RW im VR-Modus. masterpage:Right Direktsuche MPEG-4 Wenn Sie wieder in den normalen Wiedergabemodus schalten möchten, wählen Sie „OFF“. Hinweise • Wenn Sie zum Disc-Menü bzw. zum Hauptmenü zurückschalten, wird Repeat bzw. Shuffle Play beendet. • Im Disc-Menü bzw. Hauptmenü können Sie Repeat und Shuffle Play nicht einstellen. VISUAL SETUP ENTER M/m Zahlentasten CLEAR Einstellen über das Wiedergabemodusmenü MPEG-4 Sie können eine bestimmte Stelle direkt ansteuern, indem Sie die Titelnummer, die Kapitelnummer usw. angeben. VISUAL SETUP 1 ENTER M/m Geben Sie während der Wiedergabe mit den Zahlentasten die Nummer eines Elements (Stück, Titel usw.) ein und drücken Sie dann (ENTER). Die Wiedergabe startet an der ausgewählten Stelle. Einstellen über das Wiedergabemodusmenü 1 Drücken Sie während der Wiedergabe (VISUAL SETUP). Das Wiedergabemodusmenü erscheint. 2 Wählen Sie mit M/m die Option oder aus und drücken Sie (ENTER). 12(67) 018(034) T 1:35:55 MPEG-4 Die Elemente, nach denen gesucht werden kann, unterscheiden sich je nach Disc/Format wie folgt: Disc/Format Elemente TITLE Die Wiedergabe beginnt ab dem ausgewählten Titel. CHAPTER Die Wiedergabe beginnt ab dem ausgewählten Kapitel. TIME Die Wiedergabe beginnt ab der Stelle, die Sie durch Eingabe des Zeitcodes angegeben haben. PLAY DVD VIDEO OFF CHAPTER TITLE OFF 3 Wählen Sie mit M/m die gewünschte Option aus und drücken Sie (ENTER). Repeat oder Shuffle Play beginnt. Blenden Sie das Wiedergabemodusmenü mit (VISUAL SETUP) aus. Hinweis Der ausgewählte Wiedergabemodus wird deaktiviert, wenn die wiedergegebene Disc ausgeworfen wird. * TRACK Die Wiedergabe beginnt ab dem ausgewählten Stück. Fortsetzung auf der nächsten Seite t 33 MEX-DV1500U 4-120-899-21 (1) D:\Documents and Settings\takashi-shimomura\Desktop\DTP\848220S MEXDV1500U(EUR)\4120899211_MEX-DV1500U_ML\02DE02CD-E.fm ALBUM Die Wiedergabe beginnt ab dem ausgewählten Album. IMAGE Die Wiedergabe beginnt ab dem ausgewählten Bild. MPEG-4 masterpage:Left Auflisten von Stücken/Bildern/ Videodateien — Quick-BrowZer ALBUM Die Wiedergabe beginnt ab dem ausgewählten Album (Ordner). FILE Die Wiedergabe beginnt ab der ausgewählten Datei. </M/m/, ENTER * Steht nur bei der Wiedergabe von VCDs ohne PBC-Funktionen zur Verfügung. 1 Drücken Sie während der Wiedergabe (VISUAL SETUP). Das Wiedergabemodusmenü erscheint. 2 Wählen Sie mit M/m das gewünschte Element aus und drücken Sie (ENTER). - - (67) 018(034) T 1:35:55 PLAY DVD VIDEO Auswählen eines Stücks/Bildes/ einer Videodatei MPEG-4 Sie können Alben/Ordner/Stücke/Bilder/ Videodateien als Liste am Monitor anzeigen lassen und das gewünschte Element zur Wiedergabe auswählen. Diese Funktion eignet sich besonders bei Discs im MP3-/WMA-/AAC-/JPEG-/DivX-/MPEG-4Format mit zahlreichen Alben/Stücken usw. 1 Die Zahl in Klammern gibt jeweils die Gesamtzahl der ausgewählten Elemente an. 3 4 Geben Sie mit den Zahlentasten die Nummer oder den Zeitcode eines Elements ein. Wenn Sie beispielsweise eine Stelle suchen, die sich 2 Stunden, 10 Minuten und 20 Sekunden nach dem Anfang befindet, geben Sie einfach „21020“ ein. Wenn Sie bereits eingegebene Zahlen löschen wollen, drücken Sie (CLEAR). Drücken Sie (ENTER). Die Wiedergabe startet an der ausgewählten Stelle. Blenden Sie das Wiedergabemodusmenü mit (VISUAL SETUP) aus. Drücken Sie während der Wiedergabe . Die Liste der Stücke/Bilder/Videodateien auf der aktuellen Disc bzw. im aktuellen Album*/ Ordner* erscheint. MP3 0003/1000 3:17 TRACK NAME ALBUM NAME ARTIST NAME ST LIST UP VIDEO FILES LIST UP IMAGE FILES ROOT MUSIC FOLDER 01 TRACK 01 02 TRACK 02 03 TRACK 03 04 TRACK 04 05 TRACK 05 Um zur vorherigen/nächsten Seite zurück-/ weiterzuschalten, drücken Sie </,. Wenn Sie um eine Ebene nach oben wechseln wollen, drücken Sie .* Um den gewünschten Ordner auszuwählen, drücken Sie M/m und dann (ENTER).* * Nur bei der MP3-/WMA-/AAC-/JPEG-/DivX-/ MPEG-4-Wiedergabe. 34 MEX-DV1500U 4-120-899-21 (1) D:\Documents and Settings\takashi-shimomura\Desktop\DTP\848220S MEXDV1500U(EUR)\4120899211_MEX-DV1500U_ML\02DE02CD-E.fm 2 Wählen Sie mit M/m das gewünschte Element (Stück/Bild/Videodatei) aus und drücken Sie (ENTER). Die Wiedergabe des gewünschten Elements (Stück/Bild/Videodatei) beginnt. Am Hauptgerät Drehen Sie den Steuerregler, statt M/m zu drücken, drücken Sie (SEEK) –/+ anstelle von </, und drücken Sie den Steuerregler anstelle von (ENTER). Auswählen eines Dateityps MPEG-4 Wenn eine Disc mehrere Dateitypen enthält, kann nur der ausgewählte Dateityp (Audio/ Video/Bild) wiedergegeben werden. Die Wiedergabereihenfolge der verschiedenen Dateitypen ist werkseitig auf Audio-, Video- und zuletzt Bilddateien festgelegt. Enthält eine Disc beispielsweise Videodateien und Bilddateien, werden nur die Videodateien wiedergegeben. Sie können den gewünschten Dateityp auswählen, so dass die entsprechende Liste angezeigt wird, und wählen Sie dann die gewünschte Datei aus. 1 Drücken Sie während der Wiedergabe . 2 Wählen Sie mit M/m den Dateityp aus, der aufgelistet werden soll, und drücken Sie dann (ENTER). Wählen Sie zum Auflisten von MP3-, WMAund AAC-Dateien die Option „LIST UP AUDIO FILES“. Wählen Sie zum Auflisten von DivX-/ MPEG-4-Dateien die Option „LIST UP VIDEO FILES“. Wählen Sie zum Auflisten von JPEG-Dateien die Option „LIST UP IMAGE FILES“. 3 Wählen Sie mit M/m die gewünschte Datei aus und drücken Sie (ENTER). Die Wiedergabe der ausgewählten Datei beginnt. Am Hauptgerät Drehen Sie den Steuerregler, statt M/m zu drücken, und drücken Sie den Steuerregler anstelle von (ENTER). masterpage:Right Anzeigen von Audio-DiscInformationen Während der Audiowiedergabe können Sie Informationen zur Disc oder die Cover (Inhaltsbilder)* der MP3-/WMA-/AAC-Dateien auf dem Monitor anzeigen. * Die empfohlene Größe beträgt zwischen 240 × 240 und 960 × 960 Pixel. Beispiel: Bei der MP3-Wiedergabe A TRACK NAME ALBUM NAME ARTIST NAME MP3 0003/1000 3:17 E To list up, press BROWSE C B F D ST SHUF G . H A Stücknummer oder Stückname Disc-Name/Albumname Interpretenname B Format C Wiedergabestatus (N, X, usw.) D Aktueller Audiokanal Bei der CD-/MP3-/WMA-/AAC-Wiedergabe kann der Audiokanal gewechselt werden. Näheres dazu finden Sie unter „Wechseln des Audiokanals“ auf Seite 27. E Stücknummer/Gesamtzahl der Stücke F Verstrichene Spieldauer G Aktueller Wiedergabemodus H Bedienungsanweisungen Tipp Sie können ein Stück zur Wiedergabe auch mithilfe einer Liste (Quick-BrowZer) auswählen (Seite 34). 35 MEX-DV1500U 4-120-899-21 (1) D:\Documents and Settings\takashi-shimomura\Desktop\DTP\848220S MEXDV1500U(EUR)\4120899211_MEX-DV1500U_ML\02DE02CD-E.fm masterpage:Left Weitere Funktionen — Radio Manuelles Speichern von Sendern Speichern und Empfangen von Sendern 1 ENTER Hinweis Wenn Sie auf der gleichen Zahlentaste einen anderen Sender speichern, wird der zuvor gespeicherte Sender ersetzt. SRC MODE Tipp Wenn ein RDS-Sender gespeichert wird, wird auch die AF/TA-Einstellung gespeichert (Seite 37). SYSTEM SETUP M/m Zahlentasten Während der zu speichernde Sender empfangen wird, halten Sie eine Zahlentaste ((1) bis (6)) gedrückt, bis am Hauptgerät „MEM“ erscheint. Die Zahlentastenanzeige erscheint am Hauptgerät. Empfangen gespeicherter Sender Achtung Wenn Sie während der Fahrt Sender einstellen, sollten Sie die BTM-Funktion (Speicherbelegungsautomatik) verwenden. Andernfalls besteht Unfallgefahr. Automatisches Speichern von Sendern — BTM 1 1 Wählen Sie den Frequenzbereich aus und drücken Sie eine Zahlentaste ((1) bis (6)). RDS Steuerregler Drücken Sie (SRC) so oft, bis am Hauptgerät „TUNER“ erscheint. Zum Wechseln des Frequenzbereichs drücken Sie mehrmals (MODE). Sie können zwischen FM1 (UKW1), FM2 (UKW2), FM3 (UKW3), MW und LW wählen. 2 Drücken Sie (SYSTEM SETUP). Eine Systemkonfigurationsoption wird angezeigt. 3 Wählen Sie mit M/m die Option „BTM“ und drücken Sie (ENTER). Das Gerät speichert die Sender in der Reihenfolge der Frequenzen auf den Zahlentasten ((1) bis (6)). Ein Signalton ist zu hören und die Einstellung wird gespeichert. Am Hauptgerät Drücken Sie (SOURCE) anstelle von (SRC), drücken Sie (SETUP) anstelle von (SYSTEM SETUP), drehen Sie den Steuerregler, statt M/m zu drücken, und drücken Sie den Steuerregler anstelle von (ENTER). AF/TA (PTY) DSPL Zahlentasten Übersicht UKW-Sender, die RDS (Radiodatensystem) unterstützen, strahlen zusammen mit den normalen Radioprogrammsignalen nicht hörbare, digitale Informationen aus. Informationen im Display A B C A Radiofrequenzbereich, Funktion B TA/TP*1 C Frequenz*2 (Programmdienstname), Speichernummer, Uhrzeit, RDS-Daten 36 MEX-DV1500U 4-120-899-21 (1) D:\Documents and Settings\takashi-shimomura\Desktop\DTP\848220S MEXDV1500U(EUR)\4120899211_MEX-DV1500U_ML\02DE02CD-E.fm *1 „TA“ blinkt während einer Verkehrsdurchsage. „TP“ leuchtet, wenn ein Sender mit Verkehrsdurchsagen empfangen wird. *2 Beim Empfang eines RDS-Senders wird „*“ links neben der Frequenz angezeigt. Zum Wechseln der angezeigten Informationen C drücken Sie (DSPL). RDS-Funktionen Mit diesem Gerät stehen folgende RDS-Funktionen automatisch zur Verfügung: AF (Alternativfrequenzen) In einem Netzwerk wird der Sender mit den stärksten Signalen ausgewählt und neu eingestellt. So können Sie auch bei einer langen Fahrt über eine große Entfernung hinweg ununterbrochen denselben Sender empfangen, ohne ihn manuell neu einstellen zu müssen. TA (Verkehrsdurchsagen)/ TP (Verkehrsfunksender) Aktuelle Verkehrsinformationen bzw. Verkehrsfunksender werden empfangen. Wenn solche Informationen bzw. Sendungen empfangen werden, wird die gerade ausgewählte Tonquelle unterbrochen. PTY (Programmtypauswahl) Der gerade empfangene Programmtyp wird angezeigt. Außerdem kann nach dem ausgewählten Programmtyp gesucht werden. CT (Uhrzeit) Mit den CT-Daten (Uhrzeitdaten), die von RDS-Sendern ausgestrahlt werden, lässt sich die Uhr einstellen. Hinweise • Je nach Land bzw. Region stehen möglicherweise nicht alle RDS-Funktionen zur Verfügung. • Die RDS-Funktion arbeitet möglicherweise nicht, wenn die Sendesignale zu schwach sind oder wenn der eingestellte Sender keine RDS-Daten ausstrahlt. Einstellen von AF und TA Die AF/TA-Einstellungen und die Umschaltreihenfolge sind unten aufgelistet. AF-ON: AF wird aktiviert, TA deaktiviert. TA-ON: TA wird aktiviert, AF deaktiviert. AF, TA-ON: AF und TA werden beide aktiviert. AF, TA-OFF: AF und TA werden beide deaktiviert. 1 Drücken Sie (AF/TA) so oft, bis die gewünschte Einstellung angezeigt wird. masterpage:Right Speichern von RDS-Sendern zusammen mit der AF- und TA-Einstellung Sie können zusammen mit den RDS-Sendern die AF/TA-Einstellung speichern. Mit der BTMFunktion werden nur RDS-Sender mit derselben AF/TA-Einstellung gespeichert. Beim manuellen Speichern von Sendern können Sie RDS- und Nicht-RDS-Sender mit unterschiedlicher AF/TA-Einstellung speichern. 1 Stellen Sie AF/TA ein und speichern Sie die Sender dann mit BTM oder manuell ab. Empfangen von Katastrophenwarnungen Wenn AF oder TA aktiviert ist, unterbrechen Katastrophenwarnungen automatisch die ausgewählte Tonquelle. Tipp Wenn Sie die Lautstärke während einer Verkehrsdurchsage einstellen, wird der eingestellte Pegel für spätere Verkehrsdurchsagen gespeichert, und zwar unabhängig von der sonst eingestellten Lautstärke. Unveränderter Empfang eines Regionalsenders — REG Wenn die AF-Funktion aktiviert ist, wird der Empfang dieses Geräts werkseitig auf eine bestimmte Region beschränkt, so dass nicht zu einem anderen Regionalsender mit einer stärkeren Frequenz gewechselt wird. Wenn Sie den Empfangsbereich des betreffenden Regionalsenders verlassen, stellen Sie während des Empfangs eines UKW-Senders in der Systemkonfiguration „REG-OFF“ ein (Seite 46). Hinweis Diese Funktion steht in Großbritannien und in einigen anderen Regionen nicht zur Verfügung. Lokalsenderfunktion (nur Großbritannien) Mithilfe dieser Funktion können Sie andere Lokalsender auswählen, auch wenn diese zuvor nicht unter einer Zahlentaste gespeichert wurden. 1 Drücken Sie während des UKW-Empfangs eine Zahlentaste ((1) bis (6)), unter der ein Lokalsender gespeichert ist. 2 Drücken Sie innerhalb von 5 Sekunden erneut die Zahlentaste des Lokalsenders. Wiederholen Sie diesen Vorgang, bis das Gerät den Lokalsender empfängt. 37 MEX-DV1500U 4-120-899-21 (1) D:\Documents and Settings\takashi-shimomura\Desktop\DTP\848220S MEXDV1500U(EUR)\4120899211_MEX-DV1500U_ML\02DE02CD-E.fm masterpage:Left Auswählen des Programmtyps (PTY) Klangeinstellungen 1 Einstellen der Klangeigenschaften Halten Sie während des UKWEmpfangs (AF/TA) (PTY) gedrückt. SOUND Der Name des aktuellen Programmtyps erscheint, wenn der Sender PTY-Daten ausstrahlt. 2 Wählen Sie durch Drehen des Steuerreglers den Programmtyp aus. 3 Drücken Sie den Steuerregler. Das Gerät sucht nach einem Sender, der den ausgewählten Programmtyp ausstrahlt. Programmtypen NEWS (Nachrichten), AFFAIRS (Aktuelles Zeitgeschehen), INFO (Informationen), SPORT (Sport), EDUCATE (Erziehung und Bildung), DRAMA (Hörspiele), CULTURE (Kultur), SCIENCE (Wissenschaft), VARIED (Verschiedenes), POP M (Pop-Musik), ROCK M (Rock-Musik), EASY M (Unterhaltungsmusik), LIGHT M (Leichte Klassik), CLASSICS (Klassik), OTHER M (Sonstige Musik), WEATHER (Wetter), FINANCE (Finanzberichte), CHILDREN (Kinderprogramme), SOCIAL A (Magazinsendungen), RELIGION (Religion), PHONE IN (Hörertelefon), TRAVEL (Reiseinformationen), LEISURE (Freizeitprogramm), JAZZ (Jazz), COUNTRY (Country-Musik), NATION M (Volksmusik), OLDIES (Oldies), FOLK M (Folk-Musik), DOCUMENT (Dokumentarbeiträge) Hinweis Sie können diese Funktion in Ländern/Regionen, in denen keine PTY-Daten zur Verfügung stehen, nicht verwenden. M/m Sie können die Klangeigenschaften nach Geschmack festlegen. Die Einstelloptionen im Klangmenü und die Umschaltreihenfolge sind unten aufgelistet. EQ3: Sie können für 7 Musiktypen eine spezielle Equalizer-Kurve auswählen. LOW, MID, HI*1: Sie können den Lautstärkepegel für den ausgewählten Frequenzbereich einstellen, wenn Sie individuelle EQ3-Einstellungen vornehmen wollen. BAL (Balance): Sie können die Tonbalance zwischen den Lautsprechern links und rechts einstellen. FAD (Fader): Sie können den relativen Lautstärkepegel der Lautsprecher vorn und hinten einstellen. SUB (Lautstärke des Tiefsttonlautsprechers)*2: Stellen Sie hier die Lautstärke des Tiefsttonlautsprechers ein. („ATT“ ist die niedrigste Einstellung.) *1 Erscheint nur, wenn EQ3 aktiviert ist. *2 Wenn als Audioausgang „SUB-OUT“ eingestellt ist (Seite 45). 1 Drücken Sie während der Wiedergabe/ des Empfangs (SOUND) so oft, bis die gewünschte Einstelloption am Hauptgerät angezeigt wird. 2 Stellen Sie mit M/m den Pegel ein oder wählen Sie die gewünschte Option. Einstellen der Uhrzeit (CT) 1 Stellen Sie in der Systemkonfiguration „CT-ON“ ein (Seite 45). Hinweise • Die CT-Funktion steht möglicherweise nicht zur Verfügung, auch wenn ein RDS-Sender empfangen wird. • Die mit der CT-Funktion eingestellte Uhrzeit ist nicht immer korrekt. 38 MEX-DV1500U 4-120-899-21 (1) D:\Documents and Settings\takashi-shimomura\Desktop\DTP\848220S MEXDV1500U(EUR)\4120899211_MEX-DV1500U_ML\02DE02CD-E.fm 3 Drücken Sie . Die Einstellung ist abgeschlossen und im Display erscheint wieder die Anzeige für den normalen Wiedergabemodus bzw. Empfangsmodus. Am Hauptgerät Drücken Sie den Steuerregler anstelle von (SOUND) und drehen Sie den Steuerregler, statt M/m zu drücken. Individuelles Einstellen der Equalizer-Kurve — EQ3 Mit „CUSTOM“ unter EQ3 können Sie Ihre individuellen Equalizer-Einstellungen vornehmen. Sie können den Pegel für 3 verschiedene Frequenzbereiche einstellen: „LOW“, „MID“ und „HI“. 1 Drücken Sie während der Wiedergabe/ des Empfangs (SOUND) so oft, bis „EQ3“ erscheint. 2 Wählen Sie mit M/m die Option „CUSTOM“ aus. 3 Drücken Sie (SOUND) so oft, bis „LOW“, „MID“ oder „HI“ erscheint. 4 Stellen Sie mit M/m den Pegel der ausgewählten Option ein. Der Pegel lässt sich schrittweise auf einen Wert zwischen –10 und +10 einstellen. Wenn Sie die werkseitig eingestellte Equalizer-Kurve wiederherstellen wollen, halten Sie (SOUND) gedrückt. 5 Drücken Sie . Die Einstellung ist abgeschlossen und im Display erscheint wieder die Anzeige für den normalen Wiedergabemodus bzw. Empfangsmodus. Tipp Andere Equalizer-Typen lassen sich ebenfalls einstellen. Am Hauptgerät Drücken Sie den Steuerregler anstelle von (SOUND) und drehen Sie den Steuerregler, statt M/m zu drücken. masterpage:Right Einstellungen Es gibt zwei Konfigurationsmenüs, über die Sie verschiedene Einstellungen konfigurieren können. • Wiedergabekonfigurationsmenü (Seite 39) Hier können Sie Optionen im Zusammenhang mit der Wiedergabe konfigurieren (über den Monitor). • Systemkonfigurationsmenü (Seite 44) Hier können Sie Optionen im Zusammenhang mit dem System konfigurieren (über das Hauptgerät). Wiedergabekonfiguration Das Wiedergabekonfigurationsmenü besteht aus folgenden Kategorien. LANGUAGE SETUP (Seite 41) Einstellen von Menüsprache, Untertitelsprache usw. DISPLAY SETUP (Seite 41) Einstellen des angeschlossenen Monitors. CUSTOM SETUP (Seite 42) Anpassen der Disc-Wiedergabe. AUDIO SETUP (Seite 43) Anpassen der Klangeinstellungen an die Disc. RESET (Seite 43) Zurücksetzen aller Einstelloptionen. Grundlegende Funktionsweise der Wiedergabekonfiguration VISUAL SETUP O ENTER M/m Im Folgenden wird das Verfahren zum Einstellen der Optionen im Menü erläutert. Fortsetzung auf der nächsten Seite t 39 MEX-DV1500U 4-120-899-21 (1) D:\Documents and Settings\takashi-shimomura\Desktop\DTP\848220S MEXDV1500U(EUR)\4120899211_MEX-DV1500U_ML\02DE02CD-E.fm masterpage:Left Beispiel: Einstellen des Bildseitenverhältnisses auf „4:3 PAN SCAN“. 1 Drücken Sie bei ausgeschaltetem Gerät die Taste (VISUAL SETUP). Das Wiedergabekonfigurationsmenü erscheint. LANGUAGE SETUP MENU : AUDIO : SUBTITLE : 2 Wählen Sie mit M/m die Option (DISPLAY SETUP) aus und drücken Sie (ENTER). Die Bildschirmkonfigurationsoptionen werden angezeigt. DISPLAY SETUP MONITOR TYPE : WALLPAPER : 3 16:9 WALLPAPER 1 Wählen Sie mit M/m die Option „MONITOR TYPE“ aus und drücken Sie (ENTER). Die Optionen erscheinen. DISPLAY SETUP MONITOR TYPE : WALLPAPER : 4 ENGLISH ENGLISH ENGLISH 16:9 16:9 4:3 LETTER BOX 4:3 PAN SCAN Wählen Sie mit M/m die Option „4:3 PAN SCAN“ aus und drücken Sie (ENTER). Die Einstellung ist damit abgeschlossen. Um zur vorherigen Anzeige zurückzuschalten, drücken Sie O. Zum Ausblenden des Wiedergabekonfigurationsmenüs drücken Sie (VISUAL SETUP). 40 MEX-DV1500U 4-120-899-21 (1) D:\Documents and Settings\takashi-shimomura\Desktop\DTP\848220S MEXDV1500U(EUR)\4120899211_MEX-DV1500U_ML\02DE02CD-E.fm masterpage:Right Spracheinstellungen für Anzeige oder Tonspur Wählen Sie (LANGUAGE SETUP) und wählen Sie dann mit M/m und (ENTER) unter den unten genannten Einstellungen und Optionen die gewünschte aus. Erläuterungen zum Vorgehen dabei finden Sie unter „Grundlegende Funktionsweise der Wiedergabekonfiguration“ auf Seite 39. Einstellung Zweck MENU Hier wechseln Sie die Menüsprache der Disc. AUDIO Hier wechseln Sie die Tonspursprache. SUBTITLE Hier wechseln Sie die Sprache der auf der Disc aufgezeichneten Untertitel. Bildschirmkonfiguration Wählen Sie (DISPLAY SETUP) und wählen Sie dann mit M/m und (ENTER) unter den unten genannten Einstellungen und Optionen die gewünschte aus. Erläuterungen zum Vorgehen dabei finden Sie unter „Grundlegende Funktionsweise der Wiedergabekonfiguration“ auf Seite 39. „z“ gibt die Standardeinstellung an. Einstellung MONITOR TYPE Stellt ein passendes Bildseitenverhältnis für den angeschlossenen Monitor ein. WALLPAPER Option Zweck 16:9 (z) Das Bild wird im Breitbildformat angezeigt. Diese Option ist geeignet, wenn Sie einen Breitbildmonitor oder einen Monitor mit Breitbildmodus anschließen. 4:3 LETTER BOX Bilder im Breitbildformat werden mit Balken am oberen und unteren Bildschirmrand angezeigt. Diese Option ist geeignet, wenn Sie einen 4:3-Monitor anschließen. 4:3 PAN SCAN Bilder im Breitbildformat werden so angezeigt, dass sie den Bildschirm füllen. Bereiche, die nicht auf den Bildschirm passen, werden automatisch abgeschnitten. WALLPAPER 1 (z), 2, 3 Hier wählen Sie ein Hintergrundbild aus. Hinweis Bei manchen Discs wird unter Umständen automatisch „4:3 LETTER BOX“ statt „4:3 PAN SCAN“ und umgekehrt ausgewählt. 41 MEX-DV1500U 4-120-899-21 (1) D:\Documents and Settings\takashi-shimomura\Desktop\DTP\848220S MEXDV1500U(EUR)\4120899211_MEX-DV1500U_ML\02DE02CD-E.fm masterpage:Left Benutzereinstellungen Wählen Sie (CUSTOM SETUP) und wählen Sie dann mit M/m und (ENTER) unter den unten genannten Einstellungen und Optionen die gewünschte aus. Erläuterungen zum Vorgehen dabei finden Sie unter „Grundlegende Funktionsweise der Wiedergabekonfiguration“ auf Seite 39. Nähere Erläuterungen finden Sie auf den angegebenen Seiten. „z“ gibt die Standardeinstellung an. Einstellung PARENTAL CONTROL (Seite 30) *1 Legt Wiedergabeeinschränkungen fest, so dass ungeeignete Discs oder Szenen nicht wiedergegeben werden. Option OFF t (z) Die Kindersicherung ist deaktiviert. ON t Die Kindersicherung ist aktiviert. PLAYER t Hier legen Sie den Einschränkungsstandard und die Altersfreigabestufe fest. PASSWORD t Hier definieren Sie ein neues 4-stelliges Kennwort. Done DivX VOD Zeigt den Registriercode für diesen Player an. Weitere Informationen finden Sie auf folgender Website: http://www.divx.com/vod SLIDE SHOW TIME MULTI-DISC RESUME *2 Die Anzeige wird ausgeblendet. 5 sec. (z), 10 sec., Das Anzeigeintervall für 20 sec., 40 sec., 60 sec. Bildpräsentationen wird festgelegt. FIXED Bildpräsentationen werden deaktiviert. ON (z) Die Stellen für die Wiedergabefortsetzung werden für bis zu 5 Discs gespeichert. Diese Einstellungen bleiben gespeichert, auch wenn Sie „OFF“ auswählen. OFF Die Stellen für die Wiedergabefortsetzung werden nicht gespeichert. Eine Wiedergabefortsetzung ist nur bei der zurzeit eingelegten Disc möglich. ON (z) Die Stellen für die Wiedergabefortsetzung werden gespeichert. Diese Einstellungen bleiben gespeichert, auch wenn Sie „OFF“ auswählen. OFF Die Stellen für die Wiedergabefortsetzung werden nicht gespeichert. MPEG-4 USB RESUME Zweck 42 MEX-DV1500U 4-120-899-21 (1) D:\Documents and Settings\takashi-shimomura\Desktop\DTP\848220S MEXDV1500U(EUR)\4120899211_MEX-DV1500U_ML\02DE02CD-E.fm masterpage:Right PLAY LIST PLAY (nur bei einer DVD-R/DVD-R DL/ DVD-RW im VR-Modus) ORIGINAL (z) Originaltitel werden wiedergegeben. PLAY LIST Eine bearbeitete Play-List wird wiedergegeben. PICTURE EQ (Seite 29) AUTO (z) Die Optionen für die Nacht/den Tag werden je nach der Dimmereinstellung in der Systemkonfiguration automatisch umgeschaltet (Seite 45). LIGHT OFF Die Optionen für den Tag werden angezeigt. LIGHT ON Die Optionen für die Nacht werden angezeigt. MPEG-4 Auswählen der Einstelloption, die im Wiedergabemodusmenü angezeigt werden soll. *1 Außer bei einer DVD-R/DVD-R DL/DVD-RW im VR-Modus. *2 Nur bei DVD VIDEO. Hinweis Wenn die Kindersicherung aktiviert ist, funktioniert die Wiedergabefortsetzung nicht. In diesem Fall startet die Wiedergabe nach dem Einlegen der Disc am Anfang. Tonkonfiguration Wählen Sie (AUDIO SETUP) und wählen Sie dann mit M/m und (ENTER) unter den unten genannten Einstellungen und Optionen die gewünschte aus. Erläuterungen zum Vorgehen dabei finden Sie unter „Grundlegende Funktionsweise der Wiedergabekonfiguration“ auf Seite 39. Nähere Erläuterungen finden Sie auf den angegebenen Seiten. „z“ gibt die Standardeinstellung an. Einstellung Option STANDARD (z) AUDIO DRC * Sorgt für hohe Tonqualität auch bei geringer Lautstärke. Nur bei DVDs WIDE RANGE mit Dynamikkontrolle (AUDIO DRC). Zweck Es gilt die Standardeinstellung. Sie erhalten den Eindruck, sich live in einer Veranstaltung zu befinden. * Außer bei einer DVD-R/DVD-R DL/DVD-RW im VR-Modus. Zurücksetzen aller Einstellungen Alle Einstellungen (mit Ausnahme der Kindersicherungseinstellungen) können in der Wiedergabekonfiguration zurückgesetzt werden. Wählen Sie mit M/m und (ENTER) die Option (RESET) und dann „RESET ALL SETTINGS“ und „YES“. Erläuterungen zum Vorgehen dabei finden Sie unter „Grundlegende Funktionsweise der Wiedergabekonfiguration“ auf Seite 39. Hinweis Schalten Sie das Gerät während des Zurücksetzens nicht aus. Dieser Vorgang kann einige Sekunden dauern. 43 MEX-DV1500U 4-120-899-21 (1) D:\Documents and Settings\takashi-shimomura\Desktop\DTP\848220S MEXDV1500U(EUR)\4120899211_MEX-DV1500U_ML\02DE02CD-E.fm Im Folgenden wird das Verfahren zum Einstellen der Optionen im Menü erläutert. Systemkonfiguration Das Systemkonfigurationsmenü besteht aus folgenden Kategorien. • • • • SET: Allgemeine Einstellungen (Seite 45) DSPL: Anzeigeeinstellungen (Seite 45) R/M: Empfangsmoduseinstellungen (Seite 46) SND: Klangeinstellungen (Seite 47) Beispiel: Einstellen des Demo-Modus 1 Drücken Sie bei ausgeschaltetem Gerät die Taste (SYSTEM SETUP). Eine Systemkonfigurationsoption erscheint am Hauptgerät. 2 Wählen Sie mit M/m die Option „DEMO“ und drücken Sie (ENTER). Die Option erscheint. 3 Wählen Sie mit M/m die Option „ON“ oder „OFF“ und drücken Sie (ENTER). Die Einstellung ist damit abgeschlossen. Grundlegende Funktionsweise der Systemkonfiguration SYSTEM SETUP ENTER M/m masterpage:Left Zum Ausblenden des Systemkonfigurationsmenüs drücken Sie (SYSTEM SETUP). Am Hauptgerät Drücken Sie (SETUP) anstelle von (SYSTEM SETUP), drehen Sie den Steuerregler, statt M/m zu drücken, und drücken Sie den Steuerregler anstelle von (ENTER). 44 MEX-DV1500U 4-120-899-21 (1) D:\Documents and Settings\takashi-shimomura\Desktop\DTP\848220S MEXDV1500U(EUR)\4120899211_MEX-DV1500U_ML\02DE02CD-E.fm masterpage:Right Nähere Erläuterungen finden Sie auf den angegebenen Seiten. „z“ gibt die Standardeinstellung an. SET (Konfiguration) Einstellung Option CLOCK-ADJ (Uhr einstellen) – (Seite 48) CT (Uhrzeit) (Seite 37, 38) BEEP COLOR-SYS (Farbsystem) Hier können Sie das ausgegebene Videosignal auf den angeschlossenen Monitor einstellen. Die Uhrzeitfunktion (CT) wird aktiviert. OFF (z) Die Uhrzeitfunktion (CT) wird deaktiviert. ON (z) Der Signalton wird aktiviert. OFF Der Signalton wird deaktiviert. PAL (z) PAL wird eingestellt. NTSC NTSC wird eingestellt. REAR-OUT Gerätestatus – ON NO (z) AUTO-OFF Schaltet das ausgeschaltete Gerät nach einer vorgegebenen 30S, 30M, 60M Zeit automatisch vollständig ab. REAR/SUB Hier können Sie den Audioausgang wechseln. Zweck Jeder Status. Ausgeschaltet. Die Ausschaltautomatik wird deaktiviert. Hier wählen Sie die Zeit bis zum Ausschalten. Der Endverstärker ist eingestellt. SUB-OUT (z) Der Tiefsttonlautsprecher ist eingestellt. Jeder Status. Ausgeschaltet. DSPL (Display) Einstellung M.DSPL (Bewegte Anzeige) Wählt den Modus der bewegten Anzeige aus. Option SA (z) Zweck Bewegte Muster und ein Spektrumanalysator werden angezeigt. OFF Die bewegte Anzeige wird deaktiviert. ON (z) Der Demo-Modus wird aktiviert. OFF Der Demo-Modus wird deaktiviert. DIMMER Dient zum Ändern der Display-Helligkeit. ON Das Display wird dunkler. OFF (z) Der Dimmer wird deaktiviert. AUTO-SCRL (Automatischer Bildlauf) Bewirkt, dass lange Anzeigen automatisch im Display durchlaufen. ON (z) Die Informationen laufen im Display durch. OFF Die Informationen laufen nicht im Display durch. DEMO (Demo-Modus) Gerätestatus Bei Wiedergabe/ Radioempfang. Ausgeschaltet. Jeder Status. Bei der DiscWiedergabe. Fortsetzung auf der nächsten Seite t 45 MEX-DV1500U 4-120-899-21 (1) D:\Documents and Settings\takashi-shimomura\Desktop\DTP\848220S MEXDV1500U(EUR)\4120899211_MEX-DV1500U_ML\02DE02CD-E.fm masterpage:Left R/M (Empfangsmodus) Einstellung Option LOCAL (Lokaler Suchmodus) ON MONO (Monauraler Modus) Einstellen des monauralen Empfangsmodus, um den Empfang von UKW-Sendern zu verbessern. Es werden nur Sender mit starken Signalen eingestellt. OFF (z) Es werden auch Sender mit normal starken Signalen eingestellt. ON Stereosender werden monaural wiedergegeben. OFF (z) Stereosender werden in stereo wiedergegeben. REGIONAL (Regionalsender) ON (z) (Seite 37) BTM (Speicherbelegungsautomatik) (Seite 36) Zweck Ein und derselbe Regionalsender wird empfangen. OFF Dient zum Deaktivieren der Funktion, wenn man den Empfangsbereich des betreffenden Regionalsenders verlässt. – – Gerätestatus Beim Radioempfang. Beim UKWEmpfang. Beim Radioempfang. 46 MEX-DV1500U 4-120-899-21 (1) D:\Documents and Settings\takashi-shimomura\Desktop\DTP\848220S MEXDV1500U(EUR)\4120899211_MEX-DV1500U_ML\02DE02CD-E.fm masterpage:Right SND (Klang) Einstellung Option Zweck HPF (Hochpassfilter) Zum Auswählen der Grenzfrequenz der Front-/ Hecklautsprecher. OFF (z) Es werden keine Frequenzen gedämpft. 80HZ, 100HZ, 120HZ, 140HZ, 160HZ Hier wählen Sie die Frequenz aus. LPF (Niedrigpassfilter)*1 Zum Auswählen der Grenzfrequenz des Tiefsttonlautsprechers. OFF (z) Es werden keine Frequenzen gedämpft. 80HZ, 100HZ, 120HZ, 140HZ, 160HZ Hier wählen Sie die Frequenz aus. LPF-PHASE (Phase des NORM (z) Niedrigpassfilters)*1 Zum Auswählen der Phase bei REV aktiviertem LPF. Für den LPF gilt die normale Phase. LOUD (Loudness) Sorgt für hohe Tonqualität auch bei geringer Lautstärke. OFF (z) Bässe und Höhen werden nicht angehoben. ON Bässe und Höhen werden angehoben. AUX-LEVEL (Pegel zusätzlicher Geräte) (Seite 49) (–8 ~ +18) z: 0 Hier wählen Sie den Pegel aus. DVD-LEVEL (DVD-Pegel) (Seite 28) ADJST-ON Hier können Sie den Ausgangspegel für das Dolby Digital-Format einstellen. ADJST-OFF (z) Die Pegeleinstellung wird deaktiviert. (–10 ~ +10) z: +8 Hier wählen Sie den Pegel aus. DOLBY-ADJ (Einstellen des Dolby-Pegels) (Seite 28)*2 Gerätestatus Bei Wiedergabe/ Radioempfang. Für den LPF gilt die umgekehrte Phase. Bei der Wiedergabe über zusätzliche Geräte (AUX). Bei der DiscWiedergabe. *1 Wenn als Audioausgang „SUB-OUT“ eingestellt ist. *2 Wird nur angezeigt und steht nur zur Verfügung, wenn „DVD-LEVEL“ auf „ADJST-ON“ gesetzt ist. 47 MEX-DV1500U 4-120-899-21 (1) D:\Documents and Settings\takashi-shimomura\Desktop\DTP\848220S MEXDV1500U(EUR)\4120899211_MEX-DV1500U_ML\02DE02CD-E.fm masterpage:Left Verwenden gesondert erhältlicher Geräte Einstellen der Uhr Zusätzliche Geräte SYSTEM SETUP </M/m/, ENTER SYSTEM SETUP ENTER DSPL M/m SRC MODE Die Uhr zeigt die Uhrzeit im 24-Stunden-Format an. 1 Drücken Sie (SYSTEM SETUP). Eine Systemkonfigurationsoption erscheint am Hauptgerät. 2 Wählen Sie mit M/m die Option „CLOCK-ADJ“ aus und drücken Sie (ENTER). Die Stundenanzeige blinkt. 3 Stellen Sie mit M/m die Stunden und Minuten ein. Wechseln Sie mit </, zum nächsten Zeichen in der Digitalanzeige. 4 Drücken Sie (ENTER). Die Einstellung ist damit abgeschlossen. Zum Ausblenden des Systemkonfigurationsmenüs drücken Sie (SYSTEM SETUP). Wenn Sie während der Wiedergabe die Uhrzeit anzeigen wollen, drücken Sie (DSPL) so oft, bis die Uhrzeit erscheint. Sie können zusätzliche Geräte an das Gerät anschließen und den Ton von diesen Geräten über die Lautsprecher des Fahrzeugs wiedergeben lassen. Bis zu 2 Geräte können angeschlossen werden, eins an die AUX-Eingangsbuchse (Stereominibuchse) an der Vorderseite und ein zweites an die Anschlüsse AUX AUDIO IN an der Rückseite. Unterschiede im Lautstärkepegel zwischen diesem Gerät und dem zusätzlichen Gerät können korrigiert werden. Anschließen eines zusätzlichen Geräts 1 Schalten Sie das zusätzliche Gerät aus. 2 Drehen Sie die Lautstärke an diesem Gerät herunter. 3 Schließen Sie das zusätzliche Gerät an dieses Gerät an. An der Vorderseite Schließen Sie das Gerät an die AUX-Eingangsbuchse an. Am Hauptgerät Drücken Sie (SETUP) anstelle von (SYSTEM SETUP), drehen Sie den Steuerregler, statt M/m zu drücken, drücken Sie .m/M> anstelle von </, und drücken Sie den Steuerregler anstelle von (ENTER). AUX AUX Verbindungskabel* (nicht mitgeliefert) * Verwenden Sie unbedingt einen geraden Stecker. 48 MEX-DV1500U 4-120-899-21 (1) D:\Documents and Settings\takashi-shimomura\Desktop\DTP\848220S MEXDV1500U(EUR)\4120899211_MEX-DV1500U_ML\02DE02CD-E.fm An der Rückseite Schließen Sie das Gerät an die Anschlüsse AUX AUDIO IN an. Auswählen eines zusätzlichen Geräts 1 Drücken Sie (SRC) so oft, bis am Hauptgerät „AUX“ erscheint. 2 Wählen Sie mit (MODE) die Option „FRONT-IN“ oder „REAR-IN“ aus. Bedienen Sie das zusätzliche Gerät. Einstellen des Lautstärkepegels Stellen Sie unbedingt vor der Wiedergabe die Lautstärke der einzelnen angeschlossenen Geräte ein. 1 Drehen Sie die Lautstärke an diesem Gerät herunter. 2 Drücken Sie (SRC) so oft, bis am Hauptgerät „AUX“ erscheint. Wenn zwei zusätzliche Geräte angeschlossen sind, wählen Sie das Gerät, dessen Lautstärke eingestellt werden soll, mit (MODE) aus. 3 Starten Sie die Wiedergabe am zusätzlichen Gerät mit gemäßigter Lautstärke. 4 Stellen Sie die gewohnte Hörlautstärke an diesem Gerät ein. 5 Drücken Sie (SYSTEM SETUP). 6 Wählen Sie mit M/m die Option „AUXLEVEL“ und drücken Sie (ENTER). 7 Stellen Sie mit M/m den gewünschten Eingangspegel ein. Der Eingangspegel lässt sich schrittweise auf einen Wert zwischen –8 und +18 einstellen. 8 Drücken Sie (ENTER). Die Einstellung ist damit abgeschlossen. Zum Ausblenden des Systemkonfigurationsmenüs drücken Sie (SYSTEM SETUP). Am Hauptgerät Drücken Sie (SOURCE) anstelle von (SRC), drücken Sie (SETUP) anstelle von (SYSTEM SETUP), drehen Sie den Steuerregler, statt M/m zu drücken, und drücken Sie den Steuerregler anstelle von (ENTER). masterpage:Right Weitere Informationen Sicherheitsmaßnahmen • Wenn das Fahrzeug längere Zeit in direktem Sonnenlicht geparkt war, lassen Sie das Gerät zunächst etwas abkühlen. • Motorantennen werden automatisch ausgefahren. Feuchtigkeitskondensation Wenn sich im Inneren des Geräts Feuchtigkeit niedergeschlagen hat, nehmen Sie die Disc heraus und warten Sie etwa eine Stunde, bis die Feuchtigkeit verdunstet ist, denn andernfalls funktioniert das Gerät nicht ordnungsgemäß. So bewahren Sie die hohe Tonqualität Achten Sie darauf, dass keine Flüssigkeiten auf das Gerät oder die Discs gelangen. Hinweise zu Discs • Setzen Sie Discs weder direktem Sonnenlicht noch Wärmequellen wie zum Beispiel Warmluftauslässen aus. Lassen Sie sie auch nicht in einem in der Sonne geparkten Auto liegen. • Reinigen Sie Discs vor dem Abspielen mit einem Reinigungstuch. Wischen Sie dabei von der Mitte nach außen. Verwenden Sie keine Lösungsmittel wie Benzin, Verdünner oder andere handelsübliche Reinigungsmittel. • Dieses Gerät ist auf die Wiedergabe von Discs ausgelegt, die dem Compact Disc-Standard (CD) entsprechen. DualDiscs und manche Musik-CDs mit Urheberrechtsschutzcodierung entsprechen nicht dem Compact Disc-Standard (CD) und können daher mit diesem Gerät nicht wiedergegeben werden. • Auf diesem Gerät NICHT abspielbare Discs – Discs mit Etiketten, Aufklebern oder aufgeklebtem Band oder Papier. Wenn Sie solche Discs verwenden, kann es zu einer Fehlfunktion kommen oder die Disc kann beschädigt werden. – Discs mit außergewöhnlichen Formen (z. B. herzförmige, quadratische oder sternförmige Discs). Falls Sie es doch versuchen, kann das Gerät beschädigt werden. – 8-cm-Discs. Fortsetzung auf der nächsten Seite t 49 MEX-DV1500U 4-120-899-21 (1) D:\Documents and Settings\takashi-shimomura\Desktop\DTP\848220S MEXDV1500U(EUR)\4120899211_MEX-DV1500U_ML\02DE02CD-E.fm masterpage:Left Hinweis zu Wiedergabefunktionen bei DVDs und VCDs Hinweise zu Multisession-CDs/MultiBorder-DVDs Einige Wiedergabefunktionen von DVDs und VCDs können von den Software-Herstellern absichtlich eingeschränkt werden. Dieses Gerät gibt DVDs und VCDs so wieder, wie es von den SoftwareHerstellern vorgesehen ist. Deshalb stehen möglicherweise einige Wiedergabefunktionen nicht zur Verfügung. Lesen Sie dazu bitte auch die Anweisungen, die mit den DVDs oder VCDs geliefert wurden. Unter folgenden Voraussetzungen können mit diesem Gerät Multisession-CDs/Multi-BorderDVDs wiedergegeben werden. Dazu muss die Session geschlossen und die Disc abgeschlossen sein. • Wenn die erste Session CD-DA-Aufnahmen (digitales CD-Audiosystem) enthält: Das Gerät erkennt die Disc als CD-DA-Disc und gibt ausschließlich die CD-DA-Aufnahmen in der ersten Session wieder, selbst wenn in anderen Sessions Aufnahmen in anderen Formaten (z. B. MP3) enthalten sind. • Wenn andere Sessions als die erste CD-DAAufnahmen enthalten: Das Gerät erkennt die Disc als DATA-CD oder DATA-DVD und alle CD-DA-Sessions werden übersprungen. • Wenn MP3-/WMA-/AAC-/JPEG-/DivX-/MPEG4-Aufnahmen vorhanden sind: Nur die Sessions mit dem ausgewählten Dateityp (Audio/Video/Bild)* werden wiedergegeben. Wenn andere Sessions CD-DA- oder andere Daten enthalten, werden diese übersprungen. Hinweise zu DATA-CDs und DATADVDs • Je nach dem Gerät, mit dem DATA-CDs/DATADVDs bespielt wurden, oder dem Zustand der DATA-CDs/DATA-DVDs selbst ist eine Wiedergabe mit diesem Gerät nicht in jedem Fall möglich. • Bestimmte Discs müssen abgeschlossen werden (Seite 50). • Das Gerät unterstützt folgende Standards. Für DATA-CDs – Format ISO 9660, Stufe 1/Stufe 2, erweitertes Joliet/Romeo-Format – Multisession Für DATA-DVDs – Format UDF Bridge (UDF und ISO 9660 kombiniert) – Multi-Border • Höchstzahl an: – Ordnern (Alben): 256 (einschließlich Stammordner und leerer Ordner). – Dateien (Stücken/Bildern/Videos) und Ordnern auf einer Disc: 2.000. Wenn die Ordner-/ Dateinamen viele Zeichen enthalten, ist die maximale Anzahl möglicherweise geringer als 2.000. – Anzeigbaren Zeichen für einen Ordner-/ Dateinamen: 64 (Joliet/Romeo). * Erläuterungen zum Auswählen des Dateityps finden Sie auf Seite 35. Wiedergabereihenfolge von MP3-/ WMA-/AAC-/JPEG-/DivX®-/MPEG-4Dateien MP3/WMA/AAC/ JPEG/DivX/ MPEG-4 Ordner (Album) MP3-/WMA-/ AAC-/JPEG-/ DivX-/MPEG-4Datei (Stück/ Bild/Video) Hinweise zum Abschließen von Discs Folgende Disc-Typen müssen abgeschlossen werden, bevor sie auf diesem Gerät wiedergegeben werden können. • DVD-R/DVD-R DL (im Videomodus/VR-Modus) • DVD-RW im Videomodus • DVD+R/DVD+R DL • CD-R • CD-RW Folgende Disc-Typen können wiedergegeben werden, ohne abgeschlossen zu sein. • DVD+RW – automatisch abgeschlossen • DVD-RW im VR-Modus – Abschließen nicht erforderlich Näheres dazu schlagen Sie bitte in den mit der Disc gelieferten Anweisungen nach. Hinweise zu MP3-Dateien • ID3-Tags der Versionen 1.0, 1.1, 2.2, 2.3 und 2.4 stehen nur bei MP3 zur Verfügung. Ein ID3Tag besteht aus 15/30 Zeichen (1.0 und 1.1) bzw. 63/126 Zeichen (2.2, 2.3 und 2.4). • Fügen Sie beim Benennen einer MP3-Datei unbedingt die Dateierweiterung „.mp3“ zum Dateinamen hinzu. Hinweis zu MP3 Wenn Sie eine MP3-Datei mit einer hohen Bitrate, wie z. B. 384 Kbps, wiedergeben, kommt es möglicherweise zu Tonaussetzern. 50 MEX-DV1500U 4-120-899-21 (1) D:\Documents and Settings\takashi-shimomura\Desktop\DTP\848220S MEXDV1500U(EUR)\4120899211_MEX-DV1500U_ML\02DE02CD-E.fm Hinweise zu WMA-Dateien • WMA-Tags bestehen aus 63 Zeichen. • Fügen Sie beim Benennen einer WMA-Datei unbedingt die Dateierweiterung „.wma“ zum Dateinamen hinzu. Hinweise zu AAC-Dateien • AAC-Tags bestehen aus 126 Zeichen. • Fügen Sie beim Benennen einer AAC-Datei unbedingt die Dateierweiterung „.m4a“ zum Dateinamen hinzu. masterpage:Right Wartung Austauschen der Lithiumbatterie der Kartenfernbedienung Unter normalen Bedingungen hält die Batterie etwa 1 Jahr. Die Lebensdauer der Batterie kann je nach Gebrauch des Geräts jedoch auch kürzer sein. Wenn die Batterie schwächer wird, verkürzt sich die Reichweite der Kartenfernbedienung. Tauschen Sie die Batterie gegen eine neue CR2025Lithiumbatterie aus. Bei Verwendung einer anderen Batterie besteht Feuer- oder Explosionsgefahr. Hinweise zu JPEG-Dateien • JPEG steht für „Joint Photographic Experts Group“ und bezeichnet einen Formatstandard zum Komprimieren von Bilddateien. Die Standbilder werden auf etwa 1/10 bis 1/100 der Originalgröße komprimiert. • Fügen Sie beim Benennen einer JPEG-Datei unbedingt die Dateierweiterung „.jpg“ zum Dateinamen hinzu. Hinweis zu JPEG Die Wiedergabe progressiver JPEG-Dateien wird nicht unterstützt. Hinweise zu DivX®-Dateien DivX® steht für „Digital Video Express“ und bezeichnet einen von der DivX, Inc., entwickelten Formatstandard zum Komprimieren von digitalen Videodateien. Dieses Produkt ist ein offizielles DivX® Certified-Produkt, geeignet zur Wiedergabe von DivX®-Videodateien jeder Version (einschließlich DivX® 6) mit den Standardwiedergabefunktionen von DivX®Mediendateien. Hinweise zu MPEG-4-Dateien MPEG-4-Dateien auf einer Disc können wiedergegeben werden, sofern sie den folgenden Anforderungen entsprechen. Die Wiedergabe kann jedoch nicht bei allen MPEG-4-Dateien garantiert werden, auch wenn sie den Anforderungen entsprechen. • Profil: MPEG-4 Simple Profile • Bitrate: max. 25.000 Kbps • Bildrate: max. 30 fps (Bilder pro Sekunde) • Bildgröße: max. 320 × 240 Pixel • Audio: max. 320 Kbps (AAC-LC) • Dateierweiterung: .mp4 Mit der Seite + nach oben c Hinweise zur Lithiumbatterie • Bewahren Sie die Lithiumbatterie außerhalb der Reichweite von Kindern auf. Sollte eine Lithiumbatterie verschluckt werden, ist umgehend ein Arzt aufzusuchen. • Wischen Sie die Batterie mit einem trockenen Tuch ab, um einen guten Kontakt zwischen den Batteriepolen und -anschlüssen sicherzustellen. • Achten Sie beim Einlegen der Batterie auf die richtige Polarität. • Halten Sie die Batterie nicht mit einer Metallpinzette. Dies könnte zu einem Kurzschluss führen. VORSICHT Die Batterie kann bei falscher Handhabung explodieren! Auf keinen Fall darf sie aufgeladen, auseinandergenommen oder ins Feuer geworfen werden. Entsorgungshinweis: Bitte werfen Sie nur entladene Batterien in die Sammelboxen beim Handel oder den Kommunen. Entladen sind Batterien in der Regel dann, wenn das Gerät abschaltet und „Batterie leer“ signalisiert oder nach längerer Gebrauchsdauer der Batterien nicht mehr einwandfrei funktioniert. Um sicherzugehen, kleben Sie die Batteriepole z. B. mit einem Klebestreifen ab oder geben Sie die Batterien einzeln in einen Plastikbeutel. Fortsetzung auf der nächsten Seite t 51 MEX-DV1500U 4-120-899-21 (1) D:\Documents and Settings\takashi-shimomura\Desktop\DTP\848220S MEXDV1500U(EUR)\4120899211_MEX-DV1500U_ML\02DE02CD-E.fm Austauschen der Sicherung masterpage:Left Ausbauen des Geräts Wenn Sie eine Sicherung austauschen, achten Sie darauf, eine Ersatzsicherung mit dem gleichen Ampere-Wert wie die Originalsicherung zu verwenden. Dieser ist auf der Originalsicherung angegeben. Wenn die Sicherung Sicherung (10 A) durchbrennt, überprüfen Sie den Stromanschluss und tauschen die Sicherung aus. Brennt die neue Sicherung ebenfalls durch, kann eine interne Fehlfunktion vorliegen. Wenden Sie sich in einem solchen Fall an Ihren Sony-Händler. 1 Entfernen Sie die Schutzumrandung. 1 Nehmen Sie die Frontplatte ab (Seite 15). 2 Fassen Sie die Schutzumrandung mit den Fingern an den Seitenkanten und ziehen Sie sie heraus. Reinigen der Anschlüsse x Das Gerät funktioniert möglicherweise nicht ordnungsgemäß, wenn die Anschlüsse zwischen dem Gerät und der Frontplatte verschmutzt sind. Um dies zu vermeiden, nehmen Sie die Frontplatte ab (Seite 15) und reinigen Sie die Anschlüsse mit einem Wattestäbchen. Drücken Sie dabei nicht zu fest auf die Anschlüsse. Andernfalls können sie beschädigt werden. 2 Nehmen Sie das Gerät heraus. 1 Setzen Sie beide Löseschlüssel gleichzeitig so ein, dass sie mit einem Klicken einrasten. Hauptgerät Rückseite der Frontplatte Hinweise • Schalten Sie aus Sicherheitsgründen vor dem Reinigen der Anschlüsse die Zündung aus und ziehen Sie den Schlüssel aus dem Zündschloss. • Berühren Sie die Anschlüsse unter keinen Umständen direkt mit den Händen oder einem Metallgegenstand. Der Haken muss nach innen weisen. 2 Ziehen Sie an den Löseschlüsseln, um das Gerät zu lösen. 3 Ziehen Sie das Gerät aus der Halterung. 52 MEX-DV1500U 4-120-899-21 (1) D:\Documents and Settings\takashi-shimomura\Desktop\DTP\848220S MEXDV1500U(EUR)\4120899211_MEX-DV1500U_ML\02DE02CD-E.fm Technische Daten System Laser: Halbleiter-Laser Signalformat: PAL/NTSC, umschaltbar DVD/CD-Player Signal-Rauschabstand: 120 dB Frequenzgang: 10 – 20.000 Hz Gleichlaufschwankungen: Unterhalb der Messgrenze Harmonische Verzerrung: 0,01 % Tuner FM (UKW) Empfangsbereich: 87,5 – 108,0 MHz Antennenanschluss: Anschluss für Außenantenne Zwischenfrequenz: 10,7 MHz/450 kHz Nutzbare Empfindlichkeit: 9 dBf Trennschärfe: 75 dB bei 400 kHz Signal-Rauschabstand: 67 dB (stereo), 69 dB (mono) Harmonische Verzerrung bei 1 kHz: 0,5 % (stereo), 0,3 % (mono) Kanaltrennung: 35 dB bei 1 kHz Frequenzgang: 30 – 15.000 Hz MW/LW Empfangsbereich: MW: 531 – 1.602 kHz LW: 153 – 279 kHz Antennenanschluss: Anschluss für Außenantenne Zwischenfrequenz: 10,7 MHz/450 kHz Empfindlichkeit: MW: 30 µV, LW: 40 µV USB-Player Schnittstelle: USB (Full-Speed) Maximale Stromstärke: 500 mA Endverstärker masterpage:Right Abmessungen: ca. 178 × 50 × 179 mm (B/H/T) Einbaumaße: ca. 182 × 53 × 163 mm (B/H/T) Gewicht: ca. 1,4 kg Mitgeliefertes Zubehör: Kartenfernbedienung RM-X168 Montageteile und Anschlusszubehör (1 Satz) Ihr Händler führt unter Umständen nicht alle der oben genannten Zubehörteile. Fragen Sie Ihren Händler nach ausführlichen Informationen. US-amerikanische Patente und Patente anderer Länder lizenziert von Dolby Laboratories. MPEG Layer-3 Audiocodiertechnologie und Patente lizenziert von Fraunhofer IIS und Thomson. DivX, DivX Certified und die zugehörigen Logos sind Markenzeichen von DivX, Inc., und werden in Lizenz verwendet. Dieses Produkt ist durch bestimmte gewerbliche Schutz- und Urheberrechte der Microsoft Corporation geschützt. Die Verwendung oder der Vertrieb derartiger Technologie außerhalb dieses Produkts ohne eine Lizenz von Microsoft oder einer autorisierten Microsoft-Niederlassung ist untersagt. Änderungen, die dem technischen Fortschritt dienen, bleiben vorbehalten. • In bestimmten Leiterplatten werden keine halogenierten Flammschutzmittel verwendet. • Im Gehäuse werden keine halogenierten Flammschutzmittel verwendet. • Papier wird als Verpackungsfüllmaterial verwendet. Ausgänge: Lautsprecherausgänge (versiegelte Anschlüsse) Lautsprecherimpedanz: 4 – 8 Ohm Maximale Ausgangsleistung: 52 W × 4 (an 4 Ohm) Allgemeines Ausgänge: Videoausgang Audioausgänge hinten Motorantennen-Steueranschluss Steueranschluss für Endverstärker Eingänge: AUX-Audioeingänge Antenneneingang Steueranschluss für Parkbremse AUX-Eingangsbuchse (Stereominibuchse) USB-Signaleingang Klangregler: Bässe: ±10 dB bei 60 Hz Mitten: ±10 dB bei 1 kHz Höhen: ±10 dB bei 10 kHz Betriebsspannung: 12 V Gleichstrom, Autobatterie (negative Erdung) 53 MEX-DV1500U 4-120-899-21 (1) D:\Documents and Settings\takashi-shimomura\Desktop\DTP\848220S MEXDV1500U(EUR)\4120899211_MEX-DV1500U_ML\02DE02CD-E.fm Störungsbehebung Anhand der folgenden Checkliste können Sie die meisten Probleme, die möglicherweise an Ihrem Gerät auftreten, selbst beheben. Bevor Sie die folgende Checkliste durchgehen, überprüfen Sie bitte zunächst, ob Sie das Gerät richtig angeschlossen und bedient haben. Wenn sich das Problem nicht beheben lässt, besuchen Sie folgende Support-Website. Support-Website http://support.sony-europe.com Je nach angeschlossenem Monitor kann es ein paar Sekunden dauern, bis sich das Gerät nach dem Ausschalten der Zündung ausschaltet. Dies ist keine Fehlfunktion. Allgemeines Das Gerät wird nicht mit Strom versorgt. • Prüfen Sie die Verbindung oder Sicherung. • Wenn Sie das Gerät ausschalten und die Anzeige ausgeblendet ist, können Sie es nicht mit der Kartenfernbedienung bedienen. t Schalten Sie das Gerät ein. Die Motorantenne wird nicht ausgefahren. Die Motorantenne hat kein Relaiskästchen. Kein Signalton ertönt. • Der Signalton ist deaktiviert (Seite 45). • Ein gesondert erhältlicher Endverstärker ist angeschlossen und Sie verwenden nicht den integrierten Verstärker. Der Speicherinhalt wurde gelöscht. • Die Taste RESET wurde gedrückt. t Speichern Sie die Einstellungen erneut. • Das Stromversorgungskabel wurde gelöst, die Verbindung zur Batterie besteht nicht mehr oder das Kabel bzw. die Batterie ist falsch angeschlossen. Gespeicherte Sender und die korrekte Uhrzeit werden gelöscht. Die Sicherung ist durchgebrannt. Störgeräusche sind zu hören, wenn der Zündschlüssel gedreht wird. Die Leitungen sind nicht korrekt an den Stromanschluss für Zubehörgeräte im Auto angeschlossen. Die Anzeige wird ausgeblendet bzw. erscheint nicht im Display. • Der Dimmer ist auf „DIM-ON“ eingestellt (Seite 45). • Die Anzeige wird ausgeblendet, wenn Sie (OFF) gedrückt halten. t Halten Sie (OFF) am Gerät erneut gedrückt, bis die Anzeige eingeblendet wird. • Die Anschlüsse sind verschmutzt (Seite 52). masterpage:Left Die Ausschaltautomatik funktioniert nicht. Das Gerät ist noch eingeschaltet. Die Ausschaltautomatik funktioniert erst bei ausgeschaltetem Gerät. t Schalten Sie das Gerät aus. Bild Es ist kein Bild zu sehen/das Bild ist verrauscht. • Eine Verbindung wurde nicht richtig vorgenommen. • Überprüfen Sie die Verbindung zum angeschlossenen Gerät und stellen Sie den Eingangswählschalter am anderen Gerät auf die Signale von diesem Gerät ein. • Die Disc ist beschädigt oder verschmutzt. • Das Gerät ist nicht richtig installiert. t Installieren Sie das Gerät in einem Winkel von unter 45° an einem stabilen Teil des Fahrzeugs. • Der Monitor ist an AUDIO/VIDEO OUT angeschlossen und die Parkleitung (hellgrün) ist nicht mit der Parkbremsenschaltleitung verbunden oder die Parkbremse wurde nicht betätigt. • Das falsche Farbsystem ist eingestellt. t Stellen Sie je nach angeschlossenem Monitor als Farbsystem „PAL“ oder „NTSC“ ein (Seite 45). Das Bild passt nicht auf den Bildschirm. Das Bildseitenverhältnis lässt sich bei dieser DVD nicht ändern. 54 MEX-DV1500U 4-120-899-21 (1) D:\Documents and Settings\takashi-shimomura\Desktop\DTP\848220S MEXDV1500U(EUR)\4120899211_MEX-DV1500U_ML\02DE02CD-E.fm Ton Es ist kein Ton zu hören/Ton setzt aus/Ton ist gestört. • Eine Verbindung wurde nicht richtig vorgenommen. • Überprüfen Sie die Verbindung zum angeschlossenen Gerät und stellen Sie den Eingangswählschalter am anderen Gerät auf die Signale von diesem Gerät ein. • Die Disc ist beschädigt oder verschmutzt. • Das Gerät ist nicht richtig installiert. t Installieren Sie das Gerät in einem Winkel von unter 45° an einem stabilen Teil des Fahrzeugs. • Die Abtastfrequenz der MP3-Datei beträgt nicht 16, 22,05, 24, 32, 44,1 oder 48 kHz. • Die Abtastfrequenz der WMA-Datei beträgt nicht 32, 44,1 oder 48 kHz. • Die Abtastfrequenz der AAC-Datei beträgt nicht 44,1 oder 48 kHz. • Die Bitrate der MP3-Datei beträgt nicht 8 bis 384 Kbps. • Die Bitrate der WMA-Datei beträgt nicht 32 bis 384 Kbps. • Die Bitrate der AAC-Datei beträgt nicht 16 bis 320 Kbps. • Das Gerät befindet sich im Pausemodus oder im Modus zum Vorwärts-/Rückwärtssuchen. • Die Einstellungen für die Ausgänge wurden nicht korrekt vorgenommen. • Der DVD-Ausgangspegel ist zu niedrig (Seite 28). • Die Lautstärke ist zu niedrig. • Die Stummschaltfunktion ist aktiviert. • Der Fader-Regler „FAD“ ist nicht für ein 2-Lautsprecher-System eingestellt. • Das Format wird nicht unterstützt (z. B. DTS). t Sehen Sie nach, ob das Format von diesem Gerät unterstützt wird (Seite 8). Der Ton ist gestört. Halten Sie die verschiedenen Kabel voneinander fern. Disc-Funktionen Es lässt sich keine Disc einlegen. • Es ist bereits eine andere Disc eingelegt. • Die Disc wurde mit Gewalt falsch herum oder falsch eingelegt. Die Disc lässt sich nicht abspielen. • Die Disc ist beschädigt oder verschmutzt. • Die Disc ist nicht geeignet. • Die DVD kann aufgrund des Regionalcodes nicht wiedergegeben werden. • Die Disc ist nicht abgeschlossen (Seite 50). • Das Disc-Format und die Dateiversion sind nicht mit diesem Gerät kompatibel (Seite 8, 50). • Drücken Sie Z und nehmen Sie die Disc heraus. masterpage:Right MP3-/WMA-/AAC-/JPEG-/DivX-/MPEG-4Dateien lassen sich nicht wiedergeben. • Die Aufnahme erfolgte nicht im Format ISO 9660, Stufe 1 oder 2, bzw. im erweiterten Joliet- oder Romeo-Format (DATA-CD) oder im Format UDF Bridge (DATA-DVD) (Seite 50). • Die Dateierweiterung ist falsch (Seite 50). • Die Dateien wurden nicht im MP3-/WMA-/AAC-/ JPEG-/DivX-/MPEG-4-Format gespeichert. • Wenn eine Disc mehrere Dateitypen enthält, kann nur der ausgewählte Dateityp (Audio/Video/Bild) wiedergegeben werden. t Wählen Sie den passenden Dateityp aus der Liste aus (Seite 35). Es dauert länger, bis die Wiedergabe von MP3-/WMA-/AAC-/JPEG-/DivX-/MPEG-4Dateien beginnt. Bei folgenden Discs dauert es länger, bis die Wiedergabe beginnt: – Discs mit einer komplizierten Datei-/Ordnerstruktur. – Multisession-/Multi-Border-Discs. – Discs, zu denen noch Daten hinzugefügt werden können. Die Disc wird nicht von vorne wiedergegeben. Die Wiedergabefortsetzung oder die Wiedergabefortsetzung für mehrere Discs (Seite 42) ist aktiviert. Bestimmte Funktionen lassen sich nicht ausführen. Bei manchen Discs lassen sich Funktionen wie Stopp, Suchen, Repeat oder Shuffle Play nicht ausführen. Näheres dazu schlagen Sie bitte in den mit der Disc gelieferten Anweisungen nach. Die Sprache für die Tonspur/Untertitel oder der Blickwinkel lässt sich nicht ändern. • Versuchen Sie es über das Menü der DVD statt mit der Direktwahltaste auf der Kartenfernbedienung (Seite 17). • Auf der betreffenden DVD sind Tonspur oder Untertitel nicht in mehreren Sprachen vorhanden bzw. es gibt nicht mehrere Blickwinkel. • Bei der DVD ist ein Wechsel nicht zulässig. Im Display angezeigte Informationen laufen nicht automatisch durch. • Bei Discs mit sehr viel Textinformationen laufen diese im Display möglicherweise nicht durch. • „AUTO-SCRL“ ist auf „OFF“ gesetzt. t Stellen Sie „A.SCRL-ON“ ein (Seite 45). Die Funktionstasten funktionieren nicht. Die Disc lässt sich nicht auswerfen. Drücken Sie die Taste RESET (Seite 14). Sie haben das Kennwort für die Kindersicherung vergessen. Geben Sie in der Kennworteingabeanzeige die Zahl „5776“ ein, um die Kindersicherung zu deaktivieren (Seite 30). Fortsetzung auf der nächsten Seite t 55 MEX-DV1500U 4-120-899-21 (1) D:\Documents and Settings\takashi-shimomura\Desktop\DTP\848220S MEXDV1500U(EUR)\4120899211_MEX-DV1500U_ML\02DE02CD-E.fm Radioempfang Sender lassen sich nicht empfangen. Der Ton ist stark gestört. • Die Verbindung wurde nicht richtig hergestellt. t Schließen Sie eine Motorantennen-Steuerleitung (blau) oder eine Stromversorgungsleitung für Zubehörgeräte (rot) an die Stromversorgungsleitung für den Antennenverstärker des Fahrzeugs an (nur, wenn das Fahrzeug mit einer in der Heck-/ Seitenfensterscheibe integrierten FM (UKW)/ MW/LW-Antenne ausgestattet ist). t Prüfen Sie die Verbindung der Autoantenne. t Wenn die Motorantenne nicht automatisch ausgefahren wird, prüfen Sie die Verbindung der Motorantennen-Steuerleitung. Gespeicherte Sender lassen sich nicht einstellen. • Speichern Sie den/die Sender unter der korrekten Frequenz ab. • Das Sendesignal ist zu schwach. Der automatische Sendersuchlauf funktioniert nicht. • Die Einstellung für den lokalen Suchmodus ist nicht korrekt. t Der automatische Sendersuchlauf stoppt zu oft: Stellen Sie „LOCAL-ON“ ein (Seite 46). t Der automatische Sendersuchlauf hält bei keinem Sender an: Stellen Sie „MONO-ON“ ein (Seite 46). • Das Sendesignal ist zu schwach. t Stellen Sie die Sender manuell ein. Während des UKW-Empfangs blinkt die Anzeige „ST“. • Stellen Sie die Frequenz genau ein. • Das Sendesignal ist zu schwach. t Stellen Sie „MONO-ON“ ein (Seite 46). Eine UKW-Stereosendung ist nur monaural zu hören. Das Gerät ist in den monauralen Empfangsmodus geschaltet. t Stellen Sie „MONO-OFF“ ein (Seite 46). RDS 56 Der Sendersuchlauf (SEEK) startet nach ein paar Sekunden Radioempfang. Der Sender ist kein Verkehrsfunksender (TP) oder die Sendesignale sind zu schwach. t Deaktivieren Sie TA (Seite 37). Es sind keine Verkehrsdurchsagen zu hören. • Aktivieren Sie TA (Seite 37). • Der Sender sendet keine Verkehrsdurchsagen, obwohl es sich um einen Verkehrsfunksender (TP) handelt. t Stellen Sie einen anderen Sender ein. Bei der PTY-Funktion wird „- - - - - - - -“ angezeigt. • Der aktuelle Sender ist kein RDS-Sender. • Es wurden keine RDS-Daten empfangen. • Der Sender gibt den Programmtyp nicht an. masterpage:Left USB-Wiedergabe Sie können über einen USB-Hub nichts wiedergeben lassen. Dieses Gerät kann keine USB-Geräte erkennen, die über einen USB-Hub angeschlossen sind. Die Wiedergabe ist nicht möglich. Das USB-Gerät funktioniert nicht. t Schließen Sie das Gerät nochmals an. Es dauert länger, bis am USB-Gerät die Wiedergabe beginnt. Die Dateien auf dem USB-Gerät befinden sich in einer komplizierten Datei-/Ordnerstruktur. Ein Signalton ist zu hören. Das USB-Gerät wurde während der Wiedergabe von diesem Gerät getrennt. t Vor dem Trennen eines USB-Geräts müssen Sie zuerst die Wiedergabe stoppen, um die Daten zu schützen. Der Ton setzt aus. Bei einer hohen Bitrate von über 320 Kbps kommt es möglicherweise zu Tonaussetzern. Fehleranzeigen/Meldungen Am Hauptgerät ERROR • Die Disc ist verschmutzt oder falsch herum eingelegt. t Reinigen Sie die Disc bzw. legen Sie sie korrekt ein. • Eine leere Disc wurde eingelegt. • Die Disc kann aufgrund eines Problems nicht wiedergegeben werden. t Legen Sie eine andere Disc ein. • Die Disc ist mit diesem Gerät nicht kompatibel. t Legen Sie eine kompatible Disc ein. • Das USB-Gerät wurde nicht automatisch erkannt. t Schließen Sie das Gerät nochmals an. • Drücken Sie Z und nehmen Sie die Disc heraus. FAILURE Die Lautsprecher-/Verstärkeranschlüsse sind nicht korrekt. t Überprüfen Sie die Verbindungen anhand der mitgelieferten Installations-/Anschlussanleitung. L. SEEK +/– Beim automatischen Sendersuchlauf ist der lokale Suchmodus aktiviert. NO AF Für den aktuellen Sender gibt es keine Alternativfrequenz. t Drücken Sie .m/M>, während der Programmdienstname blinkt. Das Gerät beginnt dann mit der Suche nach einer Frequenz mit denselben PI-Daten (Programmkennung). „PI SEEK“ wird angezeigt. MEX-DV1500U 4-120-899-21 (1) D:\Documents and Settings\takashi-shimomura\Desktop\DTP\848220S MEXDV1500U(EUR)\4120899211_MEX-DV1500U_ML\02DE02CD-E.fm NO DATA Die Disc bzw. das USB-Gerät enthält keine Musikdateien. t Legen Sie eine Musik-CD in dieses Gerät ein. t Schließen Sie ein USB-Gerät an, das Musikdateien enthält. NO DEV (Kein Gerät) „USB“ ist als Tonquelle ausgewählt, aber es ist kein USB-Gerät angeschlossen. Ein USB-Gerät oder ein USB-Kabel wurde während der Wiedergabe von diesem Gerät getrennt. t Schließen Sie unbedingt USB-Gerät und USBKabel an. NO NAME Die Datei enthält keinen Disc-/Album-/Ordner-/Stück/Bild-/Videonamen. NO TP Das Gerät sucht weiter nach verfügbaren Verkehrsfunksendern (TP). OFFSET Es liegt möglicherweise eine interne Fehlfunktion vor. t Überprüfen Sie die Verbindungen. Wenn die Fehleranzeige weiterhin im Display angezeigt wird, wenden Sie sich an einen Sony-Händler. OVERLOAD Das USB-Gerät ist überlastet. t Trennen Sie das USB-Gerät von diesem Gerät und wechseln Sie mit (SOURCE) die Tonquelle. t Zeigt an, dass das USB-Gerät nicht einwandfrei funktioniert oder dass ein nicht unterstütztes Gerät angeschlossen ist. READ Das Gerät liest gerade alle Datei-/Albuminformationen (Ordnerinformationen) von der Disc ein. t Bitte warten Sie, bis das Einlesen abgeschlossen ist. Die Wiedergabe beginnt danach automatisch. Je nach Disc-Struktur kann das Einlesen länger als eine Minute dauern. USB NO SUPRT (USB nicht unterstützt) Das angeschlossene USB-Gerät wird nicht unterstützt. t Einzelheiten zur Kompatibilität Ihres USB-Geräts finden Sie auf der Support-Website. „ “ oder „ “ Sie sind beim Vorwärts- oder Rückwärtssuchen am Anfang bzw. Ende der Disc angelangt und können nicht weitersuchen. „ “ Das Zeichen kann mit diesem Gerät nicht angezeigt werden. masterpage:Right Am Monitor Playback prohibited by region code. Die Wiedergabe der DVD ist aufgrund des unterschiedlichen Regionalcodes nicht zulässig. Cannot play this disc. • Die Disc ist mit diesem Gerät nicht kompatibel. • Die Disc ist nicht abgeschlossen. No playable data. Die Disc enthält keine abspielbaren Daten. Please press RESET. Das Gerät funktioniert aufgrund einer Störung nicht. t Drücken Sie die Taste RESET (Seite 14). Wenn sich das Problem mit diesen Abhilfemaßnahmen nicht beheben lässt, wenden Sie sich an einen Sony-Händler. Wenn Sie das Gerät aufgrund einer Störung bei der Disc-Wiedergabe zur Reparatur bringen, bringen Sie bitte auch die Disc mit, die eingelegt war, als das Problem zum ersten Mal auftrat. 57 MEX-DV1500U 4-120-899-21 (1) D:\Documents and Settings\takashi-shimomura\Desktop\DTP\848220S MEXDV1500U(EUR)\4120899211_MEX-DV1500U_ML\02DE02CD-E.fm Glossar Album Zusammenstellung von Musikstücken in Form von MP3-/WMA-/AAC-Audiostücken oder Bildern in Form von JPEG-Dateien auf einer DATA-CD/DVD. Datei • Ein MP3-/WMA-/AAC-Stück oder ein JPEG-Bild auf einer DATA-CD, DATA-DVD oder einem USB-Gerät. • Ein MP3-/WMA-/AAC-Stück, ein JPEG-Bild oder ein DivX-/MPEG-4-Video auf einer DATACD/DATA-DVD. („Datei“ wird bei diesem Gerät in einer speziellen Bedeutung verwendet.) Eine einzelne Datei besteht aus einem einzelnen Stück, Bild oder Video. DivX® Digitale, von DivX, Inc., entwickelte Videotechnologie. Mit DivX-Technologie codierte Videos bieten im Vergleich zu anderen Videoformaten mit die höchste Qualität bei einer relativ geringen Dateigröße. Dolby Digital Digitale Komprimierungstechnologie für Tondaten, entwickelt von den Dolby Laboratories. Die Technologie entspricht dem 5.1-Kanal-Raumklang. Bei diesem Format ist der hintere Kanal in Stereo und es gibt einen separaten Tiefsttonlautsprecherkanal. Dolby Digital bietet ein 5.1-Kanalformat mit guter Kanaltrennung, wie es auch in Dolby Digital-Tonsystemen für Kinos eingesetzt wird. Die hervorragende Kanaltrennung ist darauf zurückzuführen, dass alle Kanaldaten getrennt aufgezeichnet werden, und die Qualitätseinbußen sind minimal, da alle Kanaldaten digital verarbeitet werden. masterpage:Left DVD Eine Disc, auf der bis zu 8 Stunden Filmaufnahmen gespeichert werden können, obwohl ihr Durchmesser nicht größer ist als der einer CD. Die Datenkapazität einer DVD mit einer bespielten Seite und einer Daten tragenden Schicht (einseitig bespielt, einschichtig) beträgt 4,7 GB (Gigabyte) das ist das 7-Fache der Datenkapazität einer CD. Die Datenkapazität einer DVD mit einer bespielten Seite und doppelter Schicht (einseitig bespielt, zweischichtig) beträgt 8,5 GB, die einer DVD mit zwei bespielten Seiten und einer Schicht (zweiseitig bespielt, einschichtig) 9,4 GB und die einer DVD mit zwei bespielten Seiten und doppelter Schicht (zweiseitig bespielt, zweischichtig) 17 GB. Die Bilddaten werden im MPEG 2-Format aufgezeichnet, einem weltweit gültigen Standard für die digitale Datenkomprimierung. Dabei werden die Bilddaten auf etwa 1/40 (im Durchschnitt) ihrer ursprünglichen Größe komprimiert. Darüber hinaus nutzt die DVD auch eine variable Codiertechnologie, die je nach Status des Bildes die zuzuweisenden Daten variiert. Audiodaten werden in einem Mehrkanalformat wie z. B. Dolby Digital aufgezeichnet, was eine äußerst realitätsnahe Tonqualität ermöglicht. Darüber hinaus stehen auf einer DVD auch verschiedene weitere Funktionen zur Verfügung, zum Beispiel die Möglichkeit, einen von mehreren Blickwinkeln oder eine von mehreren Sprachen auszuwählen oder die Kindersicherung zu aktivieren. DVD-RW Eine DVD-RW ist ein beschreibbarer und wiederbeschreibbarer Datenträger mit derselben Größe wie eine DVD VIDEO. Die DVD-RW kann in zwei verschiedenen Modi beschrieben werden: im VR-Modus und im Videomodus. Im Videomodus erstellte DVD-RWs weisen dasselbe Format wie DVD VIDEOs auf. Im VR-Modus (Videoaufnahme) erstellte DVD-RWs bieten dagegen verschiedene Programmier- und Bearbeitungsfunktionen. DVD+RW Eine DVD+RW (plus RW) ist ein beschreibbarer und wiederbeschreibbarer Datenträger. DVD+RWs verwenden ein dem DVD VIDEO-Format vergleichbares Aufnahmeformat. Filmbasierte und videobasierte Software Die Aufzeichnungsformate von DVDs lassen sich in zwei Kategorien einteilen: filmbasiert und videobasiert. Filmbasierte DVDs enthalten Aufnahmen im gleichen Format wie Kinofilme (24 Vollbilder pro Sekunde). Videobasierte DVDs, zum Beispiel Fernsehspiele oder Sitcoms, werden mit 30 Vollbildern bzw. 60 Halbbildern pro Sekunde angezeigt. 58 Kapitel Teil eines Titels auf einer DVD. Ein Titel besteht aus mehreren Kapiteln. MEX-DV1500U 4-120-899-21 (1) D:\Documents and Settings\takashi-shimomura\Desktop\DTP\848220S MEXDV1500U(EUR)\4120899211_MEX-DV1500U_ML\02DE02CD-E.fm masterpage:Right Szene Auf einer VIDEO-CD mit PBC-Funktionen (Wiedergabesteuerung) sind die Menüanzeigen, Videos und Standbilder in so genannte „Szenen“ unterteilt. Stück Untereinheiten einer Bild- oder Tonaufnahme auf einer VIDEO-CD, CD oder MP3-/WMA-/AACDisc. Ein Album enthält mehrere Stücke (nur MP3/ WMA/AAC). Titel Die größten Einheiten von Bild- oder Tonaufnahmen auf einer DVD, ein ganzer Film usw. bei einer Video-Software oder ein ganzes Album bei einer Audio-Software. VIDEO-CD Eine CD mit Filmen. Die Bilddaten werden im MPEG 1-Format aufgezeichnet, einem weltweit gültigen Standard für die digitale Datenkomprimierung. Dabei werden die Bilddaten auf etwa 1/140 ihrer ursprünglichen Größe komprimiert. Dadurch passen auf eine VIDEO-CD mit 12 cm Durchmesser Filmaufnahmen von bis zu 74 Minuten. VIDEO-CDs enthalten darüber hinaus auch Audiodaten (Tonaufnahmen) in einem kompakten Format. Töne, die für das menschliche Ohr nicht hörbar sind, werden unterdrückt, während Töne, die für das menschliche Ohr hörbar sind, aufgezeichnet werden. Eine VIDEO-CD kann das 6-Fache an Audiodaten aufnehmen wie eine herkömmliche Audio-CD. Es gibt 3 Versionen von VIDEO-CDs. • Version 1.0, 1.1: Es können nur Filmaufnahmen mit Ton wiedergegeben werden. • Version 2.0: Es können auch Standbilder in hoher Auflösung wiedergegeben werden und es stehen PBC-Funktionen zur Verfügung. Dieses Gerät entspricht allen 3 oben genannten Versionen. 59 MEX-DV1500U 4-120-899-21 (1) D:\Documents and Settings\takashi-shimomura\Desktop\DTP\848220S MEXDV1500U(EUR)\4120899211_MEX-DV1500U_ML\02DE02CD-E.fm masterpage:Left Sprachcode-/Gebietscodeliste Liste der Sprachcodes Die Schreibung der einzelnen Sprachen entspricht der ISO-Norm 639: 1988 (E/F). Code Sprache Code Sprache Code Sprache Code Sprache 1027 1028 1032 1039 1044 1045 1051 1052 1053 1057 1059 1060 1061 1066 Afar Abkhazian Afrikaans Amharic Arabic Assamese Aymara Azerbaijani Bashkir Byelorussian Bulgarian Bihari Bislama Bengali; Bangla Tibetan Breton Catalan Corsican Czech Welsh Danish German Bhutani Greek English Esperanto Spanish Estonian Basque Persian Finnish Fiji Faroese French Frisian 1183 1186 1194 1196 1203 1209 1217 1226 1229 1233 1235 1239 1245 1248 1253 1254 1257 1261 1269 1283 1287 1297 1298 1299 1300 1301 1305 1307 1311 1313 1326 1327 1332 1334 1347 1349 1350 1352 1353 1356 1357 1358 1363 1365 1369 1376 1379 1393 1403 1408 1417 1428 1435 Samoan Shona Somali Albanian Serbian Siswati Sesotho Sundanese Swedish Swahili Tamil Telugu Tajik Thai Tigrinya Turkmen Tagalog Setswana Tonga Turkish Tsonga Tatar Twi Ukrainian Urdu Uzbek Vietnamese Volapük Wolof Xhosa Yoruba Chinese Zulu 1503 1505 1506 Maori Macedonian Malayalam Mongolian Moldavian Marathi Malay Maltese Burmese Nauru Nepali Dutch Norwegian Occitan (Afan)Oromo Oriya Punjabi Polish Pashto; Pushto Portuguese Quechua RhaetoRomance Kirundi Romanian Russian Kinyarwanda Sanskrit Sindhi Sangho SerboCroatian Singhalese Slovak Slovenian 1507 1508 1509 1511 1512 1513 1514 1515 1516 1517 1521 1525 1527 1528 1529 1531 1532 1534 1535 1538 1539 1540 1543 1557 1564 1572 1581 1587 1613 1632 1665 1684 1697 1345 Irish Scots Gaelic Galician Guarani Gujarati Hausa Hindi Croatian Hungarian Armenian Interlingua Interlingue Inupiak Indonesian Icelandic Italian Hebrew Japanese Yiddish Javanese Georgian Kazakh Greenlandic Cambodian Kannada Korean Kashmiri Kurdish Kirghiz Latin Lingala Laothian Lithuanian Latvian; Lettish Malagasy 1067 1070 1079 1093 1097 1103 1105 1109 1130 1142 1144 1145 1149 1150 1151 1157 1165 1166 1171 1174 1181 1436 1463 1481 1482 1483 1489 1491 1495 1498 1501 1502 1703 Nicht angegeben Gebietscodeliste 60 Code Gebiet Code Gebiet Code Gebiet Code Gebiet 2044 2047 2057 2070 2090 2092 2115 2109 2165 Argentinien Australien Belgien Brasilien Chile China Dänemark Deutschland Finnland 2174 2184 Frankreich Großbritannien Indien Indonesien Italien Japan Kanada Korea 2363 2362 2390 2376 2379 2046 2427 2424 2436 Malaysia Mexiko Neuseeland Niederlande Norwegen Österreich Pakistan Philippinen Portugal 2489 2499 2086 2501 2149 2528 Russland Schweden Schweiz Singapur Spanien Thailand 2248 2238 2254 2276 2079 2304 MEX-DV1500U 4-120-899-21 (1) 02DE+00COV-EIX.fm masterpage:Right Index Numerics E M 16:9 41 2000MP3 6 2000WMA 6 4:3 LETTER BOX 41 4:3 PAN SCAN 41 Einstellen des Dolby-Pegels (DOLBY-ADJ) 47 EQ3 38, 39 Equalizer Bild (PICTURE EQ) 29, 43 Klang (EQ3) 38, 39 Menüsprache (MENU) 41 Monauraler Modus (MONO) 46 Monitortyp (MONITOR TYPE) 41 MP3 9, 50 MPEG-4 9, 51 Multi-Border-DVD 50 Multisession-CD 50 A AAC 9, 51 Album (ALBUM) 34 Alternativfrequenzen (AF) 37 Auflisten 34 Ausschaltautomatik (AUTOOFF) 45 Automatischer Bildlauf (AUTO-SCRL) 45 AUX-Eingang vorn 48 B Balance (BAL) 38 Benutzereinstellungen (CUSTOM SETUP) 42 Bewegte Anzeige (M.DSPL) 45 Bild (IMAGE) 34 Bild-EQ (PICTURE EQ) 29, 43 Bildschirmkonfiguration (DISPLAY SETUP) 41 Blickwinkel (ANGLE) 17 D Datei (FILE) 34 Demo-Modus (DEMO) 45 Dimmer (DIMMER) 45 Direktsuche 33 Discs 8 DivX VOD 42 DivX® 9, 23, 51 Dolby Digital 27, 28 DVD-Hauptmenü 17 DVD-Menü 17 DVD-Pegel (DVD-LEVEL) 28, 47 Dynamikkontrolle (AUDIO DRC) 43 Dynamikkontrolle (DRC) 43 F Fader (FAD) 38 Farbsystem (COLOR-SYS) 45 Formate 9 N NTSC 45 O G Ordner (ALBUM) 34 Gebietscode 60 Geeignete Discs 8 P H Hintergrundbild (WALLPAPER) 41 I Intervall für Bildpräsentationen (SLIDE SHOW TIME) 42 PAL 45 Pegel zusätzlicher Geräte (AUX-LEVEL) 47, 49 Play-List-Wiedergabe (PLAY LIST PLAY) 43 Programmformat 27 Programmtypauswahl (PTY) 37, 38 Q Quick-BrowZer 34 J JPEG 9, 23, 51 R K Kapitel (CHAPTER) 33 Kartenfernbedienung 12, 14, 51 Kindersicherung (PARENTAL CONTROL) 30, 42 Konfigurationsmenüs Systemkonfiguration 44 Wiedergabekonfiguration 39 L Lautstärke 10 Lithiumbatterie 51 Lokaler Suchmodus (LOCAL) 46 Loudness (LOUD) 47 Radiodatensystem (RDS) 36 Regionalcode 9 Regionalsender (REGIONAL) 37, 46 Repeat Play (REP) 21, 32 S Shuffle Play (SHUF) 21, 32 Sicherung 52 Signalton (BEEP) 45 Speicherbelegungsautomatik (BTM) 36 Sprachcode 60 Spracheinstellungen (LANGUAGE SETUP) 41 Stück (TRACK) 33 Systemkonfiguration 44 Fortsetzung auf der nächsten Seite t 61 MEX-DV1500U 4-120-899-21 (1) 02DE+00COV-EIX.fm masterpage:Left T Titel (TITLE) 33 Ton (AUDIO) Format 27 Kanal 27 Sprache 27, 41 Tonkonfiguration (AUDIO SETUP) 43 Tonspursprache (AUDIO) 27, 41 U Uhr einstellen (CLOCK-ADJ) 48 Uhrzeit (CT) 37, 38, 45 Untertitelsprache (SUBTITLE) 17, 41 USB-Gerät 20 V Verkehrsdurchsagen (TA) 37 Verkehrsfunksender (TP) 37 W Wiedergabefortsetzung 17, 19 Wiedergabefortsetzung für mehrere Discs (MULTI-DISC RESUME) 6, 42 Wiedergabekonfiguration 39 Wiedergabemodusmenü 24 Wiedergabesteuerung (PBC) 24 WMA 9, 51 Z Zeitangaben/ Textinformationen (TIME) 26, 33 Zoom (CENTER ZOOM) 29 Zurücksetzen (RESET) 14, 43 Zusätzliche Geräte 48 62 MEX-DV1500U 4-120-899-21 (1) 02DE+00COV-EIX.fm masterpage:Right MEX-DV1500U 4-120-899-21 (1) D:\Documents and Settings\takashi-shimomura\Desktop\DTP\848220S MEXDV1500U(EUR)\4120899211_MEX-DV1500U_ML\03FR01INT-E.fm Avertissement Pour prévenir les risques d’incendie ou d’électrocution, tenir cet appareil à l’abri de la pluie ou de l’humidité. Pour prévenir les risques d’électrocution, ne pas ouvrir le boîtier. Confier les réparations de l’appareil à un technicien qualifié uniquement. ATTENTION L’utilisation d’instruments optiques avec ce produit peut augmenter les risques oculaires. Ne pas démonter le boîtier car le faisceau laser de ce lecteur CD/DVD constitue un danger pour les yeux. Confier les réparations de l’appareil à un technicien qualifié uniquement. masterpage:Left Traitement des appareils électriques et électroniques en fin de vie (Applicable dans les pays de l’Union Européenne et aux autres pays européens disposant de systèmes de collecte sélective) Ce symbole, apposé sur le produit ou sur son emballage, indique que ce produit ne doit pas être traité avec les déchets ménagers. Il doit être remis à un point de collecte approprié pour le recyclage des équipements électriques et électroniques. En s’assurant que ce produit est bien mis au rebut de manière appropriée, vous aiderez à prévenir les conséquences négatives potentielles pour l’environnement et la santé humaine. Le recyclage des matériaux aidera à préserver les ressources naturelles. Pour toute information supplémentaire au sujet du recyclage de ce produit, vous pouvez contacter votre municipalité, votre déchetterie ou le magasin où vous avez acheté le produit. Accessoire compatible : Télécommande Elimination des piles et accumulateurs usagés (Applicable dans les pays de l’Union Européenne et aux autres pays européens disposant de systèmes de collecte sélective) Cette étiquette est située sur la partie inférieure du châssis. CAUTION : CLASS 1M VISIBLE/INVISIBLE LASER RADIATION WHEN OPEN AND INTERLOCKS DEFEATED. DO NOT VIEW DIRECTLY WITH OPTICAL INSTRUMENTS. Cette étiquette est située sur le châssis interne de l’unité du lecteur. Avis à l’intention des clients : les informations suivantes s’appliquent uniquement aux appareils vendus dans des pays qui appliquent les directives de l’Union Européenne Le fabriquant de ce produit est Sony Corporation, 1-7-1 Konan, Minato-ku, Tokyo, Japon. Le représentant agréé en matière de normes CEM et de sécurité des produits est Sony Deutschland GmbH, Hedelfinger Strasse 61, 70327 Stuttgart, Allemagne. Pour toute demande d’entretien ou de garantie, veuillez écrire aux adresses spécifiées dans les documents d’entretien ou de garantie séparés. Ce symbole, apposé sur les piles et accumulateurs ou sur les emballages, indique que les piles et accumulateurs fournis avec ce produit ne doivent pas être traités comme de simples déchets ménagers. En vous assurant que ces piles et accumulateurs sont mis au rebut de façon appropriée, vous participez activement à la prévention des conséquences négatives que leur mauvais traitement pourrait provoquer sur l’environnement et sur la santé humaine. Le recyclage des matériaux contribue par ailleurs à la préservation des ressources naturelles. Pour les produits qui pour des raisons de sécurité, de performance ou d’intégrité de données nécessitent une connexion permanente à une pile ou à un accumulateur, il conviendra de vous rapprocher d’un service technique qualifié pour effectuer son remplacement. En rapportant votre appareil électrique en fin de vie à un point de collecte approprié vous vous assurez que la pile ou l’accumulateur incorporé sera traitée correctement. Pour tous les autres cas de figure et afin d’enlever les piles ou accumulateurs en toute sécurité de votre appareil, reportez-vous au manuel d’utilisation. Rapporter les piles ou accumulateurs usagés au point de collecte approprié pour le recyclage. Pour toute information complémentaire au sujet du recyclage de ce produit ou des piles et accumulateurs, vous pouvez contacter votre municipalité, votre déchetterie locale ou le point de vente où vous avez acheté ce produit. 2 MEX-DV1500U 4-120-899-21 (1) D:\Documents and Settings\takashi-shimomura\Desktop\DTP\848220S MEXDV1500U(EUR)\4120899211_MEX-DV1500U_ML\03FR01INT-E.fm masterpage:Right Avertissement au cas où le contact de votre voiture ne dispose pas d’une position ACC Veillez à activer la fonction de mise hors tension automatique (page 45). Une fois l’appareil mis hors tension, il s’éteint complètement et automatiquement après le laps de temps choisi, afin d’éviter que la batterie ne se décharge. Si vous ne réglez pas la fonction de mise hors tension automatique, appuyez sur la touche (OFF) et maintenez-la enfoncée jusqu’à ce que l’affichage disparaisse chaque fois que vous coupez le contact. Pour annuler la démonstration (DEMO), reportez-vous à la page 45. Sécurité • Vous devez vous conformer aux lois relatives au radioguidage en vigueur dans votre pays. • Pour votre sécurité, le moniteur raccordé à VIDEO OUT est automatiquement mis hors tension lorsque le frein à main n’est pas serré. Prévention des accidents Les images apparaissent uniquement une fois le véhicule garé et le frein à main serré. Si la voiture commence à rouler pendant une lecture de vidéo, l’affichage des images provenant de VIDEO OUT est désactivé automatiquement après affichage de l’avertissement suivant. Les images disparaissent de l’écran, mais la source audio peut être écoutée. Video blocked for your safety. N’utilisez pas l’appareil et ne regardez pas le moniteur lorsque vous conduisez. 3 MEX-DV1500U 4-120-899-21 (1) D:\Documents and Settings\takashi-shimomura\Desktop\DTP\848220S MEXDV1500U(EUR)\4120899211_MEX-DV1500U_ML\03FR+00COV-ETOC.fm masterpage:Right Table des matières Félicitations ! . . . . . . . . . . . . . . . . . . . . . . . . . . . 6 Droits d’auteur. . . . . . . . . . . . . . . . . . . . . . . . 7 Disques pouvant être lus et symboles utilisés dans ce manuel . . . . . . . . . . . . . . . . . . . . . . . . . . 8 Réglage de la qualité d’image — Picture EQ . . . . . . . . . . . . . . . . . . . . . . . . . 29 Personnalisation de la qualité d’image . . . . 30 Emplacement et fonction des commandes . . . . 10 Appareil principal . . . . . . . . . . . . . . . . . . . .10 Mini-télécommande RM-X168 . . . . . . . . . .12 Verrouillage des disques — Contrôle parental . . . . . . . . . . . . . . . . . . . . 30 Activation du contrôle parental. . . . . . . . . . 30 Modification de la zone et du niveau d’évaluation des films . . . . . . . . . . . . . . . . . 31 Préparation Lecture répétée et aléatoire . . . . . . . . . . . . . . . 32 Recherche directe . . . . . . . . . . . . . . . . . . . . . . 33 Installation de l’appareil et du moniteur en option . . . . . . . . . . . . . . . . . . . . . . . . . 14 Préparation de la mini-télécommande . . . . . . . . . . . . . . . . 14 Affichage par liste de plages/d’images/de fichiers vidéo — Quick-BrowZer . . . . . . . . . . 34 Sélection d’une plage/d’une image/d’un fichier vidéo . . . . . . . . . . . . . . . . . . . . . . . . 34 Sélection d’un type de fichier . . . . . . . . . . . 35 Retrait de la façade . . . . . . . . . . . . . . . . 15 Installation de la façade . . . . . . . . . . . . . . . . 15 Visualisation des informations relatives au disque audio. . . . . . . . . . . . . . . . . . . . . . . . . . . 35 Réinitialisation de l’appareil . . . . . . . . . 14 Opérations de base Lecture de disques vidéo . . . . . . . . . . . 16 Lecture de disques audio . . . . . . . . . . . 18 Lecture d’un périphérique USB . . . . . . 20 Rubriques d’affichage . . . . . . . . . . . . . . . . .21 Lecture répétée et aléatoire . . . . . . . . . . . . .21 Ecoute de la radio . . . . . . . . . . . . . . . . . 22 Opérations avancées — Radio Mémorisation et réception des stations . . . . . . 36 Mémorisation automatique — BTM. . . . . . 36 Mémorisation manuelle . . . . . . . . . . . . . . . 36 Réception des stations mémorisées. . . . . . . 36 Fonction RDS . . . . . . . . . . . . . . . . . . . . . . . . . 36 Aperçu. . . . . . . . . . . . . . . . . . . . . . . . . . . . . 36 Réglages AF et TA . . . . . . . . . . . . . . . . . . . 37 Sélection de PTY . . . . . . . . . . . . . . . . . . . . 38 Réglage de CT . . . . . . . . . . . . . . . . . . . . . . 38 Opérations avancées — Disques Lecture de fichiers DivX®/MPEG-4/JPEG . . .23 Lecture de vidéos DivX®/MPEG-4. . . . . . . 23 Lecture d’une image JPEG . . . . . . . . . . . . .23 Utilisation des fonctions PBC — Contrôle de lecture . . . . . . . . . . . . . . . . . . . 24 Utilisation du menu mode de lecture . . . . . . . .24 Visualisation des informations temporelles/ textuelles du disque . . . . . . . . . . . . . . . . . . . . .26 Configuration des paramètres audio. . . . . . . . . 27 Modification de la langue/du format du son . . . . . . . . . . . . . . . . . . . . . . . . . . . . . . . .27 Vérification du format du programme . . . .27 Réglage du niveau de sortie audio — Niveau DVD . . . . . . . . . . . . . . . . . . . . . .28 Réglage du son Réglage des caractéristiques du son . . . . . . . . 38 Personnalisation de la courbe de l’égaliseur — EQ3 . . . . . . . . . . . . . . . . . . . . . . . . . . . . 39 Paramètres Configuration visuelle . . . . . . . . . . . . . . . . . . . 39 Opération de base de la configuration visuelle . . . . . . . . . . . . . . . . . . . . . . . . . . . . 39 Configuration de la langue à l’écran ou de la bande son . . . . . . . . . . . . . . . . . . . . . . . . 41 Configuration de l’affichage . . . . . . . . . . . . 41 Configuration personnalisée . . . . . . . . . . . . 42 Configuration audio . . . . . . . . . . . . . . . . . . 43 Réinitialisation de tous les paramètres . . . . 43 Agrandissement d’images . . . . . . . . . . . . . . . .29 4 MEX-DV1500U 4-120-899-21 (1) D:\Documents and Settings\takashi-shimomura\Desktop\DTP\848220S MEXDV1500U(EUR)\4120899211_MEX-DV1500U_ML\03FR+00COV-ETOC.fm Configuration système. . . . . . . . . . . . . . . . . . . 44 Opération de base de la configuration système . . . . . . . . . . . . . . . . . . . . . . . . . . . . 44 Réglage de l’horloge . . . . . . . . . . . . . . . . . . 48 masterpage:Right En ce qui concerne l’installation et les connexions, consulter le manuel d’installation/raccordement fourni. Utilisation d’un appareil en option Appareil auxiliaire . . . . . . . . . . . . . . . . . . . . . . 48 Informations complémentaires Précautions . . . . . . . . . . . . . . . . . . . . . . . . . . . 49 Remarques sur les disques . . . . . . . . . . . . . 49 Ordre de lecture des fichiers MP3/WMA/ AAC/JPEG/DivX®/MPEG-4 . . . . . . . . . . . 50 A propos des fichiers MP3 . . . . . . . . . . . . . 50 A propos des fichiers WMA . . . . . . . . . . . . 51 A propos des fichiers AAC . . . . . . . . . . . . . 51 A propos des fichiers JPEG . . . . . . . . . . . . 51 A propos des fichiers DivX® . . . . . . . . . . . 51 A propos des fichiers MPEG-4 . . . . . . . . . . 51 Entretien . . . . . . . . . . . . . . . . . . . . . . . . . . . . . 51 Retrait de l’appareil . . . . . . . . . . . . . . . . . . . . . 52 Spécifications . . . . . . . . . . . . . . . . . . . . . . . . . 53 Dépannage . . . . . . . . . . . . . . . . . . . . . . . . . . . . 54 Affichage des erreurs et messages . . . . . . . 56 Glossaire . . . . . . . . . . . . . . . . . . . . . . . . . . . . . 58 Liste des codes de langue/codes de zone. . . . . 60 Index . . . . . . . . . . . . . . . . . . . . . . . . . . . . . . . . 61 Site d’assistance Si vous avez des questions ou si vous souhaitez consulter les toutes dernières informations techniques sur ce produit, rendez-vous sur le site Web suivant : http://support.sony-europe.com Fournit des informations relatives aux : • modèles et fabricants de lecteurs audio numériques compatibles ; • fichiers MP3/WMA/AAC pris en charge. 5 MEX-DV1500U 4-120-899-21 (1) D:\Documents and Settings\takashi-shimomura\Desktop\DTP\848220S MEXDV1500U(EUR)\4120899211_MEX-DV1500U_ML\03FR02CD-E.fm Félicitations ! Nous vous remercions d’avoir fait l’acquisition de ce lecteur multi-disques Sony. Avant d’utiliser cet appareil, veuillez lire ce manuel attentivement et conservez-le pour toute référence ultérieure. masterpage:Left t page 48 Les bornes AUX AUDIO IN situées à l’arrière permettent le raccordement et la sortie audio d’un appareil auxiliaire comme un appareil audio portatif (connexion analogique), un appareil de navigation dissimulé, un tuner TV, etc. Caractéristiques Pour plus de détails, reportez-vous aux numéros de pages indiqués. * Selon la longueur d’une plage et le taux d’échantillonnage enregistré. Lecture de DVD, VCD, CD t page 8 Compatible avec plusieurs formats de disque. 2000MP3, 2000WMA, 2000AAC Possibilité de lire jusqu’à 2 000 plages* enregistrées sur un disque au format MP3/ WMA/AAC. Reprise de la lecture multi-disques t page 42 Mémorise l’endroit où la lecture s’est arrêtée pour 5 disques au maximum et peut reprendre la lecture d’un DVD VIDEO/VCD/DivX/ MPEG-4 même si le disque a été éjecté. t page 38 7 courbes d’égaliseur présélectionnées, pouvant être personnalisées en réglant 3 bandes différentes. t page 29 Possibilité de sélectionner la tonalité de l’image à partir de réglages présélectionnés, selon la lumière ambiante/l’habitacle du véhicule. t page 48 Permet le raccordement d’un appareil audio portatif (connexion analogique). 6 MEX-DV1500U 4-120-899-21 (1) D:\Documents and Settings\takashi-shimomura\Desktop\DTP\848220S MEXDV1500U(EUR)\4120899211_MEX-DV1500U_ML\03FR02CD-E.fm Droits d’auteur Ce produit intègre une technologie de protection des droits d’auteur couverte par des brevets américains, ainsi que par d’autres droits relatifs à la propriété intellectuelle détenus par Macrovision Corporation et autres. L’utilisation de cette technologie de protection des droits d’auteur doit faire l’objet d’une autorisation de Macrovision Corporation et est destinée exclusivement à une utilisation dans le cercle familial et d’autres systèmes de visualisation limités, sauf autorisation contraire de Macrovision Corporation. Toute étude technique inverse ou démontage sont interdits. Fabriqué sous licence de Dolby Laboratories. Le terme « Dolby » et le sigle double D sont des marques commerciales de Dolby Laboratories. Windows Media et le logo Windows sont des marques de commerce ou des marques déposées de Microsoft Corporation aux Etats-Unis et/ou dans d’autres pays. masterpage:Right CE PRODUIT EST COMMERCIALISE SOUS LA LICENCE DU PORTEFEUILLE DE BREVETS MPEG-4 VISUAL ET EST DESTINE A L’UTILISATION PERSONNELLE ET NON COMMERCIALE D’UN UTILISATEUR A DES FINS DE DECODAGE DE VIDEOS MPEG-4 ENCODEES PAR UN UTILISATEUR DANS LE CADRE D’UNE ACTIVITE PERSONNELLE ET NON COMMERCIALE ET/OU OBTENUES AUPRES D’UN FOURNISSEUR VIDEO AGREE PAR MPEG LA POUR FOURNIR DES VIDEOS MPEG-4. AUCUNE LICENCE N’EST AUTORISEE OU IMPLICITE POUR TOUTE AUTRE UTILISATION. TOUTE INFORMATION COMPLEMENTAIRE, Y COMPRIS LES INFORMATIONS RELATIVES A DES UTILISATIONS PROMOTIONNELLES, INTERNES ET COMMERCIALES ET A LA LICENCE PEUT ETRE OBTENUE AUPRES DE MPEG LA, LLC.CONSULTEZ LE SITE HTTP://WWW.MPEGLA.COM. « DVD VIDEO », « DVD-R », « DVD-RW », « DVD+R » et « DVD+RW » sont des marques commerciales. « DivX » et « DivX Certified » sont des marques déposées ou des marques commerciales de DivX, Inc. 7 MEX-DV1500U 4-120-899-21 (1) D:\Documents and Settings\takashi-shimomura\Desktop\DTP\848220S MEXDV1500U(EUR)\4120899211_MEX-DV1500U_ML\03FR02CD-E.fm masterpage:Left Disques pouvant être lus et symboles utilisés dans ce manuel Cet appareil peut lire différents disques vidéo/audio. Le tableau suivant vous permet de vérifier si un disque est pris en charge par cet appareil, ainsi que les fonctions disponibles pour un type de disque donné. Symbole du disque dans le manuel Format du disque Logo du disque DVD VIDEO DVD-R*1 DVD-R DL*1 (Mode vidéo/mode VR) VIDEO DVD-RW*1 (Mode vidéo/mode VR) DVD+R*1 DVD+R DL*1 DVD+RW*1 CD vidéo (Ver. 1.0/1.1/2.0) AUDIO CD audio CD-ROM*2 CD-R*2 CD-RW*2 *1 Les fichiers audio peuvent également être enregistrés. Pour plus de détails, reportez-vous à la page 9. *2 Les fichiers image/vidéo peuvent également être enregistrés. Pour plus de détails, reportez-vous à la page 9. Remarque Le terme « DVD » peut être utilisé dans ce manuel comme terme générique pour les DVD VIDEO, DVD-R/DVD RW et DVD+R/DVD+RW. 8 MEX-DV1500U 4-120-899-21 (1) D:\Documents and Settings\takashi-shimomura\Desktop\DTP\848220S MEXDV1500U(EUR)\4120899211_MEX-DV1500U_ML\03FR02CD-E.fm masterpage:Right Le tableau suivant montre les formats de compression pris en charge, leurs types de fichiers et les types de disque sur lesquels ces fichiers peuvent être enregistrés. Les fonctions disponibles varient en fonction du format, quel que soit le type de disque. Les symboles de format ci-dessous apparaissent à côté de la description de fonctions disponibles pour ce format. Symbole du format dans le manuel Type de fichier Type de disque pouvant être enregistré Fichier audio MP3 Fichier audio WMA Fichier audio AAC Fichier d’image JPEG Fichier vidéo DivX® DATA DVD DVD-ROM DVD-R DVD-R DL DVD-RW DVD+R DVD+R DL DVD+RW DATA CD CD-ROM CD-R CD-RW Fichier vidéo MPEG-4 MPEG-4 Conseil Pour plus de détails sur les formats de compression, reportez-vous à la page 50. Disques non pris en charge Les disques suivants ne peuvent pas être lus sur cet appareil : • Disques de 8 cm • Disques de 12 cm utilisant uniquement la partie de données intérieure de 8 cm (le reste est transparent) • CD-ROM contenant des fichiers autres que des MP3/WMA/AAC/JPEG/DivX/MPEG-4 • SA-CD • CD-G • Photo-CD • VSD (Video Single Disc) • DVD-ROM contenant des fichiers autres que des MP3/WMA/AAC/JPEG/DivX/MPEG-4 • DVD-RAM • DVD-Audio • Active-Audio (données) • SVCD (Super Video CD) • CDV • Disques créés au format Packet Write • Disques au format DTS Remarque Selon leur état d’enregistrement, il est possible que des disques compatibles ne puissent pas être lus sur cet appareil. Code local Code local Ce système vise à protéger les droits d’auteur sur les logiciels. Le code local est situé sous l’appareil et seuls les DVD identifiés par le même code local peuvent être lus sur cet appareil. Les DVD identifiés par le logo ALL peuvent également être lus. Si vous essayez de lire un autre DVD, le message « Playback prohibited by region code. » (lecture interdite par le code local) apparaît sur le moniteur. Suivant le DVD, il se peut qu’aucune indication de code local ne soit indiquée même si la lecture du DVD est soumise à des restrictions de zone. 9 MEX-DV1500U 4-120-899-21 (1) D:\Documents and Settings\takashi-shimomura\Desktop\DTP\848220S MEXDV1500U(EUR)\4120899211_MEX-DV1500U_ML\03FR02CD-E.fm masterpage:Left Emplacement et fonction des commandes Appareil principal 1 2345 6 7 8 9 OFF SEEK SOURCE AF TA TP REG DISC ALBM ARTIST TRACK MODE SEEK SETUP PTY REP SHUF AF/TA 1 2 SHUF ZAP DM+ LOUD AUX ALBM 3 4 5 6 DSPL PUSH SOUND / ENTER q; qa qs qd qfqg qh Pour plus de détails, reportez-vous aux numéros de pages indiqués. Les instructions de ce mode d’emploi décrivent en principe les commandes de la minitélécommande.Vous pouvez également utiliser les commandes de l’appareil principal si elles portent un nom identique ou similaire à celles de la mini-télécommande. A Touche OFF page 15, 16, 18, 20, 24 Permet de mettre l’appareil hors tension/ d’arrêter la source (appuyez) ; de l’éteindre complètement (appuyez sur la touche et maintenez-la enfoncée). qj qk ql E Molette de réglage/touche SOUND/ ENTER page 28, 35, 36, 38, 39, 44, 48, 49 Permet de régler le volume/de faire un réglage (tournez) ; d’ouvrir le menu de réglage du son/d’appliquer un réglage (appuyez). F Fente d’insertion des disques page 16, 18 Permet d’insérer le disque. G Fenêtre d’affichage B Touche (Retour) page 34, 39 Permet de revenir à l’écran précédent. H Touche Z (éjecter) page 16, 18 Permet d’éjecter le disque. C Touche SOURCE page 20, 22, 36, 49 Permet de mettre l’appareil sous tension ; de changer la source (Radio/Disque/USB/ AUX). I Borne USB page 20 Permet de raccorder le périphérique USB. D Touche (Parcourir) page 34 Permet de passer en mode Quick-BrowZer.*1 10 MEX-DV1500U 4-120-899-21 (1) D:\Documents and Settings\takashi-shimomura\Desktop\DTP\848220S MEXDV1500U(EUR)\4120899211_MEX-DV1500U_ML\03FR02CD-E.fm J Touches SEEK +/– page 17, 19, 22, 23 Disque/USB : Permettent de sauter un chapitre/une plage/ une scène/un fichier (appuyez) ; d’avancer/ reculer rapidement dans un disque (appuyez et maintenez brièvement la touche enfoncée) ; d’avancer/reculer rapidement dans une plage (appuyez sur la touche et maintenez-la enfoncée).*2 Radio : Permettent de régler des stations automatiquement (appuyez) ; de rechercher une station manuellement (appuyez sur la touche et maintenez-la enfoncée). K Touche (déverrouillage de la façade) page 15 L Touche MODE page 22, 36, 49 Permet de sélectionner la bande radio (FM/ MW (PO)/LW (GO)) ; de sélectionner un appareil auxiliaire raccordé à la prise d’entrée AUX (avant) ou à la borne AUX IN (arrière). M Récepteur de la mini-télécommande N Touche RESET page 14 O Touche SETUP page 28, 36, 44, 48, 49 Permet d’ouvrir le menu de configuration système. P Touche AF (Fréquences alternatives)/ TA (Messages de radioguidage)/ PTY (Type d’émission) page 37, 38 Permet de régler AF et TA (appuyez) ; de sélectionner PTY (appuyez sur la touche et maintenez-la enfoncée) en RDS. masterpage:Right Q Touches numériques Disque/USB : (1) : b REP page 16, 17, 21, 32 (2) : SHUF B page 16, 17, 21, 32 (3)/(4) : ALBM –/+ (V/v) page 16, 17, 19, 23 Permettent de sauter un album ou un dossier/de déplacer le curseur (appuyez) ; de sauter des albums ou des dossiers successifs (appuyez sur la touche et maintenez-la enfoncée). (6) : u (lecture/pause) page 16, 17, 18, 19, 23 Permet de démarrer/d’interrompre la lecture. Radio : Permettent de capter les stations enregistrées (appuyez) ; de mémoriser des stations (appuyez sur la touche et maintenez-la enfoncée). R Touche DSPL (Affichage) page 21, 26, 37, 48 Permet de modifier la rubrique d’affichage. S Prise d’entrée AUX page 48 Permet de raccorder un appareil audio portatif. *1 Lors de la lecture d’un CD/MP3/WMA/AAC/JPEG/ DivX/MPEG-4. *2 Le fonctionnement diffère selon le disque (page 17, 19). A propos du capuchon USB Lorsque vous n’utilisez pas la borne USB I, utilisez le capuchon de protection fourni afin d’éviter que de la poussière ou des salissures n’entrent dans la borne. Afin d’éviter que les enfants ne l’avalent, tenez ce capuchon de protection hors de leur portée. 11 MEX-DV1500U 4-120-899-21 (1) D:\Documents and Settings\takashi-shimomura\Desktop\DTP\848220S MEXDV1500U(EUR)\4120899211_MEX-DV1500U_ML\03FR02CD-E.fm masterpage:Left Mini-télécommande RM-X168 9 1 0 2 qa 3 qs 4 5 qd qf qg 6 qh 7 qj 8 12 Pour plus de détails, reportez-vous aux numéros de pages indiqués. Retirez le film isolant avant l’utilisation (page 14). C Touche VISUAL SETUP page 24, 27, 29, 30, 30, 33, 34, 40 Permet d’ouvrir le mode de lecture/le menu de configuration visuelle. A Touche OFF page 16, 18, 20, 24 Permet de mettre l’appareil hors tension/ d’arrêter la source (appuyez) ; de l’éteindre complètement (appuyez sur la touche et maintenez-la enfoncée). D Touche SYSTEM SETUP page 28, 36, 44, 48, 49 Permet d’ouvrir le menu de configuration système. B Touche SOUND page 38 Permet d’ouvrir le menu de réglage du son. E Touche (retour)/O page 24, 25, 31, 32, 34, 39, 40 Permet de revenir à l’affichage précédent ; de revenir au menu sur un VCD*1. MEX-DV1500U 4-120-899-21 (1) D:\Documents and Settings\takashi-shimomura\Desktop\DTP\848220S MEXDV1500U(EUR)\4120899211_MEX-DV1500U_ML\03FR02CD-E.fm F Touches numériques page 16, 17, 24, 25, 31, 31, 33, 34, 36 Disque : Permettent de localiser un titre/un chapitre/ une plage. Radio : Permettent de capter les stations enregistrées (appuyez) ; de mémoriser des stations (appuyez sur la touche et maintenez-la enfoncée). G Touche CLEAR page 31, 34 Permet de supprimer un numéro saisi. H Touche DSPL (affichage) page 21, 26, 37, 48 Permet de modifier les rubriques d’affichage. I Touche ATT (atténuation du son) Permet d’atténuer le son (pour annuler, appuyez de nouveau sur cette touche). J Touche u (lecture/pause) page 16, 17, 18, 19, 23 Permet de démarrer/d’interrompre la lecture. K Touches .m/M> page 17, 19, 22, 23 Disque/USB : Permettent de sauter un chapitre/une plage/ une scène/un fichier (appuyez) ; d’avancer/ reculer rapidement dans un disque (appuyez et maintenez brièvement la touche enfoncée) ; d’avancer/reculer rapidement dans une plage (appuyez sur la touche et maintenez-la enfoncée).*2 Radio : Permettent de régler des stations automatiquement (appuyez) ; de rechercher une station manuellement (appuyez sur la touche et maintenez-la enfoncée). masterpage:Right L Touches de réglage de la lecture des DVD (AUDIO) : page 17, 27 Permet de changer la langue/le format du son. (Permet de changer le canal audio pour les VCD/CD/MP3/WMA/AAC.) (SUBTITLE) : page 17 Permet de changer la langue des soustitres. (ANGLE) : page 17 Permet de changer l’angle de vision. (TOP MENU) : page 17 Permet d’ouvrir le menu principal d’un DVD. (MENU) : page 17 Permet d’ouvrir le menu d’un disque. M Touche (parcourir) page 34 Permet de passer en mode Quick-BrowZer.*3 N Touches </M/m/, (curseur)/ENTER Permettent de déplacer le curseur et d’appliquer un réglage. O Touche SRC (source) page 20, 22, 36, 49 Permet de mettre l’appareil sous tension ; de changer la source (Radio/Disque/USB/ AUX). P Touche MODE page 22, 36, 49 Permet de sélectionner la bande radio (FM/ MW (PO)/LW (GO)) ; de sélectionner un appareil auxiliaire raccordé à la prise d’entrée AUX (avant) ou à la borne AUX IN (arrière). Q Touches VOL (volume) +/– Permettent de régler le volume. *1 Lors de la lecture avec la fonction PBC. *2 Le fonctionnement diffère selon le disque (page 17, 19). *3 Lors de la lecture d’un CD/MP3/WMA/AAC/JPEG/ DivX/MPEG-4. Remarque Si vous mettez l’appareil hors tension et que l’affichage est désactivé, il ne peut plus être utilisé avec la mini-télécommande sauf si la touche (SOURCE) de l’appareil principal est enfoncée ou si un disque est inséré dans le lecteur pour l’activer. 13 MEX-DV1500U 4-120-899-21 (1) D:\Documents and Settings\takashi-shimomura\Desktop\DTP\848220S MEXDV1500U(EUR)\4120899211_MEX-DV1500U_ML\03FR02CD-E.fm masterpage:Left Réinitialisation de l’appareil Préparation Installation de l’appareil et du moniteur en option Commencez par installer et raccorder l’appareil ainsi que le moniteur en option. Cet appareil peut être piloté à l’aide des écrans qui s’affichent sur l’appareil et/ou sur le moniteur en option. Notez que ce manuel inclut des instructions concernant les écrans qui s’affichent sur l’appareil et/ou sur le moniteur en option. Appareil Moniteur en option Avant la première mise en service de l’appareil, après avoir remplacé la batterie du véhicule ou modifié les raccordements, vous devez réinitialiser l’appareil. Retirez la façade (page 15) et appuyez sur la touche RESET (page 11) avec un objet pointu, comme un stylo à bille. Remarque Une pression sur la touche RESET remet l’heure à zéro et efface certaines informations mémorisées. Préparation de la minitélécommande Retirez le film isolant. Conseil Pour obtenir des informations sur la façon de remplacer la pile, reportez-vous à la page 51. Pour plus de détails, reportez-vous au manuel d’installation/de raccordement fourni. Remarque Veillez à installer le moniteur en option de façon fiable et dans un endroit où il ne gêne pas la vision du conducteur. 14 MEX-DV1500U 4-120-899-21 (1) D:\Documents and Settings\takashi-shimomura\Desktop\DTP\848220S MEXDV1500U(EUR)\4120899211_MEX-DV1500U_ML\03FR02CD-E.fm Retrait de la façade masterpage:Right Installation de la façade Insérez la partie A de la façade dans la partie B de l’appareil, comme illustré, puis poussez sur le côté gauche pour l’enclencher jusqu’au déclic. OFF Vous pouvez retirer la façade de cet appareil pour le protéger du vol. Alarme d’avertissement Si vous mettez la clé de contact en position OFF sans retirer la façade, l’alarme d’avertissement retentit pendant quelques secondes. L’alarme est émise uniquement lorsque l’amplificateur intégré est utilisé. 1 Appuyez sur (OFF). L’appareil est mis hors tension. 2 Appuyez sur A B Remarque Ne posez rien sur la face interne de la façade. , puis tirez vers vous. Remarques • N’exercez pas de pression excessive sur la façade ni sur la fenêtre d’affichage et ne la laissez pas tomber. • N’exposez pas la façade à des températures élevées ou à l’humidité. Evitez de la laisser dans un véhicule en stationnement, sur le tableau de bord ou la plage arrière. • Ne retirez pas la façade pendant la lecture du périphérique USB, sinon les données USB risquent d’être endommagées. 15 MEX-DV1500U 4-120-899-21 (1) D:\Documents and Settings\takashi-shimomura\Desktop\DTP\848220S MEXDV1500U(EUR)\4120899211_MEX-DV1500U_ML\03FR02CD-E.fm masterpage:Left Opérations de base Lecture de disques vidéo Selon le disque, il est possible que certaines opérations soient différentes ou limitées. Reportez-vous au mode d’emploi fourni avec votre disque. Z OFF OFF u </M/m/, ENTER Touches numériques b/B/V/v u 1 Mettez votre moniteur sous tension, puis sélectionnez la source d’entrée correspondant à cet appareil sur votre moniteur. 2 Insérez le disque (côté imprimé vers le haut). La lecture commence automatiquement. Si la lecture ne commence pas automatiquement, appuyez sur u. 3 Si le menu DVD apparaît, appuyez sur (1)(b)/(2)(B)/(3)(V)/(4)(v) pour déplacer le curseur, puis appuyez sur (6) (u) pour valider. Appuyez sur </M/m/,/les touches numériques de la mini-télécommande pour déplacer le curseur, puis appuyez sur (ENTER) pour valider. Pour interrompre la lecture Appuyez sur (OFF). Remarque Les disques au format DTS ne sont pas pris en charge. Aucun son n’est émis si le format DTS est sélectionné. Pour éjecter le disque Appuyez sur Z. 16 MEX-DV1500U 4-120-899-21 (1) D:\Documents and Settings\takashi-shimomura\Desktop\DTP\848220S MEXDV1500U(EUR)\4120899211_MEX-DV1500U_ML\03FR02CD-E.fm masterpage:Right A propos du menu DVD Un DVD se divise en plusieurs sections qui possèdent des caractéristiques d’image ou de musique. Ces sections sont appelées « titres ». Lorsque vous lisez un DVD contenant plusieurs titres, vous pouvez sélectionner le titre de votre choix à l’aide du menu principal du DVD. Dans le cas des DVD permettant de sélectionner des rubriques, telles que les sous-titres ou la langue de la bande son, sélectionnez ces rubriques à l’aide du menu du DVD. Autres opérations de lecture u AUDIO TOP MENU .m/M> b/B/V/v Touches numériques u Pour .m/M> SUBTITLE ANGLE MENU </M/m/, ENTER Appuyez sur faire une pause/reprendre la lecture après u une pause sauter un chapitre/une plage/une scène/ .m/M> un fichier reculer ou avancer rapidement dans un disque .m/M> et maintenez brièvement la touche enfoncée, puis appuyez à plusieurs reprises pour changer la vitesse (× 2 t × 12 t × 120 t × 2…) annuler le recul/l’avance rapide u afficher le menu DVD*1 Télécommande : (TOP MENU) ou (MENU) sélectionner des rubriques dans le menu Appareil principal : (1)(b)/(2)(B)/(3)(V)/(4)(v) pour DVD*1 déplacer le curseur, puis appuyez sur (6) (u) pour valider Télécommande : </M/m/,/touches numériques pour déplacer le curseur, puis appuyez sur (ENTER) pour valider changer la langue/le format/le canal du son (page 27)*1 Télécommande : (AUDIO) jusqu’à ce que la rubrique souhaitée apparaisse désactiver les sous-titres/modifier la langue des sous-titres*1 Télécommande : (SUBTITLE) jusqu’à ce que la rubrique souhaitée apparaisse*2 changer l’angle de vision*1 Télécommande : (ANGLE) jusqu’à ce que le numéro d’angle souhaité apparaisse *1 Non disponible suivant le disque. *2 Lorsqu’un message vous invitant à saisir un code à 4 chiffres apparaît, saisissez le code de la langue (page 60) souhaitée. 17 MEX-DV1500U 4-120-899-21 (1) D:\Documents and Settings\takashi-shimomura\Desktop\DTP\848220S MEXDV1500U(EUR)\4120899211_MEX-DV1500U_ML\03FR02CD-E.fm masterpage:Left Lecture de disques audio Selon le disque, il est possible que certaines opérations soient différentes ou limitées. Reportez-vous au mode d’emploi fourni avec votre disque. Z OFF OFF u u 1 Insérez le disque (côté imprimé vers le haut). La lecture commence automatiquement. Si la lecture ne commence pas automatiquement, appuyez sur u. Pour interrompre la lecture Appuyez sur (OFF). Remarque Les disques au format DTS ne sont pas pris en charge. Aucun son n’est émis si le format DTS est sélectionné. Pour éjecter le disque Appuyez sur Z. 18 MEX-DV1500U 4-120-899-21 (1) D:\Documents and Settings\takashi-shimomura\Desktop\DTP\848220S MEXDV1500U(EUR)\4120899211_MEX-DV1500U_ML\03FR02CD-E.fm masterpage:Right Autres opérations de lecture .m/M> u </M/m/, .m/M> ALBM Pour u Appuyez sur faire une pause/reprendre la lecture après u une pause sauter une plage .m (<)/M> (,) avancer/reculer rapidement et maintenez enfoncée .m/M> sauter un album* Appareil principal : (3) (ALBM –)/(4) (ALBM +) Télécommande : M/m sauter plusieurs albums de suite* Appareil principal : (3) (ALBM –)/(4) (ALBM +) et maintenez la touche enfoncée Télécommande : M/m et maintenez les touches enfoncées * Lors de la lecture d’un fichier MP3/WMA/AAC. 19 MEX-DV1500U 4-120-899-21 (1) D:\Documents and Settings\takashi-shimomura\Desktop\DTP\848220S MEXDV1500U(EUR)\4120899211_MEX-DV1500U_ML\03FR02CD-E.fm masterpage:Left Lecture d’un périphérique USB Pour plus de détails sur la compatibilité de votre périphérique USB, visitez le site d’assistance. Site d’assistance http://support.sony-europe.com • Les périphériques USB de type MSC (périphériques de stockage de masse) compatibles avec la norme USB peuvent être utilisés. • Le codec correspondant est MP3 (.mp3), WMA (.wma), AAC (.m4a) et JPEG (.jpg). • Il est recommandé d’effectuer des copies de sauvegarde des données contenues dans le périphérique USB. Remarque Raccordez le périphérique USB après avoir démarré le moteur. Selon le type de périphérique USB, un dysfonctionnement ou des dommages peuvent être causés si ce périphérique a été raccordé avant de démarrer le moteur. OFF SOURCE (USB) OFF SRC REP SHUF 1 DSPL DSPL Raccordez le périphérique USB à la borne USB. La lecture commence automatiquement. Si un périphérique USB est déjà raccordé, appuyez plusieurs fois sur (SOURCE) jusqu’à ce que l’indication « USB » apparaisse pour démarrer la lecture. Pour arrêter la lecture Appuyez sur (OFF). Remarque Veillez à utiliser le câble USB fourni avec l’appareil si un câble est nécessaire lors du raccordement USB. 20 MEX-DV1500U 4-120-899-21 (1) D:\Documents and Settings\takashi-shimomura\Desktop\DTP\848220S MEXDV1500U(EUR)\4120899211_MEX-DV1500U_ML\03FR02CD-E.fm masterpage:Right Retrait du périphérique USB Affichage de l’image de la pochette 1 Arrêtez la lecture du périphérique USB. 2 Retirez le périphérique USB. Si vous retirez le périphérique USB lors de la lecture, les données du périphérique risquent d’être endommagées. Pendant la lecture audio, vous pouvez vérifier les informations du contenu ou afficher l’image de la pochette* d’un fichier MP3/WMA/AAC du périphérique USB sur le moniteur. Remarques • N’utilisez pas de périphériques USB de grande taille ou lourds, qui risquent de tomber à cause des vibrations ou d’entraîner un raccordement peu fiable. • Ne retirez pas la façade pendant la lecture du périphérique USB, sinon les données du périphérique risquent d’être endommagées. • Cet appareil ne peut pas reconnaître les périphériques USB via un concentrateur USB. Rubriques d’affichage A Source B Nom de la plage, nom d’artiste, numéro d’album*, nom d’album, numéro de la plage/ temps de lecture écoulé, horloge * La taille recommandée est de 240 × 240 à 960 × 960 pixels. Lecture répétée et aléatoire 1 En cours de lecture, appuyez plusieurs fois sur (1) (REP) ou (2) (SHUF) jusqu’à ce que l’option souhaitée apparaisse. Sélectionnez Pour lire REP-TRACK une plage en boucle. REP-ALBUM un album en boucle. SHUF-ALBUM un album dans un ordre aléatoire. REP-DRIVE* un lecteur en boucle. * Si plus de deux lecteurs sont créés sur le périphérique USB. Pour revenir en mode de lecture normal, sélectionnez « REP-OFF » ou « SHUF-OFF ». * Le numéro de l’album s’affiche uniquement lorsque l’album est modifié. Pour modifier les rubriques d’affichage B, appuyez sur (DSPL). Remarques • Les paramètres affichés peuvent varier selon le type de périphérique USB, le format d’enregistrement et les réglages. Pour plus de détails, visitez le site d’assistance. • Le nombre maximum de données affichables est le suivant : – dossiers (albums) : 256 – fichiers (plages) : 2 000 • Ne laissez pas de périphérique USB dans un véhicule en stationnement car cela peut entraîner des problèmes de fonctionnement. • Le démarrage de la lecture peut prendre un certain temps, selon la quantité de données enregistrées. • Lors de la lecture d’un fichier MP3/WMA/AAC VBR (Débit variable) ou pendant l’avance ou le retour rapide, le temps de lecture écoulé qui s’affiche peut être inexact. • La lecture d’un fichier comprimé sans perte n’est pas prise en charge. 21 MEX-DV1500U 4-120-899-21 (1) D:\Documents and Settings\takashi-shimomura\Desktop\DTP\848220S MEXDV1500U(EUR)\4120899211_MEX-DV1500U_ML\03FR02CD-E.fm masterpage:Left Ecoute de la radio .m/M> SOURCE SRC MODE SEEK MODE 1 Appuyez plusieurs fois sur (SOURCE) jusqu’à ce que l’indication « TUNER » apparaisse. 2 Appuyez plusieurs fois sur (MODE) jusqu’à ce que la bande souhaitée (FM1, FM2, FM3, MW (PO) ou LW (GO)) s’affiche. A B A Bande radio/fonctionnement B Fréquence* * Le nom du service de l’émission s’affiche lorsqu’une station RDS est captée. Pour plus de détails, reportez-vous à la section « Fonction RDS » à la page 36. 3 Réglez la fréquence. Pour régler automatiquement la fréquence Appuyez sur (SEEK) +/–. Le balayage s’interrompt lorsque l’appareil capte une station. Répétez cette procédure jusqu’à ce que vous captiez la station souhaitée. Pour régler manuellement la fréquence Appuyez sur la touche (SEEK) +/– et maintenez-la enfoncée pour obtenir la fréquence approximative, puis appuyez plusieurs fois sur (SEEK) +/– pour régler la fréquence souhaitée avec précision. Conseil Pour obtenir des informations détaillées sur les autres fonctions de la radio, reportez-vous à la section « Opérations avancées — Radio » à la page 36. Avec la mini-télécommande Utilisez (SRC) au lieu de (SOURCE) et .m/M> au lieu de (SEEK) –/+. 22 MEX-DV1500U 4-120-899-21 (1) D:\Documents and Settings\takashi-shimomura\Desktop\DTP\848220S MEXDV1500U(EUR)\4120899211_MEX-DV1500U_ML\03FR02CD-E.fm Opérations avancées — Disques Ce chapitre se compose des sections suivantes : • Opérations vidéo spécifiques* t page 23 à 32 • Opérations vidéo*/audio communes t page 32 à 35 • Opérations audio spécifiques t page 35 * Opérations incluant la fonction JPEG. Lecture de fichiers DivX®/ MPEG-4/JPEG MPEG-4 masterpage:Right Lecture de vidéos DivX®/MPEG-4 Vous pouvez contrôler la lecture des DivX/ MPEG-4 de la même manière que les autres disques vidéo (page 16), ainsi que certaines fonctions de contrôle de lecture audio. Pour Appuyez sur sauter un album (dossier) Appareil principal : (3) (ALBM –)/ (4) (ALBM +) Appareil principal : sauter plusieurs albums (dossiers) de (3) (ALBM –)/ (4) (ALBM +) et suite maintenez enfoncée Conseil Vous pouvez également sélectionner un fichier à lire à l’aide d’une liste (Quick-BrowZer) (page 34). Lecture d’une image JPEG .m/M> ALBM u .m/M> u Vous pouvez visualiser un diaporama de fichiers JPEG sur cet appareil. Le diaporama démarre automatiquement lorsque vous insérez un disque ou que vous appuyez sur u. Pour obtenir des informations détaillées sur le démarrage de la lecture, suivez les étapes 1 à 4 de la section « Lecture de disques vidéo » à la page 16. Autres opérations de lecture </, Remarque Si le disque contient plusieurs types de fichiers, seul le type de fichier sélectionné (audio/vidéo/image) peut être lu. Pour lire les fichiers vidéo DivX/MPEG-4 ou les fichiers d’image JPEG d’un tel disque, appuyez sur en cours de lecture, sélectionnez le type de fichier souhaité (vidéo/image) à afficher sous forme de liste, puis sélectionnez le fichier souhaité (page 35). Pour Appuyez sur pivoter l’image Télécommande : </, (pivote de 90º à chaque fois) sauter une image .m/M> sauter un album Appareil principal : (3) (ALBM –)/ (4) (ALBM +) sauter plusieurs albums de suite Appareil principal : (3) (ALBM –)/ (4) (ALBM +) et maintenez enfoncée Remarques • Si vous faites pivoter une image de grande taille, l’affichage risque d’être plus long. • Impossible d’afficher les fichiers JPEG progressifs. Conseil Vous pouvez également sélectionner un fichier à lire à l’aide d’une liste (Quick-BrowZer) (page 34). 23 MEX-DV1500U 4-120-899-21 (1) D:\Documents and Settings\takashi-shimomura\Desktop\DTP\848220S MEXDV1500U(EUR)\4120899211_MEX-DV1500U_ML\03FR02CD-E.fm Utilisation des fonctions PBC — Contrôle de lecture masterpage:Left Utilisation du menu mode de lecture MPEG-4 OFF VISUAL SETUP O O ENTER Touches numériques Le menu PBC vous aide interactivement lorsqu’un VCD compatible PBC est lu. 1 Démarrez la lecture d’un VCD compatible PBC. Le menu PBC apparaît. 2 Appuyez sur les touches numériques pour sélectionner la rubrique souhaitée, puis appuyez sur (ENTER). 3 Suivez les instructions du menu concernant les opérations interactives. Pour revenir à l’écran précédent, appuyez sur O. Lecture sans la fonction PBC 1 2 En cours de lecture, appuyez sur (OFF). La lecture s’arrête. Touches numériques Vous pouvez utiliser le menu mode de lecture de cet appareil pour contrôler la lecture ou configurer des réglages de lecture. Pour afficher le menu mode de lecture, appuyez sur (VISUAL SETUP) en cours de lecture. Pour le masquer, appuyez de nouveau sur (VISUAL SETUP). Remarques • Pendant la lecture d’un disque audio, la touche (VISUAL SETUP) est inactive. • Pendant la lecture d’un JPEG, (VISUAL SETUP) est active uniquement si une image est affichée en plein écran. Conseil Si vous appuyez sur (VISUAL SETUP) lorsque la lecture est arrêtée, le menu de configuration visuelle (par le moniteur) apparaît là où vous pouvez configurer différents paramètres, tels que la langue d’affichage, les réglages audio, etc. (page 39). Par exemple, lors de la lecture d’un DVD Appuyez sur les touches numériques pour sélectionner la rubrique souhaitée, puis appuyez sur (ENTER). Le message « Play without PBC. » (Lecture sans fonctions PBC.) apparaît et la lecture démarre. Le menu PBC ne s’affiche pas pendant la lecture. Remarques • Les rubriques affichées dans le menu et les procédures de fonctionnement diffèrent selon le disque. • Pendant la lecture PBC, le numéro de plage, la rubrique de lecture, etc., n’apparaissent pas dans le menu mode de lecture (page 24). • La fonction de reprise de la lecture est inopérante lors de la lecture sans les fonctions PBC. Conseil Pour reprendre une lecture PBC, arrêtez la lecture en appuyant sur (OFF), puis appuyez sur u. </M/m/, ENTER B C D EF A 12(67) 018(034) T 1:35:55 PLAY DVD VIDEO G 1:ENGLISH OFF 1:ENGLISH 2:FRENCH 3:SPANISH SUBTITLE Select : I H ENTER J A Rubriques du menu mode de lecture Pour plus de détails, reportez-vous à la section « Liste des paramètres du menu mode de lecture » à la page 25. 24 MEX-DV1500U 4-120-899-21 (1) D:\Documents and Settings\takashi-shimomura\Desktop\DTP\848220S MEXDV1500U(EUR)\4120899211_MEX-DV1500U_ML\03FR02CD-E.fm B DVD : Numéro du titre/Total VCD : Numéro de la plage/Total*1 JPEG : Numéro de l’album/Total DivX/MPEG-4 : Numéro de l’album (dossier)/Total C DVD : Numéro du chapitre/Total JPEG : Numéro de l’image/Total DivX/MPEG-4 : Numéro du fichier/Total D Temps de lecture écoulé*2 E Format F Statut de lecture (PLAY N, PAUSE X, etc.) G Réglage actuel H Options I Paramètre sélectionné J Nom du paramètre sélectionné et/ou messages d’aide *1 Lors de la lecture d’un VCD doté de la fonction PBC (page 24), aucune indication ne s’affiche. *2 En cours de lecture JPEG, aucune indication ne s’affiche. Liste des paramètres du menu mode de lecture Appuyez sur </M/m/,/les touches numériques pour sélectionner un paramètre, puis appuyez sur (ENTER). Pour revenir à l’écran précédent, appuyez sur O. Pour plus de détails, reportez-vous aux numéros de pages indiqués. masterpage:Right TIME 33 Pour vérifier le temps de lecture écoulé ; saisir le code temporel. MPEG-4 AUDIO 17, 27 Pour changer la langue/le format/le canal du son ; vérifier le format du programme. MPEG-4 SUBTITLE 17 Pour activer ou désactiver les sous-titres/ changer la langue des sous-titres. ANGLE 17 Pour changer l’angle. * CENTER ZOOM 29 Pour agrandir une image. MPEG-4 REPEAT 33 Pour lire un titre/un chapitre/une plage/un album/une image/un fichier vidéo en boucle. MPEG-4 TITLE, TRACK 33 Pour sélectionner un titre, une scène ou une plage à lire. SHUFFLE 33 Pour lire des chapitres/plages/images/fichiers vidéo dans un ordre aléatoire. MPEG-4 * ALBUM 33 Pour sélectionner un album ou un dossier à afficher. PICTURE EQ 29 Pour régler la qualité d’image. MPEG-4 MPEG-4 * Sauf pour les DVD-R/DVD-R DL/DVD-RW en mode VR. CHAPTER 33 Pour sélectionner un chapitre à lire. Conseil Lorsque « SHUFFLE » ou « REPEAT » est activé ou si « ANGLE » est disponible, leurs cases à cocher s’allument en vert (par exemple, t ). Cependant, il est possible que vous ne puissiez pas changer l’angle selon la scène, même si la case à cocher est allumée en vert. IMAGE 33 Pour sélectionner une image à afficher. FILE 33 Pour sélectionner un fichier vidéo à lire. MPEG-4 25 MEX-DV1500U 4-120-899-21 (1) D:\Documents and Settings\takashi-shimomura\Desktop\DTP\848220S MEXDV1500U(EUR)\4120899211_MEX-DV1500U_ML\03FR02CD-E.fm Visualisation des informations temporelles/textuelles du disque MPEG-4 masterpage:Left • T-**:** Temps restant de la plage actuelle • D **:** Temps de lecture écoulé du disque actuel • D-**:** Temps restant du disque actuel Lecture JPEG • Numéro de l’album/Total • Numéro de l’image/Total Lecture de DivX/MPEG-4 • Numéro de l’album (dossier)/Total • Numéro du fichier/Total • T **:** Temps de lecture écoulé du fichier actuel DSPL Vérification des informations temporelles Le temps de lecture et le temps restant du titre, du chapitre, de la plage, etc. en cours de lecture peut être vérifié pendant la lecture d’image ou de vidéo. 1 Vérification des informations textuelles Vous pouvez vérifier les informations textuelles (nom de l’album, nom de l’image, etc.) des fichiers JPEG/DivX/MPEG-4. Numéro d’album/d’image/de dossier/de fichier 037(325) En cours de lecture, appuyez sur (DSPL). Les informations relatives à la lecture actuelle s’affichent. Informations temporelles T 1:01:57 Image name Informations textuelles* * L’indication « NO TEXT » s’affiche lorsqu’il n’y a pas d’informations textuelles. 2 Appuyez plusieurs fois sur (DSPL) pour changer les informations temporelles. Les informations temporelles diffèrent selon le disque ou le format, comme suit. Lecture DVD • T **:**:** Temps de lecture écoulé du titre actuel • T-**:**:** Temps restant du titre actuel • C **:**:** Temps de lecture écoulé du chapitre actuel • C-**:**:** Temps restant du chapitre actuel 26 Les informations textuelles diffèrent selon le format, comme suit. Lecture JPEG • Nom de l’album (lorsque le numéro de l’album est affiché) • Nom de l’image (lorsque le numéro de l’image est affiché) Lecture de DivX/MPEG-4 • Nom d’album (dossier) (lorsque le numéro d’album (dossier) est affiché) • Nom du fichier (lorsque le numéro du fichier est affiché) Lecture VCD (Uniquement lors de la lecture d’un VCD version 1.0/1.1 ou version 2.0 sans fonction PBC.) • T **:** Temps de lecture écoulé de la plage actuelle MEX-DV1500U 4-120-899-21 (1) D:\Documents and Settings\takashi-shimomura\Desktop\DTP\848220S MEXDV1500U(EUR)\4120899211_MEX-DV1500U_ML\03FR02CD-E.fm Configuration des paramètres audio VISUAL SETUP AUDIO SYSTEM SETUP ENTER M/m Modification du canal audio Lors de la lecture d’un VCD/CD/MP3/WMA/ AAC, vous pouvez sélectionner le son du canal droit ou gauche à écouter via les haut-parleurs droit et gauche. Les options sont indiquées ci-dessous. STEREO (ST) : son stéréo standard (par défaut) 1/L (L) : son du canal gauche (monaural) 2/R (R) : son du canal droit (monaural) 1 Remarque Les disques au format DTS ne sont pas pris en charge. Aucun son n’est émis si le format DTS est sélectionné. 1 En cours de lecture, appuyez plusieurs fois sur (AUDIO) jusqu’à ce que la langue/le format du son souhaité apparaisse. Langue/format du son* 1:ENGLISH Dolby D TRACK NAME ALBUM NAME ARTIST NAME La langue du son bascule entre les différentes langues disponibles. Lorsqu’un message vous invitant à saisir un code à 4 chiffres apparaît, saisissez le code de la langue (page 60) souhaitée. Lorsque la même langue est affichée plus de deux fois, le disque est enregistré avec plusieurs formats audio. MP3 0003/1000 3:17 ST SHUF Remarque Il est possible que vous ne puissiez pas changer les réglages audio selon le disque. Conseil Vous pouvez également modifier les paramètres des disques vidéo en sélectionnant « AUDIO » dans le menu mode de lecture (page 24). Vérification du format du programme Vous pouvez vérifier le nombre de canaux et la position des composants sur le DVD VIDEO en cours de lecture. 1 * Lors de la lecture d’un DivX, le format/canal du son (par exemple « MP3 ») s’affiche. En cours de lecture, appuyez plusieurs fois sur (AUDIO) jusqu’à ce que le canal audio souhaité apparaisse. Par exemple, lors de la lecture d’un MP3 Canal audio Modification de la langue/du format du son Pour les DVD, la langue du son peut être modifiée si le disque est enregistré avec des plages multilingues. Pour les DVD/DivX, vous pouvez modifier le format du son lors de la lecture d’un disque enregistré avec plusieurs formats du son (par exemple, Dolby Digital). masterpage:Right En cours de lecture, appuyez sur (VISUAL SETUP). Le menu mode de lecture apparaît. suite à la page suivante t 27 MEX-DV1500U 4-120-899-21 (1) D:\Documents and Settings\takashi-shimomura\Desktop\DTP\848220S MEXDV1500U(EUR)\4120899211_MEX-DV1500U_ML\03FR02CD-E.fm 2 Appuyez sur M/m pour sélectionner (AUDIO). Le format du programme s’affiche. Format audio actuel* 12(67) 018(034) T 1:35:55 1:ENGLISH Dolby D PLAY DVD VIDEO PROGRAM FORMAT DOLBY DIGITAL 3/2.1 L LS C LFE Réglage du niveau de sortie audio — Niveau DVD Vous pouvez régler le niveau de sortie audio pour un DVD enregistré au format Dolby Digital, afin de réduire les différences de niveau de volume entre le disque et la source. 1 En cours de lecture, appuyez sur (SYSTEM SETUP). La rubrique de configuration système apparaît sur l’appareil principal. 2 Appuyez sur M/m pour sélectionner « DVD-LEVEL », puis appuyez sur (ENTER). 3 Appuyez sur m pour régler sur « ADJST-ON », puis appuyez sur (ENTER). 4 Appuyez sur M/m pour sélectionner « DOLBY-ADJ », puis appuyez sur (ENTER). 5 Appuyez sur M/m pour régler le niveau de sortie. Le niveau de sortie peut être réglé par incréments uniques, entre –10 et +10. 6 Appuyez sur (ENTER). La configuration est terminée. R RS Format du programme actuel * « PCM », « DOLBY DIGITAL », etc., s’affichent selon le disque. Les lettres dans l’affichage du format du programme représentent les composants sonores suivants et leurs positions. : Avant (gauche) : Avant (droit) : Centre : Arrière (gauche) : Arrière (droit) : Arrière (monaural) : composant arrière du signal traité par Dolby Surround et du signal Dolby Digital : Signal Effets basses fréquences Le nom du format du programme et les numéros de canaux apparaissent de la façon suivante. Exemple : Dolby Digital 5.1 canaux Composant arrière × 2 DOLBY DIGITAL 3 / 2 . 1 Composant avant × 2 + Composant central × 1 Composant LFE × 1 masterpage:Left Pour masquer l’écran de configuration système, appuyez sur (SYSTEM SETUP). Avec l’appareil principal Appuyez sur (SETUP) au lieu de (SYSTEM SETUP), tournez la molette de réglage au lieu d’appuyer sur M/m, appuyez sur la molette de réglage au lieu de (ENTER). Pour masquer le menu mode de lecture, appuyez sur (VISUAL SETUP). 28 MEX-DV1500U 4-120-899-21 (1) D:\Documents and Settings\takashi-shimomura\Desktop\DTP\848220S MEXDV1500U(EUR)\4120899211_MEX-DV1500U_ML\03FR02CD-E.fm Agrandissement d’images MPEG-4 masterpage:Right Réglage de la qualité d’image — Picture EQ MPEG-4 VISUAL SETUP VISUAL SETUP </M/m/, ENTER </M/m/, ENTER Vous pouvez agrandir des images. 1 En cours de lecture, appuyez sur (VISUAL SETUP). Le menu mode de lecture apparaît. 2 Appuyez sur M/m pour sélectionner (CENTER ZOOM), puis appuyez sur (ENTER). L’option actuelle apparaît. 12(67) 018(034) T 1:35:55 Vous pouvez sélectionner une qualité d’image adaptée à la luminosité intérieure de la voiture. 1 En cours de lecture, appuyez sur (VISUAL SETUP). Le menu mode de lecture apparaît. 2 Appuyez sur M/m pour sélectionner (PICTURE EQ), puis appuyez sur (ENTER). L’option actuelle apparaît. PLAY DVD VIDEO 12(67) 018(034) T 1:35:55 x1 x1 x1.6 3 Appuyez sur M/m pour sélectionner l’option souhaitée (×1, ×1,6*), puis appuyez sur (ENTER). * Il est possible que le grain de l’image apparaisse. L’image est agrandie. Pour masquer le menu mode de lecture, appuyez sur (VISUAL SETUP). Pour faire défiler l’image, appuyez sur </M/m/,. Pour restaurer la taille originale, sélectionnez « ×1 » à l’étape 3. Remarques • Selon le disque, il est possible que vous ne puissiez pas changer le taux d’agrandissement. • Lorsque vous reprenez la lecture, l’image revient à sa taille originale. • Si vous retournez à un menu du disque/au menu principal, l’agrandissement est annulé. PLAY DVD VIDEO DAYTIME SUNSET SHINE CUSTOM NORMAL NORMAL 3 Appuyez sur M/m pour sélectionner l’option souhaitée, puis appuyez sur (ENTER). Les options diffèrent selon le réglage de la configuration visuelle (page 43). Dans la configuration visuelle, les réglages de « PICTURE EQ » dans « CUSTOM SETUP » changent les options comme suit. AUTO : permet de basculer automatiquement entre les options d’utilisation pendant la nuit/la journée en fonction du réglage du régulateur de luminosité dans la configuration système (page 46). LIGHT OFF : permet d’afficher les options d’utilisation pendant la journée. LIGHT ON : permet d’afficher les options d’utilisation pendant la nuit. suite à la page suivante t 29 MEX-DV1500U 4-120-899-21 (1) D:\Documents and Settings\takashi-shimomura\Desktop\DTP\848220S MEXDV1500U(EUR)\4120899211_MEX-DV1500U_ML\03FR02CD-E.fm Les options pour chaque paramètre sont indiquées ci-dessous. 3 masterpage:Left Appuyez sur M/m pour sélectionner « CUSTOM », puis appuyez sur (ENTER). Pour tous les paramètres NORMAL : qualité d’image normale. CUSTOM : paramètres réglables par l’utilisateur (page 30). USER CUSTOM SETUP COLOR BRIGHT SHARPNESS Lorsque « LIGHT OFF »/« AUTO » (avec « DIM-OFF ») est sélectionné DAYTIME : adapté à un endroit lumineux. SUNSET : adapté lorsqu’il fait un peu sombre. SHINE : adapté dans un endroit très clair (par exemple lorsque le soleil se reflète sur le moniteur). Lorsque « LIGHT ON »/« AUTO » (avec « DIM-ON ») est sélectionné NIGHT : assombrit le moniteur pour ne pas vous distraire lors de trajets nocturnes. MIDNIGHT : assombrit le moniteur davantage qu’avec le paramètre « NIGHT ». THEATER : éclaire le moniteur ; adapté si vous souhaitez bénéficier d’un moniteur illuminé la nuit. Select : Cancel : Appuyez sur M/m pour sélectionner la tonalité de l’image, puis appuyez sur </, pour régler le niveau. 5 Appuyez sur (ENTER). Pour masquer le menu mode de lecture, appuyez sur (VISUAL SETUP). Verrouillage des disques — Contrôle parental * * Sauf pour les DVD-R/DVD-R DL/DVD-RW en mode VR. VISUAL SETUP O ENTER L’option « CUSTOM » vous permet de définir votre propre paramètre de qualité d’image en réglant les tonalités de l’image. Vous pouvez mémoriser les paramètres pour « LIGHT OFF » et « LIGHT ON ». 2 En cours de lecture, appuyez sur (VISUAL SETUP). Le menu mode de lecture apparaît. Appuyez sur M/m pour sélectionner (PICTURE EQ), puis appuyez sur (ENTER). L’option actuelle apparaît. Set : RETURN 4 Personnalisation de la qualité d’image 1 0 0 0 M/m Touches numériques CLEAR Vous pouvez verrouiller un disque ou définir des restrictions de lecture selon un niveau prédéterminé, tel que l’âge du spectateur. Les scènes qui font l’objet de limitations peuvent être bloquées ou remplacées par des scènes différentes lors de la lecture d’un DVD compatible avec le contrôle parental. Activation du contrôle parental 1 Appuyez sur (VISUAL SETUP) lorsque l’appareil est hors tension. Le menu de configuration visuelle apparaît. 30 MEX-DV1500U 4-120-899-21 (1) D:\Documents and Settings\takashi-shimomura\Desktop\DTP\848220S MEXDV1500U(EUR)\4120899211_MEX-DV1500U_ML\03FR02CD-E.fm 2 3 Appuyez sur M/m pour sélectionner (CUSTOM SETUP), puis appuyez sur (ENTER). Les rubriques de configuration personnalisables apparaissent. Appuyez sur M/m pour sélectionner « PARENTAL CONTROL », puis appuyez sur (ENTER). Les options apparaissent. CUSTOM SETUP PARENTAL CONTROL : DivX VOD : SLIDE SHOW TIME : MULTI-DISC RESUME : PLAY LIST PLAY : PICTURE EQ : 4 masterpage:Right Modification du mot de passe Sélectionnez « PASSWORD t » à l’étape 4 ci-dessus, saisissez votre mot de passe actuel, saisissez votre nouveau mot de passe, puis saisissez-le de nouveau pour confirmer. Modification de la zone et du niveau d’évaluation des films Les niveaux de restriction peuvent être réglés selon la zone et les niveaux d’évaluation. OFF OFF ONt PLAYERt PASSWORDt AUTO Appuyez sur M/m pour sélectionner « ON t », puis appuyez sur (ENTER). L’écran de réglage du mot de passe apparaît. 1 Appuyez sur (VISUAL SETUP) lorsque l’appareil est hors tension. Le menu de configuration visuelle apparaît. 2 Appuyez sur M/m pour sélectionner (CUSTOM SETUP), puis appuyez sur (ENTER). Les rubriques de configuration personnalisables apparaissent. 3 Appuyez sur M/m pour sélectionner « PARENTAL CONTROL », puis appuyez sur (ENTER). Les options apparaissent. 4 Appuyez sur M/m pour sélectionner « PLAYER t », puis appuyez sur (ENTER). Lorsque le contrôle parental est déjà activé, l’écran de saisie du mot de passe s’affiche. Pour modifier le réglage, saisissez votre mot de passe, puis appuyez sur (ENTER). 5 Appuyez sur M/m pour sélectionner « STANDARD », puis appuyez sur (ENTER). Les options apparaissent. CUSTOM SETUP PARENTAL CONTROL Enter a new 4-digit password, then press ENTER . 5 Appuyez sur les touches numériques pour saisir votre mot de passe, puis appuyez sur (ENTER). La boîte de dialogue de confirmation s’affiche. 6 Pour valider, appuyez sur les touches numériques pour saisir à nouveau votre mot de passe, puis appuyez sur (ENTER). La configuration est terminée. Pour supprimer un numéro saisi, appuyez sur (CLEAR). Pour revenir à l’écran précédent, appuyez sur O. Pour masquer le menu de configuration visuelle, appuyez sur (VISUAL SETUP). Désactivation du contrôle parental Sélectionnez « OFF t » à l’étape 4 ci-dessus, puis saisissez votre mot de passe. Si le contrôle parental est désactivé, le message « Parental control canceled » (Contrôle parental annulé) s’affiche. CUSTOM SETUP PARENTAL CONTROL: LEVEL : STANDARD : 6 8: USA USA OTHERSt Appuyez sur M/m pour sélectionner la zone de votre choix dont vous souhaitez appliquer les niveaux d’évaluation de films, puis appuyez sur (ENTER). La zone est sélectionnée. Si vous sélectionnez « OTHERS t », saisissez le code de zone en vous reportant à la « Liste des codes de zone » à la page 60 à l’aide des touches numériques. suite à la page suivante t 31 MEX-DV1500U 4-120-899-21 (1) D:\Documents and Settings\takashi-shimomura\Desktop\DTP\848220S MEXDV1500U(EUR)\4120899211_MEX-DV1500U_ML\03FR02CD-E.fm 7 Appuyez sur M/m pour sélectionner « LEVEL », puis appuyez sur (ENTER). Les options apparaissent. Les options de répétition et l’ordre de changement de chaque disque/format sont indiqués ci-dessous. Disque/ format CUSTOM SETUP PARENTAL CONTROL: LEVEL : STANDARD : Options OFF CHAPTER : répète le chapitre en cours. TITLE : répète le titre en cours. 8: 1: G 2: 3: PG 4: PG-13 5: *1 Plus la valeur est faible, plus le niveau de restriction est élevé. 8 masterpage:Left OFF TRACK : répète la plage en cours. OFF TRACK : répète la plage en cours. ALBUM : répète l’album en cours. Appuyez sur M/m pour sélectionner le niveau souhaité, puis appuyez sur (ENTER). La configuration est terminée. OFF IMAGE : répète l’image en cours. ALBUM : répète l’album en cours. Pour revenir à l’écran précédent, appuyez sur O. Pour masquer le menu de configuration visuelle, appuyez sur (VISUAL SETUP). OFF FILE : répète le fichier vidéo en cours. ALBUM : répète l’album (dossier) en cours. Lecture répétée et aléatoire MPEG-4 MPEG-4 Les options de lecture aléatoire et l’ordre de changement de chaque disque/format sont indiqués ci-dessous. REP SHUF 1 Disque/ format En cours de lecture, appuyez plusieurs fois sur (1) (REP) ou (2) (SHUF) sur l’appareil principal jusqu’à ce que l’option souhaitée apparaisse. Options *2 *1 OFF TITLE : lit les chapitres du titre en cours dans un ordre aléatoire. OFF DISC : lit les plages du disque en cours dans un ordre aléatoire. OFF ALBUM : lit les plages/images/ fichiers vidéo de l’album (dossier) en cours dans un ordre aléatoire. La lecture répétée ou aléatoire commence. MPEG-4 32 MEX-DV1500U 4-120-899-21 (1) D:\Documents and Settings\takashi-shimomura\Desktop\DTP\848220S MEXDV1500U(EUR)\4120899211_MEX-DV1500U_ML\03FR02CD-E.fm *1 Disponible uniquement lors de la lecture d’un disque VCD version 1.0/1.1 ou 2.0 sans fonction PBC. *2 Sauf pour les DVD-R/DVD-R DL/DVD-RW en mode VR. masterpage:Right Recherche directe MPEG-4 Pour revenir en mode de lecture normal, sélectionnez « OFF ». Remarques • Si vous retournez à un menu du disque/au menu principal, la lecture répétée/aléatoire est annulée. • La lecture répétée/aléatoire ne peut pas être réglée dans le menu du disque/menu principal. VISUAL SETUP Configuration à partir du menu mode de lecture Touches numériques ENTER M/m CLEAR MPEG-4 Vous pouvez localiser directement un point de votre choix en précisant le numéro du titre, du chapitre, etc. VISUAL SETUP ENTER M/m 1 En cours de lecture, appuyez sur (VISUAL SETUP). Le menu mode de lecture apparaît. 2 Appuyez sur M/m pour sélectionner ou (ENTER). 12(67) 018(034) T 1:35:55 , puis appuyez sur 1 En cours de lecture, appuyez sur les touches numériques pour saisir un numéro de rubrique (plage, titre, etc.), puis appuyez sur (ENTER). La lecture commence au début du point sélectionné. Configuration à partir du menu mode de lecture MPEG-4 Les rubriques de recherche diffèrent selon le disque ou le format, comme suit. Disque/ format Rubriques PLAY DVD VIDEO TITLE Commence la lecture à partir d’un titre sélectionné. CHAPTER Commence la lecture à partir d’un chapitre sélectionné. TIME Commence la lecture au point déterminé par le code temporel saisi. OFF CHAPTER TITLE OFF 3 Appuyez sur M/m pour sélectionner l’option souhaitée, puis appuyez sur (ENTER). La lecture répétée ou aléatoire commence. Appuyez sur (VISUAL SETUP) pour masquer le menu mode de lecture. Remarque Le mode de lecture sélectionné est annulé lorsque le disque en cours de lecture est éjecté. * TRACK Commence la lecture à partir d’une plage sélectionnée. suite à la page suivante t 33 MEX-DV1500U 4-120-899-21 (1) D:\Documents and Settings\takashi-shimomura\Desktop\DTP\848220S MEXDV1500U(EUR)\4120899211_MEX-DV1500U_ML\03FR02CD-E.fm ALBUM Commence la lecture à partir d’un album sélectionné. IMAGE Commence la lecture à partir d’une image sélectionnée. MPEG-4 masterpage:Left Affichage par liste de plages/ d’images/de fichiers vidéo — Quick-BrowZer ALBUM Commence la lecture à partir d’un album (dossier) sélectionné. FILE Commence la lecture à partir d’un fichier sélectionné. </M/m/, ENTER * Disponible uniquement lors de la lecture de VCD sans fonction PBC. 1 En cours de lecture, appuyez sur (VISUAL SETUP). Le menu mode de lecture apparaît. 2 Appuyez sur M/m pour sélectionner la rubrique souhaitée, puis appuyez sur (ENTER). - - (67) 018(034) T 1:35:55 PLAY DVD VIDEO Sélection d’une plage/d’une image/ d’un fichier vidéo MPEG-4 Vous pouvez afficher automatiquement des albums/dossiers/plages/images/fichiers vidéo sur le moniteur et en sélectionner un de votre choix pour le lire. Cette fonction est très pratique, surtout pour les disques au format MP3/WMA/AAC/JPEG/ DivX/MPEG-4 qui contiennent de nombreux albums/nombreuses plages, etc. 1 Le numéro entre parenthèses indique le nombre total d’éléments de la rubrique sélectionnée. 3 4 Appuyez sur les touches numériques pour saisir un numéro de rubrique ou un code temporel. Par exemple, pour trouver le point situé à 2 heures, 10 minutes et 20 secondes, saisissez simplement « 21020 ». Pour supprimer les numéros déjà saisis, appuyez sur (CLEAR). Appuyez sur (ENTER). La lecture commence au point sélectionné. Appuyez sur (VISUAL SETUP) pour masquer le menu mode de lecture. En cours de lecture, appuyez sur . La liste des plages/images/fichiers vidéo du disque/de l’album*/du dossier* en cours s’affiche. MP3 0003/1000 3:17 TRACK NAME ALBUM NAME ARTIST NAME ST LIST UP VIDEO FILES LIST UP IMAGE FILES ROOT MUSIC FOLDER 01 TRACK 01 02 TRACK 02 03 TRACK 03 04 TRACK 04 05 TRACK 05 Pour revenir en arrière/passer à la page précédente/suivante, appuyez sur </,. Pour passer au niveau supérieur, appuyez sur .* Pour sélectionner le dossier souhaité, appuyez sur M/m, puis (ENTER).* * Uniquement lors de la lecture de MP3/WMA/ AAC/JPEG/DivX/MPEG-4. 34 MEX-DV1500U 4-120-899-21 (1) D:\Documents and Settings\takashi-shimomura\Desktop\DTP\848220S MEXDV1500U(EUR)\4120899211_MEX-DV1500U_ML\03FR02CD-E.fm 2 Appuyez sur M/m pour sélectionner la plage/l’image/le fichier vidéo de votre choix, puis appuyez sur (ENTER). La lecture de la plage, de l’image ou du fichier vidéo sélectionné commence. Avec l’appareil principal Tournez la molette de réglage au lieu d’appuyer sur M/m, appuyez sur (SEEK) –/+ au lieu de </,, appuyez sur la molette de réglage au lieu de (ENTER). masterpage:Right Visualisation des informations relatives au disque audio Pendant la lecture audio, vous pouvez vérifier les informations du disque ou afficher l’image de la pochette* d’un fichier MP3/WMA/AAC sur le moniteur. * La taille recommandée est de 240 × 240 à 960 × 960 pixels. Sélection d’un type de fichier Par exemple, lors de la lecture d’un MP3 MPEG-4 Si le disque contient plusieurs types de fichiers, seul le type de fichier sélectionné (audio/vidéo/ image) peut être lu. L’ordre de priorité de lecture du type de fichier est initialement le suivant : audio, vidéo, puis image (par exemple, si le disque contient des fichiers vidéo et des fichiers d’image, seuls les fichiers vidéo sont lus). Vous pouvez sélectionner le type de fichier à afficher dans la liste, puis sélectionner le fichier que vous souhaitez lire. 1 2 3 En cours de lecture, appuyez sur . Appuyez sur M/m pour sélectionner le type de fichier à afficher dans la liste, puis appuyez sur (ENTER). Pour afficher une liste des fichiers MP3, WMA et AAC, sélectionnez « LIST UP AUDIO FILES ». Pour afficher une liste des fichiers DivX/ MPEG-4, sélectionnez « LIST UP VIDEO FILES ». Pour afficher une liste des fichiers JPEG, sélectionnez « LIST UP IMAGE FILES ». Appuyez sur M/m pour sélectionner le fichier souhaité, puis appuyez sur (ENTER). La lecture du fichier sélectionné commence. Avec l’appareil principal Tournez la molette de réglage du volume au lieu d’appuyer sur M/m, appuyez sur la molette de réglage au lieu de (ENTER). A TRACK NAME ALBUM NAME ARTIST NAME MP3 0003/1000 3:17 E To list up, press BROWSE C B F D ST SHUF G . H A Numéro de plage ou nom de plage Nom du disque/Nom de l’album Nom de l’artiste B Format C Statut de lecture (N, X, etc.) D Canal audio actuel Lors de la lecture d’un fichier CD/MP3/ WMA/AAC, le canal audio peut être modifié. Pour plus de détails, reportez-vous à la section « Modification du canal audio » à la page 27. E Numéro de la plage/Total F Temps de lecture écoulé G Mode de lecture actuel H Messages d’aide Conseil Vous pouvez également sélectionner une plage à lire à l’aide d’une liste (Quick-BrowZer) (page 34). 35 MEX-DV1500U 4-120-899-21 (1) D:\Documents and Settings\takashi-shimomura\Desktop\DTP\848220S MEXDV1500U(EUR)\4120899211_MEX-DV1500U_ML\03FR02CD-E.fm Le numéro de la touche apparaît sur l’appareil principal. Opérations avancées — Radio Mémorisation et réception des stations masterpage:Left Remarque Si vous essayez de mémoriser une autre station sur la même touche numérique, la station mémorisée précédemment est effacée. Conseil Lorsqu’une station RDS est mémorisée, le réglage AF/TA est également mémorisé (page 37). SYSTEM SETUP ENTER M/m Touches numériques SRC MODE Réception des stations mémorisées 1 Sélectionnez la bande, puis appuyez sur une touche numérique ((1) à (6)). Fonction RDS Attention Pour syntoniser des stations pendant que vous conduisez, utilisez la fonction de mémorisation des meilleurs accords (BTM) afin d’éviter les accidents. Molette de réglage DSPL Mémorisation automatique — BTM 1 Appuyez plusieurs fois sur (SRC) jusqu’à ce que l’indication « TUNER » apparaisse sur l’appareil principal. Pour changer de bande, appuyez plusieurs fois sur (MODE). Vous pouvez sélectionner FM1, FM2, FM3, MW (PO) ou LW (GO). 2 Appuyez sur (SYSTEM SETUP). La rubrique de configuration système apparaît. 3 Appuyez sur M/m pour sélectionner « BTM », puis appuyez sur (ENTER). L’appareil enregistre les stations sur les touches numériques dans l’ordre des fréquences ((1) à (6)). Un bip retentit lorsque le réglage est mémorisé. Avec l’appareil principal Appuyez sur (SOURCE) au lieu de (SRC), appuyez (SETUP) au lieu de (SYSTEM SETUP), tournez la molette de réglage du volume au lieu d’appuyer sur M/m, appuyez sur la molette de réglage au lieu de (ENTER). Mémorisation manuelle 1 36 Lorsque vous recevez la station que vous souhaitez mémoriser, appuyez sur une touche numérique et maintenez-la enfoncée ((1) à (6)) jusqu’à ce que l’indication « MEM » apparaisse sur l’appareil principal. AF/TA (PTY) Touches numériques Aperçu Les stations FM disposant du système RDS (Système de radiocommunication de données) transmettent des informations numériques inaudibles en même temps que le signal normal de leurs émissions radio. Rubriques d’affichage A B C A Bande radio, fonctionnement B TA/TP*1 C Fréquence*2 (Nom du service de l’émission), Numéro de présélection, Horloge, Données RDS *1 « TA » clignote pendant les messages de radioguidage. L’indication « TP » s’allume lorsqu’une de ces stations est captée. *2 Lorsque vous captez la station RDS, « * » est affiché à gauche de l’indication de la fréquence. MEX-DV1500U 4-120-899-21 (1) D:\Documents and Settings\takashi-shimomura\Desktop\DTP\848220S MEXDV1500U(EUR)\4120899211_MEX-DV1500U_ML\03FR02CD-E.fm masterpage:Right Services RDS Si vous effectuez une présélection manuelle, vous pouvez présélectionner à la fois des stations RDS et non-RDS, avec leurs réglages AF/TA respectifs. Cet appareil propose automatiquement les services RDS, comme suit : 1 Réglez AF/TA, puis mémorisez la station à l’aide de la fonction BTM ou manuellement. AF (Fréquences alternatives) Permet de sélectionner et de régler de nouveau la station ayant le signal le plus fort sur un réseau. Cette fonction vous permet d’écouter la même émission en continu pendant un voyage longue distance sans avoir à régler de nouveau cette station manuellement. Réception de messages d’urgence Pour modifier les rubriques d’affichage C, appuyez sur (DSPL). TA (Messages de radioguidage)/ TP (Programme de radioguidage) Propose les messages et les programmes de radioguidage disponibles à cet instant. Tout message/programme reçu interrompt la source sélectionnée en cours de diffusion. PTY (Types d’émission) Permet d’afficher le type d’émission en cours de réception et de rechercher votre type d’émission sélectionné. CT (Heure) Les données CT accompagnant la transmission RDS assurent un réglage de l’horloge. Remarques • Selon le pays ou la région où vous vous trouvez, il est possible que les services RDS ne soient pas tous disponibles. • La fonction RDS ne fonctionne pas correctement si le signal de retransmission est faible ou si la station syntonisée ne transmet pas de données RDS. Réglages AF et TA Les réglages AF/TA et leur ordre de changement sont indiqués ci-dessous. AF-ON : active AF et désactive TA. TA-ON : active TA et désactive AF. AF, TA-ON : active AF et TA. AF, TA-OFF : désactive AF et TA. 1 Appuyez plusieurs fois sur (AF/TA) jusqu’à ce que le réglage souhaité apparaisse. Lorsque la fonction AF ou TA est activée, les messages d’urgence interrompent automatiquement la source sélectionnée en cours de diffusion. Conseil Si vous réglez le niveau de volume pendant la diffusion d’un message de radioguidage, ce niveau sera enregistré dans la mémoire pour les messages de radioguidage suivants, indépendamment du niveau de volume normal. Ecoute continue d’une émission régionale — REG La fonction AF est activée : ce réglage par défaut restreint la réception à une région spécifique, afin que la syntonisation ne passe pas automatiquement à une autre station régionale dont les signaux sont plus puissants. Si vous quittez la zone de réception de cette émission régionale, choisissez « REG-OFF » dans la configuration système en cours de réception FM (page 46). Remarque Cette fonction est inopérante au Royaume-Uni et dans certaines autres régions. Fonction de liaison locale (RoyaumeUni uniquement) Cette fonction vous permet de sélectionner d’autres stations locales de la région, même si elles ne sont pas associées à vos touches numériques. 1 En cours de réception FM, appuyez sur une touche numérique ((1) à (6)) sur laquelle une station locale est mémorisée. 2 Dans les 5 secondes qui suivent, appuyez de nouveau sur la touche numérique de la station locale. Répétez cette procédure jusqu’à ce que vous captiez la station locale souhaitée. Mémorisation des stations RDS avec les réglages AF et TA Vous pouvez présélectionner les stations RDS avec les réglages AF/TA. Si vous utilisez la fonction BTM, seules les stations RDS sont mémorisées avec les mêmes réglages AF/TA. 37 MEX-DV1500U 4-120-899-21 (1) D:\Documents and Settings\takashi-shimomura\Desktop\DTP\848220S MEXDV1500U(EUR)\4120899211_MEX-DV1500U_ML\03FR02CD-E.fm masterpage:Left Sélection de PTY Réglage du son 1 Réglage des caractéristiques du son Appuyez sur la touche (AF/TA) (PTY) en cours de réception FM et maintenez-la enfoncée. SOUND Le nom du type d’émission diffusé apparaît si la station transmet des données PTY. 2 Tournez la molette de réglage du volume pour sélectionner le type d’émission. 3 Appuyez sur la molette de réglage. L’appareil recherche une station diffusant le type d’émission sélectionné. Types d’émissions NEWS (nouvelles), AFFAIRS (dossiers d’actualité), INFO (informations), SPORT (sport), EDUCATE (education), DRAMA (théâtre), CULTURE (culture), SCIENCE (science), VARIED (divers), POP M (musique pop), ROCK M (rock), EASY M (musique légère), LIGHT M (musique classique légère), CLASSICS (musique classique), OTHER M (autres styles de musique), WEATHER (météo), FINANCE (finance), CHILDREN (émissions pour les enfants), SOCIAL A (affaires sociales), RELIGION (religion), PHONE IN (émissions ligne ouverte), TRAVEL (voyage), LEISURE (loisirs), JAZZ (jazz), COUNTRY (musique country), NATION M (musique nationale), OLDIES (musique d’autrefois), FOLK M (musique folk), DOCUMENT (documentaires) Remarque Cette fonction est inopérante dans certains pays ou régions où les données PTY ne sont pas disponibles. M/m Vous pouvez régler les caractéristiques du son à votre convenance. Les rubriques de réglage du menu son et l’ordre dans lequel elles s’affichent sont indiqués ci-dessous. EQ3 : permet de sélectionner une courbe de l’égaliseur entre 7 types de musique. LOW, MID, HI*1 : règle le niveau de volume de la bande sélectionnée pour le réglage personnalisé EQ3. BAL (Balance) : règle la balance du son entre les haut-parleurs gauche et droit. FAD (Equilibre avant-arrière) : règle le niveau relatif entre les haut-parleurs avant et arrière. SUB (Volume du caisson de graves)*2 : permet de régler le volume du caisson de graves. (« ATT » est le réglage inférieur.) *1 Apparaît uniquement lorsque EQ3 est activé. *2 Lorsque la sortie audio est réglée sur « SUBOUT » (page 45). 1 En cours de lecture ou de réception, appuyez plusieurs fois sur (SOUND) jusqu’à ce que la rubrique de réglage souhaitée apparaisse sur l’appareil principal. 2 Appuyez sur M/m pour régler le niveau ou sélectionner l’option souhaitée. 3 Appuyez sur . Le réglage est terminé et la fenêtre d’affichage revient au mode de lecture/ réception normal. Réglage de CT 1 Réglez « CT-ON » dans la configuration système (page 45). Remarques • Il est possible que la fonction CT ne fonctionne pas, même si une station RDS est captée. • Il peut y avoir une différence entre l’heure réglée par la fonction CT et l’heure réelle. 38 MEX-DV1500U 4-120-899-21 (1) D:\Documents and Settings\takashi-shimomura\Desktop\DTP\848220S MEXDV1500U(EUR)\4120899211_MEX-DV1500U_ML\03FR02CD-E.fm Avec l’appareil principal Appuyez sur la molette de réglage au lieu de (SOUND), tournez la molette de réglage au lieu d’appuyer sur M/m. Personnalisation de la courbe de l’égaliseur — EQ3 « CUSTOM » de EQ3 vous permet de définir vos propres réglages de l’égaliseur. Vous pouvez régler le niveau de 3 bandes différentes : « LOW », « MID » et « HI ». 1 En cours de lecture ou de réception, appuyez plusieurs fois sur (SOUND) jusqu’à ce que « EQ3 » apparaisse. 2 Appuyez sur M/m pour sélectionner « CUSTOM ». 3 Appuyez plusieurs fois sur (SOUND) jusqu’à ce que « LOW », « MID » ou « HI » apparaisse. 4 Appuyez sur M/m pour régler le niveau du paramètre sélectionné. Le niveau peut être réglé par incréments uniques, entre –10 et +10. masterpage:Right Paramètres Vous pouvez configurer plusieurs paramètres dans les deux menus de configuration suivants. • Menu de configuration visuelle (page 39) Permet de configurer toutes les rubriques visuelles (via le moniteur). • Menu de configuration système (page 44) Permet de configurer toutes les rubriques liées au système (via l’appareil principal). Configuration visuelle Le menu de configuration visuelle comprend les catégories suivantes. LANGUAGE SETUP (page 41) Permet de régler la langue du menu, des sous-titres, etc. DISPLAY SETUP (page 41) Permet de régler les paramètres du moniteur raccordé. CUSTOM SETUP (page 42) Permet de personnaliser la lecture des disques. 5 Pour restaurer la courbe par défaut de l’égaliseur, appuyez sur la touche (SOUND) et maintenez-la enfoncée. AUDIO SETUP (page 43) Permet de régler les paramètres du son selon le disque. Appuyez sur . Le réglage est terminé et la fenêtre d’affichage revient au mode de lecture/ réception normal. RESET (page 43) Permet de réinitialiser toutes les rubriques de configuration. Conseil D’autres types d’égaliseur peuvent aussi être réglés. Avec l’appareil principal Appuyez sur la molette de réglage au lieu de (SOUND), tournez la molette de réglage au lieu d’appuyer sur M/m. Opération de base de la configuration visuelle VISUAL SETUP O ENTER M/m Vous pouvez configurer les rubriques du menu en suivant la procédure suivante. suite à la page suivante t 39 MEX-DV1500U 4-120-899-21 (1) D:\Documents and Settings\takashi-shimomura\Desktop\DTP\848220S MEXDV1500U(EUR)\4120899211_MEX-DV1500U_ML\03FR02CD-E.fm masterpage:Left Par exemple, pour régler le format sur « 4:3 PAN SCAN ». 1 Appuyez sur (VISUAL SETUP) lorsque l’appareil est hors tension. Le menu de configuration visuelle apparaît. LANGUAGE SETUP MENU : AUDIO : SUBTITLE : 2 Appuyez sur M/m pour sélectionner (DISPLAY SETUP), puis appuyez sur (ENTER). Les rubriques de configuration de l’affichage apparaissent. DISPLAY SETUP MONITOR TYPE : WALLPAPER : 3 16:9 WALLPAPER 1 Appuyez sur M/m pour sélectionner « MONITOR TYPE », puis appuyez sur (ENTER). Les options apparaissent. DISPLAY SETUP MONITOR TYPE : WALLPAPER : 4 ENGLISH ENGLISH ENGLISH 16:9 16:9 4:3 LETTER BOX 4:3 PAN SCAN Appuyez sur M/m pour sélectionner « 4:3 PAN SCAN », puis appuyez sur (ENTER). La configuration est terminée. Pour revenir à l’écran précédent, appuyez sur O. Pour masquer le menu de configuration visuelle, appuyez sur (VISUAL SETUP). 40 MEX-DV1500U 4-120-899-21 (1) D:\Documents and Settings\takashi-shimomura\Desktop\DTP\848220S MEXDV1500U(EUR)\4120899211_MEX-DV1500U_ML\03FR02CD-E.fm masterpage:Right Configuration de la langue à l’écran ou de la bande son Sélectionnez (LANGUAGE SETUP), puis sélectionnez la rubrique et l’option souhaitées ci-dessous à l’aide de M/m et (ENTER). Pour plus de détails sur cette procédure, reportez-vous à la section « Opération de base de la configuration visuelle » à la page 39. Rubrique Objet MENU Permet de changer la langue du menu du disque. AUDIO Permet de changer la langue de la bande son. SUBTITLE Permet de changer la langue des sous-titres enregistrés sur le disque. Configuration de l’affichage Sélectionnez (DISPLAY SETUP), puis sélectionnez la rubrique et l’option souhaitées ci-dessous à l’aide de M/m et (ENTER). Pour plus de détails sur cette procédure, reportez-vous à la section « Opération de base de la configuration visuelle » à la page 39. « z » indique le réglage par défaut. Rubrique MONITOR TYPE Sélectionne le format adapté au moniteur raccordé. WALLPAPER Option Objet 16:9 (z) Permet d’afficher une image grand écran. Adapté lors du raccordement à un moniteur grand écran ou un moniteur doté d’une fonction mode grand écran. 4:3 LETTER BOX Permet d’afficher une image grand écran avec des bandes sur les parties supérieure et inférieure de l’écran. Adapté lors du raccordement à un moniteur avec un écran 4:3. 4:3 PAN SCAN Permet d’afficher une image grand écran sur l’écran entier et de couper automatiquement les parties qui dépassent. WALLPAPER 1 (z), 2, 3 Permet de sélectionner le papier peint. Remarque Selon le disque, « 4:3 LETTER BOX » peut être sélectionné automatiquement à la place de « 4:3 PAN SCAN », et vice-versa. 41 MEX-DV1500U 4-120-899-21 (1) D:\Documents and Settings\takashi-shimomura\Desktop\DTP\848220S MEXDV1500U(EUR)\4120899211_MEX-DV1500U_ML\03FR02CD-E.fm masterpage:Left Configuration personnalisée Sélectionnez (CUSTOM SETUP), puis sélectionnez la rubrique et l’option souhaitées ci-dessous à l’aide de M/m et (ENTER). Pour plus de détails sur cette procédure, reportez-vous à la section « Opération de base de la configuration visuelle » à la page 39. Pour plus de détails, reportez-vous aux numéros de page indiqués. « z » indique le réglage par défaut. Rubrique Option OFF t (z) PARENTAL CONTROL (page 30) *1 Permet de régler les restrictions de lecture afin de ne pas lire de scènes ON t ou de disques inadaptés. MULTI-DISC RESUME *2 Permet d’activer le contrôle parental. Permet de fixer la norme de restriction et son niveau. PASSWORD t Permet de choisir un nouveau mot de passe à 4 chiffres. Permet de désactiver l’affichage. 5 sec. (z), 10 sec., Permet de sélectionner l’intervalle 20 sec., 40 sec., 60 sec. de diaporama. FIXED Permet de désactiver le diaporama. ON (z) Permet d’enregistrer les réglages de reprise dans la mémoire pour 5 disques au maximum. (Les réglages restent dans la mémoire même lorsque vous réglez sur « OFF ».) OFF Permet de ne pas enregistrer les réglages de reprise dans la mémoire. La fonction de reprise de la lecture est disponible uniquement pour le disque actuellement inséré dans l’appareil. ON (z) Permet d’enregistrer les réglages de reprise dans la mémoire. (Les réglages restent dans la mémoire même lorsque vous réglez sur « OFF ».) OFF Permet de ne pas enregistrer les réglages de reprise dans la mémoire. MPEG-4 USB RESUME Permet de désactiver le contrôle parental. PLAYER t Done DivX VOD Affiche le code d’enregistrement de cet appareil. Pour de plus amples informations, visitez le site Web suivant : http://www.divx.com/vod SLIDE SHOW TIME Objet 42 MEX-DV1500U 4-120-899-21 (1) D:\Documents and Settings\takashi-shimomura\Desktop\DTP\848220S MEXDV1500U(EUR)\4120899211_MEX-DV1500U_ML\03FR02CD-E.fm masterpage:Right PLAY LIST PLAY (Pour les DVD-R/DVD-R DL/ DVD-RW en mode VR uniquement) ORIGINAL (z) Permet de lire les titres originaux enregistrés. PLAY LIST Permet de lire la liste de lecture éditée. PICTURE EQ (page 29) AUTO (z) Permet de basculer automatiquement entre les options d’utilisation pendant la nuit/la journée en fonction du réglage du régulateur de luminosité dans la configuration système (page 46). LIGHT OFF Permet d’afficher les options d’utilisation pendant la journée. LIGHT ON Permet d’afficher les options d’utilisation pendant la nuit. MPEG-4 Sélectionne l’option de configuration à afficher dans le menu du mode de lecture. *1 Sauf pour les DVD-R/DVD-R DL/DVD-RW en mode VR. *2 DVD VIDEO uniquement. Remarque Si le contrôle parental est activé, la fonction de reprise de la lecture ne fonctionne pas. Dans ce cas, la lecture reprend au début du disque lors de son insertion. Configuration audio Sélectionnez (AUDIO SETUP), puis sélectionnez la rubrique et l’option souhaitées ci-dessous à l’aide de M/m et (ENTER). Pour plus de détails sur cette procédure, reportez-vous à la section « Opération de base de la configuration visuelle » à la page 39. Pour plus de détails, reportez-vous aux numéros de page indiqués. « z » indique le réglage par défaut. Rubrique Option STANDARD (z) AUDIO DRC * Permet d’avoir un son clair lorsque le volume est faible. Disponible WIDE RANGE uniquement pour un DVD conforme à Audio DRC (Contrôle de plage dynamique). Objet Permet de sélectionner le réglage standard. Permet d’obtenir la sensation d’assister à un spectacle. * Sauf pour les DVD-R/DVD-R DL/DVD-RW en mode VR. Réinitialisation de tous les paramètres Tous les paramètres (à l’exception du paramètre de contrôle parental) de la configuration visuelle peuvent être réinitialisés. Sélectionnez (RESET), puis « RESET ALL SETTINGS », « YES » à l’aide de M/m et (ENTER). Pour obtenir des informations détaillées sur cette procédure, reportez-vous à la section « Opération de base de la configuration visuelle » à la page 39. Remarque Ne mettez pas l’appareil hors tension en cours de réinitialisation, étant donné que cette opération prend quelques secondes. 43 MEX-DV1500U 4-120-899-21 (1) D:\Documents and Settings\takashi-shimomura\Desktop\DTP\848220S MEXDV1500U(EUR)\4120899211_MEX-DV1500U_ML\03FR02CD-E.fm masterpage:Left Vous pouvez configurer les rubriques du menu en suivant la procédure suivante. Configuration système Le menu de configuration système comprend les catégories suivantes. • SET : paramètres généraux (page 45) • DSPL : paramètres d’affichage (page 45) • R/M : paramètres du mode de réception (page 46) • SND : paramètres du son (page 47) Par exemple, pour régler la démonstration. 1 Appuyez sur (SYSTEM SETUP) lorsque l’appareil est hors tension. La rubrique de configuration système apparaît sur l’appareil principal. 2 Appuyez sur M/m pour sélectionner « DEMO », puis appuyez sur (ENTER). L’option apparaît. 3 Appuyez sur M/m pour sélectionner « ON » ou « OFF », puis appuyez sur (ENTER). La configuration est terminée. Opération de base de la configuration système SYSTEM SETUP ENTER M/m Pour masquer l’écran de configuration système, appuyez sur (SYSTEM SETUP). Avec l’appareil principal Appuyez sur (SETUP) au lieu de (SYSTEM SETUP), tournez la molette de réglage au lieu d’appuyer sur M/m, appuyez sur la molette de réglage au lieu de (ENTER). 44 MEX-DV1500U 4-120-899-21 (1) D:\Documents and Settings\takashi-shimomura\Desktop\DTP\848220S MEXDV1500U(EUR)\4120899211_MEX-DV1500U_ML\03FR02CD-E.fm masterpage:Right Pour plus de détails, reportez-vous aux numéros de page indiqués. « z » indique le réglage par défaut. SET (Configuration) Rubrique Option Etat de l’appareil Objet CLOCK-ADJ (Réglage de l’horloge) (page 48) – – CT (Heure) (page 37, 38) ON Permet d’activer la fonction CT. OFF (z) Permet de désactiver la fonction CT. ON (z) Permet d’activer le son de fonctionnement. OFF Permet de désactiver le son de fonctionnement. BEEP PAL (z) COLOR-SYS (Système de couleurs) Permet de modifier le signal de NTSC sortie vidéo en fonction du moniteur raccordé. Permet de sélectionner PAL. NO (z) AUTO-OFF S’éteint automatiquement après un délai souhaité lorsque l’appareil est hors tension. Permet de désactiver la fonction de mise hors tension automatique. REAR/SUB Permet de commuter la sortie audio. Permet de sélectionner NTSC. 30S, 30M, 60M Permet de sélectionner le délai souhaité. REAR-OUT Permet de régler sur l’amplificateur de puissance. SUB-OUT (z) Tous les états. Appareil hors tension. Tous les états. Appareil hors tension. Permet de régler sur le caisson de graves. DSPL (Affichage) Rubrique M.DSPL (Affichage animé) Sélectionne le mode d’affichage animé. DEMO (Démonstration) Option SA (z) Etat de l’appareil Objet Permet d’afficher les motifs animés ainsi que l’analyseur de spectre. OFF Permet de désactiver le mode d’affichage animé. ON (z) Permet d’activer la démonstration. OFF Permet de désactiver la démonstration. En cours de lecture/de réception radio. Appareil hors tension. suite à la page suivante t 45 MEX-DV1500U 4-120-899-21 (1) D:\Documents and Settings\takashi-shimomura\Desktop\DTP\848220S MEXDV1500U(EUR)\4120899211_MEX-DV1500U_ML\03FR02CD-E.fm DIMMER Change la luminosité de l’affichage. ON Permet de réduire la luminosité de l’affichage. OFF (z) Permet de désactiver le régulateur de luminosité. AUTO-SCRL (Défilement automatique) Permet de faire défiler automatiquement des longues rubriques. ON (z) Permet de faire défiler. OFF Permet de ne pas faire défiler. masterpage:Left Tous les états. En cours de lecture du disque. R/M (Mode de réception) Rubrique LOCAL (Mode de recherche locale) Option ON Objet Permet de syntoniser uniquement les stations dont les signaux captés sont les plus puissants. OFF (z) Permet de syntoniser en réception normale. MONO (Mode monaural) Sélectionne le mode de réception monaurale pour améliorer une réception FM faible. ON Permet d’écouter des émissions stéréo en mode mono. OFF (z) Permet d’écouter les émissions stéréo en stéréo. REGIONAL (page 37) ON (z) Permet d’écouter une émission régionale en continu. OFF Permet de désactiver la fonction lorsque vous quittez la zone de réception de l’émission. – – BTM (Mémorisation des meilleurs accords) (page 36) Etat de l’appareil En cours de réception radio. En cours de réception FM. En cours de réception radio. 46 MEX-DV1500U 4-120-899-21 (1) D:\Documents and Settings\takashi-shimomura\Desktop\DTP\848220S MEXDV1500U(EUR)\4120899211_MEX-DV1500U_ML\03FR02CD-E.fm masterpage:Right SND (Son) Rubrique Option Objet HPF (Filtre passe-haut) Permet de sélectionner la fréquence de coupure des haut-parleurs avant/arrière. OFF (z) Permet de ne pas couper la fréquence. 80HZ,100HZ, 120HZ,140HZ, 160HZ Permet de sélectionner la fréquence. LPF (Filtre passe-bas)*1 Permet de sélectionner la fréquence de coupure du caisson de graves. OFF (z) Permet de ne pas couper la fréquence. 80HZ,100HZ, 120HZ,140HZ, 160HZ Permet de sélectionner la fréquence. LPF-PHASE (Phase du filtre passe-bas)*1 Permet de sélectionner la phase lorsque la fonction LPF est activée. NORM (z) Permet d’appliquer la phase normale au LPF. REV Permet d’appliquer la phase inversée au LPF. LOUD (Intensité sonore) Permet d’avoir un son clair lorsque le volume est faible. OFF (z) Permet de ne pas amplifier les graves et les aigus. ON Permet d’amplifier les graves et les aigus. AUX-LEVEL (page 49) (–8 ~ +18) z:0 Permet de sélectionner le niveau. DVD-LEVEL (page 28) ADJST-ON Permet d’ajuster le niveau de sortie du format Dolby Digital. ADJST-OFF (z) Permet de désactiver le réglage du niveau. DOLBY-ADJ (Réglage du niveau Dolby) (page 28)*2 (–10 ~ +10) z : +8 Etat de l’appareil En cours de lecture/de réception radio. En cours de lecture AUX. En cours de lecture du disque. Permet de sélectionner le niveau. *1 Lorsque la sortie audio est réglée sur « SUB-OUT ». *2 Apparaît et est disponible uniquement lorsque « DVD-LEVEL » est réglé sur « ADJST-ON ». 47 MEX-DV1500U 4-120-899-21 (1) D:\Documents and Settings\takashi-shimomura\Desktop\DTP\848220S MEXDV1500U(EUR)\4120899211_MEX-DV1500U_ML\03FR02CD-E.fm Réglage de l’horloge masterpage:Left Utilisation d’un appareil en option Appareil auxiliaire SYSTEM SETUP </M/m/, ENTER SYSTEM SETUP ENTER M/m SRC MODE DSPL L’horloge fonctionne suivant un cycle de 24 heures. 1 Appuyez sur (SYSTEM SETUP). La rubrique de configuration système apparaît sur l’appareil principal. 2 Appuyez sur M/m pour sélectionner « CLOCK-ADJ », puis appuyez sur (ENTER). L’indication des heures clignote. Vous pouvez raccorder des appareils auxiliaires à l’appareil et les écouter par l’intermédiaire des haut-parleurs du véhicule. Vous pouvez raccorder 2 appareils au maximum, un à la prise d’entrée AUX (mini-prise stéréo) à l’avant et l’autre aux bornes AUX AUDIO IN à l’arrière. Le niveau de volume peut être réglé pour corriger toutes les différences entre l’appareil et le périphérique auxiliaire. Raccordement d’un appareil auxiliaire 3 Appuyez sur M/m pour régler l’heure et les minutes. Appuyez sur </, pour déplacer l’indication numérique. 4 Appuyez sur (ENTER). La configuration est terminée. 1 Mettez l’appareil auxiliaire hors tension. 2 Diminuez le volume de l’appareil. 3 Effectuez le raccordement à l’appareil. A l’avant Raccordez l’appareil à la prise d’entrée AUX. Pour masquer l’écran de configuration système, appuyez sur (SYSTEM SETUP). Pour afficher l’horloge en cours de lecture, appuyez plusieurs fois sur (DSPL) jusqu’à ce qu’elle s’affiche. Avec l’appareil principal Appuyez sur (SETUP) au lieu de (SYSTEM SETUP), tournez la molette de réglage au lieu d’appuyer sur M/m, appuyez sur .m/M> au lieu de </,, appuyez sur la molette de réglage au lieu de (ENTER). AUX AUX Cordon de raccordement* (non fourni) * Veillez à utiliser une fiche de type droit. A l’arrière Raccordez l’appareil aux bornes AUX AUDIO IN. 48 MEX-DV1500U 4-120-899-21 (1) D:\Documents and Settings\takashi-shimomura\Desktop\DTP\848220S MEXDV1500U(EUR)\4120899211_MEX-DV1500U_ML\03FR02CD-E.fm Sélection d’un appareil auxiliaire masterpage:Right Informations complémentaires 1 Appuyez plusieurs fois sur (SRC) jusqu’à ce que l’indication « AUX » apparaisse sur l’appareil principal. 2 Appuyez sur (MODE) pour sélectionner « FRONT-IN » ou « REAR-IN ». Utilisez l’appareil auxiliaire directement. • Laissez l’appareil refroidir avant de l’utiliser si votre véhicule est resté garé en plein soleil. • L’antenne électrique se déploie automatiquement. Réglage du niveau de volume Condensation Avant de commencer la lecture, n’oubliez pas de régler le volume de chaque appareil raccordé. 1 Diminuez le volume de l’appareil. 2 Appuyez plusieurs fois sur (SRC) jusqu’à ce que l’indication « AUX » apparaisse sur l’appareil principal. Si deux appareils auxiliaires sont raccordés, sélectionnez l’appareil pour régler son volume en appuyant sur (MODE). 3 Démarrez la lecture sur l’appareil auxiliaire, à un niveau de volume modéré. 4 Réglez votre appareil sur le volume d’écoute habituel. 5 Appuyez sur (SYSTEM SETUP). 6 Appuyez sur M/m pour sélectionner « AUXLEVEL », puis appuyez sur (ENTER). 7 Appuyez sur M/m pour régler le niveau d’entrée. Le niveau d’entrée peut être réglé par incréments uniques, entre –8 et +18. 8 Appuyez sur (ENTER). La configuration est terminée. Pour masquer l’écran de configuration système, appuyez sur (SYSTEM SETUP). Avec l’appareil principal Appuyez sur (SOURCE) au lieu de (SRC), appuyez (SETUP) au lieu de (SYSTEM SETUP), tournez la molette de réglage du volume au lieu d’appuyer sur M/m, appuyez sur la molette de réglage au lieu de (ENTER). Précautions Si de l’humidité se forme dans l’appareil, retirez le disque et attendez environ une heure pour qu’il sèche, sinon il ne fonctionnera pas correctement. Pour conserver un son de haute qualité Ne renversez pas de liquide sur l’appareil ou les disques. Remarques sur les disques • N’exposez pas les disques aux rayons directs du soleil ni à des sources de chaleur telles que des conduits d’air chaud et ne les laissez pas dans une voiture garée en plein soleil. • Avant de lire les disques, essuyez-les avec un chiffon de nettoyage en partant du centre. N’utilisez pas de solvants comme de l’essence, du dissolvant ou des nettoyants disponibles dans le commerce. • Cet appareil est conçu pour la lecture des disques conformes à la norme Compact Disc (CD). Les DualDiscs et certains disques de musique encodés par des technologies de protection des droits d’auteur ne sont pas conformes à la norme Compact Disc (CD), par conséquent, il est possible que ces disques ne puissent pas être lus sur cet appareil. • Disques NE POUVANT PAS être lus sur cet appareil – Les disques sur lesquels sont collés des étiquettes, des autocollants, du ruban adhésif ou du papier. L’utilisation de tels disques peut entraîner des problèmes de fonctionnement ou les endommager. – Les disques de forme non standard (notamment en forme de cœur, de carré ou d’étoile) ne peuvent pas être lus avec cet appareil. Vous risquez d’endommager votre appareil si vous essayez de le faire. – Les disques de 8 cm. suite à la page suivante t 49 MEX-DV1500U 4-120-899-21 (1) D:\Documents and Settings\takashi-shimomura\Desktop\DTP\848220S MEXDV1500U(EUR)\4120899211_MEX-DV1500U_ML\03FR02CD-E.fm masterpage:Left Remarque sur les opérations de lecture des DVD et des VCD Remarques sur les CD multisession/ DVD Multi Border Certaines opérations de lecture des DVD et VCD peuvent être intentionnellement réglées par les éditeurs de logiciels. Etant donné que cet appareil lit les DVD et les VCD selon le contenu du disque conçu par les éditeurs de logiciels, certaines fonctions de lecture risquent de ne pas être disponibles. Reportez-vous au mode d’emploi fourni avec votre disque. Cet appareil peut lire les CD multisession/DVD Multi Border dans les conditions suivantes. Notez que la session doit être fermée et le disque finalisé. • Lorsqu’un CD-DA (CD audio numérique) est enregistré dans la première session : L’appareil reconnaît le disque comme un CD-DA et seul le CD-DA de la première session est lu, même si un autre format (par exemple MP3) est enregistré dans d’autres sessions. • Lorsqu’un CD-DA est enregistré dans une session autre que la première : L’appareil reconnaît le disque comme un DATA CD ou un DATA DVD et toutes les sessions CD-DA sont ignorées. • Lorsqu’un fichier MP3/WMA/AAC/JPEG/DivX/ MPEG-4 est enregistré : Seules les sessions contenant le type de fichier sélectionné (audio/vidéo/image)* sont lues (si un CD-DA ou d’autres données sont enregistrés dans d’autres sessions, ils sont ignorées). Remarques sur les DATA CD et DATA DVD • Certains DATA CD/DATA DVD (selon l’appareil utilisé pour l’enregistrement ou selon l’état du disque) risquent de ne pas être lus sur cet appareil. • La finalisation est requise pour certains disques (page 50). • Cet appareil est compatible avec les normes suivantes. Pour les DATA CD – Format ISO 9660 niveau 1/2, format d’extension Joliet/Romeo – Multisession Pour les DATA DVD – Format UDF Bridge (hybride UDF et ISO 9660) – Multi Border • Nombre maximal de : – dossiers (albums) : 256 (y compris le répertoire racine et les dossiers vides). – fichiers (plages/images/vidéos) et dossiers contenus sur un disque : 2 000 (lorsqu’un nom de dossier/fichier contient un grand nombre de caractères, ce nombre peut être inférieur à 2 000). – caractères affichables pour un nom de dossier/ fichier : 64 (Joliet/Romeo). * Pour plus de détails sur la sélection du type de fichier, reportez-vous à la page 35. Ordre de lecture des fichiers MP3/ WMA/AAC/JPEG/DivX®/MPEG-4 MP3/WMA/AAC/ JPEG/DivX/ MPEG-4 Dossier (album) Fichier MP3/ WMA/AAC/ JPEG/DivX/ MPEG-4 (plage/ image/vidéo) Remarques sur la finalisation des disques Les disques suivants doivent être finalisés pour pouvoir être lus sur cet appareil. • DVD-R/DVD-R DL (en mode vidéo/mode VR) • DVD-RW en mode vidéo • DVD+R/DVD+R DL • CD-R • CD-RW Les disques suivants peuvent être lus sans finalisation. • DVD+RW – finalisé automatiquement. • DVD-RW en mode VR – la finalisation n’est pas nécessaire. Pour plus de détails, reportez-vous au mode d’emploi fourni avec le disque. A propos des fichiers MP3 • Versions 1.0, 1.1, 2.2, 2.3 et 2.4 des étiquettes ID3 applicables aux fichiers MP3 uniquement. L’étiquette ID3 compte 15/30 caractères (1.0 et 1.1) ou 63/126 caractères (2.2, 2.3 et 2.4). • Lors de l’identification d’un fichier MP3, veillez à ajouter l’extension « .mp3 » au nom de chaque fichier. Remarque sur le MP3 Il est possible que le son soit intermittent lors de la lecture d’un fichier MP3 à haut débit binaire (par exemple 384 kbit/s). 50 MEX-DV1500U 4-120-899-21 (1) D:\Documents and Settings\takashi-shimomura\Desktop\DTP\848220S MEXDV1500U(EUR)\4120899211_MEX-DV1500U_ML\03FR02CD-E.fm A propos des fichiers WMA • L’étiquette WMA compte 63 caractères. • Lors de l’identification d’un fichier WMA, veillez à ajouter l’extension « .wma » au nom de chaque fichier. A propos des fichiers AAC • L’étiquette AAC compte 126 caractères. • Lors de l’identification d’un fichier AAC, veillez à ajouter l’extension « .m4a » au nom de chaque fichier. masterpage:Right Entretien Remplacement de la pile au lithium de la mini-télécommande Dans des conditions d’utilisation normales, la pile dure environ 1 an. (En fonction des conditions d’utilisation, sa durée de vie peut être plus courte.) Lorsque la pile est faible, la portée de la minitélécommande diminue. Remplacez la pile par une pile au lithium CR2025 neuve. L’utilisation de tout autre type de pile présente un risque d’incendie ou d’explosion. Pôle + vers le haut A propos des fichiers JPEG • JPEG, qui est l’abréviation de Joint Photographic Experts Group, est un format standard de compression des fichiers d’image. Il comprime les images fixes à environ un 1/10e à 1/100e de leur taille initiale. • Lors de l’identification d’un fichier JPEG, veillez à ajouter l’extension « .jpg » au nom de chaque fichier. Remarque sur le JPEG La lecture des fichiers JPEG progressifs n’est pas prise en charge. A propos des fichiers DivX® DivX®, qui est l’abréviation de Digital Video Express, est un format standard de compression des fichiers vidéo numériques développé par DivX, Inc. Ce produit est un produit DivX® Certified officiel et peut lire toutes les versions de vidéos DivX® (y compris les DivX® 6) avec une lecture standard de tous les fichiers DivX®. A propos des fichiers MPEG-4 Les fichiers MPEG-4 conformes aux exigences suivantes peuvent être lus. La lecture n’est pas garantie pour tous les fichiers MPEG-4 qui ne sont pas conformes. • Profil : profil simple MPEG-4 • Débit binaire : 25 000 kbit/s maximum • Débit d’images : 30 ips maximum • Taille de l’image : 320 × 240 pixels maximum • Fichiers Audio : 320 kbit/s (AAC-LC) maximum • Extension de fichier : .mp4 c Remarques sur la pile au lithium • Tenez la pile au lithium hors de la portée des enfants. En cas d’ingestion de la pile, consultez immédiatement un médecin. • Essuyez la pile avec un chiffon sec pour assurer un bon contact. • Veillez à respecter la polarité lors de l’installation de la pile. • Ne tenez pas la pile avec des pinces métalliques, car cela pourrait entraîner un court-circuit. ATTENTION Utilisée de façon incorrecte, la pile peut exploser. Ne pas la recharger, la démonter ni la jeter au feu. Remplacement du fusible Lorsque vous remplacez le fusible, veillez à utiliser un fusible dont l’intensité, en ampères, correspond à la valeur indiquée sur le fusible usagé. Si le fusible saute, vérifiez le branchement de l’alimentation et remplacez-le. Si le nouveau Fusible (10 A) fusible saute également, il est possible que l’appareil soit défectueux. Dans ce cas, consultez votre revendeur Sony le plus proche. suite à la page suivante t 51 MEX-DV1500U 4-120-899-21 (1) D:\Documents and Settings\takashi-shimomura\Desktop\DTP\848220S MEXDV1500U(EUR)\4120899211_MEX-DV1500U_ML\03FR02CD-E.fm Nettoyage des connecteurs L’appareil peut ne pas fonctionner correctement si les connecteurs entre l’appareil et la façade sont souillés. Pour éviter cette situation, retirez la façade (page 15) et nettoyez les connecteurs à l’aide d’un coton-tige. N’exercez pas une pression trop forte, sinon les connecteurs peuvent être endommagés. Appareil principal masterpage:Left Retrait de l’appareil 1 Retirez le tour de protection. 1 Retirez la façade (page 15). 2 Tirez sur les côtés du tour de protection, puis tirez-le pour le sortir. Arrière de la façade x Remarques • Pour plus de sécurité, coupez le moteur avant de nettoyer les connecteurs et retirez la clé du contact. • Ne touchez jamais les connecteurs directement avec les doigts ou avec un objet métallique. 2 Retirez l’appareil. 1 Insérez simultanément les deux clés de déblocage jusqu’à ce qu’elles émettent un déclic. Tournez le crochet vers l’intérieur. 2 Tirez sur les clés de déblocage pour extraire l’appareil. 3 Faites glisser l’appareil en dehors de son support. 52 MEX-DV1500U 4-120-899-21 (1) D:\Documents and Settings\takashi-shimomura\Desktop\DTP\848220S MEXDV1500U(EUR)\4120899211_MEX-DV1500U_ML\03FR02CD-E.fm masterpage:Right Lecteur DVD/CD Alimentation requise : batterie de véhicule 12 V CC (masse négative) Dimensions : environ 178 × 50 × 179 mm (l/h/p) Dimensions du support : environ 182 × 53 × 163 mm (l/h/p) Poids : environ 1,4 kg Accessoires fournis : Mini-télécommande : RM-X168 Composants destinés à l’installation et aux raccordements (1 jeu) Rapport signal/bruit : 120 dB Réponse en fréquence : 10 à 20 000 Hz Pleurage et scintillement : en dessous du seuil mesurable Distorsion harmonique : 0,01 % Il est possible que votre revendeur ne dispose pas de certains accessoires décrits ci-dessus. Veuillez vous adresser à lui pour tout renseignement complémentaire. Spécifications Système Laser : laser semi-conducteur Format de signal : possibilité de basculer entre PAL et NTSC Radio FM Plage de syntonisation : 87,5 à 108,0 MHz Borne d’antenne : connecteur d’antenne externe Moyenne fréquence : 10,7 MHz/450 kHz Sensibilité utile : 9 dBf Sélectivité : 75 dB à 400 kHz Rapport signal/bruit : 67 dB (stéréo), 69 dB (mono) Distorsion harmonique à 1 kHz : 0,5 % (stéréo), 0,3 % (mono) Séparation : 35 dB à 1 kHz Réponse en fréquence : 30 à 15 000 Hz MW (PO)/LW (GO) Plage de syntonisation : MW : 531 à 1 602 kHz LW : 153 à 279 kHz Borne d’antenne : connecteur d’antenne externe Moyenne fréquence : 10,7 MHz/450 kHz Sensibilité : MW (PO) : 30 µV, LW (GO) : 40 µV Brevets américains et internationaux sous licence de Dolby Laboratories. Licence de la technologie de codage audio MPEG Layer-3 et des brevets obtenue de Fraunhofer IIS et Thomson. DivX, DivX Certified et les logos associés sont des marques commerciales de DivX, Inc., et sont utilisées sous licence. Ce produit est protégé par des droits de propriété intellectuelle de Microsoft Corporation. Toute utilisation ou diffusion de la technologie décrite sortant du cadre de l’utilisation de ce produit est interdite sans licence accordée par Microsoft ou une filiale autorisée de Microsoft. La conception et les spécifications sont sujettes à modification sans préavis. Lecteur USB Interface : USB (Haute vitesse) Courant maximal : 500 mA Amplificateur de puissance Sorties : sorties haut-parleurs (connecteurs de sécurité) Impédance des haut-parleurs : 4 à 8 ohms Puissance de sortie maximale : 52 W × 4 (à 4 ohms) Généralités • Aucun retardateur de flamme halogéné n’est utilisé dans certaines cartes à circuits imprimés. • Aucun retardateur de flamme halogéné n’est utilisé dans la composition des coques. • Du papier est utilisé pour les cales d’emballage. Sorties : Borne de sortie vidéo Bornes de sortie audio arrière Borne de commande de relais d’antenne électrique Borne de commande d’amplificateur de puissance Entrées : Bornes d’entrée audio AUX Borne d’entrée d’antenne Borne de commande de frein à main Prise d’entrée AUX (mini-prise stéréo) Borne d’entrée du signal USB Commandes de tonalité : Basse : ±10 dB à 60 Hz Médiane : ±10 dB à 1 kHz Haute : ±10 dB à 10 kHz 53 MEX-DV1500U 4-120-899-21 (1) D:\Documents and Settings\takashi-shimomura\Desktop\DTP\848220S MEXDV1500U(EUR)\4120899211_MEX-DV1500U_ML\03FR02CD-E.fm Dépannage La liste de contrôles suivante vous aidera à remédier aux problèmes que vous pourriez rencontrer avec cet appareil. Avant de passer en revue la liste de contrôles ci-dessous, vérifiez les procédures de raccordement et d’utilisation. Si le problème persiste, consultez le site d’assistance suivant. Site d’assistance http://support.sony-europe.com Selon le moniteur raccordé, lorsque vous éteignez le moteur, la mise hors tension de l’appareil peut prendre quelques secondes. Généralités L’appareil n’est pas alimenté. • Vérifiez le raccordement ou le fusible. • Si vous mettez l’appareil hors tension et que l’affichage disparaît, vous ne pouvez pas le commander avec la mini-télécommande. t Mettez l’appareil sous tension. L’antenne électrique ne se déploie pas. L’antenne électrique ne dispose pas de relais. Aucun bip n’est émis. • Le bip est désactivé (page 45). • Un amplificateur de puissance en option est raccordé et vous n’utilisez pas l’amplificateur intégré. Le contenu de la mémoire a été effacé. • La touche RESET a été enfoncée. t Recommencez la procédure d’enregistrement dans la mémoire. • Le câble d’alimentation ou la batterie a été déconnecté ou n’est pas raccordé correctement. Les stations mémorisées et l’heure sont effacées. Le fusible a sauté. Emission de bruit lorsque la position de la clé de contact est modifiée. Les câbles ne sont pas raccordés correctement au connecteur d’alimentation du véhicule destiné aux accessoires. L’affichage disparaît de la fenêtre d’affichage ou il ne s’affiche pas. • Le régulateur de luminosité est réglé sur « DIMON » (page 46). • L’affichage est désactivé si vous maintenez la touche (OFF) enfoncée. t Maintenez de nouveau la touche (OFF) de l’appareil enfoncée jusqu’à ce que l’affichage apparaisse. • Les connecteurs sont sales (page 52). masterpage:Left La fonction de mise hors tension automatique est inopérante. L’appareil est mis sous tension. La fonction arrêt automatique s’active après la mise hors tension de l’appareil. t Mettez l’appareil hors tension. Image Aucune image/des parasites apparaissent sur l’image. • Un raccordement est incorrect. • Vérifiez le raccordement de l’appareil raccordé et réglez le sélecteur d’entrée de l’appareil raccordé sur la source correspondant à cet appareil. • Le disque est défectueux ou sale. • L’installation est incorrecte. t Installez l’appareil suivant un angle de moins de 45°, dans un endroit stable du véhicule. • Le moniteur est raccordé à la prise AUDIO/VIDEO OUT et le cordon du frein (vert clair) n’est pas raccordé au cordon du capteur du frein à main ou le frein à main n’est pas serré. • Le réglage du système de couleurs est incorrect. t Réglez le système de couleurs sur « PAL » ou « NTSC » en fonction du moniteur raccordé (page 45). L’image ne tient pas sur l’écran. Le format est fixé sur le DVD. 54 MEX-DV1500U 4-120-899-21 (1) D:\Documents and Settings\takashi-shimomura\Desktop\DTP\848220S MEXDV1500U(EUR)\4120899211_MEX-DV1500U_ML\03FR02CD-E.fm Son Aucun son/le son saute/le son grésille. • Un raccordement est incorrect. • Vérifiez le raccordement de l’appareil raccordé et réglez le sélecteur d’entrée de l’appareil raccordé sur la source correspondant à cet appareil. • Le disque est défectueux ou sale. • L’installation est incorrecte. t Installez l’appareil suivant un angle de moins de 45°, dans un endroit stable du véhicule. • Le taux d’échantillonnage des fichiers MP3 n’est pas 16, 22,05, 24, 32, 44,1 ou 48 kHz. • Le taux d’échantillonnage des fichiers WMA n’est pas 32, 44,1 ou 48 kHz. • Le taux d’échantillonnage des fichiers AAC n’est pas 44,1 ou 48 kHz. • Le débit binaire des fichiers MP3 n’est pas 8 à 384 kbit/s. • Le débit binaire des fichiers WMA n’est pas 32 à 384 kbit/s. • Le débit binaire des fichiers AAC n’est pas compris entre 16 à 320 kbit/s. • L’appareil est en mode de pause/d’avance rapide/de retour rapide. • Les réglages de sorties sont incorrects. • Le niveau de sortie DVD est trop faible (page 28). • Le volume est trop faible. • La fonction ATT est activée. • La position de la commande d’équilibre « FAD » n’est pas réglée pour un système à 2 enceintes. • Le format n’est pas pris en charge (comme le format DTS). t Vérifiez si le format est pris en charge par cet appareil (page 8). Le son comporte des parasites. Eloignez les cordons et les câbles. Disque Impossible d’introduire le disque. • Un autre disque est déjà en place. • Le disque a été introduit de force à l’envers ou dans le mauvais sens. La lecture du disque ne commence pas. • Le disque est défectueux ou sale. • Le disque n’est pas compatible. • Le DVD n’est pas compatible en raison du code local. • Le disque n’est pas finalisé (page 50). • Le format du disque et la version du fichier ne sont pas compatibles avec cet appareil (page 8, 50). • Appuyez sur Z pour retirer le disque. masterpage:Right Impossible de lire les fichiers MP3/WMA/AAC/ JPEG/DivX/MPEG-4. • L’enregistrement n’a pas été réalisé conformément à la norme ISO 9660 niveau 1 ou 2, au format d’extension Joliet ou Romeo (DATA CD) ou au format UDF Bridge (DATA DVD) (page 50). • L’extension de fichier est incorrecte (page 50). • Les fichiers ne sont pas sauvegardés au format MP3/ WMA/AAC/JPEG/DivX/MPEG-4. • Si le disque contient plusieurs types de fichiers, seul le type de fichier sélectionné (audio/vidéo/image) peut être lu. t Sélectionnez le type de fichier approprié à l’aide de la liste (page 35). Certains fichiers MP3/WMA/AAC/JPEG/DivX/ MPEG-4 exigent un délai plus long que d’autres avant le début de la lecture. La lecture des types de disques suivants exige un délai de démarrage plus long. – disques comportant une hiérarchie de dossiers complexe ; – disques enregistrés en multisession/Multi Border ; – disques auxquels il est possible d’ajouter des données. La lecture du disque ne commence pas au début. La reprise de la lecture ou la reprise de la lecture multidisques (page 42) est activée. Certaines fonctions sont inopérantes. Selon le disque, il est possible que vous ne puissiez pas effectuer des opérations telles que l’arrêt, la recherche, ou la lecture répétée ou aléatoire. Pour plus de détails, reportez-vous au mode d’emploi fourni avec le disque. Impossible de changer la langue de la bande son/des sous-titres ou l’angle. • Utilisez le menu DVD au lieu de la touche de sélection directe de la mini-télécommande (page 17). • Il n’y a pas de plages multilingues, de sous-titres multilingues ou d’angles multiples enregistrés sur le DVD. • Le DVD ne permet pas de changer. Les rubriques d’affichage ne défilent pas. • Pour les disques contenant un grand nombre de caractères, le défilement peut être inopérant. • « AUTO-SCRL » est réglé sur « OFF ». t Réglez « A.SCRL-ON » (page 46). Les touches de commande sont inopérantes. Le disque ne s’éjecte pas. Appuyez sur la touche RESET (page 14). Vous avez oublié le mot de passe pour le contrôle parental. Saisissez « 5776 » dans l’écran de saisie du mot de passe pour déverrouiller (page 30). suite à la page suivante t 55 MEX-DV1500U 4-120-899-21 (1) D:\Documents and Settings\takashi-shimomura\Desktop\DTP\848220S MEXDV1500U(EUR)\4120899211_MEX-DV1500U_ML\03FR02CD-E.fm Réception radio Impossible de capter des stations. Le son comporte des parasites. • Le raccordement est incorrect. t Raccordez un câble de commande d’antenne électrique (bleu) ou un câble d’alimentation d’accessoires (rouge) au câble d’alimentation de l’amplificateur d’antenne du véhicule (uniquement si votre véhicule est équipé d’une antenne FM/MW (PO)/LW (GO) intégrée dans la vitre arrière/latérale). t Vérifiez le raccordement de l’antenne du véhicule. t Si l’antenne automatique ne se déploie pas, vérifiez le raccordement du câble de commande de l’antenne électrique. Impossible de capter une présélection. • Enregistrez la fréquence correcte dans la mémoire. • Le signal capté est trop faible. Le réglage automatique des stations est impossible. • Le réglage du mode de recherche locale est incorrect. t La recherche de fréquences s’arrête trop souvent : sélectionnez « LOCAL-ON » (page 46). t La recherche de fréquences ne s’arrête sur aucune station : sélectionnez « MONO-ON » (page 46). • Le signal capté est trop faible. t Effectuez une syntonisation manuelle. En cours de réception FM, l’indication « ST » clignote. • Réglez la fréquence correctement. • Le signal capté est trop faible. t Sélectionnez « MONO-ON » (page 46). Un programme FM émis en stéréo est entendu en mono. L’appareil est en mode de réception mono. t Sélectionnez « MONO-OFF » (page 46). Fonction RDS Une recherche (SEEK) commence après quelques secondes d’écoute. La station ne diffuse pas de programmes de radioguidage (fonction TP désactivée) ou le signal capté est faible. t Désactivez TA (page 37). Aucun message de radioguidage. • Activez TA (page 37). • La station n’émet pas de messages de radioguidage, malgré l’indication TP. t Réglez la fréquence pour capter une autre station. PTY affiche « - - - - - - - - ». • La station actuellement captée n’est pas une station RDS. • Les données RDS n’ont pas été reçues. • La station ne spécifie pas le type d’émission. masterpage:Left Lecture USB Cet appareil ne permet pas la lecture d’éléments via un concentrateur USB. Cet appareil ne peut pas reconnaître les périphériques USB via un concentrateur USB. Impossible de lire des éléments. Un périphérique USB ne fonctionne pas. t Raccordez-le de nouveau. Le périphérique USB exige un délai plus long avant le début de la lecture. Le périphérique USB contient des fichiers comportant une hiérarchie de dossiers complexe. Un bip retentit. Le périphérique USB a été débranché pendant la lecture. t Veillez à arrêter la lecture avant de débrancher un périphérique USB afin de protéger les données. Le son est intermittent. Il est possible que le son soit intermittent à un haut débit binaire supérieur à 320 kbit/s. Affichage des erreurs et messages Sur l’appareil principal ERROR • Le disque est sale ou inséré à l’envers. t Nettoyez le disque ou insérez-le correctement. • Un disque vierge a été inséré. • Le disque ne peut pas être lu en raison d’un problème. t Insérez-en un autre. • Le disque n’est pas compatible avec cet appareil. t Insérez un disque compatible. • Le périphérique USB n’a pas été reconnu automatiquement. t Raccordez-le de nouveau. • Appuyez sur Z pour retirer le disque. FAILURE Les haut-parleurs ou les amplificateurs ne sont pas raccordés correctement. t Reportez-vous au manuel d’installation/de raccordement fourni avec cet appareil et vérifiez les raccordements. L. SEEK +/– Le mode de recherche locale est activé en cours de recherche automatique des fréquences. NO AF Il n’existe aucune fréquence alternative pour la station actuelle. t Appuyez sur .m/M> pendant que le nom du service de programme clignote. L’appareil commence à rechercher une autre fréquence avec les mêmes données d’identification de programme (PI) (l’indication « PI SEEK » apparaît). 56 MEX-DV1500U 4-120-899-21 (1) D:\Documents and Settings\takashi-shimomura\Desktop\DTP\848220S MEXDV1500U(EUR)\4120899211_MEX-DV1500U_ML\03FR02CD-E.fm NO DATA Le disque ou le périphérique USB ne contient pas de fichier de musique. t Insérez un CD audio dans cet appareil. t Raccordez un périphérique USB comprenant un fichier audio. NO DEV (aucun périphérique) « USB » est sélectionné comme source alors qu’aucun périphérique USB n’est raccordé. Un périphérique USB ou un câble USB a été débranché pendant la lecture. t Veillez à brancher un périphérique et un câble USB. NO NAME Aucun nom de disque/d’album/de dossier/de plage/ d’image/de vidéo n’est écrit dans le fichier. NO TP L’appareil continue à rechercher les stations diffusant des programmes de radioguidage. OFFSET Il est possible qu’il y ait un problème de fonctionnement. t Vérifiez le raccordement. Si le message d’erreur reste affiché, contactez votre revendeur Sony le plus proche. OVERLOAD Le périphérique USB est saturé. t Débranchez le périphérique USB, puis modifiez la source en appuyant sur (SOURCE). t Indique que le périphérique USB ne fonctionne plus ou qu’un périphérique non pris en charge est raccordé. READ L’appareil lit toutes les informations de fichier/album (dossier) sur le disque. t Attendez que la lecture soit terminée et la lecture commence automatiquement. Selon la structure du disque, cette opération peut prendre plus d’une minute. USB NO SUPRT (USB non pris en charge) Le périphérique USB raccordé n’est pas pris en charge. t Pour plus de détails sur la compatibilité de votre périphérique USB, visitez le site d’assistance. « » ou « » Pendant le retour ou l’avance rapide, vous avez atteint le début ou la fin du disque et vous ne pouvez pas aller plus loin. « » Le caractère ne peut pas être affiché. masterpage:Right Sur le moniteur Playback prohibited by region code. La lecture du DVD est impossible car le code local est différent. Cannot play this disc. • Le disque est incompatible avec cet appareil. • Le disque n’est pas finalisé. No playable data. Le disque ne contient pas de données lisibles. Please press RESET. L’appareil ne peut pas fonctionner en raison d’un problème. t Appuyez sur la touche RESET (page 14). Si ces solutions ne permettent pas d’améliorer la situation, contactez votre revendeur Sony le plus proche. Si vous portez l’appareil à réparer en raison d’un problème de lecture de disque, apportez le disque utilisé au moment où le problème s’est produit. 57 MEX-DV1500U 4-120-899-21 (1) D:\Documents and Settings\takashi-shimomura\Desktop\DTP\848220S MEXDV1500U(EUR)\4120899211_MEX-DV1500U_ML\03FR02CD-E.fm Glossaire Album Section d’un morceau de musique ou d’une image sur un DATA CD/DVD contenant des plages audio MP3/WMA/AAC ou des fichiers JPEG. Chapitre Sous-division d’un titre dans un DVD. Un titre est composé de plusieurs chapitres. DivX® Technologie vidéo numérique créée par DivX, Inc. Les vidéos encodées avec la technologie DivX font partie des vidéos avec la qualité la plus élevée pour une taille de fichier relativement restreinte. Dolby Digital Technologie de compression audio numérique développée par Dolby Laboratories. Cette technologie prend en charge le son surround 5.1 canaux. Le canal arrière est stéréo et, dans ce format, il existe un canal de caisson de graves discret. Dolby Digital fournit les mêmes 5.1 canaux discrets d’une qualité audio numérique élevée que les systèmes audio cinéma Dolby Digital. La séparation des canaux est efficace car tous les canaux sont enregistrés séparément, et il y a peu de détérioration car le traitement des données de tous les canaux est effectué de manière numérique. DVD Disque pouvant contenir jusqu’à 8 heures d’images animées, même si son diamètre est le même qu’un CD. La capacité de données d’un DVD simple couche, simple face est de 4,7 Go, ce qui correspond à 7 fois la capacité d’un CD. La capacité de données d’un DVD double couche, simple face est de 8,5 Go, celle d’un DVD simple couche, double face de 9,4 Go et celle d’un DVD double couche, double face de 17 Go. Les données d’image utilisent le format MPEG 2, une des normes universelles de technologie de compression numérique. Les données d’image sont compressées à environ 1/40e (en moyenne) de leur taille initiale. Le DVD utilise également une technologie d’encodage à débit variable qui modifie les données à affecter selon le statut de l’image. Les informations audio sont enregistrées dans un format multi-canaux, tel que Dolby Digital, ce qui vous permet de profiter d’un son plus réel. En outre, plusieurs fonctions avancées telles que les fonctions multiangle, multilingue et contrôle parental sont disponibles avec le DVD. masterpage:Left DVD-RW Un DVD-RW est un disque enregistrable réinscriptible de la même taille qu’un DVD VIDEO. Le DVD-RW comporte deux modes différents : mode VR et mode vidéo. Les DVD-RW créés en mode vidéo ont le même format que les DVD VIDEO, tandis que les disques créés en mode VR (enregistrement vidéo) permettent de programmer ou d’éditer le contenu. DVD+RW Un DVD+RW (plus RW) est un disque enregistrable réinscriptible. Les DVD+RW utilisent un format d’enregistrement comparable au format DVD VIDEO. Fichier • Plage MP3/WMA/AAC ou image JPEG sur un DATA CD/DATA DVD/périphérique USB. • Une plage MP3/WMA/AAC, une image JPEG ou une vidéo DivX/MPEG-4 sur un DATA CD/ DATA DVD. (« Fichier » est une définition réservée exclusivement à cet appareil.) Un fichier simple est constitué d’une seule plage, image ou d’un seul film. Logiciel de film, logiciel de vidéo Les DVD peuvent être classés comme logiciels de film ou logiciels de vidéo. Les DVD de film contiennent les mêmes images (24 images par seconde) que les films projetés dans les cinémas. Les DVD de vidéo, tels que les téléfilms ou les séries télé, affichent les images à hauteur de 30 images (ou 60 champs) par seconde. Plage Section d’une image ou d’une plage musicale d’un VIDEO CD, CD ou MP3/WMA. Un album est composé de plusieurs plages (MP3, WMA uniquement). Scène Dans un VIDEO CD doté de la fonction PBC (contrôle de lecture), les écrans de menu, les images animées et les images fixes sont divisés en sections appelées « scènes ». Titre Section la plus longue d’un fichier image ou d’une plage musicale d’un DVD, film, etc., dans un logiciel vidéo ou l’album entier dans un logiciel audio. 58 MEX-DV1500U 4-120-899-21 (1) D:\Documents and Settings\takashi-shimomura\Desktop\DTP\848220S MEXDV1500U(EUR)\4120899211_MEX-DV1500U_ML\03FR02CD-E.fm masterpage:Right VIDEO CD Disque compact qui contient des images animées. Les données d’image utilisent le format MPEG 1, une des normes universelles de technologie de compression numérique. Il comprime les données d’images à environ 1/140e de leur taille initiale. Par conséquent, un VIDEO CD de 12 cm peut contenir jusqu’à 74 minutes d’images animées. Les VIDEO CD contiennent également des données audio compactes. Les sons qui ne sont pas perçus par l’oreille humaine sont comprimés, alors que les sons audibles ne le sont pas. Les VIDEO CD peuvent contenir 6 fois plus d’informations audio que les CD conventionnels. Il existe 3 versions de VIDEO CD. • Version 1.0, 1.1 : vous pouvez lire uniquement des images animées et du son. • Version 2.0 : vous pouvez lire des images fixes haute résolution et profiter des fonctions PBC. Cet appareil est compatible avec les 3 versions ci-dessus. 59 MEX-DV1500U 4-120-899-21 (1) D:\Documents and Settings\takashi-shimomura\Desktop\DTP\848220S MEXDV1500U(EUR)\4120899211_MEX-DV1500U_ML\03FR02CD-E.fm masterpage:Left Liste des codes de langue/codes de zone Liste des codes de langue L’orthographe des langues est conforme à la norme ISO 639 : 1988 (E/F). Code Langue Code Langue Code Langue Code Langue 1027 1028 1032 1039 1044 1045 1051 1052 1053 1057 1059 1060 1061 1066 Afar Abkhazian Afrikaans Amharic Arabic Assamese Aymara Azerbaijani Bashkir Byelorussian Bulgarian Bihari Bislama Bengali; Bangla Tibetan Breton Catalan Corsican Czech Welsh Danish German Bhutani Greek English Esperanto Spanish Estonian Basque Persian Finnish Fiji Faroese French Frisian 1183 1186 1194 1196 1203 1209 1217 1226 1229 1233 1235 1239 1245 1248 1253 1254 1257 1261 1269 1283 1287 1297 1298 1299 1300 1301 1305 1307 1311 1313 1326 1327 1332 1334 Irish Scots Gaelic Galician Guarani Gujarati Hausa Hindi Croatian Hungarian Armenian Interlingua Interlingue Inupiak Indonesian Icelandic Italian Hebrew Japanese Yiddish Javanese Georgian Kazakh Greenlandic Cambodian Kannada Korean Kashmiri Kurdish Kirghiz Latin Lingala Laothian Lithuanian Latvian; Lettish Malagasy 1347 1349 1350 1352 1353 1356 1357 1358 1363 1365 1369 1376 1379 1393 1403 1408 1417 1428 1435 1507 1508 1509 1511 1512 1513 1514 1515 1516 1517 1521 1525 1527 1528 1529 1531 1532 1534 1535 1538 1539 1540 1543 1557 1564 1572 1581 1587 1613 1632 1665 1684 1697 Samoan Shona Somali Albanian Serbian Siswati Sesotho Sundanese Swedish Swahili Tamil Telugu Tajik Thai Tigrinya Turkmen Tagalog Setswana Tonga Turkish Tsonga Tatar Twi Ukrainian Urdu Uzbek Vietnamese Volapük Wolof Xhosa Yoruba Chinese Zulu 1503 1505 1506 Maori Macedonian Malayalam Mongolian Moldavian Marathi Malay Maltese Burmese Nauru Nepali Dutch Norwegian Occitan (Afan)Oromo Oriya Punjabi Polish Pashto; Pushto Portuguese Quechua RhaetoRomance Kirundi Romanian Russian Kinyarwanda Sanskrit Sindhi Sangho SerboCroatian Singhalese Slovak Slovenian 1703 Non spécifié 1067 1070 1079 1093 1097 1103 1105 1109 1130 1142 1144 1145 1149 1150 1151 1157 1165 1166 1171 1174 1181 1345 1436 1463 1481 1482 1483 1489 1491 1495 1498 1501 1502 Liste des codes de zone 60 Code Zone Code Zone Code Zone Code Zone 2109 2044 2047 2046 2057 2070 2079 2090 2092 Allemagne Argentine Australie Autriche Belgique Brésil Canada Chili Chine 2304 2115 2149 2165 2174 2248 2238 2254 2276 Corée Danemark Espagne Finlande France Inde Indonésie Italie Japon 2363 2362 2390 Malaisie Mexique Nouvelle Zélande Norvège Pays-Bas Pakistan Philippines Portugal 2184 2489 2501 2499 2086 2528 Royaume-Uni Russie Singapour Suède Suisse Thaïlande 2379 2376 2427 2424 2436 MEX-DV1500U 4-120-899-21 (1) 03FR+00COV-EIX.fm masterpage:Right Index Numerics D L 16:9 41 2000MP3 6 2000WMA 6 4:3 LETTER BOX 41 4:3 PAN SCAN 41 Défilement automatique (AUTO-SCRL) 46 Démonstration (DEMO) 45 Disques 8 Disques pouvant être lus 8 DivX VOD 42 DivX® 9, 23, 51 Dolby Digital 27, 28 Dossier (ALBUM) 34 DVD Multi Border 50 Langue de la bande son (AUDIO) 27, 41 Langue des sous-titres (SUBTITLE) 17, 41 Langue du menu (MENU) 41 Lecture aléatoire (SHUF) 21, 32 Lecture de la liste de lecture (PLAY LIST PLAY) 43 Lecture répétée (REP) 21, 32 E M Egaliseur Image (PICTURE EQ) 29, 43 Son (EQ3) 38, 39 EQ3 38, 39 Equilibre avant-arrière (FAD) 38 Mémorisation des meilleurs accords (BTM) 36 Menu de configuration Configuration système 44 Configuration visuelle 39 Menu DVD 17 Menu mode de lecture 24 Menu principal du DVD 17 Messages de radioguidage (TA) 37 Mini-télécommande 12, 14, 51 Mise hors tension automatique (AUTO-OFF) 45 Mode de recherche locale (LOCAL) 46 Mode monaural (MONO) 46 MP3 9, 50 MPEG-4 9, 51 A AAC 9, 51 Affichage animé (M.DSPL) 45 Affichage automatique par liste 34 Album (ALBUM) 34 Angle (ANGLE) 17 Appareil auxiliaire 48 Audio (AUDIO) Canal 27 Format 27 Langue 27, 41 Audio DRC (AUDIO DRC) 43 AUX avant 48 B Balance (BAL) 38 C CD multisession 50 Chapitre (CHAPTER) 33 Code de zone 60 Code local 9 Codes de langue 60 Configuration audio (AUDIO SETUP) 43 Configuration de l’affichage (DISPLAY SETUP) 41 Configuration de la langue (LANGUAGE SETUP) 41 Configuration personnalisée (CUSTOM SETUP) 42 Configuration système 44 Configuration visuelle 39 Contrôle de la lecture (PBC) 24 Contrôle de plage dynamique (DRC) 43 Contrôle parental (PARENTAL CONTROL) 30, 42 F Fichier (FILE) 34 Format du moniteur (MONITOR TYPE) 41 Format du programme 27 Formats 9 Fréquences alternatives (AF) 37 Fusible 51 H Heure (CT) 37, 38, 45 N I Image (IMAGE) 34 Informations temporelles/ textuelles (TIME) 26, 33 Intensité sonore (LOUD) 47 Intervalle de diaporama (SLIDE SHOW TIME) 42 J JPEG 9, 23, 51 Niveau auxiliaire (AUX-LEVEL) 47, 49 Niveau DVD (DVD-LEVEL) 28, 47 NTSC 45 P PAL 45 Papier peint (WALLPAPER) 41 Périphérique USB 20 Picture EQ (PICTURE EQ) 29, 43 Pile au lithium 51 Plage (TRACK) 33 Programme de radioguidage (TP) 37 suite à la page suivante t 61 MEX-DV1500U 4-120-899-21 (1) 03FR+00COV-EIX.fm masterpage:Left Q Quick-BrowZer 34 R Recherche directe 33 Régional (REGIONAL) 37, 46 Réglage de l’horloge (CLOCK-ADJ) 48 Réglage du niveau Dolby (DOLBY-ADJ) 47 Régulateur de luminosité (DIMMER) 46 Réinitialisation (RESET) 14, 43 Reprise de la lecture 17, 19 Reprise de la lecture multi-disques (MULTI-DISC RESUME) 6, 42 S Son de bip (BEEP) 45 Système de couleurs (COLOR-SYS) 45 Système de radiocommunication de données (RDS) 36 T Titre (TITLE) 33 Types d’émission (PTY) 37, 38 V Volume 10 W WMA 9, 51 Z Zoom (CENTER ZOOM) 29 62 MEX-DV1500U 4-120-899-21 (1) 03FR+00COV-EIX.fm masterpage:Right MEX-DV1500U 4-120-899-21 (1) D:\Documents and Settings\takashi-shimomura\Desktop\DTP\848220S MEXDV1500U(EUR)\4120899211_MEX-DV1500U_ML\04IT01INT-E.fm Trattamento del dispositivo elettrico od elettronico a fine vita (applicabile in tutti i paesi dell’Unione Europea e in altri paesi europei con sistema di raccolta differenziata) Si dichiara che l’apparecchio è stato fabbricato in conformità all’art.2, Comma l del D.M.28.08.1995 n.548. Avvertenza Per evitare il rischio di incendi o scosse elettriche, non esporre l’apparecchio alla pioggia o all’umidità. Per evitare scosse elettriche, non aprire l’apparecchio. Per le riparazioni, rivolgersi esclusivamente a personale qualificato. ATTENZIONE L’uso di strumenti ottici con il presente apparecchio può causare problemi agli occhi. Poiché il raggio laser utilizzato nel presente lettore CD/DVD è pericoloso per gli occhi, non tentare di smontare l’apparecchio. Per le riparazioni, rivolgersi esclusivamente a personale qualificato. Questo simbolo sul prodotto o sulla confezione indica che il prodotto non deve essere considerato come un normale rifiuto domestico, ma deve invece essere consegnato ad un punto di raccolta appropriato per il riciclo di apparecchi elettrici ed elettronici. Assicurandovi che questo prodotto sia smaltito correttamente, voi contribuirete a prevenire potenziali conseguenze negative per l’ambiente e per la salute che potrebbero altrimenti essere causate dal suo smaltimento inadeguato. Il riciclaggio dei materiali aiuta a conservare le risorse naturali. Per informazioni più dettagliate circa il riciclaggio di questo prodotto, potete contattare l’ufficio comunale, il servizio locale di smaltimento rifiuti oppure il negozio dove l’avete acquistato. Accessorio utilizzabile: Telecomando ’ Questa etichetta è posta nella parte inferiore esterna. CAUTION : CLASS 1M VISIBLE/INVISIBLE LASER RADIATION WHEN OPEN AND INTERLOCKS DEFEATED. DO NOT VIEW DIRECTLY WITH OPTICAL INSTRUMENTS. Questa etichetta si trova nel rivestimento interno dell’unità. Avviso per i clienti: le seguenti informazioni riguardano esclusivamente gli apparecchi venduti in paesi in cui sono applicate le direttive UE Il presente prodotto è fabbricato da Sony Corporation, 1-7-1 Konan, Minato-ku, Tokyo, Giappone. Il Rappresentante autorizzato per la direttiva EMC e la sicurezza del prodotto è Sony Deutschland GmbH, Hedelfinger Strasse 61, 70327 Stuttgart, Germania. Per qualsiasi questione riguardante l’assistenza o la garanzia, rivolgersi agli indirizzi che si trovano nei documenti di assistenza o di garanzia. masterpage:Left Trattamento delle pile esauste (applicabile in tutti i paesi dell’Unione Europea e in altri paesi Europei con sistema di raccolta differenziata) Questo simbolo sul prodotto o sulla confezione indica che la pila non deve essere considerata un normale rifiuto domestico. Assicurandovi che le pile siano smaltite correttamente, contribuirete a prevenire potenziali conseguenze negative per l’ambiente e per la salute che potrebbero altrimenti essere causate dal loro inadeguato smaltimento. Il riciclaggio dei materiali aiuta a conservare le risorse naturali. In caso di prodotti che per motivi di sicurezza, prestazione o protezione dei dati richiedano un collegamento fisso ad una pila interna, la stessa dovrà essere sostituita solo da personale di assistenza qualificato. Consegnare il prodotto a fine vita al punto di raccolta idoneo allo smaltimento di apparecchiature elettriche ed elettroniche; questo assicura che anche la pila al suo interno venga trattata correttamente. Per le altre pile consultate la sezione relativa alla rimozione sicura delle pile. Conferire le pile esauste presso i punti di raccolta indicati per il riciclo. Per informazioni più dettagliate circa lo smaltimento della pila esausta o del prodotto, potete contattare il Comune, il servizio locale di smaltimento rifiuti oppure il negozio dove l’avete acquistato. 2 MEX-DV1500U 4-120-899-21 (1) D:\Documents and Settings\takashi-shimomura\Desktop\DTP\848220S MEXDV1500U(EUR)\4120899211_MEX-DV1500U_ML\04IT01INT-E.fm masterpage:Right Avvertenza relativa all’installazione su un’auto sprovvista della posizione ACC (accessoria) sul blocchetto di accensione Accertarsi di impostare la funzione di spegnimento automatico (pagina 45). In seguito allo spegnimento, l’apparecchio si spegne completamente e automaticamente all’ora impostata, onde evitare di scaricare la batteria. Se la funzione di spegnimento automatico non viene impostata, ogni volta che il motore viene spento tenere premuto (OFF) finché il display non scompare. Per annullare la dimostrazione (DEMO), vedere a pagina 46. Sicurezza • Osservare le leggi sul traffico vigenti nel proprio paese. • Per motivi di sicurezza, il monitor collegato all’uscita VIDEO OUT si disattiva automaticamente quando il freno a mano non è azionato. Per evitare incidenti Le immagini vengono visualizzate soltanto dopo che l’auto è stata parcheggiata e che il freno a mano è stato azionato. Se durante la riproduzione video si aziona l’auto, viene visualizzato il seguente avvertimento e le immagini provenienti dall’uscita VIDEO OUT scompaiono automaticamente. La visualizzazione delle immagini viene disattivata, mentre la sorgente audio continua a funzionare. Video blocked for your safety. Non utilizzare l’apparecchio o il monitor durante la guida. 3 MEX-DV1500U 4-120-899-21 (1) D:\Documents and Settings\takashi-shimomura\Desktop\DTP\848220S MEXDV1500U(EUR)\4120899211_MEX-DV1500U_ML\04IT+00COV-ETOC.fm masterpage:Right Indice Congratulazioni!. . . . . . . . . . . . . . . . . . . . . . . . . 6 Diritti d’autore . . . . . . . . . . . . . . . . . . . . . . . . 7 Dischi riproducibili e simboli utilizzati nel presente manuale . . . . . . . . . . . . . . . . . . . . . . . . 8 Posizione e funzione dei comandi . . . . . . . . . . 10 Unità principale . . . . . . . . . . . . . . . . . . . . . .10 Telecomando a scheda RM-X168 . . . . . . . .12 Operazioni preliminari Installazione dell’apparecchio e del monitor opzionale . . . . . . . . . . . . . . . . . 14 Azzeramento dell’apparecchio . . . . . . . 14 Preparazione del telecomando a scheda . . . . . . . . . . . . . . . . . . . . . . . . . . . 14 Rimozione del pannello anteriore. . . . . 15 Installazione del pannello anteriore. . . . . . . 15 Operazioni di base Regolazione della qualità dell’immagine — Picture EQ . . . . . . . . . . . . . . . . . . . . . . . . . 30 Personalizzazione della qualità dell’immagine . . . . . . . . . . . . . . . . . . . . . . . 30 Blocco dei dischi — Protezione . . . . . . . . . . . 31 Attivazione della funzione di protezione . . . . . . . . . . . . . . . . . . . . . . . . . . 31 Modifica dell’area e delle relative classificazioni dei film . . . . . . . . . . . . . . . . 32 Riproduzione ripetuta e in ordine casuale . . . . 32 Riproduzione con ricerca diretta . . . . . . . . . . . 34 Visualizzazione di un elenco di brani/immagini/ file video — Quick-BrowZer . . . . . . . . . . . . . 35 Selezione di un brano/un’immagine/un file video . . . . . . . . . . . . . . . . . . . . . . . . . . . . . . 35 Selezione di un tipo di file . . . . . . . . . . . . . 35 Visualizzazione delle informazioni sul disco audio . . . . . . . . . . . . . . . . . . . . . . . . . . . . . . . . 36 Riproduzione dei dischi video . . . . . . . 16 Operazioni avanzate — Radio Riproduzione di dischi audio . . . . . . . . 18 Memorizzazione e ricezione delle stazioni . . . 36 Memorizzazione automatica — BTM . . . . 36 Memorizzazione manuale . . . . . . . . . . . . . . 37 Ricezione delle stazioni memorizzate. . . . . 37 Riproduzione di un dispositivo USB . . . . . . . . . . . . . . . . . . . . . . . . . . . . . 20 Voci del display . . . . . . . . . . . . . . . . . . . . . .21 Riproduzione ripetuta e in ordine casuale . . . . . . . . . . . . . . . . . . . . . . . . . . . . .21 Ascolto della radio . . . . . . . . . . . . . . . . . 22 Operazioni avanzate — Dischi Riproduzione di file DivX®/MPEG-4/ JPEG. . . . . . . . . . . . . . . . . . . . . . . . . . . . . . . . . 23 Riproduzione di video DivX®/MPEG-4 . . .23 Riproduzione di immagini JPEG. . . . . . . . . 23 Uso delle funzioni PBC — Controllo della riproduzione . . . . . . . . . . . .24 RDS . . . . . . . . . . . . . . . . . . . . . . . . . . . . . . . . . 37 Panoramica . . . . . . . . . . . . . . . . . . . . . . . . . 37 Impostazione dei modi AF e TA. . . . . . . . . 37 Selezione di PTY . . . . . . . . . . . . . . . . . . . . 38 Impostazione di CT. . . . . . . . . . . . . . . . . . . 38 Regolazione dell’audio Regolazione delle caratteristiche dell’audio . . . . . . . . . . . . . . . . . . . . . . . . . . . . . 39 Personalizzazione della curva dell’equalizzatore — EQ3 . . . . . . . . . . . . . 39 Uso del menu del modo di riproduzione . . . . . 25 Impostazioni Visualizzazione delle informazioni sulla durata/ informazioni di testo del disco . . . . . . . . . . . . .26 Impostazioni video . . . . . . . . . . . . . . . . . . . . . 40 Operazioni di base del menu delle impostazioni video . . . . . . . . . . . . . . . . . . . 40 Impostazione della lingua di visualizzazione o dell’audio . . . . . . . . . . . . . . . . . . . . . . . . . . 41 Impostazioni di visualizzazione . . . . . . . . . 41 Impostazioni personalizzate . . . . . . . . . . . . 42 Impostazioni audio . . . . . . . . . . . . . . . . . . . 43 Configurazione delle impostazioni audio. . . . .27 Modifica della lingua/del formato audio . . .27 Controllo del formato di programma . . . . . 28 Regolazione del livello di uscita audio — Livello DVD . . . . . . . . . . . . . . . . . . . . .29 4 Ingrandimento delle immagini . . . . . . . . . . . . 29 MEX-DV1500U 4-120-899-21 (1) D:\Documents and Settings\takashi-shimomura\Desktop\DTP\848220S MEXDV1500U(EUR)\4120899211_MEX-DV1500U_ML\04IT+00COV-ETOC.fm Azzeramento di tutte le impostazioni . . . . . 43 Impostazioni di sistema . . . . . . . . . . . . . . . . . . 44 Operazioni di base del menu delle impostazioni di sistema. . . . . . . . . . . . . . . . 44 Impostazione dell’orologio . . . . . . . . . . . . . 48 masterpage:Right Per l’installazione e i collegamenti, fare riferimento al manuale di istruzioni per l’installazione e i collegamenti in dotazione. Uso di apparecchi opzionali Apparecchi opzionali. . . . . . . . . . . . . . . . . . . . 48 Informazioni aggiuntive Precauzioni . . . . . . . . . . . . . . . . . . . . . . . . . . . 49 Note sui dischi . . . . . . . . . . . . . . . . . . . . . . 49 Ordine di riproduzione dei file MP3/WMA/ AAC/JPEG/DivX®/MPEG-4 . . . . . . . . . . . 50 Informazioni sui file MP3 . . . . . . . . . . . . . . 50 Informazioni sui file WMA . . . . . . . . . . . . 50 Informazioni sui file AAC . . . . . . . . . . . . . 50 Informazioni sui file JPEG . . . . . . . . . . . . . 51 Informazioni sui file DivX® . . . . . . . . . . . . 51 Informazioni sui file MPEG-4 . . . . . . . . . . 51 Manutenzione . . . . . . . . . . . . . . . . . . . . . . . . . 51 Rimozione dell’apparecchio . . . . . . . . . . . . . . 52 Caratteristiche tecniche . . . . . . . . . . . . . . . . . . 52 Guida alla soluzione dei problemi . . . . . . . . . . 53 Messaggi e indicazioni di errore . . . . . . . . . 56 Glossario . . . . . . . . . . . . . . . . . . . . . . . . . . . . . 57 Elenco dei codici della lingua/di zona. . . . . . . 59 Indice analitico . . . . . . . . . . . . . . . . . . . . . . . . 60 Sito di assistenza clienti In caso di domande o per le informazioni più aggiornate sul presente prodotto, visitare il seguente sito Web: http://support.sony-europe.com Nel sito sono fornite informazioni relative a: • Modelli e produttori di lettori audio digitali compatibili • File MP3/WMA/AAC supportati 5 MEX-DV1500U 4-120-899-21 (1) D:\Documents and Settings\takashi-shimomura\Desktop\DTP\848220S MEXDV1500U(EUR)\4120899211_MEX-DV1500U_ML\04IT02CD-E.fm Congratulazioni! Complimenti per l’acquisto del presente lettore Multi Disc Sony. Prima di utilizzare il presente apparecchio, leggere attentamente questo manuale e conservarlo per eventuali riferimenti futuri. masterpage:Left t pagina 48 I terminali AUX AUDIO IN sulla parte posteriore consentono il collegamento e l’uscita audio di un dispositivo ausiliare, come un dispositivo audio portatile (collegamento analogico), un dispositivo di navigazione “hideaway”, un sintonizzatore TV e così via. Funzioni Per ulteriori informazioni, consultare la pagina di riferimento. * In base alla durata dei brani e alla velocità di campionamento registrata. Riproduzione di DVD, VCD, CD t pagina 8 Compatibile con vari formati di disco. 2000MP3, 2000WMA, 2000AAC Riproduzione di un massimo di 2.000 brani* registrati su un disco nel formato MP3/WMA/ AAC. Ripristino della riproduzione multidisco t pagina 42 Mediante questa funzione, viene memorizzato il punto di arresto della riproduzione per un massimo di 5 dischi e la riproduzione di DVD VIDEO/VCD/DivX/MPEG-4 viene ripristinata anche in seguito all’espulsione del disco. t pagina 39 7 curve dell’equalizzatore preimpostate, ulteriormente personalizzabili sintonizzando 3 bande diverse. t pagina 30 Tonalità delle immagini selezionabile tra le opzioni preimpostate, in base alla luminosità dell’ambiente/all’interno dell’auto. t pagina 48 Possibilità di collegare un dispositivo audio portatile (collegamento analogico). 6 MEX-DV1500U 4-120-899-21 (1) D:\Documents and Settings\takashi-shimomura\Desktop\DTP\848220S MEXDV1500U(EUR)\4120899211_MEX-DV1500U_ML\04IT02CD-E.fm masterpage:Right Diritti d’autore Nel presente prodotto è incorporata una tecnologia di protezione dei diritti d’autore vincolata da brevetti statunitensi e da altri diritti di proprietà intellettuale di Macrovision Corporation e di altri proprietari. L’uso di tale tecnologia di protezione dei diritti d’autore deve essere autorizzato da Macrovision ed è inteso solo per l’uso domestico e per altri usi di visione limitata, salvo quanto diversamente autorizzato da Macrovision. Non è consentito lo smontaggio o la manomissione. Prodotto su licenza dei Dolby Laboratories. “Dolby” e il simbolo della doppia D sono marchi dei Dolby Laboratories. Windows Media e il loro Windows sono marchi di fabbrica o marchi registrati di Microsoft Corporation negli Stati Uniti e/o in altri paesi. “DVD VIDEO”, “DVD-R”, “DVD-RW”, “DVD+R”, e “DVD+RW” sono marchi di fabbrica. “DivX” e “DivX Certified” sono marchi di fabbrica registrati o marchi di fabbrica di DivX, Inc. IL PRESENTE PRODOTTO È CONCESSO IN LICENZA IN BASE AL PORTAFOGLIO DEI BREVETTI MPEG-4 VISUAL PER L’USO PERSONALE E NON COMMERCIALE DI UN UTENTE PER LA DECODIFICA DI UN VIDEO MPEG-4 CODIFICATO DA UN UTENTE PER FINI PRIVATI E NON COMMERCIALI E/O OTTENUTO DA UN FORNITORE VIDEO AUTORIZZATO DA MPEG LA PER LA DISTRIBUZIONE DI VIDEO MPEG-4. NON VIENE GARANTITA ALCUNA LICENZA PER ALTRI TIPI DI USO. INFORMAZIONI AGGIUNTIVE, INCLUSE QUELLE RELATIVE A LICENZE E UTILIZZI PROMOZIONALI, INTERNI E COMMERCIALI, SONO DISPONIBILI PRESSO MPEG LA, LLC. VISITARE IL SITO WEB ALL’INDIRIZZO HTTP://WWW.MPEGLA.COM 7 MEX-DV1500U 4-120-899-21 (1) D:\Documents and Settings\takashi-shimomura\Desktop\DTP\848220S MEXDV1500U(EUR)\4120899211_MEX-DV1500U_ML\04IT02CD-E.fm masterpage:Left Dischi riproducibili e simboli utilizzati nel presente manuale Il presente apparecchio può riprodurre vari dischi video/audio. Nella seguente tabella sono indicati i dischi supportati dall’apparecchio, nonché le funzioni disponibili per determinati tipi di disco. Simbolo del disco nel manuale Formato del disco Logo del disco DVD VIDEO DVD-R*1 DVD-R DL*1 (modo video/modo VR) VIDEO DVD-RW*1 (modo video/modo VR) DVD+R*1 DVD+R DL*1 DVD+RW*1 Video CD (ver. 1.0/1.1/2.0) AUDIO CD Audio CD-ROM*2 CD-R*2 CD-RW*2 *1 I file audio possono inoltre essere memorizzati. Per ulteriori informazioni, vedere a pagina 9. *2 I file video/di immagini possono inoltre essere memorizzati. Per ulteriori informazioni, vedere a pagina 9. Nota Nel presente manuale, è possibile che la dicitura “DVD” venga utilizzata come termine generale per i dischi DVD VIDEO, DVD-R/DVD-RW e DVD+R/DVD+RW. 8 MEX-DV1500U 4-120-899-21 (1) D:\Documents and Settings\takashi-shimomura\Desktop\DTP\848220S MEXDV1500U(EUR)\4120899211_MEX-DV1500U_ML\04IT02CD-E.fm masterpage:Right Nella seguente tabella sono indicati i formati di compressione supportati, i relativi tipi di file e i tipi di disco che è possibile utilizzare per memorizzarli. Le funzioni disponibili variano in base al formato, indipendentemente dal tipo di disco. I simboli dei formati indicati di seguito sono riportati accanto alla descrizione delle funzioni disponibili per gli specifici formati. Simbolo del formato nel manuale Tipo di file Tipo di disco utilizzabile per la memorizzazione File audio MP3 File audio WMA File audio AAC File di immagini JPEG File video DivX® MPEG-4 DATA DVD DVD-ROM DVD-R DVD-R DL DVD-RW DVD+R DVD+R DL DVD+RW DATA CD CD-ROM CD-R CD-RW File video MPEG-4 Suggerimento Per ulteriori informazioni sui formati di compressione, vedere a pagina 50. Tipi di disco non supportati I tipi di disco riportati di seguito non possono essere riprodotti mediante il presente apparecchio: • Dischi da 8 cm • Dischi da 12 cm che impiegano soltanto la porzione di dati più interna da 8 cm (la parte restante è trasparente) • CD-ROM contenenti file diversi da MP3/WMA/AAC/JPEG/DivX/MPEG-4 • SA-CD • CD-G • Photo-CD • VSD (Video Single Disc) • DVD-ROM contenenti file diversi da MP3/WMA/AAC/JPEG/DivX/MPEG-4 • DVD-RAM • DVD-Audio • Active-Audio (dati) • SVCD (Super Video CD) • CDV • Dischi creati nel formato Packet Write • Dischi in formato DTS Nota Anche se compatibili, a seconda delle condizioni di registrazione potrebbe non essere possibile riprodurre i dischi con il presente apparecchio. Codice di zona Codice di zona Il sistema di zona viene utilizzato per garantire la protezione dei diritti d’autore. Il codice di zona è riportato nella parte inferiore dell’apparecchio, con il quale è possibile riprodurre solo DVD aventi lo stesso codice di zona indicato sull’etichetta. È inoltre possibile riprodurre i DVD che riportano l’etichetta ALL . Se si tenta di riprodurre un altro DVD, sullo schermo del monitor viene visualizzato il messaggio “Playback prohibited by region code.” (Riproduzione non consentita dal codice di zona). A seconda del DVD, è possibile che non venga riportato alcun codice di zona, anche se è vietato riprodurre tale DVD a causa di restrizioni di zona. 9 MEX-DV1500U 4-120-899-21 (1) D:\Documents and Settings\takashi-shimomura\Desktop\DTP\848220S MEXDV1500U(EUR)\4120899211_MEX-DV1500U_ML\04IT02CD-E.fm masterpage:Left Posizione e funzione dei comandi Unità principale 1 2345 6 7 8 9 OFF SEEK SOURCE AF TA TP REG DISC ALBM ARTIST TRACK PTY REP SHUF AF/TA 1 2 MODE SEEK SETUP SHUF ZAP DM+ LOUD AUX ALBM 3 4 5 6 DSPL PUSH SOUND / ENTER q; qa qs qd qfqg qh Per ulteriori informazioni, fare riferimento alle pagine indicate. Le istruzioni contenute nel presente manuale si riferiscono generalmente ai comandi del telecomando a scheda. È inoltre possibile utilizzare i comandi dell’unità principale, se dispongono di nomi uguali o simili a quelli del telecomando a scheda. A Tasto OFF pagina 15, 16, 18, 20, 24 Per spegnere/arrestare la sorgente (premere); per spegnere completamente (tenere premuto). B Tasto (Back) pagina 35, 39 Per tornare alla schermata precedente. C Tasto SOURCE pagina 20, 22, 36, 49 Per attivare l’alimentazione; per cambiare la sorgente (radio/disco/USB/AUX). D Tasto (Browse) pagina 35 Per attivare il modo Quick-BrowZer.*1 E Manopola di controllo/tasto SOUND/ ENTER pagina 29, 35, 36, 38, 39, 44, 48, 49 Per regolare il volume/un’impostazione (ruotare), per accedere al menu audio/ applicare un’impostazione (premere). qj qk ql F Alloggiamento del disco pagina 16, 18 Per inserire il disco. G Finestra del display H Tasto Z (espulsione) pagina 16, 18 Per estrarre il disco. I Terminale USB pagina 20 Per il collegamento al dispositivo USB. J Tasti SEEK +/– pagina 17, 19, 22, 23 Disco/USB: Per saltare un capitolo/un brano/una scena/ un file (premere); per ricercare rapidamente all’indietro/in avanti nel disco (tenere premuto per un istante); per ricercare rapidamente all’indietro/in avanti in un brano (tenere premuto).*2 Radio: Per sintonizzare le stazioni in modo automatico (premere); per ricercare una stazione manualmente (tenere premuto). K Tasto (rilascio pannello anteriore) pagina 15 10 MEX-DV1500U 4-120-899-21 (1) D:\Documents and Settings\takashi-shimomura\Desktop\DTP\848220S MEXDV1500U(EUR)\4120899211_MEX-DV1500U_ML\04IT02CD-E.fm L Tasto MODE pagina 22, 36, 49 Per selezionare la banda radio (FM/MW/ LW); per selezionare un dispositivo ausiliare collegato alla presa di ingresso AUX (anteriore) o alla presa AUX IN (posteriore). masterpage:Right Informazioni sul cappuccio USB Quando il terminale USB I non viene utilizzato, applicare il cappuccio USB in dotazione onde evitare che al relativo interno penetrino polvere o sporcizia. Tenere il cappuccio USB fuori dalla portata dei bambini onde evitare che venga ingerito accidentalmente. M Ricettore del telecomando a scheda N Tasto RESET pagina 14 O Tasto SETUP pagina 29, 36, 44, 48, 49 Per accedere al menu delle impostazioni di sistema. P Tasto AF (frequenza alternative)/ TA (notiziari sul traffico)/ PTY (tipo di programma) pagina 37, 38 Per impostare AF e TA (premere); per selezionare PTY nel modo RDS (tenere premuto). Q Tasti numerici Disco/USB: (1): b REP pagina 16, 17, 21, 32 (2): SHUF B pagina 16, 17, 21, 32 (3)/(4): ALBM –/+ (V/v) pagina 16, 17, 19, 23 Per saltare un album o una cartella/ spostare il cursore (premere); per saltare gli album o le cartelle in modo continuo (tenere premuto). (6): u (riproduzione/pausa) pagina 16, 17, 18, 19, 23 Per avviare/mettere in pausa la riproduzione. Radio: Per ricevere le stazioni memorizzate (premere); per memorizzare le stazioni (tenere premuto). R Tasto DSPL (display) pagina 21, 26, 37, 48 Per cambiare la voce del display. S Presa di ingresso AUX pagina 48 Per collegare un dispositivo audio portatile. *1 Durante la riproduzione di un CD/MP3/WMA/AAC/ JPEG/DivX/MPEG-4. *2 Il funzionamento varia in base al disco (pagina 17, 19). 11 MEX-DV1500U 4-120-899-21 (1) D:\Documents and Settings\takashi-shimomura\Desktop\DTP\848220S MEXDV1500U(EUR)\4120899211_MEX-DV1500U_ML\04IT02CD-E.fm masterpage:Left Telecomando a scheda RM-X168 9 1 0 2 qa 3 qs 4 5 qd qf qg 6 qh 7 qj 8 Per ulteriori informazioni, fare riferimento alle pagine indicate. Prima dell’uso, rimuovere la pellicola protettiva (pagina 14). A Tasto OFF pagina 16, 18, 20, 24 Per spegnere/arrestare la sorgente (premere); per spegnere completamente (tenere premuto). B Tasto SOUND pagina 39 Per accedere al menu audio. C Tasto VISUAL SETUP pagina 25, 28, 29, 30, 31, 33, 34, 40 Per accedere al menu del modo di riproduzione/al menu delle impostazioni video. D Tasto SYSTEM SETUP pagina 29, 36, 44, 48, 49 Per accedere al menu delle impostazioni di sistema. 12 MEX-DV1500U 4-120-899-21 (1) D:\Documents and Settings\takashi-shimomura\Desktop\DTP\848220S MEXDV1500U(EUR)\4120899211_MEX-DV1500U_ML\04IT02CD-E.fm E Tasto (Indietro)/O pagina 24, 25, 31, 32, 35, 39, 40 Per tornare alla schermata precedente; per tornare al menu in un VCD*1. F Tasti numerici pagina 16, 17, 24, 25, 31, 32, 34, 34, 36 Disco: Per individuare un titolo/capitolo/brano. Radio: Per ricevere le stazioni memorizzate (premere); per memorizzare le stazioni (tenere premuto). G Tasto CLEAR pagina 31, 34 Per cancellare un numero immesso. H Tasto DSPL (display) pagina 21, 26, 37, 48 Per cambiare le voci del display. I Tasto ATT (attenuazione audio) Per attenuare l’audio (per annullare, premere di nuovo). J Tasto u (riproduzione/pausa) pagina 16, 17, 18, 19, 23 Per avviare/mettere in pausa la riproduzione. K Tasti .m/M> pagina 17, 19, 22, 23 Disco/USB: Per saltare un capitolo/un brano/una scena/ un file (premere); per ricercare rapidamente all’indietro/in avanti nel disco (tenere premuto per un istante); per ricercare rapidamente all’indietro/in avanti in un brano (tenere premuto).*2 Radio: Per sintonizzare le stazioni in modo automatico (premere); per ricercare una stazione manualmente (tenere premuto). masterpage:Right L Tasti di impostazione della riproduzione DVD (AUDIO): pagina 17, 27 Per modificare il formato/la lingua dell’audio. (formati VCD/CD/MP3/WMA/AAC: per modificare il canale audio) (SUBTITLE): pagina 17 Per cambiare la lingua dei sottotitoli. (ANGLE): pagina 17 Per modificare l’angolo di visualizzazione. (TOP MENU): pagina 17 Per accedere al menu principale di un DVD. (MENU): pagina 17 Per accedere al menu di un disco. M Tasto (Sfoglia) pagina 35 Per attivare il modo Quick-BrowZer.*3 N Tasti </M/m/, (cursore)/ENTER Per spostare il cursore e applicare un’impostazione. O Tasto SRC (sorgente) pagina 20, 22, 36, 49 Per attivare l’alimentazione; per cambiare la sorgente (radio/disco/USB/AUX). P Tasto MODE pagina 22, 36, 49 Per selezionare la banda radio (FM/MW/ LW); per selezionare un dispositivo ausiliare collegato alla presa di ingresso AUX (anteriore) o alla presa AUX IN (posteriore). Q Tasti VOL (volume) +/– Per regolare il volume. *1 Durante la riproduzione con la funzione PBC. *2 Il funzionamento varia in base al disco (pagina 17, 19). *3 Durante la riproduzione di un CD/MP3/WMA/AAC/ JPEG/DivX/MPEG-4. Nota Se l’apparecchio viene spento e il display disattivato, non è possibile controllarlo mediante il telecomando a scheda a meno che non venga premuto (SOURCE) sull’apparecchio o che non venga inserito un disco per accendere l’apparecchio stesso. 13 MEX-DV1500U 4-120-899-21 (1) D:\Documents and Settings\takashi-shimomura\Desktop\DTP\848220S MEXDV1500U(EUR)\4120899211_MEX-DV1500U_ML\04IT02CD-E.fm masterpage:Left Azzeramento dell’apparecchio Operazioni preliminari Installazione dell’apparecchio e del monitor opzionale Innanzitutto, installare e collegare l’apparecchio e il monitor opzionale. Il presente apparecchio può essere utilizzato tramite le indicazioni visualizzate sull’apparecchio stesso e/o su un monitor opzionale. Nel presente manuale sono incluse istruzioni relative alle indicazioni visualizzate su entrambi l’apparecchio e/o un monitor opzionale. Prima di utilizzare l’apparecchio per la prima volta, dopo la sostituzione della batteria dell’auto o dopo avere effettuato modifiche ai collegamenti, è necessario azzerare l’apparecchio stesso. Rimuovere il pannello anteriore (pagina 15), quindi premere il tasto RESET (pagina 11) utilizzando un oggetto appuntito, quale una penna a sfera. Nota Premendo il tasto RESET verranno cancellate le impostazioni dell’orologio e alcune funzioni memorizzate. Apparecchio Monitor opzionale Preparazione del telecomando a scheda Rimuovere la pellicola protettiva. Suggerimento Per ulteriori informazioni sulle modalità di sostituzione della batteria, vedere a pagina 51. Per ulteriori informazioni, consultare il manuale di installazione/dei collegamenti in dotazione. Nota Accertarsi di installare in modo sicuro il monitor opzionale, in una posizione che non ostacoli la visuale del conducente. 14 MEX-DV1500U 4-120-899-21 (1) D:\Documents and Settings\takashi-shimomura\Desktop\DTP\848220S MEXDV1500U(EUR)\4120899211_MEX-DV1500U_ML\04IT02CD-E.fm Rimozione del pannello anteriore OFF Per evitare il furto dell’apparecchio, è possibile estrarne il pannello anteriore. Segnale di avvertimento Se la chiave di accensione viene impostata sulla posizione OFF senza che il pannello anteriore sia stato rimosso, viene emesso per alcuni secondi un segnale acustico di avvertimento. Tale segnale viene emesso solo se è in uso l’amplificatore incorporato. 1 Premere (OFF). L’apparecchio si spegne. 2 Premere , quindi estrarre il pannello tirando verso di sé. masterpage:Right Installazione del pannello anteriore Inserire la parte A del pannello anteriore nella parte B dell’apparecchio, come illustrato, quindi premere il lato sinistro fino a farlo scattare in posizione. A B Nota Non collocare alcun oggetto sulla superficie interna del pannello anteriore. Note • Non fare cadere il pannello anteriore né esercitare eccessiva pressione su quest’ultimo e sulla finestra del display. • Non esporre il pannello anteriore a calore, temperature elevate o umidità. Evitare di lasciarlo all’interno di auto parcheggiate oppure su cruscotti e ripiani posteriori. • Non rimuovere il pannello anteriore durante la riproduzione sul dispositivo USB, onde evitare di danneggiare i dati USB. 15 MEX-DV1500U 4-120-899-21 (1) D:\Documents and Settings\takashi-shimomura\Desktop\DTP\848220S MEXDV1500U(EUR)\4120899211_MEX-DV1500U_ML\04IT02CD-E.fm masterpage:Left Operazioni di base Riproduzione dei dischi video A seconda del disco, alcune operazioni potrebbero risultare differenti o limitate. Consultare le istruzioni per l’uso in dotazione con il disco. Z OFF OFF u </M/m/, ENTER Tasti numerici b/B/V/v u 1 Accendere il monitor, quindi selezionare su quest’ultimo la sorgente di ingresso corrispondente alla presente unità. 2 Inserire il disco (con il lato dell’etichetta verso l’alto). La riproduzione viene avviata automaticamente. Se la riproduzione non viene avviata automaticamente, premere u. 3 Se viene visualizzato il menu DVD, premere (1)(b)/(2)(B)/(3)(V)/ (4)(v) per spostare il cursore, quindi premere (6) (u) per confermare. Con il telecomando a scheda, premere i tasti </M/m/,/numerici per spostare il cursore, quindi premere (ENTER) per confermare. Per arrestare la riproduzione Premere (OFF). Nota I dischi in formato DTS non sono supportati. Se è selezionato il formato DTS, l’audio non viene emesso. Per estrarre il disco Premere Z. 16 MEX-DV1500U 4-120-899-21 (1) D:\Documents and Settings\takashi-shimomura\Desktop\DTP\848220S MEXDV1500U(EUR)\4120899211_MEX-DV1500U_ML\04IT02CD-E.fm masterpage:Right Informazioni sul menu DVD I DVD sono suddivisi in diverse sezioni, che compongono un’immagine o una porzione musicale. Queste sezioni vengono denominate “titoli”. Se viene riprodotto un DVD contenente diversi titoli, è possibile selezionare il titolo desiderato utilizzando il menu principale del DVD stesso. Per i DVD che consentono di selezionare voci quali lingue dei sottotitoli/dell’audio, procedere alla selezione utilizzando il menu DVD. Altre funzioni di riproduzione .m/M> SUBTITLE ANGLE MENU </M/m/, ENTER u AUDIO TOP MENU .m/M> b/B/V/v Tasti numerici u Per Premere effettuare una pausa/ripristinare la riproduzione dopo una pausa u saltare un capitolo/un brano/una scena/ un file .m/M> ricercare rapidamente all’indietro/in avanti nel disco e tenere premuto brevemente .m/M>; quindi, più volte per cambiare velocità (× 2 t × 12 t × 120 t × 2…) arrestare la ricerca rapida all’indietro/in u avanti visualizzare il menu DVD*1 Telecomando: (TOP MENU) o (MENU) selezionare le voci nel menu DVD*1 Unità principale: (1)(b)/(2)(B)/(3)(V)/(4)(v) per spostare il cursore, quindi premere (6) (u) per confermare Telecomando: tasti </M/m/,/numerici per spostare il cursore, quindi premere (ENTER) per confermare cambiare la lingua dell’audio/il formato/ Telecomando: più volte (AUDIO) finché non viene il canale (pagina 27)*1 visualizzata la voce desiderata disattivare/cambiare la lingua dei sottotitoli*1 Telecomando: più volte (SUBTITLE) finché non viene visualizzata la voce desiderata*2 cambiare l’angolo di visualizzazione*1 Telecomando: più volte (ANGLE) finché non viene visualizzato il numero di angolo desiderato *1 Non disponibile a seconda del disco. *2 Quando viene visualizzato il prompt di immissione a 4 cifre, immettere il codice della lingua (pagina 59) desiderata. 17 MEX-DV1500U 4-120-899-21 (1) D:\Documents and Settings\takashi-shimomura\Desktop\DTP\848220S MEXDV1500U(EUR)\4120899211_MEX-DV1500U_ML\04IT02CD-E.fm masterpage:Left Riproduzione di dischi audio A seconda del disco, alcune operazioni potrebbero risultare differenti o limitate. Consultare le istruzioni per l’uso in dotazione con il disco. Z OFF OFF u u 1 Inserire il disco (con il lato dell’etichetta verso l’alto). La riproduzione viene avviata automaticamente. Se la riproduzione non viene avviata automaticamente, premere u. Per arrestare la riproduzione Premere (OFF). Nota I dischi in formato DTS non sono supportati. Se è selezionato il formato DTS, l’audio non viene emesso. Per estrarre il disco Premere Z. 18 MEX-DV1500U 4-120-899-21 (1) D:\Documents and Settings\takashi-shimomura\Desktop\DTP\848220S MEXDV1500U(EUR)\4120899211_MEX-DV1500U_ML\04IT02CD-E.fm masterpage:Right Altre funzioni di riproduzione .m/M> u </M/m/, .m/M> ALBM u Per Premere effettuare una pausa/ripristinare la riproduzione dopo una pausa u saltare un brano .m (<)/M> (,) ricercare rapidamente all’indietro/in avanti nel brano e tenere premuto .m/M> saltare un album* Unità principale: (3) (ALBM –)/(4) (ALBM +) Telecomando: M/m saltare gli album in modo continuo* Unità principale: e tenere premuto (3) (ALBM –)/ (4) (ALBM +) Telecomando: e tenere premuto M/m * Se viene riprodotto un file MP3/WMA/AAC. 19 MEX-DV1500U 4-120-899-21 (1) D:\Documents and Settings\takashi-shimomura\Desktop\DTP\848220S MEXDV1500U(EUR)\4120899211_MEX-DV1500U_ML\04IT02CD-E.fm masterpage:Left Riproduzione di un dispositivo USB Per ulteriori informazioni sulla compatibilità del dispositivo USB in uso, visitare il sito Web relativo all’assistenza. Sito di assistenza clienti http://support.sony-europe.com • È possibile utilizzare dispositivi USB di tipo MSC (Mass Storage Class) compatibili con lo standard USB. • I codec corrispondenti sono MP3 (.mp3), WMA (.wma), AAC (.m4a) e JPEG (.jpg). • Si consiglia di eseguire il backup dei dati contenuti in un dispositivo USB. Nota Collegare il dispositivo USB dopo avere acceso il motore dell’auto. A seconda del dispositivo USB utilizzato, potrebbero verificarsi problemi di funzionamento o danni nel caso in cui il dispositivo stesso venga collegato prima dell’accensione del motore. OFF SOURCE (USB) OFF SRC REP SHUF 1 DSPL DSPL Collegare il dispositivo USB al terminale USB. La riproduzione viene avviata automaticamente. Se è già collegato un dispositivo USB, per avviare la riproduzione premere più volte (SOURCE) fino a visualizzare “USB”. Per arrestare la riproduzione Premere (OFF). Nota Assicurarsi di utilizzare il cavo USB in dotazione con l’apparecchio qualora sia necessario un cavo durante il collegamento USB. 20 MEX-DV1500U 4-120-899-21 (1) D:\Documents and Settings\takashi-shimomura\Desktop\DTP\848220S MEXDV1500U(EUR)\4120899211_MEX-DV1500U_ML\04IT02CD-E.fm Rimozione del dispositivo USB 1 Arrestare la riproduzione sul dispositivo USB. 2 Rimuovere il dispositivo USB. Se il dispositivo USB viene rimosso durante la riproduzione, è possibile che i dati contenuti nel dispositivo USB stesso vengano danneggiati. Note • Non utilizzare dispositivi USB di dimensioni o peso eccessivi, onde evitare che cadano a causa delle vibrazioni oppure che causino la perdita della connessione. • Non rimuovere il pannello anteriore durante la riproduzione sul dispositivo USB, onde evitare di danneggiare i dati USB. • Il presente apparecchio non è in grado di riconoscere i dispositivi USB attraverso un hub USB. Voci del display A Sorgente B Nome del brano, nome dell’artista, numero dell’album*, nome dell’album, numero del brano/tempo di riproduzione trascorso, orologio * Il numero dell’album viene visualizzato solo quando si cambia album. Per cambiare le voci del display B, premere (DSPL). masterpage:Right Visualizzazione dell’immagine di copertina Durante la riproduzione audio, sul monitor è possibile controllare le informazioni relative al contenuto o visualizzare l’immagine di copertina* del file MP3/WMA/AAC memorizzato sul dispositivo USB. * Le dimensioni consigliate sono comprese tra 240 × 240 e 960 × 960 pixel. Riproduzione ripetuta e in ordine casuale 1 Durante la riproduzione, premere più volte (1) (REP) o (2) (SHUF) sull’unità principale fino a visualizzare l’impostazione desiderata. Selezionare Per riprodurre REP-TRACK un brano in modo ripetuto. REP-ALBUM un album in modo ripetuto. SHUF-ALBUM un album in ordine casuale. REP-DRIVE* il contenuto di un’unità in modo ripetuto. * Se nel dispositivo USB in uso sono state create due o più unità. Per tornare al modo di riproduzione normale, selezionare “REP-OFF” o “SHUF-OFF”. Note • Le voci del display variano a seconda del dispositivo USB utilizzato, del formato di registrazione e delle impostazioni. Per ulteriori informazioni, visitare il sito Web relativo all’assistenza. • Di seguito è riportato il numero massimo di dati visualizzabili: – cartelle (album): 256 – file (brani): 2.000 • Non lasciare un dispositivo USB in un’auto parcheggiata, onde evitare problemi di funzionamento. • A seconda della quantità di dati registrati, è possibile che l’avvio della riproduzione richieda del tempo. • Durante la riproduzione o la ricerca rapida in avanti/ all’indietro di un file MP3/WMA/AAC VBR (velocità di trasmissione variabile), è possibile che il tempo di riproduzione trascorso non venga visualizzato correttamente. • Non è supportata la riproduzione di file con compressione senza perdita di dati. 21 MEX-DV1500U 4-120-899-21 (1) D:\Documents and Settings\takashi-shimomura\Desktop\DTP\848220S MEXDV1500U(EUR)\4120899211_MEX-DV1500U_ML\04IT02CD-E.fm masterpage:Left Ascolto della radio .m/M> SOURCE SRC MODE SEEK MODE 1 Premere più volte (SOURCE) fino a visualizzare “TUNER”. 2 Premere più volte (MODE) finché non viene visualizzata la banda desiderata (FM1, FM2, FM3, MW o LW). A B A Banda radio/Funzione B Frequenza* * Durante la ricezione di una stazione RDS, viene visualizzato il nome del servizio dei programmi. Per ulteriori informazioni, vedere “RDS” a pagina 37. 3 Eseguire la sintonizzazione. Per eseguire automaticamente la sintonizzazione Premere (SEEK) +/–. La ricerca si arresta non appena l’apparecchio riceve una stazione. Ripetere questa procedura fino alla ricezione della stazione desiderata. Per eseguire manualmente la sintonizzazione Tenere premuto (SEEK) +/– per individuare la frequenza approssimativa, quindi premere più volte (SEEK) +/– per effettuare la regolazione fine della frequenza desiderata. Suggerimento Per ulteriori informazioni su altre funzioni della radio, vedere “Operazioni avanzate — Radio” a pagina 36. Con il telecomando a scheda Utilizzare (SRC) anziché (SOURCE), e .m/ M> anziché (SEEK) –/+. 22 MEX-DV1500U 4-120-899-21 (1) D:\Documents and Settings\takashi-shimomura\Desktop\DTP\848220S MEXDV1500U(EUR)\4120899211_MEX-DV1500U_ML\04IT02CD-E.fm Operazioni avanzate — Dischi Nel presente capitolo sono incluse le seguenti sezioni. • Operazioni specifiche dei video* t pagina 23 a 32 • Operazioni comuni video*/audio t pagina 32 a 35 • Operazioni specifiche dell’audio t pagina 36 Riproduzione di video DivX®/ MPEG-4 È possibile controllare la riproduzione DivX/ MPEG-4, nonché alcune funzioni di controllo della riproduzione audio, seguendo la stessa procedura utilizzata per gli altri dischi video (pagina 16). Per Premere saltare un album (cartella) Unità principale: (3) (ALBM –)/ (4) (ALBM +) saltare album (cartelle) in modo continuo Unità principale: e tenere premuto (3) (ALBM –)/ (4) (ALBM +) * Incluse le operazioni relative ai file JPEG. Riproduzione di file MPEG-4/JPEG DivX®/ masterpage:Right Suggerimento È inoltre possibile selezionare un file da riprodurre utilizzando un elenco (modo Quick-BrowZer) (pagina 35). MPEG-4 Riproduzione di immagini JPEG .m/M> ALBM .m/M> Con il presente apparecchio, è possibile riprodurre una visualizzazione in serie di file JPEG. Inserendo un disco o premendo u, la visualizzazione in serie viene avviata automaticamente. Per ulteriori informazioni sulle modalità di avvio della riproduzione, seguire la procedura riportata ai punti da 1 a 4 di “Riproduzione dei dischi video” a pagina 16. </, Altre funzioni di riproduzione u u Per Nota Se il disco contiene più tipi di file, è possibile riprodurre solo il tipo di file selezionato (audio/video/ immagine). Per riprodurre i file video DivX/MPEG-4 o i file di immagini JPEG di tale disco, premere durante la riproduzione, quindi selezionare il tipo di file (video/immagine) che si desidera visualizzare nell’elenco, infine selezionare il file desiderato (pagina 35). Premere ruotare l’immagine Telecomando: </, (ruota in incrementi di 90º) saltare un’immagine .m/M> saltare un album Unità principale: (3) (ALBM –)/ (4) (ALBM +) saltare gli album in Unità principale: modo continuo e tenere premuto (3) (ALBM –)/ (4) (ALBM +) continua alla pagina successiva t 23 MEX-DV1500U 4-120-899-21 (1) D:\Documents and Settings\takashi-shimomura\Desktop\DTP\848220S MEXDV1500U(EUR)\4120899211_MEX-DV1500U_ML\04IT02CD-E.fm Note • Se viene ruotata un’immagine di grandi dimensioni, per la relativa visualizzazione potrebbe occorrere una quantità maggiore di tempo. • Non è possibile visualizzare i file JPEG in formato progressivo. masterpage:Left Uso delle funzioni PBC — Controllo della riproduzione Suggerimento È inoltre possibile selezionare un file da riprodurre utilizzando un elenco (modo Quick-BrowZer) (pagina 35). OFF O ENTER Tasti numerici Il menu PBC consente di effettuare operazioni in modo interattivo durante la riproduzione di un VCD compatibile con le funzioni PBC. 1 Avviare la riproduzione di un VCD compatibile con le funzioni PBC. Viene visualizzato il menu PBC. 2 Premere i tasti numerici per selezionare la voce desiderata, quindi premere (ENTER). 3 Per le operazioni interattive, attenersi alle istruzioni dei menu. Per tornare al display precedente, premere O. Riproduzione senza la funzione PBC 1 Durante la riproduzione, premere (OFF). La riproduzione si arresta. 2 Premere i tasti numerici per selezionare la voce desiderata, quindi premere (ENTER). Il messaggio “Play without PBC.” (Riproduzione senza PBC) viene visualizzato e la riproduzione avviata. Il menu PBC non viene visualizzato durante la riproduzione. Note • Le voci del menu e le procedure di funzionamento variano in base al disco. • Durante la riproduzione PBC, il numero del brano, il tempo di riproduzione e così via non vengono visualizzati nel menu del modo di riproduzione (pagina 25). • La funzione di ripristino della riproduzione non è disponibile durante il modo di riproduzione senza PBC. Suggerimento Per riavviare la riproduzione PBC, arrestare la riproduzione premendo (OFF), quindi premere u. 24 MEX-DV1500U 4-120-899-21 (1) D:\Documents and Settings\takashi-shimomura\Desktop\DTP\848220S MEXDV1500U(EUR)\4120899211_MEX-DV1500U_ML\04IT02CD-E.fm Uso del menu del modo di riproduzione MPEG-4 VISUAL SETUP O </M/m/, ENTER Tasti numerici È possibile utilizzare il menu del modo di riproduzione dell’apparecchio per controllare la riproduzione o configurare le impostazioni di riproduzione. Per visualizzare il menu del modo di riproduzione, premere (VISUAL SETUP) durante la riproduzione. Per nascondere il menu, premere di nuovo (VISUAL SETUP). Note • Durante la riproduzione del disco audio, (VISUAL SETUP) non è attivo. • Durante la riproduzione JPEG, (VISUAL SETUP) è attivo solo quando un’immagine è visualizzata a schermo intero. Suggerimento Premendo (VISUAL SETUP) durante il modo di arresto della riproduzione, viene visualizzato il menu delle impostazioni video (sul monitor) in cui è possibile configurare varie impostazioni, quali la lingua delle indicazioni a schermo, la regolazione dell’audio e così via (pagina 40). Esempio: durante la riproduzione di un DVD B C D EF A 12(67) 018(034) T 1:35:55 I A Voci del menu del modo di riproduzione Per ulteriori informazioni, vedere “Elenco delle voci del menu del modo di riproduzione” a pagina 25. B DVD: numero del titolo/totale VCD: numero del brano/totale*1 JPEG: numero dell’album/totale DivX/MPEG-4: numero dell’album (cartella)/ totale C DVD: numero del capitolo/totale JPEG: numero dell’immagine/totale DivX/MPEG-4: numero del file/totale D Tempo di riproduzione trascorso*2 E Formato F Stato della riproduzione (PLAY N, PAUSE X, e così via) G Impostazione corrente H Opzioni I Voce selezionata J Nome della voce selezionata e/o i messaggi di supporto alle operazioni *1 Durante la riproduzione di VCD con la funzione PBC (pagina 24), non viene visualizzata alcuna indicazione. *2 Durante la riproduzione JPEG, non viene visualizzata alcuna indicazione. Elenco delle voci del menu del modo di riproduzione Premere </M/m/,/i tasti numerici per selezionare una voce, quindi premere (ENTER). Per tornare al display precedente, premere O. Per ulteriori informazioni, fare riferimento alle pagine indicate. TITLE, TRACK 34 Per selezionare un titolo, una scena o un brano da riprodurre. ALBUM 34 Per selezionare un album o una cartella da visualizzare. MPEG-4 PLAY DVD VIDEO CHAPTER 34 Per selezionare un capitolo da riprodurre. G 1:ENGLISH OFF 1:ENGLISH 2:FRENCH 3:SPANISH SUBTITLE Select : masterpage:Right H IMAGE 34 Per selezionare un’immagine da visualizzare. ENTER J continua alla pagina successiva t 25 MEX-DV1500U 4-120-899-21 (1) D:\Documents and Settings\takashi-shimomura\Desktop\DTP\848220S MEXDV1500U(EUR)\4120899211_MEX-DV1500U_ML\04IT02CD-E.fm FILE 34 Per selezionare un file video da riprodurre. MPEG-4 masterpage:Left Visualizzazione delle informazioni sulla durata/ informazioni di testo del disco TIME 34 Per controllare il tempo di riproduzione trascorso; per immettere il codice temporale. MPEG-4 MPEG-4 AUDIO 17, 27 Per modificare la lingua/il formato/il canale audio; per controllare il formato del programma. MPEG-4 SUBTITLE 17 Per attivare o disattivare i sottotitoli/modificare la lingua dei sottotitoli. DSPL Verifica delle informazioni sulla durata ANGLE 17 Per cambiare l’angolo. * CENTER ZOOM 29 Per ingrandire un’immagine. Durante la riproduzione di un video/di un’immagine, è possibile controllare il tempo di riproduzione e il tempo residuo del titolo, capitolo, brano corrente e così via. 1 MPEG-4 REPEAT 33 Per riprodurre un titolo/capitolo/brano/album/ immagine/file video in modo ripetuto. Informazioni sulla durata T MPEG-4 SHUFFLE 33 Per riprodurre i capitoli/brani/immagine/file video in ordine casuale. MPEG-4 * PICTURE EQ 30 Per regolare la qualità delle immagini. MPEG-4 * Ad eccezione dei DVD-R/DVD-R DL/DVD-RW nel modo VR. Suggerimento Se “SHUFFLE” o “REPEAT” è attivato oppure se “ANGLE” è disponibile, la relativa casella di controllo si illumina in verde (ad esempio, t ). A seconda della scena, potrebbe tuttavia non essere possibile cambiare angolo anche se la casella è illuminata in verde. Durante la riproduzione, premere (DSPL). Vengono visualizzate le informazioni sulla riproduzione correnti. 2 1:01:57 Premere più volte (DSPL) per visualizzare le informazioni sulla durata. Le informazioni sulla durata variano in base al disco/formato nel modo riportato di seguito. Riproduzione DVD • T **:**:** Tempo di riproduzione trascorso del titolo corrente • T-**:**:** Tempo residuo del titolo corrente • C **:**:** Tempo di riproduzione trascorso del capitolo corrente • C-**:**:** Tempo residuo del capitolo corrente 26 MEX-DV1500U 4-120-899-21 (1) D:\Documents and Settings\takashi-shimomura\Desktop\DTP\848220S MEXDV1500U(EUR)\4120899211_MEX-DV1500U_ML\04IT02CD-E.fm Riproduzione VCD (solo durante la riproduzione della versione 1.0/1.1 o 2.0 privi di funzione PBC.) • T **:** Tempo di riproduzione trascorso del brano corrente • T-**:** Tempo residuo del brano corrente • D **:** Tempo di riproduzione trascorso del disco corrente • D-**:** Tempo residuo del disco corrente masterpage:Right Configurazione delle impostazioni audio VISUAL SETUP AUDIO SYSTEM SETUP ENTER M/m Riproduzione JPEG • Numero dell’album/totale • Numero dell’immagine/totale Riproduzione DivX/MPEG-4 • Numero dell’album (cartella)/totale • Numero del file/totale • T **:** Tempo di riproduzione trascorso del file corrente Nota I dischi in formato DTS non sono supportati. Se è selezionato il formato DTS, l’audio non viene emesso. Verifica delle informazioni di testo È possibile modificare la lingua audio dei DVD, nel caso in cui sul disco siano registrati brani multilingue. È possibile modificare il formato audio di DVD/DivX durante la riproduzione di un disco registrato in più formati audio (ad esempio, Dolby Digital). È possibile controllare le informazioni di testo (nome dell’album, dell’immagine e così via) dei file JPEG/DivX/MPEG-4. Numero di album/immagine/cartella/file 037(325) Modifica della lingua/del formato audio 1 Durante la riproduzione, premere più volte (AUDIO) fino a visualizzare la lingua/il formato audio desiderato. Lingua/formato audio* 1:ENGLISH Dolby D Image name Informazioni di testo* * Se non sono disponibili informazioni di testo, viene visualizzato “NO TEXT”. Le informazioni di testo variano in base al formato nel modo riportato di seguito. Riproduzione JPEG • Nome dell’album (quando è visualizzato il numero di album) • Nome dell’immagine (quando è visualizzato il numero di immagine) * Durante la riproduzione DivX, viene visualizzato il formato/canale audio (ad esempio, “MP3”). La lingua per l’audio viene selezionata tra quelle disponibili. Quando viene visualizzato il prompt di immissione a 4 cifre, immettere il codice della lingua (pagina 59) desiderata. Se la stessa lingua viene visualizzata due o più volte, significa che il disco è registrato in più formati audio. continua alla pagina successiva t Riproduzione DivX/MPEG-4 • Nome dell’album (cartella) (quando è visualizzato il numero di album (cartella)) • Nome del file (quando è visualizzato il numero di file) 27 MEX-DV1500U 4-120-899-21 (1) D:\Documents and Settings\takashi-shimomura\Desktop\DTP\848220S MEXDV1500U(EUR)\4120899211_MEX-DV1500U_ML\04IT02CD-E.fm 2 Modifica del canale audio Durante la riproduzione di VCD/CD/MP3/ WMA/AAC, è possibile selezionare l’audio del canale destro o sinistro per l’ascolto tramite i diffusori destro e sinistro. Di seguito sono indicate le opzioni disponibili. STEREO (ST): audio stereo standard (predefinito) 1/L (L): audio del canale sinistro (monofonico) 2/R (R): audio del canale destro (monofonico) 1 Durante la riproduzione, premere più volte (AUDIO) fino a visualizzare il canale audio desiderato. Esempio: durante la riproduzione di un MP3 Canale audio masterpage:Left Premere M/m per selezionare (AUDIO). Viene visualizzato il formato di programma. Formato audio corrente* 12(67) 018(034) T 1:35:55 1:ENGLISH Dolby D PLAY DVD VIDEO PROGRAM FORMAT DOLBY DIGITAL 3/2.1 L LS C LFE R RS Formato di programma corrente * A seconda del disco, viene visualizzata l’indicazione “PCM”, “DOLBY DIGITAL”, e così via. Suggerimento È inoltre possibile cambiare le impostazioni dei dischi video selezionando “AUDIO” nel menu del modo di riproduzione (pagina 25). Le lettere visualizzate nel display del formato di programma rappresentano i seguenti componenti audio e le relative posizioni. : anteriore (sinistro) : anteriore (destro) : centrale : posteriore (sinistro) : posteriore (destro) : posteriore (monofonico): il componente posteriore del segnale elaborato mediante Dolby Surround e del segnale Dolby Digital : segnale con effetto a bassa frequenza Controllo del formato di programma Il nome del formato di programma e i numeri dei canali vengono visualizzati nel modo riportato di seguito. Esempio: Dolby Digital 5.1 canali TRACK NAME ALBUM NAME ARTIST NAME MP3 0003/1000 3:17 ST SHUF Nota A seconda del disco, potrebbe non essere possibile modificare l’impostazione audio. È possibile controllare il numero di canali e la posizione dei componenti audio sul DVD VIDEO in fase di riproduzione. 1 Durante la riproduzione, premere (VISUAL SETUP). Viene visualizzato il menu del modo di riproduzione. Componente posteriore × 2 DOLBY DIGITAL 3 / 2 . 1 Componente anteriore × 2 + Componente LFE × 1 Componente centrale × 1 Per nascondere il menu del modo di riproduzione, premere (VISUAL SETUP). 28 MEX-DV1500U 4-120-899-21 (1) D:\Documents and Settings\takashi-shimomura\Desktop\DTP\848220S MEXDV1500U(EUR)\4120899211_MEX-DV1500U_ML\04IT02CD-E.fm Regolazione del livello di uscita audio — Livello DVD masterpage:Right Ingrandimento delle immagini MPEG-4 È possibile regolare il livello di uscita audio di un DVD registrato nel formato Dolby Digital per ridurre le differenze di volume tra il disco e la sorgente. 1 VISUAL SETUP Durante la riproduzione, premere (SYSTEM SETUP). La voce delle impostazioni di sistema viene visualizzata sull’unità principale. 2 Premere M/m per selezionare “DVD-LEVEL”, quindi premere (ENTER). 3 Premere m per impostare “ADJST-ON”, quindi premere (ENTER). 4 Premere M/m per selezionare “DOLBY-ADJ”, quindi premere (ENTER). 5 Premere M/m per regolare il livello di uscita desiderato. Il livello di uscita può essere regolato in incrementi singoli, compresi tra –10 e +10. </M/m/, ENTER È possibile ingrandire le immagini. 1 Durante la riproduzione, premere (VISUAL SETUP). Viene visualizzato il menu del modo di riproduzione. 2 Premere M/m per selezionare (CENTER ZOOM), quindi premere (ENTER). Viene visualizzata l’opzione corrente. 12(67) 018(034) T 1:35:55 6 PLAY DVD VIDEO Premere (ENTER). L’impostazione è completata. x1 x1 x1.6 Per nascondere il menu delle impostazioni di sistema, premere (SYSTEM SETUP). Mediante l’unità principale Premere (SETUP) anziché (SYSTEM SETUP), ruotare la manopola di controllo anziché premere M/m, infine premere la manopola di controllo anziché (ENTER). 3 Premere M/m per selezionare l’opzione desiderata (×1, ×1.6*), quindi premere (ENTER). * L’immagine potrebbe apparire sgranata. L’immagine viene ingrandita. Per nascondere il menu del modo di riproduzione, premere (VISUAL SETUP). Per fare scorrere l’immagine, premere </M/m/,. Per ripristinare le dimensioni originali, selezionare “×1” al punto 3. Note • A seconda del disco, potrebbe non essere possibile cambiare l’ingrandimento. • Quando la riproduzione viene riavviata, l’immagine torna alle dimensioni originali. • Se si torna al menu del disco/menu principale, l’ingrandimento viene annullato. 29 MEX-DV1500U 4-120-899-21 (1) D:\Documents and Settings\takashi-shimomura\Desktop\DTP\848220S MEXDV1500U(EUR)\4120899211_MEX-DV1500U_ML\04IT02CD-E.fm Regolazione della qualità dell’immagine — Picture EQ MPEG-4 masterpage:Left Per tutte le impostazioni NORMAL: qualità delle immagini standard. CUSTOM: impostazioni regolabili dall’utente (pagina 30). Se viene impostato su “LIGHT OFF”/ “AUTO” (con “DIM-OFF”) VISUAL SETUP DAYTIME: opzione adatta per luoghi illuminati. </M/m/, ENTER SUNSET: opzione adatta in luoghi scarsamente illuminati. SHINE: opzione adatta in luoghi con illuminazione molto intensa (ad esempio, quando la luce solare si riflette sul monitor). È possibile selezionare la qualità dell’immagine più appropriata per la luminosità all’interno dell’auto. 1 2 Durante la riproduzione, premere (VISUAL SETUP). Viene visualizzato il menu del modo di riproduzione. Premere M/m per selezionare (PICTURE EQ), quindi premere (ENTER). Viene visualizzata l’opzione corrente. 12(67) 018(034) T 1:35:55 MIDNIGHT: l’illuminazione del monitor viene ridotta ulteriormente rispetto all’impostazione “NIGHT”. THEATER: consente di aumentare l’illuminazione del monitor; questa opzione è particolarmente adatta se si desidera vedere chiaramente il monitor di notte. PLAY DVD VIDEO DAYTIME SUNSET SHINE CUSTOM NORMAL NORMAL 3 Se viene impostato su “LIGHT ON”/ “AUTO” (con “DIM-ON”) NIGHT: l’illuminazione del monitor viene ridotta per non distrarre l’utente durante la guida di notte. Premere M/m per selezionare l’opzione desiderata, quindi premere (ENTER). Le opzioni variano in base all’impostazione del menu delle impostazioni video (pagina 43). Nel menu delle impostazioni video, per la voce “PICTURE EQ” in “CUSTOM SETUP” vengono attivate le opzioni riportate di seguito. AUTO: consente di selezionare automaticamente le opzioni per uso notturno/diurno in base all’impostazione dell’attenuatore di luminosità nel menu delle impostazioni di sistema (pagina 46). LIGHT OFF: consente di visualizzare le opzioni per l’uso diurno. LIGHT ON: consente di visualizzare le opzioni per l’uso notturno. Personalizzazione della qualità dell’immagine L’opzione “CUSTOM” consente di personalizzare l’impostazione relativa alla qualità delle immagini regolando le tonalità. È possibile memorizzare le regolazioni effettuate per le impostazioni “LIGHT OFF” e “LIGHT ON”. 1 Durante la riproduzione, premere (VISUAL SETUP). Viene visualizzato il menu del modo di riproduzione. 2 Premere M/m per selezionare (PICTURE EQ), quindi premere (ENTER). Viene visualizzata l’opzione corrente. Di seguito sono riportate le opzioni di ciascuna 30 impostazione. MEX-DV1500U 4-120-899-21 (1) D:\Documents and Settings\takashi-shimomura\Desktop\DTP\848220S MEXDV1500U(EUR)\4120899211_MEX-DV1500U_ML\04IT02CD-E.fm 3 Premere M/m per selezionare “CUSTOM”, quindi premere (ENTER). USER CUSTOM SETUP COLOR BRIGHT SHARPNESS Select : Cancel : 2 Premere M/m per selezionare (CUSTOM SETUP), quindi premere (ENTER). Vengono visualizzate le voci del menu delle impostazioni personalizzate. 3 Premere M/m per selezionare “PARENTAL CONTROL”, quindi premere (ENTER). Vengono visualizzate le opzioni. 0 0 0 CUSTOM SETUP PARENTAL CONTROL : DivX VOD : SLIDE SHOW TIME : MULTI-DISC RESUME : PLAY LIST PLAY : PICTURE EQ : Set : RETURN 4 Premere M/m per selezionare la tonalità dell’immagine, quindi premere </, per regolare il livello. 5 Premere (ENTER). Per nascondere il menu del modo di riproduzione, premere (VISUAL SETUP). 4 Blocco dei dischi — Protezione * Premere M/m per selezionare “ON t”, quindi premere (ENTER). Viene visualizzato il display di impostazione della password. PARENTAL CONTROL Enter a new 4-digit password, then press ENTER . 5 Premere i tasti numerici per immettere la password, quindi premere (ENTER). Viene visualizzato il display di conferma. 6 Per confermare la password, premere i tasti numerici per immettere una seconda volta la password, quindi premere (ENTER). L’impostazione è completata. M/m Tasti numerici CLEAR È possibile bloccare un disco oppure impostare delle limitazioni per la riproduzione in base a un livello predeterminato, ad esempio l’età dell’utente. Durante la riproduzione di un DVD compatibile con la funzione di protezione, le scene per le quali sono state impostate limitazioni per la riproduzione vengono bloccate o sostituite da altre scene. Attivazione della funzione di protezione 1 OFF OFF ONt PLAYERt PASSWORDt AUTO CUSTOM SETUP * Ad eccezione dei DVD-R/DVD-R DL/DVD-RW nel modo VR. VISUAL SETUP O ENTER masterpage:Right Premere (VISUAL SETUP) mentre l’apparecchio è spento. Viene visualizzato il menu delle impostazioni video. Per cancellare un numero immesso, premere (CLEAR). Per tornare al display precedente, premere O. Per nascondere il menu del modo di riproduzione, premere (VISUAL SETUP). Disattivazione della funzione di protezione Selezionare “OFF t” al punto 4 di cui sopra, quindi immettere la password. Se la funzione di protezione è disattivata, viene visualizzato il messaggio “Parental control canceled”. continua alla pagina successiva t 31 MEX-DV1500U 4-120-899-21 (1) D:\Documents and Settings\takashi-shimomura\Desktop\DTP\848220S MEXDV1500U(EUR)\4120899211_MEX-DV1500U_ML\04IT02CD-E.fm Modifica della password 7 Selezionare “PASSWORD t” al punto 4 di cui sopra, immettere la password corrente, quindi la nuova password, infine immettere di nuovo la nuova password per confermare. CUSTOM SETUP È possibile impostare i livelli di limitazione in base all’area e alle relative classificazioni dei film. 2 3 4 5 Premere (VISUAL SETUP) mentre l’apparecchio è spento. Viene visualizzato il menu delle impostazioni video. Premere M/m per selezionare (CUSTOM SETUP), quindi premere (ENTER). Vengono visualizzate le voci del menu delle impostazioni personalizzate. Premere M/m per selezionare “PARENTAL CONTROL”, quindi premere (ENTER). Vengono visualizzate le opzioni disponibili. Premere M/m per selezionare “PLAYER t”, quindi premere (ENTER). Se la funzione di protezione è già stata attivata, viene visualizzato il display per l’immissione della password. Per cambiare l’impostazione, immettere la password, quindi premere (ENTER). 8 6 32 8: USA USA OTHERSt Premere M/m per selezionare l’area desiderata per applicare le relative classificazioni dei film, quindi premere (ENTER). L’area viene selezionata. Se si seleziona “OTHERS t”, immettere il codice di zona selezionandolo nella sezione “Elenco dei codici di zona” a pagina 59, utilizzando i tasti numerici. Premere M/m per selezionare la classificazione desiderata, quindi premere (ENTER). L’impostazione è completata. Per tornare al display precedente, premere O. Per nascondere il menu del modo impostazione della visualizzazione, premere (VISUAL SETUP). Riproduzione ripetuta e in ordine casuale MPEG-4 REP SHUF 1 PARENTAL CONTROL: LEVEL : STANDARD : 8: 1: G 2: 3: PG 4: PG-13 5: Minore è il numero, più rigido è il livello di limitazione. Premere M/m per selezionare “STANDARD”, quindi premere (ENTER). Vengono visualizzate le opzioni. CUSTOM SETUP Premere M/m per selezionare “LEVEL”, quindi premere (ENTER). Vengono visualizzate le opzioni. PARENTAL CONTROL: LEVEL : STANDARD : Modifica dell’area e delle relative classificazioni dei film 1 masterpage:Left Durante la riproduzione, premere più volte (1) (REP) o (2) (SHUF) sull’unità principale fino a visualizzare l’opzione desiderata. Viene avviata la riproduzione ripetuta o in ordine casuale. MEX-DV1500U 4-120-899-21 (1) D:\Documents and Settings\takashi-shimomura\Desktop\DTP\848220S MEXDV1500U(EUR)\4120899211_MEX-DV1500U_ML\04IT02CD-E.fm masterpage:Right Di seguito sono riportati le opzioni di ripetizione e l’ordine di attivazione di ogni disco/formato. Per tornare al modo di riproduzione normale, selezionare “OFF”. Disco/ formato Note • Se si torna al menu del disco/menu principale, la riproduzione ripetuta/in ordine casuale viene annullata. • Non è possibile impostare la riproduzione ripetuta/in ordine casuale nel menu del disco/menu principale. Opzioni OFF CHAPTER: consente di ripetere il capitolo corrente. TITLE: consente di ripetere il titolo corrente. *1 OFF TRACK: consente di ripetere il brano corrente. Impostazione nel menu del modo di riproduzione MPEG-4 OFF TRACK: consente di ripetere il brano corrente. ALBUM: consente di ripetere l’album corrente. VISUAL SETUP ENTER M/m OFF IMAGE: consente di ripetere l’immagine corrente. ALBUM: consente di ripetere l’album corrente. OFF FILE: consente di ripetere il file video corrente. ALBUM: consente di ripetere l’album (cartella) corrente. MPEG-4 1 Durante la riproduzione, premere (VISUAL SETUP). Viene visualizzato il menu del modo di riproduzione. 2 Premere M/m per selezionare , quindi premere (ENTER). Di seguito sono riportati le opzioni di riproduzione casuale e l’ordine di attivazione di ogni disco/formato. Disco/ formato 12(67) 018(034) T 1:35:55 Opzioni *2 *1 OFF ALBUM: consente di riprodurre in ordine casuale i brani/le immagini/i file video inclusi nell’album (cartella) corrente. PLAY DVD VIDEO OFF CHAPTER TITLE OFF OFF TITLE: consente di riprodurre in ordine casuale i capitoli inclusi nel titolo corrente. OFF DISC: consente di riprodurre in ordine casuale i brani inclusi nel disco corrente. o 3 Premere M/m per selezionare l’opzione desiderata, quindi premere (ENTER). Viene avviata la riproduzione ripetuta o in ordine casuale. Premere (VISUAL SETUP) per nascondere il menu del modo di riproduzione. Nota Il modo di riproduzione selezionato viene disattivato se il disco in fase di riproduzione viene estratto. MPEG-4 *1 Disponibile solo durante la riproduzione di VCD versione 1.0/1.1 o 2.0 privi di funzione PBC. *2 Ad eccezione dei DVD-R/DVD-R DL/DVD-RW nel modo VR. 33 MEX-DV1500U 4-120-899-21 (1) D:\Documents and Settings\takashi-shimomura\Desktop\DTP\848220S MEXDV1500U(EUR)\4120899211_MEX-DV1500U_ML\04IT02CD-E.fm ALBUM Consente di avviare la riproduzione a partire da un album selezionato. IMAGE Consente di avviare la riproduzione a partire da un’immagine selezionata. Riproduzione con ricerca diretta MPEG-4 VISUAL SETUP ENTER M/m Tasti numerici MPEG-4 CLEAR È possibile individuare direttamente un punto desiderato specificando il numero del titolo, del capitolo e così via. 1 masterpage:Left Durante la riproduzione, premere i tasti numerici per immettere il numero di una voce (brano, titolo e così via), quindi premere (ENTER). La riproduzione viene avviata a partire dal punto selezionato. ALBUM Consente di avviare la riproduzione a partire da un album (cartella) selezionato. FILE Consente di avviare la riproduzione a partire da un file selezionato. * Disponibile solo durante la riproduzione di VCD privi di funzione PBC. 1 Durante la riproduzione, premere (VISUAL SETUP). Viene visualizzato il menu del modo di riproduzione. 2 Premere M/m per selezionare la voce desiderata, quindi premere (ENTER). - - (67) 018(034) T 1:35:55 Impostazione nel menu del modo di riproduzione PLAY DVD VIDEO MPEG-4 Le voci per la ricerca variano in base al disco/ formato nel modo riportato di seguito. Disco/ formato TITLE Consente di avviare la riproduzione a partire da un titolo selezionato. CHAPTER Consente di avviare la riproduzione a partire da un capitolo selezionato. TIME Consente di avviare la riproduzione a partire dal punto indicato dal codice temporale immesso. * 34 Il numero tra parentesi indica il numero totale di voci selezionate. Voci 3 Premere i tasti numerici per immettere il numero di una voce o il codice temporale. Ad esempio, per individuare il punto corrispondente a 2 ore, 10 minuti e 20 secondi, è sufficiente immettere “21020”. Per cancellare i numeri immessi, premere (CLEAR). 4 Premere (ENTER). La riproduzione viene avviata a partire dal punto selezionato. Premere (VISUAL SETUP) per nascondere il menu del modo di riproduzione. TRACK Consente di avviare la riproduzione a partire da un brano selezionato. MEX-DV1500U 4-120-899-21 (1) D:\Documents and Settings\takashi-shimomura\Desktop\DTP\848220S MEXDV1500U(EUR)\4120899211_MEX-DV1500U_ML\04IT02CD-E.fm 2 Visualizzazione di un elenco di brani/immagini/file video — Quick-BrowZer masterpage:Right Premere M/m per selezionare il brano/ l’immagine/il file video desiderati, quindi premere (ENTER). Viene avviata la riproduzione del brano/ dell’immagine/del file video selezionato. Mediante l’unità principale Ruotare la manopola di controllo anziché premere M/m, premere (SEEK) –/+ anziché </,, premere la manopola di controllo anziché (ENTER). </M/m/, ENTER Selezione di un tipo di file MPEG-4 Se il disco contiene più tipi di file, è possibile riprodurre solo il tipo di file selezionato (audio/ video/immagine). L’ordine di priorità di riproduzione dei tipi di file è inizialmente impostato su audio, video, infine immagine (ad esempio, se il disco contiene file video e file di immagine, vengono riprodotti solo i file video). È possibile selezionare il tipo di file da visualizzare nell’elenco, quindi selezionare il file che si desidera riprodurre. Selezione di un brano/ un’immagine/un file video MPEG-4 È possibile visualizzare l’elenco di album/ cartelle/brani/immagini/file video sul monitor, quindi selezionare quello che si desidera riprodurre. Questa funzione è particolarmente utile qualora vengano utilizzati dischi registrati nel formato MP3/WMA/AAC/JPEG/DivX/MPEG-4 contenenti più album/brani e così via. 1 Durante la riproduzione, premere Viene visualizzato l’elenco di brani/ immagini/file video contenuti nel disco/ nell’album*/nella cartella* corrente. MP3 0003/1000 3:17 TRACK NAME ALBUM NAME ARTIST NAME 1 2 Durante la riproduzione, premere 3 Premere M/m per selezionare il file desiderato, quindi premere (ENTER). Viene avviata la riproduzione del file selezionato. . ST LIST UP VIDEO FILES LIST UP IMAGE FILES ROOT MUSIC FOLDER 01 TRACK 01 02 TRACK 02 03 TRACK 03 04 TRACK 04 05 TRACK 05 . Premere M/m per selezionare il tipo di file da visualizzare nell’elenco, quindi premere (ENTER). Per visualizzare nell’elenco i file MP3, WMA e AAC, selezionare “LIST UP AUDIO FILES”. Per visualizzare nell’elenco i file DivX/ MPEG-4, selezionare “LIST UP VIDEO FILES”. Per visualizzare nell’elenco i file JPEG, selezionare “LIST UP IMAGE FILES”. Mediante l’unità principale Ruotare la manopola di controllo anziché premere M/m, premere la manopola di controllo anziché (ENTER). Per tornare/passare alla pagina precedente/ successiva, premere </,. Per passare al livello superiore, premere .* Per selezionare la cartella desiderata, premere M/m, quindi (ENTER).* * Disponibile solo durante la riproduzione di dischi in formato MP3/WMA/AAC/JPEG/DivX/MPEG-4. 35 MEX-DV1500U 4-120-899-21 (1) D:\Documents and Settings\takashi-shimomura\Desktop\DTP\848220S MEXDV1500U(EUR)\4120899211_MEX-DV1500U_ML\04IT02CD-E.fm Visualizzazione delle informazioni sul disco audio masterpage:Left Operazioni avanzate — Radio Memorizzazione e ricezione delle stazioni Durante la riproduzione audio, sul monitor è possibile controllare le informazioni sul disco o visualizzare l’immagine di copertina* del file MP3/WMA/AAC. SYSTEM SETUP * Le dimensioni consigliate sono comprese tra 240 × 240 e 960 × 960 pixel. ENTER M/m Esempio: durante la riproduzione di un MP3 A MP3 0003/1000 3:17 TRACK NAME ALBUM NAME ARTIST NAME E To list up, press BROWSE C B F SRC MODE D ST SHUF G . H A Numero o nome del brano Nome del disco/nome dell’album Nome dell’artista B Formato C Stato della riproduzione (N, X e così via) D Canale audio corrente Durante la riproduzione di CD/MP3/WMA/ AAC, è possibile modificare il canale audio. Per ulteriori informazioni, vedere “Modifica del canale audio” a pagina 28. E Numero del brano/totale F Tempo di riproduzione trascorso G Modo di riproduzione corrente H Messaggi di supporto alle operazioni Suggerimento È possibile selezionare un brano da riprodurre utilizzando un elenco (modo Quick-BrowZer) (pagina 35). Tasti numerici Attenzione Per la sintonizzazione delle stazioni durante la guida, utilizzare la funzione BTM (memorizzazione automatica delle emittenti con sintonia migliore) per evitare incidenti. Memorizzazione automatica — BTM 1 Premere più volte (SRC) fino a visualizzare “TUNER” sull’unità principale. Per cambiare la banda, premere più volte (MODE). È possibile selezionare FM1, FM2, FM3, MW o LW. 2 Premere (SYSTEM SETUP). Vengono visualizzate le voci del menu delle impostazioni di sistema. 3 Premere M/m per selezionare “BTM”, quindi premere (ENTER). L’apparecchio memorizza le stazioni in corrispondenza dei tasti numerici in base all’ordine delle frequenze (da (1) a (6)). Quando l’impostazione è stata memorizzata, viene emesso un segnale acustico. Mediante l’unità principale Premere (SOURCE) anziché (SRC), premere (SETUP) anziché (SYSTEM SETUP), ruotare la manopola di controllo anziché premere M/m, premere la manopola di controllo anziché (ENTER). 36 MEX-DV1500U 4-120-899-21 (1) D:\Documents and Settings\takashi-shimomura\Desktop\DTP\848220S MEXDV1500U(EUR)\4120899211_MEX-DV1500U_ML\04IT02CD-E.fm Memorizzazione manuale 1 Durante la ricezione della stazione che si desidera memorizzare, tenere premuto un tasto numerico (da (1) a (6)) fino a visualizzare “MEM” sull’unità principale. Sull’unità principale viene visualizzata l’indicazione del tasto numerico. Nota Se un’altra stazione viene memorizzata in corrispondenza dello stesso tasto numerico, la stazione memorizzata in precedenza viene sostituita. Suggerimento Quando si memorizza una stazione RDS, viene inoltre memorizzata l’impostazione AF/TA (pagina 37). Ricezione delle stazioni memorizzate 1 Selezionare la banda, quindi premere un tasto numerico (da (1) a (6)). RDS Manopola di controllo DSPL masterpage:Right *1 “TA” lampeggia durante la ricezione di notiziari sul traffico. “TP” si illumina durante la ricezione di una stazione che trasmette programmi sul traffico. *2 Durante la ricezione della stazione RDS, “ *” è visualizzato a sinistra dell’indicazione della frequenza. Per cambiare le voci del display C, premere (DSPL). Servizi RDS Il presente apparecchio fornisce i servizi RDS in modo automatico come segue: AF (frequenze alternative) Consente di selezionare e sintonizzare di nuovo la stazione con il segnale più potente. Utilizzando questa funzione, è possibile riprodurre in modo continuo lo stesso programma durante un viaggio di lunga durata, senza la necessità di sintonizzare di nuovo la stessa stazione manualmente. TA (notiziari sul traffico)/TP (programma sul traffico) Fornisce le informazioni o i programmi correnti relativi al traffico. Qualsiasi informazione o programma ricevuto interrompe la riproduzione della sorgente selezionata. PTY (tipo di programma) Consente di visualizzare il tipo di programma in fase di ricezione, nonché di ricercare il tipo di programma selezionato. CT (ora) L’orologio viene regolato mediante i dati CT della trasmissione RDS. AF/TA Tasti (PTY) numerici Panoramica RDS (sistema dati radio) è un servizio che consente alle stazioni radio FM di trasmettere informazioni digitali aggiuntive oltre al normale segnale in radiofrequenza. Note • È possibile che non tutte le funzioni RDS siano disponibili, a seconda del paese o della regione. • La funzione RDS non è disponibile quando il segnale è troppo debole o se la stazione sintonizzata non trasmette dati RDS. Impostazione dei modi AF e TA Di seguito sono riportati le impostazioni AF/TA e l’ordine di attivazione. Voci del display A B C A Banda radio, funzione B TA/TP*1 C Frequenza*2 (nome del servizio programmi), numero di preselezione, orologio, dati RDS AF-ON: consente di attivare la funzione AF e di disattivare la funzione TA. TA-ON: consente di attivare la funzione TA e di disattivare la funzione AF. AF, TA-ON: consente di attivare entrambe le funzioni AF e TA. AF, TA-OFF: consente di disattivare entrambe le funzioni AF e TA. 1 Premere più volte (AF/TA) fino a visualizzare l’impostazione desiderata. continua alla pagina successiva t 37 MEX-DV1500U 4-120-899-21 (1) D:\Documents and Settings\takashi-shimomura\Desktop\DTP\848220S MEXDV1500U(EUR)\4120899211_MEX-DV1500U_ML\04IT02CD-E.fm Memorizzazione di stazioni RDS con impostazione AF e TA È possibile preselezionare le stazioni RDS insieme all’impostazione AF/TA. Se viene utilizzata la funzione BTM, vengono memorizzate solo le stazioni RDS con la stessa impostazione AF/TA. Se si utilizza il modo di preselezione manuale, è possibile preselezionare le stazioni RDS e non RDS con impostazioni AF/TA distinte. masterpage:Left Selezione di PTY 1 Tenere premuto (AF/TA) (PTY) durante la ricezione FM. Se la stazione sta trasmettendo dati PTY, viene visualizzato il nome del tipo di programma corrente. 1 Impostare AF/TA, quindi memorizzare la stazione mediante la funzione BTM o manualmente. 2 Ruotare la manopola di controllo per selezionare il tipo di programma. Ricezione dei notiziari di emergenza 3 Premere la manopola di controllo. L’apparecchio avvia la ricerca di una stazione che trasmette il tipo di programma selezionato. Se è attivato il modo AF o TA, gli annunci di emergenza interrompono automaticamente la riproduzione della sorgente selezionata. Suggerimento Se si regola il livello del volume durante un notiziario sul traffico, tale livello viene memorizzato per i successivi notiziari sul traffico, indipendentemente dal normale livello del volume. Mantenimento di un programma regionale — REG Quando la funzione AF è attiva: le impostazioni predefinite dell’apparecchio limitano la ricezione a una regione specifica, in modo tale che la stazione sintonizzata non venga sostituita da una stazione regionale dal segnale più potente. Se si intende lasciare tale area di ricezione regionale, impostare “REG-OFF” nelle impostazioni di sistema durante la ricezione FM (pagina 46). Nota Questa funzione non è disponibile nel Regno Unito e in altre aree. Funzione Local Link (solo per il Regno Unito) Questa funzione consente di selezionare altre stazioni locali della stessa area, anche se non sono memorizzate in corrispondenza dei tasti numerici. 1 Durante la ricezione FM, premere un tasto numerico (da (1) a (6)) in corrispondenza del quale è memorizzata una stazione locale. 2 Entro 5 secondi, premere nuovamente il tasto numerico della stazione locale. Ripetere questa procedura fino alla ricezione della stazione locale. Tipi di programmi NEWS (Notiziario), AFFAIRS (Attualità), INFO (Informazioni), SPORT (Sport), EDUCATE (Educazione), DRAMA (Teatro), CULTURE (Cultura), SCIENCE (Scienza), VARIED (Vari), POP M (Musica pop), ROCK M (Musica rock), EASY M (Musica leggera), LIGHT M (Classica leggera), CLASSICS (Classica), OTHER M (Altri tipi di musica), WEATHER (Meteo), FINANCE (Finanza), CHILDREN (Programmi per bambini), SOCIAL A (Sociale), RELIGION (Religione), PHONE IN (Chat show), TRAVEL (Viaggi), LEISURE (Divertimento e tempo libero), JAZZ (Musica jazz), COUNTRY (Musica country), NATION M (Musica nazionale), OLDIES (Musica anni 50/60), FOLK M (Musica folk), DOCUMENT (Documentari) Nota Non è possibile utilizzare questa funzione in paesi/ regioni in cui non sono disponibili i dati PTY. Impostazione di CT 1 Impostare “CT-ON” nel menu delle impostazioni di sistema (pagina 45). Note • La funzione CT potrebbe non essere disponibile anche durante la ricezione di una stazione RDS. • L’ora impostata mediante la funzione CT e l’ora corrente potrebbero non corrispondere. 38 MEX-DV1500U 4-120-899-21 (1) D:\Documents and Settings\takashi-shimomura\Desktop\DTP\848220S MEXDV1500U(EUR)\4120899211_MEX-DV1500U_ML\04IT02CD-E.fm masterpage:Right Personalizzazione della curva dell’equalizzatore — EQ3 Regolazione dell’audio Regolazione delle caratteristiche dell’audio SOUND L’impostazione “CUSTOM” di EQ3 consente di personalizzare le impostazioni dell’equalizzatore. È possibile regolare il livello di 3 bande diverse: “LOW”, “MID” e “HI”. 1 Durante la riproduzione/ricezione, premere più volte (SOUND) fino a visualizzare “EQ3”. 2 Premere M/m per selezionare “CUSTOM”. 3 Premere più volte (SOUND) fino a visualizzare “LOW”, “MID” o “HI”. 4 Premere M/m per regolare il livello della voce desiderata. Il livello può essere regolato in incrementi singoli, compresi tra –10 e +10. M/m È possibile regolare le caratteristiche dell’audio come desiderato. Di seguito sono riportati le voci di impostazione del menu audio e l’ordine di attivazione. EQ3: consente di selezionare una curva dell’equalizzatore per 7 tipi di musica. LOW, MID, HI*1: consente di regolare il livello di volume della banda selezionata per l’impostazione di personalizzazione EQ3. BAL (bilanciamento): consente di regolare il bilanciamento dell’audio proveniente dai diffusori sinistro e destro. FAD (attenuatore): consente di regolare il livello relativo tra i diffusori anteriore e posteriore. SUB (volume subwoofer)*2: consente di regolare il volume del subwoofer (“ATT” è l’impostazione più bassa). *1 Visualizzato solo se EQ3 è attivo. *2 Se l’uscita audio è impostata su “SUB-OUT” (pagina 45). 1 Durante la riproduzione/ricezione, premere più volte (SOUND) fino a visualizzare la voce di impostazione desiderata sull’unità principale. 2 Premere M/m per regolare il livello o selezionare l’opzione desiderata. 3 Premere . L’impostazione è completata e il display torna al modo di riproduzione/ricezione normale. Per ripristinare l’impostazione di fabbrica della curva dell’equalizzatore, tenere premuto (SOUND). 5 Premere . L’impostazione è completata e il display torna al modo di riproduzione/ricezione normale. Suggerimento È possibile regolare anche altri tipi di equalizzatore. Mediante l’unità principale Premere la manopola di controllo anziché (SOUND), ruotare la manopola di controllo anziché premere M/m. Mediante l’unità principale Premere la manopola di controllo anziché (SOUND), ruotare la manopola di controllo anziché premere M/m. 39 MEX-DV1500U 4-120-899-21 (1) D:\Documents and Settings\takashi-shimomura\Desktop\DTP\848220S MEXDV1500U(EUR)\4120899211_MEX-DV1500U_ML\04IT02CD-E.fm masterpage:Left Ad esempio, per impostare il rapporto di formato su “4:3 PAN SCAN”. Impostazioni Tramite i due seguenti menu di impostazione, è possibile configurare varie impostazioni. 1 • Menu delle impostazioni video (pagina 40) Consente di configurare le voci relative alla visualizzazione (sul monitor). Premere (VISUAL SETUP) mentre l’apparecchio è spento. Viene visualizzato il menu delle impostazioni video. LANGUAGE SETUP MENU : AUDIO : SUBTITLE : • Menu di impostazione del sistema (pagina 44) Consente di configurare le voci relative al sistema (sull’unità principale). ENGLISH ENGLISH ENGLISH Impostazioni video Il menu delle impostazioni video include le categorie seguenti. 2 LANGUAGE SETUP (pagina 41) Consente di impostare la lingua dei menu, dei sottotitoli e così via. DISPLAY SETUP (pagina 41) Consente di regolare le impostazioni del monitor collegato. Premere M/m per selezionare (DISPLAY SETUP), quindi premere (ENTER). Vengono visualizzate le voci di impostazione relative alla visualizzazione. DISPLAY SETUP MONITOR TYPE : WALLPAPER : 16:9 WALLPAPER 1 CUSTOM SETUP (pagina 42) Consente di personalizzare la riproduzione dei dischi. AUDIO SETUP (pagina 43) Consente di regolare le impostazioni audio in base al disco. 3 RESET (pagina 43) Consente di azzerare tutte le voci di impostazione. Premere M/m per selezionare “MONITOR TYPE”, quindi premere (ENTER). Vengono visualizzate le opzioni. DISPLAY SETUP MONITOR TYPE : WALLPAPER : Operazioni di base del menu delle impostazioni video 16:9 16:9 4:3 LETTER BOX 4:3 PAN SCAN VISUAL SETUP O ENTER M/m 4 Premere M/m per selezionare “4:3 PAN SCAN”, quindi premere (ENTER). L’impostazione è completata. Per tornare al display precedente, premere O. Per nascondere il menu del modo di riproduzione, premere (VISUAL SETUP). Per impostare le voci del menu, attenersi alla seguente procedura. 40 MEX-DV1500U 4-120-899-21 (1) D:\Documents and Settings\takashi-shimomura\Desktop\DTP\848220S MEXDV1500U(EUR)\4120899211_MEX-DV1500U_ML\04IT02CD-E.fm masterpage:Right Impostazione della lingua di visualizzazione o dell’audio Selezionare (LANGUAGE SETUP), la voce e l’opzione desiderate indicate di seguito mediante M/m, quindi premere (ENTER). Per ulteriori informazioni sulla procedura, vedere “Operazioni di base del menu delle impostazioni video” a pagina 40. Voce Descrizione MENU Consente di modificare la lingua per il menu del disco. AUDIO Consente di modificare la lingua dell’audio. SUBTITLE Consente di modificare la lingua per i sottotitoli registrata sul disco. Impostazioni di visualizzazione Selezionare (DISPLAY SETUP), la voce e l’opzione desiderate indicate di seguito mediante M/m, quindi premere (ENTER). Per ulteriori informazioni sulla procedura, vedere “Operazioni di base del menu delle impostazioni video” a pagina 40. “z” indica l’impostazione predefinita. Voce Opzione 16:9 (z) MONITOR TYPE Consente di selezionare il rapporto di formato adatto al monitor collegato. WALLPAPER Descrizione Consente di visualizzare un’immagine ampia. Adatta per il collegamento di un monitor a schermo ampio o un monitor dotato della funzione di modo ampio. 4:3 LETTER BOX Consente di visualizzare un’immagine ampia con bande nelle parti superiore e inferiore dello schermo. Adatta per il collegamento di un monitor con rapporto di formato dello schermo 4:3. 4:3 PAN SCAN Consente di visualizzare un’immagine ampia su tutto lo schermo eliminando automaticamente le parti che non rientrano nelle dimensioni dello schermo. WALLPAPER 1 (z), 2, 3 Consente di selezionare il tipo di sfondo. Nota A seconda del disco, è possibile che l’opzione “4:3 LETTER BOX” venga selezionata automaticamente al posto di “4:3 PAN SCAN” e viceversa. 41 MEX-DV1500U 4-120-899-21 (1) D:\Documents and Settings\takashi-shimomura\Desktop\DTP\848220S MEXDV1500U(EUR)\4120899211_MEX-DV1500U_ML\04IT02CD-E.fm masterpage:Left Impostazioni personalizzate Selezionare (CUSTOM SETUP), la voce e l’opzione desiderate indicate di seguito mediante M/m, quindi premere (ENTER). Per ulteriori informazioni sulla procedura, vedere “Operazioni di base del menu delle impostazioni video” a pagina 40. Per ulteriori informazioni, consultare la pagina di riferimento. “z” indica l’impostazione predefinita. Voce Opzione Descrizione OFF t (z) Consente di disattivare la protezione. ON t Consente di attivare la protezione. PLAYER t Consente di impostare lo standard di limitazione e i relativi livelli. PASSWORD t Consente di impostare una nuova password a 4 cifre. DivX VOD Consente di visualizzare il codice di registrazione dell’apparecchio. Per ulteriori informazioni, consultare il sito Web indicato di seguito: http://www.divx.com/vod Done Per chiudere la schermata. SLIDE SHOW TIME 5 sec. (z), 10 sec., Consente di selezionare l’intervallo 20 sec., 40 sec., 60 sec. temporale della visualizzazione in PARENTAL CONTROL (pagina 31) *1 Consente di impostare delle limitazioni per la riproduzione di dischi o scene inappropriati. serie. MULTI-DISC RESUME *2 FIXED Consente di disattivare la visualizzazione in serie. ON (z) Consente di memorizzare le impostazioni di ripristino per un massimo di 5 dischi. Le impostazioni rimangono memorizzate anche se viene impostato “OFF”. OFF Consente di non memorizzare le impostazioni di ripristino. La funzione di ripristino della riproduzione è disponibile solo per il disco correntemente inserito nell’apparecchio. ON (z) Consente di memorizzare le impostazioni di ripristino. Le impostazioni rimangono memorizzate anche se viene impostato “OFF”. OFF Consente di non memorizzare le impostazioni di ripristino. MPEG-4 USB RESUME 42 MEX-DV1500U 4-120-899-21 (1) D:\Documents and Settings\takashi-shimomura\Desktop\DTP\848220S MEXDV1500U(EUR)\4120899211_MEX-DV1500U_ML\04IT02CD-E.fm masterpage:Right PLAY LIST PLAY (solo per DVD-R/DVD-R DL/ DVD-RW nel modo VR) ORIGINAL (z) Consente di riprodurre i titoli registrati originariamente. PLAY LIST Consente di riprodurre la playlist modificata. PICTURE EQ (pagina 30) AUTO (z) Consente di selezionare automaticamente le opzioni per uso notturno/diurno in base all’impostazione dell’attenuatore di luminosità nel menu delle impostazioni di sistema (pagina 46). LIGHT OFF Consente di visualizzare le opzioni per l’uso diurno. LIGHT ON Consente di visualizzare le opzioni per l’uso notturno. MPEG-4 Consente di selezionare l’opzione di impostazione da visualizzare nel menu del modo di riproduzione. *1 Ad eccezione dei DVD-R/DVD-R DL/DVD-RW nel modo VR. *2 Solo DVD VIDEO. Nota Se è attivata al protezione, la funzione di ripristino della riproduzione non è disponibile. In tal caso, la riproduzione viene avviata dall’inizio del disco quando quest’ultimo viene inserito. Impostazioni audio Selezionare (AUDIO SETUP), la voce e l’opzione desiderate indicate di seguito mediante M/m, quindi premere (ENTER). Per ulteriori informazioni sulla procedura, vedere “Operazioni di base del menu delle impostazioni video” a pagina 40. Per ulteriori informazioni, consultare la pagina di riferimento. “z” indica l’impostazione predefinita. Voce Opzione STANDARD (z) AUDIO DRC * Consente di rendere chiaro l’audio quando il volume è basso. Solo per WIDE RANGE i DVD conformi ad Audio DRC (controllo della gamma dinamica). Descrizione Consente di selezionare l’impostazione standard. Consente di ricreare l’atmosfera di un’esibizione dal vivo. * Ad eccezione dei DVD-R/DVD-R DL/DVD-RW nel modo VR. Azzeramento di tutte le impostazioni Tutte le impostazioni (esclusa l’impostazione di protezione) del menu delle impostazioni video possono essere azzerate. Selezionare (RESET), quindi “RESET ALL SETTINGS”, “YES” mediante M/m, quindi premere (ENTER). Per ulteriori informazioni sulla procedura, vedere “Operazioni di base del menu delle impostazioni video” a pagina 40. Nota Non spegnere l’apparecchio durante l’azzeramento, poiché tale operazione richiede alcuni secondi. 43 MEX-DV1500U 4-120-899-21 (1) D:\Documents and Settings\takashi-shimomura\Desktop\DTP\848220S MEXDV1500U(EUR)\4120899211_MEX-DV1500U_ML\04IT02CD-E.fm Impostazioni di sistema masterpage:Left Per impostare le voci del menu, attenersi alla seguente procedura. Il menu delle impostazioni di sistema include le seguenti categorie. Ad esempio, per impostare il modo di dimostrazione: • SET: impostazioni generali (pagina 45) • DSPL: impostazioni di visualizzazione (pagina 45) • R/M: impostazioni del modo di ricezione (pagina 46) • SND: impostazioni audio (pagina 47) 1 Premere (SYSTEM SETUP) mentre l’apparecchio è spento. La voce delle impostazioni di sistema viene visualizzata sull’unità principale. 2 Premere M/m per selezionare “DEMO”, quindi premere (ENTER). Viene visualizzata l’opzione. 3 Premere M/m per selezionare “ON” o “OFF”, quindi premere (ENTER). L’impostazione è completata. Operazioni di base del menu delle impostazioni di sistema SYSTEM SETUP ENTER M/m Per nascondere il menu delle impostazioni di sistema, premere (SYSTEM SETUP). Mediante l’unità principale Premere (SETUP) anziché (SYSTEM SETUP), ruotare la manopola di controllo anziché premere M/m, infine premere la manopola di controllo anziché (ENTER). 44 MEX-DV1500U 4-120-899-21 (1) D:\Documents and Settings\takashi-shimomura\Desktop\DTP\848220S MEXDV1500U(EUR)\4120899211_MEX-DV1500U_ML\04IT02CD-E.fm masterpage:Right Per ulteriori informazioni, consultare la pagina di riferimento. “z” indica l’impostazione predefinita. SET (Impostazione) Voce Opzione Descrizione CLOCK-ADJ (Impostazione dell’orologio) (pagina 48) – – CT (Ora) (pagina 37, 38) ON Consente di attivare la funzione CT. OFF (z) Consente di disattivare la funzione CT. ON (z) Consente di attivare il segnale acustico relativo alle operazioni. OFF Consente di disattivare il segnale acustico relativo alle operazioni. BEEP COLOR-SYS (Sistema colore) PAL (z) Consente di modificare il segnale di uscita video in base NTSC al monitor collegato. Per impostare l’opzione PAL. Per impostare l’opzione NTSC. AUTO-OFF Consente di spegnere automaticamente allo scadere dell’intervallo temporale desiderato quando l’apparecchio è spento. NO (z) Consente di disattivare la funzione di spegnimento automatico. 30S, 30M, 60M Consente di selezionare l’intervallo temporale desiderato. REAR/SUB Consente di commutare l’uscita audio. REAR-OUT Consente di impostare l’amplificatore di potenza. Stato dell’apparecchio Qualsiasi stato. Apparecchio spento. Qualsiasi stato. SUB-OUT (z) Consente di impostare il subwoofer. Apparecchio spento. DSPL (Display) Voce M.DSPL (Display in movimento) Consente di selezionare il modo del display in movimento. Opzione SA (z) OFF Descrizione Consente di visualizzare i modelli animati e l’analizzatore spettrale. Consente di disattivare il display in movimento. Stato dell’apparecchio Durante la riproduzione/ ricezione radio. continua alla pagina successiva t 45 MEX-DV1500U 4-120-899-21 (1) D:\Documents and Settings\takashi-shimomura\Desktop\DTP\848220S MEXDV1500U(EUR)\4120899211_MEX-DV1500U_ML\04IT02CD-E.fm DEMO (Dimostrazione) ON (z) Consente di attivare la dimostrazione. OFF Consente di disattivare la dimostrazione. DIMMER Consente di modificare la luminosità del display. ON Consente di attenuare la luminosità del display. OFF (z) Consente di disattivare l’attenuatore di luminosità. AUTO-SCRL (Scorrimento automatico) Consente di attivare lo scorrimento automatico delle voci. ON (z) Consente di attivare lo scorrimento. OFF Consente di disattivare lo scorrimento. masterpage:Left Apparecchio spento. Qualsiasi stato. Durante la riproduzione di un disco. R/M (Modo di ricezione) Voce LOCAL (Modo di ricerca locale) Opzione ON Consente di sintonizzare solo le stazioni con segnali più forti. OFF (z) Consente di sintonizzare le stazioni con ricezione normale. ON MONO (Modo monofonico) Consente di selezionare il modo di ricezione monofonico per migliorare la ricezione FM OFF (z) di qualità scadente. REGIONAL (pagina 38) BTM (Memorizzazione automatica delle emittenti con sintonia migliore) (pagina 36) Descrizione Stato dell’apparecchio Durante la ricezione radio. Consente di ascoltare le trasmissioni stereo in monofonia. Consente di ascoltare le trasmissioni stereo in stereofonia. ON (z) Consente di mantenere la sintonizzazione su un programma regionale. OFF Consente di disattivare la sintonizzazione regionale quando si lascia l’area di ricezione del programma. – – Durante la ricezione FM. Durante la ricezione radio. 46 MEX-DV1500U 4-120-899-21 (1) D:\Documents and Settings\takashi-shimomura\Desktop\DTP\848220S MEXDV1500U(EUR)\4120899211_MEX-DV1500U_ML\04IT02CD-E.fm masterpage:Right SND(Audio) Voce Opzione Descrizione HPF (Filtro passa alto) Consente di selezionare la frequenza di taglio dei diffusori anteriore/posteriore. OFF (z) Consente di non impostare la frequenza di taglio. 80HZ, 100HZ, 120HZ, 140HZ, 160HZ Consente di selezionare la frequenza. LPF (Filtro passa basso)*1 Consente di selezionare la frequenza di taglio del subwoofer. OFF (z) Consente di non impostare la frequenza di taglio. 80HZ, 100HZ, 120HZ, 140HZ, 160HZ Consente di selezionare la frequenza. LPF-PHASE (Fase filtro passa NORM (z) basso)*1 Consente di selezionare la fase quando il filtro passa basso è REV attivato. Consente di applicare la fase normale al filtro passa basso. LOUD (Enfasi dei bassi) Consente di rendere chiaro l’audio quando il volume è basso. OFF (z) Consente di non enfatizzare i bassi e gli acuti. ON Consente di enfatizzare i bassi e gli acuti. AUX-LEVEL (pagina 49) (–8 ~ +18) z: 0 Consente di selezionare il livello. DVD-LEVEL (pagina 29) ADJST-ON Consente di regolare il livello di uscita del formato Dolby Digital. ADJST-OFF (z) Consente di disattivare la regolazione del livello. (–10 ~ +10) DOLBY-ADJ (Regolazione del livello Dolby) (pagina 29)*2 z: +8 Stato dell’apparecchio Durante la riproduzione/ ricezione radio. Consente di applicare la fase inversa al filtro passa basso. Durante la riproduzione AUX. Durante la riproduzione di un disco. Consente di selezionare il livello. *1 Se l’uscita audio è impostata su “SUB-OUT”. *2 Visualizzato e disponibile solo se “DVD-LEVEL” è impostato su “ADJST-ON”. 47 MEX-DV1500U 4-120-899-21 (1) D:\Documents and Settings\takashi-shimomura\Desktop\DTP\848220S MEXDV1500U(EUR)\4120899211_MEX-DV1500U_ML\04IT02CD-E.fm Impostazione dell’orologio masterpage:Left Uso di apparecchi opzionali Apparecchi opzionali SYSTEM SETUP </M/m/, ENTER SYSTEM SETUP ENTER M/m SRC MODE DSPL L’orologio mostra l’indicazione dell’ora in base al sistema delle 24 ore. 1 Premere (SYSTEM SETUP). La voce delle impostazioni di sistema viene visualizzata sull’unità principale. 2 Premere M/m per selezionare “CLOCKADJ”, quindi premere (ENTER). L’indicazione dell’ora lampeggia. 3 Premere M/m per impostare l’ora e i minuti. Per passare da una cifra all’altra dell’indicazione digitale, premere </,. 4 Premere (ENTER). L’impostazione è completata. Per nascondere il menu delle impostazioni di sistema, premere (SYSTEM SETUP). È possibile collegare un dispositivo ausiliare al presente apparecchio e ascoltare l’audio mediante i diffusori dell’auto. È possibile collegare fino a 2 dispositivi, uno alla presa di ingresso AUX (minipresa stereo) sulla parte anteriore e l’altro ai terminali AUX AUDIO IN sulla parte posteriore. Il livello del volume è regolabile per intervenire su eventuali differenze tra l’apparecchio e il dispositivo ausiliare. Collegamento di un dispositivo ausiliare 1 Spegnere il dispositivo ausiliare. 2 Abbassare il volume sull’apparecchio. 3 Collegare all’apparecchio. Sulla parte anteriore Collegare alla presa di ingresso AUX. Per visualizzare l’orologio durante la riproduzione, premere più volte (DSPL) finché non viene visualizzato. Mediante l’unità principale Premere (SETUP) anziché (SYSTEM SETUP), ruotare la manopola di controllo anziché premere M/m, quindi premere .m/M> anziché </,, quindi premere la manopola di controllo anziché (ENTER). AUX AUX Cavo di collegamento* (non in dotazione) * Utilizzare una spina diritta. Sulla parte posteriore Collegare ai terminali AUX AUDIO IN. 48 MEX-DV1500U 4-120-899-21 (1) D:\Documents and Settings\takashi-shimomura\Desktop\DTP\848220S MEXDV1500U(EUR)\4120899211_MEX-DV1500U_ML\04IT02CD-E.fm Selezione di un dispositivo ausiliare 1 Premere più volte (SRC) fino a visualizzare “AUX” sull’unità principale. 2 Premere (MODE) per selezionare “FRONTIN” o “REAR-IN”. Utilizzare il dispositivo ausiliare mediante i relativi comandi. Regolazione del livello del volume Regolare il volume di ogni dispositivo collegato prima della riproduzione. 1 Abbassare il volume sull’apparecchio. 2 Premere più volte (SRC) fino a visualizzare “AUX” sull’unità principale. Se sono collegati due dispositivi ausiliari, selezionare quello per cui si desidera regolare il volume premendo (MODE). 3 Avviare la riproduzione del dispositivo ausiliare ad un volume moderato. 4 Impostare sull’apparecchio il consueto volume di ascolto. 5 Premere (SYSTEM SETUP). 6 Premere M/m per selezionare “AUX-LEVEL”, quindi premere (ENTER). 7 Premere M/m per regolare il livello di ingresso. Il livello di ingresso è regolabile in singoli incrementi, da –8 a +18. 8 Premere (ENTER). L’impostazione è completata. Per nascondere il menu delle impostazioni di sistema, premere (SYSTEM SETUP). Mediante l’unità principale Premere (SOURCE) anziché (SRC), premere (SETUP) anziché (SYSTEM SETUP), ruotare la manopola di controllo anziché premere M/m, premere la manopola di controllo anziché (ENTER). masterpage:Right Informazioni aggiuntive Precauzioni • Se l’auto è stata parcheggiata in un luogo esposto a luce solare diretta, attendere che l’apparecchio si raffreddi. • L’antenna elettrica si estende automaticamente. Formazione di condensa Se si forma della condensa all’interno dell’apparecchio, rimuovere il disco e attendere per circa un’ora fino a quando non sia evaporata completamente; diversamente l’apparecchio potrebbe non funzionare correttamente. Per mantenere una qualità audio elevata Non versare sostanze liquide sull’apparecchio o sui dischi. Note sui dischi • Non esporre i dischi a luce solare diretta o a fonti di calore, ad esempio condotti dell’aria. Evitare di lasciarli all’interno di auto parcheggiate al sole. • Prima della riproduzione, pulire i dischi con un panno apposito procedendo dal centro verso l’esterno. Non utilizzare solventi quali benzene, acquaragia o detergenti disponibili in commercio. • Questo apparecchio è stato progettato per la riproduzione di dischi conformi allo standard CD (Compact Disc). I dischi in formato DualDisc e alcuni dischi codificati mediante tecnologie di protezione dei diritti d’autore non sono conformi allo standard CD (Compact Disc), pertanto potrebbe non essere possibile riprodurli sul presente apparecchio. • Dischi NON riproducibili sull’apparecchio – Dischi su cui sono applicati etichette, adesivi, nastro adesivo o carta, onde evitare di causare problemi di funzionamento o rovinare il disco. – Non riprodurre dischi dalla forma irregolare (ad esempio a forma di cuore, quadrato o stella), onde evitare problemi di funzionamento all’apparecchio stesso. – Dischi da 8 cm. continua alla pagina successiva t 49 MEX-DV1500U 4-120-899-21 (1) D:\Documents and Settings\takashi-shimomura\Desktop\DTP\848220S MEXDV1500U(EUR)\4120899211_MEX-DV1500U_ML\04IT02CD-E.fm Nota sulle operazioni di riproduzione di DVD e VCD È possibile che alcune operazioni di riproduzione di DVD e VCD siano state intenzionalmente impostate dai produttori del software. Poiché il presente apparecchio riproduce i DVD e i VCD in base al contenuto del disco creato dai produttori del software, è possibile che alcune funzioni di riproduzione non siano disponibili. Consultare le istruzioni in dotazione con i DVD o i VCD. Note sui DATA CD e DATA DVD • Mediante il presente apparecchio, potrebbe non essere possibile riprodurre alcuni DATA CD/ DATA DVD (a seconda dell’apparecchio utilizzato per la registrazione o delle condizioni del disco). • Per alcuni dischi, è necessario procedere alla finalizzazione (pagina 50). • Il presente apparecchio è compatibile con i seguenti standard. Per DATA CD – Formato ISO 9660 livello 1/livello 2, Joliet/ Romeo nel formato di espansione – Multisessione Per DATA DVD – Formato UDF Bridge (UDF combinato e ISO 9660) – Multiborder • Numero massimo di: – Cartelle (album): 256 (incluse la cartella radice e le cartelle vuote). – File (brani/immagini/video) e cartelle contenuti in un disco: 2.000 (se il nome di una cartella/di un file contiene molti caratteri, è possibile che tale numero sia inferiore a 2.000). – Caratteri visualizzabili per il nome di una cartella/un file: 64 (Joliet/Romeo). Note sulla finalizzazione dei dischi Per riprodurre sul presente apparecchio i dischi riportati di seguito, occorre procedere alla finalizzazione. • DVD-R/DVD-R DL (nel modo video/modo VR) • DVD-RW nel modo video • DVD+R/DVD+R DL • CD-R • CD-RW I seguenti dischi possono essere riprodotti senza essere prima finalizzati. • DVD+RW – finalizzato automaticamente. • DVD-RW nel modo VR – finalizzazione non richiesta. Per ulteriori informazioni, vedere le istruzioni per l’uso fornite con il disco. Note su CD multisessione/DVD Multiborder 50 Con il presente apparecchio, è possibile riprodurre CD multisessione/DVD Multiborder nelle seguenti condizioni. Si noti che la sessione deve essere chiusa e che il disco deve essere finalizzato. masterpage:Left • Se un CD-DA (CD audio digitale) viene registrato nella prima sessione: L’unità riconosce il disco come un CD-DA e solo il CD-DA della prima sessione viene riprodotto, anche se un altro formato (ad esempio, MP3) viene registrato in altre sessioni. • Se il CD-DA viene registrato in una sessione diversa dalla prima: L’unità riconosce il disco come un DATA CD o un DATA DVD e tutte le sessioni CD-DA vengono saltare. • Se un MP3/WMA/AAC/JPEG/DivX/MPEG-4 viene registrato: Vengono riprodotte solo le sessioni contenenti il tipo di file selezionato (audio/video/immagine)* (qualora dati CD-DA o altri dati siano presenti in altre sessioni, queste vengono saltate). * Per ulteriori informazioni sulle modalità di selezione del tipo di file, vedere a pagina 35. Ordine di riproduzione dei file MP3/ WMA/AAC/JPEG/DivX®/MPEG-4 MP3/WMA/AAC/ JPEG/DivX/ MPEG-4 Cartella (album) File MP3/WMA/ AAC/JPEG/ DivX/MPEG-4 (brano/ immagine/ video) Informazioni sui file MP3 • I tag ID3 versioni 1.0, 1.1, 2.2, 2.3 e 2.4 sono relativi solo ai file MP3. I tag ID3 possono contenere 15/30 caratteri (1.0 e 1.1) o 63/126 caratteri (2.2, 2.3 e 2.4). • Durante l’assegnazione di un nome a un file MP3, assicurarsi di aggiungere l’estensione “.mp3”. Nota sui file MP3 Se viene riprodotto un file MP3 ad alta velocità di trasmissione, ad esempio 384 kbps, è possibile che l’audio sia soggetto a interruzioni. Informazioni sui file WMA • I tag WMA possono contenere 63 caratteri. • Durante l’assegnazione di un nome a un file WMA, assicurarsi di aggiungere l’estensione “.wma”. Informazioni sui file AAC • I tag AAC possono contenere 126 caratteri. • Durante l’assegnazione di un nome a un file AAC, assicurarsi di aggiungere l’estensione “.m4a”. MEX-DV1500U 4-120-899-21 (1) D:\Documents and Settings\takashi-shimomura\Desktop\DTP\848220S MEXDV1500U(EUR)\4120899211_MEX-DV1500U_ML\04IT02CD-E.fm Informazioni sui file JPEG • JPEG, acronimo di Joint Photographic Experts Group, è un formato standard di compressione dei file di immagini. I fermi immagine vengono compressi approssimativamente da 1/10 a 1/100 delle dimensioni originali. • Durante l’assegnazione di un nome a un file JPEG, assicurarsi di aggiungere l’estensione “.jpg”. Nota sui file JPEG La riproduzione dei file JPEG in formato progressivo non è supportata. Informazioni sui file DivX® ® DivX , acronimo di Digital Video Express, è un formato standard di compressione di file video digitali sviluppato da DivX, Inc. Il presente apparecchio è un prodotto DivX® Certified ufficiale ed è in grado di riprodurre tutte le versioni video DivX® (incluso il formato DivX® 6) con la riproduzione standard di file multimediali DivX®. Informazioni sui file MPEG-4 È possibile riprodurre i file MPEG-4 contenuti nei dischi che rispondono ai seguenti requisiti. La riproduzione non può essere garantita per tutti i file MPEG-4 compatibili. • Profilo: MPEG-4 Simple Profile • Velocità di trasmissione: max. 25.000 kbps • Frequenza fotogrammi: max. 30 fps • Dimensioni immagine: max. 320 × 240 pixel • Audio: max. 320 kbps (AAC-LC) • Estensione file: .mp4 masterpage:Right • Pulire la batteria con un panno asciutto per assicurare un perfetto contatto. • Assicurarsi di rispettare la corretta polarità durante l’inserimento della batteria. • Non afferrare la batteria con pinze di metallo, in quanto potrebbe verificarsi un corto circuito. AVVERTENZA La batteria può esplodere se usata scorrettamente. Pertanto, non deve essere ricaricata, smontata o gettata nel fuoco. Sostituzione del fusibile Per la sostituzione del fusibile, assicurarsi di utilizzare un fusibile dello stesso amperaggio di quello indicato sull’originale. Se il fusibile si brucia, controllare i collegamenti dell’alimentazione e sostituire Fusibile (10 A) il fusibile. Se dopo la sostituzione il fusibile si brucia di nuovo, è possibile che si tratti di un problema interno. In tal caso, rivolgersi al più vicino rivenditore Sony. Pulizia dei connettori Se i connettori tra l’apparecchio e il pannello anteriore sono sporchi, l’apparecchio potrebbe non funzionare correttamente. Per evitare questo problema, rimuovere il pannello anteriore (pagina 15), quindi pulire i connettori con un bastoncino di cotone. Non esercitare forza eccessiva. Diversamente, i connettori potrebbero venire danneggiati. Manutenzione Sostituzione della batteria al litio del telecomando a scheda In condizioni normali, la batteria dura circa 1 anno (il ciclo di vita può risultare più breve in funzione delle condizioni di utilizzo). Quando la batteria si scarica, il raggio d’azione del telecomando a scheda risulta ridotto. Sostituire la batteria con una batteria al litio CR2025 nuova. L’uso di pile diverse potrebbe comportare il rischio di incendi o esplosioni. Lato + verso l’alto c Unità principale Parte posteriore del pannello anteriore Note • Per motivi di sicurezza, spegnere il motore prima di pulire i connettori e rimuovere la chiave dal blocchetto di accensione. • Non toccare mai direttamente i connettori con le dita o con oggetti di metallo. Note sulla batteria al litio • Tenere la batteria al litio fuori dalla portata dei bambini. Se la batteria viene ingerita, consultare immediatamente un medico. 51 MEX-DV1500U 4-120-899-21 (1) D:\Documents and Settings\takashi-shimomura\Desktop\DTP\848220S MEXDV1500U(EUR)\4120899211_MEX-DV1500U_ML\04IT02CD-E.fm Rimozione dell’apparecchio 1 masterpage:Left Caratteristiche tecniche Rimuovere la cornice protettiva. Sistema 1 Rimuovere il pannello anteriore (pagina 15). Laser: laser semiconduttore Sistema di formato del segnale: selezionabile tra PAL/NTSC 2 Afferrare entrambi i bordi della cornice protettiva, quindi estrarla. Lettore DVD/CD Rapporto segnale-rumore: 120 dB Risposta in frequenza: 10 – 20.000 Hz Wow e flutter: al di sotto del limite misurabile Distorsione armonica: 0,01 % Sintonizzatore* FM Gamma di frequenze: 87,5 – 108,0 MHz Terminale dell’antenna: Connettore dell’antenna esterna Frequenza intermedia: 10,7 MHz/450 kHz Sensibilità utilizzabile: 9 dBf Selettività: 75 dB a 400 kHz Rapporto segnale-rumore: 67 dB (stereo), 69 dB (mono) Distorsione armonica a 1 kHz: 0,5 % (stereo), 0,3 % (mono) Separazione: 35 dB a 1 kHz Risposta in frequenza: 30 – 15.000 Hz x 2 Rimuovere l’apparecchio. MW/LW 1 Inserire contemporaneamente entrambe le chiavi di rilascio fino a farle scattare in posizione. Gancio rivolto verso l’interno. Gamma di frequenze: MW: 531 – 1.602 kHz LW: 153 – 279 kHz Terminale dell’antenna: Connettore dell’antenna esterna Frequenza intermedia: 10,7 MHz/450 kHz Sensibilità: MW: 30 µV, LW: 40 µV * di cui al par. 3 dell’Allegato A al D.M. 25/06/85 e al par. 3 dell’Allegato 1 al D.M. 27/08/87 Lettore USB 2 Estrarre le chiavi di rilascio per sbloccare l’apparecchio. Interfaccia: USB (Full Speed) Corrente massima: 500 mA Amplificatore di potenza Uscite: uscite diffusori (connettori a tenuta) Impedenza diffusori: 4 – 8 ohm Uscita di potenza massima: 52 W × 4 (a 4 ohm) Generali 3 Rimuovere l’apparecchio dalla struttura facendolo scorrere. Uscite: Terminale di uscita video Terminali di uscita audio posteriori Terminale di controllo del relè dell’antenna elettrica Terminale di controllo dell’amplificatore di potenza 52 MEX-DV1500U 4-120-899-21 (1) D:\Documents and Settings\takashi-shimomura\Desktop\DTP\848220S MEXDV1500U(EUR)\4120899211_MEX-DV1500U_ML\04IT02CD-E.fm Ingressi: Terminali di ingresso audio AUX Terminale di ingresso dell’antenna Terminale di controllo freno a mano Presa di ingresso AUX (minipresa stereo) Terminale di ingresso del segnale USB Comandi dei toni: Bassi: ±10 dB a 60 Hz Medi: ±10 dB a 1 kHz Alti: ±10 dB a 10 kHz Requisiti di alimentazione: batteria auto da 12 V CC (massa negativa) Dimensioni: circa 178 × 50 × 179 mm (l/a/p) Dimensioni di montaggio: circa 182 × 53 × 163 mm (l/a/p) Peso: circa 1,4 kg Accessori in dotazione: Telecomando a scheda: RM-X168 Elementi per l’installazione e i collegamenti (1 set) Il rivenditore potrebbe non disporre di alcuni degli accessori elencati. Richiedere ulteriori informazioni al rivenditore. Brevetti degli Stati Uniti d’America e di altri Paesi concessi su licenza dai Dolby Laboratories. Tecnologia di codifica audio MPEG Layer-3 e brevetti su licenza del Fraunhofer IIS e della Thomson. DivX, DivX Certified e i loghi associati sono marchi di fabbrica di DivX, Inc. e sono utilizzati su licenza. Questo prodotto è tutelato da specifici diritti di proprietà intellettuale di Microsoft Corporation. L’uso o la distribuzione della tecnologia in questione al di fuori del presente prodotto sono vietati senza apposita licenza concessa da Microsoft o da una filiale Microsoft autorizzata. Il design e le caratteristiche tecniche sono soggetti a modifiche senza preavviso. • Determinati circuiti stampati non contengono ritardanti alla fiamma alogenati. • Le parti estetiche non contengono ritardanti alla fiamma alogenati. • Come materiale di riempimento per l’imballaggio viene utilizzata carta. masterpage:Right Guida alla soluzione dei problemi Fare riferimento alla seguente lista di verifica per risolvere la maggior parte dei problemi che si potrebbero verificare durante l’uso di questo apparecchio. Prima di esaminare l’elenco che segue, verificare le procedure di collegamento e d’uso dell’apparecchio. Se il problema persiste, visitare il sito Web relativo all’assistenza al seguente indirizzo. Sito di assistenza clienti http://support.sony-europe.com A seconda del monitor collegato, l’apparecchio potrebbe impiegare alcuni secondi prima di spegnersi in seguito allo spegnimento del motore. Non si tratta di un problema di funzionamento. Generali L’apparecchio non riceve alimentazione. • Verificare il collegamento o il fusibile. • Se l’apparecchio viene spento e il display disattivato, non è possibile utilizzarlo mediante il telecomando. t Accendere l’apparecchio. L’antenna elettrica non si estende. L’antenna elettrica non dispone di una scatola a relè. Non viene emesso alcun segnale acustico. • Il segnale acustico è disattivato (pagina 45). • Un amplificatore di potenza opzionale è collegato e l’amplificatore incorporato non viene utilizzato. Il contenuto della memoria è stato cancellato. • È stato premuto il tasto RESET. t Reinserire i dati in memoria. • Il cavo di alimentazione o la batteria è stato scollegato o non è collegato correttamente. Le stazioni memorizzate e l’ora esatta sono cancellate. Si è bruciato il fusibile. Quando si cambia la posizione del blocchetto di accensione, viene emesso un disturbo. I cavi non sono collegati correttamente al connettore di alimentazione accessoria dell’auto. Il display viene disattivato/non viene visualizzato nella relativa finestra. • L’attenuatore di luminosità è impostato su “DIMON” (pagina 46). • Il display scompare tenendo premuto (OFF). t Tenere premuto (OFF) sull’apparecchio fino a visualizzare il display. • I connettori sono sporchi (pagina 51). continua alla pagina successiva t 53 MEX-DV1500U 4-120-899-21 (1) D:\Documents and Settings\takashi-shimomura\Desktop\DTP\848220S MEXDV1500U(EUR)\4120899211_MEX-DV1500U_ML\04IT02CD-E.fm La funzione di spegnimento automatico non è disponibile. L’apparecchio è acceso. La funzione di spegnimento automatico si attiva dopo avere spento l’apparecchio. t Spegnere l’apparecchio. Immagine Non viene visualizzata alcuna immagine/ l’immagine è disturbata. • Uno dei collegamenti non è stato effettuato in modo corretto. • Verificare il collegamento all’apparecchio collegato e impostare il selettore di ingresso di tale apparecchio sulla sorgente corrispondente alla presente unità. • Il disco è difettoso o sporco. • L’installazione non è corretta. t Installare l’apparecchio con un’angolazione inferiore a 45° in una parte stabile dell’auto. • Il monitor è collegato all’uscita AUDIO/VIDEO OUT e il cavo del freno a mano (verde chiaro) non è collegato al cavo di commutazione del freno a mano oppure il freno a mano non è stato azionato. • L’impostazione del sistema colore non è corretta. t Impostare il sistema colore su “PAL” o “NTSC” in base al monitor collegato (pagina 45). L’immagine non si adatta perfettamente allo schermo. Il rapporto di formato è fisso sul DVD. masterpage:Left Audio Non viene riprodotto alcun suono/l’audio salta/ l’audio si interrompe. • Uno dei collegamenti non è stato effettuato in modo corretto. • Verificare il collegamento all’apparecchio collegato e impostare il selettore di ingresso di tale apparecchio sulla sorgente corrispondente alla presente unità. • Il disco è difettoso o sporco. • L’installazione non è corretta. t Installare l’apparecchio con un’angolazione inferiore a 45° in una parte stabile dell’auto. • La frequenza di campionamento del file MP3 non è pari a 16, 22,05, 24, 32, 44,1 o 48 kHz. • La frequenza di campionamento del file WMA non è pari a 32, 44,1 o 48 kHz. • La frequenza di campionamento del file AAC non è pari a 44,1 o 48 kHz. • La velocità di trasmissione del file MP3 non è compresa tra 8 e 384 kbps. • La velocità di trasmissione del file WMA non è compresa tra 32 e 384 kbps. • La velocità di trasmissione del file AAC non è compresa tra 16 e 320 kbps. • L’apparecchio si trova nel modo di pausa/ricerca rapida all’indietro/in avanti. • Le impostazioni per le uscite non sono state effettuate in modo corretto. • Il livello di uscita per i DVD è troppo basso (pagina 29). • Il volume è troppo basso. • È stata attivata la funzione ATT. • La posizione del comando dell’attenuatore “FAD” non è appropriata per un sistema a 2 diffusori. • Formato non supportato (ad esempio DTS). t Verificare che il formato sia supportato dalla presente unità (pagina 8). L’audio è disturbato. Allontanare i cavi e i fili gli uni dagli altri. 54 MEX-DV1500U 4-120-899-21 (1) D:\Documents and Settings\takashi-shimomura\Desktop\DTP\848220S MEXDV1500U(EUR)\4120899211_MEX-DV1500U_ML\04IT02CD-E.fm Dischi Non è possibile inserire un disco. • Nell’alloggiamento è presente un altro disco. • Il disco è stato inserito forzatamente in senso contrario o nel modo sbagliato. Il disco non viene riprodotto. • Il disco è difettoso o sporco. • Il disco non è supportato dall’apparecchio. • Il DVD non è supportato dall’apparecchio a causa del codice di zona. • Il disco non è finalizzato (pagina 50). • Il formato del disco e la versione del file non sono compatibili con il presente apparecchio (pagina 8, 50). • Premere Z per rimuovere il disco. I file MP3/WMA/AAC/JPEG/DivX/MPEG-4 non vengono riprodotti. • La registrazione non è stata eseguita in base al formato ISO 9660 livello 1 o livello 2, Joliet o Romeo nel formato di espansione (DATA CD) oppure nel formato UDF Bridge (DATA DVD) (pagina 50). • L’estensione del file non è corretta (pagina 50). • I file non sono memorizzati nel formato MP3/WMA/ AAC/JPEG/DivX/MPEG-4. • Se il disco contiene più tipi di file, è possibile riprodurre solo il tipo di file selezionato (audio/video/ immagine). t Selezionare il tipo di file appropriato mediante l’elenco (pagina 35). I file MP3/WMA/AAC/JPEG/DivX/MPEG-4 necessitano di un tempo maggiore prima di poter essere riprodotti. Per i dischi indicati di seguito, l’avvio della riproduzione necessita di un tempo maggiore: – dischi registrati con una struttura ad albero complessa. – dischi registrati in multisessione/Multiborder. – dischi ai quali è possibile aggiungere dati. Il disco non viene riprodotto dall’inizio. Sono stati attivati il ripristino della riproduzione o il ripristino della riproduzione multidisco (pagina 42). Non è possibile utilizzare alcune funzioni. A seconda del disco, è possibile che alcune funzioni, quali ad esempio il modo di arresto, di ricerca, di riproduzione ripetuta o di riproduzione in ordine casuale non siano disponibili. Per ulteriori informazioni, vedere le istruzioni per l’uso fornite con il disco. La lingua dell’audio/dei sottotitoli o l’angolo non possono essere modificati. • Utilizzare il menu DVD anziché i tasti per la selezione diretta sul telecomando a scheda (pagina 17). • Sul DVD non sono registrati brani o sottotitoli multilingue o più angoli. • Il DVD non consente la modifica. Le voci del display non scorrono. • Per i dischi che presentano molti caratteri, tali voci potrebbero non scorrere. • “AUTO-SCRL” è impostato su “OFF”. t Impostare “A.SCRL-ON” (pagina 46). masterpage:Right I tasti per le operazioni non funzionano. Il disco non viene espulso. Premere il tasto RESET (pagina 14). La password per la protezione è stata dimenticata. Digitare “5776” nella schermata di immissione della password per disattivare la protezione (pagina 31). Ricezione radiofonica Non è possibile ricevere le stazioni. L’audio è disturbato. • Il collegamento non è corretto. t Collegare il cavo di controllo (blu) dell’antenna elettrica o il cavo di alimentazione accessoria (rosso) al cavo di alimentazione di un preamplificatore di antenne per auto (solo se l’auto dispone di antenna FM/MW/LW incorporata sul vetro posteriore/laterale). t Verificare il collegamento dell’antenna dell’auto. t Se l’antenna dell’auto non si estende, verificare il collegamento del cavo di controllo dell’antenna elettrica. Non è possibile effettuare la sintonizzazione preselezionata. • Memorizzare la frequenza corretta. • Il segnale di trasmissione è eccessivamente debole. Non è possibile effettuare la sintonizzazione automatica. • L’impostazione del modo di ricerca locale non è stata effettuata correttamente. t La sintonizzazione si arresta di frequente: Impostare “LOCAL-ON” (pagina 46). t La sintonizzazione non si arresta in corrispondenza di una stazione: Impostare “MONO-ON” (pagina 46). • Il segnale di trasmissione è eccessivamente debole. t Eseguire la sintonizzazione manuale. Durante la ricezione FM, lampeggia l’indicazione “ST”. • Sintonizzare la frequenza in modo corretto. • Il segnale di trasmissione è eccessivamente debole. t Impostare “MONO-ON” (pagina 46). Un programma FM trasmesso in stereofonia viene ricevuto in monofonia. L’apparecchio è impostato sul modo di ricezione monofonico. t Impostare “MONO-OFF” (pagina 46). RDS Dopo alcuni secondi di ascolto, si avvia la funzione SEEK. La stazione non è TP oppure il segnale è debole. t Disattivare il modo TA (pagina 37). continua alla pagina successiva t 55 MEX-DV1500U 4-120-899-21 (1) D:\Documents and Settings\takashi-shimomura\Desktop\DTP\848220S MEXDV1500U(EUR)\4120899211_MEX-DV1500U_ML\04IT02CD-E.fm Non viene trasmesso alcun notiziario sul traffico. • Attivare il modo TA (pagina 37). • La stazione non trasmette notiziari sul traffico pur essendo una stazione TP. t Sintonizzarsi su un’altra stazione. Il modo PTY visualizza “- - - - - - - -”. • La stazione corrente non è una stazione RDS. • I dati RDS non vengono ricevuti. • La stazione non specifica il tipo di programma. Riproduzione USB Non è possibile riprodurre le voci tramite un hub USB. Il presente apparecchio non è in grado di riconoscere i dispositivi USB attraverso un hub USB. Non è possibile riprodurre le voci. Un dispositivo USB non funziona. t Ricollegarlo. L’avvio della riproduzione sul dispositivo USB richiede più tempo. Il dispositivo USB contiene file con una struttura ad albero complessa. Viene emesso un segnale acustico. Durante la riproduzione, il dispositivo USB è stato scollegato. t Prima di scollegare un dispositivo USB, accertarsi di arrestare la riproduzione per proteggere i dati. L’audio è intermittente. È possibile che l’audio risulti intermittente a velocità di trasmissione elevate, superiori a 320 kbps. Messaggi e indicazioni di errore Sull’unità principale 56 ERROR • Il disco è sporco o è stato inserito in senso contrario. t Pulire il disco o inserirlo correttamente. • È stato inserito un disco vuoto. • Non è possibile riprodurre il disco a causa di un problema. t Inserire un altro disco. • Il disco non è compatibile con il presente apparecchio. t Inserire un disco compatibile. • Il dispositivo USB non è stato riconosciuto automaticamente. t Ricollegarlo. • Premere Z per rimuovere il disco. FAILURE I collegamenti di diffusori/amplificatori non sono corretti. t Per verificare il collegamento, consultare il manuale di installazione/dei collegamenti in dotazione. L. SEEK +/– Il modo di ricerca locale è attivato durante la sintonizzazione automatica. masterpage:Left NO AF Non esiste alcuna frequenza alternativa per la stazione corrente. t Premere .m/M> durante il lampeggiamento del nome del servizio dei programmi. L’apparecchio avvia la ricerca di un’altra frequenza con gli stessi dati PI (identificativo programma) (viene visualizzata l’indicazione “PI SEEK”). NO DATA Il disco o il dispositivo USB non contiene file audio. t Inserire un CD audio nell’unità. t Collegare un dispositivo USB contenente file audio. NO DEV (nessun dispositivo) “USB” è stato selezionato come sorgente, ma non vi è alcun dispositivo USB collegato. Un dispositivo USB o un cavo USB è stato scollegato durante la riproduzione. t Accertarsi di collegare un dispositivo USB e un cavo USB. NO NAME Il file non contiene il nome del disco/dell’album/della cartella/del brano/dell’immagine/del video. NO TP L’apparecchio continua la ricerca di stazioni TP disponibili. OFFSET Potrebbe essersi verificato un problema interno. t Verificare i collegamenti. Se l’indicazione di errore rimane visualizzata, rivolgersi al più vicino rivenditore Sony. OVERLOAD Il dispositivo USB è sovraccarico. t Scollegare il dispositivo USB, quindi cambiare sorgente premendo (SOURCE). t Indica che il dispositivo USB non funziona oppure che è stato collegato un dispositivo non supportato. READ È in corso la lettura di tutte le informazioni relative ai file/album (cartella) del disco. t Una volta terminata l’operazione, la riproduzione viene avviata automaticamente. Potrebbe essere necessario attendere alcuni minuti, a seconda della struttura del disco. USB NO SUPRT (USB non supportato) Il dispositivo USB collegato non è supportato. t Per ulteriori informazioni sulla compatibilità del dispositivo USB in uso, visitare il sito Web relativo all’assistenza. “ ”o“ ” Mentre si procede rapidamente in avanti/all’indietro, sono stati raggiunti l’inizio o la fine del disco e non è possibile andare oltre. “ ” L’apparecchio non supporta la visualizzazione di un determinato carattere. MEX-DV1500U 4-120-899-21 (1) D:\Documents and Settings\takashi-shimomura\Desktop\DTP\848220S MEXDV1500U(EUR)\4120899211_MEX-DV1500U_ML\04IT02CD-E.fm Sul monitor Playback prohibited by region code. Non è possibile riprodurre il DVD a causa di un codice di zona diverso. Cannot play this disc. • Il disco non è compatibile con il presente apparecchio. • Il disco non è finalizzato. No playable data. Il disco non contiene dati riproducibili. Please press RESET. L’apparecchio non funziona a causa di un problema non specificato. t Premere il tasto RESET (pagina 14). Se le soluzioni riportate non risolvono il problema, rivolgersi al più vicino rivenditore Sony. Se l’apparecchio viene portato in un centro di assistenza a causa di un problema relativo alla riproduzione di un disco, assicurarsi di portare anche il disco utilizzato al momento in cui si è verificato il problema. masterpage:Right Glossario Album Sezione di un pezzo musicale o di un’immagine su un DATA CD/DVD che contiene brani audio MP3/ WMA/AAC o file JPEG. Capitolo Suddivisione di un titolo in un DVD. Un titolo è composto da più capitoli. DivX® Tecnologia video digitale creata da DivX, Inc. Il materiale video codificato con la tecnologia DivX è caratterizzato da una delle più elevate qualità con dimensioni di file relativamente ridotte. Dolby Digital Tecnologia di compressione audio digitale sviluppata da Dolby Laboratories. Questa tecnologia è conforme all’audio surround a 5.1 canali. Il canale posteriore è stereo e in questo formato esiste un canale subwoofer distinto. La tecnologia Dolby Digital fornisce gli stessi 5.1 canali distinti di audio digitale di qualità elevata dei sistemi audio utilizzati nel cinema Dolby Digital. La corretta separazione dei canali è resa possibile dalla registrazione separata di tutti i dati di canale, con un deterioramento minimo grazie all’elaborazione digitale di tali dati. DVD Disco che può contenere fino a 8 ore di immagini in movimento sebbene il relativo diametro sia identico a quello di un CD. La capacità di dati di un DVD a strato singolo e a un lato è di 4,7 GB (gigabyte), ossia 7 volte superiore rispetto a quella di un CD. La capacità di dati di un DVD a doppio strato e a lato singolo è di 8,5 GB, la capacità di un DVD a strato singolo e due lati è di 9,4 GB, mentre la capacità di un DVD a doppio strato e due lati è di 17 GB. I dati di immagine utilizzano il formato MPEG 2, uno dei formati standard della tecnologia di compressione digitale più diffusi. I dati di immagine vengono compressi a circa 1/40 (mediamente) delle dimensioni originali. I DVD impiegano inoltre una tecnologia di codifica con un tasso variabile che modifica i dati da assegnare in base alle condizioni dell’immagine. I dati audio vengono registrati in un formato a più canali, quale ad esempio Dolby Digital, consentendo di ottenere una qualità audio più realistica. Inoltre, i DVD sono dotati di varie funzioni avanzate, quali le funzioni multiangolo, multilingue e di protezione. continua alla pagina successiva t 57 MEX-DV1500U 4-120-899-21 (1) D:\Documents and Settings\takashi-shimomura\Desktop\DTP\848220S MEXDV1500U(EUR)\4120899211_MEX-DV1500U_ML\04IT02CD-E.fm DVD-RW Un DVD-RW è un disco su cui è possibile registrare e scrivere con le stesse dimensioni di un DVD VIDEO. Un DVD-RW è dotato di due diversi modi: VR e video. I DVD-RW creati nel modo video hanno lo stesso formato dei DVD VIDEO, mentre i dischi creati nel modo VR (registrazione video) consentono la programmazione o la modifica dei contenuti. DVD+RW Un DVD+RW (più RW) è un disco su cui è possibile registrare e scrivere. I DVD+RW utilizzano un formato di registrazione simile a quello dei DVD VIDEO. masterpage:Left I VIDEO CD contengono inoltre dati audio compatti; la compressione viene applicata ai suoni al di fuori della gamma udibile, ma non a quelli udibili. I VIDEO CD possono contenere una quantità di informazioni 6 volte superiore rispetto ai CD audio convenzionali. Esistono 3 versioni di VIDEO CD. • Versione 1.0, 1.1: è possibile riprodurre solo immagini in movimento e audio. • Versione 2.0: è possibile riprodurre fermi immagine ad alta risoluzione e utilizzare le funzioni PBC. Il presente apparecchio è conforme a tutte e 3 le versioni sopra descritte. File • Un brano MP3/WMA/AAC o un’immagine JPEG su un DATA CD/DATA DVD/dispositivo USB. • Un brano MP3/WMA/AAC, un’immagine JPEG o un video DivX/MPEG-4 su un DATA CD/ DATA DVD. (“File” è una definizione esclusiva per il presente apparecchio.) Un file singolo consiste in un brano, un’immagine o filmato singolo. Software basato su pellicola e software basato su video I DVD possono essere classificati come software basato su pellicola o software basato su video. I DVD basati su pellicola contengono le stesse immagini (24 fotogrammi al secondo) mostrate nei cinema. I DVD basati su video, ad esempio le commedie televisive, visualizzano immagini a 30 fotogrammi (o 60 campi) al secondo. Scena In un VIDEO CD con funzioni PBC (controllo della riproduzione), le schermate dei menu, le immagini in movimento e i fermi immagine vengono suddivisi in sezioni denominate “scene”. Titolo Sezione più lunga di una parte di immagine o di audio in un DVD, un film o altro nei software video oppure un intero album nei software audio. Brano Sezione di un’immagine o di un brano musicale su un VIDEO CD, CD o MP3/WMA/AAC. Un album è composto da diversi brani (solo MP3/WMA/ AAC). VIDEO CD Un CD contenente immagini in movimento. I dati di immagine utilizzano il formato MPEG 1, uno dei formati standard della tecnologia di compressione digitale più diffusi. I dati di immagine vengono compressi a circa 1/140 delle dimensioni originali. Di conseguenza, un VIDEO CD da 12 cm può contenere fino a 74 minuti di immagini in movimento. 58 MEX-DV1500U 4-120-899-21 (1) D:\Documents and Settings\takashi-shimomura\Desktop\DTP\848220S MEXDV1500U(EUR)\4120899211_MEX-DV1500U_ML\04IT02CD-E.fm masterpage:Right Elenco dei codici della lingua/di zona Elenco dei codici della lingua Codici della lingua La redazione delle lingue è conforme allo standard ISO 639: 1988 (E/F). Codice Lingua Codice Lingua Codice Lingua Codice Lingua 1027 1028 1032 1039 1044 1045 1051 1052 1053 1057 1059 1060 1061 1066 1183 1186 1194 1196 1203 1209 1217 1226 1229 1233 1235 1239 1245 1248 1253 1254 1257 1261 1269 1283 1287 1297 1298 1299 1300 1301 1305 1307 1311 1313 1326 1327 1332 1334 1347 1349 1350 1352 1353 1356 1357 1358 1363 1365 1369 1376 1379 1393 1403 1408 1417 1428 1435 1507 1508 1509 1511 1512 1513 1514 1515 1516 1517 1521 1525 1527 1528 1529 1531 1532 1534 1535 1538 1539 1540 1543 1557 1564 1572 1581 1587 1613 1632 1665 1684 1697 Samoan Shona Somali Albanian Serbian Siswati Sesotho Sundanese Swedish Swahili Tamil Telugu Tajik Thai Tigrinya Turkmen Tagalog Setswana Tonga Turkish Tsonga Tatar Twi Ukrainian Urdu Uzbek Vietnamese Volapük Wolof Xhosa Yoruba Chinese Zulu 1703 Non specificata 1067 1070 1079 1093 1097 1103 1105 1109 1130 1142 1144 1145 1149 1150 1151 1157 1165 1166 1171 1174 1181 Afar Abkhazian Afrikaans Amharic Arabic Assamese Aymara Azerbaijani Bashkir Byelorussian Bulgarian Bihari Bislama Bengali; Bangla Tibetan Breton Catalan Corsican Czech Welsh Danish German Bhutani Greek English Esperanto Spanish Estonian Basque Persian Finnish Fiji Faroese French Frisian 1345 Irish Scots Gaelic Galician Guarani Gujarati Hausa Hindi Croatian Hungarian Armenian Interlingua Interlingue Inupiak Indonesian Icelandic Italian Hebrew Japanese Yiddish Javanese Georgian Kazakh Greenlandic Cambodian Kannada Korean Kashmiri Kurdish Kirghiz Latin Lingala Laothian Lithuanian Latvian; Lettish Malagasy 1436 1463 1481 1482 1483 1489 1491 1495 1498 1501 1502 1503 1505 1506 Maori Macedonian Malayalam Mongolian Moldavian Marathi Malay Maltese Burmese Nauru Nepali Dutch Norwegian Occitan (Afan)Oromo Oriya Punjabi Polish Pashto; Pushto Portuguese Quechua RhaetoRomance Kirundi Romanian Russian Kinyarwanda Sanskrit Sindhi Sangho SerboCroatian Singhalese Slovak Slovenian Elenco dei codici di zona Codice Zona Codice Zona Codice Zona Codice Zona 2044 2047 2046 2057 2070 2079 2090 2092 2304 2115 2424 2165 2174 2109 2276 2248 2238 2254 2363 2362 2390 2379 2376 2427 2436 2184 2489 2501 2149 2499 2086 2528 Argentina Australia Austria Belgio Brazile Canada Cile Cina Corea Danimarca Filippine Finlandia Francia Germania Giappone India Indonesia Italia Malesia Messico Nuova Zelanda Norvegia Paesi Bassi Pakistan Portogallo Regno Unito Russia Singapore Spagna Svezia Svizzera Tailandia 59 MEX-DV1500U 4-120-899-21 (1) 04IT+00COV-EIX.fm masterpage:Left Indice analitico Numerics E M 16:9 41 2000MP3 6 2000WMA 6 4:3 LETTER BOX 41 4:3 PAN SCAN 41 Enfasi dei bassi (LOUD) 47 EQ3 39 Equalizzatore audio (EQ3) 39 immagine (PICTURE EQ) 30, 43 Memorizzazione automatica delle emittenti con sintonia migliore (BTM) 36 Menu del modo di riproduzione 25 Menu di impostazione impostazioni di sistema 44 impostazioni video 40 Menu DVD 17 Menu principale del DVD 17 Modo di ricerca locale (LOCAL) 46 Modo monofonico (MONO) 46 MP3 9, 50 MPEG-4 9, 51 A AAC 9, 50 Album (ALBUM) 34 Angolo (ANGLE) 17 Apparecchi opzionali 48 Attenuatore (FAD) 39 Attenuatore di luminosità (DIMMER) 46 Audio (AUDIO) canale 28 formato 27 lingua 27, 41 Audio DRC (AUDIO DRC) 43 AUX anteriore 48 Azzeramento (RESET) 14, 43 B Batteria al litio 51 Bilanciamento (BAL) 39 Brano (TRACK) 34 C Capitolo (CHAPTER) 34 Cartella (ALBUM) 34 CD multisessione 50 Codice di zona 9 Codice lingua 59 Codici di zona 59 Controllo della gamma dinamica (DRC) 43 Controllo della riproduzione (PBC) 24 60 F File (FILE) 34 Formati 9 Formato di programma 28 Frequenze alternative (AF) 37 Fusibile 51 I Immagine (IMAGE) 34 Impostazione dell’orologio (CLOCK-ADJ) 48 Impostazione lingua (LANGUAGE SETUP) 41 Impostazioni audio (AUDIO SETUP) 43 Impostazioni di sistema 44 Impostazioni di visualizzazione (DISPLAY SETUP) 41 Impostazioni personalizzate (CUSTOM SETUP) 42 Impostazioni video 40 Informazioni sulla durata/ Informazioni di testo (TIME) 26, 34 Intervallo temporale della visualizzazione in serie (SLIDE SHOW TIME) 42 J JPEG 9, 23, 51 D L Dimostrazione (DEMO) 46 Dischi 8 Dischi riproducibili 8 Display in movimento (M.DSPL) 45 Dispositivo USB 20 DivX VOD 42 DivX® 9, 23, 51 Dolby Digital 27, 29 DVD Multiborder 50 Lingua dei sottotitoli (SUBTITLE) 17, 41 Lingua del menu (MENU) 41 Lingua dell’audio (AUDIO) 27, 41 Livello apparecchio ausiliare (AUX-LEVEL) 47, 49 Livello DVD (DVD-LEVEL) 29, 47 N Notiziari sul traffico (TA) 37 NTSC 45 O Ora (CT) 37, 38, 45 P PAL 45 Picture EQ (PICTURE EQ) 30, 43 Programma sul traffico (TP) 37 Protezione (PARENTAL CONTROL) 31, 42 Q Quick-BrowZer 35 R Regionale (REGIONAL) 38, 46 Regolazione del livello Dolby (DOLBY-ADJ) 47 Ripristino della riproduzione 17, 19 Ripristino della riproduzione multidisco (MULTI-DISC RESUME) 6, 42 Riproduzione con ricerca diretta 34 Riproduzione in ordine casuale (SHUF) 21, 32 Riproduzione playlist (PLAY LIST PLAY) 43 MEX-DV1500U 4-120-899-21 (1) 04IT+00COV-EIX.fm masterpage:Right Riproduzione ripetuta (REP) 21, 32 S Scorrimento automatico (AUTO-SCRL) 46 Segnale acustico (BEEP) 45 Sfondo (WALLPAPER) 41 Sistema colore (COLORSYS) 45 Sistema dati radio (RDS) 37 Spegnimento automatico (AUTO-OFF) 45 T Telecomando a scheda 12, 14, 51 Tipo di monitor (MONITOR TYPE) 41 Tipo di programma (PTY) 37, 38 Titolo (TITLE) 34 V Visualizzazione di un elenco 35 Volume 10 W WMA 9, 50 Z Zoom (CENTER ZOOM) 29 61 MEX-DV1500U 4-120-899-21 (1) D:\Documents and Settings\takashi-shimomura\Desktop\DTP\848220S MEXDV1500U(EUR)\4120899211_MEX-DV1500U_ML\05NL01INT-E.fm Waarschuwing Stel het apparaat niet bloot aan regen of vocht. Dit kan brand of elektrische schokken tot gevolg hebben. Open de behuizing niet. Dit kan elektrische schokken tot gevolg hebben. Laat het apparaat alleen nakijken door bevoegde servicetechnici. LET OP De optische instrumenten in dit product vergroten het risico op oogletsel. De laserstraal van deze CD/DVD-speler is schadelijk voor de ogen, dus u mag de behuizing niet openen. Laat het apparaat alleen nakijken door bevoegde servicetechnici. masterpage:Left Verwijdering van oude elektrische en elektronische apparaten (Toepasbaar in de Europese Unie en andere Europese landen met gescheiden ophaalsystemen) Het symbool op het product of op de verpakking wijst erop dat dit product niet als huishoudelijk afval mag worden behandeld. Het moet echter naar een plaats worden gebracht waar elektrische en elektronische apparatuur wordt gerecycled. Als u ervoor zorgt dat dit product op de correcte manier wordt verwijderd, voorkomt u voor mens en milieu negatieve gevolgen die zich zouden kunnen voordoen in geval van verkeerde afvalbehandeling. De recycling van materialen draagt bij tot het vrijwaren van natuurlijke bronnen. Voor meer details in verband met het recyclen van dit product, neemt u contact op met de gemeentelijke instanties, het bedrijf of de dienst belast met de verwijdering van huishoudafval of de winkel waar u het product hebt gekocht. Accessoire waarop dit van toepassing is: Afstandsbediening Dit label bevindt zich aan de onderkant van het apparaat. CAUTION : CLASS 1M VISIBLE/INVISIBLE LASER RADIATION WHEN OPEN AND INTERLOCKS DEFEATED. DO NOT VIEW DIRECTLY WITH OPTICAL INSTRUMENTS. Dit label bevindt zich op het chassis van de aandrijfeenheid. Opmerking voor klanten: de volgende informatie is enkel van toepassing voor apparaten die verkocht worden in landen die de EU-richtlijnen in acht nemen De fabrikant van dit apparaat is Sony Corporation, 1-7-1 Konan, Minato-ku, Tokio, Japan. De geautoriseerde vertegenwoordiger voor EMC en productveiligheid is Sony Deutschland GmbH, Hedelfinger Strasse 61, 70327 Stuttgart, Duitsland. Voor onderhouds- of garantiekwesties kunt u de adressen gebruiken die in de afzonderlijke onderhouds- of garantiedocumenten worden vermeld. Verwijdering van oude batterijen (in de Europese Unie en andere Europese landen met afzonderlijke inzamelingssystemen) Dit symbool op de batterij of verpakking wijst erop dat de meegeleverde batterij van dit product niet als huishoudelijk afval behandeld mag worden. Door deze batterijen op juiste wijze af te voeren, voorkomt u voor mens en milieu negatieve gevolgen die zich zouden kunnen voordoen in geval van verkeerde afvalbehandeling. Het recycleren van materialen draagt bij tot het vrijwaren van natuurlijke bronnen. In het geval dat de producten om redenen van veiligheid, prestaties dan wel in verband met data-integriteit een permanente verbinding met batterij vereisen, dient deze batterij enkel door gekwalificeerd servicepersoneel vervangen te worden. Om ervoor te zorgen dat de batterij op een juiste wijze zal worden behandeld, dient het product aan het eind van zijn levenscyclus overhandigd te worden aan het desbetreffende inzamelingspunt voor de recyclage van elektrisch en elektronisch materiaal. Voor alle andere batterijen verwijzen we u naar het gedeelte over hoe de batterij veilig uit het product te verwijderen. Overhandig de batterij bij het desbetreffende inzamelingspunt voor de recyclage van batterijen. Voor meer details in verband met het recyclen van dit product of batterij, neemt u contact op met de gemeentelijke instanties, het bedrijf of de dienst belast met de verwijdering van huishoudafval of de winkel waar u het product hebt gekocht. 2 MEX-DV1500U 4-120-899-21 (1) D:\Documents and Settings\takashi-shimomura\Desktop\DTP\848220S MEXDV1500U(EUR)\4120899211_MEX-DV1500U_ML\05NL01INT-E.fm masterpage:Right Waarschuwing als het contactslot van de auto geen ACC-positie heeft Stel de functie voor automatisch uitschakelen in (pagina 45). Hiermee wordt het apparaat na de ingestelde tijdsduur automatisch volledig uitgeschakeld nadat u het apparaat hebt uitgeschakeld. Zo voorkomt u dat de accu leegraakt. Als u de functie voor automatisch uitschakelen niet instelt, houdt u (OFF) ingedrukt totdat het scherm verdwijnt wanneer u het contactslot op uit zet. Om de demonstratie (DEMO) te annuleren, zie pagina 45. Veiligheid • Houd u aan de verkeersregels die in uw land gelden. • Voor uw veiligheid wordt de monitor die is aangesloten op de VIDEO OUT-aansluiting, automatisch uitgeschakeld als de handrem niet wordt gebruikt. Ongelukken voorkomen Beelden worden pas weergegeven als u de auto hebt geparkeerd en de handrem gebruikt. Wanneer de auto beweegt tijdens het afspelen van video, verdwijnen de beelden die afkomstig zijn van de VIDEO OUTaansluiting, automatisch nadat de volgende waarschuwing is weergegeven. De beelden op het scherm worden uitgeschakeld, maar de audiobron kan nog wel worden gehoord. Video blocked for your safety. U moet tijdens het rijden het apparaat niet bedienen of naar de monitor kijken. 3 MEX-DV1500U 4-120-899-21 (1) D:\Documents and Settings\takashi-shimomura\Desktop\DTP\848220S MEXDV1500U(EUR)\4120899211_MEX-DV1500U_ML\05NL+00COV-ETOC.fm masterpage:Right Inhoudsopgave Welkom!. . . . . . . . . . . . . . . . . . . . . . . . . . . . . . . 6 Auteursrechten. . . . . . . . . . . . . . . . . . . . . . . . 7 Afspeelbare discs en symbolen die in deze handleiding worden gebruikt . . . . . . . . . . . . . . . 8 Locatie en functie van de bedieningselementen . . . . . . . . . . . . . . . . . . . .10 Hoofdeenheid . . . . . . . . . . . . . . . . . . . . . . .10 Kaartafstandsbediening RM-X168 . . . . . . . 12 De beeldkwaliteit aanpassen — Picture EQ . . . . . . . . . . . . . . . . . . . . . . . . . 29 De beeldkwaliteit aanpassen . . . . . . . . . . . . 30 Discs vergrendelen — Kinderbeveiliging . . . . 30 Kinderbeveiliging inschakelen . . . . . . . . . . 30 Regio en bijbehorend filmbeperkingsniveau wijzigen. . . . . . . . . . . . . . . . . . . . . . . . . . . . 31 Herhaaldelijk en willekeurig afspelen . . . . . . . 32 Rechtstreeks afspelen . . . . . . . . . . . . . . . . . . . 33 Aan de slag Het apparaat en de optionele monitor installeren . . . . . . . . . . . . . . . . . . . . . . . . 14 Het apparaat opnieuw instellen . . . . . . 14 De kaartafstandsbediening voorbereiden. . . . . . . . . . . . . . . . . . . . . . 14 Het voorpaneel verwijderen . . . . . . . . . 15 Het voorpaneel bevestigen . . . . . . . . . . . . .15 Basishandelingen Videodiscs afspelen. . . . . . . . . . . . . . . . 16 Audiodiscs afspelen . . . . . . . . . . . . . . . 18 Een USB-apparaat afspelen . . . . . . . . . 20 Schermitems . . . . . . . . . . . . . . . . . . . . . . . . 21 Herhaaldelijk en willekeurig afspelen . . . . .21 Lijst met tracks/beelden/videobestanden weergeven — Quick-BrowZer . . . . . . . . . . . . 34 Een track/beeld/videobestand selecteren . . . . . . . . . . . . . . . . . . . . . . . . . . 34 Een bestandstype selecteren . . . . . . . . . . . . 35 Informatie van een audiodisc bekijken . . . . . . 35 Geavanceerde handelingen — Radio Zenders opslaan en ontvangen. . . . . . . . . . . . . 36 Automatisch opslaan — BTM . . . . . . . . . . 36 Handmatig opslaan . . . . . . . . . . . . . . . . . . . 36 Opgeslagen zenders ontvangen. . . . . . . . . . 36 RDS . . . . . . . . . . . . . . . . . . . . . . . . . . . . . . . . . 36 Overzicht. . . . . . . . . . . . . . . . . . . . . . . . . . . 36 AF en TA instellen . . . . . . . . . . . . . . . . . . . 37 PTY selecteren . . . . . . . . . . . . . . . . . . . . . . 38 CT instellen. . . . . . . . . . . . . . . . . . . . . . . . . 38 Naar de radio luisteren . . . . . . . . . . . . . 22 Geavanceerde handelingen — Discs DivX®-/MPEG-4-/ JPEG-bestanden afspelen . . . . . . . . . . . . . . . . .23 DivX-®/MPEG-4-video afspelen . . . . . . . .23 JPEG-beeld weergeven . . . . . . . . . . . . . . . .23 PBC-functies gebruiken — Playback control . . . . . . . . . . . . . . . . . . . . .24 Het weergavestandmenu gebruiken . . . . . . . . . 24 Tijd/tekstinformatie van de disc bekijken . . . .26 Audio-instellingen configureren . . . . . . . . . . .27 De audiotaal/-indeling wijzigen . . . . . . . . .27 De programma-indeling bekijken . . . . . . . .27 Het audio-uitvoerniveau aanpassen — DVD-niveau . . . . . . . . . . . . . . . . . . . . . .28 4 Beelden vergroten . . . . . . . . . . . . . . . . . . . . . . 29 Geluidsaanpassing De geluidskenmerken aanpassen . . . . . . . . . . . 38 De equalizercurve aanpassen — EQ3. . . . . 39 Instellingen Beeldinstellingen . . . . . . . . . . . . . . . . . . . . . . . 39 Basisbediening van beeldinstellingen . . . . . 39 Taalinstelling voor het scherm of de soundtrack . . . . . . . . . . . . . . . . . . . . . . . . . . 41 Scherm instellen . . . . . . . . . . . . . . . . . . . . . 41 Aangepaste instellingen . . . . . . . . . . . . . . . 42 Audio-instellingen . . . . . . . . . . . . . . . . . . . 43 Alle instellingen herstellen . . . . . . . . . . . . . 43 Systeeminstellingen . . . . . . . . . . . . . . . . . . . . . 44 Basisbediening van systeeminstellingen . . . . . . . . . . . . . . . . . . . 44 De klok instellen . . . . . . . . . . . . . . . . . . . . . 48 MEX-DV1500U 4-120-899-21 (1) D:\Documents and Settings\takashi-shimomura\Desktop\DTP\848220S MEXDV1500U(EUR)\4120899211_MEX-DV1500U_ML\05NL+00COV-ETOC.fm Optionele apparaten gebruiken Randapparatuur . . . . . . . . . . . . . . . . . . . . . . . . 48 masterpage:Right Zie voor het monteren en aansluiten van het apparaat de bijgeleverde handleiding "Installatie en aansluitingen". Aanvullende informatie Voorzorgsmaatregelen. . . . . . . . . . . . . . . . . . . 49 Opmerkingen over discs . . . . . . . . . . . . . . . 49 Afspeelvolgorde van MP3-/WMA-/AAC-/ JPEG-/DivX®-/MPEG-4-bestanden . . . . . . 50 Over MP3-bestanden . . . . . . . . . . . . . . . . . 50 Over WMA-bestanden . . . . . . . . . . . . . . . . 50 Over AAC-bestanden . . . . . . . . . . . . . . . . . 50 Over JPEG-bestanden . . . . . . . . . . . . . . . . . 51 Over DivX®-bestanden. . . . . . . . . . . . . . . . 51 Over MPEG-4-bestanden . . . . . . . . . . . . . . 51 Onderhoud . . . . . . . . . . . . . . . . . . . . . . . . . . . . 51 Het apparaat verwijderen. . . . . . . . . . . . . . . . . 52 Technische gegevens . . . . . . . . . . . . . . . . . . . . 52 Problemen oplossen . . . . . . . . . . . . . . . . . . . . . 53 Foutmeldingen/berichten . . . . . . . . . . . . . . 55 Woordenlijst . . . . . . . . . . . . . . . . . . . . . . . . . . 57 Lijst met taal-/regiocodes . . . . . . . . . . . . . . . . 59 Index . . . . . . . . . . . . . . . . . . . . . . . . . . . . . . . . 60 Ondersteuningssite Als u vragen hebt of de recentste ondersteuningsinformatie over dit product wilt hebben, gaat u naar de onderstaande website: http://support.sony-europe.com Levert informatie over: • Modellen en fabrikanten van compatibele digitale audiospelers • Ondersteunde MP3-/WMA-/AAC-bestanden 5 MEX-DV1500U 4-120-899-21 (1) D:\Documents and Settings\takashi-shimomura\Desktop\DTP\848220S MEXDV1500U(EUR)\4120899211_MEX-DV1500U_ML\05NL02CD-E.fm Welkom! Dank u voor de aankoop van deze Sony Multi Disc Player. Lees deze handleiding zorgvuldig door voordat u dit apparaat gebruikt en bewaar de handleiding voor later gebruik. Functies masterpage:Left t pagina 48 Via de AUX AUDIO IN-aansluitingen aan de achterkant kunt u een randapparaat, zoals een draagbaar audioapparaat (analoge aansluiting), verborgen navigatieapparaat, televisietuner, enzovoort, aansluiten en de audio van het betreffende apparaat uitvoeren. Volg de paginaverwijzing voor meer informatie. DVD's, VCD's en CD's afspelen t pagina 8 * Afhankelijk van de tracklengte en opgenomen bemonsteringssnelheid. Compatibel met verschillende discindelingen. 2000MP3, 2000WMA, 2000AAC Kan maximaal 2.000 tracks* afspelen die op een disc zijn opgenomen in MP3-/WMA-/ AAC-indeling. Afspelen hervatten voor Multi-disc t pagina 42 Bewaart het punt waar het afspelen is gestopt voor maximaal 5 discs en kan het afspelen hervatten van DVD VIDEO/VCD/DivX/ MPEG-4, zelfs wanneer de disc is uitgeworpen. t pagina 38 7 ingestelde equalizercurves, die verder kunnen worden aangepast door 3 verschillende banden in te stellen. t pagina 29 Kleurtoon die u kunt selecteren bij de vooraf ingestelde instellingen volgens het licht in de auto of het licht in de omgeving. t pagina 48 Hier kunt u een draagbaar audioapparaat op aansluiten (analoge aansluiting). 6 MEX-DV1500U 4-120-899-21 (1) D:\Documents and Settings\takashi-shimomura\Desktop\DTP\848220S MEXDV1500U(EUR)\4120899211_MEX-DV1500U_ML\05NL02CD-E.fm masterpage:Right Auteursrechten Dit product is voorzien van copyrightbeveiligingstechnologie die wordt beschermd door Amerikaanse patenten en andere intellectuele-eigendomsrechten die eigendom zijn van Macrovision Corporation en andere rechtenhouders. Het gebruik van deze copyrightbeveiligingstechnologie moet zijn goedgekeurd door Macrovision Corporation, en is alleen bedoeld voor gebruik in huis en beperkte kring, tenzij Macrovision Corporation uitdrukkelijk toestemming heeft verleend voor ander gebruik. Aanpassing of demontage is verboden. Gefabriceerd onder licentie van Dolby Laboratories. "Dolby" en het symbool doubleD zijn handelsmerken van Dolby Laboratories. Windows Media en het Windows-logo zijn geregistreerde handelsmerken van Microsoft Corporation in de VS en/of andere landen. "DVD VIDEO", "DVD-R", "DVD-RW", "DVD+R" en "DVD+RW" zijn handelsmerken. "DivX" en "DivX Certified" zijn gedeponeerde handelsmerken of handelsmerken van DivX, Inc. VOOR DIT PRODUCT WORDT EEN LICENTIE VERLEEND ONDER DE MPEG-4 VISUAL PATENT PORTFOLIO LICENSE VOOR PERSOONLIJK EN NIETCOMMERCIEEL GEBRUIK DOOR EEN KLANT VOOR HET DECODEREN VAN MPEG-4-VIDEO DIE IS GECODEERD DOOR EEN KLANT VOOR PERSOONLIJK EN NIET-COMMERCIEEL GEBRUIK EN/OF IS VERKREGEN VAN EEN VIDEOLEVERANCIER DIE EEN LICENTIE VOOR MPEG-4-VIDEO HEEFT VERKREGEN VAN MPEG LA. ER WORDT GEEN LICENTIE VERLEEND OF GEÏMPLICEERD VOOR ENIG ANDER GEBRUIK. AANVULLENDE INFORMATIE, WAARONDER INFORMATIE OVER PROMOTIONEEL, INTERN EN COMMERCIEEL GEBRUIK EN LICENTIES VOOR DERGELIJK GEBRUIK, KUNT U VERKRIJGEN BIJ MPEG LA, LLC. GA NAAR HTTP://WWW.MPEGLA.COM 7 MEX-DV1500U 4-120-899-21 (1) D:\Documents and Settings\takashi-shimomura\Desktop\DTP\848220S MEXDV1500U(EUR)\4120899211_MEX-DV1500U_ML\05NL02CD-E.fm masterpage:Left Afspeelbare discs en symbolen die in deze handleiding worden gebruikt Op dit apparaat kunnen verschillende video-/audiodiscs worden afgespeeld. Aan de hand van de volgende tabel kunt u controleren of een disc door dit apparaat wordt ondersteund. Daarnaast kunt u controleren welke functies beschikbaar zijn voor een bepaald type disc. Discsymbool in de handleiding Discindeling Disclogo DVD VIDEO DVD-R*1 DVD-R DL*1 (Videostand/VR-stand) VIDEO DVD-RW*1 (Videostand/VR-stand) DVD+R*1 DVD+R DL*1 DVD+RW*1 Video-CD (Ver. 1.0/1.1/2.0) AUDIO Audio-CD CD-ROM*2 CD-R*2 CD-RW*2 *1 Audiobestanden kunnen ook worden opgeslagen. Zie pagina 9 voor meer informatie. *2 Video-/beeldbestanden kunnen ook worden opgeslagen. Zie pagina 9 voor meer informatie. Opmerking "DVD" wordt in deze handleiding gebruikt als een algemene term voor DVD VIDEO's, DVD-R's/DVD-RW's en DVD+R's/DVD+RW's. 8 MEX-DV1500U 4-120-899-21 (1) D:\Documents and Settings\takashi-shimomura\Desktop\DTP\848220S MEXDV1500U(EUR)\4120899211_MEX-DV1500U_ML\05NL02CD-E.fm masterpage:Right In de volgende tabel kunt u zien welke compressie-indelingen worden ondersteund, welke bestandstypen hierbij horen en op welke discs deze bestanden kunnen worden opgeslagen. Welke functies beschikbaar zijn, is afhankelijk van de indeling, ongeacht het type disc. De onderstaande symbolen voor de indelingen worden weergegeven naast de beschrijving van de beschikbare functies voor de betreffende indeling. Discsymbool in de handleiding Bestandstype Type opslagdisc MP3-audiobestand WMA-audiobestand AAC-audiobestand JPEG-beeldbestand DivX®-videobestand DATA DVD's DVD-ROM DVD-R DVD-R DL DVD-RW DVD+R DVD+R DL DVD+RW DATA CD's CD-ROM CD-R CD-RW MPEG-4videobestand MPEG-4 Tip Zie pagina 50 voor meer informatie over compressie-indelingen. Niet-ondersteunde discs De volgende discs kunnen niet op dit apparaat worden afgespeeld. • 8-cm discs • 12-cm discs waarbij alleen de binnenste 8 cm wordt gebruikt voor het opslaan van gegevens (de rest is transparant) • CD-ROM die andere bestanden bevat dan MP3-/WMA-/AAC-/JPEG-/DivX-/MPEG-4-bestanden • SA-CD • CD-G • Photo-CD • VSD (Video Single Disc) • DVD-ROM die andere bestanden bevat dan MP3-/WMA-/AAC-/JPEG-/DivX-/MPEG-4-bestanden • DVD-RAM • DVD-Audio • Active-Audio (gegevens) • SVCD (Super Video CD) • CDV • Discs die zijn gemaakt in de Packet Write-indeling • Discs in DTS-indeling Opmerking Als een disc slecht is opgenomen, is het zelfs mogelijk dat ook een compatibele disc niet kan worden afgespeeld. Regiocode Regiocode Het regiosysteem wordt gebruikt om de software met auteursrechten te beveiligen. De regiocode vindt u aan de onderkant van het apparaat en u kunt alleen DVD's met een identieke regiocode op dit apparaat afspelen. DVD's met het label ALL kunnen ook worden afgespeeld. Als u een andere DVD probeert af te spelen, wordt het bericht "Playback prohibited by region code." op de monitor weergegeven. Ondanks dat een DVD in bepaalde regio's niet kan worden afgespeeld, wordt er mogelijk helemaal geen label op de DVD weergegeven. Dit is afhankelijk van de DVD. 9 MEX-DV1500U 4-120-899-21 (1) D:\Documents and Settings\takashi-shimomura\Desktop\DTP\848220S MEXDV1500U(EUR)\4120899211_MEX-DV1500U_ML\05NL02CD-E.fm masterpage:Left Locatie en functie van de bedieningselementen Hoofdeenheid 1 2345 6 7 8 9 OFF SEEK SOURCE AF TA TP REG DISC ALBM ARTIST TRACK PTY REP SHUF AF/TA 1 2 MODE SEEK SETUP SHUF ZAP DM+ LOUD AUX ALBM 3 4 5 6 DSPL PUSH SOUND / ENTER q; qa qs qd qfqg qh qk ql Zie de vermelde pagina's voor meer informatie. In de instructies in deze handleiding worden over het algemeen de bedieningselementen van de kaartafstandsbediening beschreven. U kunt ook de bedieningselementen op de hoofdeenheid gebruiken als deze dezelfde of vergelijkbare namen hebben als die op de kaartafstandsbediening. G Display A OFF toets pagina 15,16, 18, 20, 24 De bron uitschakelen/stoppen (indrukken); volledig uitschakelen (ingedrukt houden). C SOURCE toets pagina 20, 22, 36, 49 De bron inschakelen; de bron wijzigen (radio/disc/USB/AUX). J SEEK +/– toetsen pagina 17, 19, 22, 23 Disc/USB: Een hoofdstuk/track/scène/bestand overslaan (indrukken); vorige/volgende disc (kort ingedrukt houden); track terug-/ vooruitspoelen (ingedrukt houden).*2 Radio: Automatisch afstemmen op zenders (indrukken); handmatig zoeken naar zenders (ingedrukt houden). D K B (terug) toets pagina 34, 39 Terugkeren naar het vorige scherm. (browse) toets pagina 34 De Quick-BrowZer-stand openen.*1 E Regelknop/SOUND/ENTER toets pagina 28, 34, 35, 36, 38, 39, 44, 48, 49 Het volume aanpassen/een instelling aanpassen (draaien); het geluidsmenu openen/een instelling toepassing (indrukken). 10 qj F Discsleuf pagina 16, 18 De disc plaatsen. H Z (uitwerpen) toets pagina 16, 18 De disc uitwerpen. I USB-aansluiting pagina 20 Hierop kunt u het USB-apparaat aansluiten. (voorpaneel loslaten) toets pagina 15 L MODE toets pagina 22, 36, 49 De radioband selecteren (FM/MW/LW); een randapparaat selecteren dat is aangesloten op de AUX-ingang (voorkant) of de AUX INaansluiting (achterkant). M Ontvanger voor de kaartafstandsbediening MEX-DV1500U 4-120-899-21 (1) D:\Documents and Settings\takashi-shimomura\Desktop\DTP\848220S MEXDV1500U(EUR)\4120899211_MEX-DV1500U_ML\05NL02CD-E.fm masterpage:Right N RESET toets pagina 14 O SETUP toets pagina 28, 36, 44, 48, 49 Het menu met systeeminstellingen openen. P AF (alternatieve frequenties)/ TA (verkeersinformatie)/ PTY (programmatype) toets pagina 37, 38 AF en TA instellen (indrukken); PTY selecteren (ingedrukt houden) in RDS. Q Cijfertoetsen Disc/USB: (1): b REP pagina 16, 17, 21, 32 (2): SHUF B pagina 16, 17, 21, 32 (3)/(4): ALBM –/+ (V/v) pagina 16, 17, 19, 23 Een album of map overslaan/de cursor verplaatsen (indrukken); albums of mappen blijven overslaan (ingedrukt houden). (6): u (afspelen/onderbreken) pagina 16, 17, 18, 19, 23 Afspelen starten/onderbreken. Radio: De opgeslagen zenders ontvangen (indrukken); zenders opslaan (ingedrukt houden). R DSPL (scherm) toets pagina 21, 26, 36, 48 Het schermitem wijzigen. S AUX-ingang pagina 48 Een draagbaar audioapparaat aansluiten. *1 Wanneer een CD/MP3/WMA/AAC/JPEG/DivX/ MPEG-4 wordt afgespeeld. *2 De bediening is afhankelijk van de disc (pagina 17, 19). Informatie over de USB-afdekplug Wanneer u de USB-aansluiting I niet gebruikt, moet u de bijgeleverde USB-afdekplug gebruiken om te voorkomen dat stof en vuil in de aansluiting terechtkomen. Houd de USB-afdekplug buiten het bereik van kinderen om te voorkomen dat deze per ongeluk wordt ingeslikt. 11 MEX-DV1500U 4-120-899-21 (1) D:\Documents and Settings\takashi-shimomura\Desktop\DTP\848220S MEXDV1500U(EUR)\4120899211_MEX-DV1500U_ML\05NL02CD-E.fm masterpage:Left Kaartafstandsbediening RM-X168 9 1 0 2 qa 3 qs 4 qd 5 qf qg 6 qh 7 qj 8 Zie de vermelde pagina's voor meer informatie. Verwijder vóór gebruik het plastic beschermlaagje (pagina 14). D SYSTEM SETUP toets pagina 28, 36, 44, 48, 49 Het menu met systeeminstellingen openen. A OFF toets pagina 16, 18, 20, 24 De bron uitschakelen/stoppen (indrukken); volledig uitschakelen (ingedrukt houden). E B SOUND toets pagina 38 Het geluidsmenu openen. 12 (terug)/O toets pagina 24, 25, 31, 31, 34, 39, 40 Het vorige scherm weergeven; terugkeren naar een menu op een VCD*1. C VISUAL SETUP toets pagina 24, 27, 29, 30, 30, 32, 33, 40 Het weergavestandmenu/menu met beeldinstellingen openen. MEX-DV1500U 4-120-899-21 (1) D:\Documents and Settings\takashi-shimomura\Desktop\DTP\848220S MEXDV1500U(EUR)\4120899211_MEX-DV1500U_ML\05NL02CD-E.fm F Cijfertoetsen pagina 16, 17, 24, 25, 31, 31, 33, 34, 36 Disc: Een titel/hoofdstuk/track zoeken. Radio: De opgeslagen zenders ontvangen (indrukken); zenders opslaan (ingedrukt houden). G CLEAR toets pagina 31, 34 Een opgegeven nummer verwijderen. H DSPL (scherm) toets pagina 21, 26, 36, 48 De schermitems wijzigen. I ATT (dempen) toets Het geluid dempen (druk nogmaals om te annuleren). J u (afspelen/onderbreken) toets pagina 16, 17, 18, 19, 23 Afspelen starten/onderbreken. K .m/M> toetsen pagina 17, 19, 22, 23 Disc/USB: Een hoofdstuk/track/scène/bestand overslaan (indrukken); vorige/volgende disc (kort ingedrukt houden); track terug-/ vooruitspoelen (ingedrukt houden).*2 Radio: Automatisch afstemmen op zenders (indrukken); handmatig zoeken naar zenders (ingedrukt houden). masterpage:Right N </M/m/, (cursor)/ENTER toetsen De cursor verplaatsen en een instelling opgeven. O SRC (bron) toets pagina 20, 22, 36, 49 De bron inschakelen; de bron wijzigen (radio/disc/USB/AUX). P MODE toets pagina 22, 36, 49 De radioband selecteren (FM/MW/LW); een randapparaat selecteren dat is aangesloten op de AUX-ingang (voorkant) of de AUX INaansluiting (achterkant). Q VOL (volume) +/– toetsen Het volume aanpassen. *1 Wanneer met een PBC-functie wordt afgespeeld. *2 De bediening is afhankelijk van de disc (pagina 17, 19). *3 Wanneer een CD/MP3/WMA/AAC/JPEG/DivX/ MPEG-4 wordt afgespeeld. Opmerking Als het apparaat wordt uitgeschakeld en het scherm verdwijnt, kan het apparaat niet worden bediend met de kaartafstandsbediening, tenzij op (SOURCE) op de hoofdeenheid wordt gedrukt of er een disc wordt geplaatst om het apparaat te activeren. L Toetsen voor de afspeelinstellingen voor de DVD (AUDIO): pagina 17, 27 De audiotaal/-indeling wijzigen. (Voor VCD/CD/MP3/WMA/AAC, het audiokanaal wijzigen.) (SUBTITLE): pagina 17 De taal voor de ondertiteling wijzigen. (ANGLE): pagina 17 De weergavehoek wijzigen. (TOP MENU): pagina 17 Het hoofdmenu op een DVD openen. (MENU): pagina 17 Het menu op een disc openen. M (browse) toets pagina 34 De Quick-BrowZer-stand openen.*3 13 MEX-DV1500U 4-120-899-21 (1) D:\Documents and Settings\takashi-shimomura\Desktop\DTP\848220S MEXDV1500U(EUR)\4120899211_MEX-DV1500U_ML\05NL02CD-E.fm masterpage:Left Het apparaat opnieuw instellen Aan de slag Het apparaat en de optionele monitor installeren Installeer eerst het apparaat en de optionele monitor en sluit deze aan. Dit apparaat kan worden bediend met de schermen die op het apparaat en/of de optionele monitor worden weergegeven. Houd er rekening mee dat deze handleiding instructies bevat voor schermen op zowel het apparaat en/of de optionele monitor. Apparaat Optionele monitor Voordat u het apparaat voor het eerst gebruikt of na het vervangen van de accu of het wijzigen van de aansluitingen, moet u het apparaat opnieuw instellen. Verwijder het voorpaneel (pagina 15) en druk de RESET toets (pagina 11) in met een puntig voorwerp, zoals een balpen. Opmerking Als u op de RESET toets drukt, worden de klokinstelling en bepaalde opgeslagen gegevens gewist. De kaartafstandsbediening voorbereiden Verwijder het plastic beschermlaagje. Tip Zie pagina 51 voor meer informatie over het vervangen van de batterij. Raadpleeg de bijgeleverde handleiding voor het installeren/aansluiten van de monitor voor meer informatie. Opmerking Zorg dat u de optionele monitor veilig installeert en zodanig plaatst dat het zicht van de bestuurder niet wordt belemmerd. 14 MEX-DV1500U 4-120-899-21 (1) D:\Documents and Settings\takashi-shimomura\Desktop\DTP\848220S MEXDV1500U(EUR)\4120899211_MEX-DV1500U_ML\05NL02CD-E.fm Het voorpaneel verwijderen OFF U kunt het voorpaneel van het apparaat verwijderen om diefstal te voorkomen. Waarschuwingstoon Wanneer u het contact in de stand OFF zet zonder het voorpaneel te verwijderen, hoort u gedurende enkele seconden de waarschuwingstoon. U hoort de waarschuwingstoon alleen als de ingebouwde versterker wordt gebruikt. 1 Druk op (OFF). Het apparaat is uitgeschakeld. 2 Druk op en trek het voorpaneel naar u toe. masterpage:Right Het voorpaneel bevestigen Plaats deel A van het voorpaneel op deel B van het apparaat, zoals wordt weergegeven, en druk de linkerzijde vast tot deze vastklikt. A B Opmerking Plaats niets op de binnenkant van het voorpaneel. Opmerkingen • Laat het voorpaneel niet vallen en druk niet te hard op het voorpaneel en het display. • Stel het voorpaneel niet bloot aan hitte/hoge temperaturen of vocht. Laat het voorpaneel niet achter in een geparkeerde auto of op het dashboard/de hoedenplank. • Verwijder het voorpaneel niet als er wordt afgespeeld op het USB-apparaat, omdat de USBgegevens anders kunnen worden beschadigd. 15 MEX-DV1500U 4-120-899-21 (1) D:\Documents and Settings\takashi-shimomura\Desktop\DTP\848220S MEXDV1500U(EUR)\4120899211_MEX-DV1500U_ML\05NL02CD-E.fm masterpage:Left Basishandelingen Videodiscs afspelen Mogelijk zijn bepaalde handelingen niet beschikbaar of beperkt beschikbaar. Dit is afhankelijk van de disc. Raadpleeg de gebruiksaanwijzing die bij de disc is geleverd. Z OFF OFF u </M/m/, ENTER Cijfertoetsen b/B/V/v u 1 Schakel de monitor in en selecteer de invoerbron op uw monitor die overeenkomt met dit apparaat. 2 Plaats de disc (met het label naar boven). Het afspelen wordt automatisch gestart. Als de disc niet automatisch wordt afgespeeld, drukt u op u. 3 Als het DVD-menu wordt weergegeven, drukt u op (1)(b)/(2)(B)/ (3)(V)/(4)(v) om de cursor te verplaatsen. Druk vervolgens op (6) (u) om te bevestigen. Met de kaartafstandsbediening drukt u op de </M/m/,/cijfertoetsen om de cursor te verplaatsen en vervolgens drukt u op (ENTER) om te bevestigen. De weergave stoppen Druk op (OFF). Opmerking Discs in DTS-indeling worden niet ondersteund. Er wordt geen geluid weergegeven als de DTS-indeling is geselecteerd. De disc uitwerpen Druk op Z. 16 MEX-DV1500U 4-120-899-21 (1) D:\Documents and Settings\takashi-shimomura\Desktop\DTP\848220S MEXDV1500U(EUR)\4120899211_MEX-DV1500U_ML\05NL02CD-E.fm masterpage:Right Informatie over het DVD-menu Een film of muziekstuk op een DVD wordt onderverdeeld in verschillende delen. Deze delen worden "titels" genoemd. Wanneer u een DVD afspeelt die meerdere titels bevat, kunt u de gewenste titel selecteren in het hoofdmenu van de DVD. Wanneer u op een DVD bijvoorbeeld verschillende talen voor de ondertiteling/het geluid kunt selecteren, kunt u deze selecteren in het DVD-menu. Overige handelingen voor afspelen u AUDIO TOP MENU .m/M> SUBTITLE ANGLE MENU </M/m/, ENTER Cijfertoetsen .m/M> b/B/V/v u Actie Druk op Afspelen onderbreken/afspelen hervatten u Een hoofdstuk/track/scène/bestand overslaan .m/M> Disc terug-/vooruitspoelen .m/M> en houd de toets kort ingedrukt; druk vervolgens herhaaldelijk om de snelheid aan te passen (× 2 t × 12 t × 120 t × 2…) u Vooruit-/terugspoelen annuleren Het DVD-menu weergeven* Afstandsbediening: (TOP MENU) of (MENU) 1 Items in het DVD-menu weergeven* 1 Hoofdeenheid: druk op (1)(b)/(2)(B)/(3)(V)/(4)(v) om de cursor te verplaatsen en druk vervolgens op (6) (u) om te bevestigen. Afstandsbediening: druk op </M/m/,/cijfertoetsen om de cursor te verplaatsen en druk vervolgens op (ENTER) om te bevestigen. Audiotaal/-indeling/-kanaal wijzigen (pagina 27)*1 Afstandsbediening: druk herhaaldelijk op (AUDIO) tot het gewenste item wordt weergegeven Ondertiteling uitschakelen/taal ondertiteling wijzigen*1 Afstandsbediening: druk herhaaldelijk op (SUBTITLE) tot het gewenste item wordt weergegeven*2 De weergavehoek wijzigen*1 Afstandsbediening: druk herhaaldelijk op (ANGLE) tot de gewenste weergavehoek wordt weergegeven *1 Niet beschikbaar afhankelijk van de disc. *2 Wanneer het invoerveld van 4 tekens verschijnt, voert u de taalcode in (pagina 59) voor de gewenste taal. 17 MEX-DV1500U 4-120-899-21 (1) D:\Documents and Settings\takashi-shimomura\Desktop\DTP\848220S MEXDV1500U(EUR)\4120899211_MEX-DV1500U_ML\05NL02CD-E.fm masterpage:Left Audiodiscs afspelen Mogelijk zijn bepaalde handelingen niet beschikbaar of beperkt beschikbaar. Dit is afhankelijk van de disc. Raadpleeg de gebruiksaanwijzing die bij de disc is geleverd. Z OFF OFF u u 1 Plaats de disc (met het label naar boven). Het afspelen wordt automatisch gestart. Als de disc niet automatisch wordt afgespeeld, drukt u op u. De weergave stoppen Druk op (OFF). Opmerking Discs in DTS-indeling worden niet ondersteund. Er wordt geen geluid weergegeven als de DTS-indeling is geselecteerd. De disc uitwerpen Druk op Z. 18 MEX-DV1500U 4-120-899-21 (1) D:\Documents and Settings\takashi-shimomura\Desktop\DTP\848220S MEXDV1500U(EUR)\4120899211_MEX-DV1500U_ML\05NL02CD-E.fm masterpage:Right Overige handelingen voor afspelen .m/M> u </M/m/, .m/M> Actie ALBM u Druk op Afspelen onderbreken/afspelen hervatten u Een track overslaan .m (<)/M> (,) Track terug-/vooruitspoelen en houd .m/M> ingedrukt Een album overslaan* Hoofdeenheid: (3) (ALBM –)/(4) (ALBM +) Afstandsbediening: M/m Albums blijven overslaan* Hoofdeenheid: en houd (3) (ALBM –)/(4) (ALBM +) ingedrukt Afstandsbediening: en houd M/m ingedrukt * Bij het afspelen van een MP3-/WMA-/AAC-bestand. 19 MEX-DV1500U 4-120-899-21 (1) D:\Documents and Settings\takashi-shimomura\Desktop\DTP\848220S MEXDV1500U(EUR)\4120899211_MEX-DV1500U_ML\05NL02CD-E.fm masterpage:Left Een USB-apparaat afspelen Ga naar de ondersteuningssite voor meer informatie over de compatibiliteit van het USB-apparaat. Ondersteuningssite http://support.sony-europe.com • USB-apparaten van het type MSC (Mass Storage Class; massaopslag) die voldoen aan de USB-standaard, kunnen worden gebruikt. • De bijbehorende codecs zijn MP3 (.mp3), WMA (.wma), AAC (.m4a) en JPEG (.jpg). • U kunt het beste een reservekopie van de gegevens op een USB-apparaat maken. Opmerking Sluit het USB-apparaat aan nadat u de motor hebt gestart. Afhankelijk van het USB-apparaat kan storing of schade ontstaan wanneer het apparaat wordt aangesloten voordat de motor wordt gestart. OFF SOURCE (USB) OFF SRC REP SHUF 1 DSPL DSPL Sluit het USB-apparaat aan op de USB-aansluiting. Het afspelen wordt automatisch gestart. Als er al een USB-apparaat is aangesloten, kunt u het afspelen starten door herhaaldelijk op (SOURCE) te drukken tot "USB" wordt weergegeven. Het afspelen stoppen Druk op (OFF). Opmerking Gebruik de USB-kabel die bij het apparaat is geleverd als er een kabel moet worden gebruikt voor de USBverbinding. 20 MEX-DV1500U 4-120-899-21 (1) D:\Documents and Settings\takashi-shimomura\Desktop\DTP\848220S MEXDV1500U(EUR)\4120899211_MEX-DV1500U_ML\05NL02CD-E.fm Het USB-apparaat verwijderen 1 Stop het afspelen van het USB-apparaat. 2 Verwijder het USB-apparaat. Als u het USB-apparaat verwijdert tijdens het afspelen, kunnen de gegevens op het USB-apparaat worden beschadigd. Opmerkingen • Gebruik geen USB-apparaten die zo groot of zwaar zijn dat ze kunnen vallen als ze worden blootgesteld aan trillingen of een losse aansluiting kunnen veroorzaken. • Verwijder het voorpaneel niet als er wordt afgespeeld op het USB-apparaat, omdat de USB-gegevens anders kunnen worden beschadigd. • Dit apparaat kan geen USB-apparaten via een USB-hub herkennen. Schermitems A Bron B Tracknaam, artiestennaam, albumnummer*, albumnaam, tracknummer/verstreken speelduur, klok * Het albumnummer wordt alleen weergegeven als het album wordt gewijzigd. Als u schermitems B wilt wijzigen, drukt u op (DSPL). Opmerkingen • De weergegeven items zijn afhankelijk van het USB-apparaat, de opname-indeling en de instellingen. Ga naar de ondersteuningssite voor meer informatie. • Het maximum aantal gegevens dat kan worden weergegeven, is als volgt. – mappen (albums): 256 – bestanden (tracks): 2.000 • Laat een USB-apparaat niet in een geparkeerde auto achter, omdat dit een storing tot gevolg kan hebben. • Het kan enige tijd duren voordat het afspelen wordt gestart, afhankelijk van het aantal opgenomen gegevens. • Als u een MP3-/WMA-/AAC-bestand met VBR (variabele bitsnelheid) afspeelt of snel vooruit-/ terugspoelt, wordt de verstreken speelduur wellicht niet nauwkeurig weergegeven. • Het afspelen van bestanden die zonder gegevensverlies zijn gecomprimeerd, wordt niet ondersteund. masterpage:Right De hoesafbeelding weergeven (Hoesafbeelding) Tijdens het afspelen van audio kunt u de inhoudsinformatie controleren of de hoesafbeelding (Hoesafbeelding)* van een MP3-/WMA-/AAC-bestand op het USBapparaat weergeven op de monitor. * De aanbevolen grootte is tussen 240 × 240 en 960 × 960 pixels. Herhaaldelijk en willekeurig afspelen 1 Druk tijdens het afspelen herhaaldelijk op (1) (REP) of (2) (SHUF) tot de gewenste instelling wordt weergegeven. Selecteer Actie REP-TRACK Track herhaaldelijk afspelen. REP-ALBUM Album herhaaldelijk afspelen. SHUF-ALBUM Album in willekeurige volgorde afspelen. REP-DRIVE* Station herhaaldelijk afspelen. * Wanneer twee of meer stations zijn gemaakt op het USB-apparaat. Als u wilt terugkeren naar de normale weergavestand, selecteert u "REP-OFF" of "SHUF-OFF". 21 MEX-DV1500U 4-120-899-21 (1) D:\Documents and Settings\takashi-shimomura\Desktop\DTP\848220S MEXDV1500U(EUR)\4120899211_MEX-DV1500U_ML\05NL02CD-E.fm masterpage:Left Naar de radio luisteren .m/M> SOURCE SRC MODE SEEK MODE 1 Druk herhaaldelijk op (SOURCE) tot "TUNER" wordt weergegeven. 2 Druk herhaaldelijk op (MODE) tot de gewenste band (FM1, FM2, FM3, MW of LW) wordt weergegeven. A B A Radioband/Functie B Frequentie* * Tijdens ontvangst van een RDS-zender wordt de programmaservicenaam weergegeven. Zie "RDS" op pagina 36 voor meer informatie. 3 Stem af op de gewenste zender. Automatisch afstemmen Druk op (SEEK) +/–. Het zoeken stopt zodra een zender wordt ontvangen. Herhaal deze procedure tot de gewenste zender wordt ontvangen. Handmatig afstemmen Houd (SEEK) +/– ingedrukt tot de gewenste frequentie ongeveer is bereikt en druk vervolgens herhaaldelijk op (SEEK) +/– om nauwkeurig af te stemmen op de gewenste frequentie. Tip Zie "Geavanceerde handelingen — Radio" op pagina 36 voor meer informatie over andere radiofuncties. Met de kaartafstandsbediening Druk op (SRC) in plaats van op (SOURCE) en op .m/M> in plaats van op (SEEK) –/+. 22 MEX-DV1500U 4-120-899-21 (1) D:\Documents and Settings\takashi-shimomura\Desktop\DTP\848220S MEXDV1500U(EUR)\4120899211_MEX-DV1500U_ML\05NL02CD-E.fm Geavanceerde handelingen — Discs Dit hoofdstuk bevat de volgende gedeelten. • Videospecifieke handelingen* t pagina 23 tot en met 31 • Algemene handelingen voor video*/ audio t pagina 32 tot en met 35 • Audiospecifieke handelingen t pagina 35 * Met inbegrip van handelingen ten behoeve van JPEG. DivX®-/MPEG-4-/JPEGbestanden afspelen masterpage:Right DivX-®/MPEG-4-video afspelen U kunt het afspelen van DivX/MPEG-4 op dezelfde manier regelen als andere videodiscs (pagina 16), evenals bepaalde functies voor audioweergave. Actie Druk op Album (map) overslaan Hoofdeenheid: (3) (ALBM –)/ (4) (ALBM +) Albums (mappen) blijven overslaan Hoofdeenheid: en houd (3) (ALBM –)/ (4) (ALBM +) ingedrukt Tip U kunt ook een bestand selecteren om af te spelen met een lijst (Quick-BrowZer) (pagina 34). JPEG-beeld weergeven MPEG-4 U kunt op dit apparaat een diavoorstelling van JPEG-bestanden weergeven. De diavoorstelling begint automatisch wanneer u een disc plaatst of op u drukt. Volg stap 1 tot en met 4 van "Videodiscs afspelen" op pagina 16 voor meer informatie over het starten van de weergave. .m/M> ALBM u Overige handelingen voor afspelen .m/M> u </, Opmerking Als de disc meerdere bestandstypen bevat, kan alleen het geselecteerde bestandstype (audio/video/beeld) worden afgespeeld. Als u DivX-/MPEG-4videobestanden of JPEG-beeldbestanden van een dergelijke disc wilt afspelen, drukt u op tijdens het afspelen, selecteert u het gewenste bestandstype (video/beeld) om een lijst weer te geven en selecteert u het gewenste bestand (pagina 35). Actie Druk op Het beeld draaien Afstandsbediening: </, (draait telkens 90º) Een beeld overslaan .m/M> Een album overslaan Hoofdeenheid: (3) (ALBM –)/ (4) (ALBM +) Albums blijven overslaan Hoofdeenheid: en houd (3) (ALBM –)/ (4) (ALBM +) ingedrukt Opmerkingen • Als een groot beeld wordt gedraaid, kan het even duren voordat deze wordt weergegeven. • Progressive JPEG-bestanden kunnen niet worden weergegeven. Tip U kunt ook een bestand selecteren om af te spelen met een lijst (Quick-BrowZer) (pagina 34). 23 MEX-DV1500U 4-120-899-21 (1) D:\Documents and Settings\takashi-shimomura\Desktop\DTP\848220S MEXDV1500U(EUR)\4120899211_MEX-DV1500U_ML\05NL02CD-E.fm PBC-functies gebruiken — Playback control masterpage:Left Het weergavestandmenu gebruiken MPEG-4 OFF VISUAL SETUP O O </M/m/, ENTER ENTER Cijfertoetsen Cijfertoetsen Het PBC-menu assisteert u bij de interactieve bediening wanneer een PBC-compatibele VCD wordt afgespeeld. U kunt het weergavestandmenu op dit apparaat gebruiken om het afspelen te regelen of de instellingen voor het afspelen te configureren. 1 Start het afspelen van een PBCcompatibele VCD. Het PBC-menu wordt weergegeven. 2 Druk op de cijfertoetsen om het gewenste item te selecteren en druk op (ENTER). Als u het weergavestandmenu wilt weergeven, drukt u op (VISUAL SETUP) tijdens het afspelen. Als u het menu wilt verbergen, drukt u nogmaals op (VISUAL SETUP). 3 Volg de instructies in het menu voor interactieve handelingen. Als u wilt terugkeren naar het vorige scherm, drukt u op O. Afspelen zonder de PBC-functie 1 Druk tijdens het afspelen op (OFF). Het afspelen stopt. 2 Druk op de cijfertoetsen om het gewenste item te selecteren en druk op (ENTER). "Play without PBC." wordt weergegeven en het afspelen begint. Het PBC-menu wordt niet weergegeven tijdens het afspelen. Opmerkingen • Tijdens het afspelen van een audiodisc is (VISUAL SETUP) niet actief. • Tijdens het afspelen van JPEG is (VISUAL SETUP) alleen actief wanneer het beeld volledig wordt weergegeven. Tip Als u op (VISUAL SETUP) drukt terwijl het afspelen is gestopt, wordt het menu met beeldinstellingen (via de monitor) weergegeven. U kunt daarin verschillende instellingen configureren, bijvoorbeeld de schermtaal, audioregeling, enzovoort (pagina 39). Bijvoorbeeld tijdens het afspelen van een DVD 12(67) 018(034) T 1:35:55 Opmerkingen • De menu-items en bedieningsprocedures verschillen afhankelijk van de disc. • Tijdens afspelen met PBC worden het tracknummer, het weergave-item, enzovoort niet weergegeven in het weergavestandmenu (pagina 24). • Afspelen hervatten is niet beschikbaar tijdens afspelen zonder PBC. Tip Als u afspelen met PBC wilt hervatten, stopt u het afspelen door op (OFF) en vervolgens op u te drukken. B C D EF A PLAY DVD VIDEO G 1:ENGLISH OFF 1:ENGLISH 2:FRENCH 3:SPANISH SUBTITLE Select : I H ENTER J A Items van het weergavestandmenu Zie "Lijst met items van het weergavestandmenu" op pagina 25 voor meer informatie. 24 MEX-DV1500U 4-120-899-21 (1) D:\Documents and Settings\takashi-shimomura\Desktop\DTP\848220S MEXDV1500U(EUR)\4120899211_MEX-DV1500U_ML\05NL02CD-E.fm B DVD: titelnummer/totaal VCD: tracknummer/totaal*1 JPEG: albumnummer/totaal DivX/MPEG-4: albumnummer (map)/totaal C DVD: hoofdstuknummer/totaal JPEG: beeldnummer/totaal DivX/MPEG-4: bestandsnummer/totaal D Verstreken speelduur*2 E Indeling F Weergavestatus (PLAY N, PAUSE X, enzovoort.) G Huidige instelling H Opties I Geselecteerd item J Naam van het geselecteerde item en/of bedieningstips *1 Tijdens het afspelen van een VCD met de PBC-functie (pagina 24) wordt geen aanduiding weergegeven. *2 Tijdens JPEG-weergave wordt geen aanduiding weergegeven. Lijst met items van het weergavestandmenu Druk op </M/m/,/cijfertoetsen om een item te selecteren en druk op (ENTER). Als u wilt terugkeren naar het vorige scherm, drukt u op O. Zie de vermelde pagina's voor meer informatie. TITLE, TRACK 33 Een af te spelen titel, scène of track selecteren. masterpage:Right AUDIO 17, 27 Audiotaal/-indeling/-kanaal wijzigen, programma-indeling weergeven. MPEG-4 SUBTITLE 17 Ondertitels in- of uitschakelen, taal voor de ondertitels instellen. ANGLE 17 De hoek wijzigen. * CENTER ZOOM 29 Een beeld vergroten. MPEG-4 REPEAT 32 Titel/hoofdstuk/track/album/beeld/video herhaaldelijk afspelen. MPEG-4 SHUFFLE 32 Hoofdstukken/tracks/beelden/videobestanden in willekeurige volgorde afspelen. MPEG-4 * PICTURE EQ 29 De beeldkwaliteit aanpassen. MPEG-4 ALBUM 33 Een af te spelen album of map selecteren. MPEG-4 CHAPTER 33 Een af te spelen hoofdstuk selecteren. IMAGE 33 Een weer te geven beeld selecteren. * Met uitzondering van DVD-R/DVD-R DL/DVD-RW in VR-stand. Tip Wanneer "SHUFFLE" of "REPEAT" is ingeschakeld of "ANGLE" beschikbaar is, brandt het bijbehorende selectievakje groen (bijvoorbeeld t ). Maar afhankelijk van de scène kunt u de hoek mogelijk niet wijzigen, zelfs als het selectievakje groen brandt. FILE 33 Een af te spelen videobestand selecteren. MPEG-4 TIME 33 De verstreken speelduur controleren; tijdcode invoeren. MPEG-4 25 MEX-DV1500U 4-120-899-21 (1) D:\Documents and Settings\takashi-shimomura\Desktop\DTP\848220S MEXDV1500U(EUR)\4120899211_MEX-DV1500U_ML\05NL02CD-E.fm Tijd/tekstinformatie van de disc bekijken MPEG-4 masterpage:Left • D **:** Verstreken afspeeltijd van de huidige disc • D-**:** Resterende afspeeltijd van de huidige disc JPEG-weergave • Albumnummer/Totaal • Beeldnummer/Totaal DivX/MPEG-4 afspelen • Albumnummer (map)/Totaal • Bestandsnummer/Totaal • T **:** Verstreken afspeeltijd van het huidige bestand Tekstinformatie bekijken DSPL Tijdinformatie bekijken De verstreken afspeeltijd en de resterende tijd van de huidige titel, track, het huidige hoofdstuk, enzovoort, kan worden bekeken tijdens de weergave van video/beelden. 1 U kunt de tekstinformatie (albumnaam, beeldnaam, enzovoort) van JPEG-/DivX-/ MPEG-4-bestanden bekijken. Album/beeld/map/bestandsnummer 037(325) Druk tijdens het afspelen op (DSPL). De huidige afspeelinformatie wordt weergegeven. Tijdinformatie Image name T 1:01:57 Tekstinformatie* * Als geen tekstinformatie beschikbaar is, wordt "NO TEXT" weergegeven. 2 Druk herhaaldelijk op (DSPL) om de tijdinformatie om te schakelen. Afhankelijk van de disc en de indeling verschilt de tijdinformatie als volgt. DVD-weergave • T **:**:** Verstreken afspeeltijd van de huidige titel • T-**:**:** Resterende afspeeltijd van de huidige titel • C **:**:** Verstreken afspeeltijd van het huidige hoofdstuk • C-**:**:** Resterende afspeeltijd van het huidige hoofdstuk 26 Afhankelijk van de disc en de indeling verschilt de tekstinformatie als volgt. JPEG-weergave • Albumnaam (wanneer het albumnummer wordt weergegeven) • Beeldnaam (wanneer het beeldnummer wordt weergegeven) DivX/MPEG-4 afspelen • Albumnaam (map) (wanneer het albumnummer (map) wordt weergegeven) • Bestandsnaam (wanneer het bestandsnummer wordt weergegeven) VCD-weergave (Alleen bij het afspelen met versie 1.0/1.1 of versie 2.0 zonder PBC-functie.) • T **:** Verstreken afspeeltijd van de huidige track • T-**:** Resterende afspeeltijd van de huidige track MEX-DV1500U 4-120-899-21 (1) D:\Documents and Settings\takashi-shimomura\Desktop\DTP\848220S MEXDV1500U(EUR)\4120899211_MEX-DV1500U_ML\05NL02CD-E.fm Audio-instellingen configureren VISUAL SETUP AUDIO SYSTEM SETUP ENTER masterpage:Right Het audiokanaal wijzigen Wanneer u VCD/CD/MP3/WMA/AAC afspeelt, kunt u het rechter- of linkerkanaal selecteren om dit te beluisteren via zowel de rechter- als de linkerluidspreker. Onderstaand vindt u de opties. STEREO (ST): standaardstereogeluid (standaardinstelling) 1/L (L): geluid linkerkanaal (mono) 2/R (R): geluid rechterkanaal (mono) M/m 1 Opmerking Discs in DTS-indeling worden niet ondersteund. Er wordt geen geluid weergegeven als de DTS-indeling is geselecteerd. Druk tijdens het afspelen herhaaldelijk op (AUDIO) tot het gewenste audiokanaal wordt weergegeven. Bijvoorbeeld tijdens het afspelen van een MP3 Audiokanaal De audiotaal/-indeling wijzigen Voor DVD kan de audiotaal worden gewijzigd als op de disc sporen met meer talen zijn opgenomen. Voor DVD/DivX kunt u de audioindeling wijzigen wanneer een af te spelen disc is opgenomen in meer dan één audio-indeling (bijvoorbeeld Dolby Digital). 1 Druk tijdens het afspelen herhaaldelijk op (AUDIO) tot de gewenste audiotaal/ indeling wordt weergegeven. TRACK NAME ALBUM NAME ARTIST NAME MP3 0003/1000 3:17 ST SHUF Opmerking Afhankelijk van de disc is het soms niet mogelijk de audio-instelling te wijzigen. Tip U kunt tevens de instelling voor videodiscs wijzigen door "AUDIO" te selecteren in het weergavestandmenu (pagina 24). Audiotaal/-indeling* De programma-indeling bekijken 1:ENGLISH Dolby D * Bij het afspelen van DivX wordt informatie weergegeven over audio-indeling/audiokanalen (bijvoorbeeld "MP3"). Voor de audiotaal worden de beschikbare talen afwisselend weergegeven. Wanneer het invoerveld van 4 tekens verschijnt, voert u de taalcode in (pagina 59) voor de gewenste taal. Wanneer dezelfde taal meer dan eens wordt weergegeven, is de disc opgenomen in meerdere audio-indelingen. U kunt het aantal kanalen bekijken en de positie van de weergavecomponenten voor de DVD VIDEO die wordt afgespeeld. 1 Druk tijdens het afspelen op (VISUAL SETUP). Het weergavestandmenu wordt weergegeven. vervolg op volgende pagina t 27 MEX-DV1500U 4-120-899-21 (1) D:\Documents and Settings\takashi-shimomura\Desktop\DTP\848220S MEXDV1500U(EUR)\4120899211_MEX-DV1500U_ML\05NL02CD-E.fm 2 Druk op M/m om (AUDIO) te selecteren. De programma-indeling wordt weergegeven. Huidige audio-indeling* 12(67) 018(034) T 1:35:55 1:ENGLISH Dolby D PLAY DVD VIDEO PROGRAM FORMAT DOLBY DIGITAL 3/2.1 L LS C LFE U kunt het audio-uitvoerniveau aanpassen van een DVD opgenomen in Dolby Digital-indeling om de verschillen in volumeniveau te reduceren tussen disc en bron. 1 Druk tijdens het afspelen op (SYSTEM SETUP). Het systeeminstelitem wordt weergegeven op de hoofdeenheid. 2 Druk op M/m om "DVD-LEVEL" te selecteren en druk op (ENTER). 3 Druk op m om "ADJST-ON" in te stellen en druk op (ENTER). 4 Druk op M/m om "DOLBY-ADJ" te selecteren en druk op (ENTER). 5 Druk op M/m om het uitvoerniveau te regelen. U kunt het uitvoerniveau in stappen aanpassen tussen –10 en +10. 6 Druk op (ENTER). De instelling is voltooid. R Huidige programma-indeling De letters in het scherm programma-indeling staan voor de volgende geluidscomponenten en hun positie. : voor (links) : voor (rechts) : midden : achter (links) : achter (rechts) : achter (mono): de achtercomponent van het met Dolby Surround bewerkte signaal en het Dolby Digital-signaal : LFE-signaal (lage frequentie-effecten) De naam van de programma-indeling en de kanaalnummers worden als volgt weergegeven. Voorbeeld: Dolby Digital 5.1 ch Achtercomponent × 2 DOLBY DIGITAL 3 / 2 . 1 Voorcomponent × 2 + Middencomponent × 1 Het audio-uitvoerniveau aanpassen — DVD-niveau RS * Afhankelijk van de disc wordt "PCM", "DOLBY DIGITAL", enzovoort weergegeven. masterpage:Left Als u het scherm met systeeminstellingen wilt verbergen, drukt u op (SYSTEM SETUP). Met de hoofdeenheid Druk op (SETUP) in plaats van op (SYSTEM SETUP), draai de regelknop in plaats van op M/m te drukken, druk op de regelknop in plaats van op (ENTER). LFE-component × 1 Als u het weergavestandmenu wilt verbergen, drukt u op (VISUAL SETUP). 28 MEX-DV1500U 4-120-899-21 (1) D:\Documents and Settings\takashi-shimomura\Desktop\DTP\848220S MEXDV1500U(EUR)\4120899211_MEX-DV1500U_ML\05NL02CD-E.fm Beelden vergroten masterpage:Right De beeldkwaliteit aanpassen — Picture EQ MPEG-4 MPEG-4 VISUAL SETUP VISUAL SETUP </M/m/, ENTER </M/m/, ENTER U kunt beelden vergroten. 1 Druk tijdens het afspelen op (VISUAL SETUP). Het weergavestandmenu wordt weergegeven. 2 Druk op M/m om (CENTER ZOOM) te selecteren en druk op (ENTER). De huidige optie wordt weergegeven. 12(67) 018(034) T 1:35:55 U kunt de beeldkwaliteit aanpassen aan de helderheid in de auto. 1 Druk tijdens het afspelen op (VISUAL SETUP). Het weergavestandmenu wordt weergegeven. 2 Druk op M/m om (PICTURE EQ) te selecteren en druk op (ENTER). De huidige optie wordt weergegeven. PLAY DVD VIDEO 12(67) 018(034) T 1:35:55 x1 x1 x1.6 3 Druk op M/m om de gewenste optie te selecteren (×1, ×1.6*) en druk op (ENTER). * Het beeld kan korrelig worden. Het beeld is vergroot. Als u het weergavestandmenu wilt verbergen, drukt u op (VISUAL SETUP). Druk op </M/m/, om het beeld te verschuiven. Als u de oorspronkelijke schaal wilt herstellen, selecteert u "×1" in stap 3. Opmerkingen • Afhankelijk van de disc is het soms niet mogelijk de vergroting te wijzigen. • Wanneer u het afspelen hervat, wordt het beeld weergegeven op de oorspronkelijk schaal. • Als u terugkeert naar het menu/hoofdmenu van een disc, wordt de vergroting geannuleerd. PLAY DVD VIDEO DAYTIME SUNSET SHINE CUSTOM NORMAL NORMAL 3 Druk op M/m om de gewenste optie te selecteren en druk op (ENTER). De opties verschillen afhankelijk van de instelling bij beeldinstellingen (pagina 43). Bij beeldinstellingen worden de instellingen van "PICTURE EQ" in "CUSTOM SETUP" de opties als volgt overgeschakeld. AUTO: schakelt automatisch tussen de opties voor gebruik bij avond/daglicht volgens de dimmerinstellingen bij de systeeminstellingen (pagina 46). LIGHT OFF: geeft de opties weer voor gebruik bij daglicht. LIGHT ON: geeft de opties weer voor gebruik bij avond. Onderstaand vindt u de opties voor elk van de instellingen. vervolg op volgende pagina t 29 MEX-DV1500U 4-120-899-21 (1) D:\Documents and Settings\takashi-shimomura\Desktop\DTP\848220S MEXDV1500U(EUR)\4120899211_MEX-DV1500U_ML\05NL02CD-E.fm Voor alle instellingen NORMAL: normale beeldkwaliteit. CUSTOM: door de gebruiker aan te passen instellingen (pagina 30). masterpage:Left 4 Druk op M/m om de gewenste kleurtoon te selecteren en druk op </, om het niveau aan te passen. 5 Druk op (ENTER). Als u het weergavestandmenu wilt verbergen, drukt u op (VISUAL SETUP). Ingesteld op "LIGHT OFF"/"AUTO" (met "DIM-OFF") DAYTIME: geschikt voor een heldere omgeving. Discs vergrendelen — Kinderbeveiliging SUNSET: geschikt voor de schemering. SHINE: geschikt voor een zeer heldere omgeving (bijvoorbeeld wanneer zonlicht op de monitor valt). * * Met uitzondering van DVD-R/DVD-R DL/DVD-RW in VR-stand. Ingesteld op "LIGHT ON"/"AUTO" (met "DIM-ON") NIGHT: de helderheid van de monitor wordt verminderd zodat u tijdens het rijden 's avonds niet wordt afgeleid. VISUAL SETUP O ENTER MIDNIGHT: de helderheid van de monitor wordt sterker verminderd dan bij de instelling "NIGHT". THEATER: maakt de monitor helderder, geschikt wanneer u 's avonds naar een heldere monitor wilt kijken. De beeldkwaliteit aanpassen Met de optie "CUSTOM" kunt u eigen instellingen opgeven voor de beeldkwaliteit door de kleurtonen aan te passen. U kunt de gewijzigde instellingen opslaan, zowel voor "LIGHT OFF" als voor "LIGHT ON". Cijfertoetsen CLEAR U kunt een disc vergrendelen of afspeelbeperkingen instellen volgens een vooraf ingesteld niveau, zoals de leeftijd van de kijker. Beperkte scènes worden vergrendeld of vervangen door andere scènes wanneer een DVD die compatibel is met kinderbeveiliging, wordt afgespeeld. Kinderbeveiliging inschakelen 1 Druk op (VISUAL SETUP) terwijl het apparaat is uitgeschakeld. Het menu met beeldinstellingen wordt weergegeven. Druk op M/m om (PICTURE EQ) te selecteren en druk op (ENTER). De huidige optie wordt weergegeven. 2 Druk op M/m om (CUSTOM SETUP) te selecteren en druk op (ENTER). De bijbehorende items worden weergegeven. Druk op M/m om "CUSTOM" te selecteren en druk op (ENTER). 3 Druk op M/m om "PARENTAL CONTROL" te selecteren en druk op (ENTER). De opties worden weergegeven. 1 Druk tijdens het afspelen op (VISUAL SETUP). Het weergavestandmenu wordt weergegeven. 2 3 USER CUSTOM SETUP COLOR BRIGHT SHARPNESS 30 M/m Select : Cancel : 0 0 0 CUSTOM SETUP PARENTAL CONTROL : DivX VOD : SLIDE SHOW TIME : MULTI-DISC RESUME : PLAY LIST PLAY : PICTURE EQ : OFF OFF ONt PLAYERt PASSWORDt AUTO Set : RETURN MEX-DV1500U 4-120-899-21 (1) D:\Documents and Settings\takashi-shimomura\Desktop\DTP\848220S MEXDV1500U(EUR)\4120899211_MEX-DV1500U_ML\05NL02CD-E.fm 4 Druk op M/m om "ON t" te selecteren en druk op (ENTER). Het invoerscherm voor het wachtwoord wordt weergegeven. 3 Druk op M/m om "PARENTAL CONTROL" te selecteren en druk op (ENTER). De opties worden weergegeven. 4 Druk op M/m om "PLAYER t" te selecteren en druk op (ENTER). Als de kinderbeveiliging al is ingeschakeld, verschijnt het scherm voor het invoeren van het wachtwoord. Als u de instelling wilt wijzigen, voert u het wachtwoord in en drukt u op (ENTER). 5 Druk op M/m om "STANDARD" te selecteren en druk op (ENTER). De opties worden weergegeven. CUSTOM SETUP PARENTAL CONTROL Enter a new 4-digit password, then press ENTER . 5 6 Druk op de cijfertoetsen om een wachtwoord in te voeren en druk op (ENTER). Het bevestigingsscherm wordt weergegeven. CUSTOM SETUP PARENTAL CONTROL: LEVEL : STANDARD : Voer ter bevestiging nogmaals het wachtwoord in met de cijfertoetsen en druk op (ENTER). De instelling is voltooid. Als u een ingevoerd cijfer wilt wissen, drukt u op (CLEAR). Als u wilt terugkeren naar het vorige scherm, drukt u op O. Als u het menu met beeldinstellingen wilt verbergen, drukt u op (VISUAL SETUP). Druk op M/m om de gewenste regio te selecteren en de bijbehorende filmclassificatie toe te passen en druk op (ENTER). De regio wordt geselecteerd. Wanneer u "OTHERS t" selecteert, voert u met de cijfertoetsen de regiocode in uit de "Lijst met regiocodes" op pagina 59. 7 Druk op M/m om "LEVEL" te selecteren en druk op (ENTER). De opties worden weergegeven. Het wachtwoord wijzigen Selecteer "PASSWORD t" in stap 4 hierboven, voer het huidige wachtwoord in, voer een nieuw wachtwoord in en voer het nogmaals in ter bevestiging. CUSTOM SETUP PARENTAL CONTROL: LEVEL : STANDARD : Regio en bijbehorend filmbeperkingsniveau wijzigen De beperkingsniveaus kunnen worden ingesteld aan de hand van de regio en het bijbehorende filmbeperkingsniveau. 1 Druk op (VISUAL SETUP) terwijl het apparaat is uitgeschakeld. Het menu met beeldinstellingen wordt weergegeven. 2 Druk op M/m om (CUSTOM SETUP) te selecteren en druk op (ENTER). De bijbehorende items worden weergegeven. 8: USA USA OTHERSt 6 Kinderbeveiliging uitschakelen Selecteer "OFF t" in stap 4 hierboven en voer het wachtwoord in. Als kinderbeveiliging wordt uitgeschakeld, wordt "Parental control canceled" weergegeven. masterpage:Right 8: 1: G 2: 3: PG 4: PG-13 5: Hoe lager het getal, hoe strenger het beperkingsniveau. 8 Druk op M/m om de gewenste classificatie te selecteren en druk op (ENTER). De instelling is voltooid. Als u wilt terugkeren naar het vorige scherm, drukt u op O. Als u het menu met beeldinstellingen wilt verbergen, drukt u op (VISUAL SETUP). 31 MEX-DV1500U 4-120-899-21 (1) D:\Documents and Settings\takashi-shimomura\Desktop\DTP\848220S MEXDV1500U(EUR)\4120899211_MEX-DV1500U_ML\05NL02CD-E.fm Herhaaldelijk en willekeurig afspelen masterpage:Left Onderstaand vindt u de opties voor willekeurig afspelen en de inschakelvolgorde voor elke disc en indeling. Disc/indeling Opties MPEG-4 2 * *1 REP SHUF 1 OFF TITLE: de hoofdstukken van de huidige titel in willekeurige volgorde afspelen. OFF DISC: de tracks op de huidige disc in willekeurige volgorde afspelen. OFF ALBUM: de tracks/beelden/ videobestanden in het huidige album (map) in willekeurige volgorde afspelen. Druk tijdens het afspelen herhaaldelijk op (1) (REP) of (2) (SHUF) op de hoofdeenheid tot de gewenste optie wordt weergegeven. MPEG-4 Herhaaldelijk of willekeurig afspelen wordt gestart. Onderstaand vindt u de opties voor herhalen en de inschakelvolgorde voor elke disc en indeling. Disc/indeling Opties OFF CHAPTER: het huidige hoofdstuk herhalen. TITLE: de huidige titel herhalen. *1 OFF TRACK: de huidige track herhalen. OFF TRACK: de huidige track herhalen. ALBUM: het huidige album herhalen. *1 Alleen beschikbaar bij het afspelen van een versie 1.0/1.1-VCD of een versie 2.0-VCD zonder PBC-functie. *2 Met uitzondering van DVD-R/DVD-R DL/DVD-RW in VR-stand. Als u wilt terugkeren naar de normale weergavestand, selecteert u "OFF". Opmerkingen • Als u terugkeert naar het menu/hoofdmenu van een disc, wordt herhaaldelijk/willekeurig afspelen geannuleerd. • Herhaaldelijk/willekeurig afspelen kan niet worden ingesteld in het menu/hoofdmenu van de disc. Instellen vanuit het weergavestandmenu MPEG-4 OFF IMAGE: het huidige beeld herhalen. ALBUM: het huidige album herhalen. MPEG-4 OFF FILE: het huidige videobestand herhalen. ALBUM: het huidige album (map) herhalen. VISUAL SETUP ENTER M/m 1 Druk tijdens het afspelen op (VISUAL SETUP). Het weergavestandmenu wordt weergegeven. 32 MEX-DV1500U 4-120-899-21 (1) D:\Documents and Settings\takashi-shimomura\Desktop\DTP\848220S MEXDV1500U(EUR)\4120899211_MEX-DV1500U_ML\05NL02CD-E.fm 2 Druk op M/m om of selecteren en druk op (ENTER). 12(67) 018(034) T 1:35:55 te Instellen vanuit het weergavestandmenu MPEG-4 PLAY DVD VIDEO Afhankelijk van de disc en de indeling verschillen rechtstreeks af te spelen items als volgt. OFF CHAPTER TITLE OFF 3 Disc/indeling Items TITLE Het afspelen wordt gestart vanaf de geselecteerde titel. CHAPTER Het afspelen wordt gestart vanaf het geselecteerde hoofdstuk. TIME Het afspelen wordt gestart op het punt dat wordt bepaald door de ingevoerde tijdcode. Druk op M/m om de gewenste optie te selecteren en druk op (ENTER). Herhaaldelijk of willekeurig afspelen wordt gestart. Druk op (VISUAL SETUP) om het weergavestandmenu te verbergen. Opmerking De geselecteerde weergavestand wordt geannuleerd wanneer de disc die wordt afgespeeld, wordt uitgeworpen. * Rechtstreeks afspelen TRACK Het afspelen wordt gestart vanaf de geselecteerde track. ALBUM Het afspelen wordt gestart vanaf het geselecteerde album. IMAGE Het afspelen wordt gestart vanaf de geselecteerde beeld. MPEG-4 VISUAL SETUP ENTER M/m Cijfertoetsen MPEG-4 CLEAR U kunt een bepaald punt rechtstreeks vinden door het titelnummer, hoofdstuknummer, enzovoort op te geven. 1 masterpage:Right Druk tijdens het afspelen op de cijfertoetsen om een item (track, titel, enzovoort) in te voeren en druk op (ENTER). Het afspelen wordt gestart vanaf het begin van het geselecteerde punt. ALBUM Het afspelen wordt gestart vanaf het geselecteerde album (map). FILE Het afspelen wordt gestart vanaf het geselecteerde bestand. * Alleen beschikbaar bij het afspelen van een VCD zonder PBC-functie. 1 Druk tijdens het afspelen op (VISUAL SETUP). Het weergavestandmenu wordt weergegeven. vervolg op volgende pagina t 33 MEX-DV1500U 4-120-899-21 (1) D:\Documents and Settings\takashi-shimomura\Desktop\DTP\848220S MEXDV1500U(EUR)\4120899211_MEX-DV1500U_ML\05NL02CD-E.fm 2 Druk op M/m om het gewenste item te selecteren en druk op (ENTER). - - (67) 018(034) T 1:35:55 4 Een track/beeld/videobestand selecteren PLAY DVD VIDEO MPEG-4 Het getal tussen haakjes geeft het totale aantal geselecteerde items weer. 3 masterpage:Left Druk op de cijfertoetsen om een itemnummer of tijdcode in te voeren. Als u bijvoorbeeld rechtstreeks naar 2 uur, 10 minuten en 20 seconden wilt gaan, voert u "21020" in. Als u een ingevoerd cijfer wilt wissen, drukt u op (CLEAR). U kunt een lijst met albums/mappen/tracks/ beelden/videobestanden op de monitor weergeven en een item uit de lijst kiezen om het af te spelen. Deze functie is met name handig voor een disc in MP3-/WMA-/AAC-/JPEG-/DivX-/MPEG-4indeling die veel albums/tracks/enzovoort bevat. 1 Druk tijdens het afspelen op . De lijst met tracks/beelden/videobestanden van de huidige disc/album*/map* wordt weergegeven. MP3 0003/1000 3:17 TRACK NAME ALBUM NAME ARTIST NAME Druk op (ENTER). Het afspelen wordt gestart vanaf het geselecteerde punt. ST LIST UP VIDEO FILES LIST UP IMAGE FILES ROOT MUSIC FOLDER 01 TRACK 01 02 TRACK 02 03 TRACK 03 04 TRACK 04 05 TRACK 05 Druk op (VISUAL SETUP) om het weergavestandmenu te verbergen. Lijst met tracks/beelden/ videobestanden weergeven — Quick-BrowZer Als u wilt terugkeren/doorgaan naar de vorige/volgende pagina, drukt u op </,. Als u een niveau omhoog wilt gaan, drukt u op .* Druk op M/m om de gewenste map te selecteren en druk op (ENTER).* * Alleen bij het afspelen van MP3/WMA/AAC/ JPEG/DivX/MPEG-4. 2 </M/m/, ENTER Druk op M/m om de gewenste track/ beeld/videobestand te selecteren en druk op (ENTER). Het afspelen van de geselecteerde track/ beeld/videobestand wordt gestart. Met de hoofdeenheid Draai de regelknop in plaats van op M/m te drukken, druk op (SEEK) –/+ in plaats van op </,, druk op de regelknop in plaats van op (ENTER). 34 MEX-DV1500U 4-120-899-21 (1) D:\Documents and Settings\takashi-shimomura\Desktop\DTP\848220S MEXDV1500U(EUR)\4120899211_MEX-DV1500U_ML\05NL02CD-E.fm Een bestandstype selecteren masterpage:Right Informatie van een audiodisc bekijken MPEG-4 Als de disc meerdere bestandstypen bevat, kan alleen het geselecteerde bestandstype (audio/ video/beeld) worden afgespeeld. De afspeelvolgorde van bestandstypen is ingesteld op audio, video en vervolgens beeld (als de disc bijvoorbeeld videobestanden en beeldbestanden bevat, worden alleen videobestanden afgespeeld). U kunt het bestandstype selecteren waarvan u een lijst wilt weergeven en vervolgens het bestand selecteren dat u wilt afspelen. 1 2 3 Druk tijdens het afspelen op Tijdens het afspelen van audio kunt u de discinformatie controleren of de hoesafbeelding (Hoesafbeelding)* van een MP3-/WMA-/AACbestand weergeven op de monitor. * De aanbevolen grootte is tussen 240 × 240 en 960 × 960 pixels. Bijvoorbeeld tijdens het afspelen van een MP3 A . Druk op M/m om het bestandstype te selecteren waarvan u een lijst wilt weergeven en druk op (ENTER). Als u een lijst met MP3-, WMA- en AACbestanden wilt weergeven, selecteert u "LIST UP AUDIO FILES". Als u een lijst met DivX-/MPEG-4-bestanden wilt weergeven, selecteert u "LIST UP VIDEO FILES". Als u een lijst met JPEG-bestanden wilt weergeven, selecteert u "LIST UP IMAGE FILES". Druk op M/m om het gewenste bestand te selecteren en druk op (ENTER). Het geselecteerde bestand wordt afgespeeld. Met de hoofdeenheid Draai de regelknop in plaats van op M/m te drukken, druk op de regelknop in plaats van op (ENTER). MP3 0003/1000 3:17 TRACK NAME ALBUM NAME ARTIST NAME E To list up, press BROWSE C B F D ST SHUF G . H A Tracknummer of tracknaam Discnaam/Albumnaam Naam van de artiest B Indeling C Weergavestatus (N, X, enzovoort.) D Huidig audiokanaal Tijdens het afspelen van CD/MP3/WMA/ AAC kan het audiokanaal worden gewijzigd. Zie "Het audiokanaal wijzigen" op pagina 27 voor meer informatie. E Tracknummer/Totaal F Verstreken weergavetijd G Huidige weergavestand H Bedieningstips Tip Met een lijst (Quick-BrowZer) kunt u een track selecteren om af te spelen (pagina 34). 35 MEX-DV1500U 4-120-899-21 (1) D:\Documents and Settings\takashi-shimomura\Desktop\DTP\848220S MEXDV1500U(EUR)\4120899211_MEX-DV1500U_ML\05NL02CD-E.fm Geavanceerde handelingen — Radio Zenders opslaan en ontvangen ENTER Cijfertoetsen Opmerking Als u een andere zender opslaat onder dezelfde cijfertoets, wordt de eerder opgeslagen zender vervangen. Tip Als een RDS-zender wordt opgeslagen, wordt de AF-/ TA-instelling ook opgeslagen (pagina 37). Opgeslagen zenders ontvangen SYSTEM SETUP M/m masterpage:Left SRC MODE 1 Selecteer de band en druk vervolgens op een cijfertoets ((1) tot en met (6)). RDS Regelknop DSPL Let op Als u afstemt op zenders tijdens het rijden, moet u de BTM-functie (geheugen voor beste afstemming) gebruiken om ongelukken te vermijden. AF/TA (PTY) Automatisch opslaan — BTM 1 Druk herhaaldelijk op (SRC) tot "TUNER" wordt weergegeven op de hoofdeenheid. Druk herhaaldelijk op (MODE) om de band te wijzigen. U kunt FM1, FM2, FM3, MW of LW selecteren. 2 Druk op (SYSTEM SETUP). De systeeminstelitems worden weergegeven. 3 Druk op M/m om "BTM" te selecteren en druk op (ENTER). Het apparaat slaat de zenders op volgorde van frequentie op onder de cijfertoetsen ((1) tot en met (6)). Er klinkt een pieptoon wanneer de instelling is opgeslagen. Met de hoofdeenheid Druk op (SOURCE) in plaats van op (SRC), druk op (SETUP) in plaats van op (SYSTEM SETUP), draai de regelknop in plaats van op M/m te drukken, druk op de regelknop in plaats van op (ENTER). Handmatig opslaan 1 Als u de zender ontvangt die u wilt opslaan, houdt u een cijfertoets ((1) tot en met (6)) ingedrukt tot "MEM" wordt weergegeven op de hoofdeenheid. De aanduiding voor de cijfertoets verschijnt op de hoofdeenheid. Cijfertoetsen Overzicht FM-zenders met de RDS-dienst (radiogegevenssysteem) sturen onhoorbare digitale informatie mee met het gewone radioprogrammasignaal. Schermitems A B C A Radioband, functie B TA/TP*1 C Frequentie*2 (programmaservicenaam), voorinstelnummer, klok, RDS-gegevens *1 "TA" knippert tijdens de verkeersinformatie. "TP" gaat branden zodra een dergelijke zender wordt ontvangen. *2 Als u de RDS-zender ontvangt, wordt " *" links van de frequentieaanduiding weergegeven. Als u schermitems C wilt wijzigen, drukt u op (DSPL). 36 MEX-DV1500U 4-120-899-21 (1) D:\Documents and Settings\takashi-shimomura\Desktop\DTP\848220S MEXDV1500U(EUR)\4120899211_MEX-DV1500U_ML\05NL02CD-E.fm masterpage:Right RDS-diensten Noodberichten ontvangen Dit apparaat biedt automatisch RDS-diensten op de volgende manier: Als AF of TA is ingeschakeld, wordt de geselecteerde bron automatisch onderbroken door de noodberichten. AF (alternatieve frequenties) Hiermee wordt de zender met het sterkste signaal in een netwerk geselecteerd en wordt opnieuw op deze zender afgestemd. Als u deze functie gebruikt, kunt u onafgebroken naar hetzelfde programma luisteren tijdens een lange rit zonder dat u steeds handmatig op dezelfde zender hoeft af te stemmen. TA (verkeersinformatie)/ TP (verkeersprogramma) Hiermee ontvangt u de huidige verkeersinformatie/-programma's. De huidige bron wordt onderbroken door eventuele verkeersinformatie/-programma's. PTY (programmatypen) Hiermee geeft u het ontvangen programmatype weer. Hiermee zoekt u ook naar het geselecteerde programmatype. CT (kloktijd) Met de CT-gegevens van de RDS-uitzending wordt de klok ingesteld. Opmerkingen • In bepaalde landen/regio's zijn wellicht niet alle RDS-functies beschikbaar. • RDS functioneert niet als het ontvangstsignaal te zwak is of als de zender waarop u hebt afgestemd, geen RDS-gegevens verzendt. AF en TA instellen Onderstaand vindt u de AF-/TA-instellingen en de inschakelvolgorde. AF-ON: AF inschakelen en TA uitschakelen. TA-ON: TA inschakelen en AF uitschakelen. AF, TA-ON: AF en TA inschakelen. AF, TA-OFF: AF en TA uitschakelen. 1 Tip Als u het volume aanpast tijdens een verkeersbericht, wordt dat volume opgeslagen in het geheugen voor volgende verkeersberichten, onafhankelijk van het normale volume. Een regionaal programma blijven beluisteren — REG Als de AF-functie is ingeschakeld: de fabrieksinstelling van het apparaat beperkt de ontvangst tot een bepaalde regio, zodat er niet wordt overgeschakeld naar een andere regionale zender met een sterkere frequentie. Wanneer u het ontvangstgebied van het regionale programma verlaat, stelt u tijdens FM-ontvangst "REG-OFF" in bij de systeeminstellingen (pagina 46). Opmerking Deze functie werkt niet in het Verenigd Koninkrijk en bepaalde andere gebieden. Local Link-functie (alleen voor het Verenigd Koninkrijk) Met deze functie kunt u andere lokale zenders in het gebied selecteren, ook als deze niet zijn opgeslagen onder de cijfertoetsen. 1 Druk tijdens FM-ontvangst op een cijfertoets ((1) tot en met (6)) waaronder een lokale zender is opgeslagen. 2 Druk binnen 5 seconden nogmaals op een cijfertoets van de lokale zender. Herhaal dit tot de lokale zender wordt ontvangen. Druk herhaaldelijk op (AF/TA) tot de gewenste instelling wordt weergegeven. RDS-zenders opslaan met de AF- en TA-instelling U kunt RDS-zenders vooraf instellen met de AF-/TA-instelling. Als u de BTM-functie gebruikt, worden alleen RDS-zenders met dezelfde AF-/TA-instelling opgeslagen. Als u handmatig vooraf instelt, kunt u zowel RDS- als niet-RDS-zenders instellen, elk met hun AF-/TA-instelling. 1 Stel AF/TA in en sla de zender vervolgens op met BTM of handmatig. 37 MEX-DV1500U 4-120-899-21 (1) D:\Documents and Settings\takashi-shimomura\Desktop\DTP\848220S MEXDV1500U(EUR)\4120899211_MEX-DV1500U_ML\05NL02CD-E.fm PTY selecteren Geluidsaanpassing 1 De geluidskenmerken aanpassen Houd (AF/TA) (PTY) ingedrukt tijdens FM-ontvangst. SOUND De naam van het huidige programmatype verschijnt als de zender PTY-gegevens uitzendt. 2 Draai de regelknop om het programmatype te selecteren. 3 Druk op de regelknop. Het apparaat zoekt een zender die het geselecteerde programmatype uitzendt. Programmatypen M/m U kunt de geluidskenmerken regelen volgens uw eigen voorkeur. Onderstaand vindt u de in te stellen items en de inschakelvolgorde. NEWS (Nieuws), AFFAIRS (Actualiteiten), INFO (Informatie), SPORT (Sport), EDUCATE (Educatieve programma's), DRAMA (Toneel), CULTURE (Cultuur), SCIENCE (Wetenschap), VARIED (Diversen), POP M (Populaire muziek), ROCK M (Rockmuziek), EASY M (Easy Listening), LIGHT M (Licht klassiek), CLASSICS (Klassiek), OTHER M (Ander type muziek), WEATHER (Weerberichten), FINANCE (Financiën), CHILDREN (Kinderprogramma's), SOCIAL A (Sociale zaken), RELIGION (Religie), PHONE IN (Phone In), TRAVEL (Reizen), LEISURE (Ontspanning), JAZZ (Jazz-muziek), COUNTRY (Country-muziek), NATION M (Nationale muziek), OLDIES (Oldies), FOLK M (Folk-muziek), DOCUMENT (Documentaires) EQ3: u kunt een equalizercurve kiezen uit 7 muzieksoorten. LOW, MID, HI*1: regelt het volumeniveau van de geselecteerde band voor de aangepaste EQ3-instelling. BAL (balans): regelt de geluidsbalans tussen de linker- en rechterluidsprekers. FAD (fader): regelt het relatieve niveau tussen de voor- en achterluidsprekers. SUB (subwoofervolume)*2: regelt het volume van de subwoofer. ("ATT" is de laagste instelling.) Opmerking U kunt deze functie niet gebruiken in bepaalde landen/ regio's waar geen PTY-gegevens beschikbaar zijn. 1 Druk tijdens het afspelen/de radioontvangst herhaaldelijk op (SOUND) tot de gewenste instelling op de hoofdeenheid wordt weergegeven. 2 Druk op M/m om het niveau aan te passen of de gewenste optie te selecteren. 3 Druk op . Het instellen is voltooid en het scherm keert terug naar de normale weergave-/ ontvangststand. *1 Wordt alleen weergegeven wanneer EQ3 is ingeschakeld. *2 Als de audio-uitvoer is ingesteld op "SUB-OUT" (pagina 45). CT instellen 1 Stel "CT-ON" in bij de systeeminstellingen (pagina 45). Opmerkingen • Het is mogelijk dat de CT-functie niet werkt, ook al wordt er wel een RDS-zender ontvangen. • Er kan een verschil zijn tussen de tijd van de CT-functie en de werkelijke tijd. 38 masterpage:Left Met de hoofdeenheid Druk op de regelknop in plaats van op (SOUND), draai de regelknop in plaats van op M/m te drukken. MEX-DV1500U 4-120-899-21 (1) D:\Documents and Settings\takashi-shimomura\Desktop\DTP\848220S MEXDV1500U(EUR)\4120899211_MEX-DV1500U_ML\05NL02CD-E.fm De equalizercurve aanpassen — EQ3 Met "CUSTOM" van EQ3 kunt u uw eigen equalizerinstellingen bepalen. U kunt het niveau van 3 verschillende banden instellen: "LOW", "MID" en "HI". 1 Druk tijdens het afspelen/de radioontvangst herhaaldelijk op (SOUND) tot "EQ3" wordt weergegeven. 2 Druk op M/m om "CUSTOM" te selecteren. 3 Druk herhaaldelijk op (SOUND) tot "LOW", "MID" of "HI" wordt weergegeven. 4 Druk op M/m om het niveau van het geselecteerde item aan te passen. U kunt het niveau aanpassen in afzonderlijke stappen, tussen –10 en +10. Als u de in de fabriek ingestelde equalizercurve wilt herstellen, houdt u (SOUND) ingedrukt. 5 Druk op . Het instellen is voltooid en het scherm keert terug naar de normale weergave-/ ontvangststand. Tip Andere equalizertypen kunnen eveneens worden aangepast. Met de hoofdeenheid Druk op de regelknop in plaats van op (SOUND), draai de regelknop in plaats van op M/m te drukken. masterpage:Right Instellingen Vanuit de volgende twee menu's kunnen verschillende instellingen worden geconfigureerd. • Menu met beeldinstellingen (pagina 39) Maakt configuratie mogelijk van beeldgerelateerde items (via de monitor). • Menu met systeeminstellingen (pagina 44) Maakt configuratie mogelijk van systeemgerelateerde items (via de hoofdeenheid). Beeldinstellingen Het menu met beeldinstellingen bevat de volgende categorieën. LANGUAGE SETUP (pagina 41) Instellen van het menu, de taal voor de ondertitels, enzovoort. DISPLAY SETUP (pagina 41) De instellingen aanpassen van de aangesloten monitor. CUSTOM SETUP (pagina 42) Aanpassen van het afspelen van discs. AUDIO SETUP (pagina 43) Aanpassen van de geluidsinstellingen in overeenstemming met de disc. RESET (pagina 43) Alle instellingen herstellen. Basisbediening van beeldinstellingen VISUAL SETUP O ENTER M/m U kunt items instellen in het menu met de volgende procedure. vervolg op volgende pagina t 39 MEX-DV1500U 4-120-899-21 (1) D:\Documents and Settings\takashi-shimomura\Desktop\DTP\848220S MEXDV1500U(EUR)\4120899211_MEX-DV1500U_ML\05NL02CD-E.fm masterpage:Left Bijvoorbeeld voor het instellen van de breedte-/ hoogteverhouding op "4:3 PAN SCAN". 1 Druk op (VISUAL SETUP) terwijl het apparaat is uitgeschakeld. Het menu met beeldinstellingen wordt weergegeven. LANGUAGE SETUP MENU : AUDIO : SUBTITLE : 2 Druk op M/m om (DISPLAY SETUP) te selecteren en druk op (ENTER). De bijbehorende items worden weergegeven. DISPLAY SETUP MONITOR TYPE : WALLPAPER : 3 16:9 WALLPAPER 1 Druk op M/m om "MONITOR TYPE" te selecteren en druk op (ENTER). De opties worden weergegeven. DISPLAY SETUP MONITOR TYPE : WALLPAPER : 4 ENGLISH ENGLISH ENGLISH 16:9 16:9 4:3 LETTER BOX 4:3 PAN SCAN Druk op M/m om "4:3 PAN SCAN" te selecteren en druk op (ENTER). De instelling is voltooid. Als u wilt terugkeren naar het vorige scherm, drukt u op O. Als u het menu met beeldinstellingen wilt verbergen, drukt u op (VISUAL SETUP). 40 MEX-DV1500U 4-120-899-21 (1) D:\Documents and Settings\takashi-shimomura\Desktop\DTP\848220S MEXDV1500U(EUR)\4120899211_MEX-DV1500U_ML\05NL02CD-E.fm masterpage:Right Taalinstelling voor het scherm of de soundtrack Selecteer (LANGUAGE SETUP) en selecteer vervolgens het gewenste item en de gewenste optie met M/m en (ENTER). Zie "Basisbediening van beeldinstellingen" op pagina 39 voor meer informatie over deze procedure. Item Doel MENU De taalinstelling voor het menu van de disc wijzigen. AUDIO De taalinstelling voor de soundtrack wijzigen. SUBTITLE De taalinstelling wijzigen van de op de disc opgenomen ondertitels. Scherm instellen Selecteer (DISPLAY SETUP) en selecteer vervolgens het gewenste item en de gewenste optie met M/m en (ENTER). Zie "Basisbediening van beeldinstellingen" op pagina 39 voor meer informatie over deze procedure. "z" geeft de standaardinstellingen aan. Item MONITOR TYPE Een breedte-/hoogteverhouding selecteren die geschikt is voor de aangesloten monitor. WALLPAPER Optie Doel 16:9 (z) Breedbeeld weergeven. Geschikt voor het aansluiten van een breedbeeldmonitor of een monitor met een breedbeeldfunctie. 4:3 LETTER BOX Breedbeeld weergeven met zwarte stroken aan de boven- en onderkant van het scherm. Geschikt wanneer een 4:3-monitor is aangesloten. 4:3 PAN SCAN Breedbeeld weergeven op het volledige scherm waarbij de gedeelten die niet passen automatisch worden bijgesneden. WALLPAPER 1 (z), 2, 3 Het motief van de achtergrond selecteren. Opmerking Afhankelijk van de disc kan automatisch "4:3 LETTER BOX" worden geselecteerd in plaats van "4:3 PAN SCAN" en andersom. 41 MEX-DV1500U 4-120-899-21 (1) D:\Documents and Settings\takashi-shimomura\Desktop\DTP\848220S MEXDV1500U(EUR)\4120899211_MEX-DV1500U_ML\05NL02CD-E.fm masterpage:Left Aangepaste instellingen Selecteer (CUSTOM SETUP) en selecteer vervolgens het gewenste item en de gewenste optie met M/m en (ENTER). Zie "Basisbediening van beeldinstellingen" op pagina 39 voor meer informatie over deze procedure. Volg de paginaverwijzing voor meer informatie. "z" geeft de standaardinstellingen aan. Item Optie OFF t (z) PARENTAL CONTROL (pagina 30) *1 ON t Hiermee kunt u afspeelbeperkingen instellen zodat PLAYER t ongeschikte discs of scènes niet worden afgespeeld. PASSWORD t Done DivX VOD De registratiecode van dit apparaat weergeven. Ga naar de onderstaande website voor meer informatie: http://www.divx.com/vod SLIDE SHOW TIME MULTI-DISC RESUME *2 Kinderbeveiliging uitschakelen. Kinderbeveiliging inschakelen. De beperkingsstandaard en het bijbehorende niveau instellen. Een nieuw 4-cijferig wachtwoord instellen. Het scherm sluiten. 5 sec. (z), 10 sec., De tijd voor het wisselen van dia's 20 sec., 40 sec., 60 sec. selecteren. FIXED De diavoorstelling stoppen. ON (z) De instellingen voor het hervatten van het afspelen in het geheugen opslaan voor maximaal 5 discs. (De instellingen blijven in het geheugen bewaard, zelfs als u "OFF" instelt.) OFF De instellingen voor het hervatten van het afspelen worden niet opgeslagen in het geheugen. Afspelen hervatten is alleen beschikbaar voor de huidige disc in het apparaat. ON (z) De instellingen voor het hervatten van het afspelen worden opgeslagen in het geheugen. (De instellingen blijven in het geheugen bewaard, zelfs als u "OFF" instelt.) OFF De instellingen voor het hervatten van het afspelen worden niet opgeslagen in het geheugen. MPEG-4 USB RESUME Doel 42 MEX-DV1500U 4-120-899-21 (1) D:\Documents and Settings\takashi-shimomura\Desktop\DTP\848220S MEXDV1500U(EUR)\4120899211_MEX-DV1500U_ML\05NL02CD-E.fm masterpage:Right PLAY LIST PLAY (Alleen voor DVD-R/DVD-R DL/ DVD-RW in VR-stand) ORIGINAL (z) De oorspronkelijk opgenomen titels afspelen. PLAY LIST De bewerkte afspeellijst afspelen. PICTURE EQ (pagina 29) AUTO (z) Automatisch schakelen tussen de opties voor gebruik bij avond/ daglicht volgens de dimmerinstellingen bij de systeeminstellingen (pagina 46). LIGHT OFF Opties voor gebruik bij daglicht weergeven. LIGHT ON Opties voor gebruik bij avond weergeven. MPEG-4 Hiermee wordt de instellingsoptie geselecteerd die in het weergavestandmenu wordt weergegeven. *1 Met uitzondering van DVD-R/DVD-R DL/DVD-RW in VR-stand. *2 Alleen DVD VIDEO. Opmerking Als kinderbeveiliging is ingeschakeld, werkt de functie voor afspelen hervatten niet. In dat geval wordt na het plaatsen van de disc met afspelen begonnen aan het begin van de disc. Audio-instellingen Selecteer (AUDIO SETUP) en selecteer vervolgens het gewenste item en de gewenste optie met M/m en (ENTER). Zie "Basisbediening van beeldinstellingen" op pagina 39 voor meer informatie over deze procedure. Volg de paginaverwijzing voor meer informatie. "z" geeft de standaardinstellingen aan. Item Optie AUDIO DRC * Zorgt voor een helder geluid bij weergave met een laag volume. Alleen voor DVD's die voldoen aan Audio DRC (Dynamic Range Control). Doel STANDARD (z) De standaardinstelling selecteren. WIDE RANGE Geeft u het gevoel van een live optreden. * Met uitzondering van DVD-R/DVD-R DL/DVD-RW in VR-stand. Alle instellingen herstellen Alle instellingen bij beeldinstellingen (met uitzondering van kinderbeveiliging) kunnen worden hersteld. Selecteer (RESET) en selecteer vervolgens "RESET ALL SETTINGS" en "YES" met M/m en (ENTER). Zie "Basisbediening van beeldinstellingen" op pagina 39 voor meer informatie over deze procedure. Opmerking Schakel tijdens het herstellen het apparaat niet uit. Het duurt enkele seconden voordat het herstellen is voltooid. 43 MEX-DV1500U 4-120-899-21 (1) D:\Documents and Settings\takashi-shimomura\Desktop\DTP\848220S MEXDV1500U(EUR)\4120899211_MEX-DV1500U_ML\05NL02CD-E.fm U kunt items instellen in het menu met de volgende procedure. Systeeminstellingen Het menu met systeeminstellingen bevat de volgende categorieën. • • • • SET: algemene instellingen (pagina 45) DSPL: scherminstellingen (pagina 45) R/M: ontvangststandinstellingen (pagina 46) SND: geluidsinstellingen (pagina 47) Bijvoorbeeld om de demonstratie in te stellen. 1 Druk op (SYSTEM SETUP) terwijl het apparaat is uitgeschakeld. Het systeeminstelitem wordt weergegeven op de hoofdeenheid. 2 Druk op M/m om "DEMO" te selecteren en druk op (ENTER). De optie worden weergegeven. 3 Druk op M/m om "ON" of "OFF" te selecteren en druk op (ENTER). De instelling is voltooid. Basisbediening van systeeminstellingen SYSTEM SETUP ENTER M/m masterpage:Left Als u het scherm met systeeminstellingen wilt verbergen, drukt u op (SYSTEM SETUP). Met de hoofdeenheid Druk op (SETUP) in plaats van op (SYSTEM SETUP), draai de regelknop in plaats van op M/m te drukken, druk op de regelknop in plaats van op (ENTER). 44 MEX-DV1500U 4-120-899-21 (1) D:\Documents and Settings\takashi-shimomura\Desktop\DTP\848220S MEXDV1500U(EUR)\4120899211_MEX-DV1500U_ML\05NL02CD-E.fm masterpage:Right Volg de paginaverwijzing voor meer informatie. "z" geeft de standaardinstellingen aan. SET (instellen) Item Optie Status van het apparaat Doel CLOCK-ADJ (klok aanpassen) (pagina 48) – – CT (kloktijd) (pagina 37, 38) ON De CT-functie inschakelen. OFF (z) De CT-functie uitschakelen. ON (z) Het bedieningsgeluid inschakelen. OFF Het bedieningsgeluid uitschakelen. BEEP COLOR-SYS (kleursysteem) PAL (z) Wijzigt het videouitvoersignaal op basis van de NTSC aangesloten monitor. Instellen op PAL. NO (z) AUTO-OFF Automatisch uitschakelen na een gewenste tijd wanneer het apparaat uit is. De functie voor automatisch uitschakelen uitschakelen. 30S, 30M, 60M De gewenste tijd selecteren. REAR/SUB De audio-uitvoer wijzigen. REAR-OUT Het geluid via een versterker weergeven. Instellen op NTSC. SUB-OUT (z) Het geluid via een subwoofer weergeven. Willekeurige status. Het apparaat is uitgeschakeld. Willekeurige status. Het apparaat is uitgeschakeld. DSPL (scherm) Item M.DSPL (beweging scherm) De stand voor de beweging van het scherm selecteren. DEMO (demonstratie) Optie SA (z) Status van het apparaat Doel Bewegende patronen en de spectrum analyzer weergeven. OFF De beweging van het scherm uitschakelen. ON (z) De demonstratie inschakelen. OFF De demonstratie uitschakelen. Tijdens afspelen/ radio-ontvangst. Het apparaat is uitgeschakeld. vervolg op volgende pagina t 45 MEX-DV1500U 4-120-899-21 (1) D:\Documents and Settings\takashi-shimomura\Desktop\DTP\848220S MEXDV1500U(EUR)\4120899211_MEX-DV1500U_ML\05NL02CD-E.fm DIMMER De helderheid van het scherm wijzigen. ON Het scherm dimmen. OFF (z) De dimmer uitschakelen. AUTO-SCRL (automatisch rollen) Lange items automatisch over het scherm rollen. ON (z) Lange items rollen. OFF Lange items niet rollen. masterpage:Left Willekeurige status. Tijdens het afspelen van een disc. R/M (ontvangststand) Item LOCAL (lokale zoekfunctie) Optie ON Alleen afstemmen op krachtige zenders. OFF (z) Afstemmen met normale ontvangst. ON MONO (monostand) Selecteer de monoontvangststand als u slechte FM-ontvangst wilt verbeteren. OFF (z) REGIONAL (pagina 37) BTM (geheugen voor beste afstemming) (pagina 36) Doel Status van het apparaat Tijdens radioontvangst. Stereo-uitzendingen in mono beluisteren. Stereo-uitzendingen in stereo beluisteren. ON (z) Een bepaald regionaal programma blijven beluisteren. OFF Uitschakelen bij het verlaten van het ontvangstgebied van het programma. – – Tijdens FMontvangst. Tijdens radioontvangst. 46 MEX-DV1500U 4-120-899-21 (1) D:\Documents and Settings\takashi-shimomura\Desktop\DTP\848220S MEXDV1500U(EUR)\4120899211_MEX-DV1500U_ML\05NL02CD-E.fm masterpage:Right SND (geluid) Item Optie HPF (hoogdoorlaatfilter) De kantelfrequentie van de voor-/achterluidspreker selecteren. OFF (z) LPF (laagdoorlaatfilter)*1 De kantelfrequentie van de subwoofer selecteren. OFF (z) Doel Geen kantelfrequentie instellen. 80HZ,100HZ, De frequentie selecteren. 120HZ,140HZ, 160HZ Geen kantelfrequentie instellen. 80HZ,100HZ, De frequentie selecteren. 120HZ,140HZ, 160HZ LPF-PHASE (fase van NORM (z) laagdoorlaatfilter)*1 De fase selecteren wanneer het REV LPF is ingeschakeld. De normale fase op het LPF toepassen. LOUD (loudness) Zorgt voor een helder geluid bij weergave met een laag volume. OFF (z) Lage en hoge tonen worden niet versterkt. ON Lage en hoge tonen worden versterkt. AUX-LEVEL (pagina 49) (–8 ~ +18) z: 0 Het niveau selecteren. DVD-LEVEL (pagina 28) ADJST-ON Het aanpassen van het uitvoerniveau van de Dolby Digital-indeling toestaan. ADJST-OFF (z) Het aanpassen van het niveau uitschakelen. (–10 ~ +10) z: +8 Het niveau selecteren. DOLBY-ADJ (Dolby-sterkte aanpassen) (pagina 28)*2 Status van het apparaat Tijdens afspelen/ radio-ontvangst. De omgekeerde fase op het LPF toepassen. Tijdens afspelen van een AUXbron. Tijdens het afspelen van een disc. *1 Als de audio-uitvoer is ingesteld op "SUB-OUT". *2 Wordt alleen weergegeven en is alleen beschikbaar wanneer "DVD-LEVEL" is ingesteld op "ADJST-ON". 47 MEX-DV1500U 4-120-899-21 (1) D:\Documents and Settings\takashi-shimomura\Desktop\DTP\848220S MEXDV1500U(EUR)\4120899211_MEX-DV1500U_ML\05NL02CD-E.fm De klok instellen masterpage:Left Optionele apparaten gebruiken Randapparatuur SYSTEM SETUP </M/m/, ENTER SYSTEM SETUP ENTER M/m SRC MODE DSPL De klok werkt met het 24-uurs systeem. 1 Druk op (SYSTEM SETUP). Het systeeminstelitem wordt weergegeven op de hoofdeenheid. 2 Druk op M/m om "CLOCK-ADJ" te selecteren en druk op (ENTER). De aanduiding voor de uren gaat knipperen. 3 Druk op M/m om de uren en minuten in te stellen. Als u de digitale aanduiding wilt verplaatsen, drukt u op </,. 4 Druk op (ENTER). De instelling is voltooid. U kunt randapparaten aansluiten op het apparaat en deze beluisteren via de autoluidsprekers. Er kunnen maximaal 2 apparaten worden aangesloten, één op de AUX-ingang (stereo mini-aansluiting) aan de voorkant en de andere op de AUX AUDIO IN-aansluitingen aan de achterkant. Het volume kan worden aangepast voor elk verschil tussen het apparaat en het randapparaat. Een randapparaat aansluiten 1 Schakel het randapparaat uit. 2 Verlaag het volume op het apparaat. 3 Sluit het randapparaat aan. Aan de voorkant Sluit het randapparaat aan op de AUX-ingang. Als u het scherm met systeeminstellingen wilt verbergen, drukt u op (SYSTEM SETUP). Als u de klok tijdens het afspelen wilt weergeven, drukt u herhaaldelijk op (DSPL) tot de klok wordt weergegeven. Met de hoofdeenheid Druk op (SETUP) in plaats van op (SYSTEM SETUP), draai de regelknop in plaats van op M/m te drukken, druk op .m/M> in plaats van op </,, druk op de regelknop in plaats van op (ENTER). AUX AUX Aansluitkabel* (niet bijgeleverd) * Gebruik een rechte stekker. Aan de achterkant Sluit het randapparaat aan op de AUX AUDIO IN-aansluitingen. 48 MEX-DV1500U 4-120-899-21 (1) D:\Documents and Settings\takashi-shimomura\Desktop\DTP\848220S MEXDV1500U(EUR)\4120899211_MEX-DV1500U_ML\05NL02CD-E.fm Een randapparaat selecteren 1 Druk herhaaldelijk op (SRC) tot "AUX" wordt weergegeven op de hoofdeenheid. 2 Druk op (MODE) om "FRONT-IN" of "REAR-IN" te selecteren. Gebruik de bedieningselementen op het randapparaat om dit te bedienen. Het volume aanpassen Pas vóór het afspelen het volume van elk aangesloten apparaat aan. 1 Verlaag het volume op het apparaat. 2 Druk herhaaldelijk op (SRC) tot "AUX" wordt weergegeven op de hoofdeenheid. Als er twee randapparaten zijn aangesloten, drukt u op (MODE) om het apparaat te selecteren waarvoor u het volume wilt aanpassen. 3 Start het afspelen op het randapparaat met een normaal volume. 4 Stel uw gebruikelijke luistervolume in op het apparaat. 5 Druk op (SYSTEM SETUP). 6 Druk op M/m om "AUX-LEVEL" te selecteren en druk op (ENTER). 7 Druk op M/m om het ingangsniveau aan te passen. Het ingangsniveau kan stapsgewijs worden aangepast van –8 tot +18. 8 Druk op (ENTER). De instelling is voltooid. Als u het scherm met systeeminstellingen wilt verbergen, drukt u op (SYSTEM SETUP). Met de hoofdeenheid Druk op (SOURCE) in plaats van op (SRC), druk op (SETUP) in plaats van op (SYSTEM SETUP), draai de regelknop in plaats van op M/m te drukken, druk op de regelknop in plaats van op (ENTER). masterpage:Right Aanvullende informatie Voorzorgsmaatregelen • Laat het apparaat eerst afkoelen als uw auto geparkeerd stond in direct zonlicht. • De elektrische antenne wordt automatisch uitgeschoven. Condensvorming Als er condensvorming optreedt in het apparaat, verwijdert u de disc en wacht u ongeveer een uur om dit te laten drogen. Als u dit niet doet, werkt het apparaat wellicht niet correct. Optimale geluidskwaliteit behouden Mors geen vloeistof op het apparaat of de discs. Opmerkingen over discs • Stel een disc niet bloot aan direct zonlicht of warmtebronnen, zoals heteluchtkanalen, en laat deze niet achter in een auto die in de volle zon geparkeerd staat. • Veeg een disc van binnen naar buiten schoon met een doekje voordat u deze afspeelt. Gebruik geen oplosmiddelen zoals benzine, thinner en in de handel verkrijgbare reinigingsmiddelen. • Dit apparaat is ontworpen om discs af te spelen die voldoen aan de CD-norm (Compact Disc). DualDiscs en sommige muziekdiscs die zijn gecodeerd met copyrightbeveiligingstechnologieën voldoen niet aan de CD-norm (Compact Disc) en kunnen daarom mogelijk niet worden afgespeeld met dit apparaat. • Discs die NIET kunnen worden afgespeeld met dit apparaat – Discs waarop labels, stickers, tape of papier zijn geplakt. Hierdoor kan de werking worden verstoord of de disc worden beschadigd. – Discs met afwijkende vormen (bijvoorbeeld hart, vierkant, ster). Als u dit toch probeert, kan het apparaat worden beschadigd. – 8-cm discs. Opmerking over het afspelen van DVD's en VCD's Bepaalde afspeelbewerkingen van DVD's en VCD's zijn mogelijk bewust ingesteld door de softwareproducent. Afhankelijk van de inhoud die de softwareproducent op de disc heeft geplaatst, is het mogelijk dat bepaalde afspeelfuncties van DVD's en VCD's niet beschikbaar zijn voor dit apparaat. Raadpleeg ook de instructies die bij de DVD's of VCD's zijn geleverd. vervolg op volgende pagina t 49 MEX-DV1500U 4-120-899-21 (1) D:\Documents and Settings\takashi-shimomura\Desktop\DTP\848220S MEXDV1500U(EUR)\4120899211_MEX-DV1500U_ML\05NL02CD-E.fm Opmerkingen over DATA CD's en DATA DVD's • Bepaalde DATA CD's/DATA DVD's (afhankelijk van de opnameapparatuur of de staat van de disc) kunnen niet met dit apparaat worden afgespeeld. • Bepaalde discs moeten worden gefinaliseerd (pagina 50). • Dit apparaat is compatibel met de volgende standaards. Voor DATA CD's – ISO 9660 Level 1/Level 2, Joliet/Romeo in expansie-indeling – Multi Session Voor DATA DVD's – UDF Bridge-indeling (combinatie van UDF en ISO 9660) – Multi Border • Maximumaantal: – mappen (albums): 256 (inclusief hoofdmap en lege mappen). – bestanden (tracks/beelden/video's) en mappen die op een disc passen: 2.000 (als de naam van een map/bestand veel tekens bevat, kan dit aantal minder dan 2.000 zijn). – tekens dat kan worden weergegeven voor de naam van een map/bestand: 64 (Joliet/Romeo). masterpage:Left • Wanneer er MP3/WMA/AAC/JPEG/DivX/ MPEG-4 is opgenomen: Alleen de sessies met het geselecteerde bestandstype (audio/video/beeld)* worden afgespeeld (als CD-DA of andere gegevens voorkomen in andere sessies, worden deze overgeslagen). * Zie pagina 35 voor informatie over het selecteren van het bestandtype. Afspeelvolgorde van MP3-/WMA-/ AAC-/JPEG-/DivX®-/MPEG-4bestanden Map (album) MP3/WMA/AAC/ JPEG/DivX/ MPEG-4 MP3-/WMA-/ AAC-/JPEG-/ DivX-/MPEG-4bestand (track/ beeld/video) Opmerkingen over het finaliseren van discs De volgende discs moeten worden gefinaliseerd voor u ze op dit apparaat kunt afspelen. • DVD-R/DVD-R DL (in videostand/VR-stand) • DVD-RW in videostand • DVD+R/DVD+R DL • CD-R • CD-RW De volgende discs kunt u afspelen zonder de discs te finaliseren. • DVD+RW – automatisch gefinaliseerd. • DVD-RW in VR-stand – geen finalisering vereist. Raadpleeg de handleiding die bij de disc is geleverd voor meer informatie. Opmerkingen over Multi SessionCD's/Multi Border-DVD's Op dit apparaat kunnen in de volgende gevallen Multi Session-CD's/Multi Border-DVD's worden afgespeeld. Houd er rekening mee dat de sessie moet zijn afgesloten en dat de disc moet zijn gefinaliseerd. • Wanneer CD-DA (digitale audio voor cd's) is opgenomen tijdens de eerste sessie: Het apparaat herkent de disc als CD-DA en alleen CD-DA uit de eerste sessie wordt afgespeeld, zelfs als er tijdens een andere sessie nog een andere indeling (bijvoorbeeld MP3) is opgenomen. • Wanneer CD-DA niet tijdens de eerste sessie is opgenomen: Het apparaat herkent de disc als een DATA CD of DATA DVD en alle CD-DA-sessies worden overgeslagen. Over MP3-bestanden • ID3-tag versies 1.0, 1.1, 2.2, 2.3 en 2.4 gelden alleen voor MP3. ID3-tag is 15/30 tekens (1.0 en 1.1) of 63/126 tekens (2.2, 2.3 en 2.4). • Wanneer u een MP3-bestand een naam geeft, moet u altijd de extensie ".mp3" aan de bestandsnaam toevoegen. Opmerking over MP3 Als u een MP3-bestand met een hoge bitsnelheid afspeelt, zoals 384 kbps, wordt het geluid mogelijk onderbroken. Over WMA-bestanden • WMA-tag is 63 tekens. • Wanneer u een WMA-bestand een naam geeft, moet u altijd de extensie ".wma" aan de bestandsnaam toevoegen. Over AAC-bestanden • AAC-tag is 126 tekens. • Wanneer u een AAC-bestand een naam geeft, moet u altijd de extensie ".m4a" aan de bestandsnaam toevoegen. 50 MEX-DV1500U 4-120-899-21 (1) D:\Documents and Settings\takashi-shimomura\Desktop\DTP\848220S MEXDV1500U(EUR)\4120899211_MEX-DV1500U_ML\05NL02CD-E.fm Over JPEG-bestanden • JPEG (Joint Photographic Experts Group) is een compressie-indeling voor beeldbestanden. Stilstaande beelden worden gecomprimeerd tot ongeveer 1/10e tot 1/100e van de oorspronkelijke grootte. • Wanneer u een JPEG-bestand een naam geeft, moet u altijd de extensie ".jpg" aan de bestandsnaam toevoegen. Opmerking over JPEG Het afspelen van Progressive JPEG-bestanden wordt niet ondersteund. Over DivX®-bestanden DivX® (Digital Video Express) is een compressieindeling voor digitale-videobestanden die is ontwikkeld door DivX, Inc. Dit product is een officieel gecertificeerd DivX®-product en kan alle versies van DivX®-video afspelen (met inbegrip van DivX® 6) met standaardweergave van DivX®-mediabestanden. Over MPEG-4-bestanden MPEG-4-bestanden op een disc die voldoen aan de volgende vereisten, kunnen worden afgespeeld. Het kan niet worden gegarandeerd dat alle MPEG-4bestanden die voldoen aan de vereisten, kunnen worden afgespeeld. • Profiel: MPEG-4 Simple Profile • Bitsnelheid: Max. 25.000 kbps • Framesnelheid: Max. 30 fps • Beeldformaat: Max. 320 × 240 pixels • Audio: Max. 320 kbps (AAC-LC) • Bestandsextensie: .mp4 masterpage:Right • Veeg de batterij schoon met een droge doek voor een goed contact. • Houd bij het plaatsen van de batterij rekening met de juiste polariteit. • Houd de batterij niet vast met een metalen tang, om kortsluiting te voorkomen. WAARSCHUWING Bij oneigenlijk gebruik kan de batterij ontploffen. Probeer niet de batterij op te laden of te openen; werp ook een lege batterij nooit in het vuur. Zekeringen vervangen Vervang een zekering altijd door een identiek exemplaar. Als de zekering doorbrandt, moet u de voedingsaansluiting controleren en de zekering vervangen. Brandt de zekering vervolgens nogmaals door, dan kan er sprake zijn van een defect in het apparaat. Raadpleeg in dat geval de dichtstbijzijnde Sonyhandelaar. Zekering (10 A) Aansluitingen schoonmaken De werking van het apparaat kan worden verstoord als de aansluitingen tussen het apparaat en het voorpaneel niet schoon zijn. U kunt dit voorkomen door het voorpaneel (pagina 15) los te maken en de aansluitingen te reinigen met een wattenstaafje. Gebruik hierbij niet teveel kracht. Anders kunnen de aansluitingen worden beschadigd. Onderhoud De lithiumbatterij van de kaartafstandsbediening vervangen Onder normale omstandigheden gaat de batterij ongeveer 1 jaar mee. (Afhankelijk van de gebruiksomstandigheden kan de levensduur korter zijn.) Wanneer de batterij verzwakt, wordt het bereik van de kaartafstandsbediening kleiner. Vervang de batterij door een nieuwe CR2025-lithiumbatterij. Bij een andere batterij bestaat er brand- of explosiegevaar. Hoofdeenheid Achterkant van het voorpaneel Opmerkingen • Uit veiligheidsoverwegingen moet u de motor uitschakelen en de sleutel uit het contactslot halen voordat u de aansluitingen reinigt. • Raak de aansluitingen nooit rechtstreeks aan met uw vingers of een metalen voorwerp. + zijde omhoog c Opmerkingen over de lithiumbatterij • Houd de lithiumbatterij buiten het bereik van kinderen. Raadpleeg meteen een arts wanneer een batterij wordt ingeslikt. 51 MEX-DV1500U 4-120-899-21 (1) D:\Documents and Settings\takashi-shimomura\Desktop\DTP\848220S MEXDV1500U(EUR)\4120899211_MEX-DV1500U_ML\05NL02CD-E.fm Het apparaat verwijderen 1 masterpage:Left Technische gegevens Verwijder de beschermende rand. Systeem 1 Maak het voorpaneel los (pagina 15). Laser: Halfgeleiderlaser Signaalsysteem: Te schakelen tussen PAL/NTSC 2 Duw de zijkanten van de beschermende rand naar binnen en trek de beschermende rand naar buiten. DVD/CD-speler Signaal/ruis-afstand: 120 dB Frequentiebereik: 10 – 20.000 Hz Snelheidsfluctuaties: Minder dan meetbare waarden Harmonische vervorming: 0,01 % Tuner FM Afstembereik: 87,5 – 108,0 MHz Antenne-aansluiting: Externe antenne-aansluiting Tussenfrequentie: 10,7 MHz/450 kHz Bruikbare gevoeligheid: 9 dBf Selectiviteit: 75 dB bij 400 kHz Signaal/ruis-afstand: 67 dB (stereo), 69 dB (mono) Harmonische vervorming bij 1 kHz: 0,5 % (stereo), 0,3 % (mono) Scheiding: 35 dB bij 1 kHz Frequentiebereik: 30 – 15.000 Hz x MW/LW 2 Verwijder het apparaat. 1 Plaats beide ontgrendelingssleutels tegelijkertijd en duw hierop tot deze vastklikken. Afstembereik: MW: 531 – 1.602 kHz LW: 153 – 279 kHz Antenne-aansluiting: Externe antenne-aansluiting Tussenfrequentie: 10,7 MHz/450 kHz Gevoeligheid: MW: 30 µV, LW: 40 µV USB-speler Haakje wijst naar binnen. Interface: USB (volledige snelheid) Maximale stroomsterkte: 500 mA Versterker Uitgangen: Luidsprekeruitgangen (sure seal) Luidsprekerimpedantie: 4 – 8 ohm Maximaal uitgangsvermogen: 52 W × 4 (bij 4 ohm) 2 Trek de ontgrendelingssleutels naar u toe om het apparaat los te maken. 3 Schuif het apparaat uit de houder. Algemeen Uitgangen: Video-uitgang Audio-uitgangen (achter) Relaisaansluiting elektrische antenne Aansluiting versterker Ingangen: AUX-audio-ingangen Antenne-ingang Bedieningsaansluiting voor handrem AUX-ingang (stereo mini-aansluiting) USB-signaalingang Toonregelingen: Laag: ±10 dB bij 60 Hz Midden: ±10 dB bij 1 kHz Hoog: ±10 dB bij 10 kHz Voeding: 12 V gelijkstroom accu (negatieve aarde) Afmetingen: Ongeveer 178 × 50 × 179 mm (b/h/d) Montageafmetingen: Ongeveer 182 × 53 × 163 mm (b/h/d) Gewicht: Ongeveer 1,4 kg 52 MEX-DV1500U 4-120-899-21 (1) D:\Documents and Settings\takashi-shimomura\Desktop\DTP\848220S MEXDV1500U(EUR)\4120899211_MEX-DV1500U_ML\05NL02CD-E.fm Bijgeleverde accessoires: Kaartafstandsbediening: RM-X168 Onderdelen voor installatie en aansluitingen (1 set) Het is mogelijk dat uw handelaar niet beschikt over sommige van de hierboven vermelde accessoires. Vraag uw handelaar om meer informatie. Octrooien in de Verenigde Staten en in andere landen vallen onder de licentie van Dolby Laboratories. MPEG Layer-3 audio-codeertechnologie en -patenten gebruikt onder licentie van Fraunhofer IIS en Thomson. DivX, DivX Certified en de bijbehorende logo's zijn handelsmerken van DivX, Inc. en worden gebruikt onder licentie. Dit product wordt beschermd door bepaalde intellectuele eigendomsrechten van Microsoft Corporation. Het gebruik of de verspreiding van dergelijke technologie buiten dit product om is verboden zonder een licentie van Microsoft of een erkend dochterbedrijf van Microsoft. Wijzigingen in ontwerp en technische gegevens voorbehouden zonder voorafgaande kennisgeving. • Er werden geen halogene brandvertragende producten gebruikt in de betreffende printplaat/printplaten. • In het omhulsel werden geen halogeen bevattende brandvertragende producten gebruikt. • Als beschermings- en opvulmateriaal werd er papier gebruikt. Problemen oplossen De onderstaande controlelijst kan u helpen bij het oplossen van problemen die zich met het apparaat kunnen voordoen. Voordat u de onderstaande controlelijst doorneemt, moet u eerst de aanwijzingen voor aansluiting en gebruik controleren. Als het probleem niet is opgelost, gaat u naar de volgende ondersteuningssite. masterpage:Right Afhankelijk van de aangesloten monitor, kan het even duren voordat het apparaat wordt uitgeschakeld nadat u het contactslot op uit hebt gezet. Dit duidt niet op een storing. Algemeen Het apparaat wordt niet van stroom voorzien. • Controleer de aansluiting of de zekering. • Als het apparaat wordt uitgeschakeld en het scherm verdwijnt, kan het apparaat niet worden bediend met de afstandsbediening. t Schakel het apparaat in. De elektrische antenne schuift niet uit. De elektrische antenne heeft geen relaisdoos. Geen pieptoon. • De pieptoon is uitgeschakeld (pagina 45). • Er is een optionele versterker aangesloten en u gebruikt de ingebouwde versterker niet. De geheugeninhoud is gewist. • Er is op de RESET toets gedrukt. t Sla opnieuw op in het geheugen. • De voedingskabel of de accu is losgekoppeld of niet juist aangesloten. Opgeslagen zenders en tijd zijn gewist. De zekering is doorgebrand. Maakt geluid wanneer de positie van het contactslot wordt gewijzigd. De kabels zijn niet goed verbonden met de voedingsaansluiting voor accessoires van de auto. Het scherm verdwijnt van/verschijnt niet in het display. • De dimmer is ingesteld op "DIM-ON" (pagina 46). • Het scherm verdwijnt als u op (OFF) drukt en deze toets ingedrukt houdt. t Druk op (OFF) op het apparaat en houd deze toets ingedrukt tot het scherm verschijnt. • De aansluitingen zijn vuil (pagina 51). De functie voor automatisch uitschakelen werkt niet. Het apparaat is ingeschakeld. De functie voor het automatisch uitschakelen wordt geactiveerd nadat het apparaat is uitgeschakeld. t Schakel het apparaat uit. vervolg op volgende pagina t Ondersteuningssite http://support.sony-europe.com 53 MEX-DV1500U 4-120-899-21 (1) D:\Documents and Settings\takashi-shimomura\Desktop\DTP\848220S MEXDV1500U(EUR)\4120899211_MEX-DV1500U_ML\05NL02CD-E.fm Beeld Er wordt geen beeld of een onduidelijk beeld weergegeven. • Het apparaat is niet goed aangesloten. • Controleer de aansluiting van het aangesloten apparaat en stel de bronkeuzeschakelaar in op dit apparaat. • Disc defect of vuil. • Het apparaat is niet goed geïnstalleerd. t Installeer het apparaat onder een hoek van minder dan 45° op een stabiele plaats in de auto. • De monitor is aangesloten op de AUDIO/VIDEO OUT-ingang en de parkeerkabel (lichtgroen) is niet aangesloten op de schakelkabel van de handrem, of de handrem wordt niet gebruikt. • De instelling voor het kleursysteem is onjuist. t Stel het kleursysteem in op "PAL" of "NTSC" op basis van de aangesloten monitor (pagina 45). Het beeld past niet op het scherm. Er wordt een vaste breedte-/hoogteverhouding op de DVD gebruikt. Geluid Er is geen geluid/het geluid verspringt/het geluid kraakt. • Het apparaat is niet goed aangesloten. • Controleer de aansluiting van het aangesloten apparaat en stel de bronkeuzeschakelaar in op dit apparaat. • Disc defect of vuil. • Het apparaat is niet goed geïnstalleerd. t Installeer het apparaat onder een hoek van minder dan 45° op een stabiele plaats in de auto. • De bemonsteringsfrequentie van het MP3-bestand is niet 16, 22,05, 24, 32, 44,1 of 48 kHz. • De bemonsteringsfrequentie van het WMA-bestand is niet 32, 44,1 of 48 kHz. • De bemonsteringsfrequentie van het AAC-bestand is niet 44,1 of 48 kHz. • De bitsnelheid van het MP3-bestand ligt niet tussen 8 en 384 kbps. • De bitsnelheid van het WMA-bestand ligt niet tussen 32 en 384 kbps. • De bitsnelheid van het AAC-bestand ligt niet tussen 16 en 320 kbps. • Het apparaat staat in de pauzestand of er wordt terug-/vooruitgespoeld. • De instellingen voor de uitvoer zijn niet juist. • Het DVD-uitvoerniveau is te laag (pagina 28). • Het volume is te laag. • De ATT-functie is ingeschakeld. • De positie van de faderregelaar "FAD" is niet ingesteld op een systeem met 2 luidsprekers. • Niet-ondersteunde indeling (zoals DTS). t Controleer of de indeling wordt ondersteund door dit apparaat (pagina 8). Het geluid bevat ruis. Houd de kabels bij elkaar uit de buurt. masterpage:Left Discbediening De disc kan niet worden geplaatst. • Er zit al een disc in het apparaat. • De disc is met kracht omgekeerd of in de verkeerde richting geplaatst. De disc wordt niet afgespeeld. • Disc defect of vuil. • De disc is niet geschikt. • De DVD is niet geschikt vanwege de regiocode. • De disc is niet gefinaliseerd (pagina 50). • De discindeling en de bestandsversie zijn niet compatibel met dit apparaat (pagina 8, 50). • Druk op Z om de disc te verwijderen. MP3-/WMA-/AAC-/JPEG-/DivX-/MPEG-4bestanden worden niet afgespeeld. • De opname is niet uitgevoerd conform ISO 9660 Level 1 of Level 2 of de indeling Joliet of Romeo in expansie-indeling (DATA CD) of de UDF Bridgeindeling (DATA DVD) (pagina 50). • De bestandsextensie is onjuist (pagina 50). • Bestanden zijn niet opgeslagen in MP3-/WMA-/ AAC-/JPEG-/DivX-/MPEG-4-indeling. • Als de disc meerdere bestandstypen bevat, kan alleen het geselecteerde bestandstype (audio/video/beeld) worden afgespeeld. t Selecteer het gewenste bestandstype in de lijst (pagina 35). MP3-/WMA-/AAC-/JPEG-/DivX-/MPEG-4bestanden worden minder snel afgespeeld dan andere bestanden. Bij de volgende discs duurt het langer voordat het afspelen wordt gestart: – discs opgenomen met een ingewikkelde structuur; – discs die in Multi Session/Multi Border zijn opgenomen; – discs waaraan gegevens kunnen worden toegevoegd. De disc wordt niet vanaf het begin afgespeeld. Het afspelen van een of meer discs (pagina 42) is hervat. Bepaalde functies kunnen niet worden gebruikt. Mogelijk zijn bepaalde handelingen niet beschikbaar, zoals stoppen, zoeken, herhaaldelijk/willekeurig afspelen. Dit is afhankelijk van de disc. Raadpleeg de handleiding die bij de disc is geleverd voor meer informatie. De soundtrack/taal van ondertiteling of de hoek kan niet worden gewijzigd. • Gebruik het DVD-menu in plaats van de selectietoets op de kaartafstandsbediening (pagina 17). • Er zijn geen meertalige tracks, meertalige ondertitels of meerdere hoeken opgenomen op de DVD. • De instellingen van de DVD kunnen niet worden gewijzigd. 54 MEX-DV1500U 4-120-899-21 (1) D:\Documents and Settings\takashi-shimomura\Desktop\DTP\848220S MEXDV1500U(EUR)\4120899211_MEX-DV1500U_ML\05NL02CD-E.fm De schermitems rollen niet. • Bij sommige discs met heel veel tekens kunnen de tekens niet rollen. • "AUTO-SCRL" is ingesteld op "OFF". t Stel "A.SCRL-ON" in (pagina 46). De bedieningstoetsen werken niet. De disc wordt niet uitgeworpen. Druk op de RESET toets (pagina 14). U bent het wachtwoord voor het kinderslot vergeten. Geef in het scherm voor het invoeren van het wachtwoord "5776" op om het apparaat te ontgrendelen (pagina 30). masterpage:Right RDS SEEK begint na enkele seconden weergave. De zender is geen TP-zender of heeft een zwak signaal. t Schakel TA uit (pagina 37). Geen verkeersinformatie. • Schakel TA in (pagina 37). • De zender is een TP-zender, maar zendt toch geen verkeersinformatie uit. t Stem af op een andere zender. PTY geeft "- - - - - - - -" weer. • De huidige zender is geen RDS-zender. • Er zijn geen RDS-gegevens ontvangen. • De zender geeft het programmatype niet door. Radio-ontvangst De zenders kunnen niet worden ontvangen. Het geluid is gestoord. • De aansluiting is niet juist. t Sluit de bedieningskabel van de elektrische antenne (blauw) of voedingskabel voor accessoires (rood) aan op de voedingskabel van de auto-antenneversterker (alleen als uw auto is uitgerust met een FM/MW/LW-antenne in de achter- of zijruit). t Controleer de aansluiting van de auto-antenne. t Als de automatische antenne niet uitschuift, controleert u de aansluiting van de bedieningskabel van de elektrische antenne. Er kan niet worden afgestemd op voorkeurzenders. • Sla de juiste frequentie op in het geheugen. • Het ontvangstsignaal is te zwak. Er kan niet automatisch worden afgestemd op zenders. • De lokale zoekfunctie is niet correct ingesteld. t Het afstemmen wordt te vaak onderbroken: Stel "LOCAL-ON" in (pagina 46). t Het afstemmen stopt niet bij een zender: Stel "MONO-ON" in (pagina 46). • Het ontvangstsignaal is te zwak. t Stem handmatig af. Tijdens FM-ontvangst knippert de aanduiding "ST". • Stem nauwkeurig af op de frequentie. • Het ontvangstsignaal is te zwak. t Stel "MONO-ON" in (pagina 46). Een stereo-uitzending van een FM-programma wordt in mono weergegeven. Het apparaat staat in de mono-ontvangststand. t Stel "MONO-OFF" in (pagina 46). USB afspelen U kunt items niet via een USB-hub afspelen. Dit apparaat kan geen USB-apparaten via een USBhub herkennen. Er kunnen geen items worden afgespeeld. Een USB-apparaat functioneert niet. t Sluit het apparaat opnieuw aan. Het duurt langer om af te spelen op het USBapparaat. Het USB-apparaat bevat bestanden met een ingewikkelde structuur. U hoort een pieptoon. Tijdens het afspelen is het USB-apparaat losgekoppeld. t Voordat u een USB-apparaat loskoppelt, moet u eerst het afspelen stoppen ter bescherming van de gegevens. Het geluid wordt onderbroken. Het geluid kan worden onderbroken bij een hoge bitsnelheid van meer dan 320 kbps. Foutmeldingen/berichten Voor de hoofdeenheid ERROR • De disc is vuil of is omgekeerd geplaatst. t Reinig de disc of plaats deze op de juiste manier. • Er is een lege disc in het apparaat geplaatst. • De disc kan niet worden afgespeeld wegens een probleem. t Plaats een andere disc. • De disc is niet compatibel met dit apparaat. t Plaats een compatibele disc in het apparaat. • Het USB-apparaat is niet automatisch herkend. t Sluit het apparaat opnieuw aan. • Druk op Z om de disc te verwijderen. vervolg op volgende pagina t 55 MEX-DV1500U 4-120-899-21 (1) D:\Documents and Settings\takashi-shimomura\Desktop\DTP\848220S MEXDV1500U(EUR)\4120899211_MEX-DV1500U_ML\05NL02CD-E.fm 56 FAILURE De luidsprekers of versterkers zijn niet correct aangesloten. t Raadpleeg de bijgeleverde gebruiksaanwijzing voor installatie/aansluitingen om de aansluiting te controleren. L. SEEK +/– De lokale zoekfunctie is ingeschakeld tijdens automatisch afstemmen. NO AF Er is geen alternatieve frequentie voor de huidige zender. t Druk op .m/M> terwijl de programmaservicenaam knippert. Het apparaat gaat zoeken naar een andere frequentie met dezelfde PI-gegevens (programma-identificatie). ("PI SEEK" wordt weergegeven.) NO DATA De disc of het USB-apparaat bevat geen muziekbestanden. t Plaats een muziek-CD in dit apparaat. t Sluit een USB-apparaat met muziekbestanden aan. NO DEV (geen apparaat) "USB" is geselecteerd als bron, maar er is geen USB-apparaat aangesloten. Een USB-apparaat of USB-kabel is losgekoppeld tijdens het afspelen. t Sluit een USB-apparaat en USB-kabel aan. NO NAME Er is geen naam voor een disc/album/map/track/beeld/ video naar het bestand geschreven. NO TP Het apparaat blijft zoeken naar beschikbare TP-zenders. OFFSET Er is wellicht een interne storing. t Controleer de aansluiting. Als de foutmelding in het scherm blijft staan, moet u de dichtstbijzijnde Sony-handelaar raadplegen. OVERLOAD Het USB-apparaat is overbelast. t Koppel het USB-apparaat los en wijzig de bron door op (SOURCE) te drukken. t Dit geeft aan dat het USB-apparaat buiten gebruik is of dat een apparaat is aangesloten dat niet wordt ondersteund. READ Het apparaat leest alle bestands-/albumgegevens (map) op de disc. t Wacht totdat het lezen is voltooid en het afspelen automatisch wordt gestart. Afhankelijk van de discstructuur kan dit meer dan een minuut in beslag nemen. USB NO SUPRT (geen USB-ondersteuning) Het aangesloten USB-apparaat wordt niet ondersteund. t Ga naar de ondersteuningssite voor meer informatie over de compatibiliteit van het USB-apparaat. " " of " " Tijdens het snel terug- of vooruitspoelen hebt u het begin of het einde van de disc bereikt en kunt u niet verder. masterpage:Left " " Het teken kan niet worden weergegeven met het apparaat. Voor de monitor Playback prohibited by region code. De DVD kan niet worden afgespeeld vanwege een andere regiocode. Cannot play this disc. • De disc is niet compatibel met dit apparaat. • De disc is niet gefinaliseerd. No playable data. De disc bevat geen inhoud die kan worden afgespeeld. Please press RESET. Het apparaat kan niet worden bediend vanwege een probleem. t Druk op de RESET toets (pagina 14). Als deze oplossingen niet helpen, moet u de dichtstbijzijnde Sony-handelaar raadplegen. Als u het apparaat ter reparatie wegbrengt omdat discs niet goed worden afgespeeld, kunt u het beste de disc meenemen waarmee het probleem is begonnen. MEX-DV1500U 4-120-899-21 (1) D:\Documents and Settings\takashi-shimomura\Desktop\DTP\848220S MEXDV1500U(EUR)\4120899211_MEX-DV1500U_ML\05NL02CD-E.fm Woordenlijst Album Gedeelte van een muziekstuk of een beeld op een DATA CD/DVD dat de MP3-/WMA-/AACaudiotracks of JPEG-bestanden bevat. Bestand • Een MP3-/WMA-/AAC-track of JPEG-beeld op een DATA CD/DATA DVD/USB-apparaat. • Een MP3-/WMA-/AAC-track, JPEG-beeld of DivX-/MPEG-4-video op een DATA CD/DATA DVD. ("Bestand" is een exclusieve definitie voor dit apparaat.) Eén bestand bestaat uit één track, beeld of film. DivX® Een technologie voor digitale video die is ontwikkeld door DivX, Inc. Video's die zijn gecodeerd met DivX-technologie, hebben een zeer hoge kwaliteit en een relatief kleine bestandsgrootte. Dolby Digital Compressietechnologie voor digitale audio die is ontwikkeld door Dolby Laboratories. Deze technologie is compatibel met 5.1-kanaals surround sound. Het achterkanaal is stereo en er wordt voor deze indeling gebruikgemaakt van een afzonderlijk subwooferkanaal. Dolby Digital levert dezelfde afzonderlijke 5.1-kanalen met digitale audio van hoge kwaliteit als de Dolby Digital-audiosystemen die worden gebruikt in de bioscoop. De kanalen zijn goed gescheiden omdat alle kanaalgegevens afzonderlijk worden opgenomen. Tevens treedt er zeer weinig vervorming op omdat alle kanaalgegevens digitaal worden verwerkt. DVD Een disc die tot 8 uur aan filmmateriaal kan bevatten, ondanks dat de diameter hetzelfde is als voor een CD. De gegevenscapaciteit van een enkelzijdige DVD met één laag is 4,7 GB (Gigabyte). Dit is meer dan 7 keer de capaciteit van een CD. Een enkelzijdige DVD met twee lagen heeft een gegevenscapacitieit van 8,5 GB, een dubbelzijdige DVD met één laag een gegevenscapaciteit van 9,4 GB en een dubbelzijdige DVD met twee lagen een gegevenscapaciteit van 17 GB. Voor de beeldgegevens wordt gebruikgemaakt van de MPEG 2-indeling, een van de wereldwijde normen voor digitale compressietechnologie. De beeldgegevens worden gecomprimeerd tot ongeveer 1/40e van de oorspronkelijke grootte. Voor een DVD wordt tevens gebruikgemaakt van coderingstechnologie met een variabele bitsnelheid zodat de toewijzing van de gegevens kan worden masterpage:Right gewijzigd overeenkomstig de status van de beelden. De audiogegevens worden opgenomen met een meerkanaalse indeling, zoals Dolby Digital, zodat u kunt genieten van een zeer realistische geluidsweergave. Bovendien bevat de DVD verschillende geavanceerde functies, bijvoorbeeld voor meerdere hoeken, talen en een kinderslot. DVD-RW Een DVD-RW is een opneembare en herschrijfbare disc met dezelfde indeling als een DVD VIDEO. De DVD-RW heeft twee modi: VR- en videostand. DVD-RW's die in de videostand worden gemaakt, hebben dezelfde indeling als een DVD VIDEO, terwijl de inhoud van discs die in de VR-stand (Video Recording) zijn gemaakt, kan worden geprogrammeerd of bewerkt. DVD+RW Een DVD+RW (plus RW) is een opneembare en herschrijfbare disc. Voor DVD+RW's wordt gebruikgemaakt van een opname-indeling die vergelijkbaar is met de DVD VIDEO-indeling. Filmsoftware, videosoftware DVD's kunnen worden geclassificeerd als filmsoftware of videosoftware. Een film-DVD bevat hetzelfde aantal beelden (24 frames per seconde) als een film in een bioscoop. Een video-DVD, zoals een tv-serie, geeft 30 frames (of 60 velden) per seconde weer. Hoofdstuk Onderverdeling van een titel op een DVD. Een titel bestaat uit meerdere hoofdstukken. Scène Op een VIDEO CD met PBC-functies (Playback Control) worden de menuschermen en de bewegende en stilstaande beelden opgedeeld in zogenaamde "scènes". Titel Het langste gedeelte van een film of muziek op een DVD, film, enzovoort, in videosoftware of het hele album in audiosoftware. Track Een gedeelte van een beeld of muziekstuk op een VIDEO CD, CD of MP3/WMA/AAC. Een album bestaat uit verschillende tracks (alleen MP3/WMA/ AAC). vervolg op volgende pagina t 57 MEX-DV1500U 4-120-899-21 (1) D:\Documents and Settings\takashi-shimomura\Desktop\DTP\848220S MEXDV1500U(EUR)\4120899211_MEX-DV1500U_ML\05NL02CD-E.fm masterpage:Left VIDEO CD Een CD met bewegende beelden. Voor de beeldgegevens wordt gebruikgemaakt van de MPEG 1-indeling, een van de wereldwijde normen voor digitale compressietechnologie. De beeldgegevens worden gecomprimeerd tot ongeveer 1/140e van de oorspronkelijke grootte. Een VIDEO CD van 12 cm kan daarom 74 minuten aan bewegende beelden bevatten. VIDEO CD's bevatten ook compacte audiogegevens. Geluiden buiten het hoorbare bereik worden gecomprimeerd terwijl geluiden die de mens wel kan horen, niet worden gecomprimeerd. VIDEO CD's kunnen tot 6 keer zoveel audiogegevens bevatten als gewone audio-CD's. Er zijn 3 versies VIDEO CD's. • Versie 1.0, 1.1: u kunt alleen bewegende beelden en geluid afspelen. • Versie 2.0: u kunt stilstaande afbeeldingen met een hoge resolutie weergeven en genieten van PBCfuncties. Dit apparaat is compatibel met alle 3 bovenstaande versies. 58 MEX-DV1500U 4-120-899-21 (1) D:\Documents and Settings\takashi-shimomura\Desktop\DTP\848220S MEXDV1500U(EUR)\4120899211_MEX-DV1500U_ML\05NL02CD-E.fm masterpage:Right Lijst met taal-/regiocodes Lijst met taalcodes Taalspelling conform ISO 639: 1988 (E/F). Code Taal Code Taal Code Taal Code Taal 1027 1028 1032 1039 1044 1045 1051 1052 1053 1057 1059 1060 1061 1066 Afar Abkhazian Afrikaans Amharic Arabic Assamese Aymara Azerbaijani Bashkir Byelorussian Bulgarian Bihari Bislama Bengali; Bangla Tibetan Breton Catalan Corsican Czech Welsh Danish German Bhutani Greek English Esperanto Spanish Estonian Basque Persian Finnish Fiji Faroese French Frisian 1183 1186 1194 1196 1203 1209 1217 1226 1229 1233 1235 1239 1245 1248 1253 1254 1257 1261 1269 1283 1287 1297 1298 1299 1300 1301 1305 1307 1311 1313 1326 1327 1332 1334 Irish Scots Gaelic Galician Guarani Gujarati Hausa Hindi Croatian Hungarian Armenian Interlingua Interlingue Inupiak Indonesian Icelandic Italian Hebrew Japanese Yiddish Javanese Georgian Kazakh Greenlandic Cambodian Kannada Korean Kashmiri Kurdish Kirghiz Latin Lingala Laothian Lithuanian Latvian; Lettish Malagasy 1347 1349 1350 1352 1353 1356 1357 1358 1363 1365 1369 1376 1379 1393 1403 1408 1417 1428 1435 1507 1508 1509 1511 1512 1513 1514 1515 1516 1517 1521 1525 1527 1528 1529 1531 1532 1534 1535 1538 1539 1540 1543 1557 1564 1572 1581 1587 1613 1632 1665 1684 1697 Samoan Shona Somali Albanian Serbian Siswati Sesotho Sundanese Swedish Swahili Tamil Telugu Tajik Thai Tigrinya Turkmen Tagalog Setswana Tonga Turkish Tsonga Tatar Twi Ukrainian Urdu Uzbek Vietnamese Volapük Wolof Xhosa Yoruba Chinese Zulu 1503 1505 1506 Maori Macedonian Malayalam Mongolian Moldavian Marathi Malay Maltese Burmese Nauru Nepali Dutch Norwegian Occitan (Afan)Oromo Oriya Punjabi Polish Pashto; Pushto Portuguese Quechua RhaetoRomance Kirundi Romanian Russian Kinyarwanda Sanskrit Sindhi Sangho SerboCroatian Singhalese Slovak Slovenian 1703 Niet vermeld 1067 1070 1079 1093 1097 1103 1105 1109 1130 1142 1144 1145 1149 1150 1151 1157 1165 1166 1171 1174 1181 1345 1436 1463 1481 1482 1483 1489 1491 1495 1498 1501 1502 Lijst met regiocodes Code Regio Code Regio Code Regio Code Regio 2044 2047 2057 2070 2079 2090 2092 2115 2109 Argentinië Australië België Brazilië Canada Chili China Denemarken Duitsland 2424 2165 2174 2248 2238 2254 2276 2304 2363 Filippijnen Finland Frankrijk India Indonesië Italië Japan Korea Maleisië 2362 2376 2390 2379 2046 2427 2436 2489 2501 Mexico Nederland Nieuw-Zeeland Noorwegen Oostenrijk Pakistan Portugal Rusland Singapore 2149 2528 2184 Spanje Thailand Verenigd Koninkrijk Zweden Zwitserland 2499 2086 59 MEX-DV1500U 4-120-899-21 (1) D:\Documents and Settings\takashi-shimomura\Desktop\DTP\848220S MEXDV1500U(EUR)\4120899211_MEX-DV1500U_ML\05NL+00COV-EIX.fm masterpage:Left Index Cijfers 16:9 41 2000MP3 6 2000WMA 6 4:3 LETTER BOX 41 4:3 PAN SCAN 41 DVD-menu 17 DVD-niveau (DVD-LEVEL) 28, 47 Dynamic Range Control (DRC) 43 L Lijst weergeven 34 Lithiumbatterij 51 Lokale zoekfunctie (LOCAL) 46 Loudness (LOUD) 47 E A AAC 9, 50 Aangepaste instellingen (CUSTOM SETUP) 42 Achtergrond (WALLPAPER) 41 Afspeelbare discs 8 Afspeellijst afspelen (PLAY LIST PLAY) 43 Afspelen hervatten 17, 19 Afspelen hervatten voor Multi-disc (MULTI-DISC RESUME) 6, 42 Album (ALBUM) 33 Alternatieve frequenties (AF) 37 Audio (AUDIO) Indeling 27 Kanaal 27 Taal 27, 41 Audio DRC (AUDIO DRC) 43 Audio-instellingen (AUDIO SETUP) 43 Automatisch rollen (AUTO-SCRL) 46 Automatisch uitschakelen (AUTO-OFF) 45 AUX (voorkant) 48 AUX-niveau (AUX-LEVEL) 47, 49 B Balans (BAL) 38 Beeld (IMAGE) 33 Beeldinstellingen 39 Bestand (FILE) 33 Beweging scherm (M.DSPL) 45 D 60 Demonstratie (DEMO) 45 Dimmer (DIMMER) 46 Discs 8 DivX VOD 42 DivX® 9, 23, 51 Dolby Digital 27, 28 Dolby-sterkte aanpassen (DOLBY-ADJ) 47 EQ3 38, 39 Equalizer Beeld (PICTURE EQ) 29, 43 Geluid (EQ3) 38, 39 F Fader (FAD) 38 G Geheugen voor beste afstemming (BTM) 36 H Herhaaldelijk afspelen (REP) 21, 32 Herstellen (RESET) 14, 43 Hoek (ANGLE) 17 Hoofdmenu van de DVD 17 Hoofdstuk (CHAPTER) 33 I M Map (ALBUM) 33 Monitortype (MONITOR TYPE) 41 Monostand (MONO) 46 MP3 9, 50 MPEG-4 9, 51 Multi Border-DVD 50 Multi Session-CD 50 N NTSC 45 P PAL 45 Picture EQ (PICTURE EQ) 29, 43 Pieptoon (BEEP) 45 Playback control (PBC) 24 Programma-indeling 27 Programmatypen (PTY) 37, 38 Indelingen 9 Instelmenu Beeldinstellingen 39 Systeeminstellingen 44 Q J Radiogegevenssysteem (RDS) 36 Randapparatuur 48 Rechtstreeks afspelen 33 Regiocode 9, 59 Regionaal (REGIONAL) 37, 46 JPEG 9, 23, 51 K Kaartafstandsbediening 12, 14, 51 Kinderbeveiliging (PARENTAL CONTROL) 30, 42 Kleursysteem (COLOR-SYS) 45 Klok aanpassen (CLOCKADJ) 48 Kloktijd (CT) 37, 38, 45 Quick-BrowZer 34 R S Scherm instellen (DISPLAY SETUP) 41 Systeeminstellingen 44 MEX-DV1500U 4-120-899-21 (1) D:\Documents and Settings\takashi-shimomura\Desktop\DTP\848220S MEXDV1500U(EUR)\4120899211_MEX-DV1500U_ML\05NL+00COV-EIX.fm masterpage:Right T Taalcode 59 Taalinstelling (LANGUAGE SETUP) 41 Taalinstelling (MENU) 41 Taalinstelling ondertiteling (SUBTITLE) 17, 41 Taalinstelling soundtrack (AUDIO) 27, 41 Tijd diavoorstelling (SLIDE SHOW TIME) 42 Tijd/tekstinformatie (TIME) 26, 33 Titel (TITLE) 33 Track (TRACK) 33 U USB-apparaat 20 V Verkeersinformatie (TA) 37 Verkeersprogramma (TP) 37 Volume 10 W Weergavestandmenu 24 Willekeurig afspelen (SHUF) 21, 32 WMA 9, 50 Z Zekering 51 Zoomen (CENTER ZOOM) 29 61 MEX-DV1500U 4-120-899-21 (1) 06GB+03BCO-E.fm masterpage:Right Tragen Sie die Seriennummer (SERIAL NO.) in dem reservierten Feld ein. Sie finden diese auf einem Aufkleber, der auf dem Gerätegehäuse angebracht ist. Nehmen Sie den ausgefüllten Geräte-Pass anschließend unbedingt aus der Bedienungsanleitung heraus, falls Sie diese im Fahrzeug aufbewahren möchten. Bitte bewahren Sie den Geräte-Pass an einem sicheren Ort auf. Er kann im Falle eines Diebstahls zur ldentifikation lhres Eigentums dienen. caraudio Geräte-Pass Dieser Geräte-Pass dient als Eigentumsnachweis für Ihr caraudio-Gerät im Falle eines Diebstahls. Wir empfehlen, den Geräte-Pass nicht im Fahrzeug aufzubewahren, um Missbrauch zu verhindern. Modellbezeichnung MEX-DV1500U Seriennummer (SERIAL NO.) http://www.sony.net/ Sony Corporation Printed in Thailand MEX-DV1500U 4-120-899-21 (1)-
 1
1
-
 2
2
-
 3
3
-
 4
4
-
 5
5
-
 6
6
-
 7
7
-
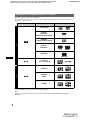 8
8
-
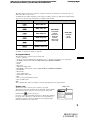 9
9
-
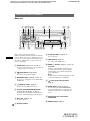 10
10
-
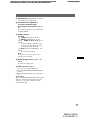 11
11
-
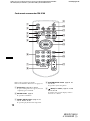 12
12
-
 13
13
-
 14
14
-
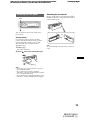 15
15
-
 16
16
-
 17
17
-
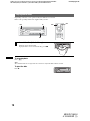 18
18
-
 19
19
-
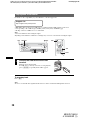 20
20
-
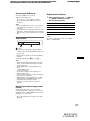 21
21
-
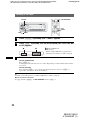 22
22
-
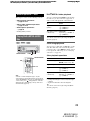 23
23
-
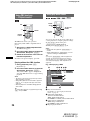 24
24
-
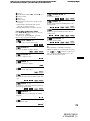 25
25
-
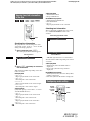 26
26
-
 27
27
-
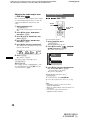 28
28
-
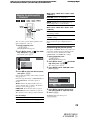 29
29
-
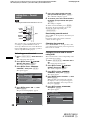 30
30
-
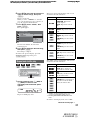 31
31
-
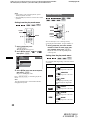 32
32
-
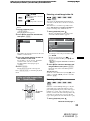 33
33
-
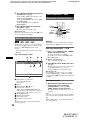 34
34
-
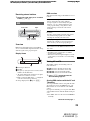 35
35
-
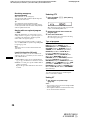 36
36
-
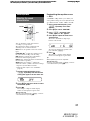 37
37
-
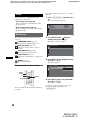 38
38
-
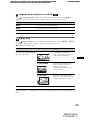 39
39
-
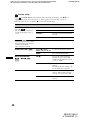 40
40
-
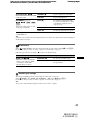 41
41
-
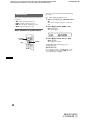 42
42
-
 43
43
-
 44
44
-
 45
45
-
 46
46
-
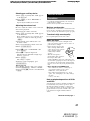 47
47
-
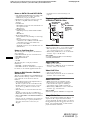 48
48
-
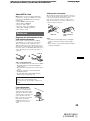 49
49
-
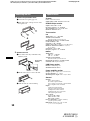 50
50
-
 51
51
-
 52
52
-
 53
53
-
 54
54
-
 55
55
-
 56
56
-
 57
57
-
 58
58
-
 59
59
-
 60
60
-
 61
61
-
 62
62
-
 63
63
-
 64
64
-
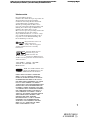 65
65
-
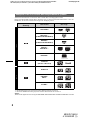 66
66
-
 67
67
-
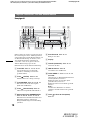 68
68
-
 69
69
-
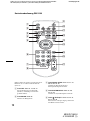 70
70
-
 71
71
-
 72
72
-
 73
73
-
 74
74
-
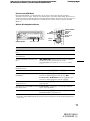 75
75
-
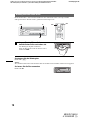 76
76
-
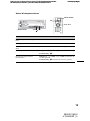 77
77
-
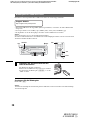 78
78
-
 79
79
-
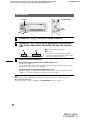 80
80
-
 81
81
-
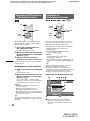 82
82
-
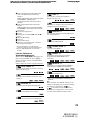 83
83
-
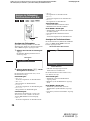 84
84
-
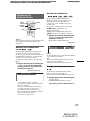 85
85
-
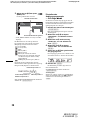 86
86
-
 87
87
-
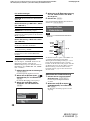 88
88
-
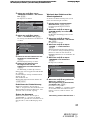 89
89
-
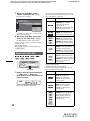 90
90
-
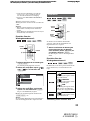 91
91
-
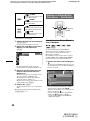 92
92
-
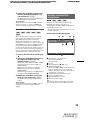 93
93
-
 94
94
-
 95
95
-
 96
96
-
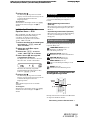 97
97
-
 98
98
-
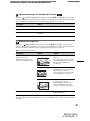 99
99
-
 100
100
-
 101
101
-
 102
102
-
 103
103
-
 104
104
-
 105
105
-
 106
106
-
 107
107
-
 108
108
-
 109
109
-
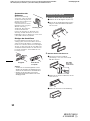 110
110
-
 111
111
-
 112
112
-
 113
113
-
 114
114
-
 115
115
-
 116
116
-
 117
117
-
 118
118
-
 119
119
-
 120
120
-
 121
121
-
 122
122
-
 123
123
-
 124
124
-
 125
125
-
 126
126
-
 127
127
-
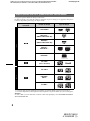 128
128
-
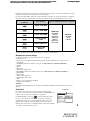 129
129
-
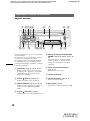 130
130
-
 131
131
-
 132
132
-
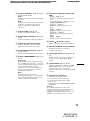 133
133
-
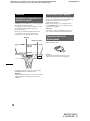 134
134
-
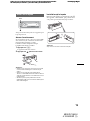 135
135
-
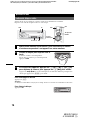 136
136
-
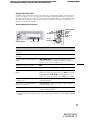 137
137
-
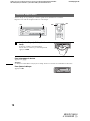 138
138
-
 139
139
-
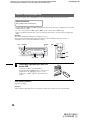 140
140
-
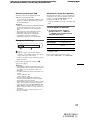 141
141
-
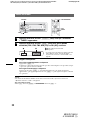 142
142
-
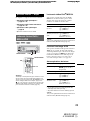 143
143
-
 144
144
-
 145
145
-
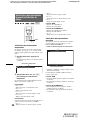 146
146
-
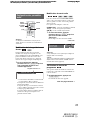 147
147
-
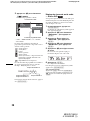 148
148
-
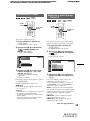 149
149
-
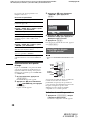 150
150
-
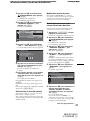 151
151
-
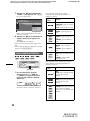 152
152
-
 153
153
-
 154
154
-
 155
155
-
 156
156
-
 157
157
-
 158
158
-
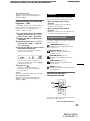 159
159
-
 160
160
-
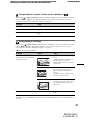 161
161
-
 162
162
-
 163
163
-
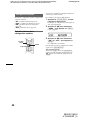 164
164
-
 165
165
-
 166
166
-
 167
167
-
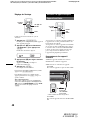 168
168
-
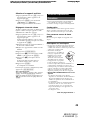 169
169
-
 170
170
-
 171
171
-
 172
172
-
 173
173
-
 174
174
-
 175
175
-
 176
176
-
 177
177
-
 178
178
-
 179
179
-
 180
180
-
 181
181
-
 182
182
-
 183
183
-
 184
184
-
 185
185
-
 186
186
-
 187
187
-
 188
188
-
 189
189
-
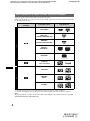 190
190
-
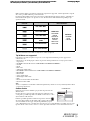 191
191
-
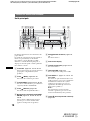 192
192
-
 193
193
-
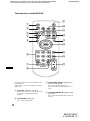 194
194
-
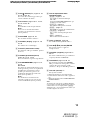 195
195
-
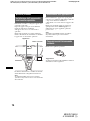 196
196
-
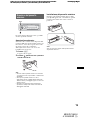 197
197
-
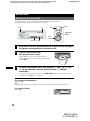 198
198
-
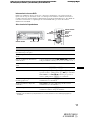 199
199
-
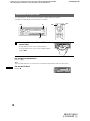 200
200
-
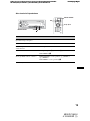 201
201
-
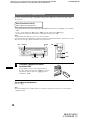 202
202
-
 203
203
-
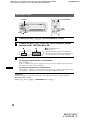 204
204
-
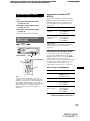 205
205
-
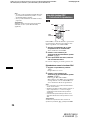 206
206
-
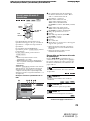 207
207
-
 208
208
-
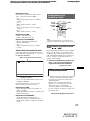 209
209
-
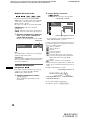 210
210
-
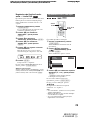 211
211
-
 212
212
-
 213
213
-
 214
214
-
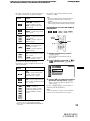 215
215
-
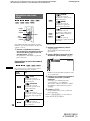 216
216
-
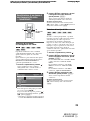 217
217
-
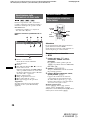 218
218
-
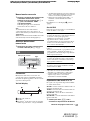 219
219
-
 220
220
-
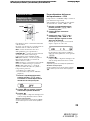 221
221
-
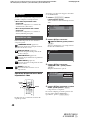 222
222
-
 223
223
-
 224
224
-
 225
225
-
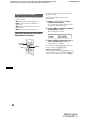 226
226
-
 227
227
-
 228
228
-
 229
229
-
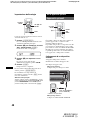 230
230
-
 231
231
-
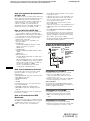 232
232
-
 233
233
-
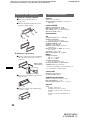 234
234
-
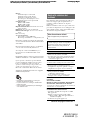 235
235
-
 236
236
-
 237
237
-
 238
238
-
 239
239
-
 240
240
-
 241
241
-
 242
242
-
 243
243
-
 244
244
-
 245
245
-
 246
246
-
 247
247
-
 248
248
-
 249
249
-
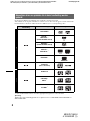 250
250
-
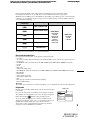 251
251
-
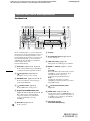 252
252
-
 253
253
-
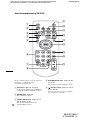 254
254
-
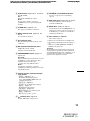 255
255
-
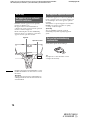 256
256
-
 257
257
-
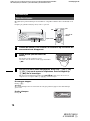 258
258
-
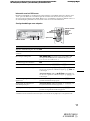 259
259
-
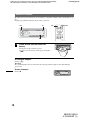 260
260
-
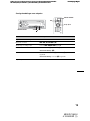 261
261
-
 262
262
-
 263
263
-
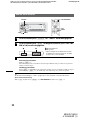 264
264
-
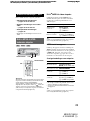 265
265
-
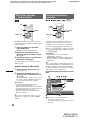 266
266
-
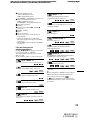 267
267
-
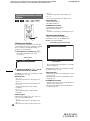 268
268
-
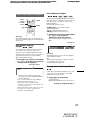 269
269
-
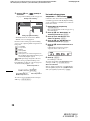 270
270
-
 271
271
-
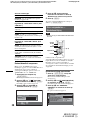 272
272
-
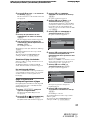 273
273
-
 274
274
-
 275
275
-
 276
276
-
 277
277
-
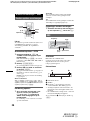 278
278
-
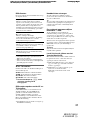 279
279
-
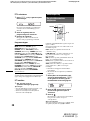 280
280
-
 281
281
-
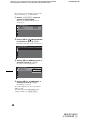 282
282
-
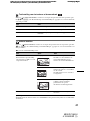 283
283
-
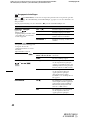 284
284
-
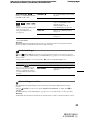 285
285
-
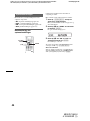 286
286
-
 287
287
-
 288
288
-
 289
289
-
 290
290
-
 291
291
-
 292
292
-
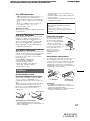 293
293
-
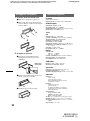 294
294
-
 295
295
-
 296
296
-
 297
297
-
 298
298
-
 299
299
-
 300
300
-
 301
301
-
 302
302
-
 303
303
-
 304
304


Sony MEX-DV1500U de handleiding
- Categorie
- Dvd spelers
- Type
- de handleiding
in andere talen
- English: Sony MEX-DV1500U Owner's manual
- italiano: Sony MEX-DV1500U Manuale del proprietario
- français: Sony MEX-DV1500U Le manuel du propriétaire
- Deutsch: Sony MEX-DV1500U Bedienungsanleitung