Philips PBCO1610G Handleiding
- Categorie
- Optische schijfstations
- Type
- Handleiding
Pagina wordt geladen...

Contents - Inhalt - Table des matières - Indice - Inhoud - Índice
2
Installation How to install this drive in my computer? 3
Installation Einbau dieses Laufwerks in den Computer 3
Installation Comment installer ce lecteur dans l’ordinateur? 3
Installazione Come installare questa unità sul computer 3
Installeren Hoe installeer ik dit station in mijn computer? 3
Instalación ¿Cómo instalar esta unidad en el ordenador? 3
Copy How to copy a CD? 17
Kopieren Eine CD kopieren 17
Copie Comment copier un CD ? 17
Copia Come copiare un CD? 17
Kopiëren Hoe kopieer ik een cd? 17
Copia ¿Cómo copiar un CD? 17
Data How to make a Data CD? 23
Daten Eine Daten-CD erstellen 23
Données Comment créer un disque de données ? 23
Dati Come creare un CD di dati? 23
Data Hoe maak ik zelf een data-cd? 23
Datos ¿Cómo crear un CD de datos ? 23
Music How to make an Audio CD? 29
Musik Erstellen einer Audio-CD 29
Musique Comment créer un CD audio? 29
Musica Come creare un CD Audio? 29
Muziek Hoe maak ik zelf muziek-cd's? 29
Música ¿Cómo crear un CD de audio? 29
Information More information about my CD-Rewriter 37
Information Mehr Informationen über meinen CD-Rewriter 37
Information Informations ultérieures à propos du CD-Rewriter 37
Informazione Ulteriori informazioni sul CD-Rewriter 37
Informatie Verdere informatie over mijn CD-Rewriter 37
Información Más información acerca de mi CD-Rewriter 37
?

3
How to install this drive
in my computer?
Einbau dieses Laufwerks in den Computer
Comment installer ce lecteur dans l’ordinateur ?
Come installare questa unità sul computer
Hoe installeer ik dit station in mijn computer?
¿Cómo instalar esta unidad en el ordenador?
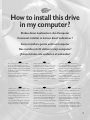
The next pages show how to install
your new DVD-ReWriter in the PC.
Since there are many brands and types
of PC's available, the next photographs
show only examples on how your drive
could be installed.
For specific information on your PC,
please refer to your PC manual or
contact your local dealer.
Auf den nächsten Seiten wird
beschrieben, wie Sie Ihren neuen DVD-
ReWriter in den PC einbauen können.
Da es viele verschiedene PC-Marken
und –Typen gibt, zeigen die folgenden
Fotos nur Beispiele dafür, wie Ihr
Laufwerk eingebaut werden kann.
Für spezielle Informationen zu Ihrem PC
beachten Sie bitte Ihr PC-Handbuch,
oder wenden Sie sich an Ihren Händler
vor Ort.
Les pages qui suivent illustrent la
procédure d’installation de votre nouveau
DVD-ReWriter dans l’ordinateur.
Il existe un grand nombre de marques
et de modèles d’ordinateurs. Les photos
suivantes ne sont présentées qu’à titre
d’illustration de la procédure à suivre
pour installer l’appareil.
Pour des informations spécifiques sur
votre ordinateur, reportez-vous à son
mode d’emploi ou contactez votre
revendeur.
Nelle prossime pagine verranno date
informazioni su come installare DVD-
ReWriter sul PC.
Poiché esistono molte marche e tipi di
PC, le prossime foto mostreranno solo
esempi di come l'unità possa essere
installata.
Per informazioni specifiche sul proprio
PC, fare riferimento al manuale PC o
rivolgersi al proprio rivenditore locale.
De volgende pagina's beschrijven het
installeren van de nieuwe DVD-
ReWriter in uw PC.
Omdat er vele soorten en merken
computers zijn, zullen de hierna volgende
afbeeldingen hoogstwaarschijnlijk niet
exact overeenkomen met uw eigen
situatie. Ze dienen slechts ter illustratie
van het installeren.
Raadpleeg voor specifieke informatie
over uw eigen computer de handleiding
van uw PC, of neem contact op met uw
leverancier.
Las páginas siguientes muestran cómo
instalar su nueva regrabadora en el
DVD-PC.
Puesto que hay muchas marcas y tipos
de ordenadores personales disponibles,
las fotografías siguientes muestran sólo
algunos ejemplos de cómo podría
instalarse la unidad.
Para obtener información específica
sobre su ordenador personal, por favor
consulte el manual de su PC o póngase
en contacto con su distribuidor local.
UK D F
I NL E
3
Pagina wordt geladen...

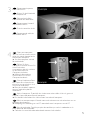
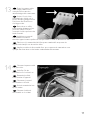
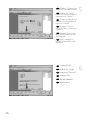
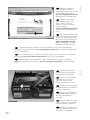
Disconnect the power
cable from the PC.
Ziehen Sie das Netzkabel
vom Computer ab.
Débranchez le câble
d’alimentation de l’ordinateur.
Disconnettere il cavo di
alimentazione dal PC.
Trek de netstekker uit de
PC.
Desconecte el cable de
alimentación del PC.
Open your computer.
You may have to unleash screws
which are mostly located at the
back of your computer.
➤ See your computer manual
for more details
Öffnen Sie Ihren
Computer. Eventuell müssen Sie
hierzu Schrauben
herausdrehen, die sich meistens
an der Rückseite Ihres
Computers befinden.
➤Weitere Informationen
hierzu finden Sie in Ihrem
Computerhandbuch.
Ouvrez l’ordinateur. Pour
cela, il peut être nécessaire de
desserrer une ou plusieurs vis à
l’arrière de l’ordinateur.
➤ Pour plus de détail, reportez-
vous au mode d’emploi de
l’ordinateur.
Aprire il computer. È possibile che si dovranno svitare delle viti che in genere si
trovano sul pannello posteriore del computer.
➤ Per ulteriori informazioni fare riferimento al manuale del computer.
Maak uw computer open. Meestal moet u de schroeven aan de achterkant van uw
computer losschroeven.
➤ Raadpleeg de handleiding van uw PC voor details over het openen van de PC
Abra el ordenador. Tendrá que quitar los tornillos que suelen ir colocados en la
parte posterior del ordenador.
➤ Consulte el manual del ordenador donde econtrará más detalles
4
3
5
UK
F
I
NL
E
D
UK
F
I
NL
E
D
Pagina wordt geladen...

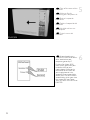
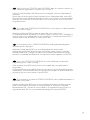
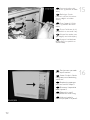
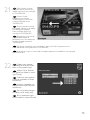
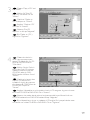
Wenn bereits ein CD-ROM- oder DVD-ROM- oder ein anderes Laufwerk an
Ihren Computer angeschlossen ist, gehen Sie zu Schritt 7.
Suchen Sie das Bandkabel (IDE-Kabel), das Ihre Festplatte mit Ihrem Motherboard
verbindet.
Neben dem Anschluss dieses Kabels befindet sich am Motherboard der zweite IDE-
Anschluss/das zweite IDE-Kabel. Befestigen Sie das neue Laufwerk an diesem zweiten
Kabel, das zum zweiten IDE-Anschluss führt. Das neue Laufwerk muss auf MASTER
eingestellt werden.
Si un lecteur de CD-ROM, de DVD-ROM ou un autre lecteur est déjà raccordé à
l’ordinateur, allez à l’étape 7.
Identifiez le câble plat (IDE) qui part du disque dur vers la carte mère.
Le second connecteur de câble IDE se trouve à côté sur la carte mère. Raccordez le
nouveau lecteur à ce second câble qui est branché sur le second connecteur IDE. Le
nouveau lecteur doit être défini en maître (MASTER).
Se si dispone già di un CDROM, DVDROM o altro dispositivo collegato al
computer, passare al punto 7.
Individuare il cavo piatto (IDE) che va dal disco rigido alla scheda madre.
Accanto alla connessione di questo cavo sulla scheda madre, si trova il secondo
cavo/connettore IDE. Collegare la nuova unità a questo secondo cavo, che andrà
connessa sul secondo connettore IDE. La nuova unità andrà impostata su MASTER.
Is er al een CD-ROM, DVD-ROM of een ander station op uw computer
aangesloten, ga dan verder met stap 7
Zoek de platte kabel (IDE-kabel) waarmee de harddisk op het moederbord is
aangesloten.
De tweede IDE-aansluiting of IDE-kabel zit naast deze eerste kabelaansluiting op het
moederbord. Sluit de tweede kabel aan op het nieuwe station en op de tweede IDE-
aansluiting. Stel het nieuwe station in op MASTER.
Si ya dispone de un lector de CDROM,DVDROM u otra unidad conectada a su
ordenador, vaya al paso 7.
Localice el cable plano (IDE), que va de la unidad de disco duro a la placa principal.
Junto a la conexión de este cable en la placa principal se encuentra el segundo
conector/cable IDE. Conecte la nueva unidad en el segundo cable que entra en el
segundo conector IDE. La nueva unidad debe configurarse como MASTER.
7
F
I
NL
E
D
Pagina wordt geladen...
Pagina wordt geladen...
Pagina wordt geladen...

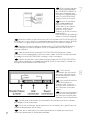
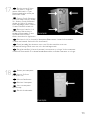
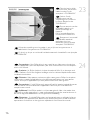
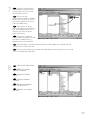
Find a free power cable
which mostly looks like this
example.Please note the
rounded edges of the connector.
Suchen Sie ein freies
Netzkabel, dass häufig wie in
diesem Beispiel gezeigt aussieht.
Die Kanten des Anschlusses
sind abgerundet.
Recherchez un câble
d’alimentation disposant d’une
fiche libre,comme l’illustre
l’exemple. La fiche présente des
bords arrondis.
Individuare un cavo di
alimentazione libero che
dovrebbe apparire come quello nell'esempio.Notare i bordi arrotondati del connettore.
Zoek een vrije stroomkabel die lijkt op ons voorbeeld. Let op waar de
afgeschuinde hoekjes van de stekker zitten.
Localice un cable de alimentación libre, que se parezca al mostrado en este
ejemplo.Por favor observe los bordes redondeados del conector.
Connect the power cable
into your drive.
Schließen Sie das
Netzkabel an Ihr Laufwerk an.
Raccordez le câble
d’alimentation à l’appareil.
Connettere i cavo di
alimentazione nell'unità.
Sluit de stroomkabel aan
op het station.
Conecte el cable de
alimentación en la unidad.
14
13
11
UK
F
I
D
N
E
UK
F
I
NL
E
D
Pagina wordt geladen...

17
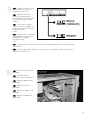
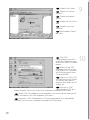
Restart your computer.
Starten Sie Ihren
Computer neu.
Allumez l’ordinateur.
Riavviare il computer.
Start uw computer
opnieuw op.
Reinicie el ordenador.
18
13
Put the screws (if there
were any) back in. Plug the
power cable back in. If you
disconnected other cables, put
these back in too.
Drehen Sie die Schrauben
(wenn da welche waren) wieder
ein. Stecken Sie das Netzkabel
wieder ein.Wenn Sie weitere
Kabel abgezogen haben, stecken
Sie diese ebenfalls wieder ein.
Resserrez la ou les vis, le
cas échéant. Rebranchez le
cordon d’alimentation. Si vous
avez débranché d’autres
câbles,rebranchez-les également.
Riavvitare le viti (se c'erano) al loro posto.Riconnettere il cavo di alimentazione.
Se sono stati staccati anche altri cavi, riconnetterli.
Draai (zo nodig) de schroeven weer vast.Sluit de netstekker weer aan.
Sluit ook de overige kabels weer aan, als u die had losgemaakt.
Ponga los tornillos (si los tenía puestos) nuevamente en su lugar. Vuelva a conectar
el cable de alimentación.Si ha desconectado otros cables, vuélvalos a conectar en su lugar.
UK
D
F
I
NL
E
UK
F
I
NL
E
D

14
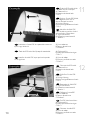
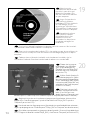
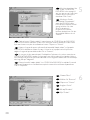
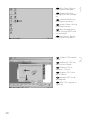
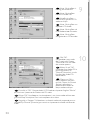
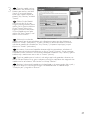
Now insert the
installation disc delivered with
the drive in your drive and
follow the instructions.This
disc will install all the software
on your computer.
Legen Sie jetzt die mit
dem Laufwerk gelieferte
Installations-CD in Ihr Laufwerk
ein und befolgen Sie die
Anweisungen. Mit Hilfe dieser
CD installieren Sie die gesamte
Software auf Ihrem Computer.
Introduisez à présent
dans le lecteur le disque
d’installation fourni avec
l’appareil et suivez les
instructions. Le disque lance
l’installation du logiciel sur
l’ordinateur.
Ora inserire il disco di installazione in dotazione all'unità e attenersi alle istruzioni.
Questo disco installerà tutto il software sul computer.
Plaats nu de meegeleverde installatie-CD in het station en voer de aanwijzingen uit
die op het scherm verschijnen. Deze cd installeert alle benodigde programma's op uw
computer.
Coloque ahora el disco de instalación suministrado con la unidad y siga las
instrucciones indicadas. Este disco instalará todo el software en su ordenador.
19
UK
F
I
NL
E
D
Choose the language to
be displayed in the Setup pro-
gram. (If not, double-click "My
Computer", then the "Philips RW"
drive icon and finally "Setup.exe"
to start the CD.)
Wählen Sie die Sprache für
das Installationsprogramm. (Sollte
dies nicht geschehen, doppelklicken
Sie auf "Arbeitsplatz", dann auf das
Laufwerkssymbol "Philips RW" und
schließlich auf die Datei Setup.exe",
um die CD zu starten.)
Choisissez la langue à affi-
cher dans le programme d’instal-
lation. (Si ce n'est pas le cas,
double-cliquez sur Poste de travail,
double-cliquez sur l'icône Philips RW et double-cliquez sur Setup.exe pour lancer l'installation.)
Scegliere la lingua che sarà visualizzata nel programma di installazione. (altrimenti fare
doppio clic su "risorse del computer", quindi sull'icona dell'unità "Philips_RW" e quindi su
"Setup.exe" per avviare il CD).
Kies de taal voor het Setup-programma.(Start de cd niet vanzelf, dubbelklik dan achtereen-
volgens op de pictogrammen "Deze computer","Philips_RW" en "Setup.exe" om de cd te starten.)
Elija el idioma que aparecerá en el programa de configuración. (Si no es así,haga doble clic en
"Mi PC", luego en el icono de la unidad "Philips_RW" y finalmente en "Setup.exe" para iniciar el CD.)
D
F
I
NL
20
UK
E
Pagina wordt geladen...
Pagina wordt geladen...

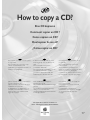
How to copy a CD?
Eine CD kopieren
Comment copier un CD ?
Come copiare un CD?
Hoe kopieer ik een cd?
¿Cómo copiar un CD?
This manual shows an example of how
to copy a CD.
This product is for personal use only.
Unauthorized duplication and
distribution of copyrighted materials is a
violation of copyright law.
In diesem Handbuch wird an einem
Beispiel gezeigt, wie eine CD kopiert
wird.
Dieses Produkt ist nur für den
persönlichen Gebrauch.
Die ungenehmigte Vervielfältigung und
der Vertrieb von urheberrechtlich
geschützten Materialien stellt eine
Verletzung des Urheberrechts dar.
Ce manuel illustre la procédure de co-
pie d’un CD.
Ce produit est à usage personnel
exclusivement.
Toute duplication et diffusion non
autorisée de matières soumises au droit
d’auteur et de copie (copyright)
constituent une violation de la loi sur les
droits d’auteur et de copie (copyright).
Questo manuale contiene informazioni
su come copiare un CD.
Questo prodotto è destinato ad un uso
esclusivamente personale.
La duplicazione e la distribuzione di
materiali protetti dal diritto d'autore
rappresentano una violazione della
legge sul copyright.
Deze handleiding beschrijft het
kopiëren van een cd.
Dit product is alleen bedoeld voor eigen
gebruik.
Het zonder toestemming vermenig-
vuldigen en verspreiden van
auteursrechtelijk beschermd materiaal
is wettelijk verboden.
Este manual muestra un ejemplo de
cómo copiar un CD.
Este producto es para uso personal
exclusivamente.
La duplicación y distribución no
autorizada de materiales con copyright
es una violación de las leyes del
copyright.
UK D F
I NL E
The application software used here is:
Nero - Burning Rom from Ahead Software
17
Pagina wordt geladen...
Pagina wordt geladen...
Pagina wordt geladen...

21
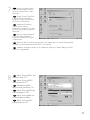
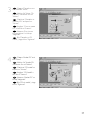
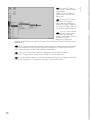
Insert the source disc in
the drive you chose in step 5.
Insert an empty DVD in your
ReWriter
Legen Sie die Quell-Disk
in das in Schritt 5 gewählte
Laufwerk. Legen Sie eine leere
DVD in Ihren ReWriter.
Introduisez le disque
source dans le lecteur
déterminé à l’étape 5 et insérez
un DVD vierge dans le graveur
ReWriter.
Inserire il disco sorgente
nell’unità scelta al passo 5.
Inserire un disco DVD vergine
nel ReWriter
Plaats de disc met het bronmateriaal in het station dat u in stap 5 heeft gekozen,
en plaats een blanco, opneembare DVD in de brander.
Coloque el disco de origen en la unidad que eligió en el paso 5. Ponga un DVD
vacío en su regrabador
7
Nero - Burning ROM will
now burn your CD.
Nero - Burning ROM
brennt jetzt Ihre CD.
Nero Burning Rom
commence la gravure du CD.
Nero - Burning ROM ora
inizierà a copiare il CD.
Nero - Burning Rom zal
nu de cd voor u branden.
Nero - Burning ROM
grabará ahora su CD.
8
UK
F
I
NL
E
D
UK
F
I
NL
E
D

22
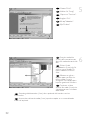
Click "OK". Your CD has
been copied successfully.
Choose "Discard" to finish the
copying process.
Klicken Sie auf "OK".
Ihre CD wurde erfolgreich
kopiert. Wählen Sie
"Verwerfen", um den
Kopiervorgang abzuschließen.
Cliquez sur OK. La
copie du CD s’est déroulée
correctement. Cliquez sur
"Rejeter" pour clore le
processus de copie.
Fare click su "OK". Il CD
è stato copiato con successo.
Scegliere "Elimina" per
terminare il processo di copia.
Klik op "OK". Er is een kopie gemaakt van de originele cd. Klik op "Verwijderen"
om het brandproces af te sluiten.
Haga clic en "OK". Su CD se ha copiado correctamente. Elija "Descartar" para
terminar el proceso de copia.
9
UK
F
I
NL
E
D

232323
How to make a Data CD?
Eine Daten-CD erstellen
Comment créer un disque de données ?
Come creare un CD di dati?
Hoe maak ik zelf een data-cd?
¿Cómo crear un CD de datos ?
This manual shows you an example of
how to make a Data CD.
This product is for personal use only.
Unauthorized duplication and
distribution of copyrighted materials is a
violation of copyright law.
In diesem Handbuch wird an einem
Beispiel gezeigt, wie eine
Daten-CD erstellt wird.
Dieses Produkt ist nur für den
persönlichen Gebrauch.
Die ungenehmigte Vervielfältigung und
der Vertrieb von urheberrechtlich
geschützten Materialien stellt eine
Verletzung des Urheberrechts dar.
Ce manuel illustre la procédure de
création d’un CD de données.
Ce produit est à usage personnel
exclusivement.
Toute duplication et diffusion non
autorisée de matières soumises au droit
d’auteur et de copie (copyright)
constituent une violation de la loi sur les
droits d’auteur et de copie (copyright).
Questo manuale contiene informazioni
su come creare un CD di dati.
Questo prodotto è destinato ad un uso
esclusivamente personale.
La duplicazione e la distribuzione di
materiali protetti dal diritto d'autore
rappresentano una violazione della
legge sul copyright.
Deze handleiding beschrijft het maken
van een data-cd.
Dit product is alleen bedoeld voor eigen
gebruik.
Het zonder toestemming
vermenigvuldigen en verspreiden van
auteursrechtelijk beschermd materiaal
is wettelijk verboden.
Este manual muestra un ejemplo de
cómo crear un CD de datos.
Este producto es para uso personal
exclusivamente.
La duplicación y distribución no
autorizada de materiales con copyright
es una violación de las leyes del
copyright.
UK D F
I NL E
The application software used here is:
Nero - Burning Rom from Ahead Software
23
Pagina wordt geladen...
Pagina wordt geladen...
Pagina wordt geladen...
Pagina wordt geladen...
Pagina wordt geladen...

29
How to make an
Audio CD?
Erstellen einer Audio-CD
Comment créer un CD audio ?
Come creare un CD Audio?
Hoe maak ik zelf muziek-cd's?
¿Cómo crear un CD de audio?
This manual shows you an example of
how to make an Audio
CD which can be played in any CD-
Player
This product is for personal use only.
Unauthorized duplication and
distribution of copyrighted materials is a
violation of copyright law.
n diesem Handbuch wird beschrieben,
wie eine Audio-CD
erstellt wird, die von jedem CD-Player
abgespielt werden kann.
Dieses Produkt ist nur für den
persönlichen Gebrauch.
Die ungenehmigte Vervielfältigung und
der Vertrieb von urheberrechtlich
geschützten Materialien stellt eine
Verletzung des Urheberrechts dar.
Ce manuel illustre la procédure de
création d’un CD audio qui pourra être
lu sur n’importe lecteur de CD.
Ce produit est à usage personnel
exclusivement.
Toute duplication et diffusion non
autorisée de matières soumises au droit
d’auteur et de copie (copyright)
constituent une violation de la loi sur les
droits d’auteur et de copie (copyright).
Questo manuale contiene informazioni
su come creare un CD Audio
che potrà essere letto da un CD-Player.
Questo prodotto è destinato ad un uso
esclusivamente personale.
La duplicazione e la distribuzione di
materiali protetti dal diritto d'autore
rappresentano una violazione della
legge sul copyright.
Deze handleiding beschrijft het maken
van een muziek-cd om in een normale
cd-speler af te spelen.
Dit product is alleen bedoeld voor eigen
gebruik.
Het zonder toestemming
vermenigvuldigen en verspreiden van
auteursrechtelijk beschermd materiaal
is wettelijk verboden.
Este manual muestra un ejemplo de
cómo crear un CD de audio
que se puede reproducir en cualquier
lector de compact disc.
Este producto es para uso personal
exclusivamente.
La duplicación y distribución no
autorizada de materiales con copyright
es una violación de las leyes del
copyright.
UK D F
I NL E
The application software used here is:
Nero - Burning Rom from Ahead Software
29
Pagina wordt geladen...
Pagina wordt geladen...
Pagina wordt geladen...

33
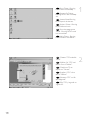
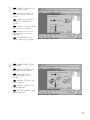
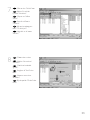
Click on the "Write" icon.
Klicken Sie auf das
Symbol "Schreiben".
Cliquez sur l'icône
"Écrire".
Fare clic sull'icona
"Trascrivi".
Klik op het pictogram
voor "CD schrijven".
Haga clic en el icono
"Escribir".
Choose burn twice.
Wählen Sie zweimal
"brennen".
Choisissez la double
"graver".
Scegliere di "Scrivi" due
volte.
Selecteer twee keer
"Branden".
Elija la opción "Grabar" dos
veces.
8
7
UK
F
I
NL
E
D
UK
F
I
NL
E
D

34
9
Click "OK".
Congratulations, your audio
disc is ready now. Choose
"Discard" to finish the audio
disc creation process.
Klicken Sie auf "OK".
Gratulation, Ihre Audio-CD ist
jetzt fertig.Wählen Sie
"Discard" (Verwerfen), um die
Erstellung der Audio-CD
abzuschließen.
Cliquez sur OK. Le
disque audio est à présent
terminé. Cliquez sur Discard
(Rejeter) pour clore le
processus de création de
disque audionumérique.
Fare click su "OK". Congratulazioni, il CD Audio ora è pronto. Scegliere "Elimina"
per terminare il processo di creazione del CD audio.
Klik op "OK". Na afloop van het brandproces is uw nieuwe audio-cd klaar voor
gebruik. Klik op "Verwijderen" om het brandproces af te sluiten.
Haga clic en "Aceptar". Felicitaciones, su disco de audio está preparado para ser
utilizado.Elija "Discard" (Desechar) para terminar el proceso de creación del disco de
audio.
UK
D
F
I
NL
E
10
Nero - Burning Rom is
burning your Audio CD.
Nero - Burning Rom
brennt Ihre Audio-CD.
Nero Burning Rom
commence la gravure du CD
audionumérique.
Nero - Burning Rom sta
copiando il CD Audio.
Nero - Burning Rom zal
nu de Audio-cd voor u branden.
Nero - Burning Rom
está grabando su CD de audio.
UK
D
F
I
NL
E
Pagina wordt geladen...
Pagina wordt geladen...
Pagina wordt geladen...
Pagina wordt geladen...
Pagina wordt geladen...
Pagina wordt geladen...
Pagina wordt geladen...
Pagina wordt geladen...
Pagina wordt geladen...
Pagina wordt geladen...
Pagina wordt geladen...
Pagina wordt geladen...
Pagina wordt geladen...
Pagina wordt geladen...
Documenttranscriptie
Contents - Inhalt -Table des matières - Indice - Inhoud - Índice ? 2 Installation Installation Installation Installazione Installeren Instalación How to install this drive in my computer? Einbau dieses Laufwerks in den Computer Comment installer ce lecteur dans l’ordinateur? Come installare questa unità sul computer Hoe installeer ik dit station in mijn computer? ¿Cómo instalar esta unidad en el ordenador? 3 3 3 3 3 3 Copy Kopieren Copie Copia Kopiëren Copia How to copy a CD? Eine CD kopieren Comment copier un CD ? Come copiare un CD? Hoe kopieer ik een cd? ¿Cómo copiar un CD? 17 17 17 17 17 17 Data Daten Données Dati Data Datos How to make a Data CD? Eine Daten-CD erstellen Comment créer un disque de données ? Come creare un CD di dati? Hoe maak ik zelf een data-cd? ¿Cómo crear un CD de datos ? 23 23 23 23 23 23 Music Musik Musique Musica Muziek Música How to make an Audio CD? Erstellen einer Audio-CD Comment créer un CD audio? Come creare un CD Audio? Hoe maak ik zelf muziek-cd's? ¿Cómo crear un CD de audio? 29 29 29 29 29 29 Information Information Information Informazione Informatie Información More information about my CD-Rewriter Mehr Informationen über meinen CD-Rewriter Informations ultérieures à propos du CD-Rewriter Ulteriori informazioni sul CD-Rewriter Verdere informatie over mijn CD-Rewriter Más información acerca de mi CD-Rewriter 37 37 37 37 37 37 How to install this drive in my computer? Einbau dieses Laufwerks in den Computer Comment installer ce lecteur dans l’ordinateur ? Come installare questa unità sul computer Hoe installeer ik dit station in mijn computer? ¿Cómo instalar esta unidad en el ordenador? UK The next pages show how to install your new DVD-ReWriter in the PC. Since there are many brands and types of PC's available, the next photographs show only examples on how your drive could be installed. For specific information on your PC, please refer to your PC manual or contact your local dealer. I Nelle prossime pagine verranno date informazioni su come installare DVDReWriter sul PC. Poiché esistono molte marche e tipi di PC, le prossime foto mostreranno solo esempi di come l'unità possa essere installata. Per informazioni specifiche sul proprio PC, fare riferimento al manuale PC o rivolgersi al proprio rivenditore locale. D Auf den nächsten Seiten wird beschrieben, wie Sie Ihren neuen DVDReWriter in den PC einbauen können. Da es viele verschiedene PC-Marken und –Typen gibt, zeigen die folgenden Fotos nur Beispiele dafür, wie Ihr Laufwerk eingebaut werden kann. Für spezielle Informationen zu Ihrem PC beachten Sie bitte Ihr PC-Handbuch, oder wenden Sie sich an Ihren Händler vor Ort. NL De volgende pagina's beschrijven het installeren van de nieuwe DVDReWriter in uw PC. Omdat er vele soorten en merken computers zijn, zullen de hierna volgende afbeeldingen hoogstwaarschijnlijk niet exact overeenkomen met uw eigen situatie. Ze dienen slechts ter illustratie van het installeren. Raadpleeg voor specifieke informatie over uw eigen computer de handleiding van uw PC, of neem contact op met uw leverancier. F Les pages qui suivent illustrent la procédure d’installation de votre nouveau DVD-ReWriter dans l’ordinateur. Il existe un grand nombre de marques et de modèles d’ordinateurs. Les photos suivantes ne sont présentées qu’à titre d’illustration de la procédure à suivre pour installer l’appareil. Pour des informations spécifiques sur votre ordinateur, reportez-vous à son mode d’emploi ou contactez votre revendeur. E Las páginas siguientes muestran cómo instalar su nueva regrabadora en el DVD-PC. Puesto que hay muchas marcas y tipos de ordenadores personales disponibles, las fotografías siguientes muestran sólo algunos ejemplos de cómo podría instalarse la unidad. Para obtener información específica sobre su ordenador personal, por favor consulte el manual de su PC o póngase en contacto con su distribuidor local. 3 3 UK Disconnect the power cable from the PC. D Ziehen Sie das Netzkabel vom Computer ab. F Débranchez le câble d’alimentation de l’ordinateur. I Disconnettere il cavo di alimentazione dal PC. NL PC. Trek de netstekker uit de E Desconecte el cable de alimentación del PC. 4 UK Open your computer. You may have to unleash screws which are mostly located at the back of your computer. ➤ See your computer manual for more details D Öffnen Sie Ihren Computer. Eventuell müssen Sie hierzu Schrauben herausdrehen, die sich meistens an der Rückseite Ihres Computers befinden. ➤ Weitere Informationen hierzu finden Sie in Ihrem Computerhandbuch. F Ouvrez l’ordinateur. Pour cela, il peut être nécessaire de desserrer une ou plusieurs vis à l’arrière de l’ordinateur. ➤ Pour plus de détail, reportezvous au mode d’emploi de l’ordinateur. I Aprire il computer. È possibile che si dovranno svitare delle viti che in genere si trovano sul pannello posteriore del computer. ➤ Per ulteriori informazioni fare riferimento al manuale del computer. NL Maak uw computer open. Meestal moet u de schroeven aan de achterkant van uw computer losschroeven. ➤ Raadpleeg de handleiding van uw PC voor details over het openen van de PC E Abra el ordenador. Tendrá que quitar los tornillos que suelen ir colocados en la parte posterior del ordenador. ➤ Consulte el manual del ordenador donde econtrará más detalles 5 D Wenn bereits ein CD-ROM- oder DVD-ROM- oder ein anderes Laufwerk an Ihren Computer angeschlossen ist, gehen Sie zu Schritt 7. Suchen Sie das Bandkabel (IDE-Kabel), das Ihre Festplatte mit Ihrem Motherboard verbindet. Neben dem Anschluss dieses Kabels befindet sich am Motherboard der zweite IDEAnschluss/das zweite IDE-Kabel. Befestigen Sie das neue Laufwerk an diesem zweiten Kabel, das zum zweiten IDE-Anschluss führt. Das neue Laufwerk muss auf MASTER eingestellt werden. F Si un lecteur de CD-ROM, de DVD-ROM ou un autre lecteur est déjà raccordé à l’ordinateur, allez à l’étape 7. Identifiez le câble plat (IDE) qui part du disque dur vers la carte mère. Le second connecteur de câble IDE se trouve à côté sur la carte mère. Raccordez le nouveau lecteur à ce second câble qui est branché sur le second connecteur IDE. Le nouveau lecteur doit être défini en maître (MASTER). I Se si dispone già di un CDROM, DVDROM o altro dispositivo collegato al computer, passare al punto 7. Individuare il cavo piatto (IDE) che va dal disco rigido alla scheda madre. Accanto alla connessione di questo cavo sulla scheda madre, si trova il secondo cavo/connettore IDE. Collegare la nuova unità a questo secondo cavo, che andrà connessa sul secondo connettore IDE. La nuova unità andrà impostata su MASTER. NL Is er al een CD-ROM, DVD-ROM of een ander station op uw computer aangesloten, ga dan verder met stap 7 Zoek de platte kabel (IDE-kabel) waarmee de harddisk op het moederbord is aangesloten. De tweede IDE-aansluiting of IDE-kabel zit naast deze eerste kabelaansluiting op het moederbord. Sluit de tweede kabel aan op het nieuwe station en op de tweede IDEaansluiting. Stel het nieuwe station in op MASTER. E Si ya dispone de un lector de CDROM, DVDROM u otra unidad conectada a su ordenador, vaya al paso 7. Localice el cable plano (IDE), que va de la unidad de disco duro a la placa principal. Junto a la conexión de este cable en la placa principal se encuentra el segundo conector/cable IDE. Conecte la nueva unidad en el segundo cable que entra en el segundo conector IDE. La nueva unidad debe configurarse como MASTER. 7 13 UK Find a free power cable which mostly looks like this example. Please note the rounded edges of the connector. D Suchen Sie ein freies Netzkabel, dass häufig wie in diesem Beispiel gezeigt aussieht. Die Kanten des Anschlusses sind abgerundet. F Recherchez un câble d’alimentation disposant d’une fiche libre, comme l’illustre l’exemple. La fiche présente des bords arrondis. I Individuare un cavo di alimentazione libero che dovrebbe apparire come quello nell'esempio. Notare i bordi arrotondati del connettore. N Zoek een vrije stroomkabel die lijkt op ons voorbeeld. Let op waar de afgeschuinde hoekjes van de stekker zitten. E Localice un cable de alimentación libre, que se parezca al mostrado en este ejemplo. Por favor observe los bordes redondeados del conector. 14 UK Connect the power cable into your drive. D Schließen Sie das Netzkabel an Ihr Laufwerk an. F Raccordez le câble d’alimentation à l’appareil. I Connettere i cavo di alimentazione nell'unità. NL Sluit de stroomkabel aan op het station. E Conecte el cable de alimentación en la unidad. 11 17 UK Put the screws (if there were any) back in. Plug the power cable back in. If you disconnected other cables, put these back in too. D Drehen Sie die Schrauben (wenn da welche waren) wieder ein. Stecken Sie das Netzkabel wieder ein.Wenn Sie weitere Kabel abgezogen haben, stecken Sie diese ebenfalls wieder ein. F Resserrez la ou les vis, le cas échéant. Rebranchez le cordon d’alimentation. Si vous avez débranché d’autres câbles, rebranchez-les également. I Riavvitare le viti (se c'erano) al loro posto. Riconnettere il cavo di alimentazione. Se sono stati staccati anche altri cavi, riconnetterli. NL Draai (zo nodig) de schroeven weer vast. Sluit de netstekker weer aan. Sluit ook de overige kabels weer aan, als u die had losgemaakt. E Ponga los tornillos (si los tenía puestos) nuevamente en su lugar. Vuelva a conectar el cable de alimentación. Si ha desconectado otros cables, vuélvalos a conectar en su lugar. 18 UK Restart your computer. D Starten Sie Ihren Computer neu. F Allumez l’ordinateur. I Riavviare il computer. Start uw computer opnieuw op. NL E Reinicie el ordenador. 13 19 UK Now insert the installation disc delivered with the drive in your drive and follow the instructions.This disc will install all the software on your computer. D Legen Sie jetzt die mit dem Laufwerk gelieferte Installations-CD in Ihr Laufwerk ein und befolgen Sie die Anweisungen. Mit Hilfe dieser CD installieren Sie die gesamte Software auf Ihrem Computer. F Introduisez à présent dans le lecteur le disque d’installation fourni avec l’appareil et suivez les instructions. Le disque lance l’installation du logiciel sur l’ordinateur. I Ora inserire il disco di installazione in dotazione all'unità e attenersi alle istruzioni. Questo disco installerà tutto il software sul computer. NL Plaats nu de meegeleverde installatie-CD in het station en voer de aanwijzingen uit die op het scherm verschijnen. Deze cd installeert alle benodigde programma's op uw computer. E Coloque ahora el disco de instalación suministrado con la unidad y siga las instrucciones indicadas. Este disco instalará todo el software en su ordenador. UK Choose the language to be displayed in the Setup program. (If not, double-click "My Computer",then the "Philips RW" drive icon and finally "Setup.exe" to start the CD.) 20 D Wählen Sie die Sprache für das Installationsprogramm. (Sollte dies nicht geschehen, doppelklicken Sie auf "Arbeitsplatz", dann auf das Laufwerkssymbol "Philips RW" und schließlich auf die Datei Setup.exe", um die CD zu starten.) F Choisissez la langue à afficher dans le programme d’installation. (Si ce n'est pas le cas, double-cliquez sur Poste de travail, double-cliquez sur l'icône Philips RW et double-cliquez sur Setup.exe pour lancer l'installation.) I Scegliere la lingua che sarà visualizzata nel programma di installazione. (altrimenti fare doppio clic su "risorse del computer", quindi sull'icona dell'unità "Philips_RW" e quindi su "Setup.exe" per avviare il CD). NL Kies de taal voor het Setup-programma.(Start de cd niet vanzelf, dubbelklik dan achtereenvolgens op de pictogrammen "Deze computer", "Philips_RW" en "Setup.exe" om de cd te starten.) 14 E Elija el idioma que aparecerá en el programa de configuración. (Si no es así,haga doble clic en "Mi PC", luego en el icono de la unidad "Philips_RW" y finalmente en "Setup.exe" para iniciar el CD.) How to copy a CD? Eine CD kopieren Comment copier un CD ? Come copiare un CD? Hoe kopieer ik een cd? ¿Cómo copiar un CD? UK This manual shows an example of how to copy a CD. This product is for personal use only. Unauthorized duplication and distribution of copyrighted materials is a violation of copyright law. I Questo manuale contiene informazioni su come copiare un CD. Questo prodotto è destinato ad un uso esclusivamente personale. La duplicazione e la distribuzione di materiali protetti dal diritto d'autore rappresentano una violazione della legge sul copyright. D In diesem Handbuch wird an einem Beispiel gezeigt, wie eine CD kopiert wird. Dieses Produkt ist nur für den persönlichen Gebrauch. Die ungenehmigte Vervielfältigung und der Vertrieb von urheberrechtlich geschützten Materialien stellt eine Verletzung des Urheberrechts dar. NL Deze handleiding beschrijft het kopiëren van een cd. Dit product is alleen bedoeld voor eigen gebruik. Het zonder toestemming vermenigvuldigen en verspreiden van auteursrechtelijk beschermd materiaal is wettelijk verboden. F Ce manuel illustre la procédure de copie d’un CD. Ce produit est à usage personnel exclusivement. Toute duplication et diffusion non autorisée de matières soumises au droit d’auteur et de copie (copyright) constituent une violation de la loi sur les droits d’auteur et de copie (copyright). E Este manual muestra un ejemplo de cómo copiar un CD. Este producto es para uso personal exclusivamente. La duplicación y distribución no autorizada de materiales con copyright es una violación de las leyes del copyright. The application software used here is: Nero - Burning Rom from Ahead Software 17 7 UK Insert the source disc in the drive you chose in step 5. Insert an empty DVD in your ReWriter D Legen Sie die Quell-Disk in das in Schritt 5 gewählte Laufwerk. Legen Sie eine leere DVD in Ihren ReWriter. F Introduisez le disque source dans le lecteur déterminé à l’étape 5 et insérez un DVD vierge dans le graveur ReWriter. I Inserire il disco sorgente nell’unità scelta al passo 5. Inserire un disco DVD vergine nel ReWriter NL Plaats de disc met het bronmateriaal in het station dat u in stap 5 heeft gekozen, en plaats een blanco, opneembare DVD in de brander. E Coloque el disco de origen en la unidad que eligió en el paso 5. Ponga un DVD vacío en su regrabador 8 UK Nero - Burning ROM will now burn your CD. D Nero - Burning ROM brennt jetzt Ihre CD. F Nero Burning Rom commence la gravure du CD. I Nero - Burning ROM ora inizierà a copiare il CD. NL Nero - Burning Rom zal nu de cd voor u branden. E Nero - Burning ROM grabará ahora su CD. 21 UK Click "OK". Your CD has been copied successfully. Choose "Discard" to finish the copying process. D Klicken Sie auf "OK". Ihre CD wurde erfolgreich kopiert. Wählen Sie "Verwerfen", um den Kopiervorgang abzuschließen. F Cliquez sur OK. La copie du CD s’est déroulée correctement. Cliquez sur "Rejeter" pour clore le processus de copie. I Fare click su "OK". Il CD è stato copiato con successo. Scegliere "Elimina" per terminare il processo di copia. NL Klik op "OK". Er is een kopie gemaakt van de originele cd. Klik op "Verwijderen" om het brandproces af te sluiten. E Haga clic en "OK". Su CD se ha copiado correctamente. Elija "Descartar" para terminar el proceso de copia. 22 9 How to make a Data CD? Eine Daten-CD erstellen Comment créer un disque de données ? Come creare un CD di dati? Hoe maak ik zelf een data-cd? ¿Cómo crear un CD de datos ? UK This manual shows you an example of how to make a Data CD. This product is for personal use only. Unauthorized duplication and distribution of copyrighted materials is a violation of copyright law. I Questo manuale contiene informazioni su come creare un CD di dati. Questo prodotto è destinato ad un uso esclusivamente personale. La duplicazione e la distribuzione di materiali protetti dal diritto d'autore rappresentano una violazione della legge sul copyright. D In diesem Handbuch wird an einem Beispiel gezeigt, wie eine Daten-CD erstellt wird. Dieses Produkt ist nur für den persönlichen Gebrauch. Die ungenehmigte Vervielfältigung und der Vertrieb von urheberrechtlich geschützten Materialien stellt eine Verletzung des Urheberrechts dar. NL Deze handleiding beschrijft het maken van een data-cd. Dit product is alleen bedoeld voor eigen gebruik. Het zonder toestemming vermenigvuldigen en verspreiden van auteursrechtelijk beschermd materiaal is wettelijk verboden. F Ce manuel illustre la procédure de création d’un CD de données. Ce produit est à usage personnel exclusivement. Toute duplication et diffusion non autorisée de matières soumises au droit d’auteur et de copie (copyright) constituent une violation de la loi sur les droits d’auteur et de copie (copyright). E Este manual muestra un ejemplo de cómo crear un CD de datos. Este producto es para uso personal exclusivamente. La duplicación y distribución no autorizada de materiales con copyright es una violación de las leyes del copyright. The application software used here is: Nero - Burning Rom from Ahead Software 23 How to make an Audio CD? Erstellen einer Audio-CD Comment créer un CD audio ? Come creare un CD Audio? Hoe maak ik zelf muziek-cd's? ¿Cómo crear un CD de audio? UK This manual shows you an example of how to make an Audio CD which can be played in any CDPlayer This product is for personal use only. Unauthorized duplication and distribution of copyrighted materials is a violation of copyright law. I Questo manuale contiene informazioni su come creare un CD Audio che potrà essere letto da un CD-Player. Questo prodotto è destinato ad un uso esclusivamente personale. La duplicazione e la distribuzione di materiali protetti dal diritto d'autore rappresentano una violazione della legge sul copyright. D n diesem Handbuch wird beschrieben, wie eine Audio-CD erstellt wird, die von jedem CD-Player abgespielt werden kann. Dieses Produkt ist nur für den persönlichen Gebrauch. Die ungenehmigte Vervielfältigung und der Vertrieb von urheberrechtlich geschützten Materialien stellt eine Verletzung des Urheberrechts dar. NL Deze handleiding beschrijft het maken van een muziek-cd om in een normale cd-speler af te spelen. Dit product is alleen bedoeld voor eigen gebruik. Het zonder toestemming vermenigvuldigen en verspreiden van auteursrechtelijk beschermd materiaal is wettelijk verboden. F Ce manuel illustre la procédure de création d’un CD audio qui pourra être lu sur n’importe lecteur de CD. Ce produit est à usage personnel exclusivement. Toute duplication et diffusion non autorisée de matières soumises au droit d’auteur et de copie (copyright) constituent une violation de la loi sur les droits d’auteur et de copie (copyright). E Este manual muestra un ejemplo de cómo crear un CD de audio que se puede reproducir en cualquier lector de compact disc. Este producto es para uso personal exclusivamente. La duplicación y distribución no autorizada de materiales con copyright es una violación de las leyes del copyright. The application software used here is: Nero - Burning Rom from Ahead Software 29 7 UK Click on the "Write" icon. Klicken Sie auf das Symbol "Schreiben". D F Cliquez sur l'icône "Écrire". I Fare clic sull'icona "Trascrivi". NL Klik op het pictogram voor "CD schrijven". E Haga clic en el icono "Escribir". 8 UK Choose burn twice. Wählen Sie zweimal "brennen". D F Choisissez la double "graver". I volte. Scegliere di "Scrivi" due NL Selecteer twee keer "Branden". E veces. Elija la opción "Grabar" dos 33 UK Nero - Burning Rom is burning your Audio CD. Nero - Burning Rom brennt Ihre Audio-CD. D 9 F Nero Burning Rom commence la gravure du CD audionumérique. I Nero - Burning Rom sta copiando il CD Audio. NL Nero - Burning Rom zal nu de Audio-cd voor u branden. E Nero - Burning Rom está grabando su CD de audio. UK Click "OK". Congratulations, your audio disc is ready now. Choose "Discard" to finish the audio disc creation process. D Klicken Sie auf "OK". Gratulation, Ihre Audio-CD ist jetzt fertig.Wählen Sie "Discard" (Verwerfen), um die Erstellung der Audio-CD abzuschließen. F Cliquez sur OK. Le disque audio est à présent terminé. Cliquez sur Discard (Rejeter) pour clore le processus de création de disque audionumérique. I Fare click su "OK". Congratulazioni, il CD Audio ora è pronto. Scegliere "Elimina" per terminare il processo di creazione del CD audio. NL Klik op "OK". Na afloop van het brandproces is uw nieuwe audio-cd klaar voor gebruik. Klik op "Verwijderen" om het brandproces af te sluiten. E Haga clic en "Aceptar". Felicitaciones, su disco de audio está preparado para ser utilizado. Elija "Discard" (Desechar) para terminar el proceso de creación del disco de audio. 34 10-
 1
1
-
 2
2
-
 3
3
-
 4
4
-
 5
5
-
 6
6
-
 7
7
-
 8
8
-
 9
9
-
 10
10
-
 11
11
-
 12
12
-
 13
13
-
 14
14
-
 15
15
-
 16
16
-
 17
17
-
 18
18
-
 19
19
-
 20
20
-
 21
21
-
 22
22
-
 23
23
-
 24
24
-
 25
25
-
 26
26
-
 27
27
-
 28
28
-
 29
29
-
 30
30
-
 31
31
-
 32
32
-
 33
33
-
 34
34
-
 35
35
-
 36
36
-
 37
37
-
 38
38
-
 39
39
-
 40
40
-
 41
41
-
 42
42
-
 43
43
-
 44
44
-
 45
45
-
 46
46
-
 47
47
-
 48
48


Philips PBCO1610G Handleiding
- Categorie
- Optische schijfstations
- Type
- Handleiding
in andere talen
- English: Philips PBCO1610G User manual
- italiano: Philips PBCO1610G Manuale utente
- français: Philips PBCO1610G Manuel utilisateur
- español: Philips PBCO1610G Manual de usuario
- Deutsch: Philips PBCO1610G Benutzerhandbuch
Gerelateerde papieren
-
Philips DVDRW416K-P00 de handleiding
-
Philips Computer Drive DVDRW228 Handleiding
-
-
Philips SPD2201BD/97 Handleiding
-
-
-
Philips DVDR16LSK Handleiding
-
-