
KDV10031FA
Gebruik‐
saanwijzing
Afwasauto‐
maat
User Manual
Dishwasher

Inhoudsopgave
Veiligheidsinformatie 2
Veiligheidsvoorschriften 3
Productbeschrijving 5
Bedieningspaneel 6
Programmakeuze 6
Basisinstellingen 8
Voordat u het apparaat voor de eerste keer gebruikt
11
Dagelijks gebruik 12
Aanwijzingen en tips 14
Onderhoud en reiniging 15
Probleemoplossing 18
Technische informatie 22
Wijzigingen voorbehouden.
GA NAAR ONZE WEBSITE VOOR:
Advies over gebruik, brochures, het oplossen van problemen, onderhouds- en reparatie-informatie:
www.zanker.de/support
Veiligheidsinformatie
Lees zorgvuldig de meegeleverde instructies voor installatie en gebruik van
het apparaat. De fabrikant is niet verantwoordelijk voor verwondingen of
schade die voortvloeit uit de onjuiste installatie of het onjuiste gebruik.
Bewaar de instructies altijd op een veilige, toegankelijke plek voor
toekomstig gebruik.
Veiligheid van kinderen en kwetsbare mensen
• Dit apparaat kan worden gebruikt door kinderen van 8 jaar en ouder en
door mensen met beperkte lichamelijke, zintuiglijke of verstandelijke
vermogens of een gebrek aan ervaring en kennis, indien zij onder toezicht
staan of instructies hebben gekregen over het veilig gebruiken van het
apparaat en indien zij de eventuele gevaren begrijpen.
• Kinderen tussen de 3 en 8 jaar oud en personen met zware en complexe
beperkingen dienen altijd uit de buurt van het apparaat te worden
gehouden, tenzij ze voortdurend onder toezicht staan.
• Kinderen jonger dan 3 jaar dienen, mits zij voortdurend onder toezicht
staan, bij het apparaat uit de buurt te worden gehouden.
• Laat kinderen niet met het apparaat spelen.
• Houd reinigingsmiddelen uit de buurt van kinderen.
• Houd kinderen en huisdieren uit de buurt van het apparaat als de deur
open is.
2

• Kinderen mogen zonder toezicht geen reinigings- en
onderhoudswerkzaamheden aan het apparaat uitvoeren.
Algemene veiligheid
• Dit apparaat is bedoeld voor gebruik in huishoudelijke en soortgelijke
toepassingen, zoals:
– boerderijen; personeelskeukens in winkels, kantoren of andere
werkomgevingen;
– door gasten in hotels, motels, bed&breakfasts- en andere
woonomgevingen.
• De specificatie van dit apparaat niet wijzigen.
• De waterdruk (minimaal en maximaal) moet liggen tussen 0.5 (0.05) / 8
(0.8) bar (MPa)
• Volg het maximale aantal 9 plaatsen.
• Als de voedingskabel beschadigd is, moet de fabrikant, een erkende
serviceverlener of een gekwalificeerd persoon deze vervangen teneinde
gevaarlijke situaties te voorkomen.
• Leg het bestek in de besteklade met de scherpe randen naar beneden of
leg ze horizontaal in de besteklade met de scherpe randen naar beneden.
• Laat om ongelukken te voorkomen het apparaat niet onbeheerd achter
met open deur.
• Schakel het apparaat uit en trek de stekker uit het stopcontact voordat u
onderhoudshandelingen verricht.
• Gebruik geen waterstralen onder druk en/of stoom om het apparaat te
reinigen.
• Als het apparaat is voorzien van ventilatieopeningen in de basis, mogen
deze niet worden afgedekt met bijv. een vloerkleed.
• Het apparaat moet met de nieuwe slangset worden aangesloten op een
kraan. Oude slangsets mogen niet opnieuw worden gebruikt.
Veiligheidsvoorschriften
Installatie
WAARSCHUWING! Alleen een erkende
installatietechnicus mag het apparaat
installeren.
• Verwijder alle verpakkingsmaterialen.
• Installeer en gebruik geen beschadigd apparaat.
• Gebruik het apparaat niet voordat u het in de
ingebouwde structuur installeert omwille van
veiligheidsredenen.
• Volg de installatie-instructies die zijn meegeleverd
met het apparaat.
• Pas altijd op bij verplaatsing van het apparaat, want
het is zwaar. Gebruik altijd veiligheidshandschoenen
en gesloten schoeisel.
3

• Installeer of gebruik het apparaat niet op een plek
waar de temperatuur onder de 0 °C komt.
• Installeer het apparaat op een veilige en geschikte
plaats die aan alle installatie-eisen voldoet.
Elektrische aansluiting
WAARSCHUWING! Gevaar voor brand
en elektrische schokken.
• Dit apparaat moet worden aangesloten op een
geaard stopcontact.
• Zorg ervoor dat de parameters op het
vermogensplaatje overeenkomen met elektrische
vermogen van de netstroom.
• Gebruik altijd een juist geïnstalleerd schokbestendig
stopcontact.
• Gebruik geen adapters met meerdere stekkers en
verlengkabels.
• Zorg dat u de netstekker en het netsnoer niet
beschadigt. Indien de voedingskabel moet worden
vervangen, dan moet dit gebeuren door onze
Klantenservice.
• Steek de stekker pas in het stopcontact als de
installatie is voltooid. Zorg ervoor dat het netsnoer
na installatie bereikbaar is.
• Trek niet aan het netsnoer om het apparaat los te
koppelen. Trek altijd aan de stekker.
• Dit apparaat is voorzien van een 13 A stekker. Als
de zekering van de stekker vervangen moet worden,
moet een ASTA (BS 1362)-zekering van 13-ampère
worden gebruikt (uitsluitend VK en Ierland).
Aansluiting aan de waterleiding
• Beschadig de waterslangen niet.
• Indien buizen lang niet zijn gebruikt, er reparaties
hebben plaatsgevonden of er nieuwe apparaten zijn
geplaatst (watermeters, enz.), moet u, voordat de
nieuwe buizen worden aangesloten, het water laten
stromen tot het schoon en helder is.
• Zorg ervoor dat er geen zichtbare waterlekken zijn
tijdens en na het eerste gebruik van het apparaat.
• De watertoevoerslang heeft een veiligheidsventiel
en een omhulsel met een hoofdkabel aan de
binnenkant.
WAARSCHUWING! Gevaarlijke
spanning.
• Als de watertoevoerslang beschadigd is, sluit dan
onmiddellijk de waterkraan en haal de stekker uit
het stopcontact. Neem contact op met de service-
afdeling om de watertoevoerslang te vervangen.
Gebruik
• Plaats geen ontvlambare producten of items die
vochtig zijn door ontvlambare producten in, bij of op
het apparaat.
• Vaatwasmiddel is gevaarlijk. Volg de
veiligheidsinstructies op de verpakking van het
wasmiddel op.
• Speel niet met het water van het apparaat en drink
het niet op.
• Verwijder de borden pas uit het apparaat als het
programma is voltooid. Er kan wat wasmiddel op de
vaat achterblijven.
• Bewaar geen voorwerpen en oefen geen druk uit op
de open deur van het apparaat.
• Het apparaat kan hete stoom laten ontsnappen als u
de deur opent terwijl er een programma wordt
uitgevoerd.
Binnenverlichting
WAARSCHUWING! Gevaar voor letsel.
• Met betrekking tot de lamp(en) in dit product en
reservelampen die afzonderlijk worden verkocht:
Deze lampen zijn bedoeld om bestand te zijn tegen
extreme fysieke omstandigheden in huishoudelijke
apparaten, zoals temperatuur, trillingen, vochtigheid,
of zijn bedoeld om informatie te geven over de
operationele status van het apparaat. Ze zijn niet
bedoeld voor gebruik in andere toepassingen en zijn
niet geschikt voor verlichting in huishoudelijke
ruimten.
• Neem contact op met het service-centrum om de
binnenverlichting te vervangen.
Service
• Neem contact op met de erkende servicedienst voor
reparatie van het apparaat. Gebruik uitsluitend
originele reserveonderdelen.
• Houd er rekening mee dat zelfreparatie of niet-
professionele reparatie gevolgen kan hebben voor
de veiligheid en de garantie kan doen vervallen.
• De volgende reserveonderdelen zijn beschikbaar
gedurende 7 jaar nadat het model is stopgezet:
motor, circulatie- en afvoerpomp,
verwarmingstoestellen en verwarmingselementen,
inclusief warmtepompen, leidingen en aanverwante
4

apparatuur, waaronder slangen, kleppen, filters en
aquastops, structurele en interne onderdelen met
betrekking tot deurconstructies, printplaten,
elektronische displays, drukschakelaars,
thermostaten en sensoren, software en firmware,
inclusief resetsoftware. Houd er rekening mee dat
sommige van deze reserveonderdelen alleen
beschikbaar zijn voor professionele reparateurs en
dat niet alle reserveonderdelen relevant zijn voor
alle modellen.
• De volgende reserveonderdelen zullen beschikbaar
zijn gedurende 10 jaar nadat het model is stopgezet:
deurscharnieren en -afdichtingen, andere
afdichtingen, spuitarmen, afvoerfilters, binnenrekken
en plastic randapparatuur zoals manden en deksels.
Verwijdering
WAARSCHUWING! Gevaar voor letsel
of verstikking.
• Haal de stekker uit het stopcontact.
• Snij het netsnoer van het apparaat af en gooi dit
weg.
• Verwijder de deurgreep om te voorkomen dat
kinderen en huisdieren opgesloten raken in het
apparaat.
Productbeschrijving
De afbeeldingen hieronder geven alleen
een algemeen productoverzicht.
Raadpleeg voor meer gedetailleerde
informatie andere hoofdstukken en/of
documenten die bij het apparaat zijn
meegeleverd.
4
3
7
8
10 9
56
11
1
2
1
Bovenste sproeiarmen
2
Onderste sproeiarm
3
Filters
4
Typeplaatje
5
Zoutreservoir
6
Ventilatie
7
Glansmiddeldoseerbakje
8
Vaatwasmiddeldoseerbakje
9
Bestekkorf
10
Onderste korf
11
Bovenste korf
5

Bedieningspaneel
1 2 3 4 5 6
1
Aan-/uittoets/Resetknop
2
Toets uitgestelde start
3
Indicatielampjes
4
Programmatoetsen
5
Extra power toets
6
AUTO programmatoets
Controlelampjes
Controlelampje Beschrijving
Controlelampje glansmiddelinstellingen. Het is aan wanneer u de vrijgegeven hoeveelheid glans-
spoelmiddel instelt. Zie "Basisinstellingen".
Zoutindicatielampje. Dit is aan als het zoutreservoir bijgevuld dient te worden. Raadpleeg "Voor
eerste ingebruikname".
Machine Care -indicatielampje. Dit is aan als het apparaat interne reiniging nodig heeft met het
programmaMachine Care. Raadpleeg "Onderhoud en reiniging".
Indicatielampje droogfase. Dit is aan als een programma met droogfase is gekozen. Het gaat
knipperen wanneer de droogfase loopt. Raadpleeg "Programmaselectie".
Programmakeuze
Programma’s
BA C
A. • 30min is het kortste programma geschikt voor
het wassen van een lading met niet-
aangekoekt en weinig vuil.
• Pre Rinse is een programma voor het
afspoelen van voedselresten van de vaat. Het
voorkomt geurvorming in het apparaat. U hoeft
voor dit programma geen afwasmiddel te
gebruiken.
B. 90min is een programma dat geschikt is voor het
wassen en drogen van zwaarbevuilde vaat.
C. ECO is het langste programma en biedt het meest
efficiënte water- en energieverbruik voor normaal
vervuild serviesgoed en bestek. Dit is het
standaard programma voor testinstituten.
1)
Extra power
Deze optie verbetert de wasresultaten van het
geselecteerde programma. De optie verhoogt de
wastemperatuur en verlengt de duur.
1) Dit programma wordt gebruikt om de naleving van Verordening (EU) 2019/2022 van de Commissie inzake ecologisch
ontwerp te beoordelen.
6

AUTO
Dit programma past de wascyclus automatisch aan aan
de type lading.
Het apparaat detecteert de vuilgraad en de hoeveelheid
serviesgoed in de korven. De temperatuur, de
hoeveelheid water en de programmaduur worden
aangepast.
Programmaoverzicht
Programma Type lading Mate van vervui-
ling
Programmafasen Opties
30min
• Vaatwerk
• Bestek
• Fris • Wassen 50 °C
• Tussentijdse spoeling
• Laatste spoeling 45 °C
• AirDry
• Extra power
Pre Rinse
• Alle soorten
vaat
• Alle vuilgra-
den
• Voorspoelen
Opties zijn niet van toe-
passing op dit program-
ma.
90min
• Vaatwerk
• Bestek
• Potten
• Pannen
• Normaal
• Licht aange-
koekt
• Wassen 60 °C
• Tussentijdse spoeling
• Laatste spoeling 55 °C
• Drogen
• AirDry
• Extra power
ECO
• Vaatwerk
• Bestek
• Potten
• Pannen
• Normaal
• Licht aange-
koekt
• Voorspoelen
• Wassen 50 °C
• Tussentijdse spoeling
• Laatste spoeling 60 °C
• Drogen
• AirDry
• Extra power
AUTO
• Vaatwerk
• Bestek
• Potten
• Pannen
Het programma
past zich aan
aan de vuil-
graad.
• Voorspoelen
• Wassen 50 - 60 °C
• Tussentijdse spoeling
• Laatste spoeling 55 °C
• Drogen
• AirDry
Opties zijn niet van toe-
passing op dit program-
ma.
Machine
Care
• Geen lading
Het programma
reinigt de bin-
nenkant van het
apparaat.
Raadpleeg "On-
derhoud en rei-
niging".
• Wassen 65 °C
• Tussentijdse spoeling
• Laatste spoelgang
• AirDry
Opties zijn niet van toe-
passing op dit program-
ma.
Verbruikswaarden
Programma
1)
Water (l) Energie (kWh) Duur (min.)
30min 7.9 -9.7 0.543 - 0.664 30
7

Programma
1)
Water (l) Energie (kWh) Duur (min.)
Pre Rinse 2.8 - 3.4 0.011 - 0.014 15
90min 8.5 - 10.4 0.743 - 0.909 90
ECO 9.9
0.778
2)
/0.779
3)
240
AUTO 8.0 - 10.7 0.683 - 1.047 120 - 170
Machine Care 7.4 - 8.9 0.396 - 0.484 60
1) De druk en temperatuur van het water, de variaties in stroomtoevoer, de opties en de hoeveelheid vaat kan de verbruiks-
waarden veranderen.
2) Conform verordening 1016/2010
3) Conform verordening 2019/2022
Aanwijzingen voor testinstituten
Om de nodige informatie te ontvangen over het
uitvoeren van prestatietesten (bijv. volgens EN60436)
stuurt u een e-mail naar:
Vermeld in uw verzoek de productnummercode (PNC)
dat u op het typeplaatje aantreft.
Raadpleeg voor andere vragen betreffende uw
vaatwasmachine het serviceboekje dat met uw apparaat
is meegeleverd.
Basisinstellingen
U kunt het apparaat configureren door de
basisinstellingen naar uw behoefte te wijzigen.
Aantal Instellingen Waarden
Omschrijving
1)
1 Waterhardheid Van niveau 1 tot
niveau 10 (stan-
daard: 5)
Aanpassen van het niveau van de waterverzachter af-
gestemd op de hardheid van het water in uw omgeving.
2 Niveau glanspoels-
middel
Van niveau 0 tot
niveau 8 (stan-
daard: 5)
Aanpassen van het niveau glansspoelmiddel volgens
de benodigde dosering.
3 Eindsignaal Aan
Uit (standaard)
Het geluidssignaal aan het eind van een programma in-
of uitschakelen.
4 Automatische deur
opening
Aan (standaard)
Uit
Activeer of deactiveer de AirDry.
5 Toetstonen Aan (standaard)
Uit
Activeren of deactiveren van het geluid van de knoppen
als u ze indrukt.
1) Raadpleeg de informatie in dit hoofdstuk voor meer details.
U kunt de basisinstelling in de instellingsmodus
wijzigen.
Als het apparaat in de instellingenstand staat,
vertegenwoordigen de indicatielampjes op het
8

bedieningspaneel de beschikbare instellingen. Voor
iedere instelling knippert een aangewezen
indicatielampje:
1 3 2
4 5
De waterontharder
De waterontharder verwijdert mineralen van de
watertoevoer die een nadelige invloed hebben op de
wasresultaten en het apparaat.
Hoe hoger het gehalte van deze mineralen, des te
harder is het water. De waterhardheid wordt gemeten in
de volgende gelijkwaardige schalen.
De waterontharder moet worden afgesteld op de
hardheid van het water in uw woonplaats. Uw
waterleidingbedrijf kan u informeren over de hardheid
van het water in uw woonplaats. Het is belangrijk om
het correcte niveau voor de waterontharder in te stellen
voor goede wasresultaten.
Waterhardheid
Duitse hardheid
(°dH)
Franse hardheid
(°fH)
mmol/l Clarke-hard-
heid
Wateronthardingsni-
veau
47 - 50 84 - 90 8,4 - 9,0 58 - 63 10
43 - 46 76 - 83 7,6 - 8,3 53 - 57 9
37 - 42 65 - 75 6,5 - 7,5 46 - 52 8
29 - 36 51 - 64 5,1 - 6,4 36 - 45 7
23 - 28 40 - 50 4,0 - 5,0 28 - 35 6
19 - 22 33 - 39 3,3 - 3,9 23 - 27
5
1)
15 - 18 26 - 32 2,6 - 3,2 18 - 22 4
11 - 14 19 - 25 1,9 - 2,5 13 - 17 3
4 - 10 7 - 18 0,7 - 1,8 5 - 12 2
<4 <7 <0,7 < 5
1
2)
1) Fabrieksinstelling.
2) Gebruik geen zout op dit niveau.
Stel ongeacht het gebruikte soort wasmiddel het
juiste waterhardheidniveau in om de bijvulindicator
voor zout geactiveerd te houden.
Multivaatwastabletten die zout bevatten
zijn niet effectief genoeg als
waterontharder.
Regeneratieproces
Voor de juiste werking van de waterontharder moet de
hars van de ontharder regelmatig worden
geregenereerd. Dit proces is automatisch en maakt deel
uit van de normale vaatwasmachinewerking.
Wanneer de voorgeschreven hoeveelheid water (zie
waarden in de tabel) is gebruikt sinds het vorige
regeneratieproces, wordt een nieuw regeneratieproces
gestart tussen de laatste spoeling en het einde van het
programma.
9

Wateronthardingsni-
veau
Hoeveelheid water (l)
1 250
2 100
3 62
4 47
5 25
6 17
7 10
8 5
9 3
10 3
In het geval van de hoge wateronthardersinstelling kan
dit ook in het midden van het programma gebeuren,
vóór het spoelen (tweemaal tijdens een programma).
De start van de regeneratie heeft geen invloed op de
cyclusduur, tenzij deze plaatsvindt in het midden van
een programma of aan het einde van een programma
met een korte droogfase. In dat geval verlengt de
regeneratie de totale duur van een programma met nog
eens 5 minuten.
Vervolgens kan het spoelen van de waterontharder wat
5 minuten duurt, beginnen in dezelfde cyclus of aan het
begin van het volgende programma. Deze activiteit
verhoogt het totale waterverbruik van een programma
met 4 liter en het totale energieverbruik van een
programma met 2 Wh. Het spoelen van de
waterontharder eindigt met een volledige afvoer.
Elke uitgevoerde waterontharderspoeling (mogelijk
meer dan één in dezelfde cyclus) kan de
programmaduur met nog eens 5 minuten verlengen
wanneer deze op enig moment aan het begin of in het
midden van een programma plaatsvindt.
Alle in deze paragraaf genoemde
verbruikswaarden worden bepaald
volgens de huidige geldende norm in
laboratoriumomstandigheden met
waterhardheid 2,5 mmol/l volgens de
verordening 2019/2022 (waterontharder:
niveau 3).
De druk en de temperatuur van het water
en de variaties van de netvoeding
kunnen de waarden veranderen.
Het glansspoelmiddelniveau
Met glansspoelmiddel wordt het serviesgoed zonder
vlekken of strepen gedroogd. Het wordt automatisch
vrijgegeven tijdens de warme spoelfase. Het is mogelijk
om de vrijgegeven hoeveelheid glansspoelmiddel in te
stellen.
Als u tevreden bent met de droogresultaten bij het
gebruik van alleen multitabletten, kunt u de het
doseerbakje deactiveren. Voor de beste droogprestaties
dient u echter altijd glansmiddel te gebruiken.
Om het glansspoelmiddeldoseerbakje te deactiveren,
stelt u het niveau van glansspoelmiddel in op 0.
Eindsignaal
U kunt een geluidssignaal activeren dat klinkt bij het
beëindigen van het programma.
Er klinken ook geluidssignalen als er zich
in het apparaat een storing voordoet. Het
is niet mogelijk deze geluidssignalen uit
te schakelen.
AirDry
AirDry verbetert de droogresultaten. Tijdens de
droogfase opent de deur van het apparaat automatisch
en blijft op een kier staan.
AirDry wordt bij alle programma's behalve Pre Rinse
automatisch geactiveerd.
Let op! Probeer de deur van het
apparaat niet binnen 2 minuten na
automatisch openen te sluiten. Dit kan
het apparaat beschadigen.
Let op! Als kinderen toegang tot het
apparaat hebben, adviseren we AirDry te
deactiveren. Het automatisch openen
van de deur kan een gevaar vormen.
10

Geluiden
De knoppen op het bedieningspaneel maken een
klikgeluid als u ze indrukt. U kunt dit geluid
uitschakelen.
Setting mode
Instellingenmodus ingaan
U kunt de instellingenmodus ingaan voordat een
programma start. U kunt de instelllingenmodus niet
ingaan als er een programma draait.
Om de instellingenmodus in te gaan, drukt u
tegelijkertijd op 30min en ECO en houdt u die ongeveer
3 seconden vast.
• Het licht dat in verband staat met
en het
indicatielampje knipperen.
• De lampjes , en zijn aan.
• De lampjes van de programmaknoppen zijn
aan.
Navigeren in de instellingenmodus
U kunt met gebruik van de programmatoetsen in de
instellingenmodus navigeren.
BA C
A. Vorige toets
B. OK toets
C. Volgende toets
Gebruik Vorige en Volgende om te schakelen tussen
de basisinstellingen en om hun waarde te wijzigen.
Gebruik OK om in de gekozen instelling te gaan en de
gewijzigde waarde te bevestigen.
Een instelling wijzigen
Zorg dat het apparaat in de instellingsmodus staat.
1. Druk op Vorige of Volgende totdat het
indicatielampje voor de gewenste instelling
knippert.
Het licht dat in verband staat met geeft de huidige
instelwaarde aan:
• Voor de instellingen met twee waarden (aan en
uit) is het licht ofwel aan (= de instelling staat
aan) of uit (= de instelling staat uit).
• Voor de instellingen met meerdere waarden
(niveaus) knippert het licht. Het aantal
knipperingen geeft de huidige instelwaarde aan
(bijv. 5 knipperingen + pauze + 5
knipperingen... = niveau 5).
2. Druk op OK om de instelling te bevestigen.
• Het indicatielampje dat verband houdt met de
instelling gaat aan.
• De andere indicatielampjes gaan uit.
• Het licht dat in verband staat met
geeft de
huidige instelwaarde aan.
3. Druk op Vorige of Volgende om de waarde te
veranderen.
4. Druk op OK om de instelling te bevestigen.
• De nieuwe instelling is opgeslagen.
• Het apparaat keert terug naar de
instellingenkeuze.
5. Druk tegelijkertijd op 30min en ECO en houd ze
ongeveer 3 seconden ingedrukt om de
instellingenmodus te verlaten.
Het apparaat keert terug naar de programmakeuze.
Opgeslagen instellingen blijven geldig totdat u ze
opnieuw wijzigt.
Voordat u het apparaat voor de eerste keer gebruikt
1. Controleer of het ingestelde stand van de
waterontharder juist is voor de waterhardheid
in uw omgeving. Indien niet, stel dan de stand
van de waterontharder juist in.
2. Vul het zoutreservoir.
3. Vul het glansspoelmiddeldoseerbakje.
4. Draai de waterkraan open.
5. Start het programma 30min om eventuele resten uit
het fabricageproces te verwijderen. Gebruik geen
afwasmiddel en plaats geen vaat in de korven.
Na het starten van het programma laadt het apparaat
de hars in de waterverzachter maximaal 5 minuten op.
De wasfase start pas nadat deze procedure voltooid is.
De procedure wordt regelmatig herhaald.
Het zoutreservoir
Let op! Gebruik uitsluitend grof zout dat
voor vaatwassers is gemaakt. Fijn zout
verhoogt het risico op corrosie.
11

Het zout wordt gebruikt om de hars in de
waterontharder te herladen en voor goede
wasresultaten voor dagelijks gebruik.
Het zoutreservoir vullen
1. Draai de dop linksom om het zoutreservoir te
openen.
2. Doe 1 liter water in het zoutreservoir (alleen de
eerste keer).
3. Vul het zoutreservoir met 1 kg zout (totdat het vol
is).
4. Schud de trechter voorzichtig bij het handvat om de
laatste korrels erin te krijgen.
5. Verwijder het zout rond de opening van het
zoutreservoir.
6. Draai de dop van het zoutreservoir rechtsom om
het zoutreservoir te sluiten.
Let op! Water en zout kunnen uit het
zoutreservoir stromen als u het bijvult.
Start na het bijvullen van het
zoutreservoir onmiddellijk een
programma om corrosie te voorkomen.
Het vullen van het glansmiddeldoseerbakje
B
C
D
A
Let op! Gebruik alleen glansspoelmiddel
voor vaatwassers.
1. Druk op het ontgrendelelement (A) om het deksel
te openen (B).
2. Giet het glansmiddel in het doseervakje (C) totdat
de vloeistof de markering "FILL” heeft bereikt.
3. Verwijder gemorst glansmiddel met een
absorberend doekje om te voorkomen dat er te
veel schuim ontstaat.
4. Sluit het deksel. Zorg ervoor dat het deksel op zijn
plek dicht klikt.
Vul het glansmiddeldoseerbakje bij
wanneer de indicatie (D) helder wordt.
Dagelijks gebruik
1. Draai de waterkraan open.
2. Houd ingedrukt totdat het apparaat wordt
geactiveerd.
3. Vul het zoutreservoir bij als het leeg is.
4. Vul het glansspoelmiddelreservoir bij als het leeg
is.
5. Ruim de korven in.
6. Voeg vaatwasmiddel toe.
7. Een programma selecteren en starten
8. Sluit de waterkraan als het programma voltooid is.
12

Vaatwasmiddel gebruiken
B
C
A
Let op! Gebruik alleen vaatwasmiddel
speciaal voor vaatwassers.
1. Druk op de ontgrendelknop (B) om het deksel te
openen (C).
2. Doe het vaatwasmiddel in het vakje (A). U kunt
vaatwasmiddel in tabletten, poeder of gel
gebruiken.
3. Plaats een kleine hoeveelheid van het
vaatwasmiddel in de binnenkant van de deur van
het apparaat als het programma een voorwasfase
heeft.
4. Sluit het deksel. Zorg ervoor dat het deksel op zijn
plek dicht klikt.
Hoe u een programma kiest en start
1. Druk op de toets van het desbetreffende
programma dat u wilt instellen.
Het lampje van de knop knippert.
2. Activeer Extra power indien gewenst.
3. Sluit de deur van de afwasmachine om het
programma te starten.
Hoe u het programma kiest en start Pre Rinse
1. Houd om Pre Rinse te selecteren 30min 3
seconden ingedrukt.
Het lampje van de knop knippert.
Extra power is niet van toepassing op dit
programma.
2. Sluit de deur van de afwasmachine om het
programma te starten.
activeren Extra power
1. Selecteer een programma.
2. Druk op Extra power.
Het lampje van de knop gaat aan.
Extra power is geen permanente optie
en moet elke keer voordat u een
programma start worden geactiveerd.
Extra power kunnen niet worden in- of
uitgeschakeld als een programma
eenmaal in werking is.
Het activeren van Extra power kan het
water- en energieverbruik verhogen en
de programmaduur verlengen.
Hoe u het programma kiest en start AUTO
1. Druk op AUTO.
Het lampje van de knop gaat aan.
Extra power is niet van toepassing op dit
programma.
2. Sluit de deur van de afwasmachine om het
programma te starten.
Het apparaat neemt het type lading waar en past aan
naar een geschikte wascyclus.
De start van een programma uitstellen
U kunt de start van het geselecteerde programma 3 uur
uitstellen.
1. Selecteer een programma.
2. Druk op .
Het lampje van de knop gaat aan.
3. Sluit de deur van het apparaat om het aftellen te
starten.
Tijdens het aftellen is het niet mogelijk de
programmakeuze te wijzigen.
Nadat het aftelproces voltooid is, wordt het programma
gestart.
De uitgestelde start annuleren tijdens het aftellen
Houd ongeveer 3 seconden ingedrukt.
Het apparaat keert terug naar de programmakeuze.
Als u de uitgestelde start annuleert, moet
u het programma opnieuw instellen.
Het annuleren van een actief programma
Houd ongeveer 3 seconden ingedrukt.
Het apparaat keert terug naar de programmakeuze.
Controleer of er vaatwasmiddel in het
vaatwasmiddelbakje aanwezig is voordat
u een nieuw programma start.
13

De deur openen als het apparaat in werking is
Als u de deur opent terwijl een programma loopt, stopt
het apparaat. Dit kan het energieverbruik en de
programmaduur beïnvloeden. Als u de deur weer sluit,
gaat het apparaat verder vanaf het moment van
onderbreking.
Als de deur tijdens de droogfase langer
dan 30 seconden wordt geopend, stopt
het lopende programma. Dit gebeurt niet
als de deur wordt geopend door de
functie AirDry.
De Auto Off-functie
Deze functie bespaart energie door het apparaat uit te
schakelen als het niet in werking is.
De functie gaat automatisch aan:
• Als het programma is voltooid.
• Als er na 5 minuten nog geen programma is gestart.
Einde van het programma
Wanneer het programma is voltooid, schakelt de functie
Auto Off het apparaat automatisch uit.
Alle knoppen zijn inactief behalve de aan/uit knop.
Aanwijzingen en tips
Algemeen
Volg de onderstaande tips om te zorgen voor optimale
schoonmaak- en droogresultaten en ook het milieu te
helpen beschermen.
• Het afwassen in de vaatwasser volgens de
instructies in de gebruikershandleiding verbruikt
meestal minder water en energie dan het afwassen
met de hand.
• Laad de vaatwasser volledig in om water en energie
te besparen. Voor de beste reinigingsresultaten
plaatst u items in de korven volgens de instructies in
de gebruikershandleiding en overbelast u de korven
niet.
• Spoel de vaat niet eerst af. Het verhoogt het water-
en energieverbruik. Kies indien nodig een
programma met voorwasfase.
• Verwijder grotere voedselresten van de borden en
lege bekers en glazen voordat u ze in het apparaat
plaatst.
• Week kookgerei met stevig vastgekookt of
vastgebakken voedsel of poets het lichtjes voordat u
het in het apparaat wast.
• Zorg ervoor dat de vaat in de manden elkaar niet
raakt of overlapt. Alleen dan kan het water de vaat
volledig bereiken en wassen.
• U kunt apart vaatwasmiddel, glansmiddel en zout
gebruiken of kiezen voor het gebruik van
multitabletten (bijv. ''alles-in-1''). Volg de instructies
op de verpakking.
• Kies een programma op basis van het type lading
en de mate van bevuiling. ECO biedt het meest
efficiënte gebruik van water en energieverbruik.
• Om kalkaanslag in het apparaat te voorkomen:
– Vul de zoutcontainer indien nodig bij.
– Gebruik de aanbevolen dosering van het
wasmiddel en spoelglansmiddel.
– Controleer of het ingestelde stand van de
waterontharder juist is voor de waterhardheid in
uw omgeving.
– Volg de instructies in het hoofdstuk
"Onderhoud en reiniging".
Gebruik van zout, glansmiddel en vaatwasmiddel
• Gebruik enkel zout, glansmiddel en vaatwasmiddel
voor vaatwassers. Overige producten kunnen het
apparaat beschadigen.
• Maar in gebieden met hard en erg hard water raden
we het gebruik aan van standaard vaatwasmiddel
(poeder, gel, tabletten zonder extra middelen), met
afzonderlijk glansmiddel en zout voor optimale
reinigings- en droogresultaten.
• Vaatwasmiddeltabletten lossen bij korte
programma's niet geheel op. Om te voorkomen dat
vaatwasmiddelresten op het servies achterblijven,
raden we u aan om tabletten enkel bij lange
programma's te gebruiken.
• Gebruik altijd de juiste hoeveelheid wasmiddel.
Onvoldoende dosering van het wasmiddel kan
leiden tot slechte reinigingsresultaten en
hardwaterfilmen of vlekken op de voorwerpen. Het
gebruik van te veel wasmiddel met zacht of verzacht
water resulteert in wasmiddelresten op de borden.
Pas de hoeveelheid wasmiddel aan op basis van de
waterhardheid. Zie de instructies van de
vaatwasmiddelfabrikant.
• Gebruik altijd de juiste hoeveelheid
spoelglansmiddel. Onvoldoende dosering van
spoelglansmiddel vermindert de droogresultaten.
14

Het gebruik van te veel spoelglansmiddel resulteert
in blauwachtige lagen op de items.
• Controleer of het wateronthardersniveau correct is.
Als het niveau te hoog is, kan de verhoogde
hoeveelheid zout in het water leiden tot roest op
bestek.
Wat moet u doen als u wilt stoppen met het
gebruik van multitabletten
Volg de volgende stappen voordat u begint met het
gebruiken van apart wasmiddel, zout en
glansspoelmiddel:
1. Stel het hoogste niveau van de waterontharder in.
2. Zorg ervoor dat het zout- en het
glansspoelmiddeldoseerbakje gevuld zijn.
3. Start het 30min-programma. Voeg geen
afwasmiddel toe en plaats vaat in de korven.
4. Als het programma is voltooid, wijzigt u de
waterontharder in de waterhardheid van uw
omgeving.
5. Stel de hoeveelheid glansspoelmiddel in.
Voor het starten van een programma
Zorg er, voordat u het gekozen programma start, voor
dat:
• De filters schoon zijn en correct zijn geplaatst.
• De dop van het zoutreservoir goed dicht zit.
• De sproeiarmen niet zijn verstopt.
• Er regenereerzout en glansmiddel is toegevoegd
(tenzij u gecombineerde afwastabletten gebruikt).
• De positie van de items in de mandjes correct is.
• Het programma geschikt is voor het type lading en
de mate van bevuiling.
• De juiste hoeveelheid afwasmiddel is gebruikt.
De korven inruimen
• Gebruik altijd de hele ruimte van de mandjes.
• Gebruik het apparaat uitsluitend om
afwasmachinebestendige voorwerpen af te wassen.
• Was in het apparaat geen items gemaakt van hout,
hoorn, aluminium, tin en koper, omdat ze kunnen
barsten, kromtrekken, verkleuren of putjes kunnen
krijgen.
• Reinig geen voorwerpen in het apparaat die water
kunnen absorberen (sponzen, keukenhanddoeken).
• Plaats holle voorwerpen (bijv. kopjes, glazen en
pannen) met de opening naar beneden.
• Zorg er voor dat glazen elkaar niet aanraken.
• Leg lichte voorwerpen in het bovenrek. Zorg ervoor
dat de voorwerpen niet kunnen verschuiven.
• Doe bestek en kleine items in het bestekmand.
• Zorg er voor dat de sproeiarmen vrij kunnen
ronddraaien voordat u een programma start.
De rekken uitruimen
1. Laat de borden afkoelen voordat u deze uit het
apparaat neemt. Hete borden zijn gevoelig voor
beschadigingen.
2. Ruim eerst het onderrek en dan het bovenrek uit.
Na voltooiing van het programma kan er
zich aan de binnenkant van het apparaat
nog water bevinden.
Onderhoud en reiniging
WAARSCHUWING! Schakel het
apparaat uit en trek de stekker uit het
stopcontact voordat u
onderhoudshandelingen verricht (met
uitzondering van het uitvoeren van het
programma Machine Care).
Vuile filters en verstopte sproeiarmen
hebben een negatief effect op de
wasresultaten. Controleer deze
onderdelen regelmatig en reinig ze zo
nodig.
Machine Care
Machine Care is een programma dat is ontworpen om
de binnenkant van het apparaat met optimale resultaten
te reinigen. Het verwijderd kalkaanslag en vetresten.
Als het apparaat reiniging nodig acht, gaat het lampje
aan. Start het programma Machine Care om de
binnenkant van het apparaat te reinigen.
Hoe ga ik te werk om het programma Machine Care
te starten
Reinig voordat u het programma
Machine Care start, de filters en
sproeiarmen.
1. Gebruik een ontkalker of schoonmaakproduct dat
specifiek is bestemd voor vaatwassers. Volg de
instructies op de verpakking. Doe geen vaat in het
manden.
2. Druk tegelijkertijd op Extra power en AUTO en
houd ze ongeveer 3 seconden ingedrukt.
De lampjes
en Extra power knipperen.
15

3. Sluit de deur van de afwasmachine om het
programma te starten.
Als het programma is voltooid, gaat lampje uit.
De binnenkant van de machine reinigen
• Reinig het apparaat zorgvuldig, inclusief de
rubberen afdichting van de deur, met een zachte,
vochtige doek.
• Gebruik geen schuurmiddelen, schuursponsjes,
scherpe voorwerpen, sterke chemicaliën,
pannensponsjes of oplosmiddelen.
• Gebruik om de prestaties van uw apparaat te
onderhouden minstens elke twee maanden een
reinigingsproduct dat specifiek is ontwikkeld voor
vaatwassers. Volg de instructies op de verpakking
van de producten zorgvuldig op.
• Start voor optimale schoonmaakresultaten het
programma Machine Care.
Verwijderen van vreemde voorwerpen
Controleer de filters en de opvangbak na elk gebruik
van de vaatwasser. Vreemde voorwerpen (bijv. stukken
glas, plastic, botten of tandenstokers, enz.) verminderen
de reinigingsprestaties en kunnen schade aan de
afvoerpomp veroorzaken.
1. Demonteer het filtersysteem volgens de instructies
in dit hoofdstuk.
2. Verwijder alle vreemde voorwerpen met de hand.
Let op! Als u de voorwerpen niet
kunt verwijderen, neem dan contact
op met een erkend servicecentrum.
3. Monteer de filters opnieuw volgens de instructies in
dit hoofdstuk.
Buitenkant reinigen
• Maak het apparaat schoon met een vochtige, zachte
doek.
• Gebruik alleen neutrale schoonmaakmiddelen.
• Gebruik geen schuurmiddelen, schuursponsjes of
oplosmiddelen.
De filters reinigen
Het filtersystem bestaat uit 3 delen.
C
B
A
1.
Draai de filter (B) linksom en verwijder het.
2. Verwijder de filter (C) uit de filter (B).
3. Verwijder de platte filter (A).
4. Was de filters.
16

5. Zorg ervoor dat er geen etensresten of vuil in of
rond de rand van de opvangbak zitten.
6. Plaats de platte filter terug (A). Zorg ervoor dat het
goed onder de 2 geleidingen zit.
7. Plaats de filters (B) en (C) terug.
8. Plaats de filter (B) terug in de platte filter (A).
Rechtsom draaien tot het vastzit.
Let op! Een onjuiste plaatsing van de
filters kan leiden tot slechte
wasresultaten en het apparaat
beschadigen.
De onderste sproeiarm schoonmaken
We raden u aan om de onderste sproeiarm regelmatig
schoon te maken om te voorkomen dat vuil de gaten
verstopt.
Verstopte gaten kunnen onbevredigende wasresultaten
opleveren.
1. Trek de onderste sproeiarm naar boven om deze te
verwijderen.
2. Reinig de sproeiarm onder stromend water.
Gebruik een smal en puntig gereedschap, bijv. een
tandenstoker, om de vuildeeltjes uit de gaten te
verwijderen.
3. Duw de sproeiarm naar beneden om deze weer
terug te plaatsen.
De bovenste sproeiarmen schoonmaken
We raden u aan om de bovenste sproeiarmen
regelmatig schoon te maken om te voorkomen dat vuil
de gaten verstopt. Verstopte gaten kunnen
onbevredigende wasresultaten opleveren.
De bovenste sproeiarmen worden onder de bovenste
korf geplaatst. De sproeiarmen (B) zijn geïnstalleerd in
de toevoerleiding (A) met de bevestigingselementen
(C).
17

A
B
C
1. Trek het bovenrek naar buiten.
2. Om de sproeiarm los te maken, draait u het
bevestigingselement met de klok mee.
3. Reinig de sproeiarm onder stromend water.
Gebruik een smal en puntig gereedschap, bijv. een
tandenstoker, om de vuildeeltjes uit de gaten te
verwijderen.
4. Steek om de sproeiarm terug te plaatsen het
bevestigingselement in de sproeiarm en bevestig
deze in de toevoerleiding door deze naar links te
draaien. Zorg ervoor dat het bevestigingselement
op zijn plek dicht klikt.
Probleemoplossing
WAARSCHUWING! Onjuiste reparatie
van het apparaat kan een gevaar voor
de veiligheid van de gebruiker vormen.
Alle reparaties moeten worden
uitgevoerd door bevoegd personeel.
Het merendeel van de problemen die ontstaan
kunnen worden opgelost zonder contact op te
nemen met een erkend servicecentrum.
Zie de onderstaande tabel voor informatie over
mogelijke problemen.
Bij enkele problemen knipperen de lampjes van de
programmaknoppen af en toe om een storing en de
alarmcode aan te geven.
Probleem en alarmcode Mogelijke oorzaak en oplossing
U kunt het apparaat niet activeren.
• Controleer of de netstekker is aangesloten op het stopcontact.
• Zorg dat er geen zekering in de zekeringenkast is doorgebrand.
18

Probleem en alarmcode Mogelijke oorzaak en oplossing
Het programma start niet.
• Controleer of de deur van het apparaat gesloten is.
• Als startuitstel is ingesteld, annuleert u deze functie of wacht u tot het ein-
de van het aftellen.
• Het apparaat herlaadt de hars uit de waterontharder. De duur van de pro-
cedure is ongeveer 5 minuten.
Het apparaat wordt niet gevuld met
water.
• De lampjes die in verband staan
met de programmatoetsen knip-
peren af en toe 1 keer.
• Er klinkt af en toe een geluids-
signaal.
• Zorg ervoor dat de waterkraan geopend is.
• Ga na of de druk van de watervoorziening niet te laag is. Neem voor deze
informatie contactpersoon op met uw plaatselijke waterleidingsbedrijf.
• Verzeker u ervan dat de waterkraan niet verstopt is.
• Controleer of het filter in de toevoerslang niet verstopt is.
• Controleer of er geen knikken of bochten in de watertoevoerslang aanwe-
zig zijn.
Het apparaat pompt geen water
weg.
• De lampjes die in verband staan
met de programmatoetsen knip-
peren af en toe 2 keer.
• Er klinkt af en toe een geluids-
signaal.
• Verzeker u ervan dat de gootsteenafvoer niet verstopt is.
• Controleer of het binnenfiltersysteem niet verstopt is.
• Verzeker u ervan dat de aftapslang geen knikken of bochten heeft.
Het beschermingssysteem tegen
waterlekkage is in werking getre-
den.
• De lampjes die in verband staan
met de programmatoetsen knip-
peren af en toe 3 keer.
• Er klinkt af en toe een geluids-
signaal.
• Draai de waterkraan dicht.
• Zorg ervoor dat het apparaat correct geïnstalleerd is.
• Zorg ervoor dat de korven zijn geladen volgens de instructies in de ge-
bruikershandleiding.
Storing van de waterniveaudetectie-
sensor.
• De lampjes die in verband staan
met de programmatoetsen knip-
peren af en toe 4 keer.
• Er klinkt af en toe een geluids-
signaal.
• Zorg dat de filters schoon zijn.
• Schakel het apparaat uit en aan.
Storing van de waspomp of de af-
voerpomp.
• De lampjes die in verband staan
met de programmatoetsen knip-
peren af en toe 5 keer.
• Er klinkt af en toe een geluids-
signaal.
• Schakel het apparaat uit en aan.
19

Probleem en alarmcode Mogelijke oorzaak en oplossing
De temperatuur van het water in het
apparaat is te hoog of er is een sto-
ring in de temperatuursensor opge-
treden.
• De lampjes die in verband staan
met de programmatoetsen knip-
peren af en toe 6 keer.
• Er klinkt af en toe een geluids-
signaal.
• Zorg ervoor dat de temperatuur van het inlaatwater niet hoger is dan 60°
C.
• Schakel het apparaat uit en aan.
Technische storing van het appa-
raat.
• De lampjes die in verband staan
met de programmatoetsen knip-
peren af en toe 12 keer.
• Er klinkt af en toe een geluids-
signaal.
• Schakel het apparaat uit en aan.
Het niveau van het water in het ap-
paraat is te hoog.
• De lampjes die in verband staan
met de programmatoetsen knip-
peren af en toe 15 keer.
• Er klinkt af en toe een geluids-
signaal.
• Schakel het apparaat uit en aan.
• Zorg dat de filters schoon zijn.
• Zorg ervoor dat de uitlaatslang op de juiste hoogte boven de vloer is geïn-
stalleerd. Raadpleeg de installatie-instructies.
Het apparaat stopt en start meerde-
re keren tijdens de werking.
• Dat is normaal. Het voorziet in optimale reinigingsresultaten en energie-
besparing.
Het programma duurt te lang.
• Als de optie uitgestelde start is ingesteld, annuleert u de uitgestelde start
of wacht u tot het aftellen voorbij is.
• Het activeren van Extra power verlengt de duur van het programma.
Kleine lekkage uit de deur van het
apparaat.
• Het apparaat staat niet waterpas. Draai aan de verstelbare pootjes (indien
van toepassing).
• De deur van het apparaat is niet gecentreerd op de kuip. Verstel de ach-
terpoot (indien van toepassing).
De deur van het apparaat sluit
moeilijk.
• Het apparaat staat niet waterpas. Draai aan de verstelbare pootjes (indien
van toepassing).
• Delen van het serviesgoed steken uit de korven.
Ratelende of kloppende geluiden
vanuit het apparaat.
• Het serviesgoed is niet juist in de korven gerangschikt. Raadpleeg de fol-
der voor het laden van de korven.
• Zorg ervoor dat de sproeiarmen vrij kunnen ronddraaien.
Het apparaat maakt kortsluiting.
• De stroomsterkte is onvoldoende om alle tegelijk werkende apparaten van
stroom te voorzien. Controleer de stroomsterkte van het stopcontact en
het vermogen op de meter, of zet één van de in gebruik zijnde apparaten
uit.
• Interne elektrische storing van het apparaat. Neem contact op met een er-
kend servicecentrum.
20

Schakel het apparaat na controle aan en uit. Als het
probleem opnieuw optreedt, neemt u contact op met
onze klantenservice of een servicecentrum.
Voor alarmcodes die niet in de tabel vermeld zijn, neemt
u contact op met de service-afdeling.
WAARSCHUWING! We raden u aan het
apparaat niet te gebruiken, totdat het
probleem volledig is opgelost. Haal de
stekker uit het stopcontact en sluit het
apparaat pas weer aan als u zeker weet
dat het correct werkt.
De was- en droogresultaten zijn niet naar tevredenheid
Probleem Mogelijke oorzaak en oplossing
Slechte wasresultaten.
• Raadpleeg "Dagelijks gebruik", "Aanwijzingen en tips" en de folder
voor het laden van de korf.
• Gebruik een intensiever wasprogramma.
• Activeer de optie Extra power om de wasresultaten van een geselec-
teerd programma te verbeteren.
• Maak de inspuiters van de sproeiarm en het filter schoon. Raadpleeg
"Onderhoud en reiniging".
Slechte droogresultaten.
• Serviesgoed heeft te lang in het gesloten apparaat gestaan. Activeer
AirDry om het automatisch openen van de deur in te stellen en de
droogprestatie te verbeteren.
• Het glansspoelmiddel is op of de dosering van glansspoelmiddel is niet
voldoende. Vul het glansspoelmiddeldoseerbakje of zet de glansspoel-
middelstand hoger.
• De kwaliteit van het glansspoelmiddel kan de oorzaak zijn.
• We raden aan altijd glansspoelmiddel te gebruiken, zelfs in combinatie
met wastabletten.
• Plastic voorwerpen moeten mogelijk met een doek worden afgedroogd.
• Het programma heeft geen droogfase. Raadpleeg "Programmaover-
zicht".
Witte strepen of een blauwe waas op
glazen en serviesgoed.
• De vrijgegeven hoeveelheid glansspoelmiddel is te hoog. Zet de dose-
ring van het glansspoelmiddel op een lagere stand.
• Er is te veel vaatwasmiddel gebruikt.
Vlekken en opgedroogde watervlekken
op glazen en servies.
• De vrijgegeven hoeveelheid glansspoelmiddel is te laag. Zet de dose-
ring van het glansspoelmiddel op een hogere stand.
• De kwaliteit van het glansspoelmiddel kan de oorzaak zijn.
De binnenkant van het apparaat is nat.
• Dit is geen storing van het apparaat. Vochtige lucht condenseert op de
wanden van het apparaat.
Opvallend veel schuim tijdens het
wassen.
• Gebruik uitsluitend vaatwasmiddelen die specifiek zijn bedoeld voor ge-
bruik in vaatwassers.
• Het glansspoelmiddeldoseerbakje is lek. Neem contact op met een er-
kend servicecentrum.
Roestresten op bestek.
• Er wordt voor het wassen te veel zout in het water gebruikt. Raadpleeg
"De waterontharder".
• Zilver en roestvrijstalen bestek zijn samen geplaatst. Zet zilveren en
roestvrijstalen voorwerpen niet dicht bij elkaar.
21

Probleem Mogelijke oorzaak en oplossing
Er bevinden zich aan het einde van
het programma resten van vaatwas-
middel in het vaatwasmiddeldoseer-
bakje.
• De vaatwastablet raakte klem in het vaatwasmiddeldoseerbakje en is
daardoor niet volledig weggespoeld door het water.
• Het water kan het vaatwasmiddel niet uit het vaatwasmiddeldoseerbak-
je spoelen. Zorg ervoor dat de sproeiarmen niet geblokkeerd of verstopt
zijn.
• Zorg dat voorwerpen in de rekken het openen van het klepje van het
afwasmiddeldoseerbakje niet kunnen belemmeren.
Geuren in het apparaat.
• Raadpleeg "Reiniging binnenkant".
• Start het programma Machine Care met een ontkalker of een reini-
gingsproduct bestemd voor vaatwassers.
Kalkresten op het serviesgoed, op de
kuip en aan de binnenkant van de
deur.
• Het zoutniveau is laag, controleer de bijvulaanduiding.
• De dop van het zoutreservoir zit los.
• U heeft hard kraanwater. Raadpleeg "De waterontharder".
• Gebruik zout en stel zelfs bij gebruik van multitabletten de wateronthar-
der in. Raadpleeg "De waterontharder".
• Start het programma Machine Care met een ontkalker bestemd voor
vaatwassers.
• Indien de kalkaanslag blijft bestaan, reinigt u het apparaat met reini-
gingsmiddelen die hier speciaal voor zijn bestemd.
• Probeer een ander wasmiddel.
• Neem contact op met de wasmiddelfabrikant.
Dof, ontkleurd of afgeschilverd ser-
viesgoed.
• Zorg dat alleen vaatwasmachinebestendige voorwerpen in het apparaat
worden gewassen.
• Laad de korf voorzichtig in en uit. Raadpleeg de folder voor het laden
van de korven.
• Leg tere voorwerpen in de bovenkorf.
Raadpleeg "Voor het eerste gebruik",
"Dagelijks gebruik", or "Hints en tips"
voor andere mogelijke oorzaken.
Technische informatie
Afmetingen Breedte / hoogte / diepte (mm) 446 / 818 - 898 / 550
Elektrische aansluiting
1)
Voltage (V) 220 - 240
Frequentie (Hz) 50
Watertoevoerdruk Min. / max. bar (MPa) 0.5 (0.05) / 8 (0.8)
Watertoevoer
Koud water of warm water
2)
max. 60 °C
Inhoud Couverts 9
Stroomverbruik Modus aan laten (W) 5.0
Uit-modus (W) 0.50
1) Zie het typeplaatje voor andere waarden.
2) Als het hete water door een alternatieve, milieuvriendelijkere energiebron geproduceerd wordt (bijv. zonnepanelen), ge-
bruik dan een heetwatervoorziening om het energieverbruik te verminderen.
22

Link naar de EU-EPREL-databank
De QR-code op het energielabel dat bij het apparaat
wordt geleverd, biedt een weblink naar de registratie
van dit apparaat in de EU-EPREL-database. Bewaar
het energielabel ter referentie samen met
de gebruikershandleiding en alle andere documenten
die bij dit apparaat worden geleverd.
Het is ook mogelijk om informatie gerelateerd aan de
prestaties van het product in de EU-EPREL-databank te
vinden via de link https://eprel.ec.europa.eu en de
modelnaam en het productnummer kunt u vinden op het
typeplaatje van het apparaat. Zie het hoofdstuk
‘Productbeschrijving’.
Kijk voor meer informatie over het energielabel op
www.theenergylabel.eu
Milieubescherming
Recycleer de materialen met het symbool . Gooi de
verpakking in een geschikte afvalcontainer om het te
recycleren. Bescherm het milieu en de volksgezondheid
en recycleer op een correcte manier het afval van
elektrische en elektronische apparaten. Gooi apparaten
gemarkeerd met het symbool niet weg met het
huishoudelijk afval. Breng het product naar het
milieustation bij u in de buurt of neem contact op met de
gemeente.
23

Contents
Safety information 24
Safety instructions 25
Product description 27
Control panel 28
Programme selection 28
Basic settings 30
Before first use
33
Daily use 34
Hints and tips 36
Care and cleaning 37
Troubleshooting 40
Technical information 44
Subject to change without notice.
VISIT OUR WEBSITE TO:
Get usage advice, brochures, trouble shooter, service and repair information:
www.zanker.de/support
Safety information
Before the installation and use of the appliance, carefully read the supplied
instructions. The manufacturer is not responsible for any injuries or damage
that are the result of incorrect installation or usage. Always keep the
instructions in a safe and accessible location for future reference.
Children and vulnerable people safety
• This appliance can be used by children aged from 8 years and above and
persons with reduced physical, sensory or mental capabilities or lack of
experience and knowledge if they have been given supervision or
instruction concerning the use of the appliance in a safe way and
understand the hazards involved.
• Children between 3 and 8 years of age and persons with very extensive
and complex disabilities shall be kept away from the appliance unless
continuously supervised.
• Children of less than 3 years of age should be kept away from the
appliance unless continuously supervised.
• Do not let children play with the appliance.
• Keep detergents away from children.
• Keep children and pets away from the appliance when the door is open.
• Children shall not carry out cleaning and user maintenance of the
appliance without supervision.
24

General Safety
• This appliance is intended to be used in household and similar
applications such as:
– farm houses; staff kitchen areas in shops, offices and other working
environments;
– by clients in hotels, motels, bed & breakfast and other residential type
environments.
• Do not change the specification of this appliance.
• The operating water pressure (minimum and maximum) must be between
0.5 (0.05) / 8 (0.8) bar (MPa)
• Follow the maximum number of 9 place settings.
• If the supply cord is damaged, it must be replaced by the manufacturer, its
Authorised Service Centre or similarly qualified persons in order to avoid a
hazard.
• Put the cutlery in the cutlery basket with the sharp ends pointing down or
put them in the cutlery drawer in a horizontal position with the sharp edges
down.
• Do not leave the appliance with the open door unattended to avoid
stepping accidentally onto it.
• Before any maintenance operation, deactivate the appliance and
disconnect the mains plug from the socket.
• Do not use high pressure water sprays and/or steam to clean the
appliance.
• If the appliance has ventilation openings in the base, they must not be
covered e.g. by a carpet.
• The appliance is to be connected to the water mains using the new
supplied hose-sets. Old hose sets must not be reused.
Safety instructions
Installation
Warning! Only a qualified person must
install this appliance.
• Remove all the packaging.
• Do not install or use a damaged appliance.
• Do not use the appliance before installing it in the
built-in structure due to safety manner.
• Follow the installation instructions supplied with the
appliance.
• Always take care when moving the appliance as it is
heavy. Always use safety gloves and enclosed
footwear.
• Do not install or use the appliance where the
temperature is less than 0 °C.
• Install the appliance in a safe and suitable place that
meets installation requirements.
25

Electrical connection
Warning! Risk of fire and electric shock.
• The appliance must be earthed.
• Make sure that the parameters on the rating plate
are compatible with the electrical ratings of the
mains power supply.
• Always use a correctly installed shockproof socket.
• Do not use multi-plug adapters and extension
cables.
• Make sure not to cause damage to the mains plug
and to the mains cable. Should the mains cable
need to be replaced, this must be carried out by our
Authorised Service Centre.
• Connect the mains plug to the mains socket only at
the end of the installation. Make sure that there is
access to the mains plug after the installation.
• Do not pull the mains cable to disconnect the
appliance. Always pull the mains plug.
• This appliance is fitted with a 13 A mains plug. If it is
necessary to change the mains plug fuse, use only
a 13 A ASTA (BS 1362) fuse (UK and Ireland only).
Water connection
• Do not cause damage to the water hoses.
• Before connection to new pipes, pipes not used for
a long time, where repair work has been carried out
or new devices fitted (water meters, etc.), let the
water flow until it is clean and clear.
• Ensure that there are no visible water leaks during
and after the first use of the appliance.
• The water inlet hose has a safety valve and a
sheath with an inner mains cable.
Warning! Dangerous voltage.
• If the water inlet hose is damaged, immediately
close the water tap and disconnect the mains plug
from the mains socket. Contact the Authorised
Service Centre to replace the water inlet hose.
Use
• Do not put flammable products or items that are wet
with flammable products in, near or on the
appliance.
• Dishwasher detergents are dangerous. Follow the
safety instructions on the detergent packaging.
• Do not drink and play with the water in the
appliance.
• Do not remove the dishes from the appliance until
the programme is complete. Some detergent may
remain on the dishes.
• Do not store items or apply pressure on the open
door of the appliance.
• The appliance can release hot steam if you open the
door while a programme operates.
Internal lighting
Warning! Risk of injury.
• Concerning the lamp(s) inside this product and
spare part lamps sold separately: These lamps are
intended to withstand extreme physical conditions in
household appliances, such as temperature,
vibration, humidity, or are intended to signal
information about the operational status of the
appliance. They are not intended to be used in other
applications and are not suitable for household room
illumination.
• To replace the internal lighting, contact the
Authorised Service Centre.
Service
• To repair the appliance contact the Authorised
Service Centre. Use original spare parts only.
• Please note that self-repair or non-professional
repair can have safety consequences and might
void the guarantee.
• The following spare parts will be available for 7
years after the model has been discontinued: motor,
circulation and drain pump, heaters and heating
elements, including heat pumps, piping and related
equipment including hoses, valves, filters and
aquastops, structural and interior parts related to
door assemblies, printed circuit boards, electronic
displays, pressure switches, thermostats and
sensors, software and firmware including reset
software. Please note that some of these spare
parts are only available to professional repairers,
and that not all spare parts are relevant for all
models.
• The following spare parts will be available for 10
years after the model has been discontinued: door
hinge and seals, other seals, spray arms, drain
26

filters, interior racks and plastic peripherals such as
baskets and lids.
Disposal
Warning! Risk of injury or suffocation.
• Disconnect the appliance from the mains supply.
• Cut off the mains cable and discard it.
• Remove the door catch to prevent children and pets
to get closed in the appliance.
Product description
The graphics below is just a general
product overview. For more detailed
information, refer to other chapters
and/or documents provided with the
appliance.
4
3
7
8
10 9
56
11
1
2
1
Upper spray arms
2
Lower spray arm
3
Filters
4
Rating plate
5
Salt container
6
Air vent
7
Rinse aid dispenser
8
Detergent dispenser
9
Cutlery basket
10
Lower basket
11
Upper basket
27

Control panel
1 2 3 4 5 6
1
On/Off button/Reset button
2
Delay start button
3
Indicators
4
Programme buttons
5
Extra power button
6
AUTO programme button
Indicators
Indicator Description
Rinse aid setting indicator. It is on when you set the released quantity of rinse aid. Refer to "Basic
settings".
Salt indicator. It is on when the salt container needs refilling. Refer to "Before first use".
Machine Care indicator. It is on when the appliance needs internal cleaning with the Machine Care
programme. Refer to "Care and cleaning".
Drying phase indicator. It is on when a programme with the drying phase is selected. It flashes
when the drying phase operates. Refer to "Programme selection".
Programme selection
Programmes
BA C
A. • 30min is the shortest programme suitable for
washing a load with fresh and light soil.
• Pre Rinse is a programme for rinsing off food
remains from the dishes. It prevents odours
forming in the appliance. Do not use detergent
with this programme.
B. 90min is a programme suitable for washing and
drying normally soiled items.
C. ECO is the longest programme offering the most
efficient use of energy and water consumption for
crockery and cutlery with normal soil. This is the
standard programme for test institutes.
1)
Extra power
This option improves the washing results of the selected
programme. It increases the wash temperature and
duration.
AUTO
This program automatically adjusts the wash cycle to
the type of load.
The appliance senses the degree of soil and the amount
of dishes in the baskets. It adjusts the temperature and
quantity of water as well as the wash duration.
1) This programme is used to assess compliance with the Ecodesign Comission Regulation (EU) 2019/2022.
28

Programmes overview
Programme Type of load Degree of soil Programme phases Options
30min
• Crockery
• Cutlery
• Fresh • Wash 50 °C
• Intermediate rinse
• Final rinse 45 °C
• AirDry
• Extra power
Pre Rinse
• All types of
loads
• All degrees
of soil
• Prewash
Options are not appli-
cable to this pro-
gramme.
90min
• Crockery
• Cutlery
• Pots
• Pans
• Normal
• Lightly dried-
on
• Wash 60 °C
• Intermediate rinse
• Final rinse 55 °C
• Drying
• AirDry
• Extra power
ECO
• Crockery
• Cutlery
• Pots
• Pans
• Normal
• Lightly dried-
on
• Prewash
• Wash 50 °C
• Intermediate rinse
• Final rinse 60 °C
• Drying
• AirDry
• Extra power
AUTO
• Crockery
• Cutlery
• Pots
• Pans
The programme
adjusts to all de-
grees of soil.
• Prewash
• Wash 50 - 60 °C
• Intermediate rinse
• Final rinse 55 °C
• Drying
• AirDry
Options are not appli-
cable to this pro-
gramme.
Machine
Care
• No load
The programme
cleans the appli-
ance interior.
Refer to "Care
and cleaning".
• Wash 65 °C
• Intermediate rinse
• Final rinse
• AirDry
Options are not appli-
cable to this pro-
gramme.
Consumption values
Programme
1)
Water (l) Energy (kWh) Duration (min)
30min 7.9 -9.7 0.543 - 0.664 30
Pre Rinse 2.8 - 3.4 0.011 - 0.014 15
90min 8.5 - 10.4 0.743 - 0.909 90
ECO 9.9
0.778
2)
/0.779
3)
240
AUTO 8.0 - 10.7 0.683 - 1.047 120 - 170
29

Programme
1)
Water (l) Energy (kWh) Duration (min)
Machine Care 7.4 - 8.9 0.396 - 0.484 60
1) The pressure and the temperature of the water, the variations of the mains supply, the options and the quantity of dishes
can change the values.
2) In accordance with the 1016/2010 regulation
3) In accordance with the 2019/2022 regulation
Information for test institutes
To receive the necessary information for conducting
performance tests (e.g. according to EN60436), send an
email to:
In your request please include the product number code
(PNC) found on the rating plate.
For any other questions regarding your dishwasher
please refer to the service book provided with your
appliance.
Basic settings
You can configure the appliance by changing basic
settings according to your needs.
Number Settings Values
Description
1)
1 Water hardness From level 1 to lev-
el 10 (default: 5)
Adjust the level of the water softener according to the
water hardness in your area.
2 Rinse aid level From level 0 to lev-
el 8 (default: 5)
Adjust the level of the rinse aid according to the neces-
sary dosage.
3 End sound On
Off (default)
Activate or deactivate the acoustic signal for the end of
a programme.
4 Auto door open On (default)
Off
Activate or deactivate the AirDry.
5 Key tones On (default)
Off
Activate or deactivate the sound of the buttons when
pressed.
1) For more details, refer to the information provided in this chapter.
You can change the basic settings in setting mode.
When the appliance is in setting mode, the indicators on
the control panel represent available settings. For each
setting, a dedicated indicator flashes:
1 3 2
4 5
30

The water softener
The water softener removes minerals from the water
supply, which would have a negative effect on the
washing results and on the appliance.
The higher the content of these minerals, the harder
your water is. Water hardness is measured in equivalent
scales.
The water softener should be adjusted according to the
hardness of the water in your area. Your local water
authority can advise you on the hardness of the water in
your area. It is important to set the right level of the
water softener to assure good washing results.
Water hardness
German degrees
(°dH)
French degrees
(°fH)
mmol/l Clarke de-
grees
Water softener level
47 - 50 84 - 90 8.4 - 9.0 58 - 63 10
43 - 46 76 - 83 7.6 - 8.3 53 - 57 9
37 - 42 65 - 75 6.5 - 7.5 46 - 52 8
29 - 36 51 - 64 5.1 - 6.4 36 - 45 7
23 - 28 40 - 50 4.0 - 5.0 28 - 35 6
19 - 22 33 - 39 3.3 - 3.9 23 - 27
5
1)
15 - 18 26 - 32 2.6 - 3.2 18 - 22 4
11 - 14 19 - 25 1.9 - 2.5 13 - 17 3
4 - 10 7 - 18 0.7 - 1.8 5 - 12 2
<4 <7 <0.7 < 5
1
2)
1) Factory setting.
2) Do not use salt at this level.
Regardless of the type of detergent used, set the
proper water hardness level to keep the salt refill
indicator active.
Multi-tabs containing salt are not
effective enough to soften hard water.
Regeneration process
For the correct water softener operation, the resin of the
softener device needs to be regenerated regularly. This
process is automatic and is the part of the normal
dishwasher operation.
When the prescribed quantity of water (see values in
the table) has been used since the previous
regeneration process, a new regeneration process will
be initiated between the final rinse and the programme
end.
Water softener level Amount of water (l)
1 250
2 100
3 62
4 47
5 25
6 17
7 10
8 5
9 3
10 3
31

In case of the high water softener setting, it may occur
also in the middle of the programme, before the rinse
(twice during a programme). Regeneration initiation has
no impact on the cycle duration, unless it occurs in the
middle of a programme or at the end of a programme
with a short drying phase. In that cases, the
regeneration prolongs the total duration of a programme
by additional 5 minutes.
Subsequently, the rinsing of the water softener that lasts
5 minutes may begin in the same cycle or at the
beginning of the next programme. This activity
increases the total water consumption of a programme
by additional 4 litres and the total energy consumption
of a programme by additional 2 Wh. The rinsing of the
softener ends with a complete drain.
Each performed softener rinse (possible more than one
in the same cycle) may prolong the programme duration
by another 5 minutes when it occurs at any point at the
beginning or in the middle of a programme.
All the consumption values mentioned in
this section are determined in
accordance with the currently applicable
standard in laboratory conditions with
water hardness 2.5mmol/L according to
the 2019/2022 regulation (water
softener: level 3).
The pressure and the temperature of
water as well as the variations of the
mains supply can change the values.
The rinse aid level
The rinse aid helps to dry the dishes without streaks
and stains. It is automatically released during the hot
rinse phase. It is possible to set the released quantity of
rinse aid.
If the drying results are satisfactory while using multi-
tablets only, it is possible to deactivate the dispenser.
However, for best drying performance, always use rinse
aid.
To deactivate the rinse aid dispenser, set the level of
rinse aid to 0.
End sound
You can activate an acoustic signal that sounds when
the programme is completed.
Acoustic signals sound also when a
malfunction of the appliance occurs. It is
not possible to deactivate these signals.
AirDry
AirDry improves the drying results. The appliance door
opens automatically during the drying phase and
remains ajar.
AirDry is automatically activated with all programmes
other than Pre Rinse.
Caution! Do not try to close the
appliance door within 2 minutes after
automatic opening. This can cause
damage to the appliance.
Caution! If children have access to the
appliance, we advise to deactivate
AirDry. The automatic opening of the
door may pose a danger.
Key tones
The buttons on the control panel make a click sound
when you press them. You can deactivate this sound.
Setting mode
How to enter setting mode
You can enter setting mode before starting a
programme. You cannot enter setting mode while the
programme is running.
To enter setting mode, press and hold simultaneously
30min and ECO for about 3 seconds.
• The light related to and the indicator
flash.
• The indicators , and are on.
• The lights related to the programme buttons
are on.
How to navigate in setting mode
You can navigate in setting mode using programme
buttons.
32

BA C
A. Previous button
B. OK button
C. Next button
Use Previous and Next to switch between the basic
settings and to change their value.
Use OK to enter the selected setting and to confirm
changing its value.
How to change a setting
Make sure the appliance is in setting mode.
1. Press Previous or Next until the indicator
dedicated to the desired setting flashes.
The light related to indicates the current setting
value:
• For the settings with two values (on and off),
the light is either on (= the setting is on) or off
(= the setting is off).
• For the settings with multiple values (levels),
the light flashes. The number of flashes
indicates the current setting value (e.g. 5
flashes + pause + 5 flashes... = level 5).
2. Press OK to enter the setting.
• The indicator related to the setting is on.
• The other indicators are off.
• The light related to indicates the current
setting value.
3. Press Previous or Next to change the value.
4. Press OK to confirm the setting.
• The new setting is saved.
• The appliance returns to the setting selection.
5. Press and hold simultaneously 30min and ECO for
about 3 seconds to exit setting mode.
The appliance returns to the programme selection.
The saved settings remain valid until you change them
again.
Before first use
1. Make sure that the current level of the water
softener agrees with the hardness of the water
supply. If not, adjust the level of the water
softener.
2. Fill the salt container.
3. Fill the rinse aid dispenser.
4. Open the water tap.
5. Start the programme 30min to remove any
residuals from the manufacturing process. Do not
use detergent and do not put dishes in the baskets.
After starting the programme, the appliance recharges
the resin in the water softener for up to 5 minutes. The
washing phase starts only after this procedure is
complete. The procedure is repeated periodically.
The salt container
Caution! Use rough salt designed for
dishwashers only. Fine salt increases the
risk of corrosion.
The salt is used to recharge the resin in the water
softener and to assure good washing results in daily
use.
How to fill the salt container
1. Turn the cap of the salt container counterclockwise
and remove it.
2. Put 1 litre of water in the salt container (only for the
first time).
3. Fill the salt container with 1 kg of salt (until it is full).
4. Carefully shake the funnel by its handle to get the
last granules inside.
5. Remove the salt around the opening of the salt
container.
33

6. Turn the cap of the salt container clockwise to
close the salt container.
Caution! Water and salt can come out of
the salt container when you fill it. After
you fill the salt container, immediately
start a programme to prevent corrosion.
How to fill the rinse aid dispenser
B
C
D
A
Caution! Only use rinse aid designed
specifically for dishwashers.
1. Press the release element (A) to open the lid (B).
2. Pour the rinse aid in the dispenser (C) until the
liquid reaches the marking "FILL".
3. Remove the spilled rinse aid with an absorbent
cloth to prevent excessive foam formation.
4. Close the lid. Make sure that the lid locks into
position.
Fill the rinse aid dispenser when the
indicator (D) is clear.
Daily use
1. Open the water tap.
2. Press and hold until the appliance is activated.
3. Fill the salt container if it is empty.
4. Fill the rinse aid dispenser if it is empty.
5. Load the baskets.
6. Add the detergent.
7. Select and start a programme.
8. Close the water tap when the programme is
complete.
Using the detergent
B
C
A
Caution! Only use detergent designed
specifically for dishwashers.
1. Press the release button (B) to open the lid (C).
2. Put the detergent in the compartment (A). You can
use detergent in tablets, powder or gel.
34

3. If the programme has a prewash phase, put a small
quantity of detergent on the inner part of the
appliance door.
4. Close the lid. Make sure that the lid locks into
position.
How to select and start a programme
1. Press the button dedicated to the programme you
want to set.
The light related to the button flashes.
2. Activate Extra power if desired.
3. Close the appliance door to start the programme.
How to select and start the programme Pre Rinse
1. To select Pre Rinse, press and hold 30min for 3
seconds.
The light related to the button flashes.
Extra power is not applicable to this
programme.
2. Close the appliance door to start the programme.
How to activate Extra power
1. Select a programme.
2. Press Extra power.
The light related to the button is on.
Extra power is not a permanent option
and must be activated every time before
you start a programme.
It is not possible to activate or deactivate
Extra power while a programme is
running.
Activating Extra power increases the
water and energy consumption as well
as the programme duration.
How to select and start the programme AUTO
1. Press AUTO.
The light related to the button is on.
Extra power is not applicable to this
programme.
2. Close the appliance door to start the programme.
The appliance senses the type of load and adjusts a
suitable wash cycle.
How to delay the start of a programme
You can delay the start of the selected programme by 3
hours.
1. Select a programme.
2. Press .
The light related to the button is on.
3. Close the appliance door to start the countdown.
During the countdown, it is not possible to change the
programme selection.
When the countdown is complete, the programme
starts.
How to cancel the delay start while the
countdown operates
Press and hold for about 3 seconds.
The appliance returns to the programme selection.
If you cancel the delay start, you have to
select the programme again.
How to cancel a running programme
Press and hold for about 3 seconds.
The appliance returns to the programme selection.
Make sure that there is detergent in the
detergent dispenser before you start a
new programme.
Opening the door while the appliance operates
Opening the door while a programme is running stops
the appliance. It may affect the energy consumption and
the programme duration. After closing the door, the
appliance continues from the point of interruption.
If the door is opened for more than 30
seconds during the drying phase, the
running programme ends. It does not
happen if the door is opened by AirDry
function.
The Auto Off function
This function saves energy by switching the appliance
off when it is not operating.
The function comes into operation automatically:
• When the programme is completed.
• After 5 minutes if a programme was not started.
35

End of the programme
When the programme is complete, the Auto Off function
switches the appliance off automatically.
All buttons are inactive except for the on/off button.
Hints and tips
General
Follow the hints below to ensure optimal cleaning and
drying results in daily use and to protect the
environment.
• Washing dishes in the dishwasher as instructed in
the user manual usually consumes less water and
energy than washing dishes by hand.
• Load the dishwasher to its full capacity to save
water and energy. For best cleaning results, arrange
items in the baskets as instructed in the user
manual and do not overload the baskets.
• Do not pre-rinse dishes by hand. It increases the
water and energy consumption. When needed,
select a programme with a prewash phase.
• Remove larger residues of food from the dishes and
empty cups and glasses before putting them inside
the appliance.
• Soak or slightly scour cookware with firmly cooked-
on or baked-on food before washing it in the
appliance.
• Make sure that items in the baskets do not touch or
cover each other. Only then can the water
completely reach and wash the dishes.
• You can use dishwasher detergent, rinse aid and
salt separately or you can use the multi-tablets (e.g.
''All in 1''). Follow the instructions on the packaging.
• Select a programme according to the type of load
and the degree of soil. ECO offers the most efficient
use of water and energy consumption.
• To prevent limescale buildup inside the appliance:
– Refill the salt container whenever necessary.
– Use the recommended dosage of the detergent
and rinse aid.
– Make sure that the current level of the water
softener agrees with the hardness of the water
supply.
– Follow the instructions in the chapter "Care
and cleaning".
Using salt, rinse aid and detergent
• Only use salt, rinse aid and detergent designed for
dishwasher. Other products can cause damage to
the appliance.
• In areas with hard and very hard water, we
recommend to use basic dishwasher detergent
(powder, gel, tablets containing no additional
agents), rinse aid and salt separately for optimal
cleaning and drying results.
• Detergent tablets do not fully dissolve with short
programmes. To prevent detergent residues on the
tableware, we recommend that you use tablets with
long programmes.
• Always use the correct quantity of detergent.
Insufficient dosage of detergent can result in poor
cleaning results and hard-water filming or spotting
on the items. Using too much detergent with soft or
softened water results in detergent residues on the
dishes. Adjust the amount of detergent based on the
water hardness. Refer to the instructions on the
detergent packaging.
• Always use the correct quantity of rinse aid.
Insufficient dosage of rinse aid decreases the drying
results. Using too much rinse aid results in bluish
layers on the items.
• Make sure that the water softener level is correct. If
the level is too high, the increased quantity of salt in
the water might result in rust on cutlery.
What to do if you want to stop using multi-tablets
Before you start using separately detergent, salt and
rinse aid, complete the following steps:
1. Set the highest level of the water softener.
2. Make sure that the salt and rinse aid containers are
full.
3. Start the 30min programme. Do not add detergent
and do not put dishes in the baskets.
4. When the programme is completed, adjust the
water softener according to the water hardness in
your area.
5. Adjust the released quantity of rinse aid.
Before starting a programme
Before you start the selected programme, make sure
that:
• The filters are clean and correctly installed.
• The cap of the salt container is tight.
• The spray arms are not clogged.
• There is enough salt and rinse aid (unless you use
multi-tablets).
• The arrangement of the items in the baskets is
correct.
• The programme is suitable to the type of load and
the degree of soil.
36

• The correct quantity of detergent is used.
Loading the baskets
• Always use the whole space of the baskets.
• Use the appliance to wash dishwasher-safe items
only.
• Do not wash in the appliance items made of wood,
horn, aluminium, pewter and copper as they could
crack, warp, get discoloured or pitted.
• Do not wash in the appliance items that can absorb
water (sponges, household cloths).
• Put hollow items (cups, glasses and pans) with the
opening facing downwards.
• Make sure that glasses do not touch each other.
• Put light items in the upper basket. Make sure that
the items do not move freely.
• Put cutlery and small items in the cutlery basket.
• Make sure that the spray arms can move freely
before you start a programme.
Unloading the baskets
1. Let the tableware cool down before you remove it
from the appliance. Hot items can be easily
damaged.
2. First remove items from the lower basket, then from
the upper basket.
After the programme is completed, water
can still remain on the inside surfaces of
the appliance.
Care and cleaning
Warning! Before any maintenance other
than running the programme Machine
Care, deactivate the appliance and
disconnect the mains plug from the main
socket.
Dirty filters and clogged spray arms
negatively affect the washing results.
Check these elements regularly and, if
necessary, clean them.
Machine Care
Machine Care is a programme designed to clean the
appliance interior with optimal results. It removes
limescale and grease buildup.
When the appliance senses the need for cleaning, the
indicator
is on. Start the Machine Care programme
to clean the appliance interior.
How to start the Machine Care programme
Before starting the Machine Care
programme, clean the filters and spray
arms.
1. Use a descaler or a cleaning product designed
specifically for dishwashers. Follow the instructions
on the packaging. Do not put dishes in the baskets.
2. Press and hold simultaneously Extra power and
AUTO for about 3 seconds.
The indicators
and Extra power flash.
3. Close the appliance door to start the programme.
When the programme is complete, the indicator is
off.
Internal cleaning
• Carefully clean the appliance, including the rubber
gasket of the door, with a soft damp cloth.
• Do not use abrasive products, abrasive cleaning
pads, sharp tools, strong chemicals, scourer or
solvents.
• To maintain the performance of your appliance, use
a cleaning product designed specifically for
dishwashers at least once every two months.
Carefully follow the instructions on the packaging of
the product.
• For optimal cleaning results, start the Machine Care
programme.
Removal of foreign objects
Check the filters and the sump after each use of the
dishwasher. Foreign objects (e.g. pieces of glass,
plastic, bones or toothpicks, etc) decrease the cleaning
performance and can cause damage to the drain pump.
1. Disassemble the filters system as instructed in this
chapter.
2. Remove any foreign objects by hand.
Caution! If unable to remove the
objects, contact an Authorised
Service Centre.
3. Reassemble the filters as instructed in this chapter.
External cleaning
• Clean the appliance with a moist soft cloth.
• Only use neutral detergents.
• Do not use abrasive products, abrasive cleaning
pads or solvents.
37

Cleaning the filters
The filter system is made of 3 parts.
C
B
A
1. Turn the filter (B) counterclockwise and remove it.
2. Remove the filter (C) out of filter (B).
3. Remove the flat filter (A).
4. Wash the filters.
5.
Make sure that there are no residues of food or soil
in or around the edge of the sump.
6. Put back in place the flat filter (A). Make sure that it
is correctly positioned under the 2 guides.
7. Reassemble the filters (B) and (C).
8. Put back the filter (B) in the flat filter (A). Turn it
clockwise until it locks.
Caution! An incorrect position of the
filters can cause bad washing results
and damage to the appliance.
38

Cleaning the lower spray arm
We recommend to clean the lower spray arm regularly
to prevent soil from clogging the holes.
Clogged holes can cause unsatisfactory washing
results.
1. To remove the lower spray arm, pull it upwards.
2. Wash the spray arm under running water. Use a
thin pointed tool, e.g. a toothpick, to remove
particles of soil from the holes.
3. To install the spray arm back, press it downwards.
Cleaning the upper spray arms
We recommend to clean the upper spray arms regularly
to prevent soil from clogging the holes. Clogged holes
can cause unsatisfactory washing results.
The upper spray arms are placed under the upper
basket. The spray arms (B) are installed in the duct (A)
with the mounting elements (C).
A
B
C
1. Pull out the upper basket.
2. To detach the spray arm, turn the mounting
element clockwise.
3. Wash the spray arm under running water. Use a
thin pointed tool, e.g. a toothpick, to remove
particles of soil from the holes.
4. To install the spray arm back, insert the mounting
element in the spray arm and fix it in the duct by
turning it counterclockwise. Make sure that the
mounting element locks into place.
39

Troubleshooting
Warning! Improper repair of the
appliance may pose a danger to the
safety of the user. Any repairs must be
performed by qualified personnel.
The majority of problems that may occur can be
solved without the need to contact an Authorised
Service Centre.
Refer to the below table for information on possible
problems.
With some problems, the lights related to the
programme buttons flash intermittently to indicate a
malfunction and the alarm code.
Problem and alarm code Possible cause and solution
You cannot activate the appliance.
• Make sure that the mains plug is connected to the mains socket.
• Make sure that there is no damaged fuse in the fuse box.
The programme does not start.
• Make sure that the appliance door is closed.
• If the delay start is set, cancel the setting or wait for the end of the count-
down.
• The appliance recharges the resin inside the water softener. The duration
of the procedure is approximately 5 minutes.
The appliance does not fill with wa-
ter.
• The lights related to the pro-
gramme buttons flash 1 time in-
termittently.
• An acoustic signal sounds inter-
mittently.
• Make sure that the water tap is open.
• Make sure that the pressure of the water supply is not too low. For this
information, contact your local water authority.
• Make sure that the water tap is not clogged.
• Make sure that the filter in the inlet hose is not clogged.
• Make sure that the inlet hose has no kinks or bends.
The appliance does not drain the
water.
• The lights related to the pro-
gramme buttons flash 2 times
intermittently.
• An acoustic signal sounds inter-
mittently.
• Make sure that the sink spigot is not clogged.
• Make sure that the interior filter system is not clogged.
• Make sure that the drain hose has no kinks or bends.
40

Problem and alarm code Possible cause and solution
The anti-flood device is on.
• The lights related to the pro-
gramme buttons flash 3 times
intermittently.
• An acoustic signal sounds inter-
mittently.
• Close the water tap.
• Make sure that the appliance is correctly installed.
• Make sure the baskets are loaded as instructed in the user manual.
Malfunction of the water level detec-
tion sensor.
• The lights related to the pro-
gramme buttons flash 4 times
intermittently.
• An acoustic signal sounds inter-
mittently.
• Make sure that the filters are clean.
• Switch the appliance off and on.
Malfunction of the wash pump or the
drain pump.
• The lights related to the pro-
gramme buttons flash 5 times
intermittently.
• An acoustic signal sounds inter-
mittently.
• Switch the appliance off and on.
The temperature of the water inside
the appliance is too high or malfunc-
tion of the temperature sensor oc-
curred.
• The lights related to the pro-
gramme buttons flash 6 times
intermittently.
• An acoustic signal sounds inter-
mittently.
• Make sure that the temperature of the inlet water does not exceed 60°C.
• Switch the appliance off and on.
Technical malfunction of the appli-
ance.
• The lights related to the pro-
gramme buttons flash 12 times
intermittently.
• An acoustic signal sounds inter-
mittently.
• Switch the appliance off and on.
The level of water inside the appli-
ance is too high.
• The lights related to the pro-
gramme buttons flash 15 times
intermittently.
• An acoustic signal sounds inter-
mittently.
• Switch the appliance off and on.
• Make sure that the filters are clean.
• Make sure that the outlet hose is installed at the right height above the
floor. Refer to the installation instructions.
The appliance stops and starts
more times during operation.
• It is normal. It provides optimal cleaning results and energy savings.
41

Problem and alarm code Possible cause and solution
The programme lasts too long.
• If the delay start option is set, cancel the delay setting or wait for the end
of the countdown.
• Activating Extra power increases the programme duration.
Small leak from the appliance door.
• The appliance is not levelled. Loosen or tighten the adjustable feet (if ap-
plicable).
• The appliance door is not centred on the tub. Adjust the rear foot (if appli-
cable).
The appliance door is difficult to
close.
• The appliance is not levelled. Loosen or tighten the adjustable feet (if ap-
plicable).
• Parts of the tableware are protruding from the baskets.
Rattling or knocking sounds from
the inside of the appliance.
• The tableware is not properly arranged in the baskets. Refer to basket
loading leaflet.
• Make sure that the spray arms can rotate freely.
The appliance trips the circuit-beak-
er.
• The amperage is insufficient to supply simultaneously all the appliances in
use. Check the socket amperage and the capacity of the meter or turn off
one of the appliances in use.
• Internal electrical fault of the appliance. Contact an Authorised Service
Centre.
Once you have checked the appliance, deactivate and
activate the appliance. If the problem occurs again,
contact an Authorised Service Centre.
For alarm codes not described in the table, contact an
Authorised Service Centre.
Warning! We do not recommend using
the appliance until the problem has been
completely fixed. Unplug the appliance
and do not plug it in again until you are
certain that it operates correctly.
The washing and drying results are not satisfactory
Problem Possible cause and solution
Poor washing results.
• Refer to "Daily use", "Hints and tips" and the basket loading leaflet.
• Use more intensive washing programme.
• Activate the Extra power option to improve the washing results of a se-
lected programme.
• Clean spray arm jets and filter. Refer to "Care and Cleaning".
Poor drying results.
• Tableware was left for too long inside the closed appliance. Activate
AirDry to set the automatic opening of the door and to improve the dry-
ing performance.
• There is no rinse aid or the dosage of rinse aid is not sufficient. Fill the
rinse aid dispenser or set the level of rinse aid to a higher level.
• The quality of the rinse aid can be the cause.
• We recommend to use rinse aid always, even in combination with multi-
tablets.
• Plastic items may need to be towel dried.
• The programme does not have the drying phase. Refer to "Pro-
grammes overview".
42

Problem Possible cause and solution
There are whitish streaks or bluish lay-
ers on glasses and dishes.
• The released quantity of rinse aid is too high. Adjust the rinse aid level
to a lower level.
• The quantity of detergent is too high.
There are stains and dry water drops
on glasses and dishes.
• The released quantity of rinse aid is not sufficient. Adjust the rinse aid
level to a higher level.
• The quality of the rinse aid can be the cause.
The interior of the appliance is wet.
• This is not a defect of the appliance. Humid air condensates on the ap-
pliance walls.
Unusual foam during washing.
• Use the detergent designed specifically for dishwashers.
• There is a leak in the rinse aid dispenser. Contact an Authorised Serv-
ice Centre.
Traces of rust on cutlery.
• There is too much salt in the water used for washing. Refer to "The
water softener".
• Silver and stainless steel cutlery were placed together. Do not put silver
and stainless steel items close together.
There are residues of detergent in the
dispenser at the end of the pro-
gramme.
• The detergent tablet was stuck in the dispenser and therefore was not
completely washed away by water.
• Water cannot wash away the detergent from the dispenser. Make sure
that the spray arms are not blocked or clogged.
• Make sure that items in the baskets do not impede the lid of the deter-
gent dispenser from opening.
Odours inside the appliance.
• Refer to "Internal cleaning".
• Start the Machine Care programme with a descaler or a cleaning prod-
uct designed for dishwashers.
Limescale deposits on the tableware,
on the tub and on the inside of the
door.
• The level of salt is low, check the refill indicator.
• The cap of the salt container is loose.
• Your tap water is hard. Refer to "The water softener".
• Use salt and set regeneration of the water softener even when multi-
functional tablets are used. Refer to "The water softener".
• Start the Machine Care programme with a descaler designed for dish-
washers.
• If limescale deposits still remain, clean the appliance with appliance
cleaners which are particularly suitable for this purpose.
• Try a different detergent.
• Contact the detergent manufacturer.
Dull, discoloured or chipped tableware.
• Make sure that only dishwasher-safe items are washed in the appli-
ance.
• Load and unload the basket carefully. Refer to the basket loading leaf-
let.
• Place delicate items in the upper basket.
Refer to "Before first use", "Daily
use", or "Hints and tips" for other
possible causes.
43

Technical information
Dimensions Width / height / depth (mm) 446 / 818 - 898 / 550
Electrical connection
1)
Voltage (V) 220 - 240
Frequency (Hz) 50
Water supply pressure Min. / max. bar (MPa) 0.5 (0.05) / 8 (0.8)
Water supply
Cold water or hot water
2)
max 60 °C
Capacity Place settings 9
Power consumption Left-on mode (W) 5.0
Off-mode (W) 0.50
1) Refer to the rating plate for other values.
2) If the hot water comes from alternative source of energy (e.g. solar panels), use the hot water supply to decrease energy
consumption.
Link to the EU EPREL database
The QR code on the energy label supplied with the
appliance provides a web link to the registration of this
appliance in the EU EPREL database. Keep the energy
label for reference together with the user manual and all
other documents provided with this appliance.
It is possible to find information related to the
performance of the product in the EU EPREL database
using the link https://eprel.ec.europa.eu and the model
name and product number that you can find on the
rating plate of the appliance. Refer to the chapter
"Product description".
For more detailed information about the energy label,
visit www.theenergylabel.eu.
Environmental concerns
Recycle materials with the symbol . Put the
packaging in relevant containers to recycle it. Help
protect the environment and human health by recycling
waste of electrical and electronic appliances. Do not
dispose of appliances marked with the symbol with
the household waste. Return the product to your local
recycling facility or contact your municipal office.
44
*


www.electrolux.com/shop
156944260-A-252020
-
 1
1
-
 2
2
-
 3
3
-
 4
4
-
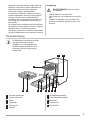 5
5
-
 6
6
-
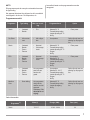 7
7
-
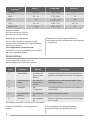 8
8
-
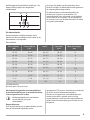 9
9
-
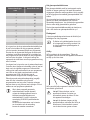 10
10
-
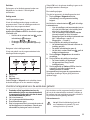 11
11
-
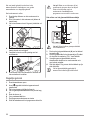 12
12
-
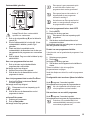 13
13
-
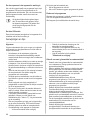 14
14
-
 15
15
-
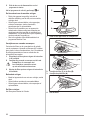 16
16
-
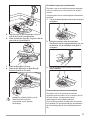 17
17
-
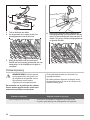 18
18
-
 19
19
-
 20
20
-
 21
21
-
 22
22
-
 23
23
-
 24
24
-
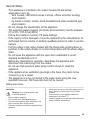 25
25
-
 26
26
-
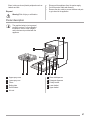 27
27
-
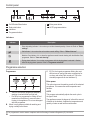 28
28
-
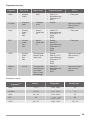 29
29
-
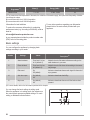 30
30
-
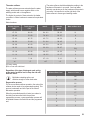 31
31
-
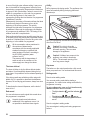 32
32
-
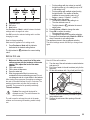 33
33
-
 34
34
-
 35
35
-
 36
36
-
 37
37
-
 38
38
-
 39
39
-
 40
40
-
 41
41
-
 42
42
-
 43
43
-
 44
44
-
 45
45
-
 46
46
-
 47
47
-
 48
48


