CHAUVET DJ Kinta FX ILS Handleiding
- Categorie
- Schijnwerpers
- Type
- Handleiding
Deze handleiding is ook geschikt voor

User Manual
English
Español
Français
Deutsch
Italiano
Nederlands
LASER LIGHT
AVOID DIRECT EYE EXPOSURE
CLASS 3R LASER PRODUCT
CLASSIFIED PER EN/IEC 60825-1: 2014
Complies with FDA performance standards for
laser products except for deviations pursuant
to Laser Notice No. 56, dated May 8, 2019.

Table of Contents
Kinta FX ILS User Manual Rev. 5
i
TABLE OF CONTENTS
Warranty/Garantía/Garantie/Garanzia ................................................................. 1
Limited Warranty ........................................................................................................... 1
Garantía Limitada.......................................................................................................... 1
Garantie Limitée ............................................................................................................ 1
Eingeschränkte Garantie............................................................................................... 2
Garanzia Limitata .......................................................................................................... 2
Beperkte Garantie ......................................................................................................... 2
1. Before You Begin .............................................................................................. 3
What Is Included............................................................................................................ 3
Unpacking Instructions .................................................................................................. 3
Claims ............................................................................................................................ 3
Text Conventions........................................................................................................... 3
Symbols.........................................................................................................................3
Disclaimer...................................................................................................................... 3
Intellectual Property....................................................................................................... 3
Safety Notes.................................................................................................................. 4
Non-Interlocked Housing Warning ................................................................................. 5
Laser Safety Notes........................................................................................................ 5
Laser Safety Label Reproduction .................................................................................. 6
Laser Exposure Warning................................................................................................ 6
Laser Emission Data ..................................................................................................... 6
Laser Compliance Statement ........................................................................................ 6
2. Introduction ....................................................................................................... 7
Product Overview .......................................................................................................... 7
Product Dimensions ...................................................................................................... 7
3. Setup .................................................................................................................. 8
AC Power ...................................................................................................................... 8
Fuse Replacement ......................................................................................................... 8
Power Linking................................................................................................................. 8
Mounting........................................................................................................................9
Orientation...................................................................................................................... 9
Rigging........................................................................................................................... 9
Proper Usage ................................................................................................................ 9
Laser Interlock and Key................................................................................................. 10
4. Operation ........................................................................................................... 11
Control Panel Operation................................................................................................ 11
Menu Map...................................................................................................................... 11
Configuration (DMX)...................................................................................................... 11
DMX Personality and Starting Address.......................................................................... 11
D-Fi USB Connectivity................................................................................................... 12
D-Fi USB Compatibility .................................................................................................. 12
Configuration (D-Fi USB) ............................................................................................... 12
D-Fi USB DIP Switch Channels...................................................................................... 12
DMX Channel Assignments and Values........................................................................ 13
Configuration (Standalone)............................................................................................ 14
Preset Kinta Effect ......................................................................................................... 14
Automatic Programs....................................................................................................... 14
Automatic Program Speed.............................................................................................. 14
Sound-Active Programs ................................................................................................. 14
Colors and Programs ..................................................................................................... 15
Custom Colors Kinta Effect............................................................................................ 15
IRC-6 Infrared Remote Control...................................................................................... 16
IRC-6 Operation ............................................................................................................. 16
Master/Slave Mode (Wired)........................................................................................... 17
Master/Slave Mode (D-Fi USB)..................................................................................... 17
ILS Mode ....................................................................................................................... 17
5. Maintenance....................................................................................................... 18
Product Maintenance..................................................................................................... 18
6. Technical Specifications .................................................................................. 19
Returns................................................................................................................... 20
Contact Us ............................................................................................................. 21

Kinta FX ILS User Manual Rev. 5
Índice
ii
ÍNDICE
1. Antes de Empezar ............................................................................................. 22
Qué va Incluido.............................................................................................................. 22
Instrucciones de Desembalaje ...................................................................................... 22
Reclamaciones............................................................................................................... 22
Convenciones del Manual ............................................................................................. 22
Símbolos........................................................................................................................ 22
Exención de responsabilidad......................................................................................... 22
Propiedad intelectual..................................................................................................... 22
Notas de Seguridad....................................................................................................... 23
Advertencia sobre Carcasa no Cerrada......................................................................... 24
Notas de Seguridad sobre Láser................................................................................... 24
Reproducción de la Etiqueta de Seguridad del Láser ................................................... 25
Advertencia sobre Exposición al Láser.......................................................................... 25
Datos de Emisión Láser ................................................................................................ 25
Declaración de Conformidad Láser............................................................................... 25
2. Introducción....................................................................................................... 26
Vista general del producto............................................................................................. 26
Dimensiones del producto............................................................................................. 26
3. Instalación.......................................................................................................... 27
Corriente alterna............................................................................................................ 27
Sustitución del fusible .................................................................................................... 27
Alimentación en cadena................................................................................................. 27
Montaje.......................................................................................................................... 28
Orientación..................................................................................................................... 28
Colocación ..................................................................................................................... 28
Uso adecuado ............................................................................................................... 28
Seguro y llave del láser ................................................................................................. 29
4. Funcionamiento................................................................................................. 30
Funcionamiento del panel de control............................................................................. 30
Mapa de menú............................................................................................................... 30
Configuración (DMX)..................................................................................................... 30
Personalidad DMX y dirección de inicio......................................................................... 30
Conectividad D-Fi USB.................................................................................................. 31
Compatibilidad D-Fi USB ............................................................................................... 31
Configuración (D-Fi USB) .............................................................................................. 31
Canales del conmutador DIP del D-Fi USB.................................................................... 31
Valores y asignaciones de canal DMX .......................................................................... 32
Configuración (Independiente) ...................................................................................... 33
Efecto kinta preestablecidos .......................................................................................... 33
Programas Automáticos................................................................................................. 33
Velocidad de programa automático ................................................................................ 33
Programas activo por sonido ......................................................................................... 34
Colores y programas...................................................................................................... 34
Efecto kinta con colores personalizados........................................................................ 34
IRC-6 control remoto por infrarrojos.............................................................................. 35
Funcionamiento de IRC-6 .............................................................................................. 35
Modo maestro/esclavo (por cable) ................................................................................ 36
Modo maestro/esclavo (D-Fi USB)................................................................................ 36
Modo ILS ....................................................................................................................... 36
5. Mantenimiento................................................................................................... 37
Mantenimiento del producto .......................................................................................... 37
6. Especificaciones Técnicas............................................................................... 38
Devoluciones......................................................................................................... 39
Contacto................................................................................................................. 40

Table des matières
Kinta FX ILS User Manual Rev. 5
iii
TABLE DES MATIÈRES
1. Avant de Commencer........................................................................................ 41
Ce Qui Est Compris....................................................................................................... 41
Instructions Relatives au Déballage .............................................................................. 41
Réclamations ................................................................................................................. 41
Conventions manuelles ................................................................................................. 41
Symboles....................................................................................................................... 41
Clause de Non-Responsabilité...................................................................................... 41
Propriété intellectuelle ................................................................................................... 41
Consignes de Sécurité .................................................................................................. 42
Avertissement : Boîtier non Verrouillable ....................................................................... 43
Consignes de Sécurité Relatives au Laser.................................................................... 43
Reproduction de l’Étiquette de Sécurité Laser .............................................................. 44
Avertissement d'Exposition au Laser ............................................................................. 44
Données d'émission laser ............................................................................................. 44
Déclaration de Conformité Laser................................................................................... 44
2. Introduction ....................................................................................................... 45
Vue d'ensemble du produit............................................................................................ 45
Dimensions du produit................................................................................................... 45
3. Configuration..................................................................................................... 46
Alimentation CA............................................................................................................. 46
Remplacement des fusibles........................................................................................... 46
Connexion électrique ..................................................................................................... 46
Installation ..................................................................................................................... 47
Orientation...................................................................................................................... 47
Suspension .................................................................................................................... 47
Utilisation Adéquate....................................................................................................... 47
Dispositif de verrouillage et clé...................................................................................... 48
4. Fonctionnement ................................................................................................ 49
Fonctionnement du Panneau de Commande................................................................ 49
Plan du menu ................................................................................................................ 49
Configuration (DMX)...................................................................................................... 49
Personnalité DMX et adresse de départ ........................................................................ 49
Connectivité D-Fi USB................................................................................................... 50
Compatibilité USB D-Fi .................................................................................................. 50
Configuration (D-Fi USB) ............................................................................................... 50
Canaux de commutation DIP USB D-Fi.......................................................................... 50
Affectation de canaux DMX et valeurs .......................................................................... 51
Configuration (Autonome) ............................................................................................. 52
Effet kinta prédéfinies..................................................................................................... 52
Programmes automatiques............................................................................................ 52
Vitesse du programme automatique............................................................................... 52
Programmes son-actif .................................................................................................... 53
Couleurs et programmes................................................................................................ 53
Effet kinta avec couleur personnalisée .......................................................................... 53
IRC-6 télécommande par infrarouge ............................................................................. 54
Fonctionnement de la IRC-6 .......................................................................................... 54
Mode maître/esclave (filaire) ......................................................................................... 55
Mode maître/esclave (D-Fi USB)................................................................................... 55
Mode ILS ....................................................................................................................... 55
5. Entretien............................................................................................................. 56
Entretien de l'appareil.................................................................................................... 56
6. Spécificités Techniques.................................................................................... 57
Renvois .................................................................................................................. 58
Nous Contacter...................................................................................................... 59

Kinta FX ILS User Manual Rev. 5
Inhaltsverzeichnis
iv
INHALTSVERZEICHNIS
1. Erste Schritte..................................................................................................... 60
Packungsinhalt .............................................................................................................. 60
Anweisungen für das Auspacken .................................................................................. 60
Schadensmeldung ......................................................................................................... 60
Konventionen des Handbuchs....................................................................................... 60
Symbole......................................................................................................................... 60
Haftungsausschluss ...................................................................................................... 60
Geistiges Eigentum ....................................................................................................... 60
Sicherheitshinweise....................................................................................................... 61
Achtung! Kein Schutz bei geöffnetem Gehäuse ............................................................ 62
Hinweise zur Lasersicherheit......................................................................................... 62
Warn- und Sicherheitsschilder auf dem Lasergerät ...................................................... 63
Laserexposition – Warnung............................................................................................ 63
Laseremissionsdaten..................................................................................................... 63
Laser-Konformitätserklärung ......................................................................................... 63
2. Einleitung ........................................................................................................... 64
Produktüberblick............................................................................................................ 64
Produktabmessungen.................................................................................................... 64
3. Einrichten des Geräts ....................................................................................... 65
Wechselstrom................................................................................................................ 65
Auswechseln der Sicherung........................................................................................... 65
Reihenschaltung der Geräte .......................................................................................... 65
Montage ........................................................................................................................ 66
Montagerichtung ............................................................................................................ 66
Hängende Montage........................................................................................................ 66
Bestimmungsgemäße Verwendung............................................................................... 66
Laser Verriegelung und Schlüssel ................................................................................. 67
4. Betrieb................................................................................................................ 68
Betrieb des Bedienfeldes............................................................................................... 68
Menüstruktur.................................................................................................................. 68
Konfiguration (DMX)...................................................................................................... 69
DMX-Persönlichkeit und Startadresse ........................................................................... 69
D-Fi USB Konnektivität.................................................................................................. 70
Kompatibilität mit D-Fi USB............................................................................................ 70
Konfiguration (D-Fi USB) ............................................................................................... 70
D-Fi USB DIP-Schalter-Kanäle....................................................................................... 70
DMX-Kanal – Zuordnungen und Werte ......................................................................... 71
Konfiguration (Einzelplatzmodus).................................................................................. 72
Voreingestellte Kinta-Effekt............................................................................................ 72
Automatischen Programme............................................................................................ 72
Automatischen Programmgeschwindigkeit..................................................................... 72
Musikgesteuertem Programme ...................................................................................... 73
Farben und Programme................................................................................................. 73
Anpassbare Farben Kinta-Effekt.................................................................................... 73
IRC-6 (Infrarot-Fernbedienung)..................................................................................... 74
IRC-6 Operation ............................................................................................................. 74
Master/Slave-Modus (kabelgebundene)........................................................................ 75
Master/Slave-Modus (D-Fi USB)................................................................................... 75
ILS-Modus ..................................................................................................................... 75
5. Wartung.............................................................................................................. 76
Wartung des Geräts ...................................................................................................... 76
6. Technische Daten.............................................................................................. 77
Reklamationen....................................................................................................... 78
Kontaktiere Uns..................................................................................................... 79

Sommario
Kinta FX ILS User Manual Rev. 5
v
SOMMARIO
1. Prima di iniziare................................................................................................. 80
Che cosa è incluso ........................................................................................................ 80
Istruzioni per il disimballaggio........................................................................................ 80
Reclami .......................................................................................................................... 80
Convenzioni di testo ...................................................................................................... 80
Simboli........................................................................................................................... 80
Liberatoria...................................................................................................................... 80
Proprietà intellettuale..................................................................................................... 80
Note sulla sicurezza ...................................................................................................... 81
Avvertenza - Contenitore non interbloccato ................................................................... 82
Note sulla sicurezza del laser........................................................................................ 82
Riproduzione di etichette sicurezza laser...................................................................... 83
Avviso di esposizione laser ............................................................................................ 83
Dati sull'emissione laser ................................................................................................ 83
Dichiarazione di conformità del laser............................................................................. 83
2. Introduzione....................................................................................................... 84
Panoramica sul prodotto................................................................................................ 84
Dimensioni del prodotto................................................................................................. 84
3. Impostazione ..................................................................................................... 85
Alimentazione CA.......................................................................................................... 85
Sostituzione del fusibile.................................................................................................. 85
Collegamento in cascata................................................................................................ 85
Montaggio...................................................................................................................... 86
Orientamento ................................................................................................................. 86
Allestimento.................................................................................................................... 86
Uso corretto................................................................................................................... 86
Interblocco e chiavetta laser.......................................................................................... 87
4. Funzionamento.................................................................................................. 88
Funzionamento del pannello di controllo....................................................................... 88
Mappa menu.................................................................................................................. 88
Configurazione (DMX)................................................................................................... 88
Caratteristiche DMX e indirizzo iniziale.......................................................................... 88
Connettività D-Fi USB ................................................................................................... 89
Compatibilità USB D-Fi .................................................................................................. 89
Configurazione (D-Fi USB) ............................................................................................ 89
Canali microinterruttori D-Fi USB.................................................................................... 89
Assegnazioni e valori dei canali DMX ........................................................................... 90
Configurazione (indipendente) ...................................................................................... 91
Effetto Kinta preimpostato.............................................................................................. 91
Programmi automatici .................................................................................................... 91
Velocità programma automatico ..................................................................................... 91
Programmi ad attivazione sonora .................................................................................. 92
Colori e Programmi ........................................................................................................ 92
Effetto Kinta con colori personalizzati ............................................................................ 92
Telecomando a infrarossi IRC-6 .................................................................................... 93
Funzionamento IRC-6.................................................................................................... 93
Modalità Master/Slave (cablato).................................................................................... 94
Modalità Master/Slave (D-Fi USB) ................................................................................ 94
Modalità ILS................................................................................................................... 94
5. Manutenzione .................................................................................................... 95
Manutenzione dell’unità................................................................................................. 95
6. Specifiche Tecniche.......................................................................................... 96
Resi......................................................................................................................... 97
Contatti................................................................................................................... 98

Kinta FX ILS User Manual Rev. 5
Inhoudsopgave
vi
INHOUDSOPGAVE
1. Voordat tu begint............................................................................................... 99
Wat is er inbegrepen ..................................................................................................... 99
Uitpakinstructies ............................................................................................................ 99
Claims ............................................................................................................................ 99
Tekstconventies............................................................................................................. 99
Symbolen....................................................................................................................... 99
Disclaimer...................................................................................................................... 99
Intellectueel eigendom................................................................................................... 99
Veiligheidsinstructies ..................................................................................................... 100
Niet-bevestigde waarschuwing op de behuizing ............................................................ 101
Veiligheidsinstructies voor de laser ............................................................................... 101
Reproductie van veiligheidsetiket voor de laser ............................................................ 102
Blootstellingswaarschuwing van de laser....................................................................... 102
Emissiegegevens van de laser...................................................................................... 102
Nalevingsverklaring van de laser................................................................................... 102
2. Inleiding.............................................................................................................. 103
Productoverzicht............................................................................................................ 103
Productafmetingen ........................................................................................................ 103
3. Instelling............................................................................................................. 104
AC-stroom ..................................................................................................................... 104
Vervangen van de zekering............................................................................................ 104
Power Linking................................................................................................................. 104
Montage ........................................................................................................................ 105
Oriëntatie........................................................................................................................ 105
Opbouw.......................................................................................................................... 105
Correct gebruik.............................................................................................................. 105
Vergrendeling en sleutel................................................................................................ 106
4. Werking .............................................................................................................. 107
Werking van het bedieningspaneel ............................................................................... 107
Menu Map...................................................................................................................... 107
Configuratie (DMX)........................................................................................................ 107
DMX-persoonlijkheid en startadres ................................................................................ 107
D-Fi USB-connectiviteit ................................................................................................. 108
D-Fi USB-compatibiliteit ................................................................................................. 108
Configuratie (D-Fi USB) ................................................................................................. 108
D-Fi USB DIP Switch-kanalen ........................................................................................ 108
DMX-kanaaltoewijzingen en waarden ........................................................................... 109
Configuratie (zelfstandig)............................................................................................... 110
Vooringesteld kinta-effect............................................................................................... 110
Automatische Programma’s ........................................................................................... 110
Automatisch Programmasnelheid................................................................................... 110
Geluidsactieve Programma’s ......................................................................................... 111
Kleuren en programma’s................................................................................................ 111
Aangepaste kleuren kinta-effect..................................................................................... 111
IRC-6 infrarood afstandsbediening................................................................................ 112
Bediening van der IRC-6................................................................................................ 112
Master/Slave-modus (bekabelde).................................................................................. 113
Master/Slave-modus (D-Fi USB)................................................................................... 113
ILS Mode ....................................................................................................................... 113
5. Onderhoud......................................................................................................... 114
Productonderhoud......................................................................................................... 114
6. Technische Specificaties.................................................................................. 115
Retouren................................................................................................................. 116
Neem contact Op................................................................................................... 117

Kinta FX ILS User Manual Rev. 5
Page 1 of 117
Warranty/Garantía/Garantie/Garanzia
Limited Warranty
FOR WARRANTY REGISTRATION AND COMPLETE TERMS AND CONDITIONS PLEASE VISIT OUR
WEBSITE.
For Customers in the United States and Mexico: www.chauvetlighting.com/warranty-registration.
For Customers in the United Kingdom, Republic of Ireland, Belgium, the Netherlands, Luxembourg,
France, and Germany: www.chauvetlighting.eu/warranty-registration.
Chauvet warrants that this product shall be free from defects in material and workmanship under normal
use, for the period specified in, and subject to the exclusions and limitations set forth in the full limited
warranty on our website. This warranty extends only to the original purchaser of the product and is not
transferable. To exercise rights under this warranty, you must provide proof of purchase in the form of an
original sales receipt from an authorized dealer that shows the product name and date of purchase.
THERE ARE NO OTHER EXPRESS OR IMPLIED WARRANTIES. This warranty gives you specific legal
rights. You may also have other rights that vary from state to state and country to country. This warranty is
valid only in the United States, United Kingdom, Republic of Ireland, Belgium, the Netherlands,
Luxembourg, France, Germany and Mexico. For warranty terms in other countries, please consult your
local distributor.
Garantía Limitada
PARA VER EL REGISTRO DE GARANTÍA Y LOS TÉRMINOS Y CONDICIONES COMPLETOS, VISITE
NUESTRO SITIO WEB.
Para clientes en los Estados Unidos y México: www.chauvetlighting.com/warranty-registration.
Para clientes en Reino Unido, República de Irlanda, Bélgica, Países Bajos, Luxemburgo, Francia y
Alemania: www.chauvetlighting.eu/warranty-registration.
Chauvet garantiza que este producto estará libre de defectos de material y mano de obra en condiciones
de uso normales, durante el periodo especificado, sujeto siempre a las exclusiones y limitaciones
establecidas en la garantía limitada completa de nuestro sitio web. Esta garantía se concede únicamente
al comprador original del producto y no es transferible. Para ejercer los derechos que otorga esta garantía,
usted debe proporcionar una prueba de compra en forma de un recibo de compra original, expedido por
un distribuidor autorizado, donde figure el nombre del producto y la fecha de compra. NO EXISTEN
OTRAS GARANTÍAS EXPRESAS NI IMPLÍCITAS. Esta garantía le otorga derechos legales específicos.
Es posible que a usted le asistan otros derechos, que variarán dependiendo del estado o del país. Esta
garantía solamente es válida en los Estados Unidos, Reino Unido, República de Irlanda, Bélgica, Países
Bajos, Luxemburgo, Francia, Alemania y México. Para conocer los términos de garantía en otros países,
consulte a su distribuidor local.
Garantie Limitée
VEUILLEZ VISITER NOTRE SITE INTERNET POUR CONSULTER LES MODALITÉES
D'ENREGISTREMENT DE LA GARANTIE ET LES CONDITIONS GÉNÉRALES COMPLÈTES.
Pour les clients aux États-Unis et au Mexique: www.chauvetlighting.com/warranty-registration.
Pour les clients du Royaume-Uni, de la République d'Irlande, de la Belgique, des Pays-Bas, du
Luxembourg, de la France et de l'Allemagne: www.chauvetlighting.eu/warranty-registration.
Chauvet garantit que cet appareil est exempt de défauts de matériaux et de fabrication dans des
conditions normales d'utilisation, pendant la période spécifiée dans la garantie limitée complète
consultable sur notre site Internet et sous réserve des exclusions et limitations qui y sont énoncées. Cette
garantie ne s'applique qu'à l'acheteur initial du produit et n'est pas transférable. Pour exercer les droits
prévus par cette garantie, vous devez fournir une preuve d'achat sous la forme d'un reçu de vente original
d'un revendeur autorisé qui indique le nom du produit et la date d'achat. IL N'EXISTE AUCUNE AUTRE
GARANTIE EXPRESSE OU IMPLICITE. Cette garantie vous confère des droits légaux spécifique. Vous
pouvez également bénéficier d'autres droits qui varient selon les états et les pays. Cette garantie n'est
valable qu'aux États-Unis, au Royaume-Uni, en République d'Irlande, en Belgique, aux Pays-Bas, au
Luxembourg, en France, en Allemagne et au Mexique. Pour connaître les conditions de garantie dans
d'autres pays, veuillez consulter votre revendeur local.

Kinta FX ILS User Manual Rev. 5 Page 2 of 117
Eingeschränkte Garantie
ZUR REGISTRIERUNG FÜR GARANTIEANSPRÜCHE UND ZUR EINSICHT IN DIE VOLLSTÄNDIGEN
GESCHÄFTSBEDINGUNGEN BESUCHEN SIE BITTE UNSERE WEBSITE.
Für Kunden in den USA und in Mexiko: www.chauvetlighting.com/warranty-registration.
Für Kunden im Vereinigten Königreich, in Irland, Belgien, den Niederlanden, Luxemburg,
Frankreich und Deutschland: www.chauvetlighting.eu/warranty-registration.
Chauvet garantiert für die in der auf unserer Website veröffentlichten vollständigen eingeschränkten
Garantie genannten Dauer und unter Vorbehalt der darin genannten Haftungsausschlüsse und -
beschränkungen, dass dieses Produkt bei normalen Gebrauch frei von Material- und Verarbeitungsfehlern
ist. Diese Garantie erstreckt sich nur auf den Erstkäufer des Produkts und ist nicht übertragbar. Zur
Ausübung der unter dieser Garantie gewährten Rechte ist der Kaufbeleg in Form der Originalrechnung
von einem autorisierten Händler vorzulegen, in der die Produktbezeichnung und das Kaufdatum vermerkt
sein müssen. ES BESTEHEN KEINE WEITEREN AUSDRÜCKLICHEN ODER STILLSCHWEIGENDEN
GARANTIEN. Diese Garantie gibt Ihnen besondere gesetzliche Rechte. Und Sie haben möglicherweise
weitere Rechte, die von Land zu Land unterschiedlich sein können. Diese Garantie ist nur in den USA, im
Vereinigten Königreich, in Irland, Belgien, den Niederlanden, Luxemburg, Frankreich, Deutschland und
Mexiko gültig. Bezüglich der Garantiebestimmungen in anderen Ländern wenden Sie sich bitte an Ihren
lokalen Händler.
Garanzia Limitata
PER LA REGISTRAZIONE DELLA GARANZIA ED I TERMINI E CONDIZIONI COMPLETI VISITARE IL
NOSTRO SITO WEB.
Per clienti di Stati Uniti e Messico consultare: www.chauvetlighting.com/warranty-registration.
Per clienti di Regno Unito, Repubblica di Irlanda, Belgio, Paesi Bassi, Lussemburgo, Francia e
Germania: www.chauvetlighting.eu/warranty-registration.
Chauvet garantisce che i propri prodotti, in condizioni di utilizzo normale, sono esenti da difetti di materiali
e manodopera, per il periodo specificato e con le esclusioni e limitazioni riportate nella garanzia integrale
limitata sul proprio sito Web. Tale garanzia si applica soltanto all'acquirente originario del prodotto e non
può essere trasferita. Per esercitare i propri diritti secondo i termini della presente garanzia è necessario
fornire prova dell'acquisto sotto forma di ricevuta o fattura originale di un distributore autorizzato che riporti
chiaramente il nome del prodotto e la data di acquisto. NON SONO PREVISTE ALTRE GARANZIE
ESPRESSE O IMPLICITE. Questa garanzia prevede diritti legali specifici. È comunque possibile avere
altri diritti che variano da stato a stato e da paese a paese. Questa garanzia si applica soltanto negli Stati
Uniti, Regno Unito, epubblica di Irlanda, Belgio, Paesi Bassi, Lussemburgo, Francia, Germania e Messico.
Per i termini di garanzia vigenti in altri paesi si prega di consultare il distributore locale.
Beperkte Garantie
GA NAAR ONZE WEBSITE VOOR REGISTRATIE VAN DE GARANTIE EN DE VOLLEDIGE
ALGEMENE VOORWAARDEN.
Voor klanten in de Verenigde Staten en Mexico: www.chauvetlighting.com/warranty-registration.
Voor klanten in het Verenigd Koninkrijk, Ierland, België, Nederland, Luxemburg, Frankrijk en
Duitsland: www.chauvetlighting.eu/warranty-registration.
Chauvet garandeert dat dit product bij normaal gebruik vrij zal blijven van defecten in materiaal en
vakmanschap, voor de opgegeven periode en onder voorbehoud van de uitzonderingen en beperkingen
die zijn uiteengezet in de volledige beperkte garantie op onze website. Deze garantie geldt uitsluitend voor
de oorspronkelijke koper van het product en is niet overdraagbaar. Om onder deze garantie rechten uit te
oefenen, moet u een aankoopbewijs overleggen in de vorm van een origineel verkoopbewijs van een
geautoriseerde dealer, waarop de naam van het product en de aankoopdatum zichtbaar zijn. ER ZIJN
GEEN ANDERE EXPLICIETE OF IMPLICIETE GARANTIES. Deze garantie geeft u specifieke wettelijke
rechten. Mogelijk heeft u ook andere rechten die van staat tot staat en van land tot land verschillen. Deze
garantie is uitsluitend geldig in de Verenigde Staten, het Verenigd Koninkrijk, Ierland, België, Nederland,
Luxemburg, Frankrijk, Duitsland en Mexico. Neem contact op met uw lokale verkoper voor
garantievoorwaarden in andere landen.

Page 3 of 117
Before You Begin
Kinta FX ILS User Manual Rev. 5
1. Before You Begin
What Is Included
Unpacking Instructions
Carefully unpack the product immediately and check the container to make sure all the parts are in the
package and are in good condition.
Claims
If the box or the contents (the product and included accessories) appear damaged from shipping, or show
signs of mishandling, notify the carrier immediately, not Chauvet. Failure to report damage to the carrier
immediately may invalidate your claim. In addition, keep the box and contents for inspection.
For other issues, such as missing components or parts, damage not related to shipping, or concealed
damage, file a claim with Chauvet within 7 days of delivery.
Text Conventions
Symbols
Disclaimer
Chauvet believes that the information contained in this manual is accurate in all respects. However,
Chauvet assumes no responsibility and specifically disclaims any and all liability to any party for any loss,
damage or disruption caused by any errors or omissions in this document, whether such errors or
omissions result from negligence, accident or any other cause. Chauvet reserves the right to revise the
content of this document without any obligation to notify any person or company of such revision, however,
Chauvet has no obligation to make, and does not commit to make, any such revisions. Download the latest
version from www.chauvetdj.com.
Intellectual Property
The works of authorship contained in this manual, including, but not limited to, all design, text and images
are owned by Chauvet.
© Copyright 2022 Chauvet & Sons, LLC. All rights reserved.
Electronically published by Chauvet in the United States of America.
CHAUVET, the Chauvet logo, ILS (patent pending), and Kinta FX ILS are registered trademarks or
trademarks of Chauvet & Sons LLC (d/b/a Chauvet and Chauvet Lighting) in the United States and other
countries. Other company and product names and logos referred to herein may be trademarks of their
respective companies.
•KintaFXILS
• Power Cord
• User Manual
Convention Meaning
1–512 A range of values
50/60 A set of values of which only one can be chosen
Settings A menu option not to be modified
<ENTER> A key to be pressed on the product’s control panel
ON A value to be entered or selected
Symbol Meaning
Electrical warning. Not following these instructions may cause electrical damage to the
product, accessories, or the user.
Critical installation, configuration, or operation information. Not following these
instructions may make the product not work, cause damage to the product, or cause
harm to the operator.
Important installation or configuration information. The product may not function
correctly if this information is not used.
Useful information.
Laser safety information.

Page 4 of 117
Kinta FX ILS User Manual Rev. 5
Before You Begin
Safety Notes
The Safety Notes include important laser system safety information. Read and understand all instructions
before powering on the laser for the first time. Knowing these safety instructions is crucial to avoiding laser
eye injury and breaking the law. Keep this User Manual in a safe place for future reference.
STOP AND READ ALL LASER SAFETY DATA
• Lasers can be hazardous and have unique safety considerations. Permanent eye injury and
blindness are possible if lasers are used incorrectly. Pay close attention to each safety
REMARK and WARNING statement in this User Manual. Read all instructions carefully
BEFORE operating this device.
• Always connect the product to a grounded circuit to avoid the risk of electrocution.
• Always disconnect the product from the power source before cleaning.
• Avoid direct eye exposure to the light source while the product is on.
• Make sure the power cord is not crimped or damaged.
• Never disconnect the product from power by pulling or tugging on the cord.
• If mounting the product overhead, always secure to a fastening device using a safety cable.
• Make sure there are no flammable materials close to the product when operating.
• Do not touch the product’s housing when operating because it may be very hot.
• This product is not intended for permanent installation.
• Always make sure that the voltage of the outlet to which you are connecting the product is
within the range stated on the decal or rear panel of the product.
• The product is for indoor use only! (IP20) To prevent risk of fire or shock, do not expose the
product to rain or moisture.
• Always install the product in a location with adequate ventilation, at least 20 in (50 cm) from
adjacent surfaces.
• Be sure that no ventilation slots on the product’s housing are blocked.
• Never connect the product to a dimmer.
• Make sure to replace the fuse with another of the same type and rating.
• Always use the mounting bracket to carry the product.
• Do not switch the product on/off in short intervals. This will reduce the laser diode life.
• Do not shake this product. Avoid brute force when mounting or operating this product.
• ALWAYS use a safety cable when mounting the product overhead.
• The ambient operating temperature for the laser is 59 °F to 95 °F (15 °C to 35 °C). Do not
operate this product outside this range.
• In the event of a serious operating problem, stop using the product immediately.
• Never try to repair the product. Repairs carried out by unskilled people can lead to damage or
malfunction. Contact the nearest authorized technical assistance center.
CAUTION! Use of controls, adjustments, or procedures other than THOSE specified IN
THIS USER MANUAL may result in hazardous radiation exposure.
• Avoid direct eye contact with laser light. Never intentionally expose your eyes or others to
direct laser light.
• This laser product can potentially cause instant eye injury or blindness if laser light directly
strikes the eyes.
• It is illegal and dangerous to shine this laser into audience areas, where the audience or other
personnel could get direct laser beams or bright reflections into their eyes.
• It is a U.S. federal offense to shine any laser at aircraft.
• To eliminate wear and improve its lifespan, during periods of non-use completely disconnect
from power via breaker or by unplugging it.
• DO NOT attempt any repairs. Repairs and servicing must be carried out by a certified
technician. Unauthorized modifications are forbidden for safety reasons!
Keep this User Manual for future consultation. If transferring ownership of the product to
another user, be sure this document is kept with the laser.

Page 5 of 117
Before You Begin
Kinta FX ILS User Manual Rev. 5
Non-Interlocked Housing Warning
Laser Safety Notes
Laser light is different from any other light. Laser light can cause eye injury if the product is not set up and
used properly. Laser light is a thousand times more concentrated than any other kind of light. This
concentration can cause instant eye injuries by burning the retina (the light-sensitive portion at the back of
the eye). The heat from a laser light cannot be felt, but it can still injure or blind product operators and the
audience. Even very small amounts of laser light at long distances are potentially hazardous.
DO NOT assume that exposure to an individual laser beam is safe, even a tiny beam split off from a larger
beam. This laser product uses dozens of milliwatts of laser power—Class 3B levels internally—and splits
them into multiple beams—Class 3R levels. The individual Class 3R level beams are potentially hazardous
to the eyes.
DO NOT assume that a moving laser light is safe. Laser light is never without risk. Since eye injuries can
occur instantly, it is critical to prevent the possibility of ANY direct eye exposure. According to laser safety
regulations, it is not legal to aim Class 3R lasers into areas where people can be exposed, even if the laser
is aimed below people’s faces, such as at a dance floor.
• This unit contains high power laser devices internally.
• Do not open the laser housing, due to potential exposure to unsafe levels of laser radiation.
• The laser power levels, accessible if the unit is opened, can cause instant blindness, skin
burns, and fires.
STOP AND READ ALL THE LASER SAFETY NOTES BELOW
• Do not operate the laser without first reading and understanding all the safety and technical
data in this manual.
• ALWAYS set up and install all laser effects so that any laser light is at least 3 meters (9.8 feet)
above the floor on which people are standing. See the Proper Usage section of this manual.
• After setup, and prior to public use, test the lasers to ensure they are functioning properly. Do
not use the product if any defect is detected.
• DO NOT point lasers at people or animals.
• DO NOT look into the laser aperture or laser beams.
• DO NOT point lasers into areas where people could be exposed to them.
• DO NOT point lasers at highly reflective surfaces such as windows, mirrors, and shiny metal.
Even laser reflections can be hazardous.
• Never point a laser at aircraft; this is a U.S. federal offense.
• Never point unterminated laser beams into the sky.
• Do not expose the output optic (aperture) to harsh cleaning chemicals.
• Do not use the laser if the housing is damaged, open, or if the optics appear damaged in any
way.
• Never open the laser housing. The high laser power levels inside of the protective housing can
start fires or burn skin, and will cause instant eye injury.
• Never leave this product running unattended.
• The operation of a Class 3R laser show is allowed only if the lasers are operated by a skilled
and well-trained professional, who is familiar with the data included in this manual.
• The legal requirements for using laser entertainment products vary from country to country.
The user is responsible for the legal requirements in the location/country of use.
CAUTION! Do not operate this device in ways not specified in this User Manual. Failure to
follow the instructions will void the warranty, may damage the product, or injure the user
or the audience.
CAUTION! This product cannot be discarded with household waste. Contact your local
waste management service for electronic disposal regulations in your area.

Page 6 of 117
Kinta FX ILS User Manual Rev. 5
Before You Begin
Laser Safety Label Reproduction
Laser Exposure Warning
Laser Emission Data
As measured under IEC measurement conditions for classification.
Laser Compliance Statement
Complies with FDA performance standards for laser products except for deviations pursuant to Laser
Notice No. 56, dated May 8, 2019. No maintenance is required to keep this product in compliance with
laser performance standards.
LASER LIGHT AVOID DIRECT EYE EXPOSURE
Further guidelines and safety programs for safe use of lasers can be found in the ANSI Z136.1
Standard “For Safe Use of Lasers”, available from the Laser Institute of America: www.lia.org.
Many local governments, corporations, agencies, military, and others, require all lasers to be
used under the guidelines of ANSI Z136.1. Laser Display guidance can be obtained via the
International Laser Display Association: www.ilda.com.
Laser Classification Class 3R
Red Laser Diode Wavelength/Optical Power 650 nm/100 mW
Green Laser Diode Wavelength/Optical Power 520 nm/30 mW
Beam Diameter <5 mm at aperture
Pulse Data All pulses < 4 Hz (>0.25 sec)
Divergence (each beam) <2 mrad
Divergence (total light) <160 degrees
Laser Power of Each Beam from Aperture <5 mW
LASER APERTURE
MODEL: KINTAFXILS
ITEM CODE: 10051879
FUSE: T 1 A, 250 V
POWER LINKING: 8 A (17 UNITS @ 120 V)
(33 UNITS @ 230 V)
ORIGIN: MADE IN CHINA
USA / CANADA
POWER: 100-125 VAC, 60 Hz
0.5 A, 25 W
WORLDWIDE
POWER: 100-240 VAC, 50/60 Hz
0.2-0.5 A, 24 W
THIS APPLIANCE MUST BE GROUNDED
CETTE UNITÉ DOIT ÊTRE RELIÉE À LA TERRE
USE ONLY FUSE OF SAME TYPE & RATING
N’UTILISER QUE DES FUSIBLES DU TYPE ET
DE L’AMPÉRAGE INDIQUÉ
NOT FOR HOUSEHOLD USE
IMPROPRE A L’USAGE DOMESTIQUE
DRY LOCATIONS
EMPLACEMENTS SECS
DISCONNECT POWER BEFORE SERVICING
DÉBRANCHER AVANT TOUT ENTRETIEN
FOR INDOOR USE ONLY
USAGE INTÉRIEUR UNIQUEMENT
WORLDWIDE HEADQUARTERS,
SUNRISE, FLORIDA USA
520/650nm
CW, <5mW
WARNING
Cancer and Reproductive Harm -
www.P65Warnings.ca.gov
IEC/EN60825-1:2014
!"#$%&'(
RoHS

Page 7 of 117
Introduction
Kinta FX ILS User Manual Rev. 5
2. Introduction
Product Overview
Product Dimensions
WARNING! DO NOT plug anything other than a D-Fi USB into the USB port. Doing so may
cause damage to the product.
DMX
in/out
Fuse
holder
Power
in Power
out
LED indicators
Safety
loop
Strobe SMD LEDs
(x16)
Laser
output
Microphone
Sensitivity
knob
Kinta effect
lenses (x24)
DMX
Sound
Auto
Slave
Display and control buttons
<MENU> <UP> <DOWN> <ENTER>
USB
port
IR
sensor
7.4 in
187 mm
7.4 in
187 mm
10.3 in
261 mm

Page 8 of 117
Kinta FX ILS User Manual Rev. 5
Setup
3. Setup
AC Power
The Kinta FX ILS has an auto-ranging power supply and it can work with an input voltage range of 100 to
240 VAC, 50/60 Hz. To determine the product’s power requirements (circuit breaker, power outlet, and
wiring), use the current value listed on the label affixed to the product’s back panel, or refer to the product’s
Technical Specifications. The listed current rating indicates the product’s average current draw under
normal conditions.
Fuse Replacement
1. Disconnect the product from power.
2. Wedge the tip of a flat-head screwdriver into the slot of the fuse holder.
3. Pry the fuse holder out of the housing.
4. Remove the blown fuse from the holder and replace with a fuse of the exact same type and rating.
5. Insert the fuse holder back in place and reconnect power.
Power Linking
The product provides power linking via the outlet located in the back of the product. See the diagram below
for further explanation.
Power Linking Diagram
• Always connect the product to a protected circuit (a circuit breaker or fuse). Make sure
the product has an appropriate electrical ground to avoid the risk of electrocution or
fire.
• To eliminate unnecessary wear and improve its lifespan, during periods of non-use
completely disconnect the product from power via breaker or by unplugging it.
Never connect the product to a rheostat (variable resistor) or dimmer circuit, even if the
rheostat or dimmer channel serves only as a 0 to 100% switch.
Disconnect the product from the power outlet before replacing the fuse.
Always replace a blown fuse with one of the same type and rating.
It is possible to link up to 17 Kinta FX ILS products at 120 V or 33 products at 230 V. Never
exceed this number. Power-linking cords can be purchased separately.
The power linking diagram shown above corresponds to the North American version of
the product ONLY! If using the product in other markets, you must consult with the local
Chauvet distributor as power linking connectors and requirements may differ in your
country or region.
Safety cap
Spare fuse holder
(inside safety cap)
Installed fuse
(held by plastic clip)
1st product 2nd product 3rd product
Power
source Additional
products

Page 9 of 117
Setup
Kinta FX ILS User Manual Rev. 5
Mounting
Before mounting the product, read and follow the safety recommendations indicated in the Safety Notes.
Orientation
The Kinta FX ILS must be mounted in a position that includes planning for safe laser usage. In addition,
make sure adequate ventilation is provided around the product.
Rigging
• Before deciding on a location for the product, always make sure there is easy access to the product
for maintenance and programming.
• Make sure that the structure or surface onto which you are mounting the product can support the
product’s weight (see the Technical Specifications)
• When mounting the product overhead, always use a safety cable. Mount the product securely to a
rigging point, such as an elevated platform or a truss.
•When rigging the product onto a truss, use a mounting clamp of appropriate weight capacity. The
bracket has a 13-mm hole, which is appropriate for this purpose.
• The bracket adjustment knobs allow for directional adjustment when aiming the product to the
desired angle. Only loosen or tighten the bracket knobs manually. Using tools could damage the
knobs.
Mounting Diagram
Proper Usage
This product is for overhead mounting only. For safety purposes, Chauvet recommends mounting lighting
effect products on steady elevated platforms or sturdy overhead supports using suitable hanging clamps.
In all cases, use safety cables. Obtain appropriate mounting hardware from your lighting vendor.
International laser safety regulations require that laser products must be operated in the fashion
illustrated below, with a minimum of 3 meters (9.8 ft) of vertical separation between the floor and
the lowest laser light. Additionally, 3 meters of horizontal separation is required between laser light
and audience or other public spaces.
CAUTION! Use of controls, adjustments, or procedures other than THOSE specified IN
THIS USER MANUAL may result in hazardous radiation exposure.
Safety cable
(such as CH-05
from Chauvet)
Mounting clamp
Mounting bracket
Bracket adjustment
knob (x2)
3 meters

Page 10 of 117
Kinta FX ILS User Manual Rev. 5
Setup
Laser Interlock and Key
If purchased outside of North America, this product will have an interlock and key to prevent the laser from
operating unless the interlock and key are both inserted and the key is turned to the ON position.
For the laser to function, you MUST DO BOTH:
• Insert the interlock
• Insert the key and turn it to the ON position
If both are not performed, the laser WILL NOT turn on!
*For illustrative purposes only
Always turn the key to the OFF position and remove it when leaving this product
unattended to prevent accidents or injuries to third parties.
Insert the interlock Insert AND turn the key
to the ON position

Page 11 of 117
Operation
Kinta FX ILS User Manual Rev. 5
4. Operation
This product is not designed for continual use. Make sure there are regular breaks during operation to
maximize the life of the lasers. Always disconnect the Kinta FX ILS from power when not in use.
Control Panel Operation
To access the control panel functions, use the four buttons located underneath the display. Please refer to
the Product Overview to see the button locations on the control panel.
Menu Map
Refer to the Kinta FX ILS product page on
www.chauvetdj.com
for the latest menu map.
Configuration (DMX)
The Kinta FX ILS works with a DMX controller. Information about DMX is in the CHAUVET DMX Primer,
which is available from the Chauvet website http://www.chauvetlighting.com/downloads/
DMX_Primer_rev05_WO.pdf.
DMX Personality and Starting Address
When selecting a starting DMX address, always consider the number of DMX channels the selected DMX
mode uses. If the starting address is set too high, access to some of the product’s channels could be
restricted.
The Kinta FX ILS uses up to 9 DMX channels in the 9-Ch mode, which defines the highest configurable
address to 504.
The Kinta FX ILS uses 2 DMX channels in the 2-Ch mode, which defines the highest configurable address
to 511.
For information about the DMX protocol, download the DMX Primer from www.chauvetdj.com.
To select the DMX personality and starting address, do the following:
1. Press <MENU> repeatedly until 2-Ch or 9-Ch shows on the display.
2. Press <ENTER>.
3. Use <UP> or <DOWN> to increase or decrease the starting address, from d 1–511.
4. Press <ENTER>.
Button Function
<MENU> Selects an operation mode or backs out of the current menu option
<UP> Navigates upwards through the menu list or increases a selected numeric value
<DOWN> Navigates downwards through the menu list or decreases a selected numeric value
<ENTER> Enables the currently displayed menu or sets a selected value into the selected function
Mode Programming Levels Description
DMX 2-Ch d 1–511 4-channel DMX mode
9-Ch d 1–504 9-channel DMX mode
Preset color C-- C 1–15 Preset kinta effect colors (see Colors and Programs)
Automatic
program P-- P 1–7 FAdE Automatic programs (see Colors and Programs)
SnAP
Program speed S-- S. 01–99 Automatic program speed
Sound-active
program Snd Snd1–7 Sound-active programs (see Colors and Programs)
Custom color u--
r000–255
Sets manual kinta effect colors
G000–255
b000–255
U000–255
F. 00–99 Sets strobe speed, slow to fast
Infrared SEt on Enables/disables infrared control
oFF
ILS mode iLS iLS1–4 Sets ILS mode
The display will continue to blink until the fixture receives a DMX signal.

Page 12 of 117
Kinta FX ILS User Manual Rev. 5
Operation
D-Fi USB Connectivity
The Kinta FX ILS is able to become a D-Fi wireless receiver/transmitter with the use of the D-Fi USB from
Chauvet DJ. Simply set the product's DMX Personality and DMX Address, set the DIP switch D-Fi
receiving/transmitting channel, then plug it into the D-Fi USB port.
D-Fi USB Compatibility
The D-Fi USB can receive a DMX signal from the D-Fi Hub and the FlareCON Air 2 as well as other D-Fi
USB products.
Configuration (D-Fi USB)
1. Set the DMX Personality and DMX address on the Kinta FX ILS.
2. Use the Chart provided to set BOTH:
• the Channel, and then
• The Receiving or Transmitting option
NOTE: DIP Switch 5 is for Transmitting OR Receiving, please choose carefully.
D-Fi USB DIP Switch Channels
WARNING! DO NOT plug anything other than a D-Fi USB into the USB port. Doing so may
cause damage to the product.
Once plugged in, the D-Fi USB will take over the product. Wired DMX and manual display
control / menu buttons will be unavailable until you unplug the D-Fi USB. The priority
levels are:
1. D-Fi USB
2. Wired DMX
3. Manual Digital Display/Menu Buttons
Ch. 1234T/R Ch. 1234T/R Ch. 1234T/R Ch. 1234T/R
1919
210 210
311 311
412 412
513 513
614 614
715 715
816 816
Receiving
Receiving
Transmitting
Transmitting

Page 13 of 117
Operation
Kinta FX ILS User Manual Rev. 5
DMX Channel Assignments and Values
2-Ch 9-Ch Function Value Percent/Setting
11
Automatic program
(overrides Ch. 3-9)
000 009 No function
010 044 Kinta, laser, and strobes
045 079 Kinta and strobes
080 114 Kinta and laser
115 149 Laser and strobes
150 184 Kinta only
185 219 Strobes only
220 255 Laser only
2 2 Program speed 000 250 Automatic program speed, slow to fast
251 255 Sound-active program
– 3 Kinta effect color
000 005 No function
006 020 Red
021 035 Green
036 050 Blue
051 065 White
066 080 Red and green
081 095 Red and blue
096 110 Red and white
111 125 Green and blue
126 140 Green and white
141 155 Blue and white
156 170 Red, green, and blue
171 185 Red. green, and white
186 200 Green, blue, and white
201 215 Red, green, blue, and white
216 230 Automatic 4-color chase
231 255 Automatic 7-color chase
– 4 Kinta effect strobe 000 005 No function
006 255 Kinta effect strobe, slow to fast
– 5 Kinta effect motor
000 No function
001 127 Kinta effect motor indexing
128 255 Kinta effect motor speed, slow to fast
– 6 SMD strobes program
000 009 No function
010 019 SMD strobes program 1, slow to fast
020 029 SMD strobes program 2, slow to fast
030 039 SMD strobes program 3, slow to fast
040 049 SMD strobes program 4, slow to fast
050 059 SMD strobes program 5, slow to fast
060 069 SMD strobes program 6, slow to fast
070 079 SMD strobes program 7, slow to fast
080 089 SMD strobes program 8, slow to fast
090 099 SMD strobes program 9, slow to fast
100 109 SMD strobes program 10, slow to fast
110 119 SMD strobes program 11, slow to fast
120 129 SMD strobes program 12, slow to fast
130 139 SMD strobes program 13, slow to fast
140 149 SMD strobes program 14, slow to fast
150 159 SMD strobes program 15, slow to fast
160 169 SMD strobes program 16, slow to fast
170 179 SMD strobes program 17, slow to fast
180 255 SMD strobes program 18, slow to fast

Page 14 of 117
Kinta FX ILS User Manual Rev. 5
Operation
Configuration (Standalone)
Set the product in one of the standalone modes to control without a DMX controller.
Preset Kinta Effect
To run the Kinta FX ILS with a static preset kinta effect color, do the following:
1. Press <MENU> repeatedly until C-- shows on the display.
2. Press <ENTER>.
3. Use <UP> or <DOWN> to select the desired colors, from C 1–15. (see Colors and Programs)
4. Press <ENTER>.
Automatic Programs
To run the Kinta FX ILS with an automatic program, follow the instructions below.
1. Press <MENU> repeatedly until P-- shows on the display.
2. Press <ENTER>.
3. Use <UP> or <DOWN> to select the desired program, from P 1–7. (see Colors and Programs)
4. Press <ENTER>.
5. Use <UP> or <DOWN> to select the program mode, from FAdE (fading) or SnAP (quick change).
6. Press <ENTER>.
Automatic Program Speed
To set the automatic program speed of the Kinta FX ILS, do the following:
1. Press <MENU> repeatedly until S-- shows on the display.
2. Press <ENTER>.
3. Use <UP> or <DOWN> to increase or decrease the speed, from S. 00–99 (slow to fast).
4. Press <ENTER>.
Sound-Active Programs
To run the Kinta FX ILS with a sound-active program, follow the instructions below.
1. Press <MENU> repeatedly until Snd shows on the display.
2. Press <ENTER>.
3. Use <UP> or <DOWN> to select the desired program, from Snd1–7. (see Colors and Programs)
4. Press <ENTER>.
5. Turn the music on and adjust the sound sensitivity knob until the product starts responding to the
beat of the music.
–7
Laser color
(Ch. 8 must be active for
strobe)
000 009 No function
010 049 Red
050 089 Green
090 129 Red and green
130 169 Red and strobing green
170 209 Green and strobing red
210 255 Red and green alternating strobe
– 8 Laser strobe
000 009 No function
010 254 Laser strobe, slow to fast
255 Sound-active laser strobe
– 9 Laser rotation
000 004 Stop
005 127 Counterclockwise rotation, slow to fast
128 133 Stop
134 255 Clockwise rotation, fast to slow
For manual operation of LEDs and lasers using DMX control, set Channel 1 to 000 009.
Never connect a product that is operating in any standalone mode to a DMX string
connected to a DMX controller. Products in standalone mode may transmit DMX signals
that could interfere with the DMX signals from the controller.
• The product will only respond to low frequencies of music (bass and drums).
• The laser will black out when in Sound-Active mode after 3 seconds of silence or noise
below the sensitivity setting.
2-Ch 9-Ch Function Value Percent/Setting

Page 15 of 117
Operation
Kinta FX ILS User Manual Rev. 5
Colors and Programs
Custom Colors Kinta Effect
To run the Kinta FX ILS with custom color and strobe values, do the following:
1. Press <MENU> repeatedly until u-- shows on the display.
2. Press <ENTER>.
3. Use <UP> or <DOWN> to increase or decrease the value of the current option, from
• r000–255 (red)
• G000–255 (green)
• b000–255 (blue)
•U000–255 (white) or
•F. 00–99 (kinta effect strobe).
4. Press <ENTER> to cycle to the next option.
5. Repeat steps 3 and 4 until the product is set as desired.
C-- Effect P--/Snd Effect
1Red 1All effects
2Green 2Kinta and strobes
3Blue 3Kinta and laser
4White 4Laser and strobes
5Red and green 5Kinta only
6Red and blue 6Strobes only
7Red and white 7Laser only
8Green and blue
9Green and white
10 Blue and white
11 Red, green, and blue
12 Red, green, and white
13 Red, blue, and white
14 Green, blue, and white
15 Red, green, blue, and white

Page 16 of 117
Kinta FX ILS User Manual Rev. 5
Operation
IRC-6 Infrared Remote Control
The Kinta FX ILS can be operated with the CHAUVET IRC-6. To enable IR wireless control, follow the
instructions below.
1. Press <MENU> repeatedly until SEt shows on the display.
2. Press <ENTER>.
3. Use <UP> or <DOWN> to select from on or oFF.
4. Press <ENTER>.
IRC-6 Operation
Automatic Mode
To turn on automatic mode with the IRC-6:
1. Press <AUTO> on the IRC-6.
2. Press <1>–<7> to select the program (see Colors and Programs).
To adjust the speed of the automatic program:
1. Press <SPEED> on the IRC-6.
2. Press <+> or <–> to increase or decrease the speed.
Sound-Active Mode
To turn on sound-active mode with the IRC-6:
1. Press <SOUND> on the IRC-6.
2. Press <1>–<7> to select the program (see Colors and Programs).
Manual Control
To manually select the kinta effect color with the IRC-6:
1. Press the desired color, from <R> (red), <G> (green), <B> (blue), or
<W> (white).
Strobe
To set the strobe with the IRC-6:
1. Press <STROBE> on the IRC-6.
2. Press <+> or <–> to increase or decrease the strobe speed.
Black Out
To black out the product with the IRC-6:
1. Press <BLACK OUT> on the IRC-6.
This will turn off all the LEDs until the button is pressed again.
NOTE: The IRC-6 will not respond to any inputs when Black Out is activated. If the
product does not respond when a button is pressed, try pressing <BLACK OUT>.
Black Out may have been activated.
The buttons on the IRC-6 not listed above are reserved for future use.
BLACK
OUT AUTO SOUND
SENSI-
TIVITY
SPEEDSTROBE
%MANUAL FADE
RGB
WUVA
+
0
-
123
654
789

Page 17 of 117
Operation
Kinta FX ILS User Manual Rev. 5
Master/Slave Mode (Wired)
The Master/Slave mode allows a single Kinta FX ILS product (the “master”) to control the actions of one or
more Kinta FX ILS products (the “slaves”) without the need of a DMX controller. The master product will be
set to operate in either standalone mode or with the IR remote, while the slave products will be set to
operate in DMX mode. Once set and connected, the slave products will operate in unison with the master
product.
Configure the products as indicated below.
Slave products:
1. Press <MENU> repeatedly until 9-Ch shows on the display.
2. Press <ENTER>.
3. Use <UP> or <DOWN> to set the starting address to d 1.
4. Press <ENTER>.
5. Connect the DMX input of the first slave product to the DMX output of the master product.
6. Connect the DMX input of the subsequent slave products to the DMX output of the previous slave
product.
7. Finish setting and connecting all the slave products.
Master product:
1. Set the master product to operate in standalone mode or with the IRC-6 remote.
2. Make the master product the first product in the DMX daisy chain.
Master/Slave Mode (D-Fi USB)
The D-Fi USB allows a single Kinta FX ILS product (the “master”) to control the actions of one or more
Kinta FX ILS products (the “slaves”) without the need of a DMX controller or DMX cables. The master
(transmitter) product will be set to operate in standalone mode, while the slave (receiver) products will be
set to operate in DMX mode. Once set and connected, the slave products will operate in unison with the
master product.
Configure the products as indicated below.
Slave products:
1. Press <MENU> repeatedly until 9-Ch shows on the display.
2. Press <ENTER>.
3. Use <UP> or <DOWN> to set the starting address to d 1.
4. Press <ENTER>.
5. Set the D-Fi USB to receive on a specific channel, 1–16.
6. Plug in the D-Fi USB.
7. Finish setting and connecting all the slave products.
Master product:
1. Set the master product to operate in standalone mode.
2. Set the D-Fi USB to transmit on the D-Fi channel the slaves are receiving on.
3. Plug in the D-Fi USB.
ILS Mode
ILS (Integrated Lighting System) provides 4 modes that synchronize with the GigBAR MOVE+ILS: Modes
1 and 3 synchronize with side 1 of the GigBAR MOVE+ILS, whereas modes 2 and 4 synchronize with side
2 of the GigBAR MOVE+ILS. When linked, effects will sync with the most similar effect on the selected side
of the GigBAR MOVE+ILS: Kinta effects will sync with one of the kintas, moving heads will sync with one of
the moving heads, and wash effects will sync with one of the pars. Laser effects will sync with the laser,
and strobe effects will sync with the strobe effects regardless of ILS mode.
This product will synchronize with the kinta effect on the selected side of the GigBAR MOVE+ILS, as well
as the laser and strobes.
To set the Kinta FX ILS to respond to an ILS signal:
1. Press <MENU> repeatedly until iLS_ shows on the display.
2. Use <UP> or <DOWN> to select from iLS1 (side 1), iLS2 (side 2), iLS3 (side 1), or iLS4 (side 2).
3. Press <ENTER>.
• Configure all the slave products before connecting the master to the daisy chain.
• Never connect a DMX controller to a DMX string configured for Master/Slave operation
because the controller may interfere with the signals from the master.
• Do not connect more than 31 slaves to the master.
• All products must be set to the same DMX personality, DMX address, and D-Fi channel.
• Configure all the slave products before configuring the master to transmit.
• Never connect a DMX controller to a D-Fi channel configured for Master/Slave operation
because the controller may interfere with the signals from the master.

Page 18 of 117
Kinta FX ILS User Manual Rev. 5
Maintenance
5. Maintenance
Product Maintenance
Dust build-up reduces light output performance and can cause overheating. This can lead to reduction of
the light source’s life and/or mechanical wear. To maintain optimum performance and minimize wear, clean
your lighting products at least twice a month. However, be aware that usage and environmental conditions
could be contributing factors to increase the cleaning frequency.
To clean the product, follow the instructions below:
1. Unplug the product from power.
2. Wait until the product is at room temperature.
3. Use a vacuum (or dry compressed air) and a soft brush to remove dust collected on the external
surface/vents.
4. Clean all transparent surfaces with a mild soap solution, ammonia-free glass cleaner, or isopropyl
alcohol.
5. Apply the solution directly to a soft, lint free cotton cloth or a lens cleaning tissue.
6. Softly drag any dirt or grime to the outside of the transparent surface.
7. Gently polish the transparent surfaces until they are free of haze and lint.
Always dry the transparent surfaces carefully after cleaning them.
Do not spin the fan using compressed air because it could be damaged.

Page 19 of 117
Technical Specifications
Kinta FX ILS User Manual Rev. 5
6. Technical Specifications
Dimensions and Weight
Note: Dimensions in inches are rounded.
Power
Light Source (Laser)
Light Source (Kinta)
Light Source (SMD Strobes)
Photometrics
Thermal
DMX
Ordering
Length Width Height Weight
7.4 in (187 mm) 10.3 in (261 mm) 7.4 in (187 mm) 3.8 lb (1.7 kg)
Power Supply Type Range Voltage Selection
Switching (internal) 100 to 240 VAC, 50/60 Hz Auto-ranging
Parameter 120 V, 60 Hz 230 V, 50 Hz
Consumption 25 W 24 W
Operating current 0.5 A 0.2 A
Power linking current (products) 8 A (17 products) 8 A (33 products)
Fuse T 1 A, 250 V T 1 A, 250 V
Power I/O U.S./Worldwide UK/Europe
Power input connector IEC IEC
Power output connector Edison IEC
Power cord plug Edison (U.S.) Local Plug
Type Power Wavelength
Laser (red) 100 mW 650 nm
Laser (green) 30 mW 520 nm
Type Color Quantity Power Current Lifespan
LED Red 1 7.5 W 2.4 A 50,000 hours
LED Green 1 7.5 W 2.4 A 50,000 hours
LED Blue 1 7.5 W 2.4 A 50,000 hours
LED White 1 7.5 W 2.4 A 50,000 hours
Type Color Quantity Power Current Lifespan
SMD LED White 16 5 W 1.6 A 50,000 hours
Strobe Rate Coverage Angle
0 to 20 Hz 118°
Laser Minimum External Temp. Laser Maximum External Temp. Cooling System
59 °F (15 °C) 95 °F (35 °C) Fan-assisted convection
I/O Connectors Channel Range
3-pin XLR 2 or 9
Product Name Item Code UPC Number
Kinta FX ILS 10051879 781462222277

Page 20 of 117
Kinta FX ILS User Manual Rev. 5
Returns
Returns
In case you need to get support or return a product:
• If you are located in the U.S., contact Chauvet World Headquarters.
• If you are located in the U.K. or Ireland, contact Chauvet Europe Ltd.
• If you are located in Benelux, contact Chauvet Europe BVBA.
• If you are located in France, contact Chauvet France.
• If you are located in Germany, contact Chauvet Germany.
• If you are located in Mexico, contact Chauvet Mexico.
• If you are located in any other country, DO NOT contact Chauvet. Instead, contact your local
distributor. See www.chauvetdj.com for distributors outside the U.S., U.K., Ireland, Benelux,
France, Germany, or Mexico.
Call the corresponding Chauvet Technical Support office and request a Return Merchandise Authorization
(RMA) number before shipping the product. Be prepared to provide the model number, serial number, and
a brief description of the cause for the return.
To submit a service request online, go to www.chauvetdj.com/service-request.
Send the merchandise prepaid, in its original box, and with its original packing and accessories. Chauvet
will not issue call tags.
Clearly label the package with the RMA number. Chauvet will refuse any product returned without an RMA
number.
Before sending the product, clearly write the following information on a piece of paper and place it inside
the box:
• Your name
• Your address
• Your phone number
• RMA number
• A brief description of the problem
Be sure to pack the product properly. Any shipping damage resulting from inadequate packaging will be
your responsibility. FedEx packing or double-boxing are recommended.
If you are located outside the U.S., U.K., Ireland, Benelux, France, Germany, or Mexico,
contact your distributor of record and follow their instructions on how to return Chauvet
products to them. Visit our website www.chauvetdj.com for contact details.
Write the RMA number on a properly affixed label. DO NOT write the RMA number directly
on the box.
Chauvet reserves the right to use its own discretion to repair or replace returned
product(s).

Page 21 of 117
Contact Us
Kinta FX ILS User Manual Rev. 5
Contact Us
Outside the U.S., U.K., Ireland, Benelux, France, Germany, or Mexico, contact the dealer of record.
Follow the instructions to request support or to return a product. Visit our website for contact details.
General Information Technical Support
Chauvet World Headquarters
Address: 5200 NW 108th Ave. Voice: (844) 393-7575
Sunrise, FL 33351 Fax: (954) 756-8015
Voice: (954) 577-4455 Email: [email protected]
Fax: (954) 929-5560
Toll Free: (800) 762-1084 Website: www.chauvetdj.com
Chauvet Europe Ltd
Address: Unit 1C Email: [email protected]
Brookhill Road Industrial Estate
Pinxton, Nottingham, UK Website: www.chauvetdj.eu
NG16 6NT
Voice: +44 (0) 1773 511115
Fax: +44 (0) 1773 511110
Chauvet Europe BVBA
Address: Stokstraat 18 Email: BNLtech@chauvetlighting.eu
9770 Kruishoutem
Belgium Website: www.chauvetdj.eu
Voice: +32 9 388 93 97
Chauvet France
Address: 3, Rue Ampère
91380 Chilly-Mazarin Email: [email protected]
France Website: www.chauvetdj.eu
Voice: +33 1 78 85 33 59
Chauvet Germany
Address: Bruno-Bürgel-Str. 11
28759 Bremen Email: DEte[email protected]
Germany Website: www.chauvetdj.eu
Voice: +49 421 62 60 20
Chauvet Mexico
Address: Av. de las Partidas 34 - 3B
(Entrance by Calle 2) Email: servicio@chauvet.com.mx
Zona Industrial Lerma Website: www.chauvetdj.mx
Lerma, Edo. de México, CP 52000
Voice: +52 (728) 690-2010

Página 22 de 117
Kinta FX ILS Manual de Usuario Rev. 5
Antes de Empezar
1. Antes de Empezar
Qué va Incluido
Instrucciones de Desembalaje
Desembale el producto con cuidado inmediatamente y compruebe la caja para asegurarse de que todas
las partes están en el paquete y en buen estado.
Reclamaciones
Si la caja o el contenido (el producto y los accesorios incluidos) parecen dañados a cause del transporte o
muestran signos de manipulación inadecuada, notifíqueselo inmediatamente al transportista, y no a
Chauvet. Si no lo a hace oportunamente, puede quedar invalidada su reclamación al transportista.
Además, guarde la caja y todo el material de embalaje para su inspección.
Para otras incidencias, como componentes o partes que falten, daños no relacionados con el transporte o
daños no evidentes, presente una reclamación a Chauvet en el plazo de 7 días de la entrega.
Convenciones del Manual
Símbolos
Exención de responsabilidad
Chauvet cree que la información contenida en este manual es exacta en todos los aspectos. Sin embargo,
Chauvet no asume responsabilidad alguna, y queda exenta específicamente de todas y cada una de las
responsabilidades y obligaciones, de la clase que sean y para con cualquier parte, por pérdida, perjuicio o
trastorno causados por cualquier error u omisión en este documento, tanto si tales errores y omisiones se
deben a negligencia o accidente como a cualquier otra causa. Chauvet se reserva el derecho a revisar el
contenido de este documento sin ninguna obligación de notificar dicha revisión a ninguna persona o
empresa; sin embargo, Chauvet no está en absoluto obligado a hacerlo así, ni se compromete a realizar
revisión alguna. Descargue la última versión de www.chauvetdj.com.
Propiedad intelectual
Las obras de autoría contenidas en este manual, incluyendo, pero sin limitarse a ellas, todos los dibujos,
textos e imágenes, son propiedad de Chauvet.
© Copyright 2022 Chauvet & Sons, LLC. Todos los derechos reservados.
Publicado en formato electrónico por Chauvet en los Estados Unidos de América.
CHAUVET, el logotipo de Chauvet, ILS (patente en trámite) y Kinta FX ILS son marcas comerciales o
marcas registradas de Chauvet & Sons Inc. (con nombres comerciales Chauvet y Chauvet Lighting) en los
Estados Unidos y otros países. Otras empresas, nombres de productos y logotipos a los que se haga
referencia aquí pueden ser marcas comerciales de sus respectivas empresas.
•KintaFXILS
• Cable de alimentación • Manual de usuario
Convención Significado
1–512 Un rango de valores
50/60 Un conjunto de valores de los cuales solo se pude escoger uno
Settings Una opción de menú que no se puede modificar
<ENTER> Una tecla que se tiene que se pulsar en el panel de control del producto
ON Un valor que se tiene que introducir o seleccionar
Símbolo Significado
Advertencia eléctrica. No seguir estas instrucciones puede provocar daño eléctrico al
producto, a los accesorios o al usuario.
Instalación, configuración o información sobre funcionamiento crítica. Hacer caso
omiso de esta información puede hacer que el producto no funcione, que se averíe, o
causar daños al usuario.
Instalación o información de configuración importante. El producto puede no funcionar
correctamente si esta información no se usa.
Información útil.
Notas de seguridad sobre láser.

Página 23 de 117
Antes de Empezar
Kinta FX ILS Manual de Usuario Rev. 5
Notas de Seguridad
Las Notas de seguridad incluyen información importante sobre seguridad del sistema láser. Lea y
comprenda todas las instrucciones antes de encender el láser por primera v. Conocer las instrucciones de
seguridad es crucial para evitar lesiones oculares y para no infringir la ley. Mantenga este manual de
usuario en un lugar seguro para futuras consultas.
DETÉNGASE Y LEA TODOS LOS DATOS DE
SEGURIDAD
•
Los láseres pueden ser peligrosos y tienen consideraciones de seguridad particulares. Puede
producirse lesión ocular permanente y ceguera si los láseres se usan incorrectamente. Ponga máxima
atención a todos los COMENTARIOS y ADVERTENCIAS de seguridad de este manual de usuario.
Lea atentamente todas las instrucciones ANTES de poner en funcionamiento este dispositivo.
• Conecte siempre el producto a un circuito con toma de tierra para evitar el riesgo de electrocución.
• Desconecte siempre el producto de la alimentación antes de limpiarlo o sustituir el fusible.
• Evite la exposición directa de los ojos a la fuente de luz mientras es producto esté encendido.
• Asegúrese de que el cable de alimentación no está retorcido ni estropeado.
• Nunca desconecte este producto de la alimentación agarrando o tirando del cable.
• Si monta el producto en alto, asegure siempre a un dispositivo de seguridad usando cable de seguridad.
• Asegúrese de que no hay materiales inflamables cerca del producto cuando esté en funcionamiento.
• No toque la carcasa del producto cuando esté en funcionamiento, porque podría estar muy caliente.
• Este producto no está concebido para una instalación permanente.
• Asegúrese siempre de que la tensión del enchufe al que conecte el producto está en el rango
establecido en el grabado o en el panel posterior del producto.
• ¡El producto es para uso en interiores solamente! (IP20) Para evitar riesgos de incendio o
descarga, no exponga el producto a la lluvia o la humedad.
• Instale siempre el producto en una ubicación con ventilación adecuada, al menos a 20'' (50
cm) de superficies adyacentes.
• Asegúrese de que ninguna ranura de ventilación en la carcasa del producto queda bloqueada.
• Nunca conecte el producto a un atenuador.
• Asegúrese de reemplazar el fusible por otro del mismo tipo y categoría.
• Use siempre el soporte de montaje para trasladar el producto.
• No Apague/Encienda el producto a intervalos cortos. Esto acortará la vida del diodo láser.
• NO sacuda este producto. Evite usar la fuerza bruta cuando monte o maneje el producto.
• Use SIEMPRE un cable de seguridad cuando monte este producto en lo alto.
• La temperatura ambiente operativa para el láser es de 59 °F a 95 °F (15 °C a 35 °C). No haga
funcionar este producto fuera de este rango.
• En caso de un problema grave de funcionamiento, deje de usar el producto inmediatamente.
• Nunca intente reparar el producto. Las reparaciones llevadas a cabo por personal no
cualificado pueden provocar averías o funcionamiento defectuoso. Póngase en contacto con
el centro de asistencia técnica autorizado más cercano.
¡CUIDADO! El uso de controles, ajustes o procedimientos distintos a ESTOS que se
especifican EN ESTE MANUAL DE USUARIO pueden causar exposición peligrosa a la
radiación.
• Evite el contacto directo de los ojos con la luz del láser. Nunca exponga intencionadamente
sus ojos o los de otras personas a la luz directa del láser.
• Este producto láser puede causar lesiones oculares al instante, o ceguera, si la luz del láser
incide directamente en los ojos.
• Es ilegal y peligroso alumbrar con este láser zonas de espectadores en las que el público u
otro personal pueda recibir rayos láser o reflejos de su brillo directamente en los ojos.
• En los EEUU es un delito federal dirigir cualquier láser hacia un avión.
• Para evitar un desgaste innecesario y alargar su vida útil, desconecte completamente el
producto mediante el interruptor o desenchufándolo durante periodos en que no se use.
• NO intente ninguna reparación. Las reparaciones y la asistencia deben ser llevadas a cabo por un
técnico autorizado. ¡Las modificaciones no autorizadas están prohibidas por motivos de seguridad!
Guarde este manual de usuario para futuras consultas. Si este producto pasa a ser
propiedad de otro usuario, asegúrese de que este documento acompaña al láser.

Página 24 de 117
Kinta FX ILS Manual de Usuario Rev. 5
Antes de Empezar
Advertencia sobre Carcasa no Cerrada
Notas de Seguridad sobre Láser
La luz láser es diferente de cualquier otra fuente de luz. La luz de este producto puede causar lesión ocular si el
producto no se instala y usa adecuadamente. La luz láser es miles de veces más concentrada que la luz de cualquier
otro tipo de fuente. Esta concentración de luz puede causar lesiones instantáneas en el ojo, fundamentalmente
por quemadura de la retina (la zona sensible a la luz en la parte posterior del ojo). Aunque usted no pueda
sentir el “calor” de un haz de láser, este puede aún potencialmente lesionar o cegarle a usted o al público.
Incluso cantidades de luz láser muy pequeñas son potencialmente peligrosas, incluso a largas distancias.
Las lesiones oculares por láser pueden ocurrir más rápido de lo que se tarda en parpadear.
NO
dé por supuesto que porque estos productos recreativos de láser dividan el láser en cientos de haces, y porque
el haz de láser se lance a alta velocidad, es segura la exposición del ojo a un haz individual de láser. Este producto
de láser utiliza docenas de milivatios de potencia láser (niveles clase 3B internamente) antes de dividirlo en múltiples
haces (niveles clase 3R). Muchos de los haces individuales son potencialmente peligrosos para los ojos.
NO
asuma que porque la luz láser está en movimiento, es segura. La luz láser no está nunca libre de riesgo, ni
aunque el haz se mueva siempre. Puesto que las lesiones oculares pueden producirse instantáneamente, es crítico
prevenir la posibilidad de CUALQUIER exposición directa al ojo. Según las disposiciones de seguridad láser, no es
legal apuntar con láseres Clase 3a hacia áreas en las que las personas puedan quedar expuestas. Esto se aplica
incluso si se apunta con el láser por debajo de las caras de la gente, por ejemplo hacia la pista de baile.
• Esta unidad contiene internamente dispositivos láser de alta potencia.
• No abra la carcasa del láser, debido a la potencial exposición a niveles no seguros de
radiación láser.
• Los niveles de láser a los que se tiene acceso si se abre la unidad pueden causar ceguera
instantánea, quemaduras en la piel e incendios.
DETÉNGASE Y LEA TODAS LAS NOTAS DE SEGURIDAD SOBRE
EL LÁSER SIGUIENTES
• No ponga en funcionamiento el láser sin primero leer y comprender todos los datos técnicos
y de seguridad de este manual.
• Ubique e instale todos los efectos láser SIEMPRE de forma que toda la luz láser está al menos
a 3 m (9,8 pies) sobre el nivel del suelo en el que se encuentra la gente. Vea la sección Uso
adecuado de este manual.
• que funciona adecuadamente. No lo use si detecta cualquier defecto.
• NO apunte con láser a personas o animales.
• Nunca mire a la apertura del láser o a los haces de láser.
• NO apunte con el láser hacia áreas en las que las personas pudieran quedar expuestas.
• NO apunte con láseres a superficies muy reflectantes como ventanas, espejos y metal pulido.
Incluso los reflejos del láser pueden ser peligrosos.
• Nunca apunte con el láser a un avión, pues constituye delito según las leyes de EE.UU.
• Nunca apunte hacia el cielo con haces láser sueltos.
• No exponga la óptica de salida (apertura) a productos de limpia químicos.
• No use el láser si la carcasa está averiada o abierta, o si la óptica parece dañada de cualquier
modo.
• Nunca abra la carcasa del láser. Los altos niveles de potencia láser dentro de la carcasa
protectora pueden originar incendios o quemaduras en la piel y causarán lesiones oculares al
instante.
• Nunca deje este producto en funcionamiento sin vigilancia.
• El funcionamiento de un láser de espectáculo de Clase 3R solo se permite si el espectáculo
es controlado por un operador experimentado y bien formado, familiarizado con los datos
contenidos en este manual.
• Los requisitos legales para usar productos de láser recreativo varían de un país a otro. El
usuario es responsable de los requisitos legales del lugar/país en que lo utilice.
¡CUIDADO! NO ponga en funcionamiento este dispositivo en formas no especificadas en
este manual de usuario. No seguir las instrucciones invalidará la garantía, podría dañar el
producto o lesionar al usuario o al público.
¡CUIDADO! Este producto no se puede tirar con la basura doméstica. Póngase en contacto
con el servicio de recogida para la eliminación de aparatos electrónicos de su zona.

Página 25 de 117
Antes de Empezar
Kinta FX ILS Manual de Usuario Rev. 5
Reproducción de la Etiqueta de Seguridad del Láser
Advertencia sobre Exposición al Láser
Datos de Emisión Láser
Según medida bajo condiciones de medición IEC para clasificación.
Declaración de Conformidad Láser
Cumple con los estándares de desempeño de la FDA para productos láser, excepto por las desviaciones
según el Laser Notice No. 56, del 8 de mayo de 2019. No es necesario ningún mantenimiento para que
este producto siga cumpliendo los estándares de rendimiento láser.
LUZ LÁSER EVITE LA EXPOSICIÓN DIRECTA AL OJO
Se pueden encontrar más directrices y programas de seguridad para el uso seguro de láseres en
la Normativa ANSI Z136.1 “Para uso seguro de Láseres”, disponible en el Laser Institute of
America: www.lia.org. Muchos gobiernos locales, corporaciones, agencias, ejército y otros
requieren que todos los láseres se usen bajo las directrices de ANSI Z136.1. La guía Laser
Display puede obtenerse `de la International Laser Display Association: www.ilda.com.
Clasificación láser Clase 3R
Longitud de onda/alimentación óptica del diodo láser rojo 650 nm/100 mW
Longitud de onda/alimentación óptica del diodo láser verde 520 nm/30 mW
Diámetro del haz <5 mm en la apertura
Datos de pulso Todos los pulsos < 4 Hz (>0,25 s)
Divergencia (cada haz) <2 mrad
Divergencia (luz total) <160 grados
Potencia láser de cada haz en la apertura <5 mW
LASER APERTURE
MODEL: KINTAFXILS
ITEM CODE: 10051879
FUSE: T 1 A, 250 V
POWER LINKING: 8 A (17 UNITS @ 120 V)
(33
UNITS @ 230 V)
ORIGIN: MADE IN CHINA
USA / CANADA
POWER: 100-125 VAC, 60 Hz
0.5 A, 25 W
WORLDWIDE
POWER: 100-240 VAC, 50/60 Hz
0.2-0.5 A, 24 W
THIS APPLIANCE MUST BE GROUNDED
CETTE UNITÉ DOIT ÊTRE RELIÉE À LA TERRE
USE ONLY FUSE OF SAME TYPE & RATING
N’UTILISER QUE DES FUSIBLES DU TYPE ET
DE L’AMPÉRAGE INDIQUÉ
NOT FOR HOUSEHOLD USE
IMPROPRE A L’USAGE DOMESTIQUE
DRY LOCATIONS
EMPLACEMENTS SECS
DISCONNECT POWER BEFORE SERVICING
DÉBRANCHER AVANT TOUT ENTRETIEN
FOR INDOOR USE ONLY
USAGE INTÉRIEUR UNIQUEMENT
WORLDWIDE HEADQUARTERS,
SUNRISE, FLORIDA USA
520/650nm
CW, <5mW
WARNING
Cancer and Reproductive Harm -
www.P65Warnings.ca.gov
IEC/EN60825-1:2014
!"#$%&'(
RoHS

Página 26 de 117
Kinta FX ILS Manual de Usuario Rev. 5
Introducción
2. Introducción
Vista general del producto
Dimensiones del producto
¡ADVERTENCIA! NO enchufe nada que no sea un D-Fi USB en el puerto USB. Si lo hace,
podría producir daños al producto.
LED SMD de estroboscopios
(x16)
Lentes de efecto
kinta (x24)
Puerto
USB
Sensor
IR
Indicadores LED
DMX
Sonido
Auto
Esclavo
Pantalla y botones de control
<MENU> <UP> <DOWN> <ENTER>
Salida
láser Porta-
fusibles
Entrada de
alimentación
Micrófono
Salida de
alimentación DMX
entrada/
salida
Mando de
sensibilidad
Anilla de
seguridad
7,4”
187 mm
7,4”
187 mm
10,3”
261 mm

Página 27 de 117
Instalación
Kinta FX ILS Manual de Usuario Rev. 5
3. Instalación
Corriente alterna
El Kinta FX ILS tiene una fuente de alimentación con detección automática que puede funcionar con un
rango de tensión de entrada de 100 a 240 VCA, 50/60 Hz. Para determinar los requerimientos de
alimentación (disyuntor, toma de alimentación y cableado), use el valor de tensión que aparece en la
etiqueta fijada en el panel trasero del producto o consulte las Especificaciones Técnicas de este manual.
La especificación de corriente listada indica el consumo de corriente promedio en condiciones normales.
Sustitución del fusible
1. Desconecte el producto de la alimentación.
2. Haga cuña con la punta de un destornillador plano en la ranura del portafusibles.
3. Saque la tapa de seguridad de la carcasa.
4. Quite el fusible fundido de la sujeción en la parte frontal de la tapa de seguridad y sustituya el
fusible con otro del mismo tipo y categoría.
5. Vuelva a insertar el portafusibles y conecte de nuevo la alimentación.
Alimentación en cadena
El producto proporciona la alimentación en cadena vía la salida de Edison situada en la parte posterior del
producto. Consulte el diagrama a continuación para obtener más información.
Diagrama de alimentación en cadena
• Conecte siempre el producto a un circuito protegido (disyuntor o fusible). Asegúrese
de que el producto tiene una toma de tierra adecuada para evitar el riesgo de
electrocución o incendio.
• Para evitar un desgaste innecesario y alargar su vida útil, desconecte complemente el
producto de la alimentación, mediante el interruptor o desenchufándolo, durante los
periodos en los que no se use.
Nunca conecte el producto a un reostato (resistor variable) o circuito de atenuación,
incluso si el canal del reostato o atenuador sirve solo como conmutador 0 a 100%.
Desconecte el producto de la alimentación antes de sustituir el fusible.
Sustituya siempre el fusible fundido con uno del mismo tipo y categoría.
Es posible enlazar hasta 17 productos Kinta FX ILS a 120 V o 33 productos a 230 V. Nunca
exceda este número. Los cables de alimentación en cadena se pueden adquirir por
separado.
¡El diagrama de alimentación de cadena de arriba muestra solamente la versión del
producto de América del Norte! Los requisitos y conectores de alimentación en cadena
difieren de un país a otro y de una región a otra. Si usa este producto en un lugar distinto
de América del Norte, consulte con el distribuidor local de Chauvet.
Cubierta de seguridad
Portafusibles de repuesto
(dentro de cubierta de seguridad)
Fusible instalado
(sujeto con clip de plástico)
Fuente de
alimentación 1er producto 2o producto 3er producto Productos
adicionales

Página 28 de 117
Kinta FX ILS Manual de Usuario Rev. 5
Instalación
Montaje
Antes de montar el producto, lea y siga las recomendaciones de seguridad indicadas en las Notas de Seguridad.
Orientación
El Kinta FX ILS se debe montar en un posición preparada para uso seguro de láser. Además, asegúrese
de proporcionar una ventilación adecuada alrededor del producto.
Colocación
• Antes de decidir una ubicación para el producto, asegúrese siempre de que hay fácil acceso al
producto para su mantenimiento y programación.
• Asegúrese de que la estructura o superficie sobre la que está montando el producto puede soportar
su peso (vea las Especificaciones Técnicas)
• Cuando monte este producto en alto, use siempre un cable de seguridad. Monte el producto con
seguridad a un punto de anclaje, como una plataforma elevada o un truss.
• Cuando cuelgue el producto de un truss, debe usar una abrazadera de montaje con la resistencia
al peso adecuada. El soporte tiene un agujero de 13 mm, que es adecuado para este propósito.
• Los mandos de ajuste del soporte permiten el ajuste direccional para dirigir el producto hacia el
ángulo deseado. Apriete y afloje los mandos de soporte únicamente con la mano. Usar
herramientas podría estropear los mandos.
Diagrama de montaje
Uso adecuado
Este producto es para montaje en alto solamente. Por seguridad, Chauvet recomienda montar los
productos de efectos de iluminación sobre plataformas estables y elevadas, o en soportes en alto sólidos
utilizando abrazaderas apropiadas para colgar. En todos los casos, utilice cables de seguridad. Obtenga
el material de fijación apropiado de su proveedor de iluminación.
Las disposiciones internacionales de seguridad láser precisan que los productos de láser se
manejen de la forma mostrada a continuación, con una separación vertical mínima de 3 metros (9,8
pies) entre el suelo y la luz láser más baja. Además, se requiere una separación horizontal de 3
metros entre la luz láser y los espectadores u otros espacios públicos.
¡CUIDADO! El uso de controles, ajustes o procedimientos distintos a LOS que se
especifican EN ESTE MANUAL DE USUARIO pueden causar exposición peligrosa a la
radiación.
Abrazadera
Cable de seguridad
(como el CH-05 de
Chauvet)
Soporte de montaje
Mando de ajuste
del soporte (x2)
3 metros

Página 29 de 117
Instalación
Kinta FX ILS Manual de Usuario Rev. 5
Seguro y llave del láser
Si se ha comprado fuera de Norteamérica, este producto tendrá un seguro y una llave para evitar que el
láser funcione a menos que ambos, el seguro y la llave, estén insertados y la llave esté en la posición ON.
Para que el láser funcione, debe HACER LAS DOS COSAS:
• Insertar el seguro
• Introducir la llave y girarla a la posición ON
¡Si no se realizan ambas acciones, el láser NO se encenderá!
*Solo a título ilustrativo
Gire siempre la llave hasta la posición de OFF y sáquela cuando deje este producto sin
vigilancia, para evitar accidentes o lesiones a terceros.
Insertar el seguro Introducir Y girar la
llave a la posición ON

Página 30 de 117
Kinta FX ILS Manual de Usuario Rev. 5
Funcionamiento
4. Funcionamiento
Este producto no está diseñado para un uso continuo. Asegúrese de que hace descansos regulares
durante su funcionamiento para maximizar la vida de su láser. Desconecte siempre el Kinta FX ILS de la
alimentación cuando no lo use.
Funcionamiento del panel de control
Para acceder a las funciones del panel de control, use los cuatro botones ubicados bajo la pantalla.
Consulte la Vista general del producto para ver la posición de los botones en el panel de control.
Mapa de menú
Consulte la página del producto Kinta FX ILS en
www.chauvetdj.com
para ver el último mapa de menú.
Configuración (DMX)
El Kinta FX ILS funciona con un controlador DMX. La información sobre DMX se encuentra en el Manual
DMX de CHAUVET, disponible desde el sitio web de Chauvet: http://www.chauvetlighting.com/downloads/
DMX_Primer_rev05_WO.pdf.
Personalidad DMX y dirección de inicio
Cuando seleccione una dirección DMX de inicio, tenga en cuenta siempre el número de canales DMX que
usa el modo seleccionado. Si escoge una dirección de inicio que es demasiado alta, podría estar
restringiendo el acceso a alguno de los canales del producto.
El Kinta FX ILS usa hasta 9 canales DMX en el modo 9-Ch, lo cual determina que la dirección más alta
que se puede configurar es 504.
El Kinta FX ILS usa 2 canales DMX en el modo 2-Ch, lo cual determina que la dirección más alta que se
puede configurar es 511.
Si no está familiarizado con el protocolo DMX, descargue el Manual DMX de www.chauvetdj.com.
Para seleccionar la personalidad y dirección de inicio, haga lo siguiente:
1. Pulse <MENU> repetidamente hasta que aparezca en la pantalla 2-Ch o 9-Ch.
2. Pulse <ENTER>.
3. Use <UP> o <DOWN> para aumentar o disminuir la dirección de inicio, de d 1–511.
4. Pulse <ENTER>.
Botón Función
<MENU> Selecciona un modo de funcionamiento o regresa a la opción de menú actual
<UP> Navega hacia arriba por la lista de menú o aumenta un valor numérico seleccionado
<DOWN> Navega hacia abajo por la lista de menú o disminuye un valor numérico seleccionado
<ENTER> Habilita el menú actualmente en pantalla o configura el valor seleccionado actualmente
dentro de la función seleccionada
Modo Niveles de programación Descripción
DMX 2-Ch d 1–511 Modo DMX de 4 canales
9-Ch d 1–504 Modo DMX de 9 canales
Color
preestablecido
C-- C 1–15 Colores de efecto kinta preestablecidos (consulte
Colores y programas)
Programa
automático P-- P 1–7 FAdE Programas automáticos (consulte Colores y programas)
SnAP
Velocidad del
programa S-- S. 01–99 Velocidad del programa automático
Programa
sonido Snd Snd1–7 Programas activos por sonido (consulte Colores y
programas)
Color
personalizado
u--
r000–255
Establece los colores de efecto kinta manual
G000–255
b000–255
U000–255
F. 00–99 Establece la velocidad del estroboscopio, lenta a rápida
Infrarrojos SEt on Habilita / deshabilita el control de infrarrojos
oFF
Modo ILS iLS iLS1–4 Establece el modo ILS
La pantalla continuará parpadeando hasta que el dispositivo reciba una señal DMX.

Página 31 de 117
Funcionamiento
Kinta FX ILS Manual de Usuario Rev. 5
Conectividad D-Fi USB
El Kinta FX ILS tiene la capacidad de convertirse en un receptor/transmisor D-Fi inalámbrico utilizando el
D-Fi USB de Chauvet DJ. Simplemente configure la personalidad DMX y dirección DMX del producto,
configure el conmutador DIP para el canal de recepción/transmisión del D-Fi y enchúfelo en el puerto
USB.
Compatibilidad D-Fi USB
El D-Fi USB puede recibir una señal DMX del D-Fi Hub y del FlareCON Air 2, así como de otros productos
D-Fi USB.
Configuración (D-Fi USB)
1. Configure la personalidad DMX y la dirección DMX en el Kinta FX ILS.
2. Utilice la tabla proporcionada para configurar AMBOS:
• primero el canal y luego
• la opción de recepción o transmisión
NOTA: El conmutador DIP 5 es para transmitir o recibir, piénselo bien antes de escoger.
Canales del conmutador DIP del D-Fi USB
¡ADVERTENCIA! NO enchufe nada que no sea un D-Fi USB en el puerto USB. Si lo hace,
podría producir daños al producto.
Una vez conectado, el D-Fi USB tomará el control del producto. El DMX por cable y el
control de pantalla manual/botones de menú no estarán disponibles hasta que desconecte
el D-Fi USB. Los niveles de prioridad son:
1. D-Fi USB
2.DMX por cable
3. Control de pantalla manual/Botones de menú
C. 1234T/R C. 1234T/R C. 1234T/R C. 1234T/R
1919
210 210
311 311
412 412
513 513
614 614
715 715
816 816
Recibir
Recibir
Transmitir
Transmitir

Página 32 de 117
Kinta FX ILS Manual de Usuario Rev. 5
Funcionamiento
Valores y asignaciones de canal DMX
2-Ch 9-Ch Función Valor Porcentaje/Configuración
11
Programa automático
(anula C. 3-9)
000 009 Sin función
010 044 Kinta, láser, y estroboscopios
045 079 Kinta y estroboscopios
080 114 Kinta y láser
115 149 Láser y estroboscopios
150 184 Kinta solamente
185 219 Estroboscopios solamente
220 255 Láser solamente
2 2 Velocidad del programa 000 250
Velocidad de programa automático, lento a rápido
251 255 Programa activo por sonido
– 3 Color de efecto kinta
000 005 Sin función
006 020 Rojo
021 035 Verde
036 050 Azul
051 065 Blanco
066 080 Rojo y verde
081 095 Rojo y azul
096 110 Rojo y blanco
111 125 Verde y azul
126 140 Verde y blanco
141 155 Azul y blanco
156 170 Rojo, verde, y azul
171 185 Rojo, verde, y blanco
186 200 Verde, azul, y blanco
201 215 Rojo, verde, azul, y blanco
216 230 Secuencia automático de 4 colores
231 255 Secuencia automático de 7 colores
–4
Estroboscopio de efecto
kinta 000 005 Sin función
006 255 Estroboscopio de efecto kinta,
lento a rápido
– 5 Motor de efecto kinta
000 Sin función
001 127 Indexado de motor de efecto kinta
128 255 Velocidad de motor de efecto kinta,
lento a rápido
–6
Programa de SMD de
estroboscopios
000 009 Sin función
010 019 Programa de estroboscopios 1,
lento a rápido
020 029 Programa de estroboscopios 2,
lento a rápido
030 039 Programa de estroboscopios 3,
lento a rápido
040 049 Programa de estroboscopios 4,
lento a rápido
050 059 Programa de estroboscopios 5,
lento a rápido
060 069 Programa de estroboscopios 6,
lento a rápido
070 079 Programa de estroboscopios 7,
lento a rápido
080 089 Programa de estroboscopios 8,
lento a rápido
090 099 Programa de estroboscopios 9,
lento a rápido
100 109 Programa de estroboscopios 10,
lento a rápido
110 119 Programa de estroboscopios 11,
lento a rápido
120 129 Programa de estroboscopios 12,
lento a rápido
130 139 Programa de estroboscopios 13,
lento a rápido
140 149 Programa de estroboscopios 14,
lento a rápido
150 159 Programa de estroboscopios 15,
lento a rápido
160 169 Programa de estroboscopios 16,
lento a rápido
170 179 Programa de estroboscopios 17,
lento a rápido
180 255 Programa de estroboscopios 18,
lento a rápido

Página 33 de 117
Funcionamiento
Kinta FX ILS Manual de Usuario Rev. 5
Configuración (Independiente)
Configure el producto en uno de los modos independientes para controlarlo sin controlador DMX.
Efecto kinta preestablecidos
Para hacer funcionar el Kinta FX ILS con un color de efecto kinta preestablecido estático, haga lo siguiente:
1. Pulse <MENU> repetidamente hasta que aparezca C-- en la pantalla.
2. Pulse <ENTER>.
3. Utilice <UP> o <DOWN> para seleccionar los colores deseados, entre C 1–15. (consulte Colores
y programas)
4. Pulse <ENTER>.
Programas Automáticos
Para hacer funcionar el Kinta FX ILS con un programa automático, siga las instrucciones siguientes.
1. Pulse <MENU> repetidamente hasta que aparezca P-- en la pantalla.
2. Pulse <ENTER>.
3. Utilice <UP> o <DOWN> para seleccionar el programa deseado, entre P 1–7. (consulte Colores y
programas)
4. Pulse <ENTER>.
5. Utilice <UP> o <DOWN> para seleccionar el modo de programa, entre FAdE (fundido) o SnAP
(cambio rápido).
6. Pulse <ENTER>.
Velocidad de programa automático
Para configurar la velocidad del programa automático del Kinta FX ILS, haga lo siguiente:
1. Pulse <MENU> repetidamente hasta que aparezca S-- en la pantalla.
2. Pulse <ENTER>.
3. Utilice <UP> o <DOWN> para aumentar o disminuir la velocidad, entre S. 00–99 (
lento a rápido
).
4. Pulse <ENTER>.
–7
Color de láser
(C. 8 debe estar activo para
estroboscopio)
000 009 Sin función
010 049 Rojo
050 089 Verde
090 129 Rojo y verde
130 169 Rojo y verde estroboscopio
170 209 Verde y rojo estroboscopio
210 255 Rojo y verde estroboscopio alterno
– 8 Estroboscopio de láser
000 009 Sin función
010 254 Estroboscopio de láser,
lento a rápido
255 Estroboscopio de láser activo por sonido
– 9 Rotación de láser
000 004 Parada
005 127 Rotación en sentido antihorario,
lento a rápido
128 133 Parada
134 255 Rotación en sentido horario,
rápido
a lento
Para la operación manual de LEDs y Láseres usando el control DMX, establecer el Canal 1
de 000 009.
Nunca conecte un producto que está funcionando en cualquier modo independiente a una
línea DMX conectada a un controlador DMX. Los productos en modo independiente pueden
transmitir señales DMX que podrían interferir con las señales DMX del controlador.
2-Ch 9-Ch Función Valor Porcentaje/Configuración

Página 34 de 117
Kinta FX ILS Manual de Usuario Rev. 5
Funcionamiento
Programas activo por sonido
Para hacer funcionar el Kinta FX ILS con un programa activo por sonido, siga las instrucciones siguientes.
1. Pulse <MENU> repetidamente hasta que aparezca Snd en la pantalla.
2. Pulse <ENTER>.
3. Utilice <UP> o <DOWN> para seleccionar el programa deseado, entre Snd1–7. (consulte Colores
y programas)
4. Pulse <ENTER>.
5. Encienda la música y ajuste el mando de sensibilidad al sonido hasta que el producto empiece a
responder al ritmo de la música.
Colores y programas
Efecto kinta con colores personalizados
Para hacer funcionar el Kinta FX ILS con valores de color y estroboscopio personalizados, haga lo
siguiente:
1. Pulse <MENU> repetidamente hasta que aparezca u-- en la pantalla.
2. Pulse <ENTER>.
3. Utilice <UP> o <DOWN> para aumentar o disminuir el valor de la opción actual, entre:
•r000–255 (rojo)
•G000–255 (verde)
•b000–255 (azul)
•U000–255 (blanco) o
•F. 00–99 (estroboscopio de efecto kinta).
4. Pulse <ENTER> para pasar a la siguiente opción.
5. Repita los pasos 3 y 4 hasta que el producto esté configurado como deseado.
• El producto solo responderá a bajas frecuencias en la música (graves y percusión).
• En modo Activo por Sonido, el láser se quedará en oscuro tras 3 segundos de silencio
o con el sonido por debajo del nivel de sensibilidad configurado.
C-- Efecto P--/Snd Efecto
1Rojo 1Todos los efectos
2Verde 2Kinta y estroboscopios
3Azul 3Kinta y láser
4Blanco 4Láser y estroboscopios
5Rojo y verde 5Kinta solamente
6Rojo y azul 6Estroboscopios solamente
7Rojo y blanco 7Láser solamente
8Verde y azul
9Verde y blanco
10 Azul y blanco
11 Rojo, verde, y azul
12 Rojo, verde, y blanco
13 Rojo, azul, y blanco
14 Verde, azul, y blanco
15 Rojo, verde, azul, y blanco

Página 35 de 117
Funcionamiento
Kinta FX ILS Manual de Usuario Rev. 5
IRC-6 control remoto por infrarrojos
El Kinta FX ILS es totalmente compatible con el control remoto por infrarrojos (IRC-6) de CHAUVET. Para
habilitar el control inalámbrico por IRC-6, siga las instrucciones siguientes.
1. Pulse <MENU> repetidamente hasta que aparezca SEt en la pantalla.
2. Pulse <ENTER>.
3. Utilice <UP> o <DOWN> para seleccionar entre on (encendido) o oFF (apagado).
4. Pulse <ENTER>.
Funcionamiento de IRC-6
Modo automático
Para activar el modo automático con el IRC-6:
1. Pulse <AUTO> en el IRC-6.
2. Pulse <1>–<7> para seleccionar el programa (consulte Colores y
programas).
Para ajuste la velocidad del programa automático:
1. Pulse <SPEED> en el IRC-6.
2. Pulse <+> o <–> para aumentar o disminuir la velocidad.
Modo activo por sonido
Para activar el modo activo por sonido con el IRC-6:
1. Pulse <SOUND> en el IRC-6.
2. Pulse <1>–<7> para seleccionar el programa (consulte Colores y
programas).
Manual Control
Para seleccionar manualmente el color del efecto kinta con el IRC-6:
1. Pulse el color deseado, entre <R> (rojo), <G> (verde), <B> (azul), o
<W> (blanco).
Estroboscopio
Para configurar el estroboscopio con el IRC-6:
1. Pulse <STROBE> en el IRC-6.
2. Pulse <+> o <–> para aumentar o disminuir la velocidad de estroboscopio.
Oscuro
Para oscurecer el producto con el IRC-6:
1. Pulse <BLACK OUT> en el IRC-6.
Esto apagará todas las luces hasta que se pulsarse nuevamente el botón.
NOTA: El IRC-6 no responderá a ninguna entrada cuando se active Oscuro. Si el
producto no responde cuando se pulsa un botón, intente pulsar <BLACK OUT>.
Oscuro puede haber sido activado.
Los botones del IRC-6 que no figuran arriba están reservados para usos futuros.
BLACK
OUT AUTO SOUND
SENSI-
TIVITY
SPEEDSTROBE
%MANUAL FADE
RGB
WUVA
+
0
-
123
654
789

Página 36 de 117
Kinta FX ILS Manual de Usuario Rev. 5
Funcionamiento
Modo maestro/esclavo (por cable)
El modo maestro/esclavo permite que un solo producto Kinta FX ILS (el maestro), controle las acciones
de uno o más productos Kinta FX ILS (los esclavos) sin necesidad de un controlador DMX. El producto
maestro se configurará para funcionar en modo Independiente o con el remoto IRC-6, mientras que los
productos esclavo se configurarán para funcionar en modo DMX. Una vez configurados y conectados, los
productos esclavo funcionarán al unísono con el producto maestro.
Configure los productos como se indica a continuación.
Productos esclavo:
1. Pulse <MENU> repetidamente hasta que aparezca 9-Ch en la pantalla.
2. Pulse <ENTER>.
3. Utilice <UP> o <DOWN> para configurar la dirección de inicio a d 1.
4. Pulse <ENTER>.
5. Conecte la entrada DMX del primer producto esclavo a la salida DMX del producto maestro.
6. Conecte la entrada DMX de los siguientes productos esclavo a la salida DMX del producto esclavo precedente.
7. Termine de configurar y conectar todos los productos esclavo.
Producto maestro:
1. Configure el producto maestro para que funcione en modo Independiente o con el remoto IRC-6.
2. Ponga el producto maestro como el primer producto de la cadena DMX.
Modo maestro/esclavo (D-Fi USB)
El D-Fi USB permite que un solo producto Kinta FX ILS (el «maestro»), controle las acciones de uno o
más productos Kinta FX ILS (los «esclavos») sin necesidad de un controlador DMX ni de cables DMX. El
maestro (transmisor) se configurará para funcionar en modo independiente, mientras que los productos
esclavo (receptor) se configurarán para funcionar en modo esclavo. Una vez configurados y conectados,
los productos esclavo funcionarán al unísono con el producto maestro.
Configure los productos como se indica a continuación.
Productos esclavo:
1. Pulse <MENU> repetidamente hasta que aparezca 9-Ch en la pantalla.
2. Pulse <ENTER>.
3. Utilice <UP> o <DOWN> para configurar la dirección de inicio a d 1.
4. Pulse <ENTER>.
5. Configure el D-Fi USB para recibir en un canal específico, 1–16.
6. Conecte el D-Fi USB.
7. Termine de configurar y conectar todos los productos esclavo.
Producto maestro:
1. Configure el producto maestro para que funcione en modo Independiente.
2. Configure el D-Fi USB para transmitir en el canal D-Fi en el que estén recibiendo los esclavos.
3. Conecte el D-Fi USB.
Modo ILS
El ILS (Integrated Lighting System) dispone de 4 modos que se sincronizan con el GigBAR MOVE+ILS: los
modos 1 y 3 se sincronizan con el lado 1 del GigBAR MOVE+ILS, mientras que los modos 2 y 4 se sincronizan
con el lado 2 del GigBAR MOVE+ILS. Cuando estén vinculados, los efectos se sincronizarán con el efecto
más parecido del lado seleccionado del GigBAR MOVE+ILS: los efectos de Kinta se sincronizarán con uno de
los Kintas, las cabezas móviles se sincronizarán con una de las cabezas móviles y los efectos de baño de luz
se sincronizarán con uno de los reflectores. Los efectos láser se sincronizarán con el láser y los efectos de
estroboscopio se sincronizarán con los efectos de estroboscopio, independientemente del modo del ILS.
Este producto se sincronizará con el kinta en el lado seleccionado del GigBAR MOVE+ILS, además de
con el láser y estroboscopios.
Para configurar el Kinta FX ILS para responder a una señal ILS:
1. Pulse <MENU> repetidamente hasta que aparezca iLS_ en la pantalla.
2. Utilice
<UP>
o
<DOWN>
para seleccionar entre
iLS1
(lado 1),
iLS2
(lado 2),
iLS3
(lado 1), o
iLS4
(lado 2).
3. Pulse <ENTER>.
• Configure todos los productos esclavo antes de conectar la unidad maestro a la cadena.
• Nunca conecte un controlador DMX a una línea DMX configurada para funcionamiento
Maestro/Esclavo, porque el controlador puede interferir con las señales del maestro.
• No conecte más de 31 esclavos al maestro.
• Todos los productos deben configurarse con la misma personalidad DMX, dirección
DMX y canal D-Fi.
• Configure todos los productos esclavo antes de configurar al maestro para transmitir.
• Nunca conecte un controlador DMX a un canal D-Fi configurado para funcionamiento
maestro/esclavo, porque el controlador puede interferir con las señales del maestro.

Página 37 de 117
Mantenimiento
Kinta FX ILS Manual de Usuario Rev. 5
5. Mantenimiento
Mantenimiento del producto
El polvo acumulado reduce el rendimiento de la salida de luz y puede provocar sobrecalentamiento. Esto
puede conducir a una reducción de la vida de la fuente de luz e incrementar el desgaste mecánico.Para
mantener un rendimiento óptimo y minimizar el desgaste, debe limpiar este producto con frecuencia.
Como norma general, limpie este producto al menos dos veces al mes. Sin embargo, el uso y las
condiciones ambientales influyen para un aumento de la frecuencia de limpieza.
Para limpiar el producto, siga las instrucciones siguientes:
1. Desenchufe el producto de la alimentación.
2. Espere a que el producto esté a temperatura ambiente.
3. Use un aspirador (o aire seco comprimido) y un cepillo suave para quitar el polvo depositado en
orificios de aireación externos.
4. Limpie todas las superficies exteriores con una solución suave de limpiador de cristales sin
amoniaco o alcohol isopropílico.
5. Aplique la solución directamente sobre un paño suave que no deje pelusa o un paño de limpiar
lentes.
6. Quite todo el polvo o suciedad de los bordes externos de la superficie de la lente.
7. Con cuidado, frote las superficies de la lente hasta que no quede turbiedad ni pelusas.
Seque siempre meticulosamente y con cuidado las superficies exteriores después de
limpiarlas.
No haga girar el ventilador usando aire comprimido, ya que podría estropearlo.

Página 38 de 117
Kinta FX ILS Manual de Usuario Rev. 5
Especificaciones Técnicas
6. Especificaciones Técnicas
Dimensiones y Peso
Nota: Las dimensiones en pulgadas están redondeadas.
Alimentación
Fuente de luz (Láser)
Fuente de luz (Kinta)
Fuente de luz (Estroboscopios)
Fotometría
Térmicas
DMX
Pedidos
Longitud Anchura Altura Peso
187 mm (7,4”) 261 mm (10,3”) 187 mm (7,4”) 1,7 kg (3,8 lb)
Tipo de fuente de alimentación Rango Selección de tensión
Conmutación (interna) 100 a 240 VCA, 50/60 Hz Detección automática (autorango)
Parámetro 120 V, 60 Hz 230 V, 50 Hz
Consumo 25 W 24 W
Corriente de funcionamiento 0,5 A 0,2 A
Intensidad de cadena (productos) 8 A (15 productos) 8 A (26 productos)
Fusible T 1 A, 250 V T 1 A, 250 V
E/S alimentación EE.UU./Mundial UK/Europa
Conector de entrada de alimentación
IEC IEC
Conector de salida de alimentación
Edison IEC
Enchufe del cable de alimentación Edison (EE.UU.) Enchufe local
Tipo Alimentación Longitud de onda
Láser (rojo) 100 mW 650 nm
Láser (verde) 30 mW 520 nm
Tipo Color Cantidad Alimentación Intensidad Duración
LED Rojo 1 7,5 W 2,4 A 50.000 horas
LED Verde 1 7,5 W 2,4 A 50.000 horas
LED Azul 1 7,5 W 2,4 A 50.000 horas
LED Blanco 1 7,5 W 2,4 A 50.000 horas
Tipo Color Cantidad Alimentación Intensidad Duración
LED SMD Blanco 16 5 W 1,6 A 50.000 horas
Frecuencia de estroboscopio Ángulo de cobertura
0 a 20 Hz 118°
Temp. externa mínima del láser Temp. externa máxima del láser Sistema de refrigeración
15 °C (59 °F) 35 °C (95 °F) Convección asistida por ventilador
Conectores E/S Rango de canal
XLR 3 pines 2 o 9
Nombre de producto Código de artículo Código UPC
Kinta FX ILS 10051879 781462222277

Página 39 de 117
Devoluciones
Kinta FX ILS Manual de Usuario Rev. 5
Devoluciones
En caso de que necesite asistencia o devolver un producto:
• Si se encuentra en EE. UU., póngase en contacto con la Oficina Central de Chauvet.
• Si se encuentra en el Reino Unido o Irlanda, póngase en contacto con Chauvet Europe Ltd.
• Si se encuentra en Benelux, póngase en contacto con Chauvet Europe BVBA.
• Si se encuentra en Francia, póngase en contacto con Chauvet France.
• Si se encuentra en Alemania, póngase en contacto con Chauvet Germany.
• Si se encuentra en México, póngase en contacto con Chauvet Mexico.
• Si se encuentra en cualquier otro país, NO contacte con Chauvet. Contacte con su distribuidor
local. Vea www.chauvetdj.com para distribuidores fuera de EE.UU., Reino Unido, Irlanda, Benelux,
Francia, Alemania o México.
Llame a la oficina de Asistencia Técnica Chauvet correspondiente y pida un número de Autorización de
Devolución de la mercancía (RMA) antes de enviar el producto. Esté preparado para proporcionar el
número de modelo, número de serie y una breve descripción de la causa de la devolución.
Para enviar una solicitud de servicio en línea, vea www.chauvetdj.com/service-request.
Envíe la mercancía a portes pagados, en su caja original y con su embalaje y accesorios originales.
Chauvet no expedirá etiquetas de devolución.
Etiquete el paquete claramente con el número de RMA. Chauvet rechazará cualquier producto devuelto
sin un número de RMA.
Antes de enviar el producto, escriba claramente la siguiente información en una hoja de papel y colóquela
dentro de la caja:
• Su nombre
• Su dirección
• Su número de teléfono
• Número de RMA
• Una breve descripción del problema
Asegúrese de que empaqueta el producto adecuadamente. Cualquier daño en el transporte que resulte
de un empaquetado inadecuado será responsabilidad suya. Se recomienda empaquetado FedEx o de
doble caja.
Si se encuentra fuera de los EE.UU., Reino Unido, Irlanda, Benelux, Francia, Alemania o
México, póngase en contacto con su distribuidor de registro y siga sus instrucciones
sobre cómo devolverle a ellos los productos Chauvet. Visite www.chauvetdj.com para
detalles de contacto.
Escriba el número de RMA en una etiqueta convenientemente adherida. NO escriba el
número de RMA directamente sobre la caja.
Chauvet se reserva el derecho de usar su propio criterio para reparar o reemplazar
productos devueltos.

Página 40 de 117
Kinta FX ILS Manual de Usuario Rev. 5
Contacto
Contacto
Fuera de EE.UU., Reino Unido, Irlanda, Benelux, Francia, Alemania o México, póngase en contacto con
su proveedor. Siga sus instrucciones para pedir soporte o para devolver un producto. Visita nuestro sitio
web para detalles de contacto.
Información general Servicio Técnico
Oficina Central de Chauvet
Dirección: 5200 NW 108th Ave. Voz: (844) 393-7575
Sunrise, FL 33351 Fax: (954) 756-8015
Voz: (954) 577-4455 Email: [email protected]
Fax: (954) 929-5560
Número gratuito: (800) 762-1084 Sitio web: www.chauvetdj.com
Chauvet Europe Ltd
Dirección: Unit 1C Email: UKtech@chauvetlighting.eu
Brookhill Road Industrial Estate
Pinxton, Nottingham, UK Sitio web: www.chauvetdj.eu
NG16 6NT
Voz: +44 (0) 1773 511115
Fax: +44 (0) 1773 511110
Chauvet Europe BVBA
Dirección: Stokstraat 18 Email: BNLte[email protected]
9770 Kruishoutem
Belgium Sitio web: www.chauvetdj.eu
Voz: +32 9 388 93 97
Chauvet France
Dirección: 3, Rue Ampère
91380 Chilly-Mazarin Email: [email protected]
France Sitio web: www.chauvetdj.eu
Voz: +33 1 78 85 33 59
Chauvet Germany
Dirección: Bruno-Bürgel-Str. 11
28759 Bremen Email: DEte[email protected]
Germany Sitio web: www.chauvetdj.eu
Voz: +49 421 62 60 20
Chauvet Mexico
Dirección: Av. de las Partidas 34 - 3B
(Entrada por Calle 2) Email: [email protected]
Zona Industrial Lerma Sitio web: www.chauvetdj.mx
Lerma, Edo. de México, CP 52000
Voz: +52 (728) 690-2010

Page 41 sur 117
Avant de Commencer
Manuel d’Utilisation des Kinta FX ILS Rév. 5
1. Avant de Commencer
Ce Qui Est Compris
Instructions Relatives au Déballage
Déballez l'appareil avec précaution et vérifiez le contenu afin de vous assurer que rien ne vous manque et
que tout est en bon état.
Réclamations
Si l'emballage ou le contenu (l'appareil et ses accessoires compris) semble avoir été endommagé pendant
le transport, ou s'il présente des signes de manipulation sans précaution, veuillez dès réception en notifier
immédiatement le transporteur et non Chauvet. Ne pas enregistrer votre réclamation auprès du transporteur en
temps et en heure peut entraîner une non validation de celle-ci. De plus, gardez l'emballage et tous les matériaux
d'emballage pour inspection. Pour tout autre problème comme la non-livraison de pièces ou composants,
des dommages non en rapport avec la livraison ou des vices cachés, veuillez déposer votre réclamation
auprès de Chauvet dans les 7 jours suivant la livraison.
Conventions manuelles
Symboles
Clause de Non-Responsabilité
Chauvet estime que les informations contenues dans ce manuel sont exactes à tous les égards. Cependant,
Chauvet n'assume aucune responsabilité et décline expressément toute responsabilité envers toute partie de toute
perte, dommage ou dérangement causés par des erreurs ou des omissions dans ce document, que ces erreurs
ou omissions résultent d'une négligence, d'un accident ou de toute autre cause. Chauvet se réserve le
droit de réviser le contenu de ce document sans aucune obligation de notifier quelque personne ou société
que ce soit de cette révision. Cependant, Chauvet n'a aucune obligation de réaliser de telles révision, sans
non plus s'engager à les réaliser. Téléchargez la dernière version de ce manuel sur www.chauvetdj.com.
Propriété intellectuelle
Les œuvres d'auteur contenues dans ce manuel, y compris, mais sans s'y limiter, l'ensemble des
conceptions, des textes et des images sont la propriété de Chauvet.
© Copyright 2022 Chauvet & Sons, LLC. Tous droits réservés.
Publié électroniquement par Chauvet aux États-Unis.
CHAUVET, le logo Chauvet, ILS (brevet en instance) et Kinta FX ILS sont des marques déposées ou des
marques de Chauvet & Sons LLC. (d/b/a Chauvet et Chauvet Lighting) aux États-Unis et dans d'autres
pays. Les autres noms de produits et logos mentionnés dans le présent manuel peuvent être des marques
commerciales de leurs sociétés respectives.
•KintaFXILS
• Cordon d’alimentation
• Manuel d'Utilisation
Convention Signification
1–512 Une plage de valeurs
50/60 Un ensemble de valeurs parmi lequel on ne peut en choisir qu'une
Settings Une option de menu ne pouvant être modifiée
<ENTER> Un bouton sur lequel appuyer sur le panneau de commande de l'appareil
ON Une valeur à saisir ou à sélectionner
Symbole Signification
Avertissement électrique. Le non-respect de ces instructions peut entraîner des
dommages électriques à l'appareil, aux accessoires ou à l’utilisateur.
Consignes importantes en matière d'installation, de configuration et de fonctionnement. Le
non-respect de ces consignes peut entraîner le non-fonctionnement de l'appareil ou lui
causer des dommages. De même, l'utilisateur peut s'en trouver affecté.
Consignes importantes en matière d'installation ou de configuration. Le produit peut ne
pas fonctionner correctement si ces instructions ne sont pas suivies.
Informations utiles.
Informations sur la sécurité des lasers.

Page 42 sur 117
Manuel d’Utilisation des Kinta FX ILS Rév. 5
Avant de Commencer
Consignes de Sécurité
Les consignes de sécurité comprennent des informations importantes sur la sécurité des systèmes laser. Veuillez
lire et bien comprendre toutes les instructions avant d'allumer le laser pour la première fois. La connaissance
de ces consignes de sécurité est cruciale pour éviter toute blessure aux yeux par un laser et pour ne pas enfreindre
la loi. Veuillez conserver ce manuel d'utilisation dans un lieu sûr pour vous y référer ultérieurement.
ARRÊTEZ ET LISEZ TOUTES LES DONNÉES DE
SÉCURITÉ DES LASERS
• Les lasers peuvent s'avérer dangereux et font l'objet de consignes de sécurité spécifiques.
Une mauvaise utilisation des lasers pourrait entraîner une cécité totale ou causer des lésions
oculaires. Portez une attention particulière aux libellés portant la mention AVERTISSEMENT
ou REMARQUE dans ce manuel d'utilisation. Lisez et assimilez toutes les consignes AVANT
de mettre cet appareil en marche pour la première fois.
• Connectez toujours l'appareil à un circuit relié à la terre afin d'éviter tout risque d'électrocution.
• Déconnectez toujours de l'alimentation principale avant de procéder à tout entretien ou
remplacement du fusible.
• Évitez tout contact visuel direct avec la source lumineuse quand cet appareil est en marche.
• Assurez-vous que le cordon d'alimentation n'est ni tordu ni endommagé.
• Ne débranchez jamais cet appareil en tirant sur le cordon.
• Si vous installez l'appareil en hauteur, utilisez impérativement une élingue de sécurité pour le
sécuriser au dispositif de fixation.
• Ne laissez aucun produit inflammable dans un rayon de 50 cm de l'appareil lorsque celui-ci fonctionne.
• Ne touchez pas cet appareil lors de son fonctionnement car il pourrait s'avérer brûlant.
• Cet appareil n'est pas conçu pour être utilisé dans une installation permanente.
• Veillez toujours à ce que la tension de la prise à laquelle vous branchez l'appareil soit comprise
dans la plage indiquée sur l'étiquette ou à l'arrière de l'appareil.
• Cet appareil doit être utilisé en intérieur uniquement ! (IP20). Afin d'éviter tout risque d'incendie
ou décharge électrique, veillez à n'exposer cet appareil ni à la pluie ni à l'humidité.
• Installez toujours cet appareil dans en endroit bien ventilé, à au moins 20 pouces (50 cm) des
surfaces adjacentes.
• Assurez-vous qu'aucune fente de ventilation sur le boîtier de l'appareil ne soit obstruée.
• Ne connectez jamais cet appareil à un gradateur.
• Assurez-vous de remplacer le fusible par un autre du même type.
• Transportez ce produit uniquement au moyen de la poignée dont il est doté.
• Mettre l'appareil hors/sous tension à de brefs intervalles est fortement déconseillé. La durée
de vie de la diode laser s'en trouverait fortement réduite.
• Ne secouez pas l'appareil. Évitez tout geste brusque lors de l'installation ou de l'utilisation de l'appareil.
• Utilisez TOUJOURS un câble de sécurité lorsque vous montez cet appareil en hauteur.
•
La plage de température ambiante de fonctionnement pour le laser est de 15 °C à 35 °C (59 °F
à 95 °F). Ne faites pas fonctionner cet appareil à des températures en dehors de cette plage.
• En cas de sérieux problèmes de fonctionnement, arrêtez le système immédiatement.
• N'essayez jamais de réparer cet appareil. Toute réparation effectuée par une personne non
qualifiée peut entraîner des dommages ou un fonctionnement erratique de l'appareil. Mettez-
vous en relation avec le centre d'assistance technique autorisé le plus près de chez vous.
ATTENTION ! L'utilisation de commandes, réglages ou procédures autres que CEUX
spécifiés DANS CE MANUEL DE L'UTILISATEUR peut entraîner une exposition à des
rayonnements dangereux.
• Lumière laser : évitez tout contact direct avec les yeux ! N'exposez jamais intentionnellement
directement vos yeux ou ceux d'autres personnes à la lumière du laser.
• Cet appareil laser peut entraîner une cécité totale ou causer des lésions oculaires
instantanées si le laser entre en contact direct avec les yeux.
• Il est illégal et dangereux de diriger ce laser vers les zones destinées au public, zones où les
yeux des membres du public ou du personnel pourraient être en contact direct avec les rayons
laser ou des réfléchissements lumineux.
• Ne pointez pas de laser sur les avions, ceci est répréhensible par la loi.
• Durant les périodes de non-utilisation, pour éviter tout usure inutile et pour prolonger la durée
de vie, déconnectez-entièrement l'appareil en le débranchant de l'alimentation électrique ou
en coupant le disjoncteur.
• N'essayez JAMAIS de réparer l'appareil vous-même. Les réparations et entretiens doivent être
effectués par un technicien agrée.

Page 43 sur 117
Avant de Commencer
Manuel d’Utilisation des Kinta FX ILS Rév. 5
Avertissement : Boîtier non Verrouillable
Consignes de Sécurité Relatives au Laser
La lumière laser est différente de toutes les autres lumières. La lumière laser peut causer des blessures aux yeux s'il
n'est pas installé et utilisé correctement. La lumière laser est plusieurs milliers de fois plus concentrée que tout autre
type de lumière. Cette concentration peut provoquer des lésions oculaires instantanés, principalement par la
combustion de la rétine (la partie sensible à la lumière à l'arrière de l'œil). La chaleur d'une lumière laser ne peut pas
être ressentie mais elle peut néanmoins blesser ou rendre aveugle les utilisateurs de l'appareil et le public. Même
de très petites quantités de lumière laser sur de longues distances sont potentiellement dangereuses.
NE PAS penser que l'exposition à un faisceau laser est sans danger, même si ce n'est qu'une petite
déviation d'un faisceau plus large. Cet appareil à laser utilise des dizaines de milliwatts de puissance laser
(niveaux internes classe 3B) avant de les séparer en plusieurs faisceaux (niveaux classe 3R). Chacun des
faisceaux laser de classe 3R est potentiellement dangereux pour les yeux.
NE SUPPOSEZ PAS
qu'une lumière laser en mouvement est sans danger. Une lumière laser n'est jamais sans
risque. Les lésions oculaires peuvent survenir en un instant, il est dont vital de faire tout le nécessaire pour
éviter toute exposition directe de l'œil. Conformément à la réglementation en matière de sécurité laser, il
est illégal de diriger des lasers de classe 3R dans des zones où des personnes peuvent être exposées,
même si le laser est dirigé en-dessous du visage des personnes, par exemple une piste de danse.
Conservez ce manuel d'utilisation pour référence future. Si vous étiez amené à vendre cet
appareil à un autre utilisateur, veillez à lui remettre ce manuel également.
• Cet appareil renferme un laser très puissant.
• N'ouvrez jamais le boîtier du laser, vous pourriez être exposé à des niveaux dangereux de
radiation laser.
• L'intensité du laser à l'ouverture du boîtier peut entraîner instantanément une cécité, des
brûlures cutanées ou des incendies.
ARRÊTEZ ET LISEZ TOUTES LES CONSIGNES DE SÉCURITÉ
DES LASERS CI-DESSOUS
• Ne pas faire fonctionner le laser sans avoir lu et bien compris toutes les données techniques
et de sécurité de ce manuel.
• TOUJOURS configurer et installer tous les effets de laser afin que toute lumière laser soit à au
moins 3 mètres (9,8 pieds) au-dessus du sol sur lequel les gens peuvent se tenir debout. Voir
la section Utilisation Adéquate de ce manuel.
• Après l'installation, et avant l'usage en public, testez les lasers pour vous assurer de leur bon
fonctionnement. Ne par utiliser l'appareil si un défaut est détecté.
• NE PAS pointer des lasers sur des personnes ou des animaux.
• NE PAS regarder dans l'ouverture laser ou dans les faisceaux laser.
• NE PAS diriger des lasers vers des zones où des personnes pourraient y être exposées.
• NE PAS pointer des lasers vers des surfaces très réfléchissantes telles que des fenêtres, des
miroirs et le métal brillant. Les réflexions de laser peuvent également être dangereuses.
• Ne jamais pointer un laser sur un avion, cela étant considéré comme une infraction fédérale.
• Ne jamais pointer une faisceau laser non terminé vers le ciel.
• Ne pas exposer l'optique de sortie (ouverture) à des produits chimiques de nettoyage agressifs.
• Ne pas utiliser le laser si le boîtier est endommagé, ouvert, ou si les optiques apparaissent
endommagées de quelque manière que ce soit.
• Ne jamais ouvrir le boîtier du laser. Les niveaux élevés de puissance de laser à l'intérieur du
boîtier de protection peuvent provoquer des incendies ou brûler la peau, et peuvent provoquer
des blessures instantanées aux yeux.
• Ne laissez jamais ce produit fonctionner sans surveillance.
• Le fonctionnement d'un show laser de classe 3R n'est autorisé que si les lasers sont contrôlés
par un professionnel qualifié, convenablement formé et ayant pris connaissance des données
présentes dans ce manuel.
•
Les exigences légales pour l'utilisation d'appareils de divertissement à laser varient d'un pays à l'autre.
L'utilisateur est responsable des exigences légales dans l'emplacement / le pays d'utilisation.
ATTENTION ! NE PAS utiliser cet appareil de manière contraire à ce qui est spécifié dans
ce manuel de l'utilisateur. Le non-respect de ces instructions annule la garantie, peut
endommager le produit ou blesser l'utilisateur ou le public.
ATTENTION ! Ce produit ne peut pas être jeté avec les ordures ménagères. Veuillez
contacter votre service de gestion des déchets pour la réglementation locale concernant
l'élimination des produits électroniques dans votre région.

Page 44 sur 117
Manuel d’Utilisation des Kinta FX ILS Rév. 5
Avant de Commencer
Reproduction de l’Étiquette de Sécurité Laser
Avertissement d'Exposition au Laser
Données d'émission laser
Tel que mesuré dans les conditions de mesure de la CEI pour la classification.
Déclaration de Conformité Laser
Conforme aux normes de performance de la FDA pour les produits laser, sauf pour les dérogations
conformément à la norme Laser Notice No. 56 du 8 mai 2019. Aucun entretien n'est nécessaire pour
maintenir la conformité de ce produit aux normes de performances laser.
LUMIERE LASER ÉVITER L'EXPOSITION DIRECTE DES YEUX
D'autres lignes directrices et programmes de sécurité pour une utilisation sans risque des lasers
peuvent être trouvés dans la norme ANSI Z136.1 “Pour l'utilisation sans risque des lasers”,
disponible auprès du Laser Institute of America : www.lia.org. De nombreux gouvernements
locaux, entreprises, institutions, militaires et autres, exigent que tous les lasers soient utilisés dans
le respect des directives de la norme ANSI Z136.1. Une aide pour l'affichage des laser peut être
obtenue par l'intermédiaire de l'ILDA (International Laser Display Association) : www.ilda.com.
Classification laser Classe 3R
Longueur d’onde/alimentation optique de la diode laser rouge 650 nm/100 mW
Longueur d’onde/alimentation optique de la diode laser vert 520 nm/30 mW
Diamètre du faisceau <5 mm à l'ouverture
Données de pulsation
Toutes les pulsations < 4 Hz (>0.25 sec)
Divergence (chaque faisceau) <2 mrad
Divergence (lumière totale) <160°
Puissance laser de chaque faisceau au l'ouverture
<5 mW
LASER APERTURE
MODEL: KINTAFXILS
ITEM CODE: 10051879
FUSE: T 1 A, 250 V
POWER LINKING: 8 A (17 UNITS @ 120 V)
(33 UNITS @ 230 V)
ORIGIN: MADE IN CHINA
USA / CANADA
POWER: 100-125 VAC, 60 Hz
0.5 A, 25 W
WORLDWIDE
POWER: 100-240 VAC, 50/60 Hz
0.2-0.5 A, 24 W
THIS APPLIANCE MUST BE GROUNDED
CETTE UNITÉ DOIT ÊTRE RELIÉE À LA TERRE
USE ONLY FUSE OF SAME TYPE & RATING
N’UTILISER QUE DES FUSIBLES DU TYPE ET
DE L’AMPÉRAGE INDIQUÉ
NOT FOR HOUSEHOLD USE
IMPROPRE A L’USAGE DOMESTIQUE
DRY LOCATIONS
EMPLACEMENTS SECS
DISCONNECT POWER BEFORE SERVICING
DÉBRANCHER AVANT TOUT ENTRETIEN
FOR INDOOR USE ONLY
USAGE INTÉRIEUR UNIQUEMENT
WORLDWIDE HEADQUARTERS,
SUNRISE, FLORIDA USA
520/650nm
CW, <5mW
WARNING
Cancer and Reproductive Harm -
www.P65Warnings.ca.gov
IEC/EN60825-1:2014
!"#$%&'(
RoHS

Page 45 sur 117
Introduction
Manuel d’Utilisation des Kinta FX ILS Rév. 5
2. Introduction
Vue d'ensemble du produit
Dimensions du produit
ATTENTION! NE branchez QUE des appareils D-Fi USB sur le port USB. Le non-respect de
cette consigne peut endommager l'appareil.
LED SMD stroboscopes
(x16)
Microphone
Lentilles d'effet
kinta (x24)
Port
USB
Capteur
IR
Indicateurs LED
DMX
Son
Auto
Esclave
Écran et Boutons de contrôle
<MENU> <UP> <DOWN> <ENTER>
Sortie
laser Entrée
d'alimentation
Porta-
fusibile
Molette de
sensibilité
Entrée/
sortie DMX
Sortie
d'alimentation
Anneau de
sécurité
7,4 po
187 mm
7,4 po
187 mm
10,3 po
261 mm

Page 46 sur 117
Manuel d’Utilisation des Kinta FX ILS Rév. 5
Configuration
3. Configuration
Alimentation CA
Le Kinta FX ILS est doté d'une alimentation universelle interne et il peut fonctionner avec des tensions
d'entrée comprises entre 100 et 240 V CA, 50/60 Hz. Pour déterminer les besoins en énergie de l'appareil
(disjoncteur, prise de courant et câblage), utilisez la valeur de courant figurant sur l'étiquette apposée sur
le panneau arrière de l'appareil, ou consultez la section Spécificités Techniques de ce manuel. La capacité
nominale affichée indique la consommation courante dans des conditions normales d'utilisation.
Remplacement des fusibles
1. Débranchez l'appareil de l'alimentation.
2. Insérez et calez la pointe d'un tournevis à tête plate dans la fente du porte-fusible.
3. En faisant levier, faites-le sortir de son emplacement.
4. Retirez le fusible obsolète du porte-fusible et remplacez avec un de même type et même ampérage.
5. Insérez à nouveau le porte-fusible à sa place et rebranchez l'appareil.
Connexion électrique
Le produit fournit la chaîne alimentaire via l’Edison de sortie à l'arrière du produit. Voir le schéma ci-
dessous pour plus d'informations.
Diagramme de raccordement d'alimentation
• Toujours connecter l'appareil à un circuit protégé (disjoncteur ou fusible). Assurez-
vous que l'appareil soit correctement mis à la terre pour éviter tout risque
d'électrocution ou d'incendie.
• Durant les périodes de non-utilisation, pour éviter tout usure inutile et pour prolonger
la durée de vie, déconnectez-entièrement l'appareil en le débranchant de l'alimentation
électrique ou en coupant le disjoncteur.
Ne connectez jamais l'appareil à un rhéostat (résistance variable) ou un circuit gradateur,
même si vous n'avez l'intention de vous servir du rhéostat ou du canal d'assombrissement
que comme interrupteur 0 à 100%.
Débranchez l'appareil avant de procéder au remplacement du fusible.
Remplacez toujours un fusible obsolète avec un de même type et même ampérage.
Il est possible connecter jusqu’à 17 produits Kinta FX ILS à 120 V ou 33 produits à 230 V.
Ne dépassez jamais ce nombre. Les cordons d’alimentation peuvent être achetés
séparément.
Le schéma de raccordement d'alimentation ci-dessus correspond UNIQUEMENT à la
version américaine de cet appareil ! Les connecteurs et exigences en matière de
raccordement en chaîne varient de pays en pays et de région en région. Si vous utilisez
cette unité en dehors de l'Amérique du nord, veuillez consulter votre distributeur Chauvet.
Capsule de sécurité
Porte-fusible de rechange
(à l'intérieur de la capsule de sécurité)
Placez le fusible
(tenu par un clip en plastique)
Source
d'alimentation 1er produit 2éme produit 3éme produit Produits
supplémentaires

Page 47 sur 117
Configuration
Manuel d’Utilisation des Kinta FX ILS Rév. 5
Installation
Avant d'installer ce produit, lisez, assimilez et suivez les recommandations en matière de sécurité reprises
dans la section Consignes de Sécurité.
Orientation
Le Kinta FX ILS doit être monté de manière à garantir l'usage en toute sécurité du laser. Assurez-vous que
la ventilation de cet appareil puisse s'effectuer de manière adéquate.
Suspension
• Avant de choisir un emplacement pour l'appareil, assurez-vous qu'il soit facile d'y accéder pour
toute opération de maintenance et de programmation.
• Assurez-vous que la structure ou la surface sur laquelle vous installez l'appareil peut en supporter
le poids (voir les Spécificités Techniques)
• Utilisez toujours un câble de sécurité lorsque vous montez cet appareil en hauteur. Garantissez un
montage en toute sécurité de l'appareil en le reliant à un point de fixation, comme une plateforme
en hauteur ou une structure.
• Lors de la suspension de l'appareil à une structure, vous devriez utiliser un clip de fixation en
mesure de supporter la charge nécessaire. La lyre comporte un orifice de 13 mm à cet effet.
• Les molettes de réglage de la fixation permettent d'ajuster la position de l'appareil lors de son
positionnement à l'angle désiré. N'utilisez aucun outil pour relâcher ou resserrer les molettes de la
fixation. En utiliser pourrait endommager les molettes.
Schéma de installation
Utilisation Adéquate
Cet appareil doit être monté en hauteur uniquement. Pour des raisons de sécurité, Chauvet recommande
de monter vos éclairages sur une plateforme élevée stable ou des supports en hauteur renforcés au
moyen de systèmes de suspension adéquats. Vous devez, dans tous les cas, utiliser des élingues de
sécurité. Le matériel de montage approprié peut être acquis auprès de votre revendeur d'éclairage.
Les réglementations internationales en matière de sécurité des appareils laser exigent que ceux-ci soient
installés de manière à ce qu'un minimum de 3 mètres de séparation à la verticale existe entre le sol
et la lumière laser la plus basse projetée. De plus, une séparation de 3 mètres à l'horizontal doit
être respectée entre toute lumière laser émise et les membres du public ou autres espaces publics.
ATTENTION : L'utilisation des commandes, réglages ou procédures autres que celles
spécifiées DANS CE MANUEL D'UTILISATION peut entraîner de dangereuses expositions
à des radiations.
Crochet
Câble de sécurité
(par exemple modèle
CH-05 de Chauvet)
Support de fixation
Molette de Réglage
de la support (x2)
3 mètres

Page 48 sur 117
Manuel d’Utilisation des Kinta FX ILS Rév. 5
Configuration
Dispositif de verrouillage et clé
Lorsque cet appareil est acheté en dehors de l'Amérique du Nord, il est équipé d'un dispositif de
verrouillage et d'une clé pour empêcher le fonctionnement du laser tant que le dispositif de verrouillage et
la clé ne sont pas insérés tous les deux et que la clé soit tournée sur la position ON (marche).
Pour que le laser fonctionne, vous devez EFFECTUER CES DEUX ACTIONS :
• Insérer le dispositif de verrouillage
• Insérer la clé et la tourner sur la position ON
Si ces deux actions ne sont pas effectuées, le laser NE PEUX PAS s'allumer !
*Uniquement à des fins d'illustration
Assurez-vous de toujours positionner cette clé sur OFF et de la retirer quand vous laissez
cet appareil sans surveillance afin de prévenir tout accident ou blessures à des tiers.
Insérer le dispositif de verrouillage Insérer la clé et la tourner
sur la position ON

Page 49 sur 117
Fonctionnement
Manuel d’Utilisation des Kinta FX ILS Rév. 5
4. Fonctionnement
Cet appareil ne doit pas fonctionner de manière continue. Afin de maximiser la durée de vie de votre laser, veillez
à le mettre en pause régulièrement. Débranchez toujours le Kinta FX ILS quand il n'est pas utilisé.
Fonctionnement du Panneau de Commande
Pour accéder aux fonctions du panneau de commande, utilisez les quatre boutons situés en dessous de
l'affichage. Veuillez vous référer à la Vue d'ensemble du produit pour voir les emplacements des boutons
sur le panneau de commande.
Plan du menu
Reportez-vous à la page du produit Kinta FX ILS sur
www.chauvetdj.com
pour la dernière carte des menu.
Configuration (DMX)
Le Kinta FX ILS fonctionne avec un contrôleur DMX. Pour plus d'informations sur le DMX, téléchargez
l'introduction au DMX de CHAUVET sur le site internet de Chauvet à l'adresse :
http://www.chauvetlighting.com/downloads/DMX_Primer_rev05_WO.pdf.
Personnalité DMX et adresse de départ
Lors de la sélection d'une adresse DMX de départ, veillez à toujours prendre en compte le nombre de
canaux DMX utilisés par le mode DMX sélectionné. Si vous choisissez une adresse de départ trop élevée
vous pouvez restreindre l'accès à certains des canaux de l'appareil.
Le Kinta FX ILS utilise jusqu'à 9 canaux DMX en mode
9-Ch
, ce qui détermine la plus haute adresse
configurable à
504.
Le Kinta FX ILS utilise 2 canaux DMX en mode
2-Ch
, ce qui détermine la plus haute adresse configurable à
511
.
S'il vous manque des informations sur le protocole DMX ou si vous souhaitez approfondir vos
connaissances, vous pouvez télécharger l'introduction au DMX à l'adresse www.chauvetdj.com.
Pour sélectionner la personnalité DMX et définir l'adresse DMX de départ, effectuez les actions suivantes :
1.
Appuyez sur la touche
<MENU>
de manière répétée jusqu'à ce que l'affichage indique
2-Ch ou 9-Ch.
2. Appuyez sur la touche <ENTER>.
3. Utilisez les touches
<UP>
ou
<DOWN>
pour augmenter ou diminuer l'adresse de départ, de
d 1–511
.
4. Appuyez sur la touche <ENTER>.
Bouton Fonction
<MENU> Sélection d'un mode de fonctionnement ou de sortie de l'option de menu en cours
<UP> Appuyez pour vous déplacer vers le haut dans une liste d'options ou pour sélectionner une
valeur plus haute
<DOWN> Appuyez pour vous déplacer vers le bas dans une liste d'options ou pour sélectionner une
valeur plus basse
<ENTER> Appuyez pour activer une option de menu ou une valeur sélectionnée
Mode Niveaux de programmation Description
DMX 2-Ch d 1–511 Mode DMX à 4 canaux
9-Ch d 1–504 Mode DMX à 9 canaux
Couleur
prédéfinie C-- C 1–15 Couleurs d'effet kinta prédéfinies (consultez Couleurs et
programmes)
Programme
automatique P-- P 1–7 FAdE Programmes automatiques (consultez Couleurs et
programmes)
SnAP
Vitesse S-- S. 01–99 Vitesse du programme automatique
Programme
son-actif Snd Snd1–7 Programmes son-actif (consultez Couleurs et
programmes)
Couleur
personnalisée
u--
r000–255
Définit les couleurs de l'effet kinta manuel
G000–255
b000–255
U000–255
F. 00–99 Définit la vitesse du stroboscope, lent à rapide
Infrarouge SEt on Activer ou désactiver le contrôle infrarouge
oFF
Mode ILS iLS iLS1–4 Définit le mode ILS
Il le fera jusqu'à réception d'un signal DMX.

Page 50 sur 117
Manuel d’Utilisation des Kinta FX ILS Rév. 5
Fonctionnement
Connectivité D-Fi USB
Le Kinta FX ILS peut se transformer en récepteur/émetteur D-Fi sans fil avec l'utilisation du module
D-Fi USB
de Chauvet DJ. Il suffit de définir la personnalité DMX et l’adresse DMX de l’appareil, de régler le
commutateur DIP du canal de réception/transmission D-Fi, puis de le brancher sur le port USB D-Fi.
Compatibilité USB D-Fi
Le D-Fi USB peut recevoir un signal DMX du D-Fi Hub et du FlareCON Air 2 ainsi que d’autres produits
D-Fi USB.
Configuration (D-Fi USB)
1. Paramétrez la personnalité DMX et l'adresse DMX sur le Kinta FX ILS.
2. Utilisez le tableau ci-dessous pour paramétrer CHACUNE de ces valeurs :
• le canal, puis
• l'option de réception ou d'émission
REMARQUE : L'interrupteur DIP 5 permet la réception OU l'émission. Faites attention dans votre
choix.
Canaux de commutation DIP USB D-Fi
ATTENTION ! NE branchez QUE des appareils D-Fi USB sur le port USB. Le non respect de
cette consigne peut endommager l'appareil.
Une fois branché, le module D-Fi USB prendra le contact de l'appareil. Le DMX filaire, le
contrôle manuel de l'affichage, les boutons du menu et l'IRC-6 seront indisponibles
jusqu'à ce que vous débranchiez le module D-Fi USB. Les niveaux de priorité sont comme
suit :
1. Module D-Fi USB
2. DMX filaire
3. Télécommande sans-fil IRC-6
4. Affichage digitale manuel / boutons du menu
C. 1234É/R C. 1234É/R C. 1234É/R C. 1234É/R
1919
210 210
311 311
412 412
513 513
614 614
715 715
816 816
Réception
Réception
Émission
Émission

Page 51 sur 117
Fonctionnement
Manuel d’Utilisation des Kinta FX ILS Rév. 5
Affectation de canaux DMX et valeurs
2-Ch 9-Ch Fonction Valeur Pourcentage/Paramétrage
11
Programme automatique
(neutralise les C. 3-9)
000 009 Pas de fonction
010 044 Kinta, laser, et stroboscopes
045 079 Kinta et stroboscopes
080 114 Kinta et laser
115 149 Laser et stroboscopes
150 184 Kinta seulement
185 219 Stroboscopes seulement
220 255 Laser seulement
2 2 Vitesse du programme 000 250 Vitesse du programme automatique, lent à rapide
251 255 Programmes son-actif
– 3 Couleur d ’effet kinta
000 005 Pas de fonction
006 020 Rouge
021 035 Vert
036 050 Bleu
051 065 Blanc
066 080 Rouge et vert
081 095 Rouge et bleu
096 110 Rouge et blanc
111 125 Vert et bleu
126 140 Vert et blanc
141 155 Bleu et blanc
156 170 Rouge, vert, et bleu
171 185 Rouge, vert, et blanc
186 200 Vert, bleu, et blanc
201 215 Rouge, vert, bleu, et blanc
216 230 Chenillard automatique de 4 couleurs
231 255 Chenillard automatique de 7 couleurs
– 4 Stroboscope d'effet kinta 000 005 Pas de fonction
006 255 Stroboscope d'effet kinta, lent à rapide
– 5 Moteur d'effet kinta
000 Pas de fonction
001 127 Moteur d'effet kinta indexation
128 255 Vitesse du moteur d'effet kinta, lent à rapide
–6
Programme SMD
stroboscopiques
000 009 Pas de fonction
010 019 Programme stroboscopiques 1, lent à rapide
020 029 Programme stroboscopiques 2, lent à rapide
030 039 Programme stroboscopiques 3, lent à rapide
040 049 Programme stroboscopiques 4, lent à rapide
050 059 Programme stroboscopiques 5, lent à rapide
060 069 Programme stroboscopiques 6, lent à rapide
070 079 Programme stroboscopiques 7, lent à rapide
080 089 Programme stroboscopiques 8, lent à rapide
090 099 Programme stroboscopiques 9, lent à rapide
100 109 Programme stroboscopiques 10, lent à rapide
110 119 Programme stroboscopiques 11, lent à rapide
120 129 Programme stroboscopiques 12, lent à rapide
130 139 Programme stroboscopiques 13, lent à rapide
140 149 Programme stroboscopiques 14, lent à rapide
150 159 Programme stroboscopiques 15, lent à rapide
160 169 Programme stroboscopiques 16, lent à rapide
170 179 Programme stroboscopiques 17, lent à rapide
180 255 Programme stroboscopiques 18, lent à rapide

Page 52 sur 117
Manuel d’Utilisation des Kinta FX ILS Rév. 5
Fonctionnement
Configuration (Autonome)
Permet de paramétrer l'appareil dans l'un des modes autonomes pour permettre l'utilisation sans
contrôleur DMX.
Effet kinta prédéfinies
Pour faire fonctionner le Kinta FX ILS avec une couleur d'effet kinta prédéfinie statique, procédez comme suit :
1. Appuyez sur la touche <MENU> de manière répétée jusqu'à ce que l'affichage indique C--.
2. Appuyez sur la touche <ENTER>.
3. Utilisez les touches <UP> ou <DOWN> pour sélectionner les couleurs désiré, de C 1–15.
(consultez Couleurs et programmes)
4. Appuyez sur la touche <ENTER>.
Programmes automatiques
Pour faire fonctionner le Kinta FX ILS avec un programme automatique, suivre les instructions ci-dessous.
1. Appuyez sur la touche <MENU> de manière répétée jusqu'à ce que l'affichage indique P--.
2. Appuyez sur la touche <ENTER>.
3. Utilisez les touches <UP> ou <DOWN> pour sélectionner le programme désiré, de P 1–7.
(consultez Couleurs et programmes)
4. Appuyez sur la touche <ENTER>.
5. Utilisez les touches <UP> ou <DOWN> pour sélectionner le mode programme, de FAdE (fondu)
ou SnAP (changement rapide).
6. Appuyez sur la touche <ENTER>.
Vitesse du programme automatique
Pour définit la vitesse du programme automatique du Kinta FX ILS, procédez comme suit :
1. Appuyez sur la touche <MENU> de manière répétée jusqu'à ce que l'affichage indique S--.
2. Appuyez sur la touche <ENTER>.
3. Utilisez les touches <UP> ou <DOWN> pour augmenter ou diminuer le vitesse, de S. 00–99 (lent
à rapide).
4. Appuyez sur la touche <ENTER>.
–7
Couleur laser
(C. 8 doit être actif pour
stroboscope)
000 009 Pas de fonction
010 049 Rouge
050 089 Vert
090 129 Rouge et vert
130 169 Rouge et stroboscope vert
170 209 Vert et stroboscope rouge
210 255 Rouge et vert stroboscope alterné
– 8 Laser stroboscope
000 009 Pas de fonction
010 254 Laser stroboscope, lent à rapide
255 Laser stroboscope son-actif
– 9 Rotation laser
000 004 Arrêt
005 127 Rotation anti-horaire, lent à rapide
128 133 Arrêt
134 255 Rotation horaire, rapide à lent
Pour un fonctionnement normal des LED et des lasers via DMX, réglez le canal 1 sur 000
009.
Ne jamais connecter un appareil qui fonctionne en mode individuel à une chaîne DMX
connectée à un contrôleur DMX. Les appareils en mode autonome peuvent émettre des
signaux DMX qui interfèrent avec les signaux DMX du contrôleur.
2-Ch 9-Ch Fonction Valeur Pourcentage/Paramétrage

Page 53 sur 117
Fonctionnement
Manuel d’Utilisation des Kinta FX ILS Rév. 5
Programmes son-actif
Pour faire fonctionner le Kinta FX ILS avec un programme son-actif, suivre les instructions ci-dessous.
1. Appuyez sur la touche <MENU> de manière répétée jusqu'à ce que l'affichage indique Snd.
2. Appuyez sur la touche <ENTER>.
3. Utilisez les touches <UP> ou <DOWN> pour sélectionner le programme désiré, de Snd1–7.
(consultez Couleurs et programmes)
4. Appuyez sur la touche <ENTER>.
5. Lancez la musique et ajustez la molette de sensibilité au son jusqu'à ce que l'unité commence à
réagir au rythme de la musique.
Couleurs et programmes
Effet kinta avec couleur personnalisée
Pour faire fonctionner le Kinta FX ILS avec valeurs personnalisée couleurs et stroboscopes, procédez
comme suit :
1. Appuyez sur la touche <MENU> de manière répétée jusqu'à ce que l'affichage indique u--.
2. Appuyez sur la touche <ENTER>.
3. Utilisez les touches <UP> ou <DOWN> pour augmenter ou diminuer la valeur de l'option actuelle,
de :
•r000–255 (rouge)
•G000–255 (vert)
•b000–255 (bleu)
•U000–255 (blanc) ou
•F. 00–99 (stroboscope d'effet kinta).
4. Appuyez sur la touche <ENTER> pour passer à l'option suivante.
5. Répétez les étapes 3 et 4 jusqu'à ce que le produit soit réglé comme vous le souhaitez.
• Le produit ne répond qu'aux basses fréquences de la musique (basses et batteries).
• Le laser s'éteint en mode son après 3 secondes de silence ou de bruit sous le réglage
de sensibilité.
C-- Effet P--/Snd Effet
1Rouge 1Tous les effets
2Vert 2Kinta et stroboscopes
3Bleu 3Kinta et laser
4Blanc 4Laser et stroboscopes
5Rouge et vert 5Kinta seulement
6Rouge et bleu 6Stroboscopes seulement
7Rouge et blanc 7Laser seulement
8Vert et bleu
9Vert et blanc
10 Bleu et blanc
11 Rouge, vert, et bleu
12 Rouge, vert, et blanc
13 Rouge, bleu, et blanc
14 Vert, bleu, et blanc
15 Rouge, vert, bleu, et blanc

Page 54 sur 117
Manuel d’Utilisation des Kinta FX ILS Rév. 5
Fonctionnement
IRC-6 télécommande par infrarouge
Le Kinta FX ILS est compatible avec la télécommande infra-rouge (IRC-6) de CHAUVET. Pour activer la
commande IRC-6, suivre les instructions ci-dessous.
1. Appuyez sur la touche <MENU> de manière répétée jusqu'à ce que l'affichage indique SEt.
2. Appuyez sur la touche <ENTER>.
3. Utilisez les touches <UP> ou <DOWN> pour sélectionner de on (activé) ou oFF (désactivé).
4. Appuyez sur la touche <ENTER>.
Fonctionnement de la IRC-6
Mode automatique
Pour activer le mode automatique avec l’IRC-6 :
1. Appuyez sur la touche <AUTO> du IRC-6.
2. Appuyez sur la touche <1>–<7> pour sélectionner le programme (consultez
Couleurs et programmes).
Pour régler la vitesse du programme automatique :
1. Appuyez sur la touche <SPEED> du IRC-6.
2. Appuyez sur la touche <+> ou <–> pour augmenter ou diminuer le vitesse.
Mode son-actif
Pour activer le mode son-actif avec l’IRC-6 :
1. Appuyez sur la touche <SOUND> du IRC-6.
2. Appuyez sur la touche <1>–<7> pour sélectionner le programme (consultez
Couleurs et programmes).
Contrôle manuel
Pour sélectionner manuellement la couleur d’effet kinta avec l’IRC-6 :
1. Appuyez sur la couleur désirée, parmi <R> (rouge), <G> (vert), <B> (bleu),
or <W> (blanc).
Stroboscope
Pour définit le stroboscope avec l’IRC-6 :
1. Appuyez sur la touche <STROBE> du IRC-6.
2. Appuyez sur la touche <+> or <–> pour augmenter ou diminuer le vitesse du
stroboscope.
Faire le noir
Pour faire le produit noir avec l’IRC-6 :
1. Appuyez sur la touche <BLACK OUT> du IRC-6.
Cela éteindra tous les LED jusqu'à ce que le bouton soit pressé à nouveau.
REMARQUE : l’IRC-6 ne répondra à aucune entrée lorsque faire le noir est activé.
Si le produit ne répond pas lorsque vous appuyez sur un bouton, essayez d’appuyer
sur <BLACK OUT>. Faire le noir peut avoir été activé.
Les boutons de la télécommande IR non mentionnés ci-dessus sont réservés pour usage
ultérieur.
BLACK
OUT AUTO SOUND
SENSI-
TIVITY
SPEEDSTROBE
%MANUAL FADE
RGB
WUVA
+
0
-
123
654
789

Page 55 sur 117
Fonctionnement
Manuel d’Utilisation des Kinta FX ILS Rév. 5
Mode maître/esclave (filaire)
Le mode maître/esclave permet à un seul appareil Kinta FX ILS (le maître) de contrôler les actions d'un ou
plusieurs autres appareils Kinta FX ILS (les esclaves) sans contrôleur DMX. L'appareil maître doit être
réglé pour fonctionner en mode autonome ou avec la télécommande IRC-6, tandis que les appareils
esclaves doivent être paramétrés pour fonctionner en mode DMX. Une fois paramétrés et connectés, les
appareils esclaves fonctionnent à l'unisson avec l'appareil maître.
Configurez les appareils comme indiqué ci-dessous :
Appareils esclaves :
1. Appuyez sur la touche <MENU> de manière répétée jusqu'à ce que l'affichage indique 9-Ch.
2. Appuyez sur la touche <ENTER>.
3. Utilisez les touches <UP> ou <DOWN> pour définit l'adresse de départ à d 1.
4. Appuyez sur la touche <ENTER>.
5. Connectez l'entrée DMX du premier appareil esclave à la sortie DMX de l'appareil maître.
6. Connectez l'entrée DMX de chaque appareil esclave subséquent à la sortie DMX de l'appareil esclave précédent.
7. Continuez jusqu'à ce que tous les appareils esclaves soient paramétrés et connectés.
Appareil maître :
1. Paramétrez l'appareil maître pour un fonctionnement en mode autonome ou avec la télécommande IRC-6.
2. Assurez-vous que l'appareil maître soit le premier appareil dans la chaîne DMX.
Mode maître/esclave (D-Fi USB)
Le D-Fi USB permet à un seul appareil Kinta FX ILS (le maître) de contrôler les actions d'un ou plusieurs
autres appareils Kinta FX ILS (les esclaves) sans contrôleur ou câbles DMX. L'appareil maître (émetteur)
doit être réglé pour fonctionner en mode autonome, tandis que les appareils esclaves (récepteurs) doivent
être réglés pour fonctionner en mode esclave. Une fois paramétrés et connectés, les appareils esclaves
fonctionnent à l'unisson avec l'appareil maître.
Configurez les appareils comme indiqué ci-dessous :
Appareils esclaves :
1. Appuyez sur la touche <MENU> de manière répétée jusqu'à ce que l'affichage indique 9-Ch.
2. Appuyez sur la touche <ENTER>.
3. Utilisez les touches <UP> ou <DOWN> pour définit l'adresse de départ à d 1.
4. Appuyez sur la touche <ENTER>.
5. Réglez le D-Fi USB pour recevoir sur un canal spécifique, 1 à 16.
6. Branchez le D-Fi USB.
7. Continuez jusqu'à ce que tous les appareils esclaves soient paramétrés et connectés.
Appareil maître :
1. Paramétrez l'appareil maître pour un fonctionnement en mode autonome.
2. Réglez le D-Fi USB pour qu’il transmette sur le canal D-Fi d'écoute des esclaves.
3. Branchez le D-Fi USB.
Mode ILS
ILS (Integrated Lighting System) offre 4 modes synchronisés avec le GigBAR Move+ILS : Les modes 1 et 3 se
synchronisent avec la face 1 du GigBAR MOVE+ILS, tandis que les modes 2 et 4 se synchronisent avec la face 2.
Une fois ILS lié au GigBAR Move+ILS, les effets se synchronisent avec l’effet le plus identique possible sur la face
sélectionnée : Les effets kinta se synchronisent avec l'un des kintas, les têtes mobiles se synchronisent avec l'une des
têtes mobiles et les effets de type wash se synchronisent avec l'un des pars. Les effets laser se synchronisent avec le
laser et les effets stroboscopiques se synchronisent avec les effets stroboscopiques quel que soit le mode ILS.
Ce produit se synchronise avec le kinta de la face sélectionnée du GigBAR MOVE+ILS, ainsi qu’avec le
laser et les stroboscopes.
Pour régler le Kinta FX ILS afin qu’il réponde à un signal ILS :
1. Appuyez sur la touche <MENU> de manière répétée jusqu'à ce que l'affichage indique iLS_.
2. Utilisez les touches <UP> ou <DOWN> pour sélectionner de iLS1 (face 1), iLS2 (face 2), iLS3
(face 1), ou iLS4 (face 2).
3. Appuyez sur la touche <ENTER>.
• Configurez tous les appareils esclaves avant de connecter le maître à la chaîne DMX.
•
Ne jamais connecter un contrôleur DMX à une chaîne DMX configurée pour le fonctionnement
en maître/esclave car le contrôleur peut rentrer en conflit avec les signaux du maître.
• Ne pas connecter plus de 31 esclaves au maître.
• Tous les appareils doivent être réglés sur la même personnalité DMX, la même adresse
DMX et le même canal D-Fi.
• Configurez tous les appareils esclaves avant de configurer le maître en émission.
•
Ne jamais connecter un contrôleur DMX à un canal DMX configuré pour le fonctionnement
en maître/esclave car le contrôleur peut rentrer en conflit avec les signaux du maître.

Page 56 sur 117
Manuel d’Utilisation des Kinta FX ILS Rév. 5
Entretien
5. Entretien
Entretien de l'appareil
L'accumulation de poussière réduit la production de lumière et peut entraîner une surchauffe de l'appareil.
Cela peut entrainer une diminution de la durée de vie de la source de lumière et/ou une usure mécanique.
Pour conserver des performances optimales et réduire l'usure, nettoyez vos appareils d'éclairage au
moins deux fois par mois. Veuillez cependant bien garder à l'esprit que l'utilisation et les conditions
environnementales peuvent contribuer à augmenter la fréquence de nettoyage.
Pour nettoyer l'appareil, suivez les instructions ci-dessous :
1. Débranchez l'appareil.
2. Attendez que l'appareil soit à la température ambiante.
3. Utilisez un aspirateur (ou un compresseur d'air) et une brosse douce pour enlever la poussière
accumulée sur les surfaces/évents externes.
4. Nettoyez toutes les surfaces transparentes avec une solution douce de nettoyant pour vitres sans
ammoniaque ou de l'alcool isopropylique.
5. Appliquez la solution directement surun chiffon de coton doux et non pelucheux ou un tissu de
nettoyage d'objectif.
6. Essuyez soigneusement toute trace de saleté ou d'encrassement sur la surface transparente.
7. Nettoyez en douceur les surfaces transparentes jusqu'à ce que toute peluche ou trace ait
disparue.
Assurez-vous de bien sécher toutes les surfaces transparentes après les avoir nettoyer.
Ne faites pas tourner le ventilateur à l'aide d'air comprimé sous risque de l'endommager.

Page 57 sur 117
Spécificités Techniques
Manuel d’Utilisation des Kinta FX ILS Rév. 5
6. Spécificités Techniques
Dimensions et poids
Remarque : Les dimensions en pouce sont arrondies.
Alimentation
Source lumineuse (Laser)
Source lumineuse (Kinta)
Source lumineuse (Stroboscopes)
Photométrie
Thermique
DMX
Commande
Longueur Largeur Hauteur Poids
187 mm (7,4 po) 261 mm (10,3 po) 187 mm (7,4 po) 1,7 kg (3,8 lb)
Type d'alimentation Plage Sélection de tension
Commutation (interne) Entre 100 et 240 VCA, 50/60 Hz Universelle
Paramètre 120 V, 60 Hz 230 V, 50 Hz
Consommation 25 W 24 W
Courant de fonctionnement 0,5 A 0,2 A
Courant de chaînage électrique
(produits) 8 A (17 produits) 8 A (33 produits)
Fusible T 1 A, 250 V T 1 A, 250 V
E/S alimentation US/Monde UK/Europe
Connecteur d'entrée d'alimentation
IEC IEC
Connecteur de sortie d'alimentation
Edison IEC
Prise du cordon d'alimentation Edison (US) Prise locale
Type Alimentation Longueur d'onde
Laser (rouge) 100 mW 650 nm
Laser (vert) 30 mW 520 nm
Type Couleur Quantité Alimentation Courant
Longueur d'onde
LED Rouge 1 7,5 W 2,4 A 50 000 heures
LED Vert 1 7,5 W 2,4 A 50 000 heures
LED Bleu 1 7,5 W 2,4 A 50 000 heures
LED Blanc 1 7,5 W 2,4 A 50 000 heures
Type Couleur Quantité Alimentation Courant
Longueur d'onde
LED SMD Blanc 16 5 W 1,6 A 50 000 heures
Fréquence de stroboscope Angle de couverture
0 à 20 Hz 118°
Temp. externe minimum du laser
Temp. externe maximum du laser
Système de refroidissement
15 °C (59 °F) 35 °C (95 °F)
Convection assistée par ventilateur
Connecteurs E/S Plage de canaux
Prise XLR à trois broches 2 ou 9
No du produit Code de l'article Code UPC
Kinta FX ILS 10051879 781462222277

Page 58 sur 117
Manuel d’Utilisation des Kinta FX ILS Rév. 5
Renvois
Renvois
Dans le cas où vous avez besoin d'aide ou pour retourner un produit :
• Si vous résidez aux États-Unis, contactez le siège mondial de Chauvet.
• Si vous vivez au Royaume-Uni ou en Irlande, contactez Chauvet Europe Ltd.
• Si vous vivez au Benelux, contactez Chauvet Europe BVBA.
• Si vous vivez au France, contactez Chauvet France.
• Si vous vivez à l’Allemagne, contactez Chauvet Germany.
• Si vous vivez au Mexique, contactez Chauvet Mexico.
• Si vous résidez n'importe où ailleurs, NE contactez pas Chauvet. Contactez votre revendeur.
Rendez-vous sur www.chauvetdj.com pour découvrir la liste des revendeurs en dehors des États-
Unis, du Royaume-Uni, de l'Irlande, du Benelux, de la France, de l'Allemagne ou du Mexique.
Téléphonez au centre d'assistance technique de Chauvet correspondant et demandez un numéro
d'autorisation de retour (NAR) avant de nous réexpédier l'appareil. Pour l'obtenir, il vous sera demandé de
fournir le numéro du modèle, le numéro de série ainsi qu'une brève description de l'objet du retour.
Pour soumettre une demande de service en ligne, rendez-vous sur www.chauvetdj.com/service-request.
Vous devez nous retournez la marchandise en port prépayé, dans ses boîte et emballage d'origine et avec
tous ses accessoires. Chauvet ne délivrera pas d'étiquettes de renvoi.
Indiquez lisiblement le NAR sur une étiquette apposée sur le colis. Chauvet refusera la réception de tout
appareil pour lequel aucun NAR n'a été demandé.
Avant de nous retourner le colis, inscrivez les informations suivantes, de manière lisible, sur une feuille de
papier, que vous placerez à l'intérieur du colis :
•Votre nom
•Votre adresse
• Votre numéro de téléphone
• Le numéro de NAR
• Une courte description du problème
Veillez à emballer l'appareil de manière adéquate. Vous serez tenu responsable de tout dommage
survenant lors de l'expédition de retour dû à un emballage inadéquat. Nous vous recommandons d'utiliser
un emballage double ou celui de FedEx.
Si vous résidez en dehors des États-Unis, du Royaume-Uni, de l'Irlande, du Benelux, de la
France, de l'Allemagne ou du Mexique contactez votre revendeur et suivez leurs
instructions quant à la procédure à suivre pour renvoyer votre appareil. Consultez notre
site Web www.chauvetdj.com pour trouver leurs coordonnées.
Inscrivez le NAR sur une étiquette convenablement collée. N'écrivez PAS le NAR
directement sur le colis.
Chauvet se réserve le droit, à sa convenance, de réparer ou remplacer tout appareil qui lui
est retourné.

Page 59 sur 117
Nous Contacter
Manuel d’Utilisation des Kinta FX ILS Rév. 5
Nous Contacter
En dehors des États-Unis, du Royaume-Uni, de l'Irlande, du Benelux, de la France, de l'Allemagne ou du
Mexique, contactez votre revendeur. Suivez leurs instructions pour accéder à l'assistance ou pour
renvoyer un produit. Consultez notre site web pour les coordonnées.
Informations Générales Support Technique
Siège mondial de Chauvet
Adresse : 5200 NW 108th Ave. Téléphone : (844) 393-7575
Sunrise, FL 33351 Télécopie : (954) 756-8015
Téléphone : (954) 577-4455 E-mail : [email protected]
Télécopie : (954) 929-5560
N° vert : (800) 762-1084 Site web : www.chauvetdj.com
Chauvet Europe Ltd
Adresse : Unit 1C E-mail : [email protected]
Brookhill Road Industrial Estate
Pinxton, Nottingham, UK Site web : www.chauvetdj.eu
NG16 6NT
Téléphone : +44 (0) 1773 511115
Fax : +44 (0) 1773 511110
Chauvet Europe BVBA
Adresse : Stokstraat 18 E-mail : [email protected]
9770 Kruishoutem
Belgium Site web : www.chauvetdj.eu
Téléphone : +32 9 388 93 97
Chauvet France
Adresse : 3, Rue Ampère
91380 Chilly-Mazarin E-mail : [email protected]
France Site web : www.chauvetdj.eu
Téléphone : +33 1 78 85 33 59
Chauvet Germany
Adresse : Bruno-Bürgel-Str. 11
28759 Bremen E-mail : DEtech@chauvetlighting.de
Germany Site web : www.chauvetdj.eu
Téléphone : +49 421 62 60 20
Chauvet Mexico
Adresse : Av. de las Partidas 34 - 3B
(Entrance by Calle 2) E-mail : servicio@chauvet.com.mx
Zona Industrial Lerma Site web : www.chauvetdj.mx
Lerma, Edo. de México, CP 52000
Téléphone : +52 (728) 690-2010

Seite 60 von 117
Kinta FX ILS Bedienungsanleitung Rev. 5
Erste Schritte
1. Erste Schritte
Packungsinhalt
Anweisungen für das Auspacken
Packen Sie das Produkt sofort vorsichtig aus und überprüfen Sie, ob Sie alle Teile unbeschädigt erhalten haben.
Schadensmeldung
Wenn die Verpackung oder die in der Verpackung befindlichen Teile (Gerät und Zubehör) beschädigt sind
oder Mängel durch nicht einwandfreie Behandlung aufweisen, benachrichtigen Sie umgehend das
Transportunternehmen, nicht jedoch Chauvet. Eine nicht zeitnah erfolgte Benachrichtigung kann dazu
führen, dass Sie Ihren Gewährleistungsanspruch gegenüber dem Transportunternehmen verlieren.
Bewahren Sie überdies die Verpackung für eine spätere Überprüfung auf.
Bei anderen Problemen wie etwa fehlende Komponenten oder Teile, Schäden, die nicht durch den
Transport entstanden sind, oder nicht offensichtliche Schäden, machen Sie Ihren Anspruch gegenüber
Chauvet innerhalb von 7 Tagen ab Lieferung der Waren geltend.
Konventionen des Handbuchs
Symbole
Haftungsausschluss
Chauvet geht davon aus, dass alle in diesem Handbuch enthaltenen Informationen in jeder Hinsicht sorgfältig
und genau sind. Chauvet übernimmt jedoch keine Haftung und schließt speziell jegliche Verantwortung
gegenüber Dritten für Verluste, Schäden oder Störungen aus, die durch Fehler oder Auslassungen in diesem
Dokument entstanden sind, unabhängig davon, ob sich diese Fehler oder Auslassungen aus einer Nachlässigkeit,
einem Versehen oder aus anderen Gründen ergeben haben. Chauvet behält sich das Recht vor, den Inhalt
dieses Dokuments zu ändern, ohne Verpflichtung, andere Personen oder Unternehmen von dieser Überarbeitung
in Kenntnis zu setzen, Chauvet ist jedoch nicht verpflichtet, solche Überarbeitungen vorzunehmen und verpflichtet
sich auch nicht, dies zu tun. Laden Sie die jeweils aktuelle Version unter www.chauvetdj.com herunter.
Geistiges Eigentum
Die in diesem Handbuch enthaltenen urheberrechtlich geschützten Arbeiten, einschließlich, aber nicht
beschränkt darauf, aller Zeichnungen, Texte und Bilder, sind das Eigentum von Chauvet.
© Copyright 2022 Chauvet & Sons, LLC. Alle Rechte vorbehalten.
Durch Chauvet elektronisch in den Vereinigten Staaten veröffentlicht.
CHAUVET, das Chauvet Firmenlogo, ILS (Patent ausstehend) und der Kinta FX ILS sind eingetragene
Marken oder Warenzeichen von Chauvet & Sons LLC (d/b/a Chauvet und Chauvet Lighting) in den
Vereinigten Staaten und in anderen Ländern. Andere Unternehmens- und Produktnamen, auf die hier
Bezug genommen wird, können Warenzeichen der jeweiligen Unternehmen sein.
•KintaFXILS
• Netzkabel • Bedienungsanleitung
Konvention Bedeutung
1–512 Eine Bandbreite an Werten
50/60 Ein Wertesatz, aus dem nur ein Wert ausgewählt werden kann
Settings Eine Menüoption, die nicht geändert werden kann
<ENTER> Eine zu betätigende Taste auf dem Bedienfeld des Geräts
ON Ein Wert, der eingegeben oder ausgewählt werden muss
Symbol Bedeutung
Warnung vor gefährlicher elektrischer Spannung. Bei Nichtbeachtung dieser
Anweisungen kann es zu elektrischen Schäden am Gerät, am Zubehör oder zu
Verletzungen des Bedieners kommen.
Wichtige Informationen zur Installation, Konfiguration und zum Betrieb. Bei
Nichtbeachtung dieser Informationen kann es zu Fehlfunktionen oder Beschädigungen
des Geräts oder zu Verletzungen des Bedieners kommen.
Wichtige Informationen zur Installation oder Konfiguration. Wenn diese Informationen
nicht beachtet werden, kann es zu Fehlfunktionen kommen.
Nützliche Informationen.
Hinweise zur Lasersicherheit.

Seite 61 von 117
Erste Schritte
Kinta FX ILS Bedienungsanleitung Rev. 5
Sicherheitshinweise
Diese Anleitung enthält wichtige Sicherheits- und Betriebshinweise über das Lasersystem Alle Anweisungen vor der
ersten Inbetriebnahme lesen und verstehen, um Augenverletzungen und Verstöße gegen Gesetze zu vermeiden. Die
Kenntnis der Sicherheitshinweise ist wichtig, um Augenverletzungen durch Laserstrahlen und Gesetzesverstöße zu
vermeiden. Bitte heben Sie diese Bedienungsanleitung zur späteren Einsicht an einem sicheren Ort auf.
STOPPE UND LESEN SIE ALLE
LASERSICHERHEITSHINWEISE
• Laserstrahlen sind gefährlich und bedürfen besonderer Sicherheitsvorkehrungen. Bei
falschem Gebrauch kann Blindheit und dauerhafter Augenschäden die Folge sein. Bitte
beachten Sie ALLE Sicherheitshinweise und Warnungen in dieser Anleitung. Alle
Anweisungen genau durchlesen, BEVOR Sie das Gerät in Betrieb nehmen.
• Schließen Sie dieses Gerät immer an die Masse an, um die Gefahr elektrischer Schläge zu reduzieren.
• Trennen Sie das Gerät von der Stromquelle, bevor Sie es reinigen.
• Bei eingeschaltetem Gerät direkten Augenkontakt mit der Lichtquelle vermeiden.
• Stellen Sie sicher, dass das Netzkabel nicht gequetscht oder beschädigt ist.
• Ziehen Sie beim Trennen des Geräts von der Stromversorgung nie am Kabel.
• Verwenden Sie für die Montage der Effektgeräte über Kopf immer ordnungsgemäße Sicherheitskabel.
• Stellen Sie sicher, dass das Gerät mit einem Sicherheitsabstand zu entzündlichen Materialien
betrieben wird.
• Niemals während des Betriebs das Gehäuse berühren, da dies sehr heiß wird.
• Dieses Produkt eignet sich nicht für eine permanente Installation.
• Die Spannung der Schukosteckdose, an die Sie das Gerät anschließen, muss sich innerhalb
des Spannungsbereiches befinden, der auf dem Hinweisschild oder dem rückwärtigen
Bedienfeld des Geräts angegeben ist.
•
Dieses Gerät darf nur im Innenbereich verwendet werden. (IP20) Um das Risiko von Bränden oder
elektrischen Schlägen zu vermeiden, dürfen Sie das Gerät nicht Regen oder Feuchtigkeit aussetzen.
• Installieren Sie das Gerät immer an einem Ort mit ausreichender Belüftung und mit einem
Abstand von 50 cm zu den angrenzenden Flächen.
• Stellen Sie sicher, dass die Lüftungsöffnungen am Gehäuse des Geräts nicht verschlossen sind.
• Schließen Sie dieses Gerät niemals an einen Dimmer an.
• Achten Sie beim Auswechseln der Sicherung darauf, den gleichen Typ mit den gleichen
Werten zu verwenden.
• Heben Sie das Produkt zum Tragen nur am Hänge-/Befestigungsbügel an.
• Vermeiden Sie wiederholtes Ein- und Ausschalten des Geräts innerhalb eines kurzen
Zeitraums. Dadurch wird die Lebensdauer der Laserdiode reduziert.
• Dieses Gerät nicht schütteln. Vermeiden Sie, bei der Montage oder dem Betrieb des Geräts
übermäßige Gewalt anzuwenden.
• STETS angemessene Sicherheitskabel zum Aufhängen von Lichteffektgeräten verwenden.
• Die Betriebsumgebungstemperatur des Lasers beträgt 59 °F bis 95 °F (15 °C bis 35 °C).
Dieses Produkt nicht außerhalb dieses Bereichs zu betreiben.
• Bei ernsthaften Betriebsproblemen stoppen Sie umgehend die Verwendung des Geräts.
VORSICHT! Die Ausführung von Befehlen, Einstellungen und Handlungen, die nicht in
dieser Anleitung beschrieben sind, können zu gefährlichen Laserstrahlungen führen.
• Vermeiden Sie direkten Augenkontakt mit dem Laserstrahl. Niemals absichtlich Ihre Augen
oder die Augen anderer Personen direktem Laserlicht aussetzen.
• Der Laserstrahl kann sofort Ihre Augen verletzen oder zu Blindheit führen, wenn er direkt ins Auge fällt.
• Es ist verboten und gefährlich, den Laserstrahl aufs Publikum zu richten, wo das Licht oder die
Reflexion des Lichtstrahls Personen ins Auge treffen kann.
• Es ist gesetzeswidrig, den Laserstrahl auf Flugzeuge richten.
• Sie setzen sich gefährlichen Strahlungen aus, wenn Sie Einstellungen oder Arbeiten am Gerät
vornehmen, die nicht ausdrücklich in dieser Anleitung erwähnt sind.
• Um unnötigen Verschleiß zu vermeiden und die Lebensdauer des Geräts zu verlängern,
trennen Sie während längerer Perioden des Nichtgebrauchs das Gerät vom Stromnetz –
entweder per Trennschalter oder durch Herausziehen des Steckers aus der Steckdose.
• Versuchen Sie NICHT, selbst Reparaturen durchzuführen. Bei Reparaturbedarf wenden Sie
sich bitte an Ihren Fachhändler. Aus Gründen der Sicherheit sind nicht autorisierte
Änderungen am Gerät unzulässig!

Seite 62 von 117
Kinta FX ILS Bedienungsanleitung Rev. 5
Erste Schritte
Achtung! Kein Schutz bei geöffnetem Gehäuse
Hinweise zur Lasersicherheit
Laserlicht hat nichts mit anderen Lichtquellen, die sie vielleicht kennen, zu tun. Das Licht dieses Produktes kann
Augenverletzungen verursachen, wenn es nicht richtig installiert und bedient wird. Laserlicht ist mehrere tausend Male
konzentrierter als jede andere Lichtquelle. Diese hohe Konzentration kann zu sofortigen Augenverletzungen führen,
insbesondere zur Verbrennung der Netzhaut. Selbst wenn Sie keine Hitze vom Laserstrahl spüren, kann er trotzdem
Blindheit verursachen. Sogar ganz geringe Mengen von Laserstrahlen auf lange Entfernungen sind gefährlich.
Es ist FALSCH zu denken, dass der einzelne Strahl fürs Auge ungefährlich ist, weil diese Produkte der
Unterhaltungselektronik den Strahl in hunderte von Strahlen teilen oder bei hoher Geschwindigkeit durch
den Raum schießen. Dieses Laserprodukt verwendet Dutzende von Milliwatt Laserleistung (Klasse 3B
Laser). Viele der einzelnen Strahlen stellen eine potenzielle Gefahr dar.
Es ist ebenfalls FALSCH zu glauben, dass der Laserstrahl harmlos ist, weil er sich bewegt. Das ist nicht
wahr und außerdem bewegt er sich auch nicht ständig. Da Augenverletzungen sofort auftreten, ist es
lebenswichtig, die Möglichkeit von eventuellem, direktem Augenkontakt völlig auszuschließen. In den
Sicherheitsbestimmungen für Laser ist es illegal, einen Laser der Klasse 3B auf Bereiche zu richten, wo
sich Personen befinden können. Dies gilt auch, wenn der Strahl unterhalb von den Augen der Menschen,
z. B. auf den Tanzboden gerichtet ist.
Bitte heben Sie diese Bedienungsanleitung zur späteren Einsicht auf. Achten Sie bei einem
Eigentümerwechsel des Geräts darauf, dass dieses Dokument am Lasergerät verbleibt.
• Das Gerät enthält Laser mit hohen Leistungen.
• Den Laser nicht bei geöffnetem Gehäuse betreiben, da Sie sich sonst einer
gesundheitsschädlichen Laserexposition aussetzen könnten.
• Die Energie der Laserstrahlung kann bei einem Betrieb des Lasers bei geöffnetem Gehäuse
zu Erblindung, Hautverbrennungen und Feuer führen.
STOPPE UND LESEN SIE ALLE
LASERSICHERHEITSHINWEISE UNTEN
• Betreiben Sie den Laser nicht, ohne zunächst die in dieser Bedienungsanleitung aufgeführten
Sicherheits- und technischen Daten gelesen und verstanden zu haben.
• Installieren Sie die Lasereffekte IMMER so, dass alle Laserstrahlen mindestens 3 Meter.
• (9,8 Fuß) über dem Boden verlaufen, auf dem Personen stehen können. Siehe den Abschnitt
Bestimmungsgemäße Verwendung in dieser Anleitung.
• Nach der Montage und vor der Inbetriebnahme in der Öffentlichkeit, testen Sie, ob das Gerät
einwandfrei funktioniert. Falls ein Defekt auftritt, darf das Gerät nicht benutzt werden.
• Verwenden Sie das Lasergerät auch dann NICHT, wenn es nur einen oder zwei Laserstrahlen
statt Dutzende/Hunderte ausstrahlt, da dies auf eine Beschädigung der Beugungsgitteroptik
hinweisen kann und eine Laserstrahlung erzeugen könnte, die über die der Klasse 2M liegt.
• Den Laserstrahl NIEMALS auf Menschen oder Tiere richten.
• NIEMALS in die Laseraustrittsöffnung oder einen Laserstrahl blicken.
• Den Laserstrahl NICHT auf Bereiche richten, wo Menschen möglicherweise dem Strahl
ausgesetzt werden können.
• Den Laser NIEMALS auf stark reflektierende Oberflächen richten, wie Fenster, Spiegel und
glänzendes Metall. Sogar reflektierte Laserstrahlen können gefährlich sein.
• Den Laser niemals auf Flugzeuge richten; prüfen Sie vor Gebrauch dieses Lasergeräts Ihre
lokal geltenden Gesetze.
• Niemals unbegrenzte Laserstrahlen in den Himmel richten.
• Niemals die Austrittsoptik aggressiven chemischen Reinigungsmitteln aussetzen.
• Niemals den Laser verwenden, wenn das Gehäuse beschädigt oder geöffnet ist oder die Optik
auf irgendeiner Art beschädigt zu sein scheint.
• Niemals das Gehäuse des Lasers öffnen. Die hohe Laserleistung im Innern des Gehäuses
kann Feuer, Hautverbrennungen und Augenverletzungen verursachen.
• Das Gerät niemals ohne Aufsicht laufen lassen.
•
Die gesetzlichen Vorschriften zum Gebrauch von Laserprodukten für die Unterhaltungsindustrie
sind länderspezifisch. Der Nutzer des Geräts ist für die Einhaltung der gesetzlichen Vorschriften
am Standort / im Land der Verwendung verantwortlich.
VORSICHT! Dieses Gerät darf nicht auf eine andere Art betrieben werden, als in dieser
Bedienungsanleitung beschrieben. Bei einer Nichtbeachtung kann das Produkt
beschädigt werden oder es kann zu Verletzungen beim Benutzer oder Publikum kommen
und jeglicher Garantieanspruch verfällt.
VORSICHT! Dieses Produkt darf nicht im Hausmüll entsorgt werden. Weitere Informationen
zu den Vorschriften in Ihrem Gebiet erhalten Sie bei den zuständigen Abfallbehörden.

Seite 63 von 117
Erste Schritte
Kinta FX ILS Bedienungsanleitung Rev. 5
Warn- und Sicherheitsschilder auf dem Lasergerät
Laserexposition – Warnung
Laseremissionsdaten
Gemäß der Messung unter den IEC-Messbedingungen zur Klassifizierung.
Laser-Konformitätserklärung
Diese Lasergerät entspricht EN/IEC 60825-1: 2014 und den US-Bestimmungen FDA/CDRH FLPPS per
den Bestimmungen der Laser Notice Nr. 56, vom 8. Mai 2019. Dieses Lasergerät ist ein Produkt der
Klasse 3R. Zur Wahrung der Konformität des Geräts bezüglich der Laserleistungsstandards sind keine
Wartungsarbeiten erforderlich.
LASERSTRAHLEN: DIE AUGEN NICHT DIREKTEN STRAHLEN AUSSETZEN
Weitere Richtlinien und Programme zur sicheren Benutzung von Lasergeräten finden Sie in der
Norm ANSI Z136.1 “For Safe Use of Lasers”, die vom Laser Institute of America bezogen werden
kann, unter: www.lia.org. Viele lokale Behörden, Unternehmen, Agenturen, das Militär und
andere Einrichtungen erfordern eine Benutzung von Lasergeräten gemäß der Norm ANSI
Z136.1. Die Richtlinie “Laser Display” kann über die International Laser Display Association
bezogen werden kann, unter: www.ilda.com.
Laserklassifizierung Klasse 3R
Wellenlänge/optische Leistung der roten Laserdiode 650 nm/100 mW
Wellenlänge/optische Leistung der grünen Laserdiode 520 nm/30 mW
Strahldurchmesser <5 mm am Austritt
Impulsdaten Alle Impulse < 4 Hz (>0,25 Sek.)
Streuverlust (jeder Strahl) <2 mrad
Streuverlust (Gesamtlicht) <160 Grad
Laserleistung jedes Strahls am Austritt* <5 mW
LASER APERTURE
MODEL: KINTAFXILS
ITEM CODE: 10051879
FUSE: T 1 A, 250 V
POWER LINKING: 8 A (17 UNITS @ 120 V)
(33
UNITS @ 230 V)
ORIGIN: MADE IN CHINA
USA / CANADA
POWER: 100-125 VAC, 60 Hz
0.5 A, 25 W
WORLDWIDE
POWER: 100-240 VAC, 50/60 Hz
0.2-0.5 A, 24 W
THIS APPLIANCE MUST BE GROUNDED
CETTE UNITÉ DOIT ÊTRE RELIÉE À LA TERRE
USE ONLY FUSE OF SAME TYPE & RATING
N’UTILISER QUE DES FUSIBLES DU TYPE ET
DE L’AMPÉRAGE INDIQUÉ
NOT FOR HOUSEHOLD USE
IMPROPRE A L’USAGE DOMESTIQUE
DRY LOCATIONS
EMPLACEMENTS SECS
DISCONNECT POWER BEFORE SERVICING
DÉBRANCHER AVANT TOUT ENTRETIEN
FOR INDOOR USE ONLY
USAGE INTÉRIEUR UNIQUEMENT
WORLDWIDE HEADQUARTERS,
SUNRISE, FLORIDA USA
520/650nm
CW, <5mW
WARNING
Cancer and Reproductive Harm -
www.P65Warnings.ca.gov
IEC/EN60825-1:2014
!"#$%&'(
RoHS

Seite 64 von 117
Kinta FX ILS Bedienungsanleitung Rev. 5
Einleitung
2. Einleitung
Produktüberblick
Produktabmessungen
ACHTUNG! KEIN anderes Gerät als einen D-Fi USB in den USB-Anschluss einstecken.
Dies könnte zu Beschädigungen des Produkts führen.
SMD Stroboskop-
LEDs (x16)
Kinta-Effektlinsen
(x24)
USB -
Anschluss
Infrarot
sensor
LED-Anzeigen
DMX
Musik
Auto
Slave
Anzeige- und Steuerungstasten
<MENU> <UP> <DOWN> <ENTER>
Mikrofon
Empfindlichkeit
knopf
DMX
In/Ausgang
Sicherheitsöse
Strom-
ausgang
Sicherungs
-halter
Strom-
zufuhr
Laser-
ausgang
7,4 Zoll
187 mm
7,4 Zoll
187 mm
10,3 Zoll
261 mm

Seite 65 von 117
Einrichten des Geräts
Kinta FX ILS Bedienungsanleitung Rev. 5
3. Einrichten des Geräts
Wechselstrom
Der Kinta FX ILS verfügt über ein Vorschaltgerät, das automatisch die anliegende Spannung erkennt,
sobald der Netzstecker in die Schukosteckdose gesteckt wird, und kann mit einer Eingangsspannung von
100~240 V AC, 50/60 Hz arbeiten. Um die erforderlichen Kennzahlen des Netzanschlusses
(Leistungsschalter, Wandsteckdose und Netzkabel) zu ermitteln, verwenden Sie den aktuellen Wert, der
sich auf dem Hinweisschild auf der Rückseite des Geräts befindet, oder lesen Sie dazu den Abschnitt
Technische Daten in dieser Anleitung. Die aktuell aufgeführten Werte entsprechen dem durchschnittlichen
Stromverbrauch des Geräts unter normalen Bedingungen.
Auswechseln der Sicherung
1. Klemmen Sie die Spitze eines Flachkopfschraubendrehers in den Schlitz des Sicherungshalters.
2. Hebeln Sie den Sicherungshalter vom Gehäuse weg ab.
3. Entfernen Sie die durchgebrannte Sicherung aus der Halterung.
4. Die Sicherung darf nur durch eine vollkommen gleichwertige ersetzt werden.
5. Setzen Sie die Sicherung wieder ein, und schließen Sie das Gerät an das Stromnetz an.
Reihenschaltung der Geräte
Das Produkt bietet Reihenschaltungen durch die Edison-Steckdose auf der Rückseite des Produkt.
Weitere Erläuterungen entnehmen Sie bitte dem nachfolgenden Abbildung.
Abbildung für Serienschaltung
•
Schließen Sie dieses Gerät nur an einen abgesicherten Stromkreislauf (Leistungsschalter
oder Sicherung) an. Stellen Sie sicher, dass das Gerät entsprechend an die Masse
angeschlossen ist, um die Gefahr elektrischer Schläge oder eines Brands zu vermeiden.
• Um unnötigen Verschleiß zu vermeiden und die Lebensdauer des Geräts zu verlängern,
trennen Sie während längerer Perioden des Nichtgebrauchs das Gerät vom Stromnetz
– entweder per Trennschalter oder durch Herausziehen des Steckers aus der Steckdose.
Schließen Sie dieses Gerät niemals an einen Regelwiderstand oder Dimmer an, auch nicht,
wenn der Regelwiderstand oder Dimmer nur als 0 bis 100% Schalter dient.
Trennen Sie das Gerät von der Stromquelle, bevor Sie die Sicherung auswechseln.
Die Sicherung darf nur durch eine vollkommen gleichwertige ersetzt werden.
Bis zu 17 Kinta FX ILS-Produkte mit 120 V oder 33 Produkte mit 230 V verbinden.
Überschreiten Sie niemals diese Anzahl. Power-Link-Kabel können separat erworben
werden.
Die obere Abbildung für Serienschaltung entspricht nur den Produktversionen für den
nordamerikanischen Markt. Die Serienschaltung von Geräten ist länder- und
regionsspezifisch. Wenn Sie dieses Produkt außerhalb von Nordamerika verwenden,
wenden Sie sich an den lokalen Distributor von Chauvet.
Sicherheitsabdeckung
Ersatzsicherungshalter
(unter der Sicherheitsabdeckung)
Installierte Sicherung
(wird durch Kunststoffclip gehalten)
Energi
equelle 1. Produkt 2. Produkt 3. Produkt Zusätzliche
Geräte

Seite 66 von 117
Kinta FX ILS Bedienungsanleitung Rev. 5
Einrichten des Geräts
Montage
Lesen Sie vor der Montage des Geräts die in den Sicherheitshinweise enthaltenen.
Montagerichtung
Der Kinta FX ILS muss in einer Position befestigt werden, die einen sicheren Betrieb des Lasers erlaubt.
Stellen Sie außerdem sorgen Sie zudem dafür, dass das Gerät ausreichend belüftet ist.
Hängende Montage
• Bevor Sie sich für eine Montagestelle entscheiden, müssen Sie bedenken, dass das Gerät zur
Wartung und Programmierung immer leicht zugänglich ist.
• Stellen Sie sicher, dass die Struktur oder Oberfläche, an oder auf die Sie das Gerät montieren,
dessen Gewicht tragen kann (siehe Technische Daten).
• Verwenden Sie für die Montage des Geräts über Kopf immer ordnungsgemäße Sicherheitskabel.
Befestigen Sie das Gerät sicher an einem Aufhängepunkt, was etwa ein erhöhtes Podest oder ein
Gerüstelement sein kann.
• Verwenden Sie bei der Befestigung an ein Gerüstelement eine Befestigungsschelle mit der
erforderlichen Tragfähigkeit. Der Bügel verfügt dazu über mehrere 13 mm große Löcher.
• Mit den Bügeleinstellknöpfen lässt sich die winklige Ausrichtung des Geräts justieren. Die
Bügeleinstellknöpfe nur manuell lösen und festschrauben. Bei der Verwendung von
Hebelwerkzeugen können die Bügeleinstellknöpfe beschädigt werden.
Montageansicht
Bestimmungsgemäße Verwendung
Das Gerät muss aufgehängt werden. Aus Sicherheitsgründen ist es empfehlenswert, den Lichteffekt auf
festen, erhöhten Plattformen oder an festen Befestigungsstützen mit geeigneten Befestigungsschellen zu
befestigen. Verwenden Sie immer Sicherheitskabel. Geeignetes Material erhalten Sie bei Ihrem
Fachhändler für Lichteffektgeräte.
Internationale Laser-Sicherheitsbestimmungen verlangen, dass Laser wie unten abgebildet
eingesetzt werden, in einer Mindesthöhe von 3 m über dem Boden. Hinzu kommt ein horizontaler
Abstand von 3 m zwischen Laser und Publikum.
VORSICHT! Die Ausführung von Befehlen, Einstellungen und Handlungen, die nicht in
dieser Anleitung beschrieben sind, können zu gefährlichen Laserstrahlungen führen.
Klemme
Befestigungsbügel
Bügeleinstellknöpfe
(x2)
Sicherheitskabel
(wie die CH-05 von
Chauvet)
3 Meter

Seite 67 von 117
Einrichten des Geräts
Kinta FX ILS Bedienungsanleitung Rev. 5
Laser Verriegelung und Schlüssel
Wenn dieses Produkt außerhalb von Nordamerika gekauft wird, hat es über eine Verriegelung und einen
Schlüssel; bei eingesteckter Verriegelung und eingestecktem und in die Stellung „ON“ (Ein) gedrehtem
Schlüssel wird, dass der Laser in Betrieb genommen werden kann.
Damit der Laser in Betrieb genommen werden kann, ist folgendermaßen vorzugehen:
• Die Verriegelung einstecken
• Den Schlüssel einstecken und in die Stellung „ON“ (Ein) drehen
Wenn nicht BEIDE dieser Schritte durchgeführt worden sind, kann der Laser nicht in
Betrieb genommen werden.
*Nur zur Veranschaulichung
Drehen Sie den Schlüssel immer in die Stellung „OFF“ (Aus), und ziehen Sie ihn heraus,
wenn Sie das Produkt unbeaufsichtigt lassen, um Verletzungen Dritter zu vermeiden.
Die Verriegelung einstecken Den Schlüssel einstecken und in
die Stellung „ON“ (Ein) drehen

Seite 68 von 117
Kinta FX ILS Bedienungsanleitung Rev. 5
Betrieb
4. Betrieb
Dieses Produkt eignet sich nicht für den Dauereinsatz geeignet. Regelmäßige Betriebspausen sind wichtig,
um die Lebensdauer dieses Geräts zu erhöhen. Immer den Netzstecker abziehen, wenn der Kinta FX ILS
längere Zeit nicht benutzt wird.
Betrieb des Bedienfeldes
Zum Zugreifen auf das Bedienfeld verwenden Sie die vier Tasten unter der Anzeige. Im Abschnitt
Produktüberblick finden Sie eine Übersicht über die Anordnung dieser Tasten.
Menüstruktur
Die neueste Menükarte finden Sie auf der Kinta FX ILS-Produktseite unter
www.chauvetdj.com
.
Taste Funktion
<MENU> Um einen Betriebsmodus zu suchen oder zum Hauptmenü zurückzukehren, betätigen Sie
diese Taste
<UP> Damit navigieren Sie durch die Menüpunkte nach oben und erhöhen den numerischen
Wert der entsprechenden Funktionen
<DOWN> Damit navigieren Sie durch die Menüpunkte nach unten und verringern den numerischen
Wert der entsprechenden Funktionen
<ENTER> Mit dieser Taste wählen und bestätigen Sie eine Funktion im System-Menü oder einen
ausgewählten Wert
Modus Programmierebenen Beschreibung
DMX 2-Ch d 1–511 4-Kanal-DMX-Modus
9-Ch d 1–504 9-Kanal-DMX-Modus
Voreingestellte
Farbe C-- C 1–15 Voreingestellte Kinta-Effektfarben (siehe Farben und
Programme)
Automatischen
Programm P-- P 1–7 FAdE Automatischen Programme (siehe Farben und
Programme)
SnAP
Geschwindigkeit
S-- S. 01–99 Automatischen Programmgeschwindigkeit
Musiksteuerung
Snd Snd1–7 Musikgesteuertem Programme (siehe Farben und
Programme)
Anpassbare
Farben u--
r000–255
Setzt manuelle Kinta-Effektfarben
G000–255
b000–255
U000–255
F. 00–99 Setzt Stroboskopgeschwindigkeit, langsam bis schnell
Infrarot SEt on Aktiviert/deaktiviert die Infrarotsteuerung
oFF
ILS-Modus iLS iLS1–4 Stellt ILS-Modus

Seite 69 von 117
Betrieb
Kinta FX ILS Bedienungsanleitung Rev. 5
Konfiguration (DMX)
Der Kinta FX ILS kann mit einem DMX-Controller angesteuert werden. Informationen über DMX finden Sie
im Dokument “DMX - Eine Einführung” von CHAUVET, das Sie auf der Website von Chauvet unter http://
www.chauvetlighting.com/downloads/DMX_Primer_rev05_WO.pdf herunterladen können.
DMX-Persönlichkeit und Startadresse
Beachten Sie bei der Auswahl der DMX-Startadresse die Anzahl der DMX-Kanäle, die der ausgewählte
DMX-Modus verwendet. Wenn Sie eine Startadresse verwenden, die zu hoch ist, müssen Sie den Zugang
zu einigen Gerätekanälen beschränken.
Der Kinta FX ILS verwendet bis zu 9 DMX-Kanäle im 9-Ch-Modus, die höchste konfigurierbare Adresse
auf 504 festlegen.
Der Kinta FX ILS verwendet 2 DMX-Kanäle im 2-Ch-Modus, die höchste konfigurierbare Adresse auf 511
festlegen.
Wenn Sie mit
dem DMX-Protokoll nicht vertraut sind, laden Sie “DMX - Eine Einführung” unter
www.chauvetdj.com herunter.
Um die Startadresse auszuwählen, gehen Sie wie folgt vor:
1. Drücken Sie wiederholt auf <MENU>, bis 2-Ch oder 9-Ch auf der Anzeige angezeigt wird.
2. Drücken Sie <ENTER>.
3. Verwenden Sie
<UP>
oder
<DOWN>
, um die Startadresse von
d 1–511
zu erhöhen oder zu verringern.
4. Drücken Sie <ENTER>.
Die Anzeige blinkt weiterhin, bis das Gerät ein DMX-Signal empfängt.

Seite 70 von 117
Kinta FX ILS Bedienungsanleitung Rev. 5
Betrieb
D-Fi USB Konnektivität
Der Kinta FX ILS kann mit einem D-Fi USB von Chauvet DJ in einen drahtlosen D-Fi Transceiver
umgewandelt werden. Stellen Sie dazu einfach die DMX-Eigenschaften sowie die DMX-Adresse des
Geräts, den DIP-Schalter auf den Kanal des D-Fi Transceivers ein und stecken Sie das Gerät in den D-FI
USB-Anschluss ein.
Kompatibilität mit D-Fi USB
Der D-Fi USB kann ein DMX-Signal vom D-Fi Hub und vom FlareCON Air 2 sowie von anderen D-Fi USB-
Geräten empfangen.
Konfiguration (D-Fi USB)
1. Stellen Sie die DMX-Eigenschaften und die DMX-Adresse am Kinta FX ILS ein.
2. Verwenden Sie die nachstehende Übersicht, um BEIDES einzustellen:
• Den Kanal und dann
• Die Option zum Empfangen und Senden
HINWEIS: Der DIP-Schalter 5 gilt für das Empfangen ODER das Senden, bitte daher sorgfältig
auswählen.
D-Fi USB DIP-Schalter-Kanäle
ACHTUNG! KEIN anderes Gerät als einen D-Fi USB in den USB-Anschluss einstecken.
Dies könnte zu Beschädigungen des Produkts führen.
Nach dem Einstecken übernimmt der D-Fi USB die Steuerung des Geräts.
Drahtgebundenes DMX, manuelle Bedienelemente und Menüschaltflächen sowie IR-
Fernbedienung sind deaktiviert, bis Sie den D-Fi USB wieder ausstecken. Die
Prioritätenebenen sind wie folgt verteilt:
1. D-Fi USB
2. Drahtgebundenes DMX
3. Fernbedienung IRC-6
4. Manuelle Bedienelemente und Menüschaltflächen
K. 1234S/E K. 1234S/E K. 1234S/E K. 1234S/E
1919
210 210
311 311
412 412
513 513
614 614
715 715
816 816
Empfangen
Empfangen
Senden
Senden

Seite 71 von 117
Betrieb
Kinta FX ILS Bedienungsanleitung Rev. 5
DMX-Kanal – Zuordnungen und Werte
2-Ch 9-Ch Funktion Wert Prozent/Einstellung
11
Automatischen Programm
(überschreibt K. 3-9)
000 009 Keine Funktion
010 044 Kinta, Laser, und Stroboskope
045 079 Kinta und Stroboskope
080 114 Kinta und Laser
115 149 Laser und Stroboskope
150 184 Nur Kinta
185 219 Nur Stroboskope
220 255 Nur Laser
2 2 Programmgeschwindigkeit 000 250 Programmgeschwindigkeit, langsam bis schnell
251 255 Musikgesteuertem Programm
– 3 Kinta-Effektfarben
000 005 Keine Funktion
006 020 Rot
021 035 Grün
036 050 Blau
051 065 Weiß
066 080 Rot und grün
081 095 Rot und blau
096 110 Rot und weiß
111 125 Grün und blau
126 140 Grün und weiß
141 155 Blau und weiß
156 170 Rot, grün, und blau
171 185 Rot, grün, und weiß
186 200 Grün, blau, und weiß
201 215 Rot, grün, blau, und weiß
216 230 Automatischen 4-Farben Chase
231 255 Automatischen 7-Farben Chase
– 4 Kinta-Effekt Stroboskop 000 005 Keine Funktion
006 255 Kinta-Effekt Stroboskop, langsam bis schnell
– 5 Kinta-Effektmotor
000 Keine Funktion
001 127 Kinta-Effektmotor Indexierung
128 255 Motorgeschwindigkeit, langsam bis schnell
–6
SMD-Stroboskope
Programm
000 009 Keine Funktion
010 019 Stroboskope-Programm 1, langsam bis schnell
020 029 Stroboskope-Programm 2, langsam bis schnell
030 039 Stroboskope-Programm 3, langsam bis schnell
040 049 Stroboskope-Programm 4, langsam bis schnell
050 059 Stroboskope-Programm 5, langsam bis schnell
060 069 Stroboskope-Programm 6, langsam bis schnell
070 079 Stroboskope-Programm 7, langsam bis schnell
080 089 Stroboskope-Programm 8, langsam bis schnell
090 099 Stroboskope-Programm 9, langsam bis schnell
100 109 Stroboskope-Programm 10, langsam bis schnell
110 119 Stroboskope-Programm 11, langsam bis schnell
120 129 Stroboskope-Programm 12, langsam bis schnell
130 139 Stroboskope-Programm 13, langsam bis schnell
140 149 Stroboskope-Programm 14, langsam bis schnell
150 159 Stroboskope-Programm 15, langsam bis schnell
160 169 Stroboskope-Programm 16, langsam bis schnell
170 179 Stroboskope-Programm 17, langsam bis schnell
180 255 Stroboskope-Programm 18, langsam bis schnell

Seite 72 von 117
Kinta FX ILS Bedienungsanleitung Rev. 5
Betrieb
Konfiguration (Einzelplatzmodus)
Zur Steuerung ohne einen DMX-Controller versetzen Sie das Gerät in einen der Einzelplatzmodi.
Voreingestellte Kinta-Effekt
Zum Betrieb des Kinta FX ILS mit eine statische voreingestellte Kinta-Effektfarbe, gehen Sie wie folgt vor:
1. Drücken Sie wiederholt auf <MENU> bis C-- auf der Anzeige angezeigt wird.
2. Drücken Sie <ENTER>.
3.
Verwenden Sie
<UP>
oder
<DOWN>
um das gewünschte Farbe aus C 1–15 auswählen. (siehe
Farben und Programme)
4. Drücken Sie <ENTER>.
Automatischen Programme
Zum Betrieb des Kinta FX ILS mit automatischen Programm, befolgen Sie die Anweisungen unten.
1. Drücken Sie wiederholt auf <MENU> bis P-- auf der Anzeige angezeigt wird.
2. Drücken Sie <ENTER>.
3.
Verwenden Sie
<UP>
oder
<DOWN>
um das gewünschte Programm aus P 1–7 auswählen. (siehe
Farben und Programme)
4. Drücken Sie <ENTER>.
5.
Verwenden Sie
<UP>
oder
<DOWN>
um den Programmmodus aus FAdE (verblassende) oder
SnAP (schneller Wechsel) auswählen.
6. Drücken Sie <ENTER>.
Automatischen Programmgeschwindigkeit
Um den automatischen Programmgeschwindigkeit festzulegen des Kinta FX ILS, gehen Sie wie folgt vor:
1. Drücken Sie wiederholt auf <MENU> bis S-- auf der Anzeige angezeigt wird.
2. Drücken Sie <ENTER>.
3.
Verwenden Sie
<UP>
oder
<DOWN>
um die Geschwindigkeit S. 00–99 (langsam bis schnell) zu
erhöhen oder zu verringern.
4. Drücken Sie <ENTER>.
–7
Laserfarbe
(K. 8 muss für den Stroboskop
aktiv sein)
000 009 Keine Funktion
010 049 Rot
050 089 Grün
090 129 Rot und grün
130 169 Rot und Stroboskop-grün
170 209 Grün und Stroboskop-rot
210 255 Rot und grün Wechselnder Stroboskop
– 8 Laserstroboskop
000 009 Keine Funktion
010 254 Laserstroboskop, langsam bis schnell
255 Musikgesteuertes Laserstroboskop
– 9 Laserrotation
000 004 Anhalten
005 127
Rotation gegen den Uhrzeigersinn, langsam bis schnell
128 133 Anhalten
134 255 Drehung im Uhrzeigersinn, schnell bis langsam
Für einen manuellen Betrieb der LEDs und des Lasers per DMX-Steuerung muss Kanal 1
auf einen 000 009 eingestellt sein.
Schließen Sie ein Gerät, das sich im Einzelplatzmodus befindet, an eine mit einem DMX-
Controller verbundenen DMX-Leitung an. Geräte im Einzelplatzmodus können DMX-
Signale aussenden, die mit den DMX-Signalen des DMX-Controllers interferieren können.
2-Ch 9-Ch Funktion Wert Prozent/Einstellung

Seite 73 von 117
Betrieb
Kinta FX ILS Bedienungsanleitung Rev. 5
Musikgesteuertem Programme
Zum Betrieb des Kinta FX ILS mit musikgesteuertem Programme, befolgen Sie die Anweisungen unten.
1. Drücken Sie wiederholt auf <MENU> bis Snd auf der Anzeige angezeigt wird.
2. Drücken Sie <ENTER>.
3.
Verwenden Sie
<UP>
oder
<DOWN>
um das gewünschte Programm aus Snd1–7 auswählen.
(siehe Farben und Programme)
4. Drücken Sie <ENTER>.
5. Schalten Sie die Musik ein, und drehen Sie solange am Empfindlichkeitknopf, bis das Gerät
beginnt, auf die Musik zu reagieren.
Farben und Programme
Anpassbare Farben Kinta-Effekt
Zum Betrieb des Kinta FX ILS mit anpassbare Farben- und Stroboskop-Werte, gehen Sie wie folgt vor:
1. Drücken Sie wiederholt auf <MENU> bis u-- auf der Anzeige angezeigt wird.
2. Drücken Sie <ENTER>.
3.
Verwenden Sie
<UP>
oder
<DOWN>
um der Wert der aktuellen Option zu erhöhen oder zu
verringern, von
•r000–255 (rot)
•G000–255 (grün)
•b000–255 (blau)
•U000–255 (weiß) oder
•F. 00–99 (Kinta-Effekt Stroboskop).
4. Drücken Sie <ENTER> um zur nächsten Option zu wechseln.
5. Wiederholen Sie die Schritte 3 und 4, bis das Produkt wie gewünscht eingestellt ist.
• Das Gerät reagiert nur auf niedrige Musikfrequenzen (Bass oder Trommeln).
• Der Laser wird nach 3 Sekunden abgedunkelt, wenn im Musiksteuerungs-Modus kein
Geräusch vorhanden ist oder das Geräusch unter der eingestellten Empfindlichkeit liegt.
C-- Effekt P--/Snd Effekt
1Rot 1Alle Effekte
2Grün 2Kinta und Stroboskope
3Blau 3Kinta und Laser
4Weiß 4Laser und Stroboskope
5Rot und grün 5Nur Kinta
6Rot und blau 6Nur Stroboskope
7Rot und weiß 7Nur Laser
8Grün und blau
9Grün und weiß
10 Blau und weiß
11 Rot, grün, und blau
12 Rot, grün, und weiß
13 Rot, blau, und weiß
14 Grün, blau, und weiß
15 Red, grün, blau, und weiß

Seite 74 von 117
Kinta FX ILS Bedienungsanleitung Rev. 5
Betrieb
IRC-6 (Infrarot-Fernbedienung)
Der Kinta FX ILS ist kompatibel mit der Infrarot-Fernbedienung IRC-6 von Chauvet. Zum Aktivieren des
IR-Modus befolgen Sie die Anweisungen unten:
1. Drücken Sie wiederholt auf <MENU> bis SEt auf der Anzeige angezeigt wird.
2. Drücken Sie <ENTER>.
3.
Verwenden Sie
<UP>
oder
<DOWN>
um aus on (Ein) oder oFF (Aus) auswählen.
4. Drücken Sie <ENTER>.
IRC-6 Operation
Automatischen-Modus
Um den Automatischen-Modus einzuschalten mit der IRC-6:
1. Drücken Sie auf der IRC-6 auf <AUTO>.
2. Drücken Sie <1>–<7> um das Programm auswählen (siehe Farben und
Programme).
Um der Automatischen Programmgeschwindigkeit anpassen:
1. Drücken Sie auf der IRC-6 auf <SPEED>.
2. Drücken Sie <+> oder <–> um die Geschwindigkeit erhöhen oder zu
verringern.
Musikgesteuertem Modus
Um den Musikgesteuertem Modus einzuschalten mit der IRC-6:
1. Drücken Sie auf der IRC-6 auf <SOUND>.
2. Drücken Sie <1>–<7> um das Programm auswählen (siehe Farben und
Programme).
Manuellersteuerung
Um die Kinta-Effektfarbe manuell auszuwählen mit der IRC-6:
1. Drucken Sie die gewünschte Farb, von <R> (rot), <G> (grün), <B> (blau),
oder <W> (weiß).
Stroboskop
Um das Stroboskop einstellen mit der IRC-6:
1. Drücken Sie auf der IRC-6 auf <STROBE>.
2. Drücken Sie <+> oder <–> um die Stroboskop-Geschwindigkeit erhöhen
oder zu verringern.
Verdunkelung
Um die Produkt verdunkeln mit der IRC-6:
1. Drücken Sie auf der IRC-6 auf <BLACK OUT>.
Damit schalten Sie alle Leuchten aus, bis diese Taste erneut gedrückt wird.
HINWEIS: Die IRC-6 reagiert auf keine Eingabe, solange diese Verdunkelung
aktiviert ist. Wenn die Fernbedienung auf das Drücken einer Taste nicht reagiert,
drücken Sie auf <BLACK OUT>. Sie haben eventuell unabsichtlich auf BLACK OUT
gedrückt und damit die Verdunkelung aktiviert.
Die oben nicht aufgeführten Tasten des IRC-6 sind für die zukünftige Verwendung
reserviert.
BLACK
OUT AUTO SOUND
SENSI-
TIVITY
SPEEDSTROBE
%MANUAL FADE
RGB
WUVA
+
0
-
123
654
789

Seite 75 von 117
Betrieb
Kinta FX ILS Bedienungsanleitung Rev. 5
Master/Slave-Modus (kabelgebundene)
Im Master/Slave-Modus lassen sich mit einem einzigen Kinta FX ILS-Gerät (das Master-Gerät) die Aktionen
eines oder mehrerer Kinta FX ILS-Geräte (die Slave-Geräte) ansteuern, ohne einen DMX-Controller verwenden
zu müssen. Das Master-Gerät wird so eingerichtet, dass es entweder im Einzelplatzmodus oder mit der IRC-6
betrieben wird, während die Slave-Geräte so eingerichtet werden, dass sie im Slave-Modus arbeiten. Sobald
dies eingestellt ist und alle Geräte verbunden sind, arbeiten die Slave-Geräte im Takt des Master-Geräts.
Konfigurieren Sie die Geräte wie unten angezeigt.
Slave-Geräte:
1. Drücken Sie wiederholt auf <MENU> bis 9-Ch auf der Anzeige angezeigt wird.
2. Drücken Sie <ENTER>.
3.
Verwenden Sie
<UP>
oder
<DOWN>
die Startadresse bis d 1 stellen.
4. Drücken Sie <ENTER>.
5. Verbinden Sie den DMX-Eingang des ersten Slave-Geräts mit dem DMX-Ausgang des Master-Geräts.
6. Verbinden Sie den DMX-Eingang des folgenden Slave-Geräts mit dem DMX-Ausgang des vorherigen Slave-Geräts.
7. Beenden Sie die Einstellungen und das Anschließen aller Slave-Geräte.
Master-Gerät:
1. Stellen Sie den Betrieb des Master-Geräts entweder auf Einzelplatzmodus oder auf IRC-6 ein.
2. Das Master-Gerät muss nun als erstes Gerät in der DMX-Serienschaltung festgelegt werden.
Master/Slave-Modus (D-Fi USB)
Der D-Fi USB ermöglicht einem einzigen Kinta FX ILS-Gerät (das Master-Gerät) die Aktionen eines oder mehrerer
Kinta FX ILS-Geräte (die Slave-Geräte) anzusteuern, ohne einen DMX-Controller oder DMX-Kabel verwenden zu
müssen. Das Master-Gerät (Sender) wird so eingerichtet, dass es entweder im Einzelplatzmodus betrieben wird,
während die Slave-Geräte (Empfänger) so eingerichtet werden, dass sie im Slave-Modus arbeiten. Sobald dies
eingestellt ist und alle Geräte verbunden sind, arbeiten die Slave-Geräte im Takt des Master-Geräts.
Konfigurieren Sie die Geräte wie unten angezeigt.
Slave-Geräte:
1. Drücken Sie wiederholt auf <MENU> bis 9-Ch auf der Anzeige angezeigt wird.
2. Drücken Sie <ENTER>.
3.
Verwenden Sie
<UP>
oder
<DOWN>
die Startadresse bis d 1 stellen.
4. Drücken Sie <ENTER>.
5. Stellen Sie den D-Fi USB so ein, dass er auf einem bestimmten Kanal empfangen kann (1–16).
6. Schließen Sie den D-Fi USB an.
7. Beenden Sie die Einstellungen und das Anschließen aller Slave-Geräte.
Master-Gerät:
1. Stellen Sie den Betrieb des Master-Geräts auf Einzelplatzmodus ein.
2. Stellen Sie den D-Fi USB so ein, dass er auf dem D-Fi-Kanal senden kann, auf dem die Slave-Geräte empfangen.
3. Schließen Sie den D-Fi USB an.
ILS-Modus
ILS (Integrated Lighting System) bietet 4 Modi, die mit dem GigBAR MOVE+ILS synchronisiert werden: Modi 1 und 3
synchronisieren mit Seite 1 des GigBAR MOVE+ILS, wohingegen Modi 2 und 4 mit Seite 2 des GigBAR MOVE+ILS
synchronisiert werden. Bei einer Verknüpfung werden die Effekte mit dem ähnlichsten Effekt an der ausgewählten
Seite des GigBAR MOVE+ILS synchronisiert: Kinta-Effekte werden mit einem der Kinta-Geräten synchronisiert,
Moving Heads mit einem der Moving Heads und Wash-Effekte mit einer der PAR-Kannen. Laser-Effekte werden mit
dem Laser synchronisiert und Stroboskopeffekte mit den Stroboskopeffekten, unabhängig vom ILS-Modus.
Dieses Gerät wird mit den Kinta an der ausgewählten Seite des GigBAR MOVE+ILS sowie mit Laser und
Stroboskopeffekten synchronisiert.
So konfigurieren Sie den Kinta FX ILS für die Reaktion auf ein ILS-Signal:
1. Drücken Sie wiederholt auf <MENU> bis iLS_ auf der Anzeige angezeigt wird.
2.
Verwenden Sie
<UP>
oder
<DOWN>
um aus iLS1 (Seite 1), iLS2 (Seite 2), iLS3 (Seite 1), oder
iLS4 (Seite 2) auswählen.
3. Drücken Sie <ENTER>.
• Konfigurieren Sie alle Slave-Geräte, bevor Sie das Master-Gerät an die Serienschaltung anschließen.
•
Schließen Sie niemals einen DMX-Controller an eine DMX-Leitung an, die für einen Master/Slave-
Betrieb konfiguriert ist, da der Controller die Signale des Master-Geräts stören kann.
• Schließen Sie nicht mehr als 31 Slave-Geräte an das Master-Gerät an.
• Alle Geräte müssen auf die/den gleiche/n DMX-Eigenschaften, DMX-Adresse und D-Fi-
Kanal eingestellt sein.
• Konfigurieren Sie alle Slave-Geräte, bevor Sie das Master-Gerät für das Senden konfigurieren.
•
Schließen Sie niemals einen DMX-Controller an einen D-Fi-Kanal an, der für einen Master/Slave-
Betrieb konfiguriert ist, da der Controller die Signale des Master-Geräts stören kann.

Seite 76 von 117
Kinta FX ILS Bedienungsanleitung Rev. 5
Wartung
5. Wartung
Wartung des Geräts
Staubablagerungen reduzieren die Lichtabgabe und können zu Überhitzung führen. Das kann die
Lebensdauer des Leuchtmittels reduzieren und/oder die mechanische Abnutzung beschleunigen. Zum
Erhalt der optimalen Leistungsfähigkeit und der Minimierung der Abnutzung sollten Sie Ihren Lichteffekt
mindestens zweimal pro Monat reinigen. Allerdings hängt die erforderliche Häufigkeit der Reinigung von
der Nutzung und den Umgebungsbedingungen ab.
Zum Reinigen des Geräts befolgen Sie die Anweisungen unten:
1. Trennen Sie das Gerät vom Stromnetz.
2. Warten Sie, bis das Gerät auf Raumtemperatur abgekühlt ist.
3. Verwenden Sie einen Staubsauger (oder Druckluft) sowie eine weiche Bürste, um den Staub auf
der Oberfläche des Geräts und in den Lüftungsbereichen zu entfernen.
4. Reinigen Sie alle transparenten Oberflächen mit einer milden Seifenlösung, mit ammoniakfreiem
Glasreiniger oder Isopropylalkohol.
5. Geben Sie die Lösung direkt auf ein weiches, faserfreies Baumwolltuch oder
Linsenreinigungstuch.
6. Ziehen Sie sanft Schmutz oder Ablagerungen in Richtung der Außenkanten der transparenten
Oberflächen.
7. Polieren Sie sorgfältig diese transparenten Oberflächen, bis alle Schmutzfilme und Fasern
verschwunden sind.
Trocknen Sie die transparenten Oberflächen immer sorgfältig nach der Reinigung ab.
Drehen Sie das Gebläse nicht mit Druckluft, da dieses dadurch beschädigt werden könnte.

Seite 77 von 117
Technische Daten
Kinta FX ILS Bedienungsanleitung Rev. 5
6. Technische Daten
Abmessungen und Gewicht
Hinweis: Abmessungen in Zoll sind gerundet.
Leistungsaufnahme
Leuchtquelle (Laser)
Leuchtquelle (Kinta)
Leuchtquelle (weiße Stroboskope)
Lichttechnische Daten
Wärmeentwicklung
DMX
Bestellung
Länge Breite Höhe Gewicht
187 mm (7,4 Zoll) 261 mm (10,3 Zoll) 187 mm (7,4 Zoll) 1,7 kg (3,8 lb)
Eingangsspannung Bereich Spannungsschalter
Vorschaltgerät (integriert) 100-240 V AC 50/60 Hz Autom. Spann.-Erkennung
Parameter 120 V / 60 Hz 230 V / 50 Hz
Stromverbrauch 25 W 24 W
Betriebsstromstärke 0,5 A 0,2 A
Stromstärke für Serienschaltung
(Geräte) 8 A (17 Produkten) 8 A (33 Produkten)
Sicherung T 1 A, 250 V T 1 A, 250 V
I/O-Eingangsbuchse USA/weltweit GB/Europa
Stromeingangsbuchse IEC IEC
Stromausgangsbuchse Edison IEC
Netzkabelstecker Edison (USA) Lokaler Stecker
Typ Leistung Wellenlänge
Laser (rot) 100 mW 650 nm
Laser (grün) 30 mW 520 nm
Typ Farbe Menge Leistung Strom Betriebsdauer
LED Rot 1 7,5 W 2,4 A 50.000 Stunden
LED Grün 1 7,5 W 2,4 A 50.000 Stunden
LED Blau 1 7,5 W 2,4 A 50.000 Stunden
LED Weiß 1 7,5 W 2,4 A 50.000 Stunden
Typ Farbe Menge Leistung Strom Betriebsdauer
SMD-LED Weiß 16 5 W 1,6 A 50.000 Stunden
Stroboskopfrequenz Abdeckungswinkel
0 bis 20 Hz 118°
Laser Min. externe Temp. Laser Max. externe Temp. Kühlsystem
15 °C (59 °F) 35 °C (95 °F) Ventilatorunterstützte Konvektion
I/O-Buchsen Kanalbereich
3-polig XLR 2 oder 9
Produktbezeichnung Artikelcode UPC-Code
Kinta FX ILS 10051879 781462222277

Seite 78 von 117
Kinta FX ILS Bedienungsanleitung Rev. 5
Reklamationen
Reklamationen
Wenn Sie Unterstützung benötigen oder ein Gerät zurückgeben möchten:
• Wenn Sie Ihren Wohnsitz in den U.S.A. haben, wenden sich an Chauvet World Headquarters.
• Wenn Sie Ihren Wohnsitz in G.B. oder Irland haben, wenden Sie sich an Chauvet Europe Ltd.
• Wenn Sie Ihren Wohnsitz in Benelux haben, wenden Sie sich an Chauvet Europe BVBA.
• Wenn Sie Ihren Wohnsitz in Frankreich haben, wenden sich an Chauvet France.
• Wenn Sie Ihren Wohnsitz in Deutschland haben, wenden sich an Chauvet Germany.
• Wenn Sie Ihren Wohnsitz in Mexiko haben, wenden Sie sich an Chauvet Mexiko.
• Wenn Sie in einem anderen Land leben, wenden Sie sich NICHT an Chauvet. Wenden Sie sich
stattdessen an Ihren lokalen Lieferanten. Unter www.chauvetdj.com www.chauvetdj.com finden Sie
die Lieferanten außerhalb der U.S.A., G.B., Irlands, Benelux, Frankreich, Deutschland, und
Mexikos.
Nehmen Sie telefonisch Kontakt mit dem Technischen Support von Chauvet auf, und fordern Sie vor dem
Verschicken eine Warenrücksendegenehmigungsnummer (RMA) an. Seien Sie darauf vorbereitet, die
Modellnummer, Seriennummer und eine kurze Beschreibung des Grundes für das Zurückschicken
angeben zu können.
Um eine Serviceanfrage online zu stellen, gehen Sie zu www.chauvetdj.com/service-request.
Senden Sie die Ware frei, in der Originalverpackung und mit den originalen Zubehörteilen zurück. Chauvet
lässt keine Retouren abholen.
Schreiben Sie die RMA gut leserlich auf die Verpackung. Chauvet weist alle Waren zurück, die keine RMA
besitzen.
Bevor Sie die Ware versenden, schreiben Sie klar und deutlich folgende Informationen auf einen Bogen
Papier und legen ihn in die Verpackung:
•Ihr Name
• Ihre Adresse
• Ihre Telefonnummer
• RMA-Nummer
• Eine kurze Problembeschreibung
Achten Sie auf eine sachgemäße Verpackung der Ware. Schäden, die durch unsachgemäßes Verpacken
entstanden sind, liegen in Ihrer Verantwortung. Eine FedEx-Verpackung oder doppelte Verpackung wird
empfohlen.
Kunden außerhalb der U.S.A., G.B., Irland, Benelux, Frankreich, Deutschland, oder Mexiko
wenden sich an den aufgeführten Lieferanten und befolgen die Anweisungen zum
Zurücksenden der Geräte von Chauvet. Um zu den Kontaktdaten zu gelangen, besuchen
Sie bitte unsere Website unter www.chauvetdj.com.
Schreiben Sie die RMA auf ein ordnungsgemäß angebrachtes Hinweisschild. Die RMA
NICHT DIREKT auf den Karton schreiben.
Chauvet behält sich das Recht vor, nach eigenem Ermessen über Reparatur oder Ersatz
der Ware zu befinden.

Seite 79 von 117
Kontaktiere Uns
Kinta FX ILS Bedienungsanleitung Rev. 5
Kontaktiere Uns
Kunden außerhalb der U.S.A., G.B., Irland, Benelux, Frankreich, Deutschland, oder Mexiko wenden sich
an ihren Lieferanten. Befolgen Sie die Anweisungen zum Erhalt von Unterstützung oder zur Rückgabe
eines Produkts. Um zu den Kontaktdaten zu gelangen, besuchen Sie unsere Website.
Allgemeine Information Technischer Support
Chauvet World Headquarters
Adresse: 5200 NW 108th Ave. Telefon: (844) 393-7575
Sunrise, FL 33351 Fax: (954) 756-8015
Telefon: (954) 577-4455 Email: [email protected]
Fax: (954) 929-5560
Zollfrei: (800) 762-1084 Webseite: www.chauvetdj.com
Chauvet Europe Ltd
Adresse: Unit 1C Email: [email protected]
Brookhill Road Industrial Estate
Pinxton, Nottingham, UK Webseite: www.chauvetdj.eu
NG16 6NT
Telefon: +44 (0) 1773 511115
Fax: +44 (0) 1773 511110
Chauvet Europe BVBA
Adresse: Stokstraat 18 Email: [email protected]
9770 Kruishoutem
Belgium Webseite: www.chauvetdj.eu
Telefon: +32 9 388 93 97
Chauvet France
Adresse: 3, Rue Ampère
91380 Chilly-Mazarin Email: [email protected]
France Webseite: www.chauvetdj.eu
Telefon: +33 1 78 85 33 59
Chauvet Germany
Adresse: Bruno-Bürgel-Str. 11
28759 Bremen Email: DEte[email protected]
Germany Webseite: www.chauvetdj.eu
Telefon: +49 421 62 60 20
Chauvet Mexico
Adresse: Av. de las Partidas 34 - 3B
(Eingang von der Calle 2) Email: [email protected]
Zona Industrial Lerma Webseite: www.chauvetdj.mx
Lerma, Edo. de México, CP 52000
Telefon: +52 (728) 690-2010

Pagina 80 di 117
Kinta FX ILS Manuale dell'utente Rev. 5
Prima di iniziare
1. Prima di iniziare
Che cosa è incluso
Istruzioni per il disimballaggio
Disimballare immediatamente e con attenzione l’unità e verificare che nella scatola siano presenti tutte le
parti e che siano in buone condizioni.
Reclami
Se la scatola o il contenuto (l’unità e gli accessori inclusi) appaiono danneggiati dalla spedizione, o
mostrano segni di maltrattamento, informare immediatamente il vettore, non Chauvet. La mancata
segnalazione tempestiva dei danni al trasportatore può invalidare la richiesta di risarcimento. Inoltre,
conservare la scatola e il contenuto per l'ispezione.
Per altri problemi, quali componenti o parti mancanti, danni non legati alla spedizione o danni nascosti,
inviare una richiesta di risarcimento a Chauvet entro 7 giorni dalla consegna.
Convenzioni di testo
Simboli
Liberatoria
Chauvet ritiene le informazioni contenute in questo manuale accurate in ogni aspetto. Tuttavia, Chauvet
declina qualsiasi responsabilità nei confronti di chiunque per eventuali perdite, danni o interruzioni causati
da errori od omissioni in questo documento, sia che tali errori od omissioni derivino da negligenza,
incidente o altra causa. Chauvet si riserva il diritto di modificare il contenuto di questo documento senza
alcun obbligo di preavviso a persone o società; in ogni caso, Chauvet non è tenuta ad effettuare, e non si
impegna a farlo, tali modifiche. Scaricare l'ultima versione da www.chauvetdj.com.
Proprietà intellettuale
Le opere d'autore contenute in questo manuale, inclusi, ma non limitati a, tutto il design, il testo e le
immagini sono di proprietà di Chauvet.
© Copyright 2022 Chauvet & Sons, LLC. Tutti i diritti riservati.
Pubblicato elettronicamente da Chauvet negli Stati Uniti d'America.
CHAUVET, il logo Chauvet, ILS (in attesa di brevetto) e Kinta FX ILS sono marchi registrati o marchi di
Chauvet & Sons LLC (d/b/a Chauvet e Chauvet Lighting) negli Stati Uniti e in altri paesi. Altri nomi di
società e prodotti e loghi a cui si fa riferimento nel presente documento possono essere marchi di fabbrica
delle rispettive società.
•KintaFXILS
• Cavo di alimentazione
• Manuale dell’utente
Convenzione Significato
1–512 Gamma di valori
50/60 Serie di valori tra i quali è possibile sceglierne solo uno
Settings Opzione di menù da non modificare
<ENTER> Tasto da premere sul pannello di controllo dell’unità
ON Valore da inserire o selezionare
Simbolo Significato
Avvertenza elettrica. La mancata osservanza di queste istruzioni può causare danni
elettrici all’unità, agli accessori o all'utilizzatore.
Informazioni essenziali per l'installazione, la configurazione o il funzionamento. La
mancata osservanza di queste istruzioni potrebbe compromettere il funzionamento
dell’unità, danneggiarla o causare danni all'operatore.
Informazioni importanti per il montaggio o la configurazione. Se non si utilizzano queste
informazioni, l’unità potrebbe non funzionare correttamente.
Informazioni utili.
Informazioni sulla sicurezza del laser.

Pagina 81 di 117
Prima di iniziare
Kinta FX ILS Manuale dell'utente Rev. 5
Note sulla sicurezza
Le note sulla sicurezza includono importanti informazioni sulla sicurezza del sistema laser. Prima di
attivare il laser per la prima volta, leggere e comprendere tutte le istruzioni. La conoscenza di queste
istruzioni di sicurezza è fondamentale al fine di evitare lesioni agli occhi causate dal laser e di violare la
legge. Conservare questo Manuale d'uso in un luogo sicuro per riferimenti futuri.
SOFFERMARSI A LEGGERE TUTTI I DATI SULLA
SICUREZZA DEL LASER
• I laser possono essere pericolosi e implicano considerazioni specifiche sulla sicurezza. Se i
laser vengono utilizzati in modo non corretto, si rischiano lesioni permanenti agli occhi e cecità.
Prestare particolare attenzione a tutte le AVVERTENZE e alle INDICAZIONI di sicurezza
contenute in questo Manuale d'uso. PRIMA di utilizzare questo dispositivo, leggere
attentamente tutte le istruzioni.
• Per evitare il rischio di folgorazione, collegare sempre l'unità a un circuito dotato di messa a terra.
• Prima della pulizia, scollegare sempre l'unità dalla fonte di alimentazione.
• Evitare l'esposizione diretta degli occhi alla sorgente luminosa mentre l'unità è accesa.
• Assicurarsi che il cavo di alimentazione non sia piegato o danneggiato.
• Non scollegare mai l'unità dalla presa di alimentazione tirando o strattonando il cavo.
• In caso di montaggio sospeso, assicurare sempre l’unità a un dispositivo di fissaggio con un
cavo di sicurezza.
• Quando in funzione, assicurarsi che non vi siano materiali infiammabili vicino all’unità.
• Non toccare il contenitore dell’unità quando in funzione perché potrebbe essere molto caldo.
• Questa unità non è destinata all'installazione permanente.
• Assicurarsi sempre che la tensione della presa a cui si sta collegando l'unità sia compresa
nell'intervallo indicato sulla targhetta o sul pannello posteriore.
• L'unità è solo per uso interno! (IP20) Per prevenire il rischio di incendi o folgorazioni, non
esporre l'unità alla pioggia o all'umidità.
• Installare sempre l'unità in un luogo con adeguata ventilazione, ad almeno 50 cm dalle
superfici adiacenti.
•Assicurarsi che nessuna feritoia di ventilazione sul contenitore del prodotto sia bloccata.
• Non collegare mai l'unità a un dimmer.
• Assicurarsi di sostituire il fusibile con un altro dello stesso tipo e valore.
• Per trasportare l'unità, utilizzare sempre la staffa di montaggio.
• Non accendere e spegnere l'unità ad intervalli brevi. Così facendo, si riduce la durata del diodo laser.
• Non scuotere l'unità. Durante il montaggio o il funzionamento, evitare di maltrattare l'unità.
• Per il montaggio sospeso dell’unità, utilizzare SEMPRE un cavo di sicurezza.
• La temperatura ambiente di esercizio del laser è compresa tra 15 °C e 35 °C. Non utilizzare
l'unità se non in questo intervallo.
• In caso di grave problema di funzionamento, interrompere immediatamente l'uso dell’unità.
• Non tentare mai di riparare l'unità. Le riparazioni effettuate da persone non qualificate possono
causare danni o malfunzionamenti. Contattare il più vicino centro di assistenza tecnica autorizzato.
ATTENZIONE! L'uso di controlli, regolazioni o procedure diversi da quelli specificati in
questo Manuale d'uso può comportare l'esposizione a radiazioni pericolose.
• Evitare il contatto diretto degli occhi con la luce laser. Non esporre mai intenzionalmente gli
occhi propri o di altri alla luce laser diretta.
• Questa unità può potenzialmente causare lesioni oculari istantanee o cecità qualora la luce
laser colpisca direttamente gli occhi.
• La proiezione di questo laser nelle aree pubbliche, dove gli spettatori o altro personale
potrebbero essere colpiti da raggi laser diretti o riflessi negli occhi, è illegale e pericolosa.
• Negli USA proiettare un laser in direzione di un aereo è un reato federale.
• Per evitare che si usuri e prolungarne la durata, quando non utilizzata, scollegare
completamente l'unità dall'alimentazione tramite l'interruttore o staccando la spina.
• NON tentare alcuna riparazione. Riparazioni e assistenza devono essere eseguite da un
tecnico certificato. Le modifiche non autorizzate sono vietate per motivi di sicurezza!
Conservare questo Manuale d'uso per consultazioni future. Se si trasferisce la proprietà del
prodotto ad altro utente, assicurarsi che questo documento venga conservato con il laser.

Pagina 82 di 117
Kinta FX ILS Manuale dell'utente Rev. 5
Prima di iniziare
Avvertenza - Contenitore non interbloccato
Note sulla sicurezza del laser
La luce laser è diversa da qualsiasi altra luce. Se l'unità non è impostata e utilizzata correttamente, la luce
laser può causare lesioni agli occhi. La luce laser è migliaia di volte più concentrata di qualsiasi altro tipo di
luce. Tale concentrazione può causare lesioni oculari istantanee bruciando la retina (la parte sensibile alla
luce nella parte posteriore dell'occhio). Il calore di una luce laser non può essere percepito, ma può
comunque ferire o accecare gli operatori e il pubblico. Anche minime emissioni di luce laser a lunghe
distanze sono potenzialmente pericolose.
NON presumere che l'esposizione a un singolo raggio laser non sia pericolosa, anche se si tratta di un
piccolo raggio separato da un fascio maggiore. Questo prodotto laser utilizza decine di milliwatt di potenza
laser (livelli interni di classe 3B) e li suddivide in più raggi (livelli di classe 3R). I singoli raggi di livello 3R
sono potenzialmente pericolosi per gli occhi.
NON presumere che una luce laser in movimento sia sicura. La luce laser non è mai priva di rischi. Dato
che anche una brevissima esposizione al raggio laser può danneggiare la retina, è fondamentale evitare
che ciò accada. In base alle norme di sicurezza laser, è vietato dirigere i laser di classe 3R su aree
pubbliche, anche se il laser è puntato al di sotto del viso, come ad esempio su una pista da ballo.
• Questa unità contiene internamente dispositivi laser ad alta potenza.
• Non aprire il contenitore del laser per evitare la potenziale esposizione a livelli non sicuri di
radiazioni laser.
• I livelli di potenza del laser, quando l'unità è aperta, possono causare cecità istantanea, ustioni
cutanee e incendi.
SOFFERMARSI A LEGGERE TUTTE LE NOTE SULLA
SICUREZZA DEL LASER RIPORTATE DI SEGUITO
• Non utilizzare il laser senza aver prima letto e compreso tutti i dati tecnici e di sicurezza riportati
nel presente Manuale.
• Impostare e installare SEMPRE tutti gli effetti laser ad almeno 3 metri sopra la pista/pavimento.
Vedere la sezione Uso corretto di questo Manuale.
• Dopo l'impostazione, e prima di utilizzarli in pubblico, testare i laser per assicurarsi che
funzionino correttamente. Non utilizzare l'unità se vengono rilevati difetti.
• NON puntare il laser su persone o animali.
• NON guardare l'apertura laser o i raggi laser.
• NON puntare i laser su aree pubbliche.
• NON puntare i laser su superfici altamente riflettenti come finestre, specchi e metalli lucidi.
Anche i riflessi laser possono essere pericolosi.
• Non puntare mai il laser in direzione di velivoli; negli Stati uniti questo è un reato federale.
• Non puntare mai il laser non terminato verso il cielo.
• Non utilizzare agenti chimici per la pulizia dell'ottica di proiezione (apertura).
• Non utilizzare il laser se il contenitore è danneggiato, aperto o se l'ottica appare in qualche
modo danneggiata.
• Non aprire mai il contenitore del laser. Gli elevati livelli di potenza del laser all’interno del
contenitore protettivo possono provocare incendi o bruciature della pelle e lesioni istantanee
agli occhi.
• Non lasciare mai questo prodotto in funzione incustodito.
• L’utilizzo di una apparecchiatura laser in Classe 3R è consentita solo ad un operatore esperto
e ben preparato che sia a conoscenza di tutti i dati riportati nel presente Manuale.
• Le norme relative all'utilizzo di apparecchiature per intrattenimento al laser variano da Paese
a Paese. L'utilizzatore è responsabile della conformità alle norme locali.
ATTENZIONE! Non utilizzare questo dispositivo diversamente da come specificato nel
presente Manuale d’uso. Il mancato rispetto delle istruzioni comporta l'annullamento della
garanzia, può danneggiare l'unità o causare lesioni all'utilizzatore o al pubblico.
ATTENZIONE! Questo prodotto non può essere smaltito come rifiuto domestico.
Contattare il servizio di gestione rifiuti locale per le norme sullo smaltimento dei
dispositivi elettronici.

Pagina 83 di 117
Prima di iniziare
Kinta FX ILS Manuale dell'utente Rev. 5
Riproduzione di etichette sicurezza laser
Avviso di esposizione laser
Dati sull'emissione laser
Misurata in condizioni di misurazione IEC per la classificazione.
Dichiarazione di conformità del laser
Conforme agli standard di prestazione della FDA per i prodotti laser, salvo le deviazioni ai sensi del Laser
Notice No. 56, del 8 maggio 2019. Per mantenere questo prodotto in conformità con gli standard di
prestazione del laser non è richiesta alcuna manutenzione.
LUCE LASER EVITARE L'ESPOSIZIONE DIRETTA DEGLI OCCHI
È possibile trovare ulteriori informazioni e programmi di sicurezza per l'uso corretto dei laser nella
norma ANSI Z136.1 “For Safe Use of Lasers”, disponibile presso il Laser Institute of America:
www.lia.org. Molti governi locali, società, agenzie, enti militari e altri richiedono che tutti i laser
vengano usati conformemente alle linee guida ANSI Z136.1. È possibile ottenere assistenza in
merito tramite l'International Laser Display Association: www.ilda.com.
Classificazione laser Classe 3R
Lunghezza d'onda/alimentazione ottica del diodo laser rosso 650 nm/100 mW
Lunghezza d'onda/alimentazione ottica del diodo laser verde 520 nm/30 mW
Diametro del fascio <5 mm all’apertura
Dati impulso Tutti gli impulsi < 4 Hz (>0,25 sec)
Divergenza (ciascun fascio) <2 mrad
Divergenza (luce totale) <160 gradi
Potenza laser di ogni fascio dall'apertura <5 mW
LASER APERTURE
MODEL: KINTAFXILS
ITEM CODE: 10051879
FUSE: T 1 A, 250 V
POWER LINKING: 8 A (17 UNITS @ 120 V)
(33
UNITS @ 230 V)
ORIGIN: MADE IN CHINA
USA / CANADA
POWER: 100-125 VAC, 60 Hz
0.5 A, 25 W
WORLDWIDE
POWER: 100-240 VAC, 50/60 Hz
0.2-0.5 A, 24 W
THIS APPLIANCE MUST BE GROUNDED
CETTE UNITÉ DOIT ÊTRE RELIÉE À LA TERRE
USE ONLY FUSE OF SAME TYPE & RATING
N’UTILISER QUE DES FUSIBLES DU TYPE ET
DE L’AMPÉRAGE INDIQUÉ
NOT FOR HOUSEHOLD USE
IMPROPRE A L’USAGE DOMESTIQUE
DRY LOCATIONS
EMPLACEMENTS SECS
DISCONNECT POWER BEFORE SERVICING
DÉBRANCHER AVANT TOUT ENTRETIEN
FOR INDOOR USE ONLY
USAGE INTÉRIEUR UNIQUEMENT
WORLDWIDE HEADQUARTERS,
SUNRISE, FLORIDA USA
520/650nm
CW, <5mW
WARNING
Cancer and Reproductive Harm -
www.P65Warnings.ca.gov
IEC/EN60825-1:2014
!"#$%&'(
RoHS

Pagina 84 di 117
Kinta FX ILS Manuale dell'utente Rev. 5
Introduzione
2. Introduzione
Panoramica sul prodotto
Dimensioni del prodotto
ATTENZIONE! Nella porta USB collegare SOLO un D-Fi USB. In caso contrario l'unità
potrebbe danneggiarsi.
Ingresso/
uscita DMX
Porta-
fusibile
Ingresso
alimentazione Uscita
alimentazione
Indicatori LED
Anello di
sicurezza
LED SMD strobo
(x16)
Emissione
laser
Microfono
Manopola
sensibilità
Lenti effetto
Kinta (x24)
DMX
Sound
Auto
Slave
Display e pulsanti di controllo
<MENU> <UP> <DOWN> <ENTER>
Porta
USB
Sensore
IR
7,4 po
187 mm
7,4 po
187 mm
10,3 po
261 mm

Pagina 85 di 117
Impostazione
Kinta FX ILS Manuale dell'utente Rev. 5
3. Impostazione
Alimentazione CA
Kinta FX ILS può funzionare con un intervallo di tensione in ingresso compreso tra 100 e 240 V CA, 50/60
Hz. Per stabilire i requisiti di alimentazione del prodotto (interruttore, presa di corrente e cablaggio),
utilizzare il valore di corrente indicato sull'etichetta applicata sul pannello posteriore o fare riferimento alle
Specifiche Tecniche del prodotto. La corrente nominale riportata indica l'assorbimento medio di corrente
del prodotto in condizioni normali.
Sostituzione del fusibile
1. Scollegare l'unità dall’alimentazione.
2. Inserire la punta di un giravite a lama piatta nella fessura del portafusibili.
3. Estrarre il portafusibili dall'alloggiamento.
4. Rimuovere il fusibile bruciato dal supporto e sostituirlo con un altro dello stesso tipo e valore.
5. Reinserire il portafusibile e ricollegare l'alimentazione.
Collegamento in cascata
E' possibile collegare l'unità all'alimentazione tramite la presa situata nella parte posteriore. Per ulteriori
spiegazioni, vedere lo schema in basso.
Schema di collegamento in cascata
• Collegare sempre l'unità a un circuito protetto (sezionatore o fusibile). Per evitare il
rischio di folgorazione o di incendio, assicurarsi che l'unità abbia una messa a terra
elettrica adeguata.
• Per evitare che si usuri inutilmente e prolungarne la durata, quando non utilizzata,
scollegare completamente l'unità dall'alimentazione tramite l'interruttore o staccando la
spina.
Non collegare mai l'unità a un reostato (resistore variabile) o a un circuito dimmer, anche
se il reostato o il canale dimmer servono solo come interruttore da 0 a 100%.
Prima di sostituire il fusibile, scollegare l'unità dalla presa di alimentazione.
Sostituire sempre il fusibile bruciato con un altro dello stesso tipo e valore.
É possibile collegare fino a 17 prodotti Kinta FX ILS a 120 V o 33 a 230 V. Non superare mai
questo numero. I cavi di alimentazione possono essere acquistati separatamente.
Lo schema di collegamento in cascata mostrato sopra corrisponde SOLO alla versione
nordamericana dell’unità! Se si utilizza l'unità in altri paesi, è necessario consultare il
distributore Chauvet locale poiché i connettori e i requisiti di collegamento in cascata
possono essere differenti nel paese o regione di utilizzo.
Coperchio di sicurezza
Portafusibile di ricambio
(dentro il coperchio di sicurezza)
Fusibile inserito
(tenuto da una clip di plastica)
1° unità 2° unità 3° unitàSorgente di
alimentazione Ulteriori
unità

Pagina 86 di 117
Kinta FX ILS Manuale dell'utente Rev. 5
Impostazione
Montaggio
Prima di montare l'unità, leggere e seguire le raccomandazioni riportate nelle Note sulla sicurezza.
Orientamento
Lo Kinta FX ILS deve essere montato in posizione tale da garantire un utilizzo sicuro del laser. Inoltre,
assicurarsi che attorno all’unità sia prevista un'adeguata ventilazione.
Allestimento
• Prima di scegliere la posizione, assicurarsi sempre di poter accedere facilmente all’unità per
manutenzione e programmazione.
• Assicurarsi che la struttura o la superficie su cui si monta l'unità sia in grado di sostenerne il peso
(vedere le Specifiche Tecniche)
• Per il montaggio sospeso dell'unità, utilizzare sempre un cavo di sicurezza. Montare saldamente
l'unità su un punto di sospensione, quale una piattaforma elevata o un traliccio.
• Quando si monta l'unità su un traliccio, usare un morsetto con capacità di peso adeguata. La staffa
è dotata di foro da 13 mm, adatta a questo scopo.
• Le manopole di regolazione staffa consentono di orientare l'unità verso l'angolo desiderato.
Allentare o serrare le manopole della staffa solo manualmente. L'uso di attrezzi potrebbe
danneggiare le manopole.
Schema di montaggio
Uso corretto
Questo prodotto è destinato esclusivamente al montaggio sospeso. Per motivi di sicurezza, Chauvet
raccomanda di montare gli effetti luminosi su piattaforme rialzate e stabili o su robusti sostegni
sopraelevati utilizzando appositi morsetti. In tutti i casi, utilizzare cavi di sicurezza. Procurarsi la ferramenta
di montaggio adatta dal fornitore di articoli di illuminazione.
Le norme internazionali sulla sicurezza dei laser richiedono che i prodotti laser siano utilizzati nel
modo illustrato di seguito, con un minimo di 3 metri di separazione verticale tra il pavimento e la
luce laser più bassa. Inoltre, sono richiesti 3 metri di separazione orizzontale tra la luce laser e il
pubblico o altri spazi pubblici.
ATTENZIONE! L'uso di controlli, regolazioni o procedure diversi da quelli specificati in
questo Manuale d'uso può comportare l'esposizione a radiazioni pericolose.
Morsetto
Cavo di sicurezza
(come il CH-05 di Chauvet)
Staffa di montaggio
Manopola di regolazione
staffa (x2)
3 metri

Pagina 87 di 117
Impostazione
Kinta FX ILS Manuale dell'utente Rev. 5
Interblocco e chiavetta laser
Nei paesi al di fuori del Nord America, questa unità è dotata di un interblocco e di una chiavetta che
impediscono il funzionamento del laser, a meno che l'interblocco e la chiavetta siano entrambi inseriti e la
chiavetta sia in posizione ON.
Affinché il laser funzioni, è necessario ESEGUIRE ENTRAMBE LE OPERAZIONI:
• inserire l’interblocco
• inserire la chiavetta e ruotarla in posizione ON
In caso contrario il laser NON si attiva!
*Solo a scopo illustrativo
Quando si lascia questo prodotto incustodito, ruotare sempre la chiavetta in posizione
OFF e rimuoverla per evitare incidenti o lesioni a terzi.
Inserire l’interblocco Inserire la chiavetta E
ruotarla in posizione ON

Pagina 88 di 117
Kinta FX ILS Manuale dell'utente Rev. 5
Funzionamento
4. Funzionamento
Questo prodotto non è progettato per uso continuo. Per massimizzare la durata dei laser, assicurarsi di
effettuare pause regolari durante il funzionamento. Scollegare sempre Kinta FX ILS dall'alimentazione
quando non utilizzato.
Funzionamento del pannello di controllo
Per accedere alle funzioni del pannello di controllo, utilizzare i quattro pulsanti sotto il display. Per le
posizioni dei pulsanti sul pannello di controllo, fare riferimento alla Panoramica sul prodotto.
Mappa menu
Fare riferimento alla pagina del prodotto Kinta FX ILS su www.chauvetdj.com per la mappa dei menu più recente.
Configurazione (DMX)
Kinta FX ILS funziona con un controller DMX. Le informazioni relative al DMX si trovano in CHAUVET
DMX Primer, disponibile sul sito web di Chauvet http://www.chauvetlighting.com/downloads/
DMX_Primer_rev05_WO.pdf.
Caratteristiche DMX e indirizzo iniziale
Quando si seleziona un indirizzo iniziale DMX, considerare sempre il numero di canali DMX che la modalità
DMX selezionata utilizza. Se l'indirizzo iniziale è impostato su un valore troppo alto, l'accesso ad alcuni dei
canali dell’unità potrebbe essere limitato.
Kinta FX ILS utilizza fino a 9 canali DMX in modalità 9-Ch, che definisce il valore più alto dell'indirizzo
configurabile a 504.
Lo Kinta FX ILS utilizza 2 canali DMX in modalità 2-Ch, che definisce il valore più alto dell'indirizzo
configurabile a 511.
Per informazioni sul protocollo DMX, scaricare DMX Primer da www.chauvetdj.com.
Per selezionare la caratteristica DMX e l'indirizzo iniziale, procedere come segue:
1. Premere <MENU> ripetutamente fino a visualizzare sul display 2-Ch o 9-Ch.
2. Premere <ENTER>.
3. Utilizzare <UP> oppure <DOWN> per aumentare o diminuire l'indirizzo iniziale, da d 1–511.
4. Premere <ENTER>.
Pulsante Funzione
<MENU> Consente di uscire dal menù o dalla funzione corrente
<UP> Consente di spostarsi verso l'alto nell'elenco menù e di aumentare il valore numerico
all'interno di una funzione
<DOWN> Consente di spostarsi verso il basso nell'elenco menù e di diminuire il valore numerico
all'interno di una funzione
<ENTER>
Consente di attivare il menù visualizzato o impostare il valore selezionato nella funzione selezionata
Modalità Livelli di programmazione Descrizione
DMX 2-Ch d 1–511 Modalità DMX 4 canali
9-Ch d 1–504 Modalità DMX 9 canali
Colore
preimpostato
C-- C 1–15 Colori dell'effetto kinta preimpostati (vedere Colori e
Programmi)
Programma
automatico P-- P 1–7 FAdE Programmi automatici (vedere Colori e Programmi)
SnAP
Velocità S-- S. 01–99 Velocità del programma automatico
Sonoro attivo
Snd Snd1–7 Programmi sonori attivi (vedere Colori e Programmi)
Colore
personalizzato
u--
r000–255
Imposta manualmente i colori dell'effetto kinta
G000–255
b000–255
U000–255
F. 00–99 Imposta la velocità dello stroboscopio, da lento a veloce
Infrarossi SEt on Attivazione/disattivazione controllo infrarossi
oFF
Modalità ILS iLS iLS1–4 Imposta modalità ILS
Il display continuerà a lampeggiare finché l'apparecchiatura non riceverà un segnale DMX.

Pagina 89 di 117
Funzionamento
Kinta FX ILS Manuale dell'utente Rev. 5
Connettività D-Fi USB
Kinta FX ILS è in grado di trasformarsi in un ricevitore/trasmettitore wireless D-Fi utilizzando il D-Fi USB di
Chauvet DJ. È sufficiente impostare la caratteristica e l'indirizzo DMX dell’unità, impostare il
microinterruttore del canale di ricezione/trasmissione D-Fi e collegarla1 alla porta USB D-Fi.
Compatibilità USB D-Fi
Il D-Fi USB può ricevere un segnale DMX dal D-Fi Hub e dal FlareCON Air 2 e da altri prodotti D-Fi USB.
Configurazione (D-Fi USB)
1. Impostare caratteristica e indirizzo DMX sullo Kinta FX ILS.
2. Per impostare ENTRAMBI, utilizzare lo schema fornito:
• Il canale e
• L'opzione Ricezione o Trasmissione
NOTA: il microinterruttore 5 è per trasmissione o ricezione, scegliere con attenzione.
Canali microinterruttori D-Fi USB
ATTENZIONE! Nella porta USB collegare SOLO un D-Fi USB. In caso contrario l'unità
potrebbe danneggiarsi.
Dopo il collegamento, D-Fi USB prende il controllo del prodotto. DMX cablato, controllo
manuale del display / pulsanti del menù ed IRC-6 non saranno disponibili fino a quando
D-Fi USB non verrà scollegato. I livelli di priorità sono:
1. D-Fi USB
2. DMX cablato
3. Telecomando IRC-6
4. Display digitale manuale / Pulsanti del menù
C. 1234T/R C. 1234T/R C. 1234T/R C. 1234T/R
1919
210 210
311 311
412 412
513 513
614 614
715 715
816 816
Ricezione
Ricezione
Trasmissione
Trasmissione

Pagina 90 di 117
Kinta FX ILS Manuale dell'utente Rev. 5
Funzionamento
Assegnazioni e valori dei canali DMX
2-Ch 9-Ch Funzione Valore Percentuale/Impostazione
11
Programma automatico
(sovrascrive i can. 3-9)
000 009 Nessuna funzione
010 044 Kinta, laser, e strobo
045 079 Kinta e strobo
080 114 Kinta e laser
115 149 Laser e strobo
150 184 Solo kinta
185 219 Solo strobo
220 255 Solo laser
2 2 Velocità del programma 000 250
Velocità del programma automatico, lento a veloce
251 255 Programmi sonori attivi
– 3 Colori dell'effetto kinta
000 005 Nessuna funzione
006 020 Rosso
021 035 Verde
036 050 Blu
051 065 Bianco
066 080 Rosso e verde
081 095 Rosso e blu
096 110 Rosso e bianco
111 125 Verde e blu
126 140 Verde e bianco
141 155 Blu e bianco
156 170 Rosso, verde, e blu
171 185 Rosso. verde, e bianco
186 200 Verde, blu, e bianco
201 215 Rosso, verde, blu, e bianco
216 230 Chase automatica a 4 colori
231 255 Chase automatica a 7 colori
–4
Stroboscopio dell'effetto
kinta 000 005 Nessuna funzione
006 255 Stroboscopio dell'effetto kinta, lento a veloce
– 5 Motore dell'effetto kinta
000 Nessuna funzione
001 127 Indicizzazione motore dell'effetto kinta
128 255
Velocità del motore dell'effetto kinta, lento a veloce
– 6 Programma SMD strobo
000 009 Nessuna funzione
010 019 Programma SMD strobo 1, lento a veloce
020 029 Programma SMD strobo 2, lento a veloce
030 039 Programma SMD strobo 3, lento a veloce
040 049 Programma SMD strobo 4, lento a veloce
050 059 Programma SMD strobo 5, lento a veloce
060 069 Programma SMD strobo 6, lento a veloce
070 079 Programma SMD strobo 7, lento a veloce
080 089 Programma SMD strobo 8, lento a veloce
090 099 Programma SMD strobo 9, lento a veloce
100 109 Programma SMD strobo 10, lento a veloce
110 119 Programma SMD strobo 11, lento a veloce
120 129 Programma SMD strobo 12, lento a veloce
130 139 Programma SMD strobo 13, lento a veloce
140 149 Programma SMD strobo 14, lento a veloce
150 159 Programma SMD strobo 15, lento a veloce
160 169 Programma SMD strobo 16, lento a veloce
170 179 Programma SMD strobo 17, lento a veloce
180 255 Programma SMD strobo 18, lento a veloce

Pagina 91 di 117
Funzionamento
Kinta FX ILS Manuale dell'utente Rev. 5
Configurazione (indipendente)
Per la gestione senza controller DMX, impostare l'unità in una delle modalità indipendenti.
Effetto Kinta preimpostato
Per far funzionare Kinta FX ILS con un colore effetto kinta statico preimpostato, procedere come segue:
1. Premere <MENU> ripetutamente fino a visualizzare sul display C--.
2. Premere <ENTER>.
3. Utilizzare <UP> oppure <DOWN> per selezionare i colori desiderati, da C 1–15. (vedere Colori e
Programmi)
4. Premere <ENTER>.
Programmi automatici
Per far funzionare Kinta FX ILS con un programma automatico, attenersi alle istruzioni riportate di seguito.
1. Premere <MENU> ripetutamente fino a visualizzare sul display P--.
2. Premere <ENTER>.
3. Utilizzare <UP> oppure <DOWN> per selezionare il programma desiderato, da P 1–7. (vedere
Colori e Programmi)
4. Premere <ENTER>.
5. Utilizzare <UP> oppure <DOWN> per selezionare il modalità del programma, da FAdE
(dissolvenza) o SnAP (cambio veloce).
6. Premere <ENTER>.
Velocità programma automatico
Per impostare la velocità del programma automatico dello Kinta FX ILS, procedere come segue:
1. Premere <MENU> ripetutamente fino a visualizzare sul display S--.
2. Premere <ENTER>.
3. Utilizzare <UP> oppure <DOWN> per aumentare o diminuire la velocità, da S. 00–99 (lento a
veloce).
4. Premere <ENTER>.
–7
Colore laser
(C. 8 deve essere attivo per lo
stroboscopio)
000 009 Nessuna funzione
010 049 Rosso
050 089 Verde
090 129 Rosso e verde
130 169 Rosso e verde stroboscopico
170 209 Verde e rosso stroboscopico
210 255 Stroboscopio alternato rosso e verde
– 8 Stroboscopio laser
000 009 Nessuna funzione
010 254 Stroboscopio laser, lento a veloce
255 Stroboscopio laser sonori attivi
– 9 Rotazione laser
000 004 Fermare
005 127 Rotazione antioraria, lento a veloce
128 133 Fermare
134 255 Rotazione in senso orario, veloce a lento
Per la gestione manuale di LED e laser con controller DMX, impostare il canale 1 su 000
009.
Non collegare mai un prodotto che sta funzionando in una qualsiasi modalità indipendente
a una serie DMX collegata a un controller DMX. I prodotti in modalità indipendente possono
trasmettere segnali DMX che potrebbero interferire con i segnali DMX del controller.
2-Ch 9-Ch Funzione Valore Percentuale/Impostazione

Pagina 92 di 117
Kinta FX ILS Manuale dell'utente Rev. 5
Funzionamento
Programmi ad attivazione sonora
Per far funzionare Kinta FX ILS con un programma ad attivazione sonora, attenersi alle istruzioni riportate
di seguito.
1. Premere <MENU> ripetutamente fino a visualizzare sul display Snd.
2. Premere <ENTER>.
3. Utilizzare <UP> oppure <DOWN> per selezionare il programma desiderato, da Snd1–7. (vedere
Colori e Programmi)
4. Premere <ENTER>.
5. Avviare la musica e regolare la manopola di sensibilità audio fino a che l'unità inizia a funzionare a
tempo di musica.
Colori e Programmi
Effetto Kinta con colori personalizzati
Per far funzionare Kinta FX ILS con valori di colore e strobo personalizzati, procedere come segue:
1. Premere <MENU> ripetutamente fino a visualizzare sul display u--.
2. Premere <ENTER>.
3. Utilizzare <UP> oppure <DOWN> per aumentare o diminuire il valore dell’opzione corrente, da
• r000–255 (rosso)
• G000–255 (verde)
• b000–255 (blu)
•U000–255 (bianco) or
•F. 00–99 (stroboscopio effetto kinta).
4. Premere <ENTER> per passare da un'opzione all'altra.
5. Ripetere i passaggi 3 e 4 fino a impostare l'unità come desiderato.
• L'unità risponde solo alle basse frequenze della musica (basso e batteria).
• In modalità Attivazione sonora, dopo 3 secondi di silenzio o di rumore al di sotto del
livello di sensibilità impostato, il laser si spegne.
C-- Effetto P--/Snd Effetto
1Rosso 1Tutti gli effetti
2Verde 2Kinta e strobo
3Blu 3Kinta e laser
4Bianco 4Laser e strobo
5Rosso e verde 5Solo kinta
6Rosso e blu 6Solo strobo
7Rosso e bianco 7Solo laser
8Verde y blue
9Verde e bianco
10 Blu e bianco
11 Rosso, verde, e blu
12 Rosso, verde, e bianco
13 Rosso, blu, e bianco
14 Verde, blu, e bianco
15 Rosso, verde, blu, e bianco

Pagina 93 di 117
Funzionamento
Kinta FX ILS Manuale dell'utente Rev. 5
Telecomando a infrarossi IRC-6
È possibile utilizzare Kinta FX ILS con lo IRC-6 di CHAUVET. Per abilitare il controllo wireless IR, attenersi
alle istruzioni riportate di seguito.
1. Premere <MENU> ripetutamente fino a visualizzare sul display SEt.
2. Premere <ENTER>.
3. Utilizzare <UP> oppure <DOWN> per selezionare on oppure oFF.
4. Premere <ENTER>.
Funzionamento IRC-6
Modalità automatica
Per attivare la modalità automatica con il telecomando IRC-6:
1. Premere <AUTO> sullo IRC-6.
2. Premere <1>–<7> per selezionare il programma (vedere Colori e
Programmi).
Per regolare la velocità del programma automatico:
1. Premere <SPEED> sullo IRC-6.
2. Premere <+> or <–> per aumentare o diminuire la velocità.
Modalità attivazione sonora
Per attivare la modalità Attivazione sonora con il telecomando IRC-6:
1. Premere <SOUND> sullo IRC-6.
2. Premere <1>–<7> per selezionare il programma (vedere Colori e
Programmi).
Controllo manuale
Per selezionare manualmente il colore dell'effetto kinta con il telecomando IRC-6:
1. Premere il colore desiderato, da <R> (rosso), <G> (verde), <B> (blu), o
<W> (bianco).
Stroboscopio
Per impostare il stroboscopio con il telecomando IRC-6:
1. Premere <STROBE> sullo IRC-6.
2. Premere <+> or <–> per aumentare o diminuire la velocità stroboscopio.
Black Out
Per spegnere l'unità con il telecomando IRC-6:
1. Premere <BLACK OUT> sullo IRC-6.
In questo modo vengono spenti tutti i LED fino a quando il pulsante non sarà
premuto di nuovo.
NOTA: quando il Black Out è attivo, lo IRC-6 non risponde ad alcun segnale Se
l'unità non reagisce quando si preme un pulsante, provare a premere <BLACK
OUT>. È possibile che sia stato attivato il Black Out.
I pulsanti dello IRC-6 non elencati sopra sono destinati ad un uso futuro.
BLACK
OUT AUTO SOUND
SENSI-
TIVITY
SPEEDSTROBE
%MANUAL FADE
RGB
WUVA
+
0
-
123
654
789

Pagina 94 di 117
Kinta FX ILS Manuale dell'utente Rev. 5
Funzionamento
Modalità Master/Slave (cablato)
La modalità Master/Slave consente a un singolo Kinta FX ILS (“master”) di controllare il funzionamento di
uno o più Kinta FX ILS (“slave”) senza necessità di un controller DMX. L’unità master (principale) sarà
impostata per funzionare in modalità indipendente o con il telecomando IR, mentre le unità slave
(secondarie) saranno impostate per funzionare in modalità DMX. Una volta impostate e collegate, le unità
slave funzioneranno in sincronia con l’unità master.
Configurare le unità come indicato di seguito.
Unità slave:
1. Premere <MENU> ripetutamente fino a visualizzare sul display 9-Ch.
2. Premere <ENTER>.
3. Utilizzare <UP> oppure <DOWN> per impostare l'indirizzo iniziale su d 1.
4. Premere <ENTER>.
5. Collegare l'ingresso DMX della prima unità slave all'uscita DMX dell’unità master.
6. Collegare l'ingresso DMX delle successive unità slave all'uscita DMX dell'unità slave precedente.
7. Terminare l'impostazione e il collegamento di tutte le unità slave.
Unità master:
1. Impostare l'unità master per il funzionamento in modalità indipendente o con il telecomando IRC-6.
2. L’unità master deve essere la prima della serie DMX.
Modalità Master/Slave (D-Fi USB)
Il D-Fi USB consente a un singolo Kinta FX ILS (“master”) di controllare il funzionamento di uno o più
Kinta FX ILS (“slave”) senza necessità di un controller DMX o cavi DMX. L'unità master (trasmettitore)
sarà impostata per funzionare in modalità indipendente, mentre l'unità slave (ricevitore) sarà impostata per
funzionare in modalità DMX. Una volta impostate e collegate, le unità slave funzioneranno in sincronia con
l’unità master.
Configurare le unità come indicato di seguito.
Unità slave:
1. Premere <MENU> ripetutamente fino a visualizzare sul display 9-Ch.
2. Premere <ENTER>.
3. Utilizzare <UP> oppure <DOWN> per impostare l'indirizzo iniziale su d 1.
4. Premere <ENTER>.
5. Impostare il D-Fi USB per ricevere su un canale specifico, 1-16.
6. Collegare il D-Fi USB.
7. Terminare l'impostazione e il collegamento di tutte le unità slave.
Unità master:
1. Impostare l'unità master per il funzionamento in modalità indipendente.
2. Impostare il D-Fi USB per trasmettere sul canale D-Fi su cui le unità slave stanno ricevendo.
3. Collegare il D-Fi USB.
Modalità ILS
ILS (Sistema di illuminazione integrato) fornisce 4 modalità che si sincronizzano con la GigBAR MOVE+ILS: Modalità 1
e 3 si sincronizzano con il lato 1 della GigBAR MOVE+ILS, mentre le modalità 2 e 4 si sincronizzano con il lato 2 della
GigBAR MOVE+ILS. Quando collegati, gli effetti si sincronizzeranno con l’effetto più simile sul lato selezionato della
GigBAR MOVE+ILS: gli effetti Kinta si sincronizzeranno con uno dei Kinta, le teste mobili si sincronizzeranno con una
delle teste mobili, e gli effetti wash si sincronizzeranno con uno dei par. Gli effetti laser si sincronizzeranno con il laser e
gli effetti stroboscopici si sincronizzeranno con gli effetti stroboscopici indipendentemente dalla modalità ILS.
Questo prodotto si sincronizzerà con kinta sul lato selezionato di GigBAR MOVE+ILS, come anche con il
laser e le luci stroboscopiche.
Per impostare Kinta FX ILS in modo che risponda ad un segnale ILS:
1. Premere <MENU> ripetutamente fino a visualizzare sul display iLS_.
2. Utilizzare <UP> oppure <DOWN> per selezionare da iLS1 (lato 1), iLS2 (lato 2), iLS3 (lato 1), o
iLS4 (lato 2).
3. Premere <ENTER>.
• Configurare tutte le unità slave prima di collegare l’unità master alla serie.
• Non collegare mai un controller DMX a una serie DMX configurata per il funzionamento
Master/Slave perché il controller potrebbe interferire con i segnali della master.
• Non collegare più di 31 unità slave all’unità master.
• Tutte le unità devono avere la stessa impostazione della caratteristica DMX, lo stesso
indirizzo DMX e lo stesso canale D-Fi.
• Per trasmettere, configurare tutte le unità slave prima di configurare l’unità master
• Non collegare mai un controller DMX a un canale D-Fi configurato per il funzionamento
Master/Slave perché potrebbe interferire con i segnali del master.

Pagina 95 di 117
Manutenzione
Kinta FX ILS Manuale dell'utente Rev. 5
5. Manutenzione
Manutenzione dell’unità
L'accumulo di polvere riduce il rendimento luminoso e può causare surriscaldamento. Ciò può causare una
minor durata della sorgente luminosa e/o usura meccanica. Per mantenere prestazioni ottimali e
minimizzare l'usura, pulire le apparecchiature di illuminazione almeno due volte al mese. In ogni caso, è
bene tener presente che l'uso e le condizioni ambientali potrebbero essere fattori che incidono sulla
frequenza di pulizia.
Per pulire l’unità, attenersi alle istruzioni riportate di seguito:
1. Scollegare l'unità dalla presa di alimentazione.
2. Attendere che il prodotto sia a temperatura ambiente.
3. Usare un aspirapolvere (o aria compressa asciutta) e una spazzola morbida per rimuovere la
polvere formatasi sulla superficie e sulle bocchette di ventilazione esterne.
4. Pulire tutte le superfici trasparenti con una soluzione di sapone delicato, un detergente per vetri
senza ammoniaca o alcol isopropilico.
5. Applicare la soluzione direttamente su un panno di cotone morbido e privo di pelucchi o su un
pannetto per la pulizia delle lenti.
6. Rimuovere delicatamente polvere e sporcizia dalla superficie trasparente.
7. Lucidare delicatamente le superfici trasparenti fino ad eliminare opacità e pelucchi.
Dopo averle pulite, asciugare sempre con cura le superfici trasparenti.
Non far girare la ventola con aria compressa perché potrebbe essere danneggiata.

Pagina 96 di 117
Kinta FX ILS Manuale dell'utente Rev. 5
Specifiche Tecniche
6. Specifiche Tecniche
Dimensioni e Peso
Nota: le dimensioni sono state arrotondate.
Alimentazione
Lunghezza d'onda (Laser)
Lunghezza d'onda (Kinta)
Lunghezza d'onda (SMD Strobo)
Fotometrici
Termico
DMX
Ordinazione
Lunghezza Larghezza Altezza Peso
187 mm (7,4 po) 261 mm (10,3 po) 187 mm (7,4 po) 1,7 kg (3,8 lb)
Tipo di alimentazione Intervallo Selezione tensione
Commutazione (interna) 100 - 240 V CA, 50/60 Hz Commutazione automatica
Parametro 120 V, 60 Hz 230 V, 50 Hz
Consumo 25 W 24 W
Corrente di funzionamento 0,5 A 0,2 A
Corrente di collegamento in
cascata (prodotti) 8 A (17 prodotti 8 A (33 prodotti)
Fusibile T 1 A, 250 V T 1 A, 250 V
I/U alimentazione Stati Uniti/Mondo Regno unito/Europa
Connettore ingresso
alimentazione IEC IEC
Connettore uscita alimentazione Edison IEC
Spina cavo di alimentazione Edison (Stati Uniti) Spina locale
Tipo Alimentazione Lunghezza d'onda
Laser (rosso) 100 mW 650 nm
Laser (verde) 30 mW 520 nm
Tipo Color Quantità Alimentazione Corrente
Durata Nominale
LED Rosso 1 7,5 W 2,4 A 50000 ore
LED Verde 1 7,5 W 2,4 A 50000 ore
LED Blu 1 7,5 W 2,4 A 50000 ore
LED Bianco 1 7,5 W 2,4 A 50000 ore
Tipo Color Quantità Alimentazione Corrente
Durata Nominale
SMD LED Bianco 16 5 W 1.6 A 50000 ore
Frequenza stroboscopica Angolo di copertura
0 a 20 Hz 118°
Temp. minima esterna laser Temp. massima esterna laser Raffreddamento
59 °F (15 °C) 95 °F (35 °C) Convezione a ventola
Connettori I/U Gamma di canali
XLR a 3 pin 2 o 9
Nome prodotto Codice articolo Numero UPC
Kinta FX ILS 10051879 781462222277

Pagina 97 di 117
Resi
Kinta FX ILS Manuale dell'utente Rev. 5
Resi
Qualora sia necessario ottenere assistenza o restituire un prodotto:
• Per chi risiede negli Stati Uniti, contattare la sede centrale di Chauvet.
• Per chi risiede nel Regno Unito o in Irlanda, contattare Chauvet Europe Ltd.
• Per chi risiede in Benelux, contattare Chauvet Europe BVBA.
• Per chi risiede in Francia, contattare Chauvet France.
• Per chi risiede in Germania, contattare Chauvet Germany
• Per chi risiede in Messico, contattare Chauvet Mexico.
• Per chi risiede in qualsiasi altro paese, NON contattare Chauvet. Contattare il distributore locale.
Per i distributori al di fuori di Stati Uniti, Regno Unito, Irlanda, Benelux, Francia, Germania o
Messico, vedere www.chauvetdj.com.
Prima di spedire il prodotto, chiamare l'ufficio Assistenza Tecnica Chauvet corrispondente e richiedere un
numero di Autorizzazione al reso (RMA) . Prepararsi a fornire il numero del modello, il numero di serie e
una breve descrizione del motivo del reso.
Per inviare una richiesta di assistenza online, andare su www.chauvetdj.com/service-request.
Inviare la merce in porto franco, nella scatola originale con l'imballaggio originale e gli accessori. Chauvet
non emette etichette di reso prepagato.
Etichettare il pacco in modo chiaro con il numero di Autorizzazione al reso (RMA). Chauvet rifiuterà
qualsiasi reso privo del numero RMA.
Prima di spedire il prodotto, scrivere chiaramente le seguenti informazioni su un foglio di carta e metterlo
all'interno della scatola:
•Nome
• Indirizzo
• Numero di telefono
• Numero di Autorizzazione al reso (RMA)
• Breve descrizione del problema
Assicurarsi di imballare correttamente il prodotto. Eventuali danni da trasporto derivanti da un imballaggio
inadeguato saranno responsabilità del cliente. Si raccomanda l'imballaggio FedEx o il doppio imballaggio.
Per chi risiede fuori da Stati Uniti, Regno Unito, Irlanda, Benelux, Francia, Germania o
Messico, contattare il proprio distributore di riferimento e attenersi alle istruzioni su come
restituire i prodotti Chauvet. Per i dettagli di contatto, visitare il nostro sito web
www.chauvetdj.com.
Scrivere il numero RMA su un'etichetta correttamente applicata. NON scrivere il numero
RMA direttamente sulla scatola.
Chauvet si riserva il diritto di riparare o sostituire a propria discrezione i prodotti restituiti.

Pagina 98 di 117
Kinta FX ILS Manuale dell'utente Rev. 5
Contatti
Contatti
Al di fuori di Stati Uniti, Regno Unito, Irlanda, Benelux, Francia, Germania o Messico, contattare il
rivenditore di riferimento. Per richiedere assistenza o restituire un prodotto, seguire le istruzioni. Per i
dettagli di contatto, visitare il nostro sito web.
Informazioni generali Assistenza tecnica
Sede centrale Chauvet
Indirizzo: 5200 NW 108th Ave. Telefono: (844) 393-7575
Sunrise, FL 33351 Fax: (954) 756-8015
Telefono: (954) 577-4455 E-mail: [email protected]
Fax: (954) 929-5560
Numero verde: (800) 762-1084 Website: www.chauvetdj.com
Chauvet Europe Ltd
Indirizzo: Unit 1C E-mail: [email protected]
Brookhill Road Industrial Estate
Pinxton, Nottingham, UK Website: www.chauvetdj.eu
NG16 6NT
Telefono: +44 (0) 1773 511115
Fax: +44 (0) 1773 511110
Chauvet Europe BVBA
Indirizzo: Stokstraat 18 E-mail: BNLtec[email protected]
9770 Kruishoutem
Belgium Website: www.chauvetdj.eu
Telefono: +32 9 388 93 97
Chauvet France
Indirizzo: 3, Rue Ampère
91380 Chilly-Mazarin E-mail: [email protected]
France Website: www.chauvetdj.eu
Telefono: +33 1 78 85 33 59
Chauvet Germany
Indirizzo: Bruno-Bürgel-Str. 11
28759 Bremen E-mail: [email protected]
Germany Website: www.chauvetdj.eu
Telefono: +49 421 62 60 20
Chauvet Mexico
Indirizzo: Av. de las Partidas 34 - 3B
(Entrance by Calle 2) E-mail: [email protected]
Zona Industrial Lerma Website: www.chauvetdj.mx
Lerma, Edo. de México, CP 52000
Telefono: +52 (728) 690-2010

Pagina 99 van 117
Voordat tu begint
Kinta FX ILS Gebruikershandleiding Rev. 5
1. Voordat tu begint
Wat is er inbegrepen
Uitpakinstructies
Pak het product direct voorzichtig uit en controleer de doos om te controleren of alle onderdelen in de
verpakking zitten en in goede conditie zijn.
Claims
Als de doos of de inhoud (het product en meegeleverde accessoires) beschadigd zijn door de verzending
of tekenen van ruwe behandeling vertonen, laat dit dan onmiddellijk weten aan de vervoerder en niet aan
Chauvet. Als u dit niet tijdig doet, kan uw claim bij de vervoerder verlopen. Daarnaast moet u de
verpakking en al het verpakkingsmateriaal bewaren voor inspectie.
Voor andere problemen, zoals missende componenten of onderdelen, schade die niet is veroorzaakt door
de verzending, kunt u binnen 7 dagen na ontvangst een claim indienen bij Chauvet.
Tekstconventies
Symbolen
Disclaimer
Chauvet gelooft dat de informatie in deze handleiding in alle aspecten accuraat is. Chauvet aanvaardt
echter geen verantwoordelijkheid en wijst alle aansprakelijkheid af jegens enige partij voor enig verlies,
schade of storingen die worden veroorzaakt door fouten of omissies in dit document, ongeacht of
dergelijke fouten of omissies het gevolg zijn van nalatigheid, een ongeval of enige andere oorzaak.
Chauvet behoudt zich het recht voor om de inhoud van dit document te wijzigen zonder enige verplichting
om enig persoon of bedrijf van een dergelijke herziening te op de hoogte te stellen. Chauvet is echter niet
verplicht dergelijke herzieningen te maken. Download de nieuwste versie van www.chauvetdj.com.
Intellectueel eigendom
De auteursrechtelijk beschermde werken in deze handleiding, waaronder, maar niet beperkt tot, alle
ontwerpen, teksten en afbeeldingen, zijn eigendom van Chauvet.
© Copyright 2022 Chauvet & Sons, LLC. Alle rechten voorbehouden.
Elektronisch uitgegeven door Chauvet in de Verenigde Staten van Amerika.
CHAUVET, het Chauvet-logo, ILS (patent aangevraagd) en Kinta FX ILS zijn geregistreerde
handelsmerken of handelsmerken van Chauvet & Sons LLC (d/b/a Chauvet en Chauvet Lighting) in de
Verenigde Staten en andere landen. Hierin genoemde andere bedrijfs- en productnamen en logo's kunnen
handelsmerken zijn van hun betreffende bedrijven.
•KintaFXILS
• Stroomsnoer
• Gebruikershandleiding
Conventie Betekenis
1–512 Een reeks waarden
50/60 Een set waarden waarvan er slechts één gekozen kan worden
Settings Een menuoptie die niet gewijzigd kan worden
<ENTER> Een toets die op het bedieningspaneel van het product moet worden ingedrukt
ON Een waarde die ingevuld of geselecteerd moet worden
Symbool Betekenis
Waarschuwing elektriciteit. Het niet naleven van deze instructies kan leiden tot
elektrische schade aan het product, de accessoires of letsel van de gebruiker.
Kritieke installatie-, configuratie- of bedieningsinformatie. Het negeren van deze
informatie kan ervoor zorgen dat het product niet werkt, beschadigd raakt of leidt tot
letsel van de gebruiker.
Belangrijke installatie- of configuratie-informatie. Als deze informatie niet wordt gebruikt
kan het product net correct functioneren.
Nuttige informatie.
Veiligheidsinformatie voor de laser.

Pagina 100 van 117
Kinta FX ILS Gebruikershandleiding Rev. 5
Voordat tu begint
Veiligheidsinstructies
De Veiligheidsinstructies bevatten belangrijke veiligheidsinformatie met betrekking tot het lasersysteem.
Zorg dat u alle instructies hebt gelezen en begrepen voordat u de laser voor de eerste keer inschakelt. Het
kennen van deze veiligheidsinstructies is cruciaal voor het vermijden van oogletsel door de laser en het
overtreden van de wet. Bewaar deze gebruikershandleiding voor toekomstige naslag op een veilige plek.
STOP EN LEES EERST ALLE GEGEVENS
LASERVEILIGHEIDS
• Lasers kunnen gevaarlijk zijn en hebben unieke veiligheidsvoorschriften. Als lasers onjuist
worden gebruikt kan dit leiden tot permanent oogletsel en blindheid. Let goed op elke
veiligheidsKENMERK en elke WAARSCHUWING in deze gebruikershandleiding. Lees
VOORDAT u het apparaat gebruik zorgvuldig alle instructies.
• Sluit het product altijd aan op een geaard circuit om elektrocutierisico's uit te sluiten.
• Ontkoppel het product vóór het schoonmaken altijd eerst van de voedingsbron.
• Vermijd directe blootstelling van het oog aan de lichtbron als het product in werking is.
• Zorg ervoor dat het stroomsnoer niet knikt of beschadigd.
• Koppel het product nooit los van het stopcontact door aan het snoer te trekken of te rukken.
• Als het product boven het hoofd wordt geplaatst, moet u het altijd met een veiligheidskabel
vastmaken aan een bevestigingsmiddel.
• Controleer dat er tijdens gebruik geen ontvlambare materialen dichtbij het product staan.
• Raak de behuizing van het product tijdens gebruik niet aan, omdat het zeer warm kan worden.
• Dit product is niet bedoeld voor permanente installatie.
• Controleer altijd of de spanning van het stopcontact waar u het product op aansluit binnen het
bereik is dat staat vermeld op de sticker of het achterpaneel van het product.
• Het product is alleen geschikt voor gebruik binnenshuis! (IP20) Om het risico op brand en
schokken te vermijden mag u het product niet blootstellen aan regen of vocht.
• Installeer het product op een locatie met voldoende ventilatie, op ten minste 50 cm afstand van
aangrenzende oppervlakken.
• Zorg ervoor dat de ventilatiesleuven op de behuizing van het product nooit geblokkeerd worden.
• Sluit het product nooit aan op een dimmer.
• Vervang de zekering met een van hetzelfde type en met dezelfde waarde.
• Gebruik altijd de bevestigingsbeugel om het product te dragen.
• Schakel het product niet kort na elkaar aan/uit. Dit verlaagt de levensduur van de laserdiode.
• Schud het product niet door elkaar. Vermijd brute kracht bij het monteren of gebruiken van dit product.
• Gebruik ALTIJD een veiligheidskabel bij het boven het hoofd plaatsen van het product.
• De omgevingstemperatuur bedrijfstemperatuur voor de laser 59 °F tot 95 °F (15 °C tot 35 °C).
Gebruik dit product niet buiten dit bereik.
• Stop direct met het gebruik van het product in geval van ernstige gebruiksproblemen.
LET OP! Het gebruik van bedieningselementen, wijzigingen of procedures anders dan DIE
zijn gespecificeerd IN DEZE GEBRUIKERSHANDLEIDING, kan leiden tot blootstelling aan
gevaarlijke straling.
• Vermijd direct oogcontact met het laserlicht. Nooit uw ogen of die van anderen opzettelijk
blootstellen aan direct laserlicht.
• Dit laserproduct kan mogelijk direct oogletsel of blindheid veroorzaken als het laserlicht direct
op de ogen valt.
•
Het is illegaal en gevaarlijk om deze laser direct in publieksgebieden te schijnen, waar het publiek
of ander personeel directe laserstralen of heldere reflecties in hun ogen kunnen krijgen.
• In de VS is het een misdrijf om een laser op een vliegtuig te richten.
•
Het gebruik van bedieningselementen, wijzigingen of procedures anders dan die zijn gespecificeerd
in deze gebruikershandleiding, kan leiden tot blootstelling aan gevaarlijke straling.
• Sluit om onnodige slijtage te verhinderen en de levensduur te verlengen tijdens periodes van
niet-gebruik het product via stroomonderbreker of de stekker volledig van stroom af.
• Probeer het product NOOIT zelf te repareren. Reparaties en onderhoud moeten worden
uitgevoerd door een bevoegd monteur. Onbevoegde aanpassingen aan het product zijn om
veiligheidsredenen verboden!
Bewaar deze gebruikershandleiding voor toekomstige naslag. Wanneer het product eigendom
wordt van een andere gebruiker, moet dit document bij de laser worden bewaard.

Pagina 101 van 117
Voordat tu begint
Kinta FX ILS Gebruikershandleiding Rev. 5
Niet-bevestigde waarschuwing op de behuizing
Veiligheidsinstructies voor de laser
Laserlicht verschilt van elk ander licht. Laserlicht kan oogletsel veroorzaken als het product niet goed is
ingesteld en niet goed wordt gebruikt. Laserlicht is duizend maal geconcentreerder dan elk ander soort
licht. Deze concentratie kan door het verbranden van het netvlies direct oogletsel veroorzaken (het
lichtgevoelige deel aan de achterzijde van het oog). De warmte van laserlicht is niet voelbaar, maar het is
voldoende om gebruikers van het product en het publiek te verwonden of te verblinden. Zelfs zeer kleine
hoeveelheden laserlicht kunnen op grote afstand nog gevaarlijk zijn.
Neem NOOIT aan dat blootstelling aan een individueel laserlicht veilig is, zelfs niet een kleine straal die is
afgesplitst van een grotere straal. Dit laserproduct gebruikt tientallen milliwatt aan laservermogen —Klasse
3B-niveaus intern—en verdeelt ze in eerdere stralen—Klasse 3R-niveaus. De individuele bundels van
Klasse 3R-niveau zijn mogelijk gevaarlijk voor de ogen.
Neem NOOIT aan dat bewegend laserlicht veilig is. Laserlicht is nooit zonder risico. Aangezien er op elk
moment oogletsel kan ontstaan, is het van kritiek belang om de kans op ELKE directe blootstelling van het
oog te vermijden. In overeenstemming met veiligheidsvoorschriften voor lasers, is het niet legaal om lasers
van Klasse 3R te richten op gebieden waar mensen blootgesteld kunnen worden, zelfs als de laser onder
het gezicht van mensen is gericht, zoals op een dansvloer.
• Dit apparaat bevat intern laserapparaten met hoog vermogen.
• Maak de laserbehuizing niet open, door mogelijke blootstelling aan onveilige laserstralingsniveaus.
• Het vermogen van de laser, dat toegankelijk is als het apparaat is geopend, kan directe
blindheid, brandwonden en branden veroorzaken.
STOP EN LEES ALLE HIERONDER INSTRUCTIES
LASERVEILIGHEIDS
• Gebruik de laser niet zonder eerst alle veiligheidsinformatie en technische gegevens in deze
handleiding gelezen en begrepen te hebben.
•
Alle lasereffecten moeten ALTIJD worden opgesteld en geplaatst zodat het laserlicht ten minste 3 meter
boven de vloer is waar mensen op staan. Zie de paragraaf Correct gebruik van deze handleiding.
• Na instelling, en voor openbaar gebruik, moeten de lasers getest worden om te controleren of
ze goed functioneren. Dit product niet gebruiken als er een storing is gedetecteerd.
• De laser NIET gebruiken als het slechts een of twee bundels emitteert, in plaats van tientallen/
honderden, aangezien dit aangeeft dat er schade is aan het optische element van het
diffractierooster en emissie van laserniveaus hoger dan Klasse 3R mogelijk maakt.
• Richt lasers NOOIT op mens of dier.
• Kijk NOOIT direct in de laseropening of laserstraal.
• Richt lasers NOOIT op gebieden waar mensen er aan kunnen worden blootgesteld.
• Richt lasers NOOIT op sterk reflecterende oppervlakken, zoals ramen, spiegels en glimmend
metaal. Zelfs laserreflecties kunnen gevaarlijk zijn.
• Richt een laser nooit op een vliegtuig; dat is een misdrijf.
• Richt nooit oneindige laserstralen op de open lucht.
• Stel de optische uitgangselementen (opening) niet bloot aan agressieve chemische
schoonmaakmiddelen.
• De laser niet gebruiken als de behuizing is beschadigd, open is, of als de optische onderdelen
op wat voor wijze dan ook beschadigd lijken.
•
De behuizing van de laser nooit openen. Het hoge vermogen van de laser binnen de beschermende
behuizing kan brand veroorzaken of de huid verbranden en zal leiden tot direct oogletsel.
• Laat dit product nooit onbemand draaien.
• Het gebruik van een lasershow van Klasse 3R is alleen toegestaan als de lasers worden
gebruikt door een geschoolde en goed getrainde professional die bekend is met de gegevens
die zijn opgenomen in deze handleiding.
• De wettelijke vereisten voor het gebruik van laserproducten voor amusement verschillen van
land tot land. De gebruiker is zelf verantwoordelijk voor de wettelijke vereisten in de locatie/het
land van gebruik.
LET OP! Gebruik dit apparaat niet op een andere wijze dan is vermeld in deze
gebruikershandleiding. Het niet volgen van de instructies zal de garantie doen vervallen,
kan het product beschadigen of de gebruiker of het publiek verwonden.
LET OP! Dit product mag niet worden afgevoerd met het huishoudelijk afval. Neem contact
op met uw plaatselijke afvalbeheerdienst voor regelgeving met betrekking tot elektronisch
afval in uw gebied.

Pagina 102 van 117
Kinta FX ILS Gebruikershandleiding Rev. 5
Voordat tu begint
Reproductie van veiligheidsetiket voor de laser
Blootstellingswaarschuwing van de laser
Emissiegegevens van de laser
Zoals gemeten onder IEC-meetomstandigheden voor classificatie.
Nalevingsverklaring van de laser
Dit laserproduct voldoet aan EN/IEC 60825-1: 2014, en U.S. FDA/CDRH FLPPS via de voorwaarden van
Laser Notice nr. 56 gedateerd op 8 mei 2019. Dit laserapparaat is geclassificeerd als 3R. Er is geen
onderhoud nodig om dit product in overeenstemming te houden van de laserprestatienormen.
VERMIJD DIRECTE BLOOTSTELLING AAN LASERLICHT
Verdere richtlijnen en veiligheidsprogramma's voor het veilige gebruik van lasers zijn te vinden in
de ANSI Z136.1 Standaard “voor het veilige gebruik van lasers”, beschikbaar bij het Laser
Institute of America: www.lia.org. M Vele plaatselijke overheden, bedrijven, agentschappen,
legers en andere instanties vereisen allemaal dat lasers worden gebruikt onder de richtlijnen van
ANSI Z136.1. De richtlijn voor laservertoning kan worden verkregen via de International Laser
Display Association: www.ilda.com.
Laserclassificatie Klasse 3R
Rode laserdiode golflengte/optische vermogen 650 nm/100 mW
Groene laserdiode golflengte/optische vermogen 520 nm/30 mW
Diameter van de straal <5 mm bij de opening
Pulsgegevens Alle pulsen < 4 Hz (>0,25 sec)
Divergentie (elke straal) <2 mrad
Divergentie (totale licht) <160 graden
Laservermogen van elke straal vanaf de opening
<5 mW
LASER APERTURE
MODEL: KINTAFXILS
ITEM CODE: 10051879
FUSE: T 1 A, 250 V
POWER LINKING: 8 A (17 UNITS @ 120 V)
(33 UNITS @ 230 V)
ORIGIN: MADE IN CHINA
USA / CANADA
POWER: 100-125 VAC, 60 Hz
0.5 A, 25 W
WORLDWIDE
POWER: 100-240 VAC, 50/60 Hz
0.2-0.5 A, 24 W
THIS APPLIANCE MUST BE GROUNDED
CETTE UNITÉ DOIT ÊTRE RELIÉE À LA TERRE
USE ONLY FUSE OF SAME TYPE & RATING
N’UTILISER QUE DES FUSIBLES DU TYPE ET
DE L’AMPÉRAGE INDIQUÉ
NOT FOR HOUSEHOLD USE
IMPROPRE A L’USAGE DOMESTIQUE
DRY LOCATIONS
EMPLACEMENTS SECS
DISCONNECT POWER BEFORE SERVICING
DÉBRANCHER AVANT TOUT ENTRETIEN
FOR INDOOR USE ONLY
USAGE INTÉRIEUR UNIQUEMENT
WORLDWIDE HEADQUARTERS,
SUNRISE, FLORIDA USA
520/650nm
CW, <5mW
WARNING
Cancer and Reproductive Harm -
www.P65Warnings.ca.gov
IEC/EN60825-1:2014
!"#$%&'(
RoHS

Pagina 103 van 117
Inleiding
Kinta FX ILS Gebruikershandleiding Rev. 5
2. Inleiding
Productoverzicht
Productafmetingen
Waarschuwing! NIETS anders dan een D-Fi-USB in de USB-poort plaatsen. Dit kan het
product namelijk beschadigen.
SMD-LED-
Stroboscopen (x16)
Kinta-effect
lenzen (x24)
USB
poort
IR-
sensor
LED-indicatoren
DMX
Geluid
Auto
Slave
Display en bedieningsknoppen
<MENU> <UP> <DOWN> <ENTER>
Laser
uitvoer Stroom
ingang Zekering
houder
Microfoon
Gevoeligheids
knop
DMX
in/uitgang
Veiligheidslus
Vermogens
uitgang
7,4 in
187 mm
7,4 in
187 mm
10,3 in
261 mm

Pagina 104 van 117
Kinta FX ILS Gebruikershandleiding Rev. 5
Instelling
3. Instelling
AC-stroom
De Kinta FX ILS heeft een voeding met automatisch bereik, die kan werken met een ingangsspanning van
100 tot 240 VAC, 50/60 Hz. Om de vermogensvereisten te bepalen van het product (aardlekschakelaar,
stopcontact en bedrading), moet de huidige waarde worden gebruikt die staat vermeld op het etiket dat is
bevestigd aan het achterpaneel van het product of moet Technische Specificaties in deze handleiding
geraadpleegd worden. Het gemelde spanningsvermogen geeft het gemiddelde stroomverbruik aan onder
normale omstandigheden.
Vervangen van de zekering
1. Ontkoppel het apparaat van de stroom.
2. Wig de punt van een platte schroevendraaier in de sleuf van de zekeringhouder.
3. Druk de zekeringhouder uit de behuizing.
4. Haal de doorgebrande zekering uit de houder en vervangen met een zekering van hetzelfde type
en met dezelfde waarde.
5. Plaats de zekeringhouder terug en steek de stekker er weer in.
Power Linking
Het product levert power linking via de Edison uitlaat gelegen aan de achterkant van het product. Zie het
onderstaande diagram voor verdere uitleg.
Power Linking Diagram
• Sluit het product altijd aan op een beschermd circuit (aardlekschakelaar of zekering).
Zorg ervoor dat het product voldoende elektrisch is geaard om het risico op
elektrocutie of brand te vermijden.
•
Sluit om onnodige slijtage te verhinderen en de levensduur te verlengen tijdens periodes
van niet-gebruik het product via stroomonderbreker of de stekker volledig van stroom af.
Sluit het product nooit aan op een reostaat (variabele weerstand) of dimmercircuit, zelfs
als het reostaat- of dimmerkanaal alleen dient als een 0 tot 100%-schakelaar dient.
Ontkoppel het product van de stroom uit voordat u de zekering vervangt.
Vervang de zekering met een van hetzelfde type en met dezelfde waarde.
Het is mogelijk tot maximaal 17 Kinta FX ILS-producten koppelen aan 120 V of 33
producten aan 230 V. Overschrijd dit aantal nooit. Stroomkabels kunnen afzonderlijk
worden gekocht.
Het bovenstaande power linking-diagram toont alleen de Noord-Amerikaanse versie van
het product! Power linking-stekkers en vereisten verschillen van land tot land, en van
gebied tot gebied. Als u het product buiten Noord-Amerika gebruikt, raadpleeg dan de
plaatselijke Chauvet-distributeur.
Beveiligingskap
Reserve zekeringhouder
(binnen beveiligingskap)
Geplaatste zekering
(vastgezet met plastic
beveiligingskap)
Voedingsbron 1e product 2e product 3e product Aanvullende
producten

Pagina 105 van 117
Instelling
Kinta FX ILS Gebruikershandleiding Rev. 5
Montage
Vóór montage van het product moet u de veiligheidsaanbevelingen lezen en volgen die zijn aangegeven in
de Veiligheidsinstructies.
Oriëntatie
De Kinta FX ILS-producten moeten worden gemonteerd in een positie volgens de planning voor veilig
lasergebruik. Daarnaast moet er in voldoende ventilatie rond het product zijn voorzien.
Opbouw
• Vóór het nemen van een besluit over de locatie van het product, moet u er altijd voor zorgen dat er
eenvoudige toegang is tot het product, voor onderhoud en programmering.
• Controleer of de constructie of het oppervlak waar u het product op monteert het gewicht van het
product kan dragen (zie Technische Specificaties).
•
Gebruik altijd een veiligheidskabel wanneer het product boven lichaamshoogte wordt gemonteerd (zoals CH-05
van Chauvet). Monteer het product stevig aan een bevestigingspunt, zoals een verhoogd platform of een spant.
• Bij het opbouwen van het product op een spant, moet u een montageklem gebruiken met voldoende
draagvermogen. De beugel heeft een gat van 13 mm, die geschikt is voor dit doeleinde.
• De verstelknoppen van de beugel zorgen voor directionele verstelling bij het richten van het product
naar de gewenste hoek. Maak de beugelknoppen alleen met de hand los of vast. Het gebruik van
gereedschap kan de knoppen beschadigen.
Montagediagram
Correct gebruik
Dit product is alleen geschikt voor gebruik boven lichaamshoogte. Voor veiligheidsdoeleinden raadt
Chauvet aan om lichteffectproducten te bevestigen aan stabiele verhoogde platformen of stevige
overhangende steunen, met geschikte hangklemmen. Gebruik in alle gevallen veiligheidskabels. Haal
geschikte bevestigingsapparatuur bij uw verlichtingsleverancier.
Internationale regelgeving omtrent veiligheid rond lasers, vereist dat laserproducten moeten
worden bediend op de wijze die hieronder is geïllustreerd, met minimaal 3 meter verticale
scheiding tussen de vloer en het laagste laserlicht. Daarnaast is 3 meter horizontale scheiding
vereist tussen laserlicht en het publiek of ruimtes met publiek.
LET OP! Het gebruik van bedieningselementen, wijzigingen of procedures anders dan DIE
zijn gespecificeerd IN DEZE GEBRUIKERSHANDLEIDING, kan leiden tot blootstelling aan
gevaarlijke straling.
Montageklem
Veiligheidskabel
(zoals de CH-05 van Chauvet)
Montagebeugel
Instelknop van
de beugel (x2)
3 meter

Pagina 106 van 117
Kinta FX ILS Gebruikershandleiding Rev. 5
Instelling
Vergrendeling en sleutel
Indien het buiten Noord-Amerika wordt gekocht, heeft dit product een vergrendeling en sleutel om te
vermijden dat de laser werkt, tenzij de vergrendeling en de sleutel beiden worden geplaatst en de sleutel
naar de AAN-stand wordt gedraaid.
Voordat de laser werkt MOET U ZOWEL:
• De vergrendeling plaatsen
• De sleutel plaatsen en naar de AAN-stand draaien
Als deze beide handelingen niet uitgevoerd worden, zal de laser niet inschakelen!
*Alleen voor illustratieve doeleinden
De sleutel naar de UIT-stand draaien en het verwijderen wanneer dit product onbeheerd
wordt achtergelaten om ongelukken of letsel aan derden te vermijden.
De vergrendeling plaatsen De sleutel plaatsen en naar
de AAN-stand draaien

Pagina 107 van 117
Werking
Kinta FX ILS Gebruikershandleiding Rev. 5
4. Werking
Dit product is niet ontworpen voor onafgebroken gebruik. Zorg dat er regelmatige pauzes zijn tijdens het
gebruik, om de levensduur van uw laser te maximaliseren. Ontkoppel de Kinta FX ILS altijd van de stroom
als het niet in gebruik is.
Werking van het bedieningspaneel
Voor toegang tot de functies van het bedieningspaneel gebruikt u de vier knoppen onder het display.
Raadpleeg het Productoverzicht om de locaties van de toetsen op het bedieningspaneel te zien.
Menu Map
Raadpleeg de productpagina van Kinta FX ILS op
www.chauvetdj.com
voor de nieuwste menukaart.
Configuratie (DMX)
De Kinta FX ILS werkt met een DMX-regelaar. Informatie over DMX staat in het DMX-basishandboek van
CHAUVET, dat beschikbaar is op de website van Chauvet onder http://www.chauvetlighting.com/
downloads/DMX_Primer_rev05_WO.pdf.
DMX-persoonlijkheid en startadres
Bij het selecteren van een startend DMX-adres, moet u altijd denken aan het aantal DMX-kanalen die de
geselecteerde DMX-modus gebruikt. Als u een startadres gebruikt dat te hoog is, kunt u toegang aan
enkele productkanalen beperken.
De Kinta FX ILS gebruikt tot 9 DMX-kanalen in 9-Ch-modus, wat bepaalt dat het hoogst configureerbare
adres 504 is.
De Kinta FX ILS gebruikt 2 DMX-kanalen in 2-Ch-modus, wat bepaalt dat het hoogst configureerbare
adres 511 is.
Als u niet bekend bent met het DMX-protocol, download dat de DMX-primer van www.chauvetdj.com.
Om het persoonlijkheid en startadres te selecteren doet u het volgende:
1. Druk op <MENU> totdat 2-Ch of 9-Ch weergegeven wordt op het display.
2. Druk op <ENTER>.
3. Gebruik <UP> of <DOWN> om het startadres te selecteren, van d 1–511.
4. Druk op <ENTER>.
Toet Functie
<MENU> Selecteert een bedieningsmodus of verlaat de huidige menu-optie
<UP> Drukken om omhoog te bladeren in de optielijst of een hogere waarde te vinden
<DOWN> Drukken om omlaag te bladeren in de optielijst of een lagere waarde te vinden
<ENTER> Drukken om een menu-optie of een geselecteerde waarde te vinden
Modus Programmeerniveaus Beschrijving
DMX 2-Ch d 1–511 4-kanaals DMX-modus
9-Ch d 1–504 9-kanaals DMX-modus
Vooringestelde
kleur C-- C 1–15 Vooringestelde kinta-effectkleuren (zie Kleuren en
programma’s)
Automatisch
programma P-- P 1–7 FAdE Automatische programma’s (zie Kleuren en
programma’s)
SnAP
Program speed S-- S. 01–99 Automatisch programmasnelheid
Snelheid Snd Snd1–7 Geluidsactieve programma’s (zie Kleuren en
programma’s)
Geluidsactief
programma
u--
r000–255
Stelt handmatige kinta-effectkleuren
Aangepaste
kleur
G000–255
b000–255
U000–255
F. 00–99 Stelt stroboscoop snelheid, langzaam tot snel
SEt on Schakelt infraroodbesturing in/uit
Infrarood oFF
iLS iLS1–4 Sets ILS mode
Het display blijft knipperen totdat de armatuur een DMX-signaal ontvangt.

Pagina 108 van 117
Kinta FX ILS Gebruikershandleiding Rev. 5
Werking
D-Fi USB-connectiviteit
De Kinta FX ILS kan door middel van de D-Fi USB van Chauvet DJ een draadloze D-Fi-zender/ontvanger
worden. Stel simpelweg de DMX-persoonlijkheid en het DMX-adres is, stel het DIP switch D-Fi-ontvangst/
zendkanaal in, en sluit hem daarna aan op de D-Fi USB-poort.
D-Fi USB-compatibiliteit
De D-Fi USB kan een DMX-signaal vanaf de D-Fi Hub en de FlareCON Air 2 ontvangen evenals vanaf
andere D-Fi USB-producten.
Configuratie (D-Fi USB)
1. Stel de DMX-persoonlijkheid en het DMX-adres op de Kinta FX ILS in.
2. Gebruik de tabel voor het instellen van ZOWEL:
• Het kanaal en daarna
• De ontvangst- en zendoptie
LET OP: DIP Switch 5 is voor verzenden OF ontvangen, dus kies zorgvuldig.
D-Fi USB DIP Switch-kanalen
Waarschuwing! NIETS anders dan een D-Fi-USB in de USB-poort plaatsen. Dit kan het
product namelijk beschadigen.
Nadat het is aangesloten zal de D-Fi USB het product overnemen. Bedrade DMX,
handmatige DMX-bediening/menuknoppen en IRC-6 zijn niet beschikbaar totdat u de D-Fi
USB afkoppelt. De prioriteitsniveaus zijn:
1. D-Fi USB
2. Bedrade DMX
3. IRC-6 afstandsbediening
4. Handmatige digitale display/menuknoppen
K. 1234O/V K. 1234O/V K. 1234O/V K. 1234O/V
1919
210 210
311 311
412 412
513 513
614 614
715 715
816 816
Ontvangen
Ontvangen
Verzenden
Verzenden

Pagina 109 van 117
Werking
Kinta FX ILS Gebruikershandleiding Rev. 5
DMX-kanaaltoewijzingen en waarden
2-Ch 9-Ch Functie Waarde Procent/Instelling
11
Automatisch programma
(overschrijft K. 3-9)
000 009 Geen functie
010 044 Kinta, laser, en stroboscoop’s
045 079 Kinta en stroboscoop’s
080 114 Kinta en laser
115 149 Laser en stroboscoop’s
150 184 Alleen kinta
185 219 Alleen stroboscoop’s
220 255 Alleen laser
2 2 Programmasnelheid 000 250
Automatisch programmasnelheid, langzaam tot snel
251 255 Geluidsactief programma
– 3 Kinta-effectkleur
000 005 Geen functie
006 020 Rood
021 035 Groen
036 050 Blauw
051 065 Wit
066 080 Rood en groen
081 095 Rood en blauw
096 110 Rood en wit
111 125 Groen en blauw
126 140 Groen en wit
141 155 Blauw en wit
156 170 Rood, groen, en blauw
171 185 Rood, groen, en wit
186 200 Groen, blauw, en wit
201 215 Rood, green, blauw, en wit
216 230 Automatische 4-kleuren achtervolging
231 255 Automatische 7-kleuren achtervolging
– 4 Kinta-effect-stroboscoop 000 005 Geen functie
006 255 Kinta-effect-stroboscoop, langzaam tot snel
– 5 Kinta-effect-motor
000 Geen functie
001 127 Kinta-effect-motor indexeren
128 255 Kinta-effect-motor snelheid, langzaam tot snel
–6
SMD-stroboscopen
programma
000 009 Geen functie
010 019 Stroboscopen programma 1, langzaam tot snel
020 029 Stroboscopen programma 2, langzaam tot snel
030 039 Stroboscopen programma 3, langzaam tot snel
040 049 Stroboscopen programma 4, langzaam tot snel
050 059 Stroboscopen programma 5, langzaam tot snel
060 069 Stroboscopen programma 6, langzaam tot snel
070 079 Stroboscopen programma 7, langzaam tot snel
080 089 Stroboscopen programma 8, langzaam tot snel
090 099 Stroboscopen programma 9, langzaam tot snel
100 109 Stroboscopen programma 10, langzaam tot snel
110 119 Stroboscopen programma 11, langzaam tot snel
120 129 Stroboscopen programma 12, langzaam tot snel
130 139 Stroboscopen programma 13, langzaam tot snel
140 149 Stroboscopen programma 14, langzaam tot snel
150 159 Stroboscopen programma 15, langzaam tot snel
160 169 Stroboscopen programma 16, langzaam tot snel
170 179 Stroboscopen programma 17, langzaam tot snel
180 255 Stroboscopen programma 18, langzaam tot snel

Pagina 110 van 117
Kinta FX ILS Gebruikershandleiding Rev. 5
Werking
Configuratie (zelfstandig)
Plaatst het product in een van de zelfstandige modi om te bedienen zonder een DMX-regelaar.
Vooringesteld kinta-effect
Om de Kinta FX ILS met een statisch vooringesteld kinta-effectkleur te laten lopen, doet u het volgende:
1. Druk herhaaldelijk op <MENU> totdat C-- weergegeven wordt op het display.
2. Druk op <ENTER>.
3. Gebruik <UP> of <DOWN> om het gewenste kleuren te selecteren, van C 1–15. (zie Kleuren en
programma’s)
4. Druk op <ENTER>.
Automatische Programma’s
Om de Kinta FX ILS met een automatisch programma te laten lopen, volg onderstaande instructies.
1. Druk herhaaldelijk op <MENU> totdat P-- weergegeven wordt op het display.
2. Druk op <ENTER>.
3. Gebruik <UP> of <DOWN> om het gewenste programma te selecteren, van P 1–7. (zie Kleuren
en programma’s)
4. Druk op <ENTER>.
5. Gebruik <UP> of <DOWN> om de programmamodus te selecteren, van FAdE (vervagende) of
SnAP (snelle verandering).
6. Druk op <ENTER>.
Automatisch Programmasnelheid
Om de automatisch programmasnelheid van het Kinta FX ILS te stellen, doet u het volgende:
1. Druk herhaaldelijk op <MENU> totdat S-- weergegeven wordt op het display.
2. Druk op <ENTER>.
3. Gebruik <UP> of <DOWN> om de snelheid te verhogen of te verlagen, van S. 00–99 (langzaam
tot snel).
4. Druk op <ENTER>.
–7
Laserkleur
(K. 8 moet actief zijn om de
stroboscoop
000 009 Geen functie
010 049 Rood
050 089 Groen
090 129 Rood en groen
130 169 Rood en stroboscoop groen
170 209 Groen en stroboscoop rood
210 255 Rood en groen wisselende stroboscoop
– 8 Laser-stroboscoop
000 009 Geen functie
010 254 Laserstroboscoop, langzaam tot snel
255 Geluidsactief laserstroboscoop
– 9 Laser-rotatie
000 004 Stop
005 127 Rotatie tegen de klok, langzaam tot snel
128 133 Stop
134 255 Rotatie met de klok, snel tot langzaam
Voor handmatige bediening van LED's en lasers met DMX-regeling, stel kanaal 1 in op 000
009.
Sluit nooit een product, die in een zelfstandige modus werkt, aan op een DMX-rij die is
verbonden aan een DMX-regelaar. Producten in zelfstandige modus kunnen DMX-signalen
verzenden die de DMX-signalen van de regelaar verstoren.
2-Ch 9-Ch Functie Waarde Procent/Instelling

Pagina 111 van 117
Werking
Kinta FX ILS Gebruikershandleiding Rev. 5
Geluidsactieve Programma’s
Om de Kinta FX ILS met een geluidsactief programma te laten lopen, volg onderstaande instructies.
1. Druk herhaaldelijk op <MENU> totdat Snd weergegeven wordt op het display.
2. Druk op <ENTER>.
3. Gebruik <UP> of <DOWN> om het gewenste programma te selecteren, van Snd1–7. (zie Kleuren
en programma’s)
4. Druk op <ENTER>.
5. Zet de muziek aan en stel de geluidsgevoeligheidsknop in totdat het product begint te reageren op
de beat van de muziek.
Kleuren en programma’s
Aangepaste kleuren kinta-effect
Om de Kinta FX ILS met aangepaste kleuren- en stroboscoop-waarden te laten lopen, doet u het
volgende:
1. Druk herhaaldelijk op <MENU> totdat u-- weergegeven wordt op het display.
2. Druk op <ENTER>.
3. Gebruik <UP> of <DOWN> de waarde van de huidige optie te verhogen of te verlagen, van
•r000–255 (rood)
•G000–255 (groen)
•b000–255 (blauw)
•U000–255 (wit) of
•F. 00–99 (kinta-effect-stroboscoop).
4. Druk op <ENTER> om naar de volgende optie te gaan.
5. Herhaal stap 3 en 4 totdat het product naar wens is ingesteld.
• Het product reageert alleen op lage frequenties van de muziek (lage bas en drums).
• De laser verduistert in de geluidsactieve modus na 3 seconden stilte of geluid onder de
gevoeligheidsinstelling.
C-- Effect P--/Snd Effect
1Rood 1Alle effecten
2Groen 2Kinta en stroboscopen
3Blauw 3Kinta en laser
4Wit 4Laser en stroboscopen
5Rood en groen 5Alleen kinta
6Rood en blauw 6Alleen stroboscopen
7Rood en wit 7Alleen laser
8Groen en blauw
9Groen en wit
10 Blauw en wit
11 Rood, groen, en blauw
12 Rood, groen, en wit
13 Rood, blauw, en wit
14 Groen, blauw, en wit
15 Rood, groen, blauw, en wit

Pagina 112 van 117
Kinta FX ILS Gebruikershandleiding Rev. 5
Werking
IRC-6 infrarood afstandsbediening
De Kinta FX ILS is compatibel met de IRC-6 infrarood afstandsbediening van Chauvet Volg onderstaande
instructies om de IR-modus te activeren:
1. Druk herhaaldelijk op <MENU> totdat SEt weergegeven wordt op het display.
2. Druk op <ENTER>.
3. Gebruik <UP> of <DOWN> te selecteren van on (aan) of oFF (uit).
4. Druk op <ENTER>.
Bediening van der IRC-6
Automatisch-modus
Om de automatisch-modus in te schakelen met de IRC-6:
1. Druk op <AUTO> op de IRC-6.
2. Druk op <1>–<7> om het programma te kiezen (zie Kleuren en
programma’s).
Om de snelheid van het automatische programma af te stellen:
1. Druk op <SPEED> op de IRC-6.
2. Druk op <+> of <–> om de programmasnelheid te verhogen of te verlagen.
Geluidsactief-modus
Om de geluidsactief-modus in te schakelen met de IRC-6:
1. Druk op <SOUND> op de IRC-6.
2. Druk op <1>–<7> om het programma te kiezen (zie Kleuren en
programma’s).
Handmatige bediening
Om de kinta-effectkleur handmatig te selecteren met de IRC-6:
1. Druk op het gewenste kleur, van <R> (rood), <G> (groen), <B> (blauw), of
<W> (wit).
Stroboscoop
Om de stroboscoop-snelheid te stellen met de IRC-6:
1. Druk op <STROBE> op de IRC-6.
2. Druk op <+> of <–> om de stroboscoop-snelheid te verhogen of te verlagen.
Verduisteren
Om de product te verduisteren met de IRC-6:
1. Druk op <BLACK OUT> op de IRC-6.
Dit schakelt de lampen uit totdat de knop opnieuw wordt ingedrukt.
LET OP: Wanneer Black Out (verduistering) is geactiveerd zal de IRC-6 niet op
invoeren reageren. Als de afstandsbediening niet reageert wanneer een knop wordt
ingedrukt, probeer dan op <BLACK OUT> te drukken. Het kan zijn dat u per
ongeluk Black Out (verduisteren) hebt geactiveerd.
De knoppen op de IRC-6 die hierboven niet worden vermeld, zijn gereserveerd voor
toekomstig gebruik.
BLACK
OUT AUTO SOUND
SENSI-
TIVITY
SPEEDSTROBE
%MANUAL FADE
RGB
WUVA
+
0
-
123
654
789

Pagina 113 van 117
Werking
Kinta FX ILS Gebruikershandleiding Rev. 5
Master/Slave-modus (bekabelde)
De Master/Slave-modus zorgt ervoor dat een enkel Kinta FX ILS Q6-product (de “master”) de acties regelt
van een of meer Kinta FX ILS -producten (de “slaves”) zonder de behoefte aan een DMX-regelaar. Het
masterproduct wordt ingesteld voor gebruik in zelfstandige modus of met de IRC-6, terwijl de
slaveproducten worden ingesteld voor gebruik in Slave-modus. Na instelling en aansluiting zullen de
slaveproducten in harmonie met het masterproduct werken.
Configureer de producten zoals hieronder is aangegeven.
Slaaf-producten:
1. Druk herhaaldelijk op <MENU> totdat 9-Ch weergegeven wordt op het display.
2. Druk op <ENTER>.
3. Gebruik <UP> of <DOWN> om het startadres in te stellen op d 1.
4. Druk op <ENTER>.
5. Sluit de DMX-ingang van het eerste slaaf-product aan op de DMX-uitgang van het masterproduct.
6. Sluit de DMX-ingang van de volgende slaaf-producten aan op de DMX-uitgang van het vorige slaveproduct.
7. Voltooi het instellen en aansluiten van alle slaaf-producten.
Master-product:
8. Stel het masterproduct in om te werken in zelfstandige modus of met de IRC-6.
9. Maak het masterproduct het eerste product in de DMX-keten.
Master/Slave-modus (D-Fi USB)
De D-Fi USB zorgt ervoor dat een enkel Kinta FX ILS-product (de “master”) de acties regelt van een of
meer Kinta FX ILS-producten (de “slaves”) zonder de behoefte aan een DMX-regelaar of DMX-kabels. Het
master-product (zender) wordt ingesteld om in de zelfstandige modus te werken, terwijl de slave-
producten (ontvangers) ingesteld worden om in slave-modus te werken. Na instelling en aansluiting zullen
de slaveproducten in harmonie met het masterproduct werken.
Configureer de producten zoals hieronder is aangegeven.
Slaaf-producten:
1. Druk herhaaldelijk op <MENU> totdat 9-Ch weergegeven wordt op het display.
2. Druk op <ENTER>.
3. Gebruik <UP> of <DOWN> om het startadres in te stellen op d 1.
4. Druk op <ENTER>.
5. Stel de D-Fi USB in om op een specifiek kanaal, 1–16 te werken.
6. Sluit de D-Fi USB aan.
7. Voltooi het instellen en aansluiten van alle slaaf-producten.
Master-product:
1. Stel het masterproduct in om te werken in zelfstandige modus.
2. Stel D-Fi USB in om op het D-Fi-kanaal uit te zenden waar de slaves op ontvangen.
3. Sluit de D-Fi USB aan.
ILS Mode
ILS (geïntegreerd verlichtingssystseem) biedt 4 modi die synchroniseren met de GigBAR MOVE+ILS: Modi 1 en 3
synchroniseren met zijde 1 van de GigBAR MOVE+ILS, terwijl modi 2 en 4 synchroniseren met zijde 2 van de GigBAR
MOVE+ILS. Wanneer ze gekoppeld zijn, wordrden de effecten gesynchroniseerd met het meest vergelijkbare effect
aan de geselecteerde zijde van de GigBAR MOVE+ILS: Kinta-effecten worden gesynchroniseerdmet een van de
kinta's, bewegende koppen worden gesynchroniseerdmet een van de bewegende koppen en wash-effecten worden
gesynchroniseerd met een van de pars. Lasereffecten worden gesynchroniseerd met de laser en stroboscoopeffecten
worden gesynchroniseerd met de stroboscoopeffecten, ongeacht de ILS-modus.
Dit product worden gesynchroniseerd met de kinta op de geselecteerde zijde van de GigBAR MOVE+ILS,
evenals de laser en stroboscopen.
De Kinta FX ILS instellen om te reageren op een ILS-signaal:
1. Druk herhaaldelijk op <MENU> totdat iLS_ weergegeven wordt op het display.
2. Gebruik
<UP>
of
<DOWN>
te selecteren van
iLS1
(zijde 1),
iLS2
(zijde 2),
iLS3
(zijde 1), of
iLS4
(zijde 2).
3. Druk op <ENTER>.
• Configureer alle slaveproducten vóór het aansluiten van de master op de seriële keten.
• Sluit nooit een DMX-controller aan op een DMX-rij die is geconfigureerd voor Master/
Slave functie, omdat de regelaar de signalen van de master kan verstoren.
• Sluit niet meer dan 31 slaves aan op de master.
• Alle producten moeten op dezelfde DMX-persoonlijkheid, DMX-adres en D-Fi-kanaal ingesteld zijn.
• Configureer eerst alle slaveproducten voordat u de master configureert om uit te zenden.
• Sluit nooit een DMX-controller aan op een D-Fi-kanaal die is geconfigureerd voor
Master/Slave functie, omdat de regelaar de signalen van de master kan verstoren.

Pagina 114 van 117
Kinta FX ILS Gebruikershandleiding Rev. 5
Onderhoud
5. Onderhoud
Productonderhoud
De ophoping van stof verlaagt de lichtemissieprestaties en kan oververhitting veroorzaken. Dit kan leiden
tot een lagere levensduur en/of mechanische slijtage van de lichtbron. Om optimale prestaties te
behouden en slijtage te minimaliseren moeten uw verlichtingsproducten ten minste tweemaal per maand
gereinigd worden. Let er echter op dat het gebruik en omgevingsomstandigheden ook factoren zijn voor
het verhogen van de schoonmaakfrequentie.
Volg onderstaande instructies om het product te reinigen:
1. Haal het apparaat van de stroom.
2. Wacht totdat het product op kamertemperatuur is.
3. Gebruik een stofzuiger (of droge perslucht) en een zachte borstel om opgehoopt stof van de
externe oppervlakken en ventilatiegaten te verwijderen.
4. Reinig alle transparante oppervlakken met een milde zeepoplossing, ammoniumvrije glasreiniger
of isopropylalcohol.
5. Pas de schoonmaakoplossing direct toe op een zachte, pluisvrije katoenen doek of een
brillendoekje.
6. Veeg vuil of roet voorzichtig naar de buitenrand van het transparante oppervlak.
7. Poets de transparante oppervlakken voorzichtig totdat het vrij is van waas en pluisjes.
Droog de transparante oppervlakken altijd zorgvuldig na het reinigen.
Draai de ventilator niet rond met perslucht, omdat u deze dan kunt beschadigen.

Pagina 115 van 117
Technische Specificaties
Kinta FX ILS Gebruikershandleiding Rev. 5
6. Technische Specificaties
Afmetingen en gewicht
Let op: Afmetingen in inches zijn afgerond.
Vermogen
Lightbron (Laser)
Lightbron (Kinta)
Lightbron (SMD-stroboscopen)
Photometrics
Thermaal
DMX
Bestellen
Lengte Breedte Hoogte Gewicht
187 mm (7,4 in) 261 mm (10,3 in) 187 mm (7,4 in) 1,7 kg (3,8 lb)
Ingangsspanning Bereik Spanningsselectie
Schakeling (intern) 100–240 VAC, 50/60 Hz Automatisch wisselend bereik
Parameter 120 V, 60 Hz 230 V, 50 Hz
Verbruik 25 W 24 W
Bedrijfstroom 0,5 A 0,2 A
Power linking stroomsterkte
(producten) 8 A (17 producten) 8 A (33 producten)
Zekering T 1 A, 250 V T 1 A, 250 V
Stroom I/O VS/wereldwijd VK/Europa
Stroomingangsstekker IEC IEC
Stroomuitgangsstekker Edison IEC
Stroomsnoerstekker Edison (VS) Lokale stekker
Type Vermogen Golflengte
Laser (rood) 100 mW 650 nm
Laser (groen) 30 mW 520 nm
Type Kleur Aantal Vermogen Stroomsterkte Levensduur
LED Rood 1 7,5 W 2,4 A 50.000 uur
LED Groen 1 7,5 W 2,4 A 50.000 uur
LED Blauw 1 7,5 W 2,4 A 50.000 uur
LED Wit 1 7,5 W 2,4 A 50.000 uur
Type Kleur Aantal Vermogen Stroomsterkte Levensduur
SMD-LED Wit 16 5 W 1,6 A 50.000 uur
Stroboscoopfrequentie Dekkingshoek
0 tot 20 Hz 118°
Laser minimum externe temp. Laser maximale externe temp. Koelsysteem
15 °C (59 °F) 35 °C (95 °F) Ventilatorgeholpen convectie
I/O-stekker Kanaalbereik
3-pins XLR 2 of 9
Productnaam Artikelcode UPC-code
Kinta FX ILS 10051879 781462222277

Pagina 116 van 117
Kinta FX ILS Gebruikershandleiding Rev. 5
Retouren
Retouren
Als u ondersteuning nodig hebt of een product wilt retourneren:
• Neem contact op met het Chauvet wereldwijde hoofdkwartier als u zich in de V.S. bevindt.
• Als u zich in V.K. en Ierland bevindt, neem dan contact op met Chauvet Europe Ltd.
• Als u zich in Benelux bevindt, neem dan contact op met Chauvet Europe BVBA.
• Als u zich in Frankrijk bevindt, neem dan contact op met Chauvet France.
• Als u zich in Duitsland bevindt, neem dan contact op met Chauvet Germany.
• Als u zich in Mexico bevindt, neem dan contact op met Chauvet Mexico.
• Als u zich in een ander land bevindt, neem dan GEEN contact op met Chauvet. Neem in plaats
daarvan contact op met uw plaatselijke distributeur. Zie www.chauvetdj.com voor distributeurs
buiten de V.S., V.K., Ierland, Benelux, Frankrijk, Duitsland of Mexico.
Bel de corresponderende technische afdeling van Chauvet en vraag om een retouropdrachtformulier
(RMA)-nummer vóór het verzenden van het product. Zorg dat u het modelnummer, serienummer en een
korte beschrijving van de retouroorzaak bij de hand hebt.
Om een serviceaanvraag online in te dienen, ga naar www.chauvetdj.com/service-request.
Stuur het product gefrankeerd, in zijn originele doos en met zijn originele verpakking en accessoires.
Chauvet geeft geen telefoon-tags.
Label het pakket duidelijk met het RMA-nummer. Chauvet weigert producten die worden geretourneerd
zonder een RMA-nummer.
Vóór het verzenden van het product moet u de volgende informatie duidelijk op een stuk papier schrijven
en het binnen de doos plaatsen:
• Uw naam:
• Uw adres:
• Uw telefoonnummer
• RMA-nummer
• Een korte beschrijving van het probleem
Zorg ervoor dat u het product voldoende inpakt. Alle verzendschade die resulteert uit onvoldoende
verpakking is uw verantwoordelijkheid. FedEx-verpakking of dubbele dozen worden aanbevolen.
Als u zich buiten de V.S., V.K., Ierland, Benelux, Frankrijk, Duitsland of Mexico bevindt,
neem dan contact op met uw geregistreerde distributeur en volg hun instructies over het
retourneren van Chauvet-producten naar hen. Ga naar onze website www.chauvetdj.com
voor contactinformatie.
Schrijf het RMA-nummer op een voldoende bevestigd etiket. Schrijf het RMA-nummer
NIET direct op de doos.
Chauvet behoudt zich het recht voor om (het) geretourneerde product(en) naar eigen
inzicht te repareren of te vervangen.

Pagina 117 van 117
Neem contact Op
Kinta FX ILS Gebruikershandleiding Rev. 5
Neem contact Op
Van buiten de V.S., V.K., Ierland, Benelux, Frankrijk, Duitsland of Mexico kunt u contact opnemen met de
distributeur. Volg hun instructies om support aan te vragen of om een product te retourneren. Ga naar
onze website voor contactinformatie.
Algemene Informatie Technische support
Chauvet wereldwijde hoofdkwartier
Adres: 5200 NW 108th Ave. Bandopname: (844) 393-7575
Sunrise, FL 33351 Fax: (954) 756-8015
Bandopname: (954) 577-4455 E-mail: [email protected]
Fax: (954) 929-5560
Tolvrij: (800) 762-1084 Website: www.chauvetdj.com
Chauvet Europe Ltd
Adres: Unit 1C E-mail: [email protected]
Brookhill Road Industrial Estate
Pinxton, Nottingham, UK Website: www.chauvetdj.eu
NG16 6NT
Bandopname: +44 (0) 1773 511115
Fax: +44 (0) 1773 511110
Chauvet Europe BVBA
Adres: Stokstraat 18 E-mail: BNLte[email protected]
9770 Kruishoutem
Belgium Website: www.chauvetdj.eu
Bandopname: +32 9 388 93 97
Chauvet France
Adres: 3, Rue Ampère
91380 Chilly-Mazarin E-mail: [email protected]
France Website: www.chauvetdj.eu
Bandopname: +33 1 78 85 33 59
Chauvet Germany
Adres: Bruno-Bürgel-Str. 11
28759 Bremen E-mail: [email protected]
Germany Website: www.chauvetdj.eu
Bandopname: +49 421 62 60 20
Chauvet Mexico
Adres: Av. de las Partidas 34 - 3B
(Ingang door Calle 2) E-mail: [email protected]
Zona Industrial Lerma Website: www.chauvetdj.mx
Lerma, Edo. de México, CP 52000
Bandopname: +52 (728) 690-2010
-
 1
1
-
 2
2
-
 3
3
-
 4
4
-
 5
5
-
 6
6
-
 7
7
-
 8
8
-
 9
9
-
 10
10
-
 11
11
-
 12
12
-
 13
13
-
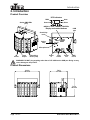 14
14
-
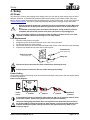 15
15
-
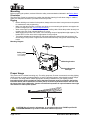 16
16
-
 17
17
-
 18
18
-
 19
19
-
 20
20
-
 21
21
-
 22
22
-
 23
23
-
 24
24
-
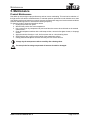 25
25
-
 26
26
-
 27
27
-
 28
28
-
 29
29
-
 30
30
-
 31
31
-
 32
32
-
 33
33
-
 34
34
-
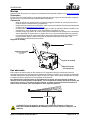 35
35
-
 36
36
-
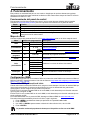 37
37
-
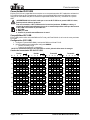 38
38
-
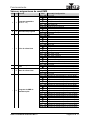 39
39
-
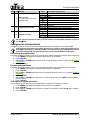 40
40
-
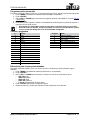 41
41
-
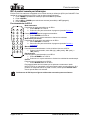 42
42
-
 43
43
-
 44
44
-
 45
45
-
 46
46
-
 47
47
-
 48
48
-
 49
49
-
 50
50
-
 51
51
-
 52
52
-
 53
53
-
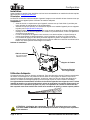 54
54
-
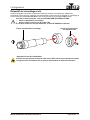 55
55
-
 56
56
-
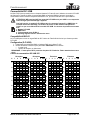 57
57
-
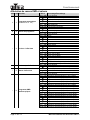 58
58
-
 59
59
-
 60
60
-
 61
61
-
 62
62
-
 63
63
-
 64
64
-
 65
65
-
 66
66
-
 67
67
-
 68
68
-
 69
69
-
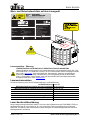 70
70
-
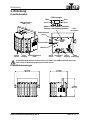 71
71
-
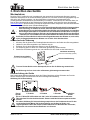 72
72
-
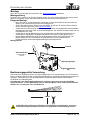 73
73
-
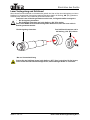 74
74
-
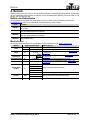 75
75
-
 76
76
-
 77
77
-
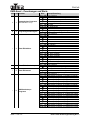 78
78
-
 79
79
-
 80
80
-
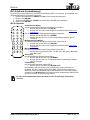 81
81
-
 82
82
-
 83
83
-
 84
84
-
 85
85
-
 86
86
-
 87
87
-
 88
88
-
 89
89
-
 90
90
-
 91
91
-
 92
92
-
 93
93
-
 94
94
-
 95
95
-
 96
96
-
 97
97
-
 98
98
-
 99
99
-
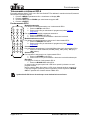 100
100
-
 101
101
-
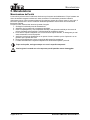 102
102
-
 103
103
-
 104
104
-
 105
105
-
 106
106
-
 107
107
-
 108
108
-
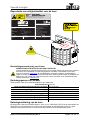 109
109
-
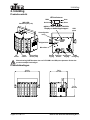 110
110
-
 111
111
-
 112
112
-
 113
113
-
 114
114
-
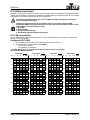 115
115
-
 116
116
-
 117
117
-
 118
118
-
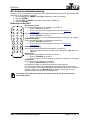 119
119
-
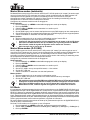 120
120
-
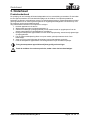 121
121
-
 122
122
-
 123
123
-
 124
124


CHAUVET DJ Kinta FX ILS Handleiding
- Categorie
- Schijnwerpers
- Type
- Handleiding
- Deze handleiding is ook geschikt voor
in andere talen
- italiano: CHAUVET DJ Kinta FX ILS Manuale utente
- français: CHAUVET DJ Kinta FX ILS Manuel utilisateur
- español: CHAUVET DJ Kinta FX ILS Manual de usuario
- Deutsch: CHAUVET DJ Kinta FX ILS Benutzerhandbuch
Gerelateerde papieren
-
CHAUVET DJ GigBar Move DJ Complete Light Set Handleiding
-
-
-
-
-
-
-
-
-