Yamaha CDR-S1000 de handleiding
- Categorie
- CD spelers
- Type
- de handleiding

OPEN/CLOSE
C
D DIRECT
REC
INPUT
PHONES
REC LEVEL
LEVEL
DIGITAL/ANALOG
MIN MAX
010
OPTICAL
COAXIAL ANALOG
REC
MUTE
/
//
CDR-S1000
OWNER’S MANUAL
MODE D’EMPLOI
BEDIENUNGSANLEITUNG
BRUKSANVISNING
MANUALE DI ISTRUZIONI
MANUAL DE INSTRUCCIONES
GEBRUIKSAANWIJZING
Compact Disc Recorder
Lecteur/Enregistreur CD
BG

E-1
INTRODUCTION
Thank you for purchasing this YAMAHA product. We hope it will give you many years of trouble-free enjoyment. For the
best performance, read this manual carefully. It will guide you in operating your YAMAHA product.
ENGLISH
FEATURES
• Playback of CD-R, CD-RW, and
Prerecorded CD Disc Formats
• Recording to CD-R and CD-RW Disc
Formats
• Remote Control Capability
• Car Sound Processing (Dynamic Range
Compression Recording)
• Sampling Rate Converter
• Synchronized Recording
• Digital Recording Level Adjustment
• 4 Times Speed Finalization
• 4 Times Speed Erase
• CD Direct Digital Input Recording
• Automatic and Manual Track Marking
• Optical and Coaxial Digital Input and
Output
• Random Access Programmable Play
• Single Track/Entire Disc Repeat Play
• Random-Sequence Play
• PHONES jack
• Adjustable Display Brightness
CONTENTS
PRECAUTIONS ..............................................2
DISCS COMPATIBLE WITH THIS UNIT .........3
GETTING STARTED.......................................4
Supplied accessories ............................................... 4
Notes on the transportation pad .............................. 4
The remote control ................................................. 5
Connections ............................................................ 6
NAMES OF BUTTONS AND CONTROLS .....8
Front panel.............................................................. 8
Display.................................................................... 8
Remote control ....................................................... 9
BASIC OPERATION .....................................10
Turning on the power and loading a disc ............. 10
Removing the disc and turning the power off ...... 11
Selecting a time display........................................ 11
RECORDING FUNCTIONS ..........................12
Recording modes .................................................. 12
Synchronized recording of a single track ............. 13
Synchronized recording of ALL tracks ................ 14
Synchronized recording with finalization ............ 15
Manual recording.................................................. 16
Setting the recording levels .................................. 17
Manual track marking........................................... 18
Recording directly from a source CD................... 18
Applying dynamic range compression
to a recording .................................................. 19
Finalization ........................................................... 20
Track and Disc Erase (CD-RW discs only) .......... 21
PLAYBACK FUNCTIONS.............................23
Playing a CD disc ................................................. 23
Searching for a track............................................. 24
Scanning forward or backward rapidly ................ 24
Program play ........................................................ 25
Random sequence play ......................................... 26
Repeat play ........................................................... 27
Index search.......................................................... 27
OTHER FUNCTIONS....................................28
Changing the brightness of the display ................ 28
Listening with headphones ................................... 28
ADDITIONAL INFORMATION ......................29
CD preventive care ............................................... 29
Display messages.................................................. 30
Troubleshooting.................................................... 31
SCMS copy protection ......................................... 32
CD-Recorder system notes and limitations .......... 33
Specifications ....................................................... 34

E-2
English
IMPORTANT:
The wires in the mains lead are coloured in accordance
with the following code:
Blue: NEUTRAL
Brown: LIVE
As the colours of the wires in the mains lead of this
apparatus may not correspond with the coloured
markings identifying the terminals in your plug,
proceed as follows: The wire which is coloured BLUE
must be connected to the terminal which is marked
with the letter N or coloured BLACK. The wire which
is coloured BROWN must be connected to the terminal
which is marked with the letter L or coloured RED.
Making sure that neither core is connected to the earth
terminal of the three pin plug.
CAUTIONS
• To assure the finest performance, please read this
manual carefully. Keep it in a safe place for future
reference.
• Install your unit in a well ventilated, cool, dry, clean
place – away from windows, heat sources, vibration,
dust, moisture, or cold. To avoid humming sounds,
locate the unit away from other electrical appliances,
motors, and transformers. To prevent fire or electrical
shock, do not expose to rain and water.
• Be sure to allow at least 10 cm of ventilation space at
the top, on left, right, and back sides of this unit.
• Do not operate the unit upside-down. It may overheat,
possibly causing damage.
• Never open the cabinet. If something drops into the set,
contact your dealer.
• Do not use force on switches, knobs or cords.
• When not planning to use this unit for long periods of
time (i.e., vacation, etc.), disconnect the AC power plug
from the wall outlet.
• Grounding or polarization – Precautions should be taken
so that the grounding or polarization of the unit is not
defeated.
• Do not clean the unit with chemical solvents; this might
damage the finish. Use a clean, dry cloth.
• Be sure to read the “Troubleshooting” section on
common operating errors before concluding that your
unit is faulty.
• Do not place another component on top of this unit, as
damage or discoloration on the surface of the unit may
result.
• To prevent damage by lightning, disconnect the power
cord from the wall outlet during an electrical storm.
• When disconnecting the power cord from the wall
outlet, grasp the plug; do not pull the cord.
• Do not plug the AC power plug to the wall outlet before
you finish all connections.
• The voltage to be used must be the same as that
specified on this unit. Using this unit with a higher
voltage than that which is specified is dangerous and
may result in a fire or other type of accident causing
damage. YAMAHA will not be held responsible for any
damage resulting from use of this unit with a voltage
other than that which is specified.
• Sudden temperature changes and storage or operation in
an extremely humid environment may cause
condensation inside the cabinet.
• When this unit is shipped, there is a protective pad in
the disc tray. For correct operation of this unit, remove
before use.
PRECAUTIONS: READ THIS BEFORE OPERATING THE UNIT
This compact disc recorder is
classified as a CLASS 1
LASER product.
The CLASS 1 LASER
PRODUCT label is located
on the rear exterior.
CLASS 1 LASER PRODUCT
Laser component in this product is capable of
emitting radiation exceeding the limit for Class 1.
CAUTION FOR MOVING THE UNIT
Before moving the unit, first check that there is no
disc in the disc tray. To prevent malfunction of this
unit, be sure to insert the transportation pad in the
disc tray as described on page 4. Finally, press
POWER to turn the unit off, and disconnect the AC
power plug from the wall outlet.
CAUTION
Use of controls or adjustments or performance of
procedures other than those specified herein may
result in hazardous radiation exposure.
For U.K. customers
If the socket outlets in the home are not suitable for the
plug supplied with this appliance, it should be cut off and
an appropriate 3 pin plug fitted. For details, refer to the
instructions described above.
Note: The plug severed from the mains lead must be
destroyed, as a plug with bared flexible cord is hazardous
if engaged in a live socket outlet.
SPECIAL INSTRUCTIONS FOR U.K. MODEL

E-3
DISCS COMPATIBLE WITH THIS UNIT
Discs that can be used for recording
Be sure to use only CD-R and CD-RW discs made by
reliable manufacturers.
CD-R and CD-RW digital audio discs that display either
of the following marks can be used with this unit.
In addition to these marks being present on the disc, check
that at least one of the following phrases can also be
found on the disc or disc case.
FOR CONSUMER
FOR CONSUMER USE
FOR MUSIC USE ONLY
Regarding discs that can be used for recording
• CD-R discs can only be recorded on once, and the
recorded material cannot be erased.
• CD-RW discs can be recorded on, have the recorded
material erased, and then recorded on again any number
of times.
The following discs cannot be used for recording
on this unit.
• Discs bearing marks other than those shown above.
• Discs intended for recording computer data.
• Discs intended for professional use or labeled “FOR
PROFESSIONAL USE ONLY”.
Discs that can be played back
In addition to CD-R and CD-RW digital audio discs
described above, commercially available pre-recorded CD
discs bearing the mark shown below can also be played on
this unit.
Note
Please check the copyright laws in your country to
record from records, compact discs, radio, etc.
Recording of copyright material may infringe
copyright laws.
Finalization of CD-R discs for
playback on standard CD players
Although a partially recorded CD-R disc can be played on
this unit, it cannot be played on a standard CD player until
it has undergone a process known as “finalization”. In the
finalization process, the Table of Contents (TOC) is
written onto the disc and further recording is not possible.
However, this process makes it possible to play a CD-R
disc on a standard CD player.
Some CD players may not play back the finalized CD-R
discs properly due to differences in the playback system
of different manufacturers.
See page 20 for more information on finalization.
Playback of CD-RW discs
Please note that even after a CD-RW disc has been
finalized, it still cannot be played on a standard CD
player. CD-RW discs can only be played back on CD-RW
compatible players such as this unit.
Additionally, CD-RW discs can be erased even after
finalization has been performed, and recorded onto again.
See pages 21 and 22 for more information on erasing
recordings.
Playback on DVD players
Before playing back a finalized CD-R or CD-RW discs on
a DVD player, please check whether the DVD player is
compatible with CD-R or CD-RW discs or not. Refer to
the owner's manual of the DVD player for more
information. If the DVD player is not compatible with
CD-R or CD-RW discs, do not attempt to play them on
the DVD player.
Regarding erasure or loss of data
Yamaha and suppliers accept no liability for the loss of
data or any problems caused as a result. As a precaution,
it is recommended that the discs are tested after they have
been written to. Furthermore, under no circumstances
does Yamaha and suppliers guarantee the reliability of the
discs.
IMPORTANT
•Small scratches, fingerprints, dust, foreign
substances, or direct sunlight on the recorded
surface of the disc may aversely affect the disc's
ability to record and play back properly.
•Be sure to use a felt-tip pen or similar writing tool
when writing on the label side of the disc. Do not
use a ball-point pen, pencil, or other hard-tipped
writing tool, as these may damage the disc and
may aversely affect further recording on the disc.
•Be sure to read “CD preventive care” on page 29
for information on the proper care and handling of
CD discs.

E-4
English
• Batteries (size AA, UM-3, R6) (2)
• RCA Pin Cables (2)
• Optical Fiber Cable
GETTING STARTED
Supplied accessories
EFFECT
FINALIZE
STOP PAUSE PLAY
SEARCH
SKIP
ERASE REC
REC MUTE
123
456
789
+10
0
INDEX
REPEAT RANDOM CLEAR PROG
REC MODE
TRACK NO.
WRITE
DIMMER DISPLAY
OPEN/
CLOSE
After unpacking, check that the following parts are
contained.
• Remote Control
Notes on the transportation pad
Before using the unit
This unit is shipped with a transportation pad inserted in
the disc tray to prevent impact to the internal mechanism
that could occur during transportation. Before using this
unit, press POWER on the front panel to turn the power
on, press
OPEN/CLOSE (OPEN/CLOSE on the
remote) to open the disc tray, and remove the pad.
Storing the transportation pad
It is recommended to use the transportation pad whenever
the unit is moved. Therefore, store the transportation pad
for future transportation of the unit.
Installing the transportation pad
1 Press POWER on the front panel to turn the power
on.
2 Press OPEN/CLOSE (OPEN/CLOSE on the
remote) to open the disc tray.
3 Place the transportation pad in the disc tray.
4 Press OPEN/CLOSE (OPEN/CLOSE on the
remote) to close the disc tray.
• If a portion of the transportation pad remains out of
the unit, push gently to slide it into the unit.
5 Press POWER on the front panel to turn the power
off.

E-5
NATURAL SOUND CD RECORDER CDR-S1000
POWER
FINALIZE ERASE DISPLAY
TRACK NO.
EFFECT
REC MODE
OPEN/CLOSE
CD DIRECT
REC
INPUT
PHONES
REC LEVEL
LEVEL
DIGITAL/ANALOG
MIN MAX
010
OPTICAL
COAXIAL ANALOG
REC
MUTE
/
//
30°
30°
Battery replacement
If you find that the remote control must be used closer to
the main unit than usual, the batteries are weak. Replace
batteries with new ones.
Notes
• Use only AA, UM-3, R6 batteries for replacement.
• Be sure the polarities are correct. (See the illustration inside
the battery compartment.)
• Remove the batteries if the remote control will not be used for
an extended period of time.
• If batteries leak, dispose of them immediately. Avoid touching
the leaked material or letting it come in contact with clothing,
etc. Clean the battery compartment thoroughly before
installing new batteries.
Remote control
sensor
The remote control
Loading the batteries for the remote control Remote control operation range
Notes
• There should be no large obstacles between the remote control
and the main unit.
• If the remote control sensor is directly illuminated by strong
lighting (especially an inverter type of fluorescent lamp, etc.),
it might cause the remote control not to work correctly. In this
case, reposition the main unit to avoid direct lighting.
Within approximately
6 m (20 feet)
1
3
2
GETTING STARTED

E-6
English
Connections
GETTING STARTED
Digital connections using the DIGITAL OPTICAL and COAXIAL jacks
• Before using the DIGITAL OPTICAL jacks, be sure to remove the jack covers. Replace the jack covers in order to
protect the jacks from dust when they are not being used.
• Make connections from the DIGITAL OPTICAL jacks on this unit to the “MD/DAT” (or equivalent) digital optical jacks
on an amplifier or receiver by using optical fiber cables.
• Make connections from the DIGITAL COAXIAL jacks on this unit to the “MD/DAT” (or equivalent) digital coaxial
jacks on an amplifier or receiver by using commercially available coaxial cables.
* Do not connect the digital audio coaxial cable to analog line jacks. If connection is made, noise will be produced.
Do not plug in this unit or other components until all connections are completed.
• Connections should be made to the correct input and output jacks of the amplifier or other components.
• To record a wider variety of sources, it is recommended to make both analog and digital connections to this unit.
• Arrow marks (
) in the illustration below indicate the direction of the audio signal.
• Guidelines for making both analog and digital connections to this unit are outlined on this and the following page.
• When all connections are complete, plug in this unit to a wall outlet.
ANALOG
LINE IN
REC
4
L
PLAY
3
LINE OUT
R
L
R
DIGITAL IN
COAXIAL OPTICAL
DIGITAL OUT
COAXIAL OPTICAL
MD/DAT
MD/
DAT
MD/
DAT
PLAY
RL
REC
DIGITAL IN DIGITAL OUT
OPTICAL OPTICAL
COAXIAL COAXIAL
To wall
outlet
Amplifier or Receiver
RCA pin cable
(included)
<CDR-S1000>
RCA pin cable
(included)
Optical fiber cables
(one included)
Coaxial cables
(not included)
Continued on next page

E-7
GETTING STARTED
INPUT
OPTICAL
COAXIAL ANALOG
Analog connections using the LINE IN and OUT jacks
• Be sure that the left (“L”) and right (“R”) LINE IN (REC) and LINE OUT (PLAY) jacks are connected correctly.
• Connect the LINE IN (REC) and LINE OUT (PLAY) jacks to the “MD/DAT” (or equivalent) jacks of the amplifier or
receiver. For additional details concerning these connections, refer to the operating instructions for the amplifier being
used.
• Be sure to connect the LINE OUT (PLAY) jacks on this unit to the LINE IN (PLAY) jacks on the amplifier, and
similarly the LINE IN (REC) jacks on this unit to the LINE OUT (REC) jacks on the amplifier.
• The LINE IN (REC) and LINE OUT (PLAY) jacks of this unit are numbered 4 and 3 respectively. When connecting
this unit with a YAMAHA amplifier or receiver whose jacks on the rear panel are numbered as 1, 2, 3, etc., connect
the LINE IN (REC) and LINE OUT (PLAY) jacks of this unit to the input jacks numbered 4 and 3 on the rear of the
amplifier or receiver.
To select an input source using INPUT on the front panel
With this recorder, it is possible to make analog, digital optical, and digital coaxial connections. When recording, use
INPUT on the front panel to select which of the three types of signal to input.
• When recording a digital source, set INPUT to OPTICAL to record the digital signal input from the DIGITAL IN
OPTICAL jack.
• When recording a digital source, set INPUT to COAXIAL to record the digital signal input from the DIGITAL IN
COAXIAL jack.
• When recording an analog source, set INPUT to ANALOG to record the signal input from the LINE IN jacks.
• This recorder outputs both analog and digital signals simultaneously regardless of the INPUT setting. Please refer to the
instructions supplied with the amplifer, etc. for details on how to select the preferred signal type.
• When INPUT is set to either OPTICAL or COAXIAL, the sampling rate indicator corresponding to the digital sampling
rate of the input source signal lights in the display.

E-8
English
Display
Front panel
~ POWER (P.10/P.11)
Ÿ TRACK NO. (P.18)
! EFFECT (P.19)
⁄ REC MODE (P.13 to P.15)
@ Remote control sensor (P.5)
¤ Display (P.11)
# CD DIRECT (P.18)
‹ REC MUTE (P.16)
$ REC (P.13 to P.16)
› INPUT (P.7)
% REC LEVEL DIGITAL/ANALOG (P.17)
~ PROG indicator (P.25)
Ÿ Sampling rate indicators (P.7)
! Disc format indicator (P.13 to P.16)
⁄ TOTAL/REMAIN indicators (P.11)
@ EFFECT indicator (P.19)
¤ REC indicator (P.13 to P.16)
# * indicator (P.13 to P.16/P.23)
‹ # indicator (P.11/P.23)
NAMES OF BUTTONS AND CONTROLS
CD-RW
CD TOTAL
REMAIN
PROG
RNDM
REPEAT
SINGLE
EFFECT
REC
ALL
AUTO SYNC
TOC
R
dB
L
SF
32 44 48.1
–
60 30 10 6 4 2 1 0 OVER00
––– ––––
NATURAL SOUND CD RECORDER CDR-S1000
POWER
FINALIZE ERASE DISPLAY
TRACK NO.
EFFECT
REC MODE
OPEN/CLOSE
CD DIRECT
REC
INPUT
PHONES
REC LEVEL
LEVEL
DIGITAL/ANALOG
MIN MAX
010
OPTICAL
COAXIAL ANALOG
REC
MUTE
/
//
fi& (Stop) (P.23)
^ LEVEL (P.28)
fl PHONES (P.28)
& ^ (Play/Pause) (P.23)
‡ $/! ⁄/› (Skip/Search) (P.24)
* OPEN/CLOSE (P.4/P.10/P.11)
° Disc tray (P.4/P.10/P.11)
( DISPLAY (P.11)
· ERASE (P.21/P.22)
) FINALIZE (P.20)
$ Multi-information display (P.11)
› Level indicator (P.17)
% TOC indicator (P.20/P.22)
fi SYNC indicator (P.13 to P.15)
^ SINGLE/ALL/AUTO indicators (P.13 to P.15)
fl REPEAT S/F indicators (P.27)
& RNDM indicator (P.26)

E-9
Remote control
~ RANDOM (P.26)
Ÿ TRACK NO. WRITE (P.18)
! REC MODE (P.13 to P.15)
⁄ EFFECT (P.19)
@ REPEAT (P.27)
¤ Numeric buttons (P.23/P.25/P.27)
# FINALIZE (P.20)
‹ ERASE (P.21/P.22)
$ ! SEARCH ⁄ (P.24)
› STOP & (P.23)
% PAUSE * (P.23)
fi DIMMER (P.28)
^ DISPLAY (P.11)
fl OPEN/CLOSE (P.4/P.10/P.11)
& CLEAR (P.25/P.26)
‡ PROG (P.25/P.26)
* INDEX (P.27)
° REC MUTE (P.16)
( REC (P.13 to P.16)
· $ SKIP › (P.24)
) PLAY # (P.23)
NAMES OF BUTTONS AND CONTROLS
EFFECT
FINALIZE
STOP PAUSE PLAY
SEARCH
SKIP
ERASE REC
REC MUTE
123
456
789
+10
0
INDEX
REPEAT RANDOM CLEAR PROG
REC MODE
TRACK NO.
WRITE
DIMMER DISPLAY
OPEN/
CLOSE

E-10
English
BASIC OPERATION
To load a disc
1 Press POWER on the front panel to turn the power
on.
2 Press OPEN/CLOSE (OPEN/CLOSE on the
remote) to open the disc tray.
3 Load a disc using the disc guide to align the disc
correctly in the disc tray.
• When loading a prerecorded CD disc, load the disc
with the label side up.
• When loading a CD-R or CD-RW disc for
recording, load with the recordable side down.
4 Press OPEN/CLOSE (OPEN/CLOSE on the
remote) to close the disc tray.
5 Select the function you want.
• For disc recording functions, see pages 12 to 20.
• For disc playback functions, see pages 23 to 27.
To load an 8 cm (3 in.) CD disc
Place it in the inner recessed area of the disc tray. Do not
put a normal 12 cm (5 in.) CD disc on top of an 8 cm (3
in.) CD disc.
Note
• You can also close the disc tray by pressing the front edge of
the disc tray gently. Play begins automatically if the tray is
closed by pressing ^ on the front panel or PLAY #, a
numeric button, or RANDOM on the remote. However, the
display will not show the total number of tracks or the total
recorded time of the disc.
When a disc is loaded
When a disc is loaded in the recorder, the recorder
performs a number of internal operations to determine the
format and content of the disc. During this time,
“Reading” appears in the display. This process requires
approximately 10 seconds to complete for any type of
disc.
When a new CD-R or CD-RW disc is loaded in the
recorder, OPC (Optimum Power Calibration) is usually
performed as well. OPC optimizes the laser power to the
reflectivity of the disc. During this time, “OPC Adjust”
appears in the display. This process requires an additional
15 seconds to complete. Recording is not possible until
these operations are complete.
After the disc has been read and any necessary internal
adjustments have been performed, one of the following
displays appear, and normal operation of the recorder is
possible.
A prerecorded audio CD disc is loaded in the recorder.
A CD-R or CD-RW disc that has not yet been recorded on
is loaded in the recorder.
EFFECT
FINALIZE
STOP PAUSE PLAY
SEARCH
SKIP
ERASE REC
REC MUTE
123
456
789
+10
0
INDEX
REPEAT RANDOM CLEAR PROG
REC MODE
TRACK NO.
WRITE
DIMMER DISPLAY
OPEN/
CLOSE
NATURAL SOUND CD RECORDER CDR-S1000
POWER
FINALIZE ERASE DISPLAY
TRACK NO.
EFFECT
REC MODE
OPEN/CLOSE
CD DIRECT
REC
INPUT
PHONES
REC LEVEL
LEVEL
DIGITAL/ANALOG
MIN MAX
010
OPTICAL
COAXIAL ANALOG
REC
MUTE
/
//
Turning on the power
and loading a disc
OPEN/CLOSE
OPEN/CLOSEPOWER
CD-R
RNDM
REPEAT
SINGLE
EFFECT
REC
ALL
AUTO SYNC
TOC
X2 X4
R
dB
L
SF
32 44 48.1
–
60 30 10 6 4 2 1 0 OVER00
––– ––––
TOTAL
REMAIN
REPEAT
SINGLE
EFFECT
REC
ALL
AUTO SYNC
TOC
X2 X4
R
dB
L
SF
–
60 30 10 6 4 2 1 0 OVER00
––– ––––
CD
R
dB
L
–
60 30 10 6 4 2 1 0 OVER00
––– ––––
CD-R
CD TOTAL
REMAIN
PROG
RNDM
REPEAT
SINGLE
EFFECT
AUTO
TOC
R
dB
L
SF
32
–
60 30 10 6 4 2 1 0 OVER00
––– ––––

E-11
BASIC OPERATION
Important
Do not turn off the power during finalization of a
CD-R or CD-RW disc (after recording). Doing so may
result in a misoperation in which recorded material
may be lost and further recording on the disc made
impossible. For more information on finalization of
CD-R and CD-RW discs, please see page 20.
Elapsed time of the track now playing
Remaining time of the track now playing
Total disc play time
Total remaining time on the disc
You can change the disc information that is shown in the
display by pressing DISPLAY. Each time DISPLAY is
pressed, the display changes as follows.
When a disc is playing
When a disc is being recorded
Selecting a time display
CD-R
CD TOTAL
REMAIN
PROG
RNDM
REPEAT
SINGLE
EFFECT
REC
ALL
AUTO SYNC
TOC
R
dB
L
SF
32 44 48.1
–
60 30 10 6 4 2 1 0 OVER00
––– ––––
CD-R
CD TOTAL
REMAIN
PROG
RNDM
REPEAT
SINGLE
EFFECT
REC
ALL
AUTO SYNC
TOC
R
dB
L
SF
32 44 48.1
–
60 30 10 6 4 2 1 0 OVER00
––– ––––
CD-R
CD TOTAL
PROG
RNDM
REPEAT
SINGLE
EFFECT
REC
ALL
AUTO SYNC
TOC
R
dB
L
SF
32 44 48.1
–
60 30 10 6 4 2 1 0 OVER00
––– ––––
CD-R
CD TOTAL
REMAIN
PROG
RNDM
REPEAT
SINGLE
EFFECT
REC
ALL
AUTO SYNC
TOC
R
dB
L
SF
32 44 48.1
–
60 30 10 6 4 2 1 0 OVER00
––– ––––
Removing the disc and
turning the power off
NATURAL SOUND CD RECORDER CDR-S1000
POWER
FINALIZE ERASE DISPLAY
TRACK NO.
EFFECT
REC MODE
OPEN/CLOSE
CD DIRECT
REC
INPUT
PHONES
REC LEVEL
LEVEL
DIGITAL/ANALOG
MIN MAX
010
OPTICAL
COAXIAL ANALOG
REC
MUTE
/
//
EFFECT
FINALIZE
STOP PAUSE PLAY
SEARCH
SKIP
ERASE REC
REC MUTE
123
456
789
+10
0
INDEX
REPEAT RANDOM CLEAR PROG
REC MODE
TRACK NO.
WRITE
DIMMER DISPLAY
OPEN/
CLOSE
POWER OPEN/CLOSE
OPEN/CLOSE
Elapsed time of the track being recorded
Total remaining recording time on the disc
Total time recorded on the disc
CD-R
CD TOTAL
REMAIN
PROG
RNDM
REPEAT
SINGLE
EFFECT
REC
ALL
AUTO SYNC
TOC
X2 X4
R
dB
L
SF
32 44 48
1
–
60 30 10 6 4 2 1 0 OVER00
––– ––––
CD-R
TOTAL
REMAIN
RNDM
REPEAT
SINGLE
EFFECT
REC
ALL
AUTO SYNC
TOC
X2 X4
R
dB
L
SF
–
60 30 10 6 4 2 1 0 OVER00
––– ––––
CD-R
CD
REMAIN
PROG
RNDM
REPEAT
SINGLE
EFFECT
REC
ALL
AUTO SYNC
TOC
X2 X4
R
dB
L
SF
32 44 481
–
60 30 10 6 4 2 1 0 OVER00
––– ––––
1Press OPEN/CLOSE (OPEN/CLOSE on the
remote) to open the disc tray and remove the disc.
• If a disc is playing, playback is stopped
automatically, and then the disc tray opens.
2 Press OPEN/CLOSE (OPEN/CLOSE on the
remote) again to close the disc tray.
3 Press POWER on the front panel to turn the power
off.

E-12
RECORDING FUNCTIONS
English
Recording modes
This recorder features a number of recording modes
allowing you to make recordings from a wide variety of
program sources (both analog and digital).
• When using this unit to make recordings, subcode
information that may be present in the source audio
signal such as CD TEXT, index data, etc., will not be
recorded.
Before recording
•
Set your amplifier or receiver to the source to be recorded.
•
Check that INPUT on the front panel is set appropriately
for the source to be recorded as described on page 7.
About the recording modes
Synchronized recording is recommended when making a
digital recording from a CD or MD, etc.
Manual recording is recommended when making an
analog recording.
Single track synchronized recording
After recording a single track, the unit is put in the record
pause mode. This mode is convenient for recording a mix
of tracks from different sources. See page 13 for this
procedure.
ALL track synchronized recording
When the source component starts to play, all tracks are
recorded and the recording automatically stops after the
last track. This mode is convenient for recording an entire
CD, DAT, MD or LP, etc. See page 14 for this procedure.
Full AUTO synchronized recording
This mode automatically finalizes the disc after ALL track
synchronized recording. See page 15 for this procedure.
Manual recording
This recording mode is used mainly when manual control
of the recording is required or preferred. Recording is
started and stopped manually. See page 16 for this
procedure.
IMPORTANT
•Do not turn off the power during recording. If the
power is turned off, recorded material may be lost
and the disc may not perform normally.
•If a power failure occurs or if the power cord is
pulled out of the wall outlet while recording on a
CD-RW disc, any material recorded before the
information is written to the PMA (Program
Memory Area) will be lost and left unrecorded.
When using a CD-R disc, the disc will no longer
be usable.
•During recording, make sure that the recorder is
not subjected to shock or vibration as this may
cause skips or jumps to be included in the
recording.
In the following cases recording is NOT possible
• When the CD indicator is lit indicating that a CD disc
or finalized CD-R disc is loaded in the recorder.
• When the CD-RW and TOC indicators are lit indicating
that a finalized CD-RW disc is loaded in the recorder.
• When there is no recording time remaining on the disc
and “Disc Full” appears in the display.
•
When 99 tracks have been recorded and “Track Full” appears
in the display. Only 99 tracks may be recorded on a CD disc.
• When the CD-R or CD-RW disc loaded in the recorder
is not intended for recording audio and “Not Audio”
appears in the display.
Notes
• If a source component connected to the DIGITAL IN jacks on
this unit is recorded by another recording device connected to
the DIGITAL OUT jacks on this unit, the recording function
may not perform correctly.
•
Depending on the source component, recording may not always
be possible when using the digital input jacks on this unit.
When recording onto a partially
recorded disc
If a CD-R or CD-RW disc has some recording time
remaining on it before finalization is performed, any of
the recording modes can be performed as normal.
Recording is automatically started from the location
immediately after the last recorded track on the disc.
Before CD-R discs can be played on
standard CD players – Finalization
When you have finished recording on a CD-R disc, it is
necessary to finalize the disc to make it compatible with
standard CD players. If this procedure is not performed, the
CD-R disc will not be playable on a standard CD player.
•
If Full AUTO synchronized recording is performed, finalization
is automatically performed following the conclusion of recording.
Notes for synchronized recording
•When performing synchronized recording of a
Video CD (audio portion only), the synchronized
recording function may not work correctly
depending on the source component being used to
play the Video CD.
•
Depending on the operation of the DVD player, this
unit may not stop the synchronized recording although
20 seconds of silence is continued. In this case, press
&
(STOP
&
on the remote) to stop this unit.
•Extremely low level signals will not be recognized
during analog input signal recording and will be
treated as silence. Be aware of low level signals
during synchronized recording.
•Although it takes less than 100 msec to detect
input signals in the synchronized recording mode,
this unit may not record the first portion of input
signals depending on discs. In this case, select the
syncronized recording mode after the manual
recording is started.

E-13
RECORDING FUNCTIONS
This is a recording mode suitable for compiling single
tracks from different audio sources. A new track marker is
automatically placed at the start of the track.
Synchronized recording
of a single track
NATURAL SOUND CD RECORDER CDR-S1000
POWER
FINALIZE ERASE DISPLAY
TRACK NO.
EFFECT
REC MODE
OPEN/CLOSE
CD DIRECT
REC
INPUT
PHONES
REC LEVEL
LEVEL
DIGITAL/ANALOG
MIN MAX
010
OPTICAL
COAXIAL ANALOG
REC
MUTE
/
//
EFFECT
FINALIZE
STOP PAUSE PLAY
SEARCH
SKIP
ERASE REC
REC MUTE
123
456
789
+10
0
INDEX
REPEAT RANDOM CLEAR PROG
REC MODE
TRACK NO.
WRITE
DIMMER DISPLAY
OPEN/
CLOSE
CD-R
CD TOTAL
REMAIN
PROG
RNDM
REPEAT
SINGLE
EFFECT
REC
ALL
AUTO SYNC
TOC
R
dB
L
SF
32 44 48.1
–
60 30 10 6 4 2 1 0 OVER00
––– ––––
INPUT
REC MODE
&
REC MODE
STOP &
CD-R
CD TOTAL
REMAIN
PROG
RNDM
REPEAT
SINGLE
EFFECT
REC
ALL
AUTO SYNC
TOC
X2 X4
R
dB
L
SF
32 44 48.1
–
60 30 10 6 4 2 1 0 OVER00
––– ––––
REC
REC
4 Adjust the recording level as described on page 17.
• The recording level of digital and analog sources
can be adjusted.
• Start playing the source to set the recording level.
When the recording level is set, stop playback of
the source component.
• The recording level cannot be changed when the
CD DIRECT function is on.
5 Ensure that the source is in pause or stop mode, as
synchronized recording cannot be started if the
source is playing.
• Confirm the correct track is selected before
proceeding to the next step.
6 Press REC MODE once.
• The SINGLE and SYNC indicators light in the
display.
7 Start playing the source.
• The unit starts recording automatically when it
detects an audio signal.
• When the track being recorded ends, “Standby”
blinks in the display while information is being
written to the PMA (Program Memory Area) and
the unit is put in the record pause mode.
8 To record another track, repeat steps 5, 6, and 7.
9 After recording is complete, press & (STOP & on the
remote) to cancel recording and put the unit in the
stop mode.
When you are finished recording, follow the
finalization procedure described on page 20.
1 Load a CD-R or CD-RW disc containing space for
recording.
• To ensure proper recording, make sure that you
have more than enough space on the disc.
2 Press REC.
• This unit enters record pause mode.
3 Set INPUT on the front panel to the appropriate input
to be used for recording.

E-14
RECORDING FUNCTIONS
English
NATURAL SOUND CD RECORDER CDR-S1000
POWER
FINALIZE ERASE DISPLAY
TRACK NO.
EFFECT
REC MODE
OPEN/CLOSE
CD DIRECT
REC
INPUT
PHONES
REC LEVEL
LEVEL
DIGITAL/ANALOG
MIN MAX
010
OPTICAL
COAXIAL ANALOG
REC
MUTE
/
//
EFFECT
FINALIZE
STOP PAUSE PLAY
SEARCH
SKIP
ERASE REC
REC MUTE
123
456
789
+10
0
INDEX
REPEAT RANDOM CLEAR PROG
REC MODE
TRACK NO.
WRITE
DIMMER DISPLAY
OPEN/
CLOSE
Synchronized recording
of ALL tracks
This is a recording mode suitable for recording all of the
material from a single audio source such as a CD, MD,
cassette, or LP. Track markers are automatically placed
between the tracks being recorded.
CD-R
CD TOTAL
REMAIN
PROG
RNDM
REPEAT
SINGLE
EFFECT
REC
ALL
AUTO SYNC
TOC
R
dB
L
SF
32 44 48.1
–
60 30 10 6 4 2 1 0 OVER00
––– ––––
INPUTREC MODE
REC MODE
CD-R
CD TOTAL
REMAIN
PROG
RNDM
REPEAT
SINGLE
EFFECT
REC
ALL
AUTO SYNC
TOC
X2 X4
R
dB
L
SF
32 44 48.1
–
60 30 10 6 4 2 1 0 OVER00
––– ––––
REC
REC
4 Adjust the recording level as described on page 17.
• The recording level of digital and analog sources
can be adjusted.
• Start playing the source to set the recording level.
When the recording level is set, stop playback of
the source component.
• The recording level cannot be changed when the
CD DIRECT function is on.
5 Ensure that the source is in pause or stop mode, as
synchronized recording cannot be started if the
source is playing.
6 Press REC MODE twice.
• The ALL and SYNC indicators light in the display.
7 Start playing the source.
• The unit starts recording automatically when it
detects an audio signal.
• When making a digital recording, a new track
marker is placed each time a new track begins on
the source component.
• Depending on the source component, a new track
marker may not always be placed correctly. When
this occurs, use the manual track marking function.
• When making an analog recording, spaces of
silence are interpreted as track separations, and a
new track marker is automatically placed when a
new audio signal is detected. The silence should be
about 4 seconds long. Automatic track marking
may not be performed properly if the recording
source has excessive noise or contains a lot of low
level sounds. In this case, we recommend manual
recording as described on page 16.
• Once the unit has recorded 20 seconds of
continuous silence, recording ends and “Wait”
blinks in the display while information is being
written to the PMA (Program Memory Area). After
this is complete, the unit is put in the stop mode.
• When making a recording using the program
playback function of the source component, make
sure that the space between each track is under 10
seconds.
When you are finished recording, follow the
finalization procedure described on page 20.
1 Load a CD-R or CD-RW disc containing space for
recording.
• To ensure proper recording, make sure that you
have more than enough space on the disc.
2 Press REC.
• This unit enters record pause mode.
3 Set INPUT on the front panel to the appropriate input
to be used for recording.

E-15
RECORDING FUNCTIONS
The Full AUTO synchronized recording mode
automatically performs finalization after ALL track
synchronized recording (described on the previous page).
Finalization is the final process in recording a CD-R disc
that makes it playable on standard CD players. (CD-RW
discs can only be played back on a CD-RW compatible
player, even if finalization is performed.) Refer to page 20
for more information on finalization.
Synchronized recording
with finalization
NATURAL SOUND CD RECORDER CDR-S1000
POWER
FINALIZE ERASE DISPLAY
TRACK NO.
EFFECT
REC MODE
OPEN/CLOSE
CD DIRECT
REC
INPUT
PHONES
REC LEVEL
LEVEL
DIGITAL/ANALOG
MIN MAX
010
OPTICAL
COAXIAL ANALOG
REC
MUTE
/
//
EFFECT
FINALIZE
STOP PAUSE PLAY
SEARCH
SKIP
ERASE REC
REC MUTE
123
456
789
+10
0
INDEX
REPEAT RANDOM CLEAR PROG
REC MODE
TRACK NO.
WRITE
DIMMER DISPLAY
OPEN/
CLOSE
&
REC MODE
REC MODE
CD-R
CD TOTAL
REMAIN
PROG
RNDM
REPEAT
SINGLE
EFFECT
REC
ALL
AUTO SYNC
TOC
R
dB
L
SF
32 44 48.1
–
60 30 10 6 4 2 1 0 OVER00
––– ––––
CD-R
CD TOTAL
REMAIN
PROG
RNDM
REPEAT
SINGLE
EFFECT
REC
ALL
AUTO SYNC
TOC
X2 X4
R
dB
L
SF
32 44 48.1
–
60 30 10 6 4 2 1 0 OVER00
––– ––––
INPUTREC
REC
STOP &
4 Adjust the recording level as described on page 17.
• The recording level of digital and analog sources
can be adjusted.
• Start playing the source to set the recording level.
When the recording level is set, stop playback of
the source component.
• The recording level cannot be changed when the
CD DIRECT function is on.
5 Ensure that the source is in pause or stop mode, as
synchronized recording cannot be started if the
source is playing.
6 Press REC MODE three times.
• The AUTO and SYNC indicators light in the
display.
7 Start playing the source.
• The unit starts recording automatically when it
detects an audio signal.
8 Once the unit has recorded 20 seconds of continuous
silence, recording ends and “Wait” blinks in the
display while information is being written to the
PMA (Program Memory Area). After this is
complete, finalization begins automatically.
• In the Full AUTO synchronized recording mode,
the finalization process following the end of
recording can be canceled by pressing & (STOP &
on the remote) during the 20 seconds of silence at
the end of the recording. If this is done, however, it
will be necessary to perform finalization as
described on page 20.
• When making a recording using the program
playback function of the source component, make
sure that the space between each track is under 10
seconds.
• Operation buttons do not respond once finalization
has begun.
• Never turn the power off during finalization!
• System operation stops automatically without
performing finalization when there is no more
recording time or when 99 tracks have already been
recorded.
1 Load a CD-R or CD-RW disc containing space for
recording.
• To ensure proper recording, make sure that you
have more than enough space on the disc.
2 Press REC.
• This unit enters record pause mode.
3 Set INPUT on the front panel to the appropriate input
to be used for recording.

E-16
RECORDING FUNCTIONS
English
This is a recording mode used when manual control of the
recording is required or preferred.
(Please note that synchronized recording (single or ALL)
is recommended when making a digital recording from
CD or MD, etc.)
Manual recording
NATURAL SOUND CD RECORDER CDR-S1000
POWER
FINALIZE ERASE DISPLAY
TRACK NO.
EFFECT
REC MODE
OPEN/CLOSE
CD DIRECT
REC
INPUT
PHONES
REC LEVEL
LEVEL
DIGITAL/ANALOG
MIN MAX
010
OPTICAL
COAXIAL ANALOG
REC
MUTE
/
//
EFFECT
FINALIZE
STOP PAUSE PLAY
SEARCH
SKIP
ERASE REC
REC MUTE
123
456
789
+10
0
INDEX
REPEAT RANDOM CLEAR PROG
REC MODE
TRACK NO.
WRITE
DIMMER DISPLAY
OPEN/
CLOSE
CD-R
CD TOTAL
REMAIN
PROG
RNDM
REPEAT
SINGLE
EFFECT
REC
ALL
AUTO SYNC
TOC
X2 X4
R
dB
L
SF
32 44 48.1
–
60 30 10 6 4 2 1 0 OVER00
––– ––––
REC MUTE REC INPUT
&
^
REC MUTE
REC
STOP &
PAUSE *
PLAY #
4 Adjust the recording level as described on the
following page.
• The recording level of digital and analog sources
can be adjusted.
• Start playing the source to set the recording level.
When the recording level is set, stop playback of
the source component.
• The recording level cannot be changed when the
CD DIRECT function is on.
5 Press ^ (PAUSE * or PLAY # on the remote) to
start recording.
6 Start playing the source.
7 After recording is complete, press & (STOP & on the
remote) to stop recording.
• “Wait” blinks in the display while information is
being written to the PMA (Program Memory Area).
To pause during recording
Press ^ (PAUSE * on the remote) to pause recording
temporarily. “Standby” blinks in the display while
information is being written to the PMA (Program
Memory Area).
To resume recording, press ^ (PAUSE * or PLAY #
on the remote).
To record blank space at the end of a
track
Press REC MUTE.
A 4-second blank space is recorded, and the unit
automatically enters the record pause mode.
• The REC indicator blinks while blank space is being
recorded.
• You can create blank spaces longer than 4 seconds by
pressing and holding REC MUTE. The unit is put in
the record pause mode when the button is released.
• REC MUTE cannot be used when the record pause
mode is activated from the stop mode.
When you are finished recording, follow the
finalization procedure described on page 20.
1 Load a CD-R or CD-RW disc containing space for
recording.
• To ensure proper recording, make sure that you
have more than enough space on the disc.
2 Press REC.
• This unit enters record pause mode.
3 Set INPUT on the front panel to the appropriate input
to be used for recording.

E-17
RECORDING FUNCTIONS
Setting the digital recording level
The volume level of digital audio sources is often similar,
however, level differences may be quite obvious between
different digital audio sources and even between one
recording and another. To maintain a consistent recording
level in CD recordings, it is possible to change the volume
of the input digital signal.
• Please note that the digital recording level cannot be
adjusted when the CD DIRECT function is on (the CD
DIRECT indicator is lit on the front panel).
To select the digital signal to be recorded, set INPUT to
the appropriate digital input (OPTICAL or COAXIAL).
To set the digital recording level, play the digital source to
be recorded during record or record pause mode, and turn
REC LEVEL DIGITAL/ANALOG to adjust the volume
of the digital signal to a level that sounds appropriate. The
digital volume can be adjusted up to a MAX of +12 dB
and down to a MIN of –12 dB from the center position of
0 dB, the level of the input digital signal.
Notes
• Although some sources can be recorded with lower peak
levels, setting the peak levels too low may degrade the quality
of the recording.
• By pressing CD DIRECT (the CD DIRECT indicator lights on
the front panel), the digital level is automatically set to that of
the CD disc being recorded, and turning REC LEVEL
DIGITAL/ANALOG has no effect.
L
R
dB
–
60 30 10 6 4 2 1 0 OVER00
––– – ––
Should not light
Setting the
recording levels
NATURAL SOUND CD RECORDER CDR-S1000
POWER
FINALIZE ERASE DISPLAY
TRACK NO.
EFFECT
REC MODE
OPEN/CLOSE
CD DIRECT
REC
INPUT
PHONES
REC LEVEL
LEVEL
DIGITAL/ANALOG
MIN MAX
010
OPTICAL
COAXIAL ANALOG
REC
MUTE
/
//
INPUT
REC LEVEL
DIGITAL/ANALOG
Setting the analog recording level
To select the analog signal, set INPUT to ANALOG.
Turn REC LEVEL DIGITAL/ANALOG during record or
record pause mode to adjust the analog recording level.
For best results, play the loudest passage of the source to
be recorded and watch the recording level meter in the
display. Adjust REC LEVEL DIGITAL/ANALOG so
that the highest peak causes the 0 dB level indicators to
flicker. Do not set the recording level so that the OVER
indicators light as it may produce distortion in the audio
signal.

E-18
RECORDING FUNCTIONS
English
Manual track marking
NATURAL SOUND CD RECORDER CDR-S1000
POWER
FINALIZE ERASE DISPLAY
TRACK NO.
EFFECT
REC MODE
OPEN/CLOSE
CD DIRECT
REC
INPUT
PHONES
REC LEVEL
LEVEL
DIGITAL/ANALOG
MIN MAX
010
OPTICAL
COAXIAL ANALOG
REC
MUTE
/
//
EFFECT
FINALIZE
STOP PAUSE PLAY
SEARCH
SKIP
ERASE REC
REC MUTE
123
456
789
+10
0
INDEX
REPEAT RANDOM CLEAR PROG
REC MODE
TRACK NO.
WRITE
DIMMER DISPLAY
OPEN/
CLOSE
TRACK NO.
WRITE
TRACK NO.
Recording directly
from a source CD
NATURAL SOUND CD RECORDER CDR-S1000
POWER
FINALIZE ERASE DISPLAY
TRACK NO.
EFFECT
REC MODE
OPEN/CLOSE
CD DIRECT
REC
INPUT
PHONES
REC LEVEL
LEVEL
DIGITAL/ANALOG
MIN MAX
010
OPTICAL
COAXIAL ANALOG
REC
MUTE
/
//
Because CD discs are recorded at a sampling rate of 44.1
kHz, this unit makes it possible to make a direct recording
of another CD disc that bypasses unnecessary digital
processing such as the sampling rate converter.
CD DIRECT
CD DIRECT
1 Press CD DIRECT while in record pause mode.
• When the CD DIRECT function is on, the CD
DIRECT indicator lights.
2 Perform one of the recording procedures as outlined
on pages 13 to 16.
• Any of the recording modes may be used.
• When the CD DIRECT indicator is lit, recording
level adjustment is not possible. Additionally,
dynamic range compression cannot be applied to
the recording.
To turn off the CD DIRECT function
Press CD DIRECT again.
Note
• Due to variances in recordings, the CD DIRECT function may
not work with all CD discs. If the CD DIRECT function is not
possible, pressing CD DIRECT causes the CD DIRECT
indicator to blink for 3 seconds and then turn off.
While recording, press TRACK NO. (TRACK NO.
WRITE on the remote).
• A new track number is added at the location on the disc
corresponding to the time TRACK NO. (TRACK NO.
WRITE on the remote) is pressed.
• Please note that tracks cannot be shorter than 4 seconds,
and that a disc cannot contain more than 99 tracks.
Even if there is time remaining on the disc, further
recording is impossible once 99 tracks have been
recorded.
Notes
• When digitally recording DAT sources, be sure to start
recording on the CD-R disc after pausing the source at the
beginning of a track (start ID, etc.).
• Manual track marking is recommended for the following:
* When an analog source is being recorded that contains a
section or numerous sections with levels too low to be
detected on the level meter.
* When recording digital satellite broadcasts
• Manual track marking is possible even during synchronized
recording.
You can manually mark tracks as you like anywhere in
your recording.

E-19
RECORDING FUNCTIONS
Applying dynamic
range compression
to a recording
NATURAL SOUND CD RECORDER CDR-S1000
POWER
FINALIZE ERASE DISPLAY
TRACK NO.
EFFECT
REC MODE
OPEN/CLOSE
CD DIRECT
REC
INPUT
PHONES
REC LEVEL
LEVEL
DIGITAL/ANALOG
MIN MAX
010
OPTICAL
COAXIAL ANALOG
REC
MUTE
/
//
EFFECT
FINALIZE
STOP PAUSE PLAY
SEARCH
SKIP
ERASE REC
REC MUTE
123
456
789
+10
0
INDEX
REPEAT RANDOM CLEAR PROG
REC MODE
TRACK NO.
WRITE
DIMMER DISPLAY
OPEN/
CLOSE
CD-R
CD TOTAL
REMAIN
PROG
RNDM
REPEAT
SINGLE
EFFECT
REC
ALL
AUTO SYNC
TOC
X2 X4
R
dB
L
SF
32 44 481
–
60 30 10 6 4 2 1 0 OVER00
––– ––––
CD discs can be enjoyed in car CD players, but often
sounds can get lost when competing with engine noises
and other factors. To remedy this problem, this recorder
features an effect that essentially records a compressed
sound range in which soft sounds are boosted and louder
sounds are lowered and produces music that can be more
fully enjoyed when listening to CDs in a car or similar
environment.
EFFECT
EFFECT
1 Press EFFECT in record or record pause mode.
• The EFFECT indicator lights in the display.
2 Perform one of the recording procedures as outlined
on pages 13 to 16.
• Any of the recording modes may be used.
• The effects of the dynamic range compression can
be heard during the recording process.
3 Press EFFECT again to cancel the effect.
• The EFFECT indicator disappears from the display.
• Dynamic range compression is automatically
canceled if recording is stopped.
Note
• Dynamic range compression cannot be applied to a recording
when the CD DIRECT function is on.

E-20
RECORDING FUNCTIONS
English
Finalization is the process that concludes recording, and
allows a CD-R disc to be played on a standard CD player.
(Please note that CD-RW discs can only be played on a
CD-RW compatible player even after finalization has
been performed. CD-RW discs cannot be played on a
standard CD player.)
• Please note that once a CD-R disc is finalized,
recording is no longer possible. Please ensure the disc is
in its final form before performing finalization.
• If the power is turned off or interrupted during
finalization, the recorded material may be lost and the
disc may not be usable.
Finalization
EFFECT
FINALIZE
STOP PAUSE PLAY
SEARCH
SKIP
ERASE REC
REC MUTE
123
456
789
+10
0
INDEX
REPEAT RANDOM CLEAR PROG
REC MODE
TRACK NO.
WRITE
DIMMER DISPLAY
OPEN/
CLOSE
NATURAL SOUND CD RECORDER CDR-S1000
POWER
FINALIZE ERASE DISPLAY
TRACK NO.
EFFECT
REC MODE
OPEN/CLOSE
CD DIRECT
REC
INPUT
PHONES
REC LEVEL
LEVEL
DIGITAL/ANALOG
MIN MAX
010
OPTICAL
COAXIAL ANALOG
REC
MUTE
/
//
FINALIZE
FINALIZE
STOP &
&
PLAY #
^
CD-R
CD TOTAL
REMAIN
PROG
RNDM
REPEAT
SINGLE
EFFECT
REC
ALL
AUTO SYNC X2 X4
R
dB
L
SF
32 44 481
–
60 30 10 6 4 2 1 0 OVER00
––– ––––
To finalize a CD-R or CD-RW disc
1 Load a recorded (but not finalized) CD-R or CD-RW
disc.
• Before loading the disc, make sure there are no
scratches, dust, fingerprints or similar marks on the
disc. If necessary, clean the disc as described on
page 29.
2 Press FINALIZE.
• If you want to cancel finalization, press &
(STOP & on the remote).
3 Press ^ (PLAY # on the remote) to start the
finalization procedure.
• The remaining time required for finalization to
complete is displayed. Finalization can usually be
completed within about 2 minutes.
• When CD-R disc finalization is complete, the CD-
R indicator changes to the CD indicator in the
display, and the recorder is put in the stop mode.
• When CD-RW disc finalization is complete, the
TOC indicator lights in the display, and the
recorder is put in the stop mode.
Notes on finalization
• Once the finalization process has started, no other
operation is possible until finalization has been
completed.
• If the disc is marked or scratched, finalization may not
be possible.
• Do not turn off the power or disconnect the power
during finalization.

E-21
RECORDING FUNCTIONS
CD-RW discs can be erased and new recordings can be
made after material has been erased. The following types
of erasing are possible with this unit.
Last Track Erase
Erases the last track. This operation is not possible on a
CD-RW disc that has been finalized or when only one
track has been recorded on the disc.
All Track Erase
Erases all of the tracks recorded on the disc. This
operation is not possible on a CD-RW disc that has been
finalized.
TOC Erase
TOC Erase is only available on a CD-RW disc that has
been finalized. After the TOC is erased, the effects of
finalization are defeated, and further recording is possible.
Disc Erase
This operation deletes all data on the disc. It is usually not
necessary to perform this function, however, it may be
used to recover a disc that was stopped during a
finalization or erase operation, etc.
To select an erase mode
Each time ERASE is pressed, the Erase mode changes as
follows.
CD-RW discs that have not been finalized:
Erase off = Last Track Erase = All Track Erase
Finalized CD-RW discs:
Erase off = TOC erase
All CD-RW discs:
Holding down ERASE for at least 2 seconds initiates
Disc Erase.
Note
• When there is only one track recorded on a CD-RW that has
not been finalized, only All Track Erase is possible.
IMPORTANT
•Do not turn off the power during an erase
procedure as this could cause the player to
malfunction and make the disc unusable.
•If the message “Check Disc” appears during an
erase operation and erasing stops, the disc may be
damaged. Should this occur, inspect the disc and
then try erasing it again.
Last Track Erase
1 Load a CD-RW disc that has been recorded on.
• This function is not possible on a finalized
CD-RW disc.
2 Press ERASE.
• “Erase LAST?”, appears in the display.
• If you want to cancel the Erase mode, press &
(STOP & on the remote).
3 Press ^ (PLAY # on the remote) to start the Last
Track Erase process.
• This operation requires several seconds to
complete.
• During Last Track Erase, “Erase” and the
remaining time to completion appear in the display.
4 The recorder stops when Last Track Erase is
complete.
Track and Disc Erase
(CD-RW discs only)
±
EFFECT
FINALIZE
STOP PAUSE PLAY
SEARCH
SKIP
ERASE REC
REC MUTE
123
456
789
+10
0
INDEX
REPEAT RANDOM CLEAR PROG
REC MODE
TRACK NO.
WRITE
DIMMER DISPLAY
OPEN/
CLOSE
NATURAL SOUND CD RECORDER CDR-S1000
POWER
FINALIZE ERASE DISPLAY
TRACK NO.
EFFECT
REC MODE
OPEN/CLOSE
CD DIRECT
REC
INPUT
PHONES
REC LEVEL
LEVEL
DIGITAL/ANALOG
MIN MAX
010
OPTICAL
COAXIAL ANALOG
REC
MUTE
/
//
ERASE
ERASE
PLAY #
^
&
STOP &

E-22
RECORDING FUNCTIONS
English
All Track Erase
1 Load a CD-RW disc that has been recorded on.
• This function is not possible on a finalized
CD-RW disc.
2 Press ERASE until “Erase ALL?” appears on the
display.
• If you want to cancel the Erase mode, press &
(STOP & on the remote).
3 Press ^ (PLAY # on the remote) to start the All
Track Erase process.
• This process requires from several seconds up to 3
minutes depending on the amount of recorded
material.
• During All Track Erase, “Erase” and the remaining
time to completion appear in the display.
4 The recorder stops when All Track Erase is complete.
TOC Erase
1 Load a CD-RW disc that has been finalized.
2 Press ERASE.
• “Erase TOC?” appears in the display.
• If you want to cancel the Erase mode, press &
(STOP & on the remote).
3 Press ^ (PLAY # on the remote) to start the TOC
Erase process.
• This process requires approximately 1 minute to
complete.
• During TOC Erase, “Erase” and the remaining time
to completion appear in the display.
4 The recorder stops when TOC Erase is completed.
Note
• When TOC Erase is complete, the TOC indicator goes out.
Disc Erase
1 Load a CD-RW disc that has been recorded on.
• The CD-RW disc may be finalized or not.
2 Press and hold ERASE for about 2 seconds.
• “Erase DISC?” appears in the display.
• If you want to cancel the Erase mode, press &
(STOP & on the remote).
3 Press ^ (PLAY # on the remote) to start the Disc
Erase process.
• This process requires approximately one-fourth the
total time on the disc.
4 The recorder stops when Disc Erase is completed.

E-23
PLAYBACK FUNCTIONS
Playing a CD disc
To pause play temporarily
During playback, press ^ (PAUSE * on the remote).
To resume play, press ^ (PAUSE * or PLAY # on
the remote).
To stop play completely
During playback, press & (STOP & on the remote).
To play a desired track number on
the disc
Select a desired track by using the numeric buttons on the
remote. The selected track number appears in the display.
Example: To select track 25
Press +10 twice, then immediately press 5 once.
Note
• If a track number higher than the highest track number on the
disc is selected, the last track on the disc will be played.
This unit is capable of playing CD, CD-R and CD-RW
discs.
NATURAL SOUND CD RECORDER CDR-S1000
POWER
FINALIZE ERASE DISPLAY
TRACK NO.
EFFECT
REC MODE
OPEN/CLOSE
CD DIRECT
REC
INPUT
PHONES
REC LEVEL
LEVEL
DIGITAL/ANALOG
MIN MAX
010
OPTICAL
COAXIAL ANALOG
REC
MUTE
/
//
EFFECT
FINALIZE
STOP PAUSE PLAY
SEARCH
SKIP
ERASE REC
REC MUTE
123
456
789
+10
0
INDEX
REPEAT RANDOM CLEAR PROG
REC MODE
TRACK NO.
WRITE
DIMMER DISPLAY
OPEN/
CLOSE
^&
Numeric
buttons
PLAY #
PAUSE *
STOP &
To play a CD disc
1 Turn the recorder’s power on and load a disc as
described on page 10.
2 Press ^ (PLAY # on the remote).
• Playback starts from the beginning of track 1.

E-24
PLAYBACK FUNCTIONS
English
Searching for a track
To go forward rapidly
Press and hold ⁄/› (SEARCH ⁄ on the remote)
during play. When the button is released, normal playback
is resumed.
To go backward rapidly
Press and hold $/! (SEARCH ! on the remote)
during play. When the button is released, normal playback
is resumed.
Notes
• The sound cannot be heard during scanning in either direction.
• Scanning can also be performed while disc play is paused.
Scanning forward or
backward rapidly
NATURAL SOUND CD RECORDER CDR-S1000
POWER
FINALIZE ERASE DISPLAY
TRACK NO.
EFFECT
REC MODE
OPEN/CLOSE
CD DIRECT
REC
INPUT
PHONES
REC LEVEL
LEVEL
DIGITAL/ANALOG
MIN MAX
010
OPTICAL
COAXIAL ANALOG
REC
MUTE
/
//
To advance to the next track
During playback, press ⁄/› (SKIP › on the
remote). Pressing ⁄/› (SKIP › on the remote)
repeatedly advances to other tracks.
To return to the beginning of current
track
During playback, press $/! (SKIP $ on the
remote) once.
To return to previous tracks
During playback, press $/! (SKIP $ on the
remote) twice in succession to return to the previous track.
Repeatedly press $/! (SKIP $ on the remote) to
return to other previous tracks.
Note
• It is also possible to use ⁄/› or $/! (SKIP › or
SKIP $ on the remote) to cue a track when the unit is
paused or stopped. When a track is cued in this manner,
playback does not begin until ^ (PLAY # on the remote) is
pressed.
$/! ⁄/›
NATURAL SOUND CD RECORDER CDR-S1000
POWER
FINALIZE ERASE DISPLAY
TRACK NO.
EFFECT
REC MODE
OPEN/CLOSE
CD DIRECT
REC
INPUT
PHONES
REC LEVEL
LEVEL
DIGITAL/ANALOG
MIN MAX
010
OPTICAL
COAXIAL ANALOG
REC
MUTE
/
//
EFFECT
FINALIZE
STOP PAUSE PLAY
SEARCH
SKIP
ERASE REC
REC MUTE
123
456
789
+10
0
INDEX
REPEAT RANDOM CLEAR PROG
REC MODE
TRACK NO.
WRITE
DIMMER DISPLAY
OPEN/
CLOSE
EFFECT
FINALIZE
STOP PAUSE PLAY
SEARCH
SKIP
ERASE REC
REC MUTE
123
456
789
+10
0
INDEX
REPEAT RANDOM CLEAR PROG
REC MODE
TRACK NO.
WRITE
DIMMER DISPLAY
OPEN/
CLOSE
$ SKIP ›
! SEARCH ⁄
$/! ⁄/›

E-25
PLAYBACK FUNCTIONS
You can enjoy listening to your favorite tracks in any
desired order by programming tracks.
Program play
Display information during
programming
1 Shows the step number for the track to be
programmed next.
2 Shows the programmed track number.
3 Shows the total time of the tracks currently
programmed. If the total time exceeds 100 minutes,
only the last two digits of the total minutes will be
displayed.
Notes
• You can program as many as 40 tracks at one time.
• If DISPLAY is pressed during programming, the program
number display can be changed to display the total time of the
programmed tracks. To return to the previous display, press
DISPLAY again.
• During program play, pressing a numeric button on the remote
stops program play and skips to the beginning of the track of
the number pressed. Once that track has finished playing, the
previously interrupted program resumes play.
• To skip tracks within the program, press $/! or ⁄/›
(SKIP $ or SKIP › on the remote) during program play.
• To search all tracks including unprogrammed tracks, press and
hold $/! or ⁄/› (SEARCH ! or SEARCH ⁄
on the remote) during program play.
NATURAL SOUND CD RECORDER CDR-S1000
POWER
FINALIZE ERASE DISPLAY
TRACK NO.
EFFECT
REC MODE
OPEN/CLOSE
CD DIRECT
REC
INPUT
PHONES
REC LEVEL
LEVEL
DIGITAL/ANALOG
MIN MAX
010
OPTICAL
COAXIAL ANALOG
REC
MUTE
/
//
EFFECT
FINALIZE
STOP PAUSE PLAY
SEARCH
SKIP
ERASE REC
REC MUTE
123
456
789
+10
0
INDEX
REPEAT RANDOM CLEAR PROG
REC MODE
TRACK NO.
WRITE
DIMMER DISPLAY
OPEN/
CLOSE
DISPLAY
^
DISPLAY
PROG
Numeric
buttons
&
$ SKIP ›
STOP &
$/! ⁄/›
CLEAR
CD-RW
CD TOTAL
REMAIN
PROG
RNDM
REPEAT
SINGLE
EFFECT
REC
ALL
AUTO SYNC
TOC
R
dB
L
SF
32 44 48.1
–
60 30 10 6 4 2 1 0 OVER00
––– ––––
1
2
CD-RW
CD TOTAL
REMAIN
PROG
RNDM
REPEAT
SINGLE
EFFECT
REC
ALL
AUTO SYNC
TOC
R
dB
L
SF
32 44 48.1
–
60 30 10 6 4 2 1 0 OVER00
––– ––––
CD-RW
CD TOTAL
REMAIN
PROG
RNDM
REPEAT
SINGLE
EFFECT
REC
ALL
AUTO SYNC
TOC
R
dB
L
SF
32 44 48.1
–
60 30 10 6 4 2 1 0 OVER00
––– ––––
3
PLAY #
1 Press PROG on the remote to begin programming.
• The PROG indicator lights in the display.
• If “P-01” does not appear in the display after
PROG on the remote is pressed, press DISPLAY
repeatedly until it appears in the display.
2 Program the tracks in the order you want by pressing
the corresponding numeric buttons on the remote.
3 When the programming is completed, press ^
(PLAY # on the remote) to start programmed play.

E-26
PLAYBACK FUNCTIONS
English
To check program data
1. During program play, press & (STOP & on the
remote).
2. Press PROG on the remote.
3. Each time ⁄/› (SKIP › on the remote) is
pressed, the programmed track numbers and their order
in the program can be checked one after another. Each
time $/! (SKIP $ on the remote) is pressed, the
programmed track numbers and their order in the
program can be checked in reverse sequential order.
To correct program data
1. Follow steps 1 and 2 described in the above procedure
“To check program data”.
2. Display the track number to be corrected by pressing
$/! or ⁄/› (SKIP › or SKIP $ on the
remote).
3. Press a numeric button on the remote to select a track to
replace the one displayed. The previously programmed
track will be cleared from the memory and the new one
will be programmed.
4. After the correction has been completed, press
^
(PLAY # or PROG on the remote).
To stop program play
Press & (STOP & on the remote). The first programmed
track number will be displayed.
To start program play again, press ^ (PLAY # on the
remote). Play will begin from the beginning of the
program.
To cancel a programmed sequence
Press & (STOP & or CLEAR on the remote) while the
unit is stopped.
You can play all the tracks on a disc in a random
sequence.
Random sequence play
Press RANDOM.
The RNDM indicator appears in the display and the unit
starts random sequence play.
To cancel random sequence play mode
Press STOP & or RANDOM.
• The RNDM indicator disappears from the display.
Notes
• This feature will not function during programming, or during
programmed play.
• If SKIP › is pressed during random sequence play, the next
randomly selected track will be played.
If SKIP $ is pressed, play will return to the beginning of the
current track. It is not possible to return to previously played
tracks during random sequence play mode.
• Total remaining time on the disc will not be displayed during
random sequence play.
EFFECT
FINALIZE
STOP PAUSE PLAY
SEARCH
SKIP
ERASE REC
REC MUTE
123
456
789
+10
0
INDEX
REPEAT RANDOM CLEAR PROG
REC MODE
TRACK NO.
WRITE
DIMMER DISPLAY
OPEN/
CLOSE
RANDOM
CD-RW
CD TOTAL
REMAIN
PROG
RNDM SINGLE
EFFECT
REC
ALL
AUTO SYNC
TOC
R
dB
L
32 44 48.1
–
60 30 10 6 4 2 1 0 OVER00
––– ––––
STOP &

E-27
PLAYBACK FUNCTIONS
To select an index number
1 Use the numeric buttons to select a track that has
index numbers.
2 Press INDEX.
3 Use the numeric buttons to select the desired index
number.
To cancel the index search function
Press INDEX.
Notes
• Not all discs have index numbers. The index system has a
method for sub-dividing tracks into smaller divisions (for
example, the movements within classical symphonies) for
easier location of those parts. The liner notes with the disc
usually tell if such index numbers are included.
• If an index number is selected that is higher than any index
number on that disc, play will start from the last index number
point on the disc.
• For some discs, play may begin slightly prior to the actual
designated index point.
• If the disc has no encoded index points, play will begin from
the start of the selected track.
You can play a single track or the entire disc repeatedly. If the disc includes index numbers, play can be started
from any desired index number.
Repeat play Index search
EFFECT
FINALIZE
STOP PAUSE PLAY
SEARCH
SKIP
ERASE REC
REC MUTE
123
456
789
+10
0
INDEX
REPEAT RANDOM CLEAR PROG
REC MODE
TRACK NO.
WRITE
DIMMER DISPLAY
OPEN/
CLOSE
EFFECT
FINALIZE
STOP PAUSE PLAY
SEARCH
SKIP
ERASE REC
REC MUTE
123
456
789
+10
0
INDEX
REPEAT RANDOM CLEAR PROG
REC MODE
TRACK NO.
WRITE
DIMMER DISPLAY
OPEN/
CLOSE
CD-RW
CD TOTAL
REMAIN
PROG
RNDM
REPEAT
SINGLE
EFFECT
REC
ALL
AUTO SYNC
TOC
X2 X4
R
dB
L
SF
32 44 48.1
–
60 30 10 6 4 2 1 0 OVER00
––– ––––
REPEAT
CD-RW
CD TOTAL
REMAIN
PROG
RNDM
REPEAT
SINGLE
EFFECT
REC
ALL
AUTO SYNC
TOC
X2 X4
R
dB
L
SF
32 44 48.1
–
60 30 10 6 4 2 1 0 OVER00
––– ––––
INDEX
Numeric buttons
STOP &
SINGLE REPEAT (REPEAT S)
Press REPEAT until the indicators REPEAT and S
appear in the display.
The current track is played repeatedly.
• This is also available in the program play mode and the
random sequence play mode. (If the repeat play mode is
switched off, the program play mode or the random
sequence play mode will be resumed.)
FULL REPEAT (REPEAT F)
Press REPEAT until the indicators REPEAT and F
appear in the display.
All the tracks on a disc are repeated.
• In the program play mode, all programmed tracks are
repeatedly played.
• In the random sequence play mode, all randomly
sequenced tracks are played repeatedly.
To cancel repeat play
Press REPEAT until the REPEAT indicator disappears
from the display.

E-28
OTHER FUNCTIONS
English
You can select the brightness level of the display as it
suits your preferences.
Changing the brightness
of the display
Connect the headphones to the PHONES jack and adjust
the volume by using LEVEL.
Listening with
headphones
EFFECT
FINALIZE
STOP PAUSE PLAY
SEARCH
SKIP
ERASE REC
REC MUTE
123
456
789
+10
0
INDEX
REPEAT RANDOM CLEAR PROG
REC MODE
TRACK NO.
WRITE
DIMMER DISPLAY
OPEN/
CLOSE
NATURAL SOUND CD RECORDER CDR-S1000
POWER
FINALIZE ERASE DISPLAY
TRACK NO.
EFFECT
REC MODE
OPEN/CLOSE
CD DIRECT
REC
INPUT
PHONES
REC LEVEL
LEVEL
DIGITAL/ANALOG
MIN MAX
010
OPTICAL
COAXIAL ANALOG
REC
MUTE
/
//
DIMMER
PHONES LEVEL
PHONES
The brightness of the display is changed each time
DIMMER is pressed as follows.
Normal illumination
Medium dim
Maximum dim

E-29
ADDITIONAL INFORMATION
• This compact disc recorder is designed for use with
compact discs bearing the
, , or marks
only. Never attempt to load any other type of disc into
the unit.
The unit will also play 8-cm (3-inch) compact discs.
• Compact discs are not subjected to wear during play,
but damage to the disc surface when the disc is being
handled can adversely affect the disc’s play.
• Do not use cleaning discs or warped discs. All of these
could damage the unit.
To prevent a malfunction of this unit
• Do not use any non standard shaped CD discs (heart,
etc.) available on the market, because it may damage
the unit.
• Do not use a CD disc with tape, seals, or paste on it,
because damage to the unit may result.
• Be sure to use a felt-tip pen or similar writing tool when
writing on the label side of the disc. Do not use a
ball-point pen, pencil, or other hard-tipped writing tool,
as these may damage the disc and may aversely affect
further recording on the disc.
CD preventive care
• Although playback of compact discs is generally not
affected by small particles of dust or fingerprints on
their playing surface, dust, fingerprints, small scratches
and direct sunlight on the recording surface of a CD-R
or CD-RW disc may make recording impossible.
Therefore, for optimal performance of the recorder and
for long-term enjoyment of your CD collection, handle
discs correctly as outlined in the following guidelines.
• Hold discs by touching only the edges or center
hole.
• When a disc is not currently being used, remove it
from the recorder and store in an appropriate case.
• With proper disc maintenance, cleaning should not
be necessary. However, should cleaning be
required, wipe by using a clean, dry cloth. Do not
wipe with a circular motion; wipe straight outward
from the center.
• Do not try to clean the disc’s surface by using any type
of disc cleaner, record spray, antistatic spray or liquid,
or any other chemical-based liquid, because such
substances might irreparably damage the disc’s surface.
• Do not expose discs to direct sunlight, high temperature
or high humidity for a long period of time, because
these might warp or otherwise damage the disc.
No!

E-30
ADDITIONAL INFORMATION
English
Can’t Copy
Digital recording cannot be performed. (See “SCMS copy
protection” on page 32.)
Disc Full
Recording is not possible because there is no blank space
remaining on the disc.
Track Full
Recording is not possible because the maximum number
of 99 tracks has already been recorded on the disc.
Not Audio
The inserted disc is not an audio CD-R or CD-RW disc.
OPEN
The disc tray is being opened.
CLOSE
The disc tray is being closed.
Standby
The recorder has been put in the record pause mode from
either the stop or record mode, and information is being
written to the disc’s PMA (Program Memory Area).
Never turn the power off when this is displayed.
Wait
The recorder has been put in the stop mode from the
record mode and information is being written to the PMA
(Program Memory Area). Never turn the power off when
this is displayed.
Erase LAST?
Erases the last track on a CD-RW disc.
If you want to erase the last track, press ^ (PLAY # on
the remote).
Erase ALL?
Erases all tracks on a CD-RW disc.
If you want to erase all tracks, press ^ (PLAY # on the
remote).
Check Disc
This is displayed when the recorder stops after reading
disc information, while performing an erase procedure,
finalization, or OPC. If this occurs, the disc may be dirty
or possibly even damaged. Remove the disc and inspect it.
Data Track
This is displayed when the data track is played back.
Display messages
Erase DISC?
Erases all of the information a CD-RW disc.
If you want to erase all of the information, press ^
(PLAY # on the remote).
Erase TOC?
Erases the TOC (Table Of Contents) on a CD-RW disc.
If you want to erase the TOC, press ^ (PLAY # on the
remote).
Finalize OK?
Finalizes the CD.
If you want to finalize the disc, press ^ (PLAY # on
the remote).
Finalized
Recording has been attempted on a CD-RW disc that has
already been finalized.
No Input
The digital input is selected, but the connections are not
correct, or the digital signal is not being output from the
source device. Please check all cabling, and the status of
the source device.
Reading
When the recorder is turned on or a disc is loaded, the
recorder reads the format of the disc loaded in the
recorder.
OPC Adjust
Adjustments performed when OPC (Optimum Power
Calibration) optimizes the laser power to the reflectivity
of the disc. Some time is required to complete these
automatic adjustments.
No Disc
There is no disc in the disc tray.
New Disc
The disc in the disc tray is either a new CD-R or CD-RW
disc or a CD-RW disc that has been erased using the
Erase ALL or Erase DISC function.
TOC
During the finalization process, the TOC (Table Of
Contents) is being written onto the disc.

E-31
ADDITIONAL INFORMATION
SYMPTOM CAUSE REMEDY
If the unit fails to operate normally, check the following points to determine whether the fault can be corrected by the
simple measures suggested. If it cannot be corrected, or if the fault is not listed in the SYMPTOM column, disconnect the
power cord and contact your authorized YAMAHA dealer or service center for help. When talking to the service center, the
CDR-S1000 may be needed. For details, contact your authorized YAMAHA dealer or service center.
Troubleshooting
The unit does not switch on when
POWER is pressed.
Play does not begin.
Play is delayed, or begins at the wrong
place.
Recording is not possible.
Cannot play back a recorded CD-R or
CD-RW disc on other CD or DVD
players.
Sound “skips.”
Sound “hums.”
Noise from inside of the unit.
The remote control does not work.
TV functions strangely when the
remote control is being used.
Securely connect the power cord.
Check the disc carefully; replace it if necessary.
Wait 20 to 30 minutes after switching the unit on
before trying to play a disc.
Reload the disc with the label side facing up.
Clean the disc.
Check the disc carefully; replace it if necessary.
Load a recordable CD that has not been finalized yet.
For a CD-RW disc, TOC Erase or Disc Erase may be
needed.
Load a recordable CD disc.
Set INPUT to the position that reflects the source of
the input signal.
Set the output level of the source to MAX.
Load a recordable CD disc.
If the recording of a CD-RW disc is interrupted, try
recording again from the beginning. When the
recording of a CD-R disc is interrupted, start recording
over again with a disc that can be recorded on.
Clean or replace the disc.
Use a CD or DVD player compatible with CD-R or
CD-RW discs.
Finalize the disc.
Relocate the unit(s). This is not possible if the
skipping sound is already on the recording due to
vibrations or impact that occurred during recording.
Clean the disc.
Securely connect the audio cables. If the problem
persists, the cables may be defective.
Replace the disc.
Replace the batteries with new ones.
Use within 6 meters and 60 degree radius.
Change the position of the unit.
Relocate this unit away from the TV or cover the
TV’s remote control sensor.
The AC power cord is not connected or not
completely connected.
The disc is damaged.
There is moisture on the laser pick-up.
The disc has been loaded upside down.
The disc is dirty.
The disc may be scratched or damaged.
The disc is finalized.
A pre-mastered CD disc is loaded.
The input setting is incorrect.
The output level of the source is too low.
There is not enough blank space left or 99
tracks have already been recorded on the disc.
If the power cord was unplugged or there was a
power outage during recording, the recorded
material may be lost.
The disc is dirty or damaged.
The CD or DVD players are not compatible
with CD-R or CD-RW discs.
The disc is not finalized.
The unit and/or the component being recorded
is being subjected to vibration or impact.
The disc is dirty.
Improper cable connections.
The disc may be warped.
The batteries of the remote control are too
weak.
Remote control is too far away or is being used
at an incorrect angle.
Direct sunlight or lighting (of an inverter type of
fluorescent lamp, etc.) is striking the remote
control sensor of the unit.
Remote control is being used near TV set with a
remote control sensor.

E-32
ADDITIONAL INFORMATION
English
SCMS copy protection
As a digital audio component, this CD recorder conforms
with the Serial Copy Management System (SCMS)
standards. The Serial Copy Management System restricts
copies made by recording digital signals to first
generation copies only. Therefore, a CD disc recorded
using a DIGITAL IN jack cannot be used as a source for
making another digital recording. However, subsequent
recordings can be made from the first generation copy by
using the ANALOG jacks.
There are three general rules that apply to this unit.
Rule 1
You can record digital program sources onto a recordable
CD disc using a DIGITAL IN jack to create a first
generation digital copy. You cannot, however, record
from this recorded CD disc to another recordable CD disc
using a DIGITAL IN jack.
Rule 2
You can record a digital signal input from a digital
satellite broadcast onto a recordable CD disc using a
DIGITAL IN jack. If the broadcast does not contain a
copyright protection code, you can then record the
contents of this recorded CD disc (first generation) onto
other digital recording media to create a second
generation digital copy (these copies may also be copied
digitally). Note, however, that if the broadcast contains a
copyright protection code, second generation digital
copying will not be possible.
Rule 3
A CD disc that was recorded using the ANALOG jacks
can be recorded onto other digital recording media using a
DIGITAL OUT jack to create a first generation digital
copy. You cannot, however, make a second generation
copy using a DIGITAL OUT jack.

E-33
ADDITIONAL INFORMATION
CD-Recorder system
notes and limitations
About track length and number
• The CD specifications state that the minimum length of
a CD track must be 4 seconds. If a recording is stopped
while the track is less than 4 seconds long, the unit will
record silence until the 4 second track length
requirement has been reached, and then stop recording.
• CD discs can be recorded with up to 99 tracks on them.
Recording will be automatically stopped if the 99 track
limit is exceeded. Once 99 tracks have been recorded,
no further recording is possible even if time is
remaining on the disc.
About source sampling rate conversion
When recording an analog source (such as an LP or
cassette), this unit converts the analog signals to a 44.1
kHz digital signal before recording them onto the CD-R
or CD-RW disc.
When recording a digital source, this unit converts the
digital signals to 44.1 kHz for recording onto the CD-R or
CD-RW disc. However, if you are recording a 44.1 kHz
source signal (such as another CD disc) there is no need
for conversion. This unit can record 32, 44.1 and 48 kHz
digital signals.
Recording of non-audio signals
This unit is designed exclusively for recording audio
signals. Non-audio signals from sources such as CD-ROM
cannot be recorded. Recording is possible only when the
input digital signal is an audio signal. Similarly, when a
digital signal contains graphic or character information
such as a CD+graphics or CD TEXT disc, the graphic or
character information is not recorded.
When making digital recordings from DAT
When recording from a DAT source, make sure that the
start IDs on DAT tapes are in positions slightly before the
actual audio begins.
DAT tapes that are originally recorded using the DAT
recorder’s auto ID function record the start ID slightly
after the actual recording begins. Because this recorder
uses the start ID on the DAT to indicate the transition
between tracks, the following problems may occur during
synchronized recording (single track or ALL track).
• The beginning of the audio on a track is not recorded.
• A new track number is created slightly after the
beginning of a new track.
• The beginning of the next track is recorded at the end of
a recording.
To avoid these potential problems, it is recommended to
perform manual recording of DAT sources. For more
information on DAT operations, refer to the operating
instructions provided with the DAT recorder.

E-34
ADDITIONAL INFORMATION
English
Specifications
Audio Performance
Frequency response
...................................................................... 5 - 20,000 Hz, ±0.5 dB
S/N ratio
Playback ................................................................................ 107 dB
Recording ................................................................................ 90 dB
Total harmonic distortion (1 kHz)
Playback ................................................................................0.004%
Recording ..............................................................................0.008%
Dynamic range
Playback ................................................................................ 100 dB
Recording ................................................................................ 94 dB
Laser Diode Properties
Material
..............................................................................................GaAIAs
Wavelength
..................................................................................... 783 - 789 nm
Emission duration
........................................................................................ Continuous
Laser output
................................................................................. Max. 44.6 µW*
ANSI Class
............................................................................................... Class 1
* This output is the value measured at a distance of about 200 mm
from the objective lens surface on the Optical Pick-up Block.
Inputs
LINE IN (REC)
Type ...................................................................................... Pin jack
Standard input level ............................................ 500 mV/24 k-ohms
DIGITAL IN OPTICAL
Type ................................................... Square optical connector jack
DIGITAL IN COAXIAL
Type ...................................................................................... Pin jack
Outputs
LINE OUT (PLAY)
Type ...................................................................................... Pin jack
Standard output level (1 kHz, 0 dB) .......................... 2.0 ± 0.5 Vrms
DIGITAL OUT OPTICAL
Type ................................................... Square optical connector jack
DIGITAL OUT COAXIAL
Type ...................................................................................... Pin jack
PHONES
Standard output level (Input 150 ohms shorted, –20 dB)
............................................................................. 300 mV/150 ohms
General
Power supply
[U.S.A. and Canada models] ................................. AC 120 V, 60 Hz
[Australia model]................................................... AC 240 V, 50 Hz
[U.K. and Europe models]..................................... AC 230 V, 50 Hz
Power consumption
.................................................................................................. 35 W
Dimensions (W x H x D)
........................... 435 x 108 x 400 mm (17-1/8” x 4-1/4” x 15-3/4”)
Weight
........................................................................ 6.3 kg (13 lbs. 14 oz.)
Accessories
...........................................................................RCA Pin Cables (2)
Optical Fiber Cable
Remote Control
Batteries (2)
Specifications are subject to change without notice.
Documenttranscriptie
BG CDR-S1000 Compact Disc Recorder Lecteur/Enregistreur CD REC LEVEL INPUT DIGITAL/ANALOG OPTICAL COAXIAL CD DIRECT REC MUTE ANALOG REC MIN OPEN/CLOSE / / MAX / PHONES LEVEL OWNER’S MANUAL 10 MODE D’EMPLOI BEDIENUNGSANLEITUNG BRUKSANVISNING MANUALE DI ISTRUZIONI MANUAL DE INSTRUCCIONES GEBRUIKSAANWIJZING 0 ENGLISH INTRODUCTION Thank you for purchasing this YAMAHA product. We hope it will give you many years of trouble-free enjoyment. For the best performance, read this manual carefully. It will guide you in operating your YAMAHA product. FEATURES • Playback of CD-R, CD-RW, and Prerecorded CD Disc Formats • Recording to CD-R and CD-RW Disc Formats • Remote Control Capability • Car Sound Processing (Dynamic Range Compression Recording) • Sampling Rate Converter • Synchronized Recording • Digital Recording Level Adjustment • 4 Times Speed Finalization • • • • • • • • • 4 Times Speed Erase CD Direct Digital Input Recording Automatic and Manual Track Marking Optical and Coaxial Digital Input and Output Random Access Programmable Play Single Track/Entire Disc Repeat Play Random-Sequence Play PHONES jack Adjustable Display Brightness CONTENTS PRECAUTIONS .............................................. 2 DISCS COMPATIBLE WITH THIS UNIT ......... 3 GETTING STARTED ....................................... 4 Supplied accessories ............................................... 4 Notes on the transportation pad .............................. 4 The remote control ................................................. 5 Connections ............................................................ 6 NAMES OF BUTTONS AND CONTROLS ..... 8 Front panel .............................................................. 8 Display .................................................................... 8 Remote control ....................................................... 9 BASIC OPERATION ..................................... 10 Turning on the power and loading a disc ............. 10 Removing the disc and turning the power off ...... 11 Selecting a time display ........................................ 11 RECORDING FUNCTIONS .......................... 12 Recording modes .................................................. 12 Synchronized recording of a single track ............. 13 Synchronized recording of ALL tracks ................ 14 Synchronized recording with finalization ............ 15 Manual recording .................................................. 16 Setting the recording levels .................................. 17 Manual track marking ........................................... 18 E-1 Recording directly from a source CD ................... 18 Applying dynamic range compression to a recording .................................................. 19 Finalization ........................................................... 20 Track and Disc Erase (CD-RW discs only) .......... 21 PLAYBACK FUNCTIONS ............................. 23 Playing a CD disc ................................................. 23 Searching for a track ............................................. 24 Scanning forward or backward rapidly ................ 24 Program play ........................................................ 25 Random sequence play ......................................... 26 Repeat play ........................................................... 27 Index search .......................................................... 27 OTHER FUNCTIONS .................................... 28 Changing the brightness of the display ................ 28 Listening with headphones ................................... 28 ADDITIONAL INFORMATION ...................... 29 CD preventive care ............................................... 29 Display messages .................................................. 30 Troubleshooting .................................................... 31 SCMS copy protection ......................................... 32 CD-Recorder system notes and limitations .......... 33 Specifications ....................................................... 34 PRECAUTIONS: READ THIS BEFORE OPERATING THE UNIT CAUTIONS • • • • • • • • • • • • • • • • To assure the finest performance, please read this manual carefully. Keep it in a safe place for future reference. Install your unit in a well ventilated, cool, dry, clean place – away from windows, heat sources, vibration, dust, moisture, or cold. To avoid humming sounds, locate the unit away from other electrical appliances, motors, and transformers. To prevent fire or electrical shock, do not expose to rain and water. Be sure to allow at least 10 cm of ventilation space at the top, on left, right, and back sides of this unit. Do not operate the unit upside-down. It may overheat, possibly causing damage. Never open the cabinet. If something drops into the set, contact your dealer. Do not use force on switches, knobs or cords. When not planning to use this unit for long periods of time (i.e., vacation, etc.), disconnect the AC power plug from the wall outlet. Grounding or polarization – Precautions should be taken so that the grounding or polarization of the unit is not defeated. Do not clean the unit with chemical solvents; this might damage the finish. Use a clean, dry cloth. Be sure to read the “Troubleshooting” section on common operating errors before concluding that your unit is faulty. Do not place another component on top of this unit, as damage or discoloration on the surface of the unit may result. To prevent damage by lightning, disconnect the power cord from the wall outlet during an electrical storm. When disconnecting the power cord from the wall outlet, grasp the plug; do not pull the cord. Do not plug the AC power plug to the wall outlet before you finish all connections. The voltage to be used must be the same as that specified on this unit. Using this unit with a higher voltage than that which is specified is dangerous and may result in a fire or other type of accident causing damage. YAMAHA will not be held responsible for any damage resulting from use of this unit with a voltage other than that which is specified. Sudden temperature changes and storage or operation in an extremely humid environment may cause condensation inside the cabinet. When this unit is shipped, there is a protective pad in the disc tray. For correct operation of this unit, remove before use. CAUTION FOR MOVING THE UNIT Before moving the unit, first check that there is no disc in the disc tray. To prevent malfunction of this unit, be sure to insert the transportation pad in the disc tray as described on page 4. Finally, press POWER to turn the unit off, and disconnect the AC power plug from the wall outlet. SPECIAL INSTRUCTIONS FOR U.K. MODEL IMPORTANT: The wires in the mains lead are coloured in accordance with the following code: Blue: NEUTRAL Brown: LIVE As the colours of the wires in the mains lead of this apparatus may not correspond with the coloured markings identifying the terminals in your plug, proceed as follows: The wire which is coloured BLUE must be connected to the terminal which is marked with the letter N or coloured BLACK. The wire which is coloured BROWN must be connected to the terminal which is marked with the letter L or coloured RED. Making sure that neither core is connected to the earth terminal of the three pin plug. For U.K. customers If the socket outlets in the home are not suitable for the plug supplied with this appliance, it should be cut off and an appropriate 3 pin plug fitted. For details, refer to the instructions described above. Note: The plug severed from the mains lead must be destroyed, as a plug with bared flexible cord is hazardous if engaged in a live socket outlet. CAUTION Use of controls or adjustments or performance of procedures other than those specified herein may result in hazardous radiation exposure. CLASS 1 LASER PRODUCT This compact disc recorder is classified as a CLASS 1 LASER product. The CLASS 1 LASER PRODUCT label is located on the rear exterior. Laser component in this product is capable of emitting radiation exceeding the limit for Class 1. E-2 English • DISCS COMPATIBLE WITH THIS UNIT Discs that can be used for recording Be sure to use only CD-R and CD-RW discs made by reliable manufacturers. CD-R and CD-RW digital audio discs that display either of the following marks can be used with this unit. In addition to these marks being present on the disc, check that at least one of the following phrases can also be found on the disc or disc case. FOR CONSUMER FOR CONSUMER USE FOR MUSIC USE ONLY Regarding discs that can be used for recording • CD-R discs can only be recorded on once, and the recorded material cannot be erased. • CD-RW discs can be recorded on, have the recorded material erased, and then recorded on again any number of times. The following discs cannot be used for recording on this unit. • Discs bearing marks other than those shown above. • Discs intended for recording computer data. • Discs intended for professional use or labeled “FOR PROFESSIONAL USE ONLY”. Discs that can be played back In addition to CD-R and CD-RW digital audio discs described above, commercially available pre-recorded CD discs bearing the mark shown below can also be played on this unit. IMPORTANT • Small scratches, fingerprints, dust, foreign substances, or direct sunlight on the recorded surface of the disc may aversely affect the disc's ability to record and play back properly. • Be sure to use a felt-tip pen or similar writing tool when writing on the label side of the disc. Do not use a ball-point pen, pencil, or other hard-tipped writing tool, as these may damage the disc and may aversely affect further recording on the disc. • Be sure to read “CD preventive care” on page 29 for information on the proper care and handling of CD discs. E-3 Finalization of CD-R discs for playback on standard CD players Although a partially recorded CD-R disc can be played on this unit, it cannot be played on a standard CD player until it has undergone a process known as “finalization”. In the finalization process, the Table of Contents (TOC) is written onto the disc and further recording is not possible. However, this process makes it possible to play a CD-R disc on a standard CD player. Some CD players may not play back the finalized CD-R discs properly due to differences in the playback system of different manufacturers. See page 20 for more information on finalization. Playback of CD-RW discs Please note that even after a CD-RW disc has been finalized, it still cannot be played on a standard CD player. CD-RW discs can only be played back on CD-RW compatible players such as this unit. Additionally, CD-RW discs can be erased even after finalization has been performed, and recorded onto again. See pages 21 and 22 for more information on erasing recordings. Playback on DVD players Before playing back a finalized CD-R or CD-RW discs on a DVD player, please check whether the DVD player is compatible with CD-R or CD-RW discs or not. Refer to the owner's manual of the DVD player for more information. If the DVD player is not compatible with CD-R or CD-RW discs, do not attempt to play them on the DVD player. Regarding erasure or loss of data Yamaha and suppliers accept no liability for the loss of data or any problems caused as a result. As a precaution, it is recommended that the discs are tested after they have been written to. Furthermore, under no circumstances does Yamaha and suppliers guarantee the reliability of the discs. Note Please check the copyright laws in your country to record from records, compact discs, radio, etc. Recording of copyright material may infringe copyright laws. GETTING STARTED After unpacking, check that the following parts are contained. English Supplied accessories • Batteries (size AA, UM-3, R6) (2) • Remote Control REC MODE TRACK NO. OPEN/ WRITE DIMMER DISPLAY CLOSE EFFECT REPEAT RANDOM CLEAR 1 2 3 INDEX 4 5 6 +10 7 8 9 0 FINALIZE ERASE REC SEARCH STOP • RCA Pin Cables (2) PROG REC MUTE SKIP PAUSE PLAY • Optical Fiber Cable Notes on the transportation pad Before using the unit Installing the transportation pad This unit is shipped with a transportation pad inserted in the disc tray to prevent impact to the internal mechanism that could occur during transportation. Before using this unit, press POWER on the front panel to turn the power on, press OPEN/CLOSE (OPEN/CLOSE on the remote) to open the disc tray, and remove the pad. 1 2 3 4 Storing the transportation pad Press POWER on the front panel to turn the power on. Press OPEN/CLOSE (OPEN/CLOSE on the remote) to open the disc tray. Place the transportation pad in the disc tray. Press OPEN/CLOSE (OPEN/CLOSE on the remote) to close the disc tray. It is recommended to use the transportation pad whenever the unit is moved. Therefore, store the transportation pad for future transportation of the unit. 5 • If a portion of the transportation pad remains out of the unit, push gently to slide it into the unit. Press POWER on the front panel to turn the power off. E-4 GETTING STARTED The remote control Loading the batteries for the remote control Remote control operation range NATURAL SOUND CD RECORDER CDR-S1000 REC LEVEL INPUT DIGITAL/ANALOG OPTICAL COAXIAL TRACK NO. EFFECT REC MODE CD DIRECT REC MUTE ANALOG REC MIN POWER FINALIZE ERASE DISPLAY OPEN/CLOSE / / 2 MAX / PHONES LEVEL 0 1 10 Remote control sensor 3 Within approximately 6 m (20 feet) Battery replacement If you find that the remote control must be used closer to the main unit than usual, the batteries are weak. Replace batteries with new ones. 30° 30° Notes • Use only AA, UM-3, R6 batteries for replacement. • Be sure the polarities are correct. (See the illustration inside the battery compartment.) • Remove the batteries if the remote control will not be used for an extended period of time. • If batteries leak, dispose of them immediately. Avoid touching the leaked material or letting it come in contact with clothing, etc. Clean the battery compartment thoroughly before installing new batteries. E-5 Notes • There should be no large obstacles between the remote control and the main unit. • If the remote control sensor is directly illuminated by strong lighting (especially an inverter type of fluorescent lamp, etc.), it might cause the remote control not to work correctly. In this case, reposition the main unit to avoid direct lighting. GETTING STARTED English Connections Do not plug in this unit or other components until all connections are completed. • • • • • Connections should be made to the correct input and output jacks of the amplifier or other components. To record a wider variety of sources, it is recommended to make both analog and digital connections to this unit. ) in the illustration below indicate the direction of the audio signal. Arrow marks ( Guidelines for making both analog and digital connections to this unit are outlined on this and the following page. When all connections are complete, plug in this unit to a wall outlet. <CDR-S1000> DIGITAL IN ANALOG LINE IN LINE OUT 4 3 COAXIAL L L R R REC OPTICAL DIGITAL OUT COAXIAL To wall outlet OPTICAL PLAY Coaxial cables (not included) RCA pin cable (included) RCA pin cable (included) Optical fiber cables (one included) DIGITAL IN DIGITAL OUT OPTICAL OPTICAL PLAY MD/ DAT MD/DAT MD/ DAT COAXIAL COAXIAL REC R L Amplifier or Receiver Digital connections using the DIGITAL OPTICAL and COAXIAL jacks • Before using the DIGITAL OPTICAL jacks, be sure to remove the jack covers. Replace the jack covers in order to protect the jacks from dust when they are not being used. • Make connections from the DIGITAL OPTICAL jacks on this unit to the “MD/DAT” (or equivalent) digital optical jacks on an amplifier or receiver by using optical fiber cables. • Make connections from the DIGITAL COAXIAL jacks on this unit to the “MD/DAT” (or equivalent) digital coaxial jacks on an amplifier or receiver by using commercially available coaxial cables. * Do not connect the digital audio coaxial cable to analog line jacks. If connection is made, noise will be produced. Continued on next page E-6 GETTING STARTED Analog connections using the LINE IN and OUT jacks • Be sure that the left (“L”) and right (“R”) LINE IN (REC) and LINE OUT (PLAY) jacks are connected correctly. • Connect the LINE IN (REC) and LINE OUT (PLAY) jacks to the “MD/DAT” (or equivalent) jacks of the amplifier or receiver. For additional details concerning these connections, refer to the operating instructions for the amplifier being used. • Be sure to connect the LINE OUT (PLAY) jacks on this unit to the LINE IN (PLAY) jacks on the amplifier, and similarly the LINE IN (REC) jacks on this unit to the LINE OUT (REC) jacks on the amplifier. • The LINE IN (REC) and LINE OUT (PLAY) jacks of this unit are numbered 4 and 3 respectively. When connecting this unit with a YAMAHA amplifier or receiver whose jacks on the rear panel are numbered as 1, 2, 3, etc., connect the LINE IN (REC) and LINE OUT (PLAY) jacks of this unit to the input jacks numbered 4 and 3 on the rear of the amplifier or receiver. To select an input source using INPUT on the front panel With this recorder, it is possible to make analog, digital optical, and digital coaxial connections. When recording, use INPUT on the front panel to select which of the three types of signal to input. • When recording a digital source, set INPUT to OPTICAL to record the digital signal input from the DIGITAL IN OPTICAL jack. • When recording a digital source, set INPUT to COAXIAL to record the digital signal input from the DIGITAL IN COAXIAL jack. • When recording an analog source, set INPUT to ANALOG to record the signal input from the LINE IN jacks. INPUT OPTICAL COAXIAL ANALOG • This recorder outputs both analog and digital signals simultaneously regardless of the INPUT setting. Please refer to the instructions supplied with the amplifer, etc. for details on how to select the preferred signal type. • When INPUT is set to either OPTICAL or COAXIAL, the sampling rate indicator corresponding to the digital sampling rate of the input source signal lights in the display. E-7 NAMES OF BUTTONS AND CONTROLS English Front panel NATURAL SOUND CD RECORDER CDR-S1000 REC LEVEL INPUT DIGITAL/ANALOG OPTICAL COAXIAL TRACK NO. EFFECT REC MODE FINALIZE ERASE DISPLAY CD DIRECT REC MUTE OPEN/CLOSE / ANALOG REC MIN POWER / MAX / PHONES LEVEL 0 ~ Ÿ ! ⁄ @ ¤ # ‹ $ › % fi ^ fl & ‡ * ° ( · ) POWER (P.10/P.11) TRACK NO. (P.18) EFFECT (P.19) REC MODE (P.13 to P.15) Remote control sensor (P.5) Display (P.11) CD DIRECT (P.18) REC MUTE (P.16) REC (P.13 to P.16) INPUT (P.7) REC LEVEL DIGITAL/ANALOG (P.17) 10 & (Stop) (P.23) LEVEL (P.28) PHONES (P.28) ^ (Play/Pause) (P.23) $/! ⁄/› (Skip/Search) (P.24) OPEN/CLOSE (P.4/P.10/P.11) Disc tray (P.4/P.10/P.11) DISPLAY (P.11) ERASE (P.21/P.22) FINALIZE (P.20) Display CD-RW CD 32 44 .1 48 PROG RNDM REPEAT SF ~ Ÿ ! ⁄ @ ¤ # ‹ TOTAL REMAIN SINGLE ALL AUTO EFFECT REC SYNC PROG indicator (P.25) Sampling rate indicators (P.7) Disc format indicator (P.13 to P.16) TOTAL/REMAIN indicators (P.11) EFFECT indicator (P.19) REC indicator (P.13 to P.16) * indicator (P.13 to P.16/P.23) # indicator (P.11/P.23) TOC L dB –00 –60 R $ › % fi ^ fl & –30 –10 –6 – 4 – 2 –1 0 OVER Multi-information display (P.11) Level indicator (P.17) TOC indicator (P.20/P.22) SYNC indicator (P.13 to P.15) SINGLE/ALL/AUTO indicators (P.13 to P.15) REPEAT S/F indicators (P.27) RNDM indicator (P.26) E-8 NAMES OF BUTTONS AND CONTROLS Remote control REC MODE TRACK NO. OPEN/ WRITE DIMMER DISPLAY CLOSE EFFECT REPEAT RANDOM CLEAR 1 2 3 INDEX 4 5 6 +10 7 8 9 0 FINALIZE ERASE REC REC MUTE SEARCH STOP E-9 PROG SKIP PAUSE PLAY ~ Ÿ ! ⁄ @ ¤ # ‹ $ › % fi ^ fl & ‡ * ° ( · ) RANDOM (P.26) TRACK NO. WRITE (P.18) REC MODE (P.13 to P.15) EFFECT (P.19) REPEAT (P.27) Numeric buttons (P.23/P.25/P.27) FINALIZE (P.20) ERASE (P.21/P.22) ! SEARCH ⁄ (P.24) STOP & (P.23) PAUSE * (P.23) DIMMER (P.28) DISPLAY (P.11) OPEN/CLOSE (P.4/P.10/P.11) CLEAR (P.25/P.26) PROG (P.25/P.26) INDEX (P.27) REC MUTE (P.16) REC (P.13 to P.16) $ SKIP › (P.24) PLAY # (P.23) BASIC OPERATION NATURAL SOUND CD RECORDER CDR-S1000 REC LEVEL INPUT DIGITAL/ANALOG OPTICAL COAXIAL TRACK NO. EFFECT REC MODE CD DIRECT REC MUTE ANALOG REC MIN POWER FINALIZE ERASE DISPLAY OPEN/CLOSE / MAX Note • You can also close the disc tray by pressing the front edge of the disc tray gently. Play begins automatically if the tray is closed by pressing ^ on the front panel or PLAY #, a numeric button, or RANDOM on the remote. However, the display will not show the total number of tracks or the total recorded time of the disc. / / PHONES LEVEL 0 10 When a disc is loaded POWER OPEN/CLOSE REC MODE TRACK NO. OPEN/ WRITE DIMMER DISPLAY CLOSE OPEN/CLOSE EFFECT REPEAT RANDOM CLEAR PROG 1 2 3 INDEX 4 5 6 +10 7 8 9 0 When a disc is loaded in the recorder, the recorder performs a number of internal operations to determine the format and content of the disc. During this time, “Reading” appears in the display. This process requires approximately 10 seconds to complete for any type of disc. TOTAL REMAIN REPEAT SF FINALIZE ERASE REC SEARCH STOP EFFECT REC SYNC X2 X4 TOC L dB –00 –60 R –30 –10 –6 – 4 – 2 –1 0 OVER REC MUTE SKIP PAUSE SINGLE ALL AUTO PLAY When a new CD-R or CD-RW disc is loaded in the recorder, OPC (Optimum Power Calibration) is usually performed as well. OPC optimizes the laser power to the reflectivity of the disc. During this time, “OPC Adjust” appears in the display. This process requires an additional 15 seconds to complete. Recording is not possible until these operations are complete. CD-R 32 44 .1 48 RNDM REPEAT SF To load a disc 1 2 3 4 5 Press POWER on the front panel to turn the power on. Press OPEN/CLOSE (OPEN/CLOSE on the remote) to open the disc tray. Load a disc using the disc guide to align the disc correctly in the disc tray. • When loading a prerecorded CD disc, load the disc with the label side up. • When loading a CD-R or CD-RW disc for recording, load with the recordable side down. Press OPEN/CLOSE (OPEN/CLOSE on the remote) to close the disc tray. Select the function you want. • For disc recording functions, see pages 12 to 20. • For disc playback functions, see pages 23 to 27. SINGLE ALL AUTO EFFECT REC SYNC X2 X4 TOC L dB –00 –60 R –30 –10 –6 – 4 – 2 –1 0 OVER After the disc has been read and any necessary internal adjustments have been performed, one of the following displays appear, and normal operation of the recorder is possible. A prerecorded audio CD disc is loaded in the recorder. CD L dB –00 –60 R –30 –10 –6 – 4 – 2 –1 0 OVER A CD-R or CD-RW disc that has not yet been recorded on is loaded in the recorder. CD-R CD 32 PROG RNDM REPEAT SF TOTAL REMAIN SINGLE AUTO EFFECT TOC L dB –00 –60 R –30 –10 –6 – 4 – 2 –1 0 OVER To load an 8 cm (3 in.) CD disc Place it in the inner recessed area of the disc tray. Do not put a normal 12 cm (5 in.) CD disc on top of an 8 cm (3 in.) CD disc. E-10 English Turning on the power and loading a disc BASIC OPERATION Removing the disc and turning the power off Important Do not turn off the power during finalization of a CD-R or CD-RW disc (after recording). Doing so may result in a misoperation in which recorded material may be lost and further recording on the disc made impossible. For more information on finalization of CD-R and CD-RW discs, please see page 20. Selecting a time display You can change the disc information that is shown in the display by pressing DISPLAY. Each time DISPLAY is pressed, the display changes as follows. When a disc is playing Elapsed time of the track now playing CD-R CD 32 44 .1 48 PROG RNDM REPEAT SF NATURAL SOUND CD RECORDER CDR-S1000 TOTAL REMAIN SINGLE ALL AUTO EFFECT REC SYNC TOC L dB –00 –60 R –30 –10 –6 – 4 – 2 –1 0 OVER REC LEVEL INPUT DIGITAL/ANALOG OPTICAL COAXIAL TRACK NO. EFFECT REC MODE FINALIZE ERASE DISPLAY CD DIRECT REC MUTE OPEN/CLOSE / ANALOG REC MIN POWER MAX / / PHONES LEVEL 0 10 Remaining time of the track now playing CD-R CD 32 44 .1 48 POWER OPEN/CLOSE REC MODE PROG RNDM REPEAT SF TOTAL REMAIN SINGLE ALL AUTO TRACK NO. OPEN/ WRITE DIMMER DISPLAY CLOSE PROG 2 3 INDEX 4 5 6 +10 7 8 9 0 ERASE REC SEARCH STOP L dB –00 –60 R –30 –10 –6 – 4 – 2 –1 0 OVER CD-R CD TOTAL 32 44 .1 48 1 FINALIZE TOC Total disc play time OPEN/CLOSE EFFECT REPEAT RANDOM CLEAR EFFECT REC SYNC PROG RNDM REPEAT SF REC MUTE SINGLE ALL AUTO EFFECT REC SYNC TOC L dB –00 –60 R –30 –10 –6 – 4 – 2 –1 0 OVER Total remaining time on the disc SKIP PAUSE PLAY CD-R CD 32 44 .1 48 PROG RNDM REPEAT SF TOTAL REMAIN SINGLE ALL AUTO EFFECT REC SYNC TOC L dB –00 –60 R –30 –10 –6 – 4 – 2 –1 0 OVER When a disc is being recorded Elapsed time of the track being recorded CD-R CD 32 44 1 48 PROG RNDM REPEAT SF 1 2 3 Press OPEN/CLOSE (OPEN/CLOSE on the remote) to open the disc tray and remove the disc. • If a disc is playing, playback is stopped automatically, and then the disc tray opens. Press OPEN/CLOSE (OPEN/CLOSE on the remote) again to close the disc tray. Press POWER on the front panel to turn the power off. EFFECT REC SYNC X2 X4 TOC L dB –00 –60 R –30 –10 –6 – 4 – 2 –1 0 OVER Total time recorded on the disc CD-R CD 32 44 1 48 PROG RNDM REPEAT SF TOTAL REMAIN SINGLE ALL AUTO EFFECT REC SYNC X2 X4 TOC L dB –00 –60 R –30 –10 –6 – 4 – 2 –1 0 OVER Total remaining recording time on the disc CD-R TOTAL REMAIN RNDM REPEAT SF E-11 REMAIN SINGLE ALL AUTO SINGLE ALL AUTO EFFECT REC SYNC X2 X4 TOC L dB –00 –60 R –30 –10 –6 – 4 – 2 –1 0 OVER RECORDING FUNCTIONS This recorder features a number of recording modes allowing you to make recordings from a wide variety of program sources (both analog and digital). • When using this unit to make recordings, subcode information that may be present in the source audio signal such as CD TEXT, index data, etc., will not be recorded. Before recording • Set your amplifier or receiver to the source to be recorded. • Check that INPUT on the front panel is set appropriately for the source to be recorded as described on page 7. About the recording modes Synchronized recording is recommended when making a digital recording from a CD or MD, etc. Manual recording is recommended when making an analog recording. In the following cases recording is NOT possible • When the CD indicator is lit indicating that a CD disc or finalized CD-R disc is loaded in the recorder. • When the CD-RW and TOC indicators are lit indicating that a finalized CD-RW disc is loaded in the recorder. • When there is no recording time remaining on the disc and “Disc Full” appears in the display. • When 99 tracks have been recorded and “Track Full” appears in the display. Only 99 tracks may be recorded on a CD disc. • When the CD-R or CD-RW disc loaded in the recorder is not intended for recording audio and “Not Audio” appears in the display. Notes • If a source component connected to the DIGITAL IN jacks on this unit is recorded by another recording device connected to the DIGITAL OUT jacks on this unit, the recording function may not perform correctly. • Depending on the source component, recording may not always be possible when using the digital input jacks on this unit. When recording onto a partially recorded disc Single track synchronized recording After recording a single track, the unit is put in the record pause mode. This mode is convenient for recording a mix of tracks from different sources. See page 13 for this procedure. If a CD-R or CD-RW disc has some recording time remaining on it before finalization is performed, any of the recording modes can be performed as normal. Recording is automatically started from the location immediately after the last recorded track on the disc. ALL track synchronized recording When the source component starts to play, all tracks are recorded and the recording automatically stops after the last track. This mode is convenient for recording an entire CD, DAT, MD or LP, etc. See page 14 for this procedure. Before CD-R discs can be played on standard CD players – Finalization Full AUTO synchronized recording This mode automatically finalizes the disc after ALL track synchronized recording. See page 15 for this procedure. Manual recording This recording mode is used mainly when manual control of the recording is required or preferred. Recording is started and stopped manually. See page 16 for this procedure. IMPORTANT • Do not turn off the power during recording. If the power is turned off, recorded material may be lost and the disc may not perform normally. • If a power failure occurs or if the power cord is pulled out of the wall outlet while recording on a CD-RW disc, any material recorded before the information is written to the PMA (Program Memory Area) will be lost and left unrecorded. When using a CD-R disc, the disc will no longer be usable. • During recording, make sure that the recorder is not subjected to shock or vibration as this may cause skips or jumps to be included in the recording. When you have finished recording on a CD-R disc, it is necessary to finalize the disc to make it compatible with standard CD players. If this procedure is not performed, the CD-R disc will not be playable on a standard CD player. • If Full AUTO synchronized recording is performed, finalization is automatically performed following the conclusion of recording. Notes for synchronized recording • When performing synchronized recording of a Video CD (audio portion only), the synchronized recording function may not work correctly depending on the source component being used to play the Video CD. • Depending on the operation of the DVD player, this unit may not stop the synchronized recording although 20 seconds of silence is continued. In this case, press & (STOP & on the remote) to stop this unit. • Extremely low level signals will not be recognized during analog input signal recording and will be treated as silence. Be aware of low level signals during synchronized recording. • Although it takes less than 100 msec to detect input signals in the synchronized recording mode, this unit may not record the first portion of input signals depending on discs. In this case, select the syncronized recording mode after the manual recording is started. E-12 English Recording modes RECORDING FUNCTIONS Synchronized recording of a single track 4 This is a recording mode suitable for compiling single tracks from different audio sources. A new track marker is automatically placed at the start of the track. REC REC MODE 5 INPUT NATURAL SOUND CD RECORDER CDR-S1000 REC LEVEL INPUT DIGITAL/ANALOG OPTICAL COAXIAL TRACK NO. EFFECT REC MODE CD DIRECT REC MUTE ANALOG REC MIN POWER FINALIZE ERASE DISPLAY OPEN/CLOSE / MAX / / PHONES LEVEL 0 10 6 & Adjust the recording level as described on page 17. • The recording level of digital and analog sources can be adjusted. • Start playing the source to set the recording level. When the recording level is set, stop playback of the source component. • The recording level cannot be changed when the CD DIRECT function is on. Ensure that the source is in pause or stop mode, as synchronized recording cannot be started if the source is playing. • Confirm the correct track is selected before proceeding to the next step. Press REC MODE once. • The SINGLE and SYNC indicators light in the display. CD-R CD 32 44 .1 48 REC MODE REC MODE PROG RNDM REPEAT SF TRACK NO. OPEN/ WRITE DIMMER DISPLAY CLOSE EFFECT REPEAT RANDOM CLEAR 2 3 INDEX 4 5 6 +10 7 8 9 0 FINALIZE ERASE REC REC MUTE 7 REC STOP SKIP PAUSE EFFECT REC SYNC TOC L dB –00 –60 R –30 –10 –6 – 4 – 2 –1 0 OVER PROG 1 SEARCH TOTAL REMAIN SINGLE ALL AUTO PLAY STOP & 8 9 Start playing the source. • The unit starts recording automatically when it detects an audio signal. • When the track being recorded ends, “Standby” blinks in the display while information is being written to the PMA (Program Memory Area) and the unit is put in the record pause mode. To record another track, repeat steps 5, 6, and 7. After recording is complete, press & (STOP & on the remote) to cancel recording and put the unit in the stop mode. When you are finished recording, follow the finalization procedure described on page 20. 1 2 Load a CD-R or CD-RW disc containing space for recording. • To ensure proper recording, make sure that you have more than enough space on the disc. Press REC. • This unit enters record pause mode. CD-R CD 32 44 .1 48 PROG RNDM REPEAT SF 3 TOTAL REMAIN SINGLE ALL AUTO EFFECT REC SYNC X2 X4 TOC L dB –00 –60 R –30 –10 –6 – 4 – 2 –1 0 OVER Set INPUT on the front panel to the appropriate input to be used for recording. E-13 RECORDING FUNCTIONS This is a recording mode suitable for recording all of the material from a single audio source such as a CD, MD, cassette, or LP. Track markers are automatically placed between the tracks being recorded. REC REC MODE REC LEVEL INPUT DIGITAL/ANALOG OPTICAL COAXIAL EFFECT REC MODE CD DIRECT REC MUTE ANALOG REC MIN POWER FINALIZE ERASE DISPLAY OPEN/CLOSE 5 INPUT NATURAL SOUND CD RECORDER CDR-S1000 TRACK NO. 4 / / 6 MAX / PHONES Adjust the recording level as described on page 17. • The recording level of digital and analog sources can be adjusted. • Start playing the source to set the recording level. When the recording level is set, stop playback of the source component. • The recording level cannot be changed when the CD DIRECT function is on. Ensure that the source is in pause or stop mode, as synchronized recording cannot be started if the source is playing. Press REC MODE twice. • The ALL and SYNC indicators light in the display. LEVEL 0 10 CD-R CD 32 44 .1 48 PROG RNDM REPEAT SF 7 REC MODE REC MODE TRACK NO. OPEN/ WRITE DIMMER DISPLAY CLOSE EFFECT REPEAT RANDOM CLEAR PROG 1 2 3 INDEX 4 5 6 +10 7 8 9 0 FINALIZE ERASE REC REC MUTE REC SEARCH STOP 1 2 PLAY Load a CD-R or CD-RW disc containing space for recording. • To ensure proper recording, make sure that you have more than enough space on the disc. Press REC. • This unit enters record pause mode. CD-R CD 32 44 .1 48 PROG RNDM REPEAT SF 3 SKIP PAUSE TOTAL REMAIN SINGLE ALL AUTO EFFECT REC SYNC TOC L dB –00 –60 R –30 –10 –6 – 4 – 2 –1 0 OVER Start playing the source. • The unit starts recording automatically when it detects an audio signal. • When making a digital recording, a new track marker is placed each time a new track begins on the source component. • Depending on the source component, a new track marker may not always be placed correctly. When this occurs, use the manual track marking function. • When making an analog recording, spaces of silence are interpreted as track separations, and a new track marker is automatically placed when a new audio signal is detected. The silence should be about 4 seconds long. Automatic track marking may not be performed properly if the recording source has excessive noise or contains a lot of low level sounds. In this case, we recommend manual recording as described on page 16. • Once the unit has recorded 20 seconds of continuous silence, recording ends and “Wait” blinks in the display while information is being written to the PMA (Program Memory Area). After this is complete, the unit is put in the stop mode. • When making a recording using the program playback function of the source component, make sure that the space between each track is under 10 seconds. TOTAL REMAIN SINGLE ALL AUTO EFFECT REC SYNC X2 X4 TOC L dB –00 –60 R –30 –10 –6 – 4 – 2 –1 0 OVER Set INPUT on the front panel to the appropriate input to be used for recording. When you are finished recording, follow the finalization procedure described on page 20. E-14 English Synchronized recording of ALL tracks RECORDING FUNCTIONS Synchronized recording with finalization The Full AUTO synchronized recording mode automatically performs finalization after ALL track synchronized recording (described on the previous page). Finalization is the final process in recording a CD-R disc that makes it playable on standard CD players. (CD-RW discs can only be played back on a CD-RW compatible player, even if finalization is performed.) Refer to page 20 for more information on finalization. REC REC MODE 4 5 6 INPUT NATURAL SOUND CD RECORDER CDR-S1000 CD-R CD REC LEVEL INPUT DIGITAL/ANALOG OPTICAL COAXIAL TRACK NO. EFFECT REC MODE CD DIRECT REC MUTE 32 44 .1 48 ANALOG FINALIZE ERASE DISPLAY OPEN/CLOSE / PROG RNDM REPEAT SF REC MIN POWER MAX 10 7 & 8 TRACK NO. OPEN/ WRITE DIMMER DISPLAY CLOSE REC MODE PROG 1 2 3 INDEX 4 5 6 +10 7 8 9 0 FINALIZE ERASE REC REC MUTE REC SEARCH STOP SKIP PAUSE PLAY STOP & 1 2 Load a CD-R or CD-RW disc containing space for recording. • To ensure proper recording, make sure that you have more than enough space on the disc. Press REC. • This unit enters record pause mode. CD-R CD 32 44 .1 48 PROG RNDM REPEAT SF 3 TOTAL REMAIN SINGLE ALL AUTO EFFECT REC SYNC X2 X4 TOC L dB –00 –60 R –30 –10 –6 – 4 – 2 –1 0 OVER Set INPUT on the front panel to the appropriate input to be used for recording. E-15 EFFECT REC SYNC TOC L dB –00 –60 R –30 –10 –6 – 4 – 2 –1 0 OVER LEVEL 0 EFFECT REPEAT RANDOM CLEAR TOTAL REMAIN SINGLE ALL AUTO / / PHONES REC MODE Adjust the recording level as described on page 17. • The recording level of digital and analog sources can be adjusted. • Start playing the source to set the recording level. When the recording level is set, stop playback of the source component. • The recording level cannot be changed when the CD DIRECT function is on. Ensure that the source is in pause or stop mode, as synchronized recording cannot be started if the source is playing. Press REC MODE three times. • The AUTO and SYNC indicators light in the display. Start playing the source. • The unit starts recording automatically when it detects an audio signal. Once the unit has recorded 20 seconds of continuous silence, recording ends and “Wait” blinks in the display while information is being written to the PMA (Program Memory Area). After this is complete, finalization begins automatically. • In the Full AUTO synchronized recording mode, the finalization process following the end of recording can be canceled by pressing & (STOP & on the remote) during the 20 seconds of silence at the end of the recording. If this is done, however, it will be necessary to perform finalization as described on page 20. • When making a recording using the program playback function of the source component, make sure that the space between each track is under 10 seconds. • Operation buttons do not respond once finalization has begun. • Never turn the power off during finalization! • System operation stops automatically without performing finalization when there is no more recording time or when 99 tracks have already been recorded. RECORDING FUNCTIONS This is a recording mode used when manual control of the recording is required or preferred. (Please note that synchronized recording (single or ALL) is recommended when making a digital recording from CD or MD, etc.) REC MUTE REC INPUT NATURAL SOUND CD RECORDER CDR-S1000 REC LEVEL INPUT DIGITAL/ANALOG OPTICAL COAXIAL TRACK NO. EFFECT REC MODE CD DIRECT REC MUTE ANALOG REC MIN POWER FINALIZE ERASE DISPLAY OPEN/CLOSE / MAX / / PHONES LEVEL 0 ^ 10 & 5 6 7 Adjust the recording level as described on the following page. • The recording level of digital and analog sources can be adjusted. • Start playing the source to set the recording level. When the recording level is set, stop playback of the source component. • The recording level cannot be changed when the CD DIRECT function is on. Press ^ (PAUSE * or PLAY # on the remote) to start recording. Start playing the source. After recording is complete, press & (STOP & on the remote) to stop recording. • “Wait” blinks in the display while information is being written to the PMA (Program Memory Area). To pause during recording REC MODE TRACK NO. OPEN/ WRITE DIMMER DISPLAY CLOSE EFFECT REPEAT RANDOM CLEAR PROG 1 2 3 INDEX 4 5 6 +10 7 8 9 0 FINALIZE ERASE REC REC MUTE REC MUTE SEARCH STOP REC SKIP PAUSE PLAY PLAY # STOP & PAUSE * 1 2 Load a CD-R or CD-RW disc containing space for recording. • To ensure proper recording, make sure that you have more than enough space on the disc. Press REC. • This unit enters record pause mode. CD-R CD 32 44 .1 48 PROG RNDM REPEAT SF 3 Press ^ (PAUSE * on the remote) to pause recording temporarily. “Standby” blinks in the display while information is being written to the PMA (Program Memory Area). To resume recording, press ^ (PAUSE * or PLAY # on the remote). To record blank space at the end of a track Press REC MUTE. A 4-second blank space is recorded, and the unit automatically enters the record pause mode. • The REC indicator blinks while blank space is being recorded. • You can create blank spaces longer than 4 seconds by pressing and holding REC MUTE. The unit is put in the record pause mode when the button is released. • REC MUTE cannot be used when the record pause mode is activated from the stop mode. When you are finished recording, follow the finalization procedure described on page 20. TOTAL REMAIN SINGLE ALL AUTO EFFECT REC SYNC X2 X4 TOC L dB –00 –60 R –30 –10 –6 – 4 – 2 –1 0 OVER Set INPUT on the front panel to the appropriate input to be used for recording. E-16 English 4 Manual recording RECORDING FUNCTIONS Setting the analog recording level Setting the recording levels REC LEVEL DIGITAL/ANALOG INPUT NATURAL SOUND CD RECORDER CDR-S1000 REC LEVEL INPUT DIGITAL/ANALOG OPTICAL COAXIAL TRACK NO. EFFECT REC MODE CD DIRECT REC MUTE ANALOG REC MIN POWER FINALIZE ERASE DISPLAY OPEN/CLOSE / / MAX / PHONES LEVEL 0 10 Setting the digital recording level The volume level of digital audio sources is often similar, however, level differences may be quite obvious between different digital audio sources and even between one recording and another. To maintain a consistent recording level in CD recordings, it is possible to change the volume of the input digital signal. • Please note that the digital recording level cannot be adjusted when the CD DIRECT function is on (the CD DIRECT indicator is lit on the front panel). To select the digital signal to be recorded, set INPUT to the appropriate digital input (OPTICAL or COAXIAL). To set the digital recording level, play the digital source to be recorded during record or record pause mode, and turn REC LEVEL DIGITAL/ANALOG to adjust the volume of the digital signal to a level that sounds appropriate. The digital volume can be adjusted up to a MAX of +12 dB and down to a MIN of –12 dB from the center position of 0 dB, the level of the input digital signal. Notes • Although some sources can be recorded with lower peak levels, setting the peak levels too low may degrade the quality of the recording. • By pressing CD DIRECT (the CD DIRECT indicator lights on the front panel), the digital level is automatically set to that of the CD disc being recorded, and turning REC LEVEL DIGITAL/ANALOG has no effect. E-17 To select the analog signal, set INPUT to ANALOG. Turn REC LEVEL DIGITAL/ANALOG during record or record pause mode to adjust the analog recording level. For best results, play the loudest passage of the source to be recorded and watch the recording level meter in the display. Adjust REC LEVEL DIGITAL/ANALOG so that the highest peak causes the 0 dB level indicators to flicker. Do not set the recording level so that the OVER indicators light as it may produce distortion in the audio signal. L dB – 00 – 60 R –30 –10 –6 4 – 2 –1 0 OVER Should not light RECORDING FUNCTIONS You can manually mark tracks as you like anywhere in your recording. TRACK NO. NATURAL SOUND CD RECORDER CDR-S1000 REC LEVEL INPUT DIGITAL/ANALOG OPTICAL COAXIAL TRACK NO. EFFECT REC MODE CD DIRECT REC MUTE FINALIZE ERASE DISPLAY OPEN/CLOSE / Because CD discs are recorded at a sampling rate of 44.1 kHz, this unit makes it possible to make a direct recording of another CD disc that bypasses unnecessary digital processing such as the sampling rate converter. ANALOG REC MIN POWER Recording directly from a source CD English Manual track marking / MAX CD DIRECT / PHONES LEVEL 0 10 NATURAL SOUND CD RECORDER CDR-S1000 REC LEVEL INPUT DIGITAL/ANALOG OPTICAL COAXIAL TRACK NO. EFFECT REC MODE CD DIRECT REC MUTE ANALOG REC MIN POWER FINALIZE ERASE DISPLAY OPEN/CLOSE / / MAX / PHONES LEVEL 0 TRACK NO. WRITE REC MODE 10 TRACK NO. OPEN/ WRITE DIMMER DISPLAY CLOSE EFFECT REPEAT RANDOM CLEAR PROG 1 2 3 INDEX 4 5 6 +10 7 8 9 0 ERASE REC FINALIZE SEARCH STOP 1 Press CD DIRECT while in record pause mode. • When the CD DIRECT function is on, the CD DIRECT indicator lights. REC MUTE SKIP PAUSE CD DIRECT PLAY 2 While recording, press TRACK NO. (TRACK NO. WRITE on the remote). • A new track number is added at the location on the disc corresponding to the time TRACK NO. (TRACK NO. WRITE on the remote) is pressed. • Please note that tracks cannot be shorter than 4 seconds, and that a disc cannot contain more than 99 tracks. Even if there is time remaining on the disc, further recording is impossible once 99 tracks have been recorded. Notes • When digitally recording DAT sources, be sure to start recording on the CD-R disc after pausing the source at the beginning of a track (start ID, etc.). • Manual track marking is recommended for the following: * When an analog source is being recorded that contains a section or numerous sections with levels too low to be detected on the level meter. * When recording digital satellite broadcasts • Manual track marking is possible even during synchronized recording. Perform one of the recording procedures as outlined on pages 13 to 16. • Any of the recording modes may be used. • When the CD DIRECT indicator is lit, recording level adjustment is not possible. Additionally, dynamic range compression cannot be applied to the recording. To turn off the CD DIRECT function Press CD DIRECT again. Note • Due to variances in recordings, the CD DIRECT function may not work with all CD discs. If the CD DIRECT function is not possible, pressing CD DIRECT causes the CD DIRECT indicator to blink for 3 seconds and then turn off. E-18 RECORDING FUNCTIONS Applying dynamic range compression to a recording CD discs can be enjoyed in car CD players, but often sounds can get lost when competing with engine noises and other factors. To remedy this problem, this recorder features an effect that essentially records a compressed sound range in which soft sounds are boosted and louder sounds are lowered and produces music that can be more fully enjoyed when listening to CDs in a car or similar environment. EFFECT NATURAL SOUND CD RECORDER CDR-S1000 REC LEVEL INPUT DIGITAL/ANALOG OPTICAL COAXIAL TRACK NO. EFFECT REC MODE CD DIRECT REC MUTE ANALOG REC MIN POWER FINALIZE ERASE DISPLAY OPEN/CLOSE / / MAX / PHONES LEVEL 0 REC MODE TRACK NO. OPEN/ WRITE DIMMER DISPLAY CLOSE EFFECT REPEAT RANDOM CLEAR EFFECT 2 3 INDEX 4 5 6 +10 7 8 9 0 ERASE REC REC MUTE SEARCH STOP 32 44 1 48 PROG RNDM REPEAT SF 3 SKIP PAUSE PLAY Press EFFECT in record or record pause mode. • The EFFECT indicator lights in the display. CD-R CD 2 PROG 1 FINALIZE 1 10 TOTAL REMAIN SINGLE ALL AUTO EFFECT REC SYNC X2 X4 TOC L dB –00 –60 R –30 –10 –6 – 4 – 2 –1 0 OVER Perform one of the recording procedures as outlined on pages 13 to 16. • Any of the recording modes may be used. • The effects of the dynamic range compression can be heard during the recording process. Press EFFECT again to cancel the effect. • The EFFECT indicator disappears from the display. • Dynamic range compression is automatically canceled if recording is stopped. Note • Dynamic range compression cannot be applied to a recording when the CD DIRECT function is on. E-19 RECORDING FUNCTIONS 1 Finalization is the process that concludes recording, and allows a CD-R disc to be played on a standard CD player. (Please note that CD-RW discs can only be played on a CD-RW compatible player even after finalization has been performed. CD-RW discs cannot be played on a standard CD player.) • Please note that once a CD-R disc is finalized, recording is no longer possible. Please ensure the disc is in its final form before performing finalization. • If the power is turned off or interrupted during finalization, the recorded material may be lost and the disc may not be usable. NATURAL SOUND CD RECORDER CDR-S1000 REC LEVEL INPUT DIGITAL/ANALOG OPTICAL COAXIAL TRACK NO. EFFECT REC MODE CD DIRECT REC MUTE ANALOG REC MIN POWER FINALIZE ERASE DISPLAY OPEN/CLOSE / / MAX / PHONES LEVEL 0 ^ FINALIZE REC MODE PROG 1 2 3 INDEX 4 5 6 +10 7 8 9 0 FINALIZE ERASE REC REC MUTE SEARCH STOP STOP & & TRACK NO. OPEN/ WRITE DIMMER DISPLAY CLOSE EFFECT REPEAT RANDOM CLEAR FINALIZE 10 CD-R CD 32 44 148 PROG RNDM REPEAT SF 3 TOTAL REMAIN SINGLE ALL AUTO EFFECT REC SYNC X2 X4 L dB –00 –60 R –30 –10 –6 – 4 – 2 –1 0 OVER • If you want to cancel finalization, press & (STOP & on the remote). Press ^ (PLAY # on the remote) to start the finalization procedure. • The remaining time required for finalization to complete is displayed. Finalization can usually be completed within about 2 minutes. • When CD-R disc finalization is complete, the CDR indicator changes to the CD indicator in the display, and the recorder is put in the stop mode. • When CD-RW disc finalization is complete, the TOC indicator lights in the display, and the recorder is put in the stop mode. Notes on finalization SKIP PAUSE 2 Load a recorded (but not finalized) CD-R or CD-RW disc. • Before loading the disc, make sure there are no scratches, dust, fingerprints or similar marks on the disc. If necessary, clean the disc as described on page 29. Press FINALIZE. PLAY PLAY # • Once the finalization process has started, no other operation is possible until finalization has been completed. • If the disc is marked or scratched, finalization may not be possible. • Do not turn off the power or disconnect the power during finalization. E-20 English To finalize a CD-R or CD-RW disc Finalization RECORDING FUNCTIONS Track and Disc Erase (CD-RW discs only) CD-RW discs can be erased and new recordings can be made after material has been erased. The following types of erasing are possible with this unit. To select an erase mode Each time ERASE is pressed, the Erase mode changes as follows. CD-RW discs that have not been finalized: Erase off = Last Track Erase = All Track Erase ± Finalized CD-RW discs: Erase off = TOC erase Last Track Erase Erases the last track. This operation is not possible on a CD-RW disc that has been finalized or when only one track has been recorded on the disc. All Track Erase Erases all of the tracks recorded on the disc. This operation is not possible on a CD-RW disc that has been finalized. All CD-RW discs: Holding down ERASE for at least 2 seconds initiates Disc Erase. Note • When there is only one track recorded on a CD-RW that has not been finalized, only All Track Erase is possible. TOC Erase IMPORTANT TOC Erase is only available on a CD-RW disc that has been finalized. After the TOC is erased, the effects of finalization are defeated, and further recording is possible. • Do not turn off the power during an erase procedure as this could cause the player to malfunction and make the disc unusable. • If the message “Check Disc” appears during an erase operation and erasing stops, the disc may be damaged. Should this occur, inspect the disc and then try erasing it again. Disc Erase This operation deletes all data on the disc. It is usually not necessary to perform this function, however, it may be used to recover a disc that was stopped during a finalization or erase operation, etc. NATURAL SOUND CD RECORDER CDR-S1000 REC LEVEL INPUT DIGITAL/ANALOG OPTICAL COAXIAL TRACK NO. EFFECT REC MODE CD DIRECT REC MUTE ANALOG REC MIN POWER FINALIZE ERASE DISPLAY OPEN/CLOSE / Last Track Erase 1 MAX / / PHONES LEVEL 0 10 2 ^ ERASE REC MODE & 3 TRACK NO. OPEN/ WRITE DIMMER DISPLAY CLOSE EFFECT REPEAT RANDOM CLEAR PROG 1 2 3 INDEX 4 5 6 +10 7 8 9 0 ERASE REC ERASE FINALIZE SEARCH STOP STOP & E-21 4 REC MUTE SKIP PAUSE PLAY PLAY # Load a CD-RW disc that has been recorded on. • This function is not possible on a finalized CD-RW disc. Press ERASE. • “Erase LAST?”, appears in the display. • If you want to cancel the Erase mode, press & (STOP & on the remote). Press ^ (PLAY # on the remote) to start the Last Track Erase process. • This operation requires several seconds to complete. • During Last Track Erase, “Erase” and the remaining time to completion appear in the display. The recorder stops when Last Track Erase is complete. RECORDING FUNCTIONS 1 2 3 4 English All Track Erase Load a CD-RW disc that has been recorded on. • This function is not possible on a finalized CD-RW disc. Press ERASE until “Erase ALL?” appears on the display. • If you want to cancel the Erase mode, press & (STOP & on the remote). Press ^ (PLAY # on the remote) to start the All Track Erase process. • This process requires from several seconds up to 3 minutes depending on the amount of recorded material. • During All Track Erase, “Erase” and the remaining time to completion appear in the display. The recorder stops when All Track Erase is complete. TOC Erase 1 2 3 4 Load a CD-RW disc that has been finalized. Press ERASE. • “Erase TOC?” appears in the display. • If you want to cancel the Erase mode, press & (STOP & on the remote). Press ^ (PLAY # on the remote) to start the TOC Erase process. • This process requires approximately 1 minute to complete. • During TOC Erase, “Erase” and the remaining time to completion appear in the display. The recorder stops when TOC Erase is completed. Note • When TOC Erase is complete, the TOC indicator goes out. Disc Erase 1 2 3 4 Load a CD-RW disc that has been recorded on. • The CD-RW disc may be finalized or not. Press and hold ERASE for about 2 seconds. • “Erase DISC?” appears in the display. • If you want to cancel the Erase mode, press & (STOP & on the remote). Press ^ (PLAY # on the remote) to start the Disc Erase process. • This process requires approximately one-fourth the total time on the disc. The recorder stops when Disc Erase is completed. E-22 PLAYBACK FUNCTIONS To pause play temporarily Playing a CD disc This unit is capable of playing CD, CD-R and CD-RW discs. During playback, press ^ (PAUSE * on the remote). To resume play, press ^ (PAUSE * or PLAY # on the remote). To stop play completely NATURAL SOUND CD RECORDER CDR-S1000 REC LEVEL INPUT DIGITAL/ANALOG OPTICAL COAXIAL TRACK NO. EFFECT REC MODE FINALIZE ERASE DISPLAY CD DIRECT REC MUTE OPEN/CLOSE / ANALOG REC MIN POWER MAX PHONES LEVEL 0 ^ REC MODE 10 & PROG 1 2 3 INDEX 4 5 6 +10 7 8 9 0 ERASE REC FINALIZE SEARCH STOP Note Numeric buttons REC MUTE SKIP PAUSE STOP & PLAY PLAY # PAUSE * To play a CD disc 1 2 Turn the recorder’s power on and load a disc as described on page 10. Press ^ (PLAY # on the remote). • Playback starts from the beginning of track 1. E-23 To play a desired track number on the disc Select a desired track by using the numeric buttons on the remote. The selected track number appears in the display. Example: To select track 25 Press +10 twice, then immediately press 5 once. TRACK NO. OPEN/ WRITE DIMMER DISPLAY CLOSE EFFECT REPEAT RANDOM CLEAR During playback, press & (STOP & on the remote). / / • If a track number higher than the highest track number on the disc is selected, the last track on the disc will be played. PLAYBACK FUNCTIONS NATURAL SOUND CD RECORDER CDR-S1000 REC LEVEL INPUT Scanning forward or backward rapidly DIGITAL/ANALOG OPTICAL COAXIAL TRACK NO. EFFECT REC MODE CD DIRECT REC MUTE ANALOG REC MIN POWER FINALIZE ERASE DISPLAY OPEN/CLOSE / MAX / / PHONES LEVEL NATURAL SOUND CD RECORDER CDR-S1000 REC LEVEL INPUT DIGITAL/ANALOG OPTICAL COAXIAL 0 10 TRACK NO. EFFECT REC MODE CD DIRECT REC MUTE ANALOG REC MIN POWER FINALIZE ERASE DISPLAY OPEN/CLOSE $/! ⁄/› / / MAX / PHONES LEVEL 0 10 $/! ⁄/› TRACK NO. OPEN/ REC MODE WRITE DIMMER DISPLAY CLOSE EFFECT REPEAT RANDOM CLEAR PROG 1 2 3 INDEX 4 5 6 +10 7 8 9 0 REC MODE TRACK NO. OPEN/ WRITE DIMMER DISPLAY CLOSE EFFECT REPEAT RANDOM CLEAR FINALIZE ERASE REC SEARCH STOP 2 3 INDEX 4 5 6 +10 7 8 9 0 ERASE REC REC MUTE SKIP PAUSE PROG 1 PLAY $ SKIP › FINALIZE ! SEARCH ⁄ SEARCH STOP REC MUTE SKIP PAUSE PLAY To advance to the next track During playback, press ⁄/› (SKIP › on the remote). Pressing ⁄/› (SKIP › on the remote) repeatedly advances to other tracks. To return to the beginning of current track During playback, press $/! (SKIP $ on the remote) once. To return to previous tracks During playback, press $/! (SKIP $ on the remote) twice in succession to return to the previous track. Repeatedly press $/! (SKIP $ on the remote) to return to other previous tracks. To go forward rapidly Press and hold ⁄/› (SEARCH ⁄ on the remote) during play. When the button is released, normal playback is resumed. To go backward rapidly Press and hold $/! (SEARCH ! on the remote) during play. When the button is released, normal playback is resumed. Notes • The sound cannot be heard during scanning in either direction. • Scanning can also be performed while disc play is paused. Note • It is also possible to use ⁄/› or $/! (SKIP › or SKIP $ on the remote) to cue a track when the unit is paused or stopped. When a track is cued in this manner, playback does not begin until ^ (PLAY # on the remote) is pressed. E-24 English Searching for a track PLAYBACK FUNCTIONS Display information during programming Program play 1 You can enjoy listening to your favorite tracks in any desired order by programming tracks. NATURAL SOUND CD RECORDER CDR-S1000 CD-RW CD 32 44 .1 48 PROG RNDM REPEAT SF TOTAL REMAIN SINGLE ALL AUTO EFFECT REC MODE CD DIRECT REC MUTE FINALIZE ERASE DISPLAY OPEN/CLOSE / DIGITAL/ANALOG ANALOG $/! ⁄/› REC MODE CLEAR TRACK NO. OPEN/ WRITE DIMMER DISPLAY CLOSE EFFECT REPEAT RANDOM CLEAR 2 3 INDEX 4 5 6 +10 7 8 9 0 ERASE REC FINALIZE SEARCH STOP 32 44 .1 48 PROG RNDM REPEAT SF 3 ^ DISPLAY $ SKIP › PLAY PLAY # EFFECT REC SYNC TOC L dB –00 –60 R –30 –10 –6 – 4 – 2 –1 0 OVER • The PROG indicator lights in the display. • If “P-01” does not appear in the display after PROG on the remote is pressed, press DISPLAY repeatedly until it appears in the display. Program the tracks in the order you want by pressing the corresponding numeric buttons on the remote. When the programming is completed, press ^ (PLAY # on the remote) to start programmed play. E-25 –6 – 4 – 2 –1 0 OVER 3 TOTAL REMAIN SINGLE ALL AUTO EFFECT REC SYNC TOC L dB –00 –60 R –30 –10 –6 – 4 – 2 –1 0 OVER 1 Shows the step number for the track to be programmed next. 2 Shows the programmed track number. 3 Shows the total time of the tracks currently programmed. If the total time exceeds 100 minutes, only the last two digits of the total minutes will be displayed. REC MUTE TOTAL REMAIN SINGLE ALL AUTO –10 & Press PROG on the remote to begin programming. CD-RW CD 2 PROG RNDM REPEAT SF Numeric buttons STOP & 1 32 44 .1 48 10 PROG SKIP PAUSE CD-RW CD LEVEL 0 PROG 1 –30 MAX / / PHONES DISPLAY L dB –00 –60 R REC MIN POWER TOC 2 REC LEVEL INPUT OPTICAL COAXIAL TRACK NO. EFFECT REC SYNC Notes • You can program as many as 40 tracks at one time. • If DISPLAY is pressed during programming, the program number display can be changed to display the total time of the programmed tracks. To return to the previous display, press DISPLAY again. • During program play, pressing a numeric button on the remote stops program play and skips to the beginning of the track of the number pressed. Once that track has finished playing, the previously interrupted program resumes play. • To skip tracks within the program, press $/! or ⁄/› (SKIP $ or SKIP › on the remote) during program play. • To search all tracks including unprogrammed tracks, press and hold $/! or ⁄/› (SEARCH ! or SEARCH ⁄ on the remote) during program play. PLAYBACK FUNCTIONS 1. During program play, press & (STOP & on the remote). 2. Press PROG on the remote. 3. Each time ⁄/› (SKIP › on the remote) is pressed, the programmed track numbers and their order in the program can be checked one after another. Each time $/! (SKIP $ on the remote) is pressed, the programmed track numbers and their order in the program can be checked in reverse sequential order. Random sequence play You can play all the tracks on a disc in a random sequence. REC MODE TRACK NO. OPEN/ WRITE DIMMER DISPLAY CLOSE EFFECT REPEAT RANDOM CLEAR PROG 1 2 3 INDEX 4 5 6 +10 7 8 9 0 ERASE REC RANDOM To correct program data FINALIZE 1. Follow steps 1 and 2 described in the above procedure “To check program data”. 2. Display the track number to be corrected by pressing $/! or ⁄/› (SKIP › or SKIP $ on the remote). 3. Press a numeric button on the remote to select a track to replace the one displayed. The previously programmed track will be cleared from the memory and the new one will be programmed. 4. After the correction has been completed, press ^ (PLAY # or PROG on the remote). SEARCH STOP REC MUTE SKIP PAUSE PLAY STOP & Press RANDOM. The RNDM indicator appears in the display and the unit starts random sequence play. CD-RW CD 32 44 .1 48 PROG RNDM TOTAL REMAIN SINGLE ALL AUTO EFFECT REC SYNC TOC L dB –00 –60 R –30 –10 –6 – 4 – 2 –1 0 OVER To stop program play Press & (STOP & on the remote). The first programmed track number will be displayed. To start program play again, press ^ (PLAY # on the remote). Play will begin from the beginning of the program. To cancel a programmed sequence Press & (STOP & or CLEAR on the remote) while the unit is stopped. To cancel random sequence play mode Press STOP & or RANDOM. • The RNDM indicator disappears from the display. Notes • This feature will not function during programming, or during programmed play. • If SKIP › is pressed during random sequence play, the next randomly selected track will be played. If SKIP $ is pressed, play will return to the beginning of the current track. It is not possible to return to previously played tracks during random sequence play mode. • Total remaining time on the disc will not be displayed during random sequence play. E-26 English To check program data PLAYBACK FUNCTIONS Repeat play Index search You can play a single track or the entire disc repeatedly. REC MODE If the disc includes index numbers, play can be started from any desired index number. TRACK NO. OPEN/ WRITE DIMMER DISPLAY CLOSE EFFECT REPEAT RANDOM CLEAR PROG REC MODE REPEAT 1 2 3 TRACK NO. OPEN/ WRITE DIMMER DISPLAY CLOSE INDEX EFFECT REPEAT RANDOM CLEAR 4 5 6 7 8 9 0 FINALIZE ERASE REC REC MUTE SEARCH 1 2 3 INDEX 4 5 6 +10 7 8 9 0 ERASE REC INDEX Numeric buttons SKIP FINALIZE STOP PROG +10 PAUSE REC MUTE PLAY SEARCH STOP & STOP SKIP PAUSE PLAY SINGLE REPEAT (REPEAT S) Press REPEAT until the indicators REPEAT and S appear in the display. CD-RW CD 32 44 .1 48 PROG RNDM REPEAT SF TOTAL REMAIN SINGLE ALL AUTO EFFECT REC SYNC X2 X4 TOC L dB –00 –60 R –30 –10 –6 – 4 – 2 –1 0 OVER The current track is played repeatedly. • This is also available in the program play mode and the random sequence play mode. (If the repeat play mode is switched off, the program play mode or the random sequence play mode will be resumed.) To select an index number 1 Use the numeric buttons to select a track that has index numbers. Press INDEX. Use the numeric buttons to select the desired index number. FULL REPEAT (REPEAT F) 2 3 Press REPEAT until the indicators REPEAT and F appear in the display. To cancel the index search function Press INDEX. CD-RW CD 32 44 .1 48 PROG RNDM REPEAT SF TOTAL REMAIN SINGLE ALL AUTO EFFECT REC SYNC X2 X4 TOC L dB –00 –60 R –30 –10 –6 – 4 – 2 –1 0 OVER All the tracks on a disc are repeated. • In the program play mode, all programmed tracks are repeatedly played. • In the random sequence play mode, all randomly sequenced tracks are played repeatedly. To cancel repeat play Press REPEAT until the REPEAT indicator disappears from the display. E-27 Notes • Not all discs have index numbers. The index system has a method for sub-dividing tracks into smaller divisions (for example, the movements within classical symphonies) for easier location of those parts. The liner notes with the disc usually tell if such index numbers are included. • If an index number is selected that is higher than any index number on that disc, play will start from the last index number point on the disc. • For some discs, play may begin slightly prior to the actual designated index point. • If the disc has no encoded index points, play will begin from the start of the selected track. OTHER FUNCTIONS You can select the brightness level of the display as it suits your preferences. Listening with headphones English Changing the brightness of the display Connect the headphones to the PHONES jack and adjust the volume by using LEVEL. NATURAL SOUND CD RECORDER CDR-S1000 REC LEVEL INPUT DIGITAL/ANALOG OPTICAL COAXIAL TRACK NO. EFFECT REC MODE CD DIRECT REC MUTE ANALOG REC MIN REC MODE TRACK NO. OPEN/ WRITE DIMMER DISPLAY CLOSE POWER FINALIZE ERASE DISPLAY OPEN/CLOSE / / EFFECT REPEAT RANDOM CLEAR PROG 1 2 3 INDEX 4 5 6 +10 7 8 9 0 ERASE REC FINALIZE SEARCH STOP DIMMER LEVEL 0 PHONES 10 LEVEL REC MUTE SKIP PAUSE MAX / PHONES PHONES PLAY The brightness of the display is changed each time DIMMER is pressed as follows. Normal illumination Medium dim Maximum dim E-28 ADDITIONAL INFORMATION CD preventive care • This compact disc recorder is designed for use with compact discs bearing the , , or marks only. Never attempt to load any other type of disc into the unit. The unit will also play 8-cm (3-inch) compact discs. • Compact discs are not subjected to wear during play, but damage to the disc surface when the disc is being handled can adversely affect the disc’s play. • Do not use cleaning discs or warped discs. All of these could damage the unit. To prevent a malfunction of this unit • Do not use any non standard shaped CD discs (heart, etc.) available on the market, because it may damage the unit. • Do not use a CD disc with tape, seals, or paste on it, because damage to the unit may result. • Be sure to use a felt-tip pen or similar writing tool when writing on the label side of the disc. Do not use a ball-point pen, pencil, or other hard-tipped writing tool, as these may damage the disc and may aversely affect further recording on the disc. • Although playback of compact discs is generally not affected by small particles of dust or fingerprints on their playing surface, dust, fingerprints, small scratches and direct sunlight on the recording surface of a CD-R or CD-RW disc may make recording impossible. Therefore, for optimal performance of the recorder and for long-term enjoyment of your CD collection, handle discs correctly as outlined in the following guidelines. • Hold discs by touching only the edges or center hole. • When a disc is not currently being used, remove it from the recorder and store in an appropriate case. • With proper disc maintenance, cleaning should not be necessary. However, should cleaning be required, wipe by using a clean, dry cloth. Do not wipe with a circular motion; wipe straight outward from the center. • Do not try to clean the disc’s surface by using any type of disc cleaner, record spray, antistatic spray or liquid, or any other chemical-based liquid, because such substances might irreparably damage the disc’s surface. • Do not expose discs to direct sunlight, high temperature or high humidity for a long period of time, because these might warp or otherwise damage the disc. No! E-29 ADDITIONAL INFORMATION Can’t Copy Digital recording cannot be performed. (See “SCMS copy protection” on page 32.) Disc Full Recording is not possible because there is no blank space remaining on the disc. Track Full Erase DISC? Erases all of the information a CD-RW disc. If you want to erase all of the information, press ^ (PLAY # on the remote). Erase TOC? Erases the TOC (Table Of Contents) on a CD-RW disc. If you want to erase the TOC, press ^ (PLAY # on the remote). Finalize OK? Recording is not possible because the maximum number of 99 tracks has already been recorded on the disc. Finalizes the CD. If you want to finalize the disc, press ^ (PLAY # on the remote). Not Audio Finalized The inserted disc is not an audio CD-R or CD-RW disc. Recording has been attempted on a CD-RW disc that has already been finalized. OPEN The disc tray is being opened. CLOSE The disc tray is being closed. Standby The recorder has been put in the record pause mode from either the stop or record mode, and information is being written to the disc’s PMA (Program Memory Area). Never turn the power off when this is displayed. Wait The recorder has been put in the stop mode from the record mode and information is being written to the PMA (Program Memory Area). Never turn the power off when this is displayed. Erase LAST? Erases the last track on a CD-RW disc. If you want to erase the last track, press ^ (PLAY # on the remote). Erase ALL? Erases all tracks on a CD-RW disc. If you want to erase all tracks, press ^ (PLAY # on the remote). Check Disc This is displayed when the recorder stops after reading disc information, while performing an erase procedure, finalization, or OPC. If this occurs, the disc may be dirty or possibly even damaged. Remove the disc and inspect it. No Input The digital input is selected, but the connections are not correct, or the digital signal is not being output from the source device. Please check all cabling, and the status of the source device. Reading When the recorder is turned on or a disc is loaded, the recorder reads the format of the disc loaded in the recorder. OPC Adjust Adjustments performed when OPC (Optimum Power Calibration) optimizes the laser power to the reflectivity of the disc. Some time is required to complete these automatic adjustments. No Disc There is no disc in the disc tray. New Disc The disc in the disc tray is either a new CD-R or CD-RW disc or a CD-RW disc that has been erased using the Erase ALL or Erase DISC function. TOC During the finalization process, the TOC (Table Of Contents) is being written onto the disc. Data Track This is displayed when the data track is played back. E-30 English Display messages ADDITIONAL INFORMATION Troubleshooting If the unit fails to operate normally, check the following points to determine whether the fault can be corrected by the simple measures suggested. If it cannot be corrected, or if the fault is not listed in the SYMPTOM column, disconnect the power cord and contact your authorized YAMAHA dealer or service center for help. When talking to the service center, the CDR-S1000 may be needed. For details, contact your authorized YAMAHA dealer or service center. SYMPTOM CAUSE The unit does not switch on when POWER is pressed. The AC power cord is not connected or not completely connected. Securely connect the power cord. Play does not begin. The disc is damaged. Check the disc carefully; replace it if necessary. There is moisture on the laser pick-up. Wait 20 to 30 minutes after switching the unit on before trying to play a disc. The disc has been loaded upside down. Reload the disc with the label side facing up. The disc is dirty. Clean the disc. Play is delayed, or begins at the wrong place. The disc may be scratched or damaged. Check the disc carefully; replace it if necessary. Recording is not possible. The disc is finalized. Load a recordable CD that has not been finalized yet. For a CD-RW disc, TOC Erase or Disc Erase may be needed. A pre-mastered CD disc is loaded. Load a recordable CD disc. The input setting is incorrect. Set INPUT to the position that reflects the source of the input signal. The output level of the source is too low. Set the output level of the source to MAX. There is not enough blank space left or 99 tracks have already been recorded on the disc. Load a recordable CD disc. If the power cord was unplugged or there was a power outage during recording, the recorded material may be lost. If the recording of a CD-RW disc is interrupted, try recording again from the beginning. When the recording of a CD-R disc is interrupted, start recording over again with a disc that can be recorded on. The disc is dirty or damaged. Clean or replace the disc. The CD or DVD players are not compatible with CD-R or CD-RW discs. Use a CD or DVD player compatible with CD-R or CD-RW discs. The disc is not finalized. Finalize the disc. The unit and/or the component being recorded is being subjected to vibration or impact. Relocate the unit(s). This is not possible if the skipping sound is already on the recording due to vibrations or impact that occurred during recording. The disc is dirty. Clean the disc. Sound “hums.” Improper cable connections. Securely connect the audio cables. If the problem persists, the cables may be defective. Noise from inside of the unit. The disc may be warped. Replace the disc. The remote control does not work. The batteries of the remote control are too weak. Replace the batteries with new ones. Remote control is too far away or is being used at an incorrect angle. Use within 6 meters and 60 degree radius. Direct sunlight or lighting (of an inverter type of fluorescent lamp, etc.) is striking the remote control sensor of the unit. Change the position of the unit. Remote control is being used near TV set with a remote control sensor. Relocate this unit away from the TV or cover the TV’s remote control sensor. Cannot play back a recorded CD-R or CD-RW disc on other CD or DVD players. Sound “skips.” TV functions strangely when the remote control is being used. E-31 REMEDY ADDITIONAL INFORMATION English SCMS copy protection As a digital audio component, this CD recorder conforms with the Serial Copy Management System (SCMS) standards. The Serial Copy Management System restricts copies made by recording digital signals to first generation copies only. Therefore, a CD disc recorded using a DIGITAL IN jack cannot be used as a source for making another digital recording. However, subsequent recordings can be made from the first generation copy by using the ANALOG jacks. There are three general rules that apply to this unit. Rule 1 You can record digital program sources onto a recordable CD disc using a DIGITAL IN jack to create a first generation digital copy. You cannot, however, record from this recorded CD disc to another recordable CD disc using a DIGITAL IN jack. Rule 2 You can record a digital signal input from a digital satellite broadcast onto a recordable CD disc using a DIGITAL IN jack. If the broadcast does not contain a copyright protection code, you can then record the contents of this recorded CD disc (first generation) onto other digital recording media to create a second generation digital copy (these copies may also be copied digitally). Note, however, that if the broadcast contains a copyright protection code, second generation digital copying will not be possible. Rule 3 A CD disc that was recorded using the ANALOG jacks can be recorded onto other digital recording media using a DIGITAL OUT jack to create a first generation digital copy. You cannot, however, make a second generation copy using a DIGITAL OUT jack. E-32 ADDITIONAL INFORMATION CD-Recorder system notes and limitations About track length and number • The CD specifications state that the minimum length of a CD track must be 4 seconds. If a recording is stopped while the track is less than 4 seconds long, the unit will record silence until the 4 second track length requirement has been reached, and then stop recording. • CD discs can be recorded with up to 99 tracks on them. Recording will be automatically stopped if the 99 track limit is exceeded. Once 99 tracks have been recorded, no further recording is possible even if time is remaining on the disc. About source sampling rate conversion When recording an analog source (such as an LP or cassette), this unit converts the analog signals to a 44.1 kHz digital signal before recording them onto the CD-R or CD-RW disc. When recording a digital source, this unit converts the digital signals to 44.1 kHz for recording onto the CD-R or CD-RW disc. However, if you are recording a 44.1 kHz source signal (such as another CD disc) there is no need for conversion. This unit can record 32, 44.1 and 48 kHz digital signals. E-33 Recording of non-audio signals This unit is designed exclusively for recording audio signals. Non-audio signals from sources such as CD-ROM cannot be recorded. Recording is possible only when the input digital signal is an audio signal. Similarly, when a digital signal contains graphic or character information such as a CD+graphics or CD TEXT disc, the graphic or character information is not recorded. When making digital recordings from DAT When recording from a DAT source, make sure that the start IDs on DAT tapes are in positions slightly before the actual audio begins. DAT tapes that are originally recorded using the DAT recorder’s auto ID function record the start ID slightly after the actual recording begins. Because this recorder uses the start ID on the DAT to indicate the transition between tracks, the following problems may occur during synchronized recording (single track or ALL track). • The beginning of the audio on a track is not recorded. • A new track number is created slightly after the beginning of a new track. • The beginning of the next track is recorded at the end of a recording. To avoid these potential problems, it is recommended to perform manual recording of DAT sources. For more information on DAT operations, refer to the operating instructions provided with the DAT recorder. ADDITIONAL INFORMATION English Specifications Audio Performance General Frequency response ...................................................................... 5 - 20,000 Hz, ±0.5 dB S/N ratio Playback ................................................................................ 107 dB Recording ................................................................................ 90 dB Total harmonic distortion (1 kHz) Playback ................................................................................ 0.004% Recording .............................................................................. 0.008% Dynamic range Playback ................................................................................ 100 dB Recording ................................................................................ 94 dB Power supply [U.S.A. and Canada models] ................................. AC 120 V, 60 Hz [Australia model] ................................................... AC 240 V, 50 Hz [U.K. and Europe models] ..................................... AC 230 V, 50 Hz Power consumption .................................................................................................. 35 W Dimensions (W x H x D) ........................... 435 x 108 x 400 mm (17-1/8” x 4-1/4” x 15-3/4”) Weight ........................................................................ 6.3 kg (13 lbs. 14 oz.) Accessories ........................................................................... RCA Pin Cables (2) Optical Fiber Cable Remote Control Batteries (2) Laser Diode Properties Material .............................................................................................. GaAIAs Wavelength ..................................................................................... 783 - 789 nm Emission duration ........................................................................................ Continuous Laser output ................................................................................. Max. 44.6 µW* ANSI Class ............................................................................................... Class 1 Specifications are subject to change without notice. * This output is the value measured at a distance of about 200 mm from the objective lens surface on the Optical Pick-up Block. Inputs LINE IN (REC) Type ...................................................................................... Pin jack Standard input level ............................................ 500 mV/24 k-ohms DIGITAL IN OPTICAL Type ................................................... Square optical connector jack DIGITAL IN COAXIAL Type ...................................................................................... Pin jack Outputs LINE OUT (PLAY) Type ...................................................................................... Pin jack Standard output level (1 kHz, 0 dB) .......................... 2.0 ± 0.5 Vrms DIGITAL OUT OPTICAL Type ................................................... Square optical connector jack DIGITAL OUT COAXIAL Type ...................................................................................... Pin jack PHONES Standard output level (Input 150 ohms shorted, –20 dB) ............................................................................. 300 mV/150 ohms E-34-
 1
1
-
 2
2
-
 3
3
-
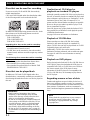 4
4
-
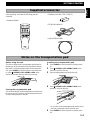 5
5
-
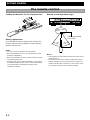 6
6
-
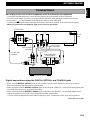 7
7
-
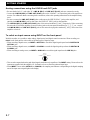 8
8
-
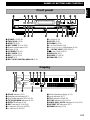 9
9
-
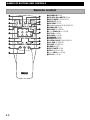 10
10
-
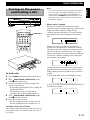 11
11
-
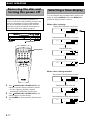 12
12
-
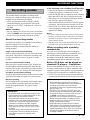 13
13
-
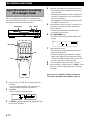 14
14
-
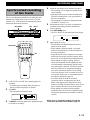 15
15
-
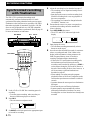 16
16
-
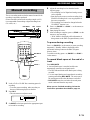 17
17
-
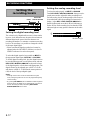 18
18
-
 19
19
-
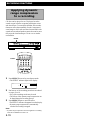 20
20
-
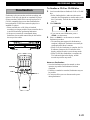 21
21
-
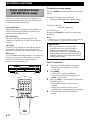 22
22
-
 23
23
-
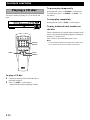 24
24
-
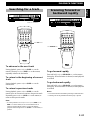 25
25
-
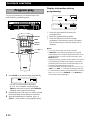 26
26
-
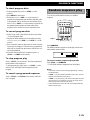 27
27
-
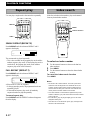 28
28
-
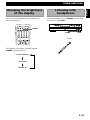 29
29
-
 30
30
-
 31
31
-
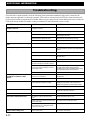 32
32
-
 33
33
-
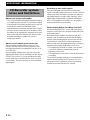 34
34
-
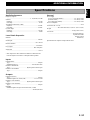 35
35


Yamaha CDR-S1000 de handleiding
- Categorie
- CD spelers
- Type
- de handleiding
in andere talen
- English: Yamaha CDR-S1000 Owner's manual
- italiano: Yamaha CDR-S1000 Manuale del proprietario
- français: Yamaha CDR-S1000 Le manuel du propriétaire
- Deutsch: Yamaha CDR-S1000 Bedienungsanleitung
- dansk: Yamaha CDR-S1000 Brugervejledning
- svenska: Yamaha CDR-S1000 Bruksanvisning
- Türkçe: Yamaha CDR-S1000 El kitabı
- română: Yamaha CDR-S1000 Manualul proprietarului