

GB
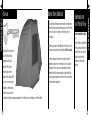
3
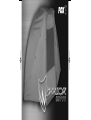
WARRIOR BIVVY
GB
2
WARRIOR BIVVY
1. All fabrics are affected by temperature. For example, the
amount of moisture in the air or the colder the temperature,
the worse the condensation will become and the harder it will
be for the material to deal with it.
2. Cold, damp conditions will cause the material to go slack,
whilst hot/dry temperatures will cause the material to tighten.
This is normal.
3. To maintain its performance, we recommend that the cover is
treated with a reputable re-proofing agent specifically
designed to be compatible with PU coated nylons. When it
needs doing is really a matter of how often you use your
Warrior Bivvy. As a rule of thumb, any water should
‘bead up’ and run off rather than soaking into the material.
How do I store my Warrior
Bivvy?
You should ensure the Warrior
Bivvy is dry before being stored
away. If this was not possible at
the end of your session, you
should allow it to dry out
thoroughly when you get home.
Warrior Bivvy Material
Maintenance of my
Warrior Bivvy
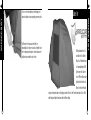
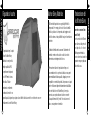
About your
Congratulations on purchasing
the Fox Warrior Bivvy
manufactured from the highest
quality 200D Nylon with a
3000mm Hydrostatic Head.
Treated properly and
maintained correctly, it will
provide you with outstanding
performance season after
season. This leaflet details some of the things you should know about your Warrior Bivvy.

GB
5
WARRIOR BIVVY
GB
4
WARRIOR BIVVY
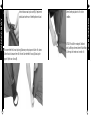
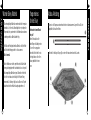
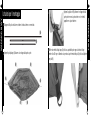
1.
(A)
(B)
Unfold all poles and join together, lay out dome flat on ground as shown.
Assembly Instructions
2.
Push longest pole (A) through flaps from side to side.
(A)
(B)
(A)
(B)
(B)(B)
3.
Push 2 shorter poles (B) through flaps from back to front with
pointed end towards the front.
4.
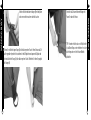
Put one end of long pole (A) into pocket then at opposite side lift bivvy whilst pulling on D ring and
stretch cover and pole end of pole (A) into pocket. Repeat for poles (B).

F
7
WARRIOR BIVVY
GB
6
WARRIOR BIVVY
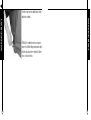
5.
Peg out rear pegging points first then adjust sides to
suit conditions.
TIP: In windy conditions, you will find it easier to
loosely peg your Warrior Bivvy down with one of the
rear peg down points and erect it ‘side into the wind’.
Votre
Félicitations d’avoir acheté la
tente Warrior Bivvy de Fox,
issue d’un matériau Nylon
200D de qualité supérieure
entièrement respirant et doté
d’une tête hydrostatique de
3000mm. Traitée et
entretenue correctement, elle
fera preuve d’une performance incomparable saison après saison. Ce livret couvre tout ce que vous
devez savoir à propos de votre Warrior Bivvy.

F
9
WARRIOR BIVVY
F
8
WARRIOR BIVVY
1. Tous les matériaux respirants sont susceptibles au changement
de température. Par exemple, plus il fait froid ou humide plus il
y a de condensation, et donc plus il sera difficile pour le
matériau de la gérer.
2. Le froid et l’humidité peuvent contribuer à l’assouplissement du
matériau, tandis que le chaud et le sec causent un
resserrement des fibres. Ceci est tout à fait normal.
3. Pour prolonger sa performance, il est conseillé de traiter la toile
externe avec un imperméabilisant conçu spécialement pour les
matériaux respirants. La fréquence de cette opération dépend
de la fréquence d’utilisation de votre Warrior Bivvy. L’humidité
devrait former des gouttelettes plutôt que de pénétrer la toile.
Le rangement de ma Warrior
Bivvy ?
Il est nécessaire de s’assurer que
votre Warrior Bivvy est sèche
avant de la ranger. Si vous n’avez
pas eu l’occasion de la sécher à
la fin de votre session, il est
conseillé de le faire en rentrant
chez soi.
Warrior Bivvy Matériau
L’entretien de ma
Warrior Bivvy
1.
(A)
(B)
Dépliez et assemblez tous les arceaux. Etendez le dôme à plat sur le sol comme indiqué.
Instructions pour le montage
2.
Insérez l’arceau le plus long (A) d’un côté à l’autre.
(A)
(B)
(A)
(B)
(B)(B)

F
11
WARRIOR BIVVY
F
10
WARRIOR BIVVY
3.
Insérez les deux arceaux les plus courts (B) à l’emplacement
prévu d’avant en arrière avec l’extrémité pointue vers l’avant.
4.
Placez une extrémité de l’arceau le plus long (A) dans une poche puis passez de l’autre côté, soulevez
l’abri en tirant sur l’anneau en forme de D et insérez l’autre extrémité de l’arceau (A) dans la poche
opposée. Répétez avec l’arceau (B).
5.
Arrimez l’arrière puis ajustez les côtés selon les
conditions.
ASTUCE: Pour faciliter le montage de l’abri dans le
vent, il suffit de grossièrement arrimer le Warrior Bivvy
à l’arrière puis de le monter avec le vent de côté.

NL
13
WARRIOR BIVVY
NL
12
WARRIOR BIVVY
Gefeliciteerd met de aanschaf
van de Fox Warrior Bivvy
gemaakt van de hoogste
kwaliteit 200D volledig
ademend nylon met een
hydrostatische druk van 3000
mm. Op een normale manier
gebruikt en onderhouden zal
deze seizoen na seizoen een
comfortabel verblijf aan de waterkant garanderen. Zie de folder voor meer informatie over de Warrior Bivvy.
Over uw
1. Alle ademende materialen worden beinvloed door temperatuur.
Voorbeelden hiervan zijn de luchttemperatuur en de hoeveelheid
vocht in de lucht. Hoe vochtiger de lucht des te groter de
condensatie.
2. Onder koude en natte omstandigheden rek het doek op, terwijl
met warm en droog weer het materiaal krimpt. Dit is normaal.
3. Om de werking van het materiaal ook op langere termijn te
garanderen, adviseren we om het doek na verloop van tijd te
behandelen met een speciaal voor ademend doek materiaal.
Wanneer dit dient te gebeuren hangt af van het gebruik. In de
regel is dit pas nodig wanneer het water niet meer van het doek
afrolt maar wordt opgenomen.
Hoe berg ik mijn Warrior Bivvy
op?
De Warrior Bivvy moet altijd droog
worden opgeborgen. Wanneer dit
aan het eind van een sessie niet
mogelijk is dient de tent bij
thuiskomst goed te worden
gedroogd.
Warrior Bivvy Materiaal
Onderhoud van
mijn Warrior Bivvy

NL
15
WARRIOR BIVVY
NL
14
WARRIOR BIVVY
1.
(A)
(B)
ouw alle stokken volledig uit elkaar en verbind ze middels de sluitingen. Leg de dome plat op de grond
zoals afgebeeld.
2.
Duw de langste stok (A) door de flappen van de ene zijde naar de andere.
(A)
(B)
(A)
(B)
(B)(B)
Montage Instructies
3.
Duw de twee korte stokken (B) van achteren naar voren door
de flappen, zorg ervoor dat het uiteinde met punt naar voren
wijst.
4.
Steek het ene uiteinde van de lange stok (A) in het hoesje aan de ene kant. Til aan de andere kant de
bivvy op terwijl u aan de D ring trekt, strek het doek en steek het andere uiteinde van stok (A) in het
hoesje. Herhaal de handelingen voor de stok (B).

D
17
WARRIOR BIVVY
NL
16
WARRIOR BIVVY
5.
Zet als eerste de achterzijde vast met haringen, stel
daarna de zijkanten in naar gelang de gewenste positie.
Tip: Wanneer het stevig waait werkt het zeer
gemakkelijk als de bivvy eerst aan de achterzijde losjes
met één haring wordt vastgezet, om deze daarna met
de zijkant tegen de wind in op te richten.
Über Ihr
Wir beglückwünschen Sie
zum Kauf des Fox Warrior
Bivvy. Das Produkt wird aus
voll atmungsfähigem 200D
Nylon hergestellt, das mit
einer 3000 mm Wassersäule
hydrostatisch belastbar ist.
Wenn Sie mit dem Produkt
sachgerecht umgehen und es richtig pflegen, werden Sie viele Jahre Freude daran haben. Dieses Blatt
enthält einige wichtige Informationen über Ihr Warrior Bivvy.

D
19
WARRIOR BIVVY
D
18
WARRIOR BIVVY
1. Alle atmungsfähigen Materialien werden durch die temperatur
beeinflusst. Je höher die Luftfeuchtigkeit oder je niedriger die
Temperatur, desto gravierender ist die Kondensation und umso
schwieriger wird das Material damit fertig.
2. Bei Kälte und Feuchtigkeit wird das Material schlaff, bei Hitze
und Trockenheit hingegen zieht es sich zusammen.
Das ist normal.
3. Um die Funktion zu erhalten, empfehlen wir, das Material mit
einem guten Imprägniermittel zu behandeln, das sich speziell
für atmungsfähige Materialien eignet. Wann dies erforderlich
ist, richtet sich danach, wie häufig Sie Ihr Warrior Bivvy
verwenden. Als Faustregel gilt, dass das Wasser als Tropfen
ablaufen und nicht vom Material aufgesaugt werden soll.
Wie bewahre ich mein Warrior
Bivvy auf ?
Achten Sie darauf, dass Ihr
Warrior Bivvy vollständig trocken
ist, bevor Sie es wegpacken.
Wenn dies bei Ende der Session
nicht möglich war, sollten Sie es
zuhause gründlich trocknen
lassen.
Warrior Bivvy Material
Pflege meines
Warrior Bivvy
1.
(A)
(B)
Legen sie alle Stangen auseinander und stecken sie dann zusammen. Legen Sie das Zelt, wie
abgebildet, flach auf den Boden.
Aufbau Anleitung
2.
Schieben Sie die längste Stange (A) von einer Seite zur anderen durch die Laschen.
(A)
(B)
(A)
(B)
(B)(B)

D
21
WARRIOR BIVVY
D
20
WARRIOR BIVVY
3.
Schieben Sie die beiden kürzeren Stangen (B) mit den Spitzen
nach vorne von hinten nach vorne durch die Laschen.
4.
Stecken Sie ein Ende der langen Stange (A) in die dafür vorgesehene Tasche. Heben Sie dann das Zelt
auf der gegenüber liegenden Seite an, während sie den D-Ring ziehen und spannen die Zeltplane und
stecken das Ende der Stange (A) in die dafür vorgesehene Tasche. Wiederholen Sie diesen Vorgang für
die Stangen (B).
5.
Stecken Sie das Zelt zuerst hinten mit Häringen fest.
Passen Sie dann die Seiten an.
TIPP: Sie werden feststellen, dass es bei Wind leichter
ist, das Warrior Bivvy an einer der hinteren Ösen locker
zu befestigen und es mit der Seite zum Wind hin
aufzustellen.

I
23
WARRIOR BIVVY
I
22
WARRIOR BIVVY
Riguardo al vostro
Congratulazioni per l’acquisto
di un Fox Warrior Bivvy
fabbricato con nylon della
miglior qualità da 200D,
completamente traspirante,
con 3000 mm di colonna
idrostatica. Trattato e
mantenuto correttamente,
continuerà a fornirvi le sue
grandi capacità, stagione dopo stagione. Questo libretto illustra alcune delle cose che dovete conoscere
relativamente al vostro Warrior Bivvy.
1. Tutti i materiali traspiranti sono soggetti agli effetti della
temperatura. Per esempio, più elevato è il tasso di umidità
dell’aria o più bassa è la temperatura, tanto peggiore sarà il
livello di condensa e tanto più difficile sarà per il materiale non
risentirne.
2. Condizioni di freddo umido causeranno l’allentamento del
materiale, mentre un clima caldo e asciutto al contrario
determinerà un restringimento dello stesso.
3. Per mantenere inalterate le prestazioni nel tempo, noi
raccomandiamo che la copertura sia trattata con un agente
impermeabilizzante di buona qualità, sviluppato per essere
compatibile con materiali traspiranti. La frequenza con la quale
ripetere il trattamento dipende fondamentalmente dall’utilizzo
che viene fatto del vostro Warrior Bivvy. Come regola
generale, una copertura in buono stato deve consentire
all’acqua di formare delle “perline” che scivolano verso il
basso, senza penetrare nel materiale.
Come devo conservare il mio
Warrior Bivvy?
Dovete accertarvi che il Warrior
Bivvy sia ben asciutto prima di
riporlo dopo l’uso. Se ciò non è
fattibile appena terminata la
sessione, dovrete assicurarvi che
l’operazione venga eseguita una
volta arrivati a casa.
Warrior Bivvy Materiale
Manutenzione del
mio Warrior Bivvy

I
25
WARRIOR BIVVY
I
24
WARRIOR BIVVY
1.
(A)
(B)
Dispiegare tutti i pali e unirli assieme, stendere la tenda sul terreno come mostrato.
Istruzioni per il montaggio
2.
Spingere il palo più lungo (A) attraverso la sede apposita da parte a parte.
(A)
(B)
(A)
(B)
(B)(B)
3.
Spingere 2 pali più corti (B) attraverso le sedi apposite dalla
parte posteriore verso la parte anteriore con le estremità
appuntite verso la parte anteriore.
4.
Mettere un’estremità del palo lungo (A) nella tasca , quindi nella parte opposta sollevare lo bivvy
mentre si tira il D ring e si distendono la copertura e la parte terminale del palo (A) nella tasca. Ripetere
per i pali (B).

27
WARRIOR BIVVY
I
26
WARRIOR BIVVY
5.
Picchettare la parte posteriore quindi regolare i lati per
adattarsi alle condizioni.
CONSIGLIO: in condizioni di vento, troverete agevole
montare il vostro Warrior Bivvy posizionando un singolo
picchetto sulla parte posteriore ed erigendo lo Warrior
stesso con il favore del vento.

Fox International Group Ltd.
Fowler Road, Hainault Industrial Estate,
Hainault, Essex, 1G6 3UT
www.foxint.com
Fox International reserve the right to modify or alter
specifications in any respect without prior notice.
Technical data and specification correct at time of going
to press. All weights and dimensions are approximate.
E.& O.E ©Copyright reserved.
United Kingdom Trade Mark 1,564,221
ISSUE: 2007/3
CUM075
Documenttranscriptie
GB GB Warrior Bivvy Material 1. All fabrics are affected by temperature. For example, the amount of moisture in the air or the colder the temperature, the worse the condensation will become and the harder it will be for the material to deal with it. Congratulations on purchasing the Fox Warrior Bivvy manufactured from the highest quality 200D Nylon with a 3000mm Hydrostatic Head. Treated properly and maintained correctly, it will provide you with outstanding performance season after season. This leaflet details some of the things you should know about your Warrior Bivvy. 2 2. Cold, damp conditions will cause the material to go slack, whilst hot/dry temperatures will cause the material to tighten. This is normal. 3. To maintain its performance, we recommend that the cover is treated with a reputable re-proofing agent specifically designed to be compatible with PU coated nylons. When it needs doing is really a matter of how often you use your Warrior Bivvy. As a rule of thumb, any water should ‘bead up’ and run off rather than soaking into the material. Maintenance of my Warrior Bivvy WARRIOR BIVVY WARRIOR BIVVY About your How do I store my Warrior Bivvy? You should ensure the Warrior Bivvy is dry before being stored away. If this was not possible at the end of your session, you should allow it to dry out thoroughly when you get home. 3 GB GB 3. Push 2 shorter poles (B) through flaps from back to front with pointed end towards the front. WARRIOR BIVVY WARRIOR BIVVY Assembly Instructions 1. Unfold all poles and join together, lay out dome flat on ground as shown. (A) (B) 4. Put one end of long pole (A) into pocket then at opposite side lift bivvy whilst pulling on D ring and stretch cover and pole end of pole (A) into pocket. Repeat for poles (B). 2. Push longest pole (A) through flaps from side to side. (B) (B) (A) (A) (B) 4 (B) 5 F GB Peg out rear pegging points first then adjust sides to suit conditions. TIP: In windy conditions, you will find it easier to loosely peg your Warrior Bivvy down with one of the rear peg down points and erect it ‘side into the wind’. 6 Votre WARRIOR BIVVY WARRIOR BIVVY 5. Félicitations d’avoir acheté la tente Warrior Bivvy de Fox, issue d’un matériau Nylon 200D de qualité supérieure entièrement respirant et doté d’une tête hydrostatique de 3000mm. Traitée et entretenue correctement, elle fera preuve d’une performance incomparable saison après saison. Ce livret couvre tout ce que vous devez savoir à propos de votre Warrior Bivvy. 7 F F 1. Tous les matériaux respirants sont susceptibles au changement de température. Par exemple, plus il fait froid ou humide plus il y a de condensation, et donc plus il sera difficile pour le matériau de la gérer. 2. Le froid et l’humidité peuvent contribuer à l’assouplissement du matériau, tandis que le chaud et le sec causent un resserrement des fibres. Ceci est tout à fait normal. 3. Pour prolonger sa performance, il est conseillé de traiter la toile externe avec un imperméabilisant conçu spécialement pour les matériaux respirants. La fréquence de cette opération dépend de la fréquence d’utilisation de votre Warrior Bivvy. L’humidité devrait former des gouttelettes plutôt que de pénétrer la toile. L’entretien de ma Warrior Bivvy Le rangement de ma Warrior Bivvy ? Il est nécessaire de s’assurer que votre Warrior Bivvy est sèche avant de la ranger. Si vous n’avez pas eu l’occasion de la sécher à la fin de votre session, il est conseillé de le faire en rentrant chez soi. Instructions pour le montage 1. Dépliez et assemblez tous les arceaux. Etendez le dôme à plat sur le sol comme indiqué. (A) (B) 2. Insérez l’arceau le plus long (A) d’un côté à l’autre. (B) (B) (A) (A) (B) 8 WARRIOR BIVVY WARRIOR BIVVY Warrior Bivvy Matériau (B) 9 F F Insérez les deux arceaux les plus courts (B) à l’emplacement prévu d’avant en arrière avec l’extrémité pointue vers l’avant. 4. Placez une extrémité de l’arceau le plus long (A) dans une poche puis passez de l’autre côté, soulevez l’abri en tirant sur l’anneau en forme de D et insérez l’autre extrémité de l’arceau (A) dans la poche opposée. Répétez avec l’arceau (B). 10 5. Arrimez l’arrière puis ajustez les côtés selon les conditions. WARRIOR BIVVY WARRIOR BIVVY 3. ASTUCE: Pour faciliter le montage de l’abri dans le vent, il suffit de grossièrement arrimer le Warrior Bivvy à l’arrière puis de le monter avec le vent de côté. 11 NL NL Warrior Bivvy Materiaal 1. Alle ademende materialen worden beinvloed door temperatuur. Voorbeelden hiervan zijn de luchttemperatuur en de hoeveelheid vocht in de lucht. Hoe vochtiger de lucht des te groter de condensatie. Gefeliciteerd met de aanschaf van de Fox Warrior Bivvy gemaakt van de hoogste kwaliteit 200D volledig ademend nylon met een hydrostatische druk van 3000 mm. Op een normale manier gebruikt en onderhouden zal deze seizoen na seizoen een comfortabel verblijf aan de waterkant garanderen. Zie de folder voor meer informatie over de Warrior Bivvy. 12 2. Onder koude en natte omstandigheden rek het doek op, terwijl met warm en droog weer het materiaal krimpt. Dit is normaal. 3. Om de werking van het materiaal ook op langere termijn te garanderen, adviseren we om het doek na verloop van tijd te behandelen met een speciaal voor ademend doek materiaal. Wanneer dit dient te gebeuren hangt af van het gebruik. In de regel is dit pas nodig wanneer het water niet meer van het doek afrolt maar wordt opgenomen. Onderhoud van mijn Warrior Bivvy WARRIOR BIVVY WARRIOR BIVVY Over uw Hoe berg ik mijn Warrior Bivvy op? De Warrior Bivvy moet altijd droog worden opgeborgen. Wanneer dit aan het eind van een sessie niet mogelijk is dient de tent bij thuiskomst goed te worden gedroogd. 13 NL NL 3. Duw de twee korte stokken (B) van achteren naar voren door de flappen, zorg ervoor dat het uiteinde met punt naar voren wijst. WARRIOR BIVVY WARRIOR BIVVY Montage Instructies 1. ouw alle stokken volledig uit elkaar en verbind ze middels de sluitingen. Leg de dome plat op de grond zoals afgebeeld. (A) (B) 4. Steek het ene uiteinde van de lange stok (A) in het hoesje aan de ene kant. Til aan de andere kant de bivvy op terwijl u aan de D ring trekt, strek het doek en steek het andere uiteinde van stok (A) in het hoesje. Herhaal de handelingen voor de stok (B). 2. Duw de langste stok (A) door de flappen van de ene zijde naar de andere. (B) (B) (A) (A) (B) 14 (B) 15 D NL Zet als eerste de achterzijde vast met haringen, stel daarna de zijkanten in naar gelang de gewenste positie. Tip: Wanneer het stevig waait werkt het zeer gemakkelijk als de bivvy eerst aan de achterzijde losjes met één haring wordt vastgezet, om deze daarna met de zijkant tegen de wind in op te richten. 16 Über Ihr WARRIOR BIVVY WARRIOR BIVVY 5. Wir beglückwünschen Sie zum Kauf des Fox Warrior Bivvy. Das Produkt wird aus voll atmungsfähigem 200D Nylon hergestellt, das mit einer 3000 mm Wassersäule hydrostatisch belastbar ist. Wenn Sie mit dem Produkt sachgerecht umgehen und es richtig pflegen, werden Sie viele Jahre Freude daran haben. Dieses Blatt enthält einige wichtige Informationen über Ihr Warrior Bivvy. 17 D D 1. Alle atmungsfähigen Materialien werden durch die temperatur beeinflusst. Je höher die Luftfeuchtigkeit oder je niedriger die Temperatur, desto gravierender ist die Kondensation und umso schwieriger wird das Material damit fertig. 2. Bei Kälte und Feuchtigkeit wird das Material schlaff, bei Hitze und Trockenheit hingegen zieht es sich zusammen. Das ist normal. 3. Um die Funktion zu erhalten, empfehlen wir, das Material mit einem guten Imprägniermittel zu behandeln, das sich speziell für atmungsfähige Materialien eignet. Wann dies erforderlich ist, richtet sich danach, wie häufig Sie Ihr Warrior Bivvy verwenden. Als Faustregel gilt, dass das Wasser als Tropfen ablaufen und nicht vom Material aufgesaugt werden soll. Pflege meines Warrior Bivvy Wie bewahre ich mein Warrior Bivvy auf ? Achten Sie darauf, dass Ihr Warrior Bivvy vollständig trocken ist, bevor Sie es wegpacken. Wenn dies bei Ende der Session nicht möglich war, sollten Sie es zuhause gründlich trocknen lassen. Aufbau Anleitung 1. Legen sie alle Stangen auseinander und stecken sie dann zusammen. Legen Sie das Zelt, wie abgebildet, flach auf den Boden. (A) (B) 2. Schieben Sie die längste Stange (A) von einer Seite zur anderen durch die Laschen. (B) (B) (A) (A) (B) 18 WARRIOR BIVVY WARRIOR BIVVY Warrior Bivvy Material (B) 19 D D Schieben Sie die beiden kürzeren Stangen (B) mit den Spitzen nach vorne von hinten nach vorne durch die Laschen. 4. Stecken Sie ein Ende der langen Stange (A) in die dafür vorgesehene Tasche. Heben Sie dann das Zelt auf der gegenüber liegenden Seite an, während sie den D-Ring ziehen und spannen die Zeltplane und stecken das Ende der Stange (A) in die dafür vorgesehene Tasche. Wiederholen Sie diesen Vorgang für die Stangen (B). 20 5. Stecken Sie das Zelt zuerst hinten mit Häringen fest. Passen Sie dann die Seiten an. WARRIOR BIVVY WARRIOR BIVVY 3. TIPP: Sie werden feststellen, dass es bei Wind leichter ist, das Warrior Bivvy an einer der hinteren Ösen locker zu befestigen und es mit der Seite zum Wind hin aufzustellen. 21 I I Warrior Bivvy Materiale 1. Tutti i materiali traspiranti sono soggetti agli effetti della temperatura. Per esempio, più elevato è il tasso di umidità dell’aria o più bassa è la temperatura, tanto peggiore sarà il livello di condensa e tanto più difficile sarà per il materiale non risentirne. Congratulazioni per l’acquisto di un Fox Warrior Bivvy fabbricato con nylon della miglior qualità da 200D, completamente traspirante, con 3000 mm di colonna idrostatica. Trattato e mantenuto correttamente, continuerà a fornirvi le sue grandi capacità, stagione dopo stagione. Questo libretto illustra alcune delle cose che dovete conoscere relativamente al vostro Warrior Bivvy. 22 2. Condizioni di freddo umido causeranno l’allentamento del materiale, mentre un clima caldo e asciutto al contrario determinerà un restringimento dello stesso. 3. Per mantenere inalterate le prestazioni nel tempo, noi raccomandiamo che la copertura sia trattata con un agente impermeabilizzante di buona qualità, sviluppato per essere compatibile con materiali traspiranti. La frequenza con la quale ripetere il trattamento dipende fondamentalmente dall’utilizzo che viene fatto del vostro Warrior Bivvy. Come regola generale, una copertura in buono stato deve consentire all’acqua di formare delle “perline” che scivolano verso il basso, senza penetrare nel materiale. Manutenzione del mio Warrior Bivvy WARRIOR BIVVY WARRIOR BIVVY Riguardo al vostro Come devo conservare il mio Warrior Bivvy? Dovete accertarvi che il Warrior Bivvy sia ben asciutto prima di riporlo dopo l’uso. Se ciò non è fattibile appena terminata la sessione, dovrete assicurarvi che l’operazione venga eseguita una volta arrivati a casa. 23 I I 3. Spingere 2 pali più corti (B) attraverso le sedi apposite dalla parte posteriore verso la parte anteriore con le estremità appuntite verso la parte anteriore. WARRIOR BIVVY WARRIOR BIVVY Istruzioni per il montaggio 1. Dispiegare tutti i pali e unirli assieme, stendere la tenda sul terreno come mostrato. (A) (B) 4. Mettere un’estremità del palo lungo (A) nella tasca , quindi nella parte opposta sollevare lo bivvy mentre si tira il D ring e si distendono la copertura e la parte terminale del palo (A) nella tasca. Ripetere per i pali (B). 2. Spingere il palo più lungo (A) attraverso la sede apposita da parte a parte. (B) (B) (A) (A) (B) 24 (B) 25 I Picchettare la parte posteriore quindi regolare i lati per adattarsi alle condizioni. WARRIOR BIVVY WARRIOR BIVVY 5. CONSIGLIO: in condizioni di vento, troverete agevole montare il vostro Warrior Bivvy posizionando un singolo picchetto sulla parte posteriore ed erigendo lo Warrior stesso con il favore del vento. 26 27 Fox International Group Ltd. Fowler Road, Hainault Industrial Estate, Hainault, Essex, 1G6 3UT www.foxint.com Fox International reserve the right to modify or alter specifications in any respect without prior notice. Technical data and specification correct at time of going to press. All weights and dimensions are approximate. E.& O.E ©Copyright reserved. United Kingdom Trade Mark 1,564,221 ISSUE: 2007/3 CUM075-
 1
1
-
 2
2
-
 3
3
-
 4
4
-
 5
5
-
 6
6
-
 7
7
-
 8
8
-
 9
9
-
 10
10
-
 11
11
-
 12
12
-
 13
13
-
 14
14
-
 15
15


Fox Warrior Shelter Handleiding
- Type
- Handleiding
- Deze handleiding is ook geschikt voor
in andere talen
- English: Fox Warrior Shelter User manual
- italiano: Fox Warrior Shelter Manuale utente
- français: Fox Warrior Shelter Manuel utilisateur
- Deutsch: Fox Warrior Shelter Benutzerhandbuch
Andere documenten
-
iON Road Warrior Handleiding
-
VENOM PC0002 Handleiding
-
ESAB Warrior™ 400i cc/cv, Warrior™ 500i cc/cv Handleiding
-
-
ESAB Warrior Tech welding helmet Handleiding
-
ESAB Warrior™ 750i CC/CV Handleiding
-
-
ESAB Warrior™ Feed 304, Warrior™ Feed 304w Handleiding
-
-
ESAB Warrior™ YardFeed 200w Handleiding