i-tec i-tec Bluetooth Comfort Optical Mouse Handleiding
- Categorie
- Muizen
- Type
- Handleiding
Deze handleiding is ook geschikt voor

P/N: MWBT244
User guide • Gebrauchsanweisung • Mode d’emploi
Manual de instrucciones • Manuale • Uživatelská příručka
Instrukcje obsługi • Užívateľská príručka • Vartotojo vadovas
Handleiding
BLUETOOTH COMFORT
OPTICAL MOUSE

EN Please read the entire instruction manual carefully. Detailed manual is
available on our website www.i-tec.cz/en/ in the tab „Manuals, drivers“. In case
of any issues, please contact our technical support at:
DE Bitte lesen Sie das gesamte Handbuch sorgfältig durch. Die ausführliche
Gebrauchsanweisung ist auch auf unserer Webseite www.i-tec.cz/de/ unter
„Benutzerhandbücher, Treiber“ bei diesem Produkt zu nden. Wenn Sie
Probleme haben, kontaktieren Sie bitte unser Support-Team unter:
FR Veuillez lire attentivement le manuel dans son intégralité. Un manuel
détaillé est disponible sur notre site www.i-tec.cz/fr/ sous l'onglet "Manuels,
pilotes". Si vous avez des problèmes, veuillez contacter notre équipe support à
ES Por favor, lea atentamente todo el manual. El manual detallado está
disponible en nuestro sitio web, www.i-tec.cz/es/ bajo la pestaña "Manuales
y controladores" de este producto. Si tiene algún problema, póngase en
contacto con nuestro equipo de soporte en [email protected]
IT Leggere attentamente tutto il Libretto d’uso. Il Libretto d’uso è a disposizione
anche sulla scheda “Manuali e strumenti” del nostro sito web: www.i-tec.cz/it/.
In caso di problemi rivolgersi al supporto tecnico: support@itecproduct.com
CZ Prosíme o pečlivé přečtení celého manuálu. Podrobný manuál je k dispozici
na našem webu www.i-tec.cz v záložce „Manuály, ovladače“ u tohoto produktu.
V případě problémů se můžete obrátit na naši technickou podporu:

Quick Start
PL Upewnij si ę , że uważnie pr ze cz y ta ł eś instrukcji obs ługi. Szczegó ł ow y po d r ę cz n i k
jest dostępny na naszej stronie internetowej www.i-tec.cz/pl/ w zakładce
„Instrukcje, sterowniki”. W razie jakichkolwiek problemów, skontaktuj się
z naszym serwisem pod adresem: [email protected]
SK Prosíme o dôkladné prečítanie celého manuálu. Podrobný manuál je k dis
pozícii tiež na našom webe www.i-tec.cz v záložke „Manuály, ovladače“ pri
tomto produkte. V prípade problémov sa môžete obrátiť na našu technickú
podporu: support@itecproduct.com
LT Prašome įdėmiai perskaityti visą vadovą. Išsamų vadovą galite rasti mūsų
svetainėje www.i-tec.cz/en/ šio produkto skyrelyje „Manuals, drivers“. Iškilus
problemoms galite susisiekti su mūsų technine pagalba: [email protected]
NL Wij vragen u vriendelijk om de volledige handleiding zorgvuldig door te
lezen. Een gedetailleerde handleiding van dit product is beschikbaar op onze
website www.i-tec.cz/nl/ onder het tabblad "Handleidingen en drivers".
Mochten er zich problemen voordoen kunt u contact opnemen met ons
supportcenter via support@itecproduct.com.

Bluetooth Comfort Optical Mouse

Quick StartBluetooth Comfort Optical Mouse
ENGLISH.................................................... 08–09
DEUTSCH.................................................. 10–11
FRANÇAIS................................................. 12–13
ESPAÑOL...................................................14–15
ITALIANO...................................................16–17
ČESKY........................................................18–19
POLSKI...................................................... 20–21
SLOVENSKY.............................................. 22–23
LIETUVOS.................................................. 24–25
NEDERLANDS........................................... 26–27
WEEE......................................................... 28–29
Declaration of Conformity........................ 30–31
FCC................................................................... 32
BLUETOOTH COMFORT
OPTICAL MOUSE


8
Bluetooth Comfort Optical Mouse
ENGLISH
PACKAGE CONTENTS:
• Bluetooth Optical Mouse
• 1x AA 1.5V battery
• User´s manual
INSTALLATION GUIDE:
Step 1: Installing the battery
• Whenever new battery is installed, make sure that the battery is undam-
aged.
• Remove the battery cover.
• Insert one AA battery into the battery compartment, make sure to properly
orient the positive and negative ends (+/) as specied by the marks in
the battery compartment. Replace the battery cover and make sure it is
locked.
• Switch on the mouse, LED light will blink.
• Low-voltage alarming function: when the battery have been used for some
time and discover the LED light in „DPI-adjusting button“ blinks automati-
cally, which reminds you that battery´s voltage is becoming low, suggested
you replace the battery with new one.
Step 2: Connecting the Bluetooth mouse
Before you install the Bluetooth mouse, please make sure that your computer
supports Bluetooth function, and nishes the Bluetooth software installation.
Press the Link button for 2 seconds, the LED light in „DPI-adjusting button“
will blink, it´s now searching the Bluetooth device. Then please follow the be-
low procedures to install the mouse (It can slightly differs according to the
Bluetooht software):
• Make sure that the Bluetooth function has been activated. Double click
the Bluetooth Icon on the Task Bar or in the Control Panel, click „Add a
Bluetooth device“.
• Select „My device is set up and ready to be found“, click „Next“.
• Select Bluetooth mouse, click „Next“.
• In case the mouse requires pairing PIN code, enter „0000“.
Note: If you use other Bluetooth software, the installing procedure may be sim-
ilar. You need to try and understand it by yourself.
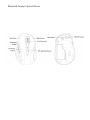
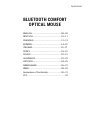
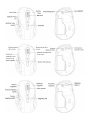
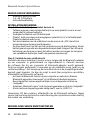
DESCRIPTION OF KEYS AND DPI ADJUSTMENT:
• Using „DPI-adjusting button“, the resolution of mouse can be switched
among 1000 / 1600 DPI in turn.
• Backward and Frontward buttons for your easily navigating forward and
backward on the internet.

9
Quick StartBluetooth Comfort Optical Mouse
ENGLISH
FUNCTION OF THE BUTTONS IN THE ANDROID OS:
• Left button: The left button has the same function as control by a nger.
Holding down the button for approximately 1 s will call special functions
(on the homepage).
• Right button: The right button functions as the back button.
• Scrolling wheel: Using the wheel you can move between the screens.
• Scrolling wheel (when pushed down): the same function as the „HOME“
button.
• Frontward button: No function allocated.
• Backward button: The backward button functions as the back button.
• DPI-adjusting button: This button switches the optic sensor sensitivity in
three steps 1000 / 1600 DPI.
SYSTEM REQUIREMENTS:
• MS Windows Vista/7/8/8.1/10 32/64 bit, macOS X, Android
• Computer with Bluetooth Dongle ore built-in Bluetooth. Bluetooth Dongle is
not included in this product.
Notice: Do not use the mouse on the reflective surface, such as glass or mirror.
Please avoid using the mouse under the following conditions:
• Direct sunlight
• Extreme hot, cold, dusty or magnetic environment
• Near by fax machine, television, radio, mobile phone or any wireless device
• Please do not repair unfunctional mouse yourselves, you should nd
authorized technical support.
FREQUENTLY ASKED QUESTIONS
Available on our website www.i-tec.cz/en/ on the "FAQ" tab of this product.

10
Bluetooth Comfort Optical Mouse
DEUTSCH
LIEFERUMFANG:
• Optische Bluetooth-Maus
• 1 Stk. AA 1.5V Batterie
• Gebrauchsanweisung
INSTALLATIONSHANDBUCH:
1. Schritt: Einlegen der Batterie und Einschaltung der Maus
• Überzeugen Sie sich, dass die Batterie unbeschädigt ist.
• Öffnen Sie den Deckel des Batteriefachs.
• Legen Sie eine AA Batterie entsprechend der richtigen Polarität (+/-) in das
Batteriefach ein. Dann verschließen Sie es wieder mit dem Deckel.
• Setzen Sie den Schalter auf der Unterseite der Maus in die Position „ON“.
Die Kontrollleuchte auf der Oberseite der Maus leuchtet auf.
• Die LED gibt eine Auskunft über Batteriezustand und Verbindungsstatus.
Fängt sie an zu blinken, ist die Batterie schwach und sollte bald ausge-
tauscht werden (bzw. der Akku aufgeladen werden)
2. Schritt: Mausanschluss über Bluetooth
Prüfen Sie, ob der Bluetooth-Adapter auf Ihrem Computer installiert ist. (Das
können Sie mit Hilfe der zu Ihrem PC oder Bluetooth-Adapter mitgelieferten
Software feststellen.) Ist das der Fall, halten Sie anschließend die Verbin-
dungstaste ca. 2 s lang gedrückt – die Kontollleuchte auf der Mausoberseite
leuchtet auf, die Maus bendet sich im Synchronisierungsmodus. Setzen Sie
die Installation fort (dauert je nach Bluetooth-Software unterschiedlich lang):
• Klicken SIe auf BluetoothSymbol und wählen „Ein neues BluetoothGerät
hinzufügen“
• Bestätigen Sie, dass das neue Gerät bereit ist für die Synchronisierung und
wählen „Weiter“
• Wählen Sie im Geräteverzeichnis „Bluetooth Mouse“ und klicken auf
„Weiter“.
• Falls ein Verbindungspassword benötigt wird, geben Sie „0000“ ein.
Bemerkung: Das beschriebene Verfahren kann je nach installierter
Blueooth-Software abweichen. Falls Sie Probleme mit der Installation bekom-
men, nehmen Sie bitte Kontakt mit unserem Support auf.
BESCHREIBUNG DER TASTENFUNKTION UND EINSTELLUNG DER
MAUSEMPFINDLICHKEIT:
• Durch das Drücken der Taste DPI auf der Mausoberseite können Sie die
Empndlichkeit des optischen Sensors in drei Schritten 1000 / 1600 DPI
ändern.

11
Quick StartBluetooth Comfort Optical Mouse
DEUTSCH
• Die 2 Tasten, die sich auf der linken Seite der Maus benden, haben die
Funktion „vor“ und „zurück“ und dienen zur einfacheren Navigation beim
Surfen auf den Internetseiten.
TASTENFUNKTIONEN UNTER OS ANDROID:
• Linke Taste: hat die gleiche Funktion wie die Bedienung mit dem Finger.
Halten Sie die Taste ca. 1 s gedrückt, werden Spezialfunktionen aufgerufen
(auf der Homepage)
• Rechte Taste: hat die gleiche Funktion wie die Taste Zurück
• Mausrad: Durch Scrollen kann man zwischen den Oberächen wechseln
• Mausrad (beim Drücken): hat die gleiche Funktion wie die Taste HOME
• Seitliche Taste Vor: hat keine Funktion
• Seitliche Taste Zurück: hat keine Funktion
• Taste DPI: dient zum Umschalten der Sensorempndlichkeit in drei Schrit-
ten 1000/1600 DPI
SYSTEMANFORDERUNGEN:
• MS Windows Vista/7/8/8.1/10 32/64 bit, macOS X, Android
• Computer mit Bluetooth-Adapter. Bluetooth-Adapter ist nicht im Liefer-
umfang enthalten.
Hinweis: Verwenden Sie die Maus nicht auf einer Reflexoberfläche, wie zum
Beispiel Glas oder Spiegel. Das Gerät darf folgenden Einflüssen nicht ausge-
setzt werden:
• Direkter Sonneneinstrahlung.
• Extremer Hitze, Kälte, Staubumgebung oder starker elektromagnetischen
Strahlung.
• Nähe eines Faxgeräts, Fernsehers, Radios, Handys oder eines anderen
drahtlosen Gerätes.
• Falls die Maus beschädigt wird, versuchen Sie bitte nicht , sie selbst zu
reparieren, sondern suchen Sie einen autorisierten Servicepartner auf.
HÄUFIG GESTELLTE FRAGEN
Verfügbar auf unserer Webseite www.i-tec.cz/de auf der Registerkarte “FAQ”
dieses Produkts.

12
Bluetooth Comfort Optical Mouse
FRANÇAIS
CONTENU DE L’EMBALLAGE :
• Bluetooth souris optique
• 1 pièce de la pile AA 1.5V
• Guide d’instructions et mode d’emploi
GUIDE D’INSTALLATION :
Pas Nº 1: L’introduction de la pile et mise de la souris en marche
• Chaque fois, avant de procéder à l’introduction d’une nouvelle batterie dans
votre souris, veuillez vérier, s’il vous plaît, qu’elle n’est pas endommagée.
• Tout d’abord, il faut enlever le couvercle du compartiment destiné aux piles.
• Dans la suite, il est nécessaire d’insérer 1 AA pile à l’intérieur, tout en sui-
vant la polarité marquée (+/-) au-dedans du compartiment pour piles. Après,
veuillez refermer le compartiment avec le couvercle, s’il vous plaît.
• Aussitôt après, il faut positionner le commutateur, qui se trouve sur la partie
inférieure de la souris, en position « ON ». Le voyant témoin lumineux, situé
sur la partie supérieure de la souris, fera un clignotement.
• La souris est dotée de la fonction de détection des batteries déchargées.
Si la tension au-dedans de la batterie abaisse au-dessous de la limite dé-
terminée, le voyant témoin lumineux LED, placé sur le corps de la souris, se
mettra à clignoter ce qui indiquera un besoin de changer la batterie (en cas
d’accumulateurs rechargeables, il sut de les recharger).
Pas Nº 2: Branchement de la souris à travers Bluetooth
Avant de procéder à l’installation de la souris, veuillez vérier, s’il vous plaît,
que votre ordinateur dispose de l’adaptateur Bluetooth installé et que ce der-
nier est mis en marche. Il est possible de le faire par l’intermédiaire du logiciel
(software) de votre ordinateur ou de l’adaptateur Bluetooth. Dans la suite, il
est nécessaire d’appuyer sur le bouton d’appareillement pour 2 secondes – le
voyant témoin lumineux sur la souris se mettra à clignoter et la souris passera
au soi-disant « mode d’appareillement ». Aussitôt après, il faut suivre les ins-
tructions du respectif procédé (ce qui peut légèrement différer en fonction du
respectif logiciel Bluetooth que vous avez à disposition) :
• Il faut activer la fonction Bluetooth à votre ordinateur. Dans l’offre de la
commande Bluetooth, veuillez choisir, s’il vous plaît, « Ajouter un nouveau
périphérique Bluetooth »
• Veuillez conrmer, s’il vous plaît, que le périphérique est prêt à l’appareille-
ment » et appuyez sur « Suivant »
• Dans la suite, il est nécessaire de choisir de la liste de périphériques
« Bluetooth Mouse » et appuyer sur « Suivant »
• Dans l’éventualité où la souris exigerait le code d’appareillement, veuillez
introduire « 0000 », s’il vous plaît.
Remarque : Le procédé mentionné ci-dessus peut différer en fonction du res-
pectif logiciel utilitaire pour Bluetooth software que vous avez à disposition.

13
Quick StartBluetooth Comfort Optical Mouse
FRANÇAIS
En cas de difcultés avec la connexion, veuillez contacter notre support tech-
nique aux clients, s’il vous plaît.
DESCRIPTION DES FONCTIONS DES BOUTONS ET RÉGLAGE DE LA
SENSIBILITÉ DE LA SOURIS :
• Par l’intermédiaire d’un appui sur le bouton-poussoir DPI sur la souris, il est
possible de changer la sensibilité du senseur optique dans trois pas 1000
/ 1600 DPI.
• 2 boutons placés au côté à gauche de la souris ont la fonction de « en avant »
et de « en arrière » pour faciliter la navigation sur les pages d’internet.
FONCTION DES BOUTONS SOUS LE SYSTÈME D’EXPLOITATION ANDROID :
• Bouton à gauche : Il a la même fonction comme la commande avec le doigt.
Au cours d’un appui sur le bouton durant environ 1 seconde, des fonctions
spéciales s’activeront (sur la page d’accueil).
• Bouton à droite : Il se comporte comme le bouton en arrière.
• La petite roue de la souris : Par l’intermédiaire de la petite roue, il est pos-
sible de se déplacer parmi des différents bureaux.
• Petite roue de la souris (en étant appuyée) : Il se comporte comme le bouton
« HOME ».
• Bouton latéral en avant : Il n’a pas de fonction.
• Bouton latéral en arrière : Il se comporte comme le bouton en arrière.
• Bouton DPI : Il fait changer la vitesse de réponse du senseur optique dans
trois pas 1000 / 1600 DPI.
EXIGENCES EN MATIÈRE DU SYSTÈME :
• Système d’exploitation : Windows Vista/7/8/8.1/10 32/64 bit, macOS X, Android
• L’ordinateur avec l’adaptateur Bluetooth. L’adaptateur Bluetooth ne fait pas
partie intégrante du présent emballage.
Avertissement : Ne pas utiliser la souris sur une surface de réflexion, telle que
du verre ou le miroir. Ne pas exposer le périphérique aux influences des élé-
ments indiquées ci-dessous :
• Rayonnement solaire direct.
• Chaleur caniculaire, froid excessif, ambiance poussiéreuse ou fort rayon-
nement électromagnétique.
• Télécopieur, téléviseur, radio, téléphones portables ou dispositifs sans l.
• En cas de panne, il faut commander la réparation chez un atelier de service
autorisé. Ne pas procéder aux réparations de la souris à la maison.
RÉPONSES AUX QUESTIONS FRÉQUEMMENT POSÉES
À votre disposition sur notre page web www.i-tec.cz/fr, où se trouvent sous
l’onglet de « FAQ » qui correspondent au respectif produit.

14
Bluetooth Comfort Optical Mouse
ESPAÑOL
CONTENIDO DEL EMBALAJE
• Ratón óptico con Bluetooth
• 1 batería AA de 1.5V
• Manual de usuario
GUÍA DE INSTALACIÓN
1.
Colocación de las baterías y activación del ratón
• Cada vez que instale batería nueva en su ratón, asegúrese de que no esté
dañadas.
• Retire la tapa del compartimento de la batería.
• Inserte 1 celda AA de acuerdo con la polaridad indicada (+/-) dentro del
compartimiento de la batería. Luego cierre la tapa nuevamente.
• Deslice el interruptor en la parte inferior del ratón a la posición «ON». La luz
en la parte superior del ratón comienza a parpadear.
• El ratón está equipado con una función de vericación de batería baja.
• Si el voltaje de la batería cae por debajo de cierto nivel, entonces el LED en
el cuerpo del ratón parpadeará y la batería deben reemplazarse (en el caso
de las baterías recargables, solo recargue).
2.
Conecta el ratón a través de Bluetooth
Antes de instalar el ratón, asegúrese de que su computadora tenga el
adaptador Bluetooth instalado y encendido. Para hacer esto, use el software
provisto con su computadora o adaptador Bluetooth. Luego presione el botón
de emparejamiento durante 2 segundos: se enciende la luz indicadora del
ratón, que ahora se encuentra en el llamado «modo de emparejamiento».
Luego siga el procedimiento (puede variar ligeramente según el software
Bluetooth):
• Active la función Bluetooth en su computadora y seleccione «Agregar
nuevo dispositivo Bluetooth» en el menú de control de Bluetooth.
• Conrme que el nuevo dispositivo esté listo para el emparejamiento y
presione «Siguiente».
• Seleccione «Bluetooth Mouse» de la lista de dispositivos y presione
«Siguiente».
• Si el ratón require, ingrese «código de emparejamiento», ingrese «0000».
Nota: El procedimiento puede variar según el software operativo Bluetooth. Si
tiene problemas para conectarse, comuníquese con nuestro soporte técnico.

15
Quick StartBluetooth Comfort Optical Mouse
ESPAÑOL
DESCRIPCIÓN DE LAS FUNCIONES DE LOS BOTONES Y LA
CONFIGURACIÓN DE SENSIBILIDAD DEL RATÓN:
• Presione el botón DPI en el ratón para cambiar la conguración de sensibil-
idad del sensor óptico en tres pasos de 1000/1600 DPI.
• Los dos botones en el lado izquierdo del ratón tienen funciones de avance
y retroceso para facilitar la navegación al navegar por la web.
FUNCIONES DE LOS BOTONES EN EL SISTEMA OPERATIVO ANDROID:
• Botón izquierdo: tiene la misma función que el control con el dedo. Cuando
se presiona el botón durante aproximadamente 1 segundo, se activan
funciones especiales (en la página de inicio).
• Botón derecho: actúa como el botón Atrás.
• Rueda del ratón: use la rueda del ratón para moverse entre las caras.
• Rueda del ratón (cuando se presiona): actúa como el botón «HOME».
• Botón de avance lateral: sin función.
• Botón de retroceso: actúa como el botón de retroceso.
• Botón DPI: cambia la sensibilidad del sensor óptico en tres pasos de
1000/1600 DPI.
REQUISITOS DEL SISTEMA:
• SO: Windows Vista / 7/8 / 8.1 / 10 32/64 bit, macOS X, Android
• Computadora con adaptador Bluetooth. El adaptador Bluetooth no está
incluido.
Precaución: No use el ratón sobre una supercie reectante como vidrio
o espejo. No exponga su dispositivo a:
• Luz solar directa.
• Calor extremo, frío, ambiente polvoriento o fuerte radiación electromag-
nética.
• Cerca de un fax, TV, radio, teléfono móvil o dispositivo inalámbrico.
• No intente reparar el dispositivo usted mismo en caso de mal funcionami-
ento del ratón y consulte a un centro de servicio autorizado.
PREGUNTAS FRECUENTES
Disponible en nuestra página web www.i-tec.cz/es/, en la pestaña «FAQ» de
este producto.

16
Bluetooth Comfort Optical Mouse
ITALIANO
CONTENUTO DELLA CONFEZIONE:
• Mouse ottico Bluetooth
• 1 batterie AA 1.5V
• Manuale dell’utente
MANUALE DI INSTALLAZIONE:
Passaggio 1: Inserimento delle batterie e accensione del mouse
• Prima di inserire una nuova batteria nel mouse assicurarsi che non sia
danneggiate.
• Rimuovere il coperchio dell’alloggiamento delle batterie.
• Inserire 1 batteria AA secondo la polarità indicata (+/-) all’interno dell’allog-
giamento delle batterie. Quindi chiudere l’alloggiamento con il coperchio.
• Spostare l’interruttore sul lato inferiore del mouse in posizione «OK». La
spia sul lato superiore del mouse inizia a lampeggiare.
• Il mouse è dotato di una funzione di controllo delle batterie scariche. Se la
tensione nelle batterie scende sotto una determinata soglia si accende la
spia LED sul corpo del mouse e le batterie devono essere sostituite
(in caso di caricabatterie basta ricaricarle).
Passaggio 2: Collegamento del mouse attraverso il Bluetooth
Prima di installare il mouse assicurarsi che il vostro computer ha installato e
acceso l’adattatore Bluetooth. Per fare questo usare il software fornito insie-
me al computer oppure all’adattatore Bluetooth. Quindi premere per 2 secondi
il pulsante di abbinamento – si accende la spia sul mouse che adesso è nella
cosiddetta «modalità di abbinamento». Quindi continuare secondo la proce-
duta (può cambiare leggermente secondo il software Bluetooth):
• Attivare la funzione Bluetooth sul vostro computer e nel menu Bluetooth
selezionare «Aggiungi nuovo dispositivo Bluetooth».
• Confermare che il nuovo dispositivo è pronto per l’abbinamento e cliccare
su «Avanti».
• Dall’elenco dei dispositivi selezionare «Bluetooth Mouse» e premere
«Avanti».
• Immettere «0000» se il mouse richiede un codice di accoppiamento.
Nota: La procedura indicata può cambiare a seconda del software Bluetooth
di gestione. In caso di difcoltà con la connessione contattare il nostro sup-
porto tecnico.

17
Quick StartBluetooth Comfort Optical Mouse
ITALIANO
DESCRIZIONE DELLA FUNZIONE DEI PULSANTI E IMPOSTAZIONE DELLA
SENSIBILITÀ DEL MOUSE:
• Premendo il pulsante DPI sul mouse è possibile modicare l’impostazione
della sensibilità del sensore ottico in tre passaggi 1000 / 1600 DPI.
• I 2 pulsanti collocati sul anco sinistro del mouse hanno la funzione di
«avanti» e «indietro» per navigare più facilmente tra le pagine Internet.
FUNZIONI DEI PULSANTI IN OS ANDROID:
• Pulsante sinistro: Ha la stessa funzione del dito di controllo. Tenendo
premuto per circa 1 secondo si richiamano le funzioni speciali (nella
pagina principale).
• Pulsante destro: Si comporta come il pulsante indietro.
• Rotella del mouse: Con l’aiuto della rotella ci si può spostare tra i desktop.
• Rotella del mouse (tenendo premuto): Si comporta come il pulsante
«HOME».
• Pulsante laterale avanti: Non ha una funzione.
• Pulsante laterale indietro: Si comporta come il pulsante indietro.
• Pulsante DPI: Commuta la sensibilità del sensore ottico in tre passaggi
1000 / 1600 DPI.
REQUISITI DI SISTEMA:
• OS: Windows Vista/7/8/8.1/10 32/64 bit, macOS X, Android
• Computer con adattatore Bluetooth. L’adattatore Bluetooth non è incluso
in questa confezione.
Avviso: Non utilizzare il mouse su una supercie riettente come il vetro o uno
specchio. Non esporre il dispositivo a questi agenti esterni:
• Illuminazione solare diretta.
• Caldo e freddo estremi, ambiente polveroso oppure forte radiazione
elettromagnetica.
• In vicinanza di fax, televisione, radio, telefono cellulare o dispositivo
wireless.
• In caso di guasto non cercare di riparare da soli il mouse e rivolgersi
all’assistenza autorizzata.
DOMANDE FREQUENTI:
Si veda la scheda “FAQ” di questo prodotto sulle nostre pagine web www.i-
tec.cz/it/.

18
Bluetooth Comfort Optical Mouse
ČESKY
OBSAH BALENÍ:
• Bluetooth optická myš
• 1ks AA 1.5V baterie
• Uživatelský manuál
INSTALAČNÍ PŘÍRUČKA:
Krok 1: Vložení baterie a zapnutí myši
• Pokaždé, když budete instalovat do myši novou baterii, ujistěte se, že je ne-
poškozená.
• Sejměte kryt přihrádky pro baterie.
• Vložte dovnitř 1 AA článek podle naznačené polarity (+/) uvnitř bateriového
prostoru. Ten následně opět uzavřete krytkou.
• Přepněte přepínač na spodní straně myši do polohy „ON“. Kontrolka na horní
straně myši problikne.
• Myš je vybavena funkcí kontroly vybitých baterií. Pokud napětí v baterii
poklesne pod určitou hranici, pak se rozbliká LED kontrolka na těle myši
a baterii je nutné vyměnit (v případě akumulátoru stačí dobít).
Krok 2: Připojení myši přes Bluetooth
Před instalací myši se ujistěte, že Váš počítač má nainstalován a zapnut Blue-
tooth adaptér. Toto provedete pomocí software dodávaný spolu s počítačem
nebo Bluetooth adaptérem. Následně na 2 sekundy stiskněte párovací tlačítko
– dojde k rozblikání kontrolky na myši, která je nyní v tzv. „párovacím módu“.
Poté pokračujte dle postupu (může se lehce lišit dle Bluetooth softwaru):
• Aktivujte Bluetooth funkci na Vašem počítači a v ovládací nabídce Bluetooth
vyberte „Přidat nové Bluetooth zařízení“.
• Potvrďte, že je nové zařízení připraveno k párování a stiskněte „Další“.
• Ze seznamu zařízení vyberte „Bluetooth Mouse“ a stiskněte „Další“.
• V případě, že myš vyžaduje párovací kód, zadejte „0000“.
Poznámka: Uvedený postup se může lišit v závislosti na obslužném Bluetooth
software. Pokud máte s připojením potíže, kontaktujte naši technickou podporu.
POPIS FUNKCE TLAČÍTEK A NASTAVENÍ CITLIVOSTI MYŠI:
• Stiskem tlačítka DPI na myši můžete měnit nastavení citlivosti optického
senzoru ve třech krocích 1000/1600 DPI.
• 2 tlačítka umístěná na levém boku myši mají funkci „vpřed“ a „vzad“ pro
jednodušší navigaci při procházení internetových stránek.
FUNKCE TLAČÍTEK V OS ANDROID:
• Levé tlačítko: Má stejnou funkci jako ovládání prstem. Při stisknutí tlačítka
po dobu cca 1 s jsou vyvolány speciální funkce (na domovské stránce).
• Pravé tlačítko: Chová se jako tlačítko zpět.

19
Quick StartBluetooth Comfort Optical Mouse
ČESKY
• Kolečko myši: Pomocí kolečka se lze přesouvat mezi plochami.
• Kolečko myši (při stisknutí): Chová se jako tlačítko „HOME“.
• Boční tlačítko vpřed: Nemá funkci.
• Boční tlačítko zpět: Chová se jako tlačítko zpět.
• Tlačítko DPI: Přepíná citlivost optického senzoru ve třech krocích
1000/1600 DPI.
SYSTÉMOVÉ POŽADAVKY:
• OS: Windows Vista/7/8/8.1/10 32/64 bit, macOS X, Android
• Počítač s Bluetooth adaptérem. Bluetooth adaptér není součástí tohoto
balení.
Upozornění: Nepoužívejte myš na reflexním povrchu, jako sklo nebo zrcadlo.
Nevystavujte zařízení těmto vlivům:
• Přímému slunečnímu záření.
• Extrémnímu horku, chladu, prašnému prostředí nebo silnému
elektromagnetickému záření.
• Blízkosti faxu, televize, rádia, mobilního telefonu nebo bezdrátového zařízení.
• Nesnažte se v případě poruchy myši opravit zařízení svépomocí a vyhledejte
autorizovaný servis.
ČASTO KLADENÉ OTÁZKY
K dispozici na našem webu www.i-tec.cz v záložce „FAQ“ u tohoto produktu.

20
Bluetooth Comfort Optical Mouse
POLSKI
ZAWARTOŚĆ OPAKOWANIA:
• Mysz optyczna Bluetooth
• 1 baterie AA 1.5V
• Instrukcja obsługi
INSTRUKCJA OBSŁUGI:
Krok 1: Włożenie baterie i uruchomienie myszy
• Podczas wymiany baterie należy upewnić się, że nie jest ona rozładowana.
• Zdjąć pokrywę komory baterii.
• Włożyć do komory baterii AA, zgodnie z zaznaczoną polaryzacją (+/).
Zamknąć pokrywę.
• Przełączyć przełącznik na spodniej części myszy do pozycji „ON”. Zacznie
migać dioda LED na wierzchniej stronie myszy.
• Mysz wyposażona jest w funkcję wykrywania niskiego poziomu
naładowania baterii. W takim przypadku dioda LED na wierzchniej stronie
myszy zacznie migać. Należy wówczas wymienić baterii na nową lub, w
przypadku zastosowania akumulatora, naładować ją.
Krok 2: Podłączenie myszy przez Bluetooth
Przed podłączeniem myszy do komputera należy upewnić się, że posiada
on zainstalowany i włączony adapter Bluetooth. Można to zrobić za pomocą
oprogramowania dołączonego do komputera lub adaptera Bluetooth.
Następnie wcisnąć przez 2 sekundy przycisk parowania na spodniej części
myszy. Po tym czasie dioda LED na wierzchniej stronie myszy będzie migać,
a mysz przejdzie w tryb parowania. Za pomocą oprogramowania Bluetooth w
komputerze należy:
• Uruchomić funkcję Bluetooth i wybrać w opcję „Dodaj nowe urządzenie
Bluetooth”.
• Potwierdzić, że nowe urządzenie jest w trybie parowania.
• Z listy dostępnych urządzeń wybrać „Bluetooth Mouse“.
• W przypadku żądania kodu PIN celem sparowania, wpisz „0000“.
Uwaga: Szczegółowa procedura może różnić się w zależności od użytego
programu. Sposób dodawania nowych urządzeń Bluetooth powinien być
opisany w instrukcji danego programu.
OPIS FUNKCJI PRZYCISKÓW I WYBÓR ROZDZIELCZOŚCI MYSZY:
• Wybór rozdzielczości myszy odbywa się za pomocą przycisku „DPI”
znajdującego się na wierzchniej stronie myszy. Przycisk umożliwia
wybranie jednej z trzech rozdzielczości: 1000 i 1600 DPI.
• Na lewym boku myszy znajdują się dwa przyciski „Dalej” i „Wstecz”,
służące do nawigacji wstecz i w przód w przeglądarce internetowej.

21
Quick StartBluetooth Comfort Optical Mouse
POLSKI
FUNKCJE PRZYCISKÓW W OS ANDROID:
• Lewy przycisk: posiada funkcję sterowania palcem. Po naciśnięciu
przez ok. 1 sekundę następuje wywołanie specjalnych funkcji (na stronie
domowej).
• Prawy przycisk: działa jako przycisk wstecz.
• Kółko do przewijanija: użycie kółka pozwala na przełączanie się pomiędzy
stronami.
• Kółko do przewijanija (przy naciśnięciu): działa jako przycisk „HOME“.
• Boczny przycisk dalej: nie ma funkcji.
• Boczny przycisk wstecz: działa jako przycisk wstecz.
• Przycisk regulacji DPI: zmienia wrażliwość sensora optycznego 1000 / 1600 DPI.
WYMAGANIA SYSTEMOWE:
• System Microsoft Windows Vista/7/8/8.1/10 32/64 bit, macOS X, Android
• Komputer z adapterem Bluetooth. Adapter Bluetooth nie jest dodawany
do zestawu.
Uwagi:
• Nie należy używać urządzenia na powierzchniach lustrzanych.
• Nie narażać urządzenia na działanie silnego światła słonecznego.
• Nie narażać urządzenia na działanie wysokich lub niskich temperatur,
silnego pola elektromagnetycznego i zapylonego środowiska.
• Nie używać w pobliżu faksu, telewizora, radia, telefonów komórkowych,
innych urządzeń bezprzewodowych.
• W przypadku uszkodzenia, nie naprawiać we własnym zakresie, ale
skontaktować się z wykwalikowanym serwisem.
CZĘSTO ZADAWANE PYTANIA
Dostępne na naszych stronach www.i-tec.cz/pl w zakładce „FAQ“ przy
niniejszym produkcie.

22
Bluetooth Comfort Optical Mouse
SLOVENSKY
OBSAH BALENIA:
• Bluetooth optická myš
• 1ks AA 1.5V batérie
• Užívateľský manuál
INŠTALAČNÁ PRÍRUČKA:
Krok 1: Vloženie batérie a zapnutie myši
• Vždy, keď budete do myši inštalovať novú batériu, uistite sa, že je
nepoškodená.
• Dajte dole kryt priehradky na batérie.
• Vložte dovnútra 1 AA článok podľa naznačenej polarity (+/) vnútri
batériového priestoru. Ten potom opäť pomocou krytu zatvorte.
• Prepnite prepínač na spodnej strane myši do polohy „ON“. Kontrolka na
hornej strane myši preblikne.
• Myš je vybavená funkciou kontroly vybitých batérií. Keď napätie v batérií
klesne pod určitú hranicu, rozbliká sa LED kontrolka na tele myši a batérií je
nutné vymeniť (v prípade akumulátora stačí dobiť).
Krok 2: Pripojenie myši prostredníctvom Bluetooth
Pred inštaláciou myši sa uistite, že má Váš počítač nainštalovaný a zapnutý
Bluetooth adaptér. Toto vykonajte pomocou softwaru dodávaného spolu
s počítačom alebo Bluetooth adaptérom. Potom na 2 sekundy stlačte
párovacie tlačidlo – dôjde k rozblikaniu kontrolky na myši, ktorá je teraz
v tzv. „párovacom móde“. Ďalej pokračujte podľa postupu (môže sa mierne
odlišovať podľa Bluetooth softwaru):
• Aktivujte funkciu Bluetooth na Vašom počítači a v ovládacej ponuke
Bluetooth vyberte „Pridať nové Bluetooth zariadenie“.
• Potvrďte, že je nové zariadenie pripravené k párovaniu a stlačte „Ďalej“.
• Zo zoznamu zariadení vyberte „Bluetooth Mouse“ a stlačte „Ďalej“.
• V prípade, že myš vyžaduje párovací kód, zadajte „0000“.
Poznámka: Uvedený postup sa môže líšiť v závislosti na obslužnom Bluetooth
software. Keď máte s pripojením problémy, kontaktujte našu technickú
podporu.
POPIS FUNKCIE TLAČIDIEL A NASTAVENIE CITLIVOSTI MYŠI:
• Stlačením tlačidla DPI na myši môžete meniť nastavenie citlivosti
optického senzoru v troch krokoch 1000 / 1600 DPI.
• 2 tlačidlá umiestnené na ľavom boku myši majú funkciu „dopredu“
a „dozadu“ pre jednoduchšiu navigáciu pri prechádzaní internetových
stránok.

23
Quick StartBluetooth Comfort Optical Mouse
SLOVENSKY
FUNKCIE TLAČIDIEL V OS ANDROID:
• Ľavé tlačidlo: Má rovnakú funkciu ako ovládanie prstom. Pri stlačení tlačidla
s dobou cca 1s sú vyvolané špeciálne funkcie (na domovej stránke).
• Pravé tlačidlo: Chová sa ako tlačidlo späť.
• Koliesko myši: Pomocou kolieska sa dá presúvať medzi plochami.
• Koliesko myši (pri stlačení): Chová sa ako tlačidlo „HOME“.
• Bočné tlačidlo vpred: Nemá funkciu.
• Bočné tlačidlo späť: Chová sa ako tlačidlo späť.
• Tlačidlo DPI: Prepína citlivosť optického senzoru v troch krokoch 1000 / 1600 DPI.
SYSTÉMOVÉ POŽIADAVKY:
• MS Windows Vista/7/8/8.1/10 32/64 bit, macOS X, Android
• Počítač s Bluetooth adaptérom. Bluetooth adaptér nie je súčasťou tohto
balenia.
Upozornenie: Nepoužívajte myš na reflexnom povrchu, ako napr. sklo alebo
zrkadlo. Nevystavujte zariadenie týmto vplyvom:
• Priamemu slnečnému žiareniu.
• Extrémnej horúčave, chladu, prašnému prostrediu alebo silnému
elektromagnetickému žiareniu.
• Blízkosti faxu, televízie, rádia, mobilného telefónu alebo bezdrôtového
zariadenia.
• Nesnažte sa v prípade poruchy myši opraviť zariadenie svojpomocou
a vyhľadajte autorizovaný servis.
ČASTO KLADENÉ OTÁZKY
K dispozícii na našom webe www.i-tec.cz v záložke „FAQ“ pri tomto produkte.

24
Bluetooth Comfort Optical Mouse
LIETUVOS
PAKUOTĖS SUDĖTYJE:
• „Bluetooth“ tipo optinė pelė
• 1vnt. AA 1.5V elementas
• Naudojimo instrukcija
ĮDIEGIMO VADOVAS:
1 žingsnis: Elemento įdėjimas ir pelės įjungimas.
• Kiekvieną kartą prieš naujo elemento įdėjimą į pelę, patikrinkite, ar jis nėra
pažeistas.
• Nuimkite elementų dėtuvės dangtelį.
• Įdėkite į vidų 1 AA tipo elementus, laikantis poliariškumo (+/), nurodyto
elementų dėtuvės viduje. Po to dėtuvės dangtelį uždėkite atgal.
• Perjungiklį, esantį pelės apačioje, nustatykite į padėtį „ON“. Pelės
viršutinėje pusėje pradės blyksėti kontrolinė lemputė.
• Pelėje įdiegta išsikrovusių elementų kontrolės funkcija. Elemento įtampai
nukritus žemiau tam tikro lygio, ant pelės korpuso pradeda blyksėti LED
kontrolinė lemputė, tada elementus reikia pakeisti (akumuliatoriaus atveju
pakanka įkrauti).
2 žingsnis: Pelės prijungimas per „Bluetooth“ įtaisą.
Prieš įdiegiant pelę, įsitikinkite, jog Jūsų kompiuteryje yra įdiegtas ir įjungtas
„Bluetooth“ adapteris. Tai atlikite programinės įrangos, tiekiamos su
kompiuteriu arba su „Bluetooth“ adapteriu, pagalba. Po to, dviem sekundėm
nuspauskite saito mygtuką – ant pelės pradės šviesti kontrolinė lemputė,
o pelė dabar yra vadinamojoje „saito veiksenoje“. Toliau atlikite įdiegimą
pagal nurodytą tvarką (gali šiek tiek neatitikti – priklauso nuo „Bluetooth“
programinės įrangos):
• Savo kompiuteryje padarykite aktyvia „Bluetooth“ funkciją ir „Bluetooth“
valdymo meniu pasirinkite „Prijungti naują Bluetooth įrenginį“.
• Patvirtinkite, kad naujas įrenginys paruoštas saitui sudaryti ir paspauskite
„Toliau“.
• Iš įrenginių sąrašo pasirinkite „Bluetooth Mouse“ ir paspauskite „Toliau“.
• Jeigu pelė reikalauja saito kodo, įrašykite „0000“.
Pastaba: Nurodytoji tvarka gali būti kiek skirtinga, priklausomai nuo
„Bluetooth“ aptarnavimo programinės įrangos. Susidarius sunkumams su
prijungimu, kreipkitės į mūsų techninės paramos tarnybą.
MYGTUKŲ FUNKCIJŲ APRAŠYMAS IR PELĖS JAUTRUMO NUSTATYMAS:
• Paspaudus ant pelės mygtuką DPI, galite keisti optinio jutiklio jautrumą
trim žingsniais: 1000 / 1600 DPI.

25
Quick StartBluetooth Comfort Optical Mouse
LIETUVOS
• 2 mygtukai, įdėti kairiajame pelės šone, turi „pirmyn“ ir „atgal“ dėl naršymo
supaprastinimo, pereinant interneto svetaines.
MYGTUKŲ OS ANDROIDE FUNKCIJOS:
• Kairysis mygtukas: Tokia pati funkcija, kaip ir valdymo pirštu. Paspaudus
mygtuką ir palaikius 1 sek. iškviečiamos specialios funkcijos (savame
žiniatinklyje).
• Dešinysis mygtukas: Veikia kaip mygtukas „Grįžti“.
• Pelės ratukas: Su ratuku galima judėti tarp plokštumų.
• Pelės ratukas (paspaudus): Veikia kaip mygtukas „HOME“.
• Šoninis mygtukas į priekį: Funkcijų neturi.
• Šoninis mygtukas grįžti: Veikia kaip mygtukas „Grįžti“.
• Mygtukas DPI: Perjungia optinio jutiklio jautrumą trimis žingsniais 1000 /
1600 DPI.
SISTEMINIAI REIKALAVIMAI:
• MS Windows Vista/7/8/8.1/10 32/64 bit, macOS X, Android
• Kompiuteris su „Bluetooth“ adapteriu. „Bluetooth“ adapteris į šios
pakuotės sudėtį neįeina.
Nurodymas: Nenaudokite pelės ant atspindinčio paviršiaus, pavyzdžiui ant
stiklo arba ant veidrodžio. Įrenginį saugokite nuo sekančių veiksnių (laikykitės
atitinkamų nurodymų):
• Tiesioginių saulės spindulių.
• Ekstremalaus karščio, šalčio, dulkėtos aplinkos arba nuo stipraus
elektromagnetinio spinduliavimo.
• Nenaudokite arti fakso, televizoriaus, radijo imtuvo, mobiliojo telefono arba
bevielio įrenginio.
• Pelės gedimo atveju nesistenkite įrenginio pataisyti savo jėgomis, bet
kreipkitės į autorizuotą techninių paslaugų įmonę.
DAŽNAI UŽDUODAMI KLAUSIMAI
Rasite mūsų svetainėje: www.i-tec.cz/en skiltyje „FAQ“ prie šio produkto.

26
Bluetooth Comfort Optical Mouse
NEDERLANDS
INHOUD VAN DE VERPAKKING:
• Bluetooth optische muis
• 1 st. AA 1,5V batterij
• Gebruikshandleiding
INSTALLATIEHANDLEIDING:
Stap 1: Plaats de batterij en schakel de muis in
• Telkens wanneer u een nieuwe batterij in uw muis plaatst, moet u ervoor
zorgen dat hij onbeschadigd is.
• Verwijder het deksel van het batterijvak.
• Plaats 1 AAA-cel volgens de aangegeven polariteit (+/-) in het batterijvak.
Plaats het deksel weer terug.
• Zet de schakelaar aan de onderkant van de muis in de „ON“-stand. Het
lampje bovenop de muis gaat knipperen.
• De muis heeft een functie voor het controleren van de batterijstatus. Als de
batterijspanning onder een bepaalde drempel daalt, knippert de LED op de
behuizing van de muis en moet de batterij worden vervangen (in het geval
van oplaadbare batterijen, laadt u ze gewoon opnieuw op).
Stap 2: Verbind de muis via Bluetooth
Voordat u de muis installeert, moet u ervoor zorgen dat de Bluetooth-adapter
op uw computer is geïnstalleerd en ingeschakeld is. Gebruik hiervoor
de software die bij uw computer of Bluetooth-adapter wordt geleverd.
Druk vervolgens gedurende 2 seconden op de middelste knop (wiel) en de
rechtermuisknop – het lampje op de muis die zich nu in de „koppelingsmodus“
bevindt, gaat branden. Ga dan als volgt te werk (kan enigszins verschillen,
afhankelijk van Bluetooth-software):
• Activeer de Bluetooth-functie op uw computer en selecteer „Nieuwe
Bluetooth-apparaten toevoegen“ in het Bluetooth-bedieningsmenu.
• Bevestig dat het nieuwe apparaat klaar is om te koppelen en druk op
„Volgende“.
• Selecteer „Bluetooth-muis“ in de lijst met apparaten en druk op „Volgende“.
• Als de muis een koppelingscode nodig heeft, voert u „0000“ in.
Opmerking: Dit kan variëren, afhankelijk van de Bluetooth-software. Neem
contact op met onze technische ondersteuning als u problemen ondervindt bij
het maken van verbinding.
BESCHRIJVING VAN DE KNOPFUNCTIES EN

27
Quick StartBluetooth Comfort Optical Mouse
NEDERLANDS
MUISGEVOELIGHEIDSINSTELLINGEN:
• Door op de DPI-knop op de muis te drukken, kunt u de gevoeligheidsinstelling
van de optische sensor in drie stappen tussen 1000/1600 DPI instellen.
• De 2 knoppen aan de linkerkant van de muis hebben een „voorwaartse“ en
een „omgekeerde“ functie voor gemakkelijker browsen tijdens het surfen
op het web.
KNOPFUNCTIES BINNEN ANDROID:
• Linkerknop: Heeft dezelfde functie als bediening met de vinger. Na ca. 1
seconde ingedrukt te houden, worden speciale functies opgeroepen (op de
startpagina).
• Rechterknop: Gedraagt zich als de knop terug.
• Muiswiel: Gebruik het wiel om tussen de oppervlakken te bewegen.
• Muiswiel (bij indrukken): Gedraagt zich als de „HOME“ knop.
• Zijknop vooruit: Zonder functie.
• Zijknop terug: Gedraagt zich als de knop terug.
• DPI-knop: Schakelt de gevoeligheid van de optische sensor in drie stappen
naar een waarde tussen 1000/1600 DPI.
SYSTEEMVEREISTEN:
• OS: Windows Vista/7/8/8.1/10 32/64 bit, macOS X, Android
• Computer met Bluetooth-adapter. De Bluetooth-adapter is niet inbegrepen.
Waarschuwing: Gebruik uw muis niet op een reflecterend oppervlak zoals een
glas of een spiegel. Stel de apparatuur niet bloot aan de volgende invloeden:
• Direct zonlicht.
• Extreme hitte, koude, stofge omgeving of sterke elektromagnetische
straling.
• Nabijheid van fax, televisie, radio, mobiele telefoon of draadloze apparatuur.
• Probeer bij storing het apparaat niet zelf te repareren roep de hulp in van een
erkend servicecentrum.
VEELGESTELDE VRAGEN
Beschikbaar op onze website www.i-tec.cz/nl/ op het tabblad “FAQ” bij dit product.

28
EUROPEAN UNION ONLY
NOTE: MARKING IS IN COMPLIANCE WITH EU WEEE DIRECTIVE
ENGLISH
This equipment is marked with the above recycling symbol. It means that at
the end of the life of the equipment you must dispose of it separately at an
appropriate collection point and not place it in the normal domestic unsorted
waste stream. This wil benet the environment for all. (European Union only).
DEUTSCH
Dieses Produkt trägt das Recycling-Symbol gemäß der EU-Richtinie. Das
bedeutet, dass das Gerät am Ende der Nutzungszeit bei einer kommunalen
Sammelstelle zum recyceln abgegeben werden muss, (kostenloss). Eine
Entsorgung űber den Haus/Restműll ist nicht gestattet. Dies ist ein aktiver
Beitrag zum Umweltschutz. (Nur innerhalb der EU).
FRANÇAIS
Ce dispositif est revêtu du marquage avec le symbole de recyclage indiqué
ci-dessus. Ça veut dire, qu'une fois découlée la vie utile dudit dispositif, vous
vous voyez dans l'obligation d'assurer, que le dispositif se trouve déposé en
un respectif centre de collecte, dûment établi à cette n, et non en d'autres
centres de ramassage qui soient destinés à déposer de courants déchets
municipaux non triés. De cette manière, on contribue considérablement à une
amélioration en matière d'environnement où nous vivons tous. (Seulement
pour l'Union Européenne).
ESPAÑOL
El dispositivo está indicado por el símbolo de reciclaje. Esto signica que al
nal de la vida útil de la instalación, debe asegurarse de que se almacene por
separado en un punto de recolección establecido para este n y no en los
lugares designados para la eliminación de desechos municipales ordinarios
sin clasicar. Contribuirá a mejorar el medio ambiente de todos nosotros.
(Sólo para la Unión Europea).

29
ITALIANO
Questo dispositivo è contrassegnato con il seguente simbolo di riciclaggio.
Si chiede di consegnarlo alla ne del suo ciclo di vita a un Centro di raccolta
dei riuti differenziati istituita per questo scopo e non in altri centri indicati
per depositare riuti urbani normali non differenziati. In questo modo si
contribuisce al miglioramento della qualità dell’ambiente (valido soltanto per
l’Unione Europea).
ČEŠTINA
Toto zařízení je označeno výše uvedeným recyklačním symbolem. To
znamená, že na konci doby života zařízení musíte zajistit, aby bylo uloženo
odděleně na sběrném místě, zřízeném pro tento účel a ne na místech
určených pro ukládání běžného netříděného komunálního odpadu. Přispěje to
ke zlepšení stavu životního prostředí nás všech. (Pouze pro Evropskou unii).
POLSKI
To urządzenie oznakowane jest specjalnym symbolem odzysku. Pookresie
użytkowania trzeba je zwrócic do odpowiedniego punktu zbiörki i nie
wolno umiestczać go razem z nieposortowanymi odpadami. Takie dzialanie
przyniese korzyść dla środowiska. (Tylko w Unii Europejskiej).
SLOVENSKY
Toto zariadenie je označené vyššie uvedeným recyklačným symbolom. To
znamená, že na konci doby života zariadenia musíte zaistiť, aby bolo uložené
oddelene na zbernom mieste, zriadenom pre tento účel a nie na miestach
určených pre ukladanie bežného netriedeného komunálneho odpadu.
Prispeje to k zlepšeniu životného prostredia nás všetkých. (Iba pre Európsku
úniu).
LIETUVOS
Šis gaminys yra pažymetas specialiu atlieku tvarkymo ženklu. Baigus
eksploataciją, gaminys turi buti atiduotas i atitinkamą surinkimo punktą
ir negali buti šalinamas kartu su nerušiuojamomis atliekomis. Tokie Jusu
veiksmai prisides prie aplinkos apsaugos. (Tiktai Europos Sąjungoje).
NEDERLANDS
Dit apparaat is voorzien van het bovenvermelde recyclingsymbool. Dit
betekent dat u aan het einde van de levensduur van het apparaat ervoor
dient te zorgen dat het afzonderlijk wordt opgeslagen op een verzamelpunt
dat hiervoor is ingericht en niet op plaatsen die zijn aangewezen voor de
verwijdering van gewoon ongesorteerd gemeentelijk afval. Dit zal bijdragen
aan de verbetering van de leefomgeving van ons allemaal. (Alleen voor de
Europese Unie).

30
EU DECLARATION OF CONFORMITY / EU KONFORMITÄTSERKLÄRUNG/
DÉCLARATION EU DE CONFORMITÉ / DECLARACIÓN UE DE
CONFORMIDAD / DICHIARAZIONE DI CONFORMITÀ UE / EU PROHLÁŠENÍ
O SHODĚ / EU PREHLÁSENIE O ZHODE / EU DECLARACJA ZGODNOŚCI /
ES ATITIKTIES DEKLARACIJA / EU-CONFORMITEITSVERKLARING
Manufacturer, Der Hersteller, Le fabricant, Fabricante, Produttore, Výrobce,
Výrobca, Producent, Gamintojas, De fabrikant:
itec Technologies s.r.o., Kalvodova 2,
709 00 Ostrava – Mariánské Hory, Czech Republic
declares that this product / erklärt hiermit, dass das Produkt / déclare que ce
produit / declara que este producto / dichiara che il seguente prodotto / tímto
prohlašuje, že výrobek / týmto prehlasuje, že výrobok / deklaruje, że produkt /
šiuo pareiškia, kad gaminys / verklaart hierbij dat het product
Product, Bezeichnung, Le prénom, Producto, Prodotto, Název, Názov,
Nazwa, Gaminys, Naam: i-tec BlueTouch 244 - Bluetooth 3.0 Optical Mouse
Adjustable DPI
Model, Modell, Modèle, Modelo, Modello, Model, Modelis, Model:
MWBT244 / MS-142BT
Determination, Bestimmung, La détermination, Determinación, Determinazione,
Určení, Určenie, Opcje, Ustatymas, Doel:
Product is determined for using in PC as equipment. Das Produkt ist für
Austattung und als Zubehör von Computern bestimmt. Le produit est déterminé
pour une utilisation sur PC comme équipement. El producto se determina
para usar en PC como equipo. Destinato per essere usato come attrezzatura
informatica o come accessorio per computer. Výrobek je určen pro přístrojové
vybavení a jako příslušenství do počítačů. Výrobok je určený pre prístrojové
vybavenie a jako príslušenstvo do počítačov. Produkt jest przeznaczony do
współpracy z komputerem jako akcesorium. Gaminys yra skirtas įrangai papildyti
ir naudojamas kaip priedas kompiuteriams. Het product is bedoeld als uitrusting
voor apparaten en als computeraccessoire.
Meets the essential requirements according to / Es entspricht den Anforderungen
der Richtlinien / Répond aux exigences essentielles selon / Cumple los requisitos
esenciales según / Soddisfa i requisiti essenziali secondo / Splňuje tyto
požadavky / Spĺňa tieto požadavky / Spełnia następujace wymagania / Atitinka
esminius reikalavimus pagal / Het voldoet aan de volgende vereisten:

31
Ostrava 10. 6. 2014
Ing. Lumír Kraina
Executive Name and Signature, Geschäftsführer,
Exécutif et signature, Nombre y rma del gerente,
Amministratore, Jednatel, Konatel, Nazwisko osoby
upowaznionej, Vadovas, Zaakvoerder
Directive 1999/5/EC, LVD 2006/95/EEC, EMC Directive 2004/108/EEC, 91/31/EEC:
EMI (For Radio parameters, Für Radioparamaterh, Pour les paramètres radio,
Para parametros de radio, Per i parametri della radio, Pro Rádiové parametry,
Pre Rádiové parametre, Dla parametrów Radiowyc, Radijo parametrams, Voor
radioparameters):
EN 300 328-1 V1.8.1(2012-06); EN 301 489-1 V1.9.2(2011-09); EN 301 489-17
V2.2.1(2012-09)
For Electrical Safety, Für die elektrische Sicherheit, Pour la sécurité électrique,
Para la seguridad eléctrica, Per la sicurezza elettrica, Pro Elektrickou
bezpečnost, pre Elektrickú bezpečnost´, dla Bezpieczeństwa, Elektros saugai,
Voor elektrische veiligheid:
EN 62479(2010); EN 60950-1:2006+A11:2009+A1:2010+A12:2011
and it is safety under conditions of standard application / und ist sicher bei standardmäßiger
Nuttzung / et c'est la sécurité dans des conditions d'application standard / y es seguridad
bajo condiciones de aplicación estándar / ed è sicuro in condizioni d’uso normali / a je
bezpečný za podmínek obvyklého použití / a je bezpečný za podmienok obvyklého
použitia / oraz jest produktem bezpiecznym przy standardowym wykorzystywaniu / ir
naudojant įprastomis sąlygomis yra saugus /en is veilig onder de omstandigheden van
normaal gebruik.
Additional information, Ergänzende Angaben, Information additionnelle, Información
Adicional, Informazioni integrative, Doplňující informace, Doplňujúce informácie,
Dodatkowe informacje, Papildoma informacija, Aanvullende informatie:
Identication Mark, Identikationskennzeichen, La marque d'identication, Marca de
identicación, Segno di identicazione, Identikační značka, Identikačná značka, Znak
identykacyjny, Identikavimo ženklas, Identicatiemerk:

32
FCC COMPLIANCE STATEMENT
This equipment has been tested and found to comply within the limits of a
Class B digital device pursuant to Part 15 of the FCC Rules. These limits are
designed to provide reasonable protection against harmful interference in a
residential installation.
www.i-tec.cz/en
-
 1
1
-
 2
2
-
 3
3
-
 4
4
-
 5
5
-
 6
6
-
 7
7
-
 8
8
-
 9
9
-
 10
10
-
 11
11
-
 12
12
-
 13
13
-
 14
14
-
 15
15
-
 16
16
-
 17
17
-
 18
18
-
 19
19
-
 20
20
-
 21
21
-
 22
22
-
 23
23
-
 24
24
-
 25
25
-
 26
26
-
 27
27
-
 28
28
-
 29
29
-
 30
30
-
 31
31
-
 32
32


i-tec i-tec Bluetooth Comfort Optical Mouse Handleiding
- Categorie
- Muizen
- Type
- Handleiding
- Deze handleiding is ook geschikt voor
in andere talen
- italiano: i-tec i-tec Bluetooth Comfort Optical Mouse Manuale utente
- français: i-tec i-tec Bluetooth Comfort Optical Mouse Manuel utilisateur
- español: i-tec i-tec Bluetooth Comfort Optical Mouse Manual de usuario
- Deutsch: i-tec i-tec Bluetooth Comfort Optical Mouse Benutzerhandbuch
- slovenčina: i-tec i-tec Bluetooth Comfort Optical Mouse Používateľská príručka
- polski: i-tec i-tec Bluetooth Comfort Optical Mouse Instrukcja obsługi
Gerelateerde papieren


Andere documenten
-
 R-Go r-go 8719274491132 HE Sport Ergonomic Mouse Handleiding
-
R-Go r-go RGOHBRSWLBL HE Break Ergonomic Mouse Handleiding
-
Conrad RGOHBRSWLBL R-Go HE Handleiding
-
Trust Wireless Optical Mini Mouse MI-4930Rp (4 Pack) Handleiding
-
Trust MI-7700R US Handleiding
-
-
-
-
Bakker Elkhuizen Grip Mouse Handleiding
