
EN
User manual 2
NL
Gebruiksaanwijzing 12
Freezer
Vriezer
ZBF7116

Contents
Safety information _ _ _ _ _ _ _ _ _ _ _ _ _ _ _ _ 2
Control panel _ _ _ _ _ _ _ _ _ _ _ _ _ _ _ _ _ _ _ 4
First use _ _ _ _ _ _ _ _ _ _ _ _ _ _ _ _ _ _ _ _ _ 5
Daily use _ _ _ _ _ _ _ _ _ _ _ _ _ _ _ _ _ _ _ _ _ 5
Helpful Hints and Tips _ _ _ _ _ _ _ _ _ _ _ _ _ _ 6
Care and cleaning _ _ _ _ _ _ _ _ _ _ _ _ _ _ _ _ _ 6
What to do if… _ _ _ _ _ _ _ _ _ _ _ _ _ _ _ _ _ _ 7
Technical data _ _ _ _ _ _ _ _ _ _ _ _ _ _ _ _ _ _ 8
Installation _ _ _ _ _ _ _ _ _ _ _ _ _ _ _ _ _ _ _ _ 9
Environmental concerns _ _ _ _ _ _ _ _ _ _ _ _ _ 11
Subject to change without notice
Safety information
In the interest of your safety and to ensure the correct
use, before installing and first using the appliance, read
this user manual carefully, including its hints and warn-
ings. To avoid unnecessary mistakes and accidents, it
is important to ensure that all people using the appli-
ance are thoroughly familiar with its operation and safe-
ty features. Save these instructions and make sure that
they remain with the appliance if it is moved or sold, so
that everyone using it through its life will be properly in-
formed on appliance use and safety.
For the safety of life and property keep the precautions
of these user's instructions as the manufacturer is not
responsible for damages caused by omission.
Children and vulnerable people safety
• This appliance is not intended for use by persons (in-
cluding children) with reduced physical, sensory or
mental capabilities, or lack of experience and knowl-
edge, unless they have been given supervision or in-
struction concerning use of the appliance by a per-
son responsible for their safety.
Children should be supervised to ensure that they do
not play with the appliance.
• Keep all packaging well away from children. There is
risk of suffocation.
• If you are discarding the appliance pull the plug out
of the socket, cut the connection cable (as close to
the appliance as you can) and remove the door to pre-
vent playing children to suffer electric shock or to
close themselves into it.
• If this appliance featuring magnetic door seals is to
replace an older appliance having a spring lock
(latch) on the door or lid, be sure to make that spring
lock unusable before you discard the old appliance.
This will prevent it from becoming a death trap for a
child.
General safety
Caution! Keep ventilation openings clear of
obstruction.
• The appliance is intended for keeping foodstuff and/
or beverages in a normal household as explained in
this instruction booklet.
• Do not use a mechanical device or any artificial
means to speed up the thawing process.
• Do not use other electrical appliances (such as ice
cream makers) inside of refrigerating appliances, un-
less they are approved for this purpose by the manu-
facturer.
• Do not damage the refrigerant circuit.
• The refrigerant isobutane (R600a) is contained within
the refrigerant circuit of the appliance, a natural gas
with a high level of environmental compatibility,
which is nevertheless flammable.
During transportation and installation of the appli-
ance, be certain that none of the components of the
refrigerant circuit become damaged.
If the refrigerant circuit should become damaged:
– avoid open flames and sources of ignition
– thoroughly ventilate the room in which the appli-
ance is situated
• It is dangerous to alter the specifications or modify
this product in any way. Any damage to the cord may
cause a short-circuit, fire and/or electric shock.
Warning! Any electrical component (power cord,
plug, compressor) must be replaced by a certified
service agent or qualified service personnel.
1. Power cord must not be lengthened.
2. Make sure that the power plug is not squashed
or damaged by the back of the appliance. A
2

squashed or damaged power plug may overheat
and cause a fire.
3. Make sure that you can come to the mains plug
of the appliance.
4. Do not pull the mains cable.
5. If the power plug socket is loose, do not insert
the power plug. There is a risk of electric shock
or fire.
6. You must not operate the appliance without the
lamp cover
1)
of interior lighting.
• This appliance is heavy. Care should be taken when
moving it.
• Do not remove nor touch items from the freezer com-
partment if your hands are damp/wet, as this could
cause skin abrasions or frost/freezer burns.
• Avoid prolonged exposure of the appliance to direct
sunlight.
•
Bulb lamps
2)
used in this appliance are special pur-
pose lamps selected for household appliances use
only. They are not suitable for household room illu-
mination.
Daily Use
• Do not put hot pot on the plastic parts in the appliance.
• Do not store flammable gas and liquid in the appli-
ance, because they may explode.
• Do not place food products directly against the air
outlet on the rear wall.
3)
• Frozen food must not be re-frozen once it has been
thawed out.
• Store pre-packed frozen food in accordance with the
frozen food manufacturer's instructions.
• Appliance's manufacturers storage recommendations
should be strictly adhered to. Refer to relevant instruc-
tions.
• Do not place carbonated or fizzy drinks in the freezer
compartment as it creates pressure on the container,
which may cause it to explode, resulting in damage
to the appliance.
• Ice lollies can cause frost burns if consumed straight
from the appliance.
Care and cleaning
• Before maintenance, switch off the appliance and dis-
connect the mains plug from the mains socket.
• Do not clean the appliance with metal objects.
• Do not use sharp objects to remove frost from the ap-
pliance. Use a plastic scraper.
Installation
Important! For electrical connection carefully follow the
instructions given in specific paragraphs.
• Unpack the appliance and check if there are damages
on it. Do not connect the appliance if it is damaged.
Report possible damages immediately to the place
you bought it. In that case retain packing.
• It is advisable to wait at least four hours before con-
necting the appliance to allow the oil to flow back in
the compressor.
• Adequate air circulation should be around the appli-
ance, lacking this leads to overheating. To achieve
sufficient ventilation follow the instructions relevant
to installation.
• Wherever possible the back of the product should be
against a wall to avoid touching or catching warm
parts (compressor, condenser) to prevent possible
burn.
• The appliance must not be located close to radiators
or cookers.
• Make sure that the mains plug is accessible after the
installation of the appliance.
•
Connect to potable water supply only.
4)
Service
• Any electrical work required to do the servicing of
the appliance should be carried out by a qualified elec-
trician or competent person.
• This product must be serviced by an authorized Serv-
ice Centre, and only genuine spare parts must be used.
1) If the lamp cover is foreseen
2) If the lamp is foreseen
3) If the appliance is Frost Free
4) If a water connection is foreseen
3

Environment Protection
This appliance does not contain gasses which
could damage the ozone layer, in either its refrig-
erant circuit or insulation materials. The appliance shall
not be discarded together with the urban refuse and rub-
bish. The insulation foam contains flammable gases:
the appliance shall be disposed according to the appli-
cable regulations to obtain from your local authorities.
Avoid damaging the cooling unit, especially at the rear
near the heat exchanger. The materials used on this ap-
pliance marked by the symbol
are recyclable.
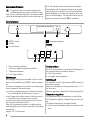
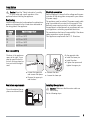
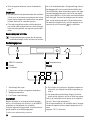
Control panel
MODE
1 2 3 4
1 ON/OFF switch
2 Display
3 Function button
4 Temperature regulator
Display
1 2 3 4
1. Door open alarm indicator
2. Positive or negative temperature indicator
3. Temperature indicator
4. Fast Freeze indicator
Switching on
After plugging the plug into the power outlet, if the dis-
play is not illuminated, press ON/OFF switch, appliance
on.
As soon as the appliance is turned on, the following sig-
nals will appear on the control panel:
• Positive or negative temperature indicator will be pos-
itive, indicating that the temperature is positive
• the Temperature indicator flashes, the background of
the display is red and you will hear a buzzer.
Press Function button and the buzzer will go off (also
see "Excessive temperature alarm" ).
Place the Temperature regulator in a middle position,
and the appliance will be set up to provide the following
temperature:
roughly -18°C in the freezer.
Functions Menu
Each time Function button is pressed, the following func-
tions are activated in a clockwise direction:
• Fast Freeze function
• no symbol: normal operation.
Switching off
The appliance is shut off by pressing ON/OFF switch for
more than 1 second.
After this, a countdown of the temperature from -3 -2 -1
will be shown.
When the appliance is switched off, Display also goes off.
Temperature regulation
The temperature within the appliance is controlled by
the Temperature regulator situated at the top of the cabi-
net.
To operate the appliance, proceed as follows:
• turn the knob clockwise to obtain the maximum cold-
ness
4

• turn the knob counter- clockwise to obtain the mini-
mum coldness.
The intermediate position is usually the most suitable.
However, the exact setting should be chosen keeping in
mind that the temperature inside the appliance depends
on:
• room temperature
• how often the door is opened
• the quantity of food stored
• the location of the appliance.
Fast Freeze Function
To freeze fresh foods, you will need to activate the Fast
Freeze function.
Press Function button (several times if necessary) until
the corresponding icon appears.
This function stops automatically after 52 hours.
It is possible to deactivate the function at any time by
pressing Function button (refer to "Functions Menu").
Excessive temperature alarm
An increase in the temperature in the freezer compart-
ment (for example due to a power failure) is indicated by:
• flashing temperature
• red illumination of display
• sounding of buzzer
When normal conditions are restored:
• the acoustic signal shuts off
• the temperature value continues to flash
• the display illumination remains red.
When you press Function button to deactivate the
alarm, the highest temperature reached in the compart-
ment appears on indicator
for some seconds.
At this point the flashing stops and the display illumina-
tion changes over from red to white.
Door open alarm
An acoustic alarm will sound when the door is left open
for more than 1 minute.
The door open alarm conditions are indicated by:
• flashing Door open alarm indicator
• red display illumination
• beeping sound.
Press the Function button to deactivate the acoustic alarm.
When normal conditions are restored (door closed), the
acoustic alarm will stop.
First use
Cleaning the interior
Before using the appliance for the first time, wash the
interior and all internal accessories with lukewarm water
and some neutral soap so as to remove the typical
smell of a brand-new product, then dry thoroughly.
Important! Do not use detergents or abrasive powders,
as these will damage the finish.
Daily use
Freezing fresh food
The freezer compartment is suitable for freezing fresh
food and storing frozen and deep-frozen food for a long
time.
To freeze fresh food activate the Fast Freeze function at
least 24 hours before placing the food to be frozen in
the freezer compartment.
Place the fresh food to be frozen in the two top compart-
ments.
The maximum amount of food that can be frozen in 24
hours is specified on the rating plate , a label located on
the inside of the appliance.
The freezing process lasts 24 hours: during this period
do not add other food to be frozen.
After 24 hours, when the freezing process is completed,
return to the required temperature (see "Temperature reg-
ulation").
Storage of frozen food
When first starting-up or after a period out of use, be-
fore putting the products in the compartment let the ap-
pliance run at least 12 hours on the Fast Freeze setting.
If large quantities of food are to be stored, remove all
drawers and baskets from appliance and place food on
cooling shelves to obtain the best performance.
5

Warning! Make sure that foods do not exceed the
load limit stated on the side of the upper section
(where applicable)
Important! In the event of accidental defrosting, for
example due to a power failure, if the power has been
off for longer that the value shown in the technical
characteristics chart under "rising time", the defrosted
food must be consumed quickly or cooked immediately
and then re-frozen (after cooling).
Thawing
Deep-frozen or frozen food, prior to being used, can be
thawed in the refrigerator compartment or at room tem-
perature, depending on the time available for this opera-
tion.
Small pieces may even be cooked still frozen, directly
from the freezer: in this case, cooking will take longer.
Ice-cube production
This appliance is equipped with one or more trays for
the production of ice-cubes. Fill these trays with water,
then put them in the freezer compartment.
Important! Do not use metallic instruments to remove
the trays from the freezer.
Helpful Hints and Tips
Hints for freezing
To help you make the most of the freezing process, here
are some important hints:
• the maximum quantity of food which can be frozen in
24 hrs. is shown on the rating plate;
• the freezing process takes 24 hours. No further food
to be frozen should be added during this period;
• only freeze top quality, fresh and thoroughly cleaned,
foodstuffs;
• prepare food in small portions to enable it to be rap-
idly and completely frozen and to make it possible
subsequently to thaw only the quantity required;
• wrap up the food in aluminium foil or polythene and
make sure that the packages are airtight;
• do not allow fresh, unfrozen food to touch food
which is already frozen, thus avoiding a rise in tem-
perature of the latter;
• lean foods store better and longer than fatty ones;
salt reduces the storage life of food;
• water ices, if consumed immediately after removal
from the freezer compartment, can possibly cause
the skin to be freeze burnt;
• it is advisable to show the freezing in date on each
individual pack to enable you to keep tab of the stor-
age time.
Hints for storage of frozen food
To obtain the best performance from this appliance, you
should:
• make sure that the commercially frozen foodstuffs
were adequately stored by the retailer;
• be sure that frozen foodstuffs are transferred from the
foodstore to the freezer in the shortest possible time;
• not open the door frequently or leave it open longer
than absolutely necessary.
• Once defrosted, food deteriorates rapidly and cannot
be refrozen.
• Do not exceed the storage period indicated by the
food manufacturer.
Care and cleaning
Caution! Unplug the appliance before carrying
out any maintenance operation.
This appliance contains hydrocarbons in its cool-
ing unit; maintenance and recharging must there-
fore only be carried out by authorized technicians.
Periodic cleaning
The equipment has to be cleaned regularly:
• clean the inside and accessories with lukewarm wa-
ter and some neutral soap.
• regularly check the door seals and wipe clean to en-
sure they are clean and free from debris.
• rinse and dry thoroughly.
6

Important! Do not pull, move or damage any pipes and/
or cables inside the cabinet.
Never use detergents, abrasive powders, highly
perfumed cleaning products or wax polishes to clean
the interior as this will damage the surface and leave a
strong odour.
Clean the condenser (black grill) and the compressor at
the back of the appliance with a brush or a vacuum clean-
er. This operation will improve the performance of the
appliance and save electricity consumption.
Important! Take care of not to damage the cooling system.
Many proprietary kitchen surface cleaners contain chem-
icals that can attack/damage the plastics used in this ap-
pliance. For this reason it is recommended that the out-
er casing of this appliance is only cleaned with warm wa-
ter with a little washing-up liquid added.
After cleaning, reconnect the equipment to the mains
supply.
Defrosting of the freezer
The freezer compartment of this model, on the other
hand, is a "no frost" type. This means that there is no
buildup of frost when it is in operation, neither on the
internal walls nor on the foods.
The absence of frost is due to the continuous circula-
tion of cold air inside the compartment, driven by an au-
tomatically controlled fan.
Periods of non-operation
When the appliance is not in use for long periods, take
the following precautions:
• disconnect the appliance from electricity supply
• remove all food
•
defrost
5)
and clean the appliance and all accessories
• leave the door/doors ajar to prevent unpleasant smells.
If the cabinet will be kept on, ask somebody to check it
once in a while to prevent the food inside from spoiling
in case of a power failure.
What to do if…
Warning! Before troubleshooting, disconnect the
mains plug from the mains socket.
Only a qualified electrician or competent person must
do the troubleshooting that is not in this manual.
Important! There are some sounds during normal use
(compressor, refrigerant circulation).
Problem Possible cause Solution
The appliance does not operate.
The Pilot light does not flash.
The appliance is switched off. Switch on the appliance.
The mains plug is not connected to
the mains socket correctly.
Connect the mains plug to the mains
socket correctly.
The appliance has no power. There is
no voltage in the mains socket.
Connect a different electrical appliance
to the mains socket.
Contact a qualified electrician.
The Pilot light flashes. The appliance is not working properly. Contact a qualified electrician.
The Alarm light flashes. The temperature in the freezer is too
high.
Refer to "Excessive Temperature Alarm"
The compressor operates con-
tinually.
The temperature is not set correctly. Set a higher temperature.
The door is not closed correctly. Refer to "Closing the door".
The door has been opened too fre-
quently.
Do not keep the door open longer than
necessary.
5) If foreseen.
7

Problem Possible cause Solution
The product temperature is too high. Let the product temperature decrease
to room temperature before storage.
The room temperature is too high. Decrease the room temperature.
The Fast Freeze function is switched
on.
Refer to "Fast Freeze function".
The temperature in the freezer is
too low.
The temperature regulator is not set
correctly.
Set a higher temperature.
TheFast Freeze function is switched
on.
Refer to" Fast Freeze function".
The temperature in the freezer is
too high.
The temperature regulator is not set
correctly.
Set a lower temperature.
The door is not closed correctly. Refer to "Closing the door".
The product temperature is too high. Let the product temperature decrease
to room temperature before storage.
Many products are stored at the
same time.
Store less products at the same time.
Products are too near to each other. Store products so that there is cold air
circulation.
There is too much frost. Food is not wrapped correctly. Wrap the food correctly.
The door is not closed correctly. Refer to "Closing the door".
The temperature regulator is not set
correctly.
Set a higher temperature.
Closing the door
1. Clean the door gaskets.
2. If necessary, adjust the door. Refer to "Installation".
3. If necessary, replace the defective door gaskets. Con-
tact the Service Center.
Technical data
Dimension of the recess
Height 1030 mm
Width 560 mm
Depth 550 mm
Rising Time 19 h
The technical information are situated in the rating plate
on the internal left side of the appliance and in the ener-
gy label.
8

Installation
Caution! Read the "Safety Information" carefully
for your safety and correct operation of the
appliance before installing the appliance.
Positioning
Install this appliance at a location where the ambient tem-
perature corresponds to the climate class indicated on
the rating plate of the appliance:
Climate
class
Ambient temperature
SN +10°C to + 32°C
N +16°C to + 32°C
ST +16°C to + 38°C
T +16°C to + 43°C
Electrical connection
Before plugging in, ensure that the voltage and frequen-
cy shown on the rating plate correspond to your domes-
tic power supply.
The appliance must be earthed. The power supply cable
plug is provided with a contact for this purpose. If the
domestic power supply socket is not earthed, connect
the appliance to a separate earth in compliance with cur-
rent regulations, consulting a qualified electrician.
The manufacturer declines all responsibility if the above
safety precautions are not observed.
This appliance complies with the E.E.C. Directives.
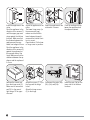
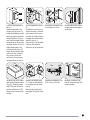
Door reversibility
The door of the appliance
opens to the right. If you
want to open the door to
the left, do these steps be-
fore you install the appli-
ance:
• Loosen the upper pin
and remove the spacer.
• Remove the upper pin
and the door.
• Remove the door.
• Loosen the lower pin.
On the opposite side:
• Install the lower pin.
• Install the door.
• Tighten the spacer and
tighten the upper pin.
Ventilation requirements
The airflow behind the ap-
pliance must be sufficient.
50 mm
min.
200 cm
2
min.
200 cm
2
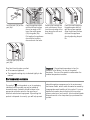
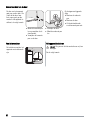
Installing the appliance
Caution! Make sure that the mains cable can
move freely.
Do the following steps:
9

1
2
Install the appliance in the
niche.
Push the appliance in the
direction of the arrows (1)
until the upper gap cover
stops against the kitchen
furniture. Make sure that
the distance between the
appliance and the cup-
board front-edge is 44 mm.
Push the appliance in the
direction of the arrows (2)
against the cupboard on
the opposite side of the
hinge. Make sure that the
clearance between the ap-
pliance and the cupboard
is 4 mm.
44mm
4mm
Adjust the appliance in the
niche.
The lower hinge cover (in
the accessories bag)
makes sure that the dis-
tance between the appli-
ance and the kitchen furni-
ture is correct.
Open the door. Put the low-
er hinge cover in position.
I
I
Attach the appliance to the
niche with 4 screws.
Push the sealing strip be-
tween the appliance and
the adjacent cabinet.
Remove the correct part
from the hinge cover (E).
Make sure to remove the
part DX, in the case of
right hinge, SX in oppo-
site case.
E
E
D
C
Attach the covers (C, D) to
the lugs and the hinge
holes.
Attach the hinge covers
(E) to the hinge.
Ha
Hb
Hc
Hd
Disconnect the parts (Ha),
(Hb), (Hc) and (Hd).
ca. 50 mm
ca. 50 mm
21 mm
90°
21 mm
90°
Install the part (Ha) on the
inner side of the kitchen
furniture.
10

Ha
Hc
Push the part (Hc) on the
part (Ha).
Ha
Hb
8 mm
Open the appliance door
and the kitchen furniture
door at an angle of 90°.
Insert the small square
(Hb) into guide (Ha).
Put together the appliance
door and the furniture
door and mark the holes.
Ha
K
8 mm
Remove the brackets and
mark a distance of 8 mm
from the outer edge of the
door where the nail must
be fitted (K).
Hb
Place the small square on
the guide again and fix it
with the screws supplied.
Align the kitchen furniture
door and the appliance
door by adjusting the part
Hb.
Hb
Hd
Press the part (Hd) on the
part (Hb).
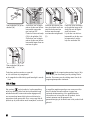
Do a final check to make sure that:
• All screws are tightened.
• The magnetic sealing strip is attached tightly to the
cabinet.
Important! If the ambient temperature is low (for
example, in the Winter), the size of the gasket
decreases. The size of the gasket increases when the
ambient temperature increases.
Environmental concerns
The symbol on the product or on its packaging
indicates that this product may not be treated as
household waste. Instead it should be taken to the
appropriate collection point for the recycling of
electrical and electronic equipment. By ensuring this
product is disposed of correctly, you will help prevent
potential negative consequences for the environment
and human health, which could otherwise be caused by
inappropriate waste handling of this product. For more
detailed information about recycling of this product,
please contact your local council, your household waste
disposal service or the shop where you purchased the
product.
11

Inhoud
Veiligheidsinformatie _ _ _ _ _ _ _ _ _ _ _ _ _ _ 12
Bedieningspaneel _ _ _ _ _ _ _ _ _ _ _ _ _ _ _ _ 14
Het eerste gebruik _ _ _ _ _ _ _ _ _ _ _ _ _ _ _ _ 15
Dagelijks gebruik _ _ _ _ _ _ _ _ _ _ _ _ _ _ _ _ 16
Handige aanwijzingen en tips _ _ _ _ _ _ _ _ _ _ 16
Onderhoud en reiniging _ _ _ _ _ _ _ _ _ _ _ _ _ 17
Problemen oplossen _ _ _ _ _ _ _ _ _ _ _ _ _ _ _ 17
Technische gegevens _ _ _ _ _ _ _ _ _ _ _ _ _ _ 19
Montage _ _ _ _ _ _ _ _ _ _ _ _ _ _ _ _ _ _ _ _ 19
Het milieu _ _ _ _ _ _ _ _ _ _ _ _ _ _ _ _ _ _ _ _ 22
Wijzigingen voorbehouden
Veiligheidsinformatie
In het belang van uw veiligheid en om een correct ge-
bruik te kunnen waarborgen is het van belang dat u, al-
vorens het apparaat te installeren en in gebruik te ne-
men, deze gebruiksaanwijzing, inclusief de tips en waar-
schuwingen, grondig doorleest. Om onnodige vergissin-
gen en ongevallen te voorkomen is het belangrijk er-
voor te zorgen dat alle mensen die het apparaat gebrui-
ken, volledig bekend zijn met de werking ervan en de vei-
ligheidsvoorzieningen. Bewaar deze instructies en zorg
ervoor dat zij bij het apparaat blijven als het wordt ver-
plaatst of verkocht, zodat iedereen die het apparaat ge-
durende zijn hele levensduur gebruikt, naar behoren is
geïnformeerd over het gebruik en de veiligheid van het
apparaat.
Voor de veiligheid van mensen en eigendommen dient
u zich aan de voorzorgsmaatregelen uit dit instructie-
boekje te houden, de fabrikant is niet verantwoordelijk
voor schade die door het niet opvolgen van de aanwij-
zingen veroorzaakt is.
Veiligheid van kinderen en kwetsbare mensen
• Dit apparaat is niet bedoeld voor gebruik door perso-
nen (waaronder begrepen kinderen) met verminderde
fysieke, zintuiglijke vermogens of een gebrek aan er-
varing en kennis, tenzij dit onder toezicht gebeurt
van een voor hun veiligheid verantwoordelijke per-
soon of tenzij zij van een dergelijke persoon instruc-
tie hebben ontvangen over het gebruik van het appa-
raat.
Houd kinderen uit de buurt om te voorkomen dat ze
met het apparaat gaan spelen.
• Houd alle verpakkingsmateriaal buiten het bereik van
kinderen. Gevaar voor verstikking.
• Als u het apparaat afdankt trek dan de stekker uit het
stopcontact, snij de voedingskabel door (zo dicht mo-
gelijk bij het apparaat) en verwijder de deur om te
voorkomen dat kinderen een elektrische schok krij-
gen of zichzelf in het apparaat opsluiten.
• Als dit apparaat, dat voorzien is van een magnetische
deursluiting, een ouder apparaat vervangt, dat voor-
zien is van een veerslot (slot) op de deur of het dek-
sel, zorg er dan voor dat u het slot onbruikbaar
maakt voordat u het oude apparaat weggooit. Dit voor-
komt dat kinderen er in opgesloten kunnen raken.
Algemene veiligheid
Let op! Houd de ventilatie-openingen altijd vrij
van obstructies.
• Dit apparaat is bedoeld voor het bewaren van levens-
middelen en/of dranken in een gewoon huishouden,
zoals uitgelegd in dit instructieboekje.
• Gebruik geen mechanische hulpmiddelen of kunst-
grepen om het ontdooiproces te versnellen.
• Gebruik geen andere elektrische apparaten (bijvoor-
beeld ijsmachines) in koelkasten, tenzij ze voor dit
doel goedgekeurd zijn door de fabrikant.
• Let op dat u het koelcircuit niet beschadigt.
• Het koelmiddel isobutaan (R600a) bevindt zich in het
koelcircuit van het apparaat, dit is een natuurlijk gas
dat weliswaar milieuvriendelijk is, maar ook uiterst
ontvlambaar.
Controleer of de onderdelen van het koelcircuit tij-
dens transport en installatie van het apparaat niet be-
schadigd zijn geraakt.
Indien het koelcircuit beschadigd is:
– open vuur en ontstekingsbronnen vermijden
– de ruimte waar het apparaat zich bevindt grondig
ventileren
• Het is gevaarlijk om wijzigingen aan te brengen in de
specificaties of dit product op enigerlei wijze te modi-
ficeren. Een beschadigd netsnoer kan kortsluiting,
brand en/of een elektrische schok veroorzaken.
12

Waarschuwing! Alle elektrische onderdelen (net-
snoer, stekker, compressor) mogen uitsluitend ver-
vangen worden door een erkende onderhoudsdienst of
gekwalificeerd onderhoudspersoneel.
1. Het netsnoer mag niet verlengd worden.
2. Verzeker u ervan dat de stekker niet platgedrukt
of beschadigd wordt door de achterkant van het
apparaat. Een platgedrukte of beschadigde stek-
ker kan oververhit raken en brand veroorzaken.
3. Verzeker u ervan dat u de stekker van het appa-
raat kunt bereiken.
4. Trek niet aan het snoer.
5. Als de stekker los zit, steek hem dan niet in het
stopcontact. Dan bestaat er een risico op een elek-
trische schok of brand.
6. U mag het apparaat niet gebruiken zonder de af-
dekking van het lampje.
6)
voor de binnenverlich-
ting.
• Dit apparaat is zwaar. Wees voorzichtig als u het ap-
paraat verplaatst.
• Haal geen artikelen uit het vriesvak en raak ze niet
aan als uw handen vochtig/nat zijn, dit kan uw huid
beschadigen of vrieswonden veroorzaken.
• Stel het apparaat niet langdurig bloot aan direct zon-
licht.
•
Gloeilampjes
7)
gebruikt voor dit apparaat is een spe-
ciaal lampje voor huishoudelijke apparaten. De lamp-
jes zijn niet geschikt voor de verlichting van ruimtes.
Dagelijks gebruik
• Zet geen hete potten op de kunststof onderdelen in
het apparaat.
• Bewaar geen brandbare gassen of vloeistoffen in het
apparaat, deze kunnen ontploffen.
• Zet geen levensmiddelen direct tegen de luchtope-
ning in de achterwand.
8)
• Diepgevroren voedsel mag niet opnieuw worden in-
gevroren als het eenmaal ontdooid is.
• Bewaar voorverpakte diepvriesproducten volgens de
aanwijzingen van de fabrikant.
• U dient zich strikt te houden aan de aanbevelingen
van de fabrikant van het apparaat met betrekking tot
het bewaren van voedsel. Raadpleeg de betreffende
aanwijzingen.
• Leg geen koolzuurhoudende of mousserende dran-
ken in de vriezer, deze veroorzaken druk op de fles
die daardoor kan ontploffen, dit kan schade toebren-
gen aan het apparaat.
• IJslollies kunnen vrieswonden veroorzaken als ze
rechtstreeks vanuit het apparaat geconsumeerd wor-
den.
Onderhoud en reiniging
• Schakel het apparaat uit en trek de stekker uit het stop-
contact voordat u onderhoudswerkzaamheden ver-
richt.
• Maak het apparaat niet schoon met metalen voorwer-
pen.
• Gebruik geen scherpe voorwerpen om ijs van het ap-
paraat te krabben. Gebruik een kunststof schraper.
Installatie
Belangrijk! Voor de aansluiting van elektriciteit dienen
de instructies in de desbetreffende paragrafen
nauwgezet te worden opgevolgd.
• Pak het apparaat uit en controleer of er beschadigin-
gen zijn. Sluit het apparaat niet aan als het bescha-
digd is. Meld mogelijke beschadigingen onmiddel-
lijk bij de winkel waar u het apparaat gekocht heeft.
Gooi in dat geval de verpakking niet weg.
• Wij adviseren u om 4 uur te wachten voordat u het
apparaat aansluit, dan kan de olie terugvloeien in de
compressor.
• Rond het apparaat dient adequate luchtcirculatie te
zijn, anders kan dit tot oververhitting leiden. Om vol-
doende ventilatie te verkrijgen de instructies met be-
trekking tot de installatie opvolgen.
• De achterkant dient zo mogelijk tegen een muur ge-
plaatst te worden, teneinde te voorkomen dat hete on-
derdelen (compressor, condensator) aangeraakt kun-
nen worden en brandwonden veroorzaken.
• Het apparaat mag niet vlakbij radiatoren of kooktoe-
stellen geplaatst worden.
• Verzeker u ervan dat de stekker bereikbaar is nadat
het apparaat geïnstalleerd is.
6) Als er een afdekking voor het lampje is voorzien
7) Het lampje
8) Als het apparaat vorstvrij is
13

• Sluit het apparaat alleen aan op een drinkwaterlei-
ding.
9)
Onderhoud
• Alle elektrotechnische werkzaamheden die noodzake-
lijk zijn voor het uitvoeren van onderhoud aan het ap-
paraat, dienen uitgevoerd te worden door een gekwa-
lificeerd elektricien of competent persoon.
• Dit product mag alleen worden onderhouden door
een erkend onderhoudscentrum en er dient alleen ge-
bruik te worden gemaakt van originele reserveonder-
delen.
Bescherming van het milieu
Dit apparaat bevat geen gassen die de ozonlaag
kunnen beschadigen, niet in het koelcircuit en even-
min in de isolatiematerialen. Het apparaat mag niet wor-
den weggegooid bij het normale huishoudelijke afval.
Het isolatieschuim bevat ontvlambare gassen: het appa-
raat moet weggegooid worden conform de van toepas-
sing zijnde regels die u bij de lokale overheidsinstanties
kunt verkrijgen. Voorkom beschadiging aan de koeleen-
heid, vooral aan de achterkant bij de warmtewisselaar.
De materialen die gebruikt zijn voor dit apparaat en die
voorzien zijn van het symbool
zijn recyclebaar.
Bedieningspaneel
MODE
1 2 3 4
1 AAN/UIT-schakelaar
2 Display
3 Functietoets
4 Temperatuurknop
Display
1 2 3 4
1. Alarmlampje deur open
2. Lampje voor positieve of negatieve temperatuur
3. Weergave temperatuur
4. Fast Freeze -controlelampje
Inschakelen
Nadat u de stekker in het stopcontact heeft gestoken
drukt u, als het display niet verlicht is, op de AAN/UIT
schakelaar om het apparaat in te schakelen.
Zodra het apparaat is ingeschakeld, verschijnen de vol-
gende signalen op het bedieningspaneel:
• De indicatie voor positieve of negatieve temperatuur
zal positief zijn, dat geeft aan dat de temperatuur po-
sitief is
• het temperatuurcontrolelampje knippert, de achter-
grond van het display is rood en er klinkt een zoemer.
Druk op de functietoets om de zoemer uit te schakelen
(zie ook "Alarm hoge temperatuur" ).
Zet de thermostaatknop in de middelste stand, het appa-
raat wordt ingesteld om de volgende temperatuur te le-
veren:
ongeveer -18°C in de vriezer.
9) Indien er een wateraansluiting voorzien is
14

Functiemenu
Elke keer als de functietoets wordt ingedrukt, worden de
volgende functies met de klok mee geactiveerd:
• Fast Freeze functie
• geen symbool: normale werking.
Uitschakelen
Het apparaat wordt uitgeschakeld door de AAN/UIT scha-
kelaar langer dan 1 seconde ingedrukt te houden.
Daarna wordt het aftellen van de temperatuur van -3 -2
-1 weergegeven.
Wanneer het apparaat wordt uitgeschakeld, gaat het dis-
play ook uit.
Temperatuurregeling
De temperatuur in het apparaat wordt gecontroleerd
door de thermostaatknop die bovenop de kast zit.
Ga als volgt te werk om het apparaat in werking te stellen:
• draai de knop met de klok mee om de maximale kou-
de te verkrijgen
• draai de knop tegen de klok in om de minimale kou-
de te verkrijgen.
De middelste stand is gewoonlijk de meest geschikte.
De exacte instelling moet echter gekozen worden reke-
ning houdend met het feit dat de temperatuur in het ap-
paraat afhankelijk is van:
• de omgevingstemperatuur
• hoe vaak de deur geopend wordt
• de hoeveelheid voedsel die bewaard wordt
• de plaats van het apparaat.
Fast Freeze Functie
Om levensmiddelen in te vriezen, moet u de functie Fast
Freeze inschakelen.
Druk op de functietoets (indien nodig meerdere malen)
tot het bijbehorende pictogram verschijnt.
Deze functie stopt automatisch na 52 uur.
Het is mogelijk om de functie op elk moment uit te scha-
kelen door op de functietoets te drukken (zie "Functie-
menu").
Alarm hoge temperatuur
Een toename van de temperatuur in het vriesvak (bijvoor-
beeld door stroomuitval) wordt aangegeven door:
• het knipperen van de temperatuur
• rode verlichting van het display
• de zoemer gaat af
Wanneer de normale omstandigheden worden hersteld:
• het geluidssignaal gaat uit
• de temperatuurwaarde blijft knipperen
• de displayverlichting blijft rood.
Als u op de functietoets drukt om het alarm uit te scha-
kelen, verschijnt de hoogste temperatuur die in het vak
bereikt is op het display
gedurende enkele seconden.
Op dit punt stopt het knipperen en de kleur van het dis-
play verandert van rood in wit.
Alarm open deur
Als de deur langer dan 1 minuut open blijft staan klinkt
er een geluidsalarm.
De alarmtoestand bij geopende deur wordt aangegeven
door:
• knipperend alarmlampje deur open
• rood branden van display
• het geluid van de zoemer.
Druk op de functietoets om het geluidsalarm uit te scha-
kelen.
Als de normale omstandigheden hersteld zijn (deur ge-
sloten), wordt het geluidsalarm uitgeschakeld.
Het eerste gebruik
De binnenkant schoonmaken
Voordat u het apparaat voor de eerste keer gebruikt,
wast u de binnenkant en de interne accessoires met lauw-
warm water en een beetje neutrale zeep om de typische
geur van een nieuw product weg te nemen. Droog daar-
na grondig af.
Belangrijk! Gebruik geen oplosmiddelen of schuurpoe-
ders. Deze beschadigen de lak.
15

Dagelijks gebruik
Levensmiddelen invriezen
Het vriesvak is geschikt om levensmiddelen in te vrie-
zen en diepgevroren levensmiddelen gedurende een lan-
ge tijd te bewaren.
Om levensmiddelen in te vriezen, activeert u de functie
Fast Freeze minimaal 24 uur voordat u deze in het vries-
vak legt.
Leg de levensmiddelen in de twee bovenste vakken.
De maximumhoeveelheid levensmiddelen die in 24 uur
kunnen worden ingevroren, is aangegeven op het type-
plaatje , een label dat zich aan de binnenkant van het
apparaat bevindt.
Het diepvriesproces duurt 24 uur: voeg gedurende deze
periode geen andere levensmiddelen aan het vriesvak toe.
Na 24 uur, wanneer het diepvriesproces is voltooid, scha-
kelt u terug naar de gewenste temperatuur (zie "Tempe-
ratuurregeling").
Het bewaren van ingevroren voedsel
Als u het apparaat voor het eerst of na een periode dat
het niet gebruikt is inschakelt, moet u het apparaat min-
stens 12 uur op de Fast Freeze-instelling laten werken
voordat u er producten in plaatst.
Als er grote hoeveelheden voedsel bewaard moeten wor-
den, alle laden en korven uit het apparaat verwijderen
en het voedsel op de koelschappen zetten, hiermee ver-
krijgt u het beste resultaat.
Waarschuwing! Zorg ervoor dat het voedsel de
beladingslimiet, die op de zijkant van het
bovenste gedeelte is vermeld, niet overschrijdt (indien
van toepassing)
Belangrijk! In het geval van onbedoelde ontdooiing,
bijvoorbeeld als de stroom langer is uitgevallen dan de
duur die op de kaart met technische kenmerken onder
"tijdsduur" is vermeld, moet het ontdooide voedsel snel
geconsumeerd worden of onmiddellijk bereid worden
en dan weer worden ingevroren (nadat het afgekoeld is).
Ontdooien
Diepgevroren of ingevroren voedsel kunt, voordat het ge-
bruikt wordt, in het koelvak of op kamertemperatuur la-
ten ontdooien, afhankelijk van de hoeveelheid tijd die
hiervoor nodig is.
Kleine stukken kunnen zelfs rechtstreeks vanuit de vrie-
zer gekookt worden als ze nog bevroren zijn: in dat ge-
val zal de bereiding iets langer duren.
Het maken van ijsblokjes
Dit apparaat is uitgerust met een of meer bladen voor
het maken van ijsblokjes. Vul deze bladen met water en
zet ze dan in het vriesvak.
Belangrijk! Gebruik geen metalen instrumenten om de
laden uit de vriezer te halen.
Handige aanwijzingen en tips
Tips voor het invriezen
Om u te helpen om het beste van het invriesproces te
maken, volgen hier een paar belangrijke tips:
• de maximale hoeveelheid voedsel die in 24 uur inge-
vroren kan worden. is vermeld op het typeplaatje;
• het invriesproces duurt 24 uur. Voeg gedurende deze
periode niet meer in te vriezen voedsel toe;
• vries alleen vers en grondig schoongemaakte levens-
middelen van uitstekende kwaliteit in;
• bereid het voedsel in kleine porties voor, zo kan het
snel en volledig worden ingevroren en zo kunt u later
alleen die hoeveelheid laten ontdooien die u nodig
heeft;
• wikkel het voedsel in aluminiumfolie of plastic en
zorg ervoor dat de pakjes luchtdicht zijn;
• leg vers, nog niet ingevroren voedsel niet tegen het
al ingevroren voedsel, om te voorkomen dat dit laat-
ste warm wordt;
• smalle pakjes zijn makkelijker op te bergen dan dik-
ke; zout maakt voedsel minder lang houdbaar;
• water bevriest, als dit rechtstreeks uit het vriesvak ge-
consumeerd wordt, kan het aan de huid vastvriezen;
• het is aan te bevelen de invriesdatum op elk pakje te
vermelden, dan kunt u zien hoe lang het al bewaard is;
Tips voor het bewaren van ingevroren voedsel
Om de beste resultaten van dit apparaat te verkrijgen,
dient u:
• er zich van te verzekeren dat de commercieel ingevro-
ren levensmiddelen op geschikte wijze door de detail-
handelaar werden opgeslagen;
16

• ervoor te zorgen dat de ingevroren levensmiddelen
zo snel mogelijk van de winkel naar uw vriezer ge-
bracht worden;
• de deur niet vaker te openen of open te laten staan
dan strikt noodzakelijk.
• Als voedsel eenmaal ontdooid is, bederft het snel en
kan het niet opnieuw worden ingevroren.
• Bewaar het voedsel niet langer dan de door de fabri-
kant aangegeven bewaarperiode.
Onderhoud en reiniging
Let op! Voordat u welke onderhoudshandeling
dan ook verricht, de stekker uit het stopcontact
trekken.
Het koelcircuit van dit apparaat bevat koolwater-
stoffen; onderhoud en herladen mag alleen uitge-
voerd worden door bevoegde technici.
Periodieke reiniging
Het apparaat moet regelmatig worden schoongemaakt:
• maak de binnenkant en de accessoires schoon met
lauw water en wat neutrale zeep.
• controleer de afdichtingen regelmatig en wrijf ze
schoon om u ervan te verzekeren dat ze schoon zijn
en vrij van restjes zijn.
• spoel ze af en maak ze grondig droog.
Belangrijk! Trek niet aan leidingen en/of kabels aan de
binnenkant van de kast en verplaats of beschadig ze niet.
Gebruik nooit schoonmaakmiddelen, schuurpoeders,
erg geparfumeerde reinigingsproducten en
waspolijstmiddelen om de binnenkant schoon te
maken, aangezien deze het oppervlak beschadigen en
een sterke geur achterlaten.
Maak de condensor (zwart rooster) en de compressor
op de achterkant van het apparaat schoon met een bor-
stel of stofzuiger. Deze handeling zal de prestatie van
het apparaat verbeteren en het elektriciteitsverbruik be-
sparen.
Belangrijk! Zorg ervoor dat u het koelsysteem niet
beschadigt.
Veel normaal verkrijgbare keukenreinigers bevatten che-
micaliën die de kunststoffen die in dit apparaat gebruikt
zijn kunnen aantasten/beschadigen. Daarom wordt het
aanbevolen de buitenkant van dit apparaat alleen
schoon te maken met warm water met een beetje afwas-
middel.
Steek, na het schoonmaken van het apparaat, de stekker
weer in het stopcontact.
Het ontdooien van de vriezer
Het vriesvak van dit model is een "no-frost"-type. Dit be-
tekent dat zich in het vriesvak geen ijs vormt als deze in
bedrijf is, noch tegen de wanden noch op de levensmid-
delen.
Het voorkomen van ijsvorming wordt gerealiseerd door
een continue circulatie van koude lucht in het vak, die
aangedreven wordt door een automatisch geregelde ven-
tilator.
Periodes dat het apparaat niet gebruikt wordt
Als het apparaat gedurende lange tijd niet gebruikt
wordt, neem dan de volgende voorzorgsmaatregelen:
• trek de stekker uit het stopcontact
• verwijder al het voedsel,
•
ontdooi de koelkast,
10)
en maak het apparaat en alle
accessoires schoon,
• laat de deur/deuren op een kier staan om de vorming
van onaangename luchtjes te voorkomen.
Als uw apparaat aan blijft staan, vraag dan iemand om
het zo nu en dan te controleren, om te voorkomen dat
het bewaarde voedsel bederft, als de stroom uitvalt.
Problemen oplossen
Waarschuwing! Voordat u storingen opspoort, de
stekker uit het stopcontact trekken.
Het opsporen van storingen die niet in deze handleiding
vermeld zijn, dient te worden verricht door een
gekwalificeerd technicus of competent persoon.
Belangrijk! Er zijn tijdens de normale werking geluiden
te horen (compressor, koelcircuit).
10) indien nodig,
17

Probleem Mogelijke oorzaak Oplossing
Het apparaat werkt niet. Het con-
trolelampje knippert niet.
Het apparaat is uitgeschakeld. Schakel het apparaat in.
De stekker zit niet goed in het stop-
contact.
Steek de stekker goed in het stopcon-
tact.
Het apparaat krijgt geen stroom. Er is
geen spanning op het stopcontact.
Sluit een ander elektrisch apparaat aan
op het stopcontact.
Neem contact op met een gekwalifi-
ceerd elektricien.
Het controlelampje knippert. Het apparaat werkt niet goed. Neem contact op met een gekwalifi-
ceerd elektricien.
Het alarmlampje knippert. De temperatuur in de vriezer is te hoog. Zie "Alarm hoge temperatuur"
De compressor werkt continu. De temperatuur is niet goed ingesteld. Stel een hogere temperatuur in.
De deur is niet goed gesloten. Zie 'De deur sluiten'.
De deur werd te vaak geopend. Laat de deur niet langer geopend dan
noodzakelijk.
De temperatuur van het voedsel is te
hoog.
Laat het voedsel afkoelen tot kamertem-
peratuur voordat u het bewaart.
De kamertemperatuur is te hoog. Verlaag de kamertemperatuur.
De Fast Freeze -functie is ingescha-
keld.
Zie " Fast Freeze -functie".
De temperatuur in de vriezer is
te laag.
De temperatuurregelaar is niet goed
ingesteld.
Stel een hogere temperatuur in.
De Fast Freeze -functie is ingescha-
keld.
Zie " Fast Freeze -functie".
De temperatuur in de vriezer is
te hoog.
De temperatuurregelaar is niet goed
ingesteld.
Stel een lagere temperatuur in.
De deur is niet goed gesloten. Zie 'De deur sluiten'.
De temperatuur van het voedsel is te
hoog.
Laat het voedsel afkoelen tot kamertem-
peratuur voordat u het bewaart.
Er worden veel producten tegelijk be-
waard.
Bewaar minder producten tegelijk.
De producten liggen te dicht op elkaar. Bewaar de producten zodanig dat er
koude lucht kan circuleren.
Er is te veel rijp. Het voedsel is niet goed verpakt. Verpak het voedsel op de juiste manier.
De deur is niet goed gesloten. Zie 'De deur sluiten'.
De temperatuurregelaar is niet goed
ingesteld.
Stel een hogere temperatuur in.
18

De deur sluiten
1. Maak de afdichtingen van de deur schoon.
2. Stel de deur, indien nodig, af. Raadpleeg "Montage".
3. Vervang, indien nodig, de defecte deurafdichtingen.
Neem contact met de service-afdeling.
Technische gegevens
Afmetingen van de uitsparing
Hoogte 1030 mm
Breedte 560 mm
Diepte 550 mm
Tijdsduur 19 h
De technische gegevens staan op het typeplaatje aan de
linker binnenkant in het apparaat en op het energielabel.
Montage
Let op! Lees voor uw eigen veiligheid en correcte
werking van het apparaat eerst de
"veiligheidsinformatie" aandachtig door, alvorens het
apparaat te installeren.
Opstelling
Installeer dit apparaat op een plaats waar de omgevings-
temperatuur overeenkomt met de klimaatklasse die ver-
meld is op het typeplaatje van het apparaat:
Klimaat-
klasse
Omgevingstemperatuur
SN +10°C tot + 32°C
N +16°C tot + 32°C
ST +16°C tot + 38°C
T +16°C tot + 43°C
Elektrische aansluiting
Zorg er vóór het aansluiten voor dat het voltage en de
frequentie op het typeplaatje overeenkomen met de
stroomtoevoer in uw huis.
Het apparaat moet geaard zijn. De netsnoerstekker is
voorzien van een contact voor dit doel. Als het stopcon-
tact niet geaard is, sluit het apparaat dan aan op een af-
zonderlijk aardepunt, in overeenstemming met de gel-
dende regels, raadpleeg hiervoor een gekwalificeerd elek-
tricien.
De fabrikant neemt geen verantwoordelijkheid op zich
als de bovenstaande veiligheidsmaatregelen niet wor-
den nageleefd.
Dit apparaat voldoet aan de EU. richtlijnen.
19

Omkeerbaarheid van de deur
De deur van het apparaat
gaat naar rechts open. Als
u wilt dat de deur naar
links open gaat, ga dan,
voordat u het apparaat in-
stalleert, als volgt te werk:
• Maak de bovenste pen
los en verwijder de af-
standhouder.
• Verwijder de bovenste
pen en de deur.
• Verwijder de deur.
• Maak de onderste pen
los.
Op de tegenoverliggende
zijde:
• Monteer de onderste
pen.
• Monteer de deur.
• Zet de afstandhouder
en de bovenste pen vast.
Ventilatievereisten
De luchtstroom achter het
apparaat moet voldoende
zijn.
50 mm
min.
200 cm
2
min.
200 cm
2
Het apparaat installeren
Let op! Zorg ervoor dat het aansluitsnoer vrij kan
bewegen.
Ga als volgt te werk:
20

1
2
Installeer het apparaat in
de nis.
Duw het apparaat in de
richting van de pijlen (1)
totdat de afdekking van de
opening tegen het keuken-
meubel aankomt. Zorg er-
voor dat de afstand tussen
het apparaat en de voorste
rand van de kast 44 mm is.
Duw het apparaat in de
richting van de pijlen (2)
tegen de kast aan de ande-
re kant van het scharnier.
Zorg ervoor dat er een
ruimte van 4 mm tussen
het apparaat en de kast is.
44mm
4mm
Stel het apparaat in de nis
af.
De afdekking voor het on-
derste scharnier (in de zak
met accessoires) zorgt er-
voor dat de afstand tussen
het apparaat en het keuken-
meubel correct is.
Open de deur. Zet de afdek-
king van het onderste
scharnier op de juiste plek.
I
I
Bevestig het apparaat met
4 schroeven in de nis.
Duw de afdichtstrip tussen
het apparaat en de aangren-
zende kast.
Verwijder het juiste onder-
deel van de scharnierafdek-
king (E). Verwijder onder-
deel DX bij een scharnier
aan de rechterkant of SX
bij een scharnier aan de lin-
kerkant.
E
E
D
C
Bevestig de afdekkingen
(C, D) aan de uitsteeksels
en de gaten van de schar-
nieren.
Bevestig de scharnieraf-
dekkingen (E) op het schar-
nier.
Ha
Hb
Hc
Hd
Maak de onderdelen (Ha),
(Hb), (Hc) en (Hd) los.
ca. 50 mm
ca. 50 mm
21 mm
90°
21 mm
90°
Monteer onderdeel (Ha)
aan de binnenkant van het
keukenmeubel.
21

Ha
Hc
Duw onderdeel (Hc) op on-
derdeel (Ha).
Ha
Hb
8 mm
Zet de deur van het appa-
raat en de deur van het keu-
kenmeubel open onder
een hoek van 90°.
Plaats het kleine vierkantje
(Hb) in de geleider (Ha).
Zet de deur van het appa-
raat en de deur van het keu-
kenmeubel tegen elkaar en
markeer de gaten.
Ha
K
8 mm
Verwijder de haken en mar-
keer een afstand van 8 mm
vanaf de buitenrand van
de deur waar de nagel
moet worden vastgemaakt
(K).
Hb
Plaats het kleine vierkantje
op de geleider terug en be-
vestig het met de bijgele-
verde schroeven.
Lijn de deur van het keu-
kenmeubel en de deur van
het apparaat uit met be-
hulp van onderdeel Hb.
Hb
Hd
Duw onderdeel (Hd) op on-
derdeel (Hb).
Controleer goed en verzeker u ervan dat:
• alle schroeven zijn aangehaald.
• de magnetische afdichtstrip goed bevestigd is aan de
kast.
Belangrijk! Als de omgevingstemperatuur laag is (bijv.
in de winter), kan de omvang van de pakking kleiner
worden. De omvang van de pakking neemt toe als de
omgevingstemperatuur toeneemt.
Het milieu
Het symbool op het product of op de verpakking
wijst erop dat dit product niet als huishoudafval mag
worden behandeld, maar moet worden afgegeven bij
een verzamelpunt waar elektrische en elektronische
apparatuur wordt gerecycled. Als u ervoor zorgt dat dit
product op de juiste manier wordt verwijderd, voorkomt
u mogelijke negatieve gevolgen voor mens en milieu
die zich zouden kunnen voordoen in geval van
verkeerde afvalverwerking. Voor gedetailleerdere
informatie over het recyclen van dit product, kunt u
contact opnemen met de gemeente, de
gemeentereiniging of de winkel waar u het product hebt
gekocht.
22

23

www.zanussi.com/shop
222349413-00-052010
-
 1
1
-
 2
2
-
 3
3
-
 4
4
-
 5
5
-
 6
6
-
 7
7
-
 8
8
-
 9
9
-
 10
10
-
 11
11
-
 12
12
-
 13
13
-
 14
14
-
 15
15
-
 16
16
-
 17
17
-
 18
18
-
 19
19
-
 20
20
-
 21
21
-
 22
22
-
 23
23
-
 24
24


