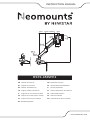
Neomounts DS70-450BL1 Handleiding
- Categorie
- Flat-panel bureausteunen
- Type
- Handleiding
Deze handleiding is ook geschikt voor

DS70-450WH1
IT
EN
NL
DE
FR
ES
PT
DK
Monitor desk mount
Monitor bureausteun
Monitor Tischhalterung
Support moniteur de bureau
Supporto da scrivania per monitor
Soporte de escritorio para monitor
Suporte de mesa para monitor
Bordbeslag skærm
NO
SE
FI
PL
CS
SK
RO
Bordstativ til skjerm
Skrivbordsfäste för bildskärm
Näytön pöytäteline
Uchwyt nabiurkowy do monitora
Stolní držák monitoru
Držiak na monitor
Suport de birou pentru monitor
WWW.NEOMOUNTS.COM
INSTRUCTION MANUAL
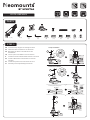
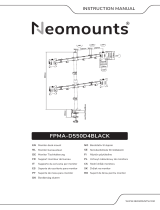
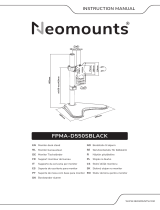
min10-max45mm
min10-max45mm
min261-max550mm
min235-max290mm170mm 54mm
115mm
115mm
100mm
100mm
75mm
75mm
±180°
±90°
+45°
-45°
±180°
±180°
±90°

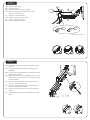
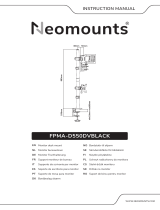
PARTS
DS70-450WH1
STEP 1
Install the clamp to/grommet through the desk
Monteer de klem aan/doorvoer in het bureau
Befestigen der Klemme am/Tülle durch den
Schreibtisch
Vissez la pince sur/ l'œillet à travers le bureau
Installa il morsetto sulla/l'occhiello attraverso scrivania
Instale la abrazadera en el/arandela a través del
escritorio
Instale a braçadeira na/o anel através da mesa
Zainstaluj zacisk na/przelotkę przez biurku
EN
NL
DE
FR
IT
ES
PT
PL
I. 3mm
(x1)
J. 6mm
(x1)
M-A. M4x12
(x4)
M-B. M4x16
(x4)
M-C. M5x12
(x4)
M-D. M5x16
(x4)
M-E. D5
(x4)
A. (x1) B. (x1) M-F. (x4)
C. (x1) D. (x1) E. (x1) F. (x1) G. (x1) H. (x1)
75x75 -
100x100 mm
1-15 kg |
2,2-33,1 lbs
Clamp installation
Grommet installation
Desktop with existing hole
J
J
J
F
E
G
D
E
10-45mm
10-45mm 10-45mm
ø10-60mm
ø 10mm
(ø 3/8")
D
D1
D1
OR
Tool Drill
26,1-55 cm 0-51,4 cm

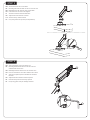
Attach the upper arm to the lower arm
Bevestig het bovenste deel van de arm aan het
onderste deel van de arm
Befestigen Sie den oberen Arm am unteren Arm
Fixez le second bras sur le bras inférieur et le visser
Attaccare la parte superiore del braccio al braccio
inferiore
Adjuntar el brazo inferior al brazo superior
Prenda o braço inferior ao braço superior
Przymocuj góne ramię do dolnego ramienia
EN
NL
DE
FR
IT
ES
PT
PL
STEP 3
Attach the lower arm to the base
Bevestig het onderste deel van de arm aan de voet
Befestigen Sie den unteren Arm an der Basis
Insérez le bras sur la base du support
Attaccare il braccio inferiore alla base
Adjuntar el brazo inferior a la base
Anexar o braço inferior à base
Przymocuj dolne ramię uchwytu do podstawy
EN
NL
DE
FR
IT
ES
PT
PL
STEP 2
B
I
A
I

* Not Included
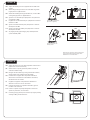
Attach the VESA plate to the monitor
Bevestig de VESA plaat op de monitor
VESA Platte am Monitor anbringen
Fixation de la plaque VESA sur le moniteur
Collegamento del piatto VESA al monitor
Colocación de la Placa VESA en el monitor
Colocar a placa VESA no monitor
Montaż płytki VESA do monitora
EN
NL
DE
FR
IT
ES
PT
PL
Install the monitor
Installeer de monitor
Installieren Sie den Monitor
Installer le moniteur
Installa il monitor
Instale el monitor
Instale o monitor
Zainstaluj monitor
EN
NL
DE
FR
IT
ES
PT
PL
M-A
M-E
M-C
STEP 4
STEP 5
C
M-B M-D
M-E
M-F
H

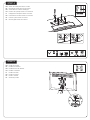
Adjust the gas spring
Stel de gasveer af
Gasfeder-Höhenverstellung einstellen
Ajustez la dureté de l'articulation en serrant ou
desserant le ressort à gaz
Regolare la forza della molla
Ajustar la fuerza de resorte de gas
Ajuste a força da mola a gás
Ustawić naprężenie sprężyny
EN
NL
DE
FR
IT
ES
PT
PL
STEP 6
Remove the cable cover and run the cable(s) through
the cover
Verwijder de kabelgoot en leid de kabel(s) door de
kabelgoot
Entfernen Sie die Kabelabdeckung und Kabel durch die
Kabelabdeckung führen
Retirez les couvercles caches câbles et positionnez vos
câbles dans les goulettes prévues à cet effet et reclipsez
les caches câbles
Rimuovere la copertura del cavo e far passare il cavo
attraverso la copertura del cavo
Retire la cubierta del cable y pase el (los) cable(s) a
través de la bandeja para cables
Remova a tampa do cabo e passe o cabo pela tampa
do cabo
Zdejmij osłonę kabli i przeprowadź kabel przez osłonę
kabla
EN
NL
DE
FR
IT
ES
PT
PL
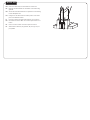
STEP 7
Do not over-tighten the screws
J

Adjust the limiting screw to (de)activate the 180° lock
system
Stel de begrenzingsschroef in om het 180° vergrende-
lingssysteem te (de)activeren
Stellen Sie die Begrenzungsschraube ein, um das 180°-
Verriegelungssystem zu (de)aktivieren
Ajustez la vis de butée pour (dés)activer le système de
verrouillage à 180°
Regolare la vite di limitazione per (dis)attivare il sistema
di blocco a 180°
Ajuste el tornillo limitador para (des)activar el sistema
de bloqueo de 180°
Ajuste o parafuso limitador para (des)ativar o sistema
de bloqueio de 180°
Wyreguluj śrubę ograniczającą, aby dezaktywować
system blokady 180°
EN
NL
DE
FR
IT
ES
PT
PL
STEP 8
Adjust the mount to your desired position and loosen or
tighten the screws if necessary
Stel de steun in op de gewenste positie en draai de
schroeven indien nodig
Bringen Sie die Halterung in die gewünschte Position,
durch lockern oder anziehen der Schrauben
Positionnez le support dans la position désirée en
désserrant et resserant les articulations de hauteur,
d'inclinaison et de rotation
Regolare il supporto nella posizione desiderata e
allentare o serrare le viti se necessario
Coloque el soporte en la posición deseada y gire los
tornillos si es necesario
Ponha o suporte na posição desejada e afrouxe ou
aperte os parafusos, se necessário
Dostosuj pozycję uchwytu do twoich wymagań i poluzuj
zaciśnij śrubki, jeśli to konieczne
EN
NL
DE
FR
IT
ES
PT
PL
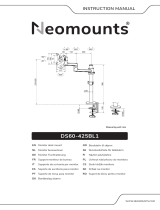
STEP 9
Note: Remove the lower cable management
cover before adjusting the limiting screw.
Reattach the cover afterwards.
±180°
Remove or loosen the
limiting screw.
Arm can rotate without stopping.
±90°
Tighten the limiting screw
(do not over tighten).
Arm can rotate 180°.
I
I
J

Place the Allen keys into the holder for future use
Bewaar de inbussleutels in de houder voor toekomstig
gebruik
Setzen Sie die Inbusschlüssel zur späteren Verwendung
in den Steckplatz ein
Rangez les clés Allen dans les tubes prévus à cet effet
pour une utilisation future
Inserire le chiavi a brugola nello slot per un uso futuro
Introduzca las llaves Allen en la ranura para usarla en el
futuro
Insira as chaves Allen na ranhura para uso futuro
Włóż klucz imbusowy do gniazda, aby móc go użyć w
przyszłości
EN
NL
DE
FR
IT
ES
PT
PL
STEP 10

-
 1
1
-
 2
2
-
 3
3
-
 4
4
-
 5
5
-
 6
6
-
 7
7
-
 8
8


Neomounts DS70-450BL1 Handleiding
- Categorie
- Flat-panel bureausteunen
- Type
- Handleiding
- Deze handleiding is ook geschikt voor
in andere talen
- English: Neomounts DS70-450BL1 User manual
- français: Neomounts DS70-450BL1 Manuel utilisateur
- español: Neomounts DS70-450BL1 Manual de usuario
- português: Neomounts DS70-450BL1 Manual do usuário
Gerelateerde papieren
-
Neomounts ds70plus-450bl1 Handleiding
-
 Neomounts ds70plus-450wh1 Handleiding
-
-
 Neomounts DS70-700BL1 Handleiding
-
 Neomounts DS70-700BL1 Handleiding
-
 Neomounts FPMA-D550D4BLACK Handleiding
-
 Neomounts FPMA-D550DVBLACK Handleiding
-
 Neomounts ds60-425bl1 Handleiding
-
 Neomounts ds60-425bl2 Handleiding
-
 Neomounts FPMA-D550SBLACK Handleiding


