Yamaha RX-A550 Installatie gids
- Categorie
- AV-ontvangers
- Type
- Installatie gids

RX-A550
© 2015 Yamaha Corporation Printed in Malaysia ZQ10680
UCAB
1
6
3
4 5 -1 5 -2
HDMI
LAN
HDMI
HDMI
HDMI HDMIHDMI
HDMI
HDMIHDMI
1 2
3 4
9
Subwoofer
Caisson de graves
5
Surround speaker (R)
Enceinte d’ambiance (D)
4
Surround speaker (L)
Enceinte d’ambiance (G)
3
Center speaker
Enceinte centrale
2
Front speaker (R)
Enceinte avant (D)
1
Front speaker (L)
Enceinte avant (G)
To an AC wall outlet
Branchement sur une prise
secteur
TV
Téléviseur
HDMI input
Entrée HDMI
HDMI output
Sortie HDMI
HDMI output
Sortie HDMI
BD/DVD player
Lecteur de disques BD/DVD
Satellite/cable set top box
Décodeur satellite/câble
Audio pin cable
Câble de broche audio
5
4
21
3
9
2
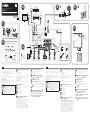
Read the supplied booklet “Safety Brochure” before using the unit.
This document explains how to set up a 5.1-channel system and play
back surround sound from a BD/DVD on the unit.
For more information about this product, refer to the Owner’s Manual
included on the supplied CD-ROM.
The latest Owner’s Manual can be downloaded from the following
website.
http://download.yamaha.com/
[For U.S. customers only]
Visit the following website for additional information, FAQ’s, downloads
such as “Owner’s Manual” and product updates.
http://usa.yamaha.com/support/
AV SETUP GUIDE
AVSETUPGUIDE is an app that guides you
through the process of connecting a TV or
playback device, such as a BD/DVD or CD
player, and speakers to the AV receiver, and
configuring the settings for the AV receiver.
Search “AVSETUPGUIDE” on the AppStore or
GooglePlay for details.
1
Accessories used with this document
1
Remote control
2
Batteries (AAA, R03, UM-4) (x2)
3
YPAO microphone
The following cables (not supplied) are required to build the system
described in this document.
• Speaker cables (depending on the number of speakers)
• Audio pin cable (x1)
• HDMI cables (x3)
• Network cable (x1) (when connecting to a router via a network
cable)
2
Placing speakers
Set up the speakers in the room using the diagram as a reference.
1 Front speaker (L)
2 Front speaker (R)
3 Center speaker
4 Surround speaker (L)
5 Surround speaker (R)
9 Subwoofer
3
Connecting speakers/subwoofer
• U.S.A. and Canada models only
When connecting 6-ohm speakers, set the unit’s speaker
impedance to “6 Ω MIN”. For details, see “Setting the speaker
impedance” in the Owner’s Manual.
• Before connecting the speakers, remove the unit’s power cable
from the AC wall outlet and turn off the subwoofer.
• Ensure that the core wires of the speaker cable do not touch one
another or come into contact with the unit’s metal parts. Doing so
may damage the unit or the speakers. If the speaker cables short
circuit, “Check SP Wires” will appear on the front display when the
unit is turned on.
4
Connecting external devices
Refer to the Owner’s Manual for details regarding the connection of
devices that support HDCP2.2.
5
Establishing a network connection
Establish wired network connection
5
-1, or a wireless network
connection
5
-2, in accordance with your network environment.
5
-1 Wired network connection
5
-2 Wireless network connection
Raise the wireless antenna so that it is standing up straight.
(Procedures for connecting the unit to a wireless router are described
in step
7
.)
Do not apply excessive force on the antenna. Doing so may damage it.
6
Connecting the power cable to an AC
wall outlet, and turning on the unit
1
Press z (receiver power) to turn on the unit.
2
Turn on the TV and switch the TV input to display
video from the unit (HDMI OUT jack).
English
RX-A550
AV Receiver/Ampli-tuner audio-vidéo
Easy Setup Guide/Manuel de conguration rapide
English
Français
10° to 30°
10° à 30°
Use a subwoofer equipped
with built-in amplier.
Utilisez un caisson de graves
équipé d’un amplicateur
intégré.
Français
The unit
L’unité
Modem
Modem
Internet
Internet
Router
Routeur
Network cable
Câble de réseau
STRAIGHT DIRECT ENHANCER BASS
RAV546
ZQ56680
ENTER
NOITPOPUTES
TOP MENU
MUTE
PROGRAM VOLUME
POP-UP/MENU
NET
AUXUSB
BLUETOOTH
SCENE
BD
DVD
TV
NET
RADIO
HDMI
AV
5 6
1 2 3 4
5 6
1 2 3 4
FM AM
TUNING PRESET
HOME
MEMORY
DISPLAY
RETURN
BLUE
YELLOWGREEN
RED
SLEEP
z
10 mm (3/8”)
10 mm
Lisez le livret fourni «Brochure sur la Sécurité» avant d’utiliser l’unité.
Ce document décrit la configuration d’un système à 5.1 voies et
explique comment restituer le son d’ambiance d’un disque BD/DVD
sur l’unité.
Pour de plus amples informations sur ce produit, reportez-vous au
Mode d’emploi inclus sur le CD-ROM fourni.
Vous pouvez télécharger le Mode d’emploi le plus récent depuis le
site Web suivant.
http://download.yamaha.com/
AV SETUP GUIDE
AVSETUPGUIDE est une app qui vous guide à
travers le processus de connexion d’un téléviseur
ou d’un appareil de lecture, comme un lecteur
BD/DVD ou CD, et des enceintes à l’ampli-tuner
audio-vidéo et de la configuration des réglages
pour l’ampli-tuner audio-vidéo. Recherchez
«AVSETUPGUIDE» sur l’AppStore ou
GooglePlay pour en savoir plus.
1
Accessoires utilisés avec ce document
1
Télécommande
2
Piles (AAA, R03, UM-4) (x2)
3
Microphone YPAO
Les câbles suivants (non fournis) sont nécessaires pour réaliser le
système décrit dans ce document.
• Câbles d’enceinte (en fonction du nombre d’enceintes)
• Câble de broche audio (x1)
• Câbles HDMI (x3)
• Câble réseau (x1) (pour la connexion à un routeur via un câble
réseau)
2
Positionnement des enceintes
Configurez les enceintes dans la pièce en vous servant du schéma
comme référence.
1 Enceinte avant (G)
2 Enceinte avant (D)
3 Enceinte centrale
4 Enceinte d’ambiance (G)
5 Enceinte d’ambiance (D)
9 Caisson de graves
3
Raccordement des enceintes ou du
caisson de graves
• Modèles pour les États-Unis et le Canada uniquement
Lorsque vous raccordez des enceintes 6ohms, réglez l’impédance
d’enceinte de l’unité sur «6 Ω MIN». Pour en savoir plus, voir
«Réglage de l’impédance des enceintes» dans le Mode d’emploi.
• Débranchez le câble d’alimentation de l’unité de la prise secteur et
éteignez le caisson de graves avant de raccorder les enceintes.
• Veillez à ce que les fils conducteurs du câble de l’enceinte ne
se touchent pas ou n’entrent pas en contact avec les parties
métalliques de l’unité. Ce contact risque d’endommager l’unité ou
les enceintes. Si un court-circuit survient au niveau des câbles de
l’enceinte, le message «Check SP Wires» apparaît sur l’afficheur
de la face avant lors de la mise sous tension de l’unité.
4
Raccordement des appareils externes
Consultez le Mode d’emploi pour en savoir plus sur la connexion
d’appareils prenant en charge HDCP 2.2.
5
Établissement d’une connexion réseau
Établissez une connexion réseau câblée
5
-1 ou une connexion
réseau sans fil
5
-2 en fonction de votre environnement réseau.
5
-1 Connexion réseau câblée
5
-2 Connexion réseau sans fil
Relevez l’antenne sans fil de sorte qu’elle soit droite.
(La marche à suivre pour connecter l’unité à un routeur sans fil est
décrite à l’étape
7
.)
N’exercez pas une force excessive sur l’antenne, sous peine de
l’endommager.
6
Raccordement du câble d’alimentation
à une prise secteur et mise sous
tension de l’unité
1
Appuyez sur z (alimentation de l’ampli-tuner) pour
mettre l’unité sous tension.
2
Mettez le téléviseur sous tension et changez la source
d’entrée an d’afficher l’image à partir de l’unité (prise
HDMI OUT).

RX-A550
English
7
8
9
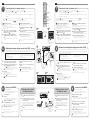
Connecting the unit to a wireless network
Optimizing the speaker settings automatically (YPAO)
Playing back a BD/DVD
Skip this step and proceed to step
8
when the unit is connected to a router via a network cable (
5
-1).
The Wireless Accessory Configuration (WAC) screen
7
-1 is displayed on the TV when the unit is turned on for the first time after purchase. It may
take several tens of seconds for the screen to be displayed.
If the WAC screen is not displayed, configure wireless network settings from the setup menu. See “Connecting to a network device wirelessly” in the
Owner’s Manual.
The Yamaha Parametric room Acoustic Optimizer (YPAO) function detects speaker connections, measures the distances from them to your listening
position(s), and then automatically optimizes the speaker settings, such as volume balance and acoustic parameters, to suit your room.
Note the following regarding YPAO measurement
• Test tones are output at high volume and may surprise or frighten
small children.
• Test tone volume cannot be adjusted.
• Keep the room as quiet as possible.
• Stay in a corner of the room behind the listening position so that
you do not become an obstacle between speakers and the YPAO
microphone.
• Do not connect headphones.
Now let’s play back a BD/DVD.
We recommend playing back multichannel audio (5.1-channel or
more) to feel surround sound produced by the unit.
A
Sharing iOS device settings
Wireless connection settings on iOS devices (iPhone/iPod touch)* can easily
be applied to the unit.
* An iOS device running iOS 7 or later is required.
Confirm that the iOS device is connected to the wireless router before
proceeding with configuration.
1
Press the cursor key (w) when the WAC screen
7
-1 is
displayed on the TV, and conrm the unit’s network name
displayed in the screen
7
-2.
2
Select the unit’s name from “SET UP NEW AIRPLAY
SPEAKER” in the Wi-Fi screen on the iOS device, and tap
“Next”.
Follow the instructions displayed on the iOS device screen to configure
the settings.
B
Using WPS push-button conguration
Wireless connection can be configured with one push of the WPS button on the
wireless router (access point).
1
Press RETURN to cancel WAC when the screen
7
-1 is
displayed on the TV.
2
Press and hold the INFO (WPS) key on the unit’s front panel
for more than 3 seconds.
“Press WPS button on Access Point” will be displayed in the front display.
3
Push the WPS button on the wireless router.
When setup is complete and a connection has been established,
“Completed” will be displayed in the front display.
If “Not connected” is displayed, repeat the process from step 1 or try another
connection method.
Follow procedure
A
when using an iOS device to connect to a wireless network. Follow procedure
B
when connecting to a wireless router (access point) that
supports WPS.
Press ENTER if a wireless connection method other than
A
or
B
below will be used, and follow the on-screen instructions.
1
Turn on the subwoofer and set the volume to half. If the
crossover frequency is adjustable, set it to maximum.
2
Place the YPAO microphone at your listening position and
connect it to the YPAO MIC jack on the front panel.
The screen
8
-1 appears on the TV.
Place the YPAO microphone at your listening position (same height as your
ears). We recommend the use of a tripod as a microphone stand. You can
use the tripod screws to stabilize the microphone.
3
Press SETUP.
The measurement will start in 10 seconds.
It takes about 3 minutes to measure.
The screen
8
-2 appears on the TV when the measurement finishes.
If any error message (such as E-1) or warning message (such as W-2)
appears, see “Error messages” or “Warning messages” in the Owner’s
Manual.
4
Conrm the results displayed on the screen and press
ENTER.
5
Use the cursor keys (e/r) to select “SAVE” (Save) and press
ENTER.
6
Disconnect the YPAO microphone from the unit.
Do not leave the YPAO microphone in a place where it will be exposed to
direct sunlight or high temperature for an extended period of time.
This completes optimization of the speaker settings.
1
Turn on the BD/DVD player.
2
Press HDMI 1.
“HDMI 1” is selected as the input source. The name of the connected
device, such as “BD Player”, may be displayed with some devices.
3
Start playback on the BD/DVD player.
4
Press STRAIGHT repeatedly to select “STRAIGHT”.
When “STRAIGHT” (straight decode) is enabled, each speaker produces
each channel audio signal directly (without sound field processing).
5
Press VOLUME to adjust the volume.
This completes the basic setup procedure.
When surround sound is not heard, or no sound is output from a specific speaker,
see “Troubleshooting” in the Owner’s Manual.
Français
1 2
3
9
54
VOLUME
CROSSOVER/
HIGH CUT
MIN MAX
MIN MAX
Ear height
Hauteur d’oreille
YPAO microphone
Microphone YPAO
Listening position
Position d’écoute
The unit
L’unité
8
N e t w o r k S e t u p
Y o u c a n s h a r e t h e n e t w o r k ’ s
w i r e l e s s ( W i - F i ) s e t t i n g s w i t h
t h i s d e v i c e u s i n g a d e v i c e
w i t h i O S 7 o r l a t e r .
N E X T
T o p e r f o r m n e t w o r k s e t u p u s i n g
a n o t h e r m e t h o d , p r e s s E N T E R .
L a n g u a g e E n g l i s h
C A N C E L : R E T U R N
W A C N e t w o r k S e t u p W A C
B A C K
S e l e c t t h i s d e v i c e f r o m i O S
d e v i c e ’ s W i - F i s e t t i n g s , a n d
t h e n f o l l o w t h e i n s t r u c t i o n s
o n t h e d e v i c e t o c o m p l e t e
s e t u p .
N e t w o r k n a m e o f t h i s d e v i c e
* * * * * * * * * * * * *
O T H E R : E N T E R
C A N C E L : R E T U R N
8
- 1
8
- 2
BLUETOOTH
1
2
-------
Remote control
Télécommande
Bluetooth device
Périphérique Bluetooth
The unit’s model name is
displayed where “
-------
” is
indicated above.
Le nom de modèle de l’unité
s’affiche là où «
-------
»
est indiqué ci-dessus.
1
Press BLUETOOTH to select “Bluetooth” as the input
source.
2
Turn on the Bluetooth function on your device, and
select the model name of the unit from the Bluetooth
device list on your device.
After pairing has been completed and the unit is connected to the
Bluetooth device, “Connected” appears in the front display.
If the pass key is required, enter the number “0000”.
3
On the Bluetooth device, select a song and start
playback.
Refer to the Owner’s Manual for details regarding the Bluetooth function.
Playing back music stored
on a Bluetooth device
Playing back music stored
on a Bluetooth device
STRAIGHT DIRECT ENHANCER BASS
RAV546
ZQ56680
ENTER
NOITPOPUTES
TOP MENU
MUTE
PROGRAM VOLUME
POP-UP/MENU
NET
AUXUSB
BLUETOOTH
SCENE
BD
DVD
TV
NET
RADIO
HDMI
AV
5 6
1 2 3 4
5 6
1 2 3 4
FM AM
TUNING PRESET
HOME
MEMORY
DISPLAY
RETURN
BLUE
YELLOWGREEN
RED
SLEEP
VOLUME (+/
-
)
ENTER
Cursor keys
Touches de curseur
STRAIGHT
RETURN
SETUP
HDMI 1
7
- 1
7
- 2
7
8
Connexion de l’unité à un réseau sans fil
Optimisation automatique des réglages d’enceintes (YPAO)
Sautez l’étape et passez à l’étape
8
si l’unité est connectée à un routeur via un câble réseau (
5
-1).
L’écran Wireless Accessory Configuration (WAC)
7
-1 s’affiche sur le téléviseur lors de la première mise sous tension de l’unité après l’achat.
L’affichage de l’écran peut prendre plusieurs dizaines de secondes.
Si l’écran WAC ne s’affiche pas, configurez les réglages du réseau sans fil depuis le menu de configuration. Voir «Raccordement à un périphérique
de réseau sans fil» dans le Mode d’emploi.
La fonction Yamaha Parametric room Acoustic Optimizer (YPAO) permet de détecter les raccordements des enceintes et de mesurer la distance
entre ces dernières et la position d’écoute. Elle optimise ensuite automatiquement les réglages des enceintes tels que les paramètres d’équilibre du
volume et les paramètres acoustiques qui conviennent à la pièce.
Veuillez noter les points suivants concernant la mesure YPAO
• Les signaux tests étant émis à un volume élevé, ils peuvent
surprendre ou effrayer les jeunes enfants.
• Le volume du signal test ne peut pas être réglé.
• Faites en sorte que la pièce soit le plus calme possible.
• Restez dans un coin de la pièce derrière la position d’écoute afin de
ne pas faire obstacle entre les enceintes et le microphone YPAO.
• Ne raccordez pas d’écouteurs.
A
Partage des réglages du périphérique iOS
Les réglages de connexion sans fil sur les périphériques iOS (iPhone/
iPodtouch)* peuvent être facilement appliqués à l’unité.
* Un périphérique iOS exécutant iOS 7 ou ultérieur est nécessaire.
Confirmez que le périphérique iOS est connecté au routeur sans fil avant de
poursuivre la configuration.
1
Appuyez sur la touche du curseur (w) lorsque l’écran WAC
7
-1 s’affiche sur le téléviseur et conrmez le nom de réseau
de l’unité affiché sur l’écran
7
-2.
2
Sélectionnez le nom de l’unité dans «SET UP NEW AIRPLAY
SPEAKER» sur l’écran Wi-Fi du périphérique iOS et touchez
«Next».
Suivez les instructions affichées sur l’écran du périphérique iOS pour
configurer les réglages.
B
Utilisation de la conguration à l’aide du bouton-
poussoir WPS
Il est possible de configurer la connexion sans fil en appuyant sur le bouton
WPS situé sur le routeur sans fil (point d’accès).
1
Appuyez sur RETURN pour annuler WAC lorsque l’écran
s’affiche sur le téléviseur
7
-1.
2
Maintenez enfoncée la touche INFO (WPS) sur le panneau
avant de l’unité pendant plus de 3 secondes.
«Press WPS button on Access Point» s’affichera sur le panneau avant.
3
Appuyez sur le bouton WPS du routeur sans l.
Une fois que la configuration est terminée et qu’une connexion est
établie, «Completed» s’affiche sur le panneau avant.
Si «Not connected» s’affiche, recommencez depuis l’étape1 ou essayez une
autre méthode de connexion.
Suivez la procédure
A
si vous utilisez un périphérique iOS pour vous connecter à un réseau sans fil. Suivez la procédure
B
si vous vous connectez à un routeur
sans fil (point d’accès) compatible WPS.
Appuyez sur ENTER si une méthode de connexion sans fil autre que
A
ou
B
ci-dessous est utilisée et suivez les instructions à l’écran.
1
Allumez le caisson de graves et réglez le volume à moitié. Si
la fréquence de coupure est réglable, réglez-la sur la valeur
maximale.
2
Placez le microphone YPAO sur la position d’écoute et
branchez-le sur la prise YPAO MIC sur le panneau avant.
L’écran
8
-1 apparaît sur le téléviseur.
Placez le microphone YPAO à votre position d’écoute (à hauteur d’oreilles).
Nous conseillons l’utilisation d’un trépied comme support de microphone.
Lorsque vous utilisez un trépied, utilisez les vis de ce dernier pour stabiliser
le microphone.
3
Appuyez sur SETUP.
La mesure commence dans les 10secondes.
La mesure dure environ 3minutes.
Lorsque la mesure est terminée, l’écran
8
-2 apparaît sur le moniteur TV.
Si un message d’erreur (comme E-1) ou un message d’avertissement
(comme W-2) apparaît, voir «Messages d’erreur» ou «Messages
d’avertissement» dans le Mode d’emploi.
4
Conrmez les résultats affichés sur l’écran et appuyez sur
ENTER.
5
Utilisez les touches du curseur (e/r) pour sélectionner
«SAVE» (Save) et appuyez sur ENTER.
6
Débranchez le microphone YPAO de l’unité.
Ne laissez pas le microphone YPAO dans un endroit où il sera exposé aux
rayons directs du soleil ou à une température élevée pendant une période
prolongée.
L’optimisation des réglages d’enceintes est maintenant terminée.
9
Lecture d’un disque BD/DVD
À présent, lisons un disque BD/DVD.
Nous vous recommandons de lire le son multivoie (5.1 voies ou
plus) pour sentir le son d’ambiance émis par l’unité.
1
Allumez le lecteur de disques BD/DVD.
2
Appuyez sur HDMI 1.
«HDMI 1» est sélectionné comme source d’entrée. Le nom de l’appareil
connecté, par exemple «BD Player», peut s’afficher pour certains
appareils.
3
Lancez la lecture sur le lecteur de disques BD/DVD.
4
Appuyez à plusieurs reprises sur STRAIGHT pour
sélectionner «STRAIGHT».
Lorsque «STRAIGHT» (décodage direct) est activé, chaque enceinte
produit directement le signal audio de sa propre voie (sans traitement du
champ sonore).
5
Appuyez sur VOLUME pour régler le volume.
Ceci termine la procédure de configuration de base.
Si vous n’entendez pas le son d’ambiance ou si aucun son n’est émis d’une
enceinte spécifique, voir «Guide de dépannage» dans le Mode d’emploi.
The network name of the unit
is displayed where “
*****
” is
indicated.
Le nom de réseau de l’unité s’affiche
là où est indiqué «
*****
».
Press the cursor key (w).
Appuyez sur la touche du
curseur (w).
Documenttranscriptie
English Français AV Receiver/Ampli-tuner audio-vidéo 4 HDMI output Sortie HDMI 5 -1 BD/DVD player Lecteur de disques BD/DVD HDMI RX-A550 Easy Setup Guide/Manuel de configuration rapide HDMI input Entrée HDMI HDMI HDMI © 2015 Yamaha Corporation Printed in Malaysia ZQ10680 LAN HDMI output Sortie HDMI Satellite/cable set top box Décodeur satellite/câble Network cable Câble de réseau HDMI Router Routeur UCAB TV Téléviseur 1 HDMI 5 -2 Internet Internet Modem Modem HDMI The unit L’unité HDMI HDMI 6 HDMI To an AC wall outlet Branchement sur une prise secteur 2 1 9 3 2 3 1 Audio pin cable Câble de broche audio 3 5 4 10° to 30° 10° à 30° Use a subwoofer equipped with built-in amplifier. Utilisez un caisson de graves équipé d’un amplificateur intégré. 10 mm (3/8”) 10 mm 2 4 z SLEEP HDMI 1 2 3 4 5 6 1 2 3 4 5 6 FM AM BLUETOOTH USB NET AUX BD DVD TV AV 9 2 1 3 5 4 Subwoofer Caisson de graves Front speaker (R) Enceinte avant (D) Front speaker (L) Enceinte avant (G) Center speaker Enceinte centrale Surround speaker (R) Enceinte d’ambiance (D) Surround speaker (L) Enceinte d’ambiance (G) SCENE PROGRAM English NET MUTE RADIO VOLUME Français Read the supplied booklet “Safety Brochure” before using the unit. This document explains how to set up a 5.1-channel system and play back surround sound from a BD/DVD on the unit. For more information about this product, refer to the Owner’s Manual included on the supplied CD-ROM. The latest Owner’s Manual can be downloaded from the following website. http://download.yamaha.com/ [For U.S. customers only] Visit the following website for additional information, FAQ’s, downloads such as “Owner’s Manual” and product updates. http://usa.yamaha.com/support/ AV SETUP GUIDE AV SETUP GUIDE is an app that guides you through the process of connecting a TV or playback device, such as a BD/DVD or CD player, and speakers to the AV receiver, and configuring the settings for the AV receiver. Search “AV SETUP GUIDE” on the App Store or Google Play for details. 1 Accessories used with this document 1 Remote control 2 Batteries (AAA, R03, UM-4) (x2) 3 YPAO microphone The following cables (not supplied) are required to build the system described in this document. • Speaker cables (depending on the number of speakers) • Audio pin cable (x1) • HDMI cables (x3) • Network cable (x1) (when connecting to a router via a network cable) 2 Placing speakers Set up the speakers in the room using the diagram as a reference. 1 Front speaker (L) 2 Front speaker (R) 3 Center speaker 4 Surround speaker (L) 5 Surround speaker (R) 9 Subwoofer 3 Connecting speakers/subwoofer • U.S.A. and Canada models only When connecting 6-ohm speakers, set the unit’s speaker impedance to “6 Ω MIN”. For details, see “Setting the speaker impedance” in the Owner’s Manual. • Before connecting the speakers, remove the unit’s power cable from the AC wall outlet and turn off the subwoofer. • Ensure that the core wires of the speaker cable do not touch one another or come into contact with the unit’s metal parts. Doing so may damage the unit or the speakers. If the speaker cables short circuit, “Check SP Wires” will appear on the front display when the unit is turned on. 4 Connecting external devices Refer to the Owner’s Manual for details regarding the connection of devices that support HDCP 2.2. 5 Establishing a network connection Establish wired network connection 5 -1, or a wireless network connection 5 -2, in accordance with your network environment. 5 -1 Wired network connection 5 -2 Wireless network connection Raise the wireless antenna so that it is standing up straight. (Procedures for connecting the unit to a wireless router are described in step 7 .) Do not apply excessive force on the antenna. Doing so may damage it. 6 Connecting the power cable to an AC wall outlet, and turning on the unit 1 2 Press z (receiver power) to turn on the unit. Turn on the TV and switch the TV input to display video from the unit (HDMI OUT jack). Lisez le livret fourni « Brochure sur la Sécurité » avant d’utiliser l’unité. Ce document décrit la configuration d’un système à 5.1 voies et explique comment restituer le son d’ambiance d’un disque BD/DVD sur l’unité. Pour de plus amples informations sur ce produit, reportez-vous au Mode d’emploi inclus sur le CD-ROM fourni. Vous pouvez télécharger le Mode d’emploi le plus récent depuis le site Web suivant. http://download.yamaha.com/ AV SETUP GUIDE AV SETUP GUIDE est une app qui vous guide à travers le processus de connexion d’un téléviseur ou d’un appareil de lecture, comme un lecteur BD/DVD ou CD, et des enceintes à l’ampli-tuner audio-vidéo et de la configuration des réglages pour l’ampli-tuner audio-vidéo. Recherchez « AV SETUP GUIDE » sur l’App Store ou Google Play pour en savoir plus. 1 Accessoires utilisés avec ce document 1 Télécommande 2 Piles (AAA, R03, UM-4) (x2) 3 Microphone YPAO Les câbles suivants (non fournis) sont nécessaires pour réaliser le système décrit dans ce document. • Câbles d’enceinte (en fonction du nombre d’enceintes) • Câble de broche audio (x1) • Câbles HDMI (x3) • Câble réseau (x1) (pour la connexion à un routeur via un câble réseau) 2 Positionnement des enceintes Configurez les enceintes dans la pièce en vous servant du schéma comme référence. 1 Enceinte avant (G) 2 Enceinte avant (D) 3 Enceinte centrale 4 Enceinte d’ambiance (G) 5 Enceinte d’ambiance (D) 9 Caisson de graves 3 Raccordement des enceintes ou du caisson de graves • Modèles pour les États-Unis et le Canada uniquement Lorsque vous raccordez des enceintes 6 ohms, réglez l’impédance d’enceinte de l’unité sur « 6 Ω MIN ». Pour en savoir plus, voir « Réglage de l’impédance des enceintes » dans le Mode d’emploi. • Débranchez le câble d’alimentation de l’unité de la prise secteur et éteignez le caisson de graves avant de raccorder les enceintes. • Veillez à ce que les fils conducteurs du câble de l’enceinte ne se touchent pas ou n’entrent pas en contact avec les parties métalliques de l’unité. Ce contact risque d’endommager l’unité ou les enceintes. Si un court-circuit survient au niveau des câbles de l’enceinte, le message « Check SP Wires » apparaît sur l’afficheur de la face avant lors de la mise sous tension de l’unité. TOP MENU POP-UP/MENU 4 Raccordement des appareils externes SETUP OPTION ENTER d’emploi pour en savoir plus sur la connexion Consultez le Mode d’appareils prenant en charge HDCP 2.2. DISPLAY RETURN 5 Établissement d’une connexion réseau RED GREEN YELLOW BLUE MEMORY Établissez une connexion réseau câblée 5 -1 ou une connexion 5 -2 en fonction de votre environnement réseau. réseau sans fil TUNING PRESET HOME 5 -1 Connexion réseau câblée STRAIGHT DIRECT ENHANCER BASS 5 -2 Connexion réseau sans fil RAV546 ZQ56680 Relevez l’antenne sans fil de sorte qu’elle soit droite. (La marche à suivre pour connecter l’unité à un routeur sans fil est décrite à l’étape 7 .) N’exercez pas une force excessive sur l’antenne, sous peine de l’endommager. 6 Raccordement du câble d’alimentation à une prise secteur et mise sous tension de l’unité 1 2 Appuyez sur z (alimentation de l’ampli-tuner) pour mettre l’unité sous tension. Mettez le téléviseur sous tension et changez la source d’entrée afin d’afficher l’image à partir de l’unité (prise HDMI OUT). English Français SLEEP HDMI 3 HDMI 1 1 2 4 5 6 1 2 3 4 5 6 FM AM BLUETOOTH USB NET AUX AV 7 Connecting the unit to a wireless network BD DVD Skip this step and proceed to step 8 when the unit is connected to a router via a network cable ( 5 -1). The Wireless Accessory Configuration (WAC) screen 7 -1 is displayed on the TV when the unit is turned on for the first time after purchase. It may take several tens of seconds for the screen to be displayed. TV PROGRAM NET Press the cursor key (w) when the WAC screen 7 -1 is displayed on the TV, and confirm the unit’s network name displayed in the screen 7 -2. 2 Select the unit’s name from “SET UP NEW AIRPLAY SPEAKER” in the Wi-Fi screen on the iOS device, and tap “Next”. RED 2 3 Press and hold the INFO (WPS) key on the unit’s front panel for more than 3 seconds. “Press WPS button on Access Point” will be displayed in the front display. Push the WPS button on the wireless router. When setup is complete and a connection has been established, “Completed” will be displayed in the front display. Follow the instructions displayed on the iOS device screen to configure the settings. YELLOW BLUE HOME TUNING STRAIGHT DIRECT ENHANCER Cursor keys Suivez la procédure A si vous utilisez un périphérique iOS pour vous connecter à un réseau sans fil. Suivez la procédure B si vous vous connectez à un routeur sans fil (point d’accès) compatible WPS. Appuyez sur ENTER si une méthode de connexion sans fil autre que A ou B ci-dessous est utilisée et suivez les instructions à l’écran. Touches de curseur RETURN PRESET BASS Sautez l’étape et passez à l’étape 8 si l’unité est connectée à un routeur via un câble réseau ( 5 -1). L’écran Wireless Accessory Configuration (WAC) 7 -1 s’affiche sur le téléviseur lors de la première mise sous tension de l’unité après l’achat. L’affichage de l’écran peut prendre plusieurs dizaines de secondes. A Partage des réglages du périphérique iOS STRAIGHT B Utilisation de la configuration à l’aide du boutonpoussoir WPS RAV546 Wireless connection can be configured with one push of the WPS button on the wireless router (access point). Press RETURN to cancel WAC when the screen 7 -1 is displayed on the TV. GREEN Connexion de l’unité à un réseau sans fil Si l’écran WAC ne s’affiche pas, configurez les réglages du réseau sans fil depuis le menu de configuration. Voir « Raccordement à un périphérique de réseau sans fil » dans le Mode d’emploi. ENTER DISPLAY MEMORY B Using WPS push-button configuration 1 SETUP OPTION ENTER Follow procedure A when using an iOS device to connect to a wireless network. Follow procedure B when connecting to a wireless router (access point) that supports WPS. Press ENTER if a wireless connection method other than A or B below will be used, and follow the on-screen instructions. Wireless connection settings on iOS devices (iPhone/iPod touch)* can easily be applied to the unit. * An iOS device running iOS 7 or later is required. Confirm that the iOS device is connected to the wireless router before proceeding with configuration. VOLUME (+/-) POP-UP/MENU SETUP RETURN A Sharing iOS device settings RADIO VOLUME MUTE TOP MENU If the WAC screen is not displayed, configure wireless network settings from the setup menu. See “Connecting to a network device wirelessly” in the Owner’s Manual. 1 7 SCENE ZQ56680 7 -1 Les réglages de connexion sans fil sur les périphériques iOS (iPhone/ iPod touch)* peuvent être facilement appliqués à l’unité. * Un périphérique iOS exécutant iOS 7 ou ultérieur est nécessaire. Confirmez que le périphérique iOS est connecté au routeur sans fil avant de poursuivre la configuration. 7 -2 Network Setup WAC Network Setup Press the cursor key (w). Appuyez sur la touche du curseur (w). You can share the network’s wireless (Wi-Fi) settings with this device using a device with iOS7 or later. NEXT BACK Select this device from iOS device’s Wi-Fi settings, and then follow the instructions on the device to complete setup. To perform network setup using another method, press ENTER. 2 Network name of this device ******* ****** OTHER:ENTER CANCEL:RETURN CANCEL:RETURN English Language 1 WAC If “Not connected” is displayed, repeat the process from step 1 or try another connection method. Appuyez sur la touche du curseur (w) lorsque l’écran WAC 7 -1 s’affiche sur le téléviseur et confirmez le nom de réseau de l’unité affiché sur l’écran 7 -2. Sélectionnez le nom de l’unité dans « SET UP NEW AIRPLAY SPEAKER » sur l’écran Wi-Fi du périphérique iOS et touchez « Next ». Il est possible de configurer la connexion sans fil en appuyant sur le bouton WPS situé sur le routeur sans fil (point d’accès). 1 2 Maintenez enfoncée la touche INFO (WPS) sur le panneau avant de l’unité pendant plus de 3 secondes. « Press WPS button on Access Point » s’affichera sur le panneau avant. 3 Appuyez sur le bouton WPS du routeur sans fil. Une fois que la configuration est terminée et qu’une connexion est établie, « Completed » s’affiche sur le panneau avant. Suivez les instructions affichées sur l’écran du périphérique iOS pour configurer les réglages. The network name of the unit is displayed where “ *****” is indicated. Le nom de réseau de l’unité s’affiche là où est indiqué « ». Appuyez sur RETURN pour annuler WAC lorsque l’écran s’affiche sur le téléviseur 7 -1. Si « Not connected » s’affiche, recommencez depuis l’étape 1 ou essayez une autre méthode de connexion. ***** 8 Optimizing the speaker settings automatically (YPAO) Turn on the subwoofer and set the volume to half. If the crossover frequency is adjustable, set it to maximum. 2 Place the YPAO microphone at your listening position and connect it to the YPAO MIC jack on the front panel. The screen 8 -1 appears on the TV. Place the YPAO microphone at your listening position (same height as your ears). We recommend the use of a tripod as a microphone stand. You can use the tripod screws to stabilize the microphone. 3 The unit L’unité Press SETUP. The measurement will start in 10 seconds. It takes about 3 minutes to measure. The screen 8 -2 appears on the TV when the measurement finishes. • Stay in a corner of the room behind the listening position so that you do not become an obstacle between speakers and the YPAO microphone. • Do not connect headphones. 4 5 6 Confirm the results displayed on the screen and press ENTER. 1 MIN MAX 9 Ear height Hauteur d’oreille 4 1 5 2 Listening position Position d’écoute Disconnect the YPAO microphone from the unit. 8 -1 8 -2 3 1 2 3 4 Playing back a BD/DVD Now let’s play back a BD/DVD. We recommend playing back multichannel audio (5.1-channel or more) to feel surround sound produced by the unit. Turn on the BD/DVD player. Press HDMI 1. “HDMI 1” is selected as the input source. The name of the connected device, such as “BD Player”, may be displayed with some devices. 5 Playing back music stored on a Bluetooth device 1 2 Press STRAIGHT repeatedly to select “STRAIGHT”. Press VOLUME to adjust the volume. This completes the basic setup procedure. When surround sound is not heard, or no sound is output from a specific speaker, see “Troubleshooting” in the Owner’s Manual. Placez le microphone YPAO sur la position d’écoute et branchez-le sur la prise YPAO MIC sur le panneau avant. Placez le microphone YPAO à votre position d’écoute (à hauteur d’oreilles). Nous conseillons l’utilisation d’un trépied comme support de microphone. Lorsque vous utilisez un trépied, utilisez les vis de ce dernier pour stabiliser le microphone. Appuyez sur SETUP. 4 5 6 Confirmez les résultats affichés sur l’écran et appuyez sur ENTER. Utilisez les touches du curseur (e/r) pour sélectionner « SAVE » (Save) et appuyez sur ENTER. Débranchez le microphone YPAO de l’unité. Ne laissez pas le microphone YPAO dans un endroit où il sera exposé aux rayons directs du soleil ou à une température élevée pendant une période prolongée. L’optimisation des réglages d’enceintes est maintenant terminée. Si un message d’erreur (comme E-1) ou un message d’avertissement (comme W-2) apparaît, voir « Messages d’erreur » ou « Messages d’avertissement » dans le Mode d’emploi. Start playback on the BD/DVD player. When “STRAIGHT” (straight decode) is enabled, each speaker produces each channel audio signal directly (without sound field processing). Allumez le caisson de graves et réglez le volume à moitié. Si la fréquence de coupure est réglable, réglez-la sur la valeur maximale. • Restez dans un coin de la pièce derrière la position d’écoute afin de ne pas faire obstacle entre les enceintes et le microphone YPAO. • Ne raccordez pas d’écouteurs. La mesure commence dans les 10 secondes. La mesure dure environ 3 minutes. Lorsque la mesure est terminée, l’écran 8 -2 apparaît sur le moniteur TV. If any error message (such as E-1) or warning message (such as W-2) appears, see “Error messages” or “Warning messages” in the Owner’s Manual. 9 La fonction Yamaha Parametric room Acoustic Optimizer (YPAO) permet de détecter les raccordements des enceintes et de mesurer la distance entre ces dernières et la position d’écoute. Elle optimise ensuite automatiquement les réglages des enceintes tels que les paramètres d’équilibre du volume et les paramètres acoustiques qui conviennent à la pièce. L’écran 8 -1 apparaît sur le téléviseur. YPAO microphone Microphone YPAO Do not leave the YPAO microphone in a place where it will be exposed to direct sunlight or high temperature for an extended period of time. Optimisation automatique des réglages d’enceintes (YPAO) Veuillez noter les points suivants concernant la mesure YPAO • Les signaux tests étant émis à un volume élevé, ils peuvent surprendre ou effrayer les jeunes enfants. • Le volume du signal test ne peut pas être réglé. • Faites en sorte que la pièce soit le plus calme possible. 3 CROSSOVER/ HIGH CUT MIN 2 MAX Use the cursor keys (e/r) to select “SAVE” (Save) and press ENTER. This completes optimization of the speaker settings. 8 VOLUME The Yamaha Parametric room Acoustic Optimizer (YPAO) function detects speaker connections, measures the distances from them to your listening position(s), and then automatically optimizes the speaker settings, such as volume balance and acoustic parameters, to suit your room. Note the following regarding YPAO measurement • Test tones are output at high volume and may surprise or frighten small children. • Test tone volume cannot be adjusted. • Keep the room as quiet as possible. 1 8 3 Playing back music stored on a Bluetooth device 1 Press BLUETOOTH to select “Bluetooth” as the input source. Turn on the Bluetooth function on your device, and select the model name of the unit from the Bluetooth device list on your device. After pairing has been completed and the unit is connected to the Bluetooth device, “Connected” appears in the front display. If the pass key is required, enter the number “0000”. On the Bluetooth device, select a song and start playback. Refer to the Owner’s Manual for details regarding the Bluetooth function. 2 1 2 ------- BLUETOOTH Remote control Télécommande Bluetooth device Périphérique Bluetooth The unit’s model name is displayed where “-------” is indicated above. Le nom de modèle de l’unité s’affiche là où « ------- » est indiqué ci-dessus. 3 Press BLUETOOTH to select “Bluetooth” as the input source. Turn on the Bluetooth function on your device, and select the model name of the unit from the Bluetooth device list on your device. After pairing has been completed and the unit is connected to the Bluetooth device, “Connected” appears in the front display. If the pass key is required, enter the number “0000”. 9 1 2 3 4 On the Bluetooth device, select a song and start playback. Refer to the Owner’s Manual for details regarding the Bluetooth function. 5 Lecture d’un disque BD/DVD À présent, lisons un disque BD/DVD. Nous vous recommandons de lire le son multivoie (5.1 voies ou plus) pour sentir le son d’ambiance émis par l’unité. Allumez le lecteur de disques BD/DVD. Appuyez sur HDMI 1. « HDMI 1 » est sélectionné comme source d’entrée. Le nom de l’appareil connecté, par exemple « BD Player », peut s’afficher pour certains appareils. Lancez la lecture sur le lecteur de disques BD/DVD. Appuyez à plusieurs reprises sur STRAIGHT pour sélectionner « STRAIGHT ». Lorsque « STRAIGHT » (décodage direct) est activé, chaque enceinte produit directement le signal audio de sa propre voie (sans traitement du champ sonore). Appuyez sur VOLUME pour régler le volume. Ceci termine la procédure de configuration de base. Si vous n’entendez pas le son d’ambiance ou si aucun son n’est émis d’une enceinte spécifique, voir « Guide de dépannage » dans le Mode d’emploi.-
 1
1
-
 2
2


Yamaha RX-A550 Installatie gids
- Categorie
- AV-ontvangers
- Type
- Installatie gids
in andere talen
- English: Yamaha RX-A550 Installation guide
- italiano: Yamaha RX-A550 Guida d'installazione
- français: Yamaha RX-A550 Guide d'installation
- Deutsch: Yamaha RX-A550 Installationsanleitung
- dansk: Yamaha RX-A550 Installationsvejledning
- suomi: Yamaha RX-A550 Asennusohje
- svenska: Yamaha RX-A550 Installationsguide
Gerelateerde papieren
-
Yamaha RX-A3050 Installatie gids
-
Yamaha RX-V583 Snelstartgids
-
Yamaha RX-V483 de handleiding
-
Yamaha RX-A770BL Gebruikershandleiding
-
Yamaha RX-V683 Snelstartgids
-
Yamaha RX-A770 Snelstartgids
-
Yamaha RX-A1070 Snelstartgids
-
Yamaha RX-A3070 Snelstartgids
-
Yamaha RX-S602 Snelstartgids
-
Yamaha RX-A680 Snelstartgids