
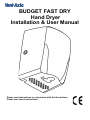
BUDGET FAST DRY
Hand Dryer
Installation & User Manual
Please read instructions in conjunction with the illustrations
Please save these instructions.

2
Safety & Guidance notes
Important:- Read all these instructions before commencing the installation.
•
All wiring of this hand dryer should be in accordance with the current IEE regulations, or the
appropriate standards in your country.
•
This hand dryer MUST be installed by a suitably qualified person.
•
Ensure that the mains supply (voltage, frequency, and phase) complies with the hand dryers
rating label.
•
This appliance is not intended for use by persons (including children) with reduced physical,
sensory or mental capabilities, or lack of experience and knowledge, unless they have been
given supervision or instruction concerning use of the appliance by a person responsible for
their safety.
•
Children should be supervised to ensure that they do not play with the appliance.
•
Do not allow hand dryer to get excessively wet.
•
Do not modify and disassemble the unit unnecessarily.
•
The hand dryer should be provided with a fused spur, isolator switch capable of disconnecting
all poles, having a contact separation of at least 3mm.
•
Ensure the hand dryer is properly earthed
•
Always use the hand dryer with the air filter provided.
•
Wear gloves when inspecting and cleaning the unit.
•
If the supply cord is damaged, it must be replaced by a suitably qualified service engineer in
order to avoid a hazard.
•
For additional protection, the installation of a residual current device (RCD) having a rated
residual operating current not exceeding 30mA is advisable in the electrical circuit supplying the
dryer.
•
Do not use the hand dryer in the following places:-
Where the ambient temperature is below 10°C or above 40°C
Where the hand dryer may come into direct contact with water
Where the unit is under direct or strong sunlight
Where condensation may form within the unit.
Locations where corrosive, neutral, or reductive gases are present.
Features
•
“No touch” hand drying ensures complete hygiene.
•
Economical high speed drying only “10 seconds”
•
Built in tamper-proof timer function (The built in timer will stop the unit after 40 seconds).
•
Fitted with air filter to remove dust.
•
Heat on/off option via internal switch
•
Automatic heating system. (when the washroom is cold the heating system will be
activated, when the room is hot the heating system will shutdown).
•
Internal UV protection.
Specifications
Rated voltage
220-240V ~
Motor
Brush motor
Input power
1150 – 1350W
Sensing distance
15-20cm
Air velocity
60 m/S
Protection class
IPX1
Heating power
650 – 750W
Dimensions
260x180x152
Net weight
3.0kg

3
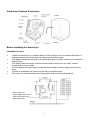
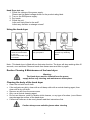
Hand dryer Features & functions
Before installing the hand dryer
Installation location
• Install the hand dryer in a location where it will be easy to use, and ensure that there is
adequate space around the dryer for cleaning and maintenance.
• The distance between the base of the hand dryer and any other surface must be greater
than 400mm.
• The sides of the hand dryer must be at least 100mm away from any walls, to allow
access to the cover screws
• Avoid installing the hand dryer in locations where people or doors might bump into the
dryer.
• Choose a completely flat surface on the wall to install the dryer.
• See below for recommended mounting heights, and mounting hole positions.
Hole position for
single gang junction box
(when using rear entry
cable knockout)
Cover
Heating
switch
Allen key

4
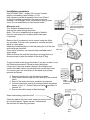
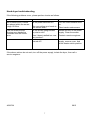
Installation procedure
Use 220-240V 50Hz ~ supply (Do not use if power
supply is exceeding rated voltage +/-10%.
Use a power cord that is between 2mm² and 2.5mm²
(A drop in voltage is possible if the power cord run
exceeds 11m in length, so we recommend using 2.5mm²
cord). Do not install above a fixed socket outlet.
Wiring the unit
Fit a suitable recessed back box
And run the cable through as shown.
Note:- The unit is supplied with a length of flexible
Cord for connecting to a suitably rated fused spur
if required).
Remove the 2 countersunk cover screws using the Allen
key provided. Pull the cover upwards to remove and then
place in a safe place.
Attach the baseplate/dryer to the wall using the 4 off screws
and wall plugs provided.
If the wall is concrete, use commercially available metal
screw plugs.
(Make sure that the wall the hand dryer is being fixed to is
strong enough to take the weight of the dryer 3.0kg)
To gain access to the wiring terminals (If you do not wish to use
the fitted cord provided). Please proceed as follows
Loosen the 3 terminal screws holding in the flexible cord.
Loosen the cable clamp and carefully pull out the fitted cord.
To connect your own cord direct to the hand dryer please
proceed as follows.
1. Remove knockout in rear of hand dryer base.
2. Pass power lead through the hole and up to the terminal
block.
3. Strip off the outer and inner insulation as required.
4. Connect the power cord to the terminal block as follows
Brown to live “L”, Green/Yellow to Earth “ “and Blue to
Netural “N”.
5. Ensure the cable clamp is fitted and tight.
Select heat setting required on/off
Carefully replace the front cover making sure the wires
do not get trapped. Tighten up the 2 countersunk
Screws with the allen key provided.
*See recommended
Mounting heights on
Page 3.
Rear
Cable entry
knockout
Allen
key
Cover
Allen key

5
provided

6
Hand Dryer test run.
1. Check the voltage of the power supply.
Please use the stated voltage shown on the product rating label.
2. Turn on the RCD/power supply.
3. Dry hands.
4. Check the unit.
Is the unit firmly fitted to the wall?
Is their any vibration or strange noises?
Using the hand dryer
Note:- This hand dryer is fitted with an Auto-stop function. The dryer will stop working after 40
seconds, once activated. Remove hands from sensor area and then try again.
Routine Cleaning & Maintenance of the hand dryer
Warning:-
The Hand dryer must be isolated from the power
supply before any cleaning and maintenance takes place.
Cleaning the body of the hand dryer
• Clean the unit with a soft cloth.
• If the unit gets very dirty, clean with a soft damp cloth with a neutral cleaning agent, then
clean with a dry soft cloth.
• Remove any dirt from the sensor area.
• Only use a neutral cleaning agent.
• Do not use thinners, acidic or alkaline toilet cleaners, or any type of brushes. (use of these
may damage the surface of the hand dryer.
• If chemical cloths are to be used, please read their instructions first.
Caution always wear suitable gloves when cleaning
1.After washing hands
shake off excess water
in the sink.
Place hands under dryer
to Activate.
2. Turn hands over to
Dry your palms.
3. Rub hands together to
remove any remaining
water.

7
Hand dryer troubleshooting
If the following problems occur, please perform checks as follows.
Problem
Check
Action
No air blows even if hands
are placed within the sensor
range 15-20cm
Is the power switched on?
Are you putting your hands in
the sensor area?
Turn the circuit breaker/RCD
on.
Place hands under sensor.
The unit does not stop
blowing once hands are
removed from the sensor
area.
Is the sensor being blocked
by dust or dirt?
Has it been installed too near
any surface?
Isolate and turn of the power
supply. Clean the sensor.
Contact a service engineer
Airflow is cold.
Has the heater switch been
turned off?
Isolate and turn off the power
supply, remove cover, and
check heater switch position.
If the above actions do not work, turn off the power supply, isolate the dryer, then call a
service engineer.
409472A 0815

8
Afvoer
Disposal
This product should not be disposed of with household waste. Please recycle
where facilities exist. Check with your local authority for recycling advice.
Voor meer informatie over de garantie en de retourprocedure, ga naar:
www.vent-axia.be, www.vent-axia.nl of www.vent-axia.de
409472A 0815
De garantie
Alleen van toepassing op in België, Nederland of Duitsland geïnstalleerde en gebruikte producten. Neem contact op met
uw plaatselijke leverancier voor meer informatie over de garantie buiten deze landen.
Vent-Axia garandeert zijn producten tegen materiaalgebreken en fabricagefouten gedurende vijf jaar vanaf de
aankoopdatum en tot maximaal 30 maanden na productiedatum. De kosten van demontage en montage vallen buiten de
garantie.
Indien een onderdeel defect wordt bevonden, wordt het product kosteloos hersteld of, naar keuze van Vent-Axia, gratis
vervangen mits dit product:
• werd geïnstalleerd en gebruikt overeenkomstig de bij elke unit geleverde instructies;
• werd aangesloten op een geschikte elektrische voeding (de juiste spanning staat vermeld op het identificatieplaatje van
de unit);
• juist werd gebruikt, niet werd verwaarloosd noch werd beschadigd;
• niet werd gewijzigd/omgebouwd of hersteld door een niet daartoe gemachtigde persoon;
• onderdelen zijn gebruikt die voorgeschreven en geleverd werden door de fabrikant.
• exclusief motor borstels door slijtage
AANSPRAAK OP GARANTIE
Retourneer het volledige product per post, port betaald, naar uw oorspronkelijke leverancier of naar de dichtstbijzijnde
vestiging van Vent-Axia, of breng dit persoonlijk binnen. Zorg ervoor dat het product goed is ingepakt en vergezeld gaat
van een brief waarop duidelijk “Aanspraak op garantie” vermeld staat en waarin een nauwkeurige beschrijving wordt
gegeven van de storing. Voeg tevens het aankoopbewijs bij waarop de datum en plaats van aankoop zijn aangegeven.
Vent-Axia behoudt zich het recht op productwijzigingen en software-updates zonder de noodzaak om eerder geleverde
producten te updaten.
De garantie geldt als extra voordeel en doet geen afbreuk aan uw wettelijke rechten.
-
 1
1
-
 2
2
-
 3
3
-
 4
4
-
 5
5
-
 6
6
-
 7
7
-
 8
8


in andere talen
Gerelateerde papieren
Andere documenten
-
American Dryer AD-235 Handleiding
-
Miele Professional PT 8807 de handleiding
-
Indesit IDCE G45X B H PS(NL) Gebruikershandleiding
-
-
Indesit IDCE 8454X A PS (NL) Gebruikershandleiding
-
Candy EVOC 780BT-S Handleiding
-
Indesit FTCF 87B 6HY (EU) Gebruikershandleiding
-
Proline VDEP65-E Handleiding
-
 CombiSteel JET FLOW Handleiding
