
PROPERTY OF
CL N° REV. DATE
SPECIFICATION
1/1
MODIFY DESCRIPTION
MODIFIED BY
BASE CODE
TREATMENT
MATERIAL
DATE SIGNATURE
DRAWN
CHECKED
FOR
WEIGHT SCALE
SIZE
NAME
(LOCAL LANGUAGE)
PART CODE
SHEET
REPLACE No ORIGIN CL No Class Specification
RELEASE LEVEL
WITHOUT OUR WRITTEN CONSENT IS FORBIDDEN
ALL RIGHTS RESERVED, THE REPRODUCTION OF ANY PART
OF EU DIRECTIVE 2002/95/CE + AMENDMENTS
MATERIALS IN COMPLIANCE WITH REQUIREMENTS
A4
------------
21.10.2020
USER MANUAL C HNMEE07
61420
21.10.2020
C.FİDANCI
K.ÖZGÜR
USER MANUAL C HNMEE07
OVEN
GENERAL TOLERANCE
ISO 2768 - m
Printing Color
Grey Scala
-
SC 000-000
PRODUCTION RELEASED
------------
A
B
C
D
E
4 2 8 3 7 1 4 6
White Paper
2 2
52 gr/m - 70 gr/m

FORNI
ISTRUZIONI PER L'USO
IT
FOURS ENCASTRABLES
NOTICE D’EMPLOI ET D’INSTALLATION
FR
NAVODILO ZA UPORABO
VEČNAMENSKE VGRADNE PEČICE
SI
ФУРНИ
ИНСТРУКЦИИ ЗА ПОТРЕБИТЕЛЯ
BG
08
HORNOS EMPOTRABLES
INSTRUCCIONES DE USO
ES
20
14
26
32
OVENS
USER INSTRUCTIONS
GB
02
0002-1576
CANDY HOOVER GROUP S.R.L. • Via Comolli 16 • 20861 Brugherio (MB) Italy
OVEN
GEBRUIKSAANWIJZING
NL
23
NL
38

• During cooking, moisture may condense inside
the oven cavity or on the glass of the door. This is
a normal condition. To reduce this effect, wait 10-
15 minutes after turning on the power before
putting food inside the oven. ln any case, the
condensation disappears when the oven reaches
the cooking temperature.
• Cook the vegetables in a container with a lid
instead of an open tray.
• Avoid leaving food inside the oven after cooking
for more than 15/20 minutes.
• WARNING: the appliance and accessible parts
become hot during use. Be careful not to touch
any hot parts.
• WARNING: the accessible parts can become
hot when the grill is in use. Children should be
kept at a safe distance.
• WARNING: ensure that the appliance is
switched off before replacing the bulb, to avoid
the possibility of electric shocks.
• WARNING: in order to avoid any danger caused
by the accidental resetting of the thermal
interruption device, the appliance should not be
powered by an external switching device, such as
a timer, or be connected to a circuit that is
regularly switched on and off.
• Children under 8 should be kept at a safe
distance from the appliance if not continuously
supervised.
• Children should not play with the appliance.
• The appliance can be used by those aged 8 or
over and by those with limited physical, sensorial
or mental capacities, without experience or
knowledge of the product, only if supervised or
provided with instruction as to the operation of the
appliance, in a safe way with awareness of the
possible risks.
• Cleaning and maintenance should not be
carried out by unsupervised children.
• Do not use rough or abrasive materials or sharp
metal scrapers to clean the oven door glasses, as
they can scratch the surface and cause the glass
to shatter.
• The oven must be switched off before removing
the removable parts. After cleaning, reassemble
them according the instructions.
• Only use the meat probe recommended for this
oven.
• Do not use a steam cleaner for cleaning
operations.
• Connect a plug to the supply cable that is able to
bear the voltage, current and load indicated on
the tag and having the earth contact. The socket
must be suitable for the load indicated on the tag
and must have ground contact connected and in
operation. The earth conductor is yellow-green in
colour. This operation should be carried out by a
suitably qualified professional. ln case of
incompatibility between the socket and the
appliance plug, ask a qualified electrician to
substitute the socket with another suitable type.
The plug and the socket must be conformed to the
current norms of the installation country.
Connection to the power source can also be
made by placing an omnipolar breaker between
the appliance and the power source that can bear
the maximum connected load and that is in line
with current legislation. The yellow-green earth
cable should not be interrupted by the breaker.
The socket or omnipolar breaker used for the
connection should be easily accessible when the
appliance is installed.
• The disconnection may be achieved by having
the plug accessible or by incorporating a switch in
the fixed wiring in accordance with the wiring
rules.
• lf the power cable is damaged, it should be
substituted with a cable or special bundle
available from the manufacturer or by contacting
the customer service department. The type of
power cable must be H05V2V2-F. This operation
should be carried out by a suitably qualified
professional. The earth conductor (yellow-green)
must be approximately 10 mm longer than the
other conductors. For any repairs, refer only to the
Customer Care Department and request the use
of original spare parts.
• Failure to comply with the above can
compromise the safety of the appliance and
invalidate the guarantee.
• Any excess of spilled material should be
removed before cleaning.
• A long power supply failure during an occurring
cooking phase may cause a malfunction of the
monitor. ln this case contact customer service.
• The appliance must not be installed behind a
decorative door in order to avoid overheating.
• When you place the shelf inside, make sure that
the stop is directed upwards and in the back of the
cavity. The shelf must be inserted completely into
the cavity.
• WARNING: Do not line the oven walls with
aluminium foil or single-use protection available
from stores. Aluminium foil or any other
protection, in direct contact with the hot enamel,
risk melting and deteriorating the enamel of the
insides.
• WARNING: Never remove the oven door seal.
• CAUTION: Do not refill the cavity bottom with
water during cooking or when the oven is hot.
• No additional operation/setting is required in
order to operate the appliance at the rated
frequencies.
SAFETY INSTRUCTIONS
GB 02

This appliance is marked according to the European directive 2012/19/EU on Waste Electrical and Electronic Equipment (WEEE). WEEE
contains both polluting substances (which can cause negative consequences for the environment) and basic components (which can be re-
used). It is important to have WEEE subjected to specific treatments, in order to remove and dispose properly all pollutants, and recover and
recycle all materials. Individuals can play an important role in ensuring that WEEE does not become an environmental issue; it is essential to
follow some basic rules:
• WEEE shall not be treated as household waste.
• WEEE shall be handed over to the relevant collection points managed by the municipality or by registered companies. In many countries, for large
WEEE, home collection could be present.
• When you buy a new appliance, the old one may be returned to the retailer who has to collect it free of charge on a one-to-one basis, as long as the
equipment is of equivalent type and has the same functions as the supplied equipment.
ENERGY SAVING AND RESPECTING THE ENVIRONMENT
Where possible, avoid pre-heating the oven and always try to fill it. Open the oven door as infrequently as possible, because heat from the cavity
disperses every time it is opened. For a significant energy saving, switch off the oven between 5 and 10 minutes before the planned end of the cooking
time, and use the residual heat that the oven continues to generate. Keep the seals clean and in order, to avoid any heat dispersal outside of the cavity.
If you have an electric contract with an hourly tariff, the "delayed cooking" programme makes energy saving more simple, moving the cooking process
to start at the reduced tariff time slot.
GB 03

Summary
General Warnings
5
1.1 Declaration of compliance
1.2 Safety hints
1.3 Installation
1.4 Fitting the oven into the kitchen unit
1.5 Important
1.6 Connecting to the power supply
1.7 Oven equipment
2.1 Shelf safety system
2.2 Grilling
2.3 The U COOK models
2.4 Cleaning and maintenance
2.5 Service centre
Useful Tips
6
3.1 Using the minute timer
3.2 Using the end of cooking timer
Timer
7
Operating Instructions
7
GB 04

1. GENERAL WARNINGS
Thank you for choosing one of our products. To get the most out of your oven we recommend that you:
• Read the notes in this manual carefully: they contain important instructions on how to install, use and service this oven safely.
• Keep this booklet in a safe place for easy, future reference.
All accessible parts are hot when the appliance is in operation, take care to not touch these elements.
When the oven is first switched on it may give out acrid smelling fumes. This is because the bonding agent for insulating panels around the oven has
been heated up for the first time.
This is a completely normal, if it does occur you merely have to wait for the fumes to clear before putting the food into the oven.
An oven by its very nature becomes very hot. Especially the glass of the oven door.
• By placing the mark on the appliance, we are confirming
compliance to all relevant European safety, health and environmental
requirements which are applicable in legislation for this product.
When you have unpacked the oven, make sure that it has not been
damaged in any way. If you have any doubts at all, do not use it:
contact a professionally qualified person. Keep packing materials
such as plastic bags, polystyrene, or nails out of the reach of children
because they are dangerous for children.
1.1 DECLARATION OF COMPLIANCE
1.2 SAFETY HINTS
•The oven must be used only for the purpose for which it was designed:
it must only be used for cooking food. Any other use, e.g. as a form of
heating, is an improper use of the oven and is therefore dangerous.
•The manufacturers cannot be held responsible for any damage caused
by improper, incorrect or unreasonable use. When using any
electrical appliance you must follow a few basic rules.
– Do not pull on the power cable to remove the plug from the socket.
– Do not touch the oven with wet or damp hands or feet.
– Do not use the oven unless you are wearing something on your feet.
– It is not generally a good idea to use adapters, multiple sockets for
several plugs and cable extensions.
– If the oven breaks down or develops a fault switch it off at the mains
and do not touch it.
•If the cable is at all damaged it must be replaced promptly.
When replacing the cable, follow these instructions. Remove the power
cable and replace it with one of the H05RRF, H05VV-F, H05V2V2-F
type. The cable must be able to bear the electrical current required by
the oven. Cable replacement must be carried out by properly qualified
technicians. The earthing cable (yellow-green) must be 10 mm longer
than the power cable.
Use only an approved service centre for repairs and ensure that only
original parts are used. If the above instructions are not adhered to the
manufacturers cannot guarantee the safety of the oven.
•Do not line the oven walls with aluminium foil or single-use
protection available from stores. Aluminium foil or any other
protection, in direct contact with the hot enamel, risks melting and
deteriorating the enamel of the insides.
1.3 INSTALLATION
Installation is the customer’s responsibility. The manufacturers have no
obligation to carry this out. If the assistance of the manufacturer is
required to rectify faults arising from incorrect installation, this
assistance is not covered by the guarantee.
The installation instructions for professionally qualified personal must
be followed. Incorrect installation may cause harm or injury to people,
animals or belongings. The manufacturer cannot be held responsible
for such harm or injury.
1.4 FITTING THE OVEN INTO THE KITCHEN UNIT
Fit the oven into the space provided in the kitchen unit; it may be fitted
underneath a work top or into an upright cupboard. Fix the oven in
position by screwing into place, using the four fixing holes in the frame.
(Fig.on last page).
To locate the fixing holes, open the oven door and look inside.To allow
adequate ventilation, the measurements and distances indicated in the
diagram on last page must be adhered to when fixing the oven.
Note: For ovens that are combined with a hob unit the instructions
contained in the manual for the hob unit must be followed.
Plug into the power supply. Ensure first that there is a third contact that
acts as earthing for the oven. The oven must be properly earthed.
If the model of oven is not fitted with a plug, fit a standard plug to the
power cable. It must be able to bear the power supply indicated on the
specifications plate. The earthing cable is yellowgreen. The plug must
be fitted by a properly qualified person. If the socket and the plug are
incompatible the socket must be changed by a properly qualified
person.A properly qualified person must also ensure that the power
cables can carry the current required to operate the oven.
An ON/OFF switch may also be connected to the power supply. The
connections must take account of the current supplied and must comply
with current legal requirements. The yellow-green earthing cable must
not be governed by the ON/OFF switch. The socket or the ON/OFF
switch used for connecting to the power supply must be easily
accessible when the oven has been installed.
1.6 CONNECTING TO THE POWER SUPPLY
If the oven is to work properly, the kitchen housing must be suitable. The
panels of the kitchen unit that are next to the oven must be made of a
heat resistant material. Ensure that the glues of units made of veneered
wood can withstand temperatures of at least 120 °C. Plastics or glues
that cannot withstand such temperatures will melt and deform the unit.
Once the oven has been lodged inside the unit, the electrical parts must
be completely insulated. This is a legal safety requirement. All guards
must be firmly fixed into place so that it is impossible to remove them
without using special tools.
Remove the back of the kitchen unit to ensure an adequate current
of air circulates around the oven. The hob must have a rear gap of
at least 45 mm.
1.5 IMPORTANT
Plug into the power supply. Ensure first that there is a third contact that
acts as earthing for the oven. The oven must be properly earthed.
If the model of oven is not fitted with a plug, fit a standard plug to the
power cable. It must be able to bear the power supply indicated on the
specifications plate. The earthing cable is yellowgreen. The plug must
be fitted by a properly qualified person. If the socket and the plug are
incompatible the socket must be changed by a properly qualified
person.A properly qualified person must also ensure that the power
cables can carry the current required to operate the oven.
An ON/OFF switch may also be connected to the power supply. The
connections must take account of the current supplied and must comply
with current legal requirements. The yellow-green earthing cable must
not be governed by the ON/OFF switch. The socket or the ON/OFF
switch used for connecting to the power supply must be easily
accessible when the oven has been installed.
Important: During installation, position the power cable in such a way
that it will not be subjected to temperatures of above 50°C at any point.
The oven complies with safety standards set by the regulatory bodies.
The oven is safe to use only if it has been adequately earthed in
compliance with current legal requirements on wiring safety. You must
ensure that the oven has been adequately earthed.
The manufacturers cannot be held responsible for any harm or
injury to persons, animals or belongings caused by failure to
properly earth the oven.
WARNING: the voltage and the supply frequency are showed on
the rating plate (fig. on last page).
The cabling and wiring system must be able to bear the maximum
electric power required by the oven. This is indicated on the
specifications plate. If you are in any doubt at all, use the services of a
professionally qualified person.
GB 05

It is necessary to do an initial cleaning of the equipment before the
first use of each of them.Wash them with a sponge. Rinse and dry
off.
1.7 OVEN EQUIPMENT (according to the model)
The simple shelf can take moulds and
dishes.
The tray holder shelf is especially
good for grilling things. Use it with the
drip tray.
The special profile of the shelves
means they stay horizontal even when
pulled right out. There is no risk of a dish
sliding or spilling.
The drip tray catches the juices from
grilled foods. It is only used with the Grill,
Rotisserie, or Fan Assisted Grill ; remove
it from the oven for other cooking
methods.
Never use the drip tray as a roasting tray as this creates smoke and fat
will spatter your oven making it dirty.
The pizza set is designed for pizza cooking.
In order to obtain the best results the set
must be used together with Pizza function.
The tray holder
The tray holder shelf is ideal for grilling. Use it
in conjunction with the drip tray. A handle
is included to assist in moving the both
accessories safely. Do no leave the
handle inside the oven.
1. Remove the wire racks by pulling them in the direction of the
arrows (see below)
2. To clean the wire racks either put them in the dishwasher or use
a wet sponge, ensuring that they are dried afterwards.
3. After the cleaning process install the wire racks in reverse order.
Removing and cleaning wire racks
2. USEFUL TIPS
2.1 SHELF SAFETY SYSTEM
The oven features a new shelf safety
system.
This allows you to pull out the oven
shelves when inspecting the food
without danger of food spillages or
shelves falling accidentally out of the
oven.
To remove the shelves pull out and lift.
All ovens feature the function.
This allows a management of the distribution of moisture
and temperature. It reduces the loss of humidity of the 50
%, which guarantees the food remains tender and tastes
better. This a delicate cooking is recommended for the
baking of the bread and pastry.
Ovens have an electronic control of the fan speed, called
and patented VARIOFAN. During the cooking, this system changes
automatically the speed of the fan (in multifunction mode) in order to
optimize the air flow and the internal temperature in the cavity of the
oven.
2.2 GRILLING
Grilling makes it possible to give food a rich brown colour quickly.
For browning we recommend that you insert the grill onto the
fourth level, depending on the proportions of the food (see fig.
page 7).
Almost all food can be cooked under the grill except for very lean
game and meat rolls.
Meat and fish that are going to be grilled should first be lightly
doused with oil.
2.3 The MODELS
It reduces the time of preheating of ovens: only 8 minutes
to reach 200 degrees Celsius.
Some ovens are equipped with the new doorj " WIDE DOOR " which
has a bigger window area, this allows better maintenance and a
improved thermal insulation.
It gives the possibility of setting level and intensity of
grilling, up to 50 % more power in comparison with a
traditional multifunction oven.
2.4 CLEANING AND MAINTENANCE
Never use abrasive cleaners, wire wool or sharp objects to clean the
glass oven door.
Clean the stainless steel and enamelled surfaces with warm, soapy
water or with suitable brand products. On no account use abrasive
powders that may damage surfaces and ruin the oven’s appearance. It
is very important to clean the oven each time that it is used. Melted fat is
deposited on the sides of the oven during cooking. The next time the
oven is used this fat could cause unpleasant odours and might even
jeopardise the success of the cooking. Use hot water and detergent to
clean; rinse out thoroughly.
To make this chore unnecessary all models can be lined with catalytic
self-cleaning panels: these are supplied as an optional extra (see the
section SELF-CLEANING OVEN WITH CATALYTIC LINING).
Use detergents and abrasive metal pads like «brillo pads» for the
stainless steel grills.
The glass surfaces as the top, oven door and warming compartment
door must be cleaned when they are cold. Damage that occurs to them
because this rule was not adhered to are not covered by the guarantee.
To replace the interior light:
• switch off the mains power supply and unscrew bulb. Replace with an
identical bulb that can withstand very high temperatures
2.5 SERVICE CENTRE
Before calling the Service Centre
If the oven is not working, we recommend that:
you check that the oven is properly plugged into the power supply.
If the cause of the fault cannot be detected:
disconnect the oven from the mains, do not touch the oven and call the
after sales service.
Before calling the Service Centre remember to make a note of the
serial number on the specifications plate (see fig. On last page).
The oven is supplied with a guarantee certificate that ensures that it
will be repaired free of charge by the Service Centre
GB 06
Lateral wire grids
It located at both sides of the
oven cavity. It holds metal grills
and drip pans.

3.2 USING THE END OF COOKING TIMER
This control enables to set the desired
cooking time (max. 120 min.) the oven will
automatically switch off at the end of the set
time.The timer will count down from the set
time return to the O position and switch off
automatically.
For normal use of oven set the timer to the
position.
To set the oven ensure the timer is not on the
O position.
To set the cooking time, turn dial one
complete revolution and then position the
index to the required time. When the time
has lapsed, the signal will ring for a few
seconds.
3.1 USING THE MINUTE TIMER
3. TIMER
4. OPERATING INSTRUCTIONS
The "COOK LIGHT" function allows you to cook in a healthier way, by reducing the amount of fat or
oil required. Thanks to the use of the grill and fan combined with a pulsating cycle of air, it will
retain the moisture content of the food, grilling the surface and using a shorter cooking time,
without compromising on taste.
It is particularly suitable for cooking meat, roasted vegetables and omelettes. The cycle of pulsed
air keeps the humidity inside the oven and the moisture content of the food, preserving the
nutritional values and ensuring a rapid uniform cooking process.
Try all your recipes and reduce the amount of dressing you usually use and experience the
lightness of this new function!
GB 07
*Tested in accordance with the EN 60350-1 for the purpose of energy consumption declaration and energy class.
210
230
210

• Durante la cottura, l'umidità può condensarsi
all'interno del vano cottura o sul vetro della porta.
Questa è una condizione normale. Per ridurre
questo effetto, attendere 10-15 minuti dopo
l'accensione prima di mettere gli alimenti all'interno
del forno. In ogni caso, la condensa scompare
quando il forno raggiunge la temperatura di cottura.
• Cuocere le verdure in un contenitore con
coperchio invece che in un vassoio aperto.
• Evitare di lasciare gli alimenti all'interno del forno
dopo la cottura per più di 15/20 minuti.
• AVVERTENZA: l'elettrodomestico e le sue parti
accessibili diventano calde durante l’uso.
Fare attenzione a non entrare in contatto con
componenti surriscaldati.
• AVVERTENZA: le parti accessibili possono
diventare calde quando si utilizza il grill. I bambini
devono rimanere a distanza di sicurezza.
• AVVERTENZA: assicurarsi che l'elettrodomestico
sia spento prima di sostituire la lampadina per
evitare ogni possibilità di folgorazione.
• AVVERTENZA: per evitare rischi causati da un
involontario ripristino dell'interruttore automatico,
l'elettrodomestico non deve essere alimentato da
un dispositivo di commutazione esterno, quale ad
esempio un
contaminuti, oppure essere collegato ad un circuito
che viene regolarmente acceso e spento.
• Mantenere lontano dall'elettrodomestico i bambini
di età inferiore agli 8 anni, a meno che non siano
continuamente supervisionati.
• I bambini non devono giocare con
l’elettrodomestico. L'elettrodomestico può essere
utilizzato da bambini di età superiore a 8 anni e da
persone con ridotte capacità fisiche, sensoriali o
mentali, oppure prive di esperienza e conoscenza,
che siano state supervisionate o istruite riguardo
all’uso dell’elettrodomestico in sicurezza,
comprendendo i rischi che derivano dall'uso dello
stesso.
• Le operazioni di pulizia e manutenzione non
devono essere effettuate dai bambini senza
sorveglianza.
• Non utilizzare materiali ruvidi, abrasivi o raschietti
metallici affilati per pulire le porte in vetro del forno,
dato che possono graffiare la superficie e causare
la frantumazione del vetro.
• Il forno deve essere spento prima di rimuovere le
parti rimovibili.
• Dopo la pulizia, rimontarle secondo le istruzioni.
• Utilizzare solo la sonda carne consigliata per
questo forno.
• Non utilizzare un getto di vapore per pulire
l’elettrodomestico.
• Collegare al cavo di alimentazione una spina
dimensionata per la tensione, la corrente e la
potenza indicate nella targhetta e dotata del
contatto di terra. La presa deve essere adatta al
carico indicato sulla targhetta e deve avere il
contatto di terra collegato e in funzione. Il
conduttore di terra è di colore giallo-verde.
Questa operazione deve essere eseguita solo da
un tecnico adeguatamente addestrato. In caso di
i n c o m p a t i b i l i t à t r a p r e s a e s p i n a
dell'elettrodomestico, richiedere ad un tecnico
specializzato di sostituire la presa con un'altra di tipo
compatibile. La spina e la presa devono essere
conformi alle normative attuali del paese di
installazione.
Il collegamento alla rete di alimentazione può
essere effettuato anche collocando un interruttore
automatico onnipolare tra l'elettrodomestico e la
rete di alimentazione, in grado di supportare il carico
massimo collegato, in linea con la legislazione
corrente.
Il cavo di terra giallo-verde non deve essere
interrotto dall'interruttore automatico. La presa o
l'interruttore automatico onnipolare utilizzati per il
collegamento devono essere facilmente accessibili
al momento del montaggio dell'elettrodomestico.
• La disconnessione può essere eseguita con la
spina accessibile o aggiungendo un interruttore sul
cablaggio fisso, nel rispetto delle normative relative
ai cablaggi.
• Se il cavo di alimentazione si danneggia, deve
essere sostituito con un cavo o uno speciale fascio
di cavi disponibile presso il produttore o contattando
il reparto assistenza al cliente.
• Il cavo di alimentazione deve essere di tipo
H05V2V2-F
• Questa operazione deve essere eseguita solo da
un tecnico adeguatamente addestrato. Il conduttore
di terra (giallo-verde) deve essere circa 10 mm più
lungo degli altri conduttori. Per qualsiasi tipo di
riparazione, fare riferimento unicamente al Reparto
di Assistenza Cliente e richiedere l'utilizzo di ricambi
originali.
• Il mancato rispetto di quanto indicato sopra può
compromettere la sicurezza dell'elettrodomestico e
rendere nulla la garanzia.
• Qualsiasi materiale fuoriuscito in eccesso deve
essere tolto prima della pulizia.
• L’interruzione prolungata dell’alimentazione
durante una fase di cottura potrebbe causare un
guasto del monitor. In tal caso contattare il servizio
clienti.
• L’elettrodomestico non deve essere installato
dietro a una porta a scopo ornamentale per evitarne
il surriscaldamento.
• Quando si posiziona uno scaffale all’interno,
accertarsi che il blocco sia rivolto verso l’alto e nella
parte posteriore della guida. Lo scaffale deve
essere inserito completamente nella guida.
INDICAZIONI DI SICUREZZA
IT 08

IT 09
Questo apparecchio è contrassegnato in conformità alla Direttiva europea 2012/19/EU sulle apparecchiature elettriche ed
elettroniche (WEEE). I WEEE contengono sia le sostanze inquinanti (che possono provocare conseguenze negative
sull'ambiente) che componenti di base (che possono essere riutilizzati). È importante che i WEEE siano soggetti a rattamenti
specifici, per rimuovere e smaltire correttamente tutti gli inquinanti e recuperare e riciclare tutti i materiali.
I singoli possono giocare un ruolo importante nell'assicurare che i WEEE non diventino un problema ambientale; è essenziale
seguire alcune regole di base:
• I WEEE non devono essere trattati come rifiuti domestici.
• I WEEE devono essere portati ai punti di raccolta appositi gestiti dal comune o da società registrate. In molti Paesi, per i WEEE
grandi, potrebbe essere presente la raccolta domestica.
• Quando si acquista un nuovo apparecchio, quello vecchio potrebbe essere restituito al rivenditore che deve acquisirlo gratuitamente su base
singola, sempre che l'apparecchio sia del tipo equivalente e abbia le stesse funzioni di quello acquistato.
RISPARMIARE E RISPETTARE L'AMBIENTE
Ove possibile, evitare di pre-riscaldare il forno e cercare sempre di riempirlo. Aprire la porta del forno quanto necessario, perché vi sono
dispersioni di calore ogni volta che viene aperta. Per risparmiare molta energia sarà sufficiente spegnere il forno dai 5 ai 10 minuti prima della
fine del tempo di cottura pianificato, e servirsi del calore che il forno continua a generare. Tenere le guarnizioni pulite e in ordine, per evitare
eventuali dispersioni di energia. Se si dispone di un contratto di energia elettrica a tariffa oraria, il programma “cottura ritardata” renderà più
semplice il risparmio spostando l’avvio del programma negli orari a tariffa ridotta.
• AVVERTENZA: Non rivestire le pareti del forno con
fogli di alluminio o protezioni monouso disponibili nei
negozi. I fogli di
alluminio o qualsiasi altra protezione, a diretto
contatto con lo smalto caldo, rischiano di
fondere e deteriorare lo smalto degli interni.
• AVVERTENZA: Non togliere mai la guarnizione
della porta del forno.
• ATTENZIONE: Non riempire il fondo della cavità
con acqua durante la cottura o quando il forno è
caldo.
• Per far funzionare l'apparecchio alle frequenze
nominali non sono necessarie ulteriori operazioni o
regolazioni.

Avvertenze Generali
11
1.1 Dichiarazione di conformità
1.2 Informazioni sulla sicurezza
1.3 Installazione
1.4 Inserimento del mobile
1.5 Importante
1.6 Allacciamento Elettrico
1.7 Dotazione del forno
2.1 Griglie forno - sistema di arresto
2.2 La cottura al grill
2.3 Pacchetto di funzioni del sistema U COOK
2.4 Pulizia e manutenzione
2.5 Servizio assistenza clienti
Consigli Utili
12
3.1 Uso del contaminuti
3.2 Uso del temporizzatore
Contaminuti
13
Istruzioni Per L’uso
13
Sommario
IT 10
Garanzie
13

1. Avvertenze Generali
Vi ringraziamo per aver scelto uno dei nostri prodotti, per ottenere da questo elettrodomestico le migliori prestazioni consigliamo di:
• Leggere attentamente le avvertenze contenute nel presente libretto.
• Conservare con cura questo libretto per ogni ulteriore consultazione.
Durante l’uso il forno diventa caldo, fare attenzione a non toccare gli elementi riscaldanti all’interno del forno.
Alla prima accensione del forno può svilupparsi fumo di odore acre, causato dal primo riscaldamento del collante dei pannelli d’isolamento
avvolgenti il forno. Si tratta di un fenomeno assolutamente normale e, in caso si verificasse, occorre attendere la cessazione del fumo prima di
introdurre le vivande.
Il forno è per sua natura un apparecchio che diventa caldo, in modo particolare in corrispondenza del cristallo porta.
• Apponendo il marchio su questo prodotto, confermiamo la
conformità a tutti i requisiti di legge europei in materia di sicurezza,
salute e tutela ambientale applicabili per legge a questo prodotto.
Inserire la spina in una presa di corrente munita di un terzo contatto
corrispondente alla presa di terra, che deve essere collegata in modo
efficiente.
Per i modelli sprovvisti di spina, montare sul cavo una spina
normalizzata che sia in grado di sopportare il carico indicato in targa. Il
conduttore di messa a terra e contraddistinto dai colori giallo-verde.
Tale operazione dovrà essere eseguita da personale professional-
mente qualificato.
In caso di incompatibilità tra la presa e la spina dell’apparecchio fare
sostituire la presa con altra di tipo adatto, da personale professional-
mente qualificato. Si può effettuare anche l’allacciamento alla rete
interponendo tra l’apparecchio e la rete un interruttore omnipolare
dimensionato al carico e rispondente alle norme in vigore. Il cavo di
terra giallo-verde non deve essere interrotto dall’interruttore. La presa
o l’interruttore omnipolare usati per l’allacciamento devono essere
facilmente accessibili ad elettrodomestico installato.
Importante: in fase di installazione, posizionare il cavo di
alimentazione in modo che in nessun punto si raggiungano
temperature superiori di 50°C alla temperatura ambiente.
L’apparecchio è conforme ai requisiti di sicurezza previsti dagli istituti
normativi. La sicurezza elettrica di questo apparecchio è assicurata
soltanto quando lo stesso è correttamente collegato ad un efficace
impianto di messa a terra come previsto dalle vigenti norme di
sicurezza elettrica, (in caso di dubbio, richiedere un controllo
accurato dell’impianto da parte di personale professionalmente
qualificato).
Importante: la ditta costruttrice resta sollevata da ogni
responsabilità per eventuali danni a persone o cose, derivanti
dal mancato allacciamento della linea di terra.
ATTENZIONE: la tensione e la frequenza di alimentazione sono
indicate in targa matricola (figura in ultima pagina). Verificare
che la portata elettrica dell’impianto e delle prese di corrente
siano adeguate alla potenza massima dell’apparecchio indicate
in targa. In caso di dubbio rivolgersi ad una persona
professionalmente qualificata.
1.6 ALLACCIAMENTO ELETTRICO
1.1. DICHIARAZIONE DI CONFORMITÀ
1.2 INFORMAZIONI SULLA SICUREZZA
•Questo apparecchio dovrà essere destinato solo all’uso per il quale è
stato espressamente concepito, e cioè per la cottura di alimenti.
Ogni altro uso (ad esempio riscaldamento ambiente) è da
considerarsi improprio e quindi pericoloso. Il costruttore non può
essere considerato responsabile per eventuali danni derivanti da usi
impropri, erronei ed irragionevoli.
•L’uso di un qualsiasi apparecchio elettrico comporta
l’osservanza di alcune regole fondamentali.
In particolare:
-non tirare il cavo di alimentazione per staccare la spina dalla presa di
corrente
-non toccare l’apparecchio con mani o piedi bagnati o umidi
-non usare l’apparecchio a piedi nudi
-in generale è sconsigliabile l’uso di adattatori, prese multiple e
prolunghe.
- In caso di guasto e/o di cattivo funzionamento dell’apparecchio,
spegnerlo e non manometterlo.
•In caso di danneggiamento del cavo, provvedere tempestivamente
alla sua sostituzione secondo le seguendi indicazioni:
aprire il coperchio morsettiera, togliere il cavo di alimentazione e
sostituirlo con uno corrispondente, (tipo H05RR-F, H05VVF,
H05V2V2-F) e adeguato alla portata dell’apparecchio.
Tale operazione dovrà essere eseguita da personale
professionalmente qualificato. Il conduttore di terra (giallo-verde),
deve obbligatoriamente essere più lungo di circa 10 mm rispetto ai
conduttori di linea.
Per l’eventuale riparazione rivolgersi solamente ad un centro di
assistenza tecnica autorizzato e richiedere l’utilizzo di ricambi
originali.
Il mancato rispetto di quanto sopra può compromettere la sicurezza
dell’apparecchio.
•Non rivestire le pareti del forno con fogli d'alluminio da cucina o
fogli monouso commerciali, perche potrebbero fondersi a
contatto con le superfici in smalto caldo e danneggiare le
superfici in smalto all'interno del forno.
1.3 INSTALLAZIONE
L’installazione è a carico dell’acquirente e la Casa Costruttrice è
esonerata da questo servizio; gli eventuali interventi richiesti alla
Casa Costruttrice che dipendono da una errata installazione non sono
compresi nella garanzia.
L’installazione deve essere effettuata secondo le istruzioni da
personale professionalmente qualificato. Una errata installazione può
causare danni a persone, animali o cose, nei confronti dei quali il
costruttore non può essere considerato responsabile.
Per garantire un buon funzionamento dell’apparecchio da incasso è
necessario che il mobile sia di caratteristiche adatte. I pannelli dei
mobili adiacenti il forno dovranno essere in materiale resistente al
calore. In particolare nel caso di mobili in legno impiallicciato le colle
dovranno essere resistenti alla temperatura di 120°C: materiali
plastici o collanti non resistenti a questa temperatura sono causa di
deformazioni o scollature. In conformità alle norme di sicurezza, una
volta incassato l’apparecchio, non debbono essere possibili eventuali
contatti con le parti elettriche. Tutte le parti che assicurano la
protezione debbono essere fissate in modo tale da non poter essere
tolta senza l’aiuto di qualche utensile.
Per garantire una buona areazione è necessario eliminare la
parete posteriore del vano; inoltre il pianale di appoggio deve
avere una luce posteriore di almeno 45 mm.
Prima di utilizzare gli accessori del forno per la prima volta è
necessario pulirli. Per questa operazione si consiglia di
utilizzare una spugna. Successivamente risciacquare ed
asciugare gli accessori.
La griglia semplice serve da supporto per teglie, pirofile, stampi per i
dolci.
La griglia porta-piatto serve in
particolare per le grigliate di carne
poiché sostiene anche la leccarda che
raccoglie i grassi che colano.
Grazie ai loro profili speciali, le griglie
restano sempre in orizzontale, anche
quando vengono estratte verso l'esterno.
Non c'é nessun rischio quindi che i tegami scivolino o si ribaltino.
1.7 DOTAZIONE DEL FORNO (secondo modello)
1.4 INSERIMENTO DEL MOBILE
Inserire l’apparecchio nel vano del mobile (sottopiano o in colonna). Il
fissaggio si esegue con 4 viti attraverso i fori della cornice, visibili
aprendo la porta.(vedere ultima pagina). Per consentire la migliore
aerazione del mobile, i forni devono essere incassati rispettando le
misure e le distanze indicate nella figura in ultima pagina.
Nota: per i forni da abbinamento con piano cottura è indispensabile
rispettare le istruzioni contenute nel libretto allegato all’
apparecchiatura da abbinare.
1.5 IMPORTANTE
IT 11

2- CONSIGLI UTILI
2.1 GRIGLIE FORNO - SISTEMA DI ARRESTO
Il forno è dotato di un nuovo sistema di
arresto griglie. Questo sistema consente
di estrarre le griglie quasi completamente
senza che queste fuoriescano dal forno
mantenendole perfettamente in piano,
consentendo di verificare e mescolare il
cibo con la massima tranquillità e
sicurezza.
2.2. LA COTTURA AL GRILL
Questo tipo di cottura consente la doratura rapida dei cibi. A questo
scopo consigliamo di inserire la griglia generalmente nel 3° o 4°
ripiano, secondo le dimensioni dei cibi (Fig. pag. 8). Quasi tutte le
carni possono essere cotte al grill, fanno eccezione alcune carni
magre di selvaggina ed i polpettoni. La carne ed il pesce da cucinare
al grill vanno leggermente unti con olio.
Per estrarre le griglie è sufficiente, come indicato sul disegno, alzarle,
prendendole dalla parte anteriore e tirarle.
Tutti i forni sono dotati di funzione ,
permettendo una gestione della distribuzione di umidità e
temperatura. Riduce la perdita degli alimenti fino al 50%,
donando morbidezza e fragranza alle pietanze. Una
cottura cosi delicata è indicata sopratutto per il pane e la
pasticceria.
I forni sono dotati di controllo elettronico della ventilazione
di cottura, brevettato VarioFan; il sistema cambia automaticamente la
velocità della ventola del multifunzione per ottimizzare le correnti
d'aria e la temperatura interna della cavità mentre il forno sta
cucinando.
2.3 PACCHETTO DI FUNZIONI DEL SISTEMA
(secondo modello)
Riduce il tempo di preriscaldamento dei forni: sono
sufficienti solo 8 minuti per raggiungere i 200°C.
La nuova porta ”WIDE DOOR” ha un'ampia superficie in vetro che
assicura una più facile pulizia e un miglior isolamento termico.
Offre la possibilità di personalizzare il livello e l'intensità gr
di grigliatura, fino al 50% in più rispetto ad un forno
multifunzione tradizionale.
Pizza set é l'idéale per la cottura delle pizze. Il
set deve essere utilizzato in abbinamento alla
funzione Pizza.
La griglia piatta da combinare con la
leccarda per tutti i tipi di grigliate. Una
presina è fornita per permettere di
estrarre l’insieme dal forno senza
scottarsi.
Non lasciare mai la presina nel forno.
Raccoglie i residui di cibo che gocciolano durante
la cottura. Deve essere utilizzata solamente
con il grill, il girarrosto o il turbo girarrosto,
secondo il modello.
Attenzione: in tutti gli altri modi di cottura, la
leccarda deve essere tolta dal forno.
Non usare mai la leccarda per cuocere gli arrosti perché ne
risulterebbe un eccessivo sviluppo di fumo e vapori e il forno si
sporcherebbe inultimente.
Gli accessori devono essere tolti dal forno se non vengono
utilizzati.
Rimozione e pulizia delle scaffalature a filo
1- Rimuovere le griglie a rete tirandole in direzione delle frecce (vedi
sotto)
2- Per pulire le griglie a rete, metterle in lavastoviglie o utilizzare una
spugna umida, assicurandosi che siano successivamente asciugate.
3- Dopo la pulizia, installarle in ordine inverso.
IT 12
2.5 SERVIZIO ASSISTENZA CLIENTI
2.4 PULIZIA E MANUTENZIONE
Per la pulizia dei vetri della porta del forno non utilizzare materiali
abrasivi raschietti o oggetti che possono graffiare la superficie del
vetro. Pulire le superfici in acciaio inox e smaltate con acqua tiepida e
sapone, oppure con appositi prodotti in commercio, evitando
assolutamente l’uso di polveri abrasive che danneggerebbero le
superfici e le parti estetiche.
La pulizia del forno è molto importante e deve essere effettuata ogni
volta che questo viene usato. Infatti, sulle pareti si depositano grassi
sciolti durante la cottura che potrebbero, alla successiva accensione,
produrre odori sgradevoli che nuocerebbero al buon esito della
cottura. Per la pulizia usare acqua calda e detersivo, sciacquando
accuratamente.
Per eliminare questo fastidioso intervento, su tutti i modelli possono
essere inseriti pannelli autopulenti, offerti come accessori opzionali:
vedere apposito paragrafo«FORNO AUTOPULENTE CATALITICO »
Usare detersivi e pagliette d’acciaio per le griglie inox. La pulizia delle
superfici in cristallo temperato deve essere eseguita quando le
superfici sono fredde. Eventuali rotture dovute alla non osservanza di
questa regola elementare non rientrano nei termini di garanzia.
La lampada forno può essere sostituita disinserendo elettricamente
l’apparecchio e svitando l’ampolla che la racchiude, sostituendo la
lampada non funzionante con una analoga resistente alle alte
temperature.
Prima di rivolgersi all'assistenza tecnica:
Se il forno non funziona, è consigliabile:
•Controllare che il forno sia correttamente collegato all'alimentazione
elettrica.
Se non è possibile individuare la causa del guasto:
•Scollegare il forno dall'alimentazione elettrica, non toccarlo e
rivolgersi all'assistenza tecnica.
Prima di chiamare il centro di assistenza, ricordarsi di prendere nota
del numero di serie riportato sulla targhetta identificativa.
Il forno viene fornito con un certificato di garanzia che ne garantisca la
riparazione gratuita presso
Griglie laterali a rete
Si trovano su entrambi i lati del
vano cottura. Contengono griglie
metalliche e vaschette
raccogligocce.
NOTA: Per un corretto utilizzo del forno, si consiglia di non porre gli
alimenti a diretto contatto con griglie e vassoi, ma di utilizzare carte
forno e/o appositi contenitori.

Con questo meccanismo è possibile
programmare la durata espressa in minuti
della cottura e quindi lo spegnimento
automatico del forno al termine del tempo
desiderato (max. 120 minuti).
Allo scadere del tempo prescelto, la
manopola raggiungerà la posizione di
suoneria O in corrispondenza della qua le i l
forno s i spegne automaticamente.
Il forno può essere acceso solo impostando un tempo di cottura
o girando la manopola in posizione .
3.2 USO DEL TEMPORIZZATORE
Per selezionare il tempo prescelto, ruotare
la manopola di un giro completo, quindi
ritornare con l’indice nella posizione
corrispondente al tempo desiderato. Allo
scadere del tempo, entrerà in azione la
suoneria per alcuni secondi.
3.1 USO DEL CONTAMINUTI
3. CONTAMINUTI
IT 13
4. ISTRUZIONI PER L’USO
Accende la luce interna.
Scongelamento
Questa posizione permette di far circolare l’aria a temperatura ambiente intorno al cibo
surgelato facendolo così scongelare in pochi minuti senza modificare od alterare il
contenuto proteico.
Convezione naturale
Sono in funzione le resistenze superiore e inferiore.
È la cottura tradizionale, ottima per arrostire cosciotti, selvaggina, ideale per biscotti,
mele al forno e per rendere i cibi molto croccanti
Forno ventilato
L’aria calda, viene ripartita sui diversi ripiani; è l’ideale per cuocere contemporaneament
e diversi tipi di cibo (carne, pesce), senza miscelare sapori e odori. Cottura delicata -
indicata per pan di Spagna, torte Margherita, pasta sfoglia, ecc...
Suola ventilata
Adatta per cotture delicate (torte-soufflè).
Grigliatura tradizionale a porta chiusa
In questa posizione viene inserita la resistenza del grill. Ottima nella cottura di carni di
medie e piccolo spessore (salsicce, costine, bacon).
Funzione pizza
Il calore avvolgente in questa funzione ricrea un ambiente simile a quello
dei forni a legna di pizzeria.
* Testato secondo la norma EN 60350-1 ai fini della dichiarazione di consumo energetico e della classe energetica.
Manopola
commutatore
Temperatura
proposta
e regolazione
(Type A)
Manopola
termostato
FUNZIONE
230
(a) SU ALCUNI MODELLI - Funzione con VARIO FAN : Vano Fan é l'esclusivo sistema di funzionamento sviluppato da Candy per ottimizzare i
risultati di cottura, la gestione della temperatura e la gestione dell'umidità. Il sistema Vario Fan modifica automaticamente la velocità di
rotazione della ventola per tutte le cotture in multifunzione. Questo sistema si attiva automaticamente tutte le volte che viene selezionata una
funzione all'interno dell'area tratteggiata sul pannello di controllo.
La funzione “COOK LIGHT” consente di cucinare in modo leggero riducendo l'utilizzo dei
grassi. Grazie ad una combinazione del grill e della ventola, associate ad un ciclo di
pulsazione dell'aria, è possibile conservare l'umidità dei cibi, grigliare la superficie e
garantire una cottura rapida delle pietanze utilizzando pochi condimenti, senza rinunciare al
sapore.
È particolarmente indicata per verdure, frittate e carni. Il ciclo di aria pulsata mantiene
l'umidità dei cibi, ne conserva le proprietà nutritive e garantisce una cottura rapida e
omogenea.
Provate tutte le vostre ricette riducendo la quantità di condimento che di solito utilizzate e
provate la leggerezza di questa nuova funzione!
5. GARANZIE
Il prodotto è garantito, oltre che ai sensi di legge, alle condizioni e nei termini riportati sul certificato di garanzia convenzionale inserito nel prodotto. Il
certificato dovrà essere conservato e mostrato al nostro Centro di Assistenza Tecnica Autorizzato, in caso di necessità, insieme allo scontrino
comprovante l'acquisto dell'elettrodomestico. Puoi consultare le condizioni di garanzia anche sul nostro sito internet. Per ottenere assistenza
compila l'apposito form on-line oppure contattaci al numero che trovi indicato nella pagina di assistenza del nostro sito internet.
210
210

• Pendant la cuisson, de l’humidité peut se
condenser à l’intérieur de la cavité ou sur la vitre de
la porte. Il s’agit d’un phénomène normal. Pour
réduire cet effet, attendez 10-15 minutes après
avoir allumé l’appareil avant de mettre les aliments
au four. La condensation disparaîtra de toutes
façons dès que le four aura atteint la température
de cuisson.
• Cuisez les légumes dans un récipient avec
couvercle plutôt que dans un ustensile ouvert.
• Évitez de laisser des aliments à l’intérieur du four
plus de 15-20 minutes après cuisson.
• AVERTISSEMENT : L’appareil et ses parties
accessibles chauffent pendant l’utilisation.
Faites attention à ne pas toucher les parties
chaudes.
• AVERTISSEMENT : Les parties accessibles
peuvent devenir très chaudes quand le grill est en
marche. Les enfants doivent être tenus à une
distance de sécurité.
• AVERTISSEMENT : Vérifiez que l’appareil est
éteint avant de remplacer l’ampoule, pour éviter le
risque de chocs électriques.
• AVERTISSEMENT : Afin d’éviter tout risque lié à la
réinitialisation accidentelle de l’interrupteur
thermique, l’appareil ne doit pas être alimenté par
un dispositif de commutation externe, tel qu’une
minuterie, ou relié à un circuit régulièrement allumé
et éteint.
• Les enfants de moins de 8 ans doivent rester à
une distance de sécurité de l’appareil s’ils ne sont
pas surveillés en permanence.
• Les enfants ne doivent pas jouer avec l’appareil.
L’appareil peut être utilisé par des enfants de plus
de 8 ans et par des personnes dont les capacités
physiques, sensorielles ou mentales sont limitées,
sans expérience ni connaissance du produit,
uniquement s’ils sont surveillés ou s’ils ont été
informés de la manière d’utiliser l’appareil, en toute
sécurité et qu’ils comprennent les risques
possibles.
• Le nettoyage et l’entretien ne doivent pas être
effectués par des enfants sans surveillance.
• N’utilisez pas de matériaux rugueux ou abrasifs
ou de racloirs métalliques acérés pour nettoyer les
vitres des portes des fours, car cela pourrait rayer la
surface et provoquer la rupture de la vitre.
• Coupez le four avant de retirer les pièces
amovibles.
• Après le nettoyage, remontez-les selon les
instructions.
• Utilisez uniquement la sonde à viande
recommandée pour ce four.
• N’utilisez pas un nettoyeur à vapeur pour le
nettoyage.
• Branchez le câble d’alimentation sur une prise de
courant qui supporte le voltage (le courant et la
charge sont indiqués sur l’étiquette) et vérifiez la
présence d’une mise à la terre. La prise
d’alimentation doit supporter la charge indiquée sur
l’étiquette et être dotée d’une mise à la terre en état
de fonctionnement. Le conducteur de mise à la
terre est jaune et vert. Cette opération doit être
exécutée par le personnel qualifié. En cas
d’incompatibilité entre la prise d’alimentation et la
fiche du câble de l’appareil, demandez à un
électricien professionnel de remplacer la prise
d’alimentation par un dispositif compatible.
La fiche du câble d’alimentation et la prise
d’alimentation doivent être conformes aux normes
en vigueur dans le pays d’installation.
Il est possible de brancher l’appareil à la prise
d’alimentation en installant entre l’appareil et la
prise d’alimentation un disjoncteur multipolaire qui
supporte la charge électrique maximale,
conformément aux lois en vigueur.
Le conducteur jaune et vert de mise à la terre ne
doit pas être bloqué par le disjoncteur. La prise
d’alimentation ou le disjoncteur multipolaire utilisé
pour le branchement doit rester à tout moment
accessible après installation de l’appareil.
• Le débranchement doit se faire à l’aide soit de la
prise d’alimentation, soit d’un interrupteur installé
sur le circuit électrique fixe, conformément aux
normes électriques.
• Si le câble d’alimentation est endommagé, il doit
être remplacé par un câble ou un faisceau de
câbles spécial disponible auprès du fabricant ou du
service après-vente.
• Le câble d’alimentation requis est le H05V2V2-F.
• Cette opération doit être exécutée par le
personnel qualifié. Le conducteur de mise à la terre
(jaune et vert) doit être environ 10 mm plus long
que les autres conducteurs. Pour toutes
réparations, contactez le service après-vente en
insistant sur l’utilisation de pièces de rechange
d’origine.
• Le non-respect des consignes ci-dessus peut
compromettre la sécurité de l’appareil et annuler la
garantie.
• Éliminez les éclaboussures importantes avant de
procéder au nettoyage.
• Une coupure de courant prolongée durant une
phase de cuisson peut engendrer un
dysfonctionnement de l’écran. Dans ce cas,
veuillez contacter le service après-vente.
• L’appareil ne doit pas être installé derrière une
porte décorative, pour éviter la surchauffe.
• Pour introduire la grille dans le four, vérifiez que le
butoir est dirigé vers le haut et au fond de la cavité.
La grille doit être complètement insérée dans la
cavité.
CONSEILS DE SÉCURITÉ
FR 14

Le présent appareil est marqué conformément à la directive 2012/19/UE relative aux déchets d'équipements électriques et électroniques
(DEEE). Les DEEE contiennent à la fois des substances polluantes (qui peuvent avoir des conséquences négatives sur l'environnement) et
des éléments de base (réutilisables). Il est important de soumettre les DEEE à des traitements spécifiques, en vue d'extraire et d'éliminer de
façon appropriée toutes les substances polluantes, puis de récupérer et recycler tous les matériaux.
Chacun peut jouer un rôle important quant à la protection de l'environnement contre les DEEE. Pour atteindre cet objectif, il est impératif de
suivre quelques règles élémentaires :
• Les DEEE ne doivent pas être traités comme des déchets ménagers.
• Ils doivent être remis aux points de collecte appropriés gérés par la municipalité ou par des sociétés immatriculées. Dans plusieurs pays, il
est possible de collecter à domicile les DEEE volumineux.
• Lorsque vous achetez un nouvel appareil, vous devez retourner l'ancien au vendeur qui le récupère gratuitement, au cas par cas, à condition que
l'équipement soit de type équivalent et possède les mêmes fonctions que celui fourni.
ÉCONOMIE ET RESPECT DE L'ENVIRONNEMENT
Lorsque cela est possible, éviter le préchauffage du four et éviter de le faire tourner à vide. N'ouvrez la porte du four que lorsque cela est nécessaire, car il y a
des déperditions de chaleur à chaque fois qu'il est ouvert. Pour une économie d'énergie significative, éteindre le four entre 5 et 10 minutes avant la fin de
cuisson prévue, et utiliser la chaleur que le four continue de générer. Gardez les joints propres et en bon état, pour éviter toute déperdition d'énergie. Si vous
avez un contrat électrique avec un tarif heure creuse, le programme "cuisson différée" peut vous faire réaliser des économies d'énergie en déplaçant le
début du programme à un intervalle de temps à tarif réduit.
• AVERTISSEMENT : Ne recouvrez pas les parois
du four avec du papier aluminium ou une
protection jetable disponible dans les magasins. Le
papier d’aluminium ou toute autre protection, en
contact direct avec l’émail chaud, risque de fondre
et de détériorer l’émail de la cavité intérieure.
• AVERTISSEMENT : N’enlevez jamais le joint de
la porte du four.
• PRUDENCE : Ne remplissez pas le fond de la
cavité avec de l’eau pendant la cuisson ou lorsque
le four est chaud.
• Aucune autre opération ni aucun autre réglage ne
sont requis pour faire fonctionner l’appareil aux
fréquences nominales.
FR 15

Sommaire
Instructions Generales
17
1.1 Declaration de conformité
1.2 Consignes de sécurité
1.3 Installation
1.4 Mise en place du four dans son meuble
1.5 Important
1.6 Alimentation electrique
1.7 Equipement du four equipement
different selon le type de four
2.1 Grilles du four, nouveau système d’arrêt
2.2 La cuisson au gril
2.3 Selon modèle le pack
2.4 Conseils de nettoyage et d’entretien
2.5 Assistance technique
Consignes Utiles
18
Minuteur
19
3.1 Utilisation du minuteur sonore
3.2 Utilisation du minuteur coupe-circuıt
Instructions Pour L’utilisation
19
FR 16

1. INSTRUCTIONS GENERALES
— Lire attentivement les instructions contenues dans cette brochure, elles fournissent d’importantes indications sur la sécurité
d’installation, l’emploi du four et son entretien.
— Conserver soigneusement cette notice d’utilisation pour toutes consultations ultérieures.
— Après avoir déballé votre four, vérifier que l’appareil est complet.
— Les emballages comme le plastique, le polystyrène, peuvent constituer un danger pour les enfants. Ne pas les laisser à leur portée.
ATTENTION
Lors de la première utilisation du four, il peut se produire un dégagement de fumée âcre provoqué par le premier échauffement du collant
des panneaux d’isolation enveloppant le four. Ce phénomène est normal. Attendez que la fumée cesse avant de cuire des aliments.
Lorsque le four est en fonctionnement, la porte en verre est particulièrement chaude. ll est donc nécessaire que les enfants ne la touchent
pas.
ATTENTION: La tension et la fréquence d’alimentation sont indiquées sur la plaque signalétique (illustration dernière page).
Faites appel à un professionnel pour l’installation de votre four.
• En plaçant la marque sur ce produit, nous confirmons la
conformité à toutes les exigences européennes concernant la
protection de l’environnement et de la santé, ainsi que la sécurité,
applicables selon la loi à ce produit.
1.1 DECLARATION DE CONFORMITÉ:
1.4 MISE EN PLACE DU FOUR DANS SON MEUBLE
1.3 INSTALLATION
1.2 CONSIGNES DE SECURITE
Cet appareil est conçu pour cuire des aliments. Tout autre utilisation
(exemple chauffage d’appoint) doit être considéré comme impropre.
Le constructeur ne peut être tenu comme responsable en cas de
dommages liés à une mauvaise utilisation ou a des modifications
techniques du produit.
L’emploi d’un appareil électrique nécessite quelques règles de
sécurité.
- Ne pas tirer sur le fil électrique pour débrancher la prise.
-Ne pas toucher l’appareil avec les pieds ou les mains mouillés.
-Evitez d’utiliser l’appareil pieds nus.
L’utilisation de multiprises et de rallonges pour raccorder votre
appareil est fortement déconseillé. En cas de panne ou de mauvais
fonctionnement il faut éteindre le four avant de le démonter. En cas de
détérioration du fil électrique, remplacez-le rapidement en suivant les
indications suivantes: ôtez le fil d’alimentation électrique et
remplacez-le par un (du type H05RR-F, H05VV-F, H05V2V2F) adapté
à la puissance de l’appareil. Vous veillerez à ce que cette opération
soit effectuée par un centre technique agréé. Pour l’utilisateur c’est la
certitude d’obtenir des pièces de rechange d’origine. Le non-respect
de ces règles peut compromettre la sécurité de l’appareil.
•Ne pas tapisser les parois du four avec des feuilles en
aluminium ou des protections jetables du commerce. La feuille
d'aluminium ou toute autre protection, en contact direct avec
l'email chauffe, risque de fondre et de deteriorer l'email du
moufle..
La mise en service de l’appareil est à la charge de l’acheteur, le
constructeur est dégagé de ce service. Les pannes liées à une
mauvaise installation ne seront pas couvertes par la garantie. Une
mauvaise installation peut provoquer des dommages aux personnes,
aux animaux domestiques; dans ce cas la responsabilité du
contructeur ne peut être engagée.
Une fois le four inséré dans son meuble, I’ancrage se fait par 4 vis
visibles en ouvrant la porte du four.
Pour permettre une meilleure aération du meuble, les fours doivent
être encastrés conformément aux mesures et distances indiquées
sur l’illustration de la dernière page.
N.B.: Pour les fours à associer avec des plaques de cuisson, il est
indispensable de respecter les instructions contenues dans la
brochure jointe à l’appareil à associer.
1.5 IMPORTANT
Le meuble qui va supporter le four doit avoir des caractéristiques
appropriés. Les panneaux du meuble doivent pouvoir résister à la
chaleur.
Dans le cas de meubles en bois plaqué, les colles doivent résister à
une température de 120°C sinon il y a un risque de décollement ou de
déformations. Conformément aux normes de sécurité, une fois
encastré, aucun contact ne doit être possible avec les parties
électriques.
Toutes les parties qui assurent la protection doivent être fixées de
façon à ne pas pouvoir être enlevées sans outil. Pour garantir une
bonne aération, retirer la paroi arrière du meuble.
1.6 ALIMENTATION ELECTRIQUE
Brancher la fiche dans une prise de courant équipée d’un troisième
contact correspondant à la prise de terre. Montez sur le fil une prise
normaliséé capable de supporter la charge indiquée sur la plaquette.
Le fil conducteur de masse à la terre est identifié par les couleurs
jaune et verte. Veiller à ce que votre installation soit capable de
supporter toute la puissance absorbée par le four. Si votre installation
électrique n’est pas conforme faites la modifier par un électricien afin
de prévenir tous risques. On peut également effectuer le
branchement au réscau en interposant entre l’appareil et le réseau un
interrupteur omnipolaire dimensionnée en fonction de la charge et
conforme aux normes en vigueur. Le fil de terre jaune et vert ne doit
pas être interrompu par l’interrupteur. La prise et l’interrupteur
omnipolaire utilisés doivent être facilement accessibles une fois
l’appareil électroménager installé.
1.7 EQUIPEMENT DU FOUR EQUIPEMENT
DIFFERENT SELON LE TYPE DE FOUR
Avant la première utilisation des différents accessoires, nous
recommandons un nettoyage avec une éponge additionnée de
produit lessiviel, suivi d'un rinçage et d'un séchage.
La grille simple sert de support aux
moules et aux plats.
La grille porte-plat sert plus
particulièrement à recevoir les grillades.
Elle est à associer au plat récolte sauce.
Grâce à leur profil spécial, les grilles
restent à l'horizontale jusqu'en butée.
Aucun risque de glissement ou de
débordement du plat.
Le plat récolte-sauce est destiné à
recevoir le jus des grillades. Il n'est à
u t i l i s e r q u ' e n m o d e g r i l l o i r,
Tournebroche ou Turbogril (selon
modèle de four).
FR 17
Attention : en cuisson autre que les modes Grilloir,Tournebroche, et
Turbo-gril, le plat récolte-sauce doit être retiré du four.
Ne jamais utiliser le plat récolte-sauce comme plat à rôtir, il en
résulterait des dégagements de fumée, des projections de graisse et
un encrassement rapide du four.

Retrait et nettoyage des grilles
1- Retirez les grilles en les tirant dans le sens des flèches (voir ci-
dessous).
2- Pour nettoyer les grilles, passez-les en lave-vaisselle ou utilisez
une éponge humide en veillant à bien les sécher ensuite.
3- Quand les grilles sont nettoyées, remettez-les en place en suivant
les instructions dans l’ordre inverse.
2. CONSIGNES UTILES
2.1 GRILLES DU FOUR, NOUVEAU SYSTÈME
D’ARRÊT
Tous les fours bénéficient d’un nouveau
système d’arrêt des grilles. Ce système
permet de sortir complètement la grille en
totale sécurité. Parfaitement bloquée elle
ne peut pas basculer vers l’avant malgré la
présence d’un poids important. Plus
stables,ces grilles assurent une plus
grande sécurité et tranquillité.
2.2 LA CUISSON AU GRIL
Le préchauffage est superflu. La cuisson peut se faire porte close et
les aliments doivent être placés par rapport au gril en fonction des
résultats que l’on souhaite obtenir.
— Plus près pour les aliments dorés en surface et saignants.
— Plus loin pour les aliments bien cuits à l’intérieur.
Le lèchefrite permet la récupération du jus.
Ne jamais utiliser le lèchefrite comme plat à rotir, il en résulterait
dégagements de fumée, des projections de graisse et un
encrassement rapide du four.
2.3 SELON MODÈLE LE PACK
FR 18
2.5 ASSISTANCE TECHNIQUE
En cas de de mauvais fonctionnement, vérifier si la prise est
branchée. Après ces vérifications, adressez vous à votre revendeur
ou prévenez directement notre service technique qui interviendra
dans les plus brefs délais. Veiller à ce que le coupon de garantie fourni
avec le produit soit correctement rempli, avec la date d’achat du four.
2.4 CONSEILS DE NETTOYAGE ET D’ENTRETIEN
Pour nettoyer les surfaces en inox et en émail, utilisez de l’eau tiède
légèrement savonneuse. Vous pouvez utiliser un produit adapté au
nettoyage de ce type de surface. Eviter absolument les produits
abrasifs qui pourraient endommager la surface du four. En cas de
salissures tenaces, évitez d’utiliser des ustensiles susceptibles de
rayer irrémédiablement la surface de votre four. Il est conseillé de
nettoyer régulièrement l’intérieur de votre four après chaque cuisson.
Si vous ne respectez pas le nettoyage de votre four après chaque
cuisson vous aurez une odeur désagréable, et les projections de
graisse seront encore plus difficiles à enlever. Pour l’intérieur du four
utiliser de l’eau chaude avec une éponge grattoir. Il existe dans le
commerce des produits adaptés au nettoyage du four. Le nettoyage
du four est fastidieux. Il existe en option des panneaux autonettoyants
spéciaux avec un émail microporeux qui peuvent s’adapter sur les
fours (voir paragraphe four autonettoyant par catalyse).
Pour nettoyer les grilles inox, utilisez une éponge avec grattoir.
Attendre que la surface soit froide avant de la nettoyer. L’utilisation
d’eau froide au contact de la vitre chaude peut briser la vitre. Si cela
devait arriver la garantie ne couvrirait pas ce dommage. Pour changer
l’ampoule d’éclairage du four veillez à débrancher électriquement le
four. Les ampoules de four sont spécifiques, elles sont conçues pour
résister à une température élevée.
Grilles latérales
Situées des deux côtés de la
cavité du four. Maintiennent
les grilles métalliques et les
lèchefrites.

FR 19
3.1 UTILISATION DU MINUTEUR SONORE
Pour sélectionner le temps de cuisson
tournez le bouton sur le temps désiré. Dès
que le temps de cuisson est écoulé une
sonneriere retentit. Il ne vous reste plus qu'à
couper manuellement le four.
3.2 UTILISATION DU MINUTEUR COUPE-CIRCUIT
Il est possible de programmer la durée de la
cuisson et l'extinction automatique du four
(max. 120 minutes).
A l'expiration du temps désigné, la manette
sera en position O, une sonnerie retentira et le
four s'arrêtera automatiquement.
Si l'on souhaite utiliser le four sans
programmer d'arrêt automatique, positionner
la manette en position .
Le tour peut être allumé seulement en
sélectionnant un temps de cuisson ou en
tournant le bouton en position .
3. MINUTEUR
4. INSTRUCTIONS POUR L’UTILISATION
Testé conformément à la norme EN 60350-1 pour la déclaration de la consommation d’énergie et la définition de la classe énergétique.
La fonction "COOK LIGHT" vous permet de cuire d'une façon saine, en réduisant la quantité de
graisse ou d'huile nécessaire à la cuisson. Grâce à l'utilisation combinée du gril, du ventilateur et
d'un brassage de l'air, elle permet de conserver la teneur en humidité des aliments, en cuisant plus
rapidement sans perte de saveurs. Le brassage de l'air d'air maintient l'humidité à l'intérieur du
four et conserve les valeurs nutritionnelles des aliments en assurant un processus de cuisson
rapide et uniforme.
Cette fonction est particulièrement adaptée pour la cuisson des viandes et des légumes grillés.
Essayer "COOK LIGHT " sur toutes vos recettes et laissez- vous tenter par la légèreté de cette
nouvelle fonction!
210
230
210

• Durante la cocción, podría condensarse
humedad dentro de la cavidad del horno o en el
cristal de la puerta. Esto es normal. Para reducir
este efecto, espere de 10 a 15 minutos antes de
introducir alimentos en el horno una vez que lo
encienda. De todos modos, la condensación
desaparece cuando el horno alcanza la
temperatura de cocción.
• Para cocinar verduras, póngalas en un
recipiente con una tapa en lugar de utilizar una
bandeja sin cubrir.
• Evite dejar los alimentos en el horno más de
15/20 minutos después de cocinarlos.
• ATENCIÓN: el electrodoméstico y todas sus
piezas se calientan durante el uso. Tenga
cuidado de no tocar las partes calientes.
• ATENCIÓN: las piezas accesibles pueden
calentarse cuando el grill está funcionando.
Mantenga el aparato fuera del alcance de los
niños.
• ATENCIÓN : asegúrese de que e l
electrodoméstico esté apagado antes de
sustituir la bombilla para evitar la posibilidadde
descargas eléctricas.
• ATENCIÓN: con el fin de evitar cualquier peligro
debido a un restablecimiento accidental del
dispositivo térmico de interrupción, este aparato
no debe recibir alimentación mediante
dispositivos de conmutación externos como
temporizadores, ni conectarse a un circuito
regularmente alimentado o interrumpido por el
servicio.
• Los niños menores de 8 años deben
mantenerse a una distancia segura del aparato si
no son supervisados continuamente.
• Los niños no deben jugar con el
electrodoméstico. Pueden utilizarlo niños a partir
de 8 años de edad y personas con facultades
físicas, sensoriales o mentales reducidas, o con
falta de experiencia y conocimiento, si lo
emplean bajo supervisión o se les instruye
acerca de la seguridad del producto y entienden
los riesgos que comporta.
• La limpieza y el mantenimiento no deben ser
llevados a cabo por niños sin supervisión.
• No utilice materiales rugosos o abrasivos ni
rasquetas metálicas afiladas para limpiar las
puertas de vidrio del horno, ya que pueden rayar
la superficie y agrietar el vidrio.
• Apague el horno antes de sacar las partes
extraíbles.
• Después de la limpieza, vuelva a montarlas
siguiendo las instrucciones.
• Utilice únicamente la sonda térmica
recomendada para este horno.
• No utilice limpiadores de vapor.
• Conecte un enchufe en el cable que transporta
la tensión, la corriente y la carga indicadas en la
etiqueta y que tiene el contacto de masa. La toma
de corriente debe ser la adecuada para la carga
indicada en la etiqueta y debe funcionar
correctamente. El conductor de toma de tierra se
caracteriza por los colores amarillo y verde. Esta
operación debe realizarla un profesional
debidamente cualificado. Si la toma de corriente
es incompatible con el enchufe del
electrodoméstico, pida a un electricista
profesional que sustituya la toma por otra del tipo
adecuado. El enchufe y la toma deben cumplir
las normas actuales del país donde se instala el
electrodoméstico.
Se puede efectuar también la conexión a la red
interponiendo, entre el aparato y la red, un
interruptor omnipolar dimensionado a la carga y
conforme con la normativa vigente. El cable de
tierra amarillo y verde no debe interrumpirse con
el interruptor. La toma o el interruptor omnipolar
usados para la conexión deben ser fácilmente
accesibles para el electrodoméstico instalado.
• La desconexión puede realizarse mediante el
enchufe accesible o mediante la incorporación
de un interruptor en el cableado fijo con arreglo a
las normativas de cableado.
• Si el cable de alimentación está dañado, debe
sustituirse por un cable o un haz de cables
especial comercializado por el fabricante;
también puede ponerse en contacto con el
departamento de atención al cliente.
• El cable de alimentación debe ser de tipo
H05V2V2-F.
• Esta operación debe realizarla un profesional
debidamente cualificado. El conductor de toma
de tierra (amarillo y verde), debe ser
aproximadamente 10 mm más largo que los
otros conductores. Para cualquier reparación,
diríjase únicamente a un centro de asistencia
técnica autorizado y solicite que se empleen
recambios originales.
• El incumplimiento de r las indicaciones
anteriores puede poner en peligro la seguridad
del electrodoméstico y anular la garantía.
• Los excesos de material deben retirarse antes
de limpiar.
• Una interrupción prolongada de la corriente
durante una fase de cocción puede causar una
avería en el monitor. Póngase en contacto con el
servicio de atención al cliente si esto ocurre.
• El electrodoméstico no debe instalarse detrás
de una puerta decorativa para evitar que se
caliente en exceso.
• Cuando coloque la bandeja interior, asegúrese
de dirigir el tope hacia arriba en la parte trasera
de la cavidad. La bandeja debe introducirse por
completo en la cavidad
INSTRUCCIONES PARA UN USO SEGURO
ES 20

Este aparato está etiquetado conforme a la Directiva europea 2012/19/EU sobre residuos de aparatos eléctricos y electrónicos.
(RAEE). La RAEE contiene tanto sustancias contaminantes (que pueden generar consecuencias negativas para el medio ambiente) como
componentes básicos (que pueden reutilizarse). Es importante someter los RAEE a tratamientos específicos, con el fin de retirar y eliminar
correctamente todos los contaminantes y reciclar todos los materiales. Los usuarios pueden desempeñar una función importante para
garantizar que los RAEE no representen un problema ambiental; es esencial que se sigan algunas reglas:
• Los RAEE no se deben tratar como residuos domésticos.
• Los RAEE se deben depositar en los puntos de recolección correspondientes gestionados por la municipalidad o por empresas registradas.
En muchos países, para los RAEE de gran tamaño, puede existir la recolección domiciliaria.
• Cuando compre un nuevo aparato, el anterior debe devolverse al vendedor que lo debe recolectar gratuitamente de manera individual, siempre que el
equipo sea de un tipo equivalente y que tenga las mismas funciones que el equipo entregado.
AHORRAR Y RESPETAR EL MEDIO AMBIENTE
Cuando es posible, evitar el precalentamiento del horno y evitar hacerlo funcionar vacío. Abrir la puerta del horno únicamente cuando es necesario,
porque hay desperdición de calor cada vez que se abre. Para un ahorro de energía significativo, apagar el horno entre 5 y 10 minutos antes del final
previsto de la cocción, y usar el calor que el horno sigue generando. Mantener las juntas limpias y en buen estado, para evitar cualquier deperdición de
energía. Si tiene un contrato eléctrico con una tarifa de horas valles, el programa "cocción diferida" puede permitirle ahorrar energía, desplazando el
principio del programa a una franja horaria con tarifa reducida.
• ATENCIÓN: No forre las paredes del horno con
aluminio u otras protecciones comercializadas.
El aluminio o los protectores podrían derretirse al
entrar en contacto directo con el esmalte caliente
y deteriorar el esmalte del interior.
• ATENCIÓN: No quite nunca la junta de
estanqueidad de la puerta del horno.
• ATENCIÓN: No llene el fondo del horno con
agua durante la cocción o cuando esté caliente.
• N o e s n e c e s a r i o l l e v a r a c a b o
operaciones/configuraciones adicionales para
que el electrodoméstico funcione a las
frecuencias nominales.
ES 21

Contenido
Instrucciones Generales
23
1.1 Declaración de conformidad
1.2 Información sobre seguridad
1.3 Instalación
1.4 Introducción del mueble
1.5 Importante
1.6 Conexión Eléctrica
1.7 Equipamiento del horno
2.1 Rejillas horno - sistema de sujeción
2.2 La coccıón al grill
2.3 Los modelos
2.4 Limpieza y mantenimiento
2.5 Asistencia técnica
Consejos Útiles
24
Minutero
25
3.1 Uso del minutero
3.2 Uso del temporizador
Instrucciones De Uso
25
ES 22

1. INSTRUCCIONES GENERALES
Le agradecemos que haya elegido uno de nuestros productos. Para obtener de este electrodoméstico las mejores prestaciones aconsejamos:
• Leer atentamente las advertencias contenidas en el presente manual.
• Conservar con cuidado este manual para cualquier consulta posterior.
Cuando el aparato està en funcionamento todos sus elementos assessibles, estan calientes. Por ello, tenga cuidado de no tocar estos elementos.
Durante la primera puesta en funcionamiento del horno puede producirse un humo de olor acre causado por el primer calentamiento del pegamento
de los paneles de aislamiento que envuelven el horno. Se trata de un fenómeno absolutamente normal y, en caso de verificarse, es preciso esperar
a la extinción del humo antes de introducir los alimentos.
Por su naturaleza el horno es un aparato que se calienta, de modo particular el cristal de la puerta.
• Al colocar la marca en este producto, declaramos, bajo nuestra
propia responsabilidad, el cumplimiento de todos los requisitos
europeos en términos de seguridad, salud y medio ambiente,
establecidos en la legislación para este producto.
1.1 DECLARACIÓN DE CONFORMIDAD
1.2 INFORMACIÓN SOBRE SEGURIDAD
•Este aparato deberá destinarse únicamente al uso para el cual ha
sido especialmente concebido, es decir, para la cocción de alimentos.
Cualquier otro uso (por ejemplo, calentamiento a temperatura
ambiente) debe considerarse impropio, y por lo tanto peligroso.
El fabricante declina toda responsabilidad por los posibles daños
causados por el uso impropio, erróneo e irracional del aparato.
•El uso de cualquier aparato eléctrico comporta la observación de
algunas reglas fundamentales. En particular:
— No tire del cable de alimentación para desenchufar el aparato.
— No toque el aparato con las manos o los pies húmedos o mojados.
— No utilice el aparato si no lleva calzado.
— No utilice adaptadores, ladrones ni alargadores.
— En caso de avería o de mal funcionamiento del aparato, apáguelo y
no lo manipule.
•En caso de deterioro del cable, sustitúyalo inmediatamente con
arreglo a las siguientes indicaciones:
— saque el cable de alimentación y sustitúyalo por uno (tipo H05RR-
F, H05VV-F, H05V2V2-F) y adecuado a la potencia del aparato.
— esta operación deberá realizarla un técnico especializado. El hilo
de tierra (amarillo-verde) debe ser obligatoriamente 10 mm más largo
que los conductores de línea.
En caso de que el aparato precise ser reparado, diríjase únicamente a
un centro de asistencia técnica autorizado y exija piezas de recambio
originales.
No observar todo lo mencionado puede comprometer la seguridad del
aparato.
•No forrar las paredes del horno con aluminio u otras
protecciones disponibles en tiendas. El aluminio o los
protectores, en contacto directo con el esmalte caliente puede
derretirse y deteriorar el esmalte del interior.
1.3 INSTALACIÓN
La instalación corre a cargo del comprador y el Fabricante queda
exento de este servicio; eventuales intervenciones requeridas a la
Casa Constructora que dependan de una instalación incorrenta no
están incluidas en la Garantia.
La instalación debe ser efectuada según las instrucciones por
personal profesionalmente cualificado. Una instalación errónea
puede causar daños a personas, animales o cosas, de los cuales el
fabricante no puede ser considerado responsable.
1.4 INTRODUCCIÓN DEL MUEBLE
Introduzca el aparato en el hueco del mueble (bajo encimera o en
columna). El horno se fija introduciendo 4 tornillos en los agujeros del
marco, visibles al abrir la puerta.
Con el objeto de permitir una mejor ventilación del mueble, empotre el
horno respetando las medidas y las distancias indicadas en la última
página.
Nota: Para los hornos que deban acoplarse a una encimera, resulta
indispensable respetar las instrucciones contenidas en el manual
adjunto al aparato a acoplar.
Para garantizar un correcto funcionamiento del aparato encastrable,
es necesario que el mueble tenga las características adecuadas. Los
paneles de los muebles adyacentes al horno deberán ser de un
material resistente al calor. En el caso de los muebles de madera
chapada, el encolado deberá resistir una temperatura de 120°C: los
materiales plásticos o encolados que no resistan esta temperatura
pueden deformarse o despegarse.
De acuerdo con las normas de seguridad, una vez empotrado el
aparato no deben existir contactos con las piezas eléctricas. Todas
las piezas protectoras deben fijarse de manera que no puedan
sacarse sin la ayuda de un utensilio.
Para garantizar una buena ventilación debe eliminarse la pared
posterior del hueco, y el panel de apoyo debe tener una apertura
mínima de 45 mm.
1.5 IMPORTANTE
Enchufe la clavija en una base provista de un tercer contacto
correspondiente a la toma de tierra, la cual deberá conectarse
correctamente.
En los modelos desprovistos de clavija, monte una clavija estándar en
el cable capaz de soportar la carga indicada en la placa de
características. El hilo de tierra es de color amarillo-verde. Esta
operación deberá realizarla un técnico especializado.
En caso de que la base y la clavija del aparato sean incompatibles,
haga que un técnico especializado le cambie la base por otra
adecuada.
También puede efectuar la conexión a la red intercalando entre el
aparato y la red un interruptor omnipolar, preparado para la carga y
con arreglo a las normas vigentes. El hilo de tierra amarilloverde no
debe quedar interrumpido por el interruptor.
La base o el interruptor omnipolar utilizados para la conexión deben
estar situados en un lugar fácilmente accesible y cerca del
electrodoméstico instalado.
Importante: en la fase de instalación, coloque el cable de
alimentación de manera que en ningún punto alcance una
temperatura superior a los 50 °C a temperatura ambiente.
El aparato cumple los requisitos de seguridad previstos por los
institutos normativos. Sólo se garantiza la seguridad eléctrica de este
aparato si ha sido conectado correctamente a una instalación de toma
de tierra eficaz, con arreglo a lo dispuesto en las normas vigentes de
seguridad eléctrica, (en caso de duda, exija un control exhaustivo de
la instalación por parte de un técnico especializado). El fabricante
declina toda responsabilidad por los posibles daños causados por la
falta de conexión a tierra de la instalación.
Importante: el fabricante queda exento de cualquier responsabilidad
por los posibles daños personales o materiales causados por la falta
de conexión a tierra.
ATENCIÓN: La tensión y frecuencia de alimentación están
indicadas en la tarjeta de matrícula (en la última página).
Compruebe que la capacidad eléctrica de la instalación de las bases
sean adecuadas para la potencia máxima del aparato, indicada en la
placa de características. En caso de duda, diríjase a un técnico
cualificado.
1.6 CONEXIÓN ELÉCTRICA
ES 23
colocar las parrilladas. Debe utilizarse
junto con la bandeja que recoge el jugo
de cocción (grasera).
Gracias a su perfil especial, las rejillas
permanecen en horizontal hasta el
tope. No hay ningún riesgo de
deslizamiento o de desbordamiento de
la fuente.
Es necesario limpiar el equipamiento del horno antes de su primer
uso. Limpie con una esponja, y séquelo.
La rejilla simple sirve de soporte para los moldes y las fuentes.
La rejilla para sostener las fuentes sirve más especialmente para
1.7 EQUIPAMIENTO DEL HORNO - según el modelo

La grasera sirve para recoger el jugo de
las parrilladas. Sólo se debe utilizar en
modo Grill, Asador o Turbogrill (según el
modelo). Para los otros modos de cocción,
retírela del horno.
No utilice nunca la grasera como fuente para asar. Ello provocaría
emanación de humos, salpicaduras de grasa y un ensuciamiento
rápido
El Set para Pizza es ideal para cocinar
pizzas. El set debe utilizarse de forma
combinada con la función Pizza.
La bandeja del horno.
La bandeja del horno es ideal para asar.
Úselo junto con la bandeja de goteo. Un
pomo o manivela viene incluido para
ayudar a mover los accesorios de
manera segura. No deje este pomo o
manivela dentro del horno.
Durante la utilización del horno, los accesorios que no utilice
deben ser retirados del mismo.
Extracción y limpieza de los bastidores cableados
1- Retire las guías metálicas tirando de ellas en la dirección de las
flechas (ver más abajo)
2- Para limpiar las guías metálicas, puede ponerlas en el lavavajillas o
utilizar una esponja húmeda, asegurándose siempre de que se
sequen después.
3- Después del proceso de limpieza, monte las guías metálicas en
orden inverso.
Los hornos tienen un control electrónico de la velocidad
del ventilador que está patentado por Candy y que se llama
VARIOFAN. Durante la cocción, este sistema cambia
automáticamente la velocidad del ventilador (en el modo
multifunción) para optimizar el flujo de aire y la temperature interna
del horno.
Todos los hornos tienen la función .
Esta función permite la distribución de la humedad y de la
temperatura. Reduce la perdida de humedad en un 50 %,
lo que garantiza un alimento más sabroso y tierno. Esta
función es recomendada para cocinar pasteles y pan.
2.3 LOS MODELOS
La función Sprinter reduce el tiempo de calentamiento del
horno; en sólo 8 minutos alcanza 200°.
Algunos hornos vienen equipados con la nueva contrapuerta de
cristal la cual tiene una mayor área de cristal y permite un mejor
aislamiento.
La función Supergrill dá la posibilidad de aumentar la
intensidad del tostado. La potencia Supergrill se
incrementa un 50% respecto a un grill convencional.
ES 24
2. CONSEJOS ÚTILES
2.1 REJILLAS HORNO - SISTEMA DE SUJECIÓN
El horno está dotado de un nuevo sistema
de sujeción de las rejillas.
Este sistema permite extraer las rejillas
casi por completo sin que caigan y
manteniéndolas perfectamente en plano,
permitiendo verificar y mezclar los
alimentos con la máxima tranqu-ilidad y
seguridad.
Para extraer las rejillas es suficiente, como
se indica en el dibujo, levantarlas,
cogiéndolas por la parte anterior y tirar de ellas.
2.2 LA COCCIÓN AL GRILL
Este tipo de cocción permite el dorado rápido de los alimentos. Con
este fin, le aconsejamos introducir la rejilla generalmente en el 3° o 4°
estante, según las dimensiones de los alimentos. (pág. 24) Casi todas
las carnes pueden ser cocidas al grill, excepto algunas carnes tiernas
de caza y albóndigas.
La carne y el pescado para cocinar al grill deben ser ligeramente
untados con aceite.
2.4 LIMPIEZA Y MANTENIMIENTO
Limpiar las superficies de acero inox y esmaltadas con agua templada y
jabón, o con productos específicos de comercios especializados,
evitando absolutamente el uso de polvos abrasivos que dañarían las
superficies y partes estéticas.
La limpieza del horno es muy importante y debe ser efectuada cada vez
que éste es utilizado. En las paredes se depositan grasas derretidas
durante la cocción que podrían, en el sucesivo encendido, producir olores
desagradables que afectarían a la cocción. Para la limpieza utilizar agua
caliente y jabón, aclarando cuidadosamente.
Para eliminar esta tarea, las paredes del horno pueden ser revestidas
con paneles autolimpiantes especiales, accesorios opcionales en
algunos modelos: ver parágrafo específico “HORNO
AUTOLIMPIANTECATALÍTICO”
Utilizar jabón y barillas de acero para las rejillas inox. La limpieza de las
superficies de cristal templado debe ser efectuada cuando las superficies
estén frias. Eventuales roturas debidas a la no observación de esta regla
elemental no están cubiertos por la garantia.
La bombilla del horno puede ser sustituida desconectando eléctricamente
el aparato y destornillando la ampolla que la encierta, sustituyendo la
bombilla por una análoga resistente a altas temperaturas.
Se aconseja además utilizar fuentes con bordes altos en el caso de
cocciones de alimentos particularmente grasos (asados, etc) y utilizar la
grasera al realizar la cocción al grill.
Para el caso que, por condiciones particulares de suciedad, no fuera
suficiente la acción precedente, se aconseja apartar las grasas con un
paño mullido o una esponja humedecidos con agua caliente. La porosidad
del esmalte es fundamental para garantizar la acción autolimpiante.
N.B. Todos los paneles autolimpiantes comercializados en el mercado
tienen una eficacia de rendimiento de aproximadamente 300 horas de
funcionamiento del horno. Pasado dicho límite los paneles deberían ser
sustituidos.
En caso de incorrecto funcionamiento del horno le aconsejamos:
—verificar la buena conexión del enchufe en la toma de corriente.
En caso de que no se determine la causa del mal funcionamiento: apagar
el aparato sin manipularlo y llamar al Servicio de Asistencia Técnica. Antes
de llamar al Centro de Asistencia recuerde tomar nota del número de
matrícula situado en la tarjeta matrícula del producto (Fig. última página).
El aparato está dotado de un certificado de garantía que le permite
disponer del Servicio Asistencia Técnica.
2.5 ASISTENCIA TÉCNICA
Soportes laterales
Se encuentran en ambos
lados del hueco del horno.
Sostienen las rejillas
metálicas y las bandejas
graseras.

Con este mecanismo es posible programar la
duración exacta en minutos de la cocción y, por
tanto, la desconexión automática del horno
(máx.120 minutos)
Una vez transcurrido el tiempo seleccionado el
mando alcanzará la posición de señal acústica
O, a partir de la cual el horno se desconectará
automáticamente.
Únicamente se podrá conectar el horno
seleccionando un tiempo de cocción o
girando el mando a la posición
3.2 USO DEL TEMPORIZADOR
3. MINUTERO
Para seleccionar el tiempo elegido, gire el
mando una vuelta completa y después
vuelva a ajustar la marca en la posición
correspondiente al tiempo deseado. Una vez
transcurrido el tiempo seleccionado se
emitirá una señal acústica durante algunos
segundos.
3.1 USO DEL MINUTERO
ES 25
4. INSTRUCCIONES DE USO
Conecta la luz interior
DESCONGELACIÓN
Funcionamiento de la turbina de cocción que hace circular el aire dentro del espacio
del horno. Ideal para realizar una descongelación previa a una cocción.
Convección natural
Funcionan la resistencia inferior y la resistencia superior del horno. Es la cocción
tradicional, ideal para cocinar asados, caza, galletas, manzanas al horno y para
conseguir alimentos crujientes.
CALOR CIRCULANTE (a)
Utilización simultánea de la resistencia inferior, superior y de la turbina que hace circular
el aire dentro del espacio del horno. Función recomendada para las aves, la repostería,
los pescados, las verduras... El calor penetra mejor dentro del alimento a cocer
reduciendo el tiempo de cocción, así como el tiempo de precalentamiento. Se pueden
realizar cocciones combinadas con preparaciones idénticas o distintas en uno o dos
niveles. Este modo de cocción garantiza una distribución homogénea del calor y no
mezcla los olores. Para una cocción combinada se deben prever unos diez minutos más.
RESISTENCIA INFERIOR CIRCULANTE (a)
Utilización de la resistencia inferior más la turbina que hace circular el aire dentro del
espacio del horno. Ideal para hacer tartas de frutas jugosas, tortadas, quiches, pasteles.
Evita que se sequen los alimentos y favorece la subida de bizcochos, masa de pan y
otras cocciones realizadas por debajo. Coloque la rejilla en la ranura inferior.
GRILL: El grill debe utilizarse con la puerta cerrada.
Utilización de la resistencia superior con posibilidad de ajustar la temperatura. Es
necesario un precalentamiento de 5 minutos para que la resistencia se ponga al rojo.
Éxito seguro con las parrilladas, las brochetas y los gratinados. Las carnes blancas
deben alejarse del grill, porque aunque así se alargará el tiempo de cocción, la carne
quedará más sabrosa. Las carnes rojas y los filetes de pescado se pueden colocar
encima de la rejilla colocando debajo la grasera.
Modalidad pizza
El calor envolvente en esta modalidad genera un ambiente similar al de los hornos de
leña de las pizzerías.
Mando
selector
Temperaturas
predeterminadas
y reglaje para el
programador
electrónico
(Type A)
Mando
termostato
FUNCIÓN
(a) SEGÚN EL MODELO, Función con VARIO FAN : Fan es el exclusivo sistema de funcionamiento desarrollado porCandy para optimizar los
resultados de cocción, la regulación de la temperatura y la regulación de la humedad. El sistema Vario Fan modifica automáticamente la velocidad de
rotación del ventilador para todo tipo de cocciones en multifunción. Este sistema se activa automáticamente cada vez que es seleccionada una función
en el interior del área descrita en el panel de control.
La función "COOK LIGHT" (“Cocina Light”) permite cocinar de manera más saludable,
reduciendo la cantidad de grasa o aceite necesaria. Gracias a la combinación del grill y el
ventilador, conjuntamente con un flujo de aire variable, se conservará el nivel de humedad de los
alimentos, dorando la superficie y reduciendo el tiempo de cocción, sin alterar su sabor.
Especialmente, es adecuado para la cocción de carnes, verduras asadas y tortillas. El flujo
variable de aire mantiene tanto la humedad en el interior del horno como en los alimentos,
conservando los valores nutricionales y garantizando un proceso de cocción uniforme rápido.
¡Pruebe todas sus recetas y reduzca la cantidad de condimentos que se emplean y experimente
la ligereza de esta nueva función!
* Probado de acuerdo con la norma EN 60350-1 para fines de declaración de consumo de energía y clase energética.
210
230
210

• Med kuhanjem lahko vlaga kondenzira znotraj
odprtine pečice ali na steklu vrat. To je normalno
stanje. Za zmanjšanje tega učinka počakajte
10–15 minut po vklopu napajanja, preden hrano
vstavite v pečico. V vsakem primeru
kondenzacija izgine, ko pečica doseže
temperaturo za kuhanje.
• Zelenjavo kuhajte v posodi s pokrovom,
namesto na odprtem pekaču.
• Izogibajte se puščanju hrane v pečici za več kot
15–20 minut po kuhanju.
• OPOZORILO: naprava in dostopni deli se med
uporabo segrejejo. Bodite previdni in se ne
dotikajte vročih delov.
• OPOZORILO: med delovanjem žara, se
izpostavljeni deli lahko zelo segrejejo. Zato
poskrbite, da bodo takrat otroci varno
oddaljeni.
• OPOZORILO: poskrbite, da je pred zamenjavo
žarnice, naprava izklopljena, da se izognete
morebitnemu električnemu udaru.
• OPOZORILO: da bi se izognili kakršni koli
nevarnosti zaradi nenamerne ponastavitve
termičnega prekinjala, te naprave ne smete
napajati preko zunanje stikalne naprave, kot je
časovnik, ali je priključiti na tokokrog, ki se redno
vklaplja ali izklaplja.
• Otroci, mlajši od 8 let, morajo biti na varno
oddaljeni od naprave, če niso pod stalnim
nadzorom.
• Otroci se z napravo ne smejo igrati. Napravo
lahko uporabljajo osebe stare 8 let ali več in
osebe z zmanjšanimi telesnimi, čutnimi ali
razumskimi sposobnostmi, brez izkušenj ali
znanja o izdelku, le pod nadzorom ali če so prejeli
ustrezna navodila glede varne uporabe naprave
in če se zavedajo nevarnosti, ki obstajajo.
• Čiščenja in vzdrževanja ne smejo opravljati
otroci, ki niso pod nadzorom.
• Za čiščenje stekla na vratih pečice ne
uporabljajte abrazivnih in grobih materialov ali
ostrih kovinskih strgal, saj lahko povzročijo
praske na stekleni površini, ki lahko povzročijo
pokanje stekla.
• Pred odstranjevanjem delov, ki jih je mogoče
odstraniti, je pečico treba izklopiti.
• Po končanem čiščenju, ponovno sestavite dele
po priloženih navodilih.
• Uporabljajte samo sondo za meso, ki je
priporočena za to pečico.
• Za čiščenje ne uporabljajte parnega čistilnika.
• Vtikač napajalnega kabla priklopite v vtičnico, ki
izpolnjuje zahteve glede napetosti, toka in moči,
ki so navedene na oznaki naprave, vtičnica pa
mora biti tudi ustrezno ozemljena. Vtičnica mora
zagotavljati ustrezno moč, ki je navedena na
oznaki naprave, biti mora ozemljena in v
brezhibnem stanju. Kabel za ozemljitev je
rumeno-zelene barve. Priklop naprave mora
izvesti ustrezno usposobljena oseba. Če vtičnica
in vtikač nista združljiva, naj ustrezno
usposobljeni elektro-serviser zamenja vtičnico s
takšno, ki se bo prilegala vtikaču. Vtičnica in
vtikač morata izpolnjevati veljavne norme v
državi, kjer bo naprava priklopljena v omrežje.
Priklop v električno omrežje je možno izvesti tudi
tako, da je napajanje urejeno prek ustrezne
varovalke, vgrajene med napravo in vir
napajanja, ki zagotavlja, da obremenitev omrežja
ne presega predpisane zakonodaje.
Rumeno-zelenega kabla ni dovoljeno prekinjati z
varovalko. Vtičnica ali varovalka, ki sta vgrajeni
med vtičnico in napravo, morata po namestitvi
naprave ostati enostavno dostopni.
• Prekinitev napajanja mora biti možna bodisi z
odklopom vtikača iz vtičnice, oziroma prek
dodatno vgrajenega stikala, nameščenega
skladno s pravili elektro-stroke.
• Če je napajalni kabel poškodovan, ga je
potrebno nadomestiti z novim ali posebnim
kablom, ki je na voljo pri proizvajalcu, lahko pa
se tudi obrnete na oddelek za podporo kupcem.
• Napajalni kabel mora biti vrste H05V2V2-F.
• Priklop naprave mora izvesti ustrezno
usposobljena oseba. Kabel za ozemljitev
(rumeno-zelen) mora biti približno 10 mm daljši
kot drugi prevodniki. Za kakršna koli popravila se
obrnite samo na oddelek za podporo strankam in
zahtevajte uporabo originalnih rezervnih delov.
• Neupoštevanje zgornjih predpisov lahko
negativno vpliva na varno uporabo naprave ter
izniči garancijo.
• Pred čiščenjem morate morebitne ostanke živil
najprej odstraniti.
• Dolg izpad napajanja, ki se pojavi med fazo
kuhanja, lahko povzroči okvaro zaslona. V tem
primeru se obrnite na servisno službo.
• Naprave ni dovoljeno namestiti za dekorativnimi
vrati, sicer lahko pride do pregrevanja.
• Pri vstavljanju polic se prepričajte, da je
zaustavljalnik na zadnji strani in obrnjen navzgor.
Polico morate vstaviti do konca
• OPOZORILO: Sten pečice na oblagajte z
aluminijasto folijo ali zaščito za enkratno
uporabo, ki je na voljo v trgovinah.
Aluminijasta folija ali katera koli druga zaščita, ki
je v neposrednem stiku z vročim emajlom,
predstavlja tveganje topljenja in slabšanja
kakovosti emajla v notranjosti.
• OPOZORILO: Nikoli ne odstranite tesnil na
vratih pečice.
• POZOR: Dna odprtine pečice ne polnite z vodo
med kuhanjem ali ko je pečica vroča.
• Za upravljanje te naprave pri nazivnih
frekvencah, ni potrebno nobeno dodatno
delovanje/nastavitev.
VARNOSTNA NAVODILA
SI 26

Ta naprava je označena v skladu z določili Evropske direktive 2012/17/EU o odpadni električni in elektronski opremi (OEEO). OEEO so tako
snovi, ki onesnažujejo okolje (lahko negativno učinkujejo na okolje) kot osnovni sestavni deli (ki jih je možno ponovno uporabiti). Pomembno
je pravilno ravnati z OEEO, da pravilno odstranimo in zavržemo vse snovi, ki onesnažujejo, okolje, ter obnovimo in recikliramo vse materiale.
Kot posamezniki lahko pomembno vplivamo na to, da OEEO ne postane okoljska težava; upoštevati moramo le nekaj osnovnih pravil:
• Z OEEO ne smemo ravnati kot z ostalimi hišnimi odpadki.
• OEEO moramo odnesti v ustrezne centre za zbiranje odpadkov, ki jih upravlja občina ali pooblaščeno podjetje. V več državah imajo urejen
prevzem večjih kosov OEEO na domu.
• Ob nakupu nove lahko staro napravo vrnemo prodajalcu, ki jo je dolžen brezplačno prevzeti na osnovi ena za eno, če je oprema enake vrste
in ima enake funkcije kot dobavljena.
PRIHRANEK NA ENERGIJI IN SPOŠTOVANJE DO OKOLJA
Če je le mogoče, se izognite predgrevanju pečice in pečico kar se da napolnite z živili. Vrata pečice odpirajte kar se da poredko, saj ob vsakem odpiranju
toplota uhaja iz pečice. Občutno boste prihranili na energiji, če boste pečico izklopili 5 do 10 minut pred predvidenim koncem pečenja in izrabili preostanek
toplote, ki je še v pečici. Tesnila naj bodo vedno čista in nepoškodovana, da preprečite morebitno uhajanje toplote iz pečice. Če imate na izbiro tudi
časovna obdobja z nižjo ceno električne energije, s pomočjo programa za zamik vklopa začetka pečenja enostavno prihranite, če pečenje zamaknete na
čas, ko je električna energija cenejša.
SI 27

Povzetek
Splošna opozorila
29
1.1 Izjava o skladnosti
1.2 Varnostni napotki
1.3 Namestitev in priključitev
1.4 Vgradnja pečice v kuhinjski niz
1.5 Pomembni napotki
1.6 Priključitev pečice na električno omrežje
1.7 Oprema pečice (odvisno od modela)
2.1 Nekaj koristnih nasvetov
2.2 Žar
2.3 Modeli U COOK
2.4 Čiščenje in vzdrževanje pečice
2.5 Servisiranje
Koristni nasveti
30
Таймер
30
3.1 Uporaba števca minut
3.2 Nastavljanje trajanja pečenja
Funkcije
31
SI 28

1. SPLOŠNA OPOZORILA
Hvala, da ste izbrali enega naših izdelkov! Da boste lahko izrabili vse možnosti, ki vam jih ponuja pečica, priporočamo naslednje:
• Pozorno preberite navodila; v njih so pomembna navodila za varno vgradnjo, priključitev, uporabo in vzdrževanje pečice.
• Priporočamo, da navodila shranite, saj jih boste morda še potrebovali.
Ob prvem segrevanju boste morda zaznali neprijeten vonj. To je posledica veziv za izolacijske plošče in je popolnoma normalen pojav.
Počakajte, da hlapi izginejo, potem pa lahko postavite jed v pečico.
Pečica se med delovanjem zelo segreje, med drugim tudi steklo na vratih.
1.1 IZJAVA O SKLADNOSTI
1.2 VARNOSTNI NAPOTKI
• Pečica je izdelana le za pečenje in kuhanje jedi v gospodinjstvu.
Uporaba pečice v kakršnekoli druge namene je (npr. za segrevanje
prostora) je neprimerna in zaradi tega tudi nevarna.
• Proizvajalec in prodajalec ne prevzemata odgovornosti za
morebitne poškodbe oseb in/ali materialno škodo, ki bi nastala zaradi
neprimerne, napačne in nespametne uporabe pečice. Pri uporabi
kakršnega koli električnega aparata morate upoštevati naslednja
osnovna varnostna pravila:
• Oznaka na izdelku potrjuje, da je oprema skladna z Evropskimi
predpisi o varnosti in zdravju ter z okoljskimi določbami, ki se
nanašajo na uporabo tovrstnih izdelkov.
Ko dobite svojo novo pečico, se najprej prepričajte, da med
transportom ni prišlo do poškodb. Če je pečica poškodovana, se
takoj obrnite na prodajalca. Če niste prepričani, se posvetujte s
strokovnjakom. Pazite, da embalaža, na primer plastične vrečke,
polistirol ali žeblji, ne pridejo v roke otrok, saj so lahko zelo nevarni
zanje.
-Ne vlecite priključnega kabla, če želite iztakniti vtikač iz vtičnice, pač
pa primite za vtikač in ga lepo iztaknite iz vtičnice.
-Ne dotikajte se aparata, če imate vlažne roke ali noge.
-Ne dotikajte se aparata, če ste bosi.
-Priključitev aparata na električno omrežje preko adapterjev,
podaljškov in razdelilcev ni priporočljiva.
- V primeru okvare in/ali slabega delovanja aparat takoj izklopite in ga
ne uporabljajte naprej.
- Če se poškoduje priključni kabel, ga morate takoj zamenjati.
Odstranite poškodovani priključni kabel in ga zamenjajte s kablom
tipa H05RRF, H05VV-F, H05V2V2-F ustrezne dolžine in preseka
Kabel mora biti sposoben prenesti obremenitev. Priključnega kabla ne
menjajte sami, pač pa naj vam ga zamenja ustrezno usposobljen
strokovnjak! Pripominjamo, da mora biti vodnik za ozemljitev (rumen
zelen) obvezno za 10 mm daljši od vodnikov za priključitev na
električno omrežje.
Za morebitna popravila se obrnite na enega od naših pooblaščenih
serviserjev ter ob morebitni zamenjavi posameznih elementov vedno
zahtevajte vgradnjo originalnih Candyjevih rezervnih delov.
Neupoštevanje zgornjih navodil lahko vpliva na varno delovanje
aparata.
• Sten pečice ne oblagajte z alu-folijo ali v oblogami za enkratno
uporabo, ki so na voljo v trgovinah, saj bi se te snovi lahko stalile
ob stiku z vročim emajlom, kar bi poškodovalo emajl.
1.3 NAMESTITEV IN PRIKLJUČITEV
Za priključitev aparata in morebitno vgradnjo poskrbi kupec in ni
odgovornost proizvajalca. Morebitni posegi s strani pooblaščenega
servisa niso vključeni v garancijo. Električna inštalacija, na katero bo
aparat priključen, mora biti urejena v skladu z veljavnimi lokalnimi
predpisi in v skladu z navodili proizvajalca, zato priporočamo, da vam
električno inštalacijo pred priključitvijo aparata pregledajo
usposobljeni strokovnjaki. Morebitna škoda, ki bi nastala zaradi
napačne priključitve in/ali namestitve aparata, ni zajeta v garancijo.
Priključitev in namestitev aparata morajo v izvesti v skladu z navodili
ustrezno usposobljeni strokovnjaki.
Morebitna napačna priključitev in namestitev lahko povzroči
poškodbe oseb, živali ali premoženja.
Proizvajalec in prodajalec ne prevzemata odgovornosti za morebitne
poškodbe oseb in/ali nastalo materialno škodo, do katere bi prišlo
zaradi napačne priključitve in/ali vgradnje aparata.
1.4 VGRADNJA PEČICE V KUHINJSKI NIZ
Dovoljena je vgradnja pečice pod delovni pult ali v nišo v visoki
kuhinjski omarici. Pečico pritrdite s pomočjo vijakov skozi luknje na
ohišju (gl. sliko na zadnji strani).
Odprite vrata pečice in poiščite luknje. Zagotoviti morate ustrezno
zračenje; upoštevajte mere, ki so navedene na skici na zadnji strani
teh navodil.
Opomba: Če kombinirate pečico in kuhalno ploščo, upoštevajte tudi
navodila, ki so bila priložena kuhalni plošči!
Pečico priključite na ozemljeno vtičnico, ali preko ustreznega
večpolnega stikala, zaščiteno z ustreznimi varovalkami. Pečica mora
biti pravilno ozemljena!
Nekateri modeli niso opremljeni z vtičem. Na priključni kabel takih
modelov pritrdite vtič, ki bo ustrezal priključni moči aparata. Priključna
moč aparata je navedena na napisni ploščici s tehničnimi podatki, ki je
pritrjena na aparatu. Ozemljitveni kabel je zeleno-rumene barve.
Če vtičnica v zidu ne ustreza vtiču, jo morate zamenjati z ustrezno.
Vsako tako delo sme opraviti le ustrezno usposobljen strokovnjak. Ta
mora ob zamenjavi tudi pregledati, če presek kablov v vtičnici ustreza
skupni priključni moči vašega aparata.
Aparat lahko priključite na omrežje tudi direktno, vendar morate med
priključni kabel in električno omrežje vgraditi večpolno stikalo
ustrezne moči, ki mora imeti razmik med kontakti najmanj 3 mm.
Vgraditi smete le tako stikalo, ki ustreza vsem varnostnim predpisom.
Ozemljitveni kabel ne sme biti prekinjen s stikalom. Vtičnica ali direktni
priključek morata biti nameščena tako, da sta enostavno dosegljiva
tudi po izvršeni vgradnji.
1.6 PRIKLJUČITEV PEČICE NA ELEKTRIČNO
OMREŽJE
Za brezhibno delovanje mora biti pečica vgrajena v ustrezno nišo.
Stranice kuhinjskih omaric poleg pečice morajo biti izdelane iz na
vročino odpornih materialov. Prepričajte se, da lepilo, uporabljeno pri
izdelavi omarice, prenese temperaturo vsaj 120 C; plastika ali lepila, ki
ne prenesejo tako visokih temperatur, se bi stalili, omarica pa bi se
deformirala. Po vgradnji pečice v nišo morajo biti vsi električni deli
povsem izolirani; to zahtevajo veljavni predpisi. Vsa varovala morajo
biti trdno pritrjena, tako da jih je nemogoče odstraniti brez uporabe
posebnih orodij.
Odstranite hrbtno stranico s kuhinjske omarice, da omogočite
kroženje zraka okoli pečice. Kuhalna plošča nad njo mora biti
oddaljena vsaj 45 mm.
Pred prvo uporabo pečice očistite vse površine z blago raztopino
čistila, nato pa z gobico izperite površine s čisto vodo in jih
obrišite s suho krpo.
1.7 OPREMA PEČICE (odvisno od modela)
1.5 POMEMBNI NAPOTKI
Na rešetko postavite različne pekače.
Ta rešetka je zelo primerna za
pripravljanje jedi na žaru. Pod njo
podstavite pekač za lovljenje maščobe.
Posebna oblika rešetko zagotavlja, da
ostanejo v vodoravnem položaju tudi če
so delno izvlečene iz pečice tako ni
nevarnosti, da bi pekač zdrsnil z rešetke.
Globji pekač je namenjen lovljenju
maščobe, ki med peko na žaru ali
ražnju (odvisno od modela) kaplja iz
mesa. Ne uporabljajte ga za peko
pečenk, saj bi se maščoba v tem
primeru razpršila po vsej pečici, se
začela žgati in pojavil bi se dim.
SI 29

Pekač za pizzo zagotavlja najboljše
rezultate ob uporabi funkcije Pizza.
Nosilec pekača je idealen za peko na
žaru; uporabljate ga skupaj s pekačem
za lovljenje maščobe. Opremljen je z
ročajem za lažje rokovanje z obema
pekačema. Ročaj je snemljiv, ne
puščajte ga v pečici!
Odstranjevanje in čiščenje žičnatih rešetk
1- Odstranite žične stranske nosilce tako, da jih potegnete v smeri
puščic (glejte spodaj).
2- Za čiščenje žičnih stranskih nosilcev jih lahko postavite v
pomivalni stroj ali uporabite mokro gobico ter jih potem dobro
osušite.
3- Po čiščenju, namestite žične stranske nosilce v nasprotnem
vrstnem redu.
Vse pečice imajo tudi funkcijo . Ta
omogoča uravnavanje vlažnosti in temperature in za 50
% zmanjša izgubo vlage, tako da ostane živilo bolj
mehko in boljšega okusa. Ta nežni način priporočamo za
peko kruha in peciva.
Pri pečicah elektronika nadzira hitrost ventilatorja ta
patentirani sistem se imenuje VARIOFAN. Med pečenjem se hitrost
ventilatorja samodejno prilagaja in s tem optimizira kroženje zraka
ter temperaturo v notranjosti pečice.
2. KORISTNI NASVETI
2.1 NEKAJ KORISTNIH NASVETOV
Pečica ima vgrajen nov sistem za blokiranje
nosilnih rešetk. Ta sistem omogoča, da
nosilne rešetke med preverjanjem jedi
izvlečete iz pečice, brez nevarnosti, da bi
povsem zdrsnile iz vodil.
Če želite rešetko odstraniti iz pečice, jo
izvlečete ter nekoliko privzdignete.
2.2 ŽAR
S pomočjo žara se živilo hitro zapeče in dobi lepo rjavo barvo.
Priporočamo, da pekač potisnete v 4. višino odvisno seveda od
količine.
Razen zelo puste divjačine in mesnih štruc lahko vsa druga živila
pripravljate na ta način.
Meso in ribe, ki jih boste spekli na ta način, narahlo namažite z oljem.
2.3 MODELI
Skrajša čas predhodnega segrevanja pečice: ta se samo
v 8 minutah segreje na 200 stopinj C.
Nekatere pečice so opremljene z novimi vrati z
večjim oknom, kar olajša vzdrževanje in izboljša termično izolacijo.
Omogoča nastavljanje stopnje intenzivnosti žara in je za
50 % močnejši v primerjavi s klasičnimi pečicami.
WIDE DOOR
SI 30
2.4 ČIŠČENJE IN VZDRŽEVANJE PEČICE
Zunanje površine iz nerjavečega inox jekla in lakirane ali emajlirane
površine očistite z mlačno milnico ali pa z namenskimi čistili za
tovrstno čiščenje, ki jih dobite v prosti prodaji. Zgoraj navedenih
površin v nobenem primeru ne smete čistiti z abrazivnimi praški, ker bi
jih s tem poškodovali. Čiščenje pečice je zelo pomembno. Pečico
morate očistiti po vsaki uporabi. Na stenah pečice se nabirajo
raztopljene maščobe, ki lahko ob naslednji uporabi povzročijo
neprijeten vonj in morda tudi slab izid peke. Notranje stene pečice
očistite s toplo vodo z dodatkom detergenta. Stene pečice nato
pomijte še s čisto vodo in jih obrišite. Neprijetnemu čiščenju notranjih
sten pečice se lahko izognete, če jih obložite s posebnimi
samočistilnimi oblogami ki so zaščitene z mikroporoznim premazom.
Samočistilne obloge lahko nabavite posebej. Več informacij o
samočistilnih oblogah pa lahko najdete v poglavju''Samočistilna
katalitična pečica''. Nosilne rešetke pečice čistite z ustreznimi
detergenti in mrežicami iz inoxa. Vrata pečice iz kaljenega stekla
smete čistiti šele, ko so hladna. Morebitne poškodbe steklenih vrat
(razbitje stekla), ki bi nastale pri čiščenju zaradi neupoštevanja zgoraj
navedenega navodila, niso zajete v garancijo!Če želite zamenjati
žarnico v pečici, morate pečico najprej ločiti od električnega omrežja.
Odvijte zaščitni pokrovček in zamenjate pregorelo žarnico z žarnico
enake vrste. Žarnica mora biti odporna na visoke temperature.
2.5 SERVISIRANJE
Če pečica ne deluje, se najprej prepričajte, da je pravilno priključena
na električno omrežje.
Če vam ne uspe odpraviti nepravilnosti v delovanju, izključite pečico
iz električnega omrežja in pokličite pooblaščeni servis. Pred tem si
zabeležite serijsko številko, ki je navedena na tablici s podatki
(gl. sliko na zadnji strani).
Pečici je priložen garancijski list, ki zagotavlja, da bo pooblaščeni
servis v garancijskem roku popravilo opravil brezplačno.
S pomočjo tega gumba lahko nastavite
ustrezen čas pečenja (največ 120 minut);
po preteku nastavljenega časa se pečica
samodejno izklopi.
Čas se bo odšteval od nastavljene
vrednosti navzdol; ko se gumb vrne v
položaj O, se bo pečica samodejno
izklopila. Če želite pečico uporabljati brez
programske ure, obrnite gumb v položaj
. Ko želite nastaviti pečico, preverite, da s
programsko uro ni v položaju O.
Gumb zavrtite za cel krog in ga nato
obrnite tako, da bo oznaka kazala želeni
čas. Ko preteče nastavljeni čas, se za
nekaj sekund oglasi zvone c.
3.1 UPORABA ŠTEVCA MINUT (KUHINJSKE URE)
3.2 NASTAVLJANJE TRAJANJA PEČENJA
3. ТАЙМЕР
Prečna žična rešetka
Se nahaja na obeh straneh odprtine
pečice. Za nameščanje kovinskih
rešetk in pladnja za kapljanje.

4. FUNKCIJE
Funkcije Funkcije
Predvide- na
temp.*
Gumb
termost.
Za prižiganje luči v pečici
Samodejno se aktivira tudi ventilator za hlajenje (modeli z ventilatorjem)
ODTALJEVANJE: Okoli živila kroži zrak sobne temperature; tako se živilo hitro
odtali z ohranjanjem vseh lastnosti živila.
ZGORNJI/SPODNJI GRELEC : Delujeta spodnji in zgornji grelec;ta funkcija je
primerna za tradicionalni način peke in jo priporočamo za peko krač,divjačine,
peciva, keksov, jabolk ter za vse jedi, ki jih želite hrustljavo zapeči.
VENTILIRANA PEČICA : Delujeta oba grelca ter ventilator, tako da vroč zrak kroži
v pečici. Ta način priporočamo za peko perutnine, sladic, rib in zelenjave.
Enakomerna temperatura v notranjosti skrajša čas pečenja in predhodnega
segrevanja pečice. Naenkrat lahko pečete različne jedi; vonji se ne bodo pomešali.
Če pečete več jedi hkrati, pečenje podaljšajte za približno 10 minut.
VENTILATOR IN SPODNJI GRELEC (a): Pečico segreva spodnji grelec, vroč zrak
pa zahvaljujoč ventilatorju kroži v notranjosti pečice. Funkcija je namenjena peki
občutljivih jedi (pite - narastki). Jed se ne izsuši in bolje naraste, predvsem to velja
za kolače, kruh in druge jedi, ki se morajo segrevati od spodaj. Pekač potisnite v
spodnjo višino vodila.
ŽAR : Pri zaprtih vratih pečice.Ta funkcija je primerna za peko tanjših kosov mesa.
Nastavljanje temperature ni mogoče. Najprej pečico segrevajte 5 minut, nato
postavite jed vanjo. Primerno za peko kebaba, mesa na žaru, gratiniranje .. Belo
meso naj bo od grelca bolj oddaljeno, peče se dlje časa, a bo bolj okusno. Rdeče
meso ali ribe pecite na rešetki, pod katero potisnete pekač za lovljenje maščobe.
FUNKCIJA PIZZA : Vroč zrak, ki kroži v pečici, zagotavlja popolne rezultate pri pek
pizz in podobnih jedi.
(a) Nekateri modeli: funkcija z Vario Fan: VarioFan je ekskluzivni sistem, ki so ga razvili pri Candyju in omogoča doseganje optimalnih
rezultatov pečenja, nadzor nad temperaturo in vlago v notranjosti pečice. To je samodejno delujoči sistem, ki prilagaja hitrost ventilatorja
pri funkcijah, kjer se vklopi tudi ventilator (označene s črtkano črto na stikalni plošči).
*Preizkušeno v skladu s standardom EN 60350-1 za izjavo o porabi energije in energijskem razredu.
Funkcija "COOK LIGHT" vam omogoča bolj zdrav način kuhanja, saj je pri kuhanju s
to funkcijo potrebno uporabiti manjšo količino maščobe ali olja. Kombinirano
delovanje grelca za žar in ventilatorja poskrbi za impulzno kroženje zraka. Na ta način
se ohrani vsebnost vlage v živilu, ki se na površini hitreje zapeče in bolje ohrani okus.
Ta način je še posebej primeren za peko mesa, zelenjave in omlet. Impulzno
dotekanje zraka ohranja vlažnost v notranjosti pečice in s tem tudi v živilu, s čimer se
ohrani hranljiva vrednost živila, pečenje pa poteka hitro in enakomerno.
Preizkusite svoje recepte, pri tem pa zmanjšajte običajno uporabljeno količino
preliva, da se prepričate o učinkovitosti te nove funkcije. Zadovoljni boste z
lahkotnostjo pripravljene jedi.
SI 31
210
230
210

ТЕХНИКА НА БЕЗОПАСНОСТ
БГ 32
• По време на готвене влагата може да
кондензира по вътрешността на фурната или по
стъклото на вратата. Това е нормално. За да
намалите този ефект, изчакайте 10-15 минути
след включване на захранването, преди да
поставите храна във фурната. Във всеки случай
кондензът изчезва, когато фурната достигне
температурата за готвене.
• Гответе зеленчуците в съд с капак вместо в
открита тава.
• Избягвайте да оставяте храна вътре във
фурната след готвене за повече от 15-20
минути.
• ПРЕДУПРЕЖДЕНИЕ: уредът и достъпните
части стават горещи по време на използване.
Внимавайте да не докосвате горещите части.
• ПРЕДУПРЕЖДЕНИЕ: достъпните части могат
да станат горещи, когато скарата се използва.
Децата трябва да бъдат държани на безопасно
разстояние.
• ПРЕДУПРЕЖДЕНИЕ: уверете се, че уредът е
изключен, преди да сменяте крушката, за да
избегнете риска от токов удар.
• ПРЕДУПРЕЖДЕНИЕ: за да се избегне
опасност, породена от неволното нулиране на
термоизключвателя, уредът не бива да се
захранва през външно изключващо устройство,
като например таймер, нито да бъде свързан
към верига, която се включва и изключва
редовно.
• Децата под 8-годишна възраст трябва да бъдат
държани на безопасно разстояние от уреда, ако
не се наблюдават непрекъснато.
• Не допускайте деца да си играят с уреда.
• Уредът може да се използва от лица на 8-
годишна възраст или повече, както и от лица с
ограничени физически, сензорни или
психически способности, без опит или знания за
продукта само ако се наблюдават или са им
били предоставени инструкции за работа с
уреда по безопасен начин с осведоменост за
възможните рискове.
• Почистването и поддръжката не трябва да се
извършват от деца без наблюдение.
• Не използвайте груби или абразивни
материали или остри метални стъргалки за
почистване на стъклата на вратата на фурната,
тъй като те може да надраскат повърхността и
да раздробят стъклото.
• Фурната трябва да се изключи преди
отстраняване на демонтиращите се части. След
почистване ги сглобете отново съгласно
инструкциите.
• Използвайте само термометъра за месо,
препоръчан за тази фурна.
• Не използвайте парочистачка за почистване на
уреда.
• Свържете щепсел към захранващия кабел,
който е в състояние да понесе напрежението,
тока и натоварването, указани на табелката и
има контакт за заземяване. Щепселът трябва да
е подходящ за натоварването, посочено на
етикета, и трябва да е свързан към заземяващ
контакт, който да работи. Заземяващият
проводник е жълто-зелен на цвят. Това действие
трябва да се извършва само от подходящо
квалифициран специалист. В случай на
несъвместимост между контакта и щепсела на
уреда, се обърнете към квалифициран
електротехник, който да замени контакта с друг
подходящ тип. Щепселът и контактът трябва да
отговарят на действащите норми на държавата
на инсталацията. Свързването към източника на
захранване може да се извърши и чрез
поставяне на универсален прекъсвач между
уреда и източника на захранване, който може да
понесе максималното свързано натоварване и
който е в съответствие с действащото
законодателство. Жълто-зеленият заземяващ
кабел не трябва да се прекъсва от прекъсвача.
Гнездото или универсалният прекъсвач,
използвани за връзката, трябва да са
леснодостъпни, когато уредът е монтиран.
• Прекъсването на връзката може да се постигне
чрез достъпност на щепсела или чрез
включване на превключвател в неподвижното
окабеляване в съответствие с правилата за
окабеляване.
• Ако захранващият кабел е повреден, той
трябва да бъде заменен с кабел или специален
пакет, предоставен от производителя, или като
се свържете с отдела за обслужване на клиенти.
Типът на захранващия кабел трябва да е
H05V2V2-F. Това действие трябва да се
извършва само от подходящо квалифициран
специалист. Заземителният проводник (жълто-
зелен) трябва да е приблизително 10 mm по-
дълъг от другите проводници. За ремонти се
обръщайте към отдела за обслужване на
клиенти и изисквайте използване на оригинални
резервни части.
• Неспазването на горното може да застраши
безопасността на уреда и да обезсили
гаранцията.
• Преди почистването трябва да се извади
излишъкът от разлетия материал.
• Дълго прекъсване на електрозахранването по
време на фаза на готвене може да причини
повреда на монитора. В този случай се
свържете с отдела за обслужване на клиентите.
• Уредът не трябва да се монтира зад
декоративна врата, за да се избегне прегряване.

Този уред е маркиран съгласно европейска Директива 2012/19/EО за Отпадъци от електрическо и електронно оборудване (WEEE). WEEE съдържа
едновременно замърсяващи субстанции (които могат да окажат отрицателно въздействие върху околната среда) и основни компоненти (които
могат да се използват повторно). Важно е WEEE да бъдат обработени по специфични начини с огрлед правилното отстраняване и изхвърлянето на
всички замърсители и възвръщането и рециклиране на всички материали.
Отделните индивиди могат до окажат важна роля, осигурявайки, че WEEE няма да станат проблем за околната среда; важно е да бъдат следвани
някои основни правила:
• WEEE не трябва да бъдат третирани като домакински отпадъци.
• WEEE трябва да бъдат предавани в съответнтие събирателни пунктове, управлявани от общината или регистрирани компании. В много държави, за
големи WEEE, може да се предлага събиране от домовете.
• когато купувате нов уред, старият може да бъде върнат на търговеца, който да го приберете безплатно на база едно-към едно, докато оборудването е от
същия тип има същите функции като доставеното оборудване.
СПЕСТЯВАНЕ НА ЕНЕРГИЯ И ОПАЗВАНЕ НА ОКОЛНАТА СРЕДА
Когато е възможно избягвайте предварителното загряване на фурната. По време на готвене отваряйте вратата на фурната възможно най-малко, защото
при всяко отваряне се губи топлина. За значителна икономия на енергия изключете фурната 5 – 10 минути преди планираният край на времето за готвене и
използвайте остатъчната топлина, която фурната продължава да генерира. За да избегнете загуба на топлина поддържайте чисти и в ред уплътненията на
фурната. Ако имате различни тарифи за електрическата енергия използвайте отложеният старт, за да стартирате готвенето на по-ниската тарифа.
• Когато поставите рафта вътре, уверете се, че
стоперът е насочен нагоре и в задната част на
кухината. Рафтът трябва да бъде пъхнат
изцяло в кухината.
• ПРЕДУПРЕЖДЕНИЕ: не облепвайте
вътрешността на фурната с алуминиево фолио
или защитно фолио за еднократна употреба от
търговската верига. При докосване до
нагорещените емайлирани повърхности,
алуминиевото фолио или другите видове
защита може да се разтопят и така да увредят
емайла на вътрешните стени.
• ПРЕДУПРЕЖДЕНИЕ: Никога не сваляйте
уплътнението на вратата на фурната.
• ВНИМАНИЕ: Не допълвайте дъното на
кухината с вода по време на готвене или когато
фурната е гореща.
• За работа с уреда при номиналните честоти
н е с е и з и с к в а д о п ъ л н и т е л н о
действие/настройка.
БГ 33

Pезюме
Общи Мерки За Безопасност
35
1.1 Декларация за съответствие
1.2 Съвети за безопасност
1.3 Монтаж
1.4 Монтиране на фурна в кухнята
1.5 Важно
1.6 Свързване към захранването
1.7 Оборудване за фурна
2.1 Система за безопастност на
рафтовете
2.2 Г рил
2.3 Моделите U COOK
2.4 Почистване и поддръжка
2.5 Сервизен център
Полезни съвети
36
Таймера
36
3.1 Използване на таймера
3.2 Използване на таймера за край
на готвенето
Инструкции за работа
37
БГ 34

1.
ОБЩИ МЕРКИ ЗА БЕЗОПАСНОСТ
Благодарим Ви, че избрахте един от нашите продукти. З а да имате възможно най-добър резултат при използването на фурната,
внимателно прочетете това ръководство.Препоръчваме Ви да запазите настоящото ръководство за монтаж и експлоатация и при
нужда да се обръщате към него.
Когато уредът е в експлоатация всички достъпни части са горещи. Внивайте да не се докосвате до тези елементи.
При първият пуск на фурната, може да се усети неприятна миризма. Това става защото изолационните елементи се загряват за
първи път. Това е абсолютно нормално и няма повод за притеснение. Изчакайте уреда да изстине и го забършете добре. След
това е готов за нормална експлоатация.
Една фурна по своята същност на работа става много гореща. Особено стъклото на вратата на фурната.
1.1 ДЕКЛАРАЦИЯ ЗА СЪОТВЕТСТВИЕ
След като разопаковате фурната, уверете се, че тя не е била
повредена по някакъв начин. Ако имате някакви съмнения , не я
използвайте: свържете се с квалифициран човек. Съхранявайте
опаковъчните материали като найлонови торбички, полистирол,
или пирони извън обсега на деца, защото те са опасни за тях.
• С поставяне на знака на този уред ние потвърждаваме
съответствие с всички съответни европейски изисквания за
безопасност и опазване на здравето и околната среда, които са
приложими в законодателството за този уред.
1.2 СЪВЕТИ ЗА БЕЗОПАСНОСТ
електрически
спазват
1.3 МОНТАЖ
1.4 МОНТИРАНЕ НА ФУРНА В КУХНЯТА
Монтажът е отговорност на клиента. Производителите не са
задължени да осъществяват тази дейност. Инструкциите за
монтаж на професионално квалифициран персонал трябва да се
спазват. Неправилният монтаж може да причини вреда или
нараняване на хора, животни или вещи. Производителят не може
да носи отговорност за тези щети или наранявания.
Поставете фурната в пространството, в кухнята, то може да бъде
монтирано под един работен плот или в един шкаф. Фиксирайте
фурната на мястото й, като се използват четирите фиксиращи
отвора в рамката. (фиг. на последната страница). За да намерите
отворите за закрепване, отворете вратата на фурната и
погледнете вътре. За да се позволи подходяща вентилация,
измерванията и разстоянията, посочени в диаграмата на
последната страница трябва да се спазват. Забележка: За фурни,
които са комбинирани с котлони инструкциите, съдържащи се в
ръководството за плочата трябва да се спазват.
БГ 35
1.6 СВЪРЗВАНЕ КЪМ ЗАХРАНВАНЕТО
Ако искате фурната ви да работи нормално, трябва корпуса на
кухнята ви да е подходящ. Панелите на кухненски блок, които
са в непосредствена близост до пещта трябва да бъде
направен от термоустойчив материал. Убедете се че всички
материали могат да издържат на нагряване до 120 градуса. В
противен случай може да се разтопят и да повредят уреда.
След като фурната се монтира , електрическите компоненти
трябва да се изолират .Това е законово изискване за
безопасност. Всички предпазители трябва да бъдат здраво
фиксирани на място, така че е невъзможно да бъдат
отстранени, без помощта на специални инструменти.
Плочата за готвене трябва да има отзад разлика от поне 45
mm, за да има добро охлаждане.
1.5 ВАЖНО
Необходимо е да се направи първоначално почистване на
оборудването, преди първото използване на всеки от тях.
Измийте ги с гъба. Изплакнете и подсушете.
1.7 ОБОРУДВАНЕ ЗА ФУРНА
(в зависимост от модела)
На скарата може да се слагат
чинии и съдове.
Особено добра е за печене на
грил. Използвайте я заедно с
тавичката за мазнини.
Специалният профил на
рафтовете означава, че те стоят
хоризонтално, дори когато се
вадят. Не съществува риск от
разливане на ястието.

Никога не използвайте тавата за улавяне на сокове като
тава за мазнини, тъй като това създава дим и мазнините
ще изпръскат и замърсят фурната.
Пица комплект . За да се получат
най-добри резултати от
комплекта трябва да се използва
заедно с функцията "пица" .
Тава за мазнини
Идеална е за печене на грил.
Изполвайте я заедно с
решетката . Включена е и дръжка
за по-лесното изваждане на 2та
елемента.
НЕ ОСТАВЯЙТЕ ДРЪЖКАТА
ВЪВ ФУРНАТА!!!
Сваляне и почистване на металните стелажи
БГ 36
Тавичката улавя соковете от
храните, които се готвят на
скарата. Използва се само с грил,
скара или Fan Grill Assisted ;
Извадете я ако използвате други
програми.
Ф урните имат електронен контрол на скоростта на
вентилатора, патентован VARIOFAN. По време на готвене, тази
система променя автоматично скоростта на вентилатора (в
многофункционалния режим), за да се оптимизира въздушния
2.
ПОЛЕЗНИ СЪВЕТИ
2.1
СИСТЕМА ЗА БЕЗОПАСТНОСТ НА РАФТОВЕТЕ
Фурната разполага с нова система
за безопасност на рафта. Това ви
позволява да извади рафтовете при
проверката на храната, без опасност
от хранителни разливи или рафтове,
попадащи случайно от фурната.
За да извадите рафтовете извадет е
и повдигнете.
2.2 Г РИЛ
Печенето позволява да се даде на храната бързо кафяв
цвят . За препичане ви препоръчваме да поставите скарата
върху четвъртото ниво, в зависимост от пропорциите на
храна (вж. фиг. Стр. 7).
Почти всички меса могат да се приготват на грил.
Изключение правят много постните храни и ролките месо.
При приготвяне на месо и риба, трябва преди поставянето
им във фурната да добавите подправки и мазнина.
2.3
МОДЕЛИТЕ
се за печене на хляб и сладкарски изделия.
Това намалява времето за подгряване на пещите: само
за 8 минути, за да достигне 200 градуса по Целзий.
Дава възможност за определяне на нивото и
интензивността на печене на грил, до 50% повече
мощност в сравнение с традиционната фурна.
2.4 ПОЧИСТВАНЕ И ПОДДРЪЖКА
идентична
2.5 СЕРВИЗЕН ЦЕНТЪР
3.1 ИЗПОЛЗВАНЕ НА ТАЙМЕРА
3. ТАЙМЕРА
3.2 ИЗПОЛЗВАНЕ НА ТАЙМЕРА ЗА КРАЙ НА
ГОТВЕНЕТО
Странични телени решетки
Разположен е от двете страни на
кухината на фурната. Държи
металните скари и съдовете за
оттичане.
1. Извадете металните скари, като ги издърпате по посока на
стрелките (виж по-долу).
2. За да почистите металните скари ги поставете в съдомиялната
машина или използвайте влажна гъба, а след това се уверете, че
са подсушени.
3. След почистване поставете металните скари в обратния ред.
Всяка фурна има функция.
Това дава възможност за управление на
разпределението на влагата и температурата. Това
намалява загубата на влага с 50%, което гарантира че
храната остава нежна и с по-добър вкус. Препоръчва

*
Тествано в съответствие с EN 60350-1 с цел декларация за потребление на енергия и енергиен клас.
4. ИНСТРУКЦИИ ЗА РАБОТА
Селектор
на
функции
Настройки на
температурата
( при модели с
електронен
програматор
TYPE A)
Термостат
селектор
ФУНКЦИИ
Включва осветлението на фурната.
Това ще активира автоматично вентилатора за охлаждане (само при модели, които го имат)
Размразяване
Когато изберете тази функция вентилатора циркулира въздуха около замразената храна
така че я размразява за няколко минути без да се промени състава на протеин.
Натурална конвекция
Използват се долен и горен нагреватели. Стандартна форма на печене. Идеална за
печене на месо , печене на бисквити. Прави храната вкусна и хрупкава
Готвене на вентилатор
Използват се долен и горен нагреватели заедно с вентилатора, който циркулира въздуха
вътре във фурната. Препоръчва се за зеленчуци, риба и др. Топлината навлиза в храна по-
добре и времената за претопляне и готвене се намаляват. Можете да приготвяте различни
храни едновременно. Този метод дава много добра дистрибуция на топлината и миризмите
не се смесват. Може да оставите около 10 мин повече когато готвите повече от 1 ястие.
Вентилатор и долен нагревател
Идеална за деликатни ястия (пайове , суфлета )
Грил
Използва се само горния нагревател и можете да настроите температурата. 5 мин
предварително нагряване са нужни за да загреете добре елементите. Идеален за кебап.
Белите меса трябва да се държат на дистанция от грила. Времето за готвене е по-дълго но
месото е по-вкусно. Можете да слагате червените меса и риба на рафта с тавичката за
мазнини отдолу.
Пица
Тази функция осигурява идеални условия за ястия като пица и фокача, чрез
цуркулиране на горещ въздух във фурната.
(а) За някой модели : функцията с VARIOFAN е екслузивна система разработена от Candy за оптимизиране на резултатите от готвенето.
VARIO FAN системата се активира сама и автоматично променя скоростта на вентилатора, когато изберете определена функция: Функциите на
вентилатора са в ограденото поле на контролния панел.
Функцията „Деликатно готвене" ви позволява да готвите по здравословен начин,като
намалите количеството на необходимата мазнина.Благодарение на използването на грил и
вентилатор,комбинирано с пулсиращо движение на въздуха се запазва съдържанието на
влага в храната,запича се повърхността,намалява се времето за готвене без да се променя
вкуса.
Особено е подходяща за готвене на месо,печени зеленчуци и омлети.Движението на
пулсираш въздух запазва влажносста вътре във фурната и влагосъдържанието на
храната,запазвайки хранителните качества и гарантирайки бърз и еднакъв процес на готвене.
Пробвайте всичките си рецепти и се възползвайте от лекотата на тази функция!
БГ 37
210
230
210

VEILIGHEIDSVOORSCHRIFTEN
NL 38
• Tijdens het koken kan vocht in de ovenruimte of
op het glas van de deur condenseren. Dit is
normaal. Om dit effect te verminderen, wacht u
10-15 minuten na het inschakelen van de stroom
voordat u voedsel in de oven doet.
Condensatie verdwijnt in elk geval de wanneer de
oven de kooktemperatuur bereikt.
• Kook de groenten in een bakje met deksel in
plaats van een open blad.
• Laat geen voedsel in de oven achter na het
koken voor langer dan 15/20 minuten.
• WAARSCHUWING: het apparaat en de
toegankelijke onderdelen worden heet tijdens
gebruik. Zorg ervoor dat u geen hete onderdelen
aanraakt.
• WAARSCHUWING: de bereikbare delen
kunnen heet worden wanneer de grill in gebruik
is. Kinderen moeten op veilige afstand worden
gehouden.
• WAARSCHUWING: zorg ervoor dat het
apparaat is uitgeschakeld voordat u de gloeilamp
vervangt, om elektrische schokken te
voorkomen.
• WAARSCHUWING: om gevaar door een
onbedoelde reset van de thermische
uitschakeling te vermijden, mag dit apparaat niet
worden aangesloten op een externe
schakelinrichting zoals een timer, of worden
aangesloten op een circuit dat regelmatig wordt
in- of uitgeschakeld.
• Kinderen jonger dan 8 jaar moeten op veilige
afstand van het apparaat worden gehouden, als
ze niet continu onder toezicht staan.
• Kinderen mogen niet met het apparaat spelen.
Dit apparaat mag alleen worden gebruikt door
kinderen van 8 jaar en ouder en personen met
een lichamelijke, zintuiglijke of verstandelijke
beperking of met gebrek aan ervaring en kennis
op voorwaarde dat zij onder toezicht staan of
aanwijzingen hebben gekregen over de manier
waarop het apparaat veilig wordt gebruikt, en zij
de bijbehorende gevaren begrijpen.
• Reiniging en onderhoud mogen niet door
kinderen worden uitgevoerd, tenzij zij onder
toezicht staan.
• Gebruik geen ruwe of schurende materialen of
scherpe metalen schrapers om de glazen van de
ovendeur schoon te maken, omdat deze krassen
op het oppervlak kunnen veroorzaken en het glas
kunnen doen barsten.
• De oven moeten worden uitgeschakeld voordat
u de verwijderbare onderdelen verwijdert.
• Na reiniging moeten ze weer in elkaar worden
gezet volgens de instructies.
• Gebruik alleen de voor deze oven aanbevolen
vleessonde.
• Gebruik geen stoomreiniger om de kookplaat te
reinigen.
• Bevestig een stekker aan de voedingskabel die
in staat is de spanning, stroom en belasting te
verdragen die vermeld staan op het etiket, en een
aardcontact heeft. Het stopcontact moet geschikt
zijn voor de belasting in bedrijf die op het etiket
staat aangegeven. De aardgeleider is groen-geel
gekleurd. Dit moet worden gedaan door een
gekwalificeerd vakman. In het geval van
incompatibiliteit tussen het stopcontact en de
stekker van het apparaat, moet u een
gekwalificeerd elektricien vragen om het
stopcontact te vervangen door een ander,
geschikt stopcontact. De stekker en het
stopcontact moeten conform de huidige normen
zijn van het land waar het apparaat geïnstalleerd
wordt.
Aansluiting op de stroombron kan ook tot stand
worden gebracht door tussen het apparaat en de
stroombron een omnipolaire stroomonderbreker
aan te brengen, die de maximaal aangesloten
belasting kan verdragen en voldoet aan de
huidige wetgeving. De geel-groene aardkabel
mag niet worden onderbroken door de
stroomonderbreker. Het stopcontact of de
omnipolaire stroomonderbreker die gebruikt
wordt voor de aansluiting moet gemakkelijk te
bereiken zijn wanneer het apparaat geïnstalleerd
is.
• Afkoppeling is mogelijk doordat de stekker
bereikbaar is of door een schakelaar in de vaste
bedrading te monteren overeenkomstig de
bedradingsregels.
• Als de voedingskabel beschadigd is, moet hij
worden vervangen door een kabel of speciale
bundel die verkrijgbaar is bij de fabrikant, of via de
klantenservice.
• De voedingskabel moet van het type H05V2V2-
F zijn.
• Dit moet worden gedaan door een
gekwalificeerd vakman. De aardgeleider (geel-
groen) moet ongeveer 10 mm langer zijn dan de
andere geleiders. Neem voor reparaties alleen
contact op met de klantenservice en vraag om het
gebruik van originele reserveonderdelen.
• Als niet aan bovenstaande wordt voldaan, kan
de veiligheid van het apparaat worden aangetast
en de garantie komen te vervallen.
• Gemorst materiaal moet worden verwijderd
alvorens het apparaat schoon te maken.
• Langdurige stroomuitval terwijl er een bereiding
bezig is, kan een storing in de monitor
veroorzaken. Neem in dat geval contact op met

de klantenservice.
• Om oververhitting te vermijden, mag het
apparaat niet achter een decoratieve deur
worden geplaatst.
• Als u het schap erin plaatst, moet u ervoor
zorgen dat de aanslag aan de bovenkant en
achterin de ovenruimte zit. Het schap moet
helemaal in de ruimte worden geschoven
• WAARSCHUWING: Bekleed de ovenruimte
n i e t m e t a l u m i n i u m f o l i e o f
wegwerpbeschermingen die verkrijgbaar zijn in
de handel. Aluminiumfolie of andere
beschermingen die rechtstreeks in contact
komen met het hete email, kunnen smelten en
het email van de binnenwanden aantasten.
• WAARSCHUWING: Verwijder nooit de
afdichting van de ovendeur.
• LET OP: Vul de bodem van de ovenruimte niet
opnieuw met water tijdens het koken of als de
oven heet is.
• Er is geen extra bediening/instelling nodig om
het apparaat op de nominale frequenties te laten
werken.
NL 39

Inhoudsopgave
Algemene Aanwijzingen
41
1.1 Lees Deze Handleiding Aandachtig
1.2 Veiligheıdsvoorschriften
1.3 Installatie
1.4 Inbouw Van De Oven
1.5 Belangrijk
1.6 Elektrische Aansluiting
1.7 Uitrustıng Van De Oven Afhankelijk Van Het Model
2.1 Veiligheidssysteem Voor De Roosters
2.2 Grilleren
2.3 De U-cook Modellen
2.4 Afhankelijk Van Model:u-see
2.5 Aquactivafunctie
2.6 Schoonmaken En Onderhoud
2.7 Servıce Dienst
Nuttige Tips
42
3.1 Gebruik Van De Kookwekker
3.2 Gebruik Van De Tımer Met Uitschakelfunctie
3.3 De Juiste Tijd Instellen
Kookwekker
43
Instructies Voor Het Gebruik Van De Oven
44
NL 40

1. ALGEMENE AANWIJZINGEN
Lees deze handleiding aandachtig. Hierin treff u betangrijke gegevens aan omtrent installatie, gebruik en onderhoud. Bewaar deze handleiding voor
eventuele toekomstige raadpleging.
De eerste keer dat de oven in werking wordt gesteld, kan er een stinkende walm vrijkomen. Dit is te wijten aan de eerste verhitting van de lijm op de
isolatiepanelen rond de oven. Dit is volkomen normaal. Wij raden u aan uw oven eerst een half uur op vol vermogen aan te zetten om deze walm uit
de oven te verwijderen. Wacht u tot de walm verdwijnt, alvorens u het voedsel in de oven plaatst.
Bij een ingeschakelde oven wordt het glas van de deur behoorlijk warm.
1.2 VEILIGHEIDSVOORSCHRIFTEN
•Het apparaat dient uitsluitend gebruikt te worden voor het doel,
waarvoor het is ontworpen, d.w.z. het bereiden van voedsel. Elk ander
doel, bijvoorbeeld als verwarming, is onjuist gebruik van de oven en
gevaarlijk.
De fabrikant is niet verantwoordelijk voor mogelijke schade ten gevolge
van een onjuist, verkeerd of onverstanding gebruik van de oven.
•Bij het gebruik van elk elektrische apparaat dienen verschillende
regels in acht genomen te worden:
- Trek niet aan de kabel om de stekker uit het stopcontact te halen;
- Raak het apparaat niet met vochtige of natte handen of voeten aan;
- Gebruik het apparaat niet indien u geen schoeisel draagt;
- Gebruik geen adapters, tussenverbindingen en/of verlengsnoeren;
- Zet het apparaat bij hapering of siechte werking af en ga er niet aan
sieutelen.
De kabel dient bij beschadiging direct vervangen te worden en wel op
de volgende wijze:
- Haal de stekker uit het stopcontact of schakel de gehele elektrische
installatie uit;
- Verwijder de kabel en vervang hem door een even lange nieuwe, (van
het type H05V2V2-F). Deze kabel moet geschikt zijn voor het vermogen
van het apparaat;
- Dit dient door een technische specialist uitgevoerd te worden;
- De aarde-draad (geel/groen) moet 10 mm langer zijn dan de andere
draden.
•Voor reparaties aan het apparaat dient u zich uitsluitend tot een
officiële technische service te wenden, alwaar u originele onderdelen
kunt bestellen. Indien al hetgeen hierboven niet in acht wordt genomen,
kan de veiligheid van het apparaat niet gegarandeerd worden.
•Bedek de wanden van de oven nooit met aluminiumfolie of met
wegwerpproducten om de oven schoon te houden.
Aluminiumfolie en andere producten kunnen smelten als ze in
aanraking komen met de hete ovenwanden, en kunnen de
emaillaag aantasten.
1.3 INSTALLATIE
De installatie valt onder de verantwoording van de koper zelf. De
fabrikant is voor de installatie niet verantwoordelijk. Eventuele bijstand
van de fabrikant bij onjuiste installatie valt niet onder de garantie. De
oven dient door een technisch bevoegd persoon geïnstalleerd te
worden volgens de installatie instructies. De fabrikant is niet
verantwoordelijk voor eventuele persoonlijke of materiële schade ten
gevolge van een onjuiste installatie.
De inbouwkast dient geschikt te zijn voor inbouw van het apparaat
teneinde een goede werking te kunnen garanderen. De panelen van de
kasten naast de oven dienen warmtebestendig te zijn. Bij kasten met
houtfineer dient de lijm een temperatuur van 120°C te kunnen
weerstaan. Plastic of gelijmde materialen, die niet bestending zijn tegen
deze temperatuur kunnen vervormd worden of loslaten. Volgens de
veiligheidsnormen dient het ingebouwde apparaat niet in contact te
1.4 INBOUW VAN DE OVEN
Plaats de oven in de daarvoor bestemde opening: onder het aanrecht of
in kolomopstelling. De oven wordt vast gezet door de vier schroeven in
de gaten in de rand vast te draaien. U kunt de schroeven zien, wanneer
u de deur opent. Voor een goede ventilatie dienen bij het inbouwen van
de oven de op de laatste pagina aangegeven maten en afstanden in
acht te worden genomen.
Opmerking: Bij ovens die onder een kookplaat aangebracht worden,
dient men de aanwijzingen in de handleiding voor de kookplaat op te
volgen.
1.5 BELANGRIJK
Door het aanbrengen van de markering op dit product, verklaren
wij onder onze eigen verantwoordelijkheid dat dit product in
overeenstemming is met alle Europese wettelijke voorschriften met
betrekking tot de vereisten inzake veiligheid, gezondheid en milieu.
1.1 LEES DEZE HANDLEIDING AANDACHTIG
Steek de stekker in een correct geïnstalleerd geaard stopcontact. Bij
modellen zonder stekker dient met een standaardstekker aan te
brengen, die geschikt is voor het op het typeplaatje vermelde
vermogen. De aarddraad is geel/groen. Deze verbinding dient door een
technisch bevoegd persoon uitgevoerd te worden. Indien het
stopcontact en de stekker niet op elkaar afgestemd zijn, laat dan een
technisch bevoegd persoon een ander stopcontact installeren. Deze
dient ook na te gaan of de draaddoor- snede van het stopcontact
geschikt is voor het door het apparaat opgenomen vermogen.
Aansluiting kan ook plaatsvinden door een geschikte meerpolige
(aan/uit) schakelaar te plaatsen tussen het elektrische net en het
apparaat, die aan de geldende normen voldoet. Zorg ervoor dat de
(geel/groen) geaarde kabel de schakelaar niet raakt. Het stopcontact of
de meerpolige schakelaar dienen op een gemakkelijk toegankelijke
plaats bij de oven gemonteerd te worden.
Belangrijk: Zorg er bij de installatie voor dat de voedingskabel nergens
warmer kan worden dan 50°C. De oven voldoet aan de veiligheidseisen
als voorzien in de normen van de desbetreffende instituten. De
elektrische veiligheid wordt uitsluitend gegarandeerd indien het
apparaart op de juiste wijze met een doelmatige aardingsinstallatie is
verbonden ingevolge de huidige normen m.b.t. elektrische veiligheid.
Ga na of aan deze fundamentele veiligheidseis is voldaan en laat de
installatie, ingeval van twijfel, grondig nakijken door een installateur.
Ga na of het elektrische vermogen van de stopcontacten overeenkomt
met het maximum vermogen van het apparaat, zoals is aangegeven op
het typeplaatje. Haal er, in geval van twijfel, een technisch bevoegd
persoon bij.
De fabrikant is niet verantwoordelijk voor eventuele persoonlijke
of materiële schade als gevolg van de nietaarding van de
installatie.
ATTENTIE: De spanning en energieverbruik staan vermeld op de
modelsticker (laatste pagina).
1.6 ELEKTRISCHE AANSLUITING
Maak voor het gebruik de accessoires eerst schoon, spoel ze af met
water en maak ze goed droog.
1.7 UITRUSTING VAN DE OVEN Afhankelijk van het model
Het eenvoudige rooster dient als steun voor vormen en schotels.
Het schotelrooster dient meer bepaald
voor het grillen. Dit wordt meestal samen
met de lekbak gebruikt.
Dankzij hun speciaal profiel blijven ze
steeds horizontaal, zelfs wanneer ze
maximaal uitgetrokken zijn. Er bestaat
geen enkel risico op het schuiven of
overlappen van de gerechten.
De Lekbak is bestemd voor het opvangen
van de jus bij het grillen. Deze wordt
slechts gebruikt in de modus Grillen,
Draaispit of Turbogrill, afhankelijk van het
model. Voor alle andere bakwijzen moet u
deze uit de oven halen. De lekbak nooit als bakschaal gebruiken, er kan
zich rookontwikkeling, vetverspreiding en een snelle vervuiling van de
oven voordoen.
NL 41
komen met elektrische onderdelen.
Alle beveiligingsonderdelen dienen zodanig aangebracht te zijn, dat zij
niet zonder gereedschap verwijderd kunnen worden.
Teneinde een goede ventilatie te garanderen, dient de achterwand
van de inbouwope- ning verwijderd te worden. Het voetstuk dient
een opening van minstens 45 mm te hebben.
Griglie laterali a rete - Si
trovano su entrambi i lati del
vano cottura. Contengono
griglie metalliche e vaschette
raccogligocce.
Rond de centrale hoofdschakelaar blijft een lampje zwak branden als
de oven uit staat. Dit is normaal. U kunt dit voorkomen door de stekker
omgekeerd in te steken of de voedingsklemmen te verwisselen.

1 - V e r w i j d e r d e
steunroosters door ze in
de richting van de pijlen
t e t r e k k e n ( z i e
hieronder)
2- Voor het reinigen van
de steunroosters kunt u ze in de
vaatwasser doen of een natte spons
gebruiken.
3- Monteer de steunen na het reinigen in
omgekeerde volgorde.
Verwijdering en reiniging van roosters
Wanneer u de oven gebruikt, moet u alle niet benutte accessoires
uit de oven verwijderen.
NL 42
De grillpan wordt in combinatie met de lekbak
gebruikt voor alle soorten grillgerechten. Een
handgreep wordt meegeleverd om het
geheel uit de oven te kunnen nemen
zonder dat u zich brandt. Laat de
handgreep nooit in de oven liggen.
De pizza set is ontwikkeld voor het bakken van
een pizza. Voor het beste resultaat moet u deze
gebruiken in combinatie met de Pizza functie
2. NUTTIGE TIPS
2.1 VEILIGHEIDSSYSTEEM VOOR DE ROOSTERS
Deze oven is uitgerust met een nieuw
veiligheidssysteem voor het uitrekken van
de roosters. Dit systeem stelt u in staat om
de roosters naar voren te trekken zonder het
gevaar op te lopen, dat het rooster of het
bereide voedsel per ongeluk uit de oven
vallen. Om de roosters uit de oven te halen,
dient u deze naar voren te trekken en lets op
te tillen
2.2 GRILLEREN
Grilleren maakt het mogelijk het voedsel snel een diepe bruine kleur te
geven. Afhankelijk van de grootte van uw gerecht raden wij u aan dit op
het vierde niveau te zetten.
Bijna elk voedsel kan worden bereid onder de grill afgezien van erg
mager vlees of.een rollade. Vlees en vis dat u gaat grillen, dient u eerst
licht tebestrijken met olie.
Alle ovens hebben de Softcook functie Dit
regeld de temperatuur en vochtgehalte. Het reduceerd het
verlies van 50%, dit garandeerd dat het voedsel luchtiger is
en beter smaakt.
ovens hebben een electronisch gecontroleerde ventilator
snelheid, genaamd VARIOVAN. Tijden s het koken word de sneldheid
van de ventilator automatisch aangepast (multifunctionmode) om zo de
luchtstroom en temperatuur in de ovenruimte te optimaliseren
2.3 De Modellen
Dit is een delicate kookmethode en uitermate geschikt voor het
bakken van brood en gebak.
Sommige ovens ziijn voorzien van de nieuwe deur WIDE DOOR
deze heeft een groter venster voor makkelijk onderhoud en een betere
thermische isolatie.
Dit geeft de mogelijkheid om het ñivo van grillen in te stellen,
tot 50% meer vermogen in vergelijking met de traditionele
multifunctionele oven.
Dit is een nieuw verlichtings systeem deze vervangt de traditionele
verlichting.
14 LED lampjes zitten geintegreerd in de deur. Deze produceren witte
hoogwaardige verlichting welke er voor zorgt dat u goed in de oven kunt
kijken, helder en zonder schaduw.
2.4 AFHANKELIJK VAN MODEL:
Voordelen :
Systeem, afgezien van het perfect verlichten van de oven is de
levernsduur langer, makkelijk te onderhouden en bespaard het ook nog
eens energie.
- Perfect zicht
- Langere levensduur
- Erg laag energieverbruik, -95%
vergeleken met de traditionele
Verlichting
“Apparaten met witte LED verlichting van 1M Klasse volgens IEC
60825- 1:1993 + A1: 1997 + A2: 2001 (gelijkwaarig aan EN 60825-1:
1994 + A1: 2002 + A2: 2001); maximale afgifte licht sterkte 459nm <
150uW. Niet rechtstreeks waargenomen met optische instrumenten.
2.5 AQUACTIVAFUNCTIE
DeAquactivaprocedure maakt gebruik vanstoomom achtergebleven
vetenetensrestenuit de ovente helpen verwijderen.
1. Giet300mlwater inhetAquactivareservoir aan
deonderkantvandeoven.
2. Stel deovenfunctieStatic ( ) ofBottom ( ) verwarming in
3. Stel de temperatuur inmet het pictogramAquactiva
4. Stel hetprogrammamet een looptijd van 30minuten in.
5. Na30minutenschakelthetprogrammauit en koelt deovenaf.
6. Als het apparaatafgekoeld is, kan het reinigen van debinnenkant
vande oven meteen doekbeginnen.
Waarschuwing:
Zorg ervoordat het apparaatafgekoeld is voordatu het aanraakt.
Opgelet voor allehete oppervlakken, omdateen risicoop
brandwonden bestaat.
Gebruikgedestilleerd ofdrinkbaarwater.
2.6 SCHOONMAKEN EN ONDERHOUD
DE GLAZEN ONDERDELEN
Wij bevelen u aan om na elk gebruik het glas van de ovendeur schoon
te maken d.m.v. absorberend papier. Indien er teveel vetspatten op
zitten kan u deze nadien met een uitgewrongen spons en een
schoonmaakmiddel reinigen en daarna spoelen. Nooit
schuurmiddelen of snijdende voorwerpen gebruiken. U mag nooit een
stoomreiniger of hogedrukreiniger gebruiken om de oven schoon te
maken. Laat het apparaat eerst afkoelen alvorens het schoon te
maken; haal vervolgens de stekker uit het stopcontact of sluit de
elektriciteit af middels de hoofdschakelaar. Maak de roestvrijstalen en
geëmaillerde delen schoon met warm water en niet bijtende of
vloeibare zeep. Gebruik geen schuurmiddelen, bijtende
wasmiddelen, bleekmiddelen of zuren om het apparaat schoon te
maken. Het is heel belangrijk de oven schoon te maken na iedere keer
dat u de oven heeft gebruikt. Vetten, die aan de wanden van de oven
zijn blijven zitten, kunnen de volgende keer dat u de oven gebruikt,
voor nare geurtjes zorgen of zelfs het kookresultaat beïnvloeden.
Gebruik heet water met een geschikt schoonmaakmiddel om de oven
schoon te maken; vewijder de zeepresten grondig. De oven kan ook
uitgerust worden met zelfreinigende ovenwanden, zodat het
bovenstaande onnodig wordt. (Zie hiervoor het volgende hoofdstuk).
Gebruik voor het schoonmaken van de roestvrijstalen grill een
schoonmaakmiddel en schuursponsje. De glazen oppervlakken dient
u schoon te maken, wanneer deze koud zijn. Schade aan de glazen
delen vallen niet onder de garantie indien u het bovenstaande niet in
acht neemt.
Om het binnenlichtje te vervangen dient u: de stekker uit het
stopcontact te halen of de elektriciteit af te sluiten en de oude lamp te
vervangen door een soortgelijke nieuwe lamp.
300 ml

NL 43
2.7 SERVICE DIENST
Alvorens u de Service Dienst belt
Indien de oven niet werkt, raden wij u aan:
— na te gaan of het apparaat goed is aangesloten. Indien u de
oorzaak niet kunt ontdekken:
— haal de stekker uit het stopcontact of sluit de elektriciteit van de
oven af middels de hoofdschakelaar
— gebruik de oven niet meer en ga er niet zelf aan sleutelen
— bel de Service Dienst
Noteert u, voordat u de Service Dienst belt, het typenummer van uw
oven (zie binnenzijde van de ovendeur) Bij de oven zit een
garantiecertificaat, welke u recht geeft op één jaar garantie vanaf de
datum van aankoop.
U stelt de kookwekker in door deze eerst een
maal compleet om te draaien (met de klok
mee).
Draai de schakelaar vervolgens terug naar
de gewenste positie/tijd.
Zodra de ingestelde tijd is overschreden,
gaat er gedurende enkele seconden een
geluidssignaal .
3.1 GEBRUIK VAN DE KOOKWEKKER
3. KOOKWEKKER
Dit apparaat is gemarkeerd volgens de Europese norm
2012/19/EU inzake Afval van elektrisch en elektronisch
a p p ar a tuu r ( WE E E). W E EE b eva t z ow e l
verontreinigende substanties (die negatieve gevolgen
op het milieu kunnen hebben) en basiscomponenten
(die hergebruikt kunnen worden). Het is belangrijk om
WEEE aan bepaalde behandelingen te onderwerpen
om alle vervuilende onderdelen te verwijderen en op
juist wijze afstand van te doen, en alle materialen te
herstellen en te recyclen.
Particulieren kunnen hier een belangrijke rol in spelen door te zorgen
dat een WEEE geen milieukwestie wordt; het is essentieel de
volgende basisregels te volgen:
• WEEE mag niet als huishoudelijk afval worden beschouwd.
• WEEE moet worden overhandigd aan relevante inzamelpunten die
worden beheerd door de gemeente of door geregistreerde
bedrijven. In veel landen bestaat er voor grote WEEE een
ophaaldienst.
• Als u een nieuw apparaat koopt, kan het oude bij de leverancier
worden ingeleverd, welke het gratis bij u moet afhalen op een één-
op-één basis, zolang het apparaat van soortgelijk type is en dezelfde
functies heeft als de geleverde apparatuur.
ENERGIE BESPAREN MET RESPECT VOOR HET MILIEU
Indien mogelijk, vermijd het voorverwarmen van de oven en vermijd
om de oven zonder inhoud te laten draaien. Laat de ovendeur niet
open alleen wanneer dat nodig is, omdat er warmteverlies ontstaat
elke keer dat de oven open staat. Voor een aanzienlijke
energiebesparing, schakelt u de oven 5 tot 10 minuten uit voor het
voorziene einde van de bereidingstijd en gebruik de warmte die de
oven blijft genereren. Houd de dichtingen schoon en in goede staat,
om energieverlies te voorkomen. Als u een contract heeft met een
laag energie tarief, kunt u gebruik maken van het "uitgesteld koken".
Deze zal uw programma laten starten in een periode waar u aan een
voordelig tarief kookt. Dit helpt u bij het besparen van energie.
Con questo meccanismo è possibile
programmare la durata espressa in minuti
della cottura e quindi lo spegnimento
automatico del forno al termine del tempo
desiderato (max. 120 minuti).
Allo scadere del tempo prescelto, la
manopola raggiungerà la posizione di
suoneria O in corrispondenza della qua le i l
forno s i spegne automaticamente.
De oven werkt alleen wanneer de
kookwekker is ingesteld of indien de timer
op de positie van het wijzersymbool is gezet
3.2 GEBRUIK VAN DE TIMER MET UITSCHAKELFUNCTIE
• Druk 4 keer op de centrale knop.
• Instellen de tijd in met de knoppen. "-" "+"
• Laat alle knoppen los.
WAARSCHUWING:
Na installatie van de oven en na
het onderbreken van de voeding
(dit is te herkennen aan de
knipperende cijfers 12:00 op het
scherm) dient u eerst de juiste tijd
in te stellen. Dit gebeurt als volgt:
3.3 DE JUISTE TIJD INSTELLEN
WAARSCHUWING: De oven werkt alleen als de klok is ingesteld.
00:00
select

4. INSTRUCTIES VOOR HET GEBRUIK VAN DE OVEN
NL 44
50 ÷ MAX
50 ÷ MAX
50 ÷ MAX
50 ÷ MAX
50 ÷ MAX
50 ÷ MAX
*Getest in overeenstemming met EN 60350-1 met het oog op de verklaring van energieverbruik en de energieklasse.
Dit schakeld de ovenverlichting in. Ditz al automatisch de koelventilator inschakelen (alleen op
modellen met mantelkoeling)
MULTI-NIVEAU: De hete lucht, wordt geleidelijk door de ventilator over alle niveaus verdeeld. Ideaal voor
het gelijktijdig bereiden van diverse gerechten (vlees, vis e.d.) zonder menging van luchtjes en smaken. Het
is zeer geschikt voor delicate gerechten, cake, taarten, bladerdeeg enz.
CONVENTIONEEL: H ierbij w erken de verw arm in g se le m e n te n aan de boven- en on de rkant. Dit is
de traditionele m anier van bereiding van voedsel. Ideaal om te braden, w ildgerechten te bereiden,
koekjes en appelbollen te bakken en om te bereiken dat het voedsel knapperig blijft.
Ontdooien: Deze stand laat lucht op kamertemperatuur rond het diepvriesprodukt circuleren, zodat het in
enkele minuten ontdooid is, zonder de proteïne samenstelling te wijzigen ofte schaden.
BODEMVERWARMING + VENTILATOR: De onderste weerstand werkt samen met de turbine die de
lucht in de ovenruimte stuwt. Deze functie is ideaal voor taarten met sappig fruit, gebakken, quiches en
pasteien. Zo voorkomt men het uitdrogen van de eetwaren en bevordert men het rijzen van cakes,
brooddeeg, enz. Het bakken gebeurt langs de onderzijde. Het rooster op het onderste schap zetten.
*
Pizzafunctie: Met deze functie wordt dezelfde warmte afgegeven als bij de traditionele houtoven waarin
pizza’s worden gebakken.
COOK LIGHT : Met deze functie kunt u gezonder koken, waarbij de benodigde hoeveelheid vet of olie
wordt verminderd. De combinatie van verwarmingselementen met een pulserende luchtcyclus
garandeert een perfect bakresultaat.
GRIL: U moe moet de grill met een gesloten deur gebruiken. Enkel de bovenweerstand wordt gebruikt en
u heeft de mogelijkheid om de temperatuur te regelen. U moet 5 minuten voorverwarmen om de
weerstand te laten gloeien. Succes verzekerd bij het grillen, bereiden van brochettes en bij het gratineren.
Wit vlees moet van de grill verwijderd blijven, hierdoor wordt de baktijd langer, maar blijft het vlees
sappiger. Rood vlees en visfilets moeten op het rooster gelegd worden en met daaronder de lekbak.
180
190
210
220
230
220
50 ÷ MAX210
T ° C
bereik
Functie-
knop
Functie (afhankelijk van het ovenmodel)
T °C
standaard
*

INSTALACIÓN
ES
INSTALLAZIONE
IT
INSTALLATION
FR
VGRADNJA
SI
МОНТАЖ БГ
INSTALLATION
GB
GB
IT
If the oven does not have a cooling fan, create an opening 460 mm x 15 mm
IT
Se il forno non dispone di una ventola di raffreddamento, lasciare uno spazio 460 mm x 15 mm
Si le four n’a pas de ventilateur de refroidissement, créer une ouverture 460 mm x 15 mm
FR
ES
Si el horno no tiene ventilador de refrigeración, practique una abertura. 460 mm x 15 mm
SI
Če pečica nima hladilnega ventilatorja, napravite ustrezno odprtino 460 mm x 15 mm
Ако фурната няма вентилатор за охлаждане, направете отвор. 460 mm x 15 mm
BG
Opening/Apertura/
Ouverture/Odprtina/Отвор
Openheid
460 mm x 15 mm
Opening/Apertura/
Ouverture/Odprtina/Отвор
Openheid
560 mm x 45 mm
If the mounting of the plinth does not allow air circulation, to obtain the
maximum performance of the oven it is necessary to create an opening of
500x10mm or the same surface in 5.000 mm2
GB
A
Se il montaggio del plinto non consente la circolazione dell'aria, per
ottenere le massime prestazioni del forno è necessario creare un'apertura di
500x10mm o la stessa superficie in 5.000 mm2.
IT
A
Si el montaje del zócalo no permite la circulación de aire, para obtener el
máximo rendimiento del horno es necesario crear una abertura de 500x10
mm o la misma superficie en 5.000 mm2.
ES
A
Si le montage du socle ne permet pas la circulation d'air, pour obtenir la
performance maximale du four, il est nécessaire de créer une ouverture de
500x10mm ou la même surface dans 5.000 mm2
Si el montaje del zócalo no permite la circulación de aire, para obtener el
máximo rendimiento del horno es necesario crear una abertura de 500x10
mm o la misma superficie en 5.000 mm2.
FR
A
ES
A
Ако монтажът на цокъла не позволява циркулация на въздуха,
за да се постигне максимална производителност на фурната е
необходимо да се пробие отвор от 500х100 mm или същата
повърхност в 5 000 mm2.
BG
A
A
600 mm
560 mm
560 mm
595 mm
595 mm
546 mm
22 mm
580 mm
560 mm
560 mm
A
560 mm
590 mm
560 mm x 45 mm
INSTALLATIE
NL
Se il mobile ha un fondo posteriore, praticare un foro per il passaggio del cavo di alimentazione.
Si le fond du meuble est doté d’un panneau de fermeture, prévoyez un orifice pour le passage du
câble d’alimentation.
Si el mueble tiene panel posterior, haga un orificio para el cable de alimentación.
Če je omarica na zadnji strani zaprta, naredite odprtino za napajalni kabel.
Ако шкафът, в който се вгражда фурната, има заден капак, направете отвор за захранващия кабел.
If the furniture is equpped with a bottom at the back part, provide an opening for the power supply cable.
ES
SI
BG
IT
FR
GB
Indien het toestel aan de achterzijde voorzien is van een afdekking, maak dan een opening voor de stroomkabel.
NL
Als de montage van de plint geen luchtcirculatie toelaat, dient
men, om de optimale prestatie te verkrijgen van de oven, een opening
te maken van 500x10mm of dezelfde oppervlakte in 5.000 mm2
NL
A
Maak een opening als de oven geen koelventilator heeft 460 mm x 15 mm
NL

La Ditta costruttrice declina ogni responsabilità per eventuali errori di stampa contenuti nel presente libretto. Si riserva inoltre il diritto di apportare le modifiche
che si renderanno utili ai propri prodotti senza compromettere le caratteristiche essenziali.
IT
La empresa constructora declina toda responsabilidad derivada de eventuales errores de impresión contenidos en el presente libro. Se reserva además el
derecho de realizar las modificaciones que se consideren útiles a los productos sin comprometer las características esenciales.
ES
Le constructeur décline toute responsabilité concernant d'éventuelles Inexacltudes Imputables à des erreurs d'impression ou de transcription contenue dans
cette notice. Le constructeur se réserve le droit de modifier les produits en cas de nécessité, même dans l'intérêt de l'utilisation, sans causer de préjudices
aux caractéristiques de fonctionnement de sécurité des appareils.
FR
42837146 • A4 • 10.2020 • Rev_0
The manufacturer will not be responsible for any inaccuracy resulting from printing or transcript errors contained in this brochure. We reserve the right to carry
out modifications to products as required, including the interests of consumption, without prejudice to the characteristics relating to safety or function.
SI
Производителя не носи отговорност за неточности и грешки възникнали при печата на тази инструкция. Производителя си запазва правото да
внесе изменения в своите продукти, който смята за полезни, без това да е в ущърб на характеристиките свързани със сигурността или основните
функции на уреда .
БГ
The manufacturer will not be responsible for any inaccuracy resulting from printing or transcript errors contained in this brochure. We reserve the
right to carry out modifications to products as required, including the interests of consumption, without prejudice to the characteristics relating to
safety or function.
GB
De fabrikant stelt zich niet aansprakelijk voor eventuele drukfouten in deze brochure. Kleine veranderingen en technische ontwikkelingen zijn voorbehouden.
NL
Documenttranscriptie
RELEASE LEVEL MATERIALS IN COMPLIANCE WITH REQUIREMENTS OF EU DIRECTIVE 2002/95/CE + AMENDMENTS ALL RIGHTS RESERVED, THE REPRODUCTION OF ANY PART WITHOUT OUR WRITTEN CONSENT IS FORBIDDEN PRODUCTION RELEASED E D C B A CL N° REV. DATE SPECIFICATION GENERAL TOLERANCE ISO 2768 - m MODIFY DESCRIPTION DATE PROPERTY OF DRAWN C.FİDANCI 21.10.2020 CHECKED 21.10.2020 K.ÖZGÜR BASE CODE FOR - OVEN TREATMENT Printing Color Grey Scala MATERIAL White Paper 52 gr/m2 - 70 gr/m2 WEIGHT MODIFIED BY SIGNATURE NAME USER MANUAL C HNMEE07 (LOCAL LANGUAGE) USER MANUAL C HNMEE07 SHEET PART CODE SCALE 4 2 8 3 7 1 4 6 SIZE REPLACE No A4 ------------ ORIGIN ------------ 1/1 CL No Class Specification 61420 SC 000-000 0002-1576 OVENS USER INSTRUCTIONS FORNI ISTRUZIONI PER L'USO FOURS ENCASTRABLES NOTICE D’EMPLOI ET D’INSTALLATION HORNOS EMPOTRABLES INSTRUCCIONES DE USO NAVODILO ZA UPORABO VEČNAMENSKE VGRADNE PEČICE ФУРНИ ИНСТРУКЦИИ ЗА ПОТРЕБИТЕЛЯ OVEN GEBRUIKSAANWIJZING CANDY HOOVER GROUP S.R.L. • Via Comolli 16 • 20861 Brugherio (MB) Italy GB 02 IT 08 FR 14 ES 20 SI 26 BG 32 23 NL 38 SAFETY INSTRUCTIONS • During cooking, moisture may condense inside the oven cavity or on the glass of the door. This is a normal condition. To reduce this effect, wait 1015 minutes after turning on the power before putting food inside the oven. ln any case, the condensation disappears when the oven reaches the cooking temperature. • Cook the vegetables in a container with a lid instead of an open tray. • Avoid leaving food inside the oven after cooking for more than 15/20 minutes. • WARNING: the appliance and accessible parts become hot during use. Be careful not to touch any hot parts. • WARNING: the accessible parts can become hot when the grill is in use. Children should be kept at a safe distance. • WARNING: ensure that the appliance is switched off before replacing the bulb, to avoid the possibility of electric shocks. • WARNING: in order to avoid any danger caused by the accidental resetting of the thermal interruption device, the appliance should not be powered by an external switching device, such as a timer, or be connected to a circuit that is regularly switched on and off. • Children under 8 should be kept at a safe distance from the appliance if not continuously supervised. • Children should not play with the appliance. • The appliance can be used by those aged 8 or over and by those with limited physical, sensorial or mental capacities, without experience or knowledge of the product, only if supervised or provided with instruction as to the operation of the appliance, in a safe way with awareness of the possible risks. • Cleaning and maintenance should not be carried out by unsupervised children. • Do not use rough or abrasive materials or sharp metal scrapers to clean the oven door glasses, as they can scratch the surface and cause the glass to shatter. • The oven must be switched off before removing the removable parts. After cleaning, reassemble them according the instructions. • Only use the meat probe recommended for this oven. • Do not use a steam cleaner for cleaning operations. • Connect a plug to the supply cable that is able to bear the voltage, current and load indicated on the tag and having the earth contact. The socket must be suitable for the load indicated on the tag and must have ground contact connected and in operation. The earth conductor is yellow-green in colour. This operation should be carried out by a suitably qualified professional. ln case of incompatibility between the socket and the appliance plug, ask a qualified electrician to substitute the socket with another suitable type. The plug and the socket must be conformed to the current norms of the installation country. Connection to the power source can also be made by placing an omnipolar breaker between the appliance and the power source that can bear the maximum connected load and that is in line with current legislation. The yellow-green earth cable should not be interrupted by the breaker. The socket or omnipolar breaker used for the connection should be easily accessible when the appliance is installed. • The disconnection may be achieved by having the plug accessible or by incorporating a switch in the fixed wiring in accordance with the wiring rules. • lf the power cable is damaged, it should be substituted with a cable or special bundle available from the manufacturer or by contacting the customer service department. The type of power cable must be H05V2V2-F. This operation should be carried out by a suitably qualified professional. The earth conductor (yellow-green) must be approximately 10 mm longer than the other conductors. For any repairs, refer only to the Customer Care Department and request the use of original spare parts. • Failure to comply with the above can compromise the safety of the appliance and invalidate the guarantee. • Any excess of spilled material should be removed before cleaning. • A long power supply failure during an occurring cooking phase may cause a malfunction of the monitor. ln this case contact customer service. • The appliance must not be installed behind a decorative door in order to avoid overheating. • When you place the shelf inside, make sure that the stop is directed upwards and in the back of the cavity. The shelf must be inserted completely into the cavity. • WARNING: Do not line the oven walls with aluminium foil or single-use protection available from stores. Aluminium foil or any other protection, in direct contact with the hot enamel, risk melting and deteriorating the enamel of the insides. • WARNING: Never remove the oven door seal. • CAUTION: Do not refill the cavity bottom with water during cooking or when the oven is hot. • No additional operation/setting is required in order to operate the appliance at the rated frequencies. GB 02 This appliance is marked according to the European directive 2012/19/EU on Waste Electrical and Electronic Equipment (WEEE). WEEE contains both polluting substances (which can cause negative consequences for the environment) and basic components (which can be reused). It is important to have WEEE subjected to specific treatments, in order to remove and dispose properly all pollutants, and recover and recycle all materials. Individuals can play an important role in ensuring that WEEE does not become an environmental issue; it is essential to follow some basic rules: • WEEE shall not be treated as household waste. • WEEE shall be handed over to the relevant collection points managed by the municipality or by registered companies. In many countries, for large WEEE, home collection could be present. • When you buy a new appliance, the old one may be returned to the retailer who has to collect it free of charge on a one-to-one basis, as long as the equipment is of equivalent type and has the same functions as the supplied equipment. ENERGY SAVING AND RESPECTING THE ENVIRONMENT Where possible, avoid pre-heating the oven and always try to fill it. Open the oven door as infrequently as possible, because heat from the cavity disperses every time it is opened. For a significant energy saving, switch off the oven between 5 and 10 minutes before the planned end of the cooking time, and use the residual heat that the oven continues to generate. Keep the seals clean and in order, to avoid any heat dispersal outside of the cavity. If you have an electric contract with an hourly tariff, the "delayed cooking" programme makes energy saving more simple, moving the cooking process to start at the reduced tariff time slot. GB 03 Summary General Warnings 5 Useful Tips 6 Timer 7 1.1 Declaration of compliance 1.2 Safety hints 1.3 Installation 1.4 Fitting the oven into the kitchen unit 1.5 Important 1.6 Connecting to the power supply 1.7 Oven equipment 2.1 Shelf safety system 2.2 Grilling 2.3 The U COOK models 2.4 Cleaning and maintenance 2.5 Service centre 3.1 Using the minute timer 3.2 Using the end of cooking timer Operating Instructions 7 GB 04 1. GENERAL WARNINGS Thank you for choosing one of our products. To get the most out of your oven we recommend that you: • Read the notes in this manual carefully: they contain important instructions on how to install, use and service this oven safely. • Keep this booklet in a safe place for easy, future reference. All accessible parts are hot when the appliance is in operation, take care to not touch these elements. When the oven is first switched on it may give out acrid smelling fumes. This is because the bonding agent for insulating panels around the oven has been heated up for the first time. This is a completely normal, if it does occur you merely have to wait for the fumes to clear before putting the food into the oven. An oven by its very nature becomes very hot. Especially the glass of the oven door. 1.1 DECLARATION OF COMPLIANCE 1.5 IMPORTANT • By placing the mark on the appliance, we are confirming compliance to all relevant European safety, health and environmental requirements which are applicable in legislation for this product. When you have unpacked the oven, make sure that it has not been damaged in any way. If you have any doubts at all, do not use it: contact a professionally qualified person. Keep packing materials such as plastic bags, polystyrene, or nails out of the reach of children because they are dangerous for children. If the oven is to work properly, the kitchen housing must be suitable. The panels of the kitchen unit that are next to the oven must be made of a heat resistant material. Ensure that the glues of units made of veneered wood can withstand temperatures of at least 120 °C. Plastics or glues that cannot withstand such temperatures will melt and deform the unit. Once the oven has been lodged inside the unit, the electrical parts must be completely insulated. This is a legal safety requirement. All guards must be firmly fixed into place so that it is impossible to remove them without using special tools. Remove the back of the kitchen unit to ensure an adequate current of air circulates around the oven. The hob must have a rear gap of at least 45 mm. 1.2 SAFETY HINTS •The oven must be used only for the purpose for which it was designed: it must only be used for cooking food. Any other use, e.g. as a form of heating, is an improper use of the oven and is therefore dangerous. •The manufacturers cannot be held responsible for any damage caused by improper, incorrect or unreasonable use. When using any electrical appliance you must follow a few basic rules. – Do not pull on the power cable to remove the plug from the socket. – Do not touch the oven with wet or damp hands or feet. – Do not use the oven unless you are wearing something on your feet. – It is not generally a good idea to use adapters, multiple sockets for several plugs and cable extensions. – If the oven breaks down or develops a fault switch it off at the mains and do not touch it. •If the cable is at all damaged it must be replaced promptly. When replacing the cable, follow these instructions. Remove the power cable and replace it with one of the H05RRF, H05VV-F, H05V2V2-F type. The cable must be able to bear the electrical current required by the oven. Cable replacement must be carried out by properly qualified technicians. The earthing cable (yellow-green) must be 10 mm longer than the power cable. Use only an approved service centre for repairs and ensure that only original parts are used. If the above instructions are not adhered to the manufacturers cannot guarantee the safety of the oven. •Do not line the oven walls with aluminium foil or single-use protection available from stores. Aluminium foil or any other protection, in direct contact with the hot enamel, risks melting and deteriorating the enamel of the insides. 1.3 INSTALLATION Installation is the customer’s responsibility. The manufacturers have no obligation to carry this out. If the assistance of the manufacturer is required to rectify faults arising from incorrect installation, this assistance is not covered by the guarantee. The installation instructions for professionally qualified personal must be followed. Incorrect installation may cause harm or injury to people, animals or belongings. The manufacturer cannot be held responsible for such harm or injury. 1.4 FITTING THE OVEN INTO THE KITCHEN UNIT Fit the oven into the space provided in the kitchen unit; it may be fitted underneath a work top or into an upright cupboard. Fix the oven in position by screwing into place, using the four fixing holes in the frame. (Fig.on last page). To locate the fixing holes, open the oven door and look inside.To allow adequate ventilation, the measurements and distances indicated in the diagram on last page must be adhered to when fixing the oven. Note: For ovens that are combined with a hob unit the instructions contained in the manual for the hob unit must be followed. 1.6 CONNECTING TO THE POWER SUPPLY Plug into the power supply. Ensure first that there is a third contact that acts as earthing for the oven. The oven must be properly earthed. If the model of oven is not fitted with a plug, fit a standard plug to the power cable. It must be able to bear the power supply indicated on the specifications plate. The earthing cable is yellowgreen. The plug must be fitted by a properly qualified person. If the socket and the plug are incompatible the socket must be changed by a properly qualified person.A properly qualified person must also ensure that the power cables can carry the current required to operate the oven. An ON/OFF switch may also be connected to the power supply. The connections must take account of the current supplied and must comply with current legal requirements. The yellow-green earthing cable must not be governed by the ON/OFF switch. The socket or the ON/OFF switch used for connecting to the power supply must be easily accessible when the oven has been installed. Plug into the power supply. Ensure first that there is a third contact that acts as earthing for the oven. The oven must be properly earthed. If the model of oven is not fitted with a plug, fit a standard plug to the power cable. It must be able to bear the power supply indicated on the specifications plate. The earthing cable is yellowgreen. The plug must be fitted by a properly qualified person. If the socket and the plug are incompatible the socket must be changed by a properly qualified person.A properly qualified person must also ensure that the power cables can carry the current required to operate the oven. An ON/OFF switch may also be connected to the power supply. The connections must take account of the current supplied and must comply with current legal requirements. The yellow-green earthing cable must not be governed by the ON/OFF switch. The socket or the ON/OFF switch used for connecting to the power supply must be easily accessible when the oven has been installed. Important: During installation, position the power cable in such a way that it will not be subjected to temperatures of above 50°C at any point. The oven complies with safety standards set by the regulatory bodies. The oven is safe to use only if it has been adequately earthed in compliance with current legal requirements on wiring safety. You must ensure that the oven has been adequately earthed. The manufacturers cannot be held responsible for any harm or injury to persons, animals or belongings caused by failure to properly earth the oven. WARNING: the voltage and the supply frequency are showed on the rating plate (fig. on last page). The cabling and wiring system must be able to bear the maximum electric power required by the oven. This is indicated on the specifications plate. If you are in any doubt at all, use the services of a professionally qualified person. GB 05 1.7 OVEN EQUIPMENT (according to the model) 2.2 GRILLING It is necessary to do an initial cleaning of the equipment before the first use of each of them.Wash them with a sponge. Rinse and dry off. The simple shelf can take moulds and dishes. The tray holder shelf is especially good for grilling things. Use it with the drip tray. Grilling makes it possible to give food a rich brown colour quickly. For browning we recommend that you insert the grill onto the fourth level, depending on the proportions of the food (see fig. page 7). Almost all food can be cooked under the grill except for very lean game and meat rolls. Meat and fish that are going to be grilled should first be lightly doused with oil. The special profile of the shelves means they stay horizontal even when pulled right out. There is no risk of a dish sliding or spilling. 2.3 The MODELS Ovens have an electronic control of the fan speed, called and patented VARIOFAN. During the cooking, this system changes automatically the speed of the fan (in multifunction mode) in order to optimize the air flow and the internal temperature in the cavity of the oven. All ovens feature the function. This allows a management of the distribution of moisture and temperature. It reduces the loss of humidity of the 50 %, which guarantees the food remains tender and tastes better. This a delicate cooking is recommended for the baking of the bread and pastry. The drip tray catches the juices from grilled foods. It is only used with the Grill, Rotisserie, or Fan Assisted Grill ; remove it from the oven for other cooking methods. Never use the drip tray as a roasting tray as this creates smoke and fat will spatter your oven making it dirty. The pizza set is designed for pizza cooking. In order to obtain the best results the set must be used together with Pizza function. It reduces the time of preheating of ovens: only 8 minutes to reach 200 degrees Celsius. The tray holder The tray holder shelf is ideal for grilling. Use it in conjunction with the drip tray. A handle is included to assist in moving the both accessories safely. Do no leave the handle inside the oven. It gives the possibility of setting level and intensity of grilling, up to 50 % more power in comparison with a traditional multifunction oven. Some ovens are equipped with the new doorj " WIDE DOOR " which has a bigger window area, this allows better maintenance and a improved thermal insulation. 2.4 CLEANING AND MAINTENANCE Lateral wire grids It located at both sides of the oven cavity. It holds metal grills and drip pans. Never use abrasive cleaners, wire wool or sharp objects to clean the glass oven door. Clean the stainless steel and enamelled surfaces with warm, soapy water or with suitable brand products. On no account use abrasive powders that may damage surfaces and ruin the oven’s appearance. It is very important to clean the oven each time that it is used. Melted fat is deposited on the sides of the oven during cooking. The next time the oven is used this fat could cause unpleasant odours and might even jeopardise the success of the cooking. Use hot water and detergent to clean; rinse out thoroughly. To make this chore unnecessary all models can be lined with catalytic self-cleaning panels: these are supplied as an optional extra (see the section SELF-CLEANING OVEN WITH CATALYTIC LINING). Use detergents and abrasive metal pads like «brillo pads» for the stainless steel grills. The glass surfaces as the top, oven door and warming compartment door must be cleaned when they are cold. Damage that occurs to them because this rule was not adhered to are not covered by the guarantee. To replace the interior light: • switch off the mains power supply and unscrew bulb. Replace with an identical bulb that can withstand very high temperatures Removing and cleaning wire racks 1. Remove the wire racks by pulling them in the direction of the arrows (see below) 2. To clean the wire racks either put them in the dishwasher or use a wet sponge, ensuring that they are dried afterwards. 3. After the cleaning process install the wire racks in reverse order. 2.5 SERVICE CENTRE Before calling the Service Centre If the oven is not working, we recommend that: you check that the oven is properly plugged into the power supply. If the cause of the fault cannot be detected: disconnect the oven from the mains, do not touch the oven and call the after sales service. Before calling the Service Centre remember to make a note of the serial number on the specifications plate (see fig. On last page). The oven is supplied with a guarantee certificate that ensures that it will be repaired free of charge by the Service Centre 2. USEFUL TIPS 2.1 SHELF SAFETY SYSTEM The oven features a new shelf safety system. This allows you to pull out the oven shelves when inspecting the food without danger of food spillages or shelves falling accidentally out of the oven. To remove the shelves pull out and lift. GB 06 3. TIMER 3.2 USING THE END OF COOKING TIMER 3.1 USING THE MINUTE TIMER To set the cooking time, turn dial one complete revolution and then position the index to the required time. When the time has lapsed, the signal will ring for a few seconds. This control enables to set the desired cooking time (max. 120 min.) the oven will automatically switch off at the end of the set time.The timer will count down from the set time return to the O position and switch off automatically. For normal use of oven set the timer to the position. To set the oven ensure the timer is not on the O position. 4. OPERATING INSTRUCTIONS 210 210 230 The "COOK LIGHT" function allows you to cook in a healthier way, by reducing the amount of fat or oil required. Thanks to the use of the grill and fan combined with a pulsating cycle of air, it will retain the moisture content of the food, grilling the surface and using a shorter cooking time, without compromising on taste. It is particularly suitable for cooking meat, roasted vegetables and omelettes. The cycle of pulsed air keeps the humidity inside the oven and the moisture content of the food, preserving the nutritional values and ensuring a rapid uniform cooking process. Try all your recipes and reduce the amount of dressing you usually use and experience the lightness of this new function! *Tested in accordance with the EN 60350-1 for the purpose of energy consumption declaration and energy class. GB 07 INDICAZIONI DI SICUREZZA contatto di terra. La presa deve essere adatta al carico indicato sulla targhetta e deve avere il contatto di terra collegato e in funzione. Il conduttore di terra è di colore giallo-verde. Questa operazione deve essere eseguita solo da un tecnico adeguatamente addestrato. In caso di incompatibilità tra presa e spina dell'elettrodomestico, richiedere ad un tecnico specializzato di sostituire la presa con un'altra di tipo compatibile. La spina e la presa devono essere conformi alle normative attuali del paese di installazione. Il collegamento alla rete di alimentazione può essere effettuato anche collocando un interruttore automatico onnipolare tra l'elettrodomestico e la rete di alimentazione, in grado di supportare il carico massimo collegato, in linea con la legislazione corrente. Il cavo di terra giallo-verde non deve essere interrotto dall'interruttore automatico. La presa o l'interruttore automatico onnipolare utilizzati per il collegamento devono essere facilmente accessibili al momento del montaggio dell'elettrodomestico. • La disconnessione può essere eseguita con la spina accessibile o aggiungendo un interruttore sul cablaggio fisso, nel rispetto delle normative relative ai cablaggi. • Se il cavo di alimentazione si danneggia, deve essere sostituito con un cavo o uno speciale fascio di cavi disponibile presso il produttore o contattando il reparto assistenza al cliente. • Il cavo di alimentazione deve essere di tipo H05V2V2-F • Questa operazione deve essere eseguita solo da un tecnico adeguatamente addestrato. Il conduttore di terra (giallo-verde) deve essere circa 10 mm più lungo degli altri conduttori. Per qualsiasi tipo di riparazione, fare riferimento unicamente al Reparto di Assistenza Cliente e richiedere l'utilizzo di ricambi originali. • Il mancato rispetto di quanto indicato sopra può compromettere la sicurezza dell'elettrodomestico e rendere nulla la garanzia. • Qualsiasi materiale fuoriuscito in eccesso deve essere tolto prima della pulizia. • L’interruzione prolungata dell’alimentazione durante una fase di cottura potrebbe causare un guasto del monitor. In tal caso contattare il servizio clienti. • L’elettrodomestico non deve essere installato dietro a una porta a scopo ornamentale per evitarne il surriscaldamento. • Quando si posiziona uno scaffale all’interno, accertarsi che il blocco sia rivolto verso l’alto e nella parte posteriore della guida. Lo scaffale deve essere inserito completamente nella guida. • Durante la cottura, l'umidità può condensarsi all'interno del vano cottura o sul vetro della porta. Questa è una condizione normale. Per ridurre questo effetto, attendere 10-15 minuti dopo l'accensione prima di mettere gli alimenti all'interno del forno. In ogni caso, la condensa scompare quando il forno raggiunge la temperatura di cottura. • Cuocere le verdure in un contenitore con coperchio invece che in un vassoio aperto. • Evitare di lasciare gli alimenti all'interno del forno dopo la cottura per più di 15/20 minuti. • AVVERTENZA: l'elettrodomestico e le sue parti accessibili diventano calde durante l’uso. Fare attenzione a non entrare in contatto con componenti surriscaldati. • AVVERTENZA: le parti accessibili possono diventare calde quando si utilizza il grill. I bambini devono rimanere a distanza di sicurezza. • AVVERTENZA: assicurarsi che l'elettrodomestico sia spento prima di sostituire la lampadina per evitare ogni possibilità di folgorazione. • AVVERTENZA: per evitare rischi causati da un involontario ripristino dell'interruttore automatico, l'elettrodomestico non deve essere alimentato da un dispositivo di commutazione esterno, quale ad esempio un contaminuti, oppure essere collegato ad un circuito che viene regolarmente acceso e spento. • Mantenere lontano dall'elettrodomestico i bambini di età inferiore agli 8 anni, a meno che non siano continuamente supervisionati. • I bambini non devono giocare con l’elettrodomestico. L'elettrodomestico può essere utilizzato da bambini di età superiore a 8 anni e da persone con ridotte capacità fisiche, sensoriali o mentali, oppure prive di esperienza e conoscenza, che siano state supervisionate o istruite riguardo all’uso dell’elettrodomestico in sicurezza, comprendendo i rischi che derivano dall'uso dello stesso. • Le operazioni di pulizia e manutenzione non devono essere effettuate dai bambini senza sorveglianza. • Non utilizzare materiali ruvidi, abrasivi o raschietti metallici affilati per pulire le porte in vetro del forno, dato che possono graffiare la superficie e causare la frantumazione del vetro. • Il forno deve essere spento prima di rimuovere le parti rimovibili. • Dopo la pulizia, rimontarle secondo le istruzioni. • Utilizzare solo la sonda carne consigliata per questo forno. • Non utilizzare un getto di vapore per pulire l’elettrodomestico. • Collegare al cavo di alimentazione una spina dimensionata per la tensione, la corrente e la potenza indicate nella targhetta e dotata del IT 08 • AVVERTENZA: Non rivestire le pareti del forno con fogli di alluminio o protezioni monouso disponibili nei negozi. I fogli di alluminio o qualsiasi altra protezione, a diretto contatto con lo smalto caldo, rischiano di fondere e deteriorare lo smalto degli interni. • AVVERTENZA: Non togliere mai la guarnizione della porta del forno. • ATTENZIONE: Non riempire il fondo della cavità con acqua durante la cottura o quando il forno è caldo. • Per far funzionare l'apparecchio alle frequenze nominali non sono necessarie ulteriori operazioni o regolazioni. Questo apparecchio è contrassegnato in conformità alla Direttiva europea 2012/19/EU sulle apparecchiature elettriche ed elettroniche (WEEE). I WEEE contengono sia le sostanze inquinanti (che possono provocare conseguenze negative sull'ambiente) che componenti di base (che possono essere riutilizzati). È importante che i WEEE siano soggetti a rattamenti specifici, per rimuovere e smaltire correttamente tutti gli inquinanti e recuperare e riciclare tutti i materiali. I singoli possono giocare un ruolo importante nell'assicurare che i WEEE non diventino un problema ambientale; è essenziale seguire alcune regole di base: • I WEEE non devono essere trattati come rifiuti domestici. • I WEEE devono essere portati ai punti di raccolta appositi gestiti dal comune o da società registrate. In molti Paesi, per i WEEE grandi, potrebbe essere presente la raccolta domestica. • Quando si acquista un nuovo apparecchio, quello vecchio potrebbe essere restituito al rivenditore che deve acquisirlo gratuitamente su base singola, sempre che l'apparecchio sia del tipo equivalente e abbia le stesse funzioni di quello acquistato. RISPARMIARE E RISPETTARE L'AMBIENTE Ove possibile, evitare di pre-riscaldare il forno e cercare sempre di riempirlo. Aprire la porta del forno quanto necessario, perché vi sono dispersioni di calore ogni volta che viene aperta. Per risparmiare molta energia sarà sufficiente spegnere il forno dai 5 ai 10 minuti prima della fine del tempo di cottura pianificato, e servirsi del calore che il forno continua a generare. Tenere le guarnizioni pulite e in ordine, per evitare eventuali dispersioni di energia. Se si dispone di un contratto di energia elettrica a tariffa oraria, il programma “cottura ritardata” renderà più semplice il risparmio spostando l’avvio del programma negli orari a tariffa ridotta. IT 09 Sommario Avvertenze Generali 11 Consigli Utili 12 Contaminuti 13 Istruzioni Per L’uso 13 Garanzie 13 IT 10 1.1 Dichiarazione di conformità 1.2 Informazioni sulla sicurezza 1.3 Installazione 1.4 Inserimento del mobile 1.5 Importante 1.6 Allacciamento Elettrico 1.7 Dotazione del forno 2.1 Griglie forno - sistema di arresto 2.2 La cottura al grill 2.3 Pacchetto di funzioni del sistema U COOK 2.4 Pulizia e manutenzione 2.5 Servizio assistenza clienti 3.1 Uso del contaminuti 3.2 Uso del temporizzatore 1. Avvertenze Generali Vi ringraziamo per aver scelto uno dei nostri prodotti, per ottenere da questo elettrodomestico le migliori prestazioni consigliamo di: • Leggere attentamente le avvertenze contenute nel presente libretto. • Conservare con cura questo libretto per ogni ulteriore consultazione. Durante l’uso il forno diventa caldo, fare attenzione a non toccare gli elementi riscaldanti all’interno del forno. Alla prima accensione del forno può svilupparsi fumo di odore acre, causato dal primo riscaldamento del collante dei pannelli d’isolamento avvolgenti il forno. Si tratta di un fenomeno assolutamente normale e, in caso si verificasse, occorre attendere la cessazione del fumo prima di introdurre le vivande. Il forno è per sua natura un apparecchio che diventa caldo, in modo particolare in corrispondenza del cristallo porta. 1.1. DICHIARAZIONE DI CONFORMITÀ 1.5 IMPORTANTE • Apponendo il marchio su questo prodotto, confermiamo la conformità a tutti i requisiti di legge europei in materia di sicurezza, salute e tutela ambientale applicabili per legge a questo prodotto. Per garantire un buon funzionamento dell’apparecchio da incasso è necessario che il mobile sia di caratteristiche adatte. I pannelli dei mobili adiacenti il forno dovranno essere in materiale resistente al calore. In particolare nel caso di mobili in legno impiallicciato le colle dovranno essere resistenti alla temperatura di 120°C: materiali plastici o collanti non resistenti a questa temperatura sono causa di deformazioni o scollature. In conformità alle norme di sicurezza, una volta incassato l’apparecchio, non debbono essere possibili eventuali contatti con le parti elettriche. Tutte le parti che assicurano la protezione debbono essere fissate in modo tale da non poter essere tolta senza l’aiuto di qualche utensile. Per garantire una buona areazione è necessario eliminare la parete posteriore del vano; inoltre il pianale di appoggio deve avere una luce posteriore di almeno 45 mm. 1.2 INFORMAZIONI SULLA SICUREZZA •Questo apparecchio dovrà essere destinato solo all’uso per il quale è stato espressamente concepito, e cioè per la cottura di alimenti. Ogni altro uso (ad esempio riscaldamento ambiente) è da considerarsi improprio e quindi pericoloso. Il costruttore non può essere considerato responsabile per eventuali danni derivanti da usi impropri, erronei ed irragionevoli. •L’uso di un qualsiasi apparecchio elettrico comporta l’osservanza di alcune regole fondamentali. In particolare: -non tirare il cavo di alimentazione per staccare la spina dalla presa di corrente -non toccare l’apparecchio con mani o piedi bagnati o umidi -non usare l’apparecchio a piedi nudi -in generale è sconsigliabile l’uso di adattatori, prese multiple e prolunghe. - In caso di guasto e/o di cattivo funzionamento dell’apparecchio, spegnerlo e non manometterlo. •In caso di danneggiamento del cavo, provvedere tempestivamente alla sua sostituzione secondo le seguendi indicazioni: aprire il coperchio morsettiera, togliere il cavo di alimentazione e sostituirlo con uno corrispondente, (tipo H05RR-F, H05VVF, H05V2V2-F) e adeguato alla portata dell’apparecchio. Tale operazione dovrà essere eseguita da personale professionalmente qualificato. Il conduttore di terra (giallo-verde), deve obbligatoriamente essere più lungo di circa 10 mm rispetto ai conduttori di linea. Per l’eventuale riparazione rivolgersi solamente ad un centro di assistenza tecnica autorizzato e richiedere l’utilizzo di ricambi originali. Il mancato rispetto di quanto sopra può compromettere la sicurezza dell’apparecchio. •Non rivestire le pareti del forno con fogli d'alluminio da cucina o fogli monouso commerciali, perche potrebbero fondersi a contatto con le superfici in smalto caldo e danneggiare le superfici in smalto all'interno del forno. 1.6 ALLACCIAMENTO ELETTRICO Inserire la spina in una presa di corrente munita di un terzo contatto corrispondente alla presa di terra, che deve essere collegata in modo efficiente. Per i modelli sprovvisti di spina, montare sul cavo una spina normalizzata che sia in grado di sopportare il carico indicato in targa. Il conduttore di messa a terra e contraddistinto dai colori giallo-verde. Tale operazione dovrà essere eseguita da personale professionalmente qualificato. In caso di incompatibilità tra la presa e la spina dell’apparecchio fare sostituire la presa con altra di tipo adatto, da personale professionalmente qualificato. Si può effettuare anche l’allacciamento alla rete interponendo tra l’apparecchio e la rete un interruttore omnipolare dimensionato al carico e rispondente alle norme in vigore. Il cavo di terra giallo-verde non deve essere interrotto dall’interruttore. La presa o l’interruttore omnipolare usati per l’allacciamento devono essere facilmente accessibili ad elettrodomestico installato. Importante: in fase di installazione, posizionare il cavo di alimentazione in modo che in nessun punto si raggiungano temperature superiori di 50°C alla temperatura ambiente. L’apparecchio è conforme ai requisiti di sicurezza previsti dagli istituti normativi. La sicurezza elettrica di questo apparecchio è assicurata soltanto quando lo stesso è correttamente collegato ad un efficace impianto di messa a terra come previsto dalle vigenti norme di sicurezza elettrica, (in caso di dubbio, richiedere un controllo accurato dell’impianto da parte di personale professionalmente qualificato). Importante: la ditta costruttrice resta sollevata da ogni responsabilità per eventuali danni a persone o cose, derivanti dal mancato allacciamento della linea di terra. ATTENZIONE: la tensione e la frequenza di alimentazione sono indicate in targa matricola (figura in ultima pagina). Verificare che la portata elettrica dell’impianto e delle prese di corrente siano adeguate alla potenza massima dell’apparecchio indicate in targa. In caso di dubbio rivolgersi ad una persona professionalmente qualificata. 1.3 INSTALLAZIONE L’installazione è a carico dell’acquirente e la Casa Costruttrice è esonerata da questo servizio; gli eventuali interventi richiesti alla Casa Costruttrice che dipendono da una errata installazione non sono compresi nella garanzia. L’installazione deve essere effettuata secondo le istruzioni da personale professionalmente qualificato. Una errata installazione può causare danni a persone, animali o cose, nei confronti dei quali il costruttore non può essere considerato responsabile. 1.4 INSERIMENTO DEL MOBILE 1.7 DOTAZIONE DEL FORNO (secondo modello) Inserire l’apparecchio nel vano del mobile (sottopiano o in colonna). Il fissaggio si esegue con 4 viti attraverso i fori della cornice, visibili aprendo la porta.(vedere ultima pagina). Per consentire la migliore aerazione del mobile, i forni devono essere incassati rispettando le misure e le distanze indicate nella figura in ultima pagina. Nota: per i forni da abbinamento con piano cottura è indispensabile rispettare le istruzioni contenute nel libretto allegato all’ apparecchiatura da abbinare. Prima di utilizzare gli accessori del forno per la prima volta è necessario pulirli. Per questa operazione si consiglia di utilizzare una spugna. Successivamente risciacquare ed asciugare gli accessori. La griglia semplice serve da supporto per teglie, pirofile, stampi per i dolci. La griglia porta-piatto serve in particolare per le grigliate di carne poiché sostiene anche la leccarda che raccoglie i grassi che colano. Grazie ai loro profili speciali, le griglie restano sempre in orizzontale, anche quando vengono estratte verso l'esterno. Non c'é nessun rischio quindi che i tegami scivolino o si ribaltino. IT 11 Griglie laterali a rete Si trovano su entrambi i lati del vano cottura. Contengono griglie metalliche e vaschette raccogligocce. Raccoglie i residui di cibo che gocciolano durante la cottura. Deve essere utilizzata solamente con il grill, il girarrosto o il turbo girarrosto, secondo il modello. Attenzione: in tutti gli altri modi di cottura, la leccarda deve essere tolta dal forno. Non usare mai la leccarda per cuocere gli arrosti perché ne risulterebbe un eccessivo sviluppo di fumo e vapori e il forno si sporcherebbe inultimente. NOTA: Per un corretto utilizzo del forno, si consiglia di non porre gli alimenti a diretto contatto con griglie e vassoi, ma di utilizzare carte forno e/o appositi contenitori. Rimozione e pulizia delle scaffalature a filo 1- Rimuovere le griglie a rete tirandole in direzione delle frecce (vedi sotto) 2- Per pulire le griglie a rete, metterle in lavastoviglie o utilizzare una spugna umida, assicurandosi che siano successivamente asciugate. 3- Dopo la pulizia, installarle in ordine inverso. Pizza set é l'idéale per la cottura delle pizze. Il set deve essere utilizzato in abbinamento alla funzione Pizza. La griglia piatta da combinare con la leccarda per tutti i tipi di grigliate. Una presina è fornita per permettere di estrarre l’insieme dal forno senza scottarsi. Non lasciare mai la presina nel forno. Gli accessori devono essere tolti dal forno se non vengono utilizzati. 2- CONSIGLI UTILI 2.1 GRIGLIE FORNO - SISTEMA DI ARRESTO 2.4 PULIZIA E MANUTENZIONE Per la pulizia dei vetri della porta del forno non utilizzare materiali abrasivi raschietti o oggetti che possono graffiare la superficie del vetro. Pulire le superfici in acciaio inox e smaltate con acqua tiepida e sapone, oppure con appositi prodotti in commercio, evitando assolutamente l’uso di polveri abrasive che danneggerebbero le superfici e le parti estetiche. La pulizia del forno è molto importante e deve essere effettuata ogni volta che questo viene usato. Infatti, sulle pareti si depositano grassi sciolti durante la cottura che potrebbero, alla successiva accensione, produrre odori sgradevoli che nuocerebbero al buon esito della cottura. Per la pulizia usare acqua calda e detersivo, sciacquando accuratamente. Per eliminare questo fastidioso intervento, su tutti i modelli possono essere inseriti pannelli autopulenti, offerti come accessori opzionali: vedere apposito paragrafo«FORNO AUTOPULENTE CATALITICO » Usare detersivi e pagliette d’acciaio per le griglie inox. La pulizia delle superfici in cristallo temperato deve essere eseguita quando le superfici sono fredde. Eventuali rotture dovute alla non osservanza di questa regola elementare non rientrano nei termini di garanzia. La lampada forno può essere sostituita disinserendo elettricamente l’apparecchio e svitando l’ampolla che la racchiude, sostituendo la lampada non funzionante con una analoga resistente alle alte temperature. Il forno è dotato di un nuovo sistema di arresto griglie. Questo sistema consente di estrarre le griglie quasi completamente senza che queste fuoriescano dal forno mantenendole perfettamente in piano, consentendo di verificare e mescolare il cibo con la massima tranquillità e sicurezza. Per estrarre le griglie è sufficiente, come indicato sul disegno, alzarle, prendendole dalla parte anteriore e tirarle. 2.2. LA COTTURA AL GRILL Questo tipo di cottura consente la doratura rapida dei cibi. A questo scopo consigliamo di inserire la griglia generalmente nel 3° o 4° ripiano, secondo le dimensioni dei cibi (Fig. pag. 8). Quasi tutte le carni possono essere cotte al grill, fanno eccezione alcune carni magre di selvaggina ed i polpettoni. La carne ed il pesce da cucinare al grill vanno leggermente unti con olio. 2.3 PACCHETTO DI FUNZIONI DEL SISTEMA (secondo modello) 2.5 SERVIZIO ASSISTENZA CLIENTI I forni sono dotati di controllo elettronico della ventilazione di cottura, brevettato VarioFan; il sistema cambia automaticamente la velocità della ventola del multifunzione per ottimizzare le correnti d'aria e la temperatura interna della cavità mentre il forno sta cucinando. Tutti i forni sono dotati di funzione , permettendo una gestione della distribuzione di umidità e temperatura. Riduce la perdita degli alimenti fino al 50%, donando morbidezza e fragranza alle pietanze. Una cottura cosi delicata è indicata sopratutto per il pane e la pasticceria. Prima di rivolgersi all'assistenza tecnica: Se il forno non funziona, è consigliabile: •Controllare che il forno sia correttamente collegato all'alimentazione elettrica. Se non è possibile individuare la causa del guasto: •Scollegare il forno dall'alimentazione elettrica, non toccarlo e rivolgersi all'assistenza tecnica. Prima di chiamare il centro di assistenza, ricordarsi di prendere nota del numero di serie riportato sulla targhetta identificativa. Il forno viene fornito con un certificato di garanzia che ne garantisca la riparazione gratuita presso Riduce il tempo di preriscaldamento dei forni: sono sufficienti solo 8 minuti per raggiungere i 200°C. Offre la possibilità di personalizzare il livello e l'intensità gr di grigliatura, fino al 50% in più rispetto ad un forno multifunzione tradizionale. La nuova porta ”WIDE DOOR” ha un'ampia superficie in vetro che assicura una più facile pulizia e un miglior isolamento termico. IT 12 3. CONTAMINUTI 3.2 USO DEL TEMPORIZZATORE 3.1 USO DEL CONTAMINUTI Con questo meccanismo è possibile programmare la durata espressa in minuti della cottura e quindi lo spegnimento automatico del forno al termine del tempo desiderato (max. 120 minuti). Allo scadere del tempo prescelto, la manopola raggiungerà la posizione di suoneria O in corrispondenza della qua le i l forno s i spegne automaticamente. Per selezionare il tempo prescelto, ruotare la manopola di un giro completo, quindi ritornare con l’indice nella posizione corrispondente al tempo desiderato. Allo scadere del tempo, entrerà in azione la suoneria per alcuni secondi. Il forno può essere acceso solo impostando un tempo di cottura o girando la manopola in posizione . 4. ISTRUZIONI PER L’USO Manopola commutatore Temperatura proposta e regolazione (Type A) Manopola termostato FUNZIONE Accende la luce interna. Scongelamento Questa posizione permette di far circolare l’aria a temperatura ambiente intorno al cibo surgelato facendolo così scongelare in pochi minuti senza modificare od alterare il contenuto proteico. Convezione naturale Sono in funzione le resistenze superiore e inferiore. È la cottura tradizionale, ottima per arrostire cosciotti, selvaggina, ideale per biscotti, mele al forno e per rendere i cibi molto croccanti 210 Forno ventilato L’aria calda, viene ripartita sui diversi ripiani; è l’ideale per cuocere contemporaneament e diversi tipi di cibo (carne, pesce), senza miscelare sapori e odori. Cottura delicata indicata per pan di Spagna, torte Margherita, pasta sfoglia, ecc... 210 Suola ventilata Adatta per cotture delicate (torte-soufflè). 230 Grigliatura tradizionale a porta chiusa In questa posizione viene inserita la resistenza del grill. Ottima nella cottura di carni di medie e piccolo spessore (salsicce, costine, bacon). Funzione pizza Il calore avvolgente in questa funzione ricrea un ambiente simile a quello dei forni a legna di pizzeria. La funzione “COOK LIGHT” consente di cucinare in modo leggero riducendo l'utilizzo dei grassi. Grazie ad una combinazione del grill e della ventola, associate ad un ciclo di pulsazione dell'aria, è possibile conservare l'umidità dei cibi, grigliare la superficie e garantire una cottura rapida delle pietanze utilizzando pochi condimenti, senza rinunciare al sapore. È particolarmente indicata per verdure, frittate e carni. Il ciclo di aria pulsata mantiene l'umidità dei cibi, ne conserva le proprietà nutritive e garantisce una cottura rapida e omogenea. Provate tutte le vostre ricette riducendo la quantità di condimento che di solito utilizzate e provate la leggerezza di questa nuova funzione! (a) SU ALCUNI MODELLI - Funzione con VARIO FAN : Vano Fan é l'esclusivo sistema di funzionamento sviluppato da Candy per ottimizzare i risultati di cottura, la gestione della temperatura e la gestione dell'umidità. Il sistema Vario Fan modifica automaticamente la velocità di rotazione della ventola per tutte le cotture in multifunzione. Questo sistema si attiva automaticamente tutte le volte che viene selezionata una funzione all'interno dell'area tratteggiata sul pannello di controllo. * Testato secondo la norma EN 60350-1 ai fini della dichiarazione di consumo energetico e della classe energetica. 5. GARANZIE Il prodotto è garantito, oltre che ai sensi di legge, alle condizioni e nei termini riportati sul certificato di garanzia convenzionale inserito nel prodotto. Il certificato dovrà essere conservato e mostrato al nostro Centro di Assistenza Tecnica Autorizzato, in caso di necessità, insieme allo scontrino comprovante l'acquisto dell'elettrodomestico. Puoi consultare le condizioni di garanzia anche sul nostro sito internet. Per ottenere assistenza compila l'apposito form on-line oppure contattaci al numero che trovi indicato nella pagina di assistenza del nostro sito internet. IT 13 CONSEILS DE SÉCURITÉ • Pendant la cuisson, de l’humidité peut se condenser à l’intérieur de la cavité ou sur la vitre de la porte. Il s’agit d’un phénomène normal. Pour réduire cet effet, attendez 10-15 minutes après avoir allumé l’appareil avant de mettre les aliments au four. La condensation disparaîtra de toutes façons dès que le four aura atteint la température de cuisson. • Cuisez les légumes dans un récipient avec couvercle plutôt que dans un ustensile ouvert. • Évitez de laisser des aliments à l’intérieur du four plus de 15-20 minutes après cuisson. • AVERTISSEMENT : L’appareil et ses parties accessibles chauffent pendant l’utilisation. Faites attention à ne pas toucher les parties chaudes. • AVERTISSEMENT : Les parties accessibles peuvent devenir très chaudes quand le grill est en marche. Les enfants doivent être tenus à une distance de sécurité. • AVERTISSEMENT : Vérifiez que l’appareil est éteint avant de remplacer l’ampoule, pour éviter le risque de chocs électriques. • AVERTISSEMENT : Afin d’éviter tout risque lié à la réinitialisation accidentelle de l’interrupteur thermique, l’appareil ne doit pas être alimenté par un dispositif de commutation externe, tel qu’une minuterie, ou relié à un circuit régulièrement allumé et éteint. • Les enfants de moins de 8 ans doivent rester à une distance de sécurité de l’appareil s’ils ne sont pas surveillés en permanence. • Les enfants ne doivent pas jouer avec l’appareil. L’appareil peut être utilisé par des enfants de plus de 8 ans et par des personnes dont les capacités physiques, sensorielles ou mentales sont limitées, sans expérience ni connaissance du produit, uniquement s’ils sont surveillés ou s’ils ont été informés de la manière d’utiliser l’appareil, en toute sécurité et qu’ils comprennent les risques possibles. • Le nettoyage et l’entretien ne doivent pas être effectués par des enfants sans surveillance. • N’utilisez pas de matériaux rugueux ou abrasifs ou de racloirs métalliques acérés pour nettoyer les vitres des portes des fours, car cela pourrait rayer la surface et provoquer la rupture de la vitre. • Coupez le four avant de retirer les pièces amovibles. • Après le nettoyage, remontez-les selon les instructions. • Utilisez uniquement la sonde à viande recommandée pour ce four. • N’utilisez pas un nettoyeur à vapeur pour le nettoyage. • Branchez le câble d’alimentation sur une prise de courant qui supporte le voltage (le courant et la charge sont indiqués sur l’étiquette) et vérifiez la présence d’une mise à la terre. La prise d’alimentation doit supporter la charge indiquée sur l’étiquette et être dotée d’une mise à la terre en état de fonctionnement. Le conducteur de mise à la terre est jaune et vert. Cette opération doit être exécutée par le personnel qualifié. En cas d’incompatibilité entre la prise d’alimentation et la fiche du câble de l’appareil, demandez à un électricien professionnel de remplacer la prise d’alimentation par un dispositif compatible. La fiche du câble d’alimentation et la prise d’alimentation doivent être conformes aux normes en vigueur dans le pays d’installation. Il est possible de brancher l’appareil à la prise d’alimentation en installant entre l’appareil et la prise d’alimentation un disjoncteur multipolaire qui supporte la charge électrique maximale, conformément aux lois en vigueur. Le conducteur jaune et vert de mise à la terre ne doit pas être bloqué par le disjoncteur. La prise d’alimentation ou le disjoncteur multipolaire utilisé pour le branchement doit rester à tout moment accessible après installation de l’appareil. • Le débranchement doit se faire à l’aide soit de la prise d’alimentation, soit d’un interrupteur installé sur le circuit électrique fixe, conformément aux normes électriques. • Si le câble d’alimentation est endommagé, il doit être remplacé par un câble ou un faisceau de câbles spécial disponible auprès du fabricant ou du service après-vente. • Le câble d’alimentation requis est le H05V2V2-F. • Cette opération doit être exécutée par le personnel qualifié. Le conducteur de mise à la terre (jaune et vert) doit être environ 10 mm plus long que les autres conducteurs. Pour toutes réparations, contactez le service après-vente en insistant sur l’utilisation de pièces de rechange d’origine. • Le non-respect des consignes ci-dessus peut compromettre la sécurité de l’appareil et annuler la garantie. • Éliminez les éclaboussures importantes avant de procéder au nettoyage. • Une coupure de courant prolongée durant une phase de cuisson peut engendrer un dysfonctionnement de l’écran. Dans ce cas, veuillez contacter le service après-vente. • L’appareil ne doit pas être installé derrière une porte décorative, pour éviter la surchauffe. • Pour introduire la grille dans le four, vérifiez que le butoir est dirigé vers le haut et au fond de la cavité. La grille doit être complètement insérée dans la cavité. FR 14 • AVERTISSEMENT : Ne recouvrez pas les parois du four avec du papier aluminium ou une protection jetable disponible dans les magasins. Le papier d’aluminium ou toute autre protection, en contact direct avec l’émail chaud, risque de fondre et de détériorer l’émail de la cavité intérieure. • AVERTISSEMENT : N’enlevez jamais le joint de la porte du four. • PRUDENCE : Ne remplissez pas le fond de la cavité avec de l’eau pendant la cuisson ou lorsque le four est chaud. • Aucune autre opération ni aucun autre réglage ne sont requis pour faire fonctionner l’appareil aux fréquences nominales. Le présent appareil est marqué conformément à la directive 2012/19/UE relative aux déchets d'équipements électriques et électroniques (DEEE). Les DEEE contiennent à la fois des substances polluantes (qui peuvent avoir des conséquences négatives sur l'environnement) et des éléments de base (réutilisables). Il est important de soumettre les DEEE à des traitements spécifiques, en vue d'extraire et d'éliminer de façon appropriée toutes les substances polluantes, puis de récupérer et recycler tous les matériaux. Chacun peut jouer un rôle important quant à la protection de l'environnement contre les DEEE. Pour atteindre cet objectif, il est impératif de suivre quelques règles élémentaires : • Les DEEE ne doivent pas être traités comme des déchets ménagers. • Ils doivent être remis aux points de collecte appropriés gérés par la municipalité ou par des sociétés immatriculées. Dans plusieurs pays, il est possible de collecter à domicile les DEEE volumineux. • Lorsque vous achetez un nouvel appareil, vous devez retourner l'ancien au vendeur qui le récupère gratuitement, au cas par cas, à condition que l'équipement soit de type équivalent et possède les mêmes fonctions que celui fourni. ÉCONOMIE ET RESPECT DE L'ENVIRONNEMENT Lorsque cela est possible, éviter le préchauffage du four et éviter de le faire tourner à vide. N'ouvrez la porte du four que lorsque cela est nécessaire, car il y a des déperditions de chaleur à chaque fois qu'il est ouvert. Pour une économie d'énergie significative, éteindre le four entre 5 et 10 minutes avant la fin de cuisson prévue, et utiliser la chaleur que le four continue de générer. Gardez les joints propres et en bon état, pour éviter toute déperdition d'énergie. Si vous avez un contrat électrique avec un tarif heure creuse, le programme "cuisson différée" peut vous faire réaliser des économies d'énergie en déplaçant le début du programme à un intervalle de temps à tarif réduit. FR 15 Sommaire Instructions Generales 17 Consignes Utiles 18 Minuteur 19 1.1 Declaration de conformité 1.2 Consignes de sécurité 1.3 Installation 1.4 Mise en place du four dans son meuble 1.5 Important 1.6 Alimentation electrique 1.7 Equipement du four equipement different selon le type de four 2.1 Grilles du four, nouveau système d’arrêt 2.2 La cuisson au gril 2.3 Selon modèle le pack 2.4 Conseils de nettoyage et d’entretien 2.5 Assistance technique 3.1 Utilisation du minuteur sonore 3.2 Utilisation du minuteur coupe-circuıt Instructions Pour L’utilisation 19 FR 16 1. INSTRUCTIONS GENERALES — Lire attentivement les instructions contenues dans cette brochure, elles fournissent d’importantes indications sur la sécurité d’installation, l’emploi du four et son entretien. — Conserver soigneusement cette notice d’utilisation pour toutes consultations ultérieures. — Après avoir déballé votre four, vérifier que l’appareil est complet. — Les emballages comme le plastique, le polystyrène, peuvent constituer un danger pour les enfants. Ne pas les laisser à leur portée. ATTENTION Lors de la première utilisation du four, il peut se produire un dégagement de fumée âcre provoqué par le premier échauffement du collant des panneaux d’isolation enveloppant le four. Ce phénomène est normal. Attendez que la fumée cesse avant de cuire des aliments. Lorsque le four est en fonctionnement, la porte en verre est particulièrement chaude. ll est donc nécessaire que les enfants ne la touchent pas. ATTENTION: La tension et la fréquence d’alimentation sont indiquées sur la plaque signalétique (illustration dernière page). Faites appel à un professionnel pour l’installation de votre four. 1.1 DECLARATION DE CONFORMITÉ: 1.5 IMPORTANT • En plaçant la marque sur ce produit, nous confirmons la conformité à toutes les exigences européennes concernant la protection de l’environnement et de la santé, ainsi que la sécurité, applicables selon la loi à ce produit. Le meuble qui va supporter le four doit avoir des caractéristiques appropriés. Les panneaux du meuble doivent pouvoir résister à la chaleur. Dans le cas de meubles en bois plaqué, les colles doivent résister à une température de 120°C sinon il y a un risque de décollement ou de déformations. Conformément aux normes de sécurité, une fois encastré, aucun contact ne doit être possible avec les parties électriques. Toutes les parties qui assurent la protection doivent être fixées de façon à ne pas pouvoir être enlevées sans outil. Pour garantir une bonne aération, retirer la paroi arrière du meuble. 1.2 CONSIGNES DE SECURITE Cet appareil est conçu pour cuire des aliments. Tout autre utilisation (exemple chauffage d’appoint) doit être considéré comme impropre. Le constructeur ne peut être tenu comme responsable en cas de dommages liés à une mauvaise utilisation ou a des modifications techniques du produit. L’emploi d’un appareil électrique nécessite quelques règles de sécurité. - Ne pas tirer sur le fil électrique pour débrancher la prise. -Ne pas toucher l’appareil avec les pieds ou les mains mouillés. -Evitez d’utiliser l’appareil pieds nus. L’utilisation de multiprises et de rallonges pour raccorder votre appareil est fortement déconseillé. En cas de panne ou de mauvais fonctionnement il faut éteindre le four avant de le démonter. En cas de détérioration du fil électrique, remplacez-le rapidement en suivant les indications suivantes: ôtez le fil d’alimentation électrique et remplacez-le par un (du type H05RR-F, H05VV-F, H05V2V2F) adapté à la puissance de l’appareil. Vous veillerez à ce que cette opération soit effectuée par un centre technique agréé. Pour l’utilisateur c’est la certitude d’obtenir des pièces de rechange d’origine. Le non-respect de ces règles peut compromettre la sécurité de l’appareil. 1.6 ALIMENTATION ELECTRIQUE Brancher la fiche dans une prise de courant équipée d’un troisième contact correspondant à la prise de terre. Montez sur le fil une prise normaliséé capable de supporter la charge indiquée sur la plaquette. Le fil conducteur de masse à la terre est identifié par les couleurs jaune et verte. Veiller à ce que votre installation soit capable de supporter toute la puissance absorbée par le four. Si votre installation électrique n’est pas conforme faites la modifier par un électricien afin de prévenir tous risques. On peut également effectuer le branchement au réscau en interposant entre l’appareil et le réseau un interrupteur omnipolaire dimensionnée en fonction de la charge et conforme aux normes en vigueur. Le fil de terre jaune et vert ne doit pas être interrompu par l’interrupteur. La prise et l’interrupteur omnipolaire utilisés doivent être facilement accessibles une fois l’appareil électroménager installé. •Ne pas tapisser les parois du four avec des feuilles en aluminium ou des protections jetables du commerce. La feuille d'aluminium ou toute autre protection, en contact direct avec l'email chauffe, risque de fondre et de deteriorer l'email du moufle.. 1.7 EQUIPEMENT DU FOUR EQUIPEMENT DIFFERENT SELON LE TYPE DE FOUR 1.3 INSTALLATION La mise en service de l’appareil est à la charge de l’acheteur, le constructeur est dégagé de ce service. Les pannes liées à une mauvaise installation ne seront pas couvertes par la garantie. Une mauvaise installation peut provoquer des dommages aux personnes, aux animaux domestiques; dans ce cas la responsabilité du contructeur ne peut être engagée. 1.4 MISE EN PLACE DU FOUR DANS SON MEUBLE Une fois le four inséré dans son meuble, I’ancrage se fait par 4 vis visibles en ouvrant la porte du four. Pour permettre une meilleure aération du meuble, les fours doivent être encastrés conformément aux mesures et distances indiquées sur l’illustration de la dernière page. N.B.: Pour les fours à associer avec des plaques de cuisson, il est indispensable de respecter les instructions contenues dans la brochure jointe à l’appareil à associer. Avant la première utilisation des différents accessoires, nous recommandons un nettoyage avec une éponge additionnée de produit lessiviel, suivi d'un rinçage et d'un séchage. La grille simple sert de support aux moules et aux plats. La grille porte-plat sert plus particulièrement à recevoir les grillades. Elle est à associer au plat récolte sauce. Grâce à leur profil spécial, les grilles restent à l'horizontale jusqu'en butée. Aucun risque de glissement ou de débordement du plat. Le plat récolte-sauce est destiné à recevoir le jus des grillades. Il n'est à u t i l i s e r q u ' e n m o d e g r i l l o i r, Tournebroche ou Turbogril (selon modèle de four). Attention : en cuisson autre que les modes Grilloir,Tournebroche, et Turbo-gril, le plat récolte-sauce doit être retiré du four. Ne jamais utiliser le plat récolte-sauce comme plat à rôtir, il en résulterait des dégagements de fumée, des projections de graisse et un encrassement rapide du four. FR 17 2.3 SELON MODÈLE LE PACK Grilles latérales Situées des deux côtés de la cavité du four. Maintiennent les grilles métalliques et les lèchefrites. 2.4 CONSEILS DE NETTOYAGE ET D’ENTRETIEN Retrait et nettoyage des grilles Pour nettoyer les surfaces en inox et en émail, utilisez de l’eau tiède légèrement savonneuse. Vous pouvez utiliser un produit adapté au nettoyage de ce type de surface. Eviter absolument les produits abrasifs qui pourraient endommager la surface du four. En cas de salissures tenaces, évitez d’utiliser des ustensiles susceptibles de rayer irrémédiablement la surface de votre four. Il est conseillé de nettoyer régulièrement l’intérieur de votre four après chaque cuisson. Si vous ne respectez pas le nettoyage de votre four après chaque cuisson vous aurez une odeur désagréable, et les projections de graisse seront encore plus difficiles à enlever. Pour l’intérieur du four utiliser de l’eau chaude avec une éponge grattoir. Il existe dans le commerce des produits adaptés au nettoyage du four. Le nettoyage du four est fastidieux. Il existe en option des panneaux autonettoyants spéciaux avec un émail microporeux qui peuvent s’adapter sur les fours (voir paragraphe four autonettoyant par catalyse). Pour nettoyer les grilles inox, utilisez une éponge avec grattoir. Attendre que la surface soit froide avant de la nettoyer. L’utilisation d’eau froide au contact de la vitre chaude peut briser la vitre. Si cela devait arriver la garantie ne couvrirait pas ce dommage. Pour changer l’ampoule d’éclairage du four veillez à débrancher électriquement le four. Les ampoules de four sont spécifiques, elles sont conçues pour résister à une température élevée. 1- Retirez les grilles en les tirant dans le sens des flèches (voir cidessous). 2- Pour nettoyer les grilles, passez-les en lave-vaisselle ou utilisez une éponge humide en veillant à bien les sécher ensuite. 3- Quand les grilles sont nettoyées, remettez-les en place en suivant les instructions dans l’ordre inverse. 2.5 ASSISTANCE TECHNIQUE 2. CONSIGNES UTILES 2.1 GRILLES DU FOUR, NOUVEAU SYSTÈME D’ARRÊT En cas de de mauvais fonctionnement, vérifier si la prise est branchée. Après ces vérifications, adressez vous à votre revendeur ou prévenez directement notre service technique qui interviendra dans les plus brefs délais. Veiller à ce que le coupon de garantie fourni avec le produit soit correctement rempli, avec la date d’achat du four. Tous les fours bénéficient d’un nouveau système d’arrêt des grilles. Ce système permet de sortir complètement la grille en totale sécurité. Parfaitement bloquée elle ne peut pas basculer vers l’avant malgré la présence d’un poids important. Plus stables,ces grilles assurent une plus grande sécurité et tranquillité. 2.2 LA CUISSON AU GRIL Le préchauffage est superflu. La cuisson peut se faire porte close et les aliments doivent être placés par rapport au gril en fonction des résultats que l’on souhaite obtenir. — Plus près pour les aliments dorés en surface et saignants. — Plus loin pour les aliments bien cuits à l’intérieur. Le lèchefrite permet la récupération du jus. Ne jamais utiliser le lèchefrite comme plat à rotir, il en résulterait dégagements de fumée, des projections de graisse et un encrassement rapide du four. FR 18 3. MINUTEUR 3.2 UTILISATION DU MINUTEUR COUPE-CIRCUIT 3.1 UTILISATION DU MINUTEUR SONORE Il est possible de programmer la durée de la cuisson et l'extinction automatique du four (max. 120 minutes). A l'expiration du temps désigné, la manette sera en position O, une sonnerie retentira et le four s'arrêtera automatiquement. Si l'on souhaite utiliser le four sans programmer d'arrêt automatique, positionner la manette en position . Le tour peut être allumé seulement en sélectionnant un temps de cuisson ou en tournant le bouton en position . Pour sélectionner le temps de cuisson tournez le bouton sur le temps désiré. Dès que le temps de cuisson est écoulé une sonneriere retentit. Il ne vous reste plus qu'à couper manuellement le four. 4. INSTRUCTIONS POUR L’UTILISATION 210 210 230 La fonction "COOK LIGHT" vous permet de cuire d'une façon saine, en réduisant la quantité de graisse ou d'huile nécessaire à la cuisson. Grâce à l'utilisation combinée du gril, du ventilateur et d'un brassage de l'air, elle permet de conserver la teneur en humidité des aliments, en cuisant plus rapidement sans perte de saveurs. Le brassage de l'air d'air maintient l'humidité à l'intérieur du four et conserve les valeurs nutritionnelles des aliments en assurant un processus de cuisson rapide et uniforme. Cette fonction est particulièrement adaptée pour la cuisson des viandes et des légumes grillés. Essayer "COOK LIGHT " sur toutes vos recettes et laissez- vous tenter par la légèreté de cette nouvelle fonction! Testé conformément à la norme EN 60350-1 pour la déclaration de la consommation d’énergie et la définition de la classe énergétique. FR 19 INSTRUCCIONES PARA UN USO SEGURO • Durante la cocción, podría condensarse humedad dentro de la cavidad del horno o en el cristal de la puerta. Esto es normal. Para reducir este efecto, espere de 10 a 15 minutos antes de introducir alimentos en el horno una vez que lo encienda. De todos modos, la condensación desaparece cuando el horno alcanza la temperatura de cocción. • Para cocinar verduras, póngalas en un recipiente con una tapa en lugar de utilizar una bandeja sin cubrir. • Evite dejar los alimentos en el horno más de 15/20 minutos después de cocinarlos. • ATENCIÓN: el electrodoméstico y todas sus piezas se calientan durante el uso. Tenga cuidado de no tocar las partes calientes. • ATENCIÓN: las piezas accesibles pueden calentarse cuando el grill está funcionando. Mantenga el aparato fuera del alcance de los niños. • AT E N C I Ó N : a s e g ú r e s e d e q u e e l electrodoméstico esté apagado antes de sustituir la bombilla para evitar la posibilidadde descargas eléctricas. • ATENCIÓN: con el fin de evitar cualquier peligro debido a un restablecimiento accidental del dispositivo térmico de interrupción, este aparato no debe recibir alimentación mediante dispositivos de conmutación externos como temporizadores, ni conectarse a un circuito regularmente alimentado o interrumpido por el servicio. • Los niños menores de 8 años deben mantenerse a una distancia segura del aparato si no son supervisados continuamente. • Los niños no deben jugar con el electrodoméstico. Pueden utilizarlo niños a partir de 8 años de edad y personas con facultades físicas, sensoriales o mentales reducidas, o con falta de experiencia y conocimiento, si lo emplean bajo supervisión o se les instruye acerca de la seguridad del producto y entienden los riesgos que comporta. • La limpieza y el mantenimiento no deben ser llevados a cabo por niños sin supervisión. • No utilice materiales rugosos o abrasivos ni rasquetas metálicas afiladas para limpiar las puertas de vidrio del horno, ya que pueden rayar la superficie y agrietar el vidrio. • Apague el horno antes de sacar las partes extraíbles. • Después de la limpieza, vuelva a montarlas siguiendo las instrucciones. • Utilice únicamente la sonda térmica recomendada para este horno. • No utilice limpiadores de vapor. • Conecte un enchufe en el cable que transporta la tensión, la corriente y la carga indicadas en la etiqueta y que tiene el contacto de masa. La toma de corriente debe ser la adecuada para la carga indicada en la etiqueta y debe funcionar correctamente. El conductor de toma de tierra se caracteriza por los colores amarillo y verde. Esta operación debe realizarla un profesional debidamente cualificado. Si la toma de corriente es incompatible con el enchufe del electrodoméstico, pida a un electricista profesional que sustituya la toma por otra del tipo adecuado. El enchufe y la toma deben cumplir las normas actuales del país donde se instala el electrodoméstico. Se puede efectuar también la conexión a la red interponiendo, entre el aparato y la red, un interruptor omnipolar dimensionado a la carga y conforme con la normativa vigente. El cable de tierra amarillo y verde no debe interrumpirse con el interruptor. La toma o el interruptor omnipolar usados para la conexión deben ser fácilmente accesibles para el electrodoméstico instalado. • La desconexión puede realizarse mediante el enchufe accesible o mediante la incorporación de un interruptor en el cableado fijo con arreglo a las normativas de cableado. • Si el cable de alimentación está dañado, debe sustituirse por un cable o un haz de cables especial comercializado por el fabricante; también puede ponerse en contacto con el departamento de atención al cliente. • El cable de alimentación debe ser de tipo H05V2V2-F. • Esta operación debe realizarla un profesional debidamente cualificado. El conductor de toma de tierra (amarillo y verde), debe ser aproximadamente 10 mm más largo que los otros conductores. Para cualquier reparación, diríjase únicamente a un centro de asistencia técnica autorizado y solicite que se empleen recambios originales. • El incumplimiento de r las indicaciones anteriores puede poner en peligro la seguridad del electrodoméstico y anular la garantía. • Los excesos de material deben retirarse antes de limpiar. • Una interrupción prolongada de la corriente durante una fase de cocción puede causar una avería en el monitor. Póngase en contacto con el servicio de atención al cliente si esto ocurre. • El electrodoméstico no debe instalarse detrás de una puerta decorativa para evitar que se caliente en exceso. • Cuando coloque la bandeja interior, asegúrese de dirigir el tope hacia arriba en la parte trasera de la cavidad. La bandeja debe introducirse por completo en la cavidad ES 20 • ATENCIÓN: No forre las paredes del horno con aluminio u otras protecciones comercializadas. El aluminio o los protectores podrían derretirse al entrar en contacto directo con el esmalte caliente y deteriorar el esmalte del interior. • ATENCIÓN: No quite nunca la junta de estanqueidad de la puerta del horno. • ATENCIÓN: No llene el fondo del horno con agua durante la cocción o cuando esté caliente. • No es necesario llevar a cabo operaciones/configuraciones adicionales para que el electrodoméstico funcione a las frecuencias nominales. Este aparato está etiquetado conforme a la Directiva europea 2012/19/EU sobre residuos de aparatos eléctricos y electrónicos. (RAEE). La RAEE contiene tanto sustancias contaminantes (que pueden generar consecuencias negativas para el medio ambiente) como componentes básicos (que pueden reutilizarse). Es importante someter los RAEE a tratamientos específicos, con el fin de retirar y eliminar correctamente todos los contaminantes y reciclar todos los materiales. Los usuarios pueden desempeñar una función importante para garantizar que los RAEE no representen un problema ambiental; es esencial que se sigan algunas reglas: • Los RAEE no se deben tratar como residuos domésticos. • Los RAEE se deben depositar en los puntos de recolección correspondientes gestionados por la municipalidad o por empresas registradas. En muchos países, para los RAEE de gran tamaño, puede existir la recolección domiciliaria. • Cuando compre un nuevo aparato, el anterior debe devolverse al vendedor que lo debe recolectar gratuitamente de manera individual, siempre que el equipo sea de un tipo equivalente y que tenga las mismas funciones que el equipo entregado. AHORRAR Y RESPETAR EL MEDIO AMBIENTE Cuando es posible, evitar el precalentamiento del horno y evitar hacerlo funcionar vacío. Abrir la puerta del horno únicamente cuando es necesario, porque hay desperdición de calor cada vez que se abre. Para un ahorro de energía significativo, apagar el horno entre 5 y 10 minutos antes del final previsto de la cocción, y usar el calor que el horno sigue generando. Mantener las juntas limpias y en buen estado, para evitar cualquier deperdición de energía. Si tiene un contrato eléctrico con una tarifa de horas valles, el programa "cocción diferida" puede permitirle ahorrar energía, desplazando el principio del programa a una franja horaria con tarifa reducida. ES 21 Contenido Instrucciones Generales 23 Consejos Útiles 24 Minutero 25 1.1 Declaración de conformidad 1.2 Información sobre seguridad 1.3 Instalación 1.4 Introducción del mueble 1.5 Importante 1.6 Conexión Eléctrica 1.7 Equipamiento del horno 2.1 Rejillas horno - sistema de sujeción 2.2 La coccıón al grill 2.3 Los modelos 2.4 Limpieza y mantenimiento 2.5 Asistencia técnica 3.1 Uso del minutero 3.2 Uso del temporizador Instrucciones De Uso 25 ES 22 1. INSTRUCCIONES GENERALES Le agradecemos que haya elegido uno de nuestros productos. Para obtener de este electrodoméstico las mejores prestaciones aconsejamos: • Leer atentamente las advertencias contenidas en el presente manual. • Conservar con cuidado este manual para cualquier consulta posterior. Cuando el aparato està en funcionamento todos sus elementos assessibles, estan calientes. Por ello, tenga cuidado de no tocar estos elementos. Durante la primera puesta en funcionamiento del horno puede producirse un humo de olor acre causado por el primer calentamiento del pegamento de los paneles de aislamiento que envuelven el horno. Se trata de un fenómeno absolutamente normal y, en caso de verificarse, es preciso esperar a la extinción del humo antes de introducir los alimentos. Por su naturaleza el horno es un aparato que se calienta, de modo particular el cristal de la puerta. 1.1 DECLARACIÓN DE CONFORMIDAD 1.5 IMPORTANTE • Al colocar la marca en este producto, declaramos, bajo nuestra propia responsabilidad, el cumplimiento de todos los requisitos europeos en términos de seguridad, salud y medio ambiente, establecidos en la legislación para este producto. Para garantizar un correcto funcionamiento del aparato encastrable, es necesario que el mueble tenga las características adecuadas. Los paneles de los muebles adyacentes al horno deberán ser de un material resistente al calor. En el caso de los muebles de madera chapada, el encolado deberá resistir una temperatura de 120°C: los materiales plásticos o encolados que no resistan esta temperatura pueden deformarse o despegarse. De acuerdo con las normas de seguridad, una vez empotrado el aparato no deben existir contactos con las piezas eléctricas. Todas las piezas protectoras deben fijarse de manera que no puedan sacarse sin la ayuda de un utensilio. Para garantizar una buena ventilación debe eliminarse la pared posterior del hueco, y el panel de apoyo debe tener una apertura mínima de 45 mm. 1.2 INFORMACIÓN SOBRE SEGURIDAD •Este aparato deberá destinarse únicamente al uso para el cual ha sido especialmente concebido, es decir, para la cocción de alimentos. Cualquier otro uso (por ejemplo, calentamiento a temperatura ambiente) debe considerarse impropio, y por lo tanto peligroso. El fabricante declina toda responsabilidad por los posibles daños causados por el uso impropio, erróneo e irracional del aparato. •El uso de cualquier aparato eléctrico comporta la observación de algunas reglas fundamentales. En particular: — No tire del cable de alimentación para desenchufar el aparato. — No toque el aparato con las manos o los pies húmedos o mojados. — No utilice el aparato si no lleva calzado. — No utilice adaptadores, ladrones ni alargadores. — En caso de avería o de mal funcionamiento del aparato, apáguelo y no lo manipule. •En caso de deterioro del cable, sustitúyalo inmediatamente con arreglo a las siguientes indicaciones: — saque el cable de alimentación y sustitúyalo por uno (tipo H05RRF, H05VV-F, H05V2V2-F) y adecuado a la potencia del aparato. — esta operación deberá realizarla un técnico especializado. El hilo de tierra (amarillo-verde) debe ser obligatoriamente 10 mm más largo que los conductores de línea. En caso de que el aparato precise ser reparado, diríjase únicamente a un centro de asistencia técnica autorizado y exija piezas de recambio originales. No observar todo lo mencionado puede comprometer la seguridad del aparato. •No forrar las paredes del horno con aluminio u otras protecciones disponibles en tiendas. El aluminio o los protectores, en contacto directo con el esmalte caliente puede derretirse y deteriorar el esmalte del interior. 1.3 INSTALACIÓN La instalación corre a cargo del comprador y el Fabricante queda exento de este servicio; eventuales intervenciones requeridas a la Casa Constructora que dependan de una instalación incorrenta no están incluidas en la Garantia. La instalación debe ser efectuada según las instrucciones por personal profesionalmente cualificado. Una instalación errónea puede causar daños a personas, animales o cosas, de los cuales el fabricante no puede ser considerado responsable. 1.4 INTRODUCCIÓN DEL MUEBLE Introduzca el aparato en el hueco del mueble (bajo encimera o en columna). El horno se fija introduciendo 4 tornillos en los agujeros del marco, visibles al abrir la puerta. Con el objeto de permitir una mejor ventilación del mueble, empotre el horno respetando las medidas y las distancias indicadas en la última página. Nota: Para los hornos que deban acoplarse a una encimera, resulta indispensable respetar las instrucciones contenidas en el manual adjunto al aparato a acoplar. 1.6 CONEXIÓN ELÉCTRICA Enchufe la clavija en una base provista de un tercer contacto correspondiente a la toma de tierra, la cual deberá conectarse correctamente. En los modelos desprovistos de clavija, monte una clavija estándar en el cable capaz de soportar la carga indicada en la placa de características. El hilo de tierra es de color amarillo-verde. Esta operación deberá realizarla un técnico especializado. En caso de que la base y la clavija del aparato sean incompatibles, haga que un técnico especializado le cambie la base por otra adecuada. También puede efectuar la conexión a la red intercalando entre el aparato y la red un interruptor omnipolar, preparado para la carga y con arreglo a las normas vigentes. El hilo de tierra amarilloverde no debe quedar interrumpido por el interruptor. La base o el interruptor omnipolar utilizados para la conexión deben estar situados en un lugar fácilmente accesible y cerca del electrodoméstico instalado. Importante: en la fase de instalación, coloque el cable de alimentación de manera que en ningún punto alcance una temperatura superior a los 50 °C a temperatura ambiente. El aparato cumple los requisitos de seguridad previstos por los institutos normativos. Sólo se garantiza la seguridad eléctrica de este aparato si ha sido conectado correctamente a una instalación de toma de tierra eficaz, con arreglo a lo dispuesto en las normas vigentes de seguridad eléctrica, (en caso de duda, exija un control exhaustivo de la instalación por parte de un técnico especializado). El fabricante declina toda responsabilidad por los posibles daños causados por la falta de conexión a tierra de la instalación. Importante: el fabricante queda exento de cualquier responsabilidad por los posibles daños personales o materiales causados por la falta de conexión a tierra. ATENCIÓN: La tensión y frecuencia de alimentación están indicadas en la tarjeta de matrícula (en la última página). Compruebe que la capacidad eléctrica de la instalación de las bases sean adecuadas para la potencia máxima del aparato, indicada en la placa de características. En caso de duda, diríjase a un técnico cualificado. 1.7 EQUIPAMIENTO DEL HORNO - según el modelo Es necesario limpiar el equipamiento del horno antes de su primer uso. Limpie con una esponja, y séquelo. La rejilla simple sirve de soporte para los moldes y las fuentes. La rejilla para sostener las fuentes sirve más especialmente para colocar las parrilladas. Debe utilizarse junto con la bandeja que recoge el jugo de cocción (grasera). Gracias a su perfil especial, las rejillas permanecen en horizontal hasta el tope. No hay ningún riesgo de deslizamiento o de desbordamiento de la fuente. ES 23 2.3 LOS MODELOS La grasera sirve para recoger el jugo de las parrilladas. Sólo se debe utilizar en modo Grill, Asador o Turbogrill (según el modelo). Para los otros modos de cocción, retírela del horno. No utilice nunca la grasera como fuente para asar. Ello provocaría emanación de humos, salpicaduras de grasa y un ensuciamiento rápido Los hornos tienen un control electrónico de la velocidad del ventilador que está patentado por Candy y que se llama VARIOFAN. Durante la cocción, este sistema cambia automáticamente la velocidad del ventilador (en el modo multifunción) para optimizar el flujo de aire y la temperature interna del horno. Todos los hornos tienen la función . Esta función permite la distribución de la humedad y de la temperatura. Reduce la perdida de humedad en un 50 %, lo que garantiza un alimento más sabroso y tierno. Esta función es recomendada para cocinar pasteles y pan. La función Sprinter reduce el tiempo de calentamiento del horno; en sólo 8 minutos alcanza 200°. El Set para Pizza es ideal para cocinar pizzas. El set debe utilizarse de forma combinada con la función Pizza. La bandeja del horno. La bandeja del horno es ideal para asar. Úselo junto con la bandeja de goteo. Un pomo o manivela viene incluido para ayudar a mover los accesorios de manera segura. No deje este pomo o manivela dentro del horno. Durante la utilización del horno, los accesorios que no utilice deben ser retirados del mismo. La función Supergrill dá la posibilidad de aumentar la intensidad del tostado. La potencia Supergrill se incrementa un 50% respecto a un grill convencional. Algunos hornos vienen equipados con la nueva contrapuerta de cristal la cual tiene una mayor área de cristal y permite un mejor aislamiento. Soportes laterales Se encuentran en ambos lados del hueco del horno. Sostienen las rejillas metálicas y las bandejas graseras. 2.4 LIMPIEZA Y MANTENIMIENTO Extracción y limpieza de los bastidores cableados 1- Retire las guías metálicas tirando de ellas en la dirección de las flechas (ver más abajo) 2- Para limpiar las guías metálicas, puede ponerlas en el lavavajillas o utilizar una esponja húmeda, asegurándose siempre de que se sequen después. 3- Después del proceso de limpieza, monte las guías metálicas en orden inverso. Limpiar las superficies de acero inox y esmaltadas con agua templada y jabón, o con productos específicos de comercios especializados, evitando absolutamente el uso de polvos abrasivos que dañarían las superficies y partes estéticas. La limpieza del horno es muy importante y debe ser efectuada cada vez que éste es utilizado. En las paredes se depositan grasas derretidas durante la cocción que podrían, en el sucesivo encendido, producir olores desagradables que afectarían a la cocción. Para la limpieza utilizar agua caliente y jabón, aclarando cuidadosamente. Para eliminar esta tarea, las paredes del horno pueden ser revestidas con paneles autolimpiantes especiales, accesorios opcionales en algunos modelos: ver parágrafo específico “HORNO AUTOLIMPIANTECATALÍTICO” Utilizar jabón y barillas de acero para las rejillas inox. La limpieza de las superficies de cristal templado debe ser efectuada cuando las superficies estén frias. Eventuales roturas debidas a la no observación de esta regla elemental no están cubiertos por la garantia. La bombilla del horno puede ser sustituida desconectando eléctricamente el aparato y destornillando la ampolla que la encierta, sustituyendo la bombilla por una análoga resistente a altas temperaturas. Se aconseja además utilizar fuentes con bordes altos en el caso de cocciones de alimentos particularmente grasos (asados, etc) y utilizar la grasera al realizar la cocción al grill. Para el caso que, por condiciones particulares de suciedad, no fuera suficiente la acción precedente, se aconseja apartar las grasas con un paño mullido o una esponja humedecidos con agua caliente. La porosidad del esmalte es fundamental para garantizar la acción autolimpiante. N.B. Todos los paneles autolimpiantes comercializados en el mercado tienen una eficacia de rendimiento de aproximadamente 300 horas de funcionamiento del horno. Pasado dicho límite los paneles deberían ser sustituidos. 2. CONSEJOS ÚTILES 2.1 REJILLAS HORNO - SISTEMA DE SUJECIÓN 2.5 ASISTENCIA TÉCNICA El horno está dotado de un nuevo sistema de sujeción de las rejillas. Este sistema permite extraer las rejillas casi por completo sin que caigan y manteniéndolas perfectamente en plano, permitiendo verificar y mezclar los alimentos con la máxima tranqu-ilidad y seguridad. Para extraer las rejillas es suficiente, como se indica en el dibujo, levantarlas, cogiéndolas por la parte anterior y tirar de ellas. 2.2 LA COCCIÓN AL GRILL Este tipo de cocción permite el dorado rápido de los alimentos. Con este fin, le aconsejamos introducir la rejilla generalmente en el 3° o 4° estante, según las dimensiones de los alimentos. (pág. 24) Casi todas las carnes pueden ser cocidas al grill, excepto algunas carnes tiernas de caza y albóndigas. La carne y el pescado para cocinar al grill deben ser ligeramente untados con aceite. ES 24 En caso de incorrecto funcionamiento del horno le aconsejamos: —verificar la buena conexión del enchufe en la toma de corriente. En caso de que no se determine la causa del mal funcionamiento: apagar el aparato sin manipularlo y llamar al Servicio de Asistencia Técnica. Antes de llamar al Centro de Asistencia recuerde tomar nota del número de matrícula situado en la tarjeta matrícula del producto (Fig. última página). El aparato está dotado de un certificado de garantía que le permite disponer del Servicio Asistencia Técnica. 3. MINUTERO 3.2 USO DEL TEMPORIZADOR Con este mecanismo es posible programar la duración exacta en minutos de la cocción y, por tanto, la desconexión automática del horno (máx.120 minutos) Una vez transcurrido el tiempo seleccionado el mando alcanzará la posición de señal acústica O, a partir de la cual el horno se desconectará automáticamente. Únicamente se podrá conectar el horno seleccionando un tiempo de cocción o girando el mando a la posición 3.1 USO DEL MINUTERO Para seleccionar el tiempo elegido, gire el mando una vuelta completa y después vuelva a ajustar la marca en la posición correspondiente al tiempo deseado. Una vez transcurrido el tiempo seleccionado se emitirá una señal acústica durante algunos segundos. 4. INSTRUCCIONES DE USO Mando selector Temperaturas predeterminadas y reglaje para el programador electrónico (Type A) Mando termostato FUNCIÓN Conecta la luz interior DESCONGELACIÓN Funcionamiento de la turbina de cocción que hace circular el aire dentro del espacio del horno. Ideal para realizar una descongelación previa a una cocción. Convección natural Funcionan la resistencia inferior y la resistencia superior del horno. Es la cocción tradicional, ideal para cocinar asados, caza, galletas, manzanas al horno y para conseguir alimentos crujientes. 210 210 230 CALOR CIRCULANTE (a) Utilización simultánea de la resistencia inferior, superior y de la turbina que hace circular el aire dentro del espacio del horno. Función recomendada para las aves, la repostería, los pescados, las verduras... El calor penetra mejor dentro del alimento a cocer reduciendo el tiempo de cocción, así como el tiempo de precalentamiento. Se pueden realizar cocciones combinadas con preparaciones idénticas o distintas en uno o dos niveles. Este modo de cocción garantiza una distribución homogénea del calor y no mezcla los olores. Para una cocción combinada se deben prever unos diez minutos más. RESISTENCIA INFERIOR CIRCULANTE (a) Utilización de la resistencia inferior más la turbina que hace circular el aire dentro del espacio del horno. Ideal para hacer tartas de frutas jugosas, tortadas, quiches, pasteles. Evita que se sequen los alimentos y favorece la subida de bizcochos, masa de pan y otras cocciones realizadas por debajo. Coloque la rejilla en la ranura inferior. GRILL: El grill debe utilizarse con la puerta cerrada. Utilización de la resistencia superior con posibilidad de ajustar la temperatura. Es necesario un precalentamiento de 5 minutos para que la resistencia se ponga al rojo. Éxito seguro con las parrilladas, las brochetas y los gratinados. Las carnes blancas deben alejarse del grill, porque aunque así se alargará el tiempo de cocción, la carne quedará más sabrosa. Las carnes rojas y los filetes de pescado se pueden colocar encima de la rejilla colocando debajo la grasera. Modalidad pizza El calor envolvente en esta modalidad genera un ambiente similar al de los hornos de leña de las pizzerías. La función "COOK LIGHT" (“Cocina Light”) permite cocinar de manera más saludable, reduciendo la cantidad de grasa o aceite necesaria. Gracias a la combinación del grill y el ventilador, conjuntamente con un flujo de aire variable, se conservará el nivel de humedad de los alimentos, dorando la superficie y reduciendo el tiempo de cocción, sin alterar su sabor. Especialmente, es adecuado para la cocción de carnes, verduras asadas y tortillas. El flujo variable de aire mantiene tanto la humedad en el interior del horno como en los alimentos, conservando los valores nutricionales y garantizando un proceso de cocción uniforme rápido. ¡Pruebe todas sus recetas y reduzca la cantidad de condimentos que se emplean y experimente la ligereza de esta nueva función! (a) SEGÚN EL MODELO, Función con VARIO FAN : Fan es el exclusivo sistema de funcionamiento desarrollado porCandy para optimizar los resultados de cocción, la regulación de la temperatura y la regulación de la humedad. El sistema Vario Fan modifica automáticamente la velocidad de rotación del ventilador para todo tipo de cocciones en multifunción. Este sistema se activa automáticamente cada vez que es seleccionada una función en el interior del área descrita en el panel de control. * Probado de acuerdo con la norma EN 60350-1 para fines de declaración de consumo de energía y clase energética. ES 25 VARNOSTNA NAVODILA izvesti ustrezno usposobljena oseba. Če vtičnica in vtikač nista združljiva, naj ustrezno usposobljeni elektro-serviser zamenja vtičnico s takšno, ki se bo prilegala vtikaču. Vtičnica in vtikač morata izpolnjevati veljavne norme v državi, kjer bo naprava priklopljena v omrežje. Priklop v električno omrežje je možno izvesti tudi tako, da je napajanje urejeno prek ustrezne varovalke, vgrajene med napravo in vir napajanja, ki zagotavlja, da obremenitev omrežja ne presega predpisane zakonodaje. Rumeno-zelenega kabla ni dovoljeno prekinjati z varovalko. Vtičnica ali varovalka, ki sta vgrajeni med vtičnico in napravo, morata po namestitvi naprave ostati enostavno dostopni. • Prekinitev napajanja mora biti možna bodisi z odklopom vtikača iz vtičnice, oziroma prek dodatno vgrajenega stikala, nameščenega skladno s pravili elektro-stroke. • Če je napajalni kabel poškodovan, ga je potrebno nadomestiti z novim ali posebnim kablom, ki je na voljo pri proizvajalcu, lahko pa se tudi obrnete na oddelek za podporo kupcem. • Napajalni kabel mora biti vrste H05V2V2-F. • Priklop naprave mora izvesti ustrezno usposobljena oseba. Kabel za ozemljitev (rumeno-zelen) mora biti približno 10 mm daljši kot drugi prevodniki. Za kakršna koli popravila se obrnite samo na oddelek za podporo strankam in zahtevajte uporabo originalnih rezervnih delov. • Neupoštevanje zgornjih predpisov lahko negativno vpliva na varno uporabo naprave ter izniči garancijo. • Pred čiščenjem morate morebitne ostanke živil najprej odstraniti. • Dolg izpad napajanja, ki se pojavi med fazo kuhanja, lahko povzroči okvaro zaslona. V tem primeru se obrnite na servisno službo. • Naprave ni dovoljeno namestiti za dekorativnimi vrati, sicer lahko pride do pregrevanja. • Pri vstavljanju polic se prepričajte, da je zaustavljalnik na zadnji strani in obrnjen navzgor. Polico morate vstaviti do konca • OPOZORILO: Sten pečice na oblagajte z aluminijasto folijo ali zaščito za enkratno uporabo, ki je na voljo v trgovinah. Aluminijasta folija ali katera koli druga zaščita, ki je v neposrednem stiku z vročim emajlom, predstavlja tveganje topljenja in slabšanja kakovosti emajla v notranjosti. • OPOZORILO: Nikoli ne odstranite tesnil na vratih pečice. • POZOR: Dna odprtine pečice ne polnite z vodo med kuhanjem ali ko je pečica vroča. • Za upravljanje te naprave pri nazivnih frekvencah, ni potrebno nobeno dodatno delovanje/nastavitev. • Med kuhanjem lahko vlaga kondenzira znotraj odprtine pečice ali na steklu vrat. To je normalno stanje. Za zmanjšanje tega učinka počakajte 10–15 minut po vklopu napajanja, preden hrano vstavite v pečico. V vsakem primeru kondenzacija izgine, ko pečica doseže temperaturo za kuhanje. • Zelenjavo kuhajte v posodi s pokrovom, namesto na odprtem pekaču. • Izogibajte se puščanju hrane v pečici za več kot 15–20 minut po kuhanju. • OPOZORILO: naprava in dostopni deli se med uporabo segrejejo. Bodite previdni in se ne dotikajte vročih delov. • OPOZORILO: med delovanjem žara, se izpostavljeni deli lahko zelo segrejejo. Zato poskrbite, da bodo takrat otroci varno oddaljeni. • OPOZORILO: poskrbite, da je pred zamenjavo žarnice, naprava izklopljena, da se izognete morebitnemu električnemu udaru. • OPOZORILO: da bi se izognili kakršni koli nevarnosti zaradi nenamerne ponastavitve termičnega prekinjala, te naprave ne smete napajati preko zunanje stikalne naprave, kot je časovnik, ali je priključiti na tokokrog, ki se redno vklaplja ali izklaplja. • Otroci, mlajši od 8 let, morajo biti na varno oddaljeni od naprave, če niso pod stalnim nadzorom. • Otroci se z napravo ne smejo igrati. Napravo lahko uporabljajo osebe stare 8 let ali več in osebe z zmanjšanimi telesnimi, čutnimi ali razumskimi sposobnostmi, brez izkušenj ali znanja o izdelku, le pod nadzorom ali če so prejeli ustrezna navodila glede varne uporabe naprave in če se zavedajo nevarnosti, ki obstajajo. • Čiščenja in vzdrževanja ne smejo opravljati otroci, ki niso pod nadzorom. • Za čiščenje stekla na vratih pečice ne uporabljajte abrazivnih in grobih materialov ali ostrih kovinskih strgal, saj lahko povzročijo praske na stekleni površini, ki lahko povzročijo pokanje stekla. • Pred odstranjevanjem delov, ki jih je mogoče odstraniti, je pečico treba izklopiti. • Po končanem čiščenju, ponovno sestavite dele po priloženih navodilih. • Uporabljajte samo sondo za meso, ki je priporočena za to pečico. • Za čiščenje ne uporabljajte parnega čistilnika. • Vtikač napajalnega kabla priklopite v vtičnico, ki izpolnjuje zahteve glede napetosti, toka in moči, ki so navedene na oznaki naprave, vtičnica pa mora biti tudi ustrezno ozemljena. Vtičnica mora zagotavljati ustrezno moč, ki je navedena na oznaki naprave, biti mora ozemljena in v brezhibnem stanju. Kabel za ozemljitev je rumeno-zelene barve. Priklop naprave mora SI 26 Ta naprava je označena v skladu z določili Evropske direktive 2012/17/EU o odpadni električni in elektronski opremi (OEEO). OEEO so tako snovi, ki onesnažujejo okolje (lahko negativno učinkujejo na okolje) kot osnovni sestavni deli (ki jih je možno ponovno uporabiti). Pomembno je pravilno ravnati z OEEO, da pravilno odstranimo in zavržemo vse snovi, ki onesnažujejo, okolje, ter obnovimo in recikliramo vse materiale. Kot posamezniki lahko pomembno vplivamo na to, da OEEO ne postane okoljska težava; upoštevati moramo le nekaj osnovnih pravil: • Z OEEO ne smemo ravnati kot z ostalimi hišnimi odpadki. • OEEO moramo odnesti v ustrezne centre za zbiranje odpadkov, ki jih upravlja občina ali pooblaščeno podjetje. V več državah imajo urejen prevzem večjih kosov OEEO na domu. • Ob nakupu nove lahko staro napravo vrnemo prodajalcu, ki jo je dolžen brezplačno prevzeti na osnovi ena za eno, če je oprema enake vrste in ima enake funkcije kot dobavljena. PRIHRANEK NA ENERGIJI IN SPOŠTOVANJE DO OKOLJA Če je le mogoče, se izognite predgrevanju pečice in pečico kar se da napolnite z živili. Vrata pečice odpirajte kar se da poredko, saj ob vsakem odpiranju toplota uhaja iz pečice. Občutno boste prihranili na energiji, če boste pečico izklopili 5 do 10 minut pred predvidenim koncem pečenja in izrabili preostanek toplote, ki je še v pečici. Tesnila naj bodo vedno čista in nepoškodovana, da preprečite morebitno uhajanje toplote iz pečice. Če imate na izbiro tudi časovna obdobja z nižjo ceno električne energije, s pomočjo programa za zamik vklopa začetka pečenja enostavno prihranite, če pečenje zamaknete na čas, ko je električna energija cenejša. SI 27 Povzetek Splošna opozorila 29 1.1 Izjava o skladnosti 1.2 Varnostni napotki 1.3 Namestitev in priključitev 1.4 Vgradnja pečice v kuhinjski niz 1.5 Pomembni napotki 1.6 Priključitev pečice na električno omrežje 1.7 Oprema pečice (odvisno od modela) 2.1 Nekaj koristnih nasvetov 2.2 Žar 2.3 Modeli U COOK 2.4 Čiščenje in vzdrževanje pečice 2.5 Servisiranje Koristni nasveti 30 Таймер 3.1 Uporaba števca minut 3.2 Nastavljanje trajanja pečenja 30 Funkcije 31 SI 28 1. SPLOŠNA OPOZORILA Hvala, da ste izbrali enega naših izdelkov! Da boste lahko izrabili vse možnosti, ki vam jih ponuja pečica, priporočamo naslednje: • Pozorno preberite navodila; v njih so pomembna navodila za varno vgradnjo, priključitev, uporabo in vzdrževanje pečice. • Priporočamo, da navodila shranite, saj jih boste morda še potrebovali. Ob prvem segrevanju boste morda zaznali neprijeten vonj. To je posledica veziv za izolacijske plošče in je popolnoma normalen pojav. Počakajte, da hlapi izginejo, potem pa lahko postavite jed v pečico. Pečica se med delovanjem zelo segreje, med drugim tudi steklo na vratih. 1.1 IZJAVA O SKLADNOSTI 1.4 VGRADNJA PEČICE V KUHINJSKI NIZ • Oznaka na izdelku potrjuje, da je oprema skladna z Evropskimi predpisi o varnosti in zdravju ter z okoljskimi določbami, ki se nanašajo na uporabo tovrstnih izdelkov. Dovoljena je vgradnja pečice pod delovni pult ali v nišo v visoki kuhinjski omarici. Pečico pritrdite s pomočjo vijakov skozi luknje na ohišju (gl. sliko na zadnji strani). Odprite vrata pečice in poiščite luknje. Zagotoviti morate ustrezno zračenje; upoštevajte mere, ki so navedene na skici na zadnji strani teh navodil. Opomba: Če kombinirate pečico in kuhalno ploščo, upoštevajte tudi navodila, ki so bila priložena kuhalni plošči! Ko dobite svojo novo pečico, se najprej prepričajte, da med transportom ni prišlo do poškodb. Če je pečica poškodovana, se takoj obrnite na prodajalca. Če niste prepričani, se posvetujte s strokovnjakom. Pazite, da embalaža, na primer plastične vrečke, polistirol ali žeblji, ne pridejo v roke otrok, saj so lahko zelo nevarni zanje. 1.5 POMEMBNI NAPOTKI 1.2 VARNOSTNI NAPOTKI Za brezhibno delovanje mora biti pečica vgrajena v ustrezno nišo. Stranice kuhinjskih omaric poleg pečice morajo biti izdelane iz na vročino odpornih materialov. Prepričajte se, da lepilo, uporabljeno pri izdelavi omarice, prenese temperaturo vsaj 120 C; plastika ali lepila, ki ne prenesejo tako visokih temperatur, se bi stalili, omarica pa bi se deformirala. Po vgradnji pečice v nišo morajo biti vsi električni deli povsem izolirani; to zahtevajo veljavni predpisi. Vsa varovala morajo biti trdno pritrjena, tako da jih je nemogoče odstraniti brez uporabe posebnih orodij. Odstranite hrbtno stranico s kuhinjske omarice, da omogočite kroženje zraka okoli pečice. Kuhalna plošča nad njo mora biti oddaljena vsaj 45 mm. • Pečica je izdelana le za pečenje in kuhanje jedi v gospodinjstvu. Uporaba pečice v kakršnekoli druge namene je (npr. za segrevanje prostora) je neprimerna in zaradi tega tudi nevarna. • Proizvajalec in prodajalec ne prevzemata odgovornosti za morebitne poškodbe oseb in/ali materialno škodo, ki bi nastala zaradi neprimerne, napačne in nespametne uporabe pečice. Pri uporabi kakršnega koli električnega aparata morate upoštevati naslednja osnovna varnostna pravila: -Ne vlecite priključnega kabla, če želite iztakniti vtikač iz vtičnice, pač pa primite za vtikač in ga lepo iztaknite iz vtičnice. -Ne dotikajte se aparata, če imate vlažne roke ali noge. -Ne dotikajte se aparata, če ste bosi. -Priključitev aparata na električno omrežje preko adapterjev, podaljškov in razdelilcev ni priporočljiva. - V primeru okvare in/ali slabega delovanja aparat takoj izklopite in ga ne uporabljajte naprej. - Če se poškoduje priključni kabel, ga morate takoj zamenjati. Odstranite poškodovani priključni kabel in ga zamenjajte s kablom tipa H05RRF, H05VV-F, H05V2V2-F ustrezne dolžine in preseka Kabel mora biti sposoben prenesti obremenitev. Priključnega kabla ne menjajte sami, pač pa naj vam ga zamenja ustrezno usposobljen strokovnjak! Pripominjamo, da mora biti vodnik za ozemljitev (rumen zelen) obvezno za 10 mm daljši od vodnikov za priključitev na električno omrežje. Za morebitna popravila se obrnite na enega od naših pooblaščenih serviserjev ter ob morebitni zamenjavi posameznih elementov vedno zahtevajte vgradnjo originalnih Candyjevih rezervnih delov. Neupoštevanje zgornjih navodil lahko vpliva na varno delovanje aparata. • Sten pečice ne oblagajte z alu-folijo ali v oblogami za enkratno uporabo, ki so na voljo v trgovinah, saj bi se te snovi lahko stalile ob stiku z vročim emajlom, kar bi poškodovalo emajl. 1.6 PRIKLJUČITEV PEČICE NA ELEKTRIČNO OMREŽJE Pečico priključite na ozemljeno vtičnico, ali preko ustreznega večpolnega stikala, zaščiteno z ustreznimi varovalkami. Pečica mora biti pravilno ozemljena! Nekateri modeli niso opremljeni z vtičem. Na priključni kabel takih modelov pritrdite vtič, ki bo ustrezal priključni moči aparata. Priključna moč aparata je navedena na napisni ploščici s tehničnimi podatki, ki je pritrjena na aparatu. Ozemljitveni kabel je zeleno-rumene barve. Če vtičnica v zidu ne ustreza vtiču, jo morate zamenjati z ustrezno. Vsako tako delo sme opraviti le ustrezno usposobljen strokovnjak. Ta mora ob zamenjavi tudi pregledati, če presek kablov v vtičnici ustreza skupni priključni moči vašega aparata. Aparat lahko priključite na omrežje tudi direktno, vendar morate med priključni kabel in električno omrežje vgraditi večpolno stikalo ustrezne moči, ki mora imeti razmik med kontakti najmanj 3 mm. Vgraditi smete le tako stikalo, ki ustreza vsem varnostnim predpisom. Ozemljitveni kabel ne sme biti prekinjen s stikalom. Vtičnica ali direktni priključek morata biti nameščena tako, da sta enostavno dosegljiva tudi po izvršeni vgradnji. 1.3 NAMESTITEV IN PRIKLJUČITEV 1.7 OPREMA PEČICE (odvisno od modela) Za priključitev aparata in morebitno vgradnjo poskrbi kupec in ni odgovornost proizvajalca. Morebitni posegi s strani pooblaščenega servisa niso vključeni v garancijo. Električna inštalacija, na katero bo aparat priključen, mora biti urejena v skladu z veljavnimi lokalnimi predpisi in v skladu z navodili proizvajalca, zato priporočamo, da vam električno inštalacijo pred priključitvijo aparata pregledajo usposobljeni strokovnjaki. Morebitna škoda, ki bi nastala zaradi napačne priključitve in/ali namestitve aparata, ni zajeta v garancijo. Priključitev in namestitev aparata morajo v izvesti v skladu z navodili ustrezno usposobljeni strokovnjaki. Morebitna napačna priključitev in namestitev lahko povzroči poškodbe oseb, živali ali premoženja. Proizvajalec in prodajalec ne prevzemata odgovornosti za morebitne poškodbe oseb in/ali nastalo materialno škodo, do katere bi prišlo zaradi napačne priključitve in/ali vgradnje aparata. Pred prvo uporabo pečice očistite vse površine z blago raztopino čistila, nato pa z gobico izperite površine s čisto vodo in jih obrišite s suho krpo. Na rešetko postavite različne pekače. Ta rešetka je zelo primerna za pripravljanje jedi na žaru. Pod njo podstavite pekač za lovljenje maščobe. Posebna oblika rešetko zagotavlja, da ostanejo v vodoravnem položaju tudi če so delno izvlečene iz pečice tako ni nevarnosti, da bi pekač zdrsnil z rešetke. Globji pekač je namenjen lovljenju maščobe, ki med peko na žaru ali ražnju (odvisno od modela) kaplja iz mesa. Ne uporabljajte ga za peko pečenk, saj bi se maščoba v tem primeru razpršila po vsej pečici, se začela žgati in pojavil bi se dim. SI 29 Pekač za pizzo zagotavlja najboljše rezultate ob uporabi funkcije Pizza. 2.4 ČIŠČENJE IN VZDRŽEVANJE PEČICE Zunanje površine iz nerjavečega inox jekla in lakirane ali emajlirane površine očistite z mlačno milnico ali pa z namenskimi čistili za tovrstno čiščenje, ki jih dobite v prosti prodaji. Zgoraj navedenih površin v nobenem primeru ne smete čistiti z abrazivnimi praški, ker bi jih s tem poškodovali. Čiščenje pečice je zelo pomembno. Pečico morate očistiti po vsaki uporabi. Na stenah pečice se nabirajo raztopljene maščobe, ki lahko ob naslednji uporabi povzročijo neprijeten vonj in morda tudi slab izid peke. Notranje stene pečice očistite s toplo vodo z dodatkom detergenta. Stene pečice nato pomijte še s čisto vodo in jih obrišite. Neprijetnemu čiščenju notranjih sten pečice se lahko izognete, če jih obložite s posebnimi samočistilnimi oblogami ki so zaščitene z mikroporoznim premazom. Samočistilne obloge lahko nabavite posebej. Več informacij o samočistilnih oblogah pa lahko najdete v poglavju''Samočistilna katalitična pečica''. Nosilne rešetke pečice čistite z ustreznimi detergenti in mrežicami iz inoxa. Vrata pečice iz kaljenega stekla smete čistiti šele, ko so hladna. Morebitne poškodbe steklenih vrat (razbitje stekla), ki bi nastale pri čiščenju zaradi neupoštevanja zgoraj navedenega navodila, niso zajete v garancijo!Če želite zamenjati žarnico v pečici, morate pečico najprej ločiti od električnega omrežja. Odvijte zaščitni pokrovček in zamenjate pregorelo žarnico z žarnico enake vrste. Žarnica mora biti odporna na visoke temperature. Nosilec pekača je idealen za peko na žaru; uporabljate ga skupaj s pekačem za lovljenje maščobe. Opremljen je z ročajem za lažje rokovanje z obema pekačema. Ročaj je snemljiv, ne puščajte ga v pečici! Prečna žična rešetka Se nahaja na obeh straneh odprtine pečice. Za nameščanje kovinskih rešetk in pladnja za kapljanje. Odstranjevanje in čiščenje žičnatih rešetk 1- Odstranite žične stranske nosilce tako, da jih potegnete v smeri puščic (glejte spodaj). 2- Za čiščenje žičnih stranskih nosilcev jih lahko postavite v pomivalni stroj ali uporabite mokro gobico ter jih potem dobro osušite. 3- Po čiščenju, namestite žične stranske nosilce v nasprotnem vrstnem redu. 2.5 SERVISIRANJE Če pečica ne deluje, se najprej prepričajte, da je pravilno priključena na električno omrežje. Če vam ne uspe odpraviti nepravilnosti v delovanju, izključite pečico iz električnega omrežja in pokličite pooblaščeni servis. Pred tem si zabeležite serijsko številko, ki je navedena na tablici s podatki (gl. sliko na zadnji strani). Pečici je priložen garancijski list, ki zagotavlja, da bo pooblaščeni servis v garancijskem roku popravilo opravil brezplačno. 3. ТАЙМЕР 3.1 UPORABA ŠTEVCA MINUT (KUHINJSKE URE) 2. KORISTNI NASVETI Gumb zavrtite za cel krog in ga nato obrnite tako, da bo oznaka kazala želeni čas. Ko preteče nastavljeni čas, se za nekaj sekund oglasi zvone c. 2.1 NEKAJ KORISTNIH NASVETOV Pečica ima vgrajen nov sistem za blokiranje nosilnih rešetk. Ta sistem omogoča, da nosilne rešetke med preverjanjem jedi izvlečete iz pečice, brez nevarnosti, da bi povsem zdrsnile iz vodil. Če želite rešetko odstraniti iz pečice, jo izvlečete ter nekoliko privzdignete. 3.2 NASTAVLJANJE TRAJANJA PEČENJA S pomočjo tega gumba lahko nastavite ustrezen čas pečenja (največ 120 minut); po preteku nastavljenega časa se pečica samodejno izklopi. Čas se bo odšteval od nastavljene vrednosti navzdol; ko se gumb vrne v položaj O, se bo pečica samodejno izklopila. Če želite pečico uporabljati brez programske ure, obrnite gumb v položaj . Ko želite nastaviti pečico, preverite, da s programsko uro ni v položaju O. 2.2 ŽAR S pomočjo žara se živilo hitro zapeče in dobi lepo rjavo barvo. Priporočamo, da pekač potisnete v 4. višino odvisno seveda od količine. Razen zelo puste divjačine in mesnih štruc lahko vsa druga živila pripravljate na ta način. Meso in ribe, ki jih boste spekli na ta način, narahlo namažite z oljem. 2.3 MODELI Pri pečicah elektronika nadzira hitrost ventilatorja ta patentirani sistem se imenuje VARIOFAN. Med pečenjem se hitrost ventilatorja samodejno prilagaja in s tem optimizira kroženje zraka ter temperaturo v notranjosti pečice. Vse pečice imajo tudi funkcijo . Ta omogoča uravnavanje vlažnosti in temperature in za 50 % zmanjša izgubo vlage, tako da ostane živilo bolj mehko in boljšega okusa. Ta nežni način priporočamo za peko kruha in peciva. Skrajša čas predhodnega segrevanja pečice: ta se samo v 8 minutah segreje na 200 stopinj C. Omogoča nastavljanje stopnje intenzivnosti žara in je za 50 % močnejši v primerjavi s klasičnimi pečicami. Nekatere pečice so opremljene z novimi vrati WIDE DOOR z večjim oknom, kar olajša vzdrževanje in izboljša termično izolacijo. SI 30 4. FUNKCIJE Funkcije Predvide- na temp.* Gumb termost. Funkcije Za prižiganje luči v pečici Samodejno se aktivira tudi ventilator za hlajenje (modeli z ventilatorjem) ODTALJEVANJE: Okoli živila kroži zrak sobne temperature; tako se živilo hitro odtali z ohranjanjem vseh lastnosti živila. ZGORNJI/SPODNJI GRELEC : Delujeta spodnji in zgornji grelec;ta funkcija je primerna za tradicionalni način peke in jo priporočamo za peko krač,divjačine, peciva, keksov, jabolk ter za vse jedi, ki jih želite hrustljavo zapeči. 210 VENTILIRANA PEČICA : Delujeta oba grelca ter ventilator, tako da vroč zrak kroži v pečici. Ta način priporočamo za peko perutnine, sladic, rib in zelenjave. Enakomerna temperatura v notranjosti skrajša čas pečenja in predhodnega segrevanja pečice. Naenkrat lahko pečete različne jedi; vonji se ne bodo pomešali. Če pečete več jedi hkrati, pečenje podaljšajte za približno 10 minut. 210 VENTILATOR IN SPODNJI GRELEC (a): Pečico segreva spodnji grelec, vroč zrak pa zahvaljujoč ventilatorju kroži v notranjosti pečice. Funkcija je namenjena peki občutljivih jedi (pite - narastki). Jed se ne izsuši in bolje naraste, predvsem to velja za kolače, kruh in druge jedi, ki se morajo segrevati od spodaj. Pekač potisnite v spodnjo višino vodila. 230 ŽAR : Pri zaprtih vratih pečice.Ta funkcija je primerna za peko tanjših kosov mesa. Nastavljanje temperature ni mogoče. Najprej pečico segrevajte 5 minut, nato postavite jed vanjo. Primerno za peko kebaba, mesa na žaru, gratiniranje .. Belo meso naj bo od grelca bolj oddaljeno, peče se dlje časa, a bo bolj okusno. Rdeče meso ali ribe pecite na rešetki, pod katero potisnete pekač za lovljenje maščobe. FUNKCIJA PIZZA : Vroč zrak, ki kroži v pečici, zagotavlja popolne rezultate pri pek pizz in podobnih jedi. Funkcija "COOK LIGHT" vam omogoča bolj zdrav način kuhanja, saj je pri kuhanju s to funkcijo potrebno uporabiti manjšo količino maščobe ali olja. Kombinirano delovanje grelca za žar in ventilatorja poskrbi za impulzno kroženje zraka. Na ta način se ohrani vsebnost vlage v živilu, ki se na površini hitreje zapeče in bolje ohrani okus. Ta način je še posebej primeren za peko mesa, zelenjave in omlet. Impulzno dotekanje zraka ohranja vlažnost v notranjosti pečice in s tem tudi v živilu, s čimer se ohrani hranljiva vrednost živila, pečenje pa poteka hitro in enakomerno. Preizkusite svoje recepte, pri tem pa zmanjšajte običajno uporabljeno količino preliva, da se prepričate o učinkovitosti te nove funkcije. Zadovoljni boste z lahkotnostjo pripravljene jedi. (a) Nekateri modeli: funkcija z Vario Fan: VarioFan je ekskluzivni sistem, ki so ga razvili pri Candyju in omogoča doseganje optimalnih rezultatov pečenja, nadzor nad temperaturo in vlago v notranjosti pečice. To je samodejno delujoči sistem, ki prilagaja hitrost ventilatorja pri funkcijah, kjer se vklopi tudi ventilator (označene s črtkano črto na stikalni plošči). *Preizkušeno v skladu s standardom EN 60350-1 za izjavo o porabi energije in energijskem razredu. SI 31 ТЕХНИКА НА БЕЗОПАСНОСТ • По време на готвене влагата може да кондензира по вътрешността на фурната или по стъклото на вратата. Това е нормално. За да намалите този ефект, изчакайте 10-15 минути след включване на захранването, преди да поставите храна във фурната. Във всеки случай кондензът изчезва, когато фурната достигне температурата за готвене. • Гответе зеленчуците в съд с капак вместо в открита тава. • Избягвайте да оставяте храна вътре във фурната след готвене за повече от 15-20 минути. • ПРЕДУПРЕЖДЕНИЕ: уредът и достъпните части стават горещи по време на използване. Внимавайте да не докосвате горещите части. • ПРЕДУПРЕЖДЕНИЕ: достъпните части могат да станат горещи, когато скарата се използва. Децата трябва да бъдат държани на безопасно разстояние. • ПРЕДУПРЕЖДЕНИЕ: уверете се, че уредът е изключен, преди да сменяте крушката, за да избегнете риска от токов удар. • ПРЕДУПРЕЖДЕНИЕ: за да се избегне опасност, породена от неволното нулиране на термоизключвателя, уредът не бива да се захранва през външно изключващо устройство, като например таймер, нито да бъде свързан към верига, която се включва и изключва редовно. • Децата под 8-годишна възраст трябва да бъдат държани на безопасно разстояние от уреда, ако не се наблюдават непрекъснато. • Не допускайте деца да си играят с уреда. • Уредът може да се използва от лица на 8годишна възраст или повече, както и от лица с ограничени физически, сензорни или психически способности, без опит или знания за продукта само ако се наблюдават или са им били предоставени инструкции за работа с уреда по безопасен начин с осведоменост за възможните рискове. • Почистването и поддръжката не трябва да се извършват от деца без наблюдение. • Не използвайте груби или абразивни материали или остри метални стъргалки за почистване на стъклата на вратата на фурната, тъй като те може да надраскат повърхността и да раздробят стъклото. • Фурната трябва да се изключи преди отстраняване на демонтиращите се части. След почистване ги сглобете отново съгласно инструкциите. • Използвайте само термометъра за месо, препоръчан за тази фурна. • Не използвайте парочистачка за почистване на уреда. • Свържете щепсел към захранващия кабел, който е в състояние да понесе напрежението, тока и натоварването, указани на табелката и има контакт за заземяване. Щепселът трябва да е подходящ за натоварването, посочено на етикета, и трябва да е свързан към заземяващ контакт, който да работи. Заземяващият проводник е жълто-зелен на цвят. Това действие трябва да се извършва само от подходящо квалифициран специалист. В случай на несъвместимост между контакта и щепсела на уреда, се обърнете към квалифициран електротехник, който да замени контакта с друг подходящ тип. Щепселът и контактът трябва да отговарят на действащите норми на държавата на инсталацията. Свързването към източника на захранване може да се извърши и чрез поставяне на универсален прекъсвач между уреда и източника на захранване, който може да понесе максималното свързано натоварване и който е в съответствие с действащото законодателство. Жълто-зеленият заземяващ кабел не трябва да се прекъсва от прекъсвача. Гнездото или универсалният прекъсвач, използвани за връзката, трябва да са леснодостъпни, когато уредът е монтиран. • Прекъсването на връзката може да се постигне чрез достъпност на щепсела или чрез включване на превключвател в неподвижното окабеляване в съответствие с правилата за окабеляване. • Ако захранващият кабел е повреден, той трябва да бъде заменен с кабел или специален пакет, предоставен от производителя, или като се свържете с отдела за обслужване на клиенти. Типът на захранващия кабел трябва да е H05V2V2-F. Това действие трябва да се извършва само от подходящо квалифициран специалист. Заземителният проводник (жълтозелен) трябва да е приблизително 10 mm подълъг от другите проводници. За ремонти се обръщайте към отдела за обслужване на клиенти и изисквайте използване на оригинални резервни части. • Неспазването на горното може да застраши безопасността на уреда и да обезсили гаранцията. • Преди почистването трябва да се извади излишъкът от разлетия материал. • Дълго прекъсване на електрозахранването по време на фаза на готвене може да причини повреда на монитора. В този случай се свържете с отдела за обслужване на клиентите. • Уредът не трябва да се монтира зад декоративна врата, за да се избегне прегряване. БГ 32 • Когато поставите рафта вътре, уверете се, че стоперът е насочен нагоре и в задната част на кухината. Рафтът трябва да бъде пъхнат изцяло в кухината. • ПРЕДУПРЕЖДЕНИЕ: не облепвайте вътрешността на фурната с алуминиево фолио или защитно фолио за еднократна употреба от търговската верига. При докосване до нагорещените емайлирани повърхности, алуминиевото фолио или другите видове защита може да се разтопят и така да увредят емайла на вътрешните стени. • ПРЕДУПРЕЖДЕНИЕ: Никога не сваляйте уплътнението на вратата на фурната. • ВНИМАНИЕ: Не допълвайте дъното на кухината с вода по време на готвене или когато фурната е гореща. • За работа с уреда при номиналните честоти не се изисква допълнително действие/настройка. Този уред е маркиран съгласно европейска Директива 2012/19/EО за Отпадъци от електрическо и електронно оборудване (WEEE). WEEE съдържа едновременно замърсяващи субстанции (които могат да окажат отрицателно въздействие върху околната среда) и основни компоненти (които могат да се използват повторно). Важно е WEEE да бъдат обработени по специфични начини с огрлед правилното отстраняване и изхвърлянето на всички замърсители и възвръщането и рециклиране на всички материали. Отделните индивиди могат до окажат важна роля, осигурявайки, че WEEE няма да станат проблем за околната среда; важно е да бъдат следвани някои основни правила: • WEEE не трябва да бъдат третирани като домакински отпадъци. • WEEE трябва да бъдат предавани в съответнтие събирателни пунктове, управлявани от общината или регистрирани компании. В много държави, за големи WEEE, може да се предлага събиране от домовете. • когато купувате нов уред, старият може да бъде върнат на търговеца, който да го приберете безплатно на база едно-към едно, докато оборудването е от същия тип има същите функции като доставеното оборудване. СПЕСТЯВАНЕ НА ЕНЕРГИЯ И ОПАЗВАНЕ НА ОКОЛНАТА СРЕДА Когато е възможно избягвайте предварителното загряване на фурната. По време на готвене отваряйте вратата на фурната възможно най-малко, защото при всяко отваряне се губи топлина. За значителна икономия на енергия изключете фурната 5 – 10 минути преди планираният край на времето за готвене и използвайте остатъчната топлина, която фурната продължава да генерира. За да избегнете загуба на топлина поддържайте чисти и в ред уплътненията на фурната. Ако имате различни тарифи за електрическата енергия използвайте отложеният старт, за да стартирате готвенето на по-ниската тарифа. БГ 33 Pезюме Общи Мерки За Безопасност 35 Полезни съвети 36 Таймера 36 Инструкции за работа 37 БГ 34 1.1 Декларация за съответствие 1.2 Съвети за безопасност 1.3 Монтаж 1.4 Монтиране на фурна в кухнята 1.5 Важно 1.6 Свързване към захранването 1.7 Оборудване за фурна 2.1 Система за безопастност на рафтовете 2.2 Г рил 2.3 Моделите U COOK 2.4 Почистване и поддръжка 2.5 Сервизен център 3.1 Използване на таймера 3.2 Използване на таймера за край на готвенето 1. ОБЩИ МЕРКИ ЗА БЕЗОПАСНОСТ Благодарим Ви, че избрахте един от нашите продукти. З а да имате възможно най-добър резултат при използването на фурната, внимателно прочетете това ръководство.Препоръчваме Ви да запазите настоящото ръководство за монтаж и експлоатация и при нужда да се обръщате към него. Когато уредът е в експлоатация всички достъпни части са горещи. Внивайте да не се докосвате до тези елементи. При първият пуск на фурната, може да се усети неприятна миризма. Това става защото изолационните елементи се загряват за първи път. Това е абсолютно нормално и няма повод за притеснение. Изчакайте уреда да изстине и го забършете добре. След това е готов за нормална експлоатация. Една фурна по своята същност на работа става много гореща. Особено стъклото на вратата на фурната. 1.1 ДЕКЛАРАЦИЯ ЗА СЪОТВЕТСТВИЕ 1.5 ВАЖНО Ако искате фурната ви да работи нормално, трябва корпуса на кухнята ви да е подходящ. Панелите на кухненски блок, които са в непосредствена близост до пещта трябва да бъде направен от термоустойчив материал. Убедете се че всички материали могат да издържат на нагряване до 120 градуса. В противен случай може да се разтопят и да повредят уреда. След като фурната се монтира , електрическите компоненти трябва да се изолират .Това е законово изискване за безопасност. Всички предпазители трябва да бъдат здраво фиксирани на място, така че е невъзможно да бъдат отстранени, без помощта на специални инструменти. Плочата за готвене трябва да има отзад разлика от поне 45 mm, за да има добро охлаждане. • С поставяне на знака на този уред ние потвърждаваме съответствие с всички съответни европейски изисквания за безопасност и опазване на здравето и околната среда, които са приложими в законодателството за този уред. След като разопаковате фурната, уверете се, че тя не е била повредена по някакъв начин. Ако имате някакви съмнения , не я използвайте: свържете се с квалифициран човек. Съхранявайте опаковъчните материали като найлонови торбички, полистирол, или пирони извън обсега на деца, защото те са опасни за тях. 1.2 СЪВЕТИ ЗА БЕЗОПАСНОСТ 1.6 СВЪРЗВАНЕ КЪМ ЗАХРАНВАНЕТО електрически спазват 1.3 МОНТАЖ Монтажът е отговорност на клиента. Производителите не са задължени да осъществяват тази дейност. Инструкциите за монтаж на професионално квалифициран персонал трябва да се спазват. Неправилният монтаж може да причини вреда или нараняване на хора, животни или вещи. Производителят не може да носи отговорност за тези щети или наранявания. 1.7 ОБОРУДВАНЕ ЗА ФУРНА (в зависимост от модела) 1.4 МОНТИРАНЕ НА ФУРНА В КУХНЯТА Поставете фурната в пространството, в кухнята, то може да бъде монтирано под един работен плот или в един шкаф. Фиксирайте фурната на мястото й, като се използват четирите фиксиращи отвора в рамката. (фиг. на последната страница). За да намерите отворите за закрепване, отворете вратата на фурната и погледнете вътре. За да се позволи подходяща вентилация, измерванията и разстоянията, посочени в диаграмата на последната страница трябва да се спазват. Забележка: За фурни, които са комбинирани с котлони инструкциите, съдържащи се в ръководството за плочата трябва да се спазват. БГ 35 Необходимо е да се направи първоначално почистване на оборудването, преди първото използване на всеки от тях. Измийте ги с гъба. Изплакнете и подсушете. На скарата може да се слагат чинии и съдове. Особено добра е за печене на грил. Използвайте я заедно с тавичката за мазнини. Специалният профил на рафтовете означава, че те стоят хоризонтално, дори когато се вадят. Не съществува риск от разливане на ястието. Тавичката улавя соковете от храните, които се готвят на скарата. Използва се само с грил, скара или Fan Grill Assisted ; Извадете я ако използвате други програми. Никога не използвайте тавата за улавяне на сокове като тава за мазнини, тъй като това създава дим и мазнините ще изпръскат и замърсят фурната. Всяка фурна има функция. Това дава възможност за управление на разпределението на влагата и температурата. Това намалява загубата на влага с 50%, което гарантира че храната остава нежна и с по-добър вкус. Препоръчва се за печене на хляб и сладкарски изделия. Това намалява времето за подгряване на пещите: само за 8 минути, за да достигне 200 градуса по Целзий. Дава възможност за определяне на нивото и интензивността на печене на грил, до 50% повече мощност в сравнение с традиционната фурна. Пица комплект. За да се получат най-добри резултати от комплекта трябва да се използва заедно с функцията "пица" . Тава за мазнини Идеална е за печене на грил. Изполвайте я заедно с решетката . Включена е и дръжка за по-лесното изваждане на 2та елемента. НЕ ОСТАВЯЙТЕ ДРЪЖКАТА ВЪВ ФУРНАТА!!! 2.4 ПОЧИСТВАНЕ И ПОДДРЪЖКА Странични телени решетки Разположен е от двете страни на кухината на фурната. Държи металните скари и съдовете за оттичане. Сваляне и почистване на металните стелажи идентична 2.5 СЕРВИЗЕН ЦЕНТЪР 1. Извадете металните скари, като ги издърпате по посока на стрелките (виж по-долу). 2. За да почистите металните скари ги поставете в съдомиялната машина или използвайте влажна гъба, а след това се уверете, че са подсушени. 3. След почистване поставете металните скари в обратния ред. 2. ПОЛЕЗНИ СЪВЕТИ 2.1 СИСТЕМА ЗА БЕЗОПАСТНОСТ НА РАФТОВЕТЕ 3. ТАЙМЕРА Фурната разполага с нова система за безопасност на рафта. Това ви позволява да извади рафтовете при проверката на храната, без опасност от хранителни разливи или рафтове, попадащи случайно от фурната. За да извадите рафтовете извадет е и повдигнете. 3.1 ИЗПОЛЗВАНЕ НА ТАЙМЕРА 2.2 Г РИЛ Печенето позволява да се даде на храната бързо кафяв цвят . За препичане ви препоръчваме да поставите скарата върху четвъртото ниво, в зависимост от пропорциите на храна (вж. фиг. Стр. 7). Почти всички меса могат да се приготват на грил. Изключение правят много постните храни и ролките месо. При приготвяне на месо и риба, трябва преди поставянето им във фурната да добавите подправки и мазнина. 3.2 ИЗПОЛЗВАНЕ НА ТАЙМЕРА ЗА КРАЙ НА ГОТВЕНЕТО 2.3 МОДЕЛИТЕ Фурните имат електронен контрол на скоростта на вентилатора, патентован VARIOFAN. По време на готвене, тази система променя автоматично скоростта на вентилатора (в многофункционалния режим), за да се оптимизира въздушния БГ 36 4. ИНСТРУКЦИИ ЗА РАБОТА Селектор на функции Настройки на температурата ( при модели с електронен програматор TYPE A) Термостат селектор ФУНКЦИИ Включва осветлението на фурната. Това ще активира автоматично вентилатора за охлаждане (само при модели, които го имат) Размразяване Когато изберете тази функция вентилатора циркулира въздуха около замразената храна така че я размразява за няколко минути без да се промени състава на протеин. Натурална конвекция Използват се долен и горен нагреватели. Стандартна форма на печене. Идеална за печене на месо , печене на бисквити. Прави храната вкусна и хрупкава Готвене на вентилатор 210 210 Използват се долен и горен нагреватели заедно с вентилатора, който циркулира въздуха вътре във фурната. Препоръчва се за зеленчуци, риба и др. Топлината навлиза в храна подобре и времената за претопляне и готвене се намаляват. Можете да приготвяте различни храни едновременно. Този метод дава много добра дистрибуция на топлината и миризмите не се смесват. Може да оставите около 10 мин повече когато готвите повече от 1 ястие. Вентилатор и долен нагревател Идеална за деликатни ястия (пайове , суфлета ) Грил 230 Използва се само горния нагревател и можете да настроите температурата. 5 мин предварително нагряване са нужни за да загреете добре елементите. Идеален за кебап. Белите меса трябва да се държат на дистанция от грила. Времето за готвене е по-дълго но месото е по-вкусно. Можете да слагате червените меса и риба на рафта с тавичката за мазнини отдолу. Пица Тази функция осигурява идеални условия за ястия като пица и фокача, чрез цуркулиране на горещ въздух във фурната. Функцията „Деликатно готвене" ви позволява да готвите по здравословен начин,като намалите количеството на необходимата мазнина.Благодарение на използването на грил и вентилатор,комбинирано с пулсиращо движение на въздуха се запазва съдържанието на влага в храната,запича се повърхността,намалява се времето за готвене без да се променя вкуса. Особено е подходяща за готвене на месо,печени зеленчуци и омлети.Движението на пулсираш въздух запазва влажносста вътре във фурната и влагосъдържанието на храната,запазвайки хранителните качества и гарантирайки бърз и еднакъв процес на готвене. Пробвайте всичките си рецепти и се възползвайте от лекотата на тази функция! (а) За някой модели : функцията с VARIOFAN е екслузивна система разработена от Candy за оптимизиране на резултатите от готвенето. VARIO FAN системата се активира сама и автоматично променя скоростта на вентилатора, когато изберете определена функция: Функциите на вентилатора са в ограденото поле на контролния панел. * Тествано в съответствие с EN 60350-1 с цел декларация за потребление на енергия и енергиен клас. БГ 37 VEILIGHEIDSVOORSCHRIFTEN • Tijdens het koken kan vocht in de ovenruimte of op het glas van de deur condenseren. Dit is normaal. Om dit effect te verminderen, wacht u 10-15 minuten na het inschakelen van de stroom voordat u voedsel in de oven doet. Condensatie verdwijnt in elk geval de wanneer de oven de kooktemperatuur bereikt. • Kook de groenten in een bakje met deksel in plaats van een open blad. • Laat geen voedsel in de oven achter na het koken voor langer dan 15/20 minuten. • WAARSCHUWING: het apparaat en de toegankelijke onderdelen worden heet tijdens gebruik. Zorg ervoor dat u geen hete onderdelen aanraakt. • WAARSCHUWING: de bereikbare delen kunnen heet worden wanneer de grill in gebruik is. Kinderen moeten op veilige afstand worden gehouden. • WAARSCHUWING: zorg ervoor dat het apparaat is uitgeschakeld voordat u de gloeilamp vervangt, om elektrische schokken te voorkomen. • WAARSCHUWING: om gevaar door een onbedoelde reset van de thermische uitschakeling te vermijden, mag dit apparaat niet worden aangesloten op een externe schakelinrichting zoals een timer, of worden aangesloten op een circuit dat regelmatig wordt in- of uitgeschakeld. • Kinderen jonger dan 8 jaar moeten op veilige afstand van het apparaat worden gehouden, als ze niet continu onder toezicht staan. • Kinderen mogen niet met het apparaat spelen. Dit apparaat mag alleen worden gebruikt door kinderen van 8 jaar en ouder en personen met een lichamelijke, zintuiglijke of verstandelijke beperking of met gebrek aan ervaring en kennis op voorwaarde dat zij onder toezicht staan of aanwijzingen hebben gekregen over de manier waarop het apparaat veilig wordt gebruikt, en zij de bijbehorende gevaren begrijpen. • Reiniging en onderhoud mogen niet door kinderen worden uitgevoerd, tenzij zij onder toezicht staan. • Gebruik geen ruwe of schurende materialen of scherpe metalen schrapers om de glazen van de ovendeur schoon te maken, omdat deze krassen op het oppervlak kunnen veroorzaken en het glas kunnen doen barsten. • De oven moeten worden uitgeschakeld voordat u de verwijderbare onderdelen verwijdert. • Na reiniging moeten ze weer in elkaar worden gezet volgens de instructies. • Gebruik alleen de voor deze oven aanbevolen NL 38 vleessonde. • Gebruik geen stoomreiniger om de kookplaat te reinigen. • Bevestig een stekker aan de voedingskabel die in staat is de spanning, stroom en belasting te verdragen die vermeld staan op het etiket, en een aardcontact heeft. Het stopcontact moet geschikt zijn voor de belasting in bedrijf die op het etiket staat aangegeven. De aardgeleider is groen-geel gekleurd. Dit moet worden gedaan door een gekwalificeerd vakman. In het geval van incompatibiliteit tussen het stopcontact en de stekker van het apparaat, moet u een gekwalificeerd elektricien vragen om het stopcontact te vervangen door een ander, geschikt stopcontact. De stekker en het stopcontact moeten conform de huidige normen zijn van het land waar het apparaat geïnstalleerd wordt. Aansluiting op de stroombron kan ook tot stand worden gebracht door tussen het apparaat en de stroombron een omnipolaire stroomonderbreker aan te brengen, die de maximaal aangesloten belasting kan verdragen en voldoet aan de huidige wetgeving. De geel-groene aardkabel mag niet worden onderbroken door de stroomonderbreker. Het stopcontact of de omnipolaire stroomonderbreker die gebruikt wordt voor de aansluiting moet gemakkelijk te bereiken zijn wanneer het apparaat geïnstalleerd is. • Afkoppeling is mogelijk doordat de stekker bereikbaar is of door een schakelaar in de vaste bedrading te monteren overeenkomstig de bedradingsregels. • Als de voedingskabel beschadigd is, moet hij worden vervangen door een kabel of speciale bundel die verkrijgbaar is bij de fabrikant, of via de klantenservice. • De voedingskabel moet van het type H05V2V2F zijn. • Dit moet worden gedaan door een gekwalificeerd vakman. De aardgeleider (geelgroen) moet ongeveer 10 mm langer zijn dan de andere geleiders. Neem voor reparaties alleen contact op met de klantenservice en vraag om het gebruik van originele reserveonderdelen. • Als niet aan bovenstaande wordt voldaan, kan de veiligheid van het apparaat worden aangetast en de garantie komen te vervallen. • Gemorst materiaal moet worden verwijderd alvorens het apparaat schoon te maken. • Langdurige stroomuitval terwijl er een bereiding bezig is, kan een storing in de monitor veroorzaken. Neem in dat geval contact op met de klantenservice. • Om oververhitting te vermijden, mag het apparaat niet achter een decoratieve deur worden geplaatst. • Als u het schap erin plaatst, moet u ervoor zorgen dat de aanslag aan de bovenkant en achterin de ovenruimte zit. Het schap moet helemaal in de ruimte worden geschoven • WAARSCHUWING: Bekleed de ovenruimte niet met aluminiumfolie of wegwerpbeschermingen die verkrijgbaar zijn in de handel. Aluminiumfolie of andere beschermingen die rechtstreeks in contact komen met het hete email, kunnen smelten en het email van de binnenwanden aantasten. • WAARSCHUWING: Verwijder nooit de afdichting van de ovendeur. • LET OP: Vul de bodem van de ovenruimte niet opnieuw met water tijdens het koken of als de oven heet is. • Er is geen extra bediening/instelling nodig om het apparaat op de nominale frequenties te laten werken. NL 39 Inhoudsopgave Algemene Aanwijzingen 41 Nuttige Tips 42 Kookwekker 43 1.1 Lees Deze Handleiding Aandachtig 1.2 Veiligheıdsvoorschriften 1.3 Installatie 1.4 Inbouw Van De Oven 1.5 Belangrijk 1.6 Elektrische Aansluiting 1.7 Uitrustıng Van De Oven Afhankelijk Van Het Model 2.1 Veiligheidssysteem Voor De Roosters 2.2 Grilleren 2.3 De U-cook Modellen 2.4 Afhankelijk Van Model:u-see 2.5 Aquactivafunctie 2.6 Schoonmaken En Onderhoud 2.7 Servıce Dienst 3.1 Gebruik Van De Kookwekker 3.2 Gebruik Van De Tımer Met Uitschakelfunctie 3.3 De Juiste Tijd Instellen Instructies Voor Het Gebruik Van De Oven 44 NL 40 1. ALGEMENE AANWIJZINGEN Lees deze handleiding aandachtig. Hierin treff u betangrijke gegevens aan omtrent installatie, gebruik en onderhoud. Bewaar deze handleiding voor eventuele toekomstige raadpleging. De eerste keer dat de oven in werking wordt gesteld, kan er een stinkende walm vrijkomen. Dit is te wijten aan de eerste verhitting van de lijm op de isolatiepanelen rond de oven. Dit is volkomen normaal. Wij raden u aan uw oven eerst een half uur op vol vermogen aan te zetten om deze walm uit de oven te verwijderen. Wacht u tot de walm verdwijnt, alvorens u het voedsel in de oven plaatst. Bij een ingeschakelde oven wordt het glas van de deur behoorlijk warm. 1.1 LEES DEZE HANDLEIDING AANDACHTIG Door het aanbrengen van de markering op dit product, verklaren wij onder onze eigen verantwoordelijkheid dat dit product in overeenstemming is met alle Europese wettelijke voorschriften met betrekking tot de vereisten inzake veiligheid, gezondheid en milieu. komen met elektrische onderdelen. Alle beveiligingsonderdelen dienen zodanig aangebracht te zijn, dat zij niet zonder gereedschap verwijderd kunnen worden. Teneinde een goede ventilatie te garanderen, dient de achterwand van de inbouwope- ning verwijderd te worden. Het voetstuk dient een opening van minstens 45 mm te hebben. 1.2 VEILIGHEIDSVOORSCHRIFTEN 1.6 ELEKTRISCHE AANSLUITING •Het apparaat dient uitsluitend gebruikt te worden voor het doel, waarvoor het is ontworpen, d.w.z. het bereiden van voedsel. Elk ander doel, bijvoorbeeld als verwarming, is onjuist gebruik van de oven en gevaarlijk. De fabrikant is niet verantwoordelijk voor mogelijke schade ten gevolge van een onjuist, verkeerd of onverstanding gebruik van de oven. •Bij het gebruik van elk elektrische apparaat dienen verschillende regels in acht genomen te worden: - Trek niet aan de kabel om de stekker uit het stopcontact te halen; - Raak het apparaat niet met vochtige of natte handen of voeten aan; - Gebruik het apparaat niet indien u geen schoeisel draagt; - Gebruik geen adapters, tussenverbindingen en/of verlengsnoeren; - Zet het apparaat bij hapering of siechte werking af en ga er niet aan sieutelen. De kabel dient bij beschadiging direct vervangen te worden en wel op de volgende wijze: - Haal de stekker uit het stopcontact of schakel de gehele elektrische installatie uit; - Verwijder de kabel en vervang hem door een even lange nieuwe, (van het type H05V2V2-F). Deze kabel moet geschikt zijn voor het vermogen van het apparaat; - Dit dient door een technische specialist uitgevoerd te worden; - De aarde-draad (geel/groen) moet 10 mm langer zijn dan de andere draden. •Voor reparaties aan het apparaat dient u zich uitsluitend tot een officiële technische service te wenden, alwaar u originele onderdelen kunt bestellen. Indien al hetgeen hierboven niet in acht wordt genomen, kan de veiligheid van het apparaat niet gegarandeerd worden. Steek de stekker in een correct geïnstalleerd geaard stopcontact. Bij modellen zonder stekker dient met een standaardstekker aan te brengen, die geschikt is voor het op het typeplaatje vermelde vermogen. De aarddraad is geel/groen. Deze verbinding dient door een technisch bevoegd persoon uitgevoerd te worden. Indien het stopcontact en de stekker niet op elkaar afgestemd zijn, laat dan een technisch bevoegd persoon een ander stopcontact installeren. Deze dient ook na te gaan of de draaddoor- snede van het stopcontact geschikt is voor het door het apparaat opgenomen vermogen. Aansluiting kan ook plaatsvinden door een geschikte meerpolige (aan/uit) schakelaar te plaatsen tussen het elektrische net en het apparaat, die aan de geldende normen voldoet. Zorg ervoor dat de (geel/groen) geaarde kabel de schakelaar niet raakt. Het stopcontact of de meerpolige schakelaar dienen op een gemakkelijk toegankelijke plaats bij de oven gemonteerd te worden. Belangrijk: Zorg er bij de installatie voor dat de voedingskabel nergens warmer kan worden dan 50°C. De oven voldoet aan de veiligheidseisen als voorzien in de normen van de desbetreffende instituten. De elektrische veiligheid wordt uitsluitend gegarandeerd indien het apparaart op de juiste wijze met een doelmatige aardingsinstallatie is verbonden ingevolge de huidige normen m.b.t. elektrische veiligheid. Ga na of aan deze fundamentele veiligheidseis is voldaan en laat de installatie, ingeval van twijfel, grondig nakijken door een installateur. Ga na of het elektrische vermogen van de stopcontacten overeenkomt met het maximum vermogen van het apparaat, zoals is aangegeven op het typeplaatje. Haal er, in geval van twijfel, een technisch bevoegd persoon bij. De fabrikant is niet verantwoordelijk voor eventuele persoonlijke of materiële schade als gevolg van de nietaarding van de installatie. ATTENTIE: De spanning en energieverbruik staan vermeld op de modelsticker (laatste pagina). •Bedek de wanden van de oven nooit met aluminiumfolie of met wegwerpproducten om de oven schoon te houden. Aluminiumfolie en andere producten kunnen smelten als ze in aanraking komen met de hete ovenwanden, en kunnen de emaillaag aantasten. Rond de centrale hoofdschakelaar blijft een lampje zwak branden als de oven uit staat. Dit is normaal. U kunt dit voorkomen door de stekker omgekeerd in te steken of de voedingsklemmen te verwisselen. 1.3 INSTALLATIE De installatie valt onder de verantwoording van de koper zelf. De fabrikant is voor de installatie niet verantwoordelijk. Eventuele bijstand van de fabrikant bij onjuiste installatie valt niet onder de garantie. De oven dient door een technisch bevoegd persoon geïnstalleerd te worden volgens de installatie instructies. De fabrikant is niet verantwoordelijk voor eventuele persoonlijke of materiële schade ten gevolge van een onjuiste installatie. 1.7 UITRUSTING VAN DE OVEN Afhankelijk van het model Maak voor het gebruik de accessoires eerst schoon, spoel ze af met water en maak ze goed droog. Het eenvoudige rooster dient als steun voor vormen en schotels. Het schotelrooster dient meer bepaald voor het grillen. Dit wordt meestal samen met de lekbak gebruikt. Dankzij hun speciaal profiel blijven ze steeds horizontaal, zelfs wanneer ze maximaal uitgetrokken zijn. Er bestaat geen enkel risico op het schuiven of overlappen van de gerechten. 1.4 INBOUW VAN DE OVEN Plaats de oven in de daarvoor bestemde opening: onder het aanrecht of in kolomopstelling. De oven wordt vast gezet door de vier schroeven in de gaten in de rand vast te draaien. U kunt de schroeven zien, wanneer u de deur opent. Voor een goede ventilatie dienen bij het inbouwen van de oven de op de laatste pagina aangegeven maten en afstanden in acht te worden genomen. Opmerking: Bij ovens die onder een kookplaat aangebracht worden, dient men de aanwijzingen in de handleiding voor de kookplaat op te volgen. De Lekbak is bestemd voor het opvangen van de jus bij het grillen. Deze wordt slechts gebruikt in de modus Grillen, Draaispit of Turbogrill, afhankelijk van het model. Voor alle andere bakwijzen moet u deze uit de oven halen. De lekbak nooit als bakschaal gebruiken, er kan zich rookontwikkeling, vetverspreiding en een snelle vervuiling van de oven voordoen. 1.5 BELANGRIJK Griglie laterali a rete - Si trovano su entrambi i lati del vano cottura. Contengono griglie metalliche e vaschette raccogligocce. De inbouwkast dient geschikt te zijn voor inbouw van het apparaat teneinde een goede werking te kunnen garanderen. De panelen van de kasten naast de oven dienen warmtebestendig te zijn. Bij kasten met houtfineer dient de lijm een temperatuur van 120°C te kunnen weerstaan. Plastic of gelijmde materialen, die niet bestending zijn tegen deze temperatuur kunnen vervormd worden of loslaten. Volgens de veiligheidsnormen dient het ingebouwde apparaat niet in contact te NL 41 De pizza set is ontwikkeld voor het bakken van een pizza. Voor het beste resultaat moet u deze gebruiken in combinatie met de Pizza functie Voordelen : Systeem, afgezien van het perfect verlichten van de oven is de levernsduur langer, makkelijk te onderhouden en bespaard het ook nog eens energie. - Perfect zicht - Langere levensduur - Erg laag energieverbruik, -95% vergeleken met de traditionele Verlichting “Apparaten met witte LED verlichting van 1M Klasse volgens IEC 60825- 1:1993 + A1: 1997 + A2: 2001 (gelijkwaarig aan EN 60825-1: 1994 + A1: 2002 + A2: 2001); maximale afgifte licht sterkte 459nm < 150uW. Niet rechtstreeks waargenomen met optische instrumenten. De grillpan wordt in combinatie met de lekbak gebruikt voor alle soorten grillgerechten. Een handgreep wordt meegeleverd om het geheel uit de oven te kunnen nemen zonder dat u zich brandt. Laat de handgreep nooit in de oven liggen. Verwijdering en reiniging van roosters 1 - Ve r w i j d e r d e steunroosters door ze in de richting van de pijlen te trekken (zie hieronder) 2- Voor het reinigen van de steunroosters kunt u ze in de vaatwasser doen of een natte spons gebruiken. 3- Monteer de steunen na het reinigen in omgekeerde volgorde. 2.5 AQUACTIVAFUNCTIE DeAquactivaprocedure maakt gebruik vanstoomom achtergebleven vetenetensrestenuit de ovente helpen verwijderen. 1. Giet300mlwater inhetAquactivareservoir aan deonderkantvandeoven. 2. Stel deovenfunctieStatic ( ) ofBottom ( ) verwarming in 3. Stel de temperatuur inmet het pictogramAquactiva 4. Stel hetprogrammamet een looptijd van 30minuten in. 5. Na30minutenschakelthetprogrammauit en koelt deovenaf. 6. Als het apparaatafgekoeld is, kan het reinigen van debinnenkant vande oven meteen doekbeginnen. Wanneer u de oven gebruikt, moet u alle niet benutte accessoires uit de oven verwijderen. Waarschuwing: Zorg ervoordat het apparaatafgekoeld is voordatu het aanraakt. Opgelet voor allehete oppervlakken, omdateen risicoop brandwonden bestaat. Gebruikgedestilleerd ofdrinkbaarwater. 2. NUTTIGE TIPS 2.1 VEILIGHEIDSSYSTEEM VOOR DE ROOSTERS Deze oven is uitgerust met een nieuw veiligheidssysteem voor het uitrekken van de roosters. Dit systeem stelt u in staat om de roosters naar voren te trekken zonder het gevaar op te lopen, dat het rooster of het bereide voedsel per ongeluk uit de oven vallen. Om de roosters uit de oven te halen, dient u deze naar voren te trekken en lets op te tillen 300 ml 2.2 GRILLEREN Grilleren maakt het mogelijk het voedsel snel een diepe bruine kleur te geven. Afhankelijk van de grootte van uw gerecht raden wij u aan dit op het vierde niveau te zetten. Bijna elk voedsel kan worden bereid onder de grill afgezien van erg mager vlees of.een rollade. Vlees en vis dat u gaat grillen, dient u eerst licht tebestrijken met olie. 2.3 De 2.6 SCHOONMAKEN EN ONDERHOUD Modellen ovens hebben een electronisch gecontroleerde ventilator snelheid, genaamd VARIOVAN. Tijden s het koken word de sneldheid van de ventilator automatisch aangepast (multifunctionmode) om zo de luchtstroom en temperatuur in de ovenruimte te optimaliseren Alle ovens hebben de Softcook functie Dit regeld de temperatuur en vochtgehalte. Het reduceerd het verlies van 50%, dit garandeerd dat het voedsel luchtiger is en beter smaakt. Dit is een delicate kookmethode en uitermate geschikt voor het bakken van brood en gebak. Dit geeft de mogelijkheid om het ñivo van grillen in te stellen, tot 50% meer vermogen in vergelijking met de traditionele multifunctionele oven. Sommige ovens ziijn voorzien van de nieuwe deur WIDE DOOR deze heeft een groter venster voor makkelijk onderhoud en een betere thermische isolatie. 2.4 AFHANKELIJK VAN MODEL: Dit is een nieuw verlichtings systeem deze vervangt de traditionele verlichting. 14 LED lampjes zitten geintegreerd in de deur. Deze produceren witte hoogwaardige verlichting welke er voor zorgt dat u goed in de oven kunt kijken, helder en zonder schaduw. NL 42 DE GLAZEN ONDERDELEN Wij bevelen u aan om na elk gebruik het glas van de ovendeur schoon te maken d.m.v. absorberend papier. Indien er teveel vetspatten op zitten kan u deze nadien met een uitgewrongen spons en een schoonmaakmiddel reinigen en daarna spoelen. Nooit schuurmiddelen of snijdende voorwerpen gebruiken. U mag nooit een stoomreiniger of hogedrukreiniger gebruiken om de oven schoon te maken. Laat het apparaat eerst afkoelen alvorens het schoon te maken; haal vervolgens de stekker uit het stopcontact of sluit de elektriciteit af middels de hoofdschakelaar. Maak de roestvrijstalen en geëmaillerde delen schoon met warm water en niet bijtende of vloeibare zeep. Gebruik geen schuurmiddelen, bijtende wasmiddelen, bleekmiddelen of zuren om het apparaat schoon te maken. Het is heel belangrijk de oven schoon te maken na iedere keer dat u de oven heeft gebruikt. Vetten, die aan de wanden van de oven zijn blijven zitten, kunnen de volgende keer dat u de oven gebruikt, voor nare geurtjes zorgen of zelfs het kookresultaat beïnvloeden. Gebruik heet water met een geschikt schoonmaakmiddel om de oven schoon te maken; vewijder de zeepresten grondig. De oven kan ook uitgerust worden met zelfreinigende ovenwanden, zodat het bovenstaande onnodig wordt. (Zie hiervoor het volgende hoofdstuk). Gebruik voor het schoonmaken van de roestvrijstalen grill een schoonmaakmiddel en schuursponsje. De glazen oppervlakken dient u schoon te maken, wanneer deze koud zijn. Schade aan de glazen delen vallen niet onder de garantie indien u het bovenstaande niet in acht neemt. Om het binnenlichtje te vervangen dient u: de stekker uit het stopcontact te halen of de elektriciteit af te sluiten en de oude lamp te vervangen door een soortgelijke nieuwe lamp. 2.7 SERVICE DIENST 3. KOOKWEKKER Alvorens u de Service Dienst belt Indien de oven niet werkt, raden wij u aan: — na te gaan of het apparaat goed is aangesloten. Indien u de oorzaak niet kunt ontdekken: — haal de stekker uit het stopcontact of sluit de elektriciteit van de oven af middels de hoofdschakelaar — gebruik de oven niet meer en ga er niet zelf aan sleutelen — bel de Service Dienst Noteert u, voordat u de Service Dienst belt, het typenummer van uw oven (zie binnenzijde van de ovendeur) Bij de oven zit een garantiecertificaat, welke u recht geeft op één jaar garantie vanaf de datum van aankoop. 3.1 GEBRUIK VAN DE KOOKWEKKER U stelt de kookwekker in door deze eerst een maal compleet om te draaien (met de klok mee). Draai de schakelaar vervolgens terug naar de gewenste positie/tijd. Zodra de ingestelde tijd is overschreden, gaat er gedurende enkele seconden een geluidssignaal . 3.2 GEBRUIK VAN DE TIMER MET UITSCHAKELFUNCTIE Dit apparaat is gemarkeerd volgens de Europese norm 2012/19/EU inzake Afval van elektrisch en elektronisch apparatuur (WEEE). WEEE bevat zowel verontreinigende substanties (die negatieve gevolgen op het milieu kunnen hebben) en basiscomponenten (die hergebruikt kunnen worden). Het is belangrijk om WEEE aan bepaalde behandelingen te onderwerpen om alle vervuilende onderdelen te verwijderen en op juist wijze afstand van te doen, en alle materialen te herstellen en te recyclen. Particulieren kunnen hier een belangrijke rol in spelen door te zorgen dat een WEEE geen milieukwestie wordt; het is essentieel de volgende basisregels te volgen: • WEEE mag niet als huishoudelijk afval worden beschouwd. • WEEE moet worden overhandigd aan relevante inzamelpunten die worden beheerd door de gemeente of door geregistreerde bedrijven. In veel landen bestaat er voor grote WEEE een ophaaldienst. • Als u een nieuw apparaat koopt, kan het oude bij de leverancier worden ingeleverd, welke het gratis bij u moet afhalen op een éénop-één basis, zolang het apparaat van soortgelijk type is en dezelfde functies heeft als de geleverde apparatuur. Con questo meccanismo è possibile programmare la durata espressa in minuti della cottura e quindi lo spegnimento automatico del forno al termine del tempo desiderato (max. 120 minuti). Allo scadere del tempo prescelto, la manopola raggiungerà la posizione di suoneria O in corrispondenza della qua le i l forno s i spegne automaticamente. De oven werkt alleen wanneer de kookwekker is ingesteld of indien de timer op de positie van het wijzersymbool is gezet 3.3 DE JUISTE TIJD INSTELLEN 00:00 WAARSCHUWING: Na installatie van de oven en na het onderbreken van de voeding (dit is te herkennen aan de knipperende cijfers 12:00 op het select scherm) dient u eerst de juiste tijd in te stellen. Dit gebeurt als volgt: • Druk 4 keer op de centrale knop. • Instellen de tijd in met de "-" "+" knoppen. • Laat alle knoppen los. ENERGIE BESPAREN MET RESPECT VOOR HET MILIEU Indien mogelijk, vermijd het voorverwarmen van de oven en vermijd om de oven zonder inhoud te laten draaien. Laat de ovendeur niet open alleen wanneer dat nodig is, omdat er warmteverlies ontstaat elke keer dat de oven open staat. Voor een aanzienlijke energiebesparing, schakelt u de oven 5 tot 10 minuten uit voor het voorziene einde van de bereidingstijd en gebruik de warmte die de oven blijft genereren. Houd de dichtingen schoon en in goede staat, om energieverlies te voorkomen. Als u een contract heeft met een laag energie tarief, kunt u gebruik maken van het "uitgesteld koken". Deze zal uw programma laten starten in een periode waar u aan een voordelig tarief kookt. Dit helpt u bij het besparen van energie. WAARSCHUWING: De oven werkt alleen als de klok is ingesteld. NL 43 4. INSTRUCTIES VOOR HET GEBRUIK VAN DE OVEN Functieknop T °C standaard T°C bereik Functie (afhankelijk van het ovenmodel) Dit schakeld de ovenverlichting in. Ditz al automatisch de koelventilator inschakelen (alleen op modellen met mantelkoeling) Ontdooien: Deze stand laat lucht op kamertemperatuur rond het diepvriesprodukt circuleren, zodat het in enkele minuten ontdooid is, zonder de proteïne samenstelling te wijzigen ofte schaden. 180 50 ÷ MAX MULTI-NIVEAU: De hete lucht, wordt geleidelijk door de ventilator over alle niveaus verdeeld. Ideaal voor het gelijktijdig bereiden van diverse gerechten (vlees, vis e.d.) zonder menging van luchtjes en smaken. Het is zeer geschikt voor delicate gerechten, cake, taarten, bladerdeeg enz. 210 50 ÷ MAX 190 50 ÷ MAX COOK LIGHT : Met deze functie kunt u gezonder koken, waarbij de benodigde hoeveelheid vet of olie wordt verminderd. De combinatie van verwarmingselementen met een pulserende luchtcyclus garandeert een perfect bakresultaat. 210 50 ÷ MAX BODEMVERWARMING + VENTILATOR: De onderste weerstand werkt samen met de turbine die de lucht in de ovenruimte stuwt. Deze functie is ideaal voor taarten met sappig fruit, gebakken, quiches en pasteien. Zo voorkomt men het uitdrogen van de eetwaren en bevordert men het rijzen van cakes, brooddeeg, enz. Het bakken gebeurt langs de onderzijde. Het rooster op het onderste schap zetten. 220 50 ÷ MAX CONVENTIONEEL: H ierbij w erken de verw arm in g se le m e n te n aan de boven- en on de rkant. Dit is de traditionele m anier van bereiding van voedsel. Ideaal om te braden, w ildgerechten te bereiden, koekjes en appelbollen te bakken en om te bereiken dat het voedsel knapperig blijft. 230 50 ÷ MAX GRIL: U moe moet de grill met een gesloten deur gebruiken. Enkel de bovenweerstand wordt gebruikt en u heeft de mogelijkheid om de temperatuur te regelen. U moet 5 minuten voorverwarmen om de weerstand te laten gloeien. Succes verzekerd bij het grillen, bereiden van brochettes en bij het gratineren. Wit vlees moet van de grill verwijderd blijven, hierdoor wordt de baktijd langer, maar blijft het vlees sappiger. Rood vlees en visfilets moeten op het rooster gelegd worden en met daaronder de lekbak. 220 50 ÷ MAX Pizzafunctie: Met deze functie wordt dezelfde warmte afgegeven als bij de traditionele houtoven waarin pizza’s worden gebakken. * * *Getest in overeenstemming met EN 60350-1 met het oog op de verklaring van energieverbruik en de energieklasse. NL 44 INSTALLATION GB INSTALLATION FR VGRADNJA SI INSTALLAZIONE IT INSTALACIÓN ES МОНТАЖ БГ INSTALLATIE NL 560 mm Opening/Apertura/ Ouverture/Odprtina/Отвор Openheid 460 mm x 15 mm 590 mm 560 mm 595 mm 580 mm 560 m m 546 mm 595 mm 22 mm GB If the furniture is equpped with a bottom at the back part, provide an opening for the power supply cable. IT Se il mobile ha un fondo posteriore, praticare un foro per il passaggio del cavo di alimentazione. FR Si le fond du meuble est doté d’un panneau de fermeture, prévoyez un orifice pour le passage du A 560 mm x 45 mm câble d’alimentation. ES Si el mueble tiene panel posterior, haga un orificio para el cable de alimentación. SI Če je omarica na zadnji strani zaprta, naredite odprtino za napajalni kabel. BG Ако шкафът, в който се вгражда фурната, има заден капак, направете отвор за захранващия кабел. NL Indien het toestel aan de achterzijde voorzien is van een afdekking, maak dan een opening voor de stroomkabel. A GB If the mounting of the plinth does not allow air circulation, to obtain the maximum performance of the oven it is necessary to create an opening of 500x10mm or the same surface in 5.000 mm2 A IT Se il montaggio del plinto non consente la circolazione dell'aria, per ottenere le massime prestazioni del forno è necessario creare un'apertura di 500x10mm o la stessa superficie in 5.000 mm2. A ES Si el montaje del zócalo no permite la circulación de aire, para obtener el máximo rendimiento del horno es necesario crear una abertura de 500x10 mm o la misma superficie en 5.000 mm2. A FR Si le montage du socle ne permet pas la circulation d'air, pour obtenir la performance maximale du four, il est nécessaire de créer une ouverture de 500x10mm ou la même surface dans 5.000 mm2 A ES Si el montaje del zócalo no permite la circulación de aire, para obtener el máximo rendimiento del horno es necesario crear una abertura de 500x10 mm o la misma superficie en 5.000 mm2. A BG Ако монтажът на цокъла не позволява циркулация на въздуха, за да се постигне максимална производителност на фурната е необходимо да се пробие отвор от 500х100 mm или същата повърхност в 5 000 mm2. A NL Als de montage van de plint geen luchtcirculatie toelaat, dient men, om de optimale prestatie te verkrijgen van de oven, een opening te maken van 500x10mm of dezelfde oppervlakte in 5.000 mm2 560 mm FR Si le four n’a pas de ventilateur de refroidissement, créer une ouverture 460 mm x 15 mm 600 mm GB If the oven does not have a cooling fan, create an opening 460 mm x 15 mm ITIT Se il forno non dispone di una ventola di raffreddamento, lasciare uno spazio 460 mm x 15 mm 560 mm ES Si el horno no tiene ventilador de refrigeración, practique una abertura. 460 mm x 15 mm SI Če pečica nima hladilnega ventilatorja, napravite ustrezno odprtino 460 mm x 15 mm BG Ако фурната няма вентилатор за охлаждане, направете отвор. 460 mm x 15 mm NL Maak een opening als de oven geen koelventilator heeft 460 mm x 15 mm Opening/Apertura/ Ouverture/Odprtina/Отвор Openheid 560 mm x 45 mm A 42837146 • A4 • 10.2020 • Rev_0 GB The manufacturer will not be responsible for any inaccuracy resulting from printing or transcript errors contained in this brochure. We reserve the right to carry out modifications to products as required, including the interests of consumption, without prejudice to the characteristics relating to safety or function. IT La Ditta costruttrice declina ogni responsabilità per eventuali errori di stampa contenuti nel presente libretto. Si riserva inoltre il diritto di apportare le modifiche che si renderanno utili ai propri prodotti senza compromettere le caratteristiche essenziali. FR Le constructeur décline toute responsabilité concernant d'éventuelles Inexacltudes Imputables à des erreurs d'impression ou de transcription contenue dans cette notice. Le constructeur se réserve le droit de modifier les produits en cas de nécessité, même dans l'intérêt de l'utilisation, sans causer de préjudices aux caractéristiques de fonctionnement de sécurité des appareils. ES La empresa constructora declina toda responsabilidad derivada de eventuales errores de impresión contenidos en el presente libro. Se reserva además el derecho de realizar las modificaciones que se consideren útiles a los productos sin comprometer las características esenciales. SI The manufacturer will not be responsible for any inaccuracy resulting from printing or transcript errors contained in this brochure. We reserve the right to carry out modifications to products as required, including the interests of consumption, without prejudice to the characteristics relating to safety or function. БГ Производителя не носи отговорност за неточности и грешки възникнали при печата на тази инструкция. Производителя си запазва правото да внесе изменения в своите продукти, който смята за полезни, без това да е в ущърб на характеристиките свързани със сигурността или основните функции на уреда . NL De fabrikant stelt zich niet aansprakelijk voor eventuele drukfouten in deze brochure. Kleine veranderingen en technische ontwikkelingen zijn voorbehouden.-
 1
1
-
 2
2
-
 3
3
-
 4
4
-
 5
5
-
 6
6
-
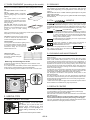 7
7
-
 8
8
-
 9
9
-
 10
10
-
 11
11
-
 12
12
-
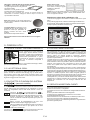 13
13
-
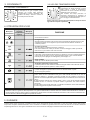 14
14
-
 15
15
-
 16
16
-
 17
17
-
 18
18
-
 19
19
-
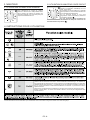 20
20
-
 21
21
-
 22
22
-
 23
23
-
 24
24
-
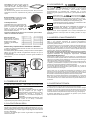 25
25
-
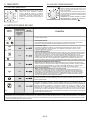 26
26
-
 27
27
-
 28
28
-
 29
29
-
 30
30
-
 31
31
-
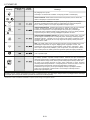 32
32
-
 33
33
-
 34
34
-
 35
35
-
 36
36
-
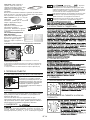 37
37
-
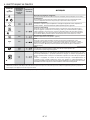 38
38
-
 39
39
-
 40
40
-
 41
41
-
 42
42
-
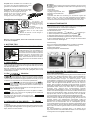 43
43
-
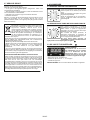 44
44
-
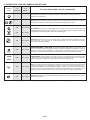 45
45
-
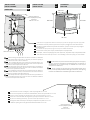 46
46
-
 47
47


Candy FCDIE206X Handleiding
- Categorie
- Ovens
- Type
- Handleiding
in andere talen
- English: Candy FCDIE206X User manual
- italiano: Candy FCDIE206X Manuale utente
- français: Candy FCDIE206X Manuel utilisateur
- español: Candy FCDIE206X Manual de usuario