
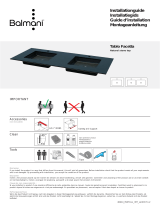
Installation guide Installatiegids Guide d’installation Montageanleitung
___________________________________________________________________ Disclaimer __________________________________________________________________
If you install the product in a way that differs from this manual, this will void all guarantees. Before installation check that the product meets all your requirements and is not damaged. By
proceeding with installation, you accept the condition of the product.
___________________________________________________________________ Disclaimer __________________________________________________________________
Indien u het product plaatst op een manier die afwijkt van deze handleiding, vervalt alle garantie. Controleer voor plaatsing of het product aan al uw eisen voldoet en niet beschadigd is.
Indien u overgaat tot plaatsing, aanvaardt u de staat waarin het product zich bevindt.
___________________________________________________________ Clause de non-responsabilité _________________________________________________________
Si vous installez le produit d’une manière différente de celle présentée dans ce manuel, toutes les garanties seront invalidées. Contrôlez avant le placement si le produit répond à toutes
vos exigences et n’est pas endommagé. En procédant au placement, vous acceptez l’état dans lequel se trouve le produit.
______________________________________________________________ Haftungsausschluss ______________________________________________________________
Wenn Sie das Produkt nicht genau nach den Angaben in dieser Montageanleitung einbauen, verfällt die Garantie. Überprüfen Sie vor dem Einbau des Produkts, ob sämtliche
Voraussetzungen erfüllt sind und das Produkt nicht beschädigt ist. Sobald Sie mit der Montage beginnen, sehen Sie, in welchem Zustand sich das Produkt befindet.
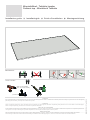
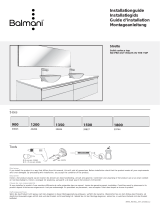
Wastafelblad - Tablette lavabo
Cabinet top - Washtisch Tablette
65860_INSTALL_INT_ver2019.1.1
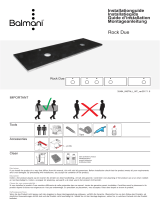
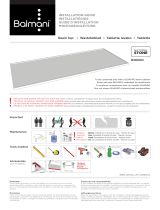
Tools needed
IMPORTANT
(art.33270)
Ø 35 mm(art.33268)
Ø 72-75 mm(art.40346)
<10° !

Installation
Installatie
installation
Installation
PRESS TO
UNLOCK
·
PRESS TO
UNLOCK
·
·
PRESS TO
UNLOCK
·
1
2
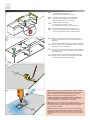
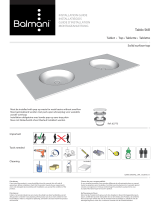
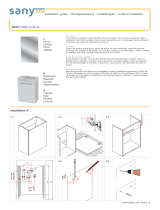
- Check the fi xation of the base cabinets
- The cabinets should be leveled
- No level differences between the cabinets
- Controleer de bevestiging van de onderkasten
- De kasten moeten waterpas uitgelijnd worden
- Geen niveauverschillen tussen de kasten
- Vérifi er la fi xation des cabinets
- Les cabinets doivent être au niveau
- Aucune différence de niveau entre les cabinets
- Überprüfen Sie die Fixierung der Unterschränke.
- Die Schränke sollten auf ebene angepasst werden
- Keine Pegelunterschiede zwischen den Kabinetten
Connect the base cabinets by means of special screws,
these are not included. Thus, it forms a solid base for your
cabinet top.
Verbind de onderkasten onderling door middel van speciale
schroeven, deze zijn niet meegeleverd. Aldus vormt dit een
solide basis voor uw wastafelblad.
Connecter les cabinets de base au moyen de vis spéciales,
ce ne sont pas inclus. Ainsi, il constitue une base solide pour
votre tablette lavabo.
Verbinden sie der Unterschränke von Sonderschrauben,
diese sind nicht im Lieferumfang inbegriffen. Daher bildet
eine solide Basis für Ihr Waschtischtablette.
EN Drill the faucet holes with appropriate tools. Under no circum-
stance use the hammer function of the drill. For details, see the
manual of the tool and the technical drawing of the cabinet top.
NL Boor de kraangaten met aangepast gereedschap.
Gebruik onder geen beding de klopboorstand van de boor-
machine. Raadpleeg de handleiding van het gereedschap en te
technische tekening van het wastafelblad voor details.
FR Percez les trous de robinet avec des outils sur mesure.
N’utilisez en aucun cas la fonction à impulsions de la perceuse.
Consultez le manuel de l’outil et le dessin technique du tablette
lavabo pour plus de détails.
DE Bohren Sie die Löcher für die Armatur mit einem geeigneten
Bohraufsatz. Verwenden Sie jedoch auf keinen Fall die Schlag-
bohrfunktion! Weitere Informationen fi nden Sie in der Anleitung
des Werkzeugs und in der technischen Zeichnung des Waschtisch-
tablette
3
4
EN
NL
FR
DE
EN
NL
FR
DE

Installation
Installatie
installation
Installation
5
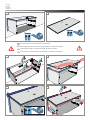
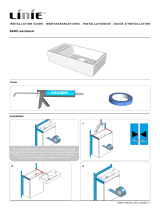
Transparant
SILICONE
transparante zuurvrije badkamersilicone
silicone transparent sans acide pour salle de bain
Transparant
SILICONE
transparante zuurvrije badkamersilicone
silicone transparent sans acide pour salle de bain
Transparant
SILICONE
transparante zuurvrije badkamersilicone
silicone transparent sans acide pour salle de bain
7
9
6
8
Transparant
SILICONE
transparante zuurvrije badkamersilicone
silicone transparent sans acide pour salle de bain
Transparant
SILICONE
transparante zuurvrije badkamersilicone
silicone transparent sans acide pour salle de bain
Transparant
SILICONE
transparante zuurvrije badkamersilicone
silicone transparent sans acide pour salle de bain
10
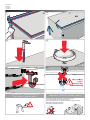
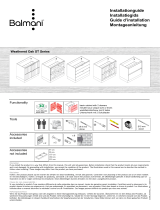
It is important to use an acid-free silicone to avoid stains
Het is belangrijk om een zuurvrije silicone te gebruiken om vlekken te vermijden
Il est important d’utiliser un silicone sans acide pour éviter les taches
Es ist wichtig, ein säurefreies Silikon zu verwenden, um Flecken zu vermeiden
EN
NL
FR
DE
3 mm
3 mm
3 mm
3 mm
3 mm
3 mm

Installation
Installatie
installation
Installation
11
13
15
12
14
16
!
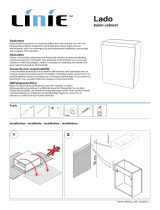
MAX 55 C°
SOAPY WATER AND CLEAN SOFT SPONGE OR CLOTH
SOPJE EN SCHONE ZACHTE SPONS OF DOEK
L’EAU SAVONNEUSE ET UNE ÉPONGE PROPRE DOUCE OU TISSU.
SEIFENWASSER UND SAUBEREN
WEICHEN SCHWAMM ODER TUCH
Maintenance - Onderhoud - Entretien - Wartung
Important notice - Belangrijke opmerking
Avis important - Wichtiger Hinweis
-
 1
1
-
 2
2
-
 3
3
-
 4
4


in andere talen
- français: storke 65861 Guide d'installation
- Deutsch: storke 65861 Installationsanleitung
Gerelateerde papieren


Andere documenten
-
 Balmani 39826 Installatie gids
-
 Balmani 22722 Installatie gids
-
 Balmani 62964 Installatie gids
-
 Balmani 31183 Installatie gids
-
 Balmani 40415 Installatie gids
-
 SanyOne 62621 Installatie gids
-
 Linie 84024 Installatie gids
-
 Linie 90638 Installatie gids
-
 Balmani 89287 Installatie gids
-
 Balmani 84838 Installatie gids


