Roland CUBE 20XL de handleiding
- Categorie
- Aanvullende muziekapparatuur
- Type
- de handleiding
Deze handleiding is ook geschikt voor

Português Italiano DeutschNederlands Español Français
English
Owner’s Manual
Bedienungsanleitung
Mode d'emploi
Manuale dell'utente
Manual del usuario
Manual do proprietário
Gebruikershandleiding
Owner’s Manual
Guitar Amplier

CAUTION
RISK OF ELECTRIC SHOCK
DO NOT OPEN
ATTENTION: RISQUE DE CHOC ELECTRIQUE NE PAS OUVRIR
CAUTION: TO REDUCE THE RISK OF ELECTRIC SHOCK,
DO NOT REMOVE COVER (OR BACK).
NO USER-SERVICEABLE PARTS INSIDE.
REFER SERVICING TO QUALIFIED SERVICE PERSONNEL.
The lightning flash with arrowhead symbol, within an
equilateral triangle, is intended to alert the user to the
presence of uninsulated “dangerous voltage” within the
product’s enclosure that may be of sufficient magnitude to
constitute a risk of electric shock to persons.
The exclamation point within an equilateral triangle is
intended to alert the user to the presence of important
operating and maintenance (servicing) instructions in the
literature accompanying the product.
INSTRUCTIONS PERTAINING TO A RISK OF FIRE, ELECTRIC SHOCK, OR INJURY TO PERSONS.
IMPORTANT SAFETY INSTRUCTIONS
SAVE THESE INSTRUCTIONS
WARNING - When using electric products, basic precautions should always be followed, including the following:
1. Read these instructions.
2. Keep these instructions.
3. Heed all warnings.
4. Follow all instructions.
5. Do not use this apparatus near water.
6. Clean only with a dry cloth.
7. Do not block any of the ventilation openings. Install in
accordance with the manufacturers instructions.
8. Do not install near any heat sources such as radiators,
heat registers, stoves, or other apparatus (including
amplifiers) that produce heat.
9. Do not defeat the safety purpose of the polarized or
grounding-type plug. A polarized plug has two blades with
one wider than the other. A grounding type plug has two
blades and a third grounding prong. The wide blade or the
third prong are provided for your safety. If the provided plug
does not fit into your outlet, consult an electrician for
replacement of the obsolete outlet.
10. Protect the power cord from being walked on or pinched
particularly at plugs, convenience receptacles, and the
point where they exit from the apparatus.
11. Only use attachments/accessories specified
by the manufacturer.
12. Unplug this apparatus during lightning storms or when
unused for long periods of time.
13. Refer all servicing to qualified service personnel. Servicing
is required when the apparatus has been damaged in any
way, such as power-supply cord or plug is damaged, liquid
has been spilled or objects have fallen into the apparatus,
the apparatus has been exposed to rain or moisture, does
not operate normally, or has been dropped.
IMPORTANT: THE WIRES IN THIS MAINS LEAD ARE COLOURED IN ACCORDANCE WITH THE FOLLOWING CODE.
BLUE:
BROWN:
As the colours of the wires in the mains lead of this apparatus may not correspond with the coloured markings identifying
the terminals in your plug, proceed as follows:
The wire which is coloured BLUE must be connected to the terminal which is marked with the letter N or coloured BLACK.
The wire which is coloured BROWN must be connected to the terminal which is marked with the letter L or coloured RED.
Under no circumstances must either of the above wires be connected to the earth terminal of a three pin plug.
NEUTRAL
LIVE
For the U.K.
WARNING: To reduce the risk of fire or electric shock, do not expose this apparatus to rain or moisture.

Português Italiano DeutschNederlands Español Français
English
Switchable between two channels: JC CLEAN and LEAD (p. 4)
• Channel switching can be done via optional foot switch.
20-watt output, high-performance, DSP guitar amp with built-in 20 cm (8-inch) speaker
• Compact size that’s perfect for anything from at-home practice to rehearsing in the studio, and is conveniently portable.
The “LEAD” oers six dierent COSM pedal eects (p. 4)
• The LEAD channel provides six types of pedal eects, including ACOUSTIC SIM, OVERDRIVE, DISTORTION, METAL, METAL STACK, and the original
EXTREME eect, giving you sounds for a broad range of styles.
Power Squeezer function (p. 5)
• This allows you to obtain a good tonal balance even at low volume, letting you enjoy powerful sound even when you’re at home.
A tuner function is included (p. 7)
• This feature allows you to tune your guitar while the instrument is connected to the CUBE-20XL.
• The tuning reference function sounds a reference pitch for your tuning convenience.
Equipped with an AUX IN jack, which is convenient for your practice sessions (p. 5)
• Use this to play along with sounds from CD players and digital audio players.
Eects include EFX/SOLO and an independent DELAY/REVERB (p. 5)
• Onboard EFX section includes 5 types of digital eect, CHORUS, FLANGER, PHASER, TREMOLO, and HEAVY OCTAVE.
• Foot switch (optional) can be used to switch EFX/SOLO on and o (p. 5).
Owner’s Manual
Guitar Amplier
Before using this unit, carefully read the sections entitled: “IMPORTANT SAFETY INSTRUCTIONS” (inside front cover), “USING THE UNIT SAFELY”
(p. 2), and “IMPORTANT NOTES” (p. 3). These sections provide important information concerning the proper operation of the unit. Additionally,
in order to feel assured that you have gained a good grasp of every feature provided by your new unit, Owner’s manual should be read in its
entirety. The manual should be saved and kept on hand as a convenient reference.
Copyright © 2010 ROLAND CORPORATION
All rights reserved. No part of this publication may be reproduced in any form without the written permission of ROLAND CORPORATION
Roland is a registered trademark of Roland Corporation in the United States and/or other countries.
Composite Object Sound Modeling (COSM) is Roland’s innovative and powerful sound modeling technology. COSM analyzes the many factors that
make up the original sound, such as the electrical and physical characteristics of the original, and then produces a digital model that can reproduce the
same sound.

2
WARNING
Do not open or perform any internal modications on the unit.
Do not attempt to repair the unit, or replace parts within it (except when
this manual provides specic instructions directing you to do so). Refer all
servicing to your retailer, the nearest Roland Service Center, or an authorized
Roland distributor, as listed on the “Information” page.
Never install the unit in any of the following locations.
• Damp (e.g., baths, washrooms, on wet oors); or are
• Exposed to steam or smoke; or are
• Subject to salt exposure; or are
• Humid; or are
• Exposed to rain; or are
• Dusty or sandy; or are
• Subject to high levels of vibration and shakiness.
Make sure you always have the unit placed so it is level and sure to remain
stable. Never place it on stands that could wobble, or on inclined surfaces.
The unit should be connected to a power supply only of the type described
as marked on the rear side of unit.
Do not excessively twist or bend the power cord, nor place heavy objects
on it. Doing so can damage the cord, producing severed elements and short
circuits. Damaged cords are re and shock hazards!
This unit, either alone or in combination with an amplier and headphones
or speakers, may be capable of producing sound levels that could cause
permanent hearing loss. Do not operate for a long period of time at a high
volume level, or at a level that is uncomfortable. If you experience any
hearing loss or ringing in the ears, you should immediately stop using the
unit, and consult an audiologist.
Do not place containers containing liquid on this product. Never allow
foreign objects (e.g., ammable objects, coins, wires) or liquids (e.g., water
or juice) to enter this product. Doing so may cause short circuits, faulty
operation, or other malfunctions.
Immediately turn the power o, remove the power cord from the outlet, and
request servicing by your retailer, the nearest Roland Service Center, or an
authorized Roland distributor, as listed on the “Information” page when:
• The power-supply cord or the plug has been damaged; or
• If smoke or unusual odor occurs
• Objects have fallen into, or liquid has been spilled onto the unit; or
• The unit has been exposed to rain (or otherwise has become wet); or
• The unit does not appear to operate normally or exhibits a marked change
in performance.
In households with small children, an adult should provide supervision until
the child is capable of following all the rules essential for the safe operation
of the unit.
WARNING
Protect the unit from strong impact.
(Do not drop it!)
Do not force the unit’s power-supply cord to share an outlet with an
unreasonable number of other devices. Be especially careful when using
extension cords---the total power used by all devices you have connected
to the extension cord’s outlet must never exceed the power rating (watts/
amperes) for the extension cord. Excessive loads can cause the insulation on
the cord to heat up and eventually melt through.
Before using the unit in a foreign country, consult with your retailer, the
nearest Roland Service Center, or an authorized Roland distributor, as listed
on the “Information” page.
CAUTION
The unit should be located so that its location or position does not interfere
with its proper ventilation.
Always grasp only the plug on the power-supply cord when plugging into, or
unplugging from an outlet.
At regular intervals, you should unplug the power plug and clean it by using
a dry cloth to wipe all dust and other accumulations away from its prongs.
Also, disconnect the power plug from the power outlet whenever the unit is
to remain unused for an extended period of time. Any accumulation of dust
between the power plug and the power outlet can result in poor insulation
and lead to re.
Try to prevent cords and cables from becoming entangled. Also, all cords and
cables should be placed so they are out of the reach of children.
Never climb on top of, nor place heavy objects on the unit.
Never handle the power cord or its plug with wet hands when plugging into,
or unplugging from, an outlet.
Before moving the unit, disconnect the power plug from the outlet, and pull
out all cords from external devices.
Before cleaning the unit, turn o the power and unplug the power cord from
the outlet (p. 6).
Whenever you suspect the possibility of lightning in your area, pull the plug
on the power cord out of the outlet.
The cooling vents on either side of the unit may become hot, so take care to
avoid burns.
Do not remove the speaker grille and speaker by any means. Speaker not
user replaceable. Shock hazardous voltages and currents are present inside
the enclosure.
USING THE UNIT SAFELY
Used for instructions intended to alert the
user to the risk of injury or material
damage should the unit be used
improperly.
* Material damage refers to damage or
other adverse effects caused with
respect to the home and all its
furnishings, as well to domestic animals
or pets.
Used for instructions intended to alert the
user to the risk of death or severe injury
should the unit be used improperly.
The symbol alerts the user to things that must be
carried out. The specific thing that must be done is
indicated by the design contained within the circle. In the
case of the symbol at left, it means that the power-cord
plug must be unplugged from the outlet.
The symbol alerts the user to important instructions or
warnings.The specific meaning of the symbol is
determined by the design contained within the triangle. In
the case of the symbol at left, it is used for general
cautions, warnings, or alerts to danger.
The symbol alerts the user to items that must never be
carried out (are forbidden). The specific thing that must
not be done is indicated by the design contained within
the circle. In the case of the symbol at left, it means that
the unit must never be disassembled.
About WARNING and CAUTION Notices
About the Symbols
ALWAYS OBSERVE THE FOLLOWING

3
Português Italiano DeutschNederlands Español Français
English
IMPORTANT NOTES
Power Supply
• Do not connect this unit to same electrical outlet that is being used
by an electrical appliance that is controlled by an inverter (such as a
refrigerator, washing machine, microwave oven, or air conditioner),
or that contains a motor. Depending on the way in which the
electrical appliance is used, power supply noise may cause this unit to
malfunction or may produce audible noise. If it is not practical to use a
separate electrical outlet, connect a power supply noise lter between
this unit and the electrical outlet.
• Before connecting this unit to other devices, turn o the power to all
units. This will help prevent malfunctions and/or damage to speakers
or other devices.
• Although the LEDs are switched o when the POWER switch is
switched o, this does not mean that the unit has been completely
disconnected from the source of power. If you need to turn o the
power completely, rst turn o the POWER switch, then unplug the
power cord from the power outlet. For this reason, the outlet into
which you choose to connect the power cord’s plug should be one
that is within easy reach and readily accessible.
Placement
• Using the unit near power ampliers (or other equipment containing
large power transformers) may induce hum. To alleviate the problem,
change the orientation of this unit; or move it farther away from the
source of interference.
• This device may interfere with radio and television reception. Do not
use this device in the vicinity of such receivers.
• Noise may be produced if wireless communications devices, such as
cell phones, are operated in the vicinity of this unit. Such noise could
occur when receiving or initiating a call, or while conversing. Should
you experience such problems, you should relocate such wireless
devices so they are at a greater distance from this unit, or switch them
o.
• Do not expose the unit to direct sunlight, place it near devices that
radiate heat, leave it inside an enclosed vehicle, or otherwise subject
it to temperature extremes. Also, do not allow lighting devices that
normally are used while their light source is very close to the unit (such
as a piano light), or powerful spotlights to shine upon the same area
of the unit for extended periods of time. Excessive heat can deform or
discolor the unit.
• When moved from one location to another where the temperature
and/or humidity is very dierent, water droplets (condensation) may
form inside the unit. Damage or malfunction may result if you attempt
to use the unit in this condition. Therefore, before using the unit, you
must allow it to stand for several hours, until the condensation has
completely evaporated.
• Do not allow rubber, vinyl, or similar materials to remain on this
unit for long periods of time. Such objects can discolor or otherwise
harmfully aect the nish.
• Do not paste stickers, decals, or the like to this instrument. Peeling
such matter o the instrument may damage the exterior nish.
• Depending on the material and temperature of the surface on which
you place the unit, its rubber feet may discolor or mar the surface.
You can place a piece of felt or cloth under the rubber feet to prevent
this from happening. If you do so, please make sure that the unit will
not slip or move accidentally.
• Do not put anything that contains water (e.g., ower vases) on this
unit. Also, avoid the use of insecticides, perfumes, alcohol, nail polish,
spray cans, etc., near the unit. Swiftly wipe away any liquid that spills
on the unit using a dry, soft cloth.
Maintenance
• For everyday cleaning wipe the unit with a soft, dry cloth or one that
has been slightly dampened with water. To remove stubborn dirt, use a
cloth impregnated with a mild, non-abrasive detergent. Afterwards, be
sure to wipe the unit thoroughly with a soft, dry cloth.
• Never use benzine, thinners, alcohol or solvents of any kind, to avoid
the possibility of discoloration and/or deformation.
Additional Precautions
• Use a reasonable amount of care when using the unit’s buttons, sliders,
or other controls; and when using its jacks and connectors. Rough
handling can lead to malfunctions.
• When connecting / disconnecting all cables, grasp the connector
itself—never pull on the cable. This way you will avoid causing shorts,
or damage to the cable’s internal elements.
• A small amount of heat will radiate from the unit during normal
operation.
• To avoid disturbing your neighbors, try to keep the unit’s volume at
reasonable levels. You may prefer to use headphones, so you do not
need to be concerned about those around you.
• When you need to transport the unit, package it in the box (including
padding) that it came in, if possible. Otherwise, you will need to use
equivalent packaging materials.
• Some connection cables contain resistors. Do not use cables that
incorporate resistors for connecting to this unit. The use of such cables
can cause the sound level to be extremely low, or impossible to hear.
For information on cable specications, contact the manufacturer of
the cable.
• Wrap the power cord around the cord hook when transporting or
storing the unit.
Trademarks
• The product names mentioned in this document are trademarks or
registered trademarks of their respective owners, and are not related
to Roland Corporation. In this manual, these names are used because
it is the most practical way of describing the sounds that are simulated
using COSM technology.

4
1. INPUT Jack
Connect your electric guitar here.
2. [SELECT] Switch
Switches between the JC CLEAN and LEAD channels.
You can conrm which channel is selected by checking which red
indicator is lit. (JC CLEAN: left; LEAD: right).
Channels can be switched using optional BOSS FS-5U or FS-6 foot
switches.
3. [TUNER] Switch
Use this when you want to tune your guitar. When you turn on the
switch, it will light red, and you’ll be able to use the Tuner function.
For more detailed information, refer to “Using the Tuner Function” (p. 7).
JC CLEAN Channel
This is a model of Roland’s famous JC-120 Jazz Chorus guitar amplier.
The ultra-clean, ultra-at sound oers a smooth feel. This amp is ideal
for creating sounds in combination with a multi-eects device.
4. [VOLUME] Knob
Adjusts the JC CLEAN channel volume.
LEAD Channel
5. Type Switch
You can select from the following six types.
When the tuner function is on, you can use this to select the name of
the string to be tuned (p. 7).
Type Description
ACOUSTIC SIM
This original amp model gives you a dynamic
acoustic guitar sound using a standard electric
guitar.
OVERDRIVE
Natural distortion sound similar to that obtained
by turning an amp’s volume up completely.
DISTORTION Harder distortion than OVERDRIVE.
METAL
Even harder and heavier than DISTORTION, which
can get long sustained notes.
METAL STACK Very fat sound of a Heavy Metal full amp stack.
EXTREME
High-gain sound delivering thick lows and
intense distortion while still preserving the
sound’s clear denition.
6. [GAIN] Knob
Adjusts the LEAD channel’s distortion level.
7. [VOLUME] Knob
Adjusts the LEAD channel volume.
Panel Descriptions
Control Panel
1 4
16
17
158 9 10 11 12
136 752 3 14

5
Português Italiano DeutschNederlands Español Français
English
EQUALIZER
8. [BASS] Knob
Adjusts the tone quality of the lower range.
9. [MIDDLE] Knob
Adjusts the tone quality of the midrange.
10. [TREBLE] Knob
Adjusts the tone quality of the upper range.
EFX/SOLO (Eects/Solo)
11. [EFX/SOLO] (Eects/Solo) Knob
Turn this knob to CHORUS, FLANGER, PHASER,
TREMOLO, or HEAVY OCTAVE to select the
corresponding eect, or to SOLO. Turn the knob to
adjust the amount of eect applied.
The ON indicator lights up when EFX is turned on,
and goes out when EFX is turned o. You can also
turn EFX on and o using optional foot switches
Graduations for CHORUS, FLANGER, PHASER,
TREMOLO, SOLO, HEAVY OCTAVE on a panel are
for reference. Be sure to check the sound as you
adjust the eects.
Type Description
CHORUS
In this eect, a slightly detuned sound is
added to the original sound, giving the
sound greater breadth and fullness.
FLANGER
This creates a anging eect that creates a
sort of spinning sensation with the sound.
PHASER
This eect adds a variable phaseshifted
signal to the direct sound, giving the sound
a swirling character.
TREMOLO
Tremolo is an eect that creates a cyclic
change in volume.
SOLO
This applies a boost eect to the original
sound. By using a foot switch to turn SOLO
on/o individually for the JC CLEAN and
LEAD channels, you can vary the volume
and distortion of your sound.
HEAVY OCTAVE
This adds sound lowered by an octave
to the original sound. Since you can play
chords even when using this eect, you can
use it to fatten the sound of your chordal
playing as well.
DELAY/REVERB
12. [DELAY/REVERB] Knob
Turn this knob to DELAY or REVERB to switch to that
eect. Turn the knob to adjust the amount of eect
applied. Set the knob to the SPRING position to enjoy
the sound of a spring reverb unit.
* Graduations for DELAY, REVERB on a panel are for
reference.
Type Description
DELAY
Turn the knob to change the time and
amount of delay eects.
REVERB Turn the knob to adjust the reverb level.
13. [POWER SQUEEZER] Switch
The switch lights in red when the power squeezer
function is on; the switch is unlit when the power
squeezer is o.
Switching on the Power Squeezer function allows you to
reduce the amp’s output to 2 watts.
Switching this on allows you to produce a sound that
preserves the same tone and balance at an output of 2
watts, for volume levels that are more suitable for the
average home.
* The Power Squeezer function aects only sounds input through the
INPUT jack. It has no eect on sounds input via the AUX IN jack.
14. AUX IN Jack
You can connect a CD player, digital audio player or other kind of
device and have it play along with your guitar.
This accepts a stereo miniature phone plug. However, the speaker
and RECORDING OUT/PHONES output is monaural. Use a cable (sold
separately) that’s appropriate for the device you’re connecting.
* Determine the volume level by adjusting the volume control of the
connected device.
* When connection cables with resistors are used, the volume level
of equipment connected to the AUX IN jack may be low. If this
happens, use connection cables that do not contain resistors.
15. FOOT SW (Foot switch) Jack
You can use foot switches (optional BOSS FS-5U or FS-6) to switch
channels (JC CLEAN/LEAD), and to turn EFX/SOLO on and o.
* CUBE-20XL is equipped with a TRS-type FOOT SW jack that accepts
plugs of the conguration shown in the gure. To connect afoot
switch pedal, use a TRS-compatible cable.
TIP : SELECT
RING : EFX/SOLO
* For details on connecting foot switches, refer to “Connections” (p. 6).
* If you use a monaural cable to connect only one foot switch, it can
be used to switch channels (JC CLEAN/LEAD).
16. RECORDING OUT/PHONES Jack
• When Using RECORDING OUT
Use mono 1/4” phone plugs when connecting to this jack.
Volume level of RECORDING OUT can be easily adjusted if
you set the JC CLEAN or LEAD Channel [VOLUME] knob as
shown in the diagram on the right.
• When Using Headphones
Connect headphones to this jack.
* No sound is played through the unit’s speaker while the RECORDING
OUT/PHONES jack is in use.
17. [POWER] Switch
This switches the power on and o.

6
Connections
Switching the Power On and O
Once the connections have been completed, turn on power to your
various devices in the order specied. By turning on devices in the
wrong order, you risk causing malfunction and/or damage to speakers
and other devices.
1. Make sure that all [VOLUME] knobs on the CUBE-20XL and
all the connected devices are set to 0.
2. Turn on all the devices connected to the CUBE-20XL’s input
jacks (INPUT jack and AUX IN jack).
3. Turn on the CUBE-20XL.
* Always make sure to have the volume level turned
down before switching on power. Even with the
volume all the way down, you may still hear some
sound when the power is switched on, but this is
normal, and does not indicate a malfunction.
* This unit is equipped with a protection circuit. A brief interval (a
few seconds) after power up is required before the unit will operate
normally.
4. Adjust the volume levels for the devices.
5. Before switching o the power, lower the volume on each of
the devices in your system and then TURN OFF the devices in
the reverse order to which they were switched on.
* If you need to turn o the power completely, rst turn o the
POWER switch, then unplug the power cord from the power outlet.
Refer to Power Supply (p. 3).
Foot switches
Recorder
Headphones
Electric Guitar
CD Player
Digital Audio Player etc
EFX/
SOLO
EFX/
SOLO
SELECT SELECT SELECT
B A
Set the switches as shown bellow.
or
or
FS-6 FS-5U
* To prevent malfunction and/or damage to speakers or other devices,
always turn down the volume, and turn o the power on all devices
before making any connections.
* Before making the connections, be sure that the volume setting of
the [VOLUME] knob for both ampliers is set to 0.
* When connection cables with resistors are used, the volume level
of equipment connected to the AUX IN jack may be low. If this
happens, use connection cables that do not contain resistors.

7
Português Italiano DeutschNederlands Español Français
English
Using the Tuner Function
CUBE-20XL is equipped with a tuner function. In addition to manual
tuning, you can also use it as a chromatic tuner.
When tuning manually, the sound of the guitar will be output from
the speaker and from the RECORDING OUT/PHONES jack. In chromatic
tuner mode, sound will not be output from the speaker nor from the
RECORDING OUT/PHONES jack.
When tuning manually, you can press the [SELECT] switch to activate a
tuning reference tone.
Manual Tuning
Use manual tuning when the strings are substantially out of tune (such
as after changing strings).
In manual tuning mode, you can tune while listening to the sound of
your guitar through the speakers or headphones.
The volume can be adjusted with the JC CLEAN’s [VOLUME] knob.
If you don’t want the sound of your guitar to be output from the
speakers or headphones, set the JC CLEAN’s [VOLUME] knob to 0.
1. Press the [TUNER] switch.
CUBE-20XL enters the Tuner mode and the [TUNER] switch lights up.
2. Use the Type switch to select the string that you want to
tune.
Knob Position Description
6E Open sixth string (E)
5A Open fth string (A)
4D Open fourth string (D)
3G Open third string (G)
2B Open second string (B)
1E Open rst string (E)
* The reference pitch is A=440 Hz. This cannot be changed.
3. Use the JC CLEAN channel’s [VOLUME] knob to adjust the
volume.
4. Play a single note on the open string that you want to tune.
Tune the string until the green indicator lights.
Flat
Lights red Lights redLights green
Sharp
Pitch is correct
* The red indicator ashes if the pitch is substantially out of tune.
* Press the [SELECT] switch, and you’ll hear a reference tone of the
pitch selected by the Type switch. (This is the Tuning Fork function.)
5. When you have nished tuning, press the [TUNER] switch
once again.
Chromatic Tuning
If you press the [TUNER] switch for one full second or more, the
[TUNER] switch ashes and the unit becomes usable as a“chromatic
tuner,” which automatically determines the name ofthe note closest to
the one played.
Once in the Chromatic Tuner mode, no sound is played from the
speaker or the RECORDING OUT/PHONES jack.
1. Press and hold the [TUNER] switch for at least one second.
[TUNER] switch ashes and CUBE-20XL enters the chromatic tuner
mode.
2. Play a single note on the open string that you want to tune.
Tune the string until the green indicator lights.
Using the Tuning Fork Function
When using manual tuning, you can press the [SELECT] switch to
sound a tuning reference tone at the pitch selected by the Type switch.
1. Press the [TUNER] switch.
CUBE-20XL enters the Tuner mode and the [TUNER] switch lights up.
2. Use the Type switch to select the string that you want to
tune.
* The reference pitch is A=440 Hz. This cannot be changed.
3. Use the JC CLEAN channel’s [VOLUME] knob to adjust the
volume.
4. Press the [SELECT] switch.
The reference tone will sound at the pitch of the string selected by the
Type switch.
5. Play a single note on the open string that you want to tune.
Play an open string or a harmonic, and tune your guitar to match the
reference tone.
6. When you have nished tuning, press the [TUNER] switch
once again.

8
EXTREME
This is an extreme sound with intense distortion.
This is a high-gain sound that packs a lot of punch in the low end,
while delivering a great deal of edge in the upper range.
You can obtain variations in the sound by moving the [MIDDLE] knob.
If you turn on HEAVY OCTAVE, you can achieve an even greater sense
of distortion in the low end.
Space Clean
This is a transparent sound using spacial eects.
Select the JC CLEAN amp, modeled on the Roland JC-120, then add
chorus and long delay.
Using this setting with a guitar equipped with single coil pickups
makes great sounding arpeggios and chord strumming.
Depending on the phrase being played, it can be eective to set the
delay sound’s delay time slightly slower than the phrase’s tempo.
Power Grunge
This produces a raging distortion sound that is very trebly and roughly
textured.
Setting the [GAIN] knob to prevent excessive distortion of the guitar
sound results in a straight guitar sound with brilliant harmonics and
powerful chord sounds.
You can also add the FLANGER to produce a sound with a powerful
swirling eect, much like the sound from a jet.
Additionally, using the guitar’s front pickup and raising the [GAIN] and
[MIDDLE] knobs results in a fat lead sound with long sustain.
Alternative Metal
The perfect sound for heavy, sharp ris.
Select the high-gain METAL STACK, then use the equalizer to boost the
low end even more.
Used with a humbucking pickup in the rear position, it results in an
extreme distortion eect.
Plus, you can add a long delay to use this as a lead sound with great
sustain.
Adding a short delay produces a doubling sound like that from two
performers playing the same phrases simultaneously.
[SELECT] switch : LEAD
[SELECT] switch : JC CLEAN
[SELECT] switch : LEAD
[SELECT] switch : LEAD
Sample Settings

9
Português Italiano DeutschNederlands Español Français
English
Setting Memo
[SELECT] switch :
[SELECT] switch :
[SELECT] switch :
[SELECT] switch :

10
Specications
CUBE-20XL
Rated Power Output 20 W
Nominal Input Level
INPUT (JC CLEAN channel) -10dBu/1MΩ
AUX IN -10dBu
Speakers 20 cm (8 inch)
Controls
[POWER] Switch
[SELECT] Switch
[TUNER] Switch
[POWER SQUEEZER] Switch
<JC CLEAN Channel> [VOLUME] Knob
<LEAD Channel>
Type switch (ACOUSTIC SIM, OVERDRIVE, DISTORTION, METAL, METAL STACK, EXTREME),
[GAIN] Knob, [VOLUME] Knob
<EQUALIZER> [BASS] Knob, [MIDDLE] Knob, [TREBLE] Knob
<EFX/SOLO> [EFX /SOLO] Knob (CHORUS, FLANGER, PHASER, TREMOLO, SOLO, HEAVY OCTAVE)
<DELAY/REVERB> [DELAY/REVERB] Knob (DELAY, REVERB, SPRING)
Indicators JC CLEAN Channel, LEAD Channel, EFX/SOLO, TUNER, POWER SQUEEZER
Connectors
INPUT Jack, AUX IN Jack, FOOT SW Jack (SELECT, EFX/SOLO), RECORDING OUT/PHONES Jack
Power Consumption 24 W
Dimensions
385 (W) x 240 (D) x 385 (H) mm
15-3/16 (W) x 9-1/2 (D) x 15-3/16 (H) inches
Weight 9 kg / 19 lbs 14 oz
Accessories Owner’s Manual
* 0 dBu = 0.775 Vrms
* In the interest of product improvement, the specications and/or appearance of this unit are subject to change without prior notice.

Português Italiano DeutschNederlands Español Français
English
Umschaltbar zwischen zwei Kanälen: JC CLEAN und LEAD (S. 4)
• Die Kanäle können am Gerät oder mit einem optionalen Fußtaster umgeschaltet werden.
Leistungsstarker DSP-Gitarrenverstärker mit 20Watt Ausgangsleistung und 8 Zoll-Lautsprecher
• Die kompakte Größe eignet sich sowohl für das Üben zu Hause als auch für das Spielen im Studio und ermöglicht einen bequemen Transport.
Der LEAD-Kanal bietet sechs unterschiedliche COSM Verstärker-Sounds (S. 4)
• Der LEAD-Kanal bietet sechs verschiedene Sounds wie ACOUSTIC SIMULATOR, OVERDRIVE, DISTORTION, METAL, METAL STACK sowie den
Original EXTREME-Eekt, so dass Sie Sounds für die unterschiedlichsten Musikstile zur Verfügung haben.
Power Squeezer-Funktion (S. 5)
• Diese Funktion ermöglicht auch bei geringer Lautstärke einen sehr rockigen Klang, als würde der Verstärker auf maximaler Leistung betrieben werden.
Integriertes Stimmgerät (S. 7)
• Diese Funktion ermöglicht das Stimmen der Gitarre, während das Instrument an den CUBE-20XL angeschlossen ist.
• Das Stimmgerät kann auch Stimmtöne über den Lautsprecher ausgeben („Stimmgabel-Funktion“).
Ausgestattet mit einer praktischen AUX IN-Buchse (S. 5)
• Diese können Sie verwenden, um von CD-Playern und MP3-Playern Musik abzuspielen und dazu zu üben.
Sieben unterschiedliche Eekte (S. 5)
• Der CUBE-20XL bietet sieben digitale Eekte: CHORUS, FLANGER, PHASER, TREMOLO und HEAVY OCTAVE sowie HALL und ECHO.
• Zum Ein- und Ausschalten der Eekte kann ein optionaler Fußtaster verwendet werden (S. 5).
Bedienungsanleitung
Gitarrenverstärker
Lesen Sie vor der Verwendung dieses Geräts sorgfältig die folgenden Abschnitte: „SICHERER BETRIEB DES GERÄTES“ und „WICHTIGE HINWEISE“
(S. 2; S. 3). Diese Abschnitte enthalten wichtige Informationen über die korrekte Bedienung des Geräts. Um sicherzustellen, dass Sie mit dem
gesamten Funktionsumfang Ihres neuen Geräts vertraut sind, sollten Sie die Bedienungsanleitung vollständig lesen. Bewahren Sie diese
Anleitung an einem Ort auf, an dem Sie bei Bedarf schnell darauf zurückgreifen können.
Copyright © 2010 ROLAND CORPORATION
Alle Rechte vorbehalten. Kein Teil dieser Publikation darf in irgendeiner Form ohne schriftliche Genehmigung der ROLAND CORPORATION reproduziert
werden. Roland ist eine eingetragene Marke der Roland Corporation in den USA und/oder anderen Ländern.
Composite Object Sound Modeling (COSM) ist eine von Roland entwickelte innovative und leistungsstarke Digital-Technologie. COSM analysiert die
unterschiedlichen Faktoren, aus denen sich der ursprüngliche Sound zusammensetzt wie elektrische und physikalische Eigenschaften des Originals,
und erstellt dann ein digitales Modell, das genau diesen Sound reproduzieren kann.

2
WARNUNG
Önen Sie das Gerät nicht, bzw. nehmen Sie keine internen Änderungen am
Gerät vor.
Versuchen Sie nicht, das Gerät zu reparieren oder darin enthaltene Teile zu
ersetzen (außer in Fällen, für die in dieser Anleitung genaue Anweisungen
gegeben sind). Wenden Sie sich bezüglich jeglicher Reparaturen an Ihren
Fachhändler, ein Roland Service Center in Ihrer Nähe oder an einen der
autorisierten Roland-Vertriebspartner, die auf der Seite „Information“
aufgelistet sind.
Stellen Sie das Gerät niemals in Umgebungen mit folgenden Bedingungen auf:
• Feuchtigkeit (z.B. Bäder, Waschräume, nasse Fußböden)
• Dampf oder Rauch
• Hoher Salzgehalt in der Luft
• Hohe Luftfeuchtigkeit
• Regen
• Staub oder Sand
• Starke Vibrationen oder Erschütterungen
Achten Sie darauf, dass das Gerät immer waagerecht und stabil steht. Platzieren
Sie es nicht auf wackeligen Ständern oder auf schiefen Standächen.
Das Gerät darf ausschließlich an einen Netzanschluss angeschlossen werden,
der den Informationen auf der Rückseite des Geräts entspricht.
Verdrehen oder biegen Sie das Netzkabel nicht zu stark, und stellen Sie keine
schweren Gegenstände auf das Kabel. Dadurch kann das Kabel beschädigt
werden, was zu Unterbrechungen und Kurzschlüssen führen kann.
Schadhafte Kabel können Brände und elektrische Schläge verursachen!
Dieses Gerät kann einzeln oder in Kombination mit einem Verstärker und
Kopfhörern oder Lautsprechern Schallpegel erzeugen, die zu dauerhaftem
Gehörverlust führen können. Betreiben Sie das Gerät nicht über längere Zeit
mit hoher oder unangenehmer Lautstärke. Sobald Sie eine Beeinträchtigung
Ihres Gehörs oder ein Klingeln in den Ohren bemerken, sollten Sie den
Betrieb des Geräts sofort einstellen und sich an einen HNO-Arzt wenden.
Stellen Sie auf diesem Gerät keine mit Flüssigkeiten gefüllten Behälter ab.
Achten Sie darauf, dass in das Gerät keine Fremdkörper (z.B. brennbare
Objekte, Münzen oder Drähte) oder Flüssigkeiten (z.B. Wasser oder Saft)
eindringen. Dies kann zu Kurzschlüssen, Fehlfunktion oder sonstigen
Störungen führen.
Wenn einer der folgenden Fälle eintritt, schalten Sie das Gerät sofort aus, ziehen
Sie das Netzkabel aus der Steckdose, und wenden Sie sich an Ihren Fachhändler,
ein Roland Service Center in Ihrer Nähe oder an einen der autorisierten Roland-
Vertriebspartner, die auf der Seite „Information“ aufgelistet sind:
• Das Netzkabel oder der Stecker wurde beschädigt;
• Es tritt Rauch oder ein ungewöhnlicher Geruch auf;
• Gegenstände oder Flüssigkeiten sind in das Gerät gelangt;
• Das Gerät war Regen (oder sonstiger Feuchtigkeit) ausgesetzt;
• Das Gerät scheint nicht normal zu funktionieren oder weist eine deutliche
Änderung der Leistungsfähigkeit auf.
In Haushalten mit Kleinkindern sollte ein Erwachsener anwesend sein und
den Betrieb überwachen, bis das Kind alle wesentlichen Regeln beachten
kann, die für den sicheren Betrieb des Geräts unerlässlich sind.
WARNUNG
Schützen Sie das Gerät vor starken Stößen.
(Lassen Sie es nicht fallen!)
Betreiben Sie den Netzadapter nicht zusammen mit einer zu großen Anzahl
von Geräten an einer einzigen Netzsteckdose. Seien Sie besonders vorsichtig
beim Einsatz von Verlängerungskabeln. Die Gesamtleistung aller an der Verlän-
gerung betriebenen Geräte darf die für das Verlängerungskabel angegebene
zulässige Leistung (Watt-/Ampère-Zahl) nicht überschreiten. Übermäßige Last
kann dazu führen, dass sich die Isolierung erhitzt und ggf. schmilzt.
Bevor Sie das Gerät in einem anderen Land betreiben, wenden Sie sich an
Ihren Fachhändler, ein Roland-Service-Center in Ihrer Nähe oder an einen
der autorisierten Roland-Vertriebspartner, die auf der Seite „Informationen“
aufgeführt sind.
VORSICHT
Das Gerät und der Netzadapter sollten so aufgestellt werden, dass deren
Aufstellort oder Position nicht die erforderliche Luftzufuhr beeinträchtigt.
Halten Sie das Netzkabel stets am Stecker, wenn Sie dieses in eine Steckdose
oder in das Gerät stecken oder herausziehen.
Sie sollten das Netzkabel in regelmäßigen Abständen aus der Steckdose
herausziehen und die Kontakte am Stecker mit einem trockenen Tuch von
Staub und anderen Ablagerungen befreien. Ziehen Sie den Netzstecker
auch dann aus der Steckdose, wenn das Gerät längere Zeit außer Betrieb ist.
Jegliche Staubansammlung zwischen Netzstecker und Steckdose kann die
Isolierung beeinträchtigen und zu Bränden führen.
Sorgen Sie dafür, dass Kabel und Leitungen nicht durcheinander geraten.
Achten Sie zudem darauf, dass sich jegliche Kabel und Leitungen außerhalb
der Reichweite von Kindern benden.
Steigen Sie niemals auf das Gerät, und stellen Sie keine schweren
Gegenstände darauf ab.
Ergreifen Sie das Netzkabel niemals mit nassen Händen, wenn Sie dieses in
eine Steckdose oder in das Gerät stecken oder herausziehen.
Bevor Sie das Gerät bewegen, ziehen Sie das Netzkabel aus der Steckdose
sowie alle weiteren Kabel von/zu externen Geräten heraus.
Bevor Sie das Gerät reinigen, schalten Sie es aus, und ziehen Sie das
Netzkabel aus der Steckdose (S. 6).
Bei angekündigtem oder heraufziehendem Gewitter sollten Sie immer den
Netzstecker aus der Steckdose ziehen.
Die Kühllüfter an beiden Seiten des Geräts können heiß werden, vermeiden
Sie daher Verbrennungen.
Entfernen Sie auf keinen Fall die Lautsprecherabdeckung oder den
Lautsprecher. Lautsprecher nicht vom Benutzer austauschbar. Innerhalb
des Gehäuses sind Ströme und Spannungen vorhanden, die zu elektrischen
Schlägen führen können.
SICHERER BETRIEB DES GERÄTS

3
Português Italiano DeutschNederlands Español Français
English
WICHTIGE HINWEISE
Stromversorgung
• Schließen Sie dieses Gerät nicht zusammen mit elektrischen Geräten
an die gleiche Netzsteckdose an, die durch einen Wechselrichter
gesteuert werden (z.B. Kühlschrank, Waschmaschine, Mikrowellenherd
oder Klimaanlage) oder durch einen Motor betrieben werden. Je nach
Art und Weise, in der das elektrische Gerät verwendet wird, können
die von diesem erzeugten Interferenzen in der Netzversorgung zu
Fehlfunktionen oder hörbaren Störgeräuschen führen. Wenn es nicht
möglich ist, eine gesonderte Steckdose zu verwenden, schalten Sie
einen Netzentstörlter zwischen dieses Gerät und die Netzsteckdose.
• Schalten Sie alle beteiligten Geräte aus, bevor Sie dieses Gerät
mit anderen Geräten verbinden. Auf diese Weise können Sie
Fehlfunktionen und/oder Schäden an den Lautsprechern oder anderen
Geräten vermeiden.
• Selbst wenn der POWER-Schalter ausgeschaltet ist und die LEDs nicht
mehr leuchten, bedeutet dies nicht, dass das Gerät vollständig von der
Stromquelle getrennt ist. Wenn Sie das Gerät vollständig ausschalten
möchten, schalten Sie den POWER-Schalter aus, und ziehen Sie das
Netzkabel aus der Steckdose. Aus diesem Grund sollte die Steckdose,
mit der das Netzkabel des Geräts verbunden ist, leicht zu erreichen
und stets zugänglich sein.
Aufstellung
• Der Einsatz des Geräts in der Nähe von Leistungsverstärkern (oder
anderen Geräten mit großen Transformatoren) kann ein Brummen
verursachen. Um dieses Problem zu umgehen, ändern Sie die
Ausrichtung dieses Geräts, oder stellen Sie es in größerer Entfernung
zur Störquelle auf.
• Dieses Gerät kann den Empfang von Radio- und Fernsehsignalen
stören. Verwenden Sie dieses Gerät nicht in der Nähe solcher
Empfangsgeräte.
• Es können Geräusche entstehen, wenn Geräte zur drahtlosen
Kommunikation wie z.B. Mobiltelefone in der Umgebung dieses
Geräts verwendet werden. Diese Geräusche können bei abgehenden
oder ankommenden Gesprächen oder während der Verbindung
entstehen. Sollten Sie Probleme dieser Art haben, verwenden Sie
die Mobilfunkgeräte in größerer Entfernung zu diesem Gerät, oder
schalten Sie sie aus.
• Setzen Sie das Gerät keinem direkten Sonnenlicht aus, stellen
Sie es nicht neben Heizgeräten auf, lassen Sie es nicht in einem
geschlossenen Fahrzeug liegen, und setzen Sie es auch sonst keinen
extremen Temperaturen aus. Vermeiden Sie ebenfalls die Beleuchtung
des Geräts durch Lichtquellen, die gewöhnlicherweise in der Nähe
des Geräts eingesetzt werden (z.B. Pianoleuchten) oder durch starke
Scheinwerfer, wenn dies über einen längeren Zeitraum geschieht.
Übermäßige Hitze kann zu Verformungen oder Verfärbungen des
Geräts führen.
• Wenn das Gerät bei einem Transport aus kalter/trockener
Umgebung in eine feucht-warme Umgebung gelangt, können
sich Wassertröpfchen (Kondensation) im Geräteinneren bilden. Es
können Schäden oder Fehlfunktionen auftreten, falls Sie versuchen,
das Gerät unter diesen Bedingungen zu betreiben. Bevor Sie das
Gerät verwenden, lassen Sie es mehrere Stunden lang stehen, bis die
Kondensation vollständig verdampft ist.
• Vermeiden Sie es, Gummi, Vinyl oder ähnliche Materialien über
längere Zeiträume auf das Gerät zu legen. Diese Gegenstände
könnten die Oberäche des Geräts verfärben oder auf andere Weise
beeinträchtigen.
• Kleben Sie keine Sticker, Abziehbilder oder ähnliches auf das Gerät.
Das Ablösen solcher Materialien vom Gerät könnte die äußere
Oberäche beschädigen.
• Je nach Material und Temperatur der Oberäche, auf der Sie das Gerät
platzieren, können dessen Gummifüße die Oberäche verfärben
oder beeinträchtigen. Sie können ein Stück Filz oder Sto unter die
Gummifüße legen, um dies zu vermeiden. Achten Sie in diesem Fall
jedoch darauf, dass das Gerät nicht wegrutschen kann.
• Stellen Sie keine mit Wasser gefüllten Behälter (z.B. Blumenvasen)
auf das Gerät. Vermeiden Sie auch die Verwendung von Insektiziden,
Parfüm, Alkohol, Nagellack, Sprühdosen etc. in der Nähe des Geräts.
Wischen Sie jegliche auf dem Gerät vergossene Flüssigkeiten rasch mit
einem trockenen, weichen Tuch ab.
Wartung
• Für die normale Reinigung wischen Sie das Gerät mit einem weichen,
trockenen oder leicht angefeuchteten Tuch ab. Um hartnäckigen
Schmutz zu entfernen, verwenden Sie ein mit einer milden, nicht
scheuernden Seifenlösung getränktes Tuch. Wischen Sie danach
sorgfältig mit einem weichen, trockenen Tuch nach.
• Verwenden Sie kein Benzin oder Verdünnungsmittel, Alkohol oder
sonstige Lösemittel, um Verfärbungen und/oder Verformungen zu
vermeiden.
Zusätzliche Vorsichtsmaßnahmen
• Seien Sie hinreichend vorsichtig bei Betätigung der Tasten, Regler
und anderer Bedienelemente sowie beim Anschließen von Kabeln an
den Buchsen des Geräts. Ein grober Umgang kann zu Fehlfunktionen
führen.
• Wenn Sie Kabel anschließen oder abziehen, ergreifen Sie das
Kabel immer am Stecker – ziehen Sie niemals am Kabel. Auf diese
Weise vermeiden Sie Kurzschlüsse und Schäden an den inneren
Bestandteilen der Kabel.
• Während des normalen Betriebs erwärmt sich das Gerät in moderatem
Maße.
• Halten Sie die Lautstärke des Geräts auf einem vernünftigen Maß, um
die Nachbarschaft nicht unnötig zu stören. Sie können auch Kopfhörer
verwenden, sodass Sie auf Ihre Umgebung keine Rücksicht zu nehmen
brauchen.
• Wenn Sie das Gerät transportieren müssen, verpacken Sie
es wenn möglich in dem Originalkarton (einschließlich des
Verpackungsmaterials), in dem es geliefert wurde. Anderenfalls sollten
Sie versuchen, ähnliches Packmaterial zu verwenden.
• Einige Anschlusskabel enthalten Widerstände. Verwenden Sie für
Anschlüsse an diesem Gerät keine Kabel mit Widerständen. Die
Verwendung solcher Kabel kann dazu führen, dass der Signalpegel
sehr niedrig oder sogar unhörbar ist. Informationen über die
technischen Daten Ihrer Kabel erhalten Sie vom jeweiligen Hersteller.
• Wickeln Sie das Netzkabel zum Transportieren und Lagern des Geräts
um die Kabelklemme.
Marken
• Die in diesem Dokument erwähnten Produktbezeichnungen sind
Warenzeichen oder eingetragene Warenzeichen der jeweiligen
Eigentümer und haben nichts mit der Roland Corporation zu tun.
In dieser Anleitung werden diese Bezeichnungen in einer Weise
verwendet, die geeignet ist, die mit der COSM-Technologie simulierten
Sounds zu beschreiben.

4
1. INPUT-Buchse
Schließen Sie hier Ihre elektrische Gitarre an.
2. [SELECT]-Schalter
Schaltet zwischen dem JC CLEAN- und dem LEAD-Kanal um. Welcher
Kanal ausgewählt ist, können Sie daran erkennen, welche rote
Anzeigeleuchte leuchtet (JC CLEAN: links, LEAD: rechts).
Die Kanäle können mithilfe der optionalen Fußschalter BOSS FS-5U
und FS-6 umgeschaltet werden.
3. [TUNER]-Schalter
Verwenden Sie diesen Schalter zum Stimmen Ihrer Gitarre. Wenn Sie
den Schalter einschalten, leuchtet die Anzeigeleuchte rot, und Sie
können die Stimmfunktion verwenden.
Weitere Informationen nden Sie unter „Verwendung der Tuner-
Funktion (Stimmgerät)“ (S. 7).
JC CLEAN-Kanal
Dies ist ein Modell des berühmten Roland-Gitarrenverstärkers JC-120
Jazz Chorus. Der extrem saubere und glockige Sound wurde von vielen
berühmten Gitarristen und Bands verwendet. Dieser Cleansound ist
auch ideal in Verbindung mit vorgeschalteten Eektpedalen oder
einem Multieektgerät.
4. [VOLUME]-Regler
Regelt die Lautstärke des JC CLEAN-Kanals.
LEAD-Kanal
5. Typschalter
Sie können die folgenden sechs Typen auswählen.
Wenn die Stimmfunktion eingeschaltet ist, können Sie diesen Schalter
verwenden, um die zu stimmende Saite auszuwählen (S. 7).
Typ Beschreibung
ACOUSTIC SIM
Simuliert den Klang einer Akustikgitarre bei
Verwendung einer E-Gitarre.
OVERDRIVE
Natürlich verzerrter Sound, z.B. für Blues und
Bluesrock.
DISTORTION Stärkere Verzerrung, ideal für Rockmusik.
METAL Zerrsound für Hardrock und Heavy Metal.
METAL STACK
Sehr satter Sound eines Heavy Metal-
Verstärkerturms.
EXTREME
DER typische Death Metal-Sound, fett und brutal,
trotzdem sehr durchsetzungsfähig.
6. [GAIN]-Regler
Regelt den Verzerrungsgrad des LEAD-Kanals.
7. [VOLUME]-Regler
Regelt die Lautstärke des LEAD-Kanals.
Beschreibungen zum Bedienfeld
Bedienfeld
1 4
16
17
158 9 10 11 12
136 752 3 14

5
Português Italiano DeutschNederlands Español Français
English
EQUALIZER
8. [BASS]-Regler
Regelt den Anteil der Bass-Frequenzen.
9. [MIDDLE]-Regler
Regelt den Anteil der Mitten-Frequenzen.
10. [TREBLE]-Regler
Regelt den Anteil der hohen Frequenzen.
EFX/SOLO (Eekte/Solo)
11. [EFX/SOLO]-Schalter (Eekte/Solo)
Drehen Sie diesen Regler auf CHORUS, FLANGER,
PHASER, TREMOLO oder HEAVY OCTAVE, um
den entsprechenden Eekt auszuwählen, oder
auf SOLO. Drehen Sie den Regler anhand der
Abstufungs-Markierungen, um die Stärke des
Eekts einzustellen.
Die Anzeigeleuchte ON leuchtet, wenn EFX
eingeschaltet ist und erlischt, wenn EFX ausgeschaltet
wird. Sie können EFX auch unter Verwendung eines
optionalen Fußtasters ein- und ausschalten.
Die Abstufungen für CHORUS, FLANGER, PHASER,
TREMOLO, SOLO und HEAVY OCTAVE auf dem
Bedienfeld dienen nur als Referenz. Hören Sie beim
Einstellen des Eekts vor allem auf den Klang.
Typ Beschreibung
CHORUS
Bei diesem Eekt wird dem Originalsignal ein leicht
verstimmtes Signal hinzugefügt, wodurch sich ein breiterer
und vollerer Sound ergibt.
FLANGER
Dies erzeugt den Flanging-Eekt, der den Eindruck eines
sich drehenden Sounds bewirkt.
PHASER
Dieser Eekt fügt dem Originalsignal ein variables
phasenverschobenes Signal hinzu, wodurch der Sound
einen wirbelnden Charakter erhält.
TREMOLO
Tremolo ist ein Eekt, bei dem eine zyklische Lautstärkever-
änderung erzeugt wird.
SOLO
Diese Funktion fügt dem Klang mehr Lautstärke und
Verzerrung (Mittenboost) hinzu, damit sich der Sound bei
einem Solo besser abhebt. Mit einem optionalen Fußtaster
kann die Solo-Funktion per Fuß aufgerufen werden.
HEAVY
OCTAVE
Dieser Eekt fügt dem gespielten Ton einen weiteren Ton
(eine Oktave tiefer) hinzu. Da bei Verwendung dieses Eekts
auch Akkorde gespielt werden können, kann er auch dazu
verwendet werden, um extrem fette und tiefe Ris zu
spielen.
DELAY/REVERB
12. [DELAY/REVERB]-Regler
Drehen Sie diesen Regler auf DELAY oder REVERB, um
den jeweiligen Eekt einzuschalten. Drehen Sie den
Regler, um die Stärke des Eekts einzustellen. Drehen
Sie den Regler in die Position SPRING, um einen
typischen Federhall-Sound hinzuzufügen.
* Die Abstufungen für DELAY und REVERB auf dem
Bedienfeld dienen nur als Referenz.
Typ Beschreibung
DELAY
Drehen Sie den Regler, um die Dauer und Stärke des
Echoeekts einzustellen.
REVERB
Drehen Sie den Regler, um die Stärke des Halleekts
einzustellen.
13. [POWER SQUEEZER]-Schalter
Die Anzeigeleuchte des Schalters leuchtet rot, wenn die
Power Squeezer-Funktion eingeschaltet ist, und sie ist
unbeleuchtet, wenn die Funktion ausgeschaltet wurde.
Durch Einschalten der Power Squeezer-Funktion wird die
Ausgangsleistung des Verstärkers auf 2Watt reduziert.
Power Squeezer (für Leistungs-Absenkung) werden
normalerweise bei großen Verstärkertürmen eingesetzt,
um deren besten Sound (den sie bei voller Lautstärke
entwickeln) auch bei geringer Lautstärke zu erhalten.
Genauso funktioniert der Power-Squeezer beim
CUBE-20XL.
* Die Power Squeezer-Funktion wirkt sich nur auf Signale aus, die
über die INPUT-Buchse eingehen. Sie wirkt sich nicht auf Signale
aus, die über die AUX IN-Buchse eingehen.
14. AUX IN-Buchse
Hier können Sie einen CD-Player, einen MP3-Player oder ein anderes
Gerät anschließen, dessen Musikausgabe Sie mit der Gitarre begleiten
können.
Es kann eine Stereo-Miniklinke angeschlossen werden. Das
Ausgangssignal des Lautsprechers und der Buchse RECORDING OUT/
PHONES ist jedoch mono. Verwenden Sie ein für das anzuschließende
Gerät geeignetes Kabel (als Zubehör erhältlich).
* Die Lautstärke wird über die Lautstärkereglung des
angeschlossenen Geräts eingestellt.
* Wenn Verbindungskabel mit Widerständen verwendet werden,
kann die Lautstärke der an die AUX IN-Buchse angeschlossenen
Geräte sehr niedrig sein. Verwenden Sie in diesem Fall Kabel ohne
Widerstände.
15. FOOT SW-Buchse (Fußtaster)
Sie können Fußtaster verwenden (optional, BOSS FS-5U oder FS-6), um
zwischen Kanälen umzuschalten (JC CLEAN/LEAD), und um EFX/SOLO
ein- und auszuschalten.
* Der CUBE-20XL verfügt über eine Stereo Fußtaster-Buchse, um zwei
Funktionen zu steuern. Dafür ist ein Doppelfußtaster FS-6 und ein
Stereo-Klinkenkabel nötig. Die Belegung des Steckers ist in der
Abbildung gezeigt.
SPITZE: SELECT
RING: EFX/SOLO
* Weitere Informationen zum Anschließen von Fußtastern nden Sie
unter „Anschlüsse“ (S. 6).
* Wenn Sie ein Monokabel verwenden, um nur einen Fußtaster
anzuschließen, steht nur das Umschalten zwischen den Kanälen zur
Verfügung.
16. RECORDING OUT/PHONES-Buchse
• Verwenden von RECORDING OUT
Verwenden Sie für den Anschluss an diese Buchse
Mono-Klinkenstecker. Die Lautstärke von RECORDING
OUT kann mithilfe des [VOLUME]-Reglers der Kanäle
JC CLEAN und LEAD angepasst werden, wie auf der
Abbildung rechts dargestellt.
• Verwenden von Kopfhörern
Schließen Sie diese an dieser Buchse an.
* Wenn die RECORDING OUT/PHONES-Buchse verwendet wird, wird
über den Lautsprecher des Geräts kein Sound ausgegeben.
17. [POWER]-Schalter
Schaltet das Gerät ein und aus.

6
Anschlüsse
Ein- und Ausschalten des Geräts
Nachdem Sie die Verbindungen hergestellt haben, schalten Sie Ihre
Geräte in der angegebenen Reihenfolge ein. Wenn Sie die Geräte
in der falschen Reihenfolge einschalten, besteht die Gefahr von
Fehlfunktionen und/oder Schäden an Lautsprechern und anderen
Geräten.
1. Achten Sie darauf, dass alle [VOLUME]-Regler am CUBE-20XL
und an allen angeschlossenen Geräten auf 0 eingestellt sind.
2. Schalten Sie alle Geräte ein, die an der INPUT- und der
AUX-IN-Buchse des CUBE-20XL angeschlossen sind.
3. Schalten Sie den CUBE-20XL ein.
* Achten Sie immer darauf, die Lautstärke
herunterzuregeln, bevor Sie das Gerät einschalten. Auch
bei vollständig heruntergeregelter Lautstärke hören Sie
beim Einschalten möglicherweise ein Geräusch, aber das
ist normal und stellt keine Fehlfunktion dar.
* Dieses Gerät ist mit einer Schutzschaltung ausgestattet. Nach dem
Einschalten dauert es einen Moment, bis das Gerät normal arbeitet.
4. Stellen Sie die Lautstärken der Geräte ein.
5. Regeln Sie vor dem Ausschalten die Lautstärken aller
Geräte in Ihrem System herunter, und schalten Sie dann die
Geräte in umgekehrter Reihenfolge, in der sie eingeschaltet
wurden, aus.
* Wenn Sie das Gerät vollständig ausschalten möchten, schalten
Sie den POWER-Schalter aus, und ziehen Sie das Netzkabel
aus der Steckdose. Weitere Informationen nden Sie unter
„Stromversorgung“ (S. 3).
Fußtaster
Aufnahmegerät
Kopfhörer
Elektrische Gitarre
CD-Player
MP3-Player usw.
EFX/
SOLO
EFX/
SOLO
SELECT SELECT SELECT
B A
Stellen Sie die Mini-Schiebeschalter wie nachstehend gezeigt ein.
oder
oder
FS-6 FS-5U
* Um Fehlfunktionen und/oder Schäden an Lautsprechern oder
anderen Geräten zu vermeiden, regeln Sie stets die Lautstärke
herunter, und schalten Sie alle Geräte aus, bevor Sie Verbindungen
herstellen.
* Stellen Sie sicher, dass die Lautstärke der [VOLUME]-Regler für beide
Verstärker auf null eingestellt ist, bevor Sie ein Gerät anschließen.
* Wenn Verbindungskabel mit Widerständen verwendet werden,
kann die Lautstärke der an die AUX IN-Buchse angeschlossenen
Geräte sehr niedrig sein. Verwenden Sie in diesem Fall Kabel ohne
Widerstände.

7
Português Italiano DeutschNederlands Español Français
English
Verwendung der Tuner-Funktion (Stimmgerät)
Der CUBE-20XL ist mit einem Stimmgerät ausgestattet. Zusätzlich
zum manuellen Stimmen (manuelle Auswahl der zu stimmenden
Saite) können Sie diese Funktion auch als chromatisches Stimmgerät
(automatisches Erkennen der zu stimmenden Saite) nutzen.
Wenn Sie das Stimmen manuell vornehmen, werden die Töne der
Gitarre über den Lautsprecher und die RECORDING OUT/PHONES-
Buchse ausgegeben. Bei der chromatischen Stimmmethode werden
die Töne weder über den Lautsprecher, noch über die RECORDING
OUT/PHONES-Buchse ausgegeben.
Während des manuellen Stimmens können Sie auf den [SELECT]-
Schalter drücken, um einen Referenzton für das Stimmen auszugeben.
Manuelles Stimmen
Stimmen Sie das Instrument manuell, wenn die Saiten stark verstimmt
sind (zum Beispiel nach dem Aufziehen neuer Saiten).
Im Modus für manuelles Stimmen können Sie während des Stimmens
die Töne der Gitarre über den Lautsprecher oder über Kopfhörer hören.
Die Lautstärke kann mit dem [VOLUME]-Regler des JC CLEAN-Kanals
angepasst werden. Wenn die Töne der Gitarre nicht über den
Lautsprecher oder die Kopfhörer ausgegeben werden sollen, stellen
Sie den [VOLUME]-Regler des JC CLEAN-Kanals auf 0.
1. Drücken Sie den [TUNER]-Taster.
Der CUBE-20XL wechselt in den Stimmmodus, und der [TUNER]-Taster
leuchtet auf.
2. Wählen Sie mit dem Typschalter die zu stimmende Saite aus.
Reglerstellung Beschreibung
6E Leere sechste Saite (E)
5A Leere fünfte Saite (A)
4D Leere vierte Saite (D)
3G Leere dritte Saite (G)
2B Leere zweite Saite (hohes B; deutsche Tonbezeichnung: H)
1E Leere erste Saite (E)
* Die Bezugstonhöhe ist A = 440 Hz. Dies kann nicht geändert werden.
3. Verwenden Sie den [VOLUME]-Regler des JC CLEAN-Kanals,
um die Lautstärke anzupassen.
4. Schlagen Sie die leere Saite, die Sie stimmen wollen, einzeln an.
Stimmen Sie die Saite, bis die grüne Anzeige aueuchtet.
Einen halben
Ton tiefer
Rote Leuchte Rote LeuchteGrüne Leuchte
Einen halben
Ton höher
Tonhöhe ist
richtig
* Die rote Anzeige leuchtet, wenn die Saite stark verstimmt ist.
* Drücken Sie den [SELECT]-Schalter, um einen Referenzton in der mit
dem Typschalter ausgewählten Tonhöhe wiederzugeben (Dies ist
die Stimmgabelfunktion).
5. Wenn Sie mit dem Stimmen fertig sind, drücken Sie noch
einmal den [TUNER]-Taster.
Chromatisches Stimmen
Wenn Sie den [TUNER]-Taster mindestens eine Sekunde gedrückt
halten, beginnt der [TUNER]-Taster zu blinken, und das Gerät kann
als chromatisches Stimmgerät verwendet werden. In dieser Funktion
orientiert sich das Stimmgerät automatisch an der Note, die der
gespielten am nächsten ist.
Im Modus für chromatisches Stimmen werden keine Töne über den
Lautsprecher oder die RECORDING OUT/PHONES-Buchse ausgegeben.
1. Drücken Sie den [TUNER]-Taster, und halten Sie diesen für
mindestens eine Sekunde gedrückt.
Der [TUNER]-Taster blinkt, und der CUBE-20XL wechselt in den Modus
für chromatisches Stimmen.
2. Schlagen Sie die leere Saite, die Sie stimmen wollen, einzeln
an.
Stimmen Sie die Saite, bis die grüne Anzeige aueuchtet.
Verwenden der Stimmgabelfunktion
Während des manuellen Stimmens können Sie auf den [SELECT]-
Schalter drücken, um einen Ton für das Stimmen in der mit dem
Typschalter ausgewählten Tonhöhe wiederzugeben.
1. Drücken Sie den [TUNER]-Taster.
Der CUBE-20XL wechselt in den Stimmmodus, und der [TUNER]-Taster
leuchtet auf.
2. Wählen Sie mit dem Typschalter die zu stimmende Saite aus.
* Die Bezugstonhöhe ist A = 440 Hz. Dies kann nicht geändert
werden.
3. Verwenden Sie den [VOLUME]-Regler des JC CLEAN-Kanals,
um die Lautstärke anzupassen.
4. Drücken Sie den [SELECT]-Schalter.
Der Stimmton wird in der Tonhöhe der mit dem Typschalter
ausgewählten Saite wiedergegeben.
5. Schlagen Sie die leere Saite, die Sie stimmen wollen, einzeln
an.
6. Wenn Sie mit dem Stimmen fertig sind, drücken Sie noch
einmal den [TUNER]-Taster.

8
EXTREME
Erzeugt einen extremen Heavy Metal-Sound.
Dieser High-Gain-Sound liefert starken Druck in den Tiefen für harte
Ris, mit scharfen Höhen für die nötige Durchsetzungskraft.
Der Sound kann durch Drehen des [MIDDLE]-Reglers angepasst
werden.
Wenn Sie den Regler auf HEAVY OCTAVE stellen, wird der Sound durch
die zugefügte Oktave extrem tief.
Space Clean
Dies ist ein transparenter Sound mit räumlichen Eekten.
Wählen Sie den nach dem Roland JC-120 modellierten JC CLEAN-Kanal
aus, und fügen Sie Chorus und langes Echo hinzu.
Wenn Sie diese Einstellung mit einer Gitarre mit Single-Coil-
Tonabnehmer verwenden, erzeugen Sie einen großartigen Sound
beim Spielen von Arpeggien und Akkorden.
In Abhängigkeit von dem gespielten Song lässt sich der Eekt
möglicherweise verbessern, wenn die Verzögerungszeit für das Echo
geringfügig kürzer ist als das Tempo des Songs.
Power Grunge
Diese Einstellung erzeugt einen rauen, agressiven Sound, ideal für
Grunge und „dreckige“ Rhythmusgitarren.
Wenn der [GAIN]-Regler entsprechend eingestellt wird, um eine zu
starke Verzerrung der Gitarre zu vermeiden, wird ein angezerrter
Sound für kraftvolle Akkorde erzeugt.
Es kann auch FLANGER hinzugefügt werden, um einen typischen
Metal-Touch hinzuzufügen.
Wenn zudem der Steg- Tonabnehmer der Gitarre verwendet wird und
die Einstellungen für [GAIN] und [MIDDLE] erhöht werden, wird ein
kraftvoller, lang anhaltender Lead-Sound erzeugt.
Alternative Metal
Der perfekte Sound für tiefe, aggressive Ris.
Wählen Sie den High-Gain METAL STACK aus, und verwenden Sie den
Equalizer, um die Tiefen noch weiter zu betonen.
Bei Verwendung eines Humbucker-Tonabnehmers in der Hals- Position
entsteht ein extremer Verzerrungseekt.
Sie können darüber hinaus ein langes Echo hinzufügen, für einen
langanhaltenden Lead-Sound.
Wenn Sie ein kurzes Echo hinzufügen, entsteht ein doppelter Sound,
so als wenn zwei Musiker das gleiche Ri spielen würden.
[SELECT]-Schalter: LEAD
[SELECT]-Schalter: JC CLEAN
[SELECT]-Schalter: LEAD
[SELECT]-Schalter: LEAD
Beispieleinstellungen

9
Português Italiano DeutschNederlands Español Français
English
Einstellungsvorlagen
[SELECT]-Schalter:
[SELECT]-Schalter:
[SELECT]-Schalter:
[SELECT]-Schalter:

10
Technische Daten
CUBE-20XL
Angegebene Ausgangslei-
stung
20 W
Nomineller Eingangspegel
EINGANG (JC CLEAN-Kanal) -10dBu/1MΩ
AUX IN -10dBu
Lautsprecher 20cm (8Zoll)
Bedienelemente
[POWER]-Schalter
[SELECT]-Schalter
[TUNER]-Schalter
[POWER SQUEEZER]-Schalter
<JC CLEAN-Kanal> [VOLUME]-Regler
<LEAD-Kanal>
Typschalter (ACOUSTIC SIM, OVERDRIVE, DISTORTION, METAL, METAL STACK, EXTREME),
[GAIN]-Regler, [VOLUME]-Regler
<EQUALIZER> [BASS]-Regler, [MIDDLE]-Regler, [TREBLE]-Regler
<EFX/SOLO> [EFX /SOLO]-Schalter (CHORUS, FLANGER, PHASER, TREMOLO, SOLO und HEAVY OCTAVE)
<DELAY/REVERB> [DELAY/REVERB]-Regler (DELAY, REVERB, SPRING)
Anzeigen JC CLEAN-Kanal, LEAD-Kanal, EFX/SOLO, TUNER, POWER SQUEEZER
Anschlüsse
INPUT-Buchse, AUX IN-Buchse, FOOT SW-Buchse (SELECT, EFX/SOLO), RECORDING OUT/PHONES-Buchse
Stromverbrauch 24 W
Abmessungen
385 (B) x 240 (T) x 385 (H) mm
15-3/16 (B) x 9-1/2 (T) x 15-3/16 (H) Zoll
Gewicht 9 kg/19lbs, 14 oz
Zubehör Bedienungsanleitung
* 0dBu = 0,775Vrms
* Im Interesse der Verbesserung des Produkts können sich die technischen Daten und/oder das Erscheinungsbild dieses Geräts ohne vorherige
Ankündigung ändern.

Português Italiano DeutschNederlands Español Français
English
Possibilité de permuter entre deux canaux: JC CLEAN et LEAD (p. 4)
• La permutation entre deux canaux peut se faire au moyen d’un commutateur au pied.
Amplicateur pour guitare DSP hautes performances, sortie 20watts, avec haut-parleur intégré 20cm
• Format compact et aisément transportable, idéal pour les répétitions à la maison comme au studio.
La fonction LEAD propose six eets de pédale COSM diérents (p. 4)
• Le canal LEAD propose six types de pédales d'eets, ACOUSTIC SIM, OVERDRIVE, DISTORTION, METAL, METAL STACK ainsi que l'eet d'origine
EXTREME, vous orant des sons adaptés à un large éventail de styles.
Fonction Power Squeezer (p. 5)
• Permet d'obtenir un bon équilibre tonal, même à faible volume, et de proter d'un son puissant, même à la maison.
La fonction d'accordage est incluse (p. 7)
• Cette fonction vous permet d'accorder votre guitare pendant qu'elle est connectée au CUBE-20XL.
• La fonction d'accordage émet une hauteur de référence pour simplier l'accordage de votre instrument.
Equipé d'une prise d'entrée auxiliaire AUX IN très pratique pour vos séances de répétitions (p. 5)
• Permet de jouer accompagné d'un lecteur CD ou de lecteurs audio numériques.
Les eets comprennent l'eet EFX/SOLO et l'eet DELAY/REVERB séparés (p. 5)
• La section EFX du panneau de contrôle comprend 5 types d'eets numériques, CHORUS, FLANGER, PHASER, TREMOLO et HEAVY OCTAVE.
• La pédale (en option) permet d'activer ou de désactiver la fonction EFX/SOLO (p. 5).
Mode d’emploi
Amplicateur de guitare
Avant d'utiliser cet appareil, lisez attentivement les sections intitulées: «UTILISATION DE L'APPAREIL EN TOUTE SECURITE» , et «REMARQUES
IMPORTANTES» (p. 2; p. 3). Ces sections fournissent des informations importantes relatives au bon fonctionnement de l’appareil. En outre, pour
être sûr de bien maîtriser chacune des fonctionnalités de votre nouvel appareil, il est nécessaire de lire le mode d’emploi dans son intégralité.
Vous devez conserver ce manuel à portée de main an de pouvoir vous y reporter au besoin.
Copyright © 2010 ROLAND CORPORATION
Tous droits réservés. Il est interdit de reproduire tout ou partie de cette publication, sous quelque forme que ce soit, sans l'autorisation écrite de
ROLAND CORPORATION. Roland est une marque déposée de Roland Corporation aux Etats-Unis et/ou dans d'autres pays.
La technologie COSM (Composite Object Sound Modeling) de Roland est une technologie de modélisation sonore innovante et puissante. COSM
permet d'analyser les nombreuses composantes d'origine d'un son, par exemple ses caractéristiques physiques et électriques, et de produire un
modèle numérique qui reproduit le même son.

2
AVERTISSEMENT
N’ouvrez pas l’appareil et n’eectuez aucune modication à l’intérieur.
N’essayez pas de réparer l’appareil ou d’en remplacer les pièces (sauf si le
présent manuel fournit des instructions spéciques dans ce sens). Pour toute
opération de maintenance, prenez contact avec votre revendeur, avec le
centre de maintenance Roland le plus proche, ou avec un distributeur Roland
agréé (voir la page Information).
N’installez jamais l’appareil à l’un des emplacements suivants.
• embué (par exemple, salle de bains, cabinets de toilettes, sur sols mouillés);
• exposé à la vapeur ou à la fumée;
• exposé au sel;
• humide;
• exposé à la pluie;
• poussiéreux ou sableux;
• soumis à de fortes vibrations et secousses.
Assurez-vous que l’appareil est toujours placé sur une surface plane et qu’il
est stable. Ne placez jamais l’appareil sur un support susceptible d’osciller ou
sur des surfaces inclinées.
L'appareil doit être branché à une prise de courant uniquement du type
décrit sur sa face arrière.
Ne tordez ni ne pliez le cordon d'alimentation de manière excessive, et ne
placez pas d'objets lourds dessus. Ce faisant, vous risqueriez d’endommager
le cordon et de provoquer de graves dommages ou des courts-circuits. Les
cordons endommagés présentent un risque d'incendie et d'électrocution.
Utilisé seul ou en association avec un amplicateur et des casques stéréo ou
des haut-parleurs, cet appareil peut produire des niveaux sonores susceptibles
d'entraîner une perte auditive dénitive. Ne travaillez pas pendant longtemps à
un niveau de volume élevé, ou à un niveau inconfortable. Si vous constatez une
perte auditive ou des bourdonnements d’oreille, vous devez immédiatement
cesser d’utiliser l’appareil et consulter un audiologiste.
Ne placez pas de récipient contenant du liquide sur l'appareil. Evitez à
tout prix l'introduction d'objets (ex., des objets inammables, des pièces
de monnaie, des câbles) ou de liquide (ex., eau, jus de fruit) à l'intérieur
de l'appareil. Vous risqueriez de provoquer un court-circuit, un mauvais
fonctionnement de l'appareil, ou tout autre problème inhérent.
Mettez immédiatement l'appareil hors tension, débranchez le cordon
d'alimentation de la prise de courant, et demandez une opération de maintenance
à votre revendeur, au centre de maintenance Roland le plus proche, ou à un
distributeur Roland agréé (voir la page Information), dans les situations suivantes:
• le cordon d'alimentation ou la prise est endommagé;
• en cas de fumée ou d’odeur inhabituelle;
• des objets ou du liquide se sont introduits dans l’appareil;
• l’appareil a été exposé à la pluie (ou s’est embué de quelque autre façon);
• si l’appareil ne semble pas fonctionner normalement ou si vous remarquez
une modication notable des performances.
Dans les environnements avec de jeunes enfants, la présence d’un adulte est
nécessaire pour exercer une surveillance jusqu’à ce que l’enfant soit capable de
respecter toutes les règles essentielles à une utilisation sans risque de l’appareil.
AVERTISSEMENT
Protégez l'appareil des chocs importants.
(Ne le laissez pas tomber!)
Ne forcez pas sur le cordon d'alimentation de l'appareil an de partager une
prise murale avec un nombre déraisonnable d'appareils supplémentaires.
Soyez particulièrement vigilant lorsque vous utilisez des rallonges: la
puissance totale utilisée par l'ensemble des appareils reliés à la prise de la
rallonge ne doit jamais dépasser la puissance nominale (watts/ampères) de
la rallonge. Des charges excessives peuvent provoquer un réchauement de
l'isolation du cordon et parfois même sa fonte.
Avant d'utiliser l'appareil dans un pays étranger, prenez contact avec votre
revendeur, avec le centre de service Roland le plus proche, ou avec un
distributeur Roland agréé (voir la page Information).
ATTENTION
L’appareil doit être positionné de façon à être susamment ventilé.
Veillez à toujours tenir la prise du cordon d'alimentation pour le brancher à
une prise murale ou l'en débrancher.
Vous devez régulièrement débrancher le cordon d'alimentation et le nettoyer
à l'aide d'un chion sec an de débarrasser les broches de toute la poussière
et d'autres dépôts accumulés. Débranchez également la prise de courant
de la prise murale chaque fois que l'appareil n'est pas utilisé pendant une
longue période. L'accumulation de poussière entre la prise de courant et la
prise murale peut entraîner une faible isolation et provoquer un incendie.
Essayez d’éviter que les cordons et les câbles ne s’entremêlent. Les cordons et
les câbles doivent également être placés hors de portée des enfants.
Ne montez jamais sur l’appareil et ne déposez jamais d’objets lourds dessus.
Ne manipulez jamais le cordon d'alimentation ou sa prise avec les mains
mouillées lorsque vous branchez l'appareil à une prise murale ou l'en
débranchez.
Avant de déplacer l'appareil, débranchez-le de la prise murale et débranchez
les cordons des appareils externes qui y sont connectés.
Avant de nettoyer l’appareil, mettez-le hors tension et débranchez le cordon
d'alimentation de la prise murale (p. 6).
Chaque fois qu’il y a un risque de foudre dans votre zone, débranchez le
cordon d'alimentation de la prise murale.
Les grilles de ventilation situées de chaque côté de l'appareil pouvant devenir
très chaudes, prenez garde de ne pas vous brûler.
Ne retirez en aucun cas la grille du haut-parleur ni celui-ci. Le haut-parleur
ne peut pas être remplacé par l'utilisateur. Des risques d'électrocution sont
possibles en ouvrant le core de l'appareil.
UTILISATION DE L'APPAREIL EN TOUTE SÉCURITÉ

3
Português Italiano DeutschNederlands Español Français
English
REMARQUES IMPORTANTES
Alimentation électrique
• Ne branchez pas cet appareil sur une prise électrique déjà utilisée
par un appareil électrique contrôlé par un onduleur (par exemple, un
réfrigérateur, un lave-linge, un four micro-ondes ou un climatiseur) ou
qui comporte un moteur. Suivant le mode d'utilisation de l'appareil
électrique, le bruit induit peut provoquer un dysfonctionnement de
l'appareil ou produire un bruit audible. Si pour des raisons pratiques,
vous ne pouvez pas utiliser une prise électrique distincte, branchez un
ltre de bruit induit entre cet appareil et la prise électrique.
• Avant de connecter cet appareil à d’autres appareils, mettez
tous les appareils hors tension. Cela vous permettra d’éviter tout
dysfonctionnement et/ou dommage des haut-parleurs ou d’autres
appareils.
• Bien que les voyants et le commutateur d'alimentation soient éteints, cela
ne signie pas que l'appareil est complètement déconnecté de la source
d'alimentation électrique. Si vous devez débrancher l'appareil, éteignez
le commutateur d'alimentation POWER, puis débranchez le cordon
d'alimentation de la prise de courant. Pour cette raison, la prise de courant
à laquelle vous souhaitez brancher l'appareil doit être facile d'accès.
Emplacement
• Lorsque l’appareil est utilisé à proximité d’amplicateurs de puissance
(ou de tout autre équipement contenant d’importants transformateurs
de puissance), un bourdonnement peut être émis. Pour contourner
ce problème, modiez l’orientation de l’appareil, ou éloignez-le de la
source d’interférence.
• Cet appareil peut interférer avec la réception radio et télévision.
N’utilisez pas cet appareil à proximité de tels récepteurs.
• Il peut y avoir production de bruit si des appareils de communication
sans l (par exemple, des téléphones portables) sont utilisés à proximité
de l’appareil. Ce bruit peut se produire lors de la réception ou de
l’émission d’un appel, ou encore pendant une conversation. Si vous
rencontrez ces problèmes, vous devez soit déplacer les appareils sans l
concernés à une plus grande distance de l’appareil, soit les éteindre.
• N'exposez pas l'appareil à la lumière directe du soleil, ne le placez pas
à proximité d'appareils qui émettent de la chaleur, ne le laissez pas
à l'intérieur d'un véhicule fermé et ne le soumettez pas de quelque
manière que ce soit à des températures élevées. Veillez également à ce
que la lumière d'appareils d'éclairage, souvent proches de l'appareil (par
exemple une lumière de piano), ou de projecteurs puissants, ne soit pas
toujours dirigée sur une même zone de l'appareil pendant une longue
période. Une chaleur excessive peut déformer ou décolorer l'appareil.
• En cas de déplacement d’un endroit vers un autre où la température
et/ou l’humidité sont très diérents, des gouttelettes d’eau (de la
condensation) peuvent se former à l’intérieur de l’appareil. L’appareil
peut alors présenter des dysfonctionnements ou des dommages si
vous essayez de l’utiliser dans ces conditions. Par conséquent, avant
d’utiliser l’appareil, vous devez le laisser reposer pendant quelques
heures, jusqu’à ce que la condensation soit complètement évaporée.
• Veillez à ce que des objets en caoutchouc, en vinyle ou d'une matière
similaire ne restent pas sur l'appareil pendant une longue période.
De tels objets peuvent décolorer ou endommager le revêtement de
l'appareil.
• Ne collez aucun autocollant, décalcomanie ou autre sur cet appareil. Le
revêtement extérieur de l'appareil risque d'être endommagé lorsque
vous les décollez.
• Suivant la matière et la température de la surface sur laquelle vous
placez l’appareil, il est possible que les pieds en caoutchouc se
décolorent ou détériorent la surface. Pour éviter cela, vous pouvez
disposer un bout de feutre ou de chion sous les pieds en caoutchouc.
Ce faisant, assurez-vous que l’appareil ne risque pas de glisser ou d’être
déplacé accidentellement.
• Ne placez aucun récipient contenant du liquide (par exemple, un
vase) sur cet appareil. Évitez également d'utiliser des insecticides,
des parfums, de l'alcool, du vernis à ongle, des aérosols, etc., près de
l'appareil. Essuyez immédiatement tout liquide répandu sur l'appareil à
l'aide d'un chion doux et sec.
Entretien
• Pour le nettoyage quotidien de l’appareil, utilisez un chion doux et
sec ou un chion légèrement imbibé d’eau. Pour retirer les saletés
tenaces, utilisez un chion imprégné de détergent doux et non abrasif.
Essuyez ensuite en profondeur l’appareil à l’aide d’un chion doux et
sec.
• N’utilisez jamais d’essence à nettoyer, de diluants, d’alcool ou de
solvants de quelque sorte que ce soit, an d’éviter tout risque de
décoloration et/ou de déformation.
Précautions supplémentaires
• Manipulez avec précaution les boutons, curseurs ou autres contrôles
de l’appareil, ainsi que les prises et les connecteurs. Une manipulation
un peu brutale peut entraîner des dysfonctionnements.
• Lors du branchement/débranchement de tous les câbles, saisissez
le connecteur et ne tirez jamais sur le câble. Vous éviterez ainsi les
courts-circuits ou une détérioration des éléments internes du câble.
• L'appareil émet un peu de chaleur en cours de fonctionnement.
• Pour éviter de déranger vos voisins, essayez de maintenir le volume de
l’appareil à des niveaux raisonnables. Vous pouvez utiliser un casque
écouteur an de n'avoir pas à vous préoccuper des personnes qui vous
entourent.
• Lorsque vous devez transporter l’appareil, utilisez si possible
l’emballage d’origine (y compris ses rembourrages). Sinon, utilisez un
emballage équivalent.
• Certains câbles de connexion contiennent des résistances. N’utilisez
pas de câbles qui comportent des résistances pour la connexion
de cet appareil. Avec ce type de câble, le niveau sonore peut être
extrêmement faible, voire inaudible. Pour plus d’informations sur les
spécications de câble, prenez contact avec le fabricant du câble.
• Lorsque vous transportez ou rangez l'appareil, enroulez le cordon
d'alimentation autour de son crochet.
Marques déposées
• Les noms de produit mentionnés dans ce document sont des marques
ou des marques déposées appartenant à leurs propriétaires respectifs
et ne sont pas liés à Roland Corporation. Dans ce manuel, ces noms
permettent de décrire le plus ecacement possible les sons simulés à
l’aide de la technologie COSM.

4
1. Entrée INPUT
Connectez votre guitare électrique à cette entrée.
2. Commutateur SELECT
Permet de permuter entre les canaux JC CLEAN et LEAD.
Vous pouvez vérier le canal sélectionné grâce à la couleur du voyant
(JC CLEAN: gauche; LEAD: droite).
Les canaux sont permutables à l'aide des commutateurs de pédales
optionnels BOSS FS-5U ou FS-6.
3. Commutateur TUNER
Utilisez ce commutateur lorsque vous souhaitez accorder votre
guitare. Lorsque vous activez le commutateur, le voyant rouge s'allume
indiquant que vous pouvez utiliser la fonction d'accordage.
Pour plus d’informations, reportez-vous à la section «Utilisation de la
fonction Tuner» (p. 7).
Canal JC CLEAN
Modèle du célèbre amplicateur pour guitare Roland JC-120 Jazz
Chorus. Son son très épuré et ultra plat donne une sensation de
douceur. Cet amplicateur est idéal pour créer des sons en lui
associant un dispositif à plusieurs eets.
4. Bouton VOLUME
Règle le volume du canal JC CLEAN.
Canal LEAD
5. Commutateur Type
Vous pouvez sélectionner un des six types suivants.
Si la fonction d'accordage est activée, vous pouvez l'utiliser pour
sélectionner le nom de la corde que vous souhaitez accorder (p. 7).
Type Description
ACOUSTIC SIM
Ce modèle d'amplication original permet
d'obtenir un son de guitare acoustique
dynamique au moyen d'une guitare électrique
standard.
OVERDRIVE
Distorsion sonore naturelle similaire à celle
obtenue en tournant à fond le volume d'un
amplicateur.
DISTORTION Distorsion plus forte qu’avec OVERDRIVE.
METAL
Distorsion plus forte et plus puissante qu'avec
DISTORTION, pouvant tenir de longues notes
soutenues.
METAL STACK
Son très lourd issu d'un bloc d'amplication
complet Heavy Metal.
EXTREME
Son à haut gain avec des basses épaisses et une
distorsion intense mais qui préserve la clarté de la
dénition du son.
6. Bouton GAIN
Règle le niveau de distorsion pour le canal LEAD.
7. Bouton VOLUME
Règle le volume du canal LEAD.
Description de l'appareil
Panneau de contrôle
1 4
16
17
158 9 10 11 12
136 752 3 14

5
Português Italiano DeutschNederlands Español Français
English
EQUALIZER
8. Bouton BASS
Règle la qualité sonore des basses fréquences.
9. Bouton MIDDLE
Règle la qualité sonore des moyennes fréquences.
10. Bouton TREBLE
Règle la qualité sonore des fréquences élevées.
EFX/SOLO (Eets/Solo)
11. Bouton EFX/SOLO (Eets/Solo)
Tournez ce bouton pour sélectionner la position qui
correspond à l'eet CHORUS, FLANGER, PHASER,
TREMOLO ou HEAVY OCTAVE, ou la position SOLO.
Tournez ce bouton pour choisir la quantité d'eet à
appliquer.
Le voyant ON s'allume lorsque la fonction EFX est
activée, et s'éteint lorsqu'elle est désactivée. Vous
pouvez aussi activer ou désactiver la fonction EFX à
l'aide de la pédale en option.
Les graduations pour les fonctions CHORUS,
FLANGER, PHASER, TREMOLO, SOLO, HEAVY
OCTAVE servent de référence. Réglez l'eet que
vous voulez obtenir à l'oreille.
Type Description
CHORUS
Permet d'ajouter un son légèrement déformé au son
d'origine pour créer un son de plus grande ampleur.
FLANGER
Permet d'obtenir un eet produisant une sensation de
rotation du son.
PHASER
Permet d'ajouter un signal déphasé variable au son
direct, produisant un eet de tourbillon sonore.
TREMOLO
Cet eet permet d'obtenir une modication cyclique
du volume.
SOLO
Permet d'appliquer un eet coup de fouet au son
d'origine. A l'aide d'une pédale interrupteur qui
permet d'activer ou de désactiver le mode SOLO
individuellement pour les canaux JC CLEAN et LEAD,
vous pouvez faire varier le volume et la distorsion de
votre son.
HEAVY OCTAVE
Cette fonction permet d'ajouter un son abaissé d'une
octave au son d'origine. Comme vous pouvez jouer
des accords même lorsque vous utilisez cet eet, vous
pouvez également l'utiliser pour alourdir le son de
votre jeu d'accords.
DELAY/REVERB
12. Bouton DELAY/REVERB
Tournez ce bouton sur DELAY ou sur REVERB pour
choisir cet eet. Tournez ce bouton pour choisir
la quantité d'eet à appliquer. Tournez le bouton
sur la position SPRING pour bénécier d'un son de
réverbération à ressort.
* Les graduations pour les fonctions DELAY et
REVERB servent de référence.
Type Description
DELAY
Tournez ce bouton pour modier la durée et la quantité
d'eets de retard.
REVERB
Tournez le bouton pour régler le niveau de
réverbération.
13. Commutateur POWER SQUEEZER
Le voyant du commutateur est rouge lorsque la fonction
Power Squeezer est activée, et éteint lorsque la fonction
est désactivée.
La fonction Power Squeezer permet de réduire à 2 watts
le son qui sort de l'amplicateur.
L'activation de ce commutateur permet d'obtenir un
son qui préserve l'équilibre et la qualité sonore avec une
puissance de 2 watts, pour produire des niveaux sonores
mieux adaptés à un foyer.
* La fonction Power Squeezer s'applique uniquement aux sons
transmis via l'entrée INPUT. Elle n'a pas d'eet sur les sons transmis
via l'entrée AUX IN.
14. Entrée AUX IN
Vous pouvez connecter un lecteur de CD, un lecteur audio numérique
ou tout autre appareil vous permettant de jouer accompagné.
Les prises stéréo miniatures sont acceptées. Toutefois, la sortie
haut-parleur et la sortie RECORDING OUT/PHONES sont des sorties en
mono. Utilisez le câble approprié (vendu séparément) à l'appareil que
vous voulez connecter.
* Déterminez le niveau sonore en réglant le bouton de volume de
l'appareil connecté.
* En cas d'utilisation de câbles de connexion comportant des
résistances, le niveau de volume du matériel connecté à l'entrée AUX
IN peut être faible. Si c'est le cas, utilisez des câbles de connexion
qui ne comportent pas de résistances.
15. Prise FOOT SW (pédale-interrupteur)
Vous pouvez utiliser des pédales (BOSS FS-5U ou FS-6 disponibles en
option) pour changer de canal (JC CLEAN/LEAD), et pour activer et
désactiver le mode EFX/SOLO.
* Le CUBE-20XL est doté d'une entrée FOOT SW de type TRS qui
accepte les prises du type illustré ci-dessous. Pour connecter la
pédale-interrupteur, utilisez un câble compatible avec la prise TRS.
EXTREMITE: SELECT
ANNEAU: EFX/SOLO
* Pour plus d’informations sur le branchement des pédales,
reportez-vous à la section «Connexions» (p. 6).
* Si vous employez un câble mono pour connecter une seule pédale,
vous pourrez l'utiliser pour permuter les canaux (JC CLEAN/LEAD).
16. Entrée RECORDING OUT/PHONES
• Avec RECORDING OUT
Utilisez des prises mono de 1/4” pour vous connecter à
cette entrée. Le niveau sonore de la prise RECORDING
OUT peut être réglé aisément si vous placez le bouton
VOLUME du canal CLEAN ou LEAD comme dans
l'illustration à droite.
• Avec un casque
Connectez un casque à cette entrée.
* Aucun son n'est émis par le haut-parleur de l'appareil lorsque
l'entrée RECORDING OUT/PHONES est utilisée.
17. Commutateur POWER
Met l'appareil sous tension ou hors tension.

6
Connexions
Mettre l’amplicateur sous tension
ou hors tension.
Une fois les branchements eectués, mettez sous tension les diérents
appareils dans l'ordre indiqué. Si vous ne respectez pas cet ordre, vous
risquez de provoquer des dysfonctionnements et/ou des dommages
aux haut-parleurs et aux autres appareils.
1. Assurez-vous que tous les boutons de volume du CUBE-20XL
et des appareils qui y sont reliés sont sur la position 0.
2. Mettez sous tension tous les appareils connectés aux entrées
du CUBE-20XL (entrées INPUT et AUX IN).
3. Mettez sous tension le CUBE-20XL.
* Veillez à toujours réduire le volume au minimum
avant de mettre l'appareil sous tension. Même si le
volume est réglé au minimum, il est possible que
vous entendiez un son lors de la mise sous tension
de l'appareil. Cela est normal et n'indique pas de
dysfonctionnement.
* Cet appareil est équipé d'un circuit de protection. Un bref intervalle
(quelques secondes) est nécessaire à la mise sous tension avant que
l'appareil ne puisse fonctionner normalement.
4. Réglez le volume des appareils.
5. Avant de couper l'alimentation, baissez le volume de tous
vos appareils sur le système, puis mettez-les SOUS TENSION
en procédant dans l'ordre inverse de la mise sous tension.
* Si vous devez débrancher l'appareil, éteignez le commutateur
d'alimentation POWER, puis débranchez le cordon d'alimentation de
la prise de courant. Reportez-vous au paragraphe sur l’alimentation
(p. 3).
Pédales interrupteurs
Enregistreur
Casque
Guitare électrique
Lecteur CD
Lecteur audio
numérique, etc.
EFX/
SOLO
EFX/
SOLO
SELECT SELECT SELECT
B A
Réglez les commutateurs comme indiqué ci-dessous.
ou
ou
FS-6 FS-5U
* Pour éviter tout dysfonctionnement et/ou dommage sur les
enceintes ou d’autres appareils, baissez toujours le volume et
mettez tous les appareils hors tension avant tout branchement.
* Avant de procéder au branchement, vériez que le bouton VOLUME
des deux amplicateurs est réglé sur 0.
* En cas d'utilisation de câbles de connexion comportant des
résistances, le niveau de volume du matériel connecté à l'entrée AUX
IN peut être faible. Si c'est le cas, utilisez des câbles de connexion
qui ne comportent pas de résistances.

7
Português Italiano DeutschNederlands Español Français
English
Utilisation de la fonction Tuner
Le CUBE-20XL est équipé d'une fonction d'accordage (TUNER). Vous
pouvez l'utiliser comme accordeur manuel ou comme accordeur
chromatique.
Lorsque la guitare est accordée manuellement, le son sort du haut-
parleur et de la prise RECORDING OUT/PHONES. En mode accordeur
chromatique, le son ne sera pas émis par le haut-parleur ni par la prise
RECORDING OUT/PHONES.
Lorsque vous vous accordez manuellement, appuyez sur l'interrupteur
SELECT pour activer la tonalité de référence de l'accordage.
Accordage manuel
Pour des cordes franchement désaccordées (par exemple après leur
changement), procédez à un accordage «manuel».
En mode accordage manuel, vous pouvez accorder votre guitare tout
en écoutant le son dans le haut-parleur ou dans le casque.
Vous pouvez régler le volume avec le bouton VOLUME JC CLEAN. Si
vous ne souhaitez pas entendre le son de votre guitare dans les haut-
parleurs ou le casque, réglez le bouton du volume JC CLEAN sur 0.
1. Appuyez sur le bouton TUNER.
Le CUBE-20XL passe en mode Tuner et le voyant du commutateur
TUNER s’allume.
2. Utilisez le commutateur Type pour choisir la corde à
accorder.
Position du
bouton
Description
6E Sixième corde à vide (E/mi)
5A Cinquième corde à vide (A/la)
4D Quatrième corde à vide (D/ré)
3G Troisième corde à vide (G/sol)
2B Deuxième corde à vide (B/si)
1E Première corde à vide (E/mi)
* La hauteur de référence est A = 440Hz. Elle n'est pas modiable.
3. Utilisez le bouton VOLUME du canal JC CLEAN pour régler le
volume.
4. Jouez une note sur la corde à vide que vous souhaitez
accorder.
Accordez la corde jusqu'à ce que le témoin vert s'allume.
Bémol
Lumière rouge Lumière rougeLumière verte
Dièse
Hauteur correcte
* Le témoin rouge clignote tant que la note n'est pas juste.
* Appuyez sur l'interrupteur SELECT pour entendre le son de
référence de la note choisie avec l'interrupteur Type. (Il s'agit de la
fonction Tuning Fork.)
5. Lorsque l'accordage est terminé, appuyez à nouveau sur le
bouton TUNER.
Accordage chromatique
Si vous appuyez sur le bouton TUNER pendant au moins une
seconde, ce bouton clignote et vous pouvez utiliser l'appareil comme
«accordeur chromatique» pour déterminer automatiquement le nom
de la note la plus proche de celle qui est jouée.
Lorsque l'appareil est en mode Chromatic Tuner, aucun son n'est émis
via les haut-parleurs ou la prise REC OUT/PHONES.
1. Appuyez sur le bouton TUNER pendant au moins une
seconde.
Le bouton TUNER clignote et le CUBE-20XL passe en mode accordeur
chromatique.
2. Jouez une note sur la corde à vide que vous souhaitez
accorder.
Accordez la corde jusqu'à ce que le voyant vert s'allume.
Utilisation de la fonction Tuning Fork
Lorsque vous accordez votre instrument manuellement, appuyez sur
le bouton SELECT pour entendre le son de référence de la note choisie
avec l'interrupteur Type.
1. Appuyez sur le bouton TUNER.
Le CUBE-20XL passe en mode Tuner et le voyant du commutateur
TUNER s’allume.
2. Utilisez le commutateur Type pour choisir la corde à
accorder.
* La hauteur de référence est A = 440Hz. Elle n'est pas modiable.
3. Utilisez le bouton VOLUME du canal JC CLEAN pour régler le
volume.
4. Appuyez sur le bouton SELECT.
Le son de référence sera à la hauteur de la corde choisie avec le bouton
Type.
5. Jouez une note sur la corde à vide que vous souhaitez
accorder.
Jouez la corde à vide ou un accord, et accordez votre guitare en
fonction de la note de référence.
6. Lorsque l'accordage est terminé, appuyez à nouveau sur le
bouton TUNER.

8
EXTREME
Son extrême avec distorsion intense.
Ce son à haut gain réunit à la fois la puissance dans les graves et
l'attaque dans les aigus.
Vous pouvez obtenir des variations de son en tournant le bouton
MIDDLE.
Si vous activez la fonction HEAVY OCTAVE, vous pouvez même obtenir
un eet de distorsion plus intense dans les graves.
Space Clean
Son transparent qui utilise des eets spatiaux.
Sélectionnez l'amplication JC CLEAN conçue sur le modèle Roland
JC-120, puis sélectionnez l'eet CHORUS avec un long DELAY.
L’utilisation de ce réglage avec une guitare équipée de micros à simple
bobinage est idéale pour jouer en arpèges et plaquer des accords
harmonieux.
En fonction de la phrase que vous jouez, il est parfois préférable de
dénir un eet DELAY un peu plus lent que le tempo de la phrase.
Power Grunge
Produit un son avec une forte distorsion, perçant et à la texture
approximative.
En réglant le bouton GAIN pour éviter une distorsion excessive,
vous obtiendrez un son de guitare clair avec une brillance dans les
harmoniques et de la puissance dans le son des cordes.
Vous pouvez aussi ajouter l'eet FLANGER pour produire un son avec
un eet puissant de tourbillon, un peu comme le bruit d'un avion à
réaction.
De plus, l'utilisation du micro à l'avant de la guitare en augmentant les
eets GAIN et MIDDLE donne un son LEAD lourd avec un eet SUSTAIN
long.
Alternative Metal
Le son parfait pour des ris lourds et aigus.
Sélectionnez l'eet METAL STACK à haut gain, puis utilisez l'égaliseur
pour améliorer encore les graves.
Utilisé avec un micro à double bobinage en position arrière, vous
obtenez un eet de distorsion intense.
De plus, vous pouvez ajouter un eet DELAY long pour l'utiliser
comme son dominant avec un eet SUSTAIN marqué.
En ajoutant un eet DELAY plus court, vous obtenez un doublement
du son comme si deux musiciens jouaient la même phrase
simultanément.
Commutateur SELECT: LEAD
Commutateur SELECT: JC CLEAN
Commutateur SELECT: LEAD
Commutateur SELECT: LEAD
Exemples de réglage

9
Português Italiano DeutschNederlands Español Français
English
Récapitulatif des paramètres
Commutateur SELECT :
Commutateur SELECT :
Commutateur SELECT :
Commutateur SELECT :

10
Fiche technique
CUBE-20XL
Puissance de sortie nominale 20W
Niveau d'entrée nominale
INPUT (canal JC CLEAN) -10dBu/1MΩ
AUX IN -10dBu
Haut-parleurs 20cm (8pouces)
Commandes
Commutateur POWER
Commutateur SELECT
Commutateur TUNER
Commutateur POWER SQUEEZER
<Canal JC CLEAN> Bouton VOLUME
<Canal LEAD>
Commutateur TYPE (ACOUSTIC SIM, OVERDRIVE, DISTORTION, METAL, METAL STACK,
EXTREME), bouton GAIN, bouton VOLUME
<EQUALIZER> Bouton BASS, bouton MIDDLE, bouton TREBLE
<EFX/SOLO> Bouton EFX (CHORUS, FLANGER, PHASER, TREMOLO, SOLO, HEAVY OCTAVE)
<DELAY/REVERB> Bouton DELAY/REVERB (DELAY, REVERB, SPRING)
Témoins Canal JC CLEAN, canal LEAD, EFX/SOLO, TUNER, POWER SQUEEZER
Connecteurs
Entrée INPUT, entrée AUX IN, entrée FOOT SW (SELECT, EFX/SOLO), entrée RECORDING OUT/PHONES
Consommation électrique 24W
Dimensions
385 (L) x 240 (P) x 385 (H)mm
15-3/16 (L) x 9-1/2 (P) x 15-3/16 (H)pouces
Poids 9kg
Accessoires Mode d’emploi
* 0dBu = 0,775Vrms
* En vue d’améliorer le produit, ses caractéristiques techniques et/ou son aspect peuvent être modiés sans avis préalable.

Português Italiano DeutschNederlands Español Français
English
Possibilità di passare da un canale all'altro: JC CLEAN e LEAD (pag. 4)
• Il passaggio da un canale all'altro può essere eseguito mediante un interruttore a pedale opzionale.
Amplicatore per chitarra DSP ad alte prestazioni con una potenza di uscita di 20 watt e un altoparlante da 20 cm
(8 pollici) incorporato
• Dimensioni compatte che rendono l'unità facilmente trasportabile e utilizzabile sia in casa che in uno studio di registrazione.
Canale "LEAD" con sei diversi eetti a pedale COSM (pag. 4)
• Il canale LEAD consente di utilizzare sei tipi di eetti a pedale, ovvero ACOUSTIC SIM, OVERDRIVE, DISTORTION, METAL, METAL STACK e l'originale
eetto EXTREME, per produrre una vasta gamma di stili.
Funzione Power Squeezer (pag. 5)
• Questa funzione consente di ottenere un buon bilanciamento dei toni anche a basso volume per poter apprezzare i suoni potenti anche a casa.
Funzione Tuner inclusa (pag. 7)
• Questa funzione consente di accordare la chitarra mentre è collegata all'unità CUBE-20XL.
• La funzione fornisce un tono di riferimento che può essere utilizzato per l'accordatura.
Dotato di un ingresso AUX IN utile per le sessioni di prova (pag. 5)
• Utilizzarlo per le esecuzioni con suoni provenienti da un lettore CD o un lettore audio digitale.
Eetti come EFX/SOLO e DELAY/REVERB indipendente (pag. 5)
• La sezione EFX dell'unità include 5 tipi di eetti digitali, ovvero CHORUS, FLANGER, PHASER, TREMOLO e HEAVY OCTAVE.
• Per accendere o spegnere EFX/SOLO, è possibile utilizzare un interruttore a pedale (opzionale) (pag. 5).
Manuale dell'utente
Amplicatore per chitarra
Prima di utilizzare questa unità, leggere attentamente le sezioni intitolate "UTILIZZO SICURO DELL'UNITÀ" e "NOTE IMPORTANTI" (pag. 2; pag. 3)
che contengono importanti informazioni sul corretto impiego dell'unità. È inoltre consigliabile leggere per intero il Manuale dell'utente, per
assicurarsi di aver compreso appieno tutte le funzioni oerte dalla nuova unità acquistata. È consigliabile conservare il manuale e tenerlo a
portata di mano per usarlo come riferimento.
Copyright © 2010 ROLAND CORPORATION
Tutti i diritti riservati. Nessuna parte di questa pubblicazione può essere in alcun modo riprodotta senza autorizzazione scritta di
ROLAND CORPORATION. Roland è un marchio registrato di Roland Corporation negli Stati Uniti e/o in altri paesi.
COSM (Composite Object Sound Modeling) è una tecnologia di modeling innovativa e potente di proprietà Roland. COSM analizza i vari fattori che
contribuiscono a creare il suono originale, ad esempio le caratteristiche elettriche e siche, e produce quindi un modello digitale in grado di riprodurre
lo stesso suono.

2
AVVISO
Non aprire l'unità né eettuare modiche interne sull'unità.
Non tentare di riparare l'unità o di sostituirne parti interne, ad eccezione dei
casi in cui il presente manuale fornisca istruzioni speciche indicando all'utente
le modalità di esecuzione di tali operazioni. Per qualsiasi tipo di assistenza,
rivolgersi al proprio fornitore, al Centro di assistenza Roland più vicino o a un
distributore Roland autorizzato, in base all'elenco della pagina "Informazioni".
Non installare l'unità nei luoghi:
• bagnati (ad esempio, bagni, lavanderie o pavimenti bagnati);
• esposti al vapore o al fumo;
• soggetti a esposizione salina;
• umidi;
• esposti alla pioggia;
• polverosi o sabbiosi;
• soggetti a livelli elevati di vibrazione e tremolio.
Assicurarsi che l'unità sia sempre posizionata in piano e in modo stabile. Non
posizionarla mai su aste che potrebbero oscillare o su superci inclinate.
L'unità deve essere collegata a un'alimentazione che sia solo del tipo
corrispondente a quanto indicato sul retro dell'unità.
Non torcere o piegare in modo eccessivo il cavo di alimentazione, né
posizionare oggetti pesanti su di esso. In caso contrario, è possibile che il
cavo venga danneggiato, causando la rottura di elementi e producendo
cortocircuiti. I cavi danneggiati possono provocare incendi e scosse elettriche.
Questa unità, da sola o utilizzata con un amplicatore e cue o altoparlanti,
è in grado di produrre livelli di suono che possono causare la perdita
permanente di udito. Non lasciare in funzione l'unità per periodi di tempo
prolungati a un livello di volume elevato o fastidioso. Se si verica perdita
di udito o si avvertono ronzii nelle orecchie, è necessario interrompere
immediatamente l'utilizzo dell'unità e consultare uno specialista dell'udito.
Non posizionare sull'unità recipienti contenenti liquidi. Evitare che qualsiasi
tipo di oggetto (ad esempio materiale inammabile, monete, spilli) o liquido
(acqua, bevande, ecc.) penetri nell'unità. In caso contrario, potrebbero
vericarsi cortocircuiti, esecuzioni non corrette o altri malfunzionamenti.
Spegnere immediatamente l'unità, rimuovere il cavo di alimentazione dalla
presa e richiedere assistenza al proprio fornitore, al Centro di assistenza
Roland più vicino o a un distributore Roland autorizzato, in base all'elenco
nella pagina "Informazioni" quando:
• la spina o il cavo di alimentazione risulta danneggiato;
• si verica emissione di fumo o di odore insolito;
• nell'unità sono caduti oggetti o sono stati versati liquidi;
• l'unità è stata esposta a pioggia (o si è bagnata in altro modo);
• l'unità non funziona normalmente o manifesta un cambiamento evidente
nelle prestazioni.
In presenza di bambini, è necessario che un adulto fornisca supervisione
nché il bambino non è in grado di seguire tutte le norme essenziali per il
funzionamento in sicurezza dell'unità.
AVVISO
Proteggere l'unità da impatti di forte entità.
Prestare molta attenzione a non farla cadere.
Per collegare il cavo di alimentazione dell'unità a una presa di corrente, non
utilizzare una presa a cui è collegato un numero eccessivo di dispositivi.
Prestare particolare attenzione quando si utilizzano prolunghe. La potenza
massima utilizzata da tutti i dispositivi collegati alla presa della prolunga non
deve mai superare la potenza prevista (watt/ampere) per la prolunga in uso.
Carichi eccessivi possono causare il surriscaldamento del materiale isolante
del cavo e provocarne la fusione.
Prima di utilizzare l'unità in un paese straniero, consultare il proprio fornitore,
il Centro di assistenza Roland più vicino o un distributore Roland autorizzato,
in base all'elenco della pagina "Informazioni".
ATTENZIONE
Posizionare l'unità in modo tale da non creare impedimenti per una corretta
ventilazione.
Aerrare solo la spina del cavo di alimentazione quando si collega o si
scollega una presa.
A intervalli regolari, è necessario scollegare la spina di alimentazione e pulirla
utilizzando un panno asciutto per eliminare tutta la polvere e altri accumuli
dai relativi denti. Inoltre, scollegare la spina dalla presa di alimentazione ogni
volta che l'unità deve restare inutilizzata per un periodo di tempo prolungato.
Eventuali accumuli di polvere tra la spina e la presa di alimentazione possono
provocare uno scarso isolamento elettrico e causare incendi.
Evitare che cavi e li elettrici si aggroviglino. Tutti i cavi e i li elettrici devono
inoltre essere posizionati fuori dalla portata dei bambini.
Mai salire sull'unità né collocare oggetti pesanti su di essa.
Mai maneggiare il cavo di alimentazione o la relativa spina con mani bagnate
quando si collega o si scollega una presa.
Prima di spostare l'unità, scollegare la spina dalla presa di alimentazione ed
estrarre tutti i cavi dai dispositivi esterni.
Prima di eettuare la pulizia dell'unità, spegnerla e scollegare il cavo di
alimentazione dalla presa (pag. 6).
Qualora si sospetti la possibilità di fulmini nella zona, togliere la spina del
cavo di alimentazione dalla presa.
Le bocchette di ventilazione ai lati dell'unità possono diventare calde. Fare
attenzione a non scottarsi.
Non rimuovere assolutamente la griglia dell'altoparlante o l'altoparlante.
L'altoparlante non può essere sostituito dall'utente. All'interno dell'unità sono
presenti tensioni e correnti che possono provocare scosse elettriche.
UTILIZZO SICURO DELL'UNITÀ

3
Português Italiano DeutschNederlands Español Français
English
NOTE IMPORTANTI
Alimentazione
• Non collegare l'unità alla stessa presa elettrica utilizzata da un altro
apparecchio elettrico controllato da un invertitore (ad esempio, un
frigorifero, una lavatrice, un forno a microonde o un condizionatore
d'aria) o contenente un motore. In base al modo in cui l'apparecchio
elettrico viene utilizzato, il rumore dell'alimentazione potrebbe causare
il malfunzionamento dell'unità o produrre rumore percepibile. Se non
è possibile utilizzare una presa elettrica separata, collegare un ltro per
il rumore dell'alimentazione tra l'unità e la presa elettrica.
• Prima di collegare questa unità ad altri dispositivi, spegnere tutte le
unità. In tal modo è possibile evitare il malfunzionamento e/o danni
agli altoparlanti oppure agli altri dispositivi.
• Anche se i LED sono spenti quando si spegne l'interruttore POWER,
questo non implica che l'unità sia stata completamente scollegata
dall'alimentatore. Se è necessario interrompere completamente
l'alimentazione, spegnere innanzitutto l'interruttore POWER, quindi
scollegare il cavo di alimentazione dalla presa. Per questo motivo è
consigliabile collegare la spina del cavo di alimentazione a una presa
nelle vicinanze e di facile accesso.
Posizionamento
• L'utilizzo dell'unità vicino ad amplicatori di potenza (o altre
apparecchiature contenenti trasformatori di potenza di grandi
dimensioni) potrebbe causare un ronzio. Per ridurre il problema,
cambiare l'orientamento dell'unità o allontanarla dall'origine
dell'interferenza.
• Questo dispositivo potrebbe interferire con la ricezione di apparecchi
radio e televisivi. Non utilizzare questo dispositivo in prossimità di tali
ricevitori.
• Se si utilizzano dispositivi di comunicazione wireless, ad esempio
telefoni cellulari, in prossimità dell'unità, è possibile che si produca
rumore. Tale rumore potrebbe vericarsi quando si riceve o si invia
una chiamata o durante la conversazione telefonica. Se si vericano
tali problemi, è necessario riposizionare i dispositivi wireless
allontanandoli dall'unità o spegnerli.
• Non esporre l'unità alla luce solare diretta, non posizionarla in
prossimità di dispositivi che irradiano calore, non lasciarla all'interno
di un veicolo chiuso o sottoporla in altri modi a temperature eccessive.
Evitare inoltre che dispositivi luminosi solitamente utilizzati quando la
fonte di luce è molto vicina all'unità (ad esempio, la luce sulla tastiera
del piano) oppure riettori potenti rimangano puntati sulla stessa
area dell'unità per lunghi periodi di tempo. Il calore eccessivo può
deformare o scolorire l'unità.
• Quando l'unità viene spostata da un luogo a un altro in cui la
temperatura e/o l'umidità sono molto diverse, è possibile che si
formino delle goccioline d'acqua (condensa) all'interno dell'unità.
Se si tenta di utilizzare l'unità in tali condizioni, potrebbero vericarsi
danni o malfunzionamenti. Prima di utilizzare l'unità, è pertanto
necessario lasciarla spenta per diverse ore nché la condensa non sia
completamente evaporata.
• Evitare che gomma, vinile o materiali di natura simile restino a lungo
sull'unità. Tali oggetti possono scolorire o deteriorare le niture.
• Non incollare adesivi, decalcomanie o altri ornamenti simili allo
strumento. Quando si cerca di staccare i residui di tali materiali, la
vernice esterna potrebbe infatti danneggiarsi.
• In base al materiale e alla temperatura della supercie su cui si
posiziona l'unità, i piedini di gomma potrebbero scolorire o rovinare la
supercie. Per evitare che ciò avvenga, è possibile collocare un pezzo
di feltro o panno sotto i piedini di gomma. In tal caso, assicurarsi che
l'unità non scivoli o non si sposti in modo accidentale.
• Non collocare sull'unità alcun oggetto contenente acqua (ad esempio,
vasi di ori). In prossimità dell'unità, evitare anche l'uso di insetticidi,
profumo, alcool, smalto per unghie, bombolette spray e così via.
Eliminare rapidamente, con un panno soce e asciutto, il liquido che
dovesse eventualmente rovesciarsi sull'unità.
Manutenzione
• Per la pulizia quotidiana, stronare l'unità con un panno soce e
asciutto o leggermente inumidito con acqua. Per rimuovere lo sporco
ostinato, utilizzare un panno imbevuto di un detergente delicato e non
abrasivo. Successivamente, assicurarsi di asciugare completamente
l'unità con un panno soce e asciutto.
• Non utilizzare mai benzina, diluenti, alcool o solventi di alcun tipo, per
evitare la possibilità di scoloritura e/o deformazione.
Precauzioni aggiuntive
• Utilizzare i pulsanti, i cursori o altri controlli, nonché i jack e i connettori
dell'unità prestando ragionevole attenzione. Una manipolazione poco
attenta può causare malfunzionamenti.
• Per collegare o scollegare tutti i cavi, aerrare il connettore stesso
senza mai tirare i cavi. In tal modo si eviterà di causare cortocircuiti o di
danneggiare gli elementi interni dei cavi.
• Una piccola quantità di calore verrà generata dall'unità durante il
normale funzionamento.
• Per evitare di arrecare disturbo ai vicini, cercare di mantenere il volume
dell'unità a livelli ragionevoli. Per utilizzare il volume desiderato, è
consigliabile servirsi di cue.
• Per trasportare l'unità, imballarla nella scatola originale, includendo
l'imbottitura, se possibile. In caso contrario, utilizzare materiali di
imballaggio equivalenti.
• Alcuni cavi di collegamento contengono resistenze. Per collegare
questa unità, non utilizzare cavi con resistenze incorporate. L'utilizzo
di tali cavi può causare una riduzione eccessiva del livello del suono o
la produzione di suono inudibile. Per informazioni sulle speciche dei
cavi, contattare il produttore del cavo.
• Quando si ripone o si trasporta l'unità, avvolgere il cavo di
alimentazione attorno all'apposito gancio.
Marchi
• I nomi di prodotto citati nel presente documento sono marchi o
marchi registrati dei rispettivi proprietari e non si riferiscono a Roland
Corporation. Nel presente manuale, questi nomi sono utilizzati perché
è il metodo più pratico di descrivere i suoni simulati utilizzando la
tecnologia COSM.

4
1. Ingresso INPUT
Collegare qui la chitarra elettrica.
2. Interruttore [SELECT]
Consente il passaggio tra i canali JC CLEAN e LEAD. È possibile
vericare quale canale è selezionato controllando l'indicatore
rosso accesso. L'indicatore sinistro indica il canale JC CLEAN mentre
l'indicatore destro indica il canale LEAD.
Il passaggio tra i canali può essere eseguito utilizzando l'interruttore a
pedale opzionale BOSS FS-5U o FS-6.
3. Interruttore [TUNER]
Utilizzarlo quando si desidera accordare la chitarra. Quando si accende
l'interruttore, la spia luminosa diventa rossa ed è possibile utilizzare la
funzione Tuner.
Per informazioni dettagliate, fare riferimento alla sezione "Utilizzo della
funzione Tuner"(pag. 7).
Canale JC CLEAN
Questo è un modello del famoso amplicatore per chitarra Roland
JC-120 Jazz Chorus. Il suono estremamente pulito e uniforme
risulta scorrevole. Questo amplicatore è ideale per creare suoni in
combinazione con un dispositivo multi-eetto.
4. Manopola [VOLUME]
Consente di regolare il volume del canale JC CLEAN.
Canale LEAD
5. Interruttore per la scelta del tipo di suono
Sono disponibili i sei tipi seguenti.
Quando la funzione Tuner è attivata, è possibile utilizzare questo
interruttore per selezionare la corda da accordare (pag. 7).
Tipo Descrizione
ACOUSTIC SIM
Questo modello di amplicatore originale consente
di ottenere il suono dinamico di una chitarra acustica
utilizzando una chitarra elettrica standard.
OVERDRIVE
Suono di distorsione naturale simile a quello che
si ottiene alzando al massimo il volume di un
amplicatore.
DISTORTION
Distorsione più forte di quella che si ottiene
selezionando OVERDRIVE.
METAL
Distorsione ancora più forte e intensa di quella che si
ottiene selezionando DISTORTION. Può produrre note
sostenute a lungo.
METAL STACK Suono molto pieno dello stack completo Heavy Metal.
EXTREME
Suono ad alto guadagno che produce bassi profondi
e una distorsione intensa mantenendo una chiara
denizione del suono.
6. Manopola [GAIN]
Consente di regolare il livello di distorsione del canale LEAD.
7. Manopola [VOLUME]
Consente di regolare il volume del canale LEAD.
Descrizioni del pannello
Pannello di controllo
1 4
16
17
158 9 10 11 12
136 752 3 14

5
Português Italiano DeutschNederlands Español Français
English
EQUALIZER
8. Manopola [BASS]
Consente di regolare la quantità del tono della gamma di basse
frequenze.
9. Manopola [MIDDLE]
Consente di regolare la quantità del tono della gamma di medie
frequenze.
10. Manopola [TREBLE]
Consente di regolare la quantità del tono della gamma di alte
frequenze.
EFX/SOLO (Eetti/Solo)
11. Manopola EFX/SOLO (Eetti/Solo)
Regolare la manopola su CHORUS, FLANGER,
PHASER, TREMOLO o HEAVY OCTAVE per selezionare
l'eetto corrispondente oppure su SOLO. Girare
la manopola per regolare l'intensità dell'eetto
applicato.
L'indicatore ON si illumina quando EFX viene acceso
e si spegne quando EFX viene spento. È possibile
accendere e spegnere EFX anche mediante gli
interruttori a pedale opzionali.
I gradi di CHORUS, FLANGER, PHASER, TREMOLO,
SOLO e HEAVY OCTAVE sul pannello servono solo
come riferimento. Assicurarsi di vericare il suono
eettivo durante la regolazione degli eetti.
Tipo Descrizione
CHORUS
Aggiunge un suono fuori fase rispetto al suono originale,
rendendolo in tal modo più ampio e corposo.
FLANGER
Crea un eetto anger che genera una sorta di
sensazione di rotazione del suono.
PHASER
Aggiunge un segnale variabile al suono diretto
conferendogli un senso di vorticosità.
TREMOLO
Tremolo è un eetto che crea un cambiamento di volume
ciclico.
SOLO
Applica un eetto boost al suono originale. Se si utilizza
un interruttore a pedale per attivare e disattivare l'eetto
SOLO per i canali JC CLEAN e LEAD singolarmente, è
possibile variare il volume e la distorsione del suono.
HEAVY OCTAVE
Aggiunge un suono abbassato di un'ottava al suono
originale. Poiché è possibile suonare accordi anche
quando questo eetto è attivato, è possibile utilizzarlo
per rendere più pieno il suono degli accordi.
DELAY/REVERB
12. Manopola [DELAY/REVERB]
Regolare la manopola su DELAY o REVERB per attivare
l'eetto corrispondente. Girare la manopola per
regolare l'intensità dell'eetto applicato. Regolare
la manopola sulla posizione SPRING per produrre il
suono di un'unità di riverbero a molla.
* I gradi di DELAY e REVERB sul pannello servono solo
come riferimento.
Tipo Descrizione
DELAY
Girare la manopola per regolare il tempo e l'intensità
dell'eetto DELAY.
REVERB
Girare la manopola per regolare il livello dell'eetto
REVERB.
13. Interruttore [POWER SQUEEZER]
Quando si attiva la funzione Power Squeezer, la spia
luminosa diventa rossa. Quando la funzione Power
Squeezer è disattivata, la spia luminosa è spenta.
Se si accende l'interruttore Power Squeezer, la potenza di
uscita dell'amplicatore viene ridotta a 2 watt.
Il suono prodotto mantiene lo stesso tono e lo stesso
bilanciamento a una potenza di uscita di 2 watt per livelli
di volume più adatti per l'utilizzo in casa.
* La funzione Power Squeezer viene applicata solo ai suoni immessi
mediante l'ingresso INPUT. Non ha alcun eetto sui suoni immessi
mediante l'ingresso AUX IN.
14. Ingresso AUX IN
Consente di collegare un lettore CD, un lettore audio digitale o un
dispositivo di altro tipo e di farlo funzionare insieme alla chitarra.
È possibile collegare cavo jack mini stereo. Poiché l'uscita
dell'altoparlante e di RECORDING OUT/PHONES è però mono,
è consigliabile utilizzare un cavo appropriato (acquistabile
separatamente) per il dispositivo da collegare.
* Determinare il livello del volume regolando il controllo volume del
dispositivo collegato.
* Quando si utilizzano cavi di collegamento con resistenze, il livello
del volume delle apparecchiature collegate all'ingresso AUX IN
potrebbe risultare basso. In tal caso, utilizzare cavi di collegamento
privi di resistenze.
15. Uscita FOOT SW (interruttore a pedale)
È possibile utilizzare interruttori a pedale (BOSS FS-5U o FS-6
opzionale) per passare da un canale all'altro (JC CLEAN/LEAD) e per
accendere o spegnere EFX/SOLO.
* L'unità CUBE-20XL è dotata di un'uscita FOOT SW di tipo TRS che
accetta le spine della congurazione illustrata nella gura. Per
collegare un interruttore a pedale, utilizzare un cavo compatibile
con TRS.
TIP: SELECT
RING: EFX/SOLO
* Per informazioni dettagliate sul collegamento degli interruttori a
pedale, fare riferimento alla sezione "Collegamenti"(pag. 6).
* Se si usa un cavo mono per collegare un solo interruttore a pedale,
l'uscita può essere utilizzata per il passaggio tra i canali (JC CLEAN/
LEAD).
16. Uscita RECORDING OUT/PHONES
• Quando si utilizza RECORDING OUT
Per il collegamento a questa uscita, utilizzare una
spina telefonica mono da 1/4". Il livello del volume di
RECORDING OUT può essere impostato facilmente
regolando la manopola [VOLUME] del canale JC CLEAN o
LEAD come illustrato nella gura a destra.
• Quando si utilizzano le cue
Collegare le cue a questa uscita.
* Quando si utilizza l'uscita RECORDING OUT/PHONES, non viene
emesso alcun suono dall'altoparlante dell'unità.
17. Interruttore [POWER]
Interruttore di accensione e spegnimento.

6
Collegamenti
Accensione e spegnimento
Dopo avere eseguito tutti i collegamenti, accendere i vari dispositivi
nell'ordine specicato. Se si segue un ordine di accensione sbagliato,
si rischiano malfunzionamenti e/o danni agli altoparlanti e agli altri
dispositivi.
1. Assicurarsi che tutte le manopole [VOLUME] dell'unità
CUBE-20XL e dei dispositivi collegati siano regolate su 0.
2. Accendere tutti i dispositivi collegati ai jack di ingresso
dell'unità CUBE-20XL, ovvero INPUT e AUX IN.
3. Accendere l'unità CUBE-20XL.
* Assicurarsi sempre che il livello del volume sia
abbassato prima di accendere l'unità. Anche con
il volume al minimo è possibile che al momento
dell'accensione si sentano dei suoni. Si tratta
comunque di una situazione normale, che non
indica un malfunzionamento.
* Questa unità è fornita di un circuito di protezione. Dopo
l'accensione, è necessario attendere alcuni secondi prima che l'unità
cominci a funzionare normalmente.
4. Regolare i livelli di volume dei dispositivi.
5. Prima di spegnere, abbassare il volume di ciascuno dei
dispositivi del sistema, quindi SPEGNERE i dispositivi
nell'ordine inverso a quello di accensione.
* Se è necessario interrompere completamente l'alimentazione,
spegnere innanzitutto l'interruttore POWER, quindi scollegare il
cavo di alimentazione dalla presa. Fare riferimento alla sezione
Alimentazione (pag. 3).
Interruttori a pedale
Registratore
Cue
Chitarra elettrica
Lettore CD
Lettore audio
digitale e così via
EFX/
SOLO
EFX/
SOLO
SELECT SELECT SELECT
B A
Impostare gli interruttori come illustrato sotto.
oppure
oppure
FS-6 FS-5U
* Per evitare malfunzionamenti e/o danni agli altoparlanti o ad altri
dispositivi, abbassare sempre il volume e spegnere tutti i dispositivi
prima di eseguire qualsiasi collegamento.
* Prima di eseguire i collegamenti, assicurarsi che le manopole
[VOLUME] di entrambi gli amplicatori siano regolate su 0.
* Quando si utilizzano cavi di collegamento con resistenze, il livello
del volume delle apparecchiature collegate all'ingresso AUX IN
potrebbe risultare basso. In tal caso, utilizzare cavi di collegamento
privi di resistenze.

7
Português Italiano DeutschNederlands Español Français
English
Utilizzo della funzione Tuner
L'unità CUBE-20XL è dotata di una funzione Tuner. Oltre che per
l'accordatura manuale, è possibile utilizzarla anche per eettuare
l'accordatura cromatica.
Quando si esegue l'accordatura manuale, il suono della chitarra viene
emesso dall'altoparlante e dall'uscita RECORDING OUT/PHONES. Nella
modalità di accordatura cromatica il suono non viene emesso né
dall'altoparlante né dall'uscita RECORDING OUT/PHONES.
Quando si esegue l'accordatura manuale, è possibile premere l'interruttore
[SELECT] per attivare un tono di riferimento per l'accordatura.
Accordatura manuale
Utilizzare l'accordatura manuale quando le corde sono notevolmente
scordate, ad esempio dopo averle cambiate.
Nella modalità di accordatura manuale è possibile eseguire l'accordatura
ascoltando il suono della chitarra mediante gli altoparlanti o le cue.
Il volume può essere regolato con la manopola [VOLUME] del canale
JC CLEAN. Se non si desidera che il suono della chitarra venga emesso
dagli altoparlanti o dalle cue, regolare la manopola [VOLUME] del
canale JC CLEAN su 0.
1. Premere l'interruttore [TUNER].
L'unità CUBE-20XL entra in modalità Tuner e l'interruttore [TUNER] si
illumina.
2. Utilizzare l'interruttore per la scelta del tipo per selezionare
la corda che si desidera accordare.
Posizione della
manopola
Descrizione
6E Consente di accordare la sesta corda (E)
5A Consente di accordare la quinta corda (A)
4D Consente di accordare la quarta corda (D)
3G Consente di accordare la terza corda (G)
2B Consente di accordare la seconda corda (B)
1E Consente di accordare la prima corda (E)
* Il tono di riferimento è A = 440 Hz e non è possibile modicarlo.
3. Utilizzare la manopola [VOLUME] del canale JC CLEAN per
regolare il volume.
4. Suonare una sola nota sulla corda da accordare.
Accordare la corda no a quando non si accende l'indicatore verde.
Bemolle
Luce rossa Luce rossaLuce verde
Diesis
Tono corretto
* Se il tono è notevolmente scordato, l'indicatore rosso lampeggia.
* Premere l'interruttore [SELECT]. Verrà emesso un tono di riferimento
per il tono selezionato mediante l'interruttore per la scelta del tipo.
(Questa è la funzione Tuning Fork.)
5. Al termine dell'operazione di accordatura, premere
nuovamente l'interruttore [TUNER].
Accordatura cromatica
Se si preme l'interruttore [TUNER] per uno o più secondi, l'interruttore
lampeggia e l'unità può essere utilizzata per eseguire l'accordatura
cromatica che riconosce automaticamente la nota più vicina a quella
suonata.
Quando l'unità è in modalità di accordatura cromatica,
dall'altoparlante e dall'uscita RECORDING OUT/PHONES non viene
emesso alcun suono.
1. Tenere premuto l'interruttore [TUNER] per almeno un
secondo.
L'interruttore [TUNER] lampeggia e l'unità CUBE-20XL entra nella
modalità di accordatura cromatica.
2. Suonare una sola nota sulla corda da accordare.
Accordare la corda no a quando non si accende l'indicatore verde.
Utilizzo della funzione Tuning Fork
Quando si utilizza l'accordatura manuale, è possibile premere
l'interruttore [SELECT] per fare in modo che venga emesso un tono di
riferimento per il tono selezionato mediante l'interruttore per la scelta
del tipo.
1. Premere l'interruttore [TUNER].
L'unità CUBE-20XL entra in modalità Tuner e l'interruttore [TUNER] si
illumina.
2. Utilizzare l'interruttore per la scelta del tipo per selezionare
la corda che si desidera accordare.
* Il tono di riferimento è A = 440 Hz e non è possibile modicarlo.
3. Utilizzare la manopola [VOLUME] del canale JC CLEAN per
regolare il volume.
4. Premere l'interruttore [SELECT].
Verrà emesso un tono di riferimento in base al tono della corda
selezionata mediante l'interruttore per la scelta del tipo.
5. Suonare una sola nota sulla corda da accordare.
Suonare una corda da accordare o un'armonica e accordare la chitarra
in base al tono di riferimento.
6. Al termine dell'operazione di accordatura, premere
nuovamente l'interruttore [TUNER].

8
EXTREME
Suono estremo con distorsione intensa.
Si tratta di un suono ad alto guadagno molto incisivo alle basse
frequenze e in grado di raggiungere un alto grado di tensione nella
gamma di alte frequenze.
È possibile ottenere variazioni del suono girando la manopola
[MIDDLE].
Se si regola la manopola su HEAVY OCTAVE, si otterrà un senso di
distorsione ancora maggiore alle basse frequenze.
Space Clean
Si tratta di un suono trasparente prodotto tramite eetti spaziali.
Selezionare l'amplicatore JC CLEAN basato sul modello Roland
JC-120, quindi aggiungere gli eetti chorus e delay lungo.
L'utilizzo di questa impostazione con una chitarra dotata di trasduttori
a bobina singola produce suoni di arpeggi e strumming di accordi
ottimali.
In base alla frase suonata, può risultare ecace impostare il tempo di
delay del suono di delay in modo che sia leggermente più lento del
tempo della frase.
Power Grunge
Produce un suono di distorsione violento con molti acuti e una
struttura ruvida.
Se si regola la manopola [GAIN] per impedire una distorsione eccessiva
del suono della chitarra, viene prodotto un suono di chitarra diretto
con armoniche brillanti e suoni di accordi potenti.
È inoltre possibile aggiungere l'eetto FLANGER per produrre un
suono con un potente eetto di vorticosità simile a quello di un jet.
Se si utilizza il trasduttore anteriore della chitarra e si aumenta
l'intensità di [GAIN] e [MIDDLE], viene inoltre prodotto un suono di
base pieno con un sustain lungo.
Alternative Metal
Il suono perfetto per ri taglienti e potenti.
Selezionare l'eetto METAL STACK ad alto guadagno, quindi utilizzare
l'equalizzatore per aumentare i bassi.
Se utilizzato con un trasduttore humbucking in posizione posteriore,
produce un eetto di distorsione estremo.
È inoltre possibile aggiungere un delay lungo per l'utilizzo come suono
di base con un sustain intenso.
Se si aggiunge un delay corto, viene prodotto un suono raddoppiato
come quello che si avrebbe se due esecutori suonassero le stesse frasi
contemporaneamente.
Interruttore [SELECT]: LEAD
Interruttore [SELECT]: JC CLEAN
Interruttore [SELECT]: LEAD
Interruttore [SELECT]: LEAD
Impostazioni di esempio

9
Português Italiano DeutschNederlands Español Français
English
Note sulle impostazioni
Interruttore [SELECT]:
Interruttore [SELECT]:
Interruttore [SELECT]:
Interruttore [SELECT]:

10
Speciche
CUBE-20XL
Emissione di potenza stimata 20 W
Livello di ingresso nominale
INPUT (canale JC CLEAN) -10dBu/1MΩ
AUX IN -10dBu
Altoparlanti 20 cm (8 pollici)
Controlli
Interruttore [POWER]
Interruttore [SELECT]
Interruttore [TUNER]
Interruttore [POWER SQUEEZER]
<Canale JC CLEAN> Manopola [VOLUME]
<Canale LEAD>
Interruttore per la scelta del tipo (ACOUSTIC SIM, OVERDRIVE, DISTORTION, METAL, METAL
STACK, EXTREME), manopola [GAIN], manopola [VOLUME]
<EQUALIZER> Manopola [BASS], manopola [MIDDLE], manopola [TREBLE]
<EFX/SOLO> Manopola [EFX /SOLO] (CHORUS, FLANGER, PHASER, TREMOLO, SOLO, HEAVY OCTAVE)
<DELAY/REVERB> Manopola [DELAY/REVERB] (DELAY, REVERB, SPRING)
Indicatori Canale JC CLEAN, canale LEAD, EFX/SOLO, TUNER, POWER SQUEEZER
Connettori
Ingresso INPUT, ingresso AUX IN, uscita FOOT SW (SELECT, EFX/SOLO), uscita RECORDING OUT/PHONES
Consumo energetico 24 W
Dimensioni
385 (L) X 240 (P) X 385 (A) mm
15-3/16 (L) x 9-1/2 (P) x 15-3/16 (A) pollici
Peso 9 kg / 19 lb, 14 oz
Accessori Manuale dell'utente
* 0 dBu = 0,775 Vrm
* Allo scopo di migliorare il prodotto, le speciche e/o l'aspetto di questa unità sono soggetti a modiche senza preavviso.

Português Italiano DeutschNederlands Español Français
English
Se puede cambiar entre dos canales: JC CLEAN y LEAD (pág. 4)
• El cambio de los canales se puede realizar mediante el pedal opcional.
Amplicador de guitarra DSP de alto rendimiento, con una salida de 20 vatios y altavoz incorporado de 20 cm (8 pulgadas)
• Tamaño compacto perfecto para cualquier ocasión, desde los ensayos en casa a las pruebas de estudio, y además es portátil.
El canal “LEAD” ofrece seis efectos diferentes de pedal COSM (pág. 4)
• El canal LEAD ofrece seis tipos de efectos de pedal, incluidos ACOUSTIC SIM, OVERDRIVE, DISTORTION, METAL, METAL STACK y el efecto EXTREME
original, que le proporcionan sonidos para una amplia variedad de estilos.
Función de reducción de potencia Power Squeezer (pág. 5)
• Permite obtener un buen equilibrio tonal incluso a bajo volumen, para disfrutar de un sonido potente también en casa.
Incluye una función de anación (pág. 7)
• Esta función le permite anar la guitarra mientras el instrumento está conectado al amplicador CUBE-20XL.
• La función de referencia de anación hace sonar un tono de referencia para facilitar la anación.
Equipado con un práctico conector AUX IN para las sesiones de ensayo (pág. 5)
• Use este conector para tocar junto con los sonidos emitidos por reproductores de CD y reproductores de audio digital.
Los efectos incluyen EFX/SOLO y DELAY/REVERB independiente (pág. 5)
• La sección EFX incorporada incluye 5 tipos de efectos digitales: CHORUS, FLANGER, PHASER, TREMOLO y HEAVY OCTAVE.
• El pedal (opcional) se puede usar para activar y desactivar EFX/SOLO (pág. 5).
Manual del usuario
Amplicador de guitarra
Antes de usar esta unidad, lea detenidamente las secciones: “UTILIZACIÓN SEGURA DE LA UNIDAD” y “NOTAS IMPORTANTES” (pág. 2 y pág. 3
respectivamente). En estas secciones encontrará información importante acerca de la utilización correcta de la unidad. También es aconsejable
leer íntegramente el manual del usuario para familiarizarse y conocer bien todas las funciones del equipo nuevo. Guarde el manual y téngalo a
mano por si necesita consultarlo.
Copyright © 2010 ROLAND CORPORATION
Todos los derechos reservados. Se prohíbe la reproducción de cualquier parte de esta publicación, en cualquier formato, sin la previa autorización por
escrito de ROLAND CORPORATION. Roland es una marca comercial registrada de Roland Corporation en los Estados Unidos y en otros países.
Composite Object Sound Modeling (COSM o modelado de sonido por objetos compuestos) es una innovadora y potente tecnología de modelado
del sonido de Roland. COSM analiza los numerosos factores que conforman el sonido original, como las características eléctricas y físicas del original y,
a continuación, produce un modelo digital que puede reproducir el mismo sonido.

2
ADVERTENCIA
No abra la unidad ni modique ninguno de sus componentes internos.
No intente reparar la unidad ni sustituir ninguna de sus piezas internas (salvo
cuando en este manual se proporcionen instrucciones especícas que le indiquen
que lo haga). Si la unidad necesitara algún tipo de reparación, póngase en contacto
con su proveedor, con el centro de servicio Roland o con un distribuidor autorizado
de Roland de los que se indican en la página de información.
No instale nunca la unidad en los siguientes lugares:
• Mojados (por ejemplo, cuartos de baño o suelos mojados).
• Expuestos al vapor o a humos.
• Expuestos a entornos salinos.
• Húmedos.
• Expuestos a la lluvia.
• Con polvo o arena.
• Expuestos a niveles altos de vibración y sacudidas.
Asegúrese de que la unidad esté siempre colocada sobre una supercie
plana, nivelada y estable. No la coloque nunca sobre soportes que puedan
moverse ni sobre supercies inclinadas.
La unidad se debe conectar a una fuente de alimentación únicamente del
tipo descrito o según lo indicado en la parte posterior de la unidad.
No doble ni retuerza excesivamente el cable de alimentación, ni ponga
objetos pesados sobre él. Todo ello podría dañar el cable, cortarlo o provocar
cortocircuitos. Los cables dañados son peligrosos, puede producir incendios
y descargas eléctricas.
Esta unidad, utilizada de manera independiente o combinada con un
amplicador y auriculares o altavoces, puede generar niveles acústicos
susceptibles de provocar la pérdida permanente de la audición. No la utilice
durante períodos prolongados con un nivel de volumen elevado, ni a un
volumen que resulte molesto. Si experimenta alguna pérdida de audición o
un zumbido en los oídos, debe dejar de utilizarla inmediatamente y consultar
a un otorrinolaringólogo.
No coloque ningún recipiente que contenga líquido encima de este
producto. No deje que caigan objetos (por ejemplo, monedas o alambres)
ni líquidos (materiales inamables, agua u otras bebidas) en el interior de
este producto. Todo ello podría provocar cortocircuitos, un funcionamiento
incorrecto u otro tipo de deciencias.
Apague la unidad inmediatamente, retire el cable de alimentación del
enchufe y póngase en contacto con su proveedor, con el centro de servicio
Roland más cercano, o con un distribuidor autorizado de Roland de los que
se indican en la página de información, siempre que:
• El cable de alimentación o el enchufe estén dañados.
• La unidad genere humo u olores raros.
• Haya caído algún objeto, o se haya derramado algún líquido, en el interior
de la unidad.
• La unidad haya estado expuesta a la lluvia, o se haya mojado por cualquier causa.
• La unidad parezca no funcionar con normalidad o muestre un cambio
notable en el rendimiento.
En lugares donde haya niños debe haber siempre un adulto presente hasta
que los menores puedan cumplir todas las reglas de seguridad esenciales
para el funcionamiento seguro de la unidad.
ADVERTENCIA
Proteja la unidad contra los golpes fuertes.
No deje que se caiga.
No enchufe el cable de alimentación de la unidad a la misma toma de
corriente donde ya hay bastantes otros dispositivos enchufados. Tenga
mucho cuidado si utiliza cables de extensión. La corriente total de todos los
dispositivos conectados a la toma del cable de extensión no debe exceder
nunca la clasicación de la corriente (vatios/amperios) del cable. Una carga
excesiva podría hacer que se calentara el material de aislamiento del cable y
llegara a fundirse.
Antes de utilizar la unidad en otro país, póngase en contacto con su
proveedor, el centro de servicio Roland más cercano, o con un distribuidor
autorizado de Roland de los que se indican en la página de información.
PRECAUCIÓN
La unidad se debe colocar en un lugar o una posición que permitan su
ventilación adecuada.
Cada vez que enchufe o desenchufe el cable de alimentación de una toma de
corriente, asegúrese de cogerlo siempre por el enchufe propiamente dicho.
Desenchufe el enchufe del cable de alimentación periódicamente y límpielo
con un paño seco para eliminar el polvo y la suciedad de las patillas.
Desenchufe el cable de alimentación de la toma de corriente siempre que
la unidad no vaya a utilizarse en un período de tiempo prolongado. La
acumulación de polvo entre el enchufe del cable de alimentación y la toma
de corriente puede reducir el aislamiento y provocar un incendio.
Trate de evitar que los cables se enreden. Además, todos los cables deben
estar fuera del alcance de los niños.
No se suba a la unidad, ni ponga objetos pesados sobre ella.
No toque el cable de alimentación ni su enchufe con las manos mojadas al
enchufarlo o desenchufarlo de una toma de corriente.
Antes de mover la unidad, desconecte el enchufe del cable de alimentación
de la toma y extraiga todos los cables procedentes de dispositivos externos.
Antes de limpiar la unidad, apáguela y desenchufe el cable de alimentación
de la toma de corriente (pág. 6).
Siempre que exista la posibilidad de que se produzcan rayos en su región,
desconecte el enchufe del cable de alimentación de la toma de corriente.
Las ranuras de ventilación de cada lado de la unidad podrían ponerse
calientes, así que tenga cuidado de no quemarse.
No extraiga la rejilla del altavoz ni el altavoz bajo ningún concepto. El usuario
no puede sustituir el altavoz. Dentro de la carcasa hay voltajes y corrientes
peligrosos.
UTILIZACIÓN SEGURA DE LA UNIDAD

3
Português Italiano DeutschNederlands Español Français
English
NOTAS IMPORTANTES
Fuente de alimentación
• No conecte la unidad a la misma toma de corriente que un aparato
eléctrico controlado por un inversor (como un frigoríco, una lavadora,
un microondas o un aparato de aire acondicionado), o que tenga
un motor. Dependiendo de cómo se utilice dicho aparato eléctrico,
el ruido de la fuente de alimentación puede hacer que la unidad no
funcione correctamente o produzca un ruido perceptible. Si no existe
la posibilidad de usar otra toma de corriente, conecte un ltro de ruido
de fuente de alimentación entre la unidad y la toma de corriente.
• Antes de conectar la unidad a otros dispositivos, apáguelos todos. De
este modo pueden prevenirse desperfectos o daños en los altavoces y
otros dispositivos.
• Aunque los LED estén apagados cuando el interruptor de alimentación
POWER esté desactivado, no signica que la unidad se haya
desconectado por completo de la fuente de alimentación. Si necesita
apagar el equipo completamente, primero sitúe en posición OFF el
interruptor POWER y, a continuación, desenchufe el cable de la toma
de corriente. Por este motivo, se debe poder acceder fácilmente a
la toma de corriente en la que elija conectar el enchufe del cable de
alimentación.
Colocación
• El uso de la unidad en las proximidades de amplicadores de potencia
(u otros equipos con grandes transformadores de potencia) puede
producir zumbidos. Para mitigar este problema, cambie la orientación
de la unidad o aléjela de la fuente de la interferencia.
• Este dispositivo puede interferir en la recepción de radio o televisión.
No utilice la unidad en las proximidades de este tipo de receptores.
• La utilización de dispositivos de comunicación inalámbricos, como
teléfonos móviles, en las proximidades de la unidad puede originar
ruidos. El ruido se puede producir al recibir o hacer una llamada, o
durante la conversación. Si observa este problema, aleje el dispositivo
inalámbrico de la unidad o apáguelo.
• No exponga la unidad a la luz directa del sol, no la ponga cerca de
aparatos que emitan calor, no la deje dentro de un vehículo cerrado,
ni la someta a temperaturas elevadas. Tampoco permita que los
dispositivos de iluminación que normalmente se utilizan mientras la
fuente de luz está muy próxima a la unidad (como una luz de piano) o
focos potentes brillen en la misma área de la unidad durante períodos
de tiempo prolongados. El calor elevado puede deformar o decolorar
la unidad.
• Si se traslada la unidad a un lugar cuyas condiciones de temperatura
o humedad sean sustancialmente diferentes, es posible que en su
interior se origine condensación. El uso de la unidad en este estado
puede dañarla o producir un funcionamiento deciente. Por lo tanto,
antes de utilizarla en tales circunstancias, déjela en reposo varias horas,
hasta que la condensación se haya evaporado por completo.
• Evite que objetos de caucho, vinilo o materiales similares permanezcan
encima de la unidad durante largos períodos de tiempo. Dichos
objetos pueden decolorar o dañar el acabado.
• No adhiera pegatinas, calcomanías o similares en este instrumento.
Al despegarlas del instrumento se puede dañar el acabado exterior.
• En función del material y de la temperatura de la supercie sobre
la que coloque la unidad, las patas de goma de la misma podrían
mancharla o estropearla. Recomendamos colocar algún tipo de paño
debajo de las patas para que esto no suceda. Si lo hace, asegúrese de
que la unidad no se puede mover ni caer accidentalmente.
• No coloque nada que contenga agua (por ejemplo, jarrones con
ores) encima de esta unidad. Asimismo, evite el uso de insecticidas,
perfumes, alcohol, esmalte de uñas, aerosoles, etc., cerca de la unidad.
Limpie rápidamente cualquier líquido que se derrame en la unidad
con un paño seco y suave.
Mantenimiento
• Limpie la unidad diariamente con un paño suave y seco, o ligeramente
humedecido en agua. Para eliminar la suciedad resistente, utilice
un paño humedecido con un detergente suave no abrasivo. A
continuación, no olvide secar bien la unidad con un paño suave y seco.
• No utilice aguarrás, alcohol ni disolventes de ningún tipo, para evitar
que la unidad se deforme o decolore.
Otras precauciones
• Utilice los botones, mandos, enchufes y conectores de la unidad con
los cuidados necesarios. Una utilización incorrecta puede dar lugar a
deciencias de funcionamiento.
• Siempre que enchufe o desenchufe algún cable, sujete el enchufe y no
tire nunca del cable. Así evitará cortocircuitos o daños a los elementos
internos del cable.
• Puede que la unidad emita una pequeña cantidad de calor durante su
funcionamiento normal.
• Para evitar molestias a terceros, mantenga el volumen de la unidad en
un nivel razonable. Podría interesarle utilizar los auriculares para no
tener que preocuparse de si molesta a otras personas.
• Cuando tenga que transportar la unidad, embálela, si ello es posible,
dentro de su caja (incluido el material de relleno). De lo contrario,
utilice materiales de embalaje adecuados.
• Algunos cables de conexión incorporan resistencias. No utilice cables
con resistencias para conectar esta unidad. Este tipo de cables puede
provocar que el nivel de sonido sea extremadamente bajo o inaudible.
Para obtener más información sobre las especicaciones de los cables,
póngase en contacto con el fabricante del cable en cuestión.
• Enrolle el cable de alimentación en el anclaje para el cable cuando
transporte o guarde la unidad.
Marcas comerciales
• Todos los nombres de productos mencionados en este documento
son marcas comerciales o marcas registradas de sus respectivos
propietarios, y no pertenecen a Roland Corporation. En el presente
manual, estos nombres se utilizan a n de describir de la manera más
práctica los sonidos que se emulan por medio de la tecnología COSM.

4
1. Conector INPUT
Conecte aquí la guitarra eléctrica.
2. Conmutador [SELECT]
Permite cambiar entre los canales JC CLEAN y LEAD. Puede conrmar
qué canal está seleccionado comprobando cuál de los indicadores
rojos está iluminado (JC CLEAN: izquierdo; LEAD: derecho).
Se puede cambiar de un canal a otro con los pedales BOSS FS-5U o
FS-6 opcionales.
3. Conmutador [TUNER]
Use este conmutador cuando desee anar su guitarra. Cuando se
enciende el conmutador se iluminará en rojo, y podrá usar la función
de anación.
Para obtener información más detallada, consulte “Uso de la función
de anación” (pág. 7).
Canal JC CLEAN
Es un modelo del famoso amplicador de guitarra JC-120 Jazz
Chorus de Roland. Su sonido ultralimpio y ultraplano ofrece una gran
sensación de suavidad. Este amplicador resulta ideal para crear
sonidos en combinación con un dispositivo de múltiples efectos.
4. Mando [VOLUME]
Ajusta el volumen del canal JC CLEAN.
Canal LEAD
5. Conmutador de tipo
Puede elegir entre los seis tipos siguientes.
Cuando la función de anación está activada, puede usarlo para
seleccionar el nombre de la cuerda que va a anar (pág. 7).
Tipo Descripción
ACOUSTIC SIM
Este modelo de amplicador original hace posible
que su guitarra eléctrica estándar le ofrezca un
sonido de guitarra acústica dinámico.
OVERDRIVE
Sonido de distorsión natural similar al obtenido
cuando el volumen del amplicador se pone al
máximo.
DISTORTION Distorsión más acusada que la de OVERDRIVE.
METAL
Distorsión aún más acusada e intensa que la de
DISTORTION, con la que se pueden obtener notas
largas sostenidas.
METAL STACK
Sonido muy grueso de un amplicador tipo
Heavy Metal Stack.
EXTREME
Sonido de alta ganancia que ofrece unos bajos
densos y una distorsión intensa al tiempo que
conserva una clara denición del sonido.
6. Mando [GAIN]
Ajusta el nivel de distorsión del canal LEAD.
7. Mando [VOLUME]
Ajusta el volumen del canal LEAD.
Descripción del panel
Panel de control
1 4
16
17
158 9 10 11 12
136 752 3 14

5
Português Italiano DeutschNederlands Español Français
English
EQUALIZER
8. Mando [BASS]
Ajusta la calidad de tono de la gama más baja.
9. Mando [MIDDLE]
Ajusta la calidad de tono de la gama media.
10. Mando [TREBLE]
Ajusta la calidad de tono de la gama más alta.
EFX/SOLO (Efectos/Solo)
11. Mando [EFX/SOLO] (Efectos/Solo)
Gire este mando a la posición CHORUS, FLANGER,
PHASER, TREMOLO o HEAVY OCTAVE para
seleccionar el efecto correspondiente, o a la
posición SOLO. Gire el mando para determinar el
valor de ajuste del efecto aplicado.
El indicador ON se ilumina cuando EFX está
activado y se apaga cuando se desactiva EFX.
También puede activar y desactivar EFX con los
pedales opcionales.
Las graduaciones de CHORUS, FLANGER, PHASER,
TREMOLO, SOLO, HEAVY OCTAVE indicadas en
un panel sirven de referencia. Asegúrese de
comprobar el sonido a medida que ajusta los
distintos efectos.
Tipo Descripción
CHORUS
En este efecto se añade un sonido ligeramente
desanado al sonido original, lo que le conere una
mayor amplitud y plenitud.
FLANGER
Crea un efecto de pestañeo que produce una especie
de sensación de rotación del sonido.
PHASER
Este efecto añade una señal desfasada variable al
sonido directo, lo que le conere un carácter de
remolino.
TREMOLO
Tremolo es un efecto que crea un cambio cíclico del
volumen.
SOLO
Aplica un efecto de refuerzo al sonido original. La
utilización del pedal para activar o desactivar el efecto
SOLO de forma individual para los canales JC CLEAN
y LEAD le permite variar el volumen y la distorsión del
sonido.
HEAVY OCTAVE
Añade sonido bajo en una octava al sonido original.
Como puede seguir tocando los acordes mientras usa
este efecto, puede usarlo para engordar también el
sonido de los acordes que está tocando.
DELAY/REVERB
12. Mando [DELAY/REVERB]
Gire este mando a la posición DELAY o REVERB para
seleccionar ese efecto. Gire el mando para determinar
el valor del ajuste del efecto aplicado. Coloque el
mando en la posición SPRING para disfrutar del
sonido de una unidad de reverberación helicoidal.
* Las graduaciones de DELAY, REVERB indicadas en
un panel sirven de referencia.
Tipo Descripción
DELAY
Gire el mando para cambiar el tiempo y la cantidad de
retardo de los efectos.
REVERB Gire el mando para ajustar el nivel de reverberación.
13. Conmutador [POWER SQUEEZER]
El conmutador se ilumina en rojo cuando la función de
reducción de potencia está activada; el conmutador se
apaga cuando la reducción de potencia está desactivada.
La activación de la función Power Squeezer le permite
reducir la salida del amplicador a 2 vatios.
Su activación le permitirá producir un sonido que
conserva el mismo tono y equilibrio con una salida de
2 vatios, para obtener unos niveles de volumen más
adecuados para el hogar medio.
* La función Power Squeezer afecta únicamente a la entrada de
sonidos por el conector INPUT. No tiene efecto alguno sobre los
sonidos que llegan por el conector AUX IN.
14. Conector AUX IN
Le permite conectar un reproductor de CD, un reproductor de audio
digital u otro tipo de dispositivo, y reproducir su contenido al tiempo
que toca la guitarra.
Admite un conector de miniclavija estéreo. No obstante, la salida del
altavoz y del conector RECORDING OUT/PHONES es monoaural. Utilice
un cable (no incluido) que resulte adecuado para el dispositivo que va
a conectar.
* Determine el nivel del volumen ajustando el control del volumen
del dispositivo conectado.
* Si se usan cables de conexión con resistencias, el nivel del volumen
del equipo conectado al conector AUX IN podría ser bajo. En tal
caso, utilice cables de conexión sin resistencias.
15. Conector FOOT SW (pedal)
Puede usar pedales (BOSS FS-5U o FS-6 opcional) para cambiar de
canal (JC CLEAN/LEAD) y para activar o desactivar EFX/SOLO.
* La unidad CUBE-20XL dispone de un conector FOOT SW de tipo TRS
que admite conectores de la conguración que se muestra en la
gura. Para conectar un pedal, use un cable compatible con TRS.
PUNTA: SELECT
ANILLO: EFX/SOLO
* Para obtener más información sobre la conexión de pedales,
consulte “Conexiones” (pág. 6).
* Si usa un cable monoaural para conectar sólo un pedal, puede
usarlo para cambiar de canales (JC CLEAN/LEAD).
16. Conector RECORDING OUT/PHONES
• Cuando se usa el conector RECORDING OUT
Use un conector de teléfono de 1/4" monoaural cuando
conecte algo aquí. El nivel de volumen de RECORDING
OUT se puede ajustar fácilmente si dene el mando
[VOLUME] del canal JC CLEAN o LEAD como se muestra
en la imagen de la derecha.
• Cuando se usan los auriculares
Conecte los auriculares a este conector.
* No se emitirá ningún sonido por el altavoz de la unidad mientras se
esté usando el conector RECORDING OUT/PHONES.
17. Interruptor [POWER]
Enciende y apaga la unidad.

6
Conexiones
Encendido y apagado de la unidad
Una vez realizadas las conexiones, encienda los diferentes dispositivos
en el orden indicado. Si enciende los dispositivos en un orden
incorrecto, podría causar anomalías en el funcionamiento o posibles
daños en los altavoces y los demás dispositivos.
1. Verique que todos los mandos [VOLUME] de la unidad
CUBE-20XL y de todos los dispositivos conectados estén en
la posición 0.
2. Encienda todos los dispositivos conectados a los conectores
de entrada (INPUT y AUX IN) de CUBE-20XL.
3. Encienda el amplicador CUBE-20XL.
* Asegúrese siempre de bajar el nivel del volumen
antes de encender el equipo. Incluso con el
volumen totalmente bajado oirá algún sonido al
encender el equipo, aunque se trata de algo normal
y no de una deciencia de funcionamiento.
* La unidad está equipada con un circuito de protección. Después del
encendido, es necesario esperar unos segundos para que la unidad
funcione con normalidad.
4. Ajuste el nivel de volumen de los dispositivos.
5. Antes de apagar, baje el volumen de cada uno de los
dispositivos del sistema y luego APAGUE los dispositivos en
el orden inverso al orden en que los encendió.
* Si necesita apagar el equipo completamente, primero sitúe en
posición OFF el interruptor POWER y, a continuación, desenchufe
el cable de la toma de corriente. Consulte el apartado Fuente de
alimentación (pág. 3).
Pedales
Grabador
Auriculares
Guitarra eléctrica
Reproductor de CD
Reproductor de
audio digital, etc.
EFX/
SOLO
EFX/
SOLO
SELECT SELECT SELECT
B A
Ajuste los conmutadores como se indica a continuación.
o
o
FS-6 FS-5U
* Para evitar que los altavoces u otros dispositivos funcionen de
manera deciente o se dañen, reduzca siempre el volumen y
apague todos los dispositivos antes de proceder a realizar cualquier
conexión.
* Antes de realizar las conexiones, asegúrese de que el ajuste del
volumen del mando [VOLUME] de ambos amplicadores está en la
posición 0.
* Si se usan cables de conexión con resistencias, el nivel del volumen
del equipo conectado al conector AUX IN podría ser bajo. En tal
caso, utilice cables de conexión sin resistencias.

7
Português Italiano DeutschNederlands Español Français
English
Uso de la función de anación
La unidad CUBE-20XL cuenta con una función de anación. Además de
la anación manual, también puede utilizar una anación cromática.
Cuando se ana manualmente, el sonido de la guitarra saldrá por
el altavoz y por el conector RECORDING OUT/PHONES. En el modo
de anación cromática, el sonido no saldrá por el altavoz ni por el
conector RECORDING OUT/PHONES.
Cuando ane manualmente, puede pulsar el conmutador [SELECT]
para activar un tono de referencia de anación.
Anación manual
Utilice la anación manual cuando las cuerdas estén muy desanadas
(como, por ejemplo, después de haberlas cambiado).
En el modo de anación manual puede anar al tiempo que escucha el
sonido de la guitarra por los altavoces o los auriculares.
El volumen se puede ajustar con el mando [VOLUME] del canal JC
CLEAN. Si no desea que el sonido de la guitarra salga por los altavoces
o los auriculares, coloque el mando [VOLUME] del canal JC CLEAN en
la posición 0.
1. Pulse el conmutador [TUNER].
CUBE-20XL entra en el modo de anación y el conmutador [TUNER] se
ilumina.
2. Utilice el conmutador de tipo para seleccionar la cuerda que
desea anar.
Posición del
mando
Descripción
6E Cuerda sexta suelta (E)
5A Cuerda quinta suelta (A)
4D Cuerda cuarta suelta (D)
3G Cuerda tercera suelta (G)
2B Cuerda segunda suelta (B)
1E Cuerda primera suelta (E)
* El tono de referencia es A=440 Hz. No se puede modicar.
3. Use el mando [VOLUME] del canal JC CLEAN para ajustar el
volumen.
4. Toque una sola nota en la cuerda suelta que desee anar.
Ane la cuerda hasta que se encienda el indicador verde.
Bemol
Se ilumina en rojo Se ilumina en rojoSe ilumina en verde
Sostenido
El tono es correcto
* El indicador rojo parpadea si el tono está sustancialmente
desanado.
* Pulse el conmutador [SELECT] y oirá un tono de referencia del tono
seleccionado por el conmutador de tipo. (Se trata de la función de
anación Tuning Fork.)
5. Cuando termine de anar, pulse de nuevo el conmutador
[TUNER].
Anación cromática
Al pulsar el conmutador [TUNER] durante un segundo o más, dicho
conmutador [TUNER] parpadea y ya puede utilizar la unidad como
un “anador cromático”, el cual determina de manera automática el
nombre de la nota más próxima a la emitida.
Una vez en el modo de anación cromática, no sale ningún sonido por
el altavoz ni por el conector RECORDING OUT/PHONES.
1. Mantenga pulsado el conmutador [TUNER] durante un
segundo como mínimo.
El conmutador [TUNER] parpadea y CUBE-20XL entra en el modo de
anación cromática.
2. Toque una sola nota en la cuerda suelta que desee anar.
Ane la cuerda hasta que se encienda el indicador verde.
Uso de la función de anación Tuning Fork
Cuando ane manualmente, puede pulsar el conmutador [SELECT]
para que suene un tono de referencia de anación en el tono
seleccionado por el conmutador de tipo.
1. Pulse el conmutador [TUNER].
CUBE-20XL entra en el modo de anación y el conmutador [TUNER] se
ilumina.
2. Utilice el conmutador de tipo para seleccionar la cuerda que
desea anar.
* El tono de referencia es A=440 Hz. No se puede modicar.
3. Use el mando [VOLUME] del canal JC CLEAN para ajustar el
volumen.
4. Pulse el conmutador [SELECT].
El tono de referencia sonará en el tono de la cuerda seleccionada por el
conmutador de tipo.
5. Toque una sola nota en la cuerda suelta que desee anar.
Toque una cuerda suelta o un armónico y ane su guitarra para que
coincida con el tono de referencia.
6. Cuando termine de anar, pulse de nuevo el conmutador
[TUNER].

8
EXTREME
Es un sonido extremo con distorsión intensa.
Es un sonido de alta ganancia de gran impacto en los graves, al tiempo
que ofrece una gran cantidad de agudos en la gama superior.
Puede obtener variaciones de sonido moviendo el mando [MIDDLE].
Si activa el efecto HEAVY OCTAVE, puede lograr una sensación de
distorsión más pronunciada en los graves.
Space Clean
Es un sonido transparente que usa efectos espaciales.
Seleccione el amplicador JC CLEAN, basado en el diseño del Roland
JC-120, y añádale los efectos de coro y retardo largo.
Si se usa este ajuste con una guitarra equipada con pastillas de
bobina única se obtienen unos arpegios y acordes de rasgueado de
extraordinario sonido.
En función de la frase que se esté tocando, puede resultar ecaz
ajustar el tiempo de retardo del sonido de retardo un poco inferior al
tempo de la frase.
Power Grunge
Produce un sonido de distorsión acusada y con una textura muy aguda
y ronca.
Si se ajusta el mando [GAIN] para evitar una distorsión excesiva del
sonido de la guitarra se obtiene un sonido de guitarra claro con
armónicos brillantes y un potente sonido de las cuerdas.
También puede añadir el efecto FLANGER para producir un sonido con
un potente efecto de remolino, muy parecido al sonido de un surtidor.
Asimismo, el uso de la pastilla delantera de la guitarra y la subida de
los mandos [GAIN] y [MIDDLE] tienen como resultado un sonido base
grueso con sostenido largo.
Alternative Metal
El sonido perfecto para ris intensos y nítidos.
Seleccione el efecto METAL STACK de alta ganancia y, a continuación,
use el ecualizador para reforzar los graves todavía más.
Si se usa con una pastilla canceladora de zumbidos en la posición
trasera, ofrece un efecto de distorsión extrema.
Además, puede añadir un retardo largo para usar esto como un sonido
base con un sostenido extraordinario.
La adición de un retardo corto produce un sonido duplicado como el
de dos intérpretes que tocan las mismas frases al mismo tiempo.
Conmutador [SELECT]: LEAD
Conmutador [SELECT]: JC CLEAN
Conmutador [SELECT]: LEAD
Conmutador [SELECT]: LEAD
Ajustes de muestra

9
Português Italiano DeutschNederlands Español Français
English
Notas de los ajustes
Conmutador [SELECT]:
Conmutador [SELECT]:
Conmutador [SELECT]:
Conmutador [SELECT]:

10
Especicaciones
CUBE-20XL
Clasicación de salida 20 W
Nivel de entrada nominal
INPUT (canal JC CLEAN) -10 dBu/1 MΩ
AUX IN -10 dBu
Altavoces 20 cm (8 pulgadas)
Controles
Interruptor [POWER]
Conmutador [SELECT]
Conmutador [TUNER]
Conmutador [POWER SQUEEZER]
<Canal JC CLEAN> Mando [VOLUME]
<Canal LEAD>
Conmutador de tipo (ACOUSTIC SIM, OVERDRIVE, DISTORTION, METAL, METAL STACK,
EXTREME), mando [GAIN], mando [VOLUME]
<ECUALIZADOR> Mando [BASS], mando [MIDDLE], mando [TREBLE]
<EFX/SOLO> Mando [EFX/SOLO] (CHORUS, FLANGER, PHASER, TREMOLO, SOLO, HEAVY OCTAVE)
<DELAY/REVERB> Mando [DELAY/REVERB] (DELAY, REVERB, SPRING)
Indicadores Canal JC CLEAN, canal LEAD, EFX/SOLO, TUNER, POWER SQUEEZER
Conectores
Conector INPUT, conector AUX IN, conector FOOT SW (SELECT, EFX/SOLO), conector RECORDING OUT/PHONES
Consumo 24 W
Dimensiones
385 (anchura) x 240 (fondo) x 385 (altura) mm
15-3/16 (anchura) x 9-1/2 (fondo) x 15-3/16 (altura) pulgadas
Peso 9 kg / 19 libras y 14 onzas
Accesorios Manual del usuario
* 0 dBu = 0,775 Vrms
* Con el n de mejorar el producto, las especicaciones y/o el aspecto de la unidad pueden modicarse sin previo aviso.

Português Italiano DeutschNederlands Español Français
English
Alternável entre dois canais: JC CLEAN e LEAD (pág. 4)
• É possível alternar os canais utilizando um FOOTSWITCH opcional.
Amplicador de guitarra DSP com 20 watts de potência, compacto, alto desempenho, com alto-falante incorporado
de 20 cm (8 pol.)
• O tamanho compacto é perfeito para qualquer prática em casa, e ensaiar no estúdio.
Canal “LEAD” oferece seis efeitos de pedal com tecnologia COSM de simulação (pág. 4)
• O canal LEAD oferece seis tipos de efeitos de pedal, incluindo ACOUSTIC SIM, OVERDRIVE, DISTORTION, METAL, METAL STACK e o efeito original
EXTREME, fornecendo sons para uma ampla faixa de estilos.
Função Power Squeezer (pág. 5)
• Permite obter um timbre com ganho alto, mesmo em volume baixo, sem perda de freqüência.
Anador incluso (pág. 7)
• Esse recurso permite anar a guitarra quando o instrumento está conectado ao CUBE-20XL.
Entrada AUX IN, ideal para conectar CD/ MP3 players, ou MÁQUINAS DE RITMO (pág. 5)
• Use-o para tocar junto com sons de leitores de CD e leitores de áudio digital.
Os efeitos incluem EFX/SOLO e um DELAY/REVERB independente (pág. 5)
• A seção EFX integrada inclui cinco tipos de efeitos digitais: CHORUS, FLANGER, PHASER, TREMOLO e HEAVY OCTAVE.
• É possível usar FOOTSWITCH (opcional) para ligar e desligar EFX/SOLO (pág. 5).
Manual do Proprietário
Amplicador de guitarra
Antes de usar este aparelho, leia atentamente as seções intituladas: “USO SEGURO DA UNIDADE” e “OBSERVAÇÕES IMPORTANTES” (pág. 2; pág. 3).
Essas seções oferecem informações importantes sobre o uso correto do equipamento. Além disso, para que você conheça todos os recursos
do seu novo equipamento, o Manual do proprietário deve ser lido por completo. O manual deverá ser guardado em local de fácil acesso para
consultas futuras.
Copyright © 2010 ROLAND CORPORATION
Todos os direitos reservados. Não é permitida a reprodução desta publicação sob qualquer forma sem o consentimento escrito da
ROLAND CORPORATION. Roland é uma marca comercial registrada da Roland Corporation nos Estados Unidos e/ou outros países.
COSM (Composite Object Sound Modeling) é uma poderosa e inovadora tecnologia de modelagem de som da Roland. A COSM analisa os muitos
fatores que compõem o som original, como por exemplo, as características elétricas e físicas do original e, em seguida, gera um modelo digital que
pode reproduzir o mesmo som.

2
AVISO
Não abra nem realize nenhuma modicação interna no equipamento.
Não tente fazer reparos nem substituir peças internas do equipamento
(exceto quando indicado especicamente pelas instruções do manual).
Procure o revendedor, o Centro de Serviços Técnicos da Roland ou um
distribuidor autorizado da Roland, conforme listado na página “Informações”.
Jamais instale o equipamento em qualquer um dos seguintes locais.
• Molhados (por exemplo, banheiros, lavatórios ou pisos molhados) ou
• Expostos ao vapor ou à fumaça ou
• Sujeitos à exposição ao sol ou
• Úmidos ou
• Expostos à chuva ou
• Empoeirados ou com areia ou
• Sujeitos a altos níveis de vibração e instabilidade.
Certique-se que o equipamento esteja sempre em superfícies planas e
estáveis. Nunca o deixe em suportes que possam tombar nem em superfícies
inclinadas.
O equipamento deve estar conectado a uma fonte de alimentação do tipo
descrito conforme a especicação na parte traseira do equipamento.
Não dobre ou torça demais o cabo de força e não coloque objetos pesados
sobre ele. Isso pode danicar o cabo e os componentes e provocar curtos
circuitos. Cabos danicados representam perigo de choque e incêndio!
Este equipamento, sozinho ou em conjunto com um amplicador e fones de
ouvido ou alto-falantes, pode produzir níveis sonoros capazes de provocar
perda permanente da audição. Não use por períodos longos com volume alto
ou com volumes desconfortáveis. Se você perceber a perda de audição ou
um chiado no ouvido, interrompa o uso imediatamente e procure um médico
especialista.
Não coloque recipientes com líquidos sobre este produto. Nunca permita
que objetos estranhos (por exemplo, objetos inamáveis, moedas, os) ou
líquidos (por exemplo, água ou suco) entrem neste produto. Isso pode causar
curtos circuitos, falha na operação ou outro mau funcionamento.
Desligue imediatamente, remova o cabo de força da tomada e procure o
revendedor, o Centro de Serviços Técnicos da Roland ou um distribuidor
autorizado, conforme listado da página “Informações” quando:
• O cabo de força ou o plugue estiver danicado; ou
• Houver fumaça ou odores estranhos
• Caírem objetos dentro do equipamento ou for derramado líquido sobre
ele; ou
• O equipamento tiver sido exposto à chuva (ou ter sido molhado); ou
• O equipamento não funcionar normalmente ou mostrar uma mudança
aparente no desempenho.
Em casas com crianças pequenas, um adulto deve supervisionar até que
a criança seja capaz de seguir as principais regras para o uso seguro do
equipamento.
AVISO
Proteja a unidade contra impacto forte.
(Não a deixe cair!)
Não force o cabo de força para compartilhar tomada com outros aparelhos.
Tenha um cuidado especial ao usar extensões — a potência total usada
por todos os aparelhos conectados nunca deverá ultrapassar a capacidade
(watts/ampéres) da extensão. A carga excessiva pode fazer com que o
isolamento do cabo aqueça e até mesmo derreta.
Antes de usar o equipamento em países estrangeiros, procure o seu
vendedor, o Centro de Serviços Técnicos da Roland mais próximo ou um
distribuidor autorizado, conforme listado da página “Informações”.
CUIDADO
O aparelho deve ser situado de modo que sua localização ou posição não
interra em sua ventilação.
Ao colocar ou tirar da tomada, segure somente pelo plugue do cabo de força.
Em intervalos regulares, desligue o plugue e limpe-o com um pano seco para
tirar toda poeira e outros acúmulos dos contatos. Além disso, desconecte o
cabo de força da tomada sempre que o equipamento permanecer sem uso
por períodos prolongados. Qualquer acúmulo de poeira entre o plugue e a
tomada pode resultar em deciência no isolamento e causar um incêndio.
Tente evitar que os e cabos quem embaraçados. Além disso, todos os os e
cabos devem ser colocados em locais fora do alcance de crianças.
Nunca suba ou coloque objetos pesados em cima do equipamento.
Nunca manuseie o cabo de força ou o plugue com as mãos molhadas ao ligar
e desligar da tomada ou esse equipamento.
Antes de mover o equipamento, desconecte o plugue da tomada e todos os
outros os dos aparelhos externos.
Antes de limpar o equipamento, desligue a energia e desconecte o cabo de
força da tomada (pág. 6).
Sempre que suspeitar da possibilidade de raio na sua área, desconecte o
plugue do cabo de força da tomada.
Os ventiladores de refrigeração em ambos os lados do aparelho podem car
quentes, por isso tenha cuidado para evitar incêndios.
Nunca remova a grade do alto-falante e o alto-falante. Alto-falante não
substituível pelo usuário. Correntes e voltagens perigosas encontram-se
dentro do invólucro.
USO SEGURO DA UNIDADE

3
Português Italiano DeutschNederlands Español Français
English
OBSERVAÇÕES IMPORTANTES
Fonte de alimentação
• Não ligue este equipamento na mesma tomada elétrica que esteja
sendo usada por aparelhos domésticos que sejam controlados por
inversores (geladeira, máquina de lavar, forno de microondas ou ar
condicionado) ou a aparelhos com motores. Dependendo da forma
como o aparelho elétrico estiver sendo usado, o ruído na alimentação
poderá fazer com que o equipamento não funcione corretamente
ou poderá produzir barulho. Se não for possível usar uma tomada
separada, conecte um ltro de linha entre este equipamento e a
tomada elétrica.
• Antes de conectar este equipamento a outros dispositivos, desligue a
energia de todos os equipamentos. Isso evitará mau funcionamento e/
ou danos aos alto-falantes ou aos outros dispositivos.
• Apesar dos LEDs carem desligados quando a chave POWER é
desligada, isso não quer dizer que o equipamento tenha sido
completamente desconectado da fonte de alimentação. Se for preciso
desligar completamente a alimentação, primeiramente desligue
a chave POWER e desconecte o cabo de força da tomada. Por essa
razão, a tomada em que você deseja conectar o plugue do cabo de
alimentação deve ser de fácil alcance e de acessibilidade imediata.
Posicionamento
• O uso deste equipamento perto de amplicadores (ou outros
equipamentos com grandes transformadores) pode induzir a formação
de ruídos. Para reduzir o problema, mude a direção do equipamento
ou mova-o para mais longe da fonte de interferência.
• Este aparelho pode interferir com a recepção de rádio e televisão. Ele
não deve ser usado perto desses tipos de receptores.
• Aparelhos de comunicação sem o, como aparelhos de telefone
celular, podem produzir ruídos quando usados perto desse
equipamento. Esse tipo de ruído pode ocorrer ao fazer ou receber
uma chamada, ou durante uma conversação. Se esse tipo de problema
ocorrer, mude os aparelhos sem o de lugar, de modo a carem mais
longe deste equipamento, ou desligue-os.
• Não exponha o equipamento diretamente ao sol, não o deixe
próximo a aparelhos que irradiem calor, não o deixe dentro de
veículos fechados nem exposto a temperaturas elevadas. Além disso,
não permita que dispositivos de iluminação, cujas fontes de luz são
normalmente usadas muito próximas do equipamento (como a luz
de um piano), ou que reetores potentes iluminem a mesma área do
equipamento por longos períodos. O calor excessivo pode deformar e
descolorir o equipamento.
• Ao mover o equipamento de um local para outro onde a temperatura
e/ou umidade seja muito diferente, gotas de água (condensação)
podem se formar dentro do equipamento. Se você tentar usar
o equipamento nessa condição, poderá ocorrer dano ou mau
funcionamento. Portanto, antes de usar o equipamento, você deverá
esperar algumas horas até que a condensação tenha evaporado por
completo.
• Não permita que materiais como a borracha, o vinil, ou semelhantes
permaneçam sobre o equipamento por longos períodos. Esses objetos
podem descolorir ou mesmo danicar o acabamento.
• Não cole rótulos, adesivos ou algo semelhante neste instrumento.
Eles podem danicar o acabamento externo do instrumento ao serem
retirados.
• Dependendo do material e da temperatura da superfície onde você
colocar o equipamento, os pés de borracha poderão desbotar ou
danicar a superfície. Coloque um pedaço de feltro ou pano embaixo
dos pés de borracha para evitar que isso aconteça. Se você zer isso,
verique se o equipamento não vai escorregar e cair acidentalmente.
• Não coloque nada que contenha água (por exemplo, vasos de ores)
sobre este equipamento. Além disso, evite o uso de inseticidas,
perfumes, álcool, esmaltes, pulverizadores, etc., próximo ao
equipamento. Retire rapidamente qualquer líquido derramado sobre o
equipamento com o uso de um pano seco e macio.
Manutenção
• Para a limpeza diária, passe um pano limpo, seco e macio ou
levemente umedecido com água. Para remover manchas difíceis, use
um pano molhado com detergente suave, não abrasivo. Em seguida,
seque completamente com um pano limpo, macio e seco.
• Nunca use benzina, tíner, álcool ou qualquer tipo de solvente, para
evitar a possibilidade de descolorir e/ou deformar o equipamento.
Cuidados adicionais
• Seja cuidadoso ao usar os botões, os controles deslizantes ou os
demais controles e também ao usar os plugues e os conectores. O uso
sem cuidado pode ocasionar mau funcionamento.
• Ao conectar / desconectar os os, segure sempre pelo conector —
nunca puxe pelo o. Isso evitará curtos circuitos e danos aos
componentes internos dos os.
• Uma pequena quantidade de calor será emitida no equipamento
durante o funcionamento normal.
• Para evitar incomodar os vizinhos, mantenha o volume do
equipamento em níveis razoáveis. Você pode usar fones de ouvidos,
assim não precisa se preocupar com as pessoas ao seu redor.
• Quando precisar transportar o equipamento, use a embalagem
original completa (incluindo o acolchoamento), se possível. Caso
contrário, use materiais de embalagem equivalentes.
• Alguns cabos de conexão possuem resistores. Não use cabos com
resistores para conectar este equipamento. O uso desses cabos pode
tornar o nível de som extremamente baixo ou inaudível. Para obter
informações sobre as especicações dos cabos, entre em contato com
o fabricante do cabo.
• Enrole o cabo de alimentação ao redor do gancho do cabo ao
transportar ou guardar o equipamento.
Marcas comerciais
• Os nomes de produto mencionados neste documento são marcas
comerciais ou marcas registradas de seus respectivos proprietários
e não estão relacionados à Roland Corporation. Neste manual, esses
nomes são usados porque esse é o modo mais prático de descrever os
sons que são simulados através da tecnologia COSM.

4
1. INPUT
Conecte sua guitarra aqui.
2. Botão [SELECT]
Alterna entre os canais JC CLEAN e LEAD.
É possível identicar o canal selecionado vericando a cor do indicador
(CLEAN: verde; LEAD: vermelho).
É possível alternar os canais usando FOOTSWITCH opcional BOSS FS-6.
3. Botão [TUNER]
Quando acionada essa função, o botão ca aceso em vermelho.
Para obter mais informações, consulte “Usando a função de anação”
(pág. 7).
Canal JC CLEAN
Esse é o modelo do famoso amplicador de guitarra JC-120 Jazz
Chorus da Roland. O som super nítido, uniforme, oferece timbre mais
real do instrumento. Esse é um amplicador ideal para criar sons em
conjunto com pedaleiras multiefeitos.
4. Botão [VOLUME]
Ajusta o volume do canal JC CLEAN.
Canal LEAD
5. KNOB Type
É possível selecionar um dos seis tipos de simulações:
Quando a função de anação está ligada, esse knob serve para indicar
o nome da corda que está sendo anada. (pág. 7).
Tipo Descrição
ACOUSTIC SIM
O modelo original do amplicador proporciona-
lhe som acústico dinâmico de guitarra usando
uma guitarra elétrica padrão.
OVERDRIVE
Som de distorção natural semelhante ao obtido
ao aumentar o volume do amplicador por
completo.
DISTORTION Distorção mais forte que OVERDRIVE.
METAL
Mais forte e mais pesada que DISTORTION, o que
pode obter tons mais prolongados.
METAL STACK
Som muito “gordo” de uma pilha cheia de
amplicadores Heavy Metal.
EXTREME
Som de alto ganho proporcionando baixos
compactos e distorção intensa mantendo a
denição clara do som.
6. Botão [GAIN]
Ajusta o nível de distorção do canal LEAD.
7. Botão [VOLUME]
Ajusta o volume do canal LEAD.
Descrições do painel
Painel de controle
1 4
16
17
158 9 10 11 12
136 752 3 14

5
Português Italiano DeutschNederlands Español Français
English
EQUALIZER
8. Botão [BASS]
Ajusta a as freqüências graves do som.
9. Botão [MIDDLE]
Ajusta a as freqüências médias do som.
10. Botão [TREBLE]
Ajusta a as freqüências agudas do som.
EFX/SOLO (Efeitos/Solo)
11. Botão [EFX/SOLO] (Efeitos/Solo)
Gire esse botão para CHORUS, FLANGER, PHASER,
TREMOLO ou HEAVY OCTAVE para selecionar o
efeito correspondente ou para SOLO. Gire o botão
para ajustar a quantidade de efeito desejada.
O indicador ON acende quando EFX é ligado e
apaga quando EFX é desligado. Também é possível
ligar e desligar EFX usando FOOTSWITCH opcionais.
As indicações de CHORUS, FLANGER, PHASER,
TREMOLO, SOLO, HEAVY OCTAVE no painel são
para referência. Verique o som real ao ajustar o
efeito.
Tipo Descrição
CHORUS
Nesse efeito, adiciona-se um som levemente
desanado ao som original, proporcionando ao som
uma amplitude e sonoridade maiores.
FLANGER
Cria um efeito anging que proporciona um tipo de
sensação giratória (vertigem) com o som.
PHASER
Esse efeito agrega um sinal de mudança de fase
variável ao som direto, proporcionando ao som uma
sensação em espiral.
TREMOLO
Tremolo é um efeito que cria uma mínima variação de
tonalidade.
SOLO
Aumenta o volume do amplicador. Pode usar um
footswitch para ligar/desligar SOLO individualmente
dos canais JC CLEAN e LEAD.
HEAVY OCTAVE
Adiciona uma oitava ao som original. Uma vez que
você pode tocar acordes quando usa esse efeito, é
possível usá-lo também para “encorpar” o som do
acorde tocado.
DELAY/REVERB
12. Botão [DELAY/REVERB]
Gire esse botão para DELAY ou REVERB para alternar
o efeito. Gire o botão para ajustar a quantidade
de efeito desejada. Coloque o botão na posição
SPRING para desfrutar do som de um aparelho de
reverberação elástico.
* As indicações para DELAY, REVERB no painel são
para referência.
Tipo Descrição
DELAY
Gire o botão para alterar o tempo e a quantidade de
efeitos.
REVERB Gire o botão para ajustar o nível de reverberação.
13. Botão [POWER SQUEEZER]
O botão ca vermelho quando a função Power squeezer
está ligada. Quando o botão está apagado a função
Power squeezer está desligada.
Se ligar a função Power Squeezer, você pode reduzir a
saída do amplicador para 2 watts, sem perder gain.
* A função Power Squeezer afeta somente sons de entrada por meio
do INPUT. Não tem efeito em sons de entrada por meio da entrada
AUX IN.
14. Entrada AUX IN
É possível conectar CD PLAYER, tocador de áudio digital ou outro tipo
de aparelho e tocá-lo junto com sua guitarra.
Aceita um plugue de fone miniatura estéreo. Porém, o alto-falante e
a saída RECORDING OUT/PHONES são designadas apenas para um
ouvido. Use um cabo adequado (vendido separadamente) para o
aparelho a ser conectado.
* Verique o nível do volume ajustando o controle do volume do
aparelho conectado.
* Quando cabos de conexão com resistores forem usados, o nível de
volume do equipamento conectado no plugue AUX IN pode ser
baixo. Se isso acontecer, use cabos de conexão que não contenham
resistores.
15. Entrada FOOT SW (Footswitch)
É possível usar footswitch (BOSS FS-5U ou FS-6 opcional) para alternar
canais (JC CLEAN/LEAD) e ligar e desligar EFX/SOLO.
* O CUBE-20XL está equipado com entrada do tipo TRS FOOT SW
que aceita plugues com a conguração mostrada na gura. Para
conectar um footswitch, use um cabo compatível com TRS.
TIP: SELECT
RING: EFX/SOLO
* Para mais informações sobre como conectar o footswitch, consulte
“Conexões” (pág. 6).
* Se usar um cabo mono para conectar somente um footswitch, pode
usá-lo para alternar canais (JC CLEAN/LEAD).
16. Saída RECORDING OUT/PHONES
• Quando usar RECORDING OUT
Use plugues de fone 1/4” designados apenas para um
ouvido ao conectar a esse plugue. É possível ajustar
facilmente o nível de RECORDING OUT, se denir o botão
[VOLUME] do canal JC CLEAN ou LEAD conforme mostra o
desenho à direita.
• Quando usar fones de ouvido
Conecte os fones de ouvido a esse plugue.
* Não é tocado nenhum som no alto-falante do equipamento quando
o plugue RECORDING OUT/PHONES está em uso.
17. Botão [POWER]
Liga e desliga o amplicador.

6
Conexões
Ligar e desligar a energia
Assim que as conexões forem feitas, ligue a energia dos vários
aparelhos na ordem especicada. Ao ligar os aparelhos na ordem
incorreta, você corre o risco de mau funcionamento e/ou danos em
alto-falantes e em outros aparelhos.
1. Verique se todos os botões [VOLUME] do CUBE-20XL e de
todos os aparelhos conectados estão ajustados como 0.
2. Ligue todos os aparelhos conectados aos plugues de
entrada do CUBE-20XL (INPUT e AUX IN).
3. Ligue o CUBE-20XL.
* Sempre verique se o nível de volume está baixo
antes de ligar a energia. Mesmo quando o volume
for completamente diminuído, ainda é possível
ouvir algum som ao ligar a força, porém isso é
normal e não indica mau funcionamento.
* Esse aparelho é equipado com um circuito de proteção. É necessário
aguardar um breve intervalo (alguns segundos) após ligar o
equipamento para que ele funcione normalmente.
4. Ajuste os níveis de volume dos aparelhos.
5. Antes de desligar a energia, diminua o volume de todos
os aparelhos em seu sistema e, em seguida, DESLIGUE os
aparelhos na ordem inversa à que eles foram ligados.
* Se for preciso desligar completamente a alimentação,
primeiramente desligue a chave POWER e desconecte o cabo de
força da tomada. Consulte Fonte de alimentação (pág. 3).
Interruptores de pé
Gravador
Fones de ouvido
Guitarra elétrica
CD/ MP3 Players
EFX/
SOLO
EFX/
SOLO
SELECT SELECT SELECT
B A
Ajuste as chaves conforme se mostra abaixo.
ou
ou
FS-6 FS-5U
* Para evitar mau funcionamento e/ou danos aos alto-falantes ou a
outros aparelhos, diminua sempre o volume e desligue da energia
todos os aparelhos antes de fazer qualquer conexão.
* Antes de fazer as conexões, certique-se que a denição do volume
do botão [VOLUME] de ambos amplicadores esteja ajustada como 0.
* Quando cabos de conexão com resistores forem usados, o nível de
volume do equipamento conectado no plugue AUX IN pode ser
baixo. Se isso acontecer, use cabos de conexão que não contenham
resistores.

7
Português Italiano DeutschNederlands Español Français
English
Usando a função de anação
O CUBE-20XL é equipado com uma função de anação. Além da
anação manual, você pode usá-la como um anador cromático.
Ao anar manualmente, o som da guitarra sairá do alto-falante e do
RECORDING OUT/PHONES. No modo de anação cromático, o som não
sairá do alto-falante e nem na saída RECORDING OUT/PHONES.
Ao anar manualmente, você pode pressionar a chave [SELECT] para
ativar o tom de referência de anação.
Anação manual
Use a anação manual quando as cordas estiverem consideravelmente
desanadas (por exemplo, após trocá-las).
No modo de anação manual, você pode anar enquanto ouve o tom
de sua guitarra por meio dos altos-falantes ou dos fones de ouvido.
É possível ajustar o volume com o botão [VOLUME] do JC CLEAN. Se
não desejar que o som da guitarra saia dos alto-falantes ou dos fones
de ouvido, ajuste o botão [VOLUME] do JC CLEAN como 0.
1. Pressione o botão [TUNER].
O CUBE-20XL entrará no modo de anação e o botão [TUNER]
acenderá.
2. Use o knob Type para selecionar a corda que deseja anar.
Posição do
botão
Descrição
6E Sexta corda solta (E)
5A Quinta corda solta (A)
4D Quarta corda solta (D)
3G Terceira corda solta (G)
2B Segunda corda solta (B)
1E Primeira corda solta (E)
* A altura de referência é A4=440 Hz. Isso não pode ser alterado.
3. Use o botão [VOLUME] do canal JC CLEAN para ajustar o
volume.
4. Toque uma única nota na corda solta que você deseja anar.
Ane a corda até que o indicador verde se acenda.
Abaixo
Indicador
vermelho aceso
Indicador
vermelho aceso
Indicador
verde aceso
Acima
O tom está correto
* O indicador vermelho piscará se a altura estiver consideravelmente
fora.
* Pressione a chave [SELECT] e ouvirá o som de referência do tom
selecionado pela chave Type. (Essa é a função Tuning Fork).
5. Assim que terminar a anação, pressione novamente a chave
[TUNER] uma vez.
Anação cromática
Se pressionar a chave [TUNER] por um segundo ou mais, ela piscará
e o equipamento poderá ser usado como um “anador cromático”,
determinando automaticamente o nome da nota mais próxima da que
foi tocada.
Uma vez no modo de anação cromático, nenhum som será
reproduzido a partir do alto-falante ou RECORDING OUT/PHONES.
1. Pressione e mantenha pressionada o botão [TUNER] por pelo
menos dois segundos.
O botão [TUNER] pisca e o CUBE-20XL entra no modo de anação
cromática.
2. Toque uma única nota na corda solta que você deseja anar.
Ane a corda até que o indicador verde se acenda.
Usando a função Tuning Fork
Ao usar anação manual, você pode pressionar a chave [SELECT] para
tocar o som de referência de anação com o tom selecionado pela
chave Type.
1. Pressione o botão [TUNER].
O CUBE-20XL entrará no modo de anação e o botão [TUNER]
acenderá.
2. Use a chave Type para selecionar a corda que deseja anar.
* A altura de referência é A4=440 Hz. Isso não pode ser alterado.
3. Use o botão [VOLUME] do canal JC CLEAN para ajustar o
volume.
4. Pressione a chave [SELECT].
É reproduzido um som referente o tom selecionado pela chave Type.
5. Toque uma única nota na corda solta que você deseja anar.
Toque uma corda aberta ou uma harmônica e ane a guitarra para
corresponder ao tom de referência.
6. Assim que terminar a anação, pressione novamente o
botão [TUNER] uma vez.

8
EXTREME
Som extremo com distorção intensa.
Timbre de alto ganho que possui graves reforçados e agudos
denidos.
É possível obter variações de timbre movendo o botão [MIDDLE].
Se ligar HEAVY OCTAVE, é possível obter maior sensação de distorção
nos graves.
Space Clean
É um som limpo que usa efeitos.
Selecione o amplicador JC CLEAN, modelado do Roland JC-120, em
seguida, adicione chorus e delay.
O uso desse ajuste com captadores tipo single coil cria timbres
denidos e comn suave efeito de chorus.
Dependendo da frase sendo reproduzida, o ajuste do tempo de delay
como mais lento que o tempo da frase pode ser ajustado.
Power Grunge
Produz som imensamente distorcido que é muito triplicado e com
textura áspera.
Ajustar o botão [GAIN] para evitar distorção excessiva do som da
guitarra resulta microfonias.
Também é possível adicionar FLANGER para produzir um som com
poderoso efeito de vertigem muito parecido com o som de um jato.
Além disso, usar o captador sonoro frontal da guitarra e aumentar
os botões [GAIN] e [MIDDLE] resulta em som principal “gordo” com
bastante sustain.
Alternative Metal
Som perfeito para refrões pesados, agudos.
Selecione METAL STACK de alto ganho, em seguida, use o equalizer
para aumentar um pouco mais os graves.
Se for usado com captador humbucker na posição traseira, resulta em
um efeito de distorção extrema.
Além disso, é possível adicionar um delay para usá-lo em momentos
de solo.
Adicionar um delay curto produz som multiplicado como o de dois
músicos reproduzindo as mesmas frases simultaneamente.
Chave [SELECT]: LEAD
Chave [SELECT]: JC CLEAN
Chave [SELECT]: LEAD
Chave [SELECT]: LEAD
Exemplos de Ajuste

9
Português Italiano DeutschNederlands Español Français
English
Ajustando memo
Chave [SELECT]:
Chave [SELECT]:
Chave [SELECT]:
Chave [SELECT]:

10
Especicações
CUBE-20XL
Saída de potência nominal 20 W
Nível de entrada nominal
INPUT (canal JC CLEAN) -10dBu/1MΩ
AUX IN -10dBu
Alto-falantes 20 cm (8 polegadas)
Controles
Chave [POWER]
Chave [SELECT]
Chave [TUNER]
Chave [POWER SQUEEZER]
<Canal JC CLEAN> Botão [VOLUME]
<Canal LEAD>
Chave Type (ACOUSTIC SIM, OVERDRIVE, DISTORTION, METAL, METAL STACK, EXTREME),
botão [GAIN], botão [VOLUME]
<EQUALIZER> Botão [BASS], botão [MIDDLE], botão [TREBLE]
<EFX/SOLO> Botão [EFX /SOLO] (CHORUS, FLANGER, PHASER, TREMOLO, SOLO, HEAVY OCTAVE)
<DELAY/REVERB> Botão [DELAY/REVERB] (DELAY, REVERB, SPRING)
Indicadores Canal JC CLEAN, canal LEAD, EFX/SOLO, TUNER, POWER SQUEEZER
Conectores
Plugue INPUT, plugue AUX IN, plugue FOOT SW (SELECT, EFX/SOLO), plugue RECORDING OUT/PHONES
Consumo de energia 24 W
Dimensões
385 (L) X 240 (P) X 385 (A) mm
15-3/16 (L) x 9-1/2 (P) x 15-3/16 (A) polegadas
Peso 9 kg / 19 lbs., 396,89 g.
Acessórios Manual do Proprietário
* 0 dBu = 0.775 Vrms
* Com a nalidade de aprimorar o produto, as especicações e/ou aparência deste equipamento estão sujeitas a mudanças sem aviso prévio.

Português Italiano DeutschNederlands Español Français
English
Schakelen tussen twee kanalen: JC CLEAN en LEAD (p. 4)
• Schakelen tussen kanalen kan met behulp van een optionele voetschakelaar.
Krachtige DSP-gitaarversterker met een vermogen van 20 watt en een ingebouwde luidspreker van 20 cm (8 inch)
• Dankzij de compacte grootte is de versterker ideaal om thuis en in de studio te oefenen en handig om mee te nemen.
Het “LEAD”-kanaal biedt zes verschillende COSM-pedaaleecten (p. 4)
• Het LEAD-kanaal biedt zes typen pedaaleecten, inclusief ACOUSTIC SIM, OVERDRIVE, DISTORTION, METAL, METAL STACK en het originele
EXTREME-eect, voor een breed gamma aan geluiden en muziekstijlen.
Power Squeezer-functie (p. 5)
• Deze functie maakt zelfs bij een laag volume een goede toonbalans mogelijk, zodat u ook thuis kunt genieten van een krachtig geluid.
Een stemfunctie is inbegrepen (p. 7)
• Met deze functie kunt u uw gitaar stemmen terwijl het instrument aangesloten is op de CUBE-20XL.
• De stemreferentiefunctie geeft een referentietoonhoogte om u het stemmen gemakkelijk te maken.
Uitgerust met een AUX IN-aansluiting die handig is voor uw oefensessies (p. 5)
• Gebruik deze aansluiting om te kunnen meespelen met muziek van cd-spelers en digitale audiospelers.
Qua eecten beschikt u onder andere over EFX/SOLO en een onafhankelijk DELAY/REVERB (p. 5)
• Een ingebouwd EFX-gedeelte bevat 5 typen digitale eecten: CHORUS, FLANGER, PHASER, TREMELO en HEAVY OCTAVE.
• Een voetschakelaar (optioneel) kan worden gebruikt om het EFX/SOLO-eect in en uit te schakelen (p. 5).
Gebruikershandleiding
Gitaarversterker
Lees zorgvuldig de hoofdstukken “HET APPARAAT VEILIG GEBRUIKEN” en “BELANGRIJKE OPMERKINGEN” (p. 2; p. 3) voordat u het apparaat gaat
gebruiken. Deze hoofdstukken bevatten belangrijke informatie over de juiste bediening van het apparaat. Om er bovendien zeker van te zijn dat
u elke functie van uw nieuwe apparaat goed begrijpt, leest u best de hele gebruikershandleiding. De handleiding moet als referentie worden
bewaard en voorhanden zijn.
Copyright © 2010 ROLAND CORPORATION
Alle rechten voorbehouden. Niets in deze publicatie mag in welke vorm dan ook worden gereproduceerd zonder de schriftelijke toestemming van
ROLAND CORPORATION. Roland is een geregistreerd handelsmerk van Roland Corporation in de Verenigde Staten en/of andere landen.
COSM (Composite Object Sound Modeling) is de innovatieve geluidsmodelleringstechnologie van Roland. COSM analyseert de verschillende
factoren van het oorspronkelijke geluid, zoals de elektrische en fysische kenmerken en maakt vervolgens een digitaal model dat hetzelfde geluid kan
reproduceren.

2
WAARSCHUWING
Open het apparaat niet en voer geen interne wijzigingen uit.
Probeer het apparaat niet te herstellen of onderdelen ervan te vervangen
(behalve als deze handleiding specieke instructies geeft om dat te doen). Laat
het onderhoud over aan uw handelaar, het dichtstbijzijnde Roland Service Center
of een erkende Roland-verdeler, zoals vermeld op de pagina “Informatie”.
Installeer het apparaat nooit op plaatsen die
• nat zijn (bv. bad, wasruimte, op natte vloeren);
• worden blootgesteld aan damp of rook;
• worden blootgesteld aan zout;
• vochtig zijn;
• aan regen worden blootgesteld;
• stog of zanderig zijn;
• aan hoge trillingsniveaus en schokken worden blootgesteld.
Zorg ervoor dat het apparaat altijd horizontaal en stabiel is geplaatst. Plaats
het nooit op een standaard die kan wankelen of op aopende oppervlakken.
Het apparaat mag alleen worden aangesloten op een voeding van het type
dat beschreven is of dat op de achterzijde van het apparaat is aangeduid.
Verdraai of buig het netsnoer niet te sterk en plaats er geen zware voorwerpen
op. Dit kan het snoer zowel binnenin als aan de buitenkant beschadigen en
kortsluitingen veroorzaken. Beschadigde kabels kunnen brand of schokken
veroorzaken!
Dit apparaat kan, apart of in combinatie met een versterker en hoofdtelefoon
of luidsprekers, geluidsniveaus produceren die permanente gehoorschade
kunnen veroorzaken. Gebruik het apparaat niet langdurig aan een hoog
volumeniveau of aan een niveau dat oncomfortabel is. Als u gehoorverlies of
oorsuizingen ervaart, moet u onmiddellijk stoppen met het gebruik van het
apparaat en een audioloog raadplegen.
Plaats geen voorwerpen die vloeistoen bevatten op de versterker. Zorg
ervoor dat er geen voorwerpen (bv. brandbare voorwerpen, munten, draden)
of vloeistoen (bv. water, fruitsap) in het apparaat terechtkomen. Op die
manier vermijdt u kortsluitingen, verkeerde werking of andere defecten aan
het apparaat.
Schakel het toestel onmiddellijk uit, trek het netsnoer uit het stopcontact en
vraag onderhoud aan bij uw handelaar, dichtstbijzijnde Roland Service Center
of een erkende Roland-verdeler, zoals vermeld op de pagina “Informatie” als:
• het netsnoer of de stekker beschadigd zijn;
• rook of ongewone geuren voorkomen;
• objecten of vloeistof in het apparaat zijn terechtgekomen;
• het apparaat aan regen werd blootgesteld (of op een andere manier nat is
geworden);
• het apparaat niet normaal lijkt te werken of opmerkelijk anders functioneert.
Bij gezinnen met kleine kinderen dient een volwassene toezicht te houden
tot het kind in staat is om alle regels te volgen die essentieel zijn voor het
veilige gebruik van het apparaat.
WAARSCHUWING
Bescherm het apparaat tegen zware schokken.
(Laat het niet vallen!)
Laat het netsnoer van het apparaat geen stopcontact delen met een
buitensporig aantal andere apparaten. Wees vooral voorzichtig met
verlengkabels. Het totale stroomverbruik van alle apparaten die u op de
verlengkabel hebt aangesloten, mag nooit het maximumvermogen (watt/
ampère) voor de verlengkabel overschrijden. Buitensporige belasting kan de
isolatie van de kabel opwarmen en uiteindelijk doen smelten.
Raadpleeg uw handelaar, het dichtstbijzijnde Roland Service Center of een
erkende Roland-verdeler, zoals vermeld op de pagina “Informatie”, vooraleer
u het apparaat in het buitenland gebruikt.
OPGELET
Het apparaat moet zo worden geplaatst dat de ventilatie niet door de locatie
of positie wordt verstoord.
Neem altijd alleen de stekker van het netsnoer vast bij het aansluiten op en
het loskoppelen van een stopcontact of dit apparaat.
U moet regelmatig de stekker loskoppelen en schoonmaken met een droge
doek om al het stof en andere ophopingen te verwijderen van de polen.
Trek ook de stekker uit het stopcontact als het apparaat langere tijd niet zal
worden gebruikt. Stofophoping tussen de stekker en het stopcontact kan
leiden tot slechte isolatie en brand veroorzaken.
Zorg ervoor dat de snoeren en kabels niet in de war raken. Plaats alle snoeren
en kabels ook buiten het bereik van kinderen.
Klim nooit op het apparaat en plaats er geen zware voorwerpen op.
Neem het netsnoer of de stekker nooit vast met natte handen bij het
aansluiten op of loskoppelen van een stopcontact of dit apparaat.
Koppel het netsnoer los van het stopcontact en verwijder alle snoeren uit
externe apparaten voordat u het apparaat verplaatst.
Schakel het apparaat uit en trek het netsnoer uit het stopcontact voordat u
het apparaat schoonmaakt (p. 6).
Trek het netsnoer uit het stopcontact als u bliksem verwacht in uw omgeving.
De ventilaties aan beide kanten van het apparaat kunnen heel warm worden.
Let dus op voor brandwonden.
Verwijder nooit het luidsprekerrooster of de luidspreker. De luidspreker kan
niet door de gebruiker vervangen worden. In de behuizing zijn spanningen
en stromen aanwezig die elektrische schokken kunnen veroorzaken.
HET APPARAAT VEILIG GEBRUIKEN

3
Português Italiano DeutschNederlands Español Français
English
BELANGRIJKE OPMERKINGEN
Stroomtoevoer
• Sluit dit apparaat niet aan op een stopcontact dat tegelijkertijd door
een elektrisch apparaat wordt gebruikt dat door een signaalomzetter
(zoals een koelkast, wasmachine, microgolfoven of airconditioner)
wordt bestuurd of dat een motor bevat. Afhankelijk van de manier
waarop elektrische apparaten worden gebruikt, kan ruis van de
stroomvoorziening defecten aan dit apparaat of hoorbare ruis
veroorzaken. Als het niet praktisch is om een apart stopcontact te
gebruiken, plaats dan een ruislter voor de stroomvoorziening tussen
dit toestel en het stopcontact.
• Schakel alle apparaten uit voordat u dit apparaat op andere apparaten
aansluit. Op die manier kunt u defecten en/of schade aan luidsprekers
of andere apparaten voorkomen.
• Zelfs als de LED’s zijn uitgeschakeld wanneer de POWER-schakelaar
is uitgeschakeld, betekent dit niet dat het apparaat volledig van de
stroomtoevoer is losgekoppeld. Schakel eerst de POWER-schakelaar
uit en trek vervolgens het netsnoer uit het stopcontact als u de stroom
volledig wilt uitschakelen. Zorg er daarom voor dat u het netsnoer
aansluit op een stopcontact dat gemakkelijk bereikbaar is.
Plaatsing
• Als u het apparaat gebruikt in de buurt van eindversterkers (of andere
apparatuur met grote eindversterkers) kan er gezoem ontstaan. Om
het probleem te verhelpen kunt u het apparaat anders richten of
verder van de storingsbron plaatsen.
• Dit apparaat kan radio- en televisieontvangst verstoren. Gebruik dit
apparaat niet in de buurt van dergelijke ontvangers.
• Ruis kan ontstaan als draadloze communicatieapparaten, zoals gsm’s,
in de buurt van dit apparaat worden gebruikt. Dergelijke ruis kan
ontstaan als een oproep wordt ontvangen of gemaakt of tijdens
gesprekken. Verplaats dergelijke apparaten zodat ze zich op een
grotere afstand van dit apparaat bevinden of schakel ze uit als u
dergelijke problemen ervaart.
• Stel het apparaat niet bloot aan rechtstreeks zonlicht, plaats het niet
in de buurt van warmtebronnen, laat het niet achter in een gesloten
voertuig en stel het niet bloot aan extreme temperaturen. Zorg ervoor
dat hetzelfde deel van het apparaat niet langdurig verlicht wordt door
verlichtingstoestellen waarvan de lichtbron zich doorgaans dichtbij
het apparaat bevindt (zoals een pianolamp), of krachtige spots.
Overmatige warmte kan het apparaat vervormen of verkleuren.
• Bij verplaatsing van een locatie naar een andere waar de temperatuur
en/of vochtigheid sterk verschilt, kunnen er waterdruppels (condens)
gevormd worden in het apparaat. Er kunnen schade of defecten
ontstaan als u het apparaat in deze toestand gebruikt. Voordat u
het apparaat gebruikt, laat u het enkele uren liggen tot de condens
volledig verdampt is.
• Laat voorwerpen uit rubber, vinyl of gelijkaardige materialen niet
langdurig op het apparaat liggen. Dergelijke voorwerpen kunnen de
afwerking verkleuren of beschadigen.
• Kleef geen stickers, transfers en dergelijke op het apparaat. De
afwerking kan beschadigd worden als u het kleefmateriaal tracht te
verwijderen.
• Afhankelijk van het materiaal en de temperatuur van het oppervlak
waarop u het apparaat plaatst, kunnen de rubberen voetstukken
mogelijk het oppervlak verkleuren of ontsieren. U kunt een stuk vilt of
stof onder de rubberen voetstukken plaatsen om dit te voorkomen.
Zorg er in dit geval voor dat het apparaat niet verschuift of per
ongeluk in beweging komt.
• Plaats geen voorwerpen die water bevatten (bv. vazen) op het
apparaat. Vermijd ook het gebruik van insecticiden, parfum, alcohol,
nagellak, spuitbussen, enz. in de nabijheid van het apparaat. Verwijder
onmiddellijk alle vloeistof die op het apparaat gemorst wordt met een
droge, zachte doek.
Onderhoud
• Gebruik een zachte, droge doek of een doek die licht bevochtigd is
met water om het apparaat dagelijks af te vegen. Gebruik een doek
die met een zachte, niet-schurende zeepoplossing is bevochtigd om
hardnekkig vuil te verwijderen. Veeg vervolgens het apparaat grondig
schoon met een zachte, droge doek.
• Gebruik geen benzine, verdunningsmiddelen, alcohol of
oplosmiddelen om verkleuring en/of vervorming te voorkomen.
Extra voorzorgsmaatregelen
• Draag voldoende zorg bij het gebruik van de knoppen, schuifknoppen
of andere bedieningselementen van het apparaat en bij het gebruik
van aansluitingen en ingangen. Ruw omgaan met de apparatuur kan
defecten veroorzaken.
• Neem het aansluitstuk vast als u kabels aansluit of loskoppelt. Trek
nooit aan de kabel. Op die manier vermijdt u kortsluitingen of schade
aan de inwendige elementen van de kabel.
• Tijdens normaal gebruik straalt het apparaat een kleine hoeveelheid
warmte uit.
• Houd het volume van het apparaat binnen de perken om te vermijden
dat u uw buren stoort. Misschien gebruikt u liever een hoofdtelefoon
en hoeft u zich geen zorgen te maken over uw omgeving.
• Verpak het apparaat indien mogelijk in de doos (inclusief opvulling)
waarin het werd geleverd als u het moet vervoeren. Anders zult u
gelijkaardige verpakkingen moeten gebruiken.
• Sommige kabels bevatten weerstanden. Gebruik geen kabels met
weerstanden om aansluitingen op dit apparaat uit te voeren. Het
gebruik van dergelijke kabels kan het geluidsniveau extreem verlagen
of zelfs onhoorbaar maken. Neem contact op met de fabrikant van de
kabel voor informatie over kabelspecicaties.
• Plaats het netsnoer om de snoerhaak wanneer u het apparaat vervoert
of opbergt.
Handelsmerken
• De productnamen die in dit document worden genoemd, zijn
handelsmerken of gedeponeerde handelsmerken van hun respectieve
eigenaars en hebben geen verband met Roland Corporation. In
deze handleiding worden deze namen gebruikt omdat het de meest
praktische manier is om de geluiden te beschrijven die gesimuleerd
worden met COSM-technologie.

4
1. INPUT-ingang
Sluit hier de gitaar aan.
2. [SELECT]-schakelaar
Schakelt tussen de JC CLEAN- en LEAD-kanalen. Het rode lampje dat
brandt, geeft aan welk kanaal is geselecteerd (JC CLEAN: links, LEAD:
rechts).
U kunt ook tussen kanalen schakelen met behulp van een optionele
voetschakelaar zoals de BOSS FS-5U of FS-6.
3. [TUNER]-schakelaar
Gebruik deze schakelaar om de gitaar te stemmen. Als u de schakelaar
inschakelt, zal deze rood branden. U kunt nu de stemfunctie gebruiken.
Zie “De stemfunctie gebruiken” (p. 7) voor meer informatie.
JC CLEAN-kanaal
Dit is een model van de bekende JC-120 Jazz Chorus-gitaarversterker
van Roland. Het zeer zuivere en lage geluid biedt een aangename,
vloeiende luisterervaring. Deze versterker is ideaal in combinatie met
een eectprocessor.
4. [VOLUME]-regelaar
Regelt het volume van het JC CLEAN-kanaal.
LEAD-kanaal
5. Type-schakelaar
U kunt kiezen uit de vier volgende typen.
Als de stemfunctie is ingeschakeld, kunt u deze gebruiken om de naam
van de te stemmen snaar te selecteren (p. 7).
Type Beschrijving
ACOUSTIC SIM
Dit originele versterkermodel biedt het
dynamische geluid van een akoestische gitaar
met een elektrische standaardgitaar.
OVERDRIVE
Een natuurlijke vervorming die vergelijkbaar
is met het geluid dat u verkrijgt wanneer u het
volume van de versterker volledig opendraait.
DISTORTION Een hardere vervorming dan OVERDRIVE.
METAL
Een hardere en zwaardere vervorming dan
DISTORTION, waardoor lange ondersteunde
noten kunnen worden verkregen.
METAL STACK
Heel vet geluid van een volledige toren (stack)
van Heavy Metal-versterkers.
EXTREME
Een gevoelig geluid met grote versterking
dat zware, lage frequenties en een intense
vervorming biedt terwijl het geluid helder blijft.
6. [GAIN]-regelaar
Regelt met vervormingsniveau van het LEAD-kanaal.
7. [VOLUME]-regelaar
Regelt het volume van het LEAD-kanaal.
Paneelbeschrijvingen
Voorpaneel
1 4
16
17
158 9 10 11 12
136 752 3 14

5
Português Italiano DeutschNederlands Español Français
English
EQUALIZER
8. [BASS]-regelaar
Hiermee regelt u de lage tonen.
9. [MIDDLE]-regelaar
Hiermee regelt u de middentonen.
10. [TREBLE]-regelaar
Hiermee regelt u de hoge tonen.
EFX/SOLO (Eecten/Solo)
11. [EFX/SOLO]-regelaar (eecten/solo)
Stel deze regelaar in op CHORUS, FLANGER,
PHASER, TREMOLO of HEAVY OCTAVE om het
overeenkomstige eect te selecteren of op SOLO.
Draai de regelaar om de gewenste hoeveelheid van
het toegepaste eect aan te passen.
Het ON-lampje brandt wanneer EFX is ingeschakeld
en brandt niet wanneer EFX is uitgeschakeld. U
kunt EFX ook in- en uitschakelen met behulp van de
optionele voetschakelaars.
De graduaties voor CHORUS, FLANGER, PHASER,
TREMOLO, SOLO en HEAVY OCTAVE op het paneel
dienen als referentie. Controleer steeds het geluid
wanneer u de eecten aanpast.
Type Beschrijving
CHORUS
Bij dit eect wordt een licht ontstemd geluid
toegevoegd aan het oorspronkelijke geluid toe,
waardoor het geluid breder en voller wordt.
FLANGER
Het angereect geef een wervelend gevoel aan het
geluid.
PHASER
Dit eect voegt een variabel gefaseerd signaal aan het
oorspronkelijke geluid toe, wat het geluid een golvend
karakter geeft.
TREMOLO
Tremolo is een eect dat een cyclische
volumeverandering creëert.
SOLO
Dit eect voegt een boost toe aan het oorspronkelijke
geluid. Als u een voetschakelaar gebruikt, kunt u het
SOLO-eect voor het JC CLEAN- en het LEAD-kanaal
afzonderlijk in- en uitschakelen. U kunt ook het volume
en de vervorming van uw geluid wijzigen.
HEAVY OCTAVE
Met dit eect wordt een geluid toegevoegd dat een
octaaf lager klinkt dan het oorspronkelijke geluid. U kunt
akkoorden spelen terwijl u dit eect gebruikt, zodat u
het geluid van uw akkoorden vetter kunt maken.
DELAY/REVERB
12. [DELAY/REVERB]-regelaar
Stel deze regelaar in op DELAY of REVERB om het
gewenste eect te kiezen. Draai de regelaar om de
gewenste hoeveelheid van het toegepaste eect aan
te passen. Stel de regelaar in op de SPRING-stand om
een veergalmeect te kiezen.
* De graduaties voor DELAY en REVERB op het paneel
dienen als referentie.
Type Beschrijving
DELAY
Draai de regelaar om de tijd en de hoeveelheid van de
delayeecten te wijzigen.
REVERB Draai de regelaar om het galmniveau aan te passen.
13. [POWER SQUEEZER]-schakelaar
De schakelaar brandt rood wanneer de Power Squeezer-
functie is ingeschakeld. De schakelaar brandt niet
wanneer de functie is uitgeschakeld.
Als u de Power Squeezer-functie inschakelt, vermindert u
de uitvoer van de versterker tot 2 watt.
Als u deze functie inschakelt, kunt u een geluid
produceren dat dezelfde klank en balans behoudt bij een
uitvoer van 2 watt voor volumeniveaus die beter geschikt
zijn voor thuis.
* De Power Squeezer-functie heeft alleen invloed op geluiden die via
de INPUT-ingang worden ingevoerd. De functie heeft geen invloed
op geluiden die via de AUX IN-ingang worden ingevoerd.
14. AUX IN-ingang
Hiermee kunt u een cd-speler, digitale audiospeler of ander apparaat
aansluiten en deze met uw gitaar laten meespelen.
U kunt hier een stereo mini-jack op aansluiten. De luidspreker en de
RECORDING OUT/PHONES-uitvoer zijn echter mono. Gebruik de juiste
kabel (apart verkrijgbaar) voor het apparaat dat u aansluit.
* Bepaal het volumeniveau door de volumeregelaar van het
aangesloten apparaat aan te passen.
* Als u verbindingskabels met weerstanden gebruikt, is het mogelijk
dat het geluidsvolume van de apparatuur die op de AUX IN-ingang
is aangesloten te laag is. Gebruik in dit geval verbindingskabels
zonder weerstanden.
15. FOOT SW-aansluiting (voetschakelaar)
U kunt voetschakelaars (de optionele BOSS FS-5U of FS-6) gebruiken
om tussen kanalen (JC CLEAN/LEAD) te schakelen en om EFX/SOLO in
en uit te schakelen.
* De CUBE-20XL is voorzien van een FOOT SW-aansluiting van het
type TRS waarop stekkers kunnen worden aangesloten zoals
hieronder afgebeeld. Gebruik een TRS-compatibele kabel als u een
voetschakelaar wilt aansluiten.
TIP: SELECT
RING: EFX/SOLO
* Raadpleeg “Aansluitingen” (p. 6) voor gegevens over het aansluiten
van voetschakelaars.
* Als u een monokabel gebruikt om slechts één voetschakelaar aan te
sluiten, kunt u deze gebruiken om te schakelen tussen kanalen (JC
CLEAN/LEAD).
16. RECORDING OUT/PHONES-aansluiting
• Als u RECORDING OUT gebruikt
Gebruik 1/4"-monoaansluitingen wanneer u verbinding
maakt met deze aansluiting. Het volumeniveau van
RECORDING OUT kan eenvoudig worden aangepast als u
de [VOLUME]-regelaar van het JC CLEAN- of LEAD-kanaal
instelt zoals rechts wordt weergegeven op de afbeelding.
• Als u een hoofdtelefoon gebruikt
Verbind de hoofdtelefoon met deze aansluiting.
* Er wordt geen geluid door de luidspreker van het apparaat
weergegeven wanneer de RECORDING OUT/PHONES-aansluitingen
in gebruik zijn.
17. [POWER]-schakelaar
Schakelt de stroomtoevoer in en uit.

6
Aansluitingen
De stroomtoevoer in- en uitschakelen
Schakel de stroomtoevoer naar uw verschillende apparaten in de
aangegeven volgorde in zodra u alle apparaten hebt aangesloten.
Als u de apparaten in de verkeerde volgorde inschakelt, kunnen er
defecten optreden en/of kan er schade aan de luidsprekers en andere
apparaten ontstaan.
1. Zorg ervoor dat alle [VOLUME]-regelaars op de CUBE-20XL
en de aangesloten apparaten op 0 zijn ingesteld.
2. Schakel alle apparaten in die aangesloten zijn op de ingangen
(INPUT-ingang en AUX IN-ingang) van de CUBE-20XL.
3. Schakel de CUBE-20XL in.
* Zorg er altijd voor dat het volume lager is gezet
voordat u het toestel inschakelt. Zelfs als het
volume volledig op nul staat, kunt u nog geluid
horen wanneer het toestel wordt ingeschakeld. Dit
is normaal en wijst niet op een defect.
* Dit apparaat is uitgerust met een beveiligingscircuit. Het duurt even
(enkele seconden) na het opstarten voordat het apparaat normaal
werkt.
4. Pas het volume van de apparaten aan.
5. Verlaag, voordat u het toestel uitschakelt, het volume van
alle apparaten in uw systeem en schakel de apparaten in de
omgekeerde volgorde uit dan de volgorde waarin u ze hebt
ingeschakeld.
* Schakel eerst de POWER-schakelaar uit en trek vervolgens
het netsnoer uit het stopcontact als u de stroom volledig wilt
uitschakelen. Raadpleeg Stroomtoevoer (p. 3).
Voetschakelaars
Recorder
Hoofdtelefoon
Elektrische gitaar
Cd-speler
Digitale audiospeler enz.
EFX/
SOLO
EFX/
SOLO
SELECT SELECT SELECT
B A
Stel de schakelaars in zoals hieronder afgebeeld.
of
of
FS-6 FS-5U
* Zet het volume altijd lager en schakel alle apparaten uit voordat u
aansluitingen maakt om defecten en/of schade aan luidsprekers of
andere apparaten te voorkomen.
* Zorg ervoor dat de volume-instelling van de [VOLUME]-regelaar
voor beide versterkers op 0 is ingesteld voordat u aansluitingen
maakt.
* Als u verbindingskabels met weerstanden gebruikt, is het mogelijk
dat het geluidsvolume van de apparatuur die op de AUX IN-ingang
is aangesloten te laag is. Gebruik in dit geval verbindingskabels
zonder weerstanden.

7
Português Italiano DeutschNederlands Español Français
English
De stemfunctie gebruiken
CUBE-20XL is voorzien van een stemfunctie. U kunt deze functie
gebruiken voor handmatig stemmen en voor chromatisch stemmen.
Als u uw instrument handmatig stemt, zal het geluid van de gitaar
door de luidspreker en de RECORDING OUT/PHONES-aansluiting
worden weergegeven. In de modus voor chromatisch stemmen
zal het geluid niet worden weergegeven door de luidspreker of de
RECORDING OUT/PHONES-aansluiting.
Als u uw gitaar handmatig stemt, kunt u op de [SELECT]-schakelaar
drukken om een stemreferentietoonhoogte te activeren.
Handmatig stemmen
Gebruik handmatige stemming als de snaren erg ontstemd zijn (zoals
na het vervangen van snaren).
In de modus voor handmatig stemmen kunt u uw gitaar stemmen
terwijl u naar het geluid luistert via de luidsprekers of de
hoofdtelefoon.
Het volume kan worden aangepast met behulp van de [VOLUME]-
regelaar van het JC CLEAN-kanaal. Als u het geluid van uw gitaar
niet wilt horen via de luidsprekers of de hoofdtelefoon, stelt u de
[VOLUME]-regelaar van het JC CLEAN-kanaal in op 0.
1. Druk op de [TUNER]-schakelaar.
De CUBE-20XL gaat in de stemmodus en de [TUNER]-schakelaar licht op.
2. Gebruik de Type-schakelaar om de snaar te selecteren die u
wilt stemmen.
Regelaarstand Beschrijving
6E Open zesde snaar (E)
5A Open vijfde snaar (A)
4D Open vierde snaar (D)
3G Open derde snaar (G)
2B Open tweede snaar (B)
1E Open eerste snaar (E)
* De referentietoonhoogte is A = 440 Hz. Dit kan niet worden
gewijzigd.
3. Gebruik de [VOLUME]-regelaar van het JC CLEAN-kanaal om
het volume aan te passen.
4. Speel een enkele noot op de open snaar die u wilt stemmen.
Stem de snaar totdat het groene lampje brandt.
Te laag
Licht rood op Licht rood opLicht groen op
Te hoog
Toonhoogte is correct
* Het rode lampje knippert als de toonhoogte helemaal niet klopt.
* Druk op de [SELECT]-schakelaar. U hoort een referentietoon van de
toonhoogte die is geselecteerd door de Type-schakelaar. (Dit is de
stemvorkfunctie.)
5. Als u klaar bent met stemmen, drukt u opnieuw op de
[TUNER]-schakelaar.
Chromatisch stemmen
Als u gedurende een volledige seconde of meer op de [TUNER]-
schakelaar drukt, licht de [TUNER]-schakelaar op en kunt u het
apparaat gebruiken voor chromatisch stemmen. Hierbij wordt de
naam van de noot die de gespeelde noot het dichtste benadert,
automatisch bepaald.
In de modus voor chromatisch stemmen zal het geluid niet worden
weergegeven door de luidspreker of de RECORDING OUT/PHONES-
aansluiting.
1. Druk op de [TUNER]-schakelaar en houd deze ten minste
gedurende één seconde ingedrukt.
De [TUNER]-schakelaar knippert en de CUBE-20XL gaat in de modus
voor chromatisch stemmen.
2. Speel een enkele noot op de open snaar die u wilt stemmen.
Stem de snaar totdat het groene lampje brandt.
De stemvorkfunctie gebruiken
Als u uw gitaar handmatig stemt, kunt u op de [SELECT]-schakelaar
drukken om een stemreferentietoon weer te geven op de toonhoogte
die is geselecteerd door de Type-schakelaar.
1. Druk op de [TUNER]-schakelaar.
De CUBE-20XL gaat in de stemmodus en de [TUNER]-schakelaar licht op.
2. Gebruik de Type-schakelaar om de snaar te selecteren die u
wilt stemmen.
* De referentietoonhoogte is A = 440 Hz. Dit kan niet worden gewijzigd.
3. Gebruik de [VOLUME]-regelaar van het JC CLEAN-kanaal om
het volume aan te passen.
4. Druk op de [SELECT]-schakelaar.
De referentietoon wordt weergegeven op de toonhoogte van de snaar
die is geselecteerd door de Type-schakelaar.
5. Speel een enkele noot op de open snaar die u wilt stemmen.
Speel een open snaar of een harmonische frequentie en stem uw
gitaar zodat deze overeenstemt met de referentietoon.
6. Als u klaar bent met stemmen, drukt u opnieuw op de
[TUNER]-schakelaar.

8
EXTREME
Dit is een extreem geluid met een intense vervorming.
Dit is een heel gevoelig geluid met heel wat pit in de lage tonen en
scherpte en kracht in de hoge tonen.
U verkrijgt variaties in het geluid door de [MIDDLE]-regelaar te draaien.
Als u HEAVY OCTAVE inschakelt, verkrijgt u een nog grotere
vervorming in de lage tonen.
Space Clean
Dit is een transparant geluid dat gebruik maakt van ruimtelijke
eecten.
Selecteer de JC CLEAN-versterker, die is gebaseerd op de Roland
JC-120, en voeg chorus en een lange delay toe.
Als u deze instelling gebruikt met een gitaar die is voorzien van single
coil pickups, verkrijgt u prachtig klinkende arpeggio's en akkoorden.
Afhankelijk van de frase die wordt gespeeld, kan het handig zijn de
delaytijd van het delaygeluid ietwat trager in te stellen dan het tempo
van de frase.
Power Grunge
Dit eect zorgt voor een hevige vervorming met hoge tonen en een
ruwe textuur.
Als u de [GAIN]-regelaar instelt om een buitensporige vervorming
van de gitaar te voorkomen, verkrijgt u een gitaargeluid met heldere
ageoletten en krachtige snaargeluiden.
U kunt ook het FLANGER-eect toevoegen om een geluid te verkrijgen
met een krachtig, golvend geluid zoals het geluid van een straaljager.
Bovendien resulteert het gebruik van een element in de voorste
positie van de gitaar en het verhogen van de [GAIN]- en [MIDDLE]-
regelaars in een vette leadklank met een lange sustain.
Alternative Metal
Het perfecte geluid voor zware, scherpe ris.
Selecteer het high-gain METAL STACK en gebruik vervolgens de
equalizer om een boost te geven aan de lage tonen.
Wanneer dit eect wordt gebruikt met een humbucking pickup bij de
brug, verkrijgt u een extreem vervormingseect.
U kunt bovendien een lange delay toevoegen om dit eect te
gebruiken voor een leadklank met een lange sustain.
Als u een korte delay toevoegt, krijgt u een dubbel geluid alsof er twee
uitvoerders tegelijk dezelfde frasen spelen.
[SELECT]-schakelaar: LEAD
[SELECT]-schakelaar: JC CLEAN
[SELECT]-schakelaar: LEAD
[SELECT]-schakelaar: LEAD
Voorbeeldinstellingen

9
Português Italiano DeutschNederlands Español Français
English
Instellingsmemo
[SELECT]-schakelaar:
[SELECT]-schakelaar:
[SELECT]-schakelaar:
[SELECT]-schakelaar:

10
Specicaties
CUBE-20XL
Nominaal uitgangsvermogen 20 W
Nominaal ingangsniveau
INPUT (JC CLEAN-kanaal) -10dBu/1MΩ
AUX IN -10dBu
Luidsprekers 20 cm (8 inch)
Bedieningselementen
[POWER]-schakelaar
[SELECT]-schakelaar
[TUNER]-schakelaar
[POWER SQUEEZER]-schakelaar
<JC CLEAN-kanaal> [VOLUME]-regelaar
<LEAD-kanaal>
Type-schakelaar (ACOUSTIC SIM, OVERDRIVE, DISTORTION, METAL, METAL STACK, EXTREME),
[GAIN]-regelaar, [VOLUME]-regelaar
<EQUALIZER> [BASS]-regelaar, [MIDDLE]-regelaar, [TREBLE]-regelaar
<EFX/SOLO> [EFX /SOLO]-regelaar (CHORUS, FLANGER, PHASER, TREMOLO, SOLO, HEAVY OCTAVE)
<DELAY/REVERB> [DELAY/REVERB]-regelaar (DELAY, REVERB, SPRING)
Indicators JC CLEAN-kanaal, LEAD-kanaal, EFX/SOLO, TUNER, POWER SQUEEZER
Aansluitingen
INPUT-ingang, AUX IN-ingang, FOOT SW-aansluiting (SELECT, EFX/SOLO), RECORDING OUT/PHONES-aansluiting
Stroomverbruik 24 W
Afmetingen
385 (B) x 240 (D) x 385 (H) mm
15-3/16 (B) x 9-1/2 (D) x 15-3/16 (H) inch
Gewicht 9 kg / 19 lbs, 14 oz
Accessoires Gebruikershandleiding
* 0 dBu = 0,775 Vrms
* Met het oog op productverbetering, kunnen de specicaties en/of het uitzicht van dit toestel worden gewijzigd zonder voorafgaande kennisgeving.

Information
When you need repair service, call your nearest Roland Service Center or authorized Roland
distributor in your country as shown below.
AFRICA
EGYPT
Al Fanny Trading O ce
9, EBN Hagar Al Askalany Street,
ARD E1 Golf, Heliopolis,
Cairo 11341, EGYPT
TEL: (022)-417-1828
REUNION
MARCEL FO-YAM Sarl
25 Rue Jules Hermann,
Chaudron - BP79 97 491
Ste Clotilde Cedex,
REUNION ISLAND
TEL: (0262) 218-429
SOUTH AFRICA
T.O.M.S. Sound & Music (Pty)Ltd.
2 ASTRON ROAD DENVER
JOHANNESBURG ZA 2195,
SOUTH AFRICA
TEL: (011) 417 3400
Paul Bothner(PTY)Ltd.
Royal Cape Park, Unit 24
Londonderry Road, Ottery 7800
Cape Town, SOUTH AFRICA
TEL: (021) 799 4900
ASIA
CHINA
Roland Shanghai Electronics
Co.,Ltd.
5F. No.1500 Pingliang Road
Shanghai 200090, CHINA
TEL: (021) 5580-0800
Roland Shanghai Electronics
Co.,Ltd. (BEIJING OFFICE)
10F. No.18 3 Section Anhuaxili
Chaoyang District Beijing
100011, CHINA
TEL: (010) 6426-5050
HONG KONG
Tom Lee Music
11/F Silvercord Tower 1
30 Canton Rd
Tsimshatsui, Kowloon,
HONG KONG
TEL: 825-2737-7688
Parsons Music Ltd.
8th Floor, Railway Plaza, 39
Chatham Road South, T.S.T,
Kowloon, HONG KONG
TEL: 2333 1863
INDIA
Rivera Digitec (India) Pvt. Ltd.
411, Nirman Kendra Mahalaxmi
Flats Compound O . Dr. Edwin
Moses Road, Mumbai-400011,
INDIA
TEL: (022) 2493 9051
INDONESIA
PT Citra Intirama
Jl. Cideng Timur No. 15J-15O
Jakarta Pusat,
INDONESIA
TEL: (021) 6324170
KOREA
Cosmos Corporation
1461-9, Seocho-Dong,
Seocho Ku, Seoul, KOREA
TEL: (02) 3486-8855
MALAYSIA
Roland Asia Paci c Sdn. Bhd.
45-1, Block C2, Jalan PJU 1/39,
Dataran Prima, 47301 Petaling
Jaya, Selangor, MALAYSIA
TEL: (03) 7805-3263
VIET NAM
VIET THUONG CORPORATION
386 CACH MANG THANG TAM ST.
DIST.3, HO CHI MINH CITY,
VIET NAM
TEL: (08) 9316540
PHILIPPINES
G.A. Yupangco & Co. Inc.
339 Gil J. Puyat Avenue
Makati, Metro Manila 1200,
PHILIPPINES
TEL: (02) 899 9801
MALAYSIA/
SINGAPORE
Roland Asia Paci c Sdn. Bhd.
45-1, Block C2, Jalan PJU 1/39,
Dataran Prima, 47301 Petaling
Jaya, Selangor, MALAYSIA
TEL: (03) 7805-3263
TAIWAN
ROLAND TAIWAN ENTERPRISE
CO., LTD.
9F-5, No. 112 Chung Shan
North Road Sec. 2 Taipei 104,
TAIWAN R.O.C.
TEL: (02) 2561 3339
THAILAND
Theera Music Co. , Ltd.
100-108 Soi Verng Nakornkasem,
New Road,Sumpantawong,
Bangkok 10100, THAILAND
TEL: (02) 224-8821
OCEANIA
AUSTRALIA/
NEW ZEALAND
Roland Corporation
Australia Pty.,Ltd.
38 Campbell Avenue
Dee Why West. NSW 2099,
AUSTRALIA
For Australia
TEL: (02) 9982 8266
For New Zealand
TEL: (09) 3098 715
CENTRAL/LATIN
AMERICA
ARGENTINA
Instrumentos Musicales S.A.
Av.Santa Fe 2055
(1123) Buenos Aires, ARGENTINA
TEL: (011) 4508-2700
BARBADOS
A&B Music Supplies LTD
12 Webster Industrial Park
Wildey, St.Michael, BARBADOS
TEL: (246) 430-1100
BRAZIL
Roland Brasil Ltda.
Rua San Jose, 211
Parque Industrial San Jose
Cotia - Sao Paulo - SP, BRAZIL
TEL: (011) 4615 5666
CHILE
Comercial Fancy II S.A.
Rut.: 96.919.420-1
Nataniel Cox #739, 4th Floor
Santiago - Centro, CHILE
TEL: (02) 688-9540
COLOMBIA
Centro Musical Ltda.
Cra 43 B No 25 A 41 Bododega 9
Medellin, COLOMBIA
TEL: (574) 3812529
COSTA RICA
JUAN Bansbach Instrumentos
Musicales
Ave.1. Calle 11, Apartado 10237,
San Jose, COSTA RICA
TEL: 258-0211
CURACAO
Zeelandia Music Center Inc.
Orionweg 30
Curacao, Netherland Antilles
TEL: (305) 5926866
DOMINICAN REPUBLIC
Instrumentos Fernando Giraldez
Calle Proyecto Central No.3
Ens.La Esperilla
Santo Domingo,
DOMINICAN REPUBLIC
TEL: (809) 683 0305
ECUADOR
Mas Musika
Rumichaca 822 y Zaruma
Guayaquil - ECUADOR
TEL: (593-4) 2302364
EL SALVADOR
OMNI MUSIC
75 Avenida Norte y Final Alameda
Juan Pablo II,
Edi cio No.4010 San Salvador,
EL SALVADOR
TEL: 262-0788
GUATEMALA
Casa Instrumental
Calzada Roosevelt 34-01,zona 11
Ciudad de Guatemala,
GUATEMALA
TEL: (502) 599-2888
HONDURAS
Almacen Pajaro Azul S.A. de C.V.
BO.Paz Barahona
3 Ave.11 Calle S.O
San Pedro Sula, HONDURAS
TEL: (504) 553-2029
MARTINIQUE
Musique & Son
Z.I.Les Mangle
97232 Le Lamantin,
MARTINIQUE F.W.I.
TEL: 596 596 426860
Gigamusic SARL
10 Rte De La Folie
97200 Fort De France
MARTINIQUE F.W.I.
TEL: 596 596 715222
MEXICO
Casa Veerkamp, s.a. de c.v.
Av. Toluca No. 323, Col. Olivar
de los Padres 01780 Mexico D.F.,
MEXICO
TEL: (55) 5668-6699
NICARAGUA
Bansbach Instrumentos
Musicales Nicaragua
Altamira D'Este Calle Principal
de la Farmacia 5ta.Avenida
1 Cuadra al Lago.#503
Managua, NICARAGUA
TEL: (505) 277-2557
PANAMA
SUPRO MUNDIAL, S.A.
Boulevard Andrews, Albrook,
Panama City, REP. DE PANAMA
TEL: 315-0101
PARAGUAY
Distribuidora De Instrumentos
Musicales
J.E. Olear y ESQ. Manduvira
Asuncion, PARAGUAY
TEL: (595) 21 492147
PERU
Audionet
Distribuciones Musicales SAC
Juan Fanning 530
Mira ores
Lima - PERU
TEL: (511) 4461388
TRINIDAD
AMR Ltd
Ground Floor
Maritime Plaza
Barataria TRINIDAD W.I.
TEL: (868) 638 6385
URUGUAY
Todo Musica S.A.
Francisco Acuna de Figueroa
1771
C.P.: 11.800
Montevideo, URUGUAY
TEL: (02) 924-2335
VENEZUELA
Instrumentos Musicales
Allegro,C.A.
Av.las industrias edf.Guitar import
#7 zona Industrial de Turumo
Caracas, VENEZUELA
TEL: (212) 244-1122
EUROPE
BELGIUM/FRANCE/
HOLLAND/
LUXEMBOURG
Roland Central Europe N.V.
Houtstraat 3, B-2260, Oevel
(Westerlo) BELGIUM
TEL: (014) 575811
CROATIA
ART-CENTAR
Degenova 3.
HR - 10000 Zagreb, CROATIA
TEL: (1) 466 8493
CZECH REP.
CZECH REPUBLIC DISTRIBUTOR
s.r.o
Voctárova 247/16
180 00 Praha 8, CZECH REP.
TEL: (2) 830 20270
DENMARK
Roland Scandinavia A/S
Skagerrakvej 7 Postbox 880
DK-2100 Copenhagen,
DENMARK
TEL: 3916 6200
FINLAND
Roland Scandinavia As, Filial
Finland
Vanha Nurmijarventie 62
01670 Vantaa, FINLAND
TEL: (0) 9 68 24 020
GERMANY/AUSTRIA
Roland Elektronische
Musikinstrumente HmbH.
Oststrasse 96, 22844 Norderstedt,
GERMANY
TEL: (040) 52 60090
GREECE/CYPRUS
STOLLAS S.A.
Music Sound Light
155, New National Road
Patras 26442, GREECE
TEL: 2610 435400
HUNGARY
Roland East Europe Ltd.
2045 Torokbalint, FSD Park,
building 3., HUNGARY
TEL: (23) 511011
IRELAND
Roland Ireland
G2 Calmount Park, Calmount
Avenue, Dublin 12,
Republic of IRELAND
TEL: (01) 4294444
ITALY
Roland Italy S. p. A.
Viale delle Industrie 8,
20020 Arese, Milano, ITALY
TEL: (02) 937-78300
NORWAY
Roland Scandinavia Avd.
Kontor Norge
Lilleakerveien 2 Postboks 95
Lilleaker N-0216 Oslo,
NORWAY
TEL: 2273 0074
POLAND
ROLAND POLSKA SP. Z O.O.
ul. Kty Grodziskie 16B
03-289 Warszawa, POLAND
TEL: (022) 678 9512
PORTUGAL
Roland Iberia, S.L.
Branch O ce Porto
Edifício Tower Plaza
Rotunda Eng. Edgar Cardoso
23, 9ºG
4400-676 Vila Nova de Gaia,
PORTUGAL
TEL: (+351) 22 608 00 60
ROMANIA
FBS LINES
Piata Libertatii 1,
535500 Gheorgheni, ROMANIA
TEL: (266) 364 609
RUSSIA
Roland Music LLC
Dorozhnaya ul.3,korp.6
117 545 Moscow, RUSSIA
TEL: (495) 981-4967
SERBIA
Music AP Ltd.
Sutjeska br. 5 XS - 24413 Palic,
SERBIA
TEL: (024) 539 395
SLOVAKIA
DAN Acoustic s.r.o.
Povazská 18.
SK - 940 01 Nové Zámky,
SLOVAKIA
TEL: (035) 6424 330
SPAIN
Roland Iberia, S.L.
Paseo García Faria, 33-35
08005 Barcelona, SPAIN
TEL: 93 493 91 00
SWEDEN
Roland Scandinavia A/S
SWEDISH SALES OFFICE
Mårbackagatan 31, 4 tr.
SE-123 43 Farsta, SWEDEN
TEL: (0) 8 683 04 30
SWITZERLAND
Roland (Switzerland) AG
Landstrasse 5, Postfach,
CH-4452 Itingen, SWITZERLAND
TEL: (061) 975-9987
UKRAINE
EURHYTHMICS Ltd.
P.O.Box: 37-a.
Nedecey Str. 30
UA - 89600 Mukachevo, UKRAINE
TEL: (03131) 414-40
UNITED KINGDOM
Roland (U.K.) Ltd.
Atlantic Close, Swansea
Enterprise Park, SWANSEA SA7
9FJ, UNITED KINGDOM
TEL: (01792) 702701
MIDDLE EAST
BAHRAIN
Moon Stores
No.1231&1249 Rumaytha
Building Road 3931,
Manama 339, BAHRAIN
TEL: 17 813 942
IRAN
MOCO INC.
NO.16 End of Nike St. Shariaty
Ave, Roberouye Cerah Mirdamad
Teheran, IRAN
TEL: (021)-2288-2998
ISRAEL
Halilit P. Greenspoon & Sons
Ltd.
8 Retzif Ha'alia Hashnia St.
Tel-Aviv-Yafo ISRAEL
TEL: (03) 6823666
JORDAN
MUSIC HOUSE CO. LTD.
FREDDY FOR MUSIC
P. O. Box 922846
Amman 11192, JORDAN
TEL: (06) 5692696
KUWAIT
EASA HUSAIN AL-YOUSIFI &
SONS CO.
Al-Yousi Service Center
P.O.Box 126 (Safat) 13002,
KUWAIT
TEL: 00 965 802929
LEBANON
Chahine S.A.L.
George Zeidan St., Chahine Bldg.,
Achra eh, P.O.Box: 16-5857
Beirut, LEBANON
TEL: (01) 20-1441
OMAN
TALENTZ CENTRE L.L.C.
Malatan House No.1
Al Noor Street, Ruwi
SULTANATE OF OMAN
TEL: 2478 3443
QATAR
AL-EMADI TRADING &
CONTRACTING CO.
P.O. Box 62, Doha, QATAR
TEL: 4423-554
SAUDI ARABIA
aDawliah Universal Electronics
APL
Behind Pizza Inn
Prince Turkey Street
aDawliah Building,
PO BOX 2154,
Alkhobar 31952,
SAUDI ARABIA
TEL: (03) 8643601
SYRIA
Technical Light & Sound Center
PO Box 13520 Bldg No.49
Khaled Abn Alwalid St.
Damascus, SYRIA
TEL: (011) 223-5384
TURKEY
ZUHAL DIS TICARET A.S.
Galip Dede Cad. No.33
Beyoglu, Istanbul, TURKEY
TEL: (0212) 249 85 10
U.A.E.
Zak Electronics & Musical
Instruments Co. L.L.C.
Zabeel Road, Al Sherooq Bldg.,
No. 14, Ground Floor, Dubai,
U.A.E.
TEL: (04) 3360715
NORTH AMERICA
CANADA
Roland Canada Ltd.
(Head O ce)
5480 Parkwood Way Richmond B.
C., V6V 2M4, CANADA
TEL: (604) 270 6626
Roland Canada Ltd.
(Toronto O ce)
170 Admiral Boulevard
Mississauga On L5T 2N6,
CANADA
TEL: (905) 362 9707
U. S. A.
Roland Corporation U.S.
5100 S. Eastern Avenue
Los Angeles, CA 90040-2938,
U. S. A.
TEL: (323) 890 3700
As of Apr. 1, 2010 (ROLAND)

For EU Countries
For China

This product complies with the requirements of EMCD 2004/108/EC and LVD 2006/95/EC.
For EU Countries
For Canada
This Class B digital apparatus meets all requirements of the Canadian Interference-Causing Equipment Regulations.
Cet appareil numérique de la classe B respecte toutes les exigences du Règlement sur le matériel brouilleur du Canada.
NOTICE
AVIS
For the USA
FEDERAL COMMUNICATIONS COMMISSION
RADIO FREQUENCY INTERFERENCE STATEMENT
This equipment has been tested and found to comply with the limits for a Class B digital device, pursuant to Part 15 of the
FCC Rules. These limits are designed to provide reasonable protection against harmful interference in a residential
installation. This equipment generates, uses, and can radiate radio frequency energy and, if not installed and used in
accordance with the instructions, may cause harmful interference to radio communications. However, there is no guarantee
that interference will not occur in a particular installation. If this equipment does cause harmful interference to radio or
television reception, which can be determined by turning the equipment off and on, the user is encouraged to try to correct the
interference by one or more of the following measures:
– Reorient or relocate the receiving antenna.
– Increase the separation between the equipment and receiver.
– Connect the equipment into an outlet on a circuit different from that to which the receiver is connected.
– Consult the dealer or an experienced radio/TV technician for help.
This device complies with Part 15 of the FCC Rules. Operation is subject to the following two conditions:
(1) this device may not cause harmful interference, and
(2) this device must accept any interference received, including interference that may cause undesired operation.
Unauthorized changes or modification to this system can void the users authority to operate this equipment.
This equipment requires shielded interface cables in order to meet FCC class B Limit.
WARNING
This product contains chemicals known to cause cancer, birth defects and other reproductive harm, including lead.
For C.A. US
(
Proposition 65
)

* 5 1 0 0 0 1 6 0 3 5 - 0 1 *
-
 1
1
-
 2
2
-
 3
3
-
 4
4
-
 5
5
-
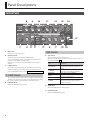 6
6
-
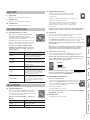 7
7
-
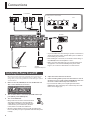 8
8
-
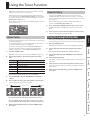 9
9
-
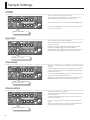 10
10
-
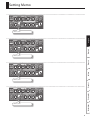 11
11
-
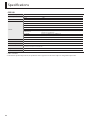 12
12
-
 13
13
-
 14
14
-
 15
15
-
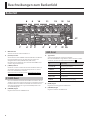 16
16
-
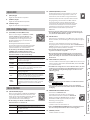 17
17
-
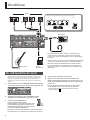 18
18
-
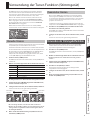 19
19
-
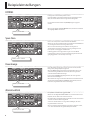 20
20
-
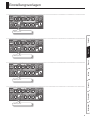 21
21
-
 22
22
-
 23
23
-
 24
24
-
 25
25
-
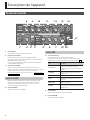 26
26
-
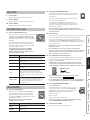 27
27
-
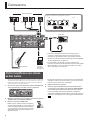 28
28
-
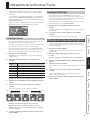 29
29
-
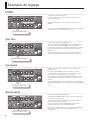 30
30
-
 31
31
-
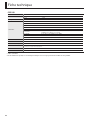 32
32
-
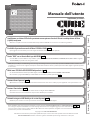 33
33
-
 34
34
-
 35
35
-
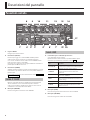 36
36
-
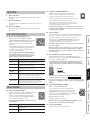 37
37
-
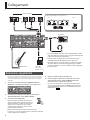 38
38
-
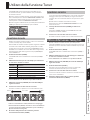 39
39
-
 40
40
-
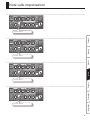 41
41
-
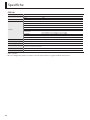 42
42
-
 43
43
-
 44
44
-
 45
45
-
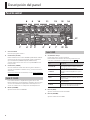 46
46
-
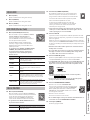 47
47
-
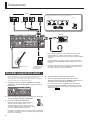 48
48
-
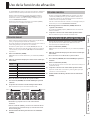 49
49
-
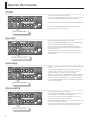 50
50
-
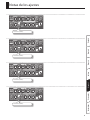 51
51
-
 52
52
-
 53
53
-
 54
54
-
 55
55
-
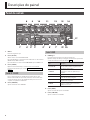 56
56
-
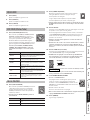 57
57
-
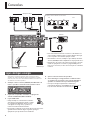 58
58
-
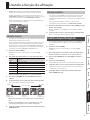 59
59
-
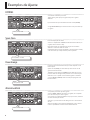 60
60
-
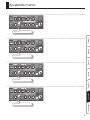 61
61
-
 62
62
-
 63
63
-
 64
64
-
 65
65
-
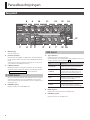 66
66
-
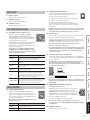 67
67
-
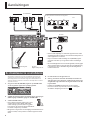 68
68
-
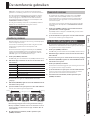 69
69
-
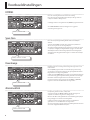 70
70
-
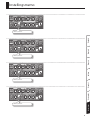 71
71
-
 72
72
-
 73
73
-
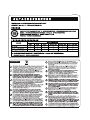 74
74
-
 75
75
-
 76
76


Roland CUBE 20XL de handleiding
- Categorie
- Aanvullende muziekapparatuur
- Type
- de handleiding
- Deze handleiding is ook geschikt voor
in andere talen
- English: Roland CUBE 20XL Owner's manual
- italiano: Roland CUBE 20XL Manuale del proprietario
- français: Roland CUBE 20XL Le manuel du propriétaire
- español: Roland CUBE 20XL El manual del propietario
- Deutsch: Roland CUBE 20XL Bedienungsanleitung
- português: Roland CUBE 20XL Manual do proprietário
Gerelateerde papieren
-
Roland CUBE-15XL de handleiding
-
-
-
-
Roland CUBE STREET de handleiding
-
-
-
Sony CUBE 80GX de handleiding
-
Roland MICRO CUBE RX de handleiding
-