
EN
FR
ES
RU
ZH
CEILING SPEAKER
S5
OWNER’S MANUAL
MODE D’EMPLOI
MANUAL DE INSTRUCCIONES

Thank you for choosing Yamaha
S5 Ceiling Speaker.
The S5 is an in-ceiling type speak-
er system designed to meet versa-
tile indoor acoustic facilities.
■ Installation location
• First, make sure that the material of
the ceiling into which you are install-
ing the speaker is sturdy enough to
support the weight of the product. If
it is not strong enough, reinforce the
strength of the ceiling board with ap-
propriate hardware.
• Yamaha will not be responsible for
any accidents caused by a speaker
that falls due to weak ceilings or in-
appropriate installation methods.
■ Installation procedure
1.Use the supplied cutout template to
cut an opening in the ceiling.
2.Connect the speaker cable to the ter-
minals on the rear of the speaker.
Red is (+) and black is (–). Pay
attention to the polarity, especially
when installing multiple speakers.
3.Remove the grille from the speaker,
insert the speaker into the ceiling
opening, then while pressing the
speaker to the ceiling by the front
baffle rim, turn two screws on the
baffle clockwise. Be sure to tighten
the screws securely until the mount-
ing clamps press down on the ceiling
board. Do not overtighten.
4.Attach the grille to the speaker by
aligning the grille with the baffle
and turning it clockwise until it
securely locks in.
Nous vous remercions d’avoir
choisi le haut-parleur pour plafond
S5 de Yamaha.
Il s’agit d’un système de haut-
parleur de type plafonnier conçu
pour les équipements acoustiques
intérieurs polyvalents.
■
Emplacement d’installation
• Vérifiez au préalable que la matière
du plafond sur lequel le haut-parleur
est fixé est suffisamment robuste
pour supporter le poids du produit. Si
ce n’est pas le cas, renforcez la soli-
dité du support pour plafond à l’aide
de matériel approprié.
• Yamaha ne sera pas tenu responsable
d’éventuels accidents causés par la
chute d’un haut-parleur en raison
d’un plafond non résistant ou de mé-
thodes d’installation inappropriées.
■ Procédure d’installation
1.Utilisez le modèle de découpe fourni
pour exécuter une ouverture dans le
plafond.
2.
Reliez le câble du haut-parleur aux
bornes situées à l’arrière du haut-
parleur. Le câble rouge correspond au
signe (+) et le noir au signe (–). Soyez
attentif à la polarité, en particulier si
vous installez plusieurs haut-parleurs..
3.Retirez la grille du haut-parleur,
insérez ce dernier dans l’ouverture
du plafond, puis, tout en enfonçant
le haut-parleur dans le plafond par le
bord de l’enceinte acoustique avant,
tournez les deux vis sur l’enceinte
dans le sens des aiguilles d’une
montre. Veillez à serrer les vis cor-
rectement jusqu’à ce que les attaches
de fixation s’appuient sur le support
pour plafond. Ne serrez pas trop.
4.Fixez la grille sur le haut-parleur en
l’alignant sur l’enceinte acoustique
et en la tournant dans le sens des
aiguilles d’une montre jusqu’à ce
qu’elle soit verrouillée.
Gracias por elegir el altavoz de te-
cho Yamaha S5.
El S5 es un sistema de altavoz
para techo diseñado para adaptar-
se a las distintas instalaciones
acústicas de interior.
■
Ubicación de la instalación
• En primer lugar, asegúrese de que el
material del techo donde vaya a ins-
talar el altavoz sea lo bastante robus-
to como para soportar el peso del
producto. Si no es lo bastante resis-
tente, refuerce el panel del techo con
los elementos de fijación adecuados.
• Yamaha no será responsable de nin-
gún accidente provocado por la caída
de un altavoz debido a la debilidad
del techo o a unos métodos de insta-
lación inadecuados.
■
Procedimiento de instalación
1.Utilice la plantilla de corte suminis-
trada para realizar una abertura en el
techo.
2.Conecte el cable del altavoz a los
terminales de la parte posterior del
altavoz. El cable rojo es (+) y el
negro es (–). Preste atención a la
polaridad, especialmente si instala
varios altavoces.
3.Extraiga la rejilla del altavoz, inserte
el altavoz en la abertura del techo y,
mientras presiona el altavoz contra
el techo por el reborde del bafle
frontal, apriete dos tornillos del
bafle en el sentido de las agujas del
reloj. Asegúrese de apretar los torni-
llos de forma segura hasta que las
abrazaderas de montaje se fijen al
panel del techo. No apriete dema-
siado.
4.Monte la rejilla en el altavoz ali-
neándola con el bafle y girando en el
sentido de las agujas del reloj hasta
que encaje de forma segura.
Благодарим вас за выбор потолоч-
ный громкоговоритель Yamaha S5.
S5 представляет собой встраива-
емую в потолок акустическую
систему, предназначенную для
эксплуатации в различных акус-
тических условиях помещений.
■ Место установки
• Вначале удостоверьтесь в достаточ-
ной прочности материала потолка,
в котором устанавливается дина-
мик, и его способности выдержать
вес продукта. Если потолок недо-
статочно прочен, усильте потолоч-
ную плиту подходящей арматурой.
• Компания Yamaha не несет ответс-
твенность за несчастные случаи,
возникающие вследствие выпаде-
ния динамика из недостаточно про-
чного потолка или вследствие
неправильной установки.
■ Установка
1.Сделайте отверстие в потолке с
помощью шаблона под выемку
из комплекта поставки.
2.Подсоедините кабель динамика к
выводам в его задней части.
Красным цветом обозначен
положительный вывод, черным
— отрицательный. Следите за
распределением выводов по
полюсам, особенно при установ-
ке нескольких динамиков.
3.Снимите сетку с динамика,
вставьте динамик в отверстие в
потолке, а затем, надавливая на
передний ободок звукоотражате-
ля и прижимая динамик к потол-
ку, поверните два винта на
звукоотражателе по часовой
стрелке. Проследите за тем, что-
бы винты были плотно затянуты,
а монтажные зажимы — прижа-
ты к потолочной плите. Не пере-
тягивайте винты.
4.Прикрепите сетку к динамику.
Для этого совместите сетку со
звукоотражателем и зафиксируй-
те ее на месте поворотом по часо-
вой стрелке.
感谢您购买 Yamaha S5 吸顶音箱。
S5 是一种顶棚内陷式音箱系统,为
室内多用途扩声设备。
• 为便于您理解使用说明书的内
容,本公司已经依据国家的相关
标准尽可能的将其中的英文表述
部分翻译成中文。但是,由于专
业性、通用性及特殊性,仍有部
分内容仅以原文形式予以记载。
如您有任何问题,烦请随时与本
公司客服联系 (热线:400-051-
7700)。
• 本使用说明书的内容为印刷时最
新的技术规格。请至 Yamaha 网站
下载最新版本的使用说明书。
■ 安装位置
• 首先,确保你安装音箱所在天花
板的材料强度足以承受本产品的
重量。如果强度不足,请用适当
的硬件加固天花板。
• Yamaha 公司对任何因天花板强度
不足或安装方法不当导致音箱坠
落所造成的意外事故不承担任何
责任。
■ 安装步骤
1.用附赠的天花板开洞模板在顶棚
上切割出一个洞口。
2.将音箱信号线连接到音箱背板上
的连接端口。红色为 ( + )黑色
为(- )。请注意连接的正负极
性,特别是安装多个音箱时。
3.去掉音箱上的外框,将音箱插入
天花板上挖开的洞口,然后将音
箱的前边缘贴紧在天花板上并按
住,同时小心地顺时针旋转音箱
前缘上的两个螺丝, 直到音箱上
的安装钩爪紧卡在天花板内侧。
不要过度拧紧螺丝。
4.将外框对准音箱的边缘并安装到
音箱上,然后顺时针旋转螺丝直
到安全锁紧。
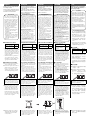
English
Cutout size (diameter) 150 mm
Minimum / Maximum
ceiling thickness
5 mm/
65 mm
Note: Before connecting or discon-
necting the speaker system from the
amplifier, turn the amplifier off. Oth-
erwise, the speaker may be damaged.
Precautions
When choosing a power amplifier
to use with your speakers, make
sure that its power output matches
the speakers’ power capacity (refer
to the Specifications). Even if the
amplifier’s power output is lower
than the speakers’ power capacity,
the speakers may be damaged
when clipping of a high input sig-
nal occurs. The following may
cause damage to speakers:
• Feedback caused when using a
microphone.
• Continuous high sound pressure
level produced by electronic
instruments.
• Continuous high-power output of
distorted signals.
• Popping noises caused by turning
on equipment, or by connecting
or disconnecting system compo-
nents while the amplifier is
turned on.
Français
Taille de découpe
(diamètre)
150 mm
Épaisseur minimale/maxi-
male du plafond
5 mm/
65 mm
Remarque :
avant de brancher ou de
débrancher le système de haut-parleur
de l’amplificateur, mettez ce dernier
hors tension. Sinon, vous pourriez en-
dommager le haut-parleur.
Précautions d’usage
Lors de la sélection de l’amplifica-
teur à utiliser avec les haut-parleurs,
vérifiez que sa puissance de sortie
correspond à la capacité de puissance
des haut-parleurs (voir la fiche tech-
nique). Même si la puissance de sor-
tie de l’amplificateur est inférieure à
la capacité de puissance des haut-
parleurs, ces derniers risquent d'être
endommagés lors de l’écrêtage d’un
signal d’entrée élevé. Les phénomè-
nes suivants risquent d’endommager
les enceintes :
• Effet Larsen provoqué lors de l’uti-
lisation d’un microphone.
• Haut niveau de pression sonore
continu engendré par des instru-
ments électroniques.
• Signaux déformés par une puis-
sance de sortie élevée continue.
• Brusques émissions de son puissant
provoquées par la mise sous ten-
sion des appareils ou le branche-
ment/débranchement des
composants du système lorsque
l’amplificateur est sous tension.
Español
Tamaño (diámetro) 150 mm
Espesor mínimo/máxi-
mo del techo
5 mm/
65 mm
Nota:
Antes de conectar o desconectar
el sistema de altavoz del amplificador,
apague este último. De lo contrario, el
altavoz podría sufrir daños.
Precauciones
Al elegir un amplificador de poten-
cia para usar con los altavoces, ase-
gúrese de que la salida de potencia
coincide con la capacidad de poten-
cia de los altavoces (consulte las
Especificaciones). Aunque la sali-
da de potencia del amplificador sea
inferior a la capacidad de los alta-
voces, los altavoces podrían sufrir
daños al cortarse una señal de en-
trada alta. Los altavoces podrían
sufrir daños por:
• Realimentación provocada por el
uso de un micrófono.
• Continuo nivel de presión acústi-
ca alto producido por instrumen-
tos electrónicos.
• Continua salida de potencia alta
de las señales distorsionadas.
• Chasquidos al encender el equipo
o al conectar o desconectar com-
ponentes mientras el amplifica-
dor está encendido.
Русский
Размер (диаметр)
выемки
150 mm
Минимальная / макси-
мальная толщина
потолка
5 mm/
65 mm
Примечание.
Отключите
усилитель перед подсоединением или
отсоединением динамика.
Невыполнение этого условия может
привести к повреждению динамика.
Предостережения
При выборе усилителя мощности
для использования с потолочным
динамиком проследите за тем, что-
бы выходная мощность усилителя
соответствовала номинальной
мощности динамика (см. «Техни-
ческие характеристики»). При ог-
раничении амплитуды высокого
входного сигнала риск поврежде-
ния потолочного динамика сущес-
твует даже в том случае, когда
выходная мощность усилителя
меньше номинальной мощности
динамика. Повреждения потолоч-
ного динамика могут быть обус-
ловлены следующими факторами:
• обратной связью при использова-
нии микрофона;
• продолжительным высоким звуко-
вым давлением, создаваемым элек-
тронными инструментами;
• продолжительным формировани-
ем искаженных сигналов высокой
выходной мощности;
• посторонними шумами, генериру-
емыми при включении оборудова-
ния либо в процессе
подсоединения или отсоединения
компонентов системы при вклю-
ченном усилителе.
中文
挖开尺寸 (直径) 150 mm
最小 / 最大顶棚厚度
5 mm/
65 mm
注:将音箱从功放断开或将音箱连
接到功放时,首先应关闭功放。否
则可能造成音箱的损坏。
注意事项
选择与音箱一起使用的功放时,
请确保功放的功率输出与音箱的
功率容量 ( 请参考技术规格 ) 相
匹配。即使功放的功率输出小于
音箱的功率容量,当高输入信号
被夹住时,仍然可能损坏音箱。
以下情况可能损坏音箱:
• 使用麦克风时引起的反馈。
• 电子仪器所产生的持续高声压
级。
• 失真信号的持续高功率输出。
• 接通设备电源或者在功放打开
时连接或断开系统组件所引起
的噪音。

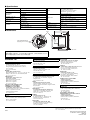
■ Specifications
■ Dimensions
Component 80 mm cone-type
Grille
Frame: White (ABS, painted)
Net: White (perforated metal, painted)
(Munsell N9.5 approximate color)
Nominal Impedance 8 :
Power Rating
(IEC268-5)
15 W (NOISE)
30 W (PGM)
Dimensions
)
180 X 122.5 mm (max.)
60 W (MAX) Mounting height (exposed): 12.5 mm
Sensitivity (1 W, 1 m) 88 dB SPL Mounting depth: 110 mm
Frequency Range 90 Hz - 20 kHz Required ceiling opening:
)
150 mm
Connectors Push terminal Required ceiling board thickness: 5 - 65 mm
Enclosure
Type: Bass reflex Weight 1.04 kg
Finish: Black (ABS) Included accessory Cutout template
Mounts: 2x Mounting tabs Optional accessory ST15 (for 70 V/100 V distributed line)
122.5
110 12.5
Min;
5
Max;65
158
177
ø147
ø180
170.5
Unit : mm
ST15
ST15 attachment holes
(Tapping screw : 4×12)
ADDRESS LIST
MEXICO
Yamaha de México S.A. de C.V.
Av. Insurgentes Sur 1647 Piso 9, Col. San José
Insurgentes, Delegación Benito Juárez, México,
D.F., C.P. 03900
Tel: +52-55-5804-0600
BRAZIL
Yamaha Musical do Brasil Ltda.
Rua Fidêncio Ramos, 302 Cj 52 e 54 Torre B Vila
Olímpia CEP 04551-010 São Paulo/SP, Brazil
Tel: +55-11-3704-1377
ARGENTINA
Yamaha Music Latin America, S.A.
Sucursal de Argentina
Olga Cossettini 1553, Piso 4 Norte
Madero Este-C1107CEK
Buenos Aires, Argentina
Tel: +54-11-4119-7000
PANAMA AND OTHER LATIN
AMERICAN COUNTRIES/
CARIBBEAN COUNTRIES
Yamaha Music Latin America, S.A.
Edif. Torre Banco General, Piso 7, Urbanización Marbella,
Calle 47 y Aquilino de la Guardia,
Ciudad de Panamá, Panamá
Tel: +507-269-5311
RUSSIA
Yamaha Music (Russia)
Room 37, entrance 7, bld. 7, Kievskaya street,
Moscow, 121059, Russia
Tel: +7-495-626-5005
Yamaha Music Gulf FZE
JAFZA-16, Office 512, P.O.Box 17328,
Jebel Ali FZE, Dubai, UAE
Tel: +971-4-801-1500
OTHER COUNTRIES
Yamaha Music Gulf FZE
JAFZA-16, Office 512, P.O.Box 17328,
Jebel Ali FZE, Dubai, UAE
Tel: +971-4-801-1500
THE PEOPLES REPUBLIC OF CHINA
Yamaha Music & Electronics (China) Co.,Ltd.
2F, Yunhedasha, 1818 Xinzha-lu, Jingan-qu,
Shanghai, China
Tel: +86-400-051-7700
INDIA
Yamaha Music India Private Limited
Spazedge Building, Ground Floor, Tower A,
Sector-47, Gurgaon- Sohna Road, Gurgaon-122002,
Haryana, India
Tel: +91-124-485-3300
INDONESIA
PT. Yamaha Musik Indonesia (Distributor)
Yamaha Music Center Bldg. Jalan Jend. Gatot
Subroto Kav. 4, Jakarta 12930, Indonesia
Tel: +62-21-520-2577
KOREA
Yamaha Music Korea Ltd.
8F, Dongsung Bldg. 21, Teheran-ro 87-gil,
Gangnam-gu, Seoul, 135-880, Korea
Tel: +82-2-3467-3300
MALAYSIA
Yamaha Music (Malaysia) Sdn., Bhd.
No.8, Jalan Perbandaran, 47301 Kelana Jaya,
Petaling Jaya, Selangor, Malaysia
Tel: +60-3-78030900
SINGAPORE
Yamaha Music (Asia) Private Limited
Block 202 Hougang Street 21, #02-00,
Singapore 530202, Singapore
Tel: +65-6740-9200
TAIWAN
Yamaha Music & Electronics Taiwan Co.,Ltd.
2F., No.1, Yuandong Rd. Banqiao Dist.
New Taipei City 22063, Taiwan, R.O.C.
Tel: +886-2-7741-8888
THAILAND
Siam Music Yamaha Co., Ltd.
3, 4, 15, 16th Fl., Siam Motors Building,
891/1 Rama 1 Road, Wangmai,
Pathumwan, Bangkok 10330, Thailand
Tel: +66-2215-2622
OTHER ASIAN COUNTRIES
Yamaha Corporation,
Sales & Marketing Division
Nakazawa-cho 10-1, Naka-ku, Hamamatsu,
Japan 430-8650
Tel: +81-53-460-2303
AUSTRALIA
Yamaha Music Australia Pty. Ltd.
Level 1, 99 Queensbridge Street, Southbank,
VIC 3006, Australia
Tel: +61-3-9693-5111
COUNTRIES AND TRUST
TERRITORIES IN PACIFIC OCEAN
Yamaha Corporation,
Sales & Marketing Division
Nakazawa-cho 10-1, Naka-ku, Hamamatsu,
Japan 430-8650
Tel: +81-53-460-2303
CENTRAL & SOUTH AMERICA
EUROPE
AFRICA
MIDDLE EAST
ASIA
OCEANIA
HEAD OFFICE Yamaha Corporation, Pro Audio Division
Nakazawa-cho 10-1, Naka-ku, Hamamatsu, Japan 430-8650
Tel: +81-53-460-2441
PA4 2
Manual Development Department
©1994-2011 Yamaha Corporation
605IP-C0
Printed in China
ֱᡸ⦃๗
ྲ᷌䴰㾱ᓏᔳ䇮༷ᰦˈ䈧оᵜൠޣᵪᶴ㚄㌫ˈ㧧ਆ↓⺞Ⲵᓏᔳᯩ⌅DŽ
䈧यሶ䇮༷䲿ђᔳᡆѪ⭏⍫ඳ൮༴⨶DŽ
Documenttranscriptie
CEILING SPEAKER S5 OWNER’S MANUAL MODE D’EMPLOI MANUAL DE INSTRUCCIONES EN FR ES RU ZH English Français Thank you for choosing Yamaha S5 Ceiling Speaker. The S5 is an in-ceiling type speaker system designed to meet versatile indoor acoustic facilities. Nous vous remercions d’avoir choisi le haut-parleur pour plafond S5 de Yamaha. Il s’agit d’un système de hautparleur de type plafonnier conçu pour les équipements acoustiques intérieurs polyvalents. 中文 Русский Español Gracias por elegir el altavoz de techo Yamaha S5. El S5 es un sistema de altavoz para techo diseñado para adaptarse a las distintas instalaciones acústicas de interior. Благодарим вас за выбор потолочный громкоговоритель Yamaha S5. S5 представляет собой встраиваемую в потолок акустическую систему, предназначенную для эксплуатации в различных акустических условиях помещений. Precautions Précautions d’usage Precauciones Предостережения When choosing a power amplifier to use with your speakers, make sure that its power output matches the speakers’ power capacity (refer to the Specifications). Even if the amplifier’s power output is lower than the speakers’ power capacity, the speakers may be damaged when clipping of a high input signal occurs. The following may cause damage to speakers: • Feedback caused when using a microphone. • Continuous high sound pressure level produced by electronic instruments. • Continuous high-power output of distorted signals. • Popping noises caused by turning on equipment, or by connecting or disconnecting system components while the amplifier is turned on. Lors de la sélection de l’amplificateur à utiliser avec les haut-parleurs, vérifiez que sa puissance de sortie correspond à la capacité de puissance des haut-parleurs (voir la fiche technique). Même si la puissance de sortie de l’amplificateur est inférieure à la capacité de puissance des hautparleurs, ces derniers risquent d'être endommagés lors de l’écrêtage d’un signal d’entrée élevé. Les phénomènes suivants risquent d’endommager les enceintes : • Effet Larsen provoqué lors de l’utilisation d’un microphone. • Haut niveau de pression sonore continu engendré par des instruments électroniques. • Signaux déformés par une puissance de sortie élevée continue. • Brusques émissions de son puissant provoquées par la mise sous tension des appareils ou le branchement/débranchement des composants du système lorsque l’amplificateur est sous tension. Al elegir un amplificador de potencia para usar con los altavoces, asegúrese de que la salida de potencia coincide con la capacidad de potencia de los altavoces (consulte las Especificaciones). Aunque la salida de potencia del amplificador sea inferior a la capacidad de los altavoces, los altavoces podrían sufrir daños al cortarse una señal de entrada alta. Los altavoces podrían sufrir daños por: • Realimentación provocada por el uso de un micrófono. • Continuo nivel de presión acústica alto producido por instrumentos electrónicos. • Continua salida de potencia alta de las señales distorsionadas. • Chasquidos al encender el equipo o al conectar o desconectar componentes mientras el amplificador está encendido. При выборе усилителя мощности для использования с потолочным динамиком проследите за тем, чтобы выходная мощность усилителя соответствовала номинальной мощности динамика (см. «Технические характеристики»). При ограничении амплитуды высокого входного сигнала риск повреждения потолочного динамика существует даже в том случае, когда выходная мощность усилителя меньше номинальной мощности динамика. Повреждения потолочного динамика могут быть обусловлены следующими факторами: ■ Emplacement d’installation ■ Ubicación de la instalación ■ Installation location Cutout size (diameter) 150 mm Minimum / Maximum ceiling thickness 5 mm/ 65 mm • First, make sure that the material of the ceiling into which you are installing the speaker is sturdy enough to support the weight of the product. If it is not strong enough, reinforce the strength of the ceiling board with appropriate hardware. • Yamaha will not be responsible for any accidents caused by a speaker that falls due to weak ceilings or inappropriate installation methods. Taille de découpe (diamètre) 150 mm Épaisseur minimale/maxi- 5 mm/ male du plafond 65 mm Tamaño (diámetro) 150 mm Espesor mínimo/máximo del techo 5 mm/ 65 mm • обратной связью при использовании микрофона; • продолжительным высоким звуковым давлением, создаваемым электронными инструментами; • продолжительным формированием искаженных сигналов высокой выходной мощности; • посторонними шумами, генерируемыми при включении оборудования либо в процессе подсоединения или отсоединения компонентов системы при включенном усилителе. ■ Место установки Размер (диаметр) выемки 150 mm Минимальная / максимальная толщина потолка 5 mm/ 65 mm • Vérifiez au préalable que la matière du plafond sur lequel le haut-parleur est fixé est suffisamment robuste pour supporter le poids du produit. Si ce n’est pas le cas, renforcez la solidité du support pour plafond à l’aide de matériel approprié. • Yamaha ne sera pas tenu responsable d’éventuels accidents causés par la chute d’un haut-parleur en raison d’un plafond non résistant ou de méthodes d’installation inappropriées. • En primer lugar, asegúrese de que el material del techo donde vaya a instalar el altavoz sea lo bastante robusto como para soportar el peso del producto. Si no es lo bastante resistente, refuerce el panel del techo con los elementos de fijación adecuados. • Yamaha no será responsable de ningún accidente provocado por la caída de un altavoz debido a la debilidad del techo o a unos métodos de instalación inadecuados. • Вначале удостоверьтесь в достаточной прочности материала потолка, в котором устанавливается динамик, и его способности выдержать вес продукта. Если потолок недостаточно прочен, усильте потолочную плиту подходящей арматурой. • Компания Yamaha не несет ответственность за несчастные случаи, возникающие вследствие выпадения динамика из недостаточно прочного потолка или вследствие неправильной установки. ■ Installation procedure ■ Procédure d’installation ■ Procedimiento de instalación ■ Установка 1. Use the supplied cutout template to 1. Utilisez le modèle de découpe fourni 1. Utilice la plantilla de corte suminis- 1. Сделайте отверстие в потолке с cut an opening in the ceiling. 2. Connect the speaker cable to the terminals on the rear of the speaker. Red is (+) and black is (–). Pay attention to the polarity, especially when installing multiple speakers. pour exécuter une ouverture dans le plafond. 2. Reliez le câble du haut-parleur aux bornes situées à l’arrière du hautparleur. Le câble rouge correspond au signe (+) et le noir au signe (–). Soyez attentif à la polarité, en particulier si vous installez plusieurs haut-parleurs.. trada para realizar una abertura en el techo. 2. Conecte el cable del altavoz a los terminales de la parte posterior del altavoz. El cable rojo es (+) y el negro es (–). Preste atención a la polaridad, especialmente si instala varios altavoces. Note: Before connecting or disconnecting the speaker system from the amplifier, turn the amplifier off. Otherwise, the speaker may be damaged. Remarque : avant de brancher ou de débrancher le système de haut-parleur de l’amplificateur, mettez ce dernier hors tension. Sinon, vous pourriez endommager le haut-parleur. Nota: Antes de conectar o desconectar el sistema de altavoz del amplificador, apague este último. De lo contrario, el altavoz podría sufrir daños. 3. Remove the grille from the speaker, insert the speaker into the ceiling opening, then while pressing the speaker to the ceiling by the front baffle rim, turn two screws on the baffle clockwise. Be sure to tighten the screws securely until the mounting clamps press down on the ceiling board. Do not overtighten. 4. Attach the grille to the speaker by aligning the grille with the baffle and turning it clockwise until it securely locks in. 3. Retirez la grille du haut-parleur, insérez ce dernier dans l’ouverture du plafond, puis, tout en enfonçant le haut-parleur dans le plafond par le bord de l’enceinte acoustique avant, tournez les deux vis sur l’enceinte dans le sens des aiguilles d’une montre. Veillez à serrer les vis correctement jusqu’à ce que les attaches de fixation s’appuient sur le support pour plafond. Ne serrez pas trop. 4. Fixez la grille sur le haut-parleur en l’alignant sur l’enceinte acoustique et en la tournant dans le sens des aiguilles d’une montre jusqu’à ce qu’elle soit verrouillée. 3. Extraiga la rejilla del altavoz, inserte el altavoz en la abertura del techo y, mientras presiona el altavoz contra el techo por el reborde del bafle frontal, apriete dos tornillos del bafle en el sentido de las agujas del reloj. Asegúrese de apretar los tornillos de forma segura hasta que las abrazaderas de montaje se fijen al panel del techo. No apriete demasiado. 4. Monte la rejilla en el altavoz alineándola con el bafle y girando en el sentido de las agujas del reloj hasta que encaje de forma segura. 感谢您购买 Yamaha S5 吸顶音箱。 S5 是一种顶棚内陷式音箱系统,为 室内多用途扩声设备。 注意事项 选择与音箱一起使用的功放时, 请确保功放的功率输出与音箱的 功率容量 ( 请参考技术规格 ) 相 匹配。即使功放的功率输出小于 音箱的功率容量,当高输入信号 被夹住时,仍然可能损坏音箱。 以下情况可能损坏音箱: • 使用麦克风时引起的反馈。 • 电子仪器所产生的持续高声压 级。 • 失真信号的持续高功率输出。 • 接通设备电源或者在功放打开 时连接或断开系统组件所引起 的噪音。 • 为便于您理解使用说明书的内 容,本公司已经依据国家的相关 标准尽可能的将其中的英文表述 部分翻译成中文。但是,由于专 业性、通用性及特殊性,仍有部 分内容仅以原文形式予以记载。 如您有任何问题,烦请随时与本 公司客服联系 (热线:400-0517700)。 • 本使用说明书的内容为印刷时最 新的技术规格。请至 Yamaha 网站 下载最新版本的使用说明书。 ■ 安装位置 挖开尺寸 (直径) 150 mm 最小 / 最大顶棚厚度 5 mm/ 65 mm • 首先,确保你安装音箱所在天花 板的材料强度足以承受本产品的 重量。如果强度不足,请用适当 的硬件加固天花板。 • Yamaha 公司对任何因天花板强度 不足或安装方法不当导致音箱坠 落所造成的意外事故不承担任何 责任。 помощью шаблона под выемку из комплекта поставки. 2. Подсоедините кабель динамика к выводам в его задней части. Красным цветом обозначен положительный вывод, черным — отрицательный. Следите за распределением выводов по полюсам, особенно при установке нескольких динамиков. ■ 安装步骤 1. 用附赠的天花板开洞模板在顶棚 Примечание. Отключите усилитель перед подсоединением или отсоединением динамика. Невыполнение этого условия может привести к повреждению динамика. 注:将音箱从功放断开或将音箱连 接到功放时,首先应关闭功放。否 则可能造成音箱的损坏。 3. Снимите сетку с динамика, вставьте динамик в отверстие в потолке, а затем, надавливая на передний ободок звукоотражателя и прижимая динамик к потолку, поверните два винта на звукоотражателе по часовой стрелке. Проследите за тем, чтобы винты были плотно затянуты, а монтажные зажимы — прижаты к потолочной плите. Не перетягивайте винты. 4. Прикрепите сетку к динамику. Для этого совместите сетку со звукоотражателем и зафиксируйте ее на месте поворотом по часовой стрелке. 上切割出一个洞口。 2. 将音箱信号线连接到音箱背板上 的连接端口。红色为 ( + ) 黑色 为 ( - )。请注意连接的正负极 性,特别是安装多个音箱时。 3. 去掉音箱上的外框,将音箱插入 天花板上挖开的洞口,然后将音 箱的前边缘贴紧在天花板上并按 住,同时小心地顺时针旋转音箱 前缘上的两个螺丝, 直到音箱上 的安装钩爪紧卡在天花板内侧。 不要过度拧紧螺丝。 4. 将外框对准音箱的边缘并安装到 音箱上,然后顺时针旋转螺丝直 到安全锁紧。 ■ Specifications Component 80 mm cone-type Nominal Impedance 8: Power Rating (IEC268-5) 15 W (NOISE) 30 W (PGM) 60 W (MAX) )180 X 122.5 mm (max.) Sensitivity (1 W, 1 m) 88 dB SPL Mounting depth: 110 mm Frequency Range 90 Hz - 20 kHz Connectors Frame: White (ABS, painted) Net: White (perforated metal, painted) (Munsell N9.5 approximate color) Grille Mounting height (exposed): 12.5 mm Dimensions Required ceiling opening: )150 mm Push terminal Weight 1.04 kg Finish: Black (ABS) Included accessory Cutout template Mounts: 2x Mounting tabs Optional accessory ST15 (for 70 V/100 V distributed line) ■ Dimensions 170.5 158 ST15 Max;65 Min; 5 177 ø147 ø180 Enclosure Required ceiling board thickness: 5 - 65 mm Type: Bass reflex ST15 attachment holes (Tapping screw : 4×12) 110 122.5 12.5 Unit : mm ֱᡸ⦃๗ ྲ᷌䴰㾱ᓏᔳ䇮༷ᰦˈ䈧оᵜൠޣᵪᶴ㚄㌫ˈ㧧ਆ↓⺞Ⲵᓏᔳᯩ⌅DŽ 䈧यሶ䇮༷䲿ђᔳᡆѪ⭏⍫ඳ൮༴⨶DŽ ADDRESS LIST CENTRAL & SOUTH AMERICA MEXICO Yamaha de México S.A. de C.V. Av. Insurgentes Sur 1647 Piso 9, Col. San José Insurgentes, Delegación Benito Juárez, México, D.F., C.P. 03900 Tel: +52-55-5804-0600 BRAZIL Yamaha Musical do Brasil Ltda. Rua Fidêncio Ramos, 302 Cj 52 e 54 Torre B Vila Olímpia CEP 04551-010 São Paulo/SP, Brazil Tel: +55-11-3704-1377 ARGENTINA Yamaha Music Latin America, S.A. Sucursal de Argentina Olga Cossettini 1553, Piso 4 Norte Madero Este-C1107CEK Buenos Aires, Argentina Tel: +54-11-4119-7000 PANAMA AND OTHER LATIN AMERICAN COUNTRIES/ CARIBBEAN COUNTRIES Yamaha Music Latin America, S.A. Edif. Torre Banco General, Piso 7, Urbanización Marbella, Calle 47 y Aquilino de la Guardia, Ciudad de Panamá, Panamá Tel: +507-269-5311 EUROPE RUSSIA Yamaha Music (Russia) Room 37, entrance 7, bld. 7, Kievskaya street, Moscow, 121059, Russia Tel: +7-495-626-5005 AFRICA Yamaha Music Gulf FZE JAFZA-16, Office 512, P.O.Box 17328, Jebel Ali FZE, Dubai, UAE Tel: +971-4-801-1500 MIDDLE EAST OTHER COUNTRIES Yamaha Music Gulf FZE JAFZA-16, Office 512, P.O.Box 17328, Jebel Ali FZE, Dubai, UAE Tel: +971-4-801-1500 ASIA THE PEOPLES REPUBLIC OF CHINA Yamaha Music & Electronics (China) Co.,Ltd. 2F, Yunhedasha, 1818 Xinzha-lu, Jingan-qu, Shanghai, China Tel: +86-400-051-7700 INDIA Yamaha Music India Private Limited Spazedge Building, Ground Floor, Tower A, Sector-47, Gurgaon- Sohna Road, Gurgaon-122002, Haryana, India Tel: +91-124-485-3300 INDONESIA PT. Yamaha Musik Indonesia (Distributor) Yamaha Music Center Bldg. Jalan Jend. Gatot Subroto Kav. 4, Jakarta 12930, Indonesia Tel: +62-21-520-2577 KOREA Yamaha Music Korea Ltd. 8F, Dongsung Bldg. 21, Teheran-ro 87-gil, Gangnam-gu, Seoul, 135-880, Korea Tel: +82-2-3467-3300 SINGAPORE Yamaha Music (Asia) Private Limited Block 202 Hougang Street 21, #02-00, Singapore 530202, Singapore Tel: +65-6740-9200 TAIWAN Yamaha Music & Electronics Taiwan Co.,Ltd. 2F., No.1, Yuandong Rd. Banqiao Dist. New Taipei City 22063, Taiwan, R.O.C. Tel: +886-2-7741-8888 THAILAND Siam Music Yamaha Co., Ltd. 3, 4, 15, 16th Fl., Siam Motors Building, 891/1 Rama 1 Road, Wangmai, Pathumwan, Bangkok 10330, Thailand Tel: +66-2215-2622 OTHER ASIAN COUNTRIES Yamaha Corporation, Sales & Marketing Division Nakazawa-cho 10-1, Naka-ku, Hamamatsu, Japan 430-8650 Tel: +81-53-460-2303 OCEANIA AUSTRALIA Yamaha Music Australia Pty. Ltd. Level 1, 99 Queensbridge Street, Southbank, VIC 3006, Australia Tel: +61-3-9693-5111 COUNTRIES AND TRUST TERRITORIES IN PACIFIC OCEAN Yamaha Corporation, Sales & Marketing Division Nakazawa-cho 10-1, Naka-ku, Hamamatsu, Japan 430-8650 Tel: +81-53-460-2303 MALAYSIA Yamaha Music (Malaysia) Sdn., Bhd. No.8, Jalan Perbandaran, 47301 Kelana Jaya, Petaling Jaya, Selangor, Malaysia Tel: +60-3-78030900 HEAD OFFICE Yamaha Corporation, Pro Audio Division PA42 Nakazawa-cho 10-1, Naka-ku, Hamamatsu, Japan 430-8650 Tel: +81-53-460-2441 Manual Development Department ©1994-2011 Yamaha Corporation 605IP-C0 Printed in China-
 1
1
-
 2
2
-
 3
3


in andere talen
- English: Yamaha S5 Owner's manual
- italiano: Yamaha S5 Manuale del proprietario
- русский: Yamaha S5 Инструкция по применению
- français: Yamaha S5 Le manuel du propriétaire
- español: Yamaha S5 El manual del propietario
- Deutsch: Yamaha S5 Bedienungsanleitung
- português: Yamaha S5 Manual do proprietário
- dansk: Yamaha S5 Brugervejledning
- čeština: Yamaha S5 Návod k obsluze
- svenska: Yamaha S5 Bruksanvisning
- Türkçe: Yamaha S5 El kitabı
- polski: Yamaha S5 Instrukcja obsługi
- română: Yamaha S5 Manualul proprietarului