
Las Vegas
Projection Clock
Réveil à projection
Sveglia con proiezione
Projektionswecker
Reloj con proyección
Projectie klok
| EN | FR | IT | DE | ES | NL |
SKU# CL030086-EU1

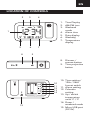
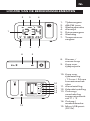
LOCATION OF CONTROLS
8 9
1
2
5
3
6
4
7
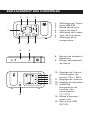
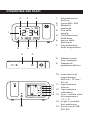
1. Time Display
2. AM/FM icon
3. Weekend
mode
4. Alarm time
5. Date display
6. Weekday
7. Temperature
display
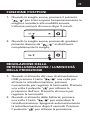
10. Time setting /
12Hr / 24Hr
format switch
11. Alarm setting
12. Calendar
setting
13. Up / switch
temperature
units °C / °F
14. Down /
weekend mode
15. Micro USB port
(DC-5V)
8. Dimmer /
snooze button
9. Time projection
button
15
10
11
12
13
14
EN

OVERVIEW
Congratulations on your purchase of this projection
alarm clock. This alarm clock includes the following
features: time, date, month, temperature display,
alarm clock, backlit display, time projection, 180º
adjustable angle, ultra-clear projection for dark /
poorly lit conditions.
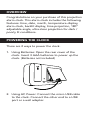
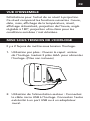
POWERING THE CLOCK
There are 2 ways to power the clock.
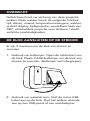
1. Using Batteries: Open the rear cover of the
clock. Insert 3 AAA batteries to power up the
clock. (Batteries not included)
2. Using AC Power: Connect the micro USB cable
to the clock. Connect the other end to a USB
port or a wall adapter.

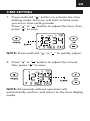
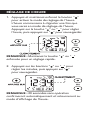
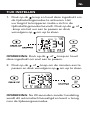
TIME SETTING
1. Press and hold “ ” button to activate the time
setting mode. the hour will start to blink once
you are in time setting mode.
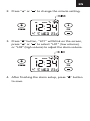
Press “ ” or “ ” button to adjust the hour, then
press “ ” to save.
NOTE: Press and hold “ ” or “ ” to quickly adjust.
2. Press “ ” or “ ” button to adjust the minute,
then press “ ” to save.
NOTE: 20 seconds without operation will
automatically conrm, and return to the time display
mode.
EN

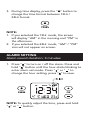
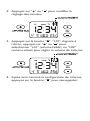
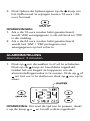
3. During time display, press the “ ” button to
change the time format between 12Hr /
24Hr format.
NOTE:
1. If you selected the 12Hr mode, the screen
will display “AM” in the morning and “PM” in
the afternoon.
2. If you selected the 24Hr mode, “AM” / “PM”
icon will not appear on screen.
ALARM SETTING
Alarm sound duration: 3 minutes
1. Press “ ” to turn on / off the alarm. Press and
hold “ ” button until the hour starts blinking to
enter alarm set mode. Press “ ” or “ ” to
change the hour setting, press “ ” to save.
NOTE: To quickly adjust the time, press and hold
“” or “ ” button.

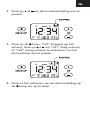
2. Press “ ” or “ ” to change the minute setting.
3. Press “ ” button, “L01” will blink on the screen,
press “ ” or “ ” to select “L01” (low volume),
or “L02” (high volume) to adjust the alarm volume.
4. After nishing the alarm setup, press “ ” button
to save.
EN

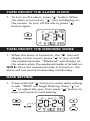
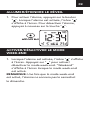
TURN ON/OFF THE ALARM CLOCK
1. To turn on the alarm, press “ ” button. When
the alarm is turned on, “ ” icon will display on
the screen. To turn off the alarm, press “ ”
button again.
TURN ON/OFF THE WEEKEND MODE
1. When the alarm is turned on, the “ ” icon will
display on the screen. press “ ” to turn on/off
the weekend mode. “Weekend” will display on
the screen when the weekend mode is turned on.
NOTE: Once the weekend mode is turned on, the
alarm will not sound on Saturday and Sunday.
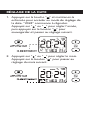
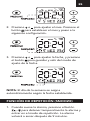
DATE SETTING
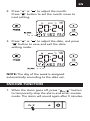
1. Press and hold “ ” button to enter date setting
mode. “2024” will begin ashing. Press “ ” or
“ ” to adjust the year, then press “ ” button to
save and move to next setting.

2. Press “ ” or “ ” to adjust the month.
Press “ ” button to set the month move to
next setting.
3. Press “ ” or “ ” to adjust the date, and press
“ ” button to save and exit the date
setting mode.
NOTE: The day of the week is assigned
automatically according to the date set.
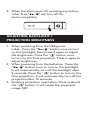
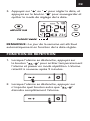
SNOOZE FUNCTION
1. When the alarm goes off, press “ ” button
to temporarily stop the alarm and enter snooze
mode. The alarm will sound again after 9 minutes.
EN

2. When the alarm goes off, pressing any button
other than “ ” will turn off the
alarm completely.
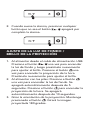
ADJUSTING BACKLIGHT /
PROJECTION BRIGHTNESS
1. When powering from the USB power
cable: Press the “ ” button once to turn
on the backlight, then press it again to adjust
the brightness. Press the “ ” button once
to turn on the time projection. Press it again to
adjust brightness.
2. When powering from the batteries: Press the
“ ” button once to turn on the backlight.
It will automatically turn off the backlight after
5 seconds. Press the “ ” button to turn on the
time projection. It will automatically turn off the
projection after 10 seconds.
3. Rotating projection orientation: Press and hold
the “ ” button. It will rotate the projected
image 180º.

SWITCHING TEMPERATURE UNITS (°C / °F)
In standard mode, press “ ” to switch the
temperature units between Celsius (°C) and
Fahrenheit (°F).
PACKAGE CONTENTS
Clock
Micro USB cable
AC Adapter
User Manual
Warranty Card
EN
Our Products contain high quality components and are designed to facilitate
recycling. Our products or product packaging are marked with the symbol
below. The symbol indicates that the product must not be treated as
municipal waste. It must be disposed of separately via the appropriate return
and collection systems available. By following these instructions you ensure
that this product is treated correctly and help to reduce potential impacts
on the environment and human health, which could otherwise result from
inappropriate handling. Recycling of products helps to conserve natural
resources and protect the environment. For more detailed information on
collection and recycling systems for this product, please contact the shop
where you purchased it, your local dealer or sales/service representatives.

EMPLACEMENT DES CONTRÔLES
8 9
1
2
5
3
6
4
7
1. Afchage de l’heure
2. Icône AM/FM
3. Mode Week-end
4. Heure de réveil
5. Afchage de la date
6. Jour de la semaine
7. Afchage de la
température
10. Réglage de l’heure /
commutateur de
format 12Hr / 24Hr
11. Réglage de l’alarme
12. Réglage du calendrier
13. Unités de
température de
montée / de
commutation
°C / °F14.
14. Mode d’attente /
week-end
15. Micro port USB
(DC-5V)
8. Bouton de variateur /
Répétition
9. Bouton de projection
de l’heure
15
10
11
12
13
14

VUE D’ENSEMBLE
Félicitations pour l’achat de ce réveil à projection.
Ce réveil comprend les fonctions suivantes : heure,
date, mois, afchage de la température, réveil,
afchage rétroéclairé, projection de l’heure, angle
réglable à 180º, projection ultra claire pour les
conditions sombres / mal éclairées.
MISE SOUS TENSION DE L’HORLOGE
Il y a 2 façons de mettre sous tension l’horloge.
1. Utilisation par piles : Ouvrez le capot arrière
de l’horloge. Insérez 3 piles AAA pour alimenter
l’horloge. (Piles non incluses)
2. Utilisation de l’alimentation secteur : Connectez
le câble micro USB à l’horloge. Connectez l’autre
extrémité à un port USB ou à un adaptateur
mural.
FR

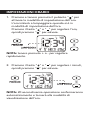
RÉGLAGE DE L’HEURE
1. Appuyez et maintenez enfoncé le bouton “ ”
pour activer le mode de réglage de l’heure.
L’heure commencera à clignoter une fois que
vous serez en mode de réglage de l’heure.
Appuyez sur la touche “ ” ou “ ” pour régler
l’heure, puis appuyez sur “ ” pour sauvegarder.
REMARQUE : Maintenez la touche “ ” ou “ ”
enfoncée pour un réglage rapide.
2. Appuyez sur les boutons “ ” ou “ ” pour
régler les minutes, puis appuyez sur “ ”
pour sauvegarder.
REMARQUE : 20 secondes sans opération
conrmeront automatiquement et retourneront au
mode d’afchage de l’heure.

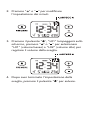
3. Pendant l’afchage de l’heure, appuyez sur la
touche “ ” pour changer le format de l’heure
entre 12Hr / 24Hr.
REMARQUE :
1. Si vous avez sélectionné le mode 12 heures,
l’écran afche “AM” le matin et “PM”
l’après-midi.
2. Si vous avez sélectionné le mode 24 heures,
l’icône “AM” / “PM” n’apparaît pas à l’écran.
RÉGLAGE DE L’ALARME :
Durée du son de l’alarme : 3 minutes
1. Appuyez sur “ ” pour activer/désactiver
l’alarme. Appuyez et maintenez enfoncé le
bouton “ ” jusqu’à ce que l’heure commence à
clignoter pour entrer en mode de réglage de
l’alarme. Appuyez sur “ ” ou “ ” pour modier
le réglage de l’heure, appuyez sur “alarme”
pour sauvegarder.
REMARQUE: Pour régler rapidement l’heure,
appuyez et maintenez enfoncée la touche “” ou “”.
FR

2. Appuyez sur “ ” ou “ ” pour modier le
réglage des minutes.
3. Appuyez sur la touche “ ”, “L01” clignote à
l’écran, appuyez sur “ ” ou “ ” pour
sélectionner “L01” (volume faible), ou “L02”
(volume élevé) pour régler le volume de l’alarme.
4. Après avoir terminé la conguration de l’alarme,
appuyez sur le bouton “ ” pour sauvegarder.

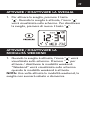
ALLUMER/ÉTEINDRE LE RÉVEIL
1. Pour activer l’alarme, appuyez sur le bouton
“ ”. Lorsque l’alarme est activée, l’icône “ ”
s’afche à l’écran. Pour désactiver l’alarme,
appuyez à nouveau sur la touche “ ”.
ACTIVER/DÉSACTIVER LE MODE
WEEK-END
1. Lorsque l’alarme est activée, l’icône “ ” s’afche
à l’écran. Appuyez sur “ ” pour activer/
désactiver le mode week-end. “Weekend”
s’afche à l’écran lorsque le mode week-end
est activé.
REMARQUE: Une fois que le mode week-end
est activé, l’alarme ne sonnera pas le samedi et
le dimanche.
FR

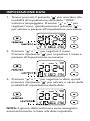
RÉGLAGE DE LA DATE
1. Appuyez sur la touche “ ” et maintenez-la
enfoncée pour accéder au mode de réglage de
la date. “2024” commence à clignoter.
Appuyez sur “ ” ou “ ” pour régler l’année,
puis appuyez sur le bouton “ ” pour
sauvegarder et passer au réglage suivant.
2. Appuyez sur “ ” ou “ ” pour régler le mois.
Appuyez sur le bouton “ ” pour passer au
réglage du mois suivant.

3. Appuyez sur “ ” ou “ ” pour régler la date, et
appuyez sur le bouton “ ” pour sauvegarder et
quitter le mode de réglage de la date.
REMARQUE : Le jour de la semaine est attribué
automatiquement en fonction de la date réglée.
FONCTION DE RÉPÉTITION
1. Lorsque l’alarme se déclenche, appuyez sur
le bouton “ ” pour arrêter temporairement
l’alarme et passer en mode répétition. L’alarme
retentit à nouveau après 9 minutes.
2. Lorsque l’alarme se déclenche, appuyer sur
n’importe quel bouton autre que “ ”
éteindra complètement l’alarme.
FR

RÉGLAGE DU RÉTROÉCLAIRAGE ET DE LA
LUMINOSITÉ DE LA PROJECTION
1. Lorsqu’il est alimenté par le câble d’alimentation
USB : Appuyez une fois sur la touche
“ ” pour allumer le rétroéclairage, puis
appuyez de nouveau pour régler la
luminosité. Appuyez une fois sur la touche
“ ” pour activer la projection temporelle.
Appuyez de nouveau sur cette touche pour
régler la luminosité.
2. Lorsqu’il est alimenté par des piles : Appuyez
une fois sur la touche “ ” pour allumer
le rétroéclairage. Il s’éteindra automatiquement
après 5 secondes. Appuyez sur le bouton
“ ” pour activer la projection temporelle. Il
éteindra automatiquement la projection au bout
de 10 secondes.
3. Orientation rotative de la projection : Appuyez
sur la touche “ ” et maintenez-la enfoncée.
Cela fera pivoter l’image projetée à 180º.
UNITÉS DE TEMPÉRATURE DE
COMMUTATION (°C / °F)
En mode standard, appuyez sur “ ” pour commuter
les unités de température entre Celsius (°C) et
Fahrenheit (°F).

CONTENU DU PACKAGE
Horloge
Câble Micro USB
Adaptateur secteur
Manuel d’utilisation
Carte de garantie
FR
Nos produits contiennent des composants haute qualité conçus pour en
faciliter le recyclage. Le symbole ci-après est apposé sur nos produits ou leurs
emballages. Le symbole indique que le produit ne doit pas être traité en tant
qu’ordure ménagère. Il doit être mis au rebut séparément, par les systèmes de
recyclage et de collecte appropriés et disponibles. En suivant ces instructions,
vous vous assurez que ce produit est traité correctement et vous contribuez
à réduire les impacts potentiels sur l’environnement et la santé, alors que
l’inverse entraînerait un traitement inadéquat. Le recyclage des produits
contribue à la conservation des ressources naturelles et à la protection de
l’environnement. Pour plus d’informations sur les systèmes de recyclage et de
collecte disponibles pour cet appareil, veuillez contacter le magasin où vous
avez acquis ce produit, votre revendeur local, votre revendeur ou le SAV.

POSIZIONE DEI TASTI
8 9
1
2
5
3
6
4
7
1. Visualizzazione
dell’ora
2. Icona AM / FM
3. Modalità
weekend
4. Ora della
sveglia
5. Visualizzazione
della data
6. giorno della
settimana
7. Visualizzazione
della temperatura
10. Interruttore di
impostazione
dell’ora / 12 ore /
24 ore
11. Impostazione
allarme
12. Impostazione
calendario
13. In su / cambia unità
di temperatura
° C / ° F
14. In giù / modalità
ne settimana
15. Porta micro USB
(DC-5V)
8. Pulsante meno
luce / postponi
9. Pulsante di
proiezione dell’ora
15
10
11
12
13
14

PANORAMICA
Congratulazioni per aver acquistato questa sveglia
a proiezione. Questa sveglia include le seguenti
funzioni: ora, data, mese, display della temperatura,
sveglia, display retroilluminato, proiezione del
tempo, angolo regolabile a 180 °, proiezione ultra
chiara per condizioni di scarsa luminosità.
ALIMENTAZIONE DELL’OROLOGIO
Ci sono 2 modi per alimentare l’orologio.
1. Uso delle batterie: aprire il coperchio posteriore
dell’orologio. Inserire 3 batterie AAA per
accendere l’orologio. (Batterie non incluse)
2. Utilizzo dell’alimentazione a corrente alternata:
Collegare il cavo micro USB all’orologio.
Collegare l’altra estremità a una porta USB o a
un adattatore da parete.
IT

IMPOSTAZIONI ORARIO
1. Premere e tenere premuto il pulsante “ ” per
attivare la modalità di impostazione dell’ora.
L’ora inizierà a lampeggiare quando si è in
modalità di impostazione dell’ora.
Premere il tasto “ ” o “ “ per regolare l’ora,
quindi premere “ ” per salvare.
NOTA: tenere premuto + o - per regolare
rapidamente.
2. Premere il tasto “ ” o “ ” per regolare i minuti,
quindi premere “ ” per salvare.
NOTA: 20 secondi senza operazione confermeranno
automaticamente e tornerà alla modalità di
visualizzazione dell’ora.

3. Durante la visualizzazione dell’ora, premere il
pulsante “ ” per cambiare il formato dell’ora tra
il formato 12Hr / 24Hr.
NOTA:
1. Se è stata selezionata la modalità 12 ore, lo
schermo visualizzerà “AM” al mattino e “PM”
al pomeriggio.
2. Se è stata selezionata la modalità 24 ore, l’icona
“AM” / “PM” non apparirà sullo schermo.
IMPOSTAZIONE SVEGLIA:
Durata del suono della sveglia: 3 minuti
1. Premere “ ” per attivare / disattivare la sveglia.
Tenere premuto il pulsante “ ” no a quando
l’ora inizia a lampeggiare per accedere alla
modalità di impostazione della sveglia. Premere
“ ” o “ ” per modicare l’impostazione dell’ora,
premere “ ” per salvare.
NOTE: per regolare rapidamente l’ora, tenere
premuto il tasto “ ” o “ “.
IT

2. Premere “ ” o “ ” per modicare
l’impostazione dei minuti.
3. Premere il pulsante “ ”, “L01” lampeggerà sullo
schermo, premere “ ” o “ ” per selezionare
“L01” (volume basso) o “L02” (volume alto) per
regolare il volume della sveglia.
4. Dopo aver terminato l’impostazione della
sveglia, premere il pulsante “ ” per salvare.

ATTIVARE / DISATTIVARE LA SVEGLIA
1. Per attivare la sveglia, premere il tasto
“ ”. Quando la sveglia è attivata, l’icona “ ”
verrà visualizzata sullo schermo. Per disattivare
la sveglia, premere di nuovo il tasto “ ”.
ATTIVARE / DISATTIVARE LA
MODALITÀ WEEKEND
1. Quando la sveglia è attivata, l’icona “ ” verrà
visualizzata sullo schermo. Premere “ “ per
attivare / disattivare la modalità weekend.
“Weekend” verrà visualizzato sullo schermo
quando la modalità weekend è attivata.
NOTA: Una volta attivata la modalità weekend, la
sveglia non suonerà sabato e domenica.
IT

IMPOSTAZIONE DATA
1. Tenere premuto il pulsante “ ” per accedere alla
modalità di impostazione della data. “2024”
inizierà a lampeggiare. Premere “ ” o “ ” per
regolare l’anno, quindi premere il pulsante “ ”
per salvare e passare all’impostazione successiva.
2. Premere “ ” o “ ” per regolare il mese.
Premere il pulsante “ ” per impostare il mese e
passare all’impostazione successiva.
3. Premere “ ” o “ ” per regolare la data, quindi
premere il pulsante “ ” per salvare e uscire dalla
modalità di impostazione della data.
NOTA: Il giorno della settimana viene assegnato
automaticamente in base alla data impostata.

FUNZIONE POSTPONI
1. Quando la sveglia suona, premere il pulsante
“ ” per interrompere temporaneamente la
sveglia e accedere alla modalità snooze.
L’allarme suonerà di nuovo dopo 9 minuti.
2. Quando la sveglia suona, premendo qualsiasi
pulsante diverso da “ ” si disattiverà
completamente la sveglia.
REGOLAZIONE DELLA
RETROILLUMINAZIONE / LUMINOSITÀ
DELLA PROIEZIONE
1. Quando si alimenta dal cavo di alimentazione
USB: premere il tasto “ ” una volta per
attivare la retroilluminazione, premere
nuovamente per regolare la luminosità. Premere
una volta il pulsante “ ” per attivare la
proiezione dell’ora. Premerlo di nuovo per
regolare la luminosità.
2. Quando si alimenta dalle batterie: premere
una volta il tasto “ ” per accendere la
retroilluminazione. Spegnerà automaticamente
la retroilluminazione dopo 5 secondi. Premere
il pulsante “ ” per attivare la proiezione
IT

dell’ora. Spegnerà automaticamente la
proiezione dopo 10 secondi.
3. Rotazione dell’orientamento della proiezione:
premere e tenere premuto il pulsante “ ”.
Ruoterà l’immagine proiettata di 180º.
CAMBIARE UNITÀ DI TEMPERATURA
(° C / ° F)
In modalità standard, premere “ ” per alternare
le unità di temperatura tra Celsius (° C) e
Fahrenheit (° F).
CONTENUTO DELLA CONFEZIONE
Orologio
Cavo micro USB
Adattatore di corrente
Manuale utente
Certicato di garanzia
I nostri prodotti contengono componenti di alta qualità e sono progettati per
facilitarne il riciclo. I nostri prodotti e le relative confezioni sono contrassegnati
dal simbolo indicato di seguito. Il simbolo indica che il prodotto non deve
essere trattato come riuto domestico. Deve essere smaltito separatamente
tramite i sistemi di restituzione e di raccolta adeguati disponibili. Seguendo
queste istruzioni si garantisce che il prodotto venga trattato correttamente e
si aiuta a ridurre l’impatto potenziale sull’ambiente e sulla salute umana che
potrebbe altrimenti derivare da una gestione inadeguata. Il riciclo dei prodotti
aiuta a conservare le risorse naturali e a proteggere l’ambiente. Per ulteriori
informazioni sullo smaltimento e il riciclo di questo prodotto, contattare il
negozio in cui è stato effettuato l’acquisto, il punto vendita o gli addetti alla
vendita/all’assistenza locali.

IT

POSITION DER STEUERUNG
8 9
1
2
5
3
6
4
7
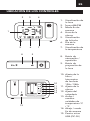
1. Zeitanzeige
2. AM / FM-Symbol
3. Wochenendmodus
4. Weckzeit
5. Datumsanzeige
6. Wochentag
7. Temperaturanzeige
10. Zeiteinstellung /
12 Std. / 24 Std.
Formatschalter
11. Wecker Einstellung
12. Kalendereinstellung
13. Temperatureinheiten
auf / umschalten
° C / ° F
14. Down /
Wochenend-Modus
15. Micro-USB-
Anschluss (DC-5V)
8. Dimmer /
Snooze-Taste
9. Zeitprojektionstaste
15
10
11
12
13
14

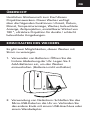
ÜBERSICHT
Herzlichen Glückwunsch zum Kauf dieses
Projektionsweckers. Dieser Wecker verfügt
über die folgenden Funktionen: Uhrzeit, Datum,
Monat, Temperaturanzeige, Wecker, beleuchtete
Anzeige, Zeitprojektion, einstellbarer Winkel von
180 °, ultraklare Projektion für dunkle / schlecht
beleuchtete Umgebungen.
EINSCHALTEN DES WECKERS
Es gibt zwei Möglichkeiten, diesen Wecker mit
Strom zu versorgen.
1. Verwenden von Batterien: Öffnen Sie die
hintere Abdeckung der Uhr. Legen Sie 3
AAA-Batterien ein, um den Wecker
einzuschalten. (Batterien nicht enthalten)
2. Verwendung von Netzstrom: Schließen Sie das
Micro-USB-Kabel an die Uhr an. Verbinden Sie
das andere Ende mit einem USB-Anschluss oder
einem Wandadapter.
DE

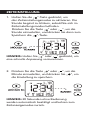
ZEITEINSTELLUNG
1. Halten Sie die „ “-Taste gedrückt, um
den Zeiteinstellungsmodus zu aktivieren. Die
Stunde beginnt zu blinken, sobald Sie sich im
Zeiteinstellungsmodus benden.
Drücken Sie die Taste „ “ oder „ “, um die
Stunde einzustellen, und drücken Sie dann zum
Speichern die „ “-Taste.
HINWEIS: Halten Sie „ “ oder „ “ gedrückt, um
eine schnelle Anpassung vorzunehmen.
2. Drücken Sie die Taste „ “ oder „ “, um die
Minute einzustellen, und drücken Sie „ “, um
die Einstellung zu speichern.
HINWEIS: 20 Sekunden ohne Bedienung
werden automatisch bestätigt und kehren zum
Zeitanzeigemodus zurück.

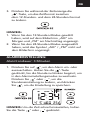
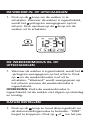
3. Drücken Sie während der Zeitanzeige die
„ “-Taste, um das Zeitformat zwischen
dem 12-Stunden- und dem 24-Stunden-Format
zu ändern.
HINWEIS:
1. Wenn Sie den 12-Stunden-Modus gewählt
haben, wird auf dem Bildschirm „AM“ am
Morgen und „PM“ am Nachmittag angezeigt.
2. Wenn Sie den 24-Stunden-Modus ausgewählt
haben, wird das Symbol „AM“ / „PM“ nicht auf
dem Bildschirm angezeigt.
ALARMEINSTELLUNG:
Alarmtondauer: 3 Minuten
1. Drücken Sie auf „ “, um den Alarm ein- oder
auszuschalten. Halten Sie die „ “-Taste
gedrückt, bis die Stunde zu blinken beginnt, um
in den Alarmeinstellungsmodus zu wechseln.
Drücken Sie „ “ oder „ “, um die
Stundeneinstellung zu ändern, und drücken
Sie „ “, um die Einstellung zu speichern.
HINWEIS: Um die Zeit schnell einzustellen, halten
Sie die Taste „ “ oder „ “ gedrückt.
DE

2. Drücken Sie „ “ oder „ “, um die
Minuteneinstellung zu ändern.
3. Drücken Sie die „ “-Taste. Auf dem
Bildschirm blinkt „L01“. Drücken Sie „ “ oder
„ “, um „L01“ (niedrige Lautstärke)
auszuwählen, oder „L02“ (hohe Lautstärke),
um die Alarmlautstärke anzupassen.
4. Drücken Sie nach Abschluss des Alarm-
Setups die „ “-Taste, um die Einstellungen
zu speichern.

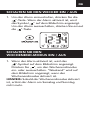
SCHALTEN SIE DEN WECKER EIN / AUS
1. Um den Alarm einzuschalten, drücken Sie die
„ “-Taste. Wenn der Alarm aktiviert ist, wird
das Symbol „ “ auf dem Bildschirm angezeigt.
Um den Alarm auszuschalten, drücken Sie erneut
die „ “-Taste.
SCHALTEN SIE DEN
WOCHENEND-MODUS EIN / AUS
1. Wenn der Alarm aktiviert ist, wird das
„ “-Symbol auf dem Bildschirm angezeigt.
Drücken Sie „ ”, um den Wochenendmodus
ein- oder auszuschalten. “Weekend” wird auf
dem Bildschirm angezeigt, wenn der
Wochenendmodus aktiviert ist.
HINWEIS: Sobald der Wochenendmodus aktiviert
ist, ertönt der Alarm am Samstag und Sonntag
nicht mehr.
DE

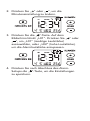
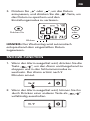
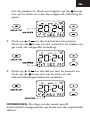
DATUM EINSTELLEN
1. Halten Sie die „ ”-Taste gedrückt, um den
Datumseinstellungsmodus aufzurufen. “2024”
beginnt zu blinken. Drücken Sie „ “ oder
„ “, um das Jahr einzustellen, und drücken Sie
dann die „ ”, um die Einstellung zu speichern
und zur nächsten zu wechseln.
2. Drücken Sie „ “ oder „ “, um den Monat
einzustellen. Drücken Sie die „ ”-Taste, um den
Monat auf die nächste Einstellung zu stellen.
Drücken Sie oder
Blinken
Drücken Sie oder
Blinken

3. Drücken Sie „ “ oder „ “, um das Datum
anzupassen, und drücken Sie die „ ”-Taste, um
das Datum zu speichern und den
Einstellungsmodus zu verlassen.
HINWEIS: Der Wochentag wird automatisch
entsprechend dem eingestellten Datum
zugewiesen.
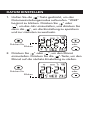
SNOOZE-FUNKTION
1. Wenn der Alarm ausgelöst wird, drücken Sie die
Taste „ ”, um den Alarm vorübergehend zu
stoppen und in den Schlummermodus zu
wechseln. Der Alarm ertönt nach 9
Minuten erneut.
2. Wenn der Alarm ausgelöst wird, können Sie ihn
durch Drücken einer anderen Taste als „ ”
vollständig ausschalten.
Drücken Sie oder
Blinken
DE

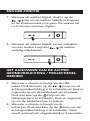
EINSTELLEN DER HINTERGRUNDBE-
LEUCHTUNG / PROJEKTIONSHELLIGKEIT
1. Beim Einschalten über das USB-Stromkabel:
Drücken Sie die Taste „ ” einmal, um die
Hintergrundbeleuchtung einzuschalten, und
drücken Sie sie dann erneut, um die Helligkeit
anzupassen. Drücken Sie die Taste „ ” einmal,
um die Zeitprojektion einzuschalten. Drücken Sie
erneut, um die Helligkeit anzupassen.
2. Beim Einschalten der Batterien: Drücken
Sie die Taste „ ” einmal, um die
Hintergrundbeleuchtung einzuschalten. Die
Hintergrundbeleuchtung wird nach 5 Sekunden
automatisch ausgeschaltet. Drücken Sie die
Taste „ ”, um die Zeitprojektion einzuschalten.
Die Projektion wird nach 10 Sekunden
automatisch ausgeschaltet.
3. Projektionsausrichtung drehen: Halten Sie
die „ ” gedrückt. Das projizierte Bild wird
um 180 ° gedreht.
TEMPERATUR EINHEITEN UMSCHALTEN
(° C / ° F)
Drücken Sie im Standardmodus „ ”, um die
Temperatureinheiten zwischen Celsius (° C) und
Fahrenheit (° F) umzuschalten.

LIEFERUMFANG
Uhr
Micro-USB-Kabel
Netzteil
Benutzerhandbuch
Garantiekarte
DE
Unsere Produkte enthalten qualitativ hochwertige Komponenten und sind für
einfaches Recycling konzipiert. Unsere Produkte oder Produktverpackungen
sind mit folgendem Symbol markiert. Das Symbol zeigt an, dass das
Produkt nicht als Hausmüll behandelt werden darf. Es muss separat über die
verfügbaren entsprechenden Rücklauf- und Sammlungssysteme entsorgt
werden. Durch Befolgen dieser Anweisungen stellen Sie sicher, dass dieses
Produkt richtig behandelt wird, und helfen, potenzielle Auswirkungen
auf die Umwelt und menschliche Gesundheit zu reduzieren, die sonst aus
ungeeigneter Behandlung resultieren könnten. Wiederverwertung von
Produkten hilft, natürliche Ressourcen zu erhalten und die Umwelt zu
schützen. Weitere Einzelheiten zu Sammel- und Recyclingsystemen für dieses
Produkt erhalten Sie in dem Geschäft, in dem Sie es erworben haben, bei
Ihrem örtlichen Händler oder von einem Vertriebs-/ Kundendienstmitarbeiter.


UBICACIÓN DE LOS CONTROLES
8 9
1
2
5
3
6
4
7
1. Visualización de
la hora
2. Ícono AM/FM
3. Modo n de
semana
4. Hora de la
alarma
5. Visualización
de la fecha
6. Día de la
semana
7. Visualización de
la temperatura
10. Ajuste de la
hora /
Interruptor
de formato
12Hr / 24Hr
11. Ajuste de la
alarma
12. Ajuste del
calendario
13. Arriba /
cambiar
unidades de
temperatura °C
/ °F
14. Abajo / modo
n de semana
15. Puerto micro
USB (DC-5V)
8. Botón de
atenuación /
repetición
9. Botón de
proyección de
la hora
15
10
11
12
13
14
ES

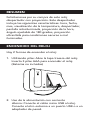
RESUMEN
Felicitaciones por su compra de este reloj
despertador con proyección. Este despertador
incluye las siguientes características: hora, fecha,
mes, visualización de la temperatura, despertador,
pantalla retroiluminada, proyección de la hora,
ángulo ajustable de 180 grados, proyección
ultranítida para condiciones oscuras o mal
iluminadas.
ENCENDIDO DEL RELOJ
Hay 2 formas de encender el reloj:
1. Utilizando pilas: Abre la tapa trasera del reloj.
Inserta 3 pilas AAA para encender el reloj.
(Baterías no incluidas)
2. Uso de la alimentación con corriente
alterna: Conecte el cable micro USB al reloj.
Conecte el otro extremo a un puerto USB o a un
adaptador de pared.

ES
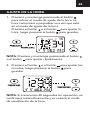
AJUSTE DE LA HORA
1. Presione y mantenga presionado el botón
para activar el modo de ajuste de la hora. La
hora comenzará a parpadear una vez que esté
en el modo de ajuste de la hora.
Presione el botón o el botón para ajustar la
hora, luego presione el botón para guardar.
NOTA: Presione y mantenga presionado el botón
o el botón para ajustar rápidamente.
2. Presione el botón o el botón para ajustar los
minutos, luego presione el botón para
guardar.
NOTA: Si transcurren 20 segundos sin operación, se
conrmará automáticamente y se volverá al modo
de visualización de la hora.

3. Durante la visualización de la hora, presione el
botón
para cambiar el formato de hora entre
el formato 12Hr y el formato 24Hr.
NOTA:
1. Si seleccionó el modo de 12Hr, la pantalla
mostrará “AM” por la mañana y “PM” por la
tarde.
2. Si seleccionó el modo de 24Hr, el ícono “AM” /
“PM” no aparecerá en la pantalla.
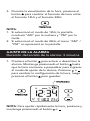
AJUSTE DE LA ALARMA
Duración del sonido de la alarma: 3 minutos
1. Presione el botón para activar o desactivar la
alarma. Mantenga presionado el botón hasta
que la hora comience a parpadear para ingresar
al modo de ajuste de la alarma. Presione o
para cambiar la conguración de la hora, luego
presione el botón para guardar.
NOTA: Para ajustar rápidamente la hora, presione y
mantenga presionado el botón o .

ES
2. Presione o para cambiar la conguración de
los minutos.
3. Presione el botón , en la pantalla parpadeará
“L01”, presione o para seleccionar “L01”
(volumen bajo) o “L02” (volumen alto) para
ajustar el volumen de la alarma.
4. Después de terminar la conguración de la
alarma, presione el botón para guardar.

ENCENDIDO/APAGADO DEL DESPERTADOR
1. Para encender la alarma, presione el botón .
Cuando la alarma está encendida, el ícono
se mostrará en la pantalla. Para apagar la alarma,
presione nuevamente el botón .
ENCENDIDO/APAGADO DEL MODO FIN
DE SEMANA
1. Cuando la alarma está encendida, el ícono se
mostrará en la pantalla. Presione para
encender/apagar el modo n de semana. “Fin
de semana” se mostrará en la pantalla cuando el
modo n de semana esté activado.
NOTA: Una vez que se activa el modo n de
semana, la alarma no sonará los sábados y
domingos.
AJUSTE DE LA FECHA
1. Mantenga presionado el botón para ingresar
al modo de ajuste de la fecha. “2024”
comenzará a parpadear. Presione o para
ajustar el año, luego presione el botón para
guardar y pasar a la siguiente conguración.

ES
2. Presione o para ajustar el mes. Presione el
botón
para establecer el mes y pasar a la
siguiente conguración.
3. Presione o para ajustar la fecha, y presione
el botón para guardar y salir del modo de
ajuste de la fecha.
NOTA: El día de la semana se asigna
automáticamente según la fecha establecida.
FUNCIÓN DE REPETICIÓN (SNOOZE)
1. Cuando suene la alarma, presione el botón
para detener temporalmente la alarma y
entrar en el modo de repetición. La alarma
volverá a sonar después de 9 minutos.

2. Cuando suene la alarma, presionar cualquier
botón que no sea el botón apagará por
completo la alarma.
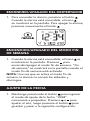
AJUSTE DE LA LUZ DE FONDO /
BRILLO DE LA PROYECCIÓN
1. Al alimentar desde el cable de alimentación USB:
Presione el botón una vez para encender
la luz de fondo y luego presiónelo nuevamente
para ajustar el brillo. Presione el botón una
vez para encender la proyección de la hora.
Presiónelo nuevamente para ajustar el brillo.
2. Al alimentar con las pilas: Presione el botón
una vez para encender la luz de fondo. Se
apagará automáticamente después de 5
segundos. Presione el botón para encender la
proyección de la hora. Se apagará
automáticamente después de 10 segundos.
3. Girar la orientación de la proyección: Mantenga
presionado el botón . Girará la imagen
proyectada 180 grados.

CAMBIO DE UNIDADES DE
TEMPERATURA (°C / °F)
En modo estándar, presione para cambiar las
unidades de temperatura entre Celsius (°C) y
Fahrenheit (°F).
CONTENIDO DEL PAQUETE
Reloj
Cable micro USB
Adaptador de corriente alterna
Manual de usuario
Tarjeta de garant
Nuestros productos contienen componentes de alta calidad y están diseñados
para facilitar el reciclaje. Nuestros productos o el embalaje del producto están
marcados con el siguiente símbolo. Este símbolo indica que el producto no
debe ser tratado como residuo municipal. Debe ser desechado por separado
a través de los sistemas de devolución y recogida apropiados disponibles.
Siguiendo estas instrucciones, asegura que este producto sea tratado
correctamente y ayuda a reducir los posibles impactos en el medio ambiente
y la salud humana que podrían resultar de un manejo inadecuado. El reciclaje
de productos ayuda a conservar los recursos naturales y proteger el medio
ambiente. Para obtener información más detallada sobre los sistemas de
recogida y reciclaje para este producto, por favor, contacte con la tienda
donde lo adquirió, su distribuidor local o representantes de ventas/servicio.
ES


LOCATIE VAN DE BEDIENINGSELEMENTEN
8 9
1
2
5
3
6
4
7
1. Tijdsweergave
2. AM/FM icoon
3. Weekendmodus
4. Alarmtijd
5. Datumweergave
6. Weekdag
7. Temperatuurw-
eergave
10. Knop voor
tijdsinstelling
/ 12-uurs / 24-uurs
formaatomschak-
elaar
11. Alarminstelling
12. Kalenderinstelling
13. Omhoog /
omschakeling
temperatuureenh-
eid °C / °F
14. Omlaag /
weekendmodus
15. Micro USB-poort
(DC-5V)
8. Dimmer /
snooze-knop
9. Knop voor
tijdsprojectie
15
10
11
12
13
14
NL

OVERZICHT
Gefeliciteerd met uw aankoop van deze projectie
wekker. Deze wekker bevat de volgende functies:
tijd, datum, maand, temperatuurweergave, wekker,
verlicht display, tijdsprojectie, verstelbare hoek van
180º, ultra-heldere projectie voor donkere / slecht
verlichte omstandigheden.
DE KLOK AANSLUITEN OP DE STROOM
Er zijn 2 manieren om de klok van stroom te
voorzien.
1. Gebruik van batterijen: Open de achterkant van
de klok. Plaats 3 AAA-batterijen om de klok van
stroom te voorzien. (Batterijen niet inbegrepen)
2. Gebruik van wisselstroom: Sluit de micro-USB-
kabel aan op de klok. Sluit het andere uiteinde
aan op een USB-poort of een wandadapter.

TIJD INSTELLEN
1. Druk op de -knop en houd deze ingedrukt om
de tijdinstellingsmodus te activeren. Het
uur begint te knipperen zodra u zich in de
tijdinstellingsmodus bevindt. Druk op de - of
-knop om het uur aan te passen en druk
vervolgens op om op te slaan.
OPMERKING: Druk op de - of -knop en houd
deze ingedrukt om snel aan te passen.
2. Druk op de - of -knop om de minuten aan te
passen en druk vervolgens op om op te slaan.
OPMERKING: Na 20 seconden zonder handeling
wordt dit automatisch bevestigd en keert u terug
naar de tijdweergavemodus.
NL

3. Druk tijdens de tijdweergave op de -knop om
het tijdformaat te wijzigen tussen 12-uurs / 24-
uurs formaat.
OPMERKINGEN:
1. Als u de 12-uurs modus hebt geselecteerd,
wordt ‘AM’ weergegeven in de ochtend en ‘PM’
in de middag.
2. Als u de 24-uurs modus hebt geselecteerd,
wordt het ‘AM’ / ‘PM’-pictogram niet
weergegeven op het scherm.
ALARMINSTELLING
Alarmduur: 3 minuten
1. Druk op om de wekker in of uit te schakelen.
Druk op de -knop en houd deze ingedrukt
totdat het uur begint te knipperen om de
alarminstellingsmodus in te voeren. Druk op of
om het uur in te stellen en druk op om op te
slaan.
OPMERKING: Om snel de tijd aan te passen, drukt
u op de knop o en houdt u deze ingedrukt.

2. Druk op of om de minuteninstelling aan te
passen.
3. Druk op de -knop, “L01” knippert op het
scherm, druk op o om “L01” (laag volume)
of “L02” (hoog volume) te selecteren om het
alarmvolume aan te passen.
4. Druk na het voltooien van de alarminstelling op
de
-knop om op te slaan.
NL

DE WEKKER IN- OF UITSCHAKELEN
1. Druk op de -knop om de wekker in te
schakelen. Wanneer de wekker is ingeschakeld,
wordt het -pictogram weergegeven op het
scherm. Druk opnieuw op de -knop om de
wekker uit te schakelen.
DE WEEKENDMODUS IN- OF
UITSCHAKELEN
1. Wanneer de wekker is ingeschakeld, wordt het
-pictogram weergegeven op het scherm. Druk
op
om de weekendmodus in of uit te
schakelen. “Weekend” wordt weergegeven op
het scherm wanneer de weekendmodus is
ingeschakeld.
OPMERKING: Zodra de weekendmodus is
ingeschakeld, zal de wekker niet afgaan op zaterdag
en zondag.
DATUM INSTELLEN
1. Druk op de -knop en houd deze ingedrukt om
de datuminstellingsmodus te betreden. “2024”
begint te knipperen. Druk op of om het jaar

2. Druk op of om de maand aan te passen.
Druk op de -knop om de maand in te stellen en
ga naar de volgende instelling.
3. Druk op of om de datum aan te passen en
druk op de -knop om op te slaan en de
datuminstellingsmodus te verlaten.
OPMERKING: De dag van de week wordt
automatisch toegewezen op basis van de ingestelde
datum.
NL
aan te passen en druk vervolgens op de -knop
om op te slaan en naar de volgende instelling te
gaan.

2. Wanneer de wekker afgaat, zal het indrukken
van een andere knop dan de wekker
volledig uitschakelen.
HET AANPASSEN VAN DE ACHTER-
GRONDVERLICHTING / PROJECTIEHEL-
DERHEID
1. Wanneer u stroom ontvangt via de USB-
kabel: Druk één keer op de -knop om de
achtergrondverlichting in te schakelen en druk er
nogmaals op om de helderheid aan te passen.
Druk één keer op de -knop om de
tijdsprojectie in te schakelen. Druk er nogmaals
op om de helderheid aan te passen.
2. Wanneer u stroom ontvangt via de
batterijen: Druk één keer op de -knop om de
achtergrondverlichting in te schakelen. Deze
wordt automatisch uitgeschakeld na 5 seconden.
SNOOZE-FUNCTIE
1. Wanneer de wekker afgaat, drukt u op de
-knop om de wekker tijdelijk te stoppen
en de sluimermodus in te gaan. De wekker zal
na 9 minuten opnieuw afgaan.

HET OMSCHAKELEN VAN
TEMPERATUUREENHEDEN (°C / °F)
In de standaardmodus drukt u op om te schakelen
tussen de temperatuureenheid Celsius (°C) en
Fahrenheit (°F).
INHOUD VAN DE VERPAKKING
Klok
Micro USB-kabel
AC-adapter
Gebruikershandleiding
Garantiekaart
NL
Druk op de -knop om de tijdsprojectie in te
schakelen. Deze wordt automatisch
uitgeschakeld na 10 seconden.
3. Het draaien van de projectieoriëntatie:
Houd de -knop ingedrukt. Hiermee wordt het
geprojecteerde beeld 180º gedraaid.


Onze producten bevatten hoogwaardige componenten en zijn ontworpen om
recycling te vergemakkelijken. Onze producten of productverpakkingen zijn
gemarkeerd met het onderstaande symbool. Het symbool geeft aan dat het
product niet als huishoudelijk afval mag worden behandeld. Het moet apart
worden afgevoerd via de daarvoor bestemde retour- en inzamelsystemen.
Door deze instructies te volgen, zorgt u ervoor dat dit product correct wordt
behandeld en draagt u bij aan het verminderen van mogelijke gevolgen
voor het milieu en de menselijke gezondheid die anders zouden kunnen
voortvloeien uit onjuiste behandeling. Recycling van producten helpt bij het
behoud van natuurlijke hulpbronnen en de bescherming van het milieu. Voor
meer gedetailleerde informatie over inzamelings- en recyclingsystemen voor
dit product kunt u contact opnemen met de winkel waar u het hebt gekocht,
uw lokale dealer of verkoop-/servicevertegenwoordigers.
NL

Marathon Watch Company Ltd.
Customer Service: / Service Clients: / Servisio
clienti: / Kundendienst: / Servicio al cliente: /
Klantenservice:
www.MarathonWatch.com
Made in China / Fabriqué en Chine / Prodotto in
Cina / In China hergestellt / Hencho en China /
Gemaakt in China
Designed in Canada / Conçu au Canada /
Progettato in Canada / Entwickelt in Kanada /
Diseñado en Canadá / Ontworpen in Canada
Garantie
de 2 ans
2 year
warranty
2 anni
di garanzia
2 jahre
garantie
2 años
garantía
2 jaar
garantie
-
 1
1
-
 2
2
-
 3
3
-
 4
4
-
 5
5
-
 6
6
-
 7
7
-
 8
8
-
 9
9
-
 10
10
-
 11
11
-
 12
12
-
 13
13
-
 14
14
-
 15
15
-
 16
16
-
 17
17
-
 18
18
-
 19
19
-
 20
20
-
 21
21
-
 22
22
-
 23
23
-
 24
24
-
 25
25
-
 26
26
-
 27
27
-
 28
28
-
 29
29
-
 30
30
-
 31
31
-
 32
32
-
 33
33
-
 34
34
-
 35
35
-
 36
36
-
 37
37
-
 38
38
-
 39
39
-
 40
40
-
 41
41
-
 42
42
-
 43
43
-
 44
44
-
 45
45
-
 46
46
-
 47
47
-
 48
48
-
 49
49
-
 50
50
-
 51
51
-
 52
52
-
 53
53
-
 54
54
-
 55
55
-
 56
56
-
 57
57
-
 58
58
-
 59
59
-
 60
60
-
 61
61
-
 62
62
-
 63
63


in andere talen
- English: Marathon CL030086 User manual
- italiano: Marathon CL030086 Manuale utente
- français: Marathon CL030086 Manuel utilisateur
- español: Marathon CL030086 Manual de usuario
- Deutsch: Marathon CL030086 Benutzerhandbuch

