
185118/1
SIGMA-ELEKTRO GmbH
Dr.-Julius-Leber-Straße 15
67433 Neustadt/Weinstraße, Germany
Tel. +49 6321-9120-118
kundenservice@sigmasport.com
BLAZE FLASH
≤ 500m
≤ 50h
Chargeur + Câble Micro-USB
Caricatore + Cavo Micro USB
Cargador + Cable micro USB
Oplader + Micro-USB kabel
Câble Micro-USB
Cavo Micro USB
Cable micro USB
Micro-USB kabel
Support de rechange
Supporto in silicone
Soporte de recambio de silicona
Siliconen reservehouder
ACCESSOIRES / ACCESSORI /
ACCESORIOS / ACCESSOIRES
Ref. No. 18552
ACCESSOIRES / ACCESSORI /
ACCESORIOS / ACCESSOIRES
Ref. No. 18553
ACCESSOIRES / ACCESSORI /
ACCESORIOS / ACCESSOIRES
Ref. No. 00481
EN SIGMA-ELEKTRO GmbH hereby declares that the BLAZE FLASH complies with the
fundamental requirements and other relevant regulations of Directive 2014/30/EU
and RoHS Directive 2011/65/EU. You can fi nd the CE declaration at:
ce.sigmasport.com/blazefl ash
FR Vous trouverez la déclaration CE à l’adresse : ce.sigmasport.com/blazefl ash
IT La dichiarazione CE è disponibile all‘indirizzo: ce.sigmasport.com/blazefl ash
ES Puede encontrar la declaración de conformidad CE en: ce.sigmasport.com/blazefl ash
NL U kunt de CE-certifi cering vinden op: ce.sigmasport.com/blazefl ash
We, SIGMA-ELEKTRO GmbH, declare that the equipment above has been tested in our facility
and found compliance with the requirement limits of applicable standards, in accordance with
the Radio Equipment Regulations 2017 and the Restriction of the Use of Certain Hazardous
Substances in Electrical and Electronic Equipment Regulations 2012. The test record, data
evaluation and Equipment Under Test (EUT) confi gurations represented herein are true and
accurate under the standards herein specifi ed.
CE INFORMATION
UKCA STATEMENT
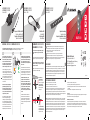
BRAKE
FLASH
La diffusion de la lumière ne doit pas être gênée! / La distribuzione della luce non deve essere coperta! /
¡El haz de luz no se debe tapar con ningún objeto! / De lichtverdeling mag niet verborgen zijn!
Avant le montage, nettoyer et dégraisser la
tige de selle pour garantir une bonne fi xation.
Lors de la fi xation, veiller à ce que la bande
en silicone soit suffi samment serrée pour
que le phare arrière ne puisse pas bouger de
lui-même ou être déplacé trop facilement.
Hauteur de montage entre 250 et 1200 mm.
Prima del montaggio pulire e sgrassare il
reggisella, per garantire un posizionamento
stabile. Per il fi ssaggio assicurarsi che l‘attacco
a fascia in silicone durante il montaggio venga
fi ssato saldamente e posizionato in modo tale
che il fanale posteriore non possa spostarsi,
neanche leggermente. Altezza di installazione
di 250-1200 mm.
Antes de montarlo, limpia y desengrasa la
tija del sillín para garantizar que se sujete
fi rmemente. Cuando lo fi jes, observa que la
correa de silicona esté tan apretada que el
faro no se pueda mover fácilmente. Altura de
montaje entre 250 y 1200 mm.
Vóór de montage de zadelbuis reinigen en
ontvetten, om een goede bevestiging te
waarborgen. Let er bij het bevestigen op dat
de siliconenbandbevestiging bij de montage
zo stevig wordt aangetrokken en aangebracht,
dat het achterlicht niet vanzelf kan verstellen
en ook niet heel licht versteld kan worden.
Montagehoogte tussen de 250 en 1200 mm.
21 3
Unifi t:
25-32 mm
Le BLAZE FLASH est un éclairage temporisé
à calibrage automatique également doté d‘un
capteur de luminosité. L‘indicateur LED jaune
(Pic. 1) clignote pendant env. 3 secondes,
puis reste allumé en permanence, indiquant le
mode «AUTO».
Il BLAZE FLASH è una luce di decelerazione
autocalibrante, dotata inoltre di un sensore di
luminosità. Durante la calibrazione l‘indicatore
a LED giallo lampeggia (Pic. 1) per circa 3 sec.,
quindi diventa fi sso e indica la modalità AUTO.
El BLAZE FLASH se autocalibra y está
equipado con un sensor de luminosidad
adicional. Durante el calibrado automático,
cuando se enciende, el indicador LED amarillo
(Pic.1) parpadea durante 3s aproximadamente,
y después permanece encendido, indicando
con ello que el faro está en „modo AUTO“.
Para cambiar de modo, presionar nuevamente
el botón.
Het BLAZE FLASH is een zelfkalibrerend
Remlicht, dat tevens met een lichtsensor is
uitgerust. Tijdens de kalibratie knippert de
gele indicator-led (Pic. 1) gedurende ca. 3 s,
vervolgens permanent en geeft daarmee AUTO
modus aan.
Pic. 1
MONTAGE / MONTAGGIO / MONTAJE / MONTAGE
L’axe du feu arrière doit être perpendiculaire par rapport
à la route et à angle droit par rapport à l‘axe central du
véhicule.
Lato di chiusura del fanalino posteriore perpendicolare alla
carreggiata e a 90° rispetto all‘asse centrale del veicolo.
Sitúa la parte frontal del faro trasero en posición vertical
con respecto a la calzada, y en ángulo recto con respecto
al eje central de la bicicleta.
Afsluitzijde van het achterlicht verticaal met de rijweg en
haaks op de hartlijn van de fi ets uitlijnen.
Axe central du véhicule /
Asse centrale del veicolo /
Eje central de la bicicleta /
Hartlijn van het fi ets
17°
Axe de référence
parallèle à la route /
Asse di riferimento
parallelo alla carreggiata /
Eje de referencia en
paralelo a la calzada /
Referentie-as parallel
aan de rijbaan
90°
ALIGNEMENT / ORIENTAMENTO /
ALINEAMIENTO / UITLIJNING
SP1
This device complies with Part 15 of the FCC Rules.
Operation is subject to the following two conditions:
(1) This device may not cause harmful interference, and
(2) This device must accept any interference received, including interference that may cause
undesired operation. The grantee is not responsible for any changes or modifi cations not
expressly approved by the party responsible for compliance. Such modifi cations could void the
user’s authority to operate the equipment.This equipment should be installed and operated with
a minimum distance of 5 millimeters between the radiator and your body.
NOTE: This equipment has been tested and found to comply with the limits for a Class B digital
device, pursuant to part 15 of the FCC Rules. These limits are designed to provide reasonable
protection against harmful interference in a residential installation. This equipment generates,
uses and can radiate radio frequency energy and, if not installed and used in accordance with
the instructions, may cause harmful interference to radio communications. However, there is
no guarantee that interference will not occur in a particular installation. If this equipment does
cause harmful interference to radio or television reception, which can be determined by turning
the equipment off and on, the user is encouraged to try to correct the interference by one or
more of the following measures:
FCC DECLARATION OF CONFORMITY
− Reorient or relocate the receiving antenna.
− Increase the separation between the equipment and receiver.
− Connect the equipment into an outlet on a circuit different from that to which the receiver
is connected.
− Consult the dealer or an experienced radio/TV technician for help.
FCC Caution:
Any changes or modifi cations not expressly approved by the party responsible for compliance
could void the user’s authority to operate this equipment.
Radiation Exposure Statement:
The product comply with the FCC portable RF exposure limit set forth for an uncontrolled
environment and are safe for intended operation as described in this manual. The further RF
exposure reduction can be achieved if the product can be kept as far as possible from the user
body or set the device to lower output power if such function is available.

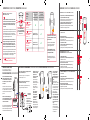
Après la recharge, vérifi ez que le joint rouge de protection
de la prise USB soit bien clipsé.
Accertarsi che il sigillo rosso sia sempre chiuso
correttamente dopo la carica.
Asegúrese de que el precinto marcado en rojo esté
correctamente cerrado tras cargar.
Zorg ervoor dat de rood gemarkeerde afdichting
altijd goed wordt gesloten na het laden.
2
1
3
Micro
L’éclairage ne peut pas être
utilisé lors de la recharge.
Ce phare doit être
remplacé si son ampoule
est défectueuse. /
Un prelievo di energia
tramite collegamento
Micro USB non è possibile.
In caso di sorgente
luminosa difettosa, è
necessario sostituire la
lampada. /
No es posible extraer
energía mediante la
conexión micro-USB.
Si la fuente luminosa
está defectuosa,
remplace el faro. /
Stroomafname via de
Micro-USB-aansluiting is
niet mogelijk. Deze lamp
moet bij een defecte licht-
bron worden vervangen.
Le témoin de la batterie
devient jaune pendant
le chargement. Celui-ci
s‘éteint lorsque la batterie
est à nouveau opération-
nelle. /
Durante il processo di
carica il sistema di controllo
della batteria si illumina di
giallo. Quando la batteria è
nuovamente pronta all‘uso,
il sistema di controllo della
batteria si spegne. /
Durante el proceso de
carga, el sistema de control
de la batería luce amarillo.
En cuanto la batería está
lista de nuevo, el sistema
del control de la batería se
apaga. /
Tijdens het laadproces
brandt het accu-indicator
geel. Is de accu weer gereed
voor gebruik, dan is de
accu-indicator uit.
La batterie doit immédiatement être rechargée
lorsque le dispositif de contrôle / le témoin
bleu s‘allume. Les LED ne se remplacent pas.
Si une LED est en panne, le feu arrière doit
être remplacé.
La batteria deve essere caricata immediata-
mente se la spia / l‘indicatore blu si attiva. I LED
non si possono sostituire. Se un LED smette
di funzionare, è necessario sostituire il fanale
posteriore.
Cuando se enciende el indicador, hay que
recargar la batería inmediatamente. Los LEDs
no son recambiables. Si un LED falla, el faro
trasero debe ser substituido.
De accu moet direct worden opgeladen wanneer
de blauwe indicator is geactiveerd. De leds
kunnen niet worden vervangen. Wanneer een led
uitvalt moet het achterlicht worden vervangen.
3 MODES /
3 MODALITÀ /
3 MODOS /
3 MODI
Éclairage arrière allumé /
Il fanale posteriore
è acceso /
Faro trasero encendido /
Achterlicht is aan /
Le mode “Feu Stop”
est activé /
La luce del freno è attiva /
Luz de freno encendida /
Remlicht is actief
2 x = STANDARD
(Durée de fonctionnement /
Durata / Duración /
Brandduur: 9 h)
✔ ✔
+ 1 x = PULSE FLASHING
(Durée de fonctionnement /
Durata / Duración /
Brandduur: 11 h)
clignotant / fl ashing /
intermitente / knipperend ✔
+ 1 x = ECO FLASHING
(Durée de fonctionnement /
Durata / Duración /
Brandduur: 50 h)
clignotant / fl ashing /
intermitente / knipperend ✔
+ 1 x = OFF
1 x
Le capteur de luminosité du feu arrière est activé et allume
ou éteint le feu arrière en fonction de la luminosité ambiante
(après env. 4 minutes). L‘éclairage temporisé est actif. Sans
mouvement du vélo, le feu arrière s‘éteint totalement après
env. 9 minutes.
Il sensore di luminosità del fanale posteriore si attiva e accende
o spegne automaticamente il fanale posteriore a seconda della
luce ambiente (dopo circa 4 minuti). Luce di decelerazione
attiva. In assenza di movimento della bici, il fanale posteriore si
spegne completamente dopo circa 9 minuti.
El sensor de luminosidad del faro trasero está activado y se
encarga de encender o apagar el faro según la luz ambiente
(después de 4 minutos aproximadamente). La luz de freno
está activa. Si no detecta movimiento de la bicicleta, el faro
trasero se apaga completamente después de unos 9 minutos.
Achterlicht lichtsensor is geactiveerd en schakelt het achterlicht
al naar gelang het omgevingslucht automatisch aan of uit (na
ca. 4 minuten). Remlicht is actief. Zonder beweging van de fi ets
schakelt het achterlicht na ca. 9 minuten volledig uit.
+ 1 x = MODE «STANDARD » / MODALITÀ STANDARD /
MODO AUTO / STANDARD MODE ...
BOUTON MARCHE / ARRÊT
PULSANTE ACCESO / SPENTO
BOTÓN ENCENDIDO / APAGADO
AAN / UIT-KNOP
MODE «AUTO» / MODALITÀ AUTOMATICA /
MODO AUTO / AUTO MODUS
INTERRUPTEUR / INTERRUTTORE / INTERRUPTOR / SCHAKELAAR
TÉMOIN DE LA BATTERIE /
INDICATORE BATTERIA /
INDICADOR DE BATERÍA / ACCU-INDICATOR
PROCESSUS DE CHARGEMENT / PROCESSO DI CARICA / PROCESO DE CARGA / LAADPROCEDURE
MODE LED / MODALITÀ LED / MODO LED / LED MODUS
MODE AUTO / MODALITÀ AUTO / MODO AUTO / AUTO MODUS
Lorsque vous freinez, les 3 LED s‘allument pendant environ 3 sec.
Le voyant du mode AUTO s‘allume en jaune. /
Durante la frenata, tutti e 3 i LED rossi si illuminano per ca. 3 sec.
L‘indicatore della modalità AUTO si illumina di giallo. /
Al frenar, todos los LEDs se encienden durante aprox. 3 seg.
El indicador de modo AUTO se enciende en amarillo. /
Bij remmen gaan alle 3 de rode LED‘s gedurende ca. 3 s branden.
De AUTO modus indicator gaat geel branden.
MODE STANDARD / MODALITÀ STANDARD / MODO ESTÁNDAR /
STANDAARD MODUS
L‘éclairage arrière est allumé.
Lorsque vous freinez, les 3 LED s‘allument pendant environ 3 sec. /
Il fanale posteriore è acceso.
Durante la frenata, tutti e 3 i LED rossi si illuminano per ca. 3 sec. /
La luz trasera está encendida.
Al frenar, todos los LEDs se encienden durante aprox. 3 seg. /
Het achterlicht is ingeschakeld.
Bij remmen gaan alle 3 de rode LED‘s gedurende ca. 3 s branden.
MODE CLIGNOTANT / PULSE FLASHING /
INTERMITENTE DE PULSOS / PULSEREND KNIPPEREN
Le mode clignotant est allumé.
Lorsque vous freinez, les 3 LED s‘allument pendant environ 3 sec. /
La modalità fl ash è accesa.
Durante la frenata, tutti e 3 i LED rossi si illuminano per ca. 3 sec. /
El modo intermitente está encendido.
Al frenar, todos los LEDs se encienden durante aprox. 3 seg. /
De knippermodus is ingeschakeld.
Bij remmen gaan alle 3 de rode LED‘s gedurende ca. 3 s branden.
CLIGNOTANT ÉCONOMIQUE / ECO FLASHING / INTERMITENTE ECO /
ECO KNIPPEREN
Le mode clignotant est allumé.
Lorsque vous freinez, les 3 LED s‘allument pendant environ 3 sec. /
La modalità fl ash è accesa.
Durante la frenata, tutti e 3 i LED rossi si illuminano per ca. 3 sec. /
El modo intermitente está encendido.
Al frenar, todos los LEDs se encienden durante aprox. 3 seg. /
De knippermodus is ingeschakeld.
Bij remmen gaan alle 3 de rode LED‘s gedurende ca. 3 s branden.
~ 3 h
Chargeur non fourni. /
Caricatore non incl. /
El cargador no está incluido. /
Oplader niet inbegrepen
Battery Rating
3.7V 300mAh
5V
max. 1 A
Le témoin du mode «AUTO» est activé et
est parfaitement visible dans une position
légèrement latérale.
L‘indicatore di modalità AUTOMATICA
è attivo e facile da vedere in quanto
posizionato leggermente di lato.
El indicador AUTOMÁTICO de modo
diurno está activado y se ve desde una
posición ligeramente ladeada.
AUTO-modus indicator actief en is in
een licht zijdelingse positie optimaal te
herkennen.
Battery %
100 % - 31 %
30 - 0 %
-
 1
1
-
 2
2


in andere talen
- English: Sigma BUSTER 400 User manual
- italiano: Sigma BUSTER 400 Manuale utente
- français: Sigma BUSTER 400 Manuel utilisateur
- español: Sigma BUSTER 400 Manual de usuario
Gerelateerde papieren
Andere documenten
-
 busch muller 163 Eyro Battery LED Headlight Handleiding
-
General Motors Merge EB16-EU-RD Handleiding
-
busch muller IQ-X Handleiding
-
 Busch M ller 365 LEVAL Cornering Light Handleiding
-
Volkswagen 3AB 055 204 Fitting Instructions Manual
-
Stiga Road Light Kit - right hand drive Handleiding
-
Carrera Audi R8 DTM Safety Car Handleiding

