Pagina wordt geladen...

Quickstart Guide English ( 3 – 7 )
Guía de inicio rápido Español ( 8 – 13 )
Guide d'utilisation rapide Français ( 14 – 19 )
Guida rapida Italiano ( 20 – 25 )
Schnellstart-Anleitung Deutsch ( 26 – 31 )
Snelstartgids Nederlands ( 32 – 37 )
Appendix English ( 38 )

2

3
Quickstart Guide (English)
Introduction
• Sing karaoke using your favorite YouTube music on your smartphone, tablet, or computer
with Karaoke Star’s Bluetooth connection.
• Connect a variety of audio sources to Karaoke Star’s Aux input to play karaoke songs.
• Use the built-in FX processor to match your singing to favorite music genres, vocal
harmonies, gender voices, or other versatile effects.
• Light Mode offers a full range of color options and patterns to let you control the light
show.
Box Contents
Karaoke Star
Power Cable (standard IEC)
Microphone with mic cable
3.5 mm (1/8”) to 3.5 mm (1/8”) cable
Quickstart Guide
Safety & Warranty Manual
Support
For the latest information about this product (documentation, technical specifications, system
requirements, compatibility information, etc.) and product registration, visit ionaudio.com.
For additional product support, visit ionaudio.com/support.
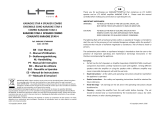
Setup
Items shown but not listed under Introduction > Box Contents are sold separately.
Tablet
MP3
Player
Microphone
Power
REAR PANEL
FRONT PANEL

4
Features
Front Panel
1. Microphone Inputs: Connect the included dynamic microphone to these 1/4” (6.35 mm) inputs.
2. Microphone Volume: Adjust this dial to control the volume for both microphone inputs.
3. Master Volume: Adjust this dial to control the speaker’s main mix volume, which includes the
microphone inputs, Aux input, and the audio from a paired Bluetooth device.
4. Aux Input: Connect a smartphone, MP3 player, DVD player, computer soundcard, or other line-level
audio source to this 1/8” (3.5 mm) Aux input.
5. Aux Volume +/-: Press these buttons to control the volume for the Aux input and Bluetooth signal.
Note: The Aux input volume will be adjusted separately from the Bluetooth volume.
6. Bluetooth: Press this button to pair to a Bluetooth device. Press this button again to unpair from a
connected Bluetooth device.
Note: Volume on your Bluetooth device should be turned up.
7. Bluetooth Icon: The Bluetooth icon will be lit solid when a device is paired to Karaoke Star.
8. Aux/Headphone Output: Connect this 1/8” (3.5 mm) output to headphones, a powered speaker, or a
recorder.
9. FX Group: Press one of the A-D buttons to select an effect category.
10. FX Group Icon: The display will show the selected category for the built-in effects.
11. Voice Effect On/Off: Press this button to activate/deactivate the built-in effects. The built-in effects
are applied to both microphone inputs.
12. Voice Effect Icon: The display will show the effect preset icon when the built-in effects are activated.
13. -/+: Use these buttons to select one of the built-in effects.
14. Light Mode: Press this button to cycle through these different light effects:
• Off (no lights)
• EQ Bars (reactive to music)
• Horizontal Color Wipe (non-reactive to music)
• Shimmering Large Blocks (non-reactive to music)
• Shimmering Small Blocks (non-reactive to music)
• Falling Blocks (non-reactive to music)
• Wavy Line (reactive to music)
• Pulsating Block (reactive to music)
• Light Bar (reactive to music)
• Snowflake/Square Lights (non-reactive to music)
• Vertical Lights (non-reactive to music)
15. USB Charge: Connect your device’s charge cable here to charge it.
Note: The USB charging port does not play music. Use Bluetooth or the Aux input to play your music
source.
1
4
15
15
8
6
7
9
11
11
13
13
5
2
3
14
14
10
10
12
12
1
3
4
2
1
2

5
Top Panel
1. Cradle: Place your tablet here to view
lyrics if you are singing karaoke.
2. Storage Tray: Use this integrated
storage tray for smartphones, keys, etc.
Rear Panel
1. Power Cable Input: Connect the
included IEC power cable from here to a
power outlet.
2. Fuse Cover: If the unit’s fuse is
broken, use a screwdriver or other tool to
lift this tab to replace the fuse. Replace it
with a fuse of the same rating. Using
a fuse with an incorrect rating can
damage the unit and/or fuse.
3. Power Switch: Use this switch to turn the
unit on/off.
4. Bass Port: This port enhances the bass
generated by the woofer to increase the
low-frequencies. Make sure this hole is
not obstructed since this will adversely
affect bass response.
1
4
15
8
6
7
9
11
13
5
2
3
14
10
12
1
3
4
2
1
2
1
4
15
8
6
7
9
11
13
5
2
3
14
10
12
1
3
4
2
1
2

6
Operation
Pairing to a Bluetooth Device
1. Turn on your Bluetooth device.
2. Power on Karaoke Star. If you have previously connected to a Bluetooth device, Karaoke Star will reconnect to it. If this
is the first time connecting to the device, press the Bluetooth button on Karaoke Star to enter pairing mode.
3. Navigate to your Bluetooth device’s setup screen, find “Karaoke Star” and connect. When the device is “paired” to
Karaoke Star, the Bluetooth icon will be lit solid and a confirmation tone will be heard.
Note: If your Bluetooth device prompts for a pairing code, enter “0000”.
4. Press and release the Bluetooth button to disconnect a paired Bluetooth device.
5. To connect to another Bluetooth device, repeat step 3.
Performing with Karaoke Star
1. Power on Karaoke Star.
2. Connect a microphone to one of the microphone inputs.
3. To use the built-in effects, select a category by pressing one of the FX Group buttons.
4. Use the -/+ buttons to select an effect preset; then press the Voice Effect button to turn on the effects.
5. Sing into the microphone while adjusting the Microphone Volume dial and the Master Volume dial.
Note: To avoid feedback, move the microphone away from the front of Karaoke Star’s speaker, as this will cause high pitched
and damaging sound waves. If feedback starts, move away from the speaker and lower the Microphone Volume dial.
Effects
Gender Effects
Novelty Effects
FX
Group
Preset
Number
Preset Name FX
Group
Preset
Number
Preset Name
C 1 Barry D 1 D-
V
ader
C 2 Male to Female D 2 Aliens
C 3 Female to Male D 3 Flea
C 4 Pop Eye D 4 Froggy
C 5 Olive D 5 Little Robot
C 6 Tinker Bell D 6 Evil Robot
C 7 Octivator D 7 Robot Chorus
C 8 Prankster D 8 Monster
C 9 Munchkin D 9 Psycho
C 10 Way Down D 10 Warehouse
C 11
V
entriloquist D 11 Flange
C 12 Hip Deep D 12 Telephone
C 13 Stadium D 13 Echo
C 14 Station D 14 Big Echo
C 15 David & Goliath D 15 Grand Canyon
Core Effects
FX
Group
Preset
Number
Preset Name
A
1 Super Star
A
2 On Stage
A
3 Auto-Pain
A
4 Modern Pop Tuned
A
5 Star
A
6 Super Group
A
7 Arena
A
8 Lead Singer
A
9 Grunge
A
10 Modern Rap
A
11 Classic Rap
A
12 Rock Out
A
13 Rockabilly
A
14 Church
A
15 Cathedral
Harmony Effects
FX
Group
Preset
Number
Preset Name
B 1 Barbershop
B 2 Chapel Girls
B3 Trio
B4 Bohemian
B5 Rapsody
B 6 Group Harmony
B 7 Tuned Girls
B 8 Girl Pop
B 9 Tuned Girl Group
B 10 Tuned On Stage
B 11 Angelic Choir
B 12 Country Ladies
B 13 Country Gent
B 14 Hmmmm

7
Troubleshooting
If you can’t hear any sound from the microphone: Make sure the microphone On/Off switch is “on”.
If the sound is distorted: Try lowering the volume control of your sound source or microphone. Also, try to
reduce the overall volume of Karaoke Star using the Master Volume knob.
If there is a high-pitched whistling noise when using microphones: This is probably feedback. Point the
microphone away from the speaker.
If you can’t hear the microphone over the music volume: Turn down the music volume from your source.

8
Guía de inicio rápido (Español)
Introducción
• Cante karaoke usando su música de YouTube favorita en su teléfono inteligente
(smartphone), tableta un ordenador con la conexión Bluetooth del Karaoke Star.
• Conecte una variedad de fuentes de audio a la entrada auxiliar del Karaoke Star para
reproducir canciones de karaoke.
• Use el procesador de efectos integrado para adaptar su voz según sus géneros
musicales favoritos, armonías vocales, voces de género y otros efectos versátiles.
• El modo de iluminación ofrece una gama completa de opciones de color y patrones que
le permitirán controlar el show de luces.
Contenido de la caja
Karaoke Star
Cable de corriente (IEC estándar)
Micrófono con cable
Cable de 1/8 pulg. (3,5 mm) a 1/8 pulg. (3,5 mm)
Guía de inicio rápido
Manual sobre la seguridad y garantía
Soporte
Para obtener la información más reciente acerca de este producto (documentación,
especificaciones técnicas, requisitos de sistema, información de compatibilidad, etc.) y
registrarlo, visite ionaudio.com.
Para soporte adicional del producto, visite ionaudio.com/support.
Instalación
Los elementos que se muestran pero que no se enumeran en Introducción > Contenido de
la caja se venden por separado.
Tableta
Reproductor de
MP3
Micrófono
Suministro
eléctrico
PANEL TRASERO
PANEL FRONTAL

9
Características
Panel frontal
1. Entradas de micrófono: Conecte a estas entradas de 6,35 mm (1/4 pulg.) los micrófono dinámicos incluidos.
2. Volumen del micrófono: Ajuste este cuadrante para controlar el volumen de ambas entradas de micrófono.
3. Volumen maestro: Ajuste este cuadrante para controlar la mezcla principal del altavoz, que incluye las
entradas de micrófono, la entrada auxiliar y el audio de un dispositivo Bluetooth apareado.
4. Entrada auxiliar: Conecte un teléfono inteligente (smartphone), reproductor mp3, reproductor de DVD, la
tarjeta de sonido de un ordenador u otra fuente de audio de nivel de línea a esta entrada auxiliar de 3,5 mm
(1/8 pulg.).
5. Volumen auxiliar +/-: Pulse estos botones para controlar el volumen de la entrada auxiliar y de la señal de
Bluetooth.
Nota: El volumen de la entrada auxiliar se ajusta de forma independiente del volumen de Bluetooth.
6. Bluetooth: Pulse este botón para aparear la unidad con un dispositivo Bluetooth. Pulse este botón
nuevamente para desaparear la unidad de un dispositivo Bluetooth.
Nota: El volumen en su dispositivo Bluetooth debe subirse.
7. Icono de Bluetooth: El icono de Bluetooth se enciende con luz azul continua cuando hay un dispositivo
apareado al Karaoke Star.
8. Salida auxiliar/para auriculares: Conecte esta salida de 3,5 mm (1/8 pulg.) auriculares, altavoces
alimentados o un grabador.
9. Grupo de efectos: Pulse uno de los botones A-D para seleccionar una categoría de efecto.
10. Icono del grupo de efectos: La pantalla mostrará la categoría seleccionada de efectos integrados.
11. Efecto de voz encendido/apagado: Pulse este botón para activar/desactivar los efectos integrados. Los
efectos integrados se aplican a ambas entradas de micrófono.
12. Icono del efecto de voz: La pantalla mostrará el icono del preset de efecto cuando se activan los efectos
integrados.
13. -/+: Use estos botones para seleccionar uno de los efectos integrados.
14. Modo de luz: Pulse este botón para alternar los siguientes efectos de iluminación diferentes:
• Apagado (sin luces)
• Barras de ecualización (reacciona con la música)
• Barrido de color horizontal (no reacciona con la música)
• Bloques grandes brillantes (no reacciona con la música)
• Bloques pequeños brillantes (no reacciona con la música)
• Bloques descendentes (no reacciona con la música)
• Línea ondulada (reacciona con la música)
• Bloque pulsante (reacciona con la música)
• Barra de luz (reacciona con la música)
•
Luces tipo copo de nieve/cuadrado (no reactivas a la música)
• Luces verticales (no reacciona con la música)
15. Carga USB: Conecte aquí el cable de carga de su dispositivo para cargarlo.
Nota: El puerto de carga USB no reproduce música. Use el Bluetooth o la entrada auxiliar para reproducir su
fuente de música.
1
4
15
15
8
6
7
9
11
11
13
13
5
2
3
14
14
10
10
12
12
1
3
4
2
1
2

10
Panel superior
1. Base: Coloque aquí su tableta para leer
la letra si está cantando karaoke.
2. Bandeja de almacenamiento: Use esta
bandeja de almacenamiento integrada
para colocar teléfonos móviles, llaves,
etc.
Panel trasero
1. Entrada del cable de alimentación:
Conecte el cable de corriente IEC
incluido desde aquí hasta una toma de
corriente estándar.
2. Tapa de fusibles: Si se quemó el fusible,
use un destornillador u otra herramienta
para levantar esta lengüeta a fin de
reemplazar el fusible. Reemplácelo por
un fusible de la misma especificación. Si
utiliza un fusible de especificación
incorrecta, puede dañarse la unidad y/o
el fusible.
3. Interruptor de encendido: Utilice este
interruptor para encender/apagar la
unidad.
4. Puerto de graves: Este puerto mejora
los graves generados por el woofer a fin
de aumentar las frecuencias bajas.
Asegúrese de que el orificio no quede
obstruido, puesto que se afectará
perjudicialmente a la respuesta en
graves.
1
4
15
8
6
7
9
11
13
5
2
3
14
10
12
1
3
4
2
1
2
1
4
15
8
6
7
9
11
13
5
2
3
14
10
12
1
3
4
2
1
2

11
Funcionamiento
Apareamiento de un dispositivo Bluetooth
1. Encienda su dispositivo Bluetooth.
2. Encienda el Karaoke Star. Si ya lo había conectado a otro dispositivo Bluetooth, el
Karaoke Star se reconectará a él. Si esta es la primera vez que se conecta a ese
dispositivo, pulse el botón Bluetooth del Karaoke Star para entrar al modo de
apareamiento.
3. Navegue a la pantalla de configuración de su dispositivo Bluetooth, busque “Karaoke
Star” y establezca la conexión. Cuando el dispositivo está "apareado" con el Karaoke
Star, el icono Bluetooth quedará encendido permanentemente y se escuchara un tono de
confirmación.
Nota: Si su dispositivo Bluetooth solicita un código de apareamiento, ingrese "0000".
4. Pulse y suelte el botón de Bluetooth para desconectar un dispositivo Bluetooth
apareado.
5. Para conectarse a otro dispositivo Bluetooth repita los pasos 3 y 4.
Cómo cantar con el Karaoke Star
1. Encienda el Karaoke Star.
2. Conecte un micrófono a una de las entradas de micrófono.
3. Para usar los efectos integrados, seleccione una categoría pulsando uno de los botones
FX Group.
4. Use los botones -/+ para seleccionar un preset de efecto; luego pulse el botón Voice
Effect para activar los efectos.
5. Cante al micrófono mientras ajusta el cuadrante del volumen del micrófono y el
cuadrante del volumen maestro.
Nota: Para evitar el acople, aleje el micrófono del frente del altavoz del Karaoke Star, ya que
de lo contrario se generarán ondas de sonido agudas y dañinas. Si se genera acople, aléjese
del altavoz y disminuya el ajuste del cuadrante del volumen del micrófono.

12
Efectos
Efectos de género
Efectos novedosos
Grupo
de
efectos
Preset
Número
Nombre del preset Grupo
de
efectos
Preset
Número
Nombre del preset
C 1 Barry D 1 D-
V
ader
C 2 Male to Female D 2 Aliens
C 3 Female to Male D 3 Flea
C 4 Pop Eye D 4 Froggy
C 5 Olive D 5 Little Robot
C 6 Tinker Bell D 6 Evil Robot
C 7 Octivator D 7 Robot Chorus
C 8 Prankster D 8 Monster
C 9 Munchkin D 9 Psycho
C 10 Way Down D 10 Warehouse
C 11
V
entriloquist D 11 Flange
C 12 Hip Deep D 12 Telephone
C 13 Stadium D 13 Echo (Eco)
C 14 Station D 14 Big Echo
C 15 David & Goliath D 15 Grand Canyon
Efectos principales
Grupo
de
efectos
Preset
Número
Nombre del preset
R 1 Super Star
R 2 On Stage
R 3 Auto-Pain
R 4 Modern Pop Tuned
R 5 Star
R 6 Super Group
R 7 Arena
R 8 Lead Singer
R 9 Grunge
R 10 Modern Rap
R 11 Classic Rap
R 12 Rock Out
R 13 Rockabilly
R 14 Iglesia
R 15 Cathedral
Efectos de armonía
Grupo
de
efectos
Preset
Número
Nombre del preset
B 1 Barbershop
B 2 Chapel Girls
B3 Trio
B4 Bohemian
B5 Rapsody
B 6 Group Harmony
B 7 Tuned Girls
B 8 Girl Pop
B 9 Tuned Girl Group
B 10 Tuned On Stage
B 11 Angelic Choir
B 12 Country Ladies
B 13 Country Gent
B 14 Hmmmm

13
Solución de problemas
Si no puede escuchar el sonido del micrófono: Asegúrese de que el interruptor de encendido/apagado
del micrófono esté conectado.
Si el sonido está distorsionado: Pruebe bajando el control de volumen de su fuente de sonido o
micrófono. Pruebe también reduciendo el volumen general del Karaoke Star utilizando la perilla de volumen
maestro.
Hay un silbido agudo cuando se utilizan micrófonos: Probablemente sea realimentación. Apunte el
micrófono apartándolo del altavoz.
Si no puede oír el micrófono por arriba del volumen de la música: Disminuya el volumen de la música
en su fuente.

14
Guide d’utilisation rapide (Français)
Présentation
• Chantez sur votre musique YouTube préférée que vous avez sur votre smartphone,
tablette ou ordinateur grâce à la connexion Bluetooth de la Karaoke Star.
• Reliez différentes sources audio à l'entrée auxiliaire de la Karaoke Star afin de faire jouer
des chansons de karaoké.
• Utilisez le processeur d’effets intégré afin d’adapter votre voix selon vos genres musicaux
préférés, les harmonies vocales, le sexe de la voix ou pour d’autres effets polyvalents.
• Le mode d’éclairage offre une gamme complète de choix de couleurs et de motifs pour
vous permettre de contrôler le spectacle de lumière.
Contenu de la boîte
Karaoke Star
Câble d'alimentation (standard CEI)
Microphone avec câble
Câble 3,5 mm (1/8 po) à 3,5 mm (1/8 po)
Guide d'utilisation rapide
Consignes de sécurité et informations concernant la garantie
Assistance technique
Pour les toutes dernières informations concernant la documentation, les spécifications
techniques, la configuration requise, la compatibilité et l’enregistrement du produit, veuillez
visiter ionaudio.com.
Pour de l’assistance supplémentaire, veuillez visiter le site ionaudio.com/support.
Installation
Les articles qui ne figurent pas dans la section Présentation > Contenu de la boîte sont
vendus séparément.
Tablette
Lecteur
MP3
Microphone
Alimentation
PANNEAU ARRIÈRE
PANNEAU AVANT

15
Caractéristiques
Panneau avant
1. Entrées microphone : Ces entrées 6,35 mm permettent de brancher les microphone électrodynamiques
inclus.
2. Volume microphone : Cette molette permet de contrôler le volume des deux entrées microphone.
3. Volume général : Cette molette permet de régler le volume du mix général de l’enceinte qui comprend les
entrées microphones, l’entrée auxiliaire et l'audio provenant d'un appareil Bluetooth jumelé.
4. Entrée auxiliaire : Cette entrée 3,5 permet de brancher un smartphone, un lecteur MP3, un lecteur DVD, une
carte son d’ordinateur ou une autre source audio à niveau ligne.
5. Vol auxiliaire +/- : Ces touches permettent de régler le volume de l'entrée auxiliaire et du signal Bluetooth.
Remarque : Le volume de l'entrée auxiliaire est réglé séparément du volume Bluetooth.
6. Bluetooth : Cette touche permet de jumeler un appareil Bluetooth. Appuyer de nouveau sur cette touche
permet de déjumeler un appareil Bluetooth.
Remarque : Le volume sur votre appareil Bluetooth devrait être est assez élevé.
7. Icône Bluetooth : L’icône Bluetooth s’allume lorsqu'un appareil est jumelé à la Karaoke Star.
8. Sortie auxiliaire/casque : Cette sortie 3,5 mm permet de brancher un casque d’écoute, une enceinte
amplifiée ou un enregistreur.
9. FX Group : Ces touches (A à D) permettent de sélectionner une catégorie d’effets.
10. Icône FX Group : La catégorie d’effets intégrés sélectionnée s’affiche sur l’écran.
11. Voice Effects On/Off : Cette touche permet d’activer et de désactiver les effets de voix intégrés. Les effets
intégrés sont ajoutés aux deux entrées microphone.
12. Icône Voice Effect : L’icône du préréglage des effets s’affiche lorsque les effets intégrés sont activés.
13. -/+: Ces touches permettent de sélectionner un des effets intégrés.
14. Light Mode : Cette touche permet de parcourir les différents modes d’éclairage :
• Éteint (aucune lumière)
• Barres d'égalisation (mode réactif à la musique)
• Effet de volet de couleur horizontal (mode non réactif à la musique)
• Grands blocs chatoyants (mode non réactif à la musique)
• Petits blocs chatoyants (mode non réactif à la musique)
• Blocs en chute (mode non réactif à la musique)
• Trait ondulé (mode réactif à la musique)
• Bloc pulsatoire (mode réactif à la musique)
• Barre de lumière (mode réactif à la musique)
•
Flocons de neige et carrés (mode non réactif à la musique)
• Lumières verticales (mode non réactif à la musique)
15. Port de rechargement USB : Ce port permet de brancher le câble de rechargement de votre appareil afin de
le recharger.
Remarque : La lecture de musique ne peut se faire à partir du port de rechargement USB. Veuillez utiliser la
connexion Bluetooth ou l’entrée auxiliaire afin de faire la lecture de la source audio.
1
4
15
15
8
6
7
9
11
11
13
13
5
2
3
14
14
10
10
12
12
1
3
4
2
1
2

16
Panneau supérie
1. Station d’accueil : Ce support permet de
placer votre tablette afin d’afficher les paroles
lorsque vous utilisez le karaoké.
2. Plateau de rangement : Ce plateau de
rangement intégré permet de placer un
smartphone, des clefs, etc.
Panneau arrière
1. Entrée d'alimentation : Cette entrée permet
de brancher le câble d’alimentation CEI fourni
à une prise secteur.
2. Compartiment du fusible : Si le fusible de
l’appareil est endommagé, utiliser un
tournevis ou autre outil pour soulever le
couvercle afin de remplacer le fusible par un
nouveau de même calibre. L’utilisation d’un
fusible de calibre inapproprié pourrait
endommager l’appareil et/ou le fusible.
3. Interrupteur d'alimentation : Cet interrupteur
permet de mettre l'appareil sous et hors
tension.
4. Évent : Le port arrière améliore les basses
générées par le haut-parleur d’extrêmes
graves, augmentant les basses fréquences.
Assurez-vous que ce port n’est pas obstrué,
car cela pourrait nuire à la réponse en basse.
1
4
15
8
6
7
9
11
13
5
2
3
14
10
12
1
3
4
2
1
2
1
4
15
8
6
7
9
11
13
5
2
3
14
10
12
1
3
4
2
1
2

17
Fonctionnement
Jumelage d'un appareil Bluetooth
1. Veuillez mettre votre appareil Bluetooth sous tension.
2. Mettez la Karaoke Star sous tension. Si vous aviez précédemment jumelé un appareil
Bluetooth, l'enceinte Karaoke Star se reconnectera à cet appareil. Si c’est la première
fois que vous jumelez l’appareil, appuyez sur la touche Bluetooth de la Karaoke Star pour
lancer le jumelage.
3. Accédez à l'écran de configuration de votre appareil Bluetooth, recherchez « Karaoke
Star » et lancez le jumelage. Lorsque l’appareil est jumelé à la Karaoke Star, l’icône
Bluetooth s’allumera et vous entendrez une « tonalité de confirmation ».
Remarque : Si votre appareil Bluetooth vous demande d’entrer un code de jumelage,
entrez « 0000 ».
4. Pour déjumeler un appareil Bluetooth, appuyez et relâchez la touche de jumelage.
5. Pour jumeler un autre appareil Bluetooth, répétez l’étape 3.
Chanter avec la Karaoke Star
1. Mettez la Karaoke Star sous tension.
2. Reliez un microphone à l’une des entrées microphone.
3. Pour utiliser les effets intégrés, sélectionnez une catégorie d’effets en utilisant les
touches FX Group.
4. Utilisez les touches -/+ afin de sélectionner le préréglage d’effets, puis appuyez sur la
touche Voice Effect afin de les activer.
5. Chantez dans le microphone tout en ajustant le bouton du volume microphone et le
bouton du volume général.
Remarque : Pour éviter toute rétroaction, déplacez le microphone loin du devant du haut-
parleur de la Karaoke Star, car cela provoquerait des sons aigus et potentiellement
dommageables. En cas de rétroaction, éloignez-vous du haut-parleur et diminuez le réglage
du bouton du volume microphone.

18
Effets
Effets selon le sexe de la voix
Effets spéciaux
Groupe
d’effets
Numéro du
préréglage
Nom du préréglage Groupe
d’effets
Numéro du
préréglage
Nom du préréglage
C 1 Barry D 1 D-
V
ader
C 2 Male to Female D 2 Aliens
C 3 Female to Male D 3 Flea
C 4 Pop Eye D 4 Froggy
C 5 Olive D 5 Little Robot
C 6 Tinker Bell D 6 Evil Robot
C 7 Octivator D 7 Robot Chorus
C 8 Prankster D 8 Monster
C 9 Munchkin D 9 Psycho
C 10 Way Down D 10 Warehouse
C 11
V
entriloquist D 11 Flange
C 12 Hip Deep D 12 Telephone
C 13 Stadium D 13 Echo
C 14 Station D 14 Big Echo
C 15 David & Goliath D 15 Grand Canyon
Effets de base
Groupe
d’effets
Numéro du
préréglage
Nom du préréglage
A
1 Super Star
A
2 On Stage
A
3 Auto-Pain
A
4 Modern Pop Tuned
A
5 Star
A
6 Super Group
A
7 Arena
A
8 Lead Singer
A
9 Grunge
A
10 Modern Rap
A
11 Classic Rap
A
12 Rock Out
A
13 Rockabilly
A
14 Church
A
15 Cathedral
Effets d'harmonie
Groupe
d’effets
Numéro du
préréglage
Nom du préréglage
B 1 Barbershop
B 2 Chapel Girls
B3 Trio
B4 Bohemian
B5 Rapsody
B 6 Group Harmony
B 7 Tuned Girls
B 8 Girl Pop
B 9 Tuned Girl Group
B 10 Tuned On Stage
B 11 Angelic Choir
B 12 Country Ladies
B 13 Country Gent
B 14 Hmmmm

19
Dépannage
Lorsque vous ne pouvez entendre le son du microphone : Veuillez vous assurer que
l’interrupteur d’alimentation du microphone a été activé.
Lorsqu’il y a de la distorsion : Essayez de diminuer le volume de votre appareil ou du
microphone. Essayez également de réduire le volume général de l’enceinte Karaoke Star avec
le bouton de volume générale.
Lorsqu’il y a un sifflement aigu lors de l’utilisation des microphones : Ceci est
probablement causé par la rétroaction (effet Larsen). Pointez le microphone dans la direction
opposée de l’enceinte.
Lorsque vous ne pouvez entendre le microphone à cause du volume trop élevé de la
musique : Diminuez le volume sur votre appareil source.

20
Guida rapida (Italiano)
Introduzione
• Canta il karaoke con la tua musica preferita di YouTube sul tuo smartphone, tablet o
computer grazie al collegamento Bluetooth del Karaoke Star.
• Collega tutta una serie di fonti audio all'ingresso Aux del Karaoke Star per riprodurre
canzoni da karaoke.
• Utilizza il processore FX incorporato per abbinare i tuoi generi musicali preferiti, le
armonie vocali, voci per genere o altri effetti versatili.
• La modalità Light offre una gamma completa di opzioni cromatiche e pattern che
consentono di cvontrollare lo show luminoso.
Contenuti della confezione
Karaoke Star
Cavo di alimentazione (standard IEC)
Microfono con relativi cavo
Cavo da 3,5mm (1/8”) a 3,5mm (1/8”)
Guida rapida
Istruzioni di sicurezza e garanzia
Assistenza
Per le ultime informazioni in merito a questo prodotto (documentazione, specifiche tecniche,
requisiti di sistema, informazioni sulla compatibilità, ecc.) e per effettuarne la registrazione,
recarsi alla pagina ionaudio.com.
Per ulteriore assistenza sul prodotto, recarsi alla pagina ionaudio.com/support.
Configurazione
Elementi illustrati, ma non elencati sotto Introduzione > Contenuti della confezione sono
venduti separatamente.
Tablet
Lettore
MP3
Microfono
Alimentazione
PANNELLO POSTERIORE
PANNELLO ANTERIORE

21
Caratteristiche
Pannello anteriore
1. Ingressi microfono: collegare i microfono dinamici in dotazione a questi ingressi da 1/4" (6,35 mm).
2. Volume microfono: regolare questa manopola per controllare il volume di entrambi gli ingressi microfono.
3. Volume Master: servirsi di questo comando per regolare il volume principale di mix dell'altoparlante, che
comprende gli ingressi microfono, l'ingresso ausiliario (aux) e l'audio di un dispositivo Bluetooth collegato.
4. Ingresso Aux: collegare uno smartphone, un lettore MP3, un lettore DVD, la scheda audio di un computer o
altre fonti audio a livello di linea a questo ingresso Aux da 1/8” (3,5 mm).
5. Aux Volume +/-: premere questi tasti per regolare il volume dell'ingresso Aux e del segnale Bluetooth.
Nota bene: il volume dell'ingresso Aux sarà regolato separatamente dal volume Bluetooth.
6. Bluetooth: premere questo tasto per effettuare il collegamento a un dispositivo Bluetooth. Premere
nuovamente questo pulsante per scollegare un dispositivo Bluetooth collegato.
Nota bene: il volume a livello del dispositivo Bluetooth deve essere acceso.
7. Icona Bluetooth: quando un dispositivo è collegato al Karaoke Star, l'icona Bluetooth è illuminata in maniera
fissa.
8. Uscita Aux/cuffie: collegare questa uscita da 1/8” (3,5 mm) a cuffie, un altoparlante o a un registratore.
9. Gruppo FX: premere uno dei tasti A-D per selezionare una categoria di effetti.
10. Icona Gruppo FX: a display compare la categoria selezionate per gli effetti incorporati.
11. Effetto vocale On/Off: premere questo tasto per attivare o disattivare gli effetti incorporati. Gli effetti
incorporati sono applicati a entrambi gli ingressi microfono.
12. Icona effetto vocale: a display compare l'icona relativa all'effetto predefinito quando gli effetti incorporati
sono attivati.
13. -/+: servirsi di questi tasti per selezionare uno degli effetti incorporati.
14. Modalità luci (light): premere questo tasto per commutare tra i diversi effetti di illuminazione disponibili:
• Off (nessuna luce)
• Barre EQ (reattive alla musica)
• Colore a comparsa orizzontale (non reattivo alla musica)
• Grandi blocchi brillanti (non reattivi alla musica)
• Piccoli blocchi brillanti (non reattivi alla musica)
• Blocchi a cascata (non reattivi alla musica)
• Linea ondulata (reattiva alla musica)
• Blocco pulsante (reattivo alla musica)
•
Barra luminosa (reattiva alla musica)
• Luci a fiocchi di neve/quadrati (non reattive alla musica)
• Luci verticali (non reattive alla musica)
15. Carica USB: collegare a questo livello il cavo di ricarica del dispositivo per ricaricarlo.
Nota bene: la porta di carica USB non riproduce musica. Servirsi dell'ingresso Bluetooth o Aux per riprodurre
la propria fonte musicale.
1
4
15
15
8
6
7
9
11
11
13
13
5
2
3
14
14
10
10
12
12
1
3
4
2
1
2

22
Pannello superiore
1. Cradle: collocare il tablet qui per
visualizzare il testo delle canzoni se si
canta il karaoke.
2. Vassoio: servirsi di questo vassoio
integrato per riporre smartphone, chiavi,
ecc.
Pannello posteriore
1. Ingresso cavo di alimentazione:
collegare il cavo IEC di
alimentazione in dotazione da
questo livello a una presa di
alimentazione.
2. Coperchio dei fusibili: se il fusibile
dell'apparecchio è rotto, sollevare
questa linguetta servendosi di un
cacciavite o di un altro strumento
per sostituirlo. Sostituirlo con un
fusibile dalla stessa tensione
nominale. L'utilizzo di un fusibile
dalla tensione nominale errata può
danneggiare l'apparecchio e/o il
fusibile.
3. Interruttore di alimentazione:
servirsi di questo interruttore per
accendere o spegnere
l'apparecchio.
4. Porta dei bassi: questa porta
migliora i bassi generati dal woofer
per aumentare le basse frequenze.
Assicurarsi che questa non sia
ostruita, in quanto ciò influirebbe
negativamente sulla risposta dei
bassi.
1
4
15
8
6
7
9
11
13
5
2
3
14
10
12
1
3
4
2
1
2
1
4
15
8
6
7
9
11
13
5
2
3
14
10
12
1
3
4
2
1
2

23
Uso
Collegamento di un dispositivo Bluetooth
1. Accendere il dispositivo Bluetooth.
2. Accendere il Karaoke Star. Se in precedenza è stato collegato a un altro dispositivo
Bluetooth, il Karaoke Star vi si riconnetterà. Se è la prima volta che ci si connette al
dispositivo, premere il tasto Bluetooth sul Karaoke Star per entrare in modalità di
collegamento.
3. Navigare nella schermata di configurazione del dispositivo Bluetooth, trovare “Karaoke
Star” e collegarlo. Quando il dispositivo è “collegato” al Karaoke Star, l'icona Bluetooth
sarà illuminata in maniera fissa e si sentirà un tono di conferma.
Nota bene: se il dispositivo Bluetooth richiede un codice, digitare “0000”.
4. Premere e rilasciare il tasto Bluetooth per scollegare un dispositivo Bluetooth collegato.
5. Per collegarlo ad un altro dispositivo Bluetooth, ripetere la fase 3.
Esibirsi con il Karaoke Star
1. Accendere il Karaoke Star.
2. Collegare un microfono a uno degli ingressi microfono.
3. Per utilizzare gli effetti incorporati, selezionare una categoria premendo uno dei tasti FX
Group (gruppo FX).
4. Servirsi dei tasti -/+ per selezionare un effetto predefinito; quindi premere il tasto Voice
Effect per accendere gli effetti.
5. Cantare nel microfono regolando al tempo stesso la manopola del Volume microfono e
la manopola Volume master.
Nota bene: per evitare il feedback, allontanare il microfono dalla parte anteriore
dell'altoparlante del Karaoke Star in quanto ciò provocherà tonalità alte e onde sonore
dannose. In caso di feedback, allontanarsi dall'altoparlante e abbassare la manopola Volume
microfono.

24
Effetti
Effetti per genere
Effetti novità
Gruppo
FX
Numero
di
preset
Nome preset Gruppo
FX
Numero
di
preset
Nome preset
C 1 Barry D 1 D-
V
ader
C 2 Male to Female D 2 Aliens
C 3 Female to Male D 3 Flea
C 4 Pop Eye D 4 Froggy
C 5 Olive D 5 Little Robot
C 6 Tinker Bell D 6 Evil Robot
C 7 Octivator D 7 Robot Chorus
C 8 Prankster D 8 Monster
C 9 Munchkin D 9 Psycho
C 10 Way Down D 10 Warehouse
C 11
V
entriloquist D 11 Flange
C 12 Hip Deep D 12 Telephone
C 13 Stadium D 13 Echo
C 14 Station D 14 Big Echo
C 15 David & Goliath D 15 Grand Canyon
Effetti principali
Gruppo
FX
Numero
di
preset
Nome preset
A
1 Super Star
A
2 On Stage
A
3 Auto-Pain
A
4 Modern Pop Tuned
A
5 Star
A
6 Super Group
A
7 Arena
A
8 Lead Singer
A
9 Grunge
A
10 Modern Rap
A
11 Classic Rap
A
12 Rock Out
A
13 Rockabilly
A
14 Church
A
15 Cathedral
Effetti armonici
Gruppo
FX
Numero
di
preset
Nome preset
B 1 Barbershop
B 2 Chapel Girls
B3 Trio
B4 Bohemian
B5 Rapsody
B 6 Group Harmony
B 7 Tuned Girls
B 8 Girl Pop
B 9 Tuned Girl Group
B 10 Tuned On Stage
B 11 Angelic Choir
B 12 Country Ladies
B 13 Country Gent
B 14 Hmmmm

25
Risoluzione di problemi
Se non si sente alcun suono dal microfono: assicurarsi che l'interruttore On/Off del
microfono sia impostato su “on”.
Il suono è distorto: provare ad abbassare il volume della propria fonte audio o del microfono.
Inoltre, provare a ridurre il volume complessivo del Karaoke Star utilizzando la manopola
Volume Master.
Quando si utilizzano i microfoni si verifica un fischio ad alto pitch: si tratta probabilmente
di ritorno. Puntare il microfono lontano dall'altoparlante.
Se non si sente il microfono al di sopra della musica: abbassare il volume della musica
dalla fonte.

26
Schnellstart-Anleitung (Deutsch)
Einführung
• Singen Sie Karaoke mit Ihrer Lieblings-YouTube-Musik auf Ihrem Smartphone, Tablet
oder Computer mit Karaoke Star's Bluetooth-Verbindung.
• Schließen Sie eine Vielzahl von Audioquellen an den Aux-Eingang von Karaoke Star an,
um Karaoke-Songs abzuspielen.
• Verwenden Sie den eingebauten FX-Prozessor, um Ihren Gesang an Ihre bevorzugten
Musikgenres, Gesangsharmonien, Stimmlagen oder an andere vielseitige Effekte
anzupassen.
• Der Licht-Modus bietet eine breite Palette von Farb-Optionen und Mustern an, damit Sie
die Licht-Show steuern können.
Lieferumfang
Karaoke Star
Netzkabel (IEC-Norm)
Mikrofon mit Mikrofonkabel
3,5 mm (1/8") auf 3,5 mm (1/8") Kabel
Schnellstart-Anleitung
Sicherheitshinweise und Garantieinformationen
Kundendienst
Für die neuesten Informationen zu diesem Produkt (Dokumentation, technische Daten,
Systemanforderungen, Informationen zur Kompatibilität etc.) und zur Produktregistrierung
besuchen Sie ionaudio.com.
Für zusätzlichen Produkt-Support besuchen Sie www.ionaudio.com/support.
Setup
Teile, die nicht unter Einführung > Lieferumfang angegeben sind, sind separat erhältlich.
Tablet
MP3-
Player
Mikrofon
Stromversorgung
RÜCKSEITE
VORDERSEITE

27
Funktionen
Vorderseite
1. Mikrofoneingänge: Schließen Sie das mitgelieferte dynamische Mikrofon an diesen 1/4” (6,35 mm) Eingang
an.
2. Mikrofonlautstärke: Stellen Sie mit diesem Regler die Lautstärke für beide Mikrofoneingänge ein.
3. Master-Lautstärke: Verwenden Sie diesen Regler, um die Lautstärke des Main-Mix einzustellen. Dazu
gehören die Mikrofoneingänge, der Aux-Eingang und das Audiosignal eines gekoppelten Bluetooth-Geräts.
4. Aux-Eingang: Schließen Sie ein Smartphone, einen MP3-Player, einen DVD-Player, eine Computer-
Soundkarte oder eine andere Line-Pegel-Audioquelle an diesen 1/8” (3,5 mm) Aux-Eingang an.
5. Aux-Lautstärke +/-: Drücken Sie diese Tasten, um die Lautstärke für den Aux-Eingang und das Bluetooth-
Signal zu steuern.
Hinweis: Die Aux-Eingangslautstärke wird getrennt von der Bluetooth-Lautstärke eingestellt.
6. Bluetooth: Drücken Sie diese Taste, um das Bluetooth-Gerät zu koppeln. Drücken Sie diese Taste erneut, um
die Verbindung zu einem gekoppelten Bluetooth-Gerät zu trennen.
Hinweis: Die Lautstärke auf Ihrem Bluetooth-Gerät muss aufgedreht sein.
7. Bluetooth-Symbol: Das Bluetooth-Symbol leuchtet, wenn ein Gerät mit Karaoke Star gekoppelt ist.
8. Aux/Kopfhörer-Ausgang: Schließen Sie Kopfhörer, einen Aktivlautsprecher oder einen Recorder an diesen
1/8” (3,5 mm) Ausgang an.
9. FX-Gruppe: Drücken Sie eine der A-D-Tasten, um eine Effektkategorie auszuwählen.
10. FX Gruppen-Symbol: Im Display erscheint die gewählte Kategorie der integrierten Effekte.
11. Gesangseffekt Ein/Aus: Drücken Sie diese Taste, um die eingebauten Effekte zu aktivieren/deaktivieren. Die
eingebauten Effekte werden auf beide Mikrofoneingänge angewendet.
12. Gesangseffekt-Symbol: Auf dem Display erscheint das Effekt-Preset-Symbol, wenn die integrierten Effekte
aktiviert sind.
13. -/+: Verwenden Sie diese Tasten, um einen der eingebauten Effekte auszuwählen.
14. Licht-Modus: Drücken Sie diese Taste, um durch folgende unterschiedliche Lichteffekte zu blättern:
• Aus (keine Lichter)
• EQ-Anzeige (reagiert auf die Musik)
• Horizontales Wischen in Farbe (reagiert nicht auf die Musik)
• Schimmernde große Blöcke (reagieren nicht auf die Musik)
• Schimmernde kleine Blöcke (reagieren nicht auf die Musik)
• Fallende Blöcke (reagieren nicht auf die Musik)
• Wellenlinie (reagiert auf die Musik)
• Pulsierender Block (reagiert auf die Musik)
•
Lichtleiste (reagiert auf die Musik)
• Schneeflocke/Quadrat (reagiert nicht auf die Musik)
• Vertikale Lichter (reagieren nicht auf die Musik)
15. USB-Ladung: Schließen Sie das Ladekabel Ihres Geräts hier an, um es aufzuladen.
Hinweis: Der USB-Ladeanschluss spielt keine Musik ab. Verwenden Sie Bluetooth oder den Aux-Eingang, um
Ihre Musik abzuspielen.
1
4
15
15
8
6
7
9
11
11
13
13
5
2
3
14
14
10
10
12
12
1
3
4
2
1
2

28
Oberseite
1. Halterung: Legen Sie Ihr Tablet hier ab,
um beim Karaoke-Singen die Texte zu
sehen.
2. Ablagefach: Verwenden Sie dieses
integrierte Ablagefach für Smartphones,
Schlüssel usw.
Rückseite
1. Stromkabeleingang: Schließen Sie das
mitgelieferte IEC-Netzkabel von hier an
eine Steckdose an.
2. Sicherungsabdeckung: Wenn die
Sicherung des Geräts defekt ist, heben
Sie diese Platte mit einem
Schraubendreher oder einem anderen
Werkzeug an, um die Sicherung zu
ersetzen. Ersetzen Sie sie mit einer
Sicherung mit entsprechendem
Sicherungswert. Die Verwendung einer
Sicherung mit falschem Sicherungswert
kann das Produkt und/oder die Sicherung
beschädigen.
3. Netzschalter: Verwenden Sie diesen
Schalter, um das Gerät ein- oder
auszuschalten.
4. Bass-Öffnung: Diese Öffnung erweitert
den Bass, der durch den Woofer erzeugt
wird, um die tiefen Frequenzen zu
verstärken. Stellen Sie sicher, dass
dieses Loch nicht blockiert ist, da dies
die Basswiedergabe negativ beeinflusst.
1
4
15
8
6
7
9
11
13
5
2
3
14
10
12
1
3
4
2
1
2
1
4
15
8
6
7
9
11
13
5
2
3
14
10
12
1
3
4
2
1
2

29
Betrieb
Koppeln eines Bluetooth-Geräts
1. Schalten Sie Ihr Bluetooth-Gerät ein.
2. Schalten Sie Karaoke Star ein. Wenn Sie zuvor eine Verbindung zu einem Bluetooth-
Gerät hergestellt haben, stellt Karaoke Star wieder eine Verbindung her. Wenn Sie zum
ersten Mal eine Verbindung zum Gerät herstellen, drücken Sie die Bluetooth-Taste auf
Karaoke Star, um den Kopplungsmodus aufzurufen.
3. Navigieren Sie zum Setup-Bildschirm Ihres Bluetooth-Geräts, suchen „Karaoke Star“ und
stellen eine Verbindung her. Wenn das Gerät „gekoppelt“ ist, leuchtet das Bluetooth-
Symbol und es ertönt ein Bestätigungston.
Hinweis: Wenn Ihr Bluetooth-Gerät die Eingabe eines Koppel-Codes anfordert, geben
Sie „0000“ ein.
4. Drücken Sie kurz die Bluetooth-Taste, um ein gekoppeltes Bluetooth-Gerät zu trennen.
5. Um ein anderes Bluetooth-Gerät zu verbinden, wiederholen Sie Schritt 3.
Ihr Auftritt mit Karaoke Star
1. Schalten Sie Karaoke Star ein.
2. Schließen Sie ein Mikrofon an einen der Mikrofoneingänge an.
3. Um die eingebauten Effekte zu verwenden, wählen Sie eine Kategorie, indem Sie eine der
FX Gruppe-Tasten drücken.
4. Wählen Sie mit den Tasten -/+ ein Effekt-Preset aus. Drücken Sie anschließend die Taste
Gesangseffekt, um die Effekte einzuschalten.
5. Singen Sie ins Mikrofon und passen Sie dabei die Regler Mikrofonlautstärke und
Gesamtlautstärke an.
Hinweis: Um Rückkopplungen zu vermeiden, bewegen Sie das Mikrofon von der Vorderseite
des Karaoke Star-Lautsprechers weg, da dies zu starken und schädlichen Schallwellen führen
kann. Wenn es zu einer Rückkopplung kommt, bewegen Sie sich vom Lautsprecher weg und
passen den Lautstärkeregler an.

30
Effekte
Stimmlagen
Originelle Effekte
FX-
Gruppe
Preset-
Nummer
Preset-Name FX
Gruppe
Preset-
Nummer
Preset-Name
C 1 Barry D 1 D-
V
ader
C 2 Male to Female D 2 Aliens
C 3 Female to Male D 3 Flea
C 4 Pop Eye D 4 Froggy
C 5 Olive D 5 Little Robot
C 6 Tinker Bell D 6 Evil Robot
C 7 Octivator D 7 Robot Chorus
C 8 Prankster D 8 Monster
C 9 Munchkin D 9 Psycho
C 10 Way Down D 10 Warehouse
C 11
V
entriloquist D 11 Flange
C 12 Hip Deep D 12 Telephone
C 13 Stadium D 13 Echo
C 14 Station D 14 Big Echo
C 15 David & Goliath D 15 Grand Canyon
Grundeffekte
FX-
Gruppe
Preset-
Nummer
Preset-Name
A
1 Super Star
A
2 On Stage
A
3 Auto-Pain
A
4 Modern Pop Tuned
A
5 Star
A
6 Super Group
A
7 Arena
A
8 Lead Singer
A
9 Grunge
A
10 Modern Rap
A
11 Classic Rap
A
12 Rock Out
A
13 Rockabilly
A
14 Church
A
15 Cathedral
Harmonie-Effekte
FX-
Gruppe
Preset-
Nummer
Preset-Name
B 1 Barbershop
B 2 Chapel Girls
B3Trio
B4Bohemian
B5Rapsody
B 6 Group Harmony
B 7 Tuned Girls
B 8 Girl Pop
B 9 Tuned Girl Group
B 10 Tuned On Stage
B 11 Angelic Choir
B 12 Country Ladies
B 13 Country Gent
B 14 Hmmmm

31
Fehlerbehebung
Wenn Sie keinen Ton vom Mikrofon hören können: Stellen Sie sicher, dass der Ein-/Aus-
Schalter des Mikrofons auf „Ein“ steht.
Der Ton klingt verzerrt: Drehen Sie den Lautstärkeregler an Ihrer Tonquelle oder am Mikrofon
zurück. Versuchen Sie auch, die Gesamtlautstärke des Karaoke Star mit dem
Gesamtlautstärkeregler zu reduzieren.
Bei der Verwendung von Mikrofonen tritt ein hoher Pfeifton auf: Hier handelt es sich
wahrscheinlich um einen Rückkopplungseffekt. Richten Sie es so ein, dass das Mikrofon vom
Lautsprecher weg zeigt.
Wenn das Mikrofon im Vergleich zur Musik zu leise eingestellt ist: Verringern Sie die
Musiklautstärke Ihrer Quelle.

32
Snelstartgids (Nederlands)
Inleiding
• Karaoke zingen op uw favoriete YouTube-muziek vanaf uw smartphone, tablet of
computer met de Bluetooth-verbinding van de Karaoke Star.
• Sluit diverse audiobronnen aan op de aux-ingang van de Karaoke Star om
karaokenummers af te spelen.
• Gebruik de ingebouwde effectenprocessor om uw zangstijl aan te passen aan uw
favoriete muziekgenres, creëer vocale harmonieën, mannelijke of vrouwelijke stemmen of
gebruik de andere veelzijdige effecten.
• De lichtmodus biedt een volledig gamma kleurenopties en patronen, zodat u de lichtshow
kunt controleren.
Inhoud van de doos
Karaoke Star
Stroomkabel (IEC-standaard)
Microfoon met microfoonkabel
Kabel 3,5mm (1/8”) - 3,5mm (1/8”)
Snelstartgids
Veiligheids- en garantiehandleiding
Ondersteuning
Raadpleeg voor de laatste informatie over dit product (documentatie, technische specificaties,
systeemvereisten, compatibiliteitsinformatie, enz.) en productregistratie ionaudio.com.
Raadpleeg voor extra productondersteuning ionaudio.com/support.
Setup
Artikels die worden getoond, maar niet zijn opgesomd in Inleiding > Inhoud van de doos zijn
afzonderlijk verkrijgbaar.
Tablet
Mp3-
speler
Microfoon
Stopcontact
Achterpaneel
Frontpaneel

33
Kenmerken
Voorpaneel
1. Microfooningangen Sluit de meegeleverde dynamische microfoon aan op deze ingangen van 1/4"
(6,35 mm).
2. Microfoonvolume: Stel deze knop in om het volume van beide microfooningangen in te stellen.
3. Hoofdvolume: Gebruik deze knop om het volume van de hoofdmix te regelen, waaronder de
microfooningangen, de aux-ingang en de audio van een gekoppeld Bluetooth-toestel.
4. Aux-ingang: Sluit een sz xmartphone, mp3-speler, dvd-speler, de geluidskaart van een computer of
een andere audiobron op lijnniveau op deze aux-ingang van 1/8" (3,5 mm) aan.
5. Aux-volume +/-: Druk op deze toetsen om het volume van de aux-ingang en het Bluetooth-signaal te
regelen.
Opmerking: Het volume van de aux-ingang wordt afzonderlijk van het Bluetooth-volume geregeld.
6. Bluetooth: Druk op deze knop om een Bluetooth-apparaat te koppelen. Druk nogmaals op deze knop
om een verbonden Bluetooth-toestel te ontkoppelen.
Opmerking: Het volume op uw Bluetooth-toestel moet ingeschakeld zijn.
7. Bluetooth-pictogram: Het Bluetooth-pictogram blijft branden wanneer een toestel aan de Karaoke
Star wordt gekoppeld.
8. Aux-/koptelefoonuitgang: Sluit deze uitgang van 1/8" (3,5 mm) aan op een koptelefoon, actieve
luidspreker of opnameapparaat.
9. FX-groep: Druk op een van de A-D-knoppen om een effectencategorie te selecteren.
10. Pictogram FX-groep: Het scherm toont de geselecteerde categorie ingebouwde effecten.
11. Stemeffect aan/uit: Druk op deze knop om de ingebouwde effecten te activeren/uit te schakelen. De
ingebouwde effecten worden toegepast op beide microfooningangen.
12. Pictogram stemeffect: Wanneer de ingebouwde effecten worden geactiveerd, wordt op het scherm
het pictogram van de effectpreset weergegeven.
13. -/+: Gebruik deze knoppen om een van de ingebouwde effecten te selecteren.
14. Lichtmodus: Druk op deze knop om de verschillende lichteffecten te doorlopen:
• Uit (geen lichten)
• EQ-balken (reageert op muziek)
• Horizontale kleurvegen (reageert niet op muziek)
• Grote glinsterende blokken (reageert niet op muziek)
• Kleine glinsterende blokken (reageert niet op muziek)
• Vallende blokken (reageert niet op muziek)
• Golvende lijn (reageert op muziek)
• Pulserend blok (reageert op muziek)
• Lichtbalk (reageert op muziek)
• Sneeuwvlok/Vierkante lichten (reageert niet op muziek)
• Vertikale lichten (reageert niet op muziek)
15. USB laden: Sluit de oplaadkabel van uw apparaat hier aan om het op te laden.
Opmerking: De USB-oplaadpoort speelt geen muziek. Gebruik Bluetooth of de aux-ingang om uw
muziekbron af te spelen.
1
4
15
15
8
6
7
9
11
11
13
13
5
2
3
14
14
10
10
12
12
1
3
4
2
1
2

34
Bovenpaneel
1. Houder: Plaats hier uw tablet om de
tekst te volgen als u karaoke zingt.
2. Opberglade: Gebruik deze ingebouwde
opberglade voor smartphones, sleutels,
enz.
Achterpaneel
1. Ingang voor stroomkabel: Sluit de
meegeleverde IEC-stroomkabel aan
op een stopcontact.
2. Zekeringsklep: Als de zekering van
het apparaat kapot is, til dan met
behulp van een schroevendraaier of
ander gereedschap dit klepje op om
de zekering te vervangen. Vervang de
zekering door een zekering met
dezelfde waarde. Het gebruik van een
zekering met een verkeerde waarde
kan het apparaat en/of de zekering
beschadigen.
3. Stroomschakelaar: Gebruik deze
schakelaar om het apparaat aan/uit te
schakelen.
4. Baspoort: Deze poort verbetert de
bastonen die de woofer genereert om
de lage frequenties te benadrukken.
Zorg ervoor dat deze opening niet
wordt geblokkeerd, omdat dit de
basrespons negatief zal beïnvloeden.
1
4
15
8
6
7
9
11
13
5
2
3
14
10
12
1
3
4
2
1
2
1
4
15
8
6
7
9
11
13
5
2
3
14
10
12
1
3
4
2
1
2

35
Werking
Koppelen met een Bluetooth-apparaat
1. Zet uw Bluetooth-apparaat aan.
2. Zet de Karaoke Star aan. Als u voordien een Bluetooth-apparaat had verbonden, dan
maakt Karaoke Star opnieuw verbinding. Als u voor het eerst een apparaat aansluit, druk
dan de Bluetooth-knop van de Karaoke Star in om de koppelingsmodus te activeren.
3. Navigeer naar het instelscherm van uw Bluetooth-apparaat, zoek naar "Karaoke Star" en
maak een verbinding. Wanneer het apparaat wordt "gekoppeld" aan de Karaoke Star,
gaat het Bluetooth-pictogram branden en weerklinkt een bevestigingstoon.
Opmerking: Als uw Bluetooth-apparaat vraagt om een koppelingscode, voer dan "0000"
in.
4. Druk de Bluetooth-knop in om een gekoppeld Bluetooth-apparaat af te koppelen.
5. Om verbinding te maken met een ander Bluetooth-apparaat, herhaal dan stap 3.
Optreden met de Karaoke Star
1. Zet de Karaoke Star aan.
2. Sluit een microfoon aan op een van de microfooningangen.
3. Selecteer om de ingebouwde effecten te gebruiken een categorie door een van de
toetsen van FX-groep in te drukken.
4. Selecteer met behulp van de +/--toetsen een effectpreset; druk vervolgens op de knop
Stemeffect om de effecten aan te zetten.
5. Zing in de microfoon terwijl u het Microfoonvolume en het Hoofdvolume aanpast.
Opmerking: Houd om feedback te vermijden de microfoon van de voorkant van de
luidspreker van de Karaoke Star verwijderd, omdat dit hoge en schadelijke geluidsgolven kan
produceren. Als er feedback optreedt, ga dan verder van de luidspreker staan en verlaag het
Microfoonvolume.

36
Effecten
Mannelijk of vrouwelijke stemmen
Speciale effecten
FX
Groep
Preset
Nummer
Presetnaam FX
Groep
Preset
Nummer
Presetnaam
C 1 Barry D 1 D-
V
ader
C 2 Man naar vrouw D 2 Aliens
C 3
V
rouw naar man D 3 Flea
C 4 Pop Eye D 4 Froggy
C 5 Olive D 5 Little Robot
C 6 Tinker Bell D 6 Evil Robot
C 7 Octivator D 7 Robotkoor
C 8 Grappenmaker D 8 Monster
C 9 Eekhoorn D 9 Psycho
C 10 Naar beneden D 10 Magazijn
C 11 Buikspreker D 11 Flange
C 12 Heupdiep D 12 Telefoon
C 13 Stadion D 13 Echo
C 14 Station D 14 Grote echo
C 15 David en Goliath D 15 Grand Canyon
Hoofdeffecten
FX-
Groep
Preset
Nummer
Presetnaam
A
1 Super Star
A
2 On Stage
A
3 Auto-Pain
A
4 Modern Pop Tuned
A
5 Star
A
6 Super Group
A
7 Arena
A
8 Lead Singer
A
9 Grunge
A
10 Modern Rap
A
11 Classic Rap
A
12 Rock Out
A
13 Rockabilly
A
14 Church
A
15 Cathedral
Harmony Effects
FX
Groep
Preset
Nummer
Presetnaam
B 1 Barbershop
B 2 Chapel Girls
B3 Trio
B4 Bohemian
B5 Rapsody
B 6 Group Harmony
B 7 Tuned Girls
B 8 Girl Pop
B 9 Tuned Girl Group
B 10 Tuned On Stage
B 11 Angelic Choir
B 12 Country Ladies
B 13 Country Gent
B 14 Hmmmm

37
Problemen oplossen
Als u geen klank hoort van de microfoon: Controleer of de aan-/uitschakelaar van de
microfoon op "aan" staat.
Als het geluid vervormd is: Probeer het volume van uw geluidsbron of microfoon te verlagen.
Probeer ook het algemene volume van de Karaoke Star te verlagen met behulp van de
Hoofdvolumeknop.
Als er een hoge fluittoon weerklinkt bij het gebruik van microfoons: Dit is waarschijnlijk
feedback. Richt de microfoon weg van de luidspreker.
Als u boven de muziek de microfoon niet hoort: Verlaag het muziekvolume op uw bron.

38
Appendix (English)
Technical Specifications
Tweeter
3.0”
76 mm
Woofer
8.0”
203 mm
Output Power
50 W (peak)
Frequency Response
65 Hz–20 kHz
Bluetooth Specification Profiles: A2DP, AVRCP
Range: Up to 65 feet / 20 meters
Microphone Type
Dynamic microphones
Charge Port
USB; +5V, 2.1A
Power Input Voltage: 100–240V~ 50/60 Hz, 50 W
Dimensions
(width x depth x height)
15.0” x 11.0” x 17.2”
381 x 279 x 438 mm
Weight
18.8 lbs.
8.52 kg
Specifications are subject to change without notice.
Bluetooth range is affected by walls, obstructions, and movement. For optimal performance, place the
product in the center of the room so it is unobstructed by walls, furniture, etc.
Trademarks & Licenses
ION Audio is a trademark of ION Audio, LLC, registered in the U.S. and other countries.
The Bluetooth word mark and logos are owned by the Bluetooth SIG, Inc. and any use of such marks by
ION Audio is under license.
YouTube is a trademark of Google Inc.
All other product names, company names, trademarks, or trade names are those of their respective owners.

39

ionaudio.com
Manual Version 1.4
/