

VISIT OUR WEBSITE TO:
Get usage advice, brochures, trouble shooter, service and repair information:
www.zanussi.com/support
Subject to change without notice.
CONTENTS
1. SAFETY INFORMATION................................................................................................ 2
2. SAFETY INSTRUCTIONS.............................................................................................. 4
3. INSTALLATION...............................................................................................................6
4. PRODUCT DESCRIPTION.............................................................................................8
5. BEFORE FIRST USE......................................................................................................8
6. DAILY USE......................................................................................................................9
7. CLOCK FUNCTIONS......................................................................................................9
8. USING THE ACCESSORIES........................................................................................10
9. ADDITIONAL FUNCTIONS...........................................................................................11
10. HINTS AND TIPS........................................................................................................11
11. CARE AND CLEANING.............................................................................................. 18
12. TROUBLESHOOTING................................................................................................ 21
13. ENERGY EFFICIENCY...............................................................................................22
1. SAFETY INFORMATION
Before the installation and use of the appliance, carefully read
the supplied instructions. The manufacturer is not responsible
for any injuries or damage that are the result of incorrect
installation or usage. Always keep the instructions in a safe
and accessible location for future reference.
1.1 Children and vulnerable people safety
• This appliance can be used by children aged from 8 years
and above and persons with reduced physical, sensory or
mental capabilities or lack of experience and knowledge if
they have been given supervision or instruction concerning
the use of the appliance in a safe way and understand the
hazards involved. Children of less than 8 years of age and
persons with very extensive and complex disabilities shall
be kept away from the appliance unless continuously
supervised.
• Do not let children play with the appliance.
2 ENGLISH

• Keep all packaging away from children and dispose of it
appropriately.
• WARNING: Keep children and pets away from the
appliance when it operates or when it cools down.
Accessible parts become hot during use.
• If the appliance has a child safety device, it should be
activated.
• Children shall not carry out cleaning and user maintenance
of the appliance without supervision.
1.2 General Safety
• Only a qualified person must install this appliance and
replace the cable.
• WARNING: The appliance and its accessible parts become
hot during use. Care should be taken to avoid touching
heating elements.
• Always use oven gloves to remove or put in accessories or
ovenware.
• Before carrying out any maintenance, disconnect the
appliance from the power supply.
• WARNING: Ensure that the appliance is switched off before
replacing the lamp to avoid the possibility of electric shock.
• Do not use the appliance before installing it in the built-in
structure.
• Do not use a steam cleaner to clean the appliance.
• Do not use harsh abrasive cleaners or sharp metal scrapers
to clean the glass door since they can scratch the surface,
which may result in shattering of the glass.
• If the mains power supply cable is damaged, it must be
replaced by the manufacturer, its Authorised Service Centre
or similarly qualified persons to avoid an electrical hazard.
• To remove the shelf supports first pull the front of the shelf
support and then the rear end away from the side walls.
Install the shelf supports in the opposite sequence.
ENGLISH 3

2. SAFETY INSTRUCTIONS
2.1 Installation
WARNING!
Only a qualified person must
install this appliance.
• Remove all the packaging.
• Do not install or use a damaged
appliance.
• Follow the installation instructions
supplied with the appliance.
• Always take care when moving the
appliance as it is heavy. Always use
safety gloves and enclosed footwear.
• Do not pull the appliance by the handle.
• Install the appliance in a safe and suitable
place that meets installation requirements.
• Keep the minimum distance from other
appliances and units.
• Before mounting the appliance, check if
the oven door opens without restraint.
• The appliance is equipped with an electric
cooling system. It must be operated with
the electric power supply.
Cabinet minimum height
(Cabinet under the worktop
minimum height)
590 (600) mm
Cabinet width 560 mm
Cabinet depth 550 (550) mm
Height of the front of the
appliance
594 mm
Height of the back of the
appliance
576 mm
Width of the front of the ap‐
pliance
595 mm
Width of the back of the
appliance
559 mm
Depth of the appliance 569 mm
Built in depth of the appli‐
ance
548 mm
Depth with open door 1022 mm
Ventilation opening mini‐
mum size. Opening placed
on the bottom rear side
560x20 mm
Mains supply cable length.
Cable is placed in the right
corner of the back side
1500 mm
Mounting screws 4x25 mm
2.2 Electrical connection
WARNING!
Risk of fire and electric shock.
• All electrical connections should be made
by a qualified electrician.
• The appliance must be earthed.
• Make sure that the parameters on the
rating plate are compatible with the
electrical ratings of the mains power
supply.
• Always use a correctly installed
shockproof socket.
• Do not use multi-plug adapters and
extension cables.
• Make sure not to cause damage to the
mains plug and to the mains cable.
Should the mains cable need to be
replaced, this must be carried out by our
Authorised Service Centre.
• Do not let mains cables touch or come
near the appliance door or the niche
below the appliance, especially when it
operates or the door is hot.
• The shock protection of live and insulated
parts must be fastened in such a way that
it cannot be removed without tools.
• Connect the mains plug to the mains
socket only at the end of the installation.
Make sure that there is access to the
mains plug after the installation.
• If the mains socket is loose, do not
connect the mains plug.
• Do not pull the mains cable to disconnect
the appliance. Always pull the mains plug.
• Use only correct isolation devices: line
protecting cut-outs, fuses (screw type
fuses removed from the holder), earth
leakage trips and contactors.
• The electrical installation must have an
isolation device which lets you disconnect
the appliance from the mains at all poles.
The isolation device must have a contact
opening width of minimum 3 mm.
• This appliance is supplied with a main
plug and a main cable.
4 ENGLISH

Cable types applicable for installation or
replacement for Europe:
H07 RN-F, H05 RN-F, H05 RRF, H05 VV-F, H05
V2V2-F (T90), H05 BB-F
For the section of the cable refer to the total
power on the rating plate. You can also refer
to the table:
Total power (W) Section of the cable
(mm²)
maximum 1380 3 x 0.75
maximum 2300 3 x 1
maximum 3680 3 x 1.5
The earth cord (green / yellow cable) must be
2 cm longer than phase and neutral cables
(blue and brown cables).
2.3 Use
WARNING!
Risk of injury, burns and electric
shock or explosion.
• This appliance is for household use only.
• Do not change the specification of this
appliance.
• Make sure that the ventilation openings
are not blocked.
• Do not let the appliance stay unattended
during operation.
• Deactivate the appliance after each use.
• Be careful when you open the appliance
door while the appliance is in operation.
Hot air can release.
• Do not operate the appliance with wet
hands or when it has contact with water.
• Do not apply pressure on the open door.
• Do not use the appliance as a work
surface or as a storage surface.
• Open the appliance door carefully. The
use of ingredients with alcohol can cause
a mixture of alcohol and air.
• Do not let sparks or open flames to come
in contact with the appliance when you
open the door.
• Do not put flammable products or items
that are wet with flammable products in,
near or on the appliance.
WARNING!
Risk of damage to the appliance.
• To prevent damage or discoloration to the
enamel:
– do not put ovenware or other objects
in the appliance directly on the
bottom.
– do not put aluminium foil directly on
the bottom of cavity of the appliance.
– do not put water directly into the hot
appliance.
– do not keep moist dishes and food in
the appliance after you finish the
cooking.
– be careful when you remove or install
the accessories.
• Discoloration of the enamel or stainless
steel has no effect on the performance of
the appliance.
• Use a deep pan for moist cakes. Fruit
juices cause stains that can be
permanent.
• This appliance is for cooking purposes
only. It must not be used for other
purposes, for example room heating.
• Always cook with the oven door closed.
• If the appliance is installed behind a
furniture panel (e.g. a door) make sure the
door is never closed when the appliance
operates. Heat and moisture can build up
behind a closed furniture panel and cause
subsequent damage to the appliance, the
housing unit or the floor. Do not close the
furniture panel until the appliance has
cooled down completely after use.
2.4 Care and cleaning
WARNING!
Risk of injury, fire, or damage to
the appliance.
• Before maintenance, deactivate the
appliance and disconnect the mains plug
from the mains socket.
• Make sure the appliance is cold. There is
the risk that the glass panels can break.
• Replace immediately the door glass
panels when they are damaged. Contact
the Authorised Service Centre.
ENGLISH 5

• Be careful when you remove the door
from the appliance. The door is heavy!
• Clean regularly the appliance to prevent
the deterioration of the surface material.
• Clean the appliance with a moist soft
cloth. Use only neutral detergents. Do not
use abrasive products, abrasive cleaning
pads, solvents or metal objects.
• If you use an oven spray, follow the safety
instructions on its packaging.
2.5 Internal lighting
WARNING!
Risk of electric shock.
• Concerning the lamp(s) inside this product
and spare part lamps sold separately:
These lamps are intended to withstand
extreme physical conditions in household
appliances, such as temperature,
vibration, humidity, or are intended to
signal information about the operational
status of the appliance. They are not
intended to be used in other applications
and are not suitable for household room
illumination.
• Use only lamps with the same
specifications.
2.6 Service
• To repair the appliance contact the
Authorised Service Centre.
• Use original spare parts only.
2.7 Disposal
WARNING!
Risk of injury or suffocation.
• Disconnect the appliance from the mains
supply.
• Cut off the mains electrical cable close to
the appliance and dispose of it.
• Remove the door catch to prevent
children or pets from becoming trapped in
the appliance.
3. INSTALLATION
WARNING!
Refer to Safety chapters.
3.1 Building in
18
594
589
114
21548
595
+-1
min. 550
20
600
min. 560
3
5
60
20
80
520
60
198
523
(*mm)
6 ENGLISH

min. 550
20
595
+-1
18
590
min. 560
594
589
114
21548
3
5
70
60
520
60
20
198
523
(*mm)
3.2 Securing the oven to the cabinet
ENGLISH 7

4. PRODUCT DESCRIPTION
4.1 General overview
8
7
9
10
11
5
4
3
2
1
321 64 5
12
1
Control panel
2
Power lamp / symbol
3
Knob for the heating functions
4
Knob for the timer
5
Control knob (for the temperature)
6
Temperature indicator / symbol
7
Heating element
8
Lamp
9
Fan
10
Aqua cleaning container
11
Shelf support, removable
12
Shelf positions
4.2 Accessories
• Wire shelf
For cookware, cake tins, roasts.
• Baking tray
For cakes and biscuits.
5. BEFORE FIRST USE
WARNING!
Refer to Safety chapters.
5.1 Before first use
The oven can emit an odour and smoke during preheating. Make sure that the room is
ventilated.
Step 1
Step 2
Clean the oven Preheat the empty oven
1. Remove all accessories and removable shelf sup‐
ports from the oven.
2. Clean the oven and the accessories with a soft
cloth, warm water and a mild detergent.
1. Set the maximum temperature for the function: .
Time: 1 h.
2. Set the maximum temperature for the function: .
Time: 15 min.
Turn off the oven and wait until it is cold. Place the accessories and the removable shelf supports in the oven.
8 ENGLISH

6. DAILY USE
WARNING!
Refer to Safety chapters.
6.1 How to set: Heating function
Step 1 Turn the knob for the heating functions
to select a heating function.
Step 2 Turn the control knob to select the tem‐
perature.
Step 3 When the cooking ends, turn the knobs
to the off position to turn off the oven.
6.2 Heating functions
Heating
function
Application
Off position
The oven is off.
Light
To turn on the lamp.
Moist Fan Bak‐
ing
This function is designed to save
energy during cooking. When you
use this function, the temperature in
the cavity may differ from the set
temperature. The heating power
may be reduced. For more informa‐
tion refer to "Daily Use" chapter,
Notes on: Moist Fan Baking.
Fan Cooking
To roast or roast and bake food with
the same cooking temperature on
more than one shelf position, with‐
out flavour transference.
Turbo Grilling
To roast large meat joints or poultry
with bones on one shelf position. To
make gratins and to brown.
Heating
function
Application
Bottom Heat
To bake cakes with crispy bottom
and to preserve food.
Pizza Function
To bake pizza. To make intensive
browning and a crispy bottom. Set
the temperature 230°C.
Defrost
To defrost food (vegetables and
fruit). The defrosting time depends
on the amount and size of the fro‐
zen food.
Conventional
Cooking /
Aqua Clean
To bake and roast food on one shelf
position.
Refer to "Care and cleaning" chap‐
ter for more information about: Aqua
Clean.
6.3 Notes on: Moist Fan Baking
This function was used to comply with the
energy efficiency class and ecodesign
requirements according to EU 65/2014 and
EU 66/2014. Tests according to EN 60350-1.
The oven door should be closed during
cooking so that the function is not interrupted
and the oven operates with the highest
energy efficiency possible.
When you use this function the lamp
automatically turns off.
For the cooking instructions refer to "Hints
and tips" chapter, Moist Fan Baking. For
general energy saving recommendations
refer to "Energy Efficiency" chapter, Energy
Saving.
7. CLOCK FUNCTIONS
7.1 How to set: End of Cooking
To set the switch-off time for oven functions.
ENGLISH 9

Step 1 Set the oven function and the temperature.
Step 2 Turn the knob for the timer to its full range.
Step 3 Turn the knob for the timer to set the switch-off time.
When the set time ends, the signal sounds and the oven turns off.
Step 4 Turn the knob for the oven functions and the knob for the temperature to the off position.
8. USING THE ACCESSORIES
WARNING!
Refer to Safety chapters.
8.1 Inserting accessories
A small indentation at the top increases
safety. The indentations are also anti-tip
devices. The high rim around the shelf
prevents cookware from slipping of the shelf.
Wire shelf:
Push the shelf between the guide bars of the shelf
support and make sure that the feet point down.
Baking tray:
Push the tray between the guide bars of the shelf
support.
10 ENGLISH

Wire shelf, Baking tray:
Push the tray between the guide bars of the shelf
support and the wire shelf on the guide bars
above.
9. ADDITIONAL FUNCTIONS
9.1 Cooling fan
When the oven operates, the cooling fan
turns on automatically to keep the surfaces of
the oven cool. If you turn off the oven, the
cooling fan can continue to operate until the
oven cools down.
9.2 Safety thermostat
Incorrect operation of the oven or defective
components can cause dangerous
overheating. To prevent this, the oven has a
safety thermostat which interrupts the power
supply. The oven turns on again
automatically when the temperature drops.
10. HINTS AND TIPS
Refer to Safety chapters.
10.1 Cooking recommendations
The oven has five shelf positions.
Count the shelf positions from the bottom of
the oven floor.
Your oven may bake or roast differently to
the oven you had before. The below tables
provide you with the standard settings for
temperature, cooking time and shelf position.
If you cannot find the settings for a special
recipe, look for the similar one.
The oven has a special system which
circulates the air and constantly recycles the
steam. With this system you can cook in a
steamy environment and keep the food soft
inside and crusty outside. It decreases the
cooking time and energy consumption.
Baking cakes
Do not open the oven door before 3/4 of the
set cooking time is up.
If you use two baking trays at the same time,
keep one empty level between them.
Cooking meat and fish
Leave the meat for approximately 15 minutes
before carving so that the juice does not
seep out.
To prevent too much smoke in the oven
during roasting, add some water into the
deep pan. To prevent the smoke
condensation, add water each time after it
dries up.
Cooking times
Cooking times depend on the type of food, its
consistency, and volume.
Initially, monitor the performance when you
cook. Find the best settings (heat setting,
cooking time, etc.) for your cookware, recipes
and quantities when you use this appliance.
ENGLISH 11

10.2 Baking and roasting
CAKES
Conventional Cook‐
ing
Fan Cooking
(min)
(°C) (°C)
Whisked recipes 170 2 160 3 45 - 60 Cake mould
Shortbread dough 170 2 160 3 20 - 30 Cake mould
Buttermilk
cheesecake
170 1 160 1 70 - 80 Cake mould, Ø 26
cm
Strudel 175 3 150 2 60 - 80 Baking tray
Jam tart 170 2 165 2 30 - 40 Baking tray
Christmas cake,
preheat the empty
oven
160 2 150 2 90 - 120 Cake mould, Ø 20
cm
Plum cake, pre‐
heat the empty
oven
175 1 160 2 50 - 60 Bread tin
Biscuits 140 3 140 - 150 3 30 - 35 Baking tray
Biscuits, two lev‐
els
- - 140 - 150 2 and 4 35 - 40 Baking tray
Biscuits, three lev‐
els
120 3 120 3 80 - 100 Baking tray
Meringues 190 3 180 3 15 - 20 Baking tray
Buns, preheat the
empty oven
190 3 170 3 25 - 35 Baking tray
Eclairs, one level 180 2 170 2 45 - 70 Baking tray
Eclairs, two levels 160 1 150 2 110 - 120 Baking tray
Plate tarts 170 1 160 1 50 - 60 Baking tray
Rich fruit cake 190 3 190 3 12 - 20 Baking tray
Victoria sandwich 190 3 170 3 25 - 35 Baking tray
Preheat the empty oven.
BREAD
AND PIZZA
Conventional Cooking Fan Cooking
(min)
(°C) (°C)
White bread, 1 - 2
pieces, 0.5 kg
each
190 1 190 1 60 - 70 -
12 ENGLISH

BREAD
AND PIZZA
Conventional Cooking Fan Cooking
(min)
(°C) (°C)
Rye bread, pre‐
heating is not
needed
190 1 180 1 30 - 45 Bread tin
Bread rolls, 6 - 8
rolls
230 - 250 1 230 - 250 1 10 - 20 Baking tray
Pizza 200 3 190 3 10 - 20 Baking tray / Deep
pan
Scones 200 3 190 3 10 - 20 Baking tray
Preheat the empty oven.
Use the cake mould.
FLANS
Conventional Cooking Fan Cooking
(min)
(°C) (°C)
Pasta flan, preheating
is not needed
200 2 180 2 40 - 50
Vegetable flan, pre‐
heating is not needed
200 2 175 2 45 - 60
Quiches 180 1 180 1 50 - 60
Lasagne 180 - 190 2 180 - 190 2 25 - 40
Cannelloni 180 - 190 2 180 - 190 2 25 - 40
Use the wire shelf.
MEAT
Conventional Cooking Fan Cooking
(min)
(°C) (°C)
Beef 200 2 190 2 50 - 70
Pork 180 2 180 2 90 - 120
Veal 190 2 175 2 90 - 120
English roast beef,
rare
210 2 200 2 50 - 60
English roast beef,
medium
210 2 200 2 60 - 70
English roast beef,
well done
210 2 200 2 70 - 75
ENGLISH 13

MEAT
Conventional Cooking Fan Cooking
(min)
(°C) (°C)
Pork shoulder, with
rind
180 2 170 2 120 - 150
Pork shin, 2 pieces 180 2 160 2 100 - 120
Leg of lamb 190 2 175 2 110 - 130
Whole chicken 220 2 200 2 70 - 85
Whole turkey 180 2 160 2 210 - 240
Whole duck 175 2 220 2 120 - 150
Whole goose 175 2 160 1 150 - 200
Rabbit, cut in pieces 190 2 175 2 60 - 80
Hare, cut in pieces 190 2 175 2 150 - 200
Whole pheasant 190 2 175 2 90 - 120
FISH
Conventional Cooking Fan Cooking
(min)
(°C) (°C)
Trout / Sea bream, 3 - 4
fish
190 2 175 2 40 - 55
Tuna / Salmon, 4 - 6 fillets 190 2 175 2 35 - 60
10.3 Turbo Grilling
Preheat the empty oven.
Use the first or the second shelf position.
To calculate the roasting time multiple the
time given in the table below by the
centimetres of thickness of the fillet.
BEEF
(°C) (min)
Roast beef or fillet, rare 190 - 200 5 - 6
Roast beef or fillet, me‐
dium
180 - 190 6 - 8
Roast beef or fillet, well
done
170 - 180 8 - 10
PORK
(°C) (min)
Shoulder / Neck / Ham
joint, 1 - 1.5 kg
160 - 180 90 - 120
Chops / Spare rib, 1 -
1.5 kg
170 - 180 60 - 90
Meatloaf, 0.75 - 1 kg 160 - 170 50 - 60
Pork knuckle, pre‐
cooked, 0.75 - 1 kg
150 - 170 90 - 120
VEAL
(°C) (min)
Roast veal, 1 kg 160 - 180 90 - 120
14 ENGLISH

VEAL
(°C) (min)
Veal knuckle, 1.5 - 2 kg 160 - 180 120 - 150
LAMB
(°C) (min)
Lamb leg / Roast lamb,
1 - 1.5 kg
150 - 170 100 - 120
Lamb saddle, 1 - 1.5
kg
160 - 180 40 - 60
POULTRY
(°C) (min)
Poultry, portions, 0.2 -
0.25 kg each
200 - 220 30 - 50
POULTRY
(°C) (min)
Chicken, half, 0.4 - 0.5
kg each
190 - 210 35 - 50
Chicken, poulard, 1 -
1.5 kg
190 - 210 50 - 70
Duck, 1.5 - 2 kg 180 - 200 80 - 100
Goose, 3.5 - 5 kg 160 - 180 120 - 180
Turkey, 2.5 - 3.5 kg 160 - 180 120 - 150
Turkey, 4 - 6 kg 140 - 160 150 - 240
FISH
(STEAMED) (°C) (min)
Whole fish, 1 - 1.5 kg 210 - 220 40 - 60
10.4 Defrost
(kg)
Defrosting time
(min)
Further defrosting
time (min)
Chicken 1 100 - 140 20 - 30 Place chicken on an up‐
turned saucer placed on a
large plate. Turn halfway
through.
Meat 1 100 - 140 20 - 30 Turn halfway through.
0.5 90 - 120
Cream 2 x 0.2 80 - 100 10 - 15 Cream can also be whip‐
ped when still slightly fro‐
zen in places.
Trout 0.15 25 - 35 10 - 15 -
Strawberries 0.3 30 - 40 10 - 20 -
Butter 0.25 30 - 40 10 - 15 -
Gateau 1.4 60 60 -
10.5 Dehydrating - Fan Cooking
Cover trays with grease proof paper or
baking parchment.
For a better result, stop the oven halfway
through the drying time, open the door and
let it cool down for one night to complete the
drying.
For 1 tray use the third shelf position.
ENGLISH 15

For 2 trays use the first and fourth shelf
position.
VEGETA‐
BLES (°C) (h)
Beans 60 - 70 6 - 8
Peppers 60 - 70 5 - 6
Vegetables for soup 60 - 70 5 - 6
Mushrooms 50 - 60 6 - 8
Herbs 40 - 50 2 - 3
Set the temperature to 60 - 70 °C.
FRUIT
(h)
Plums 8 - 10
Apricots 8 - 10
Apple slices 6 - 8
Pears 6 - 9
10.6 Moist Fan Baking - recommended accessories
Use the dark and non-reflective tins and containers. They have better heat absorption than the
light colour and reflective dishes.
Pizza pan
Baking dish
Ramekins
Flan base tin
Dark, non-reflective
28 cm diameter
Dark, non-reflective
26 cm diameter
Ceramic
8 cm diameter, 5
cm height
Dark, non-reflective
28 cm diameter
10.7 Moist Fan Baking
For the best results follow suggestions listed
in the table below.
(°C) (min)
Sweet rolls, 12 pieces baking tray or dripping pan 175 3 40 - 50
Rolls, 9 pieces baking tray or dripping pan 180 2 35 - 45
Pizza, frozen, 0.35 kg wire shelf 180 2 45 - 55
Swiss roll baking tray or dripping pan 170 2 30 - 40
Brownie baking tray or dripping pan 170 2 45 - 50
Soufflè, 6 pieces ceramic ramekins on wire
shelf
190 3 45 - 55
Sponge flan base flan base tin on wire shelf 180 2 35 - 45
Victoria sandwich baking dish on wire shelf 170 2 35 - 50
16 ENGLISH

(°C) (min)
Poached fish, 0.3 kg baking tray or dripping pan 180 2 35 - 45
Whole fish, 0.2 kg baking tray or dripping pan 180 3 25 - 35
Fish fillet, 0.3 kg pizza pan on wire shelf 170 3 30 - 40
Poached meat, 0.25
kg
baking tray or dripping pan 180 3 35 - 45
Shashlik, 0.5 kg baking tray or dripping pan 180 3 40 - 50
Cookies, 16 pieces baking tray or dripping pan 150 2 30 - 45
Macaroons, 20 pieces baking tray or dripping pan 180 2 45 - 55
Muffins, 12 pieces baking tray or dripping pan 170 2 30 - 40
Savory pastry, 16
pieces
baking tray or dripping pan 170 2 35 - 45
Short crust biscuits,
20 pieces
baking tray or dripping pan 150 2 40 - 50
Tartlets, 8 pieces baking tray or dripping pan 170 2 30 - 40
Vegetables, poached,
0.4 kg
baking tray or dripping pan 180 2 35 - 45
Vegetarian omelette pizza pan on wire shelf 180 3 35 - 45
Mediterranean vege‐
tables, 0.7 kg
baking tray or dripping pan 180 4 35 - 45
10.8 Information for test institutes
Tests according to IEC 60350-1.
(°C) (min)
Small
cakes, 20
per tray
Conventional
Cooking
Baking tray 3 170 20 - 30 -
Small
cakes, 20
per tray
Fan Cooking Baking tray 3 150 -
160
20 - 35 -
Small
cakes, 20
per tray
Fan Cooking Baking tray 2 and 4 150 -
160
20 - 35 -
Apple pie, 2
tins Ø20 cm
Conventional
Cooking
Wire shelf 2 180 70 - 90 -
Apple pie, 2
tins Ø20 cm
Fan Cooking Wire shelf 2 160 70 - 90 -
ENGLISH 17

(°C) (min)
Sponge
cake, cake
mould Ø26
cm
Conventional
Cooking
Wire shelf 2 170 40 - 50 Preheat the oven for
10 minutes.
Sponge
cake, cake
mould Ø26
cm
Fan Cooking Wire shelf 2 160 40 - 50 Preheat the oven for
10 minutes.
Sponge
cake, cake
mould Ø26
cm
Fan Cooking Wire shelf 2 and 4 160 40 - 60 Preheat the oven for
10 minutes.
Short bread Fan Cooking Baking tray 3 140 -
150
20 - 40 -
Short bread Fan Cooking Baking tray 2 and 4 140 -
150
25 - 45 -
Short bread Conventional
Cooking
Baking tray 3 140 -
150
25 - 45 -
Toast, 4 - 6
pieces
Grill Wire shelf 4 max. 2 - 3 minutes first
side; 2 - 3 minutes
second side
Preheat the oven for 3
minutes.
Beef burger,
6 pieces,
0.6 kg
Grill Wire shelf
and dripping
pan
4 max. 20 - 30 Put the wire shelf on
the fourth level and the
dripping pan on the
third level of the oven.
Turn the food halfway
through the cooking
time.
Preheat the oven for 3
minutes.
11. CARE AND CLEANING
WARNING!
Refer to Safety chapters.
11.1 Notes on cleaning
Cleaning Agents
Clean the front of the oven with a soft cloth with warm water and a mild detergent. Clean and
check the door gasket around the frame of the cavity.
Use a cleaning solution to clean metal surfaces.
Clean stains with a mild detergent.
18 ENGLISH

Everyday Use
Clean the cavity after each use. Fat accumulation or other residue may cause fire.
Moisture can condense in the oven or on the door glass panels. To decrease the condensa‐
tion, let the oven work for 10 minutes before cooking. Do not store the food in the oven for
longer than 20 minutes. Dry the cavity with a soft cloth after each use.
Accessories
Clean all accessories after each use and let them dry. Use a soft cloth with warm water and
a mild detergent. Do not clean the accessories in a dishwasher.
Do not clean the non-stick accessories using abrasive cleaner or sharp-edged objects.
11.2 How to remove: Shelf supports
Remove the shelf supports to clean the oven.
Step 1 Turn off the oven and wait until it is
cold.
Step 2 Pull the front of the shelf support
away from the side wall.
Step 3 Pull the rear end of the shelf support
away from the side wall and remove
it.
2
1
Step 4 Install the shelf supports in the oppo‐
site sequence.
11.3 How to use: Aqua Clean
This cleaning procedure uses humidity to
remove remaining fat and food particles from
the oven.
Step 1 Pour water into the cavity embossment:
300 ml.
Step 2
Set the function: .
Step 3 Set the temperature to 90 °C.
Step 4 Let the oven work for 30 min.
Step 5 Turn off the oven.
Step 6 Wait until the oven is cold. Dry the cavi‐
ty with a soft cloth.
11.4 How to remove and install: Door
The oven door has two glass panels. You can remove the oven door and the internal glass
panel to clean it. Read the whole "Removing and installing door" instruction before you remove
the glass panels.
CAUTION!
Do not use the oven without the glass panels.
ENGLISH 19

Step 1 Open the door fully and hold both hinges.
Step 2 Lift and turn the levers fully on both hinges.
Step 3 Close the oven door halfway to the first
opening position. Then lift and pull forward
and remove the door from its seat.
Step 4 Put the door on a soft cloth on a stable sur‐
face.
Step 5 Hold the door trim (B) on the top edge of the
door at the two sides and push inwards to re‐
lease the clip seal.
Step 6 Pull the door trim to the front to remove it.
1
2
B
Step 7 Hold the door glass panel by its top edge
and carefully pull it out. Make sure the glass
slides out of the supports completely.
Step 8 Clean the glass panels with water and soap.
Dry the glass panels carefully. Do not clean
the glass panels in the dishwasher.
Step 9 After cleaning, install the glass panel and the
oven door.
20 ENGLISH

The screen-printing zone must face the inner side of
the door. Make sure that after the installation the sur‐
face of the glass panel frame on the screen-printing
zones is not rough when you touch it.
When installed correctly the door trim clicks.
Make sure that you install the internal glass panel in
the seats correctly.
A
11.5 How to replace: Lamp
WARNING!
Risk of electric shock.
The lamp can be hot.
Always hold the halogen lamp with a cloth to
prevent grease residue from burning on the
lamp.
Before you replace the lamp:
Step 1 Step 2 Step 3
Turn off the oven. Wait until the
oven is cold.
Disconnect the oven from the
mains.
Put a cloth on the bottom of the cav‐
ity.
Back lamp
Step 1 Turn the glass cover to remove it.
Step 2 Clean the glass cover.
Step 3 Replace the lamp with a suitable 300 °C heat-resistant lamp.
Step 4 Install the glass cover.
12. TROUBLESHOOTING
WARNING!
Refer to Safety chapters.
12.1 What to do if...
In any cases not included in this table please
contact with an Authorised Service Centre.
Problem Check if...
The oven does not heat
up.
The fuse is blown.
The door gasket is dam‐
aged.
Do not use the oven.
Contact an Authorised
Service Centre.
Problem Check if...
End of Cooking - is not
set.
Set: End of Cooking. Re‐
fer to "Clock functions".
The lamp does not work. The lamp is burnt out.
12.2 Service data
If you cannot find a solution to the problem
yourself, contact your dealer or an
Authorised Service Centre.
The necessary data for the service centre is
on the rating plate. The rating plate is on the
front frame of the oven cavity. Do not remove
the rating plate from the oven cavity.
ENGLISH 21

We recommend that you write the data here:
Model (MOD.) .........................................
Product number (PNC) .........................................
Serial number (S.N.) .........................................
13. ENERGY EFFICIENCY
13.1 Product Information and Product Information Sheet*
Supplier's name Zanussi
Model identification
ZOHKF1X1 949496249
ZOHNF1K1 949496304
ZOHNF1W1 949496305
Energy Efficiency Index 81.2
Energy efficiency class A+
Energy consumption with a standard load, conventional mode 0.93 kWh/cycle
Energy consumption with a standard load, fan-forced mode 0.69 kWh/cycle
Number of cavities 1
Heat source Electricity
Volume 72 l
Type of oven Built-In Oven
Mass
ZOHKF1X1 26.7 kg
ZOHNF1K1 26.7 kg
ZOHNF1W1 26.7 kg
* For European Union according to EU Regulations 65/2014 and 66/2014.
For Republic of Belarus according to STB 2478-2017, Appendix G; STB 2477-2017, Annexes A and B.
For Ukraine according to 568/32020.
Energy efficiency class is not applicable for Russia.
EN 60350-1 - Household electric cooking appliances - Part 1: Ranges, ovens, steam ovens and grills - Methods
for measuring performance.
13.2 Energy saving
The oven has features which
help you save energy during
everyday cooking.
Make sure that the oven door is closed when
the oven operates. Do not open the oven
door too often during cooking. Keep the door
gasket clean and make sure it is well fixed in
its position.
Use metal cookware to improve energy
saving.
When possible, do not preheat the oven
before cooking.
Keep breaks between baking as short as
possible when you prepare a few dishes at
one time.
Cooking with fan
When possible, use the cooking functions
with fan to save energy.
22 ENGLISH

Residual heat
When the cooking duration is longer than 30
min, reduce the oven temperature to
minimum 3 - 10 min before the end of
cooking. The residual heat inside the oven
will continue to cook.
Use the residual heat to warm up other
dishes.
Keep food warm
Choose the lowest possible temperature
setting to use residual heat and keep a meal
warm.
Moist Fan Baking
Function designed to save energy during
cooking.
When you use this function the lamp is off.
14. ENVIRONMENTAL CONCERNS
Recycle materials with the symbol . Put
the packaging in relevant containers to
recycle it. Help protect the environment and
human health by recycling waste of electrical
and electronic appliances. Do not dispose of
appliances marked with the symbol with
the household waste. Return the product to
your local recycling facility or contact your
municipal office.
ENGLISH 23

GA NAAR ONZE WEBSITE VOOR:
Advies over gebruik, brochures, het oplossen van problemen, service- en reparatie-
informatie:
www.zanussi.com/support
Wijzigingen voorbehouden.
INHOUDSOPGAVE
1. VEILIGHEIDSINFORMATIE..........................................................................................24
2. VEILIGHEIDSVOORSCHRIFTEN.................................................................................26
3. MONTAGE ................................................................................................................... 29
4. BESCHRIJVING VAN HET PRODUCT........................................................................ 30
5. VOOR HET EERSTE GEBRUIK...................................................................................30
6. DAGELIJKS GEBRUIK................................................................................................. 31
7. KLOKFUNCTIES...........................................................................................................32
8. GEBRUIK VAN DE ACCESSOIRES.............................................................................32
9. EXTRA FUNCTIES....................................................................................................... 33
10. AANWIJZINGEN EN TIPS.......................................................................................... 34
11. ONDERHOUD EN REINIGING...................................................................................41
12. PROBLEEMOPLOSSING........................................................................................... 44
13. ENERGIEZUINIGHEID............................................................................................... 45
1. VEILIGHEIDSINFORMATIE
Lees zorgvuldig de meegeleverde instructies voor installatie
en gebruik van het apparaat. De fabrikant is niet
verantwoordelijk voor verwondingen of schade die voortvloeit
uit de onjuiste installatie of het onjuiste gebruik. Bewaar de
instructies altijd op een veilige, toegankelijke plek voor
toekomstig gebruik.
1.1 De veiligheid van kinderen en kwetsbare
personen
• Dit apparaat kan worden gebruikt door kinderen van 8 jaar
en ouder en door mensen met beperkte lichamelijke,
zintuiglijke of verstandelijke vermogens of een gebrek aan
ervaring en kennis, indien zij onder toezicht staan of
instructies hebben gekregen over het veilig gebruiken van
het apparaat en indien zij de eventuele gevaren begrijpen.
Kinderen jonger dan 8 jaar oud en personen met zware en
complexe beperkingen dienen altijd uit de buurt van het
24 NEDERLANDS

apparaat te worden gehouden, tenzij ze voortdurend onder
toezicht staan.
• Laat kinderen niet spelen met het apparaat.
• Houd alle verpakkingen uit de buurt van kinderen en
verwijder ze op gepaste wijze.
• WAARSCHUWING: Houd kinderen en huisdieren uit de
buurt van het apparaat als het in werking is of afkoelt.
Makkelijk toegankelijke onderdelen worden heet tijdens
gebruik.
• Als het apparaat is voorzien van een kinderslot, dient dit te
worden geactiveerd.
• Kinderen mogen zonder toezicht geen reinigings- en
onderhoudswerkzaamheden aan het apparaat uitvoeren.
1.2 Algemene veiligheid
• Alleen een erkende installatietechnicus mag het apparaat
en de kabel vervangen.
• WAARSCHUWING: Het apparaat en de toegankelijke
onderdelen ervan worden heet tijdens gebruik. U dient te
voorkomen de verwarmingselementen aan te raken.
• Gebruik altijd ovenhandschoenen om accessoires of
kookgerei te plaatsen of verwijderen.
• Voordat u welke onderhoudshandeling dan ook verricht,
dient u de stekker van het apparaat uit het stopcontact te
trekken.
• WAARSCHUWING: Zorg ervoor dat het apparaat is
uitgeschakeld voordat u de lamp vervangt om elektrische
schokken te voorkomen.
• Gebruik het apparaat niet voordat u het in de ingebouwde
structuur installeert.
• Gebruik geen stoomreiniger om het apparaat schoon te
maken.
• Gebruik nooit agressieve reinigingsmiddelen of scherpe
metalen schrapers om de glazen deur schoon te maken,
deze kunnen krassen veroorzaken op het oppervlak,
waardoor het glas zou kunnen breken.
• Als het netsnoer beschadigd is, moet de fabrikant, een
erkende serviceverlener of een gekwalificeerd persoon
NEDERLANDS 25

deze vervangen teneinde gevaarlijke situaties te
voorkomen.
• Om de inschuifrails te verwijderen trekt u eerst de voorkant
van de inschuifrail en dan de achterkant uit de zijwanden.
Installeer de inschuifrails in de omgekeerde volgorde.
2. VEILIGHEIDSVOORSCHRIFTEN
2.1 Installatie
WAARSCHUWING!
Alleen een erkende
installatietechnicus mag het
apparaat installeren.
• Verwijder alle verpakkingsmaterialen.
• Installeer en gebruik geen beschadigd
apparaat.
• Volg de installatie-instructies die zijn
meegeleverd met het apparaat.
• Pas altijd op bij verplaatsing van het
apparaat, want het is zwaar. Gebruik altijd
veiligheidshandschoenen en gesloten
schoeisel.
• Trek het apparaat nooit aan de handgreep
van zijn plaats.
• Installeer het apparaat op een veilige en
geschikte plaats die aan alle installatie-
eisen voldoet.
• Houd de minimumafstand naar andere
apparaten en units in acht.
• Controleer voordat u het apparaat
monteert of de ovendeur onbelemmerd
opent.
• Het apparaat is uitgerust met een
elektrisch koelsysteem. Het heeft
elektrische stroom nodig.
Minimumhoogte kast (Mini‐
mumhoogte kast onder
werkblad)
590 (600) mm
Kastbreedte 560 mm
Kastdiepte 550 (550) mm
Hoogte van de voorkant
van het apparaat
594 mm
Hoogte van de achterkant
van het apparaat
576 mm
Breedte van de voorkant
van het apparaat
595 mm
Breedte van de achterkant
van het apparaat
559 mm
Diepte van het apparaat 569 mm
Ingebouwde diepte van het
apparaat
548 mm
Diepte met open deur 1022 mm
Minimumgrootte ventilatie‐
opening. Opening ge‐
plaatst aan de onderkant
van de achterzijde
560x20 mm
Lengte netvoedingskabel.
Kabel wordt in de rechter‐
hoek van de achterzijde
geplaatst
1500 mm
Bevestigingsschroeven 4x25 mm
2.2 Elektrische aansluiting
WAARSCHUWING!
Gevaar voor brand en
elektrische schokken.
• Alle elektrische aansluitingen moeten
door een gediplomeerd elektromonteur
worden gemaakt.
• Dit apparaat moet worden aangesloten op
een geaard stopcontact.
• Zorg ervoor dat de parameters op het
vermogensplaatje overeenkomen met
elektrische vermogen van de netstroom.
• Gebruik altijd een juist geïnstalleerd
schokbestendig stopcontact.
• Gebruik geen adapters met meerdere
stekkers en verlengkabels.
• Zorg dat u de netstekker en het netsnoer
niet beschadigt. Indien de voedingskabel
moet worden vervangen, dan moet dit
gebeuren door onze Klantenservice.
• Laat de stroomkabel niet in aanraking
komen met de deur van het apparaat of
26 NEDERLANDS

de niche onder het apparaat, met name
niet als deze werkt of als de deur heet is.
• De schokbescherming van delen onder
stroom en geïsoleerde delen moet op zo'n
manier worden bevestigd dat het niet
zonder gereedschap kan worden
verplaatst.
• Steek de stekker pas in het stopcontact
als de installatie is voltooid. Zorg ervoor
dat het netsnoer na installatie bereikbaar
is.
• Als het stopcontact los zit, mag u de
stekker niet in het stopcontact steken.
• Trek niet aan het netsnoer om het
apparaat los te koppelen. Trek altijd aan
de stekker.
• Gebruik enkel correcte
isolatievoorzieningen:
stroomonderbrekers, zekeringen
(schroefzekeringen moeten uit de houder
worden verwijderd), aardlekschakelaars
en contactgevers.
• De elektrische installatie moet een
isolatieapparaat bevatten waardoor het
apparaat volledig van het lichtnet
afgesloten kan worden. Het
isolatieapparaat moet een contactopening
hebben met een minimale breedte van 3
mm.
• Dit apparaat wordt geleverd met stekker
en netsnoer.
Kabeltypes die van toepassing zijn op de
installatie of vervanging voor Europa:
H07 RN-F, H05 RN-F, H05 RRF, H05 VV-F, H05
V2V2-F (T90), H05 BB-F
Voor het deel van de kabel raadpleegt u het
totale vermogen op het typeplaatje. U kunt
ook de tabel raadplegen:
Totaal vermogen (W) Doorsnede kabel
(mm²)
maximaal 1380 3 x 0.75
maximaal 2300 3 x 1
maximaal 3680 3 x 1.5
De aardkabel (groene/gele kabel) moet 2 cm
langer zijn dan fase- en neutrale kabels
(blauwe en bruine kabels).
2.3 Gebruik
WAARSCHUWING!
Gevaar voor letsel,
brandwonden, elektrische
schokken of een explosie.
• Dit apparaat is uitsluitend bestemd voor
huishoudelijk gebruik.
• De specificatie van dit apparaat niet
wijzigen.
• Zorg ervoor dat de ventilatieopeningen
niet geblokkeerd zijn.
• Laat het apparaat tijdens het gebruik niet
onbeheerd achter.
• Schakel het apparaat telkens na gebruik
uit.
• Wees voorzichtig met het openen van de
deur van het apparaat als het apparaat
aan staat. Er kan hete lucht ontsnappen.
• Bedien het apparaat niet met natte
handen of als het contact maakt met
water.
• Oefen geen kracht uit op een geopende
deur.
• Het apparaat mag niet worden gebruikt
als werkblad of aanrecht.
• Open de deur van het apparaat
voorzichtig. Als u alcoholische
toevoegingen gebruikt, kan er alcohol-
luchtmengsel ontstaan.
• Houd vonken of open vlammen uit de
buurt van het apparaat bij het openen van
de deur.
• Plaats geen ontvlambare producten of
items die vochtig zijn door ontvlambare
producten in, bij of op het apparaat.
WAARSCHUWING!
Risico op schade aan het
apparaat.
• Om schade of verkleuring van het email te
voorkomen:
– zet geen kookgerei of andere
voorwerpen direct op de bodem van
het apparaat.
– leg geen aluminiumfolie op de bodem
van de ruimte in het apparaat.
– plaats geen water direct in het hete
apparaat.
NEDERLANDS 27

– haal vochthoudende schotels en eten
uit het apparaat als u klaar bent met
koken.
– wees voorzichtig bij het verwijderen of
bevestigen van accessoires.
• Verkleuring van het email of roestvrij staal
is niet van invloed op de werking van het
apparaat.
• Gebruik een diepe pan voor vochtige
taarten. Fruitsappen kunnen permanente
vlekken maken.
• Dit apparaat is uitsluitend bestemd om
mee te koken. Het mag niet worden
gebruikt voor andere doeleinden, zoals
het verwarmen van een kamer.
• Alle bereidingen moeten worden
uitgevoerd met gesloten ovendeur.
• Als het apparaat achter een
meubelpaneel gemonteerd is (bijv. een
deur), zorg er dan voor dat de deur nooit
gesloten is als het apparaat in werking is.
Warmte en vocht kunnen achter een
gesloten meubelpaneel ophopen en
schade aan het apparaat, de behuizing of
de vloer veroorzaken. Sluit het
meubelpaneel niet tot het apparaat
compleet is afgekoeld na gebruik.
2.4 Onderhoud en reiniging
WAARSCHUWING!
Gevaar voor letsel, brand en
schade aan het apparaat.
• Schakel het apparaat uit en trek de
stekker uit het stopcontact voordat u
onderhoudshandelingen verricht.
• Zorg ervoor dat het apparaat is afgekoeld.
Er bestaat een risico dat de glasplaten
kunnen breken.
• Vervang direct de glazen deurpanelen als
deze beschadigd zijn. Neem contact op
met een erkend servicecentrum.
• Wees voorzichtig als u de deur van het
apparaat verwijdert. De deur is zwaar!
• Reinig het apparaat regelmatig om te
voorkomen dat het materiaal van het
oppervlak achteruitgaat.
• Maak het apparaat schoon met een
vochtige zachte doek. Gebruik alleen
neutrale schoonmaakmiddelen. Gebruik
geen schuurmiddelen, schuursponsjes,
oplosmiddelen of metalen voorwerpen.
• Volg als u een ovenspray gebruikt de
aanwijzingen op de verpakking.
2.5 Binnenverlichting
WAARSCHUWING!
Gevaar voor elektrische
schokken.
• Met betrekking tot de lamp(en) in dit
product en reservelampen die afzonderlijk
worden verkocht: Deze lampen zijn
bedoeld om bestand te zijn tegen extreme
fysieke omstandigheden in huishoudelijke
apparaten, zoals temperatuur, trillingen,
vochtigheid, of zijn bedoeld om informatie
te geven over de operationele status van
het apparaat. Ze zijn niet bedoeld voor
gebruik in andere toepassingen en zijn
niet geschikt voor verlichting in
huishoudelijke ruimten.
• Gebruik alleen lampjes met dezelfde
specificaties.
2.6 Service
• Neem contact op met de erkende
servicedienst voor reparatie van het
apparaat.
• Gebruik uitsluitend originele
reserveonderdelen.
2.7 Afvalverwerking
WAARSCHUWING!
Gevaar voor letsel of verstikking.
• Haal de stekker uit het stopcontact.
• Snijd het netsnoer vlak bij het apparaat af
en gooi het weg.
• Verwijder de deurvergrendeling om te
voorkomen dat kinderen of huisdieren
binnen in het apparaat vast komen te
zitten.
28 NEDERLANDS

3. MONTAGE
WAARSCHUWING!
Raadpleeg de hoofdstukken
Veiligheid.
3.1 Inbouwen
18
594
589
114
21548
595
+-1
min. 550
20
600
min. 560
3
5
60
20
80
520
60
198
523
(*mm)
min. 550
20
595
+-1
18
590
min. 560
594
589
114
21548
3
5
70
60
520
60
20
198
523
(*mm)
NEDERLANDS 29

3.2 Bevestiging van de oven aan de
kast
4. BESCHRIJVING VAN HET PRODUCT
4.1 Algemeen overzicht
8
7
9
10
11
5
4
3
2
1
321 64 5
12
1
Bedieningspaneel
2
Stroomlampje/symbool
3
Knop voor verwarmingsfuncties
4
Knop voor de timer
5
Bedieningsknop (voor de temperatuur)
6
Temperatuurindicator/symbool
7
Verwarmingselement
8
Lamp
9
Ventilator
10
Bak voor reiniging met water
11
Verwijderbare inschuifrail
12
Roosterhoogtes
4.2 Accessoires
• Bakrooster
Voor kookgerei, bak- en braadvormen.
• Bakplaat
Voor gebak en koekjes.
5. VOOR HET EERSTE GEBRUIK
WAARSCHUWING!
Raadpleeg de hoofdstukken
Veiligheid.
30 NEDERLANDS

5.1 Voorafgaand aan het eerste gebruik
De oven kan een vreemde geur en rook afgeven tijdens het voorverwarmen. Zorg ervoor dat
de kamer goed is geventileerd.
Stap 1
Stap 2
De oven reinigen Verwarm de lege oven voor
1. Haal alle accessoires en verwijderbare inschuifrails
uit de oven.
2. Reinig de oven en de accessoires met een zachte
doek, warm water en een mild reinigingsmiddel.
1. Stel de maximale temperatuur in voor de functie:
.
Tijd: 1 uur
2. Stel de maximale temperatuur in voor de functie:
.
Tijd: 15 min
Schakel de oven uit en wacht tot deze is afgekoeld. Plaats de accessoires en de verwijderbare inschuifrails in de
oven.
6. DAGELIJKS GEBRUIK
WAARSCHUWING!
Raadpleeg de hoofdstukken
Veiligheid.
6.1 Instellen: Verwarmingsfunctie
Stap 1 Draai aan de knop voor de verwar‐
mingsfuncties om een verwarmings‐
functie te selecteren.
Stap 2 Draai aan de regelknop om de tempe‐
ratuur te selecteren.
Stap 3 Draai wanneer het bereiden stopt aan
de knoppen naar de uit-stand om de
oven uit te schakelen.
6.2 Verwarmingsfuncties
Verwar‐
mingsfunc‐
tie
Toepassing
Uit-stand
De oven is uitgeschakeld.
Verwar‐
mingsfunc‐
tie
Toepassing
Binnenverlich‐
ting
Om de lamp in te schakelen.
Warmelucht
(vochtig)
Deze functie is ontworpen om tij‐
dens de bereiding energie te bespa‐
ren. Bij het gebruik van deze functie
kan de temperatuur in de ruimte
verschillen van de ingestelde tem‐
peratuur. Het verwarmingsvermo‐
gen kan worden verminderd. Raad‐
pleeg voor meer informatie het
hoofdstuk "Dagelijks gebruik", op‐
merkingen op: Warmelucht (voch‐
tig) .
Warme lucht
Voor het braden of bakken van ge‐
rechten waarvoor dezelfde berei‐
dingstemperatuur nodig is, op meer‐
dere roosterhoogten, zonder dat er
smaken worden overgebracht van
het ene naar het andere gerecht.
Turbo grill
Voor het braden van grotere stuk‐
ken vlees of gevogelte met botten
op één niveau. Voor gratineren en
bruinen.
NEDERLANDS 31

Verwar‐
mingsfunc‐
tie
Toepassing
Onderwarmte
Voor het bakken van taarten met
een knapperige bodem en het in‐
maken van voedsel.
Pizza-functie
Voor het bakken van pizza. Voor in‐
tensieve bruining en een knapperi‐
ge bodem. Stel de temperatuur in
op 230 °C.
Ontdooien
Om voedsel te ontdooien (groenten
en fruit). De ontdooitijd hangt af van
de hoeveelheid en dikte van het
voedsel.
Boven- /onder‐
warmte / Reini‐
gen met water
Voor het bakken en braden op één
rekstand.
Zie het hoofdstuk "Onderhoud en
reiniging" voor meer informatie
over: Aqua Clean.
6.3 Toelichting van: Warmelucht
(vochtig)
Deze functie wordt gebruikt om te voldoen
aan de energie-efficiëntieklasse en
ecodesign-vereisten overeenkomstig EU
65/2014 en EU 66/2014. Testen volgens EN
60350-1.
De ovendeur dient tijdens de bereiding
gesloten te zijn zodat de functie niet wordt
onderbroken en de oven werkt op de hoogst
mogelijke energie-efficiëntie.
Bij gebruik van deze functie gaat de
verlichting automatisch uit.
Zie het hoofdstuk 'Hints and tips’,
Warmelucht (vochtig) voor
bereidingsinstructies. Zie voor algemene
aanbevelingen voor energiebesparing het
hoofdstuk ‘Energie-efficiëntie’,
Energiebesparing.
7. KLOKFUNCTIES
7.1 Hoe instellen: Einde bereiding
Hier stelt u de tijd in voor het uitschakelen van de ovenfuncties.
Stap 1 Selecteer de ovenfunctie en de temperatuur.
Stap 2 Draai de knop van de timer naar zijn volledige bereik.
Stap 3 Draai de knop van de timer om de uitschakeltijd in te stellen.
Wanneer de ingestelde tijd eindigt, klinkt er een geluidssignaal en schakelt de oven uit.
Stap 4 Draai de knop voor de ovenfuncties en de temperatuurknop naar de uit-stand.
8. GEBRUIK VAN DE ACCESSOIRES
WAARSCHUWING!
Raadpleeg de hoofdstukken
Veiligheid.
8.1 Accessoires plaatsen
Een kleine inkeping bovenaan verhoogt de
veiligheid. Deze inkepingen voorkomen
bovendien omkanteling. De hoge rand rond
het rooster voorkomt dat het kookgerei van
het rooster afglijdt.
32 NEDERLANDS

Bakrooster:
Plaats het rooster tussen de geleidestangen van
de inschuifrailen zorg ervoor dat de pootjes om‐
laag wijzen.
Bakplaat:
Schuif de plaat tussen de geleidestangen van de
inschuifrail.
Bakrooster, Bakplaat:
Plaats de plaat tussen de geleiders van de in‐
schuifrails en het bakrooster op de geleiders erbo‐
ven.
9. EXTRA FUNCTIES
9.1 Koelventilator
Als de oven in werking is, wordt de
koelventilator automatisch ingeschakeld om
de oppervlakken van de oven koel te
houden. Als u de oven uitschakelt, kan de
koelventilator blijven werken totdat de oven is
afgekoeld.
9.2 Veiligheidsthermostaat
Een onjuiste bediening van de oven of
defecte componenten kunnen gevaarlijke
oververhitting veroorzaken. Om dit te
voorkomen is de oven voorzien van een
veiligheidsthermostaat die de stroomtoevoer
onderbreekt. Zodra de temperatuur is
gedaald, wordt de oven automatisch weer
ingeschakeld.
NEDERLANDS 33

10. AANWIJZINGEN EN TIPS
Raadpleeg de hoofdstukken
Veiligheid.
10.1 Kookadviezen
De oven heeft vijf rekniveaus.
Tel de rekniveaus vanaf de bodem van de
oven.
Uw oven kan anders bakken of roosteren
dan de oven die u tot nu toe gebruikt heeft. In
de onderstaande tabel vindt u de
standaardinstellingen voor temperatuur,
kooktijd en roosterniveau.
Als u voor een speciaal recept de instelling
niet kunt vinden, zoek dan naar een
soortgelijk recept.
De oven heeft een speciaal systeem dat de
lucht circuleert en voor doorlopende recycling
van stoom zorgt. Dankzij dit systeem is het
mogelijk om voedsel te bereiden in een
atmosfeer met stoom en worden de
gerechten zacht van binnen en knapperig
van buiten. Dit reduceert zowel de
bereidingstijd als het energieverbruik.
Voor de bereiding van gebak
De ovendeur mag pas worden geopend als
driekwart van de baktijd is verstreken.
Als u twee bakplaten tegelijkertijd gebruikt,
dient u één niveau ertussen leeg te laten.
Voor de bereiding van vlees en vis
Laat het vlees ongeveer 15 minuten rusten
voordat u het aansnijdt, zodat het vleessap
er niet uit stroomt.
Om te veel rook tijdens het braden in de
oven te vermijden, kunt u een beetje water in
de lekbak gieten. Om rook te vermijden,
voegt u water toe wanneer het is
opgedroogd.
Bereidingstijden
De bereidingsduur is afhankelijk van het
soort voedsel, de samenstelling en het
volume.
Houd in eerste instantie het bereidingsproces
in de gaten. Zoek bij het gebruik van dit
apparaat de beste instellingen (temperatuur,
bereidingsduur, etc.) voor uw kookgerei,
recepten en hoeveelheden.
10.2 Bakken en braden
CA‐
KES
Boven- /onderwarmte Warme lucht
(min)
(°C) (°C)
Recepten met
klopper
170 2 160 3 45 - 60 Cakevorm
Zandkoekjesdeeg 170 2 160 3 20 - 30 Cakevorm
Kwarktaart met
karnemelk
170 1 160 1 70 - 80 Cakevorm, Ø 26
cm
Strudel 175 3 150 2 60 - 80 Bakplaat
Jamtaart 170 2 165 2 30 - 40 Bakplaat
Kerstkrans, ver‐
warm de oven
voor
160 2 150 2 90 - 120 Cakevorm, Ø 20
cm
Pruimentaart, ver‐
warm de oven
voor
175 1 160 2 50 - 60 Broodvorm
34 NEDERLANDS

CA‐
KES
Boven- /onderwarmte Warme lucht
(min)
(°C) (°C)
Koekjes 140 3 140 - 150 3 30 - 35 Bakplaat
Koekjes, twee ni‐
veaus
- - 140 - 150 2 en 4 35 - 40 Bakplaat
Koekjes, drie ni‐
veaus
120 3 120 3 80 - 100 Bakplaat
Schuimgebakjes 190 3 180 3 15 - 20 Bakplaat
Broodjes, ver‐
warm de oven
voor
190 3 170 3 25 - 35 Bakplaat
Eclairs, een ni‐
veau
180 2 170 2 45 - 70 Bakplaat
Eclairs, twee ni‐
veaus
160 1 150 2 110 - 120 Bakplaat
Taartjes 170 1 160 1 50 - 60 Bakplaat
Rijke vruchtenca‐
ke
190 3 190 3 12 - 20 Bakplaat
Victoriataart met
jamvulling
190 3 170 3 25 - 35 Bakplaat
Verwarm de lege oven voor.
BROOD
EN PIZZA
Boven- /onderwarmte Warme lucht
(min)
(°C) (°C)
Witbrood, 1 - 2
stuks; 0,5 kg per
stuk
190 1 190 1 60 - 70 -
Roggebrood,
voorverwarming is
niet nodig
190 1 180 1 30 - 45 Broodvorm
Broodjes, 6 - 8
broodjes
230 - 250 1 230 - 250 1 10 - 20 Bakplaat
Pizza 200 3 190 3 10 - 20 Bakplaat / Braad‐
pan
Scones 200 3 190 3 10 - 20 Bakplaat
Verwarm de lege oven voor.
Gebruik de taartvorm.
NEDERLANDS 35

VLAAIEN
Boven- /onderwarmte Warme lucht
(min)
(°C) (°C)
Pastataart, voorver‐
warming is niet nodig
200 2 180 2 40 - 50
Hartige groentetaart,
voorverwarming is niet
nodig
200 2 175 2 45 - 60
Quiches 180 1 180 1 50 - 60
Lasagne 180 - 190 2 180 - 190 2 25 - 40
Cannelloni 180 - 190 2 180 - 190 2 25 - 40
Gebruik het ovenrek.
VLEES
Boven- /onderwarmte Warme lucht
(min)
(°C) (°C)
Rundvlees 200 2 190 2 50 - 70
Varkensvlees 180 2 180 2 90 - 120
Kalfsvlees 190 2 175 2 90 - 120
Engelse rosbief, rood 210 2 200 2 50 - 60
Engelse rosbief, medi‐
um
210 2 200 2 60 - 70
Engelse biefstuk, bien
cuit
210 2 200 2 70 - 75
VLEES
Boven- /onderwarmte Warme lucht
(min)
(°C) (°C)
Varkensbraadstuk,
met zwoerd
180 2 170 2 120 - 150
Varkensschenkel, 2
stuks
180 2 160 2 100 - 120
Lamsbout 190 2 175 2 110 - 130
Hele kip 220 2 200 2 70 - 85
Hele kalkoen 180 2 160 2 210 - 240
Hele eend 175 2 220 2 120 - 150
Hele gans 175 2 160 1 150 - 200
36 NEDERLANDS

VLEES
Boven- /onderwarmte Warme lucht
(min)
(°C) (°C)
Konijn, in stukken ge‐
sneden
190 2 175 2 60 - 80
Haas, in stukken ge‐
sneden
190 2 175 2 150 - 200
Hele fazant 190 2 175 2 90 - 120
VIS
Boven- /onderwarmte Warme lucht
(min)
(°C) (°C)
Forel / Zeebrasem, 3 - 4
vissen
190 2 175 2 40 - 55
Tonijn / Zalm, 4 - 6 filets 190 2 175 2 35 - 60
10.3 Turbo grill
Verwarm de lege oven voor.
Gebruik de eerste of tweede rekstand.
Om de baktijd te berekenen vermenigvuldigt
u de tijd die in de onderstaande tabel wordt
gegeven met de centimeters van de dikte
van de filet.
RUNDVLEES
(°C) (min)
Rosbief of ossenhaas,
rood
190 - 200 5 - 6
Rosbief of ossenhaas,
medium
180 - 190 6 - 8
Rosbief of ossenhaas,
gaar
170 - 180 8 - 10
VARKENS‐
VLEES (°C) (min)
Schouder / Nek / Ham‐
lap, 1 - 1,5 kg
160 - 180 90 - 120
Karbonade / Spare
ribs, 1 - 1,5 kg
170 - 180 60 - 90
VARKENS‐
VLEES (°C) (min)
Gehaktbrood, 0,75 - 1
kg
160 - 170 50 - 60
Varkensschenkel, voor‐
gekookt, 0,75 - 1 kg
150 - 170 90 - 120
KALFS‐
VLEES (°C) (min)
Geroosterd kalfsvlees,
1 kg
160 - 180 90 - 120
Kalfsschenkel, 1,5 - 2
kg
160 - 180 120 - 150
LAMSVLEES
(°C) (min)
Lamsbout / Geroosterd
lamsvlees, 1 - 1,5 kg
150 - 170 100 - 120
Lamsrugfilet, 1 - 1,5 kg 160 - 180 40 - 60
NEDERLANDS 37

GEVOGELTE
(°C) (min)
Gevogelte, porties, 0,2
- 0,25 kg elk
200 - 220 30 - 50
Halve kip, 0,4 - 0,5 kg
elk
190 - 210 35 - 50
Kip, haantje, 1 - 1,5 kg 190 - 210 50 - 70
Eend, 1,5 - 2 kg 180 - 200 80 - 100
Gans, 3,5 - 5 kg 160 - 180 120 - 180
GEVOGELTE
(°C) (min)
Kalkoen, 2,5 - 3,5 kg 160 - 180 120 - 150
Kalkoen, 4 - 6 kg 140 - 160 150 - 240
VIS (GE‐
STOOMD) (°C) (min)
Hele vis, 1 - 1,5 kg 210 - 220 40 - 60
10.4 Ontdooien
(kg)
Ontdooitijd
(min.)
Nadooitijd (min)
Kip 1 100 - 140 20 - 30 Leg de kip op een omge‐
keerde onderschotel in
een groot bord. Halverwe‐
ge de bereidingstijd om‐
draaien.
Vlees 1 100 - 140 20 - 30 Halverwege de bereidings‐
tijd omdraaien.
0,5 90 - 120
Room 2 x 0,2 80 - 100 10 - 15 Room kan ook met nog
licht bevroren deeltjes
goed worden geklopt.
Forel 0,15 25 - 35 10 - 15 -
Aardbeien 0,3 30 - 40 10 - 20 -
Boter 0,25 30 - 40 10 - 15 -
Taart 1,4 60 60 -
10.5 Dehydrateren - Warme lucht
Bedek de bakplaten met vetbestendig papier
of bakpapier.
Voor een beter resultaat, stop de oven
halverwege de droogtijd, open de deur en
laat het een nacht afkoelen om het drogen af
te ronden.
Gebruik de derde rekstand voor 1 bakplaat.
Gebruik de eerste en de vierde rekstand voor
2 bakplaten.
GROENTEN
(°C) (u)
Bonen 60 - 70 6 - 8
Paprika’s 60 - 70 5 - 6
Soepgroenten 60 - 70 5 - 6
Champignons 50 - 60 6 - 8
Kruiden 40 - 50 2 - 3
Stel de temperatuur in op 60 - 70 °C.
38 NEDERLANDS

FRUIT
(u)
Pruimen 8 - 10
Abrikozen 8 - 10
FRUIT
(u)
Schijfjes appel 6 - 8
Peren 6 - 9
10.6 Warmelucht (vochtig) - aanbevolen accessoires
Gebruik de donkere en niet-reflecterende bakjes en schalen. Ze nemen de warmte beter op
dan licht en reflecterend servies.
Pizza pan
Ovenschotel
Ovenschaaltjes
Blik voor flanbodem
Donker, niet-reflecterend
Diameter van 28 cm
Donker, niet-reflecterend
Diameter van 26 cm
Keramiek
8 cm diameter, 5
cm hoog
Donker, niet-reflecterend
Diameter van 28 cm
10.7 Warmelucht (vochtig)
Volg voor de beste resultaten de volgende
aanwijzingen op die hieronder in de tabel
staan.
(°C) (min)
Zoete broodjes, 12
stuks
bakplaat of lekschaal 175 3 40 - 50
Broodjes, 9 stuks bakplaat of lekschaal 180 2 35 - 45
Pizza, bevroren, 0,35
kg
rooster 180 2 45 - 55
Koninginnenbrood
(opgerolde cake met
jam)
bakplaat of lekschaal 170 2 30 - 40
Brownie bakplaat of lekschaal 170 2 45 - 50
Soufflé, 6 stuks keramieken vormpjes op roos‐
ter
190 3 45 - 55
Luchtige vlaaibodem flanvorm op rooster 180 2 35 - 45
Victoriataart met jam‐
vulling
ovenschaal op rooster 170 2 35 - 50
Gepocheerde vis, 0,3
kg
bakplaat of lekschaal 180 2 35 - 45
NEDERLANDS 39

(°C) (min)
Hele vis, 0,2 kg bakplaat of lekschaal 180 3 25 - 35
Visfilet, 0,3 kg pizzavorm op rooster 170 3 30 - 40
Gepocheerd vlees,
0,25 kg
bakplaat of lekschaal 180 3 35 - 45
Sjasliek, 0,5 kg bakplaat of lekschaal 180 3 40 - 50
Koekjes, 16 stuks bakplaat of lekschaal 150 2 30 - 45
Makarons, 20 stuks bakplaat of lekschaal 180 2 45 - 55
Muffins, 12 stuks bakplaat of lekschaal 170 2 30 - 40
Hartig gebak, 16
stuks
bakplaat of lekschaal 170 2 35 - 45
Zandkoekjes, 20
stuks
bakplaat of lekschaal 150 2 40 - 50
Taartjes, 8 stuks bakplaat of lekschaal 170 2 30 - 40
Groenten, gepo‐
cheerd, 0,4 kg
bakplaat of lekschaal 180 2 35 - 45
Vegetarisch omelet pizzavorm op rooster 180 3 35 - 45
Mediterrane groen‐
ten, 0,7 kg
bakplaat of lekschaal 180 4 35 - 45
10.8 Aanwijzingen voor
testinstituten
Testen volgens IEC 60350-1.
(°C) (min)
Kleine ca‐
kes, 20
stuks per
bakplaat
Boven- /onder‐
warmte
Bakplaat 3 170 20 - 30 -
Kleine ca‐
kes, 20
stuks per
bakplaat
Warme lucht Bakplaat 3 150 -
160
20 - 35 -
Kleine ca‐
kes, 20
stuks per
bakplaat
Warme lucht Bakplaat 2 en 4 150 -
160
20 - 35 -
40 NEDERLANDS

(°C) (min)
Appeltaart,
2 blikken
Ø20 cm
Boven- /onder‐
warmte
Bakrooster 2 180 70 - 90 -
Appeltaart,
2 blikken
Ø20 cm
Warme lucht Bakrooster 2 160 70 - 90 -
Biscuitge‐
bak, taart‐
vorm Ø26
cm
Boven- /onder‐
warmte
Bakrooster 2 170 40 - 50 Verwarm de oven 10
minuten voor.
Biscuitge‐
bak, taart‐
vorm Ø26
cm
Warme lucht Bakrooster 2 160 40 - 50 Verwarm de oven 10
minuten voor.
Biscuitge‐
bak, taart‐
vorm Ø26
cm
Warme lucht Bakrooster 2 en 4 160 40 - 60 Verwarm de oven 10
minuten voor.
Zandtaart‐
deeg
Warme lucht Bakplaat 3 140 -
150
20 - 40 -
Zandtaart‐
deeg
Warme lucht Bakplaat 2 en 4 140 -
150
25 - 45 -
Zandtaart‐
deeg
Boven- /onder‐
warmte
Bakplaat 3 140 -
150
25 - 45 -
Geroosterd
brood, 4 - 6
stuks
Grill Bakrooster 4 max. 2 - 3 minuten eer‐
ste kant; 2 - 3 mi‐
nuten tweede kant
Verwarm de oven 3
minuten voor.
Runderbur‐
ger, 6 stuks,
0,6 kg
Grill Rooster en
lekbak
4 max. 20 - 30 Plaats het rooster op
het vierde niveau en
de lekbak op het derde
niveau in de oven.
Draai het voedsel hal‐
verwege de berei‐
dingstijd om.
Verwarm de oven 3
minuten voor.
11. ONDERHOUD EN REINIGING
WAARSCHUWING!
Raadpleeg de hoofdstukken
Veiligheid.
NEDERLANDS 41

11.1 Opmerkingen over schoonmaken
Reinigingsmid‐
delen
Maak de voorkant van de oven schoon met een zachte doek, warm water en een mild reini‐
gingsmiddel. Reinig en controleer de deurpakking rond het frame van de uitsparing.
Gebruik een reinigingsoplossing om metalen oppervlakken te reinigen.
Reinig vlekken met een mild reinigingsmiddel.
Dagelijks gebruik
Reinig de uitsparing telkens na gebruik. Vetophoping of andere resten kunnen brand veroor‐
zaken.
Vocht kan in de oven of op de glazen deurpanelen condenseren. Om de condens te vermin‐
deren, dient u de oven 10 minuten te laten werken voordat u er iets in plaatst. Bewaar het
voedsel niet langer dan 20 minuten in de oven. Droog de uitsparing na elk gebruik met een
zachte doek.
Accessoires
Reinig alle accessoires na elk gebruik en laat ze drogen. Gebruik een zachte doek met
warm water en een mild reinigingsmiddel. De accessoires niet in de afwasmachine reinigen.
Reinig de antiaanbakaccessoires niet met agressieve reinigingsmiddelen of scherpe voor‐
werpen.
11.2 Hoe te verwijderen:
Inschuifrails/
Verwijder de inschuifrails om de oven te
reinigen.
Stap 1 Schakel de oven uit en wacht tot deze
afgekoeld is.
Stap 2 Trek de inschuifrail bij de voorkant uit
de zijwand.
Stap 3 Trek de inschuifrail bij de achterkant
uit de zijwand en verwijder deze.
2
1
Stap 4 Installeer de inschuifrails in de omge‐
keerde volgorde.
11.3 Ga als volgt te werk voor
gebruik: Reinigen met water
Deze reinigingsprocedure maakt gebruik van
vocht om achtergebleven vet en
voedselresten uit de oven te verwijderen.
Stap 1 Giet water in de uitsparing van de
ovenruimte: 300 ml.
Stap 2
Stel de functie in: .
42 NEDERLANDS

Stap 3 Stel de temperatuur in op 90 °C.
Stap 4 Laat de oven 30 minuten werken.
Stap 5 Schakel de oven uit.
Stap 6 Wacht tot de oven afgekoeld is. Maak
de holte droog met een zachte doek.
11.4 Hoe te verwijderen en installeren: Deur
De ovendeur beschikt over twee glasplaten. U kunt de ovendeur en de interne glasplaat
verwijderen om ze schoon te maken. Lees de volledige instructie 'Verwijderen van
installatiedeur' voordat u de glasplaten verwijdert.
LET OP!
Gebruik de oven nooit zonder de glasplaten.
Stap 1 Open de deur volledig en houd beide schar‐
nieren vast.
Stap 2 Til de hendel op beide scharnieren volledig
omhoog en draai het.
Stap 3 Sluit de ovendeur halverwege tot de eerste
openingsstand. Til hem daarna op en trek
hem naar voren en verwijder hem van zijn
plek.
Stap 4 Leg de deur op een zachte doek op een sta‐
biele ondergrond.
Stap 5 Deurafdekking (B) aan de bovenkant van de
deur aan beide kanten vastpakken en naar
binnen drukken om de klemsluiting te ont‐
grendelen.
Stap 6 Trek de deurlijst naar voren om hem te ver‐
wijderen.
1
2
B
Stap 7 Houd de glasplaat van de deur bij de boven‐
kant vast en trek deze voorzichtig naar bui‐
ten. Zorg dat het glas volledig uit de gelei‐
ders schuift.
NEDERLANDS 43

Stap 8 Reinig de glasplaten met een sopje. Droog
de glasplaten voorzichtig af. Reinig de glas‐
platen niet in de vaatwasser.
Stap 9 Installeer na het reinigen de glasplaat en de
ovendeur.
De bedrukte zone moet naar de binnenkant van de
deur gericht zijn. Zorg ervoor dat het oppervlak van
de glasplaat op de bedrukte zijde na de installatie niet
ruw aanvoelt.
Als de deur correct wordt geïnstalleerd, klikt de rand
van de deur.
Zorg ervoor dat u de interne glasplaat correct in de
uitsparingen plaatst.
A
11.5 Hoe te vervangen: Lamp
WAARSCHUWING!
Gevaar voor elektrische
schokken.
Het lampje kan heet zijn.
Houd de halogeenlamp altijd met een doek
vast om te voorkomen dat er vetrestjes op de
ovenlamp verbranden.
Voordat u de lamp vervangt:
Stap 1 Stap 2 Stap 3
Schakel de oven uit. Wacht tot de
oven afgekoeld is.
Trek de oven uit het stopcontact. Plaats een doek op de bodem van
de holte.
Achterlamp
Stap 1 Draai de glazen afdekking om die te verwijderen.
Stap 2 Reinig het glazen deksel.
Stap 3 Vervang de lamp door een geschikte hittebestendige lamp van 300 °C.
Stap 4 Installeer het glazen deksel.
12. PROBLEEMOPLOSSING
WAARSCHUWING!
Raadpleeg de hoofdstukken
Veiligheid.
12.1 Wat te doen in de volgende
gevallen...
Neem in alle gevallen die niet in deze tabel
zijn opgenomen contact op met een erkend
servicecentrum.
44 NEDERLANDS

Probleem Controleer of de vol‐
gende zaken gel‐
den...
De oven wordt niet warm. De zekering is doorgesla‐
gen.
De deurpakking is be‐
schadigd.
Gebruik de oven niet.
Neem contact op met
een erkend servicecen‐
trum.
Einde van het koken - is
niet ingesteld.
Instellen: Einde van het
koken. Zie 'Klokfuncties'.
Probleem Controleer of de vol‐
gende zaken gel‐
den...
De lamp werkt niet. De lamp is opgebrand.
12.2 Onderhoudsgegevens
Als u niet zelf het probleem kunt verhelpen,
neem dan contact op met uw verkoper ofeen
erkende serviceafdeling.
De contactgegevens van het servicecentrum
staan op het typeplaatje. Het typeplaatje
bevindt zich aan de voorkant van de
binnenkant van de oven. Verwijder het
typeplaatje niet uit de ovenruimte.
Wij adviseren u om de gegevens hier te noteren:
Model (MOD.) .........................................
Productnummer (PNC) .........................................
Serienummer (S.N.) .........................................
13. ENERGIEZUINIGHEID
13.1 Productinformatie- en productinformatieblad*
Naam leverancier Zanussi
Modelidentificatie
ZOHKF1X1 949496249
ZOHNF1K1 949496304
ZOHNF1W1 949496305
Energie-efficiëntie-index 81.2
Energie-efficiëntieklasse A+
Energieverbruik bij een standaardbelasting, stand boven + onder‐
warmte
0.93 kWh/cyclus
Energieverbruik bij een standaardbelasting, stand hetelucht 0.69 kWh/cyclus
Aantal ruimten 1
Warmtebron Elektriciteit
Volume 72 l
Soort oven Inbouwoven
Massa
ZOHKF1X1 26.7 kg
ZOHNF1K1 26.7 kg
ZOHNF1W1 26.7 kg
NEDERLANDS 45

* Voor de Europese Unie overeenkomstig EU-verordeningen 65/2014 en 66/2014.
Voor de Republiek Belarus overeenkomstig STB 2478-2017, aanhangsel G; STB 2477-2017, bijlagen A en B.
Voor Oekraïne overeenkomstig 568/32020.
De energie-efficiëntieklasse is niet van toepassing op Rusland.
EN 60350-1 - Elektrische huishoudelijke kookapparaten - Deel 1: Range-ovens, ovens, stoomovens en grills -
Methoden voor prestatiemeting.
13.2 Energiebesparing
Deze oven bevat functies die u
helpen energie te besparen
tijdens het dagelijks koken.
Zorg ervoor dat de ovendeur gesloten is als u
de oven in werking stelt. Open de ovendeur
niet te vaak tijdens gebruik. Houd het
deurrubber schoon en zorg ervoor dat het
goed op zijn plaats vastzit.
Gebruik metalen kookgerei om meer energie
te besparen.
Verwarm de oven indien mogelijk niet voor
het koken voor.
Houd de onderbrekingen tussen het bakken
zo kort mogelijk als u een aantal gerechten
tegelijkertijd bereidt.
Bereiding met hete lucht
Gebruik indien mogelijk de bereidingsfuncties
met hete lucht om energie te besparen.
Restwarmte
Wanneer de kookduur langer is dan 30
minuten, verlaag dan de oventemperatuur tot
minimaal 3-10 minuten voor het einde van
het koken. De restwarmte in de oven zorgt
ervoor dat het gerecht wordt voltooid.
U kunt de restwarmte gebruiken om andere
maaltijden op te warmen.
Eten warm houden
Kies de laagst mogelijke
temperatuurinstelling om de restwarmte te
gebruiken en een maaltijd warm te houden.
Warmelucht (vochtig)
Functie is ontworpen om tijdens de bereiding
energie te besparen.
Als u deze functie gebruikt is de verlichting
uit.
14. MILIEUBESCHERMING
Recycleer de materialen met het symbool
. Gooi de verpakking in een geschikte
afvalcontainer om het te recycleren.
Bescherm het milieu en de volksgezondheid
en recycleer op een correcte manier het afval
van elektrische en elektronische apparaten.
Gooi apparaten gemarkeerd met het symbool
niet weg met het huishoudelijk afval. Breng
het product naar het milieustation bij u in de
buurt of neem contact op met de gemeente.
46 NEDERLANDS

VISITEZ NOTRE SITE WEB POUR :
Obtenir des conseils d’utilisation, des brochures, un dépanneur, des informations sur
le service et les réparations :
www.zanussi.com/support
Sous réserve de modifications.
TABLE DES MATIÈRES
1. INFORMATION SUR LA SÉCURITÉ............................................................................47
2. CONSIGNES DE SÉCURITÉ........................................................................................49
3. INSTALLATION.............................................................................................................52
4. DESCRIPTION DE L'APPAREIL.................................................................................. 53
5. AVANT LA PREMIÈRE UTILISATION..........................................................................53
6. UTILISATION QUOTIDIENNE...................................................................................... 54
7. FONCTIONS DE L'HORLOGE..................................................................................... 55
8. UTILISATION DES ACCESSOIRES.............................................................................55
9. FONCTIONS SUPPLÉMENTAIRES.............................................................................56
10. CONSEILS ET ASTUCES...........................................................................................57
11. ENTRETIEN ET NETTOYAGE................................................................................... 65
12. DÉPANNAGE..............................................................................................................68
13. RENDEMENT ÉNERGÉTIQUE.................................................................................. 69
1. INFORMATION SUR LA SÉCURITÉ
Avant d'installer et d'utiliser cet appareil, lisez soigneusement
les instructions fournies. Le fabricant ne pourra être tenu pour
responsable des blessures et dégâts résultant d'une
mauvaise installation ou utilisation. Conservez toujours les
instructions dans un lieu sûr et accessible pour vous y référer
ultérieurement.
1.1 Sécurité des enfants et des personnes
vulnérables
• Cet appareil peut être utilisé par des enfants âgés d'au
moins 8 ans et par des personnes ayant des capacités
physiques, sensorielles ou mentales réduites ou dénuées
d’expérience ou de connaissance, s'ils sont correctement
surveillés ou si des instructions relatives à l'utilisation de
l'appareil en toute sécurité leur ont été données et s’ils
comprennent les risques encourus. Les enfants de moins
de 8 ans et les personnes ayant un handicap très important
FRANÇAIS 47

et complexe doivent être tenus à l'écart de l’appareil, à
moins d'être surveillés en permanence.
• Ne laissez pas les enfants jouer avec l'appareil.
• Ne laissez pas les emballages à la portée des enfants et
jetez-les convenablement.
• AVERTISSEMENT : Tenez les enfants et les animaux
éloignés de l'appareil lorsqu'il est en cours de
fonctionnement ou lorsqu'il refroidit. Les parties accessibles
deviennent chaudes en cours d'utilisation.
• Si l'appareil est équipé d'un dispositif de sécurité enfants,
nous vous recommandons de l'activer.
• Le nettoyage et l'entretien ne doivent pas être effectués par
des enfants sans surveillance.
1.2 Consignes générales de sécurité
• L'appareil doit être installé et le câble remplacé uniquement
par un professionnel qualifié.
• AVERTISSEMENT : L'appareil et ses parties accessibles
deviennent chauds pendant son fonctionnement. Veillez à
ne pas toucher les éléments chauffants.
• Utilisez toujours des gants de cuisine pour retirer ou
enfourner des accessoires ou des plats allant au four.
• Avant d'effectuer une opération de maintenance,
débranchez l'appareil de la prise secteur.
• AVERTISSEMENT : Assurez-vous que l'appareil est éteint
et débranché avant de remplacer l'éclairage afin d'éviter
tout risque de choc électrique.
• N'utilisez pas l'appareil avant de l'avoir installé dans la
structure encastrée.
• N'utilisez pas de nettoyeur vapeur pour nettoyer l'appareil.
• N'utilisez pas de produits abrasifs ni de racloirs pointus en
métal pour nettoyer la porte en verre car ils peuvent rayer
sa surface, ce qui peut briser le verre.
• Si le câble d'alimentation est endommagé, il doit être
remplacé par le fabricant, un service de maintenance agréé
ou un technicien qualifié afin d'éviter tout danger lié à
l'électricité.
48 FRANÇAIS

• Pour retirer les supports de grille, tirez d'abord sur l'avant
de ceux-ci, puis sur l'arrière, pour les écarter des parois
extérieures. Réinstallez les supports de grille en répétant
cette procédure dans l'ordre inverse.
2. CONSIGNES DE SÉCURITÉ
2.1 Installation
AVERTISSEMENT!
L'appareil doit être installé
uniquement par un professionnel
qualifié.
• Retirez l'intégralité de l'emballage.
• N'installez pas et ne branchez pas un
appareil endommagé.
• Suivez scrupuleusement les instructions
d'installation fournies avec l'appareil.
• Soyez toujours vigilants lorsque vous
déplacez l'appareil car il est lourd. Utilisez
toujours des gants de sécurité et des
chaussures fermées.
• Ne tirez jamais l'appareil par la poignée.
• Installez l'appareil dans un lieu sûr et
adapté répondant aux exigences
d'installation.
• Respectez l'espacement minimal requis
par rapport aux autres appareils et
éléments.
• Avant de monter l’appareil, vérifiez si la
porte du four s’ouvre sans retenue.
• Cet appareil est équipé d'un système de
refroidissement électrique. Il doit être
utilisé lorsque l'appareil est raccordé à
une prise secteur.
Hauteur minimale du meu‐
ble (Hauteur minimale du
meuble sous le plan de tra‐
vail)
590 (600) mm
Largeur du meuble 560 mm
Profondeur du meuble 550 (550) mm
Hauteur de l’avant de l’ap‐
pareil
594 mm
Hauteur de l’arrière de l’ap‐
pareil
576 mm
Largeur de l’avant de l’ap‐
pareil
595 mm
Largeur de l’arrière de l’ap‐
pareil
559 mm
Profondeur de l'appareil 569 mm
Profondeur d’encastrement
de l’appareil
548 mm
Profondeur avec porte ou‐
verte
1022 mm
Dimensions minimales de
l’ouverture de ventilation.
Ouverture placée sur la
partie inférieure de la face
arrière
560x20 mm
Longueur du câble d’ali‐
mentation secteur. Le câ‐
ble est placé dans le coin
droit de la face arrière
1500 mm
Vis de montage 4x25 mm
2.2 Raccordement électrique
AVERTISSEMENT!
Risque d'incendie ou
d'électrocution.
• Tous les raccordements électriques
doivent être effectués par un électricien
qualifié.
• L’appareil doit être relié à la terre.
• Assurez-vous que les paramètres figurant
sur la plaque signalétique correspondent
aux données électriques nominale de
l’alimentation secteur.
• Utilisez toujours une prise de courant de
sécurité correctement installée.
• N'utilisez pas d'adaptateurs multiprise et
de rallonges.
• Veillez à ne pas endommager la fiche
secteur ni le câble d'alimentation. Le
remplacement du câble d’alimentation de
l’appareil doit être effectué par notre
service après-vente agréé.
• Ne laissez pas les câbles d'alimentation
entrer en contact ou s'approcher de la
FRANÇAIS 49

porte de l'appareil ou de la niche
d'encastrement sous l'appareil,
particulièrement lorsqu'il est en marche ou
que la porte est chaude.
• La protection contre les chocs des parties
sous tension et isolées doit être fixée de
telle manière qu'elle ne puisse pas être
enlevée sans outils.
• Ne branchez la fiche secteur dans la prise
secteur qu'à la fin de l'installation.
Assurez-vous que la prise secteur est
accessible après l'installation.
• Si la prise secteur est détachée, ne
branchez pas la fiche secteur.
• Ne tirez pas sur le câble secteur pour
débrancher l'appareil. Tirez toujours sur la
fiche de la prise secteur.
• N'utilisez que des systèmes d'isolation
appropriés : des coupe-circuits, des
fusibles (les fusibles à visser doivent être
retirés du support), un disjoncteur
différentiel et des contacteurs.
• L'installation électrique doit comporter un
dispositif d'isolation qui vous permet de
déconnecter l'appareil du secteur à tous
les pôles. Le dispositif d'isolement doit
avoir une largeur d'ouverture de contact
de 3 mm minimum.
• Cet appareil est fourni avec une fiche
d'alimentation et un câble d'alimentation.
Types de câbles compatibles pour l'instal‐
lation ou le remplacement pour l’Europe :
H07 RN-F, H05 RN-F, H05 RRF, H05 VV-F, H05
V2V2-F (T90), H05 BB-F
Pour la section du câble, consultez la
puissance totale sur la plaque signalétique.
Vous pouvez également consulter le
tableau :
Puissance totale (W) Section du câble
(mm²)
maximum 1380 3 x 0.75
maximum 2300 3 x 1
maximum 3680 3 x 1.5
Le fil de masse (fil jaune/vert) doit faire 2 cm
de plus que les fils de phase et neutre (fils
bleu et marron).
2.3 Utilisation
AVERTISSEMENT!
Risque de blessures, de
brûlures, d'électrocution ou
d'explosion.
• Cet appareil est exclusivement destiné à
une utilisation domestique.
• Ne modifiez pas les caractéristiques de
cet appareil.
• Assurez-vous que les orifices de
ventilation ne sont pas bouchés.
• Ne laissez jamais l'appareil sans
surveillance pendant son fonctionnement.
• Éteignez l'appareil après chaque
utilisation.
• Soyez prudent lors de l'ouverture de la
porte de l'appareil lorsque celui-ci est en
fonctionnement. De l'air brûlant peut s'en
échapper.
• N'utilisez jamais cet appareil avec les
mains mouillées ou lorsqu'il est en contact
avec de l'eau.
• N'exercez jamais de pression sur la porte
ouverte.
• N'utilisez jamais l'appareil comme plan de
travail ou comme plan de stockage.
• Ouvrez prudemment la porte de l'appareil.
Si vous utilisez des ingrédients contenant
de l'alcool, un mélange d'alcool et d'air
facilement inflammable peut
éventuellement se former.
• Ne laissez pas des étincelles ou des
flammes nues entrer en contact avec
l'appareil lorsque vous ouvrez la porte.
• Ne placez pas de produits inflammables
ou d'éléments imbibés de produits
inflammables à l'intérieur ou à proximité
de l'appareil, ni sur celui-ci.
AVERTISSEMENT!
Risque d'endommagement de
l'appareil.
• Pour éviter tout endommagement ou
décoloration de l’émail :
– ne posez pas de plats allant au four ni
aucun autre objet directement sur le
fond de l'appareil.
50 FRANÇAIS

– ne placez jamais de feuilles
d'aluminium directement sur le fond
de la cavité de l'appareil.
– ne versez jamais d'eau directement
dans l'appareil lorsqu'il est chaud.
– une fois la cuisson terminée, ne
laissez jamais d'aliments ou de plats
humides à l'intérieur de l'appareil.
– faites attention lorsque vous retirez ou
remettez en place les accessoires.
• La décoloration de l'émail ou de l'acier
inoxydable est sans effet sur les
performances de l'appareil.
• Utilisez un plat à rôtir pour obtenir des
gâteaux moelleux. Les jus de fruits
causent des taches qui peuvent être
permanentes.
• Cet appareil est exclusivement destiné à
un usage culinaire. Ne l'utilisez pas pour
des usages autres que celui pour lequel il
a été conçu, à des fins de chauffage par
exemple.
• La porte du four doit toujours être fermée
pendant la cuisson.
• Si l’appareil est installé derrière la paroi
d’un meuble (par ex. une porte), veuillez à
ce que la porte ne soit jamais fermée
lorsque l’appareil fonctionne. La chaleur
et l’humidité peuvent s’accumuler derrière
la porte fermée du meuble et provoquer
d’importants dégâts sur l’appareil, votre
logement ou le sol. Ne fermez pas la paroi
du meuble tant que l’appareil n’a pas
refroidi complètement.
2.4 Entretien et Nettoyage
AVERTISSEMENT!
Risque de blessure, d'incendie
ou de dommages matériels sur
l'appareil.
• Avant toute opération d'entretien, éteignez
l'appareil et débranchez la fiche de la
prise secteur.
• Vérifiez que l'appareil est froid. Les
panneaux de verre risquent de se briser.
• Remplacez immédiatement les vitres de
la porte si elles sont endommagées.
Contactez le service après-vente agréé.
• Soyez prudent lorsque vous retirez la
porte de l'appareil. La porte est lourde !
• Nettoyez régulièrement l'appareil afin de
maintenir le revêtement en bon état.
• Nettoyez l'appareil avec un chiffon doux
humide. Utilisez uniquement des produits
de lavage neutres. N'utilisez pas de
produits abrasifs, de tampons à récurer,
de solvants ni d'objets métalliques.
• Si vous utilisez un spray pour four, suivez
les consignes de sécurité figurant sur son
emballage.
2.5 Éclairage intérieur
AVERTISSEMENT!
Risque d'électrocution !
• Concernant la/les lampe(s) à l’intérieur de
ce produit et les lampes de rechange
vendues séparément : Ces lampes sont
conçues pour résister à des conditions
physiques extrêmes dans les appareils
électroménagers, telles que la
température, les vibrations, l’humidité, ou
sont conçues pour signaler des
informations sur le statut opérationnel de
l’appareil. Elles ne sont pas destinées à
être utilisées dans d'autres applications et
ne conviennent pas à l’éclairage des
pièces d’un logement.
• Utilisez uniquement des ampoules ayant
les mêmes spécifications.
2.6 Maintenance
• Pour réparer l'appareil, contactez un
service après-vente agréé.
• Utilisez exclusivement des pièces
d'origine.
2.7 Mise au rebut
AVERTISSEMENT!
Risque de blessure ou
d'asphyxie.
• Débranchez l'appareil de l'alimentation
électrique.
• Coupez le câble d'alimentation au ras de
l'appareil et mettez-le au rebut.
• Retirez le dispositif de verrouillage du
hublot pour empêcher les enfants et les
animaux de s'enfermer dans l'appareil.
FRANÇAIS 51

3. INSTALLATION
AVERTISSEMENT!
Reportez-vous aux chapitres
concernant la sécurité.
3.1 Encastrement
18
594
589
114
21548
595
+-1
min. 550
20
600
min. 560
3
5
60
20
80
520
60
198
523
(*mm)
min. 550
20
595
+-1
18
590
min. 560
594
589
114
21548
3
5
70
60
520
60
20
198
523
(*mm)
52 FRANÇAIS

3.2 Fixation du four au meuble
4. DESCRIPTION DE L'APPAREIL
4.1 Vue d’ensemble
8
7
9
10
11
5
4
3
2
1
321 64 5
12
1
Bandeau de commande
2
Voyant / symbole de mise sous tension
3
Manette de sélection des modes de
cuisson
4
Manette du minuteur
5
Thermostat
6
Indicateur / symbole de température
7
Élément chauffant
8
Éclairage
9
Ventilateur
10
Bac de nettoyage Aqua Clean
11
Support de grille, amovible
12
Position des grilles
4.2 Accessoires
• Grille métallique
Pour les plats à rôti, à gratin et les moules
à gâteau/pâtisserie.
• Plateau de cuisson
Pour les gâteaux et les biscuits.
5. AVANT LA PREMIÈRE UTILISATION
AVERTISSEMENT!
Reportez-vous aux chapitres
concernant la sécurité.
FRANÇAIS 53

5.1 Avant la première utilisation
Une odeur et de la fumée peuvent s'échapper du four durant le préchauffage. Assurez-vous
que la pièce est ventilée.
Étape 1
Étape 2
Nettoyez le four Préchauffez le four à vide
1. Retirez les supports de grille amovibles et tous les
accessoires du four.
2. Nettoyez le four et les accessoires avec un chiffon
doux, de l’eau tiède et un détergent doux.
1. Réglez la température maximale pour la fonction :
.
Durée : 1 h.
2. Réglez la température maximale pour la fonction :
.
Durée : 15'
Éteignez le four et attendez qu’il soit froid. Placez les accessoires et les supports de grille amovibles dans le four.
6. UTILISATION QUOTIDIENNE
AVERTISSEMENT!
Reportez-vous aux chapitres
concernant la sécurité.
6.1 Comment régler : Mode de
cuisson
Étape 1 Tournez la manette des modes de cuis‐
son pour sélectionner un mode de cuis‐
son.
Étape 2 Tournez la manette pour sélectionner
la température.
Étape 3 Une fois la cuisson terminée, tournez
les manettes sur la position Arrêt pour
éteindre le four.
6.2 Modes de cuisson
Mode de
cuisson
Application
Position Arrêt
Le four est éteint.
Eclairage four
Pour allumer l’éclairage.
Mode de
cuisson
Application
Chaleur tour‐
nante humide
Cette fonction est conçue pour éco‐
nomiser de l'énergie en cours de
cuisson. Lorsque vous utilisez cette
fonction, la température à l'intérieur
de la cavité peut différer de la tem‐
pérature sélectionnée. La puissan‐
ce peut être réduite. Pour plus d’in‐
formations, consultez le chapitre
« Utilisation quotidienne », Remar‐
ques sur : Chaleur tournante humi‐
de.
Chaleur tour‐
nante
Pour cuire ou rôtir simultanément
sur plusieurs niveaux des aliments
nécessitant une température de
cuisson identique, sans que les sa‐
veurs ne se mélangent.
Turbo gril
Pour rôtir de grosses pièces de
viande ou de volaille avec os sur un
seul niveau. Également pour grati‐
ner et faire dorer.
Cuisson de so‐
le
Pour cuire des gâteaux à fond
croustillant et pour stériliser des ali‐
ments.
Fonction Pizza
Pour cuire des pizzas. Pour dorer
de façon intensive et obtenir un
fond croustillant. Réglez la tempéra‐
ture sur 230 °C.
54 FRANÇAIS

Mode de
cuisson
Application
Décongélation
Pour décongeler des aliments (fruits
et légumes). Le temps de décongé‐
lation dépend de la quantité et de
l'épaisseur des aliments surgelés.
Chauffage
Haut/ Bas /
Nettoyage
Aqua Clean
Pour cuire et rôtir des aliments sur
un seul niveau.
Reportez-vous au chapitre « Entre‐
tien et nettoyage » pour obtenir plus
d'informations sur : Aqua Clean.
6.3 Remarques sur : Chaleur
tournante humide
Cette fonction était utilisée pour se conformer
à la classe d'efficacité énergétique et aux
exigences d’éco-conception selon les
normes EU 65/2014 et EU 66/2014. Tests
conformément à la norme EN 60350-1.
Pendant la cuisson, la porte du four doit
rester fermée pour éviter d'interrompre la
fonction et pour un fonctionnement avec la
meilleure efficacité énergétique possible.
Lorsque vous utilisez cette fonction,
l'éclairage s'éteint automatiquement.
Pour obtenir des instructions de cuisson,
reportez-vous au chapitre « Conseils »,
paragraphe Chaleur tournante humide. Pour
obtenir des recommandations générales sur
les économies d'énergie, consultez le
chapitre « Efficacité énergétique, « Four -
Économie d'énergie ».
7. FONCTIONS DE L'HORLOGE
7.1 Comment régler : Heure de fin
de cuisson
Pour régler l'heure d'arrêt des fonctions du four.
Étape 1 Sélectionnez la fonction du four et la température.
Étape 2 Tournez la manette du minuteur sur sa position maximale.
Étape 3 Tournez la manette du minuteur pour définir l'heure d’arrêt.
Lorsque la durée définie est écoulée, le signal sonore retentit et le four s'éteint.
Étape 4 Tournez les boutons de fonction du four et de température sur la position d'arrêt.
8. UTILISATION DES ACCESSOIRES
AVERTISSEMENT!
Reportez-vous aux chapitres
concernant la sécurité.
8.1 Insertion des accessoires
Une petite indentation sur le dessus apporte
plus de sécurité. Les indentations sont
également des dispositifs anti-bascule. Le
rebord élevé de la grille empêche les
ustensiles de cuisine de glisser.
FRANÇAIS 55

Grille métallique:
Poussez la grille entre les barres de guidage des
supports de grille et assurez-vous que les pieds
sont orientés vers le bas.
Plateau de cuisson:
Poussez le plateau entre les rails du support de
grille.
Grille métallique, Plateau de cuisson:
Poussez le plateau entre les rails du support de
grille et glissez la grille métallique entre les rails se
trouvant juste au-dessus.
9. FONCTIONS SUPPLÉMENTAIRES
9.1 Ventilateur de refroidissement
Lorsque le four fonctionne, le ventilateur de
refroidissement se met automatiquement en
marche pour refroidir les surfaces du four. Si
vous éteignez le four, le ventilateur de
refroidissement continue à fonctionner
jusqu'à ce que le four refroidisse.
9.2 Thermostat de sécurité
Un mauvais fonctionnement du four ou des
composants défectueux peuvent causer une
surchauffe dangereuse. Pour éviter cela, le
four dispose d'un thermostat de sécurité
interrompant l'alimentation électrique. Le four
se remet automatiquement en
fonctionnement lorsque la température
baisse.
56 FRANÇAIS

10. CONSEILS ET ASTUCES
Reportez-vous aux chapitres
concernant la sécurité.
10.1 Conseils de cuisson
Le four dispose de cinq niveaux de grille.
Comptez les niveaux de grille à partir du bas
du four.
Votre four peut cuire les aliments d'une
manière complètement différente de celle de
votre ancien four. Les tableaux ci-dessous
vous indiquent les réglages standard pour la
température, le temps de cuisson et le
niveau du four.
Si vous ne trouvez pas les réglages
appropriés pour une recette spécifique,
cherchez-en une qui s'en rapproche.
Le four est doté d'un système spécial qui
permet à l'air de circuler et qui recycle
perpétuellement la vapeur. Dans cet
environnement, ce système permet de
cuisiner des plats tout en maintenant ceux-ci
tendres à l'intérieur et croquants à l'extérieur.
Le temps de cuisson et la consommation
énergétique sont donc réduits.
Cuisson de gâteaux
N'ouvrez la porte du four qu'aux 3/4 du
temps de cuisson défini.
Si vous utilisez deux plaques de cuisson en
même temps, laissez un niveau libre entre
les deux.
Cuisson de viande et de poisson
Avant de couper la viande, laissez-la reposer
pendant environ 15 minutes afin d'éviter que
le jus ne s'écoule.
Pour éviter qu'une trop grande quantité de
fumée ne se forme dans le four, ajoutez de
l'eau dans le plat à rôtir. Pour éviter que la
fumée ne se condense, ajoutez à nouveau
de l'eau dans le plat à rôtir à chaque fois qu'il
n'en contient plus.
Temps de cuisson
Le temps de cuisson varie selon le type
d'aliment, sa consistance et son volume.
Au départ, surveillez la cuisson lorsque vous
cuisinez. Ainsi, vous trouverez les meilleurs
réglages (fonction, temps de cuisson, etc.)
pour vos ustensiles, vos recettes et les
quantités lorsque vous utiliserez l'appareil.
10.2 Rôtissage et cuisson
GÂ‐
TEAUX
Chauffage Haut/ Bas Chaleur tournante
(min)
(°C) (°C)
Recettes avec un
fouet
170 2 160 3 45 à 60 Moule à gâteau
Pâte sablée 170 2 160 3 20 à 30 Moule à gâteau
Cheesecake au
babeurre
170 1 160 1 70 à 80 Moule à gâteau, Ø
26 cm
Strudel 175 3 150 2 60 à 80 Plateau de cuis‐
son
Tarte à la confitu‐
re
170 2 165 2 30 à 40 Plateau de cuis‐
son
Gâteau de Noël,
préchauffer le four
à vide
160 2 150 2 90 à 120 Moule à gâteau, Ø
20 cm
FRANÇAIS 57

GÂ‐
TEAUX
Chauffage Haut/ Bas Chaleur tournante
(min)
(°C) (°C)
Gâteau aux pru‐
nes, préchauffer
le four à vide
175 1 160 2 50 à 60 Moule à pain
Biscuits 140 3 140 à 150 3 30 à 35 Plateau de cuis‐
son
Biscuits, deux ni‐
veaux
- - 140 à 150 2 et 4 35 à 40 Plateau de cuis‐
son
Biscuits, trois ni‐
veaux
120 3 120 3 80 à 100 Plateau de cuis‐
son
Meringues 190 3 180 3 15 à 20 Plateau de cuis‐
son
Petits pains, pré‐
chauffer le four à
vide
190 3 170 3 25 à 35 Plateau de cuis‐
son
Éclairs, un niveau 180 2 170 2 45 à 70 Plateau de cuis‐
son
Éclairs, deux ni‐
veaux
160 1 150 2 110 à 120 Plateau de cuis‐
son
Tartes sur plateau 170 1 160 1 50 à 60 Plateau de cuis‐
son
Gâteau avec
beaucoup de
fruits
190 3 190 3 12 à 20 Plateau de cuis‐
son
Génoise Victoria 190 3 170 3 25 à 35 Plateau de cuis‐
son
Préchauffez le four à vide.
PAIN ET
PIZZA
Chauffage Haut/ Bas Chaleur tournante
(min)
(°C) (°C)
Pain blanc, 1 à
2 pièces, 0,5 kg
chacune
190 1 190 1 60 à 70 -
Pain de seigle, le
préchauffage
n’est pas néces‐
saire
190 1 180 1 30 à 45 Moule à pain
Petits pains, 6 à 8
petits pains
230 à 250 1 230 à 250 1 10 à 12 Plateau de cuis‐
son
58 FRANÇAIS

PAIN ET
PIZZA
Chauffage Haut/ Bas Chaleur tournante
(min)
(°C) (°C)
Pizza 200 3 190 3 10 à 12 Plateau de cuis‐
son / Plat à rôtir
Scones 200 3 190 3 10 à 12 Plateau de cuis‐
son
Préchauffez le four à vide.
Utilisez le moule à gâteaux.
FLANS
Chauffage Haut/ Bas Chaleur tournante
(min)
(°C) (°C)
Flan de pâtes, le pré‐
chauffage n’est pas
nécessaire
200 2 180 2 40 à 50
Flan de légumes, le
préchauffage n’est pas
nécessaire
200 2 175 2 45 à 60
Quiches 180 1 180 1 50 à 60
Lasagne 180 à 190 2 180 à 190 2 25 à 40
Cannellonis 180 à 190 2 180 à 190 2 25 à 40
Utilisez la grille métallique.
VIANDE
Chauffage Haut/ Bas Chaleur tournante
(min)
(°C) (°C)
Bœuf 200 2 190 2 50 à 60
Porc 180 2 180 2 90 à 120
Veau 190 2 175 2 90 à 120
Rôti de bœuf, saignant 210 2 200 2 50 à 60
Rôti de bœuf, cuit à
point
210 2 200 2 60 à 70
Rôti de bœuf, bien cuit 210 2 200 2 70 à 90
FRANÇAIS 59

VIANDE
Chauffage Haut/ Bas Chaleur tournante
(min)
(°C) (°C)
Palette de porc, avec
couenne
180 2 170 2 120 à 150
Jarret de porc, 2 mor‐
ceaux
180 2 160 2 100 à 120
Gigot d’agneau 190 2 175 2 110 à 130
Poulet entier 220 2 200 2 70 à 85
Dinde entière 180 2 160 2 210 à 240
Canard entier 175 2 220 2 120 à 150
Oie entière 175 2 160 1 150 à 200
Lapin, en morceaux 190 2 175 2 60 à 80
Lièvre, en morceaux 190 2 175 2 150 à 200
Faisan entier 190 2 175 2 90 à 120
POISSON
Chauffage Haut/ Bas Chaleur tournante
(min)
(°C) (°C)
Truite / Dorade/ , 3 à
4 poissons
190 2 175 2 40 à 55
Thon / Saumon/ , 4 à 6 fi‐
lets
190 2 175 2 35 à 60
10.3 Turbo gril
Préchauffez le four à vide.
Utilisez le premier ou le deuxième niveau de
la grille.
Pour calculer le temps de rôtissage,
multipliez le temps indiqué dans le tableau ci-
dessous par l'épaisseur de la viande en cm.
BŒUF
(°C) (min)
Rôti ou filet de bœuf,
saignant
190 - 200 5 - 6
Rôti ou filet de bœuf, à
point
180 - 190 6 - 8
BŒUF
(°C) (min)
Rôti ou filet de bœuf,
bien cuit
170 - 180 8 - 10
PORC
(°C) (min)
Épaule / Cou / Noix de
jambon, 1 - 1,5 kg
160 - 180 90 - 120
Côtelettes / Côte levée,
1 - 1,5 kg
170 - 180 60 - 90
Pain de viande, 0,75 -
1 kg
160 - 170 50 - 60
60 FRANÇAIS

PORC
(°C) (min)
Jarret de porc, pré-cuit,
0,75 - 1 kg
150 - 170 90 - 120
VEAU
(°C) (min)
Rôti de veau, 1 kg 160 - 180 90 - 120
Jarret de veau, 1,5 - 2
kg
160 - 180 120 - 150
AGNEAU
(°C) (min)
Gigot d’agneau / Rôti
d’agneau, 1 - 1,5 kg
150 - 170 100 - 120
Selle d’agneau, 1 - 1,5
kg
160 - 180 40 - 60
VOLAILLE
(°C) (min)
Volaille, portions0,2 -
0,25 kg chacune
200 - 220 30 - 50
VOLAILLE
(°C) (min)
Poulet, demi0,4 - 0,5
kg chacune
190 - 210 35 - 50
Poulet, poularde, 1 -
1,5 kg
190 - 210 50 - 70
Canard, 1,5 - 2 kg 180 - 200 80 - 100
Oie, 3,5 - 5 kg 160 - 180 120 - 180
Dinde, 2,5 - 3,5 kg 160 - 180 120 - 150
Dinde, 4 - 6 kg 140 - 160 150 - 240
POISSON
(À LA VAPEUR) (°C) (min)
Poisson entier, 1 - 1,5
kg
210 - 220 40 - 60
10.4 Décongélation
(kg)
Durée de décon‐
gélation (min)
Décongélation com‐
plémentaire (min)
Poulet 1 100 - 140 20 - 30 Placez le poulet sur une
sous-tasse retournée, po‐
sée sur une grande assiet‐
te. Retournez à la moitié
du temps.
Viande 1 100 - 140 20 - 30 Retournez à la moitié du
temps.
0,5 90 - 120
Crème 2 x 0,2 80 - 100 10 - 15 La crème fraîche peut
aussi être battue même si
elle n'est pas complète‐
ment décongelée.
FRANÇAIS 61

(kg)
Durée de décon‐
gélation (min)
Décongélation com‐
plémentaire (min)
Truite 0,15 25 - 35 10 - 15 -
Fraises 0,3 30 - 40 10 - 20 -
Beurre 0,25 30 - 40 10 - 15 -
Gâteau 1,4 60 60 -
10.5 Déshydratation - Chaleur
tournante
Couvrez les plateaux avec du papier
sulfurisé ou du papier de cuisson.
Pour de meilleurs résultats, arrêtez le four à
mi-cuisson, ouvrez la porte et laissez-la
refroidir pendant une nuit pour terminer le
séchage.
Pour un plateau, utilisez le troisième niveau
de la grille.
Pour deux plateaux, utilisez les premier et
quatrième niveaux de la grille.
LÉGUMES
(°C) (h)
Haricots 60 - 70 6 - 8
Poivrons 60 - 70 5 à 6
LÉGUMES
(°C) (h)
Légumes pour soupe 60 - 70 5 à 6
Champignons 50 - 60 6 - 8
Herbes 40 - 50 2 à 3
Réglez la température sur 60 - 70 °C.
FRUITS
(h)
Prunes 8 à 10
Abricots 8 à 10
Tranches de pommes 6 - 8
Poires 6 à 9
10.6 Chaleur tournante humide - accessoires recommandés
Utilisez les moules et récipients foncés et non réfléchissants. Ils offrent une meilleure
absorption de la chaleur que les plats réfléchissants de couleur claire.
Plaque à pizza
Plat de cuisson
Ramequins
Moule pour fond de tarte
Sombre, non réfléchissant
Diamètre de 28 cm
Sombre, non réfléchissant
Diamètre de 26 cm
Céramique
8 cm de diamètre,
5 cm de hauteur
Sombre, non réfléchissant
Diamètre de 28 cm
62 FRANÇAIS

10.7 Chaleur tournante humide
Pour de meilleurs résultats, suivez les
suggestions indiquées dans le tableau ci-
dessous.
(°C) (min)
Petits pains sucrés,
(12 pièces)
Plateau de cuisson ou plat à
rôtir
175 3 40 - 50
Petits pains, (9 piè‐
ces)
Plateau de cuisson ou plat à
rôtir
180 2 35 - 45
Pizza, surgelée, 0,35
kg
grille métallique 180 2 45 - 55
Gâteau roulé Plateau de cuisson ou plat à
rôtir
170 2 30 - 40
Brownie Plateau de cuisson ou plat à
rôtir
170 2 45 - 50
Soufflé, (6 pièces) ramequins en céramique sur
une grille métallique
190 3 45 - 55
Fond de tarte en gé‐
noise
moule à tarte sur une grille
métallique
180 2 35 - 45
Génoise Victoria Plat de cuisson sur la grille
métallique
170 2 35 - 50
Poisson poché, 0,3
kg
Plateau de cuisson ou plat à
rôtir
180 2 35 - 45
Poisson entier, 0,2 kg Plateau de cuisson ou plat à
rôtir
180 3 25 - 35
Filet de poisson, 0,3
kg
plaque à pizza sur la grille mé‐
tallique
170 3 30 - 40
Viande pochée, 0,25
kg
Plateau de cuisson ou plat à
rôtir
180 3 35 - 45
Chachlyk, 0.5 kg Plateau de cuisson ou plat à
rôtir
180 3 40 - 50
Cookies, (16 pièces) Plateau de cuisson ou plat à
rôtir
150 2 30 - 45
Macarons, (20 piè‐
ces)
Plateau de cuisson ou plat à
rôtir
180 2 45 - 55
Muffins, (12 pièces) Plateau de cuisson ou plat à
rôtir
170 2 30 - 40
Pâtisserie salée,
(16 pièces)
Plateau de cuisson ou plat à
rôtir
170 2 35 - 45
Biscuits à pâte brisée,
(20 pièces)
Plateau de cuisson ou plat à
rôtir
150 2 40 - 50
FRANÇAIS 63

(°C) (min)
Tartelettes, (8 pièces) Plateau de cuisson ou plat à
rôtir
170 2 30 - 40
Légumes, pochés,
0.4 kg
Plateau de cuisson ou plat à
rôtir
180 2 35 - 45
Omelette végétarien‐
ne
plaque à pizza sur la grille mé‐
tallique
180 3 35 - 45
Légumes méditerra‐
néens, 0.7 kg
Plateau de cuisson ou plat à
rôtir
180 4 35 - 45
10.8 Informations pour les instituts
de test
Tests conformément à la norme IEC
60350-1.
(°C) (min)
Petits gâ‐
teaux, 20
par plateau
Chauffage
Haut/ Bas
Plateau de
cuisson
3 170 20 - 30 -
Petits gâ‐
teaux, 20
par plateau
Chaleur tour‐
nante
Plateau de
cuisson
3 150 -
160
20 - 35 -
Petits gâ‐
teaux, 20
par plateau
Chaleur tour‐
nante
Plateau de
cuisson
2 et 4 150 -
160
20 - 35 -
Tourte aux
pommes,
2 moules
Ø20 cm
Chauffage
Haut/ Bas
Grille métal‐
lique
2 180 70 - 90 -
Tourte aux
pommes,
2 moules
Ø20 cm
Chaleur tour‐
nante
Grille métal‐
lique
2 160 70 - 90 -
Génoise,
moule à gâ‐
teau de
26 cm
Chauffage
Haut/ Bas
Grille métal‐
lique
2 170 40 - 50 Préchauffez le four
pendant 10 minutes.
Génoise,
moule à gâ‐
teau de
26 cm
Chaleur tour‐
nante
Grille métal‐
lique
2 160 40 - 50 Préchauffez le four
pendant 10 minutes.
64 FRANÇAIS

(°C) (min)
Génoise,
moule à gâ‐
teau de
26 cm
Chaleur tour‐
nante
Grille métal‐
lique
2 et 4 160 40 - 60 Préchauffez le four
pendant 10 minutes.
Sablé Chaleur tour‐
nante
Plateau de
cuisson
3 140 -
150
20 - 40 -
Sablé Chaleur tour‐
nante
Plateau de
cuisson
2 et 4 140 -
150
25 - 45 -
Sablé Chauffage
Haut/ Bas
Plateau de
cuisson
3 140 -
150
25 - 45 -
Toasts, 4 -
6 morceaux
Gril Grille métal‐
lique
4 max. 2 à 3 minutes sur
la première face ;
2 à 3 minutes sur
la seconde face.
Préchauffez le four
pendant 3 minutes.
Steak ha‐
ché, 6 piè‐
ces, 0,6 kg
Gril Grille métal‐
lique et lè‐
chefrite
4 max. 20 - 30 Placez la grille métalli‐
que sur le quatrième
niveau et la lèchefrite
sur le troisième niveau
du four. Tournez les
aliments à mi-cuisson.
Préchauffez le four
pendant 3 minutes.
11. ENTRETIEN ET NETTOYAGE
AVERTISSEMENT!
Reportez-vous aux chapitres
concernant la sécurité.
11.1 Remarques concernant l'entretien
Agents nettoy‐
ants
Nettoyez la façade du four avec un chiffon doux, de l’eau tiède et un détergent doux. Net‐
toyez et contrôlez le joint de la porte autour du cadre de la cavité.
Utilisez une solution de nettoyage pour nettoyer les surfaces métalliques.
Nettoyez les taches avec un détergent doux.
Utilisation quoti‐
dienne
Nettoyez la cavité après chaque utilisation. L’accumulation de graisse ou d’autres résidus
peut provoquer un incendie.
De l'humidité peut se déposer dans l'enceinte du four ou sur les vitres de la porte. Pour dimi‐
nuer la condensation, laissez fonctionner le four pendant 10 minutes avant la cuisson. Ne
conservez pas les aliments dans le four pendant plus de 20 minutes. Sécher la cavité avec
un chiffon doux après chaque utilisation.
FRANÇAIS 65

Accessoires
Après chaque utilisation, lavez tous les accessoires et séchez-les. Utilisez un chiffon doux
avec de l’eau tiède et un détergent doux. Ne lavez pas les accessoires au lave-vaisselle.
Ne nettoyez pas les accessoires antiadhésifs avec un produit nettoyant abrasif ou des objets
tranchants.
11.2 Comment enlever : Supports
de grille
Retirez les supports de grille pour nettoyer le
four.
Étape 1 Éteignez le four et attendez qu’il soit
froid.
Étape 2 Écartez l'avant du support de grille de
la paroi latérale.
Étape 3 Écartez l'arrière du support de grille
de la paroi latérale et retirez le sup‐
port.
2
1
Étape 4 Réinstallez les supports de grille en
répétant cette procédure dans l'ordre
inverse.
11.3 Comment utiliser : Nettoyage
Aqua Clean
Ce processus de nettoyage utilise l'humidité
pour retirer la graisse et les particules
alimentaires restant dans le four.
Étape 1 Versez de l’eau dans le bac de la cavi‐
té : 300 ml.
Étape 2
Réglez la fonction : .
Étape 3 Réglez la température sur 90 °C.
Étape 4 Laissez le four fonctionner pendant
30 minutes.
Étape 5 Éteignez le four.
Étape 6 Attendez que le four ait refroidi. Séchez
la cavité avec un chiffon doux.
11.4 Comment démonter et installer : Porte
La porte du four est dotée de deux panneaux de verre. Vous pouvez retirer la porte du four
ainsi que le panneau de verre intérieur afin de le nettoyer. Lisez toutes les instructions du
chapitre « Retrait et installation de la porte » avant de retirer les panneaux de verre.
ATTENTION!
N’utilisez pas le four sans les panneaux en verre.
66 FRANÇAIS

Étape 1 Ouvrez complètement la porte et saisissez
les 2 charnières de porte.
Étape 2 Soulevez et faites tourner les leviers sur les
2 charnières.
Étape 3 Fermez la porte du four à la première posi‐
tion d'ouverture (mi-parcours). Puis soulevez
et tirez la porte vers l'avant et retirez-la de
son logement.
Étape 4 Déposez la porte sur une surface stable re‐
couverte d'un tissu doux.
Étape 5 Tenez la garniture de porte (B) sur le bord
supérieur de la porte des deux côtés et
poussez vers l'intérieur pour libérer le joint
du clip.
Étape 6 Tirez la garniture de porte vers l'avant pour
la déposer.
1
2
B
Étape 7 Prenez le panneau de verre de la porte par
son bord supérieur et tirez-le doucement.
Assurez-vous que la vitre glisse entièrement
hors de ses supports.
Étape 8 Nettoyez les panneaux de verre avec de
l'eau savonneuse. Séchez soigneusement
les panneaux de verre. Ne nettoyez pas les
panneaux de verre au lave-vaisselle.
Étape 9 Après le nettoyage, installez le panneau de
verre et la porte du four.
FRANÇAIS 67

La zone imprimée doit faire face à l'intérieur de la por‐
te. Après l'installation, vérifiez que la surface du pan‐
neau de verre où se trouve la zone imprimée est lisse
au toucher (le relief doit être de l'autre côté).
Lorsque le cadre de la porte est installé correctement,
il émet un clic.
Veillez à installer correctement le panneau de verre
intérieur dans son logement.
A
11.5 Comment remplacer :
Éclairage
AVERTISSEMENT!
Risque d'électrocution.
L'éclairage peut être chaud.
Tenez toujours l'ampoule halogène avec un
chiffon afin d'éviter que des résidus de
graisse ne brûlent sur l'ampoule.
Avant de remplacer l'éclairage :
Étape 1 Étape 2 Étape 3
Éteignez le four. Attendez que le
four ait refroidi.
Débranchez le four de l'alimentation
secteur.
Placez un chiffon au fond de la cavi‐
té.
Lampe arrière
Étape 1 Tournez le diffuseur en verre pour le retirer.
Étape 2 Nettoyez le diffuseur en verre.
Étape 3 Remplacez l'éclairage par une ampoule adaptée résistant à une température de 300 °C.
Étape 4 Remettez en place le diffuseur en verre.
12. DÉPANNAGE
AVERTISSEMENT!
Reportez-vous aux chapitres
concernant la sécurité.
12.1 Que faire si…
Dans tous les cas ne figurant pas dans ce
tableau, veuillez contacter un service après-
vente agréé.
Problème Vérifiez si...
Le four ne chauffe pas. Le fusible a disjoncté.
Le joint de la porte est
endommagé.
N'utilisez pas le four.
Contactez un service
après-vente agréé.
Problème Vérifiez si...
Heure de fin de cuisson -
n’est pas réglé.
Réglez : Heure de fin de
cuisson. Consultez
« Fonctions de l'horlo‐
ge ».
L'éclairage ne fonctionne
pas.
L’ampoule est grillée.
12.2 Données de maintenance
Si vous ne trouvez pas de solution au
problème, veuillez contacter votre revendeur
ou un service après-vente agréé.
Les informations à fournir au service après-
vente figurent sur la plaque signalétique. La
plaque signalétique se trouve sur
68 FRANÇAIS

l'encadrement avant de la cavité du four. Ne
retirez pas la plaque signalétique de la cavité
du four.
Nous vous recommandons de noter ces informations ici :
Modèle (MOD.) .........................................
Référence du produit (PNC) .........................................
Numéro de série (S.N.) .........................................
13. RENDEMENT ÉNERGÉTIQUE
13.1 Informations produit et Fiche d’informations produit*
Nom du fournisseur Zanussi
Identification du modèle
ZOHKF1X1 949496249
ZOHNF1K1 949496304
ZOHNF1W1 949496305
Index d'efficacité énergétique 81.2
Classe d’efficacité énergétique A+
Consommation d'énergie avec charge standard et mode tradition‐
nel
0.93 kWh/cycle
Consommation d'énergie avec charge standard et mode air pulsé 0.69 kWh/cycle
Nombre de cavités 1
Source de chaleur Électricité
Volume 72 l
Type de four Four encastrable
Masse
ZOHKF1X1 26.7 kg
ZOHNF1K1 26.7 kg
ZOHNF1W1 26.7 kg
* Pour l’Union européenne conformément aux Règlements UE 65/2014 et 66/2014.
Pour la République de Biélorussie conformément à STB 2478-2017, Annexe G ; STB 2477-2017, Annexes A et
B.
Pour l’Ukraine conformément à 568/32020.
La classe d’efficacité énergétique n’est pas applicable pour la Russie.
EN 60350-1 - Appareils de cuisson domestiques électriques - Partie 1 : Plages, fours, fours à vapeur et grils -
Méthodes de mesure des performances.
FRANÇAIS 69

13.2 Économie d'énergie
Ce four est doté de
caractéristiques qui vous
permettent d'économiser de
l'énergie lors de votre cuisine au
quotidien.
Veillez à ce que la porte du four soit fermée
lorsqu'il fonctionne. N'ouvrez pas la porte du
four trop souvent pendant la cuisson. Gardez
le joint de porte propre et veillez à ce qu'il
soit bien fixé en place.
Utilisez des plats en métal pour accroître les
économies d'énergie.
Si possible, ne préchauffez pas le four avant
la cuisson.
Lorsque vous cuisez plusieurs plats les uns
après les autres, veillez à ne pas trop
espacer les cuissons.
Cuisson avec ventilation
Si possible, utilisez les fonctions de cuisson
avec la ventilation pour économiser de
l'énergie.
Chaleur résiduelle
Si la cuisson doit durer plus de 30 minutes,
réduisez la température du four au minimum
3 à 10 minutes avant la fin de la cuisson. La
chaleur résiduelle à l’intérieur du four
poursuivra la cuisson.
Utilisez la chaleur résiduelle pour réchauffer
d'autres plats.
Maintien des aliments au chaud
Sélectionnez la température la plus basse
possible pour utiliser la chaleur résiduelle et
maintenir le repas au chaud.
Chaleur tournante humide
Fonction conçue pour économiser de
l'énergie en cours de cuisson.
Lorsque la fonction est en cours, l'éclairage
est éteint.
14. EN MATIÈRE DE PROTECTION DE L'ENVIRONNEMENT
Recyclez les matériaux portant le symbole
. Déposez les emballages dans les
conteneurs prévus à cet effet. Contribuez à
la protection de l'environnement et à votre
sécurité, recyclez vos produits électriques et
électroniques. Ne jetez pas les appareils
portant le symbole avec les ordures
ménagères. Emmenez un tel produit dans
votre centre local de recyclage ou contactez
vos services municipaux.
70 FRANÇAIS

BESUCHEN SIE UNSERE WEBSITE, UM:
Anwendungshinweise, Prospekte, Informationen zu Fehlerbehebung, Service und
Reparatur zu erhalten:
www.zanussi.com/support
Änderungen vorbehalten.
INHALTSVERZEICHNIS
1. SICHERHEITSHINWEISE............................................................................................ 71
2. SICHERHEITSANWEISUNGEN...................................................................................73
3. MONTAGE.................................................................................................................... 76
4. GERÄTEBESCHREIBUNG...........................................................................................77
5. VOR DER ERSTEN INBETRIEBNAHME..................................................................... 77
6. TÄGLICHER GEBRAUCH............................................................................................ 78
7. UHRFUNKTIONEN....................................................................................................... 79
8. VERWENDUNG DES ZUBEHÖRS...............................................................................79
9. ZUSATZFUNKTIONEN.................................................................................................80
10. TIPPS UND HINWEISE.............................................................................................. 81
11. REINIGUNG UND PFLEGE........................................................................................88
12. FEHLERSUCHE..........................................................................................................91
13. ENERGIEEFFIZIENZ..................................................................................................92
1. SICHERHEITSHINWEISE
Lesen Sie vor der Montage und dem Gebrauch des Geräts
zuerst die Bedienungsanleitung. Bei Verletzungen oder
Schäden infolge nicht ordnungsgemäßer Montage oder
Verwendung übernimmt der Hersteller keine Haftung.
Bewahren Sie die Anleitung zum Nachschlagen an einem
sicheren und zugänglichen Ort auf.
1.1 Sicherheit von Kindern und schutzbedürftigen
Personen
• Das Gerät kann von Kindern ab 8 Jahren und Personen mit
eingeschränkten physischen, sensorischen oder geistigen
Fähigkeiten oder mit mangelnder Erfahrung und/oder
mangelndem Wissen nur dann verwendet werden, wenn sie
durch eine für ihre Sicherheit zuständige Person
beaufsichtigt werden oder in die sichere Verwendung des
Geräts eingewiesen wurden und die mit dem Gerät
verbundenen Gefahren verstanden haben. Kinder unter 8
DEUTSCH 71

Jahren und Personen mit schweren Behinderungen oder
Mehrfachbehinderung müssen vom Gerät ferngehalten
werden, wenn sie nicht ständig beaufsichtigt werden.
• Kinder dürfen nicht mit dem Gerät spielen.
• Halten Sie sämtliches Verpackungsmaterial von Kindern
fern und entsorgen Sie es ordnungsgemäß.
• WARNUNG: Halten Sie Kinder und Haustiere während des
Betriebs oder der Abkühlphase vom Gerät fern. Die
zugänglichen Geräteteile werden beim Betrieb sehr heiß.
• Falls Ihr Gerät mit einer Kindersicherung ausgestattet ist,
empfehlen wir, diese einzuschalten.
• Kinder dürfen keine Reinigung und Wartung ohne
Beaufsichtigung durchführen.
1.2 Allgemeine Sicherheit
• Die Montage des Geräts und der Austausch des Kabels
muss von einer Fachkraft vorgenommen werden.
• WARNUNG: Das Gerät und die zugänglichen Geräteteile
werden während des Betriebs heiß. Seien Sie vorsichtig
und berühren Sie niemals die Heizelemente.
• Verwenden Sie zum Anfassen des Zubehörs und der Töpfe
wärmeisolierende Handschuhe.
• Ziehen Sie bitte vor jeder Wartungsmaßnahme den
Netzstecker aus der Steckdose.
• WARNUNG: Vergewissern Sie sich, dass das Gerät
ausgeschaltet ist, bevor Sie die Lampe austauschen, um
einen Stromschlag zu vermeiden.
• Verwenden Sie das Gerät nicht, bevor es in den
Einbauschrank gesetzt wird.
• Reinigen Sie das Gerät nicht mit einem
Dampfstrahlreiniger.
• Benutzen Sie keine scharfe Scheuermittel oder
Metallschwämmchen zum Reinigen der Glastür; sie können
die Glasfläche verkratzen und zum Zersplittern der Scheibe
führen.
• Wenn das Netzkabel beschädigt ist, muss es vom
Hersteller, seinem autorisierten Kundenservice oder einer
72 DEUTSCH

gleichermaßen qualifizierten Person ausgetauscht werden,
um Gefahren durch elektrischen Strom zu vermeiden.
• Ziehen Sie die Einhängegitter erst vorne und dann hinten
von der Seitenwand weg und nehmen Sie sie heraus.
Führen Sie zum Einsetzen der Einhängegitter die oben
aufgeführten Schritte in umgekehrter Reihenfolge durch.
2. SICHERHEITSANWEISUNGEN
2.1 Montage
WARNUNG!
Die Montage des Geräts darf nur
von einer qualifizierten Fachkraft
durchgeführt werden.
• Entfernen Sie das gesamte
Verpackungsmaterial.
• Montieren Sie ein beschädigtes Gerät
nicht und benutzen Sie es nicht.
• Halten Sie sich an die mitgelieferte
Montageanleitung.
• Seien Sie beim Umsetzen des Gerätes
vorsichtig, da es sehr schwer ist. Tragen
Sie stets Sicherheitshandschuhe und
festes Schuhwerk.
• Ziehen Sie das Gerät nicht am Griff.
• Montieren Sie das Gerät an einem
sicheren und geeigneten Ort, der den
Montageanforderungen entspricht.
• Die Mindestabstände zu anderen Geräten
und Küchenmöbeln sind einzuhalten.
• Überprüfen Sie vor der Montage des
Gerätes, ob sich die Ofentür ohne
Kraftanwendung öffnen lässt.
• Das Gerät ist mit einem elektrischen
Kühlsystem ausgestattet. Es muss an die
Stromversorgung angeschlossen werden.
Mindesthöhe des Einbau‐
möbels (Mindesthöhe des
Schranks unter der Arbeits‐
platte)
590 (600) mm
Schrankbreite 560 mm
Schranktiefe 550 (550) mm
Höhe der Gerätevordersei‐
te
594 mm
Höhe der Geräterückseite 576 mm
Breite der Gerätevordersei‐
te
595 mm
Breite der Geräterückseite 559 mm
Gerätetiefe 569 mm
Geräteeinbautiefe 548 mm
Tiefe bei geöffneter Tür 1022 mm
Mindestgröße der Belüf‐
tungsöffnung. Öffnung auf
der Rückseite unten
560x20 mm
Länge des Netzanschluss‐
kabels. Das Kabel befindet
sich in der rechten Ecke
auf der Rückseite.
1500 mm
Befestigungsschrauben 4x25 mm
2.2 Elektroanschluss
WARNUNG!
Brand- und Stromschlaggefahr.
• Alle elektrischen Anschlüsse sind von
einem geprüften Elektriker vorzunehmen.
• Das Gerät muss geerdet sein.
• Stellen Sie sicher, dass die Daten auf
dem Typenschild mit den elektrischen
Nennwerten der Netzspannung
übereinstimmen.
• Schließen Sie das Gerät nur an eine
ordnungsgemäß installierte
Schutzkontaktsteckdose an.
• Verwenden Sie keine
Mehrfachsteckdosen oder
Verlängerungskabel.
• Achten Sie darauf, Netzstecker und
Netzkabel nicht zu beschädigen. Falls das
Netzkabel des Geräts ersetzt werden
muss, lassen Sie diese Arbeit durch
unseren autorisierten Kundendienst
durchführen.
• Achten Sie darauf, dass das Netzkabel
die Gerätetür oder die Nische unter dem
DEUTSCH 73

Gerät nicht berührt oder in ihre Nähe
gelangt, insbesondere wenn das Gerät
eingeschaltet oder die Tür heiß ist.
• Alle Teile, die gegen direktes Berühren
schützen, sowie die isolierten Teile
müssen so befestigt werden, dass sie
nicht ohne Werkzeug entfernt werden
können.
• Stecken Sie den Netzstecker erst nach
Abschluss der Montage in die Steckdose.
Stellen Sie sicher, dass der Netzstecker
nach der Montage noch zugänglich ist.
• Falls die Steckdose lose ist, schließen Sie
den Netzstecker nicht an.
• Ziehen Sie nicht am Netzkabel, wenn Sie
das Gerät von der Stromversorgung
trennen möchten. Ziehen Sie stets am
Netzstecker.
• Verwenden Sie nur geeignete
Trenneinrichtungen: Überlastschalter,
Sicherungen (Schraubsicherungen
müssen aus dem Halter entfernt werden
können), Fehlerstromschutzschalter und
Schütze.
• Die elektrische Installation muss eine
Trenneinrichtung aufweisen, mit der Sie
das Gerät allpolig von der
Stromversorgung trennen können. Die
Trenneinrichtung muss mit einer
Kontaktöffnungsbreite von mindestens
3 mm ausgeführt sein.
• Das Gerät wird mit einem Netzstecker
und Netzkabel geliefert.
Einsetzbare Kabeltypen für Einbau oder
Austausch in Europa:
H07 RN-F, H05 RN-F, H05 RRF, H05 VV-F, H05
V2V2-F (T90), H05 BB-F
Näheres zum Kabelquerschnitt siehe
Gesamtleistung auf dem Typenschild.
Weitere Informationen finden Sie in der
Tabelle:
Gesamtleistung (W) Kabelquerschnitt
(mm²)
Maximal 1380 3 x 0.75
Maximal 2300 3 x 1
Maximal 3680 3 x 1.5
Die Erdleitung (gelb/grünes Kabel) muss 2
cm länger sein als die Phasenleitung und der
Nullleiter (blaues und braunes Kabel).
2.3 Gebrauch
WARNUNG!
Verletzungs-, Verbrennungs-,
Stromschlag- oder
Explosionsgefahr.
• Dieses Gerät ist ausschließlich zur
Verwendung im Haushalt bestimmt.
• Nehmen Sie keine technischen
Änderungen am Gerät vor.
• Die Lüftungsöffnungen dürfen nicht
abgedeckt werden.
• Lassen Sie das Gerät bei Betrieb nicht
unbeaufsichtigt.
• Schalten Sie das Gerät nach jedem
Gebrauch aus.
• Gehen Sie beim Öffnen der Tür vorsichtig
vor, wenn das Gerät in Betrieb ist. Es
kann heiße Luft austreten.
• Bedienen Sie das Gerät nicht mit feuchten
oder nassen Händen oder wenn es mit
Wasser in Kontakt gekommen ist.
• Üben Sie keinen Druck auf die geöffnete
Gerätetür aus.
• Benutzen Sie das Gerät nicht als Arbeits-
oder Abstellfläche.
• Öffnen Sie die Gerätetür vorsichtig. Bei
der Verwendung von Zutaten, die Alkohol
enthalten, kann ein Alkohol-Luftgemisch
entstehen.
• Achten Sie beim Öffnen der Tür darauf,
dass keine Funken oder offenen Flammen
in das Gerät gelangen.
• Laden Sie keine entflammbaren Produkte
oder Gegenstände, die mit entflammbaren
Produkten benetzt sind, in das Gerät und
stellen Sie solche nicht in die Nähe oder
auf das Gerät.
WARNUNG!
Risiko von Schäden am Gerät.
• Um Beschädigungen und Verfärbungen
der Emailbeschichtung zu vermeiden:
– Stellen Sie feuerfestes Geschirr oder
andere Gegenstände nicht direkt auf
den Boden des Geräts.
– Legen Sie keine Alufolie direkt auf
den Boden des Garraums.
74 DEUTSCH

– Füllen Sie kein Wasser in das heiße
Gerät.
– Lassen Sie nach Abschluss des
Garvorgangs kein feuchtes Geschirr
oder feuchte Speisen im Gerät
stehen.
– Gehen Sie beim Herausnehmen oder
Einsetzen des Zubehörs sorgfältig
vor.
• Verfärbungen der Email- oder
Edelstahlbeschichtung haben keine
Auswirkung auf die Leistung des Geräts.
• Verwenden Sie für feuchte Kuchen das
tiefe Blech. Fruchtsäfte können bleibende
Flecken verursachen.
• Dieses Gerät ist nur zum Kochen
bestimmt. Jeder andere Gebrauch ist als
bestimmungsfremd anzusehen, zum
Beispiel das Beheizen eines Raums.
• Die Backofentür muss beim Betrieb
geschlossen sein.
• Ist das Gerät hinter einer Möbelfront (wie
etwa einer Tür) installiert, achten Sie
darauf, dass die Tür während des
Gerätebetriebs nicht geschlossen wird.
Hinter einer geschlossenen Möbelfront
können sich Hitze und Feuchtigkeit
ansammeln und das Gerät, das Gehäuse
oder den Boden beschädigen. Schließen
Sie die Möbelfront nicht, bevor das Gerät
nach dem Gebrauch völlig abgekühlt ist.
2.4 Reinigung und Pflege
WARNUNG!
Verletzungs-, Brandgefahr sowie
Risiko von Schäden am Gerät.
• Schalten Sie das Gerät immer aus und
ziehen Sie den Netzstecker aus der
Steckdose, bevor Reinigungsarbeiten
durchgeführt werden.
• Vergewissern Sie sich, dass das Gerät
abgekühlt ist. Es besteht die Gefahr, dass
die Glasscheiben brechen.
• Ersetzen Sie die Türglasscheiben
umgehend, wenn sie beschädigt sind.
Wenden Sie sich an einen autorisierten
Kundendienst.
• Gehen Sie beim Aushängen der Tür
vorsichtig vor. Die Tür ist schwer!
• Reinigen Sie das Gerät regelmäßig, um
eine Verschlechterung des
Oberflächenmaterials zu verhindern.
• Reinigen Sie das Geräts mit einem
weichen, feuchten Tuch. Verwenden Sie
ausschließlich Neutralreiniger. Benutzen
Sie keine Scheuermittel, scheuernde
Reinigungsschwämmchen, Lösungsmittel
oder Metallgegenstände.
• Falls Sie ein Backofenspray verwenden,
befolgen Sie die Sicherheitsanweisungen
auf seiner Verpackung.
2.5 Innenbeleuchtung
WARNUNG!
Stromschlaggefahr.
• Bezüglich der Lampe(n) in diesem Gerät
und separat verkaufter Ersatzlampen:
Diese Lampen müssen extremen
physikalischen Bedingungen in
Haushaltsgeräten standhalten, wie z.B.
Temperatur, Vibration, Feuchtigkeit, oder
sollen Informationen über den
Betriebszustand des Gerätes anzeigen.
Sie sind nicht für den Einsatz in anderen
Geräten vorgesehen und nicht für die
Raumbeleuchtung geeignet.
• Verwenden Sie nur Lampen mit der
gleichen Leistung .
2.6 Service
• Wenden Sie sich zur Reparatur des
Geräts an den autorisierten
Kundendienst.
• Verwenden Sie ausschließlich
Originalersatzteile.
2.7 Entsorgung
WARNUNG!
Verletzungs- und
Erstickungsgefahr.
• Trennen Sie das Gerät von der
Stromversorgung.
• Schneiden Sie das Netzkabel in der Nähe
des Geräts ab, und entsorgen Sie es.
• Entfernen Sie das Türschloss, um zu
verhindern, dass sich Kinder oder
Haustiere im Gerät einschließen.
DEUTSCH 75

3. MONTAGE
WARNUNG!
Siehe Kapitel
Sicherheitshinweise.
3.1 Montage
18
594
589
114
21548
595
+-1
min. 550
20
600
min. 560
3
5
60
20
80
520
60
198
523
(*mm)
min. 550
20
595
+-1
18
590
min. 560
594
589
114
21548
3
5
70
60
520
60
20
198
523
(*mm)
76 DEUTSCH

3.2 Befestigung des Ofens am
Möbel
4. GERÄTEBESCHREIBUNG
4.1 Gesamtansicht
8
7
9
10
11
5
4
3
2
1
321 64 5
12
1
Bedienblende
2
Betriebskontrolllampe/-symbol
3
Einstellknopf für die Ofenfunktionen
4
Timer-Einstellknopf
5
Einstellknopf (für die Temperatur)
6
Temperaturanzeige/-symbol
7
Heizelement
8
Lampe
9
Ventilator
10
Behälter für die Aqua-Reinigungsfunktion
11
Einhängeschienen, herausnehmbar
12
Einschubebenen
4.2 Zubehör
• Kombirost
Für Kochgeschirr, Kuchenformen, Braten.
• Backblech
Für Kuchen und Plätzchen.
5. VOR DER ERSTEN INBETRIEBNAHME
WARNUNG!
Siehe Kapitel
Sicherheitshinweise.
DEUTSCH 77

5.1 Vor der ersten Inbetriebnahme
Der Backofen kann während des Aufheizens Geruch und Rauch verströmen. Stellen Sie
sicher, dass der Raum belüftet ist.
Schritt 1
Schritt 2
Reinigen Sie den Backofen Heizen Sie den leeren Backofen vor
1. Entfernen Sie alle Zubehörteile und die heraus‐
nehmbaren Einhängegitter aus dem Backofen.
2. Feuchten Sie ein weiches Tuch mit warmem Was‐
ser und etwas mildem Reinigungsmittel an, und
reinigen Sie damit den Backofen und das Zubehör.
1. Stellen Sie die Höchsttemperatur für folgende
Funktion ein: .
Zeit: 1 Std.
2. Stellen Sie die Höchsttemperatur für folgende
Funktion ein: .
Zeit: 15 min.
Schalten Sie den Backofen aus und warten Sie, bis er abgekühlt ist. Setzen Sie die Zubehörteile und die heraus‐
nehmbaren Einhängegitter in den Backofen.
6. TÄGLICHER GEBRAUCH
WARNUNG!
Siehe Kapitel
Sicherheitshinweise.
6.1 Einstellung: Ofenfunktion
Schritt 1 Drehen Sie den Backofen-Einstellknopf
auf eine Ofenfunktion.
Schritt 2 Drehen Sie den Wahlknopf, um die
Temperatur auszuwählen.
Schritt 3 Drehen Sie nach Beendigung des Gar‐
vorgangs die Knöpfe in die Aus-Positi‐
on, um den Backofen auszuschalten.
6.2 Ofenfunktionen
Ofenfunkti‐
on
Anwendung
Stellung Aus
Der Backofen ist ausgeschaltet.
Backofenbe‐
leuchtung
Einschalten der Lampe.
Ofenfunkti‐
on
Anwendung
Feuchte Um‐
luft
Diese Funktion ist entwickelt wor‐
den, um während des Garvorgangs
Energie zu sparen. Wenn Sie diese
Funktion nutzen, kann die Tempera‐
tur im Garraum von der eingestell‐
ten Temperatur abweichen. Die
Wärmeleistung kann geringer sein.
Weitere Informationen zu folgenden
Themen finden Sie im Kapitel „Täg‐
licher Gebrauch“: Feuchte Umluft.
Umluft
Zum Braten oder zum Braten und
Backen von Speisen mit derselben
Gartemperatur auf mehreren Ebe‐
nen gleichzeitig, ohne dass es zu
einer Aromaübertragung kommt.
Heißluftgrillen
Zum Braten großer Fleischstücke
oder von Geflügel mit Knochen auf
einer Ebene. Zum Gratinieren und
Überbacken.
Unterhitze
Zum Backen von Kuchen mit knusp‐
rigen Böden und zum Einkochen
von Lebensmitteln.
Pizzastufe
Zum Backen von Pizza. Für ein in‐
tensives Überbacken und einen
knusprigen Boden. Stellen Sie die
Temperatur auf 230 °C ein.
78 DEUTSCH

Ofenfunkti‐
on
Anwendung
Auftauen
Zum Auftauen von Lebensmitteln
(Gemüse und Obst). Die Auftauzeit
hängt ab von der Menge und Größe
der Tiefkühlgerichte.
Ober-/Unterhit‐
ze / Aqua Rei‐
nigung
Zum Backen und Braten auf einer
Ebene.
Weitere Informationen zu folgenden
Themen finden Sie im Kapitel „Pfle‐
ge und Reinigung“: Aqua-Reini‐
gung.
6.3 Hinweise zu: Feuchte Umluft
Diese Funktion wurde zur Bestimmung der
Energieeffizienzklasse und den
Anforderungen an die umweltgerechte
Gestaltung EU 65/2014 und EU 66/2014
verwendet. Tests gemäß EN 60350-1.
Die Backofentür sollte während des
Garvorgangs geschlossen bleiben, damit die
Funktion nicht unterbrochen wird. So wird
gewährleistet, dass der Backofen mit der
höchsten Energieeffizienz arbeitet.
Wenn Sie diese Funktion verwenden,
schaltet sich die Backofenbeleuchtung
automatisch aus.
Die Kochanleitungen finden Sie im Kapitel
"Hinweise und Tipps", Feuchte Umluft.
Allgemeine Empfehlungen zur
Energieeinsparung finden Sie im Kapitel
„Energieeffizienz“, Energie sparen.
7. UHRFUNKTIONEN
7.1 Einstellen von: Garzeitende
Zum Einstellen der Abschaltzeit für Ofenfunktionen.
Schritt 1 Stellen Sie die Ofenfunktion und Temperatur ein.
Schritt 2 Drehen Sie den Timer-Einstellknopf auf den höchsten Wert.
Schritt 3 Stellen Sie die Ausschaltzeit durch Drehen des Timer-Einstellknopfs ein.
Wenn die eingestellte Zeit abgelaufen ist, ertönt der Signalton, und der Backofen wird ausgeschal‐
tet.
Schritt 4 Drehen Sie den Backofen-Einstellknopf und den Temperaturwahlknopf in die Aus-Position.
8. VERWENDUNG DES ZUBEHÖRS
WARNUNG!
Siehe Kapitel
Sicherheitshinweise.
8.1 Einsetzen des Zubehörs
Die kleine Einkerbung auf der Oberseite
erhöht die Sicherheit. Diese Einkerbungen
dienen auch als Kippsicherung. Durch den
umlaufend erhöhten Rand des Rosts ist das
Kochgeschirr gegen Abrutschen vom Rost
gesichert.
DEUTSCH 79

Kombirost:
Schieben Sie den Kombirost zwischen die Füh‐
rungsschienen der Einhängegitter mit den Füßen
nach unten zeigend.
Backblech:
Schieben Sie das Blech zwischen die Führungs‐
stäbe der Einhängegitter.
Kombirost, Backblech:
Schieben Sie das Backblech zwischen die Füh‐
rungsstäbe der Einhängegitter und dem Kombirost
auf die Führungsstäbe darüber.
9. ZUSATZFUNKTIONEN
9.1 Kühlgebläse
Wenn der Backofen in Betrieb ist, wird das
Kühlgebläse automatisch eingeschaltet, um
die Ofenoberflächen zu kühlen. Wenn Sie
den Backofen ausschalten kann das
Kühlgebläse weiter laufen, bis der Ofen
abgekühlt ist.
9.2 Sicherheitsthermostat
Ein unsachgemäßer Gebrauch des Ofens
oder defekte Bestandteile können zu einer
gefährlichen Überhitzung führen. Um dies zu
verhindern, ist der Backofen mit einem
Sicherheitsthermostat ausgestattet, der die
Stromzufuhr unterbrechen kann. Die
Wiedereinschaltung des Backofens erfolgt
automatisch bei Temperaturabfall.
80 DEUTSCH

10. TIPPS UND HINWEISE
Siehe Kapitel
Sicherheitshinweise.
10.1 Garempfehlungen
Der Backofen hat fünf Einschubebenen.
Die Ebenen werden vom Boden des
Backofens aus gezählt.
Ihr Backofen backt oder brät unter
Umständen anders als Ihr früherer Backofen.
Die nachstehenden Tabellen enthalten die
standardmäßigen Temperatureinstellungen,
die Gardauer und die Einschubebene.
Finden Sie für ein bestimmtes Rezept keine
konkreten Angaben, orientieren Sie sich an
einem ähnlichem Rezept.
Der Backofen ist mit einem speziellen
System ausgestattet, das die Luft zirkulieren
lässt und den Dampf ständig
wiederverwendet. Mit diesem System macht
das Garen mit Dampf Ihre Speisen innen
weich und außen knusprig. So verringert sich
die Gardauer und der Energieverbrauch.
Backen von Kuchen
Die Backofentür nicht öffnen, bevor 3/4 der
Backzeit abgelaufen ist.
Wenn Sie zwei Backbleche gleichzeitig
nutzen, lassen Sie eine Ebene dazwischen
frei.
Garen von Fleisch und Fisch
Lassen Sie das Fleisch vor dem
Anschneiden etwa 15 Minuten ruhen, damit
der Fleischsaft nicht ausläuft.
Um die Rauchbildung beim Braten im
Backofen zu vermindern, geben Sie etwas
Wasser in die Brat- und Fettpfanne. Um die
Kondensierung des Rauchs zu vermeiden,
geben Sie jedes Mal, wenn das Wasser
verdampft ist, erneut Wasser in die Brat- und
Fettpfanne.
Garzeiten
Die Garzeiten hängen von der Art des
Garguts, seiner Konsistenz und der Menge
ab.
Beobachten Sie den Garfortschritt. Finden
Sie heraus, welche Geräteeinstellungen
(Garstufe, Gardauer, usw.) für Ihr
Kochgeschirr, Ihre Rezepte und die von
Ihnen zubereiteten Garmengen am besten
geeignet sind.
10.2 Backen und Braten
KU‐
CHEN
Ober-/Unterhitze Umluft
(Min.)
(°C) (°C)
Rührteig 170 2 160 3 45–60 Kuchenform
Mürbeteig 170 2 160 3 20–30 Kuchenform
Buttermilch-Käse‐
kuchen
170 1 160 1 70–80 Kuchenform, Ø
26 cm
Strudel/Stollen 175 3 150 2 60–80 Backblech
Marmeladentorte 170 2 165 2 30–40 Backblech
Christstollen, Hei‐
zen Sie den lee‐
ren Backofen vor
160 2 150 2 90–120 Kuchenform, Ø
20 cm
DEUTSCH 81

KU‐
CHEN
Ober-/Unterhitze Umluft
(Min.)
(°C) (°C)
Rosinenkuchen,
Heizen Sie den
leeren Backofen
vor
175 1 160 2 50–60 Brotform
Kekse 140 3 140–150 3 30–35 Backblech
Kekse, zwei Ebe‐
nen
- - 140–150 2 und 4 35–40 Backblech
Kekse, drei Ebe‐
nen
120 3 120 3 80–100 Backblech
Baiser 190 3 180 3 15–20 Backblech
Brötchen, Heizen
Sie den leeren
Backofen vor
190 3 170 3 25–35 Backblech
Eclairs, eine Ebe‐
ne
180 2 170 2 45–70 Backblech
Eclairs, zwei Ebe‐
nen
160 1 150 2 110–120 Backblech
Törtchen 170 1 160 1 50–60 Backblech
Üppiger Obstku‐
chen
190 3 190 3 12–20 Backblech
Englischer Sand‐
wichkuchen à la
Victoria
190 3 170 3 25–35 Backblech
Heizen Sie den leeren Backofen vor.
BROT
UND PIZZA
Ober-/Unterhitze Umluft
(Min.)
(°C) (°C)
Weißbrot, 1–2
Stück, je 0,5 kg
190 1 190 1 60–70 -
Roggenbrot, Vor‐
heizen ist nicht er‐
forderlich
190 1 180 1 30–45 Brotform
Brot/Brötchen, 6–
8 Brötchen
230–250 1 230–250 1 10–20 Backblech
Pizza 200 3 190 3 10–20 Backblech / Tiefes
Blech
Scones 200 3 190 3 10–20 Backblech
Heizen Sie den leeren Backofen vor.
82 DEUTSCH

Verwenden Sie eine Kuchenform.
FLANS
Ober-/Unterhitze Umluft
(Min.)
(°C) (°C)
Nudelauflauf, Vorhei‐
zen ist nicht erforder‐
lich
200 2 180 2 40–50
Gemüseauflauf, Vor‐
heizen ist nicht erfor‐
derlich
200 2 175 2 45–60
Quiche 180 1 180 1 50–60
Lasagne 180–190 2 180–190 2 25–40
Cannelloni 180–190 2 180–190 2 25–40
Verwenden Sie den Kombirost.
FLEISCH
Ober-/Unterhitze Umluft
(Min.)
(°C) (°C)
Rind 200 2 190 2 50–70
Schweinefleisch 180 2 180 2 90–120
Kalb 190 2 175 2 90–120
Roastbeef, englisch,
blutig
210 2 200 2 50–60
Roastbeef, englisch,
rosa
210 2 200 2 60–70
Roastbeef, englisch,
durch
210 2 200 2 70–75
FLEISCH
Ober-/Unterhitze Umluft
(Min.)
(°C) (°C)
Schweineschulter, mit
Schwarte
180 2 170 2 120–150
Schweinshaxe, 2
Stück
180 2 160 2 100–120
Lammkeule 190 2 175 2 110–130
Hähnchen, ganz 220 2 200 2 70–85
Pute, ganz 180 2 160 2 210–240
DEUTSCH 83

FLEISCH
Ober-/Unterhitze Umluft
(Min.)
(°C) (°C)
Ente, ganz 175 2 220 2 120–150
Gans, ganz 175 2 160 1 150–200
Kaninchen, in Stücke
geschnitten
190 2 175 2 60–80
Kaninchen, in Stücke
geschnitten
190 2 175 2 150–200
Fasan, ganz 190 2 175 2 90–120
FISCH
Ober-/Unterhitze Umluft
(Min.)
(°C) (°C)
Forelle / Seebrasse, 3–4
Fische
190 2 175 2 40–55
Thunfisch / Lachs, 4–6 Fi‐
lets
190 2 175 2 35–60
10.3 Heißluftgrillen
Leeren Backofen vorheizen.
Nutzen Sie die erste oder zweite
Einschubebene.
Multiplizieren Sie zur Berechnung der Garzeit
die Zeit, die in der Tabelle unten angegeben
ist, mit der Dicke des Filets in Zentimetern.
RIND‐
FLEISCH (°C) (Min.)
Roastbeef/Filet, blutig 190 - 200 5 - 6
Roastbeef/Filet, rosa 180 - 190 6 - 8
Roastbeef/Filet, durch 170 - 180 8 - 10
SCHWEINE‐
FLEISCH (°C) (Min.)
Schulter / Nacken /
Schinkenstück, 1 - 1,5
kg
160 - 180 90 - 120
SCHWEINE‐
FLEISCH (°C) (Min.)
Koteletts / Rippchen, 1
- 1,5 kg
170 - 180 60 - 90
Hackbraten, 0,75 - 1 kg 160 - 170 50 - 60
Schweinshaxe, vorge‐
gart, 0,75 - 1 kg
150 - 170 90 - 120
KALB
(°C) (Min.)
Kalbsbraten, 1 kg 160 - 180 90 - 120
Kalbshaxe, 1,5 - 2 kg 160 - 180 120 - 150
LAMM
(°C) (Min.)
Lammkeule / Lamm‐
braten, 1 - 1,5 kg
150 - 170 100 - 120
84 DEUTSCH

LAMM
(°C) (Min.)
Lammrücken, 1 - 1,5
kg
160 - 180 40 - 60
GEFLÜGEL
(°C) (Min.)
Geflügelteile, je 0,2 -
0,25 kg
200 - 220 30 - 50
Hähnchen, halbiert, je
0,4 - 0,5 kg
190 - 210 35 - 50
Hähnchen, Poularde, 1
- 1,5 kg
190 - 210 50 - 70
GEFLÜGEL
(°C) (Min.)
Ente, 1,5 - 2 kg 180 - 200 80 - 100
Gans, 3,5 - 5 kg 160 - 180 120 - 180
Pute, 2,5 - 3,5 kg 160 - 180 120 - 150
Pute, 4 - 6 kg 140 - 160 150 - 240
FISCH, GE‐
DÄMPFT (°C) (Min.)
Fisch, 1 - 1,5 kg 210 - 220 40 - 60
10.4 Auftauen
(kg)
Auftauzeit (Min.) Zusätzliche Auftau‐
zeit (Min.)
Hähnchen 1 100 – 140 20 – 30 Legen Sie das Hähnchen
auf eine umgedrehte Un‐
tertasse auf einem größe‐
ren Teller. Nach der Hälfte
der Gardauer wenden.
Fleisch 1 100 – 140 20 – 30 Nach der Hälfte der Gar‐
dauer wenden.
0,5 90 – 120
Sahne 2 x 0,2 80 – 100 10 – 15 Sahne lässt sich auch mit
noch leicht gefrorenen
Stellen gut aufschlagen.
Forelle 0,15 25 – 35 10 – 15 –
Erdbeeren 0,3 30 – 40 10 – 20 –
Butter 0,25 30 – 40 10 – 15 –
Torte 1,4 60 60 –
10.5 Dörren - Umluft
Bleche mit fettbeständigem Papier oder
Backpapier abdecken.
Um ein besseres Ergebnis zu erzielen,
schalten Sie den Backofen nach der Hälfte
der Trockenzeit aus, öffnen Sie die Tür und
lassen Sie ihn eine Nacht abkühlen, um das
Trocknen abzuschließen.
Nutzen Sie für 1 Blech die dritte
Einschubebene.
Für 2 Bleche verwenden Sie die erste und
vierte Einschubebene.
DEUTSCH 85

GEMÜSE
(°C) (Std.)
Bohnen 60 - 70 6 - 8
Paprika 60 - 70 5 - 6
Suppengemüse 60 - 70 5 - 6
Pilze 50 - 60 6 - 8
Kräuter 40 - 50 2 - 3
Stellen Sie die Temperatur auf 60 - 70 °C
ein.
OBST
(Std.)
Pflaumen 8 - 10
Aprikosen 8 - 10
Apfelscheiben 6 - 8
Birnen 6 - 9
10.6 Feuchte Umluft - Empfohlenes Zubehör
Verwenden Sie die dunklen und nicht reflektierenden Formen und Behälter. Sie haben eine
bessere Wärmeabsorption als helle Farbe und reflektierende Schüsseln.
Pizzapfanne
Backform
Förmchen
Tortenbodenform
Dunkel, nicht reflektierend
28 cm Durchmesser
Dunkel, nicht reflektierend
26 cm Durchmesser
Keramikform
8 cm Durchmes‐
ser, 5 cm Höhe
Dunkel, nicht reflektierend
28 cm Durchmesser
10.7 Feuchte Umluft
Beachten Sie für beste Ergebnisse die unten
in der Tabelle aufgeführten Empfehlungen.
(°C) (Min.)
Brötchen, süß, 12
Stück
Backblech oder tiefes Blech 175 3 40 - 50
Brötchen, 9 Stück Backblech oder tiefes Blech 180 2 35 - 45
Pizza, gefroren, 0,35
kg
Kombirost 180 2 45 - 55
Biskuitrolle Backblech oder tiefes Blech 170 2 30 - 40
Brownie Backblech oder tiefes Blech 170 2 45 - 50
Soufflé, 6 Stück Keramikförmchen auf Kombi‐
rost
190 3 45 - 55
Biskuitboden Biskuitform auf Kombirost 180 2 35 - 45
86 DEUTSCH

(°C) (Min.)
Englischer Sandwich‐
kuchen à la Victoria
Backform auf Kombirost 170 2 35 - 50
Fisch, pochiert, 0,3 kg Backblech oder tiefes Blech 180 2 35 - 45
Fisch, 0,2 kg Backblech oder tiefes Blech 180 3 25 - 35
Fischfilet, 0,3 kg Pizzapfanne auf Kombirost 170 3 30 - 40
Fleisch, pochiert, 0,25
kg
Backblech oder tiefes Blech 180 3 35 - 45
Schaschlik, 0,5 kg Backblech oder tiefes Blech 180 3 40 - 50
Plätzchen, 16 Stück Backblech oder tiefes Blech 150 2 30 - 45
Makronen, 20 Stück Backblech oder tiefes Blech 180 2 45 - 55
Muffins, 12 Stück Backblech oder tiefes Blech 170 2 30 - 40
Kleingebäck, pikant,
16 Stück
Backblech oder tiefes Blech 170 2 35 - 45
Mürbeteigplätzchen,
20 Stück
Backblech oder tiefes Blech 150 2 40 - 50
Törtchen, 8 Stück Backblech oder tiefes Blech 170 2 30 - 40
Gemüse, pochiert,
0,4 kg
Backblech oder tiefes Blech 180 2 35 - 45
Vegetarisches Ome‐
lett
Pizzapfanne auf Kombirost 180 3 35 - 45
Mediterranes Gemü‐
se, 0,7 kg
Backblech oder tiefes Blech 180 4 35 - 45
10.8 Informationen für Prüfinstitute
Tests gemäß IEC 60350-1.
(°C) (Min.)
Törtchen, 20
pro Blech
Ober-/Unterhit‐
ze
Backblech 3 170 20 - 30 -
Törtchen, 20
pro Blech
Umluft Backblech 3 150 -
160
20 - 35 -
Törtchen, 20
pro Blech
Umluft Backblech 2 und 4 150 -
160
20 - 35 -
Apfelku‐
chen, 2 For‐
men à Ø 20
cm
Ober-/Unterhit‐
ze
Kombirost 2 180 70 - 90 -
DEUTSCH 87

(°C) (Min.)
Apfelku‐
chen, 2 For‐
men à Ø 20
cm
Umluft Kombirost 2 160 70 - 90 -
Biskuit, Ku‐
chenform Ø
26 cm
Ober-/Unterhit‐
ze
Kombirost 2 170 40 - 50 Backofen 10 Min. vor‐
heizen.
Biskuit, Ku‐
chenform Ø
26 cm
Umluft Kombirost 2 160 40 - 50 Backofen 10 Min. vor‐
heizen.
Biskuit, Ku‐
chenform Ø
26 cm
Umluft Kombirost 2 und 4 160 40 - 60 Backofen 10 Min. vor‐
heizen.
Mürbeteig‐
gebäck
Umluft Backblech 3 140 -
150
20 - 40 -
Mürbeteig‐
gebäck
Umluft Backblech 2 und 4 140 -
150
25 - 45 -
Mürbeteig‐
gebäck
Ober-/Unterhit‐
ze
Backblech 3 140 -
150
25 - 45 -
Toast, 4 - 6
Stück
Grill Kombirost 4 Max. 2 - 3 Minuten auf
der ersten Seite, 2
- 3 Minuten auf der
zweiten Seite
Backofen 3 Min. vor‐
heizen.
Hamburger
aus Rind‐
fleisch, 6
Stück, 0,6
kg
Grill Kombirost
und Fett‐
pfanne
4 Max. 20 - 30 Kombirost in die vierte
und Fettpfanne in die
dritte Einschubebene
des Backofens ein‐
schieben. Wenden Sie
das Lebensmittel nach
der Hälfte der Gardau‐
er.
Backofen 3 Min. vor‐
heizen.
11. REINIGUNG UND PFLEGE
WARNUNG!
Siehe Kapitel
Sicherheitshinweise.
88 DEUTSCH

11.1 Hinweise zur Reinigung
Reinigungsmittel
Feuchten Sie ein weiches Tuch mit warmem Wasser und etwas mildem Reinigungsmittel an,
und reinigen Sie damit die Vorderseite des Backofens. Reinigen und überprüfen Sie die Tür‐
dichtung um den Garraumrahmen.
Reinigen Sie die Metalloberflächen mit einer Reinigungslösung.
Reinigen Sie Flecken mit einem milden Reinigungsmittel.
Täglicher Ge‐
brauch
Reinigen Sie den Garraum nach jedem Gebrauch. Fettansammlungen oder andere Speise‐
reste könnten einen Brand verursachen.
Es kann sich Feuchtigkeit im Ofen oder an den Glasscheiben der Tür niederschlagen. Um
die Kondensation zu reduzieren, schalten Sie den Backofen immer 10 Minuten vor dem Ga‐
ren ein. Lassen Sie die Speisen nicht länger als 20 Minuten im Backofen stehen. Trocknen
Sie den Garraum nach jedem Gebrauch mit einem weichen Tuch ab.
Zubehör
Reinigen Sie alle Zubehörteile nach jedem Gebrauch und lassen Sie sie trocknen. Feuchten
Sie ein weiches Tuch mit warmem Wasser und einem milden Reinigungsmittel an. Reinigen
Sie die Zubehörteile nicht im Geschirrspüler.
Reinigen Sie das Zubehör mit Antihaftbeschichtung nicht mit Scheuermitteln oder scharfkan‐
tigen Gegenständen.
11.2 Entfernen: Einhängegitter
Entfernen Sie Einhängegitter zur Reinigung
des Backofens.
Schritt 1 Schalten Sie den Backofen aus und
warten Sie, bis er abgekühlt ist.
Schritt 2 Ziehen Sie das Einhängegitter vorne
von der Seitenwand weg.
Schritt 3 Ziehen Sie das Einhängegitter hinten
von der Seitenwand weg und nehmen
Sie es heraus.
2
1
Schritt 4 Führen Sie zum Einsetzen der Ein‐
hängegitter die oben aufgeführten
Schritte in umgekehrter Reihenfolge
durch.
11.3 Verwendung: Aqua Reinigung
Bei dieser Reinigungsfunktion werden
mithilfe von Feuchtigkeit Fett- und
Speisereste aus dem Backofen entfernt.
Schritt 1 Füllen Sie Wasser in die Garraumver‐
tiefung: 300 ml.
Schritt 2 Stellen Sie die folgende Funktion ein:
.
DEUTSCH 89

Schritt 3 Stellen Sie die Temperatur auf 90 °C.
Schritt 4 Lassen Sie den Backofen 30 Min. lang
eingeschaltet.
Schritt 5 Schalten Sie den Ofen aus.
Schritt 6 Warten Sie, bis der Ofen kalt ist. Trock‐
nen Sie den Garraum mit einem wei‐
chen Tuch ab.
11.4 Aus- und Einbau der: Tür
Die Backofentür hat zwei Glasscheiben. Die Backofentür und die innere Glasscheibe können
zur Reinigung ausgebaut werden. Lesen Sie die gesamte Anleitung „Aus- und Einbauen der
Tür“, bevor Sie die Glasscheiben entfernen.
VORSICHT!
Benutzen Sie den Backofen nicht ohne die Glasscheiben.
Schritt 1 Öffnen Sie die Backofentür vollständig und
halten Sie beide Scharniere fest.
Schritt 2 Heben Sie die Hebel an den beiden Schar‐
nieren an und klappen Sie sie nach vorne.
Schritt 3 Schließen Sie die Backofentür halb bis zur
ersten Raststellung. Anschließend heben
und ziehen Sie die Tür nach vorn aus der
Aufnahme heraus.
Schritt 4 Legen Sie die Backofentür auf ein weiches
Tuch auf einer stabilen Fläche.
Schritt 5 Fassen Sie die Türabdeckung (B) an der
Oberkante der Tür an beiden Seiten an. Drü‐
cken Sie sie nach innen, um den Klippver‐
schluss zu lösen.
Schritt 6 Ziehen Sie die Türabdeckung nach vorn, um
sie abzunehmen.
1
2
B
Schritt 7 Halten Sie die Oberkante der Türglasscheibe
fest und ziehen Sie vorsichtig heraus. Ach‐
ten Sie darauf, dass die Glasscheiben voll‐
ständig aus den Halterungen gezogen wer‐
den.
90 DEUTSCH

Schritt 8 Reinigen Sie die Glasscheiben mit Wasser
und Spülmittel. Trocknen Sie die Glasschei‐
ben sorgfältig ab. Reinigen Sie die Glas‐
scheiben nicht im Geschirrspüler.
Schritt 9 Setzen Sie nach der Reinigung die Glas‐
scheibe und die Backofentür ein
Der bedruckte Bereich muss zur Innenseite der Tür
zeigen. Vergewissern Sie sich nach der Montage,
dass sich der Glasscheibenrahmen an der bedruckten
Zone nicht rau anfühlt.
Bei korrektem Einbau macht die Türabdeckung ein
Klickgeräusch.
Achten Sie darauf, die innere Glasscheibe richtig in
die Aufnahmen einzusetzen.
A
11.5 Austausch: Lampe
WARNUNG!
Stromschlaggefahr.
Die Lampe kann heiß sein.
Halten Sie die Halogenlampe stets mit einem
Tuch, um zu verhindern, dass Fettrückstände
auf der Lampe einbrennen.
Bevor Sie die Lampe austauschen:
Schritt 1 Schritt 2 Schritt 3
Schalten Sie den Backofen aus.
Warten Sie, bis der Ofen kalt ist.
Trennen Sie den Ofen von der Netz‐
versorgung.
Breiten Sie ein Tuch auf dem Gar‐
raumboden aus.
Hintere Lampe
Schritt 1 Drehen Sie die Glasabdeckung und nehmen Sie sie ab.
Schritt 2 Reinigen Sie die Glasabdeckung.
Schritt 3 Ersetzen Sie die Lampe durch eine geeignete, bis 300 °C hitzebeständige Lampe.
Schritt 4 Bringen Sie die Glasabdeckung wieder an.
12. FEHLERSUCHE
WARNUNG!
Siehe Kapitel
Sicherheitshinweise.
12.1 Was tun, wenn...
In allen Fällen, die nicht in dieser Tabelle
aufgeführt sind, wenden Sie sich bitte an
einen autorisierten Kundendienst.
Störung Prüfen Sie, ob...
Der Backofen nicht heizt. Die Sicherung durchge‐
brannt ist.
DEUTSCH 91

Störung Prüfen Sie, ob...
Die Türdichtung beschä‐
digt ist.
Benutzen Sie den Ofen
nicht. Wenden Sie sich
an den autorisierten Kun‐
dendienst.
Garzeitende nicht einge‐
stellt ist.
Einstellung: Garzeitende.
Siehe „Uhrfunktionen“.
Die Lampe nicht funktio‐
niert.
Die Lampe durchge‐
brannt ist.
12.2 Servicedaten
Wenn Sie das Problem nicht selbst lösen
können, wenden Sie sich an Ihren Händler
oder einen autorisierten Kundendienst.
Die vom Kundendienst benötigten Daten
finden Sie auf dem Typenschild. Das
Typenschild befindet sich am Frontrahmen
des Garraums. Entfernen Sie das
Typenschild nicht vom Garraum.
Wir empfehlen, hier folgende Daten zu notieren:
Modell (MOD.) .........................................
Produktnummer (PNC) .........................................
Seriennummer (S.N.) .........................................
13. ENERGIEEFFIZIENZ
13.1 Produktinformationen und Produktdatenblatt*
Herstellername Zanussi
Modellidentifikation
ZOHKF1X1 949496249
ZOHNF1K1 949496304
ZOHNF1W1 949496305
Energieeffizienzindex 81.2
Energieeffizienzklasse A+
Energieverbrauch bei Standardbeladung, Ober-/Unterhitze 0.93 kWh/Programm
Energieverbrauch bei Standardbeladung, Umluft 0.69 kWh/Programm
Anzahl der Garräume 1
Wärmequelle Strom
Fassungsvermögen 72 l
Backofentyp Einbau-Backofen
Gewicht
ZOHKF1X1 26.7 kg
ZOHNF1K1 26.7 kg
ZOHNF1W1 26.7 kg
* Für die Europäische Union gemäß EU-Richtlinien 65/2014 und 66/2014.
Für die Republik Weißrussland gemäß STB 2478-2017, Anhang G; STB 2477-2017, Anlagen A und B.
Für die Ukraine gemäß 568/32020.
Die Energieeffizienzklasse gilt nicht für Russland.
EN 60350-1 - Elektrische Kochgeräte für den Hausgebrauch - Teil 1: Herde, Backöfen, Dampfgarer und Grillgerä‐
te - Verfahren zur Messung der Gebrauchseigenschaften.
92 DEUTSCH

13.2 Energie sparen
Der Backofen verfügt über
Funktionen, mit deren Hilfe Sie
beim täglichen Kochen Energie
sparen können.
Achten Sie darauf, dass die Backofentür
während des Ofenbetriebs geschlossen ist.
Die Backofentür darf während des
Garvorgangs nicht zu oft geöffnet werden.
Halten Sie die Türdichtung sauber und
stellen Sie sicher, dass sie sich fest in der
richtigen Position befindet.
Verwenden Sie Kochgeschirr aus Metall, um
mehr Energie zu sparen.
Heizen Sie, wenn möglich, den Backofen
nicht vor.
Halten Sie die Unterbrechungen beim
Backen so kurz wie möglich, wenn Sie
mehrere Speisen gleichzeitig zubereiten.
Garen mit Heißluft
Nutzen Sie, wenn möglich, die Garfunktionen
mit Heißluft, um Energie zu sparen.
Restwärme
Beträgt die Garzeit mehr als 30 Minuten,
reduzieren Sie die Ofentemperatur 3 - 10
Min. vor Ablauf des Garvorgangs. Durch die
Restwärme des Backofens werden die
Speisen weiter gegart.
Nutzen Sie die Restwärme, um andere
Speisen aufzuwärmen.
Warmhalten von Speisen
Wählen Sie die niedrigste
Temperatureinstellung, wenn Sie die
Restwärme zum Warmhalten von Speisen
nutzen möchten.
Feuchte Umluft
Diese Funktion ist entwickelt worden, um
während des Garvorgangs Energie zu
sparen.
Die Backofenlampe ist während dieser
Funktion ausgeschaltet.
14. UMWELTTIPPS
Recyceln Sie Materialien mit dem Symbol
. Entsorgen Sie die Verpackung in den
entsprechenden Recyclingbehältern.
Recyceln Sie zum Umwelt- und
Gesundheitsschutz elektrische und
elektronische Geräte. Entsorgen Sie Geräte
mit diesem Symbol nicht mit dem
Hausmüll. Bringen Sie das Gerät zu Ihrer
örtlichen Sammelstelle oder wenden Sie sich
an Ihr Gemeindeamt.
DEUTSCH 93

VISITE O NOSSO WEBSITE PARA:
Resolver problemas e obter conselhos de utilização, catálogos e informações sobre
assistência e reparações:
www.zanussi.com/support
Sujeito a alterações sem aviso prévio.
ÍNDICE
1. INFORMAÇÕES DE SEGURANÇA..............................................................................94
2. INSTRUÇÕES DE SEGURANÇA.................................................................................96
3. INSTALAÇÃO................................................................................................................99
4. DESCRIÇÃO DO PRODUTO......................................................................................100
5. ANTES DA PRIMEIRA UTILIZAÇÃO..........................................................................100
6. UTILIZAÇÃO DIÁRIA.................................................................................................. 101
7. FUNÇÕES DE RELÓGIO........................................................................................... 102
8. UTILIZAR OS ACESSÓRIOS..................................................................................... 102
9. FUNÇÕES ADICIONAIS.............................................................................................103
10. SUGESTÕES E DICAS.............................................................................................104
11. MANUTENÇÃO E LIMPEZA.....................................................................................112
12. RESOLUÇÃO DE PROBLEMAS.............................................................................. 115
13. EFICIÊNCIA ENERGÉTICA......................................................................................116
1. INFORMAÇÕES DE SEGURANÇA
Leia atentamente as instruções fornecidas antes de instalar e
utilizar o aparelho. O fabricante não é responsável por
quaisquer ferimentos ou danos resultantes de instalação ou
utilização incorretas. Guarde sempre as instruções em local
seguro e acessível para consultar no futuro.
1.1 Segurança de crianças e pessoas vulneráveis
• Este aparelho pode ser utilizado por crianças de 8 ou mais
anos de idade e por pessoas com capacidades físicas,
sensoriais ou mentais reduzidas ou com pouca experiência
e conhecimento se tiverem recebido supervisão ou
instruções relativas à utilização do aparelho de forma
segura e compreenderem os perigos envolvidos. É
necessário manter as crianças com menos de 8 anos de
idade e pessoas com incapacidades muito extensas e
complexas afastadas do aparelho, a menos que
constantemente vigiadas.
94 PORTUGUÊS

• Não permita que crianças brinquem com o aparelho.
• Mantenha todos os materiais de embalagem fora do
alcance das crianças e elimine-os de forma apropriada.
• AVISO: Mantenha as crianças e os animais domésticos
afastados do aparelho quando ele estiver a funcionar ou a
arrefecer. As partes acessíveis ficam quentes durante a
utilização.
• Se o aparelho tiver um dispositivo de segurança para
crianças, recomendamos que o active.
• A limpeza e a manutenção básica do aparelho não devem
ser efectuadas por crianças sem supervisão.
1.2 Segurança geral
• Apenas uma pessoa qualificada pode instalar este aparelho
e substituir o cabo.
• AVISO: O aparelho e as partes acessíveis ficam quentes
durante a utilização. Deve ter cuidado para evitar tocar nas
resistências de aquecimento.
• Utilize sempre luvas de forno para retirar e colocar
acessórios ou recipientes de ir ao forno.
• Antes de efetuar qualquer ação de manutenção, desligue o
aparelho da corrente elétrica.
• AVISO: Certifique-se de que o aparelho está desligado
antes de substituir a lâmpada, para evitar a possibilidade
de choque elétrico.
• Não use o aparelho antes de instalá-lo na estrutura
embutida.
• Não utilize uma máquina de limpar a vapor para limpar o
aparelho.
• Não utilize agentes de limpeza abrasivos ou raspadores
metálicos afiados para limpar a porta de vidro, porque
podem riscar a superfície e causar a quebra do vidro.
• Se o cabo de alimentação elétrica estiver danificado, deve
ser substituído pelo fabricante, por um Centro de
Assistência Técnica Autorizado ou por uma pessoa
igualmente qualificada, para evitar perigos elétricos.
• Para remover os apoios para prateleiras, puxe primeiro a
parte da frente e depois a parte de trás do apoio para
PORTUGUÊS 95

prateleiras para fora da parede lateral. Instale os apoios
para prateleiras na sequência inversa.
2. INSTRUÇÕES DE SEGURANÇA
2.1 Instalação
AVISO!
A instalação deste aparelho tem
de ser efetuada por uma pessoa
qualificada.
• Retire a embalagem toda.
• Não instale nem utilize o aparelho se
estiver danificado.
• Siga as instruções de instalação
fornecidas com o aparelho.
• Tenha sempre cuidado quando deslocar o
aparelho porque ele é pesado. Utilize
sempre luvas de proteção e calçado
fechado.
• Não puxe o aparelho pela pega.
• Instale o aparelho num local seguro e
adequado que cumpra com os requisitos
da instalação.
• Respeite as distâncias mínimas
relativamente a outros aparelhos e
unidades.
• Antes de montar o aparelho, verifique se
a porta do forno abre sem limitações.
• O aparelho está equipado com um
sistema de arrefecimento elétrico. É
necessário que tenha alimentação
elétrica.
Altura mínima do armário
(altura mínima do armário
debaixo do balcão)
590 (600) mm
Largura do armário 560 mm
Profundidade do armário 550 (550) mm
Altura da parte da frente do
aparelho
594 mm
Altura da parte de trás do
aparelho
576 mm
Largura da parte da frente
do aparelho
595 mm
Largura da parte de trás do
aparelho
559 mm
Profundidade do aparelho 569 mm
Profundidade de encastre
do aparelho
548 mm
Profundidade com a porta
aberta
1022 mm
Dimensão mínima da aber‐
tura de ventilação. Abertu‐
ra localizada na parte infe‐
rior traseira
560x20 mm
Comprimento do cabo de
alimentação elétrica. O ca‐
bo sai pelo canto traseiro
direito
1500 mm
Parafusos de montagem 4x25 mm
2.2 Ligação elétrica
AVISO!
Risco de incêndio e choque
elétrico.
• Todas as ligações eléctricas devem ser
efectuadas por um electricista qualificado.
• O aparelho tem de ficar ligado à terra.
• Certifique-se de que os parâmetros
indicados na placa de características são
compatíveis com as características da
alimentação eléctrica.
• Utilize sempre uma tomada devidamente
instalada e à prova de choques elétricos.
• Não utilize adaptadores de tomadas
duplas ou triplas, nem cabos de extensão.
• Certifique-se de que não danifica a ficha e
o cabo de alimentação eléctrica. Se for
necessário substituir o cabo de
alimentação, esta operação deve ser
efectuada pelo nosso Centro de
Assistência Técnica.
• Não permita que algum cabo eléctrico
toque na porta do aparelho ou no nicho
abaixo do aparelho, especialmente
quando a porta estiver quente.
• As protecções contra choques eléctricos
das peças isoladas e não isoladas devem
estar fixas de modo a não poderem ser
retiradas sem ferramentas.
96 PORTUGUÊS

• Ligue a ficha à tomada elétrica apenas no
final da instalação. Certifique-se de que a
ficha fica acessível após a instalação.
• Se a tomada eléctrica estiver solta, não
ligue a ficha.
• Não puxe o cabo de alimentação para
desligar o aparelho. Puxe sempre a ficha.
• disjuntores de protecção, fusíveis (os
fusíveis de rosca devem ser retirados do
suporte), diferenciais e contactores.
• A instalação eléctrica deve possuir um
dispositivo de isolamento que lhe permita
desligar o aparelho da corrente eléctrica
em todos os pólos. O dispositivo de
isolamento deve ter uma abertura de
contacto com uma largura mínima de 3
mm.
• Este aparelho é fornecido com ficha e
com cabo de alimentação.
Tipos de cabos aplicáveis para instalação
ou substituição para a Europa:
H07 RN-F, H05 RN-F, H05 RRF, H05 VV-F, H05
V2V2-F (T90), H05 BB-F
Para informações sobre a secção do cabo,
consulte a potência total na placa de
características. Também pode consultar a
tabela:
Potência total (W) Secção do cabo
(mm²)
máximo de 1380 3 x 0.75
máximo de 2300 3 x 1
máximo de 3680 3 x 1.5
O cabo de terra (cabo verde/amarelo) tem de
ser 2 cm mais comprido do que os cabos de
fase e neutro (cabos azul e castanho).
2.3 Utilização
AVISO!
Risco de ferimentos,
queimaduras, choque elétrico ou
explosão.
• Este aparelho destina-se apenas a uso
doméstico.
• Não altere as especificações deste
aparelho.
• Certifique-se de que as aberturas de
ventilação não ficam obstruídas.
• Não deixe o aparelho a funcionar sem
vigilância.
• Desative o aparelho após cada utilização.
• Tenha cuidado sempre que abrir a porta
do aparelho quando ele estiver a
funcionar. Pode sair ar muito quente.
• Não utilize o aparelho com as mãos
húmidas ou se ele estiver em contacto
com água.
• Não exerça pressão sobre a porta se ela
estiver aberta.
• Não utilize o aparelho como superfície de
trabalho ou armazenamento.
• Abra a porta do aparelho com cuidado. A
utilização de ingredientes com álcool
pode provocar uma mistura de álcool e ar.
• Evite que faíscas ou chamas entrem em
contacto com o aparelho quando abrir a
porta.
• Não coloque produtos inflamáveis, ou
objetos molhados com produtos
inflamáveis, no interior, perto ou em cima
do aparelho.
AVISO!
Risco de danos no aparelho.
• Para evitar danos ou descoloração no
esmalte:
– Não coloque recipientes de ir ao forno
ou outros objetos diretamente sobre o
fundo da cavidade do aparelho.
– Não coloque folha de alumínio
diretamente sobre o fundo da
cavidade do aparelho.
– Não verta água diretamente sobre o
aparelho quando ele estiver quente.
– Não coloque pratos ou alimentos
húmidos no aparelho após acabar de
cozinhar.
– Tenha cuidado quando remover ou
instalar os acessórios.
• A eventual descoloração do esmalte ou
do aço inoxidável não afeta o
desempenho do aparelho.
• Utilize um recipiente profundo quando
cozer bolos muito húmidos. Caso
contrário, os sucos da fruta podem
provocar manchas permanentes.
• Este aparelho serve apenas para
cozinhar. Não pode ser usado para outras
PORTUGUÊS 97

funções como, por exemplo, aquecimento
de divisões.
• Cozinhe sempre com a porta do forno
fechada.
• Se o aparelho ficar instalado atrás de
uma porta de armário, nunca feche a
porta com o aparelho em funcionamento.
Se a porta ficar fechada, poderá ocorrer
acumulação de calor e humidade que
podem danificar o aparelho, os móveis ou
o piso. Não feche a porta do armário
enquanto o aparelho não tiver arrefecido
completamente após utilização.
2.4 Manutenção e limpeza
AVISO!
Risco de ferimentos, incêndio e
danos no aparelho.
• Antes de qualquer ação de manutenção,
desative o aparelho e desligue a ficha da
tomada elétrica.
• Certifique-se de que o aparelho está frio.
Existe o risco de quebra dos painéis de
vidro.
• Substitua imediatamente os painéis de
vidro se estiverem danificados. Contacte
um Centro de Assistência Técnica
Autorizado.
• Tenha cuidado quando remover a porta
do aparelho. A porta é pesada!
• Limpe o aparelho com regularidade para
evitar que o material da superfície se
deteriore.
• Limpe o aparelho com um pano macio e
húmido. Utilize apenas detergentes
neutros. Não utilize produtos abrasivos,
esfregões, solventes ou objetos
metálicos.
• Se utilizar um spray para forno, siga as
instruções de segurança da embalagem.
2.5 Iluminação interna
AVISO!
Risco de choque elétrico.
• Relativamente à(s) lâmpada(s) no interior
deste produto e às lâmpadas
sobressalentes vendidas separadamente:
Estas lâmpadas destinam-se a suportar
condições físicas extremas em
eletrodomésticos, tais como temperatura,
vibração, humidade, ou destinam-se a
sinalizar informação relativamente ao
estado operacional do aparelho. Não se
destinam a ser utilizadas em outras
aplicações e não se adequam à
iluminação de espaços domésticos.
• Utilize apenas lâmpadas com as mesmas
especificações.
2.6 Assistência
• Contacte um Centro de Assistência
Técnica Autorizado se for necessário
reparar o aparelho.
• Utilize apenas peças de substituição
originais.
2.7 Eliminação
AVISO!
Risco de ferimentos ou asfixia.
• Desligue o aparelho da alimentação
eléctrica.
• Corte o cabo de alimentação eléctrica do
aparelho e elimine-o.
• Remova o trinco da porta para evitar que
crianças ou animais de estimação fiquem
presos no aparelho.
98 PORTUGUÊS

3. INSTALAÇÃO
AVISO!
Consulte os capítulos relativos à
segurança.
3.1 Encastre
18
594
589
114
21548
595
+-1
min. 550
20
600
min. 560
3
5
60
20
80
520
60
198
523
(*mm)
min. 550
20
595
+-1
18
590
min. 560
594
589
114
21548
3
5
70
60
520
60
20
198
523
(*mm)
PORTUGUÊS 99

3.2 Fixação do forno no armário
4. DESCRIÇÃO DO PRODUTO
4.1 Resumo geral
8
7
9
10
11
5
4
3
2
1
321 64 5
12
1
Painel de controlo
2
Lâmpada/símbolo de alimentação
3
Botão para as funções de aquecimento
do forno
4
Botão do temporizador
5
Botão de controlo (para a temperatura)
6
Símbolo / indicador de temperatura
7
Elemento de aquecimento
8
Lâmpada
9
Ventilador
10
Recipiente da limpeza com água
11
Apoio para prateleira, removível
12
Posições de prateleira
4.2 Acessórios
• Prateleira em grelha
Para recipientes, formas de bolo,
assados.
• Tabuleiro para assar
Para bolos e biscoitos.
5. ANTES DA PRIMEIRA UTILIZAÇÃO
AVISO!
Consulte os capítulos relativos à
segurança.
100 PORTUGUÊS

5.1 Antes da primeira utilização
O forno pode emitir algum odor e fumo durante o pré-aquecimento. Certifique-se de que o
espaço é ventilado.
Passo 1
Passo 2
Limpeza do forno Pré-aqueça o forno vazio
1. Remova todos os acessórios e apoios para prate‐
leiras amovíveis do forno.
2. Limpe o forno e os acessórios com um pano ma‐
cio, água morna e um detergente suave.
1. Regule a temperatura máxima para a função. .
Tempo: 1 h.
2. Regule a temperatura máxima para a função. .
Tempo: 15 min.
Desligue o forno e aguarde até estar frio. Coloque os acessórios e apoios de prateleiras amovíveis do forno.
6. UTILIZAÇÃO DIÁRIA
AVISO!
Consulte os capítulos relativos à
segurança.
6.1 Como definir: Função de
aquecimento
Passo 1 Rode o botão para as funções de
aquecimento para selecionar uma fun‐
ção de aquecimento.
Passo 2 Rode o botão de controlo para selecio‐
nar a temperatura.
Passo 3 Quando a cozedura terminar, rode os
botões para a posição off (desligado)
para desligar o forno.
6.2 Funções de aquecimento
Função de
aquecimen‐
to
Aplicação
Posição off
(desligado)
O forno está desligado.
Luz
Para ativar a lâmpada:
Função de
aquecimen‐
to
Aplicação
Ventilado com
Resistência
Esta função foi concebida para pou‐
par energia durante o cozinhado.
Quando utilizar esta função, a tem‐
peratura na cavidade pode diferir a
temperatura definida. A potência do
aquecimento pode ser reduzida.
Para mais informações consulte o
capítulo “Utilização diária”, notas
sobre: Ventilado com Resistência.
Cozedura ven‐
tilada
Para assar ou assar e cozer alimen‐
tos em mais do que uma posição de
prateleira com a mesma temperatu‐
ra de cozedura, sem transferência
de sabores.
Turbo Grill
Para assar peças de carne grandes
ou aves com ossos numa posição
da prateleira. Para fazer gratinados
e alourar.
Aquecimento
inferior
Para cozer bolos com bases estala‐
diças e conservar alimentos.
Função Pizza
Para cozer pizza. Para um tostado
intenso e uma base crocante. Re‐
gule a temperatura para 230°C.
PORTUGUÊS 101

Função de
aquecimen‐
to
Aplicação
Descongelar
Para descongelar alimentos (legu‐
mes e fruta). O tempo de desconge‐
lação depende da quantidade e do
tamanho dos alimentos congelados.
Cozedura
Convencional /
Limpeza com
água
Para cozer e assar pratos numa po‐
sição de prateleira.
Consulte o capítulo "Cuidados e
limpeza" para mais informações so‐
bre: Limpeza com água.
6.3 Notas sobre: Ventilado com
Resistência
Esta função foi utilizada para cumprir com os
requisitos de classe de eficiência energética
e design ecológico de acordo com as normas
EU 65/2014 e EU 66/2014. Testes de acordo
com a norma EN 60350-1.
A porta do forno deve estar fechada durante
a cozedura para que a função não seja
interrompida e o forno funcione com a mais
alta eficiência energética possível.
Quando utiliza esta função a lâmpada é
automaticamente desativada.
Para instruções de cozedura, consulte o
capítulo "Sugestões e dicas", Ventilado com
Resistência. Para recomendações gerais
sobre poupança de energia, consulte o
capítulo "Eficiência energética", Poupança
de energia.
7. FUNÇÕES DE RELÓGIO
7.1 Como definir: Fim de cozedura
Para definir a hora de desligar funções do forno.
Passo 1 Selecionar a função do forno e a temperatura.
Passo 2 Rodar o botão do temporizador até ao fim.
Passo 3 Rodar o botão do temporizador para definir a hora de desligar
O sinal soa no tempo definido e o forno desliga.
Passo 4 Rodar o botão das funções do forno e o botão da temperatura para a posição de desligado (off).
8. UTILIZAR OS ACESSÓRIOS
AVISO!
Consulte os capítulos relativos à
segurança.
8.1 Inserir acessórios
Um pequeno entalhe na parte inferior
aumenta a segurança. Estes entalhes são
também dispositivos anti-inclinação. A
armação elevada à volta da prateleira
impede que os recipientes deslizem para
fora da prateleira.
102 PORTUGUÊS

Prateleira em grelha:
Introduza a prateleira entre as barras-guia dos
apoios para prateleiras e certifique-se de que os
pés de apoio ficam para baixo.
Tabuleiro para assar:
Introduza o tabuleiro entre as barras-guia do apoio
para prateleiras.
Prateleira em grelha, Tabuleiro para assar:
Introduza o tabuleiro entre as barras-guia dos
apoios para prateleiras e a prateleira em grelha
sobre as barras imediatamente acima.
9. FUNÇÕES ADICIONAIS
9.1 Ventoinha de arrefecimento
Quando o forno está a funcionar, a ventoinha
de arrefecimento é ativada automaticamente
para manter as superfícies do forno frias. Se
desligar o forno, a ventoinha de
arrefecimento pode continuar a funcionar aé
o forno arrefecer.
9.2 Termóstato de segurança
Se o forno for utilizado incorretamente ou
tiver alguma anomalia, pode ocorrer um
sobreaquecimento perigoso. Para evitar isso,
o forno possui um termóstato de segurança
que corta a alimentação elétrica. O forno
volta a ativar-se automaticamente quando a
temperatura baixar.
PORTUGUÊS 103

10. SUGESTÕES E DICAS
Consulte os capítulos relativos à
segurança.
10.1 Recomendações para cozinhar
O forno possui cinco posições de prateleira.
Conte as posições de prateleira a partir do
fundo do forno.
O forno pode ter um processo para cozer ou
assar diferente do forno que utilizava
anteriormente. As tabelas em baixo indicam
regulações de temperatura, tempos de
cozedura e posições de prateleira para
algumas receitas comuns.
Se não encontrar as regulações para alguma
receita específica, procure uma semelhante.
O forno possui um sistema especial que faz
circular o ar e renova constantemente o
vapor. Este sistema permite cozinhar num
ambiente a vapor e manter os alimentos
macios por dentro e estaladiços por fora.
Diminui o tempo de cozedura e o consumo
de energia.
Cozer bolos
Não abra a porta do forno até ter decorrido
3/4 do tempo de cozedura.
Se utilizar dois tabuleiros para assar em
simultâneo, mantenha um nível vazio entre
os mesmos.
Cozinhar carne e peixe
Deixe a carne repousar cerca de 15 minutos
antes de a cortar, para não perder os sucos.
Para evitar demasiado fumo no forno quando
assar, coloque um pouco de água no
tabuleiro para grelhar. Para evitar a
condensação de fumo, acrescente água
sempre que ele secar.
Tempos de cozedura
Os tempos de cozedura dependem do tipo
de alimento, da consistência e do volume.
No início, monitorize o desempenho quando
cozinhar. Quando utilizar este aparelho,
procure as melhores regulações (grau de
cozedura, tempo de cozedura, etc.) para os
seus recipientes e para as suas receitas e
quantidades.
10.2 Bolos e assados
BO‐
LOS
Cozedura Convencio‐
nal
Cozedura ventilada
(min)
(°C) (°C)
Receitas batidas 170 2 160 3 45 – 60 Forma de bolo
Massa amantei‐
gada
170 2 160 3 20 – 30 Forma de bolo
Cheesecake but‐
termilk
170 1 160 1 70 – 80 Forma de bolo, Ø
26 cm
Strudel 175 3 150 2 60 – 80 Tabuleiro para as‐
sar
Torta de compota 170 2 165 2 30 – 40 Tabuleiro para as‐
sar
Bolo-rei, pré-
-aqueça o forno
vazio
160 2 150 2 90 – 120 Forma de bolo, Ø
20 cm
104 PORTUGUÊS

BO‐
LOS
Cozedura Convencio‐
nal
Cozedura ventilada
(min)
(°C) (°C)
Bolo de ameixa,
pré-aqueça o for‐
no vazio
175 1 160 2 50 – 60 Forma retangular
Biscoitos 140 3 140 – 150 3 30 – 35 Tabuleiro para as‐
sar
Biscoitos, dois ní‐
veis
- - 140 – 150 2 e 4 35 - 40 Tabuleiro para as‐
sar
Biscoitos, três ní‐
veis
120 3 120 3 80 – 100 Tabuleiro para as‐
sar
Merengue 190 3 180 3 15 – 20 Tabuleiro para as‐
sar
Pãezinhos, pré-
-aqueça o forno
vazio
190 3 170 3 25 – 35 Tabuleiro para as‐
sar
Éclairs, um nível 180 2 170 2 45 – 70 Tabuleiro para as‐
sar
Éclairs, dois ní‐
veis
160 1 150 2 110 – 120 Tabuleiro para as‐
sar
Tartes 170 1 160 1 50 – 60 Tabuleiro para as‐
sar
Bolo de fruta rico 190 3 190 3 12 – 20 Tabuleiro para as‐
sar
Bolo de duas ca‐
madas
190 3 170 3 25 – 35 Tabuleiro para as‐
sar
Pré-aqueça o forno vazio.
PÃO E
PIZZA
Cozedura Convencio‐
nal
Cozedura ventilada
(min)
(°C) (°C)
Pão branco, 1 – 2
unidades, 0,5 kg
cada
190 1 190 1 60 – 70 -
Pão de centeio,
não é necessário
pré-aquecer
190 1 180 1 30 – 45 Forma retangular
Pãezinhos, 6 – 8
pastéis
230 – 250 1 230 – 250 1 10 – 20 Tabuleiro para as‐
sar
PORTUGUÊS 105

PÃO E
PIZZA
Cozedura Convencio‐
nal
Cozedura ventilada
(min)
(°C) (°C)
Pizza massa fina 200 3 190 3 10 – 20 Tabuleiro para as‐
sar / Tabuleiro pa‐
ra grelhar
Scones 200 3 190 3 10 – 20 Tabuleiro para as‐
sar
Pré-aqueça o forno vazio.
Utilize uma forma de bolo.
FLANS
Cozedura Convencional Cozedura ventilada
(min)
(°C) (°C)
Empadas, não é ne‐
cessário pré-aquecer
200 2 180 2 40 – 50
Flan de vegetais, não
é necessário pré-
-aquecer
200 2 175 2 45 – 60
Quiches 180 1 180 1 50 – 60
Lasanha 180 – 190 2 180 – 190 2 25 – 40
Canelones 180 – 190 2 180 – 190 2 25 – 40
Utilize a prateleira em grelha.
CARNE
Cozedura Convencional Cozedura ventilada
(min)
(°C) (°C)
Carne De Vaca 200 2 190 2 50 – 70
Lombo de porco 180 2 180 2 90 – 120
Vitela 190 2 175 2 90 – 120
Carne assada, mal
passada
210 2 200 2 50 – 60
Carne assada, média 210 2 200 2 60 – 70
Carne assada, bem
passada
210 2 200 2 70 – 75
106 PORTUGUÊS

CARNE
Cozedura Convencional Cozedura ventilada
(min)
(°C) (°C)
Pá de porco, com cou‐
rato
180 2 170 2 120 – 150
Perna de porco, 2 uni‐
dades
180 2 160 2 100 – 120
Perna de borrego 190 2 175 2 110 – 130
Frango inteiro 220 2 200 2 70 – 85
Peru inteiro 180 2 160 2 210 – 240
Pato inteiro 175 2 220 2 120 – 150
Ganso inteiro 175 2 160 1 150 – 200
Coelho, cortado em
pedaços
190 2 175 2 60 – 80
Lebre, cortada em pe‐
daços
190 2 175 2 150 – 200
Faisão inteiro 190 2 175 2 90 – 120
PEIXE
Cozedura Convencional Cozedura ventilada
(min)
(°C) (°C)
Truta / Dourada, 3 – 4 pei‐
xes
190 2 175 2 40 – 55
Atum / Salmão, 4 – 6 file‐
tes
190 2 175 2 35 – 60
10.3 Turbo Grill
Pré-aqueça o forno vazio.
Utilize a primeira e a segunda posições da
prateleira
Para calcular o tempo do assado, multiplique
o tempo dado na tabela abaixo pelos
centímetros de espessura do filete.
CARNE DE
VACA (°C) (min)
Carne assada ou lom‐
bo, mal passado
190 - 200 5 - 6
Carne assada ou lom‐
bo, médio
180 - 190 6 - 8
CARNE DE
VACA (°C) (min)
Carne assada ou lom‐
bo, bem passado
170 - 180 8 - 10
PORCO
(°C) (min)
Pá / Cachaço / Fiam‐
bre, 1 - 1,5 kg
160 - 180 90 - 120
Costeletas / Entrecos‐
to, 1 - 1,5 kg
170 - 180 60 - 90
PORTUGUÊS 107

PORCO
(°C) (min)
Rolo de carne, 0,75 - 1
kg
160 - 170 50 - 60
Joelho de porco, pré-
-cozido, 0,75 - 1 kg
150 - 170 90 - 120
VITELA
(°C) (min)
Vitela assada, 1 kg 160 - 180 90 - 120
Mão de vitela, 1,5 - 2
kg
160 - 180 120 - 150
CORDEIRO
(°C) (min)
Perna de borrego /
Borrego assado, 1 -
1,5 kg
150 - 170 100 - 120
Lombo de borrego, 1 -
1,5 kg
160 - 180 40 - 60
AVES
(°C) (min)
Aves, partes, 0,2 -
0,25 kg cada
200 - 220 30 - 50
1/2 Frango, 0,4 - 0,5
kg cada
190 - 210 35 - 50
Frango, galinha, 1 -
1,5 kg
190 - 210 50 - 70
Pato, 1,5 - 2 kg 180 - 200 80 - 100
Ganso, 3,5 - 5 kg 160 - 180 120 - 180
Peru, 2,5 - 3,5 kg 160 - 180 120 - 150
Peru, 4 - 6 kg 140 - 160 150 - 240
PEIXE (AO
VAPOR) (°C) (min)
Peixe, inteiro (até
1Kg), 1 - 1,5 kg
210 - 220 40 - 60
10.4 Descongelar
(kg)
Tempo de des‐
congelação
(min.)
Tempo extra de des‐
congelação (min.)
Frango 1 100 - 140 20 - 30 Coloque o frango sobre
um pires virado ao contrá‐
rio e este sobre um prato
grande. Vire a meio do
tempo.
Carne 1 100 - 140 20 - 30 Vire a meio do tempo.
0,5 90 - 120
Natas 2 x 0,2 80 - 100 10 - 15 Também é possível bater
as natas quando ainda es‐
tão ligeiramente congela‐
das.
Truta 0,15 25 - 35 10 - 15 -
Morangos 0,3 30 - 40 10 - 20 -
108 PORTUGUÊS

(kg)
Tempo de des‐
congelação
(min.)
Tempo extra de des‐
congelação (min.)
Manteiga 0,25 30 - 40 10 - 15 -
Gateau 1,4 60 60 -
10.5 Secagem - Cozedura ventilada
Cubra os tabuleiros com papel impermeável
à gordura ou papel vegetal.
Para obter o melhor resultado, desligue o
forno a meio do tempo de secagem, abra a
porta e deixe arrefecer durante uma noite
para terminar a secagem.
Para 1 tabuleiro, utilize a terceira posição da
prateleira.
Para 2 tabuleiros, utilize a primeira e quarta
posições da prateleira.
LEGUMES
(°C) (h)
Feijões 60 - 70 6 - 8
Pimentos 60 - 70 5 - 6
LEGUMES
(°C) (h)
Legumes para sopa 60 - 70 5 - 6
Cogumelos 50 - 60 6 - 8
Ervas aromáticas 40 – 50 2 - 3
Defina a temperatura para 60 a 70 ºC.
FRUTA
(h)
Ameixas 8 - 10
Alperces 8 - 10
Fatias de maçã 6 - 8
Peras 6 - 9
10.6 Ventilado com Resistência - acessórios recomendados
Utilize os tabuleiros e recipientes escuros e não refletores. Têm melhor absorção do calor do
que a loiça de cor clara e refletora.
Forma para pizza
Assadeira
Formas individu‐
ais
Forma com base para
flan
Escuro, não refletor
28 cm de diâmetro
Escuro, não refletor
26 cm de diâmetro
Vitrocerâmica
8 cm de diâmetro,
5 cm de altura
Escuro, não refletor
28 cm de diâmetro
10.7 Ventilado com Resistência
Para obter os melhores resultados, siga as
sugestões indicadas na tabela abaixo.
PORTUGUÊS 109

(°C) (min.)
Pastéis doces, 12
unidades
tabuleiro para assar ou tabu‐
leiro para recolha de gorduras
175 3 40 - 50
Pasteis, 9 unidades tabuleiro para assar ou tabu‐
leiro para recolha de gorduras
180 2 35 - 45
Pizza, congelada,
0,35 kg
prateleira em grelha 180 2 45 - 55
Torta suíça tabuleiro para assar ou tabu‐
leiro para recolha de gorduras
170 2 30 - 40
Brownie tabuleiro para assar ou tabu‐
leiro para recolha de gorduras
170 2 45 - 50
Soufflé, 6 unidades formas pequenas de cerâmica
na prateleira em grelha
190 3 45 - 55
Base de flan de mas‐
sa batida
forma de base de flan na pra‐
teleira em grelha
180 2 35 - 45
Bolo de duas cama‐
das
assadeira na prateleira em
grelha
170 2 35 - 50
Peixe escalfado, 0,3
kg
tabuleiro para assar ou tabu‐
leiro para recolha de gorduras
180 2 35 - 45
Peixe, inteiro (até
1Kg), 0,2 kg
tabuleiro para assar ou tabu‐
leiro para recolha de gorduras
180 3 25 - 35
Filete de peixe, 0,3 kg forma de piza na prateleira em
grelha
170 3 30 - 40
Carne escalfada, 0,25
kg
tabuleiro para assar ou tabu‐
leiro para recolha de gorduras
180 3 35 - 45
Shashlik, 0,5 kg tabuleiro para assar ou tabu‐
leiro para recolha de gorduras
180 3 40 - 50
Biscoitos, 16 unida‐
des
tabuleiro para assar ou tabu‐
leiro para recolha de gorduras
150 2 30 - 45
Biscoitos de amên‐
doa, 20 unidades
tabuleiro para assar ou tabu‐
leiro para recolha de gorduras
180 2 45 - 55
Queques, 12 unida‐
des
tabuleiro para assar ou tabu‐
leiro para recolha de gorduras
170 2 30 - 40
Pastelaria salgada,
16 unidades
tabuleiro para assar ou tabu‐
leiro para recolha de gorduras
170 2 35 - 45
Biscoitos de massa fi‐
na, 20 unidades
tabuleiro para assar ou tabu‐
leiro para recolha de gorduras
150 2 40 - 50
Tarteletes, 8 unida‐
des
tabuleiro para assar ou tabu‐
leiro para recolha de gorduras
170 2 30 - 40
Legumes, escalfados,
0,4 kg
tabuleiro para assar ou tabu‐
leiro para recolha de gorduras
180 2 35 - 45
Omeleta de legumes forma de piza na prateleira em
grelha
180 3 35 - 45
110 PORTUGUÊS

(°C) (min.)
Legumes mediterrâni‐
cos, 0,7 kg
tabuleiro para assar ou tabu‐
leiro para recolha de gorduras
180 4 35 - 45
10.8 Informação para testes
Testes de acordo com a norma IEC 60350-1.
(°C) (min)
Bolos pe‐
quenos, 20
por tabuleiro
Cozedura Con‐
vencional
Tabuleiro
para assar
3 170 20 - 30 -
Bolos pe‐
quenos, 20
por tabuleiro
Cozedura venti‐
lada
Tabuleiro
para assar
3 150 -
160
20 - 35 -
Bolos pe‐
quenos, 20
por tabuleiro
Cozedura venti‐
lada
Tabuleiro
para assar
2 e 4 150 -
160
20 - 35 -
Tarte de
maçã, 2 for‐
mas, Ø 20
cm
Cozedura Con‐
vencional
Prateleira
em grelha
2 180 70 - 90 -
Tarte de
maçã, 2 for‐
mas, Ø 20
cm
Cozedura venti‐
lada
Prateleira
em grelha
2 160 70 - 90 -
Pão-de-ló,
forma de
bolo de Ø26
cm
Cozedura Con‐
vencional
Prateleira
em grelha
2 170 40 - 50 Pré-aqueça o forno du‐
rante 10 minutos.
Pão-de-ló,
forma de
bolo de Ø26
cm
Cozedura venti‐
lada
Prateleira
em grelha
2 160 40 - 50 Pré-aqueça o forno du‐
rante 10 minutos.
Pão-de-ló,
forma de
bolo de Ø26
cm
Cozedura venti‐
lada
Prateleira
em grelha
2 e 4 160 40 - 60 Pré-aqueça o forno du‐
rante 10 minutos.
Massa
amanteiga‐
da
Cozedura venti‐
lada
Tabuleiro
para assar
3 140 -
150
20 - 40 -
Massa
amanteiga‐
da
Cozedura venti‐
lada
Tabuleiro
para assar
2 e 4 140 -
150
25 - 45 -
PORTUGUÊS 111

(°C) (min)
Massa
amanteiga‐
da
Cozedura Con‐
vencional
Tabuleiro
para assar
3 140 -
150
25 - 45 -
Tosta, 4 - 6
unidades
Grelhador Prateleira
em grelha
4 máx. 2 - 3 minutos para
o primeiro lado; 2 -
3 minutos para o
segundo lado
Pré-aqueça o forno du‐
rante 3 minutos.
Hambúrguer
de vaca, 6
unidades,
0,6 kg
Grelhador Prateleira
em grelha e
tabuleiro de
recolha de
gorduras
4 máx. 20 - 30 Coloque a prateleira
em grelha no quarto
nível e o tabuleiro de
recolha de gorduras no
terceiro nível do forno.
Vire os alimentos a
meio do tempo de co‐
zedura.
Pré-aqueça o forno du‐
rante 3 minutos.
11. MANUTENÇÃO E LIMPEZA
AVISO!
Consulte os capítulos relativos à
segurança.
11.1 Notas sobre a limpeza
Agentes de lim‐
peza
Limpe a parte da frente do forno com um pano macio com água morna e um detergente su‐
ave. Limpe e verifique a junta da porta em torno da moldura da cavidade.
Utilize uma solução de limpeza para limpar as superfícies metálicas.
Limpe manchas com um detergente suave.
Utilização diária
Limpe a cavidade após cada utilização. A acumulação de gordura ou outros resíduos pode
provocar incêndios.
Pode ocorrer condensação de humidade no forno ou nos painéis de vidro da porta. Para di‐
minuir a condensação, deixe o forno funcionar durante 10 minutos antes da cozedura. Não
guarde alimentos no forno durante mais de 20 minutos. Seque a cavidade com um pano
macio após cada utilização.
Acessórios
Limpe todos os acessórios do forno após cada utilização e deixe-os secar. Utilize um pano
macio com água morna e um detergente suave. Não lave os acessórios na máquina de la‐
var loiça
Não limpe acessórios anti-aderentes utilizando detergentes abrasivos ou objetos afiados.
112 PORTUGUÊS

11.2 Como remover: Apoios para
prateleiras
Retire os apoios para prateleiras para limpar
o forno.
Passo 1 Desligue o forno e aguarde até estar
frio.
Passo 2 Puxe a parte da frente do apoio para
prateleiras para fora da parede late‐
ral.
Passo 3 Puxe a parte de trás do apoio para
prateleiras para fora da parede lateral
e retire-o.
2
1
Passo 4 Instale os apoios para grelhas na se‐
quência inversa.
11.3 Como utilizar: Limpeza com
água
Este procedimento de limpeza utiliza
humidade para remover gordura e partículas
de alimentos do forno.
Passo 1 Verta água para o baixo relevo da cavi‐
dade: 300 ml.
Passo 2
Selecione a função: .
Passo 3 Regule a temperatura para 90 °C.
Passo 4 Deixe o forno funcionar durante 30 min.
Passo 5 Desligue o forno.
Passo 6 Aguarde até que o forno esteja frio. Se‐
que a cavidade com um pano macio.
11.4 Como remover e instalar: Porta
A porta do forno tem dois painéis de vidro. Pode remover a porta do forno e o painel de vidro
interno para limpar. Leia todas as instruções sobre "Remoção e instalação da porta" antes de
remover os painéis de vidro.
CUIDADO!
Não utilize o forno sem os painéis de vidro.
Passo 1 Abra completamente a porta e segure em
ambas as dobradiças.
Passo 2 Levante e rode as alavancas totalmente em
ambas as dobradiças.
PORTUGUÊS 113

Passo 3 Feche a porta do forno até meio, parando na
primeira posição de abertura. Em seguida,
levante e puxe a porta e remova-a dos en‐
caixes.
Passo 4 Coloque a porta numa superfície estável
protegida por um pano macio.
Passo 5 Segure no friso da porta (B) no rebordo su‐
perior da porta, nos dois lados, e pressione
para dentro para soltar o fecho de encaixe.
Passo 6 Puxe o friso da porta para a frente para o re‐
mover.
1
2
B
Passo 7 Segure na extremidade superior do painel
de vidro da porta e puxe-o para fora com
cuidado. Certifique-se de que o vidro desliza
totalmente para fora dos suportes.
Passo 8 Limpe os painéis de vidro com água e sabão
Seque cuidadosamente os painéis de vidro.
Não lave os acessórios na máquina de lavar
loiça.
Passo 9 Após a limpeza, instale o painel de vidro e a
porta do forno.
A zona com a impressão em relevo tem de ficar volta‐
da para o lado interior da porta. Certifique-se de que,
após a instalação, a superfície da moldura do painel
de vidro nas zonas da impressão em relevo não é ru‐
gosa.
Quando instalado corretamente, o friso para porta
emite um clique.
Certifique-se de que instala o painel de vidro interior
corretamente nos respetivos encaixes.
A
114 PORTUGUÊS

11.5 Como substituir: Lâmpada
AVISO!
Risco de choque elétrico.
A lâmpada pode estar quente.
Segure sempre a lâmpada de halogéneo
com um pano para evitar a queima de
resíduos de gordura na lâmpada.
Antes de substituir a lâmpada:
Passo 1 Passo 2 Passo 3
Desligue o forno. Aguarde até que o
forno esteja frio.
Desligue o forno da corrente elétri‐
ca.
Coloque um pano no fundo da cavi‐
dade.
Lâmpada posterior
Passo 1 Rode a proteção de vidro para a retirar.
Passo 2 Limpe a proteção de vidro.
Passo 3 Substitua a lâmpada por uma lâmpada adequada, resistente ao calor até 300 °C.
Passo 4 Instale a proteção de vidro.
12. RESOLUÇÃO DE PROBLEMAS
AVISO!
Consulte os capítulos relativos à
segurança.
12.1 O que fazer se...
Em quaisquer casos não incluídos nesta
tabela, contacte um centro de assistência
autorizado.
Problema Certifique-se de
que...
O forno não aquece. O disjuntor está desliga‐
do.
A junta da porta está da‐
nificada.
Não utilize o forno. Con‐
tacte um Centro de As‐
sistência Técnica Autori‐
zado.
Fim de cozedura - não
está definido.
Ajuste: Fim de cozedura.
Consulte “Funções do re‐
lógio”.
Problema Certifique-se de
que...
A lâmpada não funciona. A lâmpada está fundida.
12.2 Dados para a Assistência
Técnica
Se não conseguir encontrar uma solução
para o problema, contacte o concessionário
ouum Centro de Assistência Técnica
Autorizado.
Os dados de contacto do Centro de
Assistência Técnica encontram-se na placa
de características. A placa de características
está na moldura frontal da cavidade do forno.
Não remova a placa de características da
cavidade do forno.
Recomendamos que anote os dados aqui:
Modelo (MOD.) .........................................
PORTUGUÊS 115

Recomendamos que anote os dados aqui:
Número do produto (PNC) .........................................
Número de série (S.N.) .........................................
13. EFICIÊNCIA ENERGÉTICA
13.1 Informação de produto e folha de informação de produto*
Nome do fornecedor Zanussi
Identificação do modelo
ZOHKF1X1 949496249
ZOHNF1K1 949496304
ZOHNF1W1 949496305
Índice de eficiência energética 81.2
Classe de eficiência energética A+
Consumo de energia com uma carga normal, modo convencional 0.93 kWh/ciclo
Consumo de energia com uma carga normal, modo ventilado 0.69 kWh/ciclo
Número de cavidades 1
Fonte de calor Eletricidade
Volume 72 l
Tipo de forno Forno de encastrar
Massa
ZOHKF1X1 26.7 kg
ZOHNF1K1 26.7 kg
ZOHNF1W1 26.7 kg
* Para a União Europeia de acordo com os Regulamentos 65/2014 e 66/2014 da UE.
Para a República da Bielorrússia de acordo com a norma STB 2478-2017, Anexo G; STB 2477-2017, Anexos A
e B.
Para a Ucrânia de acordo com a norma 568/32020.
A classe de eficiência energética não se aplica na Rússia.
EN 60350-1 - Aparelhos elétricos domésticos para cozinhar - Parte 1: Placas, fornos, fornos a vapor e grelhado‐
res - Métodos de medição do desempenho.
13.2 Poupança de energia
O forno possui funções que
ajudam a poupar energia nos
cozinhados de todos os dias.
Certifique-se de que a porta do forno está
fechada quando o forno funcionar. Não abra
a porta do forno muitas vezes durante o
funcionamento. Mantenha a junta da porta
limpa e certifique-se de que está bem fixa na
posição correcta.
Utilize recipientes de metal para melhorar a
poupança de energia.
Quando possível, não pré-aqueça o forno
antes de cozinhar.
Quando preparar vários pratos de uma vez,
reduza ao mínimo possível os intervalos
entre cozeduras.
Cozinhar com a ventoinha
Sempre que possível, utilize as funções de
cozedura que utilizam a ventoinha, para
poupar energia.
116 PORTUGUÊS

Calor residual
Quando a duração da cozedura for superior
a 30 min, reduza a temperatura do forno
para 3 a 10 min no mínimo antes do fim da
cozedura. O calor residual no interior do
forno concluirá a cozedura.
Utilize o calor residual para aquecer outros
pratos.
Manter os alimentos quentes
Para utilizar o calor residual para manter
uma refeição quente, seleccione a regulação
de temperatura mais baixa possível.
Ventilado com Resistência
Função concebida para poupar energia
durante a cozedura.
Quando utilizar esta função, a lâmpada está
desligada.
14. PREOCUPAÇÕES AMBIENTAIS
Recicle os materiais que apresentem o
símbolo . Coloque a embalagem nos
contentores indicados para reciclagem.
Ajude a proteger o ambiente e a saúde
pública através da reciclagem dos aparelhos
eléctricos e electrónicos. Não elimine os
aparelhos que tenham o símbolo
juntamente com os resíduos domésticos.
Coloque o produto num ponto de recolha
para reciclagem local ou contacte as suas
autoridades municipais.
PORTUGUÊS 117

VISITE NUESTRO SITIO WEB PARA:
Obtener consejos, folletos, soluciones a problemas e información de servicio y
reparación:
www.zanussi.com/support
Salvo modificaciones.
CONTENIDO
1. INFORMACIÓN SOBRE SEGURIDAD.......................................................................118
2. INSTRUCCIONES DE SEGURIDAD.......................................................................... 120
3. INSTALACIÓN............................................................................................................ 123
4. DESCRIPCIÓN DEL PRODUCTO..............................................................................124
5. ANTES DEL PRIMER USO.........................................................................................124
6. USO DIARIO............................................................................................................... 125
7. FUNCIONES DEL RELOJ...........................................................................................126
8. USO DE LOS ACCESORIOS..................................................................................... 126
9. FUNCIONES ADICIONALES......................................................................................127
10. CONSEJOS...............................................................................................................128
11. MANTENIMIENTO Y LIMPIEZA............................................................................... 135
12. SOLUCIÓN DE PROBLEMAS.................................................................................. 138
13. EFICACIA ENERGÉTICA......................................................................................... 139
1. INFORMACIÓN SOBRE SEGURIDAD
Antes de instalar y utilizar el aparato, lea atentamente las
instrucciones facilitadas. El fabricante no se hace
responsable de lesiones o daños producidos como resultado
de una instalación o un uso incorrectos. Conserve siempre
estas instrucciones en lugar seguro y accesible para futuras
consultas.
1.1 Seguridad de niños y personas vulnerables
• Este aparato puede ser utilizado por niños de 8 años en
adelante y personas cuyas capacidades físicas, sensoriales
o mentales estén disminuidas o que carezcan de la
experiencia y conocimientos suficientes para manejarlo,
siempre que cuenten con las instrucciones o la supervisión
sobre el uso del electrodoméstico de forma segura y
comprendan los riesgos. Hay que mantener alejados del
producto a los niños de menos de 8 años, así como a las
118 ESPAÑOL

personas con minusvalías importantes y complejas, salvo
que estén bajo supervisión continua.
• No deje que los niños jueguen con el aparato.
• Mantenga todo el material de embalaje fuera del alcance de
los niños y deséchelo de forma adecuada.
• ADVERTENCIA: Mantenga a los niños y mascotas alejados
del aparato cuando esté funcionando o enfriándose. Las
partes accesibles se calientan durante el uso.
• Si este aparato tiene un bloqueo de seguridad para niños,
debe activarlo.
• La limpieza y mantenimiento de usuario del aparato no
podrán ser realizados por niños sin supervisión.
1.2 Seguridad general
• Solo un electricista cualificado puede instalar este aparato y
sustituir el cable.
• ADVERTENCIA: El aparato y las piezas accesibles se
calientan mucho durante el funcionamiento. Preste mucha
atención para no tocar las resistencias.
• Utilice siempre guantes de horno cuando introduzca o retire
accesorios o utensilios refractarios.
• Antes de realizar tareas de mantenimiento, desenchufe el
aparato de la red eléctrica.
• ADVERTENCIA: Asegúrese de que el aparato está
desconectado antes de reemplazar la lámpara con el fin de
impedir que se produzca una descarga eléctrica.
• No utilice el aparato antes de instalarlo en la estructura
empotrada.
• No utilice un limpiador a vapor para limpiar el aparato.
• No utilice limpiadores abrasivos ásperos ni rascadores de
metal afilado para limpiar la puerta de cristal si no quiere
arañar su superficie, lo que podría hacer que el cristal se
hiciese añicos.
• Si el cable de alimentación eléctrica sufre algún daño, el
fabricante, su servicio técnico autorizado o un profesional
cualificado tendrán que cambiarlo para evitar riesgos
eléctricos.
ESPAÑOL 119

• Para quitar los carriles laterales, tire primero del frontal del
carril y luego separe el extremo trasero de las paredes.
Coloque los carriles laterales en el orden inverso.
2. INSTRUCCIONES DE SEGURIDAD
2.1 Instalación
ADVERTENCIA!
Sólo un técnico cualificado
puede instalar el aparato.
• Retire todo el embalaje.
• No instale ni utilice un aparato dañado.
• Siga las instrucciones de instalación
suministradas con el aparato.
• Tenga cuidado al mover el aparato,
porque es pesado. Utilice siempre
guantes de protección y calzado cerrado.
• No tire nunca del aparato sujetando el
asa.
• Instale el aparato en un lugar seguro y
adecuado que cumpla los requisitos de
instalación.
• Respete siempre la distancia mínima
entre el aparato y los demás
electrodomésticos y mobiliario.
• Antes de montar el aparato, compruebe si
la puerta del horno se abre sin
limitaciones.
• El aparato dispone de un sistema de
enfriamiento eléctrico. Debe utilizarse con
alimentación eléctrica.
Altura mínima del armario
(Altura mínima del armario
debajo de la encimera)
590 (600) mm
Ancho del armario 560 mm
Profundidad del armario 550 (550) mm
Altura de la parte frontal
del aparato
594 mm
Altura de la parte trasera
del aparato
576 mm
Anchura de la parte frontal
del aparato
595 mm
Anchura de la parte trasera
del aparato
559 mm
Fondo del aparato 569 mm
Fondo empotrado del apa‐
rato
548 mm
Fondo con la puerta abier‐
ta
1022 mm
Tamaño mínimo de la
abertura de ventilación.
Abertura situada en la par‐
te trasera inferior
560x20 mm
Longitud del cable de ali‐
mentación. El cable está
en la esquina derecha de
la parte trasera
1500 mm
Tornillos de montaje 4x25 mm
2.2 Conexión eléctrica
ADVERTENCIA!
Riesgo de incendios y
descargas eléctricas.
• Todas las conexiones eléctricas deben
realizarlas electricistas cualificados.
• El aparato debe conectarse a tierra.
• Asegúrese de que los parámetros de la
placa de características son compatibles
con los valores eléctricos del suministro
eléctrico.
• Utilice siempre una toma con aislamiento
de conexión a tierra correctamente
instalada.
• No utilice adaptadores de enchufes
múltiples ni cables prolongadores.
• Asegúrese de no provocar daños en el
enchufe ni en el cable de red. Si es
necesario cambiar el cable de
alimentación del aparato, debe hacerlo el
centro de servicio técnico autorizado.
• Evite que el cable de red toque o entre en
contacto con la puerta del aparato o con
el hueco por debajo del aparato,
especialmente mientras funciona o si la
puerta está caliente.
• Los mecanismos de protección contra
descargas eléctricas de componentes con
corriente y aislados deben fijarse de
forma que no puedan aflojarse sin utilizar
herramientas.
120 ESPAÑOL

• Conecte el enchufe a la toma de corriente
únicamente cuando haya terminado la
instalación. Asegúrese de tener acceso al
enchufe del suministro de red una vez
finalizada la instalación.
• Si la toma de corriente está floja, no
conecte el enchufe.
• No desconecte el aparato tirando del
cable de conexión a la red. Tire siempre
del enchufe.
• Use únicamente dispositivos de
aislamiento apropiados: línea con
protección contra los cortocircuitos,
fusibles (tipo tornillo que puedan retirarse
del soporte), dispositivos de fuga a tierra
y contactores.
• La instalación eléctrica debe tener un
dispositivo de aislamiento que permita
desconectar el aparato de todos los polos
de la red. El dispositivo de aislamiento
debe tener una apertura de contacto con
una anchura mínima de 3 mm.
• El aparato se suministra con enchufe y
cable de red.
Tipos de cables aplicables para su instala‐
ción o cambio para Europa:
H07 RN-F, H05 RN-F, H05 RRF, H05 VV-F, H05
V2V2-F (T90), H05 BB-F
En lo que respecta a la sección del cable,
consulte la potencia total que figura en la
placa de características. También puede
consultar la tabla:
Potencia total (W) Sección del cable
(mm²)
máximo 1380 3 x 0.75
máximo 2300 3 x 1
máximo 3680 3 x 1.5
El cable de tierra (cable verde/amarillo) debe
tener 2 cm más que los cables de fase y del
neutro (cables azul y marrón).
2.3 Uso
ADVERTENCIA!
Riesgo de lesiones, quemaduras
y descargas eléctricas o
explosiones.
• Este aparato está diseñado
exclusivamente para uso doméstico.
• No cambie las especificaciones de este
aparato.
• Cerciórese de que los orificios de
ventilación no están obstruidos.
• No deje nunca el aparato desatendido
mientras está en funcionamiento.
• Desactive el aparato después de cada
uso.
• Tenga cuidado al abrir la puerta del
aparato cuando éste esté en
funcionamiento. Pueden liberarse vapores
calientes.
• No utilice el aparato con las manos
mojadas ni cuando entre en contacto con
el agua.
• No ejerza presión sobre la puerta abierta.
• No utilice el aparato como superficie de
trabajo ni de almacenamiento.
• Abra la puerta del aparato con cuidado. El
uso de ingredientes con alcohol puede
generar una mezcla de alcohol y aire.
• Procure que no haya chispas ni fuego
encendido cerca cuando se abra la puerta
del aparato.
• No coloque productos inflamables ni
objetos mojados con productos
inflamables dentro, cerca o encima del
aparato.
ADVERTENCIA!
Podría dañar el aparato.
• Para evitar daños o decoloraciones en el
esmalte:
– no coloque utensilios refractarios ni
otros objetos directamente en la parte
inferior del aparato.
– no coloque papel de aluminio
directamente en la parte inferior del
interior del aparato.
– No ponga agua directamente en el
aparato caliente.
– No deje platos húmedos ni comida en
el aparato una vez finalizada la
cocción.
– Preste especial atención al desmontar
o instalar los accesorios.
ESPAÑOL 121

• La pérdida de color del esmalte o el acero
inoxidable no afecta al rendimiento del
aparato.
• Utilice una bandeja honda para pasteles
húmedos. Los jugos de las frutas podrían
ocasionar manchas permanentes.
• Este aparato está diseñado
exclusivamente para cocinar. No debe
utilizarse para otros fines, por ejemplo,
como calefacción.
• Cocine siempre con la puerta del horno
cerrada.
• Si el aparato se instala detrás de un panel
de un mueble (por ejemplo una puerta)
asegúrese de que la puerta nunca esté
cerrada mientras funciona el aparato. El
calor y la humedad pueden acumularse
detrás de un panel del armario cerrado y
provocar daños al aparato, el alojamiento
o el suelo. No cierre del panel del armario
hasta que el aparato se haya enfriado
completamente después de su uso.
2.4 Mantenimiento y limpieza
ADVERTENCIA!
Existe riesgo de lesiones,
incendios o daños al aparato.
• Antes de proceder con el mantenimiento,
apague el aparato y desconecte el
enchufe de la red.
• Asegúrese de que el aparato esté frío.
Los paneles de cristal pueden romperse.
• Cambie inmediatamente los paneles de
cristal de la puerta que estén dañados.
Póngase en contacto con el servicio
técnico autorizado.
• Tenga cuidado al desmontar la puerta del
aparato. ¡La puerta es muy pesada!
• Limpie periódicamente el aparato para
evitar el deterioro del material de la
superficie.
• Limpie el aparato con un paño suave
humedecido. Utilice solo detergentes
neutros. No utilice productos abrasivos,
estropajos duros, disolventes ni objetos
metálicos.
• Si utiliza aerosoles de limpieza para
hornos, siga las instrucciones de
seguridad del envase.
2.5 Luces interiores
ADVERTENCIA!
Riesgo de descarga eléctrica.
• En cuanto a la(s) bombilla(s) de este
producto y las de repuesto vendidas por
separado: Estas bombillas están
destinadas a soportar condiciones físicas
extremas en los aparatos domésticos,
como la temperatura, la vibración, la
humedad, o están destinadas a señalar
información sobre el estado de
funcionamiento del aparato. No están
destinadas a utilizarse en otras
aplicaciones y no son adecuadas para la
iluminación de estancias domésticas.
• Utilice solo bombillas de las mismas
características .
2.6 Asistencia
• Para reparar el aparato, póngase en
contacto con el centro de servicio
autorizado.
• Utilice solamente piezas de recambio
originales.
2.7 Eliminación
ADVERTENCIA!
Existe riesgo de lesiones o
asfixia.
• Desconecte el aparato de la red.
• Corte el cable eléctrico cerca del aparato
y deséchelo.
• Retire el pestillo de la puerta para evitar
que los niños las mascotas queden
atrapados en el aparato.
122 ESPAÑOL

3. INSTALACIÓN
ADVERTENCIA!
Consulte los capítulos sobre
seguridad.
3.1 Empotrado
18
594
589
114
21548
595
+-1
min. 550
20
600
min. 560
3
5
60
20
80
520
60
198
523
(*mm)
min. 550
20
595
+-1
18
590
min. 560
594
589
114
21548
3
5
70
60
520
60
20
198
523
(*mm)
ESPAÑOL 123

3.2 Fijación del horno al mueble
4. DESCRIPCIÓN DEL PRODUCTO
4.1 Resumen general
8
7
9
10
11
5
4
3
2
1
321 64 5
12
1
Panel de control
2
Piloto/símbolo de alimentación
3
Mando de las funciones de cocción
4
Mando del temporizador
5
Mando de en control (de la temperatura)
6
Indicador/símbolo de temperatura
7
Resistencia
8
Bombilla
9
Ventilador
10
Contenedor de limpieza con agua
11
Carril lateral, extraíble
12
Posiciones de los estantes
4.2 Accesorios
• Parrilla
Para bandejas de horno, pastel en molde,
asados.
• Bandeja
Para bizcochos y galletas.
5. ANTES DEL PRIMER USO
ADVERTENCIA!
Consulte los capítulos sobre
seguridad.
124 ESPAÑOL

5.1 Antes del primer uso
El horno puede emitir olores y humos durante el precalentamiento. Asegúrese de que la sala
esté ventilada.
Paso 1
Paso 2
Limpie el horno Precaliente el horno vacío
1. Retire todos los accesorios y carriles de apoyo ex‐
traíbles del horno.
2. Limpie el horno y los accesorios con un paño sua‐
ve humedecido en agua templada y jabón neutro.
1. Seleccione la temperatura máxima para la función:
.
Tiempo: 1 h.
2. Seleccione la temperatura máxima para la función:
.
Tiempo: 15 min.
Apague el horno y espere a que esté frío. Coloque los accesorios y carriles de apoyo extraíbles en el horno.
6. USO DIARIO
ADVERTENCIA!
Consulte los capítulos sobre
seguridad.
6.1 Cómo configurar: Función de
cocción
Paso 1 Gire el mando del horno para seleccio‐
nar una función de cocción.
Paso 2 Gire el mando de control para seleccio‐
nar la temperatura.
Paso 3 Al terminar la cocción, gire los mandos
hasta la posición de apagado para apa‐
gar el horno.
6.2 Funciones de cocción
Función de
cocción
Aplicación
Posición de
apagado
El horno está apagado.
Luz
Para encender la luz.
Función de
cocción
Aplicación
Horneado hú‐
medo + ventil.
Función diseñada para ahorrar
energía durante la cocción. Cuando
se utiliza esta función, la temperatu‐
ra del horno puede diferir de la tem‐
peratura programada. La potencia
calorífica puede reducirse. Para
más información, consulte el capítu‐
lo “Uso diario”, Notas sobre: Hor‐
neado húmedo + ventil..
Cocción ventil.
Permite asar o asar y hornear a la
vez alimentos que requieran la mis‐
ma temperatura, utilizando más de
una bandeja y sin que se transfie‐
ran los sabores.
Grill Turbo
Para asar piezas de carne grandes
o aves con hueso en una posición
de bandeja. Para hacer gratenes y
dorar.
Calor inferior
Para preparar pasteles con bases
crujientes y conservar alimentos.
Función pizza
Para hornear pizza. Para obtener
un dorado más intenso y una base
más crujiente Ajuste la temperatura
a 230°C.
ESPAÑOL 125

Función de
cocción
Aplicación
Descongelar
Para descongelar alimentos (verdu‐
ra y fruta). El tiempo de desconge‐
lación depende de la cantidad y ta‐
maño de los alimentos congelados.
Cocción con‐
vencional /
Limpieza con
agua
Para hornear y asar alimentos en
una posición de bandeja.
Consulte el capítulo "Mantenimiento
y limpieza" para obtener más infor‐
mación sobre: Limpieza con agua.
6.3 Notas sobre: Horneado húmedo
+ ventil.
Esta función se utilizaba para cumplir con los
requisitos de categoría de eficiencia
energética y ecodiseño según EU 65/2014 y
EU 66/2014. Pruebas conforme a EN
60350-1.
La puerta del horno debe estar cerrada
durante la cocción para que la función no se
interrumpa y que el horno funcione con la
máxima eficiencia energética posible.
Cuando se utiliza esta función, la bombilla se
apaga automáticamente.
Para las instrucciones de cocción, consulte
el capítulo "Consejos", Horneado húmedo +
ventil.. Puede consultar recomendaciones
generales para ahorrar energía en el capítulo
"Eficiencia energética", bajo consumo
energético.
7. FUNCIONES DEL RELOJ
7.1 Cómo ajustar: Fin de cocción
Para ajustar la hora de desconexión de las funciones del horno.
Paso 1 Programa la función y la temperatura del horno.
Paso 2 Gira el mando del temporizador hasta el máximo.
Paso 3 Gira el mando del temporizador para ajustar la hora de apagado.
Cuando termina el tiempo ajustado, la señal suena y el horno se apaga.
Paso 4 Gira el mando de las funciones del horno y el mando de la temperatura a la posición de apagado.
8. USO DE LOS ACCESORIOS
ADVERTENCIA!
Consulte los capítulos sobre
seguridad.
8.1 Inserción de accesorios
Una pequeña muesca en la parte superior
aumenta la seguridad. Las hendiduras
también son dispositivos anti-vuelco. El
borde elevado que rodea la bandeja evita
que los utensilios de cocina resbalen de la
parrilla.
126 ESPAÑOL

Parrilla:
Inserte la parrilla entre las guías del carril y asegú‐
rese de que las hendiduras apuntan hacia abajo.
Bandeja:
Introduzca la bandeja entre las guías del carril de
apoyo.
Parrilla, Bandeja:
Posicione la bandeja entre las guías del carril de
apoyo y la parrilla en las guías de encima.
9. FUNCIONES ADICIONALES
9.1 Ventilador de enfriamiento
Cuando el horno funciona, el ventilador de
enfriamiento se pone en marcha
automáticamente para mantener frías las
superficies del horno. Una vez apagado el
horno, el ventilador sigue funcionando hasta
enfriarlo totalmente.
9.2 Termostato de seguridad
El funcionamiento incorrecto del horno o los
componentes defectuosos pueden provocar
sobrecalentamientos peligrosos. Para
evitarlo, el horno dispone de un termostato
de seguridad que interrumpe la alimentación.
El horno se vuelve a encender
automáticamente cuando desciende la
temperatura.
ESPAÑOL 127

10. CONSEJOS
Consulte los capítulos sobre
seguridad.
10.1 Recomendaciones de cocción
El horno tiene cinco niveles.
Cuente los niveles de las parrillas desde
abajo hacia arriba.
El comportamiento de su horno puede ser
diferente al del que tenía anteriormente. Las
tablas siguientes le proporcionan los ajustes
estándares de temperatura, tiempo de
cocción y posición de la parrilla.
Si no encuentra los ajustes para una receta
especial, busque otra similar.
El horno está dotado con un sistema
especial que hace circular el aire y recicla
constantemente el vapor. Gracias a este
sistema puede cocinar con un entorno de
vapor y mantener los alimentos blandos en
su interior y crujientes en su exterior. Reduce
el tiempo de cocción y el consumo de
energía.
Repostería
No abra la puerta del horno antes de que
transcurran 3/4 partes del tiempo de cocción
establecido.
Si utiliza dos bandejas al mismo tiempo, deje
un nivel libre entre ambas.
Carnes y pescados
Antes de trinchar la carne, déjela reposar
unos 15 minutos, como mínimo, para que
retenga los jugos.
Para evitar que se forme mucho humo en el
horno, vierta un poco de agua en la bandeja
honda. Para evitar la condensación de
humos, añada agua después de cada vez
que se seque.
Tiempos de cocción
Los tiempos de cocción dependen del tipo de
alimento, de su consistencia y del volumen.
Inicialmente, supervise el rendimiento
cuando cocine. Busque los ajustes óptimos
(de calor, tiempo de cocción, etc.) para sus
recipientes, recetas y cantidades cuando
utilice este horno.
10.2 Horneado y asado
PAS‐
TELES
Cocción convencio‐
nal
Cocción ventil.
(min)
(°C) (°C)
Masas batidas 170 2 160 3 45 - 60 Molde de pastel
Masa con mante‐
quilla
170 2 160 3 20 - 30 Molde de pastel
Tarta de queso
(con suero)
170 1 160 1 70 - 80 Molde de pastel,
Ø 26 cm
Strudel 175 3 150 2 60 - 80 Bandeja
Tarta de merme‐
lada
170 2 165 2 30 - 40 Bandeja
Tronco de Navi‐
dad, precaliente el
horno vacío
160 2 150 2 90 - 120 Molde de pastel,
Ø 20 cm
128 ESPAÑOL

PAS‐
TELES
Cocción convencio‐
nal
Cocción ventil.
(min)
(°C) (°C)
Pastel de ciruelas,
precaliente el hor‐
no vacío
175 1 160 2 50 - 60 Molde para pan
Galletas 140 3 140 - 150 3 30 - 35 Bandeja
Galletas, dos ni‐
veles
- - 140 - 150 2 y 4 35 - 40 Bandeja
Galletas, tres ni‐
veles
120 3 120 3 80 - 100 Bandeja
Merengues 190 3 180 3 15 - 20 Bandeja
Bollos, precaliente
el horno vacío
190 3 170 3 25 - 35 Bandeja
Bollos rellenos de
crema, un nivel
180 2 170 2 45 - 70 Bandeja
Bollos rellenos de
crema, dos nive‐
les
160 1 150 2 110 - 120 Bandeja
Tartaletas 170 1 160 1 50 - 60 Bandeja
Pastel de fruta 190 3 190 3 12 - 20 Bandeja
Tarta Victoria 190 3 170 3 25 - 35 Bandeja
Precaliente el horno vacío.
PAN Y
PIZZA
Cocción convencional Cocción ventil.
(min)
(°C) (°C)
Pan blanco, 1 - 2
trozos, 0,5 kg ca‐
da uno
190 1 190 1 60 - 70 -
Pan de centeno,
no se necesita
precalentar
190 1 180 1 30 - 45 Molde para pan
Pan/Rollitos, 6 - 8
panecillos
230 - 250 1 230 - 250 1 10 - 20 Bandeja
Pizza 200 3 190 3 10 - 20 Bandeja / Bandeja
honda
Bollitos 200 3 190 3 10 - 20 Bandeja
Precaliente el horno vacío.
Use el molde para pasteles.
ESPAÑOL 129

FLANES
Cocción convencional Cocción ventil.
(min)
(°C) (°C)
Pudin de pasta, no se
necesita precalentar
200 2 180 2 40 - 50
Pudin de verduras, no
se necesita precalen‐
tar
200 2 175 2 45 - 60
Quiches 180 1 180 1 50 - 60
Lasaña 180 - 190 2 180 - 190 2 25 - 40
Canelones 180 - 190 2 180 - 190 2 25 - 40
Utilice la parrilla.
CARNE
Cocción convencional Cocción ventil.
(min)
(°C) (°C)
Carne de res 200 2 190 2 50 - 70
Cerdo 180 2 180 2 90 - 120
Ternera 190 2 175 2 90 - 120
Rosbif poco hecho 210 2 200 2 50 - 60
Rosbif en su punto 210 2 200 2 60 - 70
Rosbif muy hecho 210 2 200 2 70 - 75
CARNE
Cocción convencional Cocción ventil.
(min)
(°C) (°C)
Paletilla de cerdo, con
corteza
180 2 170 2 120 - 150
Morcillo de cerdo, 2
trozos
180 2 160 2 100 - 120
Pata de cordero 190 2 175 2 110 - 130
Pollo entero 220 2 200 2 70 - 85
Pavo entero 180 2 160 2 210 - 240
Pato entero 175 2 220 2 120 - 150
Ganso entero 175 2 160 1 150 - 200
Conejo, en trozos 190 2 175 2 60 - 80
130 ESPAÑOL

CARNE
Cocción convencional Cocción ventil.
(min)
(°C) (°C)
Liebre, en trozos 190 2 175 2 150 - 200
Faisán entero 190 2 175 2 90 - 120
PESCADO
Cocción convencional Cocción ventil.
(min)
(°C) (°C)
Trucha / Pargo, 3 - 4 pes‐
cados
190 2 175 2 40 - 55
Atún / Salmón, 4 - 6 filetes 190 2 175 2 35 - 60
10.3 Grill Turbo
Precaliente el horno vacío.
Use el primer o el segundo nivel.
Para calcular el tiempo de asado, multiplique
el tiempo de la tabla siguiente por los
centímetros de grosor del filete.
CARNE DE
RES (°C) (min)
Rosbif o filete, poco
hecho
190 - 200 5 - 6
Rosbif o filete, al punto 180 - 190 6 - 8
Rosbif o filete, muy he‐
cho
170 - 180 8 - 10
CERDO
(°C) (min)
Paletilla / Cuello / Ja‐
món, 1 - 1,5 kg
160 - 180 90 - 120
Chuletas / Costillas, 1 -
1,5 kg
170 - 180 60 - 90
Pastel de carne, 0,75 -
1 kg
160 - 170 50 - 60
Codillo de cerdo preco‐
cinado, 0,75 - 1 kg
150 - 170 90 - 120
TERNERA
(°C) (min)
Ternera asada, 1 kg 160 - 180 90 - 120
Codillo de ternera, 1,5
- 2 kg
160 - 180 120 - 150
CORDERO
(°C) (min)
Pata de cordero / Cor‐
dero asado, 1 - 1,5 kg
150 - 170 100 - 120
Silla de cordero, 1 -
1,5 kg
160 - 180 40 - 60
AVES
(°C) (min)
Aves troceadas, 0,2 -
0,25 kg cada
200 - 220 30 - 50
Pollo, medio, 0,4 - 0,5
kg cada
190 - 210 35 - 50
Pollo, pularda, 1 - 1,5
kg
190 - 210 50 - 70
Pato, 1,5 - 2 kg 180 - 200 80 - 100
ESPAÑOL 131

AVES
(°C) (min)
Ganso, 3,5 - 5 kg 160 - 180 120 - 180
Pavo, 2,5 - 3,5 kg 160 - 180 120 - 150
Pavo, 4 - 6 kg 140 - 160 150 - 240
PESCADO
(AL VAPOR) (°C) (min)
Pescado entero, 1 -
1,5 kg
210 - 220 40 - 60
10.4 Descongelar
(kg)
Tiempo de des‐
congelación
(min)
Tiempo de descon‐
gelación posterior
(minutos)
Pollo 1 100 - 140 20 - 30 Coloque el pollo sobre un
plato puesto del revés so‐
bre otro mayor. Dele la
vuelta a media cocción.
Carne 1 100 - 140 20 - 30 Dele la vuelta a media
cocción.
0.5 90 - 120
Nata 2 x 0,2 80 - 100 10 - 15 La nata se puede montar
perfectamente incluso
aunque queden puntos li‐
geramente congelados.
Trucha 0.15 25 - 35 10 - 15 -
Fresas 0.3 30 - 40 10 - 20 -
Mantequilla 0.25 30 - 40 10 - 15 -
Pasteles 1.4 60 60 -
10.5 Desecar alimentos - Cocción
ventil.
Cubra las bandejas con papel vegetal o
papel de hornear.
Para obtener mejores resultados, apague el
horno a la mitad del tiempo de secado, abra
la puerta y déjelo enfriar durante una noche
para completar el secado.
Para 1 bandeja, use el tercer nivel.
Para 2 bandejas, use el primer y cuarto nivel.
VERDURAS
(°C) (h)
Judías 60 - 70 6 - 8
Pimientos 60 - 70 5 - 6
Verduras para sopa 60 - 70 5 - 6
Setas 50 - 60 6 - 8
Hierbas aromáticas 40 - 50 2 - 3
Ajuste de temperatura 60 - 70 °C.
132 ESPAÑOL

FRUTA
(h)
Ciruelas 8 - 10
Albaricoques 8 - 10
FRUTA
(h)
Manzanas en rodajas 6 - 8
Peras 6 - 9
10.6 Horneado húmedo + ventil.. accesorios recomendados
Utilice molde y recipientes oscuros y mates. Tiene mejor absorción del calor que los platos de
color claro y brillantes.
Bandeja para pizza
Bandeja para hornear
Ramequines
Molde para base
Oscuro, mate
28 cm de diámetro
Oscuro, mate
26 cm de diámetro
Cerámica
8 cm de diámetro,
5 cm de altura
Oscuro, mate
28 cm de diámetro
10.7 Horneado húmedo + ventil.
Para obtener el mejor resultado, siga las
recomendaciones de la tabla siguiente.
(°C) (min)
Rollitos dulces, 12
piezas
bandeja o bandeja honda 175 3 40 - 50
Rollitos, 9 piezas bandeja o bandeja honda 180 2 35 - 45
Pizza congelada,
0,35 kg
parrilla 180 2 45 - 55
Brazo de gitano bandeja o bandeja honda 170 2 30 - 40
Brownie bandeja o bandeja honda 170 2 45 - 50
Soufflé, 6 piezas ramekin cerámico sobre parri‐
lla
190 3 45 - 55
Base de masa brisé molde de base sobre parrilla 180 2 35 - 45
Tarta Victoria bandeja de hornear sobre pa‐
rrilla
170 2 35 - 50
Pescado pochado,
0,3 kg
bandeja o bandeja honda 180 2 35 - 45
Pescado entero, 0,2
kg
bandeja o bandeja honda 180 3 25 - 35
ESPAÑOL 133

(°C) (min)
Filete de pescado,
0,3 kg
molde para pizza sobre parrilla 170 3 30 - 40
Carne pochada, 0,25
kg
bandeja o bandeja honda 180 3 35 - 45
Shashlik, 0,5 kg bandeja o bandeja honda 180 3 40 - 50
Galletas, 16 piezas bandeja o bandeja honda 150 2 30 - 45
Mostachones de al‐
mendra, 20 piezas
bandeja o bandeja honda 180 2 45 - 55
Muffins, 12 piezas bandeja o bandeja honda 170 2 30 - 40
Tarta salada, 16 pie‐
zas
bandeja o bandeja honda 170 2 35 - 45
Galletas crujientes de
masa quebrada, 20
piezas
bandeja o bandeja honda 150 2 40 - 50
Tartaletas, 8 piezas bandeja o bandeja honda 170 2 30 - 40
Verduras pochadas,
0,4 kg
bandeja o bandeja honda 180 2 35 - 45
Tortilla vegetariana molde para pizza sobre parrilla 180 3 35 - 45
Verduras mediterrá‐
neas, 0,7 kg
bandeja o bandeja honda 180 4 35 - 45
10.8 Información para los institutos
de pruebas
Pruebas conforme a IEC 60350-1.
(°C) (min)
Pastelillos,
20 unidades
por bandeja
Cocción con‐
vencional
Bandeja de
cocción
3 170 20 - 30 -
Pastelillos,
20 unidades
por bandeja
Cocción ventil. Bandeja de
cocción
3 150 -
160
20 - 35 -
Pastelillos,
20 unidades
por bandeja
Cocción ventil. Bandeja de
cocción
2 y 4 150 -
160
20 - 35 -
Tarta de
manzana, 2
moldes, Ø
20 cm
Cocción con‐
vencional
Parrilla 2 180 70 - 90 -
134 ESPAÑOL

(°C) (min)
Tarta de
manzana, 2
moldes, Ø
20 cm
Cocción ventil. Parrilla 2 160 70 - 90 -
Bizcocho,
molde de re‐
postería
Ø26 cm
Cocción con‐
vencional
Parrilla 2 170 40 - 50 Precaliente el horno 10
minutos.
Bizcocho,
molde de re‐
postería
Ø26 cm
Cocción ventil. Parrilla 2 160 40 - 50 Precaliente el horno 10
minutos.
Bizcocho,
molde de re‐
postería
Ø26 cm
Cocción ventil. Parrilla 2 y 4 160 40 - 60 Precaliente el horno 10
minutos.
Mantecados Cocción ventil. Bandeja de
cocción
3 140 -
150
20 - 40 -
Mantecados Cocción ventil. Bandeja de
cocción
2 y 4 140 -
150
25 - 45 -
Mantecados Cocción con‐
vencional
Bandeja de
cocción
3 140 -
150
25 - 45 -
Tostadas, 4
- 6 trozos
Grill Parrilla 4 máx. 2 - 3 minutos el
primer lado; 2 - 3
minutos el segun‐
do
Precaliente el horno 3
minutos.
Hamburgue‐
sa de vacu‐
no, 6 trozos,
0,6 kg
Grill Parrilla y
grasera
4 máx. 20 - 30 Coloque la parrilla en
el cuarto nivel y la gra‐
sera en el tercer nivel
del horno. Dele la vuel‐
ta a la mitad del tiem‐
po.
Precaliente el horno 3
minutos.
11. MANTENIMIENTO Y LIMPIEZA
ADVERTENCIA!
Consulte los capítulos sobre
seguridad.
ESPAÑOL 135

11.1 Notas sobre la limpieza
Agentes limpia‐
dores
Limpie la parte delantera del horno con un paño suave humedecido en agua templada y ja‐
bón suave. Limpie y compruebe la junta de la puerta alrededor del interior.
Utilice un producto de limpieza para limpiar las superficies metálicas.
Limpie las manchas con un detergente suave.
Uso diario
Limpie el interior después de cada uso. La acumulación de grasa u otros residuos puede
provocar un incendio.
La humedad puede llegar a condensarse en el horno o en los paneles de cristal. Para redu‐
cir la condensación, ponga en funcionamiento el horno 10 minutos antes de cocinar. No
guarde la comida en el horno más de 20 minutos. Seque el interior con un paño suave des‐
pués de cada uso.
Accesorios
Limpie todos los accesorios después de cada uso y déjelos secar. Use un paño suave hu‐
medecido en agua caliente y detergente suave. No lave los accesorios en el lavavajillas
No limpie los accesorios no adherentes utilizando un limpiador abrasivo ni objetos afilados.
11.2 Cómo quitar: Apoyos de
baldas
Para limpiar el horno, retire los carriles de
apoyo.
Paso 1 Apague el horno y espere a que esté
frío.
Paso 2 Tire de la parte delantera del carril de
apoyo para separarlo de la pared late‐
ral.
Paso 3 Tire del extremo trasero del carril de
apoyo para despegarlo de la pared la‐
teral y sáquelo.
2
1
Paso 4 Coloque los carriles apoyo en el or‐
den inverso.
11.3 Instrucciones de uso:
Limpieza con agua
Este procedimiento de limpieza utiliza
humedad para eliminar las partículas de
grasa y alimentos restantes en el horno.
Paso 1 Vierta agua en el relieve del interior.
300 ml.
Paso 2
Ajuste la función: .
136 ESPAÑOL

Paso 3 Ajuste la temperatura a 90 °C.
Paso 4 Deje funcionar el horno 30 minutos.
Paso 5 Apague el horno.
Paso 6 Espere hasta que el horno esté frío.
Seque el interior con un paño suave.
11.4 Cómo quitar e instalar: Puerta
La puerta del horno tiene dos paneles de cristal. Es posible retirar la puerta del horno y el
panel de cristal interior para limpiarlos. Lea las instrucciones completas de "Extracción e
instalación de la puerta" antes de retirar los paneles de cristal.
PRECAUCIÓN!
No utilice el aparato sin los paneles de cristal.
Paso 1 Abra completamente la puerta y sujete las
dos bisagras.
Paso 2 Levante y gire completamente las palancas
de ambas bisagras.
Paso 3 Cierre la puerta del horno a medio camino
hasta la primera posición de apertura. A con‐
tinuación levante la puerta y tire hacia ade‐
lante para desencajarla.
Paso 4 Coloque la puerta sobre una superficie esta‐
ble y protegida por un paño suave.
Paso 5 Sujete por ambos lados el acabado de la
puerta (B), situado en el borde superior de
ésta, y empuje hacia dentro para soltar el
sello de resorte.
Paso 6 Tire del borde de la puerta hacia delante pa‐
ra desengancharla.
1
2
B
Paso 7 Sujete el panel de la puerta de cristal por el
borde superior y extráigalo con cuidado.
Asegúrese de que el cristal se desliza com‐
pletamente fuera de los soportes.
ESPAÑOL 137

Paso 8 Limpie los paneles de cristal con agua y ja‐
bón. Seque los paneles de cristal con cuida‐
do. No limpie los paneles de cristal en el la‐
vavajillas.
Paso 9 Después de la limpieza, instale el panel de
vidrio y la puerta del horno.
La cara impresa debe mirar hacia el interior de la
puerta. Después de la instalación, asegúrese de que
la superficie del marco del panel de cristal de las ca‐
ras impresas no esté áspera cuando la toque.
Al instalarlo correctamente, el acabado de la puerta
hace clic.
Asegúrese de que coloca el panel de cristal interno
en los soportes correctos.
A
11.5 Cómo cambiar: Bombilla
ADVERTENCIA!
Riesgo de descarga eléctrica.
La lámpara puede estar caliente.
Coja siempre la bombilla halógena con un
paño para evitar quemar los residuos de
grasa.
Antes de reemplazar la bombilla:
Paso 1 Paso 2 Paso 3
Apague el horno. Espere hasta que
el horno esté frío.
Desconecte el horno de la red. Coloque un paño en el fondo de la
cavidad.
Bombilla trasera
Paso 1 Gire la tapa de cristal para extraerla.
Paso 2 Limpie la tapa de cristal.
Paso 3 Cambie la bombilla por otra apropiada termorresistente hasta 300 °C.
Paso 4 Coloque la tapa de cristal.
12. SOLUCIÓN DE PROBLEMAS
ADVERTENCIA!
Consulte los capítulos sobre
seguridad.
12.1 Qué hacer si...
En cualquier caso no incluido en esta tabla,
por favor contacte con un Centro de Servicio
Autorizado.
Problema Compruebe que...
El horno no calienta. Ha saltado el fusible.
La junta de la puerta está
dañada.
No utilice el horno. Pón‐
gase en contacto con un
servicio técnico autoriza‐
do.
138 ESPAÑOL

Problema Compruebe que...
Fin de cocción - no está
ajustado.
Ajuste Fin de cocción.
Consulte "Funciones de
reloj".
La bombilla no funciona. La bombilla se ha fundi‐
do.
12.2 Datos de servicio
Si no logra subsanar el problema, póngase
en contacto con su distribuidor o el centro de
servicio técnico.
Los datos que necesita para el centro de
servicio técnico se encuentran en la placa de
características. La placa de régimen se
encuentra en el marco delantero de la
cavidad del horno. No retire la placa de
características de la cavidad del horno.
Es conveniente que anote los datos aquí:
Modelo (MOD.) .........................................
Número de producto (PNC) .........................................
Número de serie (S.N.) .........................................
13. EFICACIA ENERGÉTICA
13.1 Información del producto y Hoja de información del producto*
Nombre del proveedor Zanussi
Identificación del modelo
ZOHKF1X1 949496249
ZOHNF1K1 949496304
ZOHNF1W1 949496305
Índice de eficiencia energética 81.2
Clase de eficiencia energética A+
Consumo de energía con carga estándar, modo convencional 0.93 kWh/ciclo
Consumo de energía con carga estándar, modo con ventilador 0.69 kWh/ciclo
Número de cavidades 1
Fuente de calor Electricidad
Volumen 72 l
Tipo de horno Horno empotrado
Masa
ZOHKF1X1 26.7 kg
ZOHNF1K1 26.7 kg
ZOHNF1W1 26.7 kg
* Para la Unión Europea según los Reglamentos de la UE 65/2014 y 66/2014.
Para la República de Bielorrusia según STB 2478-2017, apéndice G; STB 2477-2017, anexos A y B.
Para Ucrania según 568/32020.
La clase de eficiencia energética no es aplicable a Rusia.
ESPAÑOL 139

EN 60350-1 - Aparatos electrodomésticos - Parte 1: Placas, hornos, hornos de vapor y parrillas - Métodos para
medir el rendimiento.
13.2 Ahorro de energía
El horno tiene características
que le ayudan a ahorrar energía
durante la cocina de cada día.
Asegúrese de que la puerta del horno está
cerrada cuando el horno funciona. No abra la
puerta del horno muchas veces durante la
cocción. Mantenga limpia la junta de la
puerta y asegúrese de que está bien fijada
en su posición.
Utilice utensilios de cocina de metal para
mejorar el ahorro energético.
En la medida de lo posible, no precaliente el
horno antes de cocinar.
Reduzca al máximo el tiempo entre
horneados cuando prepare varios platos de
una vez.
Cocción con ventilador
En la medida de lo posible, utilice las
funciones de cocción con ventilador para
ahorrar energía.
Calor residual
Para una duración de la cocción superior a
30 minutos, reduzca la temperatura del
horno un mínimo de 3 - 10 minutos antes de
que transcurra el tiempo de cocción. El calor
residual dentro del horno seguirá cocinando.
Utilice el calor residual para calentar otros
platos.
Mantener calor
Si desea utilizar el calor residual para
mantener calientes los alimentos, seleccione
el ajuste de temperatura más bajo posible.
Horneado húmedo + ventil.
Función diseñada para ahorrar energía
durante la cocción.
Cuando se utiliza esta función, la bombilla
está apagada.
14. ASPECTOS MEDIOAMBIENTALES
Recicle los materiales con el símbolo .
Coloque el material de embalaje en los
contenedores adecuados para su reciclaje.
Ayude a proteger el medio ambiente y la
salud pública, así como a reciclar residuos
de aparatos eléctricos y electrónicos. No
deseche los aparatos marcados con el
símbolo junto con los residuos
domésticos. Lleve el producto a su centro de
reciclaje local o póngase en contacto con su
oficina municipal.
140 ESPAÑOL
*

141

142

143

WWW.ZANUSSI.COM/SHOP
867360189-A-352020
Documenttranscriptie
User Manual GETTING STARTED? EASY. ZOHKF1X1 ZOHNF1K1 ZOHNF1W1 EN User Manual Oven 2 NL Gebruiksaanwijzing Oven 24 FR Notice d'utilisation Four 47 DE Benutzerinformation Backofen 71 PT Manual de instruções Forno 94 ES Manual de instrucciones Horno 118 VISIT OUR WEBSITE TO: Get usage advice, brochures, trouble shooter, service and repair information: www.zanussi.com/support Subject to change without notice. CONTENTS 1. SAFETY INFORMATION................................................................................................ 2 2. SAFETY INSTRUCTIONS.............................................................................................. 4 3. INSTALLATION...............................................................................................................6 4. PRODUCT DESCRIPTION............................................................................................. 8 5. BEFORE FIRST USE......................................................................................................8 6. DAILY USE......................................................................................................................9 7. CLOCK FUNCTIONS...................................................................................................... 9 8. USING THE ACCESSORIES........................................................................................10 9. ADDITIONAL FUNCTIONS...........................................................................................11 10. HINTS AND TIPS........................................................................................................ 11 11. CARE AND CLEANING.............................................................................................. 18 12. TROUBLESHOOTING................................................................................................ 21 13. ENERGY EFFICIENCY...............................................................................................22 1. SAFETY INFORMATION Before the installation and use of the appliance, carefully read the supplied instructions. The manufacturer is not responsible for any injuries or damage that are the result of incorrect installation or usage. Always keep the instructions in a safe and accessible location for future reference. 1.1 Children and vulnerable people safety • • 2 This appliance can be used by children aged from 8 years and above and persons with reduced physical, sensory or mental capabilities or lack of experience and knowledge if they have been given supervision or instruction concerning the use of the appliance in a safe way and understand the hazards involved. Children of less than 8 years of age and persons with very extensive and complex disabilities shall be kept away from the appliance unless continuously supervised. Do not let children play with the appliance. ENGLISH • • • • Keep all packaging away from children and dispose of it appropriately. WARNING: Keep children and pets away from the appliance when it operates or when it cools down. Accessible parts become hot during use. If the appliance has a child safety device, it should be activated. Children shall not carry out cleaning and user maintenance of the appliance without supervision. 1.2 General Safety • • • • • • • • • • Only a qualified person must install this appliance and replace the cable. WARNING: The appliance and its accessible parts become hot during use. Care should be taken to avoid touching heating elements. Always use oven gloves to remove or put in accessories or ovenware. Before carrying out any maintenance, disconnect the appliance from the power supply. WARNING: Ensure that the appliance is switched off before replacing the lamp to avoid the possibility of electric shock. Do not use the appliance before installing it in the built-in structure. Do not use a steam cleaner to clean the appliance. Do not use harsh abrasive cleaners or sharp metal scrapers to clean the glass door since they can scratch the surface, which may result in shattering of the glass. If the mains power supply cable is damaged, it must be replaced by the manufacturer, its Authorised Service Centre or similarly qualified persons to avoid an electrical hazard. To remove the shelf supports first pull the front of the shelf support and then the rear end away from the side walls. Install the shelf supports in the opposite sequence. ENGLISH 3 2. SAFETY INSTRUCTIONS 2.1 Installation WARNING! Only a qualified person must install this appliance. • • • • • • • • • Remove all the packaging. Do not install or use a damaged appliance. Follow the installation instructions supplied with the appliance. Always take care when moving the appliance as it is heavy. Always use safety gloves and enclosed footwear. Do not pull the appliance by the handle. Install the appliance in a safe and suitable place that meets installation requirements. Keep the minimum distance from other appliances and units. Before mounting the appliance, check if the oven door opens without restraint. The appliance is equipped with an electric cooling system. It must be operated with the electric power supply. Cabinet minimum height (Cabinet under the worktop minimum height) 590 (600) mm Cabinet width 560 mm Cabinet depth 550 (550) mm Height of the front of the appliance 594 mm Height of the back of the appliance 576 mm Width of the front of the ap‐ pliance 595 mm Width of the back of the appliance 559 mm Depth of the appliance 569 mm Built in depth of the appli‐ ance 548 mm Depth with open door 1022 mm 560x20 mm Mains supply cable length. Cable is placed in the right corner of the back side 1500 mm ENGLISH 4x25 mm 2.2 Electrical connection WARNING! Risk of fire and electric shock. • • • • • • • • • • • • • Ventilation opening mini‐ mum size. Opening placed on the bottom rear side 4 Mounting screws • All electrical connections should be made by a qualified electrician. The appliance must be earthed. Make sure that the parameters on the rating plate are compatible with the electrical ratings of the mains power supply. Always use a correctly installed shockproof socket. Do not use multi-plug adapters and extension cables. Make sure not to cause damage to the mains plug and to the mains cable. Should the mains cable need to be replaced, this must be carried out by our Authorised Service Centre. Do not let mains cables touch or come near the appliance door or the niche below the appliance, especially when it operates or the door is hot. The shock protection of live and insulated parts must be fastened in such a way that it cannot be removed without tools. Connect the mains plug to the mains socket only at the end of the installation. Make sure that there is access to the mains plug after the installation. If the mains socket is loose, do not connect the mains plug. Do not pull the mains cable to disconnect the appliance. Always pull the mains plug. Use only correct isolation devices: line protecting cut-outs, fuses (screw type fuses removed from the holder), earth leakage trips and contactors. The electrical installation must have an isolation device which lets you disconnect the appliance from the mains at all poles. The isolation device must have a contact opening width of minimum 3 mm. This appliance is supplied with a main plug and a main cable. • Cable types applicable for installation or replacement for Europe: WARNING! Risk of damage to the appliance. H07 RN-F, H05 RN-F, H05 RRF, H05 VV-F, H05 V2V2-F (T90), H05 BB-F For the section of the cable refer to the total power on the rating plate. You can also refer to the table: Total power (W) Section of the cable (mm²) maximum 1380 3 x 0.75 maximum 2300 3x1 maximum 3680 3 x 1.5 The earth cord (green / yellow cable) must be 2 cm longer than phase and neutral cables (blue and brown cables). • • • 2.3 Use WARNING! Risk of injury, burns and electric shock or explosion. • • • • • • • • • • • This appliance is for household use only. Do not change the specification of this appliance. Make sure that the ventilation openings are not blocked. Do not let the appliance stay unattended during operation. Deactivate the appliance after each use. Be careful when you open the appliance door while the appliance is in operation. Hot air can release. Do not operate the appliance with wet hands or when it has contact with water. Do not apply pressure on the open door. Do not use the appliance as a work surface or as a storage surface. Open the appliance door carefully. The use of ingredients with alcohol can cause a mixture of alcohol and air. Do not let sparks or open flames to come in contact with the appliance when you open the door. Do not put flammable products or items that are wet with flammable products in, near or on the appliance. • • • To prevent damage or discoloration to the enamel: – do not put ovenware or other objects in the appliance directly on the bottom. – do not put aluminium foil directly on the bottom of cavity of the appliance. – do not put water directly into the hot appliance. – do not keep moist dishes and food in the appliance after you finish the cooking. – be careful when you remove or install the accessories. Discoloration of the enamel or stainless steel has no effect on the performance of the appliance. Use a deep pan for moist cakes. Fruit juices cause stains that can be permanent. This appliance is for cooking purposes only. It must not be used for other purposes, for example room heating. Always cook with the oven door closed. If the appliance is installed behind a furniture panel (e.g. a door) make sure the door is never closed when the appliance operates. Heat and moisture can build up behind a closed furniture panel and cause subsequent damage to the appliance, the housing unit or the floor. Do not close the furniture panel until the appliance has cooled down completely after use. 2.4 Care and cleaning WARNING! Risk of injury, fire, or damage to the appliance. • • • Before maintenance, deactivate the appliance and disconnect the mains plug from the mains socket. Make sure the appliance is cold. There is the risk that the glass panels can break. Replace immediately the door glass panels when they are damaged. Contact the Authorised Service Centre. ENGLISH 5 • • • • Be careful when you remove the door from the appliance. The door is heavy! Clean regularly the appliance to prevent the deterioration of the surface material. Clean the appliance with a moist soft cloth. Use only neutral detergents. Do not use abrasive products, abrasive cleaning pads, solvents or metal objects. If you use an oven spray, follow the safety instructions on its packaging. 2.5 Internal lighting • 2.6 Service • • To repair the appliance contact the Authorised Service Centre. Use original spare parts only. 2.7 Disposal WARNING! Risk of electric shock. • intended to be used in other applications and are not suitable for household room illumination. Use only lamps with the same specifications. WARNING! Risk of injury or suffocation. Concerning the lamp(s) inside this product and spare part lamps sold separately: These lamps are intended to withstand extreme physical conditions in household appliances, such as temperature, vibration, humidity, or are intended to signal information about the operational status of the appliance. They are not • • • Disconnect the appliance from the mains supply. Cut off the mains electrical cable close to the appliance and dispose of it. Remove the door catch to prevent children or pets from becoming trapped in the appliance. 3. INSTALLATION 3.1 Building in WARNING! Refer to Safety chapters. (*mm) 548 21 min. 550 80 60 520 600 18 20 114 589 594 min. 560 595+-1 60 5 20 6 ENGLISH 3 198 523 (*mm) 70 60 548 min. 550 20 520 18 590 21 114 min. 560 589 594 198 60 595+-1 5 3 523 20 3.2 Securing the oven to the cabinet ENGLISH 7 4. PRODUCT DESCRIPTION 4.1 General overview 1 2 3 4 5 6 7 12 5 4 3 2 1 8 9 10 11 4.2 Accessories • 1 2 3 4 5 6 7 8 9 10 11 12 • Wire shelf For cookware, cake tins, roasts. Control panel Power lamp / symbol Knob for the heating functions Knob for the timer Control knob (for the temperature) Temperature indicator / symbol Heating element Lamp Fan Aqua cleaning container Shelf support, removable Shelf positions Baking tray For cakes and biscuits. 5. BEFORE FIRST USE WARNING! Refer to Safety chapters. 5.1 Before first use The oven can emit an odour and smoke during preheating. Make sure that the room is ventilated. 1. 2. Step 1 Step 2 Clean the oven Preheat the empty oven Remove all accessories and removable shelf sup‐ ports from the oven. Clean the oven and the accessories with a soft cloth, warm water and a mild detergent. 1. Set the maximum temperature for the function: Time: 1 h. . 2. Set the maximum temperature for the function: Time: 15 min. . Turn off the oven and wait until it is cold. Place the accessories and the removable shelf supports in the oven. 8 ENGLISH 6. DAILY USE WARNING! Refer to Safety chapters. Heating function 6.1 How to set: Heating function Step 1 Turn the knob for the heating functions to select a heating function. Step 2 Turn the control knob to select the tem‐ perature. Step 3 When the cooking ends, turn the knobs to the off position to turn off the oven. 6.2 Heating functions Heating function Application The oven is off. To turn on the lamp. Light This function is designed to save energy during cooking. When you use this function, the temperature in Moist Fan Bak‐ the cavity may differ from the set ing temperature. The heating power may be reduced. For more informa‐ tion refer to "Daily Use" chapter, Notes on: Moist Fan Baking. Turbo Grilling To bake cakes with crispy bottom and to preserve food. Bottom Heat Pizza Function Defrost Conventional Cooking / Aqua Clean To bake pizza. To make intensive browning and a crispy bottom. Set the temperature 230°C. To defrost food (vegetables and fruit). The defrosting time depends on the amount and size of the fro‐ zen food. To bake and roast food on one shelf position. Refer to "Care and cleaning" chap‐ ter for more information about: Aqua Clean. 6.3 Notes on: Moist Fan Baking Off position Fan Cooking Application To roast or roast and bake food with the same cooking temperature on more than one shelf position, with‐ out flavour transference. To roast large meat joints or poultry with bones on one shelf position. To make gratins and to brown. This function was used to comply with the energy efficiency class and ecodesign requirements according to EU 65/2014 and EU 66/2014. Tests according to EN 60350-1. The oven door should be closed during cooking so that the function is not interrupted and the oven operates with the highest energy efficiency possible. When you use this function the lamp automatically turns off. For the cooking instructions refer to "Hints and tips" chapter, Moist Fan Baking. For general energy saving recommendations refer to "Energy Efficiency" chapter, Energy Saving. 7. CLOCK FUNCTIONS 7.1 How to set: End of Cooking To set the switch-off time for oven functions. ENGLISH 9 Step 1 Set the oven function and the temperature. Step 2 Turn the knob for the timer to its full range. Step 3 Turn the knob for the timer to set the switch-off time. When the set time ends, the signal sounds and the oven turns off. Step 4 Turn the knob for the oven functions and the knob for the temperature to the off position. 8. USING THE ACCESSORIES WARNING! Refer to Safety chapters. 8.1 Inserting accessories A small indentation at the top increases safety. The indentations are also anti-tip Wire shelf: Push the shelf between the guide bars of the shelf support and make sure that the feet point down. Baking tray: Push the tray between the guide bars of the shelf support. 10 ENGLISH devices. The high rim around the shelf prevents cookware from slipping of the shelf. Wire shelf, Baking tray: Push the tray between the guide bars of the shelf support and the wire shelf on the guide bars above. 9. ADDITIONAL FUNCTIONS 9.1 Cooling fan 9.2 Safety thermostat When the oven operates, the cooling fan turns on automatically to keep the surfaces of the oven cool. If you turn off the oven, the cooling fan can continue to operate until the oven cools down. Incorrect operation of the oven or defective components can cause dangerous overheating. To prevent this, the oven has a safety thermostat which interrupts the power supply. The oven turns on again automatically when the temperature drops. 10. HINTS AND TIPS Refer to Safety chapters. If you use two baking trays at the same time, keep one empty level between them. 10.1 Cooking recommendations Cooking meat and fish Leave the meat for approximately 15 minutes before carving so that the juice does not seep out. The oven has five shelf positions. Count the shelf positions from the bottom of the oven floor. Your oven may bake or roast differently to the oven you had before. The below tables provide you with the standard settings for temperature, cooking time and shelf position. If you cannot find the settings for a special recipe, look for the similar one. The oven has a special system which circulates the air and constantly recycles the steam. With this system you can cook in a steamy environment and keep the food soft inside and crusty outside. It decreases the cooking time and energy consumption. To prevent too much smoke in the oven during roasting, add some water into the deep pan. To prevent the smoke condensation, add water each time after it dries up. Cooking times Cooking times depend on the type of food, its consistency, and volume. Initially, monitor the performance when you cook. Find the best settings (heat setting, cooking time, etc.) for your cookware, recipes and quantities when you use this appliance. Baking cakes Do not open the oven door before 3/4 of the set cooking time is up. ENGLISH 11 10.2 Baking and roasting Conventional Cook‐ ing Fan Cooking CAKES (min) (°C) Whisked recipes (°C) 170 2 160 3 45 - 60 Cake mould Shortbread dough 170 2 160 3 20 - 30 Cake mould Buttermilk cheesecake 170 1 160 1 70 - 80 Cake mould, Ø 26 cm Strudel 175 3 150 2 60 - 80 Baking tray Jam tart 170 2 165 2 30 - 40 Baking tray Christmas cake, 160 preheat the empty oven 2 150 2 90 - 120 Cake mould, Ø 20 cm Plum cake, pre‐ heat the empty oven 175 1 160 2 50 - 60 Bread tin Biscuits 140 3 140 - 150 3 30 - 35 Baking tray Biscuits, two lev‐ els - - 140 - 150 2 and 4 35 - 40 Baking tray Biscuits, three lev‐ 120 els 3 120 3 80 - 100 Baking tray Meringues 190 3 180 3 15 - 20 Baking tray Buns, preheat the empty oven 190 3 170 3 25 - 35 Baking tray Eclairs, one level 180 2 170 2 45 - 70 Baking tray Eclairs, two levels 160 1 150 2 110 - 120 Baking tray Plate tarts 170 1 160 1 50 - 60 Baking tray Rich fruit cake 190 3 190 3 12 - 20 Baking tray Victoria sandwich 190 3 170 3 25 - 35 Baking tray Preheat the empty oven. Conventional Cooking Fan Cooking BREAD AND PIZZA (min) (°C) White bread, 1 - 2 190 pieces, 0.5 kg each 12 ENGLISH (°C) 1 190 1 60 - 70 - Conventional Cooking Fan Cooking BREAD AND PIZZA (min) (°C) (°C) Rye bread, pre‐ heating is not needed 190 1 180 1 30 - 45 Bread tin Bread rolls, 6 - 8 rolls 230 - 250 1 230 - 250 1 10 - 20 Baking tray Pizza 200 3 190 3 10 - 20 Baking tray / Deep pan Scones 200 3 190 3 10 - 20 Baking tray Preheat the empty oven. Use the cake mould. Conventional Cooking Fan Cooking FLANS (min) (°C) (°C) Pasta flan, preheating is not needed 200 2 180 2 40 - 50 Vegetable flan, pre‐ heating is not needed 200 2 175 2 45 - 60 Quiches 180 1 180 1 50 - 60 Lasagne 180 - 190 2 180 - 190 2 25 - 40 Cannelloni 180 - 190 2 180 - 190 2 25 - 40 Use the wire shelf. Conventional Cooking Fan Cooking MEAT (min) (°C) (°C) Beef 200 2 190 2 50 - 70 Pork 180 2 180 2 90 - 120 Veal 190 2 175 2 90 - 120 English roast beef, rare 210 2 200 2 50 - 60 English roast beef, medium 210 2 200 2 60 - 70 English roast beef, well done 210 2 200 2 70 - 75 ENGLISH 13 Conventional Cooking Fan Cooking MEAT (min) (°C) (°C) Pork shoulder, with rind 180 2 170 2 120 - 150 Pork shin, 2 pieces 180 2 160 2 100 - 120 Leg of lamb 190 2 175 2 110 - 130 Whole chicken 220 2 200 2 70 - 85 Whole turkey 180 2 160 2 210 - 240 Whole duck 175 2 220 2 120 - 150 Whole goose 175 2 160 1 150 - 200 Rabbit, cut in pieces 190 2 175 2 60 - 80 Hare, cut in pieces 190 2 175 2 150 - 200 Whole pheasant 190 2 175 2 90 - 120 Conventional Cooking Fan Cooking FISH (min) (°C) (°C) Trout / Sea bream, 3 - 4 fish 190 2 175 2 40 - 55 Tuna / Salmon, 4 - 6 fillets 190 2 175 2 35 - 60 10.3 Turbo Grilling Preheat the empty oven. Use the first or the second shelf position. To calculate the roasting time multiple the time given in the table below by the centimetres of thickness of the fillet. BEEF (°C) (min) Roast beef or fillet, rare 190 - 200 5-6 Roast beef or fillet, me‐ 180 - 190 dium 6-8 Roast beef or fillet, well 170 - 180 done 8 - 10 PORK (°C) (min) Shoulder / Neck / Ham joint, 1 - 1.5 kg 160 - 180 90 - 120 Chops / Spare rib, 1 1.5 kg 170 - 180 60 - 90 Meatloaf, 0.75 - 1 kg 160 - 170 50 - 60 Pork knuckle, pre‐ cooked, 0.75 - 1 kg 150 - 170 90 - 120 (°C) (min) 160 - 180 90 - 120 VEAL Roast veal, 1 kg 14 ENGLISH VEAL (°C) POULTRY (min) (°C) (min) Chicken, half, 0.4 - 0.5 kg each 190 - 210 35 - 50 Chicken, poulard, 1 1.5 kg 190 - 210 50 - 70 (min) Duck, 1.5 - 2 kg 180 - 200 80 - 100 Lamb leg / Roast lamb, 150 - 170 1 - 1.5 kg 100 - 120 Goose, 3.5 - 5 kg 160 - 180 120 - 180 Turkey, 2.5 - 3.5 kg 160 - 180 120 - 150 Lamb saddle, 1 - 1.5 kg 40 - 60 Turkey, 4 - 6 kg 140 - 160 150 - 240 FISH (STEAMED) (°C) (min) Whole fish, 1 - 1.5 kg 210 - 220 40 - 60 Veal knuckle, 1.5 - 2 kg 160 - 180 LAMB 120 - 150 (°C) 160 - 180 POULTRY Poultry, portions, 0.2 0.25 kg each (°C) (min) 200 - 220 30 - 50 10.4 Defrost (kg) Defrosting time (min) Further defrosting time (min) Chicken 1 100 - 140 20 - 30 Place chicken on an up‐ turned saucer placed on a large plate. Turn halfway through. Meat 1 100 - 140 20 - 30 Turn halfway through. 0.5 90 - 120 Cream 2 x 0.2 80 - 100 10 - 15 Cream can also be whip‐ ped when still slightly fro‐ zen in places. Trout 0.15 25 - 35 10 - 15 - Strawberries 0.3 30 - 40 10 - 20 - Butter 0.25 30 - 40 10 - 15 - Gateau 1.4 60 60 - 10.5 Dehydrating - Fan Cooking Cover trays with grease proof paper or baking parchment. For a better result, stop the oven halfway through the drying time, open the door and let it cool down for one night to complete the drying. For 1 tray use the third shelf position. ENGLISH 15 For 2 trays use the first and fourth shelf position. FRUIT VEGETA‐ BLES Set the temperature to 60 - 70 °C. (°C) (h) Beans 60 - 70 6-8 Peppers 60 - 70 5-6 Vegetables for soup 60 - 70 5-6 Mushrooms 50 - 60 6-8 Herbs 40 - 50 2-3 (h) Plums 8 - 10 Apricots 8 - 10 Apple slices 6-8 Pears 6-9 10.6 Moist Fan Baking - recommended accessories Use the dark and non-reflective tins and containers. They have better heat absorption than the light colour and reflective dishes. Pizza pan Ramekins Baking dish Dark, non-reflective 28 cm diameter Ceramic 8 cm diameter, 5 cm height Dark, non-reflective 26 cm diameter Flan base tin Dark, non-reflective 28 cm diameter 10.7 Moist Fan Baking For the best results follow suggestions listed in the table below. (°C) (min) Sweet rolls, 12 pieces baking tray or dripping pan 175 3 40 - 50 Rolls, 9 pieces baking tray or dripping pan 180 2 35 - 45 Pizza, frozen, 0.35 kg wire shelf 180 2 45 - 55 Swiss roll baking tray or dripping pan 170 2 30 - 40 Brownie baking tray or dripping pan 170 2 45 - 50 Soufflè, 6 pieces ceramic ramekins on wire shelf 190 3 45 - 55 Sponge flan base flan base tin on wire shelf 180 2 35 - 45 Victoria sandwich baking dish on wire shelf 170 2 35 - 50 16 ENGLISH (°C) (min) Poached fish, 0.3 kg baking tray or dripping pan 180 2 35 - 45 Whole fish, 0.2 kg baking tray or dripping pan 180 3 25 - 35 Fish fillet, 0.3 kg pizza pan on wire shelf 170 3 30 - 40 Poached meat, 0.25 kg baking tray or dripping pan 180 3 35 - 45 Shashlik, 0.5 kg baking tray or dripping pan 180 3 40 - 50 Cookies, 16 pieces baking tray or dripping pan 150 2 30 - 45 Macaroons, 20 pieces baking tray or dripping pan 180 2 45 - 55 Muffins, 12 pieces baking tray or dripping pan 170 2 30 - 40 Savory pastry, 16 pieces baking tray or dripping pan 170 2 35 - 45 Short crust biscuits, 20 pieces baking tray or dripping pan 150 2 40 - 50 Tartlets, 8 pieces baking tray or dripping pan 170 2 30 - 40 Vegetables, poached, baking tray or dripping pan 0.4 kg 180 2 35 - 45 Vegetarian omelette pizza pan on wire shelf 180 3 35 - 45 Mediterranean vege‐ tables, 0.7 kg baking tray or dripping pan 180 4 35 - 45 10.8 Information for test institutes Tests according to IEC 60350-1. (°C) (min) Small cakes, 20 per tray Conventional Cooking Baking tray 3 170 20 - 30 - Small cakes, 20 per tray Fan Cooking Baking tray 3 150 160 20 - 35 - Small cakes, 20 per tray Fan Cooking Baking tray 2 and 4 150 160 20 - 35 - Apple pie, 2 tins Ø20 cm Conventional Cooking Wire shelf 2 180 70 - 90 - Apple pie, 2 tins Ø20 cm Fan Cooking Wire shelf 2 160 70 - 90 - ENGLISH 17 (°C) (min) Sponge cake, cake mould Ø26 cm Conventional Cooking Wire shelf 2 170 40 - 50 Preheat the oven for 10 minutes. Sponge cake, cake mould Ø26 cm Fan Cooking Wire shelf 2 160 40 - 50 Preheat the oven for 10 minutes. Sponge cake, cake mould Ø26 cm Fan Cooking Wire shelf 2 and 4 160 40 - 60 Preheat the oven for 10 minutes. Short bread Fan Cooking Baking tray 3 140 150 20 - 40 - Short bread Fan Cooking Baking tray 2 and 4 140 150 25 - 45 - Short bread Conventional Cooking Baking tray 3 140 150 25 - 45 - Toast, 4 - 6 pieces Grill Wire shelf 4 max. 2 - 3 minutes first side; 2 - 3 minutes second side Preheat the oven for 3 minutes. Wire shelf 4 and dripping pan max. 20 - 30 Put the wire shelf on the fourth level and the dripping pan on the third level of the oven. Turn the food halfway through the cooking time. Preheat the oven for 3 minutes. Beef burger, Grill 6 pieces, 0.6 kg 11. CARE AND CLEANING WARNING! Refer to Safety chapters. 11.1 Notes on cleaning Clean the front of the oven with a soft cloth with warm water and a mild detergent. Clean and check the door gasket around the frame of the cavity. Use a cleaning solution to clean metal surfaces. Cleaning Agents 18 ENGLISH Clean stains with a mild detergent. Clean the cavity after each use. Fat accumulation or other residue may cause fire. Everyday Use Moisture can condense in the oven or on the door glass panels. To decrease the condensa‐ tion, let the oven work for 10 minutes before cooking. Do not store the food in the oven for longer than 20 minutes. Dry the cavity with a soft cloth after each use. Clean all accessories after each use and let them dry. Use a soft cloth with warm water and a mild detergent. Do not clean the accessories in a dishwasher. Do not clean the non-stick accessories using abrasive cleaner or sharp-edged objects. Accessories 11.2 How to remove: Shelf supports Remove the shelf supports to clean the oven. Step 1 Turn off the oven and wait until it is cold. Step 2 Pull the front of the shelf support away from the side wall. Step 3 Pull the rear end of the shelf support away from the side wall and remove it. Step 4 Install the shelf supports in the oppo‐ site sequence. 11.3 How to use: Aqua Clean This cleaning procedure uses humidity to remove remaining fat and food particles from the oven. Step 1 Step 2 Pour water into the cavity embossment: 300 ml. Set the function: 1 2 Step 3 Set the temperature to 90 °C. Step 4 Let the oven work for 30 min. Step 5 Turn off the oven. Step 6 Wait until the oven is cold. Dry the cavi‐ ty with a soft cloth. . 11.4 How to remove and install: Door The oven door has two glass panels. You can remove the oven door and the internal glass panel to clean it. Read the whole "Removing and installing door" instruction before you remove the glass panels. CAUTION! Do not use the oven without the glass panels. ENGLISH 19 Step 1 Open the door fully and hold both hinges. Step 2 Lift and turn the levers fully on both hinges. Step 3 Close the oven door halfway to the first opening position. Then lift and pull forward and remove the door from its seat. Step 4 Put the door on a soft cloth on a stable sur‐ face. Step 5 Hold the door trim (B) on the top edge of the door at the two sides and push inwards to re‐ lease the clip seal. Step 6 Pull the door trim to the front to remove it. Step 7 Hold the door glass panel by its top edge and carefully pull it out. Make sure the glass slides out of the supports completely. 2 B 1 Step 8 Clean the glass panels with water and soap. Dry the glass panels carefully. Do not clean the glass panels in the dishwasher. Step 9 After cleaning, install the glass panel and the oven door. 20 ENGLISH The screen-printing zone must face the inner side of the door. Make sure that after the installation the sur‐ face of the glass panel frame on the screen-printing zones is not rough when you touch it. When installed correctly the door trim clicks. Make sure that you install the internal glass panel in the seats correctly. A 11.5 How to replace: Lamp Always hold the halogen lamp with a cloth to prevent grease residue from burning on the lamp. WARNING! Risk of electric shock. The lamp can be hot. Before you replace the lamp: Step 1 Step 2 Step 3 Turn off the oven. Wait until the oven is cold. Disconnect the oven from the mains. Put a cloth on the bottom of the cav‐ ity. Back lamp Step 1 Turn the glass cover to remove it. Step 2 Clean the glass cover. Step 3 Replace the lamp with a suitable 300 °C heat-resistant lamp. Step 4 Install the glass cover. 12. TROUBLESHOOTING WARNING! Refer to Safety chapters. 12.1 What to do if... In any cases not included in this table please contact with an Authorised Service Centre. Problem Check if... The oven does not heat up. The fuse is blown. The door gasket is dam‐ aged. Do not use the oven. Contact an Authorised Service Centre. Problem Check if... End of Cooking - is not set. Set: End of Cooking. Re‐ fer to "Clock functions". The lamp does not work. The lamp is burnt out. 12.2 Service data If you cannot find a solution to the problem yourself, contact your dealer or an Authorised Service Centre. The necessary data for the service centre is on the rating plate. The rating plate is on the front frame of the oven cavity. Do not remove the rating plate from the oven cavity. ENGLISH 21 We recommend that you write the data here: Model (MOD.) ......................................... Product number (PNC) ......................................... Serial number (S.N.) ......................................... 13. ENERGY EFFICIENCY 13.1 Product Information and Product Information Sheet* Supplier's name Zanussi Model identification ZOHKF1X1 949496249 ZOHNF1K1 949496304 ZOHNF1W1 949496305 Energy Efficiency Index 81.2 Energy efficiency class A+ Energy consumption with a standard load, conventional mode 0.93 kWh/cycle Energy consumption with a standard load, fan-forced mode 0.69 kWh/cycle Number of cavities 1 Heat source Electricity Volume 72 l Type of oven Built-In Oven Mass ZOHKF1X1 26.7 kg ZOHNF1K1 26.7 kg ZOHNF1W1 26.7 kg * For European Union according to EU Regulations 65/2014 and 66/2014. For Republic of Belarus according to STB 2478-2017, Appendix G; STB 2477-2017, Annexes A and B. For Ukraine according to 568/32020. Energy efficiency class is not applicable for Russia. EN 60350-1 - Household electric cooking appliances - Part 1: Ranges, ovens, steam ovens and grills - Methods for measuring performance. 13.2 Energy saving The oven has features which help you save energy during everyday cooking. Make sure that the oven door is closed when the oven operates. Do not open the oven door too often during cooking. Keep the door gasket clean and make sure it is well fixed in its position. 22 ENGLISH Use metal cookware to improve energy saving. When possible, do not preheat the oven before cooking. Keep breaks between baking as short as possible when you prepare a few dishes at one time. Cooking with fan When possible, use the cooking functions with fan to save energy. Residual heat When the cooking duration is longer than 30 min, reduce the oven temperature to minimum 3 - 10 min before the end of cooking. The residual heat inside the oven will continue to cook. Moist Fan Baking Function designed to save energy during cooking. When you use this function the lamp is off. Use the residual heat to warm up other dishes. Keep food warm Choose the lowest possible temperature setting to use residual heat and keep a meal warm. 14. ENVIRONMENTAL CONCERNS Recycle materials with the symbol . Put the packaging in relevant containers to recycle it. Help protect the environment and human health by recycling waste of electrical and electronic appliances. Do not dispose of appliances marked with the symbol with the household waste. Return the product to your local recycling facility or contact your municipal office. ENGLISH 23 GA NAAR ONZE WEBSITE VOOR: Advies over gebruik, brochures, het oplossen van problemen, service- en reparatieinformatie: www.zanussi.com/support Wijzigingen voorbehouden. INHOUDSOPGAVE 1. VEILIGHEIDSINFORMATIE..........................................................................................24 2. VEILIGHEIDSVOORSCHRIFTEN.................................................................................26 3. MONTAGE ................................................................................................................... 29 4. BESCHRIJVING VAN HET PRODUCT........................................................................ 30 5. VOOR HET EERSTE GEBRUIK................................................................................... 30 6. DAGELIJKS GEBRUIK................................................................................................. 31 7. KLOKFUNCTIES...........................................................................................................32 8. GEBRUIK VAN DE ACCESSOIRES.............................................................................32 9. EXTRA FUNCTIES....................................................................................................... 33 10. AANWIJZINGEN EN TIPS.......................................................................................... 34 11. ONDERHOUD EN REINIGING................................................................................... 41 12. PROBLEEMOPLOSSING........................................................................................... 44 13. ENERGIEZUINIGHEID............................................................................................... 45 1. VEILIGHEIDSINFORMATIE Lees zorgvuldig de meegeleverde instructies voor installatie en gebruik van het apparaat. De fabrikant is niet verantwoordelijk voor verwondingen of schade die voortvloeit uit de onjuiste installatie of het onjuiste gebruik. Bewaar de instructies altijd op een veilige, toegankelijke plek voor toekomstig gebruik. 1.1 De veiligheid van kinderen en kwetsbare personen • 24 Dit apparaat kan worden gebruikt door kinderen van 8 jaar en ouder en door mensen met beperkte lichamelijke, zintuiglijke of verstandelijke vermogens of een gebrek aan ervaring en kennis, indien zij onder toezicht staan of instructies hebben gekregen over het veilig gebruiken van het apparaat en indien zij de eventuele gevaren begrijpen. Kinderen jonger dan 8 jaar oud en personen met zware en complexe beperkingen dienen altijd uit de buurt van het NEDERLANDS • • • • • apparaat te worden gehouden, tenzij ze voortdurend onder toezicht staan. Laat kinderen niet spelen met het apparaat. Houd alle verpakkingen uit de buurt van kinderen en verwijder ze op gepaste wijze. WAARSCHUWING: Houd kinderen en huisdieren uit de buurt van het apparaat als het in werking is of afkoelt. Makkelijk toegankelijke onderdelen worden heet tijdens gebruik. Als het apparaat is voorzien van een kinderslot, dient dit te worden geactiveerd. Kinderen mogen zonder toezicht geen reinigings- en onderhoudswerkzaamheden aan het apparaat uitvoeren. 1.2 Algemene veiligheid • • • • • • • • • Alleen een erkende installatietechnicus mag het apparaat en de kabel vervangen. WAARSCHUWING: Het apparaat en de toegankelijke onderdelen ervan worden heet tijdens gebruik. U dient te voorkomen de verwarmingselementen aan te raken. Gebruik altijd ovenhandschoenen om accessoires of kookgerei te plaatsen of verwijderen. Voordat u welke onderhoudshandeling dan ook verricht, dient u de stekker van het apparaat uit het stopcontact te trekken. WAARSCHUWING: Zorg ervoor dat het apparaat is uitgeschakeld voordat u de lamp vervangt om elektrische schokken te voorkomen. Gebruik het apparaat niet voordat u het in de ingebouwde structuur installeert. Gebruik geen stoomreiniger om het apparaat schoon te maken. Gebruik nooit agressieve reinigingsmiddelen of scherpe metalen schrapers om de glazen deur schoon te maken, deze kunnen krassen veroorzaken op het oppervlak, waardoor het glas zou kunnen breken. Als het netsnoer beschadigd is, moet de fabrikant, een erkende serviceverlener of een gekwalificeerd persoon NEDERLANDS 25 • deze vervangen teneinde gevaarlijke situaties te voorkomen. Om de inschuifrails te verwijderen trekt u eerst de voorkant van de inschuifrail en dan de achterkant uit de zijwanden. Installeer de inschuifrails in de omgekeerde volgorde. 2. VEILIGHEIDSVOORSCHRIFTEN 2.1 Installatie WAARSCHUWING! Alleen een erkende installatietechnicus mag het apparaat installeren. • • • • • • • • • Verwijder alle verpakkingsmaterialen. Installeer en gebruik geen beschadigd apparaat. Volg de installatie-instructies die zijn meegeleverd met het apparaat. Pas altijd op bij verplaatsing van het apparaat, want het is zwaar. Gebruik altijd veiligheidshandschoenen en gesloten schoeisel. Trek het apparaat nooit aan de handgreep van zijn plaats. Installeer het apparaat op een veilige en geschikte plaats die aan alle installatieeisen voldoet. Houd de minimumafstand naar andere apparaten en units in acht. Controleer voordat u het apparaat monteert of de ovendeur onbelemmerd opent. Het apparaat is uitgerust met een elektrisch koelsysteem. Het heeft elektrische stroom nodig. Minimumhoogte kast (Mini‐ mumhoogte kast onder werkblad) Kastbreedte Kastdiepte Diepte van het apparaat 569 mm Ingebouwde diepte van het apparaat 548 mm Diepte met open deur 1022 mm Minimumgrootte ventilatie‐ opening. Opening ge‐ plaatst aan de onderkant van de achterzijde 560x20 mm Lengte netvoedingskabel. Kabel wordt in de rechter‐ hoek van de achterzijde geplaatst 1500 mm Bevestigingsschroeven 4x25 mm 2.2 Elektrische aansluiting WAARSCHUWING! Gevaar voor brand en elektrische schokken. • • • 560 mm • 550 (550) mm • 594 mm Hoogte van de achterkant van het apparaat 576 mm Breedte van de voorkant van het apparaat 595 mm NEDERLANDS 559 mm 590 (600) mm Hoogte van de voorkant van het apparaat 26 Breedte van de achterkant van het apparaat • • Alle elektrische aansluitingen moeten door een gediplomeerd elektromonteur worden gemaakt. Dit apparaat moet worden aangesloten op een geaard stopcontact. Zorg ervoor dat de parameters op het vermogensplaatje overeenkomen met elektrische vermogen van de netstroom. Gebruik altijd een juist geïnstalleerd schokbestendig stopcontact. Gebruik geen adapters met meerdere stekkers en verlengkabels. Zorg dat u de netstekker en het netsnoer niet beschadigt. Indien de voedingskabel moet worden vervangen, dan moet dit gebeuren door onze Klantenservice. Laat de stroomkabel niet in aanraking komen met de deur van het apparaat of • • • • • • • de niche onder het apparaat, met name niet als deze werkt of als de deur heet is. De schokbescherming van delen onder stroom en geïsoleerde delen moet op zo'n manier worden bevestigd dat het niet zonder gereedschap kan worden verplaatst. Steek de stekker pas in het stopcontact als de installatie is voltooid. Zorg ervoor dat het netsnoer na installatie bereikbaar is. Als het stopcontact los zit, mag u de stekker niet in het stopcontact steken. Trek niet aan het netsnoer om het apparaat los te koppelen. Trek altijd aan de stekker. Gebruik enkel correcte isolatievoorzieningen: stroomonderbrekers, zekeringen (schroefzekeringen moeten uit de houder worden verwijderd), aardlekschakelaars en contactgevers. De elektrische installatie moet een isolatieapparaat bevatten waardoor het apparaat volledig van het lichtnet afgesloten kan worden. Het isolatieapparaat moet een contactopening hebben met een minimale breedte van 3 mm. Dit apparaat wordt geleverd met stekker en netsnoer. Kabeltypes die van toepassing zijn op de installatie of vervanging voor Europa: H07 RN-F, H05 RN-F, H05 RRF, H05 VV-F, H05 V2V2-F (T90), H05 BB-F Voor het deel van de kabel raadpleegt u het totale vermogen op het typeplaatje. U kunt ook de tabel raadplegen: 2.3 Gebruik WAARSCHUWING! Gevaar voor letsel, brandwonden, elektrische schokken of een explosie. • • • • • • • • • • • • Totaal vermogen (W) Doorsnede kabel (mm²) maximaal 1380 3 x 0.75 maximaal 2300 3x1 maximaal 3680 3 x 1.5 De aardkabel (groene/gele kabel) moet 2 cm langer zijn dan fase- en neutrale kabels (blauwe en bruine kabels). Dit apparaat is uitsluitend bestemd voor huishoudelijk gebruik. De specificatie van dit apparaat niet wijzigen. Zorg ervoor dat de ventilatieopeningen niet geblokkeerd zijn. Laat het apparaat tijdens het gebruik niet onbeheerd achter. Schakel het apparaat telkens na gebruik uit. Wees voorzichtig met het openen van de deur van het apparaat als het apparaat aan staat. Er kan hete lucht ontsnappen. Bedien het apparaat niet met natte handen of als het contact maakt met water. Oefen geen kracht uit op een geopende deur. Het apparaat mag niet worden gebruikt als werkblad of aanrecht. Open de deur van het apparaat voorzichtig. Als u alcoholische toevoegingen gebruikt, kan er alcoholluchtmengsel ontstaan. Houd vonken of open vlammen uit de buurt van het apparaat bij het openen van de deur. Plaats geen ontvlambare producten of items die vochtig zijn door ontvlambare producten in, bij of op het apparaat. WAARSCHUWING! Risico op schade aan het apparaat. • Om schade of verkleuring van het email te voorkomen: – zet geen kookgerei of andere voorwerpen direct op de bodem van het apparaat. – leg geen aluminiumfolie op de bodem van de ruimte in het apparaat. – plaats geen water direct in het hete apparaat. NEDERLANDS 27 • • • • • – haal vochthoudende schotels en eten uit het apparaat als u klaar bent met koken. – wees voorzichtig bij het verwijderen of bevestigen van accessoires. Verkleuring van het email of roestvrij staal is niet van invloed op de werking van het apparaat. Gebruik een diepe pan voor vochtige taarten. Fruitsappen kunnen permanente vlekken maken. Dit apparaat is uitsluitend bestemd om mee te koken. Het mag niet worden gebruikt voor andere doeleinden, zoals het verwarmen van een kamer. Alle bereidingen moeten worden uitgevoerd met gesloten ovendeur. Als het apparaat achter een meubelpaneel gemonteerd is (bijv. een deur), zorg er dan voor dat de deur nooit gesloten is als het apparaat in werking is. Warmte en vocht kunnen achter een gesloten meubelpaneel ophopen en schade aan het apparaat, de behuizing of de vloer veroorzaken. Sluit het meubelpaneel niet tot het apparaat compleet is afgekoeld na gebruik. 2.4 Onderhoud en reiniging WAARSCHUWING! Gevaar voor letsel, brand en schade aan het apparaat. • • • • • • 28 Schakel het apparaat uit en trek de stekker uit het stopcontact voordat u onderhoudshandelingen verricht. Zorg ervoor dat het apparaat is afgekoeld. Er bestaat een risico dat de glasplaten kunnen breken. Vervang direct de glazen deurpanelen als deze beschadigd zijn. Neem contact op met een erkend servicecentrum. Wees voorzichtig als u de deur van het apparaat verwijdert. De deur is zwaar! Reinig het apparaat regelmatig om te voorkomen dat het materiaal van het oppervlak achteruitgaat. Maak het apparaat schoon met een vochtige zachte doek. Gebruik alleen NEDERLANDS • neutrale schoonmaakmiddelen. Gebruik geen schuurmiddelen, schuursponsjes, oplosmiddelen of metalen voorwerpen. Volg als u een ovenspray gebruikt de aanwijzingen op de verpakking. 2.5 Binnenverlichting WAARSCHUWING! Gevaar voor elektrische schokken. • • Met betrekking tot de lamp(en) in dit product en reservelampen die afzonderlijk worden verkocht: Deze lampen zijn bedoeld om bestand te zijn tegen extreme fysieke omstandigheden in huishoudelijke apparaten, zoals temperatuur, trillingen, vochtigheid, of zijn bedoeld om informatie te geven over de operationele status van het apparaat. Ze zijn niet bedoeld voor gebruik in andere toepassingen en zijn niet geschikt voor verlichting in huishoudelijke ruimten. Gebruik alleen lampjes met dezelfde specificaties. 2.6 Service • • Neem contact op met de erkende servicedienst voor reparatie van het apparaat. Gebruik uitsluitend originele reserveonderdelen. 2.7 Afvalverwerking WAARSCHUWING! Gevaar voor letsel of verstikking. • • • Haal de stekker uit het stopcontact. Snijd het netsnoer vlak bij het apparaat af en gooi het weg. Verwijder de deurvergrendeling om te voorkomen dat kinderen of huisdieren binnen in het apparaat vast komen te zitten. 3. MONTAGE 3.1 Inbouwen WAARSCHUWING! Raadpleeg de hoofdstukken Veiligheid. (*mm) 548 21 min. 550 80 60 520 600 114 18 20 589 594 min. 560 595+-1 60 5 198 3 523 20 (*mm) 70 60 548 min. 550 20 520 18 590 21 114 min. 560 589 594 198 60 595+-1 5 3 523 20 NEDERLANDS 29 3.2 Bevestiging van de oven aan de kast 4. BESCHRIJVING VAN HET PRODUCT 4.1 Algemeen overzicht 1 2 3 4 5 6 7 12 5 4 3 2 1 8 9 10 11 4.2 Accessoires • Bakrooster Voor kookgerei, bak- en braadvormen. 5. VOOR HET EERSTE GEBRUIK WAARSCHUWING! Raadpleeg de hoofdstukken Veiligheid. 30 NEDERLANDS 1 2 3 4 5 6 7 8 9 10 11 12 • Bedieningspaneel Stroomlampje/symbool Knop voor verwarmingsfuncties Knop voor de timer Bedieningsknop (voor de temperatuur) Temperatuurindicator/symbool Verwarmingselement Lamp Ventilator Bak voor reiniging met water Verwijderbare inschuifrail Roosterhoogtes Bakplaat Voor gebak en koekjes. 5.1 Voorafgaand aan het eerste gebruik De oven kan een vreemde geur en rook afgeven tijdens het voorverwarmen. Zorg ervoor dat de kamer goed is geventileerd. 1. 2. Stap 1 Stap 2 De oven reinigen Verwarm de lege oven voor Haal alle accessoires en verwijderbare inschuifrails 1. uit de oven. Reinig de oven en de accessoires met een zachte doek, warm water en een mild reinigingsmiddel. 2. Stel de maximale temperatuur in voor de functie: . Tijd: 1 uur Stel de maximale temperatuur in voor de functie: . Tijd: 15 min Schakel de oven uit en wacht tot deze is afgekoeld. Plaats de accessoires en de verwijderbare inschuifrails in de oven. 6. DAGELIJKS GEBRUIK WAARSCHUWING! Raadpleeg de hoofdstukken Veiligheid. Verwar‐ mingsfunc‐ tie 6.1 Instellen: Verwarmingsfunctie Stap 1 Draai aan de knop voor de verwar‐ mingsfuncties om een verwarmings‐ functie te selecteren. Stap 2 Draai aan de regelknop om de tempe‐ ratuur te selecteren. Stap 3 Draai wanneer het bereiden stopt aan de knoppen naar de uit-stand om de oven uit te schakelen. Om de lamp in te schakelen. Binnenverlich‐ ting Warmelucht (vochtig) 6.2 Verwarmingsfuncties Verwar‐ mingsfunc‐ tie Toepassing Toepassing Warme lucht De oven is uitgeschakeld. Uit-stand Turbo grill Deze functie is ontworpen om tij‐ dens de bereiding energie te bespa‐ ren. Bij het gebruik van deze functie kan de temperatuur in de ruimte verschillen van de ingestelde tem‐ peratuur. Het verwarmingsvermo‐ gen kan worden verminderd. Raad‐ pleeg voor meer informatie het hoofdstuk "Dagelijks gebruik", op‐ merkingen op: Warmelucht (voch‐ tig) . Voor het braden of bakken van ge‐ rechten waarvoor dezelfde berei‐ dingstemperatuur nodig is, op meer‐ dere roosterhoogten, zonder dat er smaken worden overgebracht van het ene naar het andere gerecht. Voor het braden van grotere stuk‐ ken vlees of gevogelte met botten op één niveau. Voor gratineren en bruinen. NEDERLANDS 31 Toepassing 6.3 Toelichting van: Warmelucht (vochtig) Voor het bakken van taarten met een knapperige bodem en het in‐ maken van voedsel. Deze functie wordt gebruikt om te voldoen aan de energie-efficiëntieklasse en ecodesign-vereisten overeenkomstig EU 65/2014 en EU 66/2014. Testen volgens EN 60350-1. Pizza-functie Voor het bakken van pizza. Voor in‐ tensieve bruining en een knapperi‐ ge bodem. Stel de temperatuur in op 230 °C. De ovendeur dient tijdens de bereiding gesloten te zijn zodat de functie niet wordt onderbroken en de oven werkt op de hoogst mogelijke energie-efficiëntie. Ontdooien Om voedsel te ontdooien (groenten en fruit). De ontdooitijd hangt af van de hoeveelheid en dikte van het voedsel. Verwar‐ mingsfunc‐ tie Onderwarmte Voor het bakken en braden op één rekstand. Zie het hoofdstuk "Onderhoud en Boven- /onder‐ reiniging" voor meer informatie warmte / Reini‐ over: Aqua Clean. gen met water Bij gebruik van deze functie gaat de verlichting automatisch uit. Zie het hoofdstuk 'Hints and tips’, Warmelucht (vochtig) voor bereidingsinstructies. Zie voor algemene aanbevelingen voor energiebesparing het hoofdstuk ‘Energie-efficiëntie’, Energiebesparing. 7. KLOKFUNCTIES 7.1 Hoe instellen: Einde bereiding Hier stelt u de tijd in voor het uitschakelen van de ovenfuncties. Stap 1 Selecteer de ovenfunctie en de temperatuur. Stap 2 Draai de knop van de timer naar zijn volledige bereik. Stap 3 Draai de knop van de timer om de uitschakeltijd in te stellen. Wanneer de ingestelde tijd eindigt, klinkt er een geluidssignaal en schakelt de oven uit. Stap 4 Draai de knop voor de ovenfuncties en de temperatuurknop naar de uit-stand. 8. GEBRUIK VAN DE ACCESSOIRES WAARSCHUWING! Raadpleeg de hoofdstukken Veiligheid. 8.1 Accessoires plaatsen Een kleine inkeping bovenaan verhoogt de veiligheid. Deze inkepingen voorkomen 32 NEDERLANDS bovendien omkanteling. De hoge rand rond het rooster voorkomt dat het kookgerei van het rooster afglijdt. Bakrooster: Plaats het rooster tussen de geleidestangen van de inschuifrailen zorg ervoor dat de pootjes om‐ laag wijzen. Bakplaat: Schuif de plaat tussen de geleidestangen van de inschuifrail. Bakrooster, Bakplaat: Plaats de plaat tussen de geleiders van de in‐ schuifrails en het bakrooster op de geleiders erbo‐ ven. 9. EXTRA FUNCTIES 9.1 Koelventilator Als de oven in werking is, wordt de koelventilator automatisch ingeschakeld om de oppervlakken van de oven koel te houden. Als u de oven uitschakelt, kan de koelventilator blijven werken totdat de oven is afgekoeld. oververhitting veroorzaken. Om dit te voorkomen is de oven voorzien van een veiligheidsthermostaat die de stroomtoevoer onderbreekt. Zodra de temperatuur is gedaald, wordt de oven automatisch weer ingeschakeld. 9.2 Veiligheidsthermostaat Een onjuiste bediening van de oven of defecte componenten kunnen gevaarlijke NEDERLANDS 33 10. AANWIJZINGEN EN TIPS Voor de bereiding van gebak De ovendeur mag pas worden geopend als driekwart van de baktijd is verstreken. Raadpleeg de hoofdstukken Veiligheid. Als u twee bakplaten tegelijkertijd gebruikt, dient u één niveau ertussen leeg te laten. 10.1 Kookadviezen De oven heeft vijf rekniveaus. Tel de rekniveaus vanaf de bodem van de oven. Uw oven kan anders bakken of roosteren dan de oven die u tot nu toe gebruikt heeft. In de onderstaande tabel vindt u de standaardinstellingen voor temperatuur, kooktijd en roosterniveau. Als u voor een speciaal recept de instelling niet kunt vinden, zoek dan naar een soortgelijk recept. De oven heeft een speciaal systeem dat de lucht circuleert en voor doorlopende recycling van stoom zorgt. Dankzij dit systeem is het mogelijk om voedsel te bereiden in een atmosfeer met stoom en worden de gerechten zacht van binnen en knapperig van buiten. Dit reduceert zowel de bereidingstijd als het energieverbruik. Voor de bereiding van vlees en vis Laat het vlees ongeveer 15 minuten rusten voordat u het aansnijdt, zodat het vleessap er niet uit stroomt. Om te veel rook tijdens het braden in de oven te vermijden, kunt u een beetje water in de lekbak gieten. Om rook te vermijden, voegt u water toe wanneer het is opgedroogd. Bereidingstijden De bereidingsduur is afhankelijk van het soort voedsel, de samenstelling en het volume. Houd in eerste instantie het bereidingsproces in de gaten. Zoek bij het gebruik van dit apparaat de beste instellingen (temperatuur, bereidingsduur, etc.) voor uw kookgerei, recepten en hoeveelheden. 10.2 Bakken en braden Boven- /onderwarmte Warme lucht CA‐ KES (min) (°C) (°C) Recepten met klopper 170 2 160 3 45 - 60 Cakevorm Zandkoekjesdeeg 170 2 160 3 20 - 30 Cakevorm Kwarktaart met karnemelk 170 1 160 1 70 - 80 Cakevorm, Ø 26 cm Strudel 175 3 150 2 60 - 80 Bakplaat Jamtaart 170 2 165 2 30 - 40 Bakplaat Kerstkrans, ver‐ warm de oven voor 160 2 150 2 90 - 120 Cakevorm, Ø 20 cm Pruimentaart, ver‐ 175 warm de oven voor 1 160 2 50 - 60 Broodvorm 34 NEDERLANDS Boven- /onderwarmte Warme lucht KES CA‐ (min) (°C) (°C) Koekjes 140 3 140 - 150 3 30 - 35 Bakplaat Koekjes, twee ni‐ veaus - - 140 - 150 2 en 4 35 - 40 Bakplaat Koekjes, drie ni‐ veaus 120 3 120 3 80 - 100 Bakplaat Schuimgebakjes 190 3 180 3 15 - 20 Bakplaat Broodjes, ver‐ warm de oven voor 190 3 170 3 25 - 35 Bakplaat Eclairs, een ni‐ veau 180 2 170 2 45 - 70 Bakplaat Eclairs, twee ni‐ veaus 160 1 150 2 110 - 120 Bakplaat Taartjes 170 1 160 1 50 - 60 Bakplaat Rijke vruchtenca‐ ke 190 3 190 3 12 - 20 Bakplaat Victoriataart met jamvulling 190 3 170 3 25 - 35 Bakplaat Verwarm de lege oven voor. Boven- /onderwarmte Warme lucht BROOD EN PIZZA (min) (°C) Witbrood, 1 - 2 stuks; 0,5 kg per stuk (°C) 190 1 190 1 60 - 70 - Roggebrood, 190 voorverwarming is niet nodig 1 180 1 30 - 45 Broodvorm Broodjes, 6 - 8 broodjes 230 - 250 1 230 - 250 1 10 - 20 Bakplaat Pizza 200 3 190 3 10 - 20 Bakplaat / Braad‐ pan Scones 200 3 190 3 10 - 20 Bakplaat Verwarm de lege oven voor. Gebruik de taartvorm. NEDERLANDS 35 Boven- /onderwarmte Warme lucht VLAAIEN (min) (°C) (°C) Pastataart, voorver‐ warming is niet nodig 200 2 180 2 40 - 50 Hartige groentetaart, voorverwarming is niet nodig 200 2 175 2 45 - 60 Quiches 180 1 180 1 50 - 60 Lasagne 180 - 190 2 180 - 190 2 25 - 40 Cannelloni 180 - 190 2 180 - 190 2 25 - 40 Gebruik het ovenrek. Boven- /onderwarmte Warme lucht VLEES (min) (°C) (°C) Rundvlees 200 2 190 2 50 - 70 Varkensvlees 180 2 180 2 90 - 120 Kalfsvlees 190 2 175 2 90 - 120 Engelse rosbief, rood 210 2 200 2 50 - 60 Engelse rosbief, medi‐ um 210 2 200 2 60 - 70 Engelse biefstuk, bien cuit 210 2 200 2 70 - 75 Boven- /onderwarmte Warme lucht VLEES (min) (°C) (°C) Varkensbraadstuk, met zwoerd 180 2 170 2 120 - 150 Varkensschenkel, 2 stuks 180 2 160 2 100 - 120 Lamsbout 190 2 175 2 110 - 130 Hele kip 220 2 200 2 70 - 85 Hele kalkoen 180 2 160 2 210 - 240 Hele eend 175 2 220 2 120 - 150 Hele gans 175 2 160 1 150 - 200 36 NEDERLANDS Boven- /onderwarmte Warme lucht VLEES (min) (°C) (°C) Konijn, in stukken ge‐ sneden 190 2 175 2 60 - 80 Haas, in stukken ge‐ sneden 190 2 175 2 150 - 200 Hele fazant 190 2 175 2 90 - 120 Boven- /onderwarmte Warme lucht VIS (min) (°C) (°C) Forel / Zeebrasem, 3 - 4 vissen 190 2 175 2 40 - 55 Tonijn / Zalm, 4 - 6 filets 190 2 175 2 35 - 60 10.3 Turbo grill Verwarm de lege oven voor. Gebruik de eerste of tweede rekstand. Om de baktijd te berekenen vermenigvuldigt u de tijd die in de onderstaande tabel wordt gegeven met de centimeters van de dikte van de filet. RUNDVLEES VARKENS‐ VLEES Gehaktbrood, 0,75 - 1 kg (°C) (min) 190 - 200 5-6 KALFS‐ VLEES Rosbief of ossenhaas, medium 180 - 190 6-8 Rosbief of ossenhaas, gaar 170 - 180 8 - 10 (min) Schouder / Nek / Ham‐ lap, 1 - 1,5 kg 160 - 180 90 - 120 Karbonade / Spare ribs, 1 - 1,5 kg 170 - 180 60 - 90 160 - 170 50 - 60 90 - 120 (°C) (min) Geroosterd kalfsvlees, 1 kg 160 - 180 90 - 120 Kalfsschenkel, 1,5 - 2 kg 160 - 180 120 - 150 (°C) (min) LAMSVLEES (°C) (min) Varkensschenkel, voor‐ 150 - 170 gekookt, 0,75 - 1 kg Rosbief of ossenhaas, rood VARKENS‐ VLEES (°C) Lamsbout / Geroosterd 150 - 170 lamsvlees, 1 - 1,5 kg 100 - 120 Lamsrugfilet, 1 - 1,5 kg 160 - 180 40 - 60 NEDERLANDS 37 GEVOGELTE (°C) (min) Gevogelte, porties, 0,2 - 0,25 kg elk 200 - 220 30 - 50 Halve kip, 0,4 - 0,5 kg elk 190 - 210 35 - 50 Kip, haantje, 1 - 1,5 kg 190 - 210 50 - 70 Eend, 1,5 - 2 kg 180 - 200 80 - 100 Gans, 3,5 - 5 kg 160 - 180 120 - 180 GEVOGELTE (°C) (min) Kalkoen, 2,5 - 3,5 kg 160 - 180 120 - 150 Kalkoen, 4 - 6 kg 140 - 160 150 - 240 VIS (GE‐ STOOMD) (°C) (min) Hele vis, 1 - 1,5 kg 210 - 220 40 - 60 10.4 Ontdooien (kg) Ontdooitijd (min.) Nadooitijd (min) Kip 1 100 - 140 20 - 30 Leg de kip op een omge‐ keerde onderschotel in een groot bord. Halverwe‐ ge de bereidingstijd om‐ draaien. Vlees 1 100 - 140 20 - 30 0,5 90 - 120 Halverwege de bereidings‐ tijd omdraaien. Room 2 x 0,2 80 - 100 10 - 15 Room kan ook met nog licht bevroren deeltjes goed worden geklopt. Forel 0,15 25 - 35 10 - 15 - Aardbeien 0,3 30 - 40 10 - 20 - Boter 0,25 30 - 40 10 - 15 - Taart 1,4 60 60 - 10.5 Dehydrateren - Warme lucht Bedek de bakplaten met vetbestendig papier of bakpapier. GROENTEN (°C) (u) Bonen 60 - 70 6-8 Paprika’s 60 - 70 5-6 Gebruik de derde rekstand voor 1 bakplaat. Soepgroenten 60 - 70 5-6 Gebruik de eerste en de vierde rekstand voor 2 bakplaten. Champignons 50 - 60 6-8 Kruiden 40 - 50 2-3 Voor een beter resultaat, stop de oven halverwege de droogtijd, open de deur en laat het een nacht afkoelen om het drogen af te ronden. Stel de temperatuur in op 60 - 70 °C. 38 NEDERLANDS FRUIT FRUIT (u) (u) Pruimen 8 - 10 Schijfjes appel 6-8 Abrikozen 8 - 10 Peren 6-9 10.6 Warmelucht (vochtig) - aanbevolen accessoires Gebruik de donkere en niet-reflecterende bakjes en schalen. Ze nemen de warmte beter op dan licht en reflecterend servies. Ovenschaaltjes Pizza pan Ovenschotel Donker, niet-reflecterend Diameter van 28 cm Donker, niet-reflecterend Diameter van 26 cm Keramiek 8 cm diameter, 5 cm hoog Blik voor flanbodem Donker, niet-reflecterend Diameter van 28 cm 10.7 Warmelucht (vochtig) Volg voor de beste resultaten de volgende aanwijzingen op die hieronder in de tabel staan. (°C) (min) Zoete broodjes, 12 stuks bakplaat of lekschaal 175 3 40 - 50 Broodjes, 9 stuks bakplaat of lekschaal 180 2 35 - 45 Pizza, bevroren, 0,35 kg rooster 180 2 45 - 55 Koninginnenbrood (opgerolde cake met jam) bakplaat of lekschaal 170 2 30 - 40 Brownie bakplaat of lekschaal 170 2 45 - 50 Soufflé, 6 stuks keramieken vormpjes op roos‐ ter 190 3 45 - 55 Luchtige vlaaibodem flanvorm op rooster 180 2 35 - 45 Victoriataart met jam‐ vulling ovenschaal op rooster 170 2 35 - 50 Gepocheerde vis, 0,3 kg bakplaat of lekschaal 180 2 35 - 45 NEDERLANDS 39 (°C) (min) Hele vis, 0,2 kg bakplaat of lekschaal 180 3 25 - 35 Visfilet, 0,3 kg pizzavorm op rooster 170 3 30 - 40 Gepocheerd vlees, 0,25 kg bakplaat of lekschaal 180 3 35 - 45 Sjasliek, 0,5 kg bakplaat of lekschaal 180 3 40 - 50 Koekjes, 16 stuks bakplaat of lekschaal 150 2 30 - 45 Makarons, 20 stuks bakplaat of lekschaal 180 2 45 - 55 Muffins, 12 stuks bakplaat of lekschaal 170 2 30 - 40 Hartig gebak, 16 stuks bakplaat of lekschaal 170 2 35 - 45 Zandkoekjes, 20 stuks bakplaat of lekschaal 150 2 40 - 50 Taartjes, 8 stuks bakplaat of lekschaal 170 2 30 - 40 Groenten, gepo‐ cheerd, 0,4 kg bakplaat of lekschaal 180 2 35 - 45 Vegetarisch omelet pizzavorm op rooster 180 3 35 - 45 Mediterrane groen‐ ten, 0,7 kg bakplaat of lekschaal 180 4 35 - 45 10.8 Aanwijzingen voor testinstituten Testen volgens IEC 60350-1. (°C) (min) Kleine ca‐ kes, 20 stuks per bakplaat Boven- /onder‐ warmte Bakplaat 3 170 20 - 30 - Kleine ca‐ kes, 20 stuks per bakplaat Warme lucht Bakplaat 3 150 160 20 - 35 - Kleine ca‐ kes, 20 stuks per bakplaat Warme lucht Bakplaat 2 en 4 150 160 20 - 35 - 40 NEDERLANDS (°C) (min) Appeltaart, 2 blikken Ø20 cm Boven- /onder‐ warmte Bakrooster 2 180 70 - 90 - Appeltaart, 2 blikken Ø20 cm Warme lucht Bakrooster 2 160 70 - 90 - Biscuitge‐ bak, taart‐ vorm Ø26 cm Boven- /onder‐ warmte Bakrooster 2 170 40 - 50 Verwarm de oven 10 minuten voor. Biscuitge‐ bak, taart‐ vorm Ø26 cm Warme lucht Bakrooster 2 160 40 - 50 Verwarm de oven 10 minuten voor. Biscuitge‐ bak, taart‐ vorm Ø26 cm Warme lucht Bakrooster 2 en 4 160 40 - 60 Verwarm de oven 10 minuten voor. Zandtaart‐ deeg Warme lucht Bakplaat 3 140 150 20 - 40 - Zandtaart‐ deeg Warme lucht Bakplaat 2 en 4 140 150 25 - 45 - Zandtaart‐ deeg Boven- /onder‐ warmte Bakplaat 3 140 150 25 - 45 - Geroosterd brood, 4 - 6 stuks Grill Bakrooster 4 max. 2 - 3 minuten eer‐ ste kant; 2 - 3 mi‐ nuten tweede kant Verwarm de oven 3 minuten voor. Runderbur‐ Grill ger, 6 stuks, 0,6 kg Rooster en lekbak 4 max. 20 - 30 Plaats het rooster op het vierde niveau en de lekbak op het derde niveau in de oven. Draai het voedsel hal‐ verwege de berei‐ dingstijd om. Verwarm de oven 3 minuten voor. 11. ONDERHOUD EN REINIGING WAARSCHUWING! Raadpleeg de hoofdstukken Veiligheid. NEDERLANDS 41 11.1 Opmerkingen over schoonmaken Maak de voorkant van de oven schoon met een zachte doek, warm water en een mild reini‐ gingsmiddel. Reinig en controleer de deurpakking rond het frame van de uitsparing. Gebruik een reinigingsoplossing om metalen oppervlakken te reinigen. Reinigingsmid‐ delen Reinig vlekken met een mild reinigingsmiddel. Reinig de uitsparing telkens na gebruik. Vetophoping of andere resten kunnen brand veroor‐ zaken. Vocht kan in de oven of op de glazen deurpanelen condenseren. Om de condens te vermin‐ deren, dient u de oven 10 minuten te laten werken voordat u er iets in plaatst. Bewaar het voedsel niet langer dan 20 minuten in de oven. Droog de uitsparing na elk gebruik met een Dagelijks gebruik zachte doek. Reinig alle accessoires na elk gebruik en laat ze drogen. Gebruik een zachte doek met warm water en een mild reinigingsmiddel. De accessoires niet in de afwasmachine reinigen. Reinig de antiaanbakaccessoires niet met agressieve reinigingsmiddelen of scherpe voor‐ werpen. Accessoires 11.2 Hoe te verwijderen: Inschuifrails/ Verwijder de inschuifrails om de oven te reinigen. Stap 1 Schakel de oven uit en wacht tot deze afgekoeld is. Stap 2 Trek de inschuifrail bij de voorkant uit de zijwand. Stap 3 Trek de inschuifrail bij de achterkant uit de zijwand en verwijder deze. Stap 4 Installeer de inschuifrails in de omge‐ keerde volgorde. 11.3 Ga als volgt te werk voor gebruik: Reinigen met water Deze reinigingsprocedure maakt gebruik van vocht om achtergebleven vet en voedselresten uit de oven te verwijderen. 42 NEDERLANDS 1 Stap 1 Stap 2 2 Giet water in de uitsparing van de ovenruimte: 300 ml. Stel de functie in: . Stap 3 Stel de temperatuur in op 90 °C. Stap 4 Laat de oven 30 minuten werken. Stap 5 Schakel de oven uit. Stap 6 Wacht tot de oven afgekoeld is. Maak de holte droog met een zachte doek. 11.4 Hoe te verwijderen en installeren: Deur De ovendeur beschikt over twee glasplaten. U kunt de ovendeur en de interne glasplaat verwijderen om ze schoon te maken. Lees de volledige instructie 'Verwijderen van installatiedeur' voordat u de glasplaten verwijdert. LET OP! Gebruik de oven nooit zonder de glasplaten. Stap 1 Open de deur volledig en houd beide schar‐ nieren vast. Stap 2 Til de hendel op beide scharnieren volledig omhoog en draai het. Stap 3 Sluit de ovendeur halverwege tot de eerste openingsstand. Til hem daarna op en trek hem naar voren en verwijder hem van zijn plek. Stap 4 Leg de deur op een zachte doek op een sta‐ biele ondergrond. Stap 5 Deurafdekking (B) aan de bovenkant van de deur aan beide kanten vastpakken en naar binnen drukken om de klemsluiting te ont‐ grendelen. Stap 6 Trek de deurlijst naar voren om hem te ver‐ wijderen. Stap 7 Houd de glasplaat van de deur bij de boven‐ kant vast en trek deze voorzichtig naar bui‐ ten. Zorg dat het glas volledig uit de gelei‐ ders schuift. 2 B 1 NEDERLANDS 43 Stap 8 Reinig de glasplaten met een sopje. Droog de glasplaten voorzichtig af. Reinig de glas‐ platen niet in de vaatwasser. Stap 9 Installeer na het reinigen de glasplaat en de ovendeur. De bedrukte zone moet naar de binnenkant van de deur gericht zijn. Zorg ervoor dat het oppervlak van de glasplaat op de bedrukte zijde na de installatie niet ruw aanvoelt. Als de deur correct wordt geïnstalleerd, klikt de rand van de deur. Zorg ervoor dat u de interne glasplaat correct in de uitsparingen plaatst. 11.5 Hoe te vervangen: Lamp WAARSCHUWING! Gevaar voor elektrische schokken. Het lampje kan heet zijn. A Houd de halogeenlamp altijd met een doek vast om te voorkomen dat er vetrestjes op de ovenlamp verbranden. Voordat u de lamp vervangt: Stap 1 Stap 2 Stap 3 Schakel de oven uit. Wacht tot de oven afgekoeld is. Trek de oven uit het stopcontact. Plaats een doek op de bodem van de holte. Achterlamp Stap 1 Draai de glazen afdekking om die te verwijderen. Stap 2 Reinig het glazen deksel. Stap 3 Vervang de lamp door een geschikte hittebestendige lamp van 300 °C. Stap 4 Installeer het glazen deksel. 12. PROBLEEMOPLOSSING WAARSCHUWING! Raadpleeg de hoofdstukken Veiligheid. 44 NEDERLANDS 12.1 Wat te doen in de volgende gevallen... Neem in alle gevallen die niet in deze tabel zijn opgenomen contact op met een erkend servicecentrum. Probleem Controleer of de vol‐ gende zaken gel‐ den... De oven wordt niet warm. De zekering is doorgesla‐ gen. De deurpakking is be‐ schadigd. Gebruik de oven niet. Neem contact op met een erkend servicecen‐ trum. Einde van het koken - is niet ingesteld. Instellen: Einde van het koken. Zie 'Klokfuncties'. Probleem Controleer of de vol‐ gende zaken gel‐ den... De lamp werkt niet. De lamp is opgebrand. 12.2 Onderhoudsgegevens Als u niet zelf het probleem kunt verhelpen, neem dan contact op met uw verkoper ofeen erkende serviceafdeling. De contactgegevens van het servicecentrum staan op het typeplaatje. Het typeplaatje bevindt zich aan de voorkant van de binnenkant van de oven. Verwijder het typeplaatje niet uit de ovenruimte. Wij adviseren u om de gegevens hier te noteren: Model (MOD.) ......................................... Productnummer (PNC) ......................................... Serienummer (S.N.) ......................................... 13. ENERGIEZUINIGHEID 13.1 Productinformatie- en productinformatieblad* Naam leverancier Zanussi Modelidentificatie ZOHKF1X1 949496249 ZOHNF1K1 949496304 ZOHNF1W1 949496305 Energie-efficiëntie-index 81.2 Energie-efficiëntieklasse A+ Energieverbruik bij een standaardbelasting, stand boven + onder‐ warmte 0.93 kWh/cyclus Energieverbruik bij een standaardbelasting, stand hetelucht 0.69 kWh/cyclus Aantal ruimten 1 Warmtebron Elektriciteit Volume 72 l Soort oven Inbouwoven Massa ZOHKF1X1 26.7 kg ZOHNF1K1 26.7 kg ZOHNF1W1 26.7 kg NEDERLANDS 45 * Voor de Europese Unie overeenkomstig EU-verordeningen 65/2014 en 66/2014. Voor de Republiek Belarus overeenkomstig STB 2478-2017, aanhangsel G; STB 2477-2017, bijlagen A en B. Voor Oekraïne overeenkomstig 568/32020. De energie-efficiëntieklasse is niet van toepassing op Rusland. EN 60350-1 - Elektrische huishoudelijke kookapparaten - Deel 1: Range-ovens, ovens, stoomovens en grills Methoden voor prestatiemeting. 13.2 Energiebesparing Deze oven bevat functies die u helpen energie te besparen tijdens het dagelijks koken. Zorg ervoor dat de ovendeur gesloten is als u de oven in werking stelt. Open de ovendeur niet te vaak tijdens gebruik. Houd het deurrubber schoon en zorg ervoor dat het goed op zijn plaats vastzit. Gebruik metalen kookgerei om meer energie te besparen. Verwarm de oven indien mogelijk niet voor het koken voor. Houd de onderbrekingen tussen het bakken zo kort mogelijk als u een aantal gerechten tegelijkertijd bereidt. Restwarmte Wanneer de kookduur langer is dan 30 minuten, verlaag dan de oventemperatuur tot minimaal 3-10 minuten voor het einde van het koken. De restwarmte in de oven zorgt ervoor dat het gerecht wordt voltooid. U kunt de restwarmte gebruiken om andere maaltijden op te warmen. Eten warm houden Kies de laagst mogelijke temperatuurinstelling om de restwarmte te gebruiken en een maaltijd warm te houden. Warmelucht (vochtig) Functie is ontworpen om tijdens de bereiding energie te besparen. Als u deze functie gebruikt is de verlichting uit. Bereiding met hete lucht Gebruik indien mogelijk de bereidingsfuncties met hete lucht om energie te besparen. 14. MILIEUBESCHERMING Recycleer de materialen met het symbool Gooi apparaten gemarkeerd met het symbool . Gooi de verpakking in een geschikte afvalcontainer om het te recycleren. Bescherm het milieu en de volksgezondheid en recycleer op een correcte manier het afval van elektrische en elektronische apparaten. niet weg met het huishoudelijk afval. Breng het product naar het milieustation bij u in de buurt of neem contact op met de gemeente. 46 NEDERLANDS VISITEZ NOTRE SITE WEB POUR : Obtenir des conseils d’utilisation, des brochures, un dépanneur, des informations sur le service et les réparations : www.zanussi.com/support Sous réserve de modifications. TABLE DES MATIÈRES 1. INFORMATION SUR LA SÉCURITÉ............................................................................ 47 2. CONSIGNES DE SÉCURITÉ........................................................................................49 3. INSTALLATION.............................................................................................................52 4. DESCRIPTION DE L'APPAREIL.................................................................................. 53 5. AVANT LA PREMIÈRE UTILISATION.......................................................................... 53 6. UTILISATION QUOTIDIENNE...................................................................................... 54 7. FONCTIONS DE L'HORLOGE..................................................................................... 55 8. UTILISATION DES ACCESSOIRES.............................................................................55 9. FONCTIONS SUPPLÉMENTAIRES............................................................................. 56 10. CONSEILS ET ASTUCES...........................................................................................57 11. ENTRETIEN ET NETTOYAGE................................................................................... 65 12. DÉPANNAGE..............................................................................................................68 13. RENDEMENT ÉNERGÉTIQUE.................................................................................. 69 1. INFORMATION SUR LA SÉCURITÉ Avant d'installer et d'utiliser cet appareil, lisez soigneusement les instructions fournies. Le fabricant ne pourra être tenu pour responsable des blessures et dégâts résultant d'une mauvaise installation ou utilisation. Conservez toujours les instructions dans un lieu sûr et accessible pour vous y référer ultérieurement. 1.1 Sécurité des enfants et des personnes vulnérables • Cet appareil peut être utilisé par des enfants âgés d'au moins 8 ans et par des personnes ayant des capacités physiques, sensorielles ou mentales réduites ou dénuées d’expérience ou de connaissance, s'ils sont correctement surveillés ou si des instructions relatives à l'utilisation de l'appareil en toute sécurité leur ont été données et s’ils comprennent les risques encourus. Les enfants de moins de 8 ans et les personnes ayant un handicap très important FRANÇAIS 47 • • • • • et complexe doivent être tenus à l'écart de l’appareil, à moins d'être surveillés en permanence. Ne laissez pas les enfants jouer avec l'appareil. Ne laissez pas les emballages à la portée des enfants et jetez-les convenablement. AVERTISSEMENT : Tenez les enfants et les animaux éloignés de l'appareil lorsqu'il est en cours de fonctionnement ou lorsqu'il refroidit. Les parties accessibles deviennent chaudes en cours d'utilisation. Si l'appareil est équipé d'un dispositif de sécurité enfants, nous vous recommandons de l'activer. Le nettoyage et l'entretien ne doivent pas être effectués par des enfants sans surveillance. 1.2 Consignes générales de sécurité • • • • • • • • • 48 L'appareil doit être installé et le câble remplacé uniquement par un professionnel qualifié. AVERTISSEMENT : L'appareil et ses parties accessibles deviennent chauds pendant son fonctionnement. Veillez à ne pas toucher les éléments chauffants. Utilisez toujours des gants de cuisine pour retirer ou enfourner des accessoires ou des plats allant au four. Avant d'effectuer une opération de maintenance, débranchez l'appareil de la prise secteur. AVERTISSEMENT : Assurez-vous que l'appareil est éteint et débranché avant de remplacer l'éclairage afin d'éviter tout risque de choc électrique. N'utilisez pas l'appareil avant de l'avoir installé dans la structure encastrée. N'utilisez pas de nettoyeur vapeur pour nettoyer l'appareil. N'utilisez pas de produits abrasifs ni de racloirs pointus en métal pour nettoyer la porte en verre car ils peuvent rayer sa surface, ce qui peut briser le verre. Si le câble d'alimentation est endommagé, il doit être remplacé par le fabricant, un service de maintenance agréé ou un technicien qualifié afin d'éviter tout danger lié à l'électricité. FRANÇAIS • Pour retirer les supports de grille, tirez d'abord sur l'avant de ceux-ci, puis sur l'arrière, pour les écarter des parois extérieures. Réinstallez les supports de grille en répétant cette procédure dans l'ordre inverse. 2. CONSIGNES DE SÉCURITÉ 2.1 Installation AVERTISSEMENT! L'appareil doit être installé uniquement par un professionnel qualifié. • • • • • • • • • Retirez l'intégralité de l'emballage. N'installez pas et ne branchez pas un appareil endommagé. Suivez scrupuleusement les instructions d'installation fournies avec l'appareil. Soyez toujours vigilants lorsque vous déplacez l'appareil car il est lourd. Utilisez toujours des gants de sécurité et des chaussures fermées. Ne tirez jamais l'appareil par la poignée. Installez l'appareil dans un lieu sûr et adapté répondant aux exigences d'installation. Respectez l'espacement minimal requis par rapport aux autres appareils et éléments. Avant de monter l’appareil, vérifiez si la porte du four s’ouvre sans retenue. Cet appareil est équipé d'un système de refroidissement électrique. Il doit être utilisé lorsque l'appareil est raccordé à une prise secteur. Hauteur minimale du meu‐ ble (Hauteur minimale du meuble sous le plan de tra‐ vail) Largeur du meuble Profondeur du meuble 590 (600) mm 560 mm 550 (550) mm Hauteur de l’avant de l’ap‐ pareil 594 mm Hauteur de l’arrière de l’ap‐ pareil 576 mm Largeur de l’avant de l’ap‐ pareil 595 mm Largeur de l’arrière de l’ap‐ pareil 559 mm Profondeur de l'appareil 569 mm Profondeur d’encastrement de l’appareil 548 mm Profondeur avec porte ou‐ verte 1022 mm Dimensions minimales de l’ouverture de ventilation. Ouverture placée sur la partie inférieure de la face arrière 560x20 mm Longueur du câble d’ali‐ mentation secteur. Le câ‐ ble est placé dans le coin droit de la face arrière 1500 mm Vis de montage 4x25 mm 2.2 Raccordement électrique AVERTISSEMENT! Risque d'incendie ou d'électrocution. • • • • • • • Tous les raccordements électriques doivent être effectués par un électricien qualifié. L’appareil doit être relié à la terre. Assurez-vous que les paramètres figurant sur la plaque signalétique correspondent aux données électriques nominale de l’alimentation secteur. Utilisez toujours une prise de courant de sécurité correctement installée. N'utilisez pas d'adaptateurs multiprise et de rallonges. Veillez à ne pas endommager la fiche secteur ni le câble d'alimentation. Le remplacement du câble d’alimentation de l’appareil doit être effectué par notre service après-vente agréé. Ne laissez pas les câbles d'alimentation entrer en contact ou s'approcher de la FRANÇAIS 49 porte de l'appareil ou de la niche d'encastrement sous l'appareil, particulièrement lorsqu'il est en marche ou que la porte est chaude. La protection contre les chocs des parties sous tension et isolées doit être fixée de telle manière qu'elle ne puisse pas être enlevée sans outils. Ne branchez la fiche secteur dans la prise secteur qu'à la fin de l'installation. Assurez-vous que la prise secteur est accessible après l'installation. Si la prise secteur est détachée, ne branchez pas la fiche secteur. Ne tirez pas sur le câble secteur pour débrancher l'appareil. Tirez toujours sur la fiche de la prise secteur. N'utilisez que des systèmes d'isolation appropriés : des coupe-circuits, des fusibles (les fusibles à visser doivent être retirés du support), un disjoncteur différentiel et des contacteurs. L'installation électrique doit comporter un dispositif d'isolation qui vous permet de déconnecter l'appareil du secteur à tous les pôles. Le dispositif d'isolement doit avoir une largeur d'ouverture de contact de 3 mm minimum. Cet appareil est fourni avec une fiche d'alimentation et un câble d'alimentation. • • • • • • • Types de câbles compatibles pour l'instal‐ lation ou le remplacement pour l’Europe : 2.3 Utilisation AVERTISSEMENT! Risque de blessures, de brûlures, d'électrocution ou d'explosion. • • • • • • • • • • H07 RN-F, H05 RN-F, H05 RRF, H05 VV-F, H05 V2V2-F (T90), H05 BB-F Pour la section du câble, consultez la puissance totale sur la plaque signalétique. Vous pouvez également consulter le tableau : Puissance totale (W) Section du câble (mm²) maximum 1380 3 x 0.75 maximum 2300 3x1 maximum 3680 3 x 1.5 Le fil de masse (fil jaune/vert) doit faire 2 cm de plus que les fils de phase et neutre (fils bleu et marron). 50 FRANÇAIS • • Cet appareil est exclusivement destiné à une utilisation domestique. Ne modifiez pas les caractéristiques de cet appareil. Assurez-vous que les orifices de ventilation ne sont pas bouchés. Ne laissez jamais l'appareil sans surveillance pendant son fonctionnement. Éteignez l'appareil après chaque utilisation. Soyez prudent lors de l'ouverture de la porte de l'appareil lorsque celui-ci est en fonctionnement. De l'air brûlant peut s'en échapper. N'utilisez jamais cet appareil avec les mains mouillées ou lorsqu'il est en contact avec de l'eau. N'exercez jamais de pression sur la porte ouverte. N'utilisez jamais l'appareil comme plan de travail ou comme plan de stockage. Ouvrez prudemment la porte de l'appareil. Si vous utilisez des ingrédients contenant de l'alcool, un mélange d'alcool et d'air facilement inflammable peut éventuellement se former. Ne laissez pas des étincelles ou des flammes nues entrer en contact avec l'appareil lorsque vous ouvrez la porte. Ne placez pas de produits inflammables ou d'éléments imbibés de produits inflammables à l'intérieur ou à proximité de l'appareil, ni sur celui-ci. AVERTISSEMENT! Risque d'endommagement de l'appareil. • Pour éviter tout endommagement ou décoloration de l’émail : – ne posez pas de plats allant au four ni aucun autre objet directement sur le fond de l'appareil. • • • • • – ne placez jamais de feuilles d'aluminium directement sur le fond de la cavité de l'appareil. – ne versez jamais d'eau directement dans l'appareil lorsqu'il est chaud. – une fois la cuisson terminée, ne laissez jamais d'aliments ou de plats humides à l'intérieur de l'appareil. – faites attention lorsque vous retirez ou remettez en place les accessoires. La décoloration de l'émail ou de l'acier inoxydable est sans effet sur les performances de l'appareil. Utilisez un plat à rôtir pour obtenir des gâteaux moelleux. Les jus de fruits causent des taches qui peuvent être permanentes. Cet appareil est exclusivement destiné à un usage culinaire. Ne l'utilisez pas pour des usages autres que celui pour lequel il a été conçu, à des fins de chauffage par exemple. La porte du four doit toujours être fermée pendant la cuisson. Si l’appareil est installé derrière la paroi d’un meuble (par ex. une porte), veuillez à ce que la porte ne soit jamais fermée lorsque l’appareil fonctionne. La chaleur et l’humidité peuvent s’accumuler derrière la porte fermée du meuble et provoquer d’importants dégâts sur l’appareil, votre logement ou le sol. Ne fermez pas la paroi du meuble tant que l’appareil n’a pas refroidi complètement. 2.4 Entretien et Nettoyage AVERTISSEMENT! Risque de blessure, d'incendie ou de dommages matériels sur l'appareil. • • • • Avant toute opération d'entretien, éteignez l'appareil et débranchez la fiche de la prise secteur. Vérifiez que l'appareil est froid. Les panneaux de verre risquent de se briser. Remplacez immédiatement les vitres de la porte si elles sont endommagées. Contactez le service après-vente agréé. Soyez prudent lorsque vous retirez la porte de l'appareil. La porte est lourde ! • • • Nettoyez régulièrement l'appareil afin de maintenir le revêtement en bon état. Nettoyez l'appareil avec un chiffon doux humide. Utilisez uniquement des produits de lavage neutres. N'utilisez pas de produits abrasifs, de tampons à récurer, de solvants ni d'objets métalliques. Si vous utilisez un spray pour four, suivez les consignes de sécurité figurant sur son emballage. 2.5 Éclairage intérieur AVERTISSEMENT! Risque d'électrocution ! • • Concernant la/les lampe(s) à l’intérieur de ce produit et les lampes de rechange vendues séparément : Ces lampes sont conçues pour résister à des conditions physiques extrêmes dans les appareils électroménagers, telles que la température, les vibrations, l’humidité, ou sont conçues pour signaler des informations sur le statut opérationnel de l’appareil. Elles ne sont pas destinées à être utilisées dans d'autres applications et ne conviennent pas à l’éclairage des pièces d’un logement. Utilisez uniquement des ampoules ayant les mêmes spécifications. 2.6 Maintenance • • Pour réparer l'appareil, contactez un service après-vente agréé. Utilisez exclusivement des pièces d'origine. 2.7 Mise au rebut AVERTISSEMENT! Risque de blessure ou d'asphyxie. • • • Débranchez l'appareil de l'alimentation électrique. Coupez le câble d'alimentation au ras de l'appareil et mettez-le au rebut. Retirez le dispositif de verrouillage du hublot pour empêcher les enfants et les animaux de s'enfermer dans l'appareil. FRANÇAIS 51 3. INSTALLATION 3.1 Encastrement AVERTISSEMENT! Reportez-vous aux chapitres concernant la sécurité. (*mm) 548 21 min. 550 80 60 520 600 114 18 20 589 594 min. 560 595+-1 60 5 198 3 523 20 (*mm) 70 60 548 min. 550 20 520 18 590 21 114 min. 560 198 60 595+-1 5 20 52 FRANÇAIS 589 594 3 523 3.2 Fixation du four au meuble 4. DESCRIPTION DE L'APPAREIL 4.1 Vue d’ensemble 1 2 3 4 5 6 7 12 5 4 3 2 1 8 9 10 11 4.2 Accessoires • Grille métallique Pour les plats à rôti, à gratin et les moules à gâteau/pâtisserie. 1 Bandeau de commande 2 Voyant / symbole de mise sous tension 3 Manette de sélection des modes de cuisson 4 Manette du minuteur 5 Thermostat 6 Indicateur / symbole de température 7 Élément chauffant 8 Éclairage 9 Ventilateur 10 Bac de nettoyage Aqua Clean 11 Support de grille, amovible 12 Position des grilles • Plateau de cuisson Pour les gâteaux et les biscuits. 5. AVANT LA PREMIÈRE UTILISATION AVERTISSEMENT! Reportez-vous aux chapitres concernant la sécurité. FRANÇAIS 53 5.1 Avant la première utilisation Une odeur et de la fumée peuvent s'échapper du four durant le préchauffage. Assurez-vous que la pièce est ventilée. 1. 2. Étape 1 Étape 2 Nettoyez le four Préchauffez le four à vide Retirez les supports de grille amovibles et tous les accessoires du four. Nettoyez le four et les accessoires avec un chiffon doux, de l’eau tiède et un détergent doux. 1. Réglez la température maximale pour la fonction : 2. . Durée : 1 h. Réglez la température maximale pour la fonction : . Durée : 15' Éteignez le four et attendez qu’il soit froid. Placez les accessoires et les supports de grille amovibles dans le four. 6. UTILISATION QUOTIDIENNE AVERTISSEMENT! Reportez-vous aux chapitres concernant la sécurité. 6.1 Comment régler : Mode de cuisson Étape 1 Tournez la manette des modes de cuis‐ son pour sélectionner un mode de cuis‐ son. Étape 2 Tournez la manette pour sélectionner la température. Étape 3 Une fois la cuisson terminée, tournez les manettes sur la position Arrêt pour éteindre le four. 6.2 Modes de cuisson Mode de cuisson Application Mode de cuisson Chaleur tour‐ nante humide Chaleur tour‐ nante Turbo gril Pour rôtir de grosses pièces de viande ou de volaille avec os sur un seul niveau. Également pour grati‐ ner et faire dorer. Cuisson de so‐ le Pour allumer l’éclairage. Eclairage four 54 FRANÇAIS Cette fonction est conçue pour éco‐ nomiser de l'énergie en cours de cuisson. Lorsque vous utilisez cette fonction, la température à l'intérieur de la cavité peut différer de la tem‐ pérature sélectionnée. La puissan‐ ce peut être réduite. Pour plus d’in‐ formations, consultez le chapitre « Utilisation quotidienne », Remar‐ ques sur : Chaleur tournante humi‐ de. Pour cuire ou rôtir simultanément sur plusieurs niveaux des aliments nécessitant une température de cuisson identique, sans que les sa‐ veurs ne se mélangent. Le four est éteint. Position Arrêt Application Pour cuire des gâteaux à fond croustillant et pour stériliser des ali‐ ments. Pour cuire des pizzas. Pour dorer de façon intensive et obtenir un fond croustillant. Réglez la tempéra‐ Fonction Pizza ture sur 230 °C. Mode de cuisson Décongélation Chauffage Haut/ Bas / Nettoyage Aqua Clean Application exigences d’éco-conception selon les normes EU 65/2014 et EU 66/2014. Tests conformément à la norme EN 60350-1. Pour décongeler des aliments (fruits et légumes). Le temps de décongé‐ lation dépend de la quantité et de l'épaisseur des aliments surgelés. Pendant la cuisson, la porte du four doit rester fermée pour éviter d'interrompre la fonction et pour un fonctionnement avec la meilleure efficacité énergétique possible. Pour cuire et rôtir des aliments sur un seul niveau. Reportez-vous au chapitre « Entre‐ tien et nettoyage » pour obtenir plus d'informations sur : Aqua Clean. 6.3 Remarques sur : Chaleur tournante humide Lorsque vous utilisez cette fonction, l'éclairage s'éteint automatiquement. Pour obtenir des instructions de cuisson, reportez-vous au chapitre « Conseils », paragraphe Chaleur tournante humide. Pour obtenir des recommandations générales sur les économies d'énergie, consultez le chapitre « Efficacité énergétique, « Four Économie d'énergie ». Cette fonction était utilisée pour se conformer à la classe d'efficacité énergétique et aux 7. FONCTIONS DE L'HORLOGE 7.1 Comment régler : Heure de fin de cuisson Pour régler l'heure d'arrêt des fonctions du four. Étape 1 Sélectionnez la fonction du four et la température. Étape 2 Tournez la manette du minuteur sur sa position maximale. Étape 3 Tournez la manette du minuteur pour définir l'heure d’arrêt. Lorsque la durée définie est écoulée, le signal sonore retentit et le four s'éteint. Étape 4 Tournez les boutons de fonction du four et de température sur la position d'arrêt. 8. UTILISATION DES ACCESSOIRES AVERTISSEMENT! Reportez-vous aux chapitres concernant la sécurité. également des dispositifs anti-bascule. Le rebord élevé de la grille empêche les ustensiles de cuisine de glisser. 8.1 Insertion des accessoires Une petite indentation sur le dessus apporte plus de sécurité. Les indentations sont FRANÇAIS 55 Grille métallique: Poussez la grille entre les barres de guidage des supports de grille et assurez-vous que les pieds sont orientés vers le bas. Plateau de cuisson: Poussez le plateau entre les rails du support de grille. Grille métallique, Plateau de cuisson: Poussez le plateau entre les rails du support de grille et glissez la grille métallique entre les rails se trouvant juste au-dessus. 9. FONCTIONS SUPPLÉMENTAIRES 9.1 Ventilateur de refroidissement Lorsque le four fonctionne, le ventilateur de refroidissement se met automatiquement en marche pour refroidir les surfaces du four. Si vous éteignez le four, le ventilateur de refroidissement continue à fonctionner jusqu'à ce que le four refroidisse. 9.2 Thermostat de sécurité Un mauvais fonctionnement du four ou des composants défectueux peuvent causer une 56 FRANÇAIS surchauffe dangereuse. Pour éviter cela, le four dispose d'un thermostat de sécurité interrompant l'alimentation électrique. Le four se remet automatiquement en fonctionnement lorsque la température baisse. 10. CONSEILS ET ASTUCES Cuisson de gâteaux N'ouvrez la porte du four qu'aux 3/4 du temps de cuisson défini. Reportez-vous aux chapitres concernant la sécurité. Si vous utilisez deux plaques de cuisson en même temps, laissez un niveau libre entre les deux. 10.1 Conseils de cuisson Le four dispose de cinq niveaux de grille. Comptez les niveaux de grille à partir du bas du four. Votre four peut cuire les aliments d'une manière complètement différente de celle de votre ancien four. Les tableaux ci-dessous vous indiquent les réglages standard pour la température, le temps de cuisson et le niveau du four. Si vous ne trouvez pas les réglages appropriés pour une recette spécifique, cherchez-en une qui s'en rapproche. Le four est doté d'un système spécial qui permet à l'air de circuler et qui recycle perpétuellement la vapeur. Dans cet environnement, ce système permet de cuisiner des plats tout en maintenant ceux-ci tendres à l'intérieur et croquants à l'extérieur. Le temps de cuisson et la consommation énergétique sont donc réduits. Cuisson de viande et de poisson Avant de couper la viande, laissez-la reposer pendant environ 15 minutes afin d'éviter que le jus ne s'écoule. Pour éviter qu'une trop grande quantité de fumée ne se forme dans le four, ajoutez de l'eau dans le plat à rôtir. Pour éviter que la fumée ne se condense, ajoutez à nouveau de l'eau dans le plat à rôtir à chaque fois qu'il n'en contient plus. Temps de cuisson Le temps de cuisson varie selon le type d'aliment, sa consistance et son volume. Au départ, surveillez la cuisson lorsque vous cuisinez. Ainsi, vous trouverez les meilleurs réglages (fonction, temps de cuisson, etc.) pour vos ustensiles, vos recettes et les quantités lorsque vous utiliserez l'appareil. 10.2 Rôtissage et cuisson Chauffage Haut/ Bas TEAUX Chaleur tournante GÂ‐ (min) (°C) (°C) Recettes avec un fouet 170 2 160 3 45 à 60 Moule à gâteau Pâte sablée 170 2 160 3 20 à 30 Moule à gâteau Cheesecake au babeurre 170 1 160 1 70 à 80 Moule à gâteau, Ø 26 cm Strudel 175 3 150 2 60 à 80 Plateau de cuis‐ son Tarte à la confitu‐ re 170 2 165 2 30 à 40 Plateau de cuis‐ son Gâteau de Noël, 160 préchauffer le four à vide 2 150 2 90 à 120 Moule à gâteau, Ø 20 cm FRANÇAIS 57 Chauffage Haut/ Bas TEAUX Chaleur tournante GÂ‐ (min) (°C) (°C) Gâteau aux pru‐ nes, préchauffer le four à vide 175 1 160 2 50 à 60 Moule à pain Biscuits 140 3 140 à 150 3 30 à 35 Plateau de cuis‐ son Biscuits, deux ni‐ veaux - - 140 à 150 2 et 4 35 à 40 Plateau de cuis‐ son Biscuits, trois ni‐ veaux 120 3 120 3 80 à 100 Plateau de cuis‐ son Meringues 190 3 180 3 15 à 20 Plateau de cuis‐ son Petits pains, pré‐ chauffer le four à vide 190 3 170 3 25 à 35 Plateau de cuis‐ son Éclairs, un niveau 180 2 170 2 45 à 70 Plateau de cuis‐ son Éclairs, deux ni‐ veaux 160 1 150 2 110 à 120 Plateau de cuis‐ son Tartes sur plateau 170 1 160 1 50 à 60 Plateau de cuis‐ son Gâteau avec beaucoup de fruits 190 3 190 3 12 à 20 Plateau de cuis‐ son Génoise Victoria 190 3 170 3 25 à 35 Plateau de cuis‐ son Préchauffez le four à vide. Chauffage Haut/ Bas Chaleur tournante PAIN ET PIZZA (min) (°C) (°C) Pain blanc, 1 à 2 pièces, 0,5 kg chacune 190 1 190 1 60 à 70 - Pain de seigle, le préchauffage n’est pas néces‐ saire 190 1 180 1 30 à 45 Moule à pain 1 230 à 250 1 10 à 12 Plateau de cuis‐ son Petits pains, 6 à 8 230 à 250 petits pains 58 FRANÇAIS Chauffage Haut/ Bas Chaleur tournante PAIN ET PIZZA (min) (°C) (°C) Pizza 200 3 190 3 10 à 12 Plateau de cuis‐ son / Plat à rôtir Scones 200 3 190 3 10 à 12 Plateau de cuis‐ son Préchauffez le four à vide. Utilisez le moule à gâteaux. Chauffage Haut/ Bas Chaleur tournante FLANS (min) (°C) Flan de pâtes, le pré‐ chauffage n’est pas nécessaire (°C) 200 2 180 2 40 à 50 Flan de légumes, le 200 préchauffage n’est pas nécessaire 2 175 2 45 à 60 Quiches 180 1 180 1 50 à 60 Lasagne 180 à 190 2 180 à 190 2 25 à 40 Cannellonis 180 à 190 2 180 à 190 2 25 à 40 Utilisez la grille métallique. Chauffage Haut/ Bas Chaleur tournante VIANDE (min) (°C) (°C) Bœuf 200 2 190 2 50 à 60 Porc 180 2 180 2 90 à 120 Veau 190 2 175 2 90 à 120 Rôti de bœuf, saignant 210 2 200 2 50 à 60 Rôti de bœuf, cuit à point 210 2 200 2 60 à 70 Rôti de bœuf, bien cuit 210 2 200 2 70 à 90 FRANÇAIS 59 Chauffage Haut/ Bas Chaleur tournante VIANDE (min) (°C) (°C) Palette de porc, avec couenne 180 2 170 2 120 à 150 Jarret de porc, 2 mor‐ ceaux 180 2 160 2 100 à 120 Gigot d’agneau 190 2 175 2 110 à 130 Poulet entier 220 2 200 2 70 à 85 Dinde entière 180 2 160 2 210 à 240 Canard entier 175 2 220 2 120 à 150 Oie entière 175 2 160 1 150 à 200 Lapin, en morceaux 190 2 175 2 60 à 80 Lièvre, en morceaux 190 2 175 2 150 à 200 Faisan entier 190 2 175 2 90 à 120 Chauffage Haut/ Bas Chaleur tournante POISSON (min) (°C) (°C) Truite / Dorade/ , 3 à 4 poissons 190 2 175 2 40 à 55 Thon / Saumon/ , 4 à 6 fi‐ lets 190 2 175 2 35 à 60 10.3 Turbo gril Préchauffez le four à vide. Utilisez le premier ou le deuxième niveau de la grille. Pour calculer le temps de rôtissage, multipliez le temps indiqué dans le tableau cidessous par l'épaisseur de la viande en cm. BŒUF Rôti ou filet de bœuf, bien cuit PORC BŒUF (°C) (min) 170 - 180 8 - 10 (°C) (min) 160 - 180 90 - 120 (°C) (min) Rôti ou filet de bœuf, saignant 190 - 200 5-6 Épaule / Cou / Noix de jambon, 1 - 1,5 kg 180 - 190 6-8 Côtelettes / Côte levée, 170 - 180 1 - 1,5 kg 60 - 90 Rôti ou filet de bœuf, à point Pain de viande, 0,75 1 kg 50 - 60 60 FRANÇAIS 160 - 170 PORC (°C) Jarret de porc, pré-cuit, 150 - 170 0,75 - 1 kg VOLAILLE (°C) (min) Poulet, demi0,4 - 0,5 kg chacune 190 - 210 35 - 50 Poulet, poularde, 1 1,5 kg 190 - 210 50 - 70 (min) 90 - 120 Canard, 1,5 - 2 kg 180 - 200 80 - 100 (°C) (min) Oie, 3,5 - 5 kg 160 - 180 120 - 180 Rôti de veau, 1 kg 160 - 180 90 - 120 Dinde, 2,5 - 3,5 kg 160 - 180 120 - 150 Jarret de veau, 1,5 - 2 kg 160 - 180 120 - 150 Dinde, 4 - 6 kg 140 - 160 150 - 240 POISSON (À LA VAPEUR) (°C) (min) 210 - 220 40 - 60 VEAU AGNEAU (°C) (min) Gigot d’agneau / Rôti d’agneau, 1 - 1,5 kg 150 - 170 100 - 120 Selle d’agneau, 1 - 1,5 kg 160 - 180 40 - 60 (°C) (min) 200 - 220 30 - 50 VOLAILLE Volaille, portions0,2 0,25 kg chacune Poisson entier, 1 - 1,5 kg 10.4 Décongélation (kg) Durée de décon‐ Décongélation com‐ gélation (min) plémentaire (min) Poulet 1 100 - 140 20 - 30 Placez le poulet sur une sous-tasse retournée, po‐ sée sur une grande assiet‐ te. Retournez à la moitié du temps. Viande 1 100 - 140 20 - 30 0,5 90 - 120 Retournez à la moitié du temps. 2 x 0,2 80 - 100 10 - 15 La crème fraîche peut aussi être battue même si elle n'est pas complète‐ ment décongelée. Crème FRANÇAIS 61 (kg) Durée de décon‐ Décongélation com‐ gélation (min) plémentaire (min) Truite 0,15 25 - 35 10 - 15 - Fraises 0,3 30 - 40 10 - 20 - Beurre 0,25 30 - 40 10 - 15 - Gâteau 1,4 60 60 - 10.5 Déshydratation - Chaleur tournante LÉGUMES Couvrez les plateaux avec du papier sulfurisé ou du papier de cuisson. Pour de meilleurs résultats, arrêtez le four à mi-cuisson, ouvrez la porte et laissez-la refroidir pendant une nuit pour terminer le séchage. Pour un plateau, utilisez le troisième niveau de la grille. (°C) (h) Légumes pour soupe 60 - 70 5à6 Champignons 50 - 60 6-8 Herbes 40 - 50 2à3 Réglez la température sur 60 - 70 °C. Pour deux plateaux, utilisez les premier et quatrième niveaux de la grille. LÉGUMES FRUITS (h) Prunes 8 à 10 (°C) (h) Abricots 8 à 10 Haricots 60 - 70 6-8 Tranches de pommes 6-8 Poivrons 60 - 70 5à6 Poires 6à9 10.6 Chaleur tournante humide - accessoires recommandés Utilisez les moules et récipients foncés et non réfléchissants. Ils offrent une meilleure absorption de la chaleur que les plats réfléchissants de couleur claire. Plaque à pizza Sombre, non réfléchissant Diamètre de 28 cm 62 FRANÇAIS Plat de cuisson Sombre, non réfléchissant Diamètre de 26 cm Ramequins Céramique 8 cm de diamètre, 5 cm de hauteur Moule pour fond de tarte Sombre, non réfléchissant Diamètre de 28 cm 10.7 Chaleur tournante humide Pour de meilleurs résultats, suivez les suggestions indiquées dans le tableau cidessous. (°C) (min) Petits pains sucrés, (12 pièces) Plateau de cuisson ou plat à rôtir 175 3 40 - 50 Petits pains, (9 piè‐ ces) Plateau de cuisson ou plat à rôtir 180 2 35 - 45 Pizza, surgelée, 0,35 kg grille métallique 180 2 45 - 55 Gâteau roulé Plateau de cuisson ou plat à rôtir 170 2 30 - 40 Brownie Plateau de cuisson ou plat à rôtir 170 2 45 - 50 Soufflé, (6 pièces) ramequins en céramique sur une grille métallique 190 3 45 - 55 Fond de tarte en gé‐ noise moule à tarte sur une grille métallique 180 2 35 - 45 Génoise Victoria Plat de cuisson sur la grille métallique 170 2 35 - 50 Poisson poché, 0,3 kg Plateau de cuisson ou plat à rôtir 180 2 35 - 45 Poisson entier, 0,2 kg Plateau de cuisson ou plat à rôtir 180 3 25 - 35 Filet de poisson, 0,3 kg plaque à pizza sur la grille mé‐ 170 tallique 3 30 - 40 Viande pochée, 0,25 kg Plateau de cuisson ou plat à rôtir 180 3 35 - 45 Chachlyk, 0.5 kg Plateau de cuisson ou plat à rôtir 180 3 40 - 50 Cookies, (16 pièces) Plateau de cuisson ou plat à rôtir 150 2 30 - 45 Macarons, (20 piè‐ ces) Plateau de cuisson ou plat à rôtir 180 2 45 - 55 Muffins, (12 pièces) Plateau de cuisson ou plat à rôtir 170 2 30 - 40 Pâtisserie salée, (16 pièces) Plateau de cuisson ou plat à rôtir 170 2 35 - 45 Biscuits à pâte brisée, Plateau de cuisson ou plat à (20 pièces) rôtir 150 2 40 - 50 FRANÇAIS 63 (°C) (min) Tartelettes, (8 pièces) Plateau de cuisson ou plat à rôtir 170 2 30 - 40 Légumes, pochés, 0.4 kg Plateau de cuisson ou plat à rôtir 180 2 35 - 45 Omelette végétarien‐ ne plaque à pizza sur la grille mé‐ 180 tallique 3 35 - 45 Légumes méditerra‐ néens, 0.7 kg Plateau de cuisson ou plat à rôtir 4 35 - 45 180 10.8 Informations pour les instituts de test Tests conformément à la norme IEC 60350-1. (°C) (min) Petits gâ‐ teaux, 20 par plateau Chauffage Haut/ Bas Plateau de cuisson 3 170 20 - 30 - Petits gâ‐ teaux, 20 par plateau Chaleur tour‐ nante Plateau de cuisson 3 150 160 20 - 35 - Petits gâ‐ teaux, 20 par plateau Chaleur tour‐ nante Plateau de cuisson 2 et 4 150 160 20 - 35 - Tourte aux pommes, 2 moules Ø20 cm Chauffage Haut/ Bas Grille métal‐ lique 2 180 70 - 90 - Tourte aux pommes, 2 moules Ø20 cm Chaleur tour‐ nante Grille métal‐ lique 2 160 70 - 90 - Génoise, moule à gâ‐ teau de 26 cm Chauffage Haut/ Bas Grille métal‐ lique 2 170 40 - 50 Préchauffez le four pendant 10 minutes. Génoise, moule à gâ‐ teau de 26 cm Chaleur tour‐ nante Grille métal‐ lique 2 160 40 - 50 Préchauffez le four pendant 10 minutes. 64 FRANÇAIS (°C) (min) Génoise, moule à gâ‐ teau de 26 cm Chaleur tour‐ nante Grille métal‐ lique 2 et 4 160 40 - 60 Préchauffez le four pendant 10 minutes. Sablé Chaleur tour‐ nante Plateau de cuisson 3 140 150 20 - 40 - Sablé Chaleur tour‐ nante Plateau de cuisson 2 et 4 140 150 25 - 45 - Sablé Chauffage Haut/ Bas Plateau de cuisson 3 140 150 25 - 45 - Toasts, 4 6 morceaux Gril Grille métal‐ lique 4 max. 2 à 3 minutes sur la première face ; 2 à 3 minutes sur la seconde face. Préchauffez le four pendant 3 minutes. Steak ha‐ ché, 6 piè‐ ces, 0,6 kg Gril Grille métal‐ lique et lè‐ chefrite 4 max. 20 - 30 Placez la grille métalli‐ que sur le quatrième niveau et la lèchefrite sur le troisième niveau du four. Tournez les aliments à mi-cuisson. Préchauffez le four pendant 3 minutes. 11. ENTRETIEN ET NETTOYAGE AVERTISSEMENT! Reportez-vous aux chapitres concernant la sécurité. 11.1 Remarques concernant l'entretien Nettoyez la façade du four avec un chiffon doux, de l’eau tiède et un détergent doux. Net‐ toyez et contrôlez le joint de la porte autour du cadre de la cavité. Utilisez une solution de nettoyage pour nettoyer les surfaces métalliques. Agents nettoy‐ ants Nettoyez les taches avec un détergent doux. Nettoyez la cavité après chaque utilisation. L’accumulation de graisse ou d’autres résidus peut provoquer un incendie. Utilisation quoti‐ dienne De l'humidité peut se déposer dans l'enceinte du four ou sur les vitres de la porte. Pour dimi‐ nuer la condensation, laissez fonctionner le four pendant 10 minutes avant la cuisson. Ne conservez pas les aliments dans le four pendant plus de 20 minutes. Sécher la cavité avec un chiffon doux après chaque utilisation. FRANÇAIS 65 Après chaque utilisation, lavez tous les accessoires et séchez-les. Utilisez un chiffon doux avec de l’eau tiède et un détergent doux. Ne lavez pas les accessoires au lave-vaisselle. Ne nettoyez pas les accessoires antiadhésifs avec un produit nettoyant abrasif ou des objets tranchants. Accessoires 11.2 Comment enlever : Supports de grille Retirez les supports de grille pour nettoyer le four. Étape 1 Éteignez le four et attendez qu’il soit froid. Étape 2 Écartez l'avant du support de grille de la paroi latérale. Étape 3 Écartez l'arrière du support de grille de la paroi latérale et retirez le sup‐ port. Étape 4 Réinstallez les supports de grille en répétant cette procédure dans l'ordre inverse. 11.3 Comment utiliser : Nettoyage Aqua Clean Ce processus de nettoyage utilise l'humidité pour retirer la graisse et les particules alimentaires restant dans le four. Étape 1 Étape 2 Versez de l’eau dans le bac de la cavi‐ té : 300 ml. Réglez la fonction : 1 2 Étape 3 Réglez la température sur 90 °C. Étape 4 Laissez le four fonctionner pendant 30 minutes. Étape 5 Éteignez le four. Étape 6 Attendez que le four ait refroidi. Séchez la cavité avec un chiffon doux. . 11.4 Comment démonter et installer : Porte La porte du four est dotée de deux panneaux de verre. Vous pouvez retirer la porte du four ainsi que le panneau de verre intérieur afin de le nettoyer. Lisez toutes les instructions du chapitre « Retrait et installation de la porte » avant de retirer les panneaux de verre. ATTENTION! N’utilisez pas le four sans les panneaux en verre. 66 FRANÇAIS Étape 1 Ouvrez complètement la porte et saisissez les 2 charnières de porte. Étape 2 Soulevez et faites tourner les leviers sur les 2 charnières. Étape 3 Fermez la porte du four à la première posi‐ tion d'ouverture (mi-parcours). Puis soulevez et tirez la porte vers l'avant et retirez-la de son logement. Étape 4 Déposez la porte sur une surface stable re‐ couverte d'un tissu doux. Étape 5 Tenez la garniture de porte (B) sur le bord supérieur de la porte des deux côtés et poussez vers l'intérieur pour libérer le joint du clip. Étape 6 Tirez la garniture de porte vers l'avant pour la déposer. Étape 7 Prenez le panneau de verre de la porte par son bord supérieur et tirez-le doucement. Assurez-vous que la vitre glisse entièrement hors de ses supports. 2 B 1 Étape 8 Nettoyez les panneaux de verre avec de l'eau savonneuse. Séchez soigneusement les panneaux de verre. Ne nettoyez pas les panneaux de verre au lave-vaisselle. Étape 9 Après le nettoyage, installez le panneau de verre et la porte du four. FRANÇAIS 67 La zone imprimée doit faire face à l'intérieur de la por‐ te. Après l'installation, vérifiez que la surface du pan‐ neau de verre où se trouve la zone imprimée est lisse au toucher (le relief doit être de l'autre côté). Lorsque le cadre de la porte est installé correctement, il émet un clic. Veillez à installer correctement le panneau de verre intérieur dans son logement. 11.5 Comment remplacer : Éclairage A Tenez toujours l'ampoule halogène avec un chiffon afin d'éviter que des résidus de graisse ne brûlent sur l'ampoule. AVERTISSEMENT! Risque d'électrocution. L'éclairage peut être chaud. Avant de remplacer l'éclairage : Étape 1 Étape 2 Étape 3 Éteignez le four. Attendez que le four ait refroidi. Débranchez le four de l'alimentation secteur. Placez un chiffon au fond de la cavi‐ té. Lampe arrière Étape 1 Tournez le diffuseur en verre pour le retirer. Étape 2 Nettoyez le diffuseur en verre. Étape 3 Remplacez l'éclairage par une ampoule adaptée résistant à une température de 300 °C. Étape 4 Remettez en place le diffuseur en verre. 12. DÉPANNAGE AVERTISSEMENT! Reportez-vous aux chapitres concernant la sécurité. 12.1 Que faire si… Dans tous les cas ne figurant pas dans ce tableau, veuillez contacter un service aprèsvente agréé. Problème Vérifiez si... Le four ne chauffe pas. Le fusible a disjoncté. Le joint de la porte est endommagé. N'utilisez pas le four. Contactez un service après-vente agréé. 68 FRANÇAIS Problème Vérifiez si... Heure de fin de cuisson n’est pas réglé. Réglez : Heure de fin de cuisson. Consultez « Fonctions de l'horlo‐ ge ». L'éclairage ne fonctionne pas. L’ampoule est grillée. 12.2 Données de maintenance Si vous ne trouvez pas de solution au problème, veuillez contacter votre revendeur ou un service après-vente agréé. Les informations à fournir au service aprèsvente figurent sur la plaque signalétique. La plaque signalétique se trouve sur l'encadrement avant de la cavité du four. Ne retirez pas la plaque signalétique de la cavité du four. Nous vous recommandons de noter ces informations ici : Modèle (MOD.) ......................................... Référence du produit (PNC) ......................................... Numéro de série (S.N.) ......................................... 13. RENDEMENT ÉNERGÉTIQUE 13.1 Informations produit et Fiche d’informations produit* Nom du fournisseur Zanussi Identification du modèle ZOHKF1X1 949496249 ZOHNF1K1 949496304 ZOHNF1W1 949496305 Index d'efficacité énergétique 81.2 Classe d’efficacité énergétique A+ Consommation d'énergie avec charge standard et mode tradition‐ nel 0.93 kWh/cycle Consommation d'énergie avec charge standard et mode air pulsé 0.69 kWh/cycle Nombre de cavités 1 Source de chaleur Électricité Volume 72 l Type de four Four encastrable Masse ZOHKF1X1 26.7 kg ZOHNF1K1 26.7 kg ZOHNF1W1 26.7 kg * Pour l’Union européenne conformément aux Règlements UE 65/2014 et 66/2014. Pour la République de Biélorussie conformément à STB 2478-2017, Annexe G ; STB 2477-2017, Annexes A et B. Pour l’Ukraine conformément à 568/32020. La classe d’efficacité énergétique n’est pas applicable pour la Russie. EN 60350-1 - Appareils de cuisson domestiques électriques - Partie 1 : Plages, fours, fours à vapeur et grils Méthodes de mesure des performances. FRANÇAIS 69 13.2 Économie d'énergie Ce four est doté de caractéristiques qui vous permettent d'économiser de l'énergie lors de votre cuisine au quotidien. Veillez à ce que la porte du four soit fermée lorsqu'il fonctionne. N'ouvrez pas la porte du four trop souvent pendant la cuisson. Gardez le joint de porte propre et veillez à ce qu'il soit bien fixé en place. Utilisez des plats en métal pour accroître les économies d'énergie. Si possible, ne préchauffez pas le four avant la cuisson. Lorsque vous cuisez plusieurs plats les uns après les autres, veillez à ne pas trop espacer les cuissons. Chaleur résiduelle Si la cuisson doit durer plus de 30 minutes, réduisez la température du four au minimum 3 à 10 minutes avant la fin de la cuisson. La chaleur résiduelle à l’intérieur du four poursuivra la cuisson. Utilisez la chaleur résiduelle pour réchauffer d'autres plats. Maintien des aliments au chaud Sélectionnez la température la plus basse possible pour utiliser la chaleur résiduelle et maintenir le repas au chaud. Chaleur tournante humide Fonction conçue pour économiser de l'énergie en cours de cuisson. Lorsque la fonction est en cours, l'éclairage est éteint. Cuisson avec ventilation Si possible, utilisez les fonctions de cuisson avec la ventilation pour économiser de l'énergie. 14. EN MATIÈRE DE PROTECTION DE L'ENVIRONNEMENT Recyclez les matériaux portant le symbole . Déposez les emballages dans les conteneurs prévus à cet effet. Contribuez à la protection de l'environnement et à votre sécurité, recyclez vos produits électriques et électroniques. Ne jetez pas les appareils 70 FRANÇAIS portant le symbole avec les ordures ménagères. Emmenez un tel produit dans votre centre local de recyclage ou contactez vos services municipaux. BESUCHEN SIE UNSERE WEBSITE, UM: Anwendungshinweise, Prospekte, Informationen zu Fehlerbehebung, Service und Reparatur zu erhalten: www.zanussi.com/support Änderungen vorbehalten. INHALTSVERZEICHNIS 1. SICHERHEITSHINWEISE............................................................................................ 71 2. SICHERHEITSANWEISUNGEN................................................................................... 73 3. MONTAGE.................................................................................................................... 76 4. GERÄTEBESCHREIBUNG...........................................................................................77 5. VOR DER ERSTEN INBETRIEBNAHME..................................................................... 77 6. TÄGLICHER GEBRAUCH............................................................................................ 78 7. UHRFUNKTIONEN....................................................................................................... 79 8. VERWENDUNG DES ZUBEHÖRS...............................................................................79 9. ZUSATZFUNKTIONEN................................................................................................. 80 10. TIPPS UND HINWEISE.............................................................................................. 81 11. REINIGUNG UND PFLEGE........................................................................................ 88 12. FEHLERSUCHE..........................................................................................................91 13. ENERGIEEFFIZIENZ.................................................................................................. 92 1. SICHERHEITSHINWEISE Lesen Sie vor der Montage und dem Gebrauch des Geräts zuerst die Bedienungsanleitung. Bei Verletzungen oder Schäden infolge nicht ordnungsgemäßer Montage oder Verwendung übernimmt der Hersteller keine Haftung. Bewahren Sie die Anleitung zum Nachschlagen an einem sicheren und zugänglichen Ort auf. 1.1 Sicherheit von Kindern und schutzbedürftigen Personen • Das Gerät kann von Kindern ab 8 Jahren und Personen mit eingeschränkten physischen, sensorischen oder geistigen Fähigkeiten oder mit mangelnder Erfahrung und/oder mangelndem Wissen nur dann verwendet werden, wenn sie durch eine für ihre Sicherheit zuständige Person beaufsichtigt werden oder in die sichere Verwendung des Geräts eingewiesen wurden und die mit dem Gerät verbundenen Gefahren verstanden haben. Kinder unter 8 DEUTSCH 71 • • • • • Jahren und Personen mit schweren Behinderungen oder Mehrfachbehinderung müssen vom Gerät ferngehalten werden, wenn sie nicht ständig beaufsichtigt werden. Kinder dürfen nicht mit dem Gerät spielen. Halten Sie sämtliches Verpackungsmaterial von Kindern fern und entsorgen Sie es ordnungsgemäß. WARNUNG: Halten Sie Kinder und Haustiere während des Betriebs oder der Abkühlphase vom Gerät fern. Die zugänglichen Geräteteile werden beim Betrieb sehr heiß. Falls Ihr Gerät mit einer Kindersicherung ausgestattet ist, empfehlen wir, diese einzuschalten. Kinder dürfen keine Reinigung und Wartung ohne Beaufsichtigung durchführen. 1.2 Allgemeine Sicherheit • • • • • • • • • 72 Die Montage des Geräts und der Austausch des Kabels muss von einer Fachkraft vorgenommen werden. WARNUNG: Das Gerät und die zugänglichen Geräteteile werden während des Betriebs heiß. Seien Sie vorsichtig und berühren Sie niemals die Heizelemente. Verwenden Sie zum Anfassen des Zubehörs und der Töpfe wärmeisolierende Handschuhe. Ziehen Sie bitte vor jeder Wartungsmaßnahme den Netzstecker aus der Steckdose. WARNUNG: Vergewissern Sie sich, dass das Gerät ausgeschaltet ist, bevor Sie die Lampe austauschen, um einen Stromschlag zu vermeiden. Verwenden Sie das Gerät nicht, bevor es in den Einbauschrank gesetzt wird. Reinigen Sie das Gerät nicht mit einem Dampfstrahlreiniger. Benutzen Sie keine scharfe Scheuermittel oder Metallschwämmchen zum Reinigen der Glastür; sie können die Glasfläche verkratzen und zum Zersplittern der Scheibe führen. Wenn das Netzkabel beschädigt ist, muss es vom Hersteller, seinem autorisierten Kundenservice oder einer DEUTSCH • gleichermaßen qualifizierten Person ausgetauscht werden, um Gefahren durch elektrischen Strom zu vermeiden. Ziehen Sie die Einhängegitter erst vorne und dann hinten von der Seitenwand weg und nehmen Sie sie heraus. Führen Sie zum Einsetzen der Einhängegitter die oben aufgeführten Schritte in umgekehrter Reihenfolge durch. 2. SICHERHEITSANWEISUNGEN 2.1 Montage WARNUNG! Die Montage des Geräts darf nur von einer qualifizierten Fachkraft durchgeführt werden. • • • • • • • • • Entfernen Sie das gesamte Verpackungsmaterial. Montieren Sie ein beschädigtes Gerät nicht und benutzen Sie es nicht. Halten Sie sich an die mitgelieferte Montageanleitung. Seien Sie beim Umsetzen des Gerätes vorsichtig, da es sehr schwer ist. Tragen Sie stets Sicherheitshandschuhe und festes Schuhwerk. Ziehen Sie das Gerät nicht am Griff. Montieren Sie das Gerät an einem sicheren und geeigneten Ort, der den Montageanforderungen entspricht. Die Mindestabstände zu anderen Geräten und Küchenmöbeln sind einzuhalten. Überprüfen Sie vor der Montage des Gerätes, ob sich die Ofentür ohne Kraftanwendung öffnen lässt. Das Gerät ist mit einem elektrischen Kühlsystem ausgestattet. Es muss an die Stromversorgung angeschlossen werden. Mindesthöhe des Einbau‐ möbels (Mindesthöhe des Schranks unter der Arbeits‐ platte) Schrankbreite Schranktiefe Breite der Geräterückseite 559 mm Gerätetiefe 569 mm Geräteeinbautiefe 548 mm Tiefe bei geöffneter Tür 560x20 mm Länge des Netzanschluss‐ kabels. Das Kabel befindet sich in der rechten Ecke auf der Rückseite. 1500 mm Befestigungsschrauben 4x25 mm 2.2 Elektroanschluss WARNUNG! Brand- und Stromschlaggefahr. • • • • 590 (600) mm • 560 mm 550 (550) mm Höhe der Gerätevordersei‐ te 594 mm Höhe der Geräterückseite 576 mm Breite der Gerätevordersei‐ te 595 mm 1022 mm Mindestgröße der Belüf‐ tungsöffnung. Öffnung auf der Rückseite unten • • Alle elektrischen Anschlüsse sind von einem geprüften Elektriker vorzunehmen. Das Gerät muss geerdet sein. Stellen Sie sicher, dass die Daten auf dem Typenschild mit den elektrischen Nennwerten der Netzspannung übereinstimmen. Schließen Sie das Gerät nur an eine ordnungsgemäß installierte Schutzkontaktsteckdose an. Verwenden Sie keine Mehrfachsteckdosen oder Verlängerungskabel. Achten Sie darauf, Netzstecker und Netzkabel nicht zu beschädigen. Falls das Netzkabel des Geräts ersetzt werden muss, lassen Sie diese Arbeit durch unseren autorisierten Kundendienst durchführen. Achten Sie darauf, dass das Netzkabel die Gerätetür oder die Nische unter dem DEUTSCH 73 • • • • • • • Gerät nicht berührt oder in ihre Nähe gelangt, insbesondere wenn das Gerät eingeschaltet oder die Tür heiß ist. Alle Teile, die gegen direktes Berühren schützen, sowie die isolierten Teile müssen so befestigt werden, dass sie nicht ohne Werkzeug entfernt werden können. Stecken Sie den Netzstecker erst nach Abschluss der Montage in die Steckdose. Stellen Sie sicher, dass der Netzstecker nach der Montage noch zugänglich ist. Falls die Steckdose lose ist, schließen Sie den Netzstecker nicht an. Ziehen Sie nicht am Netzkabel, wenn Sie das Gerät von der Stromversorgung trennen möchten. Ziehen Sie stets am Netzstecker. Verwenden Sie nur geeignete Trenneinrichtungen: Überlastschalter, Sicherungen (Schraubsicherungen müssen aus dem Halter entfernt werden können), Fehlerstromschutzschalter und Schütze. Die elektrische Installation muss eine Trenneinrichtung aufweisen, mit der Sie das Gerät allpolig von der Stromversorgung trennen können. Die Trenneinrichtung muss mit einer Kontaktöffnungsbreite von mindestens 3 mm ausgeführt sein. Das Gerät wird mit einem Netzstecker und Netzkabel geliefert. Einsetzbare Kabeltypen für Einbau oder Austausch in Europa: H07 RN-F, H05 RN-F, H05 RRF, H05 VV-F, H05 V2V2-F (T90), H05 BB-F Näheres zum Kabelquerschnitt siehe Gesamtleistung auf dem Typenschild. Weitere Informationen finden Sie in der Tabelle: Gesamtleistung (W) Kabelquerschnitt (mm²) Maximal 1380 3 x 0.75 Maximal 2300 3x1 Maximal 3680 3 x 1.5 Die Erdleitung (gelb/grünes Kabel) muss 2 cm länger sein als die Phasenleitung und der Nullleiter (blaues und braunes Kabel). 74 DEUTSCH 2.3 Gebrauch WARNUNG! Verletzungs-, Verbrennungs-, Stromschlag- oder Explosionsgefahr. • • • • • • • • • • • • Dieses Gerät ist ausschließlich zur Verwendung im Haushalt bestimmt. Nehmen Sie keine technischen Änderungen am Gerät vor. Die Lüftungsöffnungen dürfen nicht abgedeckt werden. Lassen Sie das Gerät bei Betrieb nicht unbeaufsichtigt. Schalten Sie das Gerät nach jedem Gebrauch aus. Gehen Sie beim Öffnen der Tür vorsichtig vor, wenn das Gerät in Betrieb ist. Es kann heiße Luft austreten. Bedienen Sie das Gerät nicht mit feuchten oder nassen Händen oder wenn es mit Wasser in Kontakt gekommen ist. Üben Sie keinen Druck auf die geöffnete Gerätetür aus. Benutzen Sie das Gerät nicht als Arbeitsoder Abstellfläche. Öffnen Sie die Gerätetür vorsichtig. Bei der Verwendung von Zutaten, die Alkohol enthalten, kann ein Alkohol-Luftgemisch entstehen. Achten Sie beim Öffnen der Tür darauf, dass keine Funken oder offenen Flammen in das Gerät gelangen. Laden Sie keine entflammbaren Produkte oder Gegenstände, die mit entflammbaren Produkten benetzt sind, in das Gerät und stellen Sie solche nicht in die Nähe oder auf das Gerät. WARNUNG! Risiko von Schäden am Gerät. • Um Beschädigungen und Verfärbungen der Emailbeschichtung zu vermeiden: – Stellen Sie feuerfestes Geschirr oder andere Gegenstände nicht direkt auf den Boden des Geräts. – Legen Sie keine Alufolie direkt auf den Boden des Garraums. • • • • • – Füllen Sie kein Wasser in das heiße Gerät. – Lassen Sie nach Abschluss des Garvorgangs kein feuchtes Geschirr oder feuchte Speisen im Gerät stehen. – Gehen Sie beim Herausnehmen oder Einsetzen des Zubehörs sorgfältig vor. Verfärbungen der Email- oder Edelstahlbeschichtung haben keine Auswirkung auf die Leistung des Geräts. Verwenden Sie für feuchte Kuchen das tiefe Blech. Fruchtsäfte können bleibende Flecken verursachen. Dieses Gerät ist nur zum Kochen bestimmt. Jeder andere Gebrauch ist als bestimmungsfremd anzusehen, zum Beispiel das Beheizen eines Raums. Die Backofentür muss beim Betrieb geschlossen sein. Ist das Gerät hinter einer Möbelfront (wie etwa einer Tür) installiert, achten Sie darauf, dass die Tür während des Gerätebetriebs nicht geschlossen wird. Hinter einer geschlossenen Möbelfront können sich Hitze und Feuchtigkeit ansammeln und das Gerät, das Gehäuse oder den Boden beschädigen. Schließen Sie die Möbelfront nicht, bevor das Gerät nach dem Gebrauch völlig abgekühlt ist. • • 2.5 Innenbeleuchtung WARNUNG! Stromschlaggefahr. • • • • • • • Schalten Sie das Gerät immer aus und ziehen Sie den Netzstecker aus der Steckdose, bevor Reinigungsarbeiten durchgeführt werden. Vergewissern Sie sich, dass das Gerät abgekühlt ist. Es besteht die Gefahr, dass die Glasscheiben brechen. Ersetzen Sie die Türglasscheiben umgehend, wenn sie beschädigt sind. Wenden Sie sich an einen autorisierten Kundendienst. Gehen Sie beim Aushängen der Tür vorsichtig vor. Die Tür ist schwer! Reinigen Sie das Gerät regelmäßig, um eine Verschlechterung des Oberflächenmaterials zu verhindern. Bezüglich der Lampe(n) in diesem Gerät und separat verkaufter Ersatzlampen: Diese Lampen müssen extremen physikalischen Bedingungen in Haushaltsgeräten standhalten, wie z.B. Temperatur, Vibration, Feuchtigkeit, oder sollen Informationen über den Betriebszustand des Gerätes anzeigen. Sie sind nicht für den Einsatz in anderen Geräten vorgesehen und nicht für die Raumbeleuchtung geeignet. Verwenden Sie nur Lampen mit der gleichen Leistung . 2.6 Service • 2.4 Reinigung und Pflege WARNUNG! Verletzungs-, Brandgefahr sowie Risiko von Schäden am Gerät. Reinigen Sie das Geräts mit einem weichen, feuchten Tuch. Verwenden Sie ausschließlich Neutralreiniger. Benutzen Sie keine Scheuermittel, scheuernde Reinigungsschwämmchen, Lösungsmittel oder Metallgegenstände. Falls Sie ein Backofenspray verwenden, befolgen Sie die Sicherheitsanweisungen auf seiner Verpackung. • Wenden Sie sich zur Reparatur des Geräts an den autorisierten Kundendienst. Verwenden Sie ausschließlich Originalersatzteile. 2.7 Entsorgung WARNUNG! Verletzungs- und Erstickungsgefahr. • • • Trennen Sie das Gerät von der Stromversorgung. Schneiden Sie das Netzkabel in der Nähe des Geräts ab, und entsorgen Sie es. Entfernen Sie das Türschloss, um zu verhindern, dass sich Kinder oder Haustiere im Gerät einschließen. DEUTSCH 75 3. MONTAGE 3.1 Montage WARNUNG! Siehe Kapitel Sicherheitshinweise. (*mm) 548 21 min. 550 80 60 520 600 114 18 20 589 594 min. 560 595+-1 60 5 198 3 523 20 (*mm) 70 60 548 min. 550 20 520 18 590 21 114 min. 560 198 60 595+-1 5 20 76 DEUTSCH 589 594 3 523 3.2 Befestigung des Ofens am Möbel 4. GERÄTEBESCHREIBUNG 4.1 Gesamtansicht 1 2 3 4 5 6 7 12 5 4 3 2 1 8 9 10 11 4.2 Zubehör • Kombirost Für Kochgeschirr, Kuchenformen, Braten. 1 2 3 4 5 6 7 8 9 10 11 12 • Bedienblende Betriebskontrolllampe/-symbol Einstellknopf für die Ofenfunktionen Timer-Einstellknopf Einstellknopf (für die Temperatur) Temperaturanzeige/-symbol Heizelement Lampe Ventilator Behälter für die Aqua-Reinigungsfunktion Einhängeschienen, herausnehmbar Einschubebenen Backblech Für Kuchen und Plätzchen. 5. VOR DER ERSTEN INBETRIEBNAHME WARNUNG! Siehe Kapitel Sicherheitshinweise. DEUTSCH 77 5.1 Vor der ersten Inbetriebnahme Der Backofen kann während des Aufheizens Geruch und Rauch verströmen. Stellen Sie sicher, dass der Raum belüftet ist. 1. 2. Schritt 1 Schritt 2 Reinigen Sie den Backofen Heizen Sie den leeren Backofen vor Entfernen Sie alle Zubehörteile und die heraus‐ 1. nehmbaren Einhängegitter aus dem Backofen. Feuchten Sie ein weiches Tuch mit warmem Was‐ ser und etwas mildem Reinigungsmittel an, und 2. reinigen Sie damit den Backofen und das Zubehör. Stellen Sie die Höchsttemperatur für folgende Funktion ein: . Zeit: 1 Std. Stellen Sie die Höchsttemperatur für folgende Funktion ein: Zeit: 15 min. . Schalten Sie den Backofen aus und warten Sie, bis er abgekühlt ist. Setzen Sie die Zubehörteile und die heraus‐ nehmbaren Einhängegitter in den Backofen. 6. TÄGLICHER GEBRAUCH WARNUNG! Siehe Kapitel Sicherheitshinweise. Ofenfunkti‐ on 6.1 Einstellung: Ofenfunktion Schritt 1 Drehen Sie den Backofen-Einstellknopf auf eine Ofenfunktion. Schritt 2 Drehen Sie den Wahlknopf, um die Temperatur auszuwählen. Schritt 3 Drehen Sie nach Beendigung des Gar‐ vorgangs die Knöpfe in die Aus-Positi‐ on, um den Backofen auszuschalten. 6.2 Ofenfunktionen Ofenfunkti‐ on Feuchte Um‐ luft Umluft Anwendung Heißluftgrillen Der Backofen ist ausgeschaltet. Stellung Aus Unterhitze Einschalten der Lampe. Backofenbe‐ leuchtung 78 DEUTSCH Pizzastufe Anwendung Diese Funktion ist entwickelt wor‐ den, um während des Garvorgangs Energie zu sparen. Wenn Sie diese Funktion nutzen, kann die Tempera‐ tur im Garraum von der eingestell‐ ten Temperatur abweichen. Die Wärmeleistung kann geringer sein. Weitere Informationen zu folgenden Themen finden Sie im Kapitel „Täg‐ licher Gebrauch“: Feuchte Umluft. Zum Braten oder zum Braten und Backen von Speisen mit derselben Gartemperatur auf mehreren Ebe‐ nen gleichzeitig, ohne dass es zu einer Aromaübertragung kommt. Zum Braten großer Fleischstücke oder von Geflügel mit Knochen auf einer Ebene. Zum Gratinieren und Überbacken. Zum Backen von Kuchen mit knusp‐ rigen Böden und zum Einkochen von Lebensmitteln. Zum Backen von Pizza. Für ein in‐ tensives Überbacken und einen knusprigen Boden. Stellen Sie die Temperatur auf 230 °C ein. Ofenfunkti‐ on Auftauen Anwendung Anforderungen an die umweltgerechte Gestaltung EU 65/2014 und EU 66/2014 verwendet. Tests gemäß EN 60350-1. Zum Auftauen von Lebensmitteln (Gemüse und Obst). Die Auftauzeit hängt ab von der Menge und Größe der Tiefkühlgerichte. Die Backofentür sollte während des Garvorgangs geschlossen bleiben, damit die Funktion nicht unterbrochen wird. So wird gewährleistet, dass der Backofen mit der höchsten Energieeffizienz arbeitet. Zum Backen und Braten auf einer Ebene. Weitere Informationen zu folgenden Ober-/Unterhit‐ Themen finden Sie im Kapitel „Pfle‐ ze / Aqua Rei‐ ge und Reinigung“: Aqua-Reini‐ nigung gung. 6.3 Hinweise zu: Feuchte Umluft Diese Funktion wurde zur Bestimmung der Energieeffizienzklasse und den Wenn Sie diese Funktion verwenden, schaltet sich die Backofenbeleuchtung automatisch aus. Die Kochanleitungen finden Sie im Kapitel "Hinweise und Tipps", Feuchte Umluft. Allgemeine Empfehlungen zur Energieeinsparung finden Sie im Kapitel „Energieeffizienz“, Energie sparen. 7. UHRFUNKTIONEN 7.1 Einstellen von: Garzeitende Zum Einstellen der Abschaltzeit für Ofenfunktionen. Schritt 1 Stellen Sie die Ofenfunktion und Temperatur ein. Schritt 2 Drehen Sie den Timer-Einstellknopf auf den höchsten Wert. Schritt 3 Stellen Sie die Ausschaltzeit durch Drehen des Timer-Einstellknopfs ein. Wenn die eingestellte Zeit abgelaufen ist, ertönt der Signalton, und der Backofen wird ausgeschal‐ tet. Schritt 4 Drehen Sie den Backofen-Einstellknopf und den Temperaturwahlknopf in die Aus-Position. 8. VERWENDUNG DES ZUBEHÖRS WARNUNG! Siehe Kapitel Sicherheitshinweise. dienen auch als Kippsicherung. Durch den umlaufend erhöhten Rand des Rosts ist das Kochgeschirr gegen Abrutschen vom Rost gesichert. 8.1 Einsetzen des Zubehörs Die kleine Einkerbung auf der Oberseite erhöht die Sicherheit. Diese Einkerbungen DEUTSCH 79 Kombirost: Schieben Sie den Kombirost zwischen die Füh‐ rungsschienen der Einhängegitter mit den Füßen nach unten zeigend. Backblech: Schieben Sie das Blech zwischen die Führungs‐ stäbe der Einhängegitter. Kombirost, Backblech: Schieben Sie das Backblech zwischen die Füh‐ rungsstäbe der Einhängegitter und dem Kombirost auf die Führungsstäbe darüber. 9. ZUSATZFUNKTIONEN 9.1 Kühlgebläse Wenn der Backofen in Betrieb ist, wird das Kühlgebläse automatisch eingeschaltet, um die Ofenoberflächen zu kühlen. Wenn Sie den Backofen ausschalten kann das Kühlgebläse weiter laufen, bis der Ofen abgekühlt ist. 9.2 Sicherheitsthermostat Ein unsachgemäßer Gebrauch des Ofens oder defekte Bestandteile können zu einer 80 DEUTSCH gefährlichen Überhitzung führen. Um dies zu verhindern, ist der Backofen mit einem Sicherheitsthermostat ausgestattet, der die Stromzufuhr unterbrechen kann. Die Wiedereinschaltung des Backofens erfolgt automatisch bei Temperaturabfall. 10. TIPPS UND HINWEISE Wenn Sie zwei Backbleche gleichzeitig nutzen, lassen Sie eine Ebene dazwischen frei. Siehe Kapitel Sicherheitshinweise. Garen von Fleisch und Fisch Lassen Sie das Fleisch vor dem Anschneiden etwa 15 Minuten ruhen, damit der Fleischsaft nicht ausläuft. 10.1 Garempfehlungen Der Backofen hat fünf Einschubebenen. Die Ebenen werden vom Boden des Backofens aus gezählt. Ihr Backofen backt oder brät unter Umständen anders als Ihr früherer Backofen. Die nachstehenden Tabellen enthalten die standardmäßigen Temperatureinstellungen, die Gardauer und die Einschubebene. Finden Sie für ein bestimmtes Rezept keine konkreten Angaben, orientieren Sie sich an einem ähnlichem Rezept. Der Backofen ist mit einem speziellen System ausgestattet, das die Luft zirkulieren lässt und den Dampf ständig wiederverwendet. Mit diesem System macht das Garen mit Dampf Ihre Speisen innen weich und außen knusprig. So verringert sich die Gardauer und der Energieverbrauch. Backen von Kuchen Die Backofentür nicht öffnen, bevor 3/4 der Backzeit abgelaufen ist. Um die Rauchbildung beim Braten im Backofen zu vermindern, geben Sie etwas Wasser in die Brat- und Fettpfanne. Um die Kondensierung des Rauchs zu vermeiden, geben Sie jedes Mal, wenn das Wasser verdampft ist, erneut Wasser in die Brat- und Fettpfanne. Garzeiten Die Garzeiten hängen von der Art des Garguts, seiner Konsistenz und der Menge ab. Beobachten Sie den Garfortschritt. Finden Sie heraus, welche Geräteeinstellungen (Garstufe, Gardauer, usw.) für Ihr Kochgeschirr, Ihre Rezepte und die von Ihnen zubereiteten Garmengen am besten geeignet sind. 10.2 Backen und Braten Ober-/Unterhitze CHEN Umluft KU‐ (Min.) (°C) (°C) Rührteig 170 2 160 3 45–60 Kuchenform Mürbeteig 170 2 160 3 20–30 Kuchenform Buttermilch-Käse‐ kuchen 170 1 160 1 70–80 Kuchenform, Ø 26 cm Strudel/Stollen 175 3 150 2 60–80 Backblech Marmeladentorte 170 2 165 2 30–40 Backblech Christstollen, Hei‐ zen Sie den lee‐ ren Backofen vor 160 2 150 2 90–120 Kuchenform, Ø 20 cm DEUTSCH 81 Ober-/Unterhitze CHEN Umluft KU‐ (Min.) (°C) (°C) Rosinenkuchen, Heizen Sie den leeren Backofen vor 175 1 160 2 50–60 Brotform Kekse 140 3 140–150 3 30–35 Backblech Kekse, zwei Ebe‐ nen - - 140–150 2 und 4 35–40 Backblech Kekse, drei Ebe‐ nen 120 3 120 3 80–100 Backblech Baiser 190 3 180 3 15–20 Backblech Brötchen, Heizen Sie den leeren Backofen vor 190 3 170 3 25–35 Backblech Eclairs, eine Ebe‐ ne 180 2 170 2 45–70 Backblech Eclairs, zwei Ebe‐ nen 160 1 150 2 110–120 Backblech Törtchen 170 1 160 1 50–60 Backblech Üppiger Obstku‐ chen 190 3 190 3 12–20 Backblech Englischer Sand‐ wichkuchen à la Victoria 190 3 170 3 25–35 Backblech Heizen Sie den leeren Backofen vor. Ober-/Unterhitze Umluft BROT UND PIZZA (Min.) (°C) Weißbrot, 1–2 Stück, je 0,5 kg (°C) 190 1 190 1 60–70 - Roggenbrot, Vor‐ 190 heizen ist nicht er‐ forderlich 1 180 1 30–45 Brotform Brot/Brötchen, 6– 8 Brötchen 230–250 1 230–250 1 10–20 Backblech Pizza 200 3 190 3 10–20 Backblech / Tiefes Blech Scones 200 3 190 3 10–20 Backblech Heizen Sie den leeren Backofen vor. 82 DEUTSCH Verwenden Sie eine Kuchenform. Ober-/Unterhitze Umluft FLANS (Min.) (°C) (°C) Nudelauflauf, Vorhei‐ zen ist nicht erforder‐ lich 200 2 180 2 40–50 Gemüseauflauf, Vor‐ heizen ist nicht erfor‐ derlich 200 2 175 2 45–60 Quiche 180 1 180 1 50–60 Lasagne 180–190 2 180–190 2 25–40 Cannelloni 180–190 2 180–190 2 25–40 Verwenden Sie den Kombirost. Ober-/Unterhitze Umluft FLEISCH (Min.) (°C) (°C) Rind 200 2 190 2 50–70 Schweinefleisch 180 2 180 2 90–120 Kalb 190 2 175 2 90–120 Roastbeef, englisch, blutig 210 2 200 2 50–60 Roastbeef, englisch, rosa 210 2 200 2 60–70 Roastbeef, englisch, durch 210 2 200 2 70–75 Ober-/Unterhitze Umluft FLEISCH (Min.) (°C) (°C) Schweineschulter, mit Schwarte 180 2 170 2 120–150 Schweinshaxe, 2 Stück 180 2 160 2 100–120 Lammkeule 190 2 175 2 110–130 Hähnchen, ganz 220 2 200 2 70–85 Pute, ganz 180 2 160 2 210–240 DEUTSCH 83 Ober-/Unterhitze Umluft FLEISCH (Min.) (°C) (°C) Ente, ganz 175 2 220 2 120–150 Gans, ganz 175 2 160 1 150–200 Kaninchen, in Stücke geschnitten 190 2 175 2 60–80 Kaninchen, in Stücke geschnitten 190 2 175 2 150–200 Fasan, ganz 190 2 175 2 90–120 Ober-/Unterhitze Umluft FISCH (Min.) (°C) (°C) Forelle / Seebrasse, 3–4 Fische 190 2 175 2 40–55 Thunfisch / Lachs, 4–6 Fi‐ lets 190 2 175 2 35–60 10.3 Heißluftgrillen Leeren Backofen vorheizen. SCHWEINE‐ FLEISCH Nutzen Sie die erste oder zweite Einschubebene. Multiplizieren Sie zur Berechnung der Garzeit die Zeit, die in der Tabelle unten angegeben ist, mit der Dicke des Filets in Zentimetern. RIND‐ FLEISCH (°C) (Min.) Roastbeef/Filet, blutig 190 - 200 5-6 Roastbeef/Filet, rosa 180 - 190 6-8 Roastbeef/Filet, durch 170 - 180 8 - 10 SCHWEINE‐ FLEISCH Schulter / Nacken / Schinkenstück, 1 - 1,5 kg 84 DEUTSCH (°C) (Min.) 160 - 180 90 - 120 (°C) (Min.) 170 - 180 60 - 90 Hackbraten, 0,75 - 1 kg 160 - 170 50 - 60 Schweinshaxe, vorge‐ gart, 0,75 - 1 kg 150 - 170 90 - 120 (°C) (Min.) Kalbsbraten, 1 kg 160 - 180 90 - 120 Kalbshaxe, 1,5 - 2 kg 160 - 180 120 - 150 (°C) (Min.) 150 - 170 100 - 120 Koteletts / Rippchen, 1 - 1,5 kg KALB LAMM Lammkeule / Lamm‐ braten, 1 - 1,5 kg LAMM Lammrücken, 1 - 1,5 kg GEFLÜGEL (°C) (Min.) 160 - 180 40 - 60 (°C) (Min.) Geflügelteile, je 0,2 0,25 kg 200 - 220 30 - 50 Hähnchen, halbiert, je 0,4 - 0,5 kg 190 - 210 35 - 50 Hähnchen, Poularde, 1 190 - 210 - 1,5 kg GEFLÜGEL (°C) (Min.) Ente, 1,5 - 2 kg 180 - 200 80 - 100 Gans, 3,5 - 5 kg 160 - 180 120 - 180 Pute, 2,5 - 3,5 kg 160 - 180 120 - 150 Pute, 4 - 6 kg 140 - 160 150 - 240 FISCH, GE‐ DÄMPFT (°C) (Min.) Fisch, 1 - 1,5 kg 40 - 60 210 - 220 50 - 70 10.4 Auftauen (kg) Auftauzeit (Min.) Zusätzliche Auftau‐ zeit (Min.) Hähnchen 1 100 – 140 20 – 30 Legen Sie das Hähnchen auf eine umgedrehte Un‐ tertasse auf einem größe‐ ren Teller. Nach der Hälfte der Gardauer wenden. Fleisch 1 100 – 140 20 – 30 0,5 90 – 120 Nach der Hälfte der Gar‐ dauer wenden. Sahne 2 x 0,2 80 – 100 10 – 15 Sahne lässt sich auch mit noch leicht gefrorenen Stellen gut aufschlagen. Forelle 0,15 25 – 35 10 – 15 – Erdbeeren 0,3 30 – 40 10 – 20 – Butter 0,25 30 – 40 10 – 15 – Torte 1,4 60 60 – 10.5 Dörren - Umluft Bleche mit fettbeständigem Papier oder Backpapier abdecken. Um ein besseres Ergebnis zu erzielen, schalten Sie den Backofen nach der Hälfte der Trockenzeit aus, öffnen Sie die Tür und lassen Sie ihn eine Nacht abkühlen, um das Trocknen abzuschließen. Nutzen Sie für 1 Blech die dritte Einschubebene. Für 2 Bleche verwenden Sie die erste und vierte Einschubebene. DEUTSCH 85 GEMÜSE OBST (°C) (Std.) Bohnen 60 - 70 6-8 Pflaumen 8 - 10 Paprika 60 - 70 5-6 Aprikosen 8 - 10 Suppengemüse 60 - 70 5-6 Apfelscheiben 6-8 Pilze 50 - 60 6-8 Birnen 6-9 Kräuter 40 - 50 2-3 (Std.) Stellen Sie die Temperatur auf 60 - 70 °C ein. 10.6 Feuchte Umluft - Empfohlenes Zubehör Verwenden Sie die dunklen und nicht reflektierenden Formen und Behälter. Sie haben eine bessere Wärmeabsorption als helle Farbe und reflektierende Schüsseln. Förmchen Pizzapfanne Backform Dunkel, nicht reflektierend 28 cm Durchmesser Dunkel, nicht reflektierend 26 cm Durchmesser Keramikform 8 cm Durchmes‐ ser, 5 cm Höhe Tortenbodenform Dunkel, nicht reflektierend 28 cm Durchmesser 10.7 Feuchte Umluft Beachten Sie für beste Ergebnisse die unten in der Tabelle aufgeführten Empfehlungen. (°C) (Min.) Brötchen, süß, 12 Stück Backblech oder tiefes Blech 175 3 40 - 50 Brötchen, 9 Stück Backblech oder tiefes Blech 180 2 35 - 45 Pizza, gefroren, 0,35 kg Kombirost 180 2 45 - 55 Biskuitrolle Backblech oder tiefes Blech 170 2 30 - 40 Brownie Backblech oder tiefes Blech 170 2 45 - 50 Soufflé, 6 Stück Keramikförmchen auf Kombi‐ rost 190 3 45 - 55 Biskuitboden Biskuitform auf Kombirost 180 2 35 - 45 86 DEUTSCH (°C) Englischer Sandwich‐ kuchen à la Victoria Backform auf Kombirost (Min.) 170 2 35 - 50 Fisch, pochiert, 0,3 kg Backblech oder tiefes Blech 180 2 35 - 45 Fisch, 0,2 kg Backblech oder tiefes Blech 180 3 25 - 35 Fischfilet, 0,3 kg Pizzapfanne auf Kombirost 170 3 30 - 40 Fleisch, pochiert, 0,25 Backblech oder tiefes Blech kg 180 3 35 - 45 Schaschlik, 0,5 kg Backblech oder tiefes Blech 180 3 40 - 50 Plätzchen, 16 Stück Backblech oder tiefes Blech 150 2 30 - 45 Makronen, 20 Stück Backblech oder tiefes Blech 180 2 45 - 55 Muffins, 12 Stück Backblech oder tiefes Blech 170 2 30 - 40 Kleingebäck, pikant, 16 Stück Backblech oder tiefes Blech 170 2 35 - 45 Mürbeteigplätzchen, 20 Stück Backblech oder tiefes Blech 150 2 40 - 50 Törtchen, 8 Stück Backblech oder tiefes Blech 170 2 30 - 40 Gemüse, pochiert, 0,4 kg Backblech oder tiefes Blech 180 2 35 - 45 Vegetarisches Ome‐ lett Pizzapfanne auf Kombirost 180 3 35 - 45 Mediterranes Gemü‐ se, 0,7 kg Backblech oder tiefes Blech 180 4 35 - 45 10.8 Informationen für Prüfinstitute Tests gemäß IEC 60350-1. (°C) (Min.) Törtchen, 20 Ober-/Unterhit‐ pro Blech ze Backblech 3 170 20 - 30 - Törtchen, 20 Umluft pro Blech Backblech 3 150 160 20 - 35 - Törtchen, 20 Umluft pro Blech Backblech 2 und 4 150 160 20 - 35 - Apfelku‐ chen, 2 For‐ men à Ø 20 cm Kombirost 2 180 70 - 90 - Ober-/Unterhit‐ ze DEUTSCH 87 (°C) (Min.) Apfelku‐ chen, 2 For‐ men à Ø 20 cm Umluft Kombirost 2 160 70 - 90 - Biskuit, Ku‐ chenform Ø 26 cm Ober-/Unterhit‐ ze Kombirost 2 170 40 - 50 Backofen 10 Min. vor‐ heizen. Biskuit, Ku‐ chenform Ø 26 cm Umluft Kombirost 2 160 40 - 50 Backofen 10 Min. vor‐ heizen. Biskuit, Ku‐ chenform Ø 26 cm Umluft Kombirost 2 und 4 160 40 - 60 Backofen 10 Min. vor‐ heizen. Mürbeteig‐ gebäck Umluft Backblech 3 140 150 20 - 40 - Mürbeteig‐ gebäck Umluft Backblech 2 und 4 140 150 25 - 45 - Mürbeteig‐ gebäck Ober-/Unterhit‐ ze Backblech 3 140 150 25 - 45 - Toast, 4 - 6 Stück Grill Kombirost 4 Max. 2 - 3 Minuten auf Backofen 3 Min. vor‐ der ersten Seite, 2 heizen. - 3 Minuten auf der zweiten Seite Hamburger aus Rind‐ fleisch, 6 Stück, 0,6 kg Grill Kombirost und Fett‐ pfanne 4 Max. 20 - 30 11. REINIGUNG UND PFLEGE WARNUNG! Siehe Kapitel Sicherheitshinweise. 88 DEUTSCH Kombirost in die vierte und Fettpfanne in die dritte Einschubebene des Backofens ein‐ schieben. Wenden Sie das Lebensmittel nach der Hälfte der Gardau‐ er. Backofen 3 Min. vor‐ heizen. 11.1 Hinweise zur Reinigung Feuchten Sie ein weiches Tuch mit warmem Wasser und etwas mildem Reinigungsmittel an, und reinigen Sie damit die Vorderseite des Backofens. Reinigen und überprüfen Sie die Tür‐ dichtung um den Garraumrahmen. Reinigen Sie die Metalloberflächen mit einer Reinigungslösung. Reinigungsmittel Reinigen Sie Flecken mit einem milden Reinigungsmittel. Reinigen Sie den Garraum nach jedem Gebrauch. Fettansammlungen oder andere Speise‐ reste könnten einen Brand verursachen. Täglicher Ge‐ brauch Es kann sich Feuchtigkeit im Ofen oder an den Glasscheiben der Tür niederschlagen. Um die Kondensation zu reduzieren, schalten Sie den Backofen immer 10 Minuten vor dem Ga‐ ren ein. Lassen Sie die Speisen nicht länger als 20 Minuten im Backofen stehen. Trocknen Sie den Garraum nach jedem Gebrauch mit einem weichen Tuch ab. Reinigen Sie alle Zubehörteile nach jedem Gebrauch und lassen Sie sie trocknen. Feuchten Sie ein weiches Tuch mit warmem Wasser und einem milden Reinigungsmittel an. Reinigen Sie die Zubehörteile nicht im Geschirrspüler. Zubehör Reinigen Sie das Zubehör mit Antihaftbeschichtung nicht mit Scheuermitteln oder scharfkan‐ tigen Gegenständen. 11.2 Entfernen: Einhängegitter Entfernen Sie Einhängegitter zur Reinigung des Backofens. Schritt 1 Schalten Sie den Backofen aus und warten Sie, bis er abgekühlt ist. Schritt 2 Ziehen Sie das Einhängegitter vorne von der Seitenwand weg. Schritt 3 Ziehen Sie das Einhängegitter hinten von der Seitenwand weg und nehmen Sie es heraus. Schritt 4 Führen Sie zum Einsetzen der Ein‐ hängegitter die oben aufgeführten Schritte in umgekehrter Reihenfolge durch. 11.3 Verwendung: Aqua Reinigung Bei dieser Reinigungsfunktion werden mithilfe von Feuchtigkeit Fett- und Speisereste aus dem Backofen entfernt. 2 1 Schritt 1 Füllen Sie Wasser in die Garraumver‐ tiefung: 300 ml. Schritt 2 Stellen Sie die folgende Funktion ein: . DEUTSCH 89 Schritt 3 Stellen Sie die Temperatur auf 90 °C. Schritt 4 Lassen Sie den Backofen 30 Min. lang eingeschaltet. Schritt 5 Schalten Sie den Ofen aus. Schritt 6 Warten Sie, bis der Ofen kalt ist. Trock‐ nen Sie den Garraum mit einem wei‐ chen Tuch ab. 11.4 Aus- und Einbau der: Tür Die Backofentür hat zwei Glasscheiben. Die Backofentür und die innere Glasscheibe können zur Reinigung ausgebaut werden. Lesen Sie die gesamte Anleitung „Aus- und Einbauen der Tür“, bevor Sie die Glasscheiben entfernen. VORSICHT! Benutzen Sie den Backofen nicht ohne die Glasscheiben. Schritt 1 Öffnen Sie die Backofentür vollständig und halten Sie beide Scharniere fest. Schritt 2 Heben Sie die Hebel an den beiden Schar‐ nieren an und klappen Sie sie nach vorne. Schritt 3 Schließen Sie die Backofentür halb bis zur ersten Raststellung. Anschließend heben und ziehen Sie die Tür nach vorn aus der Aufnahme heraus. Schritt 4 Legen Sie die Backofentür auf ein weiches Tuch auf einer stabilen Fläche. Schritt 5 Fassen Sie die Türabdeckung (B) an der Oberkante der Tür an beiden Seiten an. Drü‐ cken Sie sie nach innen, um den Klippver‐ schluss zu lösen. Schritt 6 Ziehen Sie die Türabdeckung nach vorn, um sie abzunehmen. Schritt 7 Halten Sie die Oberkante der Türglasscheibe fest und ziehen Sie vorsichtig heraus. Ach‐ ten Sie darauf, dass die Glasscheiben voll‐ ständig aus den Halterungen gezogen wer‐ den. 2 B 1 90 DEUTSCH Schritt 8 Reinigen Sie die Glasscheiben mit Wasser und Spülmittel. Trocknen Sie die Glasschei‐ ben sorgfältig ab. Reinigen Sie die Glas‐ scheiben nicht im Geschirrspüler. Schritt 9 Setzen Sie nach der Reinigung die Glas‐ scheibe und die Backofentür ein Der bedruckte Bereich muss zur Innenseite der Tür zeigen. Vergewissern Sie sich nach der Montage, dass sich der Glasscheibenrahmen an der bedruckten Zone nicht rau anfühlt. Bei korrektem Einbau macht die Türabdeckung ein Klickgeräusch. Achten Sie darauf, die innere Glasscheibe richtig in die Aufnahmen einzusetzen. 11.5 Austausch: Lampe A Halten Sie die Halogenlampe stets mit einem Tuch, um zu verhindern, dass Fettrückstände auf der Lampe einbrennen. WARNUNG! Stromschlaggefahr. Die Lampe kann heiß sein. Bevor Sie die Lampe austauschen: Schritt 1 Schritt 2 Schritt 3 Schalten Sie den Backofen aus. Warten Sie, bis der Ofen kalt ist. Trennen Sie den Ofen von der Netz‐ versorgung. Breiten Sie ein Tuch auf dem Gar‐ raumboden aus. Hintere Lampe Schritt 1 Drehen Sie die Glasabdeckung und nehmen Sie sie ab. Schritt 2 Reinigen Sie die Glasabdeckung. Schritt 3 Ersetzen Sie die Lampe durch eine geeignete, bis 300 °C hitzebeständige Lampe. Schritt 4 Bringen Sie die Glasabdeckung wieder an. 12. FEHLERSUCHE WARNUNG! Siehe Kapitel Sicherheitshinweise. 12.1 Was tun, wenn... Störung Prüfen Sie, ob... Der Backofen nicht heizt. Die Sicherung durchge‐ brannt ist. In allen Fällen, die nicht in dieser Tabelle aufgeführt sind, wenden Sie sich bitte an einen autorisierten Kundendienst. DEUTSCH 91 Störung Prüfen Sie, ob... Die Türdichtung beschä‐ digt ist. Benutzen Sie den Ofen nicht. Wenden Sie sich an den autorisierten Kun‐ dendienst. Garzeitende nicht einge‐ stellt ist. Einstellung: Garzeitende. Siehe „Uhrfunktionen“. Die Lampe nicht funktio‐ niert. Die Lampe durchge‐ brannt ist. 12.2 Servicedaten Wenn Sie das Problem nicht selbst lösen können, wenden Sie sich an Ihren Händler oder einen autorisierten Kundendienst. Die vom Kundendienst benötigten Daten finden Sie auf dem Typenschild. Das Typenschild befindet sich am Frontrahmen des Garraums. Entfernen Sie das Typenschild nicht vom Garraum. Wir empfehlen, hier folgende Daten zu notieren: Modell (MOD.) ......................................... Produktnummer (PNC) ......................................... Seriennummer (S.N.) ......................................... 13. ENERGIEEFFIZIENZ 13.1 Produktinformationen und Produktdatenblatt* Herstellername Zanussi Modellidentifikation ZOHKF1X1 949496249 ZOHNF1K1 949496304 ZOHNF1W1 949496305 Energieeffizienzindex 81.2 Energieeffizienzklasse A+ Energieverbrauch bei Standardbeladung, Ober-/Unterhitze 0.93 kWh/Programm Energieverbrauch bei Standardbeladung, Umluft 0.69 kWh/Programm Anzahl der Garräume 1 Wärmequelle Strom Fassungsvermögen 72 l Backofentyp Einbau-Backofen Gewicht ZOHKF1X1 26.7 kg ZOHNF1K1 26.7 kg ZOHNF1W1 26.7 kg * Für die Europäische Union gemäß EU-Richtlinien 65/2014 und 66/2014. Für die Republik Weißrussland gemäß STB 2478-2017, Anhang G; STB 2477-2017, Anlagen A und B. Für die Ukraine gemäß 568/32020. Die Energieeffizienzklasse gilt nicht für Russland. EN 60350-1 - Elektrische Kochgeräte für den Hausgebrauch - Teil 1: Herde, Backöfen, Dampfgarer und Grillgerä‐ te - Verfahren zur Messung der Gebrauchseigenschaften. 92 DEUTSCH 13.2 Energie sparen Der Backofen verfügt über Funktionen, mit deren Hilfe Sie beim täglichen Kochen Energie sparen können. Achten Sie darauf, dass die Backofentür während des Ofenbetriebs geschlossen ist. Die Backofentür darf während des Garvorgangs nicht zu oft geöffnet werden. Halten Sie die Türdichtung sauber und stellen Sie sicher, dass sie sich fest in der richtigen Position befindet. Verwenden Sie Kochgeschirr aus Metall, um mehr Energie zu sparen. Heizen Sie, wenn möglich, den Backofen nicht vor. Halten Sie die Unterbrechungen beim Backen so kurz wie möglich, wenn Sie mehrere Speisen gleichzeitig zubereiten. Restwärme Beträgt die Garzeit mehr als 30 Minuten, reduzieren Sie die Ofentemperatur 3 - 10 Min. vor Ablauf des Garvorgangs. Durch die Restwärme des Backofens werden die Speisen weiter gegart. Nutzen Sie die Restwärme, um andere Speisen aufzuwärmen. Warmhalten von Speisen Wählen Sie die niedrigste Temperatureinstellung, wenn Sie die Restwärme zum Warmhalten von Speisen nutzen möchten. Feuchte Umluft Diese Funktion ist entwickelt worden, um während des Garvorgangs Energie zu sparen. Die Backofenlampe ist während dieser Funktion ausgeschaltet. Garen mit Heißluft Nutzen Sie, wenn möglich, die Garfunktionen mit Heißluft, um Energie zu sparen. 14. UMWELTTIPPS Recyceln Sie Materialien mit dem Symbol . Entsorgen Sie die Verpackung in den entsprechenden Recyclingbehältern. Recyceln Sie zum Umwelt- und Gesundheitsschutz elektrische und elektronische Geräte. Entsorgen Sie Geräte mit diesem Symbol nicht mit dem Hausmüll. Bringen Sie das Gerät zu Ihrer örtlichen Sammelstelle oder wenden Sie sich an Ihr Gemeindeamt. DEUTSCH 93 VISITE O NOSSO WEBSITE PARA: Resolver problemas e obter conselhos de utilização, catálogos e informações sobre assistência e reparações: www.zanussi.com/support Sujeito a alterações sem aviso prévio. ÍNDICE 1. INFORMAÇÕES DE SEGURANÇA..............................................................................94 2. INSTRUÇÕES DE SEGURANÇA................................................................................. 96 3. INSTALAÇÃO................................................................................................................99 4. DESCRIÇÃO DO PRODUTO......................................................................................100 5. ANTES DA PRIMEIRA UTILIZAÇÃO..........................................................................100 6. UTILIZAÇÃO DIÁRIA.................................................................................................. 101 7. FUNÇÕES DE RELÓGIO........................................................................................... 102 8. UTILIZAR OS ACESSÓRIOS..................................................................................... 102 9. FUNÇÕES ADICIONAIS............................................................................................. 103 10. SUGESTÕES E DICAS.............................................................................................104 11. MANUTENÇÃO E LIMPEZA..................................................................................... 112 12. RESOLUÇÃO DE PROBLEMAS.............................................................................. 115 13. EFICIÊNCIA ENERGÉTICA......................................................................................116 1. INFORMAÇÕES DE SEGURANÇA Leia atentamente as instruções fornecidas antes de instalar e utilizar o aparelho. O fabricante não é responsável por quaisquer ferimentos ou danos resultantes de instalação ou utilização incorretas. Guarde sempre as instruções em local seguro e acessível para consultar no futuro. 1.1 Segurança de crianças e pessoas vulneráveis • 94 Este aparelho pode ser utilizado por crianças de 8 ou mais anos de idade e por pessoas com capacidades físicas, sensoriais ou mentais reduzidas ou com pouca experiência e conhecimento se tiverem recebido supervisão ou instruções relativas à utilização do aparelho de forma segura e compreenderem os perigos envolvidos. É necessário manter as crianças com menos de 8 anos de idade e pessoas com incapacidades muito extensas e complexas afastadas do aparelho, a menos que constantemente vigiadas. PORTUGUÊS • • • • • Não permita que crianças brinquem com o aparelho. Mantenha todos os materiais de embalagem fora do alcance das crianças e elimine-os de forma apropriada. AVISO: Mantenha as crianças e os animais domésticos afastados do aparelho quando ele estiver a funcionar ou a arrefecer. As partes acessíveis ficam quentes durante a utilização. Se o aparelho tiver um dispositivo de segurança para crianças, recomendamos que o active. A limpeza e a manutenção básica do aparelho não devem ser efectuadas por crianças sem supervisão. 1.2 Segurança geral • • • • • • • • • • Apenas uma pessoa qualificada pode instalar este aparelho e substituir o cabo. AVISO: O aparelho e as partes acessíveis ficam quentes durante a utilização. Deve ter cuidado para evitar tocar nas resistências de aquecimento. Utilize sempre luvas de forno para retirar e colocar acessórios ou recipientes de ir ao forno. Antes de efetuar qualquer ação de manutenção, desligue o aparelho da corrente elétrica. AVISO: Certifique-se de que o aparelho está desligado antes de substituir a lâmpada, para evitar a possibilidade de choque elétrico. Não use o aparelho antes de instalá-lo na estrutura embutida. Não utilize uma máquina de limpar a vapor para limpar o aparelho. Não utilize agentes de limpeza abrasivos ou raspadores metálicos afiados para limpar a porta de vidro, porque podem riscar a superfície e causar a quebra do vidro. Se o cabo de alimentação elétrica estiver danificado, deve ser substituído pelo fabricante, por um Centro de Assistência Técnica Autorizado ou por uma pessoa igualmente qualificada, para evitar perigos elétricos. Para remover os apoios para prateleiras, puxe primeiro a parte da frente e depois a parte de trás do apoio para PORTUGUÊS 95 prateleiras para fora da parede lateral. Instale os apoios para prateleiras na sequência inversa. 2. INSTRUÇÕES DE SEGURANÇA 2.1 Instalação AVISO! A instalação deste aparelho tem de ser efetuada por uma pessoa qualificada. • • • • • • • • • Retire a embalagem toda. Não instale nem utilize o aparelho se estiver danificado. Siga as instruções de instalação fornecidas com o aparelho. Tenha sempre cuidado quando deslocar o aparelho porque ele é pesado. Utilize sempre luvas de proteção e calçado fechado. Não puxe o aparelho pela pega. Instale o aparelho num local seguro e adequado que cumpra com os requisitos da instalação. Respeite as distâncias mínimas relativamente a outros aparelhos e unidades. Antes de montar o aparelho, verifique se a porta do forno abre sem limitações. O aparelho está equipado com um sistema de arrefecimento elétrico. É necessário que tenha alimentação elétrica. Altura mínima do armário (altura mínima do armário debaixo do balcão) Largura do armário Profundidade do armário 590 (600) mm 560 mm 594 mm Altura da parte de trás do aparelho 576 mm Largura da parte da frente do aparelho 595 mm Largura da parte de trás do aparelho 559 mm Profundidade do aparelho 569 mm PORTUGUÊS 548 mm Profundidade com a porta aberta 1022 mm Dimensão mínima da aber‐ tura de ventilação. Abertu‐ ra localizada na parte infe‐ rior traseira 560x20 mm Comprimento do cabo de alimentação elétrica. O ca‐ bo sai pelo canto traseiro direito 1500 mm Parafusos de montagem 4x25 mm 2.2 Ligação elétrica AVISO! Risco de incêndio e choque elétrico. • • • • • • 550 (550) mm Altura da parte da frente do aparelho 96 Profundidade de encastre do aparelho • • Todas as ligações eléctricas devem ser efectuadas por um electricista qualificado. O aparelho tem de ficar ligado à terra. Certifique-se de que os parâmetros indicados na placa de características são compatíveis com as características da alimentação eléctrica. Utilize sempre uma tomada devidamente instalada e à prova de choques elétricos. Não utilize adaptadores de tomadas duplas ou triplas, nem cabos de extensão. Certifique-se de que não danifica a ficha e o cabo de alimentação eléctrica. Se for necessário substituir o cabo de alimentação, esta operação deve ser efectuada pelo nosso Centro de Assistência Técnica. Não permita que algum cabo eléctrico toque na porta do aparelho ou no nicho abaixo do aparelho, especialmente quando a porta estiver quente. As protecções contra choques eléctricos das peças isoladas e não isoladas devem estar fixas de modo a não poderem ser retiradas sem ferramentas. • • • • • • Ligue a ficha à tomada elétrica apenas no final da instalação. Certifique-se de que a ficha fica acessível após a instalação. Se a tomada eléctrica estiver solta, não ligue a ficha. Não puxe o cabo de alimentação para desligar o aparelho. Puxe sempre a ficha. disjuntores de protecção, fusíveis (os fusíveis de rosca devem ser retirados do suporte), diferenciais e contactores. A instalação eléctrica deve possuir um dispositivo de isolamento que lhe permita desligar o aparelho da corrente eléctrica em todos os pólos. O dispositivo de isolamento deve ter uma abertura de contacto com uma largura mínima de 3 mm. Este aparelho é fornecido com ficha e com cabo de alimentação. Tipos de cabos aplicáveis para instalação ou substituição para a Europa: H07 RN-F, H05 RN-F, H05 RRF, H05 VV-F, H05 V2V2-F (T90), H05 BB-F • • • • • • • • • • • Para informações sobre a secção do cabo, consulte a potência total na placa de características. Também pode consultar a tabela: Potência total (W) Secção do cabo (mm²) máximo de 1380 3 x 0.75 máximo de 2300 3x1 máximo de 3680 3 x 1.5 AVISO! Risco de danos no aparelho. • O cabo de terra (cabo verde/amarelo) tem de ser 2 cm mais comprido do que os cabos de fase e neutro (cabos azul e castanho). 2.3 Utilização AVISO! Risco de ferimentos, queimaduras, choque elétrico ou explosão. • Este aparelho destina-se apenas a uso doméstico. Não altere as especificações deste aparelho. Certifique-se de que as aberturas de ventilação não ficam obstruídas. Não deixe o aparelho a funcionar sem vigilância. Desative o aparelho após cada utilização. Tenha cuidado sempre que abrir a porta do aparelho quando ele estiver a funcionar. Pode sair ar muito quente. Não utilize o aparelho com as mãos húmidas ou se ele estiver em contacto com água. Não exerça pressão sobre a porta se ela estiver aberta. Não utilize o aparelho como superfície de trabalho ou armazenamento. Abra a porta do aparelho com cuidado. A utilização de ingredientes com álcool pode provocar uma mistura de álcool e ar. Evite que faíscas ou chamas entrem em contacto com o aparelho quando abrir a porta. Não coloque produtos inflamáveis, ou objetos molhados com produtos inflamáveis, no interior, perto ou em cima do aparelho. • • • Para evitar danos ou descoloração no esmalte: – Não coloque recipientes de ir ao forno ou outros objetos diretamente sobre o fundo da cavidade do aparelho. – Não coloque folha de alumínio diretamente sobre o fundo da cavidade do aparelho. – Não verta água diretamente sobre o aparelho quando ele estiver quente. – Não coloque pratos ou alimentos húmidos no aparelho após acabar de cozinhar. – Tenha cuidado quando remover ou instalar os acessórios. A eventual descoloração do esmalte ou do aço inoxidável não afeta o desempenho do aparelho. Utilize um recipiente profundo quando cozer bolos muito húmidos. Caso contrário, os sucos da fruta podem provocar manchas permanentes. Este aparelho serve apenas para cozinhar. Não pode ser usado para outras PORTUGUÊS 97 • • funções como, por exemplo, aquecimento de divisões. Cozinhe sempre com a porta do forno fechada. Se o aparelho ficar instalado atrás de uma porta de armário, nunca feche a porta com o aparelho em funcionamento. Se a porta ficar fechada, poderá ocorrer acumulação de calor e humidade que podem danificar o aparelho, os móveis ou o piso. Não feche a porta do armário enquanto o aparelho não tiver arrefecido completamente após utilização. 2.5 Iluminação interna AVISO! Risco de choque elétrico. • 2.4 Manutenção e limpeza AVISO! Risco de ferimentos, incêndio e danos no aparelho. • • • • • • • 98 Antes de qualquer ação de manutenção, desative o aparelho e desligue a ficha da tomada elétrica. Certifique-se de que o aparelho está frio. Existe o risco de quebra dos painéis de vidro. Substitua imediatamente os painéis de vidro se estiverem danificados. Contacte um Centro de Assistência Técnica Autorizado. Tenha cuidado quando remover a porta do aparelho. A porta é pesada! Limpe o aparelho com regularidade para evitar que o material da superfície se deteriore. Limpe o aparelho com um pano macio e húmido. Utilize apenas detergentes neutros. Não utilize produtos abrasivos, esfregões, solventes ou objetos metálicos. Se utilizar um spray para forno, siga as instruções de segurança da embalagem. PORTUGUÊS • Relativamente à(s) lâmpada(s) no interior deste produto e às lâmpadas sobressalentes vendidas separadamente: Estas lâmpadas destinam-se a suportar condições físicas extremas em eletrodomésticos, tais como temperatura, vibração, humidade, ou destinam-se a sinalizar informação relativamente ao estado operacional do aparelho. Não se destinam a ser utilizadas em outras aplicações e não se adequam à iluminação de espaços domésticos. Utilize apenas lâmpadas com as mesmas especificações. 2.6 Assistência • • Contacte um Centro de Assistência Técnica Autorizado se for necessário reparar o aparelho. Utilize apenas peças de substituição originais. 2.7 Eliminação AVISO! Risco de ferimentos ou asfixia. • • • Desligue o aparelho da alimentação eléctrica. Corte o cabo de alimentação eléctrica do aparelho e elimine-o. Remova o trinco da porta para evitar que crianças ou animais de estimação fiquem presos no aparelho. 3. INSTALAÇÃO 3.1 Encastre AVISO! Consulte os capítulos relativos à segurança. (*mm) 548 21 min. 550 80 60 520 600 114 18 20 589 594 min. 560 595+-1 60 5 198 3 523 20 (*mm) 70 60 548 min. 550 20 520 18 590 21 114 min. 560 589 594 198 60 595+-1 5 3 523 20 PORTUGUÊS 99 3.2 Fixação do forno no armário 4. DESCRIÇÃO DO PRODUTO 4.1 Resumo geral 1 2 3 4 5 6 7 12 5 4 3 2 1 8 9 10 11 4.2 Acessórios • Prateleira em grelha Para recipientes, formas de bolo, assados. 1 Painel de controlo 2 Lâmpada/símbolo de alimentação 3 Botão para as funções de aquecimento do forno 4 Botão do temporizador 5 Botão de controlo (para a temperatura) 6 Símbolo / indicador de temperatura 7 Elemento de aquecimento 8 Lâmpada 9 Ventilador 10 Recipiente da limpeza com água 11 Apoio para prateleira, removível 12 Posições de prateleira • Tabuleiro para assar Para bolos e biscoitos. 5. ANTES DA PRIMEIRA UTILIZAÇÃO AVISO! Consulte os capítulos relativos à segurança. 100 PORTUGUÊS 5.1 Antes da primeira utilização O forno pode emitir algum odor e fumo durante o pré-aquecimento. Certifique-se de que o espaço é ventilado. 1. 2. Passo 1 Passo 2 Limpeza do forno Pré-aqueça o forno vazio Remova todos os acessórios e apoios para prate‐ leiras amovíveis do forno. Limpe o forno e os acessórios com um pano ma‐ cio, água morna e um detergente suave. 1. Regule a temperatura máxima para a função. Tempo: 1 h. . 2. Regule a temperatura máxima para a função. Tempo: 15 min. . Desligue o forno e aguarde até estar frio. Coloque os acessórios e apoios de prateleiras amovíveis do forno. 6. UTILIZAÇÃO DIÁRIA AVISO! Consulte os capítulos relativos à segurança. Função de aquecimen‐ to 6.1 Como definir: Função de aquecimento Passo 1 Rode o botão para as funções de aquecimento para selecionar uma fun‐ ção de aquecimento. Passo 2 Rode o botão de controlo para selecio‐ nar a temperatura. Passo 3 Quando a cozedura terminar, rode os botões para a posição off (desligado) para desligar o forno. Ventilado com Resistência Aplicação Esta função foi concebida para pou‐ par energia durante o cozinhado. Quando utilizar esta função, a tem‐ peratura na cavidade pode diferir a temperatura definida. A potência do aquecimento pode ser reduzida. Para mais informações consulte o capítulo “Utilização diária”, notas sobre: Ventilado com Resistência. Para assar ou assar e cozer alimen‐ tos em mais do que uma posição de prateleira com a mesma temperatu‐ Cozedura ven‐ ra de cozedura, sem transferência tilada de sabores. 6.2 Funções de aquecimento Função de aquecimen‐ to Aplicação Turbo Grill Para assar peças de carne grandes ou aves com ossos numa posição da prateleira. Para fazer gratinados e alourar. Para cozer bolos com bases estala‐ diças e conservar alimentos. O forno está desligado. Aquecimento inferior Posição off (desligado) Para ativar a lâmpada: Função Pizza Para cozer pizza. Para um tostado intenso e uma base crocante. Re‐ gule a temperatura para 230°C. Luz PORTUGUÊS 101 Função de aquecimen‐ to Descongelar Aplicação Para descongelar alimentos (legu‐ mes e fruta). O tempo de desconge‐ lação depende da quantidade e do tamanho dos alimentos congelados. Para cozer e assar pratos numa po‐ sição de prateleira. Consulte o capítulo "Cuidados e Cozedura limpeza" para mais informações so‐ Convencional / bre: Limpeza com água. Limpeza com água 6.3 Notas sobre: Ventilado com Resistência e design ecológico de acordo com as normas EU 65/2014 e EU 66/2014. Testes de acordo com a norma EN 60350-1. A porta do forno deve estar fechada durante a cozedura para que a função não seja interrompida e o forno funcione com a mais alta eficiência energética possível. Quando utiliza esta função a lâmpada é automaticamente desativada. Para instruções de cozedura, consulte o capítulo "Sugestões e dicas", Ventilado com Resistência. Para recomendações gerais sobre poupança de energia, consulte o capítulo "Eficiência energética", Poupança de energia. Esta função foi utilizada para cumprir com os requisitos de classe de eficiência energética 7. FUNÇÕES DE RELÓGIO 7.1 Como definir: Fim de cozedura Para definir a hora de desligar funções do forno. Passo 1 Selecionar a função do forno e a temperatura. Passo 2 Rodar o botão do temporizador até ao fim. Passo 3 Rodar o botão do temporizador para definir a hora de desligar O sinal soa no tempo definido e o forno desliga. Passo 4 Rodar o botão das funções do forno e o botão da temperatura para a posição de desligado (off). 8. UTILIZAR OS ACESSÓRIOS AVISO! Consulte os capítulos relativos à segurança. 8.1 Inserir acessórios Um pequeno entalhe na parte inferior aumenta a segurança. Estes entalhes são 102 PORTUGUÊS também dispositivos anti-inclinação. A armação elevada à volta da prateleira impede que os recipientes deslizem para fora da prateleira. Prateleira em grelha: Introduza a prateleira entre as barras-guia dos apoios para prateleiras e certifique-se de que os pés de apoio ficam para baixo. Tabuleiro para assar: Introduza o tabuleiro entre as barras-guia do apoio para prateleiras. Prateleira em grelha, Tabuleiro para assar: Introduza o tabuleiro entre as barras-guia dos apoios para prateleiras e a prateleira em grelha sobre as barras imediatamente acima. 9. FUNÇÕES ADICIONAIS 9.1 Ventoinha de arrefecimento Quando o forno está a funcionar, a ventoinha de arrefecimento é ativada automaticamente para manter as superfícies do forno frias. Se desligar o forno, a ventoinha de arrefecimento pode continuar a funcionar aé o forno arrefecer. sobreaquecimento perigoso. Para evitar isso, o forno possui um termóstato de segurança que corta a alimentação elétrica. O forno volta a ativar-se automaticamente quando a temperatura baixar. 9.2 Termóstato de segurança Se o forno for utilizado incorretamente ou tiver alguma anomalia, pode ocorrer um PORTUGUÊS 103 10. SUGESTÕES E DICAS Cozer bolos Não abra a porta do forno até ter decorrido 3/4 do tempo de cozedura. Consulte os capítulos relativos à segurança. 10.1 Recomendações para cozinhar O forno possui cinco posições de prateleira. Conte as posições de prateleira a partir do fundo do forno. O forno pode ter um processo para cozer ou assar diferente do forno que utilizava anteriormente. As tabelas em baixo indicam regulações de temperatura, tempos de cozedura e posições de prateleira para algumas receitas comuns. Se não encontrar as regulações para alguma receita específica, procure uma semelhante. O forno possui um sistema especial que faz circular o ar e renova constantemente o vapor. Este sistema permite cozinhar num ambiente a vapor e manter os alimentos macios por dentro e estaladiços por fora. Diminui o tempo de cozedura e o consumo de energia. Se utilizar dois tabuleiros para assar em simultâneo, mantenha um nível vazio entre os mesmos. Cozinhar carne e peixe Deixe a carne repousar cerca de 15 minutos antes de a cortar, para não perder os sucos. Para evitar demasiado fumo no forno quando assar, coloque um pouco de água no tabuleiro para grelhar. Para evitar a condensação de fumo, acrescente água sempre que ele secar. Tempos de cozedura Os tempos de cozedura dependem do tipo de alimento, da consistência e do volume. No início, monitorize o desempenho quando cozinhar. Quando utilizar este aparelho, procure as melhores regulações (grau de cozedura, tempo de cozedura, etc.) para os seus recipientes e para as suas receitas e quantidades. 10.2 Bolos e assados BO‐ LOS Cozedura Convencio‐ Cozedura ventilada nal (min) (°C) (°C) Receitas batidas 170 2 160 3 45 – 60 Forma de bolo Massa amantei‐ gada 170 2 160 3 20 – 30 Forma de bolo Cheesecake but‐ termilk 170 1 160 1 70 – 80 Forma de bolo, Ø 26 cm Strudel 175 3 150 2 60 – 80 Tabuleiro para as‐ sar Torta de compota 170 2 165 2 30 – 40 Tabuleiro para as‐ sar Bolo-rei, pré-aqueça o forno vazio 160 2 150 2 90 – 120 Forma de bolo, Ø 20 cm 104 PORTUGUÊS LOS BO‐ Cozedura Convencio‐ Cozedura ventilada nal (min) (°C) (°C) Bolo de ameixa, pré-aqueça o for‐ no vazio 175 1 160 2 50 – 60 Forma retangular Biscoitos 140 3 140 – 150 3 30 – 35 Tabuleiro para as‐ sar Biscoitos, dois ní‐ veis - - 140 – 150 2e4 35 - 40 Tabuleiro para as‐ sar Biscoitos, três ní‐ veis 120 3 120 3 80 – 100 Tabuleiro para as‐ sar Merengue 190 3 180 3 15 – 20 Tabuleiro para as‐ sar Pãezinhos, pré-aqueça o forno vazio 190 3 170 3 25 – 35 Tabuleiro para as‐ sar Éclairs, um nível 180 2 170 2 45 – 70 Tabuleiro para as‐ sar Éclairs, dois ní‐ veis 160 1 150 2 110 – 120 Tabuleiro para as‐ sar Tartes 170 1 160 1 50 – 60 Tabuleiro para as‐ sar Bolo de fruta rico 190 3 190 3 12 – 20 Tabuleiro para as‐ sar Bolo de duas ca‐ madas 190 3 170 3 25 – 35 Tabuleiro para as‐ sar Pré-aqueça o forno vazio. PÃO E PIZZA Cozedura Convencio‐ nal Cozedura ventilada (min) (°C) (°C) Pão branco, 1 – 2 unidades, 0,5 kg cada 190 1 190 1 60 – 70 - Pão de centeio, não é necessário pré-aquecer 190 1 180 1 30 – 45 Forma retangular Pãezinhos, 6 – 8 pastéis 230 – 250 1 230 – 250 1 10 – 20 Tabuleiro para as‐ sar PORTUGUÊS 105 PÃO E PIZZA Cozedura Convencio‐ nal Cozedura ventilada (min) (°C) (°C) Pizza massa fina 200 3 190 3 10 – 20 Tabuleiro para as‐ sar / Tabuleiro pa‐ ra grelhar Scones 200 3 190 3 10 – 20 Tabuleiro para as‐ sar Pré-aqueça o forno vazio. Utilize uma forma de bolo. Cozedura Convencional Cozedura ventilada FLANS (min) (°C) (°C) Empadas, não é ne‐ cessário pré-aquecer 200 2 180 2 40 – 50 Flan de vegetais, não é necessário pré-aquecer 200 2 175 2 45 – 60 Quiches 180 1 180 1 50 – 60 Lasanha 180 – 190 2 180 – 190 2 25 – 40 Canelones 180 – 190 2 180 – 190 2 25 – 40 Utilize a prateleira em grelha. Cozedura Convencional Cozedura ventilada CARNE (min) (°C) (°C) Carne De Vaca 200 2 190 2 50 – 70 Lombo de porco 180 2 180 2 90 – 120 Vitela 190 2 175 2 90 – 120 Carne assada, mal passada 210 2 200 2 50 – 60 Carne assada, média 210 2 200 2 60 – 70 Carne assada, bem passada 210 2 200 2 70 – 75 106 PORTUGUÊS Cozedura Convencional Cozedura ventilada CARNE (min) (°C) (°C) Pá de porco, com cou‐ 180 rato 2 170 2 120 – 150 Perna de porco, 2 uni‐ dades 180 2 160 2 100 – 120 Perna de borrego 190 2 175 2 110 – 130 Frango inteiro 220 2 200 2 70 – 85 Peru inteiro 180 2 160 2 210 – 240 Pato inteiro 175 2 220 2 120 – 150 Ganso inteiro 175 2 160 1 150 – 200 Coelho, cortado em pedaços 190 2 175 2 60 – 80 Lebre, cortada em pe‐ daços 190 2 175 2 150 – 200 Faisão inteiro 190 2 175 2 90 – 120 Cozedura Convencional Cozedura ventilada PEIXE (min) (°C) (°C) Truta / Dourada, 3 – 4 pei‐ 190 xes 2 175 2 40 – 55 Atum / Salmão, 4 – 6 file‐ tes 2 175 2 35 – 60 190 10.3 Turbo Grill Pré-aqueça o forno vazio. Utilize a primeira e a segunda posições da prateleira Para calcular o tempo do assado, multiplique o tempo dado na tabela abaixo pelos centímetros de espessura do filete. CARNE DE VACA Carne assada ou lom‐ bo, bem passado PORCO CARNE DE VACA (°C) (min) 170 - 180 8 - 10 (°C) (min) 160 - 180 90 - 120 5-6 Pá / Cachaço / Fiam‐ bre, 1 - 1,5 kg Costeletas / Entrecos‐ to, 1 - 1,5 kg 170 - 180 60 - 90 6-8 (°C) (min) Carne assada ou lom‐ bo, mal passado 190 - 200 Carne assada ou lom‐ bo, médio 180 - 190 PORTUGUÊS 107 PORCO (°C) (min) Rolo de carne, 0,75 - 1 kg 160 - 170 50 - 60 Joelho de porco, pré-cozido, 0,75 - 1 kg 150 - 170 90 - 120 AVES (°C) (min) Aves, partes, 0,2 0,25 kg cada 200 - 220 30 - 50 1/2 Frango, 0,4 - 0,5 kg cada 190 - 210 35 - 50 Frango, galinha, 1 1,5 kg 190 - 210 50 - 70 Pato, 1,5 - 2 kg 180 - 200 80 - 100 (°C) (min) Ganso, 3,5 - 5 kg 160 - 180 120 - 180 Vitela assada, 1 kg 160 - 180 90 - 120 Peru, 2,5 - 3,5 kg 160 - 180 120 - 150 Mão de vitela, 1,5 - 2 kg 160 - 180 120 - 150 Peru, 4 - 6 kg 140 - 160 150 - 240 PEIXE (AO VAPOR) (°C) (min) 210 - 220 40 - 60 VITELA CORDEIRO (°C) (min) Perna de borrego / Borrego assado, 1 1,5 kg 150 - 170 100 - 120 Lombo de borrego, 1 1,5 kg 160 - 180 40 - 60 Peixe, inteiro (até 1Kg), 1 - 1,5 kg 10.4 Descongelar (kg) Tempo de des‐ congelação (min.) Tempo extra de des‐ congelação (min.) Frango 1 100 - 140 20 - 30 Coloque o frango sobre um pires virado ao contrá‐ rio e este sobre um prato grande. Vire a meio do tempo. Carne 1 100 - 140 20 - 30 Vire a meio do tempo. 0,5 90 - 120 Natas 2 x 0,2 80 - 100 10 - 15 Também é possível bater as natas quando ainda es‐ tão ligeiramente congela‐ das. Truta 0,15 25 - 35 10 - 15 - Morangos 0,3 30 - 40 10 - 20 - 108 PORTUGUÊS (kg) Tempo de des‐ congelação (min.) Tempo extra de des‐ congelação (min.) Manteiga 0,25 30 - 40 10 - 15 - Gateau 1,4 60 60 - 10.5 Secagem - Cozedura ventilada Cubra os tabuleiros com papel impermeável à gordura ou papel vegetal. Para obter o melhor resultado, desligue o forno a meio do tempo de secagem, abra a porta e deixe arrefecer durante uma noite para terminar a secagem. Para 1 tabuleiro, utilize a terceira posição da prateleira. Para 2 tabuleiros, utilize a primeira e quarta posições da prateleira. LEGUMES (°C) (h) Legumes para sopa 60 - 70 5-6 Cogumelos 50 - 60 6-8 Ervas aromáticas 40 – 50 2-3 Defina a temperatura para 60 a 70 ºC. FRUTA LEGUMES (°C) (h) (h) Ameixas 8 - 10 8 - 10 Feijões 60 - 70 6-8 Alperces Pimentos 60 - 70 5-6 Fatias de maçã 6-8 Peras 6-9 10.6 Ventilado com Resistência - acessórios recomendados Utilize os tabuleiros e recipientes escuros e não refletores. Têm melhor absorção do calor do que a loiça de cor clara e refletora. Forma para pizza Assadeira Escuro, não refletor 28 cm de diâmetro Escuro, não refletor 26 cm de diâmetro Formas individu‐ ais Vitrocerâmica 8 cm de diâmetro, 5 cm de altura Forma com base para flan Escuro, não refletor 28 cm de diâmetro 10.7 Ventilado com Resistência Para obter os melhores resultados, siga as sugestões indicadas na tabela abaixo. PORTUGUÊS 109 (°C) (min.) Pastéis doces, 12 unidades tabuleiro para assar ou tabu‐ leiro para recolha de gorduras 175 3 40 - 50 Pasteis, 9 unidades tabuleiro para assar ou tabu‐ leiro para recolha de gorduras 180 2 35 - 45 Pizza, congelada, 0,35 kg prateleira em grelha 180 2 45 - 55 Torta suíça tabuleiro para assar ou tabu‐ leiro para recolha de gorduras 170 2 30 - 40 Brownie tabuleiro para assar ou tabu‐ leiro para recolha de gorduras 170 2 45 - 50 Soufflé, 6 unidades formas pequenas de cerâmica na prateleira em grelha 190 3 45 - 55 Base de flan de mas‐ sa batida forma de base de flan na pra‐ teleira em grelha 180 2 35 - 45 Bolo de duas cama‐ das assadeira na prateleira em grelha 170 2 35 - 50 Peixe escalfado, 0,3 kg tabuleiro para assar ou tabu‐ leiro para recolha de gorduras 180 2 35 - 45 Peixe, inteiro (até 1Kg), 0,2 kg tabuleiro para assar ou tabu‐ leiro para recolha de gorduras 180 3 25 - 35 Filete de peixe, 0,3 kg forma de piza na prateleira em 170 grelha 3 30 - 40 Carne escalfada, 0,25 tabuleiro para assar ou tabu‐ kg leiro para recolha de gorduras 180 3 35 - 45 Shashlik, 0,5 kg tabuleiro para assar ou tabu‐ leiro para recolha de gorduras 180 3 40 - 50 Biscoitos, 16 unida‐ des tabuleiro para assar ou tabu‐ leiro para recolha de gorduras 150 2 30 - 45 Biscoitos de amên‐ doa, 20 unidades tabuleiro para assar ou tabu‐ leiro para recolha de gorduras 180 2 45 - 55 Queques, 12 unida‐ des tabuleiro para assar ou tabu‐ leiro para recolha de gorduras 170 2 30 - 40 Pastelaria salgada, 16 unidades tabuleiro para assar ou tabu‐ leiro para recolha de gorduras 170 2 35 - 45 Biscoitos de massa fi‐ tabuleiro para assar ou tabu‐ na, 20 unidades leiro para recolha de gorduras 150 2 40 - 50 Tarteletes, 8 unida‐ des tabuleiro para assar ou tabu‐ leiro para recolha de gorduras 170 2 30 - 40 Legumes, escalfados, tabuleiro para assar ou tabu‐ 0,4 kg leiro para recolha de gorduras 180 2 35 - 45 forma de piza na prateleira em 180 grelha 3 35 - 45 Omeleta de legumes 110 PORTUGUÊS (°C) Legumes mediterrâni‐ tabuleiro para assar ou tabu‐ cos, 0,7 kg leiro para recolha de gorduras (min.) 180 4 35 - 45 10.8 Informação para testes Testes de acordo com a norma IEC 60350-1. (°C) (min) Tabuleiro para assar 3 170 20 - 30 - Bolos pe‐ Cozedura venti‐ Tabuleiro quenos, 20 lada para assar por tabuleiro 3 150 160 20 - 35 - Bolos pe‐ Cozedura venti‐ Tabuleiro quenos, 20 lada para assar por tabuleiro 2e4 150 160 20 - 35 - Tarte de maçã, 2 for‐ mas, Ø 20 cm Cozedura Con‐ vencional Prateleira em grelha 2 180 70 - 90 - Tarte de maçã, 2 for‐ mas, Ø 20 cm Cozedura venti‐ Prateleira lada em grelha 2 160 70 - 90 - Prateleira em grelha 2 170 40 - 50 Pré-aqueça o forno du‐ rante 10 minutos. Pão-de-ló, Cozedura venti‐ Prateleira forma de lada em grelha bolo de Ø26 cm 2 160 40 - 50 Pré-aqueça o forno du‐ rante 10 minutos. Pão-de-ló, Cozedura venti‐ Prateleira forma de lada em grelha bolo de Ø26 cm 2e4 160 40 - 60 Pré-aqueça o forno du‐ rante 10 minutos. Massa amanteiga‐ da Cozedura venti‐ Tabuleiro lada para assar 3 140 150 20 - 40 - Massa amanteiga‐ da Cozedura venti‐ Tabuleiro lada para assar 2e4 140 150 25 - 45 - Bolos pe‐ Cozedura Con‐ quenos, 20 vencional por tabuleiro Pão-de-ló, Cozedura Con‐ forma de vencional bolo de Ø26 cm PORTUGUÊS 111 (°C) (min) Massa amanteiga‐ da Cozedura Con‐ vencional Tabuleiro para assar 3 140 150 25 - 45 Tosta, 4 - 6 unidades Grelhador Prateleira em grelha 4 máx. 2 - 3 minutos para Pré-aqueça o forno du‐ o primeiro lado; 2 - rante 3 minutos. 3 minutos para o segundo lado Prateleira em grelha e tabuleiro de recolha de gorduras 4 máx. 20 - 30 Hambúrguer Grelhador de vaca, 6 unidades, 0,6 kg - Coloque a prateleira em grelha no quarto nível e o tabuleiro de recolha de gorduras no terceiro nível do forno. Vire os alimentos a meio do tempo de co‐ zedura. Pré-aqueça o forno du‐ rante 3 minutos. 11. MANUTENÇÃO E LIMPEZA AVISO! Consulte os capítulos relativos à segurança. 11.1 Notas sobre a limpeza Limpe a parte da frente do forno com um pano macio com água morna e um detergente su‐ ave. Limpe e verifique a junta da porta em torno da moldura da cavidade. Utilize uma solução de limpeza para limpar as superfícies metálicas. Agentes de lim‐ peza Limpe manchas com um detergente suave. Limpe a cavidade após cada utilização. A acumulação de gordura ou outros resíduos pode provocar incêndios. Utilização diária Pode ocorrer condensação de humidade no forno ou nos painéis de vidro da porta. Para di‐ minuir a condensação, deixe o forno funcionar durante 10 minutos antes da cozedura. Não guarde alimentos no forno durante mais de 20 minutos. Seque a cavidade com um pano macio após cada utilização. Limpe todos os acessórios do forno após cada utilização e deixe-os secar. Utilize um pano macio com água morna e um detergente suave. Não lave os acessórios na máquina de la‐ var loiça Não limpe acessórios anti-aderentes utilizando detergentes abrasivos ou objetos afiados. Acessórios 112 PORTUGUÊS 11.2 Como remover: Apoios para prateleiras Retire os apoios para prateleiras para limpar o forno. Passo 1 Desligue o forno e aguarde até estar frio. Passo 2 Puxe a parte da frente do apoio para prateleiras para fora da parede late‐ ral. Passo 3 Puxe a parte de trás do apoio para prateleiras para fora da parede lateral e retire-o. Passo 4 Instale os apoios para grelhas na se‐ quência inversa. 11.3 Como utilizar: Limpeza com água Este procedimento de limpeza utiliza humidade para remover gordura e partículas de alimentos do forno. Passo 1 Verta água para o baixo relevo da cavi‐ dade: 300 ml. 1 Passo 2 2 Selecione a função: . Passo 3 Regule a temperatura para 90 °C. Passo 4 Deixe o forno funcionar durante 30 min. Passo 5 Desligue o forno. Passo 6 Aguarde até que o forno esteja frio. Se‐ que a cavidade com um pano macio. 11.4 Como remover e instalar: Porta A porta do forno tem dois painéis de vidro. Pode remover a porta do forno e o painel de vidro interno para limpar. Leia todas as instruções sobre "Remoção e instalação da porta" antes de remover os painéis de vidro. CUIDADO! Não utilize o forno sem os painéis de vidro. Passo 1 Abra completamente a porta e segure em ambas as dobradiças. Passo 2 Levante e rode as alavancas totalmente em ambas as dobradiças. PORTUGUÊS 113 Passo 3 Feche a porta do forno até meio, parando na primeira posição de abertura. Em seguida, levante e puxe a porta e remova-a dos en‐ caixes. Passo 4 Coloque a porta numa superfície estável protegida por um pano macio. Passo 5 Segure no friso da porta (B) no rebordo su‐ perior da porta, nos dois lados, e pressione para dentro para soltar o fecho de encaixe. Passo 6 Puxe o friso da porta para a frente para o re‐ mover. Passo 7 Segure na extremidade superior do painel de vidro da porta e puxe-o para fora com cuidado. Certifique-se de que o vidro desliza totalmente para fora dos suportes. 2 B 1 Passo 8 Limpe os painéis de vidro com água e sabão Seque cuidadosamente os painéis de vidro. Não lave os acessórios na máquina de lavar loiça. Passo 9 Após a limpeza, instale o painel de vidro e a porta do forno. A zona com a impressão em relevo tem de ficar volta‐ da para o lado interior da porta. Certifique-se de que, após a instalação, a superfície da moldura do painel de vidro nas zonas da impressão em relevo não é ru‐ gosa. Quando instalado corretamente, o friso para porta emite um clique. Certifique-se de que instala o painel de vidro interior corretamente nos respetivos encaixes. 114 PORTUGUÊS A 11.5 Como substituir: Lâmpada Segure sempre a lâmpada de halogéneo com um pano para evitar a queima de resíduos de gordura na lâmpada. AVISO! Risco de choque elétrico. A lâmpada pode estar quente. Antes de substituir a lâmpada: Passo 1 Passo 2 Passo 3 Desligue o forno. Aguarde até que o forno esteja frio. Desligue o forno da corrente elétri‐ ca. Coloque um pano no fundo da cavi‐ dade. Lâmpada posterior Passo 1 Rode a proteção de vidro para a retirar. Passo 2 Limpe a proteção de vidro. Passo 3 Substitua a lâmpada por uma lâmpada adequada, resistente ao calor até 300 °C. Passo 4 Instale a proteção de vidro. 12. RESOLUÇÃO DE PROBLEMAS AVISO! Consulte os capítulos relativos à segurança. 12.1 O que fazer se... Em quaisquer casos não incluídos nesta tabela, contacte um centro de assistência autorizado. Problema Certifique-se de que... O forno não aquece. O disjuntor está desliga‐ do. A junta da porta está da‐ nificada. Não utilize o forno. Con‐ tacte um Centro de As‐ sistência Técnica Autori‐ zado. Fim de cozedura - não está definido. Ajuste: Fim de cozedura. Consulte “Funções do re‐ lógio”. Problema Certifique-se de que... A lâmpada não funciona. A lâmpada está fundida. 12.2 Dados para a Assistência Técnica Se não conseguir encontrar uma solução para o problema, contacte o concessionário ouum Centro de Assistência Técnica Autorizado. Os dados de contacto do Centro de Assistência Técnica encontram-se na placa de características. A placa de características está na moldura frontal da cavidade do forno. Não remova a placa de características da cavidade do forno. Recomendamos que anote os dados aqui: Modelo (MOD.) ......................................... PORTUGUÊS 115 Recomendamos que anote os dados aqui: Número do produto (PNC) ......................................... Número de série (S.N.) ......................................... 13. EFICIÊNCIA ENERGÉTICA 13.1 Informação de produto e folha de informação de produto* Nome do fornecedor Zanussi Identificação do modelo ZOHKF1X1 949496249 ZOHNF1K1 949496304 ZOHNF1W1 949496305 Índice de eficiência energética 81.2 Classe de eficiência energética A+ Consumo de energia com uma carga normal, modo convencional 0.93 kWh/ciclo Consumo de energia com uma carga normal, modo ventilado 0.69 kWh/ciclo Número de cavidades 1 Fonte de calor Eletricidade Volume 72 l Tipo de forno Forno de encastrar Massa ZOHKF1X1 26.7 kg ZOHNF1K1 26.7 kg ZOHNF1W1 26.7 kg * Para a União Europeia de acordo com os Regulamentos 65/2014 e 66/2014 da UE. Para a República da Bielorrússia de acordo com a norma STB 2478-2017, Anexo G; STB 2477-2017, Anexos A e B. Para a Ucrânia de acordo com a norma 568/32020. A classe de eficiência energética não se aplica na Rússia. EN 60350-1 - Aparelhos elétricos domésticos para cozinhar - Parte 1: Placas, fornos, fornos a vapor e grelhado‐ res - Métodos de medição do desempenho. 13.2 Poupança de energia O forno possui funções que ajudam a poupar energia nos cozinhados de todos os dias. Certifique-se de que a porta do forno está fechada quando o forno funcionar. Não abra a porta do forno muitas vezes durante o funcionamento. Mantenha a junta da porta limpa e certifique-se de que está bem fixa na posição correcta. 116 PORTUGUÊS Utilize recipientes de metal para melhorar a poupança de energia. Quando possível, não pré-aqueça o forno antes de cozinhar. Quando preparar vários pratos de uma vez, reduza ao mínimo possível os intervalos entre cozeduras. Cozinhar com a ventoinha Sempre que possível, utilize as funções de cozedura que utilizam a ventoinha, para poupar energia. Calor residual Quando a duração da cozedura for superior a 30 min, reduza a temperatura do forno para 3 a 10 min no mínimo antes do fim da cozedura. O calor residual no interior do forno concluirá a cozedura. Ventilado com Resistência Função concebida para poupar energia durante a cozedura. Quando utilizar esta função, a lâmpada está desligada. Utilize o calor residual para aquecer outros pratos. Manter os alimentos quentes Para utilizar o calor residual para manter uma refeição quente, seleccione a regulação de temperatura mais baixa possível. 14. PREOCUPAÇÕES AMBIENTAIS Recicle os materiais que apresentem o símbolo . Coloque a embalagem nos contentores indicados para reciclagem. Ajude a proteger o ambiente e a saúde pública através da reciclagem dos aparelhos eléctricos e electrónicos. Não elimine os aparelhos que tenham o símbolo juntamente com os resíduos domésticos. Coloque o produto num ponto de recolha para reciclagem local ou contacte as suas autoridades municipais. PORTUGUÊS 117 VISITE NUESTRO SITIO WEB PARA: Obtener consejos, folletos, soluciones a problemas e información de servicio y reparación: www.zanussi.com/support Salvo modificaciones. CONTENIDO 1. INFORMACIÓN SOBRE SEGURIDAD.......................................................................118 2. INSTRUCCIONES DE SEGURIDAD.......................................................................... 120 3. INSTALACIÓN............................................................................................................ 123 4. DESCRIPCIÓN DEL PRODUCTO..............................................................................124 5. ANTES DEL PRIMER USO.........................................................................................124 6. USO DIARIO............................................................................................................... 125 7. FUNCIONES DEL RELOJ...........................................................................................126 8. USO DE LOS ACCESORIOS..................................................................................... 126 9. FUNCIONES ADICIONALES...................................................................................... 127 10. CONSEJOS...............................................................................................................128 11. MANTENIMIENTO Y LIMPIEZA............................................................................... 135 12. SOLUCIÓN DE PROBLEMAS.................................................................................. 138 13. EFICACIA ENERGÉTICA......................................................................................... 139 1. INFORMACIÓN SOBRE SEGURIDAD Antes de instalar y utilizar el aparato, lea atentamente las instrucciones facilitadas. El fabricante no se hace responsable de lesiones o daños producidos como resultado de una instalación o un uso incorrectos. Conserve siempre estas instrucciones en lugar seguro y accesible para futuras consultas. 1.1 Seguridad de niños y personas vulnerables • Este aparato puede ser utilizado por niños de 8 años en adelante y personas cuyas capacidades físicas, sensoriales o mentales estén disminuidas o que carezcan de la experiencia y conocimientos suficientes para manejarlo, siempre que cuenten con las instrucciones o la supervisión sobre el uso del electrodoméstico de forma segura y comprendan los riesgos. Hay que mantener alejados del producto a los niños de menos de 8 años, así como a las 118 ESPAÑOL • • • • • personas con minusvalías importantes y complejas, salvo que estén bajo supervisión continua. No deje que los niños jueguen con el aparato. Mantenga todo el material de embalaje fuera del alcance de los niños y deséchelo de forma adecuada. ADVERTENCIA: Mantenga a los niños y mascotas alejados del aparato cuando esté funcionando o enfriándose. Las partes accesibles se calientan durante el uso. Si este aparato tiene un bloqueo de seguridad para niños, debe activarlo. La limpieza y mantenimiento de usuario del aparato no podrán ser realizados por niños sin supervisión. 1.2 Seguridad general • • • • • • • • • Solo un electricista cualificado puede instalar este aparato y sustituir el cable. ADVERTENCIA: El aparato y las piezas accesibles se calientan mucho durante el funcionamiento. Preste mucha atención para no tocar las resistencias. Utilice siempre guantes de horno cuando introduzca o retire accesorios o utensilios refractarios. Antes de realizar tareas de mantenimiento, desenchufe el aparato de la red eléctrica. ADVERTENCIA: Asegúrese de que el aparato está desconectado antes de reemplazar la lámpara con el fin de impedir que se produzca una descarga eléctrica. No utilice el aparato antes de instalarlo en la estructura empotrada. No utilice un limpiador a vapor para limpiar el aparato. No utilice limpiadores abrasivos ásperos ni rascadores de metal afilado para limpiar la puerta de cristal si no quiere arañar su superficie, lo que podría hacer que el cristal se hiciese añicos. Si el cable de alimentación eléctrica sufre algún daño, el fabricante, su servicio técnico autorizado o un profesional cualificado tendrán que cambiarlo para evitar riesgos eléctricos. ESPAÑOL 119 • Para quitar los carriles laterales, tire primero del frontal del carril y luego separe el extremo trasero de las paredes. Coloque los carriles laterales en el orden inverso. 2. INSTRUCCIONES DE SEGURIDAD 2.1 Instalación ADVERTENCIA! Sólo un técnico cualificado puede instalar el aparato. • • • • • • • • • Retire todo el embalaje. No instale ni utilice un aparato dañado. Siga las instrucciones de instalación suministradas con el aparato. Tenga cuidado al mover el aparato, porque es pesado. Utilice siempre guantes de protección y calzado cerrado. No tire nunca del aparato sujetando el asa. Instale el aparato en un lugar seguro y adecuado que cumpla los requisitos de instalación. Respete siempre la distancia mínima entre el aparato y los demás electrodomésticos y mobiliario. Antes de montar el aparato, compruebe si la puerta del horno se abre sin limitaciones. El aparato dispone de un sistema de enfriamiento eléctrico. Debe utilizarse con alimentación eléctrica. Altura mínima del armario (Altura mínima del armario debajo de la encimera) Ancho del armario Tamaño mínimo de la abertura de ventilación. Abertura situada en la par‐ te trasera inferior 560x20 mm Longitud del cable de ali‐ mentación. El cable está en la esquina derecha de la parte trasera 1500 mm Tornillos de montaje 4x25 mm 2.2 Conexión eléctrica ADVERTENCIA! Riesgo de incendios y descargas eléctricas. • • • • • 560 mm 550 (550) mm Altura de la parte frontal del aparato 594 mm Altura de la parte trasera del aparato 576 mm Anchura de la parte frontal del aparato 595 mm Anchura de la parte trasera del aparato 559 mm Fondo del aparato 569 mm Fondo empotrado del apa‐ rato 548 mm ESPAÑOL 1022 mm 590 (600) mm Profundidad del armario 120 Fondo con la puerta abier‐ ta • • • Todas las conexiones eléctricas deben realizarlas electricistas cualificados. El aparato debe conectarse a tierra. Asegúrese de que los parámetros de la placa de características son compatibles con los valores eléctricos del suministro eléctrico. Utilice siempre una toma con aislamiento de conexión a tierra correctamente instalada. No utilice adaptadores de enchufes múltiples ni cables prolongadores. Asegúrese de no provocar daños en el enchufe ni en el cable de red. Si es necesario cambiar el cable de alimentación del aparato, debe hacerlo el centro de servicio técnico autorizado. Evite que el cable de red toque o entre en contacto con la puerta del aparato o con el hueco por debajo del aparato, especialmente mientras funciona o si la puerta está caliente. Los mecanismos de protección contra descargas eléctricas de componentes con corriente y aislados deben fijarse de forma que no puedan aflojarse sin utilizar herramientas. • • • • • • Conecte el enchufe a la toma de corriente únicamente cuando haya terminado la instalación. Asegúrese de tener acceso al enchufe del suministro de red una vez finalizada la instalación. Si la toma de corriente está floja, no conecte el enchufe. No desconecte el aparato tirando del cable de conexión a la red. Tire siempre del enchufe. Use únicamente dispositivos de aislamiento apropiados: línea con protección contra los cortocircuitos, fusibles (tipo tornillo que puedan retirarse del soporte), dispositivos de fuga a tierra y contactores. La instalación eléctrica debe tener un dispositivo de aislamiento que permita desconectar el aparato de todos los polos de la red. El dispositivo de aislamiento debe tener una apertura de contacto con una anchura mínima de 3 mm. El aparato se suministra con enchufe y cable de red. Tipos de cables aplicables para su instala‐ ción o cambio para Europa: H07 RN-F, H05 RN-F, H05 RRF, H05 VV-F, H05 V2V2-F (T90), H05 BB-F En lo que respecta a la sección del cable, consulte la potencia total que figura en la placa de características. También puede consultar la tabla: Potencia total (W) Sección del cable (mm²) máximo 1380 3 x 0.75 máximo 2300 3x1 máximo 3680 3 x 1.5 El cable de tierra (cable verde/amarillo) debe tener 2 cm más que los cables de fase y del neutro (cables azul y marrón). 2.3 Uso ADVERTENCIA! Riesgo de lesiones, quemaduras y descargas eléctricas o explosiones. • • • • • • • • • • • • Este aparato está diseñado exclusivamente para uso doméstico. No cambie las especificaciones de este aparato. Cerciórese de que los orificios de ventilación no están obstruidos. No deje nunca el aparato desatendido mientras está en funcionamiento. Desactive el aparato después de cada uso. Tenga cuidado al abrir la puerta del aparato cuando éste esté en funcionamiento. Pueden liberarse vapores calientes. No utilice el aparato con las manos mojadas ni cuando entre en contacto con el agua. No ejerza presión sobre la puerta abierta. No utilice el aparato como superficie de trabajo ni de almacenamiento. Abra la puerta del aparato con cuidado. El uso de ingredientes con alcohol puede generar una mezcla de alcohol y aire. Procure que no haya chispas ni fuego encendido cerca cuando se abra la puerta del aparato. No coloque productos inflamables ni objetos mojados con productos inflamables dentro, cerca o encima del aparato. ADVERTENCIA! Podría dañar el aparato. • Para evitar daños o decoloraciones en el esmalte: – no coloque utensilios refractarios ni otros objetos directamente en la parte inferior del aparato. – no coloque papel de aluminio directamente en la parte inferior del interior del aparato. – No ponga agua directamente en el aparato caliente. – No deje platos húmedos ni comida en el aparato una vez finalizada la cocción. – Preste especial atención al desmontar o instalar los accesorios. ESPAÑOL 121 • • • • • La pérdida de color del esmalte o el acero inoxidable no afecta al rendimiento del aparato. Utilice una bandeja honda para pasteles húmedos. Los jugos de las frutas podrían ocasionar manchas permanentes. Este aparato está diseñado exclusivamente para cocinar. No debe utilizarse para otros fines, por ejemplo, como calefacción. Cocine siempre con la puerta del horno cerrada. Si el aparato se instala detrás de un panel de un mueble (por ejemplo una puerta) asegúrese de que la puerta nunca esté cerrada mientras funciona el aparato. El calor y la humedad pueden acumularse detrás de un panel del armario cerrado y provocar daños al aparato, el alojamiento o el suelo. No cierre del panel del armario hasta que el aparato se haya enfriado completamente después de su uso. 2.4 Mantenimiento y limpieza ADVERTENCIA! Existe riesgo de lesiones, incendios o daños al aparato. • • • • • • Antes de proceder con el mantenimiento, apague el aparato y desconecte el enchufe de la red. Asegúrese de que el aparato esté frío. Los paneles de cristal pueden romperse. Cambie inmediatamente los paneles de cristal de la puerta que estén dañados. Póngase en contacto con el servicio técnico autorizado. Tenga cuidado al desmontar la puerta del aparato. ¡La puerta es muy pesada! Limpie periódicamente el aparato para evitar el deterioro del material de la superficie. Limpie el aparato con un paño suave humedecido. Utilice solo detergentes neutros. No utilice productos abrasivos, 122 ESPAÑOL • estropajos duros, disolventes ni objetos metálicos. Si utiliza aerosoles de limpieza para hornos, siga las instrucciones de seguridad del envase. 2.5 Luces interiores ADVERTENCIA! Riesgo de descarga eléctrica. • • En cuanto a la(s) bombilla(s) de este producto y las de repuesto vendidas por separado: Estas bombillas están destinadas a soportar condiciones físicas extremas en los aparatos domésticos, como la temperatura, la vibración, la humedad, o están destinadas a señalar información sobre el estado de funcionamiento del aparato. No están destinadas a utilizarse en otras aplicaciones y no son adecuadas para la iluminación de estancias domésticas. Utilice solo bombillas de las mismas características . 2.6 Asistencia • • Para reparar el aparato, póngase en contacto con el centro de servicio autorizado. Utilice solamente piezas de recambio originales. 2.7 Eliminación ADVERTENCIA! Existe riesgo de lesiones o asfixia. • • • Desconecte el aparato de la red. Corte el cable eléctrico cerca del aparato y deséchelo. Retire el pestillo de la puerta para evitar que los niños las mascotas queden atrapados en el aparato. 3. INSTALACIÓN 3.1 Empotrado ADVERTENCIA! Consulte los capítulos sobre seguridad. (*mm) 548 21 min. 550 80 60 520 600 114 18 20 589 594 min. 560 595+-1 60 5 198 3 523 20 (*mm) 70 60 548 min. 550 20 520 18 590 21 114 min. 560 589 594 198 60 595+-1 5 3 523 20 ESPAÑOL 123 3.2 Fijación del horno al mueble 4. DESCRIPCIÓN DEL PRODUCTO 4.1 Resumen general 1 2 3 4 5 6 7 12 5 4 3 2 1 8 9 10 11 4.2 Accesorios • Parrilla Para bandejas de horno, pastel en molde, asados. 5. ANTES DEL PRIMER USO ADVERTENCIA! Consulte los capítulos sobre seguridad. 124 ESPAÑOL 1 2 3 4 5 6 7 8 9 10 11 12 • Panel de control Piloto/símbolo de alimentación Mando de las funciones de cocción Mando del temporizador Mando de en control (de la temperatura) Indicador/símbolo de temperatura Resistencia Bombilla Ventilador Contenedor de limpieza con agua Carril lateral, extraíble Posiciones de los estantes Bandeja Para bizcochos y galletas. 5.1 Antes del primer uso El horno puede emitir olores y humos durante el precalentamiento. Asegúrese de que la sala esté ventilada. 1. 2. Paso 1 Paso 2 Limpie el horno Precaliente el horno vacío Retire todos los accesorios y carriles de apoyo ex‐ traíbles del horno. Limpie el horno y los accesorios con un paño sua‐ ve humedecido en agua templada y jabón neutro. 1. Seleccione la temperatura máxima para la función: 2. . Tiempo: 1 h. Seleccione la temperatura máxima para la función: . Tiempo: 15 min. Apague el horno y espere a que esté frío. Coloque los accesorios y carriles de apoyo extraíbles en el horno. 6. USO DIARIO ADVERTENCIA! Consulte los capítulos sobre seguridad. 6.1 Cómo configurar: Función de cocción Paso 1 Gire el mando del horno para seleccio‐ nar una función de cocción. Paso 2 Gire el mando de control para seleccio‐ nar la temperatura. Paso 3 Al terminar la cocción, gire los mandos hasta la posición de apagado para apa‐ gar el horno. Función de cocción Horneado hú‐ medo + ventil. Aplicación El horno está apagado. Grill Turbo Para asar piezas de carne grandes o aves con hueso en una posición de bandeja. Para hacer gratenes y dorar. Para preparar pasteles con bases crujientes y conservar alimentos. Calor inferior Posición de apagado Para encender la luz. Función diseñada para ahorrar energía durante la cocción. Cuando se utiliza esta función, la temperatu‐ ra del horno puede diferir de la tem‐ peratura programada. La potencia calorífica puede reducirse. Para más información, consulte el capítu‐ lo “Uso diario”, Notas sobre: Hor‐ neado húmedo + ventil.. Permite asar o asar y hornear a la vez alimentos que requieran la mis‐ ma temperatura, utilizando más de Cocción ventil. una bandeja y sin que se transfie‐ ran los sabores. 6.2 Funciones de cocción Función de cocción Aplicación Función pizza Para hornear pizza. Para obtener un dorado más intenso y una base más crujiente Ajuste la temperatura a 230°C. Luz ESPAÑOL 125 Función de cocción Descongelar Cocción con‐ vencional / Limpieza con agua Aplicación energética y ecodiseño según EU 65/2014 y EU 66/2014. Pruebas conforme a EN 60350-1. Para descongelar alimentos (verdu‐ ra y fruta). El tiempo de desconge‐ lación depende de la cantidad y ta‐ maño de los alimentos congelados. La puerta del horno debe estar cerrada durante la cocción para que la función no se interrumpa y que el horno funcione con la máxima eficiencia energética posible. Para hornear y asar alimentos en una posición de bandeja. Consulte el capítulo "Mantenimiento y limpieza" para obtener más infor‐ mación sobre: Limpieza con agua. 6.3 Notas sobre: Horneado húmedo + ventil. Cuando se utiliza esta función, la bombilla se apaga automáticamente. Para las instrucciones de cocción, consulte el capítulo "Consejos", Horneado húmedo + ventil.. Puede consultar recomendaciones generales para ahorrar energía en el capítulo "Eficiencia energética", bajo consumo energético. Esta función se utilizaba para cumplir con los requisitos de categoría de eficiencia 7. FUNCIONES DEL RELOJ 7.1 Cómo ajustar: Fin de cocción Para ajustar la hora de desconexión de las funciones del horno. Paso 1 Programa la función y la temperatura del horno. Paso 2 Gira el mando del temporizador hasta el máximo. Paso 3 Gira el mando del temporizador para ajustar la hora de apagado. Cuando termina el tiempo ajustado, la señal suena y el horno se apaga. Paso 4 Gira el mando de las funciones del horno y el mando de la temperatura a la posición de apagado. 8. USO DE LOS ACCESORIOS ADVERTENCIA! Consulte los capítulos sobre seguridad. 8.1 Inserción de accesorios Una pequeña muesca en la parte superior aumenta la seguridad. Las hendiduras 126 ESPAÑOL también son dispositivos anti-vuelco. El borde elevado que rodea la bandeja evita que los utensilios de cocina resbalen de la parrilla. Parrilla: Inserte la parrilla entre las guías del carril y asegú‐ rese de que las hendiduras apuntan hacia abajo. Bandeja: Introduzca la bandeja entre las guías del carril de apoyo. Parrilla, Bandeja: Posicione la bandeja entre las guías del carril de apoyo y la parrilla en las guías de encima. 9. FUNCIONES ADICIONALES 9.1 Ventilador de enfriamiento Cuando el horno funciona, el ventilador de enfriamiento se pone en marcha automáticamente para mantener frías las superficies del horno. Una vez apagado el horno, el ventilador sigue funcionando hasta enfriarlo totalmente. sobrecalentamientos peligrosos. Para evitarlo, el horno dispone de un termostato de seguridad que interrumpe la alimentación. El horno se vuelve a encender automáticamente cuando desciende la temperatura. 9.2 Termostato de seguridad El funcionamiento incorrecto del horno o los componentes defectuosos pueden provocar ESPAÑOL 127 10. CONSEJOS Consulte los capítulos sobre seguridad. 10.1 Recomendaciones de cocción El horno tiene cinco niveles. Cuente los niveles de las parrillas desde abajo hacia arriba. El comportamiento de su horno puede ser diferente al del que tenía anteriormente. Las tablas siguientes le proporcionan los ajustes estándares de temperatura, tiempo de cocción y posición de la parrilla. Repostería No abra la puerta del horno antes de que transcurran 3/4 partes del tiempo de cocción establecido. Si utiliza dos bandejas al mismo tiempo, deje un nivel libre entre ambas. Carnes y pescados Antes de trinchar la carne, déjela reposar unos 15 minutos, como mínimo, para que retenga los jugos. Si no encuentra los ajustes para una receta especial, busque otra similar. Para evitar que se forme mucho humo en el horno, vierta un poco de agua en la bandeja honda. Para evitar la condensación de humos, añada agua después de cada vez que se seque. El horno está dotado con un sistema especial que hace circular el aire y recicla constantemente el vapor. Gracias a este sistema puede cocinar con un entorno de vapor y mantener los alimentos blandos en su interior y crujientes en su exterior. Reduce el tiempo de cocción y el consumo de energía. Inicialmente, supervise el rendimiento cuando cocine. Busque los ajustes óptimos (de calor, tiempo de cocción, etc.) para sus recipientes, recetas y cantidades cuando utilice este horno. Tiempos de cocción Los tiempos de cocción dependen del tipo de alimento, de su consistencia y del volumen. 10.2 Horneado y asado TELES PAS‐ Cocción convencio‐ nal Cocción ventil. (min) (°C) (°C) Masas batidas 170 2 160 3 45 - 60 Molde de pastel Masa con mante‐ quilla 170 2 160 3 20 - 30 Molde de pastel Tarta de queso (con suero) 170 1 160 1 70 - 80 Molde de pastel, Ø 26 cm Strudel 175 3 150 2 60 - 80 Bandeja Tarta de merme‐ lada 170 2 165 2 30 - 40 Bandeja Tronco de Navi‐ 160 dad, precaliente el horno vacío 2 150 2 90 - 120 Molde de pastel, Ø 20 cm 128 ESPAÑOL TELES PAS‐ Cocción convencio‐ nal Cocción ventil. (min) (°C) (°C) Pastel de ciruelas, 175 precaliente el hor‐ no vacío 1 160 2 50 - 60 Molde para pan Galletas 140 3 140 - 150 3 30 - 35 Bandeja Galletas, dos ni‐ veles - - 140 - 150 2y4 35 - 40 Bandeja Galletas, tres ni‐ veles 120 3 120 3 80 - 100 Bandeja Merengues 190 3 180 3 15 - 20 Bandeja Bollos, precaliente 190 el horno vacío 3 170 3 25 - 35 Bandeja Bollos rellenos de crema, un nivel 180 2 170 2 45 - 70 Bandeja Bollos rellenos de crema, dos nive‐ les 160 1 150 2 110 - 120 Bandeja Tartaletas 170 1 160 1 50 - 60 Bandeja Pastel de fruta 190 3 190 3 12 - 20 Bandeja Tarta Victoria 190 3 170 3 25 - 35 Bandeja Precaliente el horno vacío. Cocción convencional Cocción ventil. PAN Y PIZZA (min) (°C) (°C) Pan blanco, 1 - 2 trozos, 0,5 kg ca‐ da uno 190 1 190 1 60 - 70 - Pan de centeno, no se necesita precalentar 190 1 180 1 30 - 45 Molde para pan Pan/Rollitos, 6 - 8 panecillos 230 - 250 1 230 - 250 1 10 - 20 Bandeja Pizza 200 3 190 3 10 - 20 Bandeja / Bandeja honda Bollitos 200 3 190 3 10 - 20 Bandeja Precaliente el horno vacío. Use el molde para pasteles. ESPAÑOL 129 Cocción convencional Cocción ventil. FLANES (min) (°C) (°C) Pudin de pasta, no se necesita precalentar 200 2 180 2 40 - 50 Pudin de verduras, no se necesita precalen‐ tar 200 2 175 2 45 - 60 Quiches 180 1 180 1 50 - 60 Lasaña 180 - 190 2 180 - 190 2 25 - 40 Canelones 180 - 190 2 180 - 190 2 25 - 40 Utilice la parrilla. Cocción convencional Cocción ventil. CARNE (min) (°C) (°C) Carne de res 200 2 190 2 50 - 70 Cerdo 180 2 180 2 90 - 120 Ternera 190 2 175 2 90 - 120 Rosbif poco hecho 210 2 200 2 50 - 60 Rosbif en su punto 210 2 200 2 60 - 70 Rosbif muy hecho 210 2 200 2 70 - 75 Cocción convencional Cocción ventil. CARNE (min) (°C) (°C) Paletilla de cerdo, con corteza 180 2 170 2 120 - 150 Morcillo de cerdo, 2 trozos 180 2 160 2 100 - 120 Pata de cordero 190 2 175 2 110 - 130 Pollo entero 220 2 200 2 70 - 85 Pavo entero 180 2 160 2 210 - 240 Pato entero 175 2 220 2 120 - 150 Ganso entero 175 2 160 1 150 - 200 Conejo, en trozos 190 2 175 2 60 - 80 130 ESPAÑOL Cocción convencional Cocción ventil. CARNE (min) (°C) (°C) Liebre, en trozos 190 2 175 2 150 - 200 Faisán entero 190 2 175 2 90 - 120 Cocción convencional Cocción ventil. PESCADO (min) (°C) Trucha / Pargo, 3 - 4 pes‐ cados (°C) 190 2 175 2 40 - 55 Atún / Salmón, 4 - 6 filetes 190 2 175 2 35 - 60 10.3 Grill Turbo Precaliente el horno vacío. TERNERA Use el primer o el segundo nivel. Para calcular el tiempo de asado, multiplique el tiempo de la tabla siguiente por los centímetros de grosor del filete. RES CARNE DE (°C) (min) Rosbif o filete, poco hecho 190 - 200 5-6 Rosbif o filete, al punto 180 - 190 6-8 Rosbif o filete, muy he‐ cho 170 - 180 8 - 10 (°C) (min) CERDO (°C) (min) Ternera asada, 1 kg 160 - 180 90 - 120 Codillo de ternera, 1,5 - 2 kg 160 - 180 120 - 150 CORDERO (°C) (min) Pata de cordero / Cor‐ dero asado, 1 - 1,5 kg 150 - 170 100 - 120 Silla de cordero, 1 1,5 kg 160 - 180 40 - 60 AVES (°C) (min) 90 - 120 Aves troceadas, 0,2 0,25 kg cada 200 - 220 30 - 50 Chuletas / Costillas, 1 - 170 - 180 1,5 kg 60 - 90 Pollo, medio, 0,4 - 0,5 kg cada 190 - 210 35 - 50 Pastel de carne, 0,75 1 kg 50 - 60 Pollo, pularda, 1 - 1,5 kg 190 - 210 50 - 70 90 - 120 Pato, 1,5 - 2 kg 180 - 200 80 - 100 Paletilla / Cuello / Ja‐ món, 1 - 1,5 kg 160 - 180 160 - 170 Codillo de cerdo preco‐ 150 - 170 cinado, 0,75 - 1 kg ESPAÑOL 131 AVES (°C) (min) Ganso, 3,5 - 5 kg 160 - 180 120 - 180 Pavo, 2,5 - 3,5 kg 160 - 180 120 - 150 Pavo, 4 - 6 kg 140 - 160 150 - 240 PESCADO (AL VAPOR) Pescado entero, 1 1,5 kg (°C) (min) 210 - 220 40 - 60 10.4 Descongelar (kg) Tiempo de des‐ congelación (min) Tiempo de descon‐ gelación posterior (minutos) Pollo 1 100 - 140 20 - 30 Coloque el pollo sobre un plato puesto del revés so‐ bre otro mayor. Dele la vuelta a media cocción. Carne 1 100 - 140 20 - 30 0.5 90 - 120 Dele la vuelta a media cocción. Nata 2 x 0,2 80 - 100 10 - 15 La nata se puede montar perfectamente incluso aunque queden puntos li‐ geramente congelados. Trucha 0.15 25 - 35 10 - 15 - Fresas 0.3 30 - 40 10 - 20 - Mantequilla 0.25 30 - 40 10 - 15 - Pasteles 1.4 60 60 - 10.5 Desecar alimentos - Cocción ventil. VERDURAS Cubra las bandejas con papel vegetal o papel de hornear. (°C) (h) Para obtener mejores resultados, apague el horno a la mitad del tiempo de secado, abra la puerta y déjelo enfriar durante una noche para completar el secado. Judías 60 - 70 6-8 Pimientos 60 - 70 5-6 Verduras para sopa 60 - 70 5-6 Para 1 bandeja, use el tercer nivel. Setas 50 - 60 6-8 Para 2 bandejas, use el primer y cuarto nivel. Hierbas aromáticas 40 - 50 2-3 Ajuste de temperatura 60 - 70 °C. 132 ESPAÑOL FRUTA FRUTA (h) (h) Ciruelas 8 - 10 Manzanas en rodajas 6-8 Albaricoques 8 - 10 Peras 6-9 10.6 Horneado húmedo + ventil.. accesorios recomendados Utilice molde y recipientes oscuros y mates. Tiene mejor absorción del calor que los platos de color claro y brillantes. Bandeja para pizza Bandeja para hornear Oscuro, mate 28 cm de diámetro Oscuro, mate 26 cm de diámetro Ramequines Cerámica 8 cm de diámetro, 5 cm de altura Molde para base Oscuro, mate 28 cm de diámetro 10.7 Horneado húmedo + ventil. Para obtener el mejor resultado, siga las recomendaciones de la tabla siguiente. (°C) (min) Rollitos dulces, 12 piezas bandeja o bandeja honda 175 3 40 - 50 Rollitos, 9 piezas bandeja o bandeja honda 180 2 35 - 45 Pizza congelada, 0,35 kg parrilla 180 2 45 - 55 Brazo de gitano bandeja o bandeja honda 170 2 30 - 40 Brownie bandeja o bandeja honda 170 2 45 - 50 Soufflé, 6 piezas ramekin cerámico sobre parri‐ lla 190 3 45 - 55 Base de masa brisé molde de base sobre parrilla 180 2 35 - 45 Tarta Victoria bandeja de hornear sobre pa‐ rrilla 170 2 35 - 50 Pescado pochado, 0,3 kg bandeja o bandeja honda 180 2 35 - 45 Pescado entero, 0,2 kg bandeja o bandeja honda 180 3 25 - 35 ESPAÑOL 133 (°C) (min) Filete de pescado, 0,3 kg molde para pizza sobre parrilla 170 3 30 - 40 Carne pochada, 0,25 kg bandeja o bandeja honda 180 3 35 - 45 Shashlik, 0,5 kg bandeja o bandeja honda 180 3 40 - 50 Galletas, 16 piezas bandeja o bandeja honda 150 2 30 - 45 Mostachones de al‐ mendra, 20 piezas bandeja o bandeja honda 180 2 45 - 55 Muffins, 12 piezas bandeja o bandeja honda 170 2 30 - 40 Tarta salada, 16 pie‐ zas bandeja o bandeja honda 170 2 35 - 45 Galletas crujientes de masa quebrada, 20 piezas bandeja o bandeja honda 150 2 40 - 50 Tartaletas, 8 piezas bandeja o bandeja honda 170 2 30 - 40 Verduras pochadas, 0,4 kg bandeja o bandeja honda 180 2 35 - 45 Tortilla vegetariana molde para pizza sobre parrilla 180 3 35 - 45 Verduras mediterrá‐ neas, 0,7 kg bandeja o bandeja honda 4 35 - 45 180 10.8 Información para los institutos de pruebas Pruebas conforme a IEC 60350-1. (°C) (min) Pastelillos, Cocción con‐ 20 unidades vencional por bandeja Bandeja de cocción 3 170 20 - 30 - Pastelillos, Cocción ventil. 20 unidades por bandeja Bandeja de cocción 3 150 160 20 - 35 - Pastelillos, Cocción ventil. 20 unidades por bandeja Bandeja de cocción 2y4 150 160 20 - 35 - Tarta de manzana, 2 moldes, Ø 20 cm Parrilla 2 180 70 - 90 - 134 Cocción con‐ vencional ESPAÑOL Tarta de manzana, 2 moldes, Ø 20 cm Cocción ventil. (°C) (min) Parrilla 2 160 70 - 90 - Bizcocho, Cocción con‐ molde de re‐ vencional postería Ø26 cm Parrilla 2 170 40 - 50 Precaliente el horno 10 minutos. Bizcocho, Cocción ventil. molde de re‐ postería Ø26 cm Parrilla 2 160 40 - 50 Precaliente el horno 10 minutos. Bizcocho, Cocción ventil. molde de re‐ postería Ø26 cm Parrilla 2y4 160 40 - 60 Precaliente el horno 10 minutos. Mantecados Cocción ventil. Bandeja de cocción 3 140 150 20 - 40 - Mantecados Cocción ventil. Bandeja de cocción 2y4 140 150 25 - 45 - Mantecados Cocción con‐ vencional Bandeja de cocción 3 140 150 25 - 45 - Tostadas, 4 - 6 trozos Parrilla 4 máx. 2 - 3 minutos el primer lado; 2 - 3 minutos el segun‐ do Precaliente el horno 3 minutos. Parrilla y grasera 4 máx. 20 - 30 Coloque la parrilla en el cuarto nivel y la gra‐ sera en el tercer nivel del horno. Dele la vuel‐ ta a la mitad del tiem‐ po. Precaliente el horno 3 minutos. Grill Hamburgue‐ Grill sa de vacu‐ no, 6 trozos, 0,6 kg 11. MANTENIMIENTO Y LIMPIEZA ADVERTENCIA! Consulte los capítulos sobre seguridad. ESPAÑOL 135 11.1 Notas sobre la limpieza Limpie la parte delantera del horno con un paño suave humedecido en agua templada y ja‐ bón suave. Limpie y compruebe la junta de la puerta alrededor del interior. Utilice un producto de limpieza para limpiar las superficies metálicas. Agentes limpia‐ dores Limpie las manchas con un detergente suave. Limpie el interior después de cada uso. La acumulación de grasa u otros residuos puede provocar un incendio. Uso diario La humedad puede llegar a condensarse en el horno o en los paneles de cristal. Para redu‐ cir la condensación, ponga en funcionamiento el horno 10 minutos antes de cocinar. No guarde la comida en el horno más de 20 minutos. Seque el interior con un paño suave des‐ pués de cada uso. Limpie todos los accesorios después de cada uso y déjelos secar. Use un paño suave hu‐ medecido en agua caliente y detergente suave. No lave los accesorios en el lavavajillas No limpie los accesorios no adherentes utilizando un limpiador abrasivo ni objetos afilados. Accesorios 11.2 Cómo quitar: Apoyos de baldas Para limpiar el horno, retire los carriles de apoyo. Paso 1 Apague el horno y espere a que esté frío. Paso 2 Tire de la parte delantera del carril de apoyo para separarlo de la pared late‐ ral. Paso 3 Tire del extremo trasero del carril de apoyo para despegarlo de la pared la‐ teral y sáquelo. Paso 4 Coloque los carriles apoyo en el or‐ den inverso. 11.3 Instrucciones de uso: Limpieza con agua Este procedimiento de limpieza utiliza humedad para eliminar las partículas de grasa y alimentos restantes en el horno. 136 ESPAÑOL 1 Paso 1 Paso 2 2 Vierta agua en el relieve del interior. 300 ml. Ajuste la función: . Paso 3 Ajuste la temperatura a 90 °C. Paso 4 Deje funcionar el horno 30 minutos. Paso 5 Apague el horno. Paso 6 Espere hasta que el horno esté frío. Seque el interior con un paño suave. 11.4 Cómo quitar e instalar: Puerta La puerta del horno tiene dos paneles de cristal. Es posible retirar la puerta del horno y el panel de cristal interior para limpiarlos. Lea las instrucciones completas de "Extracción e instalación de la puerta" antes de retirar los paneles de cristal. PRECAUCIÓN! No utilice el aparato sin los paneles de cristal. Paso 1 Abra completamente la puerta y sujete las dos bisagras. Paso 2 Levante y gire completamente las palancas de ambas bisagras. Paso 3 Cierre la puerta del horno a medio camino hasta la primera posición de apertura. A con‐ tinuación levante la puerta y tire hacia ade‐ lante para desencajarla. Paso 4 Coloque la puerta sobre una superficie esta‐ ble y protegida por un paño suave. Paso 5 Sujete por ambos lados el acabado de la puerta (B), situado en el borde superior de ésta, y empuje hacia dentro para soltar el sello de resorte. Paso 6 Tire del borde de la puerta hacia delante pa‐ ra desengancharla. Paso 7 Sujete el panel de la puerta de cristal por el borde superior y extráigalo con cuidado. Asegúrese de que el cristal se desliza com‐ pletamente fuera de los soportes. 2 B 1 ESPAÑOL 137 Paso 8 Limpie los paneles de cristal con agua y ja‐ bón. Seque los paneles de cristal con cuida‐ do. No limpie los paneles de cristal en el la‐ vavajillas. Paso 9 Después de la limpieza, instale el panel de vidrio y la puerta del horno. La cara impresa debe mirar hacia el interior de la puerta. Después de la instalación, asegúrese de que la superficie del marco del panel de cristal de las ca‐ ras impresas no esté áspera cuando la toque. Al instalarlo correctamente, el acabado de la puerta hace clic. Asegúrese de que coloca el panel de cristal interno en los soportes correctos. A 11.5 Cómo cambiar: Bombilla Coja siempre la bombilla halógena con un paño para evitar quemar los residuos de grasa. ADVERTENCIA! Riesgo de descarga eléctrica. La lámpara puede estar caliente. Antes de reemplazar la bombilla: Paso 1 Paso 2 Paso 3 Apague el horno. Espere hasta que el horno esté frío. Desconecte el horno de la red. Coloque un paño en el fondo de la cavidad. Bombilla trasera Paso 1 Gire la tapa de cristal para extraerla. Paso 2 Limpie la tapa de cristal. Paso 3 Cambie la bombilla por otra apropiada termorresistente hasta 300 °C. Paso 4 Coloque la tapa de cristal. 12. SOLUCIÓN DE PROBLEMAS ADVERTENCIA! Consulte los capítulos sobre seguridad. 12.1 Qué hacer si... En cualquier caso no incluido en esta tabla, por favor contacte con un Centro de Servicio Autorizado. 138 ESPAÑOL Problema Compruebe que... El horno no calienta. Ha saltado el fusible. La junta de la puerta está No utilice el horno. Pón‐ dañada. gase en contacto con un servicio técnico autoriza‐ do. Problema Compruebe que... Fin de cocción - no está ajustado. Ajuste Fin de cocción. Consulte "Funciones de reloj". La bombilla no funciona. La bombilla se ha fundi‐ do. Los datos que necesita para el centro de servicio técnico se encuentran en la placa de características. La placa de régimen se encuentra en el marco delantero de la cavidad del horno. No retire la placa de características de la cavidad del horno. 12.2 Datos de servicio Si no logra subsanar el problema, póngase en contacto con su distribuidor o el centro de servicio técnico. Es conveniente que anote los datos aquí: Modelo (MOD.) ......................................... Número de producto (PNC) ......................................... Número de serie (S.N.) ......................................... 13. EFICACIA ENERGÉTICA 13.1 Información del producto y Hoja de información del producto* Nombre del proveedor Zanussi Identificación del modelo ZOHKF1X1 949496249 ZOHNF1K1 949496304 ZOHNF1W1 949496305 Índice de eficiencia energética 81.2 Clase de eficiencia energética A+ Consumo de energía con carga estándar, modo convencional 0.93 kWh/ciclo Consumo de energía con carga estándar, modo con ventilador 0.69 kWh/ciclo Número de cavidades 1 Fuente de calor Electricidad Volumen 72 l Tipo de horno Horno empotrado Masa ZOHKF1X1 26.7 kg ZOHNF1K1 26.7 kg ZOHNF1W1 26.7 kg * Para la Unión Europea según los Reglamentos de la UE 65/2014 y 66/2014. Para la República de Bielorrusia según STB 2478-2017, apéndice G; STB 2477-2017, anexos A y B. Para Ucrania según 568/32020. La clase de eficiencia energética no es aplicable a Rusia. ESPAÑOL 139 EN 60350-1 - Aparatos electrodomésticos - Parte 1: Placas, hornos, hornos de vapor y parrillas - Métodos para medir el rendimiento. 13.2 Ahorro de energía Calor residual Para una duración de la cocción superior a 30 minutos, reduzca la temperatura del horno un mínimo de 3 - 10 minutos antes de que transcurra el tiempo de cocción. El calor residual dentro del horno seguirá cocinando. El horno tiene características que le ayudan a ahorrar energía durante la cocina de cada día. Asegúrese de que la puerta del horno está cerrada cuando el horno funciona. No abra la puerta del horno muchas veces durante la cocción. Mantenga limpia la junta de la puerta y asegúrese de que está bien fijada en su posición. Utilice el calor residual para calentar otros platos. Mantener calor Si desea utilizar el calor residual para mantener calientes los alimentos, seleccione el ajuste de temperatura más bajo posible. Utilice utensilios de cocina de metal para mejorar el ahorro energético. Horneado húmedo + ventil. Función diseñada para ahorrar energía durante la cocción. En la medida de lo posible, no precaliente el horno antes de cocinar. Cuando se utiliza esta función, la bombilla está apagada. Reduzca al máximo el tiempo entre horneados cuando prepare varios platos de una vez. Cocción con ventilador En la medida de lo posible, utilice las funciones de cocción con ventilador para ahorrar energía. 14. ASPECTOS MEDIOAMBIENTALES deseche los aparatos marcados con el Recicle los materiales con el símbolo . Coloque el material de embalaje en los contenedores adecuados para su reciclaje. Ayude a proteger el medio ambiente y la salud pública, así como a reciclar residuos de aparatos eléctricos y electrónicos. No 140 símbolo junto con los residuos domésticos. Lleve el producto a su centro de reciclaje local o póngase en contacto con su oficina municipal. ESPAÑOL * 141 142 143 867360189-A-352020 WWW.ZANUSSI.COM/SHOP-
 1
1
-
 2
2
-
 3
3
-
 4
4
-
 5
5
-
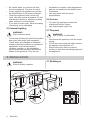 6
6
-
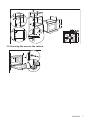 7
7
-
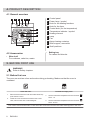 8
8
-
 9
9
-
 10
10
-
 11
11
-
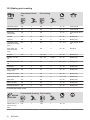 12
12
-
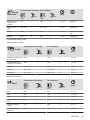 13
13
-
 14
14
-
 15
15
-
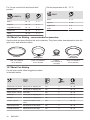 16
16
-
 17
17
-
 18
18
-
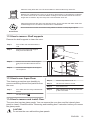 19
19
-
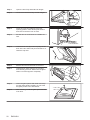 20
20
-
 21
21
-
 22
22
-
 23
23
-
 24
24
-
 25
25
-
 26
26
-
 27
27
-
 28
28
-
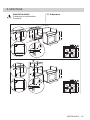 29
29
-
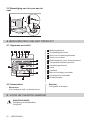 30
30
-
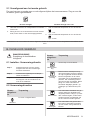 31
31
-
 32
32
-
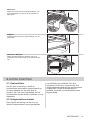 33
33
-
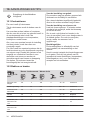 34
34
-
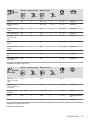 35
35
-
 36
36
-
 37
37
-
 38
38
-
 39
39
-
 40
40
-
 41
41
-
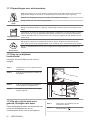 42
42
-
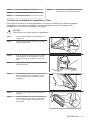 43
43
-
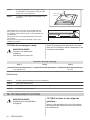 44
44
-
 45
45
-
 46
46
-
 47
47
-
 48
48
-
 49
49
-
 50
50
-
 51
51
-
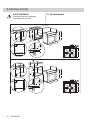 52
52
-
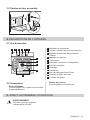 53
53
-
 54
54
-
 55
55
-
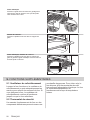 56
56
-
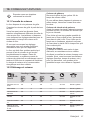 57
57
-
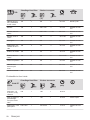 58
58
-
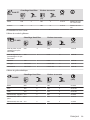 59
59
-
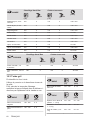 60
60
-
 61
61
-
 62
62
-
 63
63
-
 64
64
-
 65
65
-
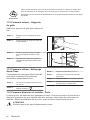 66
66
-
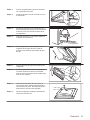 67
67
-
 68
68
-
 69
69
-
 70
70
-
 71
71
-
 72
72
-
 73
73
-
 74
74
-
 75
75
-
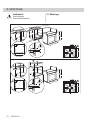 76
76
-
 77
77
-
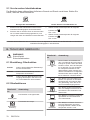 78
78
-
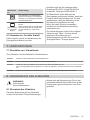 79
79
-
 80
80
-
 81
81
-
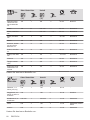 82
82
-
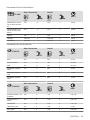 83
83
-
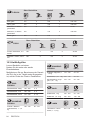 84
84
-
 85
85
-
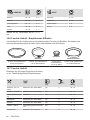 86
86
-
 87
87
-
 88
88
-
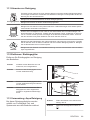 89
89
-
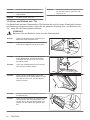 90
90
-
 91
91
-
 92
92
-
 93
93
-
 94
94
-
 95
95
-
 96
96
-
 97
97
-
 98
98
-
 99
99
-
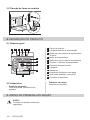 100
100
-
 101
101
-
 102
102
-
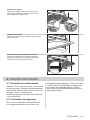 103
103
-
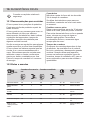 104
104
-
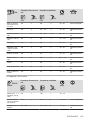 105
105
-
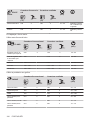 106
106
-
 107
107
-
 108
108
-
 109
109
-
 110
110
-
 111
111
-
 112
112
-
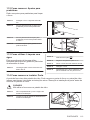 113
113
-
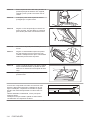 114
114
-
 115
115
-
 116
116
-
 117
117
-
 118
118
-
 119
119
-
 120
120
-
 121
121
-
 122
122
-
 123
123
-
 124
124
-
 125
125
-
 126
126
-
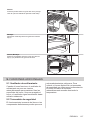 127
127
-
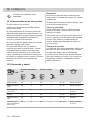 128
128
-
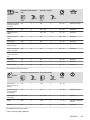 129
129
-
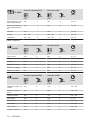 130
130
-
 131
131
-
 132
132
-
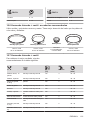 133
133
-
 134
134
-
 135
135
-
 136
136
-
 137
137
-
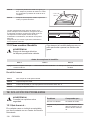 138
138
-
 139
139
-
 140
140
-
 141
141
-
 142
142
-
 143
143
-
 144
144


Zanussi ZOHKF1X1 Handleiding
- Categorie
- Magnetrons
- Type
- Handleiding
in andere talen
- English: Zanussi ZOHKF1X1 User manual
- français: Zanussi ZOHKF1X1 Manuel utilisateur
- español: Zanussi ZOHKF1X1 Manual de usuario
- Deutsch: Zanussi ZOHKF1X1 Benutzerhandbuch
- português: Zanussi ZOHKF1X1 Manual do usuário