Yamaha NS-AW194 de handleiding
- Categorie
- Auto luidsprekers
- Type
- de handleiding
Deze handleiding is ook geschikt voor

Amplifier or receiver
Amplificateur ou récepteur
Verstärker oder Receiver
Amplificatore o ricevitore
10 mm (3/8")
Speaker output terminals
Bornes de sortie enceinte
Lautsprecherausgangs-
klemmen
Morsetti di uscita degli
speaker
CONSUMER PRECAUTIONS
Read these precautions carefully before setting up your NS-AW294 / NS-AW194
speakers.
• When installing these speakers outdoors, try to minimize their exposure to rain and
snow by mounting the speaker in corners or under eaves.
• Since these speakers are to be wall / ceiling mounted, it is essential that they are
firmly secured. Be sure to consult a reliable source about the best type of
fastener for your particular wall / ceiling’s construction.
• Do not attach them to thin plywood or soft wall / ceiling surface materials as the
screws may tear free, causing the speakers to fall and be damaged, or result in
personal injury.
• Do not fasten the speakers to wall / ceiling with nails, adhesives, or other unsafe
hardware. Long-term use and vibrations may cause them to pull free.
• Do not place the speakers where they are liable to be knocked over or struck by
falling objects. Stable placement will also ensure better sound performance.
• When changing the angle of the speakers, be sure to adjust the angle after
loosening the knob on the both sides. The speakers may be damaged by excessive
power.
• Lower the power amplifier / receiver volume control before changing input sources.
Always turn the amplifier / receiver unit off when installing or removing input cables.
• Anytime you note distortion, reduce the volume control on your power amplifier /
receiver to a lower setting. Never allow your power amplifier to be driven into
“clipping”.
• Do not attempt to modify or fix the speakers. Contact qualified Yamaha service
personnel when any service is needed. The cabinet should never be opened for any
reasons.
• Do not attempt to clean the speakers with chemical solvents as this might damage
the finish. To clean wipe with a dry, soft cloth.
• Secure placement or installation is the owner’s responsibility.
Yamaha shall not be liable for any accident caused by improper placement or
installation of speakers.
After unpacking, please inspect contents to confirm all the following items are
contained.
A Speaker × 2
B Bracket × 2
C Knob × 4
Please read carefully before installation.
• Make sure that there is sufficient space without obstructions on a wall / ceiling for
installation. Be aware of the product dimensions and weight (See
SPECIFICATIONS below).
• Before installing the speakers, run the speaker cables to the installation location.
To wall / ceiling mount the speakers, use the included bracket.
! Using the bracket as a template mark the locations (four points) of the key hole
slots on the mounting area.
± Using appropriate hardware (not included) securely fasten the bracket to the wall /
ceiling.
# Position the speaker in the bracket and secure the speaker by using the two knobs
included.
$ Rotate the YAMAHA emblem according to the position of the speaker.
Before making connections, make sure that the amplifier / receiver is switched off.
CONNECTIONS
• Connect the input terminals at the rear of the speakers to the speaker output
terminals of the amplifier / receiver with the speaker cables (not included).
• Connect each speaker making sure not to reverse the polarity “+” (red), “–” (black).
If the speaker is connected with reversed polarity, the sound will be unnatural and
lack bass.
HOW TO CONNECT
! Remove approximately 10 mm (3/8″) of insulation from the end of each speaker
cable and twist the exposed wires of the cable together to prevent short circuits.
± Press and hold the terminal tab.
# Insert the bare wire.
$ Release the tab so that it closes security on the bare wire, not the insulation.
% Test the security of the connection by pulling gently on the cable.
SPECIFICATIONS (For single speaker)
* Specifications subject to change without notice due to product improvements.
English
1
UNPACKING
2
BEFORE INSTALLATION
3
MOUNTING THE SPEAKERS
Notes:
• When using the brackets to mount the speakers on a wall / ceiling, please use
safety wire (not included) between the bracket and the wall / ceiling to prevent the
speaker from falling.
• When adjusting the angle with the bracket fixed to the speaker, loosen the knobs on
both sides before changing the direction of the speaker. (Angle adjustment can be
performed after the knobs, fastened tightly, are loosened by rotating them 2 to 2-1/2
times.) When excessive force is applied while the knob is tightly shut, the fixed
portion may collapse and angle adjustment will be disabled. After adjusting the
angle, tighten the knob so that the speaker will be steadfast.
If speaker cable (not included) is being fed from a hole in the wall / ceiling behind the
bracket, pull this speaker cable through the hole in the bracket before mounting the
bracket [figure - ].
4
CONNECTING YOUR AMPLIFIER / RECEIVER
Notes:
• Do not let the bare speaker wires touch each other as this could damage the
speaker or amplifier / receiver, or both.
• Make sure the terminal is gripping the bare wire, not the insulation.
NS-AW294 NS-AW194
Type 2-Way Bass Reflex
Driver Tweeter 2.5 cm (1″) Balanced dome type
Woofer 16 cm (6-1/2″) cone type 10 cm (4″) cone type
Frequency response 80 Hz to 20 kHz (–10 dB) 100 Hz to 20 kHz (–10 dB)
Impedance 8 ohms
Nominal input 50 W 30 W
Maximum input 100 W 80 W
Sensitivity 87 dB / 2.83 V, 1 m 85 dB / 2.83 V, 1 m
Dimensions (W × H × D)
(excluding bracket and
knobs)
190 × 308 × 217 mm
(7-1/2″ × 12-1/8″ × 8-1/2″)
152 × 243 × 171 mm
(6″ × 9-5/8″ × 6-3/4″)
Weight (including bracket
and knobs)
2.3 kg (5.1 lbs.) 1.6 kg (3.5 lbs.)
Movable angle 13.5 degree pitch 13.5 degree pitch
3
a
MISES EN GARDES POUR L’UTILISATION
Avant de positionner les enceintes NS-AW294 / NS-AW194, lisez attentivement ces
mises en garde.
• En cas d’installation des enceintes à l’extérieur, faites en sorte de réduire leur
exposition à la pluie et à la neige en les installants dans des coins ou sous des
abris.
• Ces enceintes devant être installées au mur ou au plafond, il est important qu’elles
soient fixées fermement. Consultez une source fiable pour le type de fixations
les mieux adaptées à vos murs / plafond.
• Ne les fixez pas sur des contre-plaqués minces ou des surfaces de mur / plafond
molles les vis pouvant s’arracher et entraîner la chute des enceintes qui pourraient
s’endommager et provoquer des lésions corporelles.
• Ne fixez pas les enceintes au mur / plafond en utilisant des clous, des adhésifs ou
autre matériel peu sûr. Une utilisation prolongée et les vibrations pourraient les
décrocher.
• N’installez pas les enceintes où elles pourraient être renversées ou heurtées par
des objets tombant de haut. Une mise en place stable garantit aussi une meilleure
réproduction du son.
• En cas de changement d’angle des enceintes, vérifiez d’avoir correctement réglé
l’angle en desserrant le bouton situé sur les deux côtés. Sinon les enceintes
risquent d’être endommagées par une puissance trop élevée.
• Avant de modifier les sources d’entrée, baissez le volume de l’amplificateur /
récepteur. Avant de brancher ou de débrancher les câbles d’entrée éteignez
l’amplificateur / récepteur.
• Lorsque vous entendez de la distorsion, réduisez le niveau de volume de votre
amplificateur / récepteur. Ne laissez pas l’amplificateur «écrêter».
• N’essayez pas de modifier ou de réparer les enceintes. Pour la réparation,
contactez un centre de service après-vente Yamaha agréé. L’enceinte ne doit en
aucun cas être ouverte.
• N’essayez pas de nettoyer les enceintes avec des solvants chimiques. Cela
risquerait d’endommager l’apprêt. Pour le nettoyage, utilisez un chiffon sec et doux.
• Le propriétaire des enceintes est responsable de leur emplacement et de leur
installation.
Yamaha décline toute responsabilité en cas d’accident causé par un
positionnement ou une installation inadéquate des enceintes.
Après le déballage vérifiez que les articles suivant sont présents.
A Enceinte × 2
B Patte de fixation × 2
C Bouton × 4
Veuillez lire attentivement cette section avant de procéder à l’installation.
• Veillez à ce qu’il y ait un espace suffisant sans obstruction pour l’installation au mur /
plafond. Soyez conscient des dimensions et du poids du produit (voir
CARACTERISTIQUES TECHNIQUES ci-dessous).
• Avant d’installer les enceintes, acheminez les câbles d’enceinte jusqu’à
l’emplacement d’installation.
Pour l’installation au mur / plafond des enceintes, utilisez la patte de fixation livrée avec
ces dernières.
! En utilisant la patte de fixation comme gabarit, marquez les emplacements
(quatre points) des boutonnières sur la zone d’installation.
± Utilisez le matériel de fixation approprié (non compris) pour fixer fermément la
patte de fixation au mur / plafond.
# Placez l’enceinte sur la patte de fixation et fixez-la en utilisant les deux boutons
compris dans la fourniture.
$ Tournez le symbole YAMAHA suivant la position de l’enceinte.
Avant de réaliser les raccordements, assurez-vous que l’amplificateur / récepteur est
éteint.
RACCORDEMENTS
• Raccordez les bornes d’entrée situées sur la face arrière des enceintes aux bornes
de sortie des enceintes situées sur l’amplificateur / récepteur en utilisant les câbles
d’enceintes (non compris).
• Raccordez chaque enceinte en veillant à ne pas inverser la polarité « + » (rouge),
« – » (noir). Si l’enceinte est raccordée avec la polarité inversée, le son émis sera
innaturel et sans graves.
REALISATION DU RACCORDEMENT
! Enlevez environ 10 mm d’isolement de l’extrémité de chaque câble d’enceinte et
torsadez ensemble la partie dénudée des câbles afin d’éviter tout court-circuit.
± Appuyez sur le levier de la borne et maintenez-le.
# Insérez le fil dénudé.
$ Relâchez le levier pour qu’il se referme convenablement en serrant le fil dénudé et
non l’isolant.
% Vérifiez que les fils sont bien maintenus en tirant doucement dessus.
CARACTERISTIQUES TECHNIQUES (Pour une enceinte)
* Les spécifications sont sujettes à changement sans notification pour amélioration des
performances du produit.
Français
1
DEBALLAGE
2
AVANT L’INSTALLATION
3
INSTALLATION DES ENCEINTES
Remarques :
• Lors de l’utilisation des pattes de fixation pour l’installation des enceintes au mur /
plafond, placez un câble de sécurité (non compris) entre la patte de fixation et le
mur / plafond pour éviter que l’enceinte ne tombe.
• Lors du réglage de l’angle avec les pattes de fixation des enceintes, desserrez les
boutons situés sur chaque côté avant de modifier l’orientation des enceintes. (Le
réglage de l’angle peut être effectué une fois les boutons, serrés fermement,
desserrés en les tournant de 2 à 2 tours et 1/2.) Une pression excessive appliquée
alors que le bouton est fermement serré peut entraîner la chute de la partie fixe et
ainsi l’impossibilité de régler l’angle. Une fois l’angle réglé, serrez le bouton de
façon à ce que l’enceinte soit stable.
Si le câble d’enceinte (non compris) passe au travers d’un trou du mur / plafond situé
derrière la patte de fixation, avant d’installer la patte de fixation faites passer le câble
d’enceinte à travers le trou percé dans la patte de fixation [figure - ].
4
BRANCHEMENT DE L’AMPLIFICATEUR / RECEPTEUR
Remarques :
• Veillez à ce que les câbles dénudés des enceintes n’entrent pas en contact les uns
avec les autres. Cela pourrait endommager l’enceinte ou l’amplificateur / récepteur
ou les deux.
• Vérifiez que la borne serre le fil dénudé et non l’isolant.
NS-AW294 NS-AW194
Type Type bass reflex à 2 voies
Driver Tweeter 2,5 cm type dôme symétrique
Woofer 16 cm type cône 10 cm type cône
Réponse en fréquence 80 Hz à 20 kHz (–10 dB) 100 Hz à 20 kHz (–10 dB)
Impédance 8 ohms
Entrée nominale 50 W 30 W
Entrée maximum 100 W 80 W
Sensibilité 87 dB / 2,83 V, 1 m 85 dB / 2,83 V, 1 m
Dimensions (L × H × P)
(
avec exclusion des
pattes de fixation et des
boutons)
190 × 308 × 217 mm 152 × 243 × 171 mm
Poids (y compris la patte
de fixation et les boutons)
2,3 kg 1,6 kg
Angle mobile inclinaison de 13,5 degrés inclinaison de 13,5 degrés
3
a
SICHERHEITSVORSCHRIFTEN FÜR DIE KUNDEN
Lesen Sie die folgenden Sicherheitsvorschriften aufmerksam, bevor Sie Ihre
NS-AW294 / NS-AW194 Lautsprecher installieren.
• Sorgen Sie bei der Installation dieser Lautsprecher in Außenbereichen dafür, dass
sie ausreichend vor Regen und Schnee geschützt sind; montieren Sie sie zu
diesem Zweck in einer Ecke oder unter einer Traufe.
• Diese Lautsprecher sind für die Wand-/Deckenmontage ausgelegt und müssen
daher unbedingt sicher befestigt werden. Lassen Sie sich bei einem
zuverlässigen Händler über die Art Verbindungselemente beraten, die für Ihre
spezifische Wand-/Deckenkonstruktion am besten geeignet ist.
• Montieren Sie die Lautsprecher nicht an dünnem Sperrholz oder an weichen
Wand-/Deckenmaterialien, da sich die Schrauben möglicherweise lösen und die
Lautsprecher herunterfallen, was Schäden an den Lautsprechern oder
Körperverletzungen zur Folge haben kann.
• Befestigen Sie die Lautsprecher nicht mit Nägeln, Klebstoff oder anderen
ungeeigneten Verbindungselementen an der Wand/Decke. Nach langjähriger
Nutzung oder durch Vibrationen können sich die Lautsprecher ebenfalls von der
Wand/Decke lösen.
• Positionieren Sie die Lautsprecher nicht an Stellen, an denen die Gefahr besteht,
dass sie umgestoßen oder von herunterfallenden Gegenständen getroffen werden
können. Eine stabile Positionierung garantiert auch einen besseren Klang.
• Wenn Sie die Lautsprecher in einem anderen Winkel positionieren möchten, stellen
Sie den Winkel entsprechend ein, nachdem Sie den Knopf auf beiden Seiten gelöst
haben. Durch eine zu große Leistung können die Lautsprecher beschädigt werden.
• Reduzieren Sie den Lautstärkepegel des Leistungsverstärkers / Receivers, bevor
Sie den Signaleingang wechseln. Schalten Sie der Verstärker / Receiver immer
aus, bevor Sie die Eingangskabel anschließen oder entfernen.
• Reduzieren Sie jedes Mal, wenn Verzerrung auftritt, den Lautstärkepegel am
Leistungsverstärker / Receiver. Achten Sie darauf, dass der Leistungsverstärker nie
in eine „Begrenzungsverzerrung“ getrieben wird.
• Versuchen Sie nicht, die Lautsprecher abzuändern oder zu reparieren.
Falls Reparaturarbeiten erforderlich sind, wenden Sie sich bitte immer an
das qualifizierte Kundendienstpersonal von Yamaha. Das Gehäuse sollte unter
keinen Umständen geöffnet werden.
• Verwenden Sie zum Reinigen der Lautsprecher keine chemischen Lösungsmittel,
da diese die Appretur beschädigen könnten. Wischen Sie sie mit einem trockenen,
weichen Tuch ab.
• Der Benutzer ist für die sichere Positionierung oder Montage der
Lautsprecher verantwortlich.
Yamaha haftet unter keinen Umständen für Unfälle, die auf die unsachgemäße
Positionierung oder Montage der Lautsprecher zurückzuführen sind.
Prüfen Sie nach dem Auspacken, dass alle nachfolgend angeführten Artikel im
Lieferumfang enthalten sind.
A 2 Lautsprecher
B 2 Halterungen
C 4 Drehknöpfe
Bitte lesen Sie dies vor der Installation gründlich durch.
• Stellen Sie sicher, dass der Platz für die Montage ausreicht und keine Hindernisse
an der Wand/Decke vorhanden sind. Beachten Sie die Produktabmessungen und
das Gewicht (siehe TECHNISCHE DATEN weiter unten).
• Verlegen Sie vor dem Installieren der Lautsprecher die Lautsprecherkabel zum
Installationsort.
Verwenden Sie bei der Wand-/Deckenmontage der Lautsprecher die mitgelieferten
Halterungen.
! Nehmen Sie die Halterung als Vorlage und markieren Sie die Stellen (vier Punkte)
für die Löcher, die zwecks Montage der Lautsprecher zu bohren sind.
± Befestigen Sie die Halterung mit den passenden (nicht mitgelieferten)
Verbindungselementen an der Wand/Decke.
# Setzen Sie den Lautsprecher in die Halterung und sichern Sie ihn mit den beiden
mitgelieferten Drehknöpfen.
$ Drehen Sie das YAMAHA-Logo entsprechend der Position des Lautsprechers.
Stellen Sie sicher, dass der Verstärker / Receiver ausgeschaltet ist, bevor Sie die
Anschlüsse vornehmen.
ANSCHLÜSSE
• Schließen Sie die Eingangsklemmen mit den (nicht mitgelieferten)
Lautsprecherkabeln an der Rückseite der Lautsprecher an die
Lautsprecherausgangsklemmen des Verstärkers / Receivers an.
• Schließen Sie die Lautsprecher an; achten Sie dabei auf die korrekte Polarität
„+“ (rot), „–“ (schwarz). Bei umgepoltem Anschluss der Lautsprecher ist der Klang
unnatürlich und der Bass ist nicht gut hörbar.
SO NEHMEN SIE DIE ANSCHLÜSSE VOR
! Entfernen Sie circa 10 mm der Isolierung vom Ende der Lautsprecherkabel und
verdrehen Sie die abisolierten Drähte des Kabels miteinander, um Kurzschlüsse
zu vermeiden.
± Drücken Sie die Klemmlasche hinunter und halten Sie sie in dieser Position.
# Schieben Sie die Ader hinein.
$ Geben Sie die Lasche wieder frei, um die Ader (nicht aber den Mantel)
festzuklemmen.
% Ziehen Sie vorsichtig am Kabel, um zu überprüfen, ob es fest sitzt.
TECHNISCHE DATEN (je Lautsprecher)
* Änderungen der technischen Daten aus Gründen der Produktverbesserung ohne
vorherige Ankündigung vorbehalten.
Deutsch
1
AUSPACKEN
2
VOR DER INSTALLATION
3
MONTAGE DER LAUTSPRECHER
Hinweise:
• Wenn Sie die Halterungen zur Befestigung der Lautsprecher an einer Wand/Decke
verwenden, verwenden Sie bitte einen Sicherheitsdraht (nicht mitgeliefert)
zwischen der Halterung und der Wand/Decke, um ein Herabfallen des
Lautsprechers zu vermeiden.
• Wenn Sie den Winkel mit der am Lautsprecher befestigten Halterung einstellen,
lösen Sie die Drehknöpfe an beiden Seiten, bevor Sie die Richtung des
Lautsprechers ändern. (Die Anpassung des Winkels kann erfolgen, nachdem die
Drehknöpfe, wenn sie fest angezogen sind, durch eine 2- bis 2 1/2-malige Drehung
gelöst wurden.) Wenn übermäßige Kraft angewendet wird, während der Drehknopf
fest angezogen ist, kann sich der fixierte Bereich verziehen, was eine Anpassung
des Winkels unmöglich macht. Ziehen Sie die Drehknöpfe nach der Anpassung des
Winkels wieder fest, sodass der Lautsprecher fixiert ist.
Wenn das (nicht mitgelieferte) Lautsprecherkabel von einem Loch in der Wand/
Decke hinter der Halterung zum Lautsprecher geführt wird, ziehen Sie dieses Kabel
durch das Loch in der Halterung, bevor Sie die Halterung montieren [siehe
Abbildung - ].
4
ANSCHLUSS DES VERSTÄRKERS / RECEIVERS
Hinweise:
• Achten Sie darauf, dass sich die blanken Lautsprecherdrähte nicht berühren, da
anderenfalls der Lautsprecher oder der Verstärker / Receiver oder beide
beschädigt werden können.
• Die Klemmen dürfen nur jeweils die bloßliegenden Adern, nicht aber den Mantel
berühren.
NS-AW294 NS-AW194
Typ 2-Wege Bassreflextyp
Treiber Hochtöner 2,5 cm Symmetrischer Kalottentyp
Tieftöner 16 cm Konustieftöner 10 cm Konustieftöner
Frequenzgang 80 Hz bis 20 kHz (–10 dB) 100 Hz bis 20 kHz (–10 dB)
Impedanz 8 Ohm
Nenneingangsleistung 50 W 30 W
Maximale
Eingangsleistung
100 W 80 W
Empfindlichkeit 87 dB / 2,83 V, 1 m 85 dB / 2,83 V, 1 m
Abmessungen (B × H × T)
(ohne Halterung und
Drehknöpfe)
190 × 308 × 217 mm 152 × 243 × 171 mm
Gewicht (
einschließlich
Halterung und Drehknöpfe
)
2,3 kg 1,6 kg
Verschiebbarer Winkel 13,5 Grad Neigung Winkel 13,5 Grad Neigung
3
a
PRECAUZIONI PER I CONSUMATORI
Leggere attentamente queste precauzioni prima di configurare gli speaker NS-AW294 /
NS-AW194.
• In caso di installazione degli speaker in un ambiente esterno, cercare di
minimizzarne l’esposizione a pioggia e neve montandoli in angoli o sotto a dei
cornicioni.
• Dato che gli speaker sono destinati a essere montati parete / al soffitto, è
essenziale fissarli saldamente. Accertarsi di consultare una fonte affidabile per
conoscere l’elemento di fissaggio migliore per il proprio tipo di parete /
soffitto.
• Non fissare gli speaker a materiali morbidi o in legno compensato sottile per il
montaggio parete / al soffitto, dato che le viti potrebbero causare lacerazioni in
grado di far cadere e danneggiare gli speaker o di causare lesioni personali.
• Non fissare gli speaker alla parete / al soffitto con chiodi, adesivi o altre minuterie
non sicure. L’utilizzo a lungo termine e le vibrazioni potrebbero causarne la
rimozione.
• Non posizionare gli speaker in luoghi in cui potrebbero essere rovesciati o colpiti da
oggetti cadenti. Una collocazione stabile garantirà anche migliori prestazioni
acustiche.
• In fase di modifica dell’angolazione degli speaker, assicurarsi di regolare
l’angolazione dopo aver allentato la manopola su entrambi i lati. Gli speaker
potrebbero danneggiarsi a causa della potenza eccessiva.
• Abbassare il volume dell’amplificatore / ricevitore di potenza prima di modificare le
fonti di ingresso. Spegnere sempre l’amplificatore / ricevitore in fase di installazione
o rimozione dei cavi di ingresso.
• Quando si rileva una distorsione, ridurre il volume dell’amplificatore / ricevitore di
potenza a un’impostazione inferiore. Non portare mai l’amplificatore di potenza fino
al livello di saturazione.
• Non cercare di modificare o di riparare gli speaker. Contattare un tecnico qualificato
dell’assistenza Yamaha per l’esecuzione di ogni intervento di manutenzione
richiesto. Non aprire mai l’armadio per nessun motivo.
• Non cercare di pulire gli speaker con solventi chimici, in quanto potrebbero
danneggiare le finiture. Per pulirli utilizzare un panno asciutto e morbido.
• La correttezza della posizione e dell’installazione è responsabilità del
proprietario.
Yamaha esclude ogni responsabilità in caso di incidenti causati da errori di
posizionamento o installazione degli speaker.
Dopo il disimballaggio, ispezionare il contenuto della confezione per confermare la
presenza di tutti gli elementi seguenti.
A Speaker × 2
B Staffa × 2
C Manopola × 4
Si prega di leggere con attenzione prima di procedere all’installazione.
• Accertarsi che vi sia spazio sufficiente e che non siano presenti ostacoli prima di
procedere all’installazione sulla parete / sul soffitto. Tenere in considerazione le
dimensioni e il peso del prodotto (vedere SPECIFICHE qui di seguito).
• Prima d'installare gli altoparlanti, far correre i cavi dell'altoparlante fino al punto
dell'installazione.
Per montare a parete / al soffitto gli speaker, utilizzare la staffa inclusa.
! Utilizzando la staffa come guida, contrassegnare le posizioni (quattro punti) dei
fori sull’area di montaggio.
± Utilizzando della minuteria appropriata (non fornita) fissare saldamente la staffa
alla parete / al soffitto.
# Posizionare lo speaker nella staffa e fissarlo utilizzando le due manopole incluse.
$ Ruotare l’emblema YAMAHA in base alla posizione dello speaker.
Prima di effettuare i collegamenti, assicurarsi che l’amplificatore / ricevitore sia spento.
COLLEGAMENTI
• Collegare i morsetti di ingresso sul retro degli speaker ai morsetti di uscita degli
speaker dell’amplificatore / ricevitore mediante i cavi per speaker (non forniti).
• Collegare ciascuno speaker rispettandone la polarità “+” (rosso), “–” (nero). Se uno
speaker viene collegato con la polarità invertita, il suono risulterà innaturale e privo
di bassi.
COME EFFETTUARE I COLLEGAMENTI
! Rimuovere circa 10 mm di isolamento dall’estremità di ciascun cavo degli speaker
e attorcigliare insieme i fili esposti del cavo per impedire cortocircuiti.
± Premete e tenete premuta l’aletta del terminale.
# Inserite i fili.
$ Rilasciate l’aletta in modo che faccia presa sui fili, non sull’isolante.
% Per controllare che il collegamento sia stato effettuato correttamente, tirate
leggermente il cavo.
SPECIFICHE (per il singolo speaker)
* Specifiche soggette a modifica senza preavviso per miglioramenti al prodotto.
Italiano
1
DISIMBALLAGGIO
2
PRIMA DI PROCEDERE ALL’INSTALLAZIONE
3
MONTAGGIO DEGLI SPEAKER
Note:
• Se si utilizzano le staffe per montare gli speaker alla parete / al soffitto, utilizzare un
cavo di sicurezza (non fornito) tra la staffa e la parete / il soffitto per evitare che lo
speaker possa cadere.
• In fase di regolazione dell’angolazione con la staffa fissata allo speaker, allentare le
manopole su entrambi i lati prima di modificare la direzione dello speaker. (La
regolazione dell’angolazione può essere eseguita dopo che le manopole, fissate
saldamente, vengono allentate ruotandole 2 o 2,5 volte.) Se si applica una forza
eccessiva mentre la manopola è serrata saldamente, la parte fissata potrebbe
cedere e, in tal caso, la regolazione dell’angolazione sarebbe annullata. Dopo aver
completato la regolazione dell’angolazione, serrare la manopola assicurandosi che
lo speaker sia fissato saldamente.
Se il cavo dello speaker (non fornito) viene inserito attraverso un foro nella parete /
nel soffitto dietro la staffa, farlo passare attraverso il foro nella staffa prima di montare
quest’ultima [figura - ].
4
COLLEGAMENTO DELL’AMPLIFICATORE / RICEVITORE
Note:
• Impedire il contatto tra i fili privi di isolamento dello speaker, dato che ciò potrebbe
causare danni allo speaker o all’amplificatore / ricevitore o a entrambi.
• Accertatevi che il terminale faccia presa sui fili, non sull’isolante.
NS-AW294 NS-AW194
Tipo Tipo di bass reflex a 2 vie
Driver Tweeter 2,5 cm tipo di cupola bilanciata
Woofer 16 cm tipo conico 10 cm tipo conico
Risposta in frequenza Da 80 Hz a 20 kHz (–10 dB) Da 100 Hz a 20 kHz (–10 dB)
Impedenza 8 ohm
Ingresso nominale 50 W 30 W
Ingresso massimo 100 W 80 W
Sensibilità 87 dB / 2,83 V, 1 m 85 dB / 2,83 V, 1 m
Dimensioni (L × A × P)
(
esclusi staffa e
manopole)
190 × 308 × 217 mm 152 × 243 × 171 mm
Peso (inclusi staffa e
manopole)
2,3 kg 1,6 kg
Angolo di inclinazione 13,5 gradi 13,5 gradi
3
a

Amplificador o receptor
Усилитель или ресивер
放大器或接收机
10 mm
Terminales de salida del
altavoz
Выходные зажимы
колонок
扬声器输出端
PRECAUCIONES QUE EL CONSUMIDOR TIENE QUE TOMAR
Leer estas precauciones atentamente antes de montar los altavoces NS-AW294 /
NS-AW194.
• Si hay que instalar estos altavoces al aire libre, tratar de reducir la exposición de los
mismos a la lluvia y a la nieve montando los altavoces en esquinas o debajo de
aleros.
• Puesto que estos altavoces deben montarse en la pared o en el techo, es esencial
que estén fijados firmemente. Asegurarse de consultar con una fuente fiable
acerca del mejor tipo de soporte para el techo o pared específico.
• No montarlos en contrachapado delgado o en materiales de superficie de techo o
de pared débiles puesto que los tornillos pueden romperlos, causando que los
altavoces se caigan y se dañen u ocasionando lesiones personales.
• No fijar los altavoces a la pared o al techo con clavos, adhesivos u otros elementos
que no son seguros. El uso a largo plazo y las vibraciones pueden causar que los
mismos se caigan.
• No colocar los altavoces en lugares donde puedan volcarse o ser golpeados por
objetos que caen. Un lugar estable asegura también un mejor rendimiento del
sonido.
• Al cambiar el ángulo de los altavoces, asegurarse de ajustar el ángulo tras haber
aflojado la rueda en ambos lados. Los altavoces pueden dañarse por demasiada
potencia.
• Bajar el control de volumen del amplificador / receptor antes de cambiar las fuentes
de entrada. Apagar siempre el amplificador / receptor al instalar o quitar los cables
de entrada.
•
Cuando se nota que hay distorsión, reducir el control de volumen en el amplificador /
receptor a un ajuste más bajo. No permitir nunca que el amplificador de potencia
llegue al “recorte”.
• No intentar modificar o fijar los altavoces. Contactar con personal de servicio
cualificado de Yamaha, cuando sea necesario. El armario no debe abrirse por
ningún motivo.
• No intentar limpiar los altavoces con productos químicos disolventes puesto que
esto podría dañar el acabado. Para limpiarlos, usar un paño suave y seco.
• El emplazamiento o instalación segura es responsabilidad del propietario.
Yamaha no es responsable por accidentes a causa de un emplazamiento o
instalación inadecuada de los altavoces.
Tras el desembalaje, inspeccionar el contenido para comprobar que están los
siguientes elementos.
A Altavoces × 2
B Soporte × 2
C Rueda × 4
Léalo con atención antes de la instalación.
• Asegúrese de que en la pared o el techo hay un espacio suficiente y despejado de
obstáculos antes de realizar la instalación. Tenga en cuenta las dimensiones y el
peso del producto (véanse las ESPECIFICACIONES).
• Antes de instalar los altavoces, tienda los cables del altavoz hasta el lugar de la
instalación.
Para el montaje en la pared o en el techo de los altavoces, usar el soporte que se
incluye.
! Usando el soporte como plantilla, marcar los lugares (4 puntos) de las ranuras
para los orificios en el área de montaje.
± Usando los elementos apropiados (no se incluyen) fijar firmemente el soporte a la
pared o al techo.
# Colocar el altavoz en el soporte y fijar el altavoz mediante las dos ruedas que se
incluyen.
$ Girar el emblema de YAMAHA según la posición del altavoz.
Antes de realizar las conexiones, asegurarse de que el amplificador / receptor está
apagado.
CONEXIONES
• Conectar los terminales de entrada de la parte trasera de los altavoces a los
terminales de salida del altavoz del amplificador / receptor mediante los cables del
altavoz (no se incluyen).
• Conectar los altavoces asegurándose de que no se invierte la polaridad “+” (rojo),
“–” (negro). Si el altavoz está conectado con la polaridad invertida, el sonido es
poco natural y sin bajos.
REALIZACIÓN DE LA CONEXIÓN
! Quitar unos 10 mm de aislamiento del extremo de cada cable del altavoz y torcer
los cables expuestos del cable juntos para evitar cortocircuitos.
± Mantenga pulsada la lengüeta del terminal.
# Inserte el cable pelado.
$ Suelte la lengüeta para que sujete correctamente el cable por su extremo pelado,
no la parte del aislamiento.
% Compruebe que la conexión sea segura tirando ligeramente del cable.
ESPECIFICACIONES (Para cada altavoz)
* Las especificaciones están sujetas a cambio sin previo aviso debido a mejoras del
producto.
Español
1
DESEMBALAJE
2
ANTES DE LA INSTALACIÓN
3
MONTAJE DE LOS ALTAVOCES
Notas:
• Si se usan los soportes para montar los altavoces en la pared o en el techo, usar
cables de seguridad (no se incluyen) entre el soporte y la pared o el techo para
evitar que el altavoz se caiga.
• Al cambiar el ángulo con el soporte fijado al altavoz, afloje las ruedas en ambos
lados antes de modificar la dirección del altavoz. (El ajuste del ángulo puede
realizarse aflojando las ruedas, apretadas con fuerza, girándolas entre dos vueltas
y dos vueltas y media.) Si se aplica demasiada fuerza a una rueda muy apretada,
la pieza fija podría desprenderse y el ajuste del ángulo no podría realizarse.
Después de ajustar el ángulo, apriete la rueda de modo que el altavoz quede bien
fijado.
Si el cable del altavoz (no se incluye) se extiende desde un orificio en la pared o en
el techo detrás del soporte, hacer pasar este cable del altavoz a través del orificio en
el soporte antes de montar el soporte [figura - ].
4
CONEXIÓN DEL AMPLIFICADOR / RECEPTOR
Notas:
• No dejar que los cables desnudos del altavoz se toquen entre ellos puesto que esto
podría dañar el altavoz o el amplificador / receptor, o ambos.
• Compruebe que el terminal sujete los cables pelados y no la parte aislada.
NS-AW294 NS-AW194
Tipo Tipo Bass Reflex de 2 vías
Driver Tweeter 2,5 cm cúpula balanceada tipo
Woofer 16 cm tipo cono 10 cm tipo cono
Respuesta de
frecuencia
de 80 Hz a 20 kHz (–10 dB) de 100 Hz a 20 kHz (–10 dB)
Impedancia 8 ohmios
Entrada nominal 50 W 30 W
Entrada máxima 100 W 80 W
Sensibilidad 87 dB / 2,83 V, 1 m 85 dB / 2,83 V, 1 m
Dimensiones
(An × A × P)
(sin el soporte ni las
ruedas)
190 × 308 × 217 mm 152 × 243 × 171 mm
Peso (con el soporte y las
ruedas)
2,3 kg 1,6 kg
Ángulo móvil Inclinación de 13,5 grados Inclinación de 13,5 grados
3
a
МЕРЫ ПРЕДОСТОРОЖНОСТИ ДЛЯ ПОЛЬЗОВАТЕЛЯ
Внимательно прочтите эти предупреждения до настройки колонок NS-AW294 /
NS-AW194.
• При установке колонок снаружи примите меры по максимальной защите их от
дождя и снега, устанавливая колонки в углу или под навесом.
• Поскольку эти колонки предназначены для настенного / потолочного монтажа,
важно надежно закрепить их. Проверьте, что вы проконсультировались
снадежным источником по выбору наилучшего типа кр
епления для
конкретной стены / потолка.
• Не крепите их к тонкой фанере или мягким материалам стенного / потолочного
покрытия, так как винты могут оторваться, в результате чего колонки упадут
исломаются или нанесут травму.
• Не закрепляйте колонки на стене / потолке гвоздями, клеем или иными
ненадежными способами. Длительное пользование и вибрации могут
ослабить такие крепления.
• Не разм
ещайте колонки там, где о них можно споткнуться или где их могут
повредить упавшие предметы. Прочное крепление также обеспечивает
наилучшее звучание.
• При изменении угла колонок проверьте, что ручки отвинчены с обеих сторон
прежде, чем регулировать угол. Чрезмерная мощность может повредить
колонки.
• Понизьте мощность усилителя / ресивера до изменения вх
одных источников.
Всегда выключайте усилитель / ресивер при установке или демонтаже
входных кабелей.
• Если замечено искажение звука, понизьте уровень громкости на усилителе /
ресивере. Никогда не допускайте срезания звука ресивером.
• Не пытайтесь модифицировать или чинить колонки. При необходимости
обратитесь к квалифицированному сотруднику сервисного центра Yamaha.
Ни в коем случае не следует вскрывать корпус аппар
ата.
• Не пытайтесь очистить колонки химическими составами, так как они могут
повредить их отделку. Пользуйтесь для очистки сухой мягкой тряпочкой.
• Ответственность за безопасность размещения и установку несёт
владелец.
Компания Yamaha не несёт ответственности за какие-либо несчастные
случаи, вызванные ненадлежащим размещением или установкой
колонок.
После распаковки проверьте наличие следующих деталей в комплекте по
ставки.
A Колонка × 2
B Кронштейн × 2
C Ручка × 4
Прочтите внимательно перед установкой.
• Убедитесь, что на стене / потолке достаточно свободного места и отсутствуют
помехи. Выясните размеры и вес устройства (см. раздел ТЕХНИЧЕСКИЕ
ХАРАКТЕРИСТИКИ ниже).
• Перед установкой колонок проложите к месту установки кабели колонок.
Пользуйтесь кронштейном из комплекта для настенного / потолочного монтажа.
! Пользуясь кронштейном как шаблоном, разметьте четыре то
чки главных
отверстий на участке монтажа.
± С помощью креплений (не входят в комплект поставки) надежно закрепите
кронштейн на стене / потолке.
# Установите колонку на кронштейне и зафиксируйте колонку двумя ручками
из комплекта.
$ Поверните эмблему YAMAHA в зависимости от положения колонки.
Перед выполнением подключений убедитесь в том, что усилитель / ресивер
отключен.
СОЕДИНЕНИЯ
• Соедините входные зажимы на задней стороне колонок с выходными
зажимами колонок усителя / ресивера с помощью кабелей колонок (не входят
в поставку).
• Соедините каждую колонку, проверяя правильность полярности “+” (красный),
“–” (черный). Если полярность колонки перепутана, то звук будет
неестественным и без низких частот.
КАК ВЫПОЛНИТЬ СОЕДИНЕНИЕ
! Снимите примерно 10 мм изоляции с конца каждого кабеля колонок и
скрутите голые провода кабеля вместе во избежание коротких замыканий.
± Нажмите и удерживайте защелку терминала.
# Вставьте оголенную часть провода.
$ Отпустите защелку таким образом, чтобы она надежно прижала оголенную
часть провода, а не изоляцию.
% Проверьте надежность подключения, слегка потянув кабели.
ТЕХНИЧЕСКИЕ ХАРАКТЕРИСТИКИ
(для отдельной колонки)
* В результате усовершенствования изделия технические характеристики могут
изменяться без предварительного уведомления.
Русский
1
РАСПАКОВКА
2
ПЕРЕД УСТАНОВКОЙ
3
МОНТАЖ КОЛОНОК
Примечания:
• При использовании кронштейнов для настенного / потолочного монтажа
колонок применяйте крепежную проволоку (не входит в поставку) между
кронштейном и стеной / потолком для предупреждения падения колонки.
• При регулировке угла колонки, когда к ней прикреплен кронштейн, перед
изменением положения колонки ослабьте ручки с обеих сторон. (Регулировку
угла можно выполнить после того, как ту
го затянутые ручки будут ослаблены
на 2 - 2-1/2 оборота.) Если применить чрезмерную силу, когда ручки туго
затянуты, зафиксированная часть может выйти из строя и регулировка угла
будет невозможна. После регулировки угла затяните ручку, чтобы надежно
зафиксировать колонку.
Если кабель колонки (не входит в поставку) подводится из отверстия на стене /
потолке сзади кронштейна, проденьте кабель колонки через отверстие на
кронштейне до монтажа кронштейна [рис. - ].
4
ПОДКЛЮЧЕНИЕ К УСИЛИТЕЛЮ / РЕСИВЕРУ
Примечания:
• Не допускайте, чтобы голые провода колонок соприкасались, так как это
может повредить колонку или усилитель / ресивер, или и то, и другое.
• Убедитесь в том, что в терминале зажата оголенная часть провода, а не
изоляция.
NS-AW294 NS-AW194
Тип 2-полосный фазоинверторный тип
Драйвер Высоко-
частотный
динамик
2,5 см сбалансированный купольный тип
Низкочас-
тотный
динамик
16 см конический тип 10 см конический тип
Частотные
характеристики
от 80 Гц до 20 кГц (–10 дБ) от 100 Гц до 20 кГц (–10 дБ)
Импеданс 8 Ом
Номинальный вход 50 Вт 30 Вт
Максимальный вход 100 Вт 80 Вт
Чувствительность 87 дБ / 2,83 В, 1 м 85 дБ / 2,83 В, 1 м
Габариты
(шир. выс. глуб.)
(без к
ронштейна и ручек)
190 × 308 × 217 мм 152 × 243 × 171 мм
Вес (с кронштейном и
ручками)
2,3 кг 1,6 кг
Угол наклона 13,5 градусов 13,5 градусов
3
a
用户注意事项
设置 NS-AW294/NS-AW194 扬声器前,请仔细阅读这些注意事项。
• 在室外安装扬声器时,请安装到角落或屋檐下,尽量避免暴露于雨雪天气。
• 扬声器要安装到墙壁 / 天花板上,因此需要把它们牢牢固定。对于特殊的墙壁 /
天花板结构,应通过可靠的渠道咨询,以了解最适合您的紧固件类型。
• 不要将它们安装到薄胶合板或柔软的墙壁 / 天花板表层材料上,因为螺钉会很
容易扯破这些材料,使扬声器掉落,导致损坏扬声器或人身伤害。
• 不要用钉子、粘接剂或其他不安全的金属件将扬声器牢固到墙壁 / 天花板上。
由于长时间的使用和震动,它们会很容易脱落。
• 不要将扬声器放置在易于被撞翻或被坠物击中的地方。平稳放置也会确保更好
的声音效果。
• 改变扬声器角度时,应先旋松扬声器两侧的旋钮,再调整角度。施加的力量过
大可能损坏扬声器。
• 变更输入信号前,降低功率放大器 / 接收机的音量。每次安上或卸下输入电缆
线前,应先关闭放大器 / 接收机。
• 如果您察觉到失真﹐请降低功率放大器 / 接收机的音量。不要让功率放大器达
到 “限幅”状态。
• 不要试图改装或修理扬声器。如果需要服务﹐请与 Yamaha 的服务人员联系。任
何时候都不要打开壳体。
• 不要使用化学溶剂清洗扬声器﹐以免损坏其表面涂层。用柔软的干布清洁和擦
拭。
• 安全的放置和安装是用户自己应负的责任。
对于扬声器的不妥当放置和安装所引起的事故﹐ Yamaha 不负任何责任。
拆开包装之后,请检查所装物品,确认下列物品完整无缺。
A 扬声器× 2
B 托架× 2
C 旋钮× 4
在安装之前,请仔细阅读。
• 确保在墙壁 / 天花板上有足够安装空间且无障碍物。注意产品尺寸和重量 (请
参见以下规格)。
• 在安装扬声器之前,请先将扬声器电缆拉到扬声器的安装位置。
使用附带的托架将扬声器安装到墙壁 / 天花板上。
! 用托架作参照,在要安装扬声器的地方标出托架小孔槽的位置 (4 处)。
± 使用合适的金属件 (市售)将托架紧固在墙壁 / 天花板上。
# 将扬声器放入托架,用附带的两个旋钮固定扬声器。
$ 根据扬声器的位置旋转 YAMAHA 标志。
连接前,确认放大器 / 接收机已关闭。
连接
• 用扬声器电缆线 (市售)将扬声器后方的输入端连接到放大器 / 接收机的扬声
器输出端。
• 连接扬声器,注意不要将 “+”极 (红色)和 “-”极 (黑色)接反。如果扬
声器的正负极接反,声音会听起来不自然并且缺乏低音。
连接方法
! 从扬声器电缆线的末端将绝缘层剥去约 10 mm,捻合暴露的电线以防止短路。
± 按住终端卡口。
# 插入裸线。
$ 松开卡口,使其牢牢卡住裸线,而非绝缘层。
% 轻轻拉动连线,检测连接是否牢固。
规格 (单个扬声器)
* 因为产品改良﹐规格可能时有变化。
: 表示该有毒有害物质在该部件所有均质材料中的含量均在 SJ/T 11363-2006 标准
规定的限量要求以下。
: 表示该有毒有害物质至少在该部件的某一均质材料中的含量超出 SJ/T 11363-2006
标准规定的限量要求。
中文
1
拆开包装
2
安装之前
3
安装扬声器
注意:
• 使用托架将扬声器安装到墙壁 / 天花板上时,请在托架和墙壁 / 天花板之间使用
安全金属丝 (不含)以防止扬声器掉落。
• 用固定到扬声器的支架调节角度时,先旋松两侧的旋钮,再改变扬声器的方
向。(拧紧的旋钮转动 2 到 2-1/2 圈而变松后,可进行角度调节。)旋钮紧闭
时,如果施加过大的力,固定部分可能会崩裂且无法进行角度调节。调节角度
后,紧固旋钮使扬声器固定。
如果扬声器电缆线 (市售)是从托架后方墙壁 / 天花板的孔中接线,安装托架
前,先将扬声器电缆线从托架上的孔中穿过 [ 图 - ]。
4
连接放大器 / 接收机
注意:
• 不要让扬声器的裸线互相接触,否则会损坏扬声器或放大器 / 接收机,甚至造
成两者全部损坏。
• 请确保终端咬合在裸线上,而非绝缘层上。
NS-AW294 NS-AW194
类型 2 路低音反射式
发音单元 高音单体 2.5 cm 平衡圆顶型
超低音扬声器 16 cm 锥盆型 10 cm 锥盆型
频率响应 80 Hz - 20 kHz (-10 dB) 100 Hz - 20 kHz (-10 dB)
阻抗 8 欧
名义输入功率 50 W 30 W
最大输入功率 100 W 80 W
敏感度 87 dB/2.83 V, 1 m 85 dB/2.83 V, 1 m
尺寸 (宽×高×深)
( 不含托架和旋钮)
190 × 308 × 217 mm 152 × 243 × 171 mm
重量 (含托架和旋钮) 2.3 kg 1.6 kg
可转动角度 13.5 度 13.5 度
部件名称 有毒有害物质或元素
铅
(Pb)
汞
(Hg)
镉
(Cd)
六价铬
(Cr(VI))
多溴联苯
(PBB)
多溴二苯醚
(PBDE)
外壳箱体
扬声器单元
3
a
EN
Warranty policy for European Economic Area (EEA) and Switzerland,
Australia customer
In the unlikely event that your Yamaha product needs guarantee service, please contact the
dealer from whom it was purchased. If you experience any difficulty, please contact
Yamaha representative office in your country. You can find full details on our website
EEA and Switzerland: (http://europe.yamaha.com/warranty/).
Australia: (http://au.yamaha.com/)
Warranty policy for U.S. and Canada customer
Your Yamaha product is covered by a limited warranty for two years from the date of
purchase. In the unlikely event of failure due to defective materials or workmanship,
Yamaha will repair or replace them at no charge.
Please visit our website for full details.
U.S.: (http://usa.yamaha.com/), Canada: (http://ca.yamaha.com/)
Information for Users on Collection and Disposal of Old Equipment
This symbol specified in the Directives 2002/96/EC indicates that used
electrical and electronic products should not be mixed with general household
waste.
For proper treatment to avoid harmful effect on human health and
environment, please contact your local municipality, your waste disposal
service or the point of sale where you purchased the items.
FR
Conditions de garantie pour la Communauté économique européenne (CEE)
et la Suisse
Si votre produit Yamaha a besoin d’une réparation pendant sa période de garantie, veuillez
contacter votre revendeur. En cas de difficulté, veuillez contacter le représentant Yamaha
de votre pays. Vous trouverez toutes les informations nécessaires sur notre site Web (CEE
et Suisse) à l’adresse suivante : (http://europe.yamaha.com/warranty/).
Garantie Canadienne
Votre produit Yamaha est couverts par une garantie limitée de deux années à compter de
la date d’achat. Dans le cas improbable d’un échec dû aux matériaux ou à l’exécution
défectueux, Yamaha les réparera ou les remplacera gratuit.
Veuillez visiter notre site Web pour les détails complets (http://ca.yamaha.com/).
Information concernant la Collecte et le Traitement des piles Usagées et des
déchets d’équipements électriques et électroniques
Ce symbole, spécifié dans la Directive 2002/96/CE, signifie que les produits
électriques ou électroniques usagés ne doivent pas être mis au rebut avec les
déchets ménagers. Pour traiter ces équipements de manière appropriée, et
éviter ainsi les effets néfastes sur la santé humaine et sur l’environnement,
contactez votre municipalité, votre service de traitement des déchets ou le
point de vente où vous avez acheté les produits.
DE
Garantieanwendung für den Europäischen Wirtschaftsraum (EWR) und
Schweiz
Falls Sie im unwahrscheinlichen Fall für Ihr Yamaha-Produkt eine Garantie-Dienstleistung
in Anspruch nehmen müssen, kontaktieren Sie bitte den Händler, bei dem Sie das Produkt
gekauft haben. Sollten dabei Schwierigkeiten auftreten, bitte den Yamaha-Importeur Ihres
Landes benachrichtigen. Sie können die gesamten Informationen auf unserer Webseite
EWR und Schweiz finden:
(http://europe.yamaha.com/warranty/).
Verbraucherinformation zur Sammlung und Entsorgung alter Elektrogeräte
und Benutzter Batterien
Dieses Symbol, das in den Richtlinien 2002/96/EC spezifiziert wird, gibt an,
dass elektrische und elektronische Produkte nicht im allgemeinen Hausmüll
entsorgt werden dürfen. Für Einzelheiten zur korrekten Entsorgung, um
schädliche Wirkungen auf die menschliche Gesundheit und Umwelt zu
vermeiden, bitte Ihre lokale Gemeinde-/Stadtverwaltung, Ihr
Abfallbeseitigungsunternehmen oder die Verkaufsstelle, wo Sie das Produkt
erworben haben, kontaktieren.
IT
Norme di garanzia per lo Spazio economico europeo (SEE) e la Svizzera
Nell’improbabile eventualità che il prodotto Yamaha richieda un intervento di assistenza in
garanzia, rivolgersi al rivenditore presso cui il prodotto è stato acquistato. Se si dovessero
incontrare difficoltà, rivolgersi al rappresentante Yamaha nel proprio paese. Per
informazioni dettagliate consultare il sito Web per SEE e Svizzera: http://
europe.yamaha.com/warranty/.
Informazioni per gli utenti sulla raccolta e lo smaltimento di vecchia
attrezzatura e batterie Usate
Il presente simbolo, previsto dalla direttiva 2002/96/CE, indica che i prodotti
elettrici ed elettronici usati non devono essere smaltiti con i rifiuti domestici.
Per il corretto smaltimento al fine di prevenire effetti nocivi sulla salute e
sull’ambiente, rivolgersi alle autorità locali, alla società di smaltimento dei
rifiuti o al punto vendita presso cui i prodotti sono stati acquistati.
ES
Condiciones de garantía para países del Espacio Económico Europeo (EEE) y
Suiza
En el caso poco probable de que su producto Yamaha necesite una reparación cubierta
por la garantía, póngase en contacto con el distribuidor en el que lo haya adquirido. Si tiene
cualquier problema, póngase en contacto con la delegación de Yamaha de su país. Podrá
encontrar más información en el sitio web para el EEE y Suiza (http://europe.yamaha.com/
warranty/).
Información para Usuarios sobre Recolección y Disposición de Equipamiento
Viejo y Baterías Usadas
Este símbolo de las Directivas 2002/96/CE indica que los productos
eléctricos y electrónicos utilizados no deben mezclarse con residuos
domésticos generales. Para conocer el tratamiento correcto para evitar
perjudicar la salud humana y el medio ambiente, póngase en contacto con
su ayuntamiento, el servicio de recogida de residuos de su municipio o el
establecimiento en el que compró el producto.
RU
Информация для пользователей по сбору и утилизации старой
аппаратуры и Использованных батареек
Этот символ, указанный в Директивах 2002/96/EC, означает, что
используемые электрические и электронные изделия необходимо
утилизировать отдельно от остальных бытовых отходов. Для получения
дополнительной информации о правильном обращении с изделиями с
целью предотвращения вредного влияния на здоровье человека и
окружающую среду обратитесь в местные муниципальные органы,
службу сбора отходов и по месту приобретения данн
ых изделий.
Documenttranscriptie
10 mm (3/8") Speaker output terminals Bornes de sortie enceinte Lautsprecherausgangsklemmen Morsetti di uscita degli speaker Amplifier or receiver Amplificateur ou récepteur Verstärker oder Receiver Amplificatore o ricevitore English Français Deutsch Italiano CONSUMER PRECAUTIONS MISES EN GARDES POUR L’UTILISATION SICHERHEITSVORSCHRIFTEN FÜR DIE KUNDEN PRECAUZIONI PER I CONSUMATORI Read these precautions carefully before setting up your NS-AW294 / NS-AW194 speakers. • When installing these speakers outdoors, try to minimize their exposure to rain and snow by mounting the speaker in corners or under eaves. • Since these speakers are to be wall / ceiling mounted, it is essential that they are firmly secured. Be sure to consult a reliable source about the best type of fastener for your particular wall / ceiling’s construction. • Do not attach them to thin plywood or soft wall / ceiling surface materials as the screws may tear free, causing the speakers to fall and be damaged, or result in personal injury. • Do not fasten the speakers to wall / ceiling with nails, adhesives, or other unsafe hardware. Long-term use and vibrations may cause them to pull free. • Do not place the speakers where they are liable to be knocked over or struck by falling objects. Stable placement will also ensure better sound performance. • When changing the angle of the speakers, be sure to adjust the angle after loosening the knob on the both sides. The speakers may be damaged by excessive power. • Lower the power amplifier / receiver volume control before changing input sources. Always turn the amplifier / receiver unit off when installing or removing input cables. • Anytime you note distortion, reduce the volume control on your power amplifier / receiver to a lower setting. Never allow your power amplifier to be driven into “clipping”. • Do not attempt to modify or fix the speakers. Contact qualified Yamaha service personnel when any service is needed. The cabinet should never be opened for any reasons. • Do not attempt to clean the speakers with chemical solvents as this might damage the finish. To clean wipe with a dry, soft cloth. • Secure placement or installation is the owner’s responsibility. Yamaha shall not be liable for any accident caused by improper placement or installation of speakers. Avant de positionner les enceintes NS-AW294 / NS-AW194, lisez attentivement ces mises en garde. • En cas d’installation des enceintes à l’extérieur, faites en sorte de réduire leur exposition à la pluie et à la neige en les installants dans des coins ou sous des abris. • Ces enceintes devant être installées au mur ou au plafond, il est important qu’elles soient fixées fermement. Consultez une source fiable pour le type de fixations les mieux adaptées à vos murs / plafond. • Ne les fixez pas sur des contre-plaqués minces ou des surfaces de mur / plafond molles les vis pouvant s’arracher et entraîner la chute des enceintes qui pourraient s’endommager et provoquer des lésions corporelles. • Ne fixez pas les enceintes au mur / plafond en utilisant des clous, des adhésifs ou autre matériel peu sûr. Une utilisation prolongée et les vibrations pourraient les décrocher. • N’installez pas les enceintes où elles pourraient être renversées ou heurtées par des objets tombant de haut. Une mise en place stable garantit aussi une meilleure réproduction du son. • En cas de changement d’angle des enceintes, vérifiez d’avoir correctement réglé l’angle en desserrant le bouton situé sur les deux côtés. Sinon les enceintes risquent d’être endommagées par une puissance trop élevée. • Avant de modifier les sources d’entrée, baissez le volume de l’amplificateur / récepteur. Avant de brancher ou de débrancher les câbles d’entrée éteignez l’amplificateur / récepteur. • Lorsque vous entendez de la distorsion, réduisez le niveau de volume de votre amplificateur / récepteur. Ne laissez pas l’amplificateur «écrêter». • N’essayez pas de modifier ou de réparer les enceintes. Pour la réparation, contactez un centre de service après-vente Yamaha agréé. L’enceinte ne doit en aucun cas être ouverte. • N’essayez pas de nettoyer les enceintes avec des solvants chimiques. Cela risquerait d’endommager l’apprêt. Pour le nettoyage, utilisez un chiffon sec et doux. • Le propriétaire des enceintes est responsable de leur emplacement et de leur installation. Yamaha décline toute responsabilité en cas d’accident causé par un positionnement ou une installation inadéquate des enceintes. Lesen Sie die folgenden Sicherheitsvorschriften aufmerksam, bevor Sie Ihre NS-AW294 / NS-AW194 Lautsprecher installieren. • Sorgen Sie bei der Installation dieser Lautsprecher in Außenbereichen dafür, dass sie ausreichend vor Regen und Schnee geschützt sind; montieren Sie sie zu diesem Zweck in einer Ecke oder unter einer Traufe. • Diese Lautsprecher sind für die Wand-/Deckenmontage ausgelegt und müssen daher unbedingt sicher befestigt werden. Lassen Sie sich bei einem zuverlässigen Händler über die Art Verbindungselemente beraten, die für Ihre spezifische Wand-/Deckenkonstruktion am besten geeignet ist. • Montieren Sie die Lautsprecher nicht an dünnem Sperrholz oder an weichen Wand-/Deckenmaterialien, da sich die Schrauben möglicherweise lösen und die Lautsprecher herunterfallen, was Schäden an den Lautsprechern oder Körperverletzungen zur Folge haben kann. • Befestigen Sie die Lautsprecher nicht mit Nägeln, Klebstoff oder anderen ungeeigneten Verbindungselementen an der Wand/Decke. Nach langjähriger Nutzung oder durch Vibrationen können sich die Lautsprecher ebenfalls von der Wand/Decke lösen. • Positionieren Sie die Lautsprecher nicht an Stellen, an denen die Gefahr besteht, dass sie umgestoßen oder von herunterfallenden Gegenständen getroffen werden können. Eine stabile Positionierung garantiert auch einen besseren Klang. • Wenn Sie die Lautsprecher in einem anderen Winkel positionieren möchten, stellen Sie den Winkel entsprechend ein, nachdem Sie den Knopf auf beiden Seiten gelöst haben. Durch eine zu große Leistung können die Lautsprecher beschädigt werden. • Reduzieren Sie den Lautstärkepegel des Leistungsverstärkers / Receivers, bevor Sie den Signaleingang wechseln. Schalten Sie der Verstärker / Receiver immer aus, bevor Sie die Eingangskabel anschließen oder entfernen. • Reduzieren Sie jedes Mal, wenn Verzerrung auftritt, den Lautstärkepegel am Leistungsverstärker / Receiver. Achten Sie darauf, dass der Leistungsverstärker nie in eine „Begrenzungsverzerrung“ getrieben wird. • Versuchen Sie nicht, die Lautsprecher abzuändern oder zu reparieren. Falls Reparaturarbeiten erforderlich sind, wenden Sie sich bitte immer an das qualifizierte Kundendienstpersonal von Yamaha. Das Gehäuse sollte unter keinen Umständen geöffnet werden. • Verwenden Sie zum Reinigen der Lautsprecher keine chemischen Lösungsmittel, da diese die Appretur beschädigen könnten. Wischen Sie sie mit einem trockenen, weichen Tuch ab. • Der Benutzer ist für die sichere Positionierung oder Montage der Lautsprecher verantwortlich. Yamaha haftet unter keinen Umständen für Unfälle, die auf die unsachgemäße Positionierung oder Montage der Lautsprecher zurückzuführen sind. Leggere attentamente queste precauzioni prima di configurare gli speaker NS-AW294 / NS-AW194. • In caso di installazione degli speaker in un ambiente esterno, cercare di minimizzarne l’esposizione a pioggia e neve montandoli in angoli o sotto a dei cornicioni. • Dato che gli speaker sono destinati a essere montati parete / al soffitto, è essenziale fissarli saldamente. Accertarsi di consultare una fonte affidabile per conoscere l’elemento di fissaggio migliore per il proprio tipo di parete / soffitto. • Non fissare gli speaker a materiali morbidi o in legno compensato sottile per il montaggio parete / al soffitto, dato che le viti potrebbero causare lacerazioni in grado di far cadere e danneggiare gli speaker o di causare lesioni personali. • Non fissare gli speaker alla parete / al soffitto con chiodi, adesivi o altre minuterie non sicure. L’utilizzo a lungo termine e le vibrazioni potrebbero causarne la rimozione. • Non posizionare gli speaker in luoghi in cui potrebbero essere rovesciati o colpiti da oggetti cadenti. Una collocazione stabile garantirà anche migliori prestazioni acustiche. • In fase di modifica dell’angolazione degli speaker, assicurarsi di regolare l’angolazione dopo aver allentato la manopola su entrambi i lati. Gli speaker potrebbero danneggiarsi a causa della potenza eccessiva. • Abbassare il volume dell’amplificatore / ricevitore di potenza prima di modificare le fonti di ingresso. Spegnere sempre l’amplificatore / ricevitore in fase di installazione o rimozione dei cavi di ingresso. • Quando si rileva una distorsione, ridurre il volume dell’amplificatore / ricevitore di potenza a un’impostazione inferiore. Non portare mai l’amplificatore di potenza fino al livello di saturazione. • Non cercare di modificare o di riparare gli speaker. Contattare un tecnico qualificato dell’assistenza Yamaha per l’esecuzione di ogni intervento di manutenzione richiesto. Non aprire mai l’armadio per nessun motivo. • Non cercare di pulire gli speaker con solventi chimici, in quanto potrebbero danneggiare le finiture. Per pulirli utilizzare un panno asciutto e morbido. • La correttezza della posizione e dell’installazione è responsabilità del proprietario. Yamaha esclude ogni responsabilità in caso di incidenti causati da errori di posizionamento o installazione degli speaker. 1 UNPACKING After unpacking, please inspect contents to confirm all the following items are contained. A Speaker × 2 B Bracket × 2 C Knob × 4 2 BEFORE INSTALLATION Please read carefully before installation. • Make sure that there is sufficient space without obstructions on a wall / ceiling for installation. Be aware of the product dimensions and weight (See SPECIFICATIONS below). • Before installing the speakers, run the speaker cables to the installation location. 3 MOUNTING THE SPEAKERS To wall / ceiling mount the speakers, use the included bracket. ! Using the bracket as a template mark the locations (four points) of the key hole slots on the mounting area. ± Using appropriate hardware (not included) securely fasten the bracket to the wall / ceiling. # Position the speaker in the bracket and secure the speaker by using the two knobs included. Notes: • When using the brackets to mount the speakers on a wall / ceiling, please use safety wire (not included) between the bracket and the wall / ceiling to prevent the speaker from falling. • When adjusting the angle with the bracket fixed to the speaker, loosen the knobs on both sides before changing the direction of the speaker. (Angle adjustment can be performed after the knobs, fastened tightly, are loosened by rotating them 2 to 2-1/2 times.) When excessive force is applied while the knob is tightly shut, the fixed portion may collapse and angle adjustment will be disabled. After adjusting the angle, tighten the knob so that the speaker will be steadfast. $ Rotate the YAMAHA emblem according to the position of the speaker. If speaker cable (not included) is being fed from a hole in the wall / ceiling behind the bracket, pull this speaker cable through the hole in the bracket before mounting the bracket [figure 3 - a ]. 1 DEBALLAGE Après le déballage vérifiez que les articles suivant sont présents. A Enceinte × 2 B Patte de fixation × 2 C Bouton × 4 2 AVANT L’INSTALLATION Veuillez lire attentivement cette section avant de procéder à l’installation. • Veillez à ce qu’il y ait un espace suffisant sans obstruction pour l’installation au mur / plafond. Soyez conscient des dimensions et du poids du produit (voir CARACTERISTIQUES TECHNIQUES ci-dessous). • Avant d’installer les enceintes, acheminez les câbles d’enceinte jusqu’à l’emplacement d’installation. 3 INSTALLATION DES ENCEINTES Pour l’installation au mur / plafond des enceintes, utilisez la patte de fixation livrée avec ces dernières. ! En utilisant la patte de fixation comme gabarit, marquez les emplacements (quatre points) des boutonnières sur la zone d’installation. ± Utilisez le matériel de fixation approprié (non compris) pour fixer fermément la patte de fixation au mur / plafond. # Placez l’enceinte sur la patte de fixation et fixez-la en utilisant les deux boutons compris dans la fourniture. Remarques : • Lors de l’utilisation des pattes de fixation pour l’installation des enceintes au mur / plafond, placez un câble de sécurité (non compris) entre la patte de fixation et le mur / plafond pour éviter que l’enceinte ne tombe. • Lors du réglage de l’angle avec les pattes de fixation des enceintes, desserrez les boutons situés sur chaque côté avant de modifier l’orientation des enceintes. (Le réglage de l’angle peut être effectué une fois les boutons, serrés fermement, desserrés en les tournant de 2 à 2 tours et 1/2.) Une pression excessive appliquée alors que le bouton est fermement serré peut entraîner la chute de la partie fixe et ainsi l’impossibilité de régler l’angle. Une fois l’angle réglé, serrez le bouton de façon à ce que l’enceinte soit stable. 4 CONNECTING YOUR AMPLIFIER / RECEIVER $ Tournez le symbole YAMAHA suivant la position de l’enceinte. Before making connections, make sure that the amplifier / receiver is switched off. Si le câble d’enceinte (non compris) passe au travers d’un trou du mur / plafond situé derrière la patte de fixation, avant d’installer la patte de fixation faites passer le câble d’enceinte à travers le trou percé dans la patte de fixation [figure 3 - a ]. CONNECTIONS • Connect the input terminals at the rear of the speakers to the speaker output terminals of the amplifier / receiver with the speaker cables (not included). • Connect each speaker making sure not to reverse the polarity “+” (red), “–” (black). If the speaker is connected with reversed polarity, the sound will be unnatural and lack bass. HOW TO CONNECT ! Remove approximately 10 mm (3/8″) of insulation from the end of each speaker cable and twist the exposed wires of the cable together to prevent short circuits. ± Press and hold the terminal tab. # Insert the bare wire. $ Release the tab so that it closes security on the bare wire, not the insulation. % Test the security of the connection by pulling gently on the cable. Notes: • Do not let the bare speaker wires touch each other as this could damage the speaker or amplifier / receiver, or both. • Make sure the terminal is gripping the bare wire, not the insulation. SPECIFICATIONS (For single speaker) NS-AW294 Type Driver NS-AW194 2-Way Bass Reflex Tweeter Woofer Frequency response 2.5 cm (1″) Balanced dome type 16 cm (6-1/2″) cone type 10 cm (4″) cone type 80 Hz to 20 kHz (–10 dB) 100 Hz to 20 kHz (–10 dB) Impedance 8 ohms Nominal input 50 W 30 W Maximum input 100 W 80 W 87 dB / 2.83 V, 1 m 85 dB / 2.83 V, 1 m 190 × 308 × 217 mm (7-1/2″ × 12-1/8″ × 8-1/2″) 152 × 243 × 171 mm (6″ × 9-5/8″ × 6-3/4″) Sensitivity Dimensions (W × H × D) (excluding bracket and knobs) Weight (including bracket and knobs) Movable angle 2.3 kg (5.1 lbs.) 1.6 kg (3.5 lbs.) 13.5 degree pitch 13.5 degree pitch * Specifications subject to change without notice due to product improvements. 1 DISIMBALLAGGIO 1 AUSPACKEN 4 BRANCHEMENT DE L’AMPLIFICATEUR / RECEPTEUR Avant de réaliser les raccordements, assurez-vous que l’amplificateur / récepteur est éteint. Prüfen Sie nach dem Auspacken, dass alle nachfolgend angeführten Artikel im Lieferumfang enthalten sind. A 2 Lautsprecher B 2 Halterungen C 4 Drehknöpfe Dopo il disimballaggio, ispezionare il contenuto della confezione per confermare la presenza di tutti gli elementi seguenti. A Speaker × 2 B Staffa × 2 C Manopola × 4 2 VOR DER INSTALLATION 2 PRIMA DI PROCEDERE ALL’INSTALLAZIONE Bitte lesen Sie dies vor der Installation gründlich durch. • Stellen Sie sicher, dass der Platz für die Montage ausreicht und keine Hindernisse an der Wand/Decke vorhanden sind. Beachten Sie die Produktabmessungen und das Gewicht (siehe TECHNISCHE DATEN weiter unten). • Verlegen Sie vor dem Installieren der Lautsprecher die Lautsprecherkabel zum Installationsort. Si prega di leggere con attenzione prima di procedere all’installazione. • Accertarsi che vi sia spazio sufficiente e che non siano presenti ostacoli prima di procedere all’installazione sulla parete / sul soffitto. Tenere in considerazione le dimensioni e il peso del prodotto (vedere SPECIFICHE qui di seguito). • Prima d'installare gli altoparlanti, far correre i cavi dell'altoparlante fino al punto dell'installazione. 3 MONTAGE DER LAUTSPRECHER 3 MONTAGGIO DEGLI SPEAKER Verwenden Sie bei der Wand-/Deckenmontage der Lautsprecher die mitgelieferten Halterungen. ! Nehmen Sie die Halterung als Vorlage und markieren Sie die Stellen (vier Punkte) für die Löcher, die zwecks Montage der Lautsprecher zu bohren sind. ± Befestigen Sie die Halterung mit den passenden (nicht mitgelieferten) Verbindungselementen an der Wand/Decke. # Setzen Sie den Lautsprecher in die Halterung und sichern Sie ihn mit den beiden mitgelieferten Drehknöpfen. Per montare a parete / al soffitto gli speaker, utilizzare la staffa inclusa. ! Utilizzando la staffa come guida, contrassegnare le posizioni (quattro punti) dei fori sull’area di montaggio. ± Utilizzando della minuteria appropriata (non fornita) fissare saldamente la staffa alla parete / al soffitto. # Posizionare lo speaker nella staffa e fissarlo utilizzando le due manopole incluse. Hinweise: • Wenn Sie die Halterungen zur Befestigung der Lautsprecher an einer Wand/Decke verwenden, verwenden Sie bitte einen Sicherheitsdraht (nicht mitgeliefert) zwischen der Halterung und der Wand/Decke, um ein Herabfallen des Lautsprechers zu vermeiden. • Wenn Sie den Winkel mit der am Lautsprecher befestigten Halterung einstellen, lösen Sie die Drehknöpfe an beiden Seiten, bevor Sie die Richtung des Lautsprechers ändern. (Die Anpassung des Winkels kann erfolgen, nachdem die Drehknöpfe, wenn sie fest angezogen sind, durch eine 2- bis 2 1/2-malige Drehung gelöst wurden.) Wenn übermäßige Kraft angewendet wird, während der Drehknopf fest angezogen ist, kann sich der fixierte Bereich verziehen, was eine Anpassung des Winkels unmöglich macht. Ziehen Sie die Drehknöpfe nach der Anpassung des Winkels wieder fest, sodass der Lautsprecher fixiert ist. Note: • Se si utilizzano le staffe per montare gli speaker alla parete / al soffitto, utilizzare un cavo di sicurezza (non fornito) tra la staffa e la parete / il soffitto per evitare che lo speaker possa cadere. • In fase di regolazione dell’angolazione con la staffa fissata allo speaker, allentare le manopole su entrambi i lati prima di modificare la direzione dello speaker. (La regolazione dell’angolazione può essere eseguita dopo che le manopole, fissate saldamente, vengono allentate ruotandole 2 o 2,5 volte.) Se si applica una forza eccessiva mentre la manopola è serrata saldamente, la parte fissata potrebbe cedere e, in tal caso, la regolazione dell’angolazione sarebbe annullata. Dopo aver completato la regolazione dell’angolazione, serrare la manopola assicurandosi che lo speaker sia fissato saldamente. $ Ruotare l’emblema YAMAHA in base alla posizione dello speaker. $ Drehen Sie das YAMAHA-Logo entsprechend der Position des Lautsprechers. Se il cavo dello speaker (non fornito) viene inserito attraverso un foro nella parete / nel soffitto dietro la staffa, farlo passare attraverso il foro nella staffa prima di montare quest’ultima [figura 3 - a ]. Wenn das (nicht mitgelieferte) Lautsprecherkabel von einem Loch in der Wand/ Decke hinter der Halterung zum Lautsprecher geführt wird, ziehen Sie dieses Kabel durch das Loch in der Halterung, bevor Sie die Halterung montieren [siehe Abbildung 3 - a ]. 4 COLLEGAMENTO DELL’AMPLIFICATORE / RICEVITORE RACCORDEMENTS Prima di effettuare i collegamenti, assicurarsi che l’amplificatore / ricevitore sia spento. • Raccordez les bornes d’entrée situées sur la face arrière des enceintes aux bornes de sortie des enceintes situées sur l’amplificateur / récepteur en utilisant les câbles d’enceintes (non compris). • Raccordez chaque enceinte en veillant à ne pas inverser la polarité « + » (rouge), « – » (noir). Si l’enceinte est raccordée avec la polarité inversée, le son émis sera innaturel et sans graves. COLLEGAMENTI REALISATION DU RACCORDEMENT ! Enlevez environ 10 mm d’isolement de l’extrémité de chaque câble d’enceinte et torsadez ensemble la partie dénudée des câbles afin d’éviter tout court-circuit. ± Appuyez sur le levier de la borne et maintenez-le. # Insérez le fil dénudé. $ Relâchez le levier pour qu’il se referme convenablement en serrant le fil dénudé et non l’isolant. % Vérifiez que les fils sont bien maintenus en tirant doucement dessus. Remarques : • Veillez à ce que les câbles dénudés des enceintes n’entrent pas en contact les uns avec les autres. Cela pourrait endommager l’enceinte ou l’amplificateur / récepteur ou les deux. • Vérifiez que la borne serre le fil dénudé et non l’isolant. CARACTERISTIQUES TECHNIQUES (Pour une enceinte) NS-AW294 Type Driver NS-AW194 Type bass reflex à 2 voies Tweeter Woofer Réponse en fréquence 2,5 cm type dôme symétrique 16 cm type cône 10 cm type cône 80 Hz à 20 kHz (–10 dB) Impédance 100 Hz à 20 kHz (–10 dB) 50 W 30 W Entrée maximum 100 W 80 W 87 dB / 2,83 V, 1 m 85 dB / 2,83 V, 1 m • Schließen Sie die Eingangsklemmen mit den (nicht mitgelieferten) Lautsprecherkabeln an der Rückseite der Lautsprecher an die Lautsprecherausgangsklemmen des Verstärkers / Receivers an. • Schließen Sie die Lautsprecher an; achten Sie dabei auf die korrekte Polarität „+“ (rot), „–“ (schwarz). Bei umgepoltem Anschluss der Lautsprecher ist der Klang unnatürlich und der Bass ist nicht gut hörbar. SO NEHMEN SIE DIE ANSCHLÜSSE VOR ! Entfernen Sie circa 10 mm der Isolierung vom Ende der Lautsprecherkabel und verdrehen Sie die abisolierten Drähte des Kabels miteinander, um Kurzschlüsse zu vermeiden. ± Drücken Sie die Klemmlasche hinunter und halten Sie sie in dieser Position. # Schieben Sie die Ader hinein. $ Geben Sie die Lasche wieder frei, um die Ader (nicht aber den Mantel) festzuklemmen. % Ziehen Sie vorsichtig am Kabel, um zu überprüfen, ob es fest sitzt. Hinweise: • Achten Sie darauf, dass sich die blanken Lautsprecherdrähte nicht berühren, da anderenfalls der Lautsprecher oder der Verstärker / Receiver oder beide beschädigt werden können. • Die Klemmen dürfen nur jeweils die bloßliegenden Adern, nicht aber den Mantel berühren. NS-AW294 Typ Treiber 190 × 308 × 217 mm Poids (y compris la patte de fixation et les boutons) 2,3 kg 152 × 243 × 171 mm Frequenzgang inclinaison de 13,5 degrés inclinaison de 13,5 degrés * Les spécifications sont sujettes à changement sans notification pour amélioration des performances du produit. 2,5 cm Symmetrischer Kalottentyp 10 cm Konustieftöner 80 Hz bis 20 kHz (–10 dB) 100 Hz bis 20 kHz (–10 dB) 8 Ohm Nenneingangsleistung 50 W 30 W Maximale Eingangsleistung 100 W 80 W 87 dB / 2,83 V, 1 m 85 dB / 2,83 V, 1 m 190 × 308 × 217 mm 152 × 243 × 171 mm Empfindlichkeit Abmessungen (B × H × T) (ohne Halterung und Drehknöpfe) Gewicht (einschließlich Halterung und Drehknöpfe) Verschiebbarer COME EFFETTUARE I COLLEGAMENTI ! Rimuovere circa 10 mm di isolamento dall’estremità di ciascun cavo degli speaker e attorcigliare insieme i fili esposti del cavo per impedire cortocircuiti. ± Premete e tenete premuta l’aletta del terminale. # Inserite i fili. $ Rilasciate l’aletta in modo che faccia presa sui fili, non sull’isolante. % Per controllare che il collegamento sia stato effettuato correttamente, tirate leggermente il cavo. Note: • Impedire il contatto tra i fili privi di isolamento dello speaker, dato che ciò potrebbe causare danni allo speaker o all’amplificatore / ricevitore o a entrambi. • Accertatevi che il terminale faccia presa sui fili, non sull’isolante. SPECIFICHE (per il singolo speaker) NS-AW294 Tipo Driver Tweeter Woofer Risposta in frequenza 2,5 cm tipo di cupola bilanciata 16 cm tipo conico 10 cm tipo conico Da 80 Hz a 20 kHz (–10 dB) Da 100 Hz a 20 kHz (–10 dB) 2,3 kg 1,6 kg Winkel 13,5 Grad Neigung * Änderungen der technischen Daten aus Gründen der Produktverbesserung ohne vorherige Ankündigung vorbehalten. 8 ohm Ingresso nominale 50 W Ingresso massimo 100 W 80 W 87 dB / 2,83 V, 1 m 85 dB / 2,83 V, 1 m 190 × 308 × 217 mm 152 × 243 × 171 mm 2,3 kg 1,6 kg 13,5 gradi 13,5 gradi Dimensioni (L × A × P) (esclusi staffa e manopole) Peso (inclusi staffa e manopole) Angolo di inclinazione Winkel 13,5 Grad Neigung NS-AW194 Tipo di bass reflex a 2 vie Sensibilità 16 cm Konustieftöner Impedanz 1,6 kg NS-AW194 2-Wege Bassreflextyp Hochtöner • Collegare i morsetti di ingresso sul retro degli speaker ai morsetti di uscita degli speaker dell’amplificatore / ricevitore mediante i cavi per speaker (non forniti). • Collegare ciascuno speaker rispettandone la polarità “+” (rosso), “–” (nero). Se uno speaker viene collegato con la polarità invertita, il suono risulterà innaturale e privo di bassi. Impedenza TECHNISCHE DATEN (je Lautsprecher) Tieftöner Dimensions (L × H × P) (avec exclusion des pattes de fixation et des boutons) Angle mobile ANSCHLÜSSE 8 ohms Entrée nominale Sensibilité 4 ANSCHLUSS DES VERSTÄRKERS / RECEIVERS Stellen Sie sicher, dass der Verstärker / Receiver ausgeschaltet ist, bevor Sie die Anschlüsse vornehmen. 30 W * Specifiche soggette a modifica senza preavviso per miglioramenti al prodotto. 10 mm Terminales de salida del altavoz Выходные зажимы колонок 扬声器输出端 Amplificador o receptor Усилитель или ресивер 放大器或接收机 Русский Español 中文 PRECAUCIONES QUE EL CONSUMIDOR TIENE QUE TOMAR МЕРЫ ПРЕДОСТОРОЖНОСТИ ДЛЯ ПОЛЬЗОВАТЕЛЯ Leer estas precauciones atentamente antes de montar los altavoces NS-AW294 / NS-AW194. • Si hay que instalar estos altavoces al aire libre, tratar de reducir la exposición de los mismos a la lluvia y a la nieve montando los altavoces en esquinas o debajo de aleros. • Puesto que estos altavoces deben montarse en la pared o en el techo, es esencial que estén fijados firmemente. Asegurarse de consultar con una fuente fiable acerca del mejor tipo de soporte para el techo o pared específico. • No montarlos en contrachapado delgado o en materiales de superficie de techo o de pared débiles puesto que los tornillos pueden romperlos, causando que los altavoces se caigan y se dañen u ocasionando lesiones personales. • No fijar los altavoces a la pared o al techo con clavos, adhesivos u otros elementos que no son seguros. El uso a largo plazo y las vibraciones pueden causar que los mismos se caigan. • No colocar los altavoces en lugares donde puedan volcarse o ser golpeados por objetos que caen. Un lugar estable asegura también un mejor rendimiento del sonido. • Al cambiar el ángulo de los altavoces, asegurarse de ajustar el ángulo tras haber aflojado la rueda en ambos lados. Los altavoces pueden dañarse por demasiada potencia. • Bajar el control de volumen del amplificador / receptor antes de cambiar las fuentes de entrada. Apagar siempre el amplificador / receptor al instalar o quitar los cables de entrada. • Cuando se nota que hay distorsión, reducir el control de volumen en el amplificador / receptor a un ajuste más bajo. No permitir nunca que el amplificador de potencia llegue al “recorte”. • No intentar modificar o fijar los altavoces. Contactar con personal de servicio cualificado de Yamaha, cuando sea necesario. El armario no debe abrirse por ningún motivo. • No intentar limpiar los altavoces con productos químicos disolventes puesto que esto podría dañar el acabado. Para limpiarlos, usar un paño suave y seco. • El emplazamiento o instalación segura es responsabilidad del propietario. Yamaha no es responsable por accidentes a causa de un emplazamiento o instalación inadecuada de los altavoces. Внимательно прочтите эти предупреждения до настройки колонок NS-AW294 / NS-AW194. • При установке колонок снаружи примите меры по максимальной защите их от дождя и снега, устанавливая колонки в углу или под навесом. • Поскольку эти колонки предназначены для настенного / потолочного монтажа, важно надежно закрепить их. Проверьте, что вы проконсультировались с надежным источником по выбору наилучшего типа крепления для конкретной стены / потолка. • Не крепите их к тонкой фанере или мягким материалам стенного / потолочного покрытия, так как винты могут оторваться, в результате чего колонки упадут и сломаются или нанесут травму. • Не закрепляйте колонки на стене / потолке гвоздями, клеем или иными ненадежными способами. Длительное пользование и вибрации могут ослабить такие крепления. • Не размещайте колонки там, где о них можно споткнуться или где их могут повредить упавшие предметы. Прочное крепление также обеспечивает наилучшее звучание. • При изменении угла колонок проверьте, что ручки отвинчены с обеих сторон прежде, чем регулировать угол. Чрезмерная мощность может повредить колонки. • Понизьте мощность усилителя / ресивера до изменения входных источников. Всегда выключайте усилитель / ресивер при установке или демонтаже входных кабелей. • Если замечено искажение звука, понизьте уровень громкости на усилителе / ресивере. Никогда не допускайте срезания звука ресивером. • Не пытайтесь модифицировать или чинить колонки. При необходимости обратитесь к квалифицированному сотруднику сервисного центра Yamaha. Ни в коем случае не следует вскрывать корпус аппарата. • Не пытайтесь очистить колонки химическими составами, так как они могут повредить их отделку. Пользуйтесь для очистки сухой мягкой тряпочкой. • Ответственность за безопасность размещения и установку несёт владелец. Компания Yamaha не несёт ответственности за какие-либо несчастные случаи, вызванные ненадлежащим размещением или установкой колонок. 1 DESEMBALAJE После распаковки проверьте наличие следующих деталей в комплекте поставки. A Колонка × 2 B Кронштейн × 2 C Ручка × 4 Tras el desembalaje, inspeccionar el contenido para comprobar que están los siguientes elementos. A Altavoces × 2 B Soporte × 2 C Rueda × 4 2 ANTES DE LA INSTALACIÓN Léalo con atención antes de la instalación. • Asegúrese de que en la pared o el techo hay un espacio suficiente y despejado de obstáculos antes de realizar la instalación. Tenga en cuenta las dimensiones y el peso del producto (véanse las ESPECIFICACIONES). • Antes de instalar los altavoces, tienda los cables del altavoz hasta el lugar de la instalación. 3 MONTAJE DE LOS ALTAVOCES Para el montaje en la pared o en el techo de los altavoces, usar el soporte que se incluye. ! Usando el soporte como plantilla, marcar los lugares (4 puntos) de las ranuras para los orificios en el área de montaje. ± Usando los elementos apropiados (no se incluyen) fijar firmemente el soporte a la pared o al techo. # Colocar el altavoz en el soporte y fijar el altavoz mediante las dos ruedas que se incluyen. Notas: • Si se usan los soportes para montar los altavoces en la pared o en el techo, usar cables de seguridad (no se incluyen) entre el soporte y la pared o el techo para evitar que el altavoz se caiga. • Al cambiar el ángulo con el soporte fijado al altavoz, afloje las ruedas en ambos lados antes de modificar la dirección del altavoz. (El ajuste del ángulo puede realizarse aflojando las ruedas, apretadas con fuerza, girándolas entre dos vueltas y dos vueltas y media.) Si se aplica demasiada fuerza a una rueda muy apretada, la pieza fija podría desprenderse y el ajuste del ángulo no podría realizarse. Después de ajustar el ángulo, apriete la rueda de modo que el altavoz quede bien fijado. 1 РАСПАКОВКА 2 ПЕРЕД УСТАНОВКОЙ Прочтите внимательно перед установкой. • Убедитесь, что на стене / потолке достаточно свободного места и отсутствуют помехи. Выясните размеры и вес устройства (см. раздел ТЕХНИЧЕСКИЕ ХАРАКТЕРИСТИКИ ниже). • Перед установкой колонок проложите к месту установки кабели колонок. 3 МОНТАЖ КОЛОНОК Пользуйтесь кронштейном из комплекта для настенного / потолочного монтажа. ! Пользуясь кронштейном как шаблоном, разметьте четыре точки главных отверстий на участке монтажа. ± С помощью креплений (не входят в комплект поставки) надежно закрепите кронштейн на стене / потолке. # Установите колонку на кронштейне и зафиксируйте колонку двумя ручками из комплекта. Примечания: • При использовании кронштейнов для настенного / потолочного монтажа колонок применяйте крепежную проволоку (не входит в поставку) между кронштейном и стеной / потолком для предупреждения падения колонки. • При регулировке угла колонки, когда к ней прикреплен кронштейн, перед изменением положения колонки ослабьте ручки с обеих сторон. (Регулировку угла можно выполнить после того, как туго затянутые ручки будут ослаблены на 2 - 2-1/2 оборота.) Если применить чрезмерную силу, когда ручки туго затянуты, зафиксированная часть может выйти из строя и регулировка угла будет невозможна. После регулировки угла затяните ручку, чтобы надежно зафиксировать колонку. $ Поверните эмблему YAMAHA в зависимости от положения колонки. Если кабель колонки (не входит в поставку) подводится из отверстия на стене / потолке сзади кронштейна, проденьте кабель колонки через отверстие на кронштейне до монтажа кронштейна [рис. 3 - a ]. $ Girar el emblema de YAMAHA según la posición del altavoz. 4 ПОДКЛЮЧЕНИЕ К УСИЛИТЕЛЮ / РЕСИВЕРУ Si el cable del altavoz (no se incluye) se extiende desde un orificio en la pared o en el techo detrás del soporte, hacer pasar este cable del altavoz a través del orificio en el soporte antes de montar el soporte [figura 3 - a ]. Перед выполнением подключений убедитесь в том, что усилитель / ресивер отключен. 4 CONEXIÓN DEL AMPLIFICADOR / RECEPTOR Antes de realizar las conexiones, asegurarse de que el amplificador / receptor está apagado. CONEXIONES • Conectar los terminales de entrada de la parte trasera de los altavoces a los terminales de salida del altavoz del amplificador / receptor mediante los cables del altavoz (no se incluyen). • Conectar los altavoces asegurándose de que no se invierte la polaridad “+” (rojo), “–” (negro). Si el altavoz está conectado con la polaridad invertida, el sonido es poco natural y sin bajos. REALIZACIÓN DE LA CONEXIÓN ! Quitar unos 10 mm de aislamiento del extremo de cada cable del altavoz y torcer los cables expuestos del cable juntos para evitar cortocircuitos. ± Mantenga pulsada la lengüeta del terminal. # Inserte el cable pelado. $ Suelte la lengüeta para que sujete correctamente el cable por su extremo pelado, no la parte del aislamiento. % Compruebe que la conexión sea segura tirando ligeramente del cable. Notas: • No dejar que los cables desnudos del altavoz se toquen entre ellos puesto que esto podría dañar el altavoz o el amplificador / receptor, o ambos. • Compruebe que el terminal sujete los cables pelados y no la parte aislada. ESPECIFICACIONES (Para cada altavoz) NS-AW294 Tipo Driver СОЕДИНЕНИЯ • Соедините входные зажимы на задней стороне колонок с выходными зажимами колонок усителя / ресивера с помощью кабелей колонок (не входят в поставку). • Соедините каждую колонку, проверяя правильность полярности “+” (красный), “–” (черный). Если полярность колонки перепутана, то звук будет неестественным и без низких частот. КАК ВЫПОЛНИТЬ СОЕДИНЕНИЕ ! Снимите примерно 10 мм изоляции с конца каждого кабеля колонок и скрутите голые провода кабеля вместе во избежание коротких замыканий. ± Нажмите и удерживайте защелку терминала. # Вставьте оголенную часть провода. $ Отпустите защелку таким образом, чтобы она надежно прижала оголенную часть провода, а не изоляцию. % Проверьте надежность подключения, слегка потянув кабели. Примечания: • Не допускайте, чтобы голые провода колонок соприкасались, так как это может повредить колонку или усилитель / ресивер, или и то, и другое. • Убедитесь в том, что в терминале зажата оголенная часть провода, а не изоляция. NS-AW294 Тип Woofer Respuesta de frecuencia 16 cm tipo cono de 80 Hz a 20 kHz (–10 dB) Impedancia Entrada nominal Entrada máxima Sensibilidad Dimensiones (An × A × P) (sin el soporte ni las ruedas) Peso (con el soporte y las ruedas) Ángulo móvil 10 cm tipo cono de 100 Hz a 20 kHz (–10 dB) Низкочастотный динамик Частотные характеристики 2,5 см сбалансированный купольный тип 16 см конический тип 10 см конический тип от 80 Гц до 20 кГц (–10 дБ) от 100 Гц до 20 кГц (–10 дБ) Импеданс Номинальный вход Максимальный вход 8 Ом 50 Вт 30 Вт 100 Вт 80 Вт 30 W Чувствительность 87 дБ / 2,83 В, 1 м 85 дБ / 2,83 В, 1 м Габариты (шир. выс. глуб.) (без кронштейна и ручек) 190 × 308 × 217 мм 152 × 243 × 171 мм 8 ohmios 50 W 100 W 80 W 87 dB / 2,83 V, 1 m 85 dB / 2,83 V, 1 m 190 × 308 × 217 mm 152 × 243 × 171 mm Вес (с кронштейном и ручками) Угол наклона 2,3 kg 1,6 kg Inclinación de 13,5 grados Inclinación de 13,5 grados * Las especificaciones están sujetas a cambio sin previo aviso debido a mejoras del producto. 设置 NS-AW294/NS-AW194 扬声器前,请仔细阅读这些注意事项。 • 在室外安装扬声器时,请安装到角落或屋檐下,尽量避免暴露于雨雪天气。 • 扬声器要安装到墙壁 / 天花板上,因此需要把它们牢牢固定。对于特殊的墙壁 / 天花板结构,应通过可靠的渠道咨询,以了解最适合您的紧固件类型。 • 不要将它们安装到薄胶合板或柔软的墙壁 / 天花板表层材料上,因为螺钉会很 容易扯破这些材料,使扬声器掉落,导致损坏扬声器或人身伤害。 • 不要用钉子、粘接剂或其他不安全的金属件将扬声器牢固到墙壁 / 天花板上。 由于长时间的使用和震动,它们会很容易脱落。 • 不要将扬声器放置在易于被撞翻或被坠物击中的地方。平稳放置也会确保更好 的声音效果。 • 改变扬声器角度时,应先旋松扬声器两侧的旋钮,再调整角度。施加的力量过 大可能损坏扬声器。 • 变更输入信号前,降低功率放大器 / 接收机的音量。每次安上或卸下输入电缆 线前,应先关闭放大器 / 接收机。 • 如果您察觉到失真﹐请降低功率放大器 / 接收机的音量。不要让功率放大器达 到 “限幅”状态。 • 不要试图改装或修理扬声器。如果需要服务﹐请与 Yamaha 的服务人员联系。任 何时候都不要打开壳体。 • 不要使用化学溶剂清洗扬声器﹐以免损坏其表面涂层。用柔软的干布清洁和擦 拭。 • 安全的放置和安装是用户自己应负的责任。 对于扬声器的不妥当放置和安装所引起的事故﹐ Yamaha 不负任何责任。 1 拆开包装 2,3 кг 1,6 кг 13,5 градусов 13,5 градусов * В результате усовершенствования изделия технические характеристики могут изменяться без предварительного уведомления. In the unlikely event that your Yamaha product needs guarantee service, please contact the dealer from whom it was purchased. If you experience any difficulty, please contact Yamaha representative office in your country. You can find full details on our website EEA and Switzerland: (http://europe.yamaha.com/warranty/). Australia: (http://au.yamaha.com/) Warranty policy for U.S. and Canada customer Your Yamaha product is covered by a limited warranty for two years from the date of purchase. In the unlikely event of failure due to defective materials or workmanship, Yamaha will repair or replace them at no charge. Please visit our website for full details. U.S.: (http://usa.yamaha.com/), Canada: (http://ca.yamaha.com/) Information for Users on Collection and Disposal of Old Equipment This symbol specified in the Directives 2002/96/EC indicates that used electrical and electronic products should not be mixed with general household waste. For proper treatment to avoid harmful effect on human health and environment, please contact your local municipality, your waste disposal service or the point of sale where you purchased the items. FR Conditions de garantie pour la Communauté économique européenne (CEE) et la Suisse Si votre produit Yamaha a besoin d’une réparation pendant sa période de garantie, veuillez contacter votre revendeur. En cas de difficulté, veuillez contacter le représentant Yamaha de votre pays. Vous trouverez toutes les informations nécessaires sur notre site Web (CEE et Suisse) à l’adresse suivante : (http://europe.yamaha.com/warranty/). Garantie Canadienne 拆开包装之后,请检查所装物品,确认下列物品完整无缺。 A 扬声器× 2 B 托架× 2 C 旋钮× 4 Votre produit Yamaha est couverts par une garantie limitée de deux années à compter de la date d’achat. Dans le cas improbable d’un échec dû aux matériaux ou à l’exécution défectueux, Yamaha les réparera ou les remplacera gratuit. Veuillez visiter notre site Web pour les détails complets (http://ca.yamaha.com/). Information concernant la Collecte et le Traitement des piles Usagées et des déchets d’équipements électriques et électroniques 2 安装之前 Ce symbole, spécifié dans la Directive 2002/96/CE, signifie que les produits électriques ou électroniques usagés ne doivent pas être mis au rebut avec les déchets ménagers. Pour traiter ces équipements de manière appropriée, et éviter ainsi les effets néfastes sur la santé humaine et sur l’environnement, contactez votre municipalité, votre service de traitement des déchets ou le point de vente où vous avez acheté les produits. 在安装之前,请仔细阅读。 • 确保在墙壁 / 天花板上有足够安装空间且无障碍物。注意产品尺寸和重量 (请 参见以下规格)。 • 在安装扬声器之前,请先将扬声器电缆拉到扬声器的安装位置。 3 安装扬声器 DE 使用附带的托架将扬声器安装到墙壁 / 天花板上。 ! 用托架作参照,在要安装扬声器的地方标出托架小孔槽的位置 (4 处)。 ± 使用合适的金属件 (市售)将托架紧固在墙壁 / 天花板上。 # 将扬声器放入托架,用附带的两个旋钮固定扬声器。 注意: • 使用托架将扬声器安装到墙壁 / 天花板上时,请在托架和墙壁 / 天花板之间使用 安全金属丝 (不含)以防止扬声器掉落。 • 用固定到扬声器的支架调节角度时,先旋松两侧的旋钮,再改变扬声器的方 向。(拧紧的旋钮转动 2 到 2-1/2 圈而变松后,可进行角度调节。)旋钮紧闭 时,如果施加过大的力,固定部分可能会崩裂且无法进行角度调节。调节角度 后,紧固旋钮使扬声器固定。 Garantieanwendung für den Europäischen Wirtschaftsraum (EWR) und Schweiz Falls Sie im unwahrscheinlichen Fall für Ihr Yamaha-Produkt eine Garantie-Dienstleistung in Anspruch nehmen müssen, kontaktieren Sie bitte den Händler, bei dem Sie das Produkt gekauft haben. Sollten dabei Schwierigkeiten auftreten, bitte den Yamaha-Importeur Ihres Landes benachrichtigen. Sie können die gesamten Informationen auf unserer Webseite EWR und Schweiz finden: (http://europe.yamaha.com/warranty/). Verbraucherinformation zur Sammlung und Entsorgung alter Elektrogeräte und Benutzter Batterien Dieses Symbol, das in den Richtlinien 2002/96/EC spezifiziert wird, gibt an, dass elektrische und elektronische Produkte nicht im allgemeinen Hausmüll entsorgt werden dürfen. Für Einzelheiten zur korrekten Entsorgung, um schädliche Wirkungen auf die menschliche Gesundheit und Umwelt zu vermeiden, bitte Ihre lokale Gemeinde-/Stadtverwaltung, Ihr Abfallbeseitigungsunternehmen oder die Verkaufsstelle, wo Sie das Produkt erworben haben, kontaktieren. $ 根据扬声器的位置旋转 YAMAHA 标志。 如果扬声器电缆线 (市售)是从托架后方墙壁 / 天花板的孔中接线,安装托架 前,先将扬声器电缆线从托架上的孔中穿过 [ 图 3 - a ]。 IT Norme di garanzia per lo Spazio economico europeo (SEE) e la Svizzera 4 连接放大器 / 接收机 连接前,确认放大器 / 接收机已关闭。 连接 • 用扬声器电缆线 (市售)将扬声器后方的输入端连接到放大器 / 接收机的扬声 器输出端。 • 连接扬声器,注意不要将 “+”极 (红色)和 “-”极 (黑色)接反。如果扬 声器的正负极接反,声音会听起来不自然并且缺乏低音。 Nell’improbabile eventualità che il prodotto Yamaha richieda un intervento di assistenza in garanzia, rivolgersi al rivenditore presso cui il prodotto è stato acquistato. Se si dovessero incontrare difficoltà, rivolgersi al rappresentante Yamaha nel proprio paese. Per informazioni dettagliate consultare il sito Web per SEE e Svizzera: http:// europe.yamaha.com/warranty/. Informazioni per gli utenti sulla raccolta e lo smaltimento di vecchia attrezzatura e batterie Usate Il presente simbolo, previsto dalla direttiva 2002/96/CE, indica che i prodotti elettrici ed elettronici usati non devono essere smaltiti con i rifiuti domestici. Per il corretto smaltimento al fine di prevenire effetti nocivi sulla salute e sull’ambiente, rivolgersi alle autorità locali, alla società di smaltimento dei rifiuti o al punto vendita presso cui i prodotti sono stati acquistati. 连接方法 从扬声器电缆线的末端将绝缘层剥去约 10 mm,捻合暴露的电线以防止短路。 按住终端卡口。 插入裸线。 松开卡口,使其牢牢卡住裸线,而非绝缘层。 % 轻轻拉动连线,检测连接是否牢固。 ! ± # $ 注意: • 不要让扬声器的裸线互相接触,否则会损坏扬声器或放大器 / 接收机,甚至造 成两者全部损坏。 • 请确保终端咬合在裸线上,而非绝缘层上。 规格 (单个扬声器) NS-AW294 类型 ES Condiciones de garantía para países del Espacio Económico Europeo (EEE) y Suiza En el caso poco probable de que su producto Yamaha necesite una reparación cubierta por la garantía, póngase en contacto con el distribuidor en el que lo haya adquirido. Si tiene cualquier problema, póngase en contacto con la delegación de Yamaha de su país. Podrá encontrar más información en el sitio web para el EEE y Suiza (http://europe.yamaha.com/ warranty/). Información para Usuarios sobre Recolección y Disposición de Equipamiento Viejo y Baterías Usadas NS-AW194 Este símbolo de las Directivas 2002/96/CE indica que los productos eléctricos y electrónicos utilizados no deben mezclarse con residuos domésticos generales. Para conocer el tratamiento correcto para evitar perjudicar la salud humana y el medio ambiente, póngase en contacto con su ayuntamiento, el servicio de recogida de residuos de su municipio o el establecimiento en el que compró el producto. 2 路低音反射式 发音单元 高音单体 2.5 cm 平衡圆顶型 超低音扬声器 频率响应 16 cm 锥盆型 10 cm 锥盆型 80 Hz - 20 kHz (-10 dB) 100 Hz - 20 kHz (-10 dB) 阻抗 8 欧 名义输入功率 50 W 最大输入功率 RU 30 W 100 W 80 W 敏感度 87 dB/2.83 V, 1 m 85 dB/2.83 V, 1 m 尺寸 (宽×高×深) ( 不含托架和旋钮) 190 × 308 × 217 mm 152 × 243 × 171 mm 重量 (含托架和旋钮) 2.3 kg 1.6 kg 可转动角度 13.5 度 13.5 度 * 因为产品改良﹐规格可能时有变化。 NS-AW194 2-полосный фазоинверторный тип Драйвер Высокочастотный динамик NS-AW194 2,5 cm cúpula balanceada tipo 用户注意事项 ТЕХНИЧЕСКИЕ ХАРАКТЕРИСТИКИ (для отдельной колонки) Tipo Bass Reflex de 2 vías Tweeter EN Warranty policy for European Economic Area (EEA) and Switzerland, Australia customer : 表示该有毒有害物质在该部件所有均质材料中的含量均在 SJ/T 11363-2006 标准 规定的限量要求以下。 × : 表示该有毒有害物质至少在该部件的某一均质材料中的含量超出 SJ/T 11363-2006 标准规定的限量要求。 ○ 部件名称 有毒有害物质或元素 铅 (Pb) 汞 (Hg) 镉 (Cd) 六价铬 (Cr(VI)) 多溴联苯 (PBB) 多溴二苯醚 (PBDE) 外壳箱体 × ○ ○ ○ ○ ○ 扬声器单元 × ○ ○ ○ ○ ○ Информация для пользователей по сбору и утилизации старой аппаратуры и Использованных батареек Этот символ, указанный в Директивах 2002/96/EC, означает, что используемые электрические и электронные изделия необходимо утилизировать отдельно от остальных бытовых отходов. Для получения дополнительной информации о правильном обращении с изделиями с целью предотвращения вредного влияния на здоровье человека и окружающую среду обратитесь в местные муниципальные органы, службу сбора отходов и по месту приобретения данных изделий.-
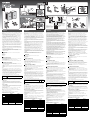 1
1
-
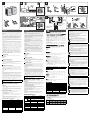 2
2


Yamaha NS-AW194 de handleiding
- Categorie
- Auto luidsprekers
- Type
- de handleiding
- Deze handleiding is ook geschikt voor
in andere talen
- English: Yamaha NS-AW194 Owner's manual
- italiano: Yamaha NS-AW194 Manuale del proprietario
- русский: Yamaha NS-AW194 Инструкция по применению
- français: Yamaha NS-AW194 Le manuel du propriétaire
- español: Yamaha NS-AW194 El manual del propietario
- Deutsch: Yamaha NS-AW194 Bedienungsanleitung
- dansk: Yamaha NS-AW194 Brugervejledning
- suomi: Yamaha NS-AW194 Omistajan opas
- svenska: Yamaha NS-AW194 Bruksanvisning
- Türkçe: Yamaha NS-AW194 El kitabı
- română: Yamaha NS-AW194 Manualul proprietarului
Gerelateerde papieren
-
Yamaha NS-AW992WH Handleiding
-
Yamaha NS-333 de handleiding
-
Yamaha NS-P446 de handleiding
-
-
Yamaha NS-P270 de handleiding
-
-
Yamaha NS-B51 Handleiding
-
-
-
Yamaha NS-IW480C de handleiding