HP BUSINESS INKJET 1000 PRINTER Handleiding
- Categorie
- Afdrukken
- Type
- Handleiding

Getting Started Guide
Leitfaden zur Inbetriebnahme
Guide de Mise en Marche
Beknopte Handleiding
Guida introduttiva
HP Business Inkjet 1000

Copyright Information
© 2005 Copyright Hewlett-Packard Development Company, L.P.
Edition 1, 4/2005
Reproduction, adaptation or translation without prior written permission is
prohibited, except as allowed under the copyright laws.
The information contained herein is subject to change without notice.
The only warranties for HP products and services are set forth in the express
warranty statements accompanying such products and services. Nothing
herein should be construed as constituting an additional warranty. HP shall
not be liable for technical or editorial errors or omissions contained herein.
Trademark credits
Microsoft
®
and Windows
®
are U.S. registered trademarks of Microsoft
Corporation. All other products mentioned herein may be trademarks of their
respective companies.
Informations sur le copyright
© 2005 Copyright Hewlett-Packard Development Company, L.P.
Édition 1, 4/2005
Toute reproduction, adaptation ou traduction sans autorisation écrite
préalable est formellement interdite, sauf si cette opération est effectuée
dans le cadre prévu par la loi sur les droits d’auteur.
Les informations contenues dans ce document peuvent faire l’objet de
modifications sans préavis.
Les seules garanties relatives aux produits et services HP sont exposées dans
les déclarations de garantie expresse qui accompagnent lesdits produits et
services. Aucun élément du présent document ne doit être considéré comme
constituant une garantie supplémentaire. HP ne pourra être tenue
responsable des erreurs techniques ou rédactionnelles ou des omissions
figurant dans le présent document.
Marques
Microsoft
®
et Windows
®
sont des marques déposées de Microsoft
Corporation aux États-Unis. Tous les autres produits mentionnés dans le
présent document sont des marques de leurs sociétés respectives.
Safety Information
Always follow basic safety precautions when using this product to reduce
risk of injury from fire or electric shock.
1. Read and understand all instructions in the documentation that comes
with the printer.
2. Use only a grounded electrical outlet when connecting this product to a
power source. If you do not know whether the outlet is grounded, check
with a qualified electrician.
3. Observe all warnings and instructions marked on the product.
4. Unplug this product from wall outlets before cleaning.
5. Do not install or use this product near water, or when you are wet.
6. Install the product securely on a stable surface.
7. Install the product in a protected location where no one can step on or
trip over the line cord, and the line cord cannot be damaged.
8. If the product does not operate normally, see “Maintaining and
troubleshooting” in the onscreen user’s guide on the Starter CD.
9. There are no user-serviceable parts inside. Refer servicing to qualified
service personnel.

Informationen zur Sicherheit
Beachten Sie beim Einsatz dieses Produkts immer die folgenden
Sicherheitshinweise, um die Verletzungsgefahr und das Risiko eines
elektrischen Schlags zu verringern.
1. Die Anweisungen in der mit dem Druckergelieferten Dokumentation
müssen von Ihnen gelesen und verstanden worden sein.
2. Verwenden Sie ausschließlich eine geerdete Steckdose für den
Anschluss dieses Produktes an die Stromversorgung. Wenn Sie sich nicht
sicher sind, ob die Steckdose geerdet ist, so lassen Sie dies durch einen
qualifizierten Elektriker überprüfen.
3. Alle am Produkt angebrachten Warnungen und Anweisungen sind
zu befolgen.
4. Ziehen Sie vor dem Reinigen des Produkts den Netzstecker aus
der Steckdose.
5. Dieses Produkt darf nicht in der Nähe von Wasser betrieben bzw. von
einer durchnässten Person aufgestellt oder bedient werden.
6. Sorgen Sie für sicheren Stand des Produkts auf einer stabilen
Auflagefläche.
7. Wählen Sie für das Produkt einen geschützten Standort, an dem keine
Personen auf das Netzkabel treten oder darüber stolpern können.
Das Netzkabel darf nicht beschädigt werden.
8. Wenn die Seite nicht korrekt kopiert wird, lesen Sie den Abschnitt zur
Fehlerbehebung im Online-Benutzerhandbuch der entsprechenden
Starter-CD für Ihr Betriebssystem.
9. Im Inneren des Geräts befinden sich keine Teile, die vom Endnutzer
gewartet werden können. Beauftragen Sie mit Wartung und
Instandsetzung qualifiziertes Kundendienstpersonal.
Consignes de sécurité
Respectez toujours les précautions de sécurité élémentaires quand vous
utilisez ce produit, afin de réduire les risques de blessures dues au feu ou
à un choc électrique.
1. Veuillez lire attentivement toutes les instructions contenues dans la
documentation livrée avec l’imprimante.
2. Utilisez toujours une prise de courant mise à la terre lors du
branchement de ce produit à une source d’alimentation. Si vous ne
savez pas si une prise de courant est mise à la terre, consultez un
électricien qualifié.
3. Suivez tous les avertissements et toutes les instructions indiqués sur
le produit.
4. Débranchez cet appareil des prises murales avant de procéder
à un nettoyage.
5. N’installez jamais cet appareil près d’une source d’eau, ni si vous
êtes mouillé.
6. Installez l’appareil en toute sécurité sur une surface stable.
7. Installez l’appareil dans un lieu protégé où personne ne risque de
marcher sur le cordon ou de trébucher sur celui-ci, et où le cordon ne
risque pas d’être endommagé.
8. Si le produit ne fonctionne pas correctement, reportez-vous à la section
« Entretien et dépannage » du guide de l’utilisateur en ligne disponible
sur le CD de démarrage relatif à votre système d’exploitation.
9. L’appareil ne contient aucune pièce dont l’entretien doit être réalisé par
l’utilisateur. Confiez-en l’entretien à du personnel qualifié.
Veiligheidsinformatie
Neem bij het gebruik van dit product altijd de elementaire
voorzorgsmaatregelen in acht om de kans op letsel ten gevolge van brand
of elektrische schokken te beperken.
1. Zorg dat u alle instructies in de documentatie die wordt geleverd bij de
printer, hebt gelezen en begrepen.
2. Sluit dit product uitsluitend aan op een geaard stopcontact. Als u niet
zeker weet of een stopcontact geaard is, kunt u advies inwinnen bij een
erkende elektricien.
3. Neem alle op dit product vermelde waarschuwingen en instructies
in acht.
4. Haal het netsnoer uit het stopcontact voordat u dit product reinigt.
5. Plaats of gebruik dit product niet in de buurt van water of wanneer
u nat bent.
6. Zorg dat het product stevig op een stabiel oppervlak staat.
7. Zet het product op een veilige plaats waar niemand op het netsnoer kan
trappen of erover kan struikelen en het netsnoer niet wordt beschadigd.
8. Als het product niet goed werkt, raadpleegt u “Onderhoud en
probleemoplossing” in de gebruikershandleiding op de Starter-cd voor
uw besturingssysteem.
9. Dit product bevat geen onderdelen die door de gebruiker kunnen
worden onderhouden. Laat onderhoudswerkzaamheden over aan
erkende onderhoudsmonteurs.
Informazioni sulla sicurezza
Durante l’utilizzo di questo prodotto, attenersi sempre alle precauzioni di
sicurezza di base al fine di ridurre il rischio di lesioni alle persone derivanti
da incendi o scariche elettriche.
1. Si consiglia di leggere e apprendere tutte le istruzioni contenute nei
documenti forniti insieme alla stampante.
2. Per collegare il prodotto a una presa di corrente, utilizzare
esclusivamente una presa elettrica collegata a massa. In caso di
dubbio, contattare un elettricista qualificato per verificare che la presa
elettrica sia collegata a massa.
3. Attenersi a tutte le avvertenze e le istruzioni indicate sul prodotto.
4. Prima di effettuare la pulizia, scollegare il prodotto dalle prese a parete.
5. Non installare o utilizzare il prodotto nelle vicinanze di acqua o se non
si è perfettamente asciutti.
6. Posizionare il prodotto su una superficie stabile.
7. Posizionare il prodotto in un luogo riparato, dove non si possa
inciampare sul cavo di alimentazione, che non deve essere
danneggiato.
8. Se il prodotto non funziona normalmente, consultare la sezione
“Manutenzione e risoluzione dei problemi” della Guida in linea
disponibile sul CD di avviamento.
9. Il prodotto non include parti riparabili dall’utente. Per le riparazioni
rivolgersi esclusivamente al personale qualificato.

English
Nederlands Français DeutschItaliano
3
Check the package contents.
1) Printer, 2) power adapter, 3) power cord,
4) four ink cartridges (cyan, magenta, yellow, black),
5) four printheads (CMYB), 6) Starter CD (software and
onscreen user’s guide), 7) printed documentation
(setup poster and getting started guide).
Step 1: Remove the packing tape and materials.
Remove all packing tape from the printer. Open the printing
supplies cover and remove the tape from the inside of
the printer.
Überprüfen des Paketinhalts.
1) Drucker, 2) Netzadapter, 3) Netzkabel,
4) vier Tintenpatronen (cCan, Magenta, Gelb, Schwarz),
5) vier Druckköpfe (CMYB), 6) Starter-CD (Software und
Onscreen-Benutzerhandbuch), 7) gedruckte Dokumentation
(Faltblatt mit Installationshinweisen, Leitfaden zur
Inbetriebnahme).
Schritt 1: Entfernen der Verpackungsklebestreifen und
des Verpackungsmaterials.
Entfernen Sie möglicherweise vorhandenes
Verpackungsmaterial aus dem Drucker. Öffnen Sie die
Tintenpatronen- und Druckkopfabdeckung und entfernen
Sie die Klebestreifen im Druckergehäuse.
Vérification du contenu du carton.
1) Imprimante, 2) Adaptateur de courant,
3) Cordon d’alimentation, 4) Quatre cartouches d’encre
(cyan, magenta, jaune, noire), 5) Quatre têtes d’impression
(CMYB), 6) CD de démarrage (logiciels et guide de
l’utilisateur en ligne), 7) Documentation imprimée
(poster d’installation et Guide de mise en marche).
Étape 1 : Retrait des matériaux d’emballage.
Retirez tous les rubans adhésifs de l’imprimante Ouvrez le
capot des composants d’impression et retirez le ruban
adhésif de l’intérieur de l’imprimante.
De inhoud van de verpakking controleren.
1) Printer, 2) adapter, 3) netsnoer, 4) vier inktcartridges
(cyaan, magenta, geel, zwart), 5) vier printkoppen
(CMYB), 6) Starter-cd (software en gebruikershandleiding),
7) gedrukte documentatie (installatieposter en beknopte
handleiding).
Stap 1: Het verpakkingsmateriaal en de tape verwijderen.
Verwijder de plakstroken van de verpakking van de printer.
Open de klep van de afdrukbenodigdheden en verwijder
de tape aan de binnenkant van de printer.
1
2
3
4
5
6
7
Verificare il contenuto dell’imballo.
1) Stampante, 2) adattatore, 3) cavo di alimentazione,
4) quattro cartucce di stampa (CMYB), 5) quattro testine di
stampa (CMYB), 6) CD di avviamento (software e Guida in
linea), 7) documentazione stampata (poster di
configurazione e Guida introduttiva).
Punto 1: Rimuovere il nastro e il materiale di imballo.
Togliere completamente il nastro di imballo dalla
stampante. Aprire il coperchio dei materiali di consumo
e rimuovere il nastro dall’interno della stampante.
1

4
2
1
2
3
Step 2: Installieren der Tintenpatronen.
1) Öffnen Sie die Verbrauchsmaterialabdeckung. 2) Nehmen
Sie jede Tintenpatrone aus ihrer Verpackung.
ACHTUNG: HP erkennt zwar die Tintenpatronen von
Drittanbietern, kann die Qualität bzw. Zuverlässigkeit
dieser Patronen jedoch nicht garantieren. Druckerdienste
bzw. –Reparaturen, die durch die Verwendung von
Tintenpatronen erforderlich sind, die nicht von HP hergestellt
wurden, sind nicht von der Garantie abgedeckt.
3) Richten Sie die einzelnen Patronen am entsprechend
farblich gekennzeichneten Schacht aus, und setzen Sie sie in
den Schacht ein. Drücken Sie zur Gewährleistung des
richtigen Kontakts fest gegen die Patronen, bis diese
einrasten. Hinweis: Alle vier Tintenpatronen müssen für die
ordnungsgemäße Funktion des Druckers richtig installiert sein.
Étape 2 : Installation des cartouches d’encre.
1) Soulevez le capot des composants d’impression. 2) Sortez
les cartouches d’encre de leurs emballages.
ATTENTION : HP respecte le choix des utilisateurs, mais n’est
pas en mesure de garantir la qualité ou la fiabilité des
cartouches d’encre d’une autre marque. Les interventions ou
réparations de l’imprimante consécutives à l’utilisation de
cartouches d’encre non HP ne sont pas couvertes par
la garantie.
3) Alignez chaque cartouche sur l’emplacement de la couleur
correspondante, puis insérez la cartouche dans son
logement. Pour assurer un bon contact, appuyez fermement
la cartouche dans son emplacement, jusqu’à son
enclenchement. Remarque : les quatre cartouches d’encre
doivent être mises en place correctement pour que
l’imprimante fonctionne.
Stap 2: De inktcartridges installeren.
1) Tel de klep van de afdrukbenodigdheden op. 2) Verwijder
de inktcartridges uit de verpakking.
LET OP: Er mogen inktcartridges van een ander merk worden
gebruikt, maar HP kan de kwaliteit of betrouwbaarheid van
deze inktcartridges niet garanderen. Reparatie of service als
gevolg van het gebruik van inktcartridges die niet van HP
zijn, vallen niet onder de garantie.
3) Plaats de cartridge ter hoogte van de sleuf met de
bijbehorende kleurcode en bevestig de cartridge in de sleuf.
Bevestig de inktcartridges goed door deze stevig in de sleuf
vast te klikken. Opmerking: de printer werkt alleen als alle
vier de inktcartridges goed zijn bevestigd.
Punto 2: Installare le cartucce di stampa.
1) Sollevare il coperchio dei materiali di consumo. 2) Rimuovere
ciascuna cartuccia di stampa dal proprio imballo.
ATTENZIONE: pur rispettando le scelte dei propri clienti,
HP non garantisce la qualità o l’affidabilità di cartucce
di stampa non originali HP. Gli interventi di assistenza
o riparazione della stampante che si rendono necessari in
conseguenza dell’utilizzo di cartucce non originali HP non
sono coperti dalla garanzia.
3) Allineare ciascuna cartuccia al relativo alloggiamento
codificato in colore, quindi inserire la cartuccia
nell’alloggiamento. Per assicurare un corretto contatto,
premere con decisione sulle cartucce finché non scattano in
posizione. Nota: perché la stampante funzioni, è necessario
che tutte e quattro le cartucce siano state installate
correttamente.
Step 2: Install the ink cartridges.
1) Lift the printing supplies cover. 2) Remove each ink
cartridge from its package.
CAUTION: HP recognizes customer’s choice but cannot
guarantee the quality or reliability of non-HP ink cartridges.
Printer services or repairs required as a result of using non-HP
ink cartridges will not be covered under warranty.
3) Align each cartridge with its color-coded slot, and then
insert the cartridge into the slot. To ensure proper contact,
press down firmly on the cartridges until they snap into place.
Note: All four ink cartridges must be correctly installed for the
printer to work.

English
Nederlands Français DeutschItaliano
5
Schritt 3: Installieren der Druckköpfe.
1) Heben Sie die Druckkopfverriegelung an.
2) Nehmen Sie jeden Druckkopf aus seiner Verpackung
und entfernen Sie das Klebeband. 3) Setzen Sie den
Druckkopf in den farblich markierten Schacht ein.
Drücken Sie die einzelnen Druckköpfe fest herunter,
um den ordnungsgemäßen Sitz zu gewährleisten.
Étape 3 : Installation des têtes d’impression.
1) Soulevez le loquet des têtes d’impression.
2) Sortez chaque tête d’impression de son emballage,
puis retirez le ruban adhésif de protection de chacune
d’elles. 3) Insérez chaque tête d’impression dans
le logement de la couleur correspondante.
Appuyez fermement sur chaque tête d’impression pour
assurer un bon contact.
Stap 3: De printkoppen installeren.
1) Til de printkopvergrendeling omhoog.
2) Haal de printkoppen uit de verpakking en verwijder de
beschermtape van de printkoppen. 3) Plaats elke printkop
in de sleuf met de kleurcode van de printkop. Druk elke
printkop goed op zijn plaats.
Punto 3: Installare le testine di stampa.
1) Sollevare il fermo della testina di stampa.
2) Rimuovere ciascuna testina di stampa dall’imballo e
quindi il nastro protettivo da ciascuna testina. 3) Inserire
ciascuna testina di stampa nel relativo alloggiamento
codificato in colore. Premere con decisione sulla testina di
stampa per assicurare il corretto contatto.
3
1
2
3
Step 3: Install the printheads.
1) Lift the printhead latch.
2) Remove each printhead from its package, and then
remove the protective tape from each printhead.
3) Insert each printhead into its color-coded slot.
Press down firmly on each printhead to ensure proper
contact.

6
4
5
4
1
2
4) Ziehen Sie die Druckkopfverriegelung ganz nach vorne
und drücken Sie die Verriegelung vollständig nach unten ein.
Hinweis: Sie müssen möglicherweise ein wenig Kraft
aufwenden, um die Verriegelung zu schließen. 5) Schließen
Sie die Verbrauchsmaterialabdeckung.
Schritt 4: Einlegen von Papier in die Fächer.
1) Ziehen Sie das Fach aus dem Drucker heraus. 2) Müssen
Sie das Ausgabefach anheben.
4) Tirez le loquet des têtes d’impression à fond vers l’avant et
appuyez vers le bas pour vous assurer qu’il est correctement
engagé. Remarque : il est parfois nécessaire d’appliquer une
certaine pression pour engager le loquet. 5) Refermez le
capot des composants d’impression.
Étape 4 : Chargement de papier dans les bacs.
1) Retirez le bac de l’imprimante. 2) Soulevez le bac de
sortie.
4) Trek de printkopvergrendeling helemaal naar voren en
druk deze omlaag, zodat de grendel goed wordt vastgezet.
Opmerking: mogelijk moet u druk uitoefenen om de grendel
vast te zetten. 5) Sluit de klep van de afdrukbenodigdheden.
Stap 4: Papier plaatsen in de laden.
1) Trek de lade uit de printer. 2) Tilt u de uitvoerlade omhoog.
4) Tirare completamente il fermo della testina di stampa
e premere verso il basso per assicurarsi che sia correttamente
agganciato. Nota: per agganciare il fermo, potrebbe essere
necessario applicare una leggera pressione. 5) Chiudere il
coperchio dei materiali di consumo.
Punto 4: Caricare la carta nei vassoi.
1) Estrarre il vassoio dalla stampante 2) Sollevare il vassoio
di raccolta.
4) Pull the printhead latch all the way forward and press
down to ensure that the latch is properly engaged.
Note: You might have to apply some pressure to engage the
latch. 5) Close the printing supplies cover.
Step 4: Load paper in the trays.
1) Pull the tray out of the printer. 2) Raise the output tray.

English
Nederlands Français DeutschItaliano
7
3) Verschieben Sie bei 356 mm bis 279 mm langem Papier
die Arretierung am Fach nach rechts bis schwenken Sie
anschließend das Vorderteil des Fachs nach unten.
4) Verschieben Sie die Papierführungen im Fach, um sie
an die von Ihnen eingelegte Papiergröße anzupassen.
5) Legen Sie höchstens 150 Blatt Papier mit der zu
bedruckenden Seite nach unten rechtsbündig in Fach 1 ein.
3) Pour charger du papier d’une longueur comprise entre
11 et 14 pouces (279 mm et 356 mm), déplacez la butée
du bac vers la droite et abaissez ensuite l’avant du bac.
4) Faites glisser les guides du bac pour les régler en
fonction de la taille du papier. 5) Placez les feuilles dans
le bac (150 au maximum) 1, face à imprimer vers le bas,
le long du bord droit du bac.
3) Voor papier met een lengte tussen de 356 and 279 mm
verplaatst u de grendel op de lade naar rechts and laat
vervolgens de voorkant van de lade zakken.
4) Stel de geleiders in de lade af op het papierformaat dat
u in de lade plaatst. 5) Plaats maximaal 150 vellen papier
met de afdrukzijde naar beneden aan de rechterkant van
lade 1.
3) Per caricare carta di formato compreso tra 11 e 14
pollici (279 e 356 mm) di lunghezza, spostare il fermo del
vassoio verso destra e Abbassare la parte anteriore del
vassoio.
4) Far scorrere le guide nel vassoio per regolarle sul
formato che si sta caricando. 5) Inserire fino a 150 fogli nel
vassoio 1 con il lato di stampa rivolto verso il basso,
allineandoli al lato destro del vassoio.
3
4
5
3) For paper between 11 inches and 14 inches (356 mm
and 279 mm) long, move the latch on the tray to the right,
and then lower the front of the tray.
4) Slide the guides in the tray to adjust them for the size that
you are loading. 5) Insert up to 150 sheets of paper into
tray 1, print-side down along the right side of the tray.

8
6
7
8
5
1
2
3
4
6) Schwenken Sie das Ausgabefach nach unten 7) Setzen Sie
das Fach vorsichtig wieder ein. 8) Ziehen Sie die
Verlängerung des Ausgabefachs heraus.
Schritt 5: Anschließen des Netzkabels und Einschalten
des Druckers.
1) Schließen Sie den Netzadapter an den Drucker an.
2) Schließen Sie das Netzkabel an den Netzadapter an.
3) Schließen Sie das andere Ende des Netzkabels an eine
Steckdose für Wechselspannung an. 4) Drücken Sie
(Netztaste), um den Drucker einzuschalten.
6) Abaissez le bac de sortie. 7) Replacez délicatement le
bac. 8) Tirez les extensions du bac de sortie.
Étape 5 : Branchez le cordon d’alimentation et mettez
l’imprimante sous tension.
1) Connectez l’adaptateur de courant dans l’imprimante.
2) Branchez le cordon d’alimentation sur l’adaptateur
de courant. 3) Branchez l’autre extrémité du cordon
d’alimentation sur une prise secteur. 4) Appuyez sur le
(bouton d’alimentation) pour mettre l’imprimante
sous tension.
6) Laat de uitvoerlade zakken. 7) Plaats de lade voorzichtig
terug. 8) Trek het verlengstuk op de uitvoerlade uit.
Stap 5: Het netsnoer aansluiten en de printer aanzetten.
1) Sluit de adapter aan op de printer. 2) Sluit het netsnoer
aan op de adapter. 3) Sluit het andere uiteinde van het
netsnoer aan op een stopcontact (AC). 4) Druk op de
(Aan/uit-knop) om de printer aan te zetten.
6) Abbassare il vassoio di raccolta. 7) Reinserire il vassoio
con delicatezza. 8) Estrarre la prolunga del vassoio di
raccolta carta.
Punto 5: Collegare il cavo di alimentazione e accendere
la stampante.
1) Collegare l’adattatore alla stampante. 2) Collegare il cavo
di alimentazione all’adattatore. 3) Collegare l’altra estremità
del cavo di alimentazione a una presa CA. 4) Premere il
(pulsante di accensione) per accendere la stampante.
6) Lower the output tray. 7) Gently reinsert the tray.
8) Pull out the extension on the output tray.
Step 5: Connect the power cord and turn on the printer.
1) Connect the power adapter into the printer. 2) Connect the
power cord to the power adapter. 3) Connect the other end
of the power cord to an alternating current (AC) power outlet.
4) Press the (power button) to turn on the printer.

English
Nederlands Français DeutschItaliano
9
Um eine optimale Druckqualität zu gewährleisten, werden
die Druckköpfe automatisch vom Drucker ausgerichtet. Zu
Beginn des Ausrichtungsvorgangs blinkt die Power-LED und
der Drucker druckt eine Statusseite. Am Ende des Vorgangs
druckt der Drucker zwei Seiten zur automatischen
Ausrichtung. Die Ausrichtung der Druckköpfe dauert
ungefähr 5 Minuten.
Hinweis: Wenn andere Kontrollleuchten des Druckers
während der Druckkopfausrichtung leuchten oder blinken,
finden Sie weitere Informationen unter “Bedeutung der LEDs
auf dem Bedienfeld” auf Seite 17. Wenn die
Ausrichtungsseite nicht gedruckt wird, führen Sie folgende
Schritte aus. 1) Vergewissern Sie sich, dass das Netzkabel
richtig angeschlossen ist. 2) Vergewissern Sie sich, dass die
Druckköpfe und die Tintenpatronen richtig installiert sind.
Pour offrir une qualité d’impression optimale, l’imprimante
aligne automatiquement les têtes d’impression. Au début de
la procédure d’alignement, le voyant d’alimentation
clignote et l’imprimante imprime une page d’état. Une fois
la procédure terminée, elle imprime deux pages
d’alignement automatique. La procédure d’alignement des
têtes d’impression dure environ 5 minutes.
Remarque : si d’autres voyants de l’imprimante sont allumés
ou clignotent lors de la procédure d’alignement des têtes
d’impression, reportez-vous à la section « Interprétation des
voyants du panneau de commande », à la page 21.
Si la page d’alignement ne s’imprime pas, procédez
comme suit. 1) Vérifiez que le cordon d’alimentation est
bien branché. 2) Vérifiez que les têtes d’impression et les
cartouches d’encre sont installées correctement.
Om de best mogelijke afdrukkwaliteit te garanderen lijnt de
printer automatisch de printkoppen uit. Aan het begin van
het uitlijningsproces knippert het Aan/uit-lampje en drukt
de printer een statuspagina af. Aan het einde van het
proces drukt de printer twee automatische testpagina’s af.
Het uitlijningsproces van de printkoppen neemt ongeveer
5 minuten in beslag.
Opmerking: zie “De betekenis van de lampjes van het
bedieningspaneel” op pagina 25 als andere
printerlampjes branden of knipperen tijdens het
uitlijningsproces van de printkoppen. Als geen testpagina
wordt afgedrukt, volgt u onderstaande stappen.
1) Controleer of het netsnoer goed is aangesloten.
2) Controleer of de printkoppen en de inktpatronen goed
geplaatst zijn.
Per assicurare la migliore qualità di stampa, la stampante
esegue automaticamente l’allineamento delle testine.
All’inizio di tale procedura, la spia di accensione
lampeggia e viene stampata una pagina di stato.
Al termine della procedura, vengono stampate due pagine
di allineamento automatico. Il processo di allineamento
della testina di stampa richiede circa 5 minuti.
Nota: se durante l’allineamento delle testine di stampa
restano accese o lampeggiano altre spie della stampante,
consultare la sezione “Significato delle spie del pannello di
controllo“ a pagina 29. Se la pagina di allineamento non
viene stampata, attenersi alla seguente procedura.
1) Verificare che il cavo di alimentazione sia correttamente
collegato. 2) Verificare che le cartucce e le testine di
stampa siano installate correttamente.
1
2
To ensure the best possible print quality, the printer
automatically aligns the printheads. At the beginning of the
alignment process, the Power light blinks and the printer
prints a status page. At the end of the process, the printer
prints two auto-alignment pages. The printhead alignment
process takes approximately 5 minutes.
Note: If other printer lights are on or blinking during the
printhead alignment process, see “Interpreting control
panel lights” on page 13. If the alignment page does not
print, follow these steps. 1) Check that the power cord is
connected firmly. 2) Check that the printheads and ink
cartridges are properly installed.

10
3
6
3) Schalten Sie den Drucker aus und dann wieder ein. Wenn
die Ausrichtungsseite immer noch nicht gedruckt wird, lesen
Sie den Abschnitt “Fehlerbehebung” auf Seite 19.
Schritt 6: Anschließen des Druckers.
1) Legen Sie die Starter-CD in das CD-Laufwerk des
Computers ein, und folgen Sie den Anweisungen auf dem
Bildschirm. Hinweis: Weitere Informationen zum Installieren
der Software finden Sie im Online-Benutzerhandbuch auf der
Starter-CD. 2) Schließen Sie das USB-Kabel ( ) (separat
erhältlich) an, wenn Sie dazu aufgefordert werden.
3) Mettez l’imprimante hors tension, puis à nouveau sous
tension. Si la page d’alignement ne s’imprime toujours pas,
reportez-vous à la section « Dépannage », à la page 23.
Étape 6 : Connexion de l’imprimante.
1) Insérez le CD de démarrage dans le lecteur de CD-ROM,
puis suivez les instructions à l’écran. Remarque : pour plus
d’informations sur l’installation de logiciels, reportez-vous au
guide de l’utilisateur en ligne, disponible sur le CD de
démarrage. 2) Branchez le câble ( ) (vendu séparément)
lorsque vous y êtes invité.
3) Zet de printer uit en weer aan. Zie “Problemen oplossen”
op pagina 27 als de testpagina nog steeds niet wordt
afgedrukt.
Stap 6: De printer aansluiten.
1) Plaats de Starter-cd in het cd-rom-station en volg de
instructies op het scherm. Opmerking: Zie de
gebruikershandleiding op de Starter-cd voor meer informatie
over het installeren van de software. 2) Sluit de USB-kabel
( ) (apart verkrijgbaar) aan als dit wordt gevraagd.
3) Spegnere e riaccendere la stampante. Se il problema
persiste, consultare la sezione “Risoluzione dei problemi“ a
pagina 31.
Punto 6: Collegare la stampante.
1) Inserire il CD di avviamento nella relativa unità e seguire le
istruzioni visualizzate. Nota: Per ulteriori informazioni sul
software di installazione, consultare la Guida in linea sul CD
di avviamento. 2) Collegare l’USB ( ) (venduto
separatamente) quando richiesto.
3) Turn off the printer, and then turn it on again. If the
alignment page still do not print, see “Troubleshooting” on
page 15.
Step 6: Connect the printer.
1) Insert the Starter CD into the CD drive, and then follow the
onscreen instructions. Note: For more information about
installing software, see the onscreen user’s guide on the
Starter CD. 2) Connect the USB ( ) (sold separately)
when prompted.

English
Nederlands Français DeutschItaliano
11
Schritt 7: Testen der Softwareinstallation.
Nachdem Sie die Installation der Software ausgeführt und
den Drucker an den Computer angeschlossen haben,
drucken Sie ein Dokument aus einer Anwendung, die Sie
häufig verwenden. Wenn das Dokument nicht gedruckt
wird, beachten Sie den Abschnitt “Fehlerbehebung” auf
Seite 19.
Schritt 8: Registrieren des Druckers.
Registrieren Sie den Drucker, damit Sie
Kundenunterstützung und wichtige technische Informationen
erhalten. Wenn Sie den Drucker nicht während der
Installation der Software registrieren, können Sie dies
später unter http://www.register.hp.com
.
Étape 7 : Testez l’installation du logiciel de l’imprimante.
Après avoir terminé l’installation du logiciel et connecté
l’imprimante à l’ordinateur, imprimez un document à partir
d’une application que vous utilisez régulièrement pour vous
assurer que le logiciel est bien installé. Si le document ne
s’imprime pas, reportez-vous à la section « Dépannage »,
à la page 23.
Étape 8 : Enregistrement de l’imprimante.
Enregistrez l’imprimante afin d’obtenir de l’aide et des
informations techniques importantes. Si vous décidez de ne
pas enregistrer votre imprimante au cours de l’installation
du logiciel, vous pourrez le faire ultérieurement à l’adresse
http://www.register.hp.com
.
Stap 7: De installatie van de printersoftware testen.
Nadat u de software hebt geïnstalleerd en de printer hebt
aangesloten op de computer, drukt u een document af
vanuit een toepassing die u vaak gebruikt om te controleren
of de software juist is geïnstalleerd. Zie “Problemen
oplossen” op pagina 27 als het document niet wordt
afgedrukt.
Stap 8: De printer registreren.
Registreer de printer om gebruik te kunnen maken van
belangrijke ondersteuning en technische informatie.
Als u de printer niet hebt geregistreerd tijdens de installatie
van de software, kunt u de printer later registreren op
http://www.register.hp.com
.
Punto 7: Verificare l’installazione del software
della stampante.
Al termine dell’installazione del software e dopo avere
collegato la stampante al computer, stampare un
documento da un’applicazione utilizzata frequentemente
per assicurarsi che l’installazione sia stata eseguita
correttamente. Se il documento non viene stampato,
consultare la sezione “Risoluzione dei problemi“ a
pagina 31.
Punto 8: Registrare la stampante.
Per ricevere importanti informazioni tecniche e
sull’assistenza, è necessario effettuare la registrazione della
stampante. Se tale operazione non è stata eseguita al
momento dell’installazione del software, sarà possibile
registrare la stampante successivamente all’indirizzo
http://www.register.hp.com
.
7 8
Step 7: Test the printer software installation.
After you complete the software installation and connect the
printer to the computer, print a document from an
application that you use frequently to ensure that the
software is installed correctly. If the document does not
print, see “Troubleshooting” on page 15.
Step 8: Register the printer.
Register the printer to receive important support and
technical information. If you did not register your printer
while installing the software, you can register later at
http://www.register.hp.com
.

12
http://www.hp.com/support/businessinkjet1000
Herzlichen Glückwunsch!
Ihr Drucker ist betriebsbereit. Informationen zur Verwendung
des Druckers und zur Fehlerbehebung können Sie folgenden
Quellen entnehmen:
• Online-Benutzerhandbuch und Readme-Datei auf der Starter-CD.
• HP Instant Support (weitere Informationen finden Sie im
Online-Benutzerhandbuch)
• Website der Produktunterstützung
http://www.hp.com/support/businessinkjet1000
Félicitations !
Votre imprimante est prête à l’emploi. Pour toute information
concernant l’imprimante et son dépannage, reportez-vous:
• au guide de l’utilisateur en ligne et au fichier Lisezmoi
disponibles sur le CD de démarrage ;
• à HP Instant Support (consultez le guide de l’utilisateur
en ligne) ;
• au site d’assistance du produit à l’adresse suivante
http://www.hp.com/support/businessinkjet1000
Gefeliciteerd.
De printer is klaar voor gebruik. Voor meer informatie over
het gebruik van de printer en het oplossen van problemen
kunt u de volgende bronnen raadplegen:
• De on line gebruikershandleiding en het Leesmij-bestand
op de Starter-cd.
• HP Instant Support (zie de on line gebruikershandleiding)
• Website voor productondersteuning op
http://www.hp.com/support/businessinkjet1000
Congratulazioni!
La stampante è pronta per l’uso. Per informazioni sull’utilizzo
della stampante e sulla risoluzione dei problemi, fare
riferimento alle risorse seguenti:
• Guida in linea e file Readme nel CD di avviamento.
• HP Instant Support (vedere la Guida in linea)
• Sito assistenza prodotti all’indirizzo
http://www.hp.com/support/businessinkjet1000
Congratulations!
Your printer is ready to use. For information about using the
printer and troubleshooting, see the following resources:
• Onscreen user’s guide and Readme file on the Starter CD.
• HP Instant Support (see the onscreen user’s guide)
• Product support site at
http://www.hp.com/support/businessinkjet1000

13
English
Understanding control panel parts
1. Power button
2. Printhead light
3. Ink cartridge light
4. Power light
5. Color indicator lights
6. Cancel button
7. Resume button
8. Resume light
Interpreting control panel lights
For more information about control panel lights, see the onscreen user’s guide on the Starter CD or visit the
product support website at http://www.hp.com/support/businessinkjet1000
.
1 2 3
4 5 6 87
Light pattern Light description Explanation and recommended action
The Power light blinks. The printer is turning on or off or
processing a print job, or a print job has
been cancelled.
• No action is required.
The Power light is on and the
Resume light blinks.
The printer is out of paper.
• Load paper and then press the
(resume button).
The printer is pausing for the ink to dry.
• Wait for the ink to dry. The Resume
light will stop blinking.
The Power light and Resume
light blink.
Print media is jammed in the printer.
• Press the (resume button) to eject
the jammed media.
• Remove all media from the output tray.
Open the top cover to locate the jam.
After clearing the jam, press the
(resume button) to continue the
print job.
The Power light blinks and
the Resume light is on.
One or more covers on the printer
are open.
• Close any open covers.
• Make sure the auto-duplex unit is
properly installed.
A printer error has occurred.
• Turn the printer off and then on again.
The Power light blinks and
the Printhead and Resume
light are on.
The printhead latch is not secured.
• Open the printing supplies cover and
secure the printhead latch.

14
English
The Printhead light, a color
indicator light, and the
Resume light are on.
One or more of the printheads
needs attention.
• Reinstall the printheads and try
to print.
• Try cleaning the printhead contacts.
See the onscreen user’s guide.
• If the error persists, replace the
printhead or printheads indicated.
The Ink Cartridge light,
a color indicator light,
and the Resume light are on.
One or more of the ink cartridges
needs attention.
• Reinstall the ink cartridges and try
to print.
• If the error persists, replace the ink
cartridge or cartridges indicated.
Light pattern Light description Explanation and recommended action

15
English
Troubleshooting
This section provides troubleshooting suggestions for some of the most common issues associated with
hardware and software installation.
Problems printing an
alignment page
Check the printer to ensure the following:
• Power light is on and not blinking. When the
printer is first turned on, it takes approximately
45 seconds to warm up.
• No lights on the control panel are lit or blinking
and that the printer is in the Ready state.
If lights are lit or blinking, see “Interpreting
control panel lights” on page 13.
• Ensure power cord and other cables are
working and firmly connected to the printer.
• All packing tapes and materials are removed
from the printer.
• Printheads and ink cartridges are properly
installed in their correct color-coded slots.
Press down firmly on each one to ensure
proper contact. Ensure you have removed the
protective tape from each printhead.
• Printhead latch and all covers are closed.
• Rear access panel or optional auto-duplex unit
is locked into place.
• Media is loaded correctly in the tray and is not
jammed in the printer.
Problems installing software
Check the computer system to ensure
the following:
The computer meets the system requirements
(see the onscreen user’s guide on the Starter CD).
Verify installation preliminaries
• Before installing software on a Windows
computer, ensure all other programs
are closed.
• If the computer does not recognize the path to
the CD drive that you type, ensure you are
specifying the correct drive letter.
• If the computer cannot recognize the
Starter CD in the CD drive, inspect the CD
for damage. Also, you can download the
printer driver from
http://www.hp.com/support/
businessinkjet1000.
Reinstall the printer software
If you are using Windows and the computer
cannot detect the printer, run the Scrubber utility
(located in the Utils\Scrubber folder on the
Starter CD) to perform a clean printer driver
uninstallation. Restart your computer, and re-install
the printer driver.
Configuration page
Use the configuration page to view current printer
settings, to help troubleshoot printer problems,
and to verify installation of optional accessories,
such as trays. The configuration page also contains
a log of recent events. If the printer is connected to
a network, an additional network configuration
page prints; this page shows the network settings
for the printer. For more information about these
tools, see the onscreen user’s guide on the
Starter CD.
If you need to call HP, print the configuration page
before calling.
To print a configuration page
1. Press and hold down the (power button).
While holding down the (power button),
press the (cancel button) one time.
2. Release the (power button). The printer
prints a printer configuration page.

English
Hewlett-Packard limited warranty statement
Extent of limited warranty
1. Hewlett-Packard warrants to the end-user customer that the HP products
specified above will be free from defects in materials and workmanship
for the duration specified above, which duration begins on the date of
purchase by the customer.
2. For software products, HP’s limited warranty applies only to a failure to
execute programming instructions. HP does not warrant that the
operation of any product will be uninterrupted or error free.
3. HP’s limited warranty covers only those defects that arise as a result of
normal use of the product, and does not cover any other problems,
including those that arise as a result of:
a. Improper maintenance or modification;
b. Software, media, parts, or supplies not provided or supported by
HP; or
c. Operation outside the product’s specifications.
d. Unauthorized modification or misuse.
4. For HP printer products, the use of a non-HP ink cartridge or a refilled
ink cartridge does not affect either the warranty to the customer or any
HP support contract with the customer. However, if printer failure or
damage is attributable to the use of a non-HP or refilled ink cartridge,
HP will charge its standard time and materials charges to service the
printer for the particular failure or damage.
5. If HP receives, during the applicable warranty period, notice of a defect
in any product which is covered by HP’s warranty, HP shall either repair
or replace the product, at HP’s option.
6. If HP is unable to repair or replace, as applicable, a defective product
which is covered by HP’s warranty, HP shall, within a reasonable time
after being notified of the defect, refund the purchase price for the
product.
7. HP shall have no obligation to repair, replace, or refund until the
customer returns the defective product to HP.
8. Any replacement product may be either new or like new, provided that it
has functionality at least equal to that of the product being replaced.
9. HP products may contain remanufactured parts, components, or
materials equivalent to new in performance.
10. HP’s Limited Warranty Statement is valid in any country/region where
the covered HP product is distributed by HP. Contracts for additional
warranty services, such as on-site service, are available from any
authorized HP service facility in countries/regions where the product is
distributed by HP or by an authorized importer.
Limitations of warranty
TO THE EXTENT ALLOWED BY LOCAL LAW, NEITHER HP NOR ITS THIRD
PARTY SUPPLIERS MAKES ANY OTHER WARRANTY OR CONDITION OF
ANY KIND, WHETHER EXPRESS OR IMPLIED WARRANTIES OR
CONDITIONS OF MERCHANTABILITY, SATISFACTORY QUALITY,
AND FITNESS FOR A PARTICULAR PURPOSE.
Limitations of liability
1. To the extent allowed by local law, the remedies provided in this
Warranty Statement are the customer’s sole and exclusive remedies.
2. TO THE EXTENT ALLOWED BY LOCAL LAW, EXCEPT FOR THE
OBLIGATIONS SPECIFICALLY SET FORTH IN THIS WARRANTY
STATEMENT, IN NO EVENT SHALL HP OR ITS THIRD PARTY SUPPLIERS
BE LIABLE FOR DIRECT, INDIRECT, SPECIAL, INCIDENTAL, OR
CONSEQUENTIAL DAMAGES, WHETHER BASED ON CONTRACT,
TORT, OR ANY OTHER LEGAL THEORY AND WHETHER ADVISED OF
THE POSSIBILITY OF SUCH DAMAGES.
Local law
1. This Warranty Statement gives the customer specific legal rights.
The customer may also have other rights which vary from state to state
in the United States, from province to province in Canada, and from
country/region to country/region elsewhere in the world.
2. To the extent that this Warranty Statement is inconsistent with local law,
this Warranty Statement shall be deemed modified to be consistent with
such local law. Under such local law, certain disclaimers and limitations
of this Warranty Statement may not apply to the customer. For example,
some states in the United States, as well as some governments outside
the United States (including provinces in Canada), may:
a. Preclude the disclaimers and limitations in this Warranty Statement
from limiting the statutory rights of a customer (e.g. the United
Kingdom);
b. Otherwise restrict the ability of a manufacturer to enforce such
disclaimers or limitations; or
c. Grant the customer additional warranty rights, specify the duration
of implied warranties which the manufacturer cannot disclaim,
or allow limitations on the duration of implied warranties.
3. FOR CONSUMER TRANSACTIONS IN AUSTRALIA AND NEW
ZEALAND, THE TERMS IN THIS WARRANTY STATEMENT, EXCEPT TO
THE EXTENT LAWFULLY PERMITTED, DO NOT EXCLUDE, RESTRICT,
OR MODIFY, AND ARE IN ADDITION TO, THE MANDATORY
STATUTORY RIGHTS APPLICABLE TO THE SALE OF THE HP PRODUCTS
TO SUCH CUSTOMERS.
HP product Duration of Limited Warranty
Software 1 year
Accessories 1 year
Ink cartridges 6 months*
Printheads 1 year*
Printer peripheral hardware (see below for details) 1 year
*For more detailed warranty information, see http://www.hp.com/support/inkjet_warranty
.

17
Deutsch
Elemente des Bedienfelds
1. Power-Taste (Netzschalter)
2. Druckkopf-LED
3. Tintenpatronen-LED
4. Power-LED
5. Farbanzeige-LED
6. Taste Abbrechen
7. Taste Fortsetzen
8. Fortsetzen-LED
Bedeutung der LEDs auf dem Bedienfeld
Weitere Informationen zu den LEDs auf dem Bedienfeld finden Sie im Online-Benutzerhandbuch
auf der Starter-CD oder auf der Website für Produktunterstützung unter
http://www.hp.com/support/businessinkjet1000
.
1 2 3
4 5 6 87
Leuchtmuster LED-Beschreibung Erklärung und empfohlene Aktionen
Die Power-LED blinkt. Der Drucker wird ein- oder ausgeschaltet,
verarbeitet einen Druckauftrag oder ein
Druckauftrag wurde abgebrochen.
• Es ist keine Aktion erforderlich.
Die Power-LED leuchtet und
die Fortsetzen-LED blinkt.
Das Papierfach ist leer.
• Legen Sie Papier ein und drücken Sie
dann die (Taste Fortsetzen).
Der Drucker pausiert, damit die Tinte
trocknen kann.
• Warten Sie, bis die Tinte getrocknet
ist. Die Fortsetzen-LED hört auf zu
blinken, wenn die Tinte getrocknet ist.
Die Power-LED und die
Fortsetzen-LED blinken.
Im Drucker liegt ein Papierstau vor.
• Drücken Sie die (Taste Fortsetzen),
um das gestaute Druckmedium
auszuwerfen.
• Entfernen Sie alle Medien aus dem
Ausgabefach. Öffnen Sie die obere
Abdeckung, um nach dem Papierstau
zu suchen. Drücken Sie nach der
Beseitigung des Papierstaus die
(Taste Fortsetzen), um den
Druckvorgang fortzusetzen.
Die Power-LED blinkt und die
Fortsetzen-LED leuchtet.
Eine oder mehrere Abdeckungen am
Drucker sind geöffnet.
• Schließen Sie alle geöffneten
Abdeckungen.
• Stellen Sie sicher, dass die Auto-
Duplex-Einheit richtig installiert ist.
Ein Druckerfehler ist aufgetreten.
• Schalten Sie den Drucker aus und
dann wieder ein.

18
Deutsch
Die Power-LED blinkt und die
Druckkopf- und Fortsetzen-
LED leuchten.
Die Druckkopfverriegelung ist nicht
geschlossen.
• Öffnen Sie die
Verbrauchsmaterialabdeckung und
schließen Sie die
Druckkopfverriegelung.
Die Druckkopf-LED, eine
Farbanzeige-LED und die
Fortsetzen-LED leuchten.
Ein oder mehrere Druckköpfe müssen
überprüft werden.
• Installieren Sie die Druckköpfe neu
und führen Sie den Druckvorgang
erneut durch.
• Reinigen Sie die Druckkopfkontakte.
Nähere Informationen finden Sie im
Online-Benutzerhandbuch.
• Wenn der Fehler weiterhin auftritt,
ersetzen Sie die angezeigten
Druckköpfe.
Die Tintenpatronen-LED, eine
Farbanzeige-LED und die
Fortsetzen-LED leuchten.
Eine oder mehrere Tintenpatronen müssen
überprüft werden.
• Installieren Sie die Tintenpatronen neu
und führen Sie den Druckvorgang
erneut durch.
• Wenn der Fehler weiterhin auftritt,
ersetzen Sie die angezeigten
Tintenpatronen.
Leuchtmuster LED-Beschreibung Erklärung und empfohlene Aktionen

19
Deutsch
Fehlerbehebung
Dieser Abschnitt enthält Hinweise zur Fehlerbehebung für allgemeine Probleme im Zusammenhang mit der
Hardware- und Softwareinstallation.
Probleme beim Drucken
einer Ausrichtungsseite
Überprüfen Sie den Drucker, um
sicherzustellen, dass folgende
Bedingungen erfüllt sind:
• Power-LED leuchtet und blinkt nicht.
Nach einem Kaltstart benötigt der Drucker
etwa 45 Sekunden bis zum Erreichen der
Betriebstemperatur.
• Auf dem Bedienfeld leuchten bzw. blinken
keine LEDs, und der Drucker ist betriebsbereit.
Wenn LEDs leuchten oder blinken, siehe
“Bedeutung der LEDs auf dem Bedienfeld” auf
Seite 17.
• Prüfen Sie, ob das Netzkabel und andere
Kabel in Ordnung und fest mit dem Drucker
verbunden sind.
• Es befindet sich kein Verpackungsmaterial mehr
am Drucker.
• Die Druckköpfe und Tintenpatronen sind
ordnungsgemäß in die entsprechend farblich
gekennzeichneten Schächte eingesetzt.
Drücken Sie jede Tintenpatrone und jeden
Druckkopf fest herunter, um ihren
ordnungsgemäßen Sitz zu gewährleisten.
Achten Sie darauf, dass die Schutzfolie von
allen Druckköpfen entfernt wurde.
• Druckkopfverriegelung und sämtliche
Abdeckungen sind geschlossen.
• Die hintere Abdeckung bzw. die optionale
Auto-Duplex-Einheit sind eingerastet.
• Die Medien sind richtig im Fach eingelegt,
und es liegt kein Papierstau im Drucker vor.
Probleme beim Installieren
der Software
Überprüfen Sie das Computersystem,
um sicherzustellen, dass folgende
Bedingungen erfüllt sind:
Der Computer erfüllt die Systemanforderungen
(siehe Online-Benutzerhandbuch auf der
Starter-CD).
Überprüfen Sie die
Installationsvorbereitungen
• Bevor Software unter Windows auf einem
Computer installiert wird, müssen alle anderen
Programme geschlossen werden.
• Wenn der Computer den von Ihnen
angegebenen Pfad zur CD nicht erkennt,
überprüfen Sie, ob Sie den richtigen
Laufwerksbuchstaben eingegeben haben.
• Wenn der Computer die Starter-CD im CD-
Laufwerk nicht erkennen kann, überprüfen Sie
die CD auf Beschädigungen. Den
Druckertreiber können Sie auch von folgender
Website herunterladen:
http://www.hp.com/support/
businessinkjet1000.
Installieren Sie die Druckersoftware erneut.
Wenn Sie mit Windows arbeiten und der
Computer den Drucker nicht erkennt, führen Sie
das Dienstprogramm zur Datenträgerbereinigung
(Scrubber) aus, um den Druckertreiber vollständig
zu deinstallieren. Das Dienstprogramm befindet
sich im Ordner Utils\Scrubber auf der Starter-CD.
Starten Sie das System neu, und installieren Sie
den Druckertreiber erneut.
Konfigurationsseite
Mit der Konfigurationsseite können Sie die
aktuellen Druckereinstellungen anzeigen,
Druckerprobleme beheben und die Installation von
optionalem Zubehör wie zum Beispiel von Fächern
überprüfen. Zudem enthält die Konfigurationsseite
ein Protokoll der letzten Ereignisse. Wenn der
Drucker an ein Netzwerk angeschlossen ist,
wird eine zusätzliche Seite für die
Netzwerkkonfiguration ausgedruckt, aus der die
Netzwerkeinstellungen des Druckers hervorgehen.
Weitere Informationen zu den Tools finden Sie im
Online-Benutzerhandbuch auf der Starter-CD.
Wenn Sie HP anrufen müssen, drucken Sie die
Konfigurationsseite vorher aus.
Drucken einer Konfigurationsseite
1. Drücken Sie die (Power-Taste) und halten Sie
diese gedrückt. Drücken Sie bei gedrückter
(Power-Taste) einmal die (Taste Abbrechen).
2. Lassen Sie die (Power-Taste) los. Der Drucker
druckt nun eine Druckerkonfigurationsseite.

Deutsch
Vereinbarung zur beschränkten Gewährleistung
von Hewlett-Packard
Umfang der beschränkten Gewährleistung
1. Hewlett-Packard (HP) gewährleistet dem Endkunden, dass die
obengenannten HP Produkte während des obengenannten
Gewährleitungszeitraums frei von Material- und Verarbeitungsfehlern
sind. Der Gewährleitungszeitraum beginnt mit dem Kaufdatum.
2. Bei Softwareprodukten gilt die beschränkte Gewährleistung von HP nur,
wenn Programmanweisungen nicht ausgeführt werden. HP gewährleistet
weder einen unterbrechungs- noch fehlerfreien Betrieb eines
Softwareproduktes.
3. Die beschränkte Gewährleistung von HP deckt nur Defekte ab, die bei
normalem Betrieb des Produkts auftreten. Nicht abgedeckt sind alle
übrigen Probleme, einschließlich der Probleme, die auf eine der
folgenden Ursachen zurückgeführt werden können:
a. Unsachgemäße Wartung oder Modifikationen
b. Verwendung von Software, Druckmedien, Ersatzteilen oder
Zubehör, die von HP nicht zur Verfügung gestellt bzw.
unterstützt werden
c. Betrieb außerhalb der technischen Daten des Produkts
d. Unberechtigte Veränderungen oder missbräuchliche Verwendung.
4. Bei allen Produkten von Hewlett-Packard hat die Verwendung von
Tintenpatronen oder nachgefüllten Tintenpatronen anderer Hersteller als
Hewlett-Packard weder Auswirkungen auf die Gewährleistung
gegenüber dem Kunden noch auf andere Support-Vereinbarungen
zwischen Hewlett-Packard und dem Kunden. Wenn jedoch ein
Druckerausfall oder -schaden auf die Verwendung nicht originaler HP
Tintenpatronen oder nachgefüllter Tintenpatronen zurückgeführt werden
kann, berechnet HP die üblichen Gebühren für Arbeitszeit und Material
für in diesem Zusammenhang am Drucker durchgeführte
Wartungsarbeiten.
5. Wenn Hewlett-Packard während der geltenden Gewährleistungsfrist
Kenntnis von einem Fehler erhält, der unter die Gewährleistung durch
Hewlett-Packard fällt, repariert oder ersetzt Hewlett-Packard das Produkt
nach eigenem Ermessen.
6. Wenn HP das defekte, unter HP Gewährleistung stehende Produkt
weder reparieren noch ersetzen kann, erstattet HP innerhalb eines
angemessenen Zeitraums den Kaufpreis für das Produkt zurück.
7. HP trägt keine Verpflichtung für Reparatur, Ersatz oder
Kaufpreisrückerstattung, solange der Kunde das defekte Produkt nicht
zurückgesendet hat.
8. Ersatzprodukte können neu oder neuwertig sein. Voraussetzung ist
jedoch, dass sie über mindestens denselben Funktionsumfang verfügen
wie das zu ersetzende Produkt.
9. HP Produkte können instandgesetzte Teile, Komponenten oder
Materialien enthalten, die hinsichtlich ihrer Leistung neuwertigen
gleichgestellt sind.
10. Die beschränkte Gewährleistung von HP ist in allen Ländern/Regionen
gültig, in denen das durch sie gedeckte HP Produkt von HP vertrieben
wird. Vereinbarungen für zusätzliche Gewährleistung, zum Beispiel
Service vor Ort, sind in Ländern/Regionen, in denen das Produkt durch
HP oder durch einen autorisierten Importeur vertrieben wird, über jede
autorisierten HP Servicestelle verfügbar.
Gewährleistungsausschlüsse
IN DEM NACH GELTENDEM RECHT ZULÄSSIGEN AUSMASS
GEWÄHREN WEDER HP NOCH DIE ZULIEFERER VON HP JEGLICHE
SONSTIGEN GEWÄHRLEISTUNGEN, WEDER AUSDRÜCKLICHE NOCH
STILLSCHWEIGENDE GEWÄHRLEISTUNGEN DER MARKTGÄNGIGKEIT,
ZUFRIEDENSTELLENDEN QUALITÄT ODER EIGNUNG FÜR EINEN
BESTIMMTEN ZWECK.
Haftungsausschlüsse
1. In dem nach geltendem Recht zulässigen Ausmaß stehen dem
Endkunden über die in dieser Gewährleistungsvereinbarung genannten
Ansprüche hinaus keine weiteren Ansprüche an HP zu.
2. IN DEM NACH GELTENDEM RECHT ZULÄSSIGEN AUSMASS,
AUSGENOMMEN DER IN DIESER
GEWÄHRLEISTUNGSVEREINBARUNG FESTGELEGTEN
VERPFLICHTUNGEN, SIND HP ODER DIE ZULIEFERER VON HP IN
KEINEM FALL HAFTBAR FÜR DIREKTE, INDIREKTE, BESONDERE,
ZUFÄLLIGE ODER FOLGESCHÄDEN, UNABHÄNGIG DAVON,
OB DIESE AUF DER BASIS VON VERTRÄGEN, DELIKTRECHT ODER
ANDEREN RECHTSTHEORIEN GELTEND GEMACHT WERDEN,
UND UNABHÄNGIG DAVON, OB HP ODER DIE ZULIEFERER VON
HP VON DER MÖGLICHKEIT EINES SOLCHEN SCHADENS
UNTERRICHTET WURDEN.
Geltendes Recht
1. Diese Gewährleistungsvereinbarung stattet den Endkunden mit
bestimmten Rechten aus. Der Endkunde hat möglicherweise noch
weitere Rechte, die in den Vereinigten Staaten von Staat zu Staat, in
Kanada von Provinz zu Provinz bzw. allgemein von Land/Region zu
Land/Region verschieden sein können.
2. Soweit diese Gewährleistungsvereinbarung nicht dem geltenden Recht
entspricht, soll sie als derart abgeändert gelten, dass die hierin
enthaltenen Bestimmungen dem geltenden Recht entsprechen. Es ist
möglich, dass bestimmte Haftungsausschlusserklärungen und
Einschränkungen dieser Gewährleistungsvereinbarung nach geltendem
Recht für den Endkunden nicht zutreffen. Bestimmte Bundesstaaten der
USA und Länder/Regionen außerhalb der USA (einschließlich einiger
kanadischer Provinzen):
a. Beschränken die Rechte des Verbrauchers nicht durch die
Erklärungen und Einschränkungen dieser Herstellergarantie
(z.B. in Großbritannien);
b. Schränken die Möglichkeit des Herstellers, solche Erklärungen und
Einschränkungen geltend zu machen, in anderer Weise ein;
c. Gewähren dem Endkunden weitere Gewährleistungsrechte,
definieren die Dauer von stillschweigenden Gewährleistungen,
die der Hersteller nicht ausschließen kann, oder gestatten eine
Beschränkung der Dauer von stillschweigenden Gewährleistungen.
3. FÜR ENDKUNDEN IN AUSTRALIEN UND NEUSEELAND: DURCH
DIESE GEWÄHRLEISTUNGSVEREINBARUNG WERDEN DIE DURCH
DAS IN DIESEN LÄNDERN GELTENDE RECHT IM ZUSAMMENHANG
MIT DEM KAUF VON HP PRODUKTEN GEWÄHRTEN
ENDKUNDENANSPRÜCHE NICHT ÜBER DAS NACH GELTENDEM
RECHT ZULÄSSIGE AUSMASS HINAUS AUSGESCHLOSSEN,
EINGESCHRÄNKT ODER GEÄNDERT. DIE BEDINGUNGEN DIESER
GEWÄHRLEISTUNGSVEREINBARUNG SIND EINE ERWEITERUNG DER
GESETZLICHEN GRUNDRECHTE FÜR ENDKUNDEN.
HP Produkt Dauer der beschränkten Gewährleistung
Software 1 Jahr
Zubehör 1 Jahr
Tintenpatronen 6 Monate*
Druckköpfe 1 Jahr*
Ekstern printerhardware (siehe folgende Details) 1 Jahr
*Weitere Garantieinformationen finden Sie unter http://www.hp.com/support/inkjet_warranty
.

21
Français
Identification des éléments du panneau de commande
1. Bouton d’alimentation
2. voyant de tête d’impression
3. Voyant de cartouche d’encre
4. voyant d’alimentation
5. Voyant indicateur de couleur
6. Bouton Annuler
7. Bouton Reprendre
8. voyant de reprise
Interprétation des voyants du panneau de commande
Pour plus d’informations sur les voyants du panneau de commande, consultez le guide de l’utilisateur en
ligne disponible sur le CD de démarrage ou rendez-vous sur le site Web d’assistance produit à l’adresse
suivante : http://www.hp.com/support/businessinkjet1000
.
1 2 3
4 5 6 87
Signification des voyants Description des voyants Explication et action recommandée
Le voyant d’alimentation
clignote.
L’imprimante est en cours de démarrage
ou d’arrêt, ou traite une tâche
d’impression, ou une tâche d’impression
est en cours d’annulation.
• Aucune action n’est requise.
Le voyant d’alimentation est
allumé et le voyant de reprise
clignote.
L’imprimante ne contient plus de papier.
• Chargez du papier et appuyez sur le
(bouton de reprise).
L’imprimante attend que l’encre sèche.
• Attendez le séchage de l’encre.
Le voyant de reprise s’arrêtera
de clignoter.
Le voyant d’alimentation et le
voyant de reprise clignotent.
Du papier est coincé dans l’imprimante.
• Appuyez sur le (bouton de reprise)
pour éjecter le support coincé.
• Retirez tous les supports du bac
de sortie. Ouvrez le capot supérieur
pour localiser le bourrage.
Après élimination du bourrage,
appuyez sur le (bouton de reprise)
pour poursuivre la tâche d’impression.
Le voyant d’alimentation
clignote et le voyant de
reprise est allumé.
Un ou plusieurs capot(s) de l’imprimante
est (sont) ouvert(s).
• Fermez tous les capots.
• Vérifiez que l’unité auto-duplex est
installée correctement.
Une erreur d’imprimante s’est produite.
• Mettez l’imprimante hors tension, puis
à nouveau sous tension.

22
Français
Le voyant d’alimentation
clignote, le voyant de tête
d’impression et le voyant de
reprise sont allumés.
Le verrou des têtes d’impression n’est pas
correctement fermé.
• Ouvrez le capot des composants
d’impression et replacez le verrou des
têtes d’impression.
Le voyant des têtes
d’impression, un voyant
indicateur de couleur et le
voyant de reprise sont
allumés.
Une ou plusieurs tête(s) d’impression
demande(nt) une intervention.
• Réinstallez les têtes d’impression et
essayez d’imprimer.
• Essayez de nettoyer les contacts des
têtes d’impression. Reportez-vous au
guide de l’utilisateur en ligne.
• Si l’erreur persiste, remplacez la ou
les tête(s) d’impression désignée(s).
Le voyant de cartouche
d’encre, un voyant indicateur
de couleur et le voyant de
reprise sont allumés.
Une ou plusieurs cartouche(s) d’encre
demande(nt) une intervention.
• Réinstallez les cartouches d’encre et
essayez d’imprimer.
• Si l’erreur persiste, remplacez la ou
les cartouche(s) d’encre désignée(s).
Signification des voyants Description des voyants Explication et action recommandée

23
Français
Dépannage
Cette section vous propose des suggestions de dépannage pour certains problèmes liés à l’installation du
matériel ou du logiciel.
Problèmes d’impression d’une page
d’alignement
Vérifiez l’imprimante pour vous assurer
des points suivants :
• Le voyant d’alimentation est allumé et ne
clignote pas. Lors de la mise sous tension
initiale de l’imprimante, il faut environ
45 secondes pour son préchauffage.
• Aucun voyant du panneau de commande n’est
allumé ou ne clignote et l’imprimante se trouve
dans l’état Prêt. Si des voyants sont allumés ou
clignotent, reportez-vous à la section
« Interprétation des voyants du panneau de
commande », à la page 21.
• Assurez-vous que le cordon d’alimentation et
les autres câbles fonctionnent et sont bien
connectés à l’imprimante.
• Tous les éléments et rubans d’emballage ont
été enlevés de l’imprimante.
• Les têtes d’impression et les cartouches d’encre
sont bien installées dans leurs emplacements
respectifs, de même couleur.
Appuyez fermement sur chacune d’elles pour
assurer un bon contact. Prenez soin de retirer
le ruban adhésif de protection de chaque tête
d’impression.
• Le loquet des têtes d’impression et tous les
capots sont fermés.
• Le panneau d’accès arrière ou l’unité auto-
duplex en option est bien en place.
• Le support est correctement chargé dans le bac
et il n’est pas coincé dans l’imprimante.
Problèmes liés à l’installation
du logiciel
Vérifiez l’ordinateur pour vous assurer des
points suivants :
La configuration système de l’ordinateur est
conforme aux exigences (consultez le guide de
l’utilisateur en ligne disponible sur le CD de
démarrage).
Vérification des étapes préalables
à l’installation
• Avant de procéder à l’installation de logiciels
sur un ordinateur Windows, assurez-vous que
tous les autres programmes sont fermés.
• Si l’ordinateur ne reconnaît pas le chemin
d’accès que vous avez indiqué pour le lecteur
de CD-ROM, vérifiez que vous avez spécifié la
lettre d’unité correcte.
• Si votre ordinateur n’arrive pas à lire le CD de
démarrage placé dans le lecteur de CD-ROM,
vérifiez si le CD n’est pas endommagé. Vous
pouvez également télécharger le pilote
d’imprimante à l’adresse suivante :
http://www.hp.com/support/
businessinkjet1000.
Réinstallation du logiciel d’imprimante
Si votre ordinateur (équipé de Windows) ne
parvient pas à détecter l’imprimante, exécutez
l’utilitaire de suppression (situé dans le dossier
Utils\Scrubber sur le CD de démarrage) pour
effectuer une désinstallation complète du pilote de
l’imprimante. Redémarrez l’ordinateur et
réinstallez le pilote de l’imprimante.
Page de configuration
La page de configuration vous permet de consulter
les paramètres actuels de l’imprimante, de
résoudre les problèmes relatifs à l’imprimante et
de vérifier l’installation des accessoires en option,
tels que des bacs. Elle contient également un
journal des événements récents. Si l’imprimante est
connectée à un réseau, une page de configuration
supplémentaire est imprimée. Cette page affiche
les paramètres réseau de l’imprimante. Pour plus
d’informations sur ces outils, reportez-vous au
guide de l’utilisateur en ligne, disponible sur le
CD de démarrage.
Si vous devez appeler HP, imprimez au préalable
la page de configuration.
Pour imprimer une page de configuration
1. Appuyez sur le (bouton d’alimentation).
Tout en conservant le (bouton
d’alimentation) enfoncé, appuyez une fois sur
le (bouton d’annulation).
2. Relâchez le (bouton d’alimentation).
L’imprimante imprime une page de
configuration.

Français
Garantie limitée Hewlett-Packard
Etendue de la garantie limitée
1. Hewlett-Packard garantit les produits HP au client final contre tout défaut
de fabrication et de main d’œuvre pendant la période désignée prenant
effet à compter de la date d’achat par le client.
2. Concernant les produits logiciels, cette garantie HP ne s’applique
qu’aux instructions de programmation enregistrées sur le support.
HP ne garantit pas le fonctionnement ininterrompu ou sans erreur de
ses produits.
3. La garantie limitée de HP ne couvre que les défauts découlant d’un
usage normal du produit. Par conséquent, cette garantie ne couvre pas
les suites :
a. d’un mauvais entretien ou d’un entretien incorrect ;
b. de l’utilisation de logiciels, de supports, de pièces ou de
consommables non fournis ou pris en charge par HP ;
c. d’une utilisation en dehors des spécifications du produit ;
d. d’une modification non autorisée ou d’une utilisation abusive.
4. En ce qui concerne les imprimantes HP, l’utilisation de cartouches
d’impression d’un autre fabricant que HP ou de cartouches
reconditionnées n’affecte ni la garantie au client, ni les contrats de
maintenance HP conclus avec le client. Cependant, si la défectuosité
présentée par l’imprimante ou son endommagement est la conséquence
de l’utilisation de telles cartouches, HP facturera le coût de la main
d’œuvre et des pièces détachées à la réparation.
5. Si le client signale à HP, pendant la période de garantie applicable,
la défectuosité d’un produit couvert par la garantie, HP réparera ou,
à son choix, remplacera le produit défectueux.
6. Si HP n’est pas en mesure de réparer ou de remplacer le produit
défectueux dans un délai raisonnable, HP remboursera le produit sous
garantie au prix d’achat payé par le client.
7. HP ne s’engage nullement à réparer, à remplacer ou à rembourser tout
produit défectueux tant que celui-ci ne lui aura pas été renvoyé.
8. Tout produit de remplacement sera neuf ou remis à neuf et, dans ce
dernier cas, présentera des fonctionnalités au moins égales à celles du
produit remplacé.
9. Les produits HP contiennent parfois des matériaux, des composants et
des pièces remanufacturées présentant des qualités équivalentes aux
produits neufs.
10. La garantie limitée HP est valide dans tous les pays et régions où les
produits HP sont distribués par HP. Des contrats d’extension des services
de garantie sur site peuvent être obtenus auprès de tout centre
d’assistance agréé HP dans tous les pays et régions où les produits HP
sont distribués par Hewlett-Packard ou un importateur agréé.
Limites de la garantie
HP OU SES FOURNISSEURS TIERS EXCLUENT TOUTE AUTRE GARANTIE,
EXPRESSE OU NON, EN RAPPORT AVEC LES PRODUITS HP. HP ET SES
FOURNISSEURS TIERS EXCLUENT EN PARTICULIER TOUTE GARANTIE
IMPLICITE CONCERNANT SES CONDITIONS DE MISE SUR LE MARCHÉ
ET SON ADEQUATION À QUELQUE UTILISATION PARTICULIÈRE QUE
CE SOIT.
Limites de responsabilité
1. Dans les limites permises par la législation locale, cette garantie limitée
constitue et exprime l’intégralité des droits et prétentions dont bénéficie
le client.
2. A L’EXCEPTION DES OBLIGATIONS SPÉCIFIÉES DANS CETTE
GARANTIE LIMITÉE, HP NE POURRA ÊTRE TENU RESPONSABLE
D’AUCUN DOMMAGE, DIRECT, INDIRECT, NATUREL OU ADÉQUAT,
QUEL QU’IL SOIT, QU’IL SE BASE SUR UN CONTRAT OU SUR LA LOI
OU TOUTE AUTRE THÉORIE JURIDIQUE, ET CELA MÊME SI HP A ÉTÉ
AVERTI DE LA POSSIBILITÉ D’UN TEL DOMMAGE.
Loi locale
1. La garantie limitée accorde au consommateur des droits spécifiques.
Ce dernier peut cependant bénéficier d’autres droits dont la nature peut
varier en fonction de l’état (aux Etats-Unis), de la province (au Canada)
et du pays/de la région (ailleurs dans le monde).
2. Si les termes de cette garantie limitée se trouvent en contradiction avec
les lois en vigueur localement, ils seront considérés comme modifiés
pour correspondre aux lois en question. Dans ce cas, certains termes de
cette garantie limitée pourraient ne pas s’appliquer à notre clientèle.
Par exemple, certains états des Etats-Unis ainsi que certains pays en
dehors des Etats-Unis (y compris certaines provinces du Canada)
peuvent :
a. assurer une garantie légale impérative au consommateur
(par exemple au Royaume-Uni) ;
b. limiter la faculté d’un fabricant à restreindre sa responsabilité ou
à imposer des limitations ; ou
c. accorder au client des garanties supplémentaires, stipuler la durée
des garanties implicites que le fabricant ne peut décliner, ou
autoriser une limitation de durée pour les garanties implicites.
3. POUR LES TRANSACTIONS DES CONSOMMATEURS EN AUSTRALIE
ET EN NOUVELLE-ZELANDE, LES TERMES DE CETTE GARANTIE,
EN DEHORS DES EXCEPTIONS LEGALEMENT PERMISES,
N’EXCLUENT, NE RESTREIGNENT, NI NE MODIFIENT LES DROITS
IMPERATIVEMENT PREVUS PAR LA LOI, AUXQUELS ILS S’AJOUTENT,
ET QUI SONT APPLICABLES A LA VENTE DES PRODUITS HP A
SES CLIENTS.
Produit HP Durée de la garantie limitée
Logiciel 1 an
Accessoires 1 an
Cartouches d’encre 6 mois*
Têtes d’impression 1 an*
Equipement périphérique de l’imprimante (voir les détails ci-dessous) 1 an
*Pour plus d’informations sur la garantie, consultez le site http://www.hp.com/support/inkjet_warranty
.

25
Nederlands
De onderdelen van het bedieningspaneel leren kennen
1. Aan/Uit-knop
2. Printkoplampje
3. Inktpatroonlampje
4. Aan/Uit-lampje
5. Kleurenlampjes
6. Knop Annuleren
7. Knop Doorgaan
8. Lampje Doorgaan
De betekenis van de lampjes van het bedieningspaneel
Zie de gebruikershandleiding op de Starter-cd voor meer informatie over de lampjes van het
bedieningspaneel. U kunt ook een bezoek brengen aan de website voor productondersteuning op
http://www.hp.com/support/businessinkjet1000
.
1 2 3
4 5 6 87
Brandpatroon Statusbeschrijving Uitleg en uit te voeren handeling
Het Aan/Uit-lampje knippert. De printer is bezig met opwarmen of met
het verwerken van een afdruktaak of er is
een afdruktaak geannuleerd.
• U hoeft niets te doen.
Het Aan/Uit-lampje brandt
en het lampje Doorgaan
knippert.
Het printerpapier is op.
• Plaats papier en druk op de
(knop Doorgaan).
De printer wacht op het drogen van
de inkt.
• Wacht totdat de inkt droog is. De inkt
is droog als het lampje Doorgaan niet
meer knippert.
Het Aan/Uit-lampje en het
lampje Doorgaan knipperen.
Er is papier vastgelopen in de printer.
• Druk op de (knop Doorgaan) om
het vastgelopen papier te verwijderen.
• Verwijder al het papier uit de
uitvoerbak. Open de bovenste klep
om het vastgelopen papier te kunnen
zien. Nadat u het vastgelopen papier
heeft verwijderd, drukt u op de
(knop Doorgaan) om de afdruktaak te
hervatten.
Het Aan/Uit-lampje knippert
en het lampje Doorgaan
brandt.
Een of meer kleppen van de printer
zijn open.
• Sluit kleppen die nog open zijn.
• Zorg dat de automatische duplex-
eenheid goed is aangebracht.
Er is een printerfout opgetreden.
• Zet de printer uit en weer aan.

26
Nederlands
Het Aan/Uit-lampje knippert
en het Printkoplampje en het
lampje Doorgaan branden.
De printkopgrendel is niet vergrendeld.
• Open de klep van de
afdrukbenodigdheden en vergrendel
de printkopgrendel.
Het printkoplampje, een
kleurenlampje en het lampje
Doorgaan branden.
Een of meer printkoppen moeten
worden nagekeken.
• Plaats de printkoppen opnieuw en
probeer af te drukken.
• Reinig de contacten van de
printkoppen. Raadpleeg de
elektronische gebruikershandleiding.
• Als het probleem aanhoudt,
moeten de aangegeven printkoppen
worden vervangen.
Het inktpatroonlampje, een
kleurenlampje en het lampje
Doorgaan branden.
Een of meer inktpatronen moeten
worden nagekeken.
• Plaats de inktpatronen opnieuw en
probeer af te drukken.
• Als het probleem aanhoudt,
moeten de aangegeven inktpatronen
worden vervangen.
Brandpatroon Statusbeschrijving Uitleg en uit te voeren handeling

27
Nederlands
Problemen oplossen
In dit gedeelte worden oplossingen beschreven voor problemen die vaak optreden tijdens de installatie
van hardware en software.
Problemen bij het afdrukken van
een uitlijnpagina
Controleer de printer op het volgende:
• Het Aan/uit-lampje brandt (knippert niet).
Nadat de printer is aangezet, heeft de printer
ongeveer 45 seconden nodig om op te
warmen.
• Geen enkel lampje op het bedieningspaneel
brand of knippert en de printer is klaar om af
te drukken. Wanneer er lampjes branden of
knipperen raadpleegt u “De betekenis van de
lampjes van het bedieningspaneel” op
pagina 25.
• Controleer of de voedingskabel en andere
kabels werken en goed op de printer zijn
aangesloten.
• Alle verpakkingstape en -materialen moeten
van de printer zijn verwijderd.
• Printkoppen en inktcartridges moeten goed
geplaatst zijn in de juiste met kleuren
gecodeerde slots. Druk de printkoppen en
inktpatronen goed op hun plaats. Controleer of
de beschermtape van alle printkoppen is
verwijderd.
• De printkopgrendel en alle kleppen moeten
gesloten zijn.
• Het achterpaneel en de optionele automatische
duplexeenheid moeten stevig op hun plaats
zitten.
• Media moeten goed in de lade geplaatst zijn
en niet in de printer zijn vastgelopen.
Problemen bij het installeren van de
software
Controleer de computer op het volgende:
De computer moet voldoen aan de
systeemvereisten (zie de gebruikershandleiding op
de Starter-cd).
Controleer of aan de installatievereisten
wordt voldaan
• Voordat u software op een computer met
Windows installeert, moeten alle andere
programma’s zijn afgesloten.
• Als het pad naar het cd-rom-station niet
wordt herkend, controleert u of u de juiste
stationsaanduiding hebt opgegeven.
• Als uw computer de cd in het cd-station niet
herkent, controleert u of de cd is beschadigd.
U kunt het printerstuurprogramma ook
downloaden van
http://www.hp.com/support/
businessinkjet1000.
Het printerstuurprogramma opnieuw
installeren
Als u Windows gebruikt en de computer kan de
printer niet vinden, voert u het hulpprogramma
voor het verwijderen van software (“Scrubber”,
te vinden in de map Utils\Scrubber op de
Starter-cd) uit. Hiermee verwijdert u het
printerstuurprogramma volledig. Start de computer
opnieuw op en installeer het
printerstuurprogramma opnieuw.
Configuratiepagina
Gebruik de configuratiepagina om de huidige
printerinstellingen te bekijken, hulp te zoeken bij
het oplossen van problemen met de printer en om
de plaatsing van optionele accessoires als laden te
controleren. De configuratiepagina bevat ook een
log met recente gebeurtenissen. Als de printer op
een netwerk is aangesloten, wordt een extra
configuratiepagina voor het netwerk afgedrukt.
Hierop staan de netwerkinstellingen voor de
printer. Zie de gebruikershandleiding op
de Starter-cd voor meer informatie over deze
hulpmiddelen.
Als u HP wilt bellen, drukt u eerst de
configuratiepagina af.
Een configuratiepagina afdrukken
1. Houd (Aan/Uit-knop) ingedrukt. Terwijl u
(Aan/Uit-knop) ingedrukt houdt, drukt u één
maal op (knop Annuleren).
2. Laat (Aan/Uit-knop) los. De printer drukt
een configuratiepagina af.

Nederlands
Beperkte garantie van Hewlett-Packard
Geldigheid van beperkte garantiey
1. Hewlett-Packard verstrekt aan de eindgebruiker de garantie dat de
bovenvermelde producten van HP vrij zijn van materiaal- en
fabricagefouten gedurende de bovenvermelde tijdsduur die begint op
de dag van aankoop door de klant.
2. Voor softwareproducten is de beperkte garantie van HP alleen van
toepassing op programmeringsinstructies die niet kunnen worden
uitgevoerd. HP garandeert niet dat de werking van een product
ononderbroken of vrij van fouten is.
3. De beperkte garantie van HP geldt alleen voor defecten die zich
voordoen als resultaat van normaal gebruik van het product en is niet
van toepassing bij andere problemen, met inbegrip van defecten die het
resultaat zijn van:
a. Verkeerd of ondeskundig onderhoud of aanpassing
b. Software, informatiedragers, onderdelen of benodigdheden die niet
door HP worden geleverd of ondersteund
c. Gebruik dat niet in overeenstemming is met de specificaties van
het product
d. Niet-geautoriseerde aanpassing of misbruik
4. Voor HP-printerproducten is het gebruik van een niet door HP
vervaardigde of nagevulde inktpatroon niet van invloed op de garantie
aan de klant of op een contract voor ondersteuning dat tussen de klant
en HP is gesloten. Als defecten of beschadigingen aan de printer echter
kunnen worden toegeschreven aan het gebruik van een niet door HP
vervaardigde of nagevulde inktpatroon, zal HP de gebruikelijke kosten
voor arbeidsuren en materiaal voor het repareren van de printer voor
het betreffende defect of de betreffende beschadiging in rekening
brengen.
5. Als HP tijdens de garantieperiode op de hoogte wordt gebracht van een
defect van een product dat onder de garantie van HP valt, wordt het
defecte product door HP gerepareerd of vervangen.
6. Als een defect product dat onder de garantie van HP valt, niet door HP
gerepareerd of vervangen kan worden, zal HP de aankoopprijs voor het
defecte product terugbetalen binnen een redelijke termijn nadat HP op
de hoogte is gebracht van het defect.
7. HP is niet verplicht het defecte product te repareren, vervangen of
vergoeden totdat het is geretourneerd aan HP.
8. Een vervangingsproduct mag nieuw of bijna nieuw zijn op voorwaarde
dat het ten minste dezelfde functionaliteit bezit als het product dat
vervangen wordt.
9. Producten van HP kunnen gereviseerde onderdelen, componenten of
materialen bevatten, waarvan de prestaties gelijkwaardig zijn aan die
van nieuwe producten.
10. De beperkte garantie van HP is geldig in elk land/elke regio waar het
gegarandeerde product van HP door HP wordt gedistribueerd.
Contracten voor extra garantieservice, zoals service op de locatie van
de klant, zijn verkrijgbaar bij ieder erkend HP servicekantoor in landen/
regio’s waar het product door HP of een erkende importeur wordt
gedistribueerd.
Beperking van garantie
IN ZOVERRE DOOR DE PLAATSELIJKE WET IS TOEGESTAAN,
VERSTREKKEN NOCH HP, NOCH DERDE LEVERANCIERS ENIGE ANDERE
GARANTIE OF VOORWAARDE, HETZIJ UITDRUKKELIJKE OF
STILZWIJGENDE GARANTIES OF VOORWAARDEN VAN
VERKOOPBAARHEID, BEVREDIGENDE KWALITEIT EN GESCHIKTHEID
VOOR EEN BEPAALD DOEL.
Beperking van aansprakelijkheid
1. In zoverre dit is toegestaan onder de lokale wetgeving zijn de
rechtsmiddelen die in deze garantieverklaring worden verstrekt,
de enige en exclusieve rechtsmiddelen van de klant.
2. IN ZOVERRE DIT IS TOEGESTAAN ONDER DE LOKALE WETGEVING,
MET UITZONDERING VAN DE SPECIFIEKE BEPALINGEN IN DEZE
GARANTIEVERKLARING, ZIJN HP EN HAAR LEVERANCIERS IN GEEN
GEVAL AANSPRAKELIJK VOOR DIRECTE, INDIRECTE, SPECIALE OF
INCIDENTELE SCHADE OF GEVOLGSCHADE, ZIJ HET OP BASIS VAN
CONTRACT, DWANG OF ENIG ANDERE JURIDISCHE THEORIE,
OOK NIET ALS HP EN HAAR LEVERANCIERS OP DE HOOGTE ZIJN
GEBRACHT VAN DE MOGELIJKHEID VAN DERGELIJKE SCHADE.
Plaatselijke wet
1. Deze garantieverklaring verleent de klant bepaalde juridische rechten.
De klant kan over andere rechten beschikken die in de VS van staat tot
staat, in Canada van provincie tot provincie en elders van land/regio tot
land/regio kunnen verschillen.
2. In zoverre deze garantieverklaring niet overeenstemt met de lokale
wetgeving, zal deze garantieverklaring als aangepast en in
overeenstemming met dergelijke lokale wetgeving worden beschouwd.
Onder deze lokale wetgeving is het mogelijk dat bepaalde afwijzingen
en beperkingen in deze garantieverklaring niet op de klant van
toepassing zijn. Sommige staten in de Verenigde Staten en bepaalde
overheden buiten de Verenigde Staten (inclusief provincies in Canada)
kunnen bijvoorbeeld:
a. De afwijzingen en beperkingen in deze garantieverklaring als
tenietgedaan beschouwen ter bescherming van de wettelijk
voorgeschreven rechten van de klant (bijvoorbeeld in het
Verenigd Koninkrijk);
b. De mogelijkheid van een fabrikant voor het doen gelden van
dergelijke afwijzingen of voorwaarden anderzijds beperken; of
c. De klant aanvullende rechten onder de garantie bieden, de
tijdsduur van stilzwijgende garanties bepalen die niet door de
fabrikant afgewezen kan worden, en beperkingen op de tijdsduur
van stilzwijgende garanties niet toestaan.
3. MET BETREKKING TOT CONSUMENTENTRANSACTIES IN AUSTRALIË
EN NIEUW-ZEELAND WORDEN DE WETTELIJK VOORGESCHREVEN
RECHTEN DIE VAN TOEPASSING ZIJN OP DE AANKOOP VAN
PRODUCTEN VAN HP AAN DERGELIJKE KLANTEN, DOOR DE
VOORWAARDEN IN DEZE GARANTIEVERKLARING NIET
TENIETGEDAAN, BEPERKT OF VERANDERD, BEHALVE IN ZOVERRE
DOOR DE WET IS TOEGESTAAN, EN VORMEN DE VOORWAARDEN
VAN DEZE GARANTIEVERKLARING EEN AANVULLING OP
DEZE RECHTEN.
Product van HP Duur van beperkte garantie
Software 1 jaar
Accessoires 1 jaar
Inktpatronen 6 maanden*
Printkoppen 1 jaar*
Printerrandapparatuur (zie de volgende gegevens) 1 jaar
*Raadpleeg voor meer gedetailleerde informatie over garantie http://www.hp.com/support/inkjet_warranty
.

29
Italiano
Identificazione delle parti del pannello di controllo
1. Pulsante Accensione
2. spia Testine di stampa
3. Spia delle cartucce di stampa
4. spia Accensione
5. Spie del colore
6. Pulsante Annulla
7. Pulsante Riavvia
8. spia Riavvia
Significato delle spie del pannello di controllo
Per ulteriori informazioni sulle spie del pannello di controllo, consultare la Guida in linea
disponibile sul CD di avviamento oppure visitare il sito Web dell’assistenza all’indirizzo
http://www.hp.com/support/businessinkjet1000
.
1 2 3
4 5 6 87
Tipo di spia Descrizione della spia Spiegazione e azione consigliata
La spia Accensione
lampeggia.
La stampante si sta spegnendo
o accendendo oppure sta elaborando
un processo di stampa, oppure ancora
è stato annullato un processo di stampa.
• Nessuna azione da eseguire.
La spia Accensione è accesa
e la spia Riavvia lampeggia.
La carta nella stampante è esaurita.
• Caricare della carta, quindi premere
(pulsante Riavvia).
La stampante è in pausa in attesa che
l’inchiostro asciughi.
• Attendere che l’inchiostro sia asciutto.
La spia Riavvia cesserà di
lampeggiare.
La spia Accensione e la spia
Riavvia lampeggiano.
Il supporto di stampa è inceppato nella
stampante.
• Premere (pulsante Riavvia) per
espellere il supporto inceppato.
• Rimuovere tutti i supporti di stampa
dal vassoio di raccolta. Aprire il
coperchio superiore per eliminare
l’inceppamento. Dopo aver eliminato
l’inceppamento, per continuare la
stampa, premere (pulsante
Riavvia).
La spia Accensione
lampeggia e la spia Riavvia
è accesa.
Uno o più coperchi della stampante
sono aperti.
• Chiudere i coperchi aperti.
• Verificare che l’unità duplex
automatico sia installata
correttamente.
Si è verificato un errore della stampante.
• Spegnere e riaccendere la stampante.

30
Italiano
La spia Accensione
lampeggia e le spie Testine
di stampa e Riavvia sono
accese.
Il fermo delle testine di stampa non
è assicurato.
• Aprire il coperchio dei materiali di
consumo ed assicurare il fermo delle
testine di stampa.
La spia Testine di stampa,
una spia di livello colore e la
spia Riavvia sono accese.
Una o più testine di stampa richiedono
un intervento.
• Installare di nuovo le testine di stampa
e riprovare a stampare.
• Provare a pulire i contatti delle testine
di stampa. Per ulteriori informazioni,
vedere la Guida in linea.
• Se l’errore persiste, sostituire la testina
o le testine di stampa come indicato.
La spia Cartucce di stampa,
una spia di livello colore e la
spia Riavvia sono accese.
Una o più cartucce di stampa richiedono
un intervento.
• Installare di nuovo le cartucce di
stampa e riprovare a stampare.
• Se l’errore persiste, sostituire la
cartuccia o le cartucce di stampa
come indicato.
Tipo di spia Descrizione della spia Spiegazione e azione consigliata

31
Italiano
Risoluzione dei problemi
In questa sezione vengono forniti suggerimenti per la risoluzione di alcuni dei più comuni problemi
associati all’installazione hardware e software.
Problemi durante la stampa di una
pagina di allineamento
Controllare la stampante e verificare
quanto segue:
• Assicurarsi che la spia Accensione sia accesa
e non lampeggi. Quando la stampante viene
accesa per la prima volta, impiega circa
45 secondi per riscaldarsi.
• Assicurarsi che le spie del pannello di controllo
siano spente e che lo stato della stampante
sia Pronto. Se delle spie sono accese
o lampeggianti, vedere “Significato delle spie
del pannello di controllo“ a pagina 29
• Assicurarsi che il cavo di alimentazione e gli
altri cavi funzionino e siano collegati
correttamente alla stampante.
• Assicurarsi di avere rimosso tutti i nastri
e i materiali di imballo dalla stampante.
• Assicurarsi di avere installato correttamente le
testine e le cartucce di stampa nei relativi
alloggiamenti codificati in colore. Premere con
decisione su ciascuna di esse per assicurare un
buon contatto. Assicurarsi di avere rimosso il
nastro protettivo da ciascuna testina di stampa.
• Assicurarsi di avere chiuso il fermo delle testine
di stampa e tutti i coperchi.
• Assicurarsi che il pannello di accesso
posteriore o l’unità duplex automatico sia
bloccato in posizione.
• Assicurarsi di avere caricato correttamente
i supporti nel vassoio e che non vi siano
inceppamenti nella stampante.
Problemi durante l’installazione
del software
Controllare il computer e verificare
quanto segue:
Assicurarsi che il computer soddisfi i requisiti di
sistema. Consultare la Guida in linea sul CD di
avviamento.
Verificare le operazioni preliminari
dell’installazione
• Prima di installare il software su un computer
Windows, verificare che tutti gli altri
programmi siano chiusi.
• Se il computer non riconosce il percorso
dell’unità del CD, verificare di avere specificato
la lettera giusta relativa a tale unità.
• Se il computer non riconosce il CD di
avviamento nella relativa unità, controllare che
il CD non sia danneggiato. È inoltre possibile
scaricare il driver della stampante da
http://www.hp.com/support/
businessinkjet1000.
Reinstallare il software della stampante
Se si utilizza Windows e la stampante non viene
rilevata dal computer, eseguire la utility Scrubber
(disponibile nella cartella Utils\Scrubber del CD di
avviamento) per disinstallare completamente il
driver della stampante. Riavviare il computer
e reinstallare il driver della stampante.
Pagina di configurazione
Utilizzare la pagina di configurazione per la
visualizzazione delle impostazioni correnti della
stampante, la risoluzione dei problemi di stampa
e la verifica dell’installazione degli accessori
opzionali, come ad esempio i vassoi. La pagina
di configurazione include inoltre un registro
degli eventi recenti. Se la stampante è collegata
a una rete, viene stampata un’ulteriore pagina di
configurazione di rete in cui sono indicate le
impostazioni di rete della stampante. Per ulteriori
informazioni su tali strumenti, consultare la Guida
in linea sul CD di avviamento.
In caso di necessità, prima di contattare HP,
stampare la pagina di configurazione.
Per stampare una pagina
di configurazione
1. Premere e tenere premuto (pulsante
Accensione). Mentre (pulsante Accensione)
è premuto, premere una volta (pulsante
Annulla).
2. Rilasciare (pulsante Accensione).
La stampante stampa una pagina di
configurazione della stampante.

Italiano
Dichiarazione di garanzia limitata Hewlett-Packard
Misura della garanzia limitata
1. La Hewlett-Packard garantisce all’utente finale che i prodotti HP
specificati in questa sede sono esenti da difetti di materiale e di
manodopera per il periodo indicato in precedenza, a partire dalla data
di acquisto del prodotto da parte del cliente.
2. Per i prodotti software, la garanzia limitata di HP viene applicata solo
nel caso in cui non sia possibile eseguire le istruzioni di
programmazione. HP non garantisce tuttavia che il funzionamento dei
propri prodotti sarà ininterrotto e privo di errori.
3. La garanzia limitata di HP copre solo i difetti derivanti dall’utilizzo
regolare del prodotto e non prevede altri problemi, inclusi quelli
risultanti da:
a. Manutenzione o modifiche improprie.
b. Software, supporti, parti o materiali di consumo non provenienti
o non supportati dalla HP.
c. Funzionamento non previsto dalle specifiche del prodotto.
d. Modifica o abuso non autorizzati.
4. Per le stampanti HP, l’uso di una cartuccia di inchiostro non HP o di una
cartuccia ricaricata non compromette la garanzia per il cliente o
qualsiasi altro contratto di assistenza HP con il cliente stesso. Tuttavia,
qualora guasti o difetti alla stampante venissero attribuiti all’uso di una
cartuccia non HP o ricaricata, la HP addebiterà i costi standard di
tempo di manutenzione e materiale per eliminare il suddetto guasto
o difetto.
5. Se, durante il periodo di garanzia, HP riceve avviso di un difetto di uno
dei prodotti coperto dalla garanzia, HP riparerà o sostituirà il prodotto
a sua discrezione.
6. Se HP non è in grado di riparare o sostituire, come di pertinenza, un
prodotto difettoso in garanzia, HP provvederà entro un periodo di
tempo ragionevole dal ricevimento dell’avviso del difetto a rimborsare il
prezzo di acquisto del prodotto.
7. HP non è tenuta in alcun modo a riparare il prodotto, a sostituirlo o a
fornire un rimborso finché il cliente non restituisce il prodotto difettoso.
8. Qualsiasi prodotto sostitutivo potrà essere nuovo o come nuovo, fermo
restando che le funzionalità saranno almeno equivalenti a quelle del
prodotto sostituito.
9. I prodotti HP possono contenere parti, componenti o materiali rigenerati
equivalenti per prestazioni a parti nuove.
10. La Dichiarazione della garanzia limitata di HP è valida in qualsiasi
Paese/regione in cui il prodotto HP specifico viene distribuito da HP.
I contratti per servizi di garanzia addizionali, quali l’assistenza in loco,
sono disponibili presso qualsiasi centro di assistenza HP autorizzato nei
Paesi/regioni in cui il prodotto viene distribuito dalla HP o da un
rivenditore autorizzato.
Limitazioni di garanzia
NELLA MISURA PREVISTA DALLE LEGGI LOCALI, NÉ LA HP E NÉ
I FORNITORI DI TERZE PARTI OFFRONO GARANZIA ALCUNA
O CONDIZIONI DI ALCUN TIPO, SIANO ESSE ESPRESSE O IMPLICITE
O CONDIZIONI DI COMMERCIABILITÀ, LIVELLO DI QUALITÀ
SODDISFACENTE ED IDONEITÀ AD UNO SCOPO PARTICOLARE.
Limitazioni di responsabilità
1. Nella misura prevista dalle leggi locali, i rimedi previsti da questa
Dichiarazione di garanzia costituiscono gli unici a disposizione
del cliente.
2. NELLA MISURA PREVISTA DALLE LEGGI LOCALI, FATTA ECCEZIONE
PER LE OBBLIGAZIONI DEFINITE IN MODO SPECIFICO IN QUESTA
DICHIARAZIONE DI GARANZIA, IN NESSUN CASO LA HP O I SUOI
RIVENDITORI DI TERZE PARTI SARANNO RITENUTI RESPONSABILI PER
DANNI DIRETTI, INDIRETTI, SPECIALI, FORTUITI O DERIVATI, SIA IN
BASE A CONTRATTO, ILLECITO O ALTRA TEORIA LEGALE CHE SU
AVVISO DELL’EVENTUALITÀ DI TALI DANNI.
Leggi locali
1. Questa Dichiarazione di garanzia offre al cliente diritti legali specifici.
Il cliente potrebbe godere di altri diritti che variano da stato a stato
negli Stati Uniti, da provincia a provincia in Canada e da Paese/
regione a Paese/regione nel resto del mondo.
2. Nella misura in cui questa Dichiarazione di garanzia risultasse in
contrasto con le leggi locali, verrà considerata modificata in modo da
renderla conforme a tali leggi. In base alle suddette leggi vigenti,
alcune dichiarazioni e limitazioni di questa Dichiarazione di garanzia
potrebbero non valere per il cliente. Ad esempio, alcuni stati negli Stati
Uniti, così come alcuni governi fuori dagli Stati Uniti (incluse le province
del Canada) potrebbero:
a. Impedire che le esclusioni e le limitazioni di questa Dichiarazione
di garanzia limitino i diritti dei consumatori previsti dalla legge
(ad esempio, nel Regno Unito);
b. Limitare altrimenti il diritto del produttore di applicare tali esclusioni
e limitazioni; oppure
c. Riconoscere al cliente ulteriori diritti derivanti dalla garanzia,
specificare la durata delle garanzie implicite che il produttore
dovrà accettare o consentire limitazioni sulla durata delle
garanzie implicite.
3. PER LE TRANSAZIONI CON I CLIENTI EFFETTUATE IN AUSTRALIA E IN
NUOVA ZELANDA, I TERMINI DELLA PRESENTE DICHIARAZIONE DI
GARANZIA, FATTA ECCEZIONE PER QUANTO LEGALMENTE
CONSENTITO, NON ESCLUDONO, LIMITANO O MODIFICANO MA
INTEGRANO I DIRITTI STATUTARI OBBLIGATORI APPLICABILI ALLA
VENDITA DEI PRODOTTI HP A TALI CLIENTI.
Prodotto HP Durata della garanzia
Software 1 anno
Accessori 1 anno
Cartucce di inchiostro 6 mesi*
Testine di stampa 1 anno*
Hardware della stampante (vedere i dettagli di seguito) 1 anno
*Per informazioni più dettagliate sulla garanzia, visitare il sito Web all’indirizzo http://www.hp.com/support/inkjet_warranty
.

»``Hô``Y
¿Éª°†dG OhóM
Ωõà∏J ’ á«∏ÙG ÚfGƒ≤dG πÑb øe É¡H 샪°ùŸG Ohóë∏d ´ƒ°†ÿG ™eHPôNBG ±ôW …CG h
ɪ«a á«æª°V hCG áëjô°U âfÉc AGƒ°S ,´ƒf …CG øe iôNCG •hô°T hCG äÉfɪ°V ájCÉH É¡d ™HÉJ
Oófi ¢VôZ …C’ áeAÓŸGh ,á«°VôŸG IOƒ÷G h ,á«≤jƒ°ùàdG á«fɵeE’G ¢üîj
á«dƒÄ°ùŸG OhóM
1
‘ IOóÙG ∫ƒ∏◊G Èà©J ,á«∏ÙG ÚfGƒ≤dG πÑb øe É¡H 샪°ùŸG Ohóë∏d ´ƒ°†ÿG ™e
√óMh 𫪩dGh 𫪩dÉH á°UÉN k’ƒ∏M ,¿Éª°†dG ¿É«H.
2
äÉeGõàd’G AÉæãà°SÉH ,á«∏ÙG ÚfGƒ≤dG πÑb øe É¡H 샪°ùŸG Ohóë∏d ´ƒ°†ÿG ™e
¿ƒµJ ’ ,Gòg áfɪ°†dG ¿É«H ‘ IOóÙGHPádƒÄ°ùe É¡d ™HÉJ ôNBG OQƒe …CG hCG
äÉ°†jƒ©J ájCG øY ,áŒÉf hCG ,á«°VôY hCG ,á°UÉN hCG ,Iô°TÉÑe ÒZ hCG Iô°TÉÑe á«dƒÄ°ùe
ájô¶f …CG hCG ,Oƒ°ü≤e ÒZ hCG Oƒ°ü≤e Qô°V hCG ó≤Y ¤EG Ióæà°ùe âfÉc AGƒ°S QGô°VCG øY
QGô°VC’G √òg πãe OƒLh ∫ɪàMÉH äô£NCG ób âfÉc AGƒ°S hCG iôNCG á«fƒfÉb.
»∏ÙG ¿ƒfÉ≤dG
1
𫪩dG π°üëj ¿CG Rƒéj ∂dP ™eh .áæ«©e á«fƒfÉb ¥ƒ≤M 𫪩dG áfɪ°†dG √òg íæ“
á©WÉ≤e ¤EG á©WÉ≤e øeh ,IóëàŸG äÉj’ƒdG ‘ áj’ƒd áj’h øe ∞∏àîJ iôNCG ¥ƒ≤M
.⁄É©dG ‘ iôNCG º«∏bEG/ádhO ¤EG º«∏bEG/ádhO øeh ,Góæc ‘ iôNCG
2
É¡fCG ≈∏Y áfɪ°†dG Gòg Èà©J ,á«∏ÙG ÚfGƒ≤dG ™e áfɪ°†dG √òg ≥aGƒJ ΩóY OhóM ‘
√òg ÖLƒÃ .á«∏ÙG ÚfGƒ≤dG √òg πãe ™e á≤aGƒàe ¿ƒµJ å«ëH πjó©àdG áÑLGh
≈∏Y áfɪ°†dG √òg äGójó– hCG äGAÉæãà°SG ¢†©H ≥«Ñ£J ΩóY Rƒéj á«∏ÙG ÚfGƒ≤dG
êQÉN äÉeƒµ◊G ¢†©H ¤EG áaÉ°V’ÉH ᫵jôeC’G äÉj’ƒdG ¢†©H ,Óãe .𫪩dG
:¿CG É¡d Rƒéj ,(Góæc ‘ äÉ©WÉ≤e ∂dP ‘ ÉÃ) IóëàŸG äÉj’ƒdG
G
Cá«fƒfÉ≤dG ¥ƒ≤◊G ójó– øe áfɪ°†dG √òg ‘ äGójóëàdGh äGAÉæãà°S’G »æãà°ùJ
,(IóëàŸG áµ∏ªŸG ,Óãe) π«ªY …C’
Ü
äGAÉæãà°S’G √òg πãe ≥«Ñ£J ≈∏Y ™æ°üŸG IQób øe ,∂dP ±ÓN ≈∏Y ó–
hCG ,äGójóëàdGh
ê
’ »àdG á«æª°†dG äÉfɪ°†dG Ióe Oó– 𫪩∏d á«aÉ°VEG äÉfɪ°V ¥ƒ≤M íæ“
.á«æª°†dG äÉfɪ°†dG Oóe ≈∏Y äGójó– í«àJ ób hCG ,ÉgAÉæãà°SG ™æ°üŸG ™«£à°ùj
3
,áfɪ°†dG √òg •hô°T »æãà°ùJ ’ ,Góæ∏jRƒ«fh É«dGΰSG ‘ AÓª©dG äÓeÉ©Ÿ áÑ°ùædÉH
≈∏Y á≤Ñ£ŸG ájQÉÑLE’G á«fƒfÉ≤dG ¥ƒ≤◊G ∫ó©J hCG ó– hCG ,É¡H 샪°ùŸG Ohó◊G øª°V
äÉéàæe ™«HHPAÓª©dG A’Dƒg πãŸ.
OhóÙG ¿Éª°†dG á«£¨J
1
øª°†JHewlett-Packard äÉéàæe ¿CG »FÉ¡ædG Ωóîà°ùª∏dHP√ÓYCG IOóÙG
™e CGóÑJ »àdGh ,√ÓYCG IOóÙG IÎØdG ‘ ™«æ°üàdG hCG OGƒŸG ‘ ܃«Y …CG øe á«dÉN
.èàæª∏d 𫪩dG AGô°T ïjQÉJ
2
¿Éª°V …ô°ùj ’ ,èeGÈdG øe äÉéàæª∏d áÑ°ùædÉH ÉeCGHP‘ π°ûØdG ≈∏Y ’EG OhóÙG
á›ÈdG äɪ«∏©J ò«ØæJ . øª°†J ’HPhCG ábÉYEG ¿hóH ¿ƒµj ±ƒ°S èàæe …CG 𫨰ûJ ¿CG
.AÉ£NC’G øe ∫ÉN
3
¿Éª°V »£¨j ’HP,èàæª∏d …OÉ©dG ∫ɪ©à°S’G øY áŒÉædG ܃«©dG ∂∏J iƒ°S OhóÙG
:»∏j ÉŸ áé«àf CÉ°ûæJ »àdG ∂∏J ∂dP ‘ Éà ,iôNCG äÓµ°ûe …CG »£¨j ’ ɪc
G
CC,πjó©àdG hCG áÄWÉÿG áfÉ«°üdG
Ü
Égóªà©J hCG ÉgôaƒJ ’ »àdG OQGƒŸG hCG QÉ«¨dG ™£b hCG ,áYÉÑ£dG §FÉ°Sh hCG èeGÈdG
HPhCG ,
ê
,èàæŸG äÉØ°UGƒe ¥É£f êQÉN 𫨰ûàdG
O
.óªà©e ÒZ ΩGóîà°SG Aƒ°Sh hCG πjó©J …CG
4
äÉéàæŸ áÑ°ùædÉHHP êÉàfEG ÒZ êÉàfEG øe ÈM ¢û«WGôN ∫ɪ©à°SG ¿Éa ,HPhCG
™e ºYO ó≤Y …CG hCG 𫪩dG áfɪ°V ≈∏Y ôKDƒj ’ AπŸG IOÉ©e ÈM ¢û«WGôN
𫪩dG.ÒZ êÉàfEG øe ÈM ¢û«WGôN ΩGóîà°SG ¬ÑÑ°S ¬Ø∏J hCG èàæŸG π°ûa ¿Éc GPEG ,ɉEG
êÉàfEGHP ¿EÉa ,¢û«WGôÿG Aπe IOÉYEG hCGHPÜÉ©JC’G ™aO 𫪩dG ≈∏Y ¢VôØà°S
π°ûØdG hCG ∞∏àdG Gòg ¢üîj ɪ«a èàæŸG áeóÿ IOóÙG ∞jQÉ°üŸGh.
5
âª∏à°SG GPEGHP»àdG äÉéàæŸG øe …CG ‘ Ö«Y OƒLƒH kGQÉ©°TEG ,áfɪ°†dG IÎa ∫ÓN ,
áfɪ°V É¡«£¨JHPÉgQÉ«àNG Ö°ùM ¬dGóÑà°SG hCG èàæŸG ìÓ°UEÉH ÉeEG ácô°ûdG Ωƒ≤J ,.
6
øµªàJ ⁄ GPEGHPáfɪ°V ¬«£¨J Ö«Y ¬«a èàæe ,ádÉ◊G Ö°ùM ,∫GóÑà°SG hCG ìÓ°UEG øe
HPAGô°ûdG øªK IOÉYEÉH Ö«©dG OƒLƒH É¡eÓYEG ó©H ádƒ≤©e IÎa ∫ÓN ácô°ûdG Ωƒ≤J
𫪩∏d èàæŸG.
7
ácô°THPΩƒ≤j ≈àM áફb OQ hCG ¬dGóÑà°SG hCG Ö«©ŸG èàæŸG ìÓ°UEÉH áeõà∏e ÒZ
¤EG èàæŸG Gòg IOÉYÉH 𫪩dG.HP
8
èàæª∏d ¿ƒµj ¿CG á£jô°T ójóL ¬fCÉc hCG kGójóL ¿ƒµj ¿CG øµÁ ∫óÑà°ùe èàæe …CG
πbC’G ≈∏Y ¬dGóÑà°SG ºàj …òdG èàæª∏d 𫨰ûàdG äÉØ°UGƒe äGP ∫óÑà°ùŸG.
9
äÉéàæe …ƒà– óbHPájhÉ°ùe ɉEG ™«æ°üàdG IOÉ©e OGƒe hCG äÉfƒµe hCG ™£b ≈∏Y
AGOC’G å«M øe Iójó÷G OGƒŸGh äÉfƒµŸGh ™£≤dG äÉØ°UGƒŸ.
10
áfɪ°V ¿É«HHP ádhO ájCG ‘ ∫ƒ©ØŸG …QÉ°S IOhóÙG/™jRƒJ É¡«a ºàj º«∏bEG
äÉéàæeHPáfɪ°†dG √ò¡H IÉ£¨ŸG .πãe ,á«aÉ°VG äÉfɪ°V Oƒ≤Y ôaƒàJ ɪc
äÉéàæe áeóÿ óªà©e õcôe …CG øe ,äÉéàæŸG OƒLh ¿Éµe ‘ ìÓ°UE’GHP‘
∫hódG/ äÉéàæe É¡«a ´RƒJ »àdG º«dÉbC’GHPóªà©e π«ch …CG πÑb øe.
¿É«H
Hewlett-Packard
OhóëªdG ¿Éª°†∏d
äÉéàæe
HP
èeGÈdG
äÉ≤ë∏ŸG
È◊G ¢û«WGôN
áYÉÑ£dG ¢ShDhQ
(π«°UÉØàdG øe ójõŸ √ÉfOCG ô¶fG) á≤ë∏ŸG á©HÉ£dG Iõ¡LCG
OhóÙG áfɪ°†dG Ióe
óMGh ΩÉY
óMGh ΩÉY
Qƒ¡°T 6
óMGh ΩÉY*
óMGh ΩÉY
* ô¶fG ,¿Éª°†dG øY á∏°üØŸG äÉeƒ∏©ŸG øe ójõe ≈∏Y ∫ƒ°üë∏dhttp://www.hp.com/support/inkjet_warranty.
*

:»dÉàdG øe ócCÉà∏d á©HÉ£dG ¢üëaCG
●á«fÉK 45 »dGƒM ¥ô¨à°ùJ ,á©HÉ£∏d 𫨰ûJ ∫hCG óæY .¢†eƒj ’h πª©j ábÉ£dG Aƒ°V
.øî°ùàd
●.OGó©à°S’G ádÉM »a áYÉÑ£dGh ºµëàdG áMƒd ≈∏Y ¢†eƒJ hCG √AÉ°†e AGƒ°VG óLƒJ ’
áMƒd AGƒ°VCG ô«°ùØJ'' ≈dEG ´ƒLôdG ≈Lôj ,¢†eƒJ hCG IAÉ°†e AGƒ°V’G âfÉc GPEG
.8 áëØ°U ≈∏Y ''ºµëàdG
●.á©HÉ£dÉH á∏°üàeh πª©J iôNC’G äÓHɵdGh ábÉ£dG ∂∏°S ¿CG øe ócCÉJ
●.á©HÉ£dG øY É¡àdGREG ºJ ób ∞«∏¨àdG OGƒeh §FGô°T ™«ªL
●¿GƒdCÉH Iõ«ªªdG äÉëàØdG »a áë«ë°U á≤jô£H áàÑãe áYÉÑ£dG ¢û«WGôNh ¢ShDhQ
.º«∏°S ƒëf ≈∏Y É¡dÉ°üJG øe ócCÉààd IóMGh πc ≈∏Y äÉÑãH πØ°SC’ §¨°VCG .í«ë°üdG
.áYÉÑW ¢SCGQ πc øY »bGƒdG §jô°ûdG ádGREG øe ócCÉJ
●.á≤∏¨e á«£ZC’G ™«ªLh áYÉÑ£dG ¢SCGQ ê’õe
●.É¡fɵe »a Iô≤à°ùe áLhOõªdG á«FÉ≤∏àdG áYÉÑ£dG IóMh hCG á«Ø∏îdG íàØdG áMƒd
●.á©HÉ£dG »a QÉ°ûëfG óLƒj ’h á«æ«°üdG »a áë«ë°U á≤jô£H á∏ªëe §FÉ°SƒdG
IGPÉëªdG áëØ°Uh áYÉÑ£dG πcÉ°ûeèeGôÑdG â«ÑãJ πcÉ°ûe
:»dÉàdG øe ócCÉà∏d ôJƒ«ÑªµdG Ωɶf ¢üëaCG
.(𫨰ûàdG AóH áfGƒ£°SG »a »fhôàµdE’G 𫨰ûàdG π«dO) ΩɶædG äÉÑ∏£àe πHÉ≤j ôJƒ«ÑªµdG
…󫡪àdG â«ÑãJ øe ócCÉJ
●¿CG øe ócCÉJ ,RhóæjƒdG 𫨰ûJ ΩɶæH πª©j …òdG ôJƒ«ÑªµdG ≈∏Y èeGôÑdG â«ÑãJ πÑb
.á≤∏¨e èeGôÑdG ™«ªL
●¢Uô≤dG π¨°ûªH ¢UÉîdG QÉ°ùªdG ≈∏Y ±ô©àdG ≈∏Y ôJƒ«ÑªµdG IQób ΩóY ádÉM »a
.π¨°ûªdÉH ¢UÉîdG í«ë°üdG ±ôëdG áHÉàµH âªb ∂fCG ócCÉJ .¬d ¬àHÉàc ºJ …òdG èeóªdG
●π¨°ûe hG áéeóªdG áfGƒ£°S’G ≈∏Y ±ô©àdG ≈∏Y ôJƒ«ÑªµdG IQób ΩóY ádÉM »a
øe á©HÉ£dG π¨°ûe π«ªëJ ∂浪jh .áØdÉJ ¿ƒµJ ó≤a áfGƒ£°S’G ¢üëaG ,äÉfGƒ£°S’G
http://www.hp.com/support/businessinkjet1000.
á©HÉ£dG èeÉfôH â«ÑãJ IOÉYCÉH ºb
𫨰ûàH ºb ,á©HÉ£dG ±É°ûàcG ™«£à°ùj ’ ôJƒ«ÑªµdGh RhóæjƒdG 𫨰ûJ Ωɶf Ωóîà°ùJ âæc GPEG
IGOCGScrubber ó∏ée »a OƒLƒªdG)Utils/Scrubber.á©HÉ£dG π¨°ûe â«ÑãJ ádGREÉH ΩÉ«≤∏d (
.á©HÉ£dG π¨°ûe â«ÑãJ IOÉYEÉH ºbh ,ôJƒ«ÑªµdG 𫨰ûJ óYCG
πcÉ°ûe áaô©e »a IóYÉ°ùª∏d ,á«dÉëdG á©HÉ£dG äGOGóYEG ¢Vô©d áÄ«¡àdG áëØ°U Ωóîà°SG
áëØ°U .êGQOC’G πãe ,ájQÉ«àN’G äÉ≤ë∏ªdG â«ÑãJ ó«cCÉàdh ,É¡MÓ°UEG ádhÉëeh á©HÉ£dG
Ωƒ≤à°S ,áµÑ°ûdÉH á©HÉ£dG ∫É°üJG ádÉM »a .áÑjô≤dG çGóMCÓd πé°S ≈∏Y …ƒàëJ áÄ«¡àdG
á°UÉîdG áµÑ°ûdG äGOGóYEG ¢Vô©J áëØ°üdG √òg ,á«aÉ°VCG áµÑ°T áÄ«¡J áëØ°U áYÉÑ£H
¢Uô≤dG ≈∏Y »fhôàµdE’G Ωóîà°ùªdG π«dO ô¶fG ,π«°UÉØàdG ≈∏Y ∫ƒ°üë∏d .á©HÉ£dÉH
.𫨰ûàdG AóÑH ¢UÉîdG •ƒ¨°†ªdG
ácô°ûH ∫É°üJ’G ≈dEG áLÉëdG ádÉM »aHP∫É°üJ’G πÑb áÄ«¡àdG áëØ°U áYÉÑ£H ºb ,.
áÄ«¡àdG áëØ°U áYÉÑW
.(ábÉ£dG QR) §¨°†dG »a QGôªà°S’G ™e §¨°VG .1
,(ábÉ£dG QR) ≈∏Y §¨°†dG AÉæKCG
.IóMGh Iôe (AɨdE’G QR) §¨°VCG
.áÄ«¡àdG áëØ°U áYÉÑ£H âeÉb á©HÉ£dG .(ábÉ£dG QR) ôjôëàH ºb .2
áÄ«¡àdG áëØ°U
10
áÄ«¡àdGh É¡MÓ°UEGh AÉ£NC’G ±É°ûàcG
.èeGôÑdG â«ÑãJ hCG äÉfƒµªdG Ö«côàH á°UÉîdGh kÉYƒ«°T ä’ÉëdG ôãcC’ É¡MÓ°UEG ádhÉëeh AÉ£NC’G ±É°ûàc’ äÉMGôàbG Ωó≤j º°ù≤dG Gòg
10

»``Hô``Y
9
ô°TDƒe Aƒ°V ,áYÉÑ£dG ¢SCGQ Aƒ°V
»a ±ÉæÄà°S’G Aƒ°Vh ,¿GƒdC’G
.𫨰ûàdG ™°Vh
.√ÉÑàfG ≈dEG êÉàëj áYÉÑ£dG ¢ShDhQ øe ôãcCG hCG óMGh
● .áYÉÑ£dG ∫hÉMh áYÉÑ£dG ¢SCGQ Ö«côJ IOÉYEÉH ºb
●.»fhôàµdE’G Ωóîà°ùªdG π«dO ô¶fG .áYÉÑ£dG ¢SCGQ ∞«¶æJ ∫hÉM
●¢ShDhQ hCG áYÉÑ£dG ¢SCGQ ∫GóÑà°SÉH ºb ,CÉ£N QGôªà°SG ádÉM »a
.É¡«dEG QÉ°ûªdG áYÉÑ£dG
Aƒ°V ,áYÉÑ£dG ¢TƒWôN Aƒ°V
±ÉæÄà°S’G Aƒ°V ,¿Gƒd’G ô°TDƒe
.𫨰ûàdG ™°Vh »a
.√ÉÑàfG ≈dEG êÉàëJ ôÑëdG ¢û«WGôN øe ôãcCG hCG óMGh
● .áYÉÑ£dG ∫hÉMh ôÑëdG ¢û«WGôN Ö«côJ IOÉYEÉH ºb
●¢û«WGôîdG hCG ôÑëdG ¢TƒWôN ∫GóÑà°SÉH ºb ,CÉ£îdG ôªà°SG GPEG
.É¡«dEG QÉ°ûªdG
Aƒ°†dG ∞°Uh
¬H ≈°UƒªdG AGOC’Gh ìô°ûdG
Aƒ°†dG §ªf
9

8
ºµëàdG áMƒd AGõLCG º¡a
ºµëàdG áMƒd AGƒ°VCG ô«°ùØJ
¬fGƒæYh èàæªdG ºYO ™bƒe IQÉjõH ºb hCG 𫨰ûàdG AóH áfGƒ£°SG »a »fhôàµdE’G 𫨰ûàdG π«dO ô¶fG,ºµëàdG áMƒd AGƒ°VCG øY äÉeƒ∏©ªdG øe ójõªd
http://www.hp.com/support/businessinkjet1000.
(5
¿Gƒd’G ô°TDƒe AGƒ°VCG
(6
AɨdE’G QR
(7
±ÉæÄà°S’G QR
(8
±ÉæÄà°S’G Aƒ°V
(1
ábÉ£dG QR
(2
áYÉÑ£dG ¢SCGQ Aƒ°V
(3
ôÑëdG á°TƒWôN Aƒ°V
(4
ábÉ£dG Aƒ°V
Aƒ°†dG ∞°Uh
¬H ≈°UƒªdG AGOC’Gh ìô°ûdG
Aƒ°†dG §ªf
.¢†eƒJ ábÉ£dG AGƒ°VCG
áØ«Xh (OGóYEG) áédÉ©ªH Ωƒ≤J hCG ±É≤jE’G hCG 𫨰ûàdG ™°Vh »a á©HÉ£dG
.É¡FɨdEG ºJ áYÉÑW áØ«Xh hCG ,áYÉÑW
●AGôLG …CÉH ΩÉ«≤dG Ö∏£àj ’
Aƒ°Vh πª©j ábÉ£dG Aƒ°V
.¢†eƒj ±ÉæÄà°S’G
.¥QƒdG øe á«dÉN á©HÉ£dG
●.(±ÉæÄà°S’G QR) ≈∏Y §¨°VG ºK ¥QƒdG π«ªëàH ºb
.ôÑëdG ∞é«d á©HÉ£dG ∞bƒàà°S
●.±ÉæÄà°S’G Aƒ°V ¢†«eh ∞bƒà«°S .ôÑëdG ∞éj ≈àM ô¶àfG
±ÉæÄà°S’G Aƒ°Vh ábÉ£dG Aƒ°V
.¿É°†eƒj
.á©HÉ£dG »a Iô°ûëæe áYÉÑ£dG §FÉ°Sh
● .Iô°ûëæªdG §FÉ°SƒdG ±ò≤d (±ÉæÄà°S’G QR) ≈∏Y §¨°VG
●…ƒ∏©dG AÉ£¨dG íàØH ºb .êôîdG êQO øe §FÉ°SƒdG πc ádGREÉH ºb
QR) ≈∏Y §¨°VCG ,QÉ°ûëf’G ádGREG ó©H .QÉ°ûëf’G ¿Éµe ójóëàd
.áYÉÑ£dG áØ«Xh ∫ɪcE’ (±ÉæÄà°S’G
¢SCGQ Aƒ°Vh ¢†eƒj ábÉ£dG Aƒ°V
™°Vh »a ±ÉæÄà°S’Gh áYÉÑ£dG
.𫨰ûàdG
.øeDƒe ô«Z áYÉÑ£dG ¢SCGQ ê’õe
●¢SCGQ ê’õe ≥∏Z ΩɵMEÉH ºbh áYÉÑ£dG OQGƒe AÉ£Z ≥∏¨H ºb
.áYÉÑ£dG
Aƒ°Vh ¢†eƒj ábÉ£dG Aƒ°V
.𫨰ûàdG ™°Vh »a ±ÉæÄà°S’G
.áMƒàØe á©HÉ£dG á«£ZCG øe ôãcCG hCG AÉ£Z
●.ìƒàØe AÉ£Z …CG ≥∏¨H ºb
●á≤jô£H áLhOõªdG á«FÉ≤∏àdG áYÉÑ£dG IóMh Ö«côJ øe ócCÉJ
.áë«ë°U
.á©HÉ£dÉH CÉ£N çóM
●.iôNG Iôe ¬∏«¨°ûàH ºb ºK á©HÉ£dG 𫨰ûJ ±É≤jEÉH ºb
5
87
6
4
3
1
2
8

8 IģN
:
á©HÉ£dG πé°S
.
π«é°ùàH âªb ób øµJ ⁄ GPEG .á«æØdG äÉeƒ∏©ŸGh ΩÉ¡dG ºYódG ≈≤∏àd á©HÉ£dG π«é°ùàH ºb
‘ É¡∏«é°ùJ ∂浪«a èeÉfÈdG â«ÑãJ óæYá©HÉ£dG
http://www.register.hp.com.
7 IģN
:
èeÉfÈdG â«ÑãJ ÈàNG
.
øe óæà°ùe áYÉÑ£H ºb ,ôJƒ«ÑªµdG RÉ¡éH á©HÉ£dG π«°UƒJh 𫨰ûàdG èeÉfôH â«ÑãJ ∫ɪcEG ó©H
.í«ë°üdG πµ°ûdÉH ¬à«ÑãJ ” ób 𫨰ûàdG èeÉfôH ¿CG øe ócCÉà∏d Qôµàe πµ°ûH ¬eóîà°ùJ ≥«Ñ£J
.10 áëØ°U ''É¡MÓ°UEGh AÉ£NC’G ±É°ûµà°SG'' ô¶fG ,óæà°ùŸG áYÉÑW ºàJ ⁄ GPEG
7
8
7
http://www.hp.com/support/businessinkjet1000
!∑hÈe
ΩGóîà°SG ∫ƒM äÉeƒ∏©ŸG øe ójõe »∏Y ∫ƒ°üë∏d .ΩGóîà°SEÓd IõgÉL ∂à©HÉW
:á«dÉàdG QOÉ°üŸG ô¶fCG ,É¡MÓ°UEGh AÉ£NC’G ±É°ûµà°SGhá©HÉ£dG
●ÊGôbBG ∞∏eh Ωóîà°ùŸG π«dO äGóæà°ùeReadme ‘ á°TÉ°ûdG ≈∏YCD.𫨰ûàdG AóH
●HP Instant Support.(á°TÉ°ûdG ≈∏Y Ωóîà°ùŸG π«dO ô¶fCG)
●‘ èàæŸG ºYód âfÎfE’G ™bƒe
http://www.hp.com/support/businessinkjet1000
»``Hô``Y
7

6
á¶MÓe
:ô¶fG áYÉÑ£dG ¢SCGQ IGPÉfi á«∏ªY AÉæKCG iôNC’G á©HÉ£dG AGƒ°VCG âÄ«°VCG GPEG
™ÑJG ,IGPÉÙG áëØ°U áYÉÑW ºàJ ⁄ GPEG .8 áëØ°U ‘ ''ºµëàdG áMƒd AGƒ°VCG ≈∏Y ±ô©àdG''
ΩɵMEÉH ábÉ£dG πHÉc π«°UƒJ øe ócCÉJ (1 .äGƒ£îdG √òg.¢ShDhQ ¿CG øe ócCÉJ (2
í«ë°üdG πµ°ûdÉH áÑcôe È◊G äGƒÑYh áYÉÑ£dG.
áYÉÑ£dG ¢ShDhQ IGPÉëªH É«FÉ≤∏J á©HÉ£dG Ωƒ≤J ,áYÉÑ£∏d á浇 IOƒL π°†aCG ¿Éª°†d .óæY
𫨰ûJ Aƒ°V ¢†eƒj ,IGPÉÙG á«∏ªY ájGóH/ábQh áYÉÑ£H á©HÉ£dG Ωƒ≤Jh á©HÉ£dG ±É≤jEG
QÉÑàNG .Úà«FÉ≤∏J IGPÉfi »àëØ°U áYÉÑ£H á©HÉ£dG Ωƒ≤J ,IGPÉÙG á«∏ªY ájÉ¡f ‘.
≥FÉbO 5 ‹GƒM áYÉÑ£dG ¢ShDhQ IGPÉfi á«∏ªY ¥ô¨à°ùJ.
2
1
iôNCG Iôe ¬∏«¨°ûàH ºb ºK ,á©HÉ£dG 𫨰ûJ ±É≤jEÉH ºb (3 .IQó≤dG ΩóY QGôªà°SG ádÉM »a
.10 áëØ°U ''É¡MÓ°UEGh AÉ£NC’G ±É°ûµà°SG'' ô¶fCG ,IGPÉëªdG áëØ°U áYÉÑW ≈∏Y
6 Iƒ£ÿG
:
á©HÉ£dG π°Uh
.
≈∏Y ô¡¶à°S »àdG äɪ«∏©àdG ™ÑJG ºK ,äÉfGƒ£°S’G π¨°ûe πNGO 𫨰ûàdG AóH áfGƒ£°SCG ™°V (1
»fhôàµdE’G Ωóîà°ùªdG π«dO ô¶fCG ,èeGôÑdG â«ÑãJ øY äÉeƒ∏©ªdG øe ójõªd :á¶MÓe .á°TÉ°ûdG
`dG π°U (2 .𫨰ûàdG AóH áfGƒ£°SG ≈∏YUSB.áLÉëdG óæY (Ó°üØæe ´ÉÑj) ( )
6
3
6

5
Ωƒ≤J …òdG §FÉ°SƒdG ºéM Ö°SÉæàd É¡£Ñ°†J ≈àM êQódG ‘ IOƒLƒŸG äÉ£HÉ°†dG ∑ôM (4
¬©°VƒH.(5áYÉÑ£dG ¬Lh ¿ƒµj åëH ,∫hC’G êQódG ‘ ábQh 150 ¤EG π°üj Ée πNOCG
êQódG ‘ πØ°SC’.
ê’õŸG ∑ôM (· 279 h 356) á°UƒH 14 h 11 ÚH Ée ¬dƒW ¿ƒµj …òdG ¥Qƒ∏d áÑ°ùædÉH (3
.êQódG øe á«eÉeC’G á«MÉædG ¢†ØNCG ºK ,Úª«dG ƒëf êQódG ≈∏Y OƒLƒŸG
4
3
5
5 Iƒ£ÿG
:
á©HÉ£dG π¨°T ºK ábÉ£dG πHÉc π°Uh
.
.á©HÉ£dG ‘ ábÉ£dG ∫ƒfi π°Uh (1(2ábÉ£dG ∫ƒëà ábÉ£dG πHÉc π°Uh.(3π°Uh
OOÎe AÉHô¡c QÉ«J ¢ùÑ≤à ábÉ£dG πHÉc øe ôNB’G ±ô£dG.(AC)(4≈∏Y §¨°VG
(ábÉ£dG QR)á©HÉ£dG 𫨰ûàd.
(7 .(∫hC’G êQódG ‘ ¥QƒdG ™°VƒH âªb ób âæc ¿EG) êQÉÿG êQO ¢†ØNCG (6∫ÉNOEG óYCG
≥aôH êQódG.êQÉÿG êQO ≈∏Y IOƒLƒŸG á∏°UƒdG ÜòLG (8.
5
6
1
8
7
4
3
2
»``Hô``Y
5

4
3 Iƒ£ÿG
:
áYÉÑ£dG ¢ShDhQ ÖcQ
.
áYÉÑ£dG ¢SCGQ ê’õe ™aQG (1.
3
2
πc øe »bGƒdG §jô°ûdG ∫RCG ºK ,¬H á°UÉÿG áeõ◊G øe áYÉÑ£dG ¢ShDhQ øe ¢SCGQ πc ∫RCG (2
ΩɵMEÉH §¨°VG .¬H á°UÉÿG áfƒ∏ŸG áëàØdG ‘ áYÉÑ£dG ¢ShDhQ øe ¢SCGQ πc πNOCG (3 .É¡æe
.í«ë°üdGh Ö°SÉæŸG πµ°ûdÉH ¬à°ùeÓe ¿Éª°†J ≈àM áYÉÑ£dG ¢SCGQ ≈∏Y
3
1
4 Iƒ£ÿG
:
êGQOC’G ‘ ¥QƒdG ™°V
.
.á©HÉ£dG êQÉN êQódG ÜòLG (1(2êQO ™aQG ,¤hC’G êQódG ‘ ¥QƒdG ™°Vh ádÉM ‘
.êQÉÿG
πµ°ûdÉH ê’õŸG ≥«°û©J ¿Éª°†d ¬«∏Y §¨°VG ºK kÉeÉ“ ΩÉeCÓd áYÉÑ£dG ¢SCGQ ê’õe ÜòLG (4
í«ë°üdG .
á¶MÓe
:ê’õŸG ≥«°û©J ¿Éª°†d kÓ«∏b §¨°†dG ¤EG êÉà– ÉÃQ.
…ƒ∏©dG AÉ£¨dG ≥∏ZCG (5.
4
1
5
2
4

1 Iƒ£ÿG
:
∞«∏¨àdG OGƒeh §jô°T ∫RCG
.
á©HÉ£dG øe ∞«∏¨àdG OGƒe áaÉc ∫RCG .πNGO øe §jô°ûdG ∫R h äGójQƒàdG áØ∏ZG áYÉÑW íàaG
á©HÉ£dG.
3
áeõ◊G äÉjƒàfi øe ócCÉJ
.
,ÊGƒLQCG ,…hɪ°S ôÑM äGƒÑY ™HQCG (4 ,ábÉ£dG πHÉc (3 ,ábÉ£dG ∫ƒfi (2 ,á©HÉ£dG (1
áYÉÑW ¢ShDhQ á©HQCG (5 ,Oƒ°SCG ,ôØ°UCG(CMYB)𫨰ûàdG èeÉfôH) 𫨰ûJ áfGƒ£°SCG (6 ,
OGóYE’G áMƒd) áYƒÑ£ŸG ≥FÉKƒdG áYƒª› (7 ,(á°TÉ°ûdG ≈∏Y ô¡¶j …òdG Ωóîà°ùŸG π«dOh
.(πª©dG ‘ ´hô°ûdG π«dOh
1
4
3
7
6
5
2
1
2 Iƒ£ÿG
:
ôÑëdG äGƒÑY ÖcQ
.
áYÉÑ£dG äGójQƒJ AÉ£Z ™aQG (1.É¡H IOƒLƒŸG áeõ◊G øe ÈM IƒÑY πc ∫RCG (2.
ôjò–
: ∑QóJHPäGƒÑY IOƒL ¿Éª°V ™«£à°ùJ ’ É¡æµdh ,QÉ«àN’G ájôM ‘ 𫪩dG ≥M
QÉÑMCG ÒZ øe È◊GHPäGƒÑ©dG √òg ≈∏Y OɪàY’G ióe hCG .¬«W ¿Éª°†dG »£¨j ød
QÉÑMCG ÒZ øe ÈM äGƒÑY ΩGóîà°SG áé«àf É¡Ñ∏£àJ »àdG äÉMÓ°UE’G hCG á©HÉ£dG äÉeóN
.HP
√òg ‘ È◊G IƒÑY πNOCG ºK É¡H á°UÉÿG áfƒ∏ŸG áëàØdG ™e IƒÑY πc IGPÉëà ºb (3
áëàØdG .‘ ô≤à°ùJ ≈àM È◊G äGƒÑY ≈∏Y ΩɵMEÉH §¨°VG ,í«ë°üdG ¢ùeÓàdG ¿Éª°†d
kÉeÉ“ É¡fɵe .
á¶MÓe
:πª©J ≈àM í«ë°U πµ°ûH ™HQC’G È◊G äGƒÑY Ö«côJ Öéj
á©HÉ£dG.
2
1
3
2
»``Hô``Y
3

¿ÉeB’G äÉeƒ∏©e
áHÉ°UE’G QÉ£NBG π«∏≤àd èàæŸG Gòg ΩGóîà°SG óæY á«°SÉ°SC’G áeÓ°ùdG äGôjò– kɪFGO ™ÑJG
.á«FÉHô¡µdG áeó°üdÉH
.á©HÉ£dG RÉ¡éH ≥ë∏ŸG óæà°ùŸG Gòg ‘ äɪ«∏©àdG ™«ªL º¡aCGh AGôbCG .1
ábÉ£dG Qó°üà èàæŸG Gòg π«°UƒJ óæY á°VQDƒŸG á«Hô¡µdG ¢ùHÉ≤ŸG iƒ°S Ωóîà°ùJ ’ .2
.¿CÉ°ûdG Gò¡H AÉHô¡c »æa ™LGQ ,¢VQDƒŸG QÉ«àdG ¢ùÑ≤e áaô©e ΩóY ádÉM ‘ .á«Hô¡µdG
.3.èàæŸG ≈∏Y áHƒàµŸG äɪ«∏©àdGh äGQɶfE’G ™«ªL ≥ÑW
.É¡Ø«¶æJ πÑb §FÉ◊G êôfl øe á©HÉ£dG ¢ùHÉb π°üaEG .4
.πàÑe âæc hCG ,AÉŸG QGƒéH á©HÉ£dG √òg Ωóîà°ùJ hCG ÖcôJ ’ .5
.¿RGƒàe í£°S ≈∏Y ¿ÉeCÉH á©HÉ£dG ÖcQ .6
πÑc ≈∏Y ¢üî°T …BG »°ûÁ hCG ƒ£îj ’ ≈àM »ªfi ¿Éµe ‘ á©HÉ£dG ÖcQ .7
.AÉHô¡µdG πÑc ∞∏àj ’ ≈àMh ,AÉHô¡µdGπ«°UƒJ
.8π«dO ‘ ''É¡MÓ°UEGh AÉ£NC’G ±É°ûµà°SGh áfÉ«°üdG'' ô¶fG ,…OÉY πµ°ûH èàæŸG πª©j ⁄ GPG
𫨰ûàdG ΩɶæH á°UÉÿG 𫨰ûàdG AóH áfGƒ£°SCG ≈∏Y .á°TÉ°ûdG ≈∏Y ô¡¶j …òdG Ωóîà°ùŸG
.∂jód
OGôa’ÉH π°üJCG .áfÉ«°üdG ¤EG áLÉ◊G óæY .Ωóîà°ùŸG ᣰSGƒH É¡àfÉ«°U ºàj AGõLG óLƒj ’ .9
.áfÉ«°üdG ∫ɪYEÉH ΩÉ«≤∏d Ú∏gDƒŸG
ô°ûædGh ™Ñ£dG ¥ƒ≤M øY äÉeƒ∏©e
ácô°ûd ô°ûædGh ™Ñ£dG ¥ƒ≤M
Hewlett-Packard ΩÉ©d ôjƒ£à∏d©
5
200P..L
2005/4 ,1 á©Ñ£dG
ÚfGƒb ¬H íª°ùJ Ée AÉæãà°SÉH ≥Ñ°ùe »HÉàc ¿PEG ¿hO áªLôJ hCG πjó©J hCG ,ï°ùf …CG ô¶ëj
.ô°ûædG ¥ƒ≤M
.QGòfEG ≥HÉ°S ¿hO Ò«¨à∏d ¬«W IOQGƒdG äÉeƒ∏©ŸG ™°†îJ
äÉéàæŸ Ió«MƒdG äÉfɪ°†dGHP√ò¡d áÑMÉ°üŸG ¿Éª°†dG äÉfÉ«H ‘ IOófi É¡JÉeóNh
äÉeóÿGh äÉéàæŸG .…CG ¿ƒµj hCG ≥∏îj ¬fCG ≈∏Y ¬«W OQGh ƒg ɇ A»°T …CG Ò°ùØJ Öéj ’
.‘É°VEG ¿Éª°Vâ°ù«dHPƒ¡°S …CG hCG ôjôëàdG ‘ AÉ£NCG hCG á«æa AÉ£NCG ájCG øY ádƒÄ°ùe
.¬«W
ájQÉéàdG äÉeÓ©dG äÉ≤jó°üJ
¿EG®Microsofth®Windowsácô°ûd á∏é°ùe ᫵jôeCG ájQÉŒ äÉeÓY
CorporationMicrosoft¿ƒµJ ¿CG Rƒéj ¬«W IQƒcòŸG iôNC’G äÉéàæŸG áaÉc .
.É¡H á°UÉÿG äÉcô°û∏d ájQÉŒ äÉeÓY

*C8179-90002*
*C8179-90002*
C8179-90002
© 2005 Hewlett-Packard Development Company, L.P.
Printed in Germany
Imprimé en Allemagne
Stampato in Germania
www.hp.com/support/businessinkjet1000
Documenttranscriptie
HP Business Inkjet 1000 Getting Started Guide Leitfaden zur Inbetriebnahme Guide de Mise en Marche Beknopte Handleiding Guida introduttiva Copyright Information Informations sur le copyright © 2005 Copyright Hewlett-Packard Development Company, L.P. © 2005 Copyright Hewlett-Packard Development Company, L.P. Edition 1, 4/2005 Édition 1, 4/2005 Reproduction, adaptation or translation without prior written permission is prohibited, except as allowed under the copyright laws. Toute reproduction, adaptation ou traduction sans autorisation écrite préalable est formellement interdite, sauf si cette opération est effectuée dans le cadre prévu par la loi sur les droits d’auteur. The information contained herein is subject to change without notice. The only warranties for HP products and services are set forth in the express warranty statements accompanying such products and services. Nothing herein should be construed as constituting an additional warranty. HP shall not be liable for technical or editorial errors or omissions contained herein. Trademark credits Microsoft® and Windows® are U.S. registered trademarks of Microsoft Corporation. All other products mentioned herein may be trademarks of their respective companies. Les informations contenues dans ce document peuvent faire l’objet de modifications sans préavis. Les seules garanties relatives aux produits et services HP sont exposées dans les déclarations de garantie expresse qui accompagnent lesdits produits et services. Aucun élément du présent document ne doit être considéré comme constituant une garantie supplémentaire. HP ne pourra être tenue responsable des erreurs techniques ou rédactionnelles ou des omissions figurant dans le présent document. Marques Microsoft® et Windows® sont des marques déposées de Microsoft Corporation aux États-Unis. Tous les autres produits mentionnés dans le présent document sont des marques de leurs sociétés respectives. Safety Information Always follow basic safety precautions when using this product to reduce risk of injury from fire or electric shock. 1. Read and understand all instructions in the documentation that comes with the printer. 2. Use only a grounded electrical outlet when connecting this product to a power source. If you do not know whether the outlet is grounded, check with a qualified electrician. 3. Observe all warnings and instructions marked on the product. 4. Unplug this product from wall outlets before cleaning. 5. Do not install or use this product near water, or when you are wet. 6. Install the product securely on a stable surface. 7. Install the product in a protected location where no one can step on or trip over the line cord, and the line cord cannot be damaged. 8. If the product does not operate normally, see “Maintaining and troubleshooting” in the onscreen user’s guide on the Starter CD. 9. There are no user-serviceable parts inside. Refer servicing to qualified service personnel. Informationen zur Sicherheit Consignes de sécurité Beachten Sie beim Einsatz dieses Produkts immer die folgenden Sicherheitshinweise, um die Verletzungsgefahr und das Risiko eines elektrischen Schlags zu verringern. Respectez toujours les précautions de sécurité élémentaires quand vous utilisez ce produit, afin de réduire les risques de blessures dues au feu ou à un choc électrique. 1. Die Anweisungen in der mit dem Druckergelieferten Dokumentation müssen von Ihnen gelesen und verstanden worden sein. 1. Veuillez lire attentivement toutes les instructions contenues dans la documentation livrée avec l’imprimante. 2. Verwenden Sie ausschließlich eine geerdete Steckdose für den Anschluss dieses Produktes an die Stromversorgung. Wenn Sie sich nicht sicher sind, ob die Steckdose geerdet ist, so lassen Sie dies durch einen qualifizierten Elektriker überprüfen. 2. Utilisez toujours une prise de courant mise à la terre lors du branchement de ce produit à une source d’alimentation. Si vous ne savez pas si une prise de courant est mise à la terre, consultez un électricien qualifié. 3. Alle am Produkt angebrachten Warnungen und Anweisungen sind zu befolgen. 3. Suivez tous les avertissements et toutes les instructions indiqués sur le produit. 4. Ziehen Sie vor dem Reinigen des Produkts den Netzstecker aus der Steckdose. 4. Débranchez cet appareil des prises murales avant de procéder à un nettoyage. 5. Dieses Produkt darf nicht in der Nähe von Wasser betrieben bzw. von einer durchnässten Person aufgestellt oder bedient werden. 5. N’installez jamais cet appareil près d’une source d’eau, ni si vous êtes mouillé. 6. Sorgen Sie für sicheren Stand des Produkts auf einer stabilen Auflagefläche. 6. Installez l’appareil en toute sécurité sur une surface stable. 7. Installez l’appareil dans un lieu protégé où personne ne risque de marcher sur le cordon ou de trébucher sur celui-ci, et où le cordon ne risque pas d’être endommagé. 8. Si le produit ne fonctionne pas correctement, reportez-vous à la section « Entretien et dépannage » du guide de l’utilisateur en ligne disponible sur le CD de démarrage relatif à votre système d’exploitation. 9. L’appareil ne contient aucune pièce dont l’entretien doit être réalisé par l’utilisateur. Confiez-en l’entretien à du personnel qualifié. 7. Wählen Sie für das Produkt einen geschützten Standort, an dem keine Personen auf das Netzkabel treten oder darüber stolpern können. Das Netzkabel darf nicht beschädigt werden. 8. Wenn die Seite nicht korrekt kopiert wird, lesen Sie den Abschnitt zur Fehlerbehebung im Online-Benutzerhandbuch der entsprechenden Starter-CD für Ihr Betriebssystem. 9. Im Inneren des Geräts befinden sich keine Teile, die vom Endnutzer gewartet werden können. Beauftragen Sie mit Wartung und Instandsetzung qualifiziertes Kundendienstpersonal. Veiligheidsinformatie Informazioni sulla sicurezza Neem bij het gebruik van dit product altijd de elementaire voorzorgsmaatregelen in acht om de kans op letsel ten gevolge van brand of elektrische schokken te beperken. Durante l’utilizzo di questo prodotto, attenersi sempre alle precauzioni di sicurezza di base al fine di ridurre il rischio di lesioni alle persone derivanti da incendi o scariche elettriche. 1. Zorg dat u alle instructies in de documentatie die wordt geleverd bij de printer, hebt gelezen en begrepen. 1. Si consiglia di leggere e apprendere tutte le istruzioni contenute nei documenti forniti insieme alla stampante. 2. Sluit dit product uitsluitend aan op een geaard stopcontact. Als u niet zeker weet of een stopcontact geaard is, kunt u advies inwinnen bij een erkende elektricien. 2. 3. Neem alle op dit product vermelde waarschuwingen en instructies in acht. Per collegare il prodotto a una presa di corrente, utilizzare esclusivamente una presa elettrica collegata a massa. In caso di dubbio, contattare un elettricista qualificato per verificare che la presa elettrica sia collegata a massa. 3. Attenersi a tutte le avvertenze e le istruzioni indicate sul prodotto. 4. Haal het netsnoer uit het stopcontact voordat u dit product reinigt. 4. Prima di effettuare la pulizia, scollegare il prodotto dalle prese a parete. 5. Plaats of gebruik dit product niet in de buurt van water of wanneer u nat bent. 5. Non installare o utilizzare il prodotto nelle vicinanze di acqua o se non si è perfettamente asciutti. 6. Zorg dat het product stevig op een stabiel oppervlak staat. 6. Posizionare il prodotto su una superficie stabile. 7. Zet het product op een veilige plaats waar niemand op het netsnoer kan trappen of erover kan struikelen en het netsnoer niet wordt beschadigd. 7. 8. Als het product niet goed werkt, raadpleegt u “Onderhoud en probleemoplossing” in de gebruikershandleiding op de Starter-cd voor uw besturingssysteem. Posizionare il prodotto in un luogo riparato, dove non si possa inciampare sul cavo di alimentazione, che non deve essere danneggiato. 8. Dit product bevat geen onderdelen die door de gebruiker kunnen worden onderhouden. Laat onderhoudswerkzaamheden over aan erkende onderhoudsmonteurs. Se il prodotto non funziona normalmente, consultare la sezione “Manutenzione e risoluzione dei problemi” della Guida in linea disponibile sul CD di avviamento. 9. Il prodotto non include parti riparabili dall’utente. Per le riparazioni rivolgersi esclusivamente al personale qualificato. 9. 1 1 7 6 4 2 5 3 English Deutsch Français Schritt 1: Entfernen der Verpackungsklebestreifen und des Verpackungsmaterials. Überprüfen des Paketinhalts. Vérification du contenu du carton. Étape 1 : Retrait des matériaux d’emballage. 1) Imprimante, 2) Adaptateur de courant, 3) Cordon d’alimentation, 4) Quatre cartouches d’encre (cyan, magenta, jaune, noire), 5) Quatre têtes d’impression (CMYB), 6) CD de démarrage (logiciels et guide de l’utilisateur en ligne), 7) Documentation imprimée (poster d’installation et Guide de mise en marche). Retirez tous les rubans adhésifs de l’imprimante Ouvrez le capot des composants d’impression et retirez le ruban adhésif de l’intérieur de l’imprimante. Nederlands Remove all packing tape from the printer. Open the printing supplies cover and remove the tape from the inside of the printer. De inhoud van de verpakking controleren. Stap 1: Het verpakkingsmateriaal en de tape verwijderen. 1) Printer, 2) adapter, 3) netsnoer, 4) vier inktcartridges (cyaan, magenta, geel, zwart), 5) vier printkoppen (CMYB), 6) Starter-cd (software en gebruikershandleiding), 7) gedrukte documentatie (installatieposter en beknopte handleiding). Verwijder de plakstroken van de verpakking van de printer. Open de klep van de afdrukbenodigdheden en verwijder de tape aan de binnenkant van de printer. Italiano Step 1: Remove the packing tape and materials. 1) Printer, 2) power adapter, 3) power cord, 4) four ink cartridges (cyan, magenta, yellow, black), 5) four printheads (CMYB), 6) Starter CD (software and onscreen user’s guide), 7) printed documentation (setup poster and getting started guide). Check the package contents. Verificare il contenuto dell’imballo. Punto 1: Rimuovere il nastro e il materiale di imballo. 1) Stampante, 2) adattatore, 3) cavo di alimentazione, 4) quattro cartucce di stampa (CMYB), 5) quattro testine di stampa (CMYB), 6) CD di avviamento (software e Guida in linea), 7) documentazione stampata (poster di configurazione e Guida introduttiva). Togliere completamente il nastro di imballo dalla stampante. Aprire il coperchio dei materiali di consumo e rimuovere il nastro dall’interno della stampante. 3 1) Drucker, 2) Netzadapter, 3) Netzkabel, 4) vier Tintenpatronen (cCan, Magenta, Gelb, Schwarz), 5) vier Druckköpfe (CMYB), 6) Starter-CD (Software und Onscreen-Benutzerhandbuch), 7) gedruckte Dokumentation (Faltblatt mit Installationshinweisen, Leitfaden zur Inbetriebnahme). Entfernen Sie möglicherweise vorhandenes Verpackungsmaterial aus dem Drucker. Öffnen Sie die Tintenpatronen- und Druckkopfabdeckung und entfernen Sie die Klebestreifen im Druckergehäuse. 2 1 2 Step 2: Install the ink cartridges. 1) Lift the printing supplies cover. 2) Remove each ink cartridge from its package. CAUTION: HP recognizes customer’s choice but cannot guarantee the quality or reliability of non-HP ink cartridges. Printer services or repairs required as a result of using non-HP ink cartridges will not be covered under warranty. Step 2: Installieren der Tintenpatronen. 1) Öffnen Sie die Verbrauchsmaterialabdeckung. 2) Nehmen Sie jede Tintenpatrone aus ihrer Verpackung. ACHTUNG: HP erkennt zwar die Tintenpatronen von Drittanbietern, kann die Qualität bzw. Zuverlässigkeit dieser Patronen jedoch nicht garantieren. Druckerdienste bzw. –Reparaturen, die durch die Verwendung von Tintenpatronen erforderlich sind, die nicht von HP hergestellt wurden, sind nicht von der Garantie abgedeckt. Étape 2 : Installation des cartouches d’encre. 1) Soulevez le capot des composants d’impression. 2) Sortez les cartouches d’encre de leurs emballages. ATTENTION : HP respecte le choix des utilisateurs, mais n’est pas en mesure de garantir la qualité ou la fiabilité des cartouches d’encre d’une autre marque. Les interventions ou réparations de l’imprimante consécutives à l’utilisation de cartouches d’encre non HP ne sont pas couvertes par la garantie. Stap 2: De inktcartridges installeren. 1) Tel de klep van de afdrukbenodigdheden op. 2) Verwijder de inktcartridges uit de verpakking. LET OP: Er mogen inktcartridges van een ander merk worden gebruikt, maar HP kan de kwaliteit of betrouwbaarheid van deze inktcartridges niet garanderen. Reparatie of service als gevolg van het gebruik van inktcartridges die niet van HP zijn, vallen niet onder de garantie. Punto 2: Installare le cartucce di stampa. 1) Sollevare il coperchio dei materiali di consumo. 2) Rimuovere ciascuna cartuccia di stampa dal proprio imballo. ATTENZIONE: pur rispettando le scelte dei propri clienti, HP non garantisce la qualità o l’affidabilità di cartucce di stampa non originali HP. Gli interventi di assistenza o riparazione della stampante che si rendono necessari in conseguenza dell’utilizzo di cartucce non originali HP non sono coperti dalla garanzia. 3 3) Align each cartridge with its color-coded slot, and then insert the cartridge into the slot. To ensure proper contact, press down firmly on the cartridges until they snap into place. Note: All four ink cartridges must be correctly installed for the printer to work. 3) Richten Sie die einzelnen Patronen am entsprechend farblich gekennzeichneten Schacht aus, und setzen Sie sie in den Schacht ein. Drücken Sie zur Gewährleistung des richtigen Kontakts fest gegen die Patronen, bis diese einrasten. Hinweis: Alle vier Tintenpatronen müssen für die ordnungsgemäße Funktion des Druckers richtig installiert sein. 3) Alignez chaque cartouche sur l’emplacement de la couleur correspondante, puis insérez la cartouche dans son logement. Pour assurer un bon contact, appuyez fermement la cartouche dans son emplacement, jusqu’à son enclenchement. Remarque : les quatre cartouches d’encre doivent être mises en place correctement pour que l’imprimante fonctionne. 3) Plaats de cartridge ter hoogte van de sleuf met de bijbehorende kleurcode en bevestig de cartridge in de sleuf. Bevestig de inktcartridges goed door deze stevig in de sleuf vast te klikken. Opmerking: de printer werkt alleen als alle vier de inktcartridges goed zijn bevestigd. 3) Allineare ciascuna cartuccia al relativo alloggiamento codificato in colore, quindi inserire la cartuccia nell’alloggiamento. Per assicurare un corretto contatto, premere con decisione sulle cartucce finché non scattano in posizione. Nota: perché la stampante funzioni, è necessario che tutte e quattro le cartucce siano state installate correttamente. 4 3 2 3 English Step 3: Install the printheads. Deutsch Schritt 3: Installieren der Druckköpfe. Français Étape 3 : Installation des têtes d’impression. Nederlands Stap 3: De printkoppen installeren. Italiano 1 Punto 3: Installare le testine di stampa. 5 1) Lift the printhead latch. 1) Heben Sie die Druckkopfverriegelung an. 1) Soulevez le loquet des têtes d’impression. 1) Til de printkopvergrendeling omhoog. 1) Sollevare il fermo della testina di stampa. 2) Remove each printhead from its package, and then remove the protective tape from each printhead. 3) Insert each printhead into its color-coded slot. Press down firmly on each printhead to ensure proper contact. 2) Nehmen Sie jeden Druckkopf aus seiner Verpackung und entfernen Sie das Klebeband. 3) Setzen Sie den Druckkopf in den farblich markierten Schacht ein. Drücken Sie die einzelnen Druckköpfe fest herunter, um den ordnungsgemäßen Sitz zu gewährleisten. 2) Sortez chaque tête d’impression de son emballage, puis retirez le ruban adhésif de protection de chacune d’elles. 3) Insérez chaque tête d’impression dans le logement de la couleur correspondante. Appuyez fermement sur chaque tête d’impression pour assurer un bon contact. 2) Haal de printkoppen uit de verpakking en verwijder de beschermtape van de printkoppen. 3) Plaats elke printkop in de sleuf met de kleurcode van de printkop. Druk elke printkop goed op zijn plaats. 2) Rimuovere ciascuna testina di stampa dall’imballo e quindi il nastro protettivo da ciascuna testina. 3) Inserire ciascuna testina di stampa nel relativo alloggiamento codificato in colore. Premere con decisione sulla testina di stampa per assicurare il corretto contatto. 5 4 4 1 2 4) Pull the printhead latch all the way forward and press down to ensure that the latch is properly engaged. Note: You might have to apply some pressure to engage the latch. 5) Close the printing supplies cover. Step 4: Load paper in the trays. 4) Ziehen Sie die Druckkopfverriegelung ganz nach vorne und drücken Sie die Verriegelung vollständig nach unten ein. Hinweis: Sie müssen möglicherweise ein wenig Kraft aufwenden, um die Verriegelung zu schließen. 5) Schließen Sie die Verbrauchsmaterialabdeckung. Schritt 4: Einlegen von Papier in die Fächer. 4) Tirez le loquet des têtes d’impression à fond vers l’avant et appuyez vers le bas pour vous assurer qu’il est correctement engagé. Remarque : il est parfois nécessaire d’appliquer une certaine pression pour engager le loquet. 5) Refermez le capot des composants d’impression. Étape 4 : Chargement de papier dans les bacs. 4) Trek de printkopvergrendeling helemaal naar voren en druk deze omlaag, zodat de grendel goed wordt vastgezet. Opmerking: mogelijk moet u druk uitoefenen om de grendel vast te zetten. 5) Sluit de klep van de afdrukbenodigdheden. Stap 4: Papier plaatsen in de laden. 4) Tirare completamente il fermo della testina di stampa e premere verso il basso per assicurarsi che sia correttamente agganciato. Nota: per agganciare il fermo, potrebbe essere necessario applicare una leggera pressione. 5) Chiudere il coperchio dei materiali di consumo. Punto 4: Caricare la carta nei vassoi. 1) Pull the tray out of the printer. 2) Raise the output tray. 1) Ziehen Sie das Fach aus dem Drucker heraus. 2) Müssen Sie das Ausgabefach anheben. 1) Retirez le bac de l’imprimante. 2) Soulevez le bac de sortie. 1) Trek de lade uit de printer. 2) Tilt u de uitvoerlade omhoog. 1) Estrarre il vassoio dalla stampante 2) Sollevare il vassoio di raccolta. 6 5 English 3) For paper between 11 inches and 14 inches (356 mm and 279 mm) long, move the latch on the tray to the right, and then lower the front of the tray. 4) Slide the guides in the tray to adjust them for the size that you are loading. 5) Insert up to 150 sheets of paper into tray 1, print-side down along the right side of the tray. Deutsch 3) Verschieben Sie bei 356 mm bis 279 mm langem Papier die Arretierung am Fach nach rechts bis schwenken Sie anschließend das Vorderteil des Fachs nach unten. 4) Verschieben Sie die Papierführungen im Fach, um sie an die von Ihnen eingelegte Papiergröße anzupassen. 5) Legen Sie höchstens 150 Blatt Papier mit der zu bedruckenden Seite nach unten rechtsbündig in Fach 1 ein. Français 3) Pour charger du papier d’une longueur comprise entre 11 et 14 pouces (279 mm et 356 mm), déplacez la butée du bac vers la droite et abaissez ensuite l’avant du bac. 4) Faites glisser les guides du bac pour les régler en fonction de la taille du papier. 5) Placez les feuilles dans le bac (150 au maximum) 1, face à imprimer vers le bas, le long du bord droit du bac. Nederlands 4 3) Voor papier met een lengte tussen de 356 and 279 mm verplaatst u de grendel op de lade naar rechts and laat vervolgens de voorkant van de lade zakken. 4) Stel de geleiders in de lade af op het papierformaat dat u in de lade plaatst. 5) Plaats maximaal 150 vellen papier met de afdrukzijde naar beneden aan de rechterkant van lade 1. Italiano 3 3) Per caricare carta di formato compreso tra 11 e 14 pollici (279 e 356 mm) di lunghezza, spostare il fermo del vassoio verso destra e Abbassare la parte anteriore del vassoio. 4) Far scorrere le guide nel vassoio per regolarle sul formato che si sta caricando. 5) Inserire fino a 150 fogli nel vassoio 1 con il lato di stampa rivolto verso il basso, allineandoli al lato destro del vassoio. 7 5 4 3 6 7 1 8 2 6) Lower the output tray. 7) Gently reinsert the tray. 8) Pull out the extension on the output tray. Step 5: Connect the power cord and turn on the printer. 6) Schwenken Sie das Ausgabefach nach unten 7) Setzen Sie das Fach vorsichtig wieder ein. 8) Ziehen Sie die Verlängerung des Ausgabefachs heraus. Schritt 5: Anschließen des Netzkabels und Einschalten des Druckers. 6) Abaissez le bac de sortie. 7) Replacez délicatement le bac. 8) Tirez les extensions du bac de sortie. Étape 5 : Branchez le cordon d’alimentation et mettez l’imprimante sous tension. 1) Connect the power adapter into the printer. 2) Connect the power cord to the power adapter. 3) Connect the other end of the power cord to an alternating current (AC) power outlet. 4) Press the (power button) to turn on the printer. 1) Schließen Sie den Netzadapter an den Drucker an. 2) Schließen Sie das Netzkabel an den Netzadapter an. 3) Schließen Sie das andere Ende des Netzkabels an eine Steckdose für Wechselspannung an. 4) Drücken Sie (Netztaste), um den Drucker einzuschalten. 1) Connectez l’adaptateur de courant dans l’imprimante. 2) Branchez le cordon d’alimentation sur l’adaptateur de courant. 3) Branchez l’autre extrémité du cordon d’alimentation sur une prise secteur. 4) Appuyez sur le (bouton d’alimentation) pour mettre l’imprimante sous tension. 6) Laat de uitvoerlade zakken. 7) Plaats de lade voorzichtig terug. 8) Trek het verlengstuk op de uitvoerlade uit. Stap 5: Het netsnoer aansluiten en de printer aanzetten. 6) Abbassare il vassoio di raccolta. 7) Reinserire il vassoio con delicatezza. 8) Estrarre la prolunga del vassoio di raccolta carta. Punto 5: Collegare il cavo di alimentazione e accendere la stampante. 1) Sluit de adapter aan op de printer. 2) Sluit het netsnoer aan op de adapter. 3) Sluit het andere uiteinde van het netsnoer aan op een stopcontact (AC). 4) Druk op de (Aan/uit-knop) om de printer aan te zetten. 1) Collegare l’adattatore alla stampante. 2) Collegare il cavo di alimentazione all’adattatore. 3) Collegare l’altra estremità del cavo di alimentazione a una presa CA. 4) Premere il (pulsante di accensione) per accendere la stampante. 8 2 English To ensure the best possible print quality, the printer automatically aligns the printheads. At the beginning of the alignment process, the Power light blinks and the printer prints a status page. At the end of the process, the printer prints two auto-alignment pages. The printhead alignment process takes approximately 5 minutes. Note: If other printer lights are on or blinking during the printhead alignment process, see “Interpreting control panel lights” on page 13. If the alignment page does not print, follow these steps. 1) Check that the power cord is connected firmly. 2) Check that the printheads and ink cartridges are properly installed. Deutsch Um eine optimale Druckqualität zu gewährleisten, werden die Druckköpfe automatisch vom Drucker ausgerichtet. Zu Beginn des Ausrichtungsvorgangs blinkt die Power-LED und der Drucker druckt eine Statusseite. Am Ende des Vorgangs druckt der Drucker zwei Seiten zur automatischen Ausrichtung. Die Ausrichtung der Druckköpfe dauert ungefähr 5 Minuten. Hinweis: Wenn andere Kontrollleuchten des Druckers während der Druckkopfausrichtung leuchten oder blinken, finden Sie weitere Informationen unter “Bedeutung der LEDs auf dem Bedienfeld” auf Seite 17. Wenn die Ausrichtungsseite nicht gedruckt wird, führen Sie folgende Schritte aus. 1) Vergewissern Sie sich, dass das Netzkabel richtig angeschlossen ist. 2) Vergewissern Sie sich, dass die Druckköpfe und die Tintenpatronen richtig installiert sind. Français Pour offrir une qualité d’impression optimale, l’imprimante aligne automatiquement les têtes d’impression. Au début de la procédure d’alignement, le voyant d’alimentation clignote et l’imprimante imprime une page d’état. Une fois la procédure terminée, elle imprime deux pages d’alignement automatique. La procédure d’alignement des têtes d’impression dure environ 5 minutes. Remarque : si d’autres voyants de l’imprimante sont allumés ou clignotent lors de la procédure d’alignement des têtes d’impression, reportez-vous à la section « Interprétation des voyants du panneau de commande », à la page 21. Si la page d’alignement ne s’imprime pas, procédez comme suit. 1) Vérifiez que le cordon d’alimentation est bien branché. 2) Vérifiez que les têtes d’impression et les cartouches d’encre sont installées correctement. Nederlands Om de best mogelijke afdrukkwaliteit te garanderen lijnt de printer automatisch de printkoppen uit. Aan het begin van het uitlijningsproces knippert het Aan/uit-lampje en drukt de printer een statuspagina af. Aan het einde van het proces drukt de printer twee automatische testpagina’s af. Het uitlijningsproces van de printkoppen neemt ongeveer 5 minuten in beslag. Opmerking: zie “De betekenis van de lampjes van het bedieningspaneel” op pagina 25 als andere printerlampjes branden of knipperen tijdens het uitlijningsproces van de printkoppen. Als geen testpagina wordt afgedrukt, volgt u onderstaande stappen. 1) Controleer of het netsnoer goed is aangesloten. 2) Controleer of de printkoppen en de inktpatronen goed geplaatst zijn. Italiano 1 Per assicurare la migliore qualità di stampa, la stampante esegue automaticamente l’allineamento delle testine. All’inizio di tale procedura, la spia di accensione lampeggia e viene stampata una pagina di stato. Al termine della procedura, vengono stampate due pagine di allineamento automatico. Il processo di allineamento della testina di stampa richiede circa 5 minuti. Nota: se durante l’allineamento delle testine di stampa restano accese o lampeggiano altre spie della stampante, consultare la sezione “Significato delle spie del pannello di controllo“ a pagina 29. Se la pagina di allineamento non viene stampata, attenersi alla seguente procedura. 1) Verificare che il cavo di alimentazione sia correttamente collegato. 2) Verificare che le cartucce e le testine di stampa siano installate correttamente. 9 3 3) Turn off the printer, and then turn it on again. If the alignment page still do not print, see “Troubleshooting” on page 15. 6 Step 6: Connect the printer. 1) Insert the Starter CD into the CD drive, and then follow the onscreen instructions. Note: For more information about installing software, see the onscreen user’s guide on the Starter CD. 2) Connect the USB ( ) (sold separately) when prompted. 3) Schalten Sie den Drucker aus und dann wieder ein. Wenn die Ausrichtungsseite immer noch nicht gedruckt wird, lesen Sie den Abschnitt “Fehlerbehebung” auf Seite 19. Schritt 6: Anschließen des Druckers. 3) Mettez l’imprimante hors tension, puis à nouveau sous tension. Si la page d’alignement ne s’imprime toujours pas, reportez-vous à la section « Dépannage », à la page 23. Étape 6 : Connexion de l’imprimante. 3) Zet de printer uit en weer aan. Zie “Problemen oplossen” op pagina 27 als de testpagina nog steeds niet wordt afgedrukt. Stap 6: De printer aansluiten. 3) Spegnere e riaccendere la stampante. Se il problema persiste, consultare la sezione “Risoluzione dei problemi“ a pagina 31. 1) Legen Sie die Starter-CD in das CD-Laufwerk des Computers ein, und folgen Sie den Anweisungen auf dem Bildschirm. Hinweis: Weitere Informationen zum Installieren der Software finden Sie im Online-Benutzerhandbuch auf der Starter-CD. 2) Schließen Sie das USB-Kabel ( ) (separat erhältlich) an, wenn Sie dazu aufgefordert werden. 1) Insérez le CD de démarrage dans le lecteur de CD-ROM, puis suivez les instructions à l’écran. Remarque : pour plus d’informations sur l’installation de logiciels, reportez-vous au guide de l’utilisateur en ligne, disponible sur le CD de démarrage. 2) Branchez le câble ( ) (vendu séparément) lorsque vous y êtes invité. 1) Plaats de Starter-cd in het cd-rom-station en volg de instructies op het scherm. Opmerking: Zie de gebruikershandleiding op de Starter-cd voor meer informatie over het installeren van de software. 2) Sluit de USB-kabel ( ) (apart verkrijgbaar) aan als dit wordt gevraagd. Punto 6: Collegare la stampante. 1) Inserire il CD di avviamento nella relativa unità e seguire le istruzioni visualizzate. Nota: Per ulteriori informazioni sul software di installazione, consultare la Guida in linea sul CD di avviamento. 2) Collegare l’USB ( ) (venduto separatamente) quando richiesto. 10 English Step 7: Test the printer software installation. Step 8: Register the printer. After you complete the software installation and connect the printer to the computer, print a document from an application that you use frequently to ensure that the software is installed correctly. If the document does not print, see “Troubleshooting” on page 15. Register the printer to receive important support and technical information. If you did not register your printer while installing the software, you can register later at http://www.register.hp.com. Deutsch Schritt 7: Testen der Softwareinstallation. Schritt 8: Registrieren des Druckers. Nachdem Sie die Installation der Software ausgeführt und den Drucker an den Computer angeschlossen haben, drucken Sie ein Dokument aus einer Anwendung, die Sie häufig verwenden. Wenn das Dokument nicht gedruckt wird, beachten Sie den Abschnitt “Fehlerbehebung” auf Seite 19. Registrieren Sie den Drucker, damit Sie Kundenunterstützung und wichtige technische Informationen erhalten. Wenn Sie den Drucker nicht während der Installation der Software registrieren, können Sie dies später unter http://www.register.hp.com. Français Étape 7 : Testez l’installation du logiciel de l’imprimante. Étape 8 : Enregistrement de l’imprimante. Après avoir terminé l’installation du logiciel et connecté l’imprimante à l’ordinateur, imprimez un document à partir d’une application que vous utilisez régulièrement pour vous assurer que le logiciel est bien installé. Si le document ne s’imprime pas, reportez-vous à la section « Dépannage », à la page 23. Enregistrez l’imprimante afin d’obtenir de l’aide et des informations techniques importantes. Si vous décidez de ne pas enregistrer votre imprimante au cours de l’installation du logiciel, vous pourrez le faire ultérieurement à l’adresse http://www.register.hp.com. Nederlands 8 Stap 7: De installatie van de printersoftware testen. Stap 8: De printer registreren. Nadat u de software hebt geïnstalleerd en de printer hebt aangesloten op de computer, drukt u een document af vanuit een toepassing die u vaak gebruikt om te controleren of de software juist is geïnstalleerd. Zie “Problemen oplossen” op pagina 27 als het document niet wordt afgedrukt. Registreer de printer om gebruik te kunnen maken van belangrijke ondersteuning en technische informatie. Als u de printer niet hebt geregistreerd tijdens de installatie van de software, kunt u de printer later registreren op http://www.register.hp.com. Italiano 7 Punto 7: Verificare l’installazione del software della stampante. Punto 8: Registrare la stampante. 11 Al termine dell’installazione del software e dopo avere collegato la stampante al computer, stampare un documento da un’applicazione utilizzata frequentemente per assicurarsi che l’installazione sia stata eseguita correttamente. Se il documento non viene stampato, consultare la sezione “Risoluzione dei problemi“ a pagina 31. Per ricevere importanti informazioni tecniche e sull’assistenza, è necessario effettuare la registrazione della stampante. Se tale operazione non è stata eseguita al momento dell’installazione del software, sarà possibile registrare la stampante successivamente all’indirizzo http://www.register.hp.com. http://www.hp.com/support/businessinkjet1000 Congratulations! Your printer is ready to use. For information about using the printer and troubleshooting, see the following resources: • Onscreen user’s guide and Readme file on the Starter CD. • HP Instant Support (see the onscreen user’s guide) • Product support site at http://www.hp.com/support/businessinkjet1000 Herzlichen Glückwunsch! Ihr Drucker ist betriebsbereit. Informationen zur Verwendung des Druckers und zur Fehlerbehebung können Sie folgenden Quellen entnehmen: • Online-Benutzerhandbuch und Readme-Datei auf der Starter-CD. • HP Instant Support (weitere Informationen finden Sie im Online-Benutzerhandbuch) • Website der Produktunterstützung http://www.hp.com/support/businessinkjet1000 Félicitations ! Votre imprimante est prête à l’emploi. Pour toute information concernant l’imprimante et son dépannage, reportez-vous: • au guide de l’utilisateur en ligne et au fichier Lisezmoi disponibles sur le CD de démarrage ; • à HP Instant Support (consultez le guide de l’utilisateur en ligne) ; • au site d’assistance du produit à l’adresse suivante http://www.hp.com/support/businessinkjet1000 Gefeliciteerd. De printer is klaar voor gebruik. Voor meer informatie over het gebruik van de printer en het oplossen van problemen kunt u de volgende bronnen raadplegen: • De on line gebruikershandleiding en het Leesmij-bestand op de Starter-cd. • HP Instant Support (zie de on line gebruikershandleiding) • Website voor productondersteuning op http://www.hp.com/support/businessinkjet1000 Congratulazioni! La stampante è pronta per l’uso. Per informazioni sull’utilizzo della stampante e sulla risoluzione dei problemi, fare riferimento alle risorse seguenti: • Guida in linea e file Readme nel CD di avviamento. • HP Instant Support (vedere la Guida in linea) • Sito assistenza prodotti all’indirizzo http://www.hp.com/support/businessinkjet1000 12 Understanding control panel parts 1 2 4 1. 2. 3. 4. 3 5 6 5. 6. 7. 8. Power button Printhead light Ink cartridge light Power light 7 8 Color indicator lights Cancel button Resume button Resume light English Interpreting control panel lights For more information about control panel lights, see the onscreen user’s guide on the Starter CD or visit the product support website at http://www.hp.com/support/businessinkjet1000. Light pattern Light description Explanation and recommended action The Power light blinks. The printer is turning on or off or processing a print job, or a print job has been cancelled. • No action is required. The Power light is on and the Resume light blinks. The printer is out of paper. • Load paper and then press the (resume button). The printer is pausing for the ink to dry. • Wait for the ink to dry. The Resume light will stop blinking. The Power light and Resume light blink. Print media is jammed in the printer. • Press the (resume button) to eject the jammed media. • Remove all media from the output tray. Open the top cover to locate the jam. After clearing the jam, press the (resume button) to continue the print job. The Power light blinks and the Resume light is on. One or more covers on the printer are open. • Close any open covers. • Make sure the auto-duplex unit is properly installed. A printer error has occurred. • Turn the printer off and then on again. The Power light blinks and the Printhead and Resume light are on. 13 The printhead latch is not secured. • Open the printing supplies cover and secure the printhead latch. Light description Explanation and recommended action The Printhead light, a color indicator light, and the Resume light are on. One or more of the printheads needs attention. • Reinstall the printheads and try to print. • Try cleaning the printhead contacts. See the onscreen user’s guide. • If the error persists, replace the printhead or printheads indicated. The Ink Cartridge light, a color indicator light, and the Resume light are on. One or more of the ink cartridges needs attention. • Reinstall the ink cartridges and try to print. • If the error persists, replace the ink cartridge or cartridges indicated. English Light pattern 14 Troubleshooting This section provides troubleshooting suggestions for some of the most common issues associated with hardware and software installation. Problems printing an alignment page Check the printer to ensure the following: English • Power light is on and not blinking. When the printer is first turned on, it takes approximately 45 seconds to warm up. • No lights on the control panel are lit or blinking and that the printer is in the Ready state. If lights are lit or blinking, see “Interpreting control panel lights” on page 13. • Ensure power cord and other cables are working and firmly connected to the printer. • All packing tapes and materials are removed from the printer. • Printheads and ink cartridges are properly installed in their correct color-coded slots. Press down firmly on each one to ensure proper contact. Ensure you have removed the protective tape from each printhead. • Printhead latch and all covers are closed. • Rear access panel or optional auto-duplex unit is locked into place. • Media is loaded correctly in the tray and is not jammed in the printer. Configuration page Use the configuration page to view current printer settings, to help troubleshoot printer problems, and to verify installation of optional accessories, such as trays. The configuration page also contains a log of recent events. If the printer is connected to a network, an additional network configuration page prints; this page shows the network settings for the printer. For more information about these tools, see the onscreen user’s guide on the Starter CD. If you need to call HP, print the configuration page before calling. To print a configuration page 1. Press and hold down the (power button). While holding down the (power button), press the (cancel button) one time. 2. Release the (power button). The printer prints a printer configuration page. 15 Problems installing software Check the computer system to ensure the following: The computer meets the system requirements (see the onscreen user’s guide on the Starter CD). Verify installation preliminaries • Before installing software on a Windows computer, ensure all other programs are closed. • If the computer does not recognize the path to the CD drive that you type, ensure you are specifying the correct drive letter. • If the computer cannot recognize the Starter CD in the CD drive, inspect the CD for damage. Also, you can download the printer driver from http://www.hp.com/support/ businessinkjet1000. Reinstall the printer software If you are using Windows and the computer cannot detect the printer, run the Scrubber utility (located in the Utils\Scrubber folder on the Starter CD) to perform a clean printer driver uninstallation. Restart your computer, and re-install the printer driver. Hewlett-Packard limited warranty statement HP product Duration of Limited Warranty Software 1 year Accessories 1 year Ink cartridges 6 months* Printheads 1 year* Printer peripheral hardware (see below for details) 1 year *For more detailed warranty information, see http://www.hp.com/support/inkjet_warranty. Extent of limited warranty Limitations of warranty 1. Hewlett-Packard warrants to the end-user customer that the HP products specified above will be free from defects in materials and workmanship for the duration specified above, which duration begins on the date of purchase by the customer. TO THE EXTENT ALLOWED BY LOCAL LAW, NEITHER HP NOR ITS THIRD PARTY SUPPLIERS MAKES ANY OTHER WARRANTY OR CONDITION OF ANY KIND, WHETHER EXPRESS OR IMPLIED WARRANTIES OR CONDITIONS OF MERCHANTABILITY, SATISFACTORY QUALITY, AND FITNESS FOR A PARTICULAR PURPOSE. 3. HP’s limited warranty covers only those defects that arise as a result of normal use of the product, and does not cover any other problems, including those that arise as a result of: a. Improper maintenance or modification; b. Software, media, parts, or supplies not provided or supported by HP; or c. Operation outside the product’s specifications. d. Unauthorized modification or misuse. 4. For HP printer products, the use of a non-HP ink cartridge or a refilled ink cartridge does not affect either the warranty to the customer or any HP support contract with the customer. However, if printer failure or damage is attributable to the use of a non-HP or refilled ink cartridge, HP will charge its standard time and materials charges to service the printer for the particular failure or damage. 5. If HP receives, during the applicable warranty period, notice of a defect in any product which is covered by HP’s warranty, HP shall either repair or replace the product, at HP’s option. Limitations of liability 1. To the extent allowed by local law, the remedies provided in this Warranty Statement are the customer’s sole and exclusive remedies. 2. TO THE EXTENT ALLOWED BY LOCAL LAW, EXCEPT FOR THE OBLIGATIONS SPECIFICALLY SET FORTH IN THIS WARRANTY STATEMENT, IN NO EVENT SHALL HP OR ITS THIRD PARTY SUPPLIERS BE LIABLE FOR DIRECT, INDIRECT, SPECIAL, INCIDENTAL, OR CONSEQUENTIAL DAMAGES, WHETHER BASED ON CONTRACT, TORT, OR ANY OTHER LEGAL THEORY AND WHETHER ADVISED OF THE POSSIBILITY OF SUCH DAMAGES. Local law 1. This Warranty Statement gives the customer specific legal rights. The customer may also have other rights which vary from state to state in the United States, from province to province in Canada, and from country/region to country/region elsewhere in the world. 2. To the extent that this Warranty Statement is inconsistent with local law, this Warranty Statement shall be deemed modified to be consistent with such local law. Under such local law, certain disclaimers and limitations of this Warranty Statement may not apply to the customer. For example, some states in the United States, as well as some governments outside the United States (including provinces in Canada), may: 6. If HP is unable to repair or replace, as applicable, a defective product which is covered by HP’s warranty, HP shall, within a reasonable time after being notified of the defect, refund the purchase price for the product. a. Preclude the disclaimers and limitations in this Warranty Statement from limiting the statutory rights of a customer (e.g. the United Kingdom); 7. b. Otherwise restrict the ability of a manufacturer to enforce such disclaimers or limitations; or HP shall have no obligation to repair, replace, or refund until the customer returns the defective product to HP. 8. Any replacement product may be either new or like new, provided that it has functionality at least equal to that of the product being replaced. 9. HP products may contain remanufactured parts, components, or materials equivalent to new in performance. 10. HP’s Limited Warranty Statement is valid in any country/region where the covered HP product is distributed by HP. Contracts for additional warranty services, such as on-site service, are available from any authorized HP service facility in countries/regions where the product is distributed by HP or by an authorized importer. c. Grant the customer additional warranty rights, specify the duration of implied warranties which the manufacturer cannot disclaim, or allow limitations on the duration of implied warranties. 3. FOR CONSUMER TRANSACTIONS IN AUSTRALIA AND NEW ZEALAND, THE TERMS IN THIS WARRANTY STATEMENT, EXCEPT TO THE EXTENT LAWFULLY PERMITTED, DO NOT EXCLUDE, RESTRICT, OR MODIFY, AND ARE IN ADDITION TO, THE MANDATORY STATUTORY RIGHTS APPLICABLE TO THE SALE OF THE HP PRODUCTS TO SUCH CUSTOMERS. English 2. For software products, HP’s limited warranty applies only to a failure to execute programming instructions. HP does not warrant that the operation of any product will be uninterrupted or error free. Elemente des Bedienfelds 1 2 4 1. 2. 3. 4. 3 5 6 5. 6. 7. 8. Power-Taste (Netzschalter) Druckkopf-LED Tintenpatronen-LED Power-LED 7 8 Farbanzeige-LED Taste Abbrechen Taste Fortsetzen Fortsetzen-LED Bedeutung der LEDs auf dem Bedienfeld Weitere Informationen zu den LEDs auf dem Bedienfeld finden Sie im Online-Benutzerhandbuch auf der Starter-CD oder auf der Website für Produktunterstützung unter http://www.hp.com/support/businessinkjet1000. Deutsch Leuchtmuster 17 LED-Beschreibung Erklärung und empfohlene Aktionen Die Power-LED blinkt. Der Drucker wird ein- oder ausgeschaltet, verarbeitet einen Druckauftrag oder ein Druckauftrag wurde abgebrochen. • Es ist keine Aktion erforderlich. Die Power-LED leuchtet und die Fortsetzen-LED blinkt. Das Papierfach ist leer. • Legen Sie Papier ein und drücken Sie dann die (Taste Fortsetzen). Der Drucker pausiert, damit die Tinte trocknen kann. • Warten Sie, bis die Tinte getrocknet ist. Die Fortsetzen-LED hört auf zu blinken, wenn die Tinte getrocknet ist. Die Power-LED und die Fortsetzen-LED blinken. Im Drucker liegt ein Papierstau vor. • Drücken Sie die (Taste Fortsetzen), um das gestaute Druckmedium auszuwerfen. • Entfernen Sie alle Medien aus dem Ausgabefach. Öffnen Sie die obere Abdeckung, um nach dem Papierstau zu suchen. Drücken Sie nach der Beseitigung des Papierstaus die (Taste Fortsetzen), um den Druckvorgang fortzusetzen. Die Power-LED blinkt und die Fortsetzen-LED leuchtet. Eine oder mehrere Abdeckungen am Drucker sind geöffnet. • Schließen Sie alle geöffneten Abdeckungen. • Stellen Sie sicher, dass die AutoDuplex-Einheit richtig installiert ist. Ein Druckerfehler ist aufgetreten. • Schalten Sie den Drucker aus und dann wieder ein. LED-Beschreibung Erklärung und empfohlene Aktionen Die Power-LED blinkt und die Druckkopf- und FortsetzenLED leuchten. Die Druckkopfverriegelung ist nicht geschlossen. • Öffnen Sie die Verbrauchsmaterialabdeckung und schließen Sie die Druckkopfverriegelung. Die Druckkopf-LED, eine Farbanzeige-LED und die Fortsetzen-LED leuchten. Ein oder mehrere Druckköpfe müssen überprüft werden. • Installieren Sie die Druckköpfe neu und führen Sie den Druckvorgang erneut durch. • Reinigen Sie die Druckkopfkontakte. Nähere Informationen finden Sie im Online-Benutzerhandbuch. • Wenn der Fehler weiterhin auftritt, ersetzen Sie die angezeigten Druckköpfe. Die Tintenpatronen-LED, eine Farbanzeige-LED und die Fortsetzen-LED leuchten. Eine oder mehrere Tintenpatronen müssen überprüft werden. • Installieren Sie die Tintenpatronen neu und führen Sie den Druckvorgang erneut durch. • Wenn der Fehler weiterhin auftritt, ersetzen Sie die angezeigten Tintenpatronen. Deutsch Leuchtmuster 18 Fehlerbehebung Deutsch Dieser Abschnitt enthält Hinweise zur Fehlerbehebung für allgemeine Probleme im Zusammenhang mit der Hardware- und Softwareinstallation. Probleme beim Drucken einer Ausrichtungsseite Probleme beim Installieren der Software Überprüfen Sie den Drucker, um sicherzustellen, dass folgende Bedingungen erfüllt sind: Überprüfen Sie das Computersystem, um sicherzustellen, dass folgende Bedingungen erfüllt sind: • Power-LED leuchtet und blinkt nicht. Nach einem Kaltstart benötigt der Drucker etwa 45 Sekunden bis zum Erreichen der Betriebstemperatur. • Auf dem Bedienfeld leuchten bzw. blinken keine LEDs, und der Drucker ist betriebsbereit. Wenn LEDs leuchten oder blinken, siehe “Bedeutung der LEDs auf dem Bedienfeld” auf Seite 17. • Prüfen Sie, ob das Netzkabel und andere Kabel in Ordnung und fest mit dem Drucker verbunden sind. • Es befindet sich kein Verpackungsmaterial mehr am Drucker. • Die Druckköpfe und Tintenpatronen sind ordnungsgemäß in die entsprechend farblich gekennzeichneten Schächte eingesetzt. Drücken Sie jede Tintenpatrone und jeden Druckkopf fest herunter, um ihren ordnungsgemäßen Sitz zu gewährleisten. Achten Sie darauf, dass die Schutzfolie von allen Druckköpfen entfernt wurde. • Druckkopfverriegelung und sämtliche Abdeckungen sind geschlossen. • Die hintere Abdeckung bzw. die optionale Auto-Duplex-Einheit sind eingerastet. • Die Medien sind richtig im Fach eingelegt, und es liegt kein Papierstau im Drucker vor. Der Computer erfüllt die Systemanforderungen (siehe Online-Benutzerhandbuch auf der Starter-CD). Überprüfen Sie die Installationsvorbereitungen • Bevor Software unter Windows auf einem Computer installiert wird, müssen alle anderen Programme geschlossen werden. • Wenn der Computer den von Ihnen angegebenen Pfad zur CD nicht erkennt, überprüfen Sie, ob Sie den richtigen Laufwerksbuchstaben eingegeben haben. • Wenn der Computer die Starter-CD im CDLaufwerk nicht erkennen kann, überprüfen Sie die CD auf Beschädigungen. Den Druckertreiber können Sie auch von folgender Website herunterladen: http://www.hp.com/support/ businessinkjet1000. Installieren Sie die Druckersoftware erneut. Wenn Sie mit Windows arbeiten und der Computer den Drucker nicht erkennt, führen Sie das Dienstprogramm zur Datenträgerbereinigung (Scrubber) aus, um den Druckertreiber vollständig zu deinstallieren. Das Dienstprogramm befindet sich im Ordner Utils\Scrubber auf der Starter-CD. Starten Sie das System neu, und installieren Sie den Druckertreiber erneut. Konfigurationsseite Mit der Konfigurationsseite können Sie die aktuellen Druckereinstellungen anzeigen, Druckerprobleme beheben und die Installation von optionalem Zubehör wie zum Beispiel von Fächern überprüfen. Zudem enthält die Konfigurationsseite ein Protokoll der letzten Ereignisse. Wenn der Drucker an ein Netzwerk angeschlossen ist, wird eine zusätzliche Seite für die Netzwerkkonfiguration ausgedruckt, aus der die Netzwerkeinstellungen des Druckers hervorgehen. Weitere Informationen zu den Tools finden Sie im Online-Benutzerhandbuch auf der Starter-CD. 19 Wenn Sie HP anrufen müssen, drucken Sie die Konfigurationsseite vorher aus. Drucken einer Konfigurationsseite 1. Drücken Sie die (Power-Taste) und halten Sie diese gedrückt. Drücken Sie bei gedrückter (Power-Taste) einmal die (Taste Abbrechen). 2. Lassen Sie die (Power-Taste) los. Der Drucker druckt nun eine Druckerkonfigurationsseite. Vereinbarung zur beschränkten Gewährleistung von Hewlett-Packard HP Produkt Dauer der beschränkten Gewährleistung Software 1 Jahr Zubehör 1 Jahr Tintenpatronen 6 Monate* Druckköpfe 1 Jahr* Ekstern printerhardware (siehe folgende Details) 1 Jahr *Weitere Garantieinformationen finden Sie unter http://www.hp.com/support/inkjet_warranty. Umfang der beschränkten Gewährleistung Gewährleistungsausschlüsse 1. Hewlett-Packard (HP) gewährleistet dem Endkunden, dass die obengenannten HP Produkte während des obengenannten Gewährleitungszeitraums frei von Material- und Verarbeitungsfehlern sind. Der Gewährleitungszeitraum beginnt mit dem Kaufdatum. IN DEM NACH GELTENDEM RECHT ZULÄSSIGEN AUSMASS GEWÄHREN WEDER HP NOCH DIE ZULIEFERER VON HP JEGLICHE SONSTIGEN GEWÄHRLEISTUNGEN, WEDER AUSDRÜCKLICHE NOCH STILLSCHWEIGENDE GEWÄHRLEISTUNGEN DER MARKTGÄNGIGKEIT, ZUFRIEDENSTELLENDEN QUALITÄT ODER EIGNUNG FÜR EINEN BESTIMMTEN ZWECK. 3. Die beschränkte Gewährleistung von HP deckt nur Defekte ab, die bei normalem Betrieb des Produkts auftreten. Nicht abgedeckt sind alle übrigen Probleme, einschließlich der Probleme, die auf eine der folgenden Ursachen zurückgeführt werden können: a. Unsachgemäße Wartung oder Modifikationen b. Verwendung von Software, Druckmedien, Ersatzteilen oder Zubehör, die von HP nicht zur Verfügung gestellt bzw. unterstützt werden c. Betrieb außerhalb der technischen Daten des Produkts d. Unberechtigte Veränderungen oder missbräuchliche Verwendung. 4. Bei allen Produkten von Hewlett-Packard hat die Verwendung von Tintenpatronen oder nachgefüllten Tintenpatronen anderer Hersteller als Hewlett-Packard weder Auswirkungen auf die Gewährleistung gegenüber dem Kunden noch auf andere Support-Vereinbarungen zwischen Hewlett-Packard und dem Kunden. Wenn jedoch ein Druckerausfall oder -schaden auf die Verwendung nicht originaler HP Tintenpatronen oder nachgefüllter Tintenpatronen zurückgeführt werden kann, berechnet HP die üblichen Gebühren für Arbeitszeit und Material für in diesem Zusammenhang am Drucker durchgeführte Wartungsarbeiten. 5. Wenn Hewlett-Packard während der geltenden Gewährleistungsfrist Kenntnis von einem Fehler erhält, der unter die Gewährleistung durch Hewlett-Packard fällt, repariert oder ersetzt Hewlett-Packard das Produkt nach eigenem Ermessen. 6. Wenn HP das defekte, unter HP Gewährleistung stehende Produkt weder reparieren noch ersetzen kann, erstattet HP innerhalb eines angemessenen Zeitraums den Kaufpreis für das Produkt zurück. 7. HP trägt keine Verpflichtung für Reparatur, Ersatz oder Kaufpreisrückerstattung, solange der Kunde das defekte Produkt nicht zurückgesendet hat. 8. Ersatzprodukte können neu oder neuwertig sein. Voraussetzung ist jedoch, dass sie über mindestens denselben Funktionsumfang verfügen wie das zu ersetzende Produkt. 9. HP Produkte können instandgesetzte Teile, Komponenten oder Materialien enthalten, die hinsichtlich ihrer Leistung neuwertigen gleichgestellt sind. 10. Die beschränkte Gewährleistung von HP ist in allen Ländern/Regionen gültig, in denen das durch sie gedeckte HP Produkt von HP vertrieben wird. Vereinbarungen für zusätzliche Gewährleistung, zum Beispiel Service vor Ort, sind in Ländern/Regionen, in denen das Produkt durch HP oder durch einen autorisierten Importeur vertrieben wird, über jede autorisierten HP Servicestelle verfügbar. Haftungsausschlüsse 1. In dem nach geltendem Recht zulässigen Ausmaß stehen dem Endkunden über die in dieser Gewährleistungsvereinbarung genannten Ansprüche hinaus keine weiteren Ansprüche an HP zu. 2. IN DEM NACH GELTENDEM RECHT ZULÄSSIGEN AUSMASS, AUSGENOMMEN DER IN DIESER GEWÄHRLEISTUNGSVEREINBARUNG FESTGELEGTEN VERPFLICHTUNGEN, SIND HP ODER DIE ZULIEFERER VON HP IN KEINEM FALL HAFTBAR FÜR DIREKTE, INDIREKTE, BESONDERE, ZUFÄLLIGE ODER FOLGESCHÄDEN, UNABHÄNGIG DAVON, OB DIESE AUF DER BASIS VON VERTRÄGEN, DELIKTRECHT ODER ANDEREN RECHTSTHEORIEN GELTEND GEMACHT WERDEN, UND UNABHÄNGIG DAVON, OB HP ODER DIE ZULIEFERER VON HP VON DER MÖGLICHKEIT EINES SOLCHEN SCHADENS UNTERRICHTET WURDEN. Geltendes Recht 1. Diese Gewährleistungsvereinbarung stattet den Endkunden mit bestimmten Rechten aus. Der Endkunde hat möglicherweise noch weitere Rechte, die in den Vereinigten Staaten von Staat zu Staat, in Kanada von Provinz zu Provinz bzw. allgemein von Land/Region zu Land/Region verschieden sein können. 2. Soweit diese Gewährleistungsvereinbarung nicht dem geltenden Recht entspricht, soll sie als derart abgeändert gelten, dass die hierin enthaltenen Bestimmungen dem geltenden Recht entsprechen. Es ist möglich, dass bestimmte Haftungsausschlusserklärungen und Einschränkungen dieser Gewährleistungsvereinbarung nach geltendem Recht für den Endkunden nicht zutreffen. Bestimmte Bundesstaaten der USA und Länder/Regionen außerhalb der USA (einschließlich einiger kanadischer Provinzen): a. Beschränken die Rechte des Verbrauchers nicht durch die Erklärungen und Einschränkungen dieser Herstellergarantie (z.B. in Großbritannien); b. Schränken die Möglichkeit des Herstellers, solche Erklärungen und Einschränkungen geltend zu machen, in anderer Weise ein; c. Gewähren dem Endkunden weitere Gewährleistungsrechte, definieren die Dauer von stillschweigenden Gewährleistungen, die der Hersteller nicht ausschließen kann, oder gestatten eine Beschränkung der Dauer von stillschweigenden Gewährleistungen. 3. FÜR ENDKUNDEN IN AUSTRALIEN UND NEUSEELAND: DURCH DIESE GEWÄHRLEISTUNGSVEREINBARUNG WERDEN DIE DURCH DAS IN DIESEN LÄNDERN GELTENDE RECHT IM ZUSAMMENHANG MIT DEM KAUF VON HP PRODUKTEN GEWÄHRTEN ENDKUNDENANSPRÜCHE NICHT ÜBER DAS NACH GELTENDEM RECHT ZULÄSSIGE AUSMASS HINAUS AUSGESCHLOSSEN, EINGESCHRÄNKT ODER GEÄNDERT. DIE BEDINGUNGEN DIESER GEWÄHRLEISTUNGSVEREINBARUNG SIND EINE ERWEITERUNG DER GESETZLICHEN GRUNDRECHTE FÜR ENDKUNDEN. Deutsch 2. Bei Softwareprodukten gilt die beschränkte Gewährleistung von HP nur, wenn Programmanweisungen nicht ausgeführt werden. HP gewährleistet weder einen unterbrechungs- noch fehlerfreien Betrieb eines Softwareproduktes. Identification des éléments du panneau de commande 1 2 4 1. 2. 3. 4. Bouton d’alimentation voyant de tête d’impression Voyant de cartouche d’encre voyant d’alimentation 3 5 6 5. 6. 7. 8. 7 8 Voyant indicateur de couleur Bouton Annuler Bouton Reprendre voyant de reprise Interprétation des voyants du panneau de commande Pour plus d’informations sur les voyants du panneau de commande, consultez le guide de l’utilisateur en ligne disponible sur le CD de démarrage ou rendez-vous sur le site Web d’assistance produit à l’adresse suivante : http://www.hp.com/support/businessinkjet1000. Français Signification des voyants 21 Description des voyants Explication et action recommandée Le voyant d’alimentation clignote. L’imprimante est en cours de démarrage ou d’arrêt, ou traite une tâche d’impression, ou une tâche d’impression est en cours d’annulation. • Aucune action n’est requise. Le voyant d’alimentation est allumé et le voyant de reprise clignote. L’imprimante ne contient plus de papier. • Chargez du papier et appuyez sur le (bouton de reprise). L’imprimante attend que l’encre sèche. • Attendez le séchage de l’encre. Le voyant de reprise s’arrêtera de clignoter. Le voyant d’alimentation et le voyant de reprise clignotent. Du papier est coincé dans l’imprimante. • Appuyez sur le (bouton de reprise) pour éjecter le support coincé. • Retirez tous les supports du bac de sortie. Ouvrez le capot supérieur pour localiser le bourrage. Après élimination du bourrage, appuyez sur le (bouton de reprise) pour poursuivre la tâche d’impression. Le voyant d’alimentation clignote et le voyant de reprise est allumé. Un ou plusieurs capot(s) de l’imprimante est (sont) ouvert(s). • Fermez tous les capots. • Vérifiez que l’unité auto-duplex est installée correctement. Une erreur d’imprimante s’est produite. • Mettez l’imprimante hors tension, puis à nouveau sous tension. Description des voyants Explication et action recommandée Le voyant d’alimentation clignote, le voyant de tête d’impression et le voyant de reprise sont allumés. Le verrou des têtes d’impression n’est pas correctement fermé. • Ouvrez le capot des composants d’impression et replacez le verrou des têtes d’impression. Le voyant des têtes d’impression, un voyant indicateur de couleur et le voyant de reprise sont allumés. Une ou plusieurs tête(s) d’impression demande(nt) une intervention. • Réinstallez les têtes d’impression et essayez d’imprimer. • Essayez de nettoyer les contacts des têtes d’impression. Reportez-vous au guide de l’utilisateur en ligne. • Si l’erreur persiste, remplacez la ou les tête(s) d’impression désignée(s). Le voyant de cartouche d’encre, un voyant indicateur de couleur et le voyant de reprise sont allumés. Une ou plusieurs cartouche(s) d’encre demande(nt) une intervention. • Réinstallez les cartouches d’encre et essayez d’imprimer. • Si l’erreur persiste, remplacez la ou les cartouche(s) d’encre désignée(s). Français Signification des voyants 22 Dépannage Français Cette section vous propose des suggestions de dépannage pour certains problèmes liés à l’installation du matériel ou du logiciel. Problèmes d’impression d’une page d’alignement Problèmes liés à l’installation du logiciel Vérifiez l’imprimante pour vous assurer des points suivants : Vérifiez l’ordinateur pour vous assurer des points suivants : • Le voyant d’alimentation est allumé et ne clignote pas. Lors de la mise sous tension initiale de l’imprimante, il faut environ 45 secondes pour son préchauffage. • Aucun voyant du panneau de commande n’est allumé ou ne clignote et l’imprimante se trouve dans l’état Prêt. Si des voyants sont allumés ou clignotent, reportez-vous à la section « Interprétation des voyants du panneau de commande », à la page 21. • Assurez-vous que le cordon d’alimentation et les autres câbles fonctionnent et sont bien connectés à l’imprimante. • Tous les éléments et rubans d’emballage ont été enlevés de l’imprimante. • Les têtes d’impression et les cartouches d’encre sont bien installées dans leurs emplacements respectifs, de même couleur. Appuyez fermement sur chacune d’elles pour assurer un bon contact. Prenez soin de retirer le ruban adhésif de protection de chaque tête d’impression. • Le loquet des têtes d’impression et tous les capots sont fermés. • Le panneau d’accès arrière ou l’unité autoduplex en option est bien en place. • Le support est correctement chargé dans le bac et il n’est pas coincé dans l’imprimante. La configuration système de l’ordinateur est conforme aux exigences (consultez le guide de l’utilisateur en ligne disponible sur le CD de démarrage). Vérification des étapes préalables à l’installation • Avant de procéder à l’installation de logiciels sur un ordinateur Windows, assurez-vous que tous les autres programmes sont fermés. • Si l’ordinateur ne reconnaît pas le chemin d’accès que vous avez indiqué pour le lecteur de CD-ROM, vérifiez que vous avez spécifié la lettre d’unité correcte. • Si votre ordinateur n’arrive pas à lire le CD de démarrage placé dans le lecteur de CD-ROM, vérifiez si le CD n’est pas endommagé. Vous pouvez également télécharger le pilote d’imprimante à l’adresse suivante : http://www.hp.com/support/ businessinkjet1000. Réinstallation du logiciel d’imprimante Si votre ordinateur (équipé de Windows) ne parvient pas à détecter l’imprimante, exécutez l’utilitaire de suppression (situé dans le dossier Utils\Scrubber sur le CD de démarrage) pour effectuer une désinstallation complète du pilote de l’imprimante. Redémarrez l’ordinateur et réinstallez le pilote de l’imprimante. Page de configuration La page de configuration vous permet de consulter les paramètres actuels de l’imprimante, de résoudre les problèmes relatifs à l’imprimante et de vérifier l’installation des accessoires en option, tels que des bacs. Elle contient également un journal des événements récents. Si l’imprimante est connectée à un réseau, une page de configuration supplémentaire est imprimée. Cette page affiche les paramètres réseau de l’imprimante. Pour plus d’informations sur ces outils, reportez-vous au guide de l’utilisateur en ligne, disponible sur le CD de démarrage. Si vous devez appeler HP, imprimez au préalable la page de configuration. 23 Pour imprimer une page de configuration 1. Appuyez sur le (bouton d’alimentation). Tout en conservant le (bouton d’alimentation) enfoncé, appuyez une fois sur le (bouton d’annulation). 2. Relâchez le (bouton d’alimentation). L’imprimante imprime une page de configuration. Garantie limitée Hewlett-Packard Produit HP Durée de la garantie limitée Logiciel 1 an Accessoires 1 an Cartouches d’encre 6 mois* Têtes d’impression 1 an* Equipement périphérique de l’imprimante (voir les détails ci-dessous) 1 an *Pour plus d’informations sur la garantie, consultez le site http://www.hp.com/support/inkjet_warranty. Etendue de la garantie limitée Limites de la garantie 1. Hewlett-Packard garantit les produits HP au client final contre tout défaut de fabrication et de main d’œuvre pendant la période désignée prenant effet à compter de la date d’achat par le client. HP OU SES FOURNISSEURS TIERS EXCLUENT TOUTE AUTRE GARANTIE, EXPRESSE OU NON, EN RAPPORT AVEC LES PRODUITS HP. HP ET SES FOURNISSEURS TIERS EXCLUENT EN PARTICULIER TOUTE GARANTIE IMPLICITE CONCERNANT SES CONDITIONS DE MISE SUR LE MARCHÉ ET SON ADEQUATION À QUELQUE UTILISATION PARTICULIÈRE QUE CE SOIT. 3. La garantie limitée de HP ne couvre que les défauts découlant d’un usage normal du produit. Par conséquent, cette garantie ne couvre pas les suites : a. d’un mauvais entretien ou d’un entretien incorrect ; b. de l’utilisation de logiciels, de supports, de pièces ou de consommables non fournis ou pris en charge par HP ; c. d’une utilisation en dehors des spécifications du produit ; d. d’une modification non autorisée ou d’une utilisation abusive. 4. En ce qui concerne les imprimantes HP, l’utilisation de cartouches d’impression d’un autre fabricant que HP ou de cartouches reconditionnées n’affecte ni la garantie au client, ni les contrats de maintenance HP conclus avec le client. Cependant, si la défectuosité présentée par l’imprimante ou son endommagement est la conséquence de l’utilisation de telles cartouches, HP facturera le coût de la main d’œuvre et des pièces détachées à la réparation. 5. Si le client signale à HP, pendant la période de garantie applicable, la défectuosité d’un produit couvert par la garantie, HP réparera ou, à son choix, remplacera le produit défectueux. 6. Si HP n’est pas en mesure de réparer ou de remplacer le produit défectueux dans un délai raisonnable, HP remboursera le produit sous garantie au prix d’achat payé par le client. 7. HP ne s’engage nullement à réparer, à remplacer ou à rembourser tout produit défectueux tant que celui-ci ne lui aura pas été renvoyé. 8. Tout produit de remplacement sera neuf ou remis à neuf et, dans ce dernier cas, présentera des fonctionnalités au moins égales à celles du produit remplacé. 9. Les produits HP contiennent parfois des matériaux, des composants et des pièces remanufacturées présentant des qualités équivalentes aux produits neufs. 10. La garantie limitée HP est valide dans tous les pays et régions où les produits HP sont distribués par HP. Des contrats d’extension des services de garantie sur site peuvent être obtenus auprès de tout centre d’assistance agréé HP dans tous les pays et régions où les produits HP sont distribués par Hewlett-Packard ou un importateur agréé. Limites de responsabilité 1. Dans les limites permises par la législation locale, cette garantie limitée constitue et exprime l’intégralité des droits et prétentions dont bénéficie le client. 2. A L’EXCEPTION DES OBLIGATIONS SPÉCIFIÉES DANS CETTE GARANTIE LIMITÉE, HP NE POURRA ÊTRE TENU RESPONSABLE D’AUCUN DOMMAGE, DIRECT, INDIRECT, NATUREL OU ADÉQUAT, QUEL QU’IL SOIT, QU’IL SE BASE SUR UN CONTRAT OU SUR LA LOI OU TOUTE AUTRE THÉORIE JURIDIQUE, ET CELA MÊME SI HP A ÉTÉ AVERTI DE LA POSSIBILITÉ D’UN TEL DOMMAGE. Loi locale 1. La garantie limitée accorde au consommateur des droits spécifiques. Ce dernier peut cependant bénéficier d’autres droits dont la nature peut varier en fonction de l’état (aux Etats-Unis), de la province (au Canada) et du pays/de la région (ailleurs dans le monde). 2. Si les termes de cette garantie limitée se trouvent en contradiction avec les lois en vigueur localement, ils seront considérés comme modifiés pour correspondre aux lois en question. Dans ce cas, certains termes de cette garantie limitée pourraient ne pas s’appliquer à notre clientèle. Par exemple, certains états des Etats-Unis ainsi que certains pays en dehors des Etats-Unis (y compris certaines provinces du Canada) peuvent : a. assurer une garantie légale impérative au consommateur (par exemple au Royaume-Uni) ; b. limiter la faculté d’un fabricant à restreindre sa responsabilité ou à imposer des limitations ; ou c. accorder au client des garanties supplémentaires, stipuler la durée des garanties implicites que le fabricant ne peut décliner, ou autoriser une limitation de durée pour les garanties implicites. 3. POUR LES TRANSACTIONS DES CONSOMMATEURS EN AUSTRALIE ET EN NOUVELLE-ZELANDE, LES TERMES DE CETTE GARANTIE, EN DEHORS DES EXCEPTIONS LEGALEMENT PERMISES, N’EXCLUENT, NE RESTREIGNENT, NI NE MODIFIENT LES DROITS IMPERATIVEMENT PREVUS PAR LA LOI, AUXQUELS ILS S’AJOUTENT, ET QUI SONT APPLICABLES A LA VENTE DES PRODUITS HP A SES CLIENTS. Français 2. Concernant les produits logiciels, cette garantie HP ne s’applique qu’aux instructions de programmation enregistrées sur le support. HP ne garantit pas le fonctionnement ininterrompu ou sans erreur de ses produits. De onderdelen van het bedieningspaneel leren kennen 1 2 4 1. 2. 3. 4. 3 5 6 5. 6. 7. 8. Aan/Uit-knop Printkoplampje Inktpatroonlampje Aan/Uit-lampje 7 8 Kleurenlampjes Knop Annuleren Knop Doorgaan Lampje Doorgaan De betekenis van de lampjes van het bedieningspaneel Zie de gebruikershandleiding op de Starter-cd voor meer informatie over de lampjes van het bedieningspaneel. U kunt ook een bezoek brengen aan de website voor productondersteuning op http://www.hp.com/support/businessinkjet1000. Brandpatroon Statusbeschrijving Uitleg en uit te voeren handeling Nederlands Het Aan/Uit-lampje knippert. De printer is bezig met opwarmen of met het verwerken van een afdruktaak of er is een afdruktaak geannuleerd. • U hoeft niets te doen. 25 Het Aan/Uit-lampje brandt en het lampje Doorgaan knippert. Het printerpapier is op. • Plaats papier en druk op de (knop Doorgaan). De printer wacht op het drogen van de inkt. • Wacht totdat de inkt droog is. De inkt is droog als het lampje Doorgaan niet meer knippert. Het Aan/Uit-lampje en het lampje Doorgaan knipperen. Er is papier vastgelopen in de printer. • Druk op de (knop Doorgaan) om het vastgelopen papier te verwijderen. • Verwijder al het papier uit de uitvoerbak. Open de bovenste klep om het vastgelopen papier te kunnen zien. Nadat u het vastgelopen papier heeft verwijderd, drukt u op de (knop Doorgaan) om de afdruktaak te hervatten. Het Aan/Uit-lampje knippert en het lampje Doorgaan brandt. Een of meer kleppen van de printer zijn open. • Sluit kleppen die nog open zijn. • Zorg dat de automatische duplexeenheid goed is aangebracht. Er is een printerfout opgetreden. • Zet de printer uit en weer aan. Statusbeschrijving Uitleg en uit te voeren handeling Het Aan/Uit-lampje knippert en het Printkoplampje en het lampje Doorgaan branden. De printkopgrendel is niet vergrendeld. • Open de klep van de afdrukbenodigdheden en vergrendel de printkopgrendel. Het printkoplampje, een kleurenlampje en het lampje Doorgaan branden. Een of meer printkoppen moeten worden nagekeken. • Plaats de printkoppen opnieuw en probeer af te drukken. • Reinig de contacten van de printkoppen. Raadpleeg de elektronische gebruikershandleiding. • Als het probleem aanhoudt, moeten de aangegeven printkoppen worden vervangen. Het inktpatroonlampje, een kleurenlampje en het lampje Doorgaan branden. Een of meer inktpatronen moeten worden nagekeken. • Plaats de inktpatronen opnieuw en probeer af te drukken. • Als het probleem aanhoudt, moeten de aangegeven inktpatronen worden vervangen. Nederlands Brandpatroon 26 Problemen oplossen In dit gedeelte worden oplossingen beschreven voor problemen die vaak optreden tijdens de installatie van hardware en software. Problemen bij het afdrukken van een uitlijnpagina Problemen bij het installeren van de software Controleer de printer op het volgende: Controleer de computer op het volgende: • Het Aan/uit-lampje brandt (knippert niet). Nadat de printer is aangezet, heeft de printer ongeveer 45 seconden nodig om op te warmen. • Geen enkel lampje op het bedieningspaneel brand of knippert en de printer is klaar om af te drukken. Wanneer er lampjes branden of knipperen raadpleegt u “De betekenis van de lampjes van het bedieningspaneel” op pagina 25. • Controleer of de voedingskabel en andere kabels werken en goed op de printer zijn aangesloten. • Alle verpakkingstape en -materialen moeten van de printer zijn verwijderd. • Printkoppen en inktcartridges moeten goed geplaatst zijn in de juiste met kleuren gecodeerde slots. Druk de printkoppen en inktpatronen goed op hun plaats. Controleer of de beschermtape van alle printkoppen is verwijderd. • De printkopgrendel en alle kleppen moeten gesloten zijn. • Het achterpaneel en de optionele automatische duplexeenheid moeten stevig op hun plaats zitten. • Media moeten goed in de lade geplaatst zijn en niet in de printer zijn vastgelopen. De computer moet voldoen aan de systeemvereisten (zie de gebruikershandleiding op de Starter-cd). Controleer of aan de installatievereisten wordt voldaan • Voordat u software op een computer met Windows installeert, moeten alle andere programma’s zijn afgesloten. • Als het pad naar het cd-rom-station niet wordt herkend, controleert u of u de juiste stationsaanduiding hebt opgegeven. • Als uw computer de cd in het cd-station niet herkent, controleert u of de cd is beschadigd. U kunt het printerstuurprogramma ook downloaden van http://www.hp.com/support/ businessinkjet1000. Het printerstuurprogramma opnieuw installeren Als u Windows gebruikt en de computer kan de printer niet vinden, voert u het hulpprogramma voor het verwijderen van software (“Scrubber”, te vinden in de map Utils\Scrubber op de Starter-cd) uit. Hiermee verwijdert u het printerstuurprogramma volledig. Start de computer opnieuw op en installeer het printerstuurprogramma opnieuw. Configuratiepagina Nederlands Gebruik de configuratiepagina om de huidige printerinstellingen te bekijken, hulp te zoeken bij het oplossen van problemen met de printer en om de plaatsing van optionele accessoires als laden te controleren. De configuratiepagina bevat ook een log met recente gebeurtenissen. Als de printer op een netwerk is aangesloten, wordt een extra configuratiepagina voor het netwerk afgedrukt. Hierop staan de netwerkinstellingen voor de printer. Zie de gebruikershandleiding op de Starter-cd voor meer informatie over deze hulpmiddelen. Als u HP wilt bellen, drukt u eerst de configuratiepagina af. 27 Een configuratiepagina afdrukken 1. Houd (Aan/Uit-knop) ingedrukt. Terwijl u (Aan/Uit-knop) ingedrukt houdt, drukt u één maal op (knop Annuleren). 2. Laat (Aan/Uit-knop) los. De printer drukt een configuratiepagina af. Beperkte garantie van Hewlett-Packard Product van HP Duur van beperkte garantie Software 1 jaar Accessoires 1 jaar Inktpatronen 6 maanden* Printkoppen 1 jaar* Printerrandapparatuur (zie de volgende gegevens) 1 jaar *Raadpleeg voor meer gedetailleerde informatie over garantie http://www.hp.com/support/inkjet_warranty. Geldigheid van beperkte garantiey Beperking van garantie 1. Hewlett-Packard verstrekt aan de eindgebruiker de garantie dat de bovenvermelde producten van HP vrij zijn van materiaal- en fabricagefouten gedurende de bovenvermelde tijdsduur die begint op de dag van aankoop door de klant. IN ZOVERRE DOOR DE PLAATSELIJKE WET IS TOEGESTAAN, VERSTREKKEN NOCH HP, NOCH DERDE LEVERANCIERS ENIGE ANDERE GARANTIE OF VOORWAARDE, HETZIJ UITDRUKKELIJKE OF STILZWIJGENDE GARANTIES OF VOORWAARDEN VAN VERKOOPBAARHEID, BEVREDIGENDE KWALITEIT EN GESCHIKTHEID VOOR EEN BEPAALD DOEL. 3. De beperkte garantie van HP geldt alleen voor defecten die zich voordoen als resultaat van normaal gebruik van het product en is niet van toepassing bij andere problemen, met inbegrip van defecten die het resultaat zijn van: a. Verkeerd of ondeskundig onderhoud of aanpassing b. Software, informatiedragers, onderdelen of benodigdheden die niet door HP worden geleverd of ondersteund c. Gebruik dat niet in overeenstemming is met de specificaties van het product d. Niet-geautoriseerde aanpassing of misbruik 4. Voor HP-printerproducten is het gebruik van een niet door HP vervaardigde of nagevulde inktpatroon niet van invloed op de garantie aan de klant of op een contract voor ondersteuning dat tussen de klant en HP is gesloten. Als defecten of beschadigingen aan de printer echter kunnen worden toegeschreven aan het gebruik van een niet door HP vervaardigde of nagevulde inktpatroon, zal HP de gebruikelijke kosten voor arbeidsuren en materiaal voor het repareren van de printer voor het betreffende defect of de betreffende beschadiging in rekening brengen. Beperking van aansprakelijkheid 1. In zoverre dit is toegestaan onder de lokale wetgeving zijn de rechtsmiddelen die in deze garantieverklaring worden verstrekt, de enige en exclusieve rechtsmiddelen van de klant. 2. IN ZOVERRE DIT IS TOEGESTAAN ONDER DE LOKALE WETGEVING, MET UITZONDERING VAN DE SPECIFIEKE BEPALINGEN IN DEZE GARANTIEVERKLARING, ZIJN HP EN HAAR LEVERANCIERS IN GEEN GEVAL AANSPRAKELIJK VOOR DIRECTE, INDIRECTE, SPECIALE OF INCIDENTELE SCHADE OF GEVOLGSCHADE, ZIJ HET OP BASIS VAN CONTRACT, DWANG OF ENIG ANDERE JURIDISCHE THEORIE, OOK NIET ALS HP EN HAAR LEVERANCIERS OP DE HOOGTE ZIJN GEBRACHT VAN DE MOGELIJKHEID VAN DERGELIJKE SCHADE. Plaatselijke wet 1. Deze garantieverklaring verleent de klant bepaalde juridische rechten. De klant kan over andere rechten beschikken die in de VS van staat tot staat, in Canada van provincie tot provincie en elders van land/regio tot land/regio kunnen verschillen. 5. Als HP tijdens de garantieperiode op de hoogte wordt gebracht van een defect van een product dat onder de garantie van HP valt, wordt het defecte product door HP gerepareerd of vervangen. 2. In zoverre deze garantieverklaring niet overeenstemt met de lokale wetgeving, zal deze garantieverklaring als aangepast en in overeenstemming met dergelijke lokale wetgeving worden beschouwd. Onder deze lokale wetgeving is het mogelijk dat bepaalde afwijzingen en beperkingen in deze garantieverklaring niet op de klant van toepassing zijn. Sommige staten in de Verenigde Staten en bepaalde overheden buiten de Verenigde Staten (inclusief provincies in Canada) kunnen bijvoorbeeld: 6. Als een defect product dat onder de garantie van HP valt, niet door HP gerepareerd of vervangen kan worden, zal HP de aankoopprijs voor het defecte product terugbetalen binnen een redelijke termijn nadat HP op de hoogte is gebracht van het defect. a. De afwijzingen en beperkingen in deze garantieverklaring als tenietgedaan beschouwen ter bescherming van de wettelijk voorgeschreven rechten van de klant (bijvoorbeeld in het Verenigd Koninkrijk); 7. b. De mogelijkheid van een fabrikant voor het doen gelden van dergelijke afwijzingen of voorwaarden anderzijds beperken; of HP is niet verplicht het defecte product te repareren, vervangen of vergoeden totdat het is geretourneerd aan HP. 8. Een vervangingsproduct mag nieuw of bijna nieuw zijn op voorwaarde dat het ten minste dezelfde functionaliteit bezit als het product dat vervangen wordt. 9. Producten van HP kunnen gereviseerde onderdelen, componenten of materialen bevatten, waarvan de prestaties gelijkwaardig zijn aan die van nieuwe producten. 10. De beperkte garantie van HP is geldig in elk land/elke regio waar het gegarandeerde product van HP door HP wordt gedistribueerd. Contracten voor extra garantieservice, zoals service op de locatie van de klant, zijn verkrijgbaar bij ieder erkend HP servicekantoor in landen/ regio’s waar het product door HP of een erkende importeur wordt gedistribueerd. c. De klant aanvullende rechten onder de garantie bieden, de tijdsduur van stilzwijgende garanties bepalen die niet door de fabrikant afgewezen kan worden, en beperkingen op de tijdsduur van stilzwijgende garanties niet toestaan. 3. MET BETREKKING TOT CONSUMENTENTRANSACTIES IN AUSTRALIË EN NIEUW-ZEELAND WORDEN DE WETTELIJK VOORGESCHREVEN RECHTEN DIE VAN TOEPASSING ZIJN OP DE AANKOOP VAN PRODUCTEN VAN HP AAN DERGELIJKE KLANTEN, DOOR DE VOORWAARDEN IN DEZE GARANTIEVERKLARING NIET TENIETGEDAAN, BEPERKT OF VERANDERD, BEHALVE IN ZOVERRE DOOR DE WET IS TOEGESTAAN, EN VORMEN DE VOORWAARDEN VAN DEZE GARANTIEVERKLARING EEN AANVULLING OP DEZE RECHTEN. Nederlands 2. Voor softwareproducten is de beperkte garantie van HP alleen van toepassing op programmeringsinstructies die niet kunnen worden uitgevoerd. HP garandeert niet dat de werking van een product ononderbroken of vrij van fouten is. Identificazione delle parti del pannello di controllo 1 2 4 1. 2. 3. 4. 3 5 6 5. 6. 7. 8. Pulsante Accensione spia Testine di stampa Spia delle cartucce di stampa spia Accensione 7 8 Spie del colore Pulsante Annulla Pulsante Riavvia spia Riavvia Italiano Significato delle spie del pannello di controllo Per ulteriori informazioni sulle spie del pannello di controllo, consultare la Guida in linea disponibile sul CD di avviamento oppure visitare il sito Web dell’assistenza all’indirizzo http://www.hp.com/support/businessinkjet1000. Tipo di spia 29 Descrizione della spia Spiegazione e azione consigliata La spia Accensione lampeggia. La stampante si sta spegnendo o accendendo oppure sta elaborando un processo di stampa, oppure ancora è stato annullato un processo di stampa. • Nessuna azione da eseguire. La spia Accensione è accesa e la spia Riavvia lampeggia. La carta nella stampante è esaurita. • Caricare della carta, quindi premere (pulsante Riavvia). La stampante è in pausa in attesa che l’inchiostro asciughi. • Attendere che l’inchiostro sia asciutto. La spia Riavvia cesserà di lampeggiare. La spia Accensione e la spia Riavvia lampeggiano. Il supporto di stampa è inceppato nella stampante. • Premere (pulsante Riavvia) per espellere il supporto inceppato. • Rimuovere tutti i supporti di stampa dal vassoio di raccolta. Aprire il coperchio superiore per eliminare l’inceppamento. Dopo aver eliminato l’inceppamento, per continuare la stampa, premere (pulsante Riavvia). La spia Accensione lampeggia e la spia Riavvia è accesa. Uno o più coperchi della stampante sono aperti. • Chiudere i coperchi aperti. • Verificare che l’unità duplex automatico sia installata correttamente. Si è verificato un errore della stampante. • Spegnere e riaccendere la stampante. Descrizione della spia Spiegazione e azione consigliata La spia Accensione lampeggia e le spie Testine di stampa e Riavvia sono accese. Il fermo delle testine di stampa non è assicurato. • Aprire il coperchio dei materiali di consumo ed assicurare il fermo delle testine di stampa. La spia Testine di stampa, una spia di livello colore e la spia Riavvia sono accese. Una o più testine di stampa richiedono un intervento. • Installare di nuovo le testine di stampa e riprovare a stampare. • Provare a pulire i contatti delle testine di stampa. Per ulteriori informazioni, vedere la Guida in linea. • Se l’errore persiste, sostituire la testina o le testine di stampa come indicato. La spia Cartucce di stampa, una spia di livello colore e la spia Riavvia sono accese. Una o più cartucce di stampa richiedono un intervento. • Installare di nuovo le cartucce di stampa e riprovare a stampare. • Se l’errore persiste, sostituire la cartuccia o le cartucce di stampa come indicato. Italiano Tipo di spia 30 Risoluzione dei problemi Italiano In questa sezione vengono forniti suggerimenti per la risoluzione di alcuni dei più comuni problemi associati all’installazione hardware e software. Problemi durante la stampa di una pagina di allineamento Problemi durante l’installazione del software Controllare la stampante e verificare quanto segue: Controllare il computer e verificare quanto segue: • Assicurarsi che la spia Accensione sia accesa e non lampeggi. Quando la stampante viene accesa per la prima volta, impiega circa 45 secondi per riscaldarsi. • Assicurarsi che le spie del pannello di controllo siano spente e che lo stato della stampante sia Pronto. Se delle spie sono accese o lampeggianti, vedere “Significato delle spie del pannello di controllo“ a pagina 29 • Assicurarsi che il cavo di alimentazione e gli altri cavi funzionino e siano collegati correttamente alla stampante. • Assicurarsi di avere rimosso tutti i nastri e i materiali di imballo dalla stampante. • Assicurarsi di avere installato correttamente le testine e le cartucce di stampa nei relativi alloggiamenti codificati in colore. Premere con decisione su ciascuna di esse per assicurare un buon contatto. Assicurarsi di avere rimosso il nastro protettivo da ciascuna testina di stampa. • Assicurarsi di avere chiuso il fermo delle testine di stampa e tutti i coperchi. • Assicurarsi che il pannello di accesso posteriore o l’unità duplex automatico sia bloccato in posizione. • Assicurarsi di avere caricato correttamente i supporti nel vassoio e che non vi siano inceppamenti nella stampante. Assicurarsi che il computer soddisfi i requisiti di sistema. Consultare la Guida in linea sul CD di avviamento. Verificare le operazioni preliminari dell’installazione • Prima di installare il software su un computer Windows, verificare che tutti gli altri programmi siano chiusi. • Se il computer non riconosce il percorso dell’unità del CD, verificare di avere specificato la lettera giusta relativa a tale unità. • Se il computer non riconosce il CD di avviamento nella relativa unità, controllare che il CD non sia danneggiato. È inoltre possibile scaricare il driver della stampante da http://www.hp.com/support/ businessinkjet1000. Reinstallare il software della stampante Se si utilizza Windows e la stampante non viene rilevata dal computer, eseguire la utility Scrubber (disponibile nella cartella Utils\Scrubber del CD di avviamento) per disinstallare completamente il driver della stampante. Riavviare il computer e reinstallare il driver della stampante. Pagina di configurazione Utilizzare la pagina di configurazione per la visualizzazione delle impostazioni correnti della stampante, la risoluzione dei problemi di stampa e la verifica dell’installazione degli accessori opzionali, come ad esempio i vassoi. La pagina di configurazione include inoltre un registro degli eventi recenti. Se la stampante è collegata a una rete, viene stampata un’ulteriore pagina di configurazione di rete in cui sono indicate le impostazioni di rete della stampante. Per ulteriori informazioni su tali strumenti, consultare la Guida in linea sul CD di avviamento. In caso di necessità, prima di contattare HP, stampare la pagina di configurazione. 31 Per stampare una pagina di configurazione 1. Premere e tenere premuto (pulsante Accensione). Mentre (pulsante Accensione) è premuto, premere una volta (pulsante Annulla). 2. Rilasciare (pulsante Accensione). La stampante stampa una pagina di configurazione della stampante. Dichiarazione di garanzia limitata Hewlett-Packard Prodotto HP Durata della garanzia Software 1 anno Accessori 1 anno Cartucce di inchiostro 6 mesi* Testine di stampa 1 anno* Hardware della stampante (vedere i dettagli di seguito) 1 anno *Per informazioni più dettagliate sulla garanzia, visitare il sito Web all’indirizzo http://www.hp.com/support/inkjet_warranty. Misura della garanzia limitata Limitazioni di garanzia 1. La Hewlett-Packard garantisce all’utente finale che i prodotti HP specificati in questa sede sono esenti da difetti di materiale e di manodopera per il periodo indicato in precedenza, a partire dalla data di acquisto del prodotto da parte del cliente. NELLA MISURA PREVISTA DALLE LEGGI LOCALI, NÉ LA HP E NÉ I FORNITORI DI TERZE PARTI OFFRONO GARANZIA ALCUNA O CONDIZIONI DI ALCUN TIPO, SIANO ESSE ESPRESSE O IMPLICITE O CONDIZIONI DI COMMERCIABILITÀ, LIVELLO DI QUALITÀ SODDISFACENTE ED IDONEITÀ AD UNO SCOPO PARTICOLARE. 3. La garanzia limitata di HP copre solo i difetti derivanti dall’utilizzo regolare del prodotto e non prevede altri problemi, inclusi quelli risultanti da: a. Manutenzione o modifiche improprie. b. Software, supporti, parti o materiali di consumo non provenienti o non supportati dalla HP. c. Funzionamento non previsto dalle specifiche del prodotto. d. Modifica o abuso non autorizzati. 4. Per le stampanti HP, l’uso di una cartuccia di inchiostro non HP o di una cartuccia ricaricata non compromette la garanzia per il cliente o qualsiasi altro contratto di assistenza HP con il cliente stesso. Tuttavia, qualora guasti o difetti alla stampante venissero attribuiti all’uso di una cartuccia non HP o ricaricata, la HP addebiterà i costi standard di tempo di manutenzione e materiale per eliminare il suddetto guasto o difetto. 5. Se, durante il periodo di garanzia, HP riceve avviso di un difetto di uno dei prodotti coperto dalla garanzia, HP riparerà o sostituirà il prodotto a sua discrezione. Limitazioni di responsabilità 1. Nella misura prevista dalle leggi locali, i rimedi previsti da questa Dichiarazione di garanzia costituiscono gli unici a disposizione del cliente. 2. NELLA MISURA PREVISTA DALLE LEGGI LOCALI, FATTA ECCEZIONE PER LE OBBLIGAZIONI DEFINITE IN MODO SPECIFICO IN QUESTA DICHIARAZIONE DI GARANZIA, IN NESSUN CASO LA HP O I SUOI RIVENDITORI DI TERZE PARTI SARANNO RITENUTI RESPONSABILI PER DANNI DIRETTI, INDIRETTI, SPECIALI, FORTUITI O DERIVATI, SIA IN BASE A CONTRATTO, ILLECITO O ALTRA TEORIA LEGALE CHE SU AVVISO DELL’EVENTUALITÀ DI TALI DANNI. Leggi locali 1. Questa Dichiarazione di garanzia offre al cliente diritti legali specifici. Il cliente potrebbe godere di altri diritti che variano da stato a stato negli Stati Uniti, da provincia a provincia in Canada e da Paese/ regione a Paese/regione nel resto del mondo. 2. Nella misura in cui questa Dichiarazione di garanzia risultasse in contrasto con le leggi locali, verrà considerata modificata in modo da renderla conforme a tali leggi. In base alle suddette leggi vigenti, alcune dichiarazioni e limitazioni di questa Dichiarazione di garanzia potrebbero non valere per il cliente. Ad esempio, alcuni stati negli Stati Uniti, così come alcuni governi fuori dagli Stati Uniti (incluse le province del Canada) potrebbero: 6. Se HP non è in grado di riparare o sostituire, come di pertinenza, un prodotto difettoso in garanzia, HP provvederà entro un periodo di tempo ragionevole dal ricevimento dell’avviso del difetto a rimborsare il prezzo di acquisto del prodotto. a. Impedire che le esclusioni e le limitazioni di questa Dichiarazione di garanzia limitino i diritti dei consumatori previsti dalla legge (ad esempio, nel Regno Unito); 7. b. Limitare altrimenti il diritto del produttore di applicare tali esclusioni e limitazioni; oppure HP non è tenuta in alcun modo a riparare il prodotto, a sostituirlo o a fornire un rimborso finché il cliente non restituisce il prodotto difettoso. 8. Qualsiasi prodotto sostitutivo potrà essere nuovo o come nuovo, fermo restando che le funzionalità saranno almeno equivalenti a quelle del prodotto sostituito. 9. I prodotti HP possono contenere parti, componenti o materiali rigenerati equivalenti per prestazioni a parti nuove. 10. La Dichiarazione della garanzia limitata di HP è valida in qualsiasi Paese/regione in cui il prodotto HP specifico viene distribuito da HP. I contratti per servizi di garanzia addizionali, quali l’assistenza in loco, sono disponibili presso qualsiasi centro di assistenza HP autorizzato nei Paesi/regioni in cui il prodotto viene distribuito dalla HP o da un rivenditore autorizzato. c. Riconoscere al cliente ulteriori diritti derivanti dalla garanzia, specificare la durata delle garanzie implicite che il produttore dovrà accettare o consentire limitazioni sulla durata delle garanzie implicite. 3. PER LE TRANSAZIONI CON I CLIENTI EFFETTUATE IN AUSTRALIA E IN NUOVA ZELANDA, I TERMINI DELLA PRESENTE DICHIARAZIONE DI GARANZIA, FATTA ECCEZIONE PER QUANTO LEGALMENTE CONSENTITO, NON ESCLUDONO, LIMITANO O MODIFICANO MA INTEGRANO I DIRITTI STATUTARI OBBLIGATORI APPLICABILI ALLA VENDITA DEI PRODOTTI HP A TALI CLIENTI. Italiano 2. Per i prodotti software, la garanzia limitata di HP viene applicata solo nel caso in cui non sia possibile eseguire le istruzioni di programmazione. HP non garantisce tuttavia che il funzionamento dei propri prodotti sarà ininterrotto e privo di errori. »``Hô``Y OhóëªdG ¿Éª°†∏d Hewlett-Packard ¿É«H OhóÙG áfɪ°†dG Ióe HP äÉéàæe óMGh ΩÉY èeGÈdG óMGh ΩÉY äÉ≤ë∏ŸG * Qƒ¡°T 6 È◊G ¢û«WGôN *óMGh ΩÉY áYÉÑ£dG ¢ShDhQ óMGh ΩÉY (π«°UÉØàdG øe ójõŸ √ÉfOCG ô¶fG) á≤ë∏ŸG á©HÉ£dG Iõ¡LCG .http://www.hp.com/support/inkjet_warranty ô¶fG ,¿Éª°†dG øY á∏°üØŸG äÉeƒ∏©ŸG øe ójõe ≈∏Y ∫ƒ°üë∏d * ¿Éª°†dG OhóM ôNBG ±ôW …CG h HP Ωõà∏J ’ á«∏ÙG ÚfGƒ≤dG πÑb øe É¡H 샪°ùŸG Ohóë∏d ´ƒ°†ÿG ™e ɪ«a á«æª°V hCG áëjô°U âfÉc AGƒ°S ,´ƒf …CG øe iôNCG •hô°T hCG äÉfɪ°V ájCÉH É¡d ™HÉJ Oófi ¢VôZ …C’ áeAÓŸGh ,á«°VôŸG IOƒ÷G h ,á«≤jƒ°ùàdG á«fɵeE’G ¢üîj á«dƒÄ°ùŸG OhóM ‘ IOóÙG ∫ƒ∏◊G Èà©J ,á«∏ÙG ÚfGƒ≤dG πÑb øe É¡H 샪°ùŸG Ohóë∏d ´ƒ°†ÿG ™e 1 .√óMh 𫪩dGh 𫪩dÉH á°UÉN k’ƒ∏M ,¿Éª°†dG ¿É«H äÉeGõàd’G AÉæãà°SÉH ,á«∏ÙG ÚfGƒ≤dG πÑb øe É¡H 샪°ùŸG Ohóë∏d ´ƒ°†ÿG ™e 2 ádƒÄ°ùe É¡d ™HÉJ ôNBG OQƒe …CG hCG HP ¿ƒµJ ’ ,Gòg áfɪ°†dG ¿É«H ‘ IOóÙG äÉ°†jƒ©J ájCG øY ,áŒÉf hCG ,á«°VôY hCG ,á°UÉN hCG ,Iô°TÉÑe ÒZ hCG Iô°TÉÑe á«dƒÄ°ùe ájô¶f …CG hCG ,Oƒ°ü≤e ÒZ hCG Oƒ°ü≤e Qô°V hCG ó≤Y ¤EG Ióæà°ùe âfÉc AGƒ°S QGô°VCG øY .QGô°VC’G √òg πãe OƒLh ∫ɪàMÉH äô£NCG ób âfÉc AGƒ°S hCG iôNCG á«fƒfÉb »∏ÙG ¿ƒfÉ≤dG 𫪩dG π°üëj ¿CG Rƒéj ∂dP ™eh .áæ«©e á«fƒfÉb ¥ƒ≤M 𫪩dG áfɪ°†dG √òg íæ“ 1 á©WÉ≤e ¤EG á©WÉ≤e øeh ,IóëàŸG äÉj’ƒdG ‘ áj’ƒd áj’h øe ∞∏àîJ iôNCG ¥ƒ≤M .⁄É©dG ‘ iôNCG º«∏bEG/ádhO ¤EG º«∏bEG/ádhO øeh ,Góæc ‘ iôNCG É¡fCG ≈∏Y áfɪ°†dG Gòg Èà©J ,á«∏ÙG ÚfGƒ≤dG ™e áfɪ°†dG √òg ≥aGƒJ ΩóY OhóM ‘ √òg ÖLƒÃ .á«∏ÙG ÚfGƒ≤dG √òg πãe ™e á≤aGƒàe ¿ƒµJ å«ëH πjó©àdG áÑLGh ≈∏Y áfɪ°†dG √òg äGójó– hCG äGAÉæãà°SG ¢†©H ≥«Ñ£J ΩóY Rƒéj á«∏ÙG ÚfGƒ≤dG êQÉN äÉeƒµ◊G ¢†©H ¤EG áaÉ°V’ÉH ᫵jôeC’G äÉj’ƒdG ¢†©H ,Óãe .𫪩dG :¿CG É¡d Rƒéj ,(Góæc ‘ äÉ©WÉ≤e ∂dP ‘ ÉÃ) IóëàŸG äÉj’ƒdG 2 á«fƒfÉ≤dG ¥ƒ≤◊G ójó– øe áfɪ°†dG √òg ‘ äGójóëàdGh äGAÉæãà°S’G »æãà°ùJ CG ,(IóëàŸG áµ∏ªŸG ,Óãe) π«ªY …C’ äGAÉæãà°S’G √òg πãe ≥«Ñ£J ≈∏Y ™æ°üŸG IQób øe ,∂dP ±ÓN ≈∏Y ó– Ü hCG ,äGójóëàdGh ’ »àdG á«æª°†dG äÉfɪ°†dG Ióe Oó– 𫪩∏d á«aÉ°VEG äÉfɪ°V ¥ƒ≤M íæ“ ê .á«æª°†dG äÉfɪ°†dG Oóe ≈∏Y äGójó– í«àJ ób hCG ,ÉgAÉæãà°SG ™æ°üŸG ™«£à°ùj ,áfɪ°†dG √òg •hô°T »æãà°ùJ ’ ,Góæ∏jRƒ«fh É«dGΰSG ‘ AÓª©dG äÓeÉ©Ÿ áÑ°ùædÉH ≈∏Y á≤Ñ£ŸG ájQÉÑLE’G á«fƒfÉ≤dG ¥ƒ≤◊G ∫ó©J hCG ó– hCG ,É¡H 샪°ùŸG Ohó◊G øª°V .AÓª©dG A’Dƒg π㟠HP äÉéàæe ™«H 3 OhóÙG ¿Éª°†dG á«£¨J √ÓYCG IOóÙG HP äÉéàæe ¿CG »FÉ¡ædG Ωóîà°ùª∏d Hewlett-Packard øª°†J 1 ™e CGóÑJ »àdGh ,√ÓYCG IOóÙG IÎØdG ‘ ™«æ°üàdG hCG OGƒŸG ‘ ܃«Y …CG øe á«dÉN .èàæª∏d 𫪩dG AGô°T ïjQÉJ ‘ π°ûØdG ≈∏Y ’EG OhóÙG HP ¿Éª°V …ô°ùj ’ ,èeGÈdG øe äÉéàæª∏d áÑ°ùædÉH ÉeCG 2 hCG ábÉYEG ¿hóH ¿ƒµj ±ƒ°S èàæe …CG 𫨰ûJ ¿CG HP øª°†J ’ .á›ÈdG äɪ«∏©J ò«ØæJ .AÉ£NC’G øe ∫ÉN ,èàæª∏d …OÉ©dG ∫ɪ©à°S’G øY áŒÉædG ܃«©dG ∂∏J iƒ°S OhóÙG HP ¿Éª°V »£¨j ’ 3 :»∏j ÉŸ áé«àf CÉ°ûæJ »àdG ∂∏J ∂dP ‘ Éà ,iôNCG äÓµ°ûe …CG »£¨j ’ ɪc ,πjó©àdG hCG áÄWÉÿG áfÉ«°üdGC CG Égóªà©J hCG ÉgôaƒJ ’ »àdG OQGƒŸG hCG QÉ«¨dG ™£b hCG ,áYÉÑ£dG §FÉ°Sh hCG èeGÈdG Ü hCG ,HP ,èàæŸG äÉØ°UGƒe ¥É£f êQÉN 𫨰ûàdG ê .óªà©e ÒZ ΩGóîà°SG Aƒ°Sh hCG πjó©J …CG O hCG HP êÉàfEG ÒZ êÉàfEG øe ÈM ¢û«WGôN ∫ɪ©à°SG ¿Éa ,HP äÉéàæŸ áÑ°ùædÉH 4 ™e ºYO ó≤Y …CG hCG 𫪩dG áfɪ°V ≈∏Y ôKDƒj ’ AπŸG IOÉ©e ÈM ¢û«WGôN ÒZ êÉàfEG øe ÈM ¢û«WGôN ΩGóîà°SG ¬ÑÑ°S ¬Ø∏J hCG èàæŸG π°ûa ¿Éc GPEG ,ɉEG.𫪩dG ÜÉ©JC’G ™aO 𫪩dG ≈∏Y ¢VôØà°S HP ¿EÉa ,¢û«WGôÿG Aπe IOÉYEG hCG HP êÉàfEG .π°ûØdG hCG ∞∏àdG Gòg ¢üîj ɪ«a èàæŸG áeóÿ IOóÙG ∞jQÉ°üŸGh »àdG äÉéàæŸG øe …CG ‘ Ö«Y OƒLƒH kGQÉ©°TEG ,áfɪ°†dG IÎa ∫ÓN ,HP âª∏à°SG GPEG 5 .ÉgQÉ«àNG Ö°ùM ¬dGóÑà°SG hCG èàæŸG ìÓ°UEÉH ÉeEG ácô°ûdG Ωƒ≤J ,HP áfɪ°V É¡«£¨J áfɪ°V ¬«£¨J Ö«Y ¬«a èàæe ,ádÉ◊G Ö°ùM ,∫GóÑà°SG hCG ìÓ°UEG øe HP øµªàJ ⁄ GPEG 6 AGô°ûdG øªK IOÉYEÉH Ö«©dG OƒLƒH É¡eÓYEG ó©H ádƒ≤©e IÎa ∫ÓN ácô°ûdG Ωƒ≤J HP .𫪩∏d èàæŸG Ωƒ≤j ≈àM áફb OQ hCG ¬dGóÑà°SG hCG Ö«©ŸG èàæŸG ìÓ°UEÉH áeõà∏e ÒZ HP ácô°T 7 .HP ¤EG èàæŸG Gòg IOÉYÉH 𫪩dG èàæª∏d ¿ƒµj ¿CG á£jô°T ójóL ¬fCÉc hCG kGójóL ¿ƒµj ¿CG øµÁ ∫óÑà°ùe èàæe …CG 8 .πbC’G ≈∏Y ¬dGóÑà°SG ºàj …òdG èàæª∏d 𫨰ûàdG äÉØ°UGƒe äGP ∫óÑà°ùŸG ájhÉ°ùe ɉEG ™«æ°üàdG IOÉ©e OGƒe hCG äÉfƒµe hCG ™£b ≈∏Y HP äÉéàæe …ƒà– ób 9 .AGOC’G å«M øe Iójó÷G OGƒŸGh äÉfƒµŸGh ™£≤dG äÉØ°UGƒŸ ™jRƒJ É¡«a ºàj º«∏bEG/ ádhO ájCG ‘ ∫ƒ©ØŸG …QÉ°S IOhóÙG HP áfɪ°V ¿É«H 10 πãe ,á«aÉ°VG äÉfɪ°V Oƒ≤Y ôaƒàJ ɪc .áfɪ°†dG √ò¡H IÉ£¨ŸG HP äÉéàæe ‘ HP äÉéàæe áeóÿ óªà©e õcôe …CG øe ,äÉéàæŸG OƒLh ¿Éµe ‘ ìÓ°UE’G .óªà©e π«ch …CG πÑb øe HP äÉéàæe É¡«a ´RƒJ »àdG º«dÉbC’G/∫hódG áÄ«¡àdGh É¡MÓ°UEGh AÉ£NC’G ±É°ûàcG .èeGôÑdG â«ÑãJ hCG äÉfƒµªdG Ö«côàH á°UÉîdGh kÉYƒ«°T ä’ÉëdG ôãcC’ É¡MÓ°UEG ádhÉëeh AÉ£NC’G ±É°ûàc’ äÉMGôàbG Ωó≤j º°ù≤dG Gòg èeGôÑdG â«ÑãJ πcÉ°ûe IGPÉëªdG áëØ°Uh áYÉÑ£dG πcÉ°ûe :»dÉàdG øe ócCÉà∏d á©HÉ£dG ¢üëaCG :»dÉàdG øe ócCÉà∏d ôJƒ«ÑªµdG Ωɶf ¢üëaCG .(𫨰ûàdG AóH áfGƒ£°SG »a »fhôàµdE’G 𫨰ûàdG π«dO) ΩɶædG äÉÑ∏£àe πHÉ≤j ôJƒ«ÑªµdG á«fÉK 45 »dGƒM ¥ô¨à°ùJ ,á©HÉ£∏d 𫨰ûJ ∫hCG óæY .¢†eƒj ’h πª©j ábÉ£dG Aƒ°V .øî°ùàd .OGó©à°S’G ádÉM »a áYÉÑ£dGh ºµëàdG áMƒd ≈∏Y ¢†eƒJ hCG √AÉ°†e AGƒ°VG óLƒJ ’ áMƒd AGƒ°VCG ô«°ùØJ'' ≈dEG ´ƒLôdG ≈Lôj ,¢†eƒJ hCG IAÉ°†e AGƒ°V’G âfÉc GPEG .8 áëØ°U ≈∏Y ''ºµëàdG .á©HÉ£dÉH á∏°üàeh πª©J iôNC’G äÓHɵdGh ábÉ£dG ∂∏°S ¿CG øe ócCÉJ .á©HÉ£dG øY É¡àdGREG ºJ ób ∞«∏¨àdG OGƒeh §FGô°T ™«ªL ¿GƒdCÉH Iõ«ªªdG äÉëàØdG »a áë«ë°U á≤jô£H áàÑãe áYÉÑ£dG ¢û«WGôNh ¢ShDhQ .º«∏°S ƒëf ≈∏Y É¡dÉ°üJG øe ócCÉààd IóMGh πc ≈∏Y äÉÑãH πØ°SC’ §¨°VCG .í«ë°üdG .áYÉÑW ¢SCGQ πc øY »bGƒdG §jô°ûdG ádGREG øe ócCÉJ .á≤∏¨e á«£ZC’G ™«ªLh áYÉÑ£dG ¢SCGQ ê’õe .É¡fɵe »a Iô≤à°ùe áLhOõªdG á«FÉ≤∏àdG áYÉÑ£dG IóMh hCG á«Ø∏îdG íàØdG áMƒd .á©HÉ£dG »a QÉ°ûëfG óLƒj ’h á«æ«°üdG »a áë«ë°U á≤jô£H á∏ªëe §FÉ°SƒdG …󫡪àdG â«ÑãJ øe ócCÉJ ¿CG øe ócCÉJ ,RhóæjƒdG 𫨰ûJ ΩɶæH πª©j …òdG ôJƒ«ÑªµdG ≈∏Y èeGôÑdG â«ÑãJ πÑb .á≤∏¨e èeGôÑdG ™«ªL ¢Uô≤dG π¨°ûªH ¢UÉîdG QÉ°ùªdG ≈∏Y ±ô©àdG ≈∏Y ôJƒ«ÑªµdG IQób ΩóY ádÉM »a .π¨°ûªdÉH ¢UÉîdG í«ë°üdG ±ôëdG áHÉàµH âªb ∂fCG ócCÉJ .¬d ¬àHÉàc ºJ …òdG èeóªdG π¨°ûe hG áéeóªdG áfGƒ£°S’G ≈∏Y ±ô©àdG ≈∏Y ôJƒ«ÑªµdG IQób ΩóY ádÉM »a øe á©HÉ£dG π¨°ûe π«ªëJ ∂浪jh .áØdÉJ ¿ƒµJ ó≤a áfGƒ£°S’G ¢üëaG ,äÉfGƒ£°S’G .http://www.hp.com/support/businessinkjet1000 ● ● ● á©HÉ£dG èeÉfôH â«ÑãJ IOÉYCÉH ºb 𫨰ûàH ºb ,á©HÉ£dG ±É°ûàcG ™«£à°ùj ’ ôJƒ«ÑªµdGh RhóæjƒdG 𫨰ûJ Ωɶf Ωóîà°ùJ âæc GPEG .á©HÉ£dG π¨°ûe â«ÑãJ ádGREÉH ΩÉ«≤∏d (Utils/Scrubber ó∏ée »a OƒLƒªdG) Scrubber IGOCG .á©HÉ£dG π¨°ûe â«ÑãJ IOÉYEÉH ºbh ,ôJƒ«ÑªµdG 𫨰ûJ óYCG ● ● ● ● ● ● ● ● áÄ«¡àdG áëØ°U πcÉ°ûe áaô©e »a IóYÉ°ùª∏d ,á«dÉëdG á©HÉ£dG äGOGóYEG ¢Vô©d áÄ«¡àdG áëØ°U Ωóîà°SG áëØ°U .êGQOC’G πãe ,ájQÉ«àN’G äÉ≤ë∏ªdG â«ÑãJ ó«cCÉàdh ,É¡MÓ°UEG ádhÉëeh á©HÉ£dG Ωƒ≤à°S ,áµÑ°ûdÉH á©HÉ£dG ∫É°üJG ádÉM »a .áÑjô≤dG çGóMCÓd πé°S ≈∏Y …ƒàëJ áÄ«¡àdG á°UÉîdG áµÑ°ûdG äGOGóYEG ¢Vô©J áëØ°üdG √òg ,á«aÉ°VCG áµÑ°T áÄ«¡J áëØ°U áYÉÑ£H ¢Uô≤dG ≈∏Y »fhôàµdE’G Ωóîà°ùªdG π«dO ô¶fG ,π«°UÉØàdG ≈∏Y ∫ƒ°üë∏d .á©HÉ£dÉH .𫨰ûàdG AóÑH ¢UÉîdG •ƒ¨°†ªdG .∫É°üJ’G πÑb áÄ«¡àdG áëØ°U áYÉÑ£H ºb ,HP ácô°ûH ∫É°üJ’G ≈dEG áLÉëdG ádÉM »a áÄ«¡àdG áëØ°U áYÉÑW .(ábÉ£dG QR) §¨°†dG »a QGôªà°S’G ™e §¨°VG .1 ,(ábÉ£dG QR) ≈∏Y §¨°†dG AÉæKCG .IóMGh Iôe (AɨdE’G QR) §¨°VCG .áÄ«¡àdG áëØ°U áYÉÑ£H âeÉb á©HÉ£dG .(ábÉ£dG QR) ôjôëàH ºb .2 10 10 Aƒ°†dG ∞°Uh .√ÉÑàfG ≈dEG êÉàëj áYÉÑ£dG ¢ShDhQ øe ôãcCG hCG óMGh .áYÉÑ£dG ∫hÉMh áYÉÑ£dG ¢SCGQ Ö«côJ IOÉYEÉH ºb ● .»fhôàµdE’G Ωóîà°ùªdG π«dO ô¶fG .áYÉÑ£dG ¢SCGQ ∞«¶æJ ∫hÉM ● ¢ShDhQ hCG áYÉÑ£dG ¢SCGQ ∫GóÑà°SÉH ºb ,CÉ£N QGôªà°SG ádÉM »a ● .É¡«dEG QÉ°ûªdG áYÉÑ£dG ô°TDƒe Aƒ°V ,áYÉÑ£dG ¢SCGQ Aƒ°V »a ±ÉæÄà°S’G Aƒ°Vh ,¿GƒdC’G .𫨰ûàdG ™°Vh .√ÉÑàfG ≈dEG êÉàëJ ôÑëdG ¢û«WGôN øe ôãcCG hCG óMGh .áYÉÑ£dG ∫hÉMh ôÑëdG ¢û«WGôN Ö«côJ IOÉYEÉH ºb ● ¢û«WGôîdG hCG ôÑëdG ¢TƒWôN ∫GóÑà°SÉH ºb ,CÉ£îdG ôªà°SG GPEG ● .É¡«dEG QÉ°ûªdG Aƒ°V ,áYÉÑ£dG ¢TƒWôN Aƒ°V ±ÉæÄà°S’G Aƒ°V ,¿Gƒd’G ô°TDƒe .𫨰ûàdG ™°Vh »a »``Hô``Y ¬H ≈°UƒªdG AGOC’Gh ìô°ûdG 9 9 Aƒ°†dG §ªf ºµëàdG áMƒd AGõLCG º¡a 1 3 2 4 6 5 7 8 ábÉ£dG QR (1 áYÉÑ£dG ¢SCGQ Aƒ°V (2 ôÑëdG á°TƒWôN Aƒ°V (3 ábÉ£dG Aƒ°V (4 ¿Gƒd’G ô°TDƒe AGƒ°VCG (5 AɨdE’G QR (6 ±ÉæÄà°S’G QR (7 ±ÉæÄà°S’G Aƒ°V (8 ºµëàdG áMƒd AGƒ°VCG ô«°ùØJ ¬fGƒæYh èàæªdG ºYO ™bƒe IQÉjõH ºb hCG 𫨰ûàdG AóH áfGƒ£°SG »a »fhôàµdE’G 𫨰ûàdG π«dO ô¶fG,ºµëàdG áMƒd AGƒ°VCG øY äÉeƒ∏©ªdG øe ójõªd .http://www.hp.com/support/businessinkjet1000 ¬H ≈°UƒªdG AGOC’Gh ìô°ûdG Aƒ°†dG ∞°Uh áØ«Xh (OGóYEG) áédÉ©ªH Ωƒ≤J hCG ±É≤jE’G hCG 𫨰ûàdG ™°Vh »a á©HÉ£dG .É¡FɨdEG ºJ áYÉÑW áØ«Xh hCG ,áYÉÑW AGôLG …CÉH ΩÉ«≤dG Ö∏£àj ’ ● .¢†eƒJ ábÉ£dG AGƒ°VCG .¥QƒdG øe á«dÉN á©HÉ£dG ≈∏Y §¨°VG ºK ¥QƒdG π«ªëàH ºb ● .ôÑëdG ∞é«d á©HÉ£dG ∞bƒàà°S .±ÉæÄà°S’G Aƒ°V ¢†«eh ∞bƒà«°S .ôÑëdG ∞éj ≈àM ô¶àfG ● Aƒ°Vh πª©j ábÉ£dG Aƒ°V .¢†eƒj ±ÉæÄà°S’G .á©HÉ£dG »a Iô°ûëæe áYÉÑ£dG §FÉ°Sh .Iô°ûëæªdG §FÉ°SƒdG ±ò≤d (±ÉæÄà°S’G QR) ≈∏Y §¨°VG ● …ƒ∏©dG AÉ£¨dG íàØH ºb .êôîdG êQO øe §FÉ°SƒdG πc ádGREÉH ºb ● QR) ≈∏Y §¨°VCG ,QÉ°ûëf’G ádGREG ó©H .QÉ°ûëf’G ¿Éµe ójóëàd .áYÉÑ£dG áØ«Xh ∫ɪcE’ (±ÉæÄà°S’G ±ÉæÄà°S’G Aƒ°Vh ábÉ£dG Aƒ°V .¿É°†eƒj .áMƒàØe á©HÉ£dG á«£ZCG øe ôãcCG hCG AÉ£Z .ìƒàØe AÉ£Z …CG ≥∏¨H ºb ● á≤jô£H áLhOõªdG á«FÉ≤∏àdG áYÉÑ£dG IóMh Ö«côJ øe ócCÉJ ● .áë«ë°U .á©HÉ£dÉH CÉ£N çóM .iôNG Iôe ¬∏«¨°ûàH ºb ºK á©HÉ£dG 𫨰ûJ ±É≤jEÉH ºb ● Aƒ°Vh ¢†eƒj ábÉ£dG Aƒ°V .𫨰ûàdG ™°Vh »a ±ÉæÄà°S’G .øeDƒe ô«Z áYÉÑ£dG ¢SCGQ ê’õe ¢SCGQ ê’õe ≥∏Z ΩɵMEÉH ºbh áYÉÑ£dG OQGƒe AÉ£Z ≥∏¨H ºb ● .áYÉÑ£dG ¢SCGQ Aƒ°Vh ¢†eƒj ábÉ£dG Aƒ°V ™°Vh »a ±ÉæÄà°S’Gh áYÉÑ£dG .𫨰ûàdG .(±ÉæÄà°S’G QR) Aƒ°†dG §ªf 8 8 8 »``Hô``Y 7 .èeÉfÈdG â«ÑãJ ÈàNG :7 Iƒ£N øe óæà°ùe áYÉÑ£H ºb ,ôJƒ«ÑªµdG RÉ¡éH á©HÉ£dG π«°UƒJh 𫨰ûàdG èeÉfôH â«ÑãJ ∫ɪcEG ó©H .í«ë°üdG πµ°ûdÉH ¬à«ÑãJ ” ób 𫨰ûàdG èeÉfôH ¿CG øe ócCÉà∏d Qôµàe πµ°ûH ¬eóîà°ùJ ≥«Ñ£J .10 áëØ°U ''É¡MÓ°UEGh AÉ£NC’G ±É°ûµà°SG'' ô¶fG ,óæà°ùŸG áYÉÑW ºàJ ⁄ GPEG .á©HÉ£dG πé°S :8 Iƒ£N π«é°ùàH âªb ób øµJ ⁄ GPEG .á«æØdG äÉeƒ∏©ŸGh ΩÉ¡dG ºYódG ≈≤∏àd á©HÉ£dG π«é°ùàH ºb .http://www.register.hp.com ‘ É¡∏«é°ùJ ∂浪«a èeÉfÈdG â«ÑãJ óæYá©HÉ£dG http://www.hp.com/support/businessinkjet1000 !∑hÈe ΩGóîà°SG ∫ƒM äÉeƒ∏©ŸG øe ójõe »∏Y ∫ƒ°üë∏d .ΩGóîà°SEÓd IõgÉL ∂à©HÉW :á«dÉàdG QOÉ°üŸG ô¶fCG ,É¡MÓ°UEGh AÉ£NC’G ±É°ûµà°SGhá©HÉ£dG .𫨰ûàdG AóH CD ‘ á°TÉ°ûdG ≈∏Y Readme ÊGôbBG ∞∏eh Ωóîà°ùŸG π«dO äGóæà°ùe .(á°TÉ°ûdG ≈∏Y Ωóîà°ùŸG π«dO ô¶fCG) HP Instant Support ‘ èàæŸG ºYód âfÎfE’G ™bƒe ● ● ● http://www.hp.com/support/businessinkjet1000 7 7 2 1 óæY .áYÉÑ£dG ¢ShDhQ IGPÉëªH É«FÉ≤∏J á©HÉ£dG Ωƒ≤J ,áYÉÑ£∏d á浇 IOƒL π°†aCG ¿Éª°†d ábQh áYÉÑ£H á©HÉ£dG Ωƒ≤Jh á©HÉ£dG ±É≤jEG/𫨰ûJ Aƒ°V ¢†eƒj ,IGPÉÙG á«∏ªY ájGóH .Úà«FÉ≤∏J IGPÉfi »àëØ°U áYÉÑ£H á©HÉ£dG Ωƒ≤J ,IGPÉÙG á«∏ªY ájÉ¡f ‘ .QÉÑàNG .≥FÉbO 5 ‹GƒM áYÉÑ£dG ¢ShDhQ IGPÉfi á«∏ªY ¥ô¨à°ùJ ô¶fG áYÉÑ£dG ¢SCGQ IGPÉfi á«∏ªY AÉæKCG iôNC’G á©HÉ£dG AGƒ°VCG âÄ«°VCG GPEG :á¶MÓe ™ÑJG ,IGPÉÙG áëØ°U áYÉÑW ºàJ ⁄ GPEG .8 áëØ°U ‘ ''ºµëàdG áMƒd AGƒ°VCG ≈∏Y ±ô©àdG'' ¢ShDhQ ¿CG øe ócCÉJ (2 .ΩɵMEÉH ábÉ£dG πHÉc π«°UƒJ øe ócCÉJ (1 .äGƒ£îdG √òg .í«ë°üdG πµ°ûdÉH áÑcôe È◊G äGƒÑYh áYÉÑ£dG 6 3 .á©HÉ£dG π°Uh :6 Iƒ£ÿG ≈∏Y ô¡¶à°S »àdG äɪ«∏©àdG ™ÑJG ºK ,äÉfGƒ£°S’G π¨°ûe πNGO 𫨰ûàdG AóH áfGƒ£°SCG ™°V (1 »fhôàµdE’G Ωóîà°ùªdG π«dO ô¶fCG ,èeGôÑdG â«ÑãJ øY äÉeƒ∏©ªdG øe ójõªd :á¶MÓe .á°TÉ°ûdG .áLÉëdG óæY (Ó°üØæe ´ÉÑj) ( ) USB `dG π°U (2 .𫨰ûàdG AóH áfGƒ£°SG ≈∏Y IQó≤dG ΩóY QGôªà°SG ádÉM »a .iôNCG Iôe ¬∏«¨°ûàH ºb ºK ,á©HÉ£dG 𫨰ûJ ±É≤jEÉH ºb (3 .10 áëØ°U ''É¡MÓ°UEGh AÉ£NC’G ±É°ûµà°SG'' ô¶fCG ,IGPÉëªdG áëØ°U áYÉÑW ≈∏Y 6 6 5 4 »``Hô``Y 3 Ωƒ≤J …òdG §FÉ°SƒdG ºéM Ö°SÉæàd É¡£Ñ°†J ≈àM êQódG ‘ IOƒLƒŸG äÉ£HÉ°†dG ∑ôM (4 áYÉÑ£dG ¬Lh ¿ƒµj åëH ,∫hC’G êQódG ‘ ábQh 150 ¤EG π°üj Ée πNOCG (5 .¬©°VƒH .êQódG ‘ πØ°SC’ ê’õŸG ∑ôM (· 279 h 356) á°UƒH 14 h 11 ÚH Ée ¬dƒW ¿ƒµj …òdG ¥Qƒ∏d áÑ°ùædÉH (3 .êQódG øe á«eÉeC’G á«MÉædG ¢†ØNCG ºK ,Úª«dG ƒëf êQódG ≈∏Y OƒLƒŸG 5 4 3 6 1 7 2 8 .á©HÉ£dG π¨°T ºK ábÉ£dG πHÉc π°Uh :5 Iƒ£ÿG π°Uh (3 .ábÉ£dG ∫ƒëà ábÉ£dG πHÉc π°Uh (2 .á©HÉ£dG ‘ ábÉ£dG ∫ƒfi π°Uh (1 ≈∏Y §¨°VG (4 .(AC) OOÎe AÉHô¡c QÉ«J ¢ùÑ≤à ábÉ£dG πHÉc øe ôNB’G ±ô£dG .á©HÉ£dG 𫨰ûàd (ábÉ£dG QR) ∫ÉNOEG óYCG (7 .(∫hC’G êQódG ‘ ¥QƒdG ™°VƒH âªb ób âæc ¿EG) êQÉÿG êQO ¢†ØNCG (6 .êQÉÿG êQO ≈∏Y IOƒLƒŸG á∏°UƒdG ÜòLG (8 .≥aôH êQódG 5 5 3 2 3 1 .áYÉÑ£dG ¢ShDhQ ÖcQ :3 Iƒ£ÿG .áYÉÑ£dG ¢SCGQ ê’õe ™aQG (1 πc øe »bGƒdG §jô°ûdG ∫RCG ºK ,¬H á°UÉÿG áeõ◊G øe áYÉÑ£dG ¢ShDhQ øe ¢SCGQ πc ∫RCG (2 ΩɵMEÉH §¨°VG .¬H á°UÉÿG áfƒ∏ŸG áëàØdG ‘ áYÉÑ£dG ¢ShDhQ øe ¢SCGQ πc πNOCG (3 .É¡æe .í«ë°üdGh Ö°SÉæŸG πµ°ûdÉH ¬à°ùeÓe ¿Éª°†J ≈àM áYÉÑ£dG ¢SCGQ ≈∏Y 4 5 4 1 2 .êGQOC’G ‘ ¥QƒdG ™°V :4 Iƒ£ÿG êQO ™aQG ,¤hC’G êQódG ‘ ¥QƒdG ™°Vh ádÉM ‘ (2 .á©HÉ£dG êQÉN êQódG ÜòLG (1 .êQÉÿG πµ°ûdÉH ê’õŸG ≥«°û©J ¿Éª°†d ¬«∏Y §¨°VG ºK kÉeÉ“ ΩÉeCÓd áYÉÑ£dG ¢SCGQ ê’õe ÜòLG (4 .ê’õŸG ≥«°û©J ¿Éª°†d kÓ«∏b §¨°†dG ¤EG êÉà– ÉÃQ :á¶MÓe .í«ë°üdG .…ƒ∏©dG AÉ£¨dG ≥∏ZCG (5 4 1 1 7 6 4 5 2 »``Hô``Y 3 .∞«∏¨àdG OGƒeh §jô°T ∫RCG :1 Iƒ£ÿG πNGO øe §jô°ûdG ∫R h äGójQƒàdG áØ∏ZG áYÉÑW íàaG .á©HÉ£dG øe ∞«∏¨àdG OGƒe áaÉc ∫RCG .á©HÉ£dG .áeõ◊G äÉjƒàfi øe ócCÉJ ,ÊGƒLQCG ,…hɪ°S ôÑM äGƒÑY ™HQCG (4 ,ábÉ£dG πHÉc (3 ,ábÉ£dG ∫ƒfi (2 ,á©HÉ£dG (1 𫨰ûàdG èeÉfôH) 𫨰ûJ áfGƒ£°SCG (6 ,(CMYB) áYÉÑW ¢ShDhQ á©HQCG (5 ,Oƒ°SCG ,ôØ°UCG OGóYE’G áMƒd) áYƒÑ£ŸG ≥FÉKƒdG áYƒª› (7 ,(á°TÉ°ûdG ≈∏Y ô¡¶j …òdG Ωóîà°ùŸG π«dOh .(πª©dG ‘ ´hô°ûdG π«dOh 2 3 1 2 .ôÑëdG äGƒÑY ÖcQ :2 Iƒ£ÿG .É¡H IOƒLƒŸG áeõ◊G øe ÈM IƒÑY πc ∫RCG (2 .áYÉÑ£dG äGójQƒJ AÉ£Z ™aQG (1 √òg ‘ È◊G IƒÑY πNOCG ºK É¡H á°UÉÿG áfƒ∏ŸG áëàØdG ™e IƒÑY πc IGPÉëà ºb (3 ‘ ô≤à°ùJ ≈àM È◊G äGƒÑY ≈∏Y ΩɵMEÉH §¨°VG ,í«ë°üdG ¢ùeÓàdG ¿Éª°†d .áëàØdG πª©J ≈àM í«ë°U πµ°ûH ™HQC’G È◊G äGƒÑY Ö«côJ Öéj :á¶MÓe .kÉeÉ“ É¡fɵe .á©HÉ£dG äGƒÑY IOƒL ¿Éª°V ™«£à°ùJ ’ É¡æµdh ,QÉ«àN’G ájôM ‘ 𫪩dG ≥M HP ∑QóJ :ôjò– ¬«W ¿Éª°†dG »£¨j ød .äGƒÑ©dG √òg ≈∏Y OɪàY’G ióe hCG HP QÉÑMCG ÒZ øe È◊G QÉÑMCG ÒZ øe ÈM äGƒÑY ΩGóîà°SG áé«àf É¡Ñ∏£àJ »àdG äÉMÓ°UE’G hCG á©HÉ£dG äÉeóN .HP 3 3 ô°ûædGh ™Ñ£dG ¥ƒ≤M øY äÉeƒ∏©e .L.P 2005 © ΩÉ©d ôjƒ£à∏d Hewlett-Packard ácô°ûd ô°ûædGh ™Ñ£dG ¥ƒ≤M 2005/4 ,1 á©Ñ£dG ÚfGƒb ¬H íª°ùJ Ée AÉæãà°SÉH ≥Ñ°ùe »HÉàc ¿PEG ¿hO áªLôJ hCG πjó©J hCG ,ï°ùf …CG ô¶ëj .ô°ûædG ¥ƒ≤M .QGòfEG ≥HÉ°S ¿hO Ò«¨à∏d ¬«W IOQGƒdG äÉeƒ∏©ŸG ™°†îJ √ò¡d áÑMÉ°üŸG ¿Éª°†dG äÉfÉ«H ‘ IOófi É¡JÉeóNh HP äÉéàæŸ Ió«MƒdG äÉfɪ°†dG …CG ¿ƒµj hCG ≥∏îj ¬fCG ≈∏Y ¬«W OQGh ƒg ɇ A»°T …CG Ò°ùØJ Öéj ’ .äÉeóÿGh äÉéàæŸG ƒ¡°S …CG hCG ôjôëàdG ‘ AÉ£NCG hCG á«æa AÉ£NCG ájCG øY ádƒÄ°ùe HP â°ù«d .‘É°VEG ¿Éª°V .¬«W ájQÉéàdG äÉeÓ©dG äÉ≤jó°üJ ácô°ûd á∏é°ùe ᫵jôeCG ájQÉŒ äÉeÓY Windows®h Microsoft® ¿EG ¿ƒµJ ¿CG Rƒéj ¬«W IQƒcòŸG iôNC’G äÉéàæŸG áaÉc .Microsoft Corporation .É¡H á°UÉÿG äÉcô°û∏d ájQÉŒ äÉeÓY ¿ÉeB’G äÉeƒ∏©e áHÉ°UE’G QÉ£NBG π«∏≤àd èàæŸG Gòg ΩGóîà°SG óæY á«°SÉ°SC’G áeÓ°ùdG äGôjò– kɪFGO ™ÑJG .á«FÉHô¡µdG áeó°üdÉH .á©HÉ£dG RÉ¡éH ≥ë∏ŸG óæà°ùŸG Gòg ‘ äɪ«∏©àdG ™«ªL º¡aCGh AGôbCG .1 ábÉ£dG Qó°üà èàæŸG Gòg π«°UƒJ óæY á°VQDƒŸG á«Hô¡µdG ¢ùHÉ≤ŸG iƒ°S Ωóîà°ùJ ’ .2 .¿CÉ°ûdG Gò¡H AÉHô¡c »æa ™LGQ ,¢VQDƒŸG QÉ«àdG ¢ùÑ≤e áaô©e ΩóY ádÉM ‘ .á«Hô¡µdG .èàæŸG ≈∏Y áHƒàµŸG äɪ«∏©àdGh äGQɶfE’G ™«ªL ≥ÑW .3 .É¡Ø«¶æJ πÑb §FÉ◊G êôfl øe á©HÉ£dG ¢ùHÉb π°üaEG .4 .πàÑe âæc hCG ,AÉŸG QGƒéH á©HÉ£dG √òg Ωóîà°ùJ hCG ÖcôJ ’ .5 .¿RGƒàe í£°S ≈∏Y ¿ÉeCÉH á©HÉ£dG ÖcQ .6 πÑc ≈∏Y ¢üî°T …BG »°ûÁ hCG ƒ£îj ’ ≈àM »ªfi ¿Éµe ‘ á©HÉ£dG ÖcQ .7 .AÉHô¡µdG πÑc ∞∏àj ’ ≈àMh ,AÉHô¡µdGπ«°UƒJ π«dO ‘ ''É¡MÓ°UEGh AÉ£NC’G ±É°ûµà°SGh áfÉ«°üdG'' ô¶fG ,…OÉY πµ°ûH èàæŸG πª©j ⁄ GPG .8 𫨰ûàdG ΩɶæH á°UÉÿG 𫨰ûàdG AóH áfGƒ£°SCG ≈∏Y .á°TÉ°ûdG ≈∏Y ô¡¶j …òdG Ωóîà°ùŸG .∂jód OGôa’ÉH π°üJCG .áfÉ«°üdG ¤EG áLÉ◊G óæY .Ωóîà°ùŸG ᣰSGƒH É¡àfÉ«°U ºàj AGõLG óLƒj ’ .9 .áfÉ«°üdG ∫ɪYEÉH ΩÉ«≤∏d Ú∏gDƒŸG © 2005 Hewlett-Packard Development Company, L.P. Printed in Germany Imprimé en Allemagne Stampato in Germania www.hp.com/support/businessinkjet1000 *C8179-90002* *C8179-90002* C8179-90002-
 1
1
-
 2
2
-
 3
3
-
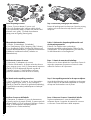 4
4
-
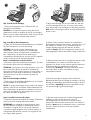 5
5
-
 6
6
-
 7
7
-
 8
8
-
 9
9
-
 10
10
-
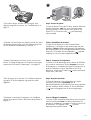 11
11
-
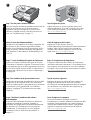 12
12
-
 13
13
-
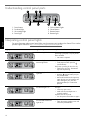 14
14
-
 15
15
-
 16
16
-
 17
17
-
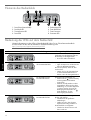 18
18
-
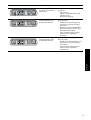 19
19
-
 20
20
-
 21
21
-
 22
22
-
 23
23
-
 24
24
-
 25
25
-
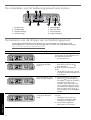 26
26
-
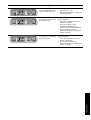 27
27
-
 28
28
-
 29
29
-
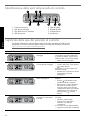 30
30
-
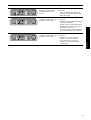 31
31
-
 32
32
-
 33
33
-
 34
34
-
 35
35
-
 36
36
-
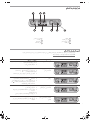 37
37
-
 38
38
-
 39
39
-
 40
40
-
 41
41
-
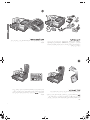 42
42
-
 43
43
-
 44
44


HP BUSINESS INKJET 1000 PRINTER Handleiding
- Categorie
- Afdrukken
- Type
- Handleiding
in andere talen
Gerelateerde papieren
-
HP Business Inkjet 1100 Printer series Handleiding
-
-
HP Business Inkjet 2800 Printer series Handleiding
-
HP OFFICEJET PRO K850DN de handleiding
-
HP OFFICEJET PRO K550DTN de handleiding
-
-
HP DesignJet Z2600 PostScript Printer Handleiding
-
-
-
HP DesignJet Z6 PostScript Printer series Handleiding