Indesit WIL 12 (NL) Gebruikershandleiding
- Categorie
- Wasmachines
- Type
- Gebruikershandleiding

1
NL
Nederlands,1
Inhoud
Installatie, 2-3
Uitpakken en waterpas zetten, 2
Water- en elektrische aansluiting, 2-3
Eerste wasprogramma, 3
Technische gegevens, 3
Beschrijving van de wasmachine, 4-5
Bedieningspaneel, 4
Controlelampjes, 5
Start en programma's, 6
In het kort: een programma starten, 6
Tabel van de programma's, 6
Persoonlijk instellen, 7
Instellen van de temperatuur, 7
Instellen van de centrifuge, 7
Functies, 7
Wasmiddel en wasgoed, 8
Wasmiddellaatje, 8
Bleekprogramma, 8
Prepareren van het wasgoed, 8
Speciale stukken, 8
Woolmark, 8
Voorzorgsmaatregelen en raadgevingen, 9
Algemene veiligheid, 9
Het afvoeren, 9
Bezuiniging en bescherming van het milieu, 9
Onderhoud, 10
Afsluiten van water en stroom, 10
Schoonmaken van de wasmachine, 10
Het wasmiddellaatje schoonmaken, 10
Reinigen van deur en trommel, 10
Reinigen van de pomp, 10
Controleer de slang van de watertoevoer, 10
Storingen en oplossingen, 11
Service, 12
Voordat u er de installateur bijhaalt, 12
NL
WASMACHINE
WIL 12
Instructies voor het gebruik
English,13
GB

2
NL
Het is belangrijk dit boekje te bewaren zodat u het
kunt raadplegen wanneer u maar wilt. In het geval dat u
de machine verkoopt, of u verhuist, moet het boekje bij
de machine blijven zodat de nieuwe gebruiker de
functies en betreffende raadgevingen kan leren kennen.
Lees de instructies met aandacht: u vindt er belang-
rijke informatie betreffende het installeren, gebruik en
veiligheid.
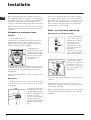
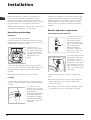
Uitpakken en waterpas zetten
Uitpakken
1. Pak de wasmachine uit.
2. Controleer of de wasmachine geen schade heeft
geleden gedurende het vervoer. Indien dit wel het
geval is moet hij niet worden aangesloten en moet u
contact opnemen met de handelaar.
3. Verwijder de 3
transportbouten met de
rubberen ring en bijbe-
horende afstandstukken
die zich aan de achter-
kant bevinden (zie
afbeelding).
4. Sluit de gaten af met de bijgeleverde plastic doppen.
5. Bewaar alle stukken: mocht de wasmachine ooit
worden vervoerd, dan moeten deze weer worden
aangebracht.
Het verpakkingsmateriaal is geen speelgoed voor
kinderen.
Waterpassen
1. Installeer de wasmachine op een rechte en stevige
vloer en laat hem niet leunen tegen een muur, meubel
of dergelijken.
2. Als de vloer niet perfect
horizontaal is kunt u de
onregelmatigheid opheffen
door de stelvoetjes aan de
voorkant in- of uit te
schroeven (zie afbeelding);
de hoek, gemeten ten
opzichte van de aanrecht,
mag de 2° niet overschrij-
den.
Een correcte waterpas geeft de machine stabiliteit
en vermijdt trillingen, lawaai en het zich verplaatsen
gedurende het functioneren van de machine. In het
geval van vaste vloerbedekking of een tapijt regelt u
de stelvoetjes zodanig dat onder de wasmachine
genoeg plaats is voor ventilatie.
Water- en elektrische aansluiting
Aansluiting van de watertoevoerslang
1. Plaats de pakking A
op het uiteinde van de
waterslang en schroef
hem op een koud-
waterkraan met een
mondstuk met schroef-
draad van 3/4 gas (zie
afbeelding).
Voordat u hem aansluit
moet u het water laten
lopen totdat het helder is.
2. Verbind de slang aan
de wasmachine door
hem op de betreffende
watertoevoer aan te
schroeven, rechtsboven
aan de achterkant (zie
afbeelding).
3. Let erop dat er geen knellingen of kronkels in de
slang zijn.
De waterdruk van de kraan moet binnen de
waarden van de tabel Technische Gegevens liggen
(zie bladzijde hiernaast).
Als de slang niet lang genoeg is moet u zich wenden
tot een gespecialiseerde handelaar of een bevoegde
installateur.
Installatie
A

3
NL
Aansluiting van de afvoerbuis
Verbind de buis, zonder
hem te buigen, aan een
afvoerleiding of aan een
afvoer in de muur tussen
65 en 100 cm van de
grond af;
of hang hem op de rand
van een wasbak of bad,
en bind de bijgeleverde
leiding aan de kraan
(zie afbeelding). Het
uiteinde van de afvoer-
slang mag niet onder
water hangen.
Gebruik geen verlengstuk voor de slang ; indien dit
niet te vermijden is moet het verlengstuk dezelfde
doorsnee hebben als de originele slang en hij mag niet
langer zijn dan 150 cm.
Elektrische aansluiting
Voordat u de stekker in het stopcontact steekt moet u
zich ervan verzekeren dat:
het stopcontact geaard is en voldoet aan de gel-
dende normen;
het stopcontact het maximum vermogen van de
machine kan verdragen, zoals aangegeven in de
tabel Technische Gegevens (zie hiernaast);
het voltage correspondeert met de waarden die zijn
aangegeven in de tabel Technische Gegevens (zie
hiernaast);
het stopcontact geschikt is voor de stekker van de
machine. Indien dit niet zo is moet de stekker of het
stopcontact vervangen worden.
De wasmachine mag niet buiten worden geinstalleerd,
ook niet op een plaats die beschut is, aangezien het
gevaarlijk is hem aan regen en onweer bloot te stellen.
Als de wasmachine is geinstalleerd moet het stop-
contact gemakkelijk te bereiken zijn.
Gebruik geen verlengsnoeren of dubbelstekkers.
Het snoer mag niet in bochten of geknikt liggen.
De voedingskabel mag alleen door een bevoegde
installateur worden vervangen.
Belangrijk! De fabrikant is niet aansprakelijk wanneer
deze normen niet gerespecteerd zijn.
Eerste wasprogramma
Voordat u de machine gaat gebruiken moet u hem een
wascycle laten uitvoeren met wasmiddel maar zonder
wasgoed, met het programma van 90° zonder voor-
wassen.
ServiceStoringen
Voorzorgs-
maatregelen
OnderhoudProgramma's WasmiddelInstallatie Beschrijving
65 - 100 cm
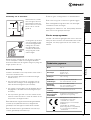
Technische gegevens
Model
WIL 12
Afmetingen
breedte cm 59,5
hoogte cm 85
diepte cm 52,5
Ver mo g e n
van 1 tot 5 kg
Elektrische
aansluitingen
spanning 220/230 Volt 50 Hz
max. aansluitwaarde 1850 W
Aansluiting
waterleiding
max. druk 1 MPa (10 bar)
min. druk 0,05 MPa (0,5 bar)
Inhoud trommel 46 liters
Snelheid
centrifuge
tot 1200 toeren per minuut
Controle-program-
ma's volgens de
norm IEC456
programma 2; temperatuur 60°C;
uitgevoerd met 5 kg lading.
Deze apparatuur voldoet aan de
volgende EEC voorschriften:
-73/23/EEC van 19/02/73
(Laagspanning) en successievelijke
modificaties
-89/336/EEC van 03/05/89
(Elektromagnetische compatiabiliteit)
en successievelijke modificaties
- 2002/96/CE

4
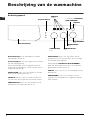
NL
Bedieningspaneel
Beschrijving van de wasmachine
Wasmiddellaatje
AAN/UIT
knop
START/RESET
knop
Wasmiddellaatje: voor wasmiddel en verdere
toevoegingen (zie blz. 8).
Controlelampjes: voor het volgen van het verloop
van het wasprogramma.
Als de functie Delay Timer is ingesteld, wordt de
resterende tijd aangegeven tot het starten van het
programma (zie blz. 5).
CENTRIFUGE knop: voor het instellen of uitscha-
kelen van de centrifuge (zie blz. 7).
FUNCTIE knoppen: voor het kiezen van de func-
ties. De knop van de gekozen functie blijft verlicht.
TEMPERATUUR knop: voor het instellen van de
temperatuur of koud wassen (zie blz. 7).
START/RESET knop: voor het starten van de
programma's of voor het annuleren als u per onge-
luk verkeerd heeft ingesteld.
Controlelampje AAN/DEUR GEBLOKKEERD:
geeft aan of de wasmachine aan is en of de deur
geopend kan worden (zie blz. 5).
AAN/UIT knop: voor het in- en uitschakelen van de
wasmachine.
PROGRAMMA knop: voor het kiezen van de
programma's. Gedurende het programma blijft de
knop stilstaan.
TEMPERATUUR
knop
PROGRAMMA
knop
Controlelampjes
FUNCTIE
knoppen
Controlelampje
AAN/DEUR
GEBLOKKEERD
CENTRIFUGE
knop

5
NL
ServiceStoringenOnderhoudProgramma's WasmiddelInstallatie Beschrijving
Voorzorgs-
maatregelen
Controlelampje AAN/DEUR GEBLOKKEERD:
Als het controlelampje brandt dan betekent dit dat de deur geblokkeerd is. Dit om te voorkomen dat hij per
ongeluk geopend zou worden; om schade te voorkomen moet u wachten tot het controlelampje knippert. Dan
pas kunt u de deur opentrekken.
Als het controlelampje van AAN/DEUR GEBLOKKEERD snel knippert tegelijkertijd met minstens één ander
controlelampje dan betekent dit dat er een storing is. Bel de Installateur.
Fase die bezig is:
Gedurende het verloop van het wasprogramma
gaan de controlelampjes een voor een aan om aan
te tonen met welk programmaonderdeel de machin
bezig is:
Voorwas
Was
Spoelen
Centrifugeren
N.B.: gedurende het afpompen gaat het controle-
lampje dat bij de fase Centrifugeren hoort branden.
Funtie-knoppen
De FUNCTIE-KNOPPEN dienen ook als controle-
lampjes.
Als u een functie kiest wordt de bijbehorende knop
verlicht.
Als de gekozen functie niet bij het ingestelde
programma hoort gaat de knop knipperen en de
functie wordt niet geactiveerd.
Als een functie wordt ingesteld die niet past bij een
andere eerder ingestelde functie, dan blijft alleen de
laatste keuze actief.
Controlelampjes
De controlelampjes geven belangrijke informatie.
Ze geven aan:
Uitgestelde start ingesteld:
Als de functie Delay Timer is geactiveerd (zie blz. 7),
nadat het programma is gestart, gaat het controle-
lampje dat bij de uitgestelde start hoort knipperen:
Naar gelang de terugloop van de tijd wordt , met het
knipperen van het betreffende controlelampje de
resterende tijd aangegeven:
Als de gekozen wachttijd is afgelopen gaat het
knipperende controlelampje uit en begint het inge-
stelde programma te lopen.

6
NL
Soort stof en vuil
Program-
ma's
Te m p e -
ratuur
Wasmiddel
Wasverz-
achter
Optie
Ontvlekken/
Bleekmiddel
Duur van
het
wasprogra-
mma (min.)
Beschrijving wasprogram ma
voor-
was
Hoof-
dwas
Standaard
Zeer vuile witte was
(lakens, tafellakens enz.)
1
90°C
135
Voorwas, hoofdwas, spoelingen,
tussen - en eindcentrifuge
Zeer vuile witte was
(lakens, tafellakens enz.)
2
90°C
Delicaat /
Traditioneel
125
H
oofdwas, spoelingen,
tussen - en eindcentrifuge
Zeer vuil wit en gekleurd
wasgoed
2
60°C
Delicaat /
Traditioneel
110
H
oofdwas, spoelingen,
tussen - en eindcentrifuge
Zeer vuile witte en gekleurde
fijne was
2
40°C
Delicaat /
Traditioneel
105
H
oofdwas, spoelingen,
tussen - en eindcentrifuge
W einig vuil wit wasgoed en
fijn gekleurd wasgoed
(overhemden, truien enz.)
3
40°C
Delicaat /
Traditioneel
70
H
oofdwas, spoelingen,
tussen - en eindcentrifuge
Zeer vuile kleurvaste stoffen
(babygoed enz.)
4
60°C Delicaat
75
Hoofdwas, spoelingen,
kreukvrij of delicate centrifuge
Zeer vuile kleurvaste stoffen
(babygoed enz.)
4
40°C Delicaat
60
Hoofdwas, spoelingen,
kreukvrij of delicate centrifuge
Licht gekleurde stoffen (ieder
soort w einig vuil w asgoed)
5
40°C Delicaat
60
Hoofdwas, spoelingen,
kreukvrij of delicate centrifuge
wol
6
40°C Delicaat
50
Hoofdwas, spoelingen en
delicate centrifuge
Speciaal fijne stoffen
(gordijnen, zijde, viscose enz.)
7
30°C
45
Hoofdwas, spoelingen,
kreukvrij of afpompen
Tim e 4 U
Zeer vuil wit en gekleurd
wasgoed
8
60°C
60
Hoofdwas, spoelingen, tussen-
en eindcentrifuge.
W einig vuil wit wasgoed en
fijn gekleurd wasgoed
(overhemden, truien enz.)
9
40°C
50
Hoofdwas, spoelingen, tussen-
en eindcentrifuge.
Licht gekleurde stoffen (ieder
soort w einig vuil w asgoed)
10
40
°C
40
Hoofdwas,
spoelingen en
delicate centrifuge
Licht gekleurde stoffen (ieder
soort w einig vuil w asgoed)
11
30°C 30
Hoofdwas,
spoelingen en
delicate centrifuge
Sport
Sportschoenen
(MAX. 2 paar.)
12
30
°C
50
Koude was (zonder wasmiddel),
wassen, spoelen en delicate
centrifuge
Stoffen voor sportkleding
(jogginpakken, shorts enz.)
13
30°C 60
Hoofdwas, spoelingen,
tussen -en eindcentrifuge
PROGRAMMA ONDERDELEN
Spoelen
Delicaat /
Traditioneel
Spoelingen en centrifuge
Centrifuge
ren
Afpompen en centrifuge
Afpompen Afpompen
Start en Programma's
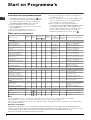
Tabel van de programma's
In het kort: een programma starten
1. Schakel de wasmachine in met de knop . Alle
controlelampjes branden gedurende enkele secon-
den, gaan vervolgens uit en het controlelampje
AAN/DEUR GEBLOKKEERD gaat knipperen.
2. Laad het wasgoed in en sluit de deur.
3. Stel het gewenste programma in met de knop
PROGRAMMA'S.
4. Stel de wastemperatuur in (zie blz. 7).
5. Stel de centrifugesnelheid in (zie blz. 7).
6. Giet het wasmiddel en verdere toevoegingen in
het laatje (zie blz. 8).
7. Start het programma met de START/RESET knop.
Voor het annuleren houdt u de START/RESET
knop minstens 2 seconden ingedrukt.
8. Aan het einde van het programma gaat het
controlelampje AAN/DEUR GEBLOKKEERD knippe-
ren hetgeen betekent dat de deur geopend kan
worden. Haal het wasgoed eruit en laat de deur op
een kier staan zodat de trommel kan drogen.
Schakel de wasmachine uit met de knop
.
Note
-Bij de programma´s 8 - 9 is het beter de machine met niet meer dan 3,5 kg wasgoed te beladen.
-Bij programma 13 raden wij aan een lading van niet meer dan 2 kg te wassen.
-Kijk voor de beschrijving van kreukvrij: Zie Minder Strijken, bladzijde hiernaast. De gevens in de tabel hebben
een indicatieve waarde.
Speciaal programma
Dagelijkse was (programma 11 voor synthetische stoffen) is bedoeld voor het snel wassen van kledingstukken die
weinig vuil zijn: het duurt slechts 30 minuten en bespaart dus elektriciteit en tijd. Met programma (11 met 30 °C) kunt
u verschillende soorten stoffen tesamen wassen (behalve zijde en wol) met een lading van max. 3 kg.
Het beste is om hierbij vloeibaar wasmiddel te gebruiken.

7
NL
Functies Effect Notities voor het gebruik
Actief bij de
programma's:
Delay T imer
Stelt de start van
de machine uit tot
aan 9 uren.
Druk meerdere malen op de knop totdat het controlelampje dat bij
de gewenste uitgestelde start hoort verlicht wordt.
Bij de vijfde druk op de knop wordt de functie gedeactiveerd.
N.B.: Als de Start/Reset knop eenmaal ingedrukt is dan kan de
uitgestelde tijd alleen verkort worden.
Allen
B leken
Bleekprogramma in
staat de meest
hardnekkige
vlekken te
verwijderen.
Vergeet niet bleekwater in het hiervoor bestemde bakje 4 te gieten
(zie blz 8).
Deze functie is niet geschikt voor de MINDER STRIJKEN.
2, 3, 4, 5, 6,
Spoelingen.
Min der
strijken
Vermindert het
kreuken van de
stoffen en
vergemakkelijkt het
strijken.
Door deze functie in te stellen worden de programma's 4, 5, 7
onderbroken, ( wasgoed blijft in water= spoelstop) (Kreukvrij), en
het controlelampje van de fase Spoelen gaat knipperen:
- voor het afmaken van de cycle drukt u op de START/RESET knop
- voor alleen waterafvoer zet u de knop op het symbool en
drukt u op de START/RESET knop.
Deze functie is niet geschikt voor de optie BLEKEN.
3, 4, 5, 7, 8,
9, 10,
Spoelen.
Ex tra
Spo elin g
Vermeerdert het
resultaat van het
spoelen.
Aangeraden voor volle lading wasgoed of met extra veel
wasmiddel.
1, 2, 3, 4, 5,
8, 9, 10, 12,
13, Spoelen.
Persoonlijk instellen
Service
Storingen
Onderhoud
Programma's
Wasmiddel
Installatie Beschrijving
Voorzorgs-
maatregelen
C
Instellen van de temperatuur
Door aan de TEMPERATUUR-knop te draaien stelt u de temperatuur van het wassen in (zie Tabel van de pro-
gramma's op blz. 6).
De temperatuur kan verlaagd worden tot aan koud (
).
Instellen van de centrifuge
Door aan de CENTRIFUGE-knop te draaien stelt u de snelheid van de centrifuge van het gekozen programma in.
De maximum snelheden voorzien voor de programma's zijn:
Programma's Maximum snelheid
Katoen 1200 toeren per minuut
Synthetisch 800 toeren per minuut
Wol 600 toeren per minuut
Zijde geen
U kunt de snelheid van de centrifuge verminderen, of het centrifugeren uitschakelen met het symbool
.
De machine voert geen centrifugesnelheid uit dat niet overeenkomt met de maximale centrifugesnelheid van het
te centrifugeren soort weefsel.
Functies
De verschillende functies van de wasmachine zorgen voor een heldere en witte was zoals door u gewenst. Voor
het activeren van de functies:
1. druk op de knop die bij de gewenste functie hoort, volgens de hiervolgende tabel;
2. het oplichten van de betreffende knop geeft aan dat de functie actief is.
N.B.: Snel knipperen van de knop geeft aan dat de bijbehorende functie van het ingestelde programma niet
gekozen kan worden.

8
NL
Wasmiddel en wasgoed
Wasmiddellaatje
Een goed resultaat van de was hangt ook af van
een juiste dosis wasmiddel: te veel maakt het
wassen niet beter en blijft in het wasgoed hangen
terwijl het slecht is voor het milieu.
Trek het laatje naar
voren en giet het was-
middel en/of de verdere
toevoegingen erin als
volgt.
bakje 1: voorwasmiddel (poeder)
Voordat u het middel erin giet moet u controleren of
het bakje 4 is geplaatst.
bakje 2: wasmiddel (poeder of vloeibaar)
Het vloeibare wasmiddel wordt erin gegoten vlak
voor de start.
bakje 3: toevoegingen (wasverzachter enz.)
De wasverzachter mag niet boven het roostertje
uitkomen.
extra bakje 4: Bleekwater
Gebruik nooit middelen voor handwas aangezien
die te veel schuim vormen.
Bleekprogramma
Het traditionele bleekmiddel kan alleen voor
stevig wit wasgoed gebruikt worden, terwijl het
delicate bleekmiddel geschikt is voor gekleurde
stoffen, synthetische stoffen en wol.
Plaats het bijgeleverde
extra bakje 4 in bakje 1.
Let er bij het gieten van
het bleekwater op dat
het niveau "max",
aangegeven op de
centrale pin, niet wordt
overschreden (zie afb.).
Als u alleen wilt bleken giet u het bleekwater in het
extra bakje 4, stelt u het programma Spoeling
en
activeert u de functie Bleken (zie blz 7).
Voor bleken tijdens het wassen giet u het wasmiddel
en de toevoegmiddelen in de bakjes, stelt u het
gewenste programma in en activeert u de functie
Bleken (zie blz 7).
Gebruik van het extra bakje 4 sluit het voorwassen uit.
Prepareren van het wasgoed
Verdeel het wasgoed volgens:
- het soort stof / het symbool op het etiket.
- de kleuren: scheid gekleurd goed van de witte
was.
Maak de zakken leeg en controleer de knopen.
Ga niet boven het aangegeven gewicht, berekend
voor droog wasgoed:
stevige stoffen: max 5 kg
synthetische stoffen max 2,5 kg
fijne stoffen max 2 kg
Wol: max 1 kg
Hoeveel weegt het wasgoed?
1 laken 400-500 gr.
1 sloop 150-200 gr.
1 tafelkleed 400-500 gr.
1 badjas 900-1200 gr.
1 handdoek 150-200 gr.
Speciale stukken
Gordijnen: vouw de gordijnen nauwkeurig en doe
ze in een kussensloop of net. Was ze apart zonder
ooit de halve lading te overschrijden. Gebruik pro-
gramma 7 dat automatisch de centrifuge uitsluit.
Donzen dekbedden en met dons gevulde
windjacks: als de vulling uit ganzenveren of
eendendons bestaat kunt u ze wassen in de was-
machine. Keer de stukken binnenste buiten en ga
niet boven een max. lading van 2-3 kg; herhaal de
spoeling een of twee keer en gebruik de delicate
centrifuge.
Wol: Gebruik voor de beste resultaten een wasmid-
del dat speciaal voor wol is bestemd en laad niet
meer dan 1kg wollen goed in de machine.
Woolmark
Voorzichtig als ware het met de hand
gewassen.
Indesit heeft een nieuwe standaard van superieure
prestaties geintroduceerd, door The Woolmark
Company erkend met het prestigieuze kenmerk
Woolmark. Als op de wasmachine het logo Woolmark
voorkomt kunt u met een gerust hart uw wollen goed
wassen dat het etiket "Handwas" bevat (M.00221):
Stel voor alle "Handwas" stukken programma
6 in, met gebruik van wasmiddel voor wol.
1
2
3
4

9
NL
Voorzorgsmaatregelen en
raadgevingen
ServiceStoringenOnderhoudProgramma's WasmiddelInstallatie Beschrijving
Voorzorgs-
maatregelen
De wasmachine is ontworpen en geproduceerd
volgens de internationale veiligheidsnormen. Deze
aanwijzingen worden voor uw eigen veiligheid gege-
ven en zij moeten met aandacht worden gelezen.
Algemene veiligheid
Dit apparaat is gemaakt voor huishoudelijk ge-
bruik, niet-professioneel, en zijn functies mogen
niet veranderd worden.
De wasmachine mag alleen door volwassen
personen en volgens de instructies in dit boekje
worden gebruikt.
Raak de machine niet aan als u blootsvoets bent
of met natte of vochtige handen of voeten.
Trek de stekker nooit aan het snoer uit het
stopcontact, maar altijd door de stekker aan te
pakken.
Open het wasmiddellaatje niet terwijl de machine
in werking is.
Raak het afvoerwater niet aan aangezien het
nogal warm kan zijn.
Forceer nooit de deur: het veiligheidsmechanisme,
dat tegen per ongeluk openen beschermt, kan
beschadigd worden.
Probeer in geval van storingen nooit zelf interne
mechanismen van de machine te repareren.
Zorg ervoor dat kleine kinderen niet te dicht bij de
machine komen als deze in werking is.
De glazen deur kan heet worden.
Als de machine verplaatst moet worden doe dit
dan met twee of drie personen en met grote
voorzichtigheid. Nooit alleen want de machine is
zwaar.
Voordat u het wasgoed in de machine laadt,
controleer dat hij leeg is.
Het afvoeren
Het afvoeren van het verpakkingsmateriaal:
houd u zich aan de plaatselijke normen zodat het
materiaal gerecycled kan worden.
De Europese Richtlijn 2002/96/EC over Vernieti
ging van Electrische en Electronische Apparatuur,
vereist dat oude huishoudelijke electrische appa
raten niet mogen vernietigd via de normale
ongesorteerde afvalstroom. Oude apparaten
moeten apart worden ingezameld om zo het
hergebruik van de gebruikte materialen te optima
liseren en de negatieve invloed op de gezondheid
en het milieu te reduceren. Het symbool op het
product van de afvalcontainer met een kruis
erdoor herinnert u aan uw verplichting, dat
wanneer u het apparaat vernietigt, het apparaat
apart moet worden ingezameld.
Consumenten moeten contact opnemen met de
locale autoriteiten voor informatie over de juiste
wijze van vernietiging van hun oude apparaat.
Bezuiniging en bescherming van het milieu
Maximale reiniging
Als er weinig water door de glazen deur te zien is
komt dat doordat met de nieuwe Indesit technologie
minder dan de helft water voldoende is voor maxi-
mum reinheid van de was: een doel dat is bereikt
ten gunste van de milieu-bescherming.
Bezuinigen op wasmiddel, water, energie en tijd
Teneinde geen energiebronnen te verkwisten
moet de machine altijd met maximum lading
worden gebruikt. U spaart 50% energie met een
volle lading i.p.v. twee half volle ladingen.
Voorwassen is alleen nodig voor erg vuil wasgoed.
Door dit te vermijden bespaart u wasmiddel, tijd,
water en ongeveer 5 tot 15% energie.
Door vlekken met een ontvlekkingsmiddel te
behandelen of in de week te zetten kunt u met
minder hoge temperaturen wassen. Een pro-
gramma op 60°C in plaats van op 90°C of op
40°C in plaats van 60°C zorgt voor een besparing
van 50% aan energie.
Doseer het wasmiddel op basis van de hardheid
van het water, de vuilheidsgraad en de hoeveel-
heid wasgoed, zo vermijd u onnodig energie-
verbruik en beschermt u het milieu. ook al zijn de
wasmiddelen biologisch afbreekbaar, toch bevat-
ten ze elementen die het evenwicht in de natuur
verstoren. Bovendien moet u zoveel mogelijk
wasverzachters vermijden.
Door zoveel mogelijk te wassen met goedkope stroom-
tarieven (s´nachts) werkt u mee aan het reduceren van
de belasting van de elektrische centrale.
De optie Delay Timer (zie blz. 7) is van groot
belang voor de uitvoering van het wasprogramma
gedurende de nacht.
Als u na het wassen het wasgoed in een dryer
wilt drogen, kunt u een hoge snelheid centrifuge
kiezen. Weinig water in het wasgoed spaart tijd
en energie bij het droogprogramma.

10
NL
Onderhoud
Afsluiten van water en stroom
Doe de kraan dicht na iedere wasbeurt. Hiermee
reduceert u de kans op lekkage.
Sluit altijd eerst de stroom af voordat u de wasma-
chine gaat schoonmaken en gedurende
onderhoudswerkzaamheden.
Schoonmaken van de wasmachine
De buitenkant en de rubber onderdelen kunnen met
een spons en lauw sopje worden schoongemaakt.
Nooit schuurmiddelen of oplosmiddelen gebruiken!
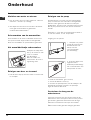
Het wasmiddellaatje schoonmaken
Verwijder het laatje door
het op te lichten en naar
voren te trekken
(zie afbeelding).
Was het onder stro-
mend water: dit moet u
regelmatig doen.
Reinigen van deur en trommel
Laat de deur altijd op een kier staan om muffe lucht
te vermijden.
Reinigen van de pomp
De wasmachine is voorzien van een zelfreinigende
pomp en hoeft dus niet te worden schoongemaakt.
Het kan echter gebeuren dat kleine voorwerpen
(geldstukken, knopen) in het voorvakje terecht komen
dat de pomp beschermt en zich aan de onderkant
bevindt.
Verzeker u ervan dat het wasprogramma klaar is
en trek de stekker uit het stopcontact.
Toegang tot het paneel:
1. verwijder het paneel-
tje aan de voorkant van
de wasmachine met
behulp van een
schroevendraaier
(zie afbeelding);
2. draai de deksel eraf,
tegen de klok in
draaiend (zie afbeelding):
het is normaal dat er een
beetje water uit komt;
3. maak de binnenkant goed schoon;
4. schroef de deksel er weer op;
5. monteer het paneeltje weer, met de haakjes in de
betreffende openingen voordat u het paneeltje
tegen de machine aan drukt.
Controleer de slang van de
watertoevoer
Controleer minstens eens per jaar de slang van de
watertoevoer. Als er barstjes in zitten moet hij vervan-
gen worden: gedurende het wassen kan de hoge
waterdruk onverwachts scheurtjes veroorzaken.
Nooit reeds eerder gebruikte slangen gebruiken.

11
NL
Het kan gebeuren dat de machine niet werkt. Voordat u de installateur opbelt (zie blz. 12), controleert u of het
een storing betreft die gemakkelijk te verhelpen is met behulp van de volgende lijst.
Storingen en oplossingen
Storingen:
De wasmachine
gaat niet aan.
Het wasprogramma
start niet.
De wasmachine neemt geen
water.
De wasmachine blijft water
aan- en afvoeren.
De wasmachine pompt het water
niet af of centrifugeert niet.
De machine trilt erg tijdens het
centirfugeren.
De wasmachine lekt.
Het controlelampje AAN/DEUR
GEBLOKKEERD knippert snel
tegelijkertijd met minstens één
ander controlelampje.
Er ontstaat teveel schuim.
Mogelijke oorzaken / Oplossing:
De stekker is niet in het stopcontact of niet ver genoeg ingestoken
om contact te maken.
Er is geen stroom.
De deur is niet goed dicht.
De knop
is niet ingedrukt.
De START/RESET knop is niet ingedrukt.
De waterkraan is niet open.
Uitgestelde start is ingesteld (Delay Timer, zie blz. 7).
De watertoevoerslang is niet aangesloten aan de kraan.
De slang ligt gekneld.
De kraan is niet open.
In huis mankeert het water.
Er is geen voldoende druk.
De START/RESET knop is niet ingedrukt.
De afvoerslang is niet geinstalleerd op 65 tot 100 cm afstand van de
grond (zie blz. 3).
Het uiteinde van de afvoerslang ligt onder water (zie blz. 3).
De afvoer in de muur heeft geen ontluchting.
Als na deze controle het probleem niet is opgelost, doet u de water-
kraan dicht, de machine uit en belt u de installateur. Als u op een van
de hoogste verdiepingen van een flatgebouw woont kan zich een
probleem met het hevelen voordoen, waarbij de machine voortdurend
water aan- en afvoert. Om deze storing te verhelpen bestaan er
speciale in de handel verkrijgbare ventielen.
Het programma voorziet niet in afvoer: bij enkele programma's
moet dit met de hand worden gestart (zie blz. 6).
De optie 'Minder strijken' is actief: voor het afmaken van het
programma drukt u op de START/RESET knop (zie blz. 7).
De afvoerslang ligt gekneld (zie blz. 3).
De afvoerleiding is verstopt.
De trommel is bij het installeren niet op de juiste wijze ontgrendeld (zie blz. 2).
De wasmachine staat niet recht (zie blz. 2).
De wasmachine staat te nauw tussen meubel en muur (zie blz. 2).
De slang van de watertoevoer is niet goed aangeschroefd (zie blz. 2).
Het wasmiddellaatje is verstopt (voor schoonmaken zie blz. 10).
De afvoerslang is niet goed bevestigd (zie blz. 3).
Bel de Installateur want dit geeft een storing aan.
Het wasmiddel is niet bedoeld voor wasmachines (er moet "voor
wasmachine", "handwas en wasmachine", of dergelijke op staan).
De dosering is te veel.
ServiceStoringenOnderhoudProgramma's WasmiddelInstallatie Beschrijving
Voorzorgs-
maatregelen

12
NL
Voordat u er de installateur bijhaalt:
Kijk eerst even of u het probleem zelf kunt oplossen (zie blz. 11);
Start het programma om te controleren of de storing is verholpen;
Is dit niet het geval dan neemt u contact op met de bevoegde dichtsbijzijnde Technische Dienst via
het telefoonnummer dat op het garantiebewijs/gebruiksaanwijzing staat.
Nooit een niet-bevoegde installateur erbij halen.
Vermeld:
het soort storing;
het model van de machine (Mod.);
het serienummer (S/N).
Deze informatie vindt u op het typeplaatje aan de achterkant van de wasmachine.
Service
Service

13
GB
English
Contents
Installation, 14-15
Unpacking and levelling, 14
Electric and water connections, 14-15
The first wash cycle, 15
Technical details, 15
Washing machine description, 16-17
Control panel, 16
Leds, 17
Starting and Programmes, 18
Briefly: how to start a programme, 18
Programme table, 18
Personalisations, 19
Setting the temperature, 19
Setting the spin speed, 19
Functions, 19
Detergents and laundry, 20
Detergent dispenser, 20
Bleach cycle, 20
Preparing your laundry, 20
Special items, 20
Woolmark, 20
Precautions and advice, 21
General safety, 21
Disposal, 21
Saving energy and respecting the environment, 21
Care and maintenance, 22
Cutting off the water or electricity supply, 22
Cleaning your appliance, 22
Cleaning the detergent dispenser, 22
Caring for your appliance door and drum, 22
Cleaning the pump, 22
Checking the water inlet hose, 22
Troubleshooting, 23
Service, 24
Before calling for Assistance, 24
WASHING MACHINE
WIL 12
Instructions for use
GB

14
GB
Installation
Keep this instruction manual in a safe place for
future reference. Should the appliance be sold,
transferred or moved, make sure the instruction
manual accompanies the washing machine to inform
the new owner as to its operation and features.
Read these instructions carefully: they contain vital
information on installation, use and safety.
Unpacking and levelling
Unpacking
1. Unpack the washing machine.
2. Check whether the washing machine has been
damaged during transport. If this is the case, do not
install it and contact your retailer.
3. Remove the 3
protective screws and
the rubber washer with
the respective spacer,
situated on the rear of
the appliance (see
figure).
4. Seal the gaps using the plastic plugs provided.
5. Keep all the parts: you will need them again if the
washing machine needs to be moved to another
location.
Packaging materials are not children's toys.
Levelling
1. Install the washing machine on a flat sturdy floor,
without resting it up against walls, furniture cabinets
or other.
2. If the floor is not
perfectly level, compen-
sate for any unevenness
by tightening or
loosening the adjustable
front feet (see figure);
the angle of inclination,
measured according to
the worktop, must not
exceed 2°.
Levelling your appliance correctly will provide it with
stability and avoid any vibrations, noise and shifting
during operation. If it is placed on a fitted or loose
carpet, adjust the feet in such a way as to allow
enough room for ventilation beneath the washing
machine.
Electric and water connections
Connecting the water inlet hose
1. Insert seal A into the
end of the inlet hose
and screw the latter
onto a cold water tap
with a 3/4 gas threaded
mouth (see figure).
Before making the
connection, allow the
water to run freely until
it is perfectly clear.
2. Connect the other end
of the water inlet hose to
the washing machine,
screwing it onto the
appliance's cold water
inlet, situated on the top
right-hand side on the
rear of the appliance
(see figure).
3. Make sure there are no kinks or bends in the
hose.
The water pressure at the tap must be within the
values indicated in the Technical details table
(on the next page).
If the water inlet hose is not long enough, contact
a specialist store or an authorised serviceman.
A

15
GB
ServiceTroubleshootingPrecautions CareProgrammes DetergentsInstallation Description
Connecting the drain hose
Connect the drain hose,
without bending it, to a
draining duct or a wall
drain situated between
65 and 100 cm from
the floor;
alternatively, place it
over the edge of a
basin, sink or tub,
fastening the duct
supplied to the tap (see
figure). The free end of
the hose should not be
underwater.
We advise against the use of hose extensions; in
case of absolute need, the extension must have the
same diameter as the original hose and must not
exceed 150 cm in length.
Electric connection
Before plugging the appliance into the mains
socket, make sure that:
the socket is earthed and in compliance with the
applicable law;
the socket is able to sustain the appliance's
maximum power load indicated in the Technical
details table (on the right);
the supply voltage is included within the values i
ndicated on the Technical details table
(on the right);
the socket is compatible with the washing
machine's plug. If this is not the case, replace
the socket or the plug.
The washing machine should not be installed in an
outdoor environment, not even when the area is
sheltered, because it may be very dangerous to
leave it exposed to rain and thunderstorms.
When the washing machine is installed, the mains
socket must be within easy reach.
Do not use extensions or multiple sockets.
The power supply cable must never be bent or
dangerously compressed.
The power supply cable must only be replaced by
an authorised serviceman.
Warning! The company denies all liability if and when
these norms are not respected.
The first wash cycle
Once the appliance has been installed, and before
you use it for the first time, run a wash cycle with
detergent and no laundry, setting the 90°C
programme without a pre-wash cycle.
65 - 100 cm
Technical details
Model
WIL 12
Dimensions
59.5 cm wide
85 cm high
52.5 cm deep
Capacity
from 1 to 5 kg
Electric
connections
voltage 220/230 Volts 50 Hz
maximum absorbed power 1850 W
Water
connections
maximum pressure 1 MPa (10 bar)
minimum pressure 0.05 MPa (0.5 bar)
drum capacity 46 litres
Spin speed
up to 1200 rpm
Control
programmes
according to
IEC456 directive
programme 2; temperature 60°C;
run with a load of 5 kg.
This appliance is compliant with the
following European Community
Directives:
- 73/23/CEE of 19/02/73 (Low
Voltage) and subsequent amendments
- 89/336/CEE of 03/05/89
(Electromagnetic Compatibility) and
subsequent amendments
- 2002/96/CE

16
GB
Washing machine description
Control panel
Detergent dispenser
ON-OFF
Button
START/RESET
Button
TEMPERATURE
Knob
PROGRAMME
Knob
Leds
FUNCTION
Buttons
SPIN SPEED
Knob
ON-OFF/
DOOR
LOCK
Led
Detergent dispenser: to add detergent and fabric
softener (see page 20).
LEDS: to find out which wash cycle phase is under
way.
If the Delay Timer function has been set, the time
left until the programme starts will be indicated (see
page 17).
SPIN SPEED knob: to set the spin speed or exclude
the spin cycle completely (see page 19).
FUNCTION buttons: to select the functions
available. The button corresponding to the function
selected will remain on.
TEMPERATURE knob: to set the temperature or
the cold wash cycle (see page 19).
START/RESET button: to start the programmes or
cancel any incorrect settings.
ON-OFF/DOOR LOCK Led: to find out whether the
washing machine is on and if the appliance door can
be opened (see page 17).
ON/OFF button: to turn the washing machine on
and off.
PROGRAMME knob: to select the wash
programmes. The knob stays still during the cycle.

17
GB
ServiceTroubleshootingPrecautions CareProgrammes DetergentsInstallation Description
ON-OFF/DOOR LOCK led:
If this LED is on, the appliance door is locked to prevent it from being opened accidentally; to avoid any
damages, wait for the LED to flash before you open the appliance door.
The rapid flashing of the ON-OFF/DOOR LOCK Led together with the flashing of at least one other LED
indicates there is an abnormality. Call for Technical Assistance.
Cycle phase under way:
During the wash cycle, the LEDs gradually illuminate
on to indicate the cycle phase under way:
Prewash
Wash
Rinse
Spin cycle
Note: during draining, the LED corresponding to
the Spin cycle phase will be turned on.
Function buttons
The FUNCTION BUTTONS also act like LEDS.
When a function is selected, the corresponding
button is illuminated.
If the function selected is incompatible with the
programme set, the button will flash and the
function will not be enabled.
If you set a function that is incompatible with
another function you selected previously, only the
last one selected will be enabled.
Leds
The LEDS provide important information.
This is what they can tell you:
Delay set:
If the Delay Timer function has been enabled (see
page. 19), once you have started the programme,
the LED corresponding to the delay set will begin to
flash:
As time passes, the remaining delay will be
displayed, and the corresponding LED will flash:
Once the set delay is complete, the flashing LED will
turn off and the programme set will start.

18
GB
Type of fabric and
degree of soil
Program m es
Te m p e -
rature
Detergent
Fabric
softener
Stain removal
option/bleach
Cycle
length
(m inute s)
Description of wash cycle
pre-
wash
wash
Standard
Extremely soiled whites
(sheets, tablecloths, etc.)
1
90°C
135
Pre-wash, wash cycle, rinse cycles,
intermediate and final spin cycles
Extremely soiled whites
(sheets, tablecloths, etc.)
2
90°C
Delicate/
Traditional
125
Wash cycle, rinse cycles,
intermediate and final spin cycles
Heavily soiled whites and fast
colours
2
60°C
Delicate/
Traditional
110
Wash cycle, rinse cycles,
intermediate and final spin cycles
Heavily soiled whites and
delicate colours
2
40°C
Delicate/
Traditional
105
Wash cycle, rinse cycles,
intermediate and final spin cycles
Slightly soiled w hites and
delicate colours (shirts,
jumpers, etc.)
3
40°C
Delicate/
Traditional
70
Wash cycle, rinse cycles,
intermediate and final spin cycles
Heavily soiled fast colours
(baby linen, etc.)
4
60°C Delicate
75
Wash cycle, rinse cycles, anti-
crease or delicate spin cycle
Heavily soiled fast colours
(baby linen, etc.)
4
40°C Delicate
60
Wash cycle, rinse cycles, anti-
crease or delicate spin cycle
Delicate colours (all types of
slightly soiled garments)
5
40°C Delicate
60
Wash cycle, rinse cycles, anti-
crease or delicate spin cycle
Wool
6
40°C Delicate
50
Wash cycle, rinse cycles and
delicate spin cycle
Very delicate fabrics
(curtains, silk, viscose, etc.)
7
30°C
45
Wash cycle, rinse cycles, anti-
crease or draining cycle
Time 4 you
Heavily soiled whites and fast
colours
8
60°C
60
Wash cycle, rinse cycles,
intermediate and final spin cycles
Slightly soiled w hites and
delicate colours (shirts,
jumpers, etc.)
9
40°C
50
Wash cycle, rinse cycles,
intermediate and final spin cycles
Delicate colours (all types of
slightly soiled garments)
10
40
°C
40
Wash cycle, rinse cycles,
delicate spin cycle
Delicate colours (all types of
slightly soiled garments)
11
30°C 30
Wash cycle, rinse cycles and
delicate spin cycle
Sports
Sports shoes
(MAX. 2 pairs)
12
30
°C
50
Cold wash (without detergents),
wash cycle, rinse cycles, and
delicate spin cycle
Fabrics for sportswear
(Tracksuits, shorts, etc.)
13
30°C 60
Wash cycle, rinse cycles,
intermediate and final spin cycles
PARTIAL PROGRAMMES
Rinse
Delicate/
Traditional
Rinse cycles and spin cycle
Spin cycle Draining and spin cycle
Draining Draining
Starting and Programmes
Programme table
Briefly: starting a programme
1. Switch the washing machine on by pressing button .
All the LEDS will light up for a few seconds and
the ON-OFF/DOOR LOCK Led will begin to flash.
2. Load your laundry into the washing machine and
shut the appliance door.
3. Set the PROGRAMME knob to the programme
required.
4. Set the wash temperature (see page 19).
5. Set the spin speed (see page 19).
6. Add the detergent and any fabric softener
(see page 20).
7. Start he programme by pressing the START/RESET
button.
To cancel it, keep the START/RESET button pressed
for at least 2 seconds.
8. When the programme is finished, the ON-OFF/
DOOR LOCK Led will flash to indicate that the
appliance door can be opened. Take out your
laundry and leave the appliance door ajar to allow
the drum to dry thoroughly. Turn the washing
machine off by pressing button
.
Notes
-For programmes 8 and 9, we advise against exceeding a wash load of 3.5 kg.
-For programme 13 we advise against exceeding a wash load of 2 kg.
-For the anti-crease function: see Easy iron, opposite page. The information contained in the table is purely indicative.
Special programme
Daily (programme 11 for Synthetics) is designed to wash lightly soiled garments in a short amount of time: it only lasts
30 minutes and allows you to save on both time and energy. By setting this programme (11 at 30°C), you can wash
different fabrics together (except for woollen and silk items), with a maximum load of 3 kg.
We recommend the use of liquid detergent.

19
GB
ServiceTroubleshootingPrecautions CareProgrammes DetergentsInstallation Description
Personalisations
Setting the temperature
Turn the TEMPERATURE knob to set the wash temperature (see Programme table on page 18).
The temperature can be lowered, or even set to a cold wash (
).
Setting the spin speed
Turn the SPIN SPEED knob to set the spin speed for the programme selected.
The maximum spin speeds for each programme are as follows:
Programmes Maximum spin speed
Cottone 1200 rpm
Synthetics 800 rpm
Wool 600 rpm
Silk no
The spin speed can be lowered, or the spin cycle can be excluded altogether by selecting symbol
.
The washing machine will automatically prevent you from selecting a spin speed higher than the maximum
speed for each programme.
Functions
To enable a function:
1. press the button corresponding to the desired function, according to the table below;
2. the function is enabled when the corresponding button is illuminated.
Note: The rapid flashing of the button indicates that the corresponding function cannot be selected for the
programme set.
Function Effect Comments
Enabled with
programmes:
Delay Timer
Delays the start
of the wash by
up to 9 hours.
Press the button repeatedly until the LED corresponding to the
desired delay is turned on.
The fifth time the button is pressed, the function will be disabled.
N.B.: Once you have pressed the Start/Reset button, the delay
can only be decreased if you wish to modify it.
All
Stain
removal
Bleaching cycle
designed to
remove the
toughest stains.
Please remember to pour the bleach into extra compartment 4
(se
e page 20)
.
This function is incompatible with the EASY IRON function.
2, 3, 4, 5, 6,
Rinse cycle.
Easy iron
This option
reduces the
amount of
creasing on
fabrics, making
them easier to
iron.
When this function is set, programmes 4, 5, 7 will end with the
laundry left to soak (Anti-crease) and the Rinse cycle phase
LED will flash.
- to conclude the cycle, press the START/RESET button;
- to run the draining cycle alone, set the knob to the relative
symbol and press the START/RESET button.
This function is incompatible with the STAIN REMOVAL function.
3, 4, 5, 7, 8,
9, 10, Rinse
cycle.
Extra Rinse
Increases the
efficiency of the
rinse.
Recommended when the appliance has a full load or with large
quantities of detergent.
1, 2, 3, 4, 5,
8, 9, 10, 12,
13, Rinse
cycle.

20
GB
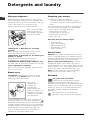
Detergent dispenser
Good washing results also depend on the correct
dose of detergent: adding too much detergent won't
necessarily make for a more efficient wash, and may
in fact cause build up on the interior of your
appliance and even pollute the environment.
Open up the detergent
dispenser and pour in
the detergent and fabric
softener, as follows.
compartment 1: Detergent for pre-wash
(powder)
Before pouring in the detergent, make sure that
extra compartment 4 has been removed.
compartment 2: Detergent for the wash cycle
(powder or liquid)
Liquid detergent should only be poured in
immediately prior to the wash cycle start.
compartment 3: Additives (fabric softeners, etc.)
The fabric softener should not overflow from the grid.
extra compartment 4: Bleach
Do not use hand wash detergent because it may
form too much foam.
Bleach cycle
Traditional bleach should be used on sturdy
white fabrics, and delicate bleach for coloured
fabrics, synthetics and for wool.
Place extra
compartment 4,
provided, into
compartment 1.
When pouring in the
bleach, be careful not to
exceed the "max" level
indicated on the central
pivot (see figure).
To run the bleach cycle alone, pour the bleach into
extra compartment 4, set the Rinse programme
and enable the Stain removal option (see page 19).
To bleach during a wash cycle, pour in the detergent
and fabric softener, set the desired programme and
enable the Stain removal option (see page 19).
The use of extra compartment 4 excludes the
possibility of using the pre-wash cycle.
Preparing your laundry
Divide your laundry according to:
- the type of fabric/the symbol on the label.
- the colours: separate coloured garments from
whites.
Empty all pockets and check for loose buttons.
Do not exceed the weight limits stated below,
which refer to the weight when dry:
Sturdy fabrics: max 5 kg
Synthetic fabrics: max 2.5 kg
Delicate fabrics: max 2 kg
Wool: max 1 kg
How much does your laundry weigh?
1 sheet 400-500 g
1 pillow case 150-200 g
1 tablecloth 400-500 g
1 bathrobe 900-1,200 g
1 towel 150-250 g
Special items
Curtains: fold curtains and place them in a pillow
case or mesh bag. Wash them separately without
exceeding half the appliance load. Use programme 7
which excludes the spin cycle automatically.
Quilted coats and windbreakers: if they are
padded with goose or duck down, they can be
machine-washed. Turn the garments inside out and
load a maximum of 2-3 kg, repeating the rinse cycle
once or twice and using the delicate spin cycle.
Wool: for best results, use a specific detergent,
taking care not to exceed a load of 1 kg.
Woolmark
As gentle as a hand wash.
Indesit sets a new standard of superior
performance that has been endorsed by The
Woolmark Company with the prestigious Woolmark
brand. Look for the Woolmark logo on the washing
machine to ensure you can safely and effectively
wash wool garments labelled as "hand wash"
(M.00221):
Set programme 6 for all "Hand wash"
garments, using the appropriate detergent.
Detergents and laundry
1
2
3
4

21
GB
Precautions and advice
ServiceTroubleshootingPrecautions CareProgrammes DetergentsInstallation Description
The washing machine was designed and built in
compliance with the applicable international safety
regulations. The following information is provided for
your safety and should consequently be read carefully.
General safety
This appliance has been designed for non-
professional, household use and its functions must
not be changed.
This washing machine should only be used by
adults and in accordance with the instructions
provided in this manual.
Never touch the washing machine when barefoot
or with wet or damp hands or feet.
Do not pull on the power supply cable to unplug
the appliance from the electricity socket. Pull the
plug out yourself.
Do not open the detergent dispenser while the
appliance is in operation.
Do not touch the drain water as it could reach
very high temperatures.
Never force the washing machine door: this could
damage the safety lock mechanism designed to
prevent any accidental openings.
In the event of a malfunction, do not under any
circumstances touch internal parts in order to
attempt repairs.
Always keep children well away from the
appliance while in operation.
The appliance door tends to get quite hot during
the wash cycle.
Should it have to be moved, proceed with the
help of two or three people and handle it with the
utmost care. Never try to do this alone, because
the appliance is very heavy.
Before loading your laundry into the washing
machine, make sure the drum is empty.
Disposal
Disposing of the packaging material:
observe local regulations, so the packaging can
be re-used.
The European Directive 2002/96/EC on Waste
Electrical and Electronic Equipment, requires that
old household electrical appliances must not be
disposed of in the normal unsorted municipal waste
stream. Old appliances must be collected
separately in order to optimise the recovery and
recycling of the materials they contain and reduce
the impact on human health and the environment.
The crossed out "wheeled bin" symbol on the
product reminds you of your obligation, that when
you dispose of the appliance it must be separately
collected.
Consumers should contact their local authority or
retailer for information concerning the correct
disposal of their old appliance.
Saving energy and respecting the
environment
Environmentally-friendly technology
If you only see a little water through your appliance
door, this is because thanks to the latest Indesit
technology, your washing machine only needs less
than half the amount of water to get the best results:
an objective reached to respect the environment.
Saving on detergent, water,
energy and time
To avoid wasting resources, the washing machine
should be used with a full load. A full load instead of
two half loads allows you to save up to 50% on energy.
The pre-wash cycle is only necessary on
extremely soiled garments. Avoiding it will save on
detergent, time, water and between 5 and 15%
energy.
Treating stains with a stain remover or leaving them
to soak before washing will cut down the need to
wash them at high temperatures. A programme at
60°C instead of 90°C or one at 40°C instead of
60°C will save up to 50% on energy.
Use the correct quantity of detergent depending
on the water hardness, how soiled the garments
are and the amount of laundry you have, to avoid
wastage and to protect the environment: despite
being biodegradable, detergents do contain
ingredients that alter the natural balance of the
environment. In addition, avoid using fabric
softener as much as possible.
If you use your washing machine from late in the
afternoon until the early hours of the morning, you
will help reduce the electricity board's peak load.
The Delay Timer option (see page 19) helps to
organise your wash cycles accordingly.
If your laundry has to be dried in a tumble dryer,
select a high spin speed. Having the least water
possible in your laundry will save you time and
energy in the drying process.

22
GB
Care and maintenance
Cutting off the water or electricity
supply
Turn off the water tap after every wash. This will
limit the wear of your appliance's water system
and also prevent leaks.
Unplug your appliance when cleaning it and
during all maintenance operations.
Cleaning your appliance
The exterior and rubber parts of your appliance can
be cleaned with a soft cloth soaked in lukewarm
soapy water. Do not use solvents or abrasives.
Cleaning the detergent dispenser
Remove the dispenser
by pulling it out (see
figure).
Wash it under running
water; this operation
should be repeated
frequently.
Caring for your appliance door and
drum
Always leave the appliance door ajar to prevent
unpleasant odours from forming.
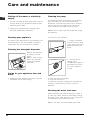
Cleaning the pump
The washing machine is fitted with a self-cleaning
pump that does not require any maintenance.
Sometimes, small items (such as coins or buttons)
may fall into the pre-chamber that protects the
pump, situated in the lower part of the same.
Make sure the wash cycle has ended and unplug
the appliance.
To access the pre-chamber:
1. using a screwdriver,
remove the cover panel
on the lower front of the
washing machine (see
figure);
2. unscrew the lid
rotating it anti-
clockwise (see figure): a
little water may trickle
out. This is perfectly
normal;
3. clean the interior thoroughly;
4. screw the lid back on;
5. reposition the panel, making sure the hooks are
securely in place before you push it onto the
appliance.
Checking the water inlet hose
Check the water inlet hose at least once a year. If
you see any cracks, replace it immediately: during
the wash cycles, water pressure is very strong and
a cracked hose could easily split open.
Never use hoses that have already been used.

23
GB
Troubleshooting
ServiceTroubleshootingPrecautions CareProgrammes DetergentsInstallation Description
Your washing machine could fail to work. Before calling for Assistance (see page 24), make sure the problem
can't easily be solved by consulting the following list.
Problem
The washing machine won't
start.
The wash cycle won't start.
The washing machine fails to
load water.
The washing machine
continuously loads and unloads
water.
The washing machine does not
drain or spin.
The washing machine vibrates
too much during the spin cycle.
The washing machine leaks.
The ON-OFF/DOOR LOCK Led
flashes rapidly at the same
time as at least one other LED.
There is too much foam.
Possible causes/Solution:
The appliance is not plugged into the socket, or not enough to
make contact.
There has been a power failure.
The appliance door is not shut properly.
The
button has not been pressed.
The START/RESET button has not been pressed.
The water tap is not turned on.
A delayed start has been set (using the Delay Timer, see page 19).
The water inlet hose is not connected to the tap.
The hose is bent.
The water tap is not turned on.
There is a water shortage.
The water pressure is insufficient.
The START/RESET button has not been pressed.
The drain hose is not fitted between 65 and 100 cm from the floor
(see page 15).
The free end of the hose is underwater (see page 15).
The wall drainage system doesn't have a breather pipe.
If the problem persists even after these checks, turn off the water tap,
switch the appliance off and call for Assistance. If the dwelling is on one of
the upper floors of a building, there may be drain trap problems causing the
washing machine to load and unload water continuously. In order to avoid
such an inconvenience, special anti-drain trap valves are available in shops.
The programme does not foresee the draining: some programmes
require enabling the draining manually (see page 18).
The Easy iron option is enabled: to complete the programme, press
the START/RESET button (see page 19).
The drain hose is bent (see page 15).
The drain duct is clogged.
The drum was not unblocked correctly during installation (see page 14).
The washing machine is not level (see page 14).
The washing machine is closed in between furniture cabinets and
the wall (see page 14).
The water inlet hose is not screwed on correctly (see page 14).
The detergent dispenser is obstructed (to clean it, see page 22).
The drain hose is not secured properly (see page 15).
Call for Assistance because this means there is an abnormality.
The detergent is not suitable for machine washing (it should bear
the definition "for washing machines" or "hand and machine wash",
or the like).
You used too much detergent.

24
GB
Before calling for Assistance:
Check whether you can solve the problem on your own (see page 23);
Restart the programme to check whether the problem has been solved;
If this is not the case, contact an authorised Technical Service Centre on the telephone number
provided on the guarantee certificate.
Always request the assistance of authorised servicemen.
Notify the operator of:
the type of problem;
the appliance model (Mod.);
the serial number (S/N).
This information can be found on the data plate situated on the rear of the washing machine.
Service
Service
195046379.01
04/2005 - Xerox Business Services
-
 1
1
-
 2
2
-
 3
3
-
 4
4
-
 5
5
-
 6
6
-
 7
7
-
 8
8
-
 9
9
-
 10
10
-
 11
11
-
 12
12
-
 13
13
-
 14
14
-
 15
15
-
 16
16
-
 17
17
-
 18
18
-
 19
19
-
 20
20
-
 21
21
-
 22
22
-
 23
23
-
 24
24


Indesit WIL 12 (NL) Gebruikershandleiding
- Categorie
- Wasmachines
- Type
- Gebruikershandleiding
in andere talen
- English: Indesit WIL 12 (NL) User guide
Gerelateerde artikelen
-
Indesit WI 142 (EU) (TEV) Gebruikershandleiding
-
-
-
Whirlpool WIXL 125 (EX) Handleiding
-
-
-
-
Indesit WIL 145 de handleiding
-
Indesit WIDL 146 (EX) Handleiding
-