Yamaha YVC-200 Gebruikershandleiding
- Categorie
- Bluetooth-muziekontvangers
- Type
- Gebruikershandleiding

YVC-200
Unified Communications Speakerphone
User Guide

Table of contents
1. Introduction . . . . . . . . . . . . . . . . . . . . . . . . . . . . . . . . . . . . . . . . . . . . . . . . . . . . . . . . . . . . . . . . . . . . . . . . . . . . . . . . . . . Ê1
1.1. About this manual. . . . . . . . . . . . . . . . . . . . . . . . . . . . . . . . . . . . . . . . . . . . . . . . . . . . . . . . . . . . . . . . . . . . . . . . . . Ê1
1.2. Features . . . . . . . . . . . . . . . . . . . . . . . . . . . . . . . . . . . . . . . . . . . . . . . . . . . . . . . . . . . . . . . . . . . . . . . . . . . . . . . . . . Ê1
1.3. Included accessories . . . . . . . . . . . . . . . . . . . . . . . . . . . . . . . . . . . . . . . . . . . . . . . . . . . . . . . . . . . . . . . . . . . . . . . Ê1
2. Components and Functions . . . . . . . . . . . . . . . . . . . . . . . . . . . . . . . . . . . . . . . . . . . . . . . . . . . . . . . . . . . . . . . . . . . . . . Ê2
2.1. Top . . . . . . . . . . . . . . . . . . . . . . . . . . . . . . . . . . . . . . . . . . . . . . . . . . . . . . . . . . . . . . . . . . . . . . . . . . . . . . . . . . . . . . Ê2
2.2. Side. . . . . . . . . . . . . . . . . . . . . . . . . . . . . . . . . . . . . . . . . . . . . . . . . . . . . . . . . . . . . . . . . . . . . . . . . . . . . . . . . . . . . . Ê3
2.3. Bottom . . . . . . . . . . . . . . . . . . . . . . . . . . . . . . . . . . . . . . . . . . . . . . . . . . . . . . . . . . . . . . . . . . . . . . . . . . . . . . . . . . . Ê5
3. Preparation . . . . . . . . . . . . . . . . . . . . . . . . . . . . . . . . . . . . . . . . . . . . . . . . . . . . . . . . . . . . . . . . . . . . . . . . . . . . . . . . . . . . Ê6
3.1. Charging. . . . . . . . . . . . . . . . . . . . . . . . . . . . . . . . . . . . . . . . . . . . . . . . . . . . . . . . . . . . . . . . . . . . . . . . . . . . . . . . . . Ê6
3.2. Installing. . . . . . . . . . . . . . . . . . . . . . . . . . . . . . . . . . . . . . . . . . . . . . . . . . . . . . . . . . . . . . . . . . . . . . . . . . . . . . . . . . Ê6
3.3. Connecting a headset/headphones . . . . . . . . . . . . . . . . . . . . . . . . . . . . . . . . . . . . . . . . . . . . . . . . . . . . . . . . . . . Ê7
3.4. Connecting a Smartphone via Bluetooth . . . . . . . . . . . . . . . . . . . . . . . . . . . . . . . . . . . . . . . . . . . . . . . . . . . . . . . Ê8
3.5. Connecting a Computer via USB. . . . . . . . . . . . . . . . . . . . . . . . . . . . . . . . . . . . . . . . . . . . . . . . . . . . . . . . . . . . . Ê10
4. Using the Product . . . . . . . . . . . . . . . . . . . . . . . . . . . . . . . . . . . . . . . . . . . . . . . . . . . . . . . . . . . . . . . . . . . . . . . . . . . . . Ê17
4.1. Turning the Power On and Off. . . . . . . . . . . . . . . . . . . . . . . . . . . . . . . . . . . . . . . . . . . . . . . . . . . . . . . . . . . . . . . Ê17
4.2. Adjusting the Speaker Volume . . . . . . . . . . . . . . . . . . . . . . . . . . . . . . . . . . . . . . . . . . . . . . . . . . . . . . . . . . . . . . Ê17
4.3. Muting/Unmuting the Microphone . . . . . . . . . . . . . . . . . . . . . . . . . . . . . . . . . . . . . . . . . . . . . . . . . . . . . . . . . . . Ê17
4.4. Muting/Unmuting the Speaker . . . . . . . . . . . . . . . . . . . . . . . . . . . . . . . . . . . . . . . . . . . . . . . . . . . . . . . . . . . . . . Ê18
4.5. Answering an Incoming Phone Call/Ending a Phone Call on a Smartphone. . . . . . . . . . . . . . . . . . . . . . . . . Ê18
5. Other Functions . . . . . . . . . . . . . . . . . . . . . . . . . . . . . . . . . . . . . . . . . . . . . . . . . . . . . . . . . . . . . . . . . . . . . . . . . . . . . . . Ê19
5.1. Checking the Battery Level . . . . . . . . . . . . . . . . . . . . . . . . . . . . . . . . . . . . . . . . . . . . . . . . . . . . . . . . . . . . . . . . . Ê19
5.2. Restoring Factory Default Settings. . . . . . . . . . . . . . . . . . . . . . . . . . . . . . . . . . . . . . . . . . . . . . . . . . . . . . . . . . . Ê19
5.3. Resetting . . . . . . . . . . . . . . . . . . . . . . . . . . . . . . . . . . . . . . . . . . . . . . . . . . . . . . . . . . . . . . . . . . . . . . . . . . . . . . . . Ê19
5.4. Updating the Firmware. . . . . . . . . . . . . . . . . . . . . . . . . . . . . . . . . . . . . . . . . . . . . . . . . . . . . . . . . . . . . . . . . . . . . Ê19
6. Troubleshooting. . . . . . . . . . . . . . . . . . . . . . . . . . . . . . . . . . . . . . . . . . . . . . . . . . . . . . . . . . . . . . . . . . . . . . . . . . . . . . . Ê20
6.1. Before Contacting Support . . . . . . . . . . . . . . . . . . . . . . . . . . . . . . . . . . . . . . . . . . . . . . . . . . . . . . . . . . . . . . . . . Ê20
6.2. Problems with Bluetooth Connections. . . . . . . . . . . . . . . . . . . . . . . . . . . . . . . . . . . . . . . . . . . . . . . . . . . . . . . . Ê20
6.3. Problems with Phone Call Audio Quality . . . . . . . . . . . . . . . . . . . . . . . . . . . . . . . . . . . . . . . . . . . . . . . . . . . . . . Ê20
6.4. Other Problems. . . . . . . . . . . . . . . . . . . . . . . . . . . . . . . . . . . . . . . . . . . . . . . . . . . . . . . . . . . . . . . . . . . . . . . . . . . Ê21

1. Introduction
Thank you for purchasing the Yamaha YVC-200.
This product is a speaker phone for a few people that is optimal for use by 1 to 3 people.
Read the attached safety precautions before using this product and use the product correctly and safely.
1.1. About this manual
• This manual provides information for using this product such as how to connect and how to operate.
• The symbols used in this manual and their meanings are as follows.
Symbol Meaning
WARNING
This content indicates “risk of serious injury or death.”
CAUTION
This content indicates “risk of injury.”
Notice
Indicates points that you must observe in order to prevent product failure,
damage or malfunction and data loss.
Important
Content that you need to know in order to operate and use the product
correctly.
Note Information related to operation and usage. Read this for reference.
• The company names and product names in this manual are the trademarks or registered trademarks of
their respective companies.
• No part of this manual may be reproduced or used in any form without the permission of Yamaha.
• The illustrations and screens in this manual are for instructional purposes only.
• The contents of this manual apply to the latest specifications as of the publishing date. To obtain the
latest manual, access the Yamaha website then download the manual file.
1.2. Features
•
Audio signal processing that automatically delivers the best audio quality
“Adaptive echo canceler” that delivers smooth two-way conversation
“Noise reduction” that eliminates noise emitted from sources such as projectors
“Auto gain control” that adjusts the volume of people near and people far from the microphone
• Microphone that captures sound omnidirectionally from all 360° and speaker that is able to output sound
at a maximum of 88 dB
• Connects to computers running Windows/macOS and smartphones running iOS/Android
• “Plug and Play” connectivity using USB, Bluetooth, and NFC
• Built-in rechargeable battery capable of a maximum of 10 hours of continuous use
1.3. Included accessories
• USB cable × 1
• Safety Brochure × 1
• Quick Start Guide × 1
• Carrying case × 1
1. Introduction
1.1. About this manual | 1

2. Components and Functions
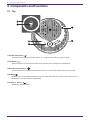
2.1. Top
① Speaker mute button ( )
Temporarily stops (mutes) speaker output. To cancel the mute function, press it again.
② Call button ( )
Allows the user to receive and end calls when connected to a smartphone via Bluetooth.
③ Microphone mute button ( )
Temporarily stops (mutes) the microphone function. To cancel the mute function, press it again.
④ N-Mark ( )
Holding an NFC-compatible smartphone over this spot allows the user to pair it with/connect it to, or
disconnect it from the product via Bluetooth.
⑤ Volume +/- button ( )
Adjusts the speaker volume.
2. Components and Functions
2 | 2.1. Top

⑥ Microphone indicator ( )
Displays the microphone mute and speaker mute setting states, etc.
Display State
Microphone light on (green)/Ring light on (green)
Normal
Microphone flashing slowly (red)/Ring light on (red)
Microphone mute
Microphone light on (green)/Ring light off
Speaker mute
Microphone flashing slowly (red)/Ring light off
Microphone and speaker mute
Flashing rapidly (green)
Incoming call to smartphone (normal)
Flashing rapidly (red)
Incoming call to smartphone (microphone mute)
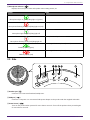
2.2. Side
① Headset port ( )
Connects to a commercial headset/headphones.
② USB port ( )
Connects a computer or a commercial USB power adapter to the product with the supplied USB cable.
③ Power button ( )
Turns on the product when pressed for more than 2 seconds. Turns off the product when pressed again
for more than 2 seconds.
2. Components and Functions
2.2. Side | 3

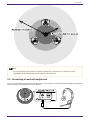
④ Battery indicator ( )
Flashes when the built-in rechargeable battery runs low.
Display State
Light off
Charging finished or rechargeable battery level high
Light on
Charging
Flashing
The battery level is low
Indicates the remaining battery level when the power button is pressed.
(→Checking the Battery Level)
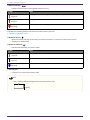
⑤ Bluetooth button ( )
Allows the user to pair the product with, connect the product to, or disconnect the product from a
smartphone via Bluetooth.
⑥ Bluetooth indicator ( )
Indicates the Bluetooth connection status.
Display State
Light off
Bluetooth not connected
Light on
Bluetooth connection finished
Flashing
Waiting for Bluetooth pairing
⑦ Security slot
Connects to a commercial security cable.
Note
•
Use a security cable that supports the size of the security slot.
(mm)
2. Components and Functions
4 | 2.2. Side

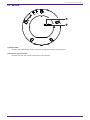
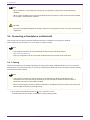
2.3. Bottom
① Serial number
Provides the serial number, which is used to manage and categorize the product.
② Production year and month
Provides the year and month of production of the product.
2. Components and Functions
2.3. Bottom | 5

3. Preparation
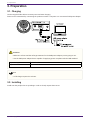
3.1. Charging
Use the supplied USB cable to transmit power and start charging.
Power can be transmitted by connecting the product to either a computer or a commercial USB power adapter.
WARNING
• Make sure to first read the safety precautions for the USB power adapter you are going to use.
• Use the USB power adapter that is capable of supplying power compliant with the USB standard.
Output voltage 4.8V to 5.2V
Output current At least 0.5 A
Note
• A full charge requires 4 to 6 hours.
3.2. Installing
Install near the people who are speaking in order to clearly capture their voices.
3. Preparation
6 | 3.1. Charging

Note
• Do not install near noise sources (computer cooling fans, projectors, etc.). These may cause
degradation of the audio quality for the other person on the call.
3.3. Connecting a headset/headphones
You can communicate using a headset/headphones by connecting a commercial headset/headphones equipped
with a mini-jack to the headset port on this product.
3. Preparation
3.3. Connecting a headset/headphones | 7

Note
• When a headset is connected, the microphone and speaker on this product are automatically
disabled.
• When a pair of headphones is connected, although the microphone on this product remains enabled,
the speaker is automatically disabled.
CAUTION
• Do not use a headset/headphones at large volumes for long periods of time. This may cause hearing
impairment.
3.4. Connecting a Smartphone via Bluetooth
This product can be paired/connected via Bluetooth with a smartphone running iOS or Android.
After connecting, check whether or not the audio is output correctly.
Note
•
The supported versions of iOS and Android are listed on the following website.
https://uc.yamaha.com/
• Only one smartphone can be connected via Bluetooth to this product at the same time.
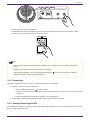
3.4.1. Pairing
Pairing is the operation of mutually registering the pairing information of Bluetooth devices to be connected.
Pairing needs to be performed when connecting a smartphone by Bluetooth for the first time and when pairing
information has been deleted.
Note
• This product is able to pair with a maximum of 8 smartphones. When pairing with the 9th
smartphone succeeds, the pairing information for the smartphone where the date and time of
Bluetooth connection is the oldest is deleted.
• When connecting this product to another smartphone via Bluetooth, disconnect the connection with
that smartphone before performing pairing.
1.
Press and hold the Bluetooth button ( ) for 2 seconds or more.
The Bluetooth indicator flashes to indicate the pairing waiting state.
3. Preparation
8 | 3.4. Connecting a Smartphone via Bluetooth

2.
Pair the product with the smartphone.
Enable Bluetooth on the smartphone you are connecting and pair with the “YVC-200 Yamaha”. When
required to enter a passkey, enter the numerals “0000”.
Note
• Check on the smartphone that pairing is complete, and if it did not succeed, perform the pairing
again.
• Normally, connection occurs at the same time as pairing.
• In the pairing wait state, if you press the Bluetooth button ( ) or if 90 seconds passes without
pairing completion, the pairing wait state ends.
3.4.2. Connecting
This section describes how to connect to a paired smartphone via Bluetooth.
1. Perform any of the following operations.
a.
Press the Bluetooth button ( ) on this product.
If there are multiple paired smartphones, the smartphone that was connected to this product last is
connected.
b. Perform the Bluetooth connection operation in the smartphone.
2. A notification sound plays and the Bluetooth indicator lights up when complete.
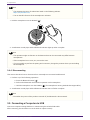
3.4.3. Pairing/Connecting via NFC
For smartphones that run Android and support NFC, Bluetooth pairing and connection can be made at the same
time by using the NFC function.
3. Preparation
3.4. Connecting a Smartphone via Bluetooth | 9

Note
•
The supported versions of Android are listed on the following website.
https://uc.yamaha.com/
• Turn on the NFC function of the smartphone in advance.
1. Hold the smartphone over the N-Mark ( ).
2. A notification sound plays and the Bluetooth indicator lights up when complete.
Note
• The operation might not function or the distance that can be connected may differ between
smartphones.
• If the smartphone has a case, etc., remove the case.
• If you are unable to perform the pairing and connection, change the position where you are holding
the smartphone.
3.4.4. Disconnecting
This section describes how to disconnect from a smartphone connected via Bluetooth.
1. Perform any of the following operations.
a. Press the Bluetooth button ( ).
b. Perform the Bluetooth disconnection operation in the smartphone.
c. Hold the smartphone over the N-Mark ( ) (for smartphones running Android that support NFC).
2. A notification sound plays and the Bluetooth indicator turns off when complete.
Note
• Even when the power of this product is turned off, the Bluetooth is disconnected.
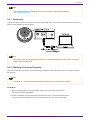
3.5. Connecting a Computer via USB
Connect a computer running Windows or macOS using the included USB cable.
After connecting, check whether or not the audio is output correctly.
3. Preparation
10 | 3.5. Connecting a Computer via USB

Note
•
The supported versions of Windows and macOS are listed on the following website.
https://uc.yamaha.com/
3.5.1. Connecting
Connect this product to the computer using the included USB cable. The product will start up automatically as
power is transmitted from the computer.
Note
• Since this product is recognized by computers as a standard USB audio device, there is no need to
install a separate USB driver.
3.5.2. Checking if Connected Correctly
Once the connection is finished, use the following procedure to check that the computer correctly recognizes
this product.
Note
• The fields, etc. on the setting screens differ depending on the computer you are using.
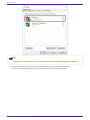
On Windows
1.
Right-click the speaker icon at the bottom right of the screen and click “Sounds”.
The “Sound” screen is displayed.
2.
Click the “Playback” tab and check that “Yamaha YVC-200” is set as the default device.
If it is not set as the default device, click “Yamaha YVC-200” and click “Set Default”.
3. Preparation
3.5. Connecting a Computer via USB | 11

Note
• Normally, the “Yamaha YVC-200” is automatically set as the default device simply by connecting.
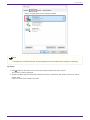
3.
Click the “Recording” tab and check that “Yamaha YVC-200” is set as the default device.
If it is not set as the default device, click “Yamaha YVC-200” and click “Set Default”.
3. Preparation
12 | 3.5. Connecting a Computer via USB

Note
• Normally, the “Yamaha YVC-200” is automatically set as the default device simply by connecting.
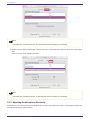
On macOS
1.
Click at the top left of the screen, and click “System Preferences” then “Sound”.
The “Sound” screen is displayed.
2. Click the “Output” tab and check that “Yamaha YVC-200” is selected in the “Select a device for sound
output” field.
If it is not select, click “Yamaha YVC-200”.
3. Preparation
3.5. Connecting a Computer via USB | 13

Note
• Normally, the “Yamaha YVC-200” is automatically selected simply by connecting.
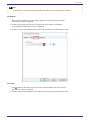
3. Click the “Input” tab and check that “Yamaha YVC-200” is selected in the “Select a device for sound input”
field.
If it is not select, click “Yamaha YVC-200”.
Note
• Normally, the “Yamaha YVC-200” is automatically selected simply by connecting.
3.5.3. Adjusting the Microphone Sensitivity
Depending on your system, the sound may break up or be too quiet at the other caller. If this happens, adjust the
microphone sensitivity (input volume).
3. Preparation
14 | 3.5. Connecting a Computer via USB

Note
• The fields, etc. on the setting screens differ depending on the computer you are using.
On Windows
1.
Right-click the speaker icon at the bottom right of the screen and click “Sounds”.
The “Sound” screen is displayed.
2.
Click the “Recording” tab, and click “Yamaha YVC-200” and then “Properties”.
The “Microphone Properties” screen is displayed.
3. Click the “Levels” tab and adjust the microphone sensitivity in the “Microphone” field.
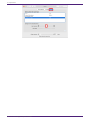
On macOS
1.
Click at the top left of the screen, and click “System Preferences” then “Sound”.
The “Sound” screen is displayed.
2. Click the “Input” tab and adjust the microphone sensitivity in the “Input volume” field.
3. Preparation
3.5. Connecting a Computer via USB | 15

3. Preparation
16 | 3.5. Connecting a Computer via USB

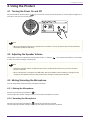
4. Using the Product
4.1. Turning the Power On and Off
Press and hold the power button ( ) for 2 seconds or more to turn the power on. Press and hold again for 2
seconds or more to turn off the power.
Note
• When not charging, if there is no operation for 3 minutes or more, the power turns off automatically
(automatic power off function).
4.2. Adjusting the Speaker Volume
The speaker volume is adjusted by pressing the Volume +/- button ( ). If you press and hold for 0.5 seconds
or more, the volume changes continuously.
Note
• Adjust the speaker volume so that the sound does not break up. Echoes may occur for the other
person on the call.
• When connected to a computer via USB cable, when the speaker volume setting is changed on the
computer, the speaker volume of this product also changes according to that value.
4.3. Muting/Unmuting the Microphone
You can temporarily stop (mute) the microphone function.
4.3.1. Muting the Microphone
Press the microphone mute button ( ).
The microphone indicator changes color to red and the microphone is muted.
4.3.2. Unmuting the Microphone
Press the microphone mute button ( ) while the microphone is muted.
The microphone indicator changes color to green and the microphone is unmuted.
4. Using the Product
4.1. Turning the Power On and Off | 17

4.4. Muting/Unmuting the Speaker
You can temporarily stop the output from the speaker.
4.4.1. Muting the Speaker
Press the microphone mute button ( ).
The ring part of the microphone indicator turns off and the speaker is muted.
4.4.2. Unmuting the Speaker
Press the speaker mute button ( ) while the speaker is muted.
The ring part of the microphone indicator light up and the speaker is muted.
Note
• If you press the Volume +/- button ( ) while the speaker is muted, the speaker becomes
unmuted.
• When connected to a computer via USB cable, when the speaker is muted on the computer, the
speaker is also muted on this product.
4.5. Answering an Incoming Phone Call/Ending a Phone Call on a
Smartphone
When connected to a smartphone via Bluetooth, you can answer incoming phone calls and end phone calls on
the smartphone from this product.
4.5.1. Answering an Incoming Phone Call
When there is an incoming phone call on the smartphone connected via Bluetooth, the microphone indicator
flashes rapidly. If you press the call button ( ) at this time, you can communicate using the microphone and
speaker on this product.
Note
• When an incoming phone call is answered, the microphone and speaker on the smartphone may
become enabled depending on the smartphone. In this case, select YVC-200 in the audio source
settings of the smartphone to enable the microphone and speaker of this product.
4.5.2. Ending a Phone Call
You can end a phone call by pressing the call button ( ) while in a phone call.
4. Using the Product
18 | 4.4. Muting/Unmuting the Speaker

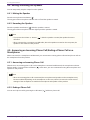
5. Other Functions
5.1. Checking the Battery Level
You can check the level of the built-in rechargeable battery.
1.
Press the power button ( ) while the device is on.
The battery indicator flashes a number of times depending on the battery level.
Indicator display
Number of flashes Battery level
× 1
1 time Approx. 0% to 40%
× 2
2 times Approx. 40% to 80%
× 3
3 times Approx. 80% to 100%
Note
• The battery indicator flashes continuously when the battery level is low.
5.2. Restoring Factory Default Settings
You can restore the settings to the factory defaults. This also deletes the Bluetooth pairing information.
1. Press and hold the speaker mute button ( ) and the volume + button ( ) at the same time for 5
seconds or more.
Release the buttons after a notification sound plays and the microphone indicator turns off.
2. After approx. 10 seconds, the microphone indicator flashes again when the process is complete.
5.3. Resetting
You can forcefully restart this product.
1. Press and hold the power button ( ) and Bluetooth button ( ) at the same time for 7.5 seconds or
more.
Release the buttons after the microphone indicator turns off.
2. The microphone indicator flashes again when the process is complete.
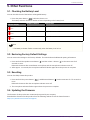
5.4. Updating the Firmware
The functions of this product are continuously improved by our company.
Download the firmware for this product from the following website to use the latest functions.
https://uc.yamaha.com/resources/support/
5. Other Functions
5.1. Checking the Battery Level | 19

6. Troubleshooting
6.1. Before Contacting Support
Read this manual to check whether the problem can be resolved.
If the problem still continues, please contact the retailer or dealer who you purchased the product from.
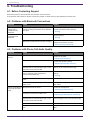
6.2. Problems with Bluetooth Connections
Symptom Cause Solution
Unable to perform
pairing with a
smartphone via
Bluetooth
The smartphone you are trying to pair
contains pairing information for a different
YVC-200.
Delete the pairing information for the other
YVC-200 and then perform pairing.
(→Pairing)
Unable to connect to
smartphone via
Bluetooth
The smartphone is not paired via Bluetooth.
Perform pairing.
(→Pairing)
Another smartphone is connected via
Bluetooth (the Bluetooth indicator is alight).
Disconnect the connection with the other
smartphone and then connect.
(→Disconnecting, Connecting)
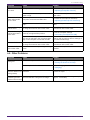
6.3. Problems with Phone Call Audio Quality
Symptom Cause Solution
Sound is inaudible or
too low
Speaker mute is active.
Unmute the speaker.
(→Unmuting the Speaker)
The speaker volume is low.
Increase the speaker volume.
(→Adjusting the Speaker Volume)
A speaker other than the YVC-200 is
selected in the communication app on the
computer connected via USB.
Select the YVC-200 in the speaker device
settings of the communication app.
The YVC-200 is not selected in the audio
source settings of the smartphone
connected via Bluetooth.
Select the YVC-200 in the audio source
settings.
(→Pairing)
Microphone mute is active on the other
caller.
Unmute the microphone on the other caller.
The microphone sensitivity on the other
caller is low.
Increase the microphone sensitivity on the
other caller.
Sound is inaudible or
too low at the other
caller
Microphone mute is active.
Unmute the microphone.
(→Unmuting the Microphone)
The microphone sensitivity on the
computer connected via USB is low.
Increase the microphone sensitivity.
(→Adjusting the Microphone Sensitivity)
A microphone other than the YVC-200 is
selected in the communication app on the
computer connected via USB.
Select the YVC-200 in the microphone
device settings of the communication app.
Speaker mute is active on the other caller. Unmute the speaker on the other caller.
The speaker volume on the other caller is
low.
Increase the speaker volume on the other
caller.
6. Troubleshooting
20 | 6.1. Before Contacting Support

Symptom Cause Solution
The sound breaks up
or is loud
The speaker volume is high.
Decrease the speaker volume.
(→Adjusting the Speaker Volume)
The microphone sensitivity on the other
caller is high.
Decrease the microphone sensitivity on the
other caller.
The sound at the
other caller breaks
up or is loud
The microphone sensitivity on the
computer connected via USB is low.
Decrease the microphone sensitivity.
(→Adjusting the Microphone Sensitivity)
The speaker volume on the other caller is
high.
Decrease the speaker volume on the other
caller.
Echoes or howling
can be heard
There is a problem with the device structure
or usage environment at the other caller.
Review the device configuration and usage
environment at the other caller.
Echoes or howling
can be heard at the
other caller
The computer connected via USB has not
correctly recognized this product.
Check the computer settings.
(→Connecting a Computer via USB)
A speaker and microphone other than the
YVC-200 is selected in the communication
app on the computer connected via USB.
Select the YVC-200 in the speaker device
settings and microphone device settings of
the communication app.
Noise can be heard There is a problem with the device structure
or usage environment at the other caller.
Review the device configuration and usage
environment at the other caller.
Noise can be heard
at the other caller
There is a device nearby that is generating
noise.
Move as far away from the noise source as
possible.
6.4. Other Problems
Symptom Cause Solution
The power turns off
during use
The automatic power off function activates.
Turn on the power again.
(→Turning the Power On and Off)
The battery level is low.
Perform charging.
(→Charging)
The microphone
indicator flashes red
during startup
A fault was detected in the software or
hardware.
Ask the store where you purchased this
product for repair.
The battery indicator
is flashing and the
product will not start.
The device has not been used for a long
time and will take a long time to charge.
Continue charging until starting is complete
(approx. 10 minutes).
6. Troubleshooting
6.4. Other Problems | 21

Manual Development Group
© 2018 Yamaha Corporation
Published 02/2020
YJ-C0
-
 1
1
-
 2
2
-
 3
3
-
 4
4
-
 5
5
-
 6
6
-
 7
7
-
 8
8
-
 9
9
-
 10
10
-
 11
11
-
 12
12
-
 13
13
-
 14
14
-
 15
15
-
 16
16
-
 17
17
-
 18
18
-
 19
19
-
 20
20
-
 21
21
-
 22
22
-
 23
23
-
 24
24


Yamaha YVC-200 Gebruikershandleiding
- Categorie
- Bluetooth-muziekontvangers
- Type
- Gebruikershandleiding
in andere talen
- English: Yamaha YVC-200 User guide
- italiano: Yamaha YVC-200 Guida utente
- français: Yamaha YVC-200 Mode d'emploi
- español: Yamaha YVC-200 Guía del usuario
- Deutsch: Yamaha YVC-200 Benutzerhandbuch
- português: Yamaha YVC-200 Guia de usuario
- dansk: Yamaha YVC-200 Brugervejledning
- čeština: Yamaha YVC-200 Uživatelská příručka
- polski: Yamaha YVC-200 instrukcja
- română: Yamaha YVC-200 Manualul utilizatorului