
EnglishFrançaisEspañol
ES
FR
EN
MUSIC SYNTHESIZER
SYNTHÉTISEUR MUSICAL
SINTETIZADOR MUSICAL
Quick Guide
Guide rapide
Guía rápida

S1 MONTAGE M Quick Guide
FCC INFORMATION (U.S.A.)
1. IMPORTANT NOTICE: DO NOT MODIFY THIS UNIT!
Thisproduct,wheninstalledasindicatedintheinstructionscontainedinthismanual,meetsFCCrequirements.Modications
not expressly approved by Yamaha may void your authority, granted by the FCC, to use the product.
2 . I MP OR TA NT: When connecting this product to accessories and/or another product use only high quality shielded cables.
Cable/s supplied with this product MUST be used. Follow all installation instructions. Failure to follow instructions could void
your FCC authorization to use this product in the USA.
3. NOTE: This product has been tested and found to comply with the requirements listed in FCC Regulations, Part 15 for
Class “B” digital devices. Compliance with these requirements provides a reasonable level of assurance that your use of
this product in a residential environment will not result in harmful interference with other electronic devices. This equipment
generates/uses radio frequencies and, if not installed and used according to the instructions found in the users manual, may
cause interference harmful to the operation of other electronic devices. Compliance with FCC regulations does not guarantee
that interference will not occur in all installations. If this product is found to be the source of interference, which can be
determined by turning the unit “OFF” and “ON”, please try to eliminate the problem by using one of the following measures:
-Relocateeitherthisproductorthedevicethatisbeingaectedbytheinterference.
-Utilizepoweroutletsthatareondierentbranch(circuitbreakerorfuse)circuitsorinstallAClinelter/s.
- In the case of radio or TV interference, relocate/reorient the antenna. If the antenna lead-in is 300 ohm ribbon lead, change
the lead-in to co-axial type cable.
If these corrective measures do not produce satisfactory results, please contact the local retailer authorized to distribute
this type of product. If you cannot locate the appropriate retailer, please contact Yamaha Corporation of America, 6600
OrangethorpeAve.,BuenaPark,CA90620,USA.
The above statements apply ONLY to those products distributed by Yamaha Corporation of America or its subsidiaries.
(529-M04FCCclassBYCA01)
COMPLIANCE INFORMATION STATEMENT
(Supplierʼs declaration of conformity procedure)
Responsible Party: Yamaha Corporation of America
Address: 6600OrangethorpeAve.BuenaParkCalif.90620
Telephone: 714-522-9011
Type of Equipment: Music Synthesizer
Model Name: MONTAGE M6, MONTAGE M7, MONTAGE M8x
This device complies with Part 15 of the FCC Rules.
Operation is subject to two following conditions:
1)thisdevicemaynotcauseharmfulinterference,and
2)thisdevicemustacceptanyinterferencereceivedincludinginterferencethatmaycauseundesiredoperation.
(529-M02FCCsdocYCA01)
IMPORTANT
Please record the serial number of this unit in the space below.
Model
Serial No.
Theserialnumberislocatedonthebottomorrearoftheunit.RetainthisQuickGuideinasafeplaceforfuturereference.
*ThisappliesonlytoproductsdistributedbyYAMAHACORPORATIONOFAMERICA. (84-M01Ser.No)

S2
MONTAGE M Quick Guide
Information for users on collection and disposal of old equipment:
Thissymbolontheproducts,packaging,and/oraccompanyingdocumentsmeansthatusedelectricaland
electronic products should not be mixed with general household waste.
Forpropertreatment,recoveryandrecyclingofoldproducts,pleasetakethemtoapplicablecollectionpoints,in
accordance with your national legislation.
By disposing of these products correctly, you will help to save valuable resources and prevent any potential
negativeeectsonhumanhealthandtheenvironmentwhichcouldotherwisearisefrominappropriatewaste
handling.
For more information about collection and recycling of old products, please contact your local municipality, your
waste disposal service or the point of sale where you purchased the items.
For business users in the European Union:
If you wish to discard electrical and electronic equipment, please contact your dealer or supplier for further
information.
Information on Disposal in other Countries outside the European Union:
This symbol is only valid in the European Union. If you wish to discard these items, please contact your local
authoritiesordealerandaskforthecorrectmethodofdisposal.
(58-M02WEEEen01)

2MONTAGE M Quick Guide
Power supply
• Donotplacethepowercordnearheatsourcessuchas
heatersorradiators.Also,donotexcessivelybendor
otherwisedamagethecord,orplaceheavyobjectsonit.
• Donottouchtheproductorthepowerplugduringan
electricalstorm.
• Useonlythecorrectvoltagespeciedfortheproduct.
Therequiredvoltageisprintedonthenameplateofthe
product.
• Useonlythesuppliedpowercord/plug.Donotusethe
powercord/plugforotherdevices.
• Checkthepowerplugperiodicallyandremoveanydirtor
dustwhichmayhaveaccumulatedonit.
• InsertthepowerplugrmlyallthewayintotheACoutlet.
Usingtheproductwhenitisnotpluggedinsuciently
cancausedusttoaccumulateontheplug,possibly
resultinginreorskinburns.
• Whensettinguptheproduct,makesurethattheAC
outletyouareusingiseasilyaccessible.Ifsometroubleor
malfunctionoccurs,immediatelyturnothepowerswitch
anddisconnecttheplugfromtheoutlet.Evenwhenthe
powerswitchisturnedo,aslongasthepowercordisnot
unpluggedfromthewallACoutlet,theproductwillnot
bedisconnectedfromthepowersource.
• Donotconnecttheproducttoanelectricaloutletusing
amulti-plugoutletextender.Doingsocanresultinlower
soundquality,orpossiblycauseoverheatingintheoutlet.
• Whendisconnectingthepowerplug,alwaysholdtheplug
itselfandnotthecord.Pullingbythecordcandamageit
andcauseelectricshocksorare.
• Ifnotusingtheproductforlongperiodsoftime,besure
topullthepowerplugfromtheACoutlet.
• Besuretoconnecttoanappropriateoutletwitha
protectivegroundingconnection.Impropergrounding
canresultinelectricalshock.
Do not disassemble
• Thisproductcontainsnouser-serviceableparts.Donot
attempttodisassembletheinternalpartsormodifythem
inanyway.
Water warning
• Donotexposetheproducttorain,useitnearwateror
indamporwetconditions,orplaceonitanycontainers
(suchasvases,bottlesorglasses)containingliquidswhich
mightspillintoanyopeningsorplaceswherewatermay
drop.Aliquidsuchaswatergettingintotheproductmay
causeare,electricshocks,ormalfunctions.
• Neverinsertorremoveapowerplugwithwethands.
Fire warning
• Donotplaceanyburningitemsoropenamesnearthe
product,sincetheymaycauseare.
If you notice any abnormality
• Ifanyofthefollowingproblemsoccur,immediatelyturn
othepowerswitchanddisconnectthepowerplugfrom
theoutlet.
FinallyhavethedeviceinspectedbyYamahaservice
personnel.
- Thepowercordorplugbecomesfrayedordamaged.
- Unusualsmellsorsmokeareemitted.
- Someobject,orwaterhasbeendroppedintothe
product.
- Thereisasuddenlossofsoundduringuseofthe
product.
- Cracksorothervisibledamageappearontheproduct.
PRECAUTIONS
PLEASE READ CAREFULLY BEFORE PROCEEDING
Pleasekeepthismanualinasafeandhandyplaceforfuturereference.
WARNING
Always follow the basic precautions listed below to avoid the possibility of serious injury or even death from
electrical shock, short-circuiting, damages, re or other hazards. These precautions include, but are not limited
to, the following:

3
MONTAGE M Quick Guide
CAUTION
Always follow the basic precautions listed below to avoid the possibility of physical injury to you or others, or
damage to the product or other property. These precautions include, but are not limited to, the following:
Location
• Donotplacetheproductinanunstablepositionor
alocationwithexcessivevibration,whereitmight
accidentallyfalloverandcauseinjury.
• Donotgoneartheproductduringanearthquake.Strong
shakingduringanearthquakecouldcausetheproductto
moveortipover,resultingindamagetotheproductorits
parts,andpossiblycausinginjury.
• Whentransportingormovingtheproduct,alwaysusetwo
ormorepeople.Attemptingtolifttheproductbyyourself
mayresultininjuries,suchasbackinjuries,orcausethe
producttobedroppedandbroken,whichcouldleadto
otherinjuries.
• Beforemovingtheproduct,removeallconnectedcables,
topreventdamagetothecablesorinjurytoanyonewho
mighttripoverthem.
Connections
• Beforeconnectingtheproducttootherelectronic
components,turnothepowerforallcomponents.
Beforeturningthepoweronoroforallcomponents,set
allvolumelevelstominimum.
• Besuretosetthevolumesofallcomponentsattheir
minimumlevelsandgraduallyraisethevolumecontrols
whileplayingtheproducttosetthedesiredlisteninglevel.
Handling
• Donotinsertforeignmaterialssuchasmetalorpaperinto
anyopeningsorgapsoftheproduct.Failuretoobserve
thismaycauseare,electricshocks,ormalfunctions.
• Donotrestyourweighton,orplaceheavyobjectsonthe
product,anddonotuseexcessiveforceonthebuttons,
switchesorconnectors.
• Donotusetheproductorheadphonesforalongperiod
oftimeatahighoruncomfortablevolumelevel,sincethis
cancausepermanenthearingloss.Ifyouexperienceany
hearinglossorringingintheears,consultaphysician.
• RemovethepowerplugfromtheACoutletbefore
cleaningtheunit.Failuretoobservethismaycause
electricshocks.
Yamahacannotbeheldresponsiblefordamagecausedbyimproperuseormodicationstotheproduct,ordatathatislost
ordestroyed.
Alwaysturnthepowerowhentheproductisnotinuse.
(D M I -11)
English

4MONTAGE M Quick Guide
NOTICE
Toavoidthepossibilityofmalfunction/damagetothe
product,damagetodata,ordamagetootherproperty,
followthenoticesbelow.
Handling
• DonotusethisproductinthevicinityofaTV,radio,stereo
equipment,mobilephone,orotherelectricdevices.
Otherwise,thisproduct,TV,orradiomaygeneratenoise.
• Whenyouusetheproductalongwithanapponyour
smartdevice,suchasasmartphoneortablet,we
recommendthatyouenable“AirplaneMode”onthe
devicetoavoidnoisecausedbycommunication.
• Donotexposetheproducttoexcessivedustorvibrations,
orextremecoldorheat(suchasindirectsunlight,neara
heater,orinacarduringtheday)topreventthepossibility
ofdisguration,damagetotheinternalcomponentsor
unstableoperation.
• Donotplacevinyl,plasticorrubberobjectsonthe
product,sincethismightdiscolortheproduct.
Maintenance
• Whencleaningtheproduct,useasoftanddry/slightly
dampcloth.Donotusepaintthinners,solvents,alcohol,
cleaninguids,orchemical-impregnatedwipingcloths.
Saving data
• EditedPerformance
EditedPerformanceislostwhenyouturnothepower
totheproductwithoutstoringit.Thisalsooccurswhen
thepoweristurnedobytheAutoPowerOfunction
(page31).
• Othersettings
Othersettingsareretainedwhenthepoweristurnedo.
• Tosaveimportantsettings
KeepinmindthatPerformancesandothersettingssaved
totheproductmayoccasionallybelostduetosome
failure,anoperationmistake,etc.Forthisreason,you
shouldsaveyourimportantsettingsontoaUSBashdrive
(refertotheOperationManual).BeforeusingaUSBash
drive,makesuretoseepage32.
Information
About copyrights
Thecopyrightofthe“content”*1installedinthisproduct
belongstoYamahaCorporationoritscopyrightholder.
Exceptaspermittedbycopyrightlawsandotherrelevant
laws,suchascopyingforpersonaluse,itisprohibited
to“reproduceordivert”*2withoutthepermissionofthe
copyrightholder.Whenusingthecontent,consultwitha
copyrightexpert.
Ifyoucreatemusicorperformwiththecontentsthroughthe
originaluseoftheproduct,andthenrecordanddistribute
them,thepermissionofYamahaCorporationisnotrequired
regardlessofwhetherthedistributionmethodispaidorfree
ofcharge.
*1:Theword“content”includesacomputerprogram,audiodata,
AccompanimentStyledata,MIDIdata,waveformdata,voice
recordingdata,musicscore,andscoredata,etc.
*2:Thephrase“reproduceordivert”includestakingoutthecontent
itselfinthisproduct,orrecordinganddistributingitwithout
changesinasimilarmanner.
About this manual
• TheillustrationsandLCDscreensasshowninthismanual
areforinstructionalpurposesonly.
• Unlessindicatedotherwise,theillustrationsandscreensas
showninthismanualarebasedontheMONTAGEM6(in
English).
• Thecompanynamesandproductnamesinthismanual
arethetrademarksorregisteredtrademarksoftheir
respectivecompanies.
About disposal
Whendisposingofthisproduct,pleasecontactthe
appropriatelocalauthorities.

5
MONTAGE M Quick Guide
MEMO

6MONTAGE M Quick Guide
Welcome
ThankyouforpurchasingthisYamahaMusicSynthesizer!
Thisagshipmodelsynthesizercomeswithmultiplesoundenginesthatmaketheinstrumentpowerfulandversatileforall
musicgenres.Werecommendthatyoureadthismanualcarefullysothatyoucanfullytakeadvantageoftheadvancedand
convenientfunctionsofthisinstrument.Wealsorecommendthatyoukeepthismanualinasafeandhandyplaceforfuture
reference.
About the manuals
Thesetofdocumentslistedbelowareincludedwiththisinstrument.
Printed manual included with this product
Quick Guide (this book)
Providesexplanationsforthebasicfunctionsoftheinstrument.
Website-based manuals
ThemanualsprovidedonthewebsitecanbedownloadedfromtheYamahaDownloads.ConnecttotheInternetandenterthe
modelname"MONTAGEM"intheModelNameorKeywordsearchboxandclickSearch.
Yamaha Downloads
https://download.yamaha.com/
Operation Manual (HTML)
Providesinstructionsonoperatingtheinstrument,aswellasdetailedinformationontheinternalstructureandconnection
ofotherinstrumentsanddevices.
https://manual.yamaha.com/mi/synth/montage_m/index_q.html
Data List (.xlsx and .pdf)
ThislecontainsvariousimportantlistssuchasthePerformancelist,Eecttypelist,Waveformlist,Arpeggiotypelist,and
MIDIimplementationchart.
Included accessories
• Powercord(×1)
• Quickguide(thisbook)
• Cubase AI Download Information
• Expanded Softsynth Plugin for MONTAGE M download information

7
MONTAGE M Quick Guide
About rmware updates
Toimplementnewfunctionsandimproveoperability,thisinstrumentmaybeshippedwithanupdatedversionofthermware
installed.
Themanualfortheupdatedversionofthermwarecanbedownloadedfromthewebsitebelow.
Yamaha Downloads:https://download.yamaha.com/
Thermwareversionofyourkeyboardcanbecheckedvia[UTILITY]gSettingsgSystem.
Notation in this document
Model name
Inthisdocument,MONTAGEM6,MONTAGEM7,andMONTAGEM8xarecollectivelycalledthe“MONTAGEM.”
NOTE
"NOTE"indicatessupplementarydescriptions.

8MONTAGE M Quick Guide
Contents
PRECAUTIONS ..................................................................2
NOTICE ........................................................................4
Information ....................................................................4
Welcome .......................................................................6
About the manuals .............................................................6
Printedmanualincludedwiththisproduct...................................................... 6
Website-basedmanuals......................................................................... 6
Included accessories ............................................................6
About rmware updates ........................................................7
Notation in this document ......................................................7
Features .......................................................................9
WhatistheMotionControlSynthesisEngine? ................................................... 9
Basic Performance structure. . . . . . . . . . . . . . . . . . . . . . . . . . . . . . . . . . . . . . . . . . . . . . . . . . . . 10
How Live Set works ............................................................11
LiveSetbank.................................................................................. 11
Panel controls and functions ...................................................12
Toppanel......................................................................................12
Rearpanel.....................................................................................26
Setting up .....................................................................30
Powersupply..................................................................................30
Connectingspeakersorheadphones...........................................................30
TurningtheinstrumentON
TurningtheinstrumentOFF....................................................................31
AutoPowerOfunction.......................................................................31
Adjustingthemastervolume..................................................................32
PanelLockfeature.............................................................................32
UsingUSBashdrives..........................................................................32
Preparation for live performance ...............................................33
Status check and basic operation ...............................................34
Checkingthestatus............................................................................34
Openingsettingscreens.......................................................................38
Movingthecursorandchangingparametervalues.............................................39
Iconsshownforspecicoperations ............................................................40
Enteringcharactersandnumbers ..............................................................41
Playing the keyboard ..........................................................44
SelectingaPerformancefromtheLiveSetscreen...............................................44
Troubleshooting ...............................................................45
Restoringthefactorydefaultsettings(InitializeAllData)........................................45
Specications .................................................................46
Index .........................................................................47

9
MONTAGE M Quick Guide
Features
TheMONTAGEMsynthesizersfeaturethebuilt-inMotion Control Synthesis Engine,lettingyoucreateenormouslycomplex,
multi-texturedsoundsbycombiningAWM2,FM-X,andAN-Xsynthesisenginesseamlesslyandfurthermodifyingthesound
usingMotioncontrol.Therefore,youcanusetheMONTAGEM,notjustforrecreatingconventionalsounds,butalsoforcreating
completelynewsounds.
What is the Motion Control Synthesis Engine?
Thisisapowerfullycomprehensivesynthesissystemthatusesahybrid,multi-tone-generatorsoundengine,andsophisticated
motioncontrolswithmultiplecontrolsourcesforcreatingcomplexandcontinuouslyshiftingsonictextures.
Hybrid sound engine
AWM2
Generatessoundsusingsoundles(orwave
les)sampledfromrealinstruments
FM-X
Generatessoundsbyusingthefrequenciesof
waveformstomodifyotherwaveforms
AN-X
Generatessoundsbymodifyingsimple
waveformsandapplying‘modeling’lters
Motion controls
Super Knob
Controlsmultipleparametersforcreating
multi-dimensionalsoundchanges
Motion Sequencer
Playsbackthemovementofthecontrollers
youhavesetbeforehandandchangesthe
soundsequentially
Envelope Follower
Generatessoundchangesthatsynchronizeto
thetempooftheinputaudio

10 MONTAGE M Quick Guide
Basic Performance structure
OntheMONTAGEM,thegroupofsettingsrelatedtoaspecicsoundiscalleda“Performance.”SelectthedesiredPerformance
andplaythekeyboard.
APerformancecanconsistofupto16Parts,withasoundassignedtoeachPart.
APerformancethatcontainsmultiplePartsiscalledaMulti-PartPerformance,whileaPerformancethatcontainsonlyonePartis
calledaSingle-PartPerformance.Single-PartPerformancescanbeusedinthesamewayasVoicesonAWM2synthesizers.
TherearefourtypesofParts.
Normal Parts (AWM2)
PartsplayedbytheAWM2soundengine.Aninstrumentsoundsuchaspiano,organ,guitar,andsynthesizercanbeassigned
toaPart.
Normal Parts (FM-X)
PartsplayedbytheFM-Xsoundengine.
Normal Parts (AN-X)
PartsplayedbytheAN-Xsoundengine.
Drum Parts (AWM2)
PartsplayedbytheAWM2soundengine.ApercussioninstrumentsoundcanbeassignedtothePart.TheDrumPartsare
usedforplayingrhythms.
NOTE
• Ifyouwishtocreatesoundsbyusingdefaultinitialvalues,selectanInitPerformance.
• Ifyouwishtousethisinstrumentasa16-partmultitimbraltonegenerator,usetheMulti/GMPerformances.ThesearePerformancesusingall
16parts,withthedrumsbeingassignedtoPart10.
PerformancesallowyoutoselectasoundforeachPartandcombinemultiplePartsinsophisticatedsplitandlayersettingsfor
playingonthekeyboard.Moreover,youcancreatecomplexsoundsbyeditingthePerformancesandPartsfromtheEditscreen
andenablingtheMotionControlsettings.
ThecreatedPerformancecanbesavedtointernalmemory,ortoUSBashdrivesconnectedtotheinstrument.Youcanalsouse
Soundmondo,asoundmanagementandsharingservice,tosavebackupsforyourselforshareyourPerformanceswithothers.
Soundmondo:https://www.yamaha.com/2/soundmondo
BycombiningtheExpanded Softsynth Plugin for MONTAGE M(thesoftwareversionoftheMONTAGEM)installedonthe
computerandthehardwareversionoftheMONTAGEM,youcancreateandmanagemanymorePerformances.Thesounds
youhaveusedinyourDAWformusicproductionandthesoundsyouhaveusedforliveperformancearesharedbetweenthe
softwareandhardwaresynthesizers.
Performance
Part1 Part2 Part3 Part4 Part5 Part6 Part16

11
MONTAGE M Quick Guide
How Live Set works
MONTAGEMseriessynthesizersfeatureapowerfulLiveSetfunctionforsavingandmanagingthePerformancesyou’vecreated.
TheLiveSetfunctionletsyouregisterthedesiredMIDIandaudiolestoplayalongwiththePerformancesyouwishtouseon
stage.
OntheLiveSetscreen,thereare16slotsperpageforsavingupto16setsofsettings.Forexample,youcanregisterthesame
PerformancewithdierentvolumesettingstovariousslotssothatyoucanchangethevolumeofthePerformanceasthesong
progresses.Thatwayyoucansimplytaptheslottoswitchtothenextvolumesettingasyouplaylive.
NOTE
AlinktotheselectedPerformanceissavedtoeachslot.WhenaPerformanceiseditedandstored,allslotsthathavethelinktothe
correspondingPerformancewillbeupdated.
Live Set bank
AbankisasetofLiveSetpagesusedformanagingPerformances.Eachbankhas16pagesofLiveSets.
Therearethreetypesofbanks:Preset,User,andLibrary.
Preset bank
ThebankforregisteredpresetPerformances.
AnyPerformancesinthePresetbankyouhaveeditedcannotbesavedbacktothePresetbank;theymustbesavedtoaUser
bank
NOTE
Refertothe“Data list”forthelistofPresetPerformances.
User bank
ThebankforregisteredPerformancesyou’veeditedyourself.NothingiscontainedinthisbankwhentheMONTAGEMis
shippedfromthefactory.
Thereareeightbanks(or128pages)available,allowingyoutoregisterupto2,048Performances.
YoucanarrangethePerformancesinyourowncustomorder—forexample,accordingtoasetlistinliveperformance
situations.
Library bank
ThebankforregisteredPerformancesfromtheLibraryles.NothingiscontainedinthisbankwhentheMONTAGEMis
shippedfromthefactory.
YoucanregisteroneLibraryleperbank.
LibrarylescanbedownloadedfromtheYamahawebsite.
WhenyourststartuptheMONTAGEM,theLiveSetscreenforthePresetbankwillbeshownontheMaindisplay.
Thestart-upscreencanbesettoaLiveSetorPerformancescreenasdesired([UTILITY]gSystem).
1Bank
Performance1 Performance2
Performance16
Page
Slot
Performance
Performancestoragearea

12 MONTAGE M Quick Guide
Panel controls and functions
Thissectionprovidesanoverviewofthepanelcontrolsandfunctions.
Top panel
Selecting a sound
Controllingparametersinrealtimeas
youplaythekeyboard,andadjusting
detailedparametervalues
Viewingthescreen,switchingsettings,
selectingitems,andenteringvalues
SelectingfunctionssuchasEditand
Utility
Selectingasound
Controllingthe
built-insequencer
Playingthekeyboard

13
MONTAGE M Quick Guide
1-1 [PERFORMANCE] button (INFO)
ThiscallsupthePerformancescreen.YoucanpressthisbuttontoswitchtoadierentPerformanceview.
Pressingthisbuttonwhileholdingdownthe[SHIFT]buttoncallsupthescreenforcheckingrelevantinformationfor
thePerformance(INFOscreen).
1-2 [LIVE SET] button (REGISTER)
ThiscallsuptheLiveSetscreen.YoucanpressthesamebuttontoselectadierentPerformancebank.
Pressthisbuttonandthentaptheslotonthetouchscreen,orusetheSlotnumberandCategorynameselection
buttonstoselectaslotfromtheLiveSetpagecurrentlyshownonthescreen.
Pressingthisbuttonwhileholdingthe[SHIFT]buttonopensthescreenforregisteringthecurrentPerformancetothe
LiveSetpage.DoingthisbeforehandallowsyoutocallupPerformancesquicklyandconvenientlyasyouplaylive.
1-3 BANK buttons
Usethesebuttonstoselectabank.
1-4 PAGE buttons
UsethesebuttonsforselectingaLiveSetpage.
OntheCategorySearchscreen,youcanusethesebuttonstoscrollthroughthelistofPerformances.
1-5 [CATEGORY] button (PART CATEGORY)
UsethisbuttontocalluptheCategorySearchfunction.Everytimeyoupressthebutton,thenextPerformancebankis
selected.
WhilethePerformancescreenisactive,pressingthisbuttonopensthePerformanceCategorySearchscreenfor
selectingaPerformance.
WhenthecursorisonaPart,pressingthisbuttonwhileholdingdownthe[SHIFT]buttonopensthePartCategory
Searchscreen.
1-6 Slot number and Category name selection buttons
Whenthe[LIVESET]buttonisselected,youcanusethesebuttonstoselectoneoftheLiveSetslots,1to16.Whenthe
[CATEGORY]buttonisselected,youcanusethesebuttonstoselectacategory.
Categories and descriptions
Categories Descriptions Categories Descriptions
Piano Piano Pad/Choir Synthpad
Keyboard Keyboardinstruments(suchas
harpsichordandClav)
Syn Comp Synthcomp(synthsoundssuitablefor
“comping”)
Organ Organ Chromatic Perc Chromaticpercussion(suchasmarimba
andglockenspiel)
Guitar Guitar Drum/Perc Drums,Percussion
Bass Bass Sound FX Soundeects
Strings Strings(instrumentssuchasviolins,or
stringensembles)
Musical FX Musicaleects(pitchedsoundeects)
Brass Brass(suchastrumpets) Ethnic Ethnic
Woodwind Woodwindinstruments(suchasclarinets,
ues,andsaxophones)
No Assign Noassign(notcategorized)
Syn Lead Synthlead(synthsoundsuitablefor
playingmelodiesandsoloing)
Init Initialized(nosettings)
YoucanalsousethesebuttonstoselectasettingontheDAW RemoteorQuick Setupscreen.
1-7 [AUDITION] button
WhileoneofthePerformance,LiveSet,orCategorySearchscreensareshown,pressingthisbuttonstartsorstopsthe
playbackoftheauditionphrasethatusesthecurrentlyselectedPerformance.

14 MONTAGE M Quick Guide
Selecting functions such as Edit and Utility
2-1 [UTILITY] button (SHOW VALUE)
ThiscallsuptheUTILITYscreenwhereyoucanchangetheoverallsettingsfortheMONTAGEM.
Pressingthisbuttonwhileholdingdownthe[SHIFT]buttonshowsthevaluesontheMaindisplayortheSubdisplayif
thereareanyvaluesnotshowngraphically.
2-2 [NAVIGATION] button (FX OVERVIEW)
AccordingtothePartyouareediting,thiscallsupthemapofthecorrespondingparameters.Whenyouselectone
itemfromthemap,theparametersettingscreenforthatitemwillbeshownontheMaindisplay.
Pressingthisbuttonwhileholdingdownthe[SHIFT]buttoncallsupthescreenforcheckingtheeectoverview
(FXOVERVIEWscreen).
2-3 [EDIT/ ] button (JOB)
ThiscallsupthePerformanceEdit,LiveSetEditorPatternEditscreen.
WhileeditingthePerformanceparameters,pressingthisbuttonallowsyoutousetheComparefunction.
WiththeComparefunction,youcancheckthesoundbeforeandaftereditingtoseehowthesoundchanges.
WhiletheEditscreenisshown,pressthe[EDIT/ ]button.The[EDIT/ ]buttonashes,andthesettingstemporarily
reverttothestatebeforetheedit.Pressthe[EDIT/ ]buttonagaintoenablethenewlyeditedsettingsagain.
Pressingthisbuttonwhileholdingdownthe[SHIFT]buttoncallsupthescreenforJobsettings(JOBscreen).
2-4 [SHIFT] button
Holddownthisbuttonalongwithanotherbuttonenablesyoutocallupthealternatefunctionprintedinredatthe
bottomofeachbutton.
Forthelistoffunctions,refertotheOperationManual.
2-5 [DAW REMOTE] button
ThiscallsuptheDAWREMOTEscreenforthePerformance.YoucanselectthedesiredDAW Remotemodebypressing
theCategorynamenumberselectionbuttonslocatedontheright.
2-6 [QUICK SETUP] button (FX BYPASS)
ThiscallsuptheUtilityQUICKSETUPscreen.YoucanselectaQuick SetupmodebypressingtheCategorynamenumber
selectionbuttonslocatedontheright.
Pressingthisbuttonwhileholdingdownthe[SHIFT]buttoncallsupthescreenformakingeectbypasssettings
(FXBYPASSscreen).

15
MONTAGE M Quick Guide
2-7 [STORE] button (FILE)
ThiscallsuptheStorescreen.OntheStorescreen,youcanselecttosavethePerformanceunderanewnameorto
overwritetheexistingperformance.
Pressingthisbuttonwhileholdingdownthe[SHIFT]buttoncallsupthescreenforFilesettings(FILEscreen).
2-8 [SPLIT] button (NOTE RANGE)
ThiscallsuptheSplit JobscreenforthePerformance.
Pressingthisbuttonwhileholdingdownthe[SHIFT]buttoncallsupthescreenforsettingnoteranges(NOTERANGE
screen).
2-9 [SONG/PATTERN] button (RHYTHM PATTERN)
ThiscallsupthePlay/RecscreenforthePerformance.
Pressingthisbuttonwhileholdingdownthe[SHIFT]buttoncallsupthescreenforsettingRhythmPatterns(RHYTHM
PATTERNscreen).
2-10 [TEMPO/TAP] button (PANEL LOCK)
ThiscallsuptheUtility Tempo Settingsscreen.
Pressingthisbuttonwhileholdingdownthe[SHIFT]buttonlocksthepanelcontrols.Repeattheoperationtounlock
thepanelcontrols.
Controlling the built-in sequencer
3 Sequencer transport buttons
UsethesebuttonsforcontrollingplaybackandrecordingofthesequencerdataforPattern,SongandAudio.
[ ] (Back) button
Usethisbuttonformovingbackonemeasureatatime.
[ ] (Forward) button
Usethisbuttonformovingforwardonemeasureatatime.
[J] (Stop) button
Usethisbuttonforstoppingplaybackorrecording.Ifyoupressthisbuttonagainwhileplaybackiscurrentlystopped,
thestartingpointforplaybackreturnstothebeginningofthesequencerdata.
YoucanalsousethisbuttontostopArpeggioplaybackthatcontinuesplayingafterkeysarereleased(incaseswhere
theArpeggioHoldswitchison).
[I] (Record) button
ThiscallsuptheRecordingscreen.WhiletheRecordingscreenisshown,pressthisbuttontocalluptheRecording
setupscreen(thebuttonstartsashing).Whenyoupressthe[R](Play)button,recordingstarts,andthebuttonstops
ashingandlightscontinuously.
[R] (Play) button
Usethisbuttonforstartingsongplaybackorrecording.Whenplaybackorrecordingstarts,thebuttonashesatthe
tempoofthesong.Thebuttonlightsupcontinuouslyforaudio.

16 MONTAGE M Quick Guide
Viewing the screen, switching settings, selecting items, and entering values
4-1 Main display (touchscreen)
Thisdisplayshowsvariousinformation.Bytouchingthescreen,youcanchangethesettings.
YoucanalsousetheSlotnumberandCategorynameselectionbutton,cursorkey,datadial,anddisplayknobsto
movethecursorandchangethevalue.Fordetails,see“Statuscheckandbasicoperation”(page34).
4-2 Display knobs
Rev SendVar SendDry LevelPanVolume
UsetheseknobstocontroltheselectedrowofparametersshownintheMaindisplay.Theknobswiththeparameter
namesshownatthebottomoftheMaindisplayandwiththeirindicatorlampsONcanbeusedforchangingthe
parametersettings.

17
MONTAGE M Quick Guide
4-3 Data dial
Usethisdialtochangethevalueshownatthecursorposition.
Movingthedialfasterletsyouchangetheparametervalueinlargerincrements.
4-4 Cursor buttons
Formovingthecursorpositionup,down,left,andright.
4-5 [DEC/NO] button
Usethisbuttontodecreasethevalueinincrements.
Youcanalsousethisbuttontoselect“NO”forthemessageshownontheStoreorJobscreen.
Pressingthisbuttonwhileholdingdownthe[SHIFT]buttonletsyoujumpthroughthevaluesinunitsof10.
4-6 [INC/YES] button
Usethisbuttontoincreasethevalueinincrements.
Youcanalsousethisbuttontoselect“YES”forthemessageshownontheStoreorJobscreen.
Pressingthisbuttonwhileholdingdownthe[SHIFT]buttonletsyoujumpthroughthevaluesinunitsof10.
4-7 [EXIT] button
Thefunctionsshownonthetouchscreenarearrangedinhierarchicalorder.Usethisbuttontoreturnupwardonthe
hierarchicallevel.
IfaPerformancescreenotherthantheHomescreenisshown,youcanusethe[EXIT]buttontoinstantlyreturntothe
Homescreen.
4-8 [ENTER] button
Usethisbuttontocalluptheitemshown/selectedonthescreen.Youcanalsousethisbuttontoselect“YES”for
promptsormessagesshownontheStoreorJobscreen.

18 MONTAGE M Quick Guide
Controlling parameters in real time as you play the keyboard, and adjusting detailed
parameter values
5-1 Sub display
5-2 Tab selection buttons
5-3 Tab PAGE buttons
TheparameterscontrolledwithKnobs1–8areshownontheseparateSubdisplay.UsetheTabselectionbuttonsand
TabPAGEbuttonstoswitchamongtheavailablescreens.
DierentparametersareavailabledependingontheparticulartonegenerationtypeforthePartbeingedited.
5-4 [PAGE JUMP] button
Thiscallsup(ontheMaindisplay)theadvancedsettingscreenfortheparametercurrentlybeingeditedontheSub
display.
Pressingthisbuttonwhileholdingdownthe[SHIFT]buttonenablestheparameterbeingeditedontheMaindisplayto
beshownontheSubdisplayaswell.
5-5 [QUICK EDIT] button
SelectthetypeofparameterstocontrolwithKnobs1–8.Youcanpressthesamebuttonasmanytimesasnecessaryto
switchtoadierentsetting.
Indicator Description
SELECTEDPART ControlstheparametersforthePartbeingedited
MULTI ControlstheparametersformultiplePartsbeingedited
GROOVE Controlsthegroove-relatedparameters
Whenthe[ASSIGN]buttonisturnedon,the[QUICKEDIT]buttonwillbeturnedo.

19
MONTAGE M Quick Guide
5-6 Knobs 1–8
Byturningtheseeightknobs,youcancontrolvariousparametersrelatedtothePartsound,Arpeggioplayback,Motion
Sequencer,andothers.SelectthefunctionsforKnobs1–8byusingtheQUICKEDITbuttonontheleft.
5-7 [ASSIGN] button
Whenthisbuttonisactivated,Knobs1–8arereadytobeusedasassignableknobs.
5-8 Super Knob
Youcanusethisknobtosimultaneouslycontrolmultipleparameters(Assign1–8)assignedtoKnobs1–8.
YoucanalsocontroltheSuperKnobfromaconnectedFC7footcontroller.
FormoreinformationonthevaluescontrolledwiththeSuperKnob,aswellasinstructionsonhowtoassignfunctions
toAssign1to8parametersandhowtomakesettingsforthefootcontrollerconnections,refertotheOperation
Manual.
5-9 KNOB POSITION buttons
UsethesebuttonstoviewthevaluescorrespondingtotheSuperKnobpositiontobeshownontheSubdisplay.
Youcanalsocheckthevaluesfrom[PERFORMANCE]gMotion ControlgSuper Knob.
[LEFT]button ThevaluecorrespondingtotheleftmostpositionfortheSuperknob
[MID]button Thevalue(thecentervalue)correspondstothemidpositionfortheSuperknob
Thecentervaluecanbeassignedtoanypositionontheknob.
NOTE
The[MID]buttonisavailableonlywhentheSuper Knob Mid Positionsettingissettosomethingotherthan
o.
[RIGHT]button ThevaluecorrespondingtotherightmostpositionfortheSuperknob
AdjusttheparametersusingKnobs1–8,andthenpressthisbuttonwhileholdingdownthe[SHIFT]buttontosavethe
settings.
Bysettingdierentvaluesforeachbutton,youcansetmorphtransitionsusingthesethreereferencepoints.

20 MONTAGE M Quick Guide
5-10 Slider function [PART VOLUME]/[EL/OP/OSC LEVEL] button
UsethisbuttontosettheeightcontrolslidersforcontrollingthevolumeofthePartsortheleveloftheelements,
operators,oscillators,ordrumkeys.Eachtimeyoupressthebutton,thesliderfunctionalternatesbetweenPART
VOLUMEandEL/OP/OSCLEVEL.
5-11 Control sliders 1–8
Usetheseslidersforreal-timecontrolofthevolumeforParts1–16(1–8/9–16),elementsofNormalParts(AWM2),
operatorsofNormalParts(FM-X),oscillatorsofNormalParts(AN-X),andkeysfortheDrumParts.
Whenthesliderfunction[PARTVOLUME]/[EL/OP/OSCLEVEL]buttonissetto“EL/OP/OSCLEVEL,”youcanusethePART
buttonstoadjustthelevelsfortheelement,operator,oscillator,ordrumkeyoftheselectedpart.
NOTE
• IfallControlSlidersaresettotheminimum,youmaynothearanysoundfromtheinstrument,evenwhenplayingthekeyboardor
aSong.Ifthisisthecase,moveallthesliderstoasuitablelevel.
• The[MASTERVOLUME]knobcontrolstheoverallaudiooutputlevelofthisinstrument.Ontheotherhand,theControlSliders
controlthelevelofeachelement/key/operatorofthePartsandthevolumeforeachPartofthePerformanceasaparameter.
Accordingly,thevaluessetviatheControlSliderscanbestoredasPerformancedata.
5-12 Part group [1-8/9-16]/[USB AUDIO / A/D INPUT] button
UsethisbuttontosetthePARTbuttonsforselectingParts1to16orforselectingUSBAUDIOandA/DINPUT.Eachtime
youpressthebutton,thesliders’functionalternatesbetween1–8/9–16andUSBAUDIO/A/DINPUT.
Bypressingthisbuttonwhileholdingdownthe[SHIFT]button,youcanusethePARTbuttonstocontrolParts9to16.
Whenthe1-8/9-16lampison,thePARTbuttonsaresettoParts1to8,andwhenthe1-8/9-16lampisashing,thePART
buttonsaresettoParts9to16.
5-13 PART buttons (EL/OP/OSC)
WhenthePartgroup[1-8/9-16]/[USBAUDIO/A/DINPUT]buttonissetto“1-8/9-16,”youcanusethesebuttonsto
selectParts1to8orParts9to16.
WhenthePartgroup[1-8/9-16]/[USBAUDIO/A/DINPUT]buttonissetto“USBAUDIO/A/DINPUT,”youcanusethese
buttonstoselectDIGITALIN,USBMAIN,USBASSIGN,andA/DINPUT.
Bypressingoneofthesebuttonswhileholdingdownthe[SHIFT]button,youcanusetheappropriatePARTbuttonto
selectElements1to8,Operators1to8,Oscillators1to3,orNoise.

21
MONTAGE M Quick Guide
5-14 [COMMON] button
UsethisbuttontoselectCommonoperationsfortheParts,elements,operators,andoscillators.
5-15 [PART SELECT] button (SOLO)
WhenthePartgroup[1-8/9-16]/[USBAUDIO/A/DINPUT]buttonissetto“1-8/9-16,”youcanusethePARTbuttons
toselectParts1to8orParts9to16.When“USBAUDIO/A/DINPUT”isselected,youcanusetheappropriatePART
buttonstoselectDIGITALIN,USBMAIN,USBASSIGN,andA/DINPUT.
Bypressingthisbuttonwhileholdingdownthe[SHIFT]button(sothattheSOLObuttonashes),andthenpressthe
appropriatePARTbuttontosetSOLOforthePartonoro.
Also,bypressingthe[PARTSELECT]buttonwhileholdingdownthe[SHIFT]buttonandthenpressingoneofthePART
buttonswhileholdingdownthe[SHIFT]button,youcanusetheappropriatePARTbuttontosetSOLOtoonorofor
theparticularElement,Operator,orOscillator.
WhenthePartissettoSOLOon,youcanseethestatuswiththeSolobuttonorthe“S”icononthescreen.
5-16 [KEYBOARD CONTROL] button (MUTE)
UsethisbuttontoenablethePARTbuttonstosetthekeyboardcontrolforeachPart.
Whenthekeyboardcontrolisenabledforthepart,thekeyboardiconappearsenabledontheMaindisplay,andthe
Partcanbeplayedonthekeyboard.
Bypressingthisbuttonwhileholdingdownthe[SHIFT]button,youcansettheParttoMUTEonoro.
Also,bypressingthe[KEYBOARDCONTROL]buttonwhileholdingdownthe[SHIFT]buttonandthenpressingoneof
thePARTbuttonswhileholdingdownthe[SHIFT]button,youcanusetheappropriatePARTbuttontosetMUTEtoon
orofortheparticularElement,Operator,orOscillator.
WhenthePartissettoMUTEon,youcanseethestatuswiththeMutebuttonorthe“M”icononthescreen.
5-17 [SHIFT] button
Holdingdownthisbuttonalongwithanotherbuttonenablesyoutocallupalternatefunctions,printedinredatthe
bottomofeachbutton.
Forthelistoffunctions,refertotheOperationManual.
5-18 OCTAVE buttons (TRANSPOSE)
Eachtimeyoupressabutton,thekeyboardrangemovesinoctaves.
Pressingthisbuttonwhileholdingdownthe[SHIFT]buttonallowsyoutotransposethekeyboard.Eachtimeyoupress
oneofthebuttons,thepitchofthekeyboardmovesinsemitones.
Pressingbothbuttonsatthesametimeresetsthesettingtothestandardpitchor“0.”
5-19 [CONTROL ASSIGN] buttons (CONTROL VIEW)
TheCONTROLASSIGNscreenappears.
WhenaparameterthatcanbeassignedtoacontrollerisselectedontheMaindisplay,youcanpressthisbuttonand
movethedesiredcontrollerforparameterassignmenttoopenthesettingscreenforthecontroller.
Pressingthisbuttonwhileholdingdownthe[SHIFT]buttonopensthescreenforcheckingthecontrollersettings
(CONTROLVIEWscreen).
5-20 SCENE buttons (STORE)
Youcanassigndierent“snapshots”ofimportantPart-relatedparameterssuchastrackmutestatusandbasicMixing
setupstoeachoftheSCENEbuttons.
Thecurrentlyselectedbuttonfullylights,thebuttonwithstoredSCENEsettinglightsdimly,andthebuttonwithno
storedSCENEsettingisturnedo.
Bypressingoneofthesebuttonswhileholdingdownthe[SHIFT]button,youcansavetheScenesettingsyou’ve
edited.

22 MONTAGE M Quick Guide
5-21 [MASTER VOLUME] knob
UsethisknobforadjustingtheMastervolume.
5-22 [A/D INPUT ON/OFF] button
UsethisbuttontoenableordisabletheinputsfromtheA/DINPUTjacks.
5-23 A/D INPUT [GAIN] knob
UsethisknobtoadjustthegainfortheaudiosignalsinputfromtheA/DINPUT.
Wheneverthereisaninput,theSIG/PEAKlampisturnedoninblue.Whentheinputsignalreachesjustshortof
clipping,theSIG/PEAKlamplightsupinred.AdjusttheknobsothattheSIG/PEAKlampbrieyturnsredwheneverthe
inputsignalreachesthemaximumlevel.
NOTE
YoumayneedtochangethegainsettingdependingontheleveloftheexternalequipmentconnectedtotheA/DINPUTjacks,in
thefollowingorder:[UTILITY]gSettingsgAudio I/OgA/D Input.Whentheoutputleveloftheconnectedequipment(suchasa
microphone)islow,setthisparametertoMic.Whentheoutputleveloftheconnectedequipment(suchasasynthesizerkeyboardor
CDplayer)ishigh,setthisparametertoLine.
Forotherinput-relatedparameters,changethesettingsasshownbelow.
The Volume for the A/D Input block and send level for the Pan and eects
• [PERFORMANCE]gMixing
• [EDIT/ ]gAudio IngMixing
• [NAVIGATION]g[PARTCOMMON]gA/D Input
or
[PARTCOMMON]g[NAVIGATION]gA/D Input
• SetthePartgroup[1-8/9-16]/[USBAUDIO/A/DINPUT]buttonto“USBAUDIO/A/DINPUT,”andthenpressPART
button8.
Destination for sending audio signals from the A/D INPUT jacks to the specic eect in the Eect block
• [EDIT/ ]gAudio IngRouting
Adjustment of the gain for the A/D INPUT jacks and enabling or disabling the jack
• A/DINPUT[GAIN]knobandA/DINPUT[ON/OFF]button
• [UTILITY]gSettingsgAudio I/OgA/D Input

23
MONTAGE M Quick Guide
5-24 [ARP ON/OFF] button (ARP EDIT)
Usethisbuttonforenablingordisablingarpeggioplayback.
TheArpeggiofunctionletsyoutriggerrhythmpatterns,ris,andphrasesusingthecurrentPartbysimplyplaying
notesonthekeyboard.
Itnotonlyprovidesinspirationandfullrhythmicpassagesinyourliveperformances,butitgivesyoufullyformed
instrumentalbackingpartsofvariousmusicgenresforeaseincreatingsongs.
IftheArpeggioswitchforthePartisdisabled,settingthisbuttontoONwillnotplaybackthearpeggioforthatPart.
Pressingthisbuttonwhileholdingdownthe[SHIFT]buttonopensthescreenformakingArpeggiosettings(ARPEDIT
screen).
5-25 [MSEQ ON/OFF] button (MSEQ EDIT)
UsethisbuttontoenableordisabletheMotionSequencer.
IftheMotionSequencerswitchforthePartortheLaneisdisabled,evensettingthisbuttontoONwillnotenable
playbacktheMotionSequenceforthatPart.
Pressingthisbuttonwhileholdingdownthe[SHIFT]buttonopensthescreenformakingMotionSequencersettings
(MSEQEDITscreen).
5-26 [KEYBOARD HOLD] button
WhenthisbuttonisturnedON,youcansustainthenotesyouplaywithoutusingthesustainpedal.Theuseofsustain
isautomaticallyadjustedtopreventtheendoftheprevioussustainednotefromblendingwiththenotesofthenext
chord.
5-27 [PORTAMENTO] button
UsethisbuttonforsettingthePortamentoeectonando.
Portamentoisafunctionthatcreatesasmoothtransitioninpitchfromtherstnoteplayedonthekeyboardtothe
next.
5-28 PORTAMENTO [TIME] knob
UsethisknobforadjustingthePortamentotime.

24 MONTAGE M Quick Guide
5-29 Pitch bend wheel
Usethiswheelforcontrollingthepitch-bendeect.
ThepitchbendrangecanbesetfromPartEditgPart SettinggPitch.
YoucanassignotherfunctionsforeachPart,viaPartEditgMod/ControlgControl Assign.
5-30 Modulation wheel
YoucanassignfunctionsindividuallytoeachPart,viaPartEditgMod/ControlgControl Assign.
5-31 [ASSIGN 1] and [ASSIGN 2] buttons
Usethesebuttonstocontroltheelementsandoperatorsduringyourperformancetocreatevariationsinsounds.
Otherfunctionscanbeassignedaswell.
ToassignotherfunctionsindividuallytoeachPart,usePartEditgMod/ControlgControl Assign.
TocontrolelementsthatgeneratesoundsbyusingtheXAfunction,useElementEditgOsc/TunegXA Control.
Youcansetthesebuttonsintwodierentways.OneistokeepthesettingONuntilthenexttimeyoupressthebutton,
andanotheristokeepthesettingONonlywhileyouarepressingthebutton.SelectthesettingsviaCommon/Audio
EditgGeneral.
5-32 [MSEQ TRIGGER] button
Whenthe[MSEQON/OFF]buttonisONortheMotion SEQ TriggersettingisON,pressingthisbuttonplaysbackthe
motionsequence.
5-33 [HOLD] button (RIBBON SETTING)
UsethisbuttonforswitchingtheRibbonControllersettings.
Pressingthisbuttonwhileholdingdownthe[SHIFT]buttoncallsupthescreenformakingRibbonControllersettings
(RIBBONSETTINGscreen).

25
MONTAGE M Quick Guide
5-34 Ribbon controller
Usethiscontrollerbyrunningyourngerlightlyacrossthesurfacelaterallytocontrolthespecicparameter
continuously.Or,youcanhavetheparameterchangeinsteps,dependingonthesetting.
Dependingonthefunctionyou’veassigned,youcanuseitasaspeedswitchfortherotaryspeaker.
Playing the keyboard
6 Keyboard
TheMONTAGEM6featuresa61-keykeyboard,whiletheMONTAGEM7has76keysandtheMONTAGEM8Xhas88keys.
Allareequippedwithatouchresponsefeature(bothinitialtouchandaftertouch).Withinitialtouch,theinstrument
senseshowstronglyorsoftlyyouplaythekeysandusesthatplayingstrengthtoalterthesoundinvariousways,
dependingontheselectedPerformance,Aftertouch,ontheotherhand,letsyoualterthesoundbytheamountof
pressureyouapplytoanoteafterplayingit.Inaddition,anyofavarietyoffunctionscanbeassignedtoaftertouchfor
eachPart.
ThesophisticatedGEXkeyboardfortheMONTAGEM8xprovidesexceptionallydelicateexpressiveness.Sincethe
instrumenthaspolyphonicaftertouchcapability,youcancontroltheaftertouchvalueindividuallyforeachkey.

26 MONTAGE M Quick Guide
Rear panel
Connecting
7-1 [STANDBY/ON] switch
PressthisswitchtosettheinstrumenttoOnorStandby.
7-2 [AC IN] jack (power cord socket)
Connectthepowercordsuppliedwiththisinstrument.
7-3 USB TO DEVICE terminals
UsetheseterminalsforconnectingUSBashdrivesandUSBMIDIkeyboards.
WhenaUSBashdriveisconnected,theterminalletsyousavedatacreatedonthisinstrumenttotheUSBashdrive
andloaddatafromtheUSBashdrivetotheinstrument.SendingandreceivingdatabetweentheUSBashdriveand
thisinstrumentcanbesetfrom[UTILITY]gContentsgStore/Save(orLoad).
WhenaUSBMIDIkeyboardisconnected,youcanuseitinthesamewayasthebuilt-inkeyboardofthisinstrument,as
farastheconnectedkeyboard’sspecicationsallow.Formorein-formation,refertotheOperationManual.
ACoutlet
ExternalUSBMIDI
keyboard
USBashdrive
Computer

27
MONTAGE M Quick Guide
Precautions when using the USB TO DEVICE terminals
Thisinstrumentfeaturesbuilt-inUSBTODEVICEterminals.WhenconnectingaUSBdevicetotheseterminals,be
suretohandletheUSBdevicewithcare.Followtheimportantprecautionsbelow.
NOTE
FormoreinformationaboutthehandlingofUSBdevices,refertotheowner’smanualfortheUSBdevice.
Compatible USB devices
• USBashdrive
• USBMIDIkeyboard
OtherUSBdevicessuchasaUSBhub,computerkeyboard,ormousecannotbeused.Theinstrumentdoesnot
necessarilysupportallcommerciallyavailableUSBdevices.YamahacannotguaranteetheoperationofUSB
devicesthatyoupurchase.
BeforepurchasingaUSBdeviceforusewiththisinstrument,pleasevisitthefollowingwebpage:
https://download.yamaha.com/
AlthoughUSBdevices1.1to3.0canbeusedonthisinstrument,theamountoftimeforsavingtoorloadingfrom
theUSBdevicemaydierdependingonthetypeofdataorthestatusoftheinstrument.
NOTICE
The rating of the USB TO DEVICE terminal is a maximum of 5 V/500 mA for each terminal. Do not connect USB devices
having a rating above this, since this can cause damage to the instrument itself.
Connecting a USB device
WhenconnectingaUSBdevicetotheUSBTODEVICEterminal,makesurethattheconnectoronthedeviceis
appropriateandthatitisconnectedintheproperdirection.
NOTICE
• Avoid connecting or disconnecting the USB device during playback/recording and le management operations (such as
Save, Copy, Delete, and Format), or when accessing the USB device. Failure to observe this may result in “freezing” of the
operation of the instrument or corruption of the USB device and the data.
• When connecting and then disconnecting the USB device (and vice versa), make sure to wait a few seconds between the
two operations.
• Use an AB type USB cable of less than 3 meters.
7-4 [USB TO HOST] terminal
UsethisterminaltoconnectacomputerviaaUSBcable,allowingyoutotransferMIDIdataandaudiodatabetween
thedevices.UnlikeMIDI,USBcanhandlemultipleportsviaasinglecable.Forinformationabouthowthisinstrument
handlesPorts,refertotheOperationManual.
NOTE
Audiodatasendingcapabilityfortheinstrumentisamaximumof32channels(16stereochannels)atasamplingfrequencyof
44.1kHzoramaximumof8channels(4stereochannels)forasamplingfrequencyof44.1kHzto192kHz.
Audiodatareceivingcapabilityisamaximumof6channels(3stereochannels).
Precautions when using the [USB TO HOST] terminal
Whenconnectingthecomputertothe[USBTOHOST]terminal,makesuretoobservethefollowingpointsto
avoidfreezingthecomputer/instrumentandcorruptingorlosingthedata.
NOTICE
• Use an AB-type USB cable.
• Execute the following before turning the power to the instrument on/o or plugging/unplugging the USB cable to/from
the [USB TO HOST] terminal.
- Quit any open application software on the computer.
- Make sure that data is not being transmitted from the instrument. (Data is transmitted when the notes on the keyboard
are played or a Song is played back.)
• While the computer is connected to the instrument, you should wait for six seconds or more between these operations:
(1) when turning the power of the instrument o and then on again, or (2) when alternately connecting/disconnecting the
USB cable.
Ifthecomputerortheinstrumentfreezes,restarttheapplicationsoftwareorthecomputerOSorturnthepower
totheinstrumentoandthenonagain.

28 MONTAGE M Quick Guide
7-5 MIDI terminals
UsethisterminalforconnectingexternalMIDIdevices.
7-6 FOOT SWITCH [ASSIGNABLE] jack
7-7 FOOT SWITCH [SUSTAIN] jack
Usethesejacksforconnectingfootswitchesandasustainpedal.
FOOTSWITCH[SUSTAIN]isajackforconnectingseparatelysoldfootswitchesFC3,FC4,andFC5touseexclusivelyfor
sustain.
FOOTSWITCH[ASSIGNABLE]jackisajackforconnectingaseparatelysoldFC4andFC5forusingotherfunctionsyou
assigntothepedal.Forexample,youcanuseafootswitchtoswitchtothenextPerformancewhiletheLiveSetscreen
isshown.
NOTE
Inthismanual,theterm“FC3”referstotheFC3andallotherequivalentproducts,suchastheFC3A,andtheterm“FC4”referstothe
FC4andallotherequivalentproducts,suchastheFC4A.
7-8 FOOT CONTROLLER jacks
UsethesejacksforconnectingaseparatelysoldFC7FootController.
YoucanassignafunctioninthePartEdittocontrolvariousparametersforthesound,suchasitsvolumeandpitch.
Jacks and pin alignment
Input and Output jacks Polarities
Balanced/Unbalanced
Connector types
7-10ASSIGNABLEOUTPUT(BALANCED)
7-11OUTPUT(BALANCED)
Tip:Hot(+)
Ring:Cold(-)
Sleeve:Ground
Balanced TRSphoneplug
7-12[PHONES] Tip:L
Ring:R
Sleeve:Ground
—
7-9A/DINPUT Tip:Signal
Sleeve:Ground
Unbalanced TSphoneplug
ExternalMIDIkeyboard
FC4,
FC5
FC3,
FC4,
FC5
FC7
Ring
Sleeve Tip
Sleeve Tip

29
MONTAGE M Quick Guide
7-9 A/D INPUT jacks
Usethesestandardphonejacksforreceivingtheaudiosignalsfromtheexternaldevice.Byconnectinganaudiodevice
suchasamicrophoneandCDplayer,aswellasanothersynthesizerandelectronicmusicalinstrument,youcanplay
thesoundasanaudioinputPart.Usethemonostandardphoneplugforconnection.Forstereoinputusingaudio
equipment,usethe[L/MONO]and[R]jacks.Formonoinputusingmicrophones,useonlythe[L/MONO]jack.
Inaddition,youcanusetheVocoderasaninternaleectwiththisinstrument.WhenusingtheVocoder,connecta
microphonetothe[L/MONO]jackandcontroltheVocoderbyusingtheaudioinputfromthemicrophone.
YoucanalsousethisjackfortheEnvelopeFollowerandABS(AudioBeatSync)features.
FordetailsabouttheEnvelopeFollowerandABSfeatures,refertotheOperationManual.
NOTE
• Aguitarorbasshavingactivepickupscanbedirectlyconnected.However,whenusingpassivepickups,connecttheinstrumentvia
aneectdevice.
• TheVocoder/EnvelopeFollowercanbecontrolledfromallPartoutputsandnotjusttheA/DINPUTjack.
7-10 ASSIGNABLE OUTPUT (BALANCED) jacks (TRS balanced output)
SeparatefromtheOUTPUTjacks,theseTRSbalancedoutputjacksareforoutputtingaspecicsoundorPart—
allowingyoutoapplyexternaleectsorprocessingforthatsoundorPart.However,keepinmindthattheSystem
eect,Mastereect,andMasterEQcannotbeappliedtothesoundoutputfromtheASSIGNABLEOUTPUTjacks.
ListedbelowarethesoundsorPartsthatcanbeoutputindividually.
• DrumPartkeystowhichdrum/percussioninstrumentsareassigned
• Metronome(Click)
• AnyPartofaPerformance*
*Formoreinformationontheaudioinputpart(AUDIOINPart),refertotheOperationManual.
7-11 OUTPUT (BALANCED) jacks (TRS balanced output)
UsetheseTRSbalancedoutputjacksforoutputtingtheaudiosignalsfromthisinstrument.Formonooutputs,useonly
the[L/MONO]jack.
7-12 [PHONES] (headphone) jack
Usethisstandardstereophonejackforconnectingasetofstereoheadphones.Thisjackoutputsaudiosignals
identicaltothosefromtheOUTPUTjacks.
Audiodevice Headphones
Microphone
Keyboardamplier
or
Monitorspeakers

30 MONTAGE M Quick Guide
Setting up
Power supply
Connectthesuppliedpowercordinthefollowingorder.Makesurethe[STANDBY/ON]switchontheinstrumentissettothe
Standbyposition.
1. Connect the supplied power cord to the AC IN
terminal on the instrument’s rear panel.
2. Connect the other end of the power cord to an AC
outlet.
WARNING
Use only the power cord supplied with your instrument. The power cord
supplied with your instrument must not be used with any other electrical
devices. Failure to observe this precaution can result in the equipment being
damaged, overheated or cause a re.
WARNING
When setting up the product, make sure that the AC outlet you are using is easily accessible. If some trouble or malfunction occurs,
immediately turn o the power switch and disconnect the plug from the outlet.
NOTE
Followthisprocedureinreverseorderwhendisconnectingthepowercord.
Connecting speakers or headphones
Sincethisinstrumenthasnobuilt-inspeakers,youwillneedtomonitorthesoundoftheinstrumentbyusingexternal
equipment.Makesuretoturnoanykeyboardampliers,monitorspeakers,andotherdevices,andthenconnectasetof
headphonesandanyotherdevicesasshownbelow.Whenmakingconnections,besurethatyourcableshavetheappropriate
ratings.
[ACIN]jack
Rearpanel
Powercord(included)
Keyboardamplier
or
Monitorspeakers
(left)
Keyboardamplier
or
Monitorspeakers
(right)
OUTPUT(BALANCED)
[R]jack
OUTPUT(BALANCED)
[L/MONO]jack
Headphones
[PHONES]jack

31
MONTAGE M Quick Guide
Turning the instrument ON
Turning the instrument OFF
Makesurethevolumesettingsoftheinstrumentandexternaldevices,suchaspoweredspeakers,areturnedtotheminimum
beforeturningthepoweron.Whenconnectingtheinstrumenttopoweredspeakers,turnonthepowerswitchofeachdevicein
thefollowingorder.
When turning the power on
First,theinstrument(displayswillturnonandbuttonswilllight),andthentheconnectedpoweredspeakers.
When turning the power o
First,theconnectedpoweredspeakers,andthentheinstrument(displayswillturnoandbuttonswillturno).
Keepinmindthatthe[STANDBY/ON]switchislocatedat
therightside(fromtheviewofthekeyboard)oftheACIN
socketontherearpaneloftheinstrument.
WARNING
Even when the [STANDBY/ON] switch is in standby status,
electricity is still owing to the product at the minimum level.
Remove the electric plug from the outlet when the instrument is
not to be used for extended periods of time, or during electrical
storms.
Auto Power O function
Topreventunnecessarypowerconsumption,thisinstrumentfeaturesanAutoPowerOfunctionthatautomaticallyturnsthe
poweroiftheinstrumentisnotoperatedforaspecicperiodoftime.
Auto Power O setting
YoucanenabletheAutoPowerOfunctionandselectthetimesettingforactivatingthefunction.
Procedure [UTILITY]gSettingsgAdvancedgAuto Power O
Settings (in minutes) O(AutoPowerOdisabled),5,10,15,30,60,120
Default O(AutoPowerOdisabled)
Disabling Auto Power O (simple method)
Turnthepoweronwhileholdingdownthelowestkeyonthekeyboard.
AnAuto power o disabledmessageappearsbrieyandAutoPowerO
isdisabled.Thesettingisretainedevenifthepoweristurnedo.
NOTICE
The setting will revert to its default value if not backed up before the power
is turned o.
• When the instrument is not operated for a specied period of time while
connected to an external device such as an amplier, speaker or computer,
make sure to follow the instructions in this Quick Guide to turn o the power to the instrument and the connected devices in the proper
sequence to protect the devices from damage. If you do not want the power to turn o automatically when a device is connected,
disable Auto Power O.
• When Auto Power O is set to o, the value will be retained even if the backup data saved on another device is loaded to the instrument.
When Auto Power O is set to something other than o, the value will be overwritten with loaded data.
NOTE
• Thesettingtimeisapproximate.
• ToturnthepoweronafterAutoPowerOhasbeencarriedout,pressthe[STANDBY/ON]switch.
• Whenthefactorysettingsarerestored,thesettingtimeischangedtothedefaultvalue(o).
[ACIN]jack
[STANDBY/ON]
switch

32 MONTAGE M Quick Guide
Adjusting the master volume
Adjusttheoveralllevelofthisinstrumentbyusingthe[MASTER
VOLUME]knob.
CAUTION
Do not listen over the headphones at high volume for long periods
of time. Doing so may cause hearing loss.
First,adjustthemastervolumeonthisinstrument,andthen
othervolumecontrols.Formoreinformation,refertothe
OperationManual.
Panel Lock feature
Pressingthisbuttonwhileholdingdownthe[SHIFT]buttonlockstheoperationsonthecontrollersonthetoppanel.
WhilePanelLockisON,anyoperationsotherthanthebuilt-inkeyboard,pedals,mastervolume,superknob,pitchbendwheel,
modulationwheel,ribboncontroller,andthePanelLockcontrolitselfwillbedisabled.Theoperationsonthetouchscreenwill
alsobedisabled.
Pressingthisbuttonagainwhileholdingdownthe[SHIFT]buttonunlockstheoperationsonthecontrollersonthetoppanel.
Using USB ash drives
ByconnectingaUSBashdrivetoaUSBTODEVICEterminal,youcansaveyourcustomdatatotheconnecteddrive,aswellas
readdatafromit.
Number of USB ash drives that can be used
UptotwoUSBashdrivescanbeused.
Formatting a USB ash drive
YoushouldformattheUSBashdriveonlyonthisinstrument.AUSBashdriveformattedonanotherdevicemaynot
operateproperly.
NOTICE
The format operation overwrites any previously existing data. Make sure that the USB ash drive you are formatting does not contain
important data. Proceed with caution, especially when connecting multiple USB ash drives.
NOTE
FormoreinformationonhowtoformattheUSBashdrive,refertotheOperationManual.
To protect your data (write-protect)
Topreventimportantdatafrombeinginadvertentlyerased,enablewriteprotectionfortheUSBashdrive.Ifyouaresaving
datatotheUSBashdrive,makesuretodisablewriteprotection.
Turning o the instrument
Whenturningotheinstrument,makesurethattheinstrumentisNOTaccessingtheUSBashdrivebyplayback,recording
orlemanagement(suchasduringSave,Copy,DeleteandFormatoperations).FailuretodosomaycorrupttheUSBash
driveandthedata.
Max.Min.

33
MONTAGE M Quick Guide
Preparation for live performance
ShownbelowisapossiblewayforpreparingtheMONTAGEMforuseinliveperformancesituations.
Selecting a Performance
fromtheLiveSetscreen
or
fromthePerformancescreen
Editing the settings
Saving edited settings
Creating a Live Set
Selecting a Performance from a Live Set
Playing the keyboard

34 MONTAGE M Quick Guide
Status check and basic operation
Youcancheckthestatusbylookingatthebuttons,sliders,anddisplaysonthetoppanel.
Byusingthedatadialandbuttonsorbytappingthetouchscreen,youcanswitchtoadierentscreenorchangesettings.
Checking the status
Shown on the top panel
Thebrightnessandthecolorofthebuttonsonthetoppanelindicatethestatusofthesettings.
Brightness
Therearethreelevelsofbrightnessforthebuttons.
Brightness Description
Fulllight ThefunctionissettoON.
Dimlight ThefunctionisavailablebutsettoOFF.
YoucanpressthebuttontosetthefunctionON.
O ThefunctionisnotavailableandissettoOFF.
Nothingoccurswhenyoupressthebutton.
Color
Thecolorofthesliderslitsandbuttonsindicatewhattheyaresettocontrol.
Slider slits
Color Controls
Brightblue Cyan InternalPart
Yellow Yellow Elements,drumkeys,operators,oscillators
Red Red Audio
Blue Blue PartsinExternalmodeorDAW Remotemode
Buttons
Color Controls
Brightblue Cyan LiveSet,Partselect
Mintgreen Mint green Category
Element,Operator,Oscillatorselect
Green Green Keyboardcontrol
White White Real-timecontrol
Magenta Magenta SoloorMute
Red Red Others

35
MONTAGE M Quick Guide
Main display
BelowareexplanationsoftheNavigationbarshownontheMaindisplayatalltimes.
Navigation bar
Edit Common FX 90
1 2 3 4 5 6 7 8
1 2 3 4 5 6 7 8 9
Indicators Descriptions
1Home Thesamefunctionasthe[PERFORMANCE]buttononthetoppanel.
TappingtheiconcallsupthePerformancescreen(Homescreen).
2Exit Thesamefunctionasthe[EXIT]buttononthetoppanel.
Tappingtheiconreturnsonelevelupinthehierarchicalorder.
3
Informationarea
ThecurrentscreennameandinformationregardingtheParts,
elements,operators,oscillators,anddrumkeys.
Bytappingq,youcanchangethePart,element,operator,oscillator,
anddrumkey.
ForNormalParts
Statusfortheelements,operators,andoscil-latorsareshown.
• Mute:green“M”icon
• Solo:red“S”icon
1 2 3 4 5 6 7 8
M S
Elementnumbers1–8
Theelementbeingplayedisindicatedbylightsbelowthenumbers.
Thisisuseful,forexample,whenspecifyingthevelocityrangeforthe
elementtoplayandcheckingtoseeiftheelementisbeingplayed.
1 2 3 4 5 6 7 8
M S Operatornumbers
1 2 3 N
M S Oscillatornumbers
ForDrumParts
Drum Keys: 73
Thestatusofthedrumkeysisshown.
• Thetotalnumberofdrumkeysset.
• ThegreenindicatorisshownasthevolumefortheDrumPartbeing
played.
4View
ForselectingaviewforthePerformancescreen
Tappingtheiconcallsupthelist.
Youcanpressthe[PERFORMANCE]buttontoswitchtoadierentview.
5Eects
TheiconisturnedowhenanInsertioneect,Systemeect,orMaster
eectisturnedo
TappingtheiconcallsuptheEectSwitchscreen.
6
QuickSetup Localcontrolon-oandMIDIINandOUTsettings
TappingtheiconcallsuptheQuickSetupscreen.
Localcontrol:on
Whenturnedo,theiconbecomesdim.
MIDIINandMIDIOUTaresettoMIDI
MIDIINandMIDIOUTaresettoUSB

36 MONTAGE M Quick Guide
Indicators Descriptions
790 Temposetting TempoforthecurrentPerformance
TappingtheiconcallsuptheTempoSettingscreen.
8LiveSet TappingtheiconcallsuptheLiveSetscreen.
9Utility TappingtheiconcallsuptheprevioustabontheUtilityscreen.
Navigation button
The“map”ofthesignalowofthisinstrumentisshownonthescreen.
Bytappingtheitemonthemapyouwishtoedit,youcancallupthe
correspondingsettingscreen.
Performances and Parts
ThePerformancesandthePartsareshownwithagsandattributes.
FlagsarelabelsthatindicatethesoundenginetypesforthePerformanceorthePart.
Flag Descriptions
AWM2 PerformanceconsistingonlyofAWM2Parts;PartusingAWM2.
(in1color) PerformanceconsistingonlyofFM-XParts;PartusingFM-X.
(in2colors) PerformanceconsistingonlyofFM-XPartsandSmartMorph;FM-XPartcontainingSmartMorph.
AN-X PerformanceconsistingonlyofAN-XParts;PartusingAN-X.
*ThePerformancesthatcombinemultiplesoundenginetypesareexpressedusingthe“+”sign.
Edit Common FX 90
1 2 3 4 5 6 7 8
1 2 3 4 5 6 7 8 9

37
MONTAGE M Quick Guide
AttributesarelabelsusedtoidentifytypesofPerformancesorParts.Youcanusetheattributetoltersearchresultstoseeonly
thePerformancesorPartsthatsuityourneeds.
Attribute Descriptions
AWM2 AWM2soundengine
FM-X FM-Xsoundengine
AN-X AN-Xsoundengine
MC PerformancethatfeaturesMotionControl
SSS
PerformancethatsupportsSeamless Sound Switching
Seamless Sound Switching(SSS)isafeaturethatletsyouswitchPerformancessmoothlywithoutanynotes
beingcuto.
SSSisavailableundertheconditionsstatedbelow.
• Parts9to16arenotused
Smart Morph PerformancewithSmartMorphsettings
Single
Single-PartPerformance(PerformancecontainingonePart)
Usethiswhenyouwanttoplayoneinstrumentsound.
TheSingle-PartPerformancesareshowningreenonthePerformanceCategorySearchscreen.
Multi
Multi-PartPerformance(PerformancecontainingmultipleParts)
Useitthiswhenyouwanttoplaymultipleinstrumentsinlayerorsplitcombinations.
Multi-PartPerformancesareshowninblueonthePerformanceCategorySearchscreen.
MOTIFXF FactoryPerformanceforMOTIFXF
MONTAGE FactoryPerformanceforMONTAGE
MONTAGEM FactoryPerformanceforMONTAGEM

38 MONTAGE M Quick Guide
Opening setting screens
Whenyouselectatabontherstcolumnfromtheleftofthetouchscreen,andthenselectatabonthesecondcolumn,the
parametereditviewappears.
Intheparametereditview,youcanchangetheparametervalueorswitchthesettingsonoro.
Selectatabonthe
rstcolumn Parametereditview
Selectatabonthesecond
column(ifavailable)
Closetheeditviewbydoing
oneofthefollowing:
• Pressthe[EXIT]button.
• Pressthe[ENTER]button.
• TaptheHomeicon.
• TaptheReturnicon.
Edit Common 1 2 3 4 5 6 7 8 FX 90
General
/ Pitch
Perf
Settings
Filter
/ Amp
Effect
Arp / MS
Control
Audio ln Pitch
Zone
Overview
USB
Monitor
Main Category
Main Category Sub Category Performance Name
Sub Category
Piano Acoustic CFX + FM EP
[T]
Operationonthetouchscreenisperformedfromlefttoright.
IntheOperationshorthand,itisshownas:thebuttononthetoppanel(ortheiconintheNavigationbaronthetouchscreen)g
tabontherstcolumngtabonthesecondcolumngtheparametereditview.
Example
Operation [PERFORMANCE]g[EDIT/ ]gPartselectiongGeneral/PitchgPart Settings
Operation [UTILITY]gSettingsgSound
Youcanusethebuttonsonthetoppanelortapthetouchscreentocalluptherelevantscreen.
By using the buttons
Youcanalsoselectthedesiredtabbysimultaneouslyholdingdownthe[SHIFT]buttonandpressingtheappropriateCategory
Selectname/numberbutton.
Whileholdingdownthe
[SHIFT]button...
Usethesebuttonsontheupperhalffor
selectingatabontherstcolumn.
Usethesebuttonsonthelowerhalffor
selectingatabonthesecondcolumn.

39
MONTAGE M Quick Guide
By using the touchscreen
Taptheappropriatetabshownonthetouchscreen.
Moving the cursor and changing parameter values
Usethefourcursorbuttonsonthedialringtomovethecursoronthetouchscreeninfourdirections.
Youcanmovethecursorbytouchingtheitemshownonthetouchscreen.
Changetheparametervalueatthecursorpositionbyusingthedatadial,[INC/YES]button,and[DEC/NO]button.
Forparameterswithlargevalueranges,youcanincreasethevalueby10byholdingdownthe[SHIFT]buttonandpressingthe
[INC/YES]button.Todecreaseby10,holddownthe[SHIFT]buttonandpressthe[DEC/NO]button.
Bymovingacursorpositiontoadierentrowoftheparametersusingtheupanddownbuttons,youcancontroladierentset
ofparametersusingthedisplayknobs
Edit Common 1 2 3 4 5 6 7 8 FX 90
General
/ Pitch
Perf
Settings
Filter
/ Amp
Effect
Arp / MS
Control
Audio ln Pitch
Zone
Overview
USB
Monitor
Main Category
Main Category Sub Category Performance Name
Sub Category
Piano Acoustic CFX + FM EP
[T]
Cursorbuttons Datadial
Decreases
number
Increases
number
1. Movethecursorupanddownto
selectadierentrow.
2. Usethedisplayknobstocontrol
theindicatedparameters.

40 MONTAGE M Quick Guide
Icons shown for specic operations
Icons Operations
Thecontextmenuappears.
Category
Search
Edit
Recall
Property
Favorite
Tapthecontextmenubuttontoswitchtoadierentscreen.
Thepop-uplistappears.
Whentherearemanyitems,upand
downscrollbuttonsareavailable.
Main Category
Piano
Keyboard
Organ
Guitar
Bass
Strings
Brass
Woodwind
Syn Lead
Touchtheitemthatyouwishtoselectfromthelist.
Toclosethepop-uplist,youcanpressthe[ENTER]buttonorthe[EXIT]buttonon
theToppanelortapoutsidethepop-uplistonthescreen.
Thescreenforenteringnamesappears. Taptheicontocallupthescreenforenteringnames.
Movetoadierentscreen Taptheicontocalluptheconrmationscreenforthefunction.
Usethe[INC/YES]buttonorthe[DEC/NO]buttontoconrmtheoperation.
AddaPart Tapthe“+”signtoaddaPart.

41
MONTAGE M Quick Guide
Entering characters and numbers
Entering characters
Toentercharacters,usethekeyboardshownonthescreen.
Thekeyboardscreenappearswhenyouselecttheitemthatrequiresenteringnamesbytappingtheitemonthescreenorby
movingthecursortotheitemandpressingthe[ENTER]button.
1Deleteallcharacters
2Cancelallcharacterchangesonthescreen
3Switchbetweenuppercaseandlowercase
4Switchtothekeyboardforenteringsymbols
5Insertaspaceatthecursorposition(sameasthe[INC/YES]button)
6Movethecursor
7Deleteonecharacter(sameasusingthe[DEC/NO]button)
8Finishenteringcharactersandclosethescreen
9Switchtothekeyboardforenteringalphabeticalcharacters
Cancel
Space Done123@
Performance Name
CFX + FM EP
q w e r t y u i o
a s d f g h j k
z x c v b n m ,
l
p
Cancel
Space Doneabc
Performance Name
CFX + FM EP
()” ! ? @ ~ 7 8 9 *
, ^ ' | _ 4 5 6
$# & % \1
0 .
2 3 +
-
/
=
1
495 58 86
2
37 7
1 2
6

42 MONTAGE M Quick Guide
Entering numbers
Forenteringnumbers,youcanusethekeysonthebuilt-inkeyboardorthenumericpadshownonthescreen.
Onewayofenteringanumberisbypressingakeyonthebuilt-inkeyboard.Thisisuseful,forexample,forenteringanote
numberorvelocityvalue.
Anotherwayofenteringanumberisbyusingthenumericpadonthescreen.Thisisuseful,forexample,forspecifyingthevalue
thatrequiresanumericalentry.
Bytappingthecorrespondingitemonthescreenorbymovingthecursorandpressingthe[ENTER]button,thefollowingtab
appears.
Performance
Smart Morph
Part 11 2 3 4 5 6 7 8 FX 90
Common
TG Vel Limit
Home Display Mode
TG Note Limit
CFX + FM EP
Keyboard
Number
1-4 5-8 9-12 13-16
1
C -2
1
G 5
127
125
PlANO
2
PlANO
3
PlANO
4
Mute
Solo
CFX + FM EP
1
2
1Enableskeyboardentry
Pressakeyonthebuilt-inkeyboardtoenterthecorrespondingvalueforthenotenumberorvelocity.
2Callsupthenumericpadscreen
TapthenumbersonthenumerickeypadonthescreenorusetheDatadial,[INC/YES],and[DEC/NO]buttonstoincreaseor
decreasethevalue.
Cancel
Done
Performance Volume
127
7 8 9
4 5 6
1
0
2 3 5
34
6
3Deletesallnumbers
4Cancelsthechangesonthescreen
5Deletesthelastdigits
6Finishenteringnumbersandclosethescreen
Numerickeypad

43
MONTAGE M Quick Guide
The Sub display
Using the Sub display
TochangesettingsshownontheSubdisplay,usethe[QUICKEDIT]button,Knobs1to8,Tabselectionbuttons,TabPAGE
buttons,andthe[ASSIGN]button.
Using the Page Jump function
TochangeadvancedsettingsoftheparametersshownontheSubdisplay,usethe[PAGEJUMP]buttontomovetothesetting
screenontheMaindisplayandthenedittheparametervalue.Afterediting,pressthe[PAGEJUMP]buttonwhileholdingdown
the[SHIFT]buttonsothattheeditedparametervaluesareshownontheSubdisplay.
ViewtheSubdisplay
ViewtheSubdisplay
ViewtheMaindisplay

44 MONTAGE M Quick Guide
Playing the keyboard
First,selectapresetPerformancefromtheLiveSetscreenandtryplayingthekeyboard.
Selecting a Performance from the Live Set screen
1. Press the [LIVE SET] button.
TheLiveSetscreenappears.
Live Set FX 90
Category
Search
Bank Page
Preset Best of MONTAGE 1
CFX + FM EP
CFX + FM EP Wax And Wane
A.PIANO CFX+FM EP
A.PIANO CFX+FM EP
SYN PAD w/ Auto SK
Pearly Gates
CHILL OUT Style ARP
DJ Montage
DANCE Style ARP
2. If necessary, press the [BANK] button and the [PAGE] button to select a dierent screen. Find a
Performance you would like to use, and touch the Performance name on the screen to select it.
3. Play the keyboard.
YoucanalsousethePerformancescreentoselectapresetPerformanceandeditPerformancesettings.Formoreinformation,
refertotheOperationManual.
Performance(16PerformanceSetsononepage)

45
MONTAGE M Quick Guide
Troubleshooting
Nosound?Wrongsound?Whentheseorotherproblemsoccur,makesuretocheckthetroubleshootingsectioninthe
OperationManualbeforeassumingthattheproductisfaulty.ManyproblemscanbesolvedbycarryingouttheInitialize All Data
operation(below),afterbackingupyourdatatoaUSBashdrive.Iftheproblempersists,consultyourYamahadealer.
Restoring the factory default settings (Initialize All Data)
NOTICE
When the Initialize All Data function is carried out, all the Performances and songs in the User memory you have stored, as well as the
Utility settings for the overall keyboard settings will be overwritten with their defaults. Make sure you are not overwriting any important
data. Therefore, you should regularly save backups of important settings to a USB ash drive (refer to the Operation Manual).
1. Open the Settings screen from [UTILITY] Settings System.
ThiscallsuptheSettingsscreenfortheentireinstrument.
2. Tap Initialize All Data.
Theconrmationscreenappears.
Tocanceltheoperation,taptheCancel Nobuttononthescreenorpressthe[DEC/NO]buttononthetoppanel.
3. Tap the Yes button on the screen or press the [INC/YES] button on the top panel.
TheInitialize All Dataoperationiscarriedout.

46 MONTAGE M Quick Guide
Specications
Keyboard MONTAGEM8x:88keys,GEXKeyboard(InitialTouch/PolyphonicAftertouch)
MONTAGEM7:76keys,FSXKeyboard(InitialTouch/Aftertouch)
MONTAGEM6:61keys,FSXKeyboard(InitialTouch/Aftertouch)
Tone Generator MotionControlSynthesisEngine
AMW2:128Elements(max.)
FM-X:8Operators,88Algorithms
AN-X:3Oscillators,1noisegenerator
Display 7"TFTColorWideVGALCDtouchscreen,512×64full-dotLCD
Connectivity USBTODEVICE[1]/[2],[USBTOHOST],MIDI[IN]/[OUT]/[THRU],FOOTCONTROLLER[1]/[2],
FOOTSWITCH[SUSTAIN]/[ASSIGNABLE],OUTPUT(BALANCED)[L/MONO]/[R](6.3mm,BalancedTRSjacks),
ASSIGNABLEOUTPUT(BALANCED)[L]/[R](6.3mm,BalancedTRSjacks),
[PHONES](6.3mm,standardstereophonejack),A/DINPUT[L/MONO]/[R](6.3mm,standardphonejacks)
Dimensions, Weight MONTAGEM8x:1,446(W)×460(D)×170(H)mm,28.1kg(56-15/16"(W)×18-1/8"(D)×6-11/16"(H),61lb15oz)
MONTAGEM7:1,244(W)×396(D)×131(H)mm,17.6kg(49-0"(W)×15-9/16"(D)×5-3/16"(H),38lb13oz)
MONTAGEM6:1,037(W)×396(D)×131(H)mm,15.3kg(40-13/16"(W)×15-9/16"(D)×5-3/16"(H),33lb12oz)
Included Accessories Powercord,QuickGuide(thisbook),Cubase AI download information
Expanded Softsynth Plugin for MONTAGE M download information
Thecompletelistofspecicationsisavailableonthefollowingwebsite.
www.yamaha.com/2/montagem
*Thecontentsofthismanualapplytothelatestspecicationsasofthepublishingdate.Sincespecications,equipmentorseparatelysold
accessoriesmaynotbethesameineverylocale,pleasecheckwithyourYamahadealer.

47
MONTAGE M Quick Guide
Index
Foraconvenientindexoftermsonhowtousetheinstrument,searchtheOperationManual(HTML).
https://manual.yamaha.com/mi/synth/montage_m/index_q.html
A
AN-X .............................................................................................. 9, 36, 37
attribute .................................................................................................. 37
Auto Power O function ...................................................................31
AWM2 ........................................................................................... 9, 36, 37
B
bank ..........................................................................................................11
D
Drum Parts (AWM2) .............................................................................10
E
Envelope Follower .................................................................................9
F
factory default settings .................................................................... 45
ag ............................................................................................................ 36
FM-X ..............................................................................................9, 36, 37
G
GEX keyboard ....................................................................................... 25
H
Hybrid sound engine ............................................................................ 9
I
Init ..............................................................................................................10
L
Library bank ...........................................................................................11
Live Set ..................................................................................................... 11
M
Motion Control .......................................................................... 9, 10, 37
Motion Control Synthesis Engine .....................................................9
Motion Sequencer .................................................................................9
Multi/GM .................................................................................................10
Multi-Part Performance ..............................................................10, 37
N
Normal Parts (AN-X) ............................................................................10
Normal Parts (AWM2) .........................................................................10
Normal Parts (FM-X) ............................................................................10
P
Panel Lock feature .............................................................................. 32
Part ............................................................................................................10
Performance ..........................................................................................10
Preset bank ............................................................................................. 11
S
Single-Part Performance ............................................................10, 37
slot .............................................................................................................11
Soundmondo ........................................................................................10
SSS............................................................................................................. 37
Super Knob ............................................................................................... 9
U
User bank ................................................................................................11
V
Voice ..........................................................................................................10

48 MONTAGE M Quick Guide
Note on source code distribution
Forthreeyearsafterthenalfactoryshipment,youmayrequestfromYamahathesourcecodeforanyportionsoftheproduct
whicharelicensedundertheGNUGeneralPublicLicenseorGNULesserGeneralPublicLicensebywritingtothefollowing
address:
DigitalMusicalInstrumentsStrategyPlanningGroup,DigitalMusicalInstrumentsDevelopmentDepartment
MusicalInstrumentsBusinessUnit,YAMAHACorporation
10-1Nakazawa-cho,Naka-ku,Hamamatsu,430-8650,JAPAN
Thesourcecodewillbeprovidedatnocharge;however,wemayrequireyoutoreimburseYamahaforthecostofdeliveringthe
sourcecodetoyou.
• Notethatweshallbearnoresponsibilitywhatsoeverforanydamagearisingfromchanges(additions/deletions)madetothe
softwareforthisproductbyathirdpartyotherthanYamaha(orpartyauthorizedbyYamaha).
• Notethatre-useofsourcecodereleasedtothepublicdomainbyYamahaisunguaranteed,andYamahashallnotbearany
responsibilitywhatsoeverforthesourcecode.
• Thesourcecodecanbedownloadedfromthefollowingaddress:
https://download.yamaha.com/sourcecodes/synth/

MEMO

MEMO

Important Notice:
U.S. LIMITED WARRANTY for Customers in the United States
FordetailedinformationaboutthisYamahaproductandwarrantyservice,
pleaseeithervisitthefollowingwebsiteaddress(printableleisavailableatourwebsite)
orcontactCustomerServiceattheaddressortelephonenumberidentiedbelow.
Website Address:
Yamaha.io/SynthAndStageWarranty
Customer Service:
YamahaCorporationofAmerica
6600OrangethorpeAvenue,BuenaPark,CA90620-1273
Telephone:800-854-1569


© 2022 Yamaha Corporation
Published 12/2022
MWMA-A0
VEW4480
10-1 Nakazawa-cho, Naka-ku,Hamamatsu, 430-8650 Japan
-
 1
1
-
 2
2
-
 3
3
-
 4
4
-
 5
5
-
 6
6
-
 7
7
-
 8
8
-
 9
9
-
 10
10
-
 11
11
-
 12
12
-
 13
13
-
 14
14
-
 15
15
-
 16
16
-
 17
17
-
 18
18
-
 19
19
-
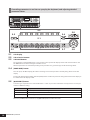 20
20
-
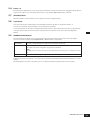 21
21
-
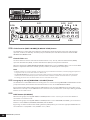 22
22
-
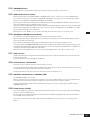 23
23
-
 24
24
-
 25
25
-
 26
26
-
 27
27
-
 28
28
-
 29
29
-
 30
30
-
 31
31
-
 32
32
-
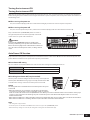 33
33
-
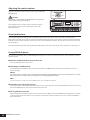 34
34
-
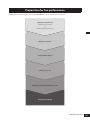 35
35
-
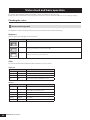 36
36
-
 37
37
-
 38
38
-
 39
39
-
 40
40
-
 41
41
-
 42
42
-
 43
43
-
 44
44
-
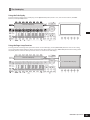 45
45
-
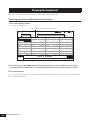 46
46
-
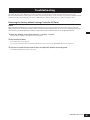 47
47
-
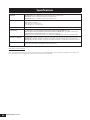 48
48
-
 49
49
-
 50
50
-
 51
51
-
 52
52
-
 53
53
-
 54
54
-
 55
55
-
 56
56


Yamaha M7 Snelstartgids
- Type
- Snelstartgids
in andere talen
- English: Yamaha M7 Quick start guide
- italiano: Yamaha M7 Guida Rapida
- русский: Yamaha M7 Инструкция по началу работы
- français: Yamaha M7 Guide de démarrage rapide
- español: Yamaha M7 Guía de inicio rápido
- Deutsch: Yamaha M7 Schnellstartanleitung
- português: Yamaha M7 Guia rápido
- dansk: Yamaha M7 Hurtig start guide
- suomi: Yamaha M7 Pikaopas
- čeština: Yamaha M7 Rychlý návod
- 日本語: Yamaha M7 クイックスタートガイド
- polski: Yamaha M7 Skrócona instrukcja obsługi
- română: Yamaha M7 Ghid de inițiere rapidă