Domo DO7087S de handleiding
- Categorie
- Strijkijzers
- Type
- de handleiding
Deze handleiding is ook geschikt voor

HANDLEIDING
MODE D’EMPLOI
GEBRAUCHSANLEITUNG
INSTRUCTION BOOKLET
MANUAL DE INSTRUCCIONES
NÁVOD K POUŽITÍ
PRODUCT OF
STRIJKIJZER MET STOOMGENERATOR
FER À REPASSER AVEC CENTRALE VAPEUR
BÜGELEISEN MIT DAMPFGENERATOR
IRON WITH STEAM GENERATOR
PLANCHA CON GENERADOR DE VAPOR
ŽEHLIČKA S PARNÍM GENERÁTOREM
DO7087S

DO7087S
LINEA 2000 - Dompel 9 - 2200 Herentals Belgium - Tel 014/21.71.91 - Fax : 014/21.54.63
GARANTIEVOORWAARDEN
Wij hanteren een garantietermijn van 2 jaar vanaf de datum van aankoop. Gedurende de
garantieperiode zal de distributeur volledige verantwoording op zich nemen voor gebreken,
die aanwijsbaar berusten op materiaal- of constructiefouten. Wanneer dergelijke gebreken
voorkomen, zal het apparaat indien nodig vervangen of gerepareerd worden. Het recht op
garantie vervalt wanneer de gebreken zijn ontstaan door hardhandig gebruik, het niet in
acht nemen van de gebruiksaanwijzing of ingreep door derden. De garantie wordt verleend
op basis van het originele kassaticket. Alle onderdelen die aan slijtage onderhevig zijn,
vallen buiten de garantie. Indien je apparaat defect is binnen de garantietermijn van 2 jaar,
dan mag je het toestel samen met het originele kassaticket binnenbrengen in de winkel
waar je het toestel hebt aangekocht.
CONDITIONS DE GARANTIE
Nous accordons une garantie de 2 ans sur ce produit à partir de la date d’achat.
Pendant la durée de la garantie, le distributeur prendra à sa charge la réparation des vices
de fabrication ou de matières, en se réservant le droit de décider si certaines pièces doivent
être réparées ou échangées, ou si l’appareil lui-même doit être échangé. Les dommages
occasionnés par une utilisation inadéquate (branchement continu, erreur de voltage, prise
inappropriée, choc, etc...), l’usure normale ne portant préjudice ni au bon fonctionnement
ni à la valeur de l’appareil, excluent toute prétention à la garantie. La garantie devient
caduque si des réparations ont été effectuées par des personnes non agréées. La garantie est
accordée sur la base du ticket de caisse original.Toutes les pièces détachées non résistantes
et par conséquent sujettes à l‘usure, ne sont pas sous garantie. Dans le cas où votre
appareil est défectueux pendant la période de garantie de 2 ans, vous pouvez ramener votre
appareil, ainsi que votre ticket de caisse, au magasin où vous l’avez acheté.
GARANTIE
Die Garantie für dieses Gerät beträgt 2 Jahre ab dem Kaufdatum. Während dieser
zweijährigen Garantie trägt der Verteiler die Verantwortung für Mängel, die eindeutig
auf Material- oder Konstruktionsfehler zurückzuführen sind. Wenn es solche Mängel
gibt, wird das Gerät, wenn notwendig, ersetzt oder repariert. Das Recht auf Garantie
erlischt, wenn die Mängel auf eine unangemessene Anwendung, die Nichtbefolgung der
Gebrauchsanleitungen oder eine Reparatur von einer dritten Partei zurückzuführen sind.
Die Garantie wird auf der Grundlage des originalen Kassenbons gewährt. Alle Teile, dem
Verschleiß ausgesetzt sein, sind nicht in der Garantie eingeschlossen. Wenn Ihr Gerät
innerhalb der Garantiefrist von zwei Jahren defekt ist, können Sie das Gerät zusammen mit
Ihrem Kassenbon in das Geschäft zurückbringen, in dem Sie es gekauft haben.
WARRANTY
This appliance has a two year warranty period. During this period the manufacturer is
responsible for any failures that are the direct result of construction failure. When these
failures occur the appliance will be repaired or replaced if necessary. The warranty will
not be valid when the damage to the appliance is caused by wrong use, not following the
instructions or repairs executed by a third party. The guarantee is issued with the original
till receipt. All parts, which are subject to wear, are excluded from the warranty.

DO7087S
LINEA 2000 - Dompel 9 - 2200 Herentals Belgium - Tel 014/21.71.91 - Fax : 014/21.54.63
www.domo-elektro.be
If your device breaks down within the 2-year warranty period, you can return the device
together with your receipt to the shop where you purchased it.
CONDICIONES DE GARANTÍA
Este aparato tiene un término de garantía de 2 años, desde la fecha de la compra.
Durante el período de garantía, el suministrador asumirá la entera responsabilidad en
cuanto a defectos debidos a errores de material o de fabricación.
En caso de tales defectos, el aparato será reemplazado o reparado, cuando sea necesario. La
garantía perderá su vigencia en caso de defectos causados por mal uso, no cumplimiento
del manual de instrucciones o intervención por una tercera persona. La garantía se concede
sobre la base del recibo de caja. La garantía no cubre piezas expuestas al desgaste.
Si el producto está defectuoso dentro del período de garantía de 2 años, puede traer su
recibo de caja junto con el teléfono a la tienda donde adquirió la unidad.
ZÁRUKA
Pro záruku začínající dnem prodeje spotřebiče platí na území ČR tyto podmínky:
1. trvání záruky: 2 roky
2. poskytování záruky:
a) záruční opravu provedeme podle našeho zvážení opravou nebo výměnou vadných dílů,
jestliže tyto závady vznikly prokazatelně vadou materiálu nebo chybou při výrobě
b) záruční oprava bude provedena jen při předložení tohoto záručního listu a dokladu o
zaplacení
c) jestliže dojde k opravě nebo výměně spotřebiče v záruční době, záruční doba se
prodlužuje
3. záruka se nevztahuje
a) na mechanické poškození
b) nesprávné používání v rozporu s návodem k použití
1. záruka zaniká:
- při použití spotřebiče jinak než v domácnosti
- při provádění opravy nebo změny na spotřebiči osobou jinou než pověřenou
naším servisem
Na tento spotřebič poskytujeme záruku na nedostatky, které jsou označeny jako výrobní
chyby nebo chyby materiálu. Záruční doba začíná dnem prodeje a je uznána po předložení
potvrzeného tohoto záručního listu nebo orig.dokladu o zaplacení + tento nepotvrzený,
ale vyplněný ZL pro záznam opravy. Případné reklamace můžete uplatnit v místě nákupu
tohoto přístroje nebo v servisním středisku rmy:
Domo-elektro s.r.o. Hluboká 147, 34506 Kdyně viz www.domo-elektro.cz
tel. 379 789 684 nebo na [email protected] , tel. 379 422 550

DO7087S
4
Type nr. apparaat
N° de modèle de l’appareil DO7087S
Typ Nr. des Gerätes
Type nr. of appliance
N° de modelo del aparato
Model
Naam
Nom ..................................................................................................................................
Name
Nombre
Jméno
Adres
Adresse .............................................................................................................................
Address
Dirección
Adresa
Aankoopdatum
Date d’achat .....................................................................................................................
Kaufdatum
Date of purchase
Fecha de compra
Datum nákupu,podpis a razítko
Tel.: ..................................................................................................................................
* Jméno kupujícího, adresu a tel.spojení je nutno vyplnit pokud si zákazník přeje
zaslání opraveného přístroje domů. Bez úplného vyplnění všech ostatních údajů v
záručním listu nebude možno Vaši reklamaci včas vyřídit.

DO7087S
5
www.domo-elektro.be
Reklamace : (vyplní zákazník nebo obchod)
Popis vady 1. reklamace/Datum uplatnění reklamace:
Popis vady 2. reklamace/Datum uplatnění reklamace:
Popis vady 3. reklamace/Datum uplatnění reklamace:
Záznamy servisu :
1.reklamace (datum přijetí/odeslání/ číslo reklamačního dokladu)
2.reklamace (datum přijetí/odeslání/ číslo reklamačního dokladu)
3.reklamace (datum přijetí/odeslání/ číslo reklamačního dokladu)
* Jméno kupujícího, adresu a tel.spojení je nutno vyplnit pokud si zákazník přeje
zaslání opraveného přístroje domů.
Bez úplného vyplnění všech ostatních údajů v záručním listu nebude možno Vaši
reklamaci včas vyřídit.

DO7087S
6
RECYCLAGE-INFORMATIE
Dit symbool op het product of op de verpakking wijst erop dat dit product niet als
huishoudafval mag worden behandeld. Het moet naar een plaats worden gebracht waar
elektrische en elektronische apparatuur wordt gerecycleerd. Als u ervoor zorgt dat dit
product op de correcte manier wordt verwijderd, voorkomt u mogelijk voor mens en
milieu negatieve gevolgen die zich zouden kunnen voordoen in geval van verkeerde
afvalbehandeling. Voor meer details in verband met het recycleren van dit product,
neemt u best contact op met de gemeentelijke instanties, het bedrijf of de dienst belast
met de verwijdering van huishoudafval of de winkel waar u het product hebt gekocht.
Het verpakkingsmateriaal is recycleerbaar. Behandel de verpakking milieubewust.
INFORMATION DE RECYCLAGE
Ce symbole sur le produit ou son emballage indique que ce produit ne peut être traité
comme déchet ménager. Il doit plutôt être remis au point de ramassage concerné, se
chargeant du recyclage du matériel électrique et électronique.
En vous assurant que ce produit est éliminé correctement,
vous favorisez la prévention des conséquences négatives pour
l’environnement et la santé humaine qui, sinon, seraient le
résulat d’un traitement inapproprié des déchets de ce produit.
Pour obtenir plus de détails sur le recyclage de ce produit,
veuillez prendre contact avec le bureau municipal de votre
région, votre service d’éliminiation des déchets ménagers ou
le magasin où vous avez acheté le produit.
L’emballage est recyclable. Traitez l’emballage
écologiquement.
RECYCLING INFORMATIONEN
Dieses Symbol auf dem Produkt oder seiner Verpackung
weist darauf hin, dass dieses Produkt nicht als normaler
Haushaltsabfall zu behandeln ist, sondern an einem
Sammelpunkt für das Recyling von elektrischen und
elektronischen Geräten abgegeben werden muss. Durch Ihren
Beitrag zum korrekten Entsorgen dieses Produkts schützen
Sie die Umwelt und die Gesundheit Ihrer Mitmenschen.
Umwelt und Gesundheit werden durch falsches Entsorgen gefährdet. Weitere
Informationen über das Recycling dieses Produkts erhalten Sie von Ihren Rathaus,
Ihrer Müllabfuhr oder dem Geschäft, in dem Sie das Produkt gekauft haben.
Das Verpackungsmaterial ist wiederverwertbar. Entsorgen Sie die Verpackung
umweltgerecht und führen Sie sie der Wertstoffsammlung zu.

DO7087S
7
www.domo-elektro.be
RECYCLING INFORMATION
This symbol on the product or on its packaging indicates that this product may not
be treated as household waste. Instead it must be brought
to the applicable collection point for recycling of electrical
and electronic equipment. By ensuring this product is
disposed of correctly, you will help prevent potential negative
consequences for the environment and human health, which
could otherwise be caused by inappropriate waste handling of
this product. For more detailed information about recycling
of this product, please contact your local city ofce, your
household waste disposal service or the shop where you
purchased the product.
The packaging is recyclable. Please treat package
ecologically.
INFORMACIÓN DE RECICLAJE
El símbolo en el producto o el embalaje indica que este
producto no puede ser tratado como residuo doméstico. Los
residuos de aparatos tienen que ser depositados en un punto
de recogida destinado al reciclaje de aparatos eléctricos y
electrónicos. Eliminando este producto de manera correcta,
se puede evitar las consecuencias negativas posibles para
el hombre y el medio ambiente en caso de un tratamiento
de residuos incorrecto. Si desea obtener más información sobre el reciclaje de este
producto, pónganse en contacto con la ocina municipal, la empresa o el servicio de
recogida de residuos domésticos correspondiente o con el establecimiento dónde ha
adquirido el producto.
El material de embalaje es reciclable. Trate el embalaje de manera ecológica.
INFORMACE O RECYKLACI ODPADU
Symbol na přístroji či na jeho obalu znamená, že s tímto výrobkem není možno
nakládat jako s běžným domovním odpadem, nýbrž musí být odevzdán na místech
určených ke sběru a likvidaci elektrických a elektronických zařízení. Dodržením
tohoto doporučení chráníte životní prostředí a zdraví spoluobčanů. Více informací o
možnostech likvidace nebezpečného odpadu obdržíte na obecních nebo městských
úřadech, sběrných dvorech nebo v prodejně, kde jste přístroj zakoupili. Obalové
materiály jsou recyklovatelné, nakládejte s nimi podle předpisů pro životní prostředí.

DO7087S
8
WEBSHOP
Accessoires en onderdelen van Domo-toestellen kunnen vanaf nu ook online besteld
worden via de webshop van Domo*:
http://webshop.domo-elektro.be
De webshop is ook te bereiken via de Domo-website: www.domo-elektro.be.
Hiernaast zijn de accessoires en onderdelen ook nog altijd te verkrijgen in de winkel
waar u het toestel heeft aangekocht.
Les accessoires et pièces détachées de Domo sont à présent disponibles en ligne sur
le webshop*:
http://webshop.domo-elektro.be
Le webshop est aussi accessible via le site internet de Domo: www.domo-elektro.be.
Vous pouvez toujours vous procurer les accessoires et pièces détachées au point de
vente dont provient votre appareil.
Zubehör und Ersatzteile von Domo-Geräten können ab jetzt auch online im Domo-
Webshop bestellt werden*:
http://webshop.domo-elektro.be
Zum Domo-Webshop gelangen Sie auch über die Domo-Internetseite: www.domo-
elektro.be.
Außerdem können Sie nach wie vor Domo-Zubehör und -Ersatzteile in Geschäften
bekommen, wo Domo-Gerät verkauft werden.
From now on, accessories and parts of Domo appliances can also be ordered online
from the Domo webshop*:
http://webshop.domo-elektro.be
You can reach the webshop through the Domo website as well: www.domo-elektro.be.
The accessories and parts can also still be obtained at the store where you bought the
appliance.
* Enkel in België, Nederland, Luxemburg, Frankrijk en Duitsland.
* Seulement dans la Belgique, le Pays-Bas, le Luxembourg, la France et l’Allemagne.
* Nur in Belgien, die Niederlande, Luxemburg, Frankreich und Deutschland.
* Only in Belgium, the Netherlands, Luxemburg, France and Germany.
NL
F
D
EN

DO7087S
9
www.domo-elektro.be
Als de voedingskabel beschadigd is, moet het vervangen
worden door de fabrikant, zijn dienst na verkoop of een
gelijkaardig gekwaliceerd persoon, om ongelukken te
voorkomen.
Si le cordon d’alimentation est endommagé, il doit être
remplacé par le fabricant, son service après-vente ou
toute autre personne qualiée, pour éviter tout accident.
Wenn das Stromzuführungskabel beschädigt ist, muss
es vom Hersteller, dessen Kundendienst oder einer
gleichartig geschulten Person ersetzt werden, um Unfälle
zu verhindern.
If the power supply cord is damaged, it must be replaced
by the manufacturer, its service agent or a similarly
qualied person in order to avoid a hazarduous situation.
Cuando el cordón de alimentación está dañado, tiene que
ser reemplazado por el fabricante, el servicio posventa
o una persona similarmente calicada, para evitar
accidentes.
Jestliže je poškozen přívodní kabel, musí být neprodleně
vyměněn v odborném servisu nebo oprávněnou osobou.
Jinak hrozí nebezpečí úrazu!

DO7087S
10
veiligheidsinstructies
Wanneer je elektrische toestellen gebruikt,
moeten volgende veiligheidsinstructies in
acht genomen worden:
• Lees deze instructies zorgvuldig door.
Behoud deze handleiding om later te
raadplegen.
• Verwijder voor het eerste gebruik alle
verpakkingsmaterialen en eventuele
promotionele stickers. Zorg ervoor dat
kinderen niet met de verpakkingsmaterialen
spelen.
• Dit toestel is geschikt om te gebruiken in de
huishoudelijke omgeving en in gelijkaardige
omgevingen zoals:
• Keukenhoek voor personeel van winkels,
kantoren en andere gelijkaardige
professionele omgevingen
• Boerderijen
• Hotel- en motelkamers en andere
omgevingen met een residentieel karakter
• Gastenkamers, of gelijkaardige
• Dit toestel mag niet gebruikt worden door

DO7087S
11
www.domo-elektro.be
personen (inclusief kinderen) met een
fysieke of sensoriële beperking of mensen
met een beperkte mentale capaciteit of
gebrek aan ervaring of kennis, behalve als
deze personen toezicht krijgen of instructies
hebben gekregen over het gebruik van het
toestel op een veilige manier door iemand
verantwoordelijk voor hun veiligheid.
• Kinderen moeten in het oog gehouden
worden zodat ze niet met het toestel spelen.
• Dit toestel mag gebruikt worden door
kinderen vanaf 16 jaar en personen met
een fysieke of sensoriële beperking of
mensen met een beperkte mentale capaciteit
of gebrek aan ervaring of kennis, op
voorwaarde dat deze personen toezicht
krijgen of instructies hebben gekregen over
het gebruik van het toestel op een veilige
manier en dat ze ook de gevaren kennen bij
het gebruik van het toestel. Kinderen mogen
niet met het toestel spelen. Het onderhoud
en de reiniging van het toestel mag niet door
kinderen gebeuren tenzij ze ouder zijn dan 8
jaar en onder toezicht staan.

DO7087S
12
• Houd het toestel en de voedingskabel buiten
het bereik van kinderen jonger dan 16 jaar.
• Het toestel moet afgesloten worden van
het elektriciteitsnet als het niet gebruikt
wordt, bij reparatie en wanneer onderdelen
vervangen worden. Laat het toestel eerst
afkoelen vooraleer onderdelen te vervangen
en vooraleer het toestel schoon te maken.
• Als de voedingskabel beschadigd is, moet
hij vervangen worden door fabrikant, een
service center or gekwaliceerde personen
om ongevallen te vermijden.
• OPGELET: Om ongevallen te vermijden,
mag dit toestel niet bediend worden door een
externe bediening, zoals een externe timer, of
op een net aangesloten worden dat regelmatig
op- en afgezet wordt.
• Laat het toestel niet zonder toezicht
achter wanneer het aangesloten is op het
elektriciteitsnet.
• De vulopening mag nooit geopend worden
tijdens gebruik. Volg de instructies in deze
handleiding om het toestel veilig aan te
vullen.

DO7087S
13
www.domo-elektro.be
• Het strijkijzer mag enkel geplaatst en
gebruikt worden op een vlak en stabiel
oppervlak dat tegen stoom en hitte kan.
• Het strijkijzer mag niet gebruikt worden als
het gevallen is, als er zichtbare tekenen van
schade zijn of als het toestel lekt. Gebruik
het toestel nooit wanneer de voedingskabel
of stekker beschadigd is, na een slechte
werking van het toestel of wanneer het
toestel beschadigd is. Breng het toestel dan
naar de dienst na verkoop van Domo of
het dichtsbijzijnde gekwaliceerde service
center voor nazicht, reparatie of elektrische/
mechanische aanpassingen. Probeer het
toestel nooit eigenhandig te repareren.
• Houd het toestel en de voedingskabel buiten
het bereik van kinderen jonger dan 16 jaar
wanneer het aan staat of aan het afkoelen is.
Waar je dit symbool ziet, kan het
toestel heel warm worden. Raak dit
oppervlak van het toestel niet aan,
gebruik altijd de handvatten.

DO7087S
14
• Gebruik het toestel niet buiten.
• Verplaats het strijkijzer niet als het nog in gebruik is of nog heet is. Laat het
toestel eerst volledig afkoelen voordat het verplaatst of onderhouden wordt.
• Gebruik het toestel enkel voor het doel waarvoor het bestemd is.
• Vul het waterreservoir nooit met een andere vloeistof dan water.
• Kijk voor gebruik na of het voltage vermeld op het toestel overeenkomt met het
voltage van het elektriciteitsnet thuis.
• De voedingskabel moet steeds aangesloten worden op een stopcontact dat
geïnstalleerd en geaard is volgens de lokale standaarden en normen.
• Gebruik enkel de accessoires die meegeleverd worden met het strijkijzer.
• Dompel het toestel, de voedingskabel of de stekker nooit onder in water of een
andere vloeistof. Dit om elektrische schokken of brand te voorkomen.
• Gebruik dit toestel niet met natte handen.
• Rol de voedingskabel volledig af om oververhitting op de kabel te voorkomen.
• Laat de voedingskabel geen warme oppervlakken aanraken.
• Sluit de voedingskabel pas op het stopcontact aan nadat het toestel zeker correct
gemonteerd is. Om het toestel te verwijderen van het stopcontact, moet de
bediening eerst in de «OFF» of «0» positie gezet worden. Daarna mag de stekker
uit het stopcontact verwijderd worden. Trek nooit aan de voedingskabel of het
toestel zelf om de stekker uit het stopcontact te verwijderen.
• Wees er zeker van dat het toestel volledig afgekoeld is voordat het waterreservoir
geopend wordt om te reinigen. Controleer achteraf dat het waterreservoir op de
juiste manier terug geïnstalleerd is.
• Als het toestel niet goed onderhouden wordt, kan dit de levensduur van het toestel
drastisch verminderen en een gevaarlijke situatie veroorzaken.
• Ongevallen of schade veroorzaakt door het niet volgen van deze regels zijn op
uw eigen risico. Noch de fabrikant, de importeur of leverancier kan daar dan
verantwoordelijk voor geacht worden.
BEWAAR DEZE INSTRUCTIES OM LATER TE RAADPLEGEN
BEWAAR DEZE INSTRUCTIES

DO7087S
15
www.domo-elektro.be
ONDERDELEN
1. Vulopening met deksel
2. Drukknop voor losmaken waterreservoir
3. Handvat
4. Waterreservoir
5. Stoomknop
6. Strijkzool
7. Temperatuurschijf
8. Temperatuurlampje
9. Strijkijzer
10. Thermische isolatiekussentjes
11. Stoomgenerator
12. Controlepaneel
13. Snoerklem
14. Antikalkcassette
Drukknop voor losmaken waterreservoir
Neem het waterreservoir bij het handvat vast en trek met de drukknop naar je toe. Je
kan nu het waterreservoir uit de generator halen.
Vulopening
Open het deksel van de vulopening om hierlangs het waterreservoir te vullen.
Aan-uitknop (A)
Steek de stekker in het stopcontact en druk op de
aan-uitknop. De aan-uitindicatie (B) zal beginnen
branden. Het toestel staat nu aan. Om het toestel
weer uit te zetten, hou de aan-uitknop ingedrukt en
de indicatielampjes zullen uitgaan. Het toestel staat
nu uit.
Temperatuurlampje
Wanneer het strijkijzer aan het opwarmen is, zal het temperatuurlampje branden.
Wanneer de ingestelde temperatuur bereikt is, zal het lampje weer uit gaan. Tijdens
het strijken zal het lampje afwisselend aan en uit gaan, omdat het strijkijzer op
temperatuur gehouden wordt.
Stoomlampje (C)
Als je het toestel aanzet, zal het stoomlampje gedoofd blijven. Zodra het toestel
voorverwarmd is, zal het stoomlampje blauw oplichten en vanaf dan mag je met stoom
beginnen strijken.
5
7
2
1
6
8
9
11
12
13
4
10
14
3
A
B C

DO7087S
16
Stoomknop
Als het stoomlampje blauw oplicht, mag je met stoom beginnen strijken. Druk op
de stoomknop aan de binnenkant van het handvat van het strijkijzer, en er zal een
continue stoom uit de zool gespoten worden. Wanneer je de knop los laat, strijk je
weer droog, zonder stoom.
Antikalkcassettes
We raden aan om de antikalkcassette na 3 maanden te vervangen. Om de
antikalkcassette te vervangen moet je het waterreservoir loskoppelen en de oude
cassette uit het toestel halen en de nieuwe op dezelfde plaats in het toestel steken.
Opgelet: een nieuwe antikalkcassette laat je best een hele nacht ondergedompeld in
een bakje water liggen zodat ze voldoende nat is voordat je hem in het toestel steekt,
waardoor je meteen kan strijken.
Snoerklem
Na het gebruik kan je de stoomslang en het snoer opbergen met behulp van
de snoerklem. Trek de snoerklem uit, leg de stoomslang en het snoer rond de
stoomgenerator en schuif de snoerklem daarna weer in om het snoer en de slang vast
te klemmen.
TEMPERATUURSCHIJF
Stel met de draaischijf de juiste temperatuur in voor de juiste stof.
Voor synthetische stoffen/zijde: 70<T<120°C
Voor wol: 100<T<160°C
Voor katoen: 140<T<210°C
Voor linnen: 170<T<225°C MAX
VOOR HET EERSTE GEBRUIK
1. Verwijder eventuele stickers en beschermfolie van de keramische strijkzool.
2. Verwarm het strijkijzer tot op de maximumtemperatuur en strijk gedurende een
aantal minuten over een vochtige doek om eventuele resten van de strijkzool te
verwijderen. Strijk volgens de instructies onder de rubriek ‘Met stoom strijken’.
Opgelet:
• Het is normaal dat er tijdens het eerste gebruik een vreemde geur vrijkomt. Deze
geur zal na een tijd verdwijnen.
• Er kunnen deeltjes uit de strijkzool komen tijdens het eerste gebruik. Dit is
normaal. De deeltjes zijn niet schadelijk en zullen na een tijd verdwijnen.
• Wanneer je het toestel aan zet, kan de stoomgenerator een pompgeluid maken.
Dit is normaal. Dit geluid is een teken dat er water in de stoomgenerator wordt
gepompt.
• Tijdens het opwarmen van de strijkzool zal er automatisch een beetje stoom uit de

DO7087S
17
www.domo-elektro.be
strijkzool komen. Ook dit is normaal en zal ongeveer 3 seconden duren.
GEBRUIK VAN DE STOOMGENERATOR
Deze stoomgenerator biedt 2 opties: droog strijken of met stoom strijken. Volg
hiervoor de onderstaande instructies. Lees ook goed de strijktips onderaan deze
rubriek alvorens het toestel te gebruiken.
Droog strijken
1. Zet het strijkijzer op de thermische isolatiekussentjes van de stoomgenerator.
2. Steek de stekker in het stopcontact en druk op de aan/uit-knop.
3. Draai de temperatuurschijf op de gewenste stand, die afhankelijk is van de soort
stof die gestreken moet worden. Het temperatuurlampje zal beginnen branden en
het strijkijzer zal beginnen opwarmen.
4. Wanneer het temperatuurlampje uit gaat, is de geselecteerde temperatuur bereikt.
Je kan nu beginnen met strijken.
Opgelet: Raak de hete strijkzool nooit aan!
Met stoom strijken
Let op: steek de stekker nog niet in het stopcontact.
1. Neem het waterreservoir van de stoomgenerator vast bij het handvat en druk
op de drukknop aan de binnenkant van het handvat om het waterreservoir uit
de generator te trekken. Open het deksel van de vulopening en vul het reservoir
met water. Gebruik hiervoor best gedemineraliseerd water. Let op dat je het
maximumniveau (1,2 l) niet overschrijdt. Sluit de vulopening na het vullen.
2. Plaats het waterreservoir terug in de stoomgenerator.
3. Zet het strijkijzer op de thermische isolatiekussentjes van de stoomgenerator.
4. Steek de stekker in het stopcontact, druk op de aan/uit-knop. Draai de
temperatuurschijf op de gewenste temperatuur, afhankelijk van de soort stof, en
het temperatuurlampje zal beginnen branden.
5. Het water in het waterreservoir zal beginnen
opwarmen en na enkele minuten zal het
temperatuurlampje uitgaan. Dit wijst erop dat
de strijkzool de juiste temperatuur heeft bereikt.
Wanneer het stoomlampje blauw oplicht, kan je
beginnen met strijken.
Let op: hiervoor moet de temperatuurknop wel in
het stoomgebied staan (aangeduid met ).
Let op:
• Raak de hete strijkzool nooit aan!
• Richt de stoom nooit op mensen!
6. Druk na het strijken een tijdje op de aan/uit-knop en het toestel zal uitschakelen.
Alle indicatielampjes gaan nu uit. Trek de stekker uit het stopcontact. Zet het
strijkijzer op de thermische isolatiekussentjes van de stoomgenerator en laat het

DO7087S
18
volledig afkoelen.
Strijktips
• Check altijd eerst of er een etiket aan het kledingstuk hangt met instructies voor
het strijken. Als dit het geval is, volg dan altijd deze instructies.
• Het strijkijzer warmt sneller op dan dat het afkoelt. Strijk daarom altijd eerst
de kledingstukken die de laagste temperatuur nodig hebben, zoals synthetische
stoffen.
• Als een stof uit meerdere soorten vezels bestaat, kies dan altijd de laagste
temperatuur om de combinatie van deze vezels te strijken.
• Zijde en andere stoffen die blinken moeten langs de binnenkant gestreken worden.
• Fluweel en andere stoffen die snel blinkend worden, moeten met lichte druk in
één richting gestreken worden. Hou het strijkijzer altijd in beweging.
• Stoffen die voor 100% uit wol bestaan mogen met stoom gestreken worden. Draai
de temperatuur op het maximum en gebruik een droge doek om op de stof te
leggen.
• Strijk nooit over ritsen of andere metalen voorwerpen in een kledingstuk. Dit kan
de strijkzool beschadigen. Strijk altijd rond zulke objecten.
Let op: wanneer je wollen stoffen strijkt, kan de stof gaan blinken. Keer daarom het
kledingstuk binnenstebuiten om het te strijken.
REINIGING EN ONDERHOUD
1. Trek de stekker uit het stopcontact en laat het toestel afkoelen alvorens het te
reinigen.
2. Veeg restjes op de strijkzool af met een vochtige doek of met een niet-bijtend
(vloeibaar) schoonmaakproduct.
Let op: Gebruik geen chemische, stalen, houten of schurende producten om
de strijkzool schoon te schrobben.
3. Maak het bovenste deel van het strijkijzer schoon met een zachte, vochtige doek.
4. Veeg de druppels op de stoomgenerator weg en maak de thermische
isolatiekussentjes schoon met een droge doek.
5. Wanneer je de stoomgenerator voor lange tijd niet gebruikt, giet het water dan uit
het waterreservoir en zet het strijkijzer op de thermische isolatiekussentjes om het
weg te bergen.
6. Wind de stoomslang en het snoer rond het toestel en hou ze op hun plaats met de
snoerklem.

DO7087S
19
www.domo-elektro.be
ANTIKALKSYSTEEM
• Dit toestel heeft een elektronisch systeem dat de waterhardheid controleert.
• De antikalkcassette zal de hardheid van het water verwijderen. Afhankelijk van
de hardheid van het water en het gebruik van het toestel zal de antikalkcassette na
ongeveer 3 maanden gebruik moeten vervangen worden.
• Neem het waterreservoir uit de stoomgenerator.
• Plaats een nieuwe antikalkcassette.
• Wanneer je geen nieuwe cassette ter beschikking hebt, mag je ook een combinatie
van 50% kraantjeswater en 50% gedestilleerd of gedemineraliseerd water
gebruiken om het toestel te vullen, i.p.v. kraantjeswater. Daarna kan je verder
strijken totdat je een nieuwe antikalkcassette besteld hebt.
Wanneer je een nieuwe antikalkcassette geplaatst hebt, zal het even duren vooraleer je
stoom krijgt, omdat de antikalkcassette droog is en het water volledig door de cassette
moet. Wij raden je aan om de nieuwe antikalkcassette een nacht in water te leggen,
zodat deze doordrenkt is.
STRIJKTABEL
Symbool Stof
Variabele stoom
synthetische stof/zijde
wol
katoen
linnen
Dit symbool betekent dat het artikel niet gestreken mag
worden!

DO7087S
20
CONSIGNES DE SECURITÉ
Les consignes de sécurité suivantes doivent
être respectées lors de l’utilisation de tout
appareil électrique:
• Lisez ces consignes très attentivement.
Conservez ce mode d’emploi an de pouvoir
le consulter ultérieurement.
• Avant la première utilisation, enlevez tous
les éléments d’emballage et les éventuels
autocollants promotionnels. Veillez à ce que
les enfants ne jouent pas avec les matériaux
d’emballage.
• Cet appareil est conçu pour être utilisé dans
un environnement domestique ou dans des
environnements comparables, tels que :
• Coin-cuisine du personnel dans les
commerces, les bureaux et autres
environnements professionnels
comparables
• Fermes
• Chambres d’hôtel ou de motel et autres
environnements à caractère résidentiel
• Chambres d’hôtes ou comparables

DO7087S
21
www.domo-elektro.be
• Cet appareil ne peut pas être utilisé par des
personnes (y inclus les enfants) présentant un
handicap physique ou sensoriel, une capacité
mentale limitée ou un manque d’expérience
ou de connaissances, sauf si ces personnes
sont sous surveillance ou qu’elles ont reçu
des instructions sur la manière d’utiliser
l’appareil en toute sécurité, par une personne
responsable de leur sécurité.
• Les enfants doivent être sous surveillance,
an qu’ils ne jouent pas avec l’appareil.
• Cet appareil peut être utilisé par des enfants
âgés de 16 ans ou plus et par des personnes
présentant un handicap physique ou
sensoriel,une capacité mentale limitée ou un
manque d’expérience ou de connaissances,
à condition que ces personnes soient
sous surveillance ou qu’elles aient reçu
des instructions sur la manière d’utiliser
l’appareil en toute sécurité et qu’elles
connaissent les dangers liés à son utilisation.
Les enfants ne peuvent pas jouer avec cet
appareil. L’entretien et le nettoyage de
l’appareil ne peuvent pas être effectués par

DO7087S
22
des enfants, sauf s’ils sont âgés de plus de 8
ans et sous la surveillance d’un adulte.
• Gardez l’appareil et le cordon électrique hors
de portée des enfants.
• Débranchez l’appareil lorsqu’il n’est pas
utilisé ainsi qu’avant d’installer ou d’enlever
des pièces et avant de nettoyer l’appareil.
Mettez au préalable tous les boutons en
position « arrêt » et débranchez l’appareil en
saisissant la che électrique. Ne tirez jamais
sur le cordon pour retirer la che de la prise.
• En cas de dégâts au cordon d’alimentation,
celui-ci doit être remplacé par le fabricant, un
centre de services ou une personne qualiée,
an d’éviter tout accident.
• ATTENTION : Pour éviter tout accident,
cet appareil ne peut pas être actionné via
une commande externe comme un minuteur
extérieur, ni être raccordé à un réseau
régulièrement mis sous tension ou hors
tension.
• Ne laissez pas l’appareil sans surveillance
tant qu’il est raccordé au réseau électrique.
• L’ouverture de remplissage ne peut jamais

DO7087S
23
www.domo-elektro.be
être ouverte lorsque l’appareil fonctionne.
Suivez les consignes de ce manuel pour
remplir l’appareil en toute sécurité.
• Le fer à repasser ne peut être placé et utilisé
que sur une surface plane et stable, résistant à
la vapeur et à la chaleur.
• Le fer à repasser ne peut être utilisé après
une chute, s’il présente des signes visibles
de dégâts ou s’il fuit. N’utilisez jamais
l’appareil si le cordon d’alimentation ou la
che est endommagé(e), après un mauvais
fonctionnement de l’appareil ou lorsque
l’appareil est lui-même endommagé. Portez
dans ce cas l’appareil au service après vente
de DOMO ou au centre de services qualié
le plus proche, pour contrôle, réparation ou
modications électriques/mécaniques. Ne
tentez jamais de réparer cet appareil vous-
même.
• Gardez l’appareil et le cordon d’alimentation
hors de protée des enfants de moins de 16
ans lorsque l’appareil est allumé ou qu’il
refroidit.

DO7087S
24
• N’utilisez pas l’appareil à l’extérieur.
• Ne déplacez pas le fer à repasser lorsqu’il fonctionne encore ou qu’il est encore chaud.
Laissez toujours refroidir l’appareil avant de le déplacer ou d’assurer son entretien.
• N’utilisez l’appareil que pour l’usage auquel il est destiné.
• Ne remplissez jamais le réservoir à eau avec un autre liquide que de l’eau.
• Vériez avant usage si la tension indiquée sur l’appareil correspond à la tension
du réseau électrique de votre domicile.
• Le cordon d’alimentation doit toujours être branché dans une prise de courant
placée et mise à la terre conformément aux normes et standards locaux.
• N’utilisez que les accessoires livrés avec le fer à repasser.
• N’immergez jamais l’appareil, le cordon d’alimentation ou la che dans l’eau ou
tout autre liquide. Ceci an d’éviter des chocs électriques ou un incendie.
• N’utilisez pas l’appareil si vous avez les mains mouillées.
• Déroulez complètement le cordon d’alimentation, pour éviter toute surchauffe.
• Ne laissez pas le cordon d’alimentation au contact de surfaces chaudes.
• Ne branchez le cordon d’alimentation dans la prise de courant qu’après vous
être assuré que l’appareil soit correctement monté. Pour débrancher l’appareil,
la commande doit être préalablement placée en position « OFF » ou « 0 ». Après
quoi, la che électrique peut être retirée de la prise de courant. Ne tirez jamais sur
le cordon d’alimentation ni sur l’appareil pour le débrancher.
• Assurez-vous que l’appareil a complètement refroidi avant d’ouvrir le réservoir
à eau pour le nettoyer. Contrôlez après coup que le réservoir à eau a été replacé
correctement.
• Si l’appareil n’est pas correctement entretenu, sa durée de vie peut en être
fortement diminuée et une situation de danger en résulter.
• Les accidents ou dommages causés par le non-respect de ces consignes sont à
vos propres risques. Ni le fabricant, ni l’importateur, ni le fournisseur ne peuvent,
dans ce cas, en être tenus pour responsables.
CONSERVEZ CES CONSIGNES POUR POUVOIR LES CONSULTER
ULTÉRIEUREMENT
Là où vous apercevez ce symbole,
l’appareil peut être brûlant. N’en-
trez pas en contact avec la surface
de l’appareil, utilisez toujours les
poignées.

DO7087S
25
www.domo-elektro.be
DESCRIPTION DES ÉLÉMENTS
1. Ouverture de remplissage avec couvercle
2. Bouton de déblocage du réservoir d’eau
3. Poignée
4. Réservoir d’eau
5. Bouton vapeur
6. Semelle de repassage
7. Sélecteur de température
8. Témoin de température
9. Fer à repasser
10. Coussinets d’isolation
thermique
11. Centrale vapeur
12. Panneau de commande
13. Bloqueur de cordon
14. Cassette anti-calcaire
Bouton de décrochage du réservoir d’eau
Saisissez le réservoir d’eau par la poignée et tirez-le vers vous en appuyant sur le
bouton. Vous pouvez alors dégager le réservoir de la centrale vapeur.
Ouverture de remplissage
Ouvrez le couvercle de l’ouverture de remplissage pour remplir le réservoir d’eau par
cet orice.
Bouton marche/arrêt (A)
Branchez la che dans une prise de courant et
appuyez sur le bouton marche/arrêt. Le témoin
marche/arrêt (B) doit s’allumer. Pour éteindre
l’appareil, maintenez le bouton marche/arrêt
enfoncé jusqu’à l’extinction des témoins.
L’appareil est à présent hors tension.
Témoin de température
Lorsque le fer à repasser est en train de chauffer, le témoin de température s’allume.
Une fois que la température souhaitée est atteinte, ce témoin s’éteint. Pendant le
repassage, le témoin va s’allumer et s’éteindre en alternance car le fer à repasser
s’efforce de rester à la bonne température.
Voyant de vapeur (C)
Lorsque vous allumez l’appareil, le voyant de vapeur reste éteint. Une fois que
l’appareil est prêt à l’emploi, le voyant de vapeur devient bleu. Vous pouvez alors
commencer à repasser à la vapeur.
5
7
2
1
6
8
9
11
12
13
4
10
14
3
A
B C

DO7087S
26
Bouton vapeur
Lorsque le voyant lumineux devient bleu, vous pouvez commencer à repasser à la
vapeur. Appuyez sur le bouton vapeur sur la face intérieure de la poignée du fer à
repasser, an de projeter un jet de vapeur continu depuis la semelle du fer. Lorsque
vous relâchez le bouton vapeur, vous repassez de nouveau à sec, c’est-à-dire sans
vapeur.
Cassettes anti-calcaires
Il est conseillé de remplacer les cassettes anti-calcaires après 3 mois. Pour remplacer
la cassette anti-calcaire, vous devez retirer le réservoir d’eau et enlever la cassette usée
de l’appareil avant d’en remettre une neuve à la même place.
Attention : il est recommandé de laisser tremper la nouvelle cassette anti-calcaire dans
un bac d’eau pendant une nuit entière an qu’elle soit sufsamment humide avant
introduction dans l’appareil. Vous pourrez repasser directement.
Bloqueur de cordon
Après utilisation, vous pouvez ranger le tuyau de vapeur et le cordon avec le bloqueur
de cordon. Dégagez le bloqueur de cordon, enroulez le tuyau de vapeur et le cordon
autour de la centrale vapeur, puis remboîtez le bloqueur de cordon pour immobiliser le
cordon et le tuyau.
SELECTEUR DE TEMPÉRATURE
Utilisez le sélecteur rotatif pour régler la température de l’appareil en fonction du tissu
à repasser.
Synthétique/soie : 70<T<120 °C
Laine : 100<T<160 °C
Coton : 140<T<210 °C
Lin : 170<T<225 °C MAX
AVANT LA PREMIÈRE UTILISATION
1. Retirez les éventuels autocollants et le lm de protection de la semelle céramique
du fer à repasser.
2. Faites chauffer le fer à repasser jusqu’à la température maximale et repassez
pendant quelques minutes sur un chiffon humide an d’éliminer les éventuels
résidus adhérant à la semelle. Ensuite, repassez en suivant les instructions
fournies à la rubrique « Repassage à la vapeur ».
Attention:
• Lors de la première utilisation, l’appareil peut dégager une odeur particulière. Ce
phénomène est tout à fait normal. Cette odeur disparaîtra après un certain temps.
• Lors de la première utilisation, des particules peuvent se dégager par la semelle

DO7087S
27
www.domo-elektro.be
du fer à repasser. Ceci est tout à fait normal. Les particules ne sont pas nocives et
elles disparaîtront après un certain temps.
• À la mise sous tension, la centrale vapeur peut produire un bruit de pompe. Ceci
est tout à fait normal. Ce bruit est un signe que de l’eau circule dans la centrale
vapeur.
• Pendant l’échauffement de la semelle, celle-ci laisse automatiquement s’échapper
un petit peu de vapeur. Ce phénomène est également normal et dure environ 3
secondes.
UTILISATION DE LA CENTRALE VAPEUR
Cette centrale vapeur offre 2 options: repassage à sec et repassage à la vapeur.
Respectez bien les instructions qui suivent. De même, avant d’utiliser l’appareil, lisez
attentivement les conseils de repassage à la n de cette rubrique.
Repassage à sec
1. Placez le fer à repasser sur les coussinets d’isolation thermique de la centrale
vapeur.
2. Branchez la che dans une prise de courant et appuyez sur le bouton marche/arrêt.
3. Réglez le sélecteur de température sur la position souhaitée, en fonction de la
nature du textile à repasser. Le témoin de température doit s’allumer et le fer à
repasser doit commencer à chauffer.
4. Le témoin de température s’éteint quand la température sélectionnée est atteinte.
Vous pouvez à présent commencer à repasser.
Attention: Ne touchez jamais la semelle de repassage, celle-ci est brûlante !
Repassage à la vapeur
Attention: Ne branchez pas encore la che dans une prise de courant.
1. Saisissez le réservoir d’eau de la centrale vapeur par la poignée et appuyez sur le
bouton sur la face intérieure de la poignée pour dégager le réservoir de la centrale.
Ouvrez le couvercle de l’ouverture de remplissage et remplissez le réservoir
d’eau. À cette n, utilisez de préférence de l’eau déminéralisée. Assurez-vous
de ne pas dépasser le niveau maximum (1,2 litre). Refermez l’ouverture après le
remplissage.
2. Replacez le réservoir d’eau dans la centrale vapeur.
3. Placez le fer à repasser sur les coussinets d’isolation thermique de la centrale
vapeur.
4. Branchez la che dans une prise de courant et appuyez sur le bouton marche/arrêt.
Placez le sélecteur de température sur la position souhaitée, en fonction du type
de textile. Le témoin de température doit s’allumer.
5. L’eau dans le réservoir d’eau va commencer à chauffer et après quelques minutes,
le témoin de température doit s’éteindre. Ceci indique que la semelle du fer à
repasser a atteint la bonne température. Lorsque le voyant bleu s’allume, vous
pouvez commencer à repasser. Attention : pour ce faire, le bouton de réglage de la

DO7087S
28
température doit pointer vers la zone «vapeur» (indiquée par ).
Attention:
• Ne touchez jamais la semelle de repassage,
celle-ci est brûlante !
• Ne dirigez jamais le jet de vapeur vers des
personnes ou des animaux !
6. Après le repassage, appuyez quelques secondes sur
le bouton marche/arrêt an d’éteindre l’appareil.
Tous les témoins doivent alors s’éteindre. Tirez
la che hors de la prise de courant. Placez le fer à
repasser sur les coussinets d’isolation thermique de la centrale vapeur et laissez-le
entièrement refroidir.
Conseils de repassage
• Commencez toujours par vérier la présence sur le vêtement d’une étiquette
reprenant des instructions de repassage. Si tel est le cas, suivez toujours ces
instructions.
• Le fer à repasser chauffe plus vite qu’il ne refroidit. C’est pourquoi il est
préférable de toujours commencer par repasser les vêtements qui nécessitent la
température la plus basse, comme les textiles synthétiques.
• Quand une matière est composée de plusieurs types de bres, choisissez toujours
la température la plus basse pour repasser cette combinaison de bres.
• La soie et les autres tissus brillants doivent être repassés sur le côté intérieur.
• Le velours et les autres tissus sensibles à l’effet luisant doivent toujours être
repassés dans le même sens en exerçant une légère pression. Maintenez toujours
le fer à repasser en mouvement.
• Les tissus composés à 100% de laine peuvent être repassés à la vapeur. Réglez la
température au maximum et interposez un linge sec entre le fer et le vêtement.
• Ne passez jamais le fer par-dessus des fermetures à glissière ou autres éléments
métalliques incorporés à un vêtement. Cela risquerait de détériorer la semelle de
repassage. Passez toujours le fer en contournant ces éléments.
Attention: Le repassage d’articles à base de laine peut produire un effet luisant. C’est
pourquoi il est recommandé de repasser ces vêtements sur l’envers.
NETTOYAGE ET ENTRETIEN
1. Avant de nettoyer l’appareil, débranchez-le et laissez-le refroidir totalement.
2. Essuyez les résidus présents sur la semelle de repassage avec un chiffon humide
ou avec un détergent (liquide) non abrasif.
Attention: N’utilisez pas de produits chimiques, abrasifs, en métal ou en bois
pour nettoyer la semelle de repassage.
3. Nettoyez la partie supérieure du fer à repasser avec un chiffon doux et humide.
4. Essuyez les gouttes sur la centrale vapeur et nettoyez les coussinets d’isolation
thermique avec un chiffon sec.

DO7087S
29
www.domo-elektro.be
5. Si vous ne comptez pas utiliser la centrale vapeur pendant une longue période,
videz l’eau contenue dans le réservoir et placez le fer à repasser sur les coussinets
d’isolation thermique avant de le ranger.
6. Enroulez le tuyau de vapeur et le cordon autour de l’appareil et maintenez-les en
place avec le bloqueur de cordon.
SYSTÈME ANTI-CALCAIRE
• Cet appareil est muni d’un système électronique qui contrôle la dureté de l’eau.
• La cassette anti-calcaire adoucit l’eau. En fonction de la dureté de l’eau et de
l’usage de l’appareil, la cassette anti-calcaire devra être remplacée après 3 mois
d’utilisation.
• Retirez le réservoir d’eau de la centrale vapeur.
• Placez une nouvelle cassette anti-calcaire.
• Si vous n’avez pas de cassette de rechange sous la main, vous pouvez continuer à
repasser à condition de remplir votre appareil avec un mélange de 50 % de l’eau
de robinet et 50 % d’eau distillée.
Lorsque vous avez installé une nouvelle cassette anti-calcaire, la génération de vapeur
n’est pas immédiate car la cassette est sèche et l’eau doit passer dans la cassette. Nous
vous conseillons de laisser d’abord la nouvelle cassette anti-calcaire une nuit dans
l’eau de manière à bien l’imprégner.

DO7087S
30
SYMBOLES DE REPASSAGE
Symbole Matière Vapeur variable
synthétique/soie
laine
coton
lin
Ne pas repasser les articles comportant ce symbole!

DO7087S
31
www.domo-elektro.be
SICHERHEITSHINWEISE
Wenn Sie elektrische Geräte verwenden,
müssen folgende Sicherheitshinweise
beachtet werden:
• Lesen Sie diese Hinweise sorgfältig durch.
Bewahren Sie diese Bedienungsanleitung
zum späteren Nachschlagen auf.
• Entfernen Sie vor dem ersten Gebrauch alle
Verpackungsmaterialien und möglichen
Werbeaufkleber. Sorgen Sie dafür, dass
Kinder nicht mit den Verpackungsmaterialien
spielen.
• Dieses Gerät eignet sich für den Einsatz im
Haushalt und in ähnlichen Umfeldern, zum
Beispiel in folgenden Bereichen:
• Küchenbereich für Mitarbeiter von
Geschäften, Büros und anderen
ähnlichen beruichen Umfeldern.
• Bauernhöfe
• Hotel- und Motelzimmer und andere
Bereiche mit wohnungsähnlichem
Charakter
• Gästezimmer oder Ähnliches

DO7087S
32
• Dieses Gerät darf nicht von Personen
(einschließlich Kindern) mit körperlichen
oder sensorischen Behinderungen oder
Menschen mit eingeschränkten geistigen
Fähigkeiten oder mangelnder Erfahrung bzw.
Sachkenntnis verwendet werden, außer wenn,
diese Personen beaufsichtigt werden oder sie
eine Anleitung zur sicheren Verwendung des
Geräts von einer Person erhalten haben, die
für ihre Sicherheit verantwortlich ist.
• Kinder sollten beaufsichtigt werden, um ein
Spielen mit dem Gerät auszuschließen.
• Diese Gerät darf von Kindern ab 16
Jahren und Menschen mit körperlichen
oder sensorischen Behinderungen oder
Menschen mit eingeschränkten geistigen
Fähigkeiten oder mangelnder Erfahrung bzw.
Sachkenntnis unter der Bedingung verwendet
werden, dass diese Personen beaufsichtigt
werden oder sie eine Anleitung zur sicheren
Verwendung des Geräts erhalten haben und
sich der Gefahren bei der Verwendung des
Geräts bewusst sind. Kinder dürfen nicht
mit dem Gerät spielen. Die Wartung und

DO7087S
33
www.domo-elektro.be
Reinigung des Geräts darf nicht durch Kinder
ausgeführt werden, außer diese sind älter als
8 Jahre und werden von einem Erwachsenen
beaufsichtigt.
• Das Gerät und das Netzkabel sind außerhalb
der Reichweite von Kindern zu bewahren.
• Netzstecker ziehen, wenn das Gerät nicht
in Gebrauch ist, bevor Teile montiert oder
abmontiert werden und vor der Reinigung.
Stellen Sie zunächst alle Schalter auf „Aus“
und ziehen Sie den Stecker am Stecker selbst
aus der Steckdose. Ziehen Sie den Stecker
nie am Netzkabel aus der Steckdose.
• Wenn das Netzkabel beschädigt ist, sollte
es, um Unfälle auszuschließen, durch den
Hersteller, den Kundendienst oder eine
qualizierte Person ersetzt werden.
• ACHTUNG: Zur Vermeidung von Unfällen
sollte das Gerät nicht mit einem externen
Zusatzgerät, wie z. B. über einen externen
Timer oder an einen Stromkreislauf
angeschlossen werden, der regelmäßig ein-
und ausgeschaltet wird.
• Lassen Sie das Gerät nicht unbeaufsichtigt

DO7087S
34
stehen, wenn es an das Stromnetz
angeschlossen ist.
• Die Einfüllöffnung darf während des
Gebrauchs auf keinen Fall geöffnet werden.
Folgen Sie für ein sicheres Befüllen den
Anweisungen in dieser Gebrauchsanleitung.
• Das Bügeleisen darf nur auf ebenen und
stabilen Oberächen verwendet und
abgestellt werden, denen Dampf und Hitze
nicht schaden kann.
• Das Bügeleisen darf nicht benutzt werden,
wenn es hingefallen ist, sichtbar beschädigt
ist oder leckt. Verwenden Sie das Gerät
nie, wenn das Netzkabel oder der Stecker
beschädigt ist, wenn es nicht richtig
funktioniert oder beschädigt ist. Bringen
Sie das Gerät in diesem Fall zur Durchsicht,
Reparatur oder für elektrische/mechanische
Anpassungen zum DOMO-Kundendienst
oder zum nächstgelegenen Servicecenter.
Versuchen Sie nie, das Gerät selbst zu
reparieren.
• Bewahren Sie das Gerät und dessen
Netzkabel außerhalb der Reichweite von

DO7087S
35
www.domo-elektro.be
Kindern unter 16 Jahren auf, wenn es
eingeschaltet oder noch nicht abgekühlt ist.
• Verwenden Sie das Gerät nicht im Freien.
• Versetzen oder tragen Sie das Bügeleisen nicht, solange es noch in Gebrauch oder
noch heiß ist. Das Gerät muss erst komplett abkühlen, bevor es an einen anderen
Ort gestellt oder gewartet wird.
• Gerät nur für den vorgesehenen Zweck verwenden.
• Der Wassertank darf nur mit Wasser befüllt werden, andere Flüssigkeiten sind
nicht zulässig.
• Vor Gebrauch überprüfen, ob die auf dem Gerät angegebene Spannung mit dem
des Stromnetzes übereinstimmt.
• Das Netzkabel muss stets an eine Steckdose angeschlossen werden, die gemäß
den örtlichen Standards und Normen isoliert und geerdet wurde.
• Verwenden Sie nur das mit dem Bügeleisen mitgelieferte Zubehör.
• Tauchen Sie das Gerät, das Kabel oder den Stecker auf keinen Fall in Wasser oder
andere Flüssigkeiten. Dies könnte andernfalls zu Stromschlägen und Brandgefahr
führen.
• Verwenden Sie das Gerät nicht mit nassen Händen.
• Rollen Sie das Netzkabel vollständig ab, um eine Überhitzung des Kabels zu
vermeiden.
• Das Netzkabel darf nicht mit heißen Flächen in Kontakt kommen.
• Schließen Sie das Netzkabel erst an die Steckdose an, wenn das Gerät korrekt
zusammengebaut wurde. Um das Gerät vom Netzstrom zu trennen, muss
der Bedienschalter zuerst in die „AUS“- oder „0“-Position gestellt werden.
Anschließend kann der Stecker aus der Steckdose gezogen werden. Ziehen Sie nie
am Gerät oder am Netzkabel, um den Stecker aus der Steckdose zu ziehen.
• Stellen Sie sicher, dass das Gerät vollständig abgekühlt ist, bevor der Wassertank
für die Reinigung geöffnet wird. Nach der Reinigung muss überprüft werden, ob
An Stellen, die durch dieses Sym-
bol gekennzeichnet sind, kann das
Gerät sehr heiß werden. Berühren
Sie die Oberäche des Geräts
nicht, verwenden Sie die Griffe
zum Anfassen.

DO7087S
36
der Wassertank wieder korrekt angebracht ist.
• Wenn das Gerät nicht gut gewartet wird, kann dies die Lebensdauer des Geräts
drastisch verringern und zu Gefahrensituationen führen.
• Für Unfälle oder Schäden, die durch die Nichtbefolgung dieser Regeln verursacht
werden, haften Sie selbst. Weder der Hersteller noch der Importeur oder der
Lieferant können in solchen Fällen zur Verantwortung gezogen werden.
BEWAHREN SIE DIESE HINWEISE ZUM SPÄTEREN NACHSCHLAGEN AUF
EINZELTEILEÜBERSICHT
1. Füllöffnung mit Verschlusskappe
2. Druckknopf zum Lösen des
Wassertanks
3. Handgriff
4. Wassertank
5. Dampfknopf
6. Bügelsohle
7. Temperaturwählscheibe
8. Temperaturlämpchen
9. Bügeleisen
10. Wärmeisolierende Kissen
11. Dampfgenerator
12. Bedienungs-Panel
13. Kabelschiene zum Aufrollen
des Stromkabels
14. Anti-Kalk-Kassette
Druckknopf zum Lösen des Wassertanks
Halten Sie den Wassertank am Handgriff fest und ziehen Sie mit einem Finger den
Druckknopf in Ihre Richtung. Nun können Sie den Wassertank aus dem Generator
nehmen.
Füllöffnung
Öffnen Sie die Verschlusskappe der Füllöffnung um den Wassertank zu füllen.
An-/Ausschalter (A)
Stecken Sie den Stecker in die Steckdose und
schalten Sie den An-/Ausschalter an. Das
Kontrolllämpchen (B) wird leuchten. Das Gerät
ist nun angeschaltet. Um das Gerät wieder
auszuschalten halten Sie den An-/Ausschalter
gedrückt, so dass die Kontrolllämpchen wieder
5
7
2
1
6
8
9
11
12
13
4
10
14
3
A
B C

DO7087S
37
www.domo-elektro.be
ausgehen. Nun ist das Gerät ausgeschaltet.
Temperaturlämpchen
Wenn das Bügeleisen aufwärmt wird das Temperaturkontrolllämpchen leuchten. Wenn
die eingestellte Temperatur erreicht ist erlischt das Lämpchen wieder. Während des
Bügelns wird das Lämpchen regelmässig wieder an- und ausgehen um die eingestellte
Temperatur zu halten.
Dampf-Kontrollleuchte (C)
Beim Einschalten des Geräts leuchtet die Dampf-Kontrollleuchte zunächst nicht auf.
Sobald das Gerät aufgeheizt ist, leuchtet die Dampf-Kontrollleuchte blau auf, jetzt
können Sie mit dem Dampfbügeln beginnen.
Dampfknopf
Wenn die Dampf-Kontrollleuchte blau aueuchtet, können Sie mit dem Dampfbügeln
beginnen. Durch Drücken des Dampfknopfes auf der Innenseite des Bügeleisen-
Griffes wird kontinuierlich Dampf aus der Bügeleisensohle ausgestoßen. Bei
Loslassen des Dampfknopfes erfolgt das Bügeln wieder trocken, ohne Dampf.
Anti-Kalk-Kassetten
Es wird empfohlen, die Anti-Kalk-Kassetten nach 3 Monaten zu ersetzen. Für den
Austausch der Anti-Kalk-Kassette wird zunächst der Wassertank abgenommen und
dann die gebrauchte Kassette aus dem Gerät entnommen. Hiernach wird die neue
Kassette an der gleichen Stelle in das Gerät eingesetzt.
Tipp: Eine neue Anti-Kalk-Kassette legt man am besten über Nacht in eine Schale mit
Wasser, sodass sie ganz mit Wasser vollgesaugt ist, bevor sie in das Gerät eingesetzt
wird, dadurch ist sofortiges Dampfbügeln möglich.
Kabelklemme
Nach jedem Gebrauch kann das Stromkabel und der Dampfschlauch mit Hilfe der
Kabelklemme vernünftig aufgerollt werden. Ziehen Sie die Kabelklemme heraus.
Wickeln Sie das Kabel und den Schlauch um den Generator herum und schieben Sie
danach die Kabelklemme wieder in die Halterung, um Kabel und Schlauch zu xieren.

DO7087S
38
TEMPERATURWÄHLSCHEIBE
Stellen Sie mit der Temperaturwählscheibe, je nach Stoffqualität, die geeignete
Temperatur ein.
Für synthetische Stoffe/Seide: 70<T<120°C
Für Wolle: 100<T<160°C
Für Baumwolle: 140<T<210°C
Für Leinen: 170<T<225°C MAX
VOR DEM ERSTEN GEBRAUCH
1. Entfernen Sie alle eventuellen Aufkleber und Schutzfolien von der
Bügeleisensohle.
2. Lassen Sie das Bügeleisen auf maximale Temperatur erwärmen und bügeln Sie
einige Minuten ein feuchtes Tuch, um eventuelle Reste auf der Bügeleisensohle
zu entfernen. Folgen Sie nun den Anweisungen der Rubrik „Mit Dampf bügeln“
Achtung:
• Es ist normal, dass während des ersten Gebrauchs ein ungewohnter Geruch
entsteht. Der Geruch wird nach kurzer Zeit verschwinden.
• Es kann sein, dass während des ersten Gebrauchs kleine Teilchen aus der
Bügeleisensohle kommen. Auch das ist normal und wird nach kurzer Zeit
aufhören.
• Wenn Sie das Gerät anstellen kann es sein, dass der Dampfgenerator ein
Pumpgeräusch macht. Dies ist ebenfalls normal. Das Geräusch entsteht, sobald
Wasser in den Dampfgenerator gepumpt wird.
• Während des Aufwärmens des Bügeleisens wird automatisch etwas Dampf aus
der Bügeleisensohle entweichen. Dies wird etwa 3 Sekunden dauern und ist
ebenfalls normal.
DEN DAMPFGENERATOR GEBRAUCHEN
Der Dampfgenerator bietet Ihnen 2 Möglichkeiten: 1. ohne Dampf bügeln, 2. mit
Dampf bügeln.
Folgen Sie hierfür den unten stehenden Anweisungen. Lesen Sie ebenfalls die
Bügeltipps, die Sie anschliessend an die Anweisungen nden können, bevor Sie das
Gerät benutzen.
Ohne Dampf bügeln
1. Stellen Sie das Bügeleisen auf die wärmeisolierenden Kissen des
Dampfgenerators.
2. Stecken Sie den Stecker in die Steckdose und schalten Sie das Gerät ein.
3. Drehen Sie die Temperaturwählscheibe auf den gewünschten Stand. Dieser ist
abhängig von der Art des Stoffes, den Sie bügeln wollen. Das Kontrolllämpchen

DO7087S
39
www.domo-elektro.be
für die Temperatur wird erleuchten und das Bügeleisen wird aufwärmen.
4. Wenn das Temperaturlämpchen erlischt ist die gewünschte Temperatur erreicht
und können Sie mit dem Bügeln beginnen.
ACHTUNG: Berühren Sie die Bügeleisensohle nicht!
Mit Dampf bügeln
Achtung: stecken Sie den Stecker noch nicht in die Steckdose.
1. Nehmen Sie den Wassertank aus dem Gerät, indem Sie auf den Druckknopf
an der Innenseite des Handgriffs drücken. Öffnen Sie die Verschlusskappe der
Einfüllöffnung und füllen Sie den Wassertank mit destilliertem Wasser. Achten
Sie darauf, dass Sie den maximal zugelassenen Wasserstand nicht überschreiten
(1,2l). Schliessen Sie danach die Verschlusskappe.
2. Setzen Sie den Wassertank wieder in das Gerät ein.
3. Stellen Sie das Bügeleisen auf die wärmeisolierenden Kissen des
Dampfgenerators.
4. Stecken Sie den Stecker in die Steckdose und schalten Sie das Gerät an. Drehen
Sie die Temperaturwählscheibe auf den gewünschten Temperaturstand. Dieser ist
abhängig von der Art des Stoffes, den Sie bügeln wollen. Das Kontrolllämpchen
für die Temperatur wird nun leuchten.
5. Das Wasser im Wassertank wird nun erwärmt. Nach
einigen Minuten wird das Temperaturlämpchen
erlischen. Die gewünschte Temperatur ist erreicht.
Wenn die Dampf-Kontrollleuchte blau aueuchtet,
können Sie mit dem Bügeln beginnen. Bitte beachten:
Hierzu muss der Temperaturregler auf den Dampf-
Bereich eingestellt sein (gekennzeichnet durch ).
ACHTUNG:
• Berühren Sie nicht die Bügeleisensohle!
• Richten Sie den Dampfstrahl nicht auf Menschen!
6. Halten Sie nach dem Bügeln den An-/Ausschalter gedrückt, bis dass sich das
Gerät abschaltet. Alle Kontrolllämpchen werden erlischen. Ziehen Sie den
Stecker aus der Steckdose. Stellen Sie das Bügeleisen auf die Ablage mit den
wärmeisolierenden Kissen und lassen Sie es vollständig abkühlen.
Bügeltipps
• Schauen Sie erst nach, ob an dem Kleidungsstück, welches Sie bügeln wollen ein
Etikett hängt, auf dem Bügelanweisungen stehen. In diesem Falle folgen Sie den
Anweisungen des Herstellers.
• Das Bügeleisen wärmt schneller auf als dass es abkühlt. Bügeln Sie darum erst
Stoffe, die eine niedrigere Temperatur nötig haben, wie z.B. synthetische Stoffe.
• Wenn ein Stoff aus gemischten Fasern gewoben ist verwenden Sie die niedrigste
Temperatur zum Bügeln dieser Stoffzusammenstellung.
• Seide und andere Stoffe, die glänzen, müssen von der Rückseite aus gebügelt

DO7087S
40
werden.
• Samt und andere Stoffe, die schnell glänzen, sollten mit leichtem Druck in eine
Richtung gebügelt werden. Achten Sie darauf, dass Sie das Bügeleisen stets in
Bewegung halten.
• Stoffe, die aus 100% Wolle sind, können mit Dampf gebügelt werden. Stellen Sie
die maximale Temperatur ein und benutzen Sie ein trockenes Tuch, um über den
wollenen Stoff zu legen.
• Bügeln Sie nicht über Reissverschlüsse oder andere Dinge aus Metall an
Kleidungsstücken, da diese die Sohle des Bügeleisens beschädigen könnten.
Bügeln Sie stets rundum diese Gegenstände.
Achtung: Wenn Sie Stoffe aus Wolle bügeln kann es sein, dass diese danach glänzen.
Drehen Sie darum bei diesen Stoffe die Innenseite nach aussen um sie zu bügeln.
REINIGUNG UND PFLEGE
1. Ziehen Sie den Stecker aus der Steckdose und lassen Sie das Gerät abkühlen,
bevor Sie es reinigen.
2. Waschen Sie Reste auf der Sohle mit einem feuchten Tuch und einem nicht
scheuernden (üssigen) Reinigungsprodukt ab.
ACHTUNG: Benutzen Sie keine chemischen oder scheuernden Produkte,
um die Bügeleisensohle zu reinigen. Benutzen Sie ebenfalls keine
Scheuerschwämme oder Metallwolle.
3. Reinigen Sie das obere Teil des Bügeleisens mit einem weichen, feuchten Tuch.
4. Trocknen Sie die Feuchtigkeitsrückstände mit einem weichen Tuch und reinigen
Sie die wärmeisolierenden Kissen mit einem trockenen Tuch.
5. Sollte der Dampfgenerator eine Zeit lang nicht benutzt werden leeren Sie
den Wassertank und stellen Sie das Bügeleisen auf die Ablage mit den
wärmeisolierenden Kissen, um es zu verstauen.
6. Wickeln Sie das Stromkabel und den Dampfschlauch um das Gerät und xieren
Sie diese mit der Kabelklemme.
KALKSCHUTZSYSTEM
• Das Gerät hat ein elektronisches System, das die Wasserhärte überwacht und
reguliert.
• Die Anti-Kalk-Kassette reduziert die Wasserhärte. Je nach der örtlichen
Wasserhärte und Ihrer Verwendung des Geräts sollte die Anti-Kalk-Kassette nach
ca. 3 Monaten Gebrauch ersetzt werden.
• Nehmen Sie den Wassertank aus der Dampfbügelstation.
• Setzen Sie eine neue Anti-Kalk-Kassette ein.

DO7087S
41
www.domo-elektro.be
• Wenn Sie keine neue Kassette zur Hand haben, füllen Sie das Bügeleisen mit eine
Mischung von 50 % destilliertem und 50% Kranwasser und bügeln Sie weiter.
Wenn Sie eine neue Anti-Kalk-Kassette eingesetzt haben wird es eine Zeit dauern, bis
das Gerät erneut Dampf produziert. Dies kommt, weil die Anti-Kalk-Kassette trocken
ist und das Wasser erst durch die Kassette geleitet wird. Wir empfehlen darum die
neue Anti-Kalk-Kassette vor dem Einsetzen eine Nacht in Wasser zu legen, so dass
diese durchtränkt ist.
BÜGELTABELLE
Symbol Stoff Variabeler Dampf
synthetischer Stoff/Seide
Wolle
Baumwolle
Leinen
Diese Symbol bedeutet, dass der Stoff nicht gebügelt
werden darf.

DO7087S
42
SAFETY INSTRUCTIONS
When using electrical appliances, basic
safety precautions should always be taken,
including the following:
• Read all instructions carefully. Keep this
manual for future reference.
• Make sure all packaging materials and
promotional stickers have been removed
before using the appliance for the rst time.
Make sure children cannot play with the
packaging materials.
• This appliance is intended to be used in
household and similar applications such as:
• staff kitchen areas in shops, ofces and
other working environments;
• farm houses;
• by clients in hotels, motels and other
residential type environments;
• bed and breakfast type environments.
• This appliance is not intended for use by
persons (including children) with reduced

DO7087S
43
www.domo-elektro.be
physical, sensory or mental capabilities,
or lack of experience and knowledge,
unless they have been given supervision or
instruction concerning use of the appliance
by a person responsible for their safety.
• Children should be supervised to ensure that
they do not play with the appliance.
• This appliance can be used by children
aged from 16 years and above and
persons with reduced physical, sensory or
mental capabilities or lack of experience
and knowledge if they have been given
supervision or instruction concerning use of
the appliance in a safe way and understand
the hazards involved. Children shall not
play with the appliance. Cleaning and user
maintenance shall not be made by children
unless they are older than 8 and supervised.
• Keep the appliance and its cord out of reach
of children younger than 16 years.
• The appliance must be disconnected from
its power source when not in use, during
service and when replacing parts. Allow to

DO7087S
44
cool before putting on or taking off parts, and
before cleaning the appliance.
• If the supply cord is damaged, it must be
replaced by the manufacturer, its service
agent or similarly qualied persons in order
to avoid a hazard.
• CAUTION: In order to avoid a hazard this
appliance must not be supplied through an
external switching device, such as a timer,
or connected to a circuit that is regularly
switched on and off by the utility.
• The iron must not be left unattended while it
is connected to the supply mains.
• The lling aperture must not be opened
during use. Follow the instructions of this
booklet for safe relling.
• The iron must be used and rested on a at,
stable surface and resistant to heat and hot
steam.
• The iron is not to be used if it has been
dropped, if there are visible signs of damage
or if it is leaking. Do not operate this
appliance with a damaged cord or plug or in

DO7087S
45
www.domo-elektro.be
the event the appliance malfunctions or has
been damaged in any manner. Return the
appliance to the DOMO Service Department
or its service agent for examination, repair, or
electrical or mechanical adjustment. Do not
try to repair the appliance yourself.
• Keep the iron and its cord out of reach of
children less than 16 years of age when it is
energized or cooling down.
The surface(s) marked with this
symbol are liable to get hot during
use. It is advised not to touch the
surfaces of the appliance other
than the handles to avoid burns.
• Do not use or store this appliance outdoors.
• Do not move the iron while in use or when still hot. Allow to cool before moving
the iron or before maintenance.
• Do not use this appliance for other than intended use.
• Do not ll the water reservoir with any other liquid than water.
• Do not use the steam function of the iron without water in the reservoir. This might
cause damage to the iron.
• Check carefully that the voltage and frequency of the power net match the
indications on the rating label of the appliance.
• The plug must be plugged into an appropriate outlet that is installed and grounded
in accordance with all local standards and requirements.
• Only use the utensils delivered with the appliance.
• To protect against electrical shock or burns, do not immerse unit, cord, or plug in
water or other liquid.

DO7087S
46
• Do not operate the appliance with wet hands.
• Unwrap the cord completely to prevent overheating of the cord.
• Do not let the power supply cord touch hot surfaces.
• Only ll the water reservoir with no other liquid than water.
• Make sure the appliance is correctly assembled, then plug the cord in the wall
outlet. To disconnect, turn controls to “OFF” or “0” position, then remove the plug
from the wall. Never pull the cord or appliance to remove the plug from the socket.
• Make sure the appliance has cooled down before opening the boiler for cleaning.
Make sure the bolt of the boiler is correctly and well xed onto the appliance after
maintenance.
• Failure to maintain this appliance in a clean condition could adversely affect the
life of the appliance and possibly result in a hazardous situation.
• Any injury or damage caused by failure to comply with these rules are at your own
risk. Neither the manufacturer, importer, or the supplier may be held liable.
SAVE THESE INSTRUCTIONS FOR FUTURE REFERENCE
PARTS
1. Filling cap
2. Trigger for removing the
water tank
3. Handle
4. Water tank
5. Steam release button
6. Soleplate
7. Temperature dial
8. Temperature indicator
9. Iron
10. Thermal insulation pads
11. Steam generator
12. Control panel
13. Cord clamp
14. Descaling cartridge
Trigger
Grab the water tank by the handle and pull the trigger. You can now remove the water
tank from the generator.
Filling cap
Open the lling cap and use the opening to ll the water tank.
On/off button (A)
Plug in the appliance and press the on/off button. The on/off indicator (B) will light
5
7
2
1
6
8
9
11
12
13
4
10
14
3

DO7087S
47
www.domo-elektro.be
up. The appliance is now switched on. To turn the
appliance off again, press the on/off button and
hold. The indicators will go out and the appliance
is now switched off.
Temperature indicator
When the iron is heating up, the temperature
indicator will be lit up. When the set temperature
has been reached, the light indicator will go out
again. During ironing the indicator will alternately light up and go out again, as the
iron is being kept at the right temperature.
Steam light (C)
When you turn on the device, the steam light will remain unlit. As soon as the device
has preheated, the steam light will light up blue, indicating you may start ironing.
Steam release button
When the light indicator lights up blue, you can start using steam. Press the steam
release button on the inside of the handle of the iron to spray a continuous steam out
of the soleplate. When you let go of the button, you will iron dry again, without steam.
Descaling cartridges
We advise you in changing the descaling cartridges after 3 months. In order to replace
the descaling cartridge, you need to remove the water tank and remove the old
cartridge and insert a new one in the same place.
Attention: A new descaling cartridge is best left soaking in a small container of water
for an entire night. This ensures it’s wet enough to allow you to iron immediately after
changing the cartridges out.
Cord clamp
After use you can easily store the cord and steam hose by using the cord clamp. Pull
out the clamp, lead the steam hose and the cord around the steam generator and push
in the clamp to lock the cord and steam hose.
TEMPERATURE DIAL
Set the right temperature for the right fabric with the temperature dial.
For synthetic fabrics/silk: 70<T<120°
For wool: 100<T<160°
For cotton: 140<T<210°
For linnen: 170<T<225° MAX
A
B C

DO7087S
48
BEFORE THE FIRST USE
1. Remove any stickers or protective foil from the ceramic soleplate.
2. Heat up the iron until the maximum temperature and iron on a damp cloth during
a couple of minutes to remove any possible residues from the soleplate. Iron
according to the instructions in the section «Steam ironing».
Caution:
• During the rst use it is normal that a specic odeur escapes from the appliance.
This odeur will disappear after a while.
• Some particles may come out of the soleplate during the rst use. This is normal.
The particles are harmless and will disappear after a while.
• When turning on the appliance, the steam generator may produce a pumping
sound. This is normal. This sound indicates that water is pumped into the steam
generator.
• While the soleplate is heating up, some steam will be released automatically. This
is also normal and will last for about 3 seconds.
USING THE STEAM GENERATOR
This steam generator offers 2 options: dry ironing or steam ironing. Follow the
instructions below. Also carefully read the ironing tips at the end of this section before
using the appliance.
Dry ironing
1. Place the iron on the thermal insulation pads of the steam generator.
2. Plug in the appliance and press the on/off button.
3. Select the desired temperature with the temperature dial, according to the kind of
fabric that needs to be ironed. The temperature indicator will light up and the iron
will start heating up.
4. When the temperature indicator goes out, the selected temperature has been
reached. You can now start ironing.
Caution: Never touch the hot soleplate!
Steam ironing
Caution: do not plug in the appliance yet at this point.
1. Grab the water tank of the steam generator by the handle and pull the trigger on
the inside of the handle to pull the water tank out of the generator. Open the lling
cap and ll the water tank with water. It is best to use demineralized water. Make
sure that you do not exceed the maximum level (1.2 L). Close the lling cap after
lling the water tank.
2. Place the water tank back into the steam generator.
3. Place the iron on the thermal insulation pads of the steam generator.
4. Plug in the generator, press the on/off button. Set the temperature dial to the
desired temperature, according to the kind of fabric, and the temperature indicator

DO7087S
49
www.domo-elektro.be
BEFORE THE FIRST USE
1. Remove any stickers or protective foil from the ceramic soleplate.
2. Heat up the iron until the maximum temperature and iron on a damp cloth during
a couple of minutes to remove any possible residues from the soleplate. Iron
according to the instructions in the section «Steam ironing».
Caution:
• During the rst use it is normal that a specic odeur escapes from the appliance.
This odeur will disappear after a while.
• Some particles may come out of the soleplate during the rst use. This is normal.
The particles are harmless and will disappear after a while.
• When turning on the appliance, the steam generator may produce a pumping
sound. This is normal. This sound indicates that water is pumped into the steam
generator.
• While the soleplate is heating up, some steam will be released automatically. This
is also normal and will last for about 3 seconds.
USING THE STEAM GENERATOR
This steam generator offers 2 options: dry ironing or steam ironing. Follow the
instructions below. Also carefully read the ironing tips at the end of this section before
using the appliance.
Dry ironing
1. Place the iron on the thermal insulation pads of the steam generator.
2. Plug in the appliance and press the on/off button.
3. Select the desired temperature with the temperature dial, according to the kind of
fabric that needs to be ironed. The temperature indicator will light up and the iron
will start heating up.
4. When the temperature indicator goes out, the selected temperature has been
reached. You can now start ironing.
Caution: Never touch the hot soleplate!
Steam ironing
Caution: do not plug in the appliance yet at this point.
1. Grab the water tank of the steam generator by the handle and pull the trigger on
the inside of the handle to pull the water tank out of the generator. Open the lling
cap and ll the water tank with water. It is best to use demineralized water. Make
sure that you do not exceed the maximum level (1.2 L). Close the lling cap after
lling the water tank.
2. Place the water tank back into the steam generator.
3. Place the iron on the thermal insulation pads of the steam generator.
4. Plug in the generator, press the on/off button. Set the temperature dial to the
desired temperature, according to the kind of fabric, and the temperature indicator
will light up.
5. The water in the water tank will start heating up
and after a couple of minutes the temperature
indicator will go out. This indicates that the
soleplate has reached the set temperature. When
the steam indication light colours blue, you may
start ironing.
Attention: make sure that the temperature dial is
positioned into the steam area (indicated by ).
Caution:
• Never touch the hot soleplate!
• Never aim the steam at people!
6. After ironing, press and hold the on/off button. The appliance will shut off
and all the light indicators will go out. Unplug the appliance. Place the iron on
the thermal insulation pads of the generator and let the appliance cool down
completely.
Ironing tips
• Always check rst if there is a label on the garment with instructions for ironing.
If this is the case, then always follow these instructions.
• The iron heats up faster than it cools down. Therefore, always iron the garments
that require the lowest temperature rst, like synthetic fabrics.
• If a fabric contains several types of bres, always choose the lowest temperature
to iron the combination of these bres.
• Silk and other shiny fabrics should be ironed inside-out.
• Velvet and other fabrics that easily become shiny should be ironing with slight
pressure, in one direction. Always keep the iron moving.
• Fabrics that are a 100% wool can be ironed with steam. Set the temperature to the
maximum and use a dry cloth to place on the fabric.
• Never iron over zippers or other metal objects in a garment. This can damage the
soleplate. Always iron around such objects.
Caution: if you iron woollen fabrics, the fabric may become shiny. That is why you
should turn the garment inside-out for ironing.
CLEANING AND MAINTENANCE
1. Unplug the appliance and let it cool down before cleaning it.
2. Wipe residues from the soleplate with a damp cloth or with a non-abrasive
(liquid) cleaner.
Caution: Do not use any chemical, steel, wooden or abrasive cleaners to
scrape the soleplate.
3. Clean the upper part of the iron with a soft, damp cloth.
4. Wipe the water drops on the steam generator and the thermal insulation pads with
a dry cloth.

DO7087S
50
5. When not using the steam generator for a long time, pour out the water from the
water tank and place the iron on the thermal insulation pads to store the appliance.
6. Wind the steam hose and cord around the appliance and lock them into place with
the cord clamp.
DESCALING SYSTEM
• This device has an electronic system that checks the water hardness.
• The descaling cartridge will remove the hard water. Depending on how hard
the water is and how the device is used, the descaling cartridge will need to be
replaced after 3 months of usage.
• Take the water reservoir out of the steam generator.
• Place a new descaling cartridge.
• Should you have no descaling cartridges handy, you may temporarily use a
combination of 50% tap water and 50% distilled or puried water to ll the
device. Afterwards you can continue ironing for a little while until your descaling
cartridge arrives.
After you have replaced your descaling cartridge, it will take a little while before you
get steam out of your iron. This is normal and happens because your cartridge is still
completely dry and it takes a bit for all the water in the generator to pass through
entirely. We advise you to replace the descaling cartridge the night before you plan on
ironing, making sure it’s drenched.
IRONING TABLE
Symbol Fabric Variable steam
synthetic fabric/silk
wool
cotton
linnen
This symbol means that the article can not be ironed!

DO7087S
51
www.domo-elektro.be
INSTRUCCIONES DE SEGURIDAD
Cuando utilice aparatos eléctricos, se
deben seguir las instrucciones de seguridad
mencionadas a continuación:
• Lea detenidamente estas instrucciones.
Conserve este manual para consultarlo
posteriormente.
• Antes del primer uso retire todos los
materiales de embalaje y etiquetas
promocionales. Asegúrese de que los niños
no puedan jugar con el material de embalaje.
• Este aparato es adecuado para su uso en el
ámbito doméstico y entornos similares como:
• Zona de cocina para el personal de
tiendas, ocinas y otros entornos
profesionales similares.
• Granjas.
• Habitaciones de hoteles y moteles, y
otros entornos de carácter residencial.
• Habitaciones de invitados o similares.
• Este aparato no puede ser utilizado
por personas (niños incluidos) con una
discapacidad física o sensorial, ni por

DO7087S
52
personas con discapacidad intelectual o sin
experiencia o conocimientos, a menos que
cuenten con supervisión o que una persona
responsable de su seguridad les haya dado
instrucciones sobre el uso del aparato.
• Supervise en todo momento a los niños para
que no jueguen con el aparato.
• Este aparato puede ser utilizado por niños de
16 años o más, personas con discapacidad
física o sensorial, o personas con capacidad
mental limitada o falta de experiencia
o conocimiento, siempre, y en tanto en
cuanto, dichas personas estén vigiladas o
hayan recibido instrucciones sobre el uso
del aparato de manera segura y conozcan
los peligros del uso del mismo. Los niños
no deben jugar con el ventilador. El
mantenimiento y la limpieza del dispositivo
no deben ser realizados por niños, a menos
que tengan 8 años o más y estén supervisados
por un adulto.
• Mantenga el aparato fuera del alcance de los
niños.
• Saque el enchufe de la toma de corriente

DO7087S
53
www.domo-elektro.be
cuando no use el aparato, antes de montar
o desmontar piezas y antes de limpiarlo.
Ponga primero todos los botones en posición
de apagado y desconecte el cable de
alimentación de la toma de corriente. No tire
nunca del cable de alimentación para sacar el
enchufe de la toma de corriente.
• Si el cable de alimentación está dañado,
para evitar accidentes, debe sustituirlo
el fabricante, un centro de reparación
autorizado o una persona cualicada.
• ATENCIÓN: para evitar peligros, el aparato
no debe ser controlado con un dispositivo
externo, como un temporizador externo, ni
debe conectarse a una red que se encienda y
se apague con frecuencia.
• No deje el aparato desatendido cuando esté
conectado a la red eléctrica.
• El oricio de llenado no se puede abrir nunca
durante el uso. Siga las instrucciones de este
manual para llenar el aparato de manera
segura.
• La plancha solo se puede colocar y utilizar
sobre una supercie plana y estable,

DO7087S
54
resistente al vapor y al calor.
• La plancha no se puede utilizar si se ha
caído, si existen signos de daño visibles o
si presenta alguna fuga. No utilice nunca
el aparato si el cable de alimentación o
el enchufe están dañados, después de un
mal funcionamiento del aparato o cuando
el aparato está dañado. En caso de que el
aparato esté dañado, llévelo al servicio de
postventa de DOMO o al centro de servicio
cualicado más cercano para su inspección,
reparación o para realizar ajustes eléctricos/
mecánicos. Nunca intente reparar el aparato
por su cuenta.
• Mantenga el aparato y el cable de
alimentación fuera del alcance de los
menores de 16 años mientras esté encendido
o enfriándose.
Si ve este símbolo, eso quiere
decir que el aparato puede
calentarse mucho. No toque nunca
la supercie del aparato; utilice
siempre las asas.

DO7087S
55
www.domo-elektro.be
• No utilice el aparato al aire libre.
• No mueva la plancha si se encuentra todavía en funcionamiento ni mientras sigue
estando caliente. Espere a que el aparato se enfríe del todo antes de cambiarlo de
lugar o efectuar labores de mantenimiento.
• Utilice el aparato únicamente para el n para el que está destinado.
• No llene nunca el depósito de agua con otro líquido que no sea agua.
• Antes de utilizarlo, compruebe si el voltaje indicado en el aparato coincide con el
voltaje de la red eléctrica de su vivienda.
• El cable de alimentación debe estar conectado a una toma de corriente que debe
haber sido instalada y conectada a tierra de acuerdo con las normas y reglamentos
locales.
• Solo debe utilizar los accesorios que se suministran con la plancha.
• Nunca sumerja el aparato, el cable de alimentación o el enchufe en agua o en
cualquier otro líquido. Esto evitará choques eléctricos o incendios.
• No utilice el aparato con las manos mojadas.
• Desenrolle el cable de alimentación completamente para evitar el
sobrecalentamiento del mismo.
• No deje que el cable de alimentación toque supercies calientes.
• Solo debe introducir el cable de alimentación en la toma de corriente después
de que el aparato se haya montado correctamente. Antes de retirar el cable del
aparato de la toma de corriente, el control se debe poner en la posición «OFF» o
«0». A continuación podrá retirar el cable de la toma de corriente. Nunca tire del
aparato o del cable de alimentación para retirar el enchufe de la toma de corriente.
• Asegúrese de que el aparato se haya enfriado por completo antes de abrir el
depósito de agua para limpiarlo. Compruebe después que el depósito de agua se
haya vuelto a instalar correctamente.
• Si no se realiza un correcto mantenimiento del aparato, la vida útil del aparato se
reducirá drásticamente y se podrían producir situaciones peligrosas.
• Los accidentes o los daños ocasionados por el no seguimiento de estas normas
son su propia responsabilidad. Ni el fabricante, ni el importador ni el distribuidor
pueden ser considerados responsables a este respecto.
CONSERVE ESTAS INSTRUCCIONES PARA CONSULTARLAS
POSTERIORMENTE

DO7087S
56
PIEZAS
1. Oricio de llenado con tapa
2. Botón para vaciar depósito de
agua
3. Asa
4. Depósito de agua
5. Botón del Vapor
6. Suela
7. Disco de temperatura
8. Indicador de temperatura
9. Plancha
10. Almohadillas de aislamiento
térmico
11. Generador de vapor
12. Panel de control
13. Abrazadera del cable
14. Cartucho antical
Botón para soltar el depósito de agua
Agarre el depósito de agua por el asa y tire con un dedo hacia usted. Ahora puede
sacar el depósito de agua del generador.
Interruptor (A)
Inserte el enchufe en la toma de corriente y
pulse el interruptor. El indicador de encendido
/ apagado (B) se ilumina. El aparato está
funcionando ahora. Para apagar otra vez el
aparato, mantenga el interruptor presionado y
la lámparas indicadoras se apagarán. Ahora el
generador está apagado.
Luz de Temperatura
Cuando la plancha se está calentando se enciende el piloto de temperatura. Cuando
se alcanza la temperatura, la luz se apaga de nuevo. Durante el planchado, la luz
parpadea, ya que se mantiene la temperatura de la plancha.
Piloto de vapor (C)
Cuando enciende el aparato, el piloto de vapor se mantendrá apagado. El piloto de
vapor azul se encenderá en cuanto el aparato se haya precalentado. A partir de ese
momento podrá a empezar a planchar con vapor.
Botón de vapor
Cuando el piloto de vapor azul se encienda podrá empezar a planchar con vapor.
5
7
2
1
6
8
9
11
12
13
4
10
14
3
A
B C

DO7087S
57
www.domo-elektro.be
Presione el botón de vapor en el interior del asa de la plancha para que salga vapor
continuo de la suela. Cuando suelte el botón volverá a planchar en seco, sin vapor.
Cartuchos antical
Recomendamos sustituir los cartuchos antical después 3 meses. Para cambiar el
cartucho antical debe soltar el depósito de agua y extraer el cartucho usado del
aparato. A continuación debe insertar un cartucho nuevo en el mismo lugar.
Atención: le recomendamos que antes de insertar el cartucho antical en el aparato lo
deje en remojo durante una noche en un recipiente con agua. De esta manera, estará lo
sucientemente húmedo como para poder planchar directamente.
Abrazadera del cable
Después de utilizar la manguera de vapor guarde el cable con ayuda de su abrazadera.
Saque la abrazadera del cable, coloque el tubo del vapor y el cable alrededor del
generador de vapor, y vuelva a insertar la abrazadera cuando quiera jar el cable y la
manguera.
MANDO DE TEMPERATURA
Seleccione con el mando giratorio la temperatura correspondiente al tejido.
Para tejido sintético /seda: 70<T<120°C
Para lana: 100<T<160°C
Para algodón: 140<T<210°C
Para lino: 170<T<225°C MAX
ANTES DEL PRIMER USO
1. Quite todas las etiquetas y la película protectora de la suela vitrocerámica.
2. Precaliente la plancha a la temperatura máxima y planche durante unos minutos
sobre un paño húmedo para limpiar cualquier residuo de la suela. Planche después
según las instrucciones del apartado “Planchar a vapor”.
Precaución:
• Es normal que durante el primer uso despida un olor extraño. Este olor
desaparecerá después de un tiempo.
• Puede que salgan residuos de la suela durante el uso inicial. Esto es normal. Las
partículas no son perjudiciales y desaparecen después de un tiempo.
• Cuando se enciende el generador pude hacer un ruido de bombeo. Esto es normal.
Este sonido es una señal de que se bombea agua al generador de vapor.
• Durante el calentamiento de la suela sale automáticamente un poco de vapor de la
suela. Una vez más, esto es normal y durará unos 3 segundos.

DO7087S
58
USO DEL GENERADOR DE VAPOR
Este generador de vapor ofrece 2 opciones: planchado en seco o con vapor. Siga
las instrucciones siguientes. Lea bien los consejos de planchado siguientes antes de
utilizar el generador.
Planchado en seco
1. Coloque la plancha sobre las almohadillas de aislamiento térmico del generador
de vapor.
2. Inserte el enchufe en la toma de corriente y presione el interruptor.
3. Gire el control de temperatura a la posición deseada, lo que depende del tipo de
tejido a planchar. La luz de temperatura se encenderá y la plancha comenzará a
calentarse.
4. Cuando el piloto de temperatura se apaga, la temperatura seleccionada se ha
alcanzado. Ahora puede empezar a planchar.
Precaución: ¡No toque nunca la suela caliente!
Planchado a vapor
Nota: no inserte aún el enchufe en la toma de corriente.
1. Agarre el depósito de agua del generador de vapor por el asa y pulse el botón del
interior del asa para sacar el depósito de agua del generador. Abra la tapa de la
boca de llenado y llene el depósito con agua. Utilice mejor agua desmineralizada.
Tenga cuidado de no exceder su nivel máximo (1,2 L). Tras llenarlo, cierre el
oricio de llenado.
2. Coloque el depósito de agua de nuevo en el generador de vapor.
3. Coloque la plancha sobre las almohadillas de aislamiento térmico del generador
de vapor.
4. Inserte el enchufe en la toma de corriente. Gire el control de temperatura a la
temperatura deseada, en función del tipo de tejido, y el piloto de temperatura
comenzará a lucir.
5. El agua del depósito se comienza a calentar y después de unos minutos el piloto
de temperatura se apaga. Esto indica que la suela ha
alcanzado la temperatura correcta. Puede empezar a
planchar en cuanto se encienda el piloto azul.
Atención: esto requiere que el regulador de temperatura
esté en la zona de vapor (indicada con ).
Nota:
• ¡No toque nunca la suela caliente!
• ¡No dirija nunca el vapor hacia las personas!
6. Después de planchar algún tiempo pulse el interruptor y el generador se apagará.
Todas las luces indicadoras se apagarán. Saque el enchufe de la toma. Coloque la
plancha sobre las almohadillas de aislamiento térmico del generador de vapor y
deje que se enfríe completamente.

DO7087S
59
www.domo-elektro.be
Consejos de planchado
• Verique siempre primero si hay una etiqueta en la prenda con instrucciones para
planchar. Si es así, siga siempre esas instrucciones.
• La plancha tarda más en calentarse que en enfriarse.
• Por tanto planche siempre primero los artículos que requieran temperatura más
baja, como los sintéticos.
• Si un tejido tiene varios tipos de bras, seleccione siempre la temperatura más
baja para planchar la combinación de estas bras.
• La seda y otras telas brillantes se deben planchar por el lado interior.
• El terciopelo y otras telas que tienden fácilmente a brillar, deben plancharse con
presión ligera y en una dirección. Mantenga la plancha siempre en movimiento.
• Los tejidos de lana 100% se pueden planchar a vapor. Gire la temperatura al
máximo y utilice un paño seco para limpiar el polvo.
• Nunca planche sobre cremalleras u otros objetos de metal de una prenda. Esto
puede dañar la suela. Planche siempre alrededor de estos objetos.
Nota: al planchar tejidos de lana, la tela puede brillar. Por lo tanto tiene que dar la
vuelta a la prenda para plancharla.
LIMPIEZA Y MANTENIMIENTO
1. Desconecte el enchufe de la toma de corriente y deje que el aparato se enfríe antes
de limpiarlo.
2. Limpie los residuos de la suela con un paño húmedo o con un agente de limpieza
no abrasivo (líquido).
Precaución: No utilice productos químicos, acero, madera o productos abrasivos
para limpiar la suela de la plancha.
3. Limpie la parte superior de la plancha con un paño suave y húmedo.
4. Limpie las gotas del generador de vapor y limpie las almohadillas de aislamiento
térmico con un paño seco.
5. Si no usa el generador de vapor durante períodos largos, vacíe el depósito de agua
y coloque la plancha sobre las almohadillas de aislamiento térmico para guardarla.
6. Enrolle la manguera de vapor y el enchufe alrededor del aparato y fíjelos en su
lugar con la abrazadera del cable.

DO7087S
60
SISTEMA ANTICAL
• Este aparato dispone de un sistema electrónico que controla la dureza del agua.
• El cartucho antical eliminará la dureza del agua. Dependiendo de la dureza del
agua y del uso del aparato, el cartucho antical se deberá cambiar cuando se haya
utilizado la plancha durante aproximadamente 3 meses.
• Retire el depósito de agua del generador de vapor.
• Coloque un nuevo cartucho antical.
• Si no tiene ningún nuevo casete disponible también puede usar una combinación
de 50% de agua del grifo y 50% de agua destilada o desmineralizada para rellenar
el aparato, en lugar de agua del grifo. Entonces puede continuar planchando hasta
haber pedido un nuevo cartucho antical.
Cuando ha insertado un nuevo cartucho antical, pasará algún tiempo antes de tener
vapor, porque el cartucho antical está seco y el agua debe pasar totalmente al cartucho.
Recomendamos encarecidamente que mantenga el nuevo cartucho antical una noche
en agua para que esté bien empapado.
TABLA DE PLANCHADO
Símbolo Tejido Vapor variable
Tejido sintético / seda
lana
algodón
lino
¡Este símbolo signica que el artículo no se debe
planchar

DO7087S
61
www.domo-elektro.be
BEZPEČNOSTNÍ POKYNY
Při používání jakkéhokoli el. spotřebiče
dbejte zvýšené opatrnosti a dodržujte určitá
bezpečnostní pravidla:
• Pečlivě si přečtěte tyto informace a manuál
nechte i pro pozdější nahlédnutí.
• Ujistěte se, že před použitím odlepíte a
odstraníte veškeré reklamní a ochranné fólie.
• Děti si s ochrannými ani reklamními polepy
nesmí hrát.
• Přístroj je určen pro používání v
domácnostech a podobných prostředích, tak
jako je:
• kuchyňky v obchodech, kancelářích atd.
• chaty, chalupy
• hotely, penziony a jiné dočasné
ubytování
• Přístroj nesmí používat osoby (ani děti)
se sníženou psychickou, motorickou
nebo mentální schopností. Pokud nejsou
pod odborným dohledem, tak jej nesmí
používat ani osoby bez dostatečného
seznámení o pravidlech správného

DO7087S
62
použití.
• Dohlédněte, aby si děti nehrály s přístrojem.
• Přístroj smí používat pouze děti starší 16 let.
Osoby se sníženou psychickou, motorickou
nebo mentální schopností smí používat
přístroj pouze za neustálého dohledu
odpovědné osoby, která je seznámena s
pravidly používání a případným rizikem.
• Čistění a běžnou údržbu smí provádět pouze
osoby starší 8 let a při tom být pod dohledem.
• Přístroj a jeho el. kabel skladujte mimo dosah
dětí mladších 16 let.
• Pokud přístroj nepoužíváte, nebo se jej
chystáte rozebírat či měnit součásti, tak
přístroj odpojte od el. napětí. Před rozebírání,
skládáním i před čistěním, vždy nechte
přístroj dostatečně vychladnout.
• Pokud je přívodní kabel poškozen, musí být
vždy okamžitě opraven v odborném servise
nebo proškolenou osobou.
• POZOR: Aby se předešlo rizikům úrazu
(poškození), nesmí být přístroj používán
se žádnou externí součástí (např. časovač,
vypínač, přepínač …)

DO7087S
63
www.domo-elektro.be
• Nenechávejte žehličku bez dozoru, pokud je
zapojena v el. síti.
• Neotevírejte zásobník vody během provozu.
Doplňujte dle přiložených instrukcí v
návodu.
• Žehličku odstavujte na rovnou a stabilní
plochu, která je odolná horkým povrchům.
• Žehličku nepoužívejte pokud z ní kape
voda nebo je jakkoli viditelně poškozena či
netěsní. Žehličku s poškozeným přívodním
kabelem nepoužívejte, i když je stále plně
funkční. Jakkoli poškozený přístroj je nutné
nechat zkontrolovat odborným servisem
DOMO-ELEKTRO nebo jiným proškoleným
pracovníkem. Nezkoušejte opravovat
žehličku sami!!
• Žehličku držte mimo dosah dětí mladších 16
let, pokud je zapojená v el. síti nebo je stále
teplá/horká.

DO7087S
64
• Nepoužívejte ani neskladujte žehličku venku.
• S přístrojem během jeho používání nemanipulujte. Vždy ho nechte důkladně
vychladnout a až poté přemisťujte.
• Nepoužívejte žehličku jinak než je zamýšleno.
• Do zásobníku vody nenalévejte žádnou jinou tekutinu než vodu.
• Pokud je žehlička s prázdným zásobníkem vody, nikdy nespouštějte parní funkce
ani páru. Mohlo by to poškodit celý přístroj.
• Před použití zkontrolujte zda parametry el. sítě odpovídají požadovaným
parametrů na informativním štítku přístroje.
• Zástrčka přívodního kabelu smí být zapojena pouze do zásuvky s uzemněním a
všemi standartními parametry dle místí sítě.
• Používejte pouze přístlušenství s přístrojem dodané.
• Přístroj ani přívodní kabel nikdy neponořujte pod vodu, jinak hrozí nebezpečí
úrazu.
• Nepoužívejte / nesahejte na přístroj s mokrýma rukama.
• Přívodní kabel co nejvíce rozviňte, aby se nepřehříval.
• Nenechávejte viset kabel přístroje přes hranu stolu a vyvarujte se toho, aby přišel
do styku s horkými plochami.
• Nikdy nenalévejte do zásobníku na vodu jinou tekutinu než je čistá voda.
• Vypnutý přístroj zkontroluje, zda je řádně složen, a až poté zapojte. Při vypnutí
přístroje nejdříve otočte spínače na polohu OFF/0, až poté odpojte z el. sítě.
Nikdy netahejte za přívodní kabel, ale odpojujte přímo za zástrčku.
• Před otevřením zásobníku/tlakového šroubu generátoru se vždy důkladně ujistěte,
že je přístroj i náplně dostatečně chladné. Po vyčistění se vždy ujistěte, že je
tlakový šroub generátoru dostatečně dotažen a zásobník na žehličce správně
usazen.
• Zanedbaná údržba může vést ke zkrácení životnosti přístroje a případně k
nebezpečí úrazu
• Veškeré zranění a rizika úrazu vzniklá nedodržením těchto pravidel a pokynů jdou
na odpovědnost uživatel. Výrobce ani prodejce není schopen nést odpovědnost za
vzniklá rizika z nedodržení těchto pokynů.
POVRCHY označené tímto
symbolem jsou při používání
velmi horké. Nedotýkejte se jich.
Pro přenos používejte výhradně
rukojeti či madla k tomu určené.

DO7087S
65
www.domo-elektro.be
ULOŽTE SI TENTO NÁVOD K POZDĚJŠÍMU NAHLÉDNUTÍ
POPIS PŘÍSTROJE
1. Víko na doplňování vody
2. Uvolňovací tlačítko zásobníku
3. Rukojeť
4. Zásobník na vodu
5. Spoušť páry
6. Žehlící plocha
7. Nastavení teploty
8. Kontrolka nastavené teploty
9. Žehlička
10. Teplu odolné polštářky
11. Parní generátor
12. Ovládací panel
13. Držák přívodního kabelu
14. Odvápňovací kazety
Uvolňovací tlačítko zásobníku
Uchopte zásobník za rukojeť a jedním prstem stiskněte tlačítko pro uvolnění
zásobníku. Nyní můžete zásobník vyjmout z generátoru ven.
Víko zásobníku
Otevřete víko zásobníku a doplňte vodu.
Hlavní vypínač (A)
Zapojte přístroj do elektrické sítě a stiskněte
tlačítko vypínače. Kontrolka zapnutí (B) přístroje
bude svítit. Přístroj je nyní zapnutý. Přístroj se
vypíná opětovným stiskem hlavního vypínače,
musíte jej chvíli podržet stisknutý. Kontrolka
zapnutí přestane svítit. Přístroj je nyní vypnutý.
Kontrolka natavené teploty
Pokud se zrovna žehlička nahřívá na nastavenou teplotu, bude kontrolka svítit.
Po nahřání na nastavenou teplotu kontrolka opět zhasne. Během žehlení se může
kontrolka průběžně rozsvěcovat a zhasínat, podle toho, jak žehlička udržuje
nastavenou teplotu.
Světelná kontrolka (C)
Když přístroj zapnete, kontrolka páry zůstané zhasnutá. Kontrolka se rozsvítí modře
až ve chvíli, kdy je žehlička dostatečně nahřátá. Signalizuje, že můžete začít žehlit.
5
7
2
1
6
8
9
11
12
13
4
10
14
3
A
B C

DO7087S
66
Spoušť na uvolnění páry
Po zapnutí přístroje, můžete začít používat k žehlení páru. Pro uvolnění páry použijte
spoušť umístěnou na vnitřní části rukojeti žehličky. Spoušť nemusíte držet po celou
dobu žehlení. Pokud potřebujete žehlit bez páry,tak spoušť uvolněte.
Odvápňovací kazety
Doporučujeme měnit odvápňovací kazety vždy po každých 3 měsíce žehlení. Při
výměně kazet musíte vyjmout zásobník vody, z něho vyjmout staré kazety a vložit na
stejné místo nové.
Doporučujeme: Nové odvápňovací kazety nechat den před výměnou ponořené ve
vodě, tím zajistíte, že budou dostatečně namočené a můžete začít žehlit ihned po jejich
výměně.
Držák přívodního kabelu
Po namotání kabelu kolem těla parního generátoru, můžete kabel tímto držákem
zajistit na místě. Jako první tažením povytáhněte držák ven. Namotejte přívodní kabel
i spojovací kabel kolem těla generátoru. Držák zasuňte zpět a zajistěte jím namotané
kabely.
NASTAVENÍ TEPLOTY ŽEHLIČKY
Správné nastavení teploty byste měli vždy najít na žehlené látce na štítku od výrobce.
Umělé materiály / hedvábí: 70<T<120°C
Vlna: 100<T<160°C
Bavlna: 140<T<210°C
Ložní prádlo: 170<T<225°C MAX
PŘED PRVNÍM POUŽITÍM
1. Odstraňte veškeré obalové materiály, samolepky a fólie ze všech částí přístroje.
2. Nechte nahřát žehličku na maximální teplotu a poté pár minut žehlete vlhkou
látku, abyste odstranili možné zbytky nečistot na žehlicí ploše. Dále již pokračujte
v žehlení podle instrukcí pro žehlení párou.
Upozornění:
• Během prvního žehlení můžete z přístroje cítit specický zápach. Tento zápach po
chvíli zmizí.
• Skrz otvory v žehlící ploše mohou při prvním žehlení vyjít nějaké částečky. Toto
je úplně normální. Tyto částečky jsou neškodné a po chvíli vymizí.
• Po zapnutí přístroje může parní generátor vydávat zvuk připomínající pumpování.
Toto je úplně normální. Tento zvuk znamená, že generátor si pumpuje do sebe ze
zásobníku vodu.
• Při nahřívání žehličky může dojít k samovolnému úniku trochy páry. Toto je
úplně normální a nebude to trvat déle než 3 vteřiny.

DO7087S
67
www.domo-elektro.be
POUŽÍVÁNÍ ŽEHLIČKY S PARNÍM GENERÁTOREM
Tento parní generátor nabízí dvě možnosti žehlení: suché, nebo s párou. Přečtěte si
následující instrukce. Také si pozorně přečtěte tipy na žehlení na konci této kapitoly.
Žehlení bez páry
1. Položte žehličku na teplu odolné polštářky na vrchu těla parního generátoru.
2. Zapojte přístroj do elektrické sítě a vypínačem zapněte.
3. Nastavte na žehličce otočným kolečkem požadovanou teplotu odpovídající
žehlenému materiálu. Kontrolka teploty se rozsvítí a žehlička se začne nahřívat.
4. Jakmile kontrolka teploty zhasne, znamená to, že nastavená teplota byla dosažena
a žehlička je připravena k žehlení.
Upozornění: Nikdy se nedotýkejte žehlící plochy žehličky!
Žehlení párou
Upozornění: zatím ještě přístroj do elektrické sítě nepřipojujte.
1. Uchopením za rukojeť a stiskem uvolňovacího tlačítka vyjměte zásobník a
naplňte jej vodu. Nejlepší je použít destilovanou vodu. Dejte pozor, abyste
nepřesáhli maximální hladinu vody (1,2 l). Nezapomeňte po doplnění vody opět
zavřít víčko zásobníku.
2. Umístěte zásobník zpět na své místo.
3. Položte žehličku na teplu odolné polštářky na vrchu těla parního generátoru.
4. Zapojte přístroj do elektrické sítě a zapněte. Nastavte na žehličce otočným
kolečkem požadovanou teplotu odpovídající žehlenému materiálu. Kontrolka
teploty se rozsvítí a žehlička se začne nahřívat.
5. Voda v parním generátoru se začne nahřívat. Během několik minut zhasne
kontrolka nahřívání na žehličce. Zhasnutí kontrolky
Vám dává vědět, že žehlicí plocha dosáhla již
požadované teploty. Jakmile přestane blikat symbol
páry a zůstane pouze svítit, můžete začít žehlit s
pomocí páry. Páru uvolníte ze žehličky stiskem
spouště.
Pozor: ujistěte se, že ovladač teploty je otočený na
žehlení párou (označeno symbolem ).
Varování:
• Nikdy se nedotýkejte horké žehlící plochy!
• Nikdy nemiřte párou na lidi, ani zvířata!
6. Po skončení žehlení stiskněte a přidržte vypínač, abyste přístroj vypnuli. Odpojte
přístroj od elektrické sítě. Žehličku odstavte na teplu odolné polštářky na parním
generátoru a nechte úplně vychladnout.
Tipy k žehlení
• Před žehlením si vždy zkontrolujte zda máte správně nastavenou teplotu s
ohledem na instrukce uvedené na štítku žehleného oděvu. Pokud se na oděvu

DO7087S
68
tento štítek nachází, vždy se jím řiďte.
• Žehlička se nahřívá rychleji, než chladne, proto první žehlete oděvy, které
vyžadují nejnižší teplotu.
• Pokud se oděv skládá z různých druhů vláken, vždy nastavte teplotu podle toho,
které vyžaduje nejnižší teplotu.
• Hedvábí a jiné lesklé textilie by měly být žehleny naruby.
• Samet a další látky, které mají podobná hlubší vlákna by se měly žehlit s mírným
tlakem a v jednom směru. Nikdy žehličku nenechávejte stát v jednom místě.
• Látky, které jsou ze 100% vlny se mohou žehlit s párou. Nastavte teplotu na
maximální a žehlete přes suchý hadřík.
• Nikdy nežehlete přes zipy, nebo jiné kovové předměty v oděvu. Mohli byste
poškodit žehlící plochu. Vždy se takovým předmětům vyhněte.
Upozornění: pokud žehlíte vlněné tkaniny, mohou se začít lesknout. Žehlete takové
tkaniny naruby.
ČIŠTĚNÍ A ÚDRŽBA
1. Odpojte přístroj od el. proudu a nechte případně úplně vychladnout.
2. Otřete zbytky ze žehlící plochy pomocí vlhkého hadříku, nebo jemným
tekutým čistícím prostředkem.
Upozornění: Nepoužívejte žádné chemické, kovové, dřevěné, nebo
hrubé čistící prostředky, abyste nepoškrábali žehlící plochu.
3. Tělo žehličky můžete vyčistit jemným vlhkým hadříkem.
4. Kapky vody na přístroji vysušte suchým hadříkem.
5. Pokud přístroj nebudete používat po delší dobu, vylijte vodu ze zásobníku
a žehličku položte na své místo na teplu odolné polštářky na vrchu parního
generátoru.
6. Kabely smotejte kolem těla parního generátoru a zajistěte na svém místě
výsuvným držákem.
ODVÁPŇOVACÍ SYSTÉM
• Tento přístroj disponuje elektronickou kontrolou tvrdosti vody
• Odvápňovací kazety změkčují vodu.V závislosti na typu vody a způsobu
používání musí být tyto kazety včas měněny. Doporučujeme po každých 3 měsíce
používání.
• Vyjměte zásobník vody z parního centra
• Vložte novou odvápňovací kazetu dle obrázku níže.
• Pokud zrovna nemáte doma náhradní novou kazetu, je dočasně možné použít
kombinaci 50% vody z kohoutku a 50% destilované vody. Taková směs umožní
krátkodobě dokončit žehlení, nebo překlenout, dobu než seženete odvápňovací
kazety.
Po výměně odvápňovací kazety zabere napařování o něco delší čas než normálně.
To je způsobené tím, že nová odvápňovací kazeta je zcela suchá a přístroj do ní musí
natlačit dostatek vody, aby se dostatečně promočila. Doporučujeme kazetu měnit
den před plánovaným žehlením, a před tím se ještě ujistit, zda je opravdu kompletně
promočená.
SYMBOLY ŽEHLENÍ
Symbol Materiál Žehlení párou
umělé vlákno, hedvábí
vlna
bavlna, ložní prádlo
Tento symbol znamená, že se tento materiál nesmí
žehlit!

DO7087S
69
www.domo-elektro.be
• Pokud zrovna nemáte doma náhradní novou kazetu, je dočasně možné použít
kombinaci 50% vody z kohoutku a 50% destilované vody. Taková směs umožní
krátkodobě dokončit žehlení, nebo překlenout, dobu než seženete odvápňovací
kazety.
Po výměně odvápňovací kazety zabere napařování o něco delší čas než normálně.
To je způsobené tím, že nová odvápňovací kazeta je zcela suchá a přístroj do ní musí
natlačit dostatek vody, aby se dostatečně promočila. Doporučujeme kazetu měnit
den před plánovaným žehlením, a před tím se ještě ujistit, zda je opravdu kompletně
promočená.
SYMBOLY ŽEHLENÍ
Symbol Materiál Žehlení párou
umělé vlákno, hedvábí
vlna
bavlna, ložní prádlo
Tento symbol znamená, že se tento materiál nesmí
žehlit!

LINEA 2000 - Dompel 9 - 2200 Herentals Belgium - Tel 014/21.71.91 - Fax : 014/21.54.63
BESTEL
de originele Do-
mo-accessoires
en -onderdelen
online via:
of scan hier:
COMMANDEZ
les pièces et
accessoires
originaux Domo
en ligne sur:
ou scannez ici:
BESTELLEN SIE
die Domo
Original-Zubehör
und -Ersatzteile
online auf:
oder hier scannen:
ORDER
the original
Domo
accessories and
parts online at:
or scan here:
webshop.domo-elektro.be
Webshop
-
 1
1
-
 2
2
-
 3
3
-
 4
4
-
 5
5
-
 6
6
-
 7
7
-
 8
8
-
 9
9
-
 10
10
-
 11
11
-
 12
12
-
 13
13
-
 14
14
-
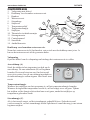 15
15
-
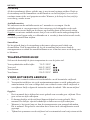 16
16
-
 17
17
-
 18
18
-
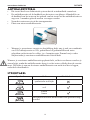 19
19
-
 20
20
-
 21
21
-
 22
22
-
 23
23
-
 24
24
-
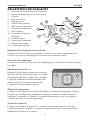 25
25
-
 26
26
-
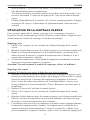 27
27
-
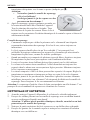 28
28
-
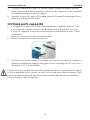 29
29
-
 30
30
-
 31
31
-
 32
32
-
 33
33
-
 34
34
-
 35
35
-
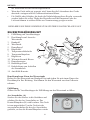 36
36
-
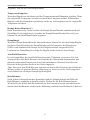 37
37
-
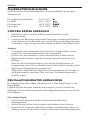 38
38
-
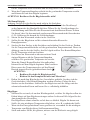 39
39
-
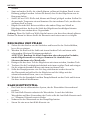 40
40
-
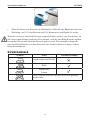 41
41
-
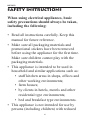 42
42
-
 43
43
-
 44
44
-
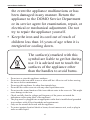 45
45
-
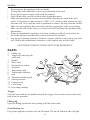 46
46
-
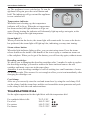 47
47
-
 48
48
-
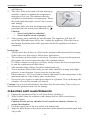 49
49
-
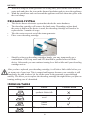 50
50
-
 51
51
-
 52
52
-
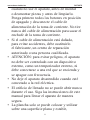 53
53
-
 54
54
-
 55
55
-
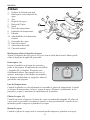 56
56
-
 57
57
-
 58
58
-
 59
59
-
 60
60
-
 61
61
-
 62
62
-
 63
63
-
 64
64
-
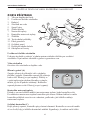 65
65
-
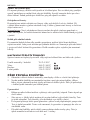 66
66
-
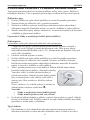 67
67
-
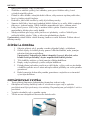 68
68
-
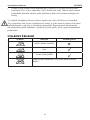 69
69
-
 70
70


Domo DO7087S de handleiding
- Categorie
- Strijkijzers
- Type
- de handleiding
- Deze handleiding is ook geschikt voor
in andere talen
- English: Domo DO7087S Owner's manual
- français: Domo DO7087S Le manuel du propriétaire
- español: Domo DO7087S El manual del propietario
- Deutsch: Domo DO7087S Bedienungsanleitung
- čeština: Domo DO7087S Návod k obsluze
Gerelateerde papieren
-
Domo DO7089S de handleiding
-
Domo DO7102S Handleiding
-
-
Domo DO7109S DO7108S de handleiding
-
-
-
Domo DO7111S de handleiding
-
Domo DO7112S de handleiding
-
Domo DO7114S de handleiding
-