Yamaha DVD-S2300 de handleiding
- Categorie
- Dvd spelers
- Type
- de handleiding

G
DVD-S2300
DVD AUDIO/VIDEO SACD PLAYER
LECTEUR DE DVD AUDIO/VIDEO SACD
OWNER’S MANUAL
MODE D’EMPLOI
BEDIENUNGSANLEITUNG
BRUKSANVISNING
MANUALE DI ISTRUZIONI
MANUAL DE INSTRUCCIONES
GEBRUIKSAANWIJZING
DIGITAL VIDEO
DVD-S2300_G.book Page 1 Friday, October 18, 2002 2:42 PM

CAUTION
1
To assure the finest performance, please read this manual
carefully. Keep it in a safe place for future reference.
2
Install this sound system in a well ventilated, cool, dry, clean
place — away from direct sunlight, heat sources, vibration,
dust, moisture, or cold. In a cabinet, allow about 2.5cm (1
inch) of free space all around this unit for adequate ventila-
tion.
3
Locate this unit away from other electrical appliances,
motors, or transformers to avoid humming sounds.
4
Do not expose this unit to sudden temperature changes from
cold to hot, nor locate this unit in an environment with high
humidity (i.e., a room with a humidifier) to prevent conden-
sation inside this unit, which may cause an electrical shock,
fire, damage to this unit, and/or personal injury.
5
Avoid installing this unit in a location where foreign objects
may fall onto this unit or where this unit may be exposed to
liquid dripping or splashing. On the top of this unit, do not
place:
– Other components, as they may cause damage and/or dis-
coloration on the surface of this unit.
– Burning objects (i.e., candles), as they may cause fire,
damage to this unit, and/or personal injury.
– Containers with liquid in them, as they may fall, spilling
the liquid and causing an electrical shock to the user and/
or damage to this unit.
6
Do not cover this unit with a newspaper, tablecloth, curtain,
etc. in order not to obstruct heat radiation. If the temperature
inside this unit rises, it may cause fire, damage to this unit,
and/or personal injury.
7
Do not plug in this unit to a wall outlet until all connections
are complete.
8
Do not operate this unit upside-down. It may overheat, possi-
bly causing damage.
9
Do not use excessive force on switches, knobs and/or cords.
10
When disconnecting the power cord from the wall outlet,
grasp the plug; do not pull the cord.
11
Do not clean this unit with chemical solvents; this might
damage the finish. Use a clean, dry cloth.
12
Use only the voltage specified on this unit. Using this unit
with a higher voltage than specified is dangerous and may
cause fire, damage to this unit, and/or personal injury.
YAMAHA will not be held responsible for any damage
resulting from use of this unit with a voltage other than as
specified.
13
To prevent damage by lightning, disconnect the power cord
from the wall outlet during an electrical storm.
14
Do not attempt to modify or fix this unit. Contact qualified
YAMAHA service personnel when any service is needed.
The cabinet should never be opened for any reason.
15
When not planning to use this unit for long periods of time
(i.e., vacation), disconnect the AC power plug from the wall
outlet.
16
Be sure to read the “TROUBLESHOOTING” section on
common operating errors before concluding that this unit is
faulty.
17
Before moving this unit, press STANBY/ON to set the unit in
standby mode, then disconnect the AC power plug from the
wall outlet.
■
For U.K. customers
If the socket outlets in the home are not suitable for the plug sup-
plied with this appliance, the plug should be cut off and an appro-
priate 3 pin plug fitted. For details, refer to the instructions
described below.
Note
• The plug severed from the mains lead must be destroyed, as a
plug with bared flexible cord is hazardous if engaged in a live
socket outlet.
■
Special Instructions for U.K.
Model
DANGER
This unit emits visible laser radiation when open. Avoid direct
eye exposure to beam.
When this unit is plugged into a wall outlet, do not place your
eyes close to the opening of the disc tray and other openings or
look inside.
CAUTION: READ THIS BEFORE OPERATING YOUR UNIT.
IMPORTANT
THE WIRES IN MAINS LEAD ARE COLOURED IN
ACCORDANCE WITH THE FOLLOWING CODE:
Blue: NEUTRAL
Brown: LIVE
As the colours of the wires in the mains lead of this apparatus
may not correspond with the coloured markings identifying
the terminals in your plug, proceed as follows:
The wire which is coloured BLUE must be connected to the
terminal which is marked with the letter N or coloured
BLACK. The wire which is coloured BROWN must be con-
nected to the terminal which is marked with the letter L or
coloured RED.
Making sure that neither core is connected to the earth termi-
nal of the three pin plug.
The laser component in this product is capable of emitting
radiation exceeding the limit for Class 1.
DVD-S2300_G.book Page 2 Friday, October 18, 2002 2:42 PM

English
1
INTRODUCTION
FEATURES ............................................................................................2
Playable disc formats...........................................................................2
CHECKING THE ACCESSORIES.....................................................3
INSTALLING BATTERIES IN THE REMOTE CONTROL...........3
CONTROLS AND FUNCTIONS .........................................................4
Front panel / Remote control...............................................................4
Front panel display ..............................................................................6
PREPARATION
CONNECTIONS....................................................................................7
Types of connectors.............................................................................7
Video connections................................................................................8
Audio connections...............................................................................9
Remote control in/out jack ..................................................................9
PLAYING A DISC
PLAYING A DISC...............................................................................10
Before starting playback....................................................................10
Basic operation..................................................................................10
Super Audio CDs...............................................................................12
MP3 playback....................................................................................12
MISCELLANEOUS FUNCTIONS....................................................13
Using disc menus...............................................................................13
Enhancing video quality - Progressive output (U.S.A. model only) .13
DVD-Audio features .........................................................................14
Switching audio tracks, subtitles and angles ..................................15
Program play ....................................................................................16
Random play .....................................................................................17
All group play ...................................................................................17
Bookmarks ........................................................................................18
Repeat play .......................................................................................18
Repeat A-B .......................................................................................19
ON-SCREEN MENU (DVD MODE ONLY).....................................20
Operating the menu bar .....................................................................20
Disc Info bar......................................................................................21
Player Info bar...................................................................................22
Shuttle bar..........................................................................................23
DETAILED SETTINGS
CHANGING THE DVD MODE SETTINGS....................................24
Using the Setup menu........................................................................24
Settings Summary..............................................................................25
Ratings ..............................................................................................28
PCM down conversion ......................................................................28
Speaker settings ................................................................................29
CHANGING THE SACD MODE SETTINGS..................................31
Speaker settings.................................................................................31
Adjusting the brightness of the display .............................................32
Changing the time indicator ..............................................................32
APPENDIX
TROUBLESHOOTING ......................................................................33
GLOSSARY..........................................................................................35
NOTES ON HANDLING DISCS.......................................................36
SPECIFICATIONS..............................................................................37
CONTENTS
■ About this manual
• Illustrations in this manual are based on the
U.S.A. model unless otherwise indicated.
•Paragraphs marked with an y indicator are
tips on operating the unit.
• The user can perform certain operations using
either the remote control or the buttons on the
main unit. This manual frequently explains
how to execute such operations only on the
remote control.
• This manual is printed prior to production.
Design and specifications of the unit are sub-
ject to change for reasons that include
improved function and operation.
• Illustrations in this manual may differ slightly
from the product or from illustrations used in
the packaging.
• The names of package content items used in
this manual may differ slightly from names
that appear on the product or elsewhere in the
packaging.
DVD-S2300_G.book Page 1 Friday, October 18, 2002 2:42 PM

2
INTRODUCTION
◆
Built-in high-performance video D/A converter
◆
Output connectors support numerous audio and
home theater component combinations.
Video out:
Component output jacks (two channels)
(U.S.A. and Australian models)
S Video jacks (two channels)
RGB SCART jacks (U.K. and European
models)
Video (Composite) connector (two channels)
Audio out:
Digital: Coaxial jack (one channel)
Optical jack (one channel)
Analog: (L/R) jacks
6ch discrete jacks
SUB OUT/BASS MGMT (man-
agement) jack to boost the low
range
◆
High-end D/A converter for SACD on all eight
channels
◆
D/A converter support for 192kHz 24-bit DVD-
Audio/Video discs
◆
Optimal picture and sound quality, courtesy of
independent circuits for SACD and DVD, and
individual tuning
◆
Dolby Digital and DTS decoders
◆
DCDi Progressive output (U.S.A. model)
◆
MP3 multi-session support
Manufactured under license from
Dolby Laboratories.
“Dolby” and the double-D symbol are
trademarks of Dolby Laboratories.
“DTS” and “DTS Digital Surround”
are registered trademarks of Digital
Theater Systems, Inc.
“DCDi” is a trademark of Faroudja, a
division of Genesis Microchip, Inc.
This product incorporates copyright protection technology
that is protected by method claims of certain U.S. patents
and other intellectual property rights owned by Macrovi-
sion Corporation and other rights owners. Use of this
copyright protection technology must be authorized by
Macrovision Corporation, and is intended for home and
other limited viewing uses only unless otherwise autho-
rized by Macrovision Corporation. Reverse engineering or
disassembly is prohibited.
This unit can play the disc types associated with the logos
shown below. (Do not attempt to load any other type of
disc into the unit, or the unit may be damaged.)
•DVD mode • SACD mode
This manual refers to disc types using the following indi-
cators:
Notes
• The unit does not support playback of the following discs:
Photo CD, CD-ROM, DVD-ROM, DVD-RAM, SVCD, CDV
• Some discs may fail to play due to recording conditions or disc
characteristics. (If you record discs on a recorder for playback
on this unit, use discs from reliable manufacturers.)
•DVD-RW discs will play only if they are recorded in video for-
mat.
• CD-R/RW, DVD-R/RW, and DVD+R discs will play only if
they are finalized.
• Do not use non-standard shaped discs (heart-shaped, etc.).
• Some DVD and VCD features described in this manual may
vary in function due to differences in software design from var-
ious manufacturers. Check the instructions for each disc.
• This unit cannot play PAL video discs. (U.S.A. model)
■
Region management information
The unit is designed to support the Region Management
System. Check the regional code number on the disc pack-
age. If the number does not match the unit’s region num-
ber (see table below, or see back of unit), the unit may be
unable to play the disc.
FEATURES
Playable disc formats
DVD-Video DVD-Audio Video CD Audio CD
Super Audio CD
Model
Region number
of this unit
Discs can be played
U.S.A. and Cana-
dian models
1
,
ALL
or a mark that includes
the region number
1
.
U.K. and Euro-
pean models
2
,
ALL
or a mark that includes
the region number
2
.
Australian model
4
,
ALL
or a mark that includes
the region number
4
.
DIGITAL VIDEO
DVD-V DVD-A VCD CD
SACD
1
2
4
DVD-S2300_G.book Page 2 Friday, October 18, 2002 2:42 PM

3
English
INTRODUCTION
Check your package to make sure it contains the following items:
Insert the batteries in the correct direction by aligning the
+ and – marks on the batteries with the polarity markings
(+ and –) inside the battery compartment.
1
Slide off the battery compartment cover.
2
Insert two batteries (AA, R06, UM-3 type) ori-
ented properly (+ and –).
3
Slide the cover back into place.
Replace worn batteries
Worn batteries limit the operating range of the remote con-
trol. Replace both batteries at the same time.
Note
• Replace both batteries if you notice a decrease in the operating
range of the remote control.
• Do not use old batteries with new ones.
• Do not use different types of batteries (such as alkaline and
manganese) together. Read the battery packaging carefully.
Different types of batteries may be the same shape or color.
• If the batteries leak, dispose of them immediately. Avoid
touching the leaked material or letting it come into contact
with clothing, etc. Clean the battery compartment thoroughly
before installing new batteries.
■
Using the remote control
Handling the remote control
• Do not spill water or other liquids on the remote control.
• Do not drop the remote control.
• Do not leave or store the remote control in the following types
of conditions:
– high humidity or temperature, such as near a heater, stove
or bath;
– dusty places; or
– places subject to extremely low temperatures.
CHECKING THE ACCESSORIES
INSTALLING BATTERIES IN THE REMOTE CONTROL
Remote control Batteries (x2) (AA, R6, UM-3) Audio/Video cable Power cable
1
3
2
30°
30°
Point the remote control at the
sensor, within approximately
6 m (20 feet) of the unit.
Remote control
sensor
DVD-S2300_G.book Page 3 Friday, October 18, 2002 2:42 PM

4
1
POWER
Turns the power to the unit on and off.
2
Disc tray
Load a disc in this tray.
3
vv
vv
(Front panel),
OPEN/CLOSE (Remote control)
Press to open or close the disc tray.
4
ww
ww
Press to start playback.
5
dd
dd
Press to pause.
6
aa
aa
Press to stop playback.
7
tt
tt
/
ee
ee
,
rr
rr
/
yy
yy
Press to access the next or previous track or chapter.
Press and hold down to fast forward or fast reverse.
8
SACD/DVD
Press to switch between DVD mode and SACD mode.
9
SACD mode indicator
Lights up in SACD mode.
0
Front panel display
Shows information about the operational status or
default settings of the unit.
q
PROGRESSIVE indicator (U.S.A. model only)
Lights up during progressive output.
w
VIDEO OFF indicator
Lights up when the VIDEO OFF function is working.
e
DVD mode indicator
Lights up in DVD mode.
r
PHONES LEVEL control
Adjusts the headphone level.
t
PHONES
Connect headphones here.
CONTROLS AND FUNCTIONS
Front panel / Remote control
12 4
0
7
356
89
wertq
6
4
d
y
3
5
8
o
a
s
p
u
i
DVD-S2300_G.book Page 4 Friday, October 18, 2002 2:42 PM

5
English
INTRODUCTION
CONTROLS AND FUNCTIONS
y
From left:
PLAY MODE
Press to switch between random play, program play,
and normal playback.
REPEAT
Press to repeat playback.
A-B
Press to repeat a section specified by two points.
MARKER
Press to mark and store location points for future ref-
erence.
u
From left:
SUBTITLE
Press to select a subtitle language.
AUDIO
Press to select a DVD-Audio language.
ANGLE
Press to change the camera angle on discs recorded
with multiple camera angles.
i
From top left:
TOP MENU
Press to display the top-level disc menu screen.
MENU
Press to display a menu screen.
kk
kk
,
nn
nn
,
ll
ll
,
hh
hh
/ENTER
Press to select and execute a menu item.
ON SCREEN
Press to turn the on-screen icons on or off on the video
monitor.
RETURN
Press to display the previous screen when navigating
the menus.
o
From left:
tt
tt
yy
yy
(skip)
Press repeatedly to locate the top of the previous or
subsequent tracks.
ee
ee
rr
rr
(slow/search)
Press to fast reverse or fast forward.
p
Numeric buttons
Press to enter numbers.
CANCEL
Press to cancel a mode or setting.
a
From left:
GROUP
Press to select a DVD-Audio group.
PAGE
Press to select a DVD-Audio still picture.
PROGRESSIVE button (U.S.A. model only)
Press to toggle between progressive video output and
interlaced video output in DVD mode.
VIDEO OFF
Press to switch video output on and off during DVD-
Audio playback.
s
From left:
TIME
Press to select the time display in SACD mode.
DIMMER
Press to adjust the brightness of the front panel display
in SACD mode.
MULTI/2CH
Press to toggle between stereo playback and multi-
channel playback in SACD mode during playback of a
super-audio CD that contains both stereo (two chan-
nels) and multi-audio channel data.
d
SETUP
Press to display the setup menu screen.
DVD-S2300_G.book Page 5 Friday, October 18, 2002 2:42 PM

CONTROLS AND FUNCTIONS
6
1
Disc type indicators
The indicator for the type of disc currently being
played lights up.
SACD:
Super audio CD
CD:
Audio CD
DVD AUDIO:
DVD-Audio
DVD VIDEO:
DVD-Video
VCD:
Video CD
MP3:
MP3-format CD-R or CD-RW
2
Playback indicator
Lights up during playback. Blinks while the resume
function is operating (see “Resume function” on
page 10).
3
Play mode indicators
The indicator for the current playback mode lights up.
PROG:
Program play
RNDM:
Random play
REP:
Repeat play
REP A-B:
Repeat A-B
REP ALL:
Repeat All
4
Audio format indicators
The indicator for the disc audio format lights up. If
multiple audio formats are recorded on a disc, the indi-
cator for the format selected by the disc menu or unit
operation lights up.
(Dolby Digital)
PCM (Linear PCM)
P.PCM (Packed PCM)
MULTI (Multi-channel)
2 CH (2-channel)
D.MIX (Down Mix):
This indicator lights up during playback of a DVD-
Audio track that has multiple audio channel signals
(that can be mixed down to two channels).
VSS:
Lights up in virtual surround mode.
5
Multi-information display
Displays various information, including the disc title,
chapter number, track number, elapsed playing time,
etc.
6
ANGLE indicator
Lights up during playback of those scenes for which
the DVD features multiple camera angles.
7
Multi-information display mode indicators
GROUP:
The display indicates a group number.
TITLE:
The display indicates a title number.
TRACK:
The display indicates a track number.
CHAP:
The display indicates a chapter number.
8
Pause indicator
Lights up when the picture freezes or disc playback
pauses.
9
Speaker channel indicators
The indicators for the current audio channel light up.
L:
left main;
C:
center;
R:
right main;
RL:
left rear;
SW:
subwoofer;
RR:
right rear
Front panel display
12 3 4
59
8 7 6
DVD-S2300_G.book Page 6 Friday, October 18, 2002 2:42 PM

7
English
PREPARATION
PREPARATION
Before you make connections, unplug the power cable for the unit and all other components. Do not plug in the power
cables until all connections are complete.
Use the following commercially-available cables to make connections:
CONNECTIONS
Types of connectors
Connect these
audio output jacks
to the audio input
of an AV amplifier.
Connect these video
output jacks to the
video input of an AV
amplifier or the input of
a video monitor.
This jack is reserved for fac-
tory use. Do not connect any
equipment to this jack.
Remote control in/out
jacks
After all connections
are complete, plug the
included power cable
into an AC outlet.
TO AC
OUTLET
Audio cables
Audio pin cable
Coaxial cable
Optical cable
Video pin cable
S Video cable
Component video cable
(for U.S.A. and Australian models)
Video cables
A/V cable
Audio/Video cable
(One cable included in the package)
SCART cable
(for U.K. and European models)
DVD-S2300_G.book Page 7 Friday, October 18, 2002 2:42 PM

CONNECTIONS
8
You can connect the unit’s video output to a video monitor, or the video input on an AV amplifier (which in turn is con-
nected to a video monitor). Connecting to an AV amplifier enables you to control audio and video using the AV amplifier.
You can set up the AV amplifier using this unit’s OSD (on-screen display).
This unit features several types of video output jacks.
Determine the one compatible with the inputs on your
video monitor. Use the appropriate cable to connect the
unit to an AV amplifier, and the AV amplifier to the moni-
tor.
1
S VIDEO outputs (1, 2)
The S VIDEO jacks output discrete C and Y signals to
reproduce higher-quality images than normal compos-
ite video. Connect one end of an S Video cable (not
included) to either S VIDEO jack. Connect the other
end to an S Video input on an AV amplifier or video
monitor.
2
VIDEO outputs (1, 2)
The VIDEO jacks output normal composite video sig-
nals. Use the yellow plugs on an audio/video cable to
connect either VIDEO jack to a video input on an AV
amplifier or video monitor.
The same signal is output from VIDEO 1 and VIDEO
2, enabling connection to two devices (e.g., a monitor
and an AV amplifier) simultaneously.
3
COMPONENT outputs
(U.S.A. and Australian models only)
These jacks output three discrete CCY signals (“com-
ponent video”) to reproduce a higher-quality image
than S Video.
(U.S.A. model only)
This unit features a DCDi circuit (with the latest con-
tour correction technology) and progressive output,
which produces very smooth and natural high-quality
pictures even on a big screen. Use a component video
cable (not included) to connect the COMPONENT
output jacks to the component video input connectors
on an AV amplifier or video monitor.
4
AV connector
(U.K. and Europe models only)
If your monitor has only one jack for video input, you
can use the SCART output jack on this unit to connect
the unit directly to the monitor. This connection pro-
vides the best picture quality.
Note
• Do not connect this unit to a video monitor through a
video cassette recorder. If you do so, the picture may not
play back properly due to the copyright protection tech-
nology incorporated in this unit.
Video connections
12
34
Monitor
AV amplifier
To S VIDEO
To VIDEO
To COMPONENT
VIDEO
MONITOR OUT
DVD-S2300_G.book Page 8 Friday, October 18, 2002 2:42 PM

9
English
CONNECTIONS
PREPARATION
Select connectors that are compatible with your amplifier and appropriate for your requirements.
1
DIGITAL OUT jacks
• Connect the OPTICAL jack to the amplifier’s optical
digital input using fiber optic cable (not included)
-or-
• Connect the COAXIAL jack to the amplifier’s coaxial
digital input using coaxial digital cable (not included).
Note
• No audio signal is output from DIGITAL OUT during
SACD playback. Use connection
2
or
3
below.
2
MIXED 2CH jacks
Use the included audio/video pin cable to connect
these jacks to analog stereo input jacks on the ampli-
fier. Connect the white plug to the L jack. Connect the
red plug to the R jack. (The yellow plug is used for the
video signal.)
3
6CH DISCRETE jacks
Use an audio pin cable
(not included)
to connect these
jacks to the corresponding channel inputs (such as
MAIN L/R, CENTER) on the amplifier (often labelled
“6CH INPUT”).
Connect the SUBWOOFER jack to the subwoofer
input on the amplifier. This jack outputs a more natu-
ral, high-fidelity low range relative to the SUB OUT/
BASS MGMT jack explained below. However, during
playback of a two-channel (stereo) source, the sub-
woofer does not output any sound due to lack of LFE
(low-frequency effects assigned to a subwoofer).
★
SUB OUT/BASS MGMT jack
SUB OUT/BASS MGMT aggregates and outputs the
low ranges of all channels. An alternative to 6CH DIS-
CRETE SUBWOOFER output, this jack outputs a
powerful and supple sound even when the main speaker
is small (with a woofer diameter of 16cm or less).
Use an audio pin cable (not included) to connect the
SUB OUT/BASS MGMT jack to the subwoofer input
on the amplifier.
These jacks are used in custom installations to transmit
remote control signals via cable.
• Connect REMOTE CONTROL IN to an output on your
remote control system.
• Connect REMOTE CONTROL OUT to a remote con-
trol input on another component to enable system con-
trol.
Audio connections
Using AV amplifier’s 6.1 channel decoding
(DVD-Video) and surround effects:
Playing SACD or DVD multi-channel audio:
Remote control in/out jack
12 3
★
Speakers
AV amplifier
DIGITAL INPUT
Either one
To OPTICAL
To AUDIO
(analog ste-
reo input)
To 6CH INPUT
To COAXIAL
DVD-S2300_G.book Page 9 Friday, October 18, 2002 2:42 PM

10
PLAYING A DISC
Before playing a disc, you must connect the unit’s audio
and video output jacks to an AV amplifier or other system
component (refer to pages 8 and 9).
Note
• If you digitally connect the unit to an amplifier that does not
feature a DTS decoder, set DTS DIGITAL SURROUND to
PCM (factory default) in the Setup/Audio menu. Otherwise,
unprocessed digital signal noise will be output that may dam-
age your hearing or speakers.
1
Press POWER to turn on the power.
2
Press OPEN/CLOSE to open the disc tray.
3
Load a disc into the disc tray.
4
If necessary, press SACD/DVD to change the
mode.
For more information, refer to “Switching disc play
mode” on page 10 (below).
5
Press
ww
ww
.
The disc tray closes and playback starts.
y
• If one of the following indicators is displayed
refer to “Using disc menus” on
page 13.
• When the unit finishes playing a DVD, it stops playback or dis-
plays a menu screen.
Note
• The unit cannot play CD-R or CD-RW discs that have not been
finalized. Be sure to finalize discs on a CD recorder before
playing them in this unit. (The term “finalize” refers to an
audio process for CD-Rs or CD-RWs that prepares them for
play on supporting players.)
■
Switching disc play mode
While the unit is stopped or the disc tray is
open, press SACD/DVD.
The unit includes independent playback circuits for
SACDs and DVDs to optimize use of each disc type.
•To play an SACD, switch to SACD mode.
•To play other types of discs, switch to DVD mode.
Use SACD mode to play .
The SACD mode indicator lights up.
Use DVD mode to play , , , and
The DVD mode indicator lights up.
y
• If you are playing a hybrid disc that contains both SACD for-
mat data and conventional CD format data, select SACD mode
to play the SACD format data, or DVD mode to play the CD
format data.
■
To stop playback
Press
a
.
■
Resume function
The unit retains memory of the point at which you pressed
the
a
button as long as the power to the unit is turned on.
During this time, the
WW
WW
indicator will flash on the display.
Press
w
to resume playback from the stop point.
PLAYING A DISC
Before starting playback
Basic operation
POWER
SACD/DVD
OPEN/CLOSE
DVD/SACD mode
indicator
DVD-A DVD-V
VCD
SACD
DVD-A DVD-V
VCD
CD
DVD-S2300_G.book Page 10 Friday, October 18, 2002 2:42 PM

11
English
PLAYING A DISC
PLAYING A DISC
To clear the memory, press
a
again. The
W
indicator dis-
appears. (When a DVD-Video disc is played, a
chapter
review screen will appear.)
Note
• Opening the disc tray cancels the resume function.
■
Chapter review function
This function plays the first few seconds of each chapter
(from the beginning of the title up to the memorized point)
so you can review previous chapters.
Press
w
while the chapter review message is displayed on
screen. (If you do not press
w
, after a while the message
disappears and playback resumes.)
Notes
• This function may not work on some DVDs.
• Canceling the resume function also clears the chapter review
function.
■
After operating the unit
Press
v
to open the disc tray. Remove the disc, then press
POWER to turn off the unit.
■
Skip
On the remote control, press
y
(or
t
) to skip forward
(or backward).
On the front panel, press
r
/
y
(or
t
/
e
) to skip for-
ward (or backward).
Press
t
on the remote control or
t
/
e
on the front
panel to locate the top of the current chapter or track.
Note
• VCDs that use playback control (page 13) may not allow the
skip operation to function as described above.
■
Selecting a track
Key in the desired track number using the numeric but-
tons.
Example (to select track 27):
1
Press
≥
10.
2
Press 2.
3
Press 7.
1
Press
≥
10 twice.
2
Press 7.
■
Search
On the remote control, press
r
(or
e
) to search for-
ward (or backward).
-or-
On the front panel, press and hold
r
/
y
(or
t
/
e
) to
search forward (or backward).
y
•To increase search speed, repeatedly press (or press and hold)
r or e on the remote control, or press and hold r/y or
t/e on the front panel.
■ Pause
Press d during playback.
To resume playback, press w.
■ Frame advance/reverse
To advance or reverse frames: While the pic-
ture is still or in pause mode, press the cur-
sor buttons (ll
ll
, hh
hh
).
•To return to normal playback, press w.
• Press the cursor buttons (l, h) repeatedly, or
press and hold them, to advance or reverse frames
at increasing rates of speed.
• Pressing d also advances a few frames.
• On certain DVD-Audio discs, frames may advance
or reverse only during the video portions of the
disc.
Note
• The Video CD format does not permit reverse navigation.
DVD-V
1
7
≥10
,
VCD CDSACD
VCD CD
SACD
VCDDVD-A DVD-V
DVD-S2300_G.book Page 11 Friday, October 18, 2002 2:42 PM

PLAYING A DISC
12
■
Slow
To play a disc slowly, while the picture is still
or paused:
Press
ee
ee
or
rr
rr
on the remote control.
-or-
Press and hold
r
/
y
(or
t
/
e
) on the
front panel.
•To return to normal playback, press
w
.
•To increase the speed, repeatedly press (or press
and hold)
r
,
e
on the remote control; or press
and hold
r
/
y
,
t
/
e
on the front panel.
Note
• The Video CD format does not permit reverse navigation.
There are three types of Super Audio CDs:
•a
2-channel disc
that contains stereo audio
•a
multi-channel disc
that includes up to six (6) channels
of data
•a
combination disc
that includes a 2-channel data area
and a multi-channel data area.
■
Switching between different chan-
nel areas
Select your desired area for playback on a combination
disc.
While the unit is stopped, press MULTI/2CH.
When the multi-channel area is selected, the MULTI indi-
cator lights up on the display. When the 2-channel area is
selected, the 2CH indicator lights up on the display.
The unit can play MP3 format audio that was recorded by
a computer onto CD-R or CD-RW.
• If an MP3 file is of poor quality, playback may not be possible.
Disc Structure Example
MP3 discs are different than standard audio CDs.
The MP3 format is so compact and efficient that the equiv-
alent of several albums or standard audio CDs may be
stored on a single MP3 disc.
The unit creates a folder for the “Title” and a file for each
“Chapter.”
Starting playback from a selected chapter
Select a chapter using the numeric buttons (see “Selecting
a track” on page 11), then press ENTER to play the chap-
ter.
Repeat play
To repeat playback, use chapter repeat or title repeat (see
page 18 for details).
Notes
• This unit can play MP3 discs recorded at bit rates of 32kbps to
320kbps and sampling frequencies of 44.1kHa and 48kHz. (A
sampling frequency of 32kHz is not supported.)
• Program play and random play are unavailable on MP3 discs.
• Chapters may not play in the order selected at the time of
recording.
Disc info icons (on-screen) during playback
Super Audio CDs
VCDDVD-A DVD-V
2-channel area
Multi-channel area
MULTI/2CH
MP3 playback
Root directory
: Title (Folder)
: Chapter (File)
1/ 59
C
0 : 01
Total chapter number
Current chapter Elapsed play time (for display
only)
DVD-S2300_G.book Page 12 Friday, October 18, 2002 2:42 PM

13
English
PLAYING A DISC
Many discs include menu screens that enable you to con-
trol special features, such as skipping to a favorite title or
chapter, or selecting an audio language or subtitle lan-
guage for a movie. This section provides general instruc-
tions on operating these screens.
1
Press TOP MENU or MENU during playback.
The video monitor displays a menu.
• On certain discs, the menu appears automatically
when you start playback.
2
Press the cursor buttons (
kk
kk
,
nn
nn
,
ll
ll
,
hh
hh
) to
select the desired item, then press ENTER.
(If another menu screen appears, repeat this step.)
■
Video CD playback control (PBC
menu play)
Video CDs that feature “playback control” allow you to
navigate certain scenes or information by menu.
This manual refers to the use of menus to control Video
CD playback as “menu play.”
Numeric buttons:
Press to select the desired item.
RETURN:
Press to display the initial menu screen.
ww
ww
(PLAY):
Press to play the selected item.
yy
yy
:
Press to display the next screen.
tt
tt
:
Press to display the previous screen.
aa
aa
(STOP):
Press while a menu is displayed to
cancel playback control.
Notes
• Playback control is automatically canceled during program
play or random play.
• Certain discs may not respond as described above.
The unit’s COMPONENT video jack can output progres-
sive signals to a progressive signal compatible monitor for
an extra high-quality picture.
Press PROGRESSIVE.
The PROGRESSIVE indicator lights up.
To cancel this feature, press PROGRESSIVE again.
Notes
• If the screen shifts off center during progressive output, refer to
“Adjusting the screen position,” described below.
• When playing 4:3 aspect video on a 16:9 aspect wide-screen
monitor using progressive output, the picture may stretch hori-
zontally to fill the screen. In this case, change the aspect ratio
to suit the monitor. If this is not possible, turn the progressive
feature off. (The progressive output will switch to interlace
output.)
• When the progressive function is working, video signals are
output from only the COMPONENT output jacks.
MISCELLANEOUS FUNCTIONS
Using disc menus
MENU
TOP MENU
RETURN
, , ,
/ ENTER
Numeric
buttons
DVD-V
DVD-A
VCD
Enhancing video quality - Progres-
sive output (U.S.A. model only)
PROGRESSIVE
PROGRESSIVE indicator
DVD-S2300_G.book Page 13 Friday, October 18, 2002 2:42 PM

MISCELLANEOUS FUNCTIONS
14
■
Adjusting the screen position
(when using progressive output)
Progressive signals output from the unit may shift off cen-
ter on certain monitors. To adjust the screen position, use
the remote control as follows:
1
Press
dd
dd
to pause playback.
2
Follow step 1 under “Operating the menu
bar” on page 20 to display the Picture set-
ting.
3
Press the cursor buttons (
ll
ll
,
hh
hh
) to select the
right-most icon ( ).
4
Adjust the screen position.
To move the image to the left, press numeric button 1.
To move the image to the right, press numeric button
3.
• Pressing numeric button 2 after pressing 1 or 3
sets the screen back to the original position.
•To check whether the picture is centered, switch to
normal output (press PROGRESSIVE to turn the
indicator off).
5
Save the adjusted position.
First press
a
, then press SETUP to display the setup
menu. Press SETUP again (or RETURN) to save the
position. (Even if you skip this step, the position will
be saved until you turn the power off.)
■
Playing a track in a specific group
1
Press GROUP.
The video monitor displays group and track icons.
2
Press the cursor buttons (
kk
kk
,
nn
nn
) to select a
group number, then press ENTER.
3
Press the cursor buttons (
kk
kk
,
nn
nn
) to select a
track number, then press ENTER.
The selected track starts to play.
y
•You can also use the numeric buttons to select a group and a track.
■
Playing bonus groups
Some discs contain bonus groups that require a four-digit
password to gain access. In this case, consult the disc
jacket and other packaging for information.
1
While playback is stopped, press GROUP.
The video monitor displays group and track icons.
2
Press the cursor buttons (
k, n) to select a
bonus group, then press ENTER or the cur-
sor button (h).
3 Enter a four-digit password using the
numeric buttons, then press ENTER.
4 Press the cursor buttons (k, n) to select a
track, then press ENTER.
CONSUMERS SHOULD NOTE THAT NOT ALL HIGH DEF-
INITION TELEVISION SETS ARE FULLY COMPATIBLE
WITH THIS PRODUCT AND MAY CAUSE ARTIFACTS TO
BE DISPLAYED IN THE PICTURE. IN CASE OF 525 PRO-
GRESSIVE SCAN PICTURE PROBLEMS, IT IS RECOM-
MENDED THAT YOU SWITCH THE CONNECTION TO
THE “STANDARD DEFINITION” OUTPUT. IF THERE ARE
QUESTIONS REGARDING YOUR VIDEO MONITOR COM-
PATIBILITY WITH THIS UNIT, PLEASE CONTACT OUR
CUSTOMER SERVICE CENTER.
This unit is compatible with the complete line of
YAMAHA projectors, including the DPX-1, LPX-500, PDM-1
and DPX-1000.
Example:
Press 3 to move to the right.
DVD-Audio features
DVD-A
, , ,
/ ENTER
PAGE
GROUP
DVD-S2300_G.book Page 14 Friday, October 18, 2002 2:42 PM

15
English
PLAYING A DISC
MISCELLANEOUS FUNCTIONS
■
Changing pages
DVD-Audio discs can contain information pages that can
include photo galleries, artist biographies, lyrics, etc.
Press PAGE to turn the page. (The page number will
update on the display when you change pages.)
Some discs are encoded with several audio tracks, multi-
lingual subtitles or multiple camera angles. Refer to the
disc jacket to learn which features are supported.
■
Changing audio tracks
You can select different audio track languages and/or for-
mats, if they are available on a disc.
Press AUDIO during playback.
• Press AUDIO repeatedly to step through all audio
tracks on a disc. The cursor buttons (
k
,
n
) and the
numeric buttons also change tracks.
y
• If you change audio tracks while playing a non-video portion
of a DVD-Audio disc, playback begins at the beginning of the
track.
• On a DVD-Audio disc, track 2 appears on the front display
even if the disc contains only one audio track.
•You can also use the button to turn the vocals on or off on
karaoke discs. See the disc instructions for details.
■
Selecting a subtitle language
Press SUBTITLE during playback.
• Press SUBTITLE repeatedly to step through all
subtitles on the disc. The cursor buttons (
k
,
n
) and
the numeric buttons also change subtitles.
y
• “- -” is displayed if a disc does not include a subtitle.
Note
• Subtitles may not be displayed immediately.
Turning subtitles on or off
1
Press SUBTITLE.
2
Press the cursor button (
hh
hh
).
(, ONLY)
3
Press the cursor buttons (
k
,
n
) to select ON
or OFF.
■
Changing angles
Press ANGLE.
• Press ANGLE repeatedly to step through all
angles recorded on the disc. The cursor buttons (
k
,
n
) and the numeric buttons also change angles.
■
Turning the icons off
Press RETURN.
Note
• Certain discs require that you use a disc menu to change audio
tracks, subtitles or angles.
Switching audio tracks, subtitles
and angles
DVD-V VCDDVD-A
RETURN
AUDIO
ANGLE
SUBTITLE
, , ,
Numeric
buttons
96k24b
LPCM
1
This icon appears on the video
monitor.
ENG
ON
1
This icon appears on the video monitor.
DVD-A
DVD-V
1
This icon appears on the video monitor.
DVD-S2300_G.book Page 15 Friday, October 18, 2002 2:42 PM

MISCELLANEOUS FUNCTIONS
16
Enjoy listening to your favorite tracks in any order. This
unit enables you to program sequence for up to 32 tracks
from disc.
1
Press
aa
aa
to stop playback.
2
Press PLAY MODE repeatedly to select the
program screen.
Each time you press PLAY MODE, the screen
changes as follows:
Press the button repeatedly to light up the indicators in the
following order:
Example: (Program play)
Note
• On combination discs (which include 2-channel and multi-
channel areas), you can program tracks only in the currently-
selected area.
3
Press numeric buttons to select the track.
4
Press
ww
ww
to start playback.
y
•You can also use numeric buttons to select a group or track.
• The “All group play” screen (playback of all groups in order) is
added to step 2.
• In step 4, press the cursor buttons (
k
,
n
) to select a group, then
press ENTER. Press the cursor buttons (
k
,
n
) again to select a
track, then press ENTER.
■
Changing or adding to the pro-
gram during program play
1
Press
aa
aa
repeatedly to stop program play.
2
Press the cursor buttons (
kk
kk
,
nn
nn
) to select the
desired track order position.
3
Press the numeric buttons to enter a track
number.
■
Canceling programmed tracks
1
Press
aa
aa
repeatedly to stop program play.
2
Press the cursor buttons (
kk
kk
,
nn
nn
) to select a
track to cancel.
3
Press CANCEL.
Note
• If you program a Video CD track (ver. 2.0), playback con-
trol is canceled during program play.
■ Navigating up and down pages on
the program screen
Press e to move up the page, or press r to move down
the page.
■ Exiting programming mode
1 Press aa
aa
repeatedly to stop program play.
2 Press PLAY MODE twice.
•Turning off the power or opening the disc tray will
cancel all programs.
Program play
CDDVD-A VCDSACD
CANCEL
PLAY MODE
, , ,
/ ENTER
Numeric
buttons
CDDVD-A VCD
PLAY MODE
Choose a track, then press ENTER.
No Track
Press PLAY to start
Play
0:00
Time
Clear
Clear all
Total time
1
ENTER
SELECT
RETURN
Video monitor display (example)
Program screen (Program play mode)
Playing in desired order
Random screen (Random play mode)
Playing in random sequence
Return to normal playback
SACD
PROG (Program play)
RNDM (Random play)normal playback
DVD-A
DVD-S2300_G.book Page 16 Friday, October 18, 2002 2:42 PM

17
English
PLAYING A DISC
MISCELLANEOUS FUNCTIONS
In random play mode, the unit plays all tracks on the disc
in random order.
1
Press
aa
aa
to stop playback.
2
Press PLAY MODE repeatedly.
The “RNDM” indicator lights up on the front panel
display.
3
Press
ww
ww
to start random play.
■
Canceling random mode
1
Press
aa
aa
repeatedly to stop playback during
random play.
2
Press PLAY MODE.
The “RNDM” indicator disappears.
• Opening the disc tray also cancels this mode.
Notes
• When the unit is in random mode, Video CD playback
control is canceled.
• Up to 100 tracks can be programmed for SACD random
play.
In step 2 of “Random play,” press the cursor buttons
(
l
,
h
) to select a group, then press ENTER.
Example: DVD-Audio (a disc with up to two groups)
y
•You can select multiple groups.
• Use the numeric buttons to select a group.
To cancel a selection, press the cursor buttons (
l
,
h
) to
select the group(s), then press CANCEL or ENTER.
y
•You can also cancel a group by entering its group number
using the numeric buttons.
1
Press
aa
aa
to stop playback.
2
Press PLAY MODE.
3
Press
ww
ww
.
Random play
CDDVD-A VCDSACD
PLAY MODE
CANCEL
ENTER
,
All group play
DVD-A
All 1 2
Choose a group or groups.
Random Playback
Press PLAY to start
ENTER
SELECT
RETURN
DVD-A
PLAY MODE
DVD-S2300_G.book Page 17 Friday, October 18, 2002 2:42 PM

MISCELLANEOUS FUNCTIONS
18
The Bookmark feature allows you to mark up to five
points (locations), enabling you to return quickly to those
points.
1
Press MARKER.
2
Press the cursor buttons (
ll
ll
,
hh
hh
) to select
one of five asterisks.
The selected asterisk is highlighted.
3
Press ENTER.
The selected asterisk changes to the bookmark num-
ber.
■
Playing from a marked point
Press the cursor buttons (
l
,
h
) to select a bookmark
number, then press ENTER.
■
Clearing a bookmark
Press the cursor buttons (
l
,
h
) to select a bookmark
number, then press CANCEL.
Note
• When you open the disc tray or turn the unit off, all bookmarks
are cleared.
To select Repeat mode, during playback
press REPEAT.
Each time you press the REPEAT button, the repeat
mode changes as follows.
During repeat play, the following indicators light up:
The selected repeat mode name scrolls across the multi-
information display.
Notes
• Repeat play may not work properly on all DVD-Video discs.
• Repeat play may not work during menu play of VCDs that fea-
ture playback control.
•For Super Audio CDs, only the indicators on the unit’s display
will light up.
• If you select “All” repeat for a disc that has a 2-channel area
and a multi-channel area, only tracks in the currently-selected
area will repeat.
Bookmarks
VCDDVD-A CDDVD-V
MARKER
CANCEL
,
/ ENTER
This icon appears on the video monitor.
Highlighted
Bookmark number
Repeat play
Indicators on
the monitor
Indicators on the unit
display
CHAPTER C REP
TITLE T REP
TRACK T REP
ALL A REP, ALL
GROUP G REP
VCDDVD-A CDDVD-VSACD
REPEAT
VCD
DVD-A
CD
DVD-V
SACD
CHAPTER
TITLE
NORMAL PLAYBACK
TRACK
GROUP
NORMAL PLAYBACK
TRACK
ALL (Entire disc)
NORMAL PLAYBACK
C
This icon appears on the video monitor.
DVD-S2300_G.book Page 18 Friday, October 18, 2002 2:42 PM

19
English
PLAYING A DISC
MISCELLANEOUS FUNCTIONS
■
Program repeat
During program play, press REPEAT.
Each time you press REPEAT, the repeat mode
changes as follows:
• The selected repeat mode is indicated on the unit’s dis-
play and on the monitor (for DVD-Audio, video CD,
and audio CD).
■
Random-sequence repeat
During random play, press REPEAT.
Each time you press REPEAT, the repeat mode
changes as follows:
• The selected repeat mode is indicated on the unit’s dis-
play and on the monitor (for DVD-Audio, video CD,
and audio CD).
The repeat A-B function enables you to specify two points
and repeatedly play the section between them.
1
During playback, press A-B at the desired
start point (A).
•“
REP
” and “
A-
” light up and “
B
” flashes on the front
panel display.
2
Press A-B at the desired end point (B).
• The flashing “
B
” lights up steadily on the front panel. The
section between points A and B starts playing repeatedly
(looping).
■
Canceling A-B repeat
Press A-B.
Notes
• This function may be unavailable on certain DVD-Video discs.
• This function works only within a title or track.
•With Super Audio CDs, the icon appears only on the unit’s dis-
play.
CDDVD-A VCDSACD
TRACK
ALL (Entire program)
NORMAL PROGRAM PLAY
CDDVD-A VCDSACD
TRACK
ALL (Entire disc)
NORMAL RANDOM PLAY
Repeat A-B
VCDDVD-A CDDVD-V
SACD
A-B
A
This icon appears on the video monitor.
AB
This icon appears on the video monitor.
This icon appears on the video monitor.
DVD-S2300_G.book Page 19 Friday, October 18, 2002 2:42 PM

20
You can control various items using the on-screen menu
bar.
1
Press ON SCREEN.
Each time you press ON SCREEN, the on-screen bar
changes as follows:
The Player Info bar includes four menu bars, as illus-
trated below. To switch menu bars, press the cursor
buttons (
k
,
n
).
2
Press the cursor buttons (
ll
ll
,
hh
hh
) to select an
item to adjust.
The selected item is highlighted.
3
Press the cursor buttons (
kk
kk
,
nn
nn
,
ll
ll
,
hh
hh
) to
adjust the setting.
• Certain items may require that you press ENTER
or
h
to execute the setting.
•You can also use the numeric buttons to specify a
chapter number, etc.
■
Turning the screen off
Press RETURN repeatedly.
Note
• Certain items are inaccessible when playback is stopped.
■
Changing the menu bar position
To adjust the menu bar position:
1
Press the cursor buttons (
ll
ll
,
hh
hh
) to select the
right-most icon ( ).
2
Press the cursor buttons (
kk
kk
,
nn
nn
) to move the
menu bar.
ON-SCREEN MENU (DVD MODE ONLY)
Operating the menu bar
ON SCREEN
RETURN
, , ,
/ ENTER
Numeric
buttons
OFF
1 2 3 ✱✱
AB
–––
2
C
2
1 : 46 : 50
1 ENG 3/2.1 ch
Digital
ENG
ON
1
1
T
+
100
–
100
a
b
c
Disc Info bar
Off
Shuttle bar
Player Info bar (Play setting)
N
OFF
SP OFF
OFF BRIGHT
IPB
OFF
1 2 3 ✱✱
AB
–––
d
e
f
g
Play setting
Picture setting
Audio setting
Display setting
N
Example)
DVD-S2300_G.book Page 20 Friday, October 18, 2002 2:42 PM

21
English
PLAYING A DISC
ON-SCREEN MENU (DVD MODE ONLY)
Example: DVD-Video
Notes
• The display may vary in accordance with disc specifications.
• The time remaining on the disc does not appear during pro-
gram play or random play.
• When playing a Video CD disc using playback control, no
track number or time is displayed.
ÅÅ
ÅÅ
Language
ıı
ıı
Signal type/data
LPCM/PPCM/
q
DolbyDigital/DTS/MPEG: Signal type
k (kHz): Sampling frequency
b (bit): Number of bits
ch (channel): Number of channels
Example:
Disc Info bar
Title number
Track number
Chapter number
Group number
Time index (hour:minute:second)
You can start playback from a specific
point by keying in the elapsed time.
For example, to start playback from
1:46:50 (1 hr 46 min 50 sec), press these
buttons in the following order:
[1]
^
[4]
^
[6]
^
[5]
^
[0]
^
[ENTER]
Changing the time display
Audio mode
Select a channel to output sound from
that channel.
Audio format
1
Audio track number
2
Audio track/language:
See Å
for language abbreviations.
3
Audio signal type:
See ı
for details.
2
C
2
1 : 46 : 50
1 ENG 3/2.1 ch
Digital
ENG
ON
1
1
T
2
T
DVD-V
DVD-A VCD CD
2
C
DVD-V
2
G
DVD-A
1 : 46 : 50
DVD-A DVD-V
DVD-A VCD CD
Track elapsed time
Track remaining time
Disc remaining time
(for display only)
L R
VCD
LR L R
1 ENG 3/2.1 ch
Digital
12 3
DVD-A DVD-V
Karaoke vocal on/off
(Karaoke DVD only)
Solo: OFF or ON
Duet: OFF, V1+V2, V1 or V2
1
Subtitle on/off
2
Subtitle language
Select a number to display the desired
subtitle language.
Angle number
Select an angle number to play the scene
from that angle.
Playback control
Indicates whether playback control is on
or off.
Playback control cannot be adjusted.
Page number
Select a page number to display the
page.
ENG: English
FRA: French
DEU: German
ITA: Italian
ESP: Spanish
NLD: Dutch
SVE: Swedish
NOR: Norwegian
DAN: Danish
POR: Portuguese
RUS: Russian
JPN: Japanese
CHI: Chinese
KOR: Korean
MAL: Malay
VIE: Vietnamese
THA: Thai
*: Others
1 ✱
Vocal
OFF
DVD-A DVD-V
ENG
ON
1
1
2
DVD-A DVD-V
1
DVD-A DVD-V
ON
P B C
VCD
Page
1
DVD-A
3/2 .1ch
1: Subwoofer
(not displayed if no subwoofer signal)
0: Rear channel not available on disc
1: Rear channel (monaural)
2: Rear channels (left/right)
1: Main channel (monaural)
2: Main channels (left/right)
3: Main channels (left/right) + Center
DVD-S2300_G.book Page 21 Friday, October 18, 2002 2:42 PM

ON-SCREEN MENU (DVD MODE ONLY)
22
■
Play setting
Example: DVD-Video
■
Display setting
Example: DVD-Video
■
Audio setting
Example: DVD-Video
Player Info bar
A-B repeat (see
page 19)
[ENTER] (start point)
^
[ENTER] (finish
point)
^
[ENTER] (playback)
To cancel
[ENTER]
Repeat play (see
page 18)
C: Chapter; T: Title; OFF: Normal play-
back
T: Track; A: All; G: Group; OFF: Nor-
mal playback
Play mode display
(for display only)
RND: Random play; PGM: Program
play; – – –: Normal playback
ALL: All groups
Bookmarks (see
page 18)
You can mark up to five (5) places to
play again.
To mark a point:
[
l
,
h
]
^
[ENTER] (at the desired point)
To recall a bookmark:
[
l
,
h
]
^
[ENTER]
To erase a bookmark:
[
l
,
h
]
^
[CANCEL]
OFF
1 2 3 ✱✱
AB
–––
AB
DVD-V VCD CDDVD-A
OFF
DVD-V
DVD-A VCD CD
–––
DVD-A VCD CD
DVD-A
1 2 3 ✱✱
DVD-V VCD CDDVD-A
IPB display
I, P, and B indicate still picture types.
Type I pictures are the largest (in data
size), followed by types P and B. Type I
pictures offer the highest picture quality.
Display dimmer
Changes the brightness of the front panel
display.
Select AUTO to dim the front panel dis-
play when a disc containing video is
played. Pressing PAUSE will brighten
the front panel temporarily.
Virtual Surround ( , ,
)
•
Speaker V.S.S (SP-V.S.S.)
Dolby Digital, DTS, MPEG, LPCM
Two or more-channel discs
•
Headphone V.S.S (HP-V.S.S.)
Dolby Digital, MPEG, LPCM
Two or more-channel discs
V.S.S. level
SP 1/HP1:
standard
SP 2/HP 2:
high
SP off/HP off:
V.S.S. canceled
Cinema dialog
(Dolby Digital/DTS 3ch or more channel
discs)
Select ON to increase the volume of dia-
log output from the center channel.
OFF BRIGHT
IPB
OFF
IPB
DVD-V
ON OFF
BRIGHT
BRIGHT DIM AUTO
SP OFF
OFF
SP OFF
V.S.S. DVD-V
VCD
OFF
DVD-V
DVD-S2300_G.book Page 22 Friday, October 18, 2002 2:42 PM

23
English
PLAYING A DISC
ON-SCREEN MENU (DVD MODE ONLY)
■
Picture setting
When PROGRESSIVE is on (U.S.A. model)
Note
• On DVD-Audio discs, slow-motion works only on the video
portion.
Digital picture mode
N:
Normal
C:
Cinema image (suited for movie
viewing)
U:
User mode
To change the User mode:
1
Select User mode.
2
Press (
l
,
h
) to select an item to
change.
3
Press (
k
,
n
) to adjust the setting.
The following items are displayed when
you select “U.”
U Contrast (–7 to +7)
Adjusts the contrast between the light
and dark areas of the picture.
Brightness (0 to +15)
Adjusts the overall brightness of the
picture.
Sharpness (–6 to +6)
(U.K., European, and Australian
models)
Adjusts the horizontal resolution of
the picture.
Color (–7 to +7)
Adjusts the picture color.
N
N
DVD-V VCDDVD-A
0
0
0
0
Digital picture mode
N:
Normal
C:
Cinema image (suited for movie
viewing)
Transfer MODE
Selects the method of converting film
material (recorded at 24fps) or video
material (recorded at 30fps) into pro-
gressive output.
Auto (normal):
For viewing film mate-
rial
Video:
For viewing video material
N
Auto
N
DVD-V VCDDVD-A
Auto
Shuttle bar
+
100
–
100
Search
: Forward
DVD-V
DVD-A
DVD-VDVD-A
VCD CD
DVD-VDVD-A
VCD
DVD-VDVD-A
VCD CD
DVD-VDVD-A
VCD CD
DVD-VDVD-A
VCD CD
Slow-motion play
: Backward
Still/Pause
Slow-motion play
: Forward
Search
: Backward
Play
DVD-S2300_G.book Page 23 Friday, October 18, 2002 2:42 PM

24
DETAILED SETTINGS
The Setup menu enables you to change the factory default
settings.
1
Press SETUP.
The video monitor displays a menu.
2
Press the cursor buttons (
ll
ll
,
hh
hh
) to select a
menu group.
There are five menu groups. The screen displays
items that belong to the selected menu group.
3
Press the cursor buttons (
kk
kk
,
nn
nn
) to select the
desired item, then press ENTER.
4
Press the cursor buttons (
kk
kk
,
nn
nn
) to change the
setting, then press ENTER again to return to
the screen illustrated in step 2.
■
Returning to the previous screen
Press RETURN.
■
Exiting Setup mode
Press SETUP.
Note
• When you display the Setup menu, the DISC DIRECT func-
tion turns on automatically. When you exit the Setup menu, the
DISC DIRECT function returns to the previous setting.
■
Returning all settings on the
Setup menu to factory defaults
Press and hold down
vv
vv
,
dd
dd
, and
tt
tt
/
ee
ee
on the
front panel simultaneously until the video
monitor displays “Initialized.”
CHANGING THE DVD MODE SETTINGS
Using the Setup menu
SET UP
RETURN
, , ,
/ ENTER
Disc
SETUP
Audio
M
English
1
2
SETUP
At ti
Video
TV Aspect
4:3 Pan&Scan
TV Type
3
Audio
Multi-channelSpeaker Setting
SETUP
Display
ML Elih
SETUP
4
5
Others
D
SETUP
Disc menu
Others menu
Display menu
Audio menu
Video menu
DVD-S2300_G.book Page 24 Friday, October 18, 2002 2:42 PM

25
English
CHANGING THE DVD MODE SETTINGS
DETAILED SETTINGS
The following chart shows Menu groups, Items, and Options. Factory default settings are underlined.
Settings Summary
Menu groups Items Options
Disc
Audio
Select the preferred audio track language.
(U.S.A. model):
English / French / Spanish / Original* / Other**
(Australian model):
English / French / German / Italian / Spanish /
Original* / Other**
(U.K. and European models):
English / French / German / Italian / Spanish /
Original* / Other**
Subtitle
Select the preferred subtitle language.
(U.S.A. model):
Automatic / English / French / Spanish / Other**
(Australian model):
Automatic / English / French / German / Italian /
Spanish / Other**
(U.K. and European models):
Automatic / English / French / German / Italian /
Spanish / Other**
Menus
Select the preferred disc menu language.
(U.S.A. model):
English / French / Spanish / Other**
(Australian model):
English
/ French / German / Italian / Spanish /
Other**
(U.K. and European models):
English / French / German / Italian / Spanish /
Other**
Ratings
Set a ratings level to limit DVD-Video playback. See
page 28 for details.
Setting ratings level
8 No Limit / 1 to 7 / 0 Lock All
Changing ratings level
Unlock Player Change Level
Change Password Temporary Unlock
Video TV Aspect
If you connect to a 4:3 conventional-type monitor, select
“4:3 Pan&Scan” (left and right sides trimmed when playing
16:9 video) or “4:3 Letterbox” (black areas appear at the
top and bottom when playing 16:9 video). Select “16:9” if
you connect to a widescreen monitor.
4:3 Pan&Scan: On a conventional monitor, the
video image fills the monitor screen but is trimmed
on its left and right sides. / 4:3 Letterbox: On a
conventional monitor, black areas appear at the top
and bottom of the screen when playing 16:9 video.
/ 16:9: For a widescreen monitor
AV Output
(U.K. and European models)
Choose the video signal format to be output from the AV1
SCART jack.
Video / S-Video / RGB
DVD-A DVD-V
DVD-A DVD-V
DVD-A DVD-V
DVD-V
DVD-S2300_G.book Page 25 Friday, October 18, 2002 2:42 PM

CHANGING THE DVD MODE SETTINGS
26
Video Still Mode
Specify the type of picture shown in pause mode. First
select “Automatic.” If still pictures jitter, select “Field.” If
visual details are still not clear, select “Frame.”
Automatic
/ Field / Frame
A moving picture is composed of numerous still
images called frames. Each frame is composed of
two alternating fields. Each fields contains only
half the information of a still frame. Two alternat-
ing fields may result in a blurred frame.
In general, set Still Mode to “Automatic.”
Black Level Control
(U.S.A. model)
Change the black level of the picture. Select “Lighter”
when you connect to a monitor using the VIDEO or S
VIDEO jacks. Select “Darker” when using COMPONENT
output.
Lighter / Darker
NTSC Disc Output
(U.K., European and Australian models)
Select a video signal format (PAL 60 or NTSC) to be output
when playing an NTSC disc.
PAL 60 / NTSC
Audio
Speaker Setting
Set the parameters for the analog audio output (6CH DIS-
CRETE or MIXED 2CH) to suit your speaker system.
Multi-channel:
If 6CH DISCRETE output is being used.
(Also, select the speakers, speaker size, delay
time, and channel balance. See page 29.)
2-channel:
If MIXED 2CH output is being used.
PCM Down Conversion
Specify how to output high sampling-frequency audio sig-
nals from discs that are not copyright-protected. (See
page 28 for details.)
No
/ Yes
Dolby Digital
Specify the signal type output from the unit’s digital out-
puts. Select “Bitstream” if the connected device features a
Dolby Digital decoder. Select “PCM” otherwise.
Bitstream / PCM
DTS Digital Surround
Specify the signal type output from the unit’s digital out-
puts. Select “Bitstream” if the connected device features a
DTS decoder. Select “PCM” otherwise.
Bitstream / PCM
MPEG
(U.K., European and Australian models)
Specify the signal type output from the unit’s digital out-
puts. Select “Bitstream” if the connected device features an
MPEG decoder. Select “PCM” otherwise.
Bitstream / PCM
D. Range Compression
(Dolby Digital only)
Change the dynamic range for late-night viewing. Select
“On” to make it easier to hear dialog at low volume levels.
Of
f / On
Audio during Search
Select to enable sound during search. Select “Off” if the
sound is distorted when searching with Dolby Digital or
DTS material. With DVD-Audio, sound may be heard even
if you select “Off.”
On
/ Off
Menu groups Items Options
DVD-A DVD-V
DVD-A DVD-V
DVD-A DVD-V
DVD-A DVD-V
DVD-A DVD-V
DVD-A DVD-V
DVD-A DVD-V
VCD
DVD-S2300_G.book Page 26 Friday, October 18, 2002 2:42 PM

27
English
CHANGING THE DVD MODE SETTINGS
DETAILED SETTINGS
* If you set Audio to “Original,” the original language of each disc will be selected.
** If you set Audio, Subtitle, or Menus to “Other,” specify the language by selecting a four-digit number from the language code list
and enter it using the numeric buttons.
*** If the audio language you select is not recorded on the disc, but subtitles for the same language are recorded, the subtitles will be
displayed. However, if the audio is recorded on the disc, the subtitles will not be displayed.
■
Language selection and language code list
Note
• The language selected in the Setup menu cannot be heard if it is not present on the disc.
Display On-Screen Menu Language
Select the preferred language for the Setup menu and on-
screen messages.
(U.S.A. model):
English
/ Français / Español
(Australian model):
English / Français / Deutsch / Italiano / Español
(U.K. and Europe models):
English / Français / Deutsch / Italiano / Español
On-Screen Messages
Select whether or not to show on-screen messages.
On / Off
Others DVD-Video Mode
Some DVD-Audio discs contain DVD-Video content that
can be played only by a DVD-Video player.
On / Off
To play DVD-Video content, select “On.” To play
a normal DVD-Audio disc, select “Off.”
Demo
A demonstration of the unit’s on-screen displays starts
when you select “On”. The demonstration stops when you
press the
a
button, etc. The setting reverts to “Off”.
On / Off
Language code list
6565: Afar
6566: Abkhazian
6570: Afrikaans
6577: Ameharic
6582: Arabic
6583: Assamese
6588: Aymara
6590: Azerbaijani
6665: Bashkir
6669: Byelorussian
6671: Bulgarian
6672: Bihari
6678: Bengali; Bangla
6679: Tibetan
6682: Breton
6765: Catalan
6779: Corsican
6783: Czech
6789: Welsh
6865: Danish
6869: German
6890: Bhutani
6976: Greek
6978: English
6979: Esperanto
6983: Spanish
6984: Estonian
6985: Basque
7065: Persian
7073: Finnish
7074: Fiji
7079: Faroese
7082: French
7089: Frisian
7165: Irish
7168: Scots Gaelic
7176: Galician
7178: Guarani
7185: Gujarati
7265: Hausa
7273: Hindi
7282: Croatian
7285: Hungarian
7289: Armenian
7365: Interlingua
7378: Indonesian
7383: Icelandic
7384: Italian
7387: Hebrew
7465: Japanese
7473: Yiddish
7487: Javanese
7565: Georgian
7575: Kazakh
7576: Greenlandic
7577: Cambodian
7578: Kannada
7579: Korean
7583: Kashmiri
7585: Kurdish
7589: Kirghiz
7665: Latin
7678: Lingala
7679: Laotian
7684: Lithuanian
7686: Latvian, Lettish
7771: Malagasy
7773: Maori
7775: Macedonian
7776: Malayalam
7778: Mongolian
7779: Moldavian
7782: Marathi
7783: Malay
7784: Maltese
7789: Burmese
7865: Nauru
7869: Nepali
7876: Dutch
7879: Norwegian
7982: Oriya
8065: Punjabi
8076: Polish
8083: Pashto, Pushto
8084: Portuguese
8185: Quechua
8277: Rhaeto-Romance
8279: Romanian
8285: Russian
8365: Sanskrit
8368: Sindhi
8372: Serbo-Croatian
8373: Singhalese
8375: Slovak
8376: Slovenian
8377: Samoan
8378: Shona
8379: Somali
8381: Albanian
8382: Serbian
8385: Sundanese
8386: Swedish
8387: Swahili
8465: Tamil
8469: Telugu
8471: Tajik
8472: Thai
8473: Tigrinya
8475: Turkmen
8476: Tagalog
8479: Tonga
8482: Turkish
8484: Tatar
8487: Twi
8575: Ukrainian
8582: Urdu
8590: Uzbek
8673: Vietnamese
8679: Volapük
8779: Wolof
8872: Xhosa
8979: Yoruba
9072: Chinese
9085: Zulu
Menu groups Items Options
DVD-S2300_G.book Page 27 Friday, October 18, 2002 2:42 PM

CHANGING THE DVD MODE SETTINGS
28
The ratings level can be set from 0 through 8. (The lower
the number, the greater the restriction.)
■
Changing the ratings level (from
Level 8)
The unit may be set so that it will not play DVD videos
unsuitable for children. To play these videos or change the
restriction, you must enter a password.
When you select level 0 through 7, the unit displays the
password screen.
1
Press SETUP.
The video monitor displays a menu.
2
Press
nn
nn
to select “Ratings,” then press
ENTER.
3
Enter a four-digit number using the numeric
buttons, then press ENTER.
Press CANCEL to enter a different number.
Remember your password!
4
Press ENTER.
The password is confirmed and the lock icon is
engaged. If you attempt to play a disc that exceeds the
ratings level, a message will appear on the video
monitor. Follow the procedure described on screen.
(Press ENTER to display the previous screen.)
■
Changing the ratings level
(from
Levels 7 - 0)
Select “Ratings” in the Setup menu to display the pass-
word screen.
1
Enter a four-digit number using the numeric
buttons, then press ENTER.
The following items are displayed:
Unlock Player: Unlocks the rating; returns to level 8.
Change Password: Changes the password.
Change Level: Changes the rating level.
Temporary Unlock: Temporarily unlocks the rating
level. It remains unlocked until you turn the power off
or open the disc tray.
2
Press the cursor buttons (
kk
kk
,
nn
nn
) to select the
desired item, then press ENTER.
■
If you forget your password
Return the unit to its factory default settings. See page 24.
Note
• All other settings return to factory defaults.
You can specify how to output high-quality digital signals
(sampling frequencies of 88.2kHz and 96kHz) from discs
that are not copyright-protected. Select an option depend-
ing on whether the connected amplifier or other compo-
nents support these signals.
If a digital signal is input to a component that does not
support 88.2kHz or higher signals, select “Yes.” (If you
select “No,” audio signals of 88.2kHz or higher sampling
frequencies will not be output.)
Note
• If a disc is copyright-protected or has a sampling frequency of
176.4 kHz or more, signals are automatically converted to
either 48 kHz or 44.1 kHz.
Ratings
DVD-V
CANCEL
, , ,
/ ENTER
Numeric
buttons
SETUP
ENTER RETURN
Enter a 4-digit password,
then press ENTER.
Ratings
✱✱✱✱
Password
SELECT
PCM down conversion
Connected
component
supports 88.2kHz
or higher signals.
PCM down
conversion
Digital output
Yes Select “Yes.” Output as is.
No Select “No.” Converted to
48kHz or 44.1kHz.
DVD-A DVD-V
DVD-S2300_G.book Page 28 Friday, October 18, 2002 2:42 PM

29
English
CHANGING THE DVD MODE SETTINGS
DETAILED SETTINGS
Set the parameters for 6CH DISCRETE output to suit the
speaker system.
If you select “Multi-channel” from the Setup menu, set
parameters a
, b
, and c
(page 29 and page 30) according
to the speaker system.
Setting panel
aa
aa
Speaker selection and size
1
Press the cursor buttons (
kk
kk
,
nn
nn
,
ll
ll
,
hh
hh
) to
select a speaker, then press ENTER.
The indicator is displayed above and below the
speaker icons.
2
Press the cursor buttons (
kk
kk
,
nn
nn
) to select a
setting, then press ENTER.
• Speaker size options:
L: Large, Small
R: Large, Small
C: Large, Small, None
SW: Used, Not used
LS: Large, Small, None
RS: Large, Small, None
The left (L or LS) speaker size is automatically
assigned to the right (R or RS) speaker. (For example,
if you select Large for the L speaker, the R speaker
will automatically be set to Large.)
• Example: Left rear speaker
1
No icon appears when the speaker is not used.
2
This icon appears when using a large speaker
capable of low-frequency (under 100 Hz) output.
3
This icon appears when using a small speaker that
is not capable of low-frequency output.
•Factory default speaker-size settings:
L/R: Large
C/LS/RS: Large
SW: Used
Speaker settings
DVD-A DVD-V
, , ,
/ ENTER
SETUP
SELECT
ENTER RETURN
ms
ms
dB
0
dBdB
L
Exit
Test
LS
R
SW
C
RS
dB
0
0
0
0
0
Main (L)
Rear
(L) a
Subwoofer
(L) c b (R) c (R) a
Exit
Test signal
Center Main (R)
aab a c
c a
LS
LS
123
DVD-S2300_G.book Page 29 Friday, October 18, 2002 2:42 PM

CHANGING THE DVD MODE SETTINGS
30
bb
bb
Delay time
(This parameter is effective on only center/rear channels
of DVD-Video discs recorded in Dolby Digital format.)
To obtain maximum effect from a Dolby Digital 5.1 chan-
nel source, all speakers (except the subwoofer) should be
located the same distance from the listening position.
However, the center speaker is often placed in line with
the front speakers. You can virtually increase the distance
of the center and rear speakers by adjusting the delay time.
1
Press the cursor buttons (
kk
kk
,
nn
nn
,
ll
ll
,
hh
hh
) to
select an “ms” box, then press ENTER.
2
Press the cursor buttons (
kk
kk
,
nn
nn
) to adjust the
delay time, then press ENTER.
• If Distance A or B in the above illustration is equal
to or greater than Distance C, set the delay time to
0 ms.
• If Distance A or Distance B is less than Distance
C, set the delay time as follows:
Center speaker
Rear speakers
cc
cc
Speaker balance
You can use the test tone to adjust the output level of each
speaker (center, rear L/R) until the volume level of each
speaker matches the main speakers.
1
Press the cursor buttons (
kk
kk
,
nn
nn
,
ll
ll
,
hh
hh
) to
select “Test,” then press ENTER.
The test tone plays through one speaker at a time in
the following order, starting with the left front
speaker.
2
Listening to the test tone, press the cursor
buttons (
kk
kk
,
nn
nn
) to adjust the volume of the
effect speakers (from -6db to +6db), then
press ENTER.
The value in the “dB” box changes.
You cannot adjust the main speaker level.
Note
• The subwoofer cannot output the test tone. Play a recording
and return to this screen to adjust the output level of the sub-
woofer.
■
Exiting speaker setting mode
Press the cursor buttons (
k
,
n
,
l
,
h
) to select “EXIT,”
then press ENTER.
Notes
•You must make separate settings for SACD mode (see
page 31).
• These adjustments may not be effective when the disc’s origi-
nal sound design is protected. In this case, the P.PCM indicator
will light up or the D.MIX indicator will turn off.
Difference Setting
Approx. 50 cm (1 1/2 feet) 1.3 ms
Approx. 100 cm (3 feet) 2.6 ms
Approx. 150 cm (5 feet) 3.9 ms
Approx. 200 cm (6 feet) 5.3 ms
Difference Setting
Approx. 200 cm (6 feet) 5.3 ms
Approx. 400 cm (12 feet) 10.6 ms
Approx. 600 cm (18 feet) 15.9 ms
LS
RS
L
R
SW
C
Distance A
Listening
position
Distance B
Distance
C
LCR
RS LS
DVD-S2300_G.book Page 30 Friday, October 18, 2002 2:42 PM

31
English
DETAILED SETTINGS
This unit features independent playback circuits for DVD
mode and SACD mode. DVD mode settings are not valid
in SACD mode. You must complete a separate group of
settings dedicated to SACD mode.
To play multi-channel Super Audio CD data effectively,
set the speaker parameters in SACD mode to suit your
speakers and components. The speaker parameters enable
you to select a speaker mode and adjust the speaker bal-
ance.
■
Setting speaker mode
Set the speaker mode according to your speaker size and
setup.
1
Press SETUP.
The unit displays “SPK MODE.”
2
Press ENTER.
The unit displays the current setting.
3
Press the cursor button
ll
ll
or
hh
hh
to change
the setting.
When you press the cursor button, the speaker mode
setting (indicated on the display) changes as follows:
Speaker mode chart
Selecting a speaker mode:
Select a speaker mode to suit your speaker setup and
performance. Speakers marked “Large” will output
all signals, including a low range of 90Hz and lower.
If you are using a large speaker with a large capacity
for low-range frequencies (i.e., the woofer diameter is
16cm or more), select a mode for which the corre-
sponding speaker is marked “Large.” The low range
on the “Small” speaker channels is output to the sub-
woofer or main speakers (marked “Large”). If you
feel that low range playback is not sufficiently power-
ful, or if the sound clips, select a mode in which the
corresponding speaker is marked “Small.”
4
Press ENTER to confirm the selected mode.
5
Press SETUP.
The unit displays the standard screen.
■
Adjusting the speaker balance
If the volume level of each speaker varies, use the test tone
to adjust the level so that all speakers sound at the same
level as the main speakers.
• The speaker balance cannot be adjusted if the speaker
mode is set to MLTCH DIRECT.
• If the speaker mode is changed, parameters set prior to
the change will be initialized (assigned as initial val-
ues).
1
Press SETUP.
2
Press the cursor button
ll
ll
or
hh
hh
to select
“SPK BALANCE.”
Pressing the cursor button toggles between “SPK
MODE” and “SPK BALANCE.”
CHANGING THE SACD MODE SETTINGS
Speaker settings
SET UP
ENTER
,
Speaker
mode
Main
speakers
Center
speaker
Rear
speakers
Sub-
woofer
MLTCH
DIRECT
Audio signals are output as recorded.
5-LRG
Large Large Large None
5-SML
+SW
Small Small Small Used
MAIN-LRG
+SW
Large Small Small Used
MAIN-LRG
Large Small Small None
NON-C
+SW
Large None Large Used
NON-C
Large None Large None
DVD-S2300_G.book Page 31 Friday, October 18, 2002 2:42 PM

CHANGING THE SACD MODE SETTINGS
32
3
Press ENTER.
The unit displays “TEST TONE.”
4
Press ENTER.
Two seconds of test tone are output from each
speaker in the following order.
5
Press ENTER to stop the test tone, press the
cursor button
ll
ll
or
hh
hh
to select a speaker to
adjust, then press ENTER again.
Pressing the cursor button
l
or
h
steps through the
display indication as follows:
Example: Adjusting the right rear speaker level
Select BALANCE RS, then press ENTER. The unit
displays the following indication, and the left and
right main speakers and the right rear speaker output
a test tone at the same time.
Notes
•You cannot adjust the level of the main speakers. Instead, you
adjust the level of the center, left and right rear speakers based
on the level of the main speakers.
• No test tone is output from speakers marked “None” in the
selected speaker mode (see the speaker mode chart on
page 31). In this case, you will be unable to adjust the level.
6
Press the cursor button
l
or
h
to adjust the
level balance.
Press the cursor button to move “+” one step.
Press
h
to increase or
l
to decrease the selected
speaker level relative to the main speaker level.
• One step equals 0.5dB.
7
Press ENTER to confirm the setting.
The unit displays the next speaker’s balance setting.
8
Press SETUP.
The unit displays the standard screen.
You can adjust brightness of the display.
Press DIMMER.
Each time you press DIMMER, the brightness
changes as follows:
• If “auto” is selected, the display dims during disc
playback. If you pause the disc or operate the unit,
the display brightens temporarily.
You can select a time indicator style for Super Audio CD
playback.
Press TIME during playback.
Press TIME to change the time indicator as follows:
Note
• The unit does not display a disc’s remaining time during pro-
gram play or random play.
TEST LEFT
(left main)
CENTER
(center)
TEST RIGHT
(right main)
TEST L. SURROUND
(left rear)
TEST R. SURROUND
(right rear)
TEST TONE
BALANCE C (center)
BALANCE RS (right surround: right rear)
BALANCE LS (left surround: left rear)
BALANCE SW (subwoofer)
Adjusting the brightness of the dis-
play
Changing the time indicator
DIMMER
bright dark auto
TIME
Track elapsed time
Track remaining time
Disc remaining time
DVD-S2300_G.book Page 32 Friday, October 18, 2002 2:42 PM

33
English
APPENDIX
APPENDIX
Refer to the chart below if the unit does not function properly. If the problem is not listed below, or if the instructions fail
to help, turn off the power to the unit, disconnect the power cable, and contact the nearest authorized YAMAHA dealer or
service center.
■
General
■
DVD mode
TROUBLESHOOTING
Problem Cause Remedy Refer to page
No response when buttons
pressed.
Some operations may be prohibited by the disc. —
Playback does not start, or
stops immediately.
There is moisture on the laser pickup. Wait one to two hours after switch-
ing the unit on before trying to play
a disc.
—
The disc has been loaded upside down. Reload the disc with the label side
facing up.
—
The disc is dirty. Clean the disc. 36
Some discs are not compatible. —
Audio or video is not played
or is abnormal.
Connections or settings are incorrect. Check the connections and input/
output settings.
8, 9, 24–32
“No Play” appears on the
unit’s display.
This unit is unable to play the loaded disc. —
The unit does not recognize
disc (“No disc” appears on
the display, or the display
indicates that no disc is
loaded).
The disc is not loaded or placed properly. Place the disc properly. —
Problem Cause Remedy Refer to page
No subtitles
The disc does not include subtitles. —
Subtitles are turned off. Display subtitles by pressing SUB-
TITLE or using the on-screen
menu.
15
Subtitles might not be displayed near repeat play
points A or B, or near bookmarks.
—
Alternative languages can-
not be selected.
An alternative language cannot be selected on discs
that do not contain more than one language.
—
On certain discs, the user cannot select an alterna-
tive language using AUDIO or SUBTITLE. In this
case, try to select an alternative language from the
disc menu, if available.
—
Angle cannot be changed.
The disc or the scene being played does not support
multiple angles.
—
No sound
Distorted sound
If the “D.MIX” indicator on the front panel turns
off during multi-channel DVD-Audio disc play-
back, sound will be output only from speakers
specified by the disc.
—
Sound “skips.”
The disc is dirty. Clean the disc. 36
Uncomfortable high-pitch
noise
The Audio setting is inappropriate for the con-
nected component.
Change the Audio setting in Setup
menu to suit the connected digital
component.
26
Picture distorted during
Search
Some distortion is normal during Search. —
DVD-S2300_G.book Page 33 Friday, October 18, 2002 2:42 PM

TROUBLESHOOTING
34
■
SACD mode
■
Remote control
No picture
(U.S.A. model)
If you play a PAL system DVD-Audio, the mes-
sage “This disc is PAL system. The output is sound
only” may appear on the monitor. No picture is
available because the disc uses an incompatible
type of video signal.
—
Video cannot be recorded.
Most DVD-Audio/Video discs are copy-protected
and cannot be recorded.
—
Picture appears incorrectly.
Incorrect “TV aspect” setting on the Video menu
(in Setup).
Select the correct setting. Note that
it may be difficult to adjust the
widescreen format of many DVD-
Videos to fit perfectly on a 4:3
video monitor.
25
(U.S.A. model)
If you play PAL system DVD-Audio, the message
“This disc is PAL system. The output is sound
only.” may appear on the monitor. No picture is
available because the disc uses an incompatible
video signal system (only audio can be played).
—
(U.S.A. model)
Due to the editing method or material used on a DVD,
ghosting may occur with progressive output.
Turn off the PROGRESSIVE out-
put.
13
(U.S.A. model) Part of the
picture doubles during pro-
gressive output.
The video is in poor material condition or was
edited or processed inappropriately. (Video will be
played correctly via interlace output.)
Turn off the PROGRESSIVE output
to output interlaced video signals to
a video monitor.
13
No on-screen display
In the Setup menu, under Display,
set On-Screen Messages to On.
25
On-screen menu icons not
displayed or only partially
displayed on the television
Press the cursor buttons [
k
,
n
]
while the right-most icon is high-
lighted to change the menu bar
position.
20
Excessive ghosting
Use the on-screen menu icons to
adjust the picture quality.
23
Problem Cause Remedy Refer to page
Problem Cause Remedy Refer to page
The Setup menu settings are
not effective.
Setup menu settings are not effective in SACD
mode.
Set the parameters for SACD mode,
instead of using the Setup menu.
Some parameters may not be avail-
able.
31, 32
No digital signal is output
from the digital output jack.
Digital signals cannot be output from a Super
Audio CD.
—
Problem Cause Remedy Refer to page
The remote control does not
function properly.
The remote control was operated at an angle or dis-
tance in excess of its operating range.
The remote control will function
within a maximum range of 6 m (20
feet) and no more than 30 degrees off-
axis from the front panel.
3
Direct sunlight or lighting (from an inverter type of
fluorescent lamp, etc.) is striking the remote control
sensor of the unit.
Reposition the unit. —
The batteries are weak. Replace all batteries with new ones. 3
DVD-S2300_G.book Page 34 Friday, October 18, 2002 2:42 PM

35
English
APPENDIX
Bitstream
In this manual, “bitstream” refers to the digital form of
multiple channel audio data (e.g., 5.1 channel audio)
before it is decoded into its various channels.
Decoder
A device or program that translates (decodes) encoded
data on DVDs into an appropriate format.
Frames
Moving pictures are composed of a sequence of still
images called frames. About 30 frames are shown each
second (30fps). Each frame is composed of two interlaced
fields. A television displays these fields in rapid succes-
sion to create frames.
Frame stills and field stills
A
frame still
is an image composed of two alternating
fields. Edges may be slightly blurry, but the overall image
quality is high.
A
field still
is an image composed from only one of the
two fields. The picture is not blurry, but contains only half
of the visual information of a frame still.
Group
A DVD audio disc is divided into large sections called
“groups” and smaller sections called “tracks.” The num-
bers allocated to these sections are called “group num-
bers” and “track numbers.”
Interlaced and progressive output
NTSC, the video signal standard, uses 525 interlaced (i)
scan lines. Progressive scanning uses twice that number of
scan lines and is called 525p. The 525i video signals out-
put from the unit’s COMPONENT VIDEO OUT jacks (Y,
P
B
, P
R
) allow you to enjoy higher quality pictures than if
the signals were output from the video output jack or S
VIDEO OUT jack. The COMPONENT VIDEO OUT
jacks are also able to handle 525p (progressive) video sig-
nals, which are of even greater resolution.
PCM
Pulse Code Modulation (PCM) converts analog waves into
digital signals. It is commonly used in the creation of
music CDs. DVDs allow greater volume, and hence use
linear PCM, which has a higher sampling rate. Com-
pressed PCM signals are called packed PCM (PPCM).
Pan&Scan/Letterbox
In general, DVD-Video discs are produced with the inten-
tion of being viewed on a widescreen television with an
aspect ratio of 16:9. This means you can view most mate-
rial at the intended aspect ratio on a widescreen television.
Material with this ratio will not fit onto a standard televi-
sion with an aspect ratio of 4:3. Two picture styles,
“Pan&Scan” and “Letterbox,” resolve this issue.
Pan&Scan: The sides of the image are trimmed so the
picture can fill the screen.
Letterbox: Black bands appear across the top and bot-
tom of the image. The picture appears at an
aspect ratio of 16:9.
Playback control (PBC)
The term “playback control” on a Video CD or its packag-
ing indicates that certain scenes or information may
viewed interactively or navigated by menu. This unit can
play Video CDs that feature playback control.
Sampling frequency and quantized bits
When digitizing an analog audio signal, the number of
times the signal is sampled per second constitutes the sam-
pling frequency. The degree of fineness with which a
sound level is converted into a numeric value is deter-
mined by the number of quantized bits.
Title/Chapter
DVD-Video discs are divided into large sections (titles),
and smaller sections (chapters). The numbers allocated to
these sections are referred to as title numbers and chapter
numbers.
Track
A track is the smallest division on DVD-Audio, CD, and
Video CD discs. It usually equates to a single song.
GLOSSARY
DVD-A
DVD-V
VCD CDSACD DVD-A
DVD-S2300_G.book Page 35 Friday, October 18, 2002 2:42 PM
Documenttranscriptie
DVD-S2300_G.book Page 1 Friday, October 18, 2002 2:42 PM G DVD-S2300 DVD AUDIO/VIDEO SACD PLAYER LECTEUR DE DVD AUDIO/VIDEO SACD DIGITAL VIDEO OWNER’S MANUAL MODE D’EMPLOI BEDIENUNGSANLEITUNG BRUKSANVISNING MANUALE DI ISTRUZIONI MANUAL DE INSTRUCCIONES GEBRUIKSAANWIJZING DVD-S2300_G.book Page 2 Friday, October 18, 2002 2:42 PM CAUTION: READ THIS BEFORE OPERATING YOUR UNIT. 1 To assure the finest performance, please read this manual carefully. Keep it in a safe place for future reference. 2 Install this sound system in a well ventilated, cool, dry, clean place — away from direct sunlight, heat sources, vibration, dust, moisture, or cold. In a cabinet, allow about 2.5cm (1 inch) of free space all around this unit for adequate ventilation. 3 Locate this unit away from other electrical appliances, motors, or transformers to avoid humming sounds. 4 Do not expose this unit to sudden temperature changes from cold to hot, nor locate this unit in an environment with high humidity (i.e., a room with a humidifier) to prevent condensation inside this unit, which may cause an electrical shock, fire, damage to this unit, and/or personal injury. 5 Avoid installing this unit in a location where foreign objects may fall onto this unit or where this unit may be exposed to liquid dripping or splashing. On the top of this unit, do not place: – Other components, as they may cause damage and/or discoloration on the surface of this unit. – Burning objects (i.e., candles), as they may cause fire, damage to this unit, and/or personal injury. – Containers with liquid in them, as they may fall, spilling the liquid and causing an electrical shock to the user and/ or damage to this unit. 6 Do not cover this unit with a newspaper, tablecloth, curtain, etc. in order not to obstruct heat radiation. If the temperature inside this unit rises, it may cause fire, damage to this unit, and/or personal injury. 7 Do not plug in this unit to a wall outlet until all connections are complete. 8 Do not operate this unit upside-down. It may overheat, possibly causing damage. 9 Do not use excessive force on switches, knobs and/or cords. 10 When disconnecting the power cord from the wall outlet, grasp the plug; do not pull the cord. 11 Do not clean this unit with chemical solvents; this might damage the finish. Use a clean, dry cloth. 12 Use only the voltage specified on this unit. Using this unit with a higher voltage than specified is dangerous and may cause fire, damage to this unit, and/or personal injury. YAMAHA will not be held responsible for any damage resulting from use of this unit with a voltage other than as specified. 13 To prevent damage by lightning, disconnect the power cord from the wall outlet during an electrical storm. 14 Do not attempt to modify or fix this unit. Contact qualified YAMAHA service personnel when any service is needed. The cabinet should never be opened for any reason. 15 When not planning to use this unit for long periods of time (i.e., vacation), disconnect the AC power plug from the wall outlet. 16 Be sure to read the “TROUBLESHOOTING” section on common operating errors before concluding that this unit is faulty. 17 Before moving this unit, press STANBY/ON to set the unit in standby mode, then disconnect the AC power plug from the wall outlet. CAUTION ■ For U.K. customers If the socket outlets in the home are not suitable for the plug supplied with this appliance, the plug should be cut off and an appropriate 3 pin plug fitted. For details, refer to the instructions described below. Note • The plug severed from the mains lead must be destroyed, as a plug with bared flexible cord is hazardous if engaged in a live socket outlet. ■ Special Instructions for U.K. Model IMPORTANT THE WIRES IN MAINS LEAD ARE COLOURED IN ACCORDANCE WITH THE FOLLOWING CODE: Blue: NEUTRAL Brown: LIVE As the colours of the wires in the mains lead of this apparatus may not correspond with the coloured markings identifying the terminals in your plug, proceed as follows: The wire which is coloured BLUE must be connected to the terminal which is marked with the letter N or coloured BLACK. The wire which is coloured BROWN must be connected to the terminal which is marked with the letter L or coloured RED. Making sure that neither core is connected to the earth terminal of the three pin plug. DANGER This unit emits visible laser radiation when open. Avoid direct eye exposure to beam. When this unit is plugged into a wall outlet, do not place your eyes close to the opening of the disc tray and other openings or look inside. The laser component in this product is capable of emitting radiation exceeding the limit for Class 1. DVD-S2300_G.book Page 1 Friday, October 18, 2002 2:42 PM CONTENTS INTRODUCTION FEATURES ............................................................................................2 Playable disc formats...........................................................................2 CHECKING THE ACCESSORIES .....................................................3 INSTALLING BATTERIES IN THE REMOTE CONTROL...........3 CONTROLS AND FUNCTIONS .........................................................4 Front panel / Remote control ...............................................................4 Front panel display ..............................................................................6 PREPARATION CONNECTIONS....................................................................................7 Types of connectors .............................................................................7 Video connections................................................................................8 Audio connections ...............................................................................9 Remote control in/out jack ..................................................................9 PLAYING A DISC ■ About this manual • • • • • DETAILED SETTINGS CHANGING THE DVD MODE SETTINGS....................................24 Using the Setup menu........................................................................24 Settings Summary..............................................................................25 Ratings ..............................................................................................28 PCM down conversion ......................................................................28 Speaker settings ................................................................................29 CHANGING THE SACD MODE SETTINGS..................................31 Speaker settings .................................................................................31 Adjusting the brightness of the display .............................................32 Changing the time indicator ..............................................................32 APPENDIX TROUBLESHOOTING ......................................................................33 GLOSSARY..........................................................................................35 NOTES ON HANDLING DISCS .......................................................36 SPECIFICATIONS..............................................................................37 1 English • Illustrations in this manual are based on the U.S.A. model unless otherwise indicated. Paragraphs marked with an y indicator are tips on operating the unit. The user can perform certain operations using either the remote control or the buttons on the main unit. This manual frequently explains how to execute such operations only on the remote control. This manual is printed prior to production. Design and specifications of the unit are subject to change for reasons that include improved function and operation. Illustrations in this manual may differ slightly from the product or from illustrations used in the packaging. The names of package content items used in this manual may differ slightly from names that appear on the product or elsewhere in the packaging. PLAYING A DISC ...............................................................................10 Before starting playback....................................................................10 Basic operation ..................................................................................10 Super Audio CDs ...............................................................................12 MP3 playback ....................................................................................12 MISCELLANEOUS FUNCTIONS....................................................13 Using disc menus...............................................................................13 Enhancing video quality - Progressive output (U.S.A. model only) .13 DVD-Audio features .........................................................................14 Switching audio tracks, subtitles and angles ..................................15 Program play ....................................................................................16 Random play .....................................................................................17 All group play ...................................................................................17 Bookmarks ........................................................................................18 Repeat play .......................................................................................18 Repeat A-B .......................................................................................19 ON-SCREEN MENU (DVD MODE ONLY).....................................20 Operating the menu bar .....................................................................20 Disc Info bar ......................................................................................21 Player Info bar ...................................................................................22 Shuttle bar..........................................................................................23 DVD-S2300_G.book Page 2 Friday, October 18, 2002 2:42 PM INTRODUCTION FEATURES ◆ Built-in high-performance video D/A converter ◆ Output connectors support numerous audio and home theater component combinations. Video out: Component output jacks (two channels) (U.S.A. and Australian models) S Video jacks (two channels) RGB SCART jacks (U.K. and European models) Video (Composite) connector (two channels) Audio out: Digital: Coaxial jack (one channel) Optical jack (one channel) Analog: (L/R) jacks 6ch discrete jacks SUB OUT/BASS MGMT (management) jack to boost the low range ◆ High-end D/A converter for SACD on all eight channels ◆ D/A converter support for 192kHz 24-bit DVDAudio/Video discs ◆ Optimal picture and sound quality, courtesy of independent circuits for SACD and DVD, and individual tuning ◆ Dolby Digital and DTS decoders ◆ DCDi Progressive output (U.S.A. model) ◆ MP3 multi-session support Manufactured under license from Dolby Laboratories. “Dolby” and the double-D symbol are trademarks of Dolby Laboratories. “DTS” and “DTS Digital Surround” are registered trademarks of Digital Theater Systems, Inc. “DCDi” is a trademark of Faroudja, a division of Genesis Microchip, Inc. This product incorporates copyright protection technology that is protected by method claims of certain U.S. patents and other intellectual property rights owned by Macrovision Corporation and other rights owners. Use of this copyright protection technology must be authorized by Macrovision Corporation, and is intended for home and other limited viewing uses only unless otherwise authorized by Macrovision Corporation. Reverse engineering or disassembly is prohibited. 2 Playable disc formats This unit can play the disc types associated with the logos shown below. (Do not attempt to load any other type of disc into the unit, or the unit may be damaged.) • DVD mode • SACD mode DIGITAL VIDEO This manual refers to disc types using the following indicators: DVD-Video DVD-Audio Video CD Audio CD DVD-V DVD-A VCD CD Super Audio CD SACD Notes • The unit does not support playback of the following discs: Photo CD, CD-ROM, DVD-ROM, DVD-RAM, SVCD, CDV • Some discs may fail to play due to recording conditions or disc characteristics. (If you record discs on a recorder for playback on this unit, use discs from reliable manufacturers.) • DVD-RW discs will play only if they are recorded in video format. • CD-R/RW, DVD-R/RW, and DVD+R discs will play only if they are finalized. • Do not use non-standard shaped discs (heart-shaped, etc.). • Some DVD and VCD features described in this manual may vary in function due to differences in software design from various manufacturers. Check the instructions for each disc. • This unit cannot play PAL video discs. (U.S.A. model) ■ Region management information The unit is designed to support the Region Management System. Check the regional code number on the disc package. If the number does not match the unit’s region number (see table below, or see back of unit), the unit may be unable to play the disc. Model U.S.A. and Canadian models U.K. and European models Australian model Region number of this unit 1 2 4 Discs can be played 1, ALL or a mark that includes the region number 1. 2, ALL or a mark that includes the region number 2. 4, ALL or a mark that includes the region number 4. DVD-S2300_G.book Page 3 Friday, October 18, 2002 2:42 PM CHECKING THE ACCESSORIES INTRODUCTION Check your package to make sure it contains the following items: Remote control Batteries (x2) (AA, R6, UM-3) Audio/Video cable Power cable INSTALLING BATTERIES IN THE REMOTE CONTROL Insert the batteries in the correct direction by aligning the + and – marks on the batteries with the polarity markings (+ and –) inside the battery compartment. • If the batteries leak, dispose of them immediately. Avoid touching the leaked material or letting it come into contact with clothing, etc. Clean the battery compartment thoroughly before installing new batteries. ■ Using the remote control 1 Remote control sensor 2 3 1 Slide off the battery compartment cover. 2 Insert two batteries (AA, R06, UM-3 type) oriented properly (+ and –). 3 Slide the cover back into place. Replace worn batteries Worn batteries limit the operating range of the remote control. Replace both batteries at the same time. Note 30° 30° Handling the remote control • • • Do not spill water or other liquids on the remote control. Do not drop the remote control. Do not leave or store the remote control in the following types of conditions: – high humidity or temperature, such as near a heater, stove or bath; – dusty places; or – places subject to extremely low temperatures. 3 English • Replace both batteries if you notice a decrease in the operating range of the remote control. • Do not use old batteries with new ones. • Do not use different types of batteries (such as alkaline and manganese) together. Read the battery packaging carefully. Different types of batteries may be the same shape or color. Point the remote control at the sensor, within approximately 6 m (20 feet) of the unit. DVD-S2300_G.book Page 4 Friday, October 18, 2002 2:42 PM CONTROLS AND FUNCTIONS Front panel / Remote control 1 2 t 8 r w q 0 e 3 y u i 4 6 5 o p a d s 4 3 9 45 8 6 7 1 POWER Turns the power to the unit on and off. 2 Disc tray Load a disc in this tray. 3 v (Front panel), OPEN/CLOSE (Remote control) Press to open or close the disc tray. 4 w Press to start playback. 5 d Press to pause. 6 a Press to stop playback. 7 t/e, r/y Press to access the next or previous track or chapter. Press and hold down to fast forward or fast reverse. 8 SACD/DVD Press to switch between DVD mode and SACD mode. 9 SACD mode indicator Lights up in SACD mode. 0 Front panel display Shows information about the operational status or default settings of the unit. q PROGRESSIVE indicator (U.S.A. model only) Lights up during progressive output. w VIDEO OFF indicator Lights up when the VIDEO OFF function is working. e DVD mode indicator Lights up in DVD mode. r PHONES LEVEL control Adjusts the headphone level. t PHONES Connect headphones here. DVD-S2300_G.book Page 5 Friday, October 18, 2002 2:42 PM CONTROLS AND FUNCTIONS s From left: TIME Press to select the time display in SACD mode. DIMMER Press to adjust the brightness of the front panel display in SACD mode. MULTI/2CH Press to toggle between stereo playback and multichannel playback in SACD mode during playback of a super-audio CD that contains both stereo (two channels) and multi-audio channel data. d SETUP Press to display the setup menu screen. INTRODUCTION English y From left: PLAY MODE Press to switch between random play, program play, and normal playback. REPEAT Press to repeat playback. A-B Press to repeat a section specified by two points. MARKER Press to mark and store location points for future reference. u From left: SUBTITLE Press to select a subtitle language. AUDIO Press to select a DVD-Audio language. ANGLE Press to change the camera angle on discs recorded with multiple camera angles. i From top left: TOP MENU Press to display the top-level disc menu screen. MENU Press to display a menu screen. k, n, l, h/ENTER Press to select and execute a menu item. ON SCREEN Press to turn the on-screen icons on or off on the video monitor. RETURN Press to display the previous screen when navigating the menus. o From left: t y (skip) Press repeatedly to locate the top of the previous or subsequent tracks. e r (slow/search) Press to fast reverse or fast forward. p Numeric buttons Press to enter numbers. CANCEL Press to cancel a mode or setting. a From left: GROUP Press to select a DVD-Audio group. PAGE Press to select a DVD-Audio still picture. PROGRESSIVE button (U.S.A. model only) Press to toggle between progressive video output and interlaced video output in DVD mode. VIDEO OFF Press to switch video output on and off during DVDAudio playback. 5 DVD-S2300_G.book Page 6 Friday, October 18, 2002 2:42 PM CONTROLS AND FUNCTIONS Front panel display 1 9 2 8 3 7 1 Disc type indicators The indicator for the type of disc currently being played lights up. SACD: Super audio CD CD: Audio CD DVD AUDIO: DVD-Audio DVD VIDEO: DVD-Video VCD: Video CD MP3: MP3-format CD-R or CD-RW 2 Playback indicator Lights up during playback. Blinks while the resume function is operating (see “Resume function” on page 10). 3 Play mode indicators The indicator for the current playback mode lights up. PROG: Program play RNDM: Random play REP: Repeat play REP A-B: Repeat A-B REP ALL: Repeat All 4 Audio format indicators The indicator for the disc audio format lights up. If multiple audio formats are recorded on a disc, the indicator for the format selected by the disc menu or unit operation lights up. (Dolby Digital) PCM (Linear PCM) P.PCM (Packed PCM) MULTI (Multi-channel) 2 CH (2-channel) D.MIX (Down Mix): This indicator lights up during playback of a DVDAudio track that has multiple audio channel signals (that can be mixed down to two channels). VSS: Lights up in virtual surround mode. 6 4 6 5 5 Multi-information display Displays various information, including the disc title, chapter number, track number, elapsed playing time, etc. 6 ANGLE indicator Lights up during playback of those scenes for which the DVD features multiple camera angles. 7 Multi-information display mode indicators GROUP: The display indicates a group number. TITLE: The display indicates a title number. TRACK: The display indicates a track number. CHAP: The display indicates a chapter number. 8 Pause indicator Lights up when the picture freezes or disc playback pauses. 9 Speaker channel indicators The indicators for the current audio channel light up. L: left main; C: center; R: right main; RL: left rear; SW: subwoofer; RR: right rear DVD-S2300_G.book Page 7 Friday, October 18, 2002 2:42 PM PREPARATION CONNECTIONS Before you make connections, unplug the power cable for the unit and all other components. Do not plug in the power cables until all connections are complete. PREPARATION Types of connectors Connect these audio output jacks to the audio input of an AV amplifier. Connect these video output jacks to the video input of an AV amplifier or the input of a video monitor. This jack is reserved for factory use. Do not connect any equipment to this jack. TO AC OUTLET After all connections are complete, plug the included power cable into an AC outlet. Remote control in/out jacks Use the following commercially-available cables to make connections: Audio cables Video cables Video pin cable Audio pin cable S Video cable Coaxial cable Component video cable (for U.S.A. and Australian models) Optical cable SCART cable (for U.K. and European models) A/V cable Audio/Video cable (One cable included in the package) English 7 DVD-S2300_G.book Page 8 Friday, October 18, 2002 2:42 PM CONNECTIONS Video connections You can connect the unit’s video output to a video monitor, or the video input on an AV amplifier (which in turn is connected to a video monitor). Connecting to an AV amplifier enables you to control audio and video using the AV amplifier. You can set up the AV amplifier using this unit’s OSD (on-screen display). This unit features several types of video output jacks. Determine the one compatible with the inputs on your video monitor. Use the appropriate cable to connect the unit to an AV amplifier, and the AV amplifier to the monitor. Note • Do not connect this unit to a video monitor through a video cassette recorder. If you do so, the picture may not play back properly due to the copyright protection technology incorporated in this unit. 1 S VIDEO outputs (1, 2) The S VIDEO jacks output discrete C and Y signals to reproduce higher-quality images than normal composite video. Connect one end of an S Video cable (not included) to either S VIDEO jack. Connect the other end to an S Video input on an AV amplifier or video monitor. Monitor AV amplifier MONITOR OUT 2 VIDEO outputs (1, 2) The VIDEO jacks output normal composite video signals. Use the yellow plugs on an audio/video cable to connect either VIDEO jack to a video input on an AV amplifier or video monitor. The same signal is output from VIDEO 1 and VIDEO 2, enabling connection to two devices (e.g., a monitor and an AV amplifier) simultaneously. To S VIDEO To VIDEO To COMPONENT VIDEO 3 COMPONENT outputs (U.S.A. and Australian models only) These jacks output three discrete CCY signals (“component video”) to reproduce a higher-quality image than S Video. (U.S.A. model only) This unit features a DCDi circuit (with the latest contour correction technology) and progressive output, which produces very smooth and natural high-quality pictures even on a big screen. Use a component video cable (not included) to connect the COMPONENT output jacks to the component video input connectors on an AV amplifier or video monitor. 4 AV connector (U.K. and Europe models only) If your monitor has only one jack for video input, you can use the SCART output jack on this unit to connect the unit directly to the monitor. This connection provides the best picture quality. 8 1 2 3 4 DVD-S2300_G.book Page 9 Friday, October 18, 2002 2:42 PM CONNECTIONS Audio connections Select connectors that are compatible with your amplifier and appropriate for your requirements. 1 DIGITAL OUT jacks Speakers • Connect the OPTICAL jack to the amplifier’s optical digital input using fiber optic cable (not included) -or• Connect the COAXIAL jack to the amplifier’s coaxial digital input using coaxial digital cable (not included). Note • No audio signal is output from DIGITAL OUT during SACD playback. Use connection 2 or 3 below. PREPARATION Using AV amplifier’s 6.1 channel decoding (DVD-Video) and surround effects: AV amplifier DIGITAL INPUT To COAXIAL To OPTICAL To AUDIO (analog stereo input) 2 MIXED 2CH jacks Use the included audio/video pin cable to connect these jacks to analog stereo input jacks on the amplifier. Connect the white plug to the L jack. Connect the red plug to the R jack. (The yellow plug is used for the video signal.) To 6CH INPUT Either one 1 2 3 ★ 3 6CH DISCRETE jacks Playing SACD or DVD multi-channel audio: Use an audio pin cable (not included) to connect these jacks to the corresponding channel inputs (such as MAIN L/R, CENTER) on the amplifier (often labelled “6CH INPUT”). Connect the SUBWOOFER jack to the subwoofer input on the amplifier. This jack outputs a more natural, high-fidelity low range relative to the SUB OUT/ BASS MGMT jack explained below. However, during playback of a two-channel (stereo) source, the subwoofer does not output any sound due to lack of LFE (low-frequency effects assigned to a subwoofer). ★ SUB OUT/BASS MGMT jack SUB OUT/BASS MGMT aggregates and outputs the low ranges of all channels. An alternative to 6CH DISCRETE SUBWOOFER output, this jack outputs a powerful and supple sound even when the main speaker is small (with a woofer diameter of 16cm or less). Use an audio pin cable (not included) to connect the SUB OUT/BASS MGMT jack to the subwoofer input on the amplifier. Remote control in/out jack 9 English These jacks are used in custom installations to transmit remote control signals via cable. • Connect REMOTE CONTROL IN to an output on your remote control system. • Connect REMOTE CONTROL OUT to a remote control input on another component to enable system control. DVD-S2300_G.book Page 10 Friday, October 18, 2002 2:42 PM PLAYING A DISC PLAYING A DISC Before starting playback Before playing a disc, you must connect the unit’s audio and video output jacks to an AV amplifier or other system component (refer to pages 8 and 9). 4 If necessary, press SACD/DVD to change the mode. For more information, refer to “Switching disc play mode” on page 10 (below). 5 Press w. The disc tray closes and playback starts. Note • If you digitally connect the unit to an amplifier that does not feature a DTS decoder, set DTS DIGITAL SURROUND to PCM (factory default) in the Setup/Audio menu. Otherwise, unprocessed digital signal noise will be output that may damage your hearing or speakers. Basic operation POWER y • If one of the following indicators is displayed VCD refer to “Using disc menus” on DVD-A DVD-V page 13. • When the unit finishes playing a DVD, it stops playback or displays a menu screen. Note • The unit cannot play CD-R or CD-RW discs that have not been finalized. Be sure to finalize discs on a CD recorder before playing them in this unit. (The term “finalize” refers to an audio process for CD-Rs or CD-RWs that prepares them for play on supporting players.) DVD/SACD mode indicator ■ Switching disc play mode While the unit is stopped or the disc tray is open, press SACD/DVD. The unit includes independent playback circuits for SACDs and DVDs to optimize use of each disc type. • To play an SACD, switch to SACD mode. • To play other types of discs, switch to DVD mode. Use SACD mode to play SACD . The SACD mode indicator lights up. Use DVD mode to play DVD-A , DVD-V , VCD , and CD The DVD mode indicator lights up. y SACD/DVD OPEN/CLOSE • If you are playing a hybrid disc that contains both SACD format data and conventional CD format data, select SACD mode to play the SACD format data, or DVD mode to play the CD format data. ■ To stop playback Press a. ■ Resume function 1 Press POWER to turn on the power. 2 Press OPEN/CLOSE to open the disc tray. 3 Load a disc into the disc tray. 10 The unit retains memory of the point at which you pressed the a button as long as the power to the unit is turned on. During this time, the W indicator will flash on the display. Press w to resume playback from the stop point. DVD-S2300_G.book Page 11 Friday, October 18, 2002 2:42 PM PLAYING A DISC To clear the memory, press a again. The W indicator disappears. (When a DVD-Video disc is played, a chapter review screen will appear.) Note • Opening the disc tray cancels the resume function. ■ Chapter review function DVD-V SACD VCD CD Key in the desired track number using the numeric buttons. Example (to select track 27): VCD CD 1 Press ≥10. 2 Press 2. 3 Press 7. PLAYING A DISC This function plays the first few seconds of each chapter (from the beginning of the title up to the memorized point) so you can review previous chapters. Press w while the chapter review message is displayed on screen. (If you do not press w, after a while the message disappears and playback resumes.) ■ Selecting a track SACD Notes • This function may not work on some DVDs. • Canceling the resume function also clears the chapter review function. ■ After operating the unit Press v to open the disc tray. Remove the disc, then press POWER to turn off the unit. 1 Press ≥10 twice. 2 Press 7. ■ Search On the remote control, press r (or e) to search forward (or backward). -orOn the front panel, press and hold r/y (or t/e) to search forward (or backward). y • To increase search speed, repeatedly press (or press and hold) r or e on the remote control, or press and hold r/y or t/e on the front panel. , ■ Pause 1 7 ≥10 Press d during playback. To resume playback, press w. ■ Frame advance/reverse DVD-A ■ Skip VCD To advance or reverse frames: While the picture is still or in pause mode, press the curl, h). sor buttons (l • To return to normal playback, press w. • Press the cursor buttons (l, h) repeatedly, or press and hold them, to advance or reverse frames at increasing rates of speed. • Pressing d also advances a few frames. • On certain DVD-Audio discs, frames may advance or reverse only during the video portions of the disc. Note Note • The Video CD format does not permit reverse navigation. • VCDs that use playback control (page 13) may not allow the skip operation to function as described above. 11 English On the remote control, press y (or t) to skip forward (or backward). On the front panel, press r/y (or t/e) to skip forward (or backward). Press t on the remote control or t/e on the front panel to locate the top of the current chapter or track. DVD-V DVD-S2300_G.book Page 12 Friday, October 18, 2002 2:42 PM PLAYING A DISC ■ Slow DVD-A DVD-V VCD MP3 playback To play a disc slowly, while the picture is still or paused: Press e or r on the remote control. -or- Press and hold r/y (or t/e) on the front panel. • To return to normal playback, press w. • To increase the speed, repeatedly press (or press and hold) r, e on the remote control; or press and hold r/y, t/e on the front panel. Note • The Video CD format does not permit reverse navigation. The unit can play MP3 format audio that was recorded by a computer onto CD-R or CD-RW. • If an MP3 file is of poor quality, playback may not be possible. Disc Structure Example MP3 discs are different than standard audio CDs. The MP3 format is so compact and efficient that the equivalent of several albums or standard audio CDs may be stored on a single MP3 disc. The unit creates a folder for the “Title” and a file for each “Chapter.” Root directory Super Audio CDs : Title (Folder) There are three types of Super Audio CDs: • a 2-channel disc that contains stereo audio • a multi-channel disc that includes up to six (6) channels of data • a combination disc that includes a 2-channel data area and a multi-channel data area. 2-channel area Multi-channel area ■ Switching between different channel areas Select your desired area for playback on a combination disc. : Chapter (File) Starting playback from a selected chapter Select a chapter using the numeric buttons (see “Selecting a track” on page 11), then press ENTER to play the chapter. Repeat play To repeat playback, use chapter repeat or title repeat (see page 18 for details). Notes MULTI/2CH • This unit can play MP3 discs recorded at bit rates of 32kbps to 320kbps and sampling frequencies of 44.1kHa and 48kHz. (A sampling frequency of 32kHz is not supported.) • Program play and random play are unavailable on MP3 discs. • Chapters may not play in the order selected at the time of recording. Disc info icons (on-screen) during playback Total chapter number C 1/ 59 While the unit is stopped, press MULTI/2CH. When the multi-channel area is selected, the MULTI indicator lights up on the display. When the 2-channel area is selected, the 2CH indicator lights up on the display. 12 Current chapter 0 : 01 Elapsed play time (for display only) DVD-S2300_G.book Page 13 Friday, October 18, 2002 2:42 PM MISCELLANEOUS FUNCTIONS Using disc menus The unit’s COMPONENT video jack can output progressive signals to a progressive signal compatible monitor for an extra high-quality picture. PROGRESSIVE TOP MENU , , , / ENTER MENU PLAYING A DISC Many discs include menu screens that enable you to control special features, such as skipping to a favorite title or chapter, or selecting an audio language or subtitle language for a movie. This section provides general instructions on operating these screens. Enhancing video quality - Progressive output (U.S.A. model only) RETURN Numeric buttons DVD-A 1 2 DVD-V Press TOP MENU or MENU during playback. The video monitor displays a menu. • On certain discs, the menu appears automatically when you start playback. Press the cursor buttons (k, n, l, h) to select the desired item, then press ENTER. (If another menu screen appears, repeat this step.) ■ Video CD playback control (PBC menu play) VCD Video CDs that feature “playback control” allow you to navigate certain scenes or information by menu. This manual refers to the use of menus to control Video CD playback as “menu play.” Numeric buttons: RETURN: w (PLAY): y: t: a (STOP): PROGRESSIVE indicator Press PROGRESSIVE. The PROGRESSIVE indicator lights up. To cancel this feature, press PROGRESSIVE again. Notes • If the screen shifts off center during progressive output, refer to “Adjusting the screen position,” described below. • When playing 4:3 aspect video on a 16:9 aspect wide-screen monitor using progressive output, the picture may stretch horizontally to fill the screen. In this case, change the aspect ratio to suit the monitor. If this is not possible, turn the progressive feature off. (The progressive output will switch to interlace output.) • When the progressive function is working, video signals are output from only the COMPONENT output jacks. Press to select the desired item. Press to display the initial menu screen. Press to play the selected item. Press to display the next screen. Press to display the previous screen. Press while a menu is displayed to cancel playback control. English Notes • Playback control is automatically canceled during program play or random play. • Certain discs may not respond as described above. 13 DVD-S2300_G.book Page 14 Friday, October 18, 2002 2:42 PM MISCELLANEOUS FUNCTIONS ■ Adjusting the screen position (when using progressive output) DVD-Audio features DVD-A Progressive signals output from the unit may shift off center on certain monitors. To adjust the screen position, use the remote control as follows: 1 Press d to pause playback. 2 Follow step 1 under “Operating the menu bar” on page 20 to display the Picture setting. 3 Press the cursor buttons (l, h) to select the , , , / ENTER right-most icon ( ). 4 Adjust the screen position. To move the image to the left, press numeric button 1. To move the image to the right, press numeric button 3. GROUP PAGE Example: Press 3 to move to the right. • Pressing numeric button 2 after pressing 1 or 3 sets the screen back to the original position. • To check whether the picture is centered, switch to normal output (press PROGRESSIVE to turn the indicator off). 5 Save the adjusted position. First press a, then press SETUP to display the setup menu. Press SETUP again (or RETURN) to save the position. (Even if you skip this step, the position will be saved until you turn the power off.) CONSUMERS SHOULD NOTE THAT NOT ALL HIGH DEFINITION TELEVISION SETS ARE FULLY COMPATIBLE WITH THIS PRODUCT AND MAY CAUSE ARTIFACTS TO BE DISPLAYED IN THE PICTURE. IN CASE OF 525 PROGRESSIVE SCAN PICTURE PROBLEMS, IT IS RECOMMENDED THAT YOU SWITCH THE CONNECTION TO THE “STANDARD DEFINITION” OUTPUT. IF THERE ARE QUESTIONS REGARDING YOUR VIDEO MONITOR COMPATIBILITY WITH THIS UNIT, PLEASE CONTACT OUR CUSTOMER SERVICE CENTER. This unit is compatible with the complete line of YAMAHA projectors, including the DPX-1, LPX-500, PDM-1 and DPX-1000. 14 ■ Playing a track in a specific group 1 Press GROUP. The video monitor displays group and track icons. 2 Press the cursor buttons (k, n) to select a group number, then press ENTER. 3 Press the cursor buttons (k, n) to select a track number, then press ENTER. The selected track starts to play. y • You can also use the numeric buttons to select a group and a track. ■ Playing bonus groups Some discs contain bonus groups that require a four-digit password to gain access. In this case, consult the disc jacket and other packaging for information. 1 While playback is stopped, press GROUP. The video monitor displays group and track icons. 2 Press the cursor buttons (k, n) to select a bonus group, then press ENTER or the cursor button (h). 3 Enter a four-digit password using the numeric buttons, then press ENTER. 4 Press the cursor buttons (k, n) to select a track, then press ENTER. DVD-S2300_G.book Page 15 Friday, October 18, 2002 2:42 PM MISCELLANEOUS FUNCTIONS ■ Changing pages ■ Selecting a subtitle language DVD-Audio discs can contain information pages that can include photo galleries, artist biographies, lyrics, etc. Press PAGE to turn the page. (The page number will update on the display when you change pages.) Some discs are encoded with several audio tracks, multilingual subtitles or multiple camera angles. Refer to the disc jacket to learn which features are supported. ON 1 ENG This icon appears on the video monitor. • Press SUBTITLE repeatedly to step through all subtitles on the disc. The cursor buttons (k, n) and the numeric buttons also change subtitles. PLAYING A DISC Switching audio tracks, subtitles and angles DVD-A DVD-V VCD Press SUBTITLE during playback. y • “- -” is displayed if a disc does not include a subtitle. Note • Subtitles may not be displayed immediately. Turning subtitles on or off SUBTITLE , , AUDIO ANGLE 1 Press SUBTITLE. 2 Press the cursor button (h). , ( DVD-A , DVD-V ONLY) RETURN 3 Numeric buttons Press the cursor buttons (k, n) to select ON or OFF. ■ Changing angles Press ANGLE. 1 This icon appears on the video monitor. • Press ANGLE repeatedly to step through all angles recorded on the disc. The cursor buttons (k, n) and the numeric buttons also change angles. ■ Changing audio tracks You can select different audio track languages and/or formats, if they are available on a disc. Press AUDIO during playback. 1 LPCM 96k24b ■ Turning the icons off Press RETURN. Note • Certain discs require that you use a disc menu to change audio tracks, subtitles or angles. This icon appears on the video monitor. • Press AUDIO repeatedly to step through all audio tracks on a disc. The cursor buttons (k, n) and the numeric buttons also change tracks. y English • If you change audio tracks while playing a non-video portion of a DVD-Audio disc, playback begins at the beginning of the track. • On a DVD-Audio disc, track 2 appears on the front display even if the disc contains only one audio track. • You can also use the button to turn the vocals on or off on karaoke discs. See the disc instructions for details. 15 DVD-S2300_G.book Page 16 Friday, October 18, 2002 2:42 PM MISCELLANEOUS FUNCTIONS Program play SACD DVD-A VCD CD Enjoy listening to your favorite tracks in any order. This unit enables you to program sequence for up to 32 tracks from disc. Note • On combination discs (which include 2-channel and multichannel areas), you can program tracks only in the currentlyselected area. 3 Press numeric buttons to select the track. 4 Press w to start playback. y PLAY MODE • You can also use numeric buttons to select a group or track. DVD-A , , , / ENTER Numeric buttons CANCEL • The “All group play” screen (playback of all groups in order) is added to step 2. • In step 4, press the cursor buttons (k, n) to select a group, then press ENTER. Press the cursor buttons (k, n) again to select a track, then press ENTER. ■ Changing or adding to the program during program play 1 Press a to stop playback. 1 Press a repeatedly to stop program play. 2 Press PLAY MODE repeatedly to select the program screen. 2 Press the cursor buttons (k, n) to select the desired track order position. 3 Press the numeric buttons to enter a track number. DVD-A VCD CD Each time you press PLAY MODE, the screen changes as follows: ■ Canceling programmed tracks Video monitor display (example) Program screen (Program play mode) Playing in desired order PLAY MODE Choose a track, then press ENTER. No 1 Track 1 Press a repeatedly to stop program play. 2 Press the cursor buttons (k, n) to select a track to cancel. 3 Press CANCEL. Time Play Clear Clear all SELECT Note Total time ENTER RETURN 0:00 • If you program a Video CD track (ver. 2.0), playback control is canceled during program play. Press PLAY to start Random screen (Random play mode) Playing in random sequence Return to normal playback SACD Press the button repeatedly to light up the indicators in the following order: PROG (Program play) normal playback Example: (Program play) 16 RNDM (Random play) ■ Navigating up and down pages on the program screen Press e to move up the page, or press r to move down the page. ■ Exiting programming mode 1 Press a repeatedly to stop program play. 2 Press PLAY MODE twice. • Turning off the power or opening the disc tray will cancel all programs. DVD-S2300_G.book Page 17 Friday, October 18, 2002 2:42 PM MISCELLANEOUS FUNCTIONS Random play DVD-A SACD DVD-A VCD CD In random play mode, the unit plays all tracks on the disc in random order. In step 2 of “Random play,” press the cursor buttons (l, h) to select a group, then press ENTER. Example: DVD-Audio (a disc with up to two groups) Random Playback Choose a group or groups. All 1 PLAY MODE 2 SELECT RETURN Press PLAY to start ENTER y • You can select multiple groups. • Use the numeric buttons to select a group. CANCEL To cancel a selection, press the cursor buttons (l, h) to select the group(s), then press CANCEL or ENTER. PLAYING A DISC ENTER , y • You can also cancel a group by entering its group number using the numeric buttons. All group play 1 Press a to stop playback. 2 Press PLAY MODE repeatedly. The “RNDM” indicator lights up on the front panel display. 3 Press w to start random play. DVD-A PLAY MODE ■ Canceling random mode 1 Press a repeatedly to stop playback during random play. 2 Press PLAY MODE. The “RNDM” indicator disappears. • Opening the disc tray also cancels this mode. Notes • When the unit is in random mode, Video CD playback control is canceled. • Up to 100 tracks can be programmed for SACD random play. 1 Press a to stop playback. 2 Press PLAY MODE. 3 Press w. English 17 DVD-S2300_G.book Page 18 Friday, October 18, 2002 2:42 PM MISCELLANEOUS FUNCTIONS Bookmarks DVD-A DVD-V VCD CD The Bookmark feature allows you to mark up to five points (locations), enabling you to return quickly to those points. Repeat play SACD DVD-A DVD-V VCD CD REPEAT MARKER , / ENTER CANCEL To select Repeat mode, during playback press REPEAT. Each time you press the REPEAT button, the repeat mode changes as follows. DVD-V TRACK TITLE GROUP NORMAL PLAYBACK NORMAL PLAYBACK SACD 1 Press MARKER. This icon appears on the video monitor. Highlighted 2 3 Press the cursor buttons (l, h) to select one of five asterisks. The selected asterisk is highlighted. Press ENTER. The selected asterisk changes to the bookmark number. Bookmark number DVD-A CHAPTER VCD CD TRACK ALL (Entire disc) NORMAL PLAYBACK During repeat play, the following indicators light up: CHAPTER TITLE TRACK ALL GROUP Indicators on the monitor Indicators on the unit display C T T A G REP REP REP REP, ALL REP The selected repeat mode name scrolls across the multiinformation display. This icon appears on the video monitor. C ■ Playing from a marked point Press the cursor buttons (l, h) to select a bookmark number, then press ENTER. ■ Clearing a bookmark Press the cursor buttons (l, h) to select a bookmark number, then press CANCEL. Note • When you open the disc tray or turn the unit off, all bookmarks are cleared. 18 Notes • Repeat play may not work properly on all DVD-Video discs. • Repeat play may not work during menu play of VCDs that feature playback control. • For Super Audio CDs, only the indicators on the unit’s display will light up. • If you select “All” repeat for a disc that has a 2-channel area and a multi-channel area, only tracks in the currently-selected area will repeat. DVD-S2300_G.book Page 19 Friday, October 18, 2002 2:42 PM MISCELLANEOUS FUNCTIONS ■ Program repeat SACD DVD-A VCD CD Repeat A-B SACD During program play, press REPEAT. Each time you press REPEAT, the repeat mode changes as follows: DVD-A DVD-V VCD CD The repeat A-B function enables you to specify two points and repeatedly play the section between them. TRACK PLAYING A DISC ALL (Entire program) A-B NORMAL PROGRAM PLAY • The selected repeat mode is indicated on the unit’s display and on the monitor (for DVD-Audio, video CD, and audio CD). 1 ■ Random-sequence repeat SACD DVD-A VCD During playback, press A-B at the desired start point (A). CD A During random play, press REPEAT. Each time you press REPEAT, the repeat mode changes as follows: TRACK ALL (Entire disc) NORMAL RANDOM PLAY • The selected repeat mode is indicated on the unit’s display and on the monitor (for DVD-Audio, video CD, and audio CD). This icon appears on the video monitor. • “REP” and “A-” light up and “B” flashes on the front panel display. 2 Press A-B at the desired end point (B). AB This icon appears on the video monitor. • The flashing “B” lights up steadily on the front panel. The section between points A and B starts playing repeatedly (looping). ■ Canceling A-B repeat Press A-B. This icon appears on the video monitor. Notes • This function may be unavailable on certain DVD-Video discs. • This function works only within a title or track. • With Super Audio CDs, the icon appears only on the unit’s display. English 19 DVD-S2300_G.book Page 20 Friday, October 18, 2002 2:42 PM ON-SCREEN MENU (DVD MODE ONLY) You can control various items using the on-screen menu bar. The Player Info bar includes four menu bars, as illustrated below. To switch menu bars, press the cursor buttons (k, n). d Play setting AB OFF ––– 1 2 3 ✱✱ e Display setting , , , / ENTER ON SCREEN IPB RETURN OFF BRIGHT f Audio setting Numeric buttons SP OFF OFF g Picture setting N 2 Press the cursor buttons (l, h) to select an item to adjust. The selected item is highlighted. 3 Press the cursor buttons (k, n, l, h) to adjust the setting. • Certain items may require that you press ENTER or h to execute the setting. • You can also use the numeric buttons to specify a chapter number, etc. Operating the menu bar 1 Press ON SCREEN. Each time you press ON SCREEN, the on-screen bar changes as follows: a Disc Info bar T 2 C 1 : 46 : 50 2 Digital 1 ENG 3/2.1 ch ON 1 ENG ■ Turning the screen off Press RETURN repeatedly. 1 Note b Player Info bar (Play setting) AB OFF ––– • Certain items are inaccessible when playback is stopped. 1 2 3 ✱✱ ■ Changing the menu bar position To adjust the menu bar position: c Shuttle bar +100 –100 1 Off Press the cursor buttons (l, h) to select the right-most icon ( ). Example) N 2 20 Press the cursor buttons (k, n) to move the menu bar. DVD-S2300_G.book Page 21 Friday, October 18, 2002 2:42 PM ON-SCREEN MENU (DVD MODE ONLY) Disc Info bar Example: DVD-Video T C 2 2 Digital 1 ENG 3/2.1 ch 1 : 46 : 50 ON 1 ENG 1 Title number T Karaoke vocal on/off 2 Track number DVD-A VCD CD Chapter number C Group number G DVD-A ON 1 ENG DVD-V 2 2 1 DVD-A 2 Time index (hour:minute:second) 1 : 46 : 50 DVD-A 1 Playback control PBC Indicates whether playback control is on or off. ON VCD Playback control cannot be adjusted. Page number DVD-A Page 1 Track remaining time Select a page number to display the page. Disc remaining time Å Language Audio mode VCD L R Select a channel to output sound from that channel. LR Digital 1 ENG 3/2.1 ch 12 3 L DVD-V 1 Subtitle on/off 2 Subtitle language Select a number to display the desired subtitle language. Select an angle number to play the scene from that angle. Changing the time display DVD-A VCD CD (for display only) Track elapsed time DVD-V Angle number DVD-A DVD-V DVD-V You can start playback from a specific point by keying in the elapsed time. For example, to start playback from 1:46:50 (1 hr 46 min 50 sec), press these buttons in the following order: [1]^[4]^[6]^[5]^[0]^[ENTER] DVD-A (Karaoke DVD only) Solo: OFF or ON Duet: OFF, V1+V2, V1 or V2 PLAYING A DISC Vocal 1 ✱ OFF DVD-V R Audio format DVD-A DVD-V 1 Audio track number 2 Audio track/language: See Å for language abbreviations. 3 Audio signal type: See ı for details. ENG: FRA: DEU: ITA: ESP: NLD: English French German Italian Spanish Dutch SVE: NOR: DAN: POR: RUS: JPN: Swedish Norwegian Danish Portuguese Russian Japanese CHI: KOR: MAL: VIE: THA: *: Chinese Korean Malay Vietnamese Thai Others ı Signal type/data LPCM/PPCM/qDolbyDigital/DTS/MPEG: Signal type k (kHz): Sampling frequency b (bit): Number of bits ch (channel): Number of channels Example: Notes • The display may vary in accordance with disc specifications. • The time remaining on the disc does not appear during program play or random play. • When playing a Video CD disc using playback control, no track number or time is displayed. 3/2 .1ch 1: Subwoofer (not displayed if no subwoofer signal) 0: Rear channel not available on disc 1: Rear channel (monaural) 2: Rear channels (left/right) English 1: Main channel (monaural) 2: Main channels (left/right) 3: Main channels (left/right) + Center 21 DVD-S2300_G.book Page 22 Friday, October 18, 2002 2:42 PM ON-SCREEN MENU (DVD MODE ONLY) Player Info bar ■ Play setting ■ Display setting Example: DVD-Video Example: DVD-Video AB OFF ––– IPB 1 2 3 ✱✱ OFF A-B repeat (see page 19) AB DVD-A DVD-V VCD CD BRIGHT IPB display IPB DVD-V OFF [ENTER] (start point)^[ENTER] (finish point)^[ENTER] (playback) To cancel [ENTER] I, P, and B indicate still picture types. Type I pictures are the largest (in data size), followed by types P and B. Type I pictures offer the highest picture quality. ON Repeat play (see page 18) OFF DVD-V C: Chapter; T: Title; OFF: Normal playback DVD-A VCD Display dimmer Changes the brightness of the front panel display. BRIGHT CD BRIGHT T: Track; A: All; G: Group; OFF: Normal playback DVD-A VCD DIM AUTO Select AUTO to dim the front panel display when a disc containing video is played. Pressing PAUSE will brighten the front panel temporarily. Play mode display ––– OFF CD (for display only) RND: Random play; PGM: Program play; – – –: Normal playback ■ Audio setting ALL: All groups DVD-A Example: DVD-Video Bookmarks (see page 18) 1 2 3 ✱✱ DVD-A DVD-V VCD SP OFF CD You can mark up to five (5) places to play again. To mark a point: [l, h]^[ENTER] (at the desired point) OFF Virtual Surround ( V.S.S. , DVD-V , SP OFF VCD ) • To recall a bookmark: [l, h]^[ENTER] • To erase a bookmark: [l, h]^[CANCEL] Speaker V.S.S (SP-V.S.S.) Dolby Digital, DTS, MPEG, LPCM Two or more-channel discs Headphone V.S.S (HP-V.S.S.) Dolby Digital, MPEG, LPCM Two or more-channel discs V.S.S. level SP 1/HP1: standard SP 2/HP 2: high SP off/HP off: V.S.S. canceled Cinema dialog OFF DVD-V (Dolby Digital/DTS 3ch or more channel discs) Select ON to increase the volume of dialog output from the center channel. 22 DVD-S2300_G.book Page 23 Friday, October 18, 2002 2:42 PM ON-SCREEN MENU (DVD MODE ONLY) ■ Picture setting When PROGRESSIVE is on (U.S.A. model) N N Digital picture mode Digital picture mode DVD-A N DVD-V Auto VCD N DVD-V VCD Auto Transfer MODE Selects the method of converting film material (recorded at 24fps) or video material (recorded at 30fps) into progressive output. Auto (normal): For viewing film material Video: For viewing video material PLAYING A DISC N: Normal C: Cinema image (suited for movie viewing) U: User mode To change the User mode: 1 Select User mode. 2 Press (l, h) to select an item to change. 3 Press (k, n) to adjust the setting. The following items are displayed when you select “U.” DVD-A N: Normal C: Cinema image (suited for movie viewing) U Contrast (–7 to +7) Adjusts the contrast between the light and dark areas of the picture. 0 Brightness (0 to +15) Adjusts the overall brightness of the picture. 0 Sharpness (–6 to +6) (U.K., European, and Australian models) Adjusts the horizontal resolution of the picture. 0 Color (–7 to +7) Adjusts the picture color. 0 Shuttle bar Slow-motion play : Backward DVD-A DVD-V Still/Pause DVD-A VCD DVD-V CD Slow-motion play : Forward DVD-A DVD-V VCD +100 –100 Search : Backward DVD-A VCD DVD-V CD Play DVD-A VCD DVD-V CD Search : Forward DVD-A VCD DVD-V CD Note • On DVD-Audio discs, slow-motion works only on the video portion. English 23 DVD-S2300_G.book Page 24 Friday, October 18, 2002 2:42 PM DETAILED SETTINGS CHANGING THE DVD MODE SETTINGS The Setup menu enables you to change the factory default settings. Using the Setup menu 3 Press the cursor buttons (k, n) to select the desired item, then press ENTER. 4 Press the cursor buttons (k, n) to change the setting, then press ENTER again to return to the screen illustrated in step 2. ■ Returning to the previous screen , , , / ENTER RETURN Press RETURN. ■ Exiting Setup mode Press SETUP. Note SET UP • When you display the Setup menu, the DISC DIRECT function turns on automatically. When you exit the Setup menu, the DISC DIRECT function returns to the previous setting. 1 2 Press SETUP. The video monitor displays a menu. Press the cursor buttons (l, h) to select a menu group. There are five menu groups. The screen displays items that belong to the selected menu group. Disc menu 1 SETUP Disc Audio Video menu English M 2 SETUP Video TV Aspect 4:3 Pan&Scan TV Type Audio menu A t ti 3 SETUP Audio Speaker Setting Multi-channel Display menu 4 SETUP Display M Others menu L 5 SETUP Others D 24 E li h ■ Returning all settings on the Setup menu to factory defaults Press and hold down v, d, and t/e on the front panel simultaneously until the video monitor displays “Initialized.” DVD-S2300_G.book Page 25 Friday, October 18, 2002 2:42 PM CHANGING THE DVD MODE SETTINGS Settings Summary The following chart shows Menu groups, Items, and Options. Factory default settings are underlined. Menu groups Disc Options Audio DVD-A DVD-V Select the preferred audio track language. (U.S.A. model): English / French / Spanish / Original* / Other** (Australian model): English / French / German / Italian / Spanish / Original* / Other** (U.K. and European models): English / French / German / Italian / Spanish / Original* / Other** Subtitle DVD-A DVD-V Select the preferred subtitle language. (U.S.A. model): Automatic / English / French / Spanish / Other** (Australian model): Automatic / English / French / German / Italian / Spanish / Other** (U.K. and European models): Automatic / English / French / German / Italian / Spanish / Other** Menus DVD-A DVD-V Select the preferred disc menu language. (U.S.A. model): English / French / Spanish / Other** (Australian model): English / French / German / Italian / Spanish / Other** (U.K. and European models): English / French / German / Italian / Spanish / Other** Ratings DVD-V Set a ratings level to limit DVD-Video playback. See page 28 for details. Setting ratings level 8 No Limit / 1 to 7 / 0 Lock All DETAILED SETTINGS Video Items Changing ratings level Unlock Player Change Level Change Password Temporary Unlock TV Aspect If you connect to a 4:3 conventional-type monitor, select “4:3 Pan&Scan” (left and right sides trimmed when playing 16:9 video) or “4:3 Letterbox” (black areas appear at the top and bottom when playing 16:9 video). Select “16:9” if you connect to a widescreen monitor. 4:3 Pan&Scan: On a conventional monitor, the video image fills the monitor screen but is trimmed on its left and right sides. / 4:3 Letterbox: On a conventional monitor, black areas appear at the top and bottom of the screen when playing 16:9 video. / 16:9: For a widescreen monitor AV Output (U.K. and European models) Choose the video signal format to be output from the AV1 SCART jack. Video / S-Video / RGB English 25 DVD-S2300_G.book Page 26 Friday, October 18, 2002 2:42 PM CHANGING THE DVD MODE SETTINGS Menu groups Video Audio Items Options Still Mode Specify the type of picture shown in pause mode. First select “Automatic.” If still pictures jitter, select “Field.” If visual details are still not clear, select “Frame.” Automatic / Field / Frame A moving picture is composed of numerous still images called frames. Each frame is composed of two alternating fields. Each fields contains only half the information of a still frame. Two alternating fields may result in a blurred frame. In general, set Still Mode to “Automatic.” Black Level Control (U.S.A. model) Change the black level of the picture. Select “Lighter” when you connect to a monitor using the VIDEO or S VIDEO jacks. Select “Darker” when using COMPONENT output. Lighter / Darker NTSC Disc Output (U.K., European and Australian models) Select a video signal format (PAL 60 or NTSC) to be output when playing an NTSC disc. PAL 60 / NTSC Speaker Setting DVD-A DVD-V Set the parameters for the analog audio output (6CH DISCRETE or MIXED 2CH) to suit your speaker system. Multi-channel: If 6CH DISCRETE output is being used. (Also, select the speakers, speaker size, delay time, and channel balance. See page 29.) 2-channel: If MIXED 2CH output is being used. 26 PCM Down Conversion DVD-A DVD-V Specify how to output high sampling-frequency audio signals from discs that are not copyright-protected. (See page 28 for details.) No / Yes Dolby Digital DVD-A DVD-V Specify the signal type output from the unit’s digital outputs. Select “Bitstream” if the connected device features a Dolby Digital decoder. Select “PCM” otherwise. Bitstream / PCM DTS Digital Surround DVD-A DVD-V Specify the signal type output from the unit’s digital outputs. Select “Bitstream” if the connected device features a DTS decoder. Select “PCM” otherwise. Bitstream / PCM MPEG DVD-A DVD-V (U.K., European and Australian models) Specify the signal type output from the unit’s digital outputs. Select “Bitstream” if the connected device features an MPEG decoder. Select “PCM” otherwise. Bitstream / PCM D. Range Compression DVD-A DVD-V (Dolby Digital only) Change the dynamic range for late-night viewing. Select “On” to make it easier to hear dialog at low volume levels. Off / On Audio during Search DVD-A DVD-V VCD Select to enable sound during search. Select “Off” if the sound is distorted when searching with Dolby Digital or DTS material. With DVD-Audio, sound may be heard even if you select “Off.” On / Off DVD-S2300_G.book Page 27 Friday, October 18, 2002 2:42 PM CHANGING THE DVD MODE SETTINGS Menu groups Display Others Items Options (U.S.A. model): English / Français / Español (Australian model): English / Français / Deutsch / Italiano / Español (U.K. and Europe models): English / Français / Deutsch / Italiano / Español On-Screen Messages Select whether or not to show on-screen messages. On / Off DVD-Video Mode Some DVD-Audio discs contain DVD-Video content that can be played only by a DVD-Video player. On / Off To play DVD-Video content, select “On.” To play a normal DVD-Audio disc, select “Off.” Demo A demonstration of the unit’s on-screen displays starts when you select “On”. The demonstration stops when you press the a button, etc. The setting reverts to “Off”. On / Off * If you set Audio to “Original,” the original language of each disc will be selected. ** If you set Audio, Subtitle, or Menus to “Other,” specify the language by selecting a four-digit number from the language code list and enter it using the numeric buttons. *** If the audio language you select is not recorded on the disc, but subtitles for the same language are recorded, the subtitles will be displayed. However, if the audio is recorded on the disc, the subtitles will not be displayed. ■ Language selection and language code list DETAILED SETTINGS On-Screen Menu Language Select the preferred language for the Setup menu and onscreen messages. Language code list 6565: 6566: 6570: 6577: 6582: 6583: 6588: 6590: 6665: 6669: 6671: 6672: 6678: 6679: 6682: 6765: 6779: 6783: 6789: 6865: 6869: 6890: 6976: 6978: 6979: 6983: 6984: 6985: 7065: 7073: 7074: Afar Abkhazian Afrikaans Ameharic Arabic Assamese Aymara Azerbaijani Bashkir Byelorussian Bulgarian Bihari Bengali; Bangla Tibetan Breton Catalan Corsican Czech Welsh Danish German Bhutani Greek English Esperanto Spanish Estonian Basque Persian Finnish Fiji 7079: 7082: 7089: 7165: 7168: 7176: 7178: 7185: 7265: 7273: 7282: 7285: 7289: 7365: 7378: 7383: 7384: 7387: 7465: 7473: 7487: 7565: 7575: 7576: 7577: 7578: 7579: 7583: 7585: 7589: 7665: Faroese French Frisian Irish Scots Gaelic Galician Guarani Gujarati Hausa Hindi Croatian Hungarian Armenian Interlingua Indonesian Icelandic Italian Hebrew Japanese Yiddish Javanese Georgian Kazakh Greenlandic Cambodian Kannada Korean Kashmiri Kurdish Kirghiz Latin 7678: 7679: 7684: 7686: 7771: 7773: 7775: 7776: 7778: 7779: 7782: 7783: 7784: 7789: 7865: 7869: 7876: 7879: 7982: 8065: 8076: 8083: 8084: 8185: 8277: 8279: 8285: 8365: 8368: 8372: 8373: Lingala Laotian Lithuanian Latvian, Lettish Malagasy Maori Macedonian Malayalam Mongolian Moldavian Marathi Malay Maltese Burmese Nauru Nepali Dutch Norwegian Oriya Punjabi Polish Pashto, Pushto Portuguese Quechua Rhaeto-Romance Romanian Russian Sanskrit Sindhi Serbo-Croatian Singhalese 8375: 8376: 8377: 8378: 8379: 8381: 8382: 8385: 8386: 8387: 8465: 8469: 8471: 8472: 8473: 8475: 8476: 8479: 8482: 8484: 8487: 8575: 8582: 8590: 8673: 8679: 8779: 8872: 8979: 9072: 9085: Slovak Slovenian Samoan Shona Somali Albanian Serbian Sundanese Swedish Swahili Tamil Telugu Tajik Thai Tigrinya Turkmen Tagalog Tonga Turkish Tatar Twi Ukrainian Urdu Uzbek Vietnamese Volapük Wolof Xhosa Yoruba Chinese Zulu Note • The language selected in the Setup menu cannot be heard if it is not present on the disc. English 27 DVD-S2300_G.book Page 28 Friday, October 18, 2002 2:42 PM CHANGING THE DVD MODE SETTINGS Ratings 4 DVD-V The ratings level can be set from 0 through 8. (The lower the number, the greater the restriction.) Press ENTER. The password is confirmed and the lock icon is engaged. If you attempt to play a disc that exceeds the ratings level, a message will appear on the video monitor. Follow the procedure described on screen. (Press ENTER to display the previous screen.) ■ Changing the ratings level (from Levels 7 - 0) Select “Ratings” in the Setup menu to display the password screen. , , , / ENTER 1 Enter a four-digit number using the numeric buttons, then press ENTER. The following items are displayed: Unlock Player: Unlocks the rating; returns to level 8. Change Password: Changes the password. Change Level: Changes the rating level. Temporary Unlock: Temporarily unlocks the rating level. It remains unlocked until you turn the power off or open the disc tray. 2 Press the cursor buttons (k, n) to select the desired item, then press ENTER. Numeric buttons CANCEL ■ Changing the ratings level (from Level 8) The unit may be set so that it will not play DVD videos unsuitable for children. To play these videos or change the restriction, you must enter a password. When you select level 0 through 7, the unit displays the password screen. 1 Press SETUP. The video monitor displays a menu. 2 Press n to select “Ratings,” then press ENTER. 3 Enter a four-digit number using the numeric buttons, then press ENTER. Press CANCEL to enter a different number. Remember your password! SETUP SELECT Ratings Enter a 4-digit password, then press ENTER. Password ✱✱✱✱ ■ If you forget your password Return the unit to its factory default settings. See page 24. Note • All other settings return to factory defaults. PCM down conversion DVD-A DVD-V You can specify how to output high-quality digital signals (sampling frequencies of 88.2kHz and 96kHz) from discs that are not copyright-protected. Select an option depending on whether the connected amplifier or other components support these signals. Connected component supports 88.2kHz or higher signals. PCM down conversion Digital output Yes Select “Yes.” Output as is. No Select “No.” Converted to 48kHz or 44.1kHz. If a digital signal is input to a component that does not support 88.2kHz or higher signals, select “Yes.” (If you select “No,” audio signals of 88.2kHz or higher sampling frequencies will not be output.) ENTER RETURN Note • If a disc is copyright-protected or has a sampling frequency of 176.4 kHz or more, signals are automatically converted to either 48 kHz or 44.1 kHz. 28 DVD-S2300_G.book Page 29 Friday, October 18, 2002 2:42 PM CHANGING THE DVD MODE SETTINGS Speaker settings a Speaker selection and size DVD-A DVD-V Press the cursor buttons (k, n, l, h) to select a speaker, then press ENTER. The indicator is displayed above and below the speaker icons. 2 Press the cursor buttons (k, n) to select a setting, then press ENTER. • Speaker size options: L: Large, Small R: Large, Small C: Large, Small, None SW: Used, Not used LS: Large, Small, None RS: Large, Small, None The left (L or LS) speaker size is automatically assigned to the right (R or RS) speaker. (For example, if you select Large for the L speaker, the R speaker will automatically be set to Large.) , , , / ENTER If you select “Multi-channel” from the Setup menu, set parameters a, b, and c (page 29 and page 30) according to the speaker system. • Example: Left rear speaker Setting panel 1 Main (L) a Center bac Main (R) a Exit SETUP L ms 0 C Exit Test dB 0 R dB 0 SW dB 0 RS SELECT LS ENTER RETURN dB 0 ms 0 Test signal 2 DETAILED SETTINGS 1 Set the parameters for 6CH DISCRETE output to suit the speaker system. 3 LS LS 1 No icon appears when the speaker is not used. 2 This icon appears when using a large speaker capable of low-frequency (under 100 Hz) output. 3 This icon appears when using a small speaker that is not capable of low-frequency output. • Factory default speaker-size settings: L/R: Large C/LS/RS: Large SW: Used Rear Subwoofer (L) a (L) c b (R) c (R) a c a English 29 DVD-S2300_G.book Page 30 Friday, October 18, 2002 2:42 PM CHANGING THE DVD MODE SETTINGS b Delay time c Speaker balance (This parameter is effective on only center/rear channels of DVD-Video discs recorded in Dolby Digital format.) To obtain maximum effect from a Dolby Digital 5.1 channel source, all speakers (except the subwoofer) should be located the same distance from the listening position. However, the center speaker is often placed in line with the front speakers. You can virtually increase the distance of the center and rear speakers by adjusting the delay time. You can use the test tone to adjust the output level of each speaker (center, rear L/R) until the volume level of each speaker matches the main speakers. 1 Press the cursor buttons (k, n, l, h) to select “Test,” then press ENTER. The test tone plays through one speaker at a time in the following order, starting with the left front speaker. L L C 2 Distance A Distance C SW Listening position LS Distance B C R RS LS R RS Listening to the test tone, press the cursor buttons (k, n) to adjust the volume of the effect speakers (from -6db to +6db), then press ENTER. The value in the “dB” box changes. You cannot adjust the main speaker level. Note 1 2 Press the cursor buttons (k, n, l, h) to select an “ms” box, then press ENTER. Press the cursor buttons (k, n) to adjust the delay time, then press ENTER. • If Distance A or B in the above illustration is equal to or greater than Distance C, set the delay time to 0 ms. • If Distance A or Distance B is less than Distance C, set the delay time as follows: Center speaker Difference Setting Approx. 50 cm (1 1/2 feet) 1.3 ms Approx. 100 cm (3 feet) 2.6 ms Approx. 150 cm (5 feet) 3.9 ms Approx. 200 cm (6 feet) 5.3 ms Rear speakers 30 Difference Setting Approx. 200 cm (6 feet) 5.3 ms Approx. 400 cm (12 feet) 10.6 ms Approx. 600 cm (18 feet) 15.9 ms • The subwoofer cannot output the test tone. Play a recording and return to this screen to adjust the output level of the subwoofer. ■ Exiting speaker setting mode Press the cursor buttons (k, n, l, h) to select “EXIT,” then press ENTER. Notes • You must make separate settings for SACD mode (see page 31). • These adjustments may not be effective when the disc’s original sound design is protected. In this case, the P.PCM indicator will light up or the D.MIX indicator will turn off. DVD-S2300_G.book Page 31 Friday, October 18, 2002 2:42 PM CHANGING THE SACD MODE SETTINGS This unit features independent playback circuits for DVD mode and SACD mode. DVD mode settings are not valid in SACD mode. You must complete a separate group of settings dedicated to SACD mode. Speaker settings 3 Press the cursor button l or h to change the setting. When you press the cursor button, the speaker mode setting (indicated on the display) changes as follows: Speaker mode chart Speaker mode MLTCH DIRECT Large Large None Small Small Small Used MAIN-LRG +SW Large Small Small Used MAIN-LRG Large Small Small None NON-C +SW Large None Large Used NON-C Large None Large None Selecting a speaker mode: Select a speaker mode to suit your speaker setup and performance. Speakers marked “Large” will output all signals, including a low range of 90Hz and lower. If you are using a large speaker with a large capacity for low-range frequencies (i.e., the woofer diameter is 16cm or more), select a mode for which the corresponding speaker is marked “Large.” The low range on the “Small” speaker channels is output to the subwoofer or main speakers (marked “Large”). If you feel that low range playback is not sufficiently powerful, or if the sound clips, select a mode in which the corresponding speaker is marked “Small.” 4 Press ENTER to confirm the selected mode. 5 Press SETUP. The unit displays the standard screen. ■ Setting speaker mode 2 Press ENTER. The unit displays the current setting. Audio signals are output as recorded. Large SET UP Press SETUP. The unit displays “SPK MODE.” Subwoofer 5-SML +SW ENTER 1 Rear speakers 5-LRG , Set the speaker mode according to your speaker size and setup. Center speaker DETAILED SETTINGS To play multi-channel Super Audio CD data effectively, set the speaker parameters in SACD mode to suit your speakers and components. The speaker parameters enable you to select a speaker mode and adjust the speaker balance. Main speakers ■ Adjusting the speaker balance If the volume level of each speaker varies, use the test tone to adjust the level so that all speakers sound at the same level as the main speakers. • The speaker balance cannot be adjusted if the speaker mode is set to MLTCH DIRECT. • If the speaker mode is changed, parameters set prior to the change will be initialized (assigned as initial values). Press SETUP. 2 Press the cursor button l or h to select “SPK BALANCE.” Pressing the cursor button toggles between “SPK MODE” and “SPK BALANCE.” English 1 31 DVD-S2300_G.book Page 32 Friday, October 18, 2002 2:42 PM CHANGING THE SACD MODE SETTINGS 3 Press ENTER. The unit displays “TEST TONE.” 7 Press ENTER to confirm the setting. The unit displays the next speaker’s balance setting. 4 Press ENTER. Two seconds of test tone are output from each speaker in the following order. 8 Press SETUP. The unit displays the standard screen. TEST LEFT (left main) CENTER (center) TEST L. SURROUND (left rear) 5 TEST RIGHT (right main) TEST R. SURROUND (right rear) Adjusting the brightness of the display You can adjust brightness of the display. Press ENTER to stop the test tone, press the cursor button l or h to select a speaker to adjust, then press ENTER again. Pressing the cursor button l or h steps through the display indication as follows: DIMMER TEST TONE BALANCE C (center) BALANCE RS (right surround: right rear) BALANCE LS (left surround: left rear) BALANCE SW (subwoofer) Example: Adjusting the right rear speaker level Select BALANCE RS, then press ENTER. The unit displays the following indication, and the left and right main speakers and the right rear speaker output a test tone at the same time. Press DIMMER. Each time you press DIMMER, the brightness changes as follows: bright dark auto • If “auto” is selected, the display dims during disc playback. If you pause the disc or operate the unit, the display brightens temporarily. Changing the time indicator You can select a time indicator style for Super Audio CD playback. Notes • You cannot adjust the level of the main speakers. Instead, you adjust the level of the center, left and right rear speakers based on the level of the main speakers. • No test tone is output from speakers marked “None” in the selected speaker mode (see the speaker mode chart on page 31). In this case, you will be unable to adjust the level. 6 Press the cursor button l or h to adjust the level balance. Press the cursor button to move “+” one step. Press h to increase or l to decrease the selected speaker level relative to the main speaker level. TIME Press TIME during playback. Press TIME to change the time indicator as follows: Track elapsed time Track remaining time • One step equals 0.5dB. Disc remaining time Note • The unit does not display a disc’s remaining time during program play or random play. 32 DVD-S2300_G.book Page 33 Friday, October 18, 2002 2:42 PM APPENDIX TROUBLESHOOTING Refer to the chart below if the unit does not function properly. If the problem is not listed below, or if the instructions fail to help, turn off the power to the unit, disconnect the power cable, and contact the nearest authorized YAMAHA dealer or service center. ■ General Problem Cause Remedy Refer to page Some operations may be prohibited by the disc. — Playback does not start, or stops immediately. There is moisture on the laser pickup. Wait one to two hours after switching the unit on before trying to play a disc. — The disc has been loaded upside down. Reload the disc with the label side facing up. — The disc is dirty. Clean the disc. 36 Some discs are not compatible. Audio or video is not played or is abnormal. Connections or settings are incorrect. “No Play” appears on the unit’s display. This unit is unable to play the loaded disc. The unit does not recognize disc (“No disc” appears on the display, or the display indicates that no disc is loaded). The disc is not loaded or placed properly. — Check the connections and input/ output settings. 8, 9, 24–32 APPENDIX No response when buttons pressed. — Place the disc properly. — ■ DVD mode Problem No subtitles Cause Remedy Refer to page Display subtitles by pressing SUBTITLE or using the on-screen menu. 15 The disc does not include subtitles. Subtitles are turned off. — Subtitles might not be displayed near repeat play points A or B, or near bookmarks. — An alternative language cannot be selected on discs that do not contain more than one language. — On certain discs, the user cannot select an alternative language using AUDIO or SUBTITLE. In this case, try to select an alternative language from the disc menu, if available. — Angle cannot be changed. The disc or the scene being played does not support multiple angles. — No sound Distorted sound If the “D.MIX” indicator on the front panel turns off during multi-channel DVD-Audio disc playback, sound will be output only from speakers specified by the disc. — Sound “skips.” The disc is dirty. Clean the disc. 36 Uncomfortable high-pitch noise The Audio setting is inappropriate for the connected component. Change the Audio setting in Setup menu to suit the connected digital component. 26 Picture distorted during Search Some distortion is normal during Search. Alternative languages cannot be selected. — English 33 DVD-S2300_G.book Page 34 Friday, October 18, 2002 2:42 PM TROUBLESHOOTING Problem Cause Remedy Refer to page No picture (U.S.A. model) If you play a PAL system DVD-Audio, the message “This disc is PAL system. The output is sound only” may appear on the monitor. No picture is available because the disc uses an incompatible type of video signal. — Video cannot be recorded. Most DVD-Audio/Video discs are copy-protected and cannot be recorded. — Picture appears incorrectly. Incorrect “TV aspect” setting on the Video menu (in Setup). Select the correct setting. Note that it may be difficult to adjust the widescreen format of many DVDVideos to fit perfectly on a 4:3 video monitor. (U.S.A. model) If you play PAL system DVD-Audio, the message “This disc is PAL system. The output is sound only.” may appear on the monitor. No picture is available because the disc uses an incompatible video signal system (only audio can be played). 25 — (U.S.A. model) Due to the editing method or material used on a DVD, ghosting may occur with progressive output. Turn off the PROGRESSIVE output. 13 The video is in poor material condition or was edited or processed inappropriately. (Video will be played correctly via interlace output.) Turn off the PROGRESSIVE output to output interlaced video signals to a video monitor. 13 No on-screen display In the Setup menu, under Display, set On-Screen Messages to On. 25 On-screen menu icons not displayed or only partially displayed on the television Press the cursor buttons [k, n] while the right-most icon is highlighted to change the menu bar position. 20 Excessive ghosting Use the on-screen menu icons to adjust the picture quality. 23 (U.S.A. model) Part of the picture doubles during progressive output. ■ SACD mode Problem Cause The Setup menu settings are not effective. Setup menu settings are not effective in SACD mode. No digital signal is output from the digital output jack. Digital signals cannot be output from a Super Audio CD. Remedy Refer to page Set the parameters for SACD mode, instead of using the Setup menu. Some parameters may not be available. 31, 32 — ■ Remote control Problem The remote control does not function properly. 34 Cause Remedy Refer to page The remote control was operated at an angle or dis- The remote control will function tance in excess of its operating range. within a maximum range of 6 m (20 feet) and no more than 30 degrees offaxis from the front panel. 3 Direct sunlight or lighting (from an inverter type of fluorescent lamp, etc.) is striking the remote control sensor of the unit. Reposition the unit. — The batteries are weak. Replace all batteries with new ones. 3 DVD-S2300_G.book Page 35 Friday, October 18, 2002 2:42 PM GLOSSARY Pan&Scan/Letterbox In this manual, “bitstream” refers to the digital form of multiple channel audio data (e.g., 5.1 channel audio) before it is decoded into its various channels. In general, DVD-Video discs are produced with the intention of being viewed on a widescreen television with an aspect ratio of 16:9. This means you can view most material at the intended aspect ratio on a widescreen television. Material with this ratio will not fit onto a standard television with an aspect ratio of 4:3. Two picture styles, “Pan&Scan” and “Letterbox,” resolve this issue. Pan&Scan: The sides of the image are trimmed so the picture can fill the screen. Letterbox: Black bands appear across the top and bottom of the image. The picture appears at an aspect ratio of 16:9. Decoder A device or program that translates (decodes) encoded data on DVDs into an appropriate format. Frames Moving pictures are composed of a sequence of still images called frames. About 30 frames are shown each second (30fps). Each frame is composed of two interlaced fields. A television displays these fields in rapid succession to create frames. Frame stills and field stills A frame still is an image composed of two alternating fields. Edges may be slightly blurry, but the overall image quality is high. A field still is an image composed from only one of the two fields. The picture is not blurry, but contains only half of the visual information of a frame still. Group DVD-A A DVD audio disc is divided into large sections called “groups” and smaller sections called “tracks.” The numbers allocated to these sections are called “group numbers” and “track numbers.” Interlaced and progressive output NTSC, the video signal standard, uses 525 interlaced (i) scan lines. Progressive scanning uses twice that number of scan lines and is called 525p. The 525i video signals output from the unit’s COMPONENT VIDEO OUT jacks (Y, PB, PR) allow you to enjoy higher quality pictures than if the signals were output from the video output jack or S VIDEO OUT jack. The COMPONENT VIDEO OUT jacks are also able to handle 525p (progressive) video signals, which are of even greater resolution. Playback control (PBC) The term “playback control” on a Video CD or its packaging indicates that certain scenes or information may viewed interactively or navigated by menu. This unit can play Video CDs that feature playback control. APPENDIX Bitstream Sampling frequency and quantized bits When digitizing an analog audio signal, the number of times the signal is sampled per second constitutes the sampling frequency. The degree of fineness with which a sound level is converted into a numeric value is determined by the number of quantized bits. Title/Chapter DVD-V DVD-Video discs are divided into large sections (titles), and smaller sections (chapters). The numbers allocated to these sections are referred to as title numbers and chapter numbers. Track SACD DVD-A VCD CD A track is the smallest division on DVD-Audio, CD, and Video CD discs. It usually equates to a single song. PCM Pulse Code Modulation (PCM) converts analog waves into digital signals. It is commonly used in the creation of music CDs. DVDs allow greater volume, and hence use linear PCM, which has a higher sampling rate. Compressed PCM signals are called packed PCM (PPCM). English 35-
 1
1
-
 2
2
-
 3
3
-
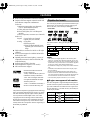 4
4
-
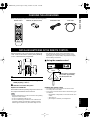 5
5
-
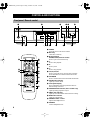 6
6
-
 7
7
-
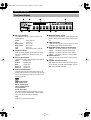 8
8
-
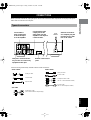 9
9
-
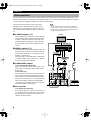 10
10
-
 11
11
-
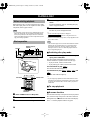 12
12
-
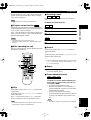 13
13
-
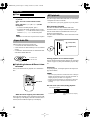 14
14
-
 15
15
-
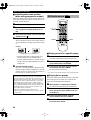 16
16
-
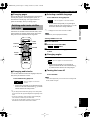 17
17
-
 18
18
-
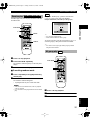 19
19
-
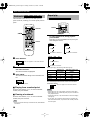 20
20
-
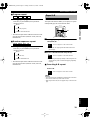 21
21
-
 22
22
-
 23
23
-
 24
24
-
 25
25
-
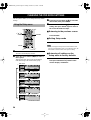 26
26
-
 27
27
-
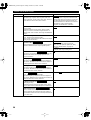 28
28
-
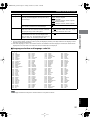 29
29
-
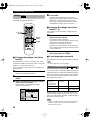 30
30
-
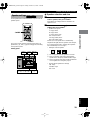 31
31
-
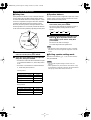 32
32
-
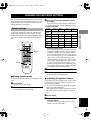 33
33
-
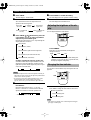 34
34
-
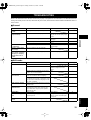 35
35
-
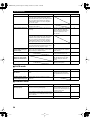 36
36
-
 37
37


Yamaha DVD-S2300 de handleiding
- Categorie
- Dvd spelers
- Type
- de handleiding
in andere talen
- English: Yamaha DVD-S2300 Owner's manual
- italiano: Yamaha DVD-S2300 Manuale del proprietario
- français: Yamaha DVD-S2300 Le manuel du propriétaire
- Deutsch: Yamaha DVD-S2300 Bedienungsanleitung
- dansk: Yamaha DVD-S2300 Brugervejledning
- svenska: Yamaha DVD-S2300 Bruksanvisning
- Türkçe: Yamaha DVD-S2300 El kitabı
- română: Yamaha DVD-S2300 Manualul proprietarului
Gerelateerde papieren
Andere documenten
-
Samsung DVD-E237 Handleiding
-
-
-
Denver MT-779DVBT de handleiding
-
-
TEAC sack/cd player Handleiding
-
TEAC CD-1000 de handleiding
-
Brandt BDVDP7X2 CARKIT Handleiding
-
Denon DVD-1600 Handleiding
-
TEAC SACD/CD Player Handleiding