Toyota DFL Superior 2D de handleiding
- Categorie
- Naaimachines
- Type
- de handleiding

RS2000-2D
Read the instruction manual.
Lisez le guide de l’utilisateur.
Lees de gebruiksaanwijzing.
Leggere il manuale istruzioni.
Series RS2000
RS2000-2D_EFNI.book Page 1 Thursday, March 30, 2006 3:31 PM

Type designation
RS2000 series have several types. The types are shown in the nameplate as follow.
MODEL / MODELE (MODEL NAME)
SERIES / SERIE
• RS2000 SERIES
• RS2000 LCD SERIES
• RS2000 EL SERIES
Type désignation
Les séries RS2000 comprennent plusieurs types de produits. Les différents types de produits
sont différentiables par la plaque identification comme suit:
MODELE / MODELE (NOM DU MODELE)
SERIE
• SERIE RS2000
• SERIE RS2000 LCD
• SERIE RS2000 EL
Type Aanduiding
RS2000 serie bestaat uit diverse modellen. De types zijn in het typeplaatje als volgt aangeduid.
MODEL / MODELE (MODEL NAAM)
SERIES / SERIE
• RS2000 SERIE
• RS2000 LCD SERIE
• RS2000 EL SERIE
Identificazione modello
La serie RS2000 ha diversi modelli. I modelli sono indicati come di seguito.
MODELLO (NOME MODELLO)
SERIE
• SERIE RS2000
• SERIE RS2000 LCD
• SERIE RS2000 EL
RS2000-2D_EFNI.book Page 2 Thursday, March 30, 2006 3:31 PM

Nameplate
When calling for service, please note the MODEL NAME and SERIES that is inscribed on the
back of your sewing machine.
Plaque d’identification
Lorsque vous appelez notre service après-vente, merci d'indiquer le MODELE et la SERIE de
votre produit inscrits au dos de votre machine à coudre.
Naamplaat
Indien u opbelt voor service, noteer dan het MODEL en de SERIE die op de achterkant van uw
machine staat vermeld.
Targhetta
Quando chiamate per il servizio assistenza prendete nota del MODELLO e delle SERIE
stampigliati sulla parte posteriore della vostra macchina per cucire.
max 15W
70W
MODEL / MODELE RS2000 SERIES / SERIE
230-240V
50Hz
Manufacturer/: ZHEJIANG AISIN ELITE
Fabricant MACHINERY & ELECTRIC
CO., LTD.P.R.C.
Importer/ : EUROPE S. A.
Importateur
MADE IN P. R. C. / FABRIQUE EN R.P.C.
MODEL NAME
NOM DU MODELE
MODEL NAAM
NOME DEL MODELLO
Pagina laadt ...
Pagina laadt ...

Nederlands
“BELANGRIJKE VEILIGHEIDSINSTRUCTIES”
Wanneer u de naaimachine gebruikt , dient u altijd een aantal belangrijke
veiligheidsmaatregelen in acht te nemen, waaronder de volgende.
Lees alle instructies voor gebruik.
GEVAAR
--
Om het risico van electrische schokken te voorkomen.
1. De naaimachine mag nooit onbeheerd worden achtergelaten als deze in het stopcontact
aangesloten staat. Haal altijd direct de stekker uit het stopcontact na gebruik en voor het
schoonmaken.
2. Haal altijd de stekker uit het stopcontact voordat u het lampje vervangt. Vervang het lampje met
hetzelfde type van 15 watt.
3. Grijp nooit naar een naaimachine die in het water is gevallen. Haal onmiddellijk de stekker uit het
stopcontact.
4. Zet of berg de machine nooit op een plaats waar deze in een badkuip of in een gootsteen kan vallen
of ingetrokken kan worden.
WAARSCHUWING
--
Om het risico van brandwonden, brand, electrische
schokken of andere verwondingen aan personen te
verminderen.
1. Sta niet toe de naaimachine als speelgoed te gebruiken. Zeer strikte aandacht is noodzakelijk als de
naaimachine door of dichtbij kinderen wordt gebruikt.
2. Gebruik de naaimachine alleen voor het bedoelde gebruik zoals beschreven in deze handleiding.
Gebruik alleen hulpstukken aanbevolen door de fabrikant en zoals aangegeven in deze handleiding.
3. Gebruik de naaimachine nooit als er een beschadigd snoer of stekker aan zit, als deze niet naar
behoren functioneert, als deze gevallen of beschadigd is of als deze in het water is gevallen. Breng
de naaimachine naar de dichtstbijzijnde dealer of service centrum voor onderzoek, reparatie,
electrische of mechanische afstellingen.
4. Gebruik de naaimachine nooit als er luchtopeningen afgesloten zijn. Houd de ventilatie openingen
van de naaimachine en voetpedaal vrij van opeenhoping van pluizen, stof en losse stukken weefsel.
5. Gooi of stop nooit enig voorwerp in enige opening.
6. Gebruik de machine niet buiten.
7. Gebruik de machine niet op een plaats waar aerosolprodukten (spuitbussen) worden gebruikt of
waar met zuurstof wordt gewerkt.
8. Om de machine uit te schakelen, draai alle bedieningsknoppen naar de uit (“0”) positie, haal dan de
stekker uit het stopcontact.
9. Trek de stekker er niet aan het snoer uit. Om af te koppelen pakt u de stekker zelf vast en niet het
snoer.
10. Houd uw vingers weg bij alle bewegende delen. Speciale aandacht is vereist in de buurt van de
naald.
11. Gebruik altijd de juiste naaldplaat. Een verkeerde naaldplaat kan de naald doen breken.
12. Gebruik geen kromme naalden.
13. Duw of trek niet aan de stof tijdens het naaien.Daardoor kan de naald buigen en zodoende breken.
14. Schakel de machine uit (“0”) als er afstellingen in de buurt van de naald plaatsvinden, zoals de draad
in de naald rijgen, de naald verwisselen, het spoeltje inrijgen of het verwisselen van het voetje, enz.
15. Haal altijd de stekker uit het stopcontact als er afdekkappen verwijderd worden, als er geolied of als
er andere onderhouds afstellingen moeten worden gedaan zoals in deze handleiding vermeld.
16. Gebruik de machine nooit op een zachte ondergrond zoals een bed of een bank waardoor de
luchtopeningen afgesloten kunnen worden.
BEWAAR DEZE VOORSCHRIFTEN
RS2000-2D_EFNI.book Page 6 Thursday, March 30, 2006 3:31 PM
Pagina laadt ...
Pagina laadt ...
Pagina laadt ...

3
Nederlands
INHOUD
NAAM VAN DE DELEN
Type met knop aan de zijkant............... 1
ACCESSOIRES ........................................ 5
AANSLUITEN
Aansluiten van voetpedaal en
lichtnetsnoer ......................................... 8
Aan / Uit schakelaar ............................. 8
Voetpedaal ........................................... 8
Aanschuiftafel ....................................... 8
VERSCHILLENDE
BEDIENINGSELEMENTEN
Steekkeuzeknop ................................. 10
Steeklengteknop................................. 10
Persvoethendel................................... 10
HET INRIJGEN VAN DE MACHINE
Spoeltje opwinden .............................. 12
Spoeltje inrijgen .................................. 14
Bovendraad inrijgen............................ 16
Het gebruik van de draadinrijger ........ 18
Het ophalen van de onderdraad ......... 19
BASIS NAAIBEGRIPPEN
Recht naaien ...................................... 20
Afstelling van de draadspanning ........ 24
Voetjes verwisselen............................ 24
Ontkoppelknop ................................... 26
Acht
eruit naaiknop.............................. 26
Transporteur verzinkknop................... 26
Persvoetdruk regelknop...................... 27
Dikke stof naaien ................................ 27
Zigzag naaien ..................................... 28
Stretchstof naaien............................... 28
GEBRUIK VAN DE INGEBOUWDE
STEKEN
Blindzoomsteek .................................. 30
Overhands naaien .............................. 30
Overlocken ......................................... 32
Rimpelen ............................................ 33
Herstelwerk......................................... 34
Appliqueren ........................................ 35
Biesversiering / Ritssluitingvoet.......... 37
Rits inzetten........................................ 38
Borduren............................................. 40
Tweelingnaald inrijgen........................ 42
Plooien innaaien met tweelingnaald ... 43
Loopvoet............................................. 44
Maasvoet ............................................ 46
Verstelvoet.......................................... 47
Open Applicatievoet ........................... 48
KNOOPSGAT
Knoopsgaten maken........................... 50
Instellen van de steekbalans van het
knoopsgat ........................................... 51
ONDERHOUD
Verwisselen van het lampje......
.......... 52
Schoonmaken..................................... 53
Olieën ................................................. 54
STORINGEN VERHELPEN
Onderdraad spannings afstelling........ 55
Naald verwisselen .............................. 57
Naald controleren ............................... 58
Schoonmaken van de spoelbaan ....... 59
Storings tabel...................................... 62
STOF, GAREN-EN NAALDTABEL........ 65
NAAM VAN DE STEEKSOORTEN ........ 67
HERGEBRUIK...................................... 69
Type met knop aan de voorkant ...........3
Pagina laadt ...
Pagina laadt ...

2
Nederlands Italiano
English Français
NAMES OF PARTS
Side dial type
1. Pre-tension
2. Upper thread tension
dial
3. Spool pin
(Removable)
4. Bobbin winder shaft
5. Stitch length dial
6. Presser foot
pressure adjustment
knob
7. Take up lever
8. Upper tension plate
9. Face cover
10.Thread cutter
11.Extension table
12.Pattern selection dial
13.Reverse sewing
lever
14.Needle threader
lever
15.Foot release lever
16.Needle clamp screw
17.Needle guide for
upper thread
18.Presser foot
19.Feed dogs
20.Needle plate
21.Free arm
22.Drop feed lever
23.Shuttle cover
24.Handle
25.Buttonhole stitch
adjuster
26.Handwheel
27.Declutch knob
28.Power / Light Switch
29.Plug socket
30.Presser foot lever
ELENCO DEI COMPONENTI
Modelli con selettore laterale dei punti
1. Pre-Tensione
2. Manopola tensione
del filo superiore
3. Portarocchetto
(amovibile)
4. Asta avvolgi bobina
5. Manopola
regolazione
lunghezza punto
6. Bottone di
regolazione della
pressione del piedino
7. Tendifilo
8. Disco tensione
superiore
9. Coperchio frontale
10.Tagliafilo
11.Prolunga
12.Manopola di
selezione dei punti
13.Leva retromarcia
14.Infila-ago
15.Leva sgancio piedino
16.Morsetto ago
17.Guida filo superiore
dell’ago
18.Piedino premistoffa
19.Griffa di trasporto
20.Placca ago
21.Braccio libero
22.Leva per il rientro
della griffa di
trasporto
23.Coperchio navetta
24.Maniglia
25.Regolazione
asolatore
26.Volantino
27.Bottone di disinnesto
28.Interruttore corrente /
luce
29.Presa corrente
30.Leva alzapiedino
NAAM VAN DE DELEN
Type met knop aan de zijkant
1. Voorspanning
2. Bovendraad
spanningsknop
3. Garenpen
(afneembaar)
4. Spoel opwindas
5. Steeklengte knop
6. Persvoetdruk
regelknop
7. Draad hefboom
8. Bovendraad
spanningsplaatjes
9. Lampkap
10.Draadafsnijder
11.Aanschuiftafel
12.Steekkeuzeknop
13.Achteruit naaihendel
14.Naaldinrijg hendel
15.Voet ontkoppel
hendeltje
16.Naaldklem schroef
17.Bovendraad geleider
18.Persvoet
19.Transporteur
20.Naaldplaat
21.Vrije arm
22.Transporteur
verzinkknop
23.Spoelhuis klep
24.Handgreep
25.Knoopsgat afstelling
26.Handwiel
27.Ontkoppelknop
28.Aan / uit schakelaar
29.Stekker ingang
30.Persvoet hendel
NOMS DES PIECES
Type de machine avec cadran sélecteur le coté
1. Pré-tension
2. Bouton de tension du
fil supérieur
3. Porte-bobine
(escamotable)
4. Axe de bobinage de la
canette
5. Cadran de réglage de
la longueur de point
6. Bonton de réglage de
la pression du pied-
de-biche
7. Tendeur de fil
8. Couvercle de la
tension supérieur
9. Couvercle latéral
10.Coupe-fil
11.Boîte d’accessoires
12.Cadran de sélection
du point
13.Levier de marche
arrière
14. Levier d’enfile-aiguille
15.Levier de relache du
pied-de-biche
16.Tournevis de serrage
de l’aiguille
17.Guide-aiguille pour fil
supérieur
18.Pied-de-biche
19.Griffe d’entraînement
20.Plaque-aiguille
21.Bras libre
22.Levier de griffe
d’entraînement
23.Cache-navette
24.Poignée
25.Equilibrage de la
boutonnière
26.Vollant
27. Bouton de débrayage
28.Interrupteur (tension /
lumière)
29.Prise de courant
30.Releveur de pied-de-
biche
RS2000-2D_EFNI.book Page 2 Thursday, March 30, 2006 3:31 PM
Pagina laadt ...

4
English Français
Nederlands Italiano
NAMES OF PARTS
Front dial type
NOMS DES PIECES
Type de machine avec cadran selecteur de face
NAAM VAN DE DELEN
Type met knop aan de voorkant
ELENCO DEI COMPONENTI
Modelli con selettore frontale dei punti
1. Pre-tension
2. Upper thread
tension dial
3. Spool pin
(Removable)
4. Bobbin winder shaft
5. Stitch length dial
(only 2 dial, 3 dial
model)
6. Presser foot
pressure adjustment
knob
7. Take up lever
8. Upper tension plate
9. Face cover
10. Thread cutter
11. Extension table
12. Pattern selection
dial
13. Reverse sewing
lever
14. Needle threader
lever
15. Foot release lever
16. Needle clamp screw
17. Needle guide for
upper thread
18. Presser foot
19. Feed dogs
20. Needle plate
21. Free arm
22. Drop feed lever
23. Shuttle cover
24. Handle
25-1. Buttonhole stitch
adjuster
25-2. Buttonhole stitch
adjuster (only 2
dial, 3 dial model)
26. Handwheel
27. Declutch knob
28. Power / Light Switch
29. Plug socket
30. Presser foot lever
Equipped on
specified models
1. Pre-Tensione
2. Manopola tensione
del filo superiore
3. Portarocchetto
(amovibile)
4. Asta avvolgi bobina
5. Manopola
regolazione
lunghezza punto
(solo modelli 2D /
3D)
6. Bottone di regolazione
della pressione del
piedino
7. Tendifilo
8. Disco tensione
superiore
9. Coperchio frontale
10. Tagliafilo
11. Prolunga
12. Manopola di
selezione dei punti
13. Leva retromarcia
14. Infila-ago
15. Leva sgancio piedino
16. Morsetto ago
17. Guida filo superiore
dell’ago
18. Piedino premistoffa
19. Griffa di trasporto
20. Placca ago
21. Braccio libero
22. Leva per il rientro
della griffa di
trasporto
23. Coperchio navetta
24. Maniglia
25-1. Regolazione
asolatore
25-2. Regolazione
asolatore (solo
modelli 2D / 3D)
26. Volantino
27. Bottone di disinnesto
28. Interruttore corrente /
luce
29. Presa corrente
30. Leva alzapiedino
Montato su modelli
specifici
1. Voorspanning
2. Bovendraad
spanningsknop
3. Garenpen
(afneembaar)
4. Spoel opwindas
5. Steeklengte knop
(alleen 2 knops en 3
knops model)
6. Persvoetdruk
regelknop
7. Draad hefboom
8. Bovendraad
spanningsplaatjes
9. Frontkap
10. Draadafsnijder
11. Aanschuiftafel
12. Steekkeuzeknop
13. Achteruit naaihendel
14. Naaldinrijg hendel
15. Voet ontkoppel
hendeltje
16. Naaldklem schroef
17. Bovendraad geleider
18. Persvoet
19. Transporteur
20. Naaldplaat
21. Vrije arm
22. Transporteur
verzinkknop
23. Spoelhuis klep
24. Handgreep
25-1. Knoopsgat
afstelling
25-2. Knoopsgat
afstelling (alleen 2
knops en 3 knops
model)
26. Handwiel
27. Ontkoppelknop
28. Aan / uit
lichtschakelaar
29. Steker entree
30. Persvoet hendel
Aanwezig op
aangegeven
modellen
1. Pre-tension
2. Bouton de tension du
fil supérieur
3. Porte-bobine
(escamotable)
4. Axe de bobinage de la
canette
5. Cadran de réglage de
la longueur de point
(uniquement sur les
modèles 2D et 3D)
6. Bonton de réglage de
la pression du pied-
de-biche
7. Tendeur de fil
8. Couvercle de la
tension supérieur
9. Couvercle latéral
10. Coupe-fil
11. Table d’extension
12. Cadran de sélection
du point
13. Levier de marche
arrière
14. Levier d’enfile-aiguille
15. Levier de relache du
pied-de-biche
16. Tournevis de serrage
de l’aiguille
17. Guide-aiguille pour fil
supérieur
18. Pied-de-biche
19. Griffe d’entraînement
20. Plaque-aiguille
21. Bras libre
22. Levier de griffe
d’entraînement
23. Cache-navette
24. Poignée
25-1. Equilibrage de la
boutonnière
25-2. Equilibrage de la
boutonnière
(uniquement sur les
modèles 2D et 3D)
26. Vollant
27. Bouton de débrayage
28. Interrupteur (tension /
lumière)
29. Prise de courant
30. Releveur de pied-de-
biche
Equipé sur les
modèles spécifiques
Pagina laadt ...

6
Nederlands Italiano
English Français
NAMES OF ACCESSORIES
Standard accessories
1. Zigzag sewing foot
(on machine)
2. Zipper foot
3. Buttonhole foot
4. Buttonhole cutter
5. Needle plate screw
driver
6. Oiler
7. Bobbins (3 pcs.)
8. Ball point needle
(1 pc.)
9. Standard needle
(3 pcs., #14)
10.Screw driver (small)
(1 pc.)
11.Spool pin supplied
(1 pc.) (on machine)
❈ Accessories are stored inside the extension
table.
Optional accessories
12.Twin needle (1 pc.)
13.Extra spool pin (for
twin needle sewing)
14.Quilting guide
15.Screw driver (large)
(1 pc.)
16.Darning foot
17.Walking foot
18.Piecing foot
19.Open toe Appliqu
é
foot
20.Overcasting foot
21.Blind stitch foot
22.Cleaning brush
23.Piping / Zipper foot
NOMS DES ACCESSOIRES
Accessoires standards
1. Pied zig zag (monté
sur la machine)
2. Pied Fermeture
3. Pied pour
boutonnière
4. Couteau à
boutonnière
5. Tournevis plaque
aiguille
6. Burette d’huile
7. Canettes (3 pièces)
8. Aiguille renflée
(1 pièce)
9. Aiguilles standards
(3 pièces, #14)
10.Tournevis (petit)
(1 pièce)
11.Tige porte bobine
fournie (monté sur la
machine)
❈ Les accessoires sont logés à l’intérieur de la
table d’extension
Accessoires en option
12.Aiguille double
(1 pièce)
13.Tige porte-bobine
(pour couture en
aiguille double)
14.Guide de piquage
15.Tournevis (1 pièce)
16.Pied libre de broderie
pour reprisage
17.Pied-de-biche
double entraînement
18.Pied d’application
19.Pied ouvert
20.Pied-de-biche pour
faufilage
21.Pied-de-biche pour
couture invisible
22.Brosse de nettoyage
et extracteur de
canette
23.Pied passepoil /
Fermeture à glissière
ELENCO DEGLI ACCESSORI
Accessori standard
1. Piedino zig-zag
(montato sulla
macchina)
2. Piedino per chiusure
lampo
3. Piedino per asola
4. Tagliasole
5. Cacciavite placca ago
6. Oliatore
7. Spoline (3 pezzi)
8. Ago con punta tonda
(a sfera) (1 pezzo)
9. Aghi standard
(3 pezzi)
10.Cacciavite (piccolo)
(1 pezzo)
11.Asta portarocchetto
(montato sulla
macchina)
❈ Gli accessori sono inseriti all’interno della
prolunga
Accessori opzionali
12.Ago gemello
(1 pezzo)
13.Asta portarocchetto
(per cuciture con ago
gemello)
14.Guida per trapuntare
15.Cacciavite (1 pezzo)
16.
Piedino per ricamo e
rammendo
17.Piedino doppio
trasporto
18.Piedino per
patchwork
19.Piedino per
applicazioni con
punta aperta
20.Piedino sopraffilo
21.Piedino per orlo
invisibile
22.Spazzolino
23.Piedino cordoncino /
Per chiusure lampo
NAAM VAN DE ACCESSOIRES
Standaard accessoires
1. Zigzagvoet
(op de machine)
2. Ritssluitingvoet
3. Knoopsgat voet
4. Tornmesje
(voor knoopsgat)
5. Naaldplaat
schroevendraaier
6. Olieflesje
7. Spoeltjes (3 stuks)
8. Balpen naald (1 st.)
9. Standaard naalden
(3 stuks, 14)
10.Schroevendraaier
(klein) (1st.)
11.Klospen bilgeleverd
(op de machine)
❈ Accessoires zijn opgeborgen in de
aanschuiftafel
Optionele accessoires
12.Tweeling naald (1 st.)
13.Extra garenpen
(voor gebruik met
tweelingnaald)
14.Quilt geleider
15.Schroevendraaier
(1st.)
16.
Borduurmaasvoet
17.Loopvoet
18.Verstelvoet
19.Open Applicatievoet
20.Overhandse voet
21.Blindzoom voet
22.Schoonmaak
borsteltje
23.Biesversiering /
Ritssluitingvoet
RS2000-2D_EFNI.book Page 4 Thursday, March 30, 2006 3:31 PM
Pagina laadt ...

Nederlands Italiano
8
CD
AANSLUITEN
Aansluiten van voetpedaal en lichtnetsnoer
(fig A)
1. Steek de stekker van het voetpedaal in de stekker
ingang.
2. Steek de lichtnetsnoer in het stopcontact.
Waarschuwing!
Overtuig u ervan dat het voltage van de machine
(vermeld op de achterkant van de machine) gelijk is
aan die van het lichtnet.
De specificaties verschillen van land tot land.
Aan / Uit schakelaar (fig B)
Zet de schakelaar aan om te gaan naaien.
Deze schakelaar regelt zowel de netspanning als de
verlichting.
De machine werkt niet als deze schakelaar niet is
ingeschakeld.
Voetpedaal (fig C)
Hoe verder u het voetpedaal indrukt, des te sneller de
machine loopt.
Aanschuiftafel (fig D)
De machine verandert in een vrije arm model als u de
aanschuiftafel afneemt.
1. Haal deze eraf door hem naar links te schuiven, de
machine is nu een vrije arm model.
De vrije arm is meer geschikt om te borduren en om
broekspijpen, mouwen en kragen van T-shirts,
blouses en dergelijke te naaien.
PREPARAZIONE
Collegamento del pedale e del cavo di alimenta-
zione (fig. A)
1. Collegate la spina del reostato nell'apposita presa.
2. Inserite il cavo di alimentazione in una presa elettrica.
Attenzione!
Assicuratevi che la tensione indicata sulla macchina (le
informazioni sono sul retro della macchina) corrisponda
alla tensione della linea elettrica.
Le specifiche tecniche variano da paese a paese
Interruttore di accensione e della luce (fig. B)
Premete l’interruttore su “On” per cucire
L’interruttore comanda sia la luce che il motore
La macchina non si accenderà se non premete
l’interruttore su “On”.
Reostato (fig. C)
Più si spinge sul pedale, più si aumenta la velocità di
funzionamento della macchina.
Prolunga (fig. D)
La macchina si trasforma in una braccio libero togliendo
la prolunga.
1. Rimuovere la prolunga tirando verso sinistra e la
macchina diventa a braccio libero.
Per cucire pantaloni, maniche polsini delle maglie,
camicie, ecc. E’più pratico usare la macchina per cucire
con il braccio libero.
RS2000-2D_EFNI.book Page 6 Thursday, March 30, 2006 3:31 PM
Pagina laadt ...

Nederlands Italiano
10
B-1
5
4
3
2
Max 15W
c
b
a
CB
VERSCHILLENDE BEDIENINGSELEMENTEN
Steekkeuzeknop (fig A)
Alvorens een steek te kiezen, overtuig u er eerst van
dat de naald in de hoogste stand staat.
De gewenste steek wordt verkregen door aan de
steekkeuzeknop te draaien.
De steekkeuzeknop kan zowel naar rechts als naar
links worden gedraaid.
Steeklengteknop (B-1)
De steeklengte kan eenvoudig worden ingesteld door
aan de steeklengteknop te draaien.
Voor een kortere steek draait u de steeklengteknop
naar een lager cijfer.
Voor een langere steek naar een hoger cijfer.
De standaard steeklengte ligt tussen 2 en 3.
Persvoethendel (fig C)
Er zijn 3 standen voor de persvoethendel.
1. Om te naaien moet de persvoethendel in de
laagste stand staan a .
2. Om de stof er onder te leggen of er onderuit te
halen en om voetjes te verwisselen, middelste
stand b .
3. Om dikke stof er onderuit te halen, hoogste stand
c.
Duw de persvoethendel zover mogelijk omhoog
als deze kan voor stand c
.
De hendel zal niet in deze stand blijven staan c .
REGOLAZIONI
Selezione dei punti (fig. A)
Per selezionare i punti, assicuratevi che l’ago si nella
posizione più alta.
Il punto richiesto si seleziona ruotando la manopola di
selezione dei punti.
La manopola può girare verso destro o verso sinistra.
Manopola di regolazione della lunghezza del
punto (B-1)
La lunghezza del punto può essere facilmente
selezionata girando l’apposita manopola.
Per un punto più corto, ruotate la manopola verso un
numero basso.
Per un punto più lungo, ruotatela verso un numero
alto.
Per un punto normale regolate la manopola tra 2 e 3.
Leva alzapiedino (fig. C)
Ci sono 3 posizioni per la leva alzapiedino.
1. Per cucire, la leva alzapiedino deve essere nella
posizione più bassa a .
2. Per inserire o rimuovere tessuti e cambiare
piedino, la posizione media b .
3. Per rimuovere tessuti spessi, la posizione più alta
c.
Spingete verso l’alto la leva del piedino
premistoffa fino a fine corsa c .
La leva non si arresterà nella posizione c .
Pagina laadt ...

12
Nederlands Italiano
English Français
THREADING THE MACHINE
Bobbin winding
1. Set the needle at its highest position by rotating the
handwheel towards you. Open the shuttle cover. Hold
the latch of bobbin case and pull it out. Release the
latch and the bobbin comes out of the bobbin case
easily. (fig A)
NOTE
Use a TOYOTA-exclusive bobbin.
2. Pull out the spool pin. Insert the shorter side of spool
pin into the machine as shown in (fig B).
3. Put a spool of thread on the spool pin. Draw thread
from spool through thread guide as shown. (fig C-1)
4. Wind the end of thread from spool around the bobbin
clockwise for several times. Place bobbin on to bobbin
winder shaft. (fig C-2)
5. Move the declutch knob into the ( ) direction.
Caution!
Never touch declutch knob while sewing or it may cause
trouble.
6. Push bobbin winder shaft to right until it clicks. Press
on foot controller to wind bobbin. (fig D)
7. When the bobbin is wound enough, (see fig E) stop
the machine. Push bobbin winder shaft to the left, and
remove bobbin.
8. Take the bobbin off the bobbin winder shaft, and cut
the thread. (fig F)
9. Move the declutch knob into the ( ) direction.
10.Always turn the handwheel towards you and listen for
the “click” inside the handwheel, before sewing.
ENFILAGE DE LA MACHINE
Bobinage de la canette
1. Placer l’aiguille dans sa position la plus haute en tournant
le volant vers vous. Ouvrir le cache-navette. Tenir le
loquet de la navette et tirer dessus.
Libérer le loquet et la canette sortira facilement de la
navette. (fig. A)
NOTE
Utiliser exclusivement une canette TOYOTA.
2. Tirer le porte-bobine. Ins
é
rer la partie courte du
portebobine dans la machine comme indiqu
é
(fig. B).
3. Mettre une bobine de fil sur le porte-bobine. Tirez le fil de
la bobine en le passant par le guide fil. Comme indiqué.
(fig. C-1)
4. Enroulez l’extrémité du fil de la bobine autour de la canette
plusieurs fois dans le sens des aiguilles d’une montre.
Placer la canette sur la tige porte-bobine. (fig.
C-2
)
5. Poussez le bouton de débrayage vers ( ) .
Attention!
Ne jamais toucher le bouton de débrayage pendant la
couture sous peine de provoquer un incident.
6. Pousser la tige porte-bobine vers la droite jusqu’à
entendre un click. Presser sur la pédale pour bobiner la
canette. (fig. D)
7. Lorsque la canette est suffisamment bobinée, (voir fig.
E) arrêter la machine, pousser la tige porte-bobine vers
la gauche, et retirer la canette.
8. Enlever la canette de la tige porte-bobine, et couper le fil.
(fig. F)
9. Pousser le bouton de débrayage vers ( ).
10.Avant de coudre, toujours tourner le volant vers vous
jusqu'à entendre un "clic".
HET INRIJGEN VAN DE MACHINE
Spoeltje opwinden
1. Breng de naald in de hoogste stand door het handwiel
naar u toe te draaien. Open de spoelhuisklep. Hou het
klepje op het spoelhuis vast en neem dit eruit. Laat het
klepje los en het spoeltje komt gemakkelijk uit het
spoelhuis. (fig A)
OPMERKING
Gebruik uitsluitend een spoeltje van TOYOTA.
2. Trek de garenpen uit. Zet de korte kant van de
garenpen in de machine zoals afgebeeld in (fig B)
3. Zet een klos garen op de garenpen. Trek nu het garen van
de klos door de draadgeleider zoals afgebeeld. (fig
C-1
)
4. Draai het einde van de draad enkele malen rechtsom
op het spoeltje. Zet het spoeltje op de spoel
opwindas. (fig C-2)
5. Zet de ontkoppelingsknop in de ( ) richting.
Waarschuwing!
Raak de ontkoppelingsknop nooit aan tijdens het naaien
want dit kan storing veroorzaken.
6. Duw de spoel opwindas naar rechts totdat deze klikt. Duw
op het voetpedaal om het spoeltje op te winden. (fig
D
)
7. Wanneer het spoeltje voldoende is opgewonden, (zie
fig E) stop dan de machine. Duw de spoel opwindas
naar links.
8. Neem het spoeltje van de opwindas en knip de draad
af. (fig F)
9. Zet de ontkoppelingsknop in de ( ) richting.
10.Draai het handwiel altijd naar u toe en naai pas nadat
u een "klik" binnen het handwiel hoort.
PREPARAZIONE PER LA CUCITURA
Riempimento della spolina
1. Far ruotare il volantino verso di voi per portare la barra
ago nel punto più alto. Aprite il coperchio della capsula.
Aprite la levetta di chiusura della capsula che contiene la
spolina ed estraetela.
Rilasciate la levetta e quindi staccate la spolina (fig. A).
NOTA
Usare solo una spolina TOYOTA.
2. Estrarre il perno portarocchetto. Inserite la parte più corta
del portarocchetto nell’apposita fessura come indicato
nella (fig. B).
3. Inserite un rocchetto di filo sul perno portarocchetto.
Estrarre il filo dal rocchetto, farlo correre attraverso il
guidafilo come mostrato nella (fig. C-1).
4. Avvolgete il filo a mano per alcuni giri intorno alla spolina
in senso orario. Posizionate la spolina sull’asse del
filarello (fig. C-2).
5. Spingete il tasto di disinnesto che si trova sul volantino
nella direzione ( ).
Attenzione!
Onde evitare inconvenienti non toccare mai il pomello di
sgancio della frizione mentre cucite.
6. Spostare il filarello a destra fino al click. Mantenere
premuto il reostato elettrico per il riavvolgimento della
spolina (fig. D).
7. Una volta riempita la spolina, (vedi fig. E) arrestate la
macchina e spostate il filarello a sinistra per poi estrarre
la spolina.
8. Togliete la spolina dall’asse del filarello e tagliate il filo (fig.
F
).
9. Spostate il tasto di disinnesto nella direzione ( ).
10.Prima di iniziare a cucire ruotare sempre il volantino
verso di sé, finché non si sente il "clic" all'interno del
volantino.
RS2000-2D_EFNI.book Page 10 Thursday, March 30, 2006 3:31 PM
Pagina laadt ...

Nederlands Italiano
14
➁
C-1 D
C-2
E
Slot
Fente
Gleuf
Apertura
Stopper
Butée
Stopper
Fermo
Bobbin case / Navette
Spoelhuis / Capsula
Spoeltje inrijgen
1. Zet het spoeltje in het spoelhuis met de draad
rechtsom. (fig A)
2. Trek de draad in de gleuf 1 van het spoelhuis.
(fig B)
3. Trek de draad naar links, breng deze onder het
spanningsveertje en dan naar het geleideoog 2.
(fig C-1)
❈ U moet zeker zijn dat de bobijn draait in de
richting van de wijzers van het uurwerk. (fig C-2)
4. Breng de naald in de hoogste stand en zet de
persvoethendel omhoog.
5. Trek ongeveer 10 cm garen uit het spoelhuis.
6. Hou het spoelhuis vast aan het klepje en duw het
in de spoelbaan. Laat het klepje los zodra het
spoelhuis er volledig in zit. (fig D)
7. Spoelhuisstopper moet altijd met de voorkant naar
boven liggen en in de spoelbaangleuf passen.
(fig E)
Sistemazione della spolina
1. Inserite la spolina nella capsula. Assicuratevi che il
filo sia avvolto in senso orario (fig. A)
2. Fate passare il filo nell’apertura 1 della capsula
(fig. B)
3. Tirando il filo verso sinistra, fatelo passare sotto la
molla di tensionamento e quindi attraverso il foro
2. (fig. C-1)
❈ Assicuratevi che il filo sia in senso orario
tirandolo come mostrato in (fig. C-2)
4. Portate l’ago nella posizione più alta e sollevate il
piedino premistoffa.
5. Estraete circa 10 cm di filo dalla spolina.
6. Tenete la levetta e spingete la capsula nel crochet.
Assicuratevi che la spolina sia bene in posizione
prima di lasciare la levetta (fig. D)
7. Il fermo della capsula deve sempre essere rivolto
verso l'alto e inserirsi nell'apertura del supporto del
crochet. (fig E)
RS2000-2D_EFNI.book Page 12 Thursday, March 30, 2006 3:31 PM
Pagina laadt ...

16
Nederlands Italiano
English Français
Upper threading
1. Raise the presser foot lever.
Raise the take-up lever to its highest position by
rotating the handwheel towards you.
2. Pull out spool pin and insert the shorter side into
the machine.
Place a spool of thread on spool pin. (fig A)
3. Pass the thread through guide 1. (fig B)
4. Lead the thread through either side of the tension
disc 2. (fig C)
5. Hook the thread under the guide 3. (fig D)
6. Thread take-up lever 4. (fig E)
7. Pass the thread through needle guide 5 (use left
one). (fig F)
8. Thread the needle from front to back. (fig G)
9. Pull out about 15 cm of thread and place it under
the presser foot. (fig H)
Enfilage du fil supérieur
1. Lever le levier presseur de pied-de-biche.
Lever le tendeur de fil à sa plus haute position en
tournant le volant vers vous.
2. Retirer la tige-bobine et insérer la par le côté court
dans la machine.
Placer la bobine du fil sur la tige porte-bobine.
(fig. A)
3. Passer le fil par le guide-fil 1. (fig. B)
4. Guider le fil entre les deux disques du tendeur 2.
(fig. C)
5. Accrocher-le au guide 3, de bas en haut et droit à
gauche. (fig. D)
6. Enfiler le fil par le tendeur 4. (fig. E)
7. Faire passer le fil dans le guide de l’aiguille 5
(utiliser le guide gauche). (fig. F)
8. Enfiler l’aiguille par l’avant. (fig. G)
9. Tirer environ 15 cm de fil et placer le sous le pied-
de-biche. (fig. H)
Bovendraad inrijgen
1. Zet de persvoethendel omhoog.
Breng de draadhefboom in de hoogste stand door
het handwiel naar u toe te draaien.
2. Trek de garenpen uit en zet de korte kant in de
machine.
Zet een klos garen op de garenpen. (fig A)
3. Geleid de draad door de geleider 1. (fig B)
4. Geleid de draad tussen de spanningsplaatjes 2
door. (fig C)
5. Haak de draad onder de geleider 3. (fig D)
6. Span de draadhefboom 4 in. (fig E)
7. Breng de draad door de naaldgeleider 5 (gebruik
de linker). (fig F)
8. Steek de draad van voor naar achter door het oog
van de naald. (fig G)
9. Trek ongeveer 15 cm draad erdoor en leg deze
onder de persvoet. (fig H)
Infilatura del filo superiore
1. Sollevate il piedino premistoffa.
Portate il tendifilo nella sua posizione più alta
facendo girare il volantino verso di voi.
2. Estraete il portarocchetto e posizionatelo
nell'apposito foro.
Ponete un rocchetto nel portarocchetto (fig. A)
3. Fate passare il filo attraverso il guidafilo 1 (fig. B)
4. Quindi tra i due dischi della tensione 2 (fig. C)
5. Agganciatelo alla guida 3 dal basso verso l’alto e
da destra verso sinistra (fig. D)
6. Infilatelo quindi nel tendifilo 4 (fig. E)
7. Passare il filo attraverso la guida dell’ago 5
(situata a sinistra). (fig. F)
8. Ed infine nella cruna dell’ago verso il retro della
macchina (fig. G)
9. Lasciate pendere all’incirca 15 cm di filo e ponetelo
sotto il piedino premistoffa (fig. H)
RS2000-2D_EFNI.book Page 14 Thursday, March 30, 2006 3:31 PM
Pagina laadt ...

Nederlands Italiano
18
➅
F-1
F-2
G
Het gebruik van de draadinrijger
(Als de machine is uitgerust met een
draadinrijger)
De draadinrijger kan worden gebruikt om de draad
makkelijker door het oog van de naald te krijgen.
1. Span de machine in tot de naaldgeleider 5 zoals
aangegeven op blz. 14. (fig A)
2. Zet de persvoethendel naar beneden. (fig B)
3. Breng de naald in de hoogste stand door het
handwiel naar u toe te draaien.
4. Duw de hendel van de draadinrijger naar beneden
6. Haak de draad van links naar rechts achter de
geleider 7. (fig C)
5. Duw de hendel van de draadinrijger naar de
laagste stand zodat de haak door het oog van de
naald gaat.
Breng de draad van geleider 7 naar de
rechterkant onder de haak 8. (fig D)
6. Neem de draad onder de haakgeleider 9, en
breng deze omhoog naar rechts terwijl u de draad
tegen de naald drukt. (fig E)
7. Laat voorzichtig de draadinrijghendel 6 enigszins
los en rijg de draad door het oog van de naald.
(fig F-1)
De draad wordt door de haak aangetrokken en
gaat door het oog van de naald.
8. Als de draad door het oog van de naald is, laat de
draad dan langzaam los en laat de
draadinrijghendel helemaal los. (fig F-2)
OPMERKING
Herhaal bovengenoemde stappen als de draad
niet door het oog van de naald is gegaan.
De draadinrijger werkt niet goed als de naald
zelf niet juist is geplaatst.
9. Trek een lusje garen eruit door het oog van de
naald. (fig G)
❈ Selecteer de rechte steek voordat u de
naaldinrijger gebruikt.
Come usare il dispositivo automatico per infila-
re gli aghi
(disponibile solo su alcuni modelli)
Per infilare l’ago più facilmente si può usare il
dispositivo automatico per infilare gli aghi
1. Inserire il filo nella guida del filo 5 come riferito a
pag. 14 (fig. A)
2. Abbassare il sollevatore del piedino premistoffa
(fig. B)
3. Portare l’ago nella posizione più alta ruotando il
volantino verso di voi
4. Abbassare la leva dell’infila-ago 6. Agganciare il
filo alla guida 7 dalla sinistra verso destra (fig. C)
5. Premere la leva dell’infila-ago fino al punto più
basso in modo che il gancio passi attraverso la
cruna dell’ago
Portare il filo alla guida 7 sul lato destro sotto il
gancio 8 (fig. D)
6. Portare il filo sotto la guida del gancio 9 e
sollevarlo verso destra, premendo il filo contro
l’ago (fig. E)
7. Rilasciare leggermente la leva dell’infila-ago 6 ed
infilare il filo allo stesso tempo (fig. F-1)
Il filo è tirato dal gancio e passa attraverso la cruna
dell’ago.
8. Quando il filo è passato attraverso la cruna,
rilasciate il filo e nello stesso tempo rilasciate
completamente la leva dell’infila-ago (fig. F-2)
Nota
se il filo non passa correttamente attraverso la
cruna, ripetere le operazioni di cui sopra. Il
dispositivo automatico per infilare l’ago non
funziona correttamente se l’ago non è
sistemato bene.
9. Tirare fuori il cappio del filo attraverso la cruna
(fig. G)
❈ Selezionare il punto dritto prima di utilizzare
l'infila-ago.
RS2000-2D_EFNI.book Page 16 Thursday, March 30, 2006 3:31 PM

19
English Français
Nederlands Italiano
15 cm
ABC
Bringing up lower thread with presser foot up
1. Loosely hold needle thread with one hand, rotate
handwheel slowly towards you with the other hand,
so the needle moves down and back again to its
highest position. (fig A)
2. Pull upper thread slowly and pick up bobbin thread
which will appear through the needle plate slot.
(fig B)
3. Pull both threads together, place them under the
presser foot leaving about 15 cm clear. (fig C)
Pour faire remonter le fil inférieur
1. Saisir doucement le fil de l’aiguille d’une main,
tourner le volant lentement vers vous avec l’autre
main, de manière à ce que l’aiguille s’abaisse et
revienne à sa position la plus haute. (fig. A)
2. Tirez lentement le fil supérieur jusqu’à ce que le fil
de la canette apparaisse par la fente de la plaque-
aiguille. (fig. B)
3. Tirez les deux fils ensemble, placez les sous le
pied-de-biche en laissant environ 15 cm. (fig. C)
Het ophalen van de onderdraad
1. Hou de draad vanuit de naald losjes met een hand
vast, draai met de andere hand het handwiel naar
u toe zodat de naald naar de laagste stand
beweegt en daarna weer naar de hoogste stand.
(fig A)
2. Trek langzaam aan de bovendraad en haal de
onderdraad op die door de gleuf in de naaldplaat
zal verschijnen. (fig B)
3. Trek aan beide draden, plaats ze onder de
persvoet met een vrij stuk van ongeveer 15 cm.
(fig C)
Per far salire il filo inferiore
1. Afferrate l’estremità del filo superiore con la mano
sinistra e ruotate lentamente il volantino verso di
voi facendo scendere e quindi risalire l’ago (fig. A)
2. Tirate lentamente il filo superiore in modo che il filo
inferiore formi un cappio (fig. B)
3. Tirate le due estremità dei fili verso il retro della
macchina a 15 cm circa dal piedino e sistematele
entrambe a sinistra e sotto il piedino premistoffa
(fig. C)
RS2000-2D_EFNI.book Page 17 Thursday, March 30, 2006 3:31 PM

20
English Français
Nederlands Italiano
1-5
43
A
SEWING BASICS
Straight stitching
Before sewing
1. Be sure that the declutch knob in the handwheel is
into the ( ) direction.
2. Set pattern selection dial and stitch length dial
as..... (fig A)
Pattern selection dial Stitch length dial
No. 3 C
No. 4 D
1-5
1-5
L’ESSENTIEL DE LA COUTURE
Points droits
Avant de coudre
1. Vérifiez que le bouton de débrayage sur le volant
est enclenché vers ( ).
2. Avec cadrans sélecteur de point et sélecteur de
la longueur du point... (fig. A).
Cadran sélecteur de point
Cadran de sélection de
longueur de point
N° 3 C
N° 4 D
1-5
1-5
BASIS NAAIBEGRIPPEN
Recht naaien
Voor het naaien
1. Overtuig u ervan dat de ontkoppelingsknop in het
handwiel in de ( ) richting staat.
2. Stel de steekkeuzeknop en steeklengteknop in
op... (fig A)
Steekkeuzeknop Steeklengteknop
No. 3 C
No. 4 D
1-5
1-5
COME ESEGUIRE I VARI PUNTI
Cucitura diritta
1. Assicurarsi che il pulsante di sblocco del volantino
sia nella posizione ( )
2. Impostare il selettore punto elamanopola della
lunghezza punto come illustrato (fig. A)
Selettore punto Manopola lunghezza
No. 3 C
No. 4 D
1-5
1-5
C D
Pagina laadt ...

Nederlands Italiano
22
15 cm
C D-1
D-2 D-3
Recht naaien
Beginnen met naaien (fig A)
❈ Houd de draden vast voor de eerste paar steken
om knopen aan de onderkant te voorkomen.
3. Breng de naald in de hoogste stand en zet de
persvoethendel omhoog.
4. Leg de stof onder de persvoet. Plaats de
persvoethendel naar beneden.
5. Druk rustig op het voetpedaal en begin te naaien,
de stof met de hand geleidend terwijl deze wordt
getransporteerd. Trek of duw niet aan de stof.
Het maken van een rechte hoek (fig B)
Het veranderen van naairichting
1. Stop de machine op het punt waar u van
naairichting wilt veranderen met de naald in de stof.
2. Zet de persvoet omhoog, draai de stof in de
gewenste richting.
3. Laat de persvoet zakken en begin in de nieuwe
richting te naaien.
Achteruit naaien (fig C)
Om een naad te versterken wordt het aanbevolen om
aan het begin en aan het einde een paar steken
achteruit te naaien.
Duw de achteruitnaai hendel in om achteruit te
naaien. Geleid de stof zoals deze getransporteerd
wordt. Trek niet aan de stof.
Voor versterking zijn enkele steken genoeg.
Laat de knop los om weer vooruit te naaien.
Stoppen met naaien (fig D)
1. Duw niet meer op het voetpedaal. Draai aan het
handwiel totdat de naald in de hoogste stand staat.
Zet de persvoet omhoog.
2. Haal de stof langs de linkerkant weg. (fig D-1)
3. Snij de draden af met de draadafsnijder. (fig D-2)
4. Laat 15 cm draad vrij aan de achterkant om te
voorkomen dat de draad uit het oog van de naald
wordt getrokken. (fig D-3)
Cucitura diritta
Cominciare a cucire (fig. A)
❈ Tenere i fili durante l'esecuzione dei primi punti
per evitare che si annodino sul rovescio.
3. Ponete l’ago nella sua posizione più alta e
sollevate la leva del piedino premistoffa
4. Posizionate la stoffa sotto il piedino. Abbassate
quest’ultimo.
5. Premete leggermente il reostato a pedale e cucite
in avanti, guidando la stoffa con le mani. Il tessuto
non deve essere tirato o spinto.
Cambio direzione della cucitura (fig. B)
1. Fermare la macchina nel punto in cui è necessario
cambiare direzione con l’ago infilato nel tessuto
2. Alzate, quindi, la leva del piedino premistoffa e
girate il tessuto nella direzione desiderata
3. Riabbassate la leva del piedino premistoffa e
continuate a cucire nella nuova direzione
Cucitura in marcia indietro (fig. C)
Posizionate il tessuto sotto il piedino a circa 1 cm dal
bordo. Per rinforzare la cucitura, passate in marcia
indietro sul bordo del tessuto.
A tal scopo abbassate la leva di marcia indietro e
cominciate a cucire guidando il tessuto con la mano.
Non tirate mai il tessuto.
Per rinforzare anche la fine della cucitura, eseguite
alcuni punti in marcia indietro.
Rilasciate la leva per tornare a cucire normalmente.
Al termine del lavoro (fig. D)
1. Sollevate il piede dal reostato e girate
manualmente il volantino fino a quando l’ago non
raggiunga il punto più alto. Sollevate la leva del
piedino premistoffa.
2. Tirare il tessuto verso sinistra (fig. D-1)
3. Tagliate il filo con le forbici (fig. D-2)
4. Lasciate 15 cm di filo per evitare che scivoli nella
cruna (fig. D-3)
RS2000-2D_EFNI.book Page 20 Thursday, March 30, 2006 3:31 PM
Pagina laadt ...

Nederlands Italiano
24
Regolazione della tensione dei fili
Una buona cucitura si ottiene quando le tensioni sono
ben bilanciate ed entrambi i fili (filo superiore e filo
inferiore) sono incrociati insieme al centro del tessuto.
Al termine della cucitura controllate se il filo superiore
ed inferiore sono uguali.
a : Tensione regolata correttamente:
entrambi i fili
s’incrociano nel centro del tessuto.
b : Tensione superiore troppo forte:
il filo inferiore
appare nella parte superiore del tessuto. Per
ottenere la tensione corretta ruotate la manopola
verso un numero basso.
c : La tensione superiore è troppo lenta:
se la
tensione del filo superiore è troppo lenta il filo
superiore appare nella parte inferiore del tessuto.
Per ottenere la tensione corretta ruotate la
manopola verso un numero maggiore.
Sostituzione del piedino premistoffa
1. Portate l’ago nella sua posizione più alta facendo
ruotare il volantino verso di voi.
Spostate la leva alza piedino nella posizione
centrale.
2. Sollevare la leva sgancia-piedino e togliete il
piedino (fig. A-1)
3. Appoggiate il piedino scelto sulla placca ago sotto
il supporto piedino.
Abbassate la leva alza piedino in modo che il
piedino si agganci automaticamente nella
scanalatura (fig. A-2)
A
A-1 A-2
Afstelling van de draadspanning
Een goede naad wordt verkregen als de spanning in
de juiste balans is en beide draden (bovendraad en
onderdraad) samen worden vastgezet in het midden
van de stof.
Als u stopt met naaien controleer dan of bovendraad
en onderdraad gelijk liggen.
Stel de draadspanning af door aan de bovendraad
spanningsknop te draaien.
a : Draadspanningen zijn gelijk. Beide draden zijn
vastgezet in het midden vande stof.
b : Bovendraad spanning is te strak. Bovendraad
ligt volledig bovenop de stof. Corrigeer de
spanning door de knop naar een lager cijfer te
draaien.
c : Bovendraad spanning is te los.
Bovendraad
ligt volledig aan de onderkant van de stof.
Corrigeer de spanning door de knop naar een
hoger cijfer te draaien.
Voetjes verwisselen
1. Breng de naald in de hoogste stand door het
handwiel naar u toe te draaien.
Zet de persvoethendel in de middelste stand.
2. Duw het voet ontkoppelknopje omhoog en
verwijder het voetje. (fig A-1)
3. Plaats het gewenste voetje op de naaldplaat onder
de voethouder.
Laat de persvoethendel naar beneden zodat het
voetje inklikt op de voethouder (fig A-2)
RS2000-2D_EFNI.book Page 22 Thursday, March 30, 2006 3:31 PM
Pagina laadt ...

Nederlands Italiano
26
a
C
Ontkoppelknop (fig A)
De ontkoppelknop bevindt zich in het handwiel. (fig A)
Als u wilt gaan naaien, zet u de knop in de ( )
richting.
Als u wilt gaan spoelen, zet u de knop in de ( )
richting.
Achteruit naaiknop (fig B)
Achteruit naaien wordt aanbevolen om de naad te
versterken.
Om achteruit te naaien drukt u de achteruit naaiknop
zover in als mogelijk is en duwt u lichtjes op het
voetpedaal.
Laat de knop los om weer vooruit te naaien.
(Als de machine is uitgevoerd met transporteur
verzinkknop)
Transporteur verzinkknop (fig C)
Het verzinken van de transporteur tanden maakt het
mogelijk om het stoftransport zelf te kunnen regelen.
Dit kan gebruikt worden tijdens knopen aanzetten,
stoppen en borduren.
De transporteur verzinkknop a bevindt zich achter de
spoelhuisklep.
Om de transporteur tanden te laten verzinken drukt u
de knop eerst naar achteren, dan naar links.
Om de transporteur verzinkknop weer uit te schakelen
drukt u deze naar rechts en de transporteur tanden
zullen weer in de normale stand terugkomen.
Bottone di disinnesto (fig. A)
Il bottone di disinnesto si trova sul volantino (fig. A)
Quando cucite portate il bottone nella direzione ( ).
Quando avvolgete la spolina portate il bottone nella
direzione ( ).
Leva di retromarcia (fig. B)
La cucitura indietro è raccomandata per rinforzare la
stessa.
Per cucire all’indietro, spingere verso il basso più a
lungo possibile e premete con delicatezza sul
reostato.
Lasciate il pulsante per tornare alla cucitura normale.
(per i modelli che ne sono equipaggiati)
Leva di rientro del trasporto (fig. C)
Abbassando la leva della griffa avrete la possibilità di
guidare voi stessi il tessuto.
Si usa per le asole, rammendi e ricami.
La leva abbassagriffa a è all’interno del coperchio
capsula.
Per abbassare la griffa dentata, spingere la leva in
avanti e portarla verso sinistra.
Per riportarla in posizione normale, portare la leva
verso destra e rilasciarla.
RS2000-2D_EFNI.book Page 24 Thursday, March 30, 2006 3:31 PM

27
English Français
Nederlands Italiano
➀
➀
x
y
x
y
AB
(When the machine is equipped with presser
foot pressure)
Presser foot pressure adjustment knob (fig A)
The presser foot pressure is adjusted by turning the
dial at the top of the machine.
When sewing normal or heavy fabric : Turn the dial
to 3.
When sewing thin or stretch fabric :
Turn the dial to 2-3.
When darning : Turn the dial to 1-2.
Thick fabric sewing
(Particularly Denim)
When sewing thick fabric or the thick part of the fabric
as shown in (fig B), it is important to sew slowly
and
use the proper needle size
(refer page 63).
Gently guide the fabric as you sew.
Especially, at the points that the thickness changes
(fig
B
-
1
), sew slowly by rotating the handwheel by
hand. This will prevent needle breaking and deflecting.
(lorsque la machine est équipée d’un régulateur
de pression du pied de biche.)
Régulateur de pression du pied (fig. A)
Pour régler la pression du pied-de-biche, tournez la
molette sur le dessus de la machine.
Couture normale ou tissus épais :
régler la molette sur 3.
Couture tissus fins ou extensibles : régler la
molette sur 2-3.
Racommodage : régler la molette sur 1-2.
Couture de tissus épais
(Spécialement le jean)
Lorsque vous faites de la couture sur des tissus épais
ou des parties de tissus épais comme indiqué (fig. B),
il est important de coudre doucement
et utiliser une
taille d’aiguille appropriée (voir page 64).
Diriger doucement le tissu au moment de coudre.
Surtout, aux endroits où l’épaisseur du tissu change
(fig. B-1), coudre lentement en tournant le volant
avec la main. Cela devrait diminuer le risque
d’altération du tissu ou de blocage de la machine.
(Als de machine is uitgevoerd met persvoet-
druk regeling)
Persvoetdruk regelknop (fig A)
De persvoetdruk wordt ingesteld door aan de knop
bovenop de machine te draaien.
Wanneer u normale of dikke stof naait :
zet de knop op 3.
Wanneer u dunne of stretch stof naait :
zet de knop op 2-3.
Wanneer u stopwerk gaat doen : zet de knop op 1-2.
Dikke stof naaien
(met name denim)
Wanneer u dikke stof naait of een dik gedeelte in de stof
zoals afgebeeld in (fig B), is het belangrijk om langzaam
te naaien en de juiste naald te gebruiken (zie pag. 63).
Geleid de stof rustig terwijl u naait.
Vooral op de plaatsen waar de stof van dikte verandert
(fig B-1), langzaam naaien door met de hand aan het
handwiel te draaien. Dit zal naaldbreuk of buigen van de
naald voorkomen.
(Per i modelli equipaggiati con il regolatore del-
la pressione del piedino)
Regolatore pressione del piedino (fig. A)
Il regolatore di pressione del piede si regola girando il
bottone sopra la macchina.
Quando cucite tessuti normali o pesanti : girate il
bottone su 3
Quando cucite tessuti sottili o elastici : girate il
bottone su 2-3
Quando rammendate : girate il bottone su 1-2
Cucitura di tessuti di grosso spessore
(ad esempio jeans)
Per cucire un grosso spessore di tessuto come mostrato
in (fig. B), è importante cucire lentamente usando aghi
della misura appropriata (rif. pag. 64).
Durante la cucitura, guidate dolcemente il tessuto.
In particolare, quando il tessuto cambia spessore
(fig. B-1), cucite lentamente ruotando il volantino con la
mano. Questo potrà prevenire le rotture degli aghi.
RS2000-2D_EFNI.book Page 25 Thursday, March 30, 2006 3:31 PM

28
English Français
Nederlands Italiano
1-5
5 76
16 17 21
BA
Zigzag stitching
1. Be sure that the declutch knob in the handwheel is
into the ( ) direction.
2. Set pattern selection dial and stitch length dial
as... (fig A)
Slightly loosen upper thread tension. Better
looking zigzag stitches require less upper
tension than straight stitching.
3. Follow the steps as you did in straight stitching.
Stretch Stitching
The following stitches shown (fig B) can be used with
stretch and knit fabrics.
(16) Straight stretch
(17) Zigzag stretch
(21) Decorative stitch
Pattern selection dial Stitch length dial Zigzag width
No. 5 E
No. 6 F
No. 7 G
1-5
1-5
1-5
2mm
3.5 mm
5mm
Points zigzag
1. Vérifiez que le bouton de débrayage sur le volant
est bien enclenché vers ( ).
2. Avec cadran sélecteur de point et cadran
sélecteur de la longueur de point... (fig. A)
Desserrer la tension du fil supérieur. Il est
préferable d’utiliser une tension du fil supérieur
moins forte pour faire des points zigzag que pour
les points droits.
3. Suivre les mêmes étapes qu’avec les points droits.
Points stretch
(16) point droit pour stretch
(17) zigzag stretch
(21) point surjet
Cadran sélecteur de
point
Cadran de sélection
de longueur de point
Cadran de sélection
de largeur de point
N° 5 E
N° 6 F
N° 7 G
1-5
1-5
1-5
2mm
3,5 mm
5mm
Zigzag naaien
1. Overtuig u ervan dat de ontkoppelingsknop in het
handwiel in de ( ) richting staat.
2. Stel de steekkeuzeknop en steeklengteknop in
op... (fig A)
Draai voorzichtig de bovenspanning iets losser.
Goede zigzagsteken vereisen een lagere
bovenspanning dan rechte steken.
3. Volg de stappen zoals u deed met recht naaien.
Stretchstof naaien
De volgende steken (fig B) kunnen worden gebruikt
voor stretchstoffen en gebreide materialen.
(16)
Rekbare rechte steek
(17) 3 Voudige stretch zigzagsteek
(21) Overlocksteek
Steekkeuzeknop Steeklengteknop Zigzagbreedte
No. 5 E
No. 6 F
No. 7 G
1-5
1-5
1-5
2mm
3,5 mm
5mm
Cucitura zigzag
1. Assicurarsi che il pulsante di sblocco del volantino
sia nella posizione ( ).
2. Impostare il selettore punto elamanopola della
lunghezza punto come illustrato (fig. A)
Per eseguire punti zigzag migliori, diminuire
leggermente la tensione del filo rispetto
all’esecuzione dei punti diritti.
3. Per il resto seguite le istruzioni valide per il punto diritto.
Punti elastici
I punti mostrati nella (fig. B) sono utilizzati per tessuti
sintetici e maglieria.
(16) Punto diritto elastico triplo
(17) Punto zigzag elastico triplo
(21) Punto sopraggitto
Selettore punto Manopola lunghezza Larghezza zigzag
No. 5 E
No. 6 F
No. 7 G
1-5
1-5
1-5
2mm
3,5 mm
5mm
E F G
P Q U
Pagina laadt ...

Nederlands Italiano
30
COME USARE I PUNTI PREDEFINITI
Cucitura orlo invisibile
1. Assicurarsi che il pulsante di sblocco del volantino
sia nella posizione ( )
2. Regolate la macchina come indicato... (fig. A)
Manopola lunghezza punto sul 2
3. Piegate il tessuto come mostrato in (fig. B)e
collocatelo sotto il piedino premistoffa.
Per ottenere un lavoro migliore, è preferibile
imbastire o stirare prima con il ferro.
4. Cominciate a cucire ed assicuratevi che i punti
diritti vengano eseguiti sul bordo dell’orlo e che i
punti zigzag prendano soltanto uno o due fili della
tela libera (fig. C)
(fig. D) a : Cucitura corretta
b
: L’ago prende troppo il bordo della tela
c : L’ago non prende affatto il bordo della
tela
Utilizzare il piedino zig-zag o il piedino opzionale
(piedino per orlo invisibile).
Sopraffilo
Sopraffilo dei tessuti leggeri
Il punto sopraffilo impedisce che i bordi si sfilaccino
1. Assicurarsi che il pulsante di sblocco del volantino
sia nella posizione ( )
2. Regolate la manopola selezione punti e la
manopola lunghezza punto come indicato (fig. E)
3. Cucite con attenzione in modo che tutti i punti
eseguiti sul bordo destro siano allineati lungo il
bordo del tessuto (fig. F)
NOTA
Per tessuti grossi (esempio jeans) usate un punto
zigzag più ampio, per tessuti leggeri usate un punto
zigzag più stretto
Utilizzare il piedino zig-zag o il piedino opzionale
(piedino per imbastiture).
1-5
7
FE
GEBRUIK VAN DE INGEBOUWDE STEKEN
Blindzoomsteek
1. Overtuig u ervan dat de ontkoppelingsknop in de
( ) richting staat.
2. Stel uw machine in op...... (fig A)
Steeklengteknop op 2
3. Vouw de stof zoals afgebeeld in (fig B). Leg de stof
onder de persvoet.
Voor een nette afwerking is het aan te bevelen de
zoom vast te spelden en te strijken voordat u gaat
naaien.
4. Naai op de vouw, zodat de rechte steken op de
rand van de zoom komen te liggen en de
zigzagsteken slechts enkele draden van de stof
vastzetten. (fig C)
(fig D) a : Correcte naad
b
: De naald raakt te veel de rand van de
vouw.
c : De naald raakt de rand van de vouw
helemaal niet.
Gebruik zigzagvoet of de optionele
blindzoomvoet.
Overhands naaien
Voor lichtgewicht materiaal:
Overhands naaien voorkomt rafelen aan de rand van
de stof.
1. Overtuig u ervan dat de ontkoppelingsknop in het
handwiel in de ( ) richting staat.
2. Zet de steekkeuzeknop en steeklengteknop
op... (fig E)
3. Leg de naad onder de persvoet met de rand van de
stof in een lijn met de zijkant van de persvoet.
(fig F)
OPMERKING
Voor dikke stof (met name denim) gebruikt u een
brede zigzagsteek, voor lichte stof gebruikt u een
smalle zigzagsteek.
Gebruik zigzagvoet of de optionele
overhandsevoet.
G
Pagina laadt ...

Nederlands Italiano
32
5
19
DC
Overhands naaien
Voor dik en elastisch materiaal, of zeer fijn ma-
teriaal:
Overhands naaien voorkomt rafelen aan de rand van
de stof.
1. Overtuig u ervan dat de ontkoppelingsknop in het
handwiel in de ( ) richting staat.
2. Zet de steekkeuzeknop en steeklengteknop
op... (fig A)
3. Leg de naad onder de persvoet met de rand van de
stof in een lijn met de zijkant van de persvoet.
(fig B)
Gebruik zigzagvoet of de optionele
overhandsevoet.
Overlocken
1. Overtuig u ervan dat de ontkoppelingsknop in het
handwiel in de ( ) richting staat.
2. Stel uw machine in op... (fig C)
Steeklengteknop op 5
3. Leg twee delen van de stof met de goede kant
tegen elkaar om te gaan naaien. (fig D)
OPMERKING
Om rafelen van de randen te voorkomen, naait u zo
dat de steken aan de rechterkant buiten de rand van
de stof vallen.
Overlocksteken kunnen gebruikt worden voor
overhands naaien.
Gebruik zigzagvoet of de optionele
overhandsevoet.
Sopraffilo
Sopraffilo di tessuti spessi o elastici
Il punto sopraffilo impedisce che i bordi si sfilaccino
1. Assicurarsi che il pulsante di sblocco del volantino
sia nella posizione ( )
2. Regolate la manopola selezione punti e la
manopola lunghezza punto come indicato (fig. A)
3. Cucite con attenzione in modo che tutti i punti
eseguiti sul bordo destro siano allineati lungo il
bordo del tessuto (fig. B)
Utilizzare il piedino zig-zag o il piedino opzionale
(piedino per imbastiture).
Sopraggitto
1. Assicurarsi che il pulsante di sblocco del volantino
sia nella posizione ( )
2. Regolate la macchina come indicato (fig. C)
Manopola lunghezza punto sul 5
3. Unite i due pezzi del lavoro con i due diritti del
tessuto uno contro l’altro e cucite (fig. D)
NOTA
Per impedire che i bordi si sfilaccino, fate in modo che
i punti della parte destra oltrepassino il tessuto.
In certi casi, il punto di sopraggitto può essere
utilizzato per sopraffilare.
Utilizzare il piedino zig-zag o il piedino opzionale
(piedino per imbastiture).
S

33
English Français
Nederlands Italiano
5
20
BA
C
Smocking
1. Be sure that the declutch knob in the handwheel is
into the ( ) direction.
2. Sew two straight lines with very loose thread
tension. Make knots in one end. (Long stitch)
3. Gather fabric towards the knots while holding the
other end of lower thread. (fig A)
4. Set your machine as... (fig B)
Stitch length dial to 5
5. Sew smocking stitches on the gathered part
between two straight stitches. (fig C)
6. Remove the straight stitches after finishing the
smocking.
Fronçage
1. Vérifier que le bouton de débrayage sur le volant
est enclenché vers ( ).
2. Piquer deux coutures droits en relâchant la tension
du fil supérieur. (point long)
Faites des noeuds à une extrémité du tissu. (fig. A)
3. Faites les fronces en poussant le tissu vers les
noeuds et en tenant par le doigts l’autre extrémité
des fils inférieurs.
4. Réglez la machine comme indiqué... (fig. B)
Cadran de sélecteur de longueur du point sur 5
5. Piquez les fronces au point de fronçage. (fig. C)
6. Lorsque vous avez terminé, tirez les deux premiers
fils qui ont servi aux coutures droites de
préparation.
Rimpelen
1. Overtuig u ervan dat de ontkoppelingsknop in het
handwiel in de ( ) richting staat.
2. Naai twee rechte lijnen met zeer losse
draadspanning. Maak knoopjes aan een einde.
(lange steek)
3. Trek wat stof samen naar de knoopjes toe terwijl u
het andere eind van de bovendraad vasthoudt.
(fig A)
4. Stel uw machine in op... (fig B)
Steeklengteknop op 5
5. Naai smoksteken op het samengetrokken gedeelte
tussen de twee rechte steken. (fig C)
6. Verwijder de rechte steken als het rimpelwerk klaar
is.
Cucitura plissé
1. Assicurarsi che il pulsante di sblocco del volantino
sia nella posizione ( )
2. Eseguire due cuciture diritte avendo cura di ridurre
la tensione del filo superiore. Annodare i fili ad una
delle estremità del tessuto.
3. Preparate il plissé spingendo il tessuto verso i nodi
e tenendo con le dita l’altra estremità dei fili inferiori
(fig. A)
4. Regolate la macchina come indicato (fig. B)
Manopola lunghezza punto sul 5
5. Eseguite la cucitura plissé (fig. C)
6. Una volta terminato, tirare i due fili che erano stati
utilizzati come cucitura diritta di preparazione.
T

34
English Français
Nederlands Italiano
1-1.5
11
BA
C
Mending
1. Be sure that the declutch knob in the handwheel is
into the ( ) direction.
2. Set your machine as... (fig A)
Stitch length dial between 1-1.5
3. Place a patch over the worn part. Sew along the
edge of the right side of the patch.
4. Trim the worn part along the seam on the wrong
side of fabric. (fig B)
Mending a rip (fig C)
Set the machine in the same way as for mending.
Sew the edges of tear together first. Then sew one
more seam on each side (right side and wrong side) of
the fabric.
A piece of fabric can be placed underneath to
reinforce the rip.
Racommodage
1. Vérifier que le bouton de débrayage sur le volant est
enclenché vers ( ).
2.
Régler la machine comme indiqué...
(fig.
A
)
Cadran de sélecteur de longueur du point entre
1 et 1,5
3. Placez la pièce de racommodage sur le tissu support.
Coudre en suivant le bord du côté droit de la pièce de
racommodage.
4. Couper légèrement le long de la couture en
retournant le tissu du mauvais côté. (fig. B)
Racommodage d’une déchirure (fig. C)
Réglez la machine de la même façon que le
raccommodage.
Commencez par coudre le milieu de la déchirure en
guidant le tissu, puis coudre de chaque côté (bon côté et
mauvais côté).
Si nécessaire, renforce
rlacoutureaumoyend’unpetit
morceau de gaze placé à l’envers du tissu déchiré.
Herstelwerk
1. Overtuig u ervan dat de ontkoppelingsknop in de
( ) richting staat.
2. Stel uw machine in op... (fig A)
Steeklengteknop tussen 1-1.5
3. Leg een lapje stof over het versleten gedeelte.
Naai langs de rechterkant van de rand van het
lapje stof.
4. Knip het versleten gedeelte langs de naad weg aan
de achterkant van de stof. (fig B)
Herstellen van een scheur (fig C)
Stel de machine in op dezelfde manier als met
herstelwerk. Naai eerst beide randen van de scheur
aan elkaar. Naai daarna nog een naad op iedere kant
van de stof.(bovenkant en onderkant). Een stukje stof
kan aan de onderkant gelegd worden om de scheur te
versterken.
Rammendo
1. Assicurarsi che il pulsante di sblocco del volantino sia
nella posizione ( )
2. Regolate la macchina come indicato (fig. A)
Manopola lunghezza punto tra 1 e 1,5
3. Ricoprite completamente la parte rovinata con un
pezzo di stoffa identica. Eseguite una cucitura lungo il
bordo della pezza di tessuto aggiunta sul diritto del
tessuto.
4. Ritagliare la parte rovinata sul rovescio del tessuto
vicino al bordo cucito (fig. B)
Rammendo di uno strappo (fig. C)
Regolate la macchina come per il rammendo appena
visto.
Cominciate cucendo il centro dello strappo e guidando il
tessuto, quindi cucite su ogni lato. Se necessario
rinforzate la cucitura per mezzo di un pezzetto di garza
posizionato sul rovescio del tessuto strappato. La
pressione del piedino deve essere annullata.
K

35
English Français
Nederlands Italiano
0.5-1
22 23
BA
C
Applique work
1. Be sure that the declutch knob in the handwheel is
into the ( ) direction.
2. Set your machine as... (fig A)
Stitch length dial between 0.5-1
3. Draw a design on material for the applique, and cut
it out. (fig B)
4. Lay stabilizer under the fabric and baste the cut out
(or pin it) on the desired location.
5. Sew around the edge of the cut carefully. (fig C)
To change directions at corners or to sew very small
circles:
Stop the machine with the needle pointing just away
from the edge of the cut. Lift presser foot and turn the
material. Lower presser foot and continue sewing.
Application
1. Vérifier que le bouton de débrayage sur le volant
est enclenché vers ( ).
2. Régler la machine comme indiqué... (fig. A)
Cadran de sélecteur de longueur du point entre
0,5 et 1
3. Dessiner le motif sur le tissu qui servira
d’application et découper-le. (fig. B)
4. Placer le motif sur le tissu support.
5.
Piquer les bords au point zigzag doucement. (fig.
C
)
Auparavant régler la longueur et la largeur du point
en fonction du motif et de la dimension de
l’application, ainsi qu’en fonction du type d’étoffe
de base.
Pour changer de direction dans les angles ou pour
piquer des courbes très serrés, arrêter la machine,
placer l’aiguille juste à côté de l’application, lever le
pied-de-biche et tourner le tissu. Abaisser le pied et
continuer à piquer.
Applicazioni
1. Assicurarsi che il pulsante di sblocco del volantino
sia nella posizione ( )
2. Regolate la macchina come indicato (fig. A)
Manopola lunghezza punto tra 1 e 1,5
3. Tracciate il motivo sul tessuto che servirà da
applicazione e ritagliate. (fig. B)
4. Posizionate l’applicazione sul tessuto di base
5. Cucite con un punto leggero lungo i bordi
dell’applicazione (fig. C)
Per cambiare direzione negli angoli o per cucire curve
molto strette, fermate la macchina, posizionate l’ago
proprio a fianco dell’applicazione, sollevate il piedino
e girate il tessuto. Quindi abbassate il piedino e
continuate a cucire. Cucite alcuni punti alla fine della
cucitura mettendo lo zigzag su 0 per evitare
sfilacciature
Appliqueren
1. Overtuig u ervan dat de ontkoppelingsknop in het
handwiel in de ( ) richting staat.
2. Stel uw machine in op... (fig A)
Steeklengteknop tussen 1-5
3. Teken een ontwerp op het materiaal voor de
applicatie, knip deze daarna uit. (fig B)
4. Leg vliseline onder de stof en rijg of speld de
applicatie vast op de gewenste plaats.
5. Naai zorgvuldig langs de rand van de applicatie.
(fig C)
Om van richting te veranderen op hoeken of om zeer
kleine cirkels te naaien: stop de machine met de naald
in de stof en iets vanaf de rand van de applicatie. Zet
de persvoet omhoog en draai de stof.
Laat de persvoet naar beneden en naai weer verder.
V W
Pagina laadt ...

Nederlands Italiano
37
Piedino cordoncino / Per chiusure lampo
Il piedino cordoncino / chiusure lampo può essere usato sia per
cucire chiusure lampo sia per fare ed attaccare un cordoncino.
Usate il punto dritto, normalmente regolato sulla llunghezza 2.5
(lunghezza media del punto dritto)
Cambio del piedino
Nota: Spegnete la macchina prima di cambiare il piedino. L’ago
della macchina per cucire è un accessorio appuntito, può
causare ferite; fate attenzione quando cambiate il piedino, come
precauzione di sicurezza.
Spegnete la macchina.
A. Alzate il piedino
B. Portate l’ago nella posizione più alta ruotando il volantino
verso di voi
C. Alzate la leva di rilascio del piedino e toglietelo (fig. A)
D. Usate il cacciavite della placca ago per allentare la vite della
staffa del piedino e togliete la staffa del piedino dalla barra
ago (fig. B)
E. Posizionate il piedino cordoncino / chiusure lampo dal dietro
verso avanti (fig. C)
F. Stringete la vite del piedino, usando il cacciavite della placca ago
G. Allentate e regolate la vite, muovete la punta verso la destra
o sinistra dell’ago, se c’ è bisogno. Stringete e regolate la vite
per tenere la punta in posizione
H. Quando avrete finito di usare il piedino cordoncino / chiusure lampo:
1) Spegnete la macchina
2) L’ago e il piedino premistoffa debbono trovarsi in alto
3) Allentate la vite del piedino con il cacciavite della placca ago
4) Togliete il piedino cordoncino / chiusure lampo
5) Posizionare il supporto del piedino e stringere la vite
6) Rimettete il piedino premistoffa standard
Inserimento della chiusura lampo / cucitura
Fate riferimento al vostro manuale di istruzioni e/o al video DVD
Inserire il cordoncino
• Tagliate delle strisce larghe abbastanza da coprire la cucitura
del cordoncino
• Segnate la linea di cucitura sulla stoffa
• Puntate ed imbastite la striscia di cordoncino e il cordoncino
alla stoffa, lungo la linea di cucitura
• Puntate ed imbastite il rovescio del tessuto
• Cucite lungo la linea più vicino possibile al cordoncino
• Pulite e aggiustate la cucitura
• Girate il tessuto sul dritto del lavoro
Nota: Se fate il punto cordoncino e lo cucite all’interno di una
cucitura, i punti potrebbero essere così vicini al cordoncino da
coprire la prima linea di cucitura (punto cordoncino)
❈ Il piedino cordoncino / per chiusure lampo è un accessorio
opzionale.
ABC
DEF
Nederlands: Biesversiering / Ritssluitingvoet
Italiano:Piedino cordoncino /
Per chiusure lampo
Nederlands: Bies / Koord
Italiano:Cordoncino
Nederlands:Naai op de
naadlijn
Italiano:Cucire sulla linea
de cuciture
Biesversiering / Ritssluitingvoet
De biesversiering / ritssluitingvoet kunt U gebruiken voor het
inzetten van een ritssluiting, maar U kunt de voet ook voor
biesversiering gebruiken. Gebruik een rechte steek en de
normale instelling, steeklengte 2.5 (middelmatige steeklengte)
Verwisselen van de persvoet
Opgelet: Schakel de machine uit voordat U een persvoetje
verwisselt. De naaimachinenaald is een scherp object, waar U
zich aan kan bezeren, wees voorzichtig met het verwisselen van
de persvoet. Het is misschien een goed idee om de naald te
verwijderen wanneer U van voet verwisseld, dit uit voorzorg.
Schakel de machine uit:
A. Zet de persvoet omhoog.
B. Plaats de naald in zijn hoogste positie door het handwiel
naar U toe te draaien.
C. Duw het hendeltje van de persvoetklikhouder omhoog en
verwijder de voet. (fig A)
D. Gebruik de naaldplaatschroevendraaier om de schroef van
de persvoethouder los te draaien en verwijder hierna de
persvoethouder van de persvoetstang. (fig B)
E. Plaats de biesversiering / ritssluitingvoet aan de
persvoetstang van achter naar voren. (fig C)
F. Draai de schroef van de persvoet vast doormiddel van de
naaldplaatschroevendraaier.
G. Draai de afstelschroef los en plaats de voet naar links of
rechts van de naald, wat U wenst. Draai daarna de
afstelschroef vast.
H. Wanneer U klaar bent met het gebruik van de biesversiering
/ ritssluitingvoet:
1) Schakel de naaimachine uit.
2) De naald en de persvoet moeten in de hoogste positie staan.
3) Maak de persvoetschroef los met de
naaldplaatschroevendraaier.
4) Verwijder de biesversiering / ritssluitingvoet.
5) Plaats de persvoetklikhouder en schroef de houder vast.
6) Klik het standaardvoetje vast.
Ritssluiting inzetten / naaien
Lees Uw instructieboek en/of sla Uw DVD erop na.
Het inzetten van een biesversiering
• Knip stroken die breed genoeg zijn om de bies/koord en
naadomslag te bedekken.
• Geef de naadlijn aan op het artikel.
• Speld de bies/koord en strook vast aan het artikel langs de
naadlijn.
• Speld het geheel vast op het achtergrond materiaal.
• Naai op de naadlijn zo dicht mogelijk tegen het bies/koord
aan. Werk de naadomslag netjes af.
• Draai het artikel naar de goede kant.
LET OP: Als u de bies/koord in een naad naait zult U de
naaisteek dichter naar het bies/koord moeten zetten om de 1
e
rij
steken te bedekken.
❈ Biesversiering / Ritssluitingvoet is een optioneel accessoire.
RS2000-2D_EFNI.book Page 35 Thursday, March 30, 2006 3:31 PM

38
English Français
Nederlands Italiano
1-5
43
BA
C
Zipper sewing
1. Be sure that the declutch knob in the handwheel is
into the ( ) direction.
2. Set your machine as... (fig A)
Stitch length dial between 1-5
3. Set the Zipper Foot on the right side of the needle.
Sew the right side of the zipper. Guide the fabric
carefully so that the zipper teeth of the right side
are parrallel with the left edge of the foot. (fig B)
4. Re-set the Zipper Foot to the left side of the needle.
Sew the left side of the zipper in the same way.
(fig C)
Use zipper foot.
Pose de fermeture à glissière
1. Vérifier que le bouton de débrayage sur le volant
est enclenché vers ( ).
2. Régler la machine comme indiqué... (fig. A)
Cadran de sélecteur de longueur du point entr e
1 et 5
3. Installer le pied-fermeture à glissière à droite de
l’aiguille.
Piquer le côté droit de la fermeture en guidant le
tissu de façon à ce que les dents de droite de la
fermeture soient parallèles avec le bord gauche du
pied. (fig. B)
4. Replacer le pied fermeture à glissière à gauche
de l’aiguille.
Piquer le côté gauche de la fermeture de la même
façon. (fig. C)
Utiliser le pied fermeture à glissière.
Rits inzetten
1. Overtuig u ervan dat de ontkoppelingsknop in het
handwiel in de ( ) richting staat.
2. Stel uw machine in op... (fig A)
Steeklengteknop tussen 1-5
3. Plaats de ritsvoet aan de rechterkant van de naald.
Naai de rechterkant van de rits. Geleid de stof
voorzichtig zo dat de ritstanden van de rechterkant
parallel liggen met de linkerkant van de voet. (fig B)
4. Plaats de voet opnieuw, echter nu aan de
linkerkant van de naald.
Naai de linkerkant van de rits op dezelfde manier.
(fig C)
Gebruik de ritssluitingvoet.
Applicazione di
cerniere lampo
1. Assicurarsi che il pulsante di sblocco del volantino
sia nella posizione ( )
2. Regolate la macchina come indicato (fig. A)
Manopola lunghezza punto t ra 1 e 5
3. Posizionate il piedino per cerniere lampo a destra
dell’ago. Cucite il bordo destro della cerniera
guidando il tessuto in modo che i denti di destra
della cerniera siano paralleli con il bordo sinistro
del piedino (fig. B)
4. Riposizionate il piedino a sinistra.
Cucite il bordo sinistro della cerniera procedendo
nello stesso modo (fig. C)
Utilizzare il piedino per chiusure lampo.
C D
Pagina laadt ...

Nederlands Italiano
40
Borduren
1. Overtuig u ervan dat de ontkoppelingsknop in het
handwiel in de ( ) richting staat.
2. Verzink de transporteur. (zie pag. 24)
3. Stel uw machine in voor satijnsteek. (fig A)
Steeklengteknop op 0
4. Verminder voorzichtig de bovendraadspanning om
te voorkomen dat de onderdraad naar boven wordt
getrokken. Satijn zigzagsteken vereisen minder
bovenspanning dan rechte steken.
VOOR GOED BORDUURWERK
Het is belangrijk om de juiste naald en het juiste garen
te gebruiken.
Gebruik borduurgaren voor de bovendraad en een
dunnere draad van dezelfde soort en kleur voor de
onderdraad.
5. Teken uw ontwerp op het materiaal en plaats dit in
het midden van een borduurhoepel. Zorg ervoor
dat het materiaal strak gespannen is.
Leg vliseline onder het borduurwerk als u fijne stof
borduurt
6.
Trek de onderdraad eruit door het handwiel naar u toe
te draaien terwijl u de bovendraad losjes vasthoudt.
Laat de persvoet zakken.
7. Neem de onderdraad op en naai twee of drie
steken. Knip de overtollige draad af. (fig B)
8. Begin te naaien langs de buitenkant van het
ontwerp. Geleid de hoepel met de hand. (fig C)
9. Naai enkele rechte steken aan het einde ter
versteviging.
❈ Maasvoet is een optioneel accessoire.
❈ Borduurhoepel niet inbegrepen.
Naald Draad
No. 9 120 - 100
No. 11 100 - 80
No. 14 60 - 50
Ricami
1. Assicurarsi che il pulsante di sblocco del volantino
sia nella posizione ( )
2. Abbassate i dentini della griffa (vedere pag. 24)
3. Regolate la macchina per il punto satin come
indicato (fig. A)
Manopola lunghezza punto su 0
4. Per evitare che il filo inferiore venga tirato verso
l’alto, ridurre la tensione del filo superiore
PER OTTENERE OTTIMI RICAMI
Per eseguire correttamente i ricami è importante che
vengano impiegati aghi e fili del tipo indicato.
Impiegare come filo superiore un filo sottile da ricamo
in seta e come filo inferiore un filo in seta più sottile,
dello stesso tipo e colore.
5. Tracciare il modello sulla stoffa da ricamare e
centrarlo sul cerchietto da ricamo. Accertarsi che la
stoffa da ricamare sia ben tesa
Per ricamare tessuti molto sottili, inserite un
leggero foglio di carta sotto al tessuto”
6. Tirate il filo inferiore facendo girare il volantino
verso di voi, trattenendo leggermente il filo
superiore. Abbassate il piedino premistoffa
7. Prendete il filo inferiore quindi fate due o tre punti.
Tagliate il filo in eccesso (fig. B)
8. Tenete i due fili ed iniziate a cucire lungo i contorni
del motivo con il punto a cordoncino. Continuate a
ricamare guidando il cerchio con la mano (fig. C)
9. Per terminare cucite alcuni punti regolando la
larghezza del zigzag su 0.
❈ Il piedino per rammendo è un accessorio
opzionale.
❈ Il cerchietto da ricamo non è incluso.
Ago Filo
No. 9 120 - 100
No. 11 100 - 80
No. 14 60 - 50
BC
RS2000-2D_EFNI.book Page 38 Thursday, March 30, 2006 3:31 PM
Pagina laadt ...

42
Nederlands Italiano
English Français
Twin needle threading
1. Set the extra spool pin on the machine. (The extra
spool pin and twin needle are optional accessories
and can be supplied with specified machines).
Place a spool of thread on each spool pin. (fig A)
2. Thread the two threads in the same way for single
needle (page 14), except the next 3 points at (fig C)
and (fig F).
1 At the Tension disc, pass threads separately to
the right and to the left. (fig C)
2 At the needle guide 5, pass threads through
separate guides, one to the left guide, other to
the right guide. (fig F)
3 At the needle eye 6, the thread from the right
needle guide should go through the right needle
eye.
The thread from the left side to the left needle
eye. (fig F)
Caution!
Remember to use less than 2.5 zigzag width.
Needle threader can not be used on twin needle
threading.
Enfilage d’une aiguille double
1. Mettre en place le porte-bobine supplémentaire sur
la machine. (Le porte-bobine supplémentaire et
l'aiguille double sont des accessoires en option
pouvant être fournis avec des machines
spécifiques.) Placez une bobine du fil sur chaque
porte-bobine. (fig. A)
2. Enfilez les deux fils de la même manière que si
vous enfilez une seule aiguille (page 14), excepté
les 3 points suivants, voir (fig. C) et (fig. F).
1 Aux disques du tendeur, passez les fils à travers
le guide-fil. (fig. C)
2 Au niveau du guide-aiguille 5, passez les fils à
travers les guides de la gauche et de la droite
séparément. (fig. F)
3 Au niveau du chas de l’aiguille, le fil venant du
guide-fil droit de l’aiguille doit passer par le chas
de l’aiguille droite.
Le fil venant du guide-fil gauche de l’aiguille par
le chas de l’aiguille gauche. (fig. F)
Attention!
Ne pas utiliser une largeur de zigzag inférieur à
2,5 mm.
Il n’est alors pas possible d’utiliser l’enfile-aiguille.
Tweelingnaald inrijgen
1. Plaats de extra garenpen. (De extra garenpen en
tweelingnaald zijn optionele accessoires die
kunnen worden geleverd bij aangegeven
modellen) Zet een klos garen op elke garenpen.
(fig A)
2. Rijg de twee draden in op dezelfde manier als met
enkele naald (pag. 14), behalve de 3 volgende
punten op (fig C) en (fig F).
1 Bij de spanningsplaatjes legt u de draden apart
aan de linkerkant en aan de rechterkant. (fig C)
2 Bij de naaldgeleider 5, geleidt u de draden
apart, een door de linkergeleider en de andere
door de rechtergeleider. (fig F)
3 Bij het oog van de naald 6 moet de draad van
de rechtergeleider door het rechteroog gaan.
De draad van de linkergeleider door het
linkeroog. (fig F)
Waarschuwing!
Vergeet niet de zigzagsteekbreedte kleiner dan 2.5 in
te stellen.
De draadinrijger kan niet gebruikt worden om een
tweelingnaald in te rijgen.
Cucitura con ago doppio
1. Tra gli accessori è incluso un perno portarocchetto
extra. (Il portarocchetto extra e l'ago doppio sono
accessori opzionali che possono essere forniti con
determinati modelli di macchine per cucire).
Inserire il perno portarocchetto extra nell’apposito
foro e infilarvi un altro rocchetto (fig. A)
2. Infilare normalmente la macchina ed eseguire le
seguenti operazioni:
1 Nel disco tenditore, far passare un filo dal lato
destro e l’altro dal lato sinistro (fig. C)
2 Nella guida del filo 5 passare i fili attraverso
guide separate, uno nella guida sinistra, l’altro
nella guida destra (fig. F)
3 Il filo di destra deve andare alla cruna dell’ago di
destra ed il filo di sinistra alla cruna dell’ago di
sinistra (fig. F)
Attenzione!
Ricordarsi di non usare una larghezza di zigzag
maggiore di 2,5. Non si può usare il dispositivo
automatico per infilare l’ago
RS2000-2D_EFNI.book Page 40 Thursday, March 30, 2006 3:31 PM

43
English Français
Nederlands Italiano
1-5
4
BA
C
Pin tucking using twin needle
For light weight material
1. Be sure that the declutch knob in the handwheel is
into the ( ) direction.
2. Set your machine as... (fig A)
Stitch length dial between 1-5
3. Insert the Quilting Guide under the spring plate on
the shank. (fig B)
4. Mark the first line with a pencil or tailors chalk, and
sew.
For the second line, follow the stitches of the first
line, using the Quilting Guide.
The intervals between the lines can be adjusted by
moving the Quilting Guide in the direction of the
arrow shown in (fig C).
Quilting Guide is an optional accessory.
Piquage matelassé
Pour tissu léger
1. Vérifier que le bouton de débrayage sur le volant
est enclenché vers ( ).
2. Régler la machine comme indiqué... (fig. A)
Cadran de sélecteur de longueur du point entre
1 et 5
3. Insérer le guide à matelasser au-dessus de la
plaque du support de pied-de-biche. (fig. B)
4. Tracer la première ligne avec un crayon ou une
craie-tailleur et piquer.
A partir de la seconde ligne, piquer en conduisant
le guide dans la première couture.
La largeur entre les coutures peut être réglée en
glissant le guide dans le sens de la flèche (fig. C)
Le guide à matelasser est un accessoire en
option.
Plooien innaaien met tweelingnaald
Voor lichtgewicht materiaal
1. Overtuig u ervan dat de ontkoppelingsknop in het
handwiel in de ( ) richting staat.
2. Stel uw machine in op... (fig A)
Steeklengteknop tussen 1-5
3. Monteer de quilt geleider onder de klemveer op de
persvoethouder. (fig B)
4. De eerste lijn met potlood of met krijt op de stof
markeren en daarna naaien. Voor de tweede lijn,
de steken van de eerste lijn volgen met gebruik van
de quilt geleider.
De afstand tussen de naden kan afgesteld worden
door de quilt geleider in de richting van de pijl te
verschuiven zoals afgebeeld in (fig C)
De quilt geleider is een optioneel accessoire.
Imbastitura con doppio ago
Per tessuti leggeri
1. Assicurarsi che il pulsante di sblocco del volantino
sia nella posizione ( )
2. Regolate la macchina come indicato (fig. A)
Manopola lunghezza punto tra 1 e 5
3. Inserite la guida distanziatrice sotto la placca
(fig. B)
4. Segnate la prima linea con una matita, o con un
gessetto, e cucite.
Per la seconda linea, seguite i punti della prima,
usando la guida distanziatrice.
Gli intervalli tra le linee possono essere variati
muovendo la guida in direzione della freccia
mostrata in (fig. C)
La guida distanziatrice è un accessorio
opzionale.
D

44
English Français
Nederlands Italiano
AB
CD
Walking Foot
This walking foot is used only with straight or zigzag stitch.
A. Name of parts
1 Holder for needle clamp
2 Holder for needle bar
B. •
Rotate the handwheel toward you and raise the needle to
its highest position. And then turn off the power. Set the
pattern selecting dial: Straight stitch or zigzag stitch.
IMPORTANT: Make sure that the needle is at its high-
est position when attaching the walking foot.
C. • Lift the presser foot lever to raise the presser foot.
• Loosen the screw of the presser foot holder by using
screw driver and remove the foot holder.
D. •
Attach the holder
1
to the needle clamp (A) and the
holder
2
to the needle bar (B). And then tighten the
screw of the presser foot holder by using screw driver.
• Lower the presser foot lifter and tighten the screw of
presser foot holder.
WARNING: To avoid injury, turn the handwheel slow-
ly toward you and make sure that the needle does not
hit the walking foot.
❈ Walking Foot is an optional accessory.
Pied-de-biche double entraînement
Ce pied-de-biche sera utilisé uniquement avec le point droit et zig zag.
A. Désignation des éléments constitutifs du pied
1 Support barre serre aiguille
2 Support barre aiguille
B. • Amenez l’aiguille en position haute et coupez
l’alimentation électrique.
IMPORTANT: Assurez vous que l’aiguille est à sa posi-
tion la plus haute lors de l’opération de mise en place du
pied-de-biche double entraînement.
C. • Sélectionnez un point droit ou un zigzag sur le bouton
sèlecteur de points.
•
Dévissez la vis de maintien du support de pied de biche
à l’aide du tournevis de plaque aiguille et ôtez le support.
D. • Attachez le support 1 à la barre serre aiguille (A) et le
support 2 à la barre aiguille (B).
• Abaissez le levier de pied-de-biche et vissez la vis de
fixation sur la barre aiguille.
ATTENTION: Pour éviter tout problème lié à cette opération,
tournez le volant vers vous mais lentement en vous assurant
que l’aiguille ne viennent pas taper sur le pied-de-biche.
❈ Le pied-de-biche double entraînement est un accessoire
en option.
Loopvoet
Deze loopvoet kunt U alleen gebruiken voor recht stikken en
de zigzagsteek.
A. Naam van het onderdeel:
1 Houder voor de naaldklem.
2 Houder voor de persvoetstang.
B. • Plaats de naald in zijn hoogste stand door aan het
handwiel te draaien en schakel daarna de machine uit.
BELANGRIJK: Wanneer U deze voet gaat gebruiken,
plaats U altijd de naald in zijn hoogste positie.
C. •
Zet de persvoet omhoog doormiddel van de persvoethendel
.
• Draai de schroef van de persvoethouder los met de
naaldplaatschroevendraaier.
D. • Plaats de houder 1 over de naaldklem (A) en de
houder 2 aan de persvoetstang (B).
• Zet de persvoethefboom naar beneden en draai de
schroef voor de persvoethouder vast.
WAARSCHUWING: Controleer eerst, voordat U gaat
naaien, dat de naald niet de persvoet raakt anders kun-
nen er ongelukken gebeuren. Dit doet U door het hand-
wiel langzaam naar U toe te draaien.
❈ Loopvoet is een optioneel accessoire.
Piedino doppio trsporto
Il piedino doppio trasporto è stato ideato per rendere la
cucitura più semplice su alcuni tessuti, quali stoffa da
giacche, pelle, lana o jersey, rendendo così il trasporto
più sicuro e compatto.
A. Componenti
1 Staffa per il morsetto dell’ago
2 Leva per la barra ago
B. •
Ruotare il volantino verso di voi e alzate l’ago nella sua
posizione più alta, e spegnete la macchina per cucire.
C. • Sollevare la barra del piedino per alzare il piedino.
• Allentare la vite del gambo del piedino usando il
cacciavite in dotazione e rimuovere il gambo.
D. • Posizionate la staffa 1 al morsetto ago (A) e la leva 2
alla barra ago (B).
• Abbassate la leva alza piedino e stringete la vite della
staffa del piedino premistoffa.
ATTENZIONE: Per evitare danni, girate il volantino len-
tamente verso di voi e assicuratevi che l’ago non urti il
piedino doppio trasporto.
❈ Il piedino doppio trasporto è un accessorio opzionale.
RS2000-2D_EFNI.book Page 42 Thursday, March 30, 2006 3:31 PM
Pagina laadt ...

Nederlands Italiano
46
Piedino per rammendo
A. Ruotare il volantino verso di voi e alzate l’ago nella
sua posizione plù alta, e spegnete la macchina per
cucire.
B. Sollevare la barra del piedino per alzare il piedino.
C. Mettete il piedino per il rammendo.
D. Selezionate un qualsiasi punto dritto (con l’ago in
posizione centrale) o un punto zig-zag.
E. Abbassate (escludete) la griffa di trasporto.
F. Lasciate 10 cm circa di filo inferiore dopo aver
infilato.
G. Mettete il tessuto sotto il piedino.
H. Se il tessuto non scivola sotto il piedino, alzate il
piedino premistoffa.
I. Girate il volantino verso di voi per tirare su il filo
inferiore.
J. Trattenendo dolcemente il filo inferiore, cucite 4
punti circa.
• Per il rammendo, tagliate ogni filo in eccesso.
• Quando trapuntate a mano libera, usate un ago
per far rientrare il filo all’interno della
trapuntatura. Ripulite da ogni filo che si possa
ancora vedere.
K. Usate entrambe le mani per guidare il tessuto e
mantenerlo in posizione.
• Tracciate il vostro disegno sulla stoffa e
centratelo sul telaio da ricamo.
• Assicuratevi che la stoffa sia tesa.
• Mettete un tessuto stabilizzatore al di sotto
quando ricamate su tessuti sottili.
• Guidate il telaio con la mano.
IMPORTANTE
Ricordate di rialzare la leva della griffa di
trasporto, quando avete finito.
❈ Il cerchietto da ricamo non è incluso.
❈ Il piedino per rammendo è un accessorio
opzionale.
GHI
JK
Maasvoet
A. Plaats de naald in zijn hoogste stand door aan het
handwiel te draaien en schakel daarna de machine
uit.
B. Zet de persvoet omhoog doormlddel van de
persvoethendel.
C. Plaats de maasvoet.
D. Selecteer een rechte steek (midden positie) of een
zigzagsteek.
E. Verzink de transporteur.
F. Zorg dat er ongeveer 10 cm onderdraad uitsteekt.
G. Plaats Uw stof onder de persvoet.
H. Als U de stof niet kunt bewegen onder de persvoet,
zet de persvoet dan omhoog.
I. Draai het handwiel naar U toe om de onderdraad
naar boven te halen.
J. Houdt de onderdraad losjes vast en naai 4 steken.
• Voor mazen knipt U overtollig garen weg.
• Voor uit de vrije hand doorstikken gebruikt U een
naald om het overtollige garen te verbergen
onder een doorstikgedeelte.
Knip de garens die nog zichtbaar zijn af.
K. Gebruik beide handen voor een goede
begeleiding.
• Loop Uw ontwerp na op het materiaal en plaats
deze in een borduurring.
• Zorg dat het materiaal strak gespannen is.
• Gebruik vlieseline wanneer U op een dunne stof
gaat borduren.
• Begeleid de borduurring met de hand.
BELANGRIJK
Denk eraan dat U de transporteur weer omhoog
zet wanneer U klaar bent.
❈ Borduurhoepel niet inbegrepen.
❈ Maasvoet is een optioneel accessoire.
RS2000-2D_EFNI.book Page 44 Thursday, March 30, 2006 3:31 PM

47
English Français
Nederlands Italiano
ABC
DE FG
Piecing Foot
Use the 1/4” piecing foot whenever a 1/4” seam allowance is
required.
A. Raise the foot release lever to remove the foot.
B. Place the piecing foot on the needle plate aligning needle
holes.
C.
Lower the presser foot lever so that the ankle snaps on the foot.
To stitch a 1/4” seam:
D. Align the edges of the fabrics with the right edge of the
presser foot.
E. When pivoting at a corner, stop when the fabric edge is
even with the front red line on the foot. Lower the needle
into the fabric and pivot. Continue to stitch.
To stitch a 1/8” seam:
F. Align the edges of the fabrics with the inside edge of the
right side of the presser foot.
G. When pivoting at a corner, stop when the fabric edge is
even with the middle red line on the foot. Lower the
needle into the fabric and pivot. Continue to stitch.
❈ Always use straight stitch (center position).
❈ Piecing Foot is an optional accessory.
Verstelvoet
Gebruik de 6mm verstelvoet wanneer U een 6mm naadomslag wilt.
A. Zet de persvoethendel omhoog zodat U het voetje kan
verwijderen.
B. Plaats de verstelvoet op de naaldplaat zodat de
naaldopening gelijk valt met die van de naaldplaat.
C. Zet de persvoethendel naar beneden zodat het pinnetje in de
houder klikt.
Het naaien van 6 mm naad:
D. Plaats de kant van de stof gelijk aan de rechterkant van de
persvoet.
E. Wanneer U op een hoek wilt draaien, stop dan wanneer de
zijkant van de stof gelijk ligt met de voorste rode lijn op het
voetje. Plaats de naald in de stof en draai de stof. Ga verder
met naaien.
Het naaien van 3 mm naad:
F. Plaats de kant van de stof gelijk aan de rechterbinnenkant
van de persvoet.
G.
Wanneer U een hoek wilt draaien, stop dan wanneer de zijkant van
de Stof gelijk ligt met de middelste rode lijn op het voetje. Plaats de
naald in de stof en draai de stof. Ga verder met naaien.
❈ Gebruik altijd de rechte steek (middelste stand).
❈ Verstelvoet is een optioneel accessoire.
Piedino per patchwork
Usate il piedino per patchwork da 6 mm quando avete
bisogno di questo tipo di cucitura.
A. Alzate la leva alza piedino per togliere il piedino.
B. Mettete il piedino per patchwork sulla placca ago
allineando i buchi dell’ago.
C. Abbassate la leva alza piedino cosicché il piedino si
agganci da solo.
Per cuciture da 6 mm di larghezza
D. Allineate i bordi del tessuto con il lato destro del piedino.
E. Quando girate un angolo, fermatevi quando il bordo del
tessuto è pari con la linea rossa frontale del piedino.
Abbassate l’ago nel tessuto e girate. Continuate a cucire.
Per cuciture di 3 mm di larghezza
F. Allineate i bordi del tessuto con il bordo interno del lato
destro del piedino.
G. Quando girate un angolo, fermatevi quando il bordo del
tessuto è pari con la linea rossa media del piedino.
Abbassate l’ago nel tessuto e girate. Continuate a cucire.
❈
Utilizzare sempre il punto diritto (posizione centrale).
❈ Il piedino per patchwork è un accessorio opzionale.
Pied d’application
Utilisez le pied quart de pouce toutes les fois ou une couture
quart de pouce est requise.
A. Poussez le levier de changement de pied-de-biche vers vous
et retirez le pied en place.
B. Mettre en place le pied d’application sur la plaque aiguille puis
alignez les trous de la plaque avec celui du pied d’application.
C. Abaissez le levier de pied-de-biche de manière à clipper le
pied sur son support.
Pour coudre une couture quart de pouce:
D. Alignez les bords du tissu avec le bord droit du pied-de-biche.
E. Lorsque vous parvenez au bord du tissu, stopper la couture
en prenant soin de vérifier que le bord du tissu soit en face de
la première ligne rouge du pied-de-biche. Piquez l’aiguille
dans le tissu, relevez le levier de pied-de-biche comme en C.
et tournez le tissu de 90
o
, vous pouvez alors poursuive la
couture en point droit et répéter l’opération à chaque angle.
Pour coudre une couture huitième de pouce:
F.
Alignez les bords du tissu avec le bord intérieur droit du pied-de-biche.
G. Pour négocier le passage des angles, lorsque vous arrivez au
bord du tissu, stopper la couture en alignant les bords du tissu
avec la 2
ème
ligne rouge (milieu) du pied-de-biche. Tout en
laissant l’aiguille plantée dans le tissu, faire pivoter l’ouvrage
et continuez ainsi à coudre.
❈ Toujours utiliser le point droit (position centrale).
❈ Le pied d'application est un accessoire en option.
RS2000-2D_EFNI.book Page 45 Thursday, March 30, 2006 3:31 PM

48
English Français
Nederlands Italiano
ABC
Open Toe Appliqué Foot
Use the Open Toe Appliqué Foot when doing
Appliqué or decorative stitches, to be able to see the
stitching line better, and to allow the foot to feed
smoothly over the build up of the satin stitching.
A. Raise the foot release lever to remove the foot.
B. Place the Open Toe Appliqué Foot on the needle
plate aligning needle holes.
C. Lower the presser foot lever so that the ankle
snaps on the foot.
❈ Open Toe Appliqué Foot is an optional
accessory.
Pied ouvert
Utilisez le pied ouvert lorsque vous devez faire des
appliques ou des points décoratifs. Le pied-de-biche
ouvert vous permettra de mieux voir les lignes de
couture et de passez aisément sur les points
décoratifs.
A. Poussez le levier de changement de pied-de-biche
vers vous et retirez le pied en place.
B. Mettre en place le pied ouvert sur la plaque aiguille
tout en alignant les trous de la plaque et du pied.
C. Abaissez le levier de pied-de-biche de manière à
clipper le pied sur son support.
❈ Le pied ouvert est un accessoire en option.
Open Applicatievoet
Gebruik de open applicatievoet voor applicaties en
decoratieve steken, dit stelt U in staat om de naailijn
beter te volgen en een beter transport te geven over
de dicht op elkaar staande steken.
A. Zet de persvoethendel omhoog om het
standaardvoetje te verwijderen.
B. Plaats de open applicatievoet op de naaldplaat
zodat de naaldopening gelijk valt met die van de
naaldplaat.
C. Zet de persvoethendel naar beneden zodat het
pinnetje in de houder klikt.
❈ Open Applicatievoet is een optioneel
accessoire.
Piedino per applicazioni con punta aperta
Usate il piedino per applicazioni con punta aperta
quando dovete fare applicazioni o punti decorativi; vi
permette di vedere in modo migliore la linea di
cucitura, e permette al piedino di trasportare in modo
scorrevole mentre si fa il punto satin.
A. Alzate la leva alza piedino per togliere il piedino.
B. Mettete il piedino per applicazioni con punta aperta
sulla barra ago allineando i buchi con l’ago.
C. Abbassate la leva del piedino.
❈ Il piedino per applicazioni con punta aperta è un
accessorio opzionale.
RS2000-2D_EFNI.book Page 46 Thursday, March 30, 2006 3:31 PM
Pagina laadt ...

Nederlands Italiano
50
Cucitura di un’asola
1. Assicurarsi che il pulsante di sblocco del volantino
sia nella posizione ( ).
2. Misurate il diametro e lo spessore del bottone
aggiungendo 0,3 cm per i punti di chiusura.
Tracciate la dimensione dell’asola sul tessuto (fig.
A
)
Per materiali elastici, ponete un leggero foglio di
carta in corrispondenza dell’asola
3. Inserite il piedino per asole. Spingete
completamente all’indietro la slitta a del piedino
per asole. Posizionate il tessuto sotto il piedino in
modo che il riferimento dell’asola si trovi al centro
del piedino stesso e la freccia indichi l’inizio
dell’asola (fig. B)
4. FASE 1 (punti di chiusura) (fig.
C
)
Posizionare la manopola selezione punti sul no. 12
Posizionare la manopola lunghezza punto sul tra 0,4 e 1
Abbassare il piedino ed eseguire 5 o 6 punti.
Arrestare la macchina in modo che l’ago si trovi
sulla sinistra dei punti. Portare l’ago in alto
5. FASE 2 (cordoncino di sinistra) (fig. D)
Posizionare la manopola selezione punti sul no. 13
Cucire il cordoncino di sinistra dalla riga d’inizio
fino alla riga finale. Arrestare la macchina in modo
che l’ago si trovi sulla sinistra dei punti. Portare
l’ago in alto.
6. FASE 3 (punto di arresto) (fig. E)
Posizionare la manopola selezione punti sul no. 14
Eseguire 5 o 6 punti. Arrestare la macchina in
modo che l’ago si trovi sulla sinistra dei punti.
Portare l’ago in alto
7. FASE 4 (cordoncino di destra) (fig. F)
Posizionare la manopola selezione punti sul no. 15
Cucite il cordoncino di destra fino al primo punto.
Arrestare la macchina in modo che l’ago si trovi
sulla sinistra dei punti. Portare l’ago in alto ed
alzare il piedino
8. Rimuovere il tessuto dalla macchina e tagliare il
centro dell’asola con il taglia asole in dotazione (fig.
G)
0.4-1
13
0.4-1
15
0.4-1
14
ED
GF
Knoopsgaten maken
1. Overtuig u ervan dat de ontkoppelingsknop in het
handwiel in de ( ) richting staat.
2. Meet de diameter en de dikte van de knoop. Voeg de
dikte en 0.3 cm (voor de trenzen) toe aan de diameter.
Markeer de maat van het knoopsgat op de stof. (fig
A
)
Voor stretch stoffen legt u een stukje papier op de
plaats waar het knoopsgat gemaakt gaat worden.
3. Bevestig de knoopsgatvoet. Duw het schuivende
gedeelte a van de knoopsgatvoet helemaal naar
achteren. De stof onder de voet leggen zodat de
markering van het knoopsgat in het midden van de
voet komt. (fig B)
4. STAP 1 (voorste trens) (fig C)
Stel de steekkeuzeknop op No. 12
Zet de steeklengteknop tussen 0.4-1
Laat de persvoet zakken en naai 5-6 steken. Stop
de machine zo dat de naald aan de linkerkant van
de steken staat. Breng de naald omhoog.
5. STAP 2 (linkerkant) (fig D)
Stel de steekkeuzeknop op No. 13
Naai de linkerkant van voor naar achter tot aan het
einde van de markering. Stop de machine zo dat
de naald aan de linkerkant van de steken staat.
Breng de naald omhoog.
6. STAP 3 (achterste trens) (fig E)
Stel de steekkeuzeknop op No. 14
Naai 5-6 steken. Stop de machine zo dat de naald
aan de rechterkant van de steken staat. Breng de
naald omhoog.
7. STAP 4 (rechterkant) (fig F)
Stel de steekkeuzeknop op No. 15
Naai de rechterkant van achter naar voor tot aan
de voorste trens. Stop de machine zo dat de naald
aan de linkerkant van de steken staat. Breng de
naald en de persvoet omhoog.
8.
Haal het werk van de machine. Duw een speld door
de trens om doorsn
ijden hiervan te voorkomen. Snij in
het midden van het knoopsgat
met een
tornmesje het knoopsgat open. (fig G)
In de accessoireset aanwezig.
M
O
N
Waarschuwing!
Als u de knoopsgaten opensnijdt met het tornmesje, houd
dan de stof niet voor het mesje.
Anders kunt u letsel oplopen aan uw hand.
Attenzione!
Quando si usa il taglia asole, evitare di tenere il tessuto di
fronte allo strumento.
La mancata osservanza della suddetta avvertenza implica il
rischio di lesioni alle mani.

51
English Français
Nederlands Italiano
ABC
Adjusting stitch balance of buttonhole
Occasionally (especially on speciality fabrics) the
stitch length shows differences in forward and reverse
stitches of the buttonhole.
Stitch balance can be equalized by turning the
Buttonhole Stitch Adjuster. (fig A)
1. If the stitches of the right side of the buttonhole
(forward stitches) are too close together, turn the
adjuster clockwise using a screw driver or a coin.
(fig B)
2. If the stitches of the left side of the buttonhole
(reverse stitches) are too close together, turn the
adjuster counterclockwise. (fig C)
Ajuster l’équilibre des points de la boutonnière
Parfois (surtout pour des tissus particuliers) la
longueur de point montre des différences entre les
points crées en marche avant et les points crées en
marche arrière pour réaliser la boutonnière.
L’équilibre des points de boutonnières s’obtient en
tournant le sélecteur de mise au point (fig. A)
1. Si les points du côté droit de la boutonnière (point
en avançant) sont trop rapprochés, tourner le
sélecteur de mise au point dans le sens des
aiguilles d’une montre en utilisant un tournevis ou
une pièce. (fig. B)
2. Si les points du côté gauche de la boutonnière
(points en reculant) sont trop rapprochés, tourner
le sélecteur de mise au point dans le sens contraire
des aiguilles d’une montre. (fig. C)
Instellen van de steekbalans van het knoopsgat
Af en toe (vooral mat speciale stoffen) vertonen de
lengtesteken verschillen in de voorwaartse en
achterwaartse steken van het knoopsgat.
De steekbalans kan gelijk gemaakt worden door aan
de knoopsgat steek instellingsknop te draaien (fig A)
1. Als de steken aan de rechterkant van het
knoopsgat (voorwaartse steken) te dicht op elkaar
zitten, draait u de afstellingsknop rechtsom met
een schroevendraaier of een munt. (fig B)
2. Als de steken aan de linkerkant van het knoopsgat
(achterwaartse steken) te dicht op elkaar zitten,
draait u de afstellingsknop linksom. (fig C)
Bilanciamento dei lati sinistro e destra
dell’asola
Su tessuti diversi, i punti sinistro e destro possono
risultare non bilanciati.
In tal caso regolare il bilanciamento dei punti ruotando
l’apposito controllo (fig. A) posto dietro la macchina
1. Se i punti del lato destro dell’occhiello sono troppo
vicini, ruotare il controllo a sinistra come mostrato
in (fig. B)
2. Se i punti del lato sinistro dell’occhiello sono troppo
vicini, ruotare il controllo a destra come mostrato in
(fig. C)
RS2000-2D_EFNI.book Page 49 Thursday, March 30, 2006 3:31 PM

52
English Français
Nederlands Italiano
➀
AB
MAINTENANCE
Changing light bulb
Caution!
Disconnect power supply before carrying out
maintenance. Make sure bulb is not hot.
1. Unplug the machine.
2. Loosen screw 1, and remove face cover. (fig A)
3. Remove bulb by unscrewing it in an anticlockwise
direction.
4. Install a new bulb by screwing it in clockwise.
(fig B)
5. Replace the face cover, tighten the screw.
MAINTENANCE
Changement d’ampoule
Attention!
Débrancher l’alimentation avant de commencer la
maintenance.
1. Débrancher la machine.
2. Dévisser les vis et ouvrir le couvercle latéral.
(fig. A)
3. Enlever l’ampoule en dévissant dans le sens
inverse des aiguilles d’une montre. (fig. B)
4. Remettez le couvercle en place et serrez la vis.
ONDERHOUD
Verwisselen van het lampje
Waarschuwing!
Haal de stekker uit het stopcontact voordat u met
onderhoud begint.
1. Haal de stekker eruit.
2. Draai schroef 1, los en open de kap. (fig A)
3. Haal het lampje eruit door het linksom los te
draaien.
4. Installeer een nieuw lampje en draai dit rechtsom
vast. (fig B)
5. Sluit de kap en draai de schroef vast.
MANUTENZIONE
Sostituzione della lampadina
Attenzione!
Togliete la spina dalla presa di corrente prima di
qualsiasi operazione di manutenzione
1. Staccate la presa
2. Togliete le viti e aprite il coperchio frontale come
indicato (fig. A)
3. Svitate la lampadina in senso antiorario
4. Installate una lampadina nuova avvitandola in
senso orario (fig. B)
5. Rimettere la copertura e stringere bene la vite.
RS2000-2D_EFNI.book Page 50 Thursday, March 30, 2006 3:31 PM

53
English Français
Nederlands Italiano
➁
➀
ABC
DE
Your machine requires cleaning and oiling for good
sewing performance.
A machine which is used for a few hours a day needs to
be cleaned and oiled once a month.
Caution!
Disconnect power supply before carrying out
maintenance. Needle in the raised position.
Cleaning
1. Remove foot and needle. Remove needle plate with
needle plate screw driver. (fig A) (needle up position)
2. Brush off all dust and lint on feed teeth with a cleaning
brush. (fig B)
3. Open shuttle cover and turn latches of shuttle 1
outwards. (fig C)
4. Remove shuttle hook cover. Remove shuttle hook.
(fig D)
5. Clean shuttle race 2 with a cleaning brush and soft
cloth. (fig E)
6. Replace hook.
7. After maintenance, replace needle plate, needle and
presser foot.
Uw machine moet schoongehouden en geolied worden
om goede prestaties te kunnen bieden.
Een machine die enkele uren per dag wordt gebruikt
moet eens per maand schoongemaakt en geolied
worden.
Waarschuwing!
Haal de stekker uit het stopcontact voordat u met
onderhoud begint. Zet de naald in de hoogste stand.
Schoonmaken
1. Verwijder de voet en de naald. Verwijder de
naaldplaat. (fig A)
(naald omhoog)
2. Borstel alle stof en pluisjes op de transporteur weg
met een schoonmaak borsteltje. (fig B)
3. Open de spoelhuisklep en draai de hendeltjes van het
grijpersysteem 1 naar buiten. (fig C)
4. Verwijder de grijper dekring. Verwijder het spoelhuis.
(fig D)
5. Maak de grijperbaan 2 schoon met een schoonmaak
borsteltje en zachte doek. (fig E)
6. Plaats spoelhuis terug.
7. Na het onderhoud kunt U de naaldplaat, naald en de
persvoet terugplaatsen.
La vostra macchina richiede una manutenzione ed una
lubrificazione regolare per poter funzionare nel migliore
dei modi.
Una macchina che viene utilizzata per alcune ore ogni
giorno deve essere pulita e lubrificata una volta al mese
Attenzione!
Togliete la spina dalla presa di corrente prima di
qualsiasi operazione di manutenzione. Ago in
posizione alta
Pulizia
1. Togliete il piedino, l’ago e la placca ago (fig. A)
(ago in posizione sollevata)
2. Con un apposito pennello togliete tutti i depositi e
pulite il trasportatore (fig. B)
3. Spostate le alette verso l’esterno (fig. C)
4. Togliete l’anello ferma crochet e il crochet (fig. D)
5. Pulitelo con un apposito pennello od un panno
morbido (fig. E)
6. Riposizionare il crochet.
7. Dopo la manutenzione, riposizionare la placca ago,
l’ago e il piedino.
Votre machine nécessite d’être nettoyer et huilée pour
une bonne performance de couture.
Une machine qui est utilisée seulement quelques heures
a besoin d’être nettoyée et huilée une fois par mois.
Attention!
Débrancher la machine avant de commencer la
maintenance. L’aiguille en position haute.
Nettoyage
1. Enlever le pied-de-biche et l’aiguille. Enlever la
plaque-aiguille. (fig. A) (aiguille en position haute)
2. Brosser tous les dépôts et la griffe d’entraînement à
l’aide de la brosse de nettoyage. (fig. B)
3. Enlever le cache-navette et repousser les loquets 1
vers l’extérieur. (fig. C)
4. Enlever l’étrier de la coursière. Enlever le crochet de
la navette. (fig. D)
5. Nettoyer l’étrier avec une brosse de nettoyage et un
chiffon doux. (fig. E)
6. Replacer le crochet.
7. Après intervention, remettre en place la plaque-
aiguille, l’aiguille et le pied presseur.
RS2000-2D_EFNI.book Page 51 Thursday, March 30, 2006 3:31 PM

54
English Français
Nederlands Italiano
F
Caution!
Disconnect power supply before carrying out
maintenance.
Oiling
Use oil manufactured specially for sewing machine
use.
Other oils will eventually cause mechanism to jam.
Apply a drop of oil to part of shuttle where friction
occures. (fig F)
Attention!
Débrancher la machine avant de commencer la
maintenance.
Huilage
N’utiliser que de l’huile spéciale pour machine à
coudre.
D’autres huiles peuvent endommager la machine.
Appliquer une goutte d’huile à la coursière au point de
friction. (fig. F)
Waarschuwing!
Haal de stekker uit het stopcontact voordat u met
onderhoud begint.
Olieën
Gebruik speciale naaimachine olie.
Andere oliesoorten kunnen uiteindelijk storingen in
het mechanisme veroorzaken.
Doe een drupje olie op het deel van de grijperbaan
waar wrijving voorkomt. (fig F)
Attenzione!
Togliete la spina dalla presa di corrente prima di
qualsiasi operazione di manutenzione
Lubrificazione
Utilizzate esclusivamente olio speciale per macchine
per cucire. Altri tipi di olio possono causare danni ai
meccanismi.
Applicate una goccia di olio nel punto di scorrimento
del crochet (fig. F)
RS2000-2D_EFNI.book Page 52 Thursday, March 30, 2006 3:31 PM

55
English Français
Nederlands Italiano
30g
AB
CD
TROUBLE SHOOTING
Lower thread tension adjustment
If your machine skips stitches or loops stitches, it may
require tension adjustment.
To check the lower thread tension, follow these steps.
Checking bobbin case tension
The needle must be in the raised position.
1. Push latches of the shuttle to the outside, as shown in
(fig A).
2. Remove shuttle hook cover as shown in (fig B).
3. Remove shuttle hook. (fig C)
4. Suspend bobbin, bobbin case, and shuttle hook all
together and hold the bobbin thread as illustrated in
(fig D).
When the bobbin case tension is correct,
the thread
should slide down with light resistance.
When the bobbin case tension is too tight,
the thread
does not slide down, or the thread jerks.
When the bobbin case tension is too loose,
the thread
easily slides down with no resistance.
STORINGEN VERHELPEN
Onderdraad spannings afstelling
Als uw machine steken overslaat of lust, is het mogelijk
dat de spanning afgesteld moet worden.
Om de onderdraad te controleren, volg de volgende stappen.
De naald moet in de hoogste stand staan.
1. Duw de hendeltjes van het grijpersysteem naar buiten
zoals afgebeeld in (fig A).
2. Verwijder de grijper dekring zoals afgebeeld in (fig B).
3. Verwijder de grijper. (fig C)
4. Laat de grijper en spoelhuis spoeltje samen zweven
door deze samen vast te houden aan de draad zoals
afgebeeld in (fig D).
Als de spoelhuis spanning goed is
, zal de draad met
lichte weerstand afrollen.
Als de spoelhuis spanning te strak is, r
olt de draad
niet af, of stootsgewijs.
Als de spoelhuis spanning te los is, rolt de draad
gemakkelijk af zonder enige weerstand.
PICCOLI INCONVENIENTI
Regolazione della tensione inferiore
Quando la macchina salta un punto o un punto si arriccia,
la tensione non è ben regolata. Per controllare la
tensione, seguite i passi successivi:
Verifica della tensione della capsula
L’ago deve essere in posizione alta
1. Spingere le alette verso l’esterno come indicato in (fig.
A
)
2. Togliere l’anello ferma crochet mostrato in (fig. B)
3. Togliere il crochet (fig. C)
4. Trattenete il filo e tenete sospeso il gruppo spolina /
capsula / crochet come illustrato in (fig. D).
Fate un movimento in su e giù verticale (tipo yo-yo)
Quando la tensione della capsula è corretta
, il filo
scivola in basso con una leggera resistenza.
Quando la tensione della capsula è troppo forte, il filo
non scivola in basso.
Quando la tensione della capsula è troppo lenta
, il filo
scivola in basso senza resistenza.
SOLUTIONS DE DEPANNAGE
Réglage de la tension du fil inférieur
Si le point saute ou boucle, votre machine n’est pas en
panne.
Pour vérifier la tension de la canette, suivre les étapes
suivantes.
Vérification de la tension de la canette
L’aiguille doit être en position haute
1. Repousser les loquets de la navette vers l’extérieur,
comme indiqué (fig. A).
2. Enlever le couvercle de l’étrier du crochet comme
indiqué (fig. B).
3. Enlever l’étrier. (fig. C)
4. Suspendre l’ensemble canette / navette / crochet et
tenir le fil de la canette comme indiqué (fig. D).
Si la tension de la canette est correcte
, le fil devrait se
dérouler avec une petite résistance.
Si la tension de la canette est trop serrée
, le fil ne se
déroule pas, ou le fil se déroule avec saccades.
Si la tension de la canette est trop faible
, le fil se
déroule très facilement sans résistance.
RS2000-2D_EFNI.book Page 53 Thursday, March 30, 2006 3:31 PM

56
English Français
Nederlands Italiano
Réglage de la tension du fil inférieur
Lorsque la tension de la canette est correctement
réglée, il est facile d’équilibrer la tension du fil
supérieur.
Réglage de la tension de la canette.
L’aiguille en position haute.
1. Tourner la vis a (sur la canette) pour régler la
tension (fig. E)
Tourner la vis vers la gauche pour desserrer la
tension
Tourner la vis vers la droite pour augmenter la
tension
2. Replacement de l’étrier.
Mettre la machine sur le dos pour effectuer plus
facilement cette opération. (fig. F)
3. Replacement du couvercle de l’étrier. (fig. G)
4. Pousser les loquets vers l’intérieur.
5. Fermer le cache-navette.
Onderdraad spannings afstelling
Als de spoelhuis spanning goed is afgesteld, is het
makkelijk om de bovenspanning in de juiste balans te
brengen.
Afstelling van de spoelhuis spanning.
Zet de naald in de hoogste stand.
1. Draai aan schroef a (op de grijper) voor de
afstelling van de spanning. (fig E)
Draai de schroef naar links om de spanning te
verlagen.
Draai de schroef naar rechts om de spanning te
verhogen.
2. Plaats het grijper terug.
Leg de machine op de achterkant om dit te
vergemakkelijken. (fig F)
3. Plaats de spoelhuis dekring terug. (fig G)
4. Duw de hendeltjes naar de binnenkant en plaats
het spoelhuis terug.
5. Sluit de spoelhuisklep.
a
EFG
Lower thread tension adjustment
When the bobbin case tension is correctly adjusted, it
is easy to balance the upper thread tension.
Adjusting bobbin case tension.
Needle in the raised position.
1. Turn screw a (on the bobbin case) for tension
adjustment. (fig E)
Turn the screw to the left to loosen tension.
Turn the screw to the right to tighten tension.
2. Replace the shuttle hook.
Lay the machine on its back to make it easier.
(fig F)
3. Replace shuttle hook cover. (fig G)
4. Push latches towards inside.
5. Close shuttle cover.
Regolazione della tensione inferiore
Quando la tensione della capsula è corretta, è più
facile regolare la tensione del filo
Regolazione della tensione della capsula
Ago in posizione alta
1. Girate la vite a sulla capsula servendovi di un
piccolo cacciavite (fig. E)
A sinistra per allentare la tensione
A destra per stringere la tensione
2. Riposizionate il crochet
Appoggiare la macchina sul dorso per facilitare
l’operazione (fig. F)
3. Reinserite l’anello portacrochet (fig. G)
4. Chiudete le alette verso l’interno
5. Chiudete lo sportellino
RS2000-2D_EFNI.book Page 54 Thursday, March 30, 2006 3:31 PM

57
English Français
Nederlands Italiano
A
A-1 A-2
Changing needle (fig A)
1. Set the needle in the highest position by turning the
handwheel toward you.
Loosen needle clamp screw by using the needle
plate screw driver.
Take out the needle. (fig A-1)
2. Insert a new needle with the flat side away from
you.
Push the needle into the clamp until it stops.
Firmly tighten needle clamp screw with screw
driver. (fig A-2)
Remplacement d’aiguille (fig. A)
1. Placer l’aiguille en position la plus haute en
tournant le volant vers vous.
Desserrer la vis de serrage de l’aiguille en utilisant
le tournevis.
Enlever l’aiguille (fig. A-1)
2. Insérer la nouvelle aiguille avec le côté plat vers
l’arrière.
Pousser l’aiguille dans son logement jusqu’à arrêt.
Serrer la vis fermement. (fig. A-2)
Naald verwisselen (fig A)
1. Breng de naald in de hoogste stand door het
handwiel naar u toe te draaien.
Draai de naaldklem schroef los met de
schroevendraaier.
Neem de naald eruit. (fig A-1)
2. Zet de nieuwe naald erin met de platte kant naar
achteren.
Duw de naald omhoog in de naaldklem totdat deze
niet verder kan.
Draai nu de naaldklem schroef goed vast. (fig A-2)
Sostituzione dell’ago (fig. A)
1. Portate l’ago nella posizione più alta girando il
volantino verso di voi.
Allentate la vite del morsetto dell’ago.
Togliete l’ago (fig. A-1)
2. Inserite un nuovo ago nel morsetto in modo che la
superficie piatta sia rivolta opposta a voi.
Spingete l’ago verso l’alto fino a fine corsa.
Serrate a fondo la vite fermago. (fig. A-2)
RS2000-2D_EFNI.book Page 55 Thursday, March 30, 2006 3:31 PM

58
English Français
Nederlands Italiano
B B-1 B-2
Checking needle (fig B)
Using defective or worn needles not only causes stitch
skipping, breakage of needles or snapping of thread.
It can also damage shuttle and needle plate.
1. Always use a straight and sharp needle. (fig B)
B-1 Straight shaft
B-2 Sharp point
Vérification de l’aiguille (fig. B)
En utilisant des aiguilles défectueuses ou usées vous
risquez non seulement de casser la pointe des
aiguilles mais également de casser le fil. Cela peut
aussi endommager la navette et la plaque-aiguille.
1. Utiliser systématiquement une aiguille droite et
pointue. (fig. B)
B-1 Une aiguille droite
B-2 Une pointe aiguisée
Naald controleren (fig B)
Het gebruik van slechte of versleten naalden
veroorzaakt niet alleen het overslaan van steken,
naaldbreuk of draadbreuk. Het kan ook de grijper en
de naaldplaat beschadigen.
1. Gebruik altijd een rechte en scherpe naald. (fig B)
B-1 Rechte schacht
B-2 Scherpe punt
Controllo dell’ago (fig. B)
L’uso di un ago non appropriato o spuntato può
portare non soltanto a salti di punto, rottura dell’ago od
attorcigliamento dei fili, ma può anche danneggiare la
navetta e la placca ago.
1. Utilizzate sempre un ago perfettamente dritto e con
la punta ben affilata. (fig. B)
B-1 ago dritto
B-2 ago affilato
RS2000-2D_EFNI.book Page 56 Thursday, March 30, 2006 3:31 PM

59
English Français
Nederlands Italiano
➀
➀
➁
AB
Cleaning the shuttle race
Thread stuck between shuttle hook and shuttle race
causes sudden rapid running or sudden stopping of
the machine. In this case you should proceed as
follows:
1. Lift presser foot and remove bobbin case.
2. Push latches 1 towards outside and remove
shuttle hook cover and shuttle hook with fingers.
(fig A)
3. Clean the shuttle race 2 and shuttle hook, and re-
assemble them. (fig B)
Nettoyage du logement de la coursière
Du fil coincé entre la navette et le logement pourrait
être à l’origine d’accélérations soudaines ou d’arrêts
inopinés, dans ce cas:
1. Soulever le pied-de-biche et enlever la boîte à
canette.
2. Pousser les loquets 1 vers l’extérieur et enlever le
couvercle de la navette avec vos doigts. (fig. A)
3. Nettoyer la navette et repositionner l’ensemble.
(fig. B)
Schoonmaken van de spoelbaan
Draad geklemd tussen de grijper en de grijperbaan
veroorzaakt het plotseling snel lopen of het plotseling
stoppen van de machine. In dit geval moet u als volgt
handelen:
1. Zet de persvoet omhoog en verwijder het grijper.
2. Duw de hendeltjes 1 naar buiten en verwijder de
grijper dekring en de grijper met uw vingers.
(fig A)
3. Maak de grijperbaan 2 en de grijper schoon en
plaats deze weer terug. (fig B)
Pulizia del supporto del crochet
Quando il filo o frammenti di filo rimangono incastrati
tra il crochet e la sua sede di scorrimento, la macchina
tenderà a bloccarsi. In questo caso procedete come
segue:
1. Sollevate il piedino premistoffa e togliete la
capsula.
2. Aprite le alette 1 che si trovano sui due lati del
supporto del crochet, togliete l’anello esterno del
crochet ed il crochet stesso (fig. A)
3. Pulite il crochet e la sede di scorrimento. Finito il
lavoro, mettete di nuovo tutto in posizione. (fig. B)
RS2000-2D_EFNI.book Page 57 Thursday, March 30, 2006 3:31 PM
Pagina laadt ...
Pagina laadt ...

62
Nederlands
Storings tabel
❈ Als de problemen zich voor blijven doen in de machine, neem dan contact op met het verkooppunt of
raadpleeg onze website. (alleen voor Europa).
Probeer niet zelf de storing te verhelpen.
STORING MOGELIJKE OORZAAK OPLOSSING
Breken onderdraad Draad niet goed opgespoeld of niet goed opgehaald
Onderdraad spanning is te strak
Stof en pluisjes tussen het spoelhuis en het spanningsveertje
P. 12, P. 16
P. 55 - 56
Verwijder stof en
pluisjes met een
borsteltje
Steken overslaan Naald niet hoog genoeg
Naald krom of bot
Dikte en type naald niet geschikt voor de stof
Bovendraad niet goed Ingeregen
Te veel olie in de machine
P. 57
P. 58
P. 65
P. 16
P. 54
Onregelmatige
steken
Verkeerde naalddikte voor de stof
Bovendraad spanning te los
Onderdraad spanning niet goed
P. 65
P. 23
P. 55 - 56
De stof wordt niet
goed
getransporteerd
Steekkeuzeknop niet in de juiste stand
Transporteur verzonken
Pluisjes op de transporteur
P. 67
P. 26
P. 59
Luidruchtige
machine
Controleer of er geen stof in het spoelhuis of in de
grijpersysteem zit
Het kleinstje deeltje kan reeds lawaai veroorzaken
Gebruik een tandenstoker of stofborsteltje
P. 59
De stof trekt samen Bovendraad of onderdraad spanning is te strak
Steeklengte te lang voor de stof
Garen te dik
Boven- of onderdraad niet goed ingeregen
P. 23, P. 55 - 56
P. 67
P. 65
P. 16, P. 14
Naald breekt Naald niet goed geplaatst
Naald krom
Naaldklem schroef te los
Bovendraad spanning te strak
Naald te dun voor de stof
Er is aan knop(pen) gedraaid terwijl de naald in de stof stond
P. 57
P. 58
P. 57
P. 23
P. 65
P. 67
RS2000-2D_EFNI.book Page 60 Thursday, March 30, 2006 3:31 PM
Pagina laadt ...
Pagina laadt ...
Pagina laadt ...
Pagina laadt ...

67
English Français
Nederlands Italiano
123456789101112
13 14 15 16 17 18 19 20 21 22 23 24
NAME OF STITCH PATTERNS
A1. Scallop
B2. Domino stitch
C3. Straight stitch
(left position)
D4. Straight stitch
(center position)
E5. Zigzag 2.2 mm
F6. Zigzag 3.5 mm
G7. Zigzag 5.0 mm
H8. Blind stitch
I9. Stretch blind hem
J10. Serpentine stitch
K11. Mending stitch
L12. Buttonhole
M13. Buttonhole
N14. Buttonhole
O15. Buttonhole
P16. Straitht stretch
Q17. Zigzag stretch
R18. Overlock
S19. Overlock stitch
T20. Honeycomb
U21. Decorative stitch
V22. Applique stitch
W23. Applique stitch
X24. Fagoting stitch
NOM DES POINTS MOTIFS
A1. Point de feston
B2. Point domino
C3. Point droit
(position à gauche)
D4. Point droit
(position centrale)
E5. Zigzag 2,2 mm
F6. Zigzag 3,5 mm
G7. Zigzag 5,0 mm
H8. Couture invisible
I9. Couture invisible
stretch
J10. Point serpentin
K11. Racommodage
L12. Boutonnière
M13. Boutonnière
N14. Boutonnière
O15. Boutonnière
P16. Triple zigzag
Q17. Zigzag stretch
R18. Point surjet
S19. Point surjet
T20. Point tricot double
U21. Point decoratif
V22. Point s’applique
W23. Point s’applique
X24. Point fagot
NAAM VAN DE STEEKSOORTEN
A1. Schulpsteek
B2. Domino steek
C3. Rechte steek
(linker positie)
D4. Rechte steek
(midden positie)
E5. Zigzagsteek 2.2 mm
F6. Zigzagsteek 3.5 mm
G7. Zigzagsteek 5.0 mm
H8. Blindzoomsteek
I9. Stretch
blindzoomsteek
J10. Serpentine steek
K11. Stikkende
zigzagsteek
L12. Knoopsgat
M13. Knoopsgat
N14. Knoopsgat
O15. Knoopsgat
P16. Rekbare rechte
steek
Q17. 3 voudige
zigzagsteek
R18. Overlocksteek
S19. Overlocksteek
T20. Honingraatsteek
U21. Elastische
afwerksteek
V22. Applicatiesteek
rechts
W23. Applicatiesteek
X24. Fagot steek
NOME DEI PUNTI ESEGUIBILI
A1. Punto a smerlo
B2. Punto greco
C3. Punto dritto
(posizione sinistra)
D4. Punto dritto
(posizione centrale)
E5. Zigzag 2.2 mm
F6. Zigzag 3.5 mm
G7. Zigzag 5.0 mm
H8. Punto invisible
I9. Punto elastico
J10. Punto onda
K11. Punto da
L12. Esecuzione asola
M13. Esecuzione asola
N14. Esecuzione asola
O15. Esecuzione asola
P16. Punto dritto elastico
triplo
Q17. Punto zigzag
elastico triplo
R18. Punto sopraggitto
S19. Punto sopraggitto
T20. Punto a nido d’ape
U21. Punto sopraggitto
V22. Punto piuma destro
W23. Punto piuma
X24. Punto elastico
ABC DE FGH I
MNO PQR ST U
J
V
KL
WX
links
rammendo
sinistro
Pagina laadt ...

Nederlands Italiano
69
ޓ
GOOI DIT NIET WEG!
NON SPRECHIAMO NULLA!
HERGEBRUIK
Wij hebben de verplichting om het milieu
te beschermen. Wij moeten streven naar
een minimale milieubelasting door onze
producten constant te verbeteren voor
wat betreft het productontwerp en
fabricage methode.
Het zich ontdoen van dit product op een milieu
verantwoordelijke manier.
Het kenmerkende “Door gekruiste afvalbak” logo
hierboven en het product informatie plaatje geven aan
dat dit product valt onder de richtlijnen van de E.U.
“Afgedankte Elektrische en Elektronische Apparatuur”
(AEEA, WEEE) en de zogenaamde RoHS richtlijn die
verbiedt het gebruik van bepaalde stoffen in
elektrische en elektronische apparatuur (Restriction of
use of certain Hazardous Substances) en mag niet
weggegooid worden met het huishoudelijk afval. Bij
het ontdoen van dit product moet U zich ervan
verzekeren dat dit gebeurd in overeenstemming met
de nationale en locale wetgeving en dat het is
ingedeeld onder Categorie 2 “Klein Huishoudelijk
Afval” (AEEA, WEEE). U kunt aansprakelijk gesteld
worden onder de lokale en nationale wetgeving
wanneer U zich op een onfatsoenlijke manier van dit
product ontdoet. Raadpleeg voor verdere informatie
het web, of een bevoegde nationale of locale instantie
voor het inleveren en inname bij het dichtstbijzijnde
verzamelpunt. Als U direct bij ons een nieuw product
koopt willen wij Uw oude product innemen ongeacht
het merk.
Als persoon kan U een positieve invloed uitoefenen op
hergebruik en andere vormen van herwinnen van
AEEA, WEEE. Dit kan de vervuiling terugdringen en
zal de belasting op het milieu minimaliseren door de
producten die U gebruikt.
Bepaalde stoffen in elektronische en elektrische
apparatuur kunnen een gevaarlijke invloed hebben op
Uw gezondheid en het milieu.
EU ONLY
RICICLAGGIO
Lavoriamo per la protezione
dell’ambiente. Cerchiamo di
minimizzare l’impatto ambientale dei
nostri prodotti, migliorando
continuamente la loro concezione e i
metodi di produzione.
Al termine della durata, smaltire il presente prodotto in
modo ecologico.
Il simbolo del bidone della spazzatura barrato
riprodotto all’inizio e sulla targhetta informativa del
prodotto indica che il presente prodotto rientra
nell’ambito della Direttiva UE “Rifiuti di
apparecchiature elettriche ed elettroniche” (RAEE) e
della Direttiva UE “Restrizione dell’uso di determinate
sostanze pericolose nelle apparecchiature elettriche
ed elettroniche” (ROHS): non ne è quindi consentito lo
smaltimento insieme ai rifiuti domestici. Al termine
della durata, il presente prodotto deve essere smaltito
in conformità alla legislazione locale e nazionale,
nonché essere classificato come rientrante nella
Categoria 2 “Piccoli elettrodomestici” della Direttiva
RAEE. Lo smaltimento improprio del presente
prodotto genera responsabilità ai sensi delle leggi
locali e nazionali. Per informazioni sui sistemi di
restituzione e di raccolta a disposizione degli utenti,
nonché sulle ubicazioni dei contenitori di riciclaggio
più vicini, visitare il Web oppure rivolgersi a un ente
locale o nazionale competente. Se un nuovo prodotto
viene acquistato direttamente dall’Azienda,
quest’ultima ritirerà il vecchio prodotto
(indipendentemente dal marchio) se la vendita
riguarda un prodotto analogo.
Ogni singola persona può influire positivamente sul
riutilizzo, sul riciclaggio e su altre forme di recupero
delle apparecchiature elettriche ed elettroniche. In tal
modo è possibile ridurre l’utilizzo delle discariche e
minimizzare l’impatto ambientale dei prodotti utilizzati.
Le sostanze pericolose contenute nelle
apparecchiature elettriche ed elettroniche possono
danneggiare sia la salute dell’uomo che l’ambiente.
RS2000-2D_EFNI.book Page 67 Thursday, March 30, 2006 3:31 PM

Notice
The incandescent lamp fitted to our product is not suitable for household lighting
and is specifically designed for lighting for your sewing area.
Important
L ampoule à incandescence insérée dans notre produit, n’est pas appropriée
pour une autre utilisation. Elle est à ce propos spécialement conçue pour
éclairer la zone de couture.
Zur besonderen Beachtung
Die Gluhbirne, die in unserem Gerat verwendet wird, ist nicht passend fur
andere Haushaltsgerate und ist nur speziell fur die Beleuchtung des
Nahbereichs produziert worden.
Waarschuwing
De gloeilamp in ons product is niet geschikt voor huishoudelijk gebruik en is
speciaal ontworpen voor de verlichting van de vrije arm.
Avviso importante
La lampada a incandescenza montata sul nostro prodotto, non adatta per l'uso
domestico e di illuminazione, e stata specificatamente progettata per
l'illuminazione della zona di cucitura.
Aviso
La lampara fluorescente que viene aclopada a nuestro producto no puede
utilizarse para iluminar habitaciones u otros menesteres , es exclusivamente util
para esta maquina , y esta disenada especificamente para la iluminacion de la
area de cosido.
Pagina laadt ...
Pagina laadt ...
Pagina laadt ...
Documenttranscriptie
RS2000-2D_EFNI.book Page 1 Thursday, March 30, 2006 3:31 PM Series RS2000 RS2000-2D Read the instruction manual. Lisez le guide de l’utilisateur. Lees de gebruiksaanwijzing. Leggere il manuale istruzioni. RS2000-2D_EFNI.book Page 2 Thursday, March 30, 2006 3:31 PM Type designation RS2000 series have several types. The types are shown in the nameplate as follow. MODEL / MODELE (MODEL NAME) SERIES / SERIE • RS2000 SERIES • RS2000 LCD SERIES • RS2000 EL SERIES Type désignation Les séries RS2000 comprennent plusieurs types de produits. Les différents types de produits sont différentiables par la plaque identification comme suit: MODELE / MODELE (NOM DU MODELE) SERIE • SERIE RS2000 • SERIE RS2000 LCD • SERIE RS2000 EL Type Aanduiding RS2000 serie bestaat uit diverse modellen. De types zijn in het typeplaatje als volgt aangeduid. MODEL / MODELE (MODEL NAAM) SERIES / SERIE • RS2000 SERIE • RS2000 LCD SERIE • RS2000 EL SERIE Identificazione modello La serie RS2000 ha diversi modelli. I modelli sono indicati come di seguito. MODELLO (NOME MODELLO) SERIE • SERIE RS2000 • SERIE RS2000 LCD • SERIE RS2000 EL Nameplate When calling for service, please note the MODEL NAME and SERIES that is inscribed on the back of your sewing machine. Plaque d’identification Lorsque vous appelez notre service après-vente, merci d'indiquer le MODELE et la SERIE de votre produit inscrits au dos de votre machine à coudre. Naamplaat Indien u opbelt voor service, noteer dan het MODEL en de SERIE die op de achterkant van uw machine staat vermeld. Targhetta Quando chiamate per il servizio assistenza prendete nota del MODELLO e delle SERIE stampigliati sulla parte posteriore della vostra macchina per cucire. MODEL NAME NOM DU MODELE MODEL NAAM NOME DEL MODELLO MODEL / MODELE RS2000 SERIES / SERIE Manufacturer/: ZHEJIANG AISIN ELITE Fabricant MACHINERY & ELECTRIC CO., LTD.P.R.C. 230-240V 70W 50Hz Importer/ : Importateur max 15W MADE IN P. R. C. / FABRIQUE EN R.P.C. EUROPE S. A. RS2000-2D_EFNI.book Page 6 Thursday, March 30, 2006 3:31 PM Nederlands “BELANGRIJKE VEILIGHEIDSINSTRUCTIES” Wanneer u de naaimachine gebruikt , dient u altijd een aantal belangrijke veiligheidsmaatregelen in acht te nemen, waaronder de volgende. Lees alle instructies voor gebruik. GEVAAR - - Om het risico van electrische schokken te voorkomen. 1. De naaimachine mag nooit onbeheerd worden achtergelaten als deze in het stopcontact aangesloten staat. Haal altijd direct de stekker uit het stopcontact na gebruik en voor het schoonmaken. 2. Haal altijd de stekker uit het stopcontact voordat u het lampje vervangt. Vervang het lampje met hetzelfde type van 15 watt. 3. Grijp nooit naar een naaimachine die in het water is gevallen. Haal onmiddellijk de stekker uit het stopcontact. 4. Zet of berg de machine nooit op een plaats waar deze in een badkuip of in een gootsteen kan vallen of ingetrokken kan worden. WAARSCHUWING - - Om het risico van brandwonden, brand, electrische schokken of andere verwondingen aan personen te verminderen. 1. Sta niet toe de naaimachine als speelgoed te gebruiken. Zeer strikte aandacht is noodzakelijk als de naaimachine door of dichtbij kinderen wordt gebruikt. 2. Gebruik de naaimachine alleen voor het bedoelde gebruik zoals beschreven in deze handleiding. Gebruik alleen hulpstukken aanbevolen door de fabrikant en zoals aangegeven in deze handleiding. 3. Gebruik de naaimachine nooit als er een beschadigd snoer of stekker aan zit, als deze niet naar behoren functioneert, als deze gevallen of beschadigd is of als deze in het water is gevallen. Breng de naaimachine naar de dichtstbijzijnde dealer of service centrum voor onderzoek, reparatie, electrische of mechanische afstellingen. 4. Gebruik de naaimachine nooit als er luchtopeningen afgesloten zijn. Houd de ventilatie openingen van de naaimachine en voetpedaal vrij van opeenhoping van pluizen, stof en losse stukken weefsel. 5. Gooi of stop nooit enig voorwerp in enige opening. 6. Gebruik de machine niet buiten. 7. Gebruik de machine niet op een plaats waar aerosolprodukten (spuitbussen) worden gebruikt of waar met zuurstof wordt gewerkt. 8. Om de machine uit te schakelen, draai alle bedieningsknoppen naar de uit (“0”) positie, haal dan de stekker uit het stopcontact. 9. Trek de stekker er niet aan het snoer uit. Om af te koppelen pakt u de stekker zelf vast en niet het snoer. 10. Houd uw vingers weg bij alle bewegende delen. Speciale aandacht is vereist in de buurt van de naald. 11. Gebruik altijd de juiste naaldplaat. Een verkeerde naaldplaat kan de naald doen breken. 12. Gebruik geen kromme naalden. 13. Duw of trek niet aan de stof tijdens het naaien.Daardoor kan de naald buigen en zodoende breken. 14. Schakel de machine uit (“0”) als er afstellingen in de buurt van de naald plaatsvinden, zoals de draad in de naald rijgen, de naald verwisselen, het spoeltje inrijgen of het verwisselen van het voetje, enz. 15. Haal altijd de stekker uit het stopcontact als er afdekkappen verwijderd worden, als er geolied of als er andere onderhouds afstellingen moeten worden gedaan zoals in deze handleiding vermeld. 16. Gebruik de machine nooit op een zachte ondergrond zoals een bed of een bank waardoor de luchtopeningen afgesloten kunnen worden. BEWAAR DEZE VOORSCHRIFTEN Nederlands INHOUD NAAM VAN DE DELEN Type met knop aan de zijkant............... 1 Type met knop aan de voorkant ...........3 ACCESSOIRES ........................................ 5 AANSLUITEN Aansluiten van voetpedaal en lichtnetsnoer ......................................... 8 Aan / Uit schakelaar ............................. 8 Voetpedaal ........................................... 8 Aanschuiftafel ....................................... 8 VERSCHILLENDE BEDIENINGSELEMENTEN Steekkeuzeknop ................................. 10 Steeklengteknop................................. 10 Persvoethendel................................... 10 HET INRIJGEN VAN DE MACHINE Spoeltje opwinden .............................. 12 Spoeltje inrijgen .................................. 14 Bovendraad inrijgen............................ 16 Het gebruik van de draadinrijger ........ 18 Het ophalen van de onderdraad ......... 19 BASIS NAAIBEGRIPPEN Recht naaien ...................................... 20 Afstelling van de draadspanning ........ 24 Voetjes verwisselen............................ 24 Ontkoppelknop ................................... 26 Achteruit naaiknop.............................. 26 Transporteur verzinkknop................... 26 Persvoetdruk regelknop...................... 27 Dikke stof naaien ................................ 27 Zigzag naaien ..................................... 28 Stretchstof naaien............................... 28 GEBRUIK VAN DE INGEBOUWDE STEKEN Blindzoomsteek .................................. 30 Overhands naaien .............................. 30 Overlocken ......................................... 32 Rimpelen ............................................ 33 Herstelwerk......................................... 34 Appliqueren ........................................ 35 Biesversiering / Ritssluitingvoet.......... 37 Rits inzetten........................................ 38 Borduren............................................. 40 Tweelingnaald inrijgen........................ 42 Plooien innaaien met tweelingnaald ... 43 Loopvoet............................................. 44 Maasvoet ............................................ 46 Verstelvoet.......................................... 47 Open Applicatievoet ........................... 48 KNOOPSGAT Knoopsgaten maken........................... 50 Instellen van de steekbalans van het knoopsgat ........................................... 51 ONDERHOUD Verwisselen van het lampje................ 52 Schoonmaken..................................... 53 Olieën ................................................. 54 STORINGEN VERHELPEN Onderdraad spannings afstelling........ 55 Naald verwisselen .............................. 57 Naald controleren ............................... 58 Schoonmaken van de spoelbaan ....... 59 Storings tabel...................................... 62 STOF, GAREN-EN NAALDTABEL ........ 65 NAAM VAN DE STEEKSOORTEN ........ 67 HERGEBRUIK ...................................... 69 3 RS2000-2D_EFNI.book Page 2 Thursday, March 30, 2006 3:31 PM English NAMES OF PARTS Side dial type 1. Pre-tension 2. Upper thread tension dial 3. Spool pin (Removable) 4. Bobbin winder shaft 5. Stitch length dial 6. Presser foot pressure adjustment knob 7. Take up lever 8. Upper tension plate 9. Face cover 10.Thread cutter 11.Extension table 12.Pattern selection dial 13.Reverse sewing lever 14.Needle threader lever Français NOMS DES PIECES 15.Foot release lever 16.Needle clamp screw 17.Needle guide for upper thread 18.Presser foot 19.Feed dogs 20.Needle plate 21.Free arm 22.Drop feed lever 23.Shuttle cover 24.Handle 25.Buttonhole stitch adjuster 26.Handwheel 27.Declutch knob 28.Power / Light Switch 29.Plug socket 30.Presser foot lever Nederlands Type de machine avec cadran sélecteur le coté 1. Pré-tension 15. Levier de relache du 2. Bouton de tension du pied-de-biche fil supérieur 16. Tournevis de serrage 3. Porte-bobine de l’aiguille (escamotable) 17. Guide-aiguille pour fil 4. Axe de bobinage de la supérieur canette 18. Pied-de-biche 5. Cadran de réglage de 19. Griffe d’entraînement la longueur de point 20. Plaque-aiguille 6. Bonton de réglage de 21. Bras libre la pression du pied22. Levier de griffe de-biche d’entraînement 7. Tendeur de fil 23. Cache-navette 8. Couvercle de la 24. Poignée tension supérieur 25. Equilibrage de la 9. Couvercle latéral boutonnière 10. Coupe-fil 26. Vollant 27. Bouton de débrayage 11. Boîte d’accessoires 28. Interrupteur (tension / 12. Cadran de sélection lumière) du point 29. Prise de courant 13. Levier de marche 30. Releveur de pied-dearrière biche 14. Levier d’enfile-aiguille Italiano NAAM VAN DE DELEN ELENCO DEI COMPONENTI Type met knop aan de zijkant Modelli con selettore laterale dei punti 1. Pre-Tensione 15.Leva sgancio piedino 2. Manopola tensione 16.Morsetto ago del filo superiore 17.Guida filo superiore 3. Portarocchetto dell’ago (amovibile) 18.Piedino premistoffa 4. Asta avvolgi bobina 19.Griffa di trasporto 5. Manopola 20.Placca ago regolazione 21.Braccio libero lunghezza punto 22.Leva per il rientro 6. Bottone di della griffa di regolazione della trasporto pressione del piedino 23.Coperchio navetta 7. Tendifilo 24.Maniglia 8. Disco tensione 25.Regolazione superiore asolatore 9. Coperchio frontale 26.Volantino 10.Tagliafilo 27.Bottone di disinnesto 11.Prolunga 28.Interruttore corrente / 12.Manopola di luce selezione dei punti 29.Presa corrente 13.Leva retromarcia 30.Leva alzapiedino 14.Infila-ago 1. Voorspanning 2. Bovendraad spanningsknop 3. Garenpen (afneembaar) 4. Spoel opwindas 5. Steeklengte knop 6. Persvoetdruk regelknop 7. Draad hefboom 8. Bovendraad spanningsplaatjes 9. Lampkap 10.Draadafsnijder 11.Aanschuiftafel 12.Steekkeuzeknop 13.Achteruit naaihendel 14.Naaldinrijg hendel 15.Voet ontkoppel hendeltje 16.Naaldklem schroef 17.Bovendraad geleider 18.Persvoet 19.Transporteur 20.Naaldplaat 21.Vrije arm 22.Transporteur verzinkknop 23.Spoelhuis klep 24.Handgreep 25.Knoopsgat afstelling 26.Handwiel 27.Ontkoppelknop 28.Aan / uit schakelaar 29.Stekker ingang 30.Persvoet hendel 2 English Français NAMES OF PARTS NOMS DES PIECES Front dial type Type de machine avec cadran selecteur de face 1. Pre-tension 2. Upper thread tension dial 3. Spool pin (Removable) 4. Bobbin winder shaft 5. Stitch length dial (only 2 dial, 3 dial model) 6. Presser foot pressure adjustment knob 7. Take up lever 8. Upper tension plate 9. Face cover 10. Thread cutter 11. Extension table 12. Pattern selection dial 13. Reverse sewing lever 14. Needle threader lever 15. Foot release lever 16. Needle clamp screw 17. Needle guide for upper thread 18. Presser foot 19. Feed dogs 20. Needle plate 21. Free arm 22. Drop feed lever 23. Shuttle cover 24. Handle 25-1. Buttonhole stitch adjuster 25-2. Buttonhole stitch adjuster (only 2 dial, 3 dial model) 26. Handwheel 27. Declutch knob 28. Power / Light Switch 29. Plug socket 30. Presser foot lever Equipped on specified models Nederlands 1. Pre-tension 2. Bouton de tension du fil supérieur 3. Porte-bobine (escamotable) 4. Axe de bobinage de la canette 5. Cadran de réglage de la longueur de point (uniquement sur les modèles 2D et 3D) 6. Bonton de réglage de la pression du piedde-biche 7. Tendeur de fil 8. Couvercle de la tension supérieur 9. Couvercle latéral 10. Coupe-fil 11. Table d’extension 12. Cadran de sélection du point 13. Levier de marche arrière 14. Levier d’enfile-aiguille 15. Levier de relache du pied-de-biche 16. Tournevis de serrage de l’aiguille 17. Guide-aiguille pour fil supérieur 18. Pied-de-biche 19. Griffe d’entraînement 20. Plaque-aiguille 21. Bras libre 22. Levier de griffe d’entraînement 23. Cache-navette 24. Poignée 25-1. Equilibrage de la boutonnière 25-2. Equilibrage de la boutonnière (uniquement sur les modèles 2D et 3D) 26. Vollant 27. Bouton de débrayage 28. Interrupteur (tension / lumière) 29. Prise de courant 30. Releveur de pied-debiche Equipé sur les modèles spécifiques Italiano NAAM VAN DE DELEN ELENCO DEI COMPONENTI Type met knop aan de voorkant Modelli con selettore frontale dei punti 1. Voorspanning 2. Bovendraad spanningsknop 3. Garenpen (afneembaar) 4. Spoel opwindas 5. Steeklengte knop (alleen 2 knops en 3 knops model) 6. Persvoetdruk regelknop 7. Draad hefboom 8. Bovendraad spanningsplaatjes 9. Frontkap 10. Draadafsnijder 11. Aanschuiftafel 12. Steekkeuzeknop 13. Achteruit naaihendel 14. Naaldinrijg hendel 15. Voet ontkoppel hendeltje 16. Naaldklem schroef 1. Pre-Tensione 2. Manopola tensione del filo superiore 3. Portarocchetto (amovibile) 4. Asta avvolgi bobina 5. Manopola regolazione lunghezza punto (solo modelli 2D / 3D) 6. Bottone di regolazione della pressione del piedino 7. Tendifilo 8. Disco tensione superiore 9. Coperchio frontale 10. Tagliafilo 11. Prolunga 12. Manopola di selezione dei punti 13. Leva retromarcia 14. Infila-ago 15. Leva sgancio piedino 16. Morsetto ago 17. Bovendraad geleider 18. Persvoet 19. Transporteur 20. Naaldplaat 21. Vrije arm 22. Transporteur verzinkknop 23. Spoelhuis klep 24. Handgreep 25-1. Knoopsgat afstelling 25-2. Knoopsgat afstelling (alleen 2 knops en 3 knops model) 26. Handwiel 27. Ontkoppelknop 28. Aan / uit lichtschakelaar 29. Steker entree 30. Persvoet hendel Aanwezig op aangegeven modellen 17. Guida filo superiore dell’ago 18. Piedino premistoffa 19. Griffa di trasporto 20. Placca ago 21. Braccio libero 22. Leva per il rientro della griffa di trasporto 23. Coperchio navetta 24. Maniglia 25-1. Regolazione asolatore 25-2. Regolazione asolatore (solo modelli 2D / 3D) 26. Volantino 27. Bottone di disinnesto 28. Interruttore corrente / luce 29. Presa corrente 30. Leva alzapiedino Montato su modelli specifici 4 RS2000-2D_EFNI.book Page 4 Thursday, March 30, 2006 3:31 PM English Français NAMES OF ACCESSORIES NOMS DES ACCESSOIRES Standard accessories 1. Zigzag sewing foot (on machine) 2. Zipper foot 3. Buttonhole foot 4. Buttonhole cutter 5. Needle plate screw driver 6. Oiler 7. Bobbins (3 pcs.) Accessoires standards 1. Pied zig zag (monté 7. Canettes (3 pièces) 8. Aiguille renflée sur la machine) (1 pièce) 2. Pied Fermeture 9. Aiguilles standards 3. Pied pour (3 pièces, #14) boutonnière 10.Tournevis (petit) 4. Couteau à (1 pièce) boutonnière 11.Tige porte bobine 5. Tournevis plaque fournie (monté sur la aiguille machine) 6. Burette d’huile ❈ Les accessoires sont logés à l’intérieur de la table d’extension 8. Ball point needle (1 pc.) 9. Standard needle (3 pcs., #14) 10.Screw driver (small) (1 pc.) 11.Spool pin supplied (1 pc.) (on machine) ❈ Accessories are stored inside the extension table. Optional accessories 12.Twin needle (1 pc.) 13.Extra spool pin (for twin needle sewing) 14.Quilting guide 15.Screw driver (large) (1 pc.) 16.Darning foot 17.Walking foot 18.Piecing foot 19.Open toe Appliqué foot 20.Overcasting foot 21.Blind stitch foot 22.Cleaning brush 23.Piping / Zipper foot Nederlands Accessoires en option 12.Aiguille double (1 pièce) 13.Tige porte-bobine (pour couture en aiguille double) 14.Guide de piquage 15.Tournevis (1 pièce) 16. Pied libre de broderie pour reprisage 17.Pied-de-biche double entraînement 18.Pied d’application 19.Pied ouvert 20.Pied-de-biche pour faufilage 21.Pied-de-biche pour couture invisible 22.Brosse de nettoyage et extracteur de canette 23.Pied passepoil / Fermeture à glissière Italiano NAAM VAN DE ACCESSOIRES ELENCO DEGLI ACCESSORI Standaard accessoires 1. Zigzagvoet (op de machine) 2. Ritssluitingvoet 3. Knoopsgat voet 4. Tornmesje (voor knoopsgat) 5. Naaldplaat schroevendraaier 6. Olieflesje Accessori standard 1. Piedino zig-zag (montato sulla macchina) 2. Piedino per chiusure lampo 3. Piedino per asola 4. Tagliasole 5. Cacciavite placca ago 6. Oliatore 7. Spoline (3 pezzi) 7. Spoeltjes (3 stuks) 8. Balpen naald (1 st.) 9. Standaard naalden (3 stuks, 14) 10.Schroevendraaier (klein) (1st.) 11.Klospen bilgeleverd (op de machine) ❈ Accessoires zijn opgeborgen in de aanschuiftafel Optionele accessoires 12.Tweeling naald (1 st.) 13.Extra garenpen (voor gebruik met tweelingnaald) 14.Quilt geleider 15.Schroevendraaier (1st.) 16.Borduurmaasvoet 17.Loopvoet 18.Verstelvoet 19.Open Applicatievoet 20.Overhandse voet 21.Blindzoom voet 22.Schoonmaak borsteltje 23.Biesversiering / Ritssluitingvoet 8. Ago con punta tonda (a sfera) (1 pezzo) 9. Aghi standard (3 pezzi) 10.Cacciavite (piccolo) (1 pezzo) 11.Asta portarocchetto (montato sulla macchina) ❈ Gli accessori sono inseriti all’interno della prolunga Accessori opzionali 12.Ago gemello (1 pezzo) 13.Asta portarocchetto (per cuciture con ago gemello) 14.Guida per trapuntare 15.Cacciavite (1 pezzo) 16.Piedino per ricamo e rammendo 17.Piedino doppio trasporto 18.Piedino per patchwork 19.Piedino per applicazioni con punta aperta 20.Piedino sopraffilo 21.Piedino per orlo invisibile 22.Spazzolino 23.Piedino cordoncino / Per chiusure lampo 6 RS2000-2D_EFNI.book Page 6 Thursday, March 30, 2006 3:31 PM C D Nederlands Italiano AANSLUITEN PREPARAZIONE Aansluiten van voetpedaal en lichtnetsnoer (fig A) 1. Steek de stekker van het voetpedaal in de stekker ingang. 2. Steek de lichtnetsnoer in het stopcontact. Waarschuwing! Overtuig u ervan dat het voltage van de machine (vermeld op de achterkant van de machine) gelijk is aan die van het lichtnet. De specificaties verschillen van land tot land. Collegamento del pedale e del cavo di alimentazione (fig. A) 1. Collegate la spina del reostato nell'apposita presa. 2. Inserite il cavo di alimentazione in una presa elettrica. Attenzione! Assicuratevi che la tensione indicata sulla macchina (le informazioni sono sul retro della macchina) corrisponda alla tensione della linea elettrica. Le specifiche tecniche variano da paese a paese Interruttore di accensione e della luce (fig. B) Aan / Uit schakelaar (fig B) Zet de schakelaar aan om te gaan naaien. Deze schakelaar regelt zowel de netspanning als de verlichting. De machine werkt niet als deze schakelaar niet is ingeschakeld. Voetpedaal (fig C) Hoe verder u het voetpedaal indrukt, des te sneller de machine loopt. Aanschuiftafel (fig D) De machine verandert in een vrije arm model als u de aanschuiftafel afneemt. 1. Haal deze eraf door hem naar links te schuiven, de machine is nu een vrije arm model. De vrije arm is meer geschikt om te borduren en om broekspijpen, mouwen en kragen van T-shirts, blouses en dergelijke te naaien. Premete l’interruttore su “On” per cucire L’interruttore comanda sia la luce che il motore La macchina non si accenderà se non premete l’interruttore su “On”. Reostato (fig. C) Più si spinge sul pedale, più si aumenta la velocità di funzionamento della macchina. Prolunga (fig. D) La macchina si trasforma in una braccio libero togliendo la prolunga. 1. Rimuovere la prolunga tirando verso sinistra e la macchina diventa a braccio libero. Per cucire pantaloni, maniche polsini delle maglie, camicie, ecc. E’più pratico usare la macchina per cucire con il braccio libero. 8 B C B-1 5 4 3 2 c b Max 15W a Nederlands Italiano VERSCHILLENDE BEDIENINGSELEMENTEN REGOLAZIONI Steekkeuzeknop (fig A) Alvorens een steek te kiezen, overtuig u er eerst van dat de naald in de hoogste stand staat. De gewenste steek wordt verkregen door aan de steekkeuzeknop te draaien. De steekkeuzeknop kan zowel naar rechts als naar links worden gedraaid. Selezione dei punti (fig. A) Per selezionare i punti, assicuratevi che l’ago si nella posizione più alta. Il punto richiesto si seleziona ruotando la manopola di selezione dei punti. La manopola può girare verso destro o verso sinistra. Steeklengteknop (B-1) De steeklengte kan eenvoudig worden ingesteld door aan de steeklengteknop te draaien. Voor een kortere steek draait u de steeklengteknop naar een lager cijfer. Voor een langere steek naar een hoger cijfer. De standaard steeklengte ligt tussen 2 en 3. Persvoethendel (fig C) Er zijn 3 standen voor de persvoethendel. 1. Om te naaien moet de persvoethendel in de laagste stand staan a . 2. Om de stof er onder te leggen of er onderuit te halen en om voetjes te verwisselen, middelste stand b . 3. Om dikke stof er onderuit te halen, hoogste stand c . Duw de persvoethendel zover mogelijk omhoog als deze kan voor stand c . De hendel zal niet in deze stand blijven staan c . Manopola di regolazione della lunghezza del punto (B-1) La lunghezza del punto può essere facilmente selezionata girando l’apposita manopola. Per un punto più corto, ruotate la manopola verso un numero basso. Per un punto più lungo, ruotatela verso un numero alto. Per un punto normale regolate la manopola tra 2 e 3. Leva alzapiedino (fig. C) Ci sono 3 posizioni per la leva alzapiedino. 1. Per cucire, la leva alzapiedino deve essere nella posizione più bassa a . 2. Per inserire o rimuovere tessuti e cambiare piedino, la posizione media b . 3. Per rimuovere tessuti spessi, la posizione più alta c . Spingete verso l’alto la leva del piedino premistoffa fino a fine corsa c . La leva non si arresterà nella posizione c . 10 RS2000-2D_EFNI.book Page 10 Thursday, March 30, 2006 3:31 PM English Français THREADING THE MACHINE ENFILAGE DE LA MACHINE Bobbin winding Bobinage de la canette 1. Set the needle at its highest position by rotating the handwheel towards you. Open the shuttle cover. Hold the latch of bobbin case and pull it out. Release the latch and the bobbin comes out of the bobbin case easily. (fig A) 1. Placer l’aiguille dans sa position la plus haute en tournant le volant vers vous. Ouvrir le cache-navette. Tenir le loquet de la navette et tirer dessus. Libérer le loquet et la canette sortira facilement de la navette. (fig. A) NOTE NOTE 2. Pull out the spool pin. Insert the shorter side of spool pin into the machine as shown in (fig B). 3. Put a spool of thread on the spool pin. Draw thread from spool through thread guide as shown. (fig C-1) 4. Wind the end of thread from spool around the bobbin clockwise for several times. Place bobbin on to bobbin winder shaft. (fig C-2) 5. Move the declutch knob into the ( ) direction. Utiliser exclusivement une canette TOYOTA. 2. Tirer le porte-bobine. Insérer la partie courte du portebobine dans la machine comme indiqué (fig. B). 3. Mettre une bobine de fil sur le porte-bobine. Tirez le fil de la bobine en le passant par le guide fil. Comme indiqué. (fig. C-1) 4. Enroulez l’extrémité du fil de la bobine autour de la canette plusieurs fois dans le sens des aiguilles d’une montre. Placer la canette sur la tige porte-bobine. (fig. C-2) 5. Poussez le bouton de débrayage vers ( ) . Caution! Attention! Never touch declutch knob while sewing or it may cause trouble. 6. Push bobbin winder shaft to right until it clicks. Press on foot controller to wind bobbin. (fig D) 7. When the bobbin is wound enough, (see fig E) stop the machine. Push bobbin winder shaft to the left, and remove bobbin. 8. Take the bobbin off the bobbin winder shaft, and cut the thread. (fig F) 9. Move the declutch knob into the ( ) direction. 10.Always turn the handwheel towards you and listen for the “click” inside the handwheel, before sewing. Ne jamais toucher le bouton de débrayage pendant la couture sous peine de provoquer un incident. 6. Pousser la tige porte-bobine vers la droite jusqu’à entendre un click. Presser sur la pédale pour bobiner la canette. (fig. D) 7. Lorsque la canette est suffisamment bobinée, (voir fig. E) arrêter la machine, pousser la tige porte-bobine vers la gauche, et retirer la canette. 8. Enlever la canette de la tige porte-bobine, et couper le fil. (fig. F) 9. Pousser le bouton de débrayage vers ( ). 10. Avant de coudre, toujours tourner le volant vers vous jusqu'à entendre un "clic". Nederlands Italiano Use a TOYOTA-exclusive bobbin. HET INRIJGEN VAN DE MACHINE PREPARAZIONE PER LA CUCITURA Spoeltje opwinden Riempimento della spolina 1. Breng de naald in de hoogste stand door het handwiel naar u toe te draaien. Open de spoelhuisklep. Hou het klepje op het spoelhuis vast en neem dit eruit. Laat het klepje los en het spoeltje komt gemakkelijk uit het spoelhuis. (fig A) 1. Far ruotare il volantino verso di voi per portare la barra ago nel punto più alto. Aprite il coperchio della capsula. Aprite la levetta di chiusura della capsula che contiene la spolina ed estraetela. Rilasciate la levetta e quindi staccate la spolina (fig. A). NOTA Usare solo una spolina TOYOTA. 2. Estrarre il perno portarocchetto. Inserite la parte più corta del portarocchetto nell’apposita fessura come indicato nella (fig. B). 3. Inserite un rocchetto di filo sul perno portarocchetto. Estrarre il filo dal rocchetto, farlo correre attraverso il guidafilo come mostrato nella (fig. C-1). 4. Avvolgete il filo a mano per alcuni giri intorno alla spolina in senso orario. Posizionate la spolina sull’asse del filarello (fig. C-2). 5. Spingete il tasto di disinnesto che si trova sul volantino nella direzione ( ). Attenzione! Onde evitare inconvenienti non toccare mai il pomello di sgancio della frizione mentre cucite. 6. Spostare il filarello a destra fino al click. Mantenere premuto il reostato elettrico per il riavvolgimento della spolina (fig. D). 7. Una volta riempita la spolina, (vedi fig. E) arrestate la macchina e spostate il filarello a sinistra per poi estrarre la spolina. 8. Togliete la spolina dall’asse del filarello e tagliate il filo (fig. F). 9. Spostate il tasto di disinnesto nella direzione ( ). 10. Prima di iniziare a cucire ruotare sempre il volantino verso di sé, finché non si sente il "clic" all'interno del volantino. OPMERKING Gebruik uitsluitend een spoeltje van TOYOTA. 2. Trek de garenpen uit. Zet de korte kant van de garenpen in de machine zoals afgebeeld in (fig B) 3. Zet een klos garen op de garenpen. Trek nu het garen van de klos door de draadgeleider zoals afgebeeld. (fig C-1) 4. Draai het einde van de draad enkele malen rechtsom op het spoeltje. Zet het spoeltje op de spoel opwindas. (fig C-2) 5. Zet de ontkoppelingsknop in de ( ) richting. Waarschuwing! Raak de ontkoppelingsknop nooit aan tijdens het naaien want dit kan storing veroorzaken. 6. Duw de spoel opwindas naar rechts totdat deze klikt. Duw op het voetpedaal om het spoeltje op te winden. (fig D) 7. Wanneer het spoeltje voldoende is opgewonden, (zie fig E) stop dan de machine. Duw de spoel opwindas naar links. 8. Neem het spoeltje van de opwindas en knip de draad af. (fig F) 9. Zet de ontkoppelingsknop in de ( ) richting. 10.Draai het handwiel altijd naar u toe en naai pas nadat u een "klik" binnen het handwiel hoort. 12 RS2000-2D_EFNI.book Page 12 Thursday, March 30, 2006 3:31 PM C-1 ➁ D E C-2 Stopper Butée Stopper Fermo Slot Fente Gleuf Apertura Bobbin case / Navette Spoelhuis / Capsula Nederlands Italiano Spoeltje inrijgen 1. Zet het spoeltje in het spoelhuis met de draad rechtsom. (fig A) 2. Trek de draad in de gleuf 1 van het spoelhuis. (fig B) 3. Trek de draad naar links, breng deze onder het spanningsveertje en dan naar het geleideoog 2. (fig C-1) Sistemazione della spolina 1. Inserite la spolina nella capsula. Assicuratevi che il filo sia avvolto in senso orario (fig. A) 2. Fate passare il filo nell’apertura 1 della capsula (fig. B) 3. Tirando il filo verso sinistra, fatelo passare sotto la molla di tensionamento e quindi attraverso il foro 2. (fig. C-1) ❈ U moet zeker zijn dat de bobijn draait in de richting van de wijzers van het uurwerk. (fig C-2) ❈ Assicuratevi che il filo sia in senso orario tirandolo come mostrato in (fig. C-2) 4. Breng de naald in de hoogste stand en zet de persvoethendel omhoog. 5. Trek ongeveer 10 cm garen uit het spoelhuis. 6. Hou het spoelhuis vast aan het klepje en duw het in de spoelbaan. Laat het klepje los zodra het spoelhuis er volledig in zit. (fig D) 7. Spoelhuisstopper moet altijd met de voorkant naar boven liggen en in de spoelbaangleuf passen. (fig E) 4. Portate l’ago nella posizione più alta e sollevate il piedino premistoffa. 5. Estraete circa 10 cm di filo dalla spolina. 6. Tenete la levetta e spingete la capsula nel crochet. Assicuratevi che la spolina sia bene in posizione prima di lasciare la levetta (fig. D) 7. Il fermo della capsula deve sempre essere rivolto verso l'alto e inserirsi nell'apertura del supporto del crochet. (fig E) 14 RS2000-2D_EFNI.book Page 14 Thursday, March 30, 2006 3:31 PM English Français Upper threading 1. Raise the presser foot lever. Raise the take-up lever to its highest position by rotating the handwheel towards you. 2. Pull out spool pin and insert the shorter side into the machine. Place a spool of thread on spool pin. (fig A) 3. Pass the thread through guide 1. (fig B) 4. Lead the thread through either side of the tension disc 2. (fig C) 5. Hook the thread under the guide 3. (fig D) 6. Thread take-up lever 4. (fig E) 7. Pass the thread through needle guide 5 (use left one). (fig F) 8. Thread the needle from front to back. (fig G) 9. Pull out about 15 cm of thread and place it under the presser foot. (fig H) Enfilage du fil supérieur 1. Lever le levier presseur de pied-de-biche. Lever le tendeur de fil à sa plus haute position en tournant le volant vers vous. 2. Retirer la tige-bobine et insérer la par le côté court dans la machine. Placer la bobine du fil sur la tige porte-bobine. (fig. A) 3. Passer le fil par le guide-fil 1. (fig. B) 4. Guider le fil entre les deux disques du tendeur 2. (fig. C) 5. Accrocher-le au guide 3, de bas en haut et droit à gauche. (fig. D) 6. Enfiler le fil par le tendeur 4. (fig. E) 7. Faire passer le fil dans le guide de l’aiguille 5 (utiliser le guide gauche). (fig. F) 8. Enfiler l’aiguille par l’avant. (fig. G) 9. Tirer environ 15 cm de fil et placer le sous le piedde-biche. (fig. H) Nederlands Italiano Bovendraad inrijgen 1. Zet de persvoethendel omhoog. Breng de draadhefboom in de hoogste stand door het handwiel naar u toe te draaien. 2. Trek de garenpen uit en zet de korte kant in de machine. Zet een klos garen op de garenpen. (fig A) 3. Geleid de draad door de geleider 1. (fig B) 4. Geleid de draad tussen de spanningsplaatjes 2 door. (fig C) 5. Haak de draad onder de geleider 3. (fig D) 6. Span de draadhefboom 4 in. (fig E) 7. Breng de draad door de naaldgeleider 5 (gebruik de linker). (fig F) 8. Steek de draad van voor naar achter door het oog van de naald. (fig G) 9. Trek ongeveer 15 cm draad erdoor en leg deze onder de persvoet. (fig H) Infilatura del filo superiore 1. Sollevate il piedino premistoffa. Portate il tendifilo nella sua posizione più alta facendo girare il volantino verso di voi. 2. Estraete il portarocchetto e posizionatelo nell'apposito foro. Ponete un rocchetto nel portarocchetto (fig. A) 3. Fate passare il filo attraverso il guidafilo 1 (fig. B) 4. Quindi tra i due dischi della tensione 2 (fig. C) 5. Agganciatelo alla guida 3 dal basso verso l’alto e da destra verso sinistra (fig. D) 6. Infilatelo quindi nel tendifilo 4 (fig. E) 7. Passare il filo attraverso la guida dell’ago 5 (situata a sinistra). (fig. F) 8. Ed infine nella cruna dell’ago verso il retro della macchina (fig. G) 9. Lasciate pendere all’incirca 15 cm di filo e ponetelo sotto il piedino premistoffa (fig. H) 16 RS2000-2D_EFNI.book Page 16 Thursday, March 30, 2006 3:31 PM F-1 G F-2 ➅ Nederlands Italiano Het gebruik van de draadinrijger (Als de machine is uitgerust met een draadinrijger) De draadinrijger kan worden gebruikt om de draad makkelijker door het oog van de naald te krijgen. Come usare il dispositivo automatico per infilare gli aghi (disponibile solo su alcuni modelli) Per infilare l’ago più facilmente si può usare il dispositivo automatico per infilare gli aghi 1. Span de machine in tot de naaldgeleider 5 zoals aangegeven op blz. 14. (fig A) 2. Zet de persvoethendel naar beneden. (fig B) 3. Breng de naald in de hoogste stand door het handwiel naar u toe te draaien. 4. Duw de hendel van de draadinrijger naar beneden 6. Haak de draad van links naar rechts achter de geleider 7. (fig C) 5. Duw de hendel van de draadinrijger naar de laagste stand zodat de haak door het oog van de naald gaat. Breng de draad van geleider 7 naar de rechterkant onder de haak 8. (fig D) 6. Neem de draad onder de haakgeleider 9, en breng deze omhoog naar rechts terwijl u de draad tegen de naald drukt. (fig E) 7. Laat voorzichtig de draadinrijghendel 6 enigszins los en rijg de draad door het oog van de naald. (fig F-1) De draad wordt door de haak aangetrokken en gaat door het oog van de naald. 8. Als de draad door het oog van de naald is, laat de draad dan langzaam los en laat de draadinrijghendel helemaal los. (fig F-2) OPMERKING Herhaal bovengenoemde stappen als de draad niet door het oog van de naald is gegaan. De draadinrijger werkt niet goed als de naald zelf niet juist is geplaatst. 9. Trek een lusje garen eruit door het oog van de naald. (fig G) 1. Inserire il filo nella guida del filo 5 come riferito a pag. 14 (fig. A) 2. Abbassare il sollevatore del piedino premistoffa (fig. B) 3. Portare l’ago nella posizione più alta ruotando il volantino verso di voi 4. Abbassare la leva dell’infila-ago 6. Agganciare il filo alla guida 7 dalla sinistra verso destra (fig. C) 5. Premere la leva dell’infila-ago fino al punto più basso in modo che il gancio passi attraverso la cruna dell’ago Portare il filo alla guida 7 sul lato destro sotto il gancio 8 (fig. D) 6. Portare il filo sotto la guida del gancio 9 e sollevarlo verso destra, premendo il filo contro l’ago (fig. E) 7. Rilasciare leggermente la leva dell’infila-ago 6 ed infilare il filo allo stesso tempo (fig. F-1) Il filo è tirato dal gancio e passa attraverso la cruna dell’ago. 8. Quando il filo è passato attraverso la cruna, rilasciate il filo e nello stesso tempo rilasciate completamente la leva dell’infila-ago (fig. F-2) ❈ Selecteer de rechte steek voordat u de naaldinrijger gebruikt. Nota se il filo non passa correttamente attraverso la cruna, ripetere le operazioni di cui sopra. Il dispositivo automatico per infilare l’ago non funziona correttamente se l’ago non è sistemato bene. 9. Tirare fuori il cappio del filo attraverso la cruna (fig. G) ❈ Selezionare il punto dritto prima di utilizzare l'infila-ago. 18 RS2000-2D_EFNI.book Page 17 Thursday, March 30, 2006 3:31 PM A B C 15 cm English Français Bringing up lower thread with presser foot up 1. Loosely hold needle thread with one hand, rotate handwheel slowly towards you with the other hand, so the needle moves down and back again to its highest position. (fig A) 2. Pull upper thread slowly and pick up bobbin thread which will appear through the needle plate slot. (fig B) 3. Pull both threads together, place them under the presser foot leaving about 15 cm clear. (fig C) Pour faire remonter le fil inférieur 1. Saisir doucement le fil de l’aiguille d’une main, tourner le volant lentement vers vous avec l’autre main, de manière à ce que l’aiguille s’abaisse et revienne à sa position la plus haute. (fig. A) 2. Tirez lentement le fil supérieur jusqu’à ce que le fil de la canette apparaisse par la fente de la plaqueaiguille. (fig. B) 3. Tirez les deux fils ensemble, placez les sous le pied-de-biche en laissant environ 15 cm. (fig. C) Nederlands Italiano Het ophalen van de onderdraad 1. Hou de draad vanuit de naald losjes met een hand vast, draai met de andere hand het handwiel naar u toe zodat de naald naar de laagste stand beweegt en daarna weer naar de hoogste stand. (fig A) 2. Trek langzaam aan de bovendraad en haal de onderdraad op die door de gleuf in de naaldplaat zal verschijnen. (fig B) 3. Trek aan beide draden, plaats ze onder de persvoet met een vrij stuk van ongeveer 15 cm. (fig C) Per far salire il filo inferiore 1. Afferrate l’estremità del filo superiore con la mano sinistra e ruotate lentamente il volantino verso di voi facendo scendere e quindi risalire l’ago (fig. A) 2. Tirate lentamente il filo superiore in modo che il filo inferiore formi un cappio (fig. B) 3. Tirate le due estremità dei fili verso il retro della macchina a 15 cm circa dal piedino e sistematele entrambe a sinistra e sotto il piedino premistoffa (fig. C) 19 A 1-5 3 4 C D English Français Straight stitching Before sewing 1. Be sure that the declutch knob in the handwheel is into the ( ) direction. 2. Set pattern selection dial and stitch length dial as..... (fig A) L’ESSENTIEL DE LA COUTURE Points droits Avant de coudre 1. Vérifiez que le bouton de débrayage sur le volant est enclenché vers ( ). 2. Avec cadrans sélecteur de point et sélecteur de la longueur du point... (fig. A). SEWING BASICS Pattern selection dial Stitch length dial No. 3 C No. 4 D 1-5 1-5 Cadran sélecteur de point Cadran de sélection de longueur de point N° 3 C N° 4 D 1-5 1-5 Nederlands Italiano BASIS NAAIBEGRIPPEN COME ESEGUIRE I VARI PUNTI Recht naaien Voor het naaien 1. Overtuig u ervan dat de ontkoppelingsknop in het handwiel in de ( ) richting staat. 2. Stel de steekkeuzeknop en steeklengteknop in op... (fig A) Cucitura diritta 1. Assicurarsi che il pulsante di sblocco del volantino sia nella posizione ( ) 2. Impostare il selettore punto e la manopola della lunghezza punto come illustrato (fig. A) Steekkeuzeknop Steeklengteknop No. 3 C No. 4 D 1-5 1-5 Selettore punto Manopola lunghezza No. 3 C No. 4 D 1-5 1-5 20 RS2000-2D_EFNI.book Page 20 Thursday, March 30, 2006 3:31 PM C D-1 D-2 D-3 15 cm Nederlands Italiano Recht naaien Beginnen met naaien (fig A) Cucitura diritta Cominciare a cucire (fig. A) ❈ Houd de draden vast voor de eerste paar steken om knopen aan de onderkant te voorkomen. ❈ Tenere i fili durante l'esecuzione dei primi punti per evitare che si annodino sul rovescio. 3. Ponete l’ago nella sua posizione più alta e sollevate la leva del piedino premistoffa 4. Posizionate la stoffa sotto il piedino. Abbassate quest’ultimo. 5. Premete leggermente il reostato a pedale e cucite in avanti, guidando la stoffa con le mani. Il tessuto non deve essere tirato o spinto. 3. Breng de naald in de hoogste stand en zet de persvoethendel omhoog. 4. Leg de stof onder de persvoet. Plaats de persvoethendel naar beneden. 5. Druk rustig op het voetpedaal en begin te naaien, de stof met de hand geleidend terwijl deze wordt getransporteerd. Trek of duw niet aan de stof. Het maken van een rechte hoek (fig B) Het veranderen van naairichting 1. Stop de machine op het punt waar u van naairichting wilt veranderen met de naald in de stof. 2. Zet de persvoet omhoog, draai de stof in de gewenste richting. 3. Laat de persvoet zakken en begin in de nieuwe richting te naaien. Cambio direzione della cucitura (fig. B) 1. Fermare la macchina nel punto in cui è necessario cambiare direzione con l’ago infilato nel tessuto 2. Alzate, quindi, la leva del piedino premistoffa e girate il tessuto nella direzione desiderata 3. Riabbassate la leva del piedino premistoffa e continuate a cucire nella nuova direzione Achteruit naaien (fig C) Om een naad te versterken wordt het aanbevolen om aan het begin en aan het einde een paar steken achteruit te naaien. Duw de achteruitnaai hendel in om achteruit te naaien. Geleid de stof zoals deze getransporteerd wordt. Trek niet aan de stof. Voor versterking zijn enkele steken genoeg. Laat de knop los om weer vooruit te naaien. Cucitura in marcia indietro (fig. C) Posizionate il tessuto sotto il piedino a circa 1 cm dal bordo. Per rinforzare la cucitura, passate in marcia indietro sul bordo del tessuto. A tal scopo abbassate la leva di marcia indietro e cominciate a cucire guidando il tessuto con la mano. Non tirate mai il tessuto. Per rinforzare anche la fine della cucitura, eseguite alcuni punti in marcia indietro. Rilasciate la leva per tornare a cucire normalmente. Stoppen met naaien (fig D) 1. Duw niet meer op het voetpedaal. Draai aan het handwiel totdat de naald in de hoogste stand staat. Zet de persvoet omhoog. 2. Haal de stof langs de linkerkant weg. (fig D-1) 3. Snij de draden af met de draadafsnijder. (fig D-2) 4. Laat 15 cm draad vrij aan de achterkant om te voorkomen dat de draad uit het oog van de naald wordt getrokken. (fig D-3) Al termine del lavoro (fig. D) 1. Sollevate il piede dal reostato e girate manualmente il volantino fino a quando l’ago non raggiunga il punto più alto. Sollevate la leva del piedino premistoffa. 2. Tirare il tessuto verso sinistra (fig. D-1) 3. Tagliate il filo con le forbici (fig. D-2) 4. Lasciate 15 cm di filo per evitare che scivoli nella cruna (fig. D-3) 22 RS2000-2D_EFNI.book Page 22 Thursday, March 30, 2006 3:31 PM A A-1 A-2 Nederlands Italiano Afstelling van de draadspanning Een goede naad wordt verkregen als de spanning in de juiste balans is en beide draden (bovendraad en onderdraad) samen worden vastgezet in het midden van de stof. Als u stopt met naaien controleer dan of bovendraad en onderdraad gelijk liggen. Stel de draadspanning af door aan de bovendraad spanningsknop te draaien. Regolazione della tensione dei fili Una buona cucitura si ottiene quando le tensioni sono ben bilanciate ed entrambi i fili (filo superiore e filo inferiore) sono incrociati insieme al centro del tessuto. Al termine della cucitura controllate se il filo superiore ed inferiore sono uguali. a : Draadspanningen zijn gelijk. Beide draden zijn vastgezet in het midden vande stof. b : Bovendraad spanning is te strak. Bovendraad ligt volledig bovenop de stof. Corrigeer de spanning door de knop naar een lager cijfer te draaien. c : Bovendraad spanning is te los. Bovendraad ligt volledig aan de onderkant van de stof. Corrigeer de spanning door de knop naar een hoger cijfer te draaien. Voetjes verwisselen 1. Breng de naald in de hoogste stand door het handwiel naar u toe te draaien. Zet de persvoethendel in de middelste stand. 2. Duw het voet ontkoppelknopje omhoog en verwijder het voetje. (fig A-1) 3. Plaats het gewenste voetje op de naaldplaat onder de voethouder. Laat de persvoethendel naar beneden zodat het voetje inklikt op de voethouder (fig A-2) a : Tensione regolata correttamente: entrambi i fili s’incrociano nel centro del tessuto. b : Tensione superiore troppo forte: il filo inferiore appare nella parte superiore del tessuto. Per ottenere la tensione corretta ruotate la manopola verso un numero basso. c : La tensione superiore è troppo lenta: se la tensione del filo superiore è troppo lenta il filo superiore appare nella parte inferiore del tessuto. Per ottenere la tensione corretta ruotate la manopola verso un numero maggiore. Sostituzione del piedino premistoffa 1. Portate l’ago nella sua posizione più alta facendo ruotare il volantino verso di voi. Spostate la leva alza piedino nella posizione centrale. 2. Sollevare la leva sgancia-piedino e togliete il piedino (fig. A-1) 3. Appoggiate il piedino scelto sulla placca ago sotto il supporto piedino. Abbassate la leva alza piedino in modo che il piedino si agganci automaticamente nella scanalatura (fig. A-2) 24 RS2000-2D_EFNI.book Page 24 Thursday, March 30, 2006 3:31 PM C a Nederlands Italiano Ontkoppelknop (fig A) De ontkoppelknop bevindt zich in het handwiel. (fig A) Als u wilt gaan naaien, zet u de knop in de ( ) richting. Als u wilt gaan spoelen, zet u de knop in de ( ) richting. Bottone di disinnesto (fig. A) Il bottone di disinnesto si trova sul volantino (fig. A) Quando cucite portate il bottone nella direzione ( ). Quando avvolgete la spolina portate il bottone nella direzione ( ). Achteruit naaiknop (fig B) Achteruit naaien wordt aanbevolen om de naad te versterken. Om achteruit te naaien drukt u de achteruit naaiknop zover in als mogelijk is en duwt u lichtjes op het voetpedaal. Laat de knop los om weer vooruit te naaien. (Als de machine is uitgevoerd met transporteur verzinkknop) Transporteur verzinkknop (fig C) Het verzinken van de transporteur tanden maakt het mogelijk om het stoftransport zelf te kunnen regelen. Dit kan gebruikt worden tijdens knopen aanzetten, stoppen en borduren. De transporteur verzinkknop a bevindt zich achter de spoelhuisklep. Om de transporteur tanden te laten verzinken drukt u de knop eerst naar achteren, dan naar links. Om de transporteur verzinkknop weer uit te schakelen drukt u deze naar rechts en de transporteur tanden zullen weer in de normale stand terugkomen. Leva di retromarcia (fig. B) La cucitura indietro è raccomandata per rinforzare la stessa. Per cucire all’indietro, spingere verso il basso più a lungo possibile e premete con delicatezza sul reostato. Lasciate il pulsante per tornare alla cucitura normale. (per i modelli che ne sono equipaggiati) Leva di rientro del trasporto (fig. C) Abbassando la leva della griffa avrete la possibilità di guidare voi stessi il tessuto. Si usa per le asole, rammendi e ricami. La leva abbassagriffa a è all’interno del coperchio capsula. Per abbassare la griffa dentata, spingere la leva in avanti e portarla verso sinistra. Per riportarla in posizione normale, portare la leva verso destra e rilasciarla. 26 RS2000-2D_EFNI.book Page 25 Thursday, March 30, 2006 3:31 PM A B ➀ x ➀ y x y English Français (When the machine is equipped with presser foot pressure) Presser foot pressure adjustment knob (fig A) The presser foot pressure is adjusted by turning the dial at the top of the machine. When sewing normal or heavy fabric : Turn the dial to 3. When sewing thin or stretch fabric : Turn the dial to 2-3. When darning : Turn the dial to 1-2. (lorsque la machine est équipée d’un régulateur de pression du pied de biche.) Régulateur de pression du pied (fig. A) Pour régler la pression du pied-de-biche, tournez la molette sur le dessus de la machine. Couture normale ou tissus épais : régler la molette sur 3. Couture tissus fins ou extensibles : régler la molette sur 2-3. Racommodage : régler la molette sur 1-2. Especially, at the points that the thickness changes (fig B-1), sew slowly by rotating the handwheel by hand. This will prevent needle breaking and deflecting. Couture de tissus épais (Spécialement le jean) Lorsque vous faites de la couture sur des tissus épais ou des parties de tissus épais comme indiqué (fig. B), il est important de coudre doucement et utiliser une taille d’aiguille appropriée (voir page 64). Diriger doucement le tissu au moment de coudre. Surtout, aux endroits où l’épaisseur du tissu change (fig. B-1), coudre lentement en tournant le volant avec la main. Cela devrait diminuer le risque d’altération du tissu ou de blocage de la machine. Nederlands Italiano Thick fabric sewing (Particularly Denim) When sewing thick fabric or the thick part of the fabric as shown in (fig B), it is important to sew slowly and use the proper needle size (refer page 63). Gently guide the fabric as you sew. (Als de machine is uitgevoerd met persvoetdruk regeling) Persvoetdruk regelknop (fig A) De persvoetdruk wordt ingesteld door aan de knop bovenop de machine te draaien. Wanneer u normale of dikke stof naait : zet de knop op 3. Wanneer u dunne of stretch stof naait : zet de knop op 2-3. Wanneer u stopwerk gaat doen : zet de knop op 1-2. Dikke stof naaien (met name denim) Wanneer u dikke stof naait of een dik gedeelte in de stof zoals afgebeeld in (fig B), is het belangrijk om langzaam te naaien en de juiste naald te gebruiken (zie pag. 63). Geleid de stof rustig terwijl u naait. Vooral op de plaatsen waar de stof van dikte verandert (fig B-1), langzaam naaien door met de hand aan het handwiel te draaien. Dit zal naaldbreuk of buigen van de naald voorkomen. 27 (Per i modelli equipaggiati con il regolatore della pressione del piedino) Regolatore pressione del piedino (fig. A) Il regolatore di pressione del piede si regola girando il bottone sopra la macchina. Quando cucite tessuti normali o pesanti : girate il bottone su 3 Quando cucite tessuti sottili o elastici : girate il bottone su 2-3 Quando rammendate : girate il bottone su 1-2 Cucitura di tessuti di grosso spessore (ad esempio jeans) Per cucire un grosso spessore di tessuto come mostrato in (fig. B), è importante cucire lentamente usando aghi della misura appropriata (rif. pag. 64). Durante la cucitura, guidate dolcemente il tessuto. In particolare, quando il tessuto cambia spessore (fig. B-1), cucite lentamente ruotando il volantino con la mano. Questo potrà prevenire le rotture degli aghi. A B 1-5 5 6 7 E F G 16 17 21 P Q U English Français Zigzag stitching 1. Be sure that the declutch knob in the handwheel is into the ( ) direction. 2. Set pattern selection dial and stitch length dial as... (fig A) Pattern selection dial Stitch length dial No. 5 E No. 6 F No. 7 G 1-5 1-5 1-5 Zigzag width 2 mm 3.5 mm 5 mm Slightly loosen upper thread tension. Better looking zigzag stitches require less upper tension than straight stitching. 3. Follow the steps as you did in straight stitching. Stretch Stitching The following stitches shown (fig B) can be used with stretch and knit fabrics. (16) Straight stretch (17) Zigzag stretch (21) Decorative stitch Points zigzag 1. Vérifiez que le bouton de débrayage sur le volant est bien enclenché vers ( ). 2. Avec cadran sélecteur de point et cadran sélecteur de la longueur de point... (fig. A) Cadran sélecteur de point Cadran de sélection de longueur de point N° 5 E N° 6 F N° 7 G 1-5 1-5 1-5 Cadran de sélection de largeur de point 2 mm 3,5 mm 5 mm Desserrer la tension du fil supérieur. Il est préferable d’utiliser une tension du fil supérieur moins forte pour faire des points zigzag que pour les points droits. 3. Suivre les mêmes étapes qu’avec les points droits. Points stretch (16) point droit pour stretch (17) zigzag stretch (21) point surjet Nederlands Italiano Zigzag naaien 1. Overtuig u ervan dat de ontkoppelingsknop in het handwiel in de ( ) richting staat. 2. Stel de steekkeuzeknop en steeklengteknop in op... (fig A) Cucitura zigzag 1. Assicurarsi che il pulsante di sblocco del volantino sia nella posizione ( ). 2. Impostare il selettore punto e la manopola della lunghezza punto come illustrato (fig. A) Steekkeuzeknop Steeklengteknop No. 5 E No. 6 F No. 7 G 1-5 1-5 1-5 Zigzagbreedte 2 mm 3,5 mm 5 mm Selettore punto Manopola lunghezza No. 5 E No. 6 F No. 7 G 1-5 1-5 1-5 Larghezza zigzag 2 mm 3,5 mm 5 mm Draai voorzichtig de bovenspanning iets losser. Goede zigzagsteken vereisen een lagere bovenspanning dan rechte steken. 3. Volg de stappen zoals u deed met recht naaien. Per eseguire punti zigzag migliori, diminuire leggermente la tensione del filo rispetto all’esecuzione dei punti diritti. 3. Per il resto seguite le istruzioni valide per il punto diritto. Stretchstof naaien De volgende steken (fig B) kunnen worden gebruikt voor stretchstoffen en gebreide materialen. (16) Rekbare rechte steek (17) 3 Voudige stretch zigzagsteek (21) Overlocksteek Punti elastici I punti mostrati nella (fig. B) sono utilizzati per tessuti sintetici e maglieria. (16) Punto diritto elastico triplo (17) Punto zigzag elastico triplo (21) Punto sopraggitto 28 E F 1-5 7 G Nederlands Italiano GEBRUIK VAN DE INGEBOUWDE STEKEN COME USARE I PUNTI PREDEFINITI Blindzoomsteek 1. Overtuig u ervan dat de ontkoppelingsknop in de ( ) richting staat. 2. Stel uw machine in op...... (fig A) Steeklengteknop op 2 3. Vouw de stof zoals afgebeeld in (fig B). Leg de stof onder de persvoet. Voor een nette afwerking is het aan te bevelen de zoom vast te spelden en te strijken voordat u gaat naaien. 4. Naai op de vouw, zodat de rechte steken op de rand van de zoom komen te liggen en de zigzagsteken slechts enkele draden van de stof vastzetten. (fig C) (fig D) a : Correcte naad b : De naald raakt te veel de rand van de vouw. c : De naald raakt de rand van de vouw helemaal niet. Gebruik zigzagvoet of de optionele blindzoomvoet. Cucitura orlo invisibile 1. Assicurarsi che il pulsante di sblocco del volantino sia nella posizione ( ) 2. Regolate la macchina come indicato... (fig. A) Manopola lunghezza punto sul 2 3. Piegate il tessuto come mostrato in (fig. B) e collocatelo sotto il piedino premistoffa. Per ottenere un lavoro migliore, è preferibile imbastire o stirare prima con il ferro. 4. Cominciate a cucire ed assicuratevi che i punti diritti vengano eseguiti sul bordo dell’orlo e che i punti zigzag prendano soltanto uno o due fili della tela libera (fig. C) (fig. D) a : Cucitura corretta b : L’ago prende troppo il bordo della tela c : L’ago non prende affatto il bordo della tela Utilizzare il piedino zig-zag o il piedino opzionale (piedino per orlo invisibile). Overhands naaien Voor lichtgewicht materiaal: Overhands naaien voorkomt rafelen aan de rand van de stof. 1. Overtuig u ervan dat de ontkoppelingsknop in het handwiel in de ( ) richting staat. 2. Zet de steekkeuzeknop en steeklengteknop op... (fig E) 3. Leg de naad onder de persvoet met de rand van de stof in een lijn met de zijkant van de persvoet. (fig F) OPMERKING Voor dikke stof (met name denim) gebruikt u een brede zigzagsteek, voor lichte stof gebruikt u een smalle zigzagsteek. Gebruik zigzagvoet of de optionele overhandsevoet. Sopraffilo Sopraffilo dei tessuti leggeri Il punto sopraffilo impedisce che i bordi si sfilaccino 1. Assicurarsi che il pulsante di sblocco del volantino sia nella posizione ( ) 2. Regolate la manopola selezione punti e la manopola lunghezza punto come indicato (fig. E) 3. Cucite con attenzione in modo che tutti i punti eseguiti sul bordo destro siano allineati lungo il bordo del tessuto (fig. F) NOTA Per tessuti grossi (esempio jeans) usate un punto zigzag più ampio, per tessuti leggeri usate un punto zigzag più stretto Utilizzare il piedino zig-zag o il piedino opzionale (piedino per imbastiture). 30 C D 5 19 S Nederlands Italiano Overhands naaien Voor dik en elastisch materiaal, of zeer fijn materiaal: Overhands naaien voorkomt rafelen aan de rand van de stof. 1. Overtuig u ervan dat de ontkoppelingsknop in het handwiel in de ( ) richting staat. 2. Zet de steekkeuzeknop en steeklengteknop op... (fig A) 3. Leg de naad onder de persvoet met de rand van de stof in een lijn met de zijkant van de persvoet. (fig B) Sopraffilo Sopraffilo di tessuti spessi o elastici Il punto sopraffilo impedisce che i bordi si sfilaccino 1. Assicurarsi che il pulsante di sblocco del volantino sia nella posizione ( ) 2. Regolate la manopola selezione punti e la manopola lunghezza punto come indicato (fig. A) 3. Cucite con attenzione in modo che tutti i punti eseguiti sul bordo destro siano allineati lungo il bordo del tessuto (fig. B) Gebruik zigzagvoet of de optionele overhandsevoet. Overlocken 1. Overtuig u ervan dat de ontkoppelingsknop in het handwiel in de ( ) richting staat. 2. Stel uw machine in op... (fig C) Steeklengteknop op 5 3. Leg twee delen van de stof met de goede kant tegen elkaar om te gaan naaien. (fig D) OPMERKING Om rafelen van de randen te voorkomen, naait u zo dat de steken aan de rechterkant buiten de rand van de stof vallen. Overlocksteken kunnen gebruikt worden voor overhands naaien. Utilizzare il piedino zig-zag o il piedino opzionale (piedino per imbastiture). Sopraggitto 1. Assicurarsi che il pulsante di sblocco del volantino sia nella posizione ( ) 2. Regolate la macchina come indicato (fig. C) Manopola lunghezza punto sul 5 3. Unite i due pezzi del lavoro con i due diritti del tessuto uno contro l’altro e cucite (fig. D) NOTA Per impedire che i bordi si sfilaccino, fate in modo che i punti della parte destra oltrepassino il tessuto. In certi casi, il punto di sopraggitto può essere utilizzato per sopraffilare. Utilizzare il piedino zig-zag o il piedino opzionale (piedino per imbastiture). Gebruik zigzagvoet of de optionele overhandsevoet. 32 A B 5 C 20 T English Français Smocking 1. Be sure that the declutch knob in the handwheel is into the ( ) direction. 2. Sew two straight lines with very loose thread tension. Make knots in one end. (Long stitch) 3. Gather fabric towards the knots while holding the other end of lower thread. (fig A) 4. Set your machine as... (fig B) Stitch length dial to 5 5. Sew smocking stitches on the gathered part between two straight stitches. (fig C) 6. Remove the straight stitches after finishing the smocking. Fronçage 1. Vérifier que le bouton de débrayage sur le volant est enclenché vers ( ). 2. Piquer deux coutures droits en relâchant la tension du fil supérieur. (point long) Faites des noeuds à une extrémité du tissu. (fig. A) 3. Faites les fronces en poussant le tissu vers les noeuds et en tenant par le doigts l’autre extrémité des fils inférieurs. 4. Réglez la machine comme indiqué... (fig. B) Cadran de sélecteur de longueur du point sur 5 5. Piquez les fronces au point de fronçage. (fig. C) 6. Lorsque vous avez terminé, tirez les deux premiers fils qui ont servi aux coutures droites de préparation. Nederlands Italiano Rimpelen 1. Overtuig u ervan dat de ontkoppelingsknop in het handwiel in de ( ) richting staat. 2. Naai twee rechte lijnen met zeer losse draadspanning. Maak knoopjes aan een einde. (lange steek) 3. Trek wat stof samen naar de knoopjes toe terwijl u het andere eind van de bovendraad vasthoudt. (fig A) 4. Stel uw machine in op... (fig B) Steeklengteknop op 5 5. Naai smoksteken op het samengetrokken gedeelte tussen de twee rechte steken. (fig C) 6. Verwijder de rechte steken als het rimpelwerk klaar is. Cucitura plissé 1. Assicurarsi che il pulsante di sblocco del volantino sia nella posizione ( ) 2. Eseguire due cuciture diritte avendo cura di ridurre la tensione del filo superiore. Annodare i fili ad una delle estremità del tessuto. 3. Preparate il plissé spingendo il tessuto verso i nodi e tenendo con le dita l’altra estremità dei fili inferiori (fig. A) 4. Regolate la macchina come indicato (fig. B) Manopola lunghezza punto sul 5 5. Eseguite la cucitura plissé (fig. C) 6. Una volta terminato, tirare i due fili che erano stati utilizzati come cucitura diritta di preparazione. 33 A B 1-1.5 C 11 K English Mending 1. Be sure that the declutch knob in the handwheel is into the ( ) direction. 2. Set your machine as... (fig A) Stitch length dial between 1-1.5 3. Place a patch over the worn part. Sew along the edge of the right side of the patch. 4. Trim the worn part along the seam on the wrong side of fabric. (fig B) Mending a rip (fig C) Set the machine in the same way as for mending. Sew the edges of tear together first. Then sew one more seam on each side (right side and wrong side) of the fabric. A piece of fabric can be placed underneath to reinforce the rip. Français Racommodage 1. Vérifier que le bouton de débrayage sur le volant est enclenché vers ( ). 2. Régler la machine comme indiqué... (fig. A) Cadran de sélecteur de longueur du point entre 1 et 1,5 3. Placez la pièce de racommodage sur le tissu support. Coudre en suivant le bord du côté droit de la pièce de racommodage. 4. Couper légèrement le long de la couture en retournant le tissu du mauvais côté. (fig. B) Racommodage d’une déchirure (fig. C) Réglez la machine de la même façon que le raccommodage. Commencez par coudre le milieu de la déchirure en guidant le tissu, puis coudre de chaque côté (bon côté et mauvais côté). Si nécessaire, renforcer la couture au moyen d’un petit morceau de gaze placé à l’envers du tissu déchiré. Nederlands Herstelwerk 1. Overtuig u ervan dat de ontkoppelingsknop in de ( ) richting staat. 2. Stel uw machine in op... (fig A) Steeklengteknop tussen 1-1.5 3. Leg een lapje stof over het versleten gedeelte. Naai langs de rechterkant van de rand van het lapje stof. 4. Knip het versleten gedeelte langs de naad weg aan de achterkant van de stof. (fig B) Italiano Rammendo 1. Assicurarsi che il pulsante di sblocco del volantino sia nella posizione ( ) 2. Regolate la macchina come indicato (fig. A) Manopola lunghezza punto tra 1 e 1,5 3. Ricoprite completamente la parte rovinata con un pezzo di stoffa identica. Eseguite una cucitura lungo il bordo della pezza di tessuto aggiunta sul diritto del tessuto. 4. Ritagliare la parte rovinata sul rovescio del tessuto vicino al bordo cucito (fig. B) Rammendo di uno strappo (fig. C) Herstellen van een scheur (fig C) Stel de machine in op dezelfde manier als met herstelwerk. Naai eerst beide randen van de scheur aan elkaar. Naai daarna nog een naad op iedere kant van de stof.(bovenkant en onderkant). Een stukje stof kan aan de onderkant gelegd worden om de scheur te versterken. Regolate la macchina come per il rammendo appena visto. Cominciate cucendo il centro dello strappo e guidando il tessuto, quindi cucite su ogni lato. Se necessario rinforzate la cucitura per mezzo di un pezzetto di garza posizionato sul rovescio del tessuto strappato. La pressione del piedino deve essere annullata. 34 A B 0.5-1 22 23 V W C English Français Applique work 1. Be sure that the declutch knob in the handwheel is into the ( ) direction. 2. Set your machine as... (fig A) Stitch length dial between 0.5-1 3. Draw a design on material for the applique, and cut it out. (fig B) 4. Lay stabilizer under the fabric and baste the cut out (or pin it) on the desired location. 5. Sew around the edge of the cut carefully. (fig C) To change directions at corners or to sew very small circles: Stop the machine with the needle pointing just away from the edge of the cut. Lift presser foot and turn the material. Lower presser foot and continue sewing. Application 1. Vérifier que le bouton de débrayage sur le volant est enclenché vers ( ). 2. Régler la machine comme indiqué... (fig. A) Cadran de sélecteur de longueur du point entre 0,5 et 1 3. Dessiner le motif sur le tissu qui servira d’application et découper-le. (fig. B) 4. Placer le motif sur le tissu support. 5. Piquer les bords au point zigzag doucement. (fig. C) Auparavant régler la longueur et la largeur du point en fonction du motif et de la dimension de l’application, ainsi qu’en fonction du type d’étoffe de base. Pour changer de direction dans les angles ou pour piquer des courbes très serrés, arrêter la machine, placer l’aiguille juste à côté de l’application, lever le pied-de-biche et tourner le tissu. Abaisser le pied et continuer à piquer. Nederlands Italiano Appliqueren 1. Overtuig u ervan dat de ontkoppelingsknop in het handwiel in de ( ) richting staat. 2. Stel uw machine in op... (fig A) Steeklengteknop tussen 1-5 3. Teken een ontwerp op het materiaal voor de applicatie, knip deze daarna uit. (fig B) 4. Leg vliseline onder de stof en rijg of speld de applicatie vast op de gewenste plaats. 5. Naai zorgvuldig langs de rand van de applicatie. (fig C) Om van richting te veranderen op hoeken of om zeer kleine cirkels te naaien: stop de machine met de naald in de stof en iets vanaf de rand van de applicatie. Zet de persvoet omhoog en draai de stof. Laat de persvoet naar beneden en naai weer verder. Applicazioni 1. Assicurarsi che il pulsante di sblocco del volantino sia nella posizione ( ) 2. Regolate la macchina come indicato (fig. A) Manopola lunghezza punto tra 1 e 1,5 3. Tracciate il motivo sul tessuto che servirà da applicazione e ritagliate. (fig. B) 4. Posizionate l’applicazione sul tessuto di base 5. Cucite con un punto leggero lungo i bordi dell’applicazione (fig. C) Per cambiare direzione negli angoli o per cucire curve molto strette, fermate la macchina, posizionate l’ago proprio a fianco dell’applicazione, sollevate il piedino e girate il tessuto. Quindi abbassate il piedino e continuate a cucire. Cucite alcuni punti alla fine della cucitura mettendo lo zigzag su 0 per evitare sfilacciature 35 RS2000-2D_EFNI.book Page 35 Thursday, March 30, 2006 3:31 PM A B D E Nederlands: Biesversiering / Ritssluitingvoet Italiano:Piedino cordoncino / Per chiusure lampo C F Nederlands: Bies / Koord Italiano:Cordoncino Nederlands Nederlands:Naai op de naadlijn Italiano:Cucire sulla linea de cuciture Italiano Biesversiering / Ritssluitingvoet Piedino cordoncino / Per chiusure lampo De biesversiering / ritssluitingvoet kunt U gebruiken voor het inzetten van een ritssluiting, maar U kunt de voet ook voor biesversiering gebruiken. Gebruik een rechte steek en de normale instelling, steeklengte 2.5 (middelmatige steeklengte) Verwisselen van de persvoet Opgelet: Schakel de machine uit voordat U een persvoetje verwisselt. De naaimachinenaald is een scherp object, waar U zich aan kan bezeren, wees voorzichtig met het verwisselen van de persvoet. Het is misschien een goed idee om de naald te verwijderen wanneer U van voet verwisseld, dit uit voorzorg. Schakel de machine uit: A. Zet de persvoet omhoog. B. Plaats de naald in zijn hoogste positie door het handwiel naar U toe te draaien. C. Duw het hendeltje van de persvoetklikhouder omhoog en verwijder de voet. (fig A) D. Gebruik de naaldplaatschroevendraaier om de schroef van de persvoethouder los te draaien en verwijder hierna de persvoethouder van de persvoetstang. (fig B) E. Plaats de biesversiering / ritssluitingvoet aan de persvoetstang van achter naar voren. (fig C) F. Draai de schroef van de persvoet vast doormiddel van de naaldplaatschroevendraaier. G. Draai de afstelschroef los en plaats de voet naar links of rechts van de naald, wat U wenst. Draai daarna de afstelschroef vast. H. Wanneer U klaar bent met het gebruik van de biesversiering / ritssluitingvoet: 1) Schakel de naaimachine uit. 2) De naald en de persvoet moeten in de hoogste positie staan. 3) Maak de persvoetschroef los met de naaldplaatschroevendraaier. 4) Verwijder de biesversiering / ritssluitingvoet. 5) Plaats de persvoetklikhouder en schroef de houder vast. 6) Klik het standaardvoetje vast. Ritssluiting inzetten / naaien Lees Uw instructieboek en/of sla Uw DVD erop na. Het inzetten van een biesversiering • Knip stroken die breed genoeg zijn om de bies/koord en naadomslag te bedekken. • Geef de naadlijn aan op het artikel. • Speld de bies/koord en strook vast aan het artikel langs de naadlijn. • Speld het geheel vast op het achtergrond materiaal. • Naai op de naadlijn zo dicht mogelijk tegen het bies/koord aan. Werk de naadomslag netjes af. • Draai het artikel naar de goede kant. LET OP: Als u de bies/koord in een naad naait zult U de naaisteek dichter naar het bies/koord moeten zetten om de 1e rij steken te bedekken. ❈ Biesversiering / Ritssluitingvoet is een optioneel accessoire. Il piedino cordoncino / chiusure lampo può essere usato sia per cucire chiusure lampo sia per fare ed attaccare un cordoncino. Usate il punto dritto, normalmente regolato sulla llunghezza 2.5 (lunghezza media del punto dritto) Cambio del piedino Nota: Spegnete la macchina prima di cambiare il piedino. L’ago della macchina per cucire è un accessorio appuntito, può causare ferite; fate attenzione quando cambiate il piedino, come precauzione di sicurezza. Spegnete la macchina. A. Alzate il piedino B. Portate l’ago nella posizione più alta ruotando il volantino verso di voi C. Alzate la leva di rilascio del piedino e toglietelo (fig. A) D. Usate il cacciavite della placca ago per allentare la vite della staffa del piedino e togliete la staffa del piedino dalla barra ago (fig. B) E. Posizionate il piedino cordoncino / chiusure lampo dal dietro verso avanti (fig. C) F. Stringete la vite del piedino, usando il cacciavite della placca ago G. Allentate e regolate la vite, muovete la punta verso la destra o sinistra dell’ago, se c’ è bisogno. Stringete e regolate la vite per tenere la punta in posizione H. Quando avrete finito di usare il piedino cordoncino / chiusure lampo: 1) Spegnete la macchina 2) L’ago e il piedino premistoffa debbono trovarsi in alto 3) Allentate la vite del piedino con il cacciavite della placca ago 4) Togliete il piedino cordoncino / chiusure lampo 5) Posizionare il supporto del piedino e stringere la vite 6) Rimettete il piedino premistoffa standard Inserimento della chiusura lampo / cucitura Fate riferimento al vostro manuale di istruzioni e/o al video DVD Inserire il cordoncino • Tagliate delle strisce larghe abbastanza da coprire la cucitura del cordoncino • Segnate la linea di cucitura sulla stoffa • Puntate ed imbastite la striscia di cordoncino e il cordoncino alla stoffa, lungo la linea di cucitura • Puntate ed imbastite il rovescio del tessuto • Cucite lungo la linea più vicino possibile al cordoncino • Pulite e aggiustate la cucitura • Girate il tessuto sul dritto del lavoro Nota: Se fate il punto cordoncino e lo cucite all’interno di una cucitura, i punti potrebbero essere così vicini al cordoncino da coprire la prima linea di cucitura (punto cordoncino) ❈ Il piedino cordoncino / per chiusure lampo è un accessorio opzionale. 37 A B 1-5 3 4 C D C English Français Zipper sewing 1. Be sure that the declutch knob in the handwheel is into the ( ) direction. 2. Set your machine as... (fig A) Stitch length dial between 1-5 3. Set the Zipper Foot on the right side of the needle. Sew the right side of the zipper. Guide the fabric carefully so that the zipper teeth of the right side are parrallel with the left edge of the foot. (fig B) 4. Re-set the Zipper Foot to the left side of the needle. Sew the left side of the zipper in the same way. (fig C) Pose de fermeture à glissière 1. Vérifier que le bouton de débrayage sur le volant est enclenché vers ( ). 2. Régler la machine comme indiqué... (fig. A) Cadran de sélecteur de longueur du point entr e 1 et 5 3. Installer le pied-fermeture à glissière à droite de l’aiguille. Piquer le côté droit de la fermeture en guidant le tissu de façon à ce que les dents de droite de la fermeture soient parallèles avec le bord gauche du pied. (fig. B) 4. Replacer le pied fermeture à glissière à gauche de l’aiguille. Piquer le côté gauche de la fermeture de la même façon. (fig. C) Use zipper foot. Utiliser le pied fermeture à glissière. Nederlands Italiano Rits inzetten 1. Overtuig u ervan dat de ontkoppelingsknop in het handwiel in de ( ) richting staat. 2. Stel uw machine in op... (fig A) Steeklengteknop tussen 1-5 3. Plaats de ritsvoet aan de rechterkant van de naald. Naai de rechterkant van de rits. Geleid de stof voorzichtig zo dat de ritstanden van de rechterkant parallel liggen met de linkerkant van de voet. (fig B) 4. Plaats de voet opnieuw, echter nu aan de linkerkant van de naald. Naai de linkerkant van de rits op dezelfde manier. (fig C) Applicazione di cerniere lampo 1. Assicurarsi che il pulsante di sblocco del volantino sia nella posizione ( ) 2. Regolate la macchina come indicato (fig. A) Manopola lunghezza punto t ra 1 e 5 3. Posizionate il piedino per cerniere lampo a destra dell’ago. Cucite il bordo destro della cerniera guidando il tessuto in modo che i denti di destra della cerniera siano paralleli con il bordo sinistro del piedino (fig. B) 4. Riposizionate il piedino a sinistra. Cucite il bordo sinistro della cerniera procedendo nello stesso modo (fig. C) Gebruik de ritssluitingvoet. Utilizzare il piedino per chiusure lampo. 38 RS2000-2D_EFNI.book Page 38 Thursday, March 30, 2006 3:31 PM B C Nederlands Italiano Borduren 1. Overtuig u ervan dat de ontkoppelingsknop in het handwiel in de ( ) richting staat. 2. Verzink de transporteur. (zie pag. 24) 3. Stel uw machine in voor satijnsteek. (fig A) Steeklengteknop op 0 4. Verminder voorzichtig de bovendraadspanning om te voorkomen dat de onderdraad naar boven wordt getrokken. Satijn zigzagsteken vereisen minder bovenspanning dan rechte steken. Ricami 1. Assicurarsi che il pulsante di sblocco del volantino sia nella posizione ( ) 2. Abbassate i dentini della griffa (vedere pag. 24) 3. Regolate la macchina per il punto satin come indicato (fig. A) Manopola lunghezza punto su 0 4. Per evitare che il filo inferiore venga tirato verso l’alto, ridurre la tensione del filo superiore VOOR GOED BORDUURWERK Het is belangrijk om de juiste naald en het juiste garen te gebruiken. Gebruik borduurgaren voor de bovendraad en een dunnere draad van dezelfde soort en kleur voor de onderdraad. Naald No. 9 No. 11 No. 14 Draad 120 - 100 100 - 80 60 - 50 5. Teken uw ontwerp op het materiaal en plaats dit in het midden van een borduurhoepel. Zorg ervoor dat het materiaal strak gespannen is. Leg vliseline onder het borduurwerk als u fijne stof borduurt 6. Trek de onderdraad eruit door het handwiel naar u toe te draaien terwijl u de bovendraad losjes vasthoudt. Laat de persvoet zakken. 7. Neem de onderdraad op en naai twee of drie steken. Knip de overtollige draad af. (fig B) 8. Begin te naaien langs de buitenkant van het ontwerp. Geleid de hoepel met de hand. (fig C) 9. Naai enkele rechte steken aan het einde ter versteviging. ❈ Maasvoet is een optioneel accessoire. ❈ Borduurhoepel niet inbegrepen. PER OTTENERE OTTIMI RICAMI Per eseguire correttamente i ricami è importante che vengano impiegati aghi e fili del tipo indicato. Impiegare come filo superiore un filo sottile da ricamo in seta e come filo inferiore un filo in seta più sottile, dello stesso tipo e colore. Ago No. 9 No. 11 No. 14 Filo 120 - 100 100 - 80 60 - 50 5. Tracciare il modello sulla stoffa da ricamare e centrarlo sul cerchietto da ricamo. Accertarsi che la stoffa da ricamare sia ben tesa Per ricamare tessuti molto sottili, inserite un leggero foglio di carta sotto al tessuto” 6. Tirate il filo inferiore facendo girare il volantino verso di voi, trattenendo leggermente il filo superiore. Abbassate il piedino premistoffa 7. Prendete il filo inferiore quindi fate due o tre punti. Tagliate il filo in eccesso (fig. B) 8. Tenete i due fili ed iniziate a cucire lungo i contorni del motivo con il punto a cordoncino. Continuate a ricamare guidando il cerchio con la mano (fig. C) 9. Per terminare cucite alcuni punti regolando la larghezza del zigzag su 0. ❈ Il piedino per rammendo è un accessorio opzionale. ❈ Il cerchietto da ricamo non è incluso. 40 RS2000-2D_EFNI.book Page 40 Thursday, March 30, 2006 3:31 PM English Français Twin needle threading 1. Set the extra spool pin on the machine. (The extra spool pin and twin needle are optional accessories and can be supplied with specified machines). Place a spool of thread on each spool pin. (fig A) 2. Thread the two threads in the same way for single needle (page 14), except the next 3 points at (fig C) and (fig F). 1 At the Tension disc, pass threads separately to the right and to the left. (fig C) 2 At the needle guide 5, pass threads through separate guides, one to the left guide, other to the right guide. (fig F) 3 At the needle eye 6, the thread from the right needle guide should go through the right needle eye. The thread from the left side to the left needle eye. (fig F) Enfilage d’une aiguille double 1. Mettre en place le porte-bobine supplémentaire sur la machine. (Le porte-bobine supplémentaire et l'aiguille double sont des accessoires en option pouvant être fournis avec des machines spécifiques.) Placez une bobine du fil sur chaque porte-bobine. (fig. A) 2. Enfilez les deux fils de la même manière que si vous enfilez une seule aiguille (page 14), excepté les 3 points suivants, voir (fig. C) et (fig. F). 1 Aux disques du tendeur, passez les fils à travers le guide-fil. (fig. C) 2 Au niveau du guide-aiguille 5, passez les fils à travers les guides de la gauche et de la droite séparément. (fig. F) 3 Au niveau du chas de l’aiguille, le fil venant du guide-fil droit de l’aiguille doit passer par le chas de l’aiguille droite. Le fil venant du guide-fil gauche de l’aiguille par le chas de l’aiguille gauche. (fig. F) Caution! Remember to use less than 2.5 zigzag width. Needle threader can not be used on twin needle threading. Attention! Ne pas utiliser une largeur de zigzag inférieur à 2,5 mm. Il n’est alors pas possible d’utiliser l’enfile-aiguille. Nederlands Italiano Tweelingnaald inrijgen 1. Plaats de extra garenpen. (De extra garenpen en tweelingnaald zijn optionele accessoires die kunnen worden geleverd bij aangegeven modellen) Zet een klos garen op elke garenpen. (fig A) 2. Rijg de twee draden in op dezelfde manier als met enkele naald (pag. 14), behalve de 3 volgende punten op (fig C) en (fig F). 1 Bij de spanningsplaatjes legt u de draden apart aan de linkerkant en aan de rechterkant. (fig C) 2 Bij de naaldgeleider 5, geleidt u de draden apart, een door de linkergeleider en de andere door de rechtergeleider. (fig F) 3 Bij het oog van de naald 6 moet de draad van de rechtergeleider door het rechteroog gaan. De draad van de linkergeleider door het linkeroog. (fig F) Cucitura con ago doppio 1. Tra gli accessori è incluso un perno portarocchetto extra. (Il portarocchetto extra e l'ago doppio sono accessori opzionali che possono essere forniti con determinati modelli di macchine per cucire). Inserire il perno portarocchetto extra nell’apposito foro e infilarvi un altro rocchetto (fig. A) 2. Infilare normalmente la macchina ed eseguire le seguenti operazioni: 1 Nel disco tenditore, far passare un filo dal lato destro e l’altro dal lato sinistro (fig. C) 2 Nella guida del filo 5 passare i fili attraverso guide separate, uno nella guida sinistra, l’altro nella guida destra (fig. F) 3 Il filo di destra deve andare alla cruna dell’ago di destra ed il filo di sinistra alla cruna dell’ago di sinistra (fig. F) Waarschuwing! Vergeet niet de zigzagsteekbreedte kleiner dan 2.5 in te stellen. De draadinrijger kan niet gebruikt worden om een tweelingnaald in te rijgen. Attenzione! Ricordarsi di non usare una larghezza di zigzag maggiore di 2,5. Non si può usare il dispositivo automatico per infilare l’ago 42 A B 1-5 C 4 D English Français Pin tucking using twin needle For light weight material 1. Be sure that the declutch knob in the handwheel is into the ( ) direction. 2. Set your machine as... (fig A) Stitch length dial between 1-5 3. Insert the Quilting Guide under the spring plate on the shank. (fig B) 4. Mark the first line with a pencil or tailors chalk, and sew. For the second line, follow the stitches of the first line, using the Quilting Guide. The intervals between the lines can be adjusted by moving the Quilting Guide in the direction of the arrow shown in (fig C). Piquage matelassé Pour tissu léger 1. Vérifier que le bouton de débrayage sur le volant est enclenché vers ( ). 2. Régler la machine comme indiqué... (fig. A) Cadran de sélecteur de longueur du point entre 1 et 5 3. Insérer le guide à matelasser au-dessus de la plaque du support de pied-de-biche. (fig. B) 4. Tracer la première ligne avec un crayon ou une craie-tailleur et piquer. A partir de la seconde ligne, piquer en conduisant le guide dans la première couture. La largeur entre les coutures peut être réglée en glissant le guide dans le sens de la flèche (fig. C) Quilting Guide is an optional accessory. Le guide à matelasser est un accessoire en option. Nederlands Italiano Plooien innaaien met tweelingnaald Voor lichtgewicht materiaal 1. Overtuig u ervan dat de ontkoppelingsknop in het handwiel in de ( ) richting staat. 2. Stel uw machine in op... (fig A) Steeklengteknop tussen 1-5 3. Monteer de quilt geleider onder de klemveer op de persvoethouder. (fig B) 4. De eerste lijn met potlood of met krijt op de stof markeren en daarna naaien. Voor de tweede lijn, de steken van de eerste lijn volgen met gebruik van de quilt geleider. De afstand tussen de naden kan afgesteld worden door de quilt geleider in de richting van de pijl te verschuiven zoals afgebeeld in (fig C) Imbastitura con doppio ago Per tessuti leggeri 1. Assicurarsi che il pulsante di sblocco del volantino sia nella posizione ( ) 2. Regolate la macchina come indicato (fig. A) Manopola lunghezza punto tra 1 e 5 3. Inserite la guida distanziatrice sotto la placca (fig. B) 4. Segnate la prima linea con una matita, o con un gessetto, e cucite. Per la seconda linea, seguite i punti della prima, usando la guida distanziatrice. Gli intervalli tra le linee possono essere variati muovendo la guida in direzione della freccia mostrata in (fig. C) De quilt geleider is een optioneel accessoire. 43 La guida distanziatrice è un accessorio opzionale. RS2000-2D_EFNI.book Page 42 Thursday, March 30, 2006 3:31 PM A B C D English Français Walking Foot Pied-de-biche double entraînement This walking foot is used only with straight or zigzag stitch. A. Name of parts 1 Holder for needle clamp 2 Holder for needle bar B. • Rotate the handwheel toward you and raise the needle to its highest position. And then turn off the power. Set the pattern selecting dial: Straight stitch or zigzag stitch. IMPORTANT: Make sure that the needle is at its highest position when attaching the walking foot. C. • Lift the presser foot lever to raise the presser foot. • Loosen the screw of the presser foot holder by using screw driver and remove the foot holder. D. • Attach the holder 1 to the needle clamp (A) and the holder 2 to the needle bar (B). And then tighten the screw of the presser foot holder by using screw driver. • Lower the presser foot lifter and tighten the screw of presser foot holder. WARNING: To avoid injury, turn the handwheel slowly toward you and make sure that the needle does not hit the walking foot. ❈ Walking Foot is an optional accessory. Ce pied-de-biche sera utilisé uniquement avec le point droit et zig zag. A. Désignation des éléments constitutifs du pied 1 Support barre serre aiguille 2 Support barre aiguille B. • Amenez l’aiguille en position haute et coupez l’alimentation électrique. IMPORTANT: Assurez vous que l’aiguille est à sa position la plus haute lors de l’opération de mise en place du pied-de-biche double entraînement. C. • Sélectionnez un point droit ou un zigzag sur le bouton sèlecteur de points. • Dévissez la vis de maintien du support de pied de biche à l’aide du tournevis de plaque aiguille et ôtez le support. D. • Attachez le support 1 à la barre serre aiguille (A) et le support 2 à la barre aiguille (B). • Abaissez le levier de pied-de-biche et vissez la vis de fixation sur la barre aiguille. ATTENTION: Pour éviter tout problème lié à cette opération, tournez le volant vers vous mais lentement en vous assurant que l’aiguille ne viennent pas taper sur le pied-de-biche. ❈ Le pied-de-biche double entraînement est un accessoire en option. Nederlands Italiano Loopvoet Piedino doppio trsporto Deze loopvoet kunt U alleen gebruiken voor recht stikken en de zigzagsteek. A. Naam van het onderdeel: 1 Houder voor de naaldklem. 2 Houder voor de persvoetstang. B. • Plaats de naald in zijn hoogste stand door aan het handwiel te draaien en schakel daarna de machine uit. BELANGRIJK: Wanneer U deze voet gaat gebruiken, plaats U altijd de naald in zijn hoogste positie. C. • Zet de persvoet omhoog doormiddel van de persvoethendel. • Draai de schroef van de persvoethouder los met de naaldplaatschroevendraaier. D. • Plaats de houder 1 over de naaldklem (A) en de houder 2 aan de persvoetstang (B). • Zet de persvoethefboom naar beneden en draai de schroef voor de persvoethouder vast. WAARSCHUWING: Controleer eerst, voordat U gaat naaien, dat de naald niet de persvoet raakt anders kunnen er ongelukken gebeuren. Dit doet U door het handwiel langzaam naar U toe te draaien. ❈ Loopvoet is een optioneel accessoire. Il piedino doppio trasporto è stato ideato per rendere la cucitura più semplice su alcuni tessuti, quali stoffa da giacche, pelle, lana o jersey, rendendo così il trasporto più sicuro e compatto. A. Componenti 1 Staffa per il morsetto dell’ago 2 Leva per la barra ago B. • Ruotare il volantino verso di voi e alzate l’ago nella sua posizione più alta, e spegnete la macchina per cucire. C. • Sollevare la barra del piedino per alzare il piedino. • Allentare la vite del gambo del piedino usando il cacciavite in dotazione e rimuovere il gambo. D. • Posizionate la staffa 1 al morsetto ago (A) e la leva 2 alla barra ago (B). • Abbassate la leva alza piedino e stringete la vite della staffa del piedino premistoffa. ATTENZIONE: Per evitare danni, girate il volantino lentamente verso di voi e assicuratevi che l’ago non urti il piedino doppio trasporto. ❈ Il piedino doppio trasporto è un accessorio opzionale. 44 RS2000-2D_EFNI.book Page 44 Thursday, March 30, 2006 3:31 PM G H J K I Nederlands Maasvoet A. Plaats de naald in zijn hoogste stand door aan het handwiel te draaien en schakel daarna de machine uit. B. Zet de persvoet omhoog doormlddel van de persvoethendel. C. Plaats de maasvoet. D. Selecteer een rechte steek (midden positie) of een zigzagsteek. E. Verzink de transporteur. F. Zorg dat er ongeveer 10 cm onderdraad uitsteekt. G. Plaats Uw stof onder de persvoet. H. Als U de stof niet kunt bewegen onder de persvoet, zet de persvoet dan omhoog. I. Draai het handwiel naar U toe om de onderdraad naar boven te halen. J. Houdt de onderdraad losjes vast en naai 4 steken. • Voor mazen knipt U overtollig garen weg. • Voor uit de vrije hand doorstikken gebruikt U een naald om het overtollige garen te verbergen onder een doorstikgedeelte. Knip de garens die nog zichtbaar zijn af. K. Gebruik beide handen voor een goede begeleiding. • Loop Uw ontwerp na op het materiaal en plaats deze in een borduurring. • Zorg dat het materiaal strak gespannen is. • Gebruik vlieseline wanneer U op een dunne stof gaat borduren. • Begeleid de borduurring met de hand. BELANGRIJK Denk eraan dat U de transporteur weer omhoog zet wanneer U klaar bent. ❈ Borduurhoepel niet inbegrepen. ❈ Maasvoet is een optioneel accessoire. Italiano Piedino per rammendo A. Ruotare il volantino verso di voi e alzate l’ago nella sua posizione plù alta, e spegnete la macchina per cucire. B. Sollevare la barra del piedino per alzare il piedino. C. Mettete il piedino per il rammendo. D. Selezionate un qualsiasi punto dritto (con l’ago in posizione centrale) o un punto zig-zag. E. Abbassate (escludete) la griffa di trasporto. F. Lasciate 10 cm circa di filo inferiore dopo aver infilato. G. Mettete il tessuto sotto il piedino. H. Se il tessuto non scivola sotto il piedino, alzate il piedino premistoffa. I. Girate il volantino verso di voi per tirare su il filo inferiore. J. Trattenendo dolcemente il filo inferiore, cucite 4 punti circa. • Per il rammendo, tagliate ogni filo in eccesso. • Quando trapuntate a mano libera, usate un ago per far rientrare il filo all’interno della trapuntatura. Ripulite da ogni filo che si possa ancora vedere. K. Usate entrambe le mani per guidare il tessuto e mantenerlo in posizione. • Tracciate il vostro disegno sulla stoffa e centratelo sul telaio da ricamo. • Assicuratevi che la stoffa sia tesa. • Mettete un tessuto stabilizzatore al di sotto quando ricamate su tessuti sottili. • Guidate il telaio con la mano. IMPORTANTE Ricordate di rialzare la leva della griffa di trasporto, quando avete finito. ❈ Il cerchietto da ricamo non è incluso. ❈ Il piedino per rammendo è un accessorio opzionale. 46 RS2000-2D_EFNI.book Page 45 Thursday, March 30, 2006 3:31 PM A B D E C F English Piecing Foot G Français Pied d’application Use the 1/4” piecing foot whenever a 1/4” seam allowance is required. A. Raise the foot release lever to remove the foot. B. Place the piecing foot on the needle plate aligning needle holes. C. Lower the presser foot lever so that the ankle snaps on the foot. To stitch a 1/4” seam: Utilisez le pied quart de pouce toutes les fois ou une couture quart de pouce est requise. A. Poussez le levier de changement de pied-de-biche vers vous et retirez le pied en place. B. Mettre en place le pied d’application sur la plaque aiguille puis alignez les trous de la plaque avec celui du pied d’application. C. Abaissez le levier de pied-de-biche de manière à clipper le pied sur son support. Pour coudre une couture quart de pouce: D. Align the edges of the fabrics with the right edge of the presser foot. E. When pivoting at a corner, stop when the fabric edge is even with the front red line on the foot. Lower the needle into the fabric and pivot. Continue to stitch. To stitch a 1/8” seam: D. Alignez les bords du tissu avec le bord droit du pied-de-biche. E. Lorsque vous parvenez au bord du tissu, stopper la couture en prenant soin de vérifier que le bord du tissu soit en face de la première ligne rouge du pied-de-biche. Piquez l’aiguille dans le tissu, relevez le levier de pied-de-biche comme en C. et tournez le tissu de 90o, vous pouvez alors poursuive la couture en point droit et répéter l’opération à chaque angle. F. Align the edges of the fabrics with the inside edge of the right side of the presser foot. G. When pivoting at a corner, stop when the fabric edge is even with the middle red line on the foot. Lower the needle into the fabric and pivot. Continue to stitch. ❈ Always use straight stitch (center position). ❈ Piecing Foot is an optional accessory. F. Alignez les bords du tissu avec le bord intérieur droit du pied-de-biche. G. Pour négocier le passage des angles, lorsque vous arrivez au bord du tissu, stopper la couture en alignant les bords du tissu avec la 2ème ligne rouge (milieu) du pied-de-biche. Tout en laissant l’aiguille plantée dans le tissu, faire pivoter l’ouvrage et continuez ainsi à coudre. ❈ Toujours utiliser le point droit (position centrale). ❈ Le pied d'application est un accessoire en option. Nederlands Pour coudre une couture huitième de pouce: Italiano Verstelvoet Piedino per patchwork Gebruik de 6mm verstelvoet wanneer U een 6mm naadomslag wilt. A. Zet de persvoethendel omhoog zodat U het voetje kan verwijderen. B. Plaats de verstelvoet op de naaldplaat zodat de naaldopening gelijk valt met die van de naaldplaat. C. Zet de persvoethendel naar beneden zodat het pinnetje in de houder klikt. Usate il piedino per patchwork da 6 mm quando avete bisogno di questo tipo di cucitura. A. Alzate la leva alza piedino per togliere il piedino. B. Mettete il piedino per patchwork sulla placca ago allineando i buchi dell’ago. C. Abbassate la leva alza piedino cosicché il piedino si agganci da solo. Het naaien van 6 mm naad: D. Plaats de kant van de stof gelijk aan de rechterkant van de persvoet. E. Wanneer U op een hoek wilt draaien, stop dan wanneer de zijkant van de stof gelijk ligt met de voorste rode lijn op het voetje. Plaats de naald in de stof en draai de stof. Ga verder met naaien. Per cuciture da 6 mm di larghezza Het naaien van 3 mm naad: Per cuciture di 3 mm di larghezza F. Plaats de kant van de stof gelijk aan de rechterbinnenkant van de persvoet. G. Wanneer U een hoek wilt draaien, stop dan wanneer de zijkant van de Stof gelijk ligt met de middelste rode lijn op het voetje. Plaats de naald in de stof en draai de stof. Ga verder met naaien. ❈ Gebruik altijd de rechte steek (middelste stand). ❈ Verstelvoet is een optioneel accessoire. 47 D. Allineate i bordi del tessuto con il lato destro del piedino. E. Quando girate un angolo, fermatevi quando il bordo del tessuto è pari con la linea rossa frontale del piedino. Abbassate l’ago nel tessuto e girate. Continuate a cucire. F. Allineate i bordi del tessuto con il bordo interno del lato destro del piedino. G. Quando girate un angolo, fermatevi quando il bordo del tessuto è pari con la linea rossa media del piedino. Abbassate l’ago nel tessuto e girate. Continuate a cucire. ❈ Utilizzare sempre il punto diritto (posizione centrale). ❈ Il piedino per patchwork è un accessorio opzionale. RS2000-2D_EFNI.book Page 46 Thursday, March 30, 2006 3:31 PM A B C English Français Open Toe Appliqué Foot Use the Open Toe Appliqué Foot when doing Appliqué or decorative stitches, to be able to see the stitching line better, and to allow the foot to feed smoothly over the build up of the satin stitching. Pied ouvert Utilisez le pied ouvert lorsque vous devez faire des appliques ou des points décoratifs. Le pied-de-biche ouvert vous permettra de mieux voir les lignes de couture et de passez aisément sur les points décoratifs. A. Raise the foot release lever to remove the foot. B. Place the Open Toe Appliqué Foot on the needle plate aligning needle holes. C. Lower the presser foot lever so that the ankle snaps on the foot. ❈ Open Toe Appliqué Foot is an optional accessory. Nederlands Open Applicatievoet Gebruik de open applicatievoet voor applicaties en decoratieve steken, dit stelt U in staat om de naailijn beter te volgen en een beter transport te geven over de dicht op elkaar staande steken. A. Zet de persvoethendel omhoog om het standaardvoetje te verwijderen. B. Plaats de open applicatievoet op de naaldplaat zodat de naaldopening gelijk valt met die van de naaldplaat. C. Zet de persvoethendel naar beneden zodat het pinnetje in de houder klikt. ❈ Open Applicatievoet is een optioneel accessoire. A. Poussez le levier de changement de pied-de-biche vers vous et retirez le pied en place. B. Mettre en place le pied ouvert sur la plaque aiguille tout en alignant les trous de la plaque et du pied. C. Abaissez le levier de pied-de-biche de manière à clipper le pied sur son support. ❈ Le pied ouvert est un accessoire en option. Italiano Piedino per applicazioni con punta aperta Usate il piedino per applicazioni con punta aperta quando dovete fare applicazioni o punti decorativi; vi permette di vedere in modo migliore la linea di cucitura, e permette al piedino di trasportare in modo scorrevole mentre si fa il punto satin. A. Alzate la leva alza piedino per togliere il piedino. B. Mettete il piedino per applicazioni con punta aperta sulla barra ago allineando i buchi con l’ago. C. Abbassate la leva del piedino. ❈ Il piedino per applicazioni con punta aperta è un accessorio opzionale. 48 D 0.4-1 E 0.4-1 14 13 N M 0.4-1 F G 15 O Nederlands Italiano Knoopsgaten maken 1. Overtuig u ervan dat de ontkoppelingsknop in het handwiel in de ( ) richting staat. 2. Meet de diameter en de dikte van de knoop. Voeg de dikte en 0.3 cm (voor de trenzen) toe aan de diameter. Markeer de maat van het knoopsgat op de stof. (fig A) Voor stretch stoffen legt u een stukje papier op de plaats waar het knoopsgat gemaakt gaat worden. 3. Bevestig de knoopsgatvoet. Duw het schuivende gedeelte a van de knoopsgatvoet helemaal naar achteren. De stof onder de voet leggen zodat de markering van het knoopsgat in het midden van de voet komt. (fig B) 4. STAP 1 (voorste trens) (fig C) Stel de steekkeuzeknop op No. 12 Zet de steeklengteknop tussen 0.4-1 Laat de persvoet zakken en naai 5-6 steken. Stop de machine zo dat de naald aan de linkerkant van de steken staat. Breng de naald omhoog. 5. STAP 2 (linkerkant) (fig D) Stel de steekkeuzeknop op No. 13 Naai de linkerkant van voor naar achter tot aan het einde van de markering. Stop de machine zo dat de naald aan de linkerkant van de steken staat. Breng de naald omhoog. 6. STAP 3 (achterste trens) (fig E) Stel de steekkeuzeknop op No. 14 Naai 5-6 steken. Stop de machine zo dat de naald aan de rechterkant van de steken staat. Breng de naald omhoog. 7. STAP 4 (rechterkant) (fig F) Stel de steekkeuzeknop op No. 15 Naai de rechterkant van achter naar voor tot aan de voorste trens. Stop de machine zo dat de naald aan de linkerkant van de steken staat. Breng de naald en de persvoet omhoog. 8. Haal het werk van de machine. Duw een speld door de trens om doorsnijden hiervan te voorkomen. Snij in het midden van het knoopsgat met een tornmesje het knoopsgat open. (fig G) In de accessoireset aanwezig. Waarschuwing! Als u de knoopsgaten opensnijdt met het tornmesje, houd dan de stof niet voor het mesje. Anders kunt u letsel oplopen aan uw hand. Cucitura di un’asola 1. Assicurarsi che il pulsante di sblocco del volantino sia nella posizione ( ). 2. Misurate il diametro e lo spessore del bottone aggiungendo 0,3 cm per i punti di chiusura. Tracciate la dimensione dell’asola sul tessuto (fig. A) Per materiali elastici, ponete un leggero foglio di carta in corrispondenza dell’asola 3. Inserite il piedino per asole. Spingete completamente all’indietro la slitta a del piedino per asole. Posizionate il tessuto sotto il piedino in modo che il riferimento dell’asola si trovi al centro del piedino stesso e la freccia indichi l’inizio dell’asola (fig. B) 4. FASE 1 (punti di chiusura) (fig. C) Posizionare la manopola selezione punti sul no. 12 Posizionare la manopola lunghezza punto sul tra 0,4 e 1 Abbassare il piedino ed eseguire 5 o 6 punti. Arrestare la macchina in modo che l’ago si trovi sulla sinistra dei punti. Portare l’ago in alto 5. FASE 2 (cordoncino di sinistra) (fig. D) Posizionare la manopola selezione punti sul no. 13 Cucire il cordoncino di sinistra dalla riga d’inizio fino alla riga finale. Arrestare la macchina in modo che l’ago si trovi sulla sinistra dei punti. Portare l’ago in alto. 6. FASE 3 (punto di arresto) (fig. E) Posizionare la manopola selezione punti sul no. 14 Eseguire 5 o 6 punti. Arrestare la macchina in modo che l’ago si trovi sulla sinistra dei punti. Portare l’ago in alto 7. FASE 4 (cordoncino di destra) (fig. F) Posizionare la manopola selezione punti sul no. 15 Cucite il cordoncino di destra fino al primo punto. Arrestare la macchina in modo che l’ago si trovi sulla sinistra dei punti. Portare l’ago in alto ed alzare il piedino 8. Rimuovere il tessuto dalla macchina e tagliare il centro dell’asola con il taglia asole in dotazione (fig. G) Attenzione! Quando si usa il taglia asole, evitare di tenere il tessuto di fronte allo strumento. La mancata osservanza della suddetta avvertenza implica il rischio di lesioni alle mani. 50 RS2000-2D_EFNI.book Page 49 Thursday, March 30, 2006 3:31 PM A B C English Français Adjusting stitch balance of buttonhole Occasionally (especially on speciality fabrics) the stitch length shows differences in forward and reverse stitches of the buttonhole. Stitch balance can be equalized by turning the Buttonhole Stitch Adjuster. (fig A) 1. If the stitches of the right side of the buttonhole (forward stitches) are too close together, turn the adjuster clockwise using a screw driver or a coin. (fig B) Ajuster l’équilibre des points de la boutonnière Parfois (surtout pour des tissus particuliers) la longueur de point montre des différences entre les points crées en marche avant et les points crées en marche arrière pour réaliser la boutonnière. L’équilibre des points de boutonnières s’obtient en tournant le sélecteur de mise au point (fig. A) 1. Si les points du côté droit de la boutonnière (point en avançant) sont trop rapprochés, tourner le sélecteur de mise au point dans le sens des aiguilles d’une montre en utilisant un tournevis ou une pièce. (fig. B) 2. If the stitches of the left side of the buttonhole (reverse stitches) are too close together, turn the adjuster counterclockwise. (fig C) 2. Si les points du côté gauche de la boutonnière (points en reculant) sont trop rapprochés, tourner le sélecteur de mise au point dans le sens contraire des aiguilles d’une montre. (fig. C) Nederlands Italiano Instellen van de steekbalans van het knoopsgat Af en toe (vooral mat speciale stoffen) vertonen de lengtesteken verschillen in de voorwaartse en achterwaartse steken van het knoopsgat. De steekbalans kan gelijk gemaakt worden door aan de knoopsgat steek instellingsknop te draaien (fig A) 1. Als de steken aan de rechterkant van het knoopsgat (voorwaartse steken) te dicht op elkaar zitten, draait u de afstellingsknop rechtsom met een schroevendraaier of een munt. (fig B) Bilanciamento dei lati sinistro e destra dell’asola Su tessuti diversi, i punti sinistro e destro possono risultare non bilanciati. In tal caso regolare il bilanciamento dei punti ruotando l’apposito controllo (fig. A) posto dietro la macchina 1. Se i punti del lato destro dell’occhiello sono troppo vicini, ruotare il controllo a sinistra come mostrato in (fig. B) 2. Als de steken aan de linkerkant van het knoopsgat (achterwaartse steken) te dicht op elkaar zitten, draait u de afstellingsknop linksom. (fig C) 51 2. Se i punti del lato sinistro dell’occhiello sono troppo vicini, ruotare il controllo a destra come mostrato in (fig. C) RS2000-2D_EFNI.book Page 50 Thursday, March 30, 2006 3:31 PM A B ➀ English Français MAINTENANCE MAINTENANCE Changing light bulb Changement d’ampoule Caution! Disconnect power supply before carrying out maintenance. Make sure bulb is not hot. Attention! Débrancher l’alimentation avant de commencer la maintenance. 1. Unplug the machine. 2. Loosen screw 1, and remove face cover. (fig A) 3. Remove bulb by unscrewing it in an anticlockwise direction. 4. Install a new bulb by screwing it in clockwise. (fig B) 5. Replace the face cover, tighten the screw. 1. Débrancher la machine. 2. Dévisser les vis et ouvrir le couvercle latéral. (fig. A) 3. Enlever l’ampoule en dévissant dans le sens inverse des aiguilles d’une montre. (fig. B) 4. Remettez le couvercle en place et serrez la vis. Nederlands Italiano ONDERHOUD MANUTENZIONE Verwisselen van het lampje Sostituzione della lampadina Waarschuwing! Haal de stekker uit het stopcontact voordat u met onderhoud begint. Attenzione! Togliete la spina dalla presa di corrente prima di qualsiasi operazione di manutenzione 1. Haal de stekker eruit. 2. Draai schroef 1, los en open de kap. (fig A) 3. Haal het lampje eruit door het linksom los te draaien. 4. Installeer een nieuw lampje en draai dit rechtsom vast. (fig B) 5. Sluit de kap en draai de schroef vast. 1. Staccate la presa 2. Togliete le viti e aprite il coperchio frontale come indicato (fig. A) 3. Svitate la lampadina in senso antiorario 4. Installate una lampadina nuova avvitandola in senso orario (fig. B) 5. Rimettere la copertura e stringere bene la vite. 52 RS2000-2D_EFNI.book Page 51 Thursday, March 30, 2006 3:31 PM A B C ➀ D E ➁ English Français Your machine requires cleaning and oiling for good sewing performance. A machine which is used for a few hours a day needs to be cleaned and oiled once a month. Caution! Disconnect power supply before carrying out maintenance. Needle in the raised position. Cleaning 1. Remove foot and needle. Remove needle plate with needle plate screw driver. (fig A) (needle up position) 2. Brush off all dust and lint on feed teeth with a cleaning brush. (fig B) 3. Open shuttle cover and turn latches of shuttle 1 outwards. (fig C) 4. Remove shuttle hook cover. Remove shuttle hook. (fig D) 5. Clean shuttle race 2 with a cleaning brush and soft cloth. (fig E) 6. Replace hook. 7. After maintenance, replace needle plate, needle and presser foot. Votre machine nécessite d’être nettoyer et huilée pour une bonne performance de couture. Une machine qui est utilisée seulement quelques heures a besoin d’être nettoyée et huilée une fois par mois. Attention! Débrancher la machine avant de commencer la maintenance. L’aiguille en position haute. Nettoyage 1. Enlever le pied-de-biche et l’aiguille. Enlever la plaque-aiguille. (fig. A) (aiguille en position haute) 2. Brosser tous les dépôts et la griffe d’entraînement à l’aide de la brosse de nettoyage. (fig. B) 3. Enlever le cache-navette et repousser les loquets 1 vers l’extérieur. (fig. C) 4. Enlever l’étrier de la coursière. Enlever le crochet de la navette. (fig. D) 5. Nettoyer l’étrier avec une brosse de nettoyage et un chiffon doux. (fig. E) 6. Replacer le crochet. 7. Après intervention, remettre en place la plaqueaiguille, l’aiguille et le pied presseur. Nederlands Italiano Uw machine moet schoongehouden en geolied worden om goede prestaties te kunnen bieden. Een machine die enkele uren per dag wordt gebruikt moet eens per maand schoongemaakt en geolied worden. Waarschuwing! Haal de stekker uit het stopcontact voordat u met onderhoud begint. Zet de naald in de hoogste stand. La vostra macchina richiede una manutenzione ed una lubrificazione regolare per poter funzionare nel migliore dei modi. Una macchina che viene utilizzata per alcune ore ogni giorno deve essere pulita e lubrificata una volta al mese Attenzione! Togliete la spina dalla presa di corrente prima di qualsiasi operazione di manutenzione. Ago in posizione alta Schoonmaken 1. Verwijder de voet en de naald. Verwijder de naaldplaat. (fig A) (naald omhoog) 2. Borstel alle stof en pluisjes op de transporteur weg met een schoonmaak borsteltje. (fig B) 3. Open de spoelhuisklep en draai de hendeltjes van het grijpersysteem 1 naar buiten. (fig C) 4. Verwijder de grijper dekring. Verwijder het spoelhuis. (fig D) 5. Maak de grijperbaan 2 schoon met een schoonmaak borsteltje en zachte doek. (fig E) 6. Plaats spoelhuis terug. 7. Na het onderhoud kunt U de naaldplaat, naald en de persvoet terugplaatsen. 53 Pulizia 1. Togliete il piedino, l’ago e la placca ago (fig. A) (ago in posizione sollevata) 2. Con un apposito pennello togliete tutti i depositi e pulite il trasportatore (fig. B) 3. Spostate le alette verso l’esterno (fig. C) 4. Togliete l’anello ferma crochet e il crochet (fig. D) 5. Pulitelo con un apposito pennello od un panno morbido (fig. E) 6. Riposizionare il crochet. 7. Dopo la manutenzione, riposizionare la placca ago, l’ago e il piedino. RS2000-2D_EFNI.book Page 52 Thursday, March 30, 2006 3:31 PM F English Français Caution! Disconnect power supply before carrying out maintenance. Attention! Débrancher la machine avant de commencer la maintenance. Oiling Use oil manufactured specially for sewing machine use. Other oils will eventually cause mechanism to jam. Huilage N’utiliser que de l’huile spéciale pour machine à coudre. D’autres huiles peuvent endommager la machine. Apply a drop of oil to part of shuttle where friction occures. (fig F) Appliquer une goutte d’huile à la coursière au point de friction. (fig. F) Nederlands Italiano Waarschuwing! Haal de stekker uit het stopcontact voordat u met onderhoud begint. Attenzione! Togliete la spina dalla presa di corrente prima di qualsiasi operazione di manutenzione Olieën Gebruik speciale naaimachine olie. Andere oliesoorten kunnen uiteindelijk storingen in het mechanisme veroorzaken. Lubrificazione Utilizzate esclusivamente olio speciale per macchine per cucire. Altri tipi di olio possono causare danni ai meccanismi. Doe een drupje olie op het deel van de grijperbaan waar wrijving voorkomt. (fig F) Applicate una goccia di olio nel punto di scorrimento del crochet (fig. F) 54 RS2000-2D_EFNI.book Page 53 Thursday, March 30, 2006 3:31 PM A B C D 30g English Français TROUBLE SHOOTING SOLUTIONS DE DEPANNAGE Lower thread tension adjustment Réglage de la tension du fil inférieur If your machine skips stitches or loops stitches, it may require tension adjustment. To check the lower thread tension, follow these steps. Si le point saute ou boucle, votre machine n’est pas en panne. Pour vérifier la tension de la canette, suivre les étapes suivantes. Checking bobbin case tension The needle must be in the raised position. 1. Push latches of the shuttle to the outside, as shown in (fig A). 2. Remove shuttle hook cover as shown in (fig B). 3. Remove shuttle hook. (fig C) 4. Suspend bobbin, bobbin case, and shuttle hook all together and hold the bobbin thread as illustrated in (fig D). When the bobbin case tension is correct, the thread should slide down with light resistance. When the bobbin case tension is too tight, the thread does not slide down, or the thread jerks. When the bobbin case tension is too loose, the thread easily slides down with no resistance. Vérification de la tension de la canette L’aiguille doit être en position haute 1. Repousser les loquets de la navette vers l’extérieur, comme indiqué (fig. A). 2. Enlever le couvercle de l’étrier du crochet comme indiqué (fig. B). 3. Enlever l’étrier. (fig. C) 4. Suspendre l’ensemble canette / navette / crochet et tenir le fil de la canette comme indiqué (fig. D). Si la tension de la canette est correcte, le fil devrait se dérouler avec une petite résistance. Si la tension de la canette est trop serrée, le fil ne se déroule pas, ou le fil se déroule avec saccades. Si la tension de la canette est trop faible, le fil se déroule très facilement sans résistance. Nederlands Italiano STORINGEN VERHELPEN PICCOLI INCONVENIENTI Onderdraad spannings afstelling Regolazione della tensione inferiore Als uw machine steken overslaat of lust, is het mogelijk dat de spanning afgesteld moet worden. Om de onderdraad te controleren, volg de volgende stappen. Quando la macchina salta un punto o un punto si arriccia, la tensione non è ben regolata. Per controllare la tensione, seguite i passi successivi: De naald moet in de hoogste stand staan. Verifica della tensione della capsula L’ago deve essere in posizione alta 1. Duw de hendeltjes van het grijpersysteem naar buiten zoals afgebeeld in (fig A). 2. Verwijder de grijper dekring zoals afgebeeld in (fig B). 3. Verwijder de grijper. (fig C) 4. Laat de grijper en spoelhuis spoeltje samen zweven door deze samen vast te houden aan de draad zoals afgebeeld in (fig D). Als de spoelhuis spanning goed is, zal de draad met lichte weerstand afrollen. Als de spoelhuis spanning te strak is, rolt de draad niet af, of stootsgewijs. Als de spoelhuis spanning te los is, rolt de draad gemakkelijk af zonder enige weerstand. 55 1. 2. 3. 4. Spingere le alette verso l’esterno come indicato in (fig. A) Togliere l’anello ferma crochet mostrato in (fig. B) Togliere il crochet (fig. C) Trattenete il filo e tenete sospeso il gruppo spolina / capsula / crochet come illustrato in (fig. D). Fate un movimento in su e giù verticale (tipo yo-yo) Quando la tensione della capsula è corretta, il filo scivola in basso con una leggera resistenza. Quando la tensione della capsula è troppo forte, il filo non scivola in basso. Quando la tensione della capsula è troppo lenta, il filo scivola in basso senza resistenza. RS2000-2D_EFNI.book Page 54 Thursday, March 30, 2006 3:31 PM E F G a English Lower thread tension adjustment When the bobbin case tension is correctly adjusted, it is easy to balance the upper thread tension. Adjusting bobbin case tension. Needle in the raised position. 1. Turn screw a (on the bobbin case) for tension adjustment. (fig E) Turn the screw to the left to loosen tension. Turn the screw to the right to tighten tension. 2. Replace the shuttle hook. Lay the machine on its back to make it easier. (fig F) 3. Replace shuttle hook cover. (fig G) 4. Push latches towards inside. 5. Close shuttle cover. Nederlands Français Réglage de la tension du fil inférieur Lorsque la tension de la canette est correctement réglée, il est facile d’équilibrer la tension du fil supérieur. Réglage de la tension de la canette. L’aiguille en position haute. 1. Tourner la vis a (sur la canette) pour régler la tension (fig. E) Tourner la vis vers la gauche pour desserrer la tension Tourner la vis vers la droite pour augmenter la tension 2. Replacement de l’étrier. Mettre la machine sur le dos pour effectuer plus facilement cette opération. (fig. F) 3. Replacement du couvercle de l’étrier. (fig. G) 4. Pousser les loquets vers l’intérieur. 5. Fermer le cache-navette. Italiano Onderdraad spannings afstelling Als de spoelhuis spanning goed is afgesteld, is het makkelijk om de bovenspanning in de juiste balans te brengen. Regolazione della tensione inferiore Quando la tensione della capsula è corretta, è più facile regolare la tensione del filo Afstelling van de spoelhuis spanning. Zet de naald in de hoogste stand. 1. Draai aan schroef a (op de grijper) voor de afstelling van de spanning. (fig E) Draai de schroef naar links om de spanning te verlagen. Draai de schroef naar rechts om de spanning te verhogen. 2. Plaats het grijper terug. Leg de machine op de achterkant om dit te vergemakkelijken. (fig F) 3. Plaats de spoelhuis dekring terug. (fig G) 4. Duw de hendeltjes naar de binnenkant en plaats het spoelhuis terug. 5. Sluit de spoelhuisklep. Regolazione della tensione della capsula Ago in posizione alta 1. Girate la vite a sulla capsula servendovi di un piccolo cacciavite (fig. E) A sinistra per allentare la tensione A destra per stringere la tensione 2. Riposizionate il crochet Appoggiare la macchina sul dorso per facilitare l’operazione (fig. F) 3. Reinserite l’anello portacrochet (fig. G) 4. Chiudete le alette verso l’interno 5. Chiudete lo sportellino 56 RS2000-2D_EFNI.book Page 55 Thursday, March 30, 2006 3:31 PM A A-1 A-2 English Français Changing needle (fig A) 1. Set the needle in the highest position by turning the handwheel toward you. Loosen needle clamp screw by using the needle plate screw driver. Take out the needle. (fig A-1) Remplacement d’aiguille (fig. A) 1. Placer l’aiguille en position la plus haute en tournant le volant vers vous. Desserrer la vis de serrage de l’aiguille en utilisant le tournevis. Enlever l’aiguille (fig. A-1) 2. Insert a new needle with the flat side away from you. Push the needle into the clamp until it stops. Firmly tighten needle clamp screw with screw driver. (fig A-2) 2. Insérer la nouvelle aiguille avec le côté plat vers l’arrière. Pousser l’aiguille dans son logement jusqu’à arrêt. Serrer la vis fermement. (fig. A-2) Nederlands Naald verwisselen (fig A) 1. Breng de naald in de hoogste stand door het handwiel naar u toe te draaien. Draai de naaldklem schroef los met de schroevendraaier. Neem de naald eruit. (fig A-1) 2. Zet de nieuwe naald erin met de platte kant naar achteren. Duw de naald omhoog in de naaldklem totdat deze niet verder kan. Draai nu de naaldklem schroef goed vast. (fig A-2) 57 Italiano Sostituzione dell’ago (fig. A) 1. Portate l’ago nella posizione più alta girando il volantino verso di voi. Allentate la vite del morsetto dell’ago. Togliete l’ago (fig. A-1) 2. Inserite un nuovo ago nel morsetto in modo che la superficie piatta sia rivolta opposta a voi. Spingete l’ago verso l’alto fino a fine corsa. Serrate a fondo la vite fermago. (fig. A-2) RS2000-2D_EFNI.book Page 56 Thursday, March 30, 2006 3:31 PM B B-1 B-2 English Français Checking needle (fig B) Using defective or worn needles not only causes stitch skipping, breakage of needles or snapping of thread. It can also damage shuttle and needle plate. Vérification de l’aiguille (fig. B) En utilisant des aiguilles défectueuses ou usées vous risquez non seulement de casser la pointe des aiguilles mais également de casser le fil. Cela peut aussi endommager la navette et la plaque-aiguille. 1. Always use a straight and sharp needle. (fig B) B-1 Straight shaft B-2 Sharp point 1. Utiliser systématiquement une aiguille droite et pointue. (fig. B) B-1 Une aiguille droite B-2 Une pointe aiguisée Nederlands Italiano Naald controleren (fig B) Het gebruik van slechte of versleten naalden veroorzaakt niet alleen het overslaan van steken, naaldbreuk of draadbreuk. Het kan ook de grijper en de naaldplaat beschadigen. Controllo dell’ago (fig. B) L’uso di un ago non appropriato o spuntato può portare non soltanto a salti di punto, rottura dell’ago od attorcigliamento dei fili, ma può anche danneggiare la navetta e la placca ago. 1. Gebruik altijd een rechte en scherpe naald. (fig B) B-1 Rechte schacht B-2 Scherpe punt 1. Utilizzate sempre un ago perfettamente dritto e con la punta ben affilata. (fig. B) B-1 ago dritto B-2 ago affilato 58 RS2000-2D_EFNI.book Page 57 Thursday, March 30, 2006 3:31 PM A B ➀ ➀ ➁ English Français Cleaning the shuttle race Thread stuck between shuttle hook and shuttle race causes sudden rapid running or sudden stopping of the machine. In this case you should proceed as follows: 1. Lift presser foot and remove bobbin case. 2. Push latches 1 towards outside and remove shuttle hook cover and shuttle hook with fingers. (fig A) 3. Clean the shuttle race 2 and shuttle hook, and reassemble them. (fig B) Nettoyage du logement de la coursière Du fil coincé entre la navette et le logement pourrait être à l’origine d’accélérations soudaines ou d’arrêts inopinés, dans ce cas: 1. Soulever le pied-de-biche et enlever la boîte à canette. 2. Pousser les loquets 1 vers l’extérieur et enlever le couvercle de la navette avec vos doigts. (fig. A) 3. Nettoyer la navette et repositionner l’ensemble. (fig. B) Nederlands Italiano Schoonmaken van de spoelbaan Draad geklemd tussen de grijper en de grijperbaan veroorzaakt het plotseling snel lopen of het plotseling stoppen van de machine. In dit geval moet u als volgt handelen: 1. Zet de persvoet omhoog en verwijder het grijper. 2. Duw de hendeltjes 1 naar buiten en verwijder de grijper dekring en de grijper met uw vingers. (fig A) 3. Maak de grijperbaan 2 en de grijper schoon en plaats deze weer terug. (fig B) Pulizia del supporto del crochet Quando il filo o frammenti di filo rimangono incastrati tra il crochet e la sua sede di scorrimento, la macchina tenderà a bloccarsi. In questo caso procedete come segue: 1. Sollevate il piedino premistoffa e togliete la capsula. 2. Aprite le alette 1 che si trovano sui due lati del supporto del crochet, togliete l’anello esterno del crochet ed il crochet stesso (fig. A) 3. Pulite il crochet e la sede di scorrimento. Finito il lavoro, mettete di nuovo tutto in posizione. (fig. B) 59 RS2000-2D_EFNI.book Page 60 Thursday, March 30, 2006 3:31 PM Nederlands Storings tabel STORING MOGELIJKE OORZAAK OPLOSSING Draad niet goed opgespoeld of niet goed opgehaald P. 12, P. 16 Onderdraad spanning is te strak P. 55 - 56 Stof en pluisjes tussen het spoelhuis en het spanningsveertje Verwijder stof en pluisjes met een borsteltje Naald niet hoog genoeg P. 57 Naald krom of bot P. 58 Dikte en type naald niet geschikt voor de stof P. 65 Bovendraad niet goed Ingeregen P. 16 Te veel olie in de machine P. 54 Verkeerde naalddikte voor de stof P. 65 Bovendraad spanning te los P. 23 Onderdraad spanning niet goed P. 55 - 56 Steekkeuzeknop niet in de juiste stand P. 67 Transporteur verzonken P. 26 Pluisjes op de transporteur P. 59 Luidruchtige machine Controleer of er geen stof in het spoelhuis of in de grijpersysteem zit Het kleinstje deeltje kan reeds lawaai veroorzaken Gebruik een tandenstoker of stofborsteltje P. 59 De stof trekt samen Bovendraad of onderdraad spanning is te strak P. 23, P. 55 - 56 Steeklengte te lang voor de stof P. 67 Garen te dik P. 65 Boven- of onderdraad niet goed ingeregen P. 16, P. 14 Naald niet goed geplaatst P. 57 Naald krom P. 58 Naaldklem schroef te los P. 57 Bovendraad spanning te strak P. 23 Naald te dun voor de stof P. 65 Er is aan knop(pen) gedraaid terwijl de naald in de stof stond P. 67 Breken onderdraad Steken overslaan Onregelmatige steken De stof wordt niet goed getransporteerd Naald breekt ❈ Als de problemen zich voor blijven doen in de machine, neem dan contact op met het verkooppunt of raadpleeg onze website. (alleen voor Europa). Probeer niet zelf de storing te verhelpen. 62 A 1 B 2 C 3 D 4 E 5 F 6 G 7 H 8 I 9 J 10 K 11 L 12 M 13 N 14 O 15 P 16 Q 17 R 18 S 19 T 20 U 21 V 22 W 23 X 24 English Français NAME OF STITCH PATTERNS NOM DES POINTS MOTIFS A1. Scallop B2. Domino stitch C3. Straight stitch (left position) D4. Straight stitch (center position) E5. Zigzag 2.2 mm F6. Zigzag 3.5 mm G7. Zigzag 5.0 mm H8. Blind stitch I9. Stretch blind hem J10. Serpentine stitch K11. Mending stitch L12. Buttonhole A1. Point de feston B2. Point domino C3. Point droit (position à gauche) D4. Point droit (position centrale) E5. Zigzag 2,2 mm F6. Zigzag 3,5 mm G7. Zigzag 5,0 mm H8. Couture invisible I9. Couture invisible stretch J10. Point serpentin K11. Racommodage L12. Boutonnière M13. Buttonhole N14. Buttonhole O15. Buttonhole P16. Straitht stretch Q17. Zigzag stretch R18. Overlock S19. Overlock stitch T20. Honeycomb U21. Decorative stitch V22. Applique stitch W23. Applique stitch X24. Fagoting stitch Nederlands M13. Boutonnière N14. Boutonnière O15. Boutonnière P16. Triple zigzag Q17. Zigzag stretch R18. Point surjet S19. Point surjet T20. Point tricot double U21. Point decoratif V22. Point s’applique W23. Point s’applique X24. Point fagot Italiano NAAM VAN DE STEEKSOORTEN NOME DEI PUNTI ESEGUIBILI A1. Schulpsteek B2. Domino steek C3. Rechte steek (linker positie) D4. Rechte steek (midden positie) E5. Zigzagsteek 2.2 mm F6. Zigzagsteek 3.5 mm G7. Zigzagsteek 5.0 mm H8. Blindzoomsteek I9. Stretch blindzoomsteek J10. Serpentine steek K11. Stikkende zigzagsteek L12. Knoopsgat A1. Punto a smerlo B2. Punto greco C3. Punto dritto (posizione sinistra) D4. Punto dritto (posizione centrale) E5. Zigzag 2.2 mm F6. Zigzag 3.5 mm G7. Zigzag 5.0 mm H8. Punto invisible I9. Punto elastico J10. Punto onda K11. Punto da rammendo L12. Esecuzione asola 67 M13. Knoopsgat N14. Knoopsgat O15. Knoopsgat P16. Rekbare rechte steek Q17. 3 voudige zigzagsteek R18. Overlocksteek S19. Overlocksteek T20. Honingraatsteek U21. Elastische afwerksteek V22. Applicatiesteek rechts W23. Applicatiesteek links X24. Fagot steek M13. Esecuzione asola N14. Esecuzione asola O15. Esecuzione asola P16. Punto dritto elastico triplo Q17. Punto zigzag elastico triplo R18. Punto sopraggitto S19. Punto sopraggitto T20. Punto a nido d’ape U21. Punto sopraggitto V22. Punto piuma destro W23. Punto piuma sinistro X24. Punto elastico RS2000-2D_EFNI.book Page 67 Thursday, March 30, 2006 3:31 PM ޓ GOOI DIT NIET WEG! NON SPRECHIAMO NULLA! EU ONLY Nederlands HERGEBRUIK Wij hebben de verplichting om het milieu te beschermen. Wij moeten streven naar een minimale milieubelasting door onze producten constant te verbeteren voor wat betreft het productontwerp en fabricage methode. Italiano RICICLAGGIO Lavoriamo per la protezione dell’ambiente. Cerchiamo di minimizzare l’impatto ambientale dei nostri prodotti, migliorando continuamente la loro concezione e i metodi di produzione. Het zich ontdoen van dit product op een milieu verantwoordelijke manier. Al termine della durata, smaltire il presente prodotto in modo ecologico. Het kenmerkende “Door gekruiste afvalbak” logo hierboven en het product informatie plaatje geven aan dat dit product valt onder de richtlijnen van de E.U. “Afgedankte Elektrische en Elektronische Apparatuur” (AEEA, WEEE) en de zogenaamde RoHS richtlijn die verbiedt het gebruik van bepaalde stoffen in elektrische en elektronische apparatuur (Restriction of use of certain Hazardous Substances) en mag niet weggegooid worden met het huishoudelijk afval. Bij het ontdoen van dit product moet U zich ervan verzekeren dat dit gebeurd in overeenstemming met de nationale en locale wetgeving en dat het is ingedeeld onder Categorie 2 “Klein Huishoudelijk Afval” (AEEA, WEEE). U kunt aansprakelijk gesteld worden onder de lokale en nationale wetgeving wanneer U zich op een onfatsoenlijke manier van dit product ontdoet. Raadpleeg voor verdere informatie het web, of een bevoegde nationale of locale instantie voor het inleveren en inname bij het dichtstbijzijnde verzamelpunt. Als U direct bij ons een nieuw product koopt willen wij Uw oude product innemen ongeacht het merk. Il simbolo del bidone della spazzatura barrato riprodotto all’inizio e sulla targhetta informativa del prodotto indica che il presente prodotto rientra nell’ambito della Direttiva UE “Rifiuti di apparecchiature elettriche ed elettroniche” (RAEE) e della Direttiva UE “Restrizione dell’uso di determinate sostanze pericolose nelle apparecchiature elettriche ed elettroniche” (ROHS): non ne è quindi consentito lo smaltimento insieme ai rifiuti domestici. Al termine della durata, il presente prodotto deve essere smaltito in conformità alla legislazione locale e nazionale, nonché essere classificato come rientrante nella Categoria 2 “Piccoli elettrodomestici” della Direttiva RAEE. Lo smaltimento improprio del presente prodotto genera responsabilità ai sensi delle leggi locali e nazionali. Per informazioni sui sistemi di restituzione e di raccolta a disposizione degli utenti, nonché sulle ubicazioni dei contenitori di riciclaggio più vicini, visitare il Web oppure rivolgersi a un ente locale o nazionale competente. Se un nuovo prodotto viene acquistato direttamente dall’Azienda, quest’ultima ritirerà il vecchio prodotto (indipendentemente dal marchio) se la vendita riguarda un prodotto analogo. Als persoon kan U een positieve invloed uitoefenen op hergebruik en andere vormen van herwinnen van AEEA, WEEE. Dit kan de vervuiling terugdringen en zal de belasting op het milieu minimaliseren door de producten die U gebruikt. Bepaalde stoffen in elektronische en elektrische apparatuur kunnen een gevaarlijke invloed hebben op Uw gezondheid en het milieu. 69 Ogni singola persona può influire positivamente sul riutilizzo, sul riciclaggio e su altre forme di recupero delle apparecchiature elettriche ed elettroniche. In tal modo è possibile ridurre l’utilizzo delle discariche e minimizzare l’impatto ambientale dei prodotti utilizzati. Le sostanze pericolose contenute nelle apparecchiature elettriche ed elettroniche possono danneggiare sia la salute dell’uomo che l’ambiente. Notice The incandescent lamp fitted to our product is not suitable for household lighting and is specifically designed for lighting for your sewing area. Important L ampoule à incandescence insérée dans notre produit, n’est pas appropriée pour une autre utilisation. Elle est à ce propos spécialement conçue pour éclairer la zone de couture. Zur besonderen Beachtung Die Gluhbirne, die in unserem Gerat verwendet wird, ist nicht passend fur andere Haushaltsgerate und ist nur speziell fur die Beleuchtung des Nahbereichs produziert worden. Waarschuwing De gloeilamp in ons product is niet geschikt voor huishoudelijk gebruik en is speciaal ontworpen voor de verlichting van de vrije arm. Avviso importante La lampada a incandescenza montata sul nostro prodotto, non adatta per l'uso domestico e di illuminazione, e stata specificatamente progettata per l'illuminazione della zona di cucitura. Aviso La lampara fluorescente que viene aclopada a nuestro producto no puede utilizarse para iluminar habitaciones u otros menesteres , es exclusivamente util para esta maquina , y esta disenada especificamente para la iluminacion de la area de cosido.-
 1
1
-
 2
2
-
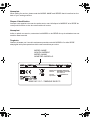 3
3
-
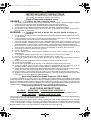 4
4
-
 5
5
-
 6
6
-
 7
7
-
 8
8
-
 9
9
-
 10
10
-
 11
11
-
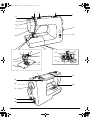 12
12
-
 13
13
-
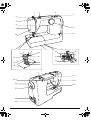 14
14
-
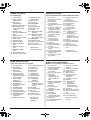 15
15
-
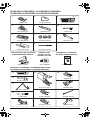 16
16
-
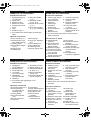 17
17
-
 18
18
-
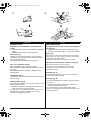 19
19
-
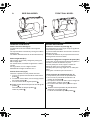 20
20
-
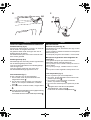 21
21
-
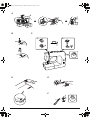 22
22
-
 23
23
-
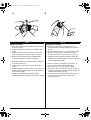 24
24
-
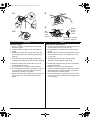 25
25
-
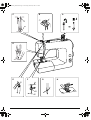 26
26
-
 27
27
-
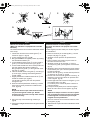 28
28
-
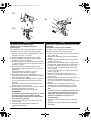 29
29
-
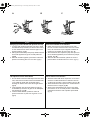 30
30
-
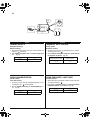 31
31
-
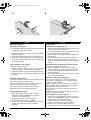 32
32
-
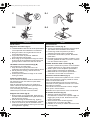 33
33
-
 34
34
-
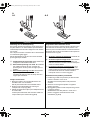 35
35
-
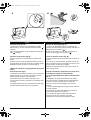 36
36
-
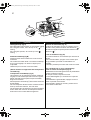 37
37
-
 38
38
-
 39
39
-
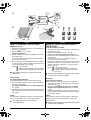 40
40
-
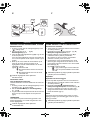 41
41
-
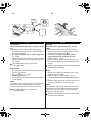 42
42
-
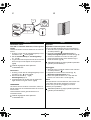 43
43
-
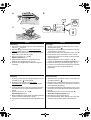 44
44
-
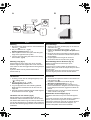 45
45
-
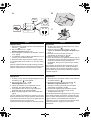 46
46
-
 47
47
-
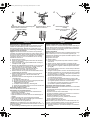 48
48
-
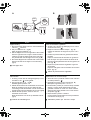 49
49
-
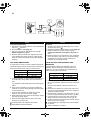 50
50
-
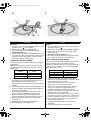 51
51
-
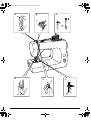 52
52
-
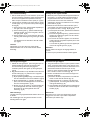 53
53
-
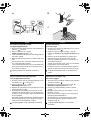 54
54
-
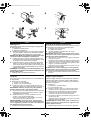 55
55
-
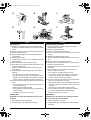 56
56
-
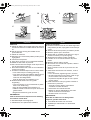 57
57
-
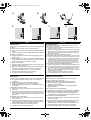 58
58
-
 59
59
-
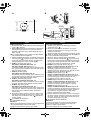 60
60
-
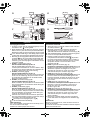 61
61
-
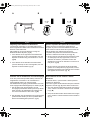 62
62
-
 63
63
-
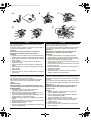 64
64
-
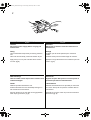 65
65
-
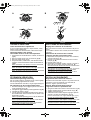 66
66
-
 67
67
-
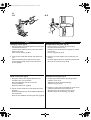 68
68
-
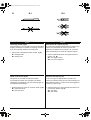 69
69
-
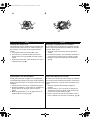 70
70
-
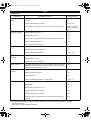 71
71
-
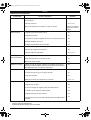 72
72
-
 73
73
-
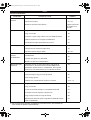 74
74
-
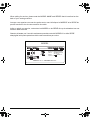 75
75
-
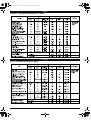 76
76
-
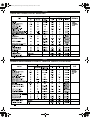 77
77
-
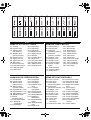 78
78
-
 79
79
-
 80
80
-
 81
81
-
 82
82
-
 83
83
-
 84
84


Toyota DFL Superior 2D de handleiding
- Categorie
- Naaimachines
- Type
- de handleiding
in andere talen
Gerelateerde artikelen
Andere documenten
-
 Riccar 2600 Handleiding
-
Bernina Bernette 75 de handleiding
-
-
-
Toshiba EC-1FZ de handleiding
-
Brother 2340CV de handleiding
-
Brother XC5434-051 Handleiding
-
-
-
 Matrimatic GOLD Diamond series Handleiding

