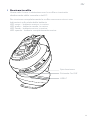
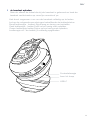
Nacon RIG600PRO_HS Gebruikershandleiding
- Categorie
- Mobiele headsets
- Type
- Gebruikershandleiding

600 PRO HS
USER GUIDE

EN /
2
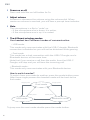
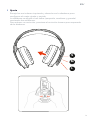
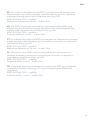
Summary
Fit
Setup and basics
Set up PC
Set up Nintendo Switch
Charging your Headset
Power on or off
Adjust volume
Mute
The different modes
• Game mode
• Dual mode
• Bluetooth mode
How to switch modes?
How to pair your headset?
• USB-C Dongle
• Bluetooth
Multi-function button
How to customize your experience?
Safety
Support
3
4
4
4
4
4
5
6
6
6
6
6
6
6
6
7
7
8

EN /
3
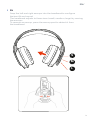
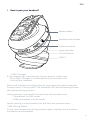
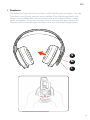
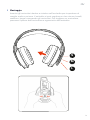
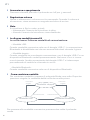
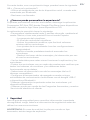
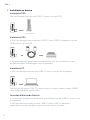
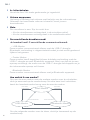
I Fit
Snap the left and right earcups into the headband to configure
the best fit and sound.
The headband adjusts to three sizes (small, medium, large) by moving
the earcups.
To remove an earcup, press the earcup post to detach it from
the headband.
S
M
L

EN /
4
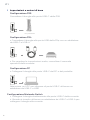
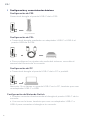
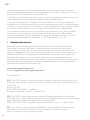
I Setup and basics
Setup PS5
Setup PS4
1. Connect your dongle using a USB-C to USB-A adaptor to the
Setup PC
1. Connect your dongle to the USB-C port of your PC or laptop.
2. To adjust system audio settings, check your console user guide.
Attention if you do not have USB-C port on your PC you will need
to use a USB-C to USB-Adaptor.
PlayStation 4®
PlayStation 5®
Set up Nintendo Switch
1. You can directly connect your dongle to the USB-C port of your
console.
2. When docked you need to use a USB-C to USB-A adaptor to
connect your dongle to your console.

EN /
5
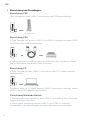
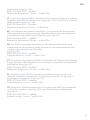
I Charging your Headset
Only use the cable provided with the headset and charge the
headset directly from your console or PC.
It takes around 2 hours to fully charge the headset.
Note the following Battery status indications:
Red LED – low battery and is charging
Yellow LED – medium battery and is charging
Green LED - high battery and is charging
LED Off - the battery is fully charged
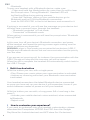
Light indicator
On/Off button
USB-C

EN /
6
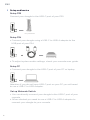
I Power on or off
I Adjust volume
Increase or decrease the volume using the volume dial. When
maximum volume is reached, you will hear a prompt tone indicator.
I Mute
The microphone is a flip to “mute” so:
•
If the microphone arm is down, it is active,
•
If the microphone arm is up, it is muted.
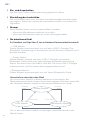
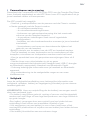
I The different wireless modes
Your headset has 3 different modes of communication:
•
USB mode:
This mode only communicates with the USB-C dongle. Bluetooth
connection is disabled so you will not be disturbed while gaming.
• Dual mode
:
This mode has a dual connection with the USB-C Dongle, and a
Bluetooth device, at the same time.
Note that if you receive a call then the audio, from the USB-C
Dongle, will stop and you will hear the incoming call.
• Bluetooth mode
:
This mode only communicates with your Bluetooth device.
How to switch modes?
To switch from one mode to another, press the mode button once.
After three single presses the headset mode will be back to the
first mode.
To jump over the next mode double press the mode button.
Dual mode
USB mode Bluetooth mode
Single press
Short press Short press
Short press
Single press
Single press

EN /
7
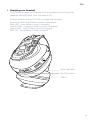
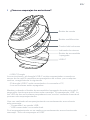
I How to pair your headset?
• USB-C Dongle
:
If you need to do a new pairing, for any reason, make sure:
- The USB-C Dongle is connected to your console or PC.
- Turn off the Headset.
Press and hold the On/Off button for more than 6s until to hear the
Prompt voice: “Pairing USB”. The Headset LED will be flashing Purple
during the pairing process.
When pairing is successful you will hear the prompt voice:
- “Connected” in USB mode,
- “USB connected” in Dual mode.
When pairing is unsccessful you will hear the prompt voice:
“USB Pairing Failed”.
In this case repeat the pairing process again making sure the above
conditions are respected.
Mode button
Multifonction button
Volume control
Light indicator
On/Off button
USB-C

EN /
8
• Bluetooth:
To pair your headset with a Bluetooth device, make sure:
- Press and hold the Mode button for more than 6s until to hear
the Prompt voice: “Pairing Bluetooth”. Headset LED will
be flashing Blue during pairing process.
- Open the `Settings’ menu on your mobile device, go to
Bluetooth and turn ON the Bluetooth connection.
If pairing is successful, you will see the message on your device but
will also hear a prompt voice, through the headset:
- “Bluetooth connected” in Dual mode,
- “Connected” in Bluetooth mode.
When pairing is unsuccessful you will hear the prompt voice: “Bluetooth
Pairing Failed”.
above conditions are respected.
WARNING: when in Dual mode you are paired to two devices (USB-C
Dongle and a Bluetooth device) but one communication has the priority
over the other.
If you answer an incoming call, for instance, the communication with the
USB-C Dongle will stop and the incoming call will be heard.
When the call is complete, the headset will automatically switch back to
the USB-C Dongle.
I Multi-function button
With this button you can, with a single press:
•
Play/Pause your music when your communication is activated,
•
Answer an incoming call when your Bluetooth communication
is activated.
Your headset remembers the latest Bluetooth device connected
so once you have set-up your device it will remember it even if you
switch between modes or power on/off your headset.
With this button you can with, a Long press: (ML> how long is the
press?)
• Activate your mobile device’s voice assistant, when connected
to Bluetooth,
• Reject a call.
I How to customize your experience?
If you want to go deeper into your headset customization, please
download the Companion APP RIG 600 PRO from the Google
PlayStore (for Android devices) and APP store (for iOs devices).

EN /
9
The APP will enable you to:
• Customize up to 3 audio profiles quickly, using the Classic mode,
or more precisely through the Expert mode:
- Your microphone gain.
- Your microphone monitoring level.
- Activate ear protection which limits the maximum volume
of the headset.
- Your equalizer settings (with pre-set configurations).
- Define the default mode when you power on your headset.
- Reduce the prompt tones and voices interaction during
headset use.
• Visualize tutorials to know how the APP and headset work.
• Test your headset via a test mode to check that all: buttons,
microphone and speakers are working as they should.
• Choose your Prompt voice language (from the 6 supported
languages).
• Set the power off timer in case of no communication activities
(headset with USB-C Dongle & Bluetooth devices.
• Get important information about your headset and Bluetooth
device.
• Get support via the FAQ and from our Customer Service.
I Safety
Please read the safety guide for important safety, charging, battery
and regulatory information before using your new headset.
WARNING:
Risk of explosion if the battery is replaced by an incorrect
type.
•
Battery cannot be subjected to high or low extreme.
temperatures, low air pressure at high altitude during use, storage
or transportation.
•
Replacement of a battery with an incorrect type that can result in
an explosion or the leakage of flammable liquid or gas.
•
Disposal of a battery into fire or a hot oven, or mechanically
crushing or cutting of a battery, that can result in an explosion.
•
Leaving a battery in an extremely high temperature surrounding
environment that can result in an explosion or the leakage of
flammable liquid or gas.
•
A battery subjected to extremely low air pressure that may result
in an explosion or the leakage of flammable liquid or gas.
•
The headset and dongle unit shall not be supplied by a power
source exceeding 15W (i.e. 5V 3A).

EN /
10
I Support
NACON offers a one year Limited (North America, Australia and
New Zealand), two years Limited (EU and UK) and one year Limited
(all other countries and regions) warranty. Please be aware that you
may have other rights depending on the laws of the state or country
where the product was purchased. We strongly advise you to keep
your receipt of purchase in order to prove the date of purchase of this
product. For warranty terms and conditions, visit our web site at
www.nacongaming.com
Email: [email protected]
Compliance
EN. The EIRP power values and the Frequencybands relating to this
product, identified in the list below, comply with the requirements of
Directive
2014/53/EU:
EIRP: RIG 600 PRO - <13dBm
Frequency band: (2,402 ~ 2,480) GHz
DE. Die EIRP-Leistungswerte und die Frequenzbander fur dieses
Produkt, die in der nachstehenden Liste aufgefuhrt sind, entsprechen
den Anforderungen der Richtlinie 2014/53/EU:
EIRP: RIG 600 PRO- <13dBm Frequenzband : (2,402 ~ 2,480) GHz
FR. Les valeurs de puissances EIRP et des bandes de Frequence
relatives au present produit, identifie dans la liste ci-apres,
sont conformes aux exigences de
la directive 2014/53/UE:
EIRP: RIG 600 PRO- <13dBm
Bande de frequence : (2,402 ~ 2,480) GHz
IT. I valori di potenza EIRP e le bande di frequenza relative a questo
prodotto, identificati nell’elenco seguente, sono conformi ai requisiti
della direttiva 2014/53/UE:
EIRP: RIG 600 PRO- <13dBm
Banda di frequenza: (2,402 ~ 2,480) GHz
ES. Los valores de potencia del IPESI y las bandas de frecuencias
relacionadas con este producto, identificadas en la lista siguiente,
cumplen los requisitos de la Directiva 2014/53/UE:
EIRP: RIG 600 PRO - <13dBm
Banda de frecuencia : (2,402 ~ 2,480) GHz

EN /
11
NL. De EIRP-vermogenswaarden en de frequentiebanden met
betrekking tot dit product, zoals vermeld in de onderstaande lijst,
voldoen aan de eisen van Richtlijn
2014/53/EU:
EIRP: RIG 600 PRO- <13dBm
Frequentieband : (2,402 ~ 2,480) GHz
PT. Os valores de potencia EIRP e as bandas de frequencia relativas a
este produto, identificados na lista abaixo, cumprem os requisitos da
Diretiva 2014/53/UE:
EIRP: RIG 600 PRO- <13dBm
Banda de frequencia : (2,402 ~ 2,480) GHz
PL.
dyrektywy 2014/53/UE:
EIRP: RIG 600 PRO - <13dBm
TR.
EIRP: RIG 600 PRO - <13dBm

EN /
12
DISTRIBUTORS /
DISTRIBUTEURS :
Bigben Interactive
DEUTSCHLAND GmbH
Bergheim, Deutschland
Bigben Interactive Belgium
s.a./n.v.
Waterloo, Belgium
Bigben Interactive
NEDERLAND b.v.
Hilversum, Nederland
Nacon Gaming ESPAÑA S.L.
Bigben Interactive ITALIA s.r.l
Legnano - MI, Italia
Nacon Gaming Inc.
SUPPORT :
FRANCE, du lundi au vendredi :
nacongaming.com
UK
DEUTSCHLAND, Montag bis
BELGIQUE,
NEDERLAND,
ESPAÑA,
ITALIA,
UNITED STATES,
MANUFACTURER / FABRICANT :
NACON - 396 - 466 Rue de la Voyette, CRT2 - 59273 Fretin, France

13
EN /

Licensed for sale in the European Union, United Kingdom, Australia, New Zealand, United States, Canada.
Manufactured by Nacon. - Licencié pour la vente en Union européenne, Royaume-Uni, Australie, Nouvelle-Zélande,
États-Unis, Canada. Fabriqué par Nacon. - Lizenziert für den Verkauf in der Europäischen Union, Großbritannien,
Australien, Neuseeland, den USA und Kanada. Hergestellt von Nacon. - Verkoopvergunning voor de Europese
Unie, het Verenigd Koninkrijk, Australië, Nieuw-Zeeland, de Verenigde Staten en Canada. Vervaardigd door Nacon.
- Autorizado para la venta en la Unión Europea, Reino Unido, Australia, Nueva Zelanda, Estados Unidos y Canadá.
Fabricado por Nacon. - Autorizzato alla vendita in Unione Europea, Regno Unito, Australia, Nuova Zelanda, Stati Uniti
Estados Unidos, Canadá. Fabricado pela Nacon.
All the trademarks belong to their respective owners. - Toutes les marques citées appartiennent à leurs propriétaires
respectifs.

600 PRO HS
BEDIENUNGSANLEITUNG

DE /
2
Inhaltsverzeichnis
Passform
Einrichtung und Grundlagen
Einrichtung PC
Einrichtung Nintendo Switch
Laden des Headsets
Ein- und Ausschalten
Einstellung der Lautstärke
Stumm
Die kabellosen Modi
• USB-Modus
• Dualer Modus
• Bluetooth-Modus
Umschalten zwischen den Modi
Kopplung des Headsets
• USB-C Dongle
• Bluetooth
Multifunktionstaste
Individuelle Anpassung Ihrer Nutzerfahrung
Sicherheit
Support
3
4
4
4
4
4
5
6
6
6
6
6
6
6
6
7
7
8

DE /
3
I Passform
Die linke und rechte Ohrmuschel in den Kopfbügel einrasten, um die
Passform und Klang optimal einzustellen. Der Kopfbügel lässt sich
durch Verschieben der Ohrmuscheln auf drei Größen (klein, mittel,
groß) einstellen. Zum Abnehmen einer Ohrmuschel den Knopf der
Ohrmuschel im Kopfbügel drücken und sie vom Kopfbügel lösen.
S
M
L

DE /
4
I Einrichtung und Grundlagen
Einrichtung PS5
Einrichtung PS4
1. Den Dongle mit einem USB-C-zu-USB-A-Adapter an den USB-
Einrichtung PC
1. Den Dongle an den USB-C-Anschluss des PCs oder Laptops
anschließen.
2. Informationen zu den Audioeinstellungen des Systems finden
Sie im Benutzerhandbuch Ihrer Konsole.
Achtung, falls Ihr PC über keinen USB-C Anschluss verfügt, einen
USB-C zu USB-Adapter verwenden.
PlayStation 4®
PlayStation 5®
Einrichtung Nintendo Switch
1. Der Dongle kann direkt an den USB-C-Anschluss Ihrer Konsole
angeschlossen werden.
2. Nach dem Andocken einen USB-C-auf-USB-A-Adapter
verwenden, um den Dongle mit Ihrer Konsole zu verbinden.

DE /
5
I Laden des Headsets
Ausschließlich das mit dem Headset gelieferte Kabel verwenden
und das Headset direkt an der Konsole oder dem PC aufladen.
Die Ladedauer bis zum vollständigen Aufladen des Headsets
beträgt etwa 2 Stunden.
Beachten Sie folgenden Anzeigen zum Akkustatus:
Rote LED – Niedriger Akkuladestand und laufender Ladevorgang,
Gelbe LED – Mittlerer Akkuladestand und laufender Ladevorgang,
Grüne LED – Hoher Akkuladestand und laufender Ladevorgang,
LED aus – Der Akku ist vollständig geladen.
Leuchtanzeige
Ein/Aus-Taste
USB-C

DE /
6
I Ein- und Ausschalten
Die Ein/Aus-Taste 3 Sekunden lang gedrückt halten.
I Einstellung der Lautstärke
Die Lautstärke lässt sich mit dem Lautstärkeregler erhöhen oder
verringern. Wenn die maximale Lautstärke erreicht ist, ertönt ein
Signalton.
I Stumm
Das Mikrofon kann «stumm geschaltet» werden:
• Wenn der Mikrofonarm unten ist, ist es aktiv
,
• Wenn der Mikrofonarm oben ist, ist es stummgeschaltet
.
I Die kabellosen Modi
Ihr Headset verfügt über 3 verschiedene Kommunikationsmodi:
• USB-Modus
:
Dieser Modus kommuniziert nur mit dem USB-C-Dongle. Die
Bluetooth-Verbindung ist deaktiviert, damit Sie beim Spielen nicht
gestört werden.
• Dualer Modus
:
Dieser Modus verfügt mit dem USB-C-Dongle und einem
Bluetooth-Gerät über eine gleichzeitige doppelte Verbindung.
Wenn Sie einen Anruf erhalten, wird der Ton vom USB-C-Dongle
unterbrochen und Sie hören den eingehenden Anruf.
• Bluetooth-Modus
:
Dieser Modus kommuniziert nur mit Ihrem Bluetooth-Gerät.
Umschalten zwischen den Modi
Um von einem Modus in einen anderen zu wechseln, die
Modustaste ein Mal drücken. Nach dreimaligem Drücken wechselt
der Headset-Modus wieder in den ersten Modus.first mode.
Um in den nächsten Modus zu springen, die Modustaste zwei
Mal drücken.
Dualer Modus
USB-Modus Bluetooth-Modus
Einfacher
Druck
Einfacher
Druck
Kurzer Druck Kurzer Druck
Kurzer Druck
Einfacher Druck

DE /
7
I Kopplung des Headsets
• USB-C Dongle
:
Das Headset und der USB-C-Dongle sind sofort nach der Entnahme
aus der Box gekoppelt. Falls die Kopplung erneut durchgeführt
werden muss, überprüfen,
- Ob der USB-C-Dongle an die Konsole oder den PC
angeschlossen ist,
- Das Headset ausschalten.
Die Ein/Aus-Taste länger als 6 Sekunden gedrückt halten, bis die
Sprachansage «USB Kopplung» zu hören ist. Die LED am Headset
blinkt während des Kopplungsvorgangs lila.
Wenn die Kopplung erfolgreich war, ertönt die Sprachansage:
- «Verbunden» im USB-Modus,
- «USB verbunden» im Dual-Modus .
Wenn die Kopplung nicht erfolgreich war, ertönt die Sprachansage:
«USB-Kopplung fehlgeschlagen».
Modustaste
Multifunktionstaste
Lautstärkeregler
Leuchtanzeige
Ein/Aus-Taste
USB-C

DE /
8
In diesem Fall den Kopplungsvorgang wiederholen und sicherstellen,
dass die oben genannten Bedingungen eingehalten wurden.
• Bluetooth:
Kopplung des Headsets mit einem Bluetooth-Gerät. Vorgehen:
- Die Modustaste länger als 6 Sekunden gedrückt halten, bis
die Sprachansage «Bluetooth Kopplung» zu hören ist. Die LED
am Headset blinkt während des Kopplungsvorgangs blau.
- Öffnen Sie das Menü «Einstellungen» auf Ihrem Mobilgerät,
gehen Sie zu Bluetooth und schalten Sie die Bluetooth-
Verbindung ein. Das RIG 600 PRO in der Geräteliste suchen und
die Verbindung herstellen.
Nach erfolgreicher Kopplung wird die entsprechende Meldung
auf Ihrem Gerät angezeigt und über das Headset ist folgende
Sprachansage zu hören:
- «Bluetooth verbunden» im Dual-Modus,
- «Verbunden» im Bluetooth-Modus.
Wenn die Kopplung nicht erfolgreich war, ertönt die Sprachansage:
«Bluetooth-Kopplung fehlgeschlagen”.
In diesem Fall die Bluetooth-Verbindung Ihres Geräts ausschalten, das
Headset ausschalten und den Kopplungsvorgang wiederholen, dabei
sicherstellen, dass die oben genannten Bedingungen erfüllt sind.
ACHTUNG: Im Dual-Modus sind zwei Geräte gekoppelt (USB-C-Dongle
und ein Bluetooth-Gerät), jedoch hat die eine Kommunikation Vorrang
vor der anderen.
Wenn Sie z. B. einen eingehenden Anruf annehmen, wird die
Kommunikation mit dem USB-C-Dongle unterbrochen und der
eingehende Anruf wird angenommen.
Wenn der Anruf beendet ist, schaltet das Headset automatisch wieder
auf den USB-C-Dongle um.
I Multifunktionstaste
Ein einziger Druck auf diese Taste ermöglicht:
• Wiedergabe/Pause der Musik, wenn die Kommunikation aktiviert ist
,
•
Annahme eines eingehenden Anrufs, wenn die Bluetooth-
Kommunikation aktiviert ist.
Das Headset speichert das zuletzt verbundene Bluetooth-Gerät.
Wenn das Gerät einmal eingerichtet ist, wird es auch nach dem
Wechseln der Modi und dem Ein- und Ausschalten erkannt.
Ein langer Druck auf diese Taste (ML> wie lange ist der Druck?)
• Ermöglicht die Aktivierung des Sprachassistenten Ihres

DE /
9
Mobilgeräts, wenn es mit Bluetooth verbunden ist,
• Anruf abweisen.
I Individuelle Anpassung Ihrer Nutzerfahrung
Wenn Sie mehr über die Personalisierung Ihres Headsets erfahren
und diese optimieren möchten, laden Sie bitte die Companion APP
RIG 600 PRO aus dem Google PlayStore (für Android-Geräte) oder
dem APP Store (für iOs-Geräte) herunter.
Diese APP ermöglicht folgende Features und Funktionen:
• Schnelle individuelle Anpassung von bis zu 3 Audioprofilen
durch den Classic-Modus oder noch präziser durch den Expert-
Modus:
- Mikrofonverstärkung.
- Überwachung des Mikrofonpegels.
- Aktivierung des Gehörschutzes, der die maximale
Lautstärke des Headsets begrenzt.
- Equalizer-Einstellungen (mit voreingestellten
Konfigurationen).
- Festlegung des Standardmodus beim Einschalten des
Headsets.
- Verringerung der interaktiven Signaltöne und
Sprachansagen während der Nutzung des Headsets.
•Veranschaulichende Tutorials über die Funktionen und
Bedienung der APP und des Headsets.
• Testung des Headsets über einen Testmodus, um zu prüfen, ob
alle Tasten, das Mikrofon und die Lautsprecher ordnungsgemäß
funktionieren.
• Wahl der Sprache für die Sprachansagen (aus 6 unterstützten
Sprachen).
•Einstellung des Ausschalttimers, falls keine
Kommunikationsaktivitäten stattfinden (Headset mit USB-C-
Dongle und Bluetooth-Geräten).
• Wichtige Informationen über Ihr Headset und Bluetooth-Gerät.
• Hilfe durch FAQ und Support von unserem Kundenservice
I Sicherheit
Bevor Sie Ihr neues Headset benutzen, lesen Sie bitte den
Sicherheitsleitfaden mit wichtigen Informationen zur Sicherheit, zum
Aufladen, zum Akku und zu den gesetzlichen Bestimmungen.
WARNUNG:
Es besteht Explosionsgefahr, wenn die Batterie durch
einen falschen Batterietyp ersetzt wird.
• Die Batterie während des Gebrauchs, der Lagerung und des
Transports vor extrem hohen und niedrigen Temperaturen schützen und
sie nicht niedrigem Luftdruck in Höhenlagen aussetzen.
• Der Ersatz einer Batterie durch einen falschen Batterietypen kann zur

DE /
10
Explosion oder zum Auslaufen von entzündlicher Flüssigkeit oder Gas
führen.
• Die Entsorgung einer Batterie im Feuer oder in einem heißen Ofen
bzw. das mechanische Zerquetschen oder Zerteilen einer Batterie
kann zur Explosion führen.
• Der Verbleib einer Batterie in einer Umgebung mit extrem
hohen Temperaturen kann zur Explosion bzw. zum Austreten von
entzündlichen Flüssigkeiten oder Gasen führen.
• Batterien, die einem extrem niedrigen Luftdruck ausgesetzt werden
können explodieren oder es kann zum Austreten von entzündlichen
Flüssigkeiten oder Gasen kommen.
• Die Stromquelle zur Versorgung des Headsets und des Dongles darf
nicht mehr als 15 W (entspricht 5V 3A) aufweisen.
I Support
NACON bietet eine einjährige beschränkte Garantie (Nordamerika,
Australien und Neuseeland), eine zweijährige beschränkte
Garantie (EU und Großbritannien) und eine einjährige beschränkte
Garantie (alle anderen Länder und Regionen). Bitte beachten
Sie, dass Sie je nach den Gesetzen des Staates oder Landes, in
dem Sie das Produkt erworben haben, möglicherweise weitere
Rechte haben. Wir empfehlen Ihnen dringend, Ihre Kaufquittung
aufzubewahren, um das Kaufdatum dieses Produkts zu belegen. Die
Garantiebedingungen finden Sie auf unserer Website
www.nacongaming.com
E-Mail: support@nacongaming.com
Konformität
EN. The EIRP power values and the Frequencybands relating to this
product, identified in the list below, comply with the requirements of
Directive
2014/53/EU:
EIRP: RIG 600 PRO - <13dBm
Frequency band: (2,402 ~ 2,480) GHz
DE. Die EIRP-Leistungswerte und die Frequenzbander fur dieses
Produkt, die in der nachstehenden Liste aufgefuhrt sind, entsprechen
den Anforderungen der Richtlinie 2014/53/EU:
EIRP: RIG 600 PRO- <13dBm Frequenzband : (2,402 ~ 2,480) GHz
FR. Les valeurs de puissances EIRP et des bandes de Frequence
relatives au present produit, identifie dans la liste ci-apres,
sont conformes aux exigences de

DE /
11
la directive 2014/53/UE:
EIRP: RIG 600 PRO- <13dBm
Bande de frequence : (2,402 ~ 2,480) GHz
IT. I valori di potenza EIRP e le bande di frequenza relative a questo
prodotto, identificati nell’elenco seguente, sono conformi ai requisiti
della direttiva 2014/53/UE:
EIRP: RIG 600 PRO- <13dBm
Banda di frequenza: (2,402 ~ 2,480) GHz
ES. Los valores de potencia del IPESI y las bandas de frecuencias
relacionadas con este producto, identificadas en la lista siguiente,
cumplen los requisitos de la Directiva 2014/53/UE:
EIRP: RIG 600 PRO - <13dBm
Banda de frecuencia : (2,402 ~ 2,480) GHz
NL. De EIRP-vermogenswaarden en de frequentiebanden met
betrekking tot dit product, zoals vermeld in de onderstaande lijst,
voldoen aan de eisen van Richtlijn
2014/53/EU:
EIRP: RIG 600 PRO- <13dBm
Frequentieband : (2,402 ~ 2,480) GHz
PT. Os valores de potencia EIRP e as bandas de frequencia relativas
a este produto, identificados na lista abaixo, cumprem os requisitos
da Diretiva 2014/53/UE:
EIRP: RIG 600 PRO- <13dBm
Banda de frequencia : (2,402 ~ 2,480) GHz
PL.
wymogami dyrektywy 2014/53/UE:
EIRP: RIG 600 PRO - <13dBm
TR.
ve
uygundur:
EIRP: RIG 600 PRO - <13dBm

DE /
12
DISTRIBUTORS /
DISTRIBUTEURS :
Bigben Interactive
DEUTSCHLAND GmbH
Bergheim, Deutschland
Bigben Interactive Belgium
s.a./n.v.
Waterloo, Belgium
Bigben Interactive
NEDERLAND b.v.
Hilversum, Nederland
Nacon Gaming ESPAÑA S.L.
Bigben Interactive ITALIA s.r.l
Legnano - MI, Italia
Nacon Gaming Inc.
SUPPORT :
FRANCE, du lundi au vendredi :
nacongaming.com
DEUTSCHLAND, Montag bis
Mail: [email protected]
BELGIQUE,
NEDERLAND,
ESPAÑA,
ITALIA,
UNITED STATES,
MANUFACTURER / FABRICANT :
NACON - 396 - 466 Rue de la Voyette, CRT2 - 59273 Fretin, France

13
EN /

Licensed for sale in the European Union, United Kingdom, Australia, New Zealand, United States, Canada.
Manufactured by Nacon. - Licencié pour la vente en Union européenne, Royaume-Uni, Australie, Nouvelle-Zélande,
États-Unis, Canada. Fabriqué par Nacon. - Lizenziert für den Verkauf in der Europäischen Union, Großbritannien,
Australien, Neuseeland, den USA und Kanada. Hergestellt von Nacon. - Verkoopvergunning voor de Europese
Unie, het Verenigd Koninkrijk, Australië, Nieuw-Zeeland, de Verenigde Staten en Canada. Vervaardigd door Nacon.
- Autorizado para la venta en la Unión Europea, Reino Unido, Australia, Nueva Zelanda, Estados Unidos y Canadá.
Fabricado por Nacon. - Autorizzato alla vendita in Unione Europea, Regno Unito, Australia, Nuova Zelanda, Stati Uniti
Estados Unidos, Canadá. Fabricado pela Nacon.
All the trademarks belong to their respective owners. - Toutes les marques citées appartiennent à leurs propriétaires
respectifs.

600 PRO HS
MANUALE OPERATIVO

IT /
2
Sommario
Montaggio
Impostazioni e nozioni di base
Configurazione PC
Configurazione Nintendo Switch
Ricaricare le cuffie
Accensione o spegnimento
Regolazione volume
Mute
Le diverse modalità senza fili
• Modalità USB
• Modalità doppia
• Modalità Bluetooth
Come cambiare modalità
Come abbinare le cuffie
• Dongle USB-C
• Bluetooth
Pulsante multifunzione
Come personalizzare l’esperienza del prodotto
Sicurezza
Assistenza
3
4
4
4
4
4
5
6
6
6
6
6
6
6
6
7
7
8
8

IT /
3
I Montaggio
Inserire gli auricolari destro e sinistro nell’archetto per impostare al
meglio audio e misura. L’archetto si può regolare su tre misure (small,
medium, large) muovendo gli auricolari. Per togliere un auricolare,
premere il perno dell’auricolare e sganciarlo dall’archetto.
S
M
L

IT /
4
I Impostazioni e nozioni di base
Configurazione PS5
Configurazione PS4
1. Connettere il dongle alla porta USB della PS4 con un adattatore
da USB-C a USB-A.
Configurazione PC
1. Collegare il dongle alla porta USB-C del PC o del portatile.
2. Per regolare le impostazioni audio, consultare il manuale
operativo della console.
Attenzione, se il PC non dispone di porta USB-C utilizzare un
adattatore da USB-C a USB.
PlayStation 4®
PlayStation 5®
Configurazione Nintendo Switch
1. Collegare il dongle direttamente alla porta USB-C della console.
2. Quando è inserito utilizzare un adattatore da USB-C a USB-A per
collegare il dongle alla console.

IT /
5
I Ricaricare le cuffie
Usare solo il cavo in dotazione con le cuffie e ricaricarle
direttamente dalla console o dal PC.
Per ricaricare completamente le cuffie occorrono circa 2 ore.
Indicazioni sullo stato della batteria:
LED rosso – batteria scarica, in carica
LED giallo – batteria media, in carica
LED verde - batteria carica, in carica
LED spento - batteria completamente carica
Spia luminosa
Pulsante On/Off
USB-C

IT /
6
I Accensione o spegnimento
Premere e tenere premuto il pulsante on/off per 3 secondi.
I Regolazione volume
Alzare o abbassare il volume con la manopola. Quando il volume è
al massimo, viene emesso un segnale acustico di avviso.
I Mute
Il microfono è flip to mute, quindi:
• Abbassando il braccio del microfono, è attivo
,
• Alzando il braccio del microfono, viene disattivato
.
I Le diverse modalità senza fili
Le cuffie hanno 3 diverse modalità di comunicazione:
• Modalità USB
:
Questa modalità comunica solo con il dongle USB-C. La connessione
Bluetooth è disabilitata così da non essere disturbati durante il gioco.
• Modalità doppia
:
Questa modalità ha una doppia connessione, con il dongle USB-C e un
dispositivo Bluetooth contemporaneamente. Nel caso in cui si riceva
una chiamata, l’audio proveniente dal dongle USB-C si interrompe
permettendo di sentire la chiamata in arrivo
• Modalità Bluetooth
:
Questa modalità comunica solo con il dispositivo Bluetooth.
I Come cambiare modalità
Per cambiare modalità, premere il pulsante Mode una volta. Dopo tre
pressioni singole, la modalità delle cuffie torna alla prima.
Per passare alla modalità successiva premere due volte il pulsante
mode.
Modalità doppia
Modalità USB Modalità Bluetooth
Pressione
singola
Pressione
singola
Pressione breve
Pressione breve Pressione breve
Pressione singola

IT /
7
I Come abbinare le cuffie
• Dongle USB-C
:
Cuffie e dongle USB-C sono già abbinati.
Nel caso in cui per qualsiasi motivo serva un nuovo abbinamento,
accertarsi che :
- Il dongle USB-C sia connesso alla console o al PC.
- Le cuffie siano spente.
Premere e tenere premuto il pulsante On/Off per oltre 6 secondi fino
al messaggio vocale: “Abbinamento USB”. Durante l’abbinamento, il
LED delle cuffie lampeggia in viola.
Quando l’abbinamento è concluso con successo, viene emesso il
seguente messaggio vocale:
- “Connesso” in modalità USB.
- “Connesso a USB” in modalità doppia .
Nel caso in cui l’abbinamento non riesca, viene emesso il seguente
messaggio vocale: “abbinamento USB non riuscito”.
Ripetere quindi l’abbinamento assicurandosi che siano rispettate le
Pulsante Mode
Pulsante multifunzione
Controllo volume
Spia luminosa
Pulsante On/Off
USB-C

IT /
8
condizioni sopraindicate.
• Bluetooth:
. Assicurarsi di:
- Premere e tenere premuto il pulsante Mode per oltre 6
secondi fino al messaggio vocale: “abbinamento Bluetooth”.
Durante l’abbinamento, il LED delle cuffie lampeggia in blu.
- Aprire il menù Impostazioni sul dispositivo mobile, andare a
PRO nell’elenco dei dispositivi e connettersi.
Se l’abbinamento riesce, appare un messaggio sul dispositivo e viene
emesso il seguente messaggio vocale attraverso le cuffie:
- “Connesso a Bluetooth” in modalità doppia .
- “Connesso” in modalità Bluetooth .
Se l’abbinamento non riesce, viene emesso il seguente messaggio
vocale: “abbinamento Bluetooth non riuscito”.
In questo caso disattivare la connessione Bluetooth del dispositivo,
rispettate le condizioni sopraindicate.
ATTENZIONE : In modalità doppia l’abbinamento è a due dispositivi
(dongle USB-C e dispositivo Bluetooth), ma uno ha la precedenza
sull’altro.
Nel caso in cui si riceva una chiamata ad esempio, la comunicazione
con il dongle USB-C si interrompe permettendo di sentire la chiamata in
arrivo.
dongle USB-C.
I Pulsante multifunzione
Premendo una volta questo pulsante, è possibile :
• Riprodurre o mettere in pausa la musica quando la comunicazione è
attivata
•
Rispondere a una chiamata in arrivo quando la comunicazione
Bluetooth è attivata.
Le cuffie tengono in memoria l’ultimo dispositivo Bluetooth collegato
quindi, dopo aver configurato il dispositivo, questo è salvato anche se
si cambia modalità o si accendono e spengono le cuffie.
Premendo a lungo questo pulsante è possibile: (ML> quanto deve
durare la pressione?)
• Attivare l’assistente vocale del dispositivo mobile quando è
connesso a Bluetooth
• Rifiutare una chiamata .

IT /
9
I Come personalizzare l’esperienza del prodotto
Per personalizzare ulteriormente le cuffie, scaricare Companion APP
RIG 600 PRO da Google PlayStore (per dispositivi Android) e APP store
(per dispositivi iOS).
L’APP consente di:
• Personalizzare in modo rapido fino 3 profili audio utilizzando la
modalità Classic o in maniera più specifica con la modalità Expert :
- Il guadagno del microfono.
- Livello di monitoraggio del microfono.
- L’attivazione della protezione dell’orecchio che limita il
volume massimo delle cuffie.
- Le impostazioni dell’equalizzatore (con configurazioni
predefinite).
- La modalità predefinita dell’accensione delle cuffie.
- L’abbassamento del tono di avviso e dell’interazione vocale
mentre si usano le cuffie.
• Visualizzare tutorial per capire come funzionano l’APP e le cuffie
•Testare le cuffie attraverso la modalità di prova per verificare che
pulsanti, microfono e altoparlanti funzionino a dovere.
• Selezionare la lingua del messaggio vocale (tra le 6 lingue
disponibili).
• Impostare il timer di spegnimento se non vi sono attività (cuffia
con dongle USB-C e dispositivi Bluetooth).
• Ricevere informazioni importanti sulle cuffie e il dispositivo
Bluetooth
• Ottenere assistenza tramite le FAQ e dal Servizio Clienti.
I Sicurezza
Prima di utilizzare le cuffie, leggere la guida alla sicurezza per
informazioni importanti su ricarica, batteria, sicurezza e normative.
ATTENZIONE: Sostituire la batteria con una batteria non idonea comporta
un rischio di esplosione.
• La batteria non può essere sottoposta a temperature estremamente
basse o alte, a bassa pressione atmosferica o ad altitudini elevate
durante l’utilizzo, lo stoccaggio o il trasporto.
• Sostituire una batteria con una batteria non idonea può causare
un’esplosione o la fuoriuscita di liquido o gas infiammabile.
• Smaltire la batteria nel fuoco o in un forno caldo, schiacciarla
meccanicamente o tagliarla può provocare un’esplosione.
• Lasciare una batteria in un ambiente a temperatura estremamente
elevata può provocare un’esplosione o la fuoriuscita di liquido o gas
infiammabile.
• Esporre una batteria a una pressione atmosferica molto bassa può
provocare un’esplosione o la fuoriuscita di liquido o gas infiammabile.

IT /
10
• Cuffie e dongle non devono essere alimentati da una fonte
energetica superiore a 15 W (ossia 5V 3A).
I Assistenza
NACON offre una garanzia limitata di un anno (Nord America,
Australia e Nuova Zelanda), limitata di due anni (UE e Regno Unito) e
limitata di un anno (tutti gli altri Paesi). A seconda della legislazione in
vigore nel Paese in cui viene acquistato il prodotto, l’utente potrebbe
esercitare altri diritti. Si raccomanda di conservare la ricevuta di
pagamento per dimostrare la data di acquisto del prodotto.
Per i termini e le condizioni di garanzia, visitare il nostro sito
www.nacongaming.com
E-mail: [email protected]om
Conformità
EN. The EIRP power values and the Frequencybands relating to this
product, identified in the list below, comply with the requirements of
Directive
2014/53/EU:
EIRP: RIG 600 PRO - <13dBm
Frequency band: (2,402 ~ 2,480) GHz
DE. Die EIRP-Leistungswerte und die Frequenzbander fur dieses
Produkt, die in der nachstehenden Liste aufgefuhrt sind, entsprechen
den Anforderungen der Richtlinie 2014/53/EU:
EIRP: RIG 600 PRO- <13dBm Frequenzband : (2,402 ~ 2,480) GHz
FR. Les valeurs de puissances EIRP et des bandes de Frequence
relatives au present produit, identifie dans la liste ci-apres,
sont conformes aux exigences de
la directive 2014/53/UE:
EIRP: RIG 600 PRO- <13dBm
Bande de frequence : (2,402 ~ 2,480) GHz
IT. I valori di potenza EIRP e le bande di frequenza relative a questo
prodotto, identificati nell’elenco seguente, sono conformi ai requisiti
della direttiva 2014/53/UE:
EIRP: RIG 600 PRO- <13dBm
Banda di frequenza: (2,402 ~ 2,480) GHz
ES. Los valores de potencia del IPESI y las bandas de frecuencias

IT /
11
relacionadas con este producto, identificadas en la lista siguiente,
cumplen los requisitos de la Directiva 2014/53/UE:
EIRP: RIG 600 PRO - <13dBm
Banda de frecuencia : (2,402 ~ 2,480) GHz
NL. De EIRP-vermogenswaarden en de frequentiebanden met
betrekking tot dit product, zoals vermeld in de onderstaande lijst,
voldoen aan de eisen van Richtlijn
2014/53/EU:
EIRP: RIG 600 PRO- <13dBm
Frequentieband : (2,402 ~ 2,480) GHz
PT. Os valores de potencia EIRP e as bandas de frequencia relativas
a este produto, identificados na lista abaixo, cumprem os requisitos
da Diretiva 2014/53/UE:
EIRP: RIG 600 PRO- <13dBm
Banda de frequencia : (2,402 ~ 2,480) GHz
PL.
wymogami dyrektywy 2014/53/UE:
EIRP: RIG 600 PRO - <13dBm
TR.
uygundur:
EIRP: RIG 600 PRO - <13dBm

IT /
12
DISTRIBUTORS /
DISTRIBUTEURS :
Bigben Interactive
DEUTSCHLAND GmbH
Bergheim, Deutschland
Bigben Interactive Belgium
s.a./n.v.
Waterloo, Belgium
Bigben Interactive
NEDERLAND b.v.
Hilversum, Nederland
Nacon Gaming ESPAÑA S.L.
Bigben Interactive ITALIA s.r.l
Legnano - MI, Italia
Nacon Gaming Inc.
SUPPORT :
FRANCE, du lundi au vendredi :
nacongaming.com
DEUTSCHLAND, Montag bis
Mail: [email protected]
BELGIQUE,
NEDERLAND,
ESPAÑA,
ITALIA,
UNITED STATES,
MANUFACTURER / FABRICANT :
NACON - 396 - 466 Rue de la Voyette, CRT2 - 59273 Fretin, France

13
EN /

Licensed for sale in the European Union, United Kingdom, Australia, New Zealand, United States, Canada.
Manufactured by Nacon. - Licencié pour la vente en Union européenne, Royaume-Uni, Australie, Nouvelle-Zélande,
États-Unis, Canada. Fabriqué par Nacon. - Lizenziert für den Verkauf in der Europäischen Union, Großbritannien,
- Autorizado para la venta en la Unión Europea, Reino Unido, Australia, Nueva Zelanda, Estados Unidos y Canadá.
Fabricado por Nacon. - Autorizzato alla vendita in Unione Europea, Regno Unito, Australia, Nuova Zelanda, Stati Uniti
Estados Unidos, Canadá. Fabricado pela Nacon.
All the trademarks belong to their respective owners. - Toutes les marques citées appartiennent à leurs propriétaires
respectifs.

600 PRO HS
GUÍA DE UTILIZACIÓN

ES /
2
Resumen
Ajuste
Configuración y conocimientos básicos
Configuración de PS5
Configuración de PS4
Configuración del PC
Configuración de Nintendo Switch
Cargar los auriculares
Encendido o apagado
Ajustar el volumen
Silenciar
Los distintos modos inalámbricos
• Modo USB
• Modo dual
• Modo Bluetooth
¿Cómo se cambia de modo?
¿Cómo se emparejan los auriculares?
• Dongle USB-C
• Bluetooth
Botón multifunción
¿Cómo se puede personalizar la experiencia?
Seguridad
Asistencia técnica
3
4
4
4
4
4
5
6
6
6
6
6
6
6
6
7
7
8
8

ES /
3
I Ajuste
Encaja los auriculares izquierdo y derecho en la diadema para
configurar el mejor ajuste y sonido.
La diadema se ajusta a tres tallas (pequeña, mediana y grande)
moviendo los audífonos.
Para extraer un auricular, presiona el auricular trasero para separarlo
de la diadema.
S
M
L

ES /
4
I Configuración y conocimientos básicos
Configuración de PS5
Configuración de PS4
1. Conecta el dongle mediante un adaptador USB-C a USB-A al
Configuración del PC
1. Conecta el dongle al puerto USB-C de tu PC o portátil.
2. Para configurar los ajustes de audio del sistema, consulta el
manual del usuario de tu consola.
Atención: Si no tienes un puerto USB-C en tu PC, tendrás que usar
un adaptador USB-C a USB.
PlayStation 4®
PlayStation 5®
Configuración de Nintendo Switch
1. Puedes conectar directamente el dongle al puerto USB-C de tu
consola.
2. Una vez en la base, tendrás que usar un adaptador USB-C a
USB-A para conectar el dongle a tu consola .

ES /
5
I Cargar los auriculares
Solamente debes utilizar el cable suministrado con los auriculares
y cargarlos directamente desde tu consola o PC.
Los auriculares tardan unas 2 horas en cargarse por completo.
Fíjate en las siguientes indicaciones de estado de la batería:
Luz LED roja: batería baja, se está cargando.
Luz LED amarilla: batería a medias, se está cargando.
Luz LED verde: batería con mucha carga, se está cargando.
Luz LED apagada: la batería se ha cargado por completo.
Indicador luminoso
Botón de encendido/
apagado
USB-C

ES /
6
I Encendido o apagado
segundos.
I Ajustar el volumen
Sube o baja el volumen con el regulador del volumen. Cuando
alcances el volumen máximo, oirás un indicador de tono.
I Silenciar
El micrófono tiene una palanca para silenciar; por lo tanto:
• Si el brazo del micrófono está bajado, está activo
,
• Si el brazo del micrófono está subido, está sin sonido
.
I Los distintos modos inalámbricos
Tus auriculares tienen 3 modos de comunicación distintos:
• Modo USB
:
Este modo solamente se comunica con el dongle USB-C. La conexión
Bluetooth está desactivada, por lo que no te molestarán mientras
juegas.
• Modo dual
:
Este modo tiene una conexión dual con el dongle USB-C y un
dispositivo Bluetooth, al mismo tiempo. Ten en cuenta que si recibes
una llamada, se detendrá el sonido procedente del dongle USB-C y
oirás la llamada entrante.
• Modo Bluetooth
:
Este modo se comunica solamente con tu dispositivo Bluetooth.
I ¿Cómo se cambia de modo?
Para cambiar de un modo a otro, pulsa el botón de modo una vez.
Después de pulsar tres veces, el modo de los auriculares volverá al
primer modo.
Para saltar al modo siguiente, pulsa dos veces el botón de modo.
Modo dual
Modo USB Modo Bluetooth
Una pulsación
Pulsación corta
Una pulsación
Una pulsación
Pulsación corta Pulsación corta

ES /
7
I ¿Cómo se emparejan los auriculares?
• USB-C Dongle
:
Los auriculares y el dongle USB-C están emparejados cuando se
sacan de la caja.Si necesitas emparejarlos de nuevo, por cualquier
motivo, asegúrate de lo siguiente:
- El dongle USB-C está conectado a tu consola o PC,
- Los auriculares están apagados.
Mantén pulsado el botón de encendido/apagado durante más de 6
segundos hasta que escuches este mensaje: “Emparejando USB”. La
luz LED de los auriculares parpadeará con una luz morada durante el
proceso de emparejamiento.
Una vez realizado el emparejamiento correctamente, escucharás
este mensaje:
- “Conectado” en modo USB,
- “USB conectado” en modo dual.
Si el emparejamiento no se realiza correctamente, escucharás este
mensaje: “Error al emparejar el USB”.
Botón de modo
Botón multifunción
Control del volumen
Indicador luminoso
Botón de encendido
/apagado
USB-C

ES /
8
En este caso, repite el proceso de emparejamiento y asegúrate de
seguir los pasos anteriores.
• Bluetooth:
Para emparejar tus auriculares con un dispositivo Bluetooth
. Comprueba
lo siguiente:
- Mantén pulsado el botón de modo durante más de 6 segundos
hasta que escuches este mensaje: “Emparejando Bluetooth”.
La luz LED de los auriculares parpadeará con una luz azul
durante el proceso de emparejamiento.
- Abre el menú “Ajustes” de tu dispositivo móvil, ve a Bluetooth
y activa la conexión Bluetooth. Busca RIG 600-PRO en la lista de
dispositivos y conéctate a él.
Si el emparejamiento se realiza correctamente, verás el mensaje
en tu dispositivo, pero también oirás un mensaje a través de los
auriculares:
- “Bluetooth conectado” en modo dual,
- “Conectado” en modo Bluetooth.
Si el emparejamiento no se realiza correctamente, escucharás este
mensaje: “Error al emparejar Bluetooth”.
En este caso, apaga la conexión Bluetooth de tu dispositivo y
desconecta los auriculares, y repite el proceso de emparejamiento de
nuevo asegurándote de seguir los pasos anteriores.
ATENCIÓN: En modo dual hay dos dispositivos emparejados (dongle
USB-C y un dispositivo Bluetooth), pero una de las comunicaciones tiene
prioridad sobre la otra.
Si respondes una llamada entrante, por ejemplo, se interrumpirá la
comunicación con el dongle USB-C y escucharás la llamada entrante.
Una vez hayas terminado la llamada, los auriculares volverán
automáticamente al dongle USB-C.
I Botón multifunción
Con este botón, pulsando una vez, puedes hacer lo siguiente:
• Reproducir/Pausar la música cuando se activa la comunicación
.
•
Responder una llamada entrante cuando se activa tu
comunicación por Bluetooth.
Los auriculares recuerdan el último dispositivo Bluetooth conectado;
por lo tanto, una vez que has configurado el dispositivo, los
auriculares lo recordarán aunque cambies de modo o enciendas o
apagues los auriculares.

ES /
9
Con este botón, con una pulsación larga, puedes hacer lo siguiente:
(ML> ¿Cómo es la pulsación?)
• Activar el asistente de voz de tu dispositivo móvil, cuando está
conectado por Bluetooth,
• Rechazar una llamada.
I ¿Cómo se puede personalizar la experiencia?
Si quieres personalizar más tus auriculares, descarga la aplicación
Companion RIG 600 PRO desde Google PlayStore (para dispositivos
Android) y desde la App Store (para dispositivos iOS).
La aplicación te permitirá hacer lo siguiente:
• Personalizar rápidamente hasta 3 perfiles de audio, mediante el
modo Clásico, o con más precisión con el modo Experto:
- La ganancia del micrófono,
- El nivel de control del micrófono,
- Activar la protección auditiva, que limita el volumen
máximo de los auriculares,
- Los ajustes de tu ecualizador (con las configuraciones
preajustadas),
- Definir el modo predeterminado al encender los
auriculares,
- Reducir los tonos de los mensajes y la interacción por voz
al usar los auriculares.
• Ver los tutoriales para saber cómo funcionan la aplicación y los
auriculares.
• Probar tus auriculares con un modo de prueba para verificar que
todos: los botones, el micrófono y los altavoces estén
funcionando como deben.
• Seleccionar el idioma de la voz de los mensajes (de los 6
idiomas compatibles).
• Configurar el temporizador de apagado cuando no haya
actividades de comunicación (auriculares con el dongle USB-C
y dispositivos Bluetooth).
• Obtener información importante sobre tus auriculares y el
dispositivo Bluetooth.
• Obtener ayuda por medio de las Preguntas frecuentes y nuestro
Servicio de atención al cliente.
I Seguridad
Leer la guía de seguridad para consultar información importante
de seguridad, carga, batería e información de regulación antes de
utilizar tus nuevos auriculares.
ADVERTENCIA:
En caso de sustituir la pila por una de un tipo
incorrecto, existe riesgo de explosión.

ES /
10
• Durante el uso, el almacenamiento y el transporte de la batería,
esta no debe exponerse a temperaturas muy altas o bajas ni a una
baja presión atmosférica a gran altitud.
• Cambiar una batería por otra de un tipo incorrecto puede provocar
una explosión o una fuga de líquido o gas inflamable.
• Arrojar una batería al fuego o introducirla en un horno caliente,
aplastarla mecánicamente o cortarla pueden provocar una explosión.
• Dejar una batería en un entorno a una temperatura muy alta puede
provocar una explosión o una fuga de líquido o gas inflamable.
• Una batería expuesta a una presión atmosférica muy baja puede
provocar una explosión o una fuga de líquido o gas inflamable.
• Los auriculares y la unidad del dongle no deben usarse con una
fuente de alimentación superior a 15 W (es decir, 5 V 3 A).
I Asistencia técnica
NACON ofrece una garantía limitada de un año (Norteamérica,
Australia y Nueva Zelanda), una garantía limitada de dos años
(UE y Reino Unido) y una garantía limitada de un año (el resto de
países y regiones). Ten en cuenta que podrías tener otros derechos,
dependiendo de la legislación del estado o del país en el que se
adquirió el producto. Te recomendamos encarecidamente que
guardes el justificante de compra para poder demostrar la fecha de
compra de este producto. Puedes consultar las condiciones de la
garantía en nuestro sitio web, en
www.nacongaming.com
Email: [email protected]
Compliance
EN. The EIRP power values and the Frequencybands relating to this
product, identified in the list below, comply with the requirements of
Directive
2014/53/EU:
EIRP: RIG 600 PRO - <13dBm
Frequency band: (2,402 ~ 2,480) GHz
DE. Die EIRP-Leistungswerte und die Frequenzbander fur dieses
Produkt, die in der nachstehenden Liste aufgefuhrt sind, entsprechen
den Anforderungen der Richtlinie 2014/53/EU:
EIRP: RIG 600 PRO- <13dBm Frequenzband : (2,402 ~ 2,480) GHz
FR. Les valeurs de puissances EIRP et des bandes de Frequence
relatives au present produit, identifie dans la liste ci-apres,
sont conformes aux exigences de

ES /
11
la directive 2014/53/UE:
EIRP: RIG 600 PRO- <13dBm
Bande de frequence : (2,402 ~ 2,480) GHz
IT. I valori di potenza EIRP e le bande di frequenza relative a questo
prodotto, identificati nell’elenco seguente, sono conformi ai requisiti
della direttiva 2014/53/UE:
EIRP: RIG 600 PRO- <13dBm
Banda di frequenza: (2,402 ~ 2,480) GHz
ES. Los valores de potencia del IPESI y las bandas de frecuencias
relacionadas con este producto, identificadas en la lista siguiente,
cumplen los requisitos de la Directiva 2014/53/UE:
EIRP: RIG 600 PRO - <13dBm
Banda de frecuencia : (2,402 ~ 2,480) GHz
NL. De EIRP-vermogenswaarden en de frequentiebanden met
betrekking tot dit product, zoals vermeld in de onderstaande lijst,
voldoen aan de eisen van Richtlijn
2014/53/EU:
EIRP: RIG 600 PRO- <13dBm
Frequentieband : (2,402 ~ 2,480) GHz
PT. Os valores de potencia EIRP e as bandas de frequencia relativas
a este produto, identificados na lista abaixo, cumprem os requisitos
da Diretiva 2014/53/UE:
EIRP: RIG 600 PRO- <13dBm
Banda de frequencia : (2,402 ~ 2,480) GHz
PL.
wymogami dyrektywy 2014/53/UE:
EIRP: RIG 600 PRO - <13dBm
TR.
uygundur:
EIRP: RIG 600 PRO - <13dBm

ES /
12
DISTRIBUTORS /
DISTRIBUTEURS :
Bigben Interactive
DEUTSCHLAND GmbH
Bergheim, Deutschland
Bigben Interactive Belgium
s.a./n.v.
Waterloo, Belgium
Bigben Interactive
NEDERLAND b.v.
Hilversum, Nederland
Nacon Gaming ESPAÑA S.L.
Bigben Interactive ITALIA s.r.l
Legnano - MI, Italia
Nacon Gaming Inc.
SUPPORT :
FRANCE, du lundi au vendredi :
nacongaming.com
UK
DEUTSCHLAND, Montag bis
BELGIQUE,
NEDERLAND,
ESPAÑA,
ITALIA,
UNITED STATES,
MANUFACTURER / FABRICANT :
NACON - 396 - 466 Rue de la Voyette, CRT2 - 59273 Fretin, France

13
EN /

Licensed for sale in the European Union, United Kingdom, Australia, New Zealand, United States, Canada.
Manufactured by Nacon. - Licencié pour la vente en Union européenne, Royaume-Uni, Australie, Nouvelle-Zélande,
États-Unis, Canada. Fabriqué par Nacon. - Lizenziert für den Verkauf in der Europäischen Union, Großbritannien,
- Autorizado para la venta en la Unión Europea, Reino Unido, Australia, Nueva Zelanda, Estados Unidos y Canadá.
Fabricado por Nacon. - Autorizzato alla vendita in Unione Europea, Regno Unito, Australia, Nuova Zelanda, Stati Uniti
Estados Unidos, Canadá. Fabricado pela Nacon.
All the trademarks belong to their respective owners. - Toutes les marques citées appartiennent à leurs propriétaires
respectifs.

600 PRO HS
GEBRUIKERSHANDLEIDING

NL /
2
Samenvatting
Passend maken
Installatie en basics
Installatie PC
Installatie Nintendo Switch
Je headset opladen
In-/uitschakelen
Volume aanpassen
Mute
De verschillende draadloze modi
• USB-Modus
• Dualer Modus
• Bluetooth-Modus
Hoe switch ik van modus?
De headset koppelen
• USB-C Dongle
• Bluetooth
Multifunctieknop
Personaliseren van je ervaring
Veiligheid
Ondersteuning
3
4
4
4
4
4
5
6
6
6
6
6
6
6
6
7
7
8

NL/
3
I Passend maken
Klik de linker- en rechteroorschelpen in de hoofdband om de beste
pasvorm en het beste geluid te configureren. De hoofdband kan op
drie maten worden (small, medium, large) worden afgesteld door de
oorschelpen te verplaatsen. Om een oorschelp te verwijderen, druk je
op de oorschelp om deze van de hoofdband te halen.
S
M
L

NL /
4
I Installatie en basics
Installatie PS5
Installatie PS4
1. Sluit je dongle aan met een USB-C naar USB-A-adapter op de
Installatie PC
1. Sluit je dongle aan op de USB-C-poort van je pc of laptop.
2. Raadpleeg de gebruikershandleiding van de console om de
systeemaudio-instellingen aan te passen.
Let op: als je geen USB-C-poort op je pc hebt, moet je een USB-C
naar USB-adapter gebruiken.
PlayStation 4®
PlayStation 5®
Installatie Nintendo Switch
1. Je kunt je dongle rechtstreeks aansluiten op de USB-C-poort van
je console.
2. Bij het docken moet je een USB-C naar USB-A-adapter
gebruiken om je dongle op je console aan te sluiten.

NL/
5
I Je headset opladen
Gebruik alleen de kabel die bij de headset is geleverd en laad de
headset rechtstreeks op vanaf je console of pc.
Het duurt ongeveer 2 uur om de headset volledig op te laden.
Let op de volgende aanwijzingen betreffende de batterijstatus:
Rood ledlampje - batterij bijna leeg en bezig met opladen,
Geel ledlampje - batterij half vol en bezig met opladen,
Groen ledlampje batterij bijna vol en bezig met opladen,
Ledlampje uit - de batterij is volledig opgeladen.
Controlelampje
Aan/uit-knop
USB-C

NL /
6
I In-/uitschakelen
Houd de Aan/Uit-toets gedurende 3s ingedrukt.
I Volume aanpassen
Verhoog of verlaag het volume met behulp van de volumeknop.
Wanneer het maximale volume is bereikt, hoort je een
toonindicator.
I Mute
De microfoon is een `flip to mute’ dus:
• Als de microfoonarm omlaag staat, is de microfoon actief;
• Als de microfoonarm omhoog staat, is de mutefunctie actief.
I De verschillende draadloze modi
Je headset heeft 3 verschillende communicatiemodi:
• USB-Modus
:
Deze modus communiceert alleen met de USB-C-dongle.
Bluetooth-verbinding is uitgeschakeld zodat je niet wordt gestoord
tijdens het gamen.
• Dualer Modus
:
Deze modus heeft tegelijkertijd een dubbele verbinding met de
USB-C-dongle en een Bluetooth-apparaat. Merk op dat als je een
oproep ontvangt, de audio van de USB-C-dongle zal stoppen en je
de inkomende oproep zult horen.
• Bluetooth-Modus
:
Deze modus communiceert alleen met je Bluetooth-apparaat.
Hoe switch ik van modus?
Om van de ene modus naar de andere modus over te schakelen,
druk je eenmaal op de modusknop. Na drie keer kort indrukken,
keert de headsetmodus terug naar de eerste modus.
Om de volgende modus over te slaan, drukt je tweemaal op de
modusknop.
Dual-Modus
USB-Modus Bluetooth-Modus
Eén keer
indrukken
Eén keer
indrukken
Kort indrukken Kort indrukken
Short press
Eén keer indrukken

NL/
7
I De headset koppelen
• USB-C Dongle
:
De Headset & USB-C-dongle worden gekoppeld geleverd. Als je een
nieuwe koppeling moet maken, om welke reden dan ook, zorg er
dan voor dat:
- De USB-C-dongle is aangesloten op je console of pc,
- De headset uitzetten.
Houd de Aan/Uit-knop langer dan 6 seconden ingedrukt totdat je
hoort: “USB aan het koppelen”. Het ledlampje van de headset zal
tijdens het koppelen paars knipperen.
Wanneer het koppelen succesvol is, hoort u:
- «Verbonden» in USB-modus,
- «USB aangesloten» in dual-modus.
Wanneer het koppelen mislukt is, hoort u: “USB-koppeling mislukt”..
Herhaal in dit geval het koppelingsproces opnieuw waarbij aan de
bovenstaande voorwaarden wordt voldaan.
Modusknop
Multifunctieknop
Volumeregelaar
Controlelampje
Aan/uit-knop
USB-C

NL /
8
• Bluetooth:
Het koppelen van je headset met een Bluetooth-apparaat. Zorg ervoor:
- Houd de modusknop langer dan 6 seconden ingedrukt totdat
je hoort: “Bluetooth aan het koppelen”. Het ledlampje van de
headset zal tijdens het koppelen blauw knipperen.
- Open het menu `Instellingen’ op je mobiele apparaat, ga naar
Bluetooth en zet de Bluetooth-verbinding AAN. Zoek in de lijst
met apparaten naar RIG 600 PRO en maak er verbinding mee.
Als het koppelen succesvol is, ziet je het bericht op je apparaat, maar
hoor je ook via de headset:
- «Bluetooth aangesloten» in dual-modus,
- «Verbonden» in Bluetooth-modus.
Wanneer het koppelen mislukt is, hoort u: “Bluetooth-koppeling mislukt”.
Schakel in dit geval de Bluetooth-verbinding van je apparaat uit, schakel
de headset uit en herhaal het koppelingsproces opnieuw waarbij aan de
bovenstaande voorwaarden wordt voldaan.
LET OP: In de Dual-modus bent je gekoppeld aan twee apparaten (USB-
C-dongle en een Bluetooth-apparaat), maar de ene communicatie heeft
voorrang op de andere.
Als je bijvoorbeeld een inkomende oproep beantwoordt, stopt de
communicatie met de USB-C-dongle en hoor je de inkomende oproep.
Wanneer het gesprek is voltooid, schakelt de headset automatisch terug
naar de USB-C-dongle.
I Multifunctieknop
Met deze knop kunt je met één druk op de knop:
• Je muziek afspelen/pauzeren wanneer je communicatie is
geactiveerd
,
•
Een inkomend gesprek beantwoorden wanneer je Bluetooth-
communicatie is geactiveerd
Jouw headset onthoudt het laatst aangesloten Bluetooth-apparaat,
dus zodra je jouw apparaat hebt ingesteld, zal het dit apparaat
onthouden, zelfs als je schakelt tussen modi of je headset in-/
uitschakelt.
Met deze knop kun je met een lange druk op de knop: (ML> hoe lang
drukken?)
• De spraakassistent van je mobiele apparaat activeren wanneer
dit verbonden is met Bluetooth
• Een oproep weigeren .

NL/
9
I Personaliseren van je ervaring
Download de Companion APP RIG 600 PRO van de Google PlayStore
(voor Android-apparaten) en de APP Store (voor IOS-apparaten) als je
jouw headset verder wilt aanpassen.
De APP maakt het mogelijk:
• Snel tot 3 audioprofielen aan te passen met de Classic-modus,
of beter gezegd met de Expert-modus:
- Je microfoonversterking,
- Je microfoonbewakingsniveau,
- Activeren van gehoorbescherming die het maximale
volume van de headset beperkt,
- Je equalizer-instellingen (met vooraf ingestelde
configuraties),
- Instellen van de standaardmodus wanneer je jouw headset
inschakelt,
- Verminderen van tonen en steminteractie tijdens het
gebruik van de headset.
•Bekijk tutorials om te weten hoe de APP en headset werken.
• Test je headset via een testmodus om te controleren of alle:
knoppen, microfoon en luidsprekers werken zoals het hoort
• Kies je spraaktaal voor de gesproken aanwijzingen (kies uit 6
talen)
• Stel de timer voor uitschakelen in als er geen
communicatieactiviteit plaatsvindt (headset met USB-C-dongle-
en Bluetooth-apparaten)r Headset und Bluetooth-Gerät.
• Ontvang belangrijke informatie over je headset en Bluetooth-
apparaat
• Krijg ondersteuning via de veelgestelde vragen en van onze
klantenservice
I Veiligheid
Lees de veiligheidshandleiding voor belangrijke informatie over
veiligheid, opladen, batterij en regelgeving voordat je jouw nieuwe
headset gebruikt.
VOORZICHTIG:
Kans op ontploffing als de batterij vervangen wordt
door een verkeerd type.
• De batterij mag tijdens gebruik, opslag of vervoer niet blootgesteld
worden aan zeer hoge of zeer lage temperaturen, een lage luchtdruk
op grote hoogte.
•Een batterij vervangen door een onjuist type kan leiden tot een
• Het weggooien van een batterij in vuur of een hete oven of het
mechanisch platdrukken of snijden van een batterij kan leiden tot een
• Een batterij blootstellen aan een extreem hoge

NL /
10
van brandbare vloeistof of gas;
• Een batterij blootstellen aan extreem lage luchtdruk kan leiden tot
• De headset en de dongle-unit mogen niet worden gevoed door een
stroombron van meer dan 15 W (d.w.z. 5V 3A).
I Ondersteuning
NACON geeft een jaar beperkte garantie (Noord-Amerika, Australië
en Nieuw-Zeeland), twee jaar beperkte garantie (EU en VK) en
een jaar beperkte garantie (alle andere landen en regio ‘s). Houd
er rekening mee dat je mogelijk andere rechten hebt, afhankelijk
van de wetten van de staat of het land waar het product is gekocht.
We raden je ten zeerste aan om uw aankoopbewijs te bewaren om
de aankoopdatum van dit product te kunnen bewijzen. Ga voor de
garantievoorwaarden naar onze website
www.nacongaming.com
E-mail: [email protected]om
Naleving
EN. The EIRP power values and the Frequencybands relating to this
product, identified in the list below, comply with the requirements of
Directive 2014/53/EU:
EIRP: RIG 600 PRO - <13dBm
Frequency band: (2,402 ~ 2,480) GHz
DE. Die EIRP-Leistungswerte und die Frequenzbander fur dieses
Produkt, die in der nachstehenden Liste aufgefuhrt sind, entsprechen
den Anforderungen der Richtlinie 2014/53/EU:
EIRP: RIG 600 PRO- <13dBm Frequenzband : (2,402 ~ 2,480) GHz
FR. Les valeurs de puissances EIRP et des bandes de Frequence
relatives au present produit, identifie dans la liste ci-apres,
sont conformes aux exigences de la directive 2014/53/UE:
EIRP: RIG 600 PRO- <13dBm
Bande de frequence : (2,402 ~ 2,480) GHz
IT. I valori di potenza EIRP e le bande di frequenza relative a questo
prodotto, identificati nell’elenco seguente, sono conformi ai requisiti
della direttiva 2014/53/UE:
EIRP: RIG 600 PRO- <13dBm
Banda di frequenza: (2,402 ~ 2,480) GHz

NL/
11
ES. Los valores de potencia del IPESI y las bandas de frecuencias
relacionadas con este producto, identificadas en la lista siguiente,
cumplen los requisitos de la Directiva 2014/53/UE:
EIRP: RIG 600 PRO - <13dBm
Banda de frecuencia : (2,402 ~ 2,480) GHz
NL. De EIRP-vermogenswaarden en de frequentiebanden met
betrekking tot dit product, zoals vermeld in de onderstaande lijst,
voldoen aan de eisen van Richtlijn 2014/53/EU:
EIRP: RIG 600 PRO- <13dBm
Frequentieband : (2,402 ~ 2,480) GHz
PT. Os valores de potencia EIRP e as bandas de frequencia relativas
a este produto, identificados na lista abaixo, cumprem os requisitos
da Diretiva 2014/53/UE:
EIRP: RIG 600 PRO- <13dBm
Banda de frequencia : (2,402 ~ 2,480) GHz
PL.
wymogami dyrektywy 2014/53/UE:
EIRP: RIG 600 PRO - <13dBm
TR.
uygundur:
EIRP: RIG 600 PRO - <13dBm

NL /
12
DISTRIBUTORS /
DISTRIBUTEURS :
Bigben Interactive
DEUTSCHLAND GmbH
Bergheim, Deutschland
Bigben Interactive Belgium
s.a./n.v.
Waterloo, Belgium
Bigben Interactive
NEDERLAND b.v.
Hilversum, Nederland
Nacon Gaming ESPAÑA S.L.
Bigben Interactive ITALIA s.r.l
Legnano - MI, Italia
Nacon Gaming Inc.
SUPPORT :
FRANCE, du lundi au vendredi :
nacongaming.com
DEUTSCHLAND, Montag bis
Mail: [email protected]
BELGIQUE,
NEDERLAND,
ESPAÑA,
ITALIA,
UNITED STATES,
MANUFACTURER / FABRICANT :
NACON - 396 - 466 Rue de la Voyette, CRT2 - 59273 Fretin, France

13
EN /

Licensed for sale in the European Union, United Kingdom, Australia, New Zealand, United States, Canada.
Manufactured by Nacon. - Licencié pour la vente en Union européenne, Royaume-Uni, Australie, Nouvelle-Zélande,
États-Unis, Canada. Fabriqué par Nacon. - Lizenziert für den Verkauf in der Europäischen Union, Großbritannien,
Australien, Neuseeland, den USA und Kanada. Hergestellt von Nacon. - Verkoopvergunning voor de Europese
Unie, het Verenigd Koninkrijk, Australië, Nieuw-Zeeland, de Verenigde Staten en Canada. Vervaardigd door Nacon.
- Autorizado para la venta en la Unión Europea, Reino Unido, Australia, Nueva Zelanda, Estados Unidos y Canadá.
Fabricado por Nacon. - Autorizzato alla vendita in Unione Europea, Regno Unito, Australia, Nuova Zelanda, Stati Uniti
Estados Unidos, Canadá. Fabricado pela Nacon.
All the trademarks belong to their respective owners. - Toutes les marques citées appartiennent à leurs propriétaires
respectifs.
-
 1
1
-
 2
2
-
 3
3
-
 4
4
-
 5
5
-
 6
6
-
 7
7
-
 8
8
-
 9
9
-
 10
10
-
 11
11
-
 12
12
-
 13
13
-
 14
14
-
 15
15
-
 16
16
-
 17
17
-
 18
18
-
 19
19
-
 20
20
-
 21
21
-
 22
22
-
 23
23
-
 24
24
-
 25
25
-
 26
26
-
 27
27
-
 28
28
-
 29
29
-
 30
30
-
 31
31
-
 32
32
-
 33
33
-
 34
34
-
 35
35
-
 36
36
-
 37
37
-
 38
38
-
 39
39
-
 40
40
-
 41
41
-
 42
42
-
 43
43
-
 44
44
-
 45
45
-
 46
46
-
 47
47
-
 48
48
-
 49
49
-
 50
50
-
 51
51
-
 52
52
-
 53
53
-
 54
54
-
 55
55
-
 56
56
-
 57
57
-
 58
58
-
 59
59
-
 60
60
-
 61
61
-
 62
62
-
 63
63
-
 64
64
-
 65
65
-
 66
66
-
 67
67
-
 68
68
-
 69
69
-
 70
70


Nacon RIG600PRO_HS Gebruikershandleiding
- Categorie
- Mobiele headsets
- Type
- Gebruikershandleiding
in andere talen
- italiano: Nacon RIG600PRO_HS Guida utente
- français: Nacon RIG600PRO_HS Mode d'emploi
- español: Nacon RIG600PRO_HS Guía del usuario
- Deutsch: Nacon RIG600PRO_HS Benutzerhandbuch