
Model KCR-100
User manual – Kitchen radio with bluetooth, light and timer
Gebruikshandleiding – Keukenradio met Bluetooth, licht en timer
Benutzerhandbuch-Küchenradio mit Bluetooth, Licht und Timer
Guide d’utilisation - Radio de cuisine avec Bluetooth, lumière et minuteur
Manual de usuario – Radio de cocina con Bluetooth, luz y temporizador

2
Index
English ....................................................................................................................................................................................................... 3
Nederlands .............................................................................................................................................................................................. 14
Deutsch .................................................................................................................................................................................................... 25
Français .................................................................................................................................................................................................... 36
Español .................................................................................................................................................................................................... 47
Version: 3.0

3
English
KCR-100
CAUTION:
Usage of controls or adjustments or performance of procedures other than those specified herein may result in
hazardous radiation exposure.
PRECAUTIONS BEFORE USE
KEEP THESE INSTRUCTIONS IN MIND:
1. Do not cover or block any ventilation openings. When placing the device on a shelf, leave
5 cm (2”) free space around the whole device.
2. Install in accordance with the supplied user manual.
3. Keep the device away from heat sources such as radiators, heaters, stoves, candles and other heat-generating
products or naked flame. The device can only be used in moderate climates. Extremely cold or warm environments
should be avoided. Working temperature between 0° and 35°C.
4. Avoid using the device near strong magnetic fields.
5. Electrostatic discharge can disturb normal usage of this device. If so, simply reset and restart the device following
the instruction manual. During file transmission, please handle with care and operate in a static-free environment.
6. Warning! Never insert an object into the product through the vents or openings. High voltage flows through the
product and inserting an object can cause electric shock and/or short circuit internal parts. For the same reason, do
not spill water or liquid on the product.
7. Do not use in wet or moist areas such as bathrooms, steamy kitchens or near swimming pools.
8. The device shall not be exposed to dripping or splashing and make sure that no objects filled with liquids, such as
vases, are placed on or near the apparatus.
9. Do not use this device when condensation may occur. When the unit is used in a warm wet room with damp, water
droplets or condensation may occur inside the unit and the unit may not function properly; let the unit stand in
power OFF for 1 or 2 hours before turning on the power: the unit should be dry before getting any power.
10. Although this device is manufactured with the utmost care and checked several times before leaving the factory, it
is still possible that problems may occur, as with all electrical appliances. If you notice smoke, an excessive build-up
of heat or any other unexpected phenomena, you should disconnect the plug from the main power socket
immediately.
11. This device must operate on a power source as specified on the specification label. If you are not sure of the type of
power supply used in your home, consult your dealer or local power company.
12. Keep away from animals. Some animals enjoy biting on power cords.
13. To clean the device, use a soft dry cloth. Do not use solvents or petrol based fluids.
To remove severe stains, you may use a damp cloth with dilute detergent.
14. The supplier is not responsible for damage or lost data caused by malfunction, misuse, modification of the device or
battery replacement.
15. Do not interrupt the connection when the device is formatting or transferring files. Otherwise, data may be
corrupted or lost.
16. If the unit has USB playback function, the USB memory stick should be plugged into the unit directly. Don’t use an
USB extension cable because it can cause interference resulting in failing of data.
17. The rating label has been marked on the bottom or back panel of the device.
18. This device is not intended for use by people (including children) with physical, sensory or mental disabilities, or a
lack of experience and knowledge, unless they’re under supervision or have received instructions about the correct
use of the device by the person who is responsible for their safety.
19. This product is intended for non professional use only and not for commercial or industrial use.
20. Make sure the unit is adjusted to a stable position. Damage caused by using this product in an unstable position
vibrations or shocks or by failure to follow any other warning or precaution contained within this user manual will
not be covered by warranty.
21. Never remove the casing of this device.
22. Never place this device on other electrical equipment.
23. Do not allow children access to plastic bags.
24. Only use attachments/accessories specified by the manufacturer.
25. Refer all servicing to qualified service personnel. Servicing is required when the device has been damaged in any
way, such as the power supply cord or the plug, when liquid has been spilled or objects have fallen into the device,
when the device has been exposed to rain or moisture, does not operate normally, or has been dropped.
26. Long exposure to loud sounds from personal music players may lead to temporary or permanent hearing loss.
27. If the product is delivered with power cable or AC power adaptor:
⚫ If any trouble occur, disconnect the AC power cord and refer servicing to qualified personnel.
⚫ Don’t step on or pinch the power adaptor. Be very careful, particularly near the plugs and the cable’s exit
point. Do not place heavy items on the power adaptor, which may damage it. Keep the entire device out of
children’s reach! When playing with the power cable, they can seriously injure themselves.

4
⚫ Unplug this device during lightning storms or when unused for a long period.
⚫ The socket outlet must be installed near the equipment and must be easily accessible.
⚫ Do not overload ac outlets or extension cords. Overloading can cause fire or electric shock.
⚫ Devices with class 1 construction should be connected to a main socket outlet with a protective earthed
connection.
⚫ Devices with class 2 construction do not require a earthed connection.
⚫ Always hold the plug when pulling it out of the main supply socket. Do not pull the power cord. This can cause
a short circuit.
⚫ Do not use a damaged power cord or plug or a loose outlet. Doing so may result in fire or electric shock.
28. If the product contains or is delivered with a remote control containing coin/cell batteries:
Warning:
⚫ “Do not ingest battery, Chemical Burn Hazard” or equivalent working.
⚫ [The remote control supplied with] This product contains a coin/button cell battery. If the battery is
swallowed, it can cause severe internal burns in just
2 hours and can lead to death.
⚫ Keep new and used batteries away from children.
⚫ If the battery compartment does not close securely, stop using the product and keep it away from children.
⚫ If you think batteries might have been swallowed or placed inside any part of the body, seek immediate
medical attention.
29. Caution about the use of Batteries:
⚫ Danger of explosion if battery is incorrectly replaced. Replace only with the same or equivalent type.
⚫ Battery cannot be subjected to high or low extreme temperatures, low air pressure at high altitude during use,
storage or transportation.
⚫ Replacement of a battery with an incorrect type that can result in an explosion or the leakage of flammable
liquid or gas.
⚫ Disposal of a battery into fire or a hot oven, or mechanically crushing or cutting of a battery, that can result in
an explosion.
⚫ Leaving a battery in an extremely high temperature surrounding environment that can result in an explosion
or that leakage of flammable liquid or gas.
⚫ A battery subjected to extremely low air pressure that may result in an explosion or the leakage of flammable
liquid or gas.
⚫ Attention should be drawn to the environmental aspects of battery disposal.
INSTALLATION
• Unpack all parts and remove protective material.
• Do not connect the unit to the mains before checking the mains voltage and before all other connections have been
made.

5
ACCESSORIES
• Mounting kit (plastic plate + 2 sets of screws + 4 spacers + drill hole paper template)
Plastic plate
Spacer
Drill hole paper template
• Instruction manual
MOUNTING THE SET UNDER A CABINET
1. Decide the location to install the unit in the cabinet/shelf. Since the unit’s speakers are located on the left edge side and right
edge side respectively, it is recommended to reserve enough space to avoid blocking the sound.
2. Once the location is decided, you can use the drill hole paper template (supplied) as a guide hole location to drill the holes.
3. Install the plastic plate under the cabinet/shelf using the supplied spacers and screws, refer to the diagram below. Spacers are
optional to install as your preference. 2 sets of screws are provided for your selection. The longer screw set is usually used when
the spaces are used. Depends on the wooden board thickness, you may decide to use other suitable screw length by yourselves.
4. After the plastic plate is installed, slide the unit into it until it locks securely.
5. Due to its weight, the unit should be installed with great care. Make sure that the cabinet that is used is sturdy enough to
support the weight of the unit.
Note:
- To reduce the risk of fire, do not place the radio on any heating area or without the spacing.
- You can slide out the unit from the plastic plate and to be used as a standing kitchen radio.

6
FRONT PANEL
1. STANDBY /SOURCE
Press to turn on the unit. When it is turned on, press this button will toggle between FM and Bluetooth mode. Press and hold to
turn off and go to Standby mode
2. LIGHT ON/OFF
Slide to turn on or turn off the downward lighting
3. NUMERIC BUTTONS
Press to direct tune to the stored preset FM channel
4. DISPLAY
5. SCAN/ST-MONO/PAIRING
FM: Press to toggle between FM Stereo and Force Mono reception. Press and hold to start the full auto-scanning and store the
available FM channels
BT: Press and hold to disconnect the current connection and start to search another new Bluetooth device
6. /MIN.
FM: Press to tune to a different frequency. Press and hold to auto-scan to the next available channel
BT: Press to skip to the previous track
Timer Setup: Press to setup the minute setting
7. /SEC.
FM: Press to tune to different frequency. Press and hold to auto-scan the next available channel
BT: Press to skip to the next track
Timer Setup: Press to setup the second setting
8. /CLOCK SET/MEMORY
FM: Press to tune to different stored preset FM channel. Press and hold to store the preset FM channel as desired
BT: Press to toggle between pause and resume playback operation
Standby mode: Press to enter the clock setup operation
9. TIMER
Press to enter the Timer Setup
10. – VOLUME +
Adjust the volume control
11. FM Freqency 0.05MHz LED
When the FM frequency of 0.05MHz is received, this LED will turn on. For example when 88.15MHz is received, the display will
show “88.1” and this LED will turn on
12. BT LED
It is an indicator and turn on when it is in Bluetooth mode
13. FM LED
It is an indicator and turn on when it is in FM mode
14. FM-ST LED
It is an indicator and turn on when it is in FM Stereo mode
15. PM LED
It is an indicator and turn on when it is in 12 hours display format at afternoon time

7
16. IR Receiver Window
17. TIMER LED
It is an indicator and turn on when the timer is set.
REMOTE CONTROL
1.
STANDBY
2.
NUMERIC BUTTONS
3.
SCAN
4.
TUNE
5.
TUNE
6.
BT PREVIOUS
BT NEXT
BT PLAY/PAUSE
7.
TIMER
MIN.
SEC.
8.
9.
10.
11.
12.
13.
14.
15.
16.
17.
VOLUME +
VOLUME –
MUTE
CH+
CH-
ST/MONO
MEMORY
PAIRING
SLEEP
CLOCK SET
SOURCE
Remote Control Battery Installation
A CR2025 battery is already installed in the remote control unit. Before using, pull out the battery insulation sheet as shown below.

8
To replace an empty battery, please refer to the figure shown below. When inserting a battery, be sure to do so in the proper
direction.
• If the remote control conflicts with other devices, the operation will be affected.
• Do not simultaneously press buttons on the unit and the remote control.
• Avoid using two remote controls at the same time as it will cause a malfunction.
• Use only CR-2025 size batteries.
• If there is battery leakage, clean the remote control thoroughly before replacing batteries.
• Do not short two terminals of the batteries. Dispose old batteries in a suitable place.
CR2025 battery
Battery case
Pull out the battery case
Push in according to this direction

9
INSTALLING THE BATTERIES FOR CLOCK/FM PRESET CHANNEL/TIMER BACKUP
The clock/FM preset channel/timer (if set) will be maintained during a power failure by installing 2 x AAA/LR03 batteries (not
supplied). Once the power is restored, check the clock to make sure it is accurate and set it again if necessary.
INSTALLING THE BATTERIES
1. Open the battery compartment at the bottom of the unit by pressing on the catch and removing the cover.
2. Insert 2 x AAA/LR03 batteries (not supplied), preferably alkaline batteries, into the battery compartment following the polarity as
shown on the diagram inside the compartment.
3. Replace the battery compartment cover.
CONNECTING TO THE POWER SUPPLY
Plug the AC power cable into the AC wall socket.
BASIC OPERATION
Press the STANDBY button to turn on the unit. To turn off, press and hold the STANDBY button again.
Alternatively press the STANDBY button on the remote control to turn on or turn off the unit.
FM/BT
When the unit is turned on, press the SOURCE button to toggle between FM and Bluetooth mode.
Volume Control
Press the VOLUME +/- buttons to change the volume.
Adjusting the Antenna
The antenna wire at the rear panel of the unit should be fully extended to ensure a good FM reception. Alter the antenna position for
the best reception.
FM RADIO OPERATION
Auto Scan
1. Turn on the unit in FM mode.
Press and hold the SCAN button on the unit (or press the SCAN button on the remote control) to start auto-scanning and saving the
available channels (Max. 20 stations can be stored)
Manual Scan
1. Press the or button on the unit (the TUNE /TUNE button on the remote control) repeatedly to tune to a different
frequency.
2. Press and hold the or button on the unit (the TUNE /TUNE button on the remote control) to automatically
search to the next available channel.
Storing FM Presets
You can save up to 20 FM presets.
1. Tune to the station you wish to store.
2. Press and hold the MEMORY button on the unit (or press the MEMORY button on the remote control). Flashing preset channel
number is displayed.
3. Press the or button on the unit (the or button on the remote control) to a preset number that you want to
store. Then press the MEMORY button to save.

10
Recall Stored FM Presets
Press the MEMORY button on the unit (or the CH-/CH+ button on the remote control) to tune to different preset channel.
To directly recall the preset channel by using the numeric buttons on the unit, press the numeric buttons [1], [2], …, [5].
For example when the button [3] is pressed, the display shows “P03” and wait for a while it will tune to the preset 3.
Or when press and hold the button [3/(8)] button until the display shows “P08” and wait for a while, it will tune to the preset 8.
Or when press the button [1] button and followed by pressing the button [2], the display will show “P12” and after a while it will tune
to the preset 12.
Or when press the button [1] button and followed by press and hold the button [3/(8)], the display will show “P18” and after a while
it will tune to the preset 18.
Alternatively you can use the remote control numeric buttons to directly recall the preset channel, press the numeric buttons [1],
[2], …, [9], [0].
For example when the button [3] is pressed, the display shows “P03” and wait for a while it will tune to the preset 3.
Or when press the button [8] until the display shows “P08” and wait for a while, it will tune to the preset 8.
Or when press the button [1] and followed by pressing the button [2], the display will show “P12” and after a while it will tune to the
preset 12.
Or when press the button [1] and followed by press the button [8], the display will show “P18” and after a while it will tune to the
preset 18.
Stereo/Force Mono Selection
When receiving a Stereo FM radio channel, press the ST/MONO button will switch between stereo audio and force mono audio.
When it is in FM Stereo, the FM-ST LED will be turned on.
Note:
- The antenna wire at the rear panel of the unit should be fully extended to ensure a good FM reception. Alter the antenna
position for the best reception.
BLUETOOTH AUDIO
Please follow the pairing instructions below to link the unit to your Bluetooth device.
1. Press the SOURCE button to enter the Bluetooth mode. The display will show “bLUE”. It will start searching and the BT LED will
flash.
2. If the unit has never been paired with a Bluetooth device before or cannot find the last paired device, the BT LED will keep on
flashing. Turn on the Bluetooth function of your device and enable the search until “Lenco KCR-100” is found. Select “Lenco KCR-
100” on the Bluetooth device to make connection. Enter the pass code “0000” if required.
3. After successfully paired the BT LED will become steady without flashing.
4. You can now start playing music from your smartphone wirelessly to the speaker.
5. You can press the PLAY/PAUSE button to pause or resume the playback.
6. You can press the PREVIOUS or button to skip to the previous or next song.
• Press and hold the PAIRING button will disconnect the current connection and start to search another new Bluetooth device.
“This product has a bluetooth reception function, you can not transmit any bluetooth sound with it: this means that you can receive
wirelessly a bluetooth sound signal from an external source like a smartphone.”
SLEEP FUNCTION
1. When the unit is switched on, press the SLEEP button on the remote control repeatedly to select the sleep duration in minutes
from 05, 10, 15, 30, 45, 90 and 00 (sleep off).
2. When the sleep timer is zero, the unit will be turned off automatically.
3. To cancel the sleep function, press and hold the STANDBY button on the unit (or press the STANDBY button on the remote
control) to turn off. Alternatively press the SLEEP button repeatedly to “00”.

11
CLOCK SETUP
1. Turn off the unit in Standby mode.
2. Press and hold the CLOCK SET button on the unit (or press the CLOCK SET button on the remote control) to enter the Clock setup.
“24H” or “12H” will be displayed.
3. Press the MIN. and SEC button on the unit (the MIN. and SEC. button on the remote control) to toggle between 24H (display 24
hours format) or 12H (display 12 hours format). Press the CLOCK SET button on the unit (the CLOCK SET button on the remote
control) to confirm.
4. Press the MIN. and SEC button on the unit (the MIN. and SEC. button on the remote control) to adjust the hour and minute
respectively. Press the CLOCK SET button on the unit (the CLOCK SET button on the remote control) to finish the clock set.
TIMER SETUP
1. Press the TIMER button to enter the Timer setup.
2. Press the MIN. and SEC button on the unit (the MIN. and SEC. button on the remote control) to adjust the minute and second
respectively. Press the TIMER button.
3. Press the MIN. and SEC button on the unit (the MIN. and SEC. button on the remote control) to enable (on) or disable (OFF) the
timer setup. When it is set to on, press the TIMER button to finish the timer setup. It will start to count down.
4. During the timer count down, the TIMER LED indicator will keep flashing.
5. During the timer count down, press the TIMER button will stop the count down. TIMER LED indicator is still turned on but
without flashing. Pressing the timerbutton again will continue the countdown and the Timer Led indicator will flash.
6. To cancel the countdown, press and hold the TIMER button
7. When the timer count down is finished, the alarm buzzer will be turned on. Press the TIMER button to stop the buzzer stop the
buzzer.
LIGHT ON/OFF
Slide the LIGHT ON/OFF switch on the front panel, to turn the downlights on/off
ENERGY SAVING
Due to ErP stage 2 requirement and protect the environment, the unit will turn off to the standby mode automatically If no music has
been playing in bluetooth mode for ~15minutes.
You can reactivate the item again by pressing the STANDBY button.

12
Trouble Shooting
No power
• Ensure that the mains cable is connected securely.
• Ensure that the unit is switched on.
The remote control does not function
• Use the remote control near to the unit.
• Point the remote control at the remote control sensor on the unit.
• Replace the batteries in the remote control with new ones.
• Remove any obstacles between the remote control and the unit.
The unit does not respond when pressing any buttons.
• In some situations the unit may freeze during use. To reset the unit, pull the plug from the mains socket, wait a few seconds and
then plug it in again.
No sound output
• Make sure that the unit is not muted.
I can’t find the Bluetooth name of this unit on my Bluetooth device for Bluetooth pairing
• Ensure that the unit is switched on.
• Ensure that the Bluetooth function is activated on your Bluetooth device.
• The unit has a Bluetooth function that can receive a signal within 10 metres.
FM reception
• Ensure the antenna wire at the rear panel should be extended fully to improve the FM reception.
• Electrical interference in your home can cause poor reception. Move the unit away from them (especially those with motors and
transformers).
Interferences in Speakers
• Check that you have not left a mobile phone near the unit.

13
TECHNICAL SPECIFICATIONS
FM radio frequency range
Bluetooth frequency range
87.5-108 MHz
2.402-2.480 GHz
AC power input
230V~, 50Hz
Power consumption
13 W
Speaker output power
Bluetooth version
2 x 1 W RMS
V4.1
Battery backup (not included)
Remote control battery (Included)
Unit dimension (L x D x H)
AAA/LR03 batteries x 2pcs
CR2025 x 1pcs
240 x 150 x 62 mm
Total weight
0.8 kg
• The specification presents only as a reference. The value of weight and size are approximation.
• Our product is improved ceaselessly and the specification and function may be changed without prior notice.
Guarantee
Lenco offers service and warranty in accordance to European law, which means that in case of repairs (both during and after the
warranty period) you should contact your local dealer.
Important note: It is not possible to send products that need repairs to Lenco directly.
Important note: If this unit is opened or accessed by a non-official service center in any way, the warranty expires.
This device is not suitable for professional use. In case of professional use, all warranty obligations of the manufacturer will be
voided.
Disclaimer
Updates to Firmware and/or hardware components are made regularly. Therefore some of the instruction, specifications and pictures
in this documentation may differ slightly from your particular situation. All items described in this guide for illustration purposes only
and may not apply to particular situation. No legal right or entitlements may be obtained from the description made in this manual.
Disposal of the Old Device
This symbol indicates that the relevant electrical product or battery should not be disposed of as general household
waste in Europe. To ensure the correct waste treatment of the product and battery, please dispose them in accordance to
any applicable local laws of requirement for disposal of electrical equipment or batteries. In so doing, you will help to
conserve natural resources and improve standards of environmental protection in treatment and disposal of electrical
waste (Waste Electrical and Electronic Equipment Directive).
CE Marking
Hereby, Lenco Benelux B.V., Thermiekstraat 1a, 6361 HB Nuth, The Netherlands, declares that this product is in compliance with the
essential EU directive requirements.
The declaration of conformity may be consulted via techdoc@commaxxgroup.com
Service
For more information and helpdesk support, please visit www.lenco.com
Lenco Benelux BV, Thermiekstraat 1a, 6361 HB, The Netherlands.

14
Nederlands
KCR-100
LET OP:
Het gebruik van afstandsbedieningen of aanpassingen of de uitvoering van procedures die niet in dit document zijn
gespecificeerd, kan leiden tot gevaarlijke blootstelling aan straling.
VOORZORGSMAATREGELEN VOOR GEBRUIK
ONTHOUD DE VOLGENDE INSTRUCTIES:
1. Bedek of blokkeer de ventilatieopeningen niet. Wanneer u het apparaat op een schap plaatst, dient u 5 cm (2”) vrije
ruimte rondom het gehele apparaat te behouden.
2. Installeer het product volgens de meegeleverde gebruikershandleiding.
3. Houd het apparaat uit de buurt van hittebronnen, zoals radiatoren, verwarmingen, kachels, kaarsen en andere
hittegenererende producten of open vuur. Het apparaat kan alleen worden gebruikt in een gematigd klimaat.
Extreem koude of warme omgevingen dienen te worden vermeden. Het bedrijfstemperatuurbereik ligt tussen 0 °C
en 35 °C.
4. Gebruik dit apparaat niet in de buurt van krachtige magnetische velden.
5. Elektrostatische ontlading kan normaal gebruik van dit apparaat verstoren. U hoeft het apparaat in dit geval slechts
te resetten en opnieuw op te starten volgens de gebruikershandleiding. Wees voorzichtig tijdens
bestandsoverdracht en gebruik het product in een omgeving zonder statische interferentie.
6. Waarschuwing! Steek nooit een voorwerp via de ventilatie- of andere openingen in het product. Er is hoogspanning
in het product aanwezig en als u er een object insteekt, kan dat een elektrische schok veroorzaken en/of kortsluiting
in de interne onderdelen. Mors om dezelfde reden geen water of vloeistof op het product.
7. Gebruik het toestel niet in vochtige ruimtes, zoals badkamers, stomende keukens of in de buurt van zwembaden.
8. Het apparaat mag niet worden blootgesteld aan druppels en spetters en zorg ervoor dat er geen met vloeistof
gevulde voorwerpen, zoals vazen, op of in de buurt van het apparaat worden geplaatst.
9. Gebruik dit apparaat niet wanneer condensatie kan optreden. Wanneer het apparaat in een warme, natte ruimte
wordt gebruikt, kunnen zich waterdruppels of condens vormen in het apparaat en kan het apparaat niet goed
functioneren. Laat het apparaat 1 of 2 uur uit staan voordat u het inschakelt: het apparaat dient droog te zijn
voordat deze stroom ontvangt.
10. Alhoewel dit apparaat met grote zorg gefabriceerd en verschillende keren geïnspecteerd is voordat het de fabriek
verlaat, is het nog steeds mogelijk dat er problemen optreden, zoals met alle elektrische apparaten. Als u rook, een
overmatige hitteontwikkeling of enig ander onverwacht verschijnsel opmerkt, moet u onmiddellijk de stekker van
het netsnoer uit het stopcontact halen.
11. Dit apparaat moet worden gebruikt met een voedingsbron zoals gespecificeerd op het specificatielabel. Als u
twijfelt over het type voeding dat gebruikt wordt in uw huis, raadpleeg dan uw dealer of plaatselijk energiebedrijf.
12. Buiten bereik van dieren houden. Sommige dieren kauwen graag op voedingskabels.
13. Gebruik een zacht, droog doekje om het apparaat te reinigen. Gebruik geen oplosmiddelen of op benzine
gebaseerde vloeistoffen. U kunt een vochtig doekje met verdund schoonmaakmiddel gebruiken om hardnekkige
vlekken te verwijderen.
14. De leverancier is niet verantwoordelijk voor schade of verloren gegevens veroorzaakt door storing, misbruik,
modificatie van het apparaat of batterijvervanging.
15. Onderbreek nooit de verbinding wanneer het apparaat formatteert of bestanden overdraagt. De gegevens kunnen
anders corrupt of verloren raken.
16. Indien het apparaat een USB-afspeelfunctie heeft, moet de USB-geheugenstick rechtstreeks op het apparaat
worden aangesloten. Gebruik geen USB-verlengkabel, omdat die kan leiden tot storingen met foutieve gegevens als
gevolg.
17. Het classificatielabel bevindt zich op de onderkant of het achterpaneel van het apparaat.
18. Dit hulpmiddel is niet bedoeld voor gebruik door mensen (inclusief kinderen) met een fysieke, zintuiglijke of
mentale handicap, of een gebrek aan ervaring en kennis, tenzij zij toezicht of instructies hebben gekregen over het
juiste gebruik van het hulpmiddel door een persoon die verantwoordelijk is voor hun veiligheid.
19. Dit product is alleen voor niet-professioneel gebruik bedoeld en niet voor commercieel of industrieel gebruik.
20. Verzeker u ervan dat het apparaat in een stabiele positie staat opgesteld. Schade die wordt veroorzaakt door het
gebruik van dit product in een onstabiele positie, trillingen of schokken of het niet opvolgen van de
waarschuwingen of voorzorgsmaatregelen in deze gebruikershandleiding wordt niet gedekt door de garantie.
21. Verwijder nooit de behuizing van dit apparaat.
22. Plaats dit apparaat nooit op andere elektrische apparatuur.
23. Geef kinderen geen gelegenheid in aanraking met plastic zakken te komen.
24. Gebruik uitsluitend uitbreidingen/accessoires gespecificeerd door de fabrikant.
25. Laat alle reparaties over aan gekwalificeerd onderhoudspersoneel. Onderhoud is nodig als het apparaat is
beschadigd, bijvoorbeeld als de voedingskabel of de stekker is beschadigd, als er vloeistof op het apparaat is
gemorst, als er voorwerpen in het apparaat zijn gevallen, als het apparaat is blootgesteld aan regen of vocht, als het
apparaat niet normaal werkt of als het is gevallen.

15
26. Langdurige blootstelling aan harde geluiden van persoonlijke muziekspelers kan leiden tot tijdelijk of permanent
gehoorverlies.
27. Als het product wordt geleverd met voedingskabel of wisselstroomvoedingsadapter:
⚫ Als er zich problemen voordoen, moet u de voedingskabel loskoppelen en het ter onderhoud aanbieden aan
gekwalificeerd personeel.
⚫ Nooit op de voedingsadapter stappen of deze indrukken. Wees zeer voorzichtig, vooral in het gebied rond de
stekkers en de kabelaansluitingen. Plaats geen zware voorwerpen op de voedingsadapter, om beschadiging
ervan te voorkomen. Houd het gehele apparaat buiten bereik van kinderen! Wanneer kinderen met de
voedingskabel spelen, kunnen zij ernstig letsel oplopen.
⚫ Haal de stekker uit het stopcontact tijdens onweer of wanneer u deze langere tijd niet gebruikt.
⚫ Het stopcontact moet in de buurt van de apparatuur zijn geïnstalleerd en eenvoudig te bereiken zijn.
⚫ Laat AC-stopcontacten of verlengsnoeren nooit overbelast raken. Overbelasting kan brand of een elektrische
schok veroorzaken.
⚫ Apparaten met een Klasse 1 structuur dienen te worden aangesloten op een stopcontact met een
beschermende aardverbinding.
⚫ Apparaten met een Klasse 2 structuur vereisen geen aardverbinding.
⚫ Houd altijd de stekker vast wanneer u deze uit het stopcontact trekt. Trek nooit aan de voedingskabel. Dit kan
tot een kortsluiting leiden.
⚫ Gebruik nooit een beschadigde voedingskabel of stekker of een los stopcontact. Dit vormt namelijk een risico
op brand of elektrische schokken.
28. Indien het product knoopcelbatterijen bevat of wordt geleverd met een afstandsbediening die knoopcelbatterijen
bevat:
Waarschuwing:
⚫ “Batterij niet inslikken, chemisch brandgevaar” of gelijkwaardige werking.
⚫ De meegeleverde afstandsbediening bevat een knoopcelbatterij. Als de batterij wordt ingeslikt, kan deze in
slechts 2 uur ernstige interne brandwonden veroorzaken en tot de dood leiden.
⚫ Houd nieuwe en gebruikte batterijen buiten bereik van kinderen.
⚫ Als de batterijhouder niet goed kan worden gesloten, dient u het product niet meer te gebruiken en buiten
bereik van kinderen te houden.
⚫ Als u denkt dat batterijen zijn ingeslikt of binnenin een willekeurig lichaamsdeel terecht zijn gekomen, dient u
onmiddellijk medische hulp te zoeken.
29. Waarschuwing m.b.t. het gebruik van batterijen:
⚫ Als de batterij onjuist wordt geplaatst, bestaat er explosiegevaar. Vervang de batterij alleen door een zelfde of
vergelijkbare soort batterij.
⚫ Stel de batterij niet bloot aan extreem hoge of lage temperaturen of een lage luchtdruk op grote hoogte
tijdens gebruik, opslag of transport.
⚫ Vervanging van een batterij door een incorrect type kan leiden tot een ontploffing of de lekkage van
ontvlambare vloeistoffen of gas.
⚫ Het weggooien van een batterij in het vuur of een hete oven, of het mechanisch verpletteren of insnijden van
een batterij, kan leiden tot een explosie.
⚫ Het achterlaten van een batterij in een omgeving met extreem hoge temperaturen kan leiden tot een explosie
of het lekken van brandbare vloeistof of gas.
⚫ Een batterij die aan een extreem lage luchtdruk wordt blootgesteld, kan leiden tot een explosie of het lekken
van brandbare vloeistof of gas.
⚫ Aandacht voor het milieu is nodig bij het verwijderen van de batterijen.
INSTALLATIE
• Pak alle onderdelen uit en verwijder de beschermende materialen.
• Sluit het apparaat niet aan op het stopcontact, voordat u de netspanning hebt gecontroleerd en voordat alle andere
aansluitingen zijn gemaakt.

16
ACCESSOIRES
• Mounting kit (plastic plate + 2 sets of screws + 4 spacers + drill hole paper template)
Kunststof plaat
Tussenring
Papieren sjabloon voor boorgaten
• Gebruiksaanwijzing
DE SET ONDER EEN KASTJE MONTEREN
1. Bepaal op welke plek u het apparaat onder het kastje/de schap wilt installeren. Omdat de luidsprekers van het apparaat aan de
linker- en rechterzijden zijn geplaatst, raden wij u aan genoeg ruimte over te laten zodat het geluid niet wordt geblokkeerd.
2. Nadat u de locatie eenmaal hebt gekozen, dan kunt u de papieren sjabloon (meegeleverd) als een referentie gebruiken om de
locaties voor de boorgaten te bepalen.
3. Installeer de kunststof plaat onder het kastje/de schap met de meegeleverde tussenringen en schroeven volgens het diagram
hieronder. De tussenringen zijn optioneel en kunnen naar wens worden gebruikt. Er zijn 2 sets schroeven meegeleverd waar u uit
kunt kiezen. De set met langere schroeven wordt gewoonlijk gebruikt wanneer de tussenringen worden gebruikt. U kunt ervoor
kiezen schroeven te gebruiken van een andere geschikte lengte, afhankelijk van de dikte van het houten paneel.
4. Nadat de kunststof plaat is geïnstalleerd, dan kunt u apparaat er inschuiven totdat deze op zijn plek vast zit.
5. Vanwege het gewicht van het apparaat, dient u deze uiterst voorzichtig te installeren. Controleer of het kastje dat u gebruikt
stevig genoeg is om het gewicht van het apparaat te ondersteunen.
Opmerking:
- Om het risico op brand te voorkomen, plaats de radio niet op verwarmingsplekken of zonder de vereiste speling.
- U kunt het apparaat uit de kunststof plaat schuiven om als een staande keukenradio te gebruiken.

17
VOORPANEEL
1. STAND-BY /BRON
Indrukken om het apparaat in te schakelen. Wanneer het apparaat is ingeschakeld, dan kunt u op deze toets drukken om te
wisselen tussen de FM-modus en Bluetooth-modus. Indrukt houden om uit en op stand-by te schakelen
2. LICHT AAN/UIT
Schuiven om de naar onder gerichte verlichting in of uit te schakelen
3. NUMERIEKE TOETSEN
Indrukken om direct af te stemmen op een opgeslagen FM-voorkeuzekanaal
4. SCHERM
5. SCAN/ST-MONO/PARING
FM: Indrukken om de ontvangst te wisselen tussen FM Stereo en Geforceerd Mono. Ingedrukt houden om de volledige
automatische scan te starten en beschikbare FM-kanalen op te slaan
BT: Ingedrukt houden om de huidige verbinding te verbreken en te beginnen met zoeken naar een andere nieuw Bluetooth-
apparaat
6. /MIN.
FM: Indrukken om op een andere frequentie af te stemmen. Ingedrukt houden om automatisch naar het volgende beschikbare
kanaal te zoeken
BT: Indrukken om het vorige nummer te selecteren
Timerinstelling: Indrukken om de minuten in te stellen
7. /SEC.
FM: Indrukken om op een andere frequentie af te stemmen. Ingedrukt houden om automatisch naar het volgende beschikbare
kanaal te zoeken
BT: Indrukken om het volgende nummer te selecteren
Timerinstelling: Indrukken om de seconden in te stellen
8. /CLOCK SET/MEMORY
FM: Indrukken om af te stemmen op een ander opgeslagen FM-voorkeuzekanaal. Ingedrukt houden om het gewenste FM-
voorkeuzekanaal op te slaan
BT: Indrukken om het afspelen te pauzeren en hervatten
Stand-by-modus: Indrukken om de klokinstelling te openen
9. TIMER
Indrukken om de timerinstelling te openen
10. – VOLUME +
Pas het volume aan.
11. LED FM-freqentie 0,05MHz
Wanneer de FM-frequentie 0,05MHz wordt ontvangen, dan zal deze LED branden. Wanneer bijvoorbeeld 88,15MHz wordt
ontvangen, dan zal de display “88.1” weergeven terwijl deze LED inschakelt
12. BT-LED
Deze indicator zal inschakelen wanneer de Bluetooth-modus is geselecteerd
13. FM-LED
Deze indicator zal inschakelen wanneer de FM-modus is geselecteerd

18
14. FM-ST-LED
Deze indicator zal inschakelen wanneer de Stereo FM-modus is geselecteerd
15. PM-LED
Deze indicator zal 's middags inschakelen wanneer het 12 uur klokformaat is geselecteerd
16. IR-ontvangstvenster
17. TIMER-LED
Deze indicator zal inschakelen wanneer de timer is ingesteld.
AFSTANDSBEDIENING
1.
Stand-by
2.
NUMERIEKE TOETSEN
3.
SCAN
4.
AFSTEMMEN
5.
AFSTEMMEN
6.
BT VORIGE
BT VOLGENDE
BT START/PAUZE
7.
TIMER
MINIMAAL
SEC.
8.
9.
10.
11.
12.
13.
14.
15.
16.
17.
VOLUME +
VOLUME –
DEMP
Kanaal+
Kanaal-
ST/MONO
GEHEUGEN
KOPPELEN
SLAPEN
KLOKINSTELLING
BRON
De batterij in de afstandsbediening installeren
Er is al een CR2025 batterij geïnstalleerd in de afstandsbediening. Trek vóór gebruik de isolatiestrip van de batterij af, zoals hieronder
staat afgebeeld.

19
Raadpleeg a.u.b. de afbeelding hieronder om een uitgeputte batterij te vervangen. Let a.u.b. op de juiste polariteitrichting wanneer u
een batterij installeert.
• Als deze afstandsbediening interferentie ontvangt van andere apparatuur, dan zal de werking ervan worden aangetast.
• Druk niet gelijktijdig knoppen op het apparaat en de afstandsbediening in.
• Gebruik nooit twee afstandsbedieningen tegelijkertijd, anders zullen er storingen optreden.
• Gebruik uitsluitend type CR-2025 batterijen.
• In het geval van een lekkende batterij, maak de afstandsbediening grondig schoon voordat u de batterij vervangt.
• Verbind twee kanten van de batterijen niet met elkaar. Gooi oude batterijen weg op de daarvoor bestemde plek.
CR2025 batterij
Batterijhouder
De batterijhouder uittrekken
In deze richting indrukken

20
DE BATTERIJEN INSTALLEREN VOOR DE KLOK/FM-VOORKEUZEKANALEN/TIMERBACK-UP
De klok/FM-voorkeuzekanalen/timer (indien ingesteld) zullen tijdens een stroomuitval worden behouden door 2 x type AAA/LR03
batterijen te installeren (niet inbegrepen). Nadat de stroom eenmaal is hersteld, controleer dan of de klok nog steeds nauwkeurig is
en stel eventueel opnieuw in.
DE BATTERIJEN INSTALLEREN
1. Open het batterijvak op de onderzijde van het apparaat door op het palletje te drukken en de klep te verwijderen.
2. Installeer 2 x type AAA/LR03 batterijen (niet inbegrepen), bij voorkeur alkalinebatterijen, in het batterijvak volgens de polariteit
gemarkeerd op het diagram binnenin het batterijvak.
3. Plaats de klep terug op het batterijvak.
AANSLUITING OP DE VOEDING
Steek de AC-voedingskabel in het AC-stopcontact.
ALGEMENE BEDIENING
Druk op de toets STANDBY om het apparaat in te schakelen. Houd de toets STANDBY nogmaals ingedrukt om uit te schakelen.
U kunt ook op de toets STANDBY op de afstandsbediening drukken om het apparaat in of uit te schakelen.
FM/BT
Wanneer het apparaat is ingeschakeld, dan kunt u op de toets SOURCE drukken om te wisselen tussen de FM-modus en Bluetooth-
modus.
Volumeregeling
Druk op de toets VOLUME +/- om het volume aan te passen.
De antenne aanpassen
De antennedraad op het achterpaneel van het apparaat dient volledig te worden uitgetrokken voor een goede FM-ontvangst. U kunt
de antennepositie aanpassen om de ontvangst te verbeteren.
FM-RADIOBEDIENING
Automatische scan
1. Schakel het apparaat in op FM-modus.
Houd de toets SCAN op het apparaat (of druk op de toets SCAN op de afstandsbediening) ingedrukt om de automatische scan te
starten en de beschikbare kanalen op te slaan (max. 20 stations kunnen worden opgeslagen)
Handmatige scan
1. Druk meerdere keren op de toets of op het apparaat (of op de toets TUNE /TUNE op de afstandsbediening) om
af te stemmen op een andere frequentie.
2. Houd de toets of op het apparaat ingedrukt (de toets TUNE /TUNE op de afstandsbediening) om automatisch
naar het volgende beschikbare kanaal te zoeken.
FM-stationsgeheugens opslaan
U kunt tot 20 FM-voorkeuzestations opslaan.
1. Stem af op het station dat u wilt opslaan.
2. Houd de toets MEMORY op het apparaat ingedrukt (of druk op de toets MEMORY op de afstandsbediening). Een knipperend
voorkeuzekanaal wordt weergegeven.
3. Druk op de toets of op het apparaat (de toets of op de afstandsbediening) om een voorkeuzenummer te
selecteren om op te slaan. Druk vervolgens op de toets MEMORY om op te slaan.

21
Opgeslagen FM-stationsgeheugens herroepen
Druk op de toets MEMORY op het apparaat (of de toets CH-/CH+ op de afstandsbediening) om af te stemmen op een ander
voorkeuzekanaal.
U kunt een voorkeuzekanaal ook direct herroepen met de cijfertoetsen op het apparaat; druk op de cijfertoetsen [1], [2], …, [5].
Wanneer u bijvoorbeeld op de toets [3] drukt, dan zal de display “P03” en eventjes wachten terwijl op voorkeuze 3 wordt afgestemd.
Of wanneer u de toets [3/(8)] ingedrukt houdt totdat de display “P08” weergeeft en eventjes wacht, dan zal op voorkeuze 8 worden
afgestemd.
Of wanneer u de de toets [1] gevolgd door de toets [2] indrukt, dan zal de display “P12” weergeven en eventjes wachten terwijl op
voorkeuze 12 wordt afgestemd.
Of wanneer u de de toets [1] indrukt en vervolgens toets [3/(8)] ingedrukt houdt, dan zal de display “P18” weergeven en eventjes
wachten terwijl op voorkeuze 18 wordt afgestemd.
U kunt ook de cijfertoetsen op de afstandsbediening drukken om een voorkeuzekanaal direct te herroepen' druk op de cijfertoetsen
[1], [2], …, [9], [0].
Wanneer u bijvoorbeeld op de toets [3] drukt, dan zal de display “P03” en eventjes wachten terwijl op voorkeuze 3 wordt afgestemd.
Of wanneer u op de toets [8] drukt totdat de display “P08” weergeeft en eventjes wacht, dan zal op voorkeuze 8 worden afgestemd.
Of wanneer u de de toets [1] gevolgd door de toets [2] indrukt, dan zal de display “P12” weergeven en eventjes wachten terwijl op
voorkeuze 12 wordt afgestemd.
Of wanneer u de de toets [1] gevolgd door de toets [8] indrukt, dan zal de display “P18” weergeven en eventjes wachten terwijl op
voorkeuze 18 wordt afgestemd.
Stereo/geforceerd mono selecteren
Wanneer een Stereo FM-radiokanaal wordt ontvangen, dan kunt u op de toets ST/MONO drukken om te wisselen tussen stereo audio
en geforceerd mono audio. Wanneer het kanaal in FM Stereo wordt ontvangen, dan zal de FM-ST-LED branden.
Opmerking:
- De antennedraad op het achterpaneel van het apparaat dient volledig te worden uitgetrokken voor een goede FM-ontvangst. U
kunt de antennepositie aanpassen om de ontvangst te verbeteren.
BLUETOOTH-AUDIO
Volg a.u.b. de paringinstructies hieronder om het apparaat te paren met uw Bluetooth-apparaat.
1. Druk op toets SOURCE om de Bluetooth-modus te openen. De display zal “bLUE” weergeven. Het apparaat zal beginnen te
zoeken terwijl de BT-LED knippert.
2. Als het apparaat nog niet eerder was gepaard met een Bluetooth-apparaat of het laatste gepaarde apparaat niet kan vinden, dan
zal de BT-LED blijven knipperen. Schakel de Bluetooth-functie van uw apparaat in en laat deze zoeken totdat “Lenco KCR-100” is
gevonden. Selecteer “Lenco KCR-100” op het Bluetooth-apparaat om de verbinding tot stand te brengen. Voer eventueel het
wachtwoord “0000” in.
3. De BT-LED zal na een geslaagde paring constant blijven branden zonder te knipperen.
4. U kunt nu beginnen de muziek van uw smartphone draadloos via de luidspreker af te spelen.
5. U kunt op de toets START/PAUZE drukken om het afspelen te pauzeren of hervatten.
6. U kunt op de toets VORIGE of drukken om de vorige of volgende track te selecteren.
• Houd de toets PAIRING ingedrukt om de huidige verbinding te verbreken en naar een ander nieuw Bluetooth-apparaat te zoeken.
“Dit product is voorzien van een Bluetooth-ontvangstfunctie, u kunt er geen Bluetooth-audio mee sturen: dit betekent dat u van een
externe bron zoals een smartphone draadloos een Bluetooth-audiosignaal kunt ontvangen.”
SLAAPFUNCTIE
1. Wanneer het apparaat is ingeschakeld, dan kunt u meerdere keren op de toets SLEEP op de afstandsbediening drukken om de
slaaptijd in minuten in te stellen van 05, 10, 15, 30, 45 to 90 en 00 (slaapfunctie uit).
2. Wanneer de slaaptimer is verstreken, dan zal het apparaat automatisch uitschakelen.
3. Houd de toets STANDBY op het apparaat ingedrukt (of druk op de toets STANDBY op de afstandsbediening) om de slaapfunctie te
annuleren. U kunt ook meerdere keren op de toets SLEEP drukken totdat “00” is geselecteerd.
KLOKINSTELLING
1. Schakel het apparaat uit en op stand-by.
2. Houd de toets CLOCK SET op het apparaat ingedrukt (of druk op de toets CLOCK SET op de afstandsbediening) om de
klokinstelling te openen. “24H” of “12H” zal worden weergegeven.

22
3. Druk op de toetsen MIN. en SEC op het apparaat (de toetsen MIN. en SEC. op de afstandsbediening) om te wisselen tussen 24H
(24 uur tijdsformaat) en 12H (12 uur tijdsformaat). Druk op de toets CLOCK SET op het apparaat (de toets CLOCK SET op de
afstandsbediening) om te bevestigen.
4. Druk op de toetsen MIN. en SEC op het apparaat (de toetsen MIN. en SEC. op de afstandsbediening) om de uren en minuten in te
stellen. Druk op de toets CLOCK SET op het apparaat (de toets CLOCK SET op de afstandsbediening) om de klokinstelling af te
ronden.
TIJD INSTELLEN
1. Druk op de toets TIMER om de timerinstelling te openen.
2. Druk op de toetsen MIN. en SEC op het apparaat (de toetsen MIN. en SEC. op de afstandsbediening) om de minuten en seconden
in te stellen. Druk op de TIMER-toets.
3. Druk op de toetsen MIN. en SEC op het apparaat (de toetsen MIN. en SEC. op de afstandsbediening) om de timerinstelling in
(ON) of uit (OFF) te schakelen. Wanneer ingeschakeld, druk dan op de toets TIMER om de timerinstelling af te ronden. De display
zal beginnen met aftellen.
4. De LED-indicator TIMER zal tijdens het aftellen knipperen.
5. Als u tijdens het aftellen op de toets TIMER drukt, dan zal het aftellen worden gestopt. De LED-indicator TIMER zal ingeschakeld
blijven, maar niet langer knipperen. Druk nogmaals op de toets TIMER om het aftellen te vervolgen terwijl de LED-indicator
Timer knippert.
6. Houd de toets TIMER ingedrukt om het afstellen te annuleren
7. Wanneer het aftellen is geëindigd, dan zal de alarmzoemer klinken. Druk op de toets TIMER om de zoemer te stoppen.
LICHT AAN/UIT
Schuif de schakelaar LIGHT ON/OFF op het voorpaneel om de naar onder gerichte verlichting in of uit te schakelen.
ENERGIEBESPARING
Wegens de vereisten van ErP Fase 2 inzake de bescherming van het milieu, zal het apparaat automatisch op stand-by schakelen als er
~15minuten lang geen muziek wordt afgespeeld in Bluetooth-modus.
U kunt de item opnieuw activeren door op de toets STANDBY te drukken.

23
Probleemoplossing
Geen spanning
• Zorg ervoor dat het netsnoer stevig is aangesloten.
• Zorg ervoor dat het apparaat is ingeschakeld.
De afstandsbediening werkt niet
• Gebruik de afstandsbediening in de buurt van het apparaat.
• Richt de afstandsbediening op de afstandsbedieningssensor op het apparaat.
• Vervang de batterijen in de afstandsbediening met nieuwe batterijen.
• Verwijder eventuele obstakels tussen de afstandsbediening en het apparaat.
Het apparaat reageert niet wanneer er op een toets wordt gedrukt.
• Het apparaat kan tijdens gebruik in sommige gevallen vastlopen. U kunt het apparaat resetten door de stekker uit het stopcontact
te trekken, enkele seconden te wachten en de stekker weer aan te sluiten.
Geen geluid
• Zorg ervoor dat het apparaat niet is gedempt.
Ik kan de Bluetooth-naam van dit apparaat niet op mijn Bluetooth-apparaat vinden om te koppelen via Bluetooth
• Zorg ervoor dat het apparaat is ingeschakeld.
• Zorg ervoor dat de Bluetooth-functie op uw Bluetooth-apparaat is ingeschakeld.
• Het apparaat heeft een Bluetooth-functie die binnen 10 meter een signaal kan ontvangen.
FM-Ontvangst
• Zorg ervoor de antennedraad op het achterpaneel volledig uit te trekken om de FM-ontvangst te verbeteren.
• Elektrische interferentie in uw huis kan een slechte ontvangst tot gevolg hebben. Verplaats het toestel uit hun buurt (vooral
apparaten met motoren en transformatoren).
Storingen in de luidsprekers
• Controleer of er in de buurt van het apparaat geen mobiele telefoon ligt.

24
TECHNISCHE SPECIFICATIES
Frequentiebereik FM-radio
Bluetooth-frequentiebereik
87,5-108 MHz
2,402-2,480 GHz
AC-voedingsingang
230 V~, 50 Hz
Energieverbruik
13 W
Uitgangsvermogen van luidspreker
Bluetooth-versie
2 x 1 W RMS
V4.1
Back-upbatterij (niet inbegrepen)
Afstandsbedieningbatterij (Inbegrepen)
Afmetingen van apparaat (L x D x H)
AAA/LR03 batterijen x 2 stuks
CR2025 x 1 stuk
240 x 150 x 62 mm
Totaal gewicht
0,8 kg
• De specificatie fungeert alleen als een referentie. Het gewicht en de afmetingen zijn gemiddelden.
• Ons product wordt continu verbeterd en de specificaties en functies kunnen zonder voorafgaande kennisgeving aangepast
worden.
Garantie
Lenco biedt service en garantie aan overeenkomstig met de Europese wetgeving. Dit houdt in dat u, in het geval van reparaties (zowel
tijdens als na de garantieperiode), uw lokale handelaar moet contacteren.
Belangrijke opmerking: Het is niet mogelijk om producten die gerepareerd moeten worden direct naar Lenco te sturen.
Belangrijke opmerking: De garantie verloopt als een onofficieel servicecenter het apparaat op wat voor manier dan ook heeft
geopend, of er toegang toe heeft gekregen.
Het apparaat is niet geschikt voor professioneel gebruik. In het geval van professioneel gebruik worden alle garantieverplichtingen
van de fabrikant nietig verklaard.
Disclaimer
Er worden regelmatig updates in de firmware en/of hardwarecomponenten gemaakt. Daardoor kunnen gedeelten van de instructie,
de specificaties en afbeeldingen in deze documentatie enigszins verschillen van uw eigen situatie. Alle onderwerpen die staan
beschreven in deze handleiding zijn bedoeld als illustratie en zijn niet van toepassing op specifieke situaties. Aan de beschrijving in dit
document kunnen geen rechten worden ontleend.
Afvoer van het oude apparaat
Dit symbool geeft aan dat het betreffende elektrische product of de batterij niet moet worden verwijderd als algemeen
huishoudelijk afval in Europa. Zorg voor een juiste afvalverwerking door het product en de batterij in overeenstemming
met alle van toepassing zijnde lokale wetten voor het verwijderen van elektrische apparatuur of batterijen te
verwijderen. Als u dit doet, helpt u de natuurlijke hulpbronnen te behouden en de standaard van milieubescherming te
verbeteren bij de behandeling en verwijdering van elektrisch afval (Afgedankte Elektrische en Elektronische Apparatuur).
CE-markering
Lenco Benelux B.V., Thermiekstraat 1a, 6361 HB Nuth, Nederland, verklaart hierbij dat dit product voldoet aan de vereisten van de
Service
Bezoek voor meer informatie en helpdeskondersteuning www.lenco.com
Lenco Benelux BV, Thermiekstraat 1a, 6361 HB, Nederland.

25
Deutsch
KCR-100
ACHTUNG:
Eine andere als die hier beschriebene Bedienung, Einstellung oder Verwendung der Funktionen kann zu gefährlicher
Strahlenbelastung führen.
VORSICHTSMASSNAHMEN VOR DER BENUTZUNG
BEFOLGEN SIE IMMER FOLGENDE ANWEISUNGEN:
1. Blockieren oder bedecken Sie keine Lüftungsöffnungen. Wenn Sie das Gerät auf ein Regal stellen, lassen Sie um das
gesamte Gerät 5 cm (2”) freien Platz.
2. Stellen Sie das Gerät entsprechend den Anweisungen der mitgelieferten Bedienungsanleitung auf.
3. Halten Sie das Gerät von Hitzequellen wie Radiatoren, Heizern, Öfen, Kerzen oder anderen hitzeerzeugenden
Produkten oder offenen Flammen fern. Das Gerät darf nur bei gemäßigtem Klima verwendet werden. Sehr kalte
oder heiße Umgebungen sind zu vermeiden. Der Betriebstemperaturbereich liegt zwischen 0 °C und 35 °C.
4. Meiden Sie bei der Nutzung des Produkts die Nähe starker Magnetfelder.
5. Elektrostatische Entladungen können die normale Verwendung von diesem Gerät stören. Sollte dies geschehen,
führen Sie einfach einen Reset aus und starten Sie dann das Gerät entsprechend den Anweisungen dieser
Bedienungsanleitung neu. Gehen Sie besonders bei Datenübertragungen mit dem Gerät vorsichtig um und führen
Sie diese nur in einer antielektrostatischen Umgebung aus.
6. Warnung! Niemals Gegenstände durch die Lüftungsschlitze oder Öffnungen in das Gerät stecken. In diesem Gerät
fließt Hochspannung und das Hineinstecken von Gegenständen kann zu elektrischem Schock und/oder Kurzschluss
interner elektrischer Bauteile führen. Aus dem gleichen Grund kein Wasser oder Flüssigkeiten in das Gerät geben.
7. Benutzen Sie das Gerät nicht in nasser oder feuchter Umgebung wie Bad, Dampfküche oder in der Nähe von
Schwimmbecken.
8. Das Gerät darf weder Tropf- noch Spritzwasser ausgesetzt werden und es dürfen keine mit Flüssigkeit gefüllten
Behälter wie z.B. Vasen auf das Gerät oder in der Nähe des Gerätes gestellt werden.
9. Benutzen Sie das Gerät nicht bei Kondensationsgefahr. Wenn Sie das Gerät in einem warmen feuchten Raum
benutzen, dann können sich im Inneren des Geräts Wassertropfen oder Kondensationen bilden und zu
Fehlfunktionen des Geräts führen. Schalten Sie in diesem Fall das Gerät für 1 – 2 Stunden aus, bevor Sie es erneut
einschalten: Das Gerät sollte vollständig getrocknet sein, wenn Sie es wieder einschalten.
10. Obwohl dieses Gerät unter größter Sorgfalt und vor Auslieferung mehrmals überprüft wurde, können trotzdem wie
bei jedem anderen elektrischen Gerät auch Probleme auftauchen. Trennen Sie das Gerät im Falle einer
Rauchentwicklung, starker Hitzeentwicklung oder jeden anderen unnatürlichen Erscheinung sofort vom Netz.
11. Dieses Gerät ist durch eine Stromquelle wie auf dem Typenschild angegeben zu betreiben. Halten Sie bei
Unsicherheiten über die Art Ihrer Stromversorgung in Ihrer Wohnung Rücksprache mit Ihrem Händler oder Ihrer
Stromzuliefererfirma.
12. Halten Sie es von Haustieren fern. Einige Nagetiere lieben es, an Netzkabeln zu nagen.
13. Benutzen Sie für die Reinigung ein weiches und trockenes Tuch. Benutzen Sie niemals Lösungsmittel oder
Flüssigkeiten auf Ölbasis. Benutzen Sie zum Entfernen hartnäckiger Flecken ein feuchtes Tuch mit mildem
Reinigungsmittel.
14. Der Hersteller haftet nicht für Schäden oder Verluste durch Fehlfunktion, Zweckentfremdung oder Modifikation des
Geräts oder durch Wechseln der Batterien.
15. Unterbrechen Sie die Verbindung nicht während einer Formatierung oder einer Datenübertragung. Bei
Unterbrechung drohen Datenverlust und Datenbeschädigung.
16. Wenn das Gerät eine USB-Wiedergabefunktion besitzt, dann stecken Sie den USB-Stick direkt in das Gerät.
Verwenden Sie kein USB-Verlängerungskabel, weil die erhöhte Störungsanfälligkeit zu Datenverlust führen könnte.
17. Das Typenschild befindet sich an der Unter- oder Rückseite des Geräts.
18. Dieses Gerät ist nicht zur Benutzung durch Personen (einschließlich Kinder) mit physischen, sensorischen oder
mentalen Beeinträchtigungen oder ohne ausreichender Erfahrung vorgesehen, es sei denn, sie werden durch eine
verantwortliche Person beaufsichtigt oder wurden in die ordnungsgemäße Bedienung des Gerätes durch eine für
ihre Sicherheit verantwortliche Person eingewiesen.
19. Dieses Produkt ist nur für den nicht-professionellen Gebrauch und nicht für gewerbliche oder industrielle Zwecke
bestimmt.
20. Stellen Sie sicher, dass das Gerät in einer stabilen Position aufgestellt ist. Schäden aufgrund Verwendung dieses
Produkts in einer instabilen Position, Vibrationen, Stöße oder Nichtbeachtung der anderen in dieser
Bedienungsanleitung enthaltenen Warnungen und Sicherheitshinweise werden nicht durch die Garantie abgedeckt.
21. Entfernen Sie niemals das Gehäuse dieses Produkts.
22. Stellen Sie das Produkt niemals auf andere elektrische Geräte.
23. Halten Sie Kinder von den Plastiktüten fern.
24. Benutzen Sie nur vom Hersteller spezifizierte Erweiterungen/Zubehörteile.
25. Lassen Sie alle Eingriffe von qualifiziertem Servicepersonal ausführen. Eingriffe werden notwendig, wenn das Gerät
auf irgendeine Weise wie beispielsweise am Netzkabel oder am Netzstecker beschädigt wurde, Flüssigkeit in das

26
Gerät eingedrungen ist, Gegenstände in das Gerät gefallen sind, das Gerät Regen oder Feuchtigkeit ausgesetzt war,
es heruntergefallen ist oder nicht ordnungsgemäß funktioniert.
26. Langes Hören lauter Töne aus einem Musikgerät kann zum zeitweiligen oder permanenten Hörverlust führen.
27. Wenn zum Lieferumfang des Produkts ein Netzkabel oder ein Netzadapter gehört:
⚫ Wenn irgendwelche Probleme auftreten, dann ziehen Sie den Netzstecker aus der Netzsteckdose und setzen
Sie sich anschließend mit einer qualifizierten Fachkraft in Verbindung.
⚫ Treten Sie nicht auf das Netzteil und klemmen Sie es auch nicht ein. Geben Sie besonders im näheren Bereich
des Steckers und der Stelle acht, wo das Kabel aus dem Gerät herausgeführt wird. Stellen Sie keine schweren
Gegenstände auf das Netzteil, weil es dadurch beschädigt werden könnte. Halten Sie das gesamte Gerät
außerhalb der Reichweite von Kindern! Durch Spielen mit dem Netzkabel können sie sich ernsthafte
Verletzungen zuziehen.
⚫ Trennen Sie das Gerät während eines Gewitters oder bei längerer Nichtbenutzung vom Netz.
⚫ Die Wandsteckdose muss sich in der Nähe des Geräts befinden und einfach zu erreichen sein.
⚫ Steckdosen und Verlängerungsleitungen nicht überlasten. Eine Überlastung kann zu Brandgefahr bzw.
Stromschlag führen.
⚫ Geräte der Schutzklasse 1 sind an eine Netzsteckdose mit Schutzleiter anzuschließen.
⚫ Geräte der Schutzklasse 2 benötigen keinen Schutzleiteranschluss.
⚫ Halten Sie den Netzstecker in der Hand, wenn Sie ihn aus der Netzsteckdose ziehen. Ziehen Sie ihn nicht durch
Zerren am Kabel heraus. Das kann zu einem Kurzschluss führen.
⚫ Verwenden Sie weder ein beschädigtes Netzkabel noch einen beschädigten Stecker oder eine lockere
Steckdose. Es besteht Brand- und Stromschlaggefahr.
28. Wenn das Produkt mit einer Fernbedienung mit Batterien/Knopfzellen geliefert wird oder das Produkt eine
derartige Fernbedienung umfasst:
Warnung:
⚫ „Die Batterie nicht einnehmen, er besteht Verätzungsgefahr”.
⚫ [Die mit diesem Produkt mitgelieferte Fernbedienung] enthält eine Knopfbatterie. Das Verschlucken der
Batterie kann innerhalb von nur 2 Stunden zu schwersten inneren Verbrennungen mit Todesfolge führen.
⚫ Halten Sie neue und gebrauchte Batterien von Kindern fern.
⚫ Verwenden Sie dieses Produkt nicht weiter und halten Sie es von Kindern fern, wenn das Batteriefach nicht
sicher schließt.
⚫ Suchen Sie umgehend ärztliche Hilfe auf, wenn Sie vermuten, dass Batterien verschluckt oder in
Körperöffnungen eingeführt wurden.
29. Warnhinweise bzgl. der Verwendung von Batterien:
⚫ Es besteht Explosionsgefahr, wenn die Batterien nicht korrekt eingelegt werden. Nur mit Batterien des
gleichen oder entsprechenden Typs ersetzen.
⚫ Die Batterie darf während der Benutzung, Aufbewahrung oder des Transports weder sehr hohen oder sehr
niedrigen Temperaturen noch niedrigem Luftdruck in großen Höhenlagen ausgesetzt werden.
⚫ Die Ersetzung der Batterie mit einem falschen Batterietyp kann zum Explodieren der Batterie oder dem
Auslaufen von entflammbarem Gas oder entflammbarer Flüssigkeit aus der Batterie führen.
⚫ Die Entsorgung der Batterie in Feuer oder einem heißen Ofen oder das mechanische Zerkleinern oder
Zerteilen der Batterie kann zu Explosionen führen.
⚫ Das Verbleiben der Batterie in einer Umgebung mit sehr hohen Temperaturen kann zum Explodieren der
Batterie oder dem Auslaufen von entflammbarem Gas oder entflammbarer Flüssigkeit führen.
⚫ Eine einem sehr niedrigen Luftdruck ausgesetzte Batterie kann explodieren oder es kann aus einer einem sehr
niedrigen Luftdruck ausgesetzten Batterie entflammbares Gas oder entflammbare Flüssigkeit auslaufen.
⚫ Augenmerk ist auf den ökologischen Aspekt der Batterieentsorgung zu legen.
ANSCHLUSS
• Packen Sie alle Teile aus und entfernen Sie danach die Schutzmaterialien.
• Schließen Sie das Gerät nicht eher an das Netz an, bevor Sie die Netzspannung überprüft haben und alle anderen
notwendigen Verbindungen hergestellt sind.

27
ZUBEHÖR
• Befestigungssatz (Kunststoffplatte + 2 Satz Schrauben + 4 Abstandshalter + Bohrlochpapierschablone)
Kunststoffplatte
Abstandshalter
Papiervorlage für Bohrlöcher
• Bedienungsanleitung
MONTAGE DES GERÄTS UNTER EINEM SCHRANK
1. Entscheiden Sie sich für den Einbauort des Gerätes im Schrank/Regal. Da sich die Lautsprecher des Geräts auf der linken bzw.
rechten Seite befinden, wird empfohlen, genügend Platz vorzusehen, um den Klang nicht zu blockieren.
2. Sobald der Einbauort festgelegt ist, können Sie die mitgelieferte Bohrlochpapiervorlage als Orientierungshilfe für die
Lochposition verwenden, um die Löcher zu bohren.
3. Montieren Sie die Kunststoffplatte unter dem Schrank/Regal mit den mitgelieferten Abstandshaltern und Schrauben, siehe
Diagramm unten. Abstandhalter sind optional und können nach Ihren Wünschen installiert werden. Zur Auswahl stehen 2
Schraubensätze zur Verfügung. Der längere Schraubensatz wird in der Regel bei Verwendung der Abstandhalter verwendet.
Abhängig von der Holzdicke können Sie sich für eine andere geeignete Schraubenlänge entscheiden.
4. Nachdem die Kunststoffplatte montiert ist, schieben Sie das Gerät hinein, bis es sicher einrastet.
5. Aufgrund des Gewichts sollte das Gerät mit größter Sorgfalt installiert werden. Vergewissern Sie sich, dass der verwendete
Schrank stabil genug ist, um das Gewicht des Gerätes zu tragen.
Hinweis:
- Um die Brandgefahr zu verringern, stellen Sie das Funkgerät nicht auf einen Heizbereich oder ohne Abstand.
- Sie können das Gerät aus der Kunststoffplatte herausziehen und als Standgerät für die Küche verwenden.

28
VORDERANSICHT
1. STANDBY /QUELLE
Drücken Sie die Taste, um das Gerät einzuschalten. Wenn es eingeschaltet ist, drücken Sie diese Taste, um zwischen FM- und
Bluetooth-Modus zu wechseln. Halten Sie die Taste gedrückt, um das Gerät auszuschalten und den Standby-Modus aufzurufen
2. BELEUCHTUNG EIN/AUS
Schieben Sie diese Taste, um die Abwärtsbeleuchtung ein- oder auszuschalten
3. ZIFFERNTASTEN
Drücken Sie diese Taste, um den gespeicherten voreingestellten FM-Kanal direkt abzustimmen
4. ANZEIGE
5. SCAN/ST-MONO/PAIRING
FM: Drücken Sie diese Taste, um zwischen FM-Stereo und Force Mono-Empfang umzuschalten. Halten Sie diese Taste gedrückt,
um den vollständigen automatischen Suchlauf zu starten und den verfügbaren FM-Kanal zu speichern.
BLUETOOTH: Gedrückt halten trennt die aktuelle Verbindung und startet die Suche nach anderen Bluetooth-Geräten
6. /MIN.
FM: Drücken, um eine andere Frequenz auszuwählen. Halten Sie diese Taste gedrückt, um den nächsten verfügbaren Kanal
automatisch zu scannen
BLUETOOTH: Drücken, um zum vorherigen Titel zurückzuspringen
Timer-Einstellung: Drücken Sie diese Taste, um die Minuteneinstellung einzustellen
7. /SEC.
FM: Drücken, um eine andere Frequenz auszuwählen. Halten Sie diese Taste gedrückt, um den nächsten verfügbaren Kanal
automatisch zu scannen
BLUETOOTH: Drücken, um zum nächsten Titel zu springen
Timer-Einstellung: Drücken Sie diese Taste, um die Sekundeneinstellung einzustellen
8. /CLOCK SET/MEMORY
FM: Drücken Sie diese Taste, um auf einen anderen gespeicherten voreingestellten FM-Kanal einzustellen. Halten Sie diese Taste
gedrückt, um den voreingestellten FM-Kanal wie gewünscht zu speichern
BLUETOOTH: Drücken, um zwischen Pause und Wiedergabe hin und her zu schalten
Standby-Modus: Drücken Sie diese Taste, um den Einstellmodus der Uhr aufzurufen
9. TIMER
Drücken Sie diese Taste, um die Timer-Einstellung aufzurufen
10. – VOLUME +
Den Lautstärkepegel anpassen.
11. FM Frequenz 0,05 MHz LED
Wenn die FM-Frequenz von 0,05 MHz empfangen wird, leuchtet diese LED auf. Wenn beispielsweise 88,15 MHz empfangen
werden, zeigt das Display „88,1“ an und diese LED leuchtet auf
12. BT LED
Es ist eine Anzeige und schaltet sich ein, wenn es sich im Bluetooth-Modus befindet
13. FM LED
Es ist eine Anzeige und schaltet sich ein, wenn es sich im FM-Modus befindet

29
14. FM-ST LED
Es ist eine Anzeige und schaltet sich ein, wenn es sich im FM-Stereo-Modus befindet
15. PM LED
Es ist eine Anzeige und schaltet sich ein, wenn es im 12-Stunden-Anzeigeformat zur Nachmittagszeit ist
16. IR Empfangsfenster
17. LED-Anzeige TIMER
Es ist eine Anzeige und schaltet sich ein, wenn der Timer eingestellt ist.
FERNBEDIENUNG
1.
STANDBY
2.
ZIFFERNTASTEN
3.
SENDERSUCHLAUF
4.
ABSTIMMEN
5.
ABSTIMMEN
6.
VORHERIGER BLUETOOTH-TITEL
NÄCHSTER BLUETOOTH-TITEL
BLUETOOTH WIEDERGABE/PAUSE
7.
ZEITSCHALTUHR
MIN.
SEC.
8.
9.
10.
11.
12.
13.
14.
15.
16.
17.
LAUTSTÄRKE +
LAUTSTÄRKE –
STUMM
SENDER+
SENDER-
ST/MONO
SPEICHER
KOPPELN
EINSCHLAFAUTOMATIK
UHREINSTELLUNG
QUELLE
Batterieeinbau in der Fernbedienung
In der Fernbedienung befindet sich bereits eine CR2025-Knopfzelle. Entfernen Sie wie nachstehend gezeigt vor der Inbetriebnahme
die Isolationsfolie von der Batterie.

30
Um eine leere Batterie zu ersetzen, beachten Sie bitte die untenstehende Abbildung. Achten Sie beim Einlegen der Batterie auf die
richtige Ausrichtung der Batterie.
• Wenn die Fernbedienung und andere Geräte sich gegenseitig stören, kann dies ihren Betrieb beeinflussen.
• Drücken Sie nicht gleichzeitig Tasten am Gerät und auf der Fernbedienung.
• Vermeiden Sie die Verwendung von zwei Fernbedienungen zur selben Zeit, weil dies zu Fehlfunktionen führt.
• Verwenden Sie nur CR2025-Knopfzellen.
• Wenn die Batterie ausgelaufen ist, dann reinigen Sie die Fernbedienung gründlich, bevor Sie die neue Batterie einsetzen.
• Schalten Sie die beiden Batteriepole nicht kurz. Entsorgen Sie verbrauchte Batterien vorschriftsmäßig.
CR2025-Knopfzelle
Batteriefach
Batteriefach herausziehen
In die angezeigte Richtung drücken

31
EINLEGEN DER BATTERIEN FÜR DIE UNTERSTÜTZUNG DER UHR/FM VOREINGESTELLTER KANAL/TIMER-BACKUP
Die Uhr/FM voreingestellter Kanal/Timer (falls eingestellt) wird bei einem Stromausfall beibehalten, indem 2 x AAA/LR03 Batterien
(nicht mitgeliefert) eingesetzt werden. Sobald die Stromversorgung wiederhergestellt ist, überprüfen Sie die Uhr auf ihre Richtigkeit
und stellen Sie sie bei Bedarf wieder ein.
EINLEGEN DER BATTERIEN
1. Öffnen Sie das Batteriefach an der Unterseite des Gerätes, indem Sie auf die Sperre drücken und den Deckel abnehmen.
2. Legen Sie 2 x AAA/LR03-Batterien (nicht im Lieferumfang enthalten), vorzugsweise Alkalibatterien, in das Batteriefach ein, und
zwar entsprechend der Polarität, wie auf dem Diagramm im Inneren des Fachs dargestellt.
3. Setzen Sie den Batteriefachdeckel wieder ein.
ANSCHLUSS AN DAS STROMNETZ
Stecken Sie das Stromkabel in eine Wandsteckdose.
GRUNDLEGENDE BEDIENUNG
Drücken Sie zum Einschalten des Geräts die Taste STANDBY . Halten Sie zum Ausschalten die Taste STANDBY erneut gedrückt.
Alternativ können Sie die STANDBY- Taste auf der Fernbedienung drücken, um das Gerät ein- oder auszuschalten.
FM/BT
Wenn das Gerät eingeschaltet ist, drücken Sie die SOURCE-Taste, um zwischen FM- und Bluetooth-Modus umzuschalten.
Lautstärkeregelung
Drücken Sie die Tasten VOLUME +/–, um den Lautstärkepegel zu ändern.
Ausrichten der Antenne
Der Antennendraht an der Rückseite des Gerätes sollte vollständig ausgezogen sein, um einen guten FM-Empfang zu gewährleisten.
Ändern Sie die Ausrichtung der Antenne, um den besten Empfang zu erhalten.
FM-RADIOBEDIENUNG
Automatischer Suchlauf
1. Wechseln Sie in den FM-Modus.
Halten Sie die SCAN-Taste am Gerät gedrückt (oder drücken Sie die SCAN-Taste auf der Fernbedienung), um den automatischen
Suchlauf zu starten und die verfügbaren Kanäle zu speichern (max. 20 Sender können gespeichert werden)
Manueller Scan
1. Drücken Sie die oder -Taste auf dem Gerät (die TUNE- /TUNE- Taste auf der Fernbedienung) wiederholt, um auf
eine andere Frequenz abzustimmen.
2. Halten Sie die oder Taste auf dem Gerät (die TUNE- /TUNE- Taste auf der Fernbedienung) gedrückt, um
automatisch den nächsten verfügbaren Kanal zu suchen.
FM-Radiosender speichern
Sie können bis zu 20 FM-Radiosender speichern.
1. Stellen Sie den Radiosender ein, den Sie speichern möchten.
2. Halten Sie die MEMORY-Taste am Gerät gedrückt (oder drücken Sie die MEMORY-Taste auf der Fernbedienung). Die Anzeige der
voreingestellten Sendernummer blinkt.
3. Drücken Sie die oder -Taste auf dem Gerät (die oder Taste auf der Fernbedienung) auf eine voreingestellte Zahl,
die Sie speichern möchten. Drücken Sie dann die MEMORY-Taste, um zu speichern.

32
Gespeicherte FM Voreinstellungen wieder abrufen
Drücken Sie die MEMORY-Taste am Gerät (oder die CH-/CH+-Taste auf der Fernbedienung), um auf einen anderen voreingestellten
Kanal einzustellen.
Um den voreingestellten Kanal über die Zifferntasten am Gerät direkt abzurufen, drücken Sie die Zifferntasten [1],[2], ..., [5].
Wenn beispielsweise die Taste [3] gedrückt wird, zeigt das Display „P03“ an und warten Sie eine Weile, bis es sich auf die
Voreinstellung 3 einstellt.
Oder wenn Sie die Taste[3/(8)] gedrückt halten, bis die Anzeige „P08“ anzeigt und warten Sie eine Weile, es wird sich auf die
Voreinstellung 8 einstellen.
Oder wenn Sie die Taste[1] drücken und anschließend die Taste[2] drücken, erscheint auf der Anzeige „P12“ und nach einer Weile
wird es sich auf die Voreinstellung 12 einstellen.
Oder wenn Sie die Taste[1] drücken und anschließend die Taste[3/(8)] gedrückt halten, erscheint auf der Anzeige „P18“ und nach
einer Weile wird es sich auf die Voreinstellung 18 einstellen.
Alternativ können Sie auch die Zifferntasten der Fernbedienung verwenden, um den voreingestellten Kanal direkt aufzurufen,
drücken Sie die Zifferntasten [1], [2], ..., [9], [0].
Wenn beispielsweise die Taste [3] gedrückt wird, zeigt das Display „P03“ an und warten Sie eine Weile, bis es sich auf die
Voreinstellung 3 einstellt.
Oder wenn Sie die Taste [8] drücken, bis die Anzeige „P08“ anzeigt und eine Weile warten, wird es sich auf die Voreinstellung 8
einstellen.
Oder wenn Sie die Taste [1] drücken und anschließend die Taste [2] drücken, erscheint auf der Anzeige „P12“ und nach einer Weile
wird es sich auf die Voreinstellung 12 einstellen.
Oder wenn Sie die Taste [1] drücken und anschließend die Taste [8] drücken, erscheint auf der Anzeige „P18“ und nach einer Weile
wird es sich auf die Voreinstellung 18 einstellen.
Auswahl Stereo/Mono erzwingen
Wenn Sie einen Stereo-FM-Radiokanal empfangen, drücken Sie die ST/MONO-Taste, um zwischen Stereo-Audio und Force Mono-
Audio zu wechseln. Wenn es sich in FM Stereo befindet, leuchtet die FM-ST LED auf.
Hinweis:
- Der Antennendraht an der Rückseite des Gerätes sollte vollständig ausgezogen sein, um einen guten FM-Empfang zu
gewährleisten. Ändern Sie die Ausrichtung der Antenne, um den besten Empfang zu erhalten.
BLUETOOTH-AUDIO
Bitte befolgen Sie die unten angegebenen Anweisungen zum Koppeln, um die Anlage mit Ihrem Bluetooth-Gerät zu verbinden.
1. Drücken Sie die SOURCE-Taste, um in den Bluetooth-Modus zu gelangen. Auf der Anzeige erscheint „bLUE“. Die Suche beginnt
und die BT-LED blinkt.
2. Wenn das Gerät noch nie mit einem Bluetooth-Gerät gekoppelt wurde oder das letzte gekoppelte Gerät nicht gefunden werden
kann, blinkt die BT-LED weiter. Schalten Sie die Bluetooth-Funktion Ihres Gerätes ein und aktivieren Sie die Suche, bis „Lenco
KCR-100“ gefunden wurde. Wählen Sie auf dem Bluetooth-Gerät „Lenco KCR-100“, um eine Verbindung herzustellen. Geben Sie,
falls erforderlich, den Zugangscode „0000“ ein.
3. Nach erfolgreichem Koppeln leuchtet die BT-LED konstant, ohne zu blinken.
4. Sie können nun Ihre drahtlose Smartphone-Musikwiedergabe über den Lautsprecher starten.
5. Sie können die Taste WIEDERGABE/PAUSE zum Unterbrechen oder Fortsetzen der Wiedergabe drücken.
6. Sie die die VORHERIGER- oder Taste drücken, um zum vorherigen oder nachfolgenden Titel zu überspringen.
• Halten Sie die Taste PAIRING gedrückt, um die aktuelle Verbindung zu trennen und ein weiteres neues Bluetooth-Gerät zu
suchen.
„Dieses Produkt besitzt eine Bluetooth-Empfangsfunktion, mit der Sie jedoch keine Klänge über Bluetooth übertragen können, d. h.
Sie können nur Bluetooth-Audiosignale von externen Quellen wie beispielsweise einem Smartphone kabellos empfangen.“
EINSCHLAFFUNKTION
1. Drücken Sie bei eingeschaltetem Gerät wiederholt die SLEEP-Taste auf der Fernbedienung, um die Schlafdauer in Minuten
zwischen 05, 10, 15, 30, 45, 90 und 00 (Schlaf aus) auszuwählen.
2. Ist der Sleep-Timer auf 0 eingestellt, schaltet sich die Anlage automatisch aus.
3. Um die Schlaffunktion abzubrechen, halten Sie die STANDBY-Taste am Gerät gedrückt (oder drücken Sie die STANDBY-Taste auf
der Fernbedienung), um sie auszuschalten. Alternativ können Sie auch die SLEEP-Taste wiederholt bis „00“ drücken.

33
EINSTELLEN DER UHRZEIT
1. Schalten Sie das Gerät aus wenn sich dieses im Bereitschaftsmodus befindet.
2. Halten Sie die Taste CLOCK SET am Gerät gedrückt (oder drücken Sie die Taste CLOCK SET auf der Fernbedienung), um die Uhr-
Einstellung aufzurufen. „24H“ oder"„12H“ wird angezeigt.
3. Drücken Sie die MIN. und SEC-Taste am Gerät (die MIN. und SEC. Taste auf der Fernbedienung), um zwischen 24H (Anzeige 24
Stunden Format) und 12H (Anzeige 12 Stunden Format) zu wechseln. Drücken Sie zur Bestätigung die Taste CLOCK SET am Gerät
(die Taste CLOCK SET auf der Fernbedienung).
4. Drücken Sie die MIN. und SEC-Taste am Gerät (die MIN. und SEC. Taste auf der Fernbedienung), um die Stunde bzw. Minute
einzustellen. Drücken Sie die Taste CLOCK SET am Gerät (die Taste CLOCK SET auf der Fernbedienung), um die Einstellung der Uhr
zu beenden.
ZEIT EINSTELLEN
1. Drücken Sie die TIMER-Taste, um die Timer-Einstellung aufzurufen.
2. Drücken Sie die MIN. und SEC-Taste am Gerät (die MIN. und SEC. Taste auf der Fernbedienung), um die Minute bzw. Sekunde
einzustellen. Drücken Sie die Taste TIMER.
3. Drücken Sie die MIN. und SEC-Taste am Gerät (die MIN. und SEC. Taste auf der Fernbedienung), um die Timer-Einstellung zu
aktivieren (ON) oder zu deaktivieren (OFF). Wenn er auf Ein gesetzt ist, drücken Sie die TIMER-Taste, um die Timer-Einstellung. Es
beginnt rückwärts zu zählen.
4. Während des Countdowns blinkt die LED-Anzeige TIMER weiter.
5. Drücken Sie während der Countdown-Zeit die Taste TIMER, um die Countdown-Zeit zu stoppen. Die TIMER-LED-Anzeige leuchtet
noch, aber ohne zu blinken. Wenn Sie die Timer-Taste erneut drücken, wird der Countdown fortgesetzt und die Anzeige der
Timer-LED blinkt.
6. Um den Countdown abzubrechen, halten Sie die Taste TIMER gedrückt
7. Wenn der Countdown des Timers beendet ist, wird der Alarmsummer eingeschaltet. Drücken Sie die TIMER-Taste, um den
Summer zu stoppen.
BELEUCHTUNG EIN/AUS
Schieben Sie den LICHT EIN/AUS-Schalter auf der Frontplatte, um die Abwärtsleuchten ein- und auszuschalten
ENERGIESPAREN
Aufgrund der Anforderung von ErP Stufe 2 und zum Schutz der Umwelt schaltet sich das Gerät automatisch in den Standby-Modus
aus, wenn für ~15 Minuten keine Musik im Bluetooth-Modus abgespielt wurde.
Sie können das Element durch Drücken der STANDBY-Taste wieder aktivieren.

34
Fehlersuche
Kein Strom
• Stellen sie sicher, dass das Netzkabel sicher eingesteckt ist.
• Stellen Sie sicher, dass die Anlage eingeschaltet ist.
Die Fernbedienung funktioniert nicht
• Verwenden Sie die Fernbedienung in der Nähe der Anlage.
• Richten Sie die Fernbedienung auf den Fernbedienungssensor der Anlage.
• Tauschen Sie die Batterien der Fernbedienung gegen neue Batterien aus.
• Entfernen Sie alle Hindernisse zwischen der Fernbedienung und der Anlage.
Die Anlage reagiert nicht auf das Drücken der Tasten.
• In einigen Situationen kann das Gerät während der Verwendung blockieren. Um das Gerät zurückzusetzen, ziehen Sie den Stecker
aus der Steckdose, warten Sie einige Sekunden und schließen Sie es dann wieder an.
Keine Tonausgabe
• Stellen Sie sicher, dass die Anlage nicht stummgeschaltet ist.
Ich kann den Bluetooth Namen dieser Anlage auf meinem Bluetooth Gerät für die Bluetooth Kopplung nicht finden
• Stellen Sie sicher, dass die Anlage eingeschaltet ist.
• Stellen Sie sicher, dass die Bluetooth Funktion an Ihrem Bluetooth Gerät aktiviert ist.
• Die Anlage hat eine Bluetooth Funktion, die ein Signal innerhalb von 10 Metern empfangen kann.
FM Empfang
• Stellen Sie sicher, dass das Antennendraht an der Rückseite vollständig ausgezogen ist, um den FM-Empfang zu verbessern.
• Elektrische Interferenz in Ihrem Haus kann schlechten Empfang verursachen. Stellen Sie die Anlage entfernt davon auf
(insbesondere wenn diese von Motoren oder Transformatoren verursacht werden).
Interferenzen an den Lautsprechern
• Prüfen Sie, dass kein Mobiltelefon in der Nähe der Anlage liegt.

35
TECHNISCHE SPEZIFIKATIONEN
FM-Radio-Frequenzbereich
Bluetooth Frequenzbereich
87,5-108 MHz
2,402-2,480 GHz
AC-Netzeingang
230 V~, 50 Hz
Leistungsaufnahme
13 W
Lautsprecherausgangsleistung
Bluetooth-Version
2 x 1 W RMS
V4.1
Batterie-Backup (nicht enthalten)
Batterie der Fernbedienung (im Lieferumfang enthalten)
Geräteabmessungen (L x T x H)
AAA/LR03 Batterien x 2 Stück
1 x CR2025
240 x 150 x 62 mm
Gesamtgewicht
0,8 kg
• Diese Angaben dienen lediglich als Richtwerte. Die Gewichts- und Größenangaben sind Näherungswerte.
• Unser Produkt wird permanent weiterentwickelt und unterliegt bezüglich Spezifikationen und Funktionen stillschweigenden
Änderungen.
Garantie
Lenco bietet Leistungen und Garantien im Einklang mit Europäischem Recht. Im Falle von Reparaturen (sowohl während als auch
nach Ablauf der Garantiezeit) sollten Sie deshalb Ihren Einzelhändler kontaktieren.
Wichtiger Hinweis: Es ist nicht möglich, Geräte für Reparaturen direkt an Lenco zu schicken.
Wichtiger Hinweis: Falls dieses Gerät von einem nicht autorisierten Kundendienst geöffnet oder darauf zugegriffen wird, erlischt die
Garantie.
Dieses Gerät ist nicht für professionelle Zwecke geeignet. Falls das Gerät für professionelle Zwecke eingesetzt wird, erlöschen alle
Garantieverpflichtungen seitens des Herstellers.
Haftungsausschluss
Aktualisierungen der Firmware und/oder Hardware-Komponenten werden regelmäßig durchgeführt. Daher können einige der
Anweisungen, Spezifikationen und Abbildungen in dieser Dokumentation von Ihrer individuellen Situation abweichen. Alle in diesem
Handbuch beschriebenen Elemente dienen nur zur Illustration und treffen auf Ihre individuelle Situation möglicherweise nicht zu. Aus
der in diesem Handbuch getätigten Beschreibung können keine Rechtsansprüche oder Ansprüche geltend gemacht werden.
Entsorgung des Altgeräts
Dieses Symbol zeigt an, dass das entsprechende Produkt oder dessen Batterie in Europa
nicht mit dem normalen Hausmüll entsorgt werden darf. Um die ordnungsgemäße
Abfallbehandlung des Produkts und dessen Batterie zu gewährleisten, müssen diese im
Einklang mit allen anwendbaren örtlichen Vorschriften zur Entsorgung von Elektrogeräten
und Batterien entsorgt werden. Dabei helfen Sie, natürliche Ressourcen zu schonen und
Umweltschutzstandards zur Verwertung und Entsorgung von Altgeräten aufrecht zu halten
(Waste Electrical and Electronic Equipment Directive).
CE-Kennzeichen
Hiermit erklärt Lenco Benelux B.V., Thermiekstraat 1a, 6361 HB Nuth, The Netherlands, dass dieses Produkt den grundsätzlichen
Anforderungen der EU-Richtlinie entspricht. Die Konformitätserklärung ist erhältlich unter [email protected]m
Service
Weitere Informationen und Unterstützung erhalten Sie unter www.lenco.com
Lenco Benelux BV, Thermiekstraat 1a, 6361 HB, Die Niederlande.

36
Français
KCR-100
ATTENTION :
L’utilisation de commandes ou d’ajustements ou l’exécution de procédures autres que celles spécifiées dans le présent
document peuvent entraîner une exposition dangereuse aux radiations.
PRÉCAUTIONS AVANT UTILISATION
GARDEZ CES INSTRUCTIONS À L’ESPRIT :
1. Ne couvrez pas et n’obturez pas les ouvertures de ventilation. Lorsque vous placez l’appareil sur une étagère, laissez
5 cm (2”) d’espace libre tout autour de l’appareil.
2. Installez-le conformément au mode d’emploi fourni.
3. Gardez l’appareil à l’écart des sources de chaleur telles que des radiateurs, appareils de chauffage, fours, bougies et
autres produits générant de la chaleur ou une flamme nue. L’appareil ne peut être utilisé que dans des climats
modérés. Les environnements extrêmement froids ou chauds doivent être évités. La plage de température de
fonctionnement se situe entre 0° et 35° C.
4. Évitez d’utiliser l’appareil à proximité de champs magnétiques puissants.
5. Des décharges électrostatiques peuvent perturber le fonctionnement de cet appareil. Dans ce cas, il suffit de
réinitialiser et de redémarrer l’appareil en suivant le mode d’emploi. Pendant le transfert de fichiers, manipulez
l’appareil avec précaution et faites-le fonctionner dans un environnement sans électricité statique.
6. Mise en garde ! N’introduisez jamais un objet dans l’appareil par les ouvertures et les fentes de ventilation. Étant
donné que des tensions élevées sont présentes à l’intérieur du produit, l’insertion d’un objet peut entraîner une
électrocution et/ou court-circuiter les composants internes. Pour les mêmes raisons, ne versez pas de l’eau ou un
liquide sur le produit.
7. Ne l’utilisez pas dans des endroits humides tels qu’une salle de bain, une cuisine pleine de vapeur ou à proximité
d’une piscine.
8. L’appareil ne doit pas être exposé à des écoulements ou des éclaboussures et aucun objet contenant un liquide, tel
qu’un vase, ne doit être posé sur ou près de l’appareil.
9. N’utilisez pas cet appareil lorsque de la condensation est possible. Lorsque l’appareil est utilisé dans une pièce
humide et chaude, des gouttelettes d’eau ou de la condensation peuvent se former à l’intérieur de l’appareil et
affecter son fonctionnement. Laissez l’appareil hors tension pendant 1 ou 2 heures avant de le mettre en marche :
l’appareil doit être sec avant sa mise sous tension.
10. Bien que ce dispositif soit fabriqué avec le plus grand soin et contrôlé à plusieurs reprises avant de quitter l’usine,
des problèmes peuvent néanmoins survenir, comme avec tous les appareils électriques. Si l’appareil émet de la
fumée ou en cas d’accumulation excessive de la chaleur ou d’un phénomène inattendu, débranchez
immédiatement la fiche d’alimentation du secteur.
11. Cet appareil doit fonctionner avec la source d’alimentation indiquée sur la plaque signalétique. Si vous n’êtes pas
sûr du type d’alimentation utilisé chez vous, contactez votre revendeur ou le fournisseur local d’électricité.
12. Tenez l’appareil à l’abri des animaux. Certains animaux aiment ronger les cordons électriques.
13. Pour nettoyer l’appareil, servez-vous d’un chiffon doux et sec. N’utilisez pas de solvant ni d’autre liquide à base de
pétrole. Pour enlever les taches importantes, vous pouvez vous servir d’un chiffon humide imbibé d’une solution de
détergent diluée.
14. Le fournisseur n’est pas responsable des dommages ou pertes de données causés par un dysfonctionnement, une
utilisation abusive, une modification de l’appareil ou un remplacement de la batterie.
15. N’interrompez pas la connexion lorsque l’appareil formate ou transfère des fichiers. Dans le cas contraire, les
données pourraient être endommagées ou perdues.
16. Si l’appareil a une fonction de lecture USB, il faut brancher la clé USB directement sur l’appareil. N’utilisez pas un
câble d’extension USB, car cela peut causer des interférences entraînant des pertes de données.
17. L’étiquette de classification se trouve sur le panneau inférieur ou arrière de l’appareil.
18. Cet appareil ne doit pas être utilisé par des personnes (y compris les enfants) souffrant de déficiences physiques,
sensorielles ou mentales, ou d’un manque d’expérience et de connaissances, à moins qu’elles n’aient été
supervisées ou qu’une personne responsable de leur sécurité ne leur ait donné des instructions sur l’utilisation
correcte de l’appareil.
19. Ce produit est réservé à un usage non professionnel, et non pas à un usage commercial ni industriel.
20. Vérifiez que l’appareil est en position stable. La garantie ne couvre pas les dégâts occasionnés par l’utilisation de cet
appareil en position instable, par les vibrations, les chocs ou par la non-observation de tout autre avertissement ou
précaution contenus dans ce mode d’emploi.
21. N’ouvrez jamais cet appareil.
22. Ne placez jamais cet appareil sur un autre appareil électrique.
23. Ne laissez pas les sacs en plastique à la portée des enfants.
24. Utilisez uniquement les accessoires recommandés par le fabricant.
25. Confiez l’entretien et les réparations à un personnel qualifié. Une réparation est nécessaire lorsque l’appareil a été
endommagé de quelque façon que ce soit, par exemple lorsque le cordon d’alimentation ou la prise sont

37
endommagés, lorsqu’un liquide s’est déversé ou des objets sont tombés sur l’appareil, lorsque l’appareil a été
exposé à la pluie ou à l’humidité, lorsqu’il ne fonctionne pas correctement ou est tombé.
26. Une exposition prolongée à la musique avec un volume élevé peut entraîner une perte auditive temporaire ou
permanente.
27. Si l’appareil est livré avec un câble d’alimentation ou un adaptateur secteur :
⚫ En cas de problème, débranchez le cordon d’alimentation CA et confiez l’entretien à un personnel qualifié.
⚫ Ne marchez pas sur l’adaptateur secteur ou ne le coincez pas. Faites très attention, en particulier à proximité
des fiches et du point de sortie du câble. Ne placez pas d’objets lourds sur l’adaptateur secteur, car ils
pourraient l’endommager. Gardez l’appareil hors de portée des enfants ! Ils pourraient se blesser gravement
s’ils jouent avec le câble d’alimentation.
⚫ Débranchez cet appareil pendant les orages ou lorsqu’il n’est pas utilisé pendant une longue durée.
⚫ La prise secteur doit être installée près de l’appareil et doit être facilement accessible.
⚫ Ne surchargez pas les prises de courant ou les rallonges. Une surcharge peut entraîner un incendie ou une
électrocution.
⚫ Les appareils de classe 1 doivent être branchés à une prise de courant disposant d’une connexion protectrice à
la terre.
⚫ Les appareils à la norme de construction de classe 2 ne nécessitent pas de connexion à la terre.
⚫ Tirez toujours sur la fiche pour débrancher le cordon de la prise secteur. Ne tirez pas sur le cordon
d’alimentation. Cela pourrait provoquer un court-circuit.
⚫ N’utilisez pas un cordon ou une fiche d’alimentation endommagé ni une prise desserrée. Vous courez un
risque d’incendie ou de décharge électrique.
28. Si le produit contient ou est livré avec une télécommande contenant des piles boutons :
Avertissement :
⚫ « N’ingérez pas la pile, car vous risquez une brûlure chimique » ou une formule équivalente.
⚫ La télécommande fournie contient une pile bouton/pièce de monnaie. Si la pile est avalée, elle peut causer de
graves brûlures internes en seulement 2 heures et peut entraîner la mort.
⚫ Tenez les piles neuves et usagées hors de portée des enfants.
⚫ Si le compartiment à piles ne se ferme pas correctement, cessez d’utiliser l’appareil et tenez-le hors de portée
des enfants.
⚫ Si vous pensez que les piles ont été avalées ou placées à l’intérieur d’une partie du corps, consultez un
médecin immédiatement.
29. Mise en garde relative à l’utilisation des piles :
⚫ Risque d’explosion si la pile est mal remplacée. Remplacez les piles par des piles d’un type identique ou
équivalent.
⚫ Pendant l’utilisation, le stockage ou le transport, la pile ne doit pas être soumise à des températures
extrêmement élevées ou basses, à une faible pression d’air à haute altitude.
⚫ Le remplacement d’une pile par une autre de type incorrect peut entraîner une explosion ou une fuite de
liquide ou de gaz inflammable.
⚫ L’introduction d’une pile dans le feu ou dans un four chaud, l’écrasement ou le découpage mécanique peut
entraîner une explosion.
⚫ L’exposition d’une pile dans un environnement à température extrêmement élevée peut entraîner une
explosion ou une fuite de liquide ou de gaz inflammable.
⚫ L’exposition d’une pile à une pression d’air extrêmement basse peut entraîner une explosion ou une fuite de
liquide ou de gaz inflammable.
⚫ Veuillez considérer les questions environnementales lors de la mise au rebut des piles.
INSTALLATION
• Déballez toutes les pièces et enlevez le matériau de protection.
• Ne connectez pas l’unité au secteur avant d’avoir vérifié la tension du secteur et avant que toutes les autres
connexions n’aient été effectuées.

38
ACCESSOIRES
• Accessoires de montage (plaque en plastique + 2 jeux de vis + 4 entretoises + gabarit de perçage)
Plaque en plastique
Entretoise
Gabarit de perçage
• Mode d’emploi
MONTAGE DU POSTE SOUS UNE ARMOIRE
1. Choisir l’emplacement d’installation de l’unité dans une armoire/étagère. Étant donné que les haut-parleurs de l’unité sont situés
du côté gauche et du côté droit, il est recommandé de réserver suffisamment d’espace pour éviter d’obstruer le son.
2. Une fois l’emplacement choisi, vous pouvez utiliser le gabarit de papier perforé (fourni) comme guide pour l’emplacement des
trous à percer.
3. Installez la plaque en plastique sous l'armoire/étagère en utilisant les entretoises et les vis fournies, reportez-vous au schéma ci-
dessous. Vous pouvez choisir d’installer les entretoises ou pas. 2 jeux de vis sont fournis à utiliser selon votre choix. Les vis les
plus longues sont généralement utilisées lorsque les entretoises sont utilisées. Selon l’épaisseur du bois, vous pouvez décider
d’utiliser d’autres vis de longueurs appropriées.
4. Une fois la plaque en plastique installée, y faire glisser l’unité jusqu’à ce qu’elle soit bien fixée.
5. À cause de son poids, l’unité doit être installée avec la plus grande précaution. Assurez-vous que l’armoire utilisée est
suffisamment solide pour supporter le poids de l’unité.
Remarque :
- Pour réduire le risque d’incendie, ne placez pas la radio au-dessus d’une zone de chauffage ou sans les entretoises.
- Vous pouvez ne pas suspendre l’unité dans la plaque en plastique et l’utiliser comme radio de cuisine sur pied.

39
FAÇADE
1. VEILLE /SOURCE
Appuyez dessus pour mettre en marche l'appareil. Lorsque l’unité est allumée, appuyez sur ce bouton pour basculer entre les
modes FM et Bluetooth. Maintenez appuyée pour passer en mode veille
2. ALLUMER/ÉTEINDRE L'ÉCLAIRAGE VERS LE BAS
Faites glisser pour allumer ou éteindre l’éclairage vers le bas
3. PAVÉ NUMÉRIQUE
Appuyez pour rappeler directement une chaîne FM mémorisée
4. AFFICHAGE
5. RECHERCHER/STÉRÉO-MONO/COUPLAGE
FM : Appuyez pour basculer entre FM Stéréo et Mono Forcé. Maintenez appuyé pour lancer une recherche automatique
complète et mémoriser les chaînes FM disponibles
BT : Si vous maintenez ce bouton enfoncé, cela désactivera la connexion actuelle et lancera une recherche de nouveaux appareils
Bluetooth.
6. /MIN.
FM : Appuyez pour syntoniser une autre fréquence. Maintenez appuyé pour rechercher automatiquement la chaîne suivante
disponible
BT : Appuyez pour aller au morceau précédent
Réglage du minuteur : Appuyez pour régler les minutes
7. /SEC.
FM : Appuyez pour syntoniser une autre fréquence. Maintenez appuyé pour rechercher automatiquement la chaîne suivante
disponible
BT : Appuyez pour aller au morceau suivant
Réglage du minuteur : Appuyez pour régler les secondes
8. /RÉGLAGE HORLOGE/MÉMOIRE
FM : Appuyez pour rappeler directement des chaînes FM mémorisées. Maintenez appuyé pour mémoriser la chaîne FM comme
préréglage
BT : Appuyez dessus pour mettre la lecture en pause ou bien reprendre la lecture.
Mode Veille : Appuyez sur pour accéder au réglage de l’horloge
9. TIMER
Appuyez sur pour accéder au réglage du minuteur
10. DIMINUER/AUGMENTER LE VOLUME
Réglez le volume
11. Témoin de fréquence FM 0,05MHz
Lorsqu’une fréquence FM de 0,05 MHz est reçue, ce témoin s’allume. Par exemple, lorsque la fréquence 88,15 MHz est reçue,
l’écran affiche «88,1» et ce témoin s’allume.
12. Témoin BT
Il s’agit d’un témoin qui s’allume quand l’unité est en mode Bluetooth
13. Témoin FM
Il s’agit d’un témoin qui s’allume quand l’unité est en mode FM

40
14. Témoin FM-ST
Il s’agit d’un témoin qui s’allume quand l’unité est en mode FM stéréo
15. Témoin PM
Il s’agit d’un témoin qui s’allume à l’heure de l’après-midi lorsque le format des heures est 12 heures
16. Fenêtre du récepteur IR
17. TÉMOIN DU MINUTEUR
Il s’agit d’un témoin qui s’allume lorsque le minuteur est réglé.
TÉLÉCOMMANDE
1.
MISE EN VEILLE
2.
PAVÉ NUMÉRIQUE
3.
RECHERCHE
4.
SYNTONISER
5.
SYNTONISER
6.
BT PRÉCÉDENT
BT SUIVANT
BT LECTURE/PAUSE
7.
MINUTEUR
MIN.
SEC.
8.
9.
10.
11.
12.
13.
14.
15.
16.
17.
VOLUME +
VOLUME –
SOURDINE
STATION+
STATION-
ST/MONO
MÉMOIRE
COUPLAGE
SOMMEIL
RÉGLAGE DE L'HORLOGE
SOURCE
Installation de la pile de la télécommande
Une pile CR2025 est déjà installée dans la télécommande. Avant utilisation, sortez la bande isolante du compartiment à pile comme
indiqué ci-dessous.

41
Pour remplacer une pile usée, reportez-vous à la figure ci-dessous. En installant une pile, veillez à suivre les instructions.
• Si la télécommande entre en conflit avec d’autres appareil, le fonctionnement sera affecté.
• N'appuyez pas simultanément sur des boutons sur l’appareil et la télécommande.
• Évitez d'utiliser deux télécommandes en même temps, car cela causerait un dysfonctionnement.
• Utilisez uniquement des piles de type CR-2025.
• Si la pile fuit, nettoyez soigneusement la télécommande avant de placer une pile neuve.
• Ne court-circuitez pas deux bornes des piles. Mettez au rebut les piles usagées dans un endroit approprié.
Pile CR2025
Compartiment à pile
Sortez le compartiment à pile.
Poussez dans ce sens.

42
INSTALLATION DES PILES POUR LA SAUVEGARDE DE L’HEURE/CHAÎNES FM PRÉRÉGLÉES/MINUTEUR
L’heure/chaînes FM préréglées/minuteur (si réglés) seront maintenus en cas de panne de courant en installant 2 piles AAA/LR03 (non
fournies). Une fois le courant rétabli, vérifiez l’heure pour s’assurer qu’elle est correcte et la régler si nécessaire.
INSTALLATION DES PILES
1. Ouvrez le compartiment à piles situé sous l’unité en appuyant sur le loquet et en retirant le couvercle.
2. Insérez 2 piles AAA/LR03 (non fournies), de préférence des piles alcalines, dans le compartiment à piles en respectant les
polarités indiquées sur le schéma situé à l’intérieur du compartiment.
3. Remettez le couvercle du compartiment à piles.
BRANCHEMENT À L'ALIMENTATION ÉLECTRIQUE
Branchez le câble d’alimentation CA dans la prise secteur.
FONCTIONNEMENT DE BASE
Appuyez sur le bouton STANDBY pour mettre l'appareil en marche. Maintenez appuyée la touche STANDBY pour éteindre
l'appareil.
Vous pouvez également appuyer sur le bouton STANDBY de la télécommande pour allumer ou éteindre l’unité.
FM/BT
Lorsque l’unité est allumée, appuyez sur le bouton SOURCE pour basculer entre les modes FM et Bluetooth.
Réglage du volume
Utilisez les boutons VOLUME+/- pour régler le volume.
Ajustement de l’antenne
Le fil d’antenne situé à l’arrière de l’unité doit être complètement déployé pour assurer une bonne réception FM. Orientez l'antenne
autrement afin d'améliorer la réception.
UTILISATION DE LA RADIO FM
Recherche automatique
1. Mettez l’appareil en marche et réglez-le en mode FM.
Maintenez appuyé le bouton SCAN de l’unité (ou appuyez sur le bouton SCAN de la télécommande) pour lancer la recherche
automatique et mémoriser les chaînes disponibles (20 stations maximum peuvent être mémorisées)
Recherche manuelle
1. Appuyez plusieurs fois sur le bouton ou de l’unité (ou TUNE /TUNE de la télécommande) pour syntoniser une
autre fréquence.
2. Maintenez appuyé le bouton ou de l’unité (boutons TUNE /TUNE de la télécommande) pour rechercher
automatiquement la chaîne suivante disponible.
Mémorisation de préréglages FM
Vous pouvez mémoriser jusqu’à 20 préréglages FM.
1. Syntonisez la station à mémoriser.
2. Appuyez sur le bouton MEMORY de l’unité (ou appuyez sur le bouton MEMORY de la télécommande). Un numéro de station
présélectionnée clignote sur l'écran.
3. Appuyez sur le bouton ou de l’unité (boutons ou de la télécommande) sur un numéro de préréglage dans lequel
vous souhaitez mémoriser une chaîne. Appuyez ensuite sur le bouton MEMORY pour mémoriser.

43
Charger des présélections FM stockées
Appuyez sur le bouton MEMORY de l’unité (ou sur les boutons CH-/CH + de la télécommande) pour syntoniser différentes chaînes
préréglées.
Utilisez les touches numériques [1], [2],…, [5], pour rappeler directement une chaîne préréglée.
Par exemple, lorsque vous appuyez sur le bouton [3], l’écran affiche « P03 », attendez un moment que l’unité syntonise le préréglage
3.
Ou lorsque vous maintenez appuyé le bouton [3/(8)] jusqu’à ce que l’écran affiche «P08», attendez un moment que l’unité syntonise
le préréglage 8.
Ou lorsque vous appuyez sur le bouton [1] suivi par le bouton [2], l’écran affiche «P12», attendez un moment que l’unité syntonise le
préréglage 12.
Ou, si vous appuyez sur le bouton [1] suivi par le bouton [3/(8)], l’écran affiche «P18», attendez un moment que l’unité syntonise le
préréglage 18.
Vous pouvez également utiliser les touches numériques [1], [2],…, [9], [0] de la télécommande pour rappeler directement une chaîne
préréglée.
Par exemple, lorsque vous appuyez sur le bouton [3], l’écran affiche « P03 », attendez un moment que l’unité syntonise le préréglage
3.
Ou lorsque vous appuyez sur le bouton [8] jusqu’à ce que l’écran affiche «P08», attendez un moment que l’unité syntonise le
préréglage 8.
Ou lorsque vous appuyez sur le bouton [1] suivi par le bouton [2], l’écran affiche «P12», attendez un moment que l’unité syntonise le
préréglage 12.
Ou lorsque vous appuyez sur le bouton [1] suivi par le bouton [8], l’écran affiche «P18», attendez un moment que l’unité syntonise le
préréglage 18.
Sélection Stéréo/forcer mono
Lors de la réception d’un chaîne radio stéréo FM, appuyez sur le bouton ST/MONO pour basculer entre la réception stéréo et mono
forcé. Lorsque la réception est en stéréo FM, le témoin FM-ST s’allume.
Remarque :
- Le fil d’antenne situé à l’arrière de l’unité doit être complètement déployé pour assurer une bonne réception FM. Orientez
l'antenne autrement afin d'améliorer la réception.
AUDIO BLUETOOTH
Suivez les instructions d'appariement ci-dessous pour associer l'appareil à votre appareil Bluetooth.
1. Appuyez sur le bouton SOURCE pour accéder au mode Bluetooth. L'écran affiche «bLUE». L’unité lance la cherche et le témoin BT
se met à clignoter.
2. Si l’unité n’a jamais été couplée à un appareil Bluetooth ou ne peut pas trouver le dernier appareil couplé, le témoin BT continue
de clignoter. Activez la fonction Bluetooth de votre appareil et activez la recherche jusqu’à ce qu'il ait trouvé « Lenco KCR-100 ».
Sélectionnez «Lenco KCR-100» sur l'appareil Bluetooth pour établir une connexion. Saisissez le mot de passe « 0000 », si
nécessaire.
3. Une fois couplée avec succès, le témoin BT cesse de clignoter.
4. Vous pouvez maintenant commencer à lire de la musique à partir de votre smartphone sans fil sur l’enceinte.
5. Vous pouvez appuyer sur le bouton LECTURE/PAUSE pour lancer/suspendre la lecture.
6. Vous pouvez appuyer sur le bouton ou pour aller au morceau précédent ou suivant.
• Maintenez appuyé le bouton PAIRING pour annuler la connexion en cours et lancer la recherche d’un autre appareil Bluetooth.
« Ce produit est doté d’une fonction de réception bluetooth, vous ne pouvez pas l’utiliser pour transmettre un son bluetooth : cela
signifie que vous pouvez recevoir sans fil un signal sonore bluetooth d'une source externe comme un smartphone. »
FONCTION VEILLE AUTOMATIQUE
1. Lorsque l’unité est allumée, appuyez plusieurs fois sur le bouton SLEEP de la télécommande pour sélectionner la durée de veille
automatique en minutes de 05, 10, 15, 30, 45, 90 et 00 (désactivé).
2. Quand le minuteur de sommeil arrive à zéro, l'appareil s'éteint automatiquement.
3. Pour annuler la veille automatique, maintenez appuyé le bouton STANDBY de l’unité (ou appuyez sur le bouton STANDBY de la
télécommande) pour la désactiver. Vous pouvez également appuyer plusieurs fois sur le bouton SLEEP jusqu’à atteindre « 00 ».

44
RÉGLAGE DE L'HORLOGE
1. Éteignez l'appareil en le mettant en mode veille.
2. Maintenez appuyé le bouton CLOCK SET de l’unité (ou CLOCK SET de la télécommande) pour accéder au réglage de l’horloge. «
24H » ou « 12H » sera affiché.
3. Appuyez sur le bouton MIN. et SEC de l’unité (MIN. et SEC. de la télécommande) pour basculer entre le format 24H (affichage 24
heures) et 12H (affichage 12 heures). Appuyez sur le bouton CLOCK SET de l’unité (ou le bouton CLOCK SET de la télécommande)
pour confirmer.
4. Appuyez sur le bouton MIN. et SEC de l’unité (MIN. et SEC. de la télécommande) pour régler respectivement les heures et les
minutes. Appuyez sur le bouton CLOCK SET de l’unité (ou le bouton CLOCK SET de la télécommande) pour terminer le réglage de
l’horloge.
CONFIGURATION DE L’HEURE
1. Appuyez sur le bouton TIMER pour accéder au réglage du minuteur.
2. Appuyez sur le bouton MIN. et SEC de l’unité (MIN. et SEC. de la télécommande) pour régler respectivement les minutes et les
secondes. Appuyez sur le bouton TIMER.
3. Appuyez sur le bouton MIN. et SEC de l’unité (MIN. et SEC. de la télécommande) pour activer (ON) ou désactiver (OFF) le réglage
du minuteur. Lorsqu’il est activé, appuyez sur le bouton TIMER pour terminer le réglage du minuteur. Le compte à rebours sera
lancé.
4. Pendant le compte à rebours, le témoin TIMER continue de clignoter.
5. Pendant le compte à rebours, appuyez sur le bouton TIMER pour arrêter le compte à rebours. Le témoin TIMER reste allumé mais
cesse de clignoter. En appuyant à nouveau sur le bouton TIMER, le compte à rebours reprend et le témoin TIMER se met à
clignoter.
6. Pour annuler le compte à rebours, maintenez appuyé le bouton TIMER
7. Lorsque le compte à rebours se termine, la sonnerie de l’alarme se déclenche. Appuyez sur le bouton TIMER pour arrêter la
sonnerie.
ALLUMER/ÉTEINDRE L'ÉCLAIRAGE VERS LE BAS
Faites glisser le commutateur LIGHT ON/OFF du panneau avant pour allumer/éteindre l'éclairage vers le bas
ÉCONOMIE D’ÉNERGIE
Pour les mesures d’économie d’énergie en relation avec les exigences de l’ErP Niveau 2, l'unité se met automatiquement en mode
veille si aucune musique Bluetooth n’a été diffusée pendant environ 15 minutes.
Vous pouvez réactiver le produit en appuyant sur le bouton STANDBY.

45
Dépannage
Pas d’alimentation
• Assurez-vous que la prise secteur est bien branchée.
• Assurez-vous que l'unité est allumée.
La télécommande ne fonctionne pas.
• Utilisez la télécommande près de l’unité.
• Pointez la télécommande vers le capteur de la télécommande de l'unité.
• Remplacez les piles de la télécommande par des piles neuves.
• Retirez tous les obstacles entre la télécommande et l'unité.
L'unité ne répond pas aux touches.
• Dans certaines situations, l’unité peut se planter pendant l’utilisation. Pour réinitialiser l’unité, débranchez la fiche de la prise
secteur, attendez quelques secondes, puis la rebrancher.
Pas de son
• Assurez-vous que le son n'est pas coupé.
Je n'arrive pas à trouver le nom Bluetooth de cette unité sur mon appareil Bluetooth pour le couplage Bluetooth
• Assurez-vous que l'unité est allumée.
• Assurez-vous que Bluetooth est activé sur votre appareil Bluetooth.
• L'unité est dotée de la fonction Bluetooth qui permet de recevoir un signal dans un rayon de 10 mètres.
Réception FM
• Assurez-vous que le fil d’antenne situé à l’arrière est complètement déployé pour améliorer la réception FM.
• Des interférences électriques chez vous peuvent ruiner la réception. Éloignez l'appareil d'elles (en particulier avec des moteurs et
des transformateurs).
Interférences au niveau des haut-parleurs
• Vérifiez que vous n'avez pas laissé un téléphone portable près de l’unité.

46
CARACTÉRISTIQUES TECHNIQUES
Plage de fréquence radio FM
Plage de fréquence Bluetooth
87,5-108 MHz
2,402 à 2,480 GHz
Entrée d'alimentation CA
230 V~, 50 Hz
Puissance absorbée
13 W
Puissance de sortie des enceintes
Version Bluetooth
2 x 1 W RMS
V4.1
Piles de secours (non incluses)
Pile de télécommande (incluse)
Dimensions de l'appareil (L x P x H)
2 x Pile AAA/LR03
1 pile CR2025
240 x 150 x 62 mm
Poids total
0,8 kg
• Les caractéristiques sont indiquées uniquement à titre indicatif. Les valeurs de poids et de taille sont des approximations.
• Étant donné que nous améliorons constamment nos produits, leurs caractéristiques et fonctions peuvent changer sans préavis.
Garantie
Lenco propose un entretien et une garantie conformément à la législation européenne, ce qui signifie qu’en cas de besoin de
réparation (aussi bien pendant et après la période de garantie), vous pouvez contacter votre revendeur le plus proche.
Remarque importante : Il n’est pas possible de renvoyer l’appareil pour réparation directement à Lenco.
Remarque importante : Si l’unité est ouverte ou modifiée de quelque manière que ce soit par un réparateur non agréé, la garantie
serait caduque.
Cet appareil ne convient pas à une utilisation professionnelle. En cas d’utilisation professionnelle, les obligations de garantie du
fabricant seront annulées.
Clause de non responsabilité
Des mises à jour du logiciel et/ou des composants informatiques sont régulièrement effectuées. Il se peut donc que certaines
instructions, caractéristiques et images présentes dans ce document diffèrent légèrement de votre configuration spécifique. Tous les
articles décrits dans ce guide le sont fournis uniquement à des fins d'illustration et peuvent ne pas s'appliquer à une configuration
spécifique. Aucun droit légal ne peut être obtenu depuis les informations contenues dans ce manuel.
Mise au rebut de l'appareil usagé
Ce symbole indique que l'équipement électrique concerné ou la batterie ne doivent pas être jetés parmi les autres
déchets ménagers en Europe. Afin de garantir un traitement approprié de la batterie ou de l’appareil usagés, veuillez les
mettre au rebut conformément à la règlementation locale en vigueur relative aux équipements électriques et autres
batteries. En agissant de la sorte, vous contribuerez à la préservation des ressources naturelles et à l’amélioration des
niveaux de protection environnementale concernant le traitement et la destruction des déchets électriques (Directive sur
les déchets des équipements électriques et électroniques).
Marquage CE
Par la présente, Lenco Benelux B.V., Thermiekstraat 1a, 6361 HB Nuth, Pays-Bas, déclare que ce produit est conforme aux exigences
principales des directives européennes. La déclaration de conformité peut être consultée au lien : [email protected]
Service
Pour en savoir plus et obtenir de l'assistance, visitez www.lenco.com
Lenco Benelux BV, Thermiekstraat 1a, 6361 HB, The Netherlands.

47
Español
KCR-100
PRECAUCIÓN:
El uso de controles o ajustes o rendimiento de procedimientos excepto aquellos que los aquí especificados puede
provocar una exposición peligrosa a la radiación.
PRECAUCIONES PREVIAS AL USO
TENGA ESTAS INSTRUCCIONES EN MENTE:
1. No cubra o bloquee ninguna apertura de ventilación. Cuando coloque el dispositivo en una estantería, deje 5 cm
(2”) de espacio libre alrededor de todo el dispositivo.
2. Instálelo conforme al manual de usuario que se adjunta.
3. Mantenga el aparato alejado de fuentes de calor, como radiadores, calentadores, estufas, velas u otros productos
que generen calor o llama viva. El aparato solo puede usarse en climas moderados. Se deben evitar los ambientes
extremadamente fríos o cálidos. La gama de temperatura de funcionamiento es de entre 0° y 35°C.
4. Evite usar el dispositivo cerca de campos magnéticos fuertes.
5. Una descarga electrostática puede entorpecer el uso normal de este dispositivo. En tal caso, simplemente reinícielo
siguiendo el manual de instrucciones. Durante la transmisión de archivos, por favor manéjelo con cuidado opérelo
en un entorno libre de electricidad estática.
6. ¡Advertencia! Nunca inserte un objeto en el producto a través de las ventilaciones o aperturas. Alto voltaje fluye a
través del producto e insertar un objeto puede provocar una descarga eléctrica y/o un cortocircuito de sus
componentes internos. Por el mismo motivo, no derrame agua o líquidos en el producto.
7. No lo utilice en zonas húmedas, como cuartos de baño, cocinas en las que se forme vapor ni cerca de piscinas.
8. El aparato no debe exponerse a goteos o salpicaduras y asegúrese de que se colocan sobre o cerca del aparato
objetos llenos de líquidos, como jarrones.
9. No use este dispositivo cuando se pueda producir condensación. Cuando la unidad se usa en una sala húmeda
cálida, se pueden formar gotitas de agua o condensación en el interior de la unidad y esta puede no funcionar
adecuadamente; deje que la unidad se apague durante 1 o 2 horas antes de volver a encender la unidad: el aparato
debe estar seco antes de conectarse a una fuente de alimentación.
10. Aunque este dispositivo está fabricado con el máximo cuidado y comprobado varias veces antes de salir de fábrica,
todavía es posible que se puedan producir problemas, al igual que con todos los aparatos eléctricos. Si observa la
aparición de humo, una acumulación excesiva de calor o cualquier otro fenómeno inesperado, deberá desconectar
inmediatamente el enchufe de la toma de corriente.
11. Este dispositivo debe funcionar con una fuente de alimentación que se especifica en la etiqueta de especificaciones.
Si no está seguro del tipo de alimentación que se usa en su hogar, consulte con el distribuidor o una compañía
eléctrica local.
12. Manténgalo alejado de los animales. A algunos animales les encanta morder los cables de alimentación.
13. Para limpiar el dispositivo use un paño seco y suave. No utilice líquidos disolventes ni con base de petróleo. Para
eliminar manchas difíciles, puede usar un paño húmedo con detergente diluido.
14. El proveedor no asume ninguna responsabilidad por daños o datos perdidos provocados por un funcionamiento
incorrecto, uso incorrecto, modificación del dispositivo o sustitución de la batería.
15. No interrumpa la conexión cuando el dispositivo esté formateando o transfiriendo archivos. En caso contrario, los
datos se pueden estropear o perder.
16. Si la unidad dispone de función de reproducción USB, se debe conectar la memoria USB directamente en la unidad.
No utilice un cable de extensión USB ya que pueden crear interferencias que causen una pérdida de datos.
17. La etiqueta calificativa se encuentra en la parte inferior o en el panel posterior del aparato.
18. Este dispositivo no está diseñado para su uso por parte de personas (incluyendo niños) con discapacidad física,
sensorial o mental o con falta de experiencia o conocimientos, salvo que se les haya dado supervisión o
instrucciones acerca del uso correcto del dispositivo por parte de una persona responsable de su seguridad.
19. Este producto está diseñado para un uso no profesional únicamente y no para un uso comercial o industrial.
20. Asegúrese de que la unidad esté fijada en una posición estable. La garantía no cubrirá los daños derivados de usar
este producto en una posición inestable, vibraciones o golpes o por no seguir otras advertencias o precauciones que
aparecen en este manual de usuario.
21. Nunca retire la carcasa del dispositivo.
22. Nunca coloque este dispositivo sobre otro equipo eléctrico.
23. Mantenga las bolsas de plástico fuera del alcance de los niños.
24. Use únicamente los dispositivos/accesorios especificados por el fabricante.
25. Remita todas las reparaciones al personal cualificado. Es necesario el mantenimiento cuando el aparato presenta
cualquier tipo de daño, por ejemplo, el cable de alimentación o el enchufe presentan daños; se ha vertido líquido
sobre el aparato; se han caído objetos en el aparato; el aparato se ha expuesto a la lluvia o humedad; el aparato no
funciona normalmente o se ha caído.
26. Una larga exposición a sonidos elevados de reproductores de música personales puede provocar una pérdida de
audición temporal o permanente.

48
27. Si el producto viene con un cable de alimentación o un adaptador de corriente de CA:
⚫ Si se produce cualquier problema, desconecte el cable de alimentación CA y remítalo a mantenimiento por
parte de personal cualificado.
⚫ No pise o pince el adaptador de alimentación. Tenga mucho cuidado, en especial en las zonas alrededor de las
tomas y el punto de salida del cable. No coloque objetos pesados en el adaptador de alimentación, ya que
pueden dañarlo. ¡Mantenga el dispositivo fuera del alcance de los niños! Si juegan con el cable de
alimentación, puede sufrir lesiones graves.
⚫ Desconecte el dispositivo durante tormentas eléctricas o cuando no vaya a usarse durante periodos
prolongados de tiempo.
⚫ La salida de la toma debe instalarse cerca del equipo y debe ser fácilmente accesible.
⚫ No sobrecargue las tomas CA o los cables de extensión. La sobrecarga puede provocar un incendio o una
descarga eléctrica.
⚫ Los dispositivos con construcción de Clase 1 deben estar conectados a una toma de corriente con una
conexión a tierra protegida.
⚫ Los dispositivos con construcción de Clase 2 no requieren una conexión a tierra.
⚫ Sujete siempre el enchufe cuando los extraiga de la toma de corriente. No tire del cable de alimentación. Esto
puede provocar un cortocircuito.
⚫ No utilice un cable de alimentación o enchufe deteriorado o una toma suelta. Si lo hace, podría provocar un
incendio o una descarga eléctrica.
28. Si el producto contiene o se entrega con un mando a distancia que contiene pilas de botón / celdas:
Advertencia:
⚫ “Ni ingiera la pila, riesgo de quemadura química” o frase equivalente.
⚫ [El mando a distancia que se suministra] Este producto contiene una pila de tipo botón/moneda. Si la pila se
traga, puede provocar graves quemaduras internas en sólo 2 horas y podría ocasionar la muerte.
⚫ Mantenga las pilas nuevas o usadas fuera del alcance de los niños.
⚫ Si el compartimiento de las pilas no se cierra correctamente, deje de usar el producto y no lo deje al alcance
los niños.
⚫ Si tiene la sospecha de que una pila ha sido ingerida o se encuentra en algún lugar del cuerpo, busque
inmediatamente atención médica.
29. Precaución sobre el uso de las pilas:
⚫ Existe riesgo de explosión si la pila no se sustituye correctamente. Sustitúyala únicamente con otra del mismo
tipo u otro equivalente.
⚫ No se pueden exponer las pilas a temperaturas extremadamente altas o bajas, baja presión de aire a gran
altitud durante el uso, almacenamiento o transporte.
⚫ Si cambia la pila por otra que no sea la correcta, se puede producir una explosión o la fuga de líquidos o gases
inflamables.
⚫ Si arroja la pila al fuego o a un horno caliente, o aplasta o cortar mecánicamente una pila, podría provocar una
explosión.
⚫ Si deja una pila en un lugar con temperaturas extremadamente altas, se puede producir una explosión o una
fuga de líquido o gas inflamable.
⚫ Si se expone la pila a una presión de aire extremadamente baja, se puede producir una explosión o la fuga de
líquidos o gases inflamables.
⚫ Se debe prestar atención a los aspectos medioambientales sobre la eliminación de baterías.
INSTALACIÓN
• Desembale todas las piezas y retire el material protector.
• No conecte la unidad a la corriente eléctrica antes de comprobar la tensión de la corriente y antes de que se hayan
hecho todas las demás conexiones.

49
ACCESORIOS
• Kit de montaje (placa de plástico + 2 juegos de tornillos + 4 espaciadores + plantilla de papel para los agujeros del taladro)
Placa de plástico
Espaciador
Plantilla de papel para los agujeros
del taladro
• Manual de instrucciones
MONTAJE DEL CONJUNTO BAJO UN ARMARIO
1. Decida la ubicación donde instalar la unidad en el armario / estantería. Como los altavoces de la unidad están situados en el
lateral del borde izquierdo y en el lateral del borde derecho respectivamente, se recomienda reservar espacio suficiente para
evitar bloquear el sonido.
2. Una vez que haya decidido la ubicación, puede usar la plantilla de papel para los agujeros del taladro (que se adjunta) como
ubicación guía de los agujeros para taladrar los mismos.
3. Instale la placa de plástico bajo el armario / estantería usando los espaciadores y tornillos que se adjuntan; remítase al diagrama
que aparece debajo. La instalación de los espaciadores es opcional, según sus preferencias. Se proporcionan 2 juegos de tornillos
para su selección. El juego de tornillos más largo normalmente se emplea cuando se usan los espaciadores. Dependiendo del
grosor de la tabla de madera, puede decidir usar otra longitud apta de tornillos usted mismo.
4. Una vez que está instalada la placa de plástico, deslice la unidad en ella hasta que se bloquee con seguridad.
5. Debido a su peso, la unidad debe instalarse con mucho cuidado. Asegúrese de que el armario que se emplea es lo
suficientemente robusto para soportar el peso de la unidad.
Nota:
- Para reducir el riesgo de incendio, no coloque la radio en ninguna zona térmica o sin espacio.
- Puede deslizar hacia afuera la unidad desde la placa de plástico y usarse como una radio de cocina de pie.

50
PANEL FRONTAL
1. EN ESPERA /FUENTE
Púlselo para encender la unidad. Cuando se encienda, pulsar este botón cambiará entre el modo FM y el modo Bluetooth.
Manténgalo pulsado para apagarlo y entrar en modo en espera.
2. LUZ ENCENDIDA / APAGADA
Deslícelo para encender o apagar la iluminación inferior.
3. BOTONES NUMÉRICOS
Púlselo para sintonizar directamente el canal FM presintonizado guardado.
4. PANTALLA
5. BÚSQUEDA/ESTÉREO-MONO/EMPAREJAMIENTO
FM: Púlselo para cambiar entre la recepción de FM estéreo y mono forzado. Manténgalo pulsado para iniciar la búsqueda
automática y guardar el canal FM disponible
BT: Mantenerlo pulsad desconectará la conexión actual y empezará a buscar Potros dispositivo Bluetooth nuevo.
6. /MIN.
FM: Púlselo para sintonizar una frecuencia diferente. Manténgalo pulsado para realizar una búsqueda automática del siguiente
canal disponible
BT: Púlselo para saltar a la pista anterior
Configuración del temporizador: Púlselo para establecer la configuración de los minutos
7. /SEC.
FM: Púlselo para sintonizar una frecuencia diferente. Manténgalo pulsado para realizar una búsqueda automática del siguiente
canal disponible
BT: Púlselo para saltar a la pista siguiente
Configuración del temporizador: Púlselo para establecer la configuración de los segundos
8. /CLOCK SET/MEMORY
FM: Púlselo para sintonizar los diferentes canales FM presintonizados guardados. Manténgalo pulsado para guardar el canal FM
presintonizado que desee.
BT: Púlselo para cambiar entre el funcionamiento de reanudar la reproducción pausa.
Modo en espera: Púlselo para entrar en el funcionamiento de la configuración del reloj.
9. TIMER
Púlselo para entrar en la configuración del temporizador
10. – VOLUME +
Ajuste el control de volumen.
11. LED de frecuencia FM de 0.05MHz
Cuando se reciba la frecuencia de FM de 0.05MHz, este LED se encenderá. Por ejemplo, cuando se reciba 88.15MHz, la pantalla
mostrará “88.1” y este LED se encenderá.
12. LED de BT
Se trata de un indicador y se enciende cuando se encuentra en modo Bluetooth.
13. LED de FM
Se trata de un indicador y se enciende cuando se encuentra en modo FM.

51
14. LED de FM-ST
Se trata de un indicador y se enciende cuando se encuentra en modo FM estéreo
15. LED de PM
Se trata de un indicador y se enciende cuando se encuentra en el formato de pantalla de 12 horas en hora vespertina
16. Ventana del receptor de infrarrojos
17. LED del TEMPORIZADOR
Se trata de un indicador y se enciende cuando está fijado el temporizador.
MANDO A DISTANCIA
1.
ESPERA
2.
BOTONES NUMÉRICOS
3.
BÚSQUEDA
4.
SINTONIZAR
5.
SINTONIZAR
6.
BT ANTERIOR
BT SIGUIENTE
REPRODUCCIÓN / PAUSA DEL BT
7.
TEMPORIZADOR
MÍN.
SEG.
8.
9.
10.
11.
12.
13.
14.
15.
16.
17.
VOLUMEN +
VOLUMEN –
SILENCIO
CH+
CH-
ESTÉREO/MONO
MEMORIA
EMPERTAJAMIENTO
SUSPENSIÓN
AJUSTAR RELOJ
FUENTE
Instalación de la pila del mando a distancia
En la unidad del mando a distancia ya se encuentra instalada una pila CR2025. Antes de usarlo, extraiga la hoja aislante de la pila tal y
como se muestra debajo.

52
Para sustituir una pila gastada, remítase a la figura que se muestra debajo. Cuando inserte una pila, asegúrese de hacerlo en la
dirección correcta.
• Si el mando a distancia entra en conflicto con otros dispositivos, se verá afectado el funcionamiento.
• No pulse simultáneamente botones en la unidad y en el mando a distancia.
• Evite usar dos mandos a distancia al mismo tiempo ya que provocará un funcionamiento incorrecto.
• Use únicamente pilas tamaño CR-2025.
• Si hay una fuga en las pilas, limpie bien el mando a distancia antes de sustituir las pilas.
• No cortocircuite dos terminales de las pilas. Deshágase de las pilas antiguas en un lugar adecuado.
Pila CR2025
Porta pilas
Saque el porta pilas
Empújela según esta dirección

53
INSTALACIÓN DE LA PILAS PARA EL RELOJ / CANAL PRESINTONIZADO FM / RESPALDO DEL TEMPORIZADOR
El reloj / el canal presintonizado FM / el temporizador (si está fijado) se mantendrán durante un fallo de alimentación instalando
2 pilas AAA/LR03 (no incluidas). Una vez que se restaure la alimentación, compruebe el reloj para asegurarse de que está bien y
vuélvalo a configurar si es necesario.
INSTALACIÓN DE LA PILAS
1. Abra el compartimento de las pilas, situado en la parte inferior de la unidad presionando el cierre y retirando la cubierta.
2. Inserte 2 pilas AAA/LR03 (no incluidas), preferentemente pilas alcalinas, en el compartimento de las pilas siguiendo la polaridad,
tal y como se muestra en el diagrama situado en el interior del compartimento.
3. Vuelva a colocar la cubierta del compartimento de las pilas.
CONEXIÓN A LA CORRIENTE ELÉCTRICA
Conecte el cable de alimentación CA en la toma de corriente CA.
OPERACIONES BÁSICAS
Pulse el botón STANDBY para encender la unidad. Para apagarlo, vuelva mantener pulsado el botón STANDBY .
De forma alternativa, pulse el botón STANDBY en el mando a distancia para encender o apagar la unidad.
FM/BT
Cuando la unidad esté encendida, pulse el botón SOURCE para cambiar entre el modo FM y Bluetooth.
Control de volumen
Pulse los botones VOLUME +/- para cambiar el volumen.
Ajuste de la antena
El cable de la antena situado en el panel posterior esté completamente extendido para asegurar una buena recepción FM. Cambie la
posición de la antena para conseguir la mejor recepción.
FUNCIONAMIENTO DE LA RADIO FM
Búsqueda automática
1. Encienda la unidad en modo FM.
Mantenga pulsado el botón SCAN en la unidad (o pulse el botón SCAN en el mando a distancia) para iniciar la búsqueda automática y
guardar los canales disponible (se puede guardar un máximo de 20 emisoras)
Búsqueda manual
1. Pulse el botón o el botón en la unidad (el botón TUNE /TUNE en el mando a distancia) de forma reiterada para
sintonizar una frecuencia diferente.
2. Mantenga pulsado el botón o el botón en la unidad (el botón TUNE /TUNE en el mando a distancia) para buscar
automáticamente el siguiente canal disponible.
Guardar presintonías FM
Puede guardar hasta 20 presintonías de FM.
1. Sintonice la emisora que desee guardar.
2. Mantenga pulsado el botón MEMORY en la unidad principal (o pulse el botón MEMORY en el mando a distancia). Se mostrará el
número de canal de presintonía parpadeando.
3. Pulse el botón o el botón en la unidad (el botón o el botón en el mando a distancia) para presintonizar un
número que desee guardar. Posteriormente, pulse el botón MEMORY para guardarlo.

54
Recuperar presintonías FM almacenadas
Pulse el botón MEMORY en la unidad (o el botón CH-/CH+ en el mando a distancia) para sintonizar un canal presintonizado diferente.
Para recordar directamente el canal presintonizado usando los botones numéricos de la unidad, pulse los botones numéricos [1],
[2], …, [5].
Por ejemplo, cuando se pulsa el botón [3], la pantalla muestra “P03”, entonces espere un instante y sintonizará la presintonía 3.
O cuando mantenga pulsado el botón [3/(8)] hasta que la pantalla muestre “P08”, entonces espere un instante y sintonizará la
presintonía 8.
O cuando pulse el botón [1] y seguidamente mantenga pulsado el botón [2], la pantalla mostrará “P12” y tras un instante sintonizará
la presintonía 12.
O cuando pulse el botón [1] y seguidamente mantenga pulsado el botón [3/(8)], la pantalla mostrará “P18” y tras un instante
sintonizará la presintonía 18.
De forma alternativa, puede usar los botones numéricos del mando a distancia para recordar directamente el canal presintonizado ;
pulse los botones numéricos [1], [2], …, [9], [0].
Por ejemplo, cuando se pulsa el botón [3], la pantalla muestra “P03”, entonces espere un instante y sintonizará la presintonía 3.
O cuando pulse el botón [8] hasta que la pantalla muestre “P08” y espere un instante y sintonizará la presintonía 8.
O cuando pulse el botón [1] y seguidamente pulse el botón [2], la pantalla mostrará “P12” y tras un instante sintonizará la presintonía
12.
O cuando pulse el botón [1] y seguidamente pulse el botón [8], la pantalla mostrará “P18” y tras un instante sintonizará la presintonía
18.
Selección de Estéreo / Fuerza Mono
Cuando reciba un canal de radio FM estéreo, pulsar el botón ST/MONO cambiará entre audio estéreo y audio mono forzado. Cuando
está en FM estéreo, se encenderá el LED de FM-ST.
Nota:
- El cable de la antena situado en el panel posterior esté completamente extendido para asegurar una buena recepción FM.
Cambie la posición de la antena para conseguir la mejor recepción.
AUDIO BLUETOOTH
Siga estas instrucciones de vinculación para conectar la unidad a su dispositivo Bluetooth.
1. Pulse el botón SOURCE para entrar en el modo Bluetooth. La pantalla mostrará “bLUE”. Empezará a buscar y el LED del BT
parpadeará.
2. Si la unidad nunca se ha emparejado con un dispositivo Bluetooth anteriormente, o no puede encontrar el último dispositivo
emparejado, el LED de BT seguirá parpadeando. Encienda la función Bluetooth de su dispositivo y active la búsqueda hasta que
se encuentre “Lenco KCR-100”. Seleccione “Lenco KCR-100” en el dispositivo Bluetooth para realizar la conexión. Introduzca la
contraseña “0000” si la solicita.
3. Una vez que haya emparejado con éxito el BT, el Led quedará constante sin parpadear.
4. Ahora puede empezar a reproducir música desde su smartphone de forma inalámbrica al altavoz.
5. Puede pulsar el botón REPRODUCCIÓN / PAUSA para hacer una pausa o reanudar la reproducción.
6. Puede pulsar el botón ANTERIOR o el botón para saltar a la canción siguiente o anterior.
• Mantener pulsado el botón PAIRING desconectará la conexión actual y empezará a buscar un Nuevo dispositivo Bluetooth.
«Este producto dispone de una función de recepción bluetooth, no puede transmitir ningún sonido bluetooth con ella: esto significa
que puede recibir de forma inalámbrica una señal de sonido bluetooth desde una fuente externa como un smartphone».
FUNCIÓN RETARDO
1. Cuando la unidad está encendida, pulse el botón SLEEP en el mando a distancia de forma reiterada para seleccionar al duración
del retardo en minutos desde 05, 10, 15, 30, 45, 90 y 00 (retardo desconectado).
2. Cuando el temporizador de retardo llegue a cero, la unidad se apagará automáticamente.
3. Para cancelar la función de retardo, mantenga pulsado el botón STANDBY en la unidad (o pulse el botón STANDBY en el mando a
distancia) para apagarla. De forma alternativa, puede pulsar el botón SLEEP de forma reiterada hasta llegar a “00”.
CONFIGURACIÓN DEL RELOJ
1. Apague la unidad en modo de espera.
2. Mantenga pulsado el botón CLOCK SET en la unidad (o pulse el botón CLOCK SET en el mando a distancia) para entrar en la
configuración del reloj. Se mostrará “24H” o “12H”.

55
3. Pulse el botón MIN. y SEC en la unidad principal (el botón MIN. y SEC. en el mando a distancia) para cambiar entre 24H (formato
de 24 horas en pantalla) o 12H (formato de 12 horas en pantalla). Pulse el botón CLOCK SET en la unidad (el botón CLOCK SET en
el mando a distancia) para confirmarlo.
4. Pulse el botón MIN. y SEC en la unidad principal (el botón MIN. y SEC. en el mando a distancia) para ajustar la hora y los minutos
respectivamente. Pulse el botón CLOCK SET en la unidad (el botón CLOCK SET en el mando a distancia) para finalizar la
configuración del reloj.
CONFIGURACIÓN DE HORA
1. Pulse el botón TIMER para entrar en la configuración del temporizador.
2. Pulse el botón MIN. y SEC en la unidad principal (el botón MIN. y SEC. en el mando a distancia) para ajustar los minutos y
segundos respectivamente. Pulse el botón TIMER.
3. Pulse el botón MIN. y SEC en la unidad principal (el botón MIN. y SEC. en el mando a distancia) para activar (on) o desactivar
(OFF) la configuración del temporizador. Cuando esté fijado en on, pulse el botón TIMER para finalizar la configuración del
temporizador. Se iniciará la cuenta atrás.
4. Durante la cuenta atrás del temporizador, el indicador LED de TIMER continuará parpadeando.
5. Durante la cuenta atrás del temporizador, pulsar el botón TIMER detendrá la cuenta atrás. El indicador LED de TIMER todavía está
encendido pero sin parpadear. Volver a pulsar el botón timer continuará con la cuenta atrás y el indicador LED del timer
parpadeará.
6. Para cancelar la cuenta atrás, mantenga pulsado el botón TIMER
7. Cuando finalice la cuenta atrás del temporizador, se encenderá el temporizador de la alarma. Pulse el botón TIMER para detener
el pitido detener el pitido.
LUZ ENCENDIDA / APAGADA
Deslice el interruptor LIGHT ON/OFF situado en el panel frontal, para encender / apagar la iluminación inferior.
AHORRO DE ENERGÍA
Debido a las exigencias de ErP fase 2 y para proteger el medioambiente, la unidad se pagará y pasará al modo en espera de forma
automática si no se ha reproducido música en el modo Bluetooth durante ~15minutos.
Puede volver a reactivar el dispositivo pulsando el botón STANDBY.

56
Solución de problemas
No se enciende
• Asegúrese de que el cable de la corriente principal está conectado de forma segura.
• Asegúrese de que la unidad está encendida.
El mando a distancia no funciona
• Use el mando a distancia cerca de la unidad.
• Apunte el mando a distancia al sensor del mando a distancia de la unidad.
• Sustituya las pilas del mando a distancia por unas nuevas.
• Retire cualquier obstáculo entre el mando a distancia y la unidad.
La unidad no responde cuando se pulsa cualquier botón.
• En algunas situaciones, la unidad puede congelarse durante su uso. Para reiniciar la unidad, tire del enchufe conectado a la toma
de corriente, espere unos segundos y después vuelva a enchufarlo.
No hay salida de sonido
• Asegúrese de que la unidad no está silenciada.
No puedo encontrar el nombre Bluetooth de esta unidad en mi dispositivo Bluetooth para el emparejamiento Bluetooth
• Asegúrese de que la unidad está encendida.
• Asegúrese de que la función Bluetooth está activada en su dispositivo Bluetooth.
• La unidad dispone de una función Bluetooth que puede recibir una señal en 10 metros.
Recepción de FM
• Asegúrese de que el cable de la antena situado en el panel posterior esté completamente extendido para mejorar la recepción
FM.
• Las interferencias eléctricas en su hogar pueden causar una mala recepción. Aleje la unidad de las mismas (especialmente de
aparatos con motor y transformadores).
Interferencias en los altavoces
• Compruebe que no se ha dejado el teléfono móvil cerca de la unidad.

57
ESPECIFICACIONES TÉCNICAS
Alcance de frecuencia de radio FM
Rango de frecuencias Bluetooth
87,5-108 MHz
2,402-2,480 GHz
Entrada de alimentación CA
230 V, 50 Hz
Consumo de energía
13 W
Potencia de salida del altavoz
Versión Bluetooth
2 x 1 W RMS
V4.1
Pilas de respaldo (no incluidas)
Pila del mando a distancia (incluida)
Dimensiones de la unidad (L x P x A)
2 pilas AAA/LR03
1 CR2025
240 x 150 x 62 mm
Peso total
0,8 kg
• La especificación se presenta solo como referencia. Los valores del peso y del tamaño son aproximados.
• Nuestro producto se mejora constantemente y las especificaciones y funciones pueden cambiarse sin previo aviso.
Garantía
Lenco ofrece servicio y garantía en cumplimiento con las leyes de la Unión Europea, lo cual implica que, en caso de que su producto
precise ser reparado (tanto durante como después del periodo de garantía), deberá contactar directamente con su distribuidor.
Nota importante: No es posible enviar sus reparaciones directamente a Lenco.
Nota importante: Si la unidad es abierta por un centro de servicio no oficial, la garantía quedará anulada.
Este aparato no es adecuado para el uso profesional. En caso de darle un uso profesional, todas las obligaciones de garantía del
fabricante quedarán anuladas.
Exención de responsabilidad
Regularmente se llevan a cabo actualizaciones en el Firmware y en los componentes del hardware. Por esta razón, algunas de las
instrucciones, especificaciones e imágenes incluidas en este documento pueden diferir ligeramente respecto a su situación particular.
Todos los elementos descritos en esta guía tienen un objetivo de mera ilustración, y pueden no ser de aplicación en su situación
particular. No se puede obtener ningún derecho ni derecho legal a partir de la descripción hecha en este manual.
Eliminación del antiguo dispositivo
Este símbolo indica que no deberá deshacerse del producto eléctrico o batería en cuestión junto con los residuos
domésticos, en el ámbito de la UE. Para garantizar un tratamiento residual correcto del producto y su batería, por favor,
elimínelos cumpliendo con las leyes locales aplicables sobre requisitos para el desechado de equipos eléctricos y baterías.
De hacerlo, ayudará a conservar recursos naturales y mejorar los estándares de protección medioambiental en el
tratamiento y eliminación de residuos eléctricos (Directiva sobre la Eliminación de Equipos Eléctricos y Electrónicos).
Marca CE
Por la presente, Lenco Benelux B.V., Thermiekstraat 1a, 6361 HB Nuth, Países Bajos, declara que este producto cumple con las
exigencias esenciales de la directiva de la UE. La declaración de conformidad puede consultarse mediante
techdoc@commaxxgroup.com
Service (Servicio)
Para obtener más información y soporte del departamento técnico, por favor, visite la página web www.lenco.com
Lenco Benelux BV, Thermiekstraat 1a, 6361 HB, Países Bajos.
Documenttranscriptie
Model KCR-100 User manual – Kitchen radio with bluetooth, light and timer Gebruikshandleiding – Keukenradio met Bluetooth, licht en timer Benutzerhandbuch-Küchenradio mit Bluetooth, Licht und Timer Guide d’utilisation - Radio de cuisine avec Bluetooth, lumière et minuteur Manual de usuario – Radio de cocina con Bluetooth, luz y temporizador Index English ....................................................................................................................................................................................................... 3 Nederlands .............................................................................................................................................................................................. 14 Deutsch .................................................................................................................................................................................................... 25 Français .................................................................................................................................................................................................... 36 Español .................................................................................................................................................................................................... 47 Version: 3.0 2 English KCR-100 CAUTION: Usage of controls or adjustments or performance of procedures other than those specified herein may result in hazardous radiation exposure. PRECAUTIONS BEFORE USE KEEP THESE INSTRUCTIONS IN MIND: 1. Do not cover or block any ventilation openings. When placing the device on a shelf, leave 5 cm (2”) free space around the whole device. 2. Install in accordance with the supplied user manual. 3. Keep the device away from heat sources such as radiators, heaters, stoves, candles and other heat-generating products or naked flame. The device can only be used in moderate climates. Extremely cold or warm environments should be avoided. Working temperature between 0° and 35°C. 4. Avoid using the device near strong magnetic fields. 5. Electrostatic discharge can disturb normal usage of this device. If so, simply reset and restart the device following the instruction manual. During file transmission, please handle with care and operate in a static-free environment. 6. Warning! Never insert an object into the product through the vents or openings. High voltage flows through the product and inserting an object can cause electric shock and/or short circuit internal parts. For the same reason, do not spill water or liquid on the product. 7. Do not use in wet or moist areas such as bathrooms, steamy kitchens or near swimming pools. 8. The device shall not be exposed to dripping or splashing and make sure that no objects filled with liquids, such as vases, are placed on or near the apparatus. 9. Do not use this device when condensation may occur. When the unit is used in a warm wet room with damp, water droplets or condensation may occur inside the unit and the unit may not function properly; let the unit stand in power OFF for 1 or 2 hours before turning on the power: the unit should be dry before getting any power. 10. Although this device is manufactured with the utmost care and checked several times before leaving the factory, it is still possible that problems may occur, as with all electrical appliances. If you notice smoke, an excessive build-up of heat or any other unexpected phenomena, you should disconnect the plug from the main power socket immediately. 11. This device must operate on a power source as specified on the specification label. If you are not sure of the type of power supply used in your home, consult your dealer or local power company. 12. Keep away from animals. Some animals enjoy biting on power cords. 13. To clean the device, use a soft dry cloth. Do not use solvents or petrol based fluids. To remove severe stains, you may use a damp cloth with dilute detergent. 14. The supplier is not responsible for damage or lost data caused by malfunction, misuse, modification of the device or battery replacement. 15. Do not interrupt the connection when the device is formatting or transferring files. Otherwise, data may be corrupted or lost. 16. If the unit has USB playback function, the USB memory stick should be plugged into the unit directly. Don’t use an USB extension cable because it can cause interference resulting in failing of data. 17. The rating label has been marked on the bottom or back panel of the device. 18. This device is not intended for use by people (including children) with physical, sensory or mental disabilities, or a lack of experience and knowledge, unless they’re under supervision or have received instructions about the correct use of the device by the person who is responsible for their safety. 19. This product is intended for non professional use only and not for commercial or industrial use. 20. Make sure the unit is adjusted to a stable position. Damage caused by using this product in an unstable position vibrations or shocks or by failure to follow any other warning or precaution contained within this user manual will not be covered by warranty. 21. Never remove the casing of this device. 22. Never place this device on other electrical equipment. 23. Do not allow children access to plastic bags. 24. Only use attachments/accessories specified by the manufacturer. 25. Refer all servicing to qualified service personnel. Servicing is required when the device has been damaged in any way, such as the power supply cord or the plug, when liquid has been spilled or objects have fallen into the device, when the device has been exposed to rain or moisture, does not operate normally, or has been dropped. 26. Long exposure to loud sounds from personal music players may lead to temporary or permanent hearing loss. 27. If the product is delivered with power cable or AC power adaptor: ⚫ If any trouble occur, disconnect the AC power cord and refer servicing to qualified personnel. ⚫ Don’t step on or pinch the power adaptor. Be very careful, particularly near the plugs and the cable’s exit point. Do not place heavy items on the power adaptor, which may damage it. Keep the entire device out of children’s reach! When playing with the power cable, they can seriously injure themselves. 3 ⚫ ⚫ ⚫ ⚫ Unplug this device during lightning storms or when unused for a long period. The socket outlet must be installed near the equipment and must be easily accessible. Do not overload ac outlets or extension cords. Overloading can cause fire or electric shock. Devices with class 1 construction should be connected to a main socket outlet with a protective earthed connection. ⚫ Devices with class 2 construction do not require a earthed connection. ⚫ Always hold the plug when pulling it out of the main supply socket. Do not pull the power cord. This can cause a short circuit. ⚫ Do not use a damaged power cord or plug or a loose outlet. Doing so may result in fire or electric shock. 28. If the product contains or is delivered with a remote control containing coin/cell batteries: Warning: ⚫ “Do not ingest battery, Chemical Burn Hazard” or equivalent working. ⚫ [The remote control supplied with] This product contains a coin/button cell battery. If the battery is swallowed, it can cause severe internal burns in just 2 hours and can lead to death. ⚫ Keep new and used batteries away from children. ⚫ If the battery compartment does not close securely, stop using the product and keep it away from children. ⚫ If you think batteries might have been swallowed or placed inside any part of the body, seek immediate medical attention. 29. Caution about the use of Batteries: ⚫ Danger of explosion if battery is incorrectly replaced. Replace only with the same or equivalent type. ⚫ Battery cannot be subjected to high or low extreme temperatures, low air pressure at high altitude during use, storage or transportation. ⚫ Replacement of a battery with an incorrect type that can result in an explosion or the leakage of flammable liquid or gas. ⚫ Disposal of a battery into fire or a hot oven, or mechanically crushing or cutting of a battery, that can result in an explosion. ⚫ Leaving a battery in an extremely high temperature surrounding environment that can result in an explosion or that leakage of flammable liquid or gas. ⚫ A battery subjected to extremely low air pressure that may result in an explosion or the leakage of flammable liquid or gas. ⚫ Attention should be drawn to the environmental aspects of battery disposal. INSTALLATION • Unpack all parts and remove protective material. • Do not connect the unit to the mains before checking the mains voltage and before all other connections have been made. 4 ACCESSORIES • Mounting kit (plastic plate + 2 sets of screws + 4 spacers + drill hole paper template) Plastic plate • Spacer Drill hole paper template Instruction manual MOUNTING THE SET UNDER A CABINET 1. Decide the location to install the unit in the cabinet/shelf. Since the unit’s speakers are located on the left edge side and right edge side respectively, it is recommended to reserve enough space to avoid blocking the sound. 2. Once the location is decided, you can use the drill hole paper template (supplied) as a guide hole location to drill the holes. 3. Install the plastic plate under the cabinet/shelf using the supplied spacers and screws, refer to the diagram below. Spacers are optional to install as your preference. 2 sets of screws are provided for your selection. The longer screw set is usually used when the spaces are used. Depends on the wooden board thickness, you may decide to use other suitable screw length by yourselves. 4. After the plastic plate is installed, slide the unit into it until it locks securely. 5. Due to its weight, the unit should be installed with great care. Make sure that the cabinet that is used is sturdy enough to support the weight of the unit. Note: To reduce the risk of fire, do not place the radio on any heating area or without the spacing. You can slide out the unit from the plastic plate and to be used as a standing kitchen radio. 5 FRONT PANEL 1. 2. 3. 4. 5. 6. 7. 8. 9. 10. 11. 12. 13. 14. 15. STANDBY /SOURCE Press to turn on the unit. When it is turned on, press this button will toggle between FM and Bluetooth mode. Press and hold to turn off and go to Standby mode LIGHT ON/OFF Slide to turn on or turn off the downward lighting NUMERIC BUTTONS Press to direct tune to the stored preset FM channel DISPLAY SCAN/ST-MONO/PAIRING FM: Press to toggle between FM Stereo and Force Mono reception. Press and hold to start the full auto-scanning and store the available FM channels BT: Press and hold to disconnect the current connection and start to search another new Bluetooth device /MIN. FM: Press to tune to a different frequency. Press and hold to auto-scan to the next available channel BT: Press to skip to the previous track Timer Setup: Press to setup the minute setting /SEC. FM: Press to tune to different frequency. Press and hold to auto-scan the next available channel BT: Press to skip to the next track Timer Setup: Press to setup the second setting /CLOCK SET/MEMORY FM: Press to tune to different stored preset FM channel. Press and hold to store the preset FM channel as desired BT: Press to toggle between pause and resume playback operation Standby mode: Press to enter the clock setup operation TIMER Press to enter the Timer Setup – VOLUME + Adjust the volume control FM Freqency 0.05MHz LED When the FM frequency of 0.05MHz is received, this LED will turn on. For example when 88.15MHz is received, the display will show “88.1” and this LED will turn on BT LED It is an indicator and turn on when it is in Bluetooth mode FM LED It is an indicator and turn on when it is in FM mode FM-ST LED It is an indicator and turn on when it is in FM Stereo mode PM LED It is an indicator and turn on when it is in 12 hours display format at afternoon time 6 16. IR Receiver Window 17. TIMER LED It is an indicator and turn on when the timer is set. REMOTE CONTROL 1. 2. 3. 4. 5. 6. 7. 8. 9. 10. 11. 12. 13. 14. 15. 16. 17. STANDBY NUMERIC BUTTONS SCAN TUNE TUNE BT PREVIOUS BT NEXT BT PLAY/PAUSE TIMER MIN. SEC. VOLUME + VOLUME – MUTE CH+ CHST/MONO MEMORY PAIRING SLEEP CLOCK SET SOURCE Remote Control Battery Installation A CR2025 battery is already installed in the remote control unit. Before using, pull out the battery insulation sheet as shown below. 7 To replace an empty battery, please refer to the figure shown below. When inserting a battery, be sure to do so in the proper direction. Battery case Pull out the battery case Push in according to this direction CR2025 battery • • • • • • If the remote control conflicts with other devices, the operation will be affected. Do not simultaneously press buttons on the unit and the remote control. Avoid using two remote controls at the same time as it will cause a malfunction. Use only CR-2025 size batteries. If there is battery leakage, clean the remote control thoroughly before replacing batteries. Do not short two terminals of the batteries. Dispose old batteries in a suitable place. 8 INSTALLING THE BATTERIES FOR CLOCK/FM PRESET CHANNEL/TIMER BACKUP The clock/FM preset channel/timer (if set) will be maintained during a power failure by installing 2 x AAA/LR03 batteries (not supplied). Once the power is restored, check the clock to make sure it is accurate and set it again if necessary. INSTALLING THE BATTERIES 1. 2. 3. Open the battery compartment at the bottom of the unit by pressing on the catch and removing the cover. Insert 2 x AAA/LR03 batteries (not supplied), preferably alkaline batteries, into the battery compartment following the polarity as shown on the diagram inside the compartment. Replace the battery compartment cover. CONNECTING TO THE POWER SUPPLY Plug the AC power cable into the AC wall socket. BASIC OPERATION Press the STANDBY button to turn on the unit. To turn off, press and hold the STANDBY button again. Alternatively press the STANDBY button on the remote control to turn on or turn off the unit. FM/BT When the unit is turned on, press the SOURCE button to toggle between FM and Bluetooth mode. Volume Control Press the VOLUME +/- buttons to change the volume. Adjusting the Antenna The antenna wire at the rear panel of the unit should be fully extended to ensure a good FM reception. Alter the antenna position for the best reception. FM RADIO OPERATION Auto Scan 1. Turn on the unit in FM mode. Press and hold the SCAN button on the unit (or press the SCAN button on the remote control) to start auto-scanning and saving the available channels (Max. 20 stations can be stored) Manual Scan 1. Press the or button on the unit (the TUNE /TUNE button on the remote control) repeatedly to tune to a different frequency. 2. Press and hold the or button on the unit (the TUNE /TUNE button on the remote control) to automatically search to the next available channel. Storing FM Presets You can save up to 20 FM presets. 1. Tune to the station you wish to store. 2. Press and hold the MEMORY button on the unit (or press the MEMORY button on the remote control). Flashing preset channel number is displayed. 3. Press the or button on the unit (the or button on the remote control) to a preset number that you want to store. Then press the MEMORY button to save. 9 Recall Stored FM Presets Press the MEMORY button on the unit (or the CH-/CH+ button on the remote control) to tune to different preset channel. To directly recall the preset channel by using the numeric buttons on the unit, press the numeric buttons [1], [2], …, [5]. For example when the button [3] is pressed, the display shows “P03” and wait for a while it will tune to the preset 3. Or when press and hold the button [3/(8)] button until the display shows “P08” and wait for a while, it will tune to the preset 8. Or when press the button [1] button and followed by pressing the button [2], the display will show “P12” and after a while it will tune to the preset 12. Or when press the button [1] button and followed by press and hold the button [3/(8)], the display will show “P18” and after a while it will tune to the preset 18. Alternatively you can use the remote control numeric buttons to directly recall the preset channel, press the numeric buttons [1], [2], …, [9], [0]. For example when the button [3] is pressed, the display shows “P03” and wait for a while it will tune to the preset 3. Or when press the button [8] until the display shows “P08” and wait for a while, it will tune to the preset 8. Or when press the button [1] and followed by pressing the button [2], the display will show “P12” and after a while it will tune to the preset 12. Or when press the button [1] and followed by press the button [8], the display will show “P18” and after a while it will tune to the preset 18. Stereo/Force Mono Selection When receiving a Stereo FM radio channel, press the ST/MONO button will switch between stereo audio and force mono audio. When it is in FM Stereo, the FM-ST LED will be turned on. Note: The antenna wire at the rear panel of the unit should be fully extended to ensure a good FM reception. Alter the antenna position for the best reception. BLUETOOTH AUDIO Please follow the pairing instructions below to link the unit to your Bluetooth device. 1. Press the SOURCE button to enter the Bluetooth mode. The display will show “bLUE”. It will start searching and the BT LED will flash. 2. If the unit has never been paired with a Bluetooth device before or cannot find the last paired device, the BT LED will keep on flashing. Turn on the Bluetooth function of your device and enable the search until “Lenco KCR-100” is found. Select “Lenco KCR100” on the Bluetooth device to make connection. Enter the pass code “0000” if required. 3. After successfully paired the BT LED will become steady without flashing. 4. You can now start playing music from your smartphone wirelessly to the speaker. 5. You can press the PLAY/PAUSE button to pause or resume the playback. 6. You can press the PREVIOUS or button to skip to the previous or next song. • Press and hold the PAIRING button will disconnect the current connection and start to search another new Bluetooth device. “This product has a bluetooth reception function, you can not transmit any bluetooth sound with it: this means that you can receive wirelessly a bluetooth sound signal from an external source like a smartphone.” SLEEP FUNCTION 1. 2. 3. When the unit is switched on, press the SLEEP button on the remote control repeatedly to select the sleep duration in minutes from 05, 10, 15, 30, 45, 90 and 00 (sleep off). When the sleep timer is zero, the unit will be turned off automatically. To cancel the sleep function, press and hold the STANDBY button on the unit (or press the STANDBY button on the remote control) to turn off. Alternatively press the SLEEP button repeatedly to “00”. 10 CLOCK SETUP 1. 2. 3. 4. Turn off the unit in Standby mode. Press and hold the CLOCK SET button on the unit (or press the CLOCK SET button on the remote control) to enter the Clock setup. “24H” or “12H” will be displayed. Press the MIN. and SEC button on the unit (the MIN. and SEC. button on the remote control) to toggle between 24H (display 24 hours format) or 12H (display 12 hours format). Press the CLOCK SET button on the unit (the CLOCK SET button on the remote control) to confirm. Press the MIN. and SEC button on the unit (the MIN. and SEC. button on the remote control) to adjust the hour and minute respectively. Press the CLOCK SET button on the unit (the CLOCK SET button on the remote control) to finish the clock set. TIMER SETUP 1. 2. 3. 4. 5. 6. 7. Press the TIMER button to enter the Timer setup. Press the MIN. and SEC button on the unit (the MIN. and SEC. button on the remote control) to adjust the minute and second respectively. Press the TIMER button. Press the MIN. and SEC button on the unit (the MIN. and SEC. button on the remote control) to enable (on) or disable (OFF) the timer setup. When it is set to on, press the TIMER button to finish the timer setup. It will start to count down. During the timer count down, the TIMER LED indicator will keep flashing. During the timer count down, press the TIMER button will stop the count down. TIMER LED indicator is still turned on but without flashing. Pressing the timerbutton again will continue the countdown and the Timer Led indicator will flash. To cancel the countdown, press and hold the TIMER button When the timer count down is finished, the alarm buzzer will be turned on. Press the TIMER button to stop the buzzer stop the buzzer. LIGHT ON/OFF Slide the LIGHT ON/OFF switch on the front panel, to turn the downlights on/off ENERGY SAVING Due to ErP stage 2 requirement and protect the environment, the unit will turn off to the standby mode automatically If no music has been playing in bluetooth mode for ~15minutes. You can reactivate the item again by pressing the STANDBY button. 11 Trouble Shooting No power • Ensure that the mains cable is connected securely. • Ensure that the unit is switched on. The remote control does not function • Use the remote control near to the unit. • Point the remote control at the remote control sensor on the unit. • Replace the batteries in the remote control with new ones. • Remove any obstacles between the remote control and the unit. The unit does not respond when pressing any buttons. • In some situations the unit may freeze during use. To reset the unit, pull the plug from the mains socket, wait a few seconds and then plug it in again. No sound output • Make sure that the unit is not muted. I can’t find the Bluetooth name of this unit on my Bluetooth device for Bluetooth pairing • Ensure that the unit is switched on. • Ensure that the Bluetooth function is activated on your Bluetooth device. • The unit has a Bluetooth function that can receive a signal within 10 metres. FM reception • Ensure the antenna wire at the rear panel should be extended fully to improve the FM reception. • Electrical interference in your home can cause poor reception. Move the unit away from them (especially those with motors and transformers). Interferences in Speakers • Check that you have not left a mobile phone near the unit. 12 TECHNICAL SPECIFICATIONS FM radio frequency range Bluetooth frequency range AC power input Power consumption Speaker output power Bluetooth version Battery backup (not included) Remote control battery (Included) Unit dimension (L x D x H) Total weight 87.5-108 MHz 2.402-2.480 GHz 230V~, 50Hz 13 W 2 x 1 W RMS V4.1 AAA/LR03 batteries x 2pcs CR2025 x 1pcs 240 x 150 x 62 mm 0.8 kg • The specification presents only as a reference. The value of weight and size are approximation. • Our product is improved ceaselessly and the specification and function may be changed without prior notice. Guarantee Lenco offers service and warranty in accordance to European law, which means that in case of repairs (both during and after the warranty period) you should contact your local dealer. Important note: It is not possible to send products that need repairs to Lenco directly. Important note: If this unit is opened or accessed by a non-official service center in any way, the warranty expires. This device is not suitable for professional use. In case of professional use, all warranty obligations of the manufacturer will be voided. Disclaimer Updates to Firmware and/or hardware components are made regularly. Therefore some of the instruction, specifications and pictures in this documentation may differ slightly from your particular situation. All items described in this guide for illustration purposes only and may not apply to particular situation. No legal right or entitlements may be obtained from the description made in this manual. Disposal of the Old Device This symbol indicates that the relevant electrical product or battery should not be disposed of as general household waste in Europe. To ensure the correct waste treatment of the product and battery, please dispose them in accordance to any applicable local laws of requirement for disposal of electrical equipment or batteries. In so doing, you will help to conserve natural resources and improve standards of environmental protection in treatment and disposal of electrical waste (Waste Electrical and Electronic Equipment Directive). CE Marking Hereby, Lenco Benelux B.V., Thermiekstraat 1a, 6361 HB Nuth, The Netherlands, declares that this product is in compliance with the essential EU directive requirements. The declaration of conformity may be consulted via [email protected] Service For more information and helpdesk support, please visit www.lenco.com Lenco Benelux BV, Thermiekstraat 1a, 6361 HB, The Netherlands. 13 Nederlands KCR-100 LET OP: Het gebruik van afstandsbedieningen of aanpassingen of de uitvoering van procedures die niet in dit document zijn gespecificeerd, kan leiden tot gevaarlijke blootstelling aan straling. VOORZORGSMAATREGELEN VOOR GEBRUIK ONTHOUD DE VOLGENDE INSTRUCTIES: 1. Bedek of blokkeer de ventilatieopeningen niet. Wanneer u het apparaat op een schap plaatst, dient u 5 cm (2”) vrije ruimte rondom het gehele apparaat te behouden. 2. Installeer het product volgens de meegeleverde gebruikershandleiding. 3. Houd het apparaat uit de buurt van hittebronnen, zoals radiatoren, verwarmingen, kachels, kaarsen en andere hittegenererende producten of open vuur. Het apparaat kan alleen worden gebruikt in een gematigd klimaat. Extreem koude of warme omgevingen dienen te worden vermeden. Het bedrijfstemperatuurbereik ligt tussen 0 °C en 35 °C. 4. Gebruik dit apparaat niet in de buurt van krachtige magnetische velden. 5. Elektrostatische ontlading kan normaal gebruik van dit apparaat verstoren. U hoeft het apparaat in dit geval slechts te resetten en opnieuw op te starten volgens de gebruikershandleiding. Wees voorzichtig tijdens bestandsoverdracht en gebruik het product in een omgeving zonder statische interferentie. 6. Waarschuwing! Steek nooit een voorwerp via de ventilatie- of andere openingen in het product. Er is hoogspanning in het product aanwezig en als u er een object insteekt, kan dat een elektrische schok veroorzaken en/of kortsluiting in de interne onderdelen. Mors om dezelfde reden geen water of vloeistof op het product. 7. Gebruik het toestel niet in vochtige ruimtes, zoals badkamers, stomende keukens of in de buurt van zwembaden. 8. Het apparaat mag niet worden blootgesteld aan druppels en spetters en zorg ervoor dat er geen met vloeistof gevulde voorwerpen, zoals vazen, op of in de buurt van het apparaat worden geplaatst. 9. Gebruik dit apparaat niet wanneer condensatie kan optreden. Wanneer het apparaat in een warme, natte ruimte wordt gebruikt, kunnen zich waterdruppels of condens vormen in het apparaat en kan het apparaat niet goed functioneren. Laat het apparaat 1 of 2 uur uit staan voordat u het inschakelt: het apparaat dient droog te zijn voordat deze stroom ontvangt. 10. Alhoewel dit apparaat met grote zorg gefabriceerd en verschillende keren geïnspecteerd is voordat het de fabriek verlaat, is het nog steeds mogelijk dat er problemen optreden, zoals met alle elektrische apparaten. Als u rook, een overmatige hitteontwikkeling of enig ander onverwacht verschijnsel opmerkt, moet u onmiddellijk de stekker van het netsnoer uit het stopcontact halen. 11. Dit apparaat moet worden gebruikt met een voedingsbron zoals gespecificeerd op het specificatielabel. Als u twijfelt over het type voeding dat gebruikt wordt in uw huis, raadpleeg dan uw dealer of plaatselijk energiebedrijf. 12. Buiten bereik van dieren houden. Sommige dieren kauwen graag op voedingskabels. 13. Gebruik een zacht, droog doekje om het apparaat te reinigen. Gebruik geen oplosmiddelen of op benzine gebaseerde vloeistoffen. U kunt een vochtig doekje met verdund schoonmaakmiddel gebruiken om hardnekkige vlekken te verwijderen. 14. De leverancier is niet verantwoordelijk voor schade of verloren gegevens veroorzaakt door storing, misbruik, modificatie van het apparaat of batterijvervanging. 15. Onderbreek nooit de verbinding wanneer het apparaat formatteert of bestanden overdraagt. De gegevens kunnen anders corrupt of verloren raken. 16. Indien het apparaat een USB-afspeelfunctie heeft, moet de USB-geheugenstick rechtstreeks op het apparaat worden aangesloten. Gebruik geen USB-verlengkabel, omdat die kan leiden tot storingen met foutieve gegevens als gevolg. 17. Het classificatielabel bevindt zich op de onderkant of het achterpaneel van het apparaat. 18. Dit hulpmiddel is niet bedoeld voor gebruik door mensen (inclusief kinderen) met een fysieke, zintuiglijke of mentale handicap, of een gebrek aan ervaring en kennis, tenzij zij toezicht of instructies hebben gekregen over het juiste gebruik van het hulpmiddel door een persoon die verantwoordelijk is voor hun veiligheid. 19. Dit product is alleen voor niet-professioneel gebruik bedoeld en niet voor commercieel of industrieel gebruik. 20. Verzeker u ervan dat het apparaat in een stabiele positie staat opgesteld. Schade die wordt veroorzaakt door het gebruik van dit product in een onstabiele positie, trillingen of schokken of het niet opvolgen van de waarschuwingen of voorzorgsmaatregelen in deze gebruikershandleiding wordt niet gedekt door de garantie. 21. Verwijder nooit de behuizing van dit apparaat. 22. Plaats dit apparaat nooit op andere elektrische apparatuur. 23. Geef kinderen geen gelegenheid in aanraking met plastic zakken te komen. 24. Gebruik uitsluitend uitbreidingen/accessoires gespecificeerd door de fabrikant. 25. Laat alle reparaties over aan gekwalificeerd onderhoudspersoneel. Onderhoud is nodig als het apparaat is beschadigd, bijvoorbeeld als de voedingskabel of de stekker is beschadigd, als er vloeistof op het apparaat is gemorst, als er voorwerpen in het apparaat zijn gevallen, als het apparaat is blootgesteld aan regen of vocht, als het apparaat niet normaal werkt of als het is gevallen. 14 26. Langdurige blootstelling aan harde geluiden van persoonlijke muziekspelers kan leiden tot tijdelijk of permanent gehoorverlies. 27. Als het product wordt geleverd met voedingskabel of wisselstroomvoedingsadapter: ⚫ Als er zich problemen voordoen, moet u de voedingskabel loskoppelen en het ter onderhoud aanbieden aan gekwalificeerd personeel. ⚫ Nooit op de voedingsadapter stappen of deze indrukken. Wees zeer voorzichtig, vooral in het gebied rond de stekkers en de kabelaansluitingen. Plaats geen zware voorwerpen op de voedingsadapter, om beschadiging ervan te voorkomen. Houd het gehele apparaat buiten bereik van kinderen! Wanneer kinderen met de voedingskabel spelen, kunnen zij ernstig letsel oplopen. ⚫ Haal de stekker uit het stopcontact tijdens onweer of wanneer u deze langere tijd niet gebruikt. ⚫ Het stopcontact moet in de buurt van de apparatuur zijn geïnstalleerd en eenvoudig te bereiken zijn. ⚫ Laat AC-stopcontacten of verlengsnoeren nooit overbelast raken. Overbelasting kan brand of een elektrische schok veroorzaken. ⚫ Apparaten met een Klasse 1 structuur dienen te worden aangesloten op een stopcontact met een beschermende aardverbinding. ⚫ Apparaten met een Klasse 2 structuur vereisen geen aardverbinding. ⚫ Houd altijd de stekker vast wanneer u deze uit het stopcontact trekt. Trek nooit aan de voedingskabel. Dit kan tot een kortsluiting leiden. ⚫ Gebruik nooit een beschadigde voedingskabel of stekker of een los stopcontact. Dit vormt namelijk een risico op brand of elektrische schokken. 28. Indien het product knoopcelbatterijen bevat of wordt geleverd met een afstandsbediening die knoopcelbatterijen bevat: Waarschuwing: ⚫ “Batterij niet inslikken, chemisch brandgevaar” of gelijkwaardige werking. ⚫ De meegeleverde afstandsbediening bevat een knoopcelbatterij. Als de batterij wordt ingeslikt, kan deze in slechts 2 uur ernstige interne brandwonden veroorzaken en tot de dood leiden. ⚫ Houd nieuwe en gebruikte batterijen buiten bereik van kinderen. ⚫ Als de batterijhouder niet goed kan worden gesloten, dient u het product niet meer te gebruiken en buiten bereik van kinderen te houden. ⚫ Als u denkt dat batterijen zijn ingeslikt of binnenin een willekeurig lichaamsdeel terecht zijn gekomen, dient u onmiddellijk medische hulp te zoeken. 29. Waarschuwing m.b.t. het gebruik van batterijen: ⚫ Als de batterij onjuist wordt geplaatst, bestaat er explosiegevaar. Vervang de batterij alleen door een zelfde of vergelijkbare soort batterij. ⚫ Stel de batterij niet bloot aan extreem hoge of lage temperaturen of een lage luchtdruk op grote hoogte tijdens gebruik, opslag of transport. ⚫ Vervanging van een batterij door een incorrect type kan leiden tot een ontploffing of de lekkage van ontvlambare vloeistoffen of gas. ⚫ Het weggooien van een batterij in het vuur of een hete oven, of het mechanisch verpletteren of insnijden van een batterij, kan leiden tot een explosie. ⚫ Het achterlaten van een batterij in een omgeving met extreem hoge temperaturen kan leiden tot een explosie of het lekken van brandbare vloeistof of gas. ⚫ Een batterij die aan een extreem lage luchtdruk wordt blootgesteld, kan leiden tot een explosie of het lekken van brandbare vloeistof of gas. ⚫ Aandacht voor het milieu is nodig bij het verwijderen van de batterijen. INSTALLATIE • Pak alle onderdelen uit en verwijder de beschermende materialen. • Sluit het apparaat niet aan op het stopcontact, voordat u de netspanning hebt gecontroleerd en voordat alle andere aansluitingen zijn gemaakt. 15 ACCESSOIRES • Mounting kit (plastic plate + 2 sets of screws + 4 spacers + drill hole paper template) Kunststof plaat • Tussenring Papieren sjabloon voor boorgaten Gebruiksaanwijzing DE SET ONDER EEN KASTJE MONTEREN 1. Bepaal op welke plek u het apparaat onder het kastje/de schap wilt installeren. Omdat de luidsprekers van het apparaat aan de linker- en rechterzijden zijn geplaatst, raden wij u aan genoeg ruimte over te laten zodat het geluid niet wordt geblokkeerd. 2. Nadat u de locatie eenmaal hebt gekozen, dan kunt u de papieren sjabloon (meegeleverd) als een referentie gebruiken om de locaties voor de boorgaten te bepalen. 3. Installeer de kunststof plaat onder het kastje/de schap met de meegeleverde tussenringen en schroeven volgens het diagram hieronder. De tussenringen zijn optioneel en kunnen naar wens worden gebruikt. Er zijn 2 sets schroeven meegeleverd waar u uit kunt kiezen. De set met langere schroeven wordt gewoonlijk gebruikt wanneer de tussenringen worden gebruikt. U kunt ervoor kiezen schroeven te gebruiken van een andere geschikte lengte, afhankelijk van de dikte van het houten paneel. 4. Nadat de kunststof plaat is geïnstalleerd, dan kunt u apparaat er inschuiven totdat deze op zijn plek vast zit. 5. Vanwege het gewicht van het apparaat, dient u deze uiterst voorzichtig te installeren. Controleer of het kastje dat u gebruikt stevig genoeg is om het gewicht van het apparaat te ondersteunen. Opmerking: Om het risico op brand te voorkomen, plaats de radio niet op verwarmingsplekken of zonder de vereiste speling. U kunt het apparaat uit de kunststof plaat schuiven om als een staande keukenradio te gebruiken. 16 VOORPANEEL 1. 2. 3. 4. 5. 6. 7. 8. 9. 10. 11. 12. 13. STAND-BY /BRON Indrukken om het apparaat in te schakelen. Wanneer het apparaat is ingeschakeld, dan kunt u op deze toets drukken om te wisselen tussen de FM-modus en Bluetooth-modus. Indrukt houden om uit en op stand-by te schakelen LICHT AAN/UIT Schuiven om de naar onder gerichte verlichting in of uit te schakelen NUMERIEKE TOETSEN Indrukken om direct af te stemmen op een opgeslagen FM-voorkeuzekanaal SCHERM SCAN/ST-MONO/PARING FM: Indrukken om de ontvangst te wisselen tussen FM Stereo en Geforceerd Mono. Ingedrukt houden om de volledige automatische scan te starten en beschikbare FM-kanalen op te slaan BT: Ingedrukt houden om de huidige verbinding te verbreken en te beginnen met zoeken naar een andere nieuw Bluetoothapparaat /MIN. FM: Indrukken om op een andere frequentie af te stemmen. Ingedrukt houden om automatisch naar het volgende beschikbare kanaal te zoeken BT: Indrukken om het vorige nummer te selecteren Timerinstelling: Indrukken om de minuten in te stellen /SEC. FM: Indrukken om op een andere frequentie af te stemmen. Ingedrukt houden om automatisch naar het volgende beschikbare kanaal te zoeken BT: Indrukken om het volgende nummer te selecteren Timerinstelling: Indrukken om de seconden in te stellen /CLOCK SET/MEMORY FM: Indrukken om af te stemmen op een ander opgeslagen FM-voorkeuzekanaal. Ingedrukt houden om het gewenste FMvoorkeuzekanaal op te slaan BT: Indrukken om het afspelen te pauzeren en hervatten Stand-by-modus: Indrukken om de klokinstelling te openen TIMER Indrukken om de timerinstelling te openen – VOLUME + Pas het volume aan. LED FM-freqentie 0,05MHz Wanneer de FM-frequentie 0,05MHz wordt ontvangen, dan zal deze LED branden. Wanneer bijvoorbeeld 88,15MHz wordt ontvangen, dan zal de display “88.1” weergeven terwijl deze LED inschakelt BT-LED Deze indicator zal inschakelen wanneer de Bluetooth-modus is geselecteerd FM-LED Deze indicator zal inschakelen wanneer de FM-modus is geselecteerd 17 14. FM-ST-LED Deze indicator zal inschakelen wanneer de Stereo FM-modus is geselecteerd 15. PM-LED Deze indicator zal 's middags inschakelen wanneer het 12 uur klokformaat is geselecteerd 16. IR-ontvangstvenster 17. TIMER-LED Deze indicator zal inschakelen wanneer de timer is ingesteld. AFSTANDSBEDIENING 1. 2. 3. 4. 5. 6. 7. 8. 9. 10. 11. 12. 13. 14. 15. 16. 17. Stand-by NUMERIEKE TOETSEN SCAN AFSTEMMEN AFSTEMMEN BT VORIGE BT VOLGENDE BT START/PAUZE TIMER MINIMAAL SEC. VOLUME + VOLUME – DEMP Kanaal+ KanaalST/MONO GEHEUGEN KOPPELEN SLAPEN KLOKINSTELLING BRON De batterij in de afstandsbediening installeren Er is al een CR2025 batterij geïnstalleerd in de afstandsbediening. Trek vóór gebruik de isolatiestrip van de batterij af, zoals hieronder staat afgebeeld. 18 Raadpleeg a.u.b. de afbeelding hieronder om een uitgeputte batterij te vervangen. Let a.u.b. op de juiste polariteitrichting wanneer u een batterij installeert. Batterijhouder De batterijhouder uittrekken In deze richting indrukken CR2025 batterij • • • • • • Als deze afstandsbediening interferentie ontvangt van andere apparatuur, dan zal de werking ervan worden aangetast. Druk niet gelijktijdig knoppen op het apparaat en de afstandsbediening in. Gebruik nooit twee afstandsbedieningen tegelijkertijd, anders zullen er storingen optreden. Gebruik uitsluitend type CR-2025 batterijen. In het geval van een lekkende batterij, maak de afstandsbediening grondig schoon voordat u de batterij vervangt. Verbind twee kanten van de batterijen niet met elkaar. Gooi oude batterijen weg op de daarvoor bestemde plek. 19 DE BATTERIJEN INSTALLEREN VOOR DE KLOK/FM-VOORKEUZEKANALEN/TIMERBACK-UP De klok/FM-voorkeuzekanalen/timer (indien ingesteld) zullen tijdens een stroomuitval worden behouden door 2 x type AAA/LR03 batterijen te installeren (niet inbegrepen). Nadat de stroom eenmaal is hersteld, controleer dan of de klok nog steeds nauwkeurig is en stel eventueel opnieuw in. DE BATTERIJEN INSTALLEREN 1. 2. 3. Open het batterijvak op de onderzijde van het apparaat door op het palletje te drukken en de klep te verwijderen. Installeer 2 x type AAA/LR03 batterijen (niet inbegrepen), bij voorkeur alkalinebatterijen, in het batterijvak volgens de polariteit gemarkeerd op het diagram binnenin het batterijvak. Plaats de klep terug op het batterijvak. AANSLUITING OP DE VOEDING Steek de AC-voedingskabel in het AC-stopcontact. ALGEMENE BEDIENING Druk op de toets STANDBY om het apparaat in te schakelen. Houd de toets STANDBY nogmaals ingedrukt om uit te schakelen. U kunt ook op de toets STANDBY op de afstandsbediening drukken om het apparaat in of uit te schakelen. FM/BT Wanneer het apparaat is ingeschakeld, dan kunt u op de toets SOURCE drukken om te wisselen tussen de FM-modus en Bluetoothmodus. Volumeregeling Druk op de toets VOLUME +/- om het volume aan te passen. De antenne aanpassen De antennedraad op het achterpaneel van het apparaat dient volledig te worden uitgetrokken voor een goede FM-ontvangst. U kunt de antennepositie aanpassen om de ontvangst te verbeteren. FM-RADIOBEDIENING Automatische scan 1. Schakel het apparaat in op FM-modus. Houd de toets SCAN op het apparaat (of druk op de toets SCAN op de afstandsbediening) ingedrukt om de automatische scan te starten en de beschikbare kanalen op te slaan (max. 20 stations kunnen worden opgeslagen) Handmatige scan 1. Druk meerdere keren op de toets of op het apparaat (of op de toets TUNE /TUNE op de afstandsbediening) om af te stemmen op een andere frequentie. 2. Houd de toets of op het apparaat ingedrukt (de toets TUNE /TUNE op de afstandsbediening) om automatisch naar het volgende beschikbare kanaal te zoeken. FM-stationsgeheugens opslaan U kunt tot 20 FM-voorkeuzestations opslaan. 1. Stem af op het station dat u wilt opslaan. 2. Houd de toets MEMORY op het apparaat ingedrukt (of druk op de toets MEMORY op de afstandsbediening). Een knipperend voorkeuzekanaal wordt weergegeven. 3. Druk op de toets of op het apparaat (de toets of op de afstandsbediening) om een voorkeuzenummer te selecteren om op te slaan. Druk vervolgens op de toets MEMORY om op te slaan. 20 Opgeslagen FM-stationsgeheugens herroepen Druk op de toets MEMORY op het apparaat (of de toets CH-/CH+ op de afstandsbediening) om af te stemmen op een ander voorkeuzekanaal. U kunt een voorkeuzekanaal ook direct herroepen met de cijfertoetsen op het apparaat; druk op de cijfertoetsen [1], [2], …, [5]. Wanneer u bijvoorbeeld op de toets [3] drukt, dan zal de display “P03” en eventjes wachten terwijl op voorkeuze 3 wordt afgestemd. Of wanneer u de toets [3/(8)] ingedrukt houdt totdat de display “P08” weergeeft en eventjes wacht, dan zal op voorkeuze 8 worden afgestemd. Of wanneer u de de toets [1] gevolgd door de toets [2] indrukt, dan zal de display “P12” weergeven en eventjes wachten terwijl op voorkeuze 12 wordt afgestemd. Of wanneer u de de toets [1] indrukt en vervolgens toets [3/(8)] ingedrukt houdt, dan zal de display “P18” weergeven en eventjes wachten terwijl op voorkeuze 18 wordt afgestemd. U kunt ook de cijfertoetsen op de afstandsbediening drukken om een voorkeuzekanaal direct te herroepen' druk op de cijfertoetsen [1], [2], …, [9], [0]. Wanneer u bijvoorbeeld op de toets [3] drukt, dan zal de display “P03” en eventjes wachten terwijl op voorkeuze 3 wordt afgestemd. Of wanneer u op de toets [8] drukt totdat de display “P08” weergeeft en eventjes wacht, dan zal op voorkeuze 8 worden afgestemd. Of wanneer u de de toets [1] gevolgd door de toets [2] indrukt, dan zal de display “P12” weergeven en eventjes wachten terwijl op voorkeuze 12 wordt afgestemd. Of wanneer u de de toets [1] gevolgd door de toets [8] indrukt, dan zal de display “P18” weergeven en eventjes wachten terwijl op voorkeuze 18 wordt afgestemd. Stereo/geforceerd mono selecteren Wanneer een Stereo FM-radiokanaal wordt ontvangen, dan kunt u op de toets ST/MONO drukken om te wisselen tussen stereo audio en geforceerd mono audio. Wanneer het kanaal in FM Stereo wordt ontvangen, dan zal de FM-ST-LED branden. Opmerking: De antennedraad op het achterpaneel van het apparaat dient volledig te worden uitgetrokken voor een goede FM-ontvangst. U kunt de antennepositie aanpassen om de ontvangst te verbeteren. BLUETOOTH-AUDIO Volg a.u.b. de paringinstructies hieronder om het apparaat te paren met uw Bluetooth-apparaat. 1. Druk op toets SOURCE om de Bluetooth-modus te openen. De display zal “bLUE” weergeven. Het apparaat zal beginnen te zoeken terwijl de BT-LED knippert. 2. Als het apparaat nog niet eerder was gepaard met een Bluetooth-apparaat of het laatste gepaarde apparaat niet kan vinden, dan zal de BT-LED blijven knipperen. Schakel de Bluetooth-functie van uw apparaat in en laat deze zoeken totdat “Lenco KCR-100” is gevonden. Selecteer “Lenco KCR-100” op het Bluetooth-apparaat om de verbinding tot stand te brengen. Voer eventueel het wachtwoord “0000” in. 3. De BT-LED zal na een geslaagde paring constant blijven branden zonder te knipperen. 4. U kunt nu beginnen de muziek van uw smartphone draadloos via de luidspreker af te spelen. 5. U kunt op de toets START/PAUZE drukken om het afspelen te pauzeren of hervatten. 6. U kunt op de toets VORIGE of drukken om de vorige of volgende track te selecteren. • Houd de toets PAIRING ingedrukt om de huidige verbinding te verbreken en naar een ander nieuw Bluetooth-apparaat te zoeken. “Dit product is voorzien van een Bluetooth-ontvangstfunctie, u kunt er geen Bluetooth-audio mee sturen: dit betekent dat u van een externe bron zoals een smartphone draadloos een Bluetooth-audiosignaal kunt ontvangen.” SLAAPFUNCTIE 1. 2. 3. Wanneer het apparaat is ingeschakeld, dan kunt u meerdere keren op de toets SLEEP op de afstandsbediening drukken om de slaaptijd in minuten in te stellen van 05, 10, 15, 30, 45 to 90 en 00 (slaapfunctie uit). Wanneer de slaaptimer is verstreken, dan zal het apparaat automatisch uitschakelen. Houd de toets STANDBY op het apparaat ingedrukt (of druk op de toets STANDBY op de afstandsbediening) om de slaapfunctie te annuleren. U kunt ook meerdere keren op de toets SLEEP drukken totdat “00” is geselecteerd. KLOKINSTELLING 1. 2. Schakel het apparaat uit en op stand-by. Houd de toets CLOCK SET op het apparaat ingedrukt (of druk op de toets CLOCK SET op de afstandsbediening) om de klokinstelling te openen. “24H” of “12H” zal worden weergegeven. 21 3. 4. Druk op de toetsen MIN. en SEC op het apparaat (de toetsen MIN. en SEC. op de afstandsbediening) om te wisselen tussen 24H (24 uur tijdsformaat) en 12H (12 uur tijdsformaat). Druk op de toets CLOCK SET op het apparaat (de toets CLOCK SET op de afstandsbediening) om te bevestigen. Druk op de toetsen MIN. en SEC op het apparaat (de toetsen MIN. en SEC. op de afstandsbediening) om de uren en minuten in te stellen. Druk op de toets CLOCK SET op het apparaat (de toets CLOCK SET op de afstandsbediening) om de klokinstelling af te ronden. TIJD INSTELLEN 1. 2. 3. 4. 5. 6. 7. Druk op de toets TIMER om de timerinstelling te openen. Druk op de toetsen MIN. en SEC op het apparaat (de toetsen MIN. en SEC. op de afstandsbediening) om de minuten en seconden in te stellen. Druk op de TIMER-toets. Druk op de toetsen MIN. en SEC op het apparaat (de toetsen MIN. en SEC. op de afstandsbediening) om de timerinstelling in (ON) of uit (OFF) te schakelen. Wanneer ingeschakeld, druk dan op de toets TIMER om de timerinstelling af te ronden. De display zal beginnen met aftellen. De LED-indicator TIMER zal tijdens het aftellen knipperen. Als u tijdens het aftellen op de toets TIMER drukt, dan zal het aftellen worden gestopt. De LED-indicator TIMER zal ingeschakeld blijven, maar niet langer knipperen. Druk nogmaals op de toets TIMER om het aftellen te vervolgen terwijl de LED-indicator Timer knippert. Houd de toets TIMER ingedrukt om het afstellen te annuleren Wanneer het aftellen is geëindigd, dan zal de alarmzoemer klinken. Druk op de toets TIMER om de zoemer te stoppen. LICHT AAN/UIT Schuif de schakelaar LIGHT ON/OFF op het voorpaneel om de naar onder gerichte verlichting in of uit te schakelen. ENERGIEBESPARING Wegens de vereisten van ErP Fase 2 inzake de bescherming van het milieu, zal het apparaat automatisch op stand-by schakelen als er ~15minuten lang geen muziek wordt afgespeeld in Bluetooth-modus. U kunt de item opnieuw activeren door op de toets STANDBY te drukken. 22 Probleemoplossing Geen spanning • Zorg ervoor dat het netsnoer stevig is aangesloten. • Zorg ervoor dat het apparaat is ingeschakeld. De afstandsbediening werkt niet • Gebruik de afstandsbediening in de buurt van het apparaat. • Richt de afstandsbediening op de afstandsbedieningssensor op het apparaat. • Vervang de batterijen in de afstandsbediening met nieuwe batterijen. • Verwijder eventuele obstakels tussen de afstandsbediening en het apparaat. Het apparaat reageert niet wanneer er op een toets wordt gedrukt. • Het apparaat kan tijdens gebruik in sommige gevallen vastlopen. U kunt het apparaat resetten door de stekker uit het stopcontact te trekken, enkele seconden te wachten en de stekker weer aan te sluiten. Geen geluid • Zorg ervoor dat het apparaat niet is gedempt. Ik kan de Bluetooth-naam van dit apparaat niet op mijn Bluetooth-apparaat vinden om te koppelen via Bluetooth • Zorg ervoor dat het apparaat is ingeschakeld. • Zorg ervoor dat de Bluetooth-functie op uw Bluetooth-apparaat is ingeschakeld. • Het apparaat heeft een Bluetooth-functie die binnen 10 meter een signaal kan ontvangen. FM-Ontvangst • Zorg ervoor de antennedraad op het achterpaneel volledig uit te trekken om de FM-ontvangst te verbeteren. • Elektrische interferentie in uw huis kan een slechte ontvangst tot gevolg hebben. Verplaats het toestel uit hun buurt (vooral apparaten met motoren en transformatoren). Storingen in de luidsprekers • Controleer of er in de buurt van het apparaat geen mobiele telefoon ligt. 23 TECHNISCHE SPECIFICATIES Frequentiebereik FM-radio Bluetooth-frequentiebereik AC-voedingsingang Energieverbruik Uitgangsvermogen van luidspreker Bluetooth-versie Back-upbatterij (niet inbegrepen) Afstandsbedieningbatterij (Inbegrepen) Afmetingen van apparaat (L x D x H) Totaal gewicht 87,5-108 MHz 2,402-2,480 GHz 230 V~, 50 Hz 13 W 2 x 1 W RMS V4.1 AAA/LR03 batterijen x 2 stuks CR2025 x 1 stuk 240 x 150 x 62 mm 0,8 kg • De specificatie fungeert alleen als een referentie. Het gewicht en de afmetingen zijn gemiddelden. • Ons product wordt continu verbeterd en de specificaties en functies kunnen zonder voorafgaande kennisgeving aangepast worden. Garantie Lenco biedt service en garantie aan overeenkomstig met de Europese wetgeving. Dit houdt in dat u, in het geval van reparaties (zowel tijdens als na de garantieperiode), uw lokale handelaar moet contacteren. Belangrijke opmerking: Het is niet mogelijk om producten die gerepareerd moeten worden direct naar Lenco te sturen. Belangrijke opmerking: De garantie verloopt als een onofficieel servicecenter het apparaat op wat voor manier dan ook heeft geopend, of er toegang toe heeft gekregen. Het apparaat is niet geschikt voor professioneel gebruik. In het geval van professioneel gebruik worden alle garantieverplichtingen van de fabrikant nietig verklaard. Disclaimer Er worden regelmatig updates in de firmware en/of hardwarecomponenten gemaakt. Daardoor kunnen gedeelten van de instructie, de specificaties en afbeeldingen in deze documentatie enigszins verschillen van uw eigen situatie. Alle onderwerpen die staan beschreven in deze handleiding zijn bedoeld als illustratie en zijn niet van toepassing op specifieke situaties. Aan de beschrijving in dit document kunnen geen rechten worden ontleend. Afvoer van het oude apparaat Dit symbool geeft aan dat het betreffende elektrische product of de batterij niet moet worden verwijderd als algemeen huishoudelijk afval in Europa. Zorg voor een juiste afvalverwerking door het product en de batterij in overeenstemming met alle van toepassing zijnde lokale wetten voor het verwijderen van elektrische apparatuur of batterijen te verwijderen. Als u dit doet, helpt u de natuurlijke hulpbronnen te behouden en de standaard van milieubescherming te verbeteren bij de behandeling en verwijdering van elektrisch afval (Afgedankte Elektrische en Elektronische Apparatuur). CE-markering Lenco Benelux B.V., Thermiekstraat 1a, 6361 HB Nuth, Nederland, verklaart hierbij dat dit product voldoet aan de vereisten van de essentiële EU-richtlijnen. De conformiteitsverklaring kan worden opgevraagd via [email protected] Service Bezoek voor meer informatie en helpdeskondersteuning www.lenco.com Lenco Benelux BV, Thermiekstraat 1a, 6361 HB, Nederland. 24 Deutsch KCR-100 ACHTUNG: Eine andere als die hier beschriebene Bedienung, Einstellung oder Verwendung der Funktionen kann zu gefährlicher Strahlenbelastung führen. VORSICHTSMASSNAHMEN VOR DER BENUTZUNG BEFOLGEN SIE IMMER FOLGENDE ANWEISUNGEN: 1. Blockieren oder bedecken Sie keine Lüftungsöffnungen. Wenn Sie das Gerät auf ein Regal stellen, lassen Sie um das gesamte Gerät 5 cm (2”) freien Platz. 2. Stellen Sie das Gerät entsprechend den Anweisungen der mitgelieferten Bedienungsanleitung auf. 3. Halten Sie das Gerät von Hitzequellen wie Radiatoren, Heizern, Öfen, Kerzen oder anderen hitzeerzeugenden Produkten oder offenen Flammen fern. Das Gerät darf nur bei gemäßigtem Klima verwendet werden. Sehr kalte oder heiße Umgebungen sind zu vermeiden. Der Betriebstemperaturbereich liegt zwischen 0 °C und 35 °C. 4. Meiden Sie bei der Nutzung des Produkts die Nähe starker Magnetfelder. 5. Elektrostatische Entladungen können die normale Verwendung von diesem Gerät stören. Sollte dies geschehen, führen Sie einfach einen Reset aus und starten Sie dann das Gerät entsprechend den Anweisungen dieser Bedienungsanleitung neu. Gehen Sie besonders bei Datenübertragungen mit dem Gerät vorsichtig um und führen Sie diese nur in einer antielektrostatischen Umgebung aus. 6. Warnung! Niemals Gegenstände durch die Lüftungsschlitze oder Öffnungen in das Gerät stecken. In diesem Gerät fließt Hochspannung und das Hineinstecken von Gegenständen kann zu elektrischem Schock und/oder Kurzschluss interner elektrischer Bauteile führen. Aus dem gleichen Grund kein Wasser oder Flüssigkeiten in das Gerät geben. 7. Benutzen Sie das Gerät nicht in nasser oder feuchter Umgebung wie Bad, Dampfküche oder in der Nähe von Schwimmbecken. 8. Das Gerät darf weder Tropf- noch Spritzwasser ausgesetzt werden und es dürfen keine mit Flüssigkeit gefüllten Behälter wie z.B. Vasen auf das Gerät oder in der Nähe des Gerätes gestellt werden. 9. Benutzen Sie das Gerät nicht bei Kondensationsgefahr. Wenn Sie das Gerät in einem warmen feuchten Raum benutzen, dann können sich im Inneren des Geräts Wassertropfen oder Kondensationen bilden und zu Fehlfunktionen des Geräts führen. Schalten Sie in diesem Fall das Gerät für 1 – 2 Stunden aus, bevor Sie es erneut einschalten: Das Gerät sollte vollständig getrocknet sein, wenn Sie es wieder einschalten. 10. Obwohl dieses Gerät unter größter Sorgfalt und vor Auslieferung mehrmals überprüft wurde, können trotzdem wie bei jedem anderen elektrischen Gerät auch Probleme auftauchen. Trennen Sie das Gerät im Falle einer Rauchentwicklung, starker Hitzeentwicklung oder jeden anderen unnatürlichen Erscheinung sofort vom Netz. 11. Dieses Gerät ist durch eine Stromquelle wie auf dem Typenschild angegeben zu betreiben. Halten Sie bei Unsicherheiten über die Art Ihrer Stromversorgung in Ihrer Wohnung Rücksprache mit Ihrem Händler oder Ihrer Stromzuliefererfirma. 12. Halten Sie es von Haustieren fern. Einige Nagetiere lieben es, an Netzkabeln zu nagen. 13. Benutzen Sie für die Reinigung ein weiches und trockenes Tuch. Benutzen Sie niemals Lösungsmittel oder Flüssigkeiten auf Ölbasis. Benutzen Sie zum Entfernen hartnäckiger Flecken ein feuchtes Tuch mit mildem Reinigungsmittel. 14. Der Hersteller haftet nicht für Schäden oder Verluste durch Fehlfunktion, Zweckentfremdung oder Modifikation des Geräts oder durch Wechseln der Batterien. 15. Unterbrechen Sie die Verbindung nicht während einer Formatierung oder einer Datenübertragung. Bei Unterbrechung drohen Datenverlust und Datenbeschädigung. 16. Wenn das Gerät eine USB-Wiedergabefunktion besitzt, dann stecken Sie den USB-Stick direkt in das Gerät. Verwenden Sie kein USB-Verlängerungskabel, weil die erhöhte Störungsanfälligkeit zu Datenverlust führen könnte. 17. Das Typenschild befindet sich an der Unter- oder Rückseite des Geräts. 18. Dieses Gerät ist nicht zur Benutzung durch Personen (einschließlich Kinder) mit physischen, sensorischen oder mentalen Beeinträchtigungen oder ohne ausreichender Erfahrung vorgesehen, es sei denn, sie werden durch eine verantwortliche Person beaufsichtigt oder wurden in die ordnungsgemäße Bedienung des Gerätes durch eine für ihre Sicherheit verantwortliche Person eingewiesen. 19. Dieses Produkt ist nur für den nicht-professionellen Gebrauch und nicht für gewerbliche oder industrielle Zwecke bestimmt. 20. Stellen Sie sicher, dass das Gerät in einer stabilen Position aufgestellt ist. Schäden aufgrund Verwendung dieses Produkts in einer instabilen Position, Vibrationen, Stöße oder Nichtbeachtung der anderen in dieser Bedienungsanleitung enthaltenen Warnungen und Sicherheitshinweise werden nicht durch die Garantie abgedeckt. 21. Entfernen Sie niemals das Gehäuse dieses Produkts. 22. Stellen Sie das Produkt niemals auf andere elektrische Geräte. 23. Halten Sie Kinder von den Plastiktüten fern. 24. Benutzen Sie nur vom Hersteller spezifizierte Erweiterungen/Zubehörteile. 25. Lassen Sie alle Eingriffe von qualifiziertem Servicepersonal ausführen. Eingriffe werden notwendig, wenn das Gerät auf irgendeine Weise wie beispielsweise am Netzkabel oder am Netzstecker beschädigt wurde, Flüssigkeit in das 25 26. 27. 28. 29. Gerät eingedrungen ist, Gegenstände in das Gerät gefallen sind, das Gerät Regen oder Feuchtigkeit ausgesetzt war, es heruntergefallen ist oder nicht ordnungsgemäß funktioniert. Langes Hören lauter Töne aus einem Musikgerät kann zum zeitweiligen oder permanenten Hörverlust führen. Wenn zum Lieferumfang des Produkts ein Netzkabel oder ein Netzadapter gehört: ⚫ Wenn irgendwelche Probleme auftreten, dann ziehen Sie den Netzstecker aus der Netzsteckdose und setzen Sie sich anschließend mit einer qualifizierten Fachkraft in Verbindung. ⚫ Treten Sie nicht auf das Netzteil und klemmen Sie es auch nicht ein. Geben Sie besonders im näheren Bereich des Steckers und der Stelle acht, wo das Kabel aus dem Gerät herausgeführt wird. Stellen Sie keine schweren Gegenstände auf das Netzteil, weil es dadurch beschädigt werden könnte. Halten Sie das gesamte Gerät außerhalb der Reichweite von Kindern! Durch Spielen mit dem Netzkabel können sie sich ernsthafte Verletzungen zuziehen. ⚫ Trennen Sie das Gerät während eines Gewitters oder bei längerer Nichtbenutzung vom Netz. ⚫ Die Wandsteckdose muss sich in der Nähe des Geräts befinden und einfach zu erreichen sein. ⚫ Steckdosen und Verlängerungsleitungen nicht überlasten. Eine Überlastung kann zu Brandgefahr bzw. Stromschlag führen. ⚫ Geräte der Schutzklasse 1 sind an eine Netzsteckdose mit Schutzleiter anzuschließen. ⚫ Geräte der Schutzklasse 2 benötigen keinen Schutzleiteranschluss. ⚫ Halten Sie den Netzstecker in der Hand, wenn Sie ihn aus der Netzsteckdose ziehen. Ziehen Sie ihn nicht durch Zerren am Kabel heraus. Das kann zu einem Kurzschluss führen. ⚫ Verwenden Sie weder ein beschädigtes Netzkabel noch einen beschädigten Stecker oder eine lockere Steckdose. Es besteht Brand- und Stromschlaggefahr. Wenn das Produkt mit einer Fernbedienung mit Batterien/Knopfzellen geliefert wird oder das Produkt eine derartige Fernbedienung umfasst: Warnung: ⚫ „Die Batterie nicht einnehmen, er besteht Verätzungsgefahr”. ⚫ [Die mit diesem Produkt mitgelieferte Fernbedienung] enthält eine Knopfbatterie. Das Verschlucken der Batterie kann innerhalb von nur 2 Stunden zu schwersten inneren Verbrennungen mit Todesfolge führen. ⚫ Halten Sie neue und gebrauchte Batterien von Kindern fern. ⚫ Verwenden Sie dieses Produkt nicht weiter und halten Sie es von Kindern fern, wenn das Batteriefach nicht sicher schließt. ⚫ Suchen Sie umgehend ärztliche Hilfe auf, wenn Sie vermuten, dass Batterien verschluckt oder in Körperöffnungen eingeführt wurden. Warnhinweise bzgl. der Verwendung von Batterien: ⚫ Es besteht Explosionsgefahr, wenn die Batterien nicht korrekt eingelegt werden. Nur mit Batterien des gleichen oder entsprechenden Typs ersetzen. ⚫ Die Batterie darf während der Benutzung, Aufbewahrung oder des Transports weder sehr hohen oder sehr niedrigen Temperaturen noch niedrigem Luftdruck in großen Höhenlagen ausgesetzt werden. ⚫ Die Ersetzung der Batterie mit einem falschen Batterietyp kann zum Explodieren der Batterie oder dem Auslaufen von entflammbarem Gas oder entflammbarer Flüssigkeit aus der Batterie führen. ⚫ Die Entsorgung der Batterie in Feuer oder einem heißen Ofen oder das mechanische Zerkleinern oder Zerteilen der Batterie kann zu Explosionen führen. ⚫ Das Verbleiben der Batterie in einer Umgebung mit sehr hohen Temperaturen kann zum Explodieren der Batterie oder dem Auslaufen von entflammbarem Gas oder entflammbarer Flüssigkeit führen. ⚫ Eine einem sehr niedrigen Luftdruck ausgesetzte Batterie kann explodieren oder es kann aus einer einem sehr niedrigen Luftdruck ausgesetzten Batterie entflammbares Gas oder entflammbare Flüssigkeit auslaufen. ⚫ Augenmerk ist auf den ökologischen Aspekt der Batterieentsorgung zu legen. ANSCHLUSS • Packen Sie alle Teile aus und entfernen Sie danach die Schutzmaterialien. • Schließen Sie das Gerät nicht eher an das Netz an, bevor Sie die Netzspannung überprüft haben und alle anderen notwendigen Verbindungen hergestellt sind. 26 ZUBEHÖR • Befestigungssatz (Kunststoffplatte + 2 Satz Schrauben + 4 Abstandshalter + Bohrlochpapierschablone) Kunststoffplatte • Abstandshalter Papiervorlage für Bohrlöcher Bedienungsanleitung MONTAGE DES GERÄTS UNTER EINEM SCHRANK 1. Entscheiden Sie sich für den Einbauort des Gerätes im Schrank/Regal. Da sich die Lautsprecher des Geräts auf der linken bzw. rechten Seite befinden, wird empfohlen, genügend Platz vorzusehen, um den Klang nicht zu blockieren. 2. Sobald der Einbauort festgelegt ist, können Sie die mitgelieferte Bohrlochpapiervorlage als Orientierungshilfe für die Lochposition verwenden, um die Löcher zu bohren. 3. Montieren Sie die Kunststoffplatte unter dem Schrank/Regal mit den mitgelieferten Abstandshaltern und Schrauben, siehe Diagramm unten. Abstandhalter sind optional und können nach Ihren Wünschen installiert werden. Zur Auswahl stehen 2 Schraubensätze zur Verfügung. Der längere Schraubensatz wird in der Regel bei Verwendung der Abstandhalter verwendet. Abhängig von der Holzdicke können Sie sich für eine andere geeignete Schraubenlänge entscheiden. 4. Nachdem die Kunststoffplatte montiert ist, schieben Sie das Gerät hinein, bis es sicher einrastet. 5. Aufgrund des Gewichts sollte das Gerät mit größter Sorgfalt installiert werden. Vergewissern Sie sich, dass der verwendete Schrank stabil genug ist, um das Gewicht des Gerätes zu tragen. Hinweis: Um die Brandgefahr zu verringern, stellen Sie das Funkgerät nicht auf einen Heizbereich oder ohne Abstand. Sie können das Gerät aus der Kunststoffplatte herausziehen und als Standgerät für die Küche verwenden. 27 VORDERANSICHT 1. 2. 3. 4. 5. 6. 7. 8. 9. 10. 11. 12. 13. STANDBY /QUELLE Drücken Sie die Taste, um das Gerät einzuschalten. Wenn es eingeschaltet ist, drücken Sie diese Taste, um zwischen FM- und Bluetooth-Modus zu wechseln. Halten Sie die Taste gedrückt, um das Gerät auszuschalten und den Standby-Modus aufzurufen BELEUCHTUNG EIN/AUS Schieben Sie diese Taste, um die Abwärtsbeleuchtung ein- oder auszuschalten ZIFFERNTASTEN Drücken Sie diese Taste, um den gespeicherten voreingestellten FM-Kanal direkt abzustimmen ANZEIGE SCAN/ST-MONO/PAIRING FM: Drücken Sie diese Taste, um zwischen FM-Stereo und Force Mono-Empfang umzuschalten. Halten Sie diese Taste gedrückt, um den vollständigen automatischen Suchlauf zu starten und den verfügbaren FM-Kanal zu speichern. BLUETOOTH: Gedrückt halten trennt die aktuelle Verbindung und startet die Suche nach anderen Bluetooth-Geräten /MIN. FM: Drücken, um eine andere Frequenz auszuwählen. Halten Sie diese Taste gedrückt, um den nächsten verfügbaren Kanal automatisch zu scannen BLUETOOTH: Drücken, um zum vorherigen Titel zurückzuspringen Timer-Einstellung: Drücken Sie diese Taste, um die Minuteneinstellung einzustellen /SEC. FM: Drücken, um eine andere Frequenz auszuwählen. Halten Sie diese Taste gedrückt, um den nächsten verfügbaren Kanal automatisch zu scannen BLUETOOTH: Drücken, um zum nächsten Titel zu springen Timer-Einstellung: Drücken Sie diese Taste, um die Sekundeneinstellung einzustellen /CLOCK SET/MEMORY FM: Drücken Sie diese Taste, um auf einen anderen gespeicherten voreingestellten FM-Kanal einzustellen. Halten Sie diese Taste gedrückt, um den voreingestellten FM-Kanal wie gewünscht zu speichern BLUETOOTH: Drücken, um zwischen Pause und Wiedergabe hin und her zu schalten Standby-Modus: Drücken Sie diese Taste, um den Einstellmodus der Uhr aufzurufen TIMER Drücken Sie diese Taste, um die Timer-Einstellung aufzurufen – VOLUME + Den Lautstärkepegel anpassen. FM Frequenz 0,05 MHz LED Wenn die FM-Frequenz von 0,05 MHz empfangen wird, leuchtet diese LED auf. Wenn beispielsweise 88,15 MHz empfangen werden, zeigt das Display „88,1“ an und diese LED leuchtet auf BT LED Es ist eine Anzeige und schaltet sich ein, wenn es sich im Bluetooth-Modus befindet FM LED Es ist eine Anzeige und schaltet sich ein, wenn es sich im FM-Modus befindet 28 14. FM-ST LED Es ist eine Anzeige und schaltet sich ein, wenn es sich im FM-Stereo-Modus befindet 15. PM LED Es ist eine Anzeige und schaltet sich ein, wenn es im 12-Stunden-Anzeigeformat zur Nachmittagszeit ist 16. IR Empfangsfenster 17. LED-Anzeige TIMER Es ist eine Anzeige und schaltet sich ein, wenn der Timer eingestellt ist. FERNBEDIENUNG 1. 2. 3. 4. 5. 6. 7. 8. 9. 10. 11. 12. 13. 14. 15. 16. 17. STANDBY ZIFFERNTASTEN SENDERSUCHLAUF ABSTIMMEN ABSTIMMEN VORHERIGER BLUETOOTH-TITEL NÄCHSTER BLUETOOTH-TITEL BLUETOOTH WIEDERGABE/PAUSE ZEITSCHALTUHR MIN. SEC. LAUTSTÄRKE + LAUTSTÄRKE – STUMM SENDER+ SENDERST/MONO SPEICHER KOPPELN EINSCHLAFAUTOMATIK UHREINSTELLUNG QUELLE Batterieeinbau in der Fernbedienung In der Fernbedienung befindet sich bereits eine CR2025-Knopfzelle. Entfernen Sie wie nachstehend gezeigt vor der Inbetriebnahme die Isolationsfolie von der Batterie. 29 Um eine leere Batterie zu ersetzen, beachten Sie bitte die untenstehende Abbildung. Achten Sie beim Einlegen der Batterie auf die richtige Ausrichtung der Batterie. Batteriefach Batteriefach herausziehen In die angezeigte Richtung drücken CR2025-Knopfzelle • • • • • • Wenn die Fernbedienung und andere Geräte sich gegenseitig stören, kann dies ihren Betrieb beeinflussen. Drücken Sie nicht gleichzeitig Tasten am Gerät und auf der Fernbedienung. Vermeiden Sie die Verwendung von zwei Fernbedienungen zur selben Zeit, weil dies zu Fehlfunktionen führt. Verwenden Sie nur CR2025-Knopfzellen. Wenn die Batterie ausgelaufen ist, dann reinigen Sie die Fernbedienung gründlich, bevor Sie die neue Batterie einsetzen. Schalten Sie die beiden Batteriepole nicht kurz. Entsorgen Sie verbrauchte Batterien vorschriftsmäßig. 30 EINLEGEN DER BATTERIEN FÜR DIE UNTERSTÜTZUNG DER UHR/FM VOREINGESTELLTER KANAL/TIMER-BACKUP Die Uhr/FM voreingestellter Kanal/Timer (falls eingestellt) wird bei einem Stromausfall beibehalten, indem 2 x AAA/LR03 Batterien (nicht mitgeliefert) eingesetzt werden. Sobald die Stromversorgung wiederhergestellt ist, überprüfen Sie die Uhr auf ihre Richtigkeit und stellen Sie sie bei Bedarf wieder ein. EINLEGEN DER BATTERIEN 1. 2. 3. Öffnen Sie das Batteriefach an der Unterseite des Gerätes, indem Sie auf die Sperre drücken und den Deckel abnehmen. Legen Sie 2 x AAA/LR03-Batterien (nicht im Lieferumfang enthalten), vorzugsweise Alkalibatterien, in das Batteriefach ein, und zwar entsprechend der Polarität, wie auf dem Diagramm im Inneren des Fachs dargestellt. Setzen Sie den Batteriefachdeckel wieder ein. ANSCHLUSS AN DAS STROMNETZ Stecken Sie das Stromkabel in eine Wandsteckdose. GRUNDLEGENDE BEDIENUNG Drücken Sie zum Einschalten des Geräts die Taste STANDBY . Halten Sie zum Ausschalten die Taste STANDBY erneut gedrückt. Alternativ können Sie die STANDBY- Taste auf der Fernbedienung drücken, um das Gerät ein- oder auszuschalten. FM/BT Wenn das Gerät eingeschaltet ist, drücken Sie die SOURCE-Taste, um zwischen FM- und Bluetooth-Modus umzuschalten. Lautstärkeregelung Drücken Sie die Tasten VOLUME +/–, um den Lautstärkepegel zu ändern. Ausrichten der Antenne Der Antennendraht an der Rückseite des Gerätes sollte vollständig ausgezogen sein, um einen guten FM-Empfang zu gewährleisten. Ändern Sie die Ausrichtung der Antenne, um den besten Empfang zu erhalten. FM-RADIOBEDIENUNG Automatischer Suchlauf 1. Wechseln Sie in den FM-Modus. Halten Sie die SCAN-Taste am Gerät gedrückt (oder drücken Sie die SCAN-Taste auf der Fernbedienung), um den automatischen Suchlauf zu starten und die verfügbaren Kanäle zu speichern (max. 20 Sender können gespeichert werden) Manueller Scan 1. Drücken Sie die oder -Taste auf dem Gerät (die TUNE/TUNETaste auf der Fernbedienung) wiederholt, um auf eine andere Frequenz abzustimmen. 2. Halten Sie die oder Taste auf dem Gerät (die TUNE/TUNETaste auf der Fernbedienung) gedrückt, um automatisch den nächsten verfügbaren Kanal zu suchen. FM-Radiosender speichern Sie können bis zu 20 FM-Radiosender speichern. 1. Stellen Sie den Radiosender ein, den Sie speichern möchten. 2. Halten Sie die MEMORY-Taste am Gerät gedrückt (oder drücken Sie die MEMORY-Taste auf der Fernbedienung). Die Anzeige der voreingestellten Sendernummer blinkt. 3. Drücken Sie die oder -Taste auf dem Gerät (die oder Taste auf der Fernbedienung) auf eine voreingestellte Zahl, die Sie speichern möchten. Drücken Sie dann die MEMORY-Taste, um zu speichern. 31 Gespeicherte FM Voreinstellungen wieder abrufen Drücken Sie die MEMORY-Taste am Gerät (oder die CH-/CH+-Taste auf der Fernbedienung), um auf einen anderen voreingestellten Kanal einzustellen. Um den voreingestellten Kanal über die Zifferntasten am Gerät direkt abzurufen, drücken Sie die Zifferntasten [1],[2], ..., [5]. Wenn beispielsweise die Taste [3] gedrückt wird, zeigt das Display „P03“ an und warten Sie eine Weile, bis es sich auf die Voreinstellung 3 einstellt. Oder wenn Sie die Taste[3/(8)] gedrückt halten, bis die Anzeige „P08“ anzeigt und warten Sie eine Weile, es wird sich auf die Voreinstellung 8 einstellen. Oder wenn Sie die Taste[1] drücken und anschließend die Taste[2] drücken, erscheint auf der Anzeige „P12“ und nach einer Weile wird es sich auf die Voreinstellung 12 einstellen. Oder wenn Sie die Taste[1] drücken und anschließend die Taste[3/(8)] gedrückt halten, erscheint auf der Anzeige „P18“ und nach einer Weile wird es sich auf die Voreinstellung 18 einstellen. Alternativ können Sie auch die Zifferntasten der Fernbedienung verwenden, um den voreingestellten Kanal direkt aufzurufen, drücken Sie die Zifferntasten [1], [2], ..., [9], [0]. Wenn beispielsweise die Taste [3] gedrückt wird, zeigt das Display „P03“ an und warten Sie eine Weile, bis es sich auf die Voreinstellung 3 einstellt. Oder wenn Sie die Taste [8] drücken, bis die Anzeige „P08“ anzeigt und eine Weile warten, wird es sich auf die Voreinstellung 8 einstellen. Oder wenn Sie die Taste [1] drücken und anschließend die Taste [2] drücken, erscheint auf der Anzeige „P12“ und nach einer Weile wird es sich auf die Voreinstellung 12 einstellen. Oder wenn Sie die Taste [1] drücken und anschließend die Taste [8] drücken, erscheint auf der Anzeige „P18“ und nach einer Weile wird es sich auf die Voreinstellung 18 einstellen. Auswahl Stereo/Mono erzwingen Wenn Sie einen Stereo-FM-Radiokanal empfangen, drücken Sie die ST/MONO-Taste, um zwischen Stereo-Audio und Force MonoAudio zu wechseln. Wenn es sich in FM Stereo befindet, leuchtet die FM-ST LED auf. Hinweis: Der Antennendraht an der Rückseite des Gerätes sollte vollständig ausgezogen sein, um einen guten FM-Empfang zu gewährleisten. Ändern Sie die Ausrichtung der Antenne, um den besten Empfang zu erhalten. BLUETOOTH-AUDIO Bitte befolgen Sie die unten angegebenen Anweisungen zum Koppeln, um die Anlage mit Ihrem Bluetooth-Gerät zu verbinden. 1. Drücken Sie die SOURCE-Taste, um in den Bluetooth-Modus zu gelangen. Auf der Anzeige erscheint „bLUE“. Die Suche beginnt und die BT-LED blinkt. 2. Wenn das Gerät noch nie mit einem Bluetooth-Gerät gekoppelt wurde oder das letzte gekoppelte Gerät nicht gefunden werden kann, blinkt die BT-LED weiter. Schalten Sie die Bluetooth-Funktion Ihres Gerätes ein und aktivieren Sie die Suche, bis „Lenco KCR-100“ gefunden wurde. Wählen Sie auf dem Bluetooth-Gerät „Lenco KCR-100“, um eine Verbindung herzustellen. Geben Sie, falls erforderlich, den Zugangscode „0000“ ein. 3. Nach erfolgreichem Koppeln leuchtet die BT-LED konstant, ohne zu blinken. 4. Sie können nun Ihre drahtlose Smartphone-Musikwiedergabe über den Lautsprecher starten. 5. Sie können die Taste WIEDERGABE/PAUSE zum Unterbrechen oder Fortsetzen der Wiedergabe drücken. 6. Sie die die VORHERIGERoder Taste drücken, um zum vorherigen oder nachfolgenden Titel zu überspringen. • Halten Sie die Taste PAIRING gedrückt, um die aktuelle Verbindung zu trennen und ein weiteres neues Bluetooth-Gerät zu suchen. „Dieses Produkt besitzt eine Bluetooth-Empfangsfunktion, mit der Sie jedoch keine Klänge über Bluetooth übertragen können, d. h. Sie können nur Bluetooth-Audiosignale von externen Quellen wie beispielsweise einem Smartphone kabellos empfangen.“ EINSCHLAFFUNKTION 1. 2. 3. Drücken Sie bei eingeschaltetem Gerät wiederholt die SLEEP-Taste auf der Fernbedienung, um die Schlafdauer in Minuten zwischen 05, 10, 15, 30, 45, 90 und 00 (Schlaf aus) auszuwählen. Ist der Sleep-Timer auf 0 eingestellt, schaltet sich die Anlage automatisch aus. Um die Schlaffunktion abzubrechen, halten Sie die STANDBY-Taste am Gerät gedrückt (oder drücken Sie die STANDBY-Taste auf der Fernbedienung), um sie auszuschalten. Alternativ können Sie auch die SLEEP-Taste wiederholt bis „00“ drücken. 32 EINSTELLEN DER UHRZEIT 1. 2. 3. 4. Schalten Sie das Gerät aus wenn sich dieses im Bereitschaftsmodus befindet. Halten Sie die Taste CLOCK SET am Gerät gedrückt (oder drücken Sie die Taste CLOCK SET auf der Fernbedienung), um die UhrEinstellung aufzurufen. „24H“ oder"„12H“ wird angezeigt. Drücken Sie die MIN. und SEC-Taste am Gerät (die MIN. und SEC. Taste auf der Fernbedienung), um zwischen 24H (Anzeige 24 Stunden Format) und 12H (Anzeige 12 Stunden Format) zu wechseln. Drücken Sie zur Bestätigung die Taste CLOCK SET am Gerät (die Taste CLOCK SET auf der Fernbedienung). Drücken Sie die MIN. und SEC-Taste am Gerät (die MIN. und SEC. Taste auf der Fernbedienung), um die Stunde bzw. Minute einzustellen. Drücken Sie die Taste CLOCK SET am Gerät (die Taste CLOCK SET auf der Fernbedienung), um die Einstellung der Uhr zu beenden. ZEIT EINSTELLEN 1. 2. 3. 4. 5. 6. 7. Drücken Sie die TIMER-Taste, um die Timer-Einstellung aufzurufen. Drücken Sie die MIN. und SEC-Taste am Gerät (die MIN. und SEC. Taste auf der Fernbedienung), um die Minute bzw. Sekunde einzustellen. Drücken Sie die Taste TIMER. Drücken Sie die MIN. und SEC-Taste am Gerät (die MIN. und SEC. Taste auf der Fernbedienung), um die Timer-Einstellung zu aktivieren (ON) oder zu deaktivieren (OFF). Wenn er auf Ein gesetzt ist, drücken Sie die TIMER-Taste, um die Timer-Einstellung. Es beginnt rückwärts zu zählen. Während des Countdowns blinkt die LED-Anzeige TIMER weiter. Drücken Sie während der Countdown-Zeit die Taste TIMER, um die Countdown-Zeit zu stoppen. Die TIMER-LED-Anzeige leuchtet noch, aber ohne zu blinken. Wenn Sie die Timer-Taste erneut drücken, wird der Countdown fortgesetzt und die Anzeige der Timer-LED blinkt. Um den Countdown abzubrechen, halten Sie die Taste TIMER gedrückt Wenn der Countdown des Timers beendet ist, wird der Alarmsummer eingeschaltet. Drücken Sie die TIMER-Taste, um den Summer zu stoppen. BELEUCHTUNG EIN/AUS Schieben Sie den LICHT EIN/AUS-Schalter auf der Frontplatte, um die Abwärtsleuchten ein- und auszuschalten ENERGIESPAREN Aufgrund der Anforderung von ErP Stufe 2 und zum Schutz der Umwelt schaltet sich das Gerät automatisch in den Standby-Modus aus, wenn für ~15 Minuten keine Musik im Bluetooth-Modus abgespielt wurde. Sie können das Element durch Drücken der STANDBY-Taste wieder aktivieren. 33 Fehlersuche Kein Strom • Stellen sie sicher, dass das Netzkabel sicher eingesteckt ist. • Stellen Sie sicher, dass die Anlage eingeschaltet ist. Die Fernbedienung funktioniert nicht • Verwenden Sie die Fernbedienung in der Nähe der Anlage. • Richten Sie die Fernbedienung auf den Fernbedienungssensor der Anlage. • Tauschen Sie die Batterien der Fernbedienung gegen neue Batterien aus. • Entfernen Sie alle Hindernisse zwischen der Fernbedienung und der Anlage. Die Anlage reagiert nicht auf das Drücken der Tasten. • In einigen Situationen kann das Gerät während der Verwendung blockieren. Um das Gerät zurückzusetzen, ziehen Sie den Stecker aus der Steckdose, warten Sie einige Sekunden und schließen Sie es dann wieder an. Keine Tonausgabe • Stellen Sie sicher, dass die Anlage nicht stummgeschaltet ist. Ich kann den Bluetooth Namen dieser Anlage auf meinem Bluetooth Gerät für die Bluetooth Kopplung nicht finden • Stellen Sie sicher, dass die Anlage eingeschaltet ist. • Stellen Sie sicher, dass die Bluetooth Funktion an Ihrem Bluetooth Gerät aktiviert ist. • Die Anlage hat eine Bluetooth Funktion, die ein Signal innerhalb von 10 Metern empfangen kann. FM Empfang • Stellen Sie sicher, dass das Antennendraht an der Rückseite vollständig ausgezogen ist, um den FM-Empfang zu verbessern. • Elektrische Interferenz in Ihrem Haus kann schlechten Empfang verursachen. Stellen Sie die Anlage entfernt davon auf (insbesondere wenn diese von Motoren oder Transformatoren verursacht werden). Interferenzen an den Lautsprechern • Prüfen Sie, dass kein Mobiltelefon in der Nähe der Anlage liegt. 34 TECHNISCHE SPEZIFIKATIONEN FM-Radio-Frequenzbereich Bluetooth Frequenzbereich AC-Netzeingang Leistungsaufnahme Lautsprecherausgangsleistung Bluetooth-Version Batterie-Backup (nicht enthalten) Batterie der Fernbedienung (im Lieferumfang enthalten) Geräteabmessungen (L x T x H) Gesamtgewicht 87,5-108 MHz 2,402-2,480 GHz 230 V~, 50 Hz 13 W 2 x 1 W RMS V4.1 AAA/LR03 Batterien x 2 Stück 1 x CR2025 240 x 150 x 62 mm 0,8 kg • Diese Angaben dienen lediglich als Richtwerte. Die Gewichts- und Größenangaben sind Näherungswerte. • Unser Produkt wird permanent weiterentwickelt und unterliegt bezüglich Spezifikationen und Funktionen stillschweigenden Änderungen. Garantie Lenco bietet Leistungen und Garantien im Einklang mit Europäischem Recht. Im Falle von Reparaturen (sowohl während als auch nach Ablauf der Garantiezeit) sollten Sie deshalb Ihren Einzelhändler kontaktieren. Wichtiger Hinweis: Es ist nicht möglich, Geräte für Reparaturen direkt an Lenco zu schicken. Wichtiger Hinweis: Falls dieses Gerät von einem nicht autorisierten Kundendienst geöffnet oder darauf zugegriffen wird, erlischt die Garantie. Dieses Gerät ist nicht für professionelle Zwecke geeignet. Falls das Gerät für professionelle Zwecke eingesetzt wird, erlöschen alle Garantieverpflichtungen seitens des Herstellers. Haftungsausschluss Aktualisierungen der Firmware und/oder Hardware-Komponenten werden regelmäßig durchgeführt. Daher können einige der Anweisungen, Spezifikationen und Abbildungen in dieser Dokumentation von Ihrer individuellen Situation abweichen. Alle in diesem Handbuch beschriebenen Elemente dienen nur zur Illustration und treffen auf Ihre individuelle Situation möglicherweise nicht zu. Aus der in diesem Handbuch getätigten Beschreibung können keine Rechtsansprüche oder Ansprüche geltend gemacht werden. Entsorgung des Altgeräts Dieses Symbol zeigt an, dass das entsprechende Produkt oder dessen Batterie in Europa nicht mit dem normalen Hausmüll entsorgt werden darf. Um die ordnungsgemäße Abfallbehandlung des Produkts und dessen Batterie zu gewährleisten, müssen diese im Einklang mit allen anwendbaren örtlichen Vorschriften zur Entsorgung von Elektrogeräten und Batterien entsorgt werden. Dabei helfen Sie, natürliche Ressourcen zu schonen und Umweltschutzstandards zur Verwertung und Entsorgung von Altgeräten aufrecht zu halten (Waste Electrical and Electronic Equipment Directive). CE-Kennzeichen Hiermit erklärt Lenco Benelux B.V., Thermiekstraat 1a, 6361 HB Nuth, The Netherlands, dass dieses Produkt den grundsätzlichen Anforderungen der EU-Richtlinie entspricht. Die Konformitätserklärung ist erhältlich unter [email protected] Service Weitere Informationen und Unterstützung erhalten Sie unter www.lenco.com Lenco Benelux BV, Thermiekstraat 1a, 6361 HB, Die Niederlande. 35 Français KCR-100 ATTENTION : L’utilisation de commandes ou d’ajustements ou l’exécution de procédures autres que celles spécifiées dans le présent document peuvent entraîner une exposition dangereuse aux radiations. PRÉCAUTIONS AVANT UTILISATION GARDEZ CES INSTRUCTIONS À L’ESPRIT : 1. Ne couvrez pas et n’obturez pas les ouvertures de ventilation. Lorsque vous placez l’appareil sur une étagère, laissez 5 cm (2”) d’espace libre tout autour de l’appareil. 2. Installez-le conformément au mode d’emploi fourni. 3. Gardez l’appareil à l’écart des sources de chaleur telles que des radiateurs, appareils de chauffage, fours, bougies et autres produits générant de la chaleur ou une flamme nue. L’appareil ne peut être utilisé que dans des climats modérés. Les environnements extrêmement froids ou chauds doivent être évités. La plage de température de fonctionnement se situe entre 0° et 35° C. 4. Évitez d’utiliser l’appareil à proximité de champs magnétiques puissants. 5. Des décharges électrostatiques peuvent perturber le fonctionnement de cet appareil. Dans ce cas, il suffit de réinitialiser et de redémarrer l’appareil en suivant le mode d’emploi. Pendant le transfert de fichiers, manipulez l’appareil avec précaution et faites-le fonctionner dans un environnement sans électricité statique. 6. Mise en garde ! N’introduisez jamais un objet dans l’appareil par les ouvertures et les fentes de ventilation. Étant donné que des tensions élevées sont présentes à l’intérieur du produit, l’insertion d’un objet peut entraîner une électrocution et/ou court-circuiter les composants internes. Pour les mêmes raisons, ne versez pas de l’eau ou un liquide sur le produit. 7. Ne l’utilisez pas dans des endroits humides tels qu’une salle de bain, une cuisine pleine de vapeur ou à proximité d’une piscine. 8. L’appareil ne doit pas être exposé à des écoulements ou des éclaboussures et aucun objet contenant un liquide, tel qu’un vase, ne doit être posé sur ou près de l’appareil. 9. N’utilisez pas cet appareil lorsque de la condensation est possible. Lorsque l’appareil est utilisé dans une pièce humide et chaude, des gouttelettes d’eau ou de la condensation peuvent se former à l’intérieur de l’appareil et affecter son fonctionnement. Laissez l’appareil hors tension pendant 1 ou 2 heures avant de le mettre en marche : l’appareil doit être sec avant sa mise sous tension. 10. Bien que ce dispositif soit fabriqué avec le plus grand soin et contrôlé à plusieurs reprises avant de quitter l’usine, des problèmes peuvent néanmoins survenir, comme avec tous les appareils électriques. Si l’appareil émet de la fumée ou en cas d’accumulation excessive de la chaleur ou d’un phénomène inattendu, débranchez immédiatement la fiche d’alimentation du secteur. 11. Cet appareil doit fonctionner avec la source d’alimentation indiquée sur la plaque signalétique. Si vous n’êtes pas sûr du type d’alimentation utilisé chez vous, contactez votre revendeur ou le fournisseur local d’électricité. 12. Tenez l’appareil à l’abri des animaux. Certains animaux aiment ronger les cordons électriques. 13. Pour nettoyer l’appareil, servez-vous d’un chiffon doux et sec. N’utilisez pas de solvant ni d’autre liquide à base de pétrole. Pour enlever les taches importantes, vous pouvez vous servir d’un chiffon humide imbibé d’une solution de détergent diluée. 14. Le fournisseur n’est pas responsable des dommages ou pertes de données causés par un dysfonctionnement, une utilisation abusive, une modification de l’appareil ou un remplacement de la batterie. 15. N’interrompez pas la connexion lorsque l’appareil formate ou transfère des fichiers. Dans le cas contraire, les données pourraient être endommagées ou perdues. 16. Si l’appareil a une fonction de lecture USB, il faut brancher la clé USB directement sur l’appareil. N’utilisez pas un câble d’extension USB, car cela peut causer des interférences entraînant des pertes de données. 17. L’étiquette de classification se trouve sur le panneau inférieur ou arrière de l’appareil. 18. Cet appareil ne doit pas être utilisé par des personnes (y compris les enfants) souffrant de déficiences physiques, sensorielles ou mentales, ou d’un manque d’expérience et de connaissances, à moins qu’elles n’aient été supervisées ou qu’une personne responsable de leur sécurité ne leur ait donné des instructions sur l’utilisation correcte de l’appareil. 19. Ce produit est réservé à un usage non professionnel, et non pas à un usage commercial ni industriel. 20. Vérifiez que l’appareil est en position stable. La garantie ne couvre pas les dégâts occasionnés par l’utilisation de cet appareil en position instable, par les vibrations, les chocs ou par la non-observation de tout autre avertissement ou précaution contenus dans ce mode d’emploi. 21. N’ouvrez jamais cet appareil. 22. Ne placez jamais cet appareil sur un autre appareil électrique. 23. Ne laissez pas les sacs en plastique à la portée des enfants. 24. Utilisez uniquement les accessoires recommandés par le fabricant. 25. Confiez l’entretien et les réparations à un personnel qualifié. Une réparation est nécessaire lorsque l’appareil a été endommagé de quelque façon que ce soit, par exemple lorsque le cordon d’alimentation ou la prise sont 36 26. 27. 28. 29. endommagés, lorsqu’un liquide s’est déversé ou des objets sont tombés sur l’appareil, lorsque l’appareil a été exposé à la pluie ou à l’humidité, lorsqu’il ne fonctionne pas correctement ou est tombé. Une exposition prolongée à la musique avec un volume élevé peut entraîner une perte auditive temporaire ou permanente. Si l’appareil est livré avec un câble d’alimentation ou un adaptateur secteur : ⚫ En cas de problème, débranchez le cordon d’alimentation CA et confiez l’entretien à un personnel qualifié. ⚫ Ne marchez pas sur l’adaptateur secteur ou ne le coincez pas. Faites très attention, en particulier à proximité des fiches et du point de sortie du câble. Ne placez pas d’objets lourds sur l’adaptateur secteur, car ils pourraient l’endommager. Gardez l’appareil hors de portée des enfants ! Ils pourraient se blesser gravement s’ils jouent avec le câble d’alimentation. ⚫ Débranchez cet appareil pendant les orages ou lorsqu’il n’est pas utilisé pendant une longue durée. ⚫ La prise secteur doit être installée près de l’appareil et doit être facilement accessible. ⚫ Ne surchargez pas les prises de courant ou les rallonges. Une surcharge peut entraîner un incendie ou une électrocution. ⚫ Les appareils de classe 1 doivent être branchés à une prise de courant disposant d’une connexion protectrice à la terre. ⚫ Les appareils à la norme de construction de classe 2 ne nécessitent pas de connexion à la terre. ⚫ Tirez toujours sur la fiche pour débrancher le cordon de la prise secteur. Ne tirez pas sur le cordon d’alimentation. Cela pourrait provoquer un court-circuit. ⚫ N’utilisez pas un cordon ou une fiche d’alimentation endommagé ni une prise desserrée. Vous courez un risque d’incendie ou de décharge électrique. Si le produit contient ou est livré avec une télécommande contenant des piles boutons : Avertissement : ⚫ « N’ingérez pas la pile, car vous risquez une brûlure chimique » ou une formule équivalente. ⚫ La télécommande fournie contient une pile bouton/pièce de monnaie. Si la pile est avalée, elle peut causer de graves brûlures internes en seulement 2 heures et peut entraîner la mort. ⚫ Tenez les piles neuves et usagées hors de portée des enfants. ⚫ Si le compartiment à piles ne se ferme pas correctement, cessez d’utiliser l’appareil et tenez-le hors de portée des enfants. ⚫ Si vous pensez que les piles ont été avalées ou placées à l’intérieur d’une partie du corps, consultez un médecin immédiatement. Mise en garde relative à l’utilisation des piles : ⚫ Risque d’explosion si la pile est mal remplacée. Remplacez les piles par des piles d’un type identique ou équivalent. ⚫ Pendant l’utilisation, le stockage ou le transport, la pile ne doit pas être soumise à des températures extrêmement élevées ou basses, à une faible pression d’air à haute altitude. ⚫ Le remplacement d’une pile par une autre de type incorrect peut entraîner une explosion ou une fuite de liquide ou de gaz inflammable. ⚫ L’introduction d’une pile dans le feu ou dans un four chaud, l’écrasement ou le découpage mécanique peut entraîner une explosion. ⚫ L’exposition d’une pile dans un environnement à température extrêmement élevée peut entraîner une explosion ou une fuite de liquide ou de gaz inflammable. ⚫ L’exposition d’une pile à une pression d’air extrêmement basse peut entraîner une explosion ou une fuite de liquide ou de gaz inflammable. ⚫ Veuillez considérer les questions environnementales lors de la mise au rebut des piles. INSTALLATION • Déballez toutes les pièces et enlevez le matériau de protection. • Ne connectez pas l’unité au secteur avant d’avoir vérifié la tension du secteur et avant que toutes les autres connexions n’aient été effectuées. 37 ACCESSOIRES • Accessoires de montage (plaque en plastique + 2 jeux de vis + 4 entretoises + gabarit de perçage) Plaque en plastique • Entretoise Gabarit de perçage Mode d’emploi MONTAGE DU POSTE SOUS UNE ARMOIRE 1. Choisir l’emplacement d’installation de l’unité dans une armoire/étagère. Étant donné que les haut-parleurs de l’unité sont situés du côté gauche et du côté droit, il est recommandé de réserver suffisamment d’espace pour éviter d’obstruer le son. 2. Une fois l’emplacement choisi, vous pouvez utiliser le gabarit de papier perforé (fourni) comme guide pour l’emplacement des trous à percer. 3. Installez la plaque en plastique sous l'armoire/étagère en utilisant les entretoises et les vis fournies, reportez-vous au schéma cidessous. Vous pouvez choisir d’installer les entretoises ou pas. 2 jeux de vis sont fournis à utiliser selon votre choix. Les vis les plus longues sont généralement utilisées lorsque les entretoises sont utilisées. Selon l’épaisseur du bois, vous pouvez décider d’utiliser d’autres vis de longueurs appropriées. 4. Une fois la plaque en plastique installée, y faire glisser l’unité jusqu’à ce qu’elle soit bien fixée. 5. À cause de son poids, l’unité doit être installée avec la plus grande précaution. Assurez-vous que l’armoire utilisée est suffisamment solide pour supporter le poids de l’unité. Remarque : Pour réduire le risque d’incendie, ne placez pas la radio au-dessus d’une zone de chauffage ou sans les entretoises. Vous pouvez ne pas suspendre l’unité dans la plaque en plastique et l’utiliser comme radio de cuisine sur pied. 38 FAÇADE 1. 2. 3. 4. 5. 6. 7. 8. 9. 10. 11. 12. 13. VEILLE /SOURCE Appuyez dessus pour mettre en marche l'appareil. Lorsque l’unité est allumée, appuyez sur ce bouton pour basculer entre les modes FM et Bluetooth. Maintenez appuyée pour passer en mode veille ALLUMER/ÉTEINDRE L'ÉCLAIRAGE VERS LE BAS Faites glisser pour allumer ou éteindre l’éclairage vers le bas PAVÉ NUMÉRIQUE Appuyez pour rappeler directement une chaîne FM mémorisée AFFICHAGE RECHERCHER/STÉRÉO-MONO/COUPLAGE FM : Appuyez pour basculer entre FM Stéréo et Mono Forcé. Maintenez appuyé pour lancer une recherche automatique complète et mémoriser les chaînes FM disponibles BT : Si vous maintenez ce bouton enfoncé, cela désactivera la connexion actuelle et lancera une recherche de nouveaux appareils Bluetooth. /MIN. FM : Appuyez pour syntoniser une autre fréquence. Maintenez appuyé pour rechercher automatiquement la chaîne suivante disponible BT : Appuyez pour aller au morceau précédent Réglage du minuteur : Appuyez pour régler les minutes /SEC. FM : Appuyez pour syntoniser une autre fréquence. Maintenez appuyé pour rechercher automatiquement la chaîne suivante disponible BT : Appuyez pour aller au morceau suivant Réglage du minuteur : Appuyez pour régler les secondes /RÉGLAGE HORLOGE/MÉMOIRE FM : Appuyez pour rappeler directement des chaînes FM mémorisées. Maintenez appuyé pour mémoriser la chaîne FM comme préréglage BT : Appuyez dessus pour mettre la lecture en pause ou bien reprendre la lecture. Mode Veille : Appuyez sur pour accéder au réglage de l’horloge TIMER Appuyez sur pour accéder au réglage du minuteur DIMINUER/AUGMENTER LE VOLUME Réglez le volume Témoin de fréquence FM 0,05MHz Lorsqu’une fréquence FM de 0,05 MHz est reçue, ce témoin s’allume. Par exemple, lorsque la fréquence 88,15 MHz est reçue, l’écran affiche «88,1» et ce témoin s’allume. Témoin BT Il s’agit d’un témoin qui s’allume quand l’unité est en mode Bluetooth Témoin FM Il s’agit d’un témoin qui s’allume quand l’unité est en mode FM 39 14. Témoin FM-ST Il s’agit d’un témoin qui s’allume quand l’unité est en mode FM stéréo 15. Témoin PM Il s’agit d’un témoin qui s’allume à l’heure de l’après-midi lorsque le format des heures est 12 heures 16. Fenêtre du récepteur IR 17. TÉMOIN DU MINUTEUR Il s’agit d’un témoin qui s’allume lorsque le minuteur est réglé. TÉLÉCOMMANDE 1. 2. 3. 4. 5. 6. 7. 8. 9. 10. 11. 12. 13. 14. 15. 16. 17. MISE EN VEILLE PAVÉ NUMÉRIQUE RECHERCHE SYNTONISER SYNTONISER BT PRÉCÉDENT BT SUIVANT BT LECTURE/PAUSE MINUTEUR MIN. SEC. VOLUME + VOLUME – SOURDINE STATION+ STATIONST/MONO MÉMOIRE COUPLAGE SOMMEIL RÉGLAGE DE L'HORLOGE SOURCE Installation de la pile de la télécommande Une pile CR2025 est déjà installée dans la télécommande. Avant utilisation, sortez la bande isolante du compartiment à pile comme indiqué ci-dessous. 40 Pour remplacer une pile usée, reportez-vous à la figure ci-dessous. En installant une pile, veillez à suivre les instructions. Compartiment à pile Sortez le compartiment à pile. Poussez dans ce sens. Pile CR2025 • • • • • • Si la télécommande entre en conflit avec d’autres appareil, le fonctionnement sera affecté. N'appuyez pas simultanément sur des boutons sur l’appareil et la télécommande. Évitez d'utiliser deux télécommandes en même temps, car cela causerait un dysfonctionnement. Utilisez uniquement des piles de type CR-2025. Si la pile fuit, nettoyez soigneusement la télécommande avant de placer une pile neuve. Ne court-circuitez pas deux bornes des piles. Mettez au rebut les piles usagées dans un endroit approprié. 41 INSTALLATION DES PILES POUR LA SAUVEGARDE DE L’HEURE/CHAÎNES FM PRÉRÉGLÉES/MINUTEUR L’heure/chaînes FM préréglées/minuteur (si réglés) seront maintenus en cas de panne de courant en installant 2 piles AAA/LR03 (non fournies). Une fois le courant rétabli, vérifiez l’heure pour s’assurer qu’elle est correcte et la régler si nécessaire. INSTALLATION DES PILES 1. 2. 3. Ouvrez le compartiment à piles situé sous l’unité en appuyant sur le loquet et en retirant le couvercle. Insérez 2 piles AAA/LR03 (non fournies), de préférence des piles alcalines, dans le compartiment à piles en respectant les polarités indiquées sur le schéma situé à l’intérieur du compartiment. Remettez le couvercle du compartiment à piles. BRANCHEMENT À L'ALIMENTATION ÉLECTRIQUE Branchez le câble d’alimentation CA dans la prise secteur. FONCTIONNEMENT DE BASE Appuyez sur le bouton STANDBY pour mettre l'appareil en marche. Maintenez appuyée la touche STANDBY l'appareil. Vous pouvez également appuyer sur le bouton STANDBY de la télécommande pour allumer ou éteindre l’unité. pour éteindre FM/BT Lorsque l’unité est allumée, appuyez sur le bouton SOURCE pour basculer entre les modes FM et Bluetooth. Réglage du volume Utilisez les boutons VOLUME+/- pour régler le volume. Ajustement de l’antenne Le fil d’antenne situé à l’arrière de l’unité doit être complètement déployé pour assurer une bonne réception FM. Orientez l'antenne autrement afin d'améliorer la réception. UTILISATION DE LA RADIO FM Recherche automatique 1. Mettez l’appareil en marche et réglez-le en mode FM. Maintenez appuyé le bouton SCAN de l’unité (ou appuyez sur le bouton SCAN de la télécommande) pour lancer la recherche automatique et mémoriser les chaînes disponibles (20 stations maximum peuvent être mémorisées) Recherche manuelle 1. Appuyez plusieurs fois sur le bouton ou de l’unité (ou TUNE autre fréquence. 2. Maintenez appuyé le bouton ou de l’unité (boutons TUNE automatiquement la chaîne suivante disponible. /TUNE /TUNE de la télécommande) pour syntoniser une de la télécommande) pour rechercher Mémorisation de préréglages FM Vous pouvez mémoriser jusqu’à 20 préréglages FM. 1. Syntonisez la station à mémoriser. 2. Appuyez sur le bouton MEMORY de l’unité (ou appuyez sur le bouton MEMORY de la télécommande). Un numéro de station présélectionnée clignote sur l'écran. 3. Appuyez sur le bouton ou de l’unité (boutons ou de la télécommande) sur un numéro de préréglage dans lequel vous souhaitez mémoriser une chaîne. Appuyez ensuite sur le bouton MEMORY pour mémoriser. 42 Charger des présélections FM stockées Appuyez sur le bouton MEMORY de l’unité (ou sur les boutons CH-/CH + de la télécommande) pour syntoniser différentes chaînes préréglées. Utilisez les touches numériques [1], [2],…, [5], pour rappeler directement une chaîne préréglée. Par exemple, lorsque vous appuyez sur le bouton [3], l’écran affiche « P03 », attendez un moment que l’unité syntonise le préréglage 3. Ou lorsque vous maintenez appuyé le bouton [3/(8)] jusqu’à ce que l’écran affiche «P08», attendez un moment que l’unité syntonise le préréglage 8. Ou lorsque vous appuyez sur le bouton [1] suivi par le bouton [2], l’écran affiche «P12», attendez un moment que l’unité syntonise le préréglage 12. Ou, si vous appuyez sur le bouton [1] suivi par le bouton [3/(8)], l’écran affiche «P18», attendez un moment que l’unité syntonise le préréglage 18. Vous pouvez également utiliser les touches numériques [1], [2],…, [9], [0] de la télécommande pour rappeler directement une chaîne préréglée. Par exemple, lorsque vous appuyez sur le bouton [3], l’écran affiche « P03 », attendez un moment que l’unité syntonise le préréglage 3. Ou lorsque vous appuyez sur le bouton [8] jusqu’à ce que l’écran affiche «P08», attendez un moment que l’unité syntonise le préréglage 8. Ou lorsque vous appuyez sur le bouton [1] suivi par le bouton [2], l’écran affiche «P12», attendez un moment que l’unité syntonise le préréglage 12. Ou lorsque vous appuyez sur le bouton [1] suivi par le bouton [8], l’écran affiche «P18», attendez un moment que l’unité syntonise le préréglage 18. Sélection Stéréo/forcer mono Lors de la réception d’un chaîne radio stéréo FM, appuyez sur le bouton ST/MONO pour basculer entre la réception stéréo et mono forcé. Lorsque la réception est en stéréo FM, le témoin FM-ST s’allume. Remarque : Le fil d’antenne situé à l’arrière de l’unité doit être complètement déployé pour assurer une bonne réception FM. Orientez l'antenne autrement afin d'améliorer la réception. AUDIO BLUETOOTH Suivez les instructions d'appariement ci-dessous pour associer l'appareil à votre appareil Bluetooth. 1. Appuyez sur le bouton SOURCE pour accéder au mode Bluetooth. L'écran affiche «bLUE». L’unité lance la cherche et le témoin BT se met à clignoter. 2. Si l’unité n’a jamais été couplée à un appareil Bluetooth ou ne peut pas trouver le dernier appareil couplé, le témoin BT continue de clignoter. Activez la fonction Bluetooth de votre appareil et activez la recherche jusqu’à ce qu'il ait trouvé « Lenco KCR-100 ». Sélectionnez «Lenco KCR-100» sur l'appareil Bluetooth pour établir une connexion. Saisissez le mot de passe « 0000 », si nécessaire. 3. Une fois couplée avec succès, le témoin BT cesse de clignoter. 4. Vous pouvez maintenant commencer à lire de la musique à partir de votre smartphone sans fil sur l’enceinte. 5. Vous pouvez appuyer sur le bouton LECTURE/PAUSE pour lancer/suspendre la lecture. 6. Vous pouvez appuyer sur le bouton ou pour aller au morceau précédent ou suivant. • Maintenez appuyé le bouton PAIRING pour annuler la connexion en cours et lancer la recherche d’un autre appareil Bluetooth. « Ce produit est doté d’une fonction de réception bluetooth, vous ne pouvez pas l’utiliser pour transmettre un son bluetooth : cela signifie que vous pouvez recevoir sans fil un signal sonore bluetooth d'une source externe comme un smartphone. » FONCTION VEILLE AUTOMATIQUE 1. 2. 3. Lorsque l’unité est allumée, appuyez plusieurs fois sur le bouton SLEEP de la télécommande pour sélectionner la durée de veille automatique en minutes de 05, 10, 15, 30, 45, 90 et 00 (désactivé). Quand le minuteur de sommeil arrive à zéro, l'appareil s'éteint automatiquement. Pour annuler la veille automatique, maintenez appuyé le bouton STANDBY de l’unité (ou appuyez sur le bouton STANDBY de la télécommande) pour la désactiver. Vous pouvez également appuyer plusieurs fois sur le bouton SLEEP jusqu’à atteindre « 00 ». 43 RÉGLAGE DE L'HORLOGE 1. 2. 3. 4. Éteignez l'appareil en le mettant en mode veille. Maintenez appuyé le bouton CLOCK SET de l’unité (ou CLOCK SET de la télécommande) pour accéder au réglage de l’horloge. « 24H » ou « 12H » sera affiché. Appuyez sur le bouton MIN. et SEC de l’unité (MIN. et SEC. de la télécommande) pour basculer entre le format 24H (affichage 24 heures) et 12H (affichage 12 heures). Appuyez sur le bouton CLOCK SET de l’unité (ou le bouton CLOCK SET de la télécommande) pour confirmer. Appuyez sur le bouton MIN. et SEC de l’unité (MIN. et SEC. de la télécommande) pour régler respectivement les heures et les minutes. Appuyez sur le bouton CLOCK SET de l’unité (ou le bouton CLOCK SET de la télécommande) pour terminer le réglage de l’horloge. CONFIGURATION DE L’HEURE 1. 2. 3. 4. 5. 6. 7. Appuyez sur le bouton TIMER pour accéder au réglage du minuteur. Appuyez sur le bouton MIN. et SEC de l’unité (MIN. et SEC. de la télécommande) pour régler respectivement les minutes et les secondes. Appuyez sur le bouton TIMER. Appuyez sur le bouton MIN. et SEC de l’unité (MIN. et SEC. de la télécommande) pour activer (ON) ou désactiver (OFF) le réglage du minuteur. Lorsqu’il est activé, appuyez sur le bouton TIMER pour terminer le réglage du minuteur. Le compte à rebours sera lancé. Pendant le compte à rebours, le témoin TIMER continue de clignoter. Pendant le compte à rebours, appuyez sur le bouton TIMER pour arrêter le compte à rebours. Le témoin TIMER reste allumé mais cesse de clignoter. En appuyant à nouveau sur le bouton TIMER, le compte à rebours reprend et le témoin TIMER se met à clignoter. Pour annuler le compte à rebours, maintenez appuyé le bouton TIMER Lorsque le compte à rebours se termine, la sonnerie de l’alarme se déclenche. Appuyez sur le bouton TIMER pour arrêter la sonnerie. ALLUMER/ÉTEINDRE L'ÉCLAIRAGE VERS LE BAS Faites glisser le commutateur LIGHT ON/OFF du panneau avant pour allumer/éteindre l'éclairage vers le bas ÉCONOMIE D’ÉNERGIE Pour les mesures d’économie d’énergie en relation avec les exigences de l’ErP Niveau 2, l'unité se met automatiquement en mode veille si aucune musique Bluetooth n’a été diffusée pendant environ 15 minutes. Vous pouvez réactiver le produit en appuyant sur le bouton STANDBY. 44 Dépannage Pas d’alimentation • Assurez-vous que la prise secteur est bien branchée. • Assurez-vous que l'unité est allumée. La télécommande ne fonctionne pas. • Utilisez la télécommande près de l’unité. • Pointez la télécommande vers le capteur de la télécommande de l'unité. • Remplacez les piles de la télécommande par des piles neuves. • Retirez tous les obstacles entre la télécommande et l'unité. L'unité ne répond pas aux touches. • Dans certaines situations, l’unité peut se planter pendant l’utilisation. Pour réinitialiser l’unité, débranchez la fiche de la prise secteur, attendez quelques secondes, puis la rebrancher. Pas de son • Assurez-vous que le son n'est pas coupé. Je n'arrive pas à trouver le nom Bluetooth de cette unité sur mon appareil Bluetooth pour le couplage Bluetooth • Assurez-vous que l'unité est allumée. • Assurez-vous que Bluetooth est activé sur votre appareil Bluetooth. • L'unité est dotée de la fonction Bluetooth qui permet de recevoir un signal dans un rayon de 10 mètres. Réception FM • Assurez-vous que le fil d’antenne situé à l’arrière est complètement déployé pour améliorer la réception FM. • Des interférences électriques chez vous peuvent ruiner la réception. Éloignez l'appareil d'elles (en particulier avec des moteurs et des transformateurs). Interférences au niveau des haut-parleurs • Vérifiez que vous n'avez pas laissé un téléphone portable près de l’unité. 45 CARACTÉRISTIQUES TECHNIQUES Plage de fréquence radio FM Plage de fréquence Bluetooth Entrée d'alimentation CA Puissance absorbée Puissance de sortie des enceintes Version Bluetooth Piles de secours (non incluses) Pile de télécommande (incluse) Dimensions de l'appareil (L x P x H) Poids total 87,5-108 MHz 2,402 à 2,480 GHz 230 V~, 50 Hz 13 W 2 x 1 W RMS V4.1 2 x Pile AAA/LR03 1 pile CR2025 240 x 150 x 62 mm 0,8 kg • Les caractéristiques sont indiquées uniquement à titre indicatif. Les valeurs de poids et de taille sont des approximations. • Étant donné que nous améliorons constamment nos produits, leurs caractéristiques et fonctions peuvent changer sans préavis. Garantie Lenco propose un entretien et une garantie conformément à la législation européenne, ce qui signifie qu’en cas de besoin de réparation (aussi bien pendant et après la période de garantie), vous pouvez contacter votre revendeur le plus proche. Remarque importante : Il n’est pas possible de renvoyer l’appareil pour réparation directement à Lenco. Remarque importante : Si l’unité est ouverte ou modifiée de quelque manière que ce soit par un réparateur non agréé, la garantie serait caduque. Cet appareil ne convient pas à une utilisation professionnelle. En cas d’utilisation professionnelle, les obligations de garantie du fabricant seront annulées. Clause de non responsabilité Des mises à jour du logiciel et/ou des composants informatiques sont régulièrement effectuées. Il se peut donc que certaines instructions, caractéristiques et images présentes dans ce document diffèrent légèrement de votre configuration spécifique. Tous les articles décrits dans ce guide le sont fournis uniquement à des fins d'illustration et peuvent ne pas s'appliquer à une configuration spécifique. Aucun droit légal ne peut être obtenu depuis les informations contenues dans ce manuel. Mise au rebut de l'appareil usagé Ce symbole indique que l'équipement électrique concerné ou la batterie ne doivent pas être jetés parmi les autres déchets ménagers en Europe. Afin de garantir un traitement approprié de la batterie ou de l’appareil usagés, veuillez les mettre au rebut conformément à la règlementation locale en vigueur relative aux équipements électriques et autres batteries. En agissant de la sorte, vous contribuerez à la préservation des ressources naturelles et à l’amélioration des niveaux de protection environnementale concernant le traitement et la destruction des déchets électriques (Directive sur les déchets des équipements électriques et électroniques). Marquage CE Par la présente, Lenco Benelux B.V., Thermiekstraat 1a, 6361 HB Nuth, Pays-Bas, déclare que ce produit est conforme aux exigences principales des directives européennes. La déclaration de conformité peut être consultée au lien : [email protected] Service Pour en savoir plus et obtenir de l'assistance, visitez www.lenco.com Lenco Benelux BV, Thermiekstraat 1a, 6361 HB, The Netherlands. 46 Español KCR-100 PRECAUCIÓN: El uso de controles o ajustes o rendimiento de procedimientos excepto aquellos que los aquí especificados puede provocar una exposición peligrosa a la radiación. PRECAUCIONES PREVIAS AL USO TENGA ESTAS INSTRUCCIONES EN MENTE: 1. No cubra o bloquee ninguna apertura de ventilación. Cuando coloque el dispositivo en una estantería, deje 5 cm (2”) de espacio libre alrededor de todo el dispositivo. 2. Instálelo conforme al manual de usuario que se adjunta. 3. Mantenga el aparato alejado de fuentes de calor, como radiadores, calentadores, estufas, velas u otros productos que generen calor o llama viva. El aparato solo puede usarse en climas moderados. Se deben evitar los ambientes extremadamente fríos o cálidos. La gama de temperatura de funcionamiento es de entre 0° y 35°C. 4. Evite usar el dispositivo cerca de campos magnéticos fuertes. 5. Una descarga electrostática puede entorpecer el uso normal de este dispositivo. En tal caso, simplemente reinícielo siguiendo el manual de instrucciones. Durante la transmisión de archivos, por favor manéjelo con cuidado opérelo en un entorno libre de electricidad estática. 6. ¡Advertencia! Nunca inserte un objeto en el producto a través de las ventilaciones o aperturas. Alto voltaje fluye a través del producto e insertar un objeto puede provocar una descarga eléctrica y/o un cortocircuito de sus componentes internos. Por el mismo motivo, no derrame agua o líquidos en el producto. 7. No lo utilice en zonas húmedas, como cuartos de baño, cocinas en las que se forme vapor ni cerca de piscinas. 8. El aparato no debe exponerse a goteos o salpicaduras y asegúrese de que se colocan sobre o cerca del aparato objetos llenos de líquidos, como jarrones. 9. No use este dispositivo cuando se pueda producir condensación. Cuando la unidad se usa en una sala húmeda cálida, se pueden formar gotitas de agua o condensación en el interior de la unidad y esta puede no funcionar adecuadamente; deje que la unidad se apague durante 1 o 2 horas antes de volver a encender la unidad: el aparato debe estar seco antes de conectarse a una fuente de alimentación. 10. Aunque este dispositivo está fabricado con el máximo cuidado y comprobado varias veces antes de salir de fábrica, todavía es posible que se puedan producir problemas, al igual que con todos los aparatos eléctricos. Si observa la aparición de humo, una acumulación excesiva de calor o cualquier otro fenómeno inesperado, deberá desconectar inmediatamente el enchufe de la toma de corriente. 11. Este dispositivo debe funcionar con una fuente de alimentación que se especifica en la etiqueta de especificaciones. Si no está seguro del tipo de alimentación que se usa en su hogar, consulte con el distribuidor o una compañía eléctrica local. 12. Manténgalo alejado de los animales. A algunos animales les encanta morder los cables de alimentación. 13. Para limpiar el dispositivo use un paño seco y suave. No utilice líquidos disolventes ni con base de petróleo. Para eliminar manchas difíciles, puede usar un paño húmedo con detergente diluido. 14. El proveedor no asume ninguna responsabilidad por daños o datos perdidos provocados por un funcionamiento incorrecto, uso incorrecto, modificación del dispositivo o sustitución de la batería. 15. No interrumpa la conexión cuando el dispositivo esté formateando o transfiriendo archivos. En caso contrario, los datos se pueden estropear o perder. 16. Si la unidad dispone de función de reproducción USB, se debe conectar la memoria USB directamente en la unidad. No utilice un cable de extensión USB ya que pueden crear interferencias que causen una pérdida de datos. 17. La etiqueta calificativa se encuentra en la parte inferior o en el panel posterior del aparato. 18. Este dispositivo no está diseñado para su uso por parte de personas (incluyendo niños) con discapacidad física, sensorial o mental o con falta de experiencia o conocimientos, salvo que se les haya dado supervisión o instrucciones acerca del uso correcto del dispositivo por parte de una persona responsable de su seguridad. 19. Este producto está diseñado para un uso no profesional únicamente y no para un uso comercial o industrial. 20. Asegúrese de que la unidad esté fijada en una posición estable. La garantía no cubrirá los daños derivados de usar este producto en una posición inestable, vibraciones o golpes o por no seguir otras advertencias o precauciones que aparecen en este manual de usuario. 21. Nunca retire la carcasa del dispositivo. 22. Nunca coloque este dispositivo sobre otro equipo eléctrico. 23. Mantenga las bolsas de plástico fuera del alcance de los niños. 24. Use únicamente los dispositivos/accesorios especificados por el fabricante. 25. Remita todas las reparaciones al personal cualificado. Es necesario el mantenimiento cuando el aparato presenta cualquier tipo de daño, por ejemplo, el cable de alimentación o el enchufe presentan daños; se ha vertido líquido sobre el aparato; se han caído objetos en el aparato; el aparato se ha expuesto a la lluvia o humedad; el aparato no funciona normalmente o se ha caído. 26. Una larga exposición a sonidos elevados de reproductores de música personales puede provocar una pérdida de audición temporal o permanente. 47 27. Si el producto viene con un cable de alimentación o un adaptador de corriente de CA: ⚫ Si se produce cualquier problema, desconecte el cable de alimentación CA y remítalo a mantenimiento por parte de personal cualificado. ⚫ No pise o pince el adaptador de alimentación. Tenga mucho cuidado, en especial en las zonas alrededor de las tomas y el punto de salida del cable. No coloque objetos pesados en el adaptador de alimentación, ya que pueden dañarlo. ¡Mantenga el dispositivo fuera del alcance de los niños! Si juegan con el cable de alimentación, puede sufrir lesiones graves. ⚫ Desconecte el dispositivo durante tormentas eléctricas o cuando no vaya a usarse durante periodos prolongados de tiempo. ⚫ La salida de la toma debe instalarse cerca del equipo y debe ser fácilmente accesible. ⚫ No sobrecargue las tomas CA o los cables de extensión. La sobrecarga puede provocar un incendio o una descarga eléctrica. ⚫ Los dispositivos con construcción de Clase 1 deben estar conectados a una toma de corriente con una conexión a tierra protegida. ⚫ Los dispositivos con construcción de Clase 2 no requieren una conexión a tierra. ⚫ Sujete siempre el enchufe cuando los extraiga de la toma de corriente. No tire del cable de alimentación. Esto puede provocar un cortocircuito. ⚫ No utilice un cable de alimentación o enchufe deteriorado o una toma suelta. Si lo hace, podría provocar un incendio o una descarga eléctrica. 28. Si el producto contiene o se entrega con un mando a distancia que contiene pilas de botón / celdas: Advertencia: ⚫ “Ni ingiera la pila, riesgo de quemadura química” o frase equivalente. ⚫ [El mando a distancia que se suministra] Este producto contiene una pila de tipo botón/moneda. Si la pila se traga, puede provocar graves quemaduras internas en sólo 2 horas y podría ocasionar la muerte. ⚫ Mantenga las pilas nuevas o usadas fuera del alcance de los niños. ⚫ Si el compartimiento de las pilas no se cierra correctamente, deje de usar el producto y no lo deje al alcance los niños. ⚫ Si tiene la sospecha de que una pila ha sido ingerida o se encuentra en algún lugar del cuerpo, busque inmediatamente atención médica. 29. Precaución sobre el uso de las pilas: ⚫ Existe riesgo de explosión si la pila no se sustituye correctamente. Sustitúyala únicamente con otra del mismo tipo u otro equivalente. ⚫ No se pueden exponer las pilas a temperaturas extremadamente altas o bajas, baja presión de aire a gran altitud durante el uso, almacenamiento o transporte. ⚫ Si cambia la pila por otra que no sea la correcta, se puede producir una explosión o la fuga de líquidos o gases inflamables. ⚫ Si arroja la pila al fuego o a un horno caliente, o aplasta o cortar mecánicamente una pila, podría provocar una explosión. ⚫ Si deja una pila en un lugar con temperaturas extremadamente altas, se puede producir una explosión o una fuga de líquido o gas inflamable. ⚫ Si se expone la pila a una presión de aire extremadamente baja, se puede producir una explosión o la fuga de líquidos o gases inflamables. ⚫ Se debe prestar atención a los aspectos medioambientales sobre la eliminación de baterías. INSTALACIÓN • Desembale todas las piezas y retire el material protector. • No conecte la unidad a la corriente eléctrica antes de comprobar la tensión de la corriente y antes de que se hayan hecho todas las demás conexiones. 48 ACCESORIOS • Kit de montaje (placa de plástico + 2 juegos de tornillos + 4 espaciadores + plantilla de papel para los agujeros del taladro) Placa de plástico • Plantilla de papel para los agujeros del taladro Espaciador Manual de instrucciones MONTAJE DEL CONJUNTO BAJO UN ARMARIO 1. Decida la ubicación donde instalar la unidad en el armario / estantería. Como los altavoces de la unidad están situados en el lateral del borde izquierdo y en el lateral del borde derecho respectivamente, se recomienda reservar espacio suficiente para evitar bloquear el sonido. 2. Una vez que haya decidido la ubicación, puede usar la plantilla de papel para los agujeros del taladro (que se adjunta) como ubicación guía de los agujeros para taladrar los mismos. 3. Instale la placa de plástico bajo el armario / estantería usando los espaciadores y tornillos que se adjuntan; remítase al diagrama que aparece debajo. La instalación de los espaciadores es opcional, según sus preferencias. Se proporcionan 2 juegos de tornillos para su selección. El juego de tornillos más largo normalmente se emplea cuando se usan los espaciadores. Dependiendo del grosor de la tabla de madera, puede decidir usar otra longitud apta de tornillos usted mismo. 4. Una vez que está instalada la placa de plástico, deslice la unidad en ella hasta que se bloquee con seguridad. 5. Debido a su peso, la unidad debe instalarse con mucho cuidado. Asegúrese de que el armario que se emplea es lo suficientemente robusto para soportar el peso de la unidad. Nota: Para reducir el riesgo de incendio, no coloque la radio en ninguna zona térmica o sin espacio. Puede deslizar hacia afuera la unidad desde la placa de plástico y usarse como una radio de cocina de pie. 49 PANEL FRONTAL 1. 2. 3. 4. 5. 6. 7. 8. 9. 10. 11. 12. 13. EN ESPERA /FUENTE Púlselo para encender la unidad. Cuando se encienda, pulsar este botón cambiará entre el modo FM y el modo Bluetooth. Manténgalo pulsado para apagarlo y entrar en modo en espera. LUZ ENCENDIDA / APAGADA Deslícelo para encender o apagar la iluminación inferior. BOTONES NUMÉRICOS Púlselo para sintonizar directamente el canal FM presintonizado guardado. PANTALLA BÚSQUEDA/ESTÉREO-MONO/EMPAREJAMIENTO FM: Púlselo para cambiar entre la recepción de FM estéreo y mono forzado. Manténgalo pulsado para iniciar la búsqueda automática y guardar el canal FM disponible BT: Mantenerlo pulsad desconectará la conexión actual y empezará a buscar Potros dispositivo Bluetooth nuevo. /MIN. FM: Púlselo para sintonizar una frecuencia diferente. Manténgalo pulsado para realizar una búsqueda automática del siguiente canal disponible BT: Púlselo para saltar a la pista anterior Configuración del temporizador: Púlselo para establecer la configuración de los minutos /SEC. FM: Púlselo para sintonizar una frecuencia diferente. Manténgalo pulsado para realizar una búsqueda automática del siguiente canal disponible BT: Púlselo para saltar a la pista siguiente Configuración del temporizador: Púlselo para establecer la configuración de los segundos /CLOCK SET/MEMORY FM: Púlselo para sintonizar los diferentes canales FM presintonizados guardados. Manténgalo pulsado para guardar el canal FM presintonizado que desee. BT: Púlselo para cambiar entre el funcionamiento de reanudar la reproducción pausa. Modo en espera: Púlselo para entrar en el funcionamiento de la configuración del reloj. TIMER Púlselo para entrar en la configuración del temporizador – VOLUME + Ajuste el control de volumen. LED de frecuencia FM de 0.05MHz Cuando se reciba la frecuencia de FM de 0.05MHz, este LED se encenderá. Por ejemplo, cuando se reciba 88.15MHz, la pantalla mostrará “88.1” y este LED se encenderá. LED de BT Se trata de un indicador y se enciende cuando se encuentra en modo Bluetooth. LED de FM Se trata de un indicador y se enciende cuando se encuentra en modo FM. 50 14. LED de FM-ST Se trata de un indicador y se enciende cuando se encuentra en modo FM estéreo 15. LED de PM Se trata de un indicador y se enciende cuando se encuentra en el formato de pantalla de 12 horas en hora vespertina 16. Ventana del receptor de infrarrojos 17. LED del TEMPORIZADOR Se trata de un indicador y se enciende cuando está fijado el temporizador. MANDO A DISTANCIA 1. 2. 3. 4. 5. 6. 7. 8. 9. 10. 11. 12. 13. 14. 15. 16. 17. ESPERA BOTONES NUMÉRICOS BÚSQUEDA SINTONIZAR SINTONIZAR BT ANTERIOR BT SIGUIENTE REPRODUCCIÓN / PAUSA DEL BT TEMPORIZADOR MÍN. SEG. VOLUMEN + VOLUMEN – SILENCIO CH+ CHESTÉREO/MONO MEMORIA EMPERTAJAMIENTO SUSPENSIÓN AJUSTAR RELOJ FUENTE Instalación de la pila del mando a distancia En la unidad del mando a distancia ya se encuentra instalada una pila CR2025. Antes de usarlo, extraiga la hoja aislante de la pila tal y como se muestra debajo. 51 Para sustituir una pila gastada, remítase a la figura que se muestra debajo. Cuando inserte una pila, asegúrese de hacerlo en la dirección correcta. Porta pilas Saque el porta pilas Empújela según esta dirección Pila CR2025 • • • • • • Si el mando a distancia entra en conflicto con otros dispositivos, se verá afectado el funcionamiento. No pulse simultáneamente botones en la unidad y en el mando a distancia. Evite usar dos mandos a distancia al mismo tiempo ya que provocará un funcionamiento incorrecto. Use únicamente pilas tamaño CR-2025. Si hay una fuga en las pilas, limpie bien el mando a distancia antes de sustituir las pilas. No cortocircuite dos terminales de las pilas. Deshágase de las pilas antiguas en un lugar adecuado. 52 INSTALACIÓN DE LA PILAS PARA EL RELOJ / CANAL PRESINTONIZADO FM / RESPALDO DEL TEMPORIZADOR El reloj / el canal presintonizado FM / el temporizador (si está fijado) se mantendrán durante un fallo de alimentación instalando 2 pilas AAA/LR03 (no incluidas). Una vez que se restaure la alimentación, compruebe el reloj para asegurarse de que está bien y vuélvalo a configurar si es necesario. INSTALACIÓN DE LA PILAS 1. 2. 3. Abra el compartimento de las pilas, situado en la parte inferior de la unidad presionando el cierre y retirando la cubierta. Inserte 2 pilas AAA/LR03 (no incluidas), preferentemente pilas alcalinas, en el compartimento de las pilas siguiendo la polaridad, tal y como se muestra en el diagrama situado en el interior del compartimento. Vuelva a colocar la cubierta del compartimento de las pilas. CONEXIÓN A LA CORRIENTE ELÉCTRICA Conecte el cable de alimentación CA en la toma de corriente CA. OPERACIONES BÁSICAS Pulse el botón STANDBY para encender la unidad. Para apagarlo, vuelva mantener pulsado el botón STANDBY De forma alternativa, pulse el botón STANDBY en el mando a distancia para encender o apagar la unidad. . FM/BT Cuando la unidad esté encendida, pulse el botón SOURCE para cambiar entre el modo FM y Bluetooth. Control de volumen Pulse los botones VOLUME +/- para cambiar el volumen. Ajuste de la antena El cable de la antena situado en el panel posterior esté completamente extendido para asegurar una buena recepción FM. Cambie la posición de la antena para conseguir la mejor recepción. FUNCIONAMIENTO DE LA RADIO FM Búsqueda automática 1. Encienda la unidad en modo FM. Mantenga pulsado el botón SCAN en la unidad (o pulse el botón SCAN en el mando a distancia) para iniciar la búsqueda automática y guardar los canales disponible (se puede guardar un máximo de 20 emisoras) Búsqueda manual 1. Pulse el botón o el botón en la unidad (el botón TUNE /TUNE sintonizar una frecuencia diferente. 2. Mantenga pulsado el botón o el botón en la unidad (el botón TUNE automáticamente el siguiente canal disponible. en el mando a distancia) de forma reiterada para /TUNE en el mando a distancia) para buscar Guardar presintonías FM Puede guardar hasta 20 presintonías de FM. 1. Sintonice la emisora que desee guardar. 2. Mantenga pulsado el botón MEMORY en la unidad principal (o pulse el botón MEMORY en el mando a distancia). Se mostrará el número de canal de presintonía parpadeando. 3. Pulse el botón o el botón en la unidad (el botón o el botón en el mando a distancia) para presintonizar un número que desee guardar. Posteriormente, pulse el botón MEMORY para guardarlo. 53 Recuperar presintonías FM almacenadas Pulse el botón MEMORY en la unidad (o el botón CH-/CH+ en el mando a distancia) para sintonizar un canal presintonizado diferente. Para recordar directamente el canal presintonizado usando los botones numéricos de la unidad, pulse los botones numéricos [1], [2], …, [5]. Por ejemplo, cuando se pulsa el botón [3], la pantalla muestra “P03”, entonces espere un instante y sintonizará la presintonía 3. O cuando mantenga pulsado el botón [3/(8)] hasta que la pantalla muestre “P08”, entonces espere un instante y sintonizará la presintonía 8. O cuando pulse el botón [1] y seguidamente mantenga pulsado el botón [2], la pantalla mostrará “P12” y tras un instante sintonizará la presintonía 12. O cuando pulse el botón [1] y seguidamente mantenga pulsado el botón [3/(8)], la pantalla mostrará “P18” y tras un instante sintonizará la presintonía 18. De forma alternativa, puede usar los botones numéricos del mando a distancia para recordar directamente el canal presintonizado ; pulse los botones numéricos [1], [2], …, [9], [0]. Por ejemplo, cuando se pulsa el botón [3], la pantalla muestra “P03”, entonces espere un instante y sintonizará la presintonía 3. O cuando pulse el botón [8] hasta que la pantalla muestre “P08” y espere un instante y sintonizará la presintonía 8. O cuando pulse el botón [1] y seguidamente pulse el botón [2], la pantalla mostrará “P12” y tras un instante sintonizará la presintonía 12. O cuando pulse el botón [1] y seguidamente pulse el botón [8], la pantalla mostrará “P18” y tras un instante sintonizará la presintonía 18. Selección de Estéreo / Fuerza Mono Cuando reciba un canal de radio FM estéreo, pulsar el botón ST/MONO cambiará entre audio estéreo y audio mono forzado. Cuando está en FM estéreo, se encenderá el LED de FM-ST. Nota: El cable de la antena situado en el panel posterior esté completamente extendido para asegurar una buena recepción FM. Cambie la posición de la antena para conseguir la mejor recepción. AUDIO BLUETOOTH Siga estas instrucciones de vinculación para conectar la unidad a su dispositivo Bluetooth. 1. Pulse el botón SOURCE para entrar en el modo Bluetooth. La pantalla mostrará “bLUE”. Empezará a buscar y el LED del BT parpadeará. 2. Si la unidad nunca se ha emparejado con un dispositivo Bluetooth anteriormente, o no puede encontrar el último dispositivo emparejado, el LED de BT seguirá parpadeando. Encienda la función Bluetooth de su dispositivo y active la búsqueda hasta que se encuentre “Lenco KCR-100”. Seleccione “Lenco KCR-100” en el dispositivo Bluetooth para realizar la conexión. Introduzca la contraseña “0000” si la solicita. 3. Una vez que haya emparejado con éxito el BT, el Led quedará constante sin parpadear. 4. Ahora puede empezar a reproducir música desde su smartphone de forma inalámbrica al altavoz. 5. Puede pulsar el botón REPRODUCCIÓN / PAUSA para hacer una pausa o reanudar la reproducción. 6. Puede pulsar el botón ANTERIOR o el botón para saltar a la canción siguiente o anterior. • Mantener pulsado el botón PAIRING desconectará la conexión actual y empezará a buscar un Nuevo dispositivo Bluetooth. «Este producto dispone de una función de recepción bluetooth, no puede transmitir ningún sonido bluetooth con ella: esto significa que puede recibir de forma inalámbrica una señal de sonido bluetooth desde una fuente externa como un smartphone». FUNCIÓN RETARDO 1. 2. 3. Cuando la unidad está encendida, pulse el botón SLEEP en el mando a distancia de forma reiterada para seleccionar al duración del retardo en minutos desde 05, 10, 15, 30, 45, 90 y 00 (retardo desconectado). Cuando el temporizador de retardo llegue a cero, la unidad se apagará automáticamente. Para cancelar la función de retardo, mantenga pulsado el botón STANDBY en la unidad (o pulse el botón STANDBY en el mando a distancia) para apagarla. De forma alternativa, puede pulsar el botón SLEEP de forma reiterada hasta llegar a “00”. CONFIGURACIÓN DEL RELOJ 1. 2. Apague la unidad en modo de espera. Mantenga pulsado el botón CLOCK SET en la unidad (o pulse el botón CLOCK SET en el mando a distancia) para entrar en la configuración del reloj. Se mostrará “24H” o “12H”. 54 3. 4. Pulse el botón MIN. y SEC en la unidad principal (el botón MIN. y SEC. en el mando a distancia) para cambiar entre 24H (formato de 24 horas en pantalla) o 12H (formato de 12 horas en pantalla). Pulse el botón CLOCK SET en la unidad (el botón CLOCK SET en el mando a distancia) para confirmarlo. Pulse el botón MIN. y SEC en la unidad principal (el botón MIN. y SEC. en el mando a distancia) para ajustar la hora y los minutos respectivamente. Pulse el botón CLOCK SET en la unidad (el botón CLOCK SET en el mando a distancia) para finalizar la configuración del reloj. CONFIGURACIÓN DE HORA 1. 2. 3. 4. 5. 6. 7. Pulse el botón TIMER para entrar en la configuración del temporizador. Pulse el botón MIN. y SEC en la unidad principal (el botón MIN. y SEC. en el mando a distancia) para ajustar los minutos y segundos respectivamente. Pulse el botón TIMER. Pulse el botón MIN. y SEC en la unidad principal (el botón MIN. y SEC. en el mando a distancia) para activar (on) o desactivar (OFF) la configuración del temporizador. Cuando esté fijado en on, pulse el botón TIMER para finalizar la configuración del temporizador. Se iniciará la cuenta atrás. Durante la cuenta atrás del temporizador, el indicador LED de TIMER continuará parpadeando. Durante la cuenta atrás del temporizador, pulsar el botón TIMER detendrá la cuenta atrás. El indicador LED de TIMER todavía está encendido pero sin parpadear. Volver a pulsar el botón timer continuará con la cuenta atrás y el indicador LED del timer parpadeará. Para cancelar la cuenta atrás, mantenga pulsado el botón TIMER Cuando finalice la cuenta atrás del temporizador, se encenderá el temporizador de la alarma. Pulse el botón TIMER para detener el pitido detener el pitido. LUZ ENCENDIDA / APAGADA Deslice el interruptor LIGHT ON/OFF situado en el panel frontal, para encender / apagar la iluminación inferior. AHORRO DE ENERGÍA Debido a las exigencias de ErP fase 2 y para proteger el medioambiente, la unidad se pagará y pasará al modo en espera de forma automática si no se ha reproducido música en el modo Bluetooth durante ~15minutos. Puede volver a reactivar el dispositivo pulsando el botón STANDBY. 55 Solución de problemas No se enciende • Asegúrese de que el cable de la corriente principal está conectado de forma segura. • Asegúrese de que la unidad está encendida. El mando a distancia no funciona • Use el mando a distancia cerca de la unidad. • Apunte el mando a distancia al sensor del mando a distancia de la unidad. • Sustituya las pilas del mando a distancia por unas nuevas. • Retire cualquier obstáculo entre el mando a distancia y la unidad. La unidad no responde cuando se pulsa cualquier botón. • En algunas situaciones, la unidad puede congelarse durante su uso. Para reiniciar la unidad, tire del enchufe conectado a la toma de corriente, espere unos segundos y después vuelva a enchufarlo. No hay salida de sonido • Asegúrese de que la unidad no está silenciada. No puedo encontrar el nombre Bluetooth de esta unidad en mi dispositivo Bluetooth para el emparejamiento Bluetooth • Asegúrese de que la unidad está encendida. • Asegúrese de que la función Bluetooth está activada en su dispositivo Bluetooth. • La unidad dispone de una función Bluetooth que puede recibir una señal en 10 metros. Recepción de FM • Asegúrese de que el cable de la antena situado en el panel posterior esté completamente extendido para mejorar la recepción FM. • Las interferencias eléctricas en su hogar pueden causar una mala recepción. Aleje la unidad de las mismas (especialmente de aparatos con motor y transformadores). Interferencias en los altavoces • Compruebe que no se ha dejado el teléfono móvil cerca de la unidad. 56 ESPECIFICACIONES TÉCNICAS Alcance de frecuencia de radio FM Rango de frecuencias Bluetooth Entrada de alimentación CA Consumo de energía Potencia de salida del altavoz Versión Bluetooth Pilas de respaldo (no incluidas) Pila del mando a distancia (incluida) Dimensiones de la unidad (L x P x A) Peso total 87,5-108 MHz 2,402-2,480 GHz 230 V, 50 Hz 13 W 2 x 1 W RMS V4.1 2 pilas AAA/LR03 1 CR2025 240 x 150 x 62 mm 0,8 kg • La especificación se presenta solo como referencia. Los valores del peso y del tamaño son aproximados. • Nuestro producto se mejora constantemente y las especificaciones y funciones pueden cambiarse sin previo aviso. Garantía Lenco ofrece servicio y garantía en cumplimiento con las leyes de la Unión Europea, lo cual implica que, en caso de que su producto precise ser reparado (tanto durante como después del periodo de garantía), deberá contactar directamente con su distribuidor. Nota importante: No es posible enviar sus reparaciones directamente a Lenco. Nota importante: Si la unidad es abierta por un centro de servicio no oficial, la garantía quedará anulada. Este aparato no es adecuado para el uso profesional. En caso de darle un uso profesional, todas las obligaciones de garantía del fabricante quedarán anuladas. Exención de responsabilidad Regularmente se llevan a cabo actualizaciones en el Firmware y en los componentes del hardware. Por esta razón, algunas de las instrucciones, especificaciones e imágenes incluidas en este documento pueden diferir ligeramente respecto a su situación particular. Todos los elementos descritos en esta guía tienen un objetivo de mera ilustración, y pueden no ser de aplicación en su situación particular. No se puede obtener ningún derecho ni derecho legal a partir de la descripción hecha en este manual. Eliminación del antiguo dispositivo Este símbolo indica que no deberá deshacerse del producto eléctrico o batería en cuestión junto con los residuos domésticos, en el ámbito de la UE. Para garantizar un tratamiento residual correcto del producto y su batería, por favor, elimínelos cumpliendo con las leyes locales aplicables sobre requisitos para el desechado de equipos eléctricos y baterías. De hacerlo, ayudará a conservar recursos naturales y mejorar los estándares de protección medioambiental en el tratamiento y eliminación de residuos eléctricos (Directiva sobre la Eliminación de Equipos Eléctricos y Electrónicos). Marca CE Por la presente, Lenco Benelux B.V., Thermiekstraat 1a, 6361 HB Nuth, Países Bajos, declara que este producto cumple con las exigencias esenciales de la directiva de la UE. La declaración de conformidad puede consultarse [email protected] Service (Servicio) Para obtener más información y soporte del departamento técnico, por favor, visite la página web www.lenco.com Lenco Benelux BV, Thermiekstraat 1a, 6361 HB, Países Bajos. 57 mediante-
 1
1
-
 2
2
-
 3
3
-
 4
4
-
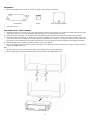 5
5
-
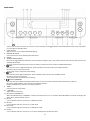 6
6
-
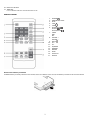 7
7
-
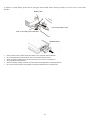 8
8
-
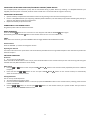 9
9
-
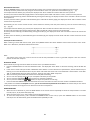 10
10
-
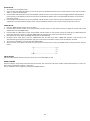 11
11
-
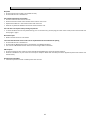 12
12
-
 13
13
-
 14
14
-
 15
15
-
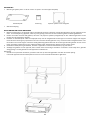 16
16
-
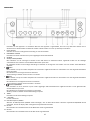 17
17
-
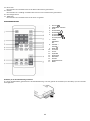 18
18
-
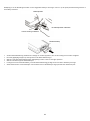 19
19
-
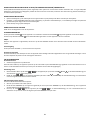 20
20
-
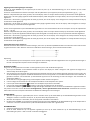 21
21
-
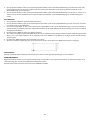 22
22
-
 23
23
-
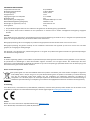 24
24
-
 25
25
-
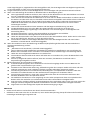 26
26
-
 27
27
-
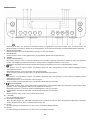 28
28
-
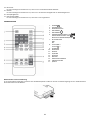 29
29
-
 30
30
-
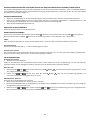 31
31
-
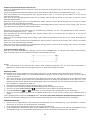 32
32
-
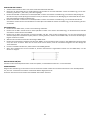 33
33
-
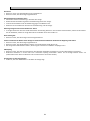 34
34
-
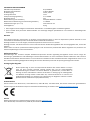 35
35
-
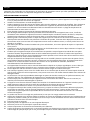 36
36
-
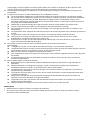 37
37
-
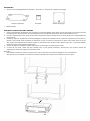 38
38
-
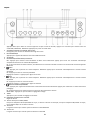 39
39
-
 40
40
-
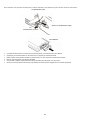 41
41
-
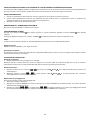 42
42
-
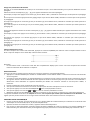 43
43
-
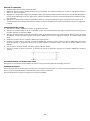 44
44
-
 45
45
-
 46
46
-
 47
47
-
 48
48
-
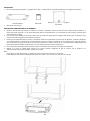 49
49
-
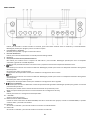 50
50
-
 51
51
-
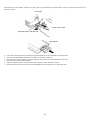 52
52
-
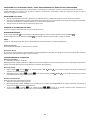 53
53
-
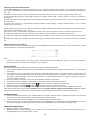 54
54
-
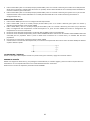 55
55
-
 56
56
-
 57
57


in andere talen
- English: Lenco KCR-100WH Owner's manual
- français: Lenco KCR-100WH Le manuel du propriétaire
- español: Lenco KCR-100WH El manual del propietario
- Deutsch: Lenco KCR-100WH Bedienungsanleitung