LA SOMMELIERE Cave à vin intelligente & connectée 149 bouteilles Handleiding
- Categorie
- Wijnkoelers
- Type
- Handleiding
Deze handleiding is ook geschikt voor

VOS VINS SONT BIEN CHEZ VOUS
MANUEL D’INSTRUCTIONS - INSTRUCTION MANUAL –
GEBRAUCHSANWEISUNG – HANDLEIDING - MANUAL DE INSTRUCCIONES -
MANUALE D’ISTRUZIONE - NÁVOD K OBSLUZE
ECELLAR185
Cave à vin de vieillissement connectée / Ageing connected wine cellar / Smarter
Weinklimaschrank / Verbonden oplegwijnkast / Vinoteca conectada para la
conservación y envejecimiento / Chytrá vinotéka
Compatible / Kompatibel mit / Compatibel met / Compatible con
FR – MANUEL D’UTILISATION p. 9 GB – USE INSTRUCTIONS p. 45
DE – BENUTZERHANDBUCH p. 78 NL – GEBRUIKSAANWIJZING p. 114
ESP – MANUAL DE INSTRUCCIONES p. 150 IT – MANUALE D’ISTRUZIONE p. 183
CZ – NÁVOD K OBSLUZE p. 216

2
Table des matières
MANUEL D’INSTRUCTIONS - INSTRUCTION MANUAL – GEBRAUCHSANWEISUNG –
HANDLEIDING - MANUAL DE INSTRUCCIONES - MANUALE D’ISTRUZIONE - NÁVOD K
OBSLUZE................................................................................................................................................ 1
1.CONSIGNES DE SÉCURITÉ .............................................................................................................. 9
2. PLAQUE SIGNALÉTIQUE ................................................................................................................ 15
3. DESCRIPTION PRODUITS .............................................................................................................. 15
Capacité annoncée _________________________________________________________ 16
Recommandations d’agencement _____________________________________________ 16
4. INSTRUCTIONS D’INSTALLATION ................................................................................................. 16
Avant d’utiliser votre cave à vin ______________________________________________ 17
Installer votre cave à vin _____________________________________________________ 18
Alimentation .................................................................................................................................. 18
Emplacement ................................................................................................................................ 18
Installation de la poignée .............................................................................................................. 19
Portée du wifi de la cave .............................................................................................................. 19
Portée du bluetooh de la cave ...................................................................................................... 19
Hygrométrie .................................................................................................................................. 20
5. INSTRUCTIONS D’UTILISATION .................................................................................................... 21
Panneau de contrôle ________________________________________________________ 21
Alarmes___________________________________________________________________ 22
Boitier maitre ______________________________________________________________ 22
Clayettes connectées _______________________________________________________ 23
Modes d’utilisation _________________________________________________________ 25
Système Hiver _____________________________________________________________ 27
L’application VINOTAG® ____________________________________________________ 27
Fonctions de VINOTAG® ............................................................................................................. 27
Créer un compte VINOTAG® ....................................................................................................... 28
Menu VINOTAG® ......................................................................................................................... 28
Ajouter une cave ........................................................................................................................... 32
Partager une cave ........................................................................................................................ 33
Supprimer une cave ..................................................................................................................... 33
Changer la configuration de la cave ............................................................................................. 33
Ajouter des bouteilles ................................................................................................................... 33
Compte premium .......................................................................................................................... 36
Retirer des bouteilles .................................................................................................................... 37
Consulter une fiche vin ................................................................................................................. 37
Créer des alertes date d’apogée .................................................................................................. 37
Créer des alertes stock ................................................................................................................ 37
Visualiser l’emplacement de vos bouteilles dans votre cave ....................................................... 38
Maintenance de la cave ............................................................................................................... 38
6. NETTOYAGE ET ENTRETIEN ......................................................................................................... 39
Dégivrage automatique ................................................................................................................ 39
Changement du filtre à charbon ................................................................................................... 39
En cas de coupure de courant ..................................................................................................... 40
Si vous partez en vacances ......................................................................................................... 40
Si vous devez déplacer votre cave à vin ...................................................................................... 40
7. EN CAS DE PANNE ......................................................................................................................... 41
8. PROBLEMES ET CAUSES POSSIBLES ......................................................................................... 41
Codes erreurs ............................................................................................................................... 43
9. ENVIRONNEMENT ........................................................................................................................... 43
10. AVERTISSEMENT .......................................................................................................................... 44

3
1.SAFETY INSTRUCTIONS ................................................................................................................. 45
2. RATING PLATE ................................................................................................................................ 51
3. DESCRIPTION OF THE APPLIANCE .............................................................................................. 51
4. INSTALLATION INSTRUCTIONS .................................................................................................... 53
Before using this appliance __________________________________________________ 53
Wine Cellar Installation ______________________________________________________ 53
Location ........................................................................................................................................ 54
Wifi range ..................................................................................................................................... 55
Hygrometry ................................................................................................................................... 55
5. OPERATING INSTRUCTIONS ......................................................................................................... 56
Control panel ______________________________________________________________ 56
Alarms____________________________________________________________________ 57
Master unit ________________________________________________________________ 57
Connected shelves _________________________________________________________ 58
Modes of use ______________________________________________________________ 59
Winter mode _______________________________________________________________ 60
VINOTAG® application______________________________________________________ 61
VINOTAG® functions ................................................................................................................... 61
How to create a VINOTAG® account ........................................................................................... 61
VINOTAG® Menus ....................................................................................................................... 62
Add a cellar ................................................................................................................................... 66
Share your cellar .......................................................................................................................... 67
Delete a cellar ............................................................................................................................... 67
Change the cellar configuration .................................................................................................... 67
Add bottles .................................................................................................................................... 68
Premium account .......................................................................................................................... 70
Remove bottles ............................................................................................................................. 70
Consult a wine sheet .................................................................................................................... 71
Create stock alerts........................................................................................................................ 71
View the location of your bottles in your cellar ............................................................................. 72
Cellar maintenance....................................................................................................................... 72
6. CARE AND MAINTENANCE ............................................................................................................ 72
Automatic defrost .......................................................................................................................... 72
In the event of a power cut ........................................................................................................... 73
If you go on vacation .................................................................................................................... 73
7. IN THE EVENT OF A BREAKDOWN ............................................................................................... 74
8. TROUBLE SHOOTING ..................................................................................................................... 75
Errors codes ................................................................................................................................. 77
9. ENVIRONNMENT ............................................................................................................................. 77
10. WARNING ....................................................................................................................................... 77
1. SICHERHEITSHINWEISE ................................................................................................................ 78
2. TYPENSCHILD ................................................................................................................................. 84
3. PRODUKTBESCHREIBUNG ............................................................................................................ 84
Angegebenes Fassungsvermögen ____________________________________________ 85
Empfehlungen zur Anordnung der Ablageroste usw. im Gerät _____________________ 85
4. INSTALLATIONSANWEISUNGEN ................................................................................................... 86
Vor Inbetriebnahme Ihres Weinschranks _______________________________________ 86
Installation Ihres Weinschranks ______________________________________________ 87
Spannungsversorgung ................................................................................................................. 87
Aufstellort ...................................................................................................................................... 87
Türgriffmontage ............................................................................................................................ 88

4
WLAN-Reichweite des Weinschranks .......................................................................................... 88
Bluetooth-Reichweite des Weinschranks ..................................................................................... 89
Luftfeuchtigkeit ............................................................................................................................. 89
5. BEDIENUNGSANWEISUNG ............................................................................................................ 90
Bedienfeld ________________________________________________________________ 90
Alarme____________________________________________________________________ 91
Master-Steuereinheit ________________________________________________________ 91
Smarte Ablageroste _________________________________________________________ 92
Betriebsarten ______________________________________________________________ 94
Winterfunktion _____________________________________________________________ 95
Die VINOTAG®-App _________________________________________________________ 96
VINOTAG®-Funktionen ................................................................................................................ 96
Ein VINOTAG®-Konto erstellen ................................................................................................... 96
VINOTAG®-Menü ........................................................................................................................ 97
Einen Weinschrank hinzufügen .................................................................................................. 101
Einen Weinschrank teilen ........................................................................................................... 102
Einen Weinschrank löschen ....................................................................................................... 102
Konfiguration des Weinschranks ändern ................................................................................... 103
Flaschen hinzufügen .................................................................................................................. 103
Premium-Konto ........................................................................................................................... 105
Flaschen entnehmen .................................................................................................................. 106
Ein Weindatenblatt einsehen ...................................................................................................... 106
Trinkreife-Benachrichtigungen erstellen ..................................................................................... 106
Benachrichtigung über niedrigen Flaschenvorrat erstellen ........................................................ 107
Die Position Ihrer Flaschen in Ihrem Weinschrank ansehen ..................................................... 107
Wartung des Weinschranks ....................................................................................................... 107
6. REINIGUNG UND PFLEGE ............................................................................................................ 108
Automatische Abtauung ............................................................................................................. 108
Wechsel des Aktivkohlefilters ..................................................................................................... 108
Im Falle eines Stromausfalls ...................................................................................................... 109
Wenn Sie in den Urlaub fahren .................................................................................................. 109
Wenn Sie den Weinschrank umsetzen müssen ......................................................................... 109
7. IM PANNENFALL ............................................................................................................................ 110
8. PROBLEME UND MÖGLICHE URSACHEN .................................................................................. 111
Fehlercodes ................................................................................................................................ 113
9. UMWELT ......................................................................................................................................... 113
10. WICHTIGER HINWEIS ................................................................................................................. 113
1. VEILIGHEIDSINSTRUCTIES.......................................................................................................... 114
2. TYPEPLAATJE ............................................................................................................................... 120
3. BESCHRIJVING VAN DE PRODUCTEN ....................................................................................... 120
Aangekondigde capaciteit __________________________________________________ 121
Indelingsaanbevelingen ____________________________________________________ 121
4. INSTALLATIE-INSTRUCTIES ........................................................................................................ 121
Voordat u uw wijnkast in gebruik neemt _______________________________________ 122
Uw wijnkast installeren _____________________________________________________ 122
Voeding ...................................................................................................................................... 122
Opstelling .................................................................................................................................... 123
De handgreep aanbrengen ........................................................................................................ 124
Wifi-bereik van de kast ............................................................................................................... 124
Bluetoothbereik van de kast ....................................................................................................... 124
Vochtigheid ................................................................................................................................. 125
5. GEBRUIKSVOORSCHRIFTEN ...................................................................................................... 126

5
Bedieningspaneel _________________________________________________________ 126
Alarmen _________________________________________________________________ 127
Masterdoos ______________________________________________________________ 127
Verbonden oplegplanken ___________________________________________________ 128
Gebruiksmodi ____________________________________________________________ 130
Wintersysteem ____________________________________________________________ 131
De VINOTAG®-applicatie ___________________________________________________ 131
VINOTAG®-functies ................................................................................................................... 132
Een VINOTAG®-account aanmaken ......................................................................................... 132
Een kast toevoegen .................................................................................................................... 137
Een kast delen ............................................................................................................................ 138
Een kast verwijderen .................................................................................................................. 138
De configuratie van de kast wijzigen .......................................................................................... 138
Flessen toevoegen ..................................................................................................................... 139
Premiumaccount ......................................................................................................................... 141
Flessen verwijderen.................................................................................................................... 141
Een wijninformatieblad raadplegen ............................................................................................ 142
Waarschuwingen aanmaken voor de datum waarop de wijn op zijn hoogtepunt is .................. 142
Voorraadwaarschuwingen aanmaken ........................................................................................ 142
De plaats van uw flessen in uw kast weergeven ........................................................................ 143
Onderhoud van de kast .............................................................................................................. 143
6. REINIGING EN ONDERHOUD ....................................................................................................... 144
Automatische ontdooiing ............................................................................................................ 144
Vervanging van de koolfilter ....................................................................................................... 144
Bij een stroomonderbreking ....................................................................................................... 145
Als u op vakantie gaat ................................................................................................................ 145
Als u uw wijnkast moet verplaatsen ........................................................................................... 145
7. IN GEVAL VAN EEN DEFECT ....................................................................................................... 146
8. PROBLEMEN EN MOGELIJKE OORZAKEN................................................................................. 146
Foutcodes ................................................................................................................................... 148
9. MILIEU ............................................................................................................................................ 149
10. WAARSCHUWING ....................................................................................................................... 149
1. INSTRUCCIONES DE SEGURIDAD ......................................................................................... 150
2. PLACA DE IDENTIFICACIÓN .................................................................................................... 156
3. DESCRIPCIÓN DEL PRODUCTO ............................................................................................. 156
Capacidad anunciada ______________________________________________________ 157
Recomendaciones de diseño ________________________________________________ 157
Características de la radiofrecuencia _________________________________________ 157
4. INSTRUCCIONES DE INSTALACIÓN....................................................................................... 157
Antes de utilizar su vinoteca ________________________________________________ 157
Instalación de su vinoteca __________________________________________________ 158
Alimentación ............................................................................................................................... 158
Ubicación .................................................................................................................................... 159
Instalación del tirador ................................................................................................................. 159
Alcance de wifi de la vinoteca .................................................................................................... 159
Gama de la vinoteca bluetooh .................................................................................................... 160
Higrometría ................................................................................................................................. 160
5. INSTRUCCIONES DE USO ....................................................................................................... 161
Panel de control ___________________________________________________________ 161
Alarmas__________________________________________________________________ 162
Caja principal _____________________________________________________________ 162

6
Estanterías conectadas ____________________________________________________ 163
Modos de uso ____________________________________________________________ 164
Sistema de invierno ________________________________________________________ 165
La aplicación VINOTAG ____________________________________________________ 166
Funciones de VINOTAG ............................................................................................................. 166
Crear una cuenta VINOTAG ...................................................................................................... 166
Menú VINOTAG ......................................................................................................................... 166
Añadir una vinoteca .................................................................................................................... 170
Compartir una vinoteca .............................................................................................................. 171
Borrar una vinoteca .................................................................................................................... 171
Cambiar la configuración de la vinoteca .................................................................................... 171
Añadir botellas ............................................................................................................................ 172
Función E-Sommelier ................................................................................................................. 173
Cuenta Premium ......................................................................................................................... 174
Retirar las botellas ...................................................................................................................... 174
Consultar un archivo de vino ...................................................................................................... 175
Crear alertas de fechas punta .................................................................................................... 175
Crear alertas de valores ............................................................................................................. 176
Visualice la ubicación de sus botellas en su vinoteca ................................................................ 176
Mantenimiento de la vinoteca ..................................................................................................... 176
6. LIMPIEZA Y MANTENIMIENTO ................................................................................................ 177
Descongelación automática ....................................................................................................... 177
Cambio del filtro de carbón ........................................................................................................ 177
En caso de fallo de alimentación ................................................................................................ 178
Si se va de vacaciones ............................................................................................................... 178
Si necesita trasladar su vinoteca ................................................................................................ 178
7. EN CASO DE FALLO ................................................................................................................. 179
8. PROBLEMAS Y POSIBLES CAUSAS ....................................................................................... 180
Códigos de error ......................................................................................................................... 182
9. MEDIO AMBIENTE .................................................................................................................... 182
10. ADVERTENCIA ....................................................................................................................... 182
1.ISTRUZIONI DI SICUREZZA ........................................................................................................... 183
2. TARGA INFORMATIVA .................................................................................................................. 186
3. DESCRIZIONE PRODOTTI ............................................................................................................ 187
Capacità annunciata _______________________________________________________ 188
Consigli sulla disposizione _________________________________________________ 188
Caratteristiche della radiofrequenza __________________________________________ 188
4. ISTRUZIONI PER L'INSTALLAZIONE............................................................................................ 188
Prima di utilizzare la tua cantina _____________________________________________ 188
Installate la vostra cantina __________________________________________________ 189
Alimentazione ............................................................................................................................. 189
Posizionamento .......................................................................................................................... 189
Installazione della maniglia ........................................................................................................ 190
Portata WiFi della cantina .......................................................................................................... 190
Portata bluetooth della cantina ................................................................................................... 191
Igrometria ................................................................................................................................... 191
5. ISTRUZIONI D’USO ........................................................................................................................ 192
Pannello di controllo _______________________________________________________ 192
Allarmi___________________________________________________________________ 193
Master box _______________________________________________________________ 193
Ripiani connessi __________________________________________________________ 194

7
Modi d’uso _______________________________________________________________ 196
Sistema Inverno ___________________________________________________________ 197
L’applicazione VINOTAG® __________________________________________________ 197
Funzioni di VINOTAG® .............................................................................................................. 197
Creare un conto VINOTAG® ...................................................................................................... 198
Menu VINOTAG® ....................................................................................................................... 198
Aggiungere una cantina ............................................................................................................. 202
Condividere una cantina ............................................................................................................. 203
Eliminare una cantina ................................................................................................................. 203
Cambiare la configurazione della cantina .................................................................................. 204
Aggiungere delle bottiglie ........................................................................................................... 205
Account premium ........................................................................................................................ 207
Ritirare delle bottiglie .................................................................................................................. 208
Consultare una scheda vino ....................................................................................................... 208
Creare allerte di data di picco ..................................................................................................... 208
Creare delle allerte di stock ........................................................................................................ 209
Visualizzare la posizione delle vostre bottiglie nella vostra cantina ........................................... 209
Manutenzione della cantina ........................................................................................................ 209
6. PULIZIA E MANUTENZIONE ......................................................................................................... 210
Sbrinamento automatico ............................................................................................................ 210
Cambio del filtro a carbone ........................................................................................................ 210
In caso di interruzione della corrente elettrica ............................................................................ 211
Se partite in vacanza .................................................................................................................. 211
Se dovete spostare la vostra cantina ......................................................................................... 211
7. IN CASO DI GUASTO ..................................................................................................................... 212
8. PROBLEMI E POSSIBILI CAUSE .................................................................................................. 212
Codici errore ............................................................................................................................... 214
9. AMBIENTE ...................................................................................................................................... 214
10. AVVERTENZE .............................................................................................................................. 215
1. BEZPEČNOSTNÍ POKYNY ....................................................................................................... 216
2. VÝROBNÍ ŠTÍTEK ...................................................................................................................... 222
3. POPIS SPOTŘEBIČE ................................................................................................................ 222
4. INSTALAČNÍ POKYNY .............................................................................................................. 224
Před uvedením spotřebiče do provozu ________________________________________ 224
Upozornění _______________________________________________________________ 224
Zdroj napájení ____________________________________________________________ 224
Umístění _________________________________________________________________ 225
Montáž madla ............................................................................................................................. 225
Dosah Wi-Fi ................................................................................................................................ 226
Vzdušná vlhkost ......................................................................................................................... 226
5. OVLÁDÁNÍ VINOTÉKY .............................................................................................................. 227
Ovládací panel ____________________________________________________________ 227
Upozornění _______________________________________________________________ 228
Hlavní řídicí jednotka ______________________________________________________ 228
Uvedení do provozu _______________________________________________________ 228
Chytré police _____________________________________________________________ 229
Provozní režimy ___________________________________________________________ 230
Zimní režim _______________________________________________________________ 231
Aplikace VINOTAG® _______________________________________________________ 232
Funkce aplikace VINOTAG® ...................................................................................................... 232
Vytvoření uživatelského účtu VINOTAG® .................................................................................. 232

8
Nabídky aplikace VINOTAG® .................................................................................................... 233
Záložka „MÁ VINOTÉKA“ ........................................................................................................... 233
Záložka „MÁ VÍNA“ ..................................................................................................................... 234
Záložka „UPOZORNĚNÍ“ ........................................................................................................... 235
Záložka „PROFIL“ ....................................................................................................................... 236
Přidání vinotéky .......................................................................................................................... 236
Přidání chytré vinotéky ............................................................................................................... 237
Sdílení vinotéky .......................................................................................................................... 237
Změna konfigurace vinotéky ...................................................................................................... 238
Vložení lahví ............................................................................................................................... 238
Funkce E-Sommelier .................................................................................................................. 239
Prémiový účet ............................................................................................................................. 240
Vyjmutí lahví ............................................................................................................................... 240
Prohlédnutí datového listu vína .................................................................................................. 241
Vytvoření upozornění na nízký stav zásob ................................................................................ 241
Vytvoření upozornění na perfektní zralost vína .......................................................................... 242
Náhled rozmístění lahví ve vinotéce .......................................................................................... 242
Údržba vinotéky .......................................................................................................................... 242
6. PÉČE A ÚDRŽBA ........................................................................................................................... 242
Automatické odmrazování .......................................................................................................... 242
Výměna uhlíkového filtru ............................................................................................................ 243
V případě výpadku elektrického proudu ..................................................................................... 243
Když jedete na dovolenou .......................................................................................................... 243
Pokud musíte vinotéku přesunout .............................................................................................. 244
7. V PŘÍPADĚ PORUCHY .................................................................................................................. 244
8. ODSTRAŇOVÁNÍ POTÍŽÍ ............................................................................................................... 245
Chybové kódy ____________________________________________________________ 247
9. ŽIVOTNÍ PROSTŘEDÍ .................................................................................................................... 247
10. VAROVÁNÍ .................................................................................................................................... 248

9
1.CONSIGNES DE SÉCURITÉ
Pour votre sécurité et pour une utilisation correcte de l’appareil, avant
d’installer et d’utiliser l’appareil pour la première fois, lisez attentivement
cette notice, y compris les mises en gardes et les conseils utiles qu’elle
contient. Afin d’éviter d’endommager l’appareil et/ou de vous blesser
inutilement, il est important que les personnes amenées à utiliser cet
appareil aient pris entièrement connaissance de son fonctionnement
ainsi que de ses fonctions de sécurité. Conservez ces consignes pour
plus tard et pensez à les ranger à côté de l’appareil, afin qu’elles soient
transmises avec ce dernier en cas de vente ou de déménagement. Cela
permettra de garantir un fonctionnement optimal du système.
Pour éviter tout risque de blessure, conservez cette notice. Le fabricant
ne saurait en effet pas être tenu responsable en cas de mauvaise
manipulation du système.
Sécurité des enfants et des autres personnes vulnérables
• Ce système peut être utilisé par des enfants âgés de 8 ans et plus et
par des personnes à capacités réduites sur le plan physique,
sensoriel ou mental, ou n’ayant pas appris à utiliser l’appareil, dans le
cadre où ils sont encadrés par une personne informée et ayant
conscience des risques impliqués. Les enfants ne doivent pas jouer
avec l’appareil. Le nettoyage et l’entretien par l’usager ne doivent pas
être effectués par des enfants, sauf s’ils ont plus de 8 ans et qu’ils
sont surveillés.
• Conservez tous les emballages hors de portée des enfants, car il
existe un risque de suffocation.
• Si vous décidez de mettre au rebut l’appareil, débranchez-le de la
prise murale, coupez le câble de connexion (aussi proche de
l’appareil que vous le pouvez) et retirez la porte afin d’empêcher les
enfants de jouer avec et de se faire électrocuter ou de s’enfermer à
l’intérieur.
• Si l’appareil, doté d’un joint de porte magnétique, doit être remplacé
par un autre appareil doté d’un loquet sur la porte ou sur le joint,
vérifiez bien que le loquet est hors d’état de fonctionner avant de
vous débarrasser de l’ancien appareil. Cela évitera de transformer cet
appareil en piège pour les enfants.
• Maintenir l’appareil et son cordon hors de portée des enfants de
moins de 8 ans.
• Les enfants ne doivent pas charger et décharger les bouteilles dans

10
l’appareil.
Sécurité générale
ATTENTION — Cet appareil est conçu pour fonctionner dans un foyer
domestique et dans les environnements de type suivant :
-locaux de cuisine et équipements vendus dans le commerce,
environnements de travail et bureaux ;
-structures de type Bed and Breakfast;
-bâtiments de ferme et hôtels, motels et autres organismes accueillant
des clients ;
-cuisine industrielle et autres applications non destinées à la revente.
ATTENTION — Ne rangez jamais de substances inflammables tels que
des aérosols à l’intérieur de cet appareil, car elles pourraient s’y
déverser.
ATTENTION — Si le cordon d’alimentation est endommagé, vous devez
le remplacer immédiatement auprès de votre fabricant, ou d’un
revendeur qualifié, afin d’éviter tout risque d’électrocution.
ATTENTION — Maintenez les ventilations bien ouvertes, et vérifiez bien
que l’air peut circuler par les ouvertures.
ATTENTION — N’endommagez pas le circuit de réfrigération.
ATTENTION — N’utilisez pas d’appareils électriques à l’intérieur du
compartiment, sauf si ces derniers sont tolérés par le fabricant.
ATTENTION — Le système réfrigérant et isolant contiennent des gaz
inflammables. Lorsque vous mettez le système au rebut, faites-le auprès
d’un centre de collecte agréé. N’exposez jamais l’appareil aux flammes.
Liquide réfrigérant
De l’isobutane réfrigérant (R600a) est utilisé dans le circuit réfrigérant du
système ; Il s’agit d’un gaz naturel hautement inflammable, et non
dangereux pour l’environnement. Pendant les transports et l’installation
du système, vérifiez qu’aucun des composants du circuit de réfrigération
ne soit endommagé. Le réfrigérant (R600a) est un liquide inflammable.
Attention : Risque d’incendie
Si le circuit de réfrigération était endommagé :
▪ Evitez les flammes nues et toute source d’inflammation.
▪ Ventilez bien la pièce où se trouve l’appareil.
Il est dangereux de modifier la composition de cet appareil, de quelque
manière que ce soit.
Tout dommage fait au cordon peut provoquer un court- circuit, et/ou une
électrocution

11
Sécurité électrique
• Le cordon d’alimentation ne doit pas être rallongé.
• Vérifiez bien que la prise murale n’est pas endommagée. Une prise
murale en mauvais état pourrait entrainer une surchauffe du système
et son explosion.
• Vérifiez bien que vous pouvez accéder à la prise murale de l’appareil.
• Ne tirez jamais sur le câble principal.
• Si la prise murale est lâche, ne branchez pas le cordon. Il existe un
risque d’électrocution ou d’incendie.
• Vous ne devez jamais utiliser l’appareil si le cache de l’éclairage
intérieur n’est pas en place.
• Cet appareil fonctionne sur un courant à phase unique de
220~240V/50Hz.
• L’appareil ne doit utiliser ni prolongateur, ni adaptateur, ni prise
multiple. L’appareil doit être impérativement relié à une prise
électrique disposant d’une mise à la terre au sol selon les normes
électriques en vigueur.
Utilisation quotidienne
• Cet appareil est destiné uniquement au stockage du vin.
• Ne stockez jamais de substances ou de liquides inflammables à
l’intérieur de l’appareil ; cela provoquerait un risque d’exposition.
• Ne faites pas fonctionner d’autres appareils électriques à l’intérieur de
cet appareil (mixeurs, turbines à glace électrique, etc).
• Lorsque vous débranchez l’appareil, tenez toujours la prise dans vos
mains et ne tirez pas sur le cordon.
• Ne placez pas d’éléments chauds ni de composants en plastique
dans cet appareil.
• Cet appareil doit être utilisé et traité selon certaines règles
spécifiques. Consultez les règles établies en matière de stockage.
• N’exposez pas l’appareil directement au soleil.
• Conservez les bougies, luminaires et autres flammes nues éloignées
de l’appareil, afin d’éviter les risques d’incendie.
• Cet appareil est destiné à ranger des boissons domestiques
traditionnelles.
• L’appareil est lourd. Soyez prudent lorsque vous le déplacez.
• N’utilisez jamais le socle, les clayettes, les portes, et autres éléments
similaires pour vous appuyer
• Pour éviter les chutes d’objets et empêcher de détériorer l’appareil,
ne surchargez pas les clayettes.

12
Attention! Nettoyage et entretien
• Avant tout entretien, débranchez l’appareil et coupez le courant.
• Ne nettoyez pas l’appareil avec des objets métalliques, un système à
vapeur, des huiles volatiles, des solvants organiques ou des
composants abrasifs.
• N’utilisez pas d’objets tranchants ou pointus pour retirer le givre
éventuel. Utilisez un grattoir en plastique.
Information importante à propos de l’installation !
• Attention ! Pour éviter que la cave à vin bascule il est important
de charger en priorité les emplacements situés au fond de la
cave. Les clayettes ne doivent pas être tirées ou laissées sorties
simultanément. Le poids des bouteilles peut entraîner un
basculement de la cave vers l'avant, il est primordial de répartir
le poids des bouteilles dans l'ensemble de la cave et la manier
avec précaution.
• Pour que les branchements électriques soient corrects, suivez bien
les consignes livrées dans ce manuel.
• Déballez l’appareil et vérifiez qu’il n’est pas endommagé
visuellement. Ne branchez pas l’appareil si ce dernier est
endommagé. Signalez tout dommage au point de vente où vous
l’avez acheté. Dans ce cas, conservez l’emballage.
• Il est recommandé d’attendre au moins vingt-quatre heures avant de
brancher l’appareil au courant, afin que le compresseur soit bien
alimenté en huile.
• Une bonne circulation de l’air est nécessaire, afin d’éviter les risques
de surchauffe. Pour que la ventilation soit suffisante, suivez bien les
consignes d’installation fournies. Attention ! Cet appareil de
réfrigération n'est pas destiné à être utilisé comme un appareil
intégrable ou encastrable.
• Évitez que l’appareil ne touche les parois murales et/ou ne soit en
contact avec des éléments chauds (compresseur, condensateur,
radiateurs, appareils de cuisson, sèche-linge…) afin d’éviter les
risques d’incendie et de surchauffe de l’appareil. Respectez toujours
bien les consignes d’installation.
• Vérifiez bien que les prises sont accessibles une fois l’appareil
installé.
• Veillez à ne pas coincer ou endommager le cordon d’alimentation
lors de la mise en place de l’appareil.
Dépannage et pieces détachées

13
• Tout opération électrique doit être effectuée par un technicien qualifié
et compétent.
• Cet appareil doit être dépanné par un Centre de Réparation Agréé, et
seules des pièces d’origine doivent être utilisées.
Les pièces de rechange esthétiques et fonctionnelles conformément au
RÈGLEMENT (UE) 2019/2019 (Annexe II, point 3.), sont mises à
disposition des réparateurs professionnels et utilisateurs finaux pour une
période 7 ans ou 10 ans (Liste en Annexe II, point 3.a.1 et 3.a.2) à
compter de la mise sur le marché de la dernière unité du modèle.
La liste des pièces de rechange et la procédure pour les commander
(accès professionnels / accès particulier) sont accessibles sur le site
internet suivant : www.interfroidservices.fr ou par voie postale à
l’adresse suivante : FRIO - Interfroid Services, 143 Bd Pierre
Lefaucheux - 72230 ARNAGE Pour les autres pièces détachées
fonctionnelles et non spécifiées dans le règlement UE 2019/2019, elles
sont disponibles pour une durée de 10 ans.
La garantie constructeur est de 1 an pièces fonctionnelles.

14
R600a
Instructions de sécurité
Attention : Ne pas utiliser de dispositifs
mécaniques ou d'autres moyens pour
accélérer le processus de dégivrage,
autres que ceux recommandés par le
fabricant.
Attention : N’obstruer aucune grille de
ventilation de l’appareil.
Attention : Ne pas stocker de
substances explosives comme les
bombes d'aérosol avec un propulseur
inflammable dans cet appareil.
Attention : Ne pas endommager le
circuit frigorifique de l’appareil.
Attention : Les unités de réfrigération
fonctionnant avec de l'isobutane
(R600a), elles ne peuvent être placées
dans une zone avec des sources
d'ignition. Le type de fluide frigorigène
est indiqué sur la plaque signalétique de
l'armoire.
Attention : Ne pas utiliser d'appareils
électriques dans les compartiments de
l'appareil, sauf si elles sont du type
recommandé par le fabricant.
Cet appareil est conforme aux exigences des Directives Européennes et à leurs modifications
éventuelles.

15
2. PLAQUE SIGNALÉTIQUE
La plaque signalétique collée à l’intérieur ou à l’arrière de l’appareil (selon modèle) comporte toutes
les informations spécifiques à votre appareil.
Nous vous conseillons de noter son numéro de série sur ce livret avant son installation, pour vous y
référer si nécessaire ultérieurement (intervention technique, demande d’assistance, etc.).
En effet, une fois l’appareil installé et chargé, son accès y est plus compliqué.
ATTENTION : aucune assistance ne pourra vous être donnée sans ces informations.
3. DESCRIPTION PRODUITS
Pour en savoir plus sur votre produit, consulter la Base EPREL en ligne. Tel que défini dans le
règlement délégué (UE) 2019/2016 de la Commission, toutes les informations relatives a cet appareil
de réfrigération sont disponibles sur la Base EPREL (European Product Database for energy
labelling). Cette base vous permet de consulter les informations et la documentation technique de
votre appareil de réfrigération. Vous pouvez accéder à la Base EPREL en scannant le QR code
présent sur l'étiquette énergie de votre appareil ou en vous rendant directement sur :
www.ec.europa.eu et en renseignant le modèle de votre appareil de réfrigération.
Retrouver toutes les informations de la ECELLAR185
et sa notice téléchargeable sur le site www.lasommeliere.com

16
Capacité annoncée
▪ La cave ECELLAR185 a une capacité de 185 bouteilles
▪ La cave est équipée de 14 clayettes connectées
▪ Chaque clayette permet de stocker 12 bouteilles
▪ La cave dispose d’une zone de stockage pouvant accueillir 17 bouteilles
La capacité annoncée est la capacité maximale calculée avec le nombre de clayettes vendues avec
la cave. Les clayettes connectées de la E-cellar ont été dimensionnées pour recevoir une bouteille
format champagne. Cette particularité permet de stocker tout type de bouteille 75cl, tel que :
Bordelaise, Champenoise, Bourgogne, Alsace, ainsi que des formats atypiques Prosecco, Sachetto,
Mateus etc…
Attention ! Le diamètre maximum des bouteilles placées sur les clayettes, doit être de 9 cm.
Dans le cas où vous souhaitez faire vieillir des bouteilles de formats différents, nous vous
recommandons d’alterner une bouteille type bordeaux standard entre vos bouteilles de formats plus
imposants, cette recommandation vous permettra d’éviter toute problématique de stockage.
Il est en effet possible que la juxtaposition de bouteilles au format atypique ou imposant vous
contraigne à utiliser que partiellement les emplacements de votre clayette. Alterner une bouteille
standard (bordeaux 75cl) avec une bouteille atypique ou imposante vous permettra d’utiliser
l’ensemble des emplacements disponibles de votre clayette.
Si malgré tous nos efforts, certains formats de bouteilles ne sont pas détectés par les clayettes de la
E-cellar, veuillez suivre les instructions suivantes :
Si une bouteille est trop grande et ne passe pas entre deux clayettes, nous vous conseillons de la
déposer :
▪ Sur la première clayette de votre cave (en partant du haut vers le bas)
▪ Dans la zone de stockage située dans le bas de la cave
Recommandations d’agencement
L’agencement initial, des équipements de votre appareil (clayettes…), est recommandé pour que
l’énergie soit utilisée le plus rationnellement possible par l’appareil de réfrigération. Tout changement
de cet agencement peut impacter la consommation énergétique de l’appareil.
Caractéristiques de Radiofréquence
Par la présente, La Sommelière déclare que l'équipement radio ECELLAR185 est conforme à la
directive 2014/53/UE et à toutes les directives européennes applicables. Directive consultable sur :
https://eur-lex.europa.eu/legal-content/FR/TXT/?uri=CELEX%3A32014L0053&qid=1617885639187
• Bande radio : 2400MHz à 2483.5MHz
• Puissance maximale :100mW
Le certificat CE est accessible et téléchargeable depuis le site La Sommelière :
https://www.lasommeliere.com/fr/155-ECELLAR185.html
4. INSTRUCTIONS D’INSTALLATION

17
Avant d’utiliser votre cave à vin
▪ Enlevez l’emballage extérieur et intérieur.
▪ Laissez votre appareil en position verticale au repos pendant environ 24h avant sa mise en
service. Cela permettra de réduire la possibilité d'un dysfonctionnement du système de
refroidissement dû au transport.
▪ Nettoyez l’intérieur à l’aide d’un chiffon doux et d’eau tiède.
▪ Lorsque vous installez votre appareil, merci de choisir un lieu autorisé.
▪ Placez votre appareil sur un sol qui est assez résistant pour le soutenir lorsqu’il est
entièrement chargé.
▪ Placez votre cave sur un sol qui est assez résistant pour la soutenir lorsqu’elle est
entièrement chargée.
▪ Veuillez ajuster les pieds de votre appareil afin que le devant de votre cave soit nivelé et que
l’arrière soit légèrement incliné vers l’arrière. Cette inclinaison permet de maintenir en place
les tiroirs ou clayettes malgré le poids des bouteilles. L’inclinaison garantie également la
bonne évacuation des eaux de condensation et la bonne étanchéité du joint de porte.
▪ Une ventilation adéquate est nécessaire, n’obstruez aucune sortie d’air.
▪ Cet appareil est destiné à être installé en pose libre. Il ne doit en aucun cas être
encastré ou intégré. Une bonne circulation de l’air, autour de votre appareil, doit être
respectée.
▪ Branchez la cave à une prise unique, laissez un espace de 50 mm entre l’arrière de la cave
et le mur et 100mm de chaque côté et au-dessus de votre appareil. Veillez à ajuster les pieds
de votre appareil afin que le devant de votre cave soit nivelé et que l’arrière soit légèrement
incliné vers l’arrière (l’utilisation d’un niveau à bulles est conseillée). Ceci évitera tout
mouvement dû à l’instabilité, générateur de bruit et de vibration et assurera la parfaite
herméticité de la porte.
▪ Cet appareil est uniquement réservé au stockage de vins.
▪ Cet appareil utilise du gaz réfrigérant inflammable, veuillez donc à ne jamais endommager le
tuyau de refroidissement pendant le transport.
Attention
▪ Stockez des bouteilles fermées.
▪ Ne surchargez pas l’appareil.
▪ N’ouvrez pas la porte plus que nécessaire.
▪ Ne couvrez pas les clayettes avec des feuilles d’aluminium ou tout autre matériau qui pourrait
empêcher une bonne circulation de l’air.
▪ Si la cave à vin doit être laissée vide pendant une longue période, il est suggéré de
débrancher l’appareil et, après un nettoyage très soigneux, de laisser la porte entrouverte
pour laisser l’air circuler et prévenir la formation de moisissures et d’odeurs.
ATTENTION : merci d’éloigner l’appareil de toute substance qui pourrait entrainer un risque
d’incendie.

18
Installer votre cave à vin
Attention ! Pour éviter que la cave à vin bascule il est important de charger en priorité les
emplacements situés au fond de la cave. Les clayettes ne doivent pas être tirées ou laissées
sorties simultanément. Le poids des bouteilles peut entraîner un basculement de la cave vers
l'avant, il est primordial de répartir le poids des bouteilles dans l'ensemble de la cave et la
manier avec précaution.
Alimentation
Brancher la cave à vin sur une prise de courant type E, murale et unique.
La cave doit être branchée sur une prise seule et facile d’accès.
Toutes questions relatives à la puissance et/ou à la mise à la terre doivent être traitées par un
personnel qualifié (électricien, service agréé).
Emplacement
• Attention ! La cave doit être placée dans un environnement propre (non poussiéreux), hors
gel, hors d’une source de chaleur, type : radiateur, four, lumière du soleil, etc… elle ne doit
pas être installée en extérieur.
• Placez la cave dans un endroit assez résistant pour supporter le poids en charge pleine.
• Pour la mettre à niveau ajustez la hauteur des pieds réglables au-dessous de la cave.
Cet appareil est indiqué pour un fonctionnement dans des pièces dont la température ambiante est
bien spécifique, cette classe climatique est indiquée sur la plaque signalétique.
N : Cet appareil de réfrigération est destiné à être utilisé à des températures ambiantes comprises
entre 16°C et 32 °C. La température ambiante a une incidence sur la température intérieure et
l’hygrométrie de votre cave.
La température de l’appareil est réglable entre 5°C et 20°C. Le réglage de la température est effectué
par un thermostat. La modification de la température génère une consommation énergétique plus
forte.
L'appareil garantit que la température est maintenue tant qu'il est en fonctionnement et qu'il est utilisé
dans des conditions normales d'utilisation. La température à l'intérieur de l'appareil et sa
consommation énergétique peuvent être influencés par de nombreux facteurs : température
ambiante, exposition au soleil, nombre d'ouvertures de porte et quantité stockée… Les légers
changements de température sont parfaitement normaux et correspondent aux cycles de froid de
l’appareil. Mais ces variations n’affectent en rien la température de conservation des vins, ces
variations étant trop courtes pour un échange thermique avec les bouteilles.

19
Installation de la poignée
- Retirer la poignée et ses deux vis du sachet en plastique présent à l’intérieur de la cave.
- Avant d’installer la poignée, vous devez retirer le joint de la porte sur une partie. Cela n’altère
en rien l’étanchéité du joint si vous prenez soin de le retirer correctement.
- Décollez le joint depuis l’angle de la porte jusqu’au niveau nécessaire puis insérez les deux
vis dans les trous de poignée.
- Vissez la poignée et remettez le joint dans la fente de la porte pour finir par l’angle.
Portée du wifi de la cave
Attention ! La cave ECELLAR fonctionne avec une connexion Wifi.
Attention ! Il est de la responsabilité de l’utilisateur de s’assurer que le réseau wifi est
suffisant (débit /puissance du signal) pour le bon fonctionnement de la cave connectée.
• L’utilisation d’un amplificateur/répéteur wifi peut être requis dans le cas d’une connexion à
faible débit.
Dans le cas d’une perte de connexion internet de la E-cellar, celle-ci sauvegarde jusqu’à 100
événements, dès lors que la connexion est revenue.
Les informations et une mise à jour des stocks seront envoyées au serveur.
Au-delà de 100 événements, les plus anciens sont effacés par les nouveaux.
L’utilisateur pourra les apercevoir dans la rubrique « Alertes » de son application.
En cas de coupure de courant la cave ne peut prendre en compte aucun mouvement, et perd aussi
les évènements qu’elle aurait en attente de synchronisation avec le serveur.
Au redémarrage après une coupure, c’est la dernière version enregistrée sur le cloud qui sera utilisée
pour représenter le contenu actuel de la cave. Il est donc important d’éviter toute modification du
contenu de la cave pendant une coupure de courant afin de ne pas générer des anomalies entre
votre registre digital et le contenu de votre cave.
Portée du bluetooh de la cave
Attention ! La cave ECELLAR fonctionne avec le bluetooth lors de la phase d’appairage de la cave
au réseau Wifi. Lors de son utilisation quotidienne, la cave communique uniquement à travers le
réseau Wifi.
La portée du Bluetooth de la cave est de 3m maximum porte fermée.

20
Hygrométrie
Un bac de récupération d’eau a été dessiné à l’intérieur de votre cave sur le dessus de la marche du
compresseur, vous pourrez y apercevoir régulièrement de l’eau dedans dans le but d’aider au
maintien du taux d’hygrométrie dans votre cave.
o Si trop d’eau est présente dans ce bac, alors le surplus est évacué par le trou
d’évacuation des eaux de condensation vers un bac de récupération situé au-dessus
du compresseur.
o Pensez à incliner légèrement votre cave en arrière en dévissant les deux pieds avant
pour garder une évacuation de l’eau convenable.
o Le trou d’évacuation ne doit pas être obstrué.
Réservoir d’eau
Trou d’évacuation des eaux vers
le compresseur

21
5. INSTRUCTIONS D’UTILISATION
Panneau de contrôle
La cave ECELLAR185 est équipée d’un panneau de contrôle électronique avec écran LCD.
Le panneau de contrôle est situé à l’intérieur de la cave sur son côté gauche
L’écran se verrouille automatiquement après 15 secondes d’inactivité, dans ce cas l’icône B sera
visible sur l’écran.
Le rétro-éclairage de l’écran d’affichage s’éteindra automatiquement après 15s d’inactivité après le
verrouillage du display, celui-ci se rallumera dès que vous appuierez de nouveau sur une touche.
Lorsqu’un code erreur ou une alarme sont présents, l’écran est automatiquement déverrouillé.
REPERE
DESCRIPTION
A
Indique le mode de la cave : MONO (mono-température) ou AUTO
(multi-température)
B
Voyant serrure, il indique que le pavé tactile est verrouillé
C
Voyant lumière, il indique si la lumière est allumée
D
Température programmée à l’intérieure de la cave. Par défaut, la e-
Cellar affiche la température de consigne sur l’écran digital,
cependant vous pouvez consulter la température réelle présente
dans votre cave en maintenant les touches I + J pendant 3
secondes, puis la température réelle lue par la sonde va s’afficher
sur l’écran et clignoter. Relacher les touches et l’écran reviendra à
l’affichage de la température normal.
E
Voyant d’unité de mesure de la température indiqué en degrés
Celsius par le symbole °C ou en Fahrenheit par le symbole °F.
F
Bouton de changement de l’unité de mesure de la température :
- Degré Celsius indiqué par le symbole « °C » ou
- Fahrenheit indiqué par le symbole « F »
G
Sélection du mode de la cave ; par défaut, la cave est en mode
MONO, appuyer une fois pour mettre la cave en mode AUTO
(utilisation multi-température)
H
Bouton pour activer / désactiver la lumière
I
Bouton de réglage de la température. Appuyer sur ce bouton pour
augmenter la température jusqu’à obtenir la température désirée.
La température de la cave est réglable entre 5°C et 20°C en mode
MONO (mono-température). En mode AUTO (multi-température), la
cave gère seule la température intérieure de la cave, ces touches
ne fonctionnent pas sous ce mode.
J
Bouton de réglage de la température. Appuyer sur ce bouton pour
diminuer la température jusqu’à obtenir la température désirée.
La température de la cave est réglable entre 5°C et 20°C en mode
MONO (mono-température). En mode AUTO (multi-température), la
cave gère seule la température intérieure de la cave, ces touches
ne fonctionnent pas sous ce mode.
K
Appuyer sur ce bouton pour allumer ou éteindre la cave sans la
débrancher.
L
Appuyer sur ce bouton pour déverrouiller - verrouiller le panneau de
commande. Appuyez 3 secondes sur le bouton pour verrouiller ou
déverrouiller l’écran. Sans action de votre part l’écran se verrouille
automatiquement après 15 secondes.

22
Alarmes
Pour garantir une sécurité totale de vos vins ; votre cave est équipée d’un système d’alarmes ;
- Alarme de température haute
- Alarme de température basse
Ces alarmes sont pré-programmées. Si après 12 heures de fonctionnement, la cave détecte une
différence de température de ± 4°C par rapport à la température de consigne, alors la cave affichera
un code erreur correspondant à l’alarme haute ou basse et une alarme sonore retentira. En cas de
défaut, le compresseur fonctionnera par court-cycles de 10 minutes ON et 10 minutes OFF.
Pour désactiver l'alarme sonore, appuyer sur une des touches du bandeau de commande.
Si une de ces alarmes est activées, veuillez contacter le service après-vente.
Boitier maitre
Votre cave est équipée d’un boitier maitre. Ce boitier est placé à l’intérieur de la cave, en haut à
droite ; il permet la connectivité entre les clayettes et l’application smartphone VINOTAG® via des
transmissions de données par le Wifi.
Attention ! Il ne faut en aucun cas manipuler ce boitier, ni l’endommager.
Ce boitier est muni d’un témoin lumineux placé sous le boitier qui donne des informations sur l’état de
la cave et d’un bouton poussoir qui sert au « reset » de la connexion wifi de la cave au réseau.
Lorsque le témoin lumineux clignote en continu cela indique que la cave n’est pas connectée ou a
perdu sa connexion à un réseau Wifi.
Ce boitier est également muni d’un QR code situé sous sa tranche inférieure (QR code également
accessible sur la fiche qualité fournie lors de l’achat de votre cave).
• Première utilisation
Le QR code sert à l’appairage de la cave (en Bluetooth). Vous devrez scanner ce QR code lors de la
première utilisation pour connecter votre cave au réseau wifi.
Attention le scan du QR code ainsi que la procédure d’appairage ne sont à réaliser
qu’une seule fois ! Si vous faites cette opération sur une cave déjà associée à un
utilisateur, vous devenez le nouveau propriétaire de celle-ci et écrasez toutes les
données précédemment associées à la cave. Vous aurez ainsi accès à une cave vide
et l’ancien propriétaire n’aura plus aucun accès à la cave. Attention, cette action est

23
irréversible et les données écrasées ne pourront être récupérées.
Attention ! Lorsque le module maitre n’est pas connecté à un réseau Wifi, une LED rouge clignote de
façon continue en dessous de celui-ci.
Attention ! Il ne faut pas retirer les différents QR codes présents dans la E-cellar, ceux-ci sont utiles
en cas d’appairage avec la cave ou de maintenance.
Attention ! Pour garantir la bonne utilisation de votre cave vous devez la disposer dans un endroit
garantissant une réception wifi de bonne qualité.
• Reset de la connexion au réseau wifi ou changement d'opérateur
Pour effectuer un reset Wifi, appuyez sur le bouton poussoir situé sous le boitier maitre pendant 3
secondes. A l’aide d’une main, veuillez maintenir fermement le boitier en plastique par le dessus et
appuyer sur le bouton à l’aide de votre pousse par le dessous. Cette opération est utile en cas de
changement de box internet.
Clayettes connectées
Votre cave est équipée de 14 clayettes connectées. Ces clayettes ont été développées, fabriquées et
assemblées en France.
Les clayettes communiquent avec le boitier maitre de votre cave. Le rangement des bouteilles sur les
clayettes se fait tête bêche, sur les 12 emplacements définis.
▪ Les goulots des bouteilles doivent reposer sur la barre centrale, au niveau des emplacements
prédéfinis. Le témoin lumineux correspondant à la position clignote 2 fois pour indiquer la
bonne détection de votre bouteille. Si la bouteille est mal déposée, il est possible que le
goulot ne soit pas détecté par le capteur, replacer la bouteille correctement sur la clayette
pour garantir sa bonne détection. La validation d'une opération est confirmée par un double
clignotement du témoin lumineux
▪ Les bouteilles reposant sur les clayettes seront légèrement inclinées de 4° (quatre degrés)
sur la barre centrale, ceci est normal et facilite la détection des goulots par les capteurs.
▪ Il est important que les goulots de bouteilles reposent de façon droite sur la barre centrale,
les goulots ne doivent pas être surélevés ou positionnés en biais sur la barre centrale,
autrement cela peut impacter la détection des bouteilles.
▪ Attention ! Pour éviter que la cave à vin bascule il est important de charger en priorité les

24
emplacements situés au fond de la cave. Les clayettes ne doivent pas être tirées ou laissées
sorties simultanément. Le poids des bouteilles peut entraîner un basculement de la cave vers
l'avant, il est primordial de répartir le poids des bouteilles dans l'ensemble de la cave et la
manier avec précaution.
▪ Attention ! Ne pas tirer les 14 clayettes connectées en même temps une fois chargées.
▪ Attention ! En cas de dépôt de bouteilles sur une clayette, réaliser l’opération délicatement
afin de ne pas endommager le support central.
▪ Attention ! Les clayettes ne sont pas faites pour accueillir des bouteilles avec un diamètre
supérieur à 9 cm.
▪ Attention ! En cas de casse de bouteille, il est important de retirer les bouteilles et de
nettoyer les orifices de la barre centrale des clayettes ou sont placés les capteurs, à l’aide
d’un chiffon doux et sec. Veillez à rescanner vos bouteilles avant de les replacer dans votre
cave.
▪ Attention ! Lors de la première utilisation, l’utilisateur doit retirer le film plastique protecteur
placé sur l’avant de chaque clayette.
Les clayettes disposent de témoins lumineux (LED) qui permettent d’indiquer à l’utilisateur :
- Bouteille(s) recherchée(s)
- Emplacement recommandé (se référer au paragraphe sur la fonction E-Sommelier)
- La détection des bouteilles par la cave lors d’un retrait ou d’un ajout de bouteille
Attention : dans un cas particulier il est possible que des LED restent allumées sur les frontons des
clayettes, une temporisation de 5 minutes est programmée dans le système électronique, passé ce
délais les LED s’éteindront automatiquement

25
Modes d’utilisation
Votre cave comporte deux modes de température :
▪ Le mode « mono-température » est activé par défaut. Il permet le
choix d’une température unique dans toute la cave comprise entre +5
et +20°C.
Dans ce mode les ventilateurs sont activés pour garantir le brassage de
l’air dans la cave.
La température affichée sur l’écran digital correspond à la température
de consigne et le message « MONO » est affiché.
▪ Le mode « multi-température » permet d’obtenir différentes
températures à l’intérieur de la cave, sous forme d’un dégradé allant
d’une température plus chaude en haut de la cave, tempérée au milieu
et plus froide dans le bas de la cave.
Dans ce mode les ventilateurs sont désactivés.
La température de consigne est fixe et ne peut pas être modifiée,
l’écran affiche « AUTO » ; l’appareil gère automatiquement la
température. Aucun réglage n’est nécessaire.
Voici les températures qui peuvent être atteintes en mode multi-température dans des conditions
normales d’utilisation soit une température ambiante de 25°C maximum (vous référer à la section
« Installer votre cave à vin »).
La répartition des températures indiquées dans Le tableau est donnée à titre indicatif, car des
variations peuvent intervenir entre les différents niveaux selon les cycles de froid, le nombre de
bouteilles chargées dans la cave et la température ambiante extérieure. Les flux d’air à l'intérieur de
la cavité seront influencés par ces différents facteurs.

26
Clayette
(haut vers le bas)
Gamme de
température
1
14°C à 18°C
Adapté pour le stockage de Vins rouges pour
dégustation.
2
3
4
10°C à 14°C
Adapté pour le vieillissement de vos vins et
champagnes.
5
6
7
8
9
10
11
5°C à 10°C
Adapté pour le stockage de Vins blancs ou Rosés et
champagne pour température de dégustation.
12
13
14
15
L'appareil garantit que la température est maintenue tant qu'il est en fonctionnement et qu'il est utilisé
dans des conditions normales d'utilisation. La température à l'intérieur de l'appareil et sa
consommation énergétique peuvent être influencés par de nombreux facteurs : température
ambiante, exposition au soleil, nombre d'ouvertures de porte et quantité stockée… Les légers
changements de température sont parfaitement normaux.
▪ Le Mode démo
Un mode démo est présent sur votre appareil, lorsque ce mode est activé, le compresseur, les
ventilateurs et les alarmes sont désactivés, cependant la cave garde ses fonctions d’affichage et de
lumière.
Pour activer ce mode vous devez rester appuyer sur les touches lumière (H) + C/F (F) pendant 3
secondes, puis la température affichée ou l’icône AUTO va clignoter 5 fois.
Pour quitter le mode démo, refaire la même manipulation.
▪ Le mode « ESOMMELIER® »
Le mode ESOMMELIER® est une fonction de placement assisté de vos bouteilles utilisable
uniquement si vous possédez une cave connectée LA SOMMELIERE et un compte VINOTAG® actif.
Cette fonction vous recommande l’emplacement idéal pour stocker votre vin.
Lorsque vous scannez une bouteille, VINOTAG® identifie le type de vin ; en fonction de chaque type
de vin, des températures de stockage sont recommandées pour une conservation optimale.
Certains emplacements de votre cave sont donc plus adaptés selon le type de vin.
En utilisant ce mode, la cave vous propose des emplacements disponibles et adaptés à la bouteille
de vin scannée ; des témoins lumineux s’allument dans la cave pour vous indiquer ces emplacements
dans la limite de 12 emplacements simultanés maximum.

27
Système Hiver
Votre cave est munie d’un système de réchauffement automatique également appelé « système hiver
». Lorsque la température mesurée par la sonde de la cave est trop froide par rapport au point de
consigne, alors la résistance de la cave est activée pour permettre le réchauffement de la
température.
Ce système s’active et se désactive automatiquement et sans intervention de l’utilisateur. L’activation
ou la désactivation automatique du système Hiver n’engendre aucun impact sur la conservation de
votre vin.
L’application VINOTAG®
La cave ECELLAR185 est compatible avec l’application de gestion de cave à vin VINOTAG®.
Pour utiliser votre cave de manière connectée, il est nécessaire d’avoir :
▪ Une source d’alimentation électrique pour alimenter la cave
▪ Avoir téléchargé l’application VINOTAG® depuis l’App Store ou Google Play Store et s’être
créé un compte utilisateur
▪ Une connexion internet stable (Wifi)
▪ Un modèle de cave ECELLAR
Fonctions de VINOTAG®
L’application VINOTAG® vous permet de :
▪ Créer, personnaliser et gérer vos caves à vin
▪ Ajouter/retirer des bouteilles
▪ Consulter votre inventaire de vins (bouteilles de vins présentes dans votre cave) et créer vos
propres fiches vins. VINOTAG® s’associe à VIVINO®, dans le cadre de son option Premium,
pour vous permettre d’exporter des fiches vins détaillées issues de la base de données
VIVINO®.
▪ Créer et consulter votre vinothèque. Le partenariat exclusif VINOTAG® - VIVINO® vous
permet de sauvegarder et consulter des fiches vins détaillées issues de la base de données
VIVINO®
▪ Partager la visualisation de votre/vos cave/s avec vos proches
▪ Être alerté de la date d’apogée de vos vins, de la nécessité de changer le filtre de votre cave
ou d’un niveau de stock bas de votre vin préféré
▪ Identifier en un clin d’œil dans votre cave une/des bouteille/s précise/s grâce à un système de
témoins lumineux.
▪ Repérer les emplacements disponibles en un clin d’œil dans votre cave grâce à un système
de témoins lumineux.

28
Créer un compte VINOTAG®
▪ Télécharger l’application VINOTAG® depuis l’App Store ou Google Play
Store selon votre type de téléphone.
▪ Créer un compte de manière manuelle ou via Facebook ou via son
compte Apple / Google Play
▪ Compléter les champs obligatoires : Prénom ; Nom ; Date de naissance ;
Pays ; Département
▪ Cocher la case « J’accepte les conditions générales d’utilisation »
▪ Cliquer sur « Finaliser mon inscription »
Vous possédez désormais un compte VINOTAG® pensez à sauvegarder vos
identifiants et mot de passe.
Menu VINOTAG®
Lorsque l’application est ouverte, le menu suivant est visible :
Ma cave Mes vins Alertes Profil
▪ MA CAVE : Permet de visualiser votre ou vos cave/s à vin.
▪ MES VINS : Permet de consulter votre vinothèque.
▪ ALERTES : Permet de consulter les alertes de votre cave
▪ PROFIL : Permet de compléter-visualiser les informations reliées à votre compte
Page « MA CAVE »
Cette page vous permet de visualiser le contenu de votre ou vos cave/s à vin.
▪ Attention ! si votre cave est vide, vous ne pourrez la visualiser ; il est nécessaire d‘ajouter des

29
bouteilles pour accéder à la vue de votre cave.
▪ La cave peut être visible en mode liste ou en mode graphique. Le réglage du mode est
accessible via l’icône située en haut à droite de votre écran. Cet icone permet la bascule d’un
mode de visualisation à l’autre. Par défaut, les caves de catégorie « cave connectée » ont
un affichage en mode liste.
Détails icone vue de la cave :
Mode liste ou Mode graphique
▪ L’icône de recherche située en haut à droite de votre écran permet de rechercher une
bouteille de vin dans votre cave ; il vous suffit d’écrire des éléments concernant la bouteille
recherchée (nom de domaine, type de vin, année…)
▪ L’icône située en bas à droite de votre écran vous permet d’ajouter des bouteilles de vin.
(voir la section « ajouter une bouteille de vin » pour plus de renseignements)
▪ Attention ! Dans le cas où vous possédez plusieurs caves, vous pouvez basculer d’une cave
à l’autre via le nom de votre cave située en haut à gauche de votre écran. Lorsque vous
cliquez sur le nom de votre cave un pop-up vous demande de sélectionner la cave que vous
souhaitez visualiser. Cliquez dans la liste de vos caves sur le modèle à visualiser.
Mode liste :
o Mode simplifié d’affichage. Une liste permet de consulter les
vins conservés dans votre cave. Les vins sont classés par
ordre alphabétique.
o Le mode liste indique pour chaque vin : le nom du vin, son
domaine, sa date, sa couleur, son type et enfin la photo de la
bouteille.
o Appuyer sur un vin permet d’accéder à sa fiche vin.
o Un indicateur est présent sur la droite de votre écran. Il
indique pour chaque vin le type de vin. Les types de vin sont
identifiables par une pastille colorée. (Pastille rouge : indique un
vin rouge / Pastille jaune : indique un vin blanc / Pastille saumon :
indique un vin rosé).
Mode graphique :
o Une vue graphique de la cave permet de visualiser le
remplissage de la cave en indiquant par des pastilles les
bouteilles stockées.
o Les vins sont classés par clayette.
o L’utilisateur peut voir, déplacer ou supprimer une bouteille.

30
▪ Appuyer sur une bouteille pour accéder à sa fiche vin
▪ Un indicateur est présent sur la gauche de votre écran. Il indique pour chaque clayette le
nombre de bouteilles par type de vin. Les types de vin sont identifiables par une pastille
colorée.
Pastille rouge : indique un vin rouge
Pastille jaune : indique un vin blanc
Pastille saumon : indique un vin rosé
Page « MES VINS »
Cette page vous permet de visualiser votre vinothèque. L’espace vinothèque vous permet de :
▪ Consulter vos vins consommés, tous les vins ajoutés (encore présents ou non) dans votre
cave sont automatiquement ajoutés dans votre espace vinothèque.
▪ Créer une wishlist ; vous pouvez enregistrer des vins dégustés chez des amis ou que vous
souhaitez acheter. L’espace vinothèque vous permet de créer une liste d’envies.
▪ L’icône de recherche situé en haut à droite de votre écran permet de rechercher une
bouteille de vin dans votre vinothèque ; il vous suffit d’écrire des éléments concernant la
bouteille recherchée (nom de domaine, type de vin, année…)
▪ Pour ajouter une bouteille dans votre vinothèque suivez la procédure « Ajouter des
bouteilles » et cliquer sur « ajouter à ma vinothèque »
▪ Appuyer sur un vin pour consulter sa fiche vin (pour plus d’informations suivez la procédure
« consulter une fiche vin »)
Page « ALERTES »
Cette page vous permet de visualiser les alertes reliées à votre cave ; une pastille
rouge à côté de l’icône vous indique d’une alerte non-lue.
Les alertes sont classées de manière chronologique.
Lorsque vous disposez de plusieurs caves, il est possible de filtrer par cave
(icone filtre situé en haut à gauche de votre écran).
Un champ de recherche vous permet de filtrer vos alertes pour retrouver un
évènement précis.
▪ Alerte changement de filtre : votre cave vous alerte lorsqu’il est nécessaire de changer le
filtre à charbon. La date de changement de filtre est automatiquement établie lorsque vous
enregistrez une nouvelle cave. Attention ! lorsque vous changez votre filtre, n’oubliez pas de
renseigner cette action dans votre cave pour que le compteur se remette à la date du jour.
(par défaut un changement de filtre doit être fait tous les ans)

31
▪ Alerte stock : vous avez la possibilité de programmer des alertes de stock sur un vin précis
et selon une quantité définie. L’application vous alerte que le vin en question va arriver en
rupture. (la quantité « rupture » est définie par vos soins, l’alerte peut être établie à un
nombre de bouteilles.)
▪ Alertes techniques : ces alertes vous indiquent un problème technique ou une action
effectuée dans la cave : bouteille consommée ; bouteille ajoutée ; cave créée ; cave rejointe ;
utilisateur X a rejoint votre cave… Dans le cas d’un problème technique, contacter un
technicien agréé. Les alertes sont présentées sous forme de liste où il est indiqué le type
d’alerte, la date, l’heure, le numéro de la clayette concernée, le nom de la cave concernée.
Page « PROFIL »
Cette page vous permet de visualiser, compléter ou modifier les informations reliées à votre compte
VINOTAG® :
▪ Modifier mes informations : pour modifier vos informations
d’inscription (nom, prénom, date d’anniversaire, pays, département)
ou supprimer votre compte. Pour accepter de recevoir les actualités
et autres informations commerciales VINOTAG.
▪ Je deviens premium : pour souscrire à l’option premium de
VINOTAG® et bénéficier de recharge de scans. Ces scans
permettent d’enregistrer directement les fiches VIVINO® dans votre
cave et de ne plus avoir à compléter les fiches vins de manière
manuelle (se référer au processus « compte premium »).
▪ Mes caves : vous permet de visualiser, modifier, partager,
supprimer, d’ajouter ou de mettre en maintenance vos caves. Il
vous permet également de consulter les caves qui ont été
partagées avec vous.
▪ Mes invitations : vous permet de consulter vos invitations.
▪ Contact : vous permet de contacter le service client
VINOTAG® une liste déroulante permet de sélectionner le sujet de
votre demande.
▪ Conditions générales d’utilisation : vous permet de consulter les
Conditions générales d’utilisation VINOTAG®
▪ Mentions légales : vous permet de consulter les Mentions
légales VINOTAG®
▪ Se déconnecter : vous permet de vous déconnecter

32
Ajouter une cave
Vous possédez désormais un compte VINOTAG® pour ajouter votre
première cave ou une nouvelle cave (l’application vous offre la possibilité de
gérer plusieurs caves parmi une sélection de modèles).
Attention ! Vous ne devez en aucun cas quitter l’application lors de l’ajout
d’une cave.
▪ Ajout d’une première cave : la création de votre cave est
obligatoire à la création de votre compte, suivez les différentes
étapes ci-dessous.
▪ Ajout d’une nouvelle cave : vous souhaitez gérer depuis votre
application une nouvelle cave, rendez-vous sur la page « profil » ->
« mes caves » et cliquer sur le bouton « ajouter une cave » ; suivez
les différentes étapes ci-dessous.
Ajout d’une « Cave connectée »
▪ Définir le type de cave « cave connectée » ou « cave non connectée ». Le modèle
ECELLAR185, fait parti de la catégorie « cave connectée ». Cliquez sur « cave connectée ».
▪ Scannez un des QR code de votre cave pour permettre à l’application de l’identifier et de s’y
connecter. Le QR code se situe à l’intérieur de votre cave, sous le boitier maitre placé en
haut à droite de la cave et en bas de la fiche qualité fournie avec votre cave lors de son
achat. Privilégier le scan de ce dernier, plus accessible, pour connecter votre cave en toute
facilité.
▪ L’application vous demande d’activer le bluetooth ; son activation est nécessaire pour
configurer la cave.
▪ Une fois votre cave connectée au bluetooth, l’application vous demande de sélectionner un
réseau Wifi ou d’utiliser un protocole WPS :
o Dans le cas d’un réseau Wi-Fi, le mot de passe du routeur Wi-Fi est demandé. Si la
connexion en Wi-Fi échoue, vérifiez le mot de passe et/ou vérifiez la distance entre

33
votre cave et votre routeur Wi-Fi. Une distance trop importante ou des murs trop
épais peuvent bloquer la connexion. Rapprochez la cave du routeur Wi-Fi pour
permettre sa connexion.
o Pour le WPS, une barre de chargement apparaît durant toute la durée du scan. Si
aucun réseau WPS n’a été trouvé après plusieurs secondes, une bannière d’erreur
s’affiche en haut de l’écran, et l’application revient sur le choix Wi-Fi / WPS.
Partager une cave
En tant que propriétaire d’une cave, vous pouvez inviter d’autres personnes à
rejoindre votre cave. La consultation de votre cave nécessite que l’invité se créé
un compte VINOTAG®.
Pour inviter une personne :
▪ Allez sur la page « mon profil » : « mes caves »
▪ Cliquer sur le bouton “Partager ma cave”,
▪ Indiquer l’adresse mail de la personne que vous souhaitez inviter.
▪ Une bannière de confirmation apparait en haut de votre écran pour vous
confirmer l’envoi de votre invitation
Lorsque vous partagez votre cave ;
▪ Un email est envoyé à la personne pour lui indiquer qu’elle a été invitée et lui propose de
télécharger l’application. Si elle ne possède pas de compte, elle pourra voir les caves qu’on
lui a partagées juste après son inscription.
▪ Si la personne invitée possède déjà un compte, elle reçoit une notification lui indiquant qu’elle
a été ajoutée à une cave partagée.
Supprimer une cave
▪ Vous souhaitez supprimer une ou des caves.
▪ Allez sur la page « mon profil » : « mes caves »
▪ La liste de vos caves apparait ;
▪ Sélectionnez la cave que vous souhaitez supprimer : appuyer sur supprimer.
▪ Réitérer l’opération sur toutes les caves que vous souhaitez supprimer.
Attention ! si la cave possède au moins une bouteille, un pop-up apparaîtra pour vous demander de
confirmer cette action. Une fois la cave supprimée, il n’est plus possible de récupérer les informations
liées.
Attention ! vous ne pouvez pas supprimer une cave qui ne vous appartient pas. Lorsqu’une cave est
partagée avec vous et donc visible depuis la page « mon profil » : « mes caves » ; vous pouvez
arrêter le partage. Lorsque vous n’êtes pas propriétaire, le bouton “Supprimer” est un bouton
“Quitter”. Il vous permet de quitter la cave. Un pop-up apparaît afin de confirmer l’action.
Changer la configuration de la cave
Vous souhaitez modifier la configuration de votre cave différemment de sa configuration standard.
Attention ! pour une cave de la catégorie « cave connectée » ; la configuration standard ne
doit pas être modifiée. Les clayettes des « caves connectées » sont des clayettes intelligentes
reliées à la cave. Alimentées de manière électrique, leur modification/retrait doivent être
réalisés par un professionnel agréé.
Ajouter des bouteilles

34
Vous avez créé votre cave dans l’application VINOTAG® ; vous pouvez désormais ajouter des
bouteilles.
A NOTER : Synchronisation : Chaque mouvement ayant lieu dans une « cave connectée » est
stocké par cette dernière. Cela permet de garder un historique lorsque la cave n’est plus
connectée à internet. À la prochaine connexion au wifi et cloud, si des mouvements ont eu
lieu, une vue de synchronisation apparaît sur votre smartphone, afin de les récupérer et de les
enregistrer en base de données pour que le stock affiché soit à jour.
Création de cave Vue liste Vue graphique
▪ Cliquer sur « ajouter ma première bouteille » dans le cas d’une nouvelle cave ou « + »
▪ Prenez en photo l’étiquette de la bouteille que vous souhaitez ajouter dans votre cave. Une
fiche vin complétée apparait ; cette fiche est issue de la base de données VIVINO®. Vous
pouvez modifier ou compléter cette fiche vin. Attention ! Si la bouteille de vin scannée
n’est pas disponible sur la base de données VIVINO® ou si vous ne disposez pas
d’abonnement premium, vous devrez compléter de manière manuelle la fiche vin
associée à votre bouteille. Si vous le souhaitez, il est possible de ne pas prendre l’étiquette
en photo, dans ce cas, vous ne pourrez accéder à la base de données VIVINO®, vous
devrez donc compléter de manière manuelle la fiche vin associée à votre bouteille.
o Lors de l’ajout d’une bouteille, vous pouvez compléter / modifier la fiche vin associée ;
renseigner un commentaire sur la bouteille de vin, l’enregistrer en favori ou encore lui
attribuer une note.
o Lorsque vous souhaitez compléter une fiche vin de manière manuelle, vous pourrez
remplir les champs suivants :
- Nom du vin
- Domaine
- Appellation
- Année
- Pays/région
- Couleur
- Quantité de bouteilles
o Un mode « avancé » vous permet d’apporter des informations complémentaires telles que ;
- Garde minimum (années)
- Garde maximum (années)
- Commentaire
- Passer en favoris

35
- Noter la bouteille (0 à 5)
- Prix d’achat
- Lien vers VIVINO® pour retrouver la fiche complète (Option Premium)
- Lien vers VIVINO® pour acheter ce vin
o La bouteille scannée n’est pas reconnue : dans le cas où la bouteille n’est pas reconnue,
l’application propose de recommencer le scan, de rechercher manuellement la bouteille (si
aucune bouteille ne correspond à sa recherche) ou de remplir manuellement la fiche.
o Il est obligatoire de renseigner un temps de garde minimum et maximum pour recevoir des
alertes date d’apogée. Si les champs temps de garde minimum et maximum ne sont pas
complétés, aucun alerte date d’apogée ne sera envoyée.
Vous ajoutez une bouteille dans une « Cave connectée »
▪ Placer la/les bouteille/s dans votre cave sur le/les emplacement/s souhaité/s ;
▪ VINOTAG® vous informe de la détection de votre/vos bouteille/s et enregistre son/leurs
emplacement/s sur la version digitale de votre cave.
o Quand la bouteille est posée et détectée, le témoin lumineux correspondant clignote
deux fois rapidement. L’emplacement est mémorisé dans votre application. Un pop-
up de succès est alors affiché avec deux boutons : “Ajouter une bouteille” ou
“Terminé”.
o Attention ! Si vous souhaitez placer une/des bouteille/s dans la zone de stockage au
bas de votre cave, veuillez noter que cette partie de la cave n’est pas connectée.
▪ Cliquer sur « + » pour continuer à ajouter des bouteilles dans votre cave.
A noter !
La zone de stockage au bas de votre cave n’est pas connectée.
L’application vous permet toutefois de conserver un registre digital des bouteilles que vous
renseignez être déposées à cet emplacement.
• La capacité réelle de la zone de stockage est de 17 bouteilles format champagne.
• L’application permet d’enregistrer néanmoins un plus grand nombre de bouteilles vous
permettant de tenir un registre des vins non stockés dans votre cave.
Fonction E-Sommelier
Lors de l’ajout d’une bouteille dans une « cave connectée » ; vous pouvez utiliser la fonction E-
Sommelier. Cette fonction vous recommande l’emplacement idéal pour stocker votre vin. Lorsque
vous scannez une bouteille, VINOTAG® identifie le type de vin ; en fonction de chaque type de
vin, des températures de stockage sont recommandées pour une conservation optimale.
Certains emplacements de votre cave sont donc plus adaptés selon le type de vin.
La fonction E-Sommelier vous accompagne pour conserver votre vin dans les meilleures
conditions. En cliquant sur ce bouton, la cave vous propose des emplacements disponibles et
adaptés à la bouteille de vin scannée ; des témoins lumineux s’allument dans la cave pour vous
indiquer ces emplacements.
o Quand la bouteille est posée et détectée le témoin lumineux correspondant clignote
deux fois rapidement. L’emplacement est mémorisé dans votre application. Un pop-
up de succès est alors affiché avec deux boutons : “Ajouter une bouteille” ou
“Terminé”.
o Attention ! Dans le cas d’un échec, où votre cave n’arriverait pas à détecter la
bouteille, le témoin lumineux ne clignotera pas. Effectuez de nouveau la manipulation
jusqu’à ce que la bouteille soit correctement détectée et que le témoin lumineux
clignote deux fois.
o Attention ! Si vous ne venez pas chercher/déposer votre bouteille, le témoin
lumineux en façade de la clayette restera allumé pour une durée de 5 minutes, passé
ce délai le témoin lumineux s’éteindra automatiquement.

36
Il est également possible d’ajouter une bouteille via une fiche vin.
▪ Cliquer sur le bouton situé en bas de page « ajouter une ou plusieurs bouteilles »
▪ Renseigner le nombre de bouteilles à ajouter et leurs formats.
▪ Placer la/es bouteille/s dans votre cave sur l’emplacement/s souhaité/s ;
▪ VINOTAG® vous informe de la détection de votre/vos bouteille/s et enregistre son/leurs
emplacement/s sur la version digitale de votre cave.
A NOTER : la création d’un compte VINOTAG® vous permet de bénéficier de «50 scans
gratuits ». Lors de l’ajout d’une cave connectée, 1 000 scans vous sont offerts. Ces scans
permettent de bénéficier de fiche vin pré-complétées grâce au partenariat VINOTAG® -
VIVINO®. Dans le cas où l’intégralité des scans offerts ont été utilisés ; il est possible de
continuer à ajouter des bouteilles en complétant manuellement leur fiche vin ou de souscrire à
l’option premium pour bénéficier d’une recharge de scans (se référer au paragraphe « Compte
premium »).
Compte premium
VINOTAG® s’associe avec VIVINO® pour faciliter l’expérience utilisateur. Lors de la création d’un
compte VINOTAG® un nombre de « scans gratuits » est offert.
Ces « scans gratuits » désignent l’action de prendre en photo une bouteille pour accéder directement
à une fiche vin détaillée extraite de la base de données VIVINO®. Attention ! les bouteilles non
reconnues sont compatibilisées comme un « scan gratuit » étant donné que la demande de
reconnaissance a été envoyée à VIVINO®. La prise de photo doit être d’une qualité et netteté
suffisante pour que la reconnaissance de bouteille soit possible.
Cette fiche vin peut être modifiée et enregistrée directement dans la version numérique de votre cave
à vin, vous n’avez plus besoin de compléter manuellement votre fiche vin. Un véritable gain de temps
pour remplir sa cave et accéder à de nombreuses informations sur vos vins préférés.
Dans le cas où l’intégralité des scans offerts a été utilisé ; il est possible de continuer à ajouter des
bouteilles en complétant manuellement leur fiche vin ou de souscrire à l’option premium pour
bénéficier d’une recharge de scans. Un pop-up vous alerte lorsque vous avez épuisé les « scans
offerts ».
Pour passer sur un compte premium ; l’utilisateur doit souscrire à l’option premium qui lui permet
d’acheter des recharges de scans.
- Recharge 200 scans
- Recharge 400 scans
- Recharge 1000 scans
Les « scans » achetés sont utilisables sans durée limitée.
La souscription à l’option premium et les conditions tarifaires sont accessibles via l’application
VINOTAG® dans l’espace « mon compte » en cliquant sur le bouton « Je deviens premium ».

37
Retirer des bouteilles
Vous avez créé votre cave dans l’application VINOTAG® ; vous pouvez désormais supprimer des
bouteilles de votre cave. Les bouteilles seront conservées sur votre espace vinothèque.
Pour une cave de catégorie « connectée »
▪ Retirer la bouteille souhaitée de votre cave ;
▪ La cave connectée détecte le retrait et en informe l’application ; une alerte vous indique le
retrait de la bouteille sur votre application
▪ Consulter la page « Alertes »
ou ▪ Sélectionner une bouteille de vin et à l’aide de la fonction « montrer dans la cave » ; la cave
va allumer le ou les témoin/s lumineux correspondant/s aux emplacements où sont stockées
la/les différentes bouteille/s de vin. Attention ! 12 témoins lumineux au maximum peuvent
être allumés simultanément. Attention ! Si vous ne venez pas chercher/déposer votre
bouteille, le témoin lumineux en façade de la clayette restera allumé pour une durée de
5 minutes, passé ce délai le témoin lumineux s’éteindra automatiquement.
▪ Le retrait est détecté par la cave, le témoin lumineux correspondant à l’ancien emplacement
de votre bouteille va clignoter deux fois rapidement pour confirmer le retrait
▪ La cave connectée informe l’application du retrait ; une alerte vous indique le retrait de la
bouteille sur votre application
▪ La vue de votre cave est automatiquement mise à jour
Attention ! pour ajouter ou retirer des bouteilles dans une cave connectée, il est nécessaire
d’être connecté à un réseau Wifi pour assurer la bonne communication des informations entre
votre cave physique et votre cave digitale visible sur VINOTAG®.
Consulter une fiche vin
La consultation de fiches vin est accessible par vos caves ou votre espace vinothèque.
Consultation de fiche vin dans ma cave – mode liste ou dans ma vinothèque
▪ Cliquez sur la bouteille de votre choix
▪ Consultez les informations relatives à votre bouteille
▪ Pour plus de détail vous pouvez-vous rendre sur le site de notre partenaire Vivino en cliquant
sur « Voir sur Vivino »
Consultation de fiche vin dans ma cave – mode graphique
▪ Cliquez sur la clayette de votre choix
▪ Cliquez sur la bouteille de votre choix
▪ Consultez les informations relatives à votre bouteille
▪ Pour plus de détail vous pouvez-vous rendre sur le site de notre partenaire Vivino en cliquant
sur « Voir sur Vivino »
Créer des alertes date d’apogée
Pour créer des alertes date d’apogée, il est obligatoire de renseigner sur la fiche vin un temps de
garde minimum (supérieur à 0) et un temps de garde maximum. Le temps de garde est exprimé en
année. Une alerte de début et de fin de date d’apogée vous sera envoyée si votre bouteille n’a pas
été consommée. Une bouteille du millésime année « X » avec un temps de garde minimum de 5 ans
et maximum de 10 ans vous alertera de la manière suivante:
- Année millésime « X » + 5 ans : Alerte de début de date d’apogée « Votre bouteille est prête
à être dégustée »
- Année millésime « X » + 10 ans : Alerte de fin de date d’apogée « Votre bouteille arrive à la
fin de sa date d’apogée »
Créer des alertes stock

38
Pour gérer au mieux votre cave et vos vins, VINOTAG® vous propose de mettre en place des
alertes de stock :
▪ Via la vue de votre cave sur l’application, cliquez sur la bouteille souhaitée pour accéder à la
fiche vin associée
▪ Cliquez sur « programmer une alerte »
▪ Indiquez à partir de combien de bouteilles restantes vous souhaitez recevoir une alerte de
stock
▪ Cliquez sur valider. L’alerte de stock est désormais activée.
Pour désactiver une alerte de stock, cliquez sur « modifier l’alerte » ; baissez le nombre de
bouteilles souhaitées jusqu’à « désactiver ». Cliquez sur valider. L’alerte de stock est
désormais désactivée.
Visualiser l’emplacement de vos bouteilles dans votre cave
▪ Vous êtes sur la vue de votre cave ; Utiliser l’icône de recherche situé en haut à droite de
votre écran
▪ Indiquez le nom du vin recherché et / ou domaine et /ou autre information liée à la bouteille
▪ La fiche vin de la bouteille recherchée s’affiche
▪ Cliquez sur le bouton situé en bas de page « Voir mes bouteilles » ou sur le bouton « Montrer
dans la cave » situé au début de votre fiche vin
▪ Des témoins lumineux s’allument dans votre cave, dans la limite de 12 simultanément, pour
vous indiquer l’emplacement de la ou des bouteilles recherchées.
Maintenance de la cave
Depuis la configuration de la cave, il est possible de mettre sa cave en maintenance.
Cette manipulation bloque tous les mouvements pouvant avoir lieu dans la cave
(ajout, déplacement, suppression).
La vue d’accueil est donc bloquée par une vue « cave en maintenance »
Pour sortir du mode maintenance cliquer sur le bouton “Sortir de la maintenance”.
Attention ! Lorsque vous sortez du mode maintenance, vous pouvez :
▪ Recharger l’ancienne disposition
▪ Repartir sur une cave vide. Dans ce cas, vous devez redémarrer le processus depuis le
début et scanner votre première bouteille.

39
6. NETTOYAGE ET ENTRETIEN
Avant de nettoyer votre appareil (opération à faire régulièrement), débranchez l’appareil en retirant la
prise de courant ou en débranchant le fusible dont elle dépend.
Nous vous conseillons, avant la première utilisation et de façon régulière, de nettoyer l’intérieur comme
l’extérieur (face avant, latérales et dessus) avec un mélange d’eau tiède et de produit de lavage doux.
Rincez avec de l’eau pure, laissez sécher totalement avant de rebrancher. N’utilisez ni solvants, ni
agents abrasifs.
Lors de la première mise sous tension, des odeurs résiduelles peuvent subsister. Dans ce cas, faites
fonctionner l’appareil à vide pendant quelques heures, en paramétrant la température la plus froide. Le
froid annihilera ces odeurs possibles.
Dégivrage automatique
Un dégivrage automatique est programmé sur votre cave. Il n’y a aucun impact pour les vins
entreposés dans la cave durant la phase de dégivrage.
Pendant le dégivrage ; le compresseur et les ventilateurs seront éteints. L’écran digital affichera une
température normale, cependant si vous souhaitez afficher la température réelle de votre cave, l’écran
vous affichera le code « DD » qui est normal.
Changement du filtre à charbon
Votre cave à vin est équipée d’un filtre à charbon, celui-ci est positionné dans le bas de votre cave au
fond à droite. Nous vous conseillons de le remplacer une fois par an. Pour le remplacer il vous suffit de
tirer dessus par l’intérieur de la cave et d’y replacer un nouveau filtre.

40
En cas de coupure de courant
La majorité des coupures de courant sont résolues pendant une courte période.
Une coupure de 1 ou 2 heures n’affectera pas les températures de votre cave.
Afin de protéger vos vins pendant les coupures de courant, pensez à minimiser le nombre d’ouvertures
de porte.
Pour des coupures de courant de très longue durée, prenez les mesures nécessaires pour protéger
votre vin.
▪ Si l’appareil est débranché, éteint ou s’il y a une coupure de courant vous devez attendre de 3 à 5
minutes avant de le redémarrer. Si vous essayez de le redémarrer avant ce délai, le compresseur
se mettra en fonction seulement au bout de 3/5 minutes (si la température le nécessite).
▪ Au premier démarrage et suite à un arrêt prolongé de la cave, il est possible qu’au moment du
redémarrage les températures choisies et celles affichées ne correspondent pas. Ceci est normal.
Il sera alors nécessaire d’attendre quelques heures avant que les températures retrouvent leur
stabilité.
▪ En cas de coupure de courant, l’appareil conserve en mémoire les températures réglées. Lors de
la remise en service de l’appareil, il est donc inutile de reprogrammer les températures de la cave.
Attention !
Lors d’une coupure de courant, la E-cellar ne comptabilise plus les mouvements, il faut donc
éviter de modifier le stock de vin.
A la remise sous tension, la cave effectuera une mise à jour des stocks afin de détecter une
sortie ou un ajout de nouvelle bouteille.
Si une opération d’ajout ou de retrait est effectuée via l’application, celle-ci enregistrera les
changements, mais s’il s’agit d’une action libre (sans passer par l’application) et qu’une
bouteille est retirée et remplacée par une nouvelle au même emplacement, la cave ne fera pas
la distinction lors de sa remise en route.
Si vous partez en vacances
- Courts séjours : laissez votre cave fonctionner pendant votre séjour si celui-ci dure moins de 3
semaines.
- Longs séjours : si votre appareil venait à ne pas être utilisé pendant plusieurs mois, retirez
toutes les bouteilles et tous les accessoires, éteignez et débranchez l’appareil de la prise de
courant. Nettoyez et séchez soigneusement l’intérieur et l’extérieur de l’appareil. Laissez
également la porte ouverte, en la bloquant si nécessaire, pour éviter la formation de
condensas, odeurs, moisissure.
Si vous devez déplacer votre cave à vin
▪ Débranchez votre cave avant toute opération.
▪ Enlevez toutes les bouteilles présentes dans la cuve et fixez les éléments mobiles.
▪ Pour éviter d’endommager les vis de mise à niveau des pieds, vissez-les à fond dans leur base.
▪ Fermez entièrement la porte.
▪ Déplacez l’appareil en position verticale de préférence ou notez à partir des inscriptions portées
sur l’emballage, le sens sur lequel peut être couché l’appareil. Protégez également votre appareil
avec une couverture ou un tissu similaire.

41
7. EN CAS DE PANNE
Malgré tout le soin que nous apportons à nos fabrications, une panne n’est jamais totalement exclue.
Avant de contacter le service après-vente de votre revendeur, vérifiez néanmoins que :
▪ La prise de courant est toujours en place
▪ Il n’y a pas de coupure de courant
▪ Que la panne n’a pas pour origine l’une de celles décrites dans le tableau en fin de ce manuel.
IMPORTANT : si le cordon d’alimentation fourni est endommagé, il doit être remplacé par le
fabricant, un service agréé de la marque ou du revendeur. Dans tous les cas, il doit être
remplacé par un personnel qualifié pour éviter tout risque de blessure.
SI CES CONTROLES NE DONNENT RIEN, CONTACTEZ ALORS LE SERVICE APRES-VENTE DE VOTRE REVENDEUR.
ATTENTION !
Débranchez la prise murale avant toute opération d’entretien ou réparation !
8. PROBLEMES ET CAUSES POSSIBLES
Beaucoup de problèmes peuvent être résolus facilement, vous permettant d’économiser le coût d’un
appel téléphonique au SAV. Essayez de résoudre votre problème en suivant les suggestions ci-
dessous avant d’appeler le SAV.
GUIDE DE RESOLUTION DES PROBLEMES
PROBLEME
CAUSE POSSIBLE
La cave à vin ne fonctionne pas
L’appareil n’est pas branché.
L’appareil est éteint.
Le disjoncteur s’est déclenché ou un fusible a sauté.
La cave à vin ne fait pas assez de
froid
Vérifiez la température de réglage.
L’environnement extérieur peut nécessiter un réglage plus élevé.
La porte est ouverte trop fréquemment.
La porte est mal fermée.
Le joint de porte n’adhère pas complètement.
L’appareil s’enclenche et s’arrête
fréquemment
La température ambiante est plus élevée que la normale.
De nombreuses bouteilles ont été ajoutées dans la cave à vin.
La porte est ouverte trop fréquemment.
La porte est mal fermée.
La température n’est pas réglée correctement.
Le joint de porte n’adhère pas complètement.
L’éclairage intérieur ne fonctionne
pas
L’appareil n’est pas branché.
Le disjoncteur s’est déclenché ou un fusible a sauté.
Le témoin lumineux est hors service.
La touche d’activation de l’éclairage est sur OFF
Vibrations
Contrôlez et assurez-vous que la cave est bien au niveau.
La cave à vin semble faire trop de
bruit
Le bruit de « cliquetis » peut venir de l’écoulement de
réfrigérant, ce qui est normal.
A chaque fin de cycle vous pouvez entendre des bruits de
« gargouillements » dus à l’écoulement de réfrigérant dans votre
cave à vin.
La contraction et l’expansion des parois internes peuvent

42
engendrer des bruits d’éclatement et de crépitement.
La cave à vin n’est pas à niveau.
En mode « mono » les ventilateurs de la cave sont activés pour
brasser l’intérieur de la cave.
La porte ne ferme pas correctement
La cave à vin n’est pas à niveau.
Le joint est sale ou abîmé.
Une partie du contenu empêche la porte de se fermer
Les charnières de portes sont mal fixées
Les clayettes ne sont pas à leur emplacement.
Bouteille posée mais non détectée
Le format de la bouteille ne correspond pas.
Le goulot de la bouteille n’est pas en contact avec la barre
centrale de la clayette.
Les capteurs de la barre centrale de la clayette sont sales =>
prévoir un nettoyage à l’aide d’un coton tige doux et sec.
La couleur du goulot n’est pas détectée par le capteur => faire
un test en ajoutant une étiquette opaque autour du goulot.
La bouteille n’est pas munie d’opercule au niveau du goulot =>
faire un test en ajoutant une étiquette opaque autour du goulot.
La cave est hors tension.
La cave n’est plus connectée à internet (Wifi).
Bouteille détectée mais non posée
Les capteurs de la barre centrale de la clayette sont sales =>
prévoir un nettoyage à l’aide d’un coton tige doux et sec.
L’appairage avec la cave ne
fonctionne pas
Le QR code du boitier maitre a été mal scanné.
Le QR code est endommagé.
La connexion Wifi est insuffisante.
La portée du Bluetooth est dépassée.
La cave n’est pas branchée.
Le Wifi ou Bluetooth du téléphone n’est pas activé.
Code défaut « EE »
Défaut de sonde de température.
Code défaut « HH »
Alarme température haute, veuillez débrancher ou arrêter votre
cave et contacter votre SAV
Code défaut « LL »
Alarme température basse, veuillez débrancher ou arrêter votre
cave et contacter votre SAV
Code défaut « DD »
Il n’y a pas d’anomalie, l’appareil est en phase de dégivrage =>
attendre la fin du dégivrage
De l’eau coule de ma cave à vin
Le trou d’évacuation à l’intérieur de votre cave est bouché.
La cave n’est pas assez inclinée vers l’arrière.
Le bac à eau présent derrière la cave est plein.
LED rouge clignote de façon
continue sous le boitier maitre
La cave n’est pas connectée ou a perdu sa connexion au réseau
Wifi
Une ou des LED restent allumées en
façade de mes clayettes
Vous avez fait un appel de position(s) et vous n’êtes pas venu
chercher/déposer la/les bouteille(s).
Attendez 5 minutes qu’elle(s) s’éteigne(nt) toute(s) seule(s) ou
ouvrez et fermez la porte de la cave à vin
Les touches du bandeau de
commande ne fonctionnent pas
Vérifiez que le bandeau de commande n'est pas verrouillé,
cadenas affiché sur l'écran. Déverrouillez en appuyant 3s sur la
touche avec le symbole cadenas pour déverrouiller le bandeau
de commande
J’ai des différences entre mon
registre digital et ma cave physique
(bouteilles en plus/moins)
Avez-vous fait des modifications pendant une coupure de
courant ?
Regardez le FAQ de l’application Vinotag pour voir comment
solutionner vos écarts de stock.
Je n’arrive pas à scanner le QR code
Privilégier le scan du QR code présent en bas de la fiche qualité
de votre cave. Placer la fiche qualité sur un support sec à plat et

43
de la cave
Je n’arrive pas à scanner le QR code de la cave
à la lumière pour faciliter le scan du QR code.
Si vous souhaitez scanner le QR code de la cave (sous le boitier
maitre), nous vous conseillons d’allumer la lumière LED de la
cave à vin, en augmentant le niveau de luminosité vous aurez
plus de facilité à détecter le QR code avec votre téléphone. Pour
les téléphones ayant besoin d’une certaine distance pour faire la
mise au point, vous pouvez tirer la clayette du haut de votre
cave afin d’avoir une meilleure distance entre l’objectif de votre
téléphone et le QR code de la cave.
L’étiquette du vin que je
photographie n’est pas reconnue par
l’application
Il faut que la photo prise via l’application soit de bonne qualité
(pas floutée), la photo doit être prise de façon à ce que
l’étiquette du vin remplisse l’encadrement blanc de l’application.
Si ça ne fonctionne toujours pas, essayez de prendre en photo
uniquement le nom du vin en gros plan.
Codes erreurs
Code erreur
Signification
HH
Alarme température haute
LL
Alarme température basse
DD
Appareil en dégivrage
EE
Défaut de sonde de température
Si tout autre code, tel quel A,B,C,D,E,G,I,J,K,M,N,O s’affiche sur votre écran, veuillez contacter le
service après-vente.
9. ENVIRONNEMENT
Ce produit est conforme à la Directive UE 2019/290/EU relative aux déchets
d'équipements électriques et électroniques (DEEE). En vous assurant que ce produit
est éliminé correctement, vous aiderez à prévenir les conséquences négatives
potentielles pour l'environnement et la santé humaine qui pourraient être dues à la
manipulation inappropriée des déchets de ce produit.
Le symbole de poubelle barrée apposé sur l’appareil indique que ce produit devra, à la fin de son
cycle de vie, être traité séparément des autres déchets domestiques. Il devra donc être emmené
dans un centre de collecte sélective destiné aux appareils électriques et/ou électroniques ou bien, si
vous achetez un appareil équivalent, au revendeur de ce nouvel appareil.
L’utilisateur est responsable d’apporter l’appareil en fin de vie aux structures de collecte appropriées.
Une collecte sélective et adéquate visant à envoyer l’appareil inutilisé au recyclage, au traitement et à
une élimination compatible avec l’environnement, contribue à éviter les effets négatifs possibles sur
l’environnement, sur la santé et favorise le recyclage des matériaux dont le produit est composé.
Lors de la mise au rebut, ou dans le cadre d’une revente, les données personnelles de l’utilisateur
sont protégées, sans action de sa part. Ces données ne sont pas enregistrées dans la cave mais sur
un serveur externe. Aucune information transmise, lors de l’utilisation normale de la cave, ne pourra
être exploitée après sa mise au rebut.
Dans le cadre d’une revente de l’appareil, le nouvel utilisateur devra obligatoirement scanner le QR
code du boitier maitre ou de la fiche qualité et suivre la procédure d’appairage obligatoire. Cette
procédure entraine l’écrasement des données précédemment stockées sur le serveur. Le nouvel
utilisateur disposera ainsi d’un compte vierge. L’ancien utilisateur ne pourra plus accéder ou
visualiser ses anciennes informations depuis l’application Vinotag.
Pour obtenir des renseignements plus détaillés sur les systèmes de collecte disponibles, s’adresser
au service local d’élimination des déchets ou bien au magasin où l’appareil a été acheté.

44
10. AVERTISSEMENT
Dans un souci d’amélioration constante de nos produits, nous nous réservons la possibilité de
modifier les caractéristiques techniques sans préavis.
Les garanties des produits de la marque LA SOMMELIERE sont exclusivement énoncées par les
distributeurs que nous avons choisis. Aucun élément des présentes ne peut être interprété comme
une garantie supplémentaire.
La société FRIO ENTREPRISE ne peut être tenue responsable des erreurs ou des omissions
techniques et de rédaction dans les présentes. Document non contractuel.

45
1.SAFETY INSTRUCTIONS
For your safety and for correct use of the device, before installing and
using the device for the first time, carefully read this manual, including
the warnings and useful tips it contains. In order to avoid damaging the
device and / or injuring yourself unnecessarily, it is important that those
who use this device are fully aware of its operation and its safety
functions. Save these instructions for later and remember to store them
next to the appliance so that they can be passed on with it in the event
of a sale or move. This will ensure optimal operation of the system.
To avoid any risk of injury, keep this manual. The manufacturer cannot
be held responsible in the event of incorrect handling of the system.
Safety of children and other vulnerable people
• This system can be used by children aged 8 and over and by
people with reduced physical, sensory or mental capacities, or who
have not learned to use the device, in the context where they are
supervised. by an informed person who is aware of the risks
involved. Children must not play with the device. Cleaning and
user maintenance should not be made by children, unless they are
over 8 years old and supervised.
• Keep all packaging out of the reach of children, as there is a risk of
suffocation.
• If you decide to dispose of the appliance, unplug it from the wall
outlet, cut the connection cable (as close to the appliance as you
can) and remove the door to prevent children from playing with it.
and being electrocuted or locked inside.
• If the appliance, fitted with a magnetic door seal, must be replaced
by another appliance fitted with a latch on the door or on the seal,
check that the latch is inoperable before proceeding. get rid of the
old device. This will avoid turning this device into a trap for
children.
• Keep the device and its cord out of the reach of children under 8
years old.
• Children should not load and unload bottles in the appliance.

46
General security
CAUTION - This appliance is designed to operate in a domestic
household and in the following environments:
• kitchen rooms and equipment sold in commerce, work
environments and offices;
• Bed and Breakfast type structures;
• farm buildings and hotels, motels and other organizations
welcoming clients;
• industrial kitchen and other applications not intended for resale.
CAUTION - Never store flammable substances such as aerosols inside
this appliance, as they may spill into it.
CAUTION - If the power cord is damaged, you must replace it
immediately with your manufacturer, or a qualified dealer, to avoid any
risk of electric shock.
CAUTION - Keep the vents fully open, and check that air can circulate
through the openings.
CAUTION - Do not damage the refrigeration circuit.
CAUTION - Do not use electrical appliances inside the compartment,
unless they are tolerated by the manufacturer.
CAUTION - The refrigerant and insulating system contain flammable
gases. When you dispose of the system, do so at an authorized
collection point. Never expose the device to flame.
Refrigerating fluid
The refrigerating circuit in the appliance uses refrigerating isobutene
(R600a), which is a highly inflammable natural gas and is therefore
dangerous for the environment. When transporting or installing the
appliance, ensure that no element of the refrigerating circuit is damaged.
The refrigerating fluid (R600a) is inflammable.
Caution: risk of fire
If the refrigerant circuit should be damaged:
• Avoid opening flames and sources of ignition.
• Thoroughly ventilate the room in which the appliance is situated. It
is dangerous to alter the specifications or modify this product in
any way.
Any damage to the cord may cause a short circuit, fire, and/or electric
shock.

47
Electrical safety
• We decline any liability in respect of incidents caused by poor
electrical installation.
• The power cord must not be lengthened. Do not use an extension
cable, or adapter, or multi-way socket.
• Make sure that the power plug is not crushed or damaged. A
crushed or damaged power plug may overheat and cause a fire.
• Make sure that you can access the main plug of the appliance.
• Do not pull the main cable.
• Ensure that the appliance is always electrically earthed.
• If the power plug socket is loose, do not insert the power plug.
There is a risk of electric shock or fire.
• You must not operate the appliance without the interior lighting
lamp cover.
• Disconnect the appliance before replacing the lighting bulb.
• The cellar is only applied with power supply of single phase
alternating current of 220~240V/50Hz.
• Do not attempt to replace a damaged power cable, contact your
after-sales service.
• The power socket must be easily accessible but out of reach of
children. In case of doubt, contact your installation technician.
• The device must not use an extension, adapter or multiple socket.
The device must be connected to an electrical outlet with a ground
connection in accordance with the electrical standards in force.
Daily use
• This appliance is intended to be used exclusively for the storage of
wine.
• Do not store flammable gas or liquids in the appliance. There is a
risk of an explosion.
• Do not operate any electrical appliances in the appliance (electric
ice cream makers, mixers etc.).
• When unplugging always pull the plug from the mains socket and
do not pull on the cable.
• Do not place hot items near the plastic components of this
appliance.
• The appliance manufactures storage recommendations should be
strictly adhered to. Refer to relevant instructions for storage.
• Keep burning candles lamps and other items with naked flames
away from the appliance so that do not set the appliance on fire.
• The appliance is intended for keeping beverages in normal

48
household as explained in this instruction booklet.
• The appliance is heavy. Care should be taken when moving it. If
your appliance is equipped with castors, remember that these are only
designed to facilitate minor movements. Do not move the appliance over
long distances.
• Never use the shelves, drawers, doors etc. to stand on or as
supports.
• To avoid items falling and causing injury or damage to the
appliance, do not overload the shelves or put food into the appliance.
Caution: cleaning and servicing
• Before carrying out servicing, switch off the power supply and
disconnect the appliance.
• When cleaning the appliance, do not use metal objects, steam
systems, volatile fluids, organic solvents or abrasive substances.
• Never clean appliance parts with flammable fluids. The fumes can
create a fire hazard or explosion.
• Do not use sharp or pointed objects to remove ice. Use a plastic
scraper.
Important information about the installation!
• • Warning! To prevent the wine cellar from tipping over, it is
important to load the places located at the back of the cellar as a
priority. The shelves must not be pulled out or left out at the same
time. The weight of the bottles can cause the cellar to tip forwards,
it is essential to distribute the weight of the bottles throughout the
cellar and to handle it with care.
For the electrical connections to be correct, follow the instructions in this
manual.
• Unpack the device and check that it is not visually damaged. Do not
plug in the device if it is damaged. Report any damage to the point of
sale where you purchased it. In this case, keep the packaging.
• It is recommended to wait at least 24 hours before connecting the
appliance to the power supply, so that the compressor is supplied with
oil.
• Good air circulation is necessary to avoid the risk of overheating. For
sufficient ventilation, carefully follow the installation instructions
provided. Warning ! This refrigeration appliance is not intended for use
as built-in or integrated device.
• Avoid the appliance touching the walls and / or coming into contact with
hot elements (compressor, condenser, radiators, cooking appliances,

49
dryer, etc.) in order to avoid the risk of fire and overheating. of the
device. Always follow the installation instructions carefully.
• Check that the outlets are accessible once the appliance is installed.
• Be careful not to trap or damage the power cord when setting up the
appliance.
Trouble shooting and spareparts
Any electrical work should be carried out by a qualified and skilled technician.
The appliance should be repaired by an accredited repair centre, using only
manufacturer’s original spare parts.
Aesthetic and functional spare parts in accordance with REGULATION (EU)
2019/2019 (Annex II, point 3.), are made available to professional repairers
and end users for a period of 7 years or 10 years (List in Annex II, point 3.a.1
and 3.a.2) from the time the last unit of the model is placed on the market. The
list of spare parts and the procedure for ordering them (professional access /
special access) are available on the following website:
www.interfroidservices.fr or by post at the following address: FRIO - Interfroid
Services, 143 Bd Pierre Lefaucheux - 72230 ARNAGE
For other functional spare parts not specified in EU regulation 2019/2019, they
are available for a period of 10 years. The manufacturer's warranty is 1 year for
functional parts.

50
R600a
Safety instructions
• Caution — Do not obstruct the ventilation grills on the appliance.
Keep ventilation openings in the appliance enclosure or in the
structure for building-in clear of obstruction.
• Caution — Do not store explosive substances, such as aerosol
cans containing an inflammable propellant, in the appliance.
• Caution — Do not damage the refrigerating circuit in the appliance.
• Caution — The refrigerating units use isobutane (R600a), and
should not be placed close to ignition sources (for example,
electrical contacts that are exposed or open contacts that could be
closed by the refrigerating fluid in the event of a leak). The
refrigerating fluid type is specified on the rating plate of the
appliance.
• Caution — Do not use electrical equipment in the compartments of
the appliance, unless they are of the type recommended by the
manufacturer.
This appliance meets the requirements of all applicable European
directives and their amendments.

51
2. RATING PLATE
The nameplate attached to the inside or rear of the appliance (depending on the model) includes the
entire information specific to your appliance.
We recommend that you make a note of its serial number in this booklet prior to installation, so that
you can refer to it later (technical work, request for assistance, etc.).
Once the appliance is installed and loaded, access to it is not so easy.
CAUTION: no assistance can be provided without this information.
3. DESCRIPTION OF THE APPLIANCE
To find out more about your product, consult the online EPREL database. As defined in Commission
Delegated Regulation (EU) 2019/2016, all information relating to this refrigeration appliance is
available on the EPREL Base (European Product Database for energy labeling). This database
enables you to consult the information and technical documentation of your refrigeration appliance.
You can access the EPREL Database by scanning the QR code on the energy label of your appliance
or by going directly to: www.ec.europa.eu and searching the reference of your refrigeration appliance.
Find all the information of the ECELLAR185

52
and its instructions downloadable from the site www.lasommeliere.com
Announced capacity
• The ECELLAR185 cellar has a capacity of 185 bottles
• The cellar is equipped with 14 connected shelves
• Each shelf can store 12 bottles
• The cellar has a storage area that can accommodate 17 bottles
The announced capacity is the maximum capacity calculated with the number of shelves sold with the
cabinet. The connected shelves of the E-cellar have been sized to accommodate a champagne-size
bottle. This particularity makes it possible to store any type of 75cl bottle, such as: Bordelaise,
Champenoise, Burgundy, Alsace, as well as atypical formats Prosecco, Sachetto, Mateus etc ...
Warning ! The maximum diameter of the bottles, placed on the shelves, must be 9 cm.
If you want to age bottles of different sizes, we recommend that you alternate a standard 75cl type
bottle between your larger size bottles, this recommendation will allow you to avoid any storage
problems.
It is indeed possible that the juxtaposition of atypical or imposing format bottles forces you to only
partially use the locations of your shelf. Alternating a standard bottle (bordeaux 75cl) with an atypical
or imposing bottle will allow you to use all the available spaces of your shelf.
If, despite our best efforts, certain bottle sizes are not detected by the shelves of the E-cellar, please
follow the following instructions:
If a bottle is too large and does not fit between two shelves, we recommend that you put it down:
• On the first shelf of your cellar (from top to bottom)
• In the storage area located at the bottom of the cellar
Layout recommendations
The initial arrangement of your appliance's equipment (shelves, etc.) is recommended so that the
energy is used as rationally as possible by the refrigeration appliance. Any change to this
arrangement may impact the energy consumption of the device.
Radiofrequency characteristics
Hereby, La Sommelière declares that the ECELLAR185 radio equipment is in compliance with
Directive 2014/53 / EU and all applicable European directives. Guideline available on:
https://eur-lex.europa.eu/legal-content/FR/TXT/?uri=CELEX%3A32014L0053&qid=1617885639187
• Radio band : 2400MHz to 2483.5MHz
• Maximum power :100mW
The CE certificate can be accessed and downloaded from the La Sommelière site:
https://www.lasommeliere.com/fr/155-ECELLAR185.html

53
4. INSTALLATION INSTRUCTIONS
Before using this appliance
• Remove the outer and inner packaging.
• Leave your device in an upright position at rest for about 24 hours before putting it into service. This will
reduce the possibility of cooling system malfunction due to transportation.
• Clean the inside with a soft cloth and lukewarm water.
• When installing your device, please choose an authorized location.
• Place your device on a floor that is strong enough to support it when fully loaded.
• Place your cellar on a floor that is strong enough to support it when fully loaded.
• Please adjust the feet of your appliance in order to level your cellar. Warning ! your cellar should be
tilted slightly backwards to ensure good drainage of condensation water and a good seal on the door
seal. This inclination will also keeps the drawers or shelves in place despite the weight of the bottles.
Adequate ventilation is necessary, do not obstruct any air outlet.
• This appliance is intended for freestanding installation. It must in no case be built-in or
integrated. Good air circulation around your device must be observed.
• Connect the cellar to a single outlet, leave a space of 50mm between the back of the cellar and the wall
and 100mm on each side and above your device. Make sure to wedge it perfectly and adjust the
horizontality of your wine cellar (the use of a spirit level is recommended). Warning ! your cellar should
be tilted slightly backwards ; this will prevent any movement due to instability, which generates noise
and vibration, and will ensure the door is completely airtight.
• This device is only used for storing wines.
• This appliance uses flammable refrigerant gas, so please never damage the cooling pipe during
transportation.
Attention
• Store wine in sealed bottles.
• Do not overload the cabinet.
• Do not open the door unless necessary.
• Do not cover shelves with aluminum foil or any other shelf material which may prevent air
circulation.
• Should the wine cooler be left empty for long periods it is suggested that the appliance is
unplugged, and after careful cleaning, leave the door ajar to allow air to circulate inside the cabinet
in order to avoid possible condensation, mold or smell.
CAUTION: please keep the appliance away from substance, which can cause ignition.
Wine Cellar Installation
Warning! To prevent the wine cellar from tipping over, it is important to load the rear bottle
positions first. The shelves must not be pulled out or left out at the same time. The weight
of the bottles can cause the cellar to tip forwards, it is essential to distribute the weight of
the bottles throughout the cellar and to handle it with care.

54
Power supply
Connect the wine cellar to a single, wall-mounted type E socket.
The cellar must be plugged into a single, easily accessible socket.
All questions relating to power and / or earthing must be handled by qualified personnel (electrician,
authorized service).
Location
• Warning ! The cellar must be placed in a clean environment (not dusty), frost-free, away from
a heat source, type: radiator, oven, sunlight, etc ... it must not be installed outdoors.
• Place the cellar in a location strong enough to support the full load weight.
• To level it adjust the height of the adjustable feet below the cellar.
This device is suitable for operation in rooms with a very specific ambient temperature, this climatic
class is indicated on the rating label.
N: This refrigeration appliance is intended for use in ambient temperatures between 16°C and 32°C.
The ambient temperature affects the interior temperature and humidity of your cellar.
The temperature of the device is adjustable between 5°C to 20°C. The temperature is regulated by a
thermostat. Changing the temperature generates higher energy consumption.
The device ensures that the temperature is maintained as long as it is in operation and is used under
normal conditions of use. The temperature inside the appliance and its energy consumption can be
influenced by many factors: ambient temperature, exposure to the sun, number of door openings and
quantity stored… Slight changes in temperature are perfectly normal and correspond to cooling cycles
of the device. But these variations in no way affect the storage temperature of the wines, these
variations being too short for heat exchange with the bottles.
Handle installation
• Remove the handle and its two screws from the plastic bag inside the cellar.
• Before installing the handle, you must remove the door seal on a part. This does not affect
the seal of the gasket if you take care to remove it correctly.
• Peel off the seal from the corner of the door to the necessary level then insert the two screws
into the handle holes.

55
• Screw the handle and put the gasket back into the slot in the door to finish with the corner.
Wifi range
Warning ! The ECELLAR cellar works with a Wifi connection.
Warning ! It is the user's responsibility to ensure that the wifi network is sufficient (signal
speed / strength) for the proper functioning of the connected cellar.
• The use of a wifi amplifier / repeater may be required for a low speed connection.
In the event of a loss of internet connection from the E-cellar, it saves up to 100 events, once the
connection is restored.
The information and a stock update will be sent to the server.
Beyond 100 events, the oldest are deleted by the new ones.
The user can see them in the "Alerts" section of their application.
In case of power break the wine cellar cannot detect or register any modification of its content, and
lose also the event memory awaiting for synchronisation with the cloud.
When restarting, the last version registered by the cloud will be used to represent the wine cellar
actual content. Therefore it is important to avoid any content modification during the power break to
avoid anomalies between your digital register and the real content of the wine cellar.
Scope of the cellar bluetooh
Warning ! The ECELLAR cellar works with bluetooth during the phase of pairing the cellar to the Wifi
network. During its daily use, the cellar communicates only through the Wifi network.
The cellar's Bluetooth range is 3m maximum with the door closed.
Hygrometry
A water collection tray has been designed inside your cellar on top of the compressor step, you can
regularly see water inside in order to help maintaining the humidity level in your cellar.
• If too much water is present in this tank, then the excess is discharged through the
condensation water drainage hole to a collection tank located above the compressor.
• Remember to tilt your cellar slightly backwards by unscrewing the two front feet to keep a
proper water draining.
• The drain hole must not be blocked.
Water drainage hole
Water tank

56
5. OPERATING INSTRUCTIONS
Control panel
The ECELLAR185 cellar is equipped with an electronic control panel with LCD screen.
The control panel is located inside the cellar on its left side
The screen will automatically lock after 15 seconds of inactivity, in which case icon B will be visible on
the screen.
The backlight of the display screen will turn off automatically after 15s of inactivity after locking the
display, it will come back on as soon as you press a key again. When an error code or an alarm is
present, the screen is automatically unlocked.
LANDMARK
DESCRIPTION
A
Indicates the cellar mode: MONO (single-temperature) or AUTO
(multi-temperature)
B
Lock indicator light, it indicates that the keyboard is locked
C
Light indicator, it indicates if the light is on
D
Temperature programmed inside the cellar. By default, the e-Cellar
displays the setpoint temperature on the digital screen, however you
can consult the actual temperature present in your cellar by holding
the I + J keys for 3 seconds, then the actual temperature read by
the probe will 'display on the screen and flash. Release the buttons
and the screen will return to the normal temperature display.
E
Temperature unit indicator light indicated in degrees Celsius by the
° C symbol or in Fahrenheit by the ° F symbol.
F
Temperature unit of measure button:
- Degree Celsius indicated by the symbol "° C" or
- Fahrenheit indicated by the symbol "F"
G
Selection of cellar mode; by default, the cellar is in MONO mode,
press once to put the cellar in AUTO mode (multi-temperature use)
H
Button to turn on / off light
I
Temperature adjustment knob. Press this button to increase the
temperature to the desired temperature. The cellar temperature is
adjustable between 5 ° C and 20 ° C in MONO mode (single
temperature). In AUTO (multi-temperature) mode, the cellar
manages the internal temperature of the cellar alone; these buttons
do not work in this mode.
J
Temperature adjustment knob. Press this button to decrease the
temperature to the desired temperature.
The cellar temperature is adjustable between 5 ° C and 20 ° C in
MONO mode (single temperature). In AUTO (multi-temperature)
mode, the cellar manages the internal temperature of the cellar
alone; these buttons do not work in this mode.
K
Press this button to turn the cellar on or off without unplugging it.
L
Press this button to unlock - lock the control panel. Press the button
for 3 seconds to lock or unlock the screen. Without any action on
your part, the screen will automatically lock after 15 seconds.

57
Alarms
To guarantee total safety of your wines; your cellar is equipped with an alarm system;
- High temperature alarm
- Low temperature alarm
These alarms are pre-programmed. If after 12 hours of operation, the cellar detects a temperature
difference of ± 4 ° C from the setpoint temperature, then the cellar will display an error code
corresponding to the high or low alarm and an audible alarm will sound. In the event of a fault, the
compressor will operate in short cycles of 10 minutes ON and 10 minutes OFF.
To deactivate the audible alarm, press one of the buttons on the control panel. If any of these
alarms are activated, please contact the after-sales service.
Master unit
Your cellar is equipped with a master unit. This unit control is placed inside the cellar, top right; it
allows connectivity between the shelves and the VINOTAG® smartphone application via wifi data
transmission.
Warning ! Under no circumstances should this unit control be handled, or damaged.
This unit control is equipped with an indicator light placed under the box which gives information on
the condition of the cellar and a push button which is used to reset the wifi connection from the cellar
to the network. When the indicator light flashes continuously, this indicates that the cellar is not
connected to wifi network or has lost its connection to a WiFi network. The box is also provided with a
QR code located under its lower edge (QR code also accessible on the quality sheet provided when
purchasing your cellar).
• First use
The QR code is used for pairing the cellar (in Bluetooth). You will need to scan this QR code during
the first use to connect your cellar to the wifi network.
Warning ! The QR code scan as well as the pairing procedure only have to be carried
out once! If you do this operation on a cellar already associated with a user, you
become the new owner and overwrite all the data previously associated with the
cellar. This will give you access to an empty cellar and the previous owner will no
longer have access to the cellar. Please note, this action is irreversible and the

58
overwritten data cannot be recovered.
Warning ! When the indicator light flashes continuously, this indicates that the cellar is not connected
or has lost its connection to a WiFi network
Warning ! Do not remove the various QR codes present in the E-cellar, these are useful in case of
pairing with the cellar or maintenance.
Warning ! To ensure the correct use of your cellar, you must place it in a place that guarantees good
quality wifi reception.
• Reset of the connection to the wifi network or change of operator
To perform a WiFi reset, press the push button on the bottom of the master box for 3 seconds. With
one hand, please hold the plastic box firmly by the top and press the button with your thumb by the
bottom. This manipulation is useful in the event of a change of internet provider.
Connected shelves
Your cellar is equipped with 14 connected shelves. These shelves were developed, manufactured
and assembled in France.
The shelves communicate with the master unit of your cellar. Storage of bottles on the shelves is
done head to tail, on the 12 defined locations.
• The necks of the bottles must rest on the central bar, at the predefined locations. The
corresponding indicator light flashes twice to indicate the correct detection of your bottle. If
the bottle is incorrectly placed, it is possible that the neck is not detected by the cellar, replace
the bottle correctly on the shelf to ensure correct detection. Validation of an operation is
confirmed by double flashing of the front indicator light
• The bottles resting on the shelves will be tilted 4° (four degrees) on the central bar, this is
normal and facilitates the detection of bottlenecks by the sensors.It is important that the bottle
necks rest straight on the central bar, the necks must not be raised or positioned at an angle
on the central bar, otherwise it may impact the detection of the bottles.

59
• Warning! To prevent the wine cellar from tipping over, it is important to load the rear positions
first. The shelves must not be pulled out or left out at the same time. The weight of the bottles
can cause the cellar to tilt forwards, it is essential to distribute the weight of the bottles
throughout the cellar and to handle it with care.
• Warning! Do not pull out the 14 connected shelves at the same time once loaded.
• Warning! If bottles are placed on a shelf, perform the operation delicately so as not to
damage the central support.
• Warning! The shelves are not made to accommodate bottles with a diameter greater than 9
cm.
• Warning! In the event of a bottle breakage, it is important to remove the bottles and clean the
holes in the central bar of the shelves where the sensors are placed, using a soft, dry cloth.
Be sure to rescan your bottles before placing them back in your cellar.
• Warning! During the first use, the user must remove the protective plastic film placed on the
front of each shelf.
The shelves have indicator lights (LED) which indicate to the user:
• Desired bottle(s)
• Recommended location (refer to the paragraph on the E-Sommelier function)
• Detection of bottles by the cellar when removing or adding bottles
Warning: in a particular case, the front led lights may remain on, they will turn off automatically after 5
minutes.
Modes of use
Your cellar has two temperature modes:
• The "mono-temperature" mode is activated by default. It allows the
choice of a single temperature throughout the cellar between +5 and +
20 ° C.In this mode the fans are activated to ensure the circulation of air
in the cellar. The temperature displayed on the digital screen
corresponds to the set temperature and the message "MONO" is
displayed.
• The "multi-temperature" mode makes it possible to obtain different
temperatures inside the cellar, in the form of a gradient ranging from a
warmer temperature at the top of the cellar, temperate in the middle and
colder at the bottom of the cellar. In this mode the fans are disabled. The
setpoint temperature is fixed automatically and cannot be changed, the
screen displays "AUTO"; the device automatically manages the
temperature. No adjustment is necessary.
Here are the temperatures that can be reached in multi-temperature mode under normal conditions of
use, i.e. an ambient temperature of 25 ° C maximum (refer to the section "Installing your wine
cabinet"). The temperature distribution indicated in the table is given as an indication, as variations
may occur between the different levels depending on the cooling cycles, the number of bottles loaded
in the cellar and the outside ambient temperature. The air flows inside the cavity will be influenced by
these different factors.

60
Shelf
(from top to bottom)
Temperature
range
1
14°C to 18°C
Suitable for storing red wines for tasting.
2
3
4
10°C to14°C
Suitable for aging your wines and champagnes.
5
6
7
8
9
10
11
5°C to 10°C
Suitable for storing white or Rosé wines and
champagne for tasting temperature.
12
13
14
15
The device ensures that the temperature is maintained as long as it is in operation and is used under
normal conditions of use. The temperature inside the appliance and its energy consumption can be
influenced by many factors: ambient temperature, exposure to the sun, number of door openings and
quantity stored… Slight changes in temperature are perfectly normal.
• Demo mode
A demo mode is present on your device, when this mode is activated, the compressor, the fans and
the alarms are deactivated, however the cellar keeps its display and light functions.
To activate this mode you must keep pressing the light (H) + C / F (F) keys for 3 seconds, then the
displayed temperature or the AUTO icon will flash 5 times.
To exit the demo mode, repeat the same operation.
• The “ESOMMELIER®” mode
ESOMMELIER® mode is an assisted placement function for your bottles that can only be used if you
have a connected LA SOMMELIERE cellar and an active VINOTAG® account.
This feature recommends the ideal location to store your wine.
When you scan a bottle, VINOTAG® identifies the type of wine; storage temperatures are
recommended for each type of wine for optimal conservation.
Certain locations in your cellar are therefore more suitable depending on the type of wine.
By using this mode, the cellar offers you available and suitable locations for the scanned bottle of
wine; indicator lights light up in the cellar to show you these locations up to a maximum of 12
simultaneous locations.
Winter mode
Your cellar is equipped with an automatic heating system also called a "winter mode". When the
temperature measured by the cellar probe is too cold compared to the set point, then the cellar
resistance is activated to allow the temperature to heat up.
This system is activated and deactivated automatically and without user intervention. The automatic
activation or deactivation of the Winter system has no impact on the conservation of your wine.

61
VINOTAG® application
The ECELLAR185 wine cellar is compatible with the VINOTAG® wine cellar management
application.
To use your cellar in a connected way, it is necessary to have:
• An electrical power source to power the cellar
• Have downloaded the VINOTAG® application from the App Store or Google Play Store and
created a user account
• A stable internet connection (Wifi)
• An ECELLAR cellar model
VINOTAG® functions
The VINOTAG® application allows you to:
• Create, customize and manage your wine cellars
• Add / remove bottles
• Consult your wine inventory (bottles of wine in your cellar) and create your own wine
description sheets. VINOTAG® is associated with VIVINO®, as part of its Premium option, to
allow you to export detailed wine sheets from the VIVINO® database.
• Create and consult your wine library. The exclusive VINOTAG® - VIVINO® partnership allows
you to save and consult detailed wine files from the VIVINO® database
• Share the visualization of your cellar / s with your loved ones
• Be alerted of the peak date of your wines, the need to change the filter in your cellar or of a
low stock level of your favorite wine
• Find easily your favorite bottle thanks to the front led light indicator.
• Find easily the free positions thanks to the front led light indicator.
How to create a VINOTAG® account
• Download the VINOTAG® application from the App Store or Google Play
Store depending on your phone type.
• Create an account manually or via Facebook or via Apple / Google Play
account
• Complete the mandatory fields: First name; Last name ; Date of Birth ;
Country; region
• Check the box "I accept the general conditions of use"
• Click on "Finalize my registration"
You now have a VINOTAG® account, remember to save your username and
password.

62
VINOTAG® Menus
When the application is open, the following menu is visible:
My cellar My wines Alerts Profile
• MY CELLAR: Allows you to view your wine cellar (s).
• MY WINES: Allows you to consult your wine library.
• ALERTS: Allows you to consult your cellar's alerts.
• PROFILE: Allows you to complete-view the information related to your account.
« MY CELLAR» page
This page allows you to view the content of your wine cellar (s).
Warning ! if your cellar is empty, you will not be able to view it; it is necessary to add bottles to access
the view of your cellar.
The cellar can be visible in list mode or in graphic mode. The mode setting is accessible via the icon
at the top right of your screen. This icon allows you to switch from one viewing mode to another. By
default, the cellars in the “connected cellar” category are displayed in list mode.
Details of the "cellar view" icon:
List mode or Graphic mode
▪ The search icon at the top right of your screen allows you to search for a bottle of wine in
your cellar; all you need to do is write information about the bottle you are looking for (domain
name, type of wine, year, etc)

63
▪ The icon at the bottom right of your screen allows you to add bottles of wine. (see the
"Add a bottle of wine" section for more information)
▪ Warning! If you have more than one cellar, you can switch from one cellar to another using
the name of your cellar located at the top left of your screen. When you click on the name of
your cellar a pop-up asks you to select the cellar you want to view. Click in the list of your
cellars on the model to view.
List mode:
o Simplified display mode. A list allows you to consult the
wines kept in your cellar. The wines are listed in
alphabetical order.
o List mode indicates for each wine: the name of the wine, its
domain, its date, its color, its type and finally the picture of
the bottle.
o Pressing a wine allows you to access its wine sheet.
o An indicator is present on the right of your screen. It
indicates for each wine the type of wine. The types of wine
are identified by a colored icon. (Red disc: indicates a red
wine / Yellow disc: indicates a white wine / Salmon disc:
indicates a rosé wine).
Graphic mode:
o A graphical view of the cellar makes it possible to
visualize the filling of the cellar by indicating the
stored bottles represented by colored rounds.
o The wines are classified by shelf.
o User can view bottles
▪ Press on a bottle to access its wine sheet
▪ An indicator is present on the left of your screen. It indicates for each shelf the number of
bottles per type of wine. The types of wine are identified by a colored round.
Red dot: indicates a red wine
Yellow dot : indicates a white wine
Pink dot: indicates a rosé wine
« MY WINES » page
This page allows you to view your wine library. The wine library area allows you to:
▪ Consult your wines consumed, all wines added (still present or not) in your cellar are
automatically added to your wine library area.
▪ Create a wishlist; you can save wines tasted at friends or you want to buy. The wine library
area allows you to create a wish list.

64
▪ The search icon at the top right of your screen allows you to search for a bottle of wine in
your wine store; all you need to do is write information about the bottle you are looking for
(domain name, type of wine, year, etc.)
▪ To add a bottle to your wine library, follow the “Add bottles” procedure and click on “add to my
wine library”
▪ Press on a wine to consult its wine file (for more information, follow the procedure "consult a
wine sheet")
« ALERTS » page
This page allows you to view the alerts related to your cellar; a red dot next to the icon indicates an
unread alert.
The alerts are classified chronologically.
When you have several cellars, it is possible to filter by cellar (filter icon located at the top left of your
screen).
A search field allows you to filter your alerts to find a specific event.
▪ Filter change alert: your cellar alerts you when it is necessary to change the filter. The
filter change date is automatically established when you register a new cellar. Warning !
when you change your filter, do not forget to enter this action in your application profile
so that the counter will reset to the current date. (by default a filter change must be done
every year)
▪ Stock alert: you have the possibility to program stock alerts for a specific wine and
according to a defined quantity. The application alerts you that the wine in question is
about to run out. (the "rupture" quantity is defined by you, the alert can be set to a
number of bottles.)
▪ Technical alerts: these alerts indicate a technical problem or an action carried out in the
cellar: bottle consumed; bottle added; cellar created; cellar joined; user X has joined your
cellar ... In the event of a technical problem, contact an authorized technician. The alerts
are presented in the form of a list indicating the type of alert, the date, the time, the
number of the shelf concerned, the name of the cellar concerned.

65
« PROFILE » page
This page allows you to view, complete or modify the information related to your VINOTAG® account:
• Modify my information: to modify your registration information (last
name, first name, birthday, country, department) or delete your
account. To agree to receive news and other commercial
information from VINOTAG.
• I become premium: to subscribe to the premium option of
VINOTAG® and benefit from recharging scans. These scans allow
you to directly save the VIVINO® files in your application and no
longer have to complete the wine sheets manually (refer to the
"premium account" process).
• My cellars: allows you to view, modify, share, delete, add or
maintain your cellars. It also allows you to view the cellars that have
been shared with you.
• My invitations: allows you to view your invitations.
• Contact: allows you to contact VINOTAG® customer service a
drop-down list allows you to select the subject of your request.
• General Conditions of Use: allows you to consult the VINOTAG®
General Conditions of Use
• Legal notices: allows you to consult the VINOTAG® Legal notices
• Disconnect: allows you to disconnect

66
Add a cellar
You now have a VINOTAG® account to add your first cellar or a new cellar
(the application offers you the possibility of managing several cellars from a
selection of models).
Warning ! Under no circumstances should you quit the application when
adding a cellar.
▪ Adding a first cellar: the creation of your cellar is mandatory when
creating your account, follow the different steps below.
▪ Adding a new cellar: you want to manage a new cellar from your
application, go to the "profile" -> "my cellars" page and click on the
"add a cellar" button; follow the different steps below.
Add a connected wine cellar
▪ Define the type of cellar “connected cellar” or “non-connected cellar”. The ECELLAR185
model is part of the “connected cellar” category. Click on “connected cellar”.
▪ Scan the QR code of your cellar to allow the application to identify it and connect to it. The
QR code is located inside your cellar, under the master box placed at the top right of the
cellar and at the bottom of the quality sheet supplied with your cellar when it was purchased.
Prefer the scan of the latter, more accessible, to connect your cellar with ease.
▪ The application asks you to activate bluetooth; its activation is necessary to configure the
cellar.
▪ Once your cellar is connected to bluetooth, the application asks you to select a Wifi network
or to use a WPS protocol:
o In the case of a Wi-Fi network, the Wi-Fi router password is requested. If the Wi-Fi
connection fails, check the password and / or check the distance between your cellar
and your Wi-Fi router. A large distance or thick walls can block the connection. Move

67
the cellar closer to the Wi-Fi router to allow its connection.
o For WPS, a loading bar appears throughout the scan. If no WPS network was found
after several seconds, an error banner will appear at the top of the screen, and the
application will revert to the Wi-Fi / WPS choice.
Share your cellar
As a cellar owner, you can invite others to join your cellar. Consulting your cellar requires the guest to
create a VINOTAG® account.
To invite a person:
▪ Go to the "my profile" page: "my cellars"
▪ Click on the “Share my cellar” button,
▪ Indicate the email address of the person you want to invite.
▪ A confirmation banner appears at the top of your screen to confirm the sending of your
invitation
When you share your cellar;
▪ An email is sent to the person indicating that they have been invited and offering to download
the application. If she does not have an account, she will be able to view the cellars that have
been shared with her right after registration.
▪ If the invited person already has an account, they will receive a notification indicating that they
have been added to a shared cellar.
Delete a cellar
You want to delete one or more cellars.
▪ Go to the "my profile" page: "my cellars"
▪ The list of your cellars appears;
▪ Select the cellar you want to delete: press delete.
▪ Repeat the operation on all the cellars you want to delete.
Warning ! if the cellar has at least one bottle, a pop-up will appear asking you to confirm this action.
Once the cellar has been deleted, it is no longer possible to recover the related information.
Warning ! you cannot delete a cellar that does not belong to you. When a cellar is shared with you
and therefore visible from the "my profile" page: "my cellars"; you can stop sharing. When you are not
an owner, the “Remove” button is an “Exit” button. It allows you to leave the cellar. A pop-up appears
to confirm the action.
Change the cellar configuration
You want to change the configuration of your cellar differently from its standard configuration.
Warning ! for a cellar in the “connected cellar” category; the standard configuration should
not be changed. The shelves of “connected cellars” are intelligent shelves connected to the
cellar. Electrically powered, their modification / removal must be carried out by an approved
professional.

68
Add bottles
You have created your cellar in the VINOTAG® application; you can now add bottles.
NOTE: Synchronization: Each movement that takes place in a “connected cellar” is stored by
the latter. This allows you to keep a history when the cellar is no longer connected to the
internet. The next time you connect to wifi and cloud, if movements have taken place, a
synchronization view appears on your smartphone, in order to retrieve them and save them in
the database so that the displayed stock is up to date.
Create a cellar List mode Graphic mode
▪ Click on "add my first bottle" in the case of a new cellar or "+" Take a picture of the label of
the bottle you want to add to your cellar. A completed wine sheet appears; this sheet comes
from the VIVINO® database. You can modify or complete this wine sheet.
▪ Warning ! If the scanned bottle of wine is not available on the VIVINO® database or if you do
not have a premium subscription, you will have to manually complete the wine sheet
associated with your bottle. If you wish, it is possible not to take a photo of the label; in this
case, you will not be able to access the VIVINO® database, so you will have to manually
complete the wine sheet associated with your bottle.
o When adding a bottle, you can complete / modify the associated wine sheet; enter a comment
on the bottle of wine, save it as a favorite or give it a rating.
- Wine name
- Field
- Appellation
- Year
- Country / region
- Color
- Quantity of bottles
o An "advanced" mode allows you to provide additional information such as;
- Minimum guard (years)
- Maximum guard (years)
- Comment
- Switch to favorites
- Rate the bottle (0 to 5)
- Buying price

69
- Link to VIVINO® to find the complete sheet (Premium Option)
- Link to VIVINO® to buy this wine
▪ The scanned bottle is not recognized: if the bottle is not recognized, the application offers to
restart the scan, to manually search for the bottle (if no bottle corresponds to its search) or to
fill manually the sheet.
▪ It is mandatory to enter a minimum and maximum conservation time to receive peak date
alerts. If the minimum and maximum conservation time fields are not completed, no peak date
alert will be sent.
You add a bottle in a "Connected cellar"
Place the bottle / s in your cellar on the desired location / s;
▪ VINOTAG® informs you of the detection of your bottle / s and records its / their location / s on
the digital version of your cellar.
▪ When the bottle is placed and detected, the corresponding front shelf indicator light flashes
twice quickly. The location is remembered in your app. A success pop-up is then displayed
with two buttons: “Add a bottle” or “Done”.
▪ Attention! If you would like to place bottle (s) in the storage area at the bottom of your cellar,
please note that this part of the cellar is not connected.
▪ Click on "+" to continue adding bottles to your cellar.
To note !
The storage area at the bottom of your cellar is not connected.
However, the application allows you to keep a digital register of the bottles that you placed at this
location.
• The actual capacity of the storage area is 17 champagne-format bottles.
• The application nevertheless allows you to register a larger number of bottles, allowing you
to keep a register of wines not stored in your cellar.
E-Sommelier function
When adding a bottle to a "connected cellar"; you can use the E-Sommelier function. This feature
recommends the ideal location to store your wine. When you scan a bottle, VINOTAG® identifies
the type of wine; storage temperatures are recommended for each type of wine for optimal
conservation.
Certain locations in your cellar are therefore more suitable depending on the type of wine.
The E-Sommelier function helps you to keep your wine in the best conditions. By clicking on this
button, the cellar offers you available locations suitable for the scanned bottle of wine; indicator
lights light up in the cellar to show you these locations.
o When the bottle is placed and detected, the corresponding indicator light flashes
twice quickly. The location is remembered in your app. A success pop-up is then
displayed with two buttons: “Add a bottle” or “Done”.
o Attention! In the event of a failure, where your cellar cannot detect the bottle, the
indicator light will not flash. Carry out the manipulation again until the bottle is
correctly detected and the indicator light flashes twice.
o Warning ! If you do not come to pick up / drop off your bottle, the indicator light on
the front of the shelf will remain on for 5 minutes, after which time the indicator light
will go off automatically.
It is also possible to add a bottle via a wine sheet.
o Click on the button located at the bottom of the page "add one or more bottles"
o Enter the number of bottles to add and their format.
o Place the bottle / s in your cellar on the desired location / s;
o VINOTAG® informs you of the detection of your bottle / s and records its / their

70
location / s on the digital version of your cellar.
PLEASE NOTE: creating a VINOTAG® account allows you to benefit from "50 free scans".
When adding a connected cellar, 1,000 scans are offered to you. These scans allow you to
benefit from pre-completed wine files thanks to the VINOTAG® - VIVINO® partnership. In the
event that all of all scans offered have been used; it is possible to continue to add bottles by
manually completing their wine sheet or to subscribe to the premium option to benefit from a
scan refill (refer to the paragraph "Premium account").
Premium account
VINOTAG® partners with VIVINO® to facilitate the user experience. When creating a VINOTAG®
account, a number of "free scans" are offered.
These "free scans" refer to the act of taking a picture of a bottle to directly access a detailed wine
sheet extracted from the VIVINO® database. Warning ! unrecognized bottles are compatibilized as a
“free scan” since the recognition request has been sent to VIVINO®. The photo capture must be of
sufficient quality and sharpness for bottle recognition to be possible.
This wine sheet can be modified and saved directly in the digital version of your wine cellar, you no
longer need to manually complete your wine sheet. A real time saver to fill your cellar and access a lot
of information on your favorite wines.
In the event that all of the scans offered have been used; it is possible to continue to add bottles by
manually completing their wine sheet or to subscribe to the premium option to benefit from a refill of
scans. A pop-up alerts you when you have used up the “free scans”.
To switch to a premium account; the user must subscribe to the premium option which allows him to
purchase scan refill.
- Refill 200 scans
- Refill 400 scans
- Refill 1000 scans
The “scans” purchased can be used without a time limit.
Subscription to the premium option and the pricing conditions are accessible via the VINOTAG®
application in "my account" area by clicking on the "I become premium" button.
Remove bottles
You have created your cellar in the VINOTAG® application; you can now delete bottles from your
cellar. The bottles will be kept in your wine library.
For a “connected” category cellar
o Remove the desired bottle from your cellar;
o The connected cellar detects the withdrawal and informs the application; an alert
indicates the withdrawal of the bottle on your application
o Consult the "Alerts" page
or
o Select a bottle of wine by using the "show in the cellar" function; the cellar will turn on the
indicator light (s) corresponding to the locations where the different bottle (s) of wine are
stored. Warning ! A maximum of 12 indicator lights can be lit simultaneously. Warning ! If
you do not come to pick up / drop off your bottle, the indicator light on the front of the
shelf will remain on for 5 minutes, after which time the indicator light will go off
automatically.
o The withdrawal is detected by the cellar, the indicator light corresponding to the previous

71
location of your bottle will flash twice quickly to confirm the withdrawal
o The connected cellar informs the application of the withdrawal; an alert indicates the
withdrawal of the bottle on your application
o The view of your cellar is automatically updated
Warning ! to add or remove bottles in a connected cellar, it is necessary to be connected to a WiFi
network to ensure good communication of information between your physical cellar and your digital
cellar visible on VINOTAG
Consult a wine sheet
The consultation of wine sheets is accessible by your cellars or your wine library.
Consultation of wine sheet in my cellar - list mode or in my wine library
o Click on the bottle of your choice
o Consult the information related to your bottle
o For more details, you can go to the site of our partner Vivino by clicking on "See on
Vivino"
Consultation of wine sheet in my cellar - graphic mode
o Click on the shelf of your choice
o Click on the bottle of your choice
o Consult the information related to your bottle
o For more details, you can go to the site of our partner Vivino by clicking on "See on
Vivino"
Create stock alerts
To better manage your cellar and your wines, VINOTAG® offers you to set up stock alerts:
o Via the view of your cellar on the application, click on the desired bottle to access the
associated wine sheet
o Click on "schedule an alert"
o Indicate from how many bottles remaining you wish to receive a stock alert
o Click on validate. The stock alert is now activated.
To deactivate a stock alert, click on "modify alert"; decrease the number of desired bottles
until "deactivate". Click on validate. The stock alert is now deactivated.
Create peak date alerts
To create peak date alerts, it is mandatory to enter a minimum aging time (greater than 0) and a
maximum aging time on the wine sheet. The conservation time is expressed in years. You will be sent
an alert for the start and end of the peak date if your bottle has not been consumed. A wine from the
year "X" with a minimum conservation time of 5 years and maximum of 10 years will alert you as
follows:
- Year "X" + 5 years: Early peak date alert "Your bottle is ready to be tasted"
- Year "X" + 10 years: End of peak date alert "Your bottle is at the end of its peak date"

72
View the location of your bottles in your cellar
You are on view from your cellar; Use the search icon located at the top right of your screen
Indicate the name of the desired wine and / or domain and / or other information related to the bottle
The wine sheet of the desired bottle is displayed
Click on the button located at the bottom of the page "See my bottles" or on the button "Show in the
cellar" located at the beginning of your wine sheet.
Indicator lights light up in your cellar, up to a limit of 12 simultaneously, to show you the location of the
bottle (s) you are looking for.
Cellar maintenance
From the cellar configuration, it is possible to put your cellar in maintenance.
This manipulation blocks all movements that may take place in the cellar (addition,
movement, deletion).
The reception view is therefore blocked by a "cellar under maintenance" view
To exit maintenance mode, click on the “Exit maintenance” button.
Warning ! When you exit maintenance mode, you can:
▪ Reload the last registered layout
▪ Go back to an empty cellar. In that case you have to restart process from the beginning and
scan your first bottle.
6. CARE AND MAINTENANCE
Before cleaning your appliance (something that should be done regularly), disconnect it by removing
the plug or by pulling the fuse on the circuit.
Before using your appliance for the first time and regularly after that, we recommend that you clean the
inside and outside (front, side and top) with warm mixed with a gentle cleaning product. Rinse with
clean water and allow drying before reconnecting. Do not use solvents or abrasives.
When the appliance is switched on for the first time, there may be a residual smell. In that case, runt
the appliance empty for a few hours at the coldest possible temperature. The cold will kill any smell.
Automatic defrost
An automatic defrost is programmed on your cellar. There is no impact for wines stored in the cellar
during the defrosting phase.
During defrost; the compressor and the fans will be off. The digital display will show normal
temperature, however if you want to display the actual temperature of your cellar, the display will show
you the code "DD" which is normal.
Changing the carbon filter
Your wine cellar is equipped with a charcoal filter, which is positioned at the bottom right corner of your

73
cellar. We recommend that you replace it once a year. To replace it, simply pull it out from inside the
cellar and put a new filter back in.
In the event of a power cut
The majority of power outages are resolved within a short period of time.
A shutdown of 1 or 2 hours will not affect your cellar temperatures.
To protect your wines during power cuts, consider minimizing the number of door openings.
For very long power cuts, take the necessary measures to protect your wine.
o If the device is unplugged, turned off or there is a power cut, you must wait 3 to 5 minutes
before restarting it. If you try to restart it before this time, the compressor will start only after 3/5
minutes (if the temperature requires it).
o At the first start-up and following a prolonged shutdown of the cellar, it is possible that when
restarting the temperatures chosen and those displayed do not correspond. This is normal. It
will then be necessary to wait a few hours before the temperatures regain their stability.
o In the event of a power cut, the device stores the set temperatures in memory. When the
appliance is put back into service, it is therefore unnecessary to reprogram the cellar
temperatures.
Warning ! During a power cut, the E-cellar no longer records movements, so avoid modifying
the wine stock.
When the power is turned on again, the cellar will update the stocks in order to detect the
release or addition of a new bottle.
If an add or remove operation is performed via the app, it will save the changes, but if it is a free
action (without going through the app) and a bottle is removed and replaced by a new one at
the same location, the cellar will not make the distinction when it is restarted.
If you go on vacation
Short stays: let your cellar operate during your stay if it lasts less than 3 weeks.

74
Long stays: if your device is not to be used for several months, remove all bottles and accessories,
turn off and unplug the device from the power outlet. Clean and dry the inside and outside of the
appliance thoroughly. Also leave the door open, blocking it if necessary, to prevent the formation of
condensate, odors and mold.
If you need to move your wine cellar
o Unplug your cellar before any operation.
o Remove all bottles from the cellar and secure the moving parts.
o To avoid damaging the leg leveling screws, screw them all the way into their base.
o Close the door completely.
o Move the device to a vertical position preferably or note from the inscriptions on the packaging,
the direction in which the device can be laid. Also protect your device with a blanket or similar
cloth.
7. IN THE EVENT OF A BREAKDOWN
Despite the care we take during production, a breakdown can never be totally excluded. Before
contacting your retailer’s after-sales department, please check that:
The appliance is properly plugged in
There is not a power cut in progress
The breakdown is not one of those described in the table at the end of this manual
IMPORTANT: if the power cable supplied is damaged, it must be replaced by the manufacturer,
a service centre approved by the brand or the retailer. In all events, it must be replaced by
qualified personnel in order to avoid any risk of injury.
IF THESE CHECKS REVEAL NOTHING, THEN CONTACT YOUR RETAILER’S AFTER-SALES
DEPARTMENT.
CAUTION!
Unplug the appliance before carrying out any maintenance or repair work.

75
8. TROUBLE SHOOTING
Many problems can be solved easily, saving you the cost of a phone call to service. Try to resolve
your problem by following the suggestions below before calling for service.
TROUBLESHOOTING SOLUTION GUIDE
PROBLEM
POSSIBLE CAUSE
The cellar is not working
The device is not plugged in.
The device is turned off.
The circuit breaker has tripped or a fuse has blown.
The wine cellar is not cold enough
Check the set temperature.
The outdoor environment may require a higher setting.
The door is opened too frequently.
The door is not closed properly.
The door seal does not adhere completely.
The device turns on and off
frequently
The ambient temperature is higher than normal.
Many bottles have been added to the wine cellar.
The door is opened too frequently.
The door is not closed properly.
The temperature is not set correctly.
The door seal does not adhere completely.
Interior lighting does not work
The device is not plugged in.
The circuit breaker has tripped or a fuse has blown.
The indicator light is off.
The lighting activation key is OFF
Vibrations
Check and make sure the cellar is level.
The wine cellar seems to make too
much noise
The "clicking" noise may come from flowing refrigerant, which is
normal.
At the end of each cooling cycle you may hear "gurgling" noises
due to the flow of refrigerant in your wine cellar.
The contraction and expansion of the internal walls can cause
popping and crackling noises.
The wine cellar is not level.
In "mono" mode the cellar fans are activated to circulate the air
flow inside the cellar.
The door does not close properly
The wine cellar is not level.
The gasket is dirty or damaged.
Some of the contents prevent the door from closing
The door hinges are loose
The shelves are not in their place.
Bottle placed but not detected
The size of the bottle does not match.
The neck of the bottle is not in contact with the central bar of the
shelf.
The sensors on the central bar of the shelf are dirty => provide
cleaning with a soft, dry cloth.
The color of the neck is not detected by the sensor => carry out
a test by adding an opaque label around the neck.
The bottle does not have a seal at the neck => test by adding an
opaque label around the neck.
The cellar is off.
The cellar is no longer connected to the internet (Wifi).

76
Bottle detected but not installed
The sensors on the central bar of the shelf are dirty => provide
cleaning with a soft, dry cloth.
Pairing with the cellar does not work
The QR code of the master box was scanned incorrectly.
The QR code is damaged.
Wifi connection is insufficient.
Bluetooth range is exceeded.
The cellar is not connected.
The phone's WiFi or Bluetooth is not activated.
Error code « EE »
Temperature probe fault.
Error code « HH »
High temperature alarm, unplug your appliance and call your
after-sales service
Error code « LL »
Low temperature alarm, unplug your appliance and call your
after-sales service
Error code « DD »
Appliance in defrost phase => wait for the end of defrost
Water is flowing from my wine cellar
The drain hole inside your cellar is blocked.
The cellar is not tilted back enough.
The water tank behind the cellar is full.
A red LED flashes continuously
under the master box
the cellar is not connected or has lost its connection to the Wifi
network ;
One or more LEDs remain on on the
front of my shelves
You made a position call (s) (locate a bottle or ESommelier
function) and you did not come to pick up / drop off the bottle (s)
=> wait 5 minutes for it (s) to go out on its own or open and close
the wine cellar door
The buttons on the control panel do
not work
Check that the control panel is not locked, padlock displayed on
the screen. Unlock by pressing the key with the padlock symbol
for 3 seconds to unlock the control panel
My digital register and my actual
stock are different
Did you make any modification during a power break?
Check in Vinotag application FAQ how to resolve your stock
discrepancies.
I cannot scan the cellar QR code
Prefer the scan of the QR code present at the bottom of the
quality sheet of your cellar. Place the quality sheet on a dry, flat
support in the light to facilitate scanning of the QR code.
if you have difficulty scanning the cellar QR code (under the
masterbox), we advise you to turn on the LED light in the wine
cellar, increasing the level brightness you will find it easier to
detect the QR code with your phone. For phones that need a
certain distance to focus, you can pull out the top shelf of your
cellar to have a better distance between the lens of your phone
and the cellar QR code.
The label of the wine I photograph is
not recognized by the application
The photo taken via the application must be of good quality (not
blurred), the photo must be taken so that the wine label fills in
the white frame of the application. If that still doesn't work, try
taking a close-up photo of just the name of the wine.

77
Errors codes
Error codes
Meaning
HH
High temperature alarm
LL
Low temperature alarm
DD
Device in defrost
EE
Temperature probe fault
If any other code, such as A, B, C, D, E, G, I, J, K, M, N, O is displayed on your screen, please
contact customer service.
9. ENVIRONNMENT
This appliance is marked according to the European directive 2019/290/EU on Waste
Electrical and Electronic Equipment (WEEE). By ensuring this product is disposed of
correctly, you will help prevent potential negative consequences for the environment
and human health, which could otherwise be caused by inappropriate waste handling
of this product.
The symbol on the product, or on the documents accompanying the product, the Crossed Out
Wheelie Bin, indicates that this appliance may not be treated as household waste. Instead it shall be
handed over to the applicable collection point for the recycling of electrical and electronic equipment,
or, if you are buying an equivalent product, to the retailer of the new product.
The user is responsible for taking the appliance to the appropriate collection center at the end of its
useful life. Selective and appropriate collection for the recycling of no longer used appliances and
their disposal and destruction in an environmentally friendly manner, helps to prevent potential
negative effects on the environment and health, and encourages the recycling of materials used to
make the product.
During disposal, or in the context of a resale, the user's personal data is protected, without action on
his part. These data are not saved in the cellar but on an external server. No information transmitted
during normal use of the cellar can be used after its disposal.
In the context of a resale of the device, the new user must scan the QR code of the master unit and
follow the mandatory pairing procedure. This procedure overwrites data previously stored on the
server. The new user will thus have a blank account. The former user will no longer be able to access
or view their old information from the Vinotag application.
For more detailed information about treatment, recovery and recycling of this product, please contact
your local authority, your household waste disposal service or the retailer where you purchased the
product.
10. WARNING
As we continuously improve our products for the benefit of our customers, we reserve the right to
modify technical characteristics without notice.
Warranties for LA SOMMELIERE brand products are offered exclusively by selected retailers. No
part of these instructions may be considered as a supplementary guarantee.
FRIO ENTREPRISE cannot be held liable for errors or technical or editorial omissions in this
document. Non-binding document.

78
1. SICHERHEITSHINWEISE
Lesen Sie diese Bedienungsanleitung einschließlich der darin
enthaltenen Warnhinweise und nützlichen Tipps sorgfältig durch, bevor
Sie das Gerät aufstellen und in Betrieb nehmen. Sie enthält wichtige
Hinweise für Ihre Sicherheit und den ordnungsgemäßen Gebrauch des
Geräts. Um das Gerät nicht zu beschädigen und/oder sich unnötig zu
verletzen, ist es wichtig, dass die Personen, die das Gerät benutzen,
seine Funktionsweise sowie seine Sicherheitsfunktionen gut kennen.
Bewahren Sie die Bedienungsanleitung zum späteren Nachschlagen
neben dem Gerät auf, damit sie beim Verkauf bzw. Umzug zusammen
mit dem Gerät übergeben werden kann. So kann gewährleistet werden,
dass das Gerät optimal funktioniert.
Bewahren Sie die Bedienungsanleitung auf, um der Verletzungsgefahr
vorzubeugen. Der Hersteller kann nicht für Schäden durch falsche
Bedienung des Geräts haftbar gemacht werden.
Sicherheit von Kindern oder anderen schutzbedürftigen Menschen
• Das Gerät kann von Kindern ab 8 Jahren sowie von Personen mit
eingeschränkten körperlichen, sensorischen oder geistigen
Fähigkeiten oder mangelnder Erfahrung und Kenntnis verwendet
werden, wenn sie von einer sachkundigen Person, die sich der damit
verbundenen Risiken bewusst ist, beaufsichtigt werden. Kinder dürfen
nicht mit dem Gerät spielen. Die Reinigung und Benutzerwartung
dürfen nicht von Kindern durchgeführt werden, außer sie sind
mindestens 8 Jahre alt und werden überwacht.
• Alle Verpackungen außerhalb der Reichweite von Kindern
aufbewahren, da Erstickungsgefahr besteht.
• Bei der Entsorgung des Geräts den Netzstecker aus der Steckdose
ziehen und das Netzkabel (möglichst dicht am Gerät) abschneiden
und die Tür entfernen, damit Kinder nicht damit spielen können und
einen Stromschlag erleiden oder sich im Geräteinneren einschließen.
• Ersetzt man das Gerät mit magnetischer Türdichtung durch ein Gerät
mit Schnappschloss an der Tür bzw. der Dichtung, ist zu prüfen, dass
das Schnappschloss funktionsunfähig ist, bevor Sie das Altgerät
entsorgen. So lässt sich vermeiden, dass das Gerät zu einer Falle für
Kinder wird.
• Das Gerät und das Netzkabel außerhalb der Reichweite von Kindern
unter 8 Jahren aufbewahren.
• Kinder dürfen keine Flaschen in das Gerät hineinlegen oder

79
herausnehmen.
Allgemeine Sicherheit
ACHTUNG — Das Gerät ist für den Betrieb im Haushalt und in
folgenden Umgebungen ausgelegt:
- Küchen und im Handel verkaufte Einrichtungen, Arbeitsumgebungen
und Büros,
- Frühstückspensionen,
- Bauernhöfe und Hotels, Motels und sonstige Einrichtungen, die Gäste
empfangen,
- Großküchen und sonstige, nicht für den Weiterverkauf bestimmte
Anwendungen.
ACHTUNG — Bewahren Sie keine entzündlichen Stoffe, wie z. B.
Spraydosen, im Inneren des Geräts auf, da sie dort auslaufen können.
ACHTUNG — Wenn das Netzkabel beschädigt ist, muss es sofort vom
Hersteller oder einem Fachhändler ausgetauscht werden, um jede
Gefahr eines Stromschlags auszuschließen.
ACHTUNG — Die Lüftungsöffnungen dürfen nicht versperrt werden. Es
ist zu prüfen, dass die Luft durch die Öffnungen frei zirkulieren kann.
ACHTUNG — Den Kältekreislauf auf keinen Fall beschädigen.
ACHTUNG — Keine Elektrogeräte im Inneren des Faches verwenden,
außer Letztere sind vom Hersteller zugelassen.
ACHTUNG! Das Kältesystem und die Wärmedämmung enthalten
entzündliche Gase. Das Gerät in einer zugelassenen Sammelstelle
entsorgen. Das Gerät keinen Flammen aussetzen.
Kältemittel
Im Kältekreislauf des Geräts wird Isobutan (R600a) eingesetzt. Es
handelt sich dabei um ein hochentzündliches Erdgas, das für die Umwelt
ungefährlich ist. Beim Transport und der Installation des Geräts prüfen,
dass keine Komponenten des Kältekreislaufs beschädigt sind. Das
Kältemittel (R600a) ist eine entzündliche Flüssigkeit.
Achtung: Brandgefahr
Bei Beschädigungen des Kältekreislaufs:
▪ Offene Flammen und sonstige Zündquellen vermeiden.
▪ Den Raum, in dem sich das Gerät befindet, gut lüften.
Es ist gefährlich, irgendwelche Änderungen an der Zusammensetzung
des Geräts vorzunehmen.
Schäden am Netzkabel können einen Kurzschluss und/oder elektrischen
Schlag verursachen.

80
Elektrosicherheit
• Das Netzkabel darf nicht verlängert werden.
• Prüfen Sie, dass die Wandsteckdose nicht beschädigt ist. Eine
Wandsteckdose in schlechtem Zustand kann zur Überhitzung des
Geräts und seiner Explosion führen.
• Prüfen Sie, dass die Wandsteckdose des Geräts leicht erreichbar ist.
• Nicht am Netzkabel ziehen.
• Das Netzkabel nicht anschließen, wenn die Wandsteckdose locker
ist. Es besteht Stromschlag- oder Brandgefahr.
• Das Gerät nicht benutzen, wenn die Abdeckung der
Innenbeleuchtung nicht angebracht ist.
• Dieses Gerät wird mit 220~240V/50Hz Einphasenstrom betrieben.
• Keine Verlängerungskabel, Adapter oder Mehrfachsteckdosen
verwenden. Das Gerät darf nur an eine ordnungsgemäß geerdete
Steckdose angeschlossen werden.
Täglicher Gebrauch
• Dieses Gerät ist ausschließlich zur Lagerung von Wein bestimmt.
• Keine entzündlichen Stoffe oder Flüssigkeiten im Geräteinneren
aufbewahren, da Expositionsgefahr besteht.
• Keine anderen Elektrogeräte (Mixer, Eismaschinen, usw.) im Inneren
des Geräts betreiben.
• Beim Trennen des Geräts von der Stromversorgung am Netzstecker
und nicht am Kabel ziehen.
• Keine warmen Gegenstände oder Kunststoffteile in das Gerät legen.
• Das Gerät muss gemäß bestimmten speziellen Regeln bedient und
behandelt werden. Hinsichtlich der Lagerung die relevanten
Vorschriften einhalten.
• Das Gerät keiner direkten Sonneneinstrahlung aussetzen.
• Kerzen, Leuchten und offene Flammen zur Vermeidung der
Brandgefahr vom Gerät fernhalten.
• Das Gerät ist für die Aufbewahrung von herkömmlichen
haushaltsüblichen Getränken bestimmt.
• Das Gerät ist schwer. Seien Sie vorsichtig, wenn Sie das Gerät
umsetzen.
• Stützen Sie sich niemals am Sockel, den Ablagerosten, Türen und
anderen ähnlichen Bauteilen ab.
• Um das Herabstürzen von Gegenständen und Beschädigungen des
Geräts zu vermeiden, sollten die Ablageroste nicht überladen werden.

81
Achtung! Reinigung und Pflege
• Stecken Sie das Gerät vor allen Instandhaltungsarbeiten ab und
schalten Sie den Strom ab.
• Reinigen Sie das Gerät nicht mit Metallgegenständen,
Dampfreinigern, flüchtigen Ölen, organischen Lösungsmitteln oder
Scheuermitteln.
• Verwenden Sie zum Entfernen von eventuell vorhandenem Eis keine
scharfen oder spitzen Gegenstände. Verwenden Sie dazu einen
Eisschaber aus Kunststoff.
Wichtige Informationen zur Installation!
• Achtung! Um zu vermeiden, dass der Weinschrank umkippt, sind
vorrangig die Flaschenplätze im hinteren Bereich des
Weinschranks zu belegen. Die Ablageroste dürfen nicht
gleichzeitig herausgezogen werden oder ausgezogen bleiben.
Da das Gewicht der Flaschen dazu führen kann, dass der
Weinschrank nach vorn kippt, ist es wichtig, dass das Gewicht
der Flaschen im gesamten Weinschrank verteilt wird und dieser
vorsichtig behandelt wird.
• Um einen korrekten elektrischen Anschluss zu gewährleisten,
befolgen Sie die Anweisungen in dieser Bedienungsanleitung.
• Packen Sie das Gerät aus und untersuchen Sie es auf sichtbare
Beschädigungen. Stecken Sie das Gerät keinesfalls an, wenn Sie
eine Beschädigung feststellen. Melden Sie jede Beschädigung im
Geschäft, in dem Sie das Gerät gekauft haben. Bewahren Sie in
diesem Fall die Verpackung auf.
• Es wird empfohlen, mindestens 24 Stunden abzuwarten, bevor Sie
das Gerät an das Stromnetz anschließen, damit der Kompressor mit
Öl versorgt wird.
• Eine gute Luftzirkulation muss gewährleistet sein, um eine
Überhitzung zu vermeiden. Befolgen Sie für eine ausreichende
Lüftung die beigelegten Installationsanweisungen. Achtung! Dieses
Kühlgerät ist nicht dafür bestimmt, als Einbaugerät verwendet zu
werden.
• Vermeiden Sie, dass das Gerät die Wand berührt und/oder mit
heißen Gegenständen (Kompressor, Kondensator, Heizung,
Kochgeräte, Wäschetrockner usw.) in Berührung kommt, um jegliche
Brandgefahr oder die Überhitzung des Geräts zu vermeiden.
Befolgen Sie stets die Installationsanweisungen.
• Prüfen Sie, ob Sie auf die Steckdosen zugreifen können, sobald das
Gerät aufgestellt ist.

82
• Achten Sie bei der Positionierung des Geräts darauf, dass das
Netzkabel nicht eingeklemmt oder beschädigt wird.
Fehlerbehebung und Ersatzteile
• Elektrische Arbeiten sind von einem qualifizierten und kompetenten
Techniker durchzuführen.
• Störungen an diesem Gerät sind von einem Fachkundendienstcenter
zu beheben, und es dürfen nur Originalteile verwendet werden.
Gemäß der VERORDNUNG (EU) 2019/2019 (Anhang II, Punkt 3.)
werden die ästhetischen und funktionalen Ersatzteile den fachlich
kompetenten Reparateuren und Endnutzern für einen Zeitraum von
7 Jahren bzw. 10 Jahren (Liste in Anhang II, Punkt 3.a.1 und 3.a.2) nach
dem Inverkehrbringen des letzten Exemplars eines Modells zur
Verfügung gestellt.
Die Ersatzteilliste und das Bestellverfahren (Zugang Gewerbetreibende /
Zugang Privatpersonen) sind auf der Internetseite
www.interfroidservices.fr oder auf dem Postweg unter folgender
Anschrift verfügbar: FRIO - Interfroid Services, 143 Bd Pierre
Lefaucheux - 72230 ARNAGE, Frankreich. Die anderen funktionalen
Ersatzteile, die nicht in der Verordnung (EU) 2019/2019 aufgeführt sind,
sind für einen Zeitraum von 10 Jahren verfügbar.
Auf Funktionsteile wird eine Herstellergarantie von 1 Jahr gewährt.

83
R600a
Sicherheitshinweise
Achtung: Zur Beschleunigung des
Abtauvorgangs kein Werkzeug oder
sonstige Mittel verwenden, die nicht
ausdrücklich vom Hersteller empfohlen
wurden.
Achtung: Die Lüftungsgitter des Geräts
nicht versperren.
Achtung: In dem Gerät keine
explosionsfähigen Stoffe, wie z. B.
Spraydosen mit entzündlichem Treibgas
lagern.
Achtung: Den Kältemittelkreislauf des
Geräts nicht beschädigen.
Achtung: Die Kühleinheiten
funktionieren mit Isobutan (R600a) und
dürfen daher nicht in einem Bereich mit
Zündquellen aufgestellt werden. Der
Kältemitteltyp ist auf dem Typenschild
des Weinschranks angegeben.
Achtung: In den Fächern des Geräts
keine Elektrogeräte verwenden, außer
sie wurden vom Hersteller ausdrücklich
empfohlen.
Dieses Gerät entspricht den Anforderungen der europäischen Richtlinien und deren eventuellen
Änderungen.
KARTONS UND VERPACKUNGEN AUS PAPIER GETRENNT ENTSORGEN

84
2. TYPENSCHILD
Das Typenschild befindet sich im Geräteinneren bzw. an der Geräterückseite (modellabhängig). Es
enthält alle gerätespezifischen Angaben.
Wir raten Ihnen, die Seriennummer vor der Installation in der Bedienungsanleitung zu notieren, um
sie später bei Bedarf griffbereit zu haben (Reparatur, Kundendienstanfrage usw.).
Ist das Gerät erst einmal installiert und gefüllt, ist der Zugriff auf die Seriennummer erschwert.
ACHTUNG: Ohne diese Angaben können wir Ihnen nicht weiterhelfen.
3. PRODUKTBESCHREIBUNG
Weitere Informationen über Ihr Produkt finden Sie in der Online-Datenbank EPREL. Gemäß den
Bestimmungen der delegierten Verordnung (EU) 2019/2016 der Kommission sind alle Angaben
bezüglich dieses Kühlgeräts in der EPREL-Produktdatenbank für die
Energieverbrauchskennzeichnung (European Product Database for energy labelling) verfügbar. In
dieser Datenbank können Sie die Informationen und technischen Unterlagen Ihres Kühlgeräts
einsehen. Um auf die EPREL-Datenbank zuzugreifen, scannen Sie den QR-Code auf dem
Energielabel Ihres Geräts oder gehen Sie direkt auf: www.ec.europa.eu und geben Sie das Modell
Ihres Kühlgeräts ein.
Master-Steuereinheit
14 smarte Ablageroste mit
Leuchtanzeige
Fassungsvermögen von 12
Flaschen pro Ablagerost
Lagerbereich
Fassungsvermögen von 17
Flaschen
Glastür
Bedienfeld mit
LCD-Display

85
Auf der Website www.lasommeliere.com können Sie alle Informationen über den
Weinklimaschrank ECELLAR185 einsehen und seine Bedienungsanleitung herunterladen.
Angegebenes Fassungsvermögen
▪ Der Weinklimaschrank ECELLAR185 hat ein Fassungsvermögen von 185 Flaschen.
▪ Er ist mit 14 smarten Ablagerosten ausgestattet.
▪ Auf jedem Ablagerost können 12 Flaschen gelagert werden.
▪ Der Weinklimaschrank verfügt über einen Lagerbereich für bis zu 17 Flaschen.
Das angegebene Fassungsvermögen entspricht dem maximalen Fassungsvermögen, das mithilfe der
Anzahl der Ablageroste, die mit dem Weinschrank verkauft werden, berechnet wird. Die smarten
Ablageroste des ECELLAR sind so dimensioniert, dass sie eine Flasche im Champagner-Format
aufnehmen können. Durch diese Besonderheit können sämtliche 75-cl-Flaschenformate gelagert
werden, wie z. B.: Bordeaux-, Champagner-, Burgunder- und Elsässer Flaschen sowie untypische
Flaschenformate wie Prosecco, Sacchetto, Mateus usw.
Achtung! Der Durchmesser der Flaschen, die auf den Rosten abgelegt werden, darf maximal
9 cm betragen.
Falls Sie Weinflaschen unterschiedlicher Größe reifen lassen wollen, empfehlen wir Ihnen, zwischen
Ihren größeren Flaschen abwechselnd eine Standard-Bordeauxflasche abzulegen, um Probleme bei
der Lagerung zu vermeiden.
Wenn Sie Flaschen mit untypischem bzw. besonders großem Format nebeneinander anordnen, ist es
möglich, dass Sie nur eine begrenzte Anzahl an Plätzen auf Ihrem Ablagerost nutzen können. Wenn
Sie abwechselnd eine Flasche im Standard-Format (Bordeaux 75cl) und eine untypische bzw. große
Flasche einlegen, können Sie die gesamten Ablageplätze der Roste nutzen.
Falls trotz unserer Bemühungen einige Flaschenformate nicht von den ECELLAR-Ablagerosten
erkannt werden, befolgen Sie bitte die folgenden Anweisungen:
Wenn eine Flasche zu groß ist und nicht zwischen zwei Ablageroste passt, empfehlen wir Ihnen:
▪ sie auf dem ersten Ablagerost Ihres Weinschranks (von oben nach unten)
▪ sie im Lagerbereich im unteren Teil des Weinschranks abzulegen.
Empfehlungen zur Anordnung der Ablageroste usw. im
Gerät
Die ursprüngliche Anordnung der Ablageroste und anderer Zubehörteile im Gerät wird empfohlen,
damit die Energie vom Kühlgerät möglichst rationell ausgenutzt wird. Jegliche Änderung an dieser
Anordnung kann sich auf den Energieverbrauch des Geräts auswirken.
Funkfrequenzmerkmale
Das Unternehmen La Sommelière erklärt hiermit, dass die Funkanlage ECELLAR185 die Richtlinie
2014/53/EU und alle anderen einschlägigen europäischen Richtlinien erfüllt. Die Richtlinie ist
einsehbar unter: https://eur-lex.europa.eu/legal-
content/DE/TXT/?uri=CELEX%3A32014L0053&qid=1617885639187
• Frequenzband: 2400 MHz bis 2483,5 MHz
• Höchstleistung:100 mW
Das CE-Zertifikat kann auf der Website von La Sommelière eingesehen und heruntergeladen werden:
https://www.lasommeliere.com/fr/155-ECELLAR185.html

86
4. INSTALLATIONSANWEISUNGEN
Vor Inbetriebnahme Ihres Weinschranks
▪ Die Außen- und Innenverpackung entfernen.
▪ Lassen Sie das Gerät vor der Inbetriebnahme rund 24 Stunden in aufrechter Position stehen.
Dadurch wird die Möglichkeit von transportbedingten Störungen im Kühlsystem reduziert.
▪ Reinigen Sie das Gerät innen mit einem weichen, mit lauwarmem Wasser getränkten Tuch.
▪ Wählen Sie einen autorisierten Standort für die Aufstellung des Geräts aus.
▪ Stellen Sie Ihr Gerät auf einem Untergrund auf, der stabil genug ist, um das Gewicht bei
voller Beladung tragen zu können.
▪ Stellen Sie Ihren Weinschrank auf einem Untergrund auf, der stabil genug ist, um das
Gewicht bei voller Beladung tragen zu können.
▪ Gleichen Sie die Füße Ihres Geräts so aus, dass der vordere Bereich nivelliert ist und der
hintere Bereich leicht nach hinten geneigt ist. Dadurch können die Einschübe oder
Ablageroste trotz des Flaschengewichts nicht herausfallen. Durch die Neigung wird zudem
das Kondenswasser gut abgeleitet und die Türdichtung schließt besser.
▪ Da eine gute Belüftung eine wichtige Rolle spielt, dürfen die Luftauslässe nicht versperrt
werden.
▪ Das Gerät ist als frei stehendes Gerät konzipiert. Es darf auf keinen Fall als
Einbaugerät verwendet werden. Es ist darauf zu achten, dass die Luft um das Gerät
herum gut zirkulieren kann.
▪ Der Weinschrank ist an einer Einzelsteckdose anzuschließen. Dabei ist ein Abstand von 50
mm zwischen der Geräterückseite und der Wand sowie ein Abstand von 100 mm an allen
Seiten und über dem Gerät zu lassen. Gleichen Sie die Füße Ihres Geräts so aus, dass der
vordere Bereich nivelliert ist und der hintere Bereich leicht nach hinten geneigt ist (Verwenden
Sie dazu eine Wasserwaage). Dies verhindert Bewegungen aufgrund mangelnder Stabilität,
die Geräusche und Vibrationen erzeugen können, und gewährleistet die vollkommene
Dichtheit der Tür.
▪ Dieses Gerät dient ausschließlich zur Lagerung von Wein.
▪ Dieses Gerät verwendet ein entzündliches Kältemittelgas. Achten Sie daher darauf, dass das
Kühlrohr beim Transport nie beschädigt wird.
Achtung!
▪ Lagern Sie nur geschlossene Flaschen.
▪ Überladen Sie das Gerät nicht.
▪ Öffnen Sie die Tür nur bei Bedarf.
▪ Decken Sie die Ablageroste nicht mit Aluminiumfolie oder irgendeinem anderen Material ab,
das die gute Luftzirkulation im Gerät beeinträchtigen könnte.
▪ Wenn der Weinschrank lange Zeit leer stehen muss, empfohlen wir Ihnen, den Netzstecker
zu ziehen. Lassen Sie nach einer sorgfältigen Reinigung die Tür etwas offen stehen, damit
die Luft zirkulieren kann und sich kein Schimmel oder unangenehme Gerüche bilden können.
ACHTUNG: Halten sie das Gerät bitte von allen Substanzen fern, die eine Brandgefahr
darstellen können.

87
Installation Ihres Weinschranks
Achtung! Um zu vermeiden, dass der Weinschrank umkippt, sind vorrangig die Flaschenplätze
im hinteren Bereich des Weinschranks zu belegen. Die Ablageroste dürfen nicht gleichzeitig
herausgezogen werden oder ausgezogen bleiben. Da das Gewicht der Flaschen dazu führen
kann, dass der Weinschrank nach vorn kippt, ist es wichtig, dass das Gewicht der Flaschen im
gesamten Weinschrank verteilt wird und dieser vorsichtig behandelt wird.
Spannungsversorgung
Schließen Sie den Weinschrank an einer Einzelwandsteckdose vom Typ E an.
Der Weinschrank muss an einer leicht zugänglichen Einzelsteckdose angeschlossen werden.
Fragen zur elektrischen Leistung und/oder Erdung sind einer Fachkraft (Elektriker, zugelassener
Reparaturdienst) zu unterbreiten.
Aufstellort
• Achtung! Der Weinschrank muss an einem sauberen (staubfreien), frostfreien Ort aufgestellt
werden und darf nicht in der Nähe einer Wärmequelle, wie z. B. einem Heizkörper, Ofen,
Sonnenlicht usw., stehen. Er darf nicht im Freien aufgestellt werden.
• Stellen Sie das Gerät auf einem Untergrund auf, der stabil genug ist, um das Gewicht des
gefüllten Weinschranks tragen zu können.
• Zur Nivellierung des Geräts stellen Sie die Höhe der Stellfüße unter dem Weinschrank ein.
Das Gerät ist für den Betrieb in Räumen mit einer bestimmten Umgebungstemperatur geeignet. Die
Klimaklasse ist auf dem Typenschild angegeben.
Hinweis: Dieses Kühlgerät ist für den Betrieb bei einer Umgebungstemperatur zwischen 16 °C und 32
°C geeignet. Die Umgebungstemperatur beeinflusst die Innentemperatur und die Luftfeuchtigkeit in
Ihrem Weinschrank.
Die Temperatur des Geräts ist zwischen 5 °C und 20 °C einstellbar. Die Temperatur wird durch einen
Thermostat geregelt. Die Änderung der Temperatur führt zu einem höheren Energieverbrauch.
Solange das Gerät in Betrieb ist und unter normalen Bedingungen verwendet wird, stellt das
Kühlgerät sicher, dass die Temperatur im Geräteinneren aufrechtgehalten wird. Die Innentemperatur
des Geräts und dessen Energieverbrauch ist von zahlreichen Faktoren abhängig:
Umgebungstemperatur, Sonneneinstrahlung, Häufigkeit der Türöffnung und Anzahl der gelagerten
Flaschen. Leichte Temperaturschwankungen sind vollkommen normal und entsprechen den
Kühlzyklen des Geräts. Diese Schwankungen haben jedoch keinen Einfluss auf die Lagertemperatur
des Weins, da die Schwankungen zu kurz sind, als dass ein Wärmeaustausch mit den Flaschen
stattfindet.

88
Türgriffmontage
- Nehmen Sie den Türgriff und die beiden Schrauben aus dem Plastikbeutel, der sich im
Inneren des Weinschranks befindet.
- Vor der Montage des Türgriffs an der entsprechenden Stelle ist die Türdichtung abzunehmen.
Die Dichtwirkung der Dichtung wird nicht beeinträchtigt, wenn sie ordnungsgemäß
abgenommen wird.
- Lösen Sie die Dichtung vom Türwinkel bis zur notwendigen Höhe und führen Sie dann die
beiden Schrauben in die Löcher des Türgriffs ein.
- Schrauben Sie den Griff fest und bringen Sie die Dichtung wieder in der Nut an, wobei Sie mit
der Ecke abschließen.
WLAN-Reichweite des Weinschranks
Achtung! Der ECELLAR Weinschrank funktioniert über eine WLAN-Verbindung.
Achtung! Der Nutzer ist selbst dafür verantwortlich, für eine ausreichende Anbindung an das
WLAN-Netz (Geschwindigkeit/Signalstärke) zu sorgen, damit der smarte Weinschrank
ordnungsgemäß funktionieren kann.
• Bei einer langsamen Verbindung kann die Verwendung eines WLAN-Repeaters bzw. WLAN-
Verstärkers erforderlich sein.
Falls die Internet-Verbindung zum ECELLAR abbricht, kann dieser bis zu 100 Ereignisse speichern,
bis die Verbindung wiederhergestellt ist.
Dann werden die Informationen und ein Update des Weinbestands an den Server gesendet.
Bei über 100 Ereignissen werden die ältesten Einträge durch die neuesten Einträge überschrieben.
Der Nutzer kann diese in seiner App unter der Rubrik „Benachrichtigungen“ einsehen.
Bei einem Stromausfall werden vom Weinschrank keine Flaschenein- bzw. ausgänge erfasst, wobei
auch die Ereignisse verloren gehen, die er bis zur Synchronisierung mit dem Server im Speicher
vorhält.
Bei einem Neustart nach einem Stromausfall wird die letzte Version, die in der Cloud gespeichert
wurde, als aktueller Bestand des Weinschranks angezeigt. Daher ist es wichtig, während eines
Stromausfalls den Inhalt des Weinschranks möglichst nicht zu ändern, damit es zwischen dem
digitalen Register und dem tatsächlichen Inhalt Ihres Weinschranks nicht zu Abweichungen kommt.
Griff
Türrahmen
Dichtung
Schraube

89
Bluetooth-Reichweite des Weinschranks
Achtung! Die Kopplung des ECELLAR-Weinschranks mit dem WLAN-Netz erfolgt über Bluetooth. Im
täglichen Gebrauch kommuniziert der Weinschrank ausschließlich über das WLAN-Netz.
Die Bluetooth-Reichweite des Weinschranks beträgt maximal 3 m bei geschlossener Tür.
Luftfeuchtigkeit
In Ihrem Weinschrank gibt es auf dem Kompressor einen Wasserauffangbehälter, der regelmäßig
Wasser enthalten wird. Dieser dient dazu, die Luftfeuchtigkeit in Ihrem Weinschrank
aufrechtzuerhalten.
o Falls der Behälter zu viel Wasser enthält, fließt das überschüssige Wasser über das
Abflussloch für Kondenswasser in einen Auffangbehälter über dem Kompressor ab.
o Denken Sie daran, Ihren Weinschrank leicht nach hinten zu neigen, indem Sie die
beiden vorderen Stellfüße herausschrauben, damit das Wasser ordnungsgemäß
ablaufen kann.
o Das Abflussloch darf nicht verstopft sein.
Wasserbehälter
Wasserabflussloch zum
Kompressor

90
5. BEDIENUNGSANWEISUNG
Bedienfeld
Der Weinschrank ECELLAR185 ist mit einem elektronischen Bedienfeld mit LCD-Display
ausgestattet.
Das Bedienfeld befindet sich im Weinschrank auf der linken Seite.
BUCHSTABE
BESCHREIBUNG
A
Zeigt den Betriebsmodus des Weinschranks an: MONO (Mono-
Temperatur) oder AUTO (Multi-Temperatur).
B
Verriegelung: zeigt an, dass das Touchpanel verriegelt ist.
C
Licht: zeigt an, dass das Licht eingeschaltet ist.
D
Einprogrammierte Temperatur für den Innenraum des
Weinschranks. Der ECELLAR zeigt standardmäßig die eingestellte
Temperatur auf der Digitalanzeige an. Sie können sich jedoch auch
die Ist-Temperatur im Inneren Ihres Weinschranks anzeigen lassen,
indem Sie die Tasten I + J 3 Sekunden lang gedrückt halten. Dann
zeigt das Display die vom Sensor gemessene Ist-Temperatur an,
die blinkt. Wenn Sie die Tasten wieder loslassen, erscheint auf dem
Display wieder die normale Temperaturanzeige.
E
Anzeige der Temperatureinheit in Grad Celsius durch das Symbol
°C oder in Fahrenheit durch das Symbol °F.
F
Taste zum Wechseln der Temperatureinheit:
- Grad Celsius mit dem Symbol „°C“ oder
- Fahrenheit mit dem Symbol „F“.
G
Auswahl des Betriebsmodus des Weinschranks. Standardmäßig
befindet sich der Weinschrank im Betriebsmodus MONO. Wenn Sie
die Taste einmal drücken, wechselt der Weinschrank in den
Betriebsmodus AUTO (Betrieb mit mehreren Temperaturen).
H
Taste zum Ein-/Ausschalten des Lichts.
I
Taste zur Temperatureinstellung. Drücken Sie auf diese Taste, um
die Temperatur bis zur gewünschten Temperatur zu erhöhen. Im
Betriebsmodus MONO (Mono-Temperatur) lässt sich die
Temperatur des Weinschranks zwischen 5 °C und 20 °C einstellen.
Im Betriebsmodus AUTO (Multi-Temperatur) verwaltet der
Weinschrank die Innentemperatur selbstständig. In diesem Modus
funktionieren diese Tasten nicht.
J
Taste zur Temperatureinstellung. Drücken Sie auf diese Taste, um
die Temperatur bis zur gewünschten Temperatur abzusenken.
Im Betriebsmodus MONO (Mono-Temperatur) lässt sich die
Temperatur des Weinschranks zwischen 5 °C und 20 °C einstellen.
Im Betriebsmodus AUTO (Multi-Temperatur) verwaltet der
Weinschrank die Innentemperatur selbstständig. In diesem Modus
funktionieren diese Tasten nicht.
K
Drücken Sie auf diese Taste, um den Weinschrank ein- oder
auszuschalten, ohne den Netzstecker zu ziehen.
L
Drücken Sie auf diese Taste, um das Bedienfeld zu verriegeln bzw.
zu entriegeln. Drücken Sie 3 Sekunden lang auf die Taste, um das
Display zu verriegeln oder zu entriegeln. Ohne weitere Aktion
Ihrerseits verriegelt sich das Display automatisch nach 15
Sekunden.

91
Bei Inaktivität verriegelt sich das Display nach 15 Sekunden. In diesem Fall ist das Symbol B auf dem
Display zu sehen.
Die Hintergrundbeleuchtung des Displays schaltet sich automatisch nach 15 Sekunden Inaktivität
nach der Display-Verriegelung aus. Sie schaltet sich wieder ein, sobald Sie erneut auf eine Taste
drücken. Liegt ein Fehlercode oder ein Alarm an, ist das Display automatisch entriegelt.
Alarme
Zur umfassenden Sicherheit Ihrer Weine ist Ihr Weinschrank mit einem Alarmsystem ausgestattet:
- Alarm hohe Temperatur
- Alarm niedrige Temperatur
Diese Alarme sind vorprogrammiert. Stellt der Weinschrank nach 12 Betriebsstunden einen
Temperaturunterschied von ± 4°C in Bezug zur eingestellten Temperatur fest, zeigt er einen
Fehlercode für den Alarm „hohe Temperatur“ bzw. „niedrige Temperatur“ an, und es ertönt ein
Alarmton. Bei einer Störung funktioniert der Kompressor in kurzen Zyklen und wird abwechselnd 10
Minuten ein- und 10 Minuten abgeschaltet.
Zur Deaktivierung des Alarmtons drücken Sie auf eine beliebige Taste des Bedienfelds.
Falls einer dieser Alarme aktiviert wird, wenden Sie sich bitte an den Kundendienst.
Master-Steuereinheit
Ihr Weinschrank ist mit einer Master-Steuereinheit ausgestattet. Die Steuereinheit befindet sich im
Inneren des Weinschranks oben rechts. Sie stellt die Verbindung zwischen den Ablagerosten und der
Smartphone App VINOTAG® sicher, indem sie die Daten per WLAN überträgt.
Achtung! Die Steuereinheit darf auf keinen Fall manipuliert oder beschädigt werden.
An der Unterseite der Steuereinheit ist eine Anzeigeleuchte angebracht, die den Status des
Weinschranks anzeigt. Außerdem verfügt sie über eine Drucktaste, mit der die WLAN-Verbindung
des Weinschranks mit dem WLAN-Netz neu gestartet wird. Wenn die Anzeigeleuchte kontinuierlich
blinkt, bedeutet das, dass der Weinschrank nicht mehr mit dem WLAN-Netz verbunden ist bzw. die
Verbindung unterbrochen wurde.
Die Steuereinheit ist zudem mit einem QR-Code versehen, der sich im unteren Bereich befindet (QR-
Code auch auf dem Qualitätsblatt zugänglich, das Sie beim Kauf Ihres Kellers erhalten).
• Erste Inbetriebnahme

92
Der QR-Code wird zum Pairing des Weinschranks (über Bluetooth) verwendet. Um Ihren
Weinschrank mit dem WLAN-Netz zu verbinden, müssen Sie diesen QR-Code bei der ersten
Verwendung scannen.
Achtung: Das Scannen des QR-Codes sowie das Pairing-Verfahren werden nur ein
einziges Mal durchgeführt! Wenn Sie diesen Vorgang mit einem Weinschrank
durchführen, der bereits einem Nutzer zugeordnet ist, werden Sie der neue Besitzer
dieses Weinschranks und Sie überschreiben alle Daten, die zuvor diesem
Weinschrank zugeordnet waren. Dadurch haben Sie Zugang zu einem leeren
Weinschrank und der frühere Eigentümer kann nicht mehr auf den Weinschrank
zugreifen. Achtung! Dieser Vorgang kann nicht rückgängig gemacht werden und die
überschriebenen Daten können nicht wiederhergestellt werden.
Achtung! Wenn die Master-Steuereinheit nicht mit einem WLAN-Netz verbunden ist, leuchtet unter
der Einheit eine rote LED-Lampe.
Achtung! Die verschiedenen QR-Codes auf dem ECELLAR dürfen nicht entfernt werden. Sie dienen
zum Pairing mit dem Weinschrank bzw. zur Wartung.
Achtung! Um die ordnungsgemäße Verwendung Ihres Weinschranks sicherzustellen, müssen Sie
ihn an einem Standort aufstellen, an dem ein guter WLAN-Empfang möglich ist.
• Reset der Verbindung zum WLAN-Netz oder bei Wechsel des Internetanbieters
Um einen Wi-Fi-Reset durchzuführen, drücken Sie den Druckknopf an der Unterseite des Master-
Geräts 3 Sekunden lang. Halten Sie mit einer Hand die Kunststoffbox von oben fest und drücken Sie
mit dem Daumen von unten auf die Taste. Dieser Vorgang ist auch bei einem Wechsel des
Internetanbieters durchzuführen.
Smarte Ablageroste
Ihr Weinschrank ist mit 14 smarten Ablagerosten ausgestattet. Die Ablageroste wurden in Frankreich
entwickelt, hergestellt und montiert.
Die Ablageroste kommunizieren mit der Master-Steuereinheit Ihres Weinschranks. Die Flaschen
werden mit den Flaschenhälsen gegeneinander auf den 12 vorgegebenen Plätzen auf den
Ablagerosten einsortiert.
▪ Die Flaschenhälse müssen in den vorgegebenen Einkerbungen auf der Mittelstrebe
aufliegen. Die Anzeigeleuchte, die dem Lagerort der Flaschen entspricht, blinkt zweimal, um
anzuzeigen, dass Ihre Flasche erkannt wurde. Wenn die Flasche falsch abgelegt wurde, kann
es vorkommen, dass der Sensor den Flaschenhals nicht erkennt. Legen Sie die Flasche
erneut auf korrekte Weise auf dem Ablagerost ab, damit sie erkannt wird. Die Validierung
eines Vorgangs wird mit zweimaligem Blinken der Anzeigeleuchte bestätigt.
▪ Die Flaschen liegen mit einer leichten Neigung von 4° (vier Grad) auf der Mittelstrebe der
Ablageroste auf. Das ist normal und dient der Erkennung der Flaschenhälse durch die
Sensoren.
▪ Die Flaschenhälse müssen gerade auf der Mittelstrebe aufliegen und dürfen nicht erhöht oder
schräg auf der Mittelstrebe positioniert werden, da sonst die Erkennung der Flaschen
beeinträchtigt wird.

93
▪ Achtung! Um zu vermeiden, dass der Weinschrank umkippt, sind vorrangig die
Flaschenplätze im hinteren Bereich des Weinschranks zu belegen. Die Ablageroste dürfen
nicht gleichzeitig herausgezogen werden oder ausgezogen bleiben. Da das Gewicht der
Flaschen dazu führen kann, dass der Weinschrank nach vorn kippt, ist es wichtig, dass das
Gewicht der Flaschen im gesamten Weinschrank verteilt wird und dieser vorsichtig behandelt
wird.
▪ Achtung! Ziehen Sie die 14 smarten Ablageroste nicht gleichzeitig heraus, wenn diese
beladen sind.
▪ Achtung! Legen Sie die Flaschen vorsichtig auf einem Ablagerost ab, um die mittlere Stütze
nicht zu beschädigen.
▪ Achtung! Die Ablageroste sind nicht dafür ausgelegt, Flaschen mit einem Durchmesser von
über 9 cm aufzunehmen.
▪ Achtung! Falls eine Flasche zerbricht, müssen alle Flaschen herausgenommen werden.
Dann sind die Aussparungen in der Mittelstrebe der Ablageroste, in der sich die Sensoren
befinden, mit einem weichen und trockenen Tuch zu reinigen. Vergessen Sie nicht, Ihre
Flaschen wieder einzuscannen, bevor Sie sie wieder in Ihren Weinschrank zurücklegen.
▪ Achtung! Bei der ersten Inbetriebnahme muss der Nutzer die Schutzfolie aus Kunststoff
abziehen, die vorn an jedem Ablagerost angebracht ist.
Die Ablageroste verfügen über Anzeigeleuchten (LED), die dem Nutzer folgende Informationen
anzeigen:
- Gewünschte Flasche(n)
- Empfohlener Lagerplatz (siehe Abschnitt zur Funktion ESOMMELIER)
- Die Erkennung der Flaschen durch den Weinschrank bei der Entnahme oder beim
Hinzufügen einer Flasche
Achtung: In bestimmten Fällen kann es vorkommen, dass die LED-Lampen an der Vorderseite der
Ablageroste angeschaltet bleiben. Im Elektroniksystem ist eine Zeitschaltung von 5 Minuten
einprogrammiert, danach schalten sich die LED-Lampen automatisch ab.

94
Betriebsarten
Ihr Weinschrank verfügt über zwei Betriebsarten in Bezug auf die Temperatur:
▪ Standardmäßig ist die Betriebsart „Mono-Temperatur“ aktiviert. In
dieser Betriebsart wird eine einzige Temperatur für den gesamten
Weinschrank ausgewählt, die zwischen +5 °C und +20 °C betragen
kann.
In diesem Modus sind die Ventilatoren aktiviert, die für eine gute
Luftumwälzung im Weinschrank sorgen.
Auf der Digitalanzeige werden die eingestellte Solltemperatur sowie
„MONO“ angezeigt.
▪ In der Betriebsart „Multi-Temperatur“ können mehrere Temperaturen
im Weinschrank in Form eines Temperaturgefälles eingestellt werden.
Dabei ist die Temperatur im oberen Teil des Weinschranks am
höchsten, im mittleren Teil gemäßigt und im unteren Teil am
niedrigsten.
In diesem Modus sind die Ventilatoren ausgeschaltet.
Die Solltemperatur ist werkseitig eingestellt und kann nicht geändert
werden. Auf dem Display wird „AUTO“ angezeigt und das Gerät
managt die Temperaturen selbstständig. Es sind keinerlei Einstellungen
erforderlich.
Im Folgenden sind die Temperaturen aufgeführt, die in der Betriebsart Multi-Temperatur unter
normalen Einsatzbedingungen, d. h. bei einer Umgebungstemperatur von maximal 25 °C erreicht
werden können (siehe Abschnitt „Installation Ihres Weinschranks“).
Die in der Tabelle angegebene Temperaturverteilung ist ein Richtwert, da es je nach Kühlzyklen,
Anzahl der im Weinschrank gelagerten Flaschen und Umgebungstemperatur zu Abweichungen auf
den verschiedenen Ebenen kommen kann. All diese verschiedenen Faktoren haben einen Einfluss
auf den Luftstrom im Weinschrank.
Rost
(von oben nach
unten)
Temperaturbereich
1
14 °C bis 18 °C
Geeignet zur trinkbereiten Lagerung von
Rotweinen
2
3
4
10 °C bis 14 °C
Geeignet für die Reifung Ihrer Weine und
Champagner.
5
6
7
8
9
10
11
5 °C bis 10 °C
Geeignet für die trinkbereite Lagerung von
Weißweinen und Roséweinen sowie von
Champagner.
12
13
14
15

95
Solange das Gerät in Betrieb ist und unter normalen Bedingungen verwendet wird, stellt das
Kühlgerät sicher, dass die Temperatur im Geräteinneren aufrechtgehalten wird.
Die Innentemperatur des Geräts und dessen Energieverbrauch ist von zahlreichen Faktoren
abhängig: Umgebungstemperatur, Sonneneinstrahlung, Häufigkeit der Türöffnung und Anzahl der
gelagerten Flaschen. Leichte Temperaturschwankungen sind vollkommen normal.
▪ Der Demo-Modus
An Ihrem Gerät gibt es einen Demo-Modus. Wenn diese Betriebsart aktiviert ist, sind der Kompressor,
die Ventilatoren und Alarme deaktiviert, während die Anzeige- und Lichtfunktionen des Weinschranks
betriebsbereit sind.
Um diesen Modus zu aktivieren, halten Sie die Tasten Licht (H) + C/F (F) 3 Sekunden lang gedrückt.
Dann blinkt die Temperaturanzeige bzw. das Symbol „AUTO“ 5 Mal.
Um den Demo-Modus zu verlassen, wiederholen Sie diesen Vorgang.
▪ „ESOMMELIER®“-Modus
Der ESOMMELIER®-Modus ist eine Funktion, die Sie bei der Platzierung Ihrer Flaschen unterstützt.
Diese kann nur genutzt werden, wenn Sie einen smarten Weinschrank von LA SOMMELIERE und ein
aktives VINOTAG®-Konto besitzen.
Diese Funktion empfiehlt den idealen Lagerplatz für die Lagerung Ihres Weins.
Wenn Sie eine Flasche scannen, erkennt VINOTAG® die Weinsorte. Anschließend wird Ihnen je
nach Weinsorte die ideale Lagertemperatur zur optimalen Konservierung des Weins empfohlen.
Je nach Weinsorte sind einige Lagerplätze Ihres Weinschranks besser als andere geeignet.
In dieser Betriebsart schlägt Ihnen der Weinschrank die verfügbaren Lagerplätze an, die für die
gescannte Weinflasche am besten geeignet sind. Im Weinschrank leuchten Anzeigeleuchten der
geeigneten Lagerplätze auf, wobei maximal 12 Plätze gleichzeitig angezeigt werden.
Winterfunktion
Ihr Weinschrank ist mit einem automatischen Heizsystem ausgestattet, das auch „Winterfunktion“
genannt wird. Wenn die Temperatur, die vom Temperaturfühler des Weinschranks gemessen wird,
unter dem Sollwert liegt, wird das Heizelement des Weinschranks aktiviert, um die Temperatur zu
erhöhen.
Dieses System schaltet sich automatisch und ohne Zutun des Nutzers ein und aus. Die automatische
Aktivierung bzw. Deaktivierung der Winterfunktion hat keinen Einfluss auf die Konservierung Ihres
Weins.

96
Die VINOTAG®-App
Der Weinschrank ECELLAR185 ist mit der App zur Weinschrankverwaltung VINOTAG® kompatibel.
Damit Sie Ihren smarten Weinschrank wie vorgesehen verwenden können, benötigen Sie:
▪ eine Stromquelle für den Weinschrank
▪ die App VINOTAG®, die Sie im App Store oder im Google Play Store heruntergeladen haben und
für die Sie ein Nutzerkonto eingerichtet haben
▪ eine stabile Internetverbindung (WLAN)
▪ einen Weinschrank vom Modell ECELLAR
VINOTAG®-Funktionen
Mit der VINOTAG®-App können Sie:
▪ Ihre Weinschränke erstellen, personalisieren und verwalten.
▪ Flaschen hinzufügen/entnehmen.
▪ Ihren Weinbestand (Weinflaschen in Ihrem Weinschrank) einsehen und Ihre eigenen
Weindatenblätter erstellen. Im Rahmen der Premium-Option kann VINOTAG® mit VIVINO®
verbunden werden, wodurch Sie detaillierte Weindatenblätter aus der VIVINO®-Datenbank
exportieren können.
▪ Ihre Weinbibliothek erstellen und einsehen. Dank der exklusiven Partnerschaft zwischen
VINOTAG® und VIVINO® können Sie die detaillierte Weindatenblätter aus der VIVINO®-
Datenbank speichern und einsehen.
▪ die Ansicht Ihres bzw. Ihrer Weinschränke mit Familie und Freunden teilen.
▪ Benachrichtigungen erhalten, wann ein Wein seine perfekte Trinkreife erreicht hat, der Filter
Ihres Weinschranks auszuwechseln ist oder nur noch wenige Flaschen von Ihrem
Lieblingswein vorrätig sind.
▪ dank der LED-Anzeigeleuchten auf einen Blick eine bestimmte Flasche bzw. mehrere
Flaschen in Ihrem Weinschrank finden.
▪ dank der LED-Anzeigeleuchten auf einen Blick die freien Lagerplätze in Ihrem Weinschrank
finden.
Ein VINOTAG®-Konto erstellen
▪ Laden Sie die App VINOTAG® je nach Smartphone im App Store oder im Google
Play Store herunter.
▪ Erstellen Sie manuell oder über Facebook bzw. Ihr Apple- oder Google-
Play-Konto ein Benutzerkonto.
▪ Füllen Sie die Pflichtfelder aus: Vorname, Name, Geburtsdatum, Land,
Bundesland
▪ Kreuzen Sie das Kästchen „Ich akzeptiere die allgemeinen
Nutzungsbedingungen“ an.
▪ Klicken Sie auf „Meine Registrierung abschließen“.
Jetzt verfügen Sie über ein VINOTAG®-Konto. Denken Sie daran, Ihren
Benutzernamen und Ihr Passwort aufzubewahren.

97
VINOTAG®-Menü
Wenn die App geöffnet ist, ist das folgende Menü zu sehen:
Mein Weinschrank Meine Weine Benachrichtigungen Profil
▪ MEIN WEINSCHRANK: Hier können Sie Ihren Weinschrank bzw. Ihre Weinschränke
ansehen.
▪ MEINE WEINE: Hier können Sie Ihre Weinbibliothek einsehen.
▪ BENACHRICHTIGUNGEN: Hier sehen Sie die Benachrichtigungen Ihres Weinschranks.
▪ PROFIL: Hier können Sie die Information zu Ihrem Konto einsehen und vervollständigen.
Seite „MEIN WEINSCHRANK“
Auf dieser Seite können Sie den Inhalt Ihres Weinschranks bzw. Ihrer Weinschränke ansehen.
▪ Achtung! Wenn Ihr Weinschrank leer ist, können Sie ihn nicht ansehen. Sie müssen Flaschen
hinzufügen, um auf die Ansicht zugreifen zu können.
▪ Der Inhalt des Weinschranks ist im Listenmodus oder Grafik-Modus einsehbar. Die
Einstellung des Ansichtsmodus erfolgt über das Symbol oben rechts auf Ihrem Bildschirm.
Über dieses Symbol können Sie zwischen den beiden Ansichten hin und her wechseln.
Standardmäßig werden „smarte Weinschränke“ im Listenmodus angezeigt.
Erläuterung des Symbols Weinschrankansicht:
Listenmodus oder Grafik-Modus
▪ Mithilfe des Suchsymbols oben rechts auf Ihrem Bildschirm können Sie in Ihrem
Weinschrank nach einer Weinflasche suchen. Sie müssen lediglich die Informationen
bezüglich der gesuchten Flasche eingeben (Name des Weinguts, Weinsorte, Jahrgang …).

98
▪ Mit dem Symbol unten rechts auf Ihrem Bildschirm können Sie Weinflaschen hinzufügen
(Weitere Informationen finden Sie im Abschnitt „Flaschen hinzufügen“.).
▪ Achtung! Falls Sie mehrere Weinschränke besitzen, können Sie zwischen den
Weinschränken hin und her wechseln, indem Sie oben links auf Ihrem Bildschirm den Namen
des Weinschranks ändern. Wenn Sie auf den Namen Ihres Weinschranks klicken, öffnet sich
ein Pop-up-Fenster, in dem Sie gebeten werden, den Weinschrank auszuwählen, den Sie
ansehen möchten. Klicken Sie in der Liste Ihrer Weinschränke auf das gewünschte Modell.
Listenmodus:
o Einfacher Ansichtsmodus. In der Liste können Sie die
Weine sehen, die Sie in Ihrem Weinschrank aufbewahren.
Die Weine werden in alphabetischer Reihenfolge
angezeigt.
o Im Listenmodus erscheinen zu jedem Wein folgende
Angaben: Name des Weins, Weingut, sein Datum, seine
Farbe, seine Sorte sowie ein Foto der Flasche.
o Wenn Sie auf einen Wein tippen, wird dessen
Weindatenblatt angezeigt.
o Auf der rechten Seite Ihres Bildschirms ist ein Indikator zu
sehen. Dieser gibt die Weinsorte für jeden Wein an. Die
Weinsorten sind an einem farbigen Halbkreis zu erkennen
(roter Halbkreis: Rotwein / gelber Halbkreis: Weißwein /
lachsfarbener Halbkreis: Roséwein).
o
Grafik-Modus:
o In der Grafik-Ansicht können Sie sehen, wie Ihr
Weinschrank befüllt ist, wobei die gelagerten Flaschen
mit einem farbigen Kreis dargestellt werden.
o Die Weine werden nach Ihrer Anordnung auf den
Ablagerosten angezeigt.
o Der Nutzer kann eine Flasche ansehen, an einer
anderen Position ablegen oder löschen.
▪ Wenn Sie auf eine Flasche tippen, wird dessen Beschreibung angezeigt.
▪ Auf der linken Seite Ihres Bildschirms ist ein Indikator zu sehen. Dieser gibt für jeden
Ablagerost die Anzahl der Flaschen pro Weinsorte an. Die Weinsorten sind an einem farbigen
Halbkreis zu erkennen.
Roter Halbkreis: Rotwein
Gelber Halbkreis: Weißwein
Lachsfarbener Halbkreis: Roséwein

99
Seite „MEINE WEINE“
Auf dieser Seite können Sie Ihre Weinbibliothek einsehen. In der Weinbibliothek können Sie:
▪ Ihre getrunkenen Weine einsehen: Alle zu Ihrem Weinschrank hinzugefügten Weine (egal ob
noch vorhanden oder nicht) werden automatisch in Ihre Weinbibliothek aufgenommen.
▪ eine „Wishlist“ erstellen: Hier können Sie Weine vormerken, die Sie bei Ihren Freunden
verkostet haben oder gerne kaufen möchten. In der Weinbibliothek können Sie eine
Wunschliste erstellen.
▪ Mithilfe des Suchsymbols oben rechts auf Ihrem Bildschirm können Sie in Ihrer
Weinbibliothek nach einer Weinflasche suchen. Sie müssen lediglich die Informationen
bezüglich der gesuchten Flasche eingeben (Name des Weinguts, Weinsorte, Jahrgang …).
▪ eine Flasche in Ihre Weinbibliothek aufnehmen: Befolgen Sie einfach die Anweisungen unter
„Flaschen hinzufügen“ und klicken Sie auf „Zu meiner Weinbibliothek hinzufügen“.
▪ auf einen Wein klicken, um sein Datenblatt anzusehen (weitere Informationen finden Sie
unter „Ein Weindatenblatt ansehen“).
Seite „BENACHRICHTIGUNGEN“
Auf dieser Seite können Sie die Benachrichtigungen zu Ihrem Weinschrank
einsehen. Ein roter Punkt neben dem Symbol zeigt an, dass eine noch nicht
gelesene Benachrichtigung vorliegt.
Die Benachrichtigungen werden chronologisch angezeigt.
Wenn Sie mehrere Weinschränke besitzen, können Sie die Benachrichtigungen
nach Weinschrank filtern (über das Filter-Symbol oben links auf Ihrem
Bildschirm).
Über ein Suchfeld können Sie Ihre Benachrichtigungen filtern, um ein bestimmtes
Ereignis zu finden.
▪ Benachrichtigung „Filter wechseln“: Ihr Weinschrank benachrichtigt Sie, dass Sie den
Aktivkohlefilter wechseln müssen. Das Datum für den Filterwechsel wird automatisch erzeugt,
wenn Sie einen neuen Weinschrank speichern. Achtung! Vergessen Sie nicht, nach dem
Filterwechsel diese Aktion in Ihrem Weinschrank einzugeben, damit der Zähler auf das
aktuelle Datum zurückgesetzt wird (Standardmäßig ist der Filterwechsel einmal pro Jahr
durchzuführen.).
▪ Bestandsbenachrichtigung: Sie haben die Möglichkeit, für einen bestimmten Wein und
nach einer von Ihnen festgelegten Menge eine Benachrichtigung bezüglich eines niedrigen
Flaschenvorrats zu programmieren. Die App sendet Ihnen eine Benachrichtigung, wenn der
jeweilige Wein zur Neige geht. (Die Menge, ab dem der Wein als „nicht vorrätig“ gilt, wird von
Ihnen festgelegt, die Benachrichtigung wird bei einer bestimmten Anzahl von Flaschen
ausgelöst.)
▪ Technische Benachrichtigungen: Diese Benachrichtigungen zeigen ein technisches

100
Problem bzw. eine Maßnahme an, die im Weinschrank stattgefunden hat: Flasche getrunken,
Flasche hinzugefügt, Weinschrank erstellt, Beitritt zu einem Weinschrank, Nutzer X ist Ihrem
Weinschrank beigetreten … Bei einem technischen Problem wenden Sie sich bitte an einen
befugten Techniker. Die Benachrichtigungen werden in Form einer Liste angezeigt, in der die
Art der Benachrichtigung, das Datum, die Uhrzeit, die Nummer des jeweiligen Ablagerosts
und der Name des jeweiligen Weinschranks angegeben werden.
Seite „PROFIL“
Auf dieser Seite können Sie die Informationen zu Ihrem VINOTAG®-Konto einsehen, vervollständigen
oder ändern.
▪ Meine Angaben ändern: Hier können Sie Ihre
Anmeldeinformationen (Name, Vorname, Geburtstag, Land,
Bundesland) ändern oder Ihr Konto löschen. Außerdem können Sie
zustimmen, Nachrichten und andere kommerzielle Mitteilungen von
VINOTAG zu erhalten.
▪ Ich werde Premium-Mitglied: Hier können Sie die Premium-
Option von VINOTAG® abonnieren und die Anzahl Ihrer Scans
auffüllen. Mit diesen Scans können Sie die VIVINO® Datenblätter
direkt in Ihrem Weinschrank speichern und brauchen die
Weindatenblätter nicht mehr von Hand ausfüllen (weitere
Informationen in der Rubrik „Premium-Konto“).
▪ Meine Weinschränke: Hier können Sie Ihre Weinschränke
einsehen, ändern, teilen, löschen, hinzufügen oder warten.
Außerdem können Sie die Weinschränke einsehen, die mit Ihnen
geteilt wurden.
▪ Meine Einladungen: Hier können Sie Ihre Einladungen einsehen.
▪ Kontakt: Hier können Sie den VINOTAG® Kundendienst
kontaktieren, wobei Sie in einer Dropdown-Liste den Betreff Ihrer
Anfrage auswählen können.
▪ Allgemeine Nutzungsbedingungen: Hier können Sie die aktuellen
Nutzungsbedingungen von VINOTAG® ansehen.
▪ Impressum: Hier ist das Impressum von VINOTAG® zu finden.
▪ Abmelden: Hier können Sie sich von der App abmelden.

101
Einen Weinschrank hinzufügen
Jetzt können Sie zu Ihrem VINOTAG®-Konto Ihren ersten Weinschrank
bzw. einen neuen Weinschrank hinzufügen (In der App haben Sie die
Möglichkeit, mehrere Weinschränke zu verwalten, die Sie aus einer Reihe
von Modellen auswählen können).
Achtung! Sie dürfen die App auf keinen Fall verlassen, wenn Sie einen
Weinschrank hinzufügen.
▪ Hinzufügen des ersten Weinschranks: Bei der Erstellung Ihres
Kontos müssen Sie Ihren Weinschrank erstellen. Befolgen Sie dazu
die nachfolgenden Schritte.
▪ Hinzufügen eines neuen Weinschranks: Wenn Sie mehrere
Weinschränke in Ihrer App verwalten wollen, gehen Sie auf die
„Profil“-Seite -> „Meine Weinschränke“ und klicken Sie auf „Einen
Weinschrank hinzufügen“. Befolgen Sie anschließend die
nachfolgenden Schritte.
Hinzufügen eines „smarten Weinschranks“
▪ Geben Sie den Typ des Weinschranks an: „smarter Weinschrank“ oder „Weinschrank ohne
Smart-Funktion“. Das Modell ECELLAR185 gehört zur Kategorie „smarter Weinschrank“.
Klicken Sie auf „Smarter Weinschrank“.
▪ Scannen Sie einen der QR-Codes Ihres Kellers, damit die App ihn identifizieren und eine
Verbindung herstellen kann. Der QR-Code befindet sich in Ihrem Keller, unter der Masterbox
oben rechts im Keller und unten auf dem Qualitätsblatt, das beim Kauf mit Ihrem Keller
geliefert wurde. Bevorzugen Sie den leichter zugänglichen Scan des letzteren, um Ihren
Keller mit Leichtigkeit zu verbinden.
▪ Die App fordert Sie auf, Ihre Bluetooth-Verbindung zu aktivieren. Die Aktivierung ist
notwendig, um den Weinschrank zu konfigurieren.
▪ Sobald Ihr Weinschrank per Bluetooth verbunden ist, fordert die App Sie auf, ein WLAN-Netz

102
auszuwählen oder ein WPS-Protokoll zu verwenden:
o Wenn Sie ein WLAN-Netz verwenden, müssen Sie das Passwort des WLAN-Routers
eingeben. Wenn die WLAN-Verbindung fehlschlägt, prüfen Sie das Passwort
und/oder welcher Abstand zwischen Ihrem Weinschrank und dem WLAN-Router
liegt. Ein zu großer Abstand oder zu dicke Wände können die WLAN-Verbindung
beeinträchtigen. Stellen Sie den Weinschrank näher am WLAN-Router auf, um die
Verbindung zu ermöglichen.
o Wenn Sie WPS verwenden, erscheint während des gesamten Scanvorgangs der
Ladebalken. Wenn nach mehreren Sekunden kein WPS-Netz gefunden werden
kann, wird oben auf dem Bildschirm eine Fehlermeldung angezeigt und die App kehrt
zur Auswahl WLAN / WPS zurück.
Einen Weinschrank teilen
Als Besitzer eines Weinschranks können Sie andere Personen einladen, Ihrem
Weinschrank beizutreten. Damit die eingeladenen Personen Ihren Weinschrank
einsehen können, müssen sie ein VINOTAG®-Konto erstellen.
Eine Person einladen:
▪ Gehen Sie auf die Seite „Profil“: „Meine Weinschränke“.
▪ Klicken Sie auf „Meinen Weinschrank teilen“.
▪ Geben Sie die E-Mail-Adresse der Person ein, die Sie einladen möchten.
▪ Oben auf Ihrem Bildschirm wird eine Bestätigungsmeldung angezeigt, um
zu bestätigen, dass Ihre Einladung versendet wurde.
Wenn Sie Ihren Weinschrank teilen:
▪ Erhält die Person eine E-Mail, in der sie die Benachrichtigung über die Einladung erhält und
aufgefordert wird, die App herunterzuladen. Wenn sie kein Konto besitzt, kann sie die
Weinschränke, zu denen sie eingeladen wurde, direkt nach ihrer Kontoerstellung einsehen.
▪ Wenn die eingeladene Person bereits ein Konto hat, erhält sie eine Nachricht, dass sie eine
Einladung zu einem Weinschrank erhalten hat.
Einen Weinschrank löschen
▪ Wenn Sie einen oder mehrere Weinschränke löschen möchten:
▪ Gehen Sie auf die Seite „Profil“: „Meine Weinschränke“.
▪ Es erscheint die Liste Ihrer Weinschränke.
▪ Wählen Sie den Weinschrank aus, den Sie löschen wollen und drücken Sie auf „Löschen“.
▪ Wiederholen Sie den Vorgang für alle Weinschränke, die Sie löschen wollen.
Achtung! Wenn in dem Weinschrank mindestens eine Flasche vorhanden ist, erscheint ein Pop-up-
Fenster, in dem Sie den Löschvorgang bestätigen sollen. Nachdem der Weinschrank gelöscht wurde,
ist es nicht mehr möglich, die Informationen wiederherzustellen.
Achtung! Sie können keinen Weinschrank löschen, der Ihnen nicht gehört. Wenn ein Weinschrank
mit Ihnen geteilt wurde und auf der Seite „Profil“: „Meine Weinschränke“ sichtbar ist, können Sie das
Teilen beenden. Wenn Sie nicht der Besitzer sind, hat die Schaltfläche „Löschen“ die Bedeutung
„Verlassen“. Wenn Sie darauf klicken, können Sie den Weinschrank verlassen. Es erscheint ein Pop-
up-Fenster, um den Vorgang zu bestätigen.

103
Konfiguration des Weinschranks ändern
Sie möchten die Konfiguration Ihres Weinschranks ändern, damit diese nicht mehr der
Standardkonfiguration entspricht.
Achtung! Bei einem Weinschrank der Kategorie „smarter Weinschrank“ darf die
Standardkonfiguration nicht verändert werden. Die Ablageroste des „smarten Weinschranks“
sind intelligente Ablageroste, die mit dem Weinschrank verbunden sind. Sie werden mit Strom
versorgt und dürfen nur von einer zertifizierten Fachkraft verändert oder entfernt werden.
Flaschen hinzufügen
Wenn Sie Ihren Weinschrank in der VINOTAG®-App erstellt haben, können Sie Flaschen hinzufügen.
HINWEIS: Synchronisierung: Jede Bewegung, die in einem „smarten Weinschrank“ stattfindet,
wird von diesem aufgezeichnet. Dadurch kann ein Verlauf erstellt werden, wenn der
Weinschrank nicht mehr mit dem Internet verbunden ist. Wenn Sie sich das nächste Mal mit
dem WLAN-Netz und der Cloud verbinden, erscheint auf Ihrem Smartphone eine
Synchronisierungsansicht, falls Bewegungen stattgefunden haben. Dabei werden die Daten
abgerufen und in der Datenbank gespeichert, damit der angezeigte Bestand aktualisiert wird.
Erstellung des Weinschranks Listenansicht Grafikansicht
▪ Klicken Sie bei einem neuen Weinschrank auf „Meine erste Weinflasche hinzufügen“ oder auf
„+“.
▪ Fotografieren Sie das Etikett der Flasche, die Sie in Ihren Weinschrank hinzufügen möchten.
Es erscheint ein ausgefülltes Weindatenblatt. Dieses Datenblatt stammt aus der VIVINO®-
Datenbank. Sie können dieses Weindatenblatt ändern oder vervollständigen. Achtung!
Wenn die Weinflasche nicht in der VIVINO®-Datenbank vorhanden ist oder Sie kein
Premium-Abo haben, müssen Sie das mit dem Wein verbundene Datenblatt selbst
ausfüllen. Sie müssen das Etikett nicht fotografieren, wenn Sie dies nicht möchten. In
diesem Fall können Sie nicht auf die VIVINO®-Datenbank zugreifen und müssen das zu Ihrer
Flasche gehörende Weindatenblatt manuell ausfüllen.
o Beim Hinzufügen einer Flasche, können Sie das dazugehörige Weindatenblatt
vervollständigen / ändern, einen Kommentar zur Weinflasche eingeben, sie in Ihren
Lieblingsweinen speichern oder eine Note erteilen.
o Wenn Sie das Weindatenblatt per Hand vervollständigen, können Sie folgende Felder
ausfüllen:

104
- Name des Weins
- Weingut
- Appellation
- Jahrgang
- Land/Region
- Weinfarbe
- Anzahl der Flaschen
o Im „erweiterten“ Modus können Sie zusätzliche Informationen eintragen, wie:
- Minimale Lagerzeit (Jahre)
- Maximale Lagerzeit (Jahre)
- Kommentar
- In Lieblingsweinen speichern
- Flasche benoten (0 bis 5)
- Kaufpreis
- Link zu VIVINO®, um komplettes Datenblatt zu finden (Premium-Option)
- Link zu VIVINO®, um diesen Wein zu kaufen
o Die gescannte Flasche wurde nicht erkannt: Für den Fall, dass die Flasche nicht erkannt
wird, schlägt die App vor, die Flasche erneut zu scannen, die Flasche manuell zu suchen
(wenn bei der Suche keine passende Flasche gefunden wurde) und das Datenblatt von Hand
auszufüllen.
o Um Benachrichtigungen zu erhalten, wann ein Wein seine perfekte Trinkreife erreicht hat,
müssen unbedingt seine minimale und maximale Lagerzeit eingegeben werden. Wenn die
Felder der minimalen und maximalen Lagerzeit nicht ausgefüllt sind, wird keine Trinkreife-
Benachrichtigung gesendet.
Sie fügen eine Flasche zu einem „smarten Weinschrank“ hinzu
▪ Legen Sie die Weinflasche(n) in Ihren Weinschrank an die gewünschte(n) Position(en).
▪ VINOTAG® informiert Sie, dass Ihre Flasche(n) erkannt wurde(n), und speichert die
Position(en) in der digitalen Version Ihres Weinschranks.
o Wenn die Flasche hineingelegt und erkannt wurde, blinkt die dazugehörige
Anzeigeleuchte zweimal schnell hintereinander. Die Position wird in Ihrer App
gespeichert. Es erscheint ein Pop-up-Fenster mit zwei Schaltflächen: „Eine Flasche
hinzufügen“ oder „Fertig“.
o Achtung! Wenn Sie eine oder mehrere Flaschen im Lagerbereich unten in Ihrem
Weinschrank aufbewahren möchten, beachten Sie bitte, dass dieser Teil des
Weinschranks nicht „smart“ ist.
▪ Klicken Sie auf „+“, um die Flaschen zu Ihrem Weinschrank hinzuzufügen.
Hinweis!
Der Lagerbereich im unteren Teil Ihres Weinschranks hat keine Smart-Funktion.
Mithilfe der App können Sie trotzdem ein digitales Verzeichnis der Flaschen anlegen. Geben Sie
einfach ein, dass Sie die Flaschen in diesem Bereich aufbewahren.
• Das tatsächliche Fassungsvermögen dieses Lagerbereichs umfasst 17 Champagner-
Flaschen.
• Mit der App können Sie jedoch eine größere Anzahl an Flaschen speichern, sodass Sie auch
die Weine erfassen können, die nicht in Ihrem Weinschrank lagern.
ESOMMELIER-Funktion
Wenn Sie eine Flasche zu einem „smarten Weinschrank“ hinzufügen, können Sie die Funktion
ESOMMELIER verwenden. Diese Funktion empfiehlt den idealen Lagerplatz für die Lagerung
Ihres Weins. Wenn Sie eine Flasche scannen, erkennt VINOTAG® die Weinsorte. Anschließend
wird Ihnen je nach Weinsorte die ideale Lagertemperatur zur optimalen Konservierung des Weins

105
empfohlen.
Je nach Weinsorte sind einige Lagerplätze Ihres Weinschranks besser als andere geeignet.
Die Funktion ESOMMELIER unterstützt Sie dabei, Ihren Wein unter den besten
Lagerbedingungen aufzubewahren. Wenn Sie auf diese Schaltfläche klicken, schlägt Ihnen der
Weinschrank die verfügbaren Lagerplätze vor, die für die gescannte Weinflasche am besten
geeignet sind. Im Weinschrank leuchten die Anzeigeleuchten auf, um Ihnen diese Lagerplätze
anzuzeigen.
o Wenn die Flasche hineingelegt und erkannt wurde, blinkt die dazugehörige
Anzeigeleuchte zweimal schnell hintereinander. Die Position wird in Ihrer App
gespeichert. Es erscheint ein Pop-up-Fenster mit zwei Schaltflächen: „Eine Flasche
hinzufügen“ oder „Fertig“.
o Achtung! Falls die Erkennung fehlschlägt, weil Ihr Weinschrank die Flasche nicht
erkennen kann, blinkt die Anzeigeleuchte nicht. Wiederholen Sie den Vorgang, bis
die Flasche korrekt erkannt wird und die Anzeigeleuchte zweimal blinkt.
o Achtung! Wenn Sie Ihre Flasche nicht herausnehmen/hineinlegen, leuchtet die
Anzeigeleuchte an der Vorderseite des Ablagerosts 5 Minuten lang, danach erlischt
sie automatisch.
Es ist auch möglich, eine Flasche über ein Weindatenblatt hinzufügen.
▪ Klicken Sie auf die Schaltfläche unten auf der Seite „Eine oder mehrere Flaschen
hinzufügen“.
▪ Geben Sie die Anzahl der Flaschen sowie deren Format ein.
▪ Legen Sie die Weinflasche(n) in Ihren Weinschrank an die gewünschte(n) Position(en).
▪ VINOTAG® informiert Sie, dass Ihre Flasche(n) erkannt wurde(n), und speichert die
Position(en) in der digitalen Version Ihres Weinschranks.
HINWEIS: Nach der Erstellung eines VINOTAG®-Kontos können Sie „50 kostenlose Scans“
nutzen. Wenn Sie einen smarten Weinschrank hinzufügen, profitieren Sie von 1.000
kostenlosen Scans. Mithilfe dieser Scans können Sie im Rahmen der Partnerschaft von
VINOTAG® - VIVINO® die vorausgefüllten Weindatenblätter nutzen. Falls Sie alle kostenlosen
Scans aufgebraucht haben, können Sie weiterhin Flaschen hinzufügen, indem Sie die
Datenblätter manuell ausfüllen oder die Premium-Option abonnieren, mit der die Anzahl der
verfügbaren Scans nachgefüllt wird (weitere Information im Abschnitt „Premium-Konto“).
Premium-Konto
Für ein angenehmeres Nutzererlebnis ist VINOTAG® eine Partnerschaft mit VIVINO® eingegangen.
Bei der Erstellung eines VINOTAG®-Kontos erhalten Sie eine Anzahl an „kostenlosen Scans“.
„Kostenloser Scan“ bezeichnet den Vorgang, wenn Sie eine Flasche fotografieren, um direkt auf das
detaillierte Weindatenblatt aus der VIVINO®-Datenbank zuzugreifen. Achtung! Nicht erkannte
Flaschen werden in der Anzahl der „kostenlosen Scans“ eingerechnet, da eine Erkennungsanfrage an
VIVINO® gesendet wurde. Das Foto muss eine ausreichende Qualität und Schärfe aufweisen,
damit die Flasche erkannt werden kann.
Das Weindatenblatt kann geändert und direkt in der digitalen Version Ihres Weinschranks gespeichert
werden. Sie müssen Ihr Weindatenblatt nicht mehr manuell ausfüllen. Ein echter Zeitgewinn beim
Befüllen Ihres Weinschranks! Außerdem erhalten Sie zahlreiche Informationen über Ihre
Lieblingsweine.
Falls Sie alle kostenlosen Scans aufgebraucht haben, können Sie weiterhin Flaschen hinzufügen,
indem Sie die Datenblätter manuell ausfüllen oder die Premium-Option abonnieren, mit der die
Anzahl der verfügbaren Scans nachgefüllt wird. Ein Pop-up-Fenster benachrichtigt Sie, dass Sie
keine kostenlosen Scans mehr haben.
Um ein Premium-Konto nutzen zu können, muss ein Premium-Abo abgeschlossen werden, mit dem
das Scan-Guthaben kostenpflichtig aufgefüllt werden kann.

106
- Guthaben von 200 Scans
- Guthaben von 400 Scans
- Guthaben von 1.000 Scans
Die gekauften „Scans“ sind ohne zeitliche Begrenzung nutzbar.
Die Premium-Option kann über die VINOTAG®-App im Bereich „Mein Konto“ durch Anklicken der
Schaltfläche „Ich werde Premium-Mitglied“ abonniert werden. Dort können auch die Preiskonditionen
abgerufen werden.
Flaschen entnehmen
Wenn Sie Ihren Weinschrank in der VINOTAG®-App erstellt haben, können Sie die Flaschen in Ihrem
Weinschrank löschen. Die Flaschen sind weiterhin in Ihrer Weinbibliothek verfügbar.
Für einen „smarten“ Weinschrank:
▪ Entnehmen Sie die gewünschte Flasche aus Ihrem Weinschrank.
▪ Der smarte Weinschrank erkennt, dass eine Flasche entnommen wurde, und informiert die
App. In Ihrer App wird eine Alarmmeldung bezüglich der Flaschenentnahme angezeigt.
▪ Sehen Sie auf der Seite „Benachrichtigungen“ nach.
oder
▪ Wählen Sie eine Weinflasche mithilfe der Funktion „Im Weinschrank anzeigen“ aus. Im
Weinschrank leuchten der oder die Anzeigeleuchten auf, die der oder den Lagerposition(en)
der verschiedenen Weinflaschen entsprechen. Achtung! Es können maximal 12
Anzeigeleuchten gleichzeitig aufleuchten. Achtung! Wenn Sie Ihre Flasche nicht
herausnehmen/hineinlegen, leuchtet die Anzeigeleuchte an der Vorderseite des
Ablagerosts 5 Minuten lang, danach erlischt sie automatisch.
▪ Die Flaschenentnahme wird vom Weinschrank erkannt. Die Anzeigeleuchte der ehemaligen
Lagerposition blinkt zweimal schnell hintereinander, um die Entnahme zu bestätigen.
▪ Der smarte Weinschrank informiert die App, dass eine Flasche entnommen wird. In Ihrer App
wird eine Alarmmeldung bezüglich der Flaschenentnahme angezeigt.
▪ Die Ansicht Ihres Weinschranks wird automatisch aktualisiert.
Achtung! Um Flaschen zu einem smarten Weinschrank hinzufügen bzw. daraus zu entnehmen,
muss eine WLAN-Verbindung bestehen, damit zwischen Ihrem realen Weinschrank und Ihrem
digitalen Weinschrank, der in der VINOTAG®-App zu sehen ist, Informationen ausgetauscht
werden.
Ein Weindatenblatt einsehen
Weindatenblätter können von Ihren Weinschränken oder Ihrer Weinbibliothek aus eingesehen
werden.
Ansicht des Weindatenblatts in meinem Weinschrank im Listenmodus oder in meiner Weinbibliothek
▪ Klicken Sie auf die gewünschte Flasche.
▪ Sehen Sie sich die Informationen zu Ihrer Flasche an.
▪ Weitere Informationen finden Sie auf der Seite unseres Partners Vivino, indem Sie auf „Auf
Vivino ansehen“ klicken.
Ansicht des Weindatenblatts in meinem Weinschrank im Grafik-Modus
▪ Klicken Sie auf den gewünschten Ablagerost.
▪ Klicken Sie auf die gewünschte Flasche.
▪ Sehen Sie sich die Informationen zu Ihrer Flasche an.
▪ Weitere Informationen finden Sie auf der Seite unseres Partners Vivino, indem Sie auf „Auf
Vivino ansehen“ klicken.
Trinkreife-Benachrichtigungen erstellen

107
Um Trinkreife-Benachrichtigungen zu erstellen, müssen unbedingt eine minimale (größer als 0) und
maximale Lagerzeit im Weindatenblatt eingegeben werden. Die Lagerzeit wird in Jahren angegeben.
Wenn Sie Ihren Wein noch nicht getrunken haben, erhalten Sie zu Beginn und am Ende der Trinkreife
eine Benachrichtigung. Für eine Flasche vom Jahrgang „X“ mit einer minimalen Lagerzeit von 5
Jahren und einer maximalen Lagerzeit von 10 Jahren, erhalten Sie folgende Benachrichtigungen:
- Jahrgang „X“ + 5 Jahre: Benachrichtigung zu Beginn der Trinkreife „Ihr Wein hat jetzt seine
Trinkreife erreicht.“
- Jahrgang „X“ + 10 Jahre: Benachrichtigung am Ende der Trinkreife „Ihr Wein erreicht das
Ende seiner Trinkreife.“
Benachrichtigung über niedrigen Flaschenvorrat erstellen
Um Ihren Weinschrank und Ihre Weine besser verwalten zu können, bietet Ihnen VINOTAG® die
Möglichkeit, Benachrichtigungen bei einem niedrigen Flaschenvorrat einzurichten:
▪ Klicken Sie in der App auf der Ansicht Ihres Weinschranks auf die gewünschte Flasche, um
das dazugehörige Weindatenblatt aufzurufen.
▪ Klicken Sie auf „Eine Benachrichtigung programmieren“.
▪ Geben Sie an, bei welchem Restbestand an Flaschen Sie eine Benachrichtigung über einen
niedrigen Flaschenvorrat erhalten möchten.
▪ Klicken Sie auf „Bestätigen“. Die Bestandsbenachrichtigung ist aktiviert.
Um eine Bestandsbenachrichtigung zu deaktivieren, klicken Sie auf „Benachrichtigung
ändern“; verringern Sie die Anzahl der gewünschten Flaschen, bis „Deaktiviert“ erscheint.
Klicken Sie auf „Bestätigen“. Die Bestandsbenachrichtigung ist deaktiviert.
Die Position Ihrer Flaschen in Ihrem Weinschrank ansehen
▪ Sie befinden sich in der Ansicht Ihres Weinschranks. Verwenden Sie das Suchsymbol oben
rechts auf Ihrem Bildschirm.
▪ Geben Sie den Namen des gesuchten Weins bzw. des Weinguts oder eine andere
Information über die Flasche an.
▪ Das Weindatenblatt der gesuchten Flasche wird angezeigt.
▪ Klicken Sie unten auf der Seite auf die Schaltfläche „Meine Flaschen ansehen“ oder auf die
Schaltfläche „Im Weinschrank anzeigen“ oben auf Ihrem Weindatenblatt.
▪ Im Ihrem Weinschrank leuchten die jeweiligen Anzeigeleuchten auf (max. 12 zur gleichen
Zeit), um Ihnen zu zeigen, wo sich die gesuchten Flaschen befinden.
Wartung des Weinschranks
Auf der Konfigurationsseite können Sie Ihren Weinschrank in den Wartungsstatus
versetzen.
Durch diesen Vorgang werden alle Bewegungen in Ihrem Weinschrank (Flaschen
hinzufügen, an eine andere Position legen, löschen) blockiert.
Die Ansicht der Startseite wird gesperrt und es erscheint die Meldung „Weinschrank
wird gewartet“.
Um den Wartungsmodus zu verlassen, klicken Sie auf die Schaltfläche
„Wartungsmodus verlassen“.
Achtung! Wenn Sie den Wartungsmodus verlassen, können Sie:
▪ entweder die zuletzt gespeicherte Anordnung laden
▪ oder zu einem leeren Weinschrank zurückkehren. In diesem Fall müssen Sie von vorn

108
beginnen und Ihre erste Flasche scannen.
6. REINIGUNG UND PFLEGE
Ziehen Sie vor der regelmäßig durchzuführenden Reinigung des Geräts den Netzstecker aus der
Steckdose oder nehmen Sie die entsprechende Sicherung heraus.
Wir raten Ihnen, das Gerät vor der ersten Inbetriebnahme und dann regelmäßig innen und außen
(Vorderseite, Seitenwände und Oberseite) mit lauwarmem Wasser und einem milden
Reinigungsmittel zu reinigen. Wischen Sie den Weinschrank mit klarem Wasser ab und lassen Sie ihn
vor dem Wiedereinschalten gut trocknen. Verwenden Sie auf keinen Fall Löse- bzw. Scheuermittel.
Bei der Erstinbetriebnahme können noch Restgerüche vorhanden sein. Lassen Sie das Gerät in
diesem Fall mehrere Stunden ohne Befüllung auf der niedrigsten Temperatur laufen. Durch die Kälte
werden etwaige Gerüche beseitigt.
Automatische Abtauung
Ihr Weinschrank wird automatisch abgetaut. Die Abtauautomatik hat keinerlei Auswirkungen auf die
im Weinschrank gelagerten Weine.
Während des Abtauens sind der Kompressor und die Ventilatoren ausgeschaltet. Die Digitalanzeige
zeigt eine normale Temperatur an. Wenn Sie jedoch die Ist-Temperatur Ihres Weinschranks ansehen
möchten, wird auf dem Display der Code „DD“ angezeigt. Das ist normal.
Wechsel des Aktivkohlefilters
Ihr Weinschrank ist mit einem Aktivkohlefilter ausgestattet, der sich unten rechts in Ihrem
Weinschrank befindet. Wir empfehlen Ihnen, den Aktivkohlefilter einmal pro Jahr auszuwechseln.
Zum Auswechseln ziehen Sie ihn einfach aus dem Weinschrank heraus und setzen Sie einen neuen
Filter ein.
Aktivkohlefilter

109
Im Falle eines Stromausfalls
Die meisten Stromausfälle sind nur von kurzer Dauer.
Ein Stromausfall von ein bis zwei Stunden hat keinen Einfluss auf die Temperatur in Ihrem
Weinschrank.
Achten Sie bei Stromausfällen darauf, die Tür nicht unnötig zu öffnen, um den Wein zu schützen.
Bei sehr langen Stromausfällen ergreifen Sie bitte die notwendigen Maßnahmen zum Schutz des
Weines.
▪ Wenn das Gerät von der Stromversorgung getrennt oder ausgeschaltet wurde oder wenn der
Strom ausgefallen ist, müssen Sie etwa 3 bis 5 Minuten abwarten, bevor Sie es erneut in Betrieb
nehmen. Sollten Sie versuchen, das Gerät vor Ablauf dieser Zeitspanne einzuschalten, schaltet
sich der Kompressor erst nach 3-5 Minuten ein (wenn dies aufgrund der Temperatur erforderlich
ist).
▪ Bei der ersten Inbetriebnahme des Weinschranks und nach längerer Abschaltung kann es beim
Wiedereinschalten zu Abweichungen zwischen der gewählten und der auf dem Display
angezeigten Temperatur kommen. Das ist normal. Sie müssen einige Stunden abwarten, bis
sich die Temperaturen wieder stabilisiert haben.
▪ Bei Stromausfällen speichert das Gerät die eingestellten Temperaturen. Bei der
Wiederinbetriebnahme des Geräts muss die Temperatur des Weinschranks daher nicht neu
programmiert werden.
Achtung!
Bei einem Stromausfall speichert der ECELLAR keine Flaschenbewegungen. Änderungen am
Weinvorrat sind daher zu vermeiden.
Wenn der Strom wiederhergestellt ist, führt der Weinschrank eine Aktualisierung des
Bestands durch, um zu erkennen, ob eine Flasche herausgenommen oder hinzugefügt wurde.
Wird die Entnahme oder das Hinzufügen über die App durchgeführt, speichert diese die
Änderungen. Wenn der Vorgang aber ohne den Umweg über die App stattfindet und eine
Flasche entnommen und durch eine neue Flasche an der gleichen Position ausgetauscht wird,
kann der Weinschrank bei einem Neustart dies nicht erkennen.
Wenn Sie in den Urlaub fahren
- Kurzurlaub: Lassen Sie Ihren Weinschrank während Ihrer Abwesenheit weiterhin normal
laufen, wenn Sie nicht länger als 3 Wochen wegfahren.
- Lange Abwesenheit: Wenn Sie Ihr Gerät mehrere Monate nicht benutzen werden, entnehmen
Sie alle Flaschen sowie alle Zubehörteile, schalten Sie das Gerät aus und trennen Sie es von
der Stromversorgung. Reinigen und trocknen Sie das Gerät sorgfältig innen und außen.
Lassen Sie die Tür offen, um die Bildung von Kondenswasser, Gerüchen und Schimmel zu
vermeiden.
Wenn Sie den Weinschrank umsetzen müssen
▪ Ziehen Sie zuerst den Netzstecker des Weinschranks.
▪ Entnehmen Sie alle Flaschen, die sich im Weinschrank befinden, und befestigen Sie bewegliche
Teile.
▪ Schrauben Sie die Stellschrauben an den Füßen komplett in die Halterung ein, um sie nicht zu
beschädigen.
▪ Schließen Sie die Tür.
▪ Bewegen Sie das Gerät vorzugsweise in aufrechter Position oder beachten Sie anhand der
Angaben auf der Verpackung, auf welche Seite das Gerät umgelegt werden kann. Schützen Sie
Ihr Gerät außerdem mit einer Decke oder einem ähnlichen Stoff.

110
7. IM PANNENFALL
Trotz aller Sorgfalt, die wir für unsere Produkte aufwenden, kann eine Störung niemals völlig
ausgeschlossen werden. Bevor Sie sich mit dem Kundendienst Ihres Händlers in Verbindung setzen,
prüfen Sie bitte folgende Punkte:
▪ Der Netzstecker ist in der Steckdose.
▪ Es liegt kein Stromausfall vor.
▪ Die Störung ist nicht auf eine der Ursachen zurückzuführen, die in der Tabelle am Ende der
Bedienungsanleitung beschrieben sind.
WICHTIG: Ist das Gerätenetzkabel beschädigt, muss es vom Hersteller oder einem von der
Marke bzw. dem Händler anerkannten Fachbetrieb ausgetauscht werden. Zur Vermeidung der
Verletzungsgefahr muss es auf jeden Fall von einer qualifizierten Fachkraft ausgetauscht
werden.
SOLLTEN DIESE KONTROLLEN ZU NICHTS FÜHREN, KONTAKTIEREN SIE BITTE DEN KUNDENDIENST IHRES
HÄNDLERS.
ACHTUNG!
Ziehen Sie vor Reinigungs- bzw. Reparaturarbeiten grundsätzlich den Netzstecker aus der
Steckdose!

111
8. PROBLEME UND MÖGLICHE URSACHEN
Viele Probleme lassen sich leicht beheben, was Ihnen den Anruf beim Kundendienst ersparen kann.
Bevor Sie den Kundendienst kontaktieren, versuchen Sie, das Problem mithilfe der nachstehenden
Empfehlungen zu beheben.
ANLEITUNG ZUR PROBLEMLÖSUNG
PROBLEM
MÖGLICHE URSACHE
Der Weinschrank
funktioniert nicht.
Das Gerät ist nicht angeschlossen.
Das Gerät ist ausgeschaltet.
Der Schutzschalter ist ausgelöst oder eine Sicherung ist durchgebrannt.
Das Gerät kühlt nicht
ausreichend.
Überprüfen Sie die Temperatureinstellung.
Die Umgebung kann vielleicht eine stärkere Einstellung notwendig machen.
Die Tür wird zu oft geöffnet.
Die Tür ist nicht richtig geschlossen.
Die Türdichtung liegt nicht voll auf.
Das Gerät schaltet sich
häufig ein und aus.
Die Umgebungstemperatur ist höher als gewöhnlich.
Es wurden viele Flaschen in den Weinschrank gelegt.
Die Tür wird zu oft geöffnet.
Die Tür ist nicht richtig geschlossen.
Die Temperatur ist nicht richtig eingestellt.
Die Türdichtung liegt nicht voll auf.
Die Innenbeleuchtung
funktioniert nicht.
Das Gerät ist nicht angeschlossen.
Der Schutzschalter ist ausgelöst oder eine Sicherung ist durchgebrannt.
Die Anzeigeleuchte ist außer Betrieb.
Die Einschalttaste für das Licht befindet sich in der Position OFF.
Vibrationen
Prüfen Sie und stellen Sie sicher, dass der Weinschrank korrekt waagerecht
ausgerichtet ist.
Der Weinschrank ist zu
laut.
Ein „Klick“-Geräusch kann vom Ablaufen des Kältemittels kommen, was normal
ist.
Bei jedem Zyklusende können „Gurgel“-Geräusche zu hören sein, die auf das
Ablaufen des Kältemittels in Ihrem Weinschrank zurückzuführen sind.
Durch das Zusammenziehen und Ausdehnen der Innenwände können Knack-
und Knistergeräusche entstehen.
Der Weinschrank ist nicht waagerecht ausgerichtet.
Im „Mono“-Modus sind die Ventilatoren eingeschaltet, um die Luft im
Weinschrank umzuwälzen.
Die Tür schließt nicht
richtig.
Der Weinschrank ist nicht waagerecht ausgerichtet.
Die Dichtung ist verschmutzt oder beschädigt.
Ein Teil des Inhalts verhindert, dass die Tür schließt.
Die Türscharniere sind schlecht angebracht.
Die Roste sind nicht an der richtigen Position eingelegt.
Die eingelegte Flasche
wird nicht erkannt.
Die Flasche hat nicht das richtige Format.
Der Flaschenhals berührt die Mittelstrebe des Ablagerosts nicht.
Die Sensoren der Mittelstrebe des Rosts sind verschmutzt. => Bitte mit einem
weichen und trockenen Wattestäbchen reinigen.
Die Farbe des Flaschenhalses wird vom Sensor nicht erkannt. => Führen Sie
einen Test mit einem undurchsichtigen Etikett am Flaschenhals durch.
Die Flasche hat keine Kapsel am Flaschenhals. => Führen Sie einen Test mit
einem undurchsichtigen Etikett am Flaschenhals durch.
Der Weinschrank ist ausgeschaltet.
Der Weinschrank ist nicht mit dem Internet (WLAN) verbunden.

112
Eine Flasche wird
erkannt, wurde aber
nicht abgelegt.
Die Sensoren der Mittelstrebe des Rosts sind verschmutzt. => Bitte mit einem
weichen und trockenen Wattestäbchen reinigen.
Das Pairing mit dem
Weinschrank
funktioniert nicht.
Der QR-Code der Master-Steuereinheit wurde falsch gescannt.
Der QR-Code ist kaputt.
Die WLAN-Verbindung reicht nicht aus.
Die Bluetooth-Reichweite wurde überschritten.
Der Weinschrank ist nicht angeschlossen.
Die WLAN- oder Bluetooth-Verbindung des Telefons sind nicht aktiviert.
Fehlercode „EE“.
Fehler des Temperaturfühlers.
Fehlercode „HH“.
Alarm „hohe Temperatur“. Bitte ziehen Sie den Netzstecker des Weinschranks
oder schalten Sie ihn aus, und wenden Sie sich an Ihren Kundendienst.
Fehlercode „LL“.
Alarm „niedrige Temperatur“. Bitte ziehen Sie den Netzstecker des
Weinschranks oder schalten Sie ihn aus, und wenden Sie sich an Ihren
Kundendienst.
Fehlercode „DD“.
Es liegt keine Störung vor. Das Gerät ist im Abtaumodus. => Bitte warten Sie,
bis der Abtauvorgang beendet ist.
Es fließt Wasser aus
dem Weinschrank.
Das Abflussloch in Ihrem Weinschrank ist verstopft.
Der Weinschrank ist nicht ausreichend nach hinten geneigt.
Der Wasserbehälter im hinteren Bereich des Weinschranks ist voll.
Die rote LED-Leuchte
unter der Master-
Steuereinheit blinkt
ununterbrochen.
Der Weinschrank ist nicht mehr mit dem WLAN-Netz verbunden oder die WLAN-
Verbindung wurde unterbrochen.
Eine oder mehrere
LED-Leuchten an der
Vorderseite der
Ablageroste sind an.
Sie haben eine Positionsanfrage gestellt und haben die Flasche(n) entweder
nicht herausgenommen oder abgelegt.
Warten Sie 5 Minuten, bis die LED-Leuchte von selbst erlischt oder öffnen und
schließen Sie die Tür des Weinschranks.
Die Tasten des
Bedienfelds
funktionieren nicht.
Überprüfen Sie, ob das Bedienfeld nicht gesperrt ist. In diesem Fall wird ein
Vorhängeschloss auf dem Display angezeigt. Entsperren Sie das Bedienfeld,
indem Sie 3 Sekunden lang auf das Vorhängeschloss-Symbol drücken.
Es gibt Unterschiede
zwischen meinem
digitalen Verzeichnis
und meinem physischen
Weinschrank
(mehr/weniger
Flaschen).
Haben Sie während eines Stromausfalls Änderungen vorgenommen?
Schauen Sie in der Rubrik FAQ in der Vinotag-App nach, um zu erfahren, wie
Sie Unterschiede im Flaschenbestand lösen können.
Ich kann den QR-Code
des Kellers nicht
scannen
Bevorzugen Sie den Scan des QR-Codes, der sich unten auf dem Qualitätsblatt
Ihres Kellers befindet. Legen Sie das Qualitätsblatt auf eine trockene, ebene
Unterlage im Licht, um das Scannen des QR-Codes zu erleichtern.
Wenn Sie den QR-Code des Kellers (unter der Masterbox) scannen möchten,
empfehlen wir Ihnen, das LED-Licht des Weinkellers einzuschalten. Durch
Erhöhen der Helligkeit können Sie den QR-Code mit Ihrem Telefon leichter
erkennen . Bei Telefonen, die eine bestimmte Entfernung zum Fokussieren
benötigen, können Sie das obere Regal Ihres Kellers herausziehen, um einen
besseren Abstand zwischen der Linse Ihres Telefons und dem Keller-QR-Code
zu haben.
Das Etikett des Weins,
den ich fotografiere,
wird von der Bewerbung
nicht erkannt
Das über die Bewerbung aufgenommene Foto muss von guter Qualität sein
(nicht verwackelt), das Foto muss so aufgenommen werden, dass das
Weinetikett den weißen Rahmen der Bewerbung ausfüllt. Wenn dies immer noch
nicht funktioniert, versuchen Sie, eine Nahaufnahme des Namens des Weins zu
machen.

113
Fehlercodes
Fehlercode
Bedeutung
HH
Alarm hohe Temperatur
LL
Alarm niedrige Temperatur
DD
Gerät im Abtaumodus
EE
Fehler des Temperaturfühlers
Wenn andere Codes auf Ihrem Display angezeigt werden (A, B, C, D, E, G, I, J, K, M, N, O), wenden
Sie sich bitte an den Kundendienst.
9. UMWELT
Dieses Produkt entspricht der EU-Richtlinie 2019/290/EU über Elektro- und Elektronik-
Altgeräte (WEEE). Wenn Sie sicherstellen, dass dieses Produkt ordnungsgemäß
entsorgt wird, helfen Sie mit bei der Vermeidung potenzieller negativer Auswirkungen
auf die Umwelt und die menschliche Gesundheit, die durch einen unangemessenen
Umgang mit den Abfällen aus diesem Produkt entstehen können.
Das auf dem Gerät angebrachte Symbol der durchgestrichenen Abfalltonne zeigt an, dass das
Produkt am Ende seiner Lebensdauer vom restlichen Hausmüll getrennt entsorgt werden muss. Es
muss daher zu einer Sammelstelle für Elektro- und Elektronikaltgeräte bzw. beim Kauf eines
gleichwertigen Geräts zum Händler des neuen Geräts gebracht werden.
Der Benutzer ist dafür verantwortlich, dass das Gerät am Ende seiner Lebensdauer einer geeigneten
Sammelstelle zugeführt wird. Eine zweckmäßige, getrennte Sammlung zur Weiterleitung des
unbenutzten Geräts zum Recycling, zur Aufbereitung und umweltgerechten Entsorgung trägt dazu
bei, mögliche negative Auswirkungen auf Umwelt und Gesundheit zu vermeiden, und fördert das
Recycling der Wertstoffe, aus denen das Produkt besteht.
Bei der Entsorgung des Geräts oder bei einem Weiterverkauf sind die personenbezogenen Daten des
Benutzers ohne dessen Zutun geschützt. Diese Daten sind nicht im Weinschrank, sondern auf einem
externen Server gespeichert. Es können keinerlei Informationen, die während der normalen Nutzung
des Weinschranks übertragen wurden, nach dessen Entsorgung verwertet werden.
Wenn das Gerät weiterverkauft wird, muss der neue Benutzer den QR-Code auf der Master-
Steuereinheit scannen und das vorgeschriebene Pairing-Verfahren durchführen. Durch diesen
Vorgang werden alle zuvor auf dem Server gespeicherten Daten überschrieben. Auf diese Weise
steht dem neuen Benutzer ein völlig leeres Konto zur Verfügung. Der ehemalige Benutzer kann von
der Vinotag-App aus nicht mehr auf seine alten Daten zugreifen oder diese ansehen.
Um genauere Auskünfte zu den bestehenden Sammelsystemen zu erhalten, wenden Sie sich bitte an
das örtliche Amt für Abfallentsorgung oder das Geschäft, in dem Sie das Gerät gekauft haben.
10. WICHTIGER HINWEIS
In dem Bestreben der kontinuierlichen Qualitätsverbesserung unserer Produkte behalten wir uns die
Möglichkeit vor, die technischen Merkmale ohne Vorankündigung zu ändern.
Die Garantien für die Produkte der Marke LA SOMMELIERE werden ausschließlich durch unsere
Vertragshändler gewährt. In dieser Bedienungsanleitung gemachte Angaben können nicht als eine
Zusatzgarantie ausgelegt werden.
Die Firma FRIO ENTREPRISE kann nicht für Fehler bzw. Auslassungen technischer oder
redaktioneller Art in dieser Bedienungsanleitung haftbar gemacht werden. Unverbindliches
Dokument.

114
1. VEILIGHEIDSINSTRUCTIES
Lees met het oog op uw veiligheid en een juiste installatie van het
apparaat aandachtig deze gebruiksaanwijzing, met inbegrip van de
waarschuwingen en nuttige tips die erin zijn terug te vinden, voordat u
het apparaat installeert en het voor het eerst gebruikt. Om te vermijden
dat het apparaat wordt beschadigd en/of dat u onnodig verwond raakt, is
het belangrijk dat de personen die worden geacht gebruik te maken van
dit apparaat, volledig op de hoogte zijn van de werking en de
veiligheidsfuncties ervan. Bewaar deze instructies voor later en denk
eraan om deze vlak bij het apparaat op te bergen, zodat de instructies
bij een verkoop of verhuizing met het apparaat worden meegegeven.
Daardoor zal een optimale werking van het systeem kunnen worden
gegarandeerd.
Bewaar deze gebruiksaanwijzing om elk gevaar voor verwondingen te
vermijden. De fabrikant kan immers niet aansprakelijk worden gesteld,
als het systeem verkeerd wordt behandeld.
Veiligheid van kinderen en andere kwetsbare personen
• Dit systeem mag worden gebruikt door kinderen van 8 jaar en ouder,
en door personen met beperkte fysieke, zintuiglijke of mentale
capaciteiten, of door personen die niet hebben geleerd om gebruik te
maken van het apparaat, als ze worden geholpen door een
geïnformeerde persoon die zich bewust is van de risico's die met het
gebruik van het apparaat gepaard gaan. Kinderen mogen niet met het
apparaat spelen. De reiniging en het onderhoud mogen niet worden
uitgevoerd door kinderen, tenzij ze ouder zijn dan 8 jaar en ze in de
gaten worden gehouden.
• Bewaar alle verpakkingen buiten het bereik van kinderen, want er
bestaat gevaar voor verstikking.
• Als u beslist om het apparaat af te danken, haalt u de stekker uit de
wandcontactdoos, snijdt u de aansluitkabel door (zo dicht mogelijk bij
het apparaat) en verwijdert u de deur om te verhinderen dat de
kinderen ermee spelen en zich laten elektrocuteren, of zich opsluiten
in het apparaat.
• Als het apparaat met een magnetische deurpakking moet worden
vervangen door een ander apparaat met een deurklink op de deur of
op de pakking, gaat u nauwkeurig na of de deurklink buiten werking
is, voordat u zich ontdoet van het oude apparaat. Zo vermijdt u dat dit
apparaat in een val voor kinderen verandert.

115
• Houd het apparaat en het snoer van het apparaat buiten het bereik
van kinderen jonger dan 8 jaar.
• Kinderen mogen geen flessen in het apparaat leggen of eruit halen.
Algemene veiligheid
OPGELET –– Dit apparaat is ontworpen om in een huiselijke omgeving
en in de volgende types omgevingen te werken:
- keukenruimten en installaties die in de handel verkrijgbaar zijn, werk-
en kantooromgevingen;
- structuren van het type Bed and Breakfast;
- boerderijgebouwen en hotels, motels en andere instellingen die klanten
ontvangen;
- industriële keuken en andere toepassingen die niet voor de
detailverkoop zijn bestemd.
OPGELET — Berg in dit apparaat nooit brandbare stoffen zoals
spuitbussen op, want deze zouden er kunnen uit lopen.
OPGELET — Als het voedingssnoer is beschadigd, moet u het
onmiddellijk bij uw fabrikant of een gekwalificeerde handelaar laten
vervangen, om elk gevaar voor elektrocutie te vermijden.
OPGELET — Houd de ventilatieopeningen goed vrij en ga na of de lucht
door de openingen kan circuleren.
OPGELET — Beschadig het koelcircuit niet.
OPGELET — Gebruik geen elektrische apparaten aan de binnenzijde
van het compartiment, tenzij die laatste door de fabrikant worden
toegestaan.
OPGELET — Het koelsysteem en het isolerende systeem bevatten
brandbare gassen. Wilt u het systeem afdanken, doe dat dan bij een
erkend inzamelcentrum. Stel het apparaat nooit bloot aan vlammen.
Koelvloeistof
Er wordt het koelmiddel isobutaan (R600a) gebruikt in het koelcircuit van
het systeem; het gaat om een licht ontvlambaar natuurlijk gas dat niet
gevaarlijk is voor de omgeving. Ga tijdens het transport en de installatie
van het systeem na of er geen onderdelen van het koelcircuit zijn
beschadigd. Het koelmiddel (R600a) is een brandbare vloeistof.
Opgelet: brandgevaar
Als het koelcircuit werd beschadigd:
▪ Vermijd open vlammen en elke ontstekingsbron.
▪ Ventileer zorgvuldig de ruimte waarin het apparaat staat.
Het is gevaarlijk om de samenstelling van dit apparaat te wijzigen, op

116
welke manier ook.
Elke beschadiging van het snoer kan een kortsluiting en/of een
elektrocutie veroorzaken.
Elektrische veiligheid
• Het voedingssnoer mag niet worden verlengd.
• Ga zorgvuldig na of de wandcontactdoos niet is beschadigd. Een
wandcontactdoos in slechte staat kan een oververhitting van het
systeem en de ontploffing ervan veroorzaken.
• Ga zorgvuldig na of u de wandcontactdoos van het apparaat kunt
bereiken.
• Trek nooit aan de hoofdkabel.
• Sluit het snoer niet aan als de wandcontactdoos loshangt. Er bestaat
gevaar voor elektrocutie of brand.
• U mag het apparaat nooit gebruiken als de bescherming van de
binnenverlichting niet is geïnstalleerd.
• Deze wijnkast werkt op een eenfasige stroom van 220~240 V / 50 Hz.
• Voor het apparaat mogen geen verlengsnoeren, adapters of
meervoudige contactdozen worden gebruikt. Het apparaat moet
worden aangesloten op een geaarde contactdoos in
overeenstemming met de geldende elektrische normen.
Dagelijks gebruik
• Dit apparaat is uitsluitend bestemd voor het opslaan van wijn.
• Sla nooit brandbare stoffen of vloeistoffen in het apparaat op; dat zou
een gevaar voor blootstelling met zich mee kunnen brengen.
• Laat nooit andere elektrische apparaten in dit apparaat werken
(mixers, elektrische ijsturbines, enz.).
• Wanneer u het apparaat loskoppelt, moet u de stekker altijd in uw
handen houden en mag u niet aan het snoer trekken.
• Plaats geen warme elementen of plastic onderdelen in dit apparaat.
• Dit apparaat moet worden gebruikt en behandeld in
overeenstemming met bepaalde specifieke voorschriften. Raadpleeg
de voorschriften die werden opgesteld op het gebied van opslag.
• Stel het apparaat niet rechtstreeks bloot aan de zon.
• Houd kaarsen, lantaarns en andere open vlammen weg van het
apparaat, om brandgevaar te vermijden.
• Dit apparaat is bestemd om traditionele huishoudelijke dranken op te
bergen.
• Het apparaat is zwaar. Wees voorzichtig wanneer u het verplaatst.
• Gebruik het voetstuk, de oplegplanken, de deuren en andere

117
soortgelijke elementen nooit om op te steunen.
• Om vallende voorwerpen te vermijden en te verhinderen dat het
apparaat defect raakt, mag u de oplegplanken niet overladen.
Opgelet! Reiniging en onderhoud
• Voor ieder onderhoud, koppel het apparaat af en onderbreek de
stroom.
• Reinig het apparaat niet met metalen voorwerpen, een
stoomsysteem, vluchtige oliën, organische oplosmiddelen of
schurende bestanddelen.
• Gebruik geen scherpe of puntige voorwerpen om het eventuele ijs te
verwijderen. Gebruik een plastic schraper.
Belangrijke informatie over de installatie!
• Opgelet! Om te voorkomen dat de wijnkast omvalt, is het
belangrijk om eerst de plaatsen onder in de kast te vullen. De
oplegplanken mogen niet tegelijk worden uitgetrokken of in
uitgetrokken toestand worden gelaten. Het gewicht van de
flessen kan de wijnkast naar voren doen kantelen. Het is
belangrijk het gewicht van de flessen over de hele kast te
verdelen, en voorzichtig met de kast om te gaan.
• Om ervoor te zorgen dat de elektrische aansluitingen correct zijn,
volg de volgende instructies die samen met de handleiding worden
geleverd.
• Haal het apparaat uit de verpakking en ga na of er geen zichtbare
schade is. Sluit het apparaat niet aan als het is beschadigd. Breng
het verkooppunt waar u het apparaat hebt gekocht, altijd op de
hoogte van schade. Bewaar in dat geval de verpakking.
• Het is raadzaam om minstens vierentwintig uur te wachten, voordat u
het apparaat aansluit op de netstroom. Zo bent u zeker dat er
voldoende olie wordt toegevoerd aan de compressor.
• Een goede luchtcirculatie is noodzakelijk om risico op oververhitting
te vermijden. Volg zorgvuldig de meegeleverde installatie-instructies,
om ervoor te zorgen dat er voldoende ventilatie is. Opgelet! Dit
koelapparaat is niet bedoeld voor gebruik als inbouwapparaat.
• Zorg ervoor dat het apparaat de muren niet raakt en/of niet in
aanraking komt met warme elementen (compressor, condensator,
radiators, kooktoestellen, droogmachine ...), om brandgevaar en
oververhitting van het apparaat te vermijden. Volg altijd de instructies
voor de installatie op.
• Controleer dat de contactdozen gemakkelijk toegankelijk zijn nadat

118
het apparaat geïnstalleerd is.
• Zorg ervoor dat het voedingssnoer niet klem of beschadigd raakt
wanneer u het apparaat installeert.
Storingen oplossen en onderdelen
• Elektriciteitswerkzaamheden moeten altijd worden uitgevoerd door
een bevoegde en bekwame technicus.
• Dit apparaat moet worden gerepareerd door een erkend
reparatiecentrum en er mogen uitsluitend originele onderdelen
worden gebruikt.
De esthetische en functionele reserveonderdelen overeenkomstig
VERORDENING (EU) 2019/2019 (bijlage II, punt 3.) worden gedurende
een periode van 7 jaar of 10 jaar (lijst in bijlage II, punt 3.a.1 en 3.a.2)
nadat het laatste exemplaar van het model op de markt is gebracht, ter
beschikking gesteld van professionele reparateurs en eindgebruikers.
De lijst van reserveonderdelen en de procedure voor de bestelling ervan
(toegang voor vakmensen / toegang voor particulieren) zijn beschikbaar
op de volgende website: www.interfroidservices.fr of per post op het
volgende adres: FRIO - Interfroid Services, 143 Bd Pierre Lefaucheux -
72230 ARNAGE. Andere functionele onderdelen die niet in EU-
verordening 2019/2019 zijn gespecificeerd, zijn gedurende 10 jaar
beschikbaar.
De fabrieksgarantie is 1 jaar voor functionele onderdelen.

119
R600a
Veiligheidsinstructies
Opgelet: gebruik geen mechanische
voorzieningen of andere middelen om
het ontdooiingsproces te versnellen,
tenzij die door de fabrikant worden
aanbevolen.
Opgelet: versper geen enkel
ventilatierooster van het apparaat.
Opgelet: sla in dit apparaat geen
ontplofbare stoffen op zoals spuitbussen
met een brandbaar drijfgas.
Opgelet: beschadig het koelcircuit van
het apparaat niet.
Opgelet: aangezien de koeleenheden
met isobutaan (R600a) werken, mogen
ze niet in een ruimte met
ontstekingsbronnen worden geplaatst.
Het type koelvloeistof wordt aangegeven
op het typeplaatje van de kast.
Opgelet: gebruik geen elektrische
apparaten in de compartimenten van het
apparaat, tenzij die van het door de
fabrikant aanbevolen type zijn.
Dit apparaat is in overeenstemming met de eisen van de Europese richtlijnen en de eventuele
wijzigingen ervan.
KARTONNEN DOZEN EN PAPIERVERPAKKINGEN MOETEN WORDEN GESORTEERD

120
2. TYPEPLAATJE
Het typeplaatje dat aan de binnenkant of achterkant van het apparaat (op basis van het model)
gekleefd is, bevat alle specifieke informatie over uw apparaat.
We raden u aan om het serienummer voor de installatie in dit boekje te noteren zodat u er later indien
nodig over beschikt (technische interventie, vraag om assistentie, enz.).
Zodra het apparaat geïnstalleerd en geladen is, kunt u niet meer zo gemakkelijk toegang tot het
typeplaatje krijgen.
OPGELET: er kan geen hulp worden verleend zonder deze gegevens.
3. BESCHRIJVING VAN DE PRODUCTEN
Raadpleeg de online EPREL-database om meer te weten te komen over uw product. Zoals is bepaald
in gedelegeerde verordening (EU) 2019/2016 van de Commissie, is alle informatie over dit
koelapparaat beschikbaar in de EPREL-database (EPREL = European Product Database for energy
labelling). Met deze database kunt u de informatie en technische documentatie van uw koelapparaat
raadplegen. U kunt toegang krijgen tot de EPREL-database door de QR-code op het energielabel van
uw apparaat te scannen, of door rechtstreeks naar www.ec.europa.eu te surfen en het model van uw
koelapparaat in te voeren.
Masterdoos
14 verbonden
oplegplanken met
lichtgevend display
Capaciteit 12 flessen per
oplegplank
Opslagruimte
Capaciteit 17 flessen
Glazen deur
Bedieningspaneel
met lcd-scherm

121
U vindt alle informatie over de ECELLAR185
en de downloadbare handleiding ervan op de website www.lasommeliere.com
Aangekondigde capaciteit
▪ De wijnkast ECELLAR185 heeft een capaciteit van 185 flessen.
▪ De kast is uitgerust met 14 verbonden oplegplanken.
▪ Op elke oplegplank kunnen 12 flessen worden bewaard.
▪ De wijnkast heeft een opslagruimte voor 17 flessen.
De aangekondigde capaciteit is de maximale capaciteit die is berekend op basis van het aantal
oplegplanken dat samen met de wijnkast wordt verkocht. De verbonden oplegplanken van de
ECELLAR zijn zo ontworpen dat ze plaats bieden aan champagneflessen. Deze bijzonderheid maakt
het mogelijk om elk type fles van 75 cl te bewaren, zoals: bordelaises, champagneflessen,
bourgogneflessen, elzasflessen, maar ook atypische formaten zoals proseccoflessen,
sacchettoflessen, mateusflessen, enz.
Opgelet! De diameter van de flessen die op de oplegplanken worden geplaatst, mag niet meer
dan 9 cm bedragen.
Als u flessen van verschillende grootte wilt opleggen, raden wij u aan om tussen uw grotere flessen
telkens een standaard bordeauxfles te plaatsen. Zo kunt u eventuele opslagproblemen vermijden.
Als u flessen met een atypisch of groot formaat naast elkaar legt, kunt u er immers toe worden
gedwongen om de plaatsen op uw oplegplank slechts gedeeltelijk te benutten. Door een
standaardfles (bordeaux van 75 cl) af te wisselen met een atypische of grote fles, kunt u alle
beschikbare plaatsen op uw oplegplank benutten.
Indien bepaalde flesformaten ondanks al onze inspanningen niet door de ECELLAR-oplegplanken
worden gedetecteerd, dient u de onderstaande instructies te volgen:
Als een fles te groot is en niet tussen twee oplegplanken past, adviseren wij u het volgende:
▪ Leg de fles op de eerste oplegplank van uw wijnkast (van boven te beginnen).
▪ Leg de fles in de opslagruimte onder in de kast.
Indelingsaanbevelingen
De oorspronkelijke indeling van de voorzieningen in uw apparaat (oplegplanken ...) wordt aanbevolen,
want met die indeling wordt de energie door het koelapparaat zo rationeel mogelijk gebruikt. Elke
verandering in deze indeling kan van invloed zijn op het energieverbruik van het apparaat.
Radiofrequentiekenmerken
La Sommelière verklaart hierbij dat de ECELLAR185-radioapparatuur in overeenstemming is met
richtlijn 2014/53/EU en alle toepasselijke Europese richtlijnen. Richtlijn raadpleegbaar op: https://eur-
lex.europa.eu/legal-content/NL/TXT/?uri=CELEX%3A32014L0053&qid=1617885639187
• Radioband: 2400 MHz tot 2483,5 MHz
• Maximaal vermogen: 100 mW
De EG-verklaring kan worden geraadpleegd en gedownload op de website van La Sommelière:
https://www.lasommeliere.com/fr/155-ECELLAR185.html
4. INSTALLATIE-INSTRUCTIES

122
Voordat u uw wijnkast in gebruik neemt
▪ Verwijder de verpakking rondom en binnenin.
▪ Laat uw apparaat ongeveer 24 u rechtop staan alvorens het in gebruik te nemen. Dit verkleint
de kans dat het koelsysteem door het transport niet goed zal werken.
▪ Maak de binnenkant schoon met behulp van een doek en lauw water.
▪ Wanneer u uw apparaat installeert, dient u een goedgekeurde locatie te kiezen.
▪ Plaats uw apparaat op een ondergrond die sterk genoeg is om het te dragen wanneer het
volledig is gevuld.
▪ Plaats uw wijnkast op een ondergrond die sterk genoeg is om de kast te dragen wanneer de
kast volledig is gevuld.
▪ Stel de voeten van uw apparaat zo af dat de voorkant van uw wijnkast waterpas staat en de
achterkant iets naar achteren helt. Deze schuine stand helpt de laden of oplegplanken op hun
plaats te houden, ondanks het gewicht van de flessen. De schuine stand garandeert ook de
goede afvoer van condenswater en de goede afdichting van de deurpakking.
▪ Voldoende ventilatie is noodzakelijk. Versper nooit luchtuitlaten.
▪ Dit apparaat is bedoeld om vrijstaand te worden geïnstalleerd. Het mag in geen geval
worden ingebouwd. De lucht moet goed rond uw apparaat kunnen circuleren.
▪ Sluit de wijnkast aan op een enkelvoudige contactdoos en laat een ruimte van 50 mm tussen
de achterkant van de wijnkast en de muur, en 100 mm aan elke zijde en boven uw apparaat.
Stel de voeten van uw apparaat zo af dat de voorkant van uw wijnkast waterpas staat en de
achterkant iets naar achteren helt (het is raadzaam om een luchtbelwaterpas te gebruiken).
Dit voorkomt dat de kast gaat bewegen door instabiliteit, wat lawaai en trillingen produceert,
en zorgt ervoor dat de deur perfect luchtdicht is.
▪ Dit apparaat is uitsluitend bestemd voor de opslag van wijn.
▪ Dit apparaat bevat ontvlambaar koelgas. Zorg er dus voor dat de koelslang tijdens het
transport nooit wordt beschadigd.
Opgelet
▪ Sla gesloten flessen op.
▪ Leg niet te veel flessen in het apparaat.
▪ Open de deur nooit langer dan nodig.
▪ Bedek de oplegplanken niet met aluminiumfolie of ander materiaal dat een goede
luchtcirculatie kan verhinderen.
▪ Indien de wijnkast gedurende lange tijd in ongevulde toestand moet worden gelaten, wordt
aanbevolen om de stekker uit de contactdoos te trekken en na een zorgvuldige reiniging de
deur op een kier te laten staan, zodat de lucht kan circuleren en schimmel- en geurvorming
wordt voorkomen.
OPGELET: houd het apparaat uit de buurt van stoffen die brand kunnen veroorzaken.
Uw wijnkast installeren
Opgelet! Om te voorkomen dat de wijnkast omvalt, is het belangrijk om eerst de plaatsen
onder in de kast te vullen. De oplegplanken mogen niet tegelijk worden uitgetrokken of in
uitgetrokken toestand worden gelaten. Het gewicht van de flessen kan de wijnkast naar voren
doen kantelen. Het is belangrijk het gewicht van de flessen over de hele kast te verdelen, en
voorzichtig met de kast om te gaan.
Voeding
Sluit de wijnkast aan op een enkelvoudige wandcontactdoos van het type E.

123
De wijnkast moet worden aangesloten op één gemakkelijk bereikbare contactdoos.
Alle problemen met betrekking tot het vermogen en/of de aarding moeten worden behandeld door
bevoegd personeel (elektricien, erkende dienst).
Opstelling
• Opgelet! De kast moet in een schone (niet-stoffige), vorstvrije omgeving worden geplaatst, uit
de buurt van warmtebronnen zoals een radiator, een oven, zonlicht ... De kast mag niet
buiten worden geplaatst.
• Zet de wijnkast op een voldoende stevige ondergrond die bestand is tegen het gewicht in
geladen toestand.
• Gebruik de regelbare voeten aan de onderkant van de wijnkast om het apparaat stabiel te
plaatsen.
Dit apparaat is geschikt voor gebruik in ruimten met een heel specifieke omgevingstemperatuur. Deze
klimaatklasse wordt aangegeven op het typeplaatje.
Onthoud: dit koelapparaat is bedoeld voor gebruik bij omgevingstemperaturen tussen 16 °C en 32 °C.
De omgevingstemperatuur beïnvloedt de binnentemperatuur en de vochtigheid van uw kast.
De temperatuur van het apparaat kan worden ingesteld tussen 5 °C en 20 °C. De temperatuur wordt
ingesteld met behulp van een thermostaat. Verandering van de temperatuur leidt tot een hoger
energieverbruik.
Het apparaat garandeert dat de temperatuur gehandhaafd blijft zolang het in werking is en onder
normale omstandigheden wordt gebruikt. De temperatuur in het apparaat en het energieverbruik
ervan kunnen door tal van factoren worden beïnvloed: omgevingstemperatuur, blootstelling aan
zonlicht, aantal deuropeningen en opgeslagen hoeveelheid ... Lichte temperatuurschommelingen zijn
volkomen normaal en komen overeen met de koelcycli van het apparaat. Deze variaties hebben
echter geen invloed op de temperatuur van de wijn, aangezien ze te kort zijn voor een warmte-
uitwisseling met de flessen.

124
De handgreep aanbrengen
- Haal de handgreep en de twee schroeven uit de plastic zak in de kast.
- Voordat u de handgreep installeert, moet u de pakking van de deur gedeeltelijk verwijderen.
De dichtheid van de pakking wordt daarbij op geen enkele manier aangetast, als u dat op de
juiste manier doet.
- Maak de pakking vanaf de hoek van de deur zo ver als nodig los en plaats de twee
schroeven vervolgens in de gaten van de handgreep.
- Schroef de handgreep vast en plaats de pakking terug in de deurgleuf. Eindig daarbij in de
hoek.
Wifi-bereik van de kast
Opgelet! De ECELLAR-kast werkt met een wifi-verbinding.
Opgelet! Het is de verantwoordelijkheid van de gebruiker om ervoor te zorgen dat het wifi-
netwerk toereikend is (snelheid/signaalsterkte) voor de goede werking van de verbonden kast.
• Het gebruik van een wifi-versterker of -repeater kan nodig zijn voor een verbinding met lage
snelheid.
Als de internetverbinding met de ECELLAR wegvalt, slaat de ECELLAR tot 100 gebeurtenissen op
zodra de verbinding is hersteld.
De gegevens en een voorraadupdate worden naar de server gestuurd.
Bij meer dan 100 gebeurtenissen worden de oudste door de nieuwe gewist.
De gebruiker kan ze zien in de rubriek "Waarschuwingen" van zijn applicatie.
Bij een stroomonderbreking kan de kast geen bewegingen registreren en verliest het apparaat ook de
gebeurtenissen die nog moesten worden gesynchroniseerd met de server.
Wanneer het apparaat na een stroomonderbreking opnieuw wordt gestart, wordt de laatste op de
cloud opgeslagen versie gebruikt om de inhoud van de kast van dat ogenblik weer te geven. Daarom
is het belangrijk dat de inhoud van de kast tijdens een stroomonderbreking niet wordt gewijzigd, om te
voorkomen dat uw digitaal register afwijkt van de inhoud van uw kast.
Bluetoothbereik van de kast
Opgelet! De ECELLAR-kast werkt met bluetooth voor de koppeling van de kast aan het wifi-netwerk.
Tijdens het dagelijks gebruik communiceert de kast alleen via het wifi-netwerk.
Het bluetoothbereik van de kast is maximaal 3 m met de deur dicht.
Handgreep
Deurkozijn
Pakking
Schroef

125
Vochtigheid
In uw kast is boven op de trede van de compressor een wateropvangbak voorzien, waarin u
regelmatig water zult zien om de vochtigheidsgraad in uw kast op peil te helpen houden.
o Als er te veel water in deze bak zit, wordt dat teveel via het condensafvoergat
afgevoerd naar een opvangbak boven de compressor.
o Denk eraan om uw kast iets naar achteren te kantelen door de twee voorste voeten
los te schroeven, zodat het water goed kan weglopen.
o Het afvoergat mag niet versperd zijn.
Waterreservoir
Gat voor de afvoer van water
naar de compressor

126
5. GEBRUIKSVOORSCHRIFTEN
Bedieningspaneel
De ECELLAR185-kast is uitgerust met een elektronisch bedieningspaneel met lcd-display.
Het bedieningspaneel bevindt zich in de kast aan de linkerkant.
Het scherm wordt automatisch vergrendeld na 15 seconden inactiviteit. In dat geval zal het pictogram
B op het scherm zichtbaar zijn.
De achtergrondverlichting van het scherm gaat automatisch uit na 15 s inactiviteit nadat het display is
vergrendeld. Deze verlichting gaat weer aan zodra u weer op een toets drukt. In geval van een
foutcode of een alarm wordt het scherm automatisch ontgrendeld.
PUNT
BESCHRIJVING
A
Geeft de kastmodus aan: MONO (één temperatuur) of AUTO
(meerdere temperaturen).
B
Slotcontrolelampje, geeft aan dat het touchpad is vergrendeld.
C
Lichtcontrolelampje, geeft aan of het licht is ingeschakeld.
D
Geprogrammeerde temperatuur binnen in de kast. Standaard geeft
de ECELLAR de ingestelde temperatuur weer op het digitale
scherm, maar u kunt de werkelijke temperatuur in uw kast
controleren door de toetsen I + J 3 seconden ingedrukt te houden,
waarna de door de sensor gemeten werkelijke temperatuur op het
scherm verschijnt en knippert. Als u de toetsen loslaat, keert het
scherm terug naar de normale temperatuurweergave.
E
Controlelampje voor de meeteenheid van de temperatuur,
aangegeven in graden Celsius met het symbool °C of in graden
Fahrenheit met het symbool °F.
F
Knop om de meeteenheid van de temperatuur te wijzigen:
- Graden Celsius, aangegeven met het symbool "C", of
- Graden Fahrenheit, aangegeven met het symbool "F".
G
Selectie van de kastmodus; standaard staat de kast in de MONO-
modus. Druk één keer om de kast in de AUTO-modus (gebruik van
meerdere temperaturen) te zetten.
H
Knop om het licht in/uit te schakelen.
I
Temperatuurinstelknop. Druk op deze knop om de temperatuur te
verhogen tot u de gewenste temperatuur bereikt. De temperatuur
van de kast kan in de MONO-modus (één temperatuur) worden
ingesteld tussen 5 °C en 20 °C. In de AUTO-modus (meerdere
temperaturen) regelt de kast zelf de binnentemperatuur van de kast.
Deze knoppen werken niet in deze modus.
J
Temperatuurinstelknop. Druk op deze knop om de temperatuur te
verlagen tot u de gewenste temperatuur bereikt.
De temperatuur van de kast kan in de MONO-modus (één
temperatuur) worden ingesteld tussen 5 °C en 20 °C. In de AUTO-
modus (meerdere temperaturen) regelt de kast zelf de
binnentemperatuur van de kast. Deze knoppen werken niet in deze
modus.
K
Druk op deze knop om de kast in of uit te schakelen zonder de kast
los te koppelen.
L
Druk op deze knop om het bedieningspaneel te ontgrendelen-
vergrendelen. Druk gedurende 3 seconden op de knop om het
scherm te vergrendelen of te ontgrendelen. Als u niets doet, wordt
het scherm na 15 seconden automatisch vergrendeld.

127
Alarmen
Om ervoor te zorgen dat uw wijnen volkomen veilig zijn, is uw kast uitgerust met een alarmsysteem:
- Alarm wegens hoge temperatuur
- Alarm wegens lage temperatuur
Deze alarmen zijn voorgeprogrammeerd. Indien de kast na 12 uur werking een temperatuurverschil
van ± 4 °C ten opzichte van de ingestelde temperatuur detecteert, geeft het apparaat een foutcode
weer die overeenkomt met het alarm wegens hoge of lage temperatuur, en weerklinkt er een
geluidsalarm. Bij een storing werkt de compressor in korte cycli van 10 minuten AAN en 10 minuten
UIT.
Om het geluidsalarm uit te schakelen, drukt u op een van de toetsen op het bedieningspaneel.
Als een van deze alarmen wordt geactiveerd, dient u contact op te nemen met de
klantenservice.
Masterdoos
Uw kast is uitgerust met een masterdoos. Deze doos wordt rechtsboven in de kast geplaatst en
maakt de verbinding mogelijk tussen de oplegplanken en de VINOTAG®-smartphoneapplicatie via
wifi-gegevenstransmissie.
Opgelet! Er mag in geen geval met deze doos worden geknoeid en ze mag niet beschadigd raken.
Deze doos is aan de onderkant uitgerust met een controlelampje dat informatie geeft over de status
van de kast, en met een drukknop waarmee de wifi-verbinding van de kast met het netwerk kan
worden "gereset". Als het controlelampje continu knippert, betekent dit dat de kast niet is verbonden
of dat de verbinding ervan met een wifi-netwerk is verbroken.
Deze doos is aan de onderkant ook voorzien van een QR-code (QR-code ook toegankelijk op het
kwaliteitsblad dat wordt verstrekt bij de aankoop van uw kelder).
• Eerste gebruik
De QR-code wordt gebruikt om de kast te koppelen (via bluetooth). U moet deze QR-code bij het
eerste gebruik scannen om uw kast met het wifi-netwerk te verbinden.
Opgelet: de QR-code mag maar één keer worden gescand en de koppelingsprocedure

128
mag maar één keer worden gebruikt! Indien u deze bewerking uitvoert op een kast die
reeds aan een gebruiker is gekoppeld, wordt u de nieuwe eigenaar van de kast en
overschrijft u alle gegevens die voordien aan de kast waren gekoppeld. U krijgt dan
toegang tot een lege kast en de vorige eigenaar heeft geen toegang meer tot de kast.
Opgelet: deze actie is onomkeerbaar en de overschreven gegevens kunnen niet
worden hersteld.
Opgelet! Wanneer de mastermodule niet is verbonden met een wifi-netwerk, knippert er aan de
onderkant van de module continu een rode led.
Opgelet! U mag de verschillende QR-codes in de ECELLAR niet verwijderen, want die zijn nuttig
wanneer de kast wordt gekoppeld of onderhouden.
Opgelet! Voor een correct gebruik van uw kast moet u die laatste installeren waar de wifi-ontvangst
gegarandeerd goed is.
• De verbinding met het wifi-netwerk resetten of van operator veranderen
Om een Wi-Fi-reset uit te voeren, drukt u gedurende 3 seconden op de drukknop aan de onderkant
van de master-unit. Houd het plastic doosje aan de bovenkant vast met één hand en druk met uw
duim op de knop van onderen. Dit is nuttig wanneer u van router verandert.
Verbonden oplegplanken
Uw kast is uitgerust met 14 verbonden oplegplanken. Deze oplegplanken zijn ontwikkeld, vervaardigd
en gemonteerd in Frankrijk.
De oplegplanken communiceren met de masterdoos van uw kast. De flessen worden kop aan staart
op de oplegplanken geplaatst, op de 12 vastgestelde plaatsen.
▪ De flessenhalzen moeten op de centrale lat rusten, ter hoogte van de vooraf bepaalde
plaatsen. Het controlelampje dat overeenkomt met de positie, knippert 2 keer om aan te
geven dat uw fles correct is gedetecteerd. Indien de fles niet correct is neergelegd, is het
mogelijk dat de hals niet wordt gedetecteerd door de sensor. Corrigeer de positie van de fles
op de oplegplank om een goede detectie te waarborgen. Het controlelampje knippert twee
keer om te bevestigen dat de handeling is gevalideerd.
▪ Flessen die op de oplegplanken rusten, doen dat onder een licht schuine hoek van 4° (vier
graden); dat is normaal en vergemakkelijkt de detectie van de flessenhalzen door de
sensoren.
▪ Het is belangrijk dat de flessenhalzen recht op de centrale lat rusten. De halzen mogen niet
hoger of schuin liggen op de centrale lat, want dat kan de detectie van de flessen
beïnvloeden.

129
▪ Opgelet! Om te voorkomen dat de wijnkast omvalt, is het belangrijk om eerst de plaatsen
onder in de kast te vullen. De oplegplanken mogen niet tegelijk worden uitgetrokken of in
uitgetrokken toestand worden gelaten. Het gewicht van de flessen kan de wijnkast naar voren
doen kantelen. Het is belangrijk het gewicht van de flessen over de hele kast te verdelen, en
voorzichtig met de kast om te gaan.
▪ Opgelet! Trek niet alle 14 verbonden oplegplanken tegelijk naar buiten als er flessen op
liggen.
▪ Opgelet! Als flessen op een oplegplank worden neergelegd, dient dat voorzichtig te gebeuren
om de centrale steun niet te beschadigen.
▪ Opgelet! De oplegplanken zijn niet gemaakt voor flessen met een diameter van meer dan 9
cm.
▪ Opgelet! Als een fles breekt, is het belangrijk dat u de flessen verwijdert en de gaten van de
centrale lat van de oplegplanken waarin de sensoren zijn geplaatst, met een zachte en droge
doek reinigt. Zorg ervoor dat u uw flessen opnieuw scant voordat u ze terug in uw kast legt.
▪ Opgelet! De eerste keer dat u de kast gebruikt, moet u de plastic beschermfolie verwijderen
die op de voorkant van elke oplegplank is aangebracht.
De oplegplanken zijn uitgerust met controlelampjes (leds) die het volgende kunnen aangeven voor de
gebruiker:
- Gezochte fles(sen)
- Aanbevolen plaats (zie paragraaf over de ESOMMELIER-functie)
- Detectie van flessen door de kast wanneer een fles wordt verwijderd of toegevoegd
Opgelet: in een bepaald geval is het mogelijk dat de leds op de voorkant van de oplegplanken blijven
branden. In het elektronische systeem is een vertraging van 5 minuten geprogrammeerd. Na die
vertraging gaan de leds automatisch uit.

130
Gebruiksmodi
Uw kast heeft twee temperatuurmodi:
▪ De modus "één temperatuur" is standaard geactiveerd. Hiermee kan
in de hele kast één temperatuur tussen +5 en +20 °C worden gekozen.
In deze modus worden de ventilatoren geactiveerd om de
luchtcirculatie in de kast te waarborgen.
De temperatuur op het digitale scherm komt overeen met de ingestelde
temperatuur en de melding "MONO" wordt weergegeven.
▪ De modus "meerdere temperaturen" maakt het mogelijk verschillende
temperaturen in de kast te verkrijgen, van hoog naar laag, met een
warmere temperatuur bovenaan in de kast, een gematigde temperatuur
in het midden en een koudere temperatuur onderaan in de kast.
In deze modus zijn de ventilatoren gedeactiveerd.
De ingestelde temperatuur is een vaste temperatuur en kan niet
worden gewijzigd. Op het scherm verschijnt "AUTO"; het apparaat
regelt de temperatuur automatisch. Er hoeft niets te worden ingesteld.
Dit zijn de temperaturen die in de modus voor meerdere temperaturen kunnen
worden bereikt onder normale gebruiksomstandigheden, dat wil zeggen een omgevingstemperatuur
van maximaal 25 °C (zie paragraaf "Uw wijnkast installeren").
De in de tabel aangegeven temperatuurverdeling is louter ter informatie, aangezien er variaties
tussen de verschillende niveaus kunnen optreden naargelang van de koelcycli, het aantal flessen dat
in de kast is gelegd, en de omgevingstemperatuur buiten. De luchtstroom in de kast wordt door deze
verschillende factoren beïnvloed.
Oplegplank
(boven naar
beneden)
Temperatuurbereik
1
14 °C tot 18 °C
Geschikt om rode wijnen te bewaren voor
degustatie.
2
3
4
10 °C tot 14 °C
Geschikt om uw wijnen en champagnewijnen op
te leggen.
5
6
7
8
9
10
11
5 °C tot 10 °C
Geschikt om witte of rosé- en champagnewijnen
op degustatietemperatuur te bewaren.
12
13
14
15
Het apparaat garandeert dat de temperatuur gehandhaafd blijft zolang het in werking is en onder
normale omstandigheden wordt gebruikt. De temperatuur in het apparaat en het energieverbruik
ervan kunnen door tal van factoren worden beïnvloed: omgevingstemperatuur, blootstelling aan
zonlicht, aantal deuropeningen en opgeslagen hoeveelheid ... Lichte temperatuurschommelingen zijn

131
volkomen normaal.
▪ Demonstratiemodus
Uw apparaat is voorzien van een demonstratiemodus. Wanneer deze modus is geactiveerd, zijn de
compressor, de ventilatoren en de alarmen gedeactiveerd, maar behoudt de kast zijn weergave- en
lichtfuncties.
Om deze modus te activeren, moet u de lichttoetsen (H) + C/F (F) gedurende 3 seconden ingedrukt
houden, waarna de weergegeven temperatuur of het AUTO-pictogram 5 keer zal knipperen.
Om de demonstratiemodus te verlaten, herhaalt u dezelfde handeling.
▪ "ESOMMELIER®"-modus
De ESOMMELIER®-modus is een functie die u helpt bij het plaatsen van uw flessen, en die alleen
kan worden gebruikt als u een verbonden LA SOMMELIERE-kast en een actieve VINOTAG®-account
hebt.
Deze functie adviseert u de ideale plaats om uw wijn te bewaren.
Wanneer u een fles scant, identificeert VINOTAG® het type wijn; voor elk type wijn worden
bewaartemperaturen aanbevolen voor een optimale bewaring.
Bepaalde plaatsen in uw kast zijn dus beter geschikt naargelang van het type wijn.
In deze modus stelt de kast beschikbare plaatsen voor die geschikt zijn voor de gescande wijnfles; in
de kast gaan controlelampjes branden om u maximaal 12 plaatsen in één keer te tonen.
Wintersysteem
Uw kast is uitgerust met een automatisch verwarmingssysteem, ook "wintersysteem" genoemd.
Wanneer de door de kastdetector gemeten temperatuur te koud is in vergelijking met de ingestelde
waarde, wordt de kastweerstand geactiveerd om de temperatuur te doen stijgen.
Dit systeem wordt automatisch en zonder tussenkomst van de gebruiker geactiveerd en
gedeactiveerd. De automatische activering of deactivering van het wintersysteem heeft geen invloed
op de bewaring van uw wijn.
De VINOTAG®-applicatie
De ECELLAR185-kast is compatibel met de VINOTAG®-applicatie voor wijnkastbeheer.
Om uw kast verbonden te gebruiken, dient u:
▪ Over een voedingsbron te beschikken om de kast van stroom te voorzien.
▪ De VINOTAG®-applicatie te hebben gedownload via de App Store of de Google Play Store,
en een gebruikersaccount te hebben aangemaakt.
▪ Over een stabiele internetverbinding (wifi) te beschikken.
▪ Over een ECELLAR-kastmodel te beschikken.

132
VINOTAG®-functies
Met de VINOTAG®-applicatie kunt u:
▪ Uw wijnkasten creëren, personaliseren en beheren.
▪ Flessen toevoegen/verwijderen.
▪ Uw wijninventaris (de wijnflessen die in uw kast liggen) raadplegen en uw eigen
wijninformatiebladen opstellen. VINOTAG® is in het kader van de Premium-optie verbonden
met VIVINO®, om u in staat te stellen gedetailleerde wijninformatiebladen uit de VIVINO®-
database te exporteren.
▪ Uw wijnbibliotheek aanmaken en raadplegen. Dankzij de exclusieve samenwerking tussen
VINOTAG® en VIVINO® kunt u gedetailleerde wijninformatiebladen uit de VIVINO®-
database opslaan en raadplegen.
▪ De visualisatie van uw kast(en) met uw familie of vrienden delen.
▪ Op de hoogte worden gebracht wanneer uw wijnen op hun hoogtepunt zijn, wanneer u uw
kastfilter moet vervangen of wanneer uw favoriete wijn bijna op is.
▪ (Een) specifieke fles(sen) in uw kast in één oogopslag identificeren dankzij een systeem van
controlelampjes.
▪ De beschikbare plaatsen in uw kast in één oogopslag lokaliseren dankzij een systeem van
controlelampjes.
Een VINOTAG®-account aanmaken
▪ Download de VINOTAG®-applicatie via de App Store of de Google Play
Store naargelang van uw type telefoon.
▪ Maak handmatig of via Facebook of via uw Apple- of Google Play-account
een account aan.
▪ Vul de verplichte velden in: Voornaam; Naam; Geboortedatum; Land;
Departement.
▪ Vink het vakje "Ik aanvaard de algemene gebruiksvoorwaarden" aan.
▪ Klik op "Mijn registratie voltooien".
U beschikt nu over een VINOTAG®-account. Denk eraan om uw
gebruikersnaam en wachtwoord op te slaan.

133
VINOTAG®-menu
Wanneer de applicatie is geopend, is het volgende menu zichtbaar:
Mijn kast Mijn wijnen Waarschuwingen Profiel
▪ MIJN KAST: om uw wijnkast(en) weer te geven.
▪ MIJN WIJNEN: om uw wijnbibliotheek te raadplegen.
▪ WAARSCHUWINGEN: om de waarschuwingen van uw kast te raadplegen.
▪ PROFIEL: om de aan uw account gekoppelde gegevens aan te vullen / weer te geven.
Pagina "MIJN KAST"
Op deze pagina kunt u de inhoud van uw wijnkast(en) weergeven.
▪ Opgelet! Als uw kast leeg is, kunt u de kast niet weergeven; u moet flessen toevoegen om uw
kast te kunnen weergeven.
▪ De kast kan zichtbaar zijn in de lijstmodus of in de grafische modus. De modus kan
worden ingesteld via het pictogram dat zich rechtsboven op uw scherm bevindt. Met dit
pictogram kunt u van de ene weergavemodus naar de andere gaan. Kasten uit de categorie
"verbonden kast" worden standaard in de lijstmodus weergegeven.
Details pictogram weergave van de kast:
Lijstmodus of Grafische modus
▪ Met het zoekpictogram rechtsboven op uw scherm kunt u naar een wijnfles in uw kast
zoeken; u hoeft alleen maar gegevens in te voeren over de fles die u zoekt (domeinnaam,
type wijn, jaar ...).

134
▪ Met het pictogram rechtsonder op uw scherm kunt u wijnflessen toevoegen (zie
paragraaf "Flessen toevoegen" voor meer informatie).
▪ Opgelet! Als u meer dan één kast hebt, kunt u van de ene kast naar de andere gaan door
linksboven op uw scherm op de naam van uw kast te klikken. Wanneer u op de naam van uw
kast klikt, verschijnt er een pop-up waarin u wordt gevraagd de kast te selecteren die u wilt
weergeven. Klik in de lijst van uw kasten op het model dat u wilt weergeven.
Lijstmodus:
o Vereenvoudigde weergavemodus. Via een lijst kunt u de
wijnen raadplegen die in uw kast worden bewaard. De
wijnen staan in alfabetische volgorde.
o De lijstmodus geeft voor elke wijn het volgende aan: de
naam van de wijn, het domein, de datum, de kleur, het type
en ten slotte de foto van de fles.
o Als u op een wijn drukt, krijgt u toegang tot het
wijninformatieblad.
o Rechts op uw scherm bevindt zich een indicator. Die geeft
voor elke wijn het type wijn aan. De wijntypes zijn te
herkennen aan een gekleurde stip. (Rode stip: wijst op een
rode wijn / gele stip: wijst op een witte wijn / zalmkleurige stip:
wijst op een roséwijn).
o
Grafische modus:
o Met een grafische weergave van de kast kunt u de
inhoud van de kast weergeven door de opgeslagen
flessen met stippen aan te geven.
o De wijnen zijn ingedeeld per oplegplank.
o De gebruiker kan een fles zien, verplaatsen of
verwijderen.
▪ Druk op een fles om toegang te krijgen tot het wijninformatieblad.
▪ Links op uw scherm bevindt zich een indicator. Die geeft voor elke oplegplank het aantal
flessen per type wijn aan. De wijntypes zijn te herkennen aan een gekleurde stip.
Rode stip: geeft een rode wijn aan
Gele stip: geeft een witte wijn aan
Zalmkleurige stip: geeft een roséwijn aan

135
Pagina "MIJN WIJNEN"
Op deze pagina kunt u uw wijnbibliotheek weergeven. Met de wijnbibliotheekruimte kunt u:
▪ Uw geconsumeerde wijnen raadplegen; alle toegevoegde wijnen (die al dan niet nog
aanwezig zijn) in uw kast worden automatisch toegevoegd in uw wijnbibliotheekruimte.
▪ Een wishlist aanmaken; u kunt er wijnen in opslaan die u bij vrienden hebt gedegusteerd of
die u wilt kopen. In de wijnbibliotheekruimte kunt u een verlanglijstje aanmaken.
▪ Met het zoekpictogram rechtsboven op uw scherm kunt u naar een wijnfles in uw
wijnbibliotheek zoeken; u hoeft alleen maar gegevens in te voeren over de fles die u zoekt
(domeinnaam, type wijn, jaar ...).
▪ Om een fles in uw wijnbibliotheek toe te voegen, volgt u de procedure "Flessen toevoegen"
en klikt u op "Toevoegen aan mijn wijnbibliotheek".
▪ Op een wijn drukken om het wijninformatieblad te raadplegen (voor meer informatie volgt u
de procedure "Een wijninformatieblad raadplegen").
Pagina "WAARSCHUWINGEN"
Op deze pagina kunt u de waarschuwingen met betrekking tot uw kast
weergeven; een rode stip naast het pictogram geeft aan dat een waarschuwing
niet is gelezen.
De waarschuwingen zijn chronologisch gerangschikt.
Wanneer u meer dan één kast hebt, is het mogelijk om op kast te filteren
(filterpictogram linksboven op uw scherm).
Met een zoekveld kunt u uw waarschuwingen filteren om een bepaalde
gebeurtenis te vinden.
▪ Waarschuwing filter vervangen: uw kast waarschuwt u wanneer de koolfilter moet worden
vervangen. De datum waarop de filter moet worden vervangen, wordt automatisch ingesteld
wanneer u een nieuwe kast registreert. Opgelet! Wanneer u uw filter vervangt, dient u eraan
te denken om deze actie in uw kast te registreren, zodat de teller weer op de huidige dag
komt te staan (standaard moet de filter elk jaar worden vervangen).
▪ Voorraadwaarschuwing: u kunt voorraadwaarschuwingen programmeren voor een
bepaalde wijn en een bepaalde hoeveelheid. De applicatie waarschuwt u dat de wijn in
kwestie bijna op is (de "bijna op"-hoeveelheid wordt door u bepaald; de waarschuwing kan op
een aantal flessen worden ingesteld).
▪ Technische waarschuwingen: deze waarschuwingen wijzen op een technisch
probleem of een actie die in de kast is ondernomen: fles geconsumeerd; fles toegevoegd;
kast aangemaakt; kast toegevoegd; gebruiker X is aan uw kast toegevoegd ... In geval van
een technisch probleem moet u contact opnemen met een erkende technicus. De
waarschuwingen worden voorgesteld in de vorm van een lijst met vermelding van het type
waarschuwing, de datum, het tijdstip, het nummer van de betrokken oplegplank en de naam

136
van de betrokken kast.
Pagina "PROFIEL"
Op deze pagina kunt u de aan uw VINOTAG®-account gekoppelde gegevens weergeven, aanvullen
of wijzigen:
▪ Mijn gegevens wijzigen: om uw inschrijvingsgegevens te wijzigen
(naam, voornaam, verjaardag, land, departement) of uw account te
verwijderen. Om ermee in te stemmen om nieuws en andere
commerciële informatie over VINOTAG te ontvangen.
▪ Ik word premium: om mij te abonneren op de premiumoptie van
VINOTAG® en gebruik te maken van extra scans. Met deze scans
kunt u de VIVINO®-informatiebladen direct in uw kast opslaan en
hoeft u de wijninformatiebladen niet langer handmatig in te vullen
(zie het "premiumaccount"-proces).
▪ Mijn kasten: om uw kasten weer te geven, te wijzigen, te delen, te
verwijderen, toe te voegen of te onderhouden. U kunt er ook de
kasten mee raadplegen die met u zijn gedeeld.
▪ Mijn uitnodigingen: om uw uitnodigingen te raadplegen.
▪ Contact: om contact op te nemen met de VINOTAG®-
klantenservice; in een vervolgkeuzelijst kunt u het onderwerp van
uw verzoek kiezen.
▪ Algemene gebruiksvoorwaarden: om de algemene
gebruiksvoorwaarden van VINOTAG® te raadplegen.
▪ Wettelijke informatie: om de wettelijke informatie van VINOTAG®
te raadplegen.
▪ Uitloggen: om uit te loggen.

137
Een kast toevoegen
U beschikt nu over een VINOTAG®-account om uw eerste kast of een
nieuwe kast toe te voegen (de applicatie biedt u de mogelijkheid om
meerdere kasten te beheren uit een selectie van modellen).
Opgelet! In geen geval mag u de applicatie afsluiten wanneer u een kast
toevoegt.
▪ Toevoeging van een eerste kast: bij het aanmaken van uw
account moet u uw kast aanmaken; volg de onderstaande stappen.
▪ Toevoeging van een nieuwe kast: als u een nieuwe kast via uw
applicatie wilt beheren, gaat u naar de pagina "Profiel" -> "Mijn
kasten" en klikt u op de knop "Een kast toevoegen"; volg de
onderstaande stappen.
Toevoeging van een "verbonden kast"
▪ Bepaal het type kast: "verbonden kast" of "niet-verbonden kast". Het model ECELLAR185
behoort tot de categorie "verbonden kast". Klik op "Verbonden kast".
▪ Scan een van de QR-codes van uw kelder zodat de app deze kan identificeren en er
verbinding mee kan maken. De QR-code bevindt zich in uw kelder, onder de masterbox die
rechtsboven in de kelder is geplaatst en onderaan het kwaliteitsblad dat bij uw kelder werd
gekocht. Geef de voorkeur aan de scan van de laatste, meer toegankelijk, om uw kelder
gemakkelijk aan te sluiten.
▪ De applicatie vraagt u om bluetooth te activeren; de activering ervan is nodig om de kast te
configureren.
▪ Zodra uw kast via bluetooth is verbonden, vraagt de applicatie u om een wifi-netwerk te
selecteren of om een WPS-protocol te gebruiken:
o In geval van een wifi-netwerk wordt het wachtwoord van de wifi-router gevraagd. Als
de wifi-verbinding mislukt, dient u het wachtwoord te controleren en/of de afstand

138
tussen uw kast en uw wifi-router te controleren. Een te grote afstand of te dikke
muren kunnen de verbinding blokkeren. Plaats de kast dichter bij de wifi-router, zodat
de verbinding tot stand kan worden gebracht.
o Voor WPS verschijnt er een laadbalk tijdens de scan. Als er na enkele seconden
geen WPS-netwerk is gevonden, verschijnt er een foutbanner bovenaan op het
scherm en keert de applicatie terug naar de keuze tussen wifi en WPS.
Een kast delen
Als eigenaar van een kast kunt u anderen uitnodigen om zich bij uw kast aan te
sluiten. Om uw kast te kunnen raadplegen, moet de gast een VINOTAG®-account
aanmaken.
Om iemand uit te nodigen:
▪ Ga naar de pagina "Profiel": "Mijn kasten".
▪ Klik op de knop "Mijn kast delen".
▪ Voer het e-mailadres in van de persoon die u wilt uitnodigen.
▪ Er verschijnt een bevestigingsbanner bovenaan op uw scherm om te
bevestigen dat uw uitnodiging is verzonden.
Wanneer u uw kast deelt:
▪ Er wordt een e-mail naar de persoon gestuurd om hem of haar te laten weten dat hij of zij is
uitgenodigd, en om hem of haar voor te stellen de applicatie te downloaden. Als hij of zij geen
account heeft, kan hij of zij de met hem of haar gedeelde kasten zien, meteen nadat hij of zij
zich heeft geregistreerd.
▪ Als de uitgenodigde persoon al een account heeft, krijgt hij of zij een melding waarin wordt
aangegeven dat hij of zij aan een gedeelde kast is toegevoegd.
Een kast verwijderen
▪ U wilt één of meerdere kasten verwijderen.
▪ Ga naar de pagina "Profiel": "Mijn kasten".
▪ De lijst van uw kasten verschijnt.
▪ Selecteer de kast die u wilt verwijderen: druk op "Verwijderen".
▪ Herhaal de bewerking voor alle kasten die u wilt verwijderen.
Opgelet! Als de kast ten minste één fles bevat, verschijnt er een pop-up waarin u wordt gevraagd om
deze actie te bevestigen. Zodra de kast is verwijderd, is het niet meer mogelijk om de bijbehorende
gegevens op te halen.
Opgelet! Een kast die niet van u is, kunt u niet verwijderen. Wanneer een kast met u wordt gedeeld
en dus zichtbaar is op de pagina "Profiel": "Mijn kasten", kunt u het delen ongedaan maken. Wanneer
u de eigenaar niet bent, is de knop "Verwijderen" een knop "Verlaten". U kunt deze knop gebruiken
om de wijnkast te verlaten. Er verschijnt een pop-up om de actie te bevestigen.
De configuratie van de kast wijzigen
U wilt uw kast anders configureren dan de standaardconfiguratie.
Opgelet! Voor een kast uit de categorie "verbonden kast" mag de standaardconfiguratie niet
worden gewijzigd. De oplegplanken van "verbonden kasten" zijn intelligente oplegplanken die
met de kast zijn verbonden. Ze worden van stroom voorzien en moeten door een erkende
vakman worden gewijzigd/verwijderd.

139
Flessen toevoegen
U hebt uw kast in de VINOTAG®-applicatie aangemaakt; u kunt nu flessen toevoegen.
ONTHOUD: synchronisatie: elke beweging die in een "verbonden kast" plaatsvindt, wordt door
die laatste opgeslagen. Zo kunt u een geschiedenis bijhouden wanneer de kast niet meer met
het internet is verbonden. Wanneer u de volgende keer verbinding maakt met wifi en de cloud
en er bewegingen hebben plaatsgevonden, verschijnt er een synchronisatieweergave op uw
smartphone om die bewegingen op te halen en in de database op te slaan, zodat de
weergegeven voorraad actueel is.
Aanmaak van kast Lijstweergave Grafische weergave
▪ Klik op "Mijn eerste fles toevoegen" in geval van een nieuwe kast, of op "+".
▪ Neem een foto van het etiket van de fles die u aan uw kast wilt toevoegen. Er verschijnt een
ingevuld wijninformatieblad; dit informatieblad is afkomstig uit de VIVINO®-database. U kunt
dit wijninformatieblad wijzigen of aanvullen. Opgelet! Als de gescande wijnfles niet
beschikbaar is in de VIVINO®-database, of als u geen premiumabonnement hebt, moet
u het bij uw fles horende wijninformatieblad handmatig invullen. Als u wilt, is het
mogelijk om geen foto van het etiket te nemen. In dat geval krijgt u geen toegang tot de
VIVINO®-database en moet u het bij uw fles horende wijninformatieblad dus handmatig
invullen.
o Wanneer u een fles toevoegt, kunt u het bijbehorende wijninformatieblad
aanvullen/wijzigen, een commentaar over de wijnfles toevoegen, de fles als favoriet
opslaan of er een score aan toekennen.
o Wanneer u een wijninformatieblad handmatig wilt invullen, kunt u de volgende velden
invullen:
- Naam van de wijn
- Domein
- Appellation
- Jaar
- Land/regio
- Kleur
- Aantal flessen
o In een "geavanceerde" modus kunt u extra informatie toevoegen, zoals:
- Minimale bewaring (jaren)

140
- Maximale bewaring (jaren)
- Commentaar
- Opnemen in de favorieten
- De fles een score geven (0 tot 5)
- Aankoopprijs
- Link naar VIVINO® om het volledige informatieblad te vinden (Premium-optie)
- Link naar VIVINO® om deze wijn te kopen
o De gescande fles wordt niet herkend: als de fles niet wordt herkend, stelt de applicatie voor
om opnieuw te scannen, om de fles handmatig te zoeken (als geen enkele fles met de
zoekopdracht overeenkomt) of om het informatieblad handmatig in te vullen.
o Het is verplicht een minimale en maximale bewaartijd in te vullen om waarschuwingen te
krijgen voor de datum waarop de wijn op zijn hoogtepunt is. Indien de velden Minimale
bewaring en Maximale bewaring niet zijn ingevuld, zullen er geen waarschuwingen worden
verstuurd voor de datum waarop de wijn op zijn hoogtepunt is.
U voegt een fles toe in een "verbonden kast"
▪ Plaats de fles(sen) in uw kast op de gewenste plaats(en).
▪ VINOTAG® informeert u over de detectie van uw fles(sen) en registreert de plaats(en) ervan
op de digitale versie van uw kast.
o Wanneer de fles is geplaatst en gedetecteerd, knippert het bijbehorende
controlelampje twee keer snel. De plaats wordt in uw applicatie opgeslagen. Er
verschijnt dan een ‘geslaagd’-pop-up met twee knoppen: "Een fles toevoegen" of
"Klaar".
o Opgelet! Als u (een) fles(sen) in de opslagruimte onder in uw kast wilt plaatsen, dient
u er rekening mee te houden dat dit gedeelte van de kast niet is verbonden.
▪ Klik op "+" om door te gaan met het toevoegen van flessen in uw kast.
Onthoud!
De opslagruimte onder in uw kast is niet verbonden.
Met de applicatie kunt u echter een digitaal register bijhouden van de flessen die u registreert als
neergelegd op deze plaats.
• De werkelijke capaciteit van de opslagruimte is 17 champagneflessen.
• Met de applicatie kunt u echter een groter aantal flessen registreren, zodat u een register
kunt bijhouden van de wijnen die niet in uw kast worden bewaard.
ESOMMELIER-functie
Wanneer u een fles toevoegt in een "verbonden kast", kunt u de ESOMMELIER-functie
gebruiken. Deze functie adviseert u de ideale plaats om uw wijn te bewaren. Wanneer u een fles
scant, identificeert VINOTAG® het type wijn; voor elk type wijn worden bewaartemperaturen
aanbevolen voor een optimale bewaring.
Bepaalde plaatsen in uw kast zijn dus beter geschikt naargelang van het type wijn.
De ESOMMELIER-functie helpt u om uw wijn in de beste omstandigheden te bewaren. Door op
deze knop te klikken, stelt de kast beschikbare plaatsen voor die geschikt zijn voor de gescande
wijnfles; er gaan controlelampjes branden in de kast om u deze plaatsen te tonen.
o Wanneer de fles is geplaatst en gedetecteerd, knippert het bijbehorende
controlelampje twee keer snel. De plaats wordt in uw applicatie opgeslagen. Er
verschijnt dan een ‘geslaagd’-pop-up met twee knoppen: "Een fles toevoegen" of
"Klaar".
o Opgelet! Wanneer uw kast er niet in slaagt om de fles detecteren, zal het
controlelampje niet knipperen. Herhaal de handeling tot de fles correct is
gedetecteerd en het controlelampje twee keer knippert.
o Opgelet! Als u uw fles niet komt halen of neerleggen, blijft het controlelampje op de

141
voorkant van de oplegplank 5 minuten branden, waarna het automatisch uitgaat.
Het is ook mogelijk om een fles toe te voegen via een wijninformatieblad.
▪ Klik op de knop onderaan op de pagina "Een of meerdere flessen toevoegen".
▪ Voer het aantal toe te voegen flessen en hun grootte in.
▪ Plaats de fles(sen) in uw kast op de gewenste plaats(en).
▪ VINOTAG® informeert u over de detectie van uw fles(sen) en registreert de plaats(en) ervan
op de digitale versie van uw kast.
ONTHOUD: als u een VINOTAG®-account aanmaakt, kunt u profiteren van "50 gratis scans".
Wanneer u een verbonden kast toevoegt, krijgt u 1000 scans gratis. Met deze scans kunt u
profiteren van vooraf ingevulde wijninformatiebladen dankzij de samenwerking tussen
VINOTAG® en VIVINO®. Als alle gratis scans zijn opgebruikt, is het mogelijk om flessen te
blijven toevoegen door het wijninformatieblad ervan handmatig in te vullen, of om u te
abonneren op de premiumoptie om te profiteren van extra scans (zie paragraaf
"Premiumaccount").
Premiumaccount
VINOTAG® werkt samen met VIVINO® om de gebruikerservaring te vergemakkelijken. Wanneer u
een VINOTAG®-account aanmaakt, wordt een aantal "gratis scans" aangeboden.
Met deze "gratis scans" wordt bedoeld dat een foto van een fles kan worden genomen om direct
toegang te krijgen tot een gedetailleerd wijninformatieblad dat uit de VIVINO®-database is gehaald.
Opgelet! Niet-herkende flessen worden beschouwd als "gratis scans", aangezien het verzoek om
herkenning naar VIVINO® is gestuurd. De genomen foto moet van voldoende kwaliteit en
scherpte zijn om de herkenning van de fles mogelijk te maken.
Dit wijninformatieblad kan rechtstreeks in de digitale versie van uw wijnkast worden gewijzigd en
opgeslagen. U hoeft uw wijninformatieblad niet meer handmatig in te vullen. Zo bespaart u veel tijd
om uw kast te vullen en toegang te krijgen tot een heleboel informatie over uw favoriete wijnen.
Als alle gratis scans zijn opgebruikt, is het mogelijk om flessen te blijven toevoegen door het
wijninformatieblad ervan handmatig in te vullen, of om u te abonneren op de premiumoptie om te
profiteren van extra scans. Een pop-up waarschuwt u wanneer uw "gratis scans" zijn opgebruikt.
Om te upgraden naar een premiumaccount, moet de gebruiker zich abonneren op de premiumoptie
waarmee hij extra scans kan kopen.
- 200 extra scans
- 400 extra scans
- 1000 extra scans
Gekochte "scans" zijn bruikbaar zonder tijdslimiet.
Klik op de knop "Ik word premium" in de "Mijn account"-ruimte van de VINOTAG®-applicatie om u in
te schrijven voor de premiumoptie en om de prijsvoorwaarden te raadplegen.
Flessen verwijderen
U hebt uw kast in de VINOTAG®-applicatie aangemaakt; u kunt nu flessen uit uw kast verwijderen.
De flessen worden in uw wijnbibliotheekruimte bewaard.
Voor een kast uit de categorie "verbonden":
▪ Verwijder de gewenste fles uit uw kast.
▪ De verbonden kast detecteert de verwijdering en brengt er de applicatie van op de hoogte;
een waarschuwing geeft de verwijdering van de fles op uw applicatie aan.
▪ Raadpleeg de pagina "Waarschuwingen".

142
of ▪ Selecteer een wijnfles met behulp van de functie "Tonen in de kast" zal (zullen) het (de)
controlelampje(s) gaan branden dat (die) overeenstemt (overeenstemmen) met de plaats(en)
waar de wijnfles(sen) wordt (worden) bewaard. Opgelet! Er kunnen maximaal 12
controlelampjes tegelijk branden. Opgelet! Als u uw fles niet komt halen of neerleggen,
blijft het controlelampje op de voorkant van de oplegplank 5 minuten branden, waarna
het automatisch uitgaat.
▪ De verwijdering wordt door de kast gedetecteerd; het controlelampje dat overeenkomt met de
oude plaats van uw fles zal twee keer snel knipperen om de verwijdering te bevestigen.
▪ De verbonden kast brengt de applicatie op de hoogte van de verwijdering; een waarschuwing
geeft de verwijdering van de fles op uw applicatie aan.
▪ De weergave van uw kast wordt automatisch bijgewerkt.
Opgelet! Om flessen toe te voegen in of te verwijderen uit een verbonden kast, moet u zijn
verbonden met een wifi-netwerk, zodat de informatie tussen uw fysieke kast en uw digitale
kast die zichtbaar is op VINOTAG®, goed wordt gecommuniceerd.
Een wijninformatieblad raadplegen
Wijninformatiebladen kunnen worden geraadpleegd via uw kasten of uw wijnbibliotheekruimte.
Een wijninformatieblad raadplegen in mijn kast - lijstmodus of in mijn wijnbibliotheek
▪ Klik op de fles van uw keuze.
▪ Raadpleeg de informatie over uw fles.
▪ Voor meer details kunt u naar de website van onze partner Vivino gaan door op "Kijk op
Vivino" te klikken.
Een wijninformatieblad raadplegen in mijn kast - grafische modus
▪ Klik op de oplegplank van uw keuze.
▪ Klik op de fles van uw keuze.
▪ Raadpleeg de informatie over uw fles.
▪ Voor meer details kunt u naar de website van onze partner Vivino gaan door op "Kijk op
Vivino" te klikken.
Waarschuwingen aanmaken voor de datum waarop de wijn op zijn hoogtepunt is
Om waarschuwingen aan te maken voor de datum waarop de wijn op zijn hoogtepunt is, is het
verplicht om een minimale bewaartijd (groter dan 0) en een maximale bewaartijd op het
wijninformatieblad in te vullen. De bewaartijd wordt uitgedrukt in jaren. U krijgt een waarschuwing
voor het begin en het einde van de datum waarop de wijn op zijn hoogtepunt is, als uw fles niet is
geconsumeerd. Voor een fles uit het jaar "X" met een minimale bewaartijd van 5 jaar en een
maximale bewaartijd van 10 jaar wordt u als volgt gewaarschuwd:
- Wijnjaar "X" + 5 jaar: waarschuwing "Uw wijn is klaar om te worden gedegusteerd" voor het
begin van de datum waarop de wijn op zijn hoogtepunt is.
- Wijnjaar "X" + 10 jaar: waarschuwing "Uw wijn heeft bijna het einde bereikt van de datum
waarop hij op zijn hoogtepunt is" voor het einde van de datum waarop de wijn op zijn
hoogtepunt is.
Voorraadwaarschuwingen aanmaken
Om uw kast en uw wijnen beter te beheren, kunt u met VINOTAG® voorraadwaarschuwingen
instellen:
▪ Klik via de weergave van uw kast in de applicatie op de gewenste fles om toegang te krijgen
tot het bijbehorende wijninformatieblad.
▪ Klik op "Een waarschuwing programmeren".
▪ Geef aan vanaf hoeveel resterende flessen u een voorraadwaarschuwing wenst te
ontvangen.
▪ Klik op "Valideren". De voorraadwaarschuwing is nu geactiveerd.

143
Om een voorraadwaarschuwing te deactiveren, klikt u op "De waarschuwing wijzigen"; verlaag
het gewenste aantal flessen tot "deactiveren". Klik op "Valideren". De voorraadwaarschuwing
is nu gedeactiveerd.
De plaats van uw flessen in uw kast weergeven
▪ Uw kast wordt weergegeven op het scherm; gebruik het zoekpictogram rechtsboven op uw
scherm.
▪ Voer de naam in van de wijn die u zoekt en/of het domein en/of andere informatie met
betrekking tot de fles.
▪ Het wijninformatieblad van de fles die u zoekt wordt weergegeven.
▪ Klik op de knop onderaan op de pagina "Mijn flessen bekijken" of op de knop "Tonen in de
kast" in het begin van uw wijninformatieblad.
▪ Er gaan controlelampjes branden in uw kast, maximaal 12 tegelijk, om de plaats aan te geven
van de fles(sen) die u zoekt.
Onderhoud van de kast
Via de configuratie van de kast is het mogelijk om de kast in de onderhoudsmodus te
zetten.
Deze bewerking blokkeert alle bewegingen die in de kast kunnen plaatsvinden
(toevoegen, verplaatsen, verwijderen).
Het startscherm wordt dus geblokkeerd door een "Kast in onderhoud"-weergave.
Om de onderhoudsmodus te verlaten, klikt u op de knop "Onderhoud afsluiten".
Opgelet! Wanneer u de onderhoudsmodus verlaat, kunt u:
▪ De oude indeling opnieuw laden.
▪ Herbeginnen met een lege kast. In dat geval moet u het proces vanaf het begin herstarten en
uw eerste fles scannen.

144
6. REINIGING EN ONDERHOUD
Voordat u uw apparaat schoonmaakt (regelmatig uit te voeren interventie), het apparaat loskoppelen
door de stekker uit te trekken of haar zekering los te koppelen.
We raden u aan om voor het eerste gebruik en daarna op regelmatige basis de binnen- en buitenkant
(voorkant, zijkant en onderkant) schoon te maken met een mengsel van lauw water en een zacht
reinigingsproduct. Spoel met zuiver water en laat het apparaat volledig drogen voordat u het opnieuw
aansluit. Gebruik geen oplos- of schuurmiddelen.
Wanneer u het apparaat voor de eerste keer voedt, kan een restgeur blijven hangen. In dit geval moet
u het apparaat enkele uren ongevuld gebruiken en de temperatuur kouder instellen. De kou zal deze
mogelijke geuren doen verdwijnen.
Automatische ontdooiing
Voor uw kast is een automatische ontdooiing geprogrammeerd. De ontdooifase heeft geen invloed op
de in de kast opgeslagen wijnen. Tijdens het ontdooien zijn de compressor en de ventilatoren
uitgeschakeld. Het digitale scherm zal een normale temperatuur weergeven, maar als u de werkelijke
temperatuur van uw kast wilt zien, zal op het scherm de code "DD" verschijnen, wat normaal is.
Vervanging van de koolfilter
Uw wijnkast is uitgerust met een koolfilter die zich achteraan rechts onder in uw kast bevindt. Wij
raden u aan de filter één keer per jaar te vervangen. Om de filter te vervangen, verwijdert u de filter
gewoon door er binnen in de kast aan te trekken, en plaatst u een nieuwe filter terug.
Koolfilter

145
Bij een stroomonderbreking
De meeste stroomonderbrekingen worden snel opgelost. Een onderbreking van 1 of 2 uur zal de
temperaturen in uw kast niet beïnvloeden. Wilt u uw wijnen tijdens stroomonderbrekingen
beschermen, denk er dan aan om de deur zo weinig mogelijk open te doen.
Voor stroomonderbrekingen die zeer lang duren, moet u de maatregelen nemen die noodzakelijk zijn
om uw wijn te beschermen.
▪ Indien uw apparaat losgekoppeld of uitgeschakeld is of bij een stroomonderbreking moet u 3 tot
5 minuten wachten om het opnieuw op te starten. Indien u de kast eerder opnieuw probeert te
starten, zal de compressor pas na 3/5 minuten beginnen werken (indien nodig op basis van de
temperatuur).
▪ Bij de eerste opstart en na een langdurige stilstand van de kast is het bij het opnieuw opstarten
mogelijk dat de gekozen en weergegeven temperaturen niet overeenstemmen. Dit is normaal. U
moet dan enkele uren wachten zodat de temperaturen zich opnieuw kunnen stabiliseren.
▪ Bij een stroomonderbreking onthoudt het apparaat de ingestelde temperaturen. Wanneer het
apparaat opnieuw in werking wordt gesteld, is het dus niet nodig om de temperaturen van de
wijnkast te herprogrammeren.
Opgelet!
Tijdens een stroomonderbreking registreert de ECELLAR de bewegingen niet meer, dus is het
belangrijk om de wijnvoorraad niet te wijzigen. Wanneer de stroom is hersteld, zal de kast de
voorraad bijwerken om de verwijdering van een fles of de toevoeging van een nieuwe fles te
detecteren. Als een toevoeging of verwijdering via de applicatie gebeurt, zal die laatste de
wijzigingen registreren, maar als het om een vrije actie gaat (zonder de applicatie te gebruiken)
en een fles wordt verwijderd en vervangen door een nieuwe op dezelfde plaats, zal de kast het
onderscheid niet maken als het apparaat opnieuw wordt ingeschakeld.
Als u op vakantie gaat
- Korte vakantie: laat uw kast draaien tijdens uw vakantie, als die minder dan 3 weken duurt.
- Lange vakantie: als uw apparaat enkele maanden niet wordt gebruikt, dient u alle flessen en
accessoires te verwijderen, het apparaat uit te schakelen en de stekker uit de contactdoos te
trekken. Reinig en droog zorgvuldig de binnen- en buitenkant van het apparaat. Laat de deur
ook openstaan en blokkeer ze daarvoor indien nodig, om condensaatvorming,
geurontwikkeling en schimmelvorming te voorkomen.
Als u uw wijnkast moet verplaatsen
▪ Koppel uw kast los voordat u actie onderneemt.
▪ Haal alle flessen uit de kuip en zet de beweegbare delen vast.
▪ Om schade te voorkomen aan de schroeven voor het waterpas zetten van de voeten, moet u ze
helemaal vastschroeven in hun basis.
▪ Doe de deur volledig dicht.
▪ Verplaats het apparaat bij voorkeur verticaal, of lees de aanwijzingen op de verpakking om te
achterhalen op welke kant het apparaat neergelegd mag worden. Bescherm uw apparaat ook met
een deken of een soortgelijke stof.

146
7. IN GEVAL VAN EEN DEFECT
Ondanks alle zorg die wij aan onze producten besteden, kan een defect nooit volledig uitgesloten
worden. Voordat u contact opneemt met de klantenservice van uw handelaar, moet u echter het
volgende controleren:
▪ Het stopcontact zit nog altijd op zijn plaats
▪ of er geen stroomonderbreking is
▪ of de storing niet veroorzaakt wordt door één van de oorzaken beschreven in de tabel aan het
einde van deze handleiding
BELANGRIJK: Als het meegeleverde voedingssnoer beschadigd is, moet het worden
vervangen door de fabrikant of door een dienst die erkend wordt door het merk of de
handelaar. In elk geval moet het snoer vervangen worden door bevoegd personeel, om elk
gevaar voor verwondingen te voorkomen.
LEVEREN DEZE CONTROLES NIETS OP, NEEM DAN CONTACT OP MET DE KLANTENSERVICE VAN UW
HANDELAAR.
OPGELET! Koppel de wandaansluiting los voor elke onderhouds- of herstellingsinterventie!
8. PROBLEMEN EN MOGELIJKE OORZAKEN
Heel wat problemen kunnen gemakkelijk worden opgelost, wat u de kostprijs van een telefoontje naar
de klantenservice bespaart. Probeer uw probleem op te lossen aan de hand van de onderstaande
voorstellen, voordat u naar de klantenservice telefoneert.
LEIDRAAD VOOR DE OPLOSSING VAN PROBLEMEN
PROBLEEM
MOGELIJKE OORZAAK
De wijnkast werkt niet
Het apparaat is niet aangesloten.
Het apparaat staat uit.
De hoofdzekering is gesprongen of er is een zekering doorgeslagen.
De wijnkast koelt niet genoeg
Controleer de ingestelde temperatuur.
De buitenomgeving kan een hogere instelwaarde noodzakelijk
maken.
De deur wordt te vaak geopend.
De deur is niet goed dicht.
De deurpakking sluit niet volledig.
Het apparaat gaat vaak aan en uit
De omgevingstemperatuur is hoger dan normaal.
Er werden veel flessen in de wijnkast geplaatst.
De deur wordt te vaak geopend.
De deur is niet goed dicht.
De temperatuur is niet juist ingesteld.
De deurpakking sluit niet volledig.
De binnenverlichting werkt niet
Het apparaat is niet aangesloten.
De hoofdzekering is gesprongen of er is een zekering doorgeslagen.
Het controlelampje is buiten werking.
De toets voor de activering van de verlichting staat op OFF.
Trillingen
Controleer of de kast goed waterpas staat.
De wijnkast lijkt te veel lawaai te
maken
Het "geratel" kan zijn toe te schrijven aan het stromende koelmiddel,
wat normaal is.

147
Telkens op het einde van een cyclus kunt u "geklater" horen, wat is
toe te schrijven aan het stromende koelmiddel in uw wijnkast.
De samentrekking en de uitzetting van de binnenwanden kunnen
krakende en knetterende geluiden voortbrengen.
De wijnkast staat niet waterpas.
In de "mono"-modus worden de kastventilatoren geactiveerd om de
binnenruimte van de kast dynamisch te koelen.
De deur sluit niet goed
De wijnkast staat niet waterpas.
De pakking is verontreinigd of beschadigd.
Een deel van de inhoud verhindert dat de deur sluit.
De scharnieren van de deur zitten los.
De oplegplanken bevinden zich niet op de goede plaats.
Fles geplaatst maar niet
gedetecteerd
De grootte van de fles komt niet overeen.
De hals van de fles komt niet in contact met de centrale lat van de
oplegplank.
De sensoren van de centrale lat van de oplegplank zijn vuil => reinig
ze met een zacht en droog wattenstaafje.
De kleur van de hals wordt niet door de sensor gedetecteerd => voer
een test uit door een ondoorzichtig etiket rond de hals aan te
brengen.
De fles is ter hoogte van de hals niet van een sluitplaatje voorzien =>
voer een test uit door een ondoorzichtig etiket rond de hals aan te
brengen.
De kast is spanningsvrij.
De kast is niet meer met het internet (wifi) verbonden.
Fles gedetecteerd, maar niet
geplaatst
De sensoren van de centrale lat van de oplegplank zijn vuil => reinig
ze met een zacht en droog wattenstaafje.
De koppeling met de kast werkt niet
De QR-code van de masterdoos is slecht gescand.
De QR-code is beschadigd.
De wifi-verbinding is onvoldoende.
Het bluetoothbereik is overschreden.
De kast is niet aangesloten.
De wifi of bluetooth van de telefoon is niet geactiveerd.
Storingscode "EE"
Storing temperatuursensor.
Storingscode "HH"
Alarm hoge temperatuur; koppel uw kast los of schakel ze uit en
neem contact op met uw klantenservice.
Storingscode "LL"
Alarm lage temperatuur; koppel uw kast los of schakel ze uit en neem
contact op met uw klantenservice.
Storingscode "DD"
Er is geen sprake van een onregelmatigheid; het apparaat staat in de
ontdooifase => wacht tot het ontdooien is voltooid.
Er loopt water van mijn wijnkast
Het afvoergat in uw kast is verstopt.
De kast staat niet schuin genoeg naar achteren.
Het waterbakje achter de kast is vol.
De rode led knippert continu onder
de masterdoos
De kast is niet verbonden of de verbinding met het wifi-netwerk is
verbroken.
Een of meerdere leds blijven
branden op de voorkant van mijn
oplegplanken
U hebt een oproep gedaan voor (een) positie(s) en u bent de
fles(sen) niet komen halen/neerleggen.
Wacht 5 minuten tot de led(s) vanzelf uitgaat (uitgaan) of open en
sluit de deur van de wijnkast.
De toetsen op het bedieningspaneel
werken niet
Controleer of het bedieningspaneel niet is vergrendeld, of er een
hangslot op het scherm wordt weergegeven. Ontgrendel het
bedieningspaneel door 3 s op de toets met het hangslotsymbool te
drukken.

148
Er zijn verschillen tussen mijn
digitaal register en mijn fysieke kast
(meer/minder flessen)
Hebt u wijzigingen aangebracht tijdens een stroomonderbreking?
Raadpleeg de FAQ’s van de Vinotag-applicatie om te zien hoe u uw
voorraadverschillen kunt oplossen.
Ik kan de QR-code van de kelder
niet scannen
Liever de scan van de aanwezige QR-code onderaan de
kwaliteitsfiche van uw kelder. Leg het kwaliteitsvel op een droge,
vlakke ondergrond in het licht om het scannen van de QR-code te
vergemakkelijken.
Als u de QR-code van de kelder (onder de masterbox) wilt scannen,
raden we u aan om de LED-verlichting van de wijnkelder aan te
zetten, door het helderheidsniveau te verhogen, kunt u de QR-code
gemakkelijker detecteren met uw telefoon . Voor telefoons die een
bepaalde afstand nodig hebben om scherp te stellen, kun je de
bovenste plank van je kelder uittrekken om een betere afstand te
hebben tussen de lens van je telefoon en de QR-code van de kelder.
Het etiket van de wijn die ik
fotografeer wordt niet herkend door
de applicatie
De foto gemaakt via de applicatie moet van goede kwaliteit zijn (niet
wazig), de foto moet zo worden genomen dat het wijnetiket het witte
kader van de applicatie vult. Als dat nog steeds niet werkt, probeer
dan een close-up foto te maken van alleen de naam van de wijn.
Foutcodes
Foutcode
Betekenis
HH
Alarm hoge temperatuur
LL
Alarm lage temperatuur
DD
Apparaat wordt ontdooid
EE
Storing temperatuursensor
Als er een andere code zoals A, B, C, D, E, G, I, J, K, M, N, O op uw scherm verschijnt, dient u
contact op te nemen met de klantenservice.

149
9. MILIEU
Dit product voldoet aan EU-richtlijn 2019/290/EU betreffende afgedankte elektrische
en elektronische apparatuur (AEEA). Door ervoor te zorgen dat dit product op de
juiste manier wordt afgedankt, helpt u mogelijke negatieve gevolgen voor het milieu
en de volksgezondheid te voorkomen, die kunnen ontstaan door een onjuiste
behandeling van het afval van dit product.
Het symbool met de doorstreepte vuilnisbak op het apparaat wijst erop dat dit product op het einde
van zijn levenscyclus los van het andere huishoudelijke afval verwerkt zal moeten worden. Het
apparaat zal dus naar een centrum voor selectieve afvalophaling voor elektrische en/of elektronische
apparaten gebracht moeten worden, of naar de doorverkoper van dit nieuwe apparaat, als u een
vergelijkbaar apparaat koopt.
De gebruiker moet het apparaat aan het einde van de levensduur naar een geschikt inzamelcentrum
brengen. Een selectieve en adequate ophaling die erop gericht is het ongebruikte apparaat te laten
recycleren, te laten verwerken en met respect voor het milieu te laten vernietigen, helpt mee de
mogelijke negatieve gevolgen voor het milieu en de gezondheid te voorkomen, en bevordert de
recyclage van de materialen waaruit het product samengesteld is.
Wanneer het product wordt afgedankt of doorverkocht, worden de persoonsgegevens van de
gebruiker beschermd zonder dat hij daar iets voor hoeft te doen. Deze gegevens worden niet in de
kast opgeslagen, maar op een externe server. Geen van de gegevens die werden doorgegeven
tijdens het normale gebruik van de kast, kunnen worden gebruikt na de afdanking van de kast.
Wanneer het apparaat wordt doorverkocht, moet de nieuwe gebruiker de QR-code op de masterdoos
scannen en de verplichte koppelingsprocedure volgen. Door deze procedure zullen de eerder op de
server opgeslagen gegevens worden overschreven. De nieuwe gebruiker zal over een blanco
account beschikken. De oude gebruiker zal zijn oude informatie niet meer kunnen raadplegen of
weergeven via de Vinotag-applicatie.
Om uitvoerigere informatie over de beschikbare systemen voor afvalophaling te verkrijgen, kunt u
contact opnemen met de plaatselijke dienst voor afvalverwijdering of met de winkel waar u het
apparaat gekocht hebt.
10. WAARSCHUWING
Met het oog op de voortdurende verbetering van onze producten behouden wij ons het recht voor om
de technische kenmerken zonder voorafgaande kennisgeving te wijzigen.
De garanties van de LA SOMMELIERE-producten worden uitsluitend door de door ons gekozen
dealers gegeven. Geen enkel onderdeel van deze handleiding kan geïnterpreteerd worden als een
aanvullende garantie.
De firma FRIO ENTREPRISE kan niet aansprakelijk worden gesteld voor technische of redactionele
fouten of nalatigheden in het onderhavige document.
Niet-contractueel document.

150
1. INSTRUCCIONES DE SEGURIDAD
Para su seguridad y el uso adecuado de la unidad, antes de instalar y
utilizar la unidad por primera vez, lea atentamente este manual,
incluyendo las advertencias y consejos útiles que contiene. Para evitar
daños innecesarios en la unidad y/o lesiones personales, es importante
que las personas que utilicen esta unidad conozcan perfectamente su
funcionamiento y sus características de seguridad. Conserve estas
instrucciones para futuras consultas y guárdelas junto al aparato para
que puedan ser transmitidas con el mismo en caso de venta o traslado.
Esto garantizará el funcionamiento óptimo del sistema.
Para evitar lesiones, mantenga estas instrucciones. El fabricante no se
hace responsable del mal uso del sistema.
Seguridad de los niños y otras personas vulnerables
• Este sistema puede ser utilizado por niños a partir de 8 años y por
personas con discapacidades físicas, sensoriales o mentales o que no
hayan recibido formación para utilizar el dispositivo, siempre que estén
supervisados por una persona informada y consciente de los riesgos
que conlleva. Los niños no deben jugar con el aparato. La limpieza y el
mantenimiento por parte del usuario no deben ser realizados por niños,
a menos que sean mayores de 8 años y estén supervisados.
• Mantenga todos los envases fuera del alcance de los niños, ya
que existe riesgo de asfixia.
• Si decide deshacerse del aparato, desenchúfelo de la toma de
corriente, corte el cable de conexión (lo más cerca posible del aparato) y
retire la puerta para evitar que los niños jueguen con él y se
electrocuten o queden atrapados en su interior.
• Si el aparato con la junta magnética de la puerta va a ser
sustituido por otro aparato que tenga un pestillo en la puerta o junta,
asegúrese de comprobar que el pestillo no funciona antes de desechar
el aparato antiguo. Esto evitará que la unidad se convierta en una
trampa para niños.
• Mantenga el aparato y su cable fuera del alcance de los niños
menores de 8 años.
• Los niños no deben cargar y descargar cilindros en el
aparato.
Seguridad general
PRECAUCIÓN - Este aparato está diseñado para su uso en un hogar y

151
en los siguientes tipos de entornos:
-Los locales y equipos de cocina vendidos en el entornos
comerciales, de trabajo y de oficina;
Estructuras de alojamiento y desayuno;
Edificios agrícolas y hoteles, moteles y otras organizaciones que reciben
huéspedes;
-Cocina y otras aplicaciones no destinadas a la venta.
PRECAUCIÓN - No almacene nunca sustancias inflamables, como
aerosoles, en el interior de este aparato, ya que podrían derramarse.
PRECAUCIÓN - Si el cable de alimentación está dañado, debe ser
sustituido inmediatamente por el fabricante, o por un distribuidor
cualificado, para evitar el riesgo de descarga eléctrica.
PRECAUCIÓN - Mantenga las rejillas de ventilación abiertas, y
asegúrese de que el aire puede fluir a través de las aberturas.
PRECAUCIÓN - No dañar el sistema de refrigeración. PRECAUCIÓN -
No utilice aparatos eléctricos dentro del compartimento, a menos que
estén permitidos por el fabricante.
PRECAUCIÓN - El refrigerante y el sistema de aislamiento contienen
gases inflamables. Cuando se desprenda del sistema, deséchelo en un
punto de recogida autorizado. No exponga nunca el aparato a las
llamas.
Líquido refrigerante
En el circuito de refrigeración del sistema se utiliza el refrigerante
isobutano (R600a), un gas natural altamente inflamable y no perjudicial
para el medio ambiente. Durante el transporte y la instalación del
sistema, compruebe que ninguno de los componentes del circuito de
refrigeración esté dañado. El refrigerante (R600a) es un líquido
inflamable.
Precaución: Peligro de incendio
Si el sistema de refrigeración está dañado:
• Evite llamas y otras fuentes de ignición.
• Ventile la habitación donde se encuentra la unidad.
Es peligroso modificar la composición de este dispositivo de cualquier
manera. Los daños en el cable pueden provocar un cortocircuito y/o una
descarga eléctrica.
Seguridad eléctrica
• El cable de alimentación no debe extenderse.

152
• Asegúrese de que la toma de corriente no esté dañada. Una toma
de corriente dañada puede hacer que el sistema se sobrecaliente
y explote.
• Asegúrate de que puedes acceder a la toma de corriente del
aparato.
• No tire nunca del cable principal.
• Si la toma de corriente está suelta, no enchufe el cable. Existe
peligro de descarga eléctrica o de incendio.
• No utilice nunca el aparato sin la tapa de la luz interior colocada.
• Esta unidad funciona con una corriente monofásica de
220~240V/50Hz.
• El aparato no debe utilizar un alargador, un adaptador o una toma
de corriente múltiple. El aparato debe conectarse a una toma de
corriente con conexión a tierra de acuerdo con las normas
eléctricas vigentes.
Uso diario
• Este aparato está destinado únicamente al almacenamiento de
vino.
• No almacene nunca sustancias o líquidos inflamables en el interior
de la unidad, ya que puede provocar una exposición.
• No haga funcionar otros aparatos eléctricos dentro de esta unidad
(batidoras, máquinas de hielo eléctricas, etc.).
• Al desenchufar el aparato, sujete siempre el enchufe con las
manos y no tire del cable.
• No coloque objetos calientes o componentes de plástico en esta
unidad.
• Este equipo debe utilizarse y operarse de acuerdo con normas
específicas. Consulte las normas de almacenamiento
establecidas.
• No exponga la cámara a la luz solar directa.
• Mantenga las velas, luces y otras fuentes de lejos de la unidad
para evitar el riesgo de incendio.
• Esta unidad es para el almacenamiento de bebidas domésticas
tradicionales.
• La unidad es pesada. Tenga cuidado al moverlo.
• Nunca utilice la base, los estantes, las puertas y otros elementos
similares como soporte.
• Para evitar la caída de objetos y daños en el aparato, no
sobrecargue los estantes.

153
Precaución. Limpieza y mantenimiento
• Antes de realizar el mantenimiento, desenchufe el aparato y
apáguelo.
• No limpie el aparato con objetos metálicos, sistemas de vapor,
aceites volátiles, disolventes orgánicos o aceites volátiles ,
disolventes orgánicos o componentes abrasivos.
• No utilice objetos afilados o puntiagudos para quitar el hielo.
Utilice un rascador de plástico.
Información importante sobre la instalación
Precaución. Para evitar que la vinoteca se vuelque, es importante
cargar primero los compartimentos del fondo de la vinoteca. Los
estantes no deben ser extraídos o dejados fuera al mismo tiempo.
El peso de las botellas puede hacer que la vinoteca se incline hacia
delante, es importante distribuir el peso de las botellas por toda la
vinoteca y manejarla con cuidado.
• Para garantizar unas conexiones eléctricas adecuadas, siga las
instrucciones de este manual.
• Desembale la unidad y compruebe si hay daños visuales. No
conecte la unidad si está dañada. Informe de cualquier daño en el
punto de venta. En este caso, conserve el embalaje.
• Se recomienda esperar al menos 24 horas antes de conectar la
unidad a la red eléctrica, para que el compresor esté bien provisto
de aceite.
• Una buena circulación de aire es necesaria para evitar el
sobrecalentamiento. Para garantizar una ventilación adecuada,
siga las instrucciones de instalación proporcionadas.
• Precaución. Este aparato de refrigeración no está destinado a
ser utilizado como aparato empotrado.
• No permita que el aparato toque la pared y/o entre en contacto
con partes calientes (compresor, condensador, radiadores,
aparatos de cocina, secadoras, etc.) para evitar el riesgo de
incendio y sobrecalentamiento del aparato. Siga siempre las
instrucciones de instalación.
• Asegúrese de que los enchufes sean accesibles después de la
instalación de la unidad.
• Tenga cuidado de no pellizcar o dañar el cable de alimentación
cuando instale la unidad.
Servicio de averías y repuestos

154
• Todos los trabajos eléctricos deben ser realizados por un técnico
cualificado y competente.
• Este aparato debe ser revisado por un Centro de Servicio
Autorizado, y sólo deben utilizarse piezas originales.
Los recambios estéticos y funcionales según el REGLAMENTO (UE)
2019/2019 (Anexo II, punto 3.), se pondrán a disposición de los
reparadores profesionales y de los usuarios finales durante un periodo
de 7 años o de 10 años (Lista del Anexo II, punto 3.a.1 y 3.a.2) a partir
de la última unidad del modelo que se comercialice.
La lista de piezas de recambio y el procedimiento para pedirlas (acceso
profesional / acceso privado) están disponibles en el siguiente sitio web:
www.interfroidservices.fr o por correo en la siguiente dirección FRIO -
Interfroid Services, 143 Bd Pierre Lefaucheux - 72230 ARNAGE Para
otras piezas de recambio funcionales no especificadas en el reglamento
UE 2019/2019, están disponibles durante un periodo de 10 años.
La garantía del fabricante es de 1 año para las piezas funcionales.

155
R600a
Instrucciones de seguridad
Atención: No utilice dispositivos mecánicos u otros
medios para acelerar el proceso de descongelación que
no sean los recomendados por el fabricante.
Precaución: No bloquee ninguna de las rejillas de
ventilación de la unidad.
Precaución: No almacene sustancias explosivas como
latas de aerosol con propelente inflamable en esta
unidad.
Precaución: No dañe el circuito de refrigeración de la
unidad.
Precaución: Como las unidades de refrigeración
funcionan con isobutano (R600a), no deben colocarse
en una zona con fuentes de ignición. El tipo de
refrigerante está indicado en la placa de características
del armario.
Precaución: No utilice aparatos eléctricos en los
compartimentos de almacenamiento el aparato, a
menos que sean del tipo recomendado por el
fabricante.
Este dispositivo cumple con los requisitos de las directivas europeas y sus
modificaciones.

156
2. PLACA DE IDENTIFICACIÓN
La placa de identificación situada en el interior o en la parte posterior del aparato (según el modelo)
contiene toda la información específica de su aparato.
Le aconsejamos que anote el número de serie en este folleto antes de la instalación, para poder
consultarlo en caso de necesidad posterior (intervención técnica, solicitud de asistencia, etc.).
En efecto, una vez instalado y cargado el dispositivo, el acceso al mismo es más complicado.
ATENCIÓN: no se puede prestar asistencia sin esta información.
3. DESCRIPCIÓN DEL PRODUCTO
Para saber más sobre su producto, visite la base de datos EPREL en línea. Tal y como se define en
el Reglamento Delegado (UE) 2019/2016 de la Comisión, toda la información sobre este aparato de
refrigeración está disponible en la base de datos EPREL (base de datos europea de productos para
el etiquetado energético). Esta base de datos le permite consultar la información y la documentación
técnica de su aparato de refrigeración. Puede acceder a la base de datos EPREL escaneando el
código QR de la etiqueta energética de su aparato o entrando directamente en www.ec.europa.eu e
introduciendo el modelo de su aparato de refrigeración.

157
Encuentre toda la información sobre el ECELLAR185
y su folleto descargable en el sitio web www.lasommeliere.com
Capacidad anunciada
• La vinoteca ECELLAR185 tiene una capacidad de 185 botellas
• La vinoteca está equipada con 14 estantes conectados
• Cada estante puede almacenar 12 botellas
• La vinoteca dispone de una zona de almacenamiento con capacidad para 17 botellas
La capacidad anunciada es la capacidad máxima calculada con el número de estantes vendidos con
la vinoteca. Los estantes conectados de la vinoteca Ecellar se han dimensionado para albergar una
botella del tamaño del champán. Esta particularidad permite almacenar cualquier tipo de botella de
75cl, como: Bordelaise, Champenoise, Borgoña, Alsacia, así como formatos atípicos como Prosecco,
Sachetto, Mateus etc...
Tenga en cuenta. El diámetro máximo de las botellas colocadas en los estantes debe ser de 9
cm.
Si desea envejecer botellas de diferentes tamaños, le recomendamos que alterne una botella
bordelesa estándar entre sus botellas más grandes. Esta recomendación le ayudará a evitar
cualquier problema de almacenamiento.
En efecto, es posible que la yuxtaposición de botellas atípicas o imponentes le obligue a utilizar sólo
parcialmente las plazas de su estantería. Alternar una botella estándar (Burdeos de 75 cl) con una
botella atípica o imponente le permitirá utilizar todos los espacios disponibles en su estantería.
Si, a pesar de nuestros esfuerzos, ciertos tamaños de botellas no son detectados por los botelleros
Ecellar, por favor, siga las siguientes instrucciones:
Si una botella es demasiado grande y no cabe entre dos estantes, le aconsejamos que la baje:
• A el primer estante de su vinoteca (de arriba a abajo)
• A la zona de almacenamiento de abajo de la vinoteca
Recomendaciones de diseño
Se recomienda la disposición inicial del equipamiento de su aparato (estanterías, etc.) para que la
energía sea utilizada de la forma más racional posible por el aparato de refrigeración. Cualquier
cambio en esta disposición puede repercutir en el consumo energético del aparato.
Características de la radiofrecuencia
La Sommelière declara que el equipo de radio ECELLAR185 cumple con la Directiva 2014/53/UE y
con todas las directivas europeas aplicables. Directiva disponible en: https://eur-lex.europa.eu/legal-
content/FR/TXT/?uri=CELEX%3A32014L0053&qid=1617885639187
• Banda de radio: 2400MHz a 2483,5MHz
• Potencia máxima: 100mW
El certificado CE puede consultarse y descargarse en el sitio web de La Sommelière:
https://www.lasommeliere.com/fr/155-ECELLAR185.html
4. INSTRUCCIONES DE INSTALACIÓN
Antes de utilizar su vinoteca
• Retire el embalaje exterior e interior.
• Deje su unidad en posición vertical durante unas 24 horas antes de ponerla en
funcionamiento. El liquido de de refrigeración se ha podido mover durante el transporte.
• Limpie el interior con un paño suave y agua tibia.

158
• Cuando instale su dispositivo, elija un lugar autorizado.
• Coloque su dispositivo en un suelo lo suficientemente fuerte como para soportarlo cuando
esté completamente cargado.
• Coloque su vinoteca en un suelo lo suficientemente fuerte como para soportarlo cuando esté
completamente cargado.
• Por favor, ajuste las patas de su aparato de manera que la parte delantera de su vinoteca
esté nivelada y la parte trasera esté ligeramente inclinada hacia atrás. Esta inclinación
permite que los cajones o estantes permanezcan en su sitio a pesar del peso de las botellas.
La inclinación también garantiza la correcta evacuación del agua de condensación y la
estanqueidad de la puerta.
• Es necesaria una ventilación adecuada, no bloquee ninguna salida de aire.
• Este aparato está destinado a una instalación independiente. En ningún caso debe estar
incorporado o integrado. Debe respetarse una buena circulación de aire alrededor de su
aparato.
• Conecte la vinoteca a una sola toma de corriente, dejando 50 mm de espacio entre la parte
trasera del sótano y la pared y 100 mm a cada lado y por encima de su aparato. Asegúrese
de ajustar las patas de su aparato de manera que la parte delantera de su vinoteca esté
nivelada y la parte trasera esté ligeramente inclinada hacia atrás (se recomienda el uso de un
nivel de burbuja). Esto evitará cualquier movimiento debido a la inestabilidad, que genera
ruidos y vibraciones, y garantizará la perfecta estanqueidad de la puerta.
• Este aparato está reservado únicamente para el almacenamiento de vino.
• Esta unidad utiliza gas refrigerante inflamable, por lo que le rogamos que no dañe la goma
de refrigeración durante el transporte.
Atención
• Almacenar las botellas cerradas.
• No sobrecargue la unidad.
• No abra la puerta más de lo necesario.
• No cubra los estantes con papel de aluminio o cualquier otro material que pueda impedir la
correcta circulación del aire.
• Si la vinoteca va a permanecer vacía durante un largo periodo de tiempo, se sugiere
desenchufar la unidad y, tras una cuidadosa limpieza, dejar la puerta entreabierta para que
circule el aire y evitar la formación de moho y olores.
PRECAUCIÓN: Mantenga la unidad alejada de cualquier sustancia que pueda provocar un
riesgo de incendio.
Instalación de su vinoteca
Precaución. Para evitar que la vinoteca se vuelque, es importante cargar primero los
compartimentos del fondo de la vinoteca. Los estantes no deben ser extraídos o dejados fuera
al mismo tiempo. El peso de las botellas puede hacer que la vinoteca se incline hacia delante,
es importante distribuir el peso de las botellas por toda la vinoteca y manejarla con cuidado.
Alimentación
Conecte la vinoteca a una sola toma de corriente tipo E en la pared.
La vinoteca debe estar conectada a una sola toma de corriente de fácil acceso.
Cualquier cuestión relacionada con la alimentación y/o la toma de tierra debe ser tratada por personal
cualificado (electricista, servicio técnico autorizado).

159
Ubicación
• Precaución. La vinoteca debe colocarse en un entorno limpio (no polvoriento), libre de
heladas, lejos de una fuente de calor, como un radiador, un horno, la luz del sol, etc... no
debe instalarse en el exterior.
• Coloque la vinoteca en un lugar lo suficientemente fuerte como para soportar el peso cuando
esté completamente cargado.
• Para nivelarla, ajuste la altura de las patas ajustables que se encuentran debajo de la
vinoteca.
Este aparato es apto para funcionar en espacios con una temperatura ambiente determinada, esta
clase climática está indicada en la placa de identificación.
N: Este aparato de refrigeración está destinado a ser utilizado a temperaturas ambiente entre 16°C y
32°C. La temperatura ambiente afecta a la temperatura y la humedad interior de su vinoteca.
La temperatura de la unidad puede ajustarse entre 5°C y 20°C. La temperatura se ajusta mediante un
termostato. La modificación de la temperatura supone un mayor consumo de energía.
El aparato garantiza el mantenimiento de la temperatura mientras esté en funcionamiento y se utilice
en condiciones normales. La temperatura en el interior del aparato y su consumo de energía pueden
verse influidos por muchos factores: la temperatura ambiente, la exposición a la luz solar, el número
de aperturas de la puerta y la cantidad almacenada... Los ligeros cambios de temperatura son
perfectamente normales y corresponden a los ciclos de frío del aparato. Sin embargo, estas
variaciones no afectan a la temperatura del vino, ya que son demasiado cortas para un intercambio
térmico con las botellas.
Instalación del tirador
-
Saque el asa y sus dos tornillos de la bolsa de plástico del interior de la vinoteca.
-
Antes de instalar el tirador, debe quitar la junta de la puerta en un lado. Esto no afectará a la
junta si se tiene cuidado de quitarla correctamente.
-
Retire la junta de la esquina de la puerta hasta el nivel deseado e introduzca los dos tornillos en
los agujeros de la manilla.
-
Atornille la manilla y vuelva a colocar la junta en la ranura de la puerta para terminar con la
esquina.
Alcance de wifi de la vinoteca
¡Atención! La vinoteca ECELLAR funciona con una conexión Wifi.
¡Atención! Es responsabilidad del usuario asegurarse de que la red wifi es suficiente
(velocidad/intensidad de señal) para el correcto funcionamiento de la vinoteca conectada.

160
Depósito de agua
Agujero de drenaje hacia el
compresor
• El uso de un amplificador/repetidor de wifi puede ser necesario en el caso de una conexión
de baja velocidad.
Si la E-cellar pierde su conexión a Internet, guardará hasta 100 registros una vez que se restablezca
la conexión.
La información y la actualización de las existencias se enviarán al servidor. Después de 100
registros, los más antiguos son eliminados por los nuevos.
Los usuarios podrán verlas en la sección "Alertas" de su aplicación.
En caso de corte de luz, la vinoteca no puede tener en cuenta ningún movimiento, y además pierde
los registros que tendría pendientes de sincronizar con el servidor.
Al reiniciar después de una interrupción, se utilizará la última versión registrada en la nube para
representar el contenido actual de la vinoteca. Por lo tanto, es importante evitar cualquier
modificación del contenido de la vinoteca durante un corte de energía para no generar anomalías
entre su registro digital y el contenido de su vinoteca.
Gama de la vinoteca bluetooh
¡Atención! La vinoteca ECELLAR funciona con Bluetooth durante la fase de emparejamiento de la
vinoteca a la red Wifi. Durante su uso diario, la vinoteca se comunica únicamente a través de la red
Wifi.
El alcance del Bluetooth de la vinoteca es de 3 m como máximo con la puerta cerrada.
Higrometría
Se ha diseñado una bandeja de recogida de agua en el interior de su vinoteca, encima del escalón
del compresor, en la que verá regularmente agua para ayudar a mantener el nivel de humedad de su
vinoteca.
o Si hay demasiada agua en esta bandeja, el exceso se drena a través del orificio de drenaje
de condensado a una bandeja de goteo por encima del compresor.
o Recuerde que debe inclinar su vinoteca ligeramente hacia atrás desatornillando las dos patas
delanteras para que el agua drene correctamente.
o El orificio de drenaje no debe estar bloqueado.

161
5. INSTRUCCIONES DE USO
Panel de control
El ECELLAR185 está equipado con un panel de control electrónico con pantalla LCD. El panel de
control se encuentra dentro de la vinoteca, en el lado izquierdo.
REFERENCIA
DESCRIPCIÓN
A
Indica el modo de vinoteca: MONO (temperatura única) o AUTO
(multitemperatura)
B
Indicador de bloqueo, indica que el panel táctil está bloqueado
C
Indicador luminoso, indica si la luz está encendida
D
Temperatura programada en el interior de la vinoteca. Por defecto, la
e-Cellar muestra la temperatura ajustada en la pantalla digital, sin
embargo puede consultar la temperatura real presente en su
vinoteca manteniendo pulsadas las teclas I + J durante 3 segundos,
entonces la temperatura real leída por el sensor se mostrará en la
pantalla y parpadeará. Suelte las teclas y la pantalla volverá a
mostrar la temperatura normal.
E
Indicador de la unidad de medida de la temperatura mostrada
en grados Celsius por el símbolo °C o en Fahrenheit por el
símbolo °F.
F
Botón para cambiar la unidad de medida de la temperatura :
-
Grado Celsius indicado por el símbolo "°C" o
-
Fahrenheit indicado por el símbolo "F"
G
Selección del modo de vinoteca; por defecto, la vinoteca está en
modo MONO, pulse una vez para poner la vinoteca en modo
AUTO (uso multitemperatura)
H
Botón para activar/desactivar la luz
I
Pomo de ajuste de la temperatura. Pulse este botón para aumentar la
temperatura hasta alcanzar la temperatura deseada. La
temperatura de la vinoteca puede ajustarse entre 5°C y 20°C en
modo MONO (temperatura única). En el modo AUTO
(multitemperatura), la vinoteca gestiona por sí misma la
temperatura en su interior, estos botones no funcionan en este
modo.
J
Botón de ajuste de la temperatura. Pulse este botón para disminuir
la temperatura hasta alcanzar la temperatura deseada.
La temperatura de la vinoteca puede ajustarse entre 5°C y 20°C en
modo MONO (temperatura única). En el modo AUTO
(multitemperatura), la vinoteca gestiona por sí sola la
temperatura interior de la misma, estos botones
no funcionan en este modo.
K
Pulse este botón para encender o apagar la vinoteca sin
necesidad de desenchufarla.
L
Pulse este botón para desbloquear - bloquear el panel de control.
Pulse el botón durante 3 segundos para bloquear o desbloquear la
pantalla. Sin ninguna acción por su parte, la pantalla se bloqueará
automáticamente después de 15 segundos.
La pantalla se bloqueará automáticamente después de 15 segundos de inactividad, en cuyo caso el
icono B será visible en la pantalla.
La luz de fondo de la pantalla se apagará automáticamente después de 15s de inactividad tras el
bloqueo de la pantalla, y se encenderá de nuevo cuando se vuelva a pulsar una tecla. Cuando hay

162
un código de error o una alarma, la pantalla se desbloquea automáticamente.
Alarmas
Para garantizar la total seguridad de sus vinos, su vinoteca está equipada con un sistema de alarma;
- Alarma de alta temperatura
- Alarma de baja temperatura
Estas alarmas están preprogramadas. Si después de 12 horas de funcionamiento, la vinoteca detecta
una diferencia de temperatura de ± 4°C con respecto a la temperatura ajustada, la vinoteca mostrará
un código de error correspondiente a la alarma de alta o baja y sonará una alarma sonora. En caso
de avería, el compresor funcionará en ciclos cortos de 10 minutos ON y 10 minutos OFF.
Para desactivar la alarma sonora, pulse uno de los botones del panel de control. Si se activa
una de estas alarmas, póngase en contacto con el servicio técnico.
Caja principal
Su vinoteca está equipada con una caja maestra. Esta caja se coloca en el interior de la vinoteca, en
la parte superior derecha; permite la conectividad entre las estanterías y la aplicación para
smartphones VINOTAG® mediante transmisiones de datos por Wifi.
Precaución. No manipule ni dañe esta unidad.
Esta caja está equipada con un indicador luminoso colocado debajo de la caja que da información
sobre el estado de la vinoteca y un pulsador que se utiliza para "reiniciar" la conexión wifi de la
vinoteca a la red. Cuando la luz indicadora parpadea continuamente, indica que la vinoteca no está
conectada o ha perdido la conexión a una red Wifi.
Esta funda también tiene un código QR situado en el borde inferior (el código QR también está
disponible en la hoja de calidad proporcionada al comprar su bodega).
• Primer uso
El código QR se utiliza para emparejar la vinoteca (en Bluetooth). Tendrás que escanear este código
QR la primera vez que lo uses para conectar tu vinoteca a la red wifi.
Tenga en cuenta que el escaneo del código QR y el procedimiento de emparejamiento sólo

163
deben realizarse una vez. Si realizas esta operación en una vinoteca ya asociada a un usuario,
te conviertes en el nuevo propietario de la vinoteca y sobrescribes todos los datos
previamente asociados a la misma. A continuación, tendrá acceso a una vinoteca vacía y el
antiguo propietario ya no tendrá acceso a la vinoteca. Tenga en cuenta que esta acción es
irreversible y los datos sobrescritos no pueden recuperarse.
Precaución. Cuando el módulo maestro no está conectado a una red Wifi, un LED rojo parpadea
continuamente debajo de él.
Tenga en cuenta. No elimine los diferentes códigos QR presentes en la cava Ecellar
, estos son útiles en caso de emparejamiento con la cava o de mantenimiento.
¡Atención! Para asegurar el buen uso de tu vinoteca debes colocarla en un lugar que garantice una
buena calidad de recepción wifi.
• Restablecimiento de la conexión a la red wifi o cambio de operador
Para llevar a cabo un reinicio del Wifi, presione el pulsador ubicado debajo de la caja maestra
durante 3 segundos. Con una mano, sujete firmemente la carcasa de plástico desde arriba y presione
el botón desde abajo. Esta manipulación es útil en caso de cambio de caja de internet.
Estanterías conectadas
Su vinoteca está equipada con 14 estantes conectados. Estas estanterías han sido desarrolladas,
fabricadas y montadas en Francia.
Las estanterías se comunican con la caja principal de su vinoteca. Las botellas se colocan en los
estantes de la cabeza a los pies, en los 12 lugares definidos.
o Los cuellos de botella deben apoyarse en la barra central en las posiciones predefinidas. El
indicador luminoso correspondiente a la posición parpadea dos veces para indicar la
detección correcta de su botella. Si la botella no está bien colocada, es posible que el cuello
no sea detectado por el sensor, vuelva a colocar la botella correctamente en el estante para
asegurar su buena detección. La validación de una operación se confirma con un doble
parpadeo del indicador luminoso
o Las botellas que descansan en los estantes estarán ligeramente inclinadas 4° (cuatro
grados) sobre la barra central, esto es normal y facilita la detección de cuellos de botella por
parte de los sensores.
o Es importante que los cuellos de las botellas descansen rectos sobre la barra central, los
cuellos no deben estar levantados o colocados en ángulo sobre la barra central, de lo
contrario puede afectar a la detección de las botellas.

164
Precaución. Para evitar que la vinoteca se vuelque, es importante cargar primero los
compartimentos del fondo de la vinoteca. Los estantes no deben ser extraídos o dejados fuera al
mismo tiempo. El peso de las botellas puede hacer que la vinoteca se incline hacia delante, es
importante distribuir el peso de las botellas por toda la vinoteca y manejarla con cuidado.
Precaución. No saque las 14 rejillas conectadas al mismo tiempo cuando estén cargadas.
Precaución. Al colocar las botellas en un bastidor, realice la operación con cuidado para no dañar el
soporte central.
Tenga en cuenta. Los estantes no son adecuados para botellas con un diámetro superior a 9 cm.
Precaución. En caso de rotura de las botellas, es importante retirarlas y limpiar los agujeros de la
barra central de los estantes donde se colocan los sensores, con un paño suave y seco. Asegúrese
de volver a escanear sus botellas antes de devolverlas a su vinoteca.
Precaución. La primera vez que se utiliza el aparato, el usuario debe retirar la película de plástico
protectora de la parte delantera de cada estante.
Los estantes están equipados con indicadores LED que muestran al usuario:
- Se busca botella(s)
- Ubicación recomendada (consulte el párrafo sobre la función E-Sommelier)
- La detección de botellas por parte de la vinoteca cuando se retira o se añade una botella
Atención: en un caso particular es posible que los LEDs permanezcan encendidos en los frentes de
los estantes, un tiempo de retardo de 5 minutos está programado en el sistema electrónico, después
de este tiempo los LEDs se apagarán automáticamente
Modos de uso
Su vinoteca tiene dos modos de temperatura:
El modo "temperatura única" está activado por defecto. Permite elegir una única
temperatura en toda la vinoteca entre +5 y +20°C. En este modo, los ventiladores se
activan para garantizar la circulación del aire en la vinoteca. La temperatura que
aparece en la pantalla digital corresponde a la temperatura ajustada y aparece el
mensaje "MONO".
El modo "multitemperatura" permite obtener diferentes temperaturas en el interior
de la vinoteca, en forma de gradiente que va desde una temperatura más cálida en la
parte superior de la vinoteca, templada en el centro y más fría en la parte inferior.
En este modo los ventiladores están desactivados.
La temperatura ajustada es fija y no se puede modificar, la pantalla muestra "AUTO";
el aparato gestiona la temperatura automáticamente. No es necesario realizar ningún
ajuste.
Estas son las temperaturas que se pueden alcanzar en el modo multitemperatura en condiciones
normales de uso, es decir, una temperatura ambiente de 25°C como máximo (consulte la sección
"Instala tu vinoteca").
La distribución de la temperatura indicada en la tabla se da a título indicativo, ya que pueden
producirse variaciones entre los distintos niveles en función de los ciclos de frío, el número de
botellas cargadas en la vinoteca y la temperatura ambiente en el exterior. El flujo de aire dentro de la
vinoteca se verá influenciado por estos diferentes factores.

165
El aparato garantiza el mantenimiento de la temperatura mientras esté en funcionamiento y se utilice
en condiciones normales. La temperatura en el interior del aparato y su consumo de energía pueden
verse influidos por muchos factores: la temperatura ambiente, la exposición a la luz solar, el número
de aperturas de las puertas y la cantidad almacenada... Es perfectamente normal que se produzcan
ligeras variaciones de temperatura.
El Modo Demo
Existe un modo de demostración en su dispositivo, cuando se activa este modo, el compresor, los
ventiladores y las alarmas se desactivan, sin embargo, la vinoteca mantiene sus funciones de
pantalla y luz.
Para activar este modo debe mantener pulsadas las teclas luz (H) + C/F (F) durante 3 segundos,
entonces la pantalla de temperatura o el icono AUTO parpadearán 5 veces.
Para salir del modo de demostración, repita el mismo procedimiento.
El modo "ESOMMELIER® ".
El modo ESOMMELIER® es una función de colocación asistida de sus botellas que sólo puede
utilizarse si dispone de una vinoteca conectada a LA SOMMELIERE y de una cuenta VINOTAG®
activa.
Esta característica recomienda el lugar ideal para almacenar su vino.
Al escanear una botella, VINOTAG® identifica el tipo de vino; según cada tipo de vino, se
recomiendan unas temperaturas de almacenamiento para su óptima conservación.
Por lo tanto, algunos lugares de la vinoteca son más adecuados en función del tipo de vino.
Al utilizar este modo, la vinoteca le ofrece ubicaciones disponibles adaptadas a la botella de vino
escaneada; se encienden luces indicadoras en la vinoteca para mostrarle estas ubicaciones dentro
del límite de 12 ubicaciones simultáneas.
Sistema de invierno
Su vinoteca está equipada con un sistema automático de calefacción, también conocido como
"sistema de invierno".
Estante
(de arriba a abajo)
Rango de
temperatura
1
14°C a 18°C
Adecuado para almacenar vinos tintos para su degustación.
2
3
4
10°C a 14°C
Adecuado para el envejecimiento de sus vinos y
champagnes.
5
6
7
8
9
10
11
5°C a 10°C
Adecuado para conservar los vinos blancos o rosados y el champán
a temperatura de degustación.
12
13
14
15

166
». Cuando la temperatura medida por la sonda de la vinoteca es demasiado fría en comparación con
el punto de consigna, una resistencia se activa para permitir subir la temperatura.
Este sistema se activa y desactiva automáticamente y sin intervención del usuario. La activación o
desactivación automática del sistema Winter no afecta a la conservación de su vino.
La aplicación VINOTAG
La vinoteca ECELLAR185 es compatible con la aplicación de gestión de vinotecas VINOTAG®. Para
utilizar su vinoteca de forma conectada, es necesario tener:
• Una fuente de energía eléctrica para alimentar la vinoteca
• Haber descargado la aplicación VINOTAG® de la App Store o Google Play Store y haber
creado una cuenta de usuario
• Una conexión a Internet estable (Wifi)
• Un modelo de vinoteca ECELLAR
Funciones de VINOTAG
La aplicación VINOTAG® le permite :
• Cree, personalice y gestione sus vinotecas
• Añadir/quitar botellas
• Consulte su inventario de vinos (botellas de vino en su vinoteca) y cree sus propios registros
de vinos. VINOTAG® se asocia con VIVINO®, como parte de su opción Premium, para
permitirle exportar archivos detallados de vinos desde la base de datos de VIVINO®.
• Cree y consulte su biblioteca de vinos. La exclusiva asociación VINOTAG® - VIVINO® le
permite guardar y consultar archivos detallados de vinos de la base de datos VIVINO®.
• Comparta la visualización de su(s) vinoteca(s) con sus amigos y familiares
• Reciba una alerta cuando sus vinos estén en su mejor momento, cuando tenga que cambiar
el filtro de su vinoteca o cuando su vino favorito tenga pocas existencias
• Identifique en un abrir y cerrar de ojos en su vinoteca una o varias botellas precisas gracias a
un sistema de indicadores luminosos.
• Localice de un vistazo los espacios disponibles en su vinoteca gracias a un sistema de
indicadores luminosos.
Crear una cuenta VINOTAG
• Descargue la aplicación VINOTAG® en la App Store o en Google
Play Store, según el tipo de teléfono.
• Crea una cuenta manualmente o a través de Facebook o de tu
cuenta de Apple / Google Play
• Rellene los campos obligatorios: Nombre; Apellido; Fecha de
nacimiento; País; Departamento
• Marque la casilla "Acepto las condiciones de uso".
• Haga clic en "Finalizar mi inscripción
Ahora tienes una cuenta VINOTAG®, recuerda guardar tu nombre de
usuario y contraseña.
Menú VINOTAG
Cuando la aplicación está abierta, el siguiente menú es visible:

167
Mi vinoteca Mis vinos Alertas Perfil
• MI VINOTECA: Le permite ver su(s) vinoteca(s).
• MIS VINOS: Le permite consultar su biblioteca de vinos.
• ALERTAS : Le permite consultar las alertas de su vinoteca
• PERFIL: Le permite completar/ver la información relacionada con su cuenta
Página "My CELLAR" (mi vinoteca)
Esta página le permite ver el contenido de su(s) vinoteca(s).
• Atención: si su vinoteca está vacía, no podrá visualizarla; es necesario añadir botellas para
acceder a la vista de su vinoteca.
• La vinoteca puede verse en modo de lista o en modo gráfico. La configuración del modo es
accesible a través del icono situado en la parte superior derecha de la pantalla. Este icono
permite pasar de un modo de visualización a otro. Por defecto, las vinotecas de la
categoría "vinoteca conectada" se muestran en modo de lista.
Detalles vista de icono de la vinoteca :
Modo de lista o Modo gráfico
• El icono de búsqueda situado en la parte superior derecha de la pantalla le permite
buscar una botella de vino en su vinoteca; sólo tiene que introducir algunos datos sobre la
botella que busca (nombre del dominio, tipo de vino, año...)
• El icono de la parte inferior derecha de la pantalla le permite añadir botellas de vino
(para más información, consulte la sección "Añadir una botella de vino")
• Tenga en cuenta. Si tienes más de una vinoteca, puedes pasar de una a otra haciendo clic
en el nombre de tu vinoteca en la parte superior izquierda de la pantalla. Cuando haga clic en

168
el nombre de su vinoteca, una ventana emergente le pedirá que seleccione la vinoteca que
desea ver. Haga clic en el modelo que desea ver en la lista de sus vinotecas.
Modo de lista :
o Modo de visualización simplificado. Una lista le permite consultar
los vinos almacenados en su vinoteca. Los vinos se enumeran por
orden alfabético.
o El modo de lista indica para cada vino: el nombre del vino, su
dominio, su fecha, su color, su tipo y finalmente la foto de la
botella.
o Pulse sobre un vino para acceder a su ficha.
o Un indicador está presente en la derecha de su pantalla. Indica
para cada vino el tipo de vino. Los tipos de vino se identifican con
un punto de color (punto rojo: indica un vino tinto / punto amarillo:
indica un vino blanco / punto salmón: indica un vino rosado).
Modo gráfico:
o Una vista gráfica de la vinoteca
permite visualizar el llenado de la
misma indicando las botellas
almacenadas mediante puntos.
o Los vinos se clasifican por estantes.
o El usuario puede ver, mover o
eliminar una botella.
▪
Haga clic en una botella para acceder a su ficha de vino
▪
Hay un indicador a la izquierda de su pantalla. Indica para cada estante el número de
botellas por tipo de vino. Los tipos de vino se identifican con un punto de color.
Punto rojo: indica un vino tinto
Punto amarillo: indica un vino blanco
Punto salmón: indica un vino rosado
Página "Mis vinos
Esta página le permite ver su biblioteca de vinos. La biblioteca de vinos le permite :
▪
Consulte sus vinos consumidos, todos los vinos añadidos (aún presentes o no) en su se

169
añaden automáticamente a su vinoteca.
▪
Cree una lista de deseos; puede guardar vinos probados en casa de amigos o que desee
comprar. La vinoteca le permite crear una lista de deseos.
▪
El icono de búsqueda situado en la parte superior derecha de la pantalla le permite
buscar una botella de vino en su vinoteca; sólo tiene que introducir los datos de la botella que
busca (nombre del dominio, tipo de vino, año...)
▪
Para añadir una botella a su vinoteca, siga el procedimiento "Añadir botellas" y haga clic en
"añadir a mi vinoteca".
▪
Haga clic en un vino para consultar su ficha (para más información siga el procedimiento (ver
"consultar un archivo de vino")
Página "ALERTAS
Esta página le permite ver las alertas relacionadas con su vinoteca; un punto
rojo junto al icono indica una alerta no leída.
Las alertas se ordenan cronológicamente.
Si tiene varias vinotecas, es posible filtrar por vinoteca (icono de filtro situado
en la parte superior izquierda de su pantalla).
Un campo de búsqueda le permite filtrar sus alertas para encontrar un evento
específico.
▪
Alerta de cambio de filtro: Su vinoteca le avisa cuando es necesario cambiar el filtro de
carbón. La fecha de cambio de filtro se establece automáticamente al registrar una nueva
vinoteca. Atención: cuando cambie el filtro, no olvide introducir esta acción en su vinoteca
para que el contador se reinicie en la fecha actual. (por defecto hay que hacer un cambio de
filtro cada año)
▪
Alertas de stock: puede programar alertas de stock para un vino específico y una cantidad
definida. La aplicación le avisa de que el vino en cuestión está a punto de agotarse. (la
cantidad "sin existencias" la define usted, la alerta puede fijarse en un número de botellas).
▪
Alertas técnicas: estas alertas indican un problema técnico o una acción realizada en la
vinoteca: botella consumida; botella añadida; vinoteca creada; vinoteca unida; el usuario X se
ha unido a su vinoteca... En caso de problema técnico, contacte con un técnico autorizado.
Las alertas se presentan en forma de lista en la que se indica el tipo de alerta, la fecha, la
hora, el número de la estantería afectada y el nombre de la vinoteca en cuestión.

170
Página "Perfil
Esta página le permite ver, completar o modificar la información relacionada con su cuenta
VINOTAG®:
▪
Modificar mis datos: para modificar sus datos de registro (apellido,
nombre, fecha de nacimiento, país, departamento) o eliminar su
cuenta. Aceptar recibir noticias y otras informaciones comerciales de
VINOTAG.
▪
Me convierto en premium : para suscribirme a la opción premium
de VINOTAG® y beneficiarme de las recargas de escaneo. Estos
escaneos le permiten guardar directamente los registros de
VIVINO® en su vinoteca y no tener que rellenar manualmente las
fichas de los vinos (véase el proceso de "cuenta premium").
▪
Mis vinotecas: Le permite ver, editar, compartir, eliminar, añadir o
mantener sus vinotecas. También le permite consultar las vinotecas
que se han compartido con usted.
▪
Mis invitaciones: le permite ver sus invitaciones.
▪
Contacto : le permite ponerse en contacto con el servicio de
atención al cliente de VINOTAG®. Una lista desplegable le permite
seleccionar el tema de su solicitud.
▪
Condiciones generales de uso : le permite consultar las
condiciones generales de uso de VINOTAG®.
▪
Aviso legal : permite consultar el aviso legal de VINOTAG®.
▪
Desconectar: permite desconectar
Añadir una vinoteca
Ahora tiene una cuenta VINOTAG® para añadir su primera vinoteca o una
nueva vinoteca (la aplicación le ofrece la posibilidad de gestionar varias
vinotecas entre una selección de modelos).
Tenga en cuenta. En ningún caso se debe abandonar la aplicación al añadir
un sótano.
▪
Añadir una primera vinoteca: la creación de su vinoteca es
obligatoria al crear su cuenta, siga los pasos siguientes.
▪
Añadir una nueva vinoteca: si quiere gestionar una nueva vinoteca
desde su aplicación, vaya a la página "perfil" -> Haga clic en el botón
"mis vinotecas" y pulse el botón "añadir una vinoteca"; siga los
diferentes pasos que se indican a continuación.
Adición de una "vinoteca conectada".
▪
Defina el tipo de vinoteca "vinoteca conectada" o "vinoteca no conectada". El modelo
ECELLAR185, forma parte de la categoría "vinoteca conectada". Haga clic en "vinoteca
conectada".
▪
Escanee uno de los códigos QR de su bodega para permitir que la aplicación lo identifique y
se conecte a él. El código QR se encuentra dentro de su bodega, debajo de la caja principal
ubicada en la parte superior derecha de la bodega y en la parte inferior de la hoja de calidad

171
suministrada con su bodega cuando se compró. Prefiere el escaneo de este último, más
accesible, para conectar tu bodega con facilidad.
▪
La aplicación le pide que active el bluetooth; su activación es necesaria para configurar la
vinoteca.
▪
Una vez que su vinoteca está conectada al bluetooth, la aplicación le pide que seleccione
una red Wifi o que utilice un protocolo WPS:
o En el caso de una red Wi-Fi, se solicita la contraseña del router Wi-Fi. Si la conexión
Wi-Fi falla, comprueba la contraseña y/o comprueba la distancia entre tu sótano y tu
router Wi-Fi. Una distancia excesiva o unas paredes gruesas pueden bloquear la
conexión. Acerque el sótano al router Wi-Fi para que pueda conectarse.
o En el caso de WPS, aparece una barra de carga durante el escaneo. Si no se ha
encontrado ninguna red WPS después de varios segundos, aparece un banner de
error en la parte superior de la pantalla, y la aplicación vuelve a la opción Wi-Fi /
WPS.
Compartir una vinoteca
Como propietario de una vinoteca, puedes invitar a otras personas a unirse a tu
vinoteca. La consulta de su vinoteca requiere que el invitado cree una cuenta
VINOTAG®.
Invitar a una persona :
▪
Ir a la página " mi perfil " : " mis vinotecas ".
▪
Haga clic en el botón "Compartir mi vinoteca",
▪
Introduzca la dirección de correo electrónico de la persona que desea invitar.
▪
En la parte superior de la pantalla aparece un banner de confirmación de que
su invitación ha sido enviada
Cuando compartes tu vinoteca ;
▪
Se envía un correo electrónico a la persona para informarle de que ha sido invitada y se le
ofrece descargar la aplicación. Si no tienen una cuenta, podrán ver las vinotecas que se
compartieron con ellos justo después de registrarse.
▪
Si el invitado ya tiene una cuenta, recibirá una notificación de que ha sido añadido a una
vinoteca compartida.
Borrar una vinoteca
Desea eliminar una o varias vinotecas.
Ir a la página " mi perfil " : " mis vinotecas ".
Aparece la lista de sus vinotecas;
Seleccione la vinoteca que desea eliminar: pulse suprimir.
Repita la operación en todas las vinotecas que desee eliminar.
Tenga en cuenta que si la vinoteca tiene al menos una botella, aparecerá una ventana emergente
pidiéndole que confirme esta acción. Una vez eliminada la vinoteca, ya no es posible recuperar la
información relacionada.
Advertencia: no puedes eliminar una vinoteca que no te pertenece. Cuando una vinoteca se
comparte con usted y, por tanto, es visible desde la página "mi perfil": "mis vinotecas"; puede detener
la compartición. Cuando usted no es el propietario, el botón "Eliminar" es un botón "Dejar". Permite
salir de la vinoteca. Aparece una ventana emergente para confirmar la acción.
Cambiar la configuración de la vinoteca

172
Desea cambiar la configuración de su vinoteca de forma diferente a su configuración estándar. Nota:
para una "vinoteca conectada", la configuración estándar no debe modificarse. Las
estanterías de las "vinotecas conectadas" son estanterías inteligentes conectadas a la
vinoteca. Se alimentan eléctricamente y deben ser modificados/desmontados por un
profesional certificado.
Añadir botellas
Ha creado su vinoteca en la aplicación VINOTAG®; ahora puede añadir botellas.
Creación de la vista cellarView listGraphic
▪
Haga clic en "añadir mi primera botella" en el caso de una nueva vinoteca o "+".
▪
Haz una foto de la etiqueta de la botella que quieres añadir a tu vinoteca. Aparecerá un
archivo de vino completado; este archivo proviene de la base de datos VIVINO®. Puede
modificar o completar este registro de vinos. Tenga en cuenta. Si la botella de vino
escaneada no está disponible en la base de datos VIVINO® o si no tiene una
suscripción premium, tendrá que completar el registro de vino asociado a su botella
manualmente. Si lo desea, es posible no tomar una foto de la etiqueta, en cuyo caso no
podrá acceder a la base de datos VIVINO®, por lo que tendrá que rellenar manualmente la
ficha del vino asociada a su botella.
▪
Cuando añada una botella, podrá completar/modificar la ficha de vino asociada, añadir un
comentario sobre la botella de vino, guardarla como favorita o darle una puntuación.
▪
Si desea completar un registro de vino manualmente, puede rellenar los siguientes campos:
- Nombre del vino
- Dominio
- Nombre
- Año
- País/región
- Color
- Cantidad de botellas
▪
Un modo "avanzado" le permite proporcionar información adicional como ;
- Edad mínima (años)
- Custodia máxima (años)
- Comentario
- Cambiar a favoritos
- Valore la botella (de 0 a 5)
- Precio de compra

173
- Enlace a VIVINO® para encontrar el archivo completo (opción Premium)
- Enlace a VIVINO® para comprar este vino
▪
La botella escaneada no es reconocida: si la botella no es reconocida, la aplicación propone
reiniciar el escaneo, buscar manualmente la botella (si ninguna botella coincide con la
búsqueda) o rellenar manualmente el formulario.
▪
Es obligatorio rellenar un tiempo de guardia mínimo y máximo para recibir alertas de fechas
punta. Si no se rellenan los campos de tiempo de guardia mínimo y máximo, no se enviarán
alertas de fechas punta.
Añade una botella a una "Vinoteca conectada
▪
Coloque la(s) botella(s) en su vinoteca en el lugar deseado;
▪
VINOTAG® le informa de la detección de su(s) botella(s) y registra su ubicación en la versión
digital de su vinoteca.
o Cuando se coloca la botella y se detecta, el indicador luminoso correspondiente
parpadea dos veces rápidamente. La ubicación se almacena en su aplicación. A
continuación aparece una ventana emergente de éxito con dos botones: "Añadir una
botella" o "Hecho".
o Tenga en cuenta. Si desea colocar una o varias botellas en la zona de
almacenamiento del fondo de su vinoteca, tenga en cuenta que esta parte de la
vinoteca no está conectada.
▪
Haga clic en "+" para seguir añadiendo botellas a su vinoteca.
Tenga en cuenta.
La zona de almacenamiento en el fondo de su vinoteca no está conectada.
Sin embargo, la aplicación le permite mantener un registro digital de los cilindros que usted indica
que se depositan en este lugar.
▪
La capacidad real del almacén es de 17 botellas de champán.
▪
Sin embargo, la aplicación permite registrar un mayor número de botellas, lo que le permite
llevar un registro de los vinos que no están almacenados en su vinoteca.
Función E-Sommelier
Cuando se añade una botella a una "vinoteca conectada", se puede utilizar la función E- Sommelier.
Esta función le recomienda el lugar ideal para guardar su vino. Al escanear una botella, VINOTAG®
identifica el tipo de vino; según el tipo de vino, se recomiendan las temperaturas de almacenamiento
para su óptima conservación.
Por lo tanto, algunos lugares de la vinoteca son más adecuados en función del tipo de vino.
La función E-Sommelier le ayuda a guardar su vino en las mejores condiciones. Al hacer clic en este
botón, la vinoteca le sugerirá lugares de almacenamiento disponibles y adecuados para la botella de
vino escaneada; los indicadores luminosos de la vinoteca le mostrarán estos lugares.
▪
Cuando se coloca la botella y se detecta, el indicador luminoso correspondiente parpadea
dos veces rápidamente. La ubicación se almacena en su aplicación. A continuación aparece
una ventana emergente de éxito con dos botones: "Añadir una botella" o "Hecho".
▪
¡Tenga cuidado! En caso de fallo, cuando su vinoteca no pueda detectar la botella, el
indicador luminoso no parpadeará. Repita la operación hasta que la botella sea detectada
correctamente y el indicador luminoso parpadee dos veces.
• ¡Atención! Si no viene a recoger/dejar su botella, el indicador luminoso de la parte delantera
del estante permanecerá encendido durante 5 minutos, transcurridos los cuales el indicador
luminoso se apagará automáticamente.
También es posible añadir una botella mediante una tarjeta de vino.
• Haga clic en el botón de la parte inferior de la página "añadir una o más botellas".
• Introduzca el número de botellas a añadir y sus tamaños.

174
• Coloque la(s) botella(s) en su vinoteca en el lugar deseado;
• VINOTAG® le informa de la detección de su(s) botella(s) y registra su ubicación en la versión
digital de su vinoteca.
NOTA: la creación de una cuenta VINOTAG® le permite beneficiarse de "50 escaneos
gratuitos". Al añadir una vinoteca conectada, se le ofrecen 1.000 escaneos. Estos escaneos le
permiten beneficiarse de archivos de vino precompletados gracias a la asociación VINOTAG®
- VIVINO®. Si se han utilizado todas las exploraciones ofrecidas, es posible seguir añadiendo
botellas completando manualmente su lista de vinos o suscribirse a la opción premium para
beneficiarse de una recarga de exploraciones (véase el apartado "Cuenta premium").
Cuenta Premium
VINOTAG® se asocia con VIVINO® para facilitar la experiencia del usuario. Al crear una cuenta
VINOTAG®, se ofrece una serie de "exploraciones gratuitas".
Estos "escaneos gratuitos" se refieren a la acción de tomar una foto de una botella para acceder
directamente a una ficha detallada del vino extraída de la base de datos VIVINO®. Tenga en cuenta
que las botellas no reconocidas se consideran "escaneos libres" desde que se envía la solicitud de
reconocimiento a VIVINO®. La foto tomada debe ser de suficiente calidad y nitidez para que sea
posible el reconocimiento de la botella.
Esta ficha de vino puede ser modificada y guardada directamente en la versión digital de su vinoteca,
ya no necesita completar manualmente su ficha de vino. Un verdadero ahorro de tiempo para llenar
su vinoteca y acceder a una gran cantidad de información sobre sus vinos favoritos.
Si se han utilizado todas las exploraciones ofrecidas, es posible seguir añadiendo botellas
completando manualmente su ficha de vino o suscribirse a la opción premium para beneficiarse de
una recarga de exploraciones. Una ventana emergente le avisará cuando haya agotado los
"escaneos gratuitos".
Para pasar a una cuenta premium, el usuario debe suscribirse a la opción premium que le permite
comprar recargas de escáner.
- Recarga de 200 escaneos
- Recarga de 400 escaneos
- Recarga de 1000 escaneos
Las "exploraciones" compradas pueden utilizarse por tiempo ilimitado.
La suscripción a la opción premium y las condiciones de precio son accesibles a través de la
aplicación VINOTAG® en el área "mi cuenta" haciendo clic en el botón "Me hago premium".
Retirar las botellas
Ha creado su vinoteca en la aplicación VINOTAG®; ahora puede eliminar botellas de su vinoteca.
Las botellas se guardarán en su vinoteca.
Para una vinoteca de categoría "conectada"
• Saque la botella deseada de su vinoteca;
• La vinoteca conectada detecta la retirada e informa a la aplicación; una alerta indica la
retirada de la botella en su aplicación
• Ir a la página de "Alertas"
• Seleccione una botella de vino y mediante la función "mostrar en vinoteca"; la vinoteca
encenderá la(s) luz(es) indicadora(s) correspondiente(s) a la(s) ubicación(es) donde se
almacenan las diferentes botellas de vino.
¡Atención! Pueden encenderse simultáneamente un máximo de 12 indicadores luminosos.
Precaución. Si no viene a recoger/dejar su botella, el indicador luminoso de la parte delantera

175
del estante permanecerá encendido durante 5 minutos, transcurridos los cuales el indicador
luminoso se apagará automáticamente.
• La retirada es detectada por el sótano, el indicador luminoso correspondiente a la antigua
ubicación de su botella parpadeará dos veces rápidamente para confirmar la retirada
• La vinoteca conectada informa a la aplicación de la retirada; una alerta indica la retirada de la
botella en su aplicación
• La vista de tu vinoteca se actualiza automáticamente
Atención: para añadir o quitar botellas de una vinoteca conectada, es necesario estar
conectado a una red Wifi para asegurar la correcta comunicación de la información entre su
vinoteca física y su vinoteca digital visible en VINOTAG®.
Consultar un archivo de vino
La consulta de los archivos de vinos es accesible a través de sus vinotecas o su biblioteca de vinos.
Consulta de archivos de vino en mi vinoteca - modo lista o en mi biblioteca de vinos
• Haga clic en la botella de su elección
• Consulte la información sobre su botella
• Para más detalles, puede visitar el sitio web de nuestro socio Vivino haciendo clic en "Ver en
Vivino".
Consulta de archivo de vino en mi vinoteca - modo gráfico
• Haga clic en el estante de su elección
• Haga clic en la botella de su elección
• Consulte la información sobre su botella
• Para más detalles, puede visitar el sitio web de nuestro socio Vivino haciendo clic en "Ver en
Vivino".
Crear alertas de fechas punta
Para crear alertas de fechas punta, es obligatorio introducir en el registro de vinos un tiempo de
retención mínimo (mayor que 0) y un tiempo de retención máximo. El tiempo de envejecimiento se
expresa en años. Se le enviará una alerta si su botella no ha sido consumida. Una botella del año de
cosecha "X" con un tiempo mínimo de envejecimiento de 5 años y un tiempo máximo de
envejecimiento de 10 años le avisará de la siguiente manera:
• Año de cosecha " X " + 5 años : Alerta del inicio de la fecha de pico " Su botella está lista
para ser degustada
• Año de cosecha " X " + 10 años : Alerta de fin de fecha de apogeo " Su botella está llegando
al final de su fecha de apogeo ".

176
Crear alertas de valores
Para gestionar mejor su vinoteca y sus vinos, VINOTAG® le ofrece la posibilidad de establecer
alertas de existencias:
•
A través de la vista de su vinoteca en la aplicación, pulse sobre la botella deseada para acceder a
la ficha de vino asociada
•
Haga clic en "programar una alerta".
•
Indique a partir de cuántas botellas restantes desea recibir una alerta de existencias
•
Haga clic en validar. La alerta de acciones está activada.
Para desactivar una alerta de stock, haga clic en "modificar la alerta"; baje el número de
botellas deseado hasta "desactivar". Haga clic en validar. La alerta de acciones está
desactivada.
Visualice la ubicación de sus botellas en su vinoteca
• Estás en la vista de tu vinoteca; utiliza el icono de búsqueda en la parte superior derecha de
tu pantalla
• Indique el nombre del vino que busca y/o el dominio y/u otra información relacionada con la
botella
• Se muestra la ficha del vino de la botella que está buscando
• Haga clic en el botón situado en la parte inferior de la página "Ver mis botellas" o en el botón
"Mostrar en la vinoteca" situado al principio de su ficha de vino
• Los indicadores se iluminan en su vinoteca, dentro del límite de 12 simultáneamente, para
mostrarle la ubicación de la botella o botellas que está buscando.
Mantenimiento de la vinoteca
A partir de la configuración de la vinoteca, es posible ponerla en mantenimiento.
Esta manipulación bloquea todos los movimientos que pueden tener lugar en la vinoteca (añadir,
mover, borrar).
Por lo tanto, la vista de la casa está bloqueada por una vista de "vinoteca en mantenimiento". Para
salir del modo de mantenimiento, pulse el botón "Salir del mantenimiento".
Precaución. Al salir del modo de mantenimiento, puede :
• Recargar el antiguo diseño
• Empezar de nuevo en una vinoteca vacía. En este caso, debe reiniciar el proceso desde el
principio y escanear su primera botella.

177
6. LIMPIEZA Y MANTENIMIENTO
Antes de limpiar el aparato (lo que debe hacerse regularmente), desenchúfelo quitando el enchufe o
desconectando el fusible.
Le aconsejamos que, antes del primer uso y de forma regular, limpie tanto el interior como el exterior
(frente, laterales y parte superior) con una mezcla de agua tibia y detergente suave. Aclare con agua
limpia y deje que se seque completamente antes de volver a conectarlo. No utilice disolventes ni
agentes abrasivos.
Cuando la unidad se enciende por primera vez, pueden quedar olores residuales. En este caso, haga
funcionar el aparato durante unas horas a la temperatura más fría. El frío eliminará los posibles
olores.
Descongelación automática
Se ha programado una descongelación automática en su vinoteca. Durante la fase de
descongelación, los vinos almacenados en la vinoteca no sufren ningún impacto.
Durante la descongelación, el compresor y los ventiladores se apagan. La pantalla digital mostrará
una temperatura normal, sin embargo, si desea visualizar la temperatura real de su vinoteca, la
pantalla le mostrará el código "DD" que es normal.
Cambio del filtro de carbón
Su vinoteca está equipada con un filtro de carbón vegetal, que se encuentra en la parte inferior
derecha de su vinoteca. Le aconsejamos que lo sustituya una vez al año. Para sustituirlo, sólo hay
que tirar de él desde el interior de la vinoteca y sustituir un filtro nuevo.

178
En caso de fallo de alimentación
La mayoría de los cortes de electricidad se resuelven en poco tiempo. Un corte de luz de 1 ó 2 horas
no afectará a las temperaturas de su vinoteca.
Para proteger sus vinos durante los cortes de electricidad, considere la posibilidad de minimizar el
número de aperturas de las puertas.
En caso de cortes de energía muy prolongados, tome las medidas necesarias para proteger su vino.
• Si la unidad se desenchufa, se apaga o se produce un fallo de alimentación, debe esperar de
3 a 5 minutos antes de volver a ponerla en marcha. Si intenta reiniciarlo antes de este
tiempo, el compresor sólo se pondrá en marcha después de 3/5 minutos (si la temperatura lo
requiere).
• Cuando la vinoteca se pone en marcha por primera vez y después de un largo periodo de no
utilización, es posible que las temperaturas seleccionadas y las mostradas no se
correspondan al reiniciar la vinoteca. Esto es normal. A continuación, habrá que esperar
unas horas hasta que las temperaturas vuelvan a ser estables.
• En caso de que se produzca un corte de corriente, las temperaturas ajustadas se almacenan
en el aparato. Por lo tanto, cuando el aparato se pone de nuevo en funcionamiento, no es
necesario reprogramar las temperaturas de la vinoteca.
¡Tenga cuidado!
En caso de corte de luz, la vinoteca electrónica deja de registrar los movimientos, por lo que
es importante evitar el cambio de existencias de vino.
Cuando se restablezca el suministro eléctrico, la vinoteca actualizará las existencias para
detectar un lanzamiento o una adición de una nueva botella.
Si se realiza una operación de adición o retirada a través de la aplicación, ésta registrará los
cambios, pero si se trata de una acción libre (sin pasar por la aplicación) y se retira una
botella y se sustituye por otra nueva en la misma ubicación, la vinoteca no hará la distinción
cuando vuelva a arrancar.
Si se va de vacaciones
-Estancias cortas: deje su vinoteca en funcionamiento durante su estancia si ésta dura
menos de 3 semanas.
-Almacenamiento a largo plazo: Si su aparato no va a ser utilizado durante varios meses,
retire todas las botellas y accesorios, apague y desenchufe el aparato de la red eléctrica.
Limpie y seque bien el interior y el exterior del aparato. Deja también la puerta abierta,
bloqueándola si es necesario, para evitar la formación de condensación, olores y moho.
Si necesita trasladar su vinoteca
• Desenchufe su vinoteca antes de cualquier operación.
• Retire todas las botellas del tanque y asegure las partes móviles.
• Para evitar que se dañen los tornillos de nivelación de las patas, atorníllelos completamente
en su base.
• Cierra la puerta por completo.
• Lo mejor es colocar la unidad en posición vertical o anotar la dirección en la que se puede
colocar la unidad en el embalaje. Proteja también la unidad con una manta o material similar.

179
7. EN CASO DE FALLO
A pesar de todo el cuidado que ponemos en nuestros productos, nunca se puede excluir por
completo una avería. Antes de ponerse en contacto con el servicio técnico de su concesionario,
compruebe que :
• El enchufe siempre está en su sitio
• No hay ningún corte de luz
• Que la avería no se deba a una de las causas descritas en la tabla al final de este manual.
IMPORTANTE: Si el cable de alimentación suministrado está dañado, debe ser sustituido por
el fabricante, un centro de servicio autorizado o el distribuidor. En todos los casos, debe ser
sustituido por personal cualificado para evitar el riesgo de lesiones.
SI ESTAS COMPROBACIONES NO TIENEN ÉXITO, PÓNGASE EN CONTACTO CON EL
SERVICIO TÉCNICO DE SU CONCESIONARIO. ATENCIÓN!
Desenchufe el aparato de la toma de corriente antes de realizar cualquier tipo de
mantenimiento o reparación.

180
8. PROBLEMAS Y POSIBLES CAUSAS
Muchos problemas pueden solucionarse fácilmente, ahorrando el coste de una llamada de servicio.
Intente resolver su problema siguiendo las siguientes sugerencias antes de llamar al servicio técnico.
GUÍA PARA LA RESOLUCIÓN DE PROBLEMAS
PROBLEMA
POSIBLE CAUSA
La vinoteca no funciona
La unidad no está enchufada.
El aparato está apagado.
El disyuntor se ha disparado o se ha fundido un fusible.
La vinoteca no hace suficiente frío
Compruebe el ajuste de la temperatura.
El entorno exterior puede requerir un ajuste más alto. La
puerta se abre con demasiada frecuencia.
La puerta no está bien cerrada.
La junta de la puerta no está totalmente adherida.
La unidad se enciende y apaga con
frecuencia
La temperatura ambiente es más alta de lo normal.
Se han añadido muchas botellas a la vinoteca. La puerta se
abre con demasiada frecuencia.
La puerta no está bien cerrada.
La temperatura no está ajustada correctamente. La junta de
la puerta no está totalmente adherida.
La iluminación interior no funciona
La unidad no está enchufada.
El disyuntor se ha disparado o se ha fundido un fusible. El
indicador luminoso no funciona.
El botón de activación de la luz está en la posición OFF
Vibraciones
Compruebe y asegúrese de que el sótano está nivelado.
La vinoteca parece hacer demasiado
ruido
El ruido de "traqueteo" puede deberse al flujo de
refrigerante, que es normal.
Al final de cada ciclo se puede notar un sonido de
"gorgoteo" debido al flujo de refrigerante en su vinoteca.
La contracción y la expansión de las paredes interiores
pueden provocar ruidos de chasquidos y crujidos.
La vinoteca no está nivelada.
En el modo "mono", los ventiladores de la vinoteca se
activan para agitar el interior de la misma.
La puerta no cierra bien
La vinoteca no está
nivelada. La junta está
sucia o dañada.
Algunos de los contenidos impiden que la puerta
se cierre Las bisagras de la puerta están sueltas
Los estantes no están en el lugar correcto.
Botella colocada pero no detectada
El tamaño de la botella no coincide.
El cuello de la botella no está en contacto con la
barra central de la estantería.
Los sensores de la barra central de la estantería están
sucios => límpielos con un bastoncillo de algodón suave
y seco.
El color del cuello no es detectado por el sensor =>
prueba añadiendo una etiqueta opaca alrededor del
cuello.
La botella no tiene un sello en el cuello => prueba
añadiendo una etiqueta opaca alrededor del cuello. El
sótano está apagado.

181
La vinoteca ya no está conectada a Internet (Wifi).
Botella detectada pero no colocada
Los sensores de la barra central de la cremallera están
sucios =>
Prever la limpieza con un bastoncillo de algodón suave y
seco.
El emparejamiento con la vinoteca
no funciona
El código QR de la unidad maestra se ha
escaneado incorrectamente. El código QR
está dañado.
La conexión Wifi es insuficiente.
Se ha superado el alcance del
Bluetooth. El sótano no está
conectado.
El Wifi o Bluetooth del teléfono no está activado.
Código por defecto "EE
Fallo del sensor de temperatura.
Código por defecto "HH
Alarma de alta temperatura, por favor desenchufe o apague
su vinoteca y póngase en contacto con su SAV
Código por defecto "LL
Alarma de baja temperatura, por favor desenchufe o apague
su vinoteca y póngase en contacto con su SAV
Código por defecto "DD
No hay ninguna anomalía, el aparato está descongelando =>
esperar a que termine el descongelamiento
El agua que fluye de mi vinoteca
El agujero de drenaje dentro de su sótano está
bloqueado. El sótano no tiene suficiente pendiente
hacia atrás.
El tanque de agua detrás de la vinoteca está lleno.
El LED rojo parpadea continuamente
en la parte inferior de la unidad
maestra
La vinoteca no está conectada o ha perdido la conexión a la
red Wifi
Uno o varios LEDs permanecen
encendidos en la parte frontal de mis
estanterías
Has hecho una llamada de posición y no has
recogido/dejado la(s) botella(s).
Espere 5 minutos a que se apague solo o abra y cierre la
puerta de la vinoteca
Los botones del panel de control no
funcionan
Compruebe que el panel de control no está bloqueado, el
candado aparece en la pantalla. Desbloquear pulsando la
tecla
llave con símbolo de candado para desbloquear el panel de
control
Tengo diferencias entre mi vinoteca
digital y física (más/menos botellas)
¿Has hecho algún cambio durante un corte de luz?
Consulte las preguntas frecuentes de la aplicación Vinotag
para ver cómo resolver sus lagunas de stock.
No puedo escanear el código QR de
la bodega
Prefiera el escaneo del código QR presente en la
parte inferior de la hoja de calidad de su bodega.
Coloque la hoja de calidad sobre un soporte plano y
seco a la luz para facilitar el escaneo del código QR.
Si tiene dificultades para escanear el código QR de
la bodega (masterbox QR), le recomendamos que
encienda la luz LED en la bodega, aumentando el
nivel de brillo le resultará más fácil detectar el
código QR con su teléfono . Para los teléfonos que
necesitan una cierta distancia para enfocar, puede
sacar el estante superior de su bodega para tener
una mejor distancia entre la lente de su teléfono y el
código QR de la bodega.
La etiqueta del vino I fotografía no es
reconocida por la aplicación
La foto tomada a través de la aplicación debe ser de
buena calidad (no borrosa), la foto debe tomarse de
manera que la etiqueta del vino llene el marco
blanco de la aplicación. Si eso aún no funciona,
intente tomar una foto en primer plano del nombre

182
del vino.
Códigos de error
Código de error
Significado
HH
Alarma de alta temperatura
LL
Alarma de baja temperatura
DD
Dispositivo en descongelación
EE
Fallo del sensor de temperatura
Si aparece cualquier otro código, como A,B,C,D,E,G,I,J,K,M,N,O en su pantalla, póngase en contacto
con el servicio de atención al cliente.
9. MEDIO AMBIENTE
Este producto cumple con la Directiva 2019/290/EU de la UE sobre residuos de aparatos
eléctricos y electrónicos (RAEE). Al asegurarse de que este producto se desecha
correctamente, ayudará a evitar las posibles consecuencias negativas para el medio
ambiente y la salud humana que pueden derivarse de la manipulación inadecuada de los
residuos de este producto.
El símbolo del cubo de basura tachado en el dispositivo indica que este producto debe eliminarse por
separado de otros residuos domésticos al final de su ciclo de vida. Por lo tanto, debe llevarse a un
centro de recogida selectiva de aparatos eléctricos y/o electrónicos o, si se compra un aparato
equivalente, al distribuidor de este nuevo aparato.
Es responsabilidad del usuario llevar el aparato a las instalaciones de recogida adecuadas al final de
su vida útil. La recogida selectiva y adecuada para enviar el aparato no utilizado para su reciclaje,
tratamiento y eliminación compatible con el medio ambiente, ayuda a evitar posibles efectos
negativos sobre el medio ambiente y la salud y promueve el reciclaje de los materiales de los que
está compuesto el producto.
En caso de enajenación o reventa, los datos personales del usuario quedan protegidos sin necesidad
de que éste actúe. Estos datos no se almacenan en la vinoteca, sino en un servidor externo. Ninguna
información transmitida durante el uso normal de la vinoteca puede ser utilizada después de su
eliminación.
Si el dispositivo se revende, el nuevo usuario debe escanear el código QR de la unidad maestra y
seguir el procedimiento de emparejamiento obligatorio. Este procedimiento sobrescribirá los datos
previamente almacenados en el servidor. El nuevo usuario tendrá una cuenta en blanco. El antiguo
usuario no podrá acceder ni ver su antigua información desde la aplicación Vinotag.
Para obtener información más detallada sobre los sistemas de recogida disponibles, póngase en
contacto con el servicio local de recogida de residuos o con la tienda donde compró la unidad.
10. ADVERTENCIA
Con el fin de mejorar constantemente nuestros productos, nos reservamos el derecho de modificar
las especificaciones técnicas sin previo aviso.
Las garantías de los productos de la marca LA SOMMELIERE son declaradas exclusivamente por
los distribuidores que hemos elegido. Nada de lo aquí expuesto se interpretará como una garantía
adicional.
FRIO ENTREPRISE no se responsabiliza de los errores u omisiones de carácter técnico o editorial
que puedan aparecer en estos documentos. Documento no contractual.

183
1.ISTRUZIONI DI SICUREZZA
Per la vostra sicurezza e per un corretto utilizzo del dispositivo, prima di installarlo e utilizzarlo per la
prima volta, leggete attentamente questo manuale, comprese le avvertenze e i consigli utili in esso
contenuti. Al fine di evitare di danneggiare il dispositivo e/o ferirsi inutilmente, è importante che chi
utilizza questo dispositivo sia pienamente consapevole del suo funzionamento e delle sue funzioni di
sicurezza. Conservare queste istruzioni accanto all'apparecchio in modo che possano essere
trasmesse con esso in caso di vendita o trasloco. Ciò garantirà un funzionamento ottimale del
sistema.
Per evitare il rischio di lesioni, conservare questo foglio illustrativo. Il produttore non può essere
ritenuto responsabile in caso di uso improprio del sistema.
Sicurezza dei bambini e di altre persone vulnerabili
• Questo sistema può essere utilizzato da bambini dagli 8 anni in su e da persone con ridotte capacità
fisiche, sensoriali o mentali, o che non hanno imparato ad usare il dispositivo, supervisionati da una
persona informata e consapevole dei possibili rischi. I bambini non devono giocare con il dispositivo.
La pulizia e la manutenzione da parte dell'utente non devono essere eseguite da bambini, a meno
che non abbiano più di 8 anni e siano sorvegliati.
• Tenere tutti gli imballaggi fuori dalla portata dei bambini, poiché sussiste un rischio di soffocamento.
• Se si decide di smaltire l'apparecchio, scollegarlo dalla presa a muro, tagliare il cavo di
collegamento (il più vicino possibile all'apparecchio) e rimuovere lo sportello per evitare che i bambini
possano giocarci e rimanere fulminati o chiusi all'interno.
• Se l'apparecchio, dotato di guarnizione magnetica della porta, deve essere sostituito da un altro
apparecchio dotato di chiavistello sulla porta o sulla guarnizione, prima di procedere verificare che il
chiavistello non sia funzionante. Ciò eviterà di trasformare questo dispositivo in una trappola per
bambini.
• Tenere il dispositivo e il suo cavo fuori dalla portata dei bambini di età inferiore a 8 anni.
• I bambini non devono caricare e scaricare bottiglie nell'apparecchio.
Sicurezza generale
ATTENZIONE - Questo apparecchio è progettato per funzionare in ambienti domestici e nei seguenti
ambienti:
-locali cucina e attrezzature vendute nei negozi, ambienti di lavoro e uffici;
- Strutture tipo Bed and Breakfast;
-agriturismi e alberghi, motel e altre organizzazioni che accolgono i clienti;
-cucina industriale e altre applicazioni non destinate alla rivendita.
ATTENZIONE - Non conservare mai sostanze infiammabili come aerosol all'interno di questo
apparecchio, poiché potrebbero riversarsi all'interno.
ATTENZIONE - Se il cavo di alimentazione è danneggiato, è necessario sostituirlo immediatamente
presso il produttore, o un rivenditore qualificato, per evitare qualsiasi rischio di scosse elettriche.
ATTENZIONE - Tenere le prese d'aria completamente aperte e controllare che l'aria possa circolare
attraverso le aperture.
ATTENZIONE - Non danneggiare il circuito refrigerante.
ATTENZIONE - Non utilizzare apparecchi elettrici all'interno del vano, a meno che non siano tollerati
dal produttore.
ATTENZIONE - Il refrigerante e il sistema di isolamento contengono gas infiammabili. Quando
smaltisci il sistema, fallo presso un centro di raccolta autorizzato. Non esporre mai il dispositivo alla
fiamma.

184
liquido di raffreddamento
L'isobutano refrigerante (R600a) viene utilizzato nel circuito refrigerante dell'impianto; È un gas
naturale altamente infiammabile e non pericoloso per l'ambiente. Durante il trasporto e l'installazione
dell'impianto, verificare che nessuno dei componenti del circuito refrigerante sia danneggiato. Il
refrigerante (R600a) è un liquido infiammabile.
Attenzione: rischio di incendio
Se il circuito refrigerante è stato danneggiato:
Evitare fiamme libere e tutte le fonti di calore.
Aerare il locale dove si trova l'apparecchio.
È pericoloso alterare in qualsiasi modo la composizione di questo dispositivo.
Eventuali danni al cavo possono causare cortocircuiti e/o scosse elettriche.
Sicurezza elettrica
• Il cavo di alimentazione non deve essere allungato.
• Verificare che la presa a muro non sia danneggiata. Una cattiva presa a muro potrebbe causare il
surriscaldamento e l'esplosione del sistema.
• Assicurarsi di poter accedere alla presa a muro dell'apparecchio.
• Non tirare mai il cavo principale.
• Se la presa a muro è allentata, non collegare il cavo. Esiste il rischio di scosse elettriche o incendi.
• Non utilizzare mai il dispositivo senza la copertura della luce interna in posizione.
• Questo dispositivo funziona con una corrente monofase di 220 ~ 240V / 50Hz.
• Non si devono utilizzare per l’apparecchio ne prolunghe, ne adattatori, ne prese multiprle.
L’apparecchio deve imperativamente essere collegato ad una presa elettrica con messa a
terra secondo le norme elettriche vigenti.
Uso quotidiano
• Questo apparecchio è destinato esclusivamente alla conservazione del vino.
• Non conservare mai sostanze o liquidi infiammabili all'interno del dispositivo; ciò comporterebbe un
rischio di esplosione.
• Non azionare altri apparecchi elettrici all'interno di questo apparecchio (frullatori, gelatiere elettriche,
ecc.).
• Quando si scollega l'apparecchio, tenere sempre la spina tra le mani e non tirare il cavo.
• Non collocare oggetti caldi o parti in plastica in questo apparecchio.
• Questo dispositivo deve essere utilizzato e trattato secondo determinate regole specifiche. Consulta
le regole per la conservazione.
• Non esporre il dispositivo alla luce solare diretta.
• Tenere candele, lampade e altre fiamme libere lontano dall'apparecchio per evitare il rischio di
incendio.
• Questo apparecchio è destinato alla conservazione delle tradizionali bevande domestiche.
• Il dispositivo è pesante. Fare attenzione quando lo si sposta.
• Non utilizzare mai la base, i ripiani, le porte e altri oggetti simili come supporto
• Per evitare la caduta di oggetti e per prevenire danni all'apparecchio, non sovraccaricare i ripiani.
Avvertenze! Pulizia e manutenzione
• Prima di qualsiasi manutenzione, scollegare l'apparecchio e spegnere l'alimentazione.
• Non pulire il dispositivo con oggetti metallici, un sistema a vapore, oli volatili, solventi organici o
componenti abrasivi.
• Non utilizzare oggetti taglienti o appuntiti per rimuovere la brina. Usare eventualmente un raschietto
di plastica.
Informazioni importanti sull'installazione!
• Avvertimento ! Per evitare che la cantinetta si ribalti, è importante caricare in via prioritaria i
posti posti sul retro della cantina. I ripiani non devono essere estratti o lasciati fuori
contemporaneamente. Il peso delle bottiglie può far ribaltare in avanti la cantina, è fondamentale
distribuire il peso delle bottiglie in tutta la cantina e maneggiarla con cura.

185
• Affinché i collegamenti elettrici siano corretti, seguire le istruzioni di questo manuale.
• Disimballare il dispositivo e verificare la presenza di danni visibili. Non collegare il dispositivo se è
danneggiato. Segnala eventuali danni al punto vendita dove lo hai acquistato. In questo caso
conservare l’imballaggio.
• Si consiglia di attendere almeno ventiquattro ore prima di collegare l'apparecchio alla rete elettrica,
in modo che il compressore sia correttamente alimentato con olio.
• È necessaria una buona circolazione dell'aria per evitare il rischio di surriscaldamento. Per una
ventilazione sufficiente, seguire le istruzioni di installazione fornite. Avvertimento ! Questo
apparecchio di refrigerazione non è destinato all'uso come dispositivo da incastro o da incasso.
• Evitare che l'apparecchio tocchi le pareti e/o venga a contatto con elementi caldi (compressore,
condensatore, radiatori, apparecchi di cottura, asciugabiancheria, ecc.) per evitare il rischio di
incendio e surriscaldamento dell'apparecchio. Seguire sempre attentamente le istruzioni di
installazione.
• Verificare che le prese siano accessibili una volta installata l'apparecchiatura.
• Fare attenzione a non incastrare o danneggiare il cavo di alimentazione durante l'installazione
dell'apparecchio.
Risoluzione dei problemi e pezzi di ricambio
• Tutte le operazioni elettriche devono essere eseguite da un tecnico qualificato e competente.
• Questo dispositivo deve essere riparato da un centro di riparazione autorizzato e devono essere
utilizzate solo parti originali.
I ricambi estetici e funzionali conformi al REGOLAMENTO (UE) 2019/2019 (Allegato II, punto 3.),
sono messi a disposizione dei riparatori autorizzati e degli utilizzatori finali per un periodo di 7 anni o
10 anni (Elenco nell'Allegato II, punto 3 .a.1 e 3.a.2) dal momento in cui l'ultima unità del modello è
immessa sul mercato.
L'elenco dei pezzi di ricambio e la procedura per ordinarli (accesso professionale / accesso privato)
sono disponibili sul seguente sito Web: www.interfroidservices.fr o per posta al seguente indirizzo:
FRIO - Interfroid Services, 143 Bd Pierre Lefaucheux - 72230 ARNAGE Altri ricambi funzionali non
specificati nel regolamento UE 2019/2019, sono disponibili per un periodo di 10 anni.
La garanzia del produttore è di 1 anno per le parti funzionali.

186
R600a
Istruzioni di sicurezza
Attenzione: non utilizzare dispositivi
meccanici o altri mezzi per accelerare il
processo di sbrinamento, diversi da
quelli consigliati dal produttore.
Attenzione: non ostruire le griglie di
ventilazione sul dispositivo.
Attenzione: non conservare sostanze
esplosive come bombolette spray con
propellenti infiammabili in questo
dispositivo.
Attenzione: non danneggiare il circuito
frigorifero dell'apparecchio.
Avvertenza: poiché le unità di
refrigerazione funzionano con isobutano
(R600a), non possono essere collocate
in un'area con fonti di ignizione. Il tipo di
refrigerante è indicato sulla targhetta
dell'apparecchio.
Avvertenza: Non utilizzare apparecchi
elettrici nei vani dell'apparecchio, a
meno che non siano del tipo consigliato
dal produttore.
Questo dispositivo è conforme ai requisiti delle Direttive Europee e alle loro eventuali modifiche.
2. TARGA INFORMATIVA

187
La targhetta informativa applicata all'interno o sul retro del dispositivo (a seconda del modello)
contiene tutte le informazioni specifiche del dispositivo.
Si consiglia di annotarne il numero di matricola in questo libretto prima di installarlo, in modo da
poterlo consultare successivamente in caso di necessità (intervento tecnico, richiesta di assistenza,
ecc.).
Una volta installato e caricato il dispositivo, il suo accesso è più complicato.
ATTENZIONE: senza queste informazioni non è possibile fornire assistenza.
3. DESCRIZIONE PRODOTTI
Per saperne di più sul prodotto, consultare il database EPREL online. Come definito nel Regolamento
delegato (UE) 2019/2016 della Commissione, tutte le informazioni relative a questo apparecchio di
refrigerazione sono disponibili sulla base EPREL (Database europeo dei prodotti per l'etichettatura
energetica). Questo database consente di consultare le informazioni e la documentazione tecnica del
proprio apparecchio di refrigerazione. Per accedere al Database EPREL, scansionare il codice QR
sull'etichetta energetica dell’elettrodomestico oppure andare direttamente su: www.ec.europa.eu e
inserire il modello dell’apparecchio di refrigerazione.
Trovate tutte le informazioni dell'ECELLAR185
e le sue istruzioni scaricabili dal sito www.lasommeliere.com

188
Capacità annunciata
• La cantina ECELLAR185 ha una capacità di 185 bottiglie
• La cantina è dotata di 14 ripiani connessi
• Ogni ripiano può contenere 12 bottiglie
• La cantina dispone di una zona di stockaggio che può ospitare 17 bottiglie
La capienza annunciata è la capienza massima calcolata con il numero di scaffali venduti con la
cantina. I ripiani connessi della cantina E-cellar sono stati dimensionati per ospitare una bottiglia di
champagne. Questa particolarità permette di conservare qualsiasi tipo di bottiglia da 75cl, come:
bordeaux, champagne, borgogna, Alsazia, oltre a formati atipici Prosecco, Sachetto, Mateus ecc...
Avvertimento ! Il diametro massimo delle bottiglie poste sui ripiani deve essere di 9 cm.
Nel caso in cui desideri invecchiare bottiglie di dimensioni diverse, vi consigliamo di alternare una
bottiglia tipo bordeaux standard tra le tue bottiglie di dimensioni maggiori, questa raccomandazione vi
consentirà di evitare problemi di conservazione.
È infatti possibile che l'accostamento di bottiglie in formato atipico o imponente vi costringa a
utilizzare solo parzialmente le posizioni del tuo scaffale. Alternare una bottiglia standard (bordeaux
75cl) con una bottiglia atipica o imponente vi permetterà di sfruttare tutti gli spazi disponibili del tuo
scaffale.
Se, nonostante i nostri sforzi, alcuni formati di bottiglia non vengono rilevati dagli scaffali della cantina
elettronica, seguire le seguenti istruzioni:
Se una bottiglia è troppo grande e non sta tra due ripiani, vi consigliamo di appoggiarla:
• Sul primo ripiano della cantina (dall'alto verso il basso)
• Nella zona di stockaggio situata in fondo alla cantina
Consigli sulla disposizione
Si consiglia la disposizione iniziale delle attrezzature del vostro apparecchio (ripiani, ecc.) in modo
che l'energia venga utilizzata nel modo più razionale possibile dall'apparecchio di refrigerazione.
Qualsiasi modifica a questa disposizione può influire sul consumo energetico del dispositivo.
Caratteristiche della radiofrequenza
Con la presente, La Sommelière dichiara che l'apparecchiatura radio ECELLAR185 è conforme alla
Direttiva 2014/53/UE e a tutte le direttive europee applicabili. Direttiva disponibile su: https://eur-
lex.europa.eu/legal-content/FR/TXT/?uri=CELEX%3A32014L0053&qid=1617885639187
• Banda radio: da 2400 MHz a 2483,5 MHz
• Potenza massima: 100 mW
Il certificato CE è accessibile e scaricabile dal sito La Sommelière:
https://www.lasommeliere.com/fr/155-ECELLAR185.html
4. ISTRUZIONI PER L'INSTALLAZIONE
Prima di utilizzare la tua cantina
• Rimuovere l'imballaggio esterno e interno.
• Lasciare il dispositivo in posizione verticale a riposo per circa 24 ore prima di metterlo in servizio.

189
Ciò ridurrà la possibilità di malfunzionamento del sistema di raffreddamento dovuto al trasporto.
• Pulire l'interno con un panno morbido e acqua tiepida.
• Quando si installa il dispositivo, scegliere una posizione autorizzata.
• Posizionare il dispositivo su un pavimento sufficientemente robusto da sostenerlo quando è
completamente carico.
• Posiziona la tua cantina su un pavimento abbastanza robusto da sostenerla a pieno carico.
• Regolare i piedini dell'apparecchio in modo che la parte anteriore della cantina sia a livello e la
parte posteriore sia leggermente inclinata all'indietro. Questa inclinazione mantiene in posizione i
cassetti oi ripiani nonostante il peso delle bottiglie. L'inclinazione garantisce inoltre un buon
drenaggio dell'acqua di condensa e una buona tenuta della guarnizione della porta.
• È necessaria un'adeguata ventilazione, non ostruire alcuna uscita d'aria.
• Questo apparecchio è concepito per l'installazione indipendente. Non deve in nessun caso
essere incassato o integrato. È necessario osservare una buona circolazione dell'aria intorno al
dispositivo.
• Collegare la cantina a un'unica presa, lasciare uno spazio di 50 mm tra il retro della cantina e il
muro e 100 mm su ciascun lato e sopra il tuo dispositivo. Assicurarsi di regolare i piedini
dell'elettrodomestico in modo che la parte anteriore della cantina sia a livello e la parte posteriore
sia leggermente inclinata all'indietro (si consiglia l'uso di una livella a bolla). Ciò impedirà qualsiasi
movimento dovuto all'instabilità, che genera rumore e vibrazioni, e garantirà la perfetta tenuta
dell'anta.
• Questo dispositivo viene utilizzato solo per la conservazione dei vini.
• Questo apparecchio utilizza gas refrigerante infiammabile, quindi non danneggiare mai il tubo di
raffreddamento durante il trasporto.
Avvertenze
• Conservare le bottiglie chiuse.
• Non sovraccaricare il dispositivo.
• Non aprire la porta più del necessario.
• Non coprire i ripiani con fogli di alluminio o altro materiale che potrebbe impedire una buona
circolazione dell'aria.
• Se la cantinetta deve essere lasciata vuota per lungo tempo, si consiglia di scollegare
l'apparecchio dalla presa di corrente e, dopo un'accurata pulizia, di lasciare la porta socchiusa per
consentire la circolazione dell'aria ed evitare la formazione di muffe e funghi.
ATTENZIONE: Si prega di tenere il dispositivo lontano da qualsiasi sostanza che potrebbe
creare un rischio di incendio.
Installate la vostra cantina
Attenzione ! Per evitare che la cantinetta si ribalti, è importante caricare prioritariamente i
posti posti sul retro della cantina. I ripiani non devono essere estratti o lasciati fuori
contemporaneamente. Il peso delle bottiglie può far ribaltare in avanti la cantina, è
fondamentale distribuire il peso delle bottiglie in tutta la cantina e maneggiarla con cura.
Alimentazione
Collegare la cantinetta a un'unica presa di tipo E a parete.
La cantina deve essere collegata a un'unica presa facilmente accessibile.
Tutte le questioni relative all'alimentazione e/o alla messa a terra devono essere gestite da personale
qualificato (elettricista, servizio autorizzato).
Posizionamento
• Attenzione ! La cantina deve essere collocata in un ambiente pulito (non polveroso), al riparo dal

190
gelo, lontano da fonti di calore, tipo: radiatore, forno, luce solare, ecc... non deve essere installata
all'aperto.
• Collocare la cantina in un luogo sufficientemente robusto da sostenere il peso a pieno carico.
• Per livellarlo, regolare l'altezza dei piedini regolabili sotto la cantina.
Questo dispositivo è adatto al funzionamento in ambienti con una temperatura ambiente molto
specifica, questa classe climatica è indicata sulla targa informativa.
N: Questo apparecchio di refrigerazione è destinato all'uso a temperature ambiente comprese tra
16°C e 32°C. La temperatura ambiente influenza la temperatura interna e l'umidità della vostra
cantina.
La temperatura del dispositivo è regolabile tra 5°C e 20°C. La temperatura è regolata da un
termostato. La modifica della temperatura genera un maggiore consumo di energia.
Il dispositivo garantisce il mantenimento della temperatura finché è in funzione e viene utilizzato in
normali condizioni di utilizzo. La temperatura all'interno dell'apparecchio e il suo consumo energetico
possono essere influenzati da molti fattori: temperatura ambiente, esposizione al sole, numero di
aperture delle porte e quantità immagazzinate… Leggeri sbalzi di temperatura sono perfettamente
normali e corrispondono a cicli di freddo dell'apparecchio. Ma queste variazioni non influiscono in
alcun modo sulla temperatura di conservazione dei vini, essendo queste variazioni troppo brevi per lo
scambio termico con le bottiglie.
Installazione della maniglia
- Rimuovere la maniglia e le sue due viti dal sacchetto di plastica all'interno della cantina.
- Prima di installare la maniglia, è necessario rimuovere la guarnizione della porta su una parte. Ciò
non pregiudica la tenuta della guarnizione se si ha cura di rimuoverla correttamente.
- Staccare la guarnizione dall'angolo della porta fino al livello necessario quindi inserire le due viti nei
fori della maniglia.
- Avvitare la maniglia e rimettere la guarnizione nella fessura della porta fino all'angolo.
Portata WiFi della cantina
Attenzione! La cantina ECELLAR funziona con una connessione Wifi.
Attenzione! È responsabilità dell'utente assicurarsi che la rete wifi sia sufficiente
(velocità/intensità del segnale) per il corretto funzionamento della cantina collegata.
• Potrebbe essere necessario l'uso di un amplificatore/ripetitore wifi per una connessione a bassa

191
velocità.
In caso di perdita della connessione internet, la E-cantina salva fino a 100 eventi una volta ripristinata
la connessione.
Le informazioni e un aggiornamento delle scorte verranno inviate al server.
Oltrepassati i 100 eventi, i più vecchi vengono cancellati da quelli nuovi.
L'utente potrà vederli nella sezione "Avvisi" della sua applicazione.
In caso di interruzione di corrente, la cantina non può tenere conto di alcun movimento e perde anche
gli eventi in attesa di sincronizzazione con il server.
Al riavvio dopo un'interruzione di corrente, l'ultima versione salvata nel cloud verrà utilizzata per
rappresentare il contenuto corrente della cantina. È quindi importante evitare qualsiasi modifica del
contenuto della cantina durante un'interruzione di corrente per non generare anomalie tra il registro
digitale e il contenuto della cantina.
Portata bluetooth della cantina
Attenzione! La cantina ECELLAR funziona con bluetooth durante la fase di abbinamento della cantina
alla rete Wifi. Durante il suo utilizzo quotidiano, la cantina comunica solo attraverso la rete Wifi.
La portata del Bluetooth della cantina è di 3 m massimo con la porta chiusa.
Igrometria
All'interno della vostra cantina è stata progettata una vaschetta di raccolta dell'acqua in cima al
gradino del compressore, sarà possibile vedere regolarmente dell'acqua al suo interno per aiutare a
mantenere il livello di umidità nella vostra cantina.
o Se in questo serbatoio è presente troppa acqua, l'eccesso viene scaricato attraverso il foro di
scarico dell'acqua di condensa in un serbatoio di raccolta posto sopra il compressore.
o Ricordati di inclinare leggermente la tua cantina all'indietro svitando i due piedini anteriori per
mantenere un drenaggio corretto dell'acqua.
o Il foro di scarico non deve essere ostruito.
Réservoir d’eau
Trou d’évacuation des eaux vers
le compresseur

192
5. ISTRUZIONI D’USO
Pannello di controllo
La cantina ECELLAR185 è dotata di un pannello di controllo elettronico con schermo LCD.
Il pannello di controllo si trova all'interno della cantina sul lato sinistro
Lo schermo si bloccherà automaticamente dopo 15 secondi di inattività, nel qual caso l'icona B sarà
visibile sullo schermo.
La retroilluminazione del display si spegne automaticamente dopo 15s di inattività dopo aver bloccato
il display, si riaccende non appena si preme nuovamente un tasto. Quando è presente un codice di
errore o un allarme, lo schermo si sblocca automaticamente.
RIFERIMENTO
DESCRIZIONE
A
Indica la modalità cantina: MONO (monotemperatura) o AUTO
(multitemperatura)
B
Spia di blocco, indica che il touchpad è bloccato
C
Indicatore luminoso, indica se la luce è accesa
D
Temperatura programmata all'interno della cantina. Di default l'e-
Cellar visualizza la temperatura di setpoint sullo schermo digitale,
tuttavia puoi consultare la temperatura effettiva presente nella tua
cantina tenendo premuti i tasti I + J per 3 secondi, poi la
temperatura effettiva letta dalla sonda verra' visualizzata sul display
e lampeggerà. Rilasciare i pulsanti e lo schermo tornerà alla
normale visualizzazione della temperatura.
E
Indicatore dell'unità di misura della temperatura indicato in gradi
Celsius dal simbolo °C o in Fahrenheit dal simbolo °F.
F
Pulsante cambio unità di misura della temperatura:
- Gradi Celsius indicati dal simbolo "° C" o
- Fahrenheit indicati dal simbolo "F"
G
Selezione modalità cantina; di default la cantina è in modalità
MONO, premere una volta per mettere la cantina in modalità AUTO
(uso multitemperatura)
H
Pulsante per attivare/disattivare la luce
I
Manopola di regolazione della temperatura. Premere questo
pulsante per aumentare la temperatura al livello desiderato. La
temperatura della cantina è regolabile tra 5°C e 20°C in modalità
MONO (singola temperatura). In modalità AUTO (multitemperatura)
la cantina gestisce da sola la temperatura interna, in questa
modalità questi pulsanti non funzionano.
J
Manopola di regolazione della temperatura. Premere questo
pulsante per ridurre la temperatura al livello desiderato.
La temperatura della cantina è regolabile tra 5°C e 20°C in modalità
MONO (singola temperatura). In modalità AUTO (multitemperatura)
la cantina gestisce da sola la temperatura interna, in questa
modalità questi pulsanti non funzionano.
K
Premi questo pulsante per accendere o spegnere la cantina senza
staccare la spina.
L
Premere questo pulsante per sbloccare/bloccare il pannello di
controllo. Premere il pulsante per 3 secondi per bloccare o
sbloccare lo schermo. Senza alcuna azione da parte vostra, lo
schermo si bloccherà automaticamente dopo 15 secondi.

193
Allarmi
Per garantire la totale sicurezza dei vostri vini, la vostra cantina è dotata di un sistema di allarme;
- Allarme alta temperatura
- Allarme bassa temperatura
Questi allarmi sono preprogrammati. Se dopo 12 ore di funzionamento la cantina rileva una differenza
di temperatura di ± 4°C dalla temperatura impostata, allora la cantina visualizzerà un codice di errore
corrispondente all'allarme alto o basso e si attiverà un allarme acustico. In caso di guasto il
compressore funzionerà con cicli brevi di 10 minuti ON e 10 minuti OFF.
Per disattivare l'allarme acustico, premere uno dei pulsanti sul pannello di controllo.
Se uno di questi allarmi viene attivato, contattare il servizio clienti.
Master box
La vostra cantina è dotata di una master box. Questa scatola è posta all'interno della cantina, in alto a
destra; consente la connettività tra gli scaffali e l'applicazione per smartphone VINOTAG® tramite
trasmissione dati via WiFi.
Avvertenza! Questa master box non deve mai essere manipolata o danneggiata.
Questa master box è dotata di una spia luminosa posta sotto la master box che dà informazioni sullo
stato della cantina e di un pulsante che serve per "reimpostare" la connessione wifi dalla cantina alla
rete. Il lampeggio continuo della spia indica che la cantina non è connessa o ha perso la connessione
alla rete WiFi.
Questa master box è anche dotata di un codice QR situato sotto il bordo inferiore (codice QR
accessibile anche sulla scheda qualità fornita al momento dell'acquisto della tua cantina).
• Prima utilizzazione
Il codice QR viene utilizzato per l'associazione della cantina (in Bluetooth). Dovrete scansionare
questo codice QR al primo utilizzo per connettere la cantina alla rete wifi.
Si prega di notare che la scansione del codice QR e la procedura di associazione
devono essere eseguite solo una volta! Se eseguite questa operazione su una cantina
già associata ad un utente, ne diventerete il nuovo proprietario e cancellerete tutti i
dati precedentemente associati alla cantina. Questo vi darà accesso a una cantina

194
vuota e il precedente proprietario non avrà più accesso alla cantina. Attenzione,
questa azione è irreversibile e i dati cancellati non possono essere recuperati.
Attenzione! Quando il master box non è connesso a una rete WiFi, un LED rosso lampeggia
continuamente sotto di esso.
Attenzione! Non rimuovere i vari QR code presenti nella E-cantina, questi sono utili per
l’abbinamento con la cantina o per la manutenzione.
Attenzione! Per garantire il corretto utilizzo della cantina, questa dev’essere posizionata in un luogo
che garantisca una ricezione wifi di buona qualità.
• Reset della connessione alla rete wifi o cambio operatore
Per eseguire un reset WiFi, premere per 3 secondi il pulsante situato sotto la master box. Usando una
mano, tenete saldamente la master box dall'alto e premete il pulsante spingendo dal basso. Questa
operazione è utile in caso di cambio della internet box.
Ripiani connessi
La tua cantina è dotata di 14 ripiani connessi. Questi scaffali sono stati concepiti, prodotti e
assemblati in Francia.
Le mensole comunicano con la master box della tua cantina. Lo stoccaggio delle bottiglie sugli
scaffali avviene in quinconce, nelle 12 posizioni definite.
I colli delle bottiglie devono poggiare sulla barra centrale, a livello delle posizioni predefinite. La spia
corrispondente alla posizione lampeggia due volte per indicare il corretto rilevamento della vostra
bottiglia. Se la bottiglia è posizionata in modo errato, è possibile che il collo non venga rilevato dal
sensore, riposizionare correttamente la bottiglia sullo scaffale per garantire il corretto rilevamento. La
convalida di un'operazione è confermata da un doppio lampeggio della spia
Le bottiglie appoggiate sui ripiani saranno leggermente inclinate di 4° (quattro gradi) sulla barra
centrale, questo è normale e facilita il rilevamento delle strozzature da parte dei sensori.
È importante che i colli delle bottiglie appoggino dritti sulla barra centrale, i colli non devono essere
sollevati o posizionati inclinati sulla barra centrale, altrimenti potrebbe compromettere il rilevamento
delle bottiglie.

195
• Attenzione! Per evitare che la cantinetta si ribalti, è importante caricare prima i posti sul retro
della cantina. I ripiani non devono essere estratti o lasciati fuori contemporaneamente. Il peso
delle bottiglie può far ribaltare in avanti la cantina, è fondamentale distribuire il peso delle bottiglie
in tutta la cantina e maneggiarla con cura.
• Attenzione! Non estrarre contemporaneamente i 14 ripiani collegati una volta caricati.
• Attenzione! Se le bottiglie vengono appoggiate su un ripiano, eseguire l'operazione con
delicatezza per non danneggiare il supporto centrale.
• Attenzione! I ripiani non sono realizzati per ospitare bottiglie con diametro superiore a 9 cm.
• Attenzione! In caso di rottura della bottiglia, è importante rimuovere le bottiglie e pulire i fori nella
barra centrale dei ripiani dove sono posizionati i sensori, utilizzando un panno morbido e asciutto.
Assicuratevi di riesaminare le bottiglie prima di rimetterle in cantina.
• Attenzione! Al primo utilizzo, l'utilizzatore deve rimuovere la pellicola protettiva in plastica posta
sulla parte anteriore di ogni ripiano.
I ripiani sono dotati di spie luminose (LED) che indicano all'utente:
- Le bottiglie ricercate
- La localizzazione consigliata (fare riferimento al paragrafo sulla funzione E-Sommelier)
- Il rilevamento delle bottiglie in cantina durante la rimozione o l'aggiunta di bottiglie
Attenzione: in un caso particolare i led possono rimanere accesi sui frontali dei ripiani, nel sistema
elettronico è programmato un ritardo di 5 minuti, trascorso questo tempo i led si spegneranno
automaticamente

196
Modi d’uso
La vostra cantina ha due modalità di temperatura:
• La modalità "monotemperatura" è attivata per impostazione
predefinita. Permette la scelta di un'unica temperatura in tutta la cantina
tra +5 e +20°C.
In questa modalità vengono attivati i ventilatori per garantire la circolazione
dell'aria.
La temperatura visualizzata sullo schermo digitale corrisponde alla
temperatura impostata e viene visualizzato il messaggio "MONO".
• La modalità "multitemperatura" permette di ottenere diverse
temperature all'interno della cantina, sotto forma di gradiente che va da
una temperatura più calda nella parte superiore della cantina, temperata
nella parte centrale e più fredda nella parte inferiore della cantina.
In questa modalità le ventole sono disattivate.
La temperatura di setpoint è fissa e non può essere modificata, lo schermo
visualizza "AUTO"; il dispositivo gestisce automaticamente la temperatura.
Non è necessaria alcuna regolazione
Ecco le temperature che possono essere raggiunte in modalità multitemperatura in condizioni normali
di utilizzo, ovvero una temperatura ambiente di 25°C massimo (fare riferimento alla sezione
"Installazione della vostra cantina").
La distribuzione della temperatura indicata in tabella è data a titolo indicativo, in quanto possono
verificarsi variazioni tra i diversi livelli a seconda dei cicli del freddo, del numero di bottiglie caricate in
cantina e della temperatura ambiente esterna. I flussi d'aria all'interno della cavità saranno influenzati
da questi diversi fattori.
Ripiani
(dall’alto verso il basso)
Gamma di
temperatura
1
14°C - 18°C
Adatto alla conservazione di vini rossi da
degustazione.
2
3
4
10°C - 14°C
Adatto per invecchiare i vostri vini e champagne.
5
6
7
8
9
10
11
5°C - 10°C
Adatto alla conservazione di vini bianchi o rosati e
champagne a temperatura di degustazione.
12
13
14
15
Il dispositivo garantisce il mantenimento della temperatura finché è in funzione e viene utilizzato in
normali condizioni di utilizzo. La temperatura all'interno dell'elettrodomestico e il suo consumo
energetico possono essere influenzati da molti fattori: temperatura ambiente, esposizione al sole,
numero di aperture delle porte e quantità immagazzinata… Leggeri sbalzi di temperatura sono
perfettamente normali.

197
▪ La Modalità demo
Sul tuo dispositivo è presente una modalità demo, quando questa modalità è attivata, il compressore,
le ventole e gli allarmi sono disattivati, tuttavia la cantina mantiene le sue funzioni di visualizzazione e
luce.
Per attivare questa modalità è necessario tenere premuti i tasti luce (H) + C / F (F) per 3 secondi, poi
la temperatura visualizzata o l'icona AUTO lampeggeranno 5 volte.
Per uscire dalla modalità demo ripetere la stessa operazione.
▪ La modalità « ESOMMELIER® »
La modalità ESOMMELIER® è una funzione di posizionamento assistito delle vostre bottiglie che può
essere utilizzata solo se avete una cantina LA SOMMELIERE collegata e un account VINOTAG®
attivo.
Questa funzione consiglia il luogo ideale per conservare il vino.
Quando si scansiona una bottiglia, VINOTAG® identifica il tipo di vino; le temperature di
conservazione sono consigliate per ogni tipologia di vino per una conservazione ottimale.
Determinate posizioni della vostra cantina sono quindi più adatte a seconda del tipo di vino.
Utilizzando questa modalità, la cantina mette a vostra disposizione le postazioni adatte alla scansione
della bottiglia di vino; si accendono delle spie luminose in cantina per mostrarvi queste posizioni, fino
ad un massimo di 12 posizioni simultanee.
Sistema Inverno
La vostra cantina è dotata di un sistema di riscaldamento automatico chiamato anche "sistema
invernale". Quando la temperatura misurata dalla sonda nella cella è troppo fredda rispetto al set
point, allora si attiva la resistenza per consentire il riscaldamento della temperatura.
Questo sistema si attiva e si disattiva automaticamente e senza l'intervento dell'utente. L'attivazione o
disattivazione automatica del sistema Inverno non ha alcun impatto sulla conservazione del tuo vino.
L’applicazione VINOTAG®
La cantina ECELLAR185 è compatibile con l’applicazione di gestione della cantina vini VINOTAG®.
Per utilizzare in modo connesso la propria cantina è necessario disporre di:
• Una fonte di energia elettrica per alimentare la cantina
• Aver scaricato l'applicazione VINOTAG® da App Store o Google Play Store e creato un account
utente
• Una connessione Internet stabile (Wifi)
• Un modello di cantina ECELLAR
Funzioni di VINOTAG®
L'applicazione VINOTAG® ti consente di:

198
• Creare, personalizzare e gestire le tue cantine
• Aggiungere/rimuovere bottiglie
• Consultare i’inventario dei vini (bottiglie di vino nella cantina) e creare i vostri file di vino.
VINOTAG® è associato a VIVINO®, come parte della sua opzione Premium, per consentire di
esportare i file di vino dettagliati dal database VIVINO®.
• Creare e consultare la vostra libreria dei vini. L'esclusiva partnership VINOTAG® - VIVINO®
permette di salvare e consultare le schede dettagliate dei vini dal database VIVINO®
• Condividere la visualizzazione della/e vostra/e cantina/e con i vostri cari
• Essere avvisati della data di picco dei tuoi vini, della necessità di cambiare il filtro della cantina o
di un basso livello di scorta del vostro vino preferito
• Individuare in un colpo d'occhio nella cantina una/e bottiglia/e specifica/e grazie ad un sistema di
spie luminose.
• Individuare in un colpo d'occhio le posizioni disponibili nella tua cantina grazie a un sistema di
spie luminose.
Creare un conto VINOTAG®
• Scaricare l'applicazione VINOTAG® dall'App Store o dal Google
Play Store a seconda del tipo di telefono.
• Creare un account manualmente o tramite Facebook o tramite il suo
account Apple / Google Play
• Completare i campi obbligatori: Nome; Cognome ; Data di nascita ;
Nazione ; Regione
• Spuntare la casella "Accetto le condizioni generali d'uso"
• Cliccare su "Finalizza la mia registrazione"
Ora hai un account VINOTAG®, ricordati di salvare username e
password.
Menu VINOTAG®
Quando l'applicazione è aperta, è visibile il seguente menu:
La mia cantina I miei vini Allerte Profilo
▪ LA MIA CANTINA : Consente di visualizzare la/e vostra/e cantina/e.
▪ I MIEI VINI : Consente di consultare la propria libreria dei vini.
▪ ALLERTE : Permette di consultare le allerte della cantina
▪ PROFILO : Permette di visualizzare in modo completo le informazioni relative al vostro
account

199
Sezione « LA MIA CANTINA »
Questa pagina permette di visualizzare il contenuto della/e vostra/e cantina/e.
• Attenzione! se la cantina è vuota, non potrete visualizzarla; è necessario aggiungere bottiglie per
accedere alla vista della vostra cantina.
• La cantina può essere visibile in modalità lista o in modalità grafica. L'impostazione della
modalità è accessibile tramite l'icona situata in alto a destra dello schermo. Questa icona
consente di passare da una modalità di visualizzazione all'altra. Per impostazione predefinita,
le cantine della categoria “cantina collegata” vengono visualizzate in modalità elenco.
Dettagli icone sulla cantina :
Modalità lista o Modalità grafica
▪ L’icona di ricerca situata in alto a destra dello schermo, vi permette di cercare una
bottiglia di vino nella cantina ; basta scrivere degli elementi di ricerca (nome dominio, tipo di
vino, annata…)
▪ L’icona situata in basso a destra dello schermo, vi permette di aggiungere delle bottiglie
di vino. (Vedere la sezione « aggiungere una bottiglia di vino » per più informazioni)
▪ Attenzione! Se avete più di una cantina, potete passare da una
cantina all'altra tramite il nome della vostra cantina che si trova
in alto a sinistra dello schermo. Quando cliccate sul nome della
cantina, un pop-up vi chiede di selezionare la cantina che
desiderate visualizzare. Cliccate nell'elenco delle cantine sul
modello da visualizzare.
Modalità lista :

200
o Modalità di visualizzazione semplificata. Un elenco vi permette di consultare i vini
custoditi nella cantina. I vini sono elencati in ordine alfabetico.
o La modalità lista indica per ogni vino: il nome del vino, il suo dominio, la sua annata, il
suo colore, la sua tipologia ed infine la foto della bottiglia.
o Cliccando su un vino è possibile accedere alla sua scheda vino.
o Sulla destra dello schermo è presente un indicatore. Indica per ogni vino il tipo di
vino. I tipi di vino sono identificati da una pastiglia colorata. (Disco rosso: indica un
vino rosso / Disco giallo: indica un vino bianco / Disco salmone: indica un vino
rosato).
Modalità grafica :
o La vista grafica della cantina permette di
visualizzare lo riempimento della cantina
indicando le bottiglie immagazzinate tramite
tablet.
o I vini sono classificati per scaffale.
o L'utente può visualizzare, spostare o
eliminare una bottiglia.

201
• Premere su una bottiglia per accedere alla sua scheda vino
• Sulla sinistra dello schermo è presente un indicatore. Questo indica per ogni ripiano il numero di
bottiglie per tipologia di vino. I tipi di vino sono identificati da una pastiglia colorata.
Pastiglia rossa : indica un vino rosso
Pastiglia gialla : indica un vino bienco
Pastiglia salmone : indica un vino rosé
Pagina « I MIEI VINI »
Questa pagina vi permette di visualizzare la vostra libreria dei vini. L'area wine bar permette di:
• Consultare i vini consumati, tutti i vini aggiunti (ancora presenti o meno) nella vostra cantina
vengono automaticamente aggiunti all’area wine library.
• Creare una lista dei desideri; puoi salvare i vini degustati presso gli amici o che vuoi acquistare.
L'area libreria dei vini permette di creare una lista dei desideri.
• L'icona di ricerca situata in alto a destra dello schermo vi permette di cercare una bottiglia di
vino nella vostra enoteca; non dovete far altro che scrivere le informazioni della bottiglia che state
cercando (nome dominio, tipo di vino, anno, ecc.)
• Per aggiungere una bottiglia alla libreria dei vini segute la procedura "Aggiungi bottiglie" e cliccate
su "aggiungi alla mia libreria dei vini"
• Premete su un vino per consultarne la scheda vino (per maggiori informazioni segui la procedura
"consulta scheda vino")
Pagina « ALLERTE »
Questa pagina vi permette di visualizzare gli avvisi relativi alla vostra cantina;
un punto rosso accanto all'icona indica un avviso non letto.
Gli avvisi sono classificati cronologicamente.
Se avete più cantine, è possibile filtrare per cantina (icona del filtro situata in
alto a sinistra dello schermo).
Un campo di ricerca vi consente di filtrare gli avvisi per trovare un evento
specifico.
• Avviso cambio filtro: la cantina vi avvisa quando è necessario cambiare il filtro a carbone. La
data di cambio filtro viene stabilita automaticamente al momento della registrazione di una nuova
cantina. Avvertenza! quando cambiate il filtro, non dimenticate di inserire questa azione nella
cantina in modo che il contatore venga ripristinato alla data corretta. (di default, un cambio filtro
deve essere effettuato ogni anno)
• Avviso di scorta: potete programmare avvisi di scorta per un vino specifico e secondo una
quantità definita. L'applicazione vi avvisa che il vino in questione sta per esaurirsi. (la quantità di
"rottura" è definita da voi, l'avviso può essere impostato su un numero prestabilito di bottiglie.)

202
• Avvisi tecnici: questi avvisi segnalano un problema tecnico o un'azione svolta in cantina:
bottiglia consumata; bottiglia aggiunta; cantina creata; cantina aggiunta; l'utente X è entrato a far
parte della vostra cantina... In caso di problemi tecnici, contattate un tecnico autorizzato. Le
segnalazioni sono presentate sotto forma di elenco che riporta il tipo di segnalazione, la data,
l'ora, il numero dello scaffale interessato, il nome della cantina interessata.
Pagina « PROFILO »
Questa pagina vi consente di visualizzare, completare o modificare le
informazioni relative al vostro account VINOTAG®:
• Modifica i miei dati: per modificare i dati di registrazione
(cognome, nome, data di nascita, paese, dipartimento) o
eliminare il tuo account. Accettare di ricevere notizie e altre
informazioni commerciali da VINOTAG.
• Divento premium: per sottoscrivere l'opzione premium di
VINOTAG® e beneficiare delle scansioni di ricarica. Queste
scansioni consentono di salvare direttamente i file VIVINO® nella
tua cantina, senza più completare manualmente i file del vino
(fare riferimento alla procedura "account premium").
• Le mie cantine: ti permette di visualizzare, modificare,
condividere, eliminare, aggiungere o mantenere le tue cantine. Ti
permette anche di visualizzare le cantine che sono state
condivise con te.
• I miei inviti: consente di consultare i propri inviti.
• Contatto: ti permette di contattare il servizio clienti VINOTAG®
un elenco a tendina ti permette di selezionare l'oggetto della tua
richiesta.
• Condizioni generali di utilizzo: consente di consultare le
Condizioni generali di utilizzo di VINOTAG®
• Note legali: consente di consultare le Note legali di VINOTAG®
• Disconnetti: consente di disconnettersi
Aggiungere una cantina
Ora avete un account VINOTAG® per aggiungere la vostra prima
cantina o una nuova cantina (l'applicazione vi offre la possibilità di
gestire più cantine da una selezione di modelli).
Attenzione ! Non chiudere l'applicazione quando si sta aggiungendo
una cantina.
• Aggiunta di una prima cantina: la creazione della vostra cantina è
obbligatoria quando create il vostro account, seguite i vari passaggi
di seguito.
• Aggiunta di una nuova cantina: volete gestire una nuova cantina
dalla vostra applicazione, andate alla pagina "profilo" -> "le mie
cantine" e cliccate sul pulsante "aggiungi una cantina"; seguire i
diversi passaggi di seguito.
Aggiunta di una « Cantina connessa »

203
• Definire il tipo di cantina “cantina collegata” o “cantina non collegata”. Il modello ECELLAR185 fa
parte della categoria “cantina connessa”. Cliccate su “cantina connessa”.
• Scansionare il codice QR della cantina per consentire all'applicazione di identificarla e collegarsi
ad essa. Il QR code si trova all'interno della tua cantina, sotto la casella master posta in alto a
destra della cantina e in fondo alla scheda qualità fornita con la tua cantina al momento
dell'acquisto. Preferisci la scansione di quest'ultimo, più accessibile, per collegare con facilità la
tua cantina.
• L'applicazione vi chiede di attivare il bluetooth; la sua attivazione è necessaria per configurare la
cantina.
• Una volta connessa la vostra cantina al bluetooth, l'applicazione vi chiede di selezionare una rete
Wifi o di utilizzare un protocollo WPS:
o In caso di rete Wi-Fi, viene richiesta la password del server Wi-Fi. Se la connessione
Wi-Fi fallisce, controllate la password e/o la distanza tra la cantina e il router Wi-Fi Una
distanza troppo grande o muri troppo spessi possono bloccare la connessione. Avvicinare la
cantina al router Wi-Fi per consentirne la connessione.
o Per WPS, durante la scansione viene visualizzata una barra di caricamento. Se non
è stata trovata alcuna rete WPS dopo alcuni secondi, verrà visualizzato un banner di errore
nella parte superiore dello schermo e l'applicazione tornerà alla scelta Wi-Fi / WPS.
Condividere una cantina
In qualità di proprietario di una cantina, potete invitare altre persone a
unirsi alla vostra. La consultazione della vostra cantina richiede che
l'ospite crei un account VINOTAG®.
Per invitare una persona:
• Andare alla pagina "il mio profilo": "le mie cantine"
• Cliccare sul pulsante “Condividi la mia cantina”,
• Indicare l'indirizzo email della persona che si vuole invitare.
• Viene visualizzato un banner di conferma nella parte superiore dello
schermo per confermare l'invio dell’invito
Quando condividi la tua cantina;
• Viene inviata un'e-mail alla persona per segnalarle di essere stata invitata e la si invita a scaricare
l'applicazione. Se non ha un account, sarà in grado di visualizzare le cantine che sono state
condivise con lei subito dopo la registrazione.
• Se la persona invitata ha già un account, riceverà una notifica che indica che è stata aggiunta a
una cantina condivisa.
Eliminare una cantina
• Si desidera eliminare una o più cantine.
• Andare alla pagina "il mio profilo": "le mie cantine"
• Appare l'elenco delle vostre cantine;
• Selezionare la cantina che si desidera eliminare: premere elimina.
• Ripetere l'operazione su tutte le cantine che si desidera eliminare.

204
Attenzione! se la cantina ha almeno una bottiglia, apparirà un pop-up che ti chiederà di confermare
questa azione. Una volta eliminata la cantina, non è più possibile recuperare le relative informazioni.
Attenzione! non è possibile cancellare una cantina di cui non si è proprietari. Quando una cantina è
condivisa con voi e quindi visibile dalla pagina "il mio profilo": "le mie cantine"; si può interrompere la
condivisione. Quando non si è proprietari, il pulsante "Rimuovi" è un pulsante "Esci". Vi permette di
uscire dalla cantina. Viene visualizzato un pop-up per confermare l'azione.
Cambiare la configurazione della cantina
Volete modificare la configurazione della vostra cantina in modo diverso dalla sua configurazione
standard.
Attenzione ! per una cantina nella categoria “cantina collegata”; la configurazione standard
non deve essere modificata. Gli scaffali delle “cantine connesse” sono scaffali intelligenti
collegati alla cantina. Alimentati elettricamente, la loro modifica/rimozione deve essere
effettuata da un professionista abilitato.

205
Aggiungere delle bottiglie
Hai creato la tua cantina nell'applicazione VINOTAG®; ora puoi aggiungere bottiglie.
NOTA. Sincronizzazione: Ogni movimento che avviene in una “cantina connessa” viene
memorizzato da quest'ultima. Ciò consente di conservare una cronologia quando la cantina
non è più connessa a Internet. La prossima volta che vi connetterete al wifi e al cloud, se sono
avvenuti degli spostamenti, sul vostro smartphone comparirà una sincronizzazione, per
recuperare e salvare i nuovi dati nel database in modo che lo stock visualizzato sia
aggiornato.
Creazione cantina Modalità lista Modalità Grafica
• Clicca su "aggiungi la mia prima bottiglia" in caso di nuova cantina o "+"
• Scattare una foto dell'etichetta della bottiglia che si vuole aggiungere alla cantina. Appare una
scheda vino completata; questa scheda proviene dal database VIVINO®. Si può modificare o
completare questa scheda vino. Attenzione! Se la bottiglia di vino scansionata non è disponibile
nel database VIVINO® o se non si ha un abbonamento premium, si dovrà compilare
manualmente la scheda vino associata alla bottiglia. Se lo si desidera, è possibile non fotografare
l'etichetta, in questo caso non si potrà accedere al database VIVINO®, quindi si dovrà compilare
manualmente la scheda vino associata alla bottiglia.
o Quando si aggiunge una bottiglia è possibile completare/modificare la scheda vino associata;
inserire un commento sulla bottiglia di vino, salvarla tra i preferiti o assegnarle una valutazione.
o Quando si desidera completare manualmente un file del vino, è possibile compilare i seguenti
campi:
-
Nome del vino
-
Dominio
-
Denominazione
-
Annata
-
Paese/regione
-
Colore
-
Quantità di bottiglie
o Una modalità "avanzata" consente di fornire informazioni aggiuntive come :
-
Conservazione minima (anni)
-
Massima conservazione (anni)
-
Osservazioni
-
Passa nei preferiti
-
Valuta la bottiglia (da 0 a 5)
-
Prezzo d'acquisto

206
-
Link VIVINO® per trovare la scheda completa (Opzione Premium)
-
Link VIVINO® per acquistare questo vino
o La bottiglia scannerizzata non viene riconosciuta: se la bottiglia non viene riconosciuta,
l'applicazione propone di riavviare la scansione, di cercare manualmente la bottiglia (se nessuna
bottiglia corrisponde alla sua ricerca) o di riempire manualmente il foglio.
o È obbligatorio inserire un tempo di conservazione minimo e massimo per ricevere avvisi di data di
punta. Se i campi del tempo di conservazione minimo e massimo non sono compilati, non verrà
inviato alcun avviso di data di picco.
Aggiungete una bottiglia nella « Cantina connessa »
• Posiziona la/e bottiglia/e nella tua cantina nel luogo/i desiderato/i;
• VINOTAG® ti informa del rilevamento della/e tua/e bottiglia/e e ne registra la/le posizione/i
sulla versione digitale della vostra cantina.
o Quando la bottiglia viene posizionata e rilevata, l'indicatore luminoso corrispondente
lampeggia due volte velocemente. La posizione viene ricordata nella tua app. Viene
quindi visualizzato un pop-up di successo con due pulsanti: "Aggiungi una bottiglia" o
"Fatto".
o Attenzione! Se desideri posizionare la/e bottiglia/e nell'area di stoccaggio in fondo
alla cantina, tieni presente che questa parte della cantina non è collegata.
• Clicca su "+" per continuare ad aggiungere bottiglie alla tua cantina.
Da notare !
L'area di stoccaggio nella parte inferiore della cantina non è connessa.
Tuttavia, l'applicazione consente di tenere un registro digitale delle bottiglie che si desidera depositare
in questa posizione.
• La capacità effettiva dell'area di stoccaggio è di 17 bottiglie in formato champagne.
• L'applicazione permette comunque di registrare un numero maggiore di bottiglie,
permettendo di tenere anche un registro dei vini non conservati nella tua cantina.
Funzione E-Sommelier
Quando si aggiunge una bottiglia a una "cantina connessa"; potete usare la funzione E-
Sommelier. Questa funzione consiglia il luogo ideale per conservare il vino. Quando si scansiona
una bottiglia, VINOTAG® identifica il tipo di vino; le temperature di conservazione sono
consigliate per ogni tipologia di vino per una conservazione ottimale.
Determinate posizioni della vostra cantina sono quindi più adatte a seconda del tipo di vino.
La funzione E-Sommelier vi aiuta a mantenere il vino nelle migliori condizioni. Cliccando su
questo pulsante, la cantina vi offre le posizioni disponibili adatte per la bottiglia di vino
scansionata; le spie luminose si accendono in cantina per mostrarvi questi luoghi.
o Quando la bottiglia viene posizionata e rilevata, l'indicatore luminoso corrispondente
lampeggia due volte velocemente. La posizione viene ricordata nell’app. Viene quindi
visualizzato un pop-up di successo con due pulsanti: "Aggiungi una bottiglia" o "Fatto".
o Attenzione! In caso di guasto, se la vostra cantina non è in grado di rilevare la bottiglia, la
spia luminosa non lampeggerà. Eseguire nuovamente la manipolazione finché la bottiglia non
viene rilevata correttamente e la spia luminosa lampeggia due volte.
o Attenzione! Se non vienite a ritirare/depositare la bottiglia, la spia sulla parte anteriore dello
scaffale rimarrà accesa per 5 minuti, dopo questo tempo la spia si spegnerà
automaticamente.
È anche possibile aggiungere una bottiglia tramite una scheda vino.
• Cliccare sul pulsante in fondo alla pagina "aggiungi una o più bottiglie"
• Immettere il numero di bottiglie da aggiungere e i loro formati.

207
• Posizionare la/e bottiglia/e nella cantina nel luogo/i desiderato/i;
• VINOTAG® vi informa del rilevamento della/e tua/e bottiglia/e e ne registra la/le
posizione/e sulla versione digitale della vostra cantina.
NOTA BENE: la creazione di un account VINOTAG® consente di beneficiare di "50 scansioni
gratuite". Quando si aggiunge una cantina connessa, vengono offerte 1.000 scansioni. Queste
scansioni consentono di beneficiare di file vino precompilati grazie alla partnership
VINOTAG® - VIVINO®. Nel caso in cui siano state utilizzate tutte le scansioni offerte, è
possibile continuare ad aggiungere bottiglie compilando manualmente la propria scheda vino
oppure sottoscrivere l'opzione premium per beneficiare di una ricarica delle scansioni (fare
riferimento al paragrafo “Account Premium”).
Account premium
VINOTAG® collabora con VIVINO® per facilitare l'esperienza dell'utente. Quando si crea un account
VINOTAG®, vengono offerte una serie di "scansioni gratuite".
Queste "scansioni gratuite" si riferiscono all'atto di scattare una foto di una bottiglia per accedere
direttamente a una scheda dettagliata del vino estratta dal database VIVINO®. Attenzione! le bottiglie
non riconosciute vengono contabilizzate come “scansione gratuita” poiché la richiesta di
riconoscimento è stata inviata a VIVINO®. La cattura della foto deve essere di qualità e nitidezza
sufficiente per consentire il riconoscimento della bottiglia.
Questa scheda vino può essere modificata e salvata direttamente nella versione digitale della
cantinetta, non dovrete più compilare manualmente la scheda vino. Un vero risparmio di tempo per
riempire la vostra cantina e accedere a tante informazioni sui vostri vini preferiti.
Nel caso in cui siano state utilizzate tutte le scansioni offerte; è possibile continuare ad aggiungere
bottiglie compilando manualmente la propria scheda vino oppure sottoscrivere l'opzione premium per
beneficiare di una ricarica di scansioni. Un pop-up vi avvisa quando avete esaurito le "scansioni
gratuite".
Per passare a un account premium; l'utente deve sottoscrivere l'opzione premium che gli consente di
acquistare le scansioni di ricarica.
- Ricarica 200 scansioni
- Ricarica 400 scansioni
- Ricarica 1000 scansioni
Le “scansioni” acquistate possono essere utilizzate senza limiti di tempo.
L'abbonamento all'opzione premium e le condizioni tariffarie sono accessibili tramite l'applicazione
VINOTAG® nell'area "il mio account" facendo clic sul pulsante "divento premium".

208
Ritirare delle bottiglie
Avete creato la vostra cantina nell'applicazione VINOTAG®; ora potete togliere le bottiglie dalla
cantina. Le bottiglie saranno conservate nella vostra zona cantina.
Per una cantina di categoria “connessa”
• Togli la bottiglia desiderata dalla tua cantina;
• La cantina collegata rileva il prelievo e informa l’app; un avviso indica il ritiro della bottiglia
sulla tua app
• Consulta la pagina "Avvisi"
allora
• Selezionare una bottiglia di vino e utilizzare la funzione "mostra in cantina"; la cantina
accenderà la/le spia/e corrispondente/i ai luoghi in cui sono conservate le diverse bottiglie di
vino. Attenzione! È possibile accendere contemporaneamente ad un massimo di 12 spie
luminose. Attenzione! Se non vieni a ritirare/lasciare la tua bottiglia, la spia sulla parte
anteriore dello scaffale rimarrà accesa per 5 minuti, dopo questo tempo la spia si spegnerà
automaticamente
• Il prelievo viene rilevato dalla cantina, la spia corrispondente alla vecchia posizione della tua
bottiglia lampeggerà due volte velocemente per confermare il prelievo
• La cantina collegata comunica la richiesta del ritiro; un avviso indica il ritiro della bottiglia sulla
tua domanda
• La visualizzazione della tua cantina si aggiorna automaticamente
Attenzione! per aggiungere o rimuovere bottiglie in una cantina connessa, è necessario essere
connessi ad una rete WiFi per garantire una buona comunicazione delle informazioni tra la tua
cantina fisica e la tua cantina digitale visibile su VINOTAG®.
Consultare una scheda vino
La consultazione delle schede vino è accessibile dalle vostre cantine o dalla vostra area cantina.
Consultazione scheda vino nella mia cantina - modalità lista o nella mia libreria vini
• Clicca sulla bottiglia che preferisci
• Consulta le informazioni relative alla tua bottiglia
• Per maggiori dettagli potete andare sul sito del nostro partner Vivino cliccando su "Vedi su
Vivino"
Consultazione scheda vino in cantina - modalità grafica
• Clicca sullo scaffale che preferisci
• Clicca sulla bottiglia che preferisci
• Consulta le informazioni relative alla tua bottiglia
• Per maggiori dettagli potete andare sul sito del nostro partner Vivino cliccando su "Vedi su
Vivino"
Creare allerte di data di picco
Per creare avvisi di data di punta è obbligatorio inserire nella scheda vino un tempo minimo di
invecchiamento (maggiore di 0) e un tempo massimo di invecchiamento. Il tempo di reperibilità è
espresso in anni. Se la bottiglia non è stata consumata, verrà inviato un avviso di inizio e fine della
data di punta. Per una bottiglia di annata "X" con un tempo di invecchiamento minimo di 5 anni e
massimo di 10 anni, l’avviso sarà come segue:
-
Annata "X" + 5 anni: Preavviso di massima data "La tua bottiglia è pronta per essere
degustata"
-
Annata "X" + 10 anni: Avviso di fine data di picco "La tua bottiglia è alla fine della data di
picco"

209
Creare delle allerte di stock
Per gestire al meglio la vostra cantina e i vostri vini, VINOTAG® propone di impostare avvisi di
giacenza:
•
Tramite la vista della tua cantina sull'applicazione, clicca sulla bottiglia desiderata per
accedere alla scheda vino associata
•
Clicca su "pianifica un avviso"
•
Indica da quante bottiglie rimanenti desideri ricevere un avviso di stock
•
Fare clic su convalida. L'avviso di magazzino è ora attivato.
Per disattivare un avviso di stock, clicca su "modifica avviso"; abbassare il numero di bottiglie
fino a "disattivare". Cliccare su convalida. L'avviso di magazzino è ora disattivato.
Visualizzare la posizione delle vostre bottiglie nella vostra cantina
• In visualizzazione cantina; usa l'icona di ricerca situata in alto a destra dello schermo
• Indicare il nome del vino desiderato e/o dominio e/o altre informazioni relative alla bottiglia
• Viene visualizzata la scheda vino della bottiglia desiderata
• Clicca sul pulsante che si trova in fondo alla pagina "Visualizza le mie bottiglie" o sul pulsante
"Mostra in cantina" che si trova all'inizio della tua scheda vino
• Le spie luminose si accendono nella tua cantina, fino a un massimo di 12
contemporaneamente, per mostrarti la posizione della/e bottiglia/e che stai cercando.
Manutenzione della cantina
Dalla configurazione cantina è possibile mettere in manutenzione la propria
cantina.
Questa manipolazione blocca tutti i movimenti che possono avvenire in
cantina (aggiunta, spostamento, cancellazione).
Lo schermo di avvio è quindi bloccato da un avviso "cantina in
manutenzione"
Per uscire dalla modalità di manutenzione, fare clic sul pulsante "Esci dalla
manutenzione".
Attenzione! Quando esci dalla modalità di manutenzione, puoi:
• Ricaricare la vecchia disposizione
• Tornare in una cantina vuota. In questo caso, devi riavviare il processo dall'inizio e
scansionare la tua prima bottiglia.

210
6. PULIZIA E MANUTENZIONE
Prima di pulire il vostro apparecchio (operazione da fare regolarmente), scollegate l'apparecchio
togliendo la spina dalla presa o scollegando il fusibile da cui dipende.
Vi consigliamo, prima del primo utilizzo e con regolarità, di pulire l'interno e l'esterno (fronte, lati e parte
superiore) con una miscela di acqua tiepida e un detergente delicato. Risciacquare con acqua
semplice, lasciare asciugare completamente prima di ricollegare. Non utilizzare solventi o agenti
abrasivi.
Alla prima accensione possono rimanere odori residui. In questo caso far funzionare l'apparecchio a
vuoto per alcune ore, impostando la temperatura più fredda. Il freddo annienterà questi possibili odori.
Sbrinamento automatico
Sulla vostra cantina è programmato uno sbrinamento automatico. Nessun impatto per i vini conservati
in cantina durante la fase di sbrinamento.
Durante lo sbrinamento il compressore e le ventole saranno spenti. Il display digitale mostrerà la
temperatura normale, tuttavia se vuoi visualizzare la temperatura effettiva della tua cantina, il display ti
mostrerà il codice "DD" che è normale.
Cambio del filtro a carbone
La vostra cantina è dotata di un filtro a carbone, posizionato in basso alla cantina sul fondo a destra. Si
consiglia di sostituirlo una volta all'anno. Per sostituirlo è sufficiente tirarlo dall'interno della cantina e
reinserire un nuovo filtro.

211
In caso di interruzione della corrente elettrica
La maggior parte delle interruzioni di corrente viene risolta in un breve periodo di tempo.
Uno spegnimento di 1 o 2 ore non influirà sulle temperature della vostra cantina.
Per proteggere i vostri vini durante le interruzioni di corrente, minimizzate il numero di aperture delle
porte.
In caso di interruzioni di corrente molto lunghe, adottare le misure necessarie per proteggere il vino.
Se il dispositivo è scollegato, spento o si verifica un'interruzione di corrente, è necessario
attendere da 3 a 5 minuti prima di riavviarlo. Se si tenta di riavviarlo prima di questo tempo, il
compressore si avvierà solo dopo 3/5 minuti (se la temperatura lo richiede).
Al primo avvio e in seguito a uno spegnimento prolungato della cantina, è possibile che al
riavvio le temperature scelte e quelle visualizzate non corrispondano. E' normale. Sarà poi
necessario attendere qualche ora prima che le temperature riacquistino la loro stabilità.
In caso di mancanza di corrente, il dispositivo mantiene in memoria le temperature
impostate. Quando l'apparecchio viene rimesso in servizio, non è quindi necessario
riprogrammare le temperature della cantina.
Attenzione!
Durante un'interruzione di corrente, la cantina E- cellar non registra più i movimenti, quindi
evitare di modificare la riserva di vino.
Quando l'alimentazione viene riattivata, la cantina aggiornerà le scorte al fine di rilevare l'uscita
o l'aggiunta di una nuova bottiglia.
Se un'operazione di aggiunta o rimozione viene eseguita tramite l'app, l'app salverà le
modifiche, ma se si tratta di un'azione gratuita senza passare dall'app e una bottiglia viene
rimossa e sostituita con una nuova nella stessa posizione, la cantina non farà la distinzione al
suo riavvio.
Se partite in vacanza
- Soggiorni brevi: lasciare in funzione la cantina durante il soggiorno sequesto dura meno di 3
settimane.
- Soggiorni lunghi: se il dispositivo non sarà utilizzato per diversi mesi, rimuovere tutte le
bottiglie e gli accessori, spegnere e scollegare il dispositivo dalla presa di corrente. Pulire e
asciugare accuratamente l'interno e l'esterno dell'apparecchio. Lasciare aperta anche la porta,
bloccandola se necessario, per evitare la formazione di condensa, odori e muffe.
Se dovete spostare la vostra cantina
▪ Scollegare la cantina prima di qualsiasi operazione.
▪ Rimuovere tutte le bottiglie presenti nella riserva e fissare le parti mobili.
▪ Per evitare di danneggiare le viti di livellamento dei piedini, avvitarle completamente nella loro
base.
▪ Chiudere completamente la porta.
▪ Spostare l'apparecchio preferibilmente in posizione verticale o annotare, dalle scritte sulla
confezione, la direzione in cui può essere posato l'apparecchio. Proteggere il dispositivo con una
coperta o simili.

212
7. IN CASO DI GUASTO
Nonostante tutta la cura che mettiamo nei nostri prodotti, un guasto non è mai totalmente escluso.
Prima di contattare il servizio post-vendita del proprio rivenditore, tuttavia, verificare che:
La presa è ancora inserita
Non ci sia un’interruzione di corrente
Che il guasto non derivi da uno di quelli descritti nella tabella alla fine di questo manuale.
IMPORTANTE: Se il cavo di alimentazione in dotazione è danneggiato, deve essere sostituito
dal produttore, da un centro di assistenza autorizzato del marchio o dal rivenditore. In ogni
caso, deve essere sostituito da personale qualificato per evitare qualsiasi rischio di lesioni.
SE QUESTE VERIFICHE NON RISOLVONO IL PROBLEMA, CONTATTARE IL SERVIZIO POST-VENDITA DEL VOSTRO
RIVENDITORE.
ATTENZIONE!
Scollegare la presa a muro prima di qualsiasi manutenzione o riparazione!
8. PROBLEMI E POSSIBILI CAUSE
Molti problemi possono essere risolti facilmente, risparmiando il costo di una telefonata al servizio
post vendita. Provate a risolvere il vostro problema seguendo i suggerimenti di seguito prima di
chiamare l'assistenza.
GUIDA ALLA RISOLUZIONE DEI PROBLEMI
PROBLEMA
CAUSE POSSIBILI
La cantina non funziona
Il dispositivo non è collegato.
Il dispositivo è spento.
L'interruttore automatico è scattato o è saltato un fusibile.
La cantina non produce abbastanza
freddo
Controllare la temperatura impostata.
L'ambiente esterno potrebbe richiedere un'impostazione più alta.
La porta viene aperta troppo frequentemente.
La porta non è chiusa correttamente.
La guarnizione della porta non aderisce completamente.
L’apparecchio si accende e si
spegne frequentemente
La temperatura ambiente è più alta del normale.
Molte bottiglie sono state aggiunte alla cantina.
La porta viene aperta troppo frequentemente.
La porta non è chiusa correttamente.
La temperatura non è impostata correttamente.
La guarnizione della porta non aderisce completamente.
La luce interna non funziona
Il dispositivo non è collegato.
L'interruttore automatico è scattato o è saltato un fusibile.
La spia è spenta.
Il tasto di attivazione dell'illuminazione è OFF
Vibrazioni
Controllare e assicurarsi che la cantina sia a livello.
La cantina sembra fare troppo
rumore
Il rumore di "clic" può provenire dal fluido refrigerante, il che è
normale.
Alla fine di ogni ciclo si possono udire rumori di "gorgoglii" dovuti
al flusso di raffreddamento nella tua cantina.
La contrazione e l'espansione delle pareti interne possono

213
causare scoppiettii e crepitii.
La cantina non è in piano.
In modalità "mono" si attivano i ventilatori della cantina per far
circolare l'interno della cantina.
La porta non si chiude correttamente
La cantina non è in piano.
La guarnizione è sporca o danneggiata.
Alcuni dei contenuti impediscono la chiusura della porta
I cardini della porta sono allentati
Gli scaffali non sono al loro posto.
Bottiglie presenti ma non rilevate
La dimensione della bottiglia non corrisponde.
Il collo della bottiglia non è a contatto con la barra centrale del
ripiano.
I sensori sulla barra centrale del ripiano sono sporchi =>
provvedere alla pulizia con un batuffolo di cotone morbido e
asciutto.
Il colore del collo non viene rilevato dal sensore => eseguire un
test aggiungendo un'etichetta opaca attorno al collo.
La bottiglia non è provvista di sigillo al collo => eseguire un test
aggiungendo un'etichetta opaca intorno al collo.
La cantina è spenta.
La cantina non è più connessa ad internet (Wifi).
Bottiglia rilevata ma non posata
I sensori sulla barra centrale del ripiano sono sporchi =>
provvedere alla pulizia con un batuffolo di cotone morbido e
asciutto.
L'abbinamento con la cantina non
funziona
Il codice QR della master box è stato scansionato in modo
errato.
Il codice QR è danneggiato.
La connessione Wi-Fi è insufficiente.
La portata del Bluetooth è stata superata.
La cantina non è connessa.
Il Wi-Fi o il Bluetooth del telefono non sono attivati.
Codice errore « EE »
Guasto sonda di temperatura.
Codice errore « HH »
Allarme alta temperatura, scollegare o spegnere la cantina e
contattare il servizio post-vendita
Codice errore « LL »
Allarme di bassa temperatura, scollegare o arrestare la cantina e
contattare il servizio post-vendita
Codice errore « DD »
Nessuna anomalia, il dispositivo è in fase di sbrinamento =>
attendere la fine dello sbrinamento
Fuga d’acqua dalla cantina
Il foro di scarico all'interno della cantina è ostruito.
La cantina non è abbastanza inclinata all'indietro.
Il serbatoio dell'acqua dietro la cantina è pieno.
Il LED rosso lampeggia di continuo
sotto la master box
La cantina non è connessa o ha perso la connessione alla rete
Wifi
Uno o più LED restano accesi sul
davanti dei ripiani
Avete effettuato una richiesta di posizione e non siete venuti a
ritirare/consegnare la/le bottiglia/e.
Attendere 5 minuti che si spenga da solo o aprire e chiudere la
porta della cantina
I pulsanti sul pannello di controllo
non funzionano
Verificare che il pannello di controllo non sia bloccato, lucchetto
visualizzato sullo schermo. Sbloccare premendo il pulsante con
il simbolo del lucchetto per 3 secondi per sbloccare il pannello di
controllo
Differenze tra il registro digitale e la
cantina fisica (più/meno bottiglie)
Avete apportato modifiche durante un'interruzione di corrente?
Verificare le domande frequenti sull'applicazione Vinotag per

214
vedere come risolvere le discrepanze nell'inventario.
Non riesco a scansionare il codice
QR della cantina
Je n’arrive pas à scanner le QR code de la cave
Preferisci la scansione del QR code presente in fondo alla
scheda qualità della tua cantina. Posizionare il foglio di qualità
su un supporto piatto e asciutto alla luce per facilitare la
scansione del codice QR.
In caso di difficoltà a scansionare il QR code nella cantina (sotto
la master box), ti consigliamo di accendere la luce LED nella
cantina, aumentando il livello di luminosità si avrà più facilità nel
rilevare il QR code con il telefono.
Per i telefoni che necessitano di una certa distanza per la messa
a fuoco, si può estrarre il ripiano superiore della cantina per
avere una distanza migliore tra l'obiettivo del telefono e il codice
QR della cantina.
L'etichetta del vino fotografato non
viene riconosciuta dall'app
La foto scattata tramite l'applicazione deve essere di buona
qualità (non sfocata), la foto deve essere scattata in modo che
l'etichetta del vino riempia la cornice bianca dell'applicazione. Se
il problema persiste, provare a scattare una foto ravvicinata solo
del nome del vino.
Codici errore
Codice errore
Significato
HH
Allarme alta temperatura
LL
Alarme bassa temperatura
DD
Dispositivo in fase di sbrinamento
EE
Sonda di temperatura difettosa
Se sullo schermo viene visualizzato un qualsiasi altro codice come A, B, C, D, E, G, I, J, K, M, N, O,
contattare il servizio clienti.
9. AMBIENTE
Questo prodotto è conforme alla Direttiva UE 2019/290/EU sui rifiuti di
apparecchiature elettriche ed elettroniche (RAEE). Assicurandovi che questo prodotto
venga smaltito correttamente, contribuirete a prevenire potenziali conseguenze
negative per l'ambiente e la salute umana che potrebbero essere causate da una
gestione impropria dei rifiuti di questo prodotto.
Il simbolo del bidone della spazzatura barrato sul dispositivo indica che questo prodotto, alla fine della
sua vita utile, deve essere trattato separatamente dagli altri rifiuti domestici. Dovrà quindi essere
portato presso un centro di raccolta differenziata per i dispositivi elettrici e/o elettronici o, se si
acquista un dispositivo equivalente, al rivenditore di questo nuovo dispositivo.
L'utente è responsabile di portare il dispositivo alla fine della sua vita utile alle strutture di raccolta
appropriate. La raccolta selettiva e adeguata finalizzata all'invio del dispositivo inutilizzato al
riciclaggio, al trattamento e allo smaltimento compatibile con l'ambiente, aiuta ad evitare possibili
effetti negativi sull'ambiente, sulla salute e favorisce il riciclaggio dei materiali di cui è composto il
prodotto.
Durante lo smaltimento, o nel contesto di una rivendita, i dati personali dell'utente sono protetti, senza
alcuna azione da parte sua. Questi dati non vengono salvati in cantina ma su un server esterno.
Nessuna informazione trasmessa durante il normale utilizzo della cantina può essere utilizzata dopo il
suo smaltimento.
Nel contesto di una rivendita del dispositivo, il nuovo utente deve scansionare il codice QR della

215
master box e seguire la procedura di abbinamento obbligatoria. Questa procedura sovrascrive i dati
precedentemente memorizzati sul server. Il nuovo utente avrà così un account vuoto. L'ex utente non
sarà più in grado di accedere o visualizzare le sue vecchie informazioni dall'applicazione Vinotag.
Per informazioni più dettagliate sui sistemi di raccolta disponibili, contattare il servizio locale di
smaltimento rifiuti o il negozio in cui è stato acquistato il dispositivo.
10. AVVERTENZE
Nell’ottica di un costante miglioramento dei nostri prodotti, ci riserviamo il diritto di modificare le
caratteristiche tecniche senza preavviso.
Le garanzie dei prodotti a marchio LA SOMMELIERE sono dichiarate esclusivamente dai distributori
che abbiamo scelto. Nulla di quanto riportato può essere interpretato come ulteriore garanzia.
FRIO ENTREPRISE non può essere ritenuta responsabile per errori tecnici ed editoriali od omissioni
nel presente documento. Documento non contrattuale.

216
1. BEZPEČNOSTNÍ POKYNY
Před instalací a prvním použitím spotřebiče si pozorně přečtěte tento
návod k obsluze včetně obsažených varování a užitečných tipů. Návod k
obsluze obsahuje důležité pokyny pro Vaši bezpečnost a správné
používání spotřebiče. Aby nedošlo k poškození spotřebiče a/nebo
poranění osob, je důležité, aby osoby, které spotřebič používají, dobře
znaly způsob ovládání a bezpečnostní funkce spotřebiče. Uschovejte si
tento návod k obsluze na bezpečném místě pro případné použití v
budoucnu. Pokud spotřebič předáváte jiné osobě nebo jej stěhujete,
nezapomeňte k němu přiložit i tento návod. Bude tak zaručeno optimální
fungování spotřebiče.
Uschovejte si návod k obsluze na bezpečném místě, předejdete tak
nebezpečí poranění. Výrobce nenese odpovědnost za škody, které byly
způsobeny nesprávným používáním spotřebiče.
Bezpečnost dětí a jiných snadno zranitelných osob
• Spotřebič smí používat děti starší 8 let a osoby s omezenými fyzickými,
smyslovými nebo duševními schopnostmi nebo s nedostatečnými
zkušenostmi a znalostmi pouze tehdy, pokud se nacházejí pod
dohledem odpovědné osoby nebo pokud byly seznámeny se správným
a bezpečným používáním spotřebiče a chápou případná rizika s tím
spojená. Děti si se spotřebičem nesmí hrát. Děti smí provádět čištění a
uživatelskou údržbu spotřebiče pouze tehdy, pokud jsou starší 8 let a je
na ně přitom dohlíženo.
• Uchovávejte veškeré obalové materiály mimo dosah dětí, neboť hrozí
nebezpečí udušení.
• Pokud se rozhodnete spotřebič zlikvidovat, vytáhněte zástrčku
napájecího kabelu ze zásuvky, odřízněte napájecí kabel (co nejblíže u
spotřebiče) a odstraňte dvířka, aby si děti nemohly ve spotřebiči hrát a
utrpět přitom úraz elektrickým proudem nebo se ve spotřebiči zavřít.
• Pokud nahrazujete spotřebič se zaklapávacím zámkem na dvířkách
nebo těsnění spotřebičem s magnetickým těsněním dvířek, ujistěte se,
že je zámek nefunkční, než spotřebič předáte k likvidaci. Spotřebič se
tak nestane léčkou pro děti.

217
• Uchovávejte spotřebič a jeho napájecí kabel mimo dosah dětí mladších
8 let.
• Děti nesmí vkládat do spotřebiče žádné lahve ani je z něj vyjímat.
Všeobecné bezpečnostní pokyny
POZOR - Spotřebič je určen k použití v domácnosti a v podobném
prostředí:
• v kuchyňkách pro zaměstnance v obchodech, kancelářích a jiném
pracovním prostředí;
• v ubytovacích zařízeních s výdejem snídaně;
• na farmách a pro klienty hotelů, motelů a jiných ubytovacích zařízení;
• v průmyslových kuchyních a pro jiné nekomerční účely.
POZOR - V chladicím prostoru spotřebiče neskladujte žádné hořlavé
látky, jako jsou například spreje, neboť by mohlo dojít k úniku hořlaviny.
POZOR - Výměnu napájecího kabelu smí z bezpečnostních důvodů
provést pouze výrobce nebo kvalifikovaný technik. Výměna musí být
provedena okamžitě.
POZOR - Dbejte na to, aby nedocházelo k blokování ventilačních otvorů,
Zkontrolujte, zda může těmito otvory volně cirkulovat vzduch.
POZOR - Dbejte na to, abyste nepoškodili chladicí okruh.
POZOR - Nepoužívejte v chladicím prostoru vinotéky žádné
elektrospotřebiče, pokud se nejedná o typ doporučený výrobcem.
POZOR - Chladicí a izolační systémy spotřebiče obsahují hořlavé plyny.
Odevzdejte vysloužilý spotřebič v příslušné sběrně elektroodpadu.
Nevystavujte spotřebič ohni.
Chladivo
V chladicím okruhu spotřebiče se používá isobutan (R600a) jako
chladivo. Jedná se o vysoce hořlavý zemní plyn, který představuje
nebezpečí pro životní prostředí. Dávejte proto při přepravě a instalaci
spotřebiče pozor, aby nedošlo k poškození částí chladicího okruhu.
Chladivo (R600a) je hořlavá tekutina.
Pozor: Nebezpečí požáru
Pokud dojde k poškození chladicího okruhu:

218
• Spotřebič nesmí přijít do styku s otevřeným ohněm a jinými zdroji
vznícení.
• Dobře vyvětrejte místnost, ve které se spotřebič nachází. Je
nebezpečné spotřebič jakkoliv upravovat nebo modifikovat.
Poškozený napájecí kabel může způsobit zkrat a/nebo úraz elektrickým
proudem.
Elektrická bezpečnost
• Neneseme žádnou odpovědnost za nehody způsobené nesprávně
provedeným připojením k elektrické síti.
• Neprodlužujte napájecí kabel. Nepoužívejte prodlužovací kabel,
adaptér ani vícenásobnou zásuvku.
• Ujistěte se, že zástrčka napájecího kabelu není poškozená. Zástrčka
ve špatném stavu může způsobit přehřátí spotřebiče a jeho vznícení.
• Ujistěte se, že zástrčka napájecího kabelu zůstane po instalaci
spotřebiče dobře dostupná.
• Netahejte na napájecí kabel.
• Ujistěte se, že je spotřebič vždy uzemněný.
• Pokud je zásuvka, ke které chcete spotřebič připojit, uvolněná,
nezasunujte do ní zástrčku napájecího kabelu. Nechte zásuvku nejprve
opravit.
• Nepoužívejte spotřebič bez krytu vnitřního osvětlení.
• Před výměnou žárovky nejprve odpojte spotřebič od elektrické sítě.
• Vinotéku lze napájet pouze jednofázovým proudem o hodnotě 220 ~
240 V / 50 Hz.
• Pokud došlo k poškození napájecího kabelu, kontaktujte zákaznický
servis a nechte kabel vyměnit.
• Zásuvka, ke které je spotřebič připojený, musí být snadno dostupná,
zároveň se však musí nacházet mimo dosah dětí. V případě
pochybností kontaktujte instalačního technika.
• Nepoužívejte k připojení spotřebiče k elektrické síti prodlužovací kabel,
adaptér ani vícenásobnou zásuvku. Spotřebič lze připojit pouze k řádně
uzemněné zásuvce, která vyhovuje platným normám.
Denní používání
• Tento spotřebič je určen výhradně ke skladování vína.

219
• Neskladujte v tomto spotřebiči hořlavé plyny ani tekutiny. Hrozí
nebezpečí výbuchu.
• Nepoužívejte v tomto spotřebiči jiné elektrické spotřebiče (elektrické
výrobníky zmrzliny, mixéry atd.).
• Při odpojování spotřebiče od elektrické sítě tahejte vždy za zástrčku
napájecího kabelu, nikoliv za samotný kabel.
• Dbejte na to, aby se do blízkosti plastových částí spotřebiče nedostaly
horké předměty.
• Přísně dodržujte doporučení výrobce spotřebiče týkající se skladování.
Přečtěte si příslušnou kapitolu v tomto návodu.
• Spotřebič nesmí přijít do styku s hořícími svíčkami, lampami a jinými
předměty, ve kterých hoří oheň.
• Spotřebič je určen ke skladování nápojů v běžné domácnosti, jak je
uvedeno v tomto návodu k obsluze.
• Spotřebič je těžký. Buďte při přemísťování spotřebiče opatrní. Pokud je
spotřebič vybavený kolečky, myslete na to, že tato kolečka jsou určena
pouze pro přesuny spotřebiče na minimální vzdálenosti. Nepřesouvejte
spotřebič na velké vzdálenosti.
• Nestoupejte si na police, přihrádky, dvířka atd. ani je nepoužívejte jako
opěru.
• Nepřeplňujte spotřebič, předejdete tak pádu skladovaných předmětů a
s tím spojenému zranění osob nebo poškození spotřebiče.
Pozor: Čištění a údržba
• Před přistoupením k údržbě nejprve vypněte spotřebič a vytáhněte
zástrčku napájecího kabelu ze zásuvky.
• Nepoužívejte k čištění spotřebiče kovové předměty, parní čističe,
těkavé látky, organická ředidla ani abrazivní prostředky.
• Nikdy nepoužívejte k čištění spotřebiče hořlavé tekutiny. Jejich výpary
představují nebezpečí požáru nebo výbuchu.
• Nepoužívejte ostré nebo špičaté předměty k odstranění námrazy.
Používejte pouze plastovou škrabku.
Důležité informace týkající se instalace!
• Varování! Abyste předešli překlopení vinotéky, umístěte lahve
nejprve do zadní části vinotéky. Nelze zároveň vysunout police

220
nebo je nechat vysunuté. Hmotnost lahví může vést k tomu, že se
vinotéka překlopí dopředu, proto je důležité, abyste lahve
rozmístili po celém vnitřním prostoru vinotéky. Manipulujte s
lahvemi i vinotékou opatrně.
• Aby bylo zaručeno správné připojení spotřebiče k elektrické síti,
postupujte podle pokynů v tomto návodu k obsluze.
• Vybalte spotřebič a zkontrolujte, zda nedošlo k viditelnému poškození.
Pokud zjistíte, že je spotřebič poškozený, v žádném případě jej
nepřipojujte k elektrické síti. Nahlaste poškození prodejci, u kterého
jste spotřebič zakoupili. Uschovejte si v takovém případě obal
spotřebiče.
• Doporučujeme vyčkat alespoň 24 hodin a teprve poté připojit spotřebič
k elektrické síti, aby olej mohl stéct zpět do kompresoru.
• Dobrá cirkulace vzduchu je nezbytná pro to, aby se předešlo přehřátí
spotřebiče. Dodržujte proto instalační pokyny uvedené v tomto návodu.
Varování! Tato vinotéka není určena k použití jako vestavěný nebo
zabudovaný spotřebič.
• Dbejte na to, aby se spotřebič nedotýkal zdí a/nebo nepřicházel do
styku s horkými předměty (kompresor, kondenzátor, radiátory, varné
spotřebiče, sušička atd.), předejte tak nebezpečí požáru a přehřátí
spotřebiče. Vždy pečlivě dodržujte pokyny k instalaci.
• Zkontrolujte, zda je zástrčka napájecího kabelu po provedené instalaci
spotřebiče stále dobře dostupná.
• Dávejte při instalaci spotřebiče pozor, aby nedošlo k zaklínění,
přiskřípnutí nebo poškození napájecího kabelu.
Odstraňování potíží a náhradní díly
Veškeré elektroinstalační práce by měl provést pouze kvalifikovaný a
kompetentní technik.
Opravu spotřebiče smí provést pouze autorizované servisní středisko, a
to za použití výhradně originálních náhradních dílů.
Podle NAŘÍZENÍ (EU) 2019/2019 (příloha II, bod 3) musí být estetické a
funkční náhradní díly dostupné servisním střediskům a koncovým
uživatelům v po dobu 7 popř. 10 let (Seznam v příloze II, bod 3.a.1 a
3.a.2) po uvedení posledního exempláře modelu na trh. Seznam
náhradních dílů a způsob jejich objednání (přístup pro servisní střediska

221
/ přístup pro soukromé osoby) získáte na následujících internetových
stránkách: www.interfroidservices.fr
nebo poštou na následující adrese: FRIO - Interfroid Services, 143 Bd
Pierre Lefaucheux - 72230 ARNAGE, Francie.
Ostatní funkční náhradní díly, které nejsou uvedeny v nařízení (EU)
2019/2019, jsou dostupné po dobu 10 let. Výrobce poskytuje záruku 1
rok na funkční díly.
R600A
Bezpečnostní pokyny
• Pozor — Neblokujte ventilační otvory ve spotřebiči. Udržujte ventilační
otvory ve spotřebiči nebo ve vestavné konstrukci bez překážek.
• Pozor — Neskladujte ve spotřebiči výbušné látky, jako jsou aerosolové
plechovky s hořlavým hnacím plynem.
• Pozor — Dbejte na to, aby nedošlo k poškození chladicího okruhu
spotřebiče.
• Pozor — Chladicí spotřebiče používají jako chladivo isobutan (R600a),
proto by se měly nacházet mimo dosah zdrojů vznícení (mohlo by
například dojít ke vznícení elektrických kontaktů v případě úniku
chladiva). Typ chladiva je uveden na výrobním štítku spotřebiče.
• Pozor — V chladicím prostoru spotřebiče nepoužívejte žádné jiné
elektrospotřebiče, pokud se nejedná o typ doporučený výrobcem.
Tento spotřebič odpovídá požadavkům evropských směrnic a jejich
případným změnám.

222
2. VÝROBNÍ ŠTÍTEK
Výrobní štítek se nachází v chladicím prostoru nebo na zadní straně spotřebiče (v závislosti na
modelu). Obsahuje všechny údaje specifické pro tento spotřebič.
Doporučujeme Vám poznamenat si před instalací spotřebiče jeho sériové číslo do tohoto návodu k
obsluze, abyste jej později v případě potřeby (oprava, dotaz zákaznického servisu atd.) nemuseli
hledat.
Po instalaci a naplnění spotřebiče je přístup k výrobnímu štítku obtížný.
POZOR: Bez této informace Vám zákaznický servis nemůže pomoci.
3. POPIS SPOTŘEBIČE
Další informace o tomto výrobku získáte v online databázi EPREL. V souladu s ustanoveními
delegovaného nařízení (EU) 2019/2016 komise jsou všechny údajů týkající se tohoto chladicího
spotřebiče obsaženy v databázi EPREL (Evropská databáze výrobků pro energetické štítky). Tato
databáze Vám umožňuje seznámit se s informacemi o výrobku a s jeho technickou dokumentací.
Přístup do databáze EPREL získáte naskenováním QR kódu na výrobním štítku spotřebiče nebo
přímým přechodem na následující webové stránky: www.ec.europa.eu a vyhledáním modelu
chladicího spotřebiče.

223
Na webových stránkách www.lasommeliere.com naleznete veškeré informace o vinotéce
ECELLAR 185 a také si zde můžete stáhnout návod k obsluze.
Deklarovaná skladovací kapacita
• Vinotéka ECELLAR185 má skladovací kapacitu 185 lahví
• Vinotéka je vybavena 14 chytrými policemi
• Každá police pojme 12 lahví
• Vinotéka je také vybavena skladovací zónou, do které lze umístit až 17 lahví
Deklarovaná skladovací kapacita odpovídá maximální skladovací kapacitě vypočítané s počtem polic,
které jsou prodávány spolu se spotřebičem. Chytré police vinotéky ECELLAR mají takové rozměry,
abyste na ně mohli umístit láhev o velikosti šampaňského. Díky této zvláštnosti můžete v této
vinotéce skladovat všechny tvary lahví o objemu 75 cl, například lahve typu bordeaux, lahve na
šampaňské, lahve burgundského typu nebo alsacké flétny. Vinotéka pojme i atypické lahve, jako jsou
lahve na prosecco, sacchetto, mateus atd.
Varování! Maximální průměr lahví, které lze umístit na police, je maximálně 9 cm.
Pokud chcete nechat zrát lahve různé velikosti, doporučujeme Vám proložit větší lahve střídavě
standardními lahvemi na bordeaux, předejdete tak problémům během skladování.
Pokud vedle sebe umístíte lahve netypického tvaru nebo obzvláště velkých rozměrů, může se stát, že
na policích bude možné skladovat pouze omezený počet těchto lahví. Pokud na polici rozmístíte
lahve běžné velikosti (bordeaux 75 cl) střídavě s lahvemi netypického tvaru nebo s velkými rozměry,
můžete využít všechna skladovací místa na polici.
Pokud i přes naši snahu police vinotéky ECELLAR nerozpoznají tvar lahve, postupujte prosím
následovně:
Když je lahev příliš velká a nevejde se na polici, postupujte následovně:
• Umístěte lahev na první polici vinotéky (seshora dolů)
• Uskladněte ji v dolní zóně vinotéky
Doporučení týkající se rozmístění polic
Doporučujeme ponechat původní rozmístění polic a jiného příslušenství, spotřebič tak bude moci co
nejlépe využít elektrickou energii. Jakákoliv změna tohoto rozmístění může mít negativní vliv na
spotřebu elektrické energie.
Vlastnosti rádiové frekvence
Společnost La Sommelière tímto prohlašuje, že rádiové zařízení ECELLAR185 vyhovuje směrnici
2014/53/EU a ostatním relevantním evropským směrnicím. Odkaz na směrnici:
https://eur-lex.europa.eu/legal-
content/FR/TXT/?uri=CELEX%3A32014L0053&qid=1617885639187
• Frekvenční pásmo: 2400 MHz až 2483,5 MHz
• Maximální výkon: 100 mW
Certifikát CE si lze prohlédnout a stáhnout na webových stránkách společnosti La Sommelière:
https://www.lasommeliere.com/fr/155-ECELLAR185.html

224
4. INSTALAČNÍ POKYNY
Před uvedením spotřebiče do provozu
• Odstraňte vnější i vnitřní obal.
• Nechte spotřebič před uvedením do provozu alespoň 24 hodin stát ve svislé poloze. Minimalizujete
tak nebezpečí poruchy chladicího systému v důsledku přepravy.
• Vyčistěte vnitřní prostor i vnější povrch spotřebiče měkkým hadříkem namočeným ve vlažné vodě.
• Rozhodněte se, kam spotřebič umístíte.
• Umístěte spotřebič na podlahu, která je dostatečně pevná, aby unesla hmotnost zcela naplněného
spotřebiče.
• Pomocí stavitelných nožiček vinotéku vyrovnejte. Varování! Vinotéka by měla být mírně nakloněná
dozadu, aby mohl odtékat kondenzát a aby dvířka dobře těsnila. Zároveň se tak předejde
nechtěnému vysunutí polic nezávisle na hmotnosti skladovaných lahví. Je nutné zajistit dostatečnou
ventilaci, neblokujte proto žádné výstupy vzduchu.
• Tento spotřebič je navržen jako volně stojící. V žádném případě nesmí být použit jako
vestavný spotřebič. Dbejte na to, aby kolem spotřebiče mohl dobře cirkulovat vzduch.
• Připojte vinotéku k vyhrazené zásuvce. Mezi zadní stěnou vinotéky a zdí ponechte odstup 50 mm,
mezi bočními stěnami a nad vinotékou musí a případným nábytkem musí zůstat odstup 100 mm.
Pomocí stavitelných nožiček vyrovnejte spotřebič (doporučujeme použít vodováhu). Varování!
Vinotéka se má mírně naklánět dozadu; zabráníte tak pohybům v důsledku nestability spotřebiče,
které by mohly způsobovat hluk a vibrace. Zároveň zajistíte, že dvířka vinotéky budou perfektně těsnit.
• Tento spotřebič je určen výhradně ke skladování vína.
• Tento spotřebič používá hořlavý chladicí plyn, dávejte proto pozor, abyste během
přepravy nepoškodili chladicí potrubí.
Upozornění
• Ve spotřebiči skladujte pouze zavřené lahve.
• Nepřeplňujte spotřebič.
• Neotevírejte zbytečně dvířka spotřebiče.
• Nezakrývejte police hliníkovou fólií ani jiným materiálem, mohli byste tak negativně
ovlivnit cirkulaci vzduchu ve spotřebiči.
• Pokud nebudete vinotéku delší dobu používat, doporučujeme Vám vytáhnout
zástrčku napájecího kabelu ze zásuvky. Pečlivě spotřebič vyčistěte a nechte dvířka
pootevřená, aby mohl cirkulovat vzduch a v chladicím prostoru nedocházelo k tvorbě
plísně nebo nepříjemného zápachu.
POZOR: Spotřebič se musí nacházet v dostatečné vzdálenosti od látek, které představují
nebezpečí požáru.
Instalace vinotéky
Varování! Abyste předešli převrácení vinotéky, nejprve naplňte police v zadní části chladicího
prostoru. Police nesmí být při vkládání lahví vysunuté. Hmotnost lahví by mohla způsobit
překlopení vinotéky dopředu, proto je důležité rozmístit lahve po celém chladicím prostoru.
Manipulujte s vinotékou i lahvemi opatrně.
Zdroj napájení
Připojte vinotéku k vyhrazené zásuvce typu E.
Zásuvka musí zůstat dobře přístupná i po připojení vinotéky.

225
Pokud máte dotazy ohledně elektrického výkonu a/nebo uzemnění, obraťte se na kvalifikovaný
personál (elektrikář, autorizovaný servis).
Umístění
• Varování! Umístěte vinotéku na čisté (bezprašné) místo, kde teplota neklesá pod bod mrazu.
Vinotéka se nesmí nacházet v blízkosti tepelných zdrojů, jako jsou např. radiátory, kamna, sluneční
paprsky atd. Vinotéka se nesmí nacházet venku.
• Postavte vinotéku na podlahu, která je dostatečně pevná, aby unesla hmotnost naplněné vinotéky.
• Vyrovnejte vinotéku pomocí stavitelných nožiček.
Tento spotřebič je vhodný pouze pro provoz v prostorách s určitou okolní teplotou. Klimatická třída je
uvedená na výrobním štítku.
N: Tento chladicí spotřebič je určen k použití při okolní teplotě v rozsahu od 16 °C do 32 °C. Okolní
teplota má vliv na teplotu a vlhkost uvnitř vinotéky.
Teplotu uvnitř spotřebiče lze nastavit v rozsahu od 5 °C do 20 °C. K regulaci teploty slouží termostat.
Změna teploty má za následek větší spotřebu elektrické energie.
Dokud je spotřebič v provozu a používá se za běžných podmínek, je garantováno dodržení teploty v
chladicím prostoru. Vnitřní teplota spotřebiče a jeho spotřeba elektrické energie závisí na četných
faktorech, jako je okolní teplota, sluneční záření, četnost otevírání dvířek a počet skladovaných lahví.
Mírné kolísání teploty je zcela normální a odpovídá chladicím cyklům spotřebiče. Toto kolísání však
nemá žádný vliv na skladovací teplotu vína, neboť kolísání trvá pouze krátce a nedojde proto k
výměně tepla s lahvemi.
Montáž madla
Vyjměte madlo dvířek a oba šrouby z plastového sáčku, který se nachází uvnitř spotřebče.
• Před montáží madla sejměte na odpovídajícím místě těsnění. Pokud těsnění sejmete opatrně,
nedojde k jeho poškození.
• Uvolněte těsnění z úhlu dvířek až po potřebnou výšku a poté zasuňte oba šrouby do otvorů madla
dvířek.

226
• Přišroubujte madlo a vložte těsnění zpět do štěrbiny ve dvířkách, abyste tak zakryli roh.
Dosah Wi-Fi
Varování! Vinotéka ECELLAR pracuje s připojením Wi-Fi.
Varování! Uživatel sám odpovídá za dostatečné připojení k síti Wi-Fi (rychlost / síla signálu),
aby mohla chytrá vinotéka správně fungovat.
• Pokud je připojení k bezdrátové síti pomalé, můžete použít zesilovač.
Pokud dojde k přerušení internetového spojení, vinotéka může uložit do paměti až 100 událostí, než
se spojení obnoví.
Poté budou informace a aktuální stav zásob vína odeslány na server.
Při překročení 100 událostí se starší záznamy přepíšou novějšími záznamy.
Uživatel si tyto informace může prohlédnout ve své aplikaci v sekci „Oznámení“.
V případě výpadku napájení vinotéka neeviduje vložení ani vyjmutí lahví vína. Dojde i ke ztrátě
událostí, které jsou uloženy v paměti vinotéky do synchronizace se serverem.
Při restartu po obnovení dodávky elektrického proudu se zobrazí poslední verze, která byla uložena
do cloudu, jako aktuální stav vinotéky. Je proto důležité během výpadku napájení pokud možno
neměnit obsah vinotéky, aby nedocházelo k rozdílům mezi digitálním registrem a skutečným
obsahem vinotéky.
Dosah Bluetooth
Varování! Párování vinotéky ECELLAR s bezdrátovou sítí probíhá prostřednictvím Bluetooth. V
každodenním použití komunikuje vinotéka výhradně prostřednictvím Wi-Fi.
Dosah Bluetooth vinotéky je maximální 3 m při zavřených dvířkách.
Vzdušná vlhkost
Uvnitř vinotéky na kompresoru se nachází zásobník na vodu, který slouží k udržení správné vzdušné
vlhkosti ve vinotéce.
• Pokud se v zásobníku nachází příliš mnoho vody, přebytečná voda proteče odtokovým otvorem do
zachycovací nádoby nad kompresorem.
• Při instalaci nezapomeňte vinotéku mírně naklonit dozadu vyšroubováním obou předních
stavitelných nožiček, aby voda mohla řádně odtékat.
• Odtokový otvor nesmí být ucpaný.

227
5. OVLÁDÁNÍ VINOTÉKY
Ovládací panel
Vinotéka ECELLAR185 je vybavená elektronickým ovládacím panelem s LCD displejem. Ovládací
panel se nachází uvnitř vinotéky na levé straně
PÍSMENO
POPIS
A
Zobrazení provozního režimu vinotéky: MONO (stejná teplota
v celé vinotéce) nebo AUTO (různá teplota)
B
Dětská pojistka: Upozornění na zablokování ovládacího panelu.
C
Kontrolka osvětlení: Upozornění na zapnuté osvětlení.
D
Teplota nastavená pro vnitřní prostor vinotéky. Vinotéka
ECELLAR zobrazuje na digitálním displeji nastavenou teplotu.
Můžete však zobrazit i aktuální teplotu v chladicím prostoru
vinotéky, a to stisknutím tlačítek I + J a jejich podržením po
dobu 3 sekund. Poté se na displeji zobrazí blikající aktuální
teplota naměřená snímačem. Po uvolnění tlačítek se na displeji
opět zobrazí nastavená teplota.
E
Zobrazení teploty ve stupních Celsia (°C) nebo stupních
Fahrenheita (F°).
F
Tlačítko pro změnu zobrazení teploty:
- stupně Celsia se symbolem „°C“ nebo
- stupně Fahrenheita se symbolem „°F“
G
Výběr provozního režimu vinotéky. Běžně vinotéka pracuje v
režimu MONO. Když jednou stisknete tlačítko, vinotéka přejde
do režimu AUTO (provoz s různými teplotami v chladicím
prostoru).
H
Tlačítko pro zapnutí/vypnutí osvětlení.
I
Tlačítko pro nastavení teploty. Stisknutím tohoto tlačítka zvýšíte
nastavovanou teplotu na požadovanou hodnotu. Teplotu v
chladicím prostoru vinotéky lze nastavit v rozmezí od 5 °C do
20 °C v režimu MONO (stejná teplota v celé vinotéce). V
režimu AUTO (různá teplota) vinotéka kontroluje vnitřní teplotu
samostatně. V tomto režimu tato tlačítka nefungují.
J
Tlačítko pro nastavení teploty. Stisknutím tohoto tlačítka snížíte
nastavovanou teplotu na požadovanou hodnotu.
V režimu MONO (stejná teplota) lze nastavit teplotu v
chladicím prostoru vinotéky v rozmezí od 5 °C do 20 °C. V
režimu AUTO (různá teplota) vinotéka kontroluje vnitřní teplotu
samostatně. V tomto režimu tato tlačítka nefungují.
K
Stisknutím tohoto tlačítka zapnete nebo vypnete vinotéku, aniž
by bylo nutné vytáhnout zástrčku napájecího kabelu ze
zásuvky.
L
Stisknutím tohoto tlačítka zablokujete nebo odblokujete
ovládací panel. Stisknutím a podržením tlačítka po dobu 3
sekund zablokujete nebo odblokujete displej. Pokud
neprovedete žádnou jinou operaci, displej se automaticky
zablokuje po uplynutí 15 Sekund.

228
V případě nečinnosti se displej zablokuje po uplynutí 15 sekund. V tomto případě se na displeji
zobrazí symbol B.
Podsvícení displeje se automaticky vypne po uplynutí 15 sekund od zablokování displeje, pokud
neprovedete žádnou operaci. Podsvícení se opět zapne, jakmile stisknete libovolné tlačítko. Pokud se
zobrazuje chybový kód nebo upozornění, displej je automaticky odblokovaný.
Upozornění
Vinotéka je vybavena výstražným systémem, aby byla zajištěna plná bezpečnost Vašich vín:
- Upozornění na vysokou teplotu
- Upozornění na nízkou teplotu
Tato upozornění jsou přeprogramovaná. Pokud vinotéka zjistí po uplynutí 12 provozních hodin rozdíl ±
4 °C mezi nastavenou a skutečnou teplotou, na displeji se zobrazí chybový kód upozornění na
vysokou nebo nízkou teplotu a zazní akustická signalizace. Pokud dojde k poruše, kompresor pracuje
v krátkých cyklech a střídavě se zapíná a vypíná v intervalu 10 minut.
Deaktivaci akustické signalizace provedete stisknutím libovolného tlačítka na ovládacím panelu.
Pokud se aktivuje jedno z těchto upozornění, obraťte se prosím na zákaznický servis.
Hlavní řídicí jednotka
Vinotéka je vybavená hlavní řídicí jednotkou. Řídicí jednotka se nachází uvnitř vinotéky vpravo nahoře.
Zajišťuje spojení mezi policemi a aplikací VINOTAG® ve smartphonu pomocí přenosu dat
prostřednictvím Wi-Fi.
Varování! Za žádných okolností nemanipulujte s řídicí jednotkou. Dávejte pozor, abyste ji nepoškodili.
Na spodní straně řidicí jednotky se nachází kontrolka, která zobrazuje stav vinotéky. Kromě toho se na
řídicí jednotce nachází tlačítko, kterým lze restartovat připojení vinotéky k bezdrátové síti. Pokud tato
kontrolka nepřetržitě bliká, znamená to, že už vinotéka není připojená k bezdrátové síti nebo že došlo k
přerušení spojení. Řídicí jednotka je opatřená QR kódem, který se nachází ve spodní části (QR kód se
také nachází na protokolu kvality, který jste obdrželi při nákupu vinotéky).
Uvedení do provozu

229
QR kód se používá ke spárování vinotéky (prostřednictvím Bluetooth). Abyste mohli vinotéku připojit k
bezdrátové síti, musíte tento QR kód při prvním použití vinotéky naskenovat.
Varování! Skenování QR kódu a proces párování se provádí pouze jednou! Pokud tento postup
provedete s vinotékou, která už je přiřazená uživateli, stanete se novým uživatelem této
vinotéky a dojde k přepisu všech dat, která byla předtím této vinotéce přiřazená. Tímto
způsobem získáte přístup k prázdné vinotéce, dřívější vlastník jej naopak ztratí. Mějte prosím na
paměti, že tuto operaci nelze vrátit a přepsaná data nelze obnovit.
Varování! Pokud kontrolka nepřetržitě bliká, upozorňuje na to, že vinotéka není připojená nebo ztratila
připojení k bezdrátové síti.
Varování! Neodstraňujte různé QR kódy nacházejí se na vinotéce. Slouží k párování nebo údržbě
vinotéky.
Varování! Aby bylo zajištěno správné fungování vinotéky, musíte ji umístit tak, aby byl umožněn dobrý
příjem Wi-Fi.
• Reset připojení k síti Wi-Fi nebo změna poskytovatele internetu
Pokud chcete provést reset Wi-Fi, stiskněte tlačítko na spodní straně hlavní řídicí jednotky a podržte je
3 sekundy stisknuté. Jednou rukou pevně seshora držte umělohmotnou skříňku a palcem stiskněte
tlačítko nacházející ve spodní části jednotky. Stejně postupujte i při změně poskytovatele internetu.
Chytré police
Vinotéka je vybavená 14 chytrými policemi. Tyto police byly vyvynuty, vyrobeny a smontovány ve
Francii.
Police komunikují s hlavní řídicí jednotkou vinotéky. Lahve jsou umístěny hrdlem proti sobě na 12
předdefinovaných místech.
• Hrdla lahví musí zapadat do zářezů ve střední části police. Kontrolka, která odpovídá umístění lahví,
dvakrát blikne a potvrdí tak rozoznání lahve. Pokud láhev umístíte nesprávně, může se stát, že snímač
nerozpozná hrdlo lahve. V takovém případě upravte polohu lahve na polici tak, aby ji vinotéka mohla
rozpoznat. Kontrolka dvakrát zabliká, čímž potvrzuje provedenou operaci.
• Lahve leží na policích v mírném sklonu 4° (čtyři stupně) na střední části. Tato poloha je zcela
normální a slouží k rozpoznání hrdel lahví snímačem. Hrlda lahví se musí nacházet přímo na střední
části police, nelze je umístit vyvýšeně nebo šikmo, neboť v takovém případě by snímač lahve
nerozeznal.

230
Varování! Abyste předešli převrácení vinotéky, uložte lahve nejprve do zadní oblasti chladicího
prostoru. Při vkládání lahví nemí být police vysunuté nebo zůstat vysunuté. Hmotnost lahví by mohla
vést k převrácení vinotéky dopředu, proto je důležité rozmístit lahve po celém chladicím prostoru.
Manipulujte s vinotékou opatrně.
• Varování! Nevysunujte všech 14 chytrých polic najednou, pokud se na nich nachází lahve.
• Varování! Umístěte lahve na polici opatrně tak, aby nedošlo k poškození středové části police.
• Varování! Police nejsou určeny ke skladování lahví o průměru přesahujícím 9 cm.
• Varování! Pokud dojde k prasknutí lahve, musíte všechny lahve vyjmout. Poté musíte zářezy ve
střední části police, ve které se nacházejí snímače, vyčistit měkkým a suchým hadříkem.
Nezapomeňte lahve znovu naskenovat, než je vložíte zpět do vinotéky.
• Varování! Při prvním uvedení do provozu musí uživatel odstranit ochrannou fólii z umělé hmoty,
která se nachází v přední části každé fólie.
Police jsou vybaveny světlenými kontrolkami (LED), které slouží ke zprostředkování následujících
informací uživateli:
• Požadovaná lahev (požadované lahve)
• Doporučené umístění (viz část týkající se funkce E-SOMMELIER)
• Rozpoznání lahví vinotékou při vyjmutí nebo vložení lahve
Varování: V určitých případech se může stát, že LED kontrolky na přední straně polic zůstanou
zapnuté. V elektronickém systému je naprogramováno spínání v rozsahu 5 minut, poté se LED
kontrolky automaticky vypnou.
Provozní režimy
Vinotéka disponuje dvěma provozními režimy:
• Výchozím nastavením je režim „se stejnou teplotou“. V
tomto provozním režimu je v celé vinotéce stejná teplota.
Teplotu lze nastavit v rozsahu od +5°C do +20 °C. V tomto
režimu se aktivují ventilátory, které zajišťují správnou
cirkulaci vzduchu ve vinotéce. Na digitálním displeji se
zobrazuje nastavená teplota spolu s hlášením „MONO“.
• Provozní režim „s různými teplotami“ umožňuje nastavit v
chladicím prostoru různou teplotu ve formě gradientu. Přitom
je teplota v horní části vinotéky nejvyšší, v prostřední části
průměrná a ve spodní části nejnižší. V tomto režimu jsou
ventilátory vypnuté. Teplota v tomto režimu byla nastavená
už ve výrobním závodě a nelze ji změnit. Na displeji se
zobrazuje „AUTO“ a spotřebič si řídí teplotu v chladicím
prostoru samostatně. Není nutné provádět žádná nastavení.
V následující tabulce jsou uvedeny teploty, kterých lze
dosáhnout v provozním režimu „AUTO“ za běžných podmínek
používání, tedy při okolní teplotě max. 25 °C (viz část
„Instalace vinotéky“). Rozložení teploty uvedené v tabulce
slouží pouze jako orientační hodnota, neboť v závislosti na
chladicích cyklech, počtu skladovaných lahví a okolní teplotě
může docházet k odchylkám na různých úrovních. Všechny
tyto různé faktory mají vliv na cirkulaci vzduchu ve vinotéce.

231
Dokud je spotřebič v provozu a používá se za běžných podmínek, garantuje dodržení nastavení teploty
v chladicím prostoru. Vnitřní teplota spotřebiče a jeho spotřeba elektrické energie závisí na četných
faktorech, jako je okolní teplota, sluneční záření, četnost otevírání dvířek a počet skladovaných lahví.
Mírné kolísání teplot je zcela normální.
• Demorežim
Spotřebič je vybaven demorežimem. Po aktivaci tohoto provozního režimu dojde k deaktivaci
kompresoru, ventilátorů i upozornění. Funguje však displej i osvětlení.
Pokud chcete tento režim aktivovat, stiskněte tlačítko osvětlení (H) + tlačítka C/F (F) a podržte je
stisknutá po dobu 3 sekund. Poté pětkrát zabliká kontrolka teploty nebo symbol „AUTO“. Opakováním
tohoto úkonu ukončíte demorežim.
• Režim „ESOMMELIER®“
Režim ESOMMELIER® je funkce, která Vám pomáhá při rozmísťování lahví v chladicím prostoru. Lze
ji používat pouze tehdy, pokud máte chytrou vinotéku LA SOMMELIERE a aktivní konto VINOTAG®.
Tato funkce doporučuje ideální místo pro skladování Vašeho vína.
Po naskenování lahve rozpozná aplikace VINOTAG® druh vína; Poté Vám v závislosti na druhu vína
doporučí ideální skladovací teplotu pro optimální konzervaci vína.
V závislosti a druhu vína jsou některá skladovací místa vinotéky vhodnější než jiná.
V tomto režimu Vám vinotéka navrhuje dostupná skladovací místa, která jsou nejvhodnější pro
naskenovanou láhev vína. Ve vinotéce se rozsvítí kontrolky vhodných skladovacích míst, přičemž se
zobrazí maximálně 12 míst současně.
Zimní režim
Vinotéka je vybavena automatickým systémem ohřevu, který se také nazývá „zimní režim“. Pokud je

232
teplota, kterou naměří čidlo vinotéky, nižší než nastavená hodnota, aktivuje se topné těleso vinotéky,
aby došlo ke zvýšení teploty.
Tento systém se zapíná a vypíná automaticky a nevyžaduje zásah uživatele. Automatická aktivace
nebo deaktivace zimního režimu nemá žádný vliv na konzervaci vína.
Aplikace VINOTAG®
Vinotéka ECELLAR185 je kompatibilní s aplikací VINOTAG® navrženou pro správu vinotéky.
Abyste mohli řádně využívat chytrou vinotéku, potřebujete následující:
• zdroj napájení pro vinotéku
• aplikaci VINOTAG®, kterou si můžete stáhnout v App Store nebo Google Play Store, a vytvořený
uživatelský účet
• stabilní připojení k internetu (Wi-Fi)
• vinotéku ECELLAR
Funkce aplikace VINOTAG®
Aplikace VINOTAG® Vám umožňuje:
• vytvářet, přizpůsobovat a spravovat vinotéky
• přidávat/odebírat lahve
• kontrolovat stav vín (lahve vína ve vinotéce) a vytvářet vlastní datové listy vín; aplikace VINOTAG® je
v rámci prémiové varianty propojena s VIVINO® - díky tomu můžete z databáze VIVINO® exportovat
podrobné datové listy
• vytvářet a kontrolovat knihovnu vín; díky exkluzivnímu partnerství mezi VINOTAG® a VIVINO®
můžete ukládat a prohlížet podrobné datové listy vín z databáze VIVINO®
• sdílet vizualizaci vinotéky nebo vinoték s rodinou a přáteli
• dostat upozornění, když víno dosáhne perfektní zralosti, když je potřeba vyměnit filtr vinotéky nebo
když ve vinotéce zbývá pouze několik málo lahví Vašeho oblíbeného vína
• díky přední LED kontrolce snadno nalézt požadovanou láhev vína
• díky přední LED kontrolce snadno nalézt volná skladovací místa
Vytvoření uživatelského účtu VINOTAG®
• V závislosti na typu Vašeho chytrého telefonu si stáhněte aplikaci
VINOTAG® z App Store nebo Google Play Store.
• Ručně nebo přes Facebook či prostřednictvím účtu Apple / Google Play
si vytvořte uživatelský účet.
• Vyplňte povinné údaje: Křestní jméno, příjmení, datum narození, země,
oblast
• Zaškrtněte políčko „Souhlasím s všeobecnými podmínkami používání“
• Klikněte na „Dokončit registraci“
Nyní jste si založili uživatelský účet VINOTAG®.
Nezapomeňte si uložit uživatelské jméno a heslo.

233
Nabídky aplikace VINOTAG®
Po otevření aplikace se zobrazí následující nabídka:
• MÁ VINOTÉKA: Prohlédnutí vinotéky (vinoték).
• MÁ VÍNA: Nahlédnutí do knihovny vín.
• UPOZORNĚNÍ: Prohlédnutí upozornění.
• PROFIL: Prohlédnutí a doplnění informací k Vašemu účtu.
Záložka „MÁ VINOTÉKA“
Zde si můžete prohlédnout obsah vinotéky/vinoték.
Varování! Pokud je vinotéka prázdná, nemůžete si ji prohlédnout. Abyste měli přístup do náhledu,
musíte do vinotéky přidat lahve.
Obsah vinotéky si můžete prohlédnout v režimu seznamu nebo v grafickém režimu. Nastavení režimu
zobrazení provedete prostřednictvím symbolu v pravé horní části displeje. Tento symbol Vám
umožňuje přepínat z jednoho režimu zobrazení na druhý. Ve výchozím nastavení se „chytré
vinotéky“ zobrazují v režimu seznamu.
Vysvětlení symbolu „zobrazení vinotéky“:
Režim seznamu
nebo
Grafický režim
Pomocí ikony vyhledávání nacházející se v pravé horní části displeje můžete vyhledávat lahví
vína ve vinotéce; vše, co musíte udělat, je zadat informace o požadované lahvi (název vinařství, druh
vína, ročník atd.).
• Pomocí symbolu v pravé spodní části displeje můžete přidávat lahve do vinotéky. (Podrobnější
informace naleznete v části „Vložení lahve vína“.)
• Varování! Pokud vlastníte několik vinoték, můžete přepínat mezi jednotlivými fonotékami změnou
názvu vinotéky v levé horní části displeje. Když kliknete na název vinotéky, otevřete se vyskakovaní
okno, ve kterém si vyberete vinotéku, kterou si chcete prohlédnout. Klikněte v seznamu vinoték na
požadovaný model.

234
Režim seznamu:
• Zjednodušený režim zobrazení. V seznamu uvidíte vína, která uchováváte ve
vinotéce. Vína se zobrazují v abecedním pořadí.
• V režimu seznamu jsou u každého vína uvedeny následující údaje: Název vína,
vinařství, datum, barva, druh a snímek lahve.
• Dotykem položky vína zobrazíte jeho datový list.
• Na pravé straně displeje se zobrazuje kontrolka, která u každého vína udává jeho
druh. Druhy vína rozpoznáte díky barevným půlkruhům (červený půlkruh: červené
víno / žlutý půlkruh: bílé víno / růžový půlkruh: růžové víno).
Grafický režim:
• V grafickém zobrazení uvidíte, jak je Vaše vinotéka naplněná,
přičemž barevné kruhy představují skladované lahve.
• Vína se zobrazují podle jejich rozmístění na policích.
• Uživatel si může lahev prohlédnout přesunout na jinou pozici
nebo smazat.
Dotykem ikony lahve zobrazíte popis vína.
• Na levé straně displeje se zobrazuje kontrolka, která udává
počet lahví podle druhu vína pro každou polici. Barevné
půlkruhy představují druhy vína.
Červený půlkruh: Červené víno
Žlutý půlkruh: Bílé víno
Růžový půlkruh: Růžové víno
Záložka „MÁ VÍNA“
Zde si můžete prohlédnout knihovnu vín. V knihovně mít můžete provádět následující:
• Prohlédnout si vypitá vína. Všechna vína, která jste přidali do vinotéky (nezáleží na tom, zda se tam
ještě nacházejí, nebo ne) se automaticky zobrazí v knihovně vín.
• Vytvořit si seznam přání: Můžete si zde poznamenat vína, která jste ochutnali u svých přátel nebo
která byste si rádi koupili. V knihovně vín můžete také vytvořit seznam přání.
• Pomocí symbolu vyhledávání v pravé horní části displeje můžete v knihovně vín vyhledat lahev
vína; stačí zadat informace o hledané lahvi (název vinařství, druh vína, ročník atd.).

235
• Přidat lahev do knihovny vín: Postupujte podle pokynů v „Přidat lahve“ a poté klikněte na „Přidat do
knihovny vín“.
• Dotykem položky vína si můžete prohlédnout jeho datový list (podrobnější informace naleznete v
„Prohlédnout datový list“).
Záložka „UPOZORNĚNÍ“
Zde si můžete prohlédnout upozornění týkající se vinotéky. Červená tečka vedle
symbolu označuje nepřečtená upozornění.
Upozornění jsou řazena chronologicky.
Pokud vlastníte několik vinoték, můžete filtrovat upozornění podle vinotéky
(pomocí symbolu filtru vlevo nahoře na displeji).
Pomocí vyhledávacího pole můžete filtrovat upozornění, abyste nalezli určitou
událost.
• Upozornění na výměnu filtru: Vinotéka Vás upozorní, když je nutné vyměnit filtr. Datum výměny
filtru se nastaví automaticky, když uložíte novou vinotéku. Pozor! Nezapomeňte po výměně filtru tento
úkon zadat ve vinotéce, aby se počítadlo resetovalo na aktuální datum (běžně se filtr mění jednou
ročně).
• Upozornění na nízký stav zásob: Můžete si nastavit upozornění na nízký stav zásob oblíbeného
vína. Aplikace Vám v takovém případě pošle upozornění, když zásoby oblíbeného vína klesnou na
zadanou hodnotu. (Množství, při kterém se aktivuje upozornění na nízký stav zásob, si určíte sami.
Upozornění se odešle, jakmile zásoby klesnou na určitý počet lahví.)
• Technická upozornění: Tato upozornění oznamují technický problém nebo na úkon, který jste ve
vinotéce provedli: Vypili jste lahev vína, přidali jste lahev vína, vytvořili jste vinotéku, vytvořili jste
přístup k vinotéce, uživatel X dostal přístupové práva k Vaší vinotéce… V případě technického
problému se obraťte na autorizovaného technika. Upozornění se zobrazují jako seznam, a to s
uvedením druhu upozornění, data, času, čísla příslušné police a názvu příslušné vinotéky.

236
Záložka „PROFIL“
Zde si můžete zobrazit, doplnit nebo změnit údaje ke svému uživatelském účtu VINOTAG®:
• Změna údajů: Můžete změnit přihlašovací údaje (jméno, příjmení, datum
narození, země, oblast) nebo smazat uživatelský účet. Kromě toho se
můžete přihlásit k odběru zpráv a jiných komerčních sdělení od společnosti
VINOTAG.
• Chci se stát prémiovým členem: Zde si můžete předplatit prémiovou
variantu aplikace VINOTAG® a doplnit počet skenů. Pomocí těchto skenů
můžete ukládat datové listy VIVINO® přímo ve vinotéce a nemusíte je již
vyplňovat ručně (podrobnější informace jsou uvedeny v části „Prémiový
účet“).
• Mé vinotéky: Zde si můžete prohlédnout vinotéky, změnit je, sdílet,
smazat, přidat novou vinotéku nebo je spravovat. Kromě toho si můžete
prohlížet sdílené vinotéky.
• Mé pozvánky: Zde si můžete prohlédnout pozvánky.
• Kontakt: Zde můžete kontaktovat zákaznický servis aplikace VINOTAG®.
V rozbalovacím seznamu si můžete vybrat téma Vašeho dotazu.
• Všeobecné podmínky používání: Zde si můžete prohlédnout aktuální
podmínky používání aplikace VINOTAG®.
• Právní upozornění: Zde se můžete seznámit s právními upozorněními
aplikace VINOTAG®.
• Odhlášení: Zde se můžete odhlásit z aplikace.
Přidání vinotéky
Nyní můžete do svého uživatelského účtu VINOTAG® přidat první nebo
novou vinotéku (v aplikace máte možnost spravovat několik vinoték, které
si vyberete z řady modelů).
Varování! Když přidáváte vinotéku, nesmíte v žádném případě opustit
aplikaci.
• Přidání první vinotéky: Během vytvoření uživatelského účtu musíte
vytvořit i vinotéku. Postupujte podle níže uvedených kroků.
• Přidání nové vinotéky: Pokud chcete spravovat v aplikaci více vinoték,
přejděte na záložku „Profil“ -> „Mé vinotéky“ a klikněte na „Přidat vinotéku“.
Poté postupujte podle níže uvedených kroků.

237
Přidání chytré vinotéky
• Zadejte typ vinotéky: „Chytrá vinotéka“ nebo „Vinotéka bez chytré funkce“. Model
ECELLAR185 patří do kategorie „Chytrá vinotéka“. Klikněte na „Chytrá vinotéka“.
• Naskenujte QR kód vinotéky, aby ji aplikaci mohla identifikovat a vytvořit spojení. QR kód
se nachází ve vinotéce, pod hlavní řidicí stříňkou vpravo nahoře, a dole na listu kvality, který
jste obdrželi při nákupu vinotéky. Pokud dáte přednost snadněji dostupnému naskenování
kódu na listu kvality, snadno vinotéku propojíte s aplikací.
• Aplikace Vás vyzve k aktivaci spojení Bluetooth. Aktivace je nutná, aby bylo možné
vinotéku nakonfigurovat.
• Jakmile se vinotéka propojí s aplikací pomocí Bluetooth, aplikace Vás vyzve k výběru Wi-
Fi sítě nebo k použití protokolu WPS:
- Pokud používáte Wi-Fi síť, musíte zadat heslo bezdrátového směrovače. Pokud se
bezdrátové spojení nezdaří, zkontrolujte heslo a/nebo vzdálenost mezi vinotékou a
bezdrátovým směšovačem. Příliš velká vzdálenost nebo příliš silné stěny mohou
negativně ovlivnit bezdrátové připojení.
- Pokud používáte WPS, zobrazuje se během skenování lišta s průběhem načítání.
Pokud ani po uplynutí několika sekund není možné nalézt WPS síť, zobrazí se nahoře
na displeji chybové hlášení a aplikace se vrátí zpět k výběru Wi-Fi/WPS.
Sdílení vinotéky
Jako vlastník vinotéky můžete sdílet vinotéku s jinými osobami. Aby si pozvané osoby mohly Vaši
vinotéku prohlédnout, musí si vytvořit uživatelský účet v aplikaci VINOTAG®.
Pozvání osoby:
• Přejděte do záložky „Můj profil“: „Mé vinotéky“.
• Klikněte na tlačítko „Sdílet vinotéku“.
• Zadejte e-mailovou adresu osoby, kterou chcete pozvat.
• Nahoře na displeji se zobrazí hlášení potvrzující, že pozvánka byla odeslána.
Sdílení vinotéky:
• Osoba obdrží e-mail s pozvánkou a je vyzvána ke stažení aplikace. Pokud ještě nemá uživatelský
účet, může si prohlédnout sdílené vinotéky ihned po vytvoření uživatelského účtu.
• Pokud už pozvaná osoba vlastní uživatelský účet, obdrží zprávu s pozvánkou k návštěvě sdílené

238
vinotéky.
Vymazání vinotéky
Když chcete vymazat jednu nebo více vinoték:
• Přejděte do záložky „Můj profil“: „Mé vinotéky“.
• Zobrazí se seznam Vašich vinoték.
• Vyberte vinotéku, kterou chcete vymazat, a poté stiskněte „Vymazat“.
• Opakujte tento postup u všech vinoték, které chcete vymazat.
Varování! Pokud se ve vinotéce nachází alespoň jedna lahev vína, objeví se vyskakovaní okno, ve
kterém musíte potvrdit vymazání. Po smazání vinotéky už není možné obnovit informace.
Varování! Nemůžete vymazat vinotéku, která Vám nepatří. Pokud je s Vámi sdílena vinotéka a je
viditelná v záložce „Můj profil“: „Mé vinotéky“, můžete ukončit sdílení. Pokud nejste vlastník, má
tlačítko „Vymazat“ význam „Opustit“. Po kliknutí na toto tlačítko můžete vinotéku opustit. Objeví se
vyskakovaní okno, ve kterém musíte tento úkon potvrdit.
Změna konfigurace vinotéky
Můžete změnit konfiguraci vinotéky tak, aby už neodpovídala běžné konfiguraci.
Varování! Pokud se jedná o vinotéku kategorie „chytrá vinotéka“, nelze běžnou konfiguraci změnit.
Police „chytré vinotéky“ jsou inteligentní police, které jsou propojené s vinotékou. Jsou napájeny
elektrickým proudem a smí je měnit nebo odstranit pouze autorizovaný odborník.
Vložení lahví
Po vytvoření vinotéky v aplikaci VINOTAG® můžete vložit lahve.
POZNÁMKA: Synchronizace: Každý pohyb, ke kterému v „chytré vinotéce“ dojde, je vinotékou
zaznamenán. Díky tomu může vinotéka uchovat historii i po přerušení připojení k internetu. Po
připojení k bezdrátové síti a cloudu se na Vašem smartphonu zobrazí synchronizační náhled, pokud
došlo k pohybům. Přitom dojde k vyvolání dat a jejich uložení v databázi, aby se aktualizoval
zobrazovaný stav zásob.
Vytvoření vinotéky Režim seznamu Grafický režim
• V případě nové vinotéky klikněte na „Přidat první lahev“ nebo na „+“. Vyfoťte etiketu lahve, kterou
chcete vložit do vinotéky. Zobrazí se vyplnění datový list vína. Tento datový list pochází z databáze
VIVINO®. Datový list můžete změnit nebo doplnit.
• Varování! Pokud se lahev víno, kterou chcete přidat do vinotéky, nenachází v databázi

239
VIVINO® nebo pokud nemáte prémiový účet, musíte si datový list vína vyplnit sami. Pokud
nechtete, nemusíte etiketu lahve fotografovat. V takovém případě nebudete mít přístup do
databáze VIVINO® a musíte datový list vína vyplnit ručně.
Při přidání lahve můžete doplnit nebo upravit příslušný datový list, zanechat komentář, uložit do svých
oblíbených vín nebo udělit hodnocení.
- Název vína
- Vinařství
- Apelace
- Ročník
- Země/oblast
- Barva vína
- Počet lahví
V „rozšířeném“ režimu můžete do datového listu zanést podrobnější informace:
- Minimální doba skladování (v letech)
- Maximální doba skladování (v letech)
- Komentář
- Přiřazení do oblíbených vín
- Hodnocení lahve (0 až 5)
- Kupní cena
- Odkaz na databázi VIVINO®, ve které naleznete kompletní datový list (platí pro prémiový účet)
- Odkaz na databázi VIVINO®, kde si můžete zakoupit toto víno
• Naskenovaná lahev nebyla rozpoznána. V takovém případě, kdy nedošlo k rozpoznání lahve,
aplikace navrhuje opětovné naskenování lahve, manuální vyhledání lahve (pokud při vyhledávání
nebyla nalezena vhodná lahev) a ruční vyplnění datového listu.
• Pokud chcete dostávat upozornění na to, že víno dosáhlo perfektní zralosti, musíte zadat jeho
minimální a maximální dobu skladování. Pokud nevyplníte políčka minimální a maximální doby
skladování, žádné upozornění se neodešle.
Přidání lahve do „chytré vinotéky“
Vložte lahev do vinotéky na požadované místo:
• Aplikace VINOTAG® Vás informuje o tom, že byla rozpoznána vložená lahev, a uloží její pozici v
digitální verzi vinotéky.
• Po vložení a rozpoznání lahve dvakrát rychle zabliká příslušná kontrolka. Poloha lahve se uloží v
aplikaci. Zobrazí se vyskakovaní okno se dvěma tlačítky: „Přidat lahev“ nebo „Hotovo“.
• Pozor! Pokud chcete uložit jednu nebo více lahví ve skladovací zóně v dolní části vinotéky, mějte
prosím na paměti, že tato zóna vinotéky není „chytrá“.
• Kliknnutím na „+“ přidáte do vinotéky další lahev.
Poznámka!
Skladovací zóna ve spodní části vinotéky nemá „chytrou“ funkci.
Pomocí aplikace však i přesto můžete vytvořit digitální seznam lahví. Jednoduše zadejte, že v této
zóně skladujete lahve.
• Aktuální kapacita skladovací zóny je 17 lahví na šampaňské.
• Aplikace Vám však umožňuje uložit větší počet lahví, takže můžete zaregistrovat i vína, která ve
vinotéce neskladujete.
Funkce E-Sommelier
Při přidání lahve do „chytré vinotéky“ můžete použít funkci E-Sommelier. Tato funkce Vám doporučí
ideální místo ve vinotéce pro skladování vína. Po naskenování lahve rozpozná aplikace VINOTAG®
druh vína. Poté Vám v závislosti na druhu vína doporučí ideální skladovací teplotu zaručující
optimální konzervaci vína.
V závislosti na druhu vína se určitá skladovací místa ve vinotéce hodí více než jiná.
Funkce E-Sommelier Vám pomáhá uchovávat vína za těch nejlepších skladovacích podmínek. Když
kliknete na toto tlačítko, vinotéka Vám navrhne dostupná skladovací místa, která jsou nejvhodnější

240
pro naskenovanou lahev vína. Ve vinotéce se rozsvítí kontrolky označující tato skladovací místa.
• Po umístění a rozpoznání lahve dvakrát rychle zabliká příslušná kontrolka. Pozice se uloží v
aplikaci. Objeví se vyskakovaní okno se dvěma tlačítky: „PřidatLahev“ nebo „Hotovo“.
• Pozor! Pokud se rozpoznání lahve nezdaří, protože vinotéka vloženou lahev nemůže rozpoznat,
kontrolka se nerozbliká. V takovém případě opakujte postup, dokud lahev nebude správně
rozpoznaná a kontrolka dvakrát nezabliká.
• Varování! Když lahev nevyjmete/nevložíte, svítí kontrolka na přední straně police po dobu 5 minut a
poté automaticky zhasne.
Lahev můžete přidat i pomocí datového listu.
• Klikněte na tlačítko dole v záložce „Přidat jednu nebo několik lahví“.
• Zadejte počet lahví a jejich formát.
• Vložte lahev/lahve do vinotéky na požadované místo.
• Aplikace VINOTAG® Vás informuje o tom, že byla rozpoznána lahev, a uloží její pozici v digitální
verzi vinotéky.
POZNÁMKA: Po vytvoření uživatelského účtu v aplikaci VINOTAG® máte k dispozici „50
bezplatných skenů“. Když přidáte chytrou vinotéku, získáte 1000 bezplatných skenů. Pomocí
těchto skenů můžete v rámci partnerství VINOTAG® - VIVINO® používat předvyplněné datové
listy vína. Po spotřebování všech bezplatných skenů můžete do vinotéky i nadále přidávat
lahve pomocí ručního vyplnění datových listů nebo si můžete předplatit prémiovou variantu
uživatelského účtu, kdy dojde k doplnění počtu dostupných skenů (další informace naleznete
v části „Prémiový účet“).
Prémiový účet
Pro příjemnější zážitek z používání vinotéky uzavřela aplikace VINOTAG® partnerství s databází vín
VIVINO®. Při vytvoření uživatelského účtu v aplikaci VINOTAG® obdržíte určitý počet „bezplatných
skenů“.
Tyto „bezplatné skeny“ umožňují vyfotografování etikety lahve s následným přímým přístupem k
podrobnému datovému listu vína z databáze VIVINO®. Varování! Nerozpoznané lahve se také
započítávají jako „bezplatné skeny“, protože byl odeslán dotaz na rozpoznání do databáze VIVINO®.
Snímek etikety musí být dostatečně kvalitný a ostrý, aby bylo možné lahev rozpoznat.
Datový list vína lze změnit a poté přímo uložit v digitální verzi Vaší vinotéky. Díky tomu už nemusíte
vyplňovat datový list ručně. Při plnění vinotéky tak ušetříte spoustu času! Kromě toho se dozvíte velké
množství informací o svých oblíbených vínech.
Pokud už jste spotřebovali všechny bezplatné skeny, můžete do vinotéky i nadále přidávat lahve,
přičemž je nutné vyplnit datové listy ručně. případně si můžete předplatit prémiovou verzi
uživatelského účtu, kdy dojde k doplnění počtu bezplatných skenů. Vyskakovací okno Vás upozorní,
že už Vám nezbývá žádný bezplatný sken.
Abyste mohli využívat výhody prémiového účtu, musíte si předplatit prémiovou verzi a tím i počet
skenů.
- Předplatné na 200 skenů
- Předplatné na 400 skenů
- Předplatné na 1000 skenů
Zakoupené „skeny“ nemají žádné časové omezení.
Prémiovou verzi si můžete předplatit v aplikaci VINOTAG® v záložce „Můj účet“ kliknutím na tlačítko
„Chci se stát prémiovým členem“. Můžete si zde také zobrazit cenové podmínky.
Vyjmutí lahví
Po vytvoření vinotéky v aplikaci VINOTAG® můžete vymazat lahve z vinotéky. V knihovně vín

241
zůstanou lahve i nadále dostupné.
V případě „chytré“ vinotéky:
• Vyjměte požadovanou lahev z vinotéky.
• Chytrá vinotéka rozpozná, že jste z ní vyjmuli lahev, a informuje o tom aplikaci. V aplikaci se zobrazí
upozornění na vyjmutí lahve z vinotéky.
• Podrobné informace o upozorněních najdete v části „Upozornění“.
Nebo
• Vyberte lahev vína pomocí funkce „Zobrazit ve vinotéce“. Ve vinotéce se rozsvítí kontrolky, které
odpovídají skladovacím pozicím různých lahví vína. Pozor! Rozsvítí se maximálně 12 kontrolek
současně. Pozor! Pokud nevyjmete lahev z vinotéky nebo ji do vinotéky nevložíte, kontrolka na přední
straně police sví
tí po dobu 5 minut a poté automaticky zhasne.
• Vinotéka rozpozná odebrání lahve. Kontrolka skladovacího místa, ze kterého jste odebrali lahev,
dvakrát rychle zabliká a potvrdí tak odebrání lahve.
• Chytrá vinotéka informuje aplikaci, že došlo k vyjmutí lahve. V aplikaci se zobrazí upozornění na
vyjmutí lahve.
• Automaticky se aktualizuje stav zásob ve vinotéce.
Varování! Aby bylo možné přidat lahve do chytré vinotéky nebo je z ní odebrat, musí být vinotéka
připojená k síti Wi-Fi. Dochází tak k výměně informací mezi reálnou vinotékou a digitální vinotékou,
která je k vidění v aplikaci VINOTAG®.
Prohlédnutí datového listu vína
Datové listy vína si můžete prohlédnout v obou vinotékách nebo v knihovně vín.
Náhled datového listu vína v mé vinotéce v režimu seznamu nebo v mé knihovně vín:
• Klikněte na požadovanou lahev.
• Prohlédněte si informace o lahvi.
• Podrobnější informace naleznete na webových stránkách našeho partnera Vivino po kliknutí na
„Prohlédnout na Vivino“.
Prohlédnutí datového listu vína v mé vinotéce v grafickém režimu:
• Klikněte na požadovanou polici.
• Klikněte na požadovanou lahev.
• Prohlédněte si informace o lahvi.
• Podrobnější informace naleznete na webových stránkách našeho partnera Vivino po kliknutí na
„Prohlédnout na Vivino“.
Vytvoření upozornění na nízký stav zásob
Abyste mohli svou vinotéku spolu s víny lépe spravovat, nabízí Vám aplikace VINOTAG® možnost
zasílání upozornění na nízký stav zásob:
• Klikněte v aplikaci v náhledu své vinotéky na požadovanou lahev a vyvolejte tak příslušný datový list
vína.
• Klikněte na „Naprogramovat upozornění“.
• Zadejte počet lahví, který platí jako minimální zásoba; po klesnutí počtu lahví na tuto hodnotu
obdržíte upozornění na nízký stav zásob tohoto druhu vína.
• Klikněte na „Potvrdit“. Upozornění na nízký stav zásob je aktivní.
Pokud chcete upozornění deaktivovat, klikněte na „Změnit upozornění“; snižte počet
požadovaných lahví tak, aby se zobrazilo hlášení „Deaktivovat“. Klikněte na „potvrdit“.
Upozornění na nízký stav zásob je nyní neaktivní.

242
Vytvoření upozornění na perfektní zralost vína
Pokud chcete vytvořit upozornění na perfektní zralost vína, musíte do datového listu vína
bezpodmínečně zadat minimální (větší než 0) a maximální dobu skladování. Doba skladování se
udává v letech. Pokud jste víno ještě nevypili, obdržíte na začátku a na konci perfektní zralosti
upozornění. V případě lahve ročníku „X“ s minimální dobou skladování 5 let a maximální dobou
skladování 10 let obdržíte následující upozornění:
- Ročník „X“ + 5 let: Upozornění na začátku perfektní zralosti vína: „Vaše víno právě dosáhlo perfektní
zralosti“.
- Ročník „X“ + 10 let: Upozornění na konci perfektní zralosti vína: „Blíží se konec perfektní zralosti
Vašeho vína“.
Náhled rozmístění lahví ve vinotéce
Nacházíte se v náhledu vinotéky. Použijte symbol vyhledávání vpravo nahoře na displeji.
Zadejte název hledaného vína nebo vinařství nebo jinou informaci o lahvi.
Zobrazí se datový list hledané lahve.
Klikněte dole v záložce na tlačítko „Prohlédnout si své lahve“ nebo na tlačítko „Ukázat ve vinotéce“
nahoře na datovém listu vína.
Ve vinotéce se rozsvítí příslušné kontrolky (max. 12 kontrolek současně) označující umístění
hledaných lahví.
Údržba vinotéky
V konfigurační záložce můžete přepnout vinotéku do stavu údržby.
Tímto úkonem zablokujete všechny pohyby ve vinotéce (přidání, přemístění nebo
smazání lahve).
Náhled záložky se zablokuje a zobrazí se hlášení „Vinotéka se nachází ve stavu
údržby“.
Pokud chcete režim údržby opustit, klikněte na tlačítko „Opustit režim údržby“.
Varování! Po opuštění režimu údržby můžete provést následující:
• Nahrát naposledy uložený stav.
• Vrátit se k prázdné vinotéce. V tomto případě musíte začít od začátku a naskenovat první lahev.
6. PÉČE A ÚDRŽBA
Před přistoupením k údržbě (kterou byste měli provádět pravidelně) vytáhněte zástrčku napájecího
kabelu ze zásuvky nebo vyjměte příslušnou pojistku.
Před prvním použitím spotřebiče (a poté pravidelně) vyčistěte vnitřní i vnější povrch vinotéky (přední
stranu, boční strany i zadní stranu) pomocí vlažné vody a šetrného čisticího prostředku. Otřete
vinotéku hadříkem namočeným v čisté vodě a nechte ji před zapnutím dobře vyschnout. V žádném
případě nepoužívejte rozpouštědla ani abrazivní prostředky.
Při prvním uvedení spotřebiče do provozu se z chladicího prostoru může linout zbytkový zápach.
Nechte proto spotřebič běžet prázdný při nejnižší teplotě. Chlad odstraní případný zápach.
Automatické odmrazování
Vinotéka se odmrazuje automaticky. Automatické odmrazování nemá žáný vliv na vína skladovaná ve
vinotéce.
Během odmrazování je kompresor spolu s ventilátory vypnutý. Na digitálním displeji se zobrazuje
normální teplota. Pokud však chcete zobrazit skutečnou teplotu ve vinotéce, na displeji se zobrazí
kód „DD“. Jedná se o zcela normální jev.

243
Výměna uhlíkového filtru
Vinotéka je vybavená filtrem s aktivním uhlím, který se nachází v chladicím prostoru vpravo dole.
Doporučujeme vyměnit filtr s aktivním uhlím jednou ročně. Vytáhněte filtr jednoduše z vinotéky a
vložte na místo nový filtr.
V případě výpadku elektrického proudu
Většina výpadků elektrického proudu trvá pouze krátce.
Přerušení dodávky elektřiny na jednu až dvě hodiny nemá na teplotu ve vinotéce žádný vliv.
Pokud dojde k výpadku elektrického proudu, neotevírejte zbytečně dvířka vinotéky, ochráníte tak své
víno.
Pokud výpadek elektrického proudu trvá velmi dlouho, je nutné provést následující opatření, aby
nedošlo k poškození vína.
• Pokud je spotřebič odpojený od zdroje napájení nebo vypnutý nebo pokud došlo k přerušení
dodávky elektřiny, vyčkejte před zapnutím spotřebiče 3 až 5 minut. Pokud se pokusíte zapnout
spotřebič před uplynutím této doby, kompresor se zapne teprve po 3 až 5 minutách (pokud to teplota
ve vinotéce vyžaduje).
• Při prvním uvedení vinotéky do provozu a po delší provozní pauze může po opětovném zapnutí
docházet k rozdílům mezi nastavenou teplotou a teplotou zobrazenou na displeji. Jedná se o
normální jev. Po několika hodinách se teplota stabilizuje.
• Při výpadku elektrického proudu vinotéka uloží nastavenou teplotu. Po opětovném zapnutí vinotéky
tak nemusíte nastavovat teplotu znovu.
Varování! Během výpadku elektrického proudu vinotéka ECELLAR neukládá žádné pohyby
lahví, neměli byste proto provádět žádné změny vinných zásob.
Po obnovení dodávky elektřiny vinotéka provede aktualizaci zásob, aby zjistila, zda jste
odebrali nebo naopak přidali nějakou lahev.
Pokud jste provedli přidání nebo odebrání prostřednictvím aplikace, dojde k uložení změn.
Pokud jste však aplikaci nepoužili a odebrali lahev nebo ji vyměnili za jinou lahev na stejném
skladovacím místě, vinotéka tuto změnu při restartu nerozpozná.
Když jedete na dovolenou
Krátká dovolená: Nechte vinotéku během své nepřítomnosti i nadále běžet, pokud neodjíždíte na více
než 3 týdny.
Dlouhá nepřítomnost: Pokud nebudete spotřebič několik měsíců používat, vyjměte z něj všechny

244
lahve a veškeré příslušenství, vypněte jej a odpojte od elektrické sítě. Počlivě vyčistěte a vysušte
vnější i vnitřní povrch spotřebiče. Nechte dvířka pootevřená, předejdete tak tvorbě kondenzátu,
zápachu a plísně.
Pokud musíte vinotéku přesunout
• Nejprve vytáhněte zástrčku napájecího kabelu ze zásuvky.
• Vyjměte z vinotéky všechny lahve a upevněte pohyblivé díly.
• Zcela zašroubujte stavitelné nožičky do základny vinotéky, předejdete tak jejich poškození.
• Zavřete dvířka.
• Přesouvejte spotřebič pokud možno ve svislé poloze nebo se řiďte pokyny na obalu, na kterou
stranu lze spotřebič položit. Chraňte spotřebič před poškozením dekou nebo podobnou látkou.
7. V PŘÍPADĚ PORUCHY
Našim výrobkům se věnujeme s veškerou pečlivostí, přesto nikdy nelze zcela vyloučit poruchu. Než
kontaktujete zákaznický servis, zkontrolujte prosím následující:
Zástrčka napájecího kabelu je řádně zastrčená do zásuvky.
Nedošlo k výpadku elektrického proudu.
K poruše nedošlo z jednoho z důvodů uvedených v tabulce na konci tohoto návodu k obsluze.
DŮLEŽITÉ! Výměnu poškozeného napájecího kabelu smí z bezpečnostních důvodů provést
pouze výrobce, autorizované servisní středisko nebo prodejce. V každém případě musí
výměnu provést pouze kvalifikovaná osoba, aby nedošlo k poranění osob.
POKUD SE VÁM NEPODAŘÍ ODSTRANIT PORUCHU POMOCÍ NÁSLEDUJÍCÍCH POKYNŮ,
KONTAKTUJTE ZÁKAZNICKÝ SERVIS NEBO PRODEJCE, U KTERÉHO JSTE SPOTŘEBIČ
ZAKOUPILI.
POZOR!
Před přistoupením k čištění nebo údržbě spotřebiče nejprve vytáhněte zástrčku napájecího
kabelu ze zásuvky.

245
8. ODSTRAŇOVÁNÍ POTÍŽÍ
Mnoho problémů můžete snadno odstranit sami, aniž by bylo nutné volat zákaznický servis. Před
kontaktováním zákaznického servisu se pokuste odstranit problém pomocí následujících doporučení.
Průvodce odstraňováním potíží

246

247
Chybové kódy
Chybové kódy
Význam
HH
Upozornění na vysokou teplotu
LL
Upozornění na nízkou teplotu
DD
Spotřebič se odmrazuje
EE
Porucha snímače teploty
Pokud se na displeji zobrazí jiný chybový kód, např. A, B, C, D, E, G, I, J, K, M, N
nebo O, kontaktujte zákaznický servis
9. ŽIVOTNÍ PROSTŘEDÍ
Tento spotřebič vyhovuje směrnici Evropské unie 2019/290/EU o odpadních elektrických
a elektronických zařízeních (OEEZ). Správnou likvidací vysloužilého spotřebiče pomáháte
předcházet případným negativním vlivům na životní prostředí a lidské zdraví, ke kterém
by mohlo dojít v případě nevhodného zacházení s likvidovaným spotřebičem.
Symbol přeškrtnuté popelnice na výrobku nebo v průvodních dokumentech upozorňuje na
to, že vysloužilý spotřebič nelze zlikvidovat spolu s běžným domovním odpadem.
Odevzdejte jej proto ve sběrně elektroodpadu nebo jej předejte obchodníkovi při nákupu
podobného spotřebiče.
Uživatel odpovídá za odevzdání vysloužilého spotřebiče v příslušné sběrně. Řádná likvidace
vysloužilých spotřebičů pomáhá předcházet možným negativným vlivům na životní prostředí a lidské
zdraví a zároveň umožňuje recyklaci cenných látek, ze kterých je spotřebič vyrobený.
Při likvidaci spotřebiče nebo jeho předání další osobě jsou osobní údaje uživatele chráněny, aniž by
bylo nutné nějak zasahovat. Tyto údaje nejsou uloženy ve vinotéce, nýbrž na externím serveru. Po
likvidaci spotřebiče proto nemůže dojít k úniku žádných informací, které byly přenášeny během
normálního používání vinotéky.
Pokud spotřebič předáváte jiné osobě, musí nový uživatel naskenovat QR kód na hlavní řídicí
jednotce a provést předepsaný postup párování. Tímto způsobem dojde k přepsání všech dat
uložených na serveru a nový uživatel má k dispozici zcela prázdný uživatelský účet. Bývalý uživatel
už nemůže přistupovat ke svým starým údajům promocí aplikace Vinotag ani si je prohlížet.

248
Podrobnější informace o dostupných sběrných systémech Vám poskytne místní úřad, služba
zajišťující svoz odpadu nebo prodejce, u kterého jste spotřebič zakoupili.
10. VAROVÁNÍ
Snažíme se naše výrobky neustále zlepšovat, proto si vyhrazujeme právo na technické změny bez
předchozího upozornění.
Záruky na výrobky značky LA SOMMELIERE poskytují výhradně naši smluvní prodejci. Údaje
uvedené v tomto návodu k obsluze nelze použít jako dodatečnou záruku.
Firma FRIO ENTREPRISE nenese odpovědnost za chyby nebo technická či redakční opomenutí v
tomto návodu k obsluze. Jedná se o nezávazný dokument.

249
La Sommelière Int.
143 boulevard Pierre Lefaucheux - 72230 Arnage
www.lasommeliere.com
-
 1
1
-
 2
2
-
 3
3
-
 4
4
-
 5
5
-
 6
6
-
 7
7
-
 8
8
-
 9
9
-
 10
10
-
 11
11
-
 12
12
-
 13
13
-
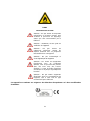 14
14
-
 15
15
-
 16
16
-
 17
17
-
 18
18
-
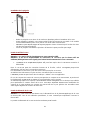 19
19
-
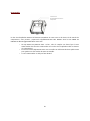 20
20
-
 21
21
-
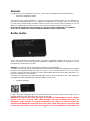 22
22
-
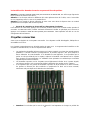 23
23
-
 24
24
-
 25
25
-
 26
26
-
 27
27
-
 28
28
-
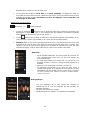 29
29
-
 30
30
-
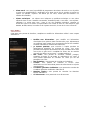 31
31
-
 32
32
-
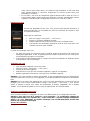 33
33
-
 34
34
-
 35
35
-
 36
36
-
 37
37
-
 38
38
-
 39
39
-
 40
40
-
 41
41
-
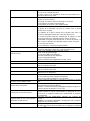 42
42
-
 43
43
-
 44
44
-
 45
45
-
 46
46
-
 47
47
-
 48
48
-
 49
49
-
 50
50
-
 51
51
-
 52
52
-
 53
53
-
 54
54
-
 55
55
-
 56
56
-
 57
57
-
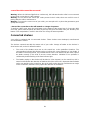 58
58
-
 59
59
-
 60
60
-
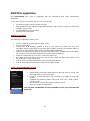 61
61
-
 62
62
-
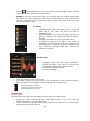 63
63
-
 64
64
-
 65
65
-
 66
66
-
 67
67
-
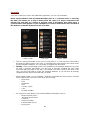 68
68
-
 69
69
-
 70
70
-
 71
71
-
 72
72
-
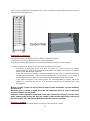 73
73
-
 74
74
-
 75
75
-
 76
76
-
 77
77
-
 78
78
-
 79
79
-
 80
80
-
 81
81
-
 82
82
-
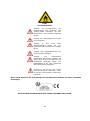 83
83
-
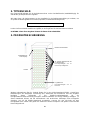 84
84
-
 85
85
-
 86
86
-
 87
87
-
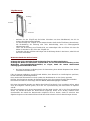 88
88
-
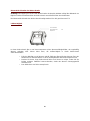 89
89
-
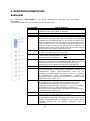 90
90
-
 91
91
-
 92
92
-
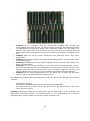 93
93
-
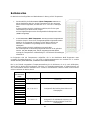 94
94
-
 95
95
-
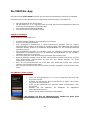 96
96
-
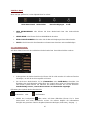 97
97
-
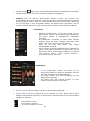 98
98
-
 99
99
-
 100
100
-
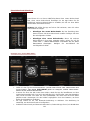 101
101
-
 102
102
-
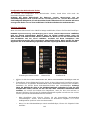 103
103
-
 104
104
-
 105
105
-
 106
106
-
 107
107
-
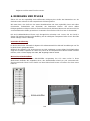 108
108
-
 109
109
-
 110
110
-
 111
111
-
 112
112
-
 113
113
-
 114
114
-
 115
115
-
 116
116
-
 117
117
-
 118
118
-
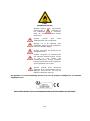 119
119
-
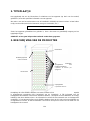 120
120
-
 121
121
-
 122
122
-
 123
123
-
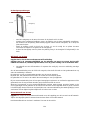 124
124
-
 125
125
-
 126
126
-
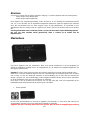 127
127
-
 128
128
-
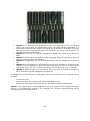 129
129
-
 130
130
-
 131
131
-
 132
132
-
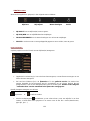 133
133
-
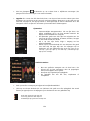 134
134
-
 135
135
-
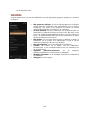 136
136
-
 137
137
-
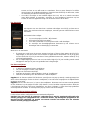 138
138
-
 139
139
-
 140
140
-
 141
141
-
 142
142
-
 143
143
-
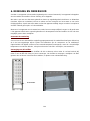 144
144
-
 145
145
-
 146
146
-
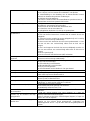 147
147
-
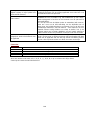 148
148
-
 149
149
-
 150
150
-
 151
151
-
 152
152
-
 153
153
-
 154
154
-
 155
155
-
 156
156
-
 157
157
-
 158
158
-
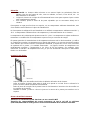 159
159
-
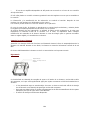 160
160
-
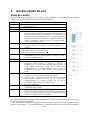 161
161
-
 162
162
-
 163
163
-
 164
164
-
 165
165
-
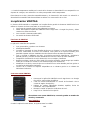 166
166
-
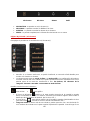 167
167
-
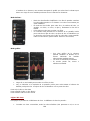 168
168
-
 169
169
-
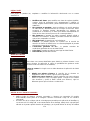 170
170
-
 171
171
-
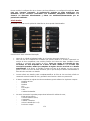 172
172
-
 173
173
-
 174
174
-
 175
175
-
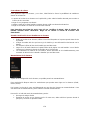 176
176
-
 177
177
-
 178
178
-
 179
179
-
 180
180
-
 181
181
-
 182
182
-
 183
183
-
 184
184
-
 185
185
-
 186
186
-
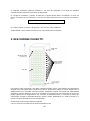 187
187
-
 188
188
-
 189
189
-
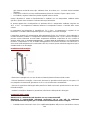 190
190
-
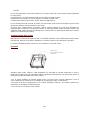 191
191
-
 192
192
-
 193
193
-
 194
194
-
 195
195
-
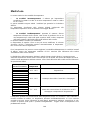 196
196
-
 197
197
-
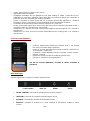 198
198
-
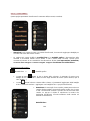 199
199
-
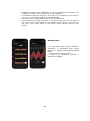 200
200
-
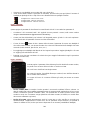 201
201
-
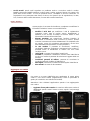 202
202
-
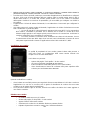 203
203
-
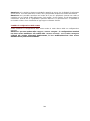 204
204
-
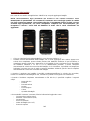 205
205
-
 206
206
-
 207
207
-
 208
208
-
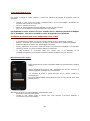 209
209
-
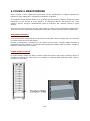 210
210
-
 211
211
-
 212
212
-
 213
213
-
 214
214
-
 215
215
-
 216
216
-
 217
217
-
 218
218
-
 219
219
-
 220
220
-
 221
221
-
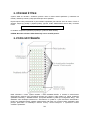 222
222
-
 223
223
-
 224
224
-
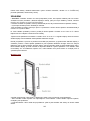 225
225
-
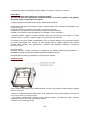 226
226
-
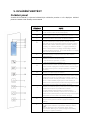 227
227
-
 228
228
-
 229
229
-
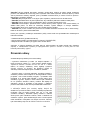 230
230
-
 231
231
-
 232
232
-
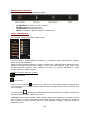 233
233
-
 234
234
-
 235
235
-
 236
236
-
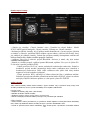 237
237
-
 238
238
-
 239
239
-
 240
240
-
 241
241
-
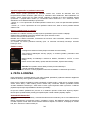 242
242
-
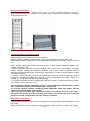 243
243
-
 244
244
-
 245
245
-
 246
246
-
 247
247
-
 248
248
-
 249
249


LA SOMMELIERE Cave à vin intelligente & connectée 149 bouteilles Handleiding
- Categorie
- Wijnkoelers
- Type
- Handleiding
- Deze handleiding is ook geschikt voor
in andere talen
- italiano: LA SOMMELIERE Cave à vin intelligente & connectée 149 bouteilles Istruzioni per l'uso
- français: LA SOMMELIERE Cave à vin intelligente & connectée 149 bouteilles Mode d'emploi
- español: LA SOMMELIERE Cave à vin intelligente & connectée 149 bouteilles Instrucciones de operación
- Deutsch: LA SOMMELIERE Cave à vin intelligente & connectée 149 bouteilles Bedienungsanleitung
- slovenčina: LA SOMMELIERE Cave à vin intelligente & connectée 149 bouteilles Návod na používanie
Gerelateerde papieren
Andere documenten
-
Avintage AVI97X3ZI de handleiding
-
Avintage AV45XDZI de handleiding
-
Avintage AV 79XDZI de handleiding
-
-
-
-
Climadiff PCLP160 de handleiding
-
Climadiff Cave de service CS105B1 Mono Compartiment Gebruikershandleiding