Philips HD4650/00 Handleiding
- Categorie
- Elektrische waterkokers
- Type
- Handleiding

ENGLISH NEDERLANDS
HD 4659, HD4650
1, 2
7, 8
3
4
5
6
HD 4657, HD 4653 & HD 4652
1
3
4
9
5
6
2
HD4657
HD4653
HD4652
HD4659
HD4650
2 3
4
5
6
7
FRANÇAIS
Introduction
.
Congratulations on acquiring your new Philips kettle! In these instructions for use you
will find all important information, so you can optimally enjoy your kettle as long as
possible.
General description
.
1) On/off switch (I/O)
2) Pilot light
3) Lid
4) Spout
5) Water-level indicator
6) Base
7) Scale filter
8) Triple-action filter (models HD4657, HD4653 and HD4652)
9) Bell (model HD4659 only)
Important
.
Read these instructions for use carefully before using the appliance and save them for
future reference.
◗ Check if the voltage indicated on the base of the kettle corresponds to the
local mains voltage before you connect the appliance.
◗ Only use the kettle in combination with its original base.
◗ Always place the base and the kettle on a dry, flat and stable surface.
◗ Keep the cord, the base and the appliance away from hot surfaces.
◗ Do not use the appliance if the mains cord, the plug, the base or the appliance
itself is damaged.
◗ If the mains cord is damaged, it must always be replaced by Philips, a service
centre authorised by Philips or similarly qualified persons in order to avoid a
hazard.
◗ Do not immerse the appliance or the base in water or any other liquid.
◗ The kettle is only meant for boiling water. Do not use it to heat up soup or
other liquids or jarred, bottled or tinned food.
◗ Boiling water can cause serious burns. Be careful when the kettle contains hot
water.
◗ Never fill the kettle beyond the maximum level indication. If the kettle has
been overfilled, boiling water may be ejected from the spout and cause
scalding.
◗ Do not open the lid while the water is boiling. Be careful when you open the
lid immediately after the water has boiled: the steam coming out of the kettle
is very hot.
◗ Avoid touching the body of the kettle, as it gets very hot during use.Always lift
the kettle by its handle.
◗ Keep the appliance and its cord out of the reach of children. Do not let the
mains cord hang over the edge of the table or worktop. Excess cord can be
stored in or around the base of the appliance.
◗ Never fill the kettle below the minimum level to prevent the kettle from
boiling dry.
◗ HD4657 only: this rapid boil kettle has a power of 3100 watts and can draw
up to 13 amps from the power supply in your home. Make sure that the
electrical system in your home and the circuit to which the kettle is
connected can cope with this level of power consumption. Do not let too
many other appliances draw power from the same circuit while the kettle is
being used.
◗ Some condensation may appear on the base of the kettle.This is perfectly
normal and does not mean that the kettle has any defects.
◗ Depending on the hardness of the water in your area, small spots may appear
on the heating element of your kettle when you use it.This phenomenon is the
result of scale build-up on the heating element and on the inside of the kettle
over time.The harder the water, the faster scale will build up. Scale can occur
in different colours.Although scale is harmless, too much scale can influence
the performance of your kettle. Descale your kettle regularly by following the
instructions given in the chapter 'Descaling'.
Boil-dry protection
This kettle is equipped with boil-dry protection.This device will automatically switch
the kettle off if it is accidentally switched on when there is no water or not enough
water in it.The on/off switch will stay in 'on' position and the pilot light, if available, will
stay on. Set the on/off switch to 'O' and let the kettle cool down for 10 minutes.
Then lift the kettle from its base to reset the boil-dry protection.The kettle is ready
for use again.
Before first use
.
◗ Remove stickers, if any, from the base or kettle.
◗ Place the base on a dry, stable and flat surface.
◗ Adjust the length of the cord by winding it round the reel in the base. Pass the
cord through one of the slots in the base (fig. 2).
Before using the kettle for the first time:
1 Rinse the kettle with water.
2 Fill the kettle with water up to the maximum level and let it boil once (see
'Using the appliance').
3 Pour out the hot water and rinse the kettle once more.
Using the appliance
.
1 Fill the kettle with water either through the spout or through the open lid
(fig. 3).
2 Close the lid.
Make sure that the lid is properly closed to prevent the kettle from boiling dry.
3 Place the kettle on its base, put the plug in the wall socket and set the on/off
switch to 'I' (fig. 4).
The kettle starts heating up.
◗ The kettle switches off ('O' position) automatically when the water has
reached boiling point.
◗ You can interrupt the boiling process by setting the on/off switch to 'O'.
Cleaning and descaling
.
Always unplug the appliance before cleaning it.
Do not use any abrasive cleaning agents, scourers etc. to clean the kettle.
Never immerse the kettle or its base in water.
Cleaning the kettle
1 Clean the outside of the kettle with a soft, damp cloth moistened with warm
water and some mild cleaning agent.
Scale is not harmful to your health but it may give your drink a powdery taste.The
scale filter prevents scale particles from ending up in your drink. Clean the scale filter
regularly. Models with a Triple-action filter have also been equipped with a mesh that
attracts scale from the water.
2 The filter can be cleaned:
◗ by taking it out of the kettle and gently brushing the filter with a soft nylon
brush under a running tap, or.. (fig. 5).
◗ by leaving it in the kettle when descaling the whole appliance, or...
◗ in the dishwasher.
For models with a triple-action filter (HD4657, HD4653 and HD4652): the mesh can
be cleaned as follows:
◗ Remove the basket from the filter by sliding it out (fig. 6).
◗ Take the stainless steel mesh out of the basket and clean it by squeezing and
rotating it under a running tap.
Descaling the kettle
Regular descaling will prolong the life of the kettle.
In case of normal use (up to 5 times a day), the following descaling frequency is
recommended:
- Once every 3 months for soft water areas (up to 18 dH).
- Once every month for hard water areas (more than 18 dH).
1 Fill the kettle with water up to three-quarters of the maximum level and bring
the water to the boil.
2 After the kettle has switched off, add white vinegar (8% acetic acid) to the
maximum level.
3 Leave the solution in the kettle overnight.
4 Empty the kettle and rinse the inside thoroughly.
5 Fill the kettle with clean water and boil the water.
6 Empty the kettle and rinse it with clean water again.
◗ Repeat the procedure if there is still some scale in the kettle.
You can also use an appropriate descaler. In that case, follow the instructions on the
package of the descaler.
Replacement
.
Replacement filters for your kettle can be purchased from your Philips dealer or a
Philips service centre.The table below indicates which filters are suitable for your
electric kettle.
If the kettle, the base or the mains cord of the appliance is damaged, take the base
or the kettle to a service centre authorised by Philips for repair or replacement of
the cord to avoid a hazard.
Guarantee & service
.
If you need information or if you have a problem, please visit the Philips website at
www.philips.com or contact the Philips Customer Care Centre in your country (you
will find its phone number in the world-wide guarantee leaflet). If there is no
Customer Care Centre in your country, turn to your local Philips dealer or contact
the Service Department of Philips Domestic Appliances and Personal Care BV.
Filter type
HD4973
HD4977 (triple-action filter)
HD4976 (triple-action filter)
HD4971
Kettle type(s)
HD4650
HD4652
HD4653 and HD4657
HD4659
www.philips.com
u
4222 001 96591
Introduction
.
Félicitations pour l'achat de votre nouvelle bouilloire Philips! Dans ce mode d'emploi
vous trouverez toutes les informations importantes pour pouvoir utiliser votre
bouilloire pendant longtemps.
Description générale
.
1) Bouton marche/arrêt (I/O)
2) Témoin lumineux
3) Couvercle
4) Bec verseur
5) Indicateur niveau d'eau
6) Support
7) Filtre anticalcaire
8) Filtre à triple action (modèles HD4657, HD4653 et HD4652)
9) Sonnerie (modèle HD4659 uniquement)
Important
.
Avant de commencer à utiliser l'appareil, lisez attentivement ce mode d'emploi et
conservez-le pour une consultation ultérieure.
◗ Avant de brancher l'appareil, vérifiez que la tension sur le fond de la bouilloire
correspond bien à la tension de votre secteur.
◗ N'utilisez la bouilloire qu'avec le support d'origine.
◗ Placez toujours la bouilloire sur une surface sèche, stable et plane.
◗ Tenez le cordon, le support et l'appareil à l'écart des surfaces chaudes.
◗ N'utilisez pas la bouilloire si la fiche, le cordon, le support ou l'appareil lui-
même sont endommagés.
◗ Si le cordon d'alimentation est endommagé, il ne doit être remplacé que par
Philips ou un Centre Service Agréé pour éviter tout accident.
◗ Ne plongez pas la bouilloire ou son support dans l'eau ou dans tout autre
liquide.
◗ Cette bouilloire est destinée à faire bouillir de l'eau uniquement. Ne l'utilisez
pas pour faire chauffer de la soupe ou d'autres liquides ou des aliments
conservés stockés dans des canettes en étain, bocaux ou bouteilles.
◗ L'eau bouillante peut causer des brûlures graves. Faites donc très attention
quand la bouilloire contient de l'eau bouillante.
◗ Remplissez la bouilloire jusqu'à l'indication maximale. Si vous mettez trop
d'eau dans la bouilloire, l'eau bouillante peut jaillir par le bec verseur et vous
pouvez vous brûler.
◗ N'ouvrez pas le couvercle lorsque l'eau bout. Faites attention lorsque vous
ouvrez le couvercle immédiatement après l'ébullition de l'eau, car de la vapeur
très chaude peut s'échapper de la bouilloire.
◗ Evitez de toucher le corps de la bouilloire car il chauffera fortement pendant
l'utilisation.Tenez toujours la bouilloire par la poignée.
◗ Tenez la bouilloire et le cordon hors de portée des enfants. Ne laissez pas le
cordon pendre du plan de travail. Enroulez le cordon autour du support pour
l'ajuster ou rangez-le à l'intérieur du support.
◗ Ne remplissez jamais la bouilloire au-dessous du niveau minimum pour éviter
une trop forte évaporation de l'eau.
◗ HD4657 uniquement: Cette bouilloire à chauffage rapide Philips de 3100 W
peut consommer jusqu'à 13 ampères.Vérifiez que l'installation électrique
puisse supporter cette intensité. Ne branchez pas plusieurs appareils sur le
même circuit pendant le fonctionnement de la bouilloire.
◗ De la condensation peut se produire sur le support de la bouilloire. Ceci est
tout à fait normal et non un défaut de fabrication.
◗ Selon la dureté de l'eau de votre région, de petites taches peuvent apparaître
sur l'élément chauffant de votre bouilloire. Ce phénomène est le résultat de
l'accumulation du calcaire sur l'élément chauffant et à l'intérieur de la
bouilloire. Plus l'eau est dure, plus le dépôt de calcaire est important. Le
calcaire peut avoir des couleurs différentes. Bien que le calcaire ne soit pas
nocif pour votre santé, il peut affecter la performance de votre bouilloire
lorsque l'accumulation est trop importante.Veuillez suivre les instructions du
chapitre "Détartrage".
Protection en cas d'évaporation de l'eau
Cette bouilloire est dotée d'un dispositif de protection en cas d'évaporation de l'eau.
Ce dispositif arrête automatiquement votre bouilloire si elle a été mise en marche
accidentellement lorsqu'il n'y a pas assez d'eau ou pas du tout. Le bouton
marche/arrêt sera sur la position "marche" et le témoin lumineux, s'il y en a, sera
allumé. Réglez le bouton marche/arrêt sur la position "O" et attendez 10 minutes
pour laisser refroidir la bouilloire. Ensuite enlevez la bouilloire du support pour
remettre à zéro la protection. La bouilloire est de nouveau prête à être utilisée.
Avant la première utilisation
.
◗ Retirez tout autocollant, s'il y en a, du support ou de la bouilloire.
◗ Placez la bouilloire sur une surface sèche, stable et plane.
◗ Enroulez le cordon autour du support pour l'ajuster. Fixez le cordon dans une
des fentes à la base de l'appareil (fig. 2).
Avant la première utilisation:
1 Rincez la bouilloire à l'eau.
2 Remplissez la bouilloire avec de l'eau jusqu'au niveau maximum et faites-la
bouillir une fois (voir chapitre "Utilisation de l'appareil").
3 Versez l'eau chaude et rincez la bouilloire de nouveau.
Utilisation de l'appareil
.
1 Remplissez la bouilloire avec de l'eau par le bec verseur ou ouvrez le
couvercle pour la remplir (fig. 3).
2 Fermez le couvercle.
Assurez-vous que le couvercle est correctement fixé pour éviter l'évaporation de
l'eau.
3 Placez la bouilloire sur son support, branchez-le et réglez le bouton
marche/arrêt sur la position I (fig. 4).
La bouilloire commence à chauffer.
◗ L'appareil s'éteint automatiquement (position "O") quand l'eau est à ébullition.
◗ Vous pouvez arrêter l'appareil en plaçant le bouton marche/arrêt sur la
position "O".
Nettoyage et détartrage
.
Débranchez toujours l'appareil avant de le nettoyer.
N'utilisez pas de produits abrasifs, tampons à récurer etc. pour nettoyer l'appareil.
Ne plongez jamais la bouilloire ou le support dans l'eau.
Nettoyage de la bouilloire
1 Nettoyez l'extérieur de la bouilloire à l'aide d'un chiffon humide et un peu de
détergent.
Le calcaire n'est pas nocif à votre santé mais votre boisson peut acquérir un goût
poudreux. Le filtre anticalcaire évite aux particules de calcaire d'arriver dans votre
boisson. Nettoyez le filtre régulièrement. Les modèles dotés d'un filtre à triple action
ont un tamis qui attire les particules de calcaire de l'eau.
2 Le filtre peut être nettoyé comme suit:
◗ retirez-le de la bouilloire et brossez-le légèrement sous le robinet d'eau avec
une brosse douce en nylon, ou.. (fig. 5).
◗ laissez-le dans la bouilloire lors du détartrage de l'appareil, ou...
◗ lavez-le au lave-vaisselle.
Pour les modèles avec un filtre à triple action (HD4657, HD4653 et HD4652), le
tamis peut être nettoyé comme suit:
◗ Otez le panier du filtre (fig. 6).
◗ Otez le tamis en inox et nettoyez-le en le pressant et en le faisant pivoter
sous le robinet d'eau.
Détartrage de la bouilloire
Un détartrage régulier prolongera la durée de vie de votre appareil.
Pour une utilisation normale (jusqu'à 5 fois par jour), il est conseillé de détartrer votre
bouilloire comme suit:
- tous les 3 mois si votre eau n'est pas trop calcaire (inférieure à 18°TH)
- chaque mois si votre eau est dure (supérieure à 18°TH).
1 Remplissez la bouilloire aux trois quarts de la capacité maximale et portez
l'eau à ébullition.
2 Quand l'appareil s'est arrêté, ajoutez du vinaigre blanc (8% acide acétique)
jusqu'à l'indication maximum.
3 Laissez la solution dans la bouilloire jusqu'au lendemain.
4 Videz la bouilloire et rincez l'interieur.
5 Remplissez la bouilloire avec de l'eau claire puis faîtes bouillir l'eau.
6 Videz la bouilloire et rincez-la de nouveau.
◗ Répétez cette opération s'il y a encore des particules de calcaire dans la
bouilloire.
Vous pouvez aussi utiliser un détartrant spécial. Dans ce cas suivez les instructions sur
l'emballage.
Remplacement
.
Des filtres de rechange pour votre bouilloire sont disponibles chez votre revendeur
Philips ou à un Centre Service Agréé. Le tableau ci-dessous indique quels sont les
filtres appropriés pour votre bouilloire.
Si la bouilloire, le support ou le cordon d'alimentation est endommagé, portez le
support ou la bouilloire à un Centre Service Agréé Philips pour réparation ou
remplacement afin d'éviter tout accident.
Garantie et service
.
Pour plus d'informations, visitez notre Philips Web site : www.philips.com ou veuillez
contacter le Service Consommateurs Philips de votre pays (vous trouverez le
numéro de téléphone dans le dépliant sur la garantie internationale). S'il n'y a aucun
Service Consommateurs Philips dans votre pays, contactez votre distributeur ou le
Service Department of Philips Domestic Appliances and Personal Care BV.
Type de filtre
HD4973
HD4977 (filtre à triple action)
HD4976 (filtre à triple action)
HD4971
Type(s) de bouilloire(s)
HD4650
HD4652
HD4653 et HD4657
HD4659
Inleiding
.
Gefeliciteerd met de aankoop van uw nieuwe Philips waterkoker! In deze
gebruiksaanwijzing vindt u alle belangrijke informatie zodat u zo lang mogelijk
optimaal kunt genieten van uw waterkoker.
Algemene beschrijving
.
1) Aan/uitknop (I/O)
2) Waarschuwingslampje
3) Deksel
4) Schenktuit
5) Waterniveau-indicator
6) Voet
7) Kalkfilter
8) Triple Action filter (types HD4657, HD4653 en HD4652)
9) Bel (alleen type HD4659)
Belangrijk
.
Lees deze gebruiksaanwijzing zorgvuldig door voordat u het apparaat gaat gebruiken
en bewaar de gebruiksaanwijzing om deze indien nodig te kunnen raadplegen.
◗ Controleer of het voltage aangegeven op de voet van de waterkoker
overeenkomt met de plaatselijke netspanning voordat u het apparaat aansluit.
◗ Gebruik de waterkoker alleen met de bijbehorende voet.
◗ Plaats de voet van de waterkoker op een droge, vlakke en stabiele
ondergrond.
◗ Houd het snoer, de voet en het apparaat uit de buurt van hete oppervlakken.
◗ Gebruik het apparaat niet als het netsnoer, de stekker of het apparaat zelf
beschadigd is.
◗ Indien het netsnoer beschadigd is, moet het vervangen worden door Philips,
een door Philips geautoriseerd servicecentrum of personen met vergelijkbare
kwalificaties om gevaar te voorkomen.
◗ Dompel de waterkoker en de voet niet in water of een andere vloeistof.
◗ Deze waterkoker is alleen bedoeld voor het koken van water. Gebruik het
apparaat niet om soep of andere vloeistoffen of voedsel in potten, flessen of
blikken op te warmen.
◗ Kokend water kan ernstige brandwonden veroorzaken.Wees voorzichtig met
de waterkoker wanneer deze heet water bevat.
◗ Vul de waterkoker nooit verder dan het aangegeven maximumniveau.Als er te
veel water in de waterkoker zit, bestaat het risico dat er kokend water uit de
schenktuit naar buiten spat.
◗ Open het deksel niet wanneer het water kookt.Wees voorzichtig wanneer u
het deksel opent direct nadat het water gekookt heeft: de stoom die uit de
waterkoker komt is erg heet.
◗ Raak de buitenwand van de waterkoker niet aan, aangezien deze erg heet
wordt tijdens gebruik.Til het apparaat alleen op aan het handvat.
◗ Houd de waterkoker en het snoer buiten het bereik van kinderen. Laat het
snoer niet over de rand hangen van de tafel of het werkblad waar de
waterkoker op staat. Overtollig snoer kan in of rond om de voet van het
apparaat worden opgeborgen.
◗ Vul de waterkoker nooit beneden het minimumniveau om te voorkomen dat
het apparaat droogkookt.
◗ Alleen type HD4657: Deze snelkokende waterkoker heeft een vermogen van
3100 watt en vormt een belasting van 13 ampère voor de elektrische
installatie in uw huis. Controleer of het elektriciteitssysteem in uw woning en
de groep waarop de waterkoker wordt aangesloten een dergelijke belasting
aan kan. Laat niet te veel andere apparaten die op dezelfde groep zijn
aangesloten werken wanneer de waterkoker aan staat.
◗ Het is mogelijk dat er enige condens ontstaat op de voet van de waterkoker.
Dit is heel normaal en betekent niet dat het apparaat een defect vertoont.
◗ Afhankelijk van de hardheid van het water in uw woongebied, kunnen er na
gebruik kleine vlekjes ontstaan op het verwarmingselement van de
waterkoker. Dit verschijnsel is het gevolg van kalkvorming die zich in de loop
van de tijd voordoet op het verwarmingselement en aan de binnenzijde van de
waterkoker. Hoe harder het water, hoe sneller er kalkaanslag zal ontstaan.
Kalkaanslag kan verschillende kleuren hebben.Alhoewel kalk onschadelijk is,
kan het een negatieve invloed hebben op het functioneren van uw waterkoker.
Ontkalk de waterkoker daarom regelmatig en volg daarbij de instructies in het
hoofdstuk 'Ontkalken'.
Droogkookbeveiliging
Het verwarmingselement van deze waterkoker is beveiligd met een
droogkookbeveiliging. Deze beveiliging zal de waterkoker automatisch uitschakelen als
hij per ongeluk wordt ingeschakeld zonder dat er water in zit of als er onvoldoende
water in zit. In dat geval gaat het indicatielampje knipperen en wordt de waterkoker
na 5 minuten automatisch uitgeschakeld. Als dit gebeurd is, til de waterkoker dan van
zijn voet om de droogkookbeveiliging te resetten. Hierna kunt u de waterkoker weer
gebruiken.
Voor het eerste gebruik
.
◗ Verwijder eventueel aanwezige stickers van de voet of de waterkoker.
◗ Plaats de voet van de waterkoker op een droge, stabiele en vlakke
ondergrond.
◗ Pas de lengte van het snoer aan door het rond de haspel in de voet te
wikkelen.Voer het snoer door een van de openingen in de voet (fig. 2).
Voordat u de waterkoker voor de eerste keer gebruikt:
1 Spoel de waterkoker met water.
2 Vul de waterkoker met water tot het maximumniveau en laat hem een keer
koken (zie 'Gebruik').
3 Giet het hete water uit de waterkoker en spoel hem nog een keer om.
Gebruik
.
1 Vul de waterkoker via de schenktuit met water of open het deksel om hem te
vullen (fig. 3).
2 Sluit het deksel.
Zorg ervoor dat het deksel goed dichtzit om te voorkomen dat het apparaat
droogkookt.
3 Plaats de waterkoker op zijn voet, steek de stekker in het stopcontact en zet
de aan/uitknop op stand 'I' (fig. 4).
De waterkoker begint op te warmen.
◗ De waterkoker schakelt automatisch uit (aan/uitknop springt terug naar stand
"O") als het water het kookpunt heeft bereikt.
◗ U kunt het kookproces onderbreken door de aan/uitknop op "O" te zetten.
Schoonmaken en ontkalken
.
Haal altijd de stekker uit het stopcontactvoordat u de waterkoker en de voet gaat
schoonmaken.
Gebruik geen agressieve schoonmaakmiddelen, schuursponsjes e.d. om de
waterkoker te reinigen.
Dompel de waterkoker of de voet nooit in water.
Schoonmaken van de waterkoker
1 Maak de buitenkant van het apparaat schoon met een zachte, vochtige doek en
een zacht schoonmaakmiddel.
Kalk is niet schadelijk voor uw gezondheid maar kan uw drank een poederig smaakje
geven. Het kalkfilter voorkomt dat er kalkdeeltjes in uw drank terecht komen. Maak
het filter regelmatig schoon.Types met een Triple Action filter zijn uitgerust met een
balletje van gaas dat kalkdeeltjes uit het water aantrekt.
2 Het filter kan worden gereinigd:
◗ door het uit de waterkoker te nemen en voorzichtig met een zachte nylon
borstel onder de lopende kraan schoon te borstelen, of .. (fig. 5).
◗ door het in de waterkoker te laten zitten wanneer het hele apparaat wordt
ontkalkt, of ...
◗ in de vaatwasmachine.
Bij types met een Triple Action filter (HD4657, HD4653 en HD4652) kan het balletje
van gaas als volgt worden gereinigd:
◗ Verwijder de houder uit het filter door hem eruit te schuiven (fig. 6).
◗ Haal het roestvrijstalen balletje gaas uit de houder en maak het schoon door
het onder een lopende kraan te draaien en er in te knijpen.
Ontkalken van de waterkoker
Regelmatig ontkalken verlengt de levensduur van het apparaat.
Bij normaal gebruik (tot 5 keer per dag), wordt u aangeraden de volgende
ontkalkingsfrequentie aan te houden:
- Eén keer per 3 maanden als u zacht water gebruikt (tot 18dH).
- Eén keer per maand als u hard water gebruikt (meer dan 18dH).
1 Vul de waterkoker tot driekwart van het aangegeven maximumniveau met
water en breng het water aan de kook.
2 Voeg, nadat het waterkoker is uitgeschakeld, schoonmaakazijn (8% azijnzuur)
toe tot aan het maximumniveau.
3 Laat het water met de azijn een nacht in de waterkoker staan.
4 Schenk het apparaat leeg en spoel de binnenzijde goed uit.
5 Vul het apparaat met schoon water en breng het water aan de kook.
6 Schenk het apparaat leeg en spoel de binnenzijde nogmaals goed uit.
◗ Herhaal deze procedure als er nog steeds kalk in de waterkoker zit.
U kunt ook een hiervoor geschikte ontkalker gebruiken.Volg in dat geval de
instructies op de verpakking van de ontkalker.
Vervanging
.
Vervangende filters voor uw waterkoker zijn verkrijgbaar bij uw Philips dealer of een
Philips servicecentrum. De onderstaande tabel laat zien welke filters geschikt zijn voor
welke types.
Indien het netsnoer beschadigd is, moet het vervangen worden door Philips, een
door Philips geautoriseerd servicecentrum of personen met vergelijkbare
kwalificaties om gevaar te voorkomen.
Garantie & service
.
Als u informatie nodig heeft of als u een probleem heeft, bezoek dan onze website
(www.philips.com), of neem contact op met het Philips Customer Care Centre in uw
land (u vindt het telefoonnummer in het 'worldwide guarantee' vouwblad). Als er
geen Customer Care Centre in uw land is, ga dan naar uw Philips dealer of neem
contact op met de afdeling Service van Philips Domestic Appliances and Personal
Care BV.
Filtertype
HD4973
HD4977 (Triple Action filter)
HD4976 (Triple Action filter)
HD4971
Waterkokertype(s)
HD4650
HD4652
HD4653 en HD4657
HD4659
HD4659, HD4657, HD4653,
HD4652, HD4650
Essence

PORTUGUÊSITALIANODEUTSCH
Introducción
.
¡Enhorabuena por adquirir la nueva hervidora de Philips! En estas instrucciones de
uso, encontrará toda la información importante para que pueda disfrutar el mayor
tiempo posible de este aparato.
Descripción general
.
1) Interruptor marcha/parada (I/O)
2) Piloto
3) Tapa
4) Boquilla
5) Indicador del nivel de agua
6) Base
7) Filtro antical
8) Filtro de triple acción (modelos HD4657, HD4653 y HD4652)
9) Señal acústica (sólo modelo HD4659)
Importante
.
Antes de usar el aparato, lea atentamente estas instrucciones y consérvelas por si
necesitara consultarlas en el futuro.
◗ Antes de conectar el aparato, compruebe si el voltaje indicado en la hervidora
se corresponde con el de su hogar.
◗ Use la hervidora de agua sólo con su base original.
◗ Coloque siempre la base y la hervidora sobre una superficie seca, plana y
estable.
◗ Evite que el cable, la base y el aparato entren en contacto con superficies
calientes.
◗ No utilice la hervidora si el cable, la clavija, la base o el aparato están dañados.
◗ Si el cable está dañado, debe ser sustituido por Philips, un centro de servicio
autorizado por Philips o personal cualificado similar para evitar situaciones de
peligro.
◗ No sumerja el aparato o la base en agua o cualquier otro líquido.
◗ Esta hervidora de agua sólo está pensada para hervir agua. No utilice el
aparato para calentar sopa u otro líquido, o comida enlatada o en conserva.
◗ El agua hirviendo puede causar serias quemaduras.Tenga cuidado cuando haya
agua caliente en la hervidora de agua.
◗ No llene nunca la hervidora por encima de la indicación de nivel máximo. Si la
hervidora de agua se llena en exceso, existe el riesgo de que el agua hirviendo
salga despedida por la boquilla y provoque quemaduras.
◗ No quite la tapa mientras hierve agua.Tenga cuidado al quitar la tapa justo
después de que el agua haya hervido, ya que saldrá vapor muy caliente de la
hervidora.
◗ Evite tocar el cuerpo de la hervidora, ya que se calienta mucho cuando está en
funcionamiento. Sujete siempre la hervidora por el asa.
◗ Mantenga la hervidora y el cable lejos del alcance de los niños. No deje el
cable colgando de la mesa o de la encimera. El exceso de cable de red puede
guardarse en la base del aparato o enrollarse en la misma.
◗ No llene nunca la hervidora por debajo de la indicación de nivel mínimo para
evitar que hierva en seco.
◗ Sólo modelo HD4657: esta rápida hervidora de 3.100 W puede llegar hasta 13
amperios de potencia en su hogar.Asegúrese de que el sistema eléctrico de su
hogar es compatible con este nivel de consumo. No utilice muchos productos
eléctricos en el mismo circuito cuando la hervidora esté funcionando.
◗ Puede aparecer cierta condensación sobre la base de la hervidora de agua.
Esto es perfectamente normal y no significa que el aparato tenga algún
defecto.
◗ Al usarla y, dependiendo de la dureza del agua de la zona, pueden aparecer
pequeñas manchas sobre el elemento calefactor de la hervidora de agua. Este
fenómeno es el resultado de la formación continua de incrustaciones de cal
sobre el elemento calefactor y sobre el interior de la hervidora de agua.
Cuanto más dura sea el agua, más rápida será la formación de incrustaciones.
Las incrustaciones pueden presentar diferentes colores.A pesar de que las
incrustaciones no son nocivas para la salud, demasiadas incrustaciones pueden
influir en el funcionamiento de la hervidora de agua. Siga las instrucciones del
capítulo 'Cómo eliminar la cal' para limpiar la hervidora de agua.
Protección contra el calentamiento en seco.
Esta hervidora está provista de una protección contra el calentamiento en seco. El
dispositivo desconecta automáticamente la hervidora si se conecta accidentalmente
cuando no tiene agua o agua suficiente. El interruptor de marcha/parada
permanecerá en la posición de marcha (I) y el piloto (si existiese) seguirá iluminado.
Coloque el interruptor de marcha/parada en la posición 'O' y espere 10 minutos a
que el aparato se enfríe. Después levante la hervidora de agua de su base para volver
a conectar la protección para calentamiento en seco. La hervidora de agua volverá a
estar lista para utilizarla de nuevo.
Antes de utilizarlo por primera vez
.
◗ Quite las pegatinas de la base o de la hervidora.
◗ Coloque la base en una superficie seca, estable y plana.
◗ Ajuste la longitud del cable enrollándolo alrededor del soporte de la base.
Pase el cable por una de las ranuras de la base (fig. 2).
Antes de utilizar la hervidora por primera vez:
1 Enjuague la hervidora con agua.
2 Llene la hervidora con agua hasta el nivel máximo y deje que hierva una vez
(consulte el apartado 'Cómo usar el aparato')
3 Vierta el agua caliente y enjuague la hervidora una vez más.
Cómo usar el aparato
.
1 Llene la hervidora de agua bien a través de la boquilla o bien abriendo la tapa
(fig. 3).
2 Cierre la tapa.
Asegúrese de que la tapa está correctamente cerrada para evitar que hierva en seco.
3 Coloque la hervidora sobre su base, conéctela a la red y coloque el
interruptor de marcha/parada en la posición 'I' (fig. 4).
La hervidora de agua empieza a calentarse.
◗ La hervidora de agua se parará (posición 'O') automáticamente cuando el agua
haya alcanzado el punto de ebullición
◗ Colocando el interruptor de marcha/parada en la posición 'O', puede
interrumpir el proceso de ebullición.
Cómo limpiar y eliminar la cal
.
Desenchufe siempre el aparato antes de limpiarlo.
No utilice ningún agente limpiador abrasivo, desengrasantes, etc. para limpiar la
hervidora de agua.
No sumerja nunca en agua ni la hervidora de agua ni su base.
Cómo limpiar la hervidora
1 Limpie la hervidora por fuera con un paño suave humedecido con agua tibia y
un producto de limpieza suave.
La cal no es perjudicial para la salud pero puede cambiar el sabor del agua. El filtro
antical evita que las partículas de cal lleguen a las bebidas. Elimine la cal del aparato
con frecuencia. Los modelos que disponen de un filtro de triple acción incorporan
además una malla que atrae la cal que contiene el agua.
2 El filtro se limpia de la siguiente forma:
◗ saque el filtro de la hervidora y cepíllelo con un cepillo de nylon suave debajo
del grifo, o.. (fig. 5).
◗ déjelo dentro de la hervidora cuando elimine la cal de todo el aparato, o...
◗ métalo en el lavavajillas.
Para los modelos con un filtro de triple acción (HD4657, HD4653 y HD4652), puede
limpiar la malla de la siguiente forma:
◗ Quite la cesta del filtro deslizándola (fig. 6).
◗ Retire la malla de acero inoxidable de la cesta y lávela girándola y
escurriéndola debajo del grifo.
Cómo eliminar la cal
Al eliminar la cal con frecuencia, prolongará la vida de la hervidora.
En caso de uso normal (hasta 5 veces al día), se recomienda la siguiente frecuencia de
limpieza:
- Una vez cada 3 meses para zonas de agua blanda (hasta 18 dH)
- Una vez al mes para zonas de agua dura (más de 18dH)
1 Llene la hervidora con agua hasta tres cuartos del nivel máximo y ponga el
agua a hervir.
2 Después de que la hervidora se haya desconectado, añada vinagre blanco
(ácido acético al 8%) hasta el nivel máximo.
3 Deje la solución en la hervidora durante toda la noche
4 Vacíe la hervidora de agua y enjuague cuidadosamente el interior.
5 Llene la hervidora con agua limpia y póngala a hervir.
6 Vacíe la hervidora de agua y vuelva a enjuagarla con agua limpia.
◗ Repita el proceso si todavía queda algo de cal en la hervidora.
También puede utilizar un agente descalcificador adecuado. En este caso, siga las
instrucciones que aparecen en la caja del descalcificador.
Sustitución
.
Los recambios de los filtros para hervidoras Philips se pueden adquirir en cualquier
distribuidor de Philips o en el Centro de Servicio Philips de su localidad. La tabla
siguiente indica el filtro adecuado para su hervidora eléctrica.
Si la hervidora, la base o el cable están dañados sólo deben ser reparados por un
Servicio Autorizado de Philips para evitar situaciones de peligro.
Garantía y servicio
.
Si necesita información o si tiene algún problema, visite la página web de Philips en
www.philips.com o póngase en contacto con el Servicio Philips de Atención al
Cliente de su país (encontrará el número de teléfono en el folleto de la Garantía
Mundial). Si en su país no hay Servicio Philips de Atención al Cliente, diríjase a su
distribuidor local Philips o póngase en contacto con el Service Department of Philips
Domestic Appliances and Personal Care BV.
Tipo de filtro
HD 4973
HD 4977 (filtro de triple acción)
HD 4976 (filtro de triple acción)
HD4971
Modelo(s) de hervidora
HD 4650
HD4652
HD4653 y HD4657
HD4659
Introduzione
.
Ci congratuliamo con lei per aver acquistato il nuovo bollitore Philips! In queste
istruzioni troverà tutte le informazioni necessarier per usare il bollitore al meglio e
per molto tempo, ottenendo sempre risultati ottimali.
Descrizione generale
.
1) Interruttore on/off (I/O)
2) Spia
3) Coperchio
4) Beccuccio
5) Indicatore del livello d' acqua
6) Base
7) Filtro anticalcare
8) Filtro a tripla azione (modelli HD4657, HD4653 e HD4625)
9) Campanello (solo mod. HD4659)
Importante
.
Leggete queste istruzioni con attenzione prima di usare l'apparecchio e conservatele
per future consultazioni.
◗ Prima di collegare l'apparecchio, controllate che la tensione indicata sulla parte
inferiore dell'apparecchio corrisponda a quella della rete locale.
◗ Usate sempre il bollitore solo con la base originale.
◗ Appoggiate sempre la base e il bollitore su una superficie asciutta, piatta e
stabile.
◗ Tenete il cavo, la base e l'apparecchio lontani da superfici bollenti.
◗ Non usate l'apparecchio nel caso in cui il cavo di alimentazione, la spina, la base
o l'apparecchio siano danneggiati.
◗ Nel caso il cavo fosse danneggiato, dovrà essere sostituito presso un Centro
Autorizzato Philips o comunque da personale debitamente autorizzato, per
evitare situazioni a rischio.
◗ Non immergete l'apparecchio o la base in acqua o altri liquidi.
◗ Il bollitore deve essere usato esclusivamente per far bollire l'acqua. Non
usatelo per riscaldare minestre o altri liquidi, e neppure cibi in scatola o in
bottiglia.
◗ L'acqua bollente può causare gravi ustioni. Fate attenzione quando il bollitore è
pieno di acqua bollente.
◗ Quando riempite il bollitore, non superate mai il livello massimo indicato. Nel
caso il bollitore fosse troppo pieno, l'acqua in ebollizione potrebbe fuoriuscire
dal beccuccio e causare scottature.
◗ Non aprite il coperchio mentre l'acqua è in ebollizione. Fate attenzione
quando aprite il coperchio dopo aver portato l'acqua a ebollizione: il vapore
che fuoriesce dal bollitore è bollente!
◗ Evitate di toccare il corpo del bollitore, che durante l'uso diventa bollente. Per
sollevare il bollitore utilizzate sempre il manico.
◗ Tenete l'apaprecchio e il cavo lontano dalla portata dei bambini. Fate in modo
che il cavo non penzoli sugli spigoli della tavola o del piano di lavoro. Il cavo in
eccesso può essere avvolto attorno alla base dell'apparecchio.
◗ Non riempite mai il bollitore al di sotto del livello minimo per evitare che
l'apparecchio funzioni a vuoto.
◗ Solo HD4657: questo bollitore a ebollizione rapida ha una potenza di 3100
watt e può attingere fino a 13 amps dall'impianto elettrico della vostra casa.
Controllate che l'impianto elettrico e il circuito al quale è stato collegato
l'apparecchio siano in grado di reggere un consumo simile. Evitate di attaccare
contemporaneamente troppi apparecchi allo stesso impianto elettrico quando
usate il bollitore.
◗ Alla base del bollitore potrebbe formarsi un po' di condensa. Si tratta di un
fenomeno del tutto normale e non significa che il bollitore sia difettoso.
◗ IN base alla durezza dell'acqua nella vostra zone, potrebbero formarsi delle
piccole macchie sulla resistenza del bollitore. Questo fenomeno è causato
dall'accumulo di calcare sulla serpentina e all'interno dell'apparecchio nel corso
del tempo. Più dura risulta l'acqua che utilizzate e più rapidamente il calcare
tende ad accumularsi. Il calcare può avere colori diversi. Pur essendo del tutto
innocuo, il calcare in dosi eccessive può influire sul rendimento del vostro
bollitore. Procedete a una disincrostazione periodica del bollitore, seguendo le
istruzioni riportate nel capitolo "Disincrostazione".
Protezione per il funzionamento senz'acqua
Questo bollitore è provvisto di un dispositivo di protezione contro il funzionamento
a secco, che spegne automaticamente l'apparecchio nel caso in cui venga messeo
accidentalmente in funzione senza acqua o con una quantità di acqua insufficiente. In
questo caso l'interruttore on/off rimane in posizione "one" e la spia, se disponibile, si
accende. Impostate l'interruttore on/off su "O" e lasciate raffreddare il bollitore per
10 minuti, poi sollevatelo dalla sua base per resettare il dispositivo di protezione
contro il funzionamento a secco. A questo punto il bollitore è nuovamente pronto
per l'uso.
Prima di usare l'apparecchio per la prima volta
.
◗ Togliete gli eventuali adesivi dalla base o dal bollitore.
◗ Appoggiate la base su una superficie asciutta, stabile e piatta.
◗ Regolate la lunghezza del cavo avvolgendo la parte in eccesso attorno alla
base. Passate il cavo attraverso una delle fessure poste sulla base (fig. 2).
Prima di usare l'apparecchio per la prima volta:
1 Risciacquate il bollitore con acqua.
2 Riempite d'acqua il bollitore fino al livello massimo e portate l'acqua a
ebollizione una volta (vedere "Come usare l'apparecchio").
3 Gettate via l'acqua bollente e risciacquate nuovamente il bollitore.
Come usare l'apparecchio
.
1 Riempite d'acqua il bollitore, attraverso il beccuccio o il coperchio aperto
(fig. 3).
2 Chiudete il coperchio.
Controllate che il coperchio sia chiuso correttamente per evitare che durante il
processo di ebollizione l'acqua evapori.
3 Appoggiate il bollitore sulla base, inserite la spina nella presa di corrente e
mettete l'interruttore on/off su "I" (fig. 4).
Il bollitore inizia a riscaldarsi.
◗ Il bollitore si spegne automaticamente (posizione "O") non appena l'acqua
raggiunge il punto di ebollizione.
◗ Potete interrompere il processo di ebollizione in ogni momento, basterà
mettere l'interruttore on/off in posizione "O".
Pulizia e disincrostazione
.
Togliete sempre la spina dalla presa prima di pulire l'apparecchio.
Non usate prodotti abrasivi, pagliette ecc. per pulire il bollitore.
Non immergete mai il bollitore o la base nell'acqua.
Come pulire il bollitore.
1 Pulite la parte esterna del bollitore con un panno morbido inumidito con
acqua tiepida, aggiungendo un po' di detergente neutro.
Il calcare non è nocivo alla salute ma può dare un sapore cattivo alle vostre bevande.
Lo speciale filtro impedisce alle particelle di calcare di finire nelle vostre bevande:
ricordate di pulirlo periodicamente. I modelli provvisti di un filtro a tripla azione
dispongono anche di una maglia in grado di attirare il calcare presente nell'acqua.
2 Per pulire il filtro:
◗ toglietelo dal bollitore e spazzolatelo delicatamente sotto l'acqua corrente con
uno spazzolino morbido, oppure.. (fig. 5).
◗ lasciatelo nel bollitore quando procedete alla disincrostazione dell'apparecchio,
oppure...
◗ mettetelo in lavastoviglie.
Per i modelli provvisti di un filtro a tripla azione (HD4657, HD4653 e HD4652), la
maglia può essere pulita come segue:
◗ Togliete il cestello dal filtro, facendolo scorrere (fig. 6).
◗ Togliete la maglia di acciaio inox dal cestello e pulitela schiacciandola e
ruotandola sotto l'acqua corrente.
Disincrostazione del calcare
Con una disincrostazione regolare, il bollitore avrà una durata maggiore.
Nel caso di un uso normale (fino a 5 volte al giorno), si consiglia di eliminare il calcare
con la frequenza sotto riportata:
- Una volta ogni 3 mesi nel caso di acqua dolce (fino a 18 dH)
- Una volta al mese nel caso di acqua dura (oltre a 18 dH)
1 Riempite d'acqua il bollitore fino ai tre quarti della sua capacità massima e
portate ad ebollizione.
2 Dopo aver spento il bollitore, aggiungete dell'aceto bianco (acido acetico
all'8%) fino a raggiungere il livello massimo.
3 Lasciate agire la soluzione per tutta la notte.
4 Svuotate il bollitore e risciacquatelo accuratamente.
5 Riempite il bollitore con acqua pulita e portate ad ebollizione.
6 Svuotate il bollitore e risciacquatelo nuovamente con acqua.
◗ Ripetete questa procedura fino alla completa eliminazione del calcare nel
bollitore.
Potete anche usare gli appositi prodotti per la disincrostazione. In questo caso, seguite
le istruzioni riportate sulla confezione del prodotto.
Ricambi
.
I filtri di ricambio per il vostro bollitore sono disponibili presso il vostro rivenditore
Philips o i Centri Assistenza Philips. La tabella riportata qui sotto indica i filtri indicati
per il vostro bollitore elettrico.
Nel caso in cui il bollitore, la base o il cavo di alimentazione fossero danneggiati,
portate la base o il bollitore presso un Centro Assistenza Philips autorizzato, per le
eventuali riparazioni o per sostituire il cavo, per evitare situazioni a rischio.
Garanzia e Assistenza
.
Per ulteriori informazioni o in caso di problemi, vi preghiamo di visitare il sito Philips
su www.philips.com, oppure contattare il Centro Assistenza Clienti Philips del vostro
paese (troverete il numero di telefono sull'opuscolo della garanzia). Qualora nel
vostro paese non ci siano Centri Assistenza Philips, rivolgetevi al rivenditore
autorizzato Philips oppure contattate il Service Department of Philips Domestic
Appliances and Personal Care BV.
Tipo filtro
HD4973
HD4977 (filtro a tripla azione)
HD4976 (filtro a tripla azione)
HD4971
modello/i bollitore
HD4650
HD4652
HD4653 e HD4657
HD4659
Introdução
.
Parabéns pela aquisição do seu novo jarro eléctrico Philips! Neste modo de emprego
encontrará informações importantes para poder desfrutar ao máximo e durante
muito tempo do seu jarro.
Descrição geral
.
1) Interruptor (I/O)
2) Lâmpada piloto
3) Tampa
4) Bico
5) Indicador nível da água
6) Base
7) Filtro anti-calcário
8) Filtro de tripla acção (modelos HD4657, HD4653 e HD4652)
9) Campainha (apenas mod. HD4659)
Importante
.
Antes de se servir do jarro, leia atentamente estas instruções e guarde-as para uma
eventual consulta futura.
◗ Antes de ligar, verifique se a voltagem indicada na base do jarro corresponde à
corrente eléctrica do local.
◗ O jarro só deve ser utilizado com a sua base original.
◗ Coloque sempre a base e o jarro sobre uma superfície seca, plana e estável.
◗ Mantenha o fio, a base e o jarro afastados de superfícies quentes.
◗ Não se sirva do jarro no caso de o fio, a ficha, a base ou o próprio jarro
estarem danificados.
◗ Se o fio estiver estragado, só deverá ser substituído pela Philips, por um
concessionário autorizado pela Philips ou por pessoal igualmente qualificado
para se evitarem situações gravosas para o utilizador.
◗ Nunca mergulhe o aparelho ou a base dentro de água ou de qualquer outro
líquido.
◗ O jarro destina-se unicamente a ferver água. Não o utilize para aquecer sopa
ou outros líquidos nem alimentos em boiões, engarrafados ou enlatados.
◗ A água a ferver pode causar queimaduras sérias.Tenha cuidado ao manusear o
jarro com água quente.
◗ Nunca encha o jarro acima da indicação de nível máximo. Se o jarro estiver
muito cheio, a água a ferver pode ser expelida para fora através do bico e
provocar alguma queimadura ou escaldão.
◗ Não abra a tampa quando a água estiver a ferver.Tenha cuidado se abrir a
tampa imediatamente a seguir à fervura da água: o vapor que sai do jarro é
muito quente.
◗ Evite tocar no corpo do jarro porque aquece bastante durante a utilização.
Segure-o sempre pela pega.
◗ Mantenha o jarro e o fio fora do alcance das crianças. Não deixe o fio
pendurado para fora da mesa ou da bancada da cozinha. O fio em excesso
pode ser enrolado na base do jarro.
◗ Nunca encha o jarro abaixo do nível mínimo para evitar que funcione a seco.
◗ Apenas mod. HD4657: este jarro de fervura rápida tem uma potência de 3100
W e pode exigir até 13 amperes de alimentação.Verifique se o sistema
eléctrico da sua casa e o circuito onde o jarro for ligado estão preparados
para o nível de consumo deste aparelho. Não ligue muitos aparelhos ao
mesmo tempo no circuito que fornece energia para o jarro quando este
estiver ligado.
◗ Pode formar-se alguma condensação na base do jarro. É perfeitamente normal
e não significa que o aparelho tenha algum defeito.
◗ Dependendo do grau de dureza da água da sua zona de residência, poderão
aparecer algumas manchas na resistência do jarro. Este fenómeno é resultante
da formação de calcário na resistência e no interior do jarro que ocorre ao
fim de algum tempo. Quanto mais dura for a água, mais depressa se formará o
calcário. O calcário pode apresentar-se com diferentes cores. Embora o
calcário seja inofensivo, se existir em quantidade poderá influenciar o
desempenho do jarro. Descalcifique o jarro com regularidade, seguindo as
instruções dadas no capítulo 'Descalcificação'.
Protecção contra funcionamento a seco
Este jarro está equipado com uma protecção anti-funcionamento a seco. Este
dispositivo desliga automaticamente o aparelho no caso de se ligar o jarro
acidentalmente sem lhe deitar água ou sem que tenha água suficiente. O interruptor
permanece na posição 'on' (ligado) e a lâmpada piloto, caso exista, permanecerá
acesa. Regule o interruptor para a posição 'O' e deixe o jarro arrefecer durante 10
minutos. Em seguida, retire o jarro para fora da base para repôr a protecção anti-
funcionamento a seco. O jarro estará novamente pronto a usar.
Antes da primeira utilização
.
◗ Retire os autocolantes que existirem na base ou no jarro.
◗ Coloque a base sobre uma superfície seca, estável e plana.
◗ Ajuste o comprimento do fio, enrolando-o na base. Passe o fio por uma das
aberturas da base (fig. 2).
Antes de se servir do jarro pela primeira vez:
1 Enxague o jarro com água.
2 Encha o jarro com água até à indicação de nível máximo e deixe ferver uma
vez (vidé 'Utilização').
3 Deite a água quente fora e volte a enxaguar o jarro mais uma vez.
Utilização
.
1 Encha o jarro com água, através do bico ou da tampa aberta (fig. 3).
2 Feche a tampa.
Certifique-se que a tampa ficou bem fechada para evitar que o jarro perca água e
funcione a seco.
3 Coloque o jarro sobre a base, ligue a ficha à tomada eléctrica e regule o
interruptor para a posição 'I' (ligado) (fig. 4).
O jarro começa a aquecer.
◗ O jarro desliga-se (posição 'O') automaticamente quando a água atinge o
ponto de fervura.
◗ Se quiser interromper a fervura da água, coloque o interruptor na posição 'O'.
Limpeza e descalcificação
.
Antes de proceder à limpeza, desligue sempre da corrente.
Não use produtos de limpeza abrasivos, esfregões, etc. para limpar o jarro.
Nunca mergulhe o jarro ou a base dentro de água.
Limpeza
1 Limpe o exterior do jarro com um pano macio e humedecido com água
quente e um pouco de detergente líquido suave.
O calcário não é prejudicial à sua saúde mas pode conferir um gosto desagradável à
bebida. O filtro anti-calcário evita que as partículas de calcário passem para o líquido.
Limpe o calcário com regularidade. Os modelos com filtro de tripla acção também
estão equipados com uma rede que atrai o calcário da água.
2 O filtro pode ser limpo:
◗ retirando-o para fora e escovando-o suavemente com uma escova de nylon
macia com água corrente, ou .. (fig. 5).
◗ deixando-o no jarro quando se procede à descalcificação do mesmo, ou ...
◗ na máquina da loiça.
Nos modelos com filtro de tripla acção (HD4657, HD4653 e HD4652): a rede pode
limpar-se da seguinte forma:
◗ Retirando o cesto do filtro, fazendo-o deslizar para fora (fig. 6).
◗ Retirando a rede de aço inoxidável para fora do cesto e lavando-a à torneira
com água corrente - espremendo e rodando.
Descalcificação
Uma descalcificação regular prolonga a vida do jarro.
No caso de uma utilização normal (até 5 vezes por dia), recomenda-se a seguinte
frequência de descalcificação:
- Uma vez a cada 3 meses nas zonas com água menos dura (até 18 dH).
- Uma vez todos os meses nas zonas onde a água for dura (mais de 18 dH).
1 Encha o jarro com água até três quartos do nível máximo e leve a água a
ferver.
2 Depois de o jarro se desligar, adicione vinagre (8% ácido acetílico) até ao nível
máximo.
3 Deixe esta solução a actuar durante a noite.
4 Esvazie o jarro e enxague muito bem.
5 Volte a encher o jarro com água limpa e leve-a a ferver.
6 Esvazie o jarro e enxague novamente com água limpa.
◗ Repita este procedimento até limpar todo o calcário.
Também pode usar um produto de descalcificação próprio. Se for esse o caso, siga as
instruções da embalagem do produto.
Substituição
.
Os filtros de substituição do jarro podem ser adquiridos no seu distribuidor Philips
ou num concessionário Philips autorizado. O quadro abaixo indica quais os filtros
adequados para o seu jarro eléctrico.
Se o jarro, a base ou o fio estiverem estragados, leve a base ou o jarro a um
concessionário autorizado pela Philips para que procedam à sua reparação ou
substituição do fio. Evitará, assim, alguma situação comprometedora.
Garantia e assistência
.
Se necessitar de informações ou se tiver algum problema, por favor visite o site da
Philips em www.philips.pt ou contacte o Centro de Informação ao Consumidor
Philips do seu país (encontrará os números de telefone no folheto da garantia
mundial). Se não existir um Centro de Informação ao Consumidor no seu país, dirija-
se ao seu agente Philips local ou contacte o Departamento de Service da Philips
Domestic Appliances and Personal Care BV.
Tipo de filtro
HD4973
HD4977 (filtro de tripla acção)
HD4976 (filtro de tripla acção)
HD4971
Modelo(s) de jarro(s)
HD4650
HD4652
HD4653 e HD4657
HD4659
ESPAÑOL
Einführung
.
Herzlichen Glückwunsch zu Ihrem neuen Philips Wasserkocher! Diese Anleitung
enthält alle wichtigen Informationen zur Bedienung des Geräts, damit Sie möglichst
lange viel Freude daran haben.
Allgemeine Beschreibung
.
1) Ein-/Ausschalter (I/O)
2) Kontrolllampe
3) Deckel
4) Ausguss
5) Füllstandsanzeige
6) Sockel
7) Kalkfilter
8) Triple-Action-Filter (Gerätetypen HD4657, HD4653, HD4652)
9) Akustisches Kochsignal (nur Typ HD4659)
Wichtig
.
Lesen Sie diese Bedienungsanleitung vor dem ersten Gebrauch des Geräts sorgfältig
durch und bewahren Sie sie zur späteren Einsichtnahme auf.
◗ Prüfen Sie vor dem Anschließen des Geräts, ob die Spannungsangabe auf dem
Sockel mit der örtlichen Netzspannung übereinstimmt.
◗ Verwenden Sie den Wasserkocher nur mit dem dazu gehörigen Sockel.
◗ Stellen Sie den Sockel und den Kessel immer auf eine trockene, ebene und
stabile Unterlage.
◗ Halten Sie das Netzkabel, den Sockel und den Kessel fern von heißen
Oberflächen.
◗ Benutzen Sie das Gerät nicht, wenn das Netzkabel, der Netzstecker, der Sockel
oder der Wasserkocher selbst beschädigt ist.
◗ Ist das Netzkabel defekt, darf es nur von einem Philips Service-Center oder
einer von Philips autorisierten Werkstatt durch ein Original-Ersatzkabel
ausgetauscht werden, um ein Sicherheitsrisiko zu vermeiden.
◗ Tauchen Sie das Gerät und den Sockel niemals in Wasser oder andere
Flüssigkeiten.
◗ Der Wasserkocher ist nur zum Kochen von Wasser vorgesehen. Er eignet sich
nicht zum Erhitzen von Suppen und anderen Flüssigkeiten oder von
Nahrungsmitteln in Gläsern, Flaschen oder Dosen.
◗ Kochendes Wasser kann Verbrühungen verursachen. Gehen Sie vorsichtig mit
dem Gerät um, wenn es heißes Wasser enthält.
◗ Füllen Sie den Wasserkocher nicht über die Höchstmarkierung hinaus. Ist der
Wasserkocher zu voll, kann kochendes Wasser aus dem Ausguss spritzen und
zu Verbrühungen führen.
◗ Öffnen Sie den Deckel nicht, während das Wasser kocht. Seien Sie vorsichtig
beim Öffnen des Deckels unmittelbar nach dem Kochen des Wassers. Der
austretende Dampf ist sehr heiß.
◗ Vermeiden Sie jede Berührung mit der Außenwand des Wasserkochers; sie
wird während des Betriebs sehr heiß. Heben Sie das Gerät nur am Handgriff
an.
◗ Halten Sie das Gerät und das Netzkabel außer Reichweite von Kindern. Lassen
Sie das Netzkabel nicht über die Kante der Arbeitsfläche hinunter hängen.
Überschüssiges Kabel lässt sich im Sockel unterbringen.
◗ Füllen Sie den Wasserkocher mindestens bis zur unteren Markierung, damit er
nicht trocken kocht.
◗ Nur HD4657: Dieser schnelle Wasserkocher arbeitet mit einer Leistung von
3100 Watt und kann Ihr Stromnetz mit bis zu 13 Ampere belasten. Prüfen Sie,
ob Ihre häusliche Stromversorgung und der Stromkreis, an den Sie das Gerät
anschließen, diesem Stromverbrauch standhalten. Betreiben Sie nicht zu viele
andere Elektrogeräte gleichzeitig mit dem Wasserkocher.
◗ Hinweis:Am Sockel kann sich etwas Kondenswasser niederschlagen. Das ist
völlig normal und kein Zeichen für einen Defekt.
◗ Abhängig vom Härtegrad des Wassers in Ihrer Region können sich im Laufe
der Zeit kleine Flecken auf dem Heizelement Ihres Wasserkochers bilden. Es
handelt sich dabei um Kalkablagerungen auf dem Heizelement und an der
Innenwand des Wasserkochers. Je härter das Wasser, desto schneller bilden
sich diese Kalkrückstände, die in unterschiedlichen Farben auftreten können.
Kalkablagerungen sind zwar unschädlich, können jedoch mit der Zeit die
Leistung Ihres Wasserkochers beeinträchtigen. Entkalken Sie Ihren
Wasserkocher regelmäßig gemäß den Anleitungen im Kapitel "Entkalken".
Trockengehschutz
Dieser Wasserkocher ist mit einer automatischen Abschaltung ausgestattet, die
aktiviert wird, wenn Sie das Gerät ohne Wasser oder bei zu geringem Wasserstand
einschalten. Der Ein-/Ausschalter bleibt in der "Ein"-Position, und die Kontrolllampe
(sofern vorhanden) leuchtet. Stellen Sie den Ein-/Ausschalter auf "O" und lassen Sie
den Wasserkocher 10 Minuten lang abkühlen. Heben Sie dann den Kessel vom
Sockel, um den automatischen Trockengehschutz zu deaktivieren.Anschließend kann
der Wasserkocher wieder wie gewohnt benutzt werden.
Vor dem ersten Gebrauch
.
◗ Entfernen Sie alle Aufkleber vom Sockel und vom Wasserkocher.
◗ Stellen Sie den Sockel auf eine trockene, stabile und ebene Unterlage.
◗ Wickeln Sie überschüssiges Kabel um die Kabelaufwicklung im Sockel und
führen Sie das Kabel durch einen der Schlitze (Abbildung 2).
Vor dem ersten Gebrauch sollten Sie
1 - den Wasserkocher mit Wasser ausspülen;
2 - den Wasserkocher bis zur MAX-Markierung mit Wasser füllen und einmal
aufkochen lassen (siehe "Der Gebrauch des Geräts);
3 - das heiße Wasser ausgießen und den Wasserkocher nochmals ausspülen.
Der Gebrauch des Geräts
.
1 Füllen Sie den Wasserkocher bei geöffnetem Deckel oder durch den Ausguss
mit Wasser (Abbildung 3).
2 Schließen Sie den Deckel.
Achten Sie darauf, dass der Deckel gut geschlossen ist, damit der Wasserkocher
trocken kocht.
3 Setzen Sie den Wasserkocher auf den Sockel, stecken Sie den Netzstecker in
die Steckdose und stellen Sie den Ein-/Ausschalter auf "I" (Abbildung 4).
Das Wasser wird jetzt erhitzt.
◗ Das Gerät wird automatisch ausgeschaltet (Position "0"), wenn das Wasser den
Siedepunkt erreicht hat.
◗ Sie können das Gerät vorher ausschalten, indem Sie den Ein-/Ausschalter auf
Position "0" stellen.
Reinigen und Entkalken
.
Ziehen Sie vor dem Reinigen stets den Netzstecker aus der Steckdose.
Verwenden Sie zum Reinigen des Geräts keine Scheuermittel oder
Scheuerschwämme.
Tauchen Sie das Gerät und den Sockel niemals in Wasser.
Den Wasserkocher reinigen
1 Reinigen Sie die Außenwand des Geräts mit einem weichen Tuch, das Sie mit
warmem Wasser und etwas Spülmittel angefeuchtet haben.
Die Kalkablagerungen, auch Kesselstein genannt, sind gesundheitlich unschädlich,
können den Getränken jedoch einen sandigen Beigeschmack geben. Der Kalkfilter
verhindert, dass Kalkpartikel in Ihre Getränke geraten. Reinigen Sie den Kalkfilter
regelmäßig. Gerätetypen mit Triple-Action-Filter sind mit einem Gewebe versehen,
das dem Wasser den Kalk entzieht.
2 Der Filter lässt sich reinigen, indem Sie ihn
◗ - aus dem Wasserkocher nehmen und unter fließendem Wasser vorsichtig mit
einer weichen Nylonbürste abbürsten; (Abbildung 5).
◗ - beim Entkalken des Wasserkochers im Gerät lassen
◗ - oder in den Geschirrspüler stellen.
Bei Gerätetypen mit einem Triple-Action-Filter (HD4657, HD4653 und HD4652)
lässt sich das Gewebe wie folgt reinigen:
◗ Ziehen Sie den Korb aus dem Filter (Abbildung 6).
◗ Nehmen Sie das Gewebe aus Edelstahl aus dem Korb und reinigen Sie es,
indem Sie es unter fließendem Wasser drücken und drehen.
Den Wasserkocher entkalken
Regelmäßiges Entkalken verlängert die Nutzungsdauer des Geräts.
Bei normalem Gebrauch (bis zu fünfmal pro Tag) empfiehlt es sich, das Gerät in
folgenen Abständen zu entkalken:
- Alle 3 Monate in Gebieten mit weichem Wasser (Härtegrad bis 18 dH).
- Einmal pro Monat in Gebieten mit hartem Wasser (Härtegrad über 18 dH).
1 Füllen Sie den Wasserkocher drei Viertel voll und lassen Sie das Wasser
aufkochen.
2 Wenn sich der Wasserkocher ausgeschaltet hat, füllen Sie ihn bis zur MAX-
Markierung mit Haushaltsessig (8% Säuregehalt) auf.
3 Lassen Sie diese Entkalkungsflüssigkeit über Nacht im Gerät stehen.
4 Leeren Sie den Wasserkocher und spülen Sie ihn gründlich aus.
5 Füllen Sie den Wasserkocher mit klarem Wasser und lassen Sie es aufkochen.
6 Leeren Sie den Wasserkocher und spülen Sie ihn erneut mit klarem Wasser
aus.
◗ Wiederholen Sie diese Vorgehensweise, wenn sich noch Kalkrückstände im
Wasserkocher befinden.
Sie können auch einen anderen geeigneten Entkalker verwenden. Halten Sie sich dann
an die Anweisungen auf der Verpackung des Entkalkers.
Ersatz und Reparatur
.
Ersatzfilter für Ihren Wasserkocher können Sie bei Ihrem Philips Händler oder einem
Philips Service-Center bestellen. Entnehmen Sie bitte der Tabelle, welche Filter für
Ihren Gerätetyp geeignet sind.
Wenn der Kessel, der Sockel oder das Netzkabel defekt oder beschädigt ist, geben
Sie das Gerät bzw. den Sockel zwecks Reparatur oder Ersatz des Netzkabels an
ein Philips Service-Center, um ein Sicherheitsrisiko zu vermeiden.
Garantie und Kundendienst
.
Benötigen Sie weitere Informationen oder treten Probleme auf, wenden Sie sich bitte
an Ihren Philips-Händler oder setzen Sie sich mit einem Philips Service-Center in
Ihrem Land in Verbindung (Tel. Nr. 0180/5356767). Besuchen Sie auch die Philips
Website www.philips.com
Filter
HD 4973
HD 4977 (Triple-Action-Filter)
HD 4976 (Triple-Action-Filter)
HD4971
Wasserkocher
HD 4650
HD4652
HD4653 und HD4657
HD4659
Documenttranscriptie
ENGLISH Introduction . FRANÇAIS NEDERLANDS Introduction Inleiding . Congratulations on acquiring your new Philips kettle! In these instructions for use you will find all important information, so you can optimally enjoy your kettle as long as possible. Félicitations pour l'achat de votre nouvelle bouilloire Philips! Dans ce mode d'emploi vous trouverez toutes les informations importantes pour pouvoir utiliser votre bouilloire pendant longtemps. General description Gefeliciteerd met de aankoop van uw nieuwe Philips waterkoker! In deze gebruiksaanwijzing vindt u alle belangrijke informatie zodat u zo lang mogelijk optimaal kunt genieten van uw waterkoker. Description générale . Algemene beschrijving . 1) On/off switch (I/O) 2) Pilot light 3) Lid 4) Spout 5) Water-level indicator 6) Base 7) Scale filter 8) Triple-action filter (models HD4657, HD4653 and HD4652) 9) Bell (model HD4659 only) 1) Bouton marche/arrêt (I/O) 2) Témoin lumineux 3) Couvercle 4) Bec verseur 5) Indicateur niveau d'eau 6) Support 7) Filtre anticalcaire 8) Filtre à triple action (modèles HD4657, HD4653 et HD4652) 9) Sonnerie (modèle HD4659 uniquement) Important . Belangrijk . . Read these instructions for use carefully before using the appliance and save them for future reference. Avant de commencer à utiliser l'appareil, lisez attentivement ce mode d'emploi et conservez-le pour une consultation ultérieure. Lees deze gebruiksaanwijzing zorgvuldig door voordat u het apparaat gaat gebruiken en bewaar de gebruiksaanwijzing om deze indien nodig te kunnen raadplegen. ◗ ◗ ◗ ◗ ◗ ◗ ◗ ◗ ◗ ◗ ◗ ◗ ◗ ◗ ◗ ◗ ◗ ◗ ◗ Check if the voltage indicated on the base of the kettle corresponds to the local mains voltage before you connect the appliance. Only use the kettle in combination with its original base. Always place the base and the kettle on a dry, flat and stable surface. Keep the cord, the base and the appliance away from hot surfaces. Do not use the appliance if the mains cord, the plug, the base or the appliance itself is damaged. If the mains cord is damaged, it must always be replaced by Philips, a service centre authorised by Philips or similarly qualified persons in order to avoid a hazard. Do not immerse the appliance or the base in water or any other liquid. The kettle is only meant for boiling water. Do not use it to heat up soup or other liquids or jarred, bottled or tinned food. Boiling water can cause serious burns. Be careful when the kettle contains hot water. Never fill the kettle beyond the maximum level indication. If the kettle has been overfilled, boiling water may be ejected from the spout and cause scalding. Do not open the lid while the water is boiling. Be careful when you open the lid immediately after the water has boiled: the steam coming out of the kettle is very hot. Avoid touching the body of the kettle, as it gets very hot during use.Always lift the kettle by its handle. Keep the appliance and its cord out of the reach of children. Do not let the mains cord hang over the edge of the table or worktop. Excess cord can be stored in or around the base of the appliance. Never fill the kettle below the minimum level to prevent the kettle from boiling dry. HD4657 only: this rapid boil kettle has a power of 3100 watts and can draw up to 13 amps from the power supply in your home. Make sure that the electrical system in your home and the circuit to which the kettle is connected can cope with this level of power consumption. Do not let too many other appliances draw power from the same circuit while the kettle is being used. Some condensation may appear on the base of the kettle.This is perfectly normal and does not mean that the kettle has any defects. Depending on the hardness of the water in your area, small spots may appear on the heating element of your kettle when you use it.This phenomenon is the result of scale build-up on the heating element and on the inside of the kettle over time.The harder the water, the faster scale will build up. Scale can occur in different colours.Although scale is harmless, too much scale can influence the performance of your kettle. Descale your kettle regularly by following the instructions given in the chapter 'Descaling'. Boil-dry protection This kettle is equipped with boil-dry protection.This device will automatically switch the kettle off if it is accidentally switched on when there is no water or not enough water in it.The on/off switch will stay in 'on' position and the pilot light, if available, will stay on. Set the on/off switch to 'O' and let the kettle cool down for 10 minutes. Then lift the kettle from its base to reset the boil-dry protection.The kettle is ready for use again. Before first use ◗ ◗ ◗ ◗ ◗ ◗ ◗ ◗ ◗ ◗ ◗ ◗ ◗ ◗ ◗ ◗ ◗ ◗ ◗ Before using the kettle for the first time: Avant la première utilisation ◗ ◗ ◗ 2 Remplissez la bouilloire avec de l'eau jusqu'au niveau maximum et faites-la bouillir une fois (voir chapitre "Utilisation de l'appareil"). 3 Pour out the hot water and rinse the kettle once more. 3 Versez l'eau chaude et rincez la bouilloire de nouveau. . 3 Place the kettle on its base, put the plug in the wall socket and set the on/off switch to 'I' (fig. 4). The kettle starts heating up. The kettle switches off ('O' position) automatically when the water has reached boiling point. You can interrupt the boiling process by setting the on/off switch to 'O'. Cleaning and descaling Never immerse the kettle or its base in water. Cleaning the kettle 1 Clean the outside of the kettle with a soft, damp cloth moistened with warm water and some mild cleaning agent. Scale is not harmful to your health but it may give your drink a powdery taste.The scale filter prevents scale particles from ending up in your drink. Clean the scale filter regularly. Models with a Triple-action filter have also been equipped with a mesh that attracts scale from the water. 2 The filter can be cleaned: by taking it out of the kettle and gently brushing the filter with a soft nylon brush under a running tap, or.. (fig. 5). by leaving it in the kettle when descaling the whole appliance, or... in the dishwasher. For models with a triple-action filter (HD4657, HD4653 and HD4652): the mesh can be cleaned as follows: Remove the basket from the filter by sliding it out (fig. 6). Take the stainless steel mesh out of the basket and clean it by squeezing and rotating it under a running tap. Descaling the kettle Regular descaling will prolong the life of the kettle. In case of normal use (up to 5 times a day), the following descaling frequency is recommended: - Once every 3 months for soft water areas (up to 18 dH). - Once every month for hard water areas (more than 18 dH). 1 Fill the kettle with water up to three-quarters of the maximum level and bring the water to the boil. ◗ ◗ L'appareil s'éteint automatiquement (position "O") quand l'eau est à ébullition. Vous pouvez arrêter l'appareil en plaçant le bouton marche/arrêt sur la position "O". Nettoyage et détartrage . Débranchez toujours l'appareil avant de le nettoyer. N'utilisez pas de produits abrasifs, tampons à récurer etc. pour nettoyer l'appareil. Ne plongez jamais la bouilloire ou le support dans l'eau. Nettoyage de la bouilloire 1 Nettoyez l'extérieur de la bouilloire à l'aide d'un chiffon humide et un peu de détergent. Le calcaire n'est pas nocif à votre santé mais votre boisson peut acquérir un goût poudreux. Le filtre anticalcaire évite aux particules de calcaire d'arriver dans votre boisson. Nettoyez le filtre régulièrement. Les modèles dotés d'un filtre à triple action ont un tamis qui attire les particules de calcaire de l'eau. ◗ ◗ ◗ ◗ ◗ ◗ ◗ ◗ ◗ ◗ retirez-le de la bouilloire et brossez-le légèrement sous le robinet d'eau avec une brosse douce en nylon, ou.. (fig. 5). laissez-le dans la bouilloire lors du détartrage de l'appareil, ou... lavez-le au lave-vaisselle. Pour les modèles avec un filtre à triple action (HD4657, HD4653 et HD4652), le tamis peut être nettoyé comme suit: ◗ ◗ Otez le panier du filtre (fig. 6). Otez le tamis en inox et nettoyez-le en le pressant et en le faisant pivoter sous le robinet d'eau. Détartrage de la bouilloire Un détartrage régulier prolongera la durée de vie de votre appareil. Pour une utilisation normale (jusqu'à 5 fois par jour), il est conseillé de détartrer votre bouilloire comme suit: - tous les 3 mois si votre eau n'est pas trop calcaire (inférieure à 18°TH) - chaque mois si votre eau est dure (supérieure à 18°TH). 1 Remplissez la bouilloire aux trois quarts de la capacité maximale et portez l'eau à ébullition. 3 Leave the solution in the kettle overnight. 4 Empty the kettle and rinse the inside thoroughly. 3 Laissez la solution dans la bouilloire jusqu'au lendemain. 5 Fill the kettle with clean water and boil the water. 4 Videz la bouilloire et rincez l'interieur. 6 Empty the kettle and rinse it with clean water again. 5 Remplissez la bouilloire avec de l'eau claire puis faîtes bouillir l'eau. Voor het eerste gebruik ◗ You can also use an appropriate descaler. In that case, follow the instructions on the package of the descaler. Replacement . Replacement filters for your kettle can be purchased from your Philips dealer or a Philips service centre.The table below indicates which filters are suitable for your electric kettle. If the kettle, the base or the mains cord of the appliance is damaged, take the base or the kettle to a service centre authorised by Philips for repair or replacement of the cord to avoid a hazard. . If you need information or if you have a problem, please visit the Philips website at www.philips.com or contact the Philips Customer Care Centre in your country (you will find its phone number in the world-wide guarantee leaflet). If there is no Customer Care Centre in your country, turn to your local Philips dealer or contact the Service Department of Philips Domestic Appliances and Personal Care BV. Kettle type(s) Filter type HD4650 HD4973 HD4652 HD4977 (triple-action filter) HD4653 and HD4657 HD4976 (triple-action filter) HD4659 HD4971 ◗ . Verwijder eventueel aanwezige stickers van de voet of de waterkoker. Plaats de voet van de waterkoker op een droge, stabiele en vlakke ondergrond. Pas de lengte van het snoer aan door het rond de haspel in de voet te wikkelen.Voer het snoer door een van de openingen in de voet (fig. 2). 2 Vul de waterkoker met water tot het maximumniveau en laat hem een keer koken (zie 'Gebruik'). 3 Giet het hete water uit de waterkoker en spoel hem nog een keer om. Gebruik 3 Plaats de waterkoker op zijn voet, steek de stekker in het stopcontact en zet de aan/uitknop op stand 'I' (fig. 4). De waterkoker begint op te warmen. ◗ ◗ Haal altijd de stekker uit het stopcontactvoordat u de waterkoker en de voet gaat schoonmaken. Type de filtre HD4650 HD4973 HD4652 HD4977 (filtre à triple action) HD4653 et HD4657 HD4976 (filtre à triple action) HD4659 HD4971 9 5 5 2 6 6 HD 4657, HD 4653 & HD 4652 HD 4659, HD4650 Gebruik geen agressieve schoonmaakmiddelen, schuursponsjes e.d. om de waterkoker te reinigen. 2 3 4 5 6 7 Dompel de waterkoker of de voet nooit in water. Schoonmaken van de waterkoker 1 Maak de buitenkant van het apparaat schoon met een zachte, vochtige doek en een zacht schoonmaakmiddel. Kalk is niet schadelijk voor uw gezondheid maar kan uw drank een poederig smaakje geven. Het kalkfilter voorkomt dat er kalkdeeltjes in uw drank terecht komen. Maak het filter regelmatig schoon.Types met een Triple Action filter zijn uitgerust met een balletje van gaas dat kalkdeeltjes uit het water aantrekt. 2 Het filter kan worden gereinigd: ◗ ◗ ◗ door het uit de waterkoker te nemen en voorzichtig met een zachte nylon borstel onder de lopende kraan schoon te borstelen, of .. (fig. 5). door het in de waterkoker te laten zitten wanneer het hele apparaat wordt ontkalkt, of ... in de vaatwasmachine. HD4657 HD4653 HD4652 HD4659 HD4650 Bij types met een Triple Action filter (HD4657, HD4653 en HD4652) kan het balletje van gaas als volgt worden gereinigd: ◗ ◗ Verwijder de houder uit het filter door hem eruit te schuiven (fig. 6). Haal het roestvrijstalen balletje gaas uit de houder en maak het schoon door het onder een lopende kraan te draaien en er in te knijpen. Ontkalken van de waterkoker Regelmatig ontkalken verlengt de levensduur van het apparaat. Bij normaal gebruik (tot 5 keer per dag), wordt u aangeraden de volgende ontkalkingsfrequentie aan te houden: - Eén keer per 3 maanden als u zacht water gebruikt (tot 18dH). - Eén keer per maand als u hard water gebruikt (meer dan 18dH). 1 Vul de waterkoker tot driekwart van het aangegeven maximumniveau met water en breng het water aan de kook. 2 Voeg, nadat het waterkoker is uitgeschakeld, schoonmaakazijn (8% azijnzuur) toe tot aan het maximumniveau. 3 Laat het water met de azijn een nacht in de waterkoker staan. 5 Vul het apparaat met schoon water en breng het water aan de kook. 6 Schenk het apparaat leeg en spoel de binnenzijde nogmaals goed uit. ◗ Herhaal deze procedure als er nog steeds kalk in de waterkoker zit. U kunt ook een hiervoor geschikte ontkalker gebruiken.Volg in dat geval de instructies op de verpakking van de ontkalker. Vervanging Type(s) de bouilloire(s) 3 . 4 Schenk het apparaat leeg en spoel de binnenzijde goed uit. Pour plus d'informations, visitez notre Philips Web site : www.philips.com ou veuillez contacter le Service Consommateurs Philips de votre pays (vous trouverez le numéro de téléphone dans le dépliant sur la garantie internationale). S'il n'y a aucun Service Consommateurs Philips dans votre pays, contactez votre distributeur ou le Service Department of Philips Domestic Appliances and Personal Care BV. 7, 8 De waterkoker schakelt automatisch uit (aan/uitknop springt terug naar stand "O") als het water het kookpunt heeft bereikt. U kunt het kookproces onderbreken door de aan/uitknop op "O" te zetten. . . 4 1, 2 Schoonmaken en ontkalken Remplacement Si la bouilloire, le support ou le cordon d'alimentation est endommagé, portez le support ou la bouilloire à un Centre Service Agréé Philips pour réparation ou remplacement afin d'éviter tout accident. 3 2 Sluit het deksel. Zorg ervoor dat het deksel goed dichtzit om te voorkomen dat het apparaat droogkookt. Vous pouvez aussi utiliser un détartrant spécial. Dans ce cas suivez les instructions sur l'emballage. Des filtres de rechange pour votre bouilloire sont disponibles chez votre revendeur Philips ou à un Centre Service Agréé. Le tableau ci-dessous indique quels sont les filtres appropriés pour votre bouilloire. 4 . 1 Vul de waterkoker via de schenktuit met water of open het deksel om hem te vullen (fig. 3). Répétez cette opération s'il y a encore des particules de calcaire dans la bouilloire. Garantie et service 4222 001 96591 Voordat u de waterkoker voor de eerste keer gebruikt: 6 Videz la bouilloire et rincez-la de nouveau. Repeat the procedure if there is still some scale in the kettle. u www.philips.com Droogkookbeveiliging Het verwarmingselement van deze waterkoker is beveiligd met een droogkookbeveiliging. Deze beveiliging zal de waterkoker automatisch uitschakelen als hij per ongeluk wordt ingeschakeld zonder dat er water in zit of als er onvoldoende water in zit. In dat geval gaat het indicatielampje knipperen en wordt de waterkoker na 5 minuten automatisch uitgeschakeld. Als dit gebeurd is, til de waterkoker dan van zijn voet om de droogkookbeveiliging te resetten. Hierna kunt u de waterkoker weer gebruiken. 2 Le filtre peut être nettoyé comme suit: 2 Quand l'appareil s'est arrêté, ajoutez du vinaigre blanc (8% acide acétique) jusqu'à l'indication maximum. Guarantee & service ◗ Controleer of het voltage aangegeven op de voet van de waterkoker overeenkomt met de plaatselijke netspanning voordat u het apparaat aansluit. Gebruik de waterkoker alleen met de bijbehorende voet. Plaats de voet van de waterkoker op een droge, vlakke en stabiele ondergrond. Houd het snoer, de voet en het apparaat uit de buurt van hete oppervlakken. Gebruik het apparaat niet als het netsnoer, de stekker of het apparaat zelf beschadigd is. Indien het netsnoer beschadigd is, moet het vervangen worden door Philips, een door Philips geautoriseerd servicecentrum of personen met vergelijkbare kwalificaties om gevaar te voorkomen. Dompel de waterkoker en de voet niet in water of een andere vloeistof. Deze waterkoker is alleen bedoeld voor het koken van water. Gebruik het apparaat niet om soep of andere vloeistoffen of voedsel in potten, flessen of blikken op te warmen. Kokend water kan ernstige brandwonden veroorzaken.Wees voorzichtig met de waterkoker wanneer deze heet water bevat. Vul de waterkoker nooit verder dan het aangegeven maximumniveau.Als er te veel water in de waterkoker zit, bestaat het risico dat er kokend water uit de schenktuit naar buiten spat. Open het deksel niet wanneer het water kookt.Wees voorzichtig wanneer u het deksel opent direct nadat het water gekookt heeft: de stoom die uit de waterkoker komt is erg heet. Raak de buitenwand van de waterkoker niet aan, aangezien deze erg heet wordt tijdens gebruik.Til het apparaat alleen op aan het handvat. Houd de waterkoker en het snoer buiten het bereik van kinderen. Laat het snoer niet over de rand hangen van de tafel of het werkblad waar de waterkoker op staat. Overtollig snoer kan in of rond om de voet van het apparaat worden opgeborgen. Vul de waterkoker nooit beneden het minimumniveau om te voorkomen dat het apparaat droogkookt. Alleen type HD4657: Deze snelkokende waterkoker heeft een vermogen van 3100 watt en vormt een belasting van 13 ampère voor de elektrische installatie in uw huis. Controleer of het elektriciteitssysteem in uw woning en de groep waarop de waterkoker wordt aangesloten een dergelijke belasting aan kan. Laat niet te veel andere apparaten die op dezelfde groep zijn aangesloten werken wanneer de waterkoker aan staat. Het is mogelijk dat er enige condens ontstaat op de voet van de waterkoker. Dit is heel normaal en betekent niet dat het apparaat een defect vertoont. Afhankelijk van de hardheid van het water in uw woongebied, kunnen er na gebruik kleine vlekjes ontstaan op het verwarmingselement van de waterkoker. Dit verschijnsel is het gevolg van kalkvorming die zich in de loop van de tijd voordoet op het verwarmingselement en aan de binnenzijde van de waterkoker. Hoe harder het water, hoe sneller er kalkaanslag zal ontstaan. Kalkaanslag kan verschillende kleuren hebben.Alhoewel kalk onschadelijk is, kan het een negatieve invloed hebben op het functioneren van uw waterkoker. Ontkalk de waterkoker daarom regelmatig en volg daarbij de instructies in het hoofdstuk 'Ontkalken'. 1 Spoel de waterkoker met water. 3 Placez la bouilloire sur son support, branchez-le et réglez le bouton marche/arrêt sur la position I (fig. 4). La bouilloire commence à chauffer. 2 After the kettle has switched off, add white vinegar (8% acetic acid) to the maximum level. ◗ ◗ 2 Fermez le couvercle. Assurez-vous que le couvercle est correctement fixé pour éviter l'évaporation de l'eau. . Do not use any abrasive cleaning agents, scourers etc. to clean the kettle. ◗ ◗ ◗ ◗ 1 Remplissez la bouilloire avec de l'eau par le bec verseur ou ouvrez le couvercle pour la remplir (fig. 3). Always unplug the appliance before cleaning it. ◗ ◗ ◗ . 2 Close the lid. Make sure that the lid is properly closed to prevent the kettle from boiling dry. ◗ ◗ ◗ Utilisation de l'appareil 1 Fill the kettle with water either through the spout or through the open lid (fig. 3). ◗ ◗ ◗ ◗ ◗ 1 Rincez la bouilloire à l'eau. 2 Fill the kettle with water up to the maximum level and let it boil once (see 'Using the appliance'). ◗ . Retirez tout autocollant, s'il y en a, du support ou de la bouilloire. Placez la bouilloire sur une surface sèche, stable et plane. Enroulez le cordon autour du support pour l'ajuster. Fixez le cordon dans une des fentes à la base de l'appareil (fig. 2). Avant la première utilisation: 1 Rinse the kettle with water. Using the appliance Avant de brancher l'appareil, vérifiez que la tension sur le fond de la bouilloire correspond bien à la tension de votre secteur. N'utilisez la bouilloire qu'avec le support d'origine. Placez toujours la bouilloire sur une surface sèche, stable et plane. Tenez le cordon, le support et l'appareil à l'écart des surfaces chaudes. N'utilisez pas la bouilloire si la fiche, le cordon, le support ou l'appareil luimême sont endommagés. Si le cordon d'alimentation est endommagé, il ne doit être remplacé que par Philips ou un Centre Service Agréé pour éviter tout accident. Ne plongez pas la bouilloire ou son support dans l'eau ou dans tout autre liquide. Cette bouilloire est destinée à faire bouillir de l'eau uniquement. Ne l'utilisez pas pour faire chauffer de la soupe ou d'autres liquides ou des aliments conservés stockés dans des canettes en étain, bocaux ou bouteilles. L'eau bouillante peut causer des brûlures graves. Faites donc très attention quand la bouilloire contient de l'eau bouillante. Remplissez la bouilloire jusqu'à l'indication maximale. Si vous mettez trop d'eau dans la bouilloire, l'eau bouillante peut jaillir par le bec verseur et vous pouvez vous brûler. N'ouvrez pas le couvercle lorsque l'eau bout. Faites attention lorsque vous ouvrez le couvercle immédiatement après l'ébullition de l'eau, car de la vapeur très chaude peut s'échapper de la bouilloire. Evitez de toucher le corps de la bouilloire car il chauffera fortement pendant l'utilisation.Tenez toujours la bouilloire par la poignée. Tenez la bouilloire et le cordon hors de portée des enfants. Ne laissez pas le cordon pendre du plan de travail. Enroulez le cordon autour du support pour l'ajuster ou rangez-le à l'intérieur du support. Ne remplissez jamais la bouilloire au-dessous du niveau minimum pour éviter une trop forte évaporation de l'eau. HD4657 uniquement: Cette bouilloire à chauffage rapide Philips de 3100 W peut consommer jusqu'à 13 ampères.Vérifiez que l'installation électrique puisse supporter cette intensité. Ne branchez pas plusieurs appareils sur le même circuit pendant le fonctionnement de la bouilloire. De la condensation peut se produire sur le support de la bouilloire. Ceci est tout à fait normal et non un défaut de fabrication. Selon la dureté de l'eau de votre région, de petites taches peuvent apparaître sur l'élément chauffant de votre bouilloire. Ce phénomène est le résultat de l'accumulation du calcaire sur l'élément chauffant et à l'intérieur de la bouilloire. Plus l'eau est dure, plus le dépôt de calcaire est important. Le calcaire peut avoir des couleurs différentes. Bien que le calcaire ne soit pas nocif pour votre santé, il peut affecter la performance de votre bouilloire lorsque l'accumulation est trop importante.Veuillez suivre les instructions du chapitre "Détartrage". Protection en cas d'évaporation de l'eau Cette bouilloire est dotée d'un dispositif de protection en cas d'évaporation de l'eau. Ce dispositif arrête automatiquement votre bouilloire si elle a été mise en marche accidentellement lorsqu'il n'y a pas assez d'eau ou pas du tout. Le bouton marche/arrêt sera sur la position "marche" et le témoin lumineux, s'il y en a, sera allumé. Réglez le bouton marche/arrêt sur la position "O" et attendez 10 minutes pour laisser refroidir la bouilloire. Ensuite enlevez la bouilloire du support pour remettre à zéro la protection. La bouilloire est de nouveau prête à être utilisée. . Remove stickers, if any, from the base or kettle. Place the base on a dry, stable and flat surface. Adjust the length of the cord by winding it round the reel in the base. Pass the cord through one of the slots in the base (fig. 2). HD4659, HD4657, HD4653, HD4652, HD4650 1) Aan/uitknop (I/O) 2) Waarschuwingslampje 3) Deksel 4) Schenktuit 5) Waterniveau-indicator 6) Voet 7) Kalkfilter 8) Triple Action filter (types HD4657, HD4653 en HD4652) 9) Bel (alleen type HD4659) Important . Essence . . Vervangende filters voor uw waterkoker zijn verkrijgbaar bij uw Philips dealer of een Philips servicecentrum. De onderstaande tabel laat zien welke filters geschikt zijn voor welke types. Indien het netsnoer beschadigd is, moet het vervangen worden door Philips, een door Philips geautoriseerd servicecentrum of personen met vergelijkbare kwalificaties om gevaar te voorkomen. Garantie & service . Als u informatie nodig heeft of als u een probleem heeft, bezoek dan onze website (www.philips.com), of neem contact op met het Philips Customer Care Centre in uw land (u vindt het telefoonnummer in het 'worldwide guarantee' vouwblad). Als er geen Customer Care Centre in uw land is, ga dan naar uw Philips dealer of neem contact op met de afdeling Service van Philips Domestic Appliances and Personal Care BV. Waterkokertype(s) Filtertype HD4650 HD4973 HD4652 HD4977 (Triple Action filter) HD4653 en HD4657 HD4976 (Triple Action filter) HD4659 HD4971 1 DEUTSCH Einführung ESPAÑOL Introducción . Allgemeine Beschreibung Ci congratuliamo con lei per aver acquistato il nuovo bollitore Philips! In queste istruzioni troverà tutte le informazioni necessarier per usare il bollitore al meglio e per molto tempo, ottenendo sempre risultati ottimali. Descripción general Importante Descrição geral . . 1) Interruttore on/off (I/O) 2) Spia 3) Coperchio 4) Beccuccio 5) Indicatore del livello d' acqua 6) Base 7) Filtro anticalcare 8) Filtro a tripla azione (modelli HD4657, HD4653 e HD4625) 9) Campanello (solo mod. HD4659) Importante . . Parabéns pela aquisição do seu novo jarro eléctrico Philips! Neste modo de emprego encontrará informações importantes para poder desfrutar ao máximo e durante muito tempo do seu jarro. Descrizione generale . 1) Interruptor marcha/parada (I/O) 2) Piloto 3) Tapa 4) Boquilla 5) Indicador del nivel de agua 6) Base 7) Filtro antical 8) Filtro de triple acción (modelos HD4657, HD4653 y HD4652) 9) Señal acústica (sólo modelo HD4659) . Introdução . ¡Enhorabuena por adquirir la nueva hervidora de Philips! En estas instrucciones de uso, encontrará toda la información importante para que pueda disfrutar el mayor tiempo posible de este aparato. . 1) Ein-/Ausschalter (I/O) 2) Kontrolllampe 3) Deckel 4) Ausguss 5) Füllstandsanzeige 6) Sockel 7) Kalkfilter 8) Triple-Action-Filter (Gerätetypen HD4657, HD4653, HD4652) 9) Akustisches Kochsignal (nur Typ HD4659) PORTUGUÊS Introduzione . Herzlichen Glückwunsch zu Ihrem neuen Philips Wasserkocher! Diese Anleitung enthält alle wichtigen Informationen zur Bedienung des Geräts, damit Sie möglichst lange viel Freude daran haben. Wichtig ITALIANO 1) Interruptor (I/O) 2) Lâmpada piloto 3) Tampa 4) Bico 5) Indicador nível da água 6) Base 7) Filtro anti-calcário 8) Filtro de tripla acção (modelos HD4657, HD4653 e HD4652) 9) Campainha (apenas mod. HD4659) Importante . . Lesen Sie diese Bedienungsanleitung vor dem ersten Gebrauch des Geräts sorgfältig durch und bewahren Sie sie zur späteren Einsichtnahme auf. Antes de usar el aparato, lea atentamente estas instrucciones y consérvelas por si necesitara consultarlas en el futuro. Leggete queste istruzioni con attenzione prima di usare l'apparecchio e conservatele per future consultazioni. Antes de se servir do jarro, leia atentamente estas instruções e guarde-as para uma eventual consulta futura. ◗ ◗ ◗ ◗ ◗ ◗ ◗ ◗ ◗ ◗ ◗ ◗ ◗ ◗ ◗ ◗ ◗ ◗ ◗ ◗ Prüfen Sie vor dem Anschließen des Geräts, ob die Spannungsangabe auf dem Sockel mit der örtlichen Netzspannung übereinstimmt. Verwenden Sie den Wasserkocher nur mit dem dazu gehörigen Sockel. Stellen Sie den Sockel und den Kessel immer auf eine trockene, ebene und stabile Unterlage. Halten Sie das Netzkabel, den Sockel und den Kessel fern von heißen Oberflächen. Benutzen Sie das Gerät nicht, wenn das Netzkabel, der Netzstecker, der Sockel oder der Wasserkocher selbst beschädigt ist. Ist das Netzkabel defekt, darf es nur von einem Philips Service-Center oder einer von Philips autorisierten Werkstatt durch ein Original-Ersatzkabel ausgetauscht werden, um ein Sicherheitsrisiko zu vermeiden. Tauchen Sie das Gerät und den Sockel niemals in Wasser oder andere Flüssigkeiten. Der Wasserkocher ist nur zum Kochen von Wasser vorgesehen. Er eignet sich nicht zum Erhitzen von Suppen und anderen Flüssigkeiten oder von Nahrungsmitteln in Gläsern, Flaschen oder Dosen. Kochendes Wasser kann Verbrühungen verursachen. Gehen Sie vorsichtig mit dem Gerät um, wenn es heißes Wasser enthält. Füllen Sie den Wasserkocher nicht über die Höchstmarkierung hinaus. Ist der Wasserkocher zu voll, kann kochendes Wasser aus dem Ausguss spritzen und zu Verbrühungen führen. Öffnen Sie den Deckel nicht, während das Wasser kocht. Seien Sie vorsichtig beim Öffnen des Deckels unmittelbar nach dem Kochen des Wassers. Der austretende Dampf ist sehr heiß. Vermeiden Sie jede Berührung mit der Außenwand des Wasserkochers; sie wird während des Betriebs sehr heiß. Heben Sie das Gerät nur am Handgriff an. Halten Sie das Gerät und das Netzkabel außer Reichweite von Kindern. Lassen Sie das Netzkabel nicht über die Kante der Arbeitsfläche hinunter hängen. Überschüssiges Kabel lässt sich im Sockel unterbringen. Füllen Sie den Wasserkocher mindestens bis zur unteren Markierung, damit er nicht trocken kocht. Nur HD4657: Dieser schnelle Wasserkocher arbeitet mit einer Leistung von 3100 Watt und kann Ihr Stromnetz mit bis zu 13 Ampere belasten. Prüfen Sie, ob Ihre häusliche Stromversorgung und der Stromkreis, an den Sie das Gerät anschließen, diesem Stromverbrauch standhalten. Betreiben Sie nicht zu viele andere Elektrogeräte gleichzeitig mit dem Wasserkocher. Hinweis:Am Sockel kann sich etwas Kondenswasser niederschlagen. Das ist völlig normal und kein Zeichen für einen Defekt. Abhängig vom Härtegrad des Wassers in Ihrer Region können sich im Laufe der Zeit kleine Flecken auf dem Heizelement Ihres Wasserkochers bilden. Es handelt sich dabei um Kalkablagerungen auf dem Heizelement und an der Innenwand des Wasserkochers. Je härter das Wasser, desto schneller bilden sich diese Kalkrückstände, die in unterschiedlichen Farben auftreten können. Kalkablagerungen sind zwar unschädlich, können jedoch mit der Zeit die Leistung Ihres Wasserkochers beeinträchtigen. Entkalken Sie Ihren Wasserkocher regelmäßig gemäß den Anleitungen im Kapitel "Entkalken". Trockengehschutz Dieser Wasserkocher ist mit einer automatischen Abschaltung ausgestattet, die aktiviert wird, wenn Sie das Gerät ohne Wasser oder bei zu geringem Wasserstand einschalten. Der Ein-/Ausschalter bleibt in der "Ein"-Position, und die Kontrolllampe (sofern vorhanden) leuchtet. Stellen Sie den Ein-/Ausschalter auf "O" und lassen Sie den Wasserkocher 10 Minuten lang abkühlen. Heben Sie dann den Kessel vom Sockel, um den automatischen Trockengehschutz zu deaktivieren. Anschließend kann der Wasserkocher wieder wie gewohnt benutzt werden. Vor dem ersten Gebrauch ◗ ◗ ◗ . Entfernen Sie alle Aufkleber vom Sockel und vom Wasserkocher. Stellen Sie den Sockel auf eine trockene, stabile und ebene Unterlage. Wickeln Sie überschüssiges Kabel um die Kabelaufwicklung im Sockel und führen Sie das Kabel durch einen der Schlitze (Abbildung 2). ◗ ◗ ◗ ◗ ◗ ◗ ◗ ◗ ◗ ◗ ◗ ◗ ◗ ◗ ◗ ◗ Antes de conectar el aparato, compruebe si el voltaje indicado en la hervidora se corresponde con el de su hogar. Use la hervidora de agua sólo con su base original. Coloque siempre la base y la hervidora sobre una superficie seca, plana y estable. Evite que el cable, la base y el aparato entren en contacto con superficies calientes. No utilice la hervidora si el cable, la clavija, la base o el aparato están dañados. Si el cable está dañado, debe ser sustituido por Philips, un centro de servicio autorizado por Philips o personal cualificado similar para evitar situaciones de peligro. No sumerja el aparato o la base en agua o cualquier otro líquido. Esta hervidora de agua sólo está pensada para hervir agua. No utilice el aparato para calentar sopa u otro líquido, o comida enlatada o en conserva. El agua hirviendo puede causar serias quemaduras.Tenga cuidado cuando haya agua caliente en la hervidora de agua. No llene nunca la hervidora por encima de la indicación de nivel máximo. Si la hervidora de agua se llena en exceso, existe el riesgo de que el agua hirviendo salga despedida por la boquilla y provoque quemaduras. No quite la tapa mientras hierve agua.Tenga cuidado al quitar la tapa justo después de que el agua haya hervido, ya que saldrá vapor muy caliente de la hervidora. Evite tocar el cuerpo de la hervidora, ya que se calienta mucho cuando está en funcionamiento. Sujete siempre la hervidora por el asa. Mantenga la hervidora y el cable lejos del alcance de los niños. No deje el cable colgando de la mesa o de la encimera. El exceso de cable de red puede guardarse en la base del aparato o enrollarse en la misma. No llene nunca la hervidora por debajo de la indicación de nivel mínimo para evitar que hierva en seco. Sólo modelo HD4657: esta rápida hervidora de 3.100 W puede llegar hasta 13 amperios de potencia en su hogar.Asegúrese de que el sistema eléctrico de su hogar es compatible con este nivel de consumo. No utilice muchos productos eléctricos en el mismo circuito cuando la hervidora esté funcionando. Puede aparecer cierta condensación sobre la base de la hervidora de agua. Esto es perfectamente normal y no significa que el aparato tenga algún defecto. Al usarla y, dependiendo de la dureza del agua de la zona, pueden aparecer pequeñas manchas sobre el elemento calefactor de la hervidora de agua. Este fenómeno es el resultado de la formación continua de incrustaciones de cal sobre el elemento calefactor y sobre el interior de la hervidora de agua. Cuanto más dura sea el agua, más rápida será la formación de incrustaciones. Las incrustaciones pueden presentar diferentes colores.A pesar de que las incrustaciones no son nocivas para la salud, demasiadas incrustaciones pueden influir en el funcionamiento de la hervidora de agua. Siga las instrucciones del capítulo 'Cómo eliminar la cal' para limpiar la hervidora de agua. Protección contra el calentamiento en seco. Esta hervidora está provista de una protección contra el calentamiento en seco. El dispositivo desconecta automáticamente la hervidora si se conecta accidentalmente cuando no tiene agua o agua suficiente. El interruptor de marcha/parada permanecerá en la posición de marcha (I) y el piloto (si existiese) seguirá iluminado. Coloque el interruptor de marcha/parada en la posición 'O' y espere 10 minutos a que el aparato se enfríe. Después levante la hervidora de agua de su base para volver a conectar la protección para calentamiento en seco. La hervidora de agua volverá a estar lista para utilizarla de nuevo. Antes de utilizarlo por primera vez Quite las pegatinas de la base o de la hervidora. Coloque la base en una superficie seca, estable y plana. Ajuste la longitud del cable enrollándolo alrededor del soporte de la base. Pase el cable por una de las ranuras de la base (fig. 2). 1 - den Wasserkocher mit Wasser ausspülen; 2 Llene la hervidora con agua hasta el nivel máximo y deje que hierva una vez (consulte el apartado 'Cómo usar el aparato') 2 - den Wasserkocher bis zur MAX-Markierung mit Wasser füllen und einmal aufkochen lassen (siehe "Der Gebrauch des Geräts); 3 Vierta el agua caliente y enjuague la hervidora una vez más. Cómo usar el aparato 2 Cierre la tapa. Asegúrese de que la tapa está correctamente cerrada para evitar que hierva en seco. ◗ Das Gerät wird automatisch ausgeschaltet (Position "0"), wenn das Wasser den Siedepunkt erreicht hat. Sie können das Gerät vorher ausschalten, indem Sie den Ein-/Ausschalter auf Position "0" stellen. ◗ La hervidora de agua se parará (posición 'O') automáticamente cuando el agua haya alcanzado el punto de ebullición Colocando el interruptor de marcha/parada en la posición 'O', puede interrumpir el proceso de ebullición. Cómo limpiar y eliminar la cal . Ziehen Sie vor dem Reinigen stets den Netzstecker aus der Steckdose. ◗ ◗ ◗ ◗ Protezione per il funzionamento senz'acqua Questo bollitore è provvisto di un dispositivo di protezione contro il funzionamento a secco, che spegne automaticamente l'apparecchio nel caso in cui venga messeo accidentalmente in funzione senza acqua o con una quantità di acqua insufficiente. In questo caso l'interruttore on/off rimane in posizione "one" e la spia, se disponibile, si accende. Impostate l'interruttore on/off su "O" e lasciate raffreddare il bollitore per 10 minuti, poi sollevatelo dalla sua base per resettare il dispositivo di protezione contro il funzionamento a secco. A questo punto il bollitore è nuovamente pronto per l'uso. Prima di usare l'apparecchio per la prima volta ◗ ◗ ◗ Den Wasserkocher reinigen 1 Reinigen Sie die Außenwand des Geräts mit einem weichen Tuch, das Sie mit warmem Wasser und etwas Spülmittel angefeuchtet haben. Die Kalkablagerungen, auch Kesselstein genannt, sind gesundheitlich unschädlich, können den Getränken jedoch einen sandigen Beigeschmack geben. Der Kalkfilter verhindert, dass Kalkpartikel in Ihre Getränke geraten. Reinigen Sie den Kalkfilter regelmäßig. Gerätetypen mit Triple-Action-Filter sind mit einem Gewebe versehen, das dem Wasser den Kalk entzieht. 2 Der Filter lässt sich reinigen, indem Sie ihn - aus dem Wasserkocher nehmen und unter fließendem Wasser vorsichtig mit einer weichen Nylonbürste abbürsten; (Abbildung 5). - beim Entkalken des Wasserkochers im Gerät lassen - oder in den Geschirrspüler stellen. Bei Gerätetypen mit einem Triple-Action-Filter (HD4657, HD4653 und HD4652) lässt sich das Gewebe wie folgt reinigen: Ziehen Sie den Korb aus dem Filter (Abbildung 6). Nehmen Sie das Gewebe aus Edelstahl aus dem Korb und reinigen Sie es, indem Sie es unter fließendem Wasser drücken und drehen. Den Wasserkocher entkalken Regelmäßiges Entkalken verlängert die Nutzungsdauer des Geräts. No sumerja nunca en agua ni la hervidora de agua ni su base. Cómo limpiar la hervidora 1 Limpie la hervidora por fuera con un paño suave humedecido con agua tibia y un producto de limpieza suave. La cal no es perjudicial para la salud pero puede cambiar el sabor del agua. El filtro antical evita que las partículas de cal lleguen a las bebidas. Elimine la cal del aparato con frecuencia. Los modelos que disponen de un filtro de triple acción incorporan además una malla que atrae la cal que contiene el agua. 2 El filtro se limpia de la siguiente forma: ◗ ◗ ◗ saque el filtro de la hervidora y cepíllelo con un cepillo de nylon suave debajo del grifo, o.. (fig. 5). déjelo dentro de la hervidora cuando elimine la cal de todo el aparato, o... métalo en el lavavajillas. En caso de uso normal (hasta 5 veces al día), se recomienda la siguiente frecuencia de limpieza: - Una vez cada 3 meses para zonas de agua blanda (hasta 18 dH) - Una vez al mes para zonas de agua dura (más de 18dH) 1 Llene la hervidora con agua hasta tres cuartos del nivel máximo y ponga el agua a hervir. Protecção contra funcionamento a seco Este jarro está equipado com uma protecção anti-funcionamento a seco. Este dispositivo desliga automaticamente o aparelho no caso de se ligar o jarro acidentalmente sem lhe deitar água ou sem que tenha água suficiente. O interruptor permanece na posição 'on' (ligado) e a lâmpada piloto, caso exista, permanecerá acesa. Regule o interruptor para a posição 'O' e deixe o jarro arrefecer durante 10 minutos. Em seguida, retire o jarro para fora da base para repôr a protecção antifuncionamento a seco. O jarro estará novamente pronto a usar. Antes da primeira utilização ◗ ◗ ◗ . Retire os autocolantes que existirem na base ou no jarro. Coloque a base sobre uma superfície seca, estável e plana. Ajuste o comprimento do fio, enrolando-o na base. Passe o fio por uma das aberturas da base (fig. 2). Antes de se servir do jarro pela primeira vez: 1 Enxague o jarro com água. 2 Encha o jarro com água até à indicação de nível máximo e deixe ferver uma vez (vidé 'Utilização'). 3 Deite a água quente fora e volte a enxaguar o jarro mais uma vez. 2 Riempite d'acqua il bollitore fino al livello massimo e portate l'acqua a ebollizione una volta (vedere "Come usare l'apparecchio"). Come usare l'apparecchio . 1 Riempite d'acqua il bollitore, attraverso il beccuccio o il coperchio aperto (fig. 3). 2 Chiudete il coperchio. Controllate che il coperchio sia chiuso correttamente per evitare che durante il processo di ebollizione l'acqua evapori. 3 Appoggiate il bollitore sulla base, inserite la spina nella presa di corrente e mettete l'interruttore on/off su "I" (fig. 4). Il bollitore inizia a riscaldarsi. ◗ ◗ Il bollitore si spegne automaticamente (posizione "O") non appena l'acqua raggiunge il punto di ebollizione. Potete interrompere il processo di ebollizione in ogni momento, basterà mettere l'interruttore on/off in posizione "O". Utilização . 1 Encha o jarro com água, através do bico ou da tampa aberta (fig. 3). 2 Feche a tampa. Certifique-se que a tampa ficou bem fechada para evitar que o jarro perca água e funcione a seco. 3 Coloque o jarro sobre a base, ligue a ficha à tomada eléctrica e regule o interruptor para a posição 'I' (ligado) (fig. 4). O jarro começa a aquecer. ◗ ◗ O jarro desliga-se (posição 'O') automaticamente quando a água atinge o ponto de fervura. Se quiser interromper a fervura da água, coloque o interruptor na posição 'O'. Limpeza e descalcificação . Antes de proceder à limpeza, desligue sempre da corrente. Não use produtos de limpeza abrasivos, esfregões, etc. para limpar o jarro. Nunca mergulhe o jarro ou a base dentro de água. Pulizia e disincrostazione Limpeza 1 Limpe o exterior do jarro com um pano macio e humedecido com água quente e um pouco de detergente líquido suave. Togliete sempre la spina dalla presa prima di pulire l'apparecchio. Non usate prodotti abrasivi, pagliette ecc. per pulire il bollitore. Non immergete mai il bollitore o la base nell'acqua. Come pulire il bollitore. 1 Pulite la parte esterna del bollitore con un panno morbido inumidito con acqua tiepida, aggiungendo un po' di detergente neutro. Il calcare non è nocivo alla salute ma può dare un sapore cattivo alle vostre bevande. Lo speciale filtro impedisce alle particelle di calcare di finire nelle vostre bevande: ricordate di pulirlo periodicamente. I modelli provvisti di un filtro a tripla azione dispongono anche di una maglia in grado di attirare il calcare presente nell'acqua. 2 Per pulire il filtro: ◗ ◗ toglietelo dal bollitore e spazzolatelo delicatamente sotto l'acqua corrente con uno spazzolino morbido, oppure.. (fig. 5). lasciatelo nel bollitore quando procedete alla disincrostazione dell'apparecchio, oppure... mettetelo in lavastoviglie. O calcário não é prejudicial à sua saúde mas pode conferir um gosto desagradável à bebida. O filtro anti-calcário evita que as partículas de calcário passem para o líquido. Limpe o calcário com regularidade. Os modelos com filtro de tripla acção também estão equipados com uma rede que atrai o calcário da água. 2 O filtro pode ser limpo: ◗ ◗ ◗ retirando-o para fora e escovando-o suavemente com uma escova de nylon macia com água corrente, ou .. (fig. 5). deixando-o no jarro quando se procede à descalcificação do mesmo, ou ... na máquina da loiça. Nos modelos com filtro de tripla acção (HD4657, HD4653 e HD4652): a rede pode limpar-se da seguinte forma: ◗ ◗ Retirando o cesto do filtro, fazendo-o deslizar para fora (fig. 6). Retirando a rede de aço inoxidável para fora do cesto e lavando-a à torneira com água corrente - espremendo e rodando. Garantía y servicio . Si necesita información o si tiene algún problema, visite la página web de Philips en www.philips.com o póngase en contacto con el Servicio Philips de Atención al Cliente de su país (encontrará el número de teléfono en el folleto de la Garantía Mundial). Si en su país no hay Servicio Philips de Atención al Cliente, diríjase a su distribuidor local Philips o póngase en contacto con el Service Department of Philips Domestic Appliances and Personal Care BV. Modelo(s) de hervidora Tipo de filtro HD 4650 HD 4973 HD4652 HD 4976 (filtro de triple acción) HD4659 HD4971 5 Volte a encher o jarro com água limpa e leve-a a ferver. ◗ Também pode usar um produto de descalcificação próprio. Se for esse o caso, siga as instruções da embalagem do produto. 6 Svuotate il bollitore e risciacquatelo nuovamente con acqua. ◗ 6 Esvazie o jarro e enxague novamente com água limpa. 4 Svuotate il bollitore e risciacquatelo accuratamente. Ripetete questa procedura fino alla completa eliminazione del calcare nel bollitore. Potete anche usare gli appositi prodotti per la disincrostazione. In questo caso, seguite le istruzioni riportate sulla confezione del prodotto. Ricambi . I filtri di ricambio per il vostro bollitore sono disponibili presso il vostro rivenditore Philips o i Centri Assistenza Philips. La tabella riportata qui sotto indica i filtri indicati per il vostro bollitore elettrico. Nel caso in cui il bollitore, la base o il cavo di alimentazione fossero danneggiati, portate la base o il bollitore presso un Centro Assistenza Philips autorizzato, per le eventuali riparazioni o per sostituire il cavo, per evitare situazioni a rischio. Garanzia e Assistenza Repita este procedimento até limpar todo o calcário. Substituição . Os filtros de substituição do jarro podem ser adquiridos no seu distribuidor Philips ou num concessionário Philips autorizado. O quadro abaixo indica quais os filtros adequados para o seu jarro eléctrico. Se o jarro, a base ou o fio estiverem estragados, leve a base ou o jarro a um concessionário autorizado pela Philips para que procedam à sua reparação ou substituição do fio. Evitará, assim, alguma situação comprometedora. Garantia e assistência . Se necessitar de informações ou se tiver algum problema, por favor visite o site da Philips em www.philips.pt ou contacte o Centro de Informação ao Consumidor Philips do seu país (encontrará os números de telefone no folheto da garantia mundial). Se não existir um Centro de Informação ao Consumidor no seu país, dirijase ao seu agente Philips local ou contacte o Departamento de Service da Philips Domestic Appliances and Personal Care BV. . Per ulteriori informazioni o in caso di problemi, vi preghiamo di visitare il sito Philips su www.philips.com, oppure contattare il Centro Assistenza Clienti Philips del vostro paese (troverete il numero di telefono sull'opuscolo della garanzia). Qualora nel vostro paese non ci siano Centri Assistenza Philips, rivolgetevi al rivenditore autorizzato Philips oppure contattate il Service Department of Philips Domestic Appliances and Personal Care BV. HD 4977 (filtro de triple acción) HD4653 y HD4657 4 Esvazie o jarro e enxague muito bem. 3 Lasciate agire la soluzione per tutta la notte. 5 Riempite il bollitore con acqua pulita e portate ad ebollizione. Repita el proceso si todavía queda algo de cal en la hervidora. Si la hervidora, la base o el cable están dañados sólo deben ser reparados por un Servicio Autorizado de Philips para evitar situaciones de peligro. 3 Deixe esta solução a actuar durante a noite. 2 Dopo aver spento il bollitore, aggiungete dell'aceto bianco (acido acetico all'8%) fino a raggiungere il livello massimo. 6 Vacíe la hervidora de agua y vuelva a enjuagarla con agua limpia. Los recambios de los filtros para hervidoras Philips se pueden adquirir en cualquier distribuidor de Philips o en el Centro de Servicio Philips de su localidad. La tabla siguiente indica el filtro adecuado para su hervidora eléctrica. 2 Depois de o jarro se desligar, adicione vinagre (8% ácido acetílico) até ao nível máximo. 1 Riempite d'acqua il bollitore fino ai tre quarti della sua capacità massima e portate ad ebollizione. 5 Llene la hervidora con agua limpia y póngala a hervir. . 1 Encha o jarro com água até três quartos do nível máximo e leve a água a ferver. Nel caso di un uso normale (fino a 5 volte al giorno), si consiglia di eliminare il calcare con la frequenza sotto riportata: - Una volta ogni 3 mesi nel caso di acqua dolce (fino a 18 dH) - Una volta al mese nel caso di acqua dura (oltre a 18 dH) 4 Vacíe la hervidora de agua y enjuague cuidadosamente el interior. Sustitución Togliete il cestello dal filtro, facendolo scorrere (fig. 6). Togliete la maglia di acciaio inox dal cestello e pulitela schiacciandola e ruotandola sotto l'acqua corrente. Disincrostazione del calcare Con una disincrostazione regolare, il bollitore avrà una durata maggiore. 3 Deje la solución en la hervidora durante toda la noche . Filter ◗ 1 Risciacquate il bollitore con acqua. 2 Después de que la hervidora se haya desconectado, añada vinagre blanco (ácido acético al 8%) hasta el nivel máximo. También puede utilizar un agente descalcificador adecuado. En este caso, siga las instrucciones que aparecen en la caja del descalcificador. Benötigen Sie weitere Informationen oder treten Probleme auf, wenden Sie sich bitte an Ihren Philips-Händler oder setzen Sie sich mit einem Philips Service-Center in Ihrem Land in Verbindung (Tel. Nr. 0180/5356767). Besuchen Sie auch die Philips Website www.philips.com ◗ No caso de uma utilização normal (até 5 vezes por dia), recomenda-se a seguinte frequência de descalcificação: - Uma vez a cada 3 meses nas zonas com água menos dura (até 18 dH). - Uma vez todos os meses nas zonas onde a água for dura (mais de 18 dH). 5 Füllen Sie den Wasserkocher mit klarem Wasser und lassen Sie es aufkochen. Garantie und Kundendienst ◗ ◗ ◗ ◗ Cómo eliminar la cal Al eliminar la cal con frecuencia, prolongará la vida de la hervidora. ◗ Wenn der Kessel, der Sockel oder das Netzkabel defekt oder beschädigt ist, geben Sie das Gerät bzw. den Sockel zwecks Reparatur oder Ersatz des Netzkabels an ein Philips Service-Center, um ein Sicherheitsrisiko zu vermeiden. ◗ Descalcificação Uma descalcificação regular prolonga a vida do jarro. Quite la cesta del filtro deslizándola (fig. 6). Retire la malla de acero inoxidable de la cesta y lávela girándola y escurriéndola debajo del grifo. 4 Leeren Sie den Wasserkocher und spülen Sie ihn gründlich aus. Ersatzfilter für Ihren Wasserkocher können Sie bei Ihrem Philips Händler oder einem Philips Service-Center bestellen. Entnehmen Sie bitte der Tabelle, welche Filter für Ihren Gerätetyp geeignet sind. ◗ Per i modelli provvisti di un filtro a tripla azione (HD4657, HD4653 e HD4652), la maglia può essere pulita come segue: 3 Lassen Sie diese Entkalkungsflüssigkeit über Nacht im Gerät stehen. . ◗ ◗ ◗ 2 Wenn sich der Wasserkocher ausgeschaltet hat, füllen Sie ihn bis zur MAXMarkierung mit Haushaltsessig (8% Säuregehalt) auf. Sie können auch einen anderen geeigneten Entkalker verwenden. Halten Sie sich dann an die Anweisungen auf der Verpackung des Entkalkers. ◗ ◗ 1 Füllen Sie den Wasserkocher drei Viertel voll und lassen Sie das Wasser aufkochen. Wiederholen Sie diese Vorgehensweise, wenn sich noch Kalkrückstände im Wasserkocher befinden. ◗ Para los modelos con un filtro de triple acción (HD4657, HD4653 y HD4652), puede limpiar la malla de la siguiente forma: Bei normalem Gebrauch (bis zu fünfmal pro Tag) empfiehlt es sich, das Gerät in folgenen Abständen zu entkalken: - Alle 3 Monate in Gebieten mit weichem Wasser (Härtegrad bis 18 dH). - Einmal pro Monat in Gebieten mit hartem Wasser (Härtegrad über 18 dH). 6 Leeren Sie den Wasserkocher und spülen Sie ihn erneut mit klarem Wasser aus. . Togliete gli eventuali adesivi dalla base o dal bollitore. Appoggiate la base su una superficie asciutta, stabile e piatta. Regolate la lunghezza del cavo avvolgendo la parte in eccesso attorno alla base. Passate il cavo attraverso una delle fessure poste sulla base (fig. 2). ◗ . Tauchen Sie das Gerät und den Sockel niemals in Wasser. Wasserkocher ◗ Desenchufe siempre el aparato antes de limpiarlo. Verwenden Sie zum Reinigen des Geräts keine Scheuermittel oder Scheuerschwämme. Ersatz und Reparatur ◗ . No utilice ningún agente limpiador abrasivo, desengrasantes, etc. para limpiar la hervidora de agua. Reinigen und Entkalken ◗ ◗ 1 Llene la hervidora de agua bien a través de la boquilla o bien abriendo la tapa (fig. 3). . 3 Setzen Sie den Wasserkocher auf den Sockel, stecken Sie den Netzstecker in die Steckdose und stellen Sie den Ein-/Ausschalter auf "I" (Abbildung 4). Das Wasser wird jetzt erhitzt. ◗ ◗ ◗ ◗ 3 Gettate via l'acqua bollente e risciacquate nuovamente il bollitore. 3 Coloque la hervidora sobre su base, conéctela a la red y coloque el interruptor de marcha/parada en la posición 'I' (fig. 4). La hervidora de agua empieza a calentarse. ◗ ◗ ◗ ◗ Antes de ligar, verifique se a voltagem indicada na base do jarro corresponde à corrente eléctrica do local. O jarro só deve ser utilizado com a sua base original. Coloque sempre a base e o jarro sobre uma superfície seca, plana e estável. Mantenha o fio, a base e o jarro afastados de superfícies quentes. Não se sirva do jarro no caso de o fio, a ficha, a base ou o próprio jarro estarem danificados. Se o fio estiver estragado, só deverá ser substituído pela Philips, por um concessionário autorizado pela Philips ou por pessoal igualmente qualificado para se evitarem situações gravosas para o utilizador. Nunca mergulhe o aparelho ou a base dentro de água ou de qualquer outro líquido. O jarro destina-se unicamente a ferver água. Não o utilize para aquecer sopa ou outros líquidos nem alimentos em boiões, engarrafados ou enlatados. A água a ferver pode causar queimaduras sérias.Tenha cuidado ao manusear o jarro com água quente. Nunca encha o jarro acima da indicação de nível máximo. Se o jarro estiver muito cheio, a água a ferver pode ser expelida para fora através do bico e provocar alguma queimadura ou escaldão. Não abra a tampa quando a água estiver a ferver.Tenha cuidado se abrir a tampa imediatamente a seguir à fervura da água: o vapor que sai do jarro é muito quente. Evite tocar no corpo do jarro porque aquece bastante durante a utilização. Segure-o sempre pela pega. Mantenha o jarro e o fio fora do alcance das crianças. Não deixe o fio pendurado para fora da mesa ou da bancada da cozinha. O fio em excesso pode ser enrolado na base do jarro. Nunca encha o jarro abaixo do nível mínimo para evitar que funcione a seco. Apenas mod. HD4657: este jarro de fervura rápida tem uma potência de 3100 W e pode exigir até 13 amperes de alimentação.Verifique se o sistema eléctrico da sua casa e o circuito onde o jarro for ligado estão preparados para o nível de consumo deste aparelho. Não ligue muitos aparelhos ao mesmo tempo no circuito que fornece energia para o jarro quando este estiver ligado. Pode formar-se alguma condensação na base do jarro. É perfeitamente normal e não significa que o aparelho tenha algum defeito. Dependendo do grau de dureza da água da sua zona de residência, poderão aparecer algumas manchas na resistência do jarro. Este fenómeno é resultante da formação de calcário na resistência e no interior do jarro que ocorre ao fim de algum tempo. Quanto mais dura for a água, mais depressa se formará o calcário. O calcário pode apresentar-se com diferentes cores. Embora o calcário seja inofensivo, se existir em quantidade poderá influenciar o desempenho do jarro. Descalcifique o jarro com regularidade, seguindo as instruções dadas no capítulo 'Descalcificação'. . 2 Schließen Sie den Deckel. Achten Sie darauf, dass der Deckel gut geschlossen ist, damit der Wasserkocher trocken kocht. ◗ ◗ ◗ ◗ ◗ ◗ ◗ Prima di usare l'apparecchio per la prima volta: 1 Enjuague la hervidora con agua. 1 Füllen Sie den Wasserkocher bei geöffnetem Deckel oder durch den Ausguss mit Wasser (Abbildung 3). ◗ ◗ Antes de utilizar la hervidora por primera vez: 3 - das heiße Wasser ausgießen und den Wasserkocher nochmals ausspülen. ◗ ◗ ◗ . ◗ ◗ ◗ Vor dem ersten Gebrauch sollten Sie Der Gebrauch des Geräts ◗ ◗ Prima di collegare l'apparecchio, controllate che la tensione indicata sulla parte inferiore dell'apparecchio corrisponda a quella della rete locale. Usate sempre il bollitore solo con la base originale. Appoggiate sempre la base e il bollitore su una superficie asciutta, piatta e stabile. Tenete il cavo, la base e l'apparecchio lontani da superfici bollenti. Non usate l'apparecchio nel caso in cui il cavo di alimentazione, la spina, la base o l'apparecchio siano danneggiati. Nel caso il cavo fosse danneggiato, dovrà essere sostituito presso un Centro Autorizzato Philips o comunque da personale debitamente autorizzato, per evitare situazioni a rischio. Non immergete l'apparecchio o la base in acqua o altri liquidi. Il bollitore deve essere usato esclusivamente per far bollire l'acqua. Non usatelo per riscaldare minestre o altri liquidi, e neppure cibi in scatola o in bottiglia. L'acqua bollente può causare gravi ustioni. Fate attenzione quando il bollitore è pieno di acqua bollente. Quando riempite il bollitore, non superate mai il livello massimo indicato. Nel caso il bollitore fosse troppo pieno, l'acqua in ebollizione potrebbe fuoriuscire dal beccuccio e causare scottature. Non aprite il coperchio mentre l'acqua è in ebollizione. Fate attenzione quando aprite il coperchio dopo aver portato l'acqua a ebollizione: il vapore che fuoriesce dal bollitore è bollente! Evitate di toccare il corpo del bollitore, che durante l'uso diventa bollente. Per sollevare il bollitore utilizzate sempre il manico. Tenete l'apaprecchio e il cavo lontano dalla portata dei bambini. Fate in modo che il cavo non penzoli sugli spigoli della tavola o del piano di lavoro. Il cavo in eccesso può essere avvolto attorno alla base dell'apparecchio. Non riempite mai il bollitore al di sotto del livello minimo per evitare che l'apparecchio funzioni a vuoto. Solo HD4657: questo bollitore a ebollizione rapida ha una potenza di 3100 watt e può attingere fino a 13 amps dall'impianto elettrico della vostra casa. Controllate che l'impianto elettrico e il circuito al quale è stato collegato l'apparecchio siano in grado di reggere un consumo simile. Evitate di attaccare contemporaneamente troppi apparecchi allo stesso impianto elettrico quando usate il bollitore. Alla base del bollitore potrebbe formarsi un po' di condensa. Si tratta di un fenomeno del tutto normale e non significa che il bollitore sia difettoso. IN base alla durezza dell'acqua nella vostra zone, potrebbero formarsi delle piccole macchie sulla resistenza del bollitore. Questo fenomeno è causato dall'accumulo di calcare sulla serpentina e all'interno dell'apparecchio nel corso del tempo. Più dura risulta l'acqua che utilizzate e più rapidamente il calcare tende ad accumularsi. Il calcare può avere colori diversi. Pur essendo del tutto innocuo, il calcare in dosi eccessive può influire sul rendimento del vostro bollitore. Procedete a una disincrostazione periodica del bollitore, seguendo le istruzioni riportate nel capitolo "Disincrostazione". modello/i bollitore Tipo filtro HD4650 HD4973 HD4977 (filtro a tripla azione) HD 4650 HD 4973 HD4652 HD4652 HD 4977 (Triple-Action-Filter) HD4653 e HD4657 HD4976 (filtro a tripla azione) HD4653 und HD4657 HD 4976 (Triple-Action-Filter) HD4659 HD4971 HD4659 HD4971 Modelo(s) de jarro(s) Tipo de filtro HD4650 HD4973 HD4652 HD4977 (filtro de tripla acção) HD4653 e HD4657 HD4976 (filtro de tripla acção) HD4659 HD4971-
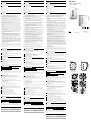 1
1
-
 2
2


Philips HD4650/00 Handleiding
- Categorie
- Elektrische waterkokers
- Type
- Handleiding
in andere talen
- English: Philips HD4650/00 User manual
- italiano: Philips HD4650/00 Manuale utente
- français: Philips HD4650/00 Manuel utilisateur
- español: Philips HD4650/00 Manual de usuario
- Deutsch: Philips HD4650/00 Benutzerhandbuch
- português: Philips HD4650/00 Manual do usuário