Zanussi ZRB936PW2 Handleiding
- Categorie
- Koelkast-diepvriezers
- Type
- Handleiding
Deze handleiding is ook geschikt voor

NL
Gebruiksaanwijzing 2
EN
User manual 16
SR
Упутство за употребу 28
SL
Navodila za uporabo 42
ES
Manual de instrucciones 55
Koel-vriescombinatie
Fridge Freezer
Фрижидер-замрзивач
Hladilnik z zamrzovalnikom
Frigorífico-congelador
ZRB936PW2
ZRB936PX2

Inhoud
Veiligheidsvoorschriften _ _ _ _ _ _ _ _ _ _ _ _ 2
Beschrijving van het product _ _ _ _ _ _ _ _ _ 5
Bediening _ _ _ _ _ _ _ _ _ _ _ _ _ _ _ _ _ _ _ 5
Het eerste gebruik _ _ _ _ _ _ _ _ _ _ _ _ _ _ 6
Dagelijks gebruik _ _ _ _ _ _ _ _ _ _ _ _ _ _ _ 6
Nuttige aanwijzingen en tips _ _ _ _ _ _ _ _ _ 7
Onderhoud en reiniging _ _ _ _ _ _ _ _ _ _ _ _ 8
Probleemoplossing _ _ _ _ _ _ _ _ _ _ _ _ _ 10
Montage _ _ _ _ _ _ _ _ _ _ _ _ _ _ _ _ _ _ _ 12
Technische gegevens _ _ _ _ _ _ _ _ _ _ _ _ 15
Het milieu _ _ _ _ _ _ _ _ _ _ _ _ _ _ _ _ _ _ 15
Wijzigingen voorbehouden.
Veiligheidsvoorschriften
In het belang van uw veiligheid en om een cor-
rect gebruik te kunnen waarborgen is het van
belang dat u, alvorens het apparaat te installe-
ren en in gebruik te nemen, deze gebruiksaan-
wijzing, inclusief de tips en waarschuwingen,
grondig doorleest. Om onnodige vergissingen
en ongevallen te voorkomen is het belangrijk er-
voor te zorgen dat alle mensen die het apparaat
gebruiken, volledig bekend zijn met de werking
ervan en de veiligheidsvoorzieningen. Bewaar
deze instructies en zorg ervoor dat zij bij het ap-
paraat blijven als het wordt verplaatst of ver-
kocht, zodat iedereen die het apparaat geduren-
de zijn hele levensduur gebruikt, naar behoren is
geïnformeerd over het gebruik en de veiligheid
van het apparaat.
Voor de veiligheid van mensen en eigendom-
men dient u zich aan de voorzorgsmaatregelen
uit dit instructieboekje te houden, de fabrikant is
niet verantwoordelijk voor schade die door het
niet opvolgen van de aanwijzingen veroorzaakt
is.
Veiligheid van kinderen en kwetsbare
mensen
• Dit apparaat is niet bedoeld voor gebruik
door personen (waaronder begrepen kinde-
ren) met verminderde fysieke, zintuiglijke ver-
mogens of een gebrek aan ervaring en ken-
nis, tenzij dit onder toezicht gebeurt van een
voor hun veiligheid verantwoordelijke persoon
of tenzij zij van een dergelijke persoon in-
structie hebben ontvangen over het gebruik
van het apparaat.
Houd kinderen uit de buurt om te voorkomen
dat ze met het apparaat gaan spelen.
• Houd alle verpakkingsmateriaal buiten het be-
reik van kinderen. Gevaar voor verstikking.
• Als u het apparaat afdankt trek dan de stek-
ker uit het stopcontact, snij de voedingskabel
door (zo dicht mogelijk bij het apparaat) en
verwijder de deur om te voorkomen dat kin-
deren een elektrische schok krijgen of zichzelf
in het apparaat opsluiten.
• Als dit apparaat, dat voorzien is van een mag-
netische deursluiting, een ouder apparaat
vervangt, dat voorzien is van een veerslot
(slot) op de deur of het deksel, zorg er dan
voor dat u het slot onbruikbaar maakt voordat
u het oude apparaat weggooit. Dit voorkomt
dat kinderen er in opgesloten kunnen raken.
Algemene veiligheid
Waarschuwing!
Houd de ventilatieopeningen altijd vrij van ob-
structies; dit geldt zowel voor losstaande als in-
gebouwde modellen.
• Dit apparaat is bedoeld voor het bewaren van
levensmiddelen en/of dranken in een gewoon
huishouden en gelijkaardig gebruik zoals:
– personeelskeukens in winkels, kantoren of
andere werkomgevingen;
– door gasten in hotels, motels en andere re-
sidentiële omgevingen;
– bed-and-breakfast-accommodatie;
– catering en gelijkaardige niet-commercieel
gebruik.
• Gebruik geen mechanische hulpmiddelen of
kunstgrepen om het ontdooiproces te ver-
snellen.
2
www.zanussi.com

• Gebruik geen andere elektrische apparaten
(bijvoorbeeld ijsmachines) in koelkasten, ten-
zij ze voor dit doel goedgekeurd zijn door de
fabrikant.
• Let op dat u het koelcircuit niet beschadigt.
• Het koelmiddel isobutaan (R600a) bevindt
zich in het koelcircuit van het apparaat, dit is
een natuurlijk gas dat weliswaar milieuvrien-
delijk is, maar ook uiterst ontvlambaar.
Controleer of de onderdelen van het koelcir-
cuit tijdens transport en installatie van het ap-
paraat niet beschadigd zijn geraakt.
Indien het koelcircuit beschadigd is:
– open vuur en ontstekingsbronnen vermij-
den
– de ruimte waar het apparaat zich bevindt
grondig ventileren
• Het is gevaarlijk om wijzigingen aan te bren-
gen in de specificaties of dit product op eni-
gerlei wijze te modificeren. Een beschadigd
netsnoer kan kortsluiting, brand en/of een
elektrische schok veroorzaken.
Waarschuwing! Alle elektrische onderde-
len (netsnoer, stekker, compressor) mogen
om gevaar te voorkomen uitsluitend worden ver-
vangen door een erkende onderhoudsdienst of
gekwalificeerd onderhoudspersoneel.
1. Het netsnoer mag niet verlengd worden.
2. Verzeker u ervan dat de stekker niet plat-
gedrukt of beschadigd wordt door de
achterkant van het apparaat. Een platge-
drukte of beschadigde stekker kan over-
verhit raken en brand veroorzaken.
3. Verzeker u ervan dat u de stekker van het
apparaat kunt bereiken.
4. Trek niet aan het snoer.
5. Als de stekker los zit, steek hem dan niet
in het stopcontact. Dan bestaat er een ri-
sico op een elektrische schok of brand.
6. U mag het apparaat niet gebruiken zon-
der het afdekkapje (indien van toepas-
sing) van het lampje.
• Dit apparaat is zwaar. Wees voorzichtig als u
het apparaat verplaatst.
• Haal geen artikelen uit het vriesvak en raak ze
niet aan als uw handen vochtig/nat zijn, dit
kan uw huid beschadigen of vrieswonden
veroorzaken.
• Stel het apparaat niet langdurig bloot aan di-
rect zonlicht.
• De eventuele gloeilampen in dit apparaat zijn
speciaal geselecteerd en uitsluitend bedoeld
voor gebruik in huishoudelijke apparaten. De
lampjes zijn niet geschikt voor de verlichting
van ruimtes.
Dagelijks gebruik
• Zet geen hete potten op de kunststof onder-
delen in het apparaat.
• Bewaar geen brandbare gassen of vloeistof-
fen in het apparaat, deze kunnen ontploffen.
• Zet geen levensmiddelen direct tegen de
luchtopening in de achterwand. (Als het ap-
paraat rijpvrij is)
• Diepgevroren voedsel mag niet opnieuw wor-
den ingevroren als het eenmaal ontdooid is.
• Bewaar voorverpakte diepvriesproducten vol-
gens de aanwijzingen van de fabrikant.
• U dient zich strikt te houden aan de aanbeve-
lingen van de fabrikant van het apparaat met
betrekking tot het bewaren van voedsel.
Raadpleeg de betreffende aanwijzingen.
• Leg geen koolzuurhoudende of mousserende
dranken in de vriezer, deze veroorzaken druk
op de fles die daardoor kan ontploffen, dit
kan schade toebrengen aan het apparaat.
• IJslollies kunnen vrieswonden veroorzaken als
ze rechtstreeks vanuit het apparaat geconsu-
meerd worden.
Onderhoud en reiniging
• Schakel het apparaat uit en trek de stekker uit
het stopcontact voordat u onderhoudshande-
lingen verricht.
• Maak het apparaat niet schoon met metalen
voorwerpen.
• Gebruik geen scherpe voorwerpen om ijs van
het apparaat te krabben. Gebruik een kunst-
stof schraper.
• Controleer de afvoer in de koelkast regelma-
tig op dooiwater. Maak de afvoer, indien no-
3
www.zanussi.com

dig, schoon. Als de afvoer verstopt is, zal er
water op de bodem van het apparaat liggen.
Installatie
Belangrijk! Voor de aansluiting van elektriciteit
dienen de instructies in de desbetreffende
paragrafen nauwgezet te worden opgevolgd.
• Pak het apparaat uit en controleer of er be-
schadigingen zijn. Sluit het apparaat niet aan
als het beschadigd is. Meld mogelijke be-
schadigingen onmiddellijk bij de winkel waar
u het apparaat gekocht heeft. Gooi in dat ge-
val de verpakking niet weg.
• Wij adviseren u om 4 uur te wachten voordat
u het apparaat aansluit, dan kan de olie terug-
vloeien in de compressor.
• Rond het apparaat dient adequate luchtcircu-
latie te zijn, anders kan dit tot oververhitting
leiden. Om voldoende ventilatie te verkrijgen
de instructies met betrekking tot de installatie
opvolgen.
• De achterkant dient zo mogelijk tegen een
muur geplaatst te worden, teneinde te voor-
komen dat hete onderdelen (compressor,
condensator) aangeraakt kunnen worden en
brandwonden veroorzaken.
• Het apparaat mag niet vlakbij radiatoren of
kooktoestellen geplaatst worden.
• Verzeker u ervan dat de stekker bereikbaar is
nadat het apparaat geïnstalleerd is.
• Aansluiten op de drinkwatervoorziening (in-
dien voorzien van een wateraansluiting).
Onderhoud
• Alle elektrotechnische werkzaamheden die
noodzakelijk zijn voor het uitvoeren van on-
derhoud aan het apparaat, dienen uitgevoerd
te worden door een gekwalificeerd elektricien
of competent persoon.
• Dit product mag alleen worden onderhouden
door een erkend onderhoudscentrum en er
dient alleen gebruik te worden gemaakt van
originele reserveonderdelen.
Bescherming van het milieu
Dit apparaat bevat geen gassen die de
ozonlaag kunnen beschadigen, niet in het
koelcircuit en evenmin in de isolatiematerialen.
Het apparaat mag niet worden weggegooid bij
het normale huishoudelijke afval. Het isolatie-
schuim bevat ontvlambare gassen: het apparaat
moet weggegooid worden conform de van toe-
passing zijnde regels die u bij de lokale over-
heidsinstanties kunt verkrijgen. Voorkom be-
schadiging aan de koeleenheid, vooral aan de
achterkant bij de warmtewisselaar. De materia-
len die gebruikt zijn voor dit apparaat en die
voorzien zijn van het symbool
zijn recycle-
baar.
4
www.zanussi.com

Beschrijving van het product
2 43 5 7 8 9
1011121314
61
1
Groentelades
2
Glazen plateau
3
Glazen plateau
4
Glazen plateau
5
Glazen plateau
6
Bedieningspaneel
7
Zuivelschap
8
Deurplateau
9
Flessenrek
10
Vrieskorf
11
Maxibox-korf
12
Frostfree-korf
13
Koudemodule
14
Typeplaatje
Bediening
Inschakelen
Steek de stekker in het stopcontact.
Draai de thermostaatknop op een gemiddelde
stand.
Uitschakelen
Draai de thermostaatknop op de stand "O" om
het apparaat uit te schakelen.
Temperatuurregeling
De temperatuur wordt automatisch geregeld.
Ga als volgt te werk om het apparaat in werking
te stellen:
• draai de thermostaatknop op een lagere
stand om de minimale koude te verkrijgen.
5
www.zanussi.com

• draai de thermostaatknop op een hogere
stand om de maximale koude te verkrijgen.
Een gemiddelde instelling is over het alge-
meen het meest geschikt.
De exacte instelling moet echter gekozen wor-
den rekening houdend met het feit dat de tem-
peratuur in het apparaat afhankelijk is van:
• de omgevingstemperatuur
• hoe vaak de deur geopend wordt
• de hoeveelheid voedsel die bewaard wordt
• plaatsing van het apparaat.
Belangrijk! Als de omgevingstemperatuur
hoog is of als het apparaat volledig gevuld is en
de thermostaatknop op de koudste instelling
staat, kan het apparaat continu werken
waardoor er ijs op de achterwand gevormd
wordt. In dat geval moet de knop op een hogere
temperatuur gezet worden om automatische
ontdooiing mogelijk te maken en zodoende het
energieverbruik te beperken.
Het eerste gebruik
De binnenkant schoonmaken
Voordat u het apparaat voor de eerste keer ge-
bruikt, wast u de binnenkant en de interne ac-
cessoires met lauwwarm water en een beetje
neutrale zeep om de typische geur van een
nieuw product weg te nemen. Droog daarna
grondig af.
Belangrijk! Gebruik geen oplosmiddelen of
schuurmiddelen. Deze beschadigen de lak.
Dagelijks gebruik
Vers voedsel invriezen
Het vriesvak is geschikt voor het invriezen van
vers voedsel en voor het voor een lange periode
bewaren van ingevroren en diepgevroren voed-
sel.
Om vers voedsel in te vriezen moet de gemid-
delde instelling veranderd worden.
Om het invriezen sneller te laten verlopen moet
u de thermostaatknop echter op een hogere
stand instellen om de maximale koude te kunnen
verkrijgen.
Belangrijk! In deze omstandigheden kan de
temperatuur in de koelkast tot onder de 0°C
dalen. Als dat gebeurt de thermostaatknop op
een warmere stand instellen.
Zet het verse voedsel dat u in wilt vriezen op het
bovenste vak.
Het bewaren van ingevroren voedsel
Als u het apparaat voor het eerst of na een pe-
riode dat het niet gebruikt is inschakelt, dient u
het apparaat minstens 2 uur op een hoge instel-
ling te laten werken voordat u er producten in
plaatst.
Belangrijk! In het geval van onbedoelde
ontdooiing, bijvoorbeeld als de stroom langer is
uitgevallen dan de duur die op de kaart met
technische kenmerken onder "tijdsduur" is
vermeld, moet het ontdooide voedsel snel
geconsumeerd worden of onmiddellijk bereid
worden en dan weer worden ingevroren (nadat
het afgekoeld is).
Ontdooien
Diepgevroren of ingevroren voedsel kunt, voor-
dat het gebruikt wordt, in het koelvak of op ka-
mertemperatuur laten ontdooien, afhankelijk van
de hoeveelheid tijd die hiervoor nodig is.
Kleine stukken kunnen zelfs rechtstreeks vanuit
de vriezer gekookt worden als ze nog bevroren
zijn: in dat geval zal de bereiding iets langer du-
ren.
Verplaatsbare legrekken
De wanden van de koelkast zijn voorzien van
een aantal glijschoenen zodat de legrekken op
de gewenste plaats gezet kunnen worden.
6
www.zanussi.com

Het plaatsen van de deurschappen
Om het bewaren van voedselpakketten van ver-
schillende afmetingen mogelijk te maken, kun-
nen de schappen op verschillende hoogtes ge-
plaatst worden.
Trek het plateau geleidelijk in de richting van de
pijlen totdat het los komt en installeer het pla-
teau dan op een andere gewenste hoogte.
2
1
3
Vriesmandjes uit de vriezer verwijderen
De vriesmandjes hebben een limietstop om te
voorkomen dat ze per ongeluk verschuiven of
vallen. Trek het mandje naar u toe om het uit de
vriezer te halen, tot het niet verder kan, verwijder
het mandje door de voorkant naar boven te kan-
telen.
Bij het terugzetten tilt u de voorkant van het
mandje een beetje op en schuift u het gekanteld
in de vriezer. Zodra het mandje over de eind-
punten heen is, kunt u het terug op zijn plaats
schuiven.
12
Nuttige aanwijzingen en tips
Normale bedrijfsgeluiden
• U kunt een zwak gorgelend en borrelend ge-
luid horen wanneer het koelmiddel door lei-
dingen wordt gepompt. Dat is normaal.
• Als de compressor aan staat, wordt het koel-
middel rondgepompt en dan zult u een zoe-
mend en kloppend geluid van de compressor
horen. Dat is normaal.
• De thermische uitzetting kan een plotseling
krakend geluid veroorzaken. Dit is een natuur-
lijk, niet gevaarlijk fysisch verschijnsel. Dat is
normaal.
• Als de compressor in- of uitgeschakeld
wordt, zult u een zacht "klikje" van de thermo-
staat horen. Dat is normaal.
Tips voor energiebesparing
• De deur niet vaker openen of open laten
staan dan strikt noodzakelijk.
• Als de omgevingstemperatuur hoog is, de
thermostaatknop op een lage temperatuur
staat en het apparaat volledig gevuld is, kan
de compressor continu aan staan waardoor
er ijs op de verdamper ontstaat. Als dit ge-
beurt, zet u de thermostaatknop naar een
warmere instelling om de koelkast automa-
tisch te laten ontdooien en zo elektriciteitsver-
bruik te besparen.
Tips voor het koelen van vers voedsel
Om de beste prestatie te verkrijgen:
• Zet geen warm voedsel of verdampende
vloeistoffen in de koelkast
• dek het voedsel af of verpak het, in het bijzon-
der als het een sterke geur heeft
• plaats het voedsel zodanig dat de lucht er
vrijelijk omheen kan circuleren
Nuttige tips voor het koelen
Nuttige tips:
7
www.zanussi.com

Vlees (alle soorten) in plastic zakken verpakken
en op het glazen schap leggen, boven de
groentelade.
Bewaar het, voor de veiligheid, slechts een of
maximaal twee dagen op deze manier.
Gekookt voedsel, koude schotels, enz: deze
moeten afgedekt worden en mogen op willekeu-
rig welk schap gezet worden.
Fruit en groente: deze moeten zorgvuldig
schoongemaakt worden en in de speciaal daar-
voor bedoelde lade(n) geplaatst worden. Ci-
troensap kan de plastic delen van de koelkast
verkleuren. Daarom wordt aangeraden om ci-
trusvruchten in aparte bakjes te bewaren.
Boter en kaas: dit moet in speciale luchtdichte
bakjes gelegd of in aluminiumfolie of plastic zak-
jes gewikkeld worden om zoveel mogelijk lucht
buiten te sluiten.
Flessen: deze moeten een afdekdop hebben en
opgeslagen worden in het flessenrek in de deur.
Bananen, aardappelen, uien en knoflook, indien
niet verpakt, mogen niet in de koelkast bewaard
worden.
Tips voor het invriezen
Om u te helpen om het beste van het invries-
proces te maken, volgen hier een paar belangrij-
ke tips:
• de maximale hoeveelheid voedsel die in 24
uur ingevroren kan worden. is vermeld op het
typeplaatje;
• het invriesproces duurt 24 uur. Voeg gedu-
rende deze periode niet meer in te vriezen
voedsel toe;
• vries alleen vers en grondig schoongemaakte
levensmiddelen van uitstekende kwaliteit in;
• bereid het voedsel in kleine porties voor, zo
kan het snel en volledig worden ingevroren en
zo kunt u later alleen die hoeveelheid laten
ontdooien die u nodig heeft;
• wikkel het voedsel in aluminiumfolie of plastic
en zorg ervoor dat de pakjes luchtdicht zijn;
• leg vers, nog niet ingevroren voedsel niet te-
gen het al ingevroren voedsel, om te voorko-
men dat dit laatste warm wordt;
• smalle pakjes zijn makkelijker op te bergen
dan dikke; zout maakt voedsel minder lang
houdbaar;
• water bevriest, als dit rechtstreeks uit het
vriesvak geconsumeerd wordt, kan het aan de
huid vastvriezen;
• het is aan te bevelen de invriesdatum op elk
pakje te vermelden, dan kunt u zien hoe lang
het al bewaard is;
Tips voor het bewaren van ingevroren
voedsel
Om de beste resultaten van dit apparaat te ver-
krijgen, dient u:
• verzeker u ervan dat de commercieel ingevro-
ren levensmiddelen op geschikte wijze door
de detailhandelaar werden opgeslagen;
• zorg ervoor dat de ingevroren levensmiddelen
zo snel mogelijk van de winkel naar uw vriezer
gebracht worden;
• de deur niet vaker te openen of open te laten
staan dan strikt noodzakelijk
• als voedsel eenmaal ontdooid is, bederft het
snel en kan het niet opnieuw worden ingevro-
ren;
• bewaar het voedsel niet langer dan de door
de fabrikant aangegeven bewaarperiode.
Onderhoud en reiniging
Let op! Voordat u welke
onderhoudshandeling dan ook verricht, de
stekker uit het stopcontact trekken.
Het koelcircuit van dit apparaat bevat kool-
waterstoffen; onderhoud en herladen mag
alleen uitgevoerd worden door bevoegde tech-
nici.
Periodieke reiniging
Het apparaat moet regelmatig worden schoon-
gemaakt:
• maak de binnenkant en de accessoires
schoon met lauw water en wat neutrale zeep.
8
www.zanussi.com

• controleer de afdichtingen regelmatig en wrijf
ze schoon om u ervan te verzekeren dat ze
schoon zijn en vrij van restjes zijn.
• spoel ze af en maak ze grondig droog.
Belangrijk! Trek niet aan leidingen en/of kabels
aan de binnenkant van de kast en verplaats of
beschadig ze niet.
Gebruik nooit schoonmaakmiddelen,
schuurpoeders, erg geparfumeerde
reinigingsproducten en waspolijstmiddelen om
de binnenkant schoon te maken, aangezien
deze het oppervlak beschadigen en een sterke
geur achterlaten.
Maak de condensor (zwart rooster) en de com-
pressor op de achterkant van het apparaat
schoon met een borstel of stofzuiger. Deze han-
deling zal de prestatie van het apparaat verbete-
ren en het elektriciteitsverbruik besparen.
Belangrijk! Zorg ervoor dat u het koelsysteem
niet beschadigt.
Veel normaal verkrijgbare keukenreinigers be-
vatten chemicaliën die de kunststoffen die in dit
apparaat gebruikt zijn kunnen aantasten/be-
schadigen. Daarom wordt het aanbevolen de
buitenkant van dit apparaat alleen schoon te
maken met warm water met een beetje afwas-
middel.
Steek, na het schoonmaken van het apparaat,
de stekker weer in het stopcontact.
Het ontdooien van de koelkast
Rijp wordt elke keer als de compressormotor tij-
dens normale werking stopt, automatisch van de
verdamper van het koelvak verwijderd. Het dooi-
water loopt via een gootje in een speciale op-
vangbak aan de achterkant van het apparaat,
boven de compressormotor, waar het verdampt.
Het is belangrijk om het afvoergaatje van het
dooiwater in het midden van het koelvak regel-
matig schoon te maken om te voorkomen dat
het water overloopt en op het voedsel in de
koelkast gaat druppelen. Gebruik daarvoor de
speciale reiniger, die al in het afvoergaatje zit.
De vriezer ontdooien
Een zekere hoeveelheid rijp zal zich altijd vor-
men op de schappen van de vriezer en rond het
bovenste vak.
Ontdooi de vriezer wanneer de rijplaag een dik-
te van ongeveer 3-5 mm bereikt heeft.
Volg onderstaande aanwijzingen om de rijp te
verwijderen:
• trek de stekker uit het stopcontact of schakel
het apparaat uit
• Verwijder al het ingevroren voedsel, wikkel
het in een paar lagen krantenpapier en leg het
op een koele plaats
• Verwijder de vriesladen
• Breng isolatiemateriaal aan rond de lades,
bijv. dikke doeken of kranten.
Het ontdooien kan versneld worden door kom-
men met heet water (niet kokend) in de vriezer
te zetten.
• Maak het afvoerkanaal aan de onderkant van
het apparaat uit de ruststand los, duw het
volgens de afbeelding en plaats het in de on-
derste vrieslade zodat u het water kunt op-
vangen
• Schraap het ijs voorzichtig los als dit begint
te dooien. Gebruik een houten of kunststof
schraper
• Als al het ijs is gesmolten, maak het vak
droog en schoon en plaats het afvoerkanaal
weer terug op zijn plek.
9
www.zanussi.com

• Zet de koelkast aan en leg de ingevroren le-
vensmiddelen terug.
Wij adviseren u het apparaat enkele uren
op de hoogste stand van de thermostaat
te laten werken zodat de bewaartempera-
tuur zo snel mogelijk bereikt wordt.
Belangrijk! Gebruik nooit scherpe metalen
voorwerpen om de rijp van de verdamper te
krabben, deze zou beschadigd kunnen raken.
Gebruik geen mechanische of kunstmatige
middelen om het ontdooiproces te versnellen,
behalve die middelen die door de fabrikant zijn
aanbevolen. Een temperatuurstijging tijdens het
ontdooien van de ingevroren levensmiddelen,
kan de veilige bewaartijd verkorten.
Probleemoplossing
Let op! Voordat u storingen opspoort, de
stekker uit het stopcontact trekken.
Het opsporen van storingen die niet in deze
handleiding vermeld zijn, dient te worden
verricht door een gekwalificeerd technicus of
deskundig persoon.
Belangrijk! Bij de werking van het apparaat zijn
bepaalde geluiden te horen die heel normaal zijn
(compressor- en circulatiegeluid).
Probleem Mogelijke oorzaak Oplossing
Het apparaat maakt lawaai. Het apparaat wordt niet goed on-
dersteund.
Controleer of het apparaat stabiel
staat (alle vier de voetjes moeten op
de vloer staan).
De compressor werkt con-
tinu.
De thermostaatknop staat mis-
schien niet goed.
Stel een hogere temperatuur in.
De deur is niet goed gesloten. Zie 'De deur sluiten'.
De deur is te vaak open gedaan. Laat de deur niet langer open staan
dan noodzakelijk.
De temperatuur van het product is
te hoog.
Laat het product afkoelen tot kamer-
temperatuur voordat u het opbergt.
De kamertemperatuur is te hoog. Verlaag de kamertemperatuur.
Er loopt water over de ach-
terkant van de koelkast.
Tijdens het automatische ontdooi-
proces ontdooit de rijp tegen de
achterwand.
Dit is normaal.
Er loopt water in de koel-
kast.
De waterafvoer is verstopt. Maak de waterafvoer schoon.
Producten verhinderen het water
om in de wateropvangbak te lopen.
Zorg ervoor dat de producten de
achterwand niet raken.
Er loopt water over de
vloer.
De dooiwaterafvoer loopt niet in de
verdamperbak boven de compres-
sor.
Maak de dooiwaterafvoer vast op de
verdamperbak.
Er is te veel rijp en ijs. De producten zijn niet op de juiste
wijze verpakt.
Pak de producten beter in.
De deur is niet goed gesloten. Zie 'De deur sluiten'.
De thermostaatknop staat mis-
schien niet goed.
Stel een hogere temperatuur in.
10
www.zanussi.com

Probleem Mogelijke oorzaak Oplossing
De temperatuur in het ap-
paraat is te laag.
De thermostaatknop staat mis-
schien niet goed.
Stel een hogere temperatuur in.
De temperatuur in het ap-
paraat is te hoog.
De thermostaatknop staat mis-
schien niet goed.
Stel een lagere temperatuur in.
De deur is niet goed gesloten. Zie 'De deur sluiten'.
De temperatuur van het product is
te hoog.
Laat het product afkoelen tot kamer-
temperatuur voordat u het opbergt.
Er zijn veel producten tegelijk opge-
borgen.
Berg minder producten tegelijk op.
De temperatuur in de koel-
kast is te hoog.
Er is geen koude luchtcirculatie in
het apparaat.
Zorg ervoor dat er koude luchtcircu-
latie in het apparaat is.
De temperatuur in het
vriesvak is te hoog.
Producten liggen te dicht op elkaar. Berg de producten zodanig op dat er
koude lucht kan circuleren.
Het apparaat werkt niet. Het apparaat is uitgeschakeld. Schakel het apparaat in.
De stekker zit niet goed in het stop-
contact.
Steek de stekker goed in het stop-
contact.
Het apparaat krijgt geen stroom. Er
staat geen spanning op het stop-
contact.
Sluit een ander elektrisch apparaat
aan op het stopcontact. Neem con-
tact op met een gekwalificeerd elek-
tricien.
Het lampje werkt niet. Het lampje staat in stand-by. Sluit en open de deur.
Het lampje is stuk. Zie 'Het lampje vervangen'.
Als het apparaat nog steeds niet naar behoren
werkt na uitvoeren van de bovenstaande contro-
les, neem dan contact op met een onderhouds-
dienst.
Het lampje vervangen
1. Schakel het apparaat uit en trek de stekker
uit het stopcontact.
2. Druk het beweegbare deel in om de afdek-
king van het lampje (1) los te haken.
3. Verwijder de afdekking van het lampje (2).
4. Vervang de lamp indien nodig door een
lamp met dezelfde eigenschappen en ver-
mogen. Aangeraden wordt om Osram PA-
RATHOM SPECIAL T26 0.8 Watt te ge-
bruiken.
5. Plaats de afdekking van het lampje terug.
6. Het apparaat aansluiten.
7. Open de deur. Controleer of het lampje
gaat branden.
1
2
De deur sluiten
1. Maak de afdichtingen van de deur schoon.
2. Stel de deur, indien nodig, af. Raadpleeg
"Montage".
3. Vervang, indien nodig, de defecte deuraf-
dichtingen. Neem contact op met de klan-
tenservice.
11
www.zanussi.com

Montage
Let op! Lees voor uw eigen veiligheid en
correcte werking van het apparaat eerst de
"veiligheidsinformatie" aandachtig door, alvorens
het apparaat te installeren.
Opstelling
Installeer dit apparaat op een plaats waar de
omgevingstemperatuur overeenkomt met de kli-
maatklasse die vermeld is op het typeplaatje van
het apparaat:
Klimaat-
klasse
Omgevingstemperatuur
SN +10°C tot + 32°C
N +16°C tot + 32°C
ST +16°C tot + 38°C
T +16°C tot + 43°C
Locatie
Het apparaat moet ver van hittebronnen, zoals
radiateurs, boilers, direct zonlicht enz., vandaan
worden geïnstalleerd. Zorg er voor dat de lucht
vrij kan circuleren aan de achterkant van de
kast. Als het apparaat onder een wandkast
wordt geplaatst, moet de minimale afstand tus-
sen de bovenkant van de kast en de wandkast
ten minste 100 mm bedragen om optimale
prestaties te garanderen. Voor de beste presta-
ties kunt u het apparaat echter beter niet onder
een wandkast zetten. De afstelbare voetjes aan
de onderkant van het apparaat zorgen voor een
nauwkeurige waterpasstelling.
Waarschuwing! De stroomtoevoer aan
het apparaat moet verbroken kunnen
worden; de stekker moet daarom na de
installatie gemakkelijk toegankelijk zijn.
A
B
100 mm
min
20 mm
Afstandhouders achterkant
U vindt de twee afstandhouders in de zak van
de gebruikershandleiding.
Volg deze stappen om de tussenstukken te in-
stalleren:
1. Draai de schroef los.
2. Plaats de afstandhouder onder de schroef.
3. Draai de afstandhouder naar rechts.
4. Draai de schroeven weer vast.
2
4
3
1
12
www.zanussi.com

Waterpas zetten
Zorg ervoor dat het apparaat waterpas staat
wanneer u het plaatst. Deze stand kan bereikt
worden met de twee afstelbare voetjes die aan
de voorkant en onderkant van het apparaat be-
vestigd zijn.
Aansluiting op het elektriciteitsnet
Zorg er vóór het aansluiten voor dat het voltage
en de frequentie op het typeplaatje overeenko-
men met de stroomtoevoer in uw huis.
Dit apparaat moet worden aangesloten op een
geaard stopcontact. De netsnoerstekker is voor-
zien van een contact voor dit doel Als het stop-
contact niet geaard is, sluit het apparaat dan
aan op een afzonderlijk aardepunt, in overeen-
stemming met de geldende regels, raadpleeg
hiervoor een gekwalificeerd elektricien
De fabrikant kan niet aansprakelijk gesteld wor-
den als bovenstaande veiligheidsvoorschriften
niet opgevolgd worden.
Dit apparaat voldoet aan de EU-richtlijnen.
Omkeerbaarheid van de deur
Waarschuwing! Voordat werkzaamheden
worden uitgevoerd, moet u zich ervan
verzekeren dat de stekker uit het stopcontact is
getrokken.
Belangrijk! Om de volgende handelingen uit te
voeren, raden we aan dit te doen met de hulp
van een tweede persoon die de deur van het
apparaat tijdens de omkeerwerkzaamheden
stevig vasthoudt.
Middelste scharnier
• Open de deur. Schroef het middelste schar-
nier (B) los. Verwijder het kunststof afstands-
stuk (A).
• Verwijder de afstandsstukken (F) en verplaats
ze naar de andere kant van het scharnier (E).
• Verwijder de deuren.
• Verwijder de pennen van de middelste schar-
nier (C, D) en verplaats ze naar de andere
kant.
• Monteer de pen van het middelste scharnier
(E) in het linkergat van de onderste deur.
DC
E
F
A
B
Onderste scharnier
• Schroef het onderste scharnier (A) los.
• Verwijder de linker pennen van het deksel (D)
en verplaats ze naar de andere kant.
• Schroef het onderste scharnier (A) vast op de
andere kant.
• Schroef het onderste scharnier (B) en het af-
standsstuk (C) los en monteer ze aan de an-
dere kant.
D
A
B
C
Deuren
• Verwijder de pluggen (A) aan de bovenzijde
van beide deuren en verplaats deze naar de
andere kant.
• Zet de onderste deur terug op het onderste
scharnier (B).
• Plaats het middelste scharnier (B) in het
linkergat van de onderste deur.
13
www.zanussi.com

A
Bovenste scharnier
• Schroef het bovenste scharnier (1) los en
monteer het aan de andere kant (2).
2
1
• Bevestig de bovenste deur aan het bovenste
deurscharnier en de onderste deur aan het
onderste deurscharnier.
• Plaats het middelste scharnier (B) terug in
de onderste en bovenste gaten van de deur-
scharnieren terwijl u de deuren licht kantelt.
3
1
2
1
3
2
• Schroef het middelste scharnier (B) weer
vast. Vergeet het kunststof afstandsstuk
(A) niet.
Voer een eindcontrole uit en verzeker u ervan
dat:
• Alle schroeven zijn aangedraaid.
• De randen van de deuren parallel lopen met
de zijkant van het apparaat.
• De magnetische afdichtstrip vast zit aan de
kast.
• De deur goed open en dicht gaat.
Als de omgevingstemperatuur laag is (bijv. in de
winter), kan het zijn dat het deurrubber niet pre-
cies op de kast past. Wacht in dat geval tot de
afdichting zich op een natuurlijke wijze zet.
Als u bovenstaande handelingen liever niet zelf
uitvoert, neem dan contact op met de dichtstbij-
zijnde klantenservice. De deskundige van de
Klantenservice zal de draairichting van de deur-
en op uw kosten veranderen.
14
www.zanussi.com

Technische gegevens
Afmeting
Hoogte 1850 mm
Breedte 595 mm
Diepte 658 mm
maximale bewaartijd bij stroomuit-
val
20 h
Voltage 230-240 V
Frequentie 50 Hz
De technische gegevens staan op het typepla-
tje aan de linker binnenkant van het apparaat en
op het energielabel.
Het milieu
Recycle de materialen met het symbool .
Gooi de verpakking in een geschikte
verzamelcontainer om het te recyclen.
Help om het milieu en de volksgezondheid te
beschermen en recycle het afval van elektrische
en elektronische apparaten. Gooi apparaten
gemarkeerd met het symbool
niet weg met het
huishoudelijk afval. Breng het product naar het
milieustation bij u in de buurt of neem contact
op met de gemeente.
15
www.zanussi.com

Contents
Safety instructions _ _ _ _ _ _ _ _ _ _ _ _ _ _ 16
Product description _ _ _ _ _ _ _ _ _ _ _ _ _ 18
Operation _ _ _ _ _ _ _ _ _ _ _ _ _ _ _ _ _ _ 19
First use _ _ _ _ _ _ _ _ _ _ _ _ _ _ _ _ _ _ _ 19
Daily use _ _ _ _ _ _ _ _ _ _ _ _ _ _ _ _ _ _ _ 19
Helpful hints and tips _ _ _ _ _ _ _ _ _ _ _ _ 20
Care and cleaning _ _ _ _ _ _ _ _ _ _ _ _ _ _ 21
Troubleshooting _ _ _ _ _ _ _ _ _ _ _ _ _ _ _ 23
Installation _ _ _ _ _ _ _ _ _ _ _ _ _ _ _ _ _ _ 24
Technical data _ _ _ _ _ _ _ _ _ _ _ _ _ _ _ _ 27
Environmental concerns _ _ _ _ _ _ _ _ _ _ _ 27
Subject to change without notice.
Safety instructions
In the interest of your safety and to ensure the
correct use, before installing and first using the
appliance, read this user manual carefully, in-
cluding its hints and warnings. To avoid unnec-
essary mistakes and accidents, it is important to
ensure that all people using the appliance are
thoroughly familiar with its operation and safety
features. Save these instructions and make sure
that they remain with the appliance if it is moved
or sold, so that everyone using it through its life
will be properly informed on appliance use and
safety.
For the safety of life and property keep the pre-
cautions of these user's instructions as the man-
ufacturer is not responsible for damages caused
by omission.
Children and vulnerable people safety
• This appliance is not intended for use by per-
sons (including children) with reduced physi-
cal, sensory or mental capabilities, or lack of
experience and knowledge, unless they have
been given supervision or instruction con-
cerning use of the appliance by a person re-
sponsible for their safety.
Children should be supervised to ensure that
they do not play with the appliance.
• Keep all packaging well away from children.
There is risk of suffocation.
• If you are discarding the appliance pull the
plug out of the socket, cut the connection ca-
ble (as close to the appliance as you can)
and remove the door to prevent playing chil-
dren to suffer electric shock or to close them-
selves into it.
• If this appliance featuring magnetic door
seals is to replace an older appliance having
a spring lock (latch) on the door or lid, be
sure to make that spring lock unusable before
you discard the old appliance. This will pre-
vent it from becoming a death trap for a child.
General safety
Warning!
Keep ventilation openings, in the appliance en-
closure or in the built-in structure, clear of ob-
struction.
• The appliance is intended for keeping food-
stuff and/or beverages in a normal household
and similar applications such as:
– staff kitchen areas in shops, offices and
other working environments;
– farm houses and by clients in hotels, mo-
tels and other residential type environ-
ments;
– bed and breakfast type environments;
– catering and similar non-retail applications.
• Do not use a mechanical device or any artifi-
cial means to speed up the thawing process.
• Do not use other electrical appliances (such
as ice cream makers) inside of refrigerating
appliances, unless they are approved for this
purpose by the manufacturer.
• Do not damage the refrigerant circuit.
• The refrigerant isobutane (R600a) is con-
tained within the refrigerant circuit of the ap-
pliance, a natural gas with a high level of envi-
ronmental compatibility, which is nevertheless
flammable.
During transportation and installation of the
appliance, be certain that none of the compo-
16
www.zanussi.com

nents of the refrigerant circuit become dam-
aged.
If the refrigerant circuit should become dam-
aged:
– avoid open flames and sources of ignition
– thoroughly ventilate the room in which the
appliance is situated
• It is dangerous to alter the specifications or
modify this product in any way. Any damage
to the cord may cause a short-circuit, fire
and/or electric shock.
Warning! Any electrical component (pow-
er cord, plug, compressor) must be re-
placed by a certified service agent or qualified
service personnel to avoid hazard.
1. Power cord must not be lengthened.
2. Make sure that the power plug is not
squashed or damaged by the back of the
appliance. A squashed or damaged pow-
er plug may overheat and cause a fire.
3. Make sure that you can come to the
mains plug of the appliance.
4. Do not pull the mains cable.
5. If the power plug socket is loose, do not
insert the power plug. There is a risk of
electric shock or fire.
6. You must not operate the appliance with-
out the lamp cover (if foreseen) of interior
lighting.
• This appliance is heavy. Care should be taken
when moving it.
• Do not remove nor touch items from the
freezer compartment if your hands are damp/
wet, as this could cause skin abrasions or
frost/freezer burns.
• Avoid prolonged exposure of the appliance to
direct sunlight.
• Bulb lamps (if foreseen) used in this appli-
ance are special purpose lamps selected for
household appliances use only. They are not
suitable for household room illumination.
Daily Use
• Do not put hot pot on the plastic parts in the
appliance.
• Do not store flammable gas and liquid in the
appliance, because they may explode.
• Do not place food products directly against
the air outlet on the rear wall. (If the appliance
is Frost Free)
• Frozen food must not be re-frozen once it has
been thawed out.
• Store pre-packed frozen food in accordance
with the frozen food manufacturer's instruc-
tions.
• Appliance's manufacturers storage recom-
mendations should be strictly adhered to. Re-
fer to relevant instructions.
• Do not place carbonated or fizzy drinks in the
freezer compartment as it creates pressure
on the container, which may cause it to ex-
plode, resulting in damage to the appliance.
• Ice lollies can cause frost burns if consumed
straight from the appliance.
Care and cleaning
• Before maintenance, switch off the appliance
and disconnect the mains plug from the
mains socket.
• Do not clean the appliance with metal ob-
jects.
• Do not use sharp objects to remove frost
from the appliance. Use a plastic scraper.
• Regularly examine the drain in the refrigerator
for defrosted water. If necessary, clean the
drain. If the drain is blocked, water will collect
in the bottom of the appliance.
Installation
Important! For electrical connection carefully
follow the instructions given in specific
paragraphs.
• Unpack the appliance and check if there are
damages on it. Do not connect the appliance
if it is damaged. Report possible damages
immediately to the place you bought it. In that
case retain packing.
• It is advisable to wait at least four hours be-
fore connecting the appliance to allow the oil
to flow back in the compressor.
• Adequate air circulation should be around the
appliance, lacking this leads to overheating.
17
www.zanussi.com

To achieve sufficient ventilation follow the in-
structions relevant to installation.
• Wherever possible the back of the product
should be against a wall to avoid touching or
catching warm parts (compressor, condens-
er) to prevent possible burn.
• The appliance must not be located close to
radiators or cookers.
• Make sure that the mains plug is accessible
after the installation of the appliance.
• Connect to potable water supply only (If a
water connection is foreseen).
Service
• Any electrical work required to do the servic-
ing of the appliance should be carried out by
a qualified electrician or competent person.
• This product must be serviced by an author-
ized Service Centre, and only genuine spare
parts must be used.
Environment Protection
This appliance does not contain gasses
which could damage the ozone layer, in ei-
ther its refrigerant circuit or insulation materials.
The appliance shall not be discarded together
with the urban refuse and rubbish. The insula-
tion foam contains flammable gases: the appli-
ance shall be disposed according to the appli-
cable regulations to obtain from your local au-
thorities. Avoid damaging the cooling unit, espe-
cially at the rear near the heat exchanger. The
materials used on this appliance marked by the
symbol
are recyclable.
Product description
2 43 5 7 8 9
1011121314
61
1
Vegetable drawers
2
Glass shelf
3
Glass shelf
4
Glass shelf
18
www.zanussi.com

5
Glass shelf
6
Control panel
7
Dairy shelf
8
Door shelf
9
Bottle shelf
10
Freezer basket
11
Maxibox basket
12
Frostfree basket
13
Cold module
14
Rating plate
Operation
Switching on
Insert the plug into the wall socket.
Turn the Temperature regulator clockwise to a
medium setting.
Switching off
To turn off the appliance, turn the Temperature
regulator to the "O" position.
Temperature regulation
The temperature is automatically regulated.
To operate the appliance, proceed as follows:
• turn the Temperature regulator toward lower
settings to obtain the minimum coldness.
• turn the Temperature regulator toward higher
settings to obtain the maximum coldness.
A medium setting is generally the most
suitable.
However, the exact setting should be chosen
keeping in mind that the temperature inside the
appliance depends on:
• room temperature
• how often the door is opened
• the quantity of food stored
• the location of the appliance.
Important! If the ambient temperature is high
or the appliance is fully loaded, and the
appliance is set to the lowest temperatures, it
may run continuously causing frost to form on
the rear wall. In this case the dial must be set to
a higher temperature to allow automatic
defrosting and therefore reduced energy
consumption.
First use
Cleaning the interior
Before using the appliance for the first time,
wash the interior and all internal accessories
with lukewarm water and some neutral soap so
as to remove the typical smell of a brand-new
product, then dry thoroughly.
Important! Do not use detergents or abrasive
powders, as these will damage the finish.
Daily use
Freezing fresh food
The freezer compartment is suitable for freezing
fresh food and storing frozen and deep-frozen
food for a long time.
To freeze fresh foods it is not necessary to
change the medium setting.
However, for a faster freezing operation, turn the
temperature regulator toward higher settings to
obtain the maximum coldness.
Important! In this condition, the refrigerator
compartment temperature might drop below
0°C. If this occurs reset the temperature
regulator to a warmer setting.
Place the fresh food to be frozen on the top
compartment.
Storage of frozen food
When first starting-up or after a period out of
use, before putting the products in the compart-
ment let the appliance run at least 2 hours on
the higher settings.
19
www.zanussi.com

Important! In the event of accidental
defrosting, for example due to a power failure, if
the power has been off for longer than the value
shown in the technical characteristics chart
under "rising time", the defrosted food must be
consumed quickly or cooked immediately and
then re-frozen (after cooling).
Thawing
Deep-frozen or frozen food, prior to being used,
can be thawed in the refrigerator compartment
or at room temperature, depending on the time
available for this operation.
Small pieces may even be cooked still frozen,
directly from the freezer: in this case, cooking
will take longer.
Movable shelves
The walls of the refrigerator are equipped with a
series of runners so that the shelves can be
positioned as desired.
Positioning the door shelves
To store various size food packages, the door
shelves can be placed at different heights.
Gradually pull the shelf in the direction of the ar-
rows until it comes free, then reposition as re-
quired.
2
1
3
Removal of freezing baskets from the
freezer
The freezing baskets have a limit stop to prevent
their accidental removal or falling out. At the
time of its removal from the freezer, pull the bas-
ket towards yourself and, upon reaching the end
point, remove the basket by tilting its front up-
wards.
At the time of putting it back, slightly lift the front
of the basket to insert it into the freezer. Once
you are over the end points, push the baskets
back in their position.
12
Helpful hints and tips
Normal Operating Sounds
• You may hear a faint gurgling and a bubbling
sound when the refrigerant is pumped
through the coils or tubing. This is correct.
• When the compressor is on, the refrigerant is
being pumped around and you will hear a
whirring sound and a pulsating noise from the
compressor. This is correct.
• The thermic dilatation might cause a sudden
cracking noise. It is natural, not dangerous
physical phenomenon. This is correct.
• When the compressor switches on or
switches off, you will hear a faint "click" of the
temperature regulator. This is correct.
Hints for energy saving
• Do not open the door frequently or leave it
open longer than absolutely necessary.
20
www.zanussi.com

• If the ambient temperature is high and the
Temperature Regulator is set to low tempera-
ture and the appliance is fully loaded, the
compressor may run continuously, causing
frost or ice on the evaporator. If this happens,
set the Temperature Regulator toward warm-
er settings to allow automatic defrosting and
so a saving in electricity consumption.
Hints for fresh food refrigeration
To obtain the best performance:
• do not store warm food or evaporating liquids
in the refrigerator
• do cover or wrap the food, particularly if it has
a strong flavour
• position food so that air can circulate freely
around it
Hints for refrigeration
Useful hints:
Meat (all types) : wrap in polythene bags and
place on the glass shelf above the vegetable
drawer.
For safety, store in this way only one or two
days at the most.
Cooked foods, cold dishes, etc.: these should
be covered and may be placed on any shelf.
Fruits and vegetables: these should be thor-
oughly cleaned and placed in the special draw-
er(s) provided. When in contact, lemon juice
can discolor the plastic parts of your fridge. It is
therefore recommended to keep citruses in sep-
arate containers.
Butter and cheese: these should be placed in
special airtight containers or wrapped in alumi-
nium foil or polythene bags to exclude as much
air as possible.
Bottles: these should have a cap and should be
stored in the bottle rack on the door.
Bananas, potatoes, onions and garlic, if not
packed, must not be kept in the refrigerator.
Hints for freezing
To help you make the most of the freezing proc-
ess, here are some important hints:
• the maximum quantity of food which can be
frozen in 24 hrs. is shown on the rating plate;
• the freezing process takes 24 hours. No fur-
ther food to be frozen should be added dur-
ing this period;
• only freeze top quality, fresh and thoroughly
cleaned, foodstuffs;
• prepare food in small portions to enable it to
be rapidly and completely frozen and to make
it possible subsequently to thaw only the
quantity required;
• wrap up the food in aluminium foil or poly-
thene and make sure that the packages are
airtight;
• do not allow fresh, unfrozen food to touch
food which is already frozen, thus avoiding a
rise in temperature of the latter;
• lean foods store better and longer than fatty
ones; salt reduces the storage life of food;
• water ices, if consumed immediately after re-
moval from the freezer compartment, can
possibly cause the skin to be freeze burnt;
• it is advisable to show the freezing in date on
each individual pack to enable you to keep
tab of the storage time.
Hints for storage of frozen food
To obtain the best performance from this appli-
ance, you should:
• make sure that the commercially frozen food-
stuffs were adequately stored by the retailer;
• be sure that frozen foodstuffs are transferred
from the foodstore to the freezer in the short-
est possible time;
• not open the door frequently or leave it open
longer than absolutely necessary;
• once defrosted, food deteriorates rapidly and
cannot be refrozen;
• do not exceed the storage period indicated
by the food manufacturer.
Care and cleaning
Caution! Unplug the appliance before
carrying out any maintenance operation.
This appliance contains hydrocarbons in its
cooling unit; maintenance and recharging
21
www.zanussi.com

must therefore only be carried out by authorized
technicians.
Periodic cleaning
The equipment has to be cleaned regularly:
• clean the inside and accessories with luke-
warm water and some neutral soap.
• regularly check the door seals and wipe clean
to ensure they are clean and free from debris.
• rinse and dry thoroughly.
Important! Do not pull, move or damage any
pipes and/or cables inside the cabinet.
Never use detergents, abrasive powders, highly
perfumed cleaning products or wax polishes to
clean the interior as this will damage the surface
and leave a strong odour.
Clean the condenser (black grill) and the com-
pressor at the back of the appliance with a
brush. This operation will improve the perform-
ance of the appliance and save electricity con-
sumption.
Important! Take care of not to damage the
cooling system.
Many proprietary kitchen surface cleaners con-
tain chemicals that can attack/damage the plas-
tics used in this appliance. For this reason it is
recommended that the outer casing of this ap-
pliance is only cleaned with warm water with a
little washing-up liquid added.
After cleaning, reconnect the equipment to the
mains supply.
Defrosting of the refrigerator
Frost is automatically eliminated from the evapo-
rator of the refrigerator compartment every time
the motor compressor stops, during normal use.
The defrost water drains out through a trough
into a special container at the back of the appli-
ance, over the motor compressor, where it
evaporates.
It is important to periodically clean the defrost
water drain hole in the middle of the refrigerator
compartment channel to prevent the water over-
flowing and dripping onto the food inside. Use
the special cleaner provided, which you will find
already inserted into the drain hole.
Defrosting the freezer
A certain amount of frost will always form on the
freezer shelves and around the top compart-
ment.
Defrost the freezer when the frost layer reaches
a thickness of about 3-5 mm.
To remove the frost, follow the instructions be-
low:
• pull out the plug from the wall socket or
switch off the appliance
• remove any stored food, wrap it in several lay-
ers of newspaper and put it in a cool place
• remove the freezer drawers
• put insulating material around the drawers,
e.g. blankets or newspapers.
Defrosting can be accelerated by placing bowls
with hot water (not boiling) inside the freezer.
• Loosen the drainage channel from its resting
position, push it in according to the illustra-
tion and place it in the bottom freezer drawer
where water can collect
• carefully scrape off the ice when it starts to
thaw. Use a wood or a plastic scraper
• when all the ice has melted, clean and wipe
the cabinet dry, then put the drainage chan-
nel back in place.
• switch on the cabinet and replace the frozen
foodstuff.
It is recommended to operate the appli-
ance at the highest position of the ther-
22
www.zanussi.com

mostatic control for some hours so that it
can reach the sufficient storing tempera-
ture as soon as possible.
Important! Never use sharp metal tools to
scrape off frost from the evaporator as you
could damage it. Do not use a mechanical
device or any artificial means to speed up the
thawing process other than those
recommended by the manufacturer. A
temperature rise of the frozen food packs,
during defrosting, may shorten their safe
storage life.
Troubleshooting
Caution! Before troubleshooting,
disconnect the power supply.
Only a qualified electrician or competent person
must do the troubleshooting that is not in this
manual.
Important! There are some sounds during
normal use (compressor, refrigerant circulation).
Problem Possible cause Solution
The appliance is noisy. The appliance is not supported
properly.
Check if the appliance stands stable
(all the four feet should be on the
floor).
The compressor operates
continually.
The Temperature regulator may be
set incorrectly.
Set a warmer temperature.
The door is not closed correctly. Refer to "Closing the door".
The door has been opened too fre-
quently.
Do not keep the door open longer
than necessary.
The product temperature is too
high.
Let the product temperature de-
crease to room temperature before
storage.
The room temperature is too high. Decrease the room temperature.
Water flows on the rear
plate of the refrigerator.
During the automatic defrosting
process, frost defrosts on the rear
plate.
This is correct.
Water flows into the refrig-
erator.
The water outlet is clogged. Clean the water outlet.
Products prevent that water flows
into the water collector.
Make sure that products do not touch
the rear plate.
Water flows on the ground. The melting water outlet does not
flow in the evaporative tray above
the compressor.
Attach the melting water outlet to the
evaporative tray.
There is too much frost
and ice.
Products are not wrapped properly. Wrap the products better.
The door is not closed correctly. Refer to "Closing the door".
The Temperature regulator may be
set incorrectly.
Set a higher temperature.
The temperature in the ap-
pliance is too low.
The Temperature regulator may be
set incorrectly.
Set a higher temperature.
23
www.zanussi.com

Problem Possible cause Solution
The temperature in the ap-
pliance is too high.
The Temperature regulator may be
set incorrectly.
Set a lower temperature.
The door is not closed correctly. Refer to "Closing the door".
The product temperature is too
high.
Let the product temperature de-
crease to room temperature before
storage.
Many products are stored at the
same time.
Store less products at the same time.
The temperature in the re-
frigeration is too high.
There is no cold air circulation in the
appliance.
Make sure that there is cold air circu-
lation in the appliance.
The temperature in the
freezer is too high.
Products are too near to each other. Store products so that there is cold
air circulation.
The appliance does not op-
erate.
The appliance is switched off. Switch on the appliance.
The mains plug is not connected to
the mains socket correctly.
Connect the mains plug to the mains
socket correctly.
The appliance has no power. There
is no voltage in the mains socket.
Connect a different electrical appli-
ance to the mains socket. Contact a
qualified electrician.
The lamp does not work. The lamp is in stand-by. Close and open the door.
The lamp is defective. Refer to "Replacing the lamp".
If your appliance is still not working properly af-
ter making the above checks, contact the After
Sales Centre.
Replacing the lamp
1. Disconnect the appliance.
2. Push the movable part to unhook the lamp
cover (1).
3. Remove the lamp cover (2).
4. If needed replace the lamp with a light of
similar characteristic and power. It is sug-
gested to use Osram PARATHOM SPE-
CIAL T26 0.8 Watts.
5. Install the lamp cover.
6. Connect the appliance.
7. Open the door. Make sure that the lamp
comes on.
1
2
Closing the door
1. Clean the door gaskets.
2. If necessary, adjust the door. Refer to "In-
stallation".
3. If necessary, replace the defective door
gaskets. Contact the Service Center.
Installation
Caution! Read the "Safety Information"
carefully for your safety and correct
operation of the appliance before installing the
appliance.
24
www.zanussi.com

Positioning
Install this appliance at a location where the am-
bient temperature corresponds to the climate
class indicated on the rating plate of the appli-
ance:
Climate
class
Ambient temperature
SN +10°C to + 32°C
N +16°C to + 32°C
ST +16°C to + 38°C
T +16°C to + 43°C
Location
The appliance should be installed well away
from sources of heat such as radiators, boilers,
direct sunlight etc. Ensure that air can circulate
freely around the back of the cabinet. To ensure
best performance, if the appliance is positioned
below an overhanging wall unit, the minimum
distance between the top of the cabinet and the
wall unit must be at least 100 mm . Ideally, how-
ever, the appliance should not be positioned
below overhanging wall units. Accurate levelling
is ensured by one or more adjustable feet at the
base of the cabinet.
Warning! It must be possible to
disconnect the appliance from the mains
power supply; the plug must therefore be easily
accessible after installation.
A
B
100 mm
min
20 mm
Rear spacers
You can find the two spacers in the bag with
documentation.
Do these steps to install the spacers:
1. Release the screw.
2. Engage the spacer below the screw.
3. Turn the spacer to the right position.
4. Tighten again the screws.
2
4
3
1
Levelling
When placing the appliance ensure that it
stands level. This can be achieved by two ad-
justable feet at the bottom in front.
Electrical connection
Before plugging in, ensure that the voltage and
frequency shown on the rating plate correspond
to your domestic power supply.
The appliance must be earthed. The power sup-
ply cable plug is provided with a contact for this
purpose. If the domestic power supply socket is
not earthed, connect the appliance to a sepa-
25
www.zanussi.com

rate earth in compliance with current regula-
tions, consulting a qualified electrician.
The manufacturer declines all responsibility if
the above safety precautions are not observed.
This appliance complies with the E.E.C. Direc-
tives.
Door reversibility
Warning! Before carrying out any
operations, remove the plug from the
power socket.
Important! To carry out the following
operations, we suggest that another person will
keep a firm hold on the appliance doors during
the door reversing procedure.
Middle Hinge
• Open the doors. Unscrew the middle hinge
(B). Remove the plastic spacer (A).
• Remove the spacer (F) and move it to the
other side of the hinge pivot (E).
• Remove the doors.
• Remove the middle hinge cover pins (C,D)
and move them to the opposite side.
• Fit the middle hinge pin (E) into the left-hand
hole of the lower door.
DC
E
F
A
B
Bottom Hinge
• Unscrew the lower hinge (A)
• Remove the left-hand cover pins (D) and
move them to the opposite side.
• Re-screw the lower hinge (A) on the opposite
side.
• Unscrew the lower hinge pivot (B) and
spacer (C), and place them on the opposite
side.
D
A
B
C
Doors
• Remove the plugs (A) on the top side of both
doors and move them to the opposite side.
• Re-insert the bottom door on the bottom
hinge pivot (B).
• Insert the middle hinge (B) into the left hole
of the bottom door.
A
Top Hinge
• Unscrew the top hinge pivot (1) and place it
on the opposite side (2).
2
1
• Fit the top door on the top door pivot, and
bottom door on the bottom hinge pivot.
• Re-insert the middle hinge pivot (B) into
bottom and top door pivot holes, slightly tilt-
ing both doors.
26
www.zanussi.com

3
1
2
1
3
2
• Re-screw the middle hinge (B). Do not
forget the plastic spacer (A).
Do a final check to make sure that:
• All screws are tightened.
• The edges of the doors run parallel to the
side edge of the appliance.
• The magnetic seal adheres to the cabinet.
• The door opens and closes correctly.
If the ambient temperature is cold (i.e. in Win-
ter), the gasket may not fit perfectly to the cabi-
net. In that case, wait for the natural fitting of the
gasket.
In case you do not want to carry out the above
mentioned operations, contact the nearest After
Sales Service Force. The After Sales Service
specialist will reverse the doors at your cost.
Technical data
Dimension
Height 1850 mm
Width 595 mm
Depth 658 mm
Rising Time 20 h
Voltage 230-240 V
Frequency 50 Hz
The technical information are situated in the rat-
ing plate on the internal left side of the appli-
ance and in the energy label.
Environmental concerns
Recycle the materials with the symbol . Put
the packaging in applicable containers to
recycle it.
Help protect the environment and human health
and to recycle waste of electrical and electronic
appliances. Do not dispose appliances marked
with the symbol
with the household waste.
Return the product to your local recycling facility
or contact your municipal office.
27
www.zanussi.com

Садржај
Упутства о безбедности _ _ _ _ _ _ _ _ _ 28
Опис производа _ _ _ _ _ _ _ _ _ _ _ _ _ 31
Руковање _ _ _ _ _ _ _ _ _ _ _ _ _ _ _ _ _ 31
Прва употреба _ _ _ _ _ _ _ _ _ _ _ _ _ _ 32
Свакодневна употреба _ _ _ _ _ _ _ _ _ 32
Помоћне напомене и савети _ _ _ _ _ _ 33
Нега и чишћење _ _ _ _ _ _ _ _ _ _ _ _ _ 34
Решавање проблема _ _ _ _ _ _ _ _ _ _ 36
Инсталација _ _ _ _ _ _ _ _ _ _ _ _ _ _ _ 38
Технички подаци _ _ _ _ _ _ _ _ _ _ _ _ _ 41
Еколошка питања _ _ _ _ _ _ _ _ _ _ _ _ 41
Задржано право измена.
Упутства о безбедности
У интересу Ваше безбедности и да би се
обезбедила правилна употреба, пре инста-
лације пажљиво прочитајте ово упутство,
укључујући његове савете и упозорења. Да
бисте избегли непотребне грешке и незго-
де, важно је да се обезбеди да све особе
које користе машину за прање посуђа буду
потпуно упознате са њеним радом и карак
-
теристикама безбедности. Чувајте ова
упутства и проверите да ли се налазе са
машином за прање посуђа уколико се пре-
мешта или прода, тако да свако ко је кори-
сти у току њеног века трајања може да бу-
де правилно информисан о употреби и без-
бедности апарата.
Због животне и материјалне безбедности,
важно је да се придржавате мера оз ових
утутстава за корисника, јер произвођач ни-
је одговоран за штете настеле због не-
придржавања.
Безбедност деце и осетљивих људи
• Овај апарат није намењен да га користе
особе (укључујући и децу) са огра-
ниченим физичким, сензорским или мен-
талним способностима, или са недостат-
ком искуства
и знања, ако немају надзор
или ако нису упућени у начин рада апа-
рата од особе која је одговорна за њихо-
ву безбедност.
Децу треба да контролишете, да би се
осигурали да се не играју са уређајем.
• Чувајте сву амбалажу далеко од деце.
Постоји опасност од гушења.
• Ако бацате уређај,
извуците утикач из
утичнице, пресеците напојни кабл (што је
могуће ближе уређаја) и скините врата,
да би спречили да децу у игри ухвати
струја или да се закључају унутра.
• Ако овај уређај, који је опремљен магнет-
ним заптивкама на вратима, треба да за-
мени старији уређај, са опружном бра-
вом (кваком), свакако уништите браву
пре него што га баците. То ће спречити
да ово постане фатална клопка
за децу.
Опште мере безбедности
УПОЗОРЕЊЕ
Отвори за вентилацију у ниши за уређај
или у простору за уградњу не смеју да буду
заклоњени.
• Уређај је намењен за чување хране и/
или пића у нормалном домаћинству или
за сличне примене као на пример за:
– кухиње за особље у продавницама,
канцеларијама и другим
радним окру-
жењима;
– сеоске куће и од стране клијената у хо-
телима, мотелима и другим окружењи-
ма за становање;
– смештај типа ноћења са доручком;
– доставу хране и пића и сличне приме-
не у великопродаји.
• Не употребљавајте никакве механичке
уређаје или вештачка средства за убрза-
вање процеса одлеђивања.
• Не употребљавајте
друге електричне
уређаје (као машине за прављење сла-
доледа) унутар уређаја за замрзавање,
осим ако то произвођач не одобрава.
• Немојте оштетити кружни ток средства
за хлађење.
28
www.zanussi.com

• Кружни ток средства за хлађење овог
уређаја садржи изобутан (R600a), приро-
дан гас са високом еколошком поднош-
љивошћу, али ипак веома запаљив.
Обратите пажњу да у току транспорта и
монтаже уређаја не дође до оштећења
било које компоненте кружног тока сред-
ства за хлађење.
Уколико дође до оштећења кружног тока
средства за хлађење:
– избегавајте отворени пламен и изворе
паљења
– темељно проветрите просторију у којој
се уређај налази
• Мењање спецификација или модифико-
вање овог производа на било који начин
је опасно. Свако оштећење кабла може
да изазове кратак спој, пожар и/или
електрични удар.
УПОЗОРЕЊЕ Замену свих елек-
тричних компоненти (напојни кабл,
утикач, компресор) мора да изведе
овлаш-
ћени сервисни представник или квалифи-
ковано сервисно особље да би се избегао
сваки ризик.
1. Напојни кабл не сме да се наставља.
2. Уверите се да напојни утикач није
прикљештен или оштећен задњим
зидом уређаја. Прикљештен или
оштећен напојни утикач може да се
прегреје и да изазове пожар.
3. Омогућите приступ до електричног
утикача
уређаја.
4. Немојте повлачити мрежни кабл за
напајање.
5. Ако је напојна утичница лабава, не-
мојте укључивати утикач. Постоји
опасност од електричног удара или
пожара.
6. Не смете користити уређај без по-
клопца за сијалицу (ако је предвиђе-
но) унутрашњег осветљења.
• Овај уређај је тежак. Будите опрезни
приликом његовог премештања.
• Немојте вадити или
додиривати предме-
те из замрзивача мокрим/влажним рука-
ма, јер тиме можете да изазовете да се
кожа огули или створе опекотине од за-
мрзавања.
• Избегавајте дуже излагање уређаја ди-
ректном сунцу.
• Сијалице (ако су предвиђене) које се ко-
ристе за овај уређај су специјалне на-
менске сијалице искључиво за уређаје у
домаћинству. Ове сијалице нису предви-
ђене за осветљавање
просторија у дома-
ћинству.
Свакодневна употреба
• Не стављајте вруће шерпе на пластичне
делове у уређају.
• Немојте у уређају да чувате запаљиве
гасове и течности, јер могу да експлоди-
рају.
• Не стављајте прехрамбене производе
директно уз испуст за ваздух на задњем
зиду. (Ако уређај има систем против за-
леђивања)
• Замрзнута храна не
сме поново да се за-
мрзава када је једном одмрзне.
• Чувајте запаковану замрзнуту храну пре-
ма упутствима произвођача за замрзнуту
храну.
• Строго се придржавајте препорука про-
извођача уређаја за чување. Погледајте
одговарајућа упутства.
• Не стављајте у замрзивач газирана или
пенушава пића, јер то ствара притисак у
посуди, од чега може да
експлодира,
изазивајући тиме оштећење уређаја.
• Ледене лизалице могу да изазову опе-
клине од мраза, ако се једу директно из
уређаја.
Нега и чишћење
• Пре одржавања, искључите апарат и из-
вуците утикач из утичнице.
• Немојте чистити апарат са влажним ру-
кама.
• Немојте употребљавати оштре предмете
за вађење леда из апарата. Употребите
пластични стругач.
29
www.zanussi.com

• Редовно проверавајте одвод за воду од
одлеђивања у фрижидеру. Ако је потреб-
но, очистите га. Ако је одвод запушен,
вода ће се сакупљати на дну апарата.
Инсталирање
ВАЖНО За повезивање струје, пажљиво
пратите упутства наведена у
одговарајућим параграфима.
• Распакујте уређај и проверите да ли на
њему има оштећења. Не прикључујте
уређај ако је
оштећен. Одмах пријавите
евентуална оштећења тамо где сте га ку-
пили. У том случају сачувајте амбалажу.
• Препоручљиво је да сачекате најмање
два часа пре него што прикључите уре-
ђај, да би уље могло да се слије назад у
компресор.
• Око уређаја треба да има одговарајуће
струјање ваздуха, у супротном може да
дође
до прегревања. Придржавајте се
упутстава у односу на монтажу, да би по-
стигли довољну вентилацију.
• Где год је то могуће, задњи зид уређај
треба да буде уза зид, да би се избегло
додиривање или хватање топлих делова
(компресора, кондензатора) и да би се
спречиле могуће опеклине.
• Уређај не сме да буде
у близини радија-
тора или шпорета.
• Уверите се да је после постављања уре-
ђаја мрежни утикач доступан.
• Прикључите искључиво довод воде за
пиће (ако је предвиђен прикључак за во-
ду).
Сервис
• Све електричне радове који су потребни
за сервисирање овог апарата, треба да
обави квалификовани електричар или
стручна особа.
• Овај производ мора да сервисира само
овлашћен сервисни центар
, и мора да се
користе само оригинални резервни дело-
ви.
Заштита животне средине
Овај уређај не садржи гасове, нити у
кружном току средства за хлађење,
нити у материјалима изолације, који могу
да оштете озонски омотач. Уређај не треба
да се баца заједно са градским смећем и
ђубрем. Изолацијска пена садржи запаљи-
ве гасове:
уређај треба да се уклања пре-
ма важећим прописима, које можете да
сазнате код локалних власти. Избегавајте
оштећење јединице за хлађење, посебно
позади, у близини измењивача топлине.
Материјали, који су коришћени у овом уре-
ђају, а који су означени симболом
могу
да се рециклирају.
30
www.zanussi.com

Опис производа
2 43 5 7 8 9
1011121314
61
1
Фиоке за поврће
2
Стаклена полица
3
Стаклена полица
4
Стаклена полица
5
Стаклена полица
6
Командна табла
7
Полица за млечне производе
8
Полица на вратима
9
Полица за боце
10
Корпа замрзивача
11
Корпа максималног капацитета
12
Корпа која не мрзне
13
Хладни модул
14
Плочица са техничким карактеристика-
ма
Руковање
Уклучивање
Утакните утикач у утичницу на зиду.
Окрените регулатор температуре у десно,
на средње подешење.
Искључивање
Да би искључивали уређај, окрените регу-
латор температуре на положај "O".
Регулација температуре
Температура се регулише аутоматски.
31
www.zanussi.com

За руковање уређајем, поступите на следе-
ћи начин:
• окрените регулатор температуре према
нижем подешењу, да би постигли мини-
малну хладноћу.
• окрените регулатор температуре према
вишем подешењу, да би постигли макси-
малну хладноћу.
У принципу, највише одговара средње
подешење.
Ипак, тачно подешење треба да се одабе-
ре имајући у виду да температура
унутар
уређаја зависи од:
• собне температуре
• колико често се отварају врата
• количине хране у њему
• место стајања уређаја.
ВАЖНО Ако је температура околине
висока или ако је уређај пун, а подешен је
на најниже температуре, може да ради
непрекидно, изазивајући стварање мраза
на задњем зиду. У том случају, бирач мора
да се подеси на већу температуру, да
би се
омогућило аутоматско одлеђивање, а тиме
и смањена потрошња струје.
Прва употреба
Чишћење унутрашњости
Пре прве употребе уређаја. оперите уну-
трашњост и сав прибор млаком водом са
мало неутралног сапуна, да би уклонили
типичан мирис сасвим новог производа, те
га темељно осушите.
ВАЖНО Не употребљавајте детерџенте
или абразивне прашкове, јер ће оштетити
завршну обраду.
Свакодневна употреба
Замрзавање свеже хране
Замрзивач је погодан за замрзавање свеже
хране и за дуго чување дубоко замрзнуте
хране.
За замрзавање свеже хране није потребно
да се мења средње подешење.
Ипак, за брже замрзавање, окрените регу-
латор температуре према вишем подеше-
њу, да би постигли максималну хладноћу.
ВАЖНО У овом стању, температура у
фрижидеру би
могла да падне испод 0°C.
Ако дође до тога, вратите регулатор
температуре на топлије подешење.
Распоредите свежу храну за замрзавање у
највишем одељку.
Чување замрзнуте хране
Пре него што ставите производе у одељак
када га први пут укључујете или након не-
ког времена неупотребљавања, оставите
уређај да ради најмање 2 часа на већем
подешењу.
ВАЖНО У случају случајног одмрзавања,
на пример, због престанка напајања
струјом, које је трајало дуже од вредности
наведне под "време пораста" у табели са
техничким карактеристикама, одмрзнута
храна мора одмах да се поједе или да се
скува па да се поново замрзне (након
хлађења).
Одмрзавање
Пре употребе, дубоко замрзнута храна мо-
же према расположивом
времену да се од-
мрзне у фрижидеру или на собној темпера-
тури.
Мали комади могу да се кувају и замрзну-
ти, директно из замрзивача: у том случају,
кување ће трајати дуже.
Покретне полице
Зидови фрижидера су опремљени са неко-
лико клизача тако да се полице могу по-
стављати према жељи.
32
www.zanussi.com

Постављање полица на вратима
За чување паковања хране различитих ве-
личина, полице на вратима се могу поста-
вити на различитој висини.
Постепено вуците полице у смеру стрели-
ца док их не ослободите, а затим их поста-
вите у жељени положај.
2
1
3
Уклањање корпи за замрзавање из
замрзивача
Корпе за замрзавање поседују граничник
који спречава случајно испадање или вађе-
ње Када желите да уклоните корпу из за-
мрзивача, повуците је према себи и, када
је извучете до крајње тачке, накривите
предњи део корпе нагоре и уклоните је.
Када је враћате, благо издигните предњи
део корпе и
уметните је у замрзивач. Чим
пређете зауставне тачке, гурните корпу
уназад у њен положај.
12
Помоћне напомене и савети
Нормални звуци рада
• Можете да чујете слабо гргутање или пе-
нушање када се расхладно средство
пумпа кроз спирале или цевне водове са
задње стране уређаја. То је нормално.
• Када је компресор укључен, средство за
хлађење циркулише и из компресора мо-
же да се чује звук зујања или пулсирања.
То је нормално.
•
Ширење услед топлоте може да изазове
изненадни звук пуцања. То је нормално и
не представља опасну физичку појаву.
То је нормално.
• При укључивању или искључивању ком-
пресора чућете слаби "клик" регулатора
температуре. То је нормално.
Савети за заштеду енергије
• Немојте да често отварате врата или да
их остављате отвореним дуже од по-
требног.
• Ако је температура околине висока и ако
је регулатор температуре подешен на
веће подешење, а уређај је пун, компре-
сор може да ради непрекидно, изазивају-
ћи стварање мраза на испаривачу. Ако
дође до тога, окрените регулатор темпе-
ратуре према нижем подешењу, да би
омогућили аутоматско одлеђивање, а ти-
ме уштеду у потрошњи
струје.
Корисни савети за чување хране у
фрижидеру
Да би постигли најбољи учинак:
• немојте у фрижидеру да чувате топлу
храну или течности које испаравају
• покријте или умотајте храну, посебно ако
има јаки мирис
• поставите храну тако да ваздух може
слободно да струју око ње
Корисни савети за чување у фрижидеру
Корисни савети:
33
www.zanussi.com

Месо (све врсте) : умотајте у пластичне
врећице и ставите на стаклену полици из-
над фијоке за поврће.
Због безбедности, чувајте га овако највише
два дана.
Кувана храна, хладна предјела итд.: треба
их поклопити, а можете их држати на било
којој полици.
Воће и поврће: ове намирнице треба те-
мељно опрати и држати их
у специјалној
фиоци (фиокама) за ту намену. Када дође
у контакт, сок од лимуна може да промени
боју пластичних делова фрижидера. Стога
се препоручује да се лимун држи у посеб-
ним посудама.
Путер и сир: треба ставити у специјалне
посуде, које не пропустају ваздух, или да
се завију у алуминијумску фолију, или пла-
стичне врећице, да би били што је могуће
мање у додиру са ваздухом.
Боце: треба да имају на себи поклопац и
треба их држати на полици за флаше у
вратима.
Осим ако нису запаковани, банане, кром-
пир, црни и бели лук не треба да се чувају
у фрижидеру.
Корисни савети за замрзавање
Ево
неколико важних савета, који ће вам
помоћи да извучете највише из процеса за-
мрзавања:
• максимална количина хране, која може
да се замрзне у 24 часа. приказана је на
плочици са ознаком типа;
• процес замрзавања траје 24 часа. У том
периоду не треба да се додаје нова хра-
на за замрзавање;
• замрзавајте само храну
врхунског квали-
тета, свежу и темељно очишћену;
• спремите храну у малим порцијама, да
би омогућили да се брзо и потпуно замр-
зне и да би омогућили да након тога од-
мрзавате само количину, која вам је по-
требна;
• умотајте храну у алуминијумску или пла-
стичну фолију и осигурајте се да пакова-
ња не пропустају ваздух;
• не дозвољавајте да свежа, незамрзнута
храна долази у додир са већ замрзлом,
да би спречили повећање
температуре
замрзле хране;
• посна храна се чува боље и дуже од
масне; со смањује век чувања хране;
• ако се замрзли водени производи уносе
одмах након вађења из замрзивача, мо-
гуће је да изазову опеклине од ниских
температура;
• пожељно је да на сваком паковању нане-
сете датум замрзавања, да би имали
увиђај у
време замрзавања;
Корисни савети за чување замрзнуте
хране
Да бисте остварили најбоље могуће пер-
формансе овог уређаја, требало би да:
• проверите да ли су комерцијално замр-
знуте намирнице биле адекватно ускла-
диштене у малопродајном објекту;
• постарате се да смрзнуте намирнице за
што је могуће краће време пренесете од
продавнице до замрзивача;
• не отварате врата често или да их остав-
љате отвореним дуже од потребног;
• када се једном одмрзне, храна се брзо
квари и не сме се поново замрзавати;
• немојте прекорачити време складиште-
ња које је прописао произвођач намирни-
ца.
Нега и чишћење
ПАЖЊА Извуците утикач уређаја из
напајања пре него што почнете са
извођењем било каквих радова
одржавања.
Овај уређај садржи углјоводонике у
својој јединици за хлађење; Стога,
одржавање и пуњење мора да изводе
овлашћени техничари.
34
www.zanussi.com

Периодично чишћење
Опрема треба редовно да се чисти:
• оперите унутрашњост и прибор млаком
водом и мало неутралног сапуна.
• редовно проверавајте заптивке на врати-
ма и бришите их, осигуравајући се да су
чисте и да на њима нема остатака.
• пажљиво исплакните и осушите.
ВАЖНО Немојте да вичете, померате или
оштећујете цеви и/
или каблове унутар
кабинета.
Никада немојте за чишћење унутрашњости
да употребљавате детерџенте, абразивне
прашкове, јако парфимисане производе за
чишћење или средства за полирање са
воском, јер ће оштетити површину и
оставити јак мирис.
Помоћу четке очистите кондензатор (ре-
шетка црне боје) и компресор са задње
стране уређаја. На тај начин ћете побољ-
шати рад
уређаја и смањити потрошњу
електричне енергије.
ВАЖНО Водите рачуна да не оштетите
систем за хлађење.
Многе марке средстава за чишћење кухи-
ња садрже хемикалије, које могу нагристи/
оштетити пластику у уређају. Стога се пре-
поручује да спољашње кућиште уређаја
чистите само топлом водом са мало сред-
ства за прање посуђа.
Када завршите
са чишћењем, поново ук-
ључите уређај у струју.
Одлеђивање фрижидера
Иње се аутоматски уклања са испаривача
фрижидера, сваки пут када се заустави мо-
тор компресора у току нормалне употребе.
Вода од одлеђивања се цеди преко грла у
специјалну посуду на позадини уређаја,
преко мотора компресорa, одакле испара-
ва.
Важно је да се
отвор за испуштање воде
од одлеђивања, који се налази у средини
одељка фрижидера, повремено очисти, да
би се спречило преливање воде и њено ка-
пање по храни. Користите испоручено по-
себно средство за чишћење које ћете наћи
већ уметнуто у отвор за испуштање.
Одлеђивање замрзивача
Извесна количина иња и леда ће се увек
образовати на полицама замрзивача и око
горњег одељка.
Одледите замрзивач када слој иња и леда
достигне дебљину од око 3-5 mm.
За уклањање иња предузмите следеће ко-
раке:
• извуците утикач из зидне утичнице или
искључите уређај
• ивадите све намирнице, умотајте их у
више слојева новинског
папира и ставите
их на хладно место
• извадите фиоке замрзивача
• обавијте фиоке изолационим материја-
лом, на пр. покривачима или новинама.
Одлеђивање може да се убрза стављањем
чинија са врућом водом (не кључалом во-
дом) у унутрашњост замрзивача.
• Отпустите канал за пражњење из свог
положаја и потисните га како је то прика-
зано
на слици, и ставите га у доњу фиоку
замрзивача где вода може да са сакуп-
ља.
• Пажљиво остружите лед када почне да
се отапа. Употребите дрвени или пла-
стични стругач
• Када се отопи сав лед, очистите и обри-
шите апарат, затим вратите канал за
пражњење на своје место.
35
www.zanussi.com

• Укључите апарат и вратите назад замр-
знуту храну.
Препоручујемо да уређај ради на најви-
шем положају термостата неколико сати
како би достигао довољну температуру
чувања у што краћем року.
ВАЖНО Никада немојте да користите
оштре металне предмете за стругање иња
са испаривача, јер бисте могли да га
оштетите. Не употребљавајте никакве
механичке уређаје или вештачка средства
за убрзавање процеса одлеђивања, које
није препоручио произвођач. Пораст
температуре на паковањима замрзнутих
намирница, током одмрзавања, може да
скрати
њихов безбедан рок чувања.
Решавање проблема
ПАЖЊА Пре отклањања
неисправности, извуците утикач из
мрежне утичнице.
Само квалификован електричар или
стручна особа смеју да отклоне
неисправнсти које нису обухваћене овим
упутством.
ВАЖНО Чују се неки звуци током нормалне
употребе (компресор, циркулација
расхладне течности).
Проблем Могући узрок Решење
Уређај је бучан. Уређај не стоји како треба. Проверите да ли уређај стабилно
стоји (све четири ножице треба
да буду на поду).
Компресор ради без пре-
кида.
Регулатор температуре није
правилно подешен.
Подесите вишу температуру.
Врата нису добро затворена. Прочитајте поглавље "Затварање
врата".
Врата се пречесто отварају. Немојте да остављате врата от-
ворена дуже него што је потреб-
но.
Температура производа је суви-
ше висока.
Оставите производ да се охлади
на собну температуру пре одлага-
ња у уређај.
Собна температура је сувише
висока.
Снизите собну температуру.
Низ задњу плочу фрижи-
дера цури вода.
За време аутоматског процеса
одмрзавања на задњој плочи се
одмрзава иње.
То је нормално.
Вода цури у одељак фри-
жидера.
Отвор за воду је запушен. Очистите испуст.
Производи спречавају проток
воде у колектор воде.
Производи не смеју да додирују
задњу плочу.
36
www.zanussi.com

Проблем Могући узрок Решење
Вода цури на под. Испуст за воду од одлеђивања
не одводи воду у посуду за
испаривање изнад компресора.
Поставите испуст за воду од од-
леђивања у посуду за испарива-
ње.
Накупило се превише иња
и леда
Производи нису правилно умо-
тани.
Боље умотајте производе.
Врата нису добро затворена. Прочитајте поглавље "Затварање
врата".
Регулатор температуре није
правилно подешен.
Подесите вишу температуру.
Температура у уређају је
прениска.
Регулатор температуре није
правилно подешен.
Подесите вишу температуру.
Температура у уређају је
превисока.
Регулатор температуре није
правилно подешен.
Подесите нижу температуру.
Врата нису добро затворена. Прочитајте поглавље "Затварање
врата".
Температура производа је суви-
ше висока.
Оставите производ да се охлади
на собну температуру пре одлага-
ња у уређај.
Истовремено се чува много про-
извода.
У фрижидеру истовремено чувај-
те мање производа.
Температура у фрижиде-
ру је сувише висока.
У уређају нема циркулације
хладног ваздуха.
Обезбедите циркулацију хладног
ваздуха у уређају.
Температура у замрзи-
вачу је сувише висока.
Производи су сувише близу је-
дан другом.
Поставите производе тако да има
циркулације хладног ваздуха.
Уређај не ради. Уређај је искључен. Укључите уређај.
Мрежни утикач није исправно
утакнут у утичницу.
Исправно утакните утикач у
мрежну утичницу.
Уређај нема напајање. Нема на-
пона у мрежној утичници.
Прикључите други електрични
уређај у мрежну утичницу. Позо-
вите квалификованог елек-
тричара.
Сијалица не ради. Сијалица је у режиму stand-by. Затворите и отворите врата.
Сијалица није исправна. Прочитајте поглавље "Замена си-
јалице".
Уколико Ваш уређај после ових провера и
даље не ради правилно, контактирајте нај-
ближи Сервисни центар.
Замена сијалице
1. Ископчајте уређај.
2. Гурните покретни део како бисте осло-
бодили поклопац унутрашњег светла
(1).
3. Уклоните поклопац унутрашњег светла
(2).
4. Ако је потребно, сијалицу замените си-
јалицом сличних карактеристика и сна-
ге. Препоручујемо да користите сијали-
цу Osram PARATHOM SPECIAL T26 0,8
W.
5. Вратите поклопац лампице.
6. Повежите уређај.
37
www.zanussi.com

7. Отворите врата. Проверите да ли се
светло пали.
1
2
Затварање врата
1. Очистите заптивке на вратима.
2. Ако је потребно, подесите врата. По-
гледајте одељак „Инсталација“.
3. Ако је потребно, замените оштећене
заптивке на вратима. Обратите се
овлашћеном сервисном центру.
Инсталација
ПАЖЊА За вашу безбедност и уа
правилан рад уређаја, пре него што
инсталирате уређај пажљиво прочитајте
"Информације о безбедности".
Постављање
Уређај инсталирајте на месту на којем соб-
на температура одговара климатској класи
означеној на плочици са техничким карак-
теристикама уређаја:
Климат-
ска кла-
са
Собна температура
SN +10°C дo + 32°C
N +16 °C дo + 32°C
SТ +16 °C дo + 38°C
T +16 °C дo + 43 °C
Постављање
Уређај треба да буде постављен далеко од
извора топлоте као што су радијатори, бој-
лери, директни сунчеви зраци, итд. Осигу-
рајте слободну циркулацију ваздуха око
задњег дела уређаја. Да би се осигурале
најбоље радне карактеристике уређаја по-
стављеног испод висећег зидног елемента,
минимално растојање између врха уређаја
и висећег елемента треба да
буде 100 мм.
Идеално би било да се уређај не налази
испод висећих зидних елемената. Исправ-
но нивелисање се обезбеђује помоћу једне
или више подесивих ногица у подножју уре-
ђаја.
УПОЗОРЕЊЕ Морате омогућити
искључивање уређаја из напајања;
зато утикач кабла за напајање мора да
буде лако приступачан након инсталације.
A
B
100 mm
min
20 mm
Одстојници са задње стране
Два одстојника се налазе у торбици са до-
кументацијом.
Да бисте поставили одстојнике, урадите
следеће:
1. Одврните навој.
2. Ставите одстојник испод навоја.
3. Померите одстојник надесно.
4. Поново заврните навоје.
38
www.zanussi.com

2
4
3
1
Нивелисање
Када постављате уређај, обезбедите да бу-
де нивелисан у водоравном положају. То
можете урадити тако што ћете подесити
две ногице уређаја са предње стране.
Електрично прикључивање
Осигурајте се пре уметања утикача да на-
пон и фреквенција, приказани на плочици
са ознаком типа, одговарају вашем кућном
напајању струјом.
Овај апарат мора бити уземљен. Утикач
напојног кабла је опремљен контактом за
ову намену. Ако утикач кућног напајања
струјом није уземљен, прикључите уређај
на посебно уземљење, и то према важе-
ћим
прописима и уз консултацију квалифи-
кованог електричара.
Произвођач одбија сваку одговорност код
непоштовања горе наведених сигурносних
мера.
Овај апарат одговара следећим Директива-
ма Е.Е.З.
Преокретљивост врата
УПОЗОРЕЊЕ Пре било којих даљих
радњи искључите утикач из утичнице.
ВАЖНО Препоручујемо да следеће радње
изведете уз помоћ друге особе која ће
током поступка преокретања чврсто
држати врата уређаја.
Средња шарка
• Отворите врата. Одвијте завртањ сред-
ње шарке (B). Уклоните пластични од-
стојник (А).
• Уклоните одстојник (F) и померите га на
другу страну
осовине шарке (Е).
• Уклоните врата.
• Скините поклопце осовине средње шар-
ке (C,D) и померите их на супротну стра-
ну.
• Поставите осовину средње шарке (E) у
рупицу на левој страни доњих врата.
DC
E
F
A
B
Доња шарка
• Одшрафите доњу шарку (А)
• Скините осовине левог поклопца (D) и
преместите их на супротну страну
• Поново зашрафите доњу шарку (А) на
супротну страну.
• Одвијте осовину доње шарке (В) и од-
стојник (С) и поставите их на супротну
страну.
39
www.zanussi.com

D
A
B
C
Врата
• Скините чепове (А) на горњој страни
обеју врата и преместите их на супротну
страну.
• Вратите доња врата на осовину доње
шарке (B).
• Убаците средњу шарку (B) у леву рупи-
цу на доњим вратима.
A
Горња шарка
• Одвијте осовину горње шарке (1) и по-
ставите је на супротну страну (2).
2
1
• Поставите горња врата на осовину гор-
њих врата, а доња врата на осовину до-
ње шарке.
• Поново убаците осовину средње шарке
(B) у рупице осовина за горња и доња
врата, лагано нагињући и једна и друга
врата.
3
1
2
1
3
2
• Затегните завртањ средње шарке (B).
Не заборавите да вратите пластични
одстојник (А).
Још једном проверите следеће ствари:
• Сви завртњи су притегнути.
• Ивице врата паралелне су са бочним
ивицама уређаја.
• Магнетна заптивка приања уз уређај.
• Врата се правилно отварају и затварају.
Уколико је у окружењу хладно (нпр. током
зиме), може да се
деси да заптивач не при-
јања за ормарић како треба. У том случају,
сачекајте да се заптивач природно уклопи.
У случају да не желите сами да обавите го-
ре наведене радње, обратите се најбли-
жем овлашћеном сервису. Стручно лице из
овлашћеног сервиса ће вам окренути врата
о вашем трошку.
40
www.zanussi.com

Технички подаци
Димензије
Висина 1850 мм
Ширина 595 мм
Дубина 658 мм
Време пораста температуре 20 ч
Напон 230-240 V
Фреквенција 50 Hz
Техничке информације се налазе на
плочици са техничким карактеристикама са
леве унутрашње стране на уређају на озна-
ци енергетског разреда.
Еколошка питања
Рециклирајте материјале са симболом .
Паковање одложите у одговарајуће
контејнере ради рециклирања.
Помозите у заштити животне средине и
људског здравља као и у рециклирању
отпадног материјала од електронских и
електричних уређаја. Уређаје обележене
симболом
немојте бацати заједно са
смећем. Производ вратите у локални
центар за рециклирање или се обратите
општинској канцеларији.
41
www.zanussi.com

Vsebina
Varnostna navodila _ _ _ _ _ _ _ _ _ _ _ _ 42
Opis izdelka _ _ _ _ _ _ _ _ _ _ _ _ _ _ _ _ 45
Delovanje _ _ _ _ _ _ _ _ _ _ _ _ _ _ _ _ _ 45
Prva uporaba _ _ _ _ _ _ _ _ _ _ _ _ _ _ _ 46
Vsakodnevna uporaba _ _ _ _ _ _ _ _ _ _ 46
Koristni namigi in nasveti _ _ _ _ _ _ _ _ _ 47
Vzdrževanje in čiščenje _ _ _ _ _ _ _ _ _ _ 48
Odpravljanje težav _ _ _ _ _ _ _ _ _ _ _ _ 49
Namestitev _ _ _ _ _ _ _ _ _ _ _ _ _ _ _ _ 51
Tehnični podatki _ _ _ _ _ _ _ _ _ _ _ _ _ 54
Skrb za okolje _ _ _ _ _ _ _ _ _ _ _ _ _ _ _ 54
Pridržujemo si pravico do sprememb.
Varnostna navodila
Pred vgradnjo in prvo uporabo hladilnika na-
tančno preberite navodila za uporabo, vključ-
no z nasveti in opozorili. S tem zagotovite var-
no in pravilno uporabo. V izogib nepotrebnim
napakam in nesrečam poskrbite, da bodo vsi
uporabniki hladilnika podrobno seznanjeni z
njegovim delovanjem in varnostnimi funkcija-
mi. Navodila shranite in poskrbite, da ob selit-
vi ali prodaji ostanejo s hladilnikom. Tako za-
gotovite, da so vsi kasnejši uporabniki ustrez-
no seznanjeni z načinom uporabe in varnim
delovanjem.
Zaradi varnosti uporabnikov in opreme izvedi-
te varnostne ukrepe, opisane v navodilih za
uporabo. Proizvajalec ni odgovoren za po-
škodbe, do katerih pride ob neizvedenih ukre-
pih.
Varnost otrok in občutljivih oseb
• Hladilnika naj ne uporabljajo osebe (vključ-
no z otroci) z omejenimi telesnimi, čutnimi
ali razumskimi sposobnostmi oz. zmanjša-
nimi izkušnjami in znanjem, razen v prime-
ru, ko je oseba, ki je odgovorna za njihovo
varnost, zagotovila nadzor oz. jih natančno
seznanila z uporabo hladilnika.
Zagotovite ustrezen nadzor otrok in prepre-
čite igranje s hladilnikom.
• Embalažo odstranite izven dosega otrok.
Obstaja nevarnost zadušitve.
• Ko odstranjujete rabljen hladilnik, izvlecite
vtič iz omrežne vtičnice, odrežite priključni
kabel (čim bližje hladilniku) in odstranite
vrata. Tako preprečite, da bi bili otroci izpo-
stavljeni nevarnosti udara električnega toka
ali bi se zaprli v hladilnik.
• Če ste s tem hladilnikom zamenjali starejši
model, ki ima namesto magnetnega tesnje-
nja vrat uporabljeno zaskočno (patentno)
ključavnico na vratih, pred odstranjevanjem
rabljenega hladilnika pokvarite ključavnico
(da ne bo več možno zaklepanje). Na ta na-
čin preprečite, da rabljen hladilnik postane
smrtno nevarna past.
Splošna varnostna navodila
Opozorilo!
Prezračevalne odprtine na ohišju naprave ali
vgradni konstrukciji naj ne bodo prekrite.
• Naprava je namenjena hrambi hrane in/ali
pijače v običajnem gospodinjstvu in podob-
ni vrsti uporabe, npr.:
– kuhinjah za zaposlene v trgovinah, pisar-
nah in drugih delovnih okoljih,
–kmečkih hišah in s strani gostov v hote-
lih, motelih in drugih stanovanjskih oko-
ljih,
– kjer nudijo prenočišča z zajtrkom,
– cateringu in podobni ponudbi na debelo.
• Za pospeševanje odtajevanja ne uporabljaj-
te mehanske naprave ali umetnih sredstev.
• V hladilnih napravah ne uporabljajte drugih
električnih naprav (kot so aparati za slado-
led), razen če jih za ta namen odobri proiz-
vajalec.
• Ne poškodujte hladilnega krogotoka.
• Znotraj hladilnega krogotoka naprave se
nahaja hladilno sredstvo izobutan (R600a),
naravni plin z visoko stopnjo okoljske neo-
porečnosti, ki pa je vseeno vnetljiv.
42
www.zanussi.com

Pazite, da se med prevozom in namešča-
njem naprave ne poškodujejo sestavni deli
hladilnega krogotoka.
Če se hladilni krogotok poškoduje, naredite
naslednje:
– izogibajte se odprtemu ognju in virom
vžiga,
– temeljito prezračite prostor, kjer stoji na-
prava.
• Vsakršno spreminjanje lastnosti izdelka ali
samega izdelka je nevarno. Poškodbe ka-
bla lahko povzročijo kratek stik, požar in/ali
električni udar.
Opozorilo! Da se izognete nevarnosti,
mora vse električne dele (električni kabel,
vtič, kompresor) zamenjati pooblaščen za-
stopnik ali usposobljeno servisno osebje.
1. Električnega kabla ni dovoljeno podalj-
ševati.
2. Pazite, da z zadnjim delom naprave ne
stisnete ali poškodujete vtiča. Stisnjen
ali poškodovan vtič se lahko pregreje in
povzroči požar.
3. Poskrbite, da boste imeli dostop do
električnega vtiča naprave.
4. Električnega priključnega kabla ne vle-
cite.
5. Če je vtičnica za električni vtič zrahlja-
na, vanjo ne vstavljajte vtiča. Lahko pri-
de do električnega udara ali požara.
6. Naprave ne smete uporabljati brez na-
meščenega pokrova žarnice (če je
predviden) za notranjo osvetlitev.
• Naprava je težka. Bodite previdni, ko jo pre-
mikate.
• Ne odstranite ali se dotikajte elementov v
predalih zamrzovalnika, če imate mokre/
vlažne roke, ker lahko pride do odrgnin ali
ozeblin na koži.
• Naprava ne sme biti dlje časa izpostavljena
neposrednemu soncu.
• Žarnice (če so predvidene) v tej napravi so
posebne vrste, namenjene le uporabi v
gospodinjskih aparatih. Niso primerne za
osvetlitev prostora.
Vsakodnevna uporaba
• Na plastične dele hladilnika ne postavljajte
vročih posod.
• V hladilniku ne hranite vnetljivih plinov in te-
kočin, ker lahko eksplodirajo.
• Živil ne postavljajte neposredno ob izstopno
odprtino za zrak na zadnji steni. (Če ima
naprava funkcijo samodejnega odtaljeva-
nja)
• Odtajanih zamrznjenih živil ni dovoljeno po-
novno zamrzniti.
• Embalirana zamrznjena živila shranjujte v
skladu z navodili proizvajalca živil.
• Natančno upoštevajte priporočila proizvajal-
ca hladilnika za shranjevanje živil. Oglejte
si ustrezna navodila.
• Pijač z ogljikovo kislino ali penečih pijač ne
shranjujte v zamrzovalniku, ker nastane pri-
tisk na posodo, ki lahko eksplodira in po-
vzroči poškodbo hladilnika.
• Ledene lizike lahko povzročijo ozebline, če
jih zaužijete takoj po jemanju iz zamrzoval-
nika.
Vzdrževanje in čiščenje
• Pred vzdrževanjem izklopite napravo in iz-
ključite vtič iz vtičnice.
•Naprave ne čistite s kovinskimi predmeti.
• Za odstranjevanje zmrzali z naprave ne
uporabljajte ostrih predmetov. Uporabite
plastično strgalo.
• Redno preverjajte odvod za odtajano vodo
v hladilniku. Odvod po potrebi očistite. Če
je odvod zamašen, se bo voda nabirala na
dnu naprave.
Namestitev
Pomembno! Za priključitev na električno
napetost dosledno upoštevajte navodila v
posebnih točkah.
• Odstranite embalažo in preverite hladilnik
glede morebitnih poškodb. Če je hladilnik
poškodovan, ga ne priključite. Morebitne
poškodbe takoj sporočite v trgovino, kjer
ste hladilnik kupili. V tem primeru obdržite
embalažo.
43
www.zanussi.com

•Priporočamo, da pred priključitvijo hladilni-
ka počakate najmanj štiri ure, da olje steče
nazaj v kompresor.
• Okoli hladilnika mora biti zagotovljeno us-
trezno kroženje zraka, da ne pride do pre-
grevanja. Za dosego zadostnega zračenja
upoštevajte navodila za pravilno namesti-
tev.
• Če je le možno, naj bo zadnja stran hladilni-
ka obrnjena proti steni, da je preprečeno
dotikanje vročih delov (kompresorja, kon-
denzatorja) in posledičnih opeklin.
• Hladilnik ne sme biti nameščen poleg radia-
torjev ali štedilnikov.
•Električni vtič mora biti dostopen tudi po na-
mestitvi hladilnika.
• Priključite le na vodovodni sistem s pitno
vodo (Če je predvidena vodovodna napelja-
va).
Servis
•Vsa električna dela, potrebna za servisira-
nje naprave, mora izvesti usposobljen elek-
tričar ali strokovno usposobljena oseba.
• Izdelek lahko servisira samo pooblaščen
serviser, ki mora uporabljati samo original-
ne nadomestne dele
Varstvo okolja
Hladilnik ne vsebuje plinov, ki bi lahko
poškodovali ozonsko plast - niti v hladil-
nem krogotoku, niti v izolacijskih materialih.
Hladilnika ni dovoljeno odstranjevati skupaj z
običajnimi gospodinjskimi odpadki. Izolacijska
pena vsebuje vnetljive pline: hladilnik odstra-
nite v skladu z veljavnimi predpisi, ki jih dobite
na ustreznem občinskem uradu. Izogibajte se
poškodbam hladilne enote, predvsem na za-
dnji strani poleg toplotnega izmenjevalnika.
Materiali, ki so uporabljeni pri tej napravi in so
označeni s simbolom
, se lahko reciklirajo.
44
www.zanussi.com

Opis izdelka
2 43 5 7 8 9
1011121314
61
1
Predala za zelenjavo
2
Steklena polica
3
Steklena polica
4
Steklena polica
5
Steklena polica
6
Upravljalna plošča
7
Polica za mlečne izdelke
8
Vratna polica
9
Polica za steklenice
10
Košara za zamrzovanje
11
Košara Maxibox
12
Košara Frostfree
13
Modul za hlajenje
14
Ploščica za tehnične navedbe
Delovanje
Vklop
Vtič priključite v omrežno vtičnico.
Regulator temperature zavrtite v smeri urine-
ga kazalca na srednjo nastavitev.
Izklop
Hladilnik izklopite z zasukom regulatorja tem-
perature v položaj "O".
Regulacija temperature
Regulacija temperature je samodejna.
Opis postopka za upravljanje hladilnika:
• Regulator temperature zavrtite proti najnižji
nastavitvi za doseganje najnižje temperatu-
re.
45
www.zanussi.com

• Regulator temperature zavrtite proti najvišji
nastavitvi za doseganje najvišje temperatu-
re.
Najbolj primerna je običajno srednja na-
stavitev.
Za natančno nastavitev upoštevajte, da je
temperatura v hladilniku odvisna od:
• temperature v prostoru
• pogostosti odpiranja vrat hladilnika
•količine shranjenih živil
• mesta namestitve hladilnika.
Pomembno! Če je temperatura okolice
visoka ali je hladilnik polno naložen ter je
nastavljen na najnižjo temperaturo, lahko
neprestano nastaja ivje na zadnji strani
hladilnika. V tem primeru nastavite preklopnik
na višjo temperaturo, da omogočite
samodejno odtaljevanje in s tem tudi manjšo
porabo energije.
Prva uporaba
Čiščenje notranjosti
Pred prvo uporabo hladilnika očistite notra-
njost in vso notranjo opremo. Za čiščenje upo-
rabite mlačno vodo z nevtralnim milom, da od-
stranite tipičen vonj po novem izdelku. Hladil-
nik nato obrišite do suhega.
Pomembno! Ne uporabljajte detergentov ali
grobih praškov, ker lahko poškodujete pre-
maz.
Vsakodnevna uporaba
Zamrzovanje svežih živil
Zamrzovalnik je primeren za zamrzovanje
svežih živil in dolgotrajno shranjevanje zamrz-
njenih in globoko zamrznjenih živil.
Za zamrzovanje svežih živil ni potrebno pre-
klopiti srednje nastavitve.
Za hitrejše zamrzovanje zavrtite regulator
temperature proti višji nastavitvi za doseganje
najnižje temperature.
Pomembno! V tem stanju lahko temperatura
v hladilniku pade pod 0 °C. V tem primeru
nastavite regulator temperature na višjo
temperaturo.
Živila, ki jih želite zamrzniti, vstavite v zgornji
predal.
Shranjevanje zamrznjene hrane
Ob prvem vklopu ali po daljšem obdobju neu-
porabe naj zamrzovalnik vsaj dve uri deluje
pri najvišji nastavitvi, preden vanj položite živi-
la.
Pomembno! V primeru nenamernega
odtajanja, npr. da je izpad električnega toka
daljši od vrednosti, navedene v razpredelnici
tehničnih podatkov pod »Čas naraščanja
temperature«, morate odtajana živila porabiti
hitro ali takoj skuhati in ponovno zamrzniti.
Odtaljevanje
Globoko zamrznjena ali zamrznjena živila lah-
ko pred uporabo odmrznete v hladilniku ali pri
sobni temperaturi, odvisno od razpoložljivega
časa.
Majhne kose lahko začnete pripravljati še za-
mrznjene, neposredno iz zamrzovalnika: v
tem primeru bo priprava hrane trajale dlje.
Premične police
Stene hladilnika so opremljene s številnimi vo-
dili, da so lahko police postavljene tako, kot
želite.
46
www.zanussi.com

Namestitev polic v vratih
Da bi lahko shranili zavitke živil različnih veli-
kosti, so lahko vratne police nameščene na
različnih višinah.
Postopoma vlecite police v smeri puščic, do-
kler jih ne odstranite, nato pa jih poljubno na-
mestite.
2
1
3
Odstranitev predalov za zamrzovanje
Predali za zamrzovanje imajo omejevalnik, ki
preprečuje naključno odstranitev ali izpad. Za
odstranitev iz zamrzovalnika predal najprej
povlecite k sebi. Ko dosežete končno točko,
dvignite sprednji del in predal izvlecite.
Predal vstavite nazaj v zamrzovalnik tako, da
narahlo dvignete sprednji del. Ko predal pride
čez končne točke, ga potisnite nazaj v svoj
osnovni položaj.
12
Koristni namigi in nasveti
Zvoki pri normalnem delovanju
•Med črpanjem hladilnega sredstva skozi tu-
ljave ali cevi lahko slišite klokotanje in šu-
menje. To je normalno in pravilno.
• Ko je kompresor vključen se prečrpava hla-
dilno sredstvo, iz kompresorja pa se lahko
sliši brenčanje, ter utripajoč šum. To je nor-
malno in pravilno.
• Temperaturni raztezki lahko povzročijo ne-
naden pok. To je naraven in ne nevaren fi-
zikalen pojav. To je normalno in pravilno.
• Ob vklopu ali izklopu kompresorja slišite ra-
hel "klik" regulatorja temperature. To je nor-
malno in pravilno.
Nasveti za varčevanje z energijo
• Vrat ne odpirajte prepogosto ter jih ne drži-
te odprta dalj časa, kot je nujno potrebno.
• Če je temperatura okolice visoka, regulator
temperature na visoki nastavitvi in je hladil-
nik polno naložen, lahko kompresor nepre-
kinjeno deluje, kar povzroči nastanek ivja
ali ledu na izparilniku. V tem primeru zavrti-
te regulator temperature na nizko nastavi-
tev, da omogočite samodejno odtaljevanje
in tako zmanjšate porabo energije.
Nasveti za shranjevanje svežih živil
Za najboljše rezultate:
• v hladilniku ne shranjujte toplih živil ali hlap-
ljivih tekočin
• živila pokrijte ali ovijte, predvsem živila z
močnim vonjem
• živila namestite tako, da je okoli njih omo-
gočeno prosto kroženje zraka
Nasveti za shranjevanje živil
Uporabni nasveti:
Meso (vse vrste): zavijte v polivinilaste vrečke
in odložite na stekleno polico nad predalom
za zelenjavo.
Zaradi varnosti je takšno shranjevanje dopust-
no največ dva dni.
Pripravljene jedi, hladne jedi itd.: morate jih
pokriti, postavite jih lahko na katerokoli polico.
Sadje in zelenjava: morate ju temeljito očistiti
in položiti v posebej za to namenjen predal.
Če pride limonin sok v stik s plastičnimi deli
hladilnika, se ti lahko razbarvajo. Zato je agru-
me priporočljivo hraniti v ločenih posodah.
Maslo in sir: postavite v posebne neprodušne
posode ali zavijte v aluminijasto folijo oz. vsta-
vite v polivinilaste vrečke, da v čim večji meri
preprečite dostop zraka.
47
www.zanussi.com

Steklenice: zaprte morajo biti s pokrovčki in
shranjene na polici za steklenice na vratih.
Banan, krompirja, čebule in česna ni dovolje-
no shranjevati v hladilniku, če niso zapakirani.
Nasveti za zamrzovanje
Nekaj pomembnih nasvetov za čim boljši po-
stopek zamrzovanja:
•največja količina živil, ki jih lahko zamrznete
v času 24 ur je prikazana na napisni plošči-
ci;
• postopek zamrzovanja traja 24 ur; med tem
časom ne dodajajte drugih živil za zamrzni-
tev;
• zamrznete lahko samo visoko kakovostna,
sveža in temeljito očiščena živila;
• živila razdelite v manjše zavoje, da hitreje
in popolnoma zamrznejo, pozneje pa lahko
odtajate samo količino, ki jo potrebujete;
• živila zavijte v aluminijasto folijo oz. vstavite
v polivinilaste vrečke, da zagotovite nepro-
dušnost;
•preprečite, da bi se sveža, nezamrznjena
živila dotikala zamrznjenih živil, ker bi se
lahko pri tem povišala temperatura slednjih;
• pusta živila se shranjujejo bolje in daljši čas
kot mastna živila; sol skrajša čas shranje-
vanja živil;
• če ledene kocke zaužijete takoj po jemanju
iz zamrzovalnika, lahko pride do ozeblin;
• priporočamo, da na posamezne pakete na-
pišete datum, da zagotovite pregled nad
časom shranjevanja.
Nasveti za shranjevanje zamrznjenih živil
Za najboljšo učinkovitost naprave morate na-
rediti naslednje:
• prepričajte se, da je imel prodajalec zamrz-
njena živila primerno shranjena,
• poskrbite, da bodo zamrznjena živila iz tr-
govine v zamrzovalnik prenesena v najkraj-
šem možnem času,
• vrat ne odpirajte pogosto in jih ne puščajte
odprtih dlje, kot je potrebno,
• odtajana živila hitro izgubijo kakovost in jih
ne smete ponovno zamrzniti,
• ne prekoračite obdobja zamrzovanja, ki ga
navede proizvajalec živil.
Vzdrževanje in čiščenje
Previdnost! Pred vzdrževalnimi deli
izklopite hladilnik iz omrežne napetosti.
Hladilnik vsebuje ogljikovodike v hladilni
enoti; vzdrževalna dela in ponovno pol-
njenje lahko izvajajo samo pooblaščeni tehni-
ki.
Redno čiščenje
Opremo je potrebno redno čistiti:
• Notranjost hladilnika in opremo očistite z
mlačno vodo in nevtralnim milom.
• Redno preverite tesnila vrat in jih dobro ob-
rišite; na tesnilu ne sme biti ostankov.
• Temeljito splaknite in posušite.
Pomembno! Ne vlecite, premikajte ali
poškodujte cevi in/ali kablov v notranjosti.
Za čiščenje notranjosti ne uporabljajte
detergentov, čistilnih praškov, močno
odišavljenih čistilnih sredstev ali loščil na
osnovi voska, ker poškodujejo površino in
puščajo močne vonjave.
Kondenzator (črna mreža) in kompresor na
hrbtni strani naprave očistite s krtačko. Na ta
način boste izboljšali delovanje naprave in pri-
hranili porabo električne energije.
Pomembno! Pazite, da ne poškodujete
hladilnega sistema.
Veliko posebnih čistil za čiščenje kuhinjskih
površin vsebuje kemikalije, ki lahko razjedajo/
poškodujejo plastične dele hladilnika. Zaradi
tega priporočamo, da zunanje dele hladilnika
čistite samo s toplo vodo z dodano majhno
količino sredstva za pomivanje.
Hladilnik po čiščenju ponovno priključite na
omrežno napetost.
48
www.zanussi.com

Odtajevanje hladilnika
Med običajno uporabo se ob vsaki zaustavitvi
kompresorja ivje samodejno odtaja z izparilni-
ka v hladilnem prostoru. Odtajana voda odte-
ka skozi odprtino za odtekanje vode v poseb-
no posodo na zadnji strani naprave nad kom-
presorjem, kjer izhlapi.
Pomembno je, da redno čistite odprtino za od-
tekanje odtajane vode na sredini kanala hla-
dilnega prostora in s tem preprečite prelivanje
in kapljanje vode po živilih v notranjosti. Za to
uporabite priloženo posebno čistilno palčko, ki
je že vstavljena v odprtino za odtekanje vode.
Odmrzovanje zamrzovalnika
Na policah in okoli zgornjega razdelka zamrz-
ovalnika se vedno nabere nekaj ledu.
Ko debelina ledu doseže 3-5 mm, ga morate
odstraniti.
Postopek za odstranjevanje ledu:
• izvlecite vtič iz omrežne vtičnice ali izklopite
hladilnik
• odstranite zamrznjena živila, jih zavijte v
več plasti časopisnega papirja in jih odložite
v hladen prostor
• izvlecite predale zamrzovalnika
• okoli predalov namestite izolacijski material,
npr. odeje ali časopise.
Odmrzovanje v zamrzovalniku lahko pospeši-
te tako, da vanj postavite posodo s toplo (ne
vrelo) vodo.
• Kanal za odvod vode sprostite z njegovega
mesta za shranjevanje in ga v skladu s sli-
ko namestite na dno predala zamrzovalni-
ka, kjer se nabira voda
• Ko se led začne tajati, ga previdno odstra-
nite. Uporabite leseno ali plastično strgalo
• Ko se odtaja ves led, očistite notranjost in
jo obrišite do suhega, kanal za odvod vode
pa namestite nazaj na svoje mesto.
• Zamrzovalnik ponovno vklopite in vanj vsta-
vite zamrznjena živila.
Priporočamo, da hladilnik nekaj ur uporab-
ljate s termostatom v položaju za najnižjo
temperaturo, da lahko čim prej doseže us-
trezno temperaturo shranjevanja.
Pomembno! Za odstranjevanje ivja ali ledu iz
izparilnika nikoli ne uporabljajte ostrih
kovinskih pripomočkov, ker lahko poškodujete
izparilnik. Za hitrejše odtaljevanje ne
uporabljajte mehanskih ali nenaravnih
sredstev, razen tistih, ki jih priporoča
proizvajalec. Povišanje temperature paketov
zamrznjenih živil med odtaljevanjem lahko
skrajša čas varnega shranjevanja živil.
Odpravljanje težav
Previdnost! Pred odpravljanjem težav
izvlecite vtič iz omrežne vtičnice.
Težave, ki niso opisane v tem priročniku,
mora odpraviti usposobljen električar ali
strokovno usposobljena oseba.
Pomembno! Med običajnim delovanjem se
pojavijo nekateri zvoki (kompresor, kroženje
hladilnega sredstva).
49
www.zanussi.com

Motnja Možen vzrok Rešitev
Hladilnik je glasen. Hladilnik ni pravilno postavljen. Preverite pravilno namestitev hladil-
nika (na tleh morajo stati vse štiri
noge).
Kompresor deluje nepreki-
njeno.
Morda je regulator temperature
nepravilno nastavljen.
Nastavite višjo temperaturo.
Vrata niso dobro zaprta. Oglejte si poglavje "Zapiranje vrat".
Vrata se prepogosto odpirajo. Vrat ne držite odprtih dalj časa, kot
je potrebno.
Temperatura živila je previsoka. Pred shranjevanjem živila počakaj-
te, da se njegova temperatura zniža
na sobno temperaturo.
Temperatura v prostoru je previso-
ka.
Znižajte temperaturo v prostoru.
Na hrbtni plošči hladilnika
teče voda.
Med samodejnim postopkom od-
mrzovanja se na hrbtni plošči taja
ivje.
To je normalno in pravilno.
Voda teče v hladilnik. Iztok vode je zamašen. Očistite iztok vode.
Živila preprečujejo odtekanje vode
v vodni zbiralnik.
Živila se ne smejo dotikati hrbtne
plošče.
Voda teče na tla. Staljena voda ne teče v zbiralni
podstavek nad kompresorjem.
Izhod za staljeno vodo namestite v
zbiralni podstavek.
Nastaja preveč ivja in ledu. Živila niso pravilno zavita. Živila bolje zavijte.
Vrata niso dobro zaprta. Oglejte si poglavje "Zapiranje vrat".
Morda je regulator temperature
nepravilno nastavljen.
Nastavite višjo temperaturo.
Temperatura v hladilniku je
prenizka.
Morda je regulator temperature
nepravilno nastavljen.
Nastavite višjo temperaturo.
Temperatura v hladilniku je
previsoka.
Morda je regulator temperature
nepravilno nastavljen.
Nastavite nižjo temperaturo.
Vrata niso dobro zaprta. Oglejte si poglavje "Zapiranje vrat".
Temperatura živila je previsoka. Pred shranjevanjem živila počakaj-
te, da se njegova temperatura zniža
na sobno temperaturo.
Veliko živil je bilo shranjenih isto-
časno.
Istočasno shranjujte manjšo količino
izdelkov.
Temperatura v hladilniku je
previsoka.
V hladilniku ni kroženja hladnega
zraka.
Zagotovite kroženje hladnega zraka
v hladilniku.
Temperatura v zamrzovalni-
ku je previsoka.
Živila so postavljena preblizu sku-
paj.
Živila shranjujte tako, da lahko med
njimi kroži hladen zrak.
Hladilnik ne deluje. Hladilnik je izključen. Vključite hladilnik.
Vtič ni pravilno priključen v omrež-
no vtičnico.
Vtič pravilno priključite v omrežno
vtičnico.
50
www.zanussi.com

Motnja Možen vzrok Rešitev
Na hladilniku ni električne napeto-
sti. V omrežni vtičnici ni električne
napetosti.
V omrežno vtičnico priključite drugo
električno napravo. Posvetujte se s
strokovno usposobljenim električa-
rjem.
Žarnica ne deluje. Luč je v stanju pripravljenosti. Zaprite in odprite vrata.
Luč je okvarjena. Glejte »Zamenjava žarnice«.
Če naprava tudi po izvedenih zgornjih preve-
rjanjih ne deluje pravilno, pokličite naš servis-
ni center.
Zamenjava žarnice
1. Napravo izključite iz električnega omrež-
ja.
2. Potisnite premični del, da sprostite pokrov
žarnice (1).
3. Odstranite pokrov žarnice (2).
4. Po potrebi zamenjajte žarnico z žarnico
podobnih značilnosti in moči. Predlagamo
vam, da uporabite žarnico znamke Osram
PARATHOM SPECIAL T26 0,8 W.
5. Namestite pokrov žarnice.
6. Priključite napravo.
7. Odprite vrata. Preverite, ali lučka zasveti.
1
2
Zapiranje vrat
1. Očistite tesnila vrat.
2. Po potrebi nastavite vrata. Glejte »Name-
stitev«.
3. Po potrebi zamenjajte poškodovana tes-
nila vrat. Obrnite se na servisni center.
Namestitev
Namestitev
To napravo namestite v prostoru s temperatu-
ro, ki ustreza klimatskemu razredu s ploščice
za tehnične navedbe naprave:
Klimatski
razred
Temperatura okolice
SN +10 °C do +32 °C
N +16 °C do +32 °C
ST +16 °C do +38 °C
T +16 °C do +43 °C
Mesto namestitve
Naprava naj bo postavljena čim dlje od virov
toplote, kot so radiatorji, grelci, neposredna
sončna svetloba itd. Zagotovite nemoteno
kroženje zraka na hrbtni strani ohišja. Za za-
gotovitev najboljšega delovanja, če je naprava
postavljena pod visečo stensko enoto, mora
biti najmanjša razdalja med vrhom ohišja in
stensko enoto najmanj 100 mm. Če je možno,
naj naprava ne bo postavljena pod visečimi
stenskimi enotami. Natančno namestitev v vo-
doravno lego dosežete z eno ali več nastavlji-
vimi nogami na dnu ohišja.
Opozorilo! Omogočena mora biti
izključitev naprave iz napajanja; vtič
mora biti po namestitvi zato enostavno
dostopen.
51
www.zanussi.com

A
B
100 mm
min
20 mm
Distančniki na hrbtni strani
V vrečki z dokumentacijo sta dva distančnika.
Postopek za namestitev distančnikov:
1. Popustite vijak.
2. Distančnik namestite pod glavo vijaka.
3. Distančnik obrnite v desno.
4. Ponovno privijte vijaka.
2
4
3
1
Namestitev v vodoraven položaj
Ko nameščate napravo, se prepričajte, da je v
vodoravni legi. To lahko dosežete z nastavlji-
vima nogama na sprednji spodnji strani.
Priključitev na električno napetost
Pred priključitvijo se prepričajte, da sta nape-
tost in frekvenca na napisni ploščici enaki kot
sta omrežna napetost in frekvenca na mestu
priključitve.
Hladilnik mora biti ozemljen. V ta namen je na
napajalnem kablu nameščen varnostni omrež-
ni vtič. Če omrežna vtičnica ni ozemljena,
priključite hladilnik na ločeno ozemljitveno toč-
ko v skladu s trenutno veljavnimi predpisi. Po-
svetujte se z usposobljenim električarjem.
Proizvajalec zavrača vsakršno odgovornost v
primeru neupoštevanja zgornjih varnostnih
opozoril.
Hladilnik je izdelan v skladu z naslednjimi
smernicami EGS.
Menjava strani odpiranja vrat
Opozorilo! Pred izvajanjem del izvlecite
vtič iz omrežne vtičnice.
Pomembno! Predlagamo, da naslednje delo
opravite skupaj z drugo osebo, ki bo med
zamenjavo strani odpiranja vrat držala vrata
naprave.
Srednji tečaj
• Odprite vrata. Odvijte srednji tečaj (B). Od-
stranite plastični distančnik (A).
• Odstranite distančnik (F) in ga premaknite
na drugo stran zatiča tečaja (E).
• Odstranite vrata.
• Odstranite pokrivna čepa srednjega tečaja
(C,D) in ju prestavite na nasprotno stran.
•Zatič srednjega tečaja (E) namestite v odpr-
tino na levi strani spodnjih vrat.
52
www.zanussi.com

DC
E
F
A
B
Spodnji tečaj
• Odvijte spodnji tečaj (A).
• Odstranite pokrivna čepa (D) z leve strani
in ju premaknite na nasprotno stran.
• Ponovno privijte spodnji tečaj (A) na na-
sprotno stran.
• Odvijte zatič spodnjega tečaja (B) in di-
stančnik (C) ter ju namestite na nasprotno
stran.
D
A
B
C
Vrata
• Odstranite čepa (A) na zgornjem delu obeh
vrat in ju premaknite na nasprotno stran.
• Ponovno namestite spodnja vrata na zatič
spodnjega tečaja (B).
• Srednji tečaj (B) vstavite v levo luknjo
spodnjih vrat.
A
Zgornji tečaj
• Odvijte zatič zgornjega tečaja (1) in ga na-
mestite na nasprotno stran (2).
2
1
• Zgornja vrata namestite na tečaj zgornjih
vrat, spodnja vrata pa na zatič spodnjega
tečaja.
• Ponovno namestite zatiča srednjega teča-
ja (B) v odprtini zatičev spodnjih in zgornjih
vrat, pri tem pa rahlo nagibajte oboja vrata.
3
1
2
1
3
2
• Ponovno privijte srednji tečaj (B). Ne po-
zabite plastičnega distančnika (A).
Opravite končni pregled, da preverite:
• Ali so priviti vsi vijaki.
• Ali so robovi vrat poravnani s stranskim ro-
bom naprave.
• Ali se magnetno tesnilo stika z omaro.
• Ali se vrata pravilno odpirajo in zapirajo.
Če je temperatura okolice prenizka (npr. pozi-
mi), se tesnilo morda ne bo povsem prilegalo
omari. V tem primeru počakajte, da pride do
naravnega prileganja tesnila.
Če zgoraj opisanega dela ne želite opraviti
sami, se obrnite na poprodajno servisno služ-
bo. Usposobljen serviser bo na vaše stroške
opravil zamenjavo strani odpiranja vrat.
53
www.zanussi.com

Tehnični podatki
Dimenzija
Višina 1850 mm
Širina 595 mm
Globina 658 mm
Čas naraščanja temperature 20 h
Napetost 230-240 V
Frekvenca 50 Hz
Tehnični podatki se nahajajo na ploščici za
tehnične navedbe na notranji levi strani na-
prave in energijski nalepki.
Skrb za okolje
Reciklirajte materiale, ki jih označuje simbol
. Embalažo odložite v ustrezne zabojnike za
reciklažo.
Pomagajte zaščititi okolje in zdravje ljudi ter
reciklirati odpadke električnih in elektronskih
naprav. Naprav, označenih s simbolom , ne
odstranjujte z gospodinjskimi odpadki. Izdelek
vrnite na krajevno zbirališče za recikliranje ali
se obrnite na občinski urad.
54
www.zanussi.com

Índice de materias
Instrucciones de seguridad _ _ _ _ _ _ _ _ _ 55
Descripción del producto _ _ _ _ _ _ _ _ _ _ 58
Funcionamiento _ _ _ _ _ _ _ _ _ _ _ _ _ _ _ 58
Primer uso _ _ _ _ _ _ _ _ _ _ _ _ _ _ _ _ _ _ 59
Uso diario _ _ _ _ _ _ _ _ _ _ _ _ _ _ _ _ _ _ 59
Consejos útiles _ _ _ _ _ _ _ _ _ _ _ _ _ _ _ 60
Mantenimiento y limpieza _ _ _ _ _ _ _ _ _ _ 61
Solución de problemas _ _ _ _ _ _ _ _ _ _ _ 63
Instalación _ _ _ _ _ _ _ _ _ _ _ _ _ _ _ _ _ _ 65
Datos técnicos _ _ _ _ _ _ _ _ _ _ _ _ _ _ _ _ 68
Aspectos medioambientales _ _ _ _ _ _ _ _ 68
Salvo modificaciones.
Instrucciones de seguridad
Por su seguridad y para garantizar el funciona-
miento correcto del aparato, antes de instalarlo
y utilizarlo por primera vez lea atentamente este
manual del usuario, incluidos los consejos y ad-
vertencias. Para evitar errores y accidentes, es
importante que todas las personas que utilicen
el aparato estén perfectamente al tanto de su
funcionamiento y de las características de segu-
ridad. Conserve estas instrucciones y no olvide
mantenerlas junto al aparato en caso de su des-
plazamiento o venta para que quienes lo utilicen
a lo largo de su vida útil dispongan siempre de
la información adecuada sobre el uso y la segu-
ridad.
Por la seguridad de personas y bienes, siga las
normas de seguridad indicadas en estas ins-
trucciones, ya que el fabricante no se hace res-
ponsable de daños provocados por omisiones.
Seguridad de niños y personas
vulnerables
• Este electrodoméstico no está diseñado para
que lo usen personas (incluidos niños) con
discapacidad física, sensorial o mental, o con
experiencia y conocimiento insuficientes, a
menos que una persona responsable de su
seguridad les supervise o instruya en el uso
del electrodoméstico.
No permita que los niños jueguen con el
electrodoméstico.
• Mantenga los materiales de embalaje aleja-
dos de los niños. Existe riesgo de asfixia.
• Si va a desechar el aparato, extraiga el en-
chufe de la toma, corte el cable de conexión
(tan cerca del aparato como pueda) y retire la
puerta para impedir que los niños al jugar
puedan sufrir descargas eléctricas o quedar
atrapados en su interior.
• Si este aparato, que cuenta con juntas de
puerta magnéticas, sustituirá a un aparato
más antiguo con cierre de muelle (pestillo) en
la puerta, cerciórese de inutilizar el cierre de
muelle antes de desechar el aparato antiguo.
Evitará así que se convierta en una trampa
mortal para niños.
Instrucciones generales de seguridad
Advertencia
Mantenga libres de obstrucciones las aberturas
de ventilación del alojamiento del aparato o de
la estructura empotrada
• El aparato está diseñado para conservar los
alimentos y bebidas de una vivienda normal,
como se explica en este folleto de instruccio-
nes.
– áreas de cocina para el personal en tien-
das, oficinas y otros entornos de trabajo;
– granjas y por clientes en hoteles, moteles y
otros entornos de tipo residencial;
– entornos de tipo hostales o pensiones;
– servicios de catering y actividades simila-
res al por mayor.
• No utilice dispositivos mecánicos ni medios
artificiales para acelerar el proceso de des-
congelación.
• No utilice otros aparatos eléctricos (como
máquinas para hacer helados) dentro de los
aparatos de refrigeración, a menos que el fa-
bricante haya autorizado su utilización para
estos fines.
55
www.zanussi.com

• No dañe el circuito del refrigerante.
• El circuito del refrigerante del aparato contie-
ne isobutano (R600a). Se trata de un gas na-
tural con un alto nivel de compatibilidad me-
dioambiental, aunque es inflamable.
Durante el transporte y la instalación del apa-
rato, cerciórese de no provocar daños en el
circuito de refrigeración.
Si el circuito de refrigeración se daña:
– mantenga el aparato alejado de las llamas
y de cualquier fuente de encendido
– ventile bien la habitación en la que se en-
cuentra el aparato
• Es peligroso alterar las especificaciones o
modificar este producto en modo alguno.
Cualquier daño en el cable de alimentación
puede provocar un cortocircuito, un incendio
o una descarga eléctrica.
Advertencia Los componentes eléctricos
(cable de alimentación, enchufe, compre-
sor) debe sustituirlos un técnico autorizado o
personal de reparaciones profesional a fin de
evitar riesgos.
1. El cable de alimentación no se debe pro-
longar.
2. Compruebe que la parte posterior del
aparato no aplaste ni dañe el enchufe.
Un enchufe aplastado o dañado puede
recalentarse y provocar un incendio.
3. Cerciórese de que tiene acceso al en-
chufe del aparato.
4. No tire del cable de alimentación.
5. Si la toma de red está floja, no introduzca
el enchufe. Existe riesgo de descarga
eléctrica o incendio.
6. No utilice el aparato sin la tapa de la
bombilla (si está provisto de ella) de ilu-
minación interior.
• Este aparato es pesado. Debe tener precau-
ciones durante su desplazamiento.
• No retire ni toque elementos del comparti-
mento congelador con las manos húmedas o
mojadas, ya que podría sufrir abrasión de la
piel o quemaduras por congelación.
• Evite la exposición prolongada del aparato a
la luz solar directa.
• Las bombillas que se utilizan en este aparato
(si está provisto de ellas) son especiales, y se
han seleccionado exclusivamente para uso en
aparatos domésticos. No pueden utilizarse
para la iluminación de la vivienda.
Uso diario
• No coloque recipientes calientes sobre las
piezas plásticas del aparato.
• No almacene gas ni líquido inflamable en el
aparato, ya que podrían estallar.
• No coloque alimentos directamente contra la
salida de aire de la pared posterior. (Si el
aparato es No Frost, es decir, no acumula es-
carcha.)
• Los alimentos que se descongelen no deben
volver a congelarse.
• Guarde los alimentos congelados, que se ad-
quieren ya envasados, siguiendo las instruc-
ciones del fabricante.
• Se deben seguir estrictamente las recomen-
daciones del fabricante del aparato sobre el
almacenamiento. Consulte las instrucciones
correspondientes.
• No coloque bebidas carbonatadas o con gas
en el congelador, ya que se genera presión
en el recipiente, que podría estallar y dañar el
aparato.
• Si se consumen polos helados retirados di-
rectamente del aparato, se pueden sufrir que-
maduras causadas por el hielo.
Cuidado y limpieza
• Antes de realizar tareas de mantenimiento,
apague el aparato y desconecte el enchufe
de la toma de red.
• No limpie el aparato con objetos metálicos.
• No utilice objetos afilados para eliminar el
hielo del aparato. Utilice un raspador plástico.
• Inspeccione habitualmente el desagüe del
agua descongelada del frigorífico. Si es ne-
cesario, limpie el desagüe. Si el desagüe se
bloquea, el agua se acumulará en la base del
aparato.
56
www.zanussi.com

Instalación
Importante Para realizar la conexión eléctrica,
siga atentamente las instrucciones de los
párrafos correspondientes.
• Desembale el aparato y compruebe que no
tiene daños. No conecte el aparato si está
dañado. Informe de los posibles daños de in-
mediato a la tienda donde lo adquirió. En ese
caso, conserve el material de embalaje.
• Es recomendable esperar al menos dos ho-
ras antes de conectar el aparato, para permi-
tir que el aceite regrese al compresor.
• El aparato debe contar con circulación de ai-
re adecuada alrededor, ya que de lo contrario
se produce recalentamiento. Para conseguir
una ventilación suficiente, siga las instruccio-
nes correspondientes a la instalación.
• Siempre que sea posible, la parte posterior
del producto debe estar contra una pared,
para evitar que se toquen las partes calientes
(compresor, condensador) y se produzcan
quemaduras.
• El aparato no debe colocarse cerca de radia-
dores ni de hornillas de cocina.
• Asegúrese de que es posible acceder al en-
chufe después de instalar el electrodomésti-
co.
• Realice la conexión sólo a un suministro de
agua potable (si está prevista una conexión
de agua).
Servicio técnico
• Un electricista homologado deberá realizar
las tareas que se requieran para ejecutar el
servicio o mantenimiento de este electrodo-
méstico.
• Las reparaciones de este aparato debe reali-
zarlas un centro de servicio técnico autoriza-
do y sólo se deben utilizar recambios origina-
les.
Protección del medio ambiente
Este aparato no contiene gases perjudicia-
les para la capa de ozono, ni en el circuito
de refrigerante ni en los materiales aislantes. El
aparato no se debe desechar junto con los resi-
duos urbanos. La espuma aislante contiene ga-
ses inflamables: el aparato se debe desechar
de acuerdo con la normativa vigente, que puede
solicitar a las autoridades locales. No dañe la
unidad de refrigeración, en especial la parte tra-
sera, cerca del intercambiador de calor. Los
materiales de este aparato marcados con el
símbolo
son reciclables.
57
www.zanussi.com

Descripción del producto
2 43 5 7 8 9
1011121314
61
1
Cajones de verduras
2
Estante de cristal
3
Estante de cristal
4
Estante de cristal
5
Estante de cristal
6
Panel de control
7
Estante para productos lácteos
8
Estante de la puerta
9
Estante para botellas
10
Cesto para congelación
11
Cesto Maxibox
12
Cesto Frostfree
13
Módulo frío
14
Placa de características
Funcionamiento
Encendido
Introduzca el enchufe en la toma.
Gire el regulador de temperatura hacia la dere-
cha, a un ajuste intermedio.
Apagado
Para apagar el aparato, gire el regulador de
temperatura hasta la posición "O".
Regulación de la temperatura
La temperatura se regula automáticamente.
Para utilizar el aparato, proceda de la manera si-
guiente:
• Gire el regulador de temperatura hacia ajus-
tes más bajos para obtener el frío mínimo.
58
www.zanussi.com

• Gire el regulador de temperatura hacia ajus-
tes más altos para obtener el frío máximo.
Lo más conveniente es ajustar la tempera-
tura en una posición intermedia.
Sin embargo, el ajuste exacto debe elegirse te-
niendo en cuenta que la temperatura interior del
aparato depende de:
• la temperatura ambiente
• la frecuencia con que se abre la puerta
• la cantidad de alimentos guardados
• la ubicación del aparato.
Importante Si la temperatura ambiente es
elevada o el aparato está totalmente lleno y se
ha ajustado a las temperaturas más bajas,
puede mantenerse en marcha de manera
continua provocando la formación de escarcha
en la pared posterior. En tal caso, el mando
debe colocarse a temperatura más elevada para
permitir la descongelación automática y reducir
así el consumo energético.
Primer uso
Limpieza de las partes internas
Antes del empleo limpiar todas las partes inter-
nas con agua tibia y jabón neutro, a fin de elimi-
nar el característico olor de nuevo y secarlas
luego cuidadosamente.
Importante No utilice detergentes ni polvos
abrasivos, ya que podrían dañar el acabado
Uso diario
Congelación de alimentos frescos
El compartimento congelador está ideado para
la congelación de alimentos frescos y para la
conservación a largo plazo de alimentos conge-
lados y ultracongelados.
Para congelar alimentos frescos no es necesa-
rio cambiar el ajuste intermedio.
Sin embargo, para lograr una congelación más
rápida, gire el regulador de temperatura a un
ajuste más alto para obtener el frío máximo.
Importante En esa situación, la temperatura
del compartimento frigorífico puede descender
por debajo de 0 °C. En ese caso, sitúe el
regulador de temperatura en un ajuste menos
frío.
Coloque los alimentos que vaya a congelar en
el compartimento superior.
Almacenamiento de alimentos
congelados
Al poner en marcha el aparato por primera vez o
después de un periodo sin uso, déjelo en mar-
cha al menos durante 2 horas con un ajuste alto
antes de colocar los productos en el comparti-
mento.
Importante En caso de producirse una
descongelación accidental, por ejemplo, por un
corte del suministro eléctrico, si la interrupción
ha sido más prolongada que el valor indicado
en la tabla de características técnicas bajo
"tiempo de elevación", los alimentos
descongelados deben consumirse cuanto antes
o cocinarlos de inmediato y volverlos a congelar
(después de que se hayan enfriado).
Descongelación
Los alimentos ultracongelados o congelados,
antes de utilizarlos, se pueden descongelar en
el compartimento frigorífico o a temperatura am-
biente, dependiendo del tiempo de que se dis-
ponga.
Es posible incluso cocinar piezas pequeñas
congeladas, tomadas directamente del congela-
dor; en tal caso, el tiempo de cocción será más
prolongado.
Estantes móviles
Las paredes del frigorífico cuentan con una se-
rie de guías para colocar los estantes del modo
que se prefiera.
59
www.zanussi.com

Colocación de los estantes de la puerta
Para guardar paquetes de alimentos de distin-
tos tamaños, los estantes de la puerta se pue-
den colocar a diferentes alturas.
Eleve paulatinamente el estante en la dirección
de las flechas hasta retirarlo del soporte y coló-
quelo en la posición que prefiera.
2
1
3
Extracción de los cestos de congelados
del congelador
Los cestos de congelados llevan un tope para
impedir que se salgan de las guías o se caigan.
Para extraer un cesto del congelador, tire de él
hacia fuera y, cuando llegue al tope, retírelo ti-
rando suavemente de su parte delantera.
Para volver a colocarlo en su lugar, levante lige-
ramente la parte delantera del cesto e insértelo
en el congelador. Cuando haya superado los to-
pes, empuje los cestos hasta el fondo.
12
Consejos útiles
Sonidos de funcionamiento normal
• Es posible que oiga un gorgoteo o burbujeo
cuando el refrigerante circula a través del cir-
cuito de refrigeración o tuberías. Esto es co-
rrecto.
• Cuando el compresor está en marcha, el re-
frigerante es bombeado a través de todo el
circuito y el compresor emite un zumbido o
un sonido intermitente. Esto es correcto.
• La dilatación térmica puede provocar un re-
pentino crujido. Es un fenómeno físico natural
que no representa riesgo alguno. Esto es co-
rrecto.
• Cuando el compresor se activa o desactiva,
el regulador de temperatura emite un chas-
quido débil. Esto es correcto.
Consejos para ahorrar energía
• No abra la puerta con frecuencia ni la deje
abierta más tiempo del estrictamente necesa-
rio.
• Si la temperatura ambiente es elevada, la
temperatura del aparato se ha ajustado en los
valores más altos y está totalmente lleno, el
compresor podría funcionar de manera conti-
nua, provocando la formación de escarcha o
hielo en el evaporador. Si esto sucede, gire el
regulador de temperatura a valores inferiores
para permitir la descongelación automática y
ahorrar en el consumo eléctrico.
Consejos para la refrigeración de
alimentos frescos
Para obtener los mejores resultados:
• no guarde en el frigorífico alimentos calientes
ni líquidos en evaporación;
• cubra o envuelva los alimentos, en especial si
tienen sabores fuertes;
• coloque los alimentos de modo que el aire
pueda circular libremente entre ellos.
Consejos para la refrigeración
Consejos útiles:
60
www.zanussi.com

Carne (de todo tipo): guárdela en bolsas de
plástico y colóquela en el estante de vidrio, so-
bre el cajón de las verduras.
Por razones de seguridad, guárdela de ese mo-
do durante uno o dos días, como máximo.
Alimentos cocinados, platos fríos, etc.: cúbralos
y colóquelos en cualquier estante.
Frutas y verduras: una vez lavadas a fondo,
guárdelas en los cajones especiales suministra-
dos al efecto. Si entra en contacto, el zumo de
limón puede decolorar las partes de plástico del
frigorífico. Por ello, se recomienda guardar los
cítricos en contenedores separados.
Mantequilla y queso: colóquelos en recipientes
herméticos especiales o envueltos en papel de
aluminio o en bolsas de plástico, para excluir
tanto aire como sea posible.
Botellas: deben guardarse tapadas en el estan-
te para botellas de la puerta.
Los plátanos, las patatas, las cebollas y los ajos,
si no están empaquetados, no deben guardarse
en el frigorífico.
Consejos sobre la congelación
Estos consejos son importantes para poder
aprovechar al máximo el proceso de congela-
ción:
• la cantidad máxima de alimentos que puede
congelarse en 24 horas se muestra en la pla-
ca de datos técnicos;
• el proceso de congelación requiere 24 horas.
Durante ese periodo no deben añadirse otros
alimentos para congelación;
• congele sólo productos alimenticios de máxi-
ma calidad, frescos y perfectamente limpios;
• prepare los alimentos en porciones pequeñas
para que se congelen de manera rápida y to-
tal, así como para poder descongelar poste-
riormente sólo las cantidades necesarias;
• envuelva los alimentos en papel de aluminio o
polietileno y compruebe que los envoltorios
quedan herméticamente cerrados;
• no permita que alimentos frescos y sin con-
gelar entren en contacto con alimentos ya
congelados, para evitar el aumento de tem-
peratura de los segundos;
• los alimentos magros se congelan mejor que
los grasos; la sal reduce el tiempo de alma-
cenamiento de los alimentos;
• el hielo, si se consume inmediatamente des-
pués de retirarlo del compartimento congela-
dor, puede provocar quemaduras por conge-
lación en la piel;
• es recomendable etiquetar cada paquete con
la fecha de congelación para controlar el
tiempo que permanecen almacenados.
Consejos para el almacenamiento de
alimentos congelados
Para obtener el máximo rendimiento de este
aparato, deberá:
• comprobar que el comerciante ha mantenido
los productos congelados correctamente al-
macenados;
• procurar que los alimentos congelados pasen
de la tienda al congelador en el menor tiempo
posible;
• evitar la apertura frecuente de la puerta o de-
jarla abierta más del tiempo estrictamente ne-
cesario;
• los alimentos descongelados se deterioran
con rapidez y no pueden congelarse de nue-
vo;
• no supere el tiempo de almacenamiento indi-
cado por el fabricante de los alimentos.
Mantenimiento y limpieza
Precaución Antes de realizar tareas de
mantenimiento, desenchufe el aparato.
Este equipo contiene hidrocarburos en la
unidad de refrigeración; por tanto, el man-
tenimiento y la recarga deben estar a cargo ex-
clusivamente de técnicos autorizados.
Limpieza periódica
El equipo debe limpiarse de manera habitual:
• Limpie el interior y los accesorios con agua
templada y un jabón neutro.
61
www.zanussi.com

• Revise y limpie periódicamente las juntas de
la puerta para mantenerlas limpias y sin res-
tos.
• Aclare y seque a fondo.
Importante No mueva, dañe ni tire de los
conductos o cables del interior del armario.
No utilice detergentes, polvos abrasivos,
productos de limpieza perfumados ni cera para
limpiar el interior, ya que dañarán la superficie y
dejarán un fuerte olor.
Limpie el condensador (rejilla negra) y el com-
presor de la parte posterior del aparato con un
cepillo. Esa operación mejorará el rendimiento
del aparato y reducirá el consumo eléctrico.
Importante Tenga cuidado para no dañar el
sistema de refrigeración.
Muchas marcas de limpiadores de superficies
de cocina contienen químicos que pueden ata-
car o dañar los plásticos del aparato. Por tal ra-
zón, se recomienda que el exterior del aparato
se limpie sólo con agua templada a la que se
añadirá un poco de líquido lavavajillas.
Después de la limpieza, vuelva a conectar el
aparato a la toma de red.
Descongelación del frigorífico
La escarcha se elimina automáticamente del
evaporador del frigorífico cada vez que se detie-
ne el compresor, durante el funcionamiento nor-
mal. El agua de la descongelación se descarga
hacia un recipiente especial situado en la parte
posterior del aparato, sobre el motor compre-
sor, donde se evapora.
Es importante limpiar periódicamente el orificio
de salida del agua de descongelación situado
en la mitad del canal del compartimento frigorífi-
co para evitar que el agua se desborde y caiga
sobre los alimentos del interior. Utilice el limpia-
dor especial suministrado, que hallará ya colo-
cado en el orificio de desagüe.
Descongelación del congelador
Siempre suele formarse un poco de escarcha
en los estantes del congelador y en torno al
compartimento superior.
Descongele el congelador sólo cuando la capa
de escarcha tenga de 3 a 5 mm de grosor.
Para eliminar la escarcha, siga estos pasos:
• desenchufe el aparato de la toma de corrien-
te o desconéctelo
• retire los alimentos congelados, envuélvalos
en varias hojas de papel periódico y colóque-
los en un sitio fresco
• retire los cestos del congelador
• coloque material aislante alrededor de los
cestos, por ejemplo, mantas o periódicos.
Para acelerar la descongelación puede colocar
recipientes con agua caliente (no hirviendo) en
el interior del congelador.
• suelte el canal de drenaje de su posición de
reposo, empújelo como indica la ilustración y
colóquelo en el cesto inferior del congelador
donde se pueda acumular el agua
• raspe suavemente el hielo a medida que se
vaya derritiendo. Utilice un raspador de ma-
dera o plástico
• Cuando termine de retirar el hielo derretido,
limpie y seque el interior del armario congela-
dor y vuelva a colocar el canal de desagüe en
su lugar
62
www.zanussi.com

• ponga en marcha el congelador y vuelva a in-
troducir los alimentos congelados.
Se recomienda hacer funcionar el aparato
con el termostato en la posición máxima
durante algunas horas para que pueda al-
canzar la temperatura de almacenamiento
adecuada en el menor tiempo posible.
Importante No raspe la escarcha del
evaporador con herramientas metálicas o
afiladas, ya que podría dañarlo. No acelere el
proceso de descongelación de hielo con
dispositivos mecánicos ni por otros medios que
no sean los recomendados por el fabricante.
Durante la descongelación, la elevación de la
temperatura de los paquetes de alimentos
congelados puede acortar su tiempo de
almacenamiento.
Solución de problemas
Precaución Antes de realizar cualquier
reparación, desenchufe el aparato de la
toma de corriente.
Sólo un electricista o un técnico profesional
debe llevar a cabo cualquier reparación que no
figure en este manual.
Importante Se producen ruidos durante el
funcionamiento normal (compresor, circulación
del refrigerante).
Problema Causa posible Solución
El aparato hace ruido. El aparato no está bien apoyado en
el suelo.
Compruebe que los soportes del
aparato descansan sobre una super-
ficie estable (las cuatro patas deben
estar bien apoyadas en el suelo).
El compresor funciona
continuamente.
El regulador de temperatura puede
estar ajustado incorrectamente.
Seleccione una temperatura menos
fría.
La puerta no está bien cerrada. Consulte "Cierre de la puerta".
La puerta se ha abierto con excesi-
va frecuencia.
No mantenga la puerta abierta más
tiempo del necesario.
La temperatura del producto es muy
elevada.
Deje que la temperatura del producto
descienda a la temperatura ambiente
antes de guardarlo.
La temperatura ambiente es muy
elevada.
Reduzca la temperatura ambiente.
El agua fluye por la placa
posterior del frigorífico.
Durante el proceso de descongela-
ción automática, la escarcha se de-
rrite en la placa posterior.
Esto es correcto.
El agua fluye al interior del
frigorífico.
La salida de agua está obstruida. Limpie la salida de agua.
Los productos impiden que el agua
fluya al colector de agua.
Compruebe que los productos no to-
can la placa posterior.
El agua fluye hacia el sue-
lo.
La salida de agua de la descongela-
ción no fluye hacia la bandeja de
evaporación situada sobre el com-
presor.
Fije la salida de agua de descongela-
ción a la bandeja de evaporación.
Hay demasiada escarcha. Los productos no están bien en-
vueltos.
Envuelva mejor los productos.
63
www.zanussi.com

Problema Causa posible Solución
La puerta no está bien cerrada. Consulte "Cierre de la puerta".
El regulador de temperatura puede
estar ajustado incorrectamente.
Seleccione una temperatura más ele-
vada.
La temperatura del aparato
es muy baja.
El regulador de temperatura puede
estar ajustado incorrectamente.
Seleccione una temperatura más ele-
vada.
La temperatura del aparato
es muy alta.
El regulador de temperatura puede
estar ajustado incorrectamente.
Seleccione una temperatura más ba-
ja.
La puerta no está bien cerrada. Consulte "Cierre de la puerta".
La temperatura del producto es muy
elevada.
Deje que la temperatura del producto
descienda a la temperatura ambiente
antes de guardarlo.
Se han almacenado muchos pro-
ductos a la vez.
Almacene menos productos a la vez.
La temperatura del frigorí-
fico es muy elevada.
No hay circulación de aire frío en el
aparato.
Compruebe que existe circulación de
aire frío en el aparato.
La temperatura del conge-
lador es muy elevada.
Los productos están demasiado
próximos entre sí.
Guarde los productos de modo que
exista circulación de aire frío.
El aparato no funciona. El aparato se apaga. Encienda el aparato.
El enchufe no está bien conectado
a la toma de red.
Conecte el enchufe correctamente.
El aparato no recibe corriente. No
hay voltaje en la toma de red.
Conecte otro aparato eléctrico a la
toma de red. Llame a un electricista
profesional.
La bombilla no funciona. La bombilla está en espera. Cierre y abra la puerta.
La bombilla es defectuosa. Consulte "Cambio de la bombilla".
Si después de las comprobaciones anteriores el
aparato no funciona correctamente, póngase en
contacto con el centro de servicio técnico más
cercano.
Cambio de la bombilla
1. Desconecte la lavadora.
2. Empuje la pieza móvil para desenganchar la
tapa de la bombilla (1).
3. Retire la tapa de la bombilla (2).
4. Si es necesario, cambie la bombilla por una
de características y potencia similares. Re-
comendamos el modelo Osram PARAT-
HOM SPECIAL T26 de 0,8 vatios.
5. Instale la tapa de la bombilla.
6. Conecte el aparato.
7. Abra la puerta. Compruebe que la bombilla
se ilumina.
1
2
Cierre de la puerta
1. Limpie las juntas de la puerta.
2. Si es necesario, ajuste la puerta. Consulte
"Instalación".
3. Si es necesario, cambie las juntas defec-
tuosas. Póngase en contacto con el servi-
cio técnico.
64
www.zanussi.com

Instalación
Precaución Lea atentamente la
"Información sobre seguridad" para
garantizar su propia seguridad y el correcto
funcionamiento del electrodoméstico antes de
instalar el electrodoméstico.
Colocación
Instale el aparato en un punto en el que la tem-
peratura ambiente se corresponda con la clase
climática indicada en la placa de datos técnicos
del aparato:
Clase cli-
mática
Temperatura ambiente
SN +10°C a + 32°C
N +16°C a + 32°C
ST +16°C a + 38°C
T +16°C a + 43°C
Ubicación
Instale el aparato alejado de fuentes de calor,
como radiadores, calderas, luz solar directa, etc.
Asegúrese también de que el aire puede circu-
lar sin obstáculos por la parte trasera del arma-
rio. Para garantizar un rendimiento óptimo, si el
aparato se coloca debajo de un mueble de co-
cina instalado en la pared, deje una distancia
mínima de 100 mm entre la parte superior del
aparato y el mueble de pared. No obstante, lo
ideal sería que el aparato no se colocara debajo
de ningún mueble instalado en la pared. La ba-
se del aparato va provista de una o varias patas
ajustables para garantizar un nivelado correcto
del mismo.
Advertencia Puede que en algún
momento sea necesario desenchufar el
aparato de la toma de corriente; por lo tanto, el
enchufe debe ser fácilmente accesible tras la
instalación del aparato.
A
B
100 mm
min
20 mm
Separadores traseros
Encontrará los dos separadores en la bolsa que
contiene la documentación.
Siga estos pasos para colocar los separadores:
1. Afloje el tornillo.
2. Encaje el separador debajo del tornillo.
3. Gire el separador a la posición derecha.
4. Apriete de nuevo los tornillos.
2
4
3
1
65
www.zanussi.com

Nivelado
Al colocar el aparato compruebe que queda ni-
velado. Esto se puede conseguir utilizando las
dos patas ajustables de la parte inferior delante-
ra.
Conexión eléctrica
Antes de conectar el aparato, compruebe que
el voltaje y la frecuencia que aparecen en la pla-
ca de datos técnicos se corresponden con el
suministro de la vivienda.
El aparato debe tener conexión a tierra. El en-
chufe del cable de alimentación se suministra
con un contacto para tal fin. Si la toma de red
de la vivienda carece de conexión a tierra, co-
necte el aparato a una toma de tierra conforme
con la normativa, después de consultar a un
electricista profesional.
El fabricante rechaza toda responsabilidad si no
se toman las precauciones antes indicadas.
Este aparato es conforme con las directivas de
la CEE.
Cambio del sentido de apertura de la
puerta
Advertencia Desenchufe siempre el
aparato antes de llevar a cabo cualquier
operación.
Importante Los procedimientos que se indican
a continuación requieren la ayuda de otra
persona que sujete bien las puertas del aparato
durante el proceso de inversión de puertas.
Bisagra central
• Abra las puertas. Desatornille la bisagra cen-
tral (B). Retire el separador de plástico (A).
• Extraiga el separador (F) y colóquelo en el
otro lado del pivote de la bisagra (E).
• Retire las puertas.
• Extraiga los pasadores de la tapa de la bisa-
gra central (C, D) y colóquelos en el lado
opuesto.
• Introduzca el pasador de la bisagra central
(E) en el orificio izquierdo de la puerta infe-
rior.
DC
E
F
A
B
Bisagra inferior
• Desatornille la bisagra inferior (A).
• Extraiga los pasadores de la tapa izquierda
(D) y colóquelos en el lado opuesto.
• Vuelva a atornillar la bisagra inferior (A) en el
lado contrario.
• Desatornille el pivote de la bisagra inferior (B)
y el separador (C), y colóquelos en el lado
contrario.
D
A
B
C
Puertas
• Retire los tacos (A) de la parte superior de
ambas puertas y colóquelos en el lado
opuesto.
• Vuelva a colocar la puerta inferior en el pivo-
te de la bisagra inferior (B).
• Inserte la bisagra central (B) en el orificio
izquierdo de la puerta inferior.
66
www.zanussi.com

A
Bisagra superior
• Desatornille el pivote de la bisagra superior
(1) y colóquelo en el lado contrario (2).
2
1
• Coloque la puerta superior en su pivote y la
puerta inferior en el pivote de la bisagra infe-
rior.
• Vuelva a insertar el pivote de la bisagra cen-
tral (B) en los orificios del pivote de la puerta
superior e inferior, inclinando ligeramente am-
bas puertas.
3
1
2
1
3
2
• Vuelva a atornillar la bisagra central (B). No
olvide colocar el separador de plástico
(A).
Finalmente, compruebe que:
• Todos los tornillos están apretados.
• Los bordes de las puertas quedan paralelos
al borde lateral del aparato.
• La junta magnética se adhiere al mueble.
• La puerta abre y cierra correctamente.
Es posible que la junta no encaje a la perfec-
ción en el mueble si la temperatura ambiente es
baja (es decir, en invierno). En tal caso, espere
hasta que la junta se fije al mueble de forma na-
tural.
Si prefiere no realizar los procedimientos ante-
riores, póngase en contacto con el centro de
servicio técnico más próximo. El personal del
servicio posventa invertirá las puertas con los
gastos a su cargo.
67
www.zanussi.com

Datos técnicos
Medidas
Altura 1850 mm
Anchura 595 mm
Profundidad 658 mm
Tiempo de estabilización 20 h
Tensión 230-240 V
Frecuencia 50 Hz
La información técnica se encuentra en la placa
de características, situada en el lado interior iz-
quierdo del aparato, y en la etiqueta de consu-
mo energético.
Aspectos medioambientales
Recicle los materiales con el símbolo .
Coloque el material de embalaje en los
contenedores adecuados para su reciclaje.
Ayude a proteger el medio ambiente y la salud
pública, así como a reciclar residuos de
aparatos eléctricos y electrónicos. No deseche
los aparatos marcados con el símbolo
junto
con los residuos domésticos. Lleve el producto
a su centro de reciclaje local o póngase en
contacto con su oficina municipal.
68
www.zanussi.com

69
www.zanussi.com

70
www.zanussi.com

71
www.zanussi.com

www.zanussi.com/shop
280152171-A-282013
-
 1
1
-
 2
2
-
 3
3
-
 4
4
-
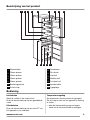 5
5
-
 6
6
-
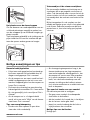 7
7
-
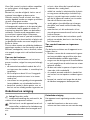 8
8
-
 9
9
-
 10
10
-
 11
11
-
 12
12
-
 13
13
-
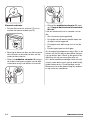 14
14
-
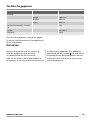 15
15
-
 16
16
-
 17
17
-
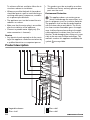 18
18
-
 19
19
-
 20
20
-
 21
21
-
 22
22
-
 23
23
-
 24
24
-
 25
25
-
 26
26
-
 27
27
-
 28
28
-
 29
29
-
 30
30
-
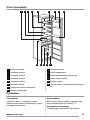 31
31
-
 32
32
-
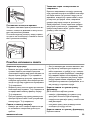 33
33
-
 34
34
-
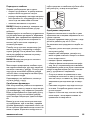 35
35
-
 36
36
-
 37
37
-
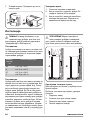 38
38
-
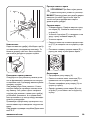 39
39
-
 40
40
-
 41
41
-
 42
42
-
 43
43
-
 44
44
-
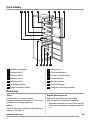 45
45
-
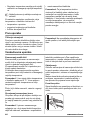 46
46
-
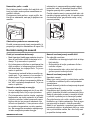 47
47
-
 48
48
-
 49
49
-
 50
50
-
 51
51
-
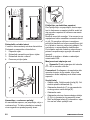 52
52
-
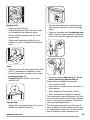 53
53
-
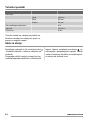 54
54
-
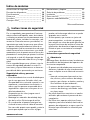 55
55
-
 56
56
-
 57
57
-
 58
58
-
 59
59
-
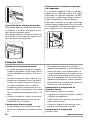 60
60
-
 61
61
-
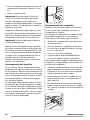 62
62
-
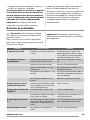 63
63
-
 64
64
-
 65
65
-
 66
66
-
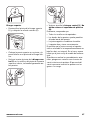 67
67
-
 68
68
-
 69
69
-
 70
70
-
 71
71
-
 72
72


Zanussi ZRB936PW2 Handleiding
- Categorie
- Koelkast-diepvriezers
- Type
- Handleiding
- Deze handleiding is ook geschikt voor
in andere talen
- English: Zanussi ZRB936PW2 User manual
- español: Zanussi ZRB936PW2 Manual de usuario