Philips HX1620/22 Handleiding
- Categorie
- Elektrische tandenborstels
- Type
- Handleiding

ENGLISH
General description (Fig. 1)
A Brush head
B Handle
C Brush head storage pins
D Charger pin
E Charger
Important
Read this user manual carefully before you use the
appliance and save it for future reference.
Check if the voltage indicated on the bottom of
the charger corresponds to the local mains voltage
before you connect the appliance.
Keep the charger away from water. Do not place or
store it over or near water contained in a bathtub,
washbasin, sink etc. Do not immerse the charger in
water or any other liquid.
Never use the charger if it is damaged or if the
cord or plug is damaged.
The cord of the charger cannot be replaced. If the
cord is damaged, the charger must be discarded.
Make sure the socket is live when you recharge
the toothbrush. The electricity supply to sockets in
mirror cabinets over washbasins or shaver sockets
in bathrooms may be cut off when the light is
turned off.
If you have had oral or gum surgery in the previous
2 months, consult your dentist before you use the
toothbrush.
Do not use other brush heads than the ones
recommended by the manufacturer.
Replace the brush head every 3 months or sooner
if signs of wear appear, such as crushed or bent
bristles.
This appliance is not intended for use by persons
(including children) with reduced physical sensory
or mental capabilities, or lack of experience and
knowledge, unless they have been given supervision
or instruction concerning use of the appliance by a
person responsible for their safety.
Children should be supervised to ensure they do
not play with the appliance.
Electromagnetic elds (EMF)
This Philips appliance complies with all standards
regarding electromagnetic elds (EMF). If handled
properly and according to the instructions in this user
manual, the appliance is safe to use based on scientic
evidence available today.
Preparing for use
Charging the appliance
1 Charge the appliance for at least 16 hours before
you use it for the rst time.
Make sure the appliance is switched off when you
start to charge it (Fig. 2).
When the battery is being charged, the green
indicator light is on (HX1630 only).
You can leave the toothbrush in the charger and let
it charge continuously.
Optimising the lifetime of the battery
After you have charged the toothbrush for the rst time,
do not recharge it between brushings. Continue to use it
until the battery is empty before you recharge it again.
Recharge the appliance when the motor almost
stops running.
Repeat this procedure three times in a row.
To extend the lifetime of the battery, repeat this
procedure every 6 months.
Using the appliance
1 To mount the brush head on the toothbrush, insert
it into the bayonet catch and turn it clockwise a
quarter turn (Fig. 3).
This prevents the brush head from becoming detached
due to vibration.
2 Put toothpaste on the brush head.
3 Place the brush head in your mouth (Fig. 4).
4 Press the on/off button to switch on the
toothbrush and start to brush your teeth (Fig. 5).
For the best brushing method and the minimum
brushing time, see ‘Brushing tips’.
Brushing tips
Brushing method
1 Place the brush head against the tooth in such a
way that it covers the surface of the tooth as well
as the gum line (Fig. 6).
2 Hold the brush head in this position for a
few seconds and then move on to the next
tooth (Fig. 7).
The round brush head removes plaque from the teeth
and beneath the gum line.
The individually moving Active Tip cleans between the
teeth.
3 Guide the brush head carefully along the teeth and
molars (Fig. 8).
Tip: Make sure you clean all surfaces of the teeth (inside,
outside and chewing surface) as well as the gum line
properly. A xed brushing pattern prevents you from skipping
certain areas.
Tip: For optimal dental hygiene, use dental oss and
toothpicks in addition to the electric toothbrush.
Minimum brushing time
A brushing time of 2 minutes is generally long enough
to clean your teeth properly. If you want, you can brush
longer than 2 minutes for an even more thorough clean.
A red indicator light will blink to indicate that
2 minutes have passed (HX1630 only).
,
,
,
,
,
,
,
,
,
,
,
,
,
-
-
-
,
,
DEUTSCH
Allgemeine Beschreibung (Abb. 1)
A Bürstenkopf
B Handstück
C Bürstenkopf-Aufbewahrungsstifte
D Ladestift
E Ladegerät
Wichtig
Lesen Sie diese Bedienungsanleitung vor dem Gebrauch
des Geräts aufmerksam durch und bewahren Sie sie für
eine spätere Verwendung auf.
Prüfen Sie vor Inbetriebnahme, ob die
Spannungsangabe auf der Unterseite des Ladegeräts
mit der örtlichen Netzspannung übereinstimmt.
Halten Sie das Ladegerät von Wasser fern. Stellen
Sie es nicht über oder direkt bei einer mit Wasser
gefüllten Badewanne bzw. einem Waschbecken ab.
Tauchen Sie das Ladegerät nicht in Wasser oder
andere Flüssigkeiten.
Benutzen Sie das Ladegerät nicht, wenn es
beschädigt ist oder wenn das Netzkabel oder der
Netzstecker defekt ist.
Das Kabel des Ladegeräts kann nicht ausgetauscht
werden. Ist das Kabel beschädigt, muss das
Ladegerät entsorgt werden.
Prüfen Sie vor dem Auaden der Zahnbürste,
ob die Steckdose kontinuierlich Strom führt.
Steckdosen in Badezimmerschränken über
Waschbecken sowie Rasierer-Steckdosen werden
häug zusammen mit der Raumbeleuchtung
ausgeschaltet.
Wenn in den vergangenen 2 Monaten ein
chirurgischer Eingriff an Ihren Zähnen oder am
Zahneisch vorgenommen wurde, sollten Sie
vor Benutzung der Zahnbürste Ihren Zahnarzt
konsultieren.
Benutzen Sie nur die vom Hersteller für diese
Zahnbürste empfohlenen Bürstenköpfe.
Tauschen Sie den Bürstenkopf spätestens nach
3 Monaten aus oder sobald
Abnutzungserscheinungen zu erkennen sind, wie z.
B. abgeknickte oder zerdrückte Borsten.
Dieses Gerät ist für Benutzer (einschl. Kinder)
mit eingeschränkten physischen, sensorischen
oder psychischen Fähigkeiten bzw. ohne jegliche
Erfahrung oder Vorwissen nur dann geeignet,
wenn eine geeignete Aufsicht oder ausführliche
Anweisungen zur Benutzung des Geräts
sichergestellt sind.
Achten Sie darauf, dass Kinder nicht mit dem Gerät
spielen.
Elektromagnetische Felder (EMF; Electro
Magnetic Fields)
Dieses Philips Gerät erfüllt sämtliche Normen bezüglich
elektromagnetischer Felder (EMF). Nach aktuellen
wissenschaftlichen Erkenntnissen ist das Gerät sicher im
Gebrauch, sofern es ordnungsgemäß und entsprechend
den Anweisungen in dieser Bedienungsanleitung
gehandhabt wird.
Für den Gebrauch vorbereiten
Das Gerät laden
1 Laden Sie das Gerät vor dem ersten Gebrauch
mindestens 16 Stunden lang auf.
Achten Sie darauf, dass das Gerät ausgeschaltet ist,
wenn Sie mit dem Laden beginnen (Abb. 2).
Beim Laden des Akkus leuchtet die grüne
Kontrollanzeige auf (nur HX1630).
Sie können die Zahnbürste zum kontinuierlichen
Nachladen im Ladegerät belassen.
Die Lebensdauer des Akkus optimieren
Laden Sie die Zahnbürste vor der ersten Benutzung
vollständig auf. Laden Sie sie aber nicht nach jeder
Anwendung neu auf. Benutzen Sie die Zahnbürste solange
ohne Nachladen, bis der Akku leer ist.
Laden Sie den Akku erst wieder auf, wenn der Motor
beinahe zum Stillstand kommt.
Wiederholen Sie diesen Vorgang dreimal
nacheinander.
Sie können die Lebensdauer des Akkus verlängern,
wenn Sie diesen Vorgang alle 6 Monate wiederholen.
Das Gerät benutzen
1 Um den Bürstenkopf aufzusetzen, setzen Sie ihn
in den Bajonettverschluss und sichern Sie ihn mit
einer Vierteldrehung im Uhrzeigersinn (Abb. 3).
Danach kann der Bürstenkopf nicht mehr durch die
Vibrationen gelockert werden.
2 Tragen Sie etwas Zahnpasta auf den Bürstenkopf
auf.
3 Halten Sie die Bürste an die Zähne (Abb. 4).
4 Betätigen Sie den Ein-/Ausschalter, um die
Zahnbürste einzuschalten und mit dem Putzen zu
beginnen (Abb. 5).
Unter “Hinweise zur Zahnpege” erhalten Sie
Informationen zur richtigen Technik sowie zur
Mindest-Putzzeit.
,
,
,
,
,
,
,
,
,
,
,
,
,
-
-
-
,
ESPAÑOL
Note: If plaque is removed properly, the gums will have a
pink colour and will rmly surround the teeth. Healthy gums
do not bleed when you eat or brush your teeth.
Note: If your gums bleed slightly the rst few times you use
this toothbrush, this bleeding will generally stop after a few
days. If your gums continue to bleed, consult your dentist or
dental hygienist.
Gum protection
1 The Gum Protection system guarantees that you
will not exert too much pressure on the teeth and
gums.
2 If you exert too much pressure on the toothbrush,
you will feel and hear a click when the brush
head exes backwards. As soon as you reduce the
pressure, the brush head will return to its normal
position. This will protect your gums (Fig. 9)
Note: This will probably happen a few times when you
rst start using the brush. After some time you will have
discovered the optimal brushing pressure and the brush
head will ex backwards less often.
Cleaning and storage
1 Switch on the toothbrush and rinse the brush head
under a hot tap (max. 60 cC) (Fig. 10).
2 Switch off the toothbrush. Detach the brush head
and rinse the inside of the brush head (Fig. 11).
3 Switch on the toothbrush and rinse the drive
shaft under the tap to remove toothpaste
residues (Fig. 12).
4 Store the brush head on the brush head storage pin
on the charger.
5 Clean the charger with a moist cloth (Fig. 13).
Unplug the charger before you start to clean it.
Replacement
1 Replace the brush head every 3 months for the
best brushing results.
Also replace the brush head when the bristles start
to bend outwards.
You can obtain new brush heads from the shop where
you purchased the toothbrush.
All round Philips replacement brush heads can be used.
Environment
Do not throw away the appliance with the normal
household waste at the end of its life, but hand it in
at an ofcial collection point for recycling. By doing
this, you help to preserve the environment (Fig. 14).
The built-in rechargeable battery contains
substances that may pollute the environment.
Always remove the battery before you discard the
appliance and hand it in at an ofcial collection
point. Dispose of the battery at an ofcial collection
point for batteries. If you have trouble removing the
battery, you can also take the appliance to a Philips
service centre. The staff of this centre will remove
the battery for you and will dispose of it in an
environmentally safe way.
Disposal of the battery
Make sure the battery is completely empty when you
dispose of it.
1 Let the appliance run until it stops before you
remove the battery.
2 Open the handle (Fig. 15) .
3 Use a screwdriver to pry the battery out of the
battery holder (Fig. 16).
The toothbrush is no longer watertight once
the housing of the toothbrush has been open. When
you open the housing, your guarantee becomes invalid.
Guarantee & service
If you need information or if you have a problem, please
visit the Philips website at
www.philips.com or contact
the Philips Customer Care Centre in your country
(you nd its phone number in the worldwide guarantee
leaet). If there is no Customer Care Centre in your
country, go to your local Philips dealer or contact the
Service Department of Philips Domestic Appliances and
Personal Care BV.
Troubleshooting
If you are unable to solve your problem with the
information below, please contact the nearest Philips
service centre or the Philips Customer Care Centre in
your country. You can also contact us online at
www.philips.com.
Problem Solution
The toothbrush
does not work
at all, although it
has been in the
charger overnight.
Make sure that the plug of the
charger is properly inserted into
the wall socket.
Make sure the socket is live (see
chapter ‘Important’).
Make sure the toothbrush is
switched off and recharge it for
at least 16 hours.
The motor of the
toothbrush works,
but the brush head
doesn’t.
Check if the brush head has
been properly attached to
appliance (see also chapter ‘Using
the appliance’).
,
,
,
Hinweise zur Zahnpege
Putztechnik
1 Setzen Sie den Bürstenkopf so an die Zähne, dass
er die Zahnoberäche und den Zahneischrand
bedeckt (Abb. 6).
2 Halten Sie den Bürstenkopf einige Sekunden in
dieser Position, und führen Sie ihn dann zum
nächsten Zahn (Abb. 7).
Der runde Bürstenkopf entfernt die Plaque vom Zahn
und unterhalb des Zahneischrandes.
Die Interdentalbürste, die sich unabhängig von der runden
Bürste bewegt, reinigt die Zahnzwischenräume.
3 Führen Sie die Bürste sorgfältig an allen Zähnen
entlang (Abb. 8).
Tipp: Achten Sie darauf, dass alle Zahnächen – d. h. Innen-
und Außenächen sowie Kauächen und Zahneischrand -
gründlich gereinigt werden. Eine feste Putzroutine verhindert,
dass Sie gewisse Bereiche vernachlässigen.
Tipp: Zur optimalen Zahnpege wird ergänzend zur
elektrischen Zahnbürste die Verwendung von Zahnseide und
Zahnstochern empfohlen.
Mindest-Putzzeit
Normalerweise sind 2 Minuten ausreichend, um die
Zähne gründlich zu putzen. Für eine besonders gründliche
Reinigung können Sie die Zähne selbstverständlich auch
länger als 2 Minuten putzen.
Nach Ablauf von 2 Minuten blinkt eine rote
Kontrollanzeige (nur HX1630).
Hinweis: Wenn Sie die Plaque gründlich entfernt haben, hat
das umgebende Zahneisch eine hellrote Färbung und liegt
fest am Zahn an. Gesundes Zahneisch blutet nicht beim
Essen oder beim Zähneputzen.
Hinweis: Sollte es anfangs doch zu leichten
Zahneischblutungen kommen, so klingen sie in der Regel
nach einigen Tagen ab. Sollten die Beschwerden andauern,
konsultieren Sie bitte Ihren Zahnarzt.
Zahneischschutz
1 Die Druckkontrolle (das sog. Gum Protection
System) verhindert, dass Sie bei der Zahnpege
mit der Bürste zu stark auf Zähne und Zahneisch
drücken.
2 Drücken Sie den Bürstenkopf zu stark an, schnellt
der Bürstenaufsatz hörbar (“Klick”) und spürbar
zurück. So wird Ihr Zahneisch vor Beschädigungen
geschützt (Abb. 9).
Hinweis: Während der Eingewöhnungsphase wird Ihnen das
häuger passieren. Bald aber nden Sie automatisch den
richtigen Andruck, und der Bürstenaufsatz wird nur noch
selten zurückschnellen.
Reinigung und Aufbewahrung
1 Schalten Sie die Zahnbürste ein und spülen Sie den
Bürstenkopf unter ießendem warmen Wasser von
max. 60c°C ab (Abb. 10).
2 Schalten Sie die Zahnbürste aus. Nehmen Sie
den Bürstenkopf ab und spülen Sie ihn von innen
aus (Abb. 11).
3 Schalten Sie die Zahnbürste wieder ein und spülen
Sie den Schaft ab, um restliche Zahnpasta zu
entfernen (Abb. 12).
4 Stecken Sie den Bürstenkopf zur Aufbewahrung auf
den Stift am Ladegerät.
5 Reinigen Sie das Ladegerät mit einem feuchten
Tuch (Abb. 13).
Ziehen Sie vor dem Reinigen des Ladegeräts den
Netzstecker aus der Steckdose.
Ersatz
1 Das beste Ergebnis erhalten Sie, wenn Sie den
Bürstenkopf alle 3 Monate ersetzen.
Ersetzen Sie den Bürstenkopf auch, sobald sich die
Borsten nach außen verbiegen.
Neue Bürstenköpfe erhalten Sie dort, wo das Gerät
gekauft wurde.
Sie können universale PHILIPS Ersatz-Bürstenköpfe
verwenden.
Umweltschutz
Werfen Sie das Gerät am Ende der Lebensdauer
nicht in den normalen Hausmüll. Bringen Sie es zum
Recycling zu einer ofziellen Sammelstelle. Auf diese
Weise helfen Sie, die Umwelt zu schonen (Abb. 14).
Der integrierte Akku enthält Substanzen, die die
Umwelt gefährden können. Entfernen Sie den
Akku, bevor Sie das Gerät an einer ofziellen
Recyclingstelle abgeben. Geben Sie den gebrauchten
Akku bei einer Batteriesammelstelle ab. Falls Sie
beim Entfernen des Akkus Probleme haben, können
Sie das Gerät auch an ein Philips Service-Center
geben. Dort wird der Akku umweltgerecht entsorgt.
Den Akku entsorgen
Vergewissern Sie sich, dass der Akku ganz leer ist, bevor
Sie ihn entsorgen.
1 Lassen Sie vorher den Motor laufen, bis er stillsteht.
2 Öffnen Sie das Handstück (Abb. 15).
3 Nehmen Sie den Akku mithilfe eines
Schraubendrehers aus dem Akkuhalter (Abb. 16).
Nach dem Öffnen des Gehäuses ist die Zahnbürste
nicht mehr wasserdicht. Wenn Sie das Gehäuse öffnen,
erlischt Ihre Garantie.
,
,
,
,
Garantie und Kundendienst
Benötigen Sie weitere Informationen oder treten
Probleme auf, wenden Sie sich bitte an Ihren Philips-
Händler oder setzen Sie sich mit einem Philips Service-
Center in Ihrem Land in Verbindung (Telefonnummer
siehe Garantieschrift). Besuchen Sie auch die Philips
Website (www.philips.com). Sie können auch direkt die
Service-Abteilung von Philips Domestic Appliances and
Personal Care BV kontaktieren.
Fehlerbehebung
Sollten Sie eventuell auftretende Probleme anhand der
folgenden Informationen nicht lösen können, so wenden
Sie sich bitte an das Philips Service Center in Ihrem Land
oder nehmen Sie online über www.philips.com mit uns
Kontakt auf.
Problem Lösung
Die
Zahnbürste
funktioniert
nicht, obwohl
sie über Nacht
aufgeladen
wurde.
Prüfen Sie, ob der Netzstecker des
Ladegeräts fest in der Steckdose
steckt.
Prüfen Sie, ob die Steckdose
kontinuierlich Strom führt (siehe
Kapitel “Wichtig”).
Schalten Sie das Gerät aus, und
laden Sie den Akku mindestens
16 Stunden lang auf.
Der Motor
läuft, aber der
Bürstenkopf
funktioniert
nicht.
Prüfen Sie, ob der Bürstenkopf
korrekt auf dem Handstück
angebracht ist (siehe auch Kapitel
“Das Gerät benutzen”).
Die
Putzleistung
ist spürbar
schwächer
geworden.
Die Zahnbürste muss aufgeladen
werden. Wenn Sie die Zahnbürste
normalerweise im Ladegerät
aufbewahren, müssen Sie
die Lebensdauer des Akkus
möglicherweise optimieren. Befolgen
Sie dazu die Anweisungen im Kapitel
“Für den Gebrauch vorbereiten”.
Die
Zahnbürste
reinigt nicht
mehr so
gründlich wie
vorher.
Ersetzen Sie den Bürstenkopf.
Descripción general (fig. 1)
A Cabezal del cepillo
B Mango
C Soportes para cabezales
D Pivote de carga
E Cargador
Importante
Antes de usar el aparato, lea atentamente este manual
del usuario y consérvelo por si necesitara consultarlo en
el futuro.
Antes de enchufar el aparato, compruebe si el
voltaje indicado en la parte inferior del cargador se
corresponde con el voltaje de red local.
Mantenga el cargador alejado del agua. No coloque
ni guarde el cargador por encima o cerca de agua
contenida en bañeras, lavabos, fregaderos, etc. No
sumerja el cargador en agua ni en otros líquidos.
No utilice nunca el cargador si está dañado o si el
cable o la clavija están dañados.
El cable del cargador no se puede sustituir. Si el
cable está dañado, deberá desechar el cargador.
Asegúrese de que el enchufe tenga corriente
cuando recargue el cepillo dental. El suministro
eléctrico a los enchufes de los armarios o espejos
de los cuartos de baño, o a los enchufes para
afeitadoras de los cuartos de baño, puede quedar
interrumpido al apagar la luz.
Consulte a su dentista antes de utilizar este cepillo
dental si ha sufrido cirugía oral o de las encías en
los 2 últimos meses.
No utilice otros cabezales que no sean los
recomendados por el fabricante.
Sustituya el cabezal del cepillo cada 3 meses o
antes si aparecen signos de desgaste, como cerdas
aplastadas o curvadas.
Este aparato no debe ser usado por personas
(incluidos los niños) con su capacidad físico-
sensorial o psíquica reducida, ni por quienes
no tengan los conocimientos y la experiencia
necesarios, a menos que sean supervisados o
instruidos acerca del uso del aparato por una
persona responsable de su seguridad.
Asegúrese de que los niños no jueguen con este
aparato.
Campos electromagnéticos (CEM)
Este aparato Philips cumple todos los estándares
sobre campos electromagnéticos (CEM). Si se utiliza
correctamente y de acuerdo con las instrucciones de este
manual, el aparato se puede usar de forma segura según
los conocimientos cientícos disponibles hoy en día.
Preparación para su uso
Carga del aparato
1 Antes de usar el aparato por vez primera, cárguelo
durante al menos 16 horas.
Asegúrese de que el aparato esté apagado cuando
comience a cargarlo (g. 2).
,
,
,
,
,
,
,
,
,
,
,
Cuando la batería se está cargando, el piloto
indicador verde se ilumina (sólo modelo HX1630).
Puede dejar el cepillo dental en el cargador y
dejarlo cargando de manera continua.
Cómo optimizar la vida útil de la batería
Después de haber cargado el cepillo dental por primera
vez, no vuelva a recargarlo entre cepillados. Continúe
utilizándolo y vuelva a cargarlo sólo cuando la batería
esté descargada.
Recargue el aparato cuando el motor casi deje de
funcionar.
Repita este procedimiento tres veces seguidas.
Para prolongar la vida de la batería, repita este
procedimiento cada 6 meses.
Uso del aparato
1 Para montar el cabezal en el mango del cepillo
dental, insértelo en el eje con enganche de
bayoneta y gírelo en el sentido de las agujas del
reloj un cuarto de vuelta (g. 3).
Esto evita que el cabezal del cepillo se suelte por las
vibraciones.
2 Ponga pasta de dientes en el cabezal del cepillo.
3 Introduzca el cabezal del cepillo en la boca (g. 4).
4 Pulse el botón de encendido/apagado para
encender el cepillo dental y comience a cepillarse
los dientes (g. 5).
Para conocer el mejor método de cepillado y el
tiempo mínimo recomendado, consulte “Consejos
de cepillado”.
Consejos de cepillado
Método de cepillado
1 Coloque el cabezal del cepillo sobre el diente de
modo que cubra la supercie del mismo y la línea
de la encía (g. 6).
2 Mantenga el cabezal del cepillo en esa posición
durante unos segundos y luego pase al diente
siguiente (g. 7).
El cabezal redondo del cepillo elimina la placa de los
dientes y debajo de la línea de las encías.
La Punta Interdental limpia entre los dientes moviéndose
por separado.
3 Guíe el cabezal del cepillo con cuidado a lo largo de
los dientes y las muelas (g. 8).
Consejo: Asegúrese de limpiar bien toda las supercies de los
dientes (interior, exterior y de masticación), así como la línea
de las encías. Una rutina ja de cepillado evitará que olvide
cepillar ciertas zonas.
Consejo: Para una higiene dental óptima, utilice hilo dental y
palillos de dientes además del cepillo dental eléctrico.
Tiempo mínimo de cepillado
Un tiempo de cepillado de 2 minutos normalmente es
suciente para limpiarse los dientes correctamente. Si
lo desea, puede cepillarse los dientes durante más de
2 minutos para una limpieza más a fondo.
Un piloto indicador rojo parpadeará para indicar
que han transcurrido 2 minutos (sólo modelo
HX1630).
Nota: Si se elimina la placa correctamente, las encías
tendrán un color rosa y rodearán los dientes con rmeza.
Las encías sanas no sangran cuando come o cuando se
cepilla los dientes.
Nota: Si sus encías sangran ligeramente las primeras
veces que utilice el cepillo dental, normalmente dejarán de
hacerlo a los pocos días. Si después de unos días sus encías
continúan sangrando al cepillarse los dientes, consulte a su
dentista o higienista dental.
Protección de las Encías
1 El sistema de Protección de las Encías evita que se
ejerza demasiada presión sobre los dientes y las
encías.
2 Si ejerce demasiada presión sobre el cepillo dental,
notará y oirá un “clic” cuando el cabezal del
cepillo se exiona hacia atrás. En cuanto reduzca la
presión, el cabezal del cepillo volverá a su posición
normal. Esto protegerá sus encías (g. 9).
Nota:Probablemente esto sucederá varias veces cuando
empiece a utilizar el aparato. Después de algún tiempo
habrá descubierto la presión de cepillado óptima y el
cabezal del cepillo se exionará hacia atrás con menos
frecuencia.
Limpieza y almacenamiento
1 Encienda el cepillo dental y enjuague el cabezal del
cepillo bajo el grifo con agua caliente (temperatura
máxima de 60
cC). (g. 10)
2 Apague el cepillo dental. Quite el cabezal del cepillo
y enjuáguelo bien por dentro (g. 11).
3 Encienda el cepillo dental y enjuague el eje motor
bajo el grifo para eliminar los restos de pasta
dental (g. 12).
4 Coloque el cabezal del cepillo en su soporte en el
cargador.
5 Limpie el cargador con un paño húmedo (g. 13).
Desenchufe el cargador antes de limpiarlo.
Sustitución
1 Sustituya el cabezal del cepillo cada 3 meses para
obtener los mejores resultados de cepillado.
Sustituya también el cabezal del cepillo cuando las
cerdas empiecen a doblarse hacia fuera.
Puede adquirir cabezales nuevos en el distribuidor donde
haya comprado su cepillo dental.
Puede usar cualquier cabezal de cepillo redondo de
Philips.
,
,
-
-
-
,
,
,
Medio ambiente
Al nal de su vida útil, no tire el aparato junto con
la basura normal del hogar. Llévelo a un punto de
recogida ocial para su reciclado. De esta manera
ayudará a conservar el medio ambiente (g. 14).
La batería recargable incorporada contiene
sustancias que pueden contaminar el medio
ambiente. Quite siempre la batería antes de
deshacerse del aparato y de llevarlo a un punto de
recogida ocial. Deposite la batería en un lugar de
recogida ocial. Si no puede sacar la batería, puede
llevar el aparato a un servicio de asistencia técnica
de Philips. El personal del servicio de asistencia
extraerá la batería y se deshará de ella de forma no
perjudicial para el medio ambiente.
Cómo extraer la batería
Asegúrese de que la batería está completamente
descargada cuando se deshaga de ella.
1 Deje que el aparato funcione hasta que se pare
antes de extraer la batería.
2 Abra el mango (g. 15).
3 Utilice un destornillador para separar la batería del
soporte (g. 16).
El cepillo dental deja de ser hermético una vez que se
ha abierto la carcasa del mismo. Si la abre, la garantía
queda anulada.
Garantía y servicio
Si necesita información o tiene algún problema, visite la
página Web de Philips en www.philips.com, o póngase en
contacto con el Servicio de Atención al Cliente de Philips
en su país (hallará el número de teléfono en el folleto
de la garantía mundial). Si no hay Servicio de Atención al
Cliente de Philips en su país, diríjase a su distribuidor local
Philips o póngase en contacto con el Service Department
de Philips Domestic Appliances and Personal Care BV.
Guía de resolución de problemas
Si no puede resolver el problema con la siguiente
información, póngase en contacto con el servicio de
asistencia técnica de Philips más cercano o con el Servicio
de Atención al cliente de Philips en su país, o bien
póngase en contacto con nosotros en www.philips.com.
Problema Solución
El cepillo dental no
funciona aunque ha
estado en el cargador
durante toda la
noche.
Asegúrese de que la clavija del
cargador está correctamente
enchufada a la toma de
corriente.
Asegúrese de que la toma de
corriente está activa (consulte
el capítulo “Importante”).
Asegúrese de que el cepillo
dental está apagado y
recárguelo durante al menos
16 horas.
El motor del cepillo
dental funciona, pero
el cabezal del cepillo
no.
Compruebe si el cabezal
del cepillo está colocado
correctamente en el aparato
(consulte también el capítulo
“Uso del aparato”).
La potencia de
cepillado del cepillo
dental ha disminuido
considerablemente.
Debe recargar el cepillo
dental. Si normalmente deja el
cepillo dental en el cargador
de forma continua, puede
que deba ampliar la vida de
la batería como se indica en
el capítulo “Preparación para
su uso”.
El cepillo dental ya no
limpia los dientes tan
ecazmente como
antes.
Sustituya el cabezal del cepillo.
,
,
1
4203.000.5607.2
Problem Solution
The brushing
power of the
toothbrush has
greatly decreased.
The toothbrush must be
recharged. If you normally leave
the toothbrush in the charger
continuously, you may have to
extend the lifetime of the battery
as described in chapter ‘Preparing
for use’.
The toothbrush
doesn’t clean my
teeth as well as
before.
Replace the brush head.
HX1630, HX1624, HX1622,
HX1620
2 3 4
5
6
7
8 9
10
11 12
13
14 15 16
4203.000.5607.2.indd 1 31-05-2007 11:12:53

FRANÇAIS
Description générale (fig. 1)
A Tête de brosse
B Poignée
C Ergots de xation pour tête de brosse
D Broche du chargeur
E Chargeur
Important
Lisez attentivement ce mode d’emploi avant d’utiliser
l’appareil et conservez-le pour un usage ultérieur.
Avant de brancher l’appareil, vériez que la tension
indiquée sur la base du chargeur correspond à la
tension secteur locale.
Évitez tout contact de l’appareil avec de l’eau !
Ne le placez pas et ne le rangez pas près d’une
baignoire, d’un lavabo ou d’un évier. N’immergez en
aucun cas le chargeur dans l’eau ou dans tout autre
liquide.
N’utilisez jamais le chargeur s’il est endommagé ou
si la che ou le cordon d’alimentation est abîmé.
Le cordon d’alimentation du chargeur ne peut pas
être remplacé séparément. S’il est abîmé, c’est le
chargeur qui devra être mis au rebut.
Assurez-vous que la prise de courant est alimentée
lorsque vous chargez la brosse à dents. Dans une
salle de bain, notez que l’alimentation électrique
des prises, notamment celles situées dans les
armoires de toilette au-dessus des lavabos ou celles
destinées aux rasoirs, peut être coupée lorsque
vous éteignez la lumière.
Si vous avez reçu des soins bucco-dentaires,
notamment au niveau des gencives, au cours des
deux derniers mois, consultez votre dentiste avant
d’utiliser cette brosse à dents.
N’utilisez pas d’autres têtes de brosse que celles
recommandées par le fabricant.
Remplacez la tête de brosse tous les 3 mois ou plus
tôt si vous constatez des signes d’usure (si les poils
sont aplatis ou tordus, par exemple).
Cet appareil n’est pas destiné à être utilisé par
des personnes (notamment des enfants) dont
les capacités sensorielles ou intellectuelles
sont réduites, ou par des personnes manquant
d’expérience ou de connaissances, à moins que
celles-ci ne soient sous surveillance ou qu’elles
aient reçu des instructions quant à l’utilisation de
l’appareil par une personne responsable de leur
sécurité.
Veillez à ce que les enfants ne puissent pas jouer
avec l’appareil.
Champs électromagnétiques
Cet appareil Philips est conforme à toutes les normes
relatives aux champs électromagnétiques (CEM). Il
répond aux règles de sécurité établies sur la base des
connaissances scientiques actuelles s’il est manipulé
correctement et conformément aux instructions de ce
mode d’emploi.
Avant l’utilisation
Charge de l’appareil
1 Chargez l’appareil pendant au moins 16 heures
avant la première utilisation.
Assurez-vous que l’appareil est éteint avant de le
mettre en charge (g. 2).
En cours de charge, le voyant vert est allumé
(HX1630 uniquement).
La brosse peut être replacée sur le chargeur et
laissée en charge.
Optimisation de la durée de vie de la
batterie
Ne chargez pas la brosse à dents entre deux brossages à
l’issue du cycle de charge initial. Attendez que la batterie
soit vide.
Ne la remettez pas en charge avant que le moteur
s’arrête.
Cette procédure doit être suivie trois fois de suite.
Pour prolonger la durée de vie de la batterie, répétez
cette opération tous les six mois.
Utilisation de l’appareil
1 Pour monter la tête de brosse sur l’appareil,
insérez-la dans le logement à baïonnette, puis
faites-la pivoter d’un quart de tour dans le sens des
aiguilles d’un montre (g. 3).
Ceci évite qu’elle ne se détache sous l’effet des vibrations.
2 Mettez du dentifrice sur la tête de brosse.
3 Placez la tête de brosse dans votre bouche (g. 4).
4 Appuyez sur le bouton marche/arrêt pour allumer
la brosse, puis lavez-vous les dents (g. 5).
Reportez-vous aux « Suggestions de brossage »
pour connaître la durée minimale de brossage et la
meilleure méthode.
Suggestions de brossage
Méthode de brossage
1 Placez la tête de brosse contre vos dents, de telle
sorte qu’elle couvre aussi bien la surface des dents
que la gencive (g. 6).
2 Maintenez-la dans cette position quelques
secondes, puis passez à la dent suivante (g. 7).
La tête ronde de la tête de brosse ôte la plaque dentaire
située sur les dents et sous les gencives.
La tête active individuelle permet de nettoyer les espaces
interdentaires.
3 Dirigez la brosse soigneusement le long des
incisives, des canines et des molaires (g. 8).
Conseil: Assurez-vous que vous nettoyez correctement
toute la surface de vos dents (interne, externe et zone de
mastication) et de vos gencives. Une méthode routinière de
,
,
,
,
,
,
,
,
,
,
,
,
,
-
-
-
,
ITALIANO
Descrizione generale (fig. 1)
A Testina
B Impugnatura
C Perno per la conservazione della testina
D Pin caricabatterie
E Caricabatterie
Importante
Prima di utilizzare l’apparecchio, leggete attentamente il
presente manuale e conservatelo per eventuali riferimenti
futuri.
Prima di collegare l’apparecchio, controllate
che la tensione indicata sulla parte inferiore
dell’apparecchio corrisponda a quella locale.
Tenete il caricabatterie lontano dall’acqua!
Non appoggiatelo o riponetelo vicino all’acqua
contenuta in vasche, lavandini ecc. Non immergete
il caricabatterie in acqua o in altre sostanze liquide.
Non utilizzate il caricabatterie nel caso in cui il cavo
o la spina siano danneggiati.
Il cavo dell’unità di carica non può essere sostituito.
Nel caso fosse danneggiato, l’unità di carica dovrà
essere gettata.
Controllate che la presa di corrente funzioni
durante la ricarica dello spazzolino. Spesso
l’erogazione di corrente alle prese dei bagni, vicino
ai lavandini, viene interrotta quando si spegne la luce.
Se nel corso degli ultimi 2 mesi vi siete sottoposti a
interventi su denti o gengive, chiedete il parere del
vostro dentista prima di utilizzare lo spazzolino.
Utilizzate esclusivamente le testine consigliate dal
produttore.
Sostituite la testina al massimo ogni 3 mesi o prima
in presenza di segni di usura, ad esempio setole
rovinate o piegate.
L’apparecchio non è stato ideato per essere usato
da persone (inclusi bambini) con capacità mentali,
siche o sensoriali ridotte, fatti salvi i casi in cui tali
persone abbiano ricevuto assistenza o formazione
per l’uso dell’apparecchio da una persona
responsabile per la loro sicurezza.
Adottate le precauzioni necessarie per evitare che i
bambini giochino con l’apparecchio.
Campi elettromagnetici (EMF)
Questo apparecchio Philips è conforme a tutti gli
standard relativi ai campi elettromagnetici (EMF).
Se utilizzato in modo appropriato seguendo le istruzioni
contenute nel presente manuale utente, l’apparecchio
consente un utilizzo sicuro come confermato dai risultati
scientici attualmente disponibili.
Predisposizione dell’apparecchio
Ricarica dell’apparecchio
1 Quando l’apparecchio viene utilizzato per la prima
volta, è necessario ricaricarlo per almeno 16 ore.
Prima di ricaricare l’apparecchio, vericate che sia
spento (g. 2).
Se la batteria è stata caricata, l’indicatore verde è
acceso (solo HX1630).
Potete riporre lo spazzolino nell’apposito supporto
e lasciarlo continuamente sotto carica.
Come ottimizzare la durata della batteria
Dopo aver caricato lo spazzolino per la prima volta non
ricaricarlo tra le sessioni di utilizzo. Continuate ad usarlo
n quando la batteria non è scarica, quindi caricarlo
nuovamente.
Ricaricate l’apparecchio quando il motore si ferma.
Ripetete questa procedure tre volte consecutive.
Per garantire una maggior durata della batteria,
ripetete questa operazione ogni 6 mesi.
Modalità d’uso dell’apparecchio
1 Per installare la testina sullo spazzolino, inserirlo
nel perno e ruotarlo per un quarto di giro in senso
orario (g. 3).
In tal modo si evita che la testina si stacchi per le
vibrazioni.
2 Mettete un po’ di dentifricio sullo spazzolino.
3 Mettete lo spazzolino all’interno della bocca (g. 4).
,
,
,
,
,
,
,
,
,
,
,
,
,
-
-
-
NEDERLANDS
Algemene beschrijving (fig. 1)
A Opzetborstel
B Handgreep
C Pinnen voor opzetborstels
D Pin van de oplader
E Oplader
Belangrijk
Lees deze gebruiksaanwijzing zorgvuldig door
voordat u het apparaat gaat gebruiken. Bewaar de
gebruiksaanwijzing om deze indien nodig te kunnen
raadplegen.
Controleer of het voltage aangegeven op de
onderkant van de oplader overeenkomt met de
plaatselijke netspanning voordat u het apparaat
aansluit.
Houd de oplader uit de buurt van water.
Plaats de oplader niet in de buurt van of boven een
bad, wasbak, gootsteen enz. Dompel de oplader
nooit in water of een andere vloeistof.
Gebruik de oplader nooit als deze beschadigd is of
als het snoer of de stekker beschadigd is.
Het snoer van de oplader kan niet worden
vervangen. Indien het snoer is beschadigd, dient de
oplader te worden afgedankt.
Zorg ervoor dat er stroom op het stopcontact
staat wanneer u de tandenborstel gaat opladen.
Het is mogelijk dat de stroomtoevoer naar
stopcontacten in spiegelkastjes boven wastafels of
stopcontacten voor scheerapparaten in badkamers
wordt afgesloten wanneer het licht in de badkamer
wordt uitgedaan.
Raadpleeg uw tandarts voordat u de tandenborstel
gebruikt als u in de afgelopen 2 maanden een
chirurgische behandeling aan uw mond of uw
tandvlees hebt ondergaan.
Gebruik dit apparaat uitsluitend met de door de
fabrikant aanbevolen opzetborstels.
Vervang de opzetborstel om de 3 maanden of
eerder indien er tekenen van slijtage optreden,
zoals verbogen of geknakte borstelharen.
Dit apparaat is niet bedoeld voor gebruik door
personen (waaronder kinderen) met verminderde
lichamelijke, zintuiglijke of geestelijke vermogens,
of die gebrek aan ervaring of kennis hebben, tenzij
iemand die verantwoordelijk is voor hun veiligheid
toezicht op hen houdt of hen heeft uitgelegd hoe
het apparaat gebruikt dient te worden.
Houd toezicht op kinderen om te voorkomen dat
ze met het apparaat gaan spelen.
Elektromagnetische velden (EMV)
Dit Philips-apparaat voldoet aan alle richtlijnen met
betrekking tot elektromagnetische velden (EMV). Mits
het apparaat op de juiste wijze en volgens de instructies
in deze gebruiksaanwijzing wordt gebruikt, is het veilig te
gebruiken volgens het nu beschikbare wetenschappelijke
bewijs.
Klaarmaken voor gebruik
Het apparaat opladen
1 Laad het apparaat ten minste 16 uur op voordat u
het voor het eerst gebruikt.
Zorg ervoor dat het apparaat uitgeschakeld is
wanneer u het gaat opladen (g. 2).
Wanneer de accu wordt opgeladen, brandt het
groene indicatielampje (alleen HX1630).
,
,
,
,
,
,
,
,
,
,
,
,
brossage vous empêchera d’oublier certaines zones.
Conseil: Pour une hygiène dentaire optimale, il est
recommandé d’utiliser du l dentaire et des cure-dents en
complément de la brosse à dents électrique.
Durée minimale de brossage
Il suft généralement de 2 minutes pour nettoyer
correctement les dents. Vous pouvez toutefois prolonger
le brossage pour un nettoyage encore plus en profondeur.
Un voyant rouge clignote pour indiquer que les
2 minutes se sont écoulées (HX1630 uniquement).
Remarque: Lorsqu’il n’y a pas de plaque dentaire, les
gencives sont roses et enchâssent bien les dents.
Des gencives saines ne saignent pas lorsque vous mangez
ou que vous vous brossez les dents.
Remarque: Il est possible que vos gencives saignent
légèrement lors des premières utilisations de la brosse.
Ce phénomène cesse au bout de quelques jours. S’il persiste,
consultez votre dentiste.
Protection des gencives
1 Le système de protection des gencives permet de
vérier que la pression exercée sur les dents et les
gencives n’est pas trop élevée.
2 Si vous exercez une pression trop forte sur la
brosse à dents, vous sentez et entendez un clic,
et la tête de brosse se rétracte. Dès que vous
réduisez la pression exercée, la tête de brosse
revient à sa position normale. Ce système permet
de protéger vos gencives (g. 9).
Remarque: Ceci se produira probablement quelques fois
lors de la première utilisation de la brosse à dents. Après un
certain temps, vous aurez trouvé la pression optimale sur les
dents et la tête de brosse se rétractera moins souvent.
Nettoyage et rangement
1 Allumez la brosse à dents, puis rincez la
tête de brosse sous un let d’eau chaude
(60
cC max.). (g. 10)
2 Éteignez la brosse à dents. Retirez la tête de brosse,
puis rincez sa partie interne (g. 11).
3 Allumez la brosse à dents, puis rincez l’axe
d’entraînement sous le robinet an de retirer les
résidus de dentifrice (g. 12).
4 Mettez la tête de brosse sur l’ergot prévu à cet
effet sur le chargeur.
5 Nettoyez le chargeur avec un chiffon
humide (g. 13).
Débranchez systématiquement le chargeur avant de le
nettoyer.
Remplacement
1 Remplacez la tête de brosse tous les 3 mois pour
de meilleurs résultats de brossage.
Remplacez également la tête de brosse si les poils
commencent à se tourner vers l’extérieur.
Vous trouverez des têtes de brosse neuves dans le
magasin où vous avez acheté votre brosse à dents
électrique.
Toutes les têtes de brosse de rechange rondes de la
marque Philips sont compatibles.
Environnement
Lorsqu’il ne fonctionnera plus, ne jetez pas
l’appareil avec les ordures ménagères, mais
déposez-le à un endroit assigné à cet effet, où il
pourra être recyclé. Vous contribuerez ainsi à la
protection de l’environnement (g. 14).
La batterie rechargeable intégrée contient des
substances qui peuvent nuire à l’environnement.
Veillez à toujours retirer la batterie avant de mettre
l’appareil au rebut et de le déposer à un endroit
assigné à cet effet. Déposez la batterie usagée à
un endroit assigné à cet effet. Si vous n’arrivez
pas à retirer la batterie, vous pouvez apporter
l’appareil dans un Centre Service Agréé Philips qui
prendra toute l’opération en charge pour préserver
l’environnement.
Mise au rebut de la batterie
Veillez à ce que la batterie soit totalement déchargée
avant de la mettre au rebut.
1 Laissez l’appareil en marche jusqu’à ce qu’il s’arrête
tout seul avant de retirer la batterie.
2 Ouvrez la poignée (g. 15).
3 Munissez-vous d’un tournevis pour extraire la
batterie de son logement (g. 16).
La brosse à dents n’est plus étanche dès lors que le
boîtier a été ouvert. L’ouverture du boîtier invalide
donc de fait la garantie.
Garantie et service
Si vous souhaitez obtenir des informations supplémentaires
ou si vous rencontrez un problème, visitez le site Web
de Philips à l’adresse www.philips.com ou contactez le
Service Consommateurs Philips de votre pays (vous
trouverez le numéro de téléphone correspondant
sur le dépliant de garantie internationale). S’il n’existe
pas de Service Consommateurs Philips dans votre
pays, renseignez-vous auprès de votre revendeur
local ou contactez le « Service Department of
Philips Domestic Appliances and Personal Care BV ».
Dépannage
Si vous ne pouvez pas résoudre le problème à l’aide
des informations ci-dessous, adressez-vous à un
Centre Service Agréé, au Service Consommateurs Philips
de votre pays ou contactez-nous en ligne à l’adresse
www.philips.com.
,
,
,
,
4 Premete il pulsante on/off per accendere lo
spazzolino e iniziate a lavarvi i denti (g. 5).
Per il miglior metodo di pulizia nel minor
tempo vedere “Consigli per lavarsi i denti”.
”Consigli per lavarsi i denti”
Metodo di pulizia
1 Appoggiate la testina al dente in modo tale
da coprire la supercie del dente e il bordo
gengivale (g. 6).
2 Tenete lo spazzolino in questa posizione per alcuni
secondi prima di passare al dente successivo (g. 7).
La testina rotonda rimuove la placca dai denti e al di sotto
del bordo gengivale.
La punta attiva si muove in modo indipendente, per una
migliore pulizia interdentale.
3 Guidate delicatamente lo spazzolino fra i denti, no
in fondo alla bocca (g. 8).
Consiglio:controllate di pulire correttamente tutte le superci
dei denti (all’interno, all’esterno e sopra) e lungo il bordo
gengivale. Provate a seguire sempre lo stesso ordine di
pulizia, per evitare di saltare qualche zona.
Consiglio:per un’igiene dentale ottimale, vi consigliamo
di usare il lo interdentale e lo scovolino in aggiunta allo
spazzolino elettrico.
Minor tempo di lavaggio
Un tempo di lavaggio di 2 minuti in genere è sufciente
per pulire i denti in modo appropriato. Se si desidera
si possono pulire i denti per un periodo di tempo
superiore ai 2 minuti, ottenendo una pulizia ancora più a
fondo.
L’indicatore rosso lampeggerà per indicare che
sono trascorsi 2 minuti (solo HX1630).
Nota: se la placca viene rimossa correttamente, le gengive
avranno un colore rosa e circonderanno i denti. Mentre si
mangia o si lavano i denti le gengive sane non sanguinano.
Nota: le prime volte che si utilizza lo spazzolino le
gengive potrebbero sanguinare. Di norma dopo qualche
giorno, questo fenomeno non si verica più. Se le gengive
continuano a sanguinare consultate il vostro dentista.
Protezione delle gengive
1 Il sistema per la protezione delle gengive vi
impedisce di esercitare una pressione eccessiva su
denti e gengive.
2 Quando esercitate una pressione eccessiva, la
testina scatta all’indietro (“clic”). Non appena
riducete la pressione, la testina ritorna nella
posizione normale. Tutto questo per proteggere le
vostre gengive (g. 9).
Nota:questo funzionamento si vericherà diverse volte
quando inizierete ad usare lo spazzolino. Con un po’ di
pratica imparerete ad applicare la pressione ottimale e la
testina scatterà indietro meno spesso.
Come pulire e riporre l’apparecchio
1 Accendete lo spazzolino e pulite la testina sotto
l’acqua calda corrente (massimo 60 cC). (g. 10)
2 Spegnete lo spazzolino. Rimuovete la testina e
pulite l’interno della testina (g. 11).
3 Accendete lo spazzolino e pulite l’albero motore
sotto l’acqua corrente per rimuovere i residui di
dentifricio (g. 12).
4 Riponete la testina nel perno di conservazione della
testina sul caricabatterie.
5 Pulite gli accessori con un panno umido (g. 13).
togliete sempre la spina del caricabatterie dalla presa di
corrente prima di pulire l’apparecchio.
Sostituzione
1 Per ottenere i migliori risultati, sostituite la testina
ogni 3 mesi.
Sostituite la testina quando le setole iniziano a
piegarsi verso l’esterno.
Potete acquistare le testine di ricambio nei negozi dove
avete comperato l’apparecchio.
È possibile utilizzare qualsiasi testina di ricambio PHILIPS.
Tutela dell’ambiente
Per contribuire alla tutela dell’ambiente, non
smaltite l’apparecchio insieme ai riuti domestici,
ma consegnatelo a un centro di raccolta ufciale
(g. 14).
La batteria ricaricabile integrata contiene sostanze
potenzialmente nocive per l’ambiente. Rimuovete
sempre la batteria prima di smaltire l’apparecchio
e consegnarlo a un centro di raccolta ufciale.
Smaltite la batteria in un apposito centro di
raccolta. In caso di difcoltà durante la rimozione
della batteria, consegnate l’apparecchio a un centro
di assistenza Philips, che si occuperà della rimozione
della batteria e dello smaltimento dell’apparecchio.
Smaltimento delle batterie
Prima di gettare la batteria accertarsi che sia
completamente scarica.
1 Prima di rimuovere la batteria, lasciate l’apparecchio
in funzione no al completo arresto.
2 Aprite l’impugnatura (g. 15).
3 Utilizzare un cacciavite per estrarre la batteria dal
supporto (g. 16).
lo spazzolino non è più impermeabile quando
l’ alloggiamento è aperto. Quando si apre
l’alloggiamento la garanzia viene invalidata.
,
,
,
,
,
U kunt de tandenborstel in de oplader laten staan
en deze continu laten opladen.
De levensduur van de accu optimaliseren
Laad de tandenborstel niet op tussen de poetsbeurten
nadat u de tandenborstel voor de eerste keer hebt
opgeladen. Blijf de tandenborstel gebruiken tot de accu
leeg is en laad de tandenborstel pas daarna opnieuw op.
Laad het apparaat op als de motor bijna stopt.
Herhaal deze procedure drie keer achterelkaar.
Herhaal deze procedure elke 6 maanden om de
levensduur van de accu te verlengen.
Het apparaat gebruiken
1 Als u de opzetborstel op de tandenborstel wilt
bevestigen, plaats dan de opzetborstel in de
bajonetsluiting en draai de opzetborstel een
kwartslag rechtsom (g. 3).
Zo wordt voorkomen dat de opzetborstel losraakt als
gevolg van trillingen.
2 Doe tandpasta op de opzetborstel.
3 Plaats de opzetborstel in uw mond (g. 4).
4 Zet de tandenborstel aan met de aan/uitknop en
begin met het poetsen van uw tanden (g. 5).
Zie ‘Poetstips’ voor de beste en snelste manier om
uw tanden te poetsen.
Poetstips
Poetsmethode
1 Plaats de opzetborstel zo tegen de tand dat de
borstel zowel het tandoppervlak als de rand van
het tandvlees bedekt (g. 6).
2 Houd de opzetborstel enkele seconden in
deze stand en ga dan verder met de volgende
tand (g. 7).
De ronde opzetborstel verwijdert plak van de tanden en
onder de rand van het tandvlees.
De onafhankelijk bewegende Active Tip reinigt tussen de
tanden.
3 Beweeg de opzetborstel voorzichtig langs alle
tanden en kiezen (g. 8).
Tip: Zorg ervoor dat u alle oppervlakken van uw tanden
en kiezen (binnenkant, buitenkant en kauwvlak) en
de tandvleesrand goed schoonmaakt. Door een vast
poetspatroon te volgen voorkomt u dat u bepaalde gebieden
overslaat.
Tip: Voor optimale gebitsverzorging is het aan te raden om
naast de elektrische tandenborstel ook tandenstokers te
gebruiken en te ossen.
Minimale poetstijd
Een poetstijd van 2 minuten is in het algemeen lang
genoeg om uw tanden goed schoon te maken. Als u wilt,
kunt u uw tanden langer dan 2 minuten poetsen voor een
nog grondigere reiniging.
Een rood indicatielampje gaat knipperen om aan
te geven dat er 2 minuten verstreken zijn (alleen
HX1630).
Opmerking: Als tandplak goed wordt verwijderd, heeft
het tandvlees een roze kleur en zal het de tanden stevig
omsluiten. Gezond tandvlees bloedt niet als u aan het eten
bent of uw tanden aan het poetsen bent.
Opmerking: Als uw tandvlees enigszins bloedt wanneer u de
tandenborstel de eerste paar keer gebruikt, stopt dit bloeden
normaal gesproken na een paar dagen. Raadpleeg uw
tandarts of mondhygiënist als uw tandvlees blijft bloeden.
Tandvleesbescherming
1 Het tandvleesbeschermingssysteem voorkomt dat u
te veel druk uitoefent op uw tanden en tandvlees.
2 Als u te veel druk uitoefent op de tandenborstel,
hoort en voelt u de opzetborstel naar achteren
klikken. Zodra u de druk vermindert, keert de
opzetborstel terug naar zijn normale positie.
Hierdoor wordt uw tandvlees beschermd (g. 9).
Opmerking: Dit zal waarschijnlijk in het begin enkele keren
gebeuren. Na een tijdje zult u echter de optimale poetsdruk
hebben ontdekt en zal de opzetborstel minder vaak naar
achteren klikken.
Schoonmaken en opbergen
1 Zet de tandenborstel aan en spoel de opzetborstel
af onder de warme kraan (max. 60cC) (g. 10).
2 Zet de tandenborstel uit. Verwijder de opzetborstel
en spoel de binnenzijde van de opzetborstel
schoon (g. 11).
3 Zet de tandborstel aan en spoel de aandrijfas
schoon onder de kraan om tandpastaresten te
verwijderen (g. 12).
4 Bewaar de opzetborstel op de pin voor
opzetborstels op de oplader.
5 Maak de oplader schoon met een vochtige
doek (g. 13).
Haal de stekker uit het stopcontact voordat u de
oplader gaat schoonmaken.
Vervangen
1 Vervang de opzetborstel elke 3 maanden voor het
beste poetsresultaat.
Vervang de opzetborstel ook als de borstelharen
naar buiten beginnen te buigen.
Nieuwe opzetborstels zijn verkrijgbaar bij de winkel waar
u de tandenborstel hebt aangeschaft.
U kunt alle ronde Philips-opzetborstels gebruiken.
Milieu
Gooi het apparaat aan het einde van zijn levensduur
niet weg met het normale huisvuil, maar lever het in
op een door de overheid aangewezen inzamelpunt
,
-
-
-
,
,
,
,
Garanzia e assistenza
Per ulteriori informazioni o eventuali problemi, visitate
il sito Web Philips all’indirizzo www.philips.com oppure
contattate il Centro Assistenza Clienti Philips locale
(il numero di telefono è riportato nell’opuscolo della
garanzia). Qualora non fosse disponibile un Centro
Assistenza Clienti locale, rivolgetevi al rivenditore
autorizzato Philips oppure contattate il Reparto assistenza
Philips Domestic Appliances & Personal Care BV.
Risoluzione dei guasti
Nel caso non riusciste a risolvere il vostro problema
mediante la tabella di localizzazione guasti riportata qui
sotto, vi preghiamo di contattare il Centro Assistenza
Philips più vicino, il Customer Care Centre del vostro
paese oppure il nostro sito www.philips.com.
Problema Soluzione
Lo spazzolino non
funziona anche
se è rimasto nel
caricabatterie per
tutta la notte.
Accertarsi che la spina del
caricabatterie sia inserita
correttamente nella presa a
muro.
Accertarsi che la presa funzioni
(vedere capitolo “Importante”).
Controllate che lo spazzolino sia
spento e ricaricatelo per almeno
16 ore.
Il motore dello
spazzolino funziona,
ma la testina no.
Accertarsi che la testina sia stata
installata correttamente sull’unità
(vedere capito “Modalità d’uso
dell’apparecchio”).
La potenza
dell’apparecchio
si è ridotta
notevolmente.
Lo spazzolino deve essere
ricaricato. Lasciando lo
spazzolino nel caricabatterie, si
prolunga la durata della batteria
come descritto nel capitolo
“Preparazione all’uso”.
Lo spazzolino non
lava i denti con la
stessa efcacia di
sempre.
Sostituire la testina.
om het te laten recyclen. Op die manier levert
u een bijdrage aan een schonere leefomgeving
(g. 14).
De ingebouwde accu bevat stoffen die schadelijk
kunnen zijn voor het milieu. Verwijder altijd de
accu voordat u het apparaat afdankt en inlevert op
een door de overheid aangewezen inzamelpunt.
Lever de accu in op een ofcieel inzamelpunt
voor batterijen. Als u problemen ondervindt
bij het verwijderen van de accu, kunt u met het
apparaat ook naar een Philips-servicecentrum
gaan. Medewerkers van dit centrum verwijderen
dan de accu voor u en zorgen ervoor dat deze op
milieuvriendelijke wijze wordt verwerkt.
De accu verwijderen
Zorg ervoor dat de accu helemaal leeg is als u deze
inlevert.
1 Laat het apparaat lopen tot het stopt en verwijder
vervolgens de accu.
2 Open de handgreep (g. 15).
3 Gebruik een schroevendraaier om de accu uit de
accuhouder te wrikken (g. 16).
De tandenborstel is niet meer waterdicht als u de
behuizing van de tandenborstel hebt geopend. Als u de
behuizing opent, vervalt de garantie.
Garantie & service
Als u informatie nodig hebt of als u een probleem hebt,
bezoek dan de Philips-website (www.philips.com), of
neem contact op met het Philips Customer Care Centre
in uw land (u vindt het telefoonnummer in het ‘worldwide
guarantee’-vouwblad). Als er geen Customer Care Centre
in uw land is, ga dan naar uw Philips-dealer of neem dan
contact op met de afdeling Service van Philips Domestic
Appliances and Personal Care BV.
Problemen oplossen
Als u er niet in slaagt uw probleem op te lossen met de
onderstaande informatie, neem dan contact op met het
dichtstbijzijnde Philips-servicecentrum of met het Philips
Customer Care Centre in uw land. U kunt ook online
contact met ons opnemen via www.philips.nl.
Probleem Oplossing
De tandenborstel
werkt helemaal
niet, hoewel deze
de hele nacht in
de oplader heeft
gestaan.
Zorg ervoor dat de stekker
van de oplader goed in het
stopcontact zit.
Controleer of er stroom op het
stopcontact staat (zie hoofdstuk
‘Belangrijk’).
Zorg ervoor dat de
tandenborstel is uitgeschakeld en
laad het apparaat minimaal
16 uur op.
De motor van
de tandenborstel
werkt wel, maar
de opzetborstel
werkt niet.
Controleer of de opzetborstel
goed op het apparaat is bevestigd
(zie ook hoofdstuk ‘Het apparaat
gebruiken’).
De poetskracht
van de
tandenborstel is
sterk afgenomen.
De tandenborstel moet worden
opgeladen. Als u de tandenborstel
gewoonlijk continu in de oplader
laat staan, is het mogelijk dat u
de levensduur van de accu moet
verlengen zoals wordt beschreven
in hoofdstuk ‘Klaarmaken voor
gebruik’.
De tandenborstel
reinigt mijn tanden
niet zo goed als
eerst het geval
was.
Vervang de opzetborstel.
,
Problème Solution
La brosse à dents
ne fonctionne pas,
bien qu’elle ait été
chargée pendant la
nuit.
Assurez-vous que la che du
chargeur est correctement
insérée dans la prise secteur.
Vériez que la prise secteur
est bien alimentée (voir le
chapitre « Important »).
Assurez-vous que la brosse à
dents est arrêtée et rechargez-
la pendant au moins 16 heures.
Le moteur de
l’appareil fonctionne,
mais pas la tête de
brosse.
Vériez que la tête de brosse
est bien montée sur l’appareil
(voir également le chapitre
« Utilisation de l’appareil »).
La puissance de
brossage a diminué
considérablement.
La brosse à dents a besoin
d’être rechargée. Si vous la
laissez continuellement sur le
chargeur, suivez les instructions
du chapitre « Avant
utilisation » pour prolonger la
durée de vie de la batterie.
La brosse à dents
ne nettoie plus mes
dents aussi bien
qu’avant.
Changez la tête de brosse.
PORTUGUÊS
Descrição geral (fig. 1)
A Cabeça da escova
B Pega
C Pinos de arrumação da cabeça da escova
D Pino do carregador
E Carregador
Importante
Leia este manual do utilizador com atenção, antes de
utilizar o aparelho e guarde-o para uma eventual consulta
futura.
Verique se a voltagem indicada na parte
inferior do carregador corresponde à voltagem
eléctrica local, antes de ligar o aparelho.
Mantenha o carregador afastado da água. Não
o coloque, nem o guarde sobre ou próximo de
banheiras, lavatórios, lava-loiças, etc. com água.
Nunca mergulhe o carregador em água ou em
qualquer outro líquido.
Nunca utilize o carregador se estiver danicado ou
se o o ou cha estiverem danicados.
O o do carregador não pode ser substituído.
Se o o estiver danicado, deve desfazer-se do
carregador.
Verique se a tomada tem corrente quando
recarregar a escova de dentes. A alimentação
eléctrica das tomadas de espelhos sobre os
lavatórios ou das tomadas de barbear pode ser
desligada quando se apaga a luz.
Se tiver sido submetido a uma cirurgia da boca ou
das gengivas nos últimos 2 meses, consulte o seu
dentista antes de utilizar a escova de dentes.
,
,
,
,
,
,
Não utilize outras cabeças a não ser as que são
recomendadas pelo fabricante.
Substitua a cabeça da escova de 3 em 3 meses
ou mais cedo no caso de aparecerem sinais de
desgaste, como é o caso de cerdas esmagadas ou
dobradas.
Este aparelho não se destina a ser utilizado por
pessoas (incluindo crianças) com sensibilidade física
ou capacidades mentais reduzidas, ou com falta de
experiência e conhecimentos, a menos que sob a
supervisão ou após formação relativa à utilização
do aparelho por uma pessoa responsável pela sua
segurança.
As crianças devem ser vigiadas para assegurar que
não brincam com o aparelho.
Campos Electromagnéticos - EMF
(Electro Magnetic Fields)
Este aparelho Philips cumpre todas as normas
relacionadas com campos electromagnéticos (EMF).
Se for manuseado correctamente e de acordo com as
instruções presentes no manual do utilizador, o aparelho
proporciona uma utilização segura, como demonstrado
pelas provas cientícas actualmente disponíveis.
Preparação
Carga do aparelho
1 Carregue o aparelho durante, pelo menos, 16 horas
antes de o utilizar pela primeira vez.
Certique-se de que desligou o aparelho quando
começar a carregá-lo (g. 2).
Quando a bateria estiver a ser carregada, a luz
indicadora verde está acesa (apenas no modelo
HX1630).
A escova pode ser deixada no carregador e car
continuamente em carga.
Optimizar a vida útil da bateria
Depois de ter carregado a escova de dentes pela
primeira vez, não volte a carregá-la entre escovagens.
Continue a utilizá-la até a bateria se gastar antes de a
carregar novamente.
Recarregue o aparelho quando o motor estiver
quase a parar.
Repita este procedimento três vezes de seguida.
Para prolongar a vida útil da bateria, repita este
procedimento de 6 em 6 meses.
Utilização do aparelho
1 Para montar a cabeça da escova na escova de
dentes, introduza-a na patilha de baioneta e rode-a
para a direita, um quarto de volta (g. 3).
Assim, evita que a cabeça da escova se desprenda devido
à vibração.
2 Coloque a pasta de dentes sobre a cabeça da
escova.
3 Coloque a cabeça da escova na boca (g. 4).
4 Prima o botão ligar/desligar para ligar a escova de
dentes e comece a lavar os dentes (g. 5).
Para obter o melhor método de escovagem
no mínimo de tempo, consulte ‘Sugestões de
escovagem’.
Sugestões de escovagem
Método de escovagem
1 Encoste a cabeça da escova ao dente de modo a
cobrir a superfície do dente, assim como a linha das
gengivas (g. 6).
2 Mantenha a cabeça da escova nesta posição durante
alguns segundos e depois passe para o dente
seguinte (g. 7).
A cabeça redonda da escova retira a placa bacteriana dos
dentes e por baixo da linha das gengivas.
A Ponta Activa, que se movimenta separadamente, limpa
os espaços interdentários.
3 Guie a cabeça da escova com cuidado ao longo dos
dentes e dos molares (g. 8).
Sugestão: Certique-se de que limpa devidamente todas
as superfícies dos dentes (interior, exterior e zona de
mastigação), bem como a linha das gengivas. Um padrão de
escovagem xo evita que quem algumas zonas por escovar.
Sugestão: Para uma higiene oral perfeita, utilize o dental e
palitos orais além da escova eléctrica.
Tempo de escovagem mínimo
Um tempo de escovagem de 2 minutos é geralmente o
suciente para limpar devidamente os dentes. Se quiser,
pode escovar por mais de 2 minutos para uma limpeza
ainda mais profunda.
Uma luz indicadora vermelha ca intermitente
indicando o m dos 2 minutos (apenas no modelo
HX1630).
Nota: Se a placa bacteriana for devidamente removida, as
gengivas cam com um tom rosado e rodeiam com rmeza
o dente. Gengivas saudáveis não sangram quando come ou
escova os dentes.
Nota: Se as suas gengivas sangram ligeiramente nas
primeiras vezes que utiliza esta escova de dentes, este
sangramento pára normalmente ao m de alguns dias.
Se as suas gengivas continuarem a sangrar, consulte o seu
dentista ou higienista oral.
Protecção das gengivas
1 O sistema de Protecção das Gengivas garante que
não será exercida demasiada pressão sobre os
dentes e as gengivas.
2 Se zer demasiada pressão sobre a escova, sentirá e
ouvirá um clique quando a cabeça da escova ectir
para trás. Assim que reduzir a pressão, a cabeça da
escova retorna à sua posição normal. Deste modo,
está a proteger as suas gengivas (g. 9).
,
,
,
,
,
,
,
-
-
-
,
,
Nota:Muito provavelmente, isto sucederá algumas vezes
nas primeiras utilizações da escova. Passado algum tempo,
já saberá qual a força de escovagem ideal e a cabeça da
escova recuará com menos frequência.
Limpeza e arrumação
1 Ligue a escova de dentes e enxagúe a cabeça da
escova sob água quente da torneira (máx.
60 cC). (g. 10)
2 Desligue a escova de dentes. Desmonte a cabeça
da escova e enxagúe o interior da cabeça da
escova (g. 11).
3 Ligue a escova de dentes e enxagúe o eixo do
motor debaixo da torneira para remover partículas
de pasta de dentes (g. 12).
4 Arrume a cabeça da escova no pino de arrumação
da cabeça da escova no carregador.
5 Limpe o carregador com um pano húmido (g. 13).
Desligue o carregador da corrente antes de o limpar.
Substituição
1 Substitua a cabeça da escova de 3 em 3 meses para
melhores resultados ao escovar.
Substitua também a cabeça da escova quando as
cerdas começarem a dobrar para fora.
Pode adquirir novas cabeças da escova na mesma loja
onde comprou a escova de dentes.
Podem ser utilizadas todas as cabeças da escova de
substituição Philips redondas.
Ambiente
Não deite fora o aparelho junto com o lixo
doméstico normal no nal da sua vida útil;
entregue-o num ponto de recolha ocial para
reciclagem. Ao fazê-lo ajuda a preservar o ambiente.
(g. 14).
A bateria incorporada recarregável contém
substâncias que podem poluir o ambiente. Retire
sempre a bateria antes de deitar fora o aparelho
e de o entregar num ponto de recolha ocial.
Coloque a bateria num ponto de recolha ocial
para baterias. Se tiver problemas na remoção da
bateria, pode também levar a máquina a um centro
de assistência Philips. A equipa deste centro poderá
remover a bateria por si e eliminá-la de forma
segura para o ambiente.
Eliminação da bateria
Certique-se de que a bateria está completamente gasta
antes de se desfazer dela.
1 Deixe o aparelho a trabalhar até parar antes de
remover a bateria.
2 Abra a pega (g. 15).
3 Utilize uma chave de parafusos para retirar
a bateria do respectivo compartimento (g. 16).
A escova de dentes deixa de ser estanque depois de
o corpo da escova de dentes ser aberto. Se abrir o
corpo, a garantia torna-se inválida.
Garantia e assistência
Se precisar de informações ou se tiver algum problema,
visite o site da Philips em
www.philips.pt ou contacte o
Centro de Atendimento ao Cliente Philips do seu país
(encontrará o número de telefone no folheto da garantia
mundial). Se não existir um Centro de Atendimento ao
Cliente no seu país, dirija-se ao distribuidor Philips local
ou contacte o Departamento de Assistência da Philips
Domestic Appliances and Personal Care BV.
Resolução de problemas
Se não for capaz de resolver o seu problema com as
indicações dadas a seguir, contacte o centro de assistência
Philips mais próximo ou o Centro de Atendimento ao
Cliente Philips do seu país. Pode também contactar-nos
on-line em www.philips.pt.
Problema Solução
A escova de dentes
não trabalha apesar
de ter cado a noite
toda colocada no
carregador.
Certique-se de que a
cha do carregador está
devidamente introduzida na
tomada eléctrica.
Certique-se de
que a tomada tem
corrente (consulte o
capítulo ‘Importante’).
Verique se a escova de
dentes está desligada e deixe-
a a carregar durante pelo
menos 16 horas.
O motor da escova
de dentes funciona,
mas a cabeça da
escova não.
Verique se a cabeça
da escova foi devidamente
colocada no aparelho
(consulte também o capítulo
‘Utilização do aparelho’).
A potência de
escovagem da escova
de dentes diminuiu
consideravelmente.
A escova de dentes tem de
ser recarregada. Se deixa
normalmente a escova no
carregador em contínuo,
talvez tenha de prolongar a
vida útil da bateria tal como
é descrito no capítuclo
‘Preparação’.
A escova de dentes já
não limpa tão bem os
meus dentes.
Substitua a cabeça da escova.
,
,
,
4203.000.5607.2.indd 2 31-05-2007 11:12:56
Documenttranscriptie
ENGLISH General description (Fig. 1) A B C D E Brush head Handle Brush head storage pins Charger pin Charger Note: If plaque is removed properly, the gums will have a pink colour and will firmly surround the teeth. Healthy gums do not bleed when you eat or brush your teeth. Note: If your gums bleed slightly the first few times you use this toothbrush, this bleeding will generally stop after a few days. If your gums continue to bleed, consult your dentist or dental hygienist. Gum protection Important Read this user manual carefully before you use the appliance and save it for future reference. , Check if the voltage indicated on the bottom of the charger corresponds to the local mains voltage before you connect the appliance. , Keep the charger away from water. Do not place or store it over or near water contained in a bathtub, washbasin, sink etc. Do not immerse the charger in water or any other liquid. , Never use the charger if it is damaged or if the cord or plug is damaged. , The cord of the charger cannot be replaced. If the cord is damaged, the charger must be discarded. , Make sure the socket is live when you recharge the toothbrush. The electricity supply to sockets in mirror cabinets over washbasins or shaver sockets in bathrooms may be cut off when the light is turned off. , If you have had oral or gum surgery in the previous 2 months, consult your dentist before you use the toothbrush. , Do not use other brush heads than the ones recommended by the manufacturer. , Replace the brush head every 3 months or sooner if signs of wear appear, such as crushed or bent bristles. , This appliance is not intended for use by persons (including children) with reduced physical sensory or mental capabilities, or lack of experience and knowledge, unless they have been given supervision or instruction concerning use of the appliance by a person responsible for their safety. , Children should be supervised to ensure they do not play with the appliance. Electromagnetic fields (EMF) This Philips appliance complies with all standards regarding electromagnetic fields (EMF). If handled properly and according to the instructions in this user manual, the appliance is safe to use based on scientific evidence available today. Preparing for use Charging the appliance 1 Charge the appliance for at least 16 hours before , , , you use it for the first time. Make sure the appliance is switched off when you start to charge it (Fig. 2). When the battery is being charged, the green indicator light is on (HX1630 only). You can leave the toothbrush in the charger and let it charge continuously. Optimising the lifetime of the battery After you have charged the toothbrush for the first time, do not recharge it between brushings. Continue to use it until the battery is empty before you recharge it again. - Recharge the appliance when the motor almost stops running. - Repeat this procedure three times in a row. - To extend the lifetime of the battery, repeat this procedure every 6 months. Using the appliance 1 To mount the brush head on the toothbrush, insert it into the bayonet catch and turn it clockwise a quarter turn (Fig. 3). This prevents the brush head from becoming detached due to vibration. 2 Put toothpaste on the brush head. 3 Place the brush head in your mouth (Fig. 4). 4 Press the on/off button to switch on the , toothbrush and start to brush your teeth (Fig. 5). For the best brushing method and the minimum brushing time, see ‘Brushing tips’. Brushing tips Brushing method 1 Place the brush head against the tooth in such a way that it covers the surface of the tooth as well as the gum line (Fig. 6). 2 Hold the brush head in this position for a few seconds and then move on to the next tooth (Fig. 7). The round brush head removes plaque from the teeth and beneath the gum line. The individually moving Active Tip cleans between the teeth. 3 Guide the brush head carefully along the teeth and 1 The Gum Protection system guarantees that you will not exert too much pressure on the teeth and gums. Tip: For optimal dental hygiene, use dental floss and toothpicks in addition to the electric toothbrush. Minimum brushing time A brushing time of 2 minutes is generally long enough to clean your teeth properly. If you want, you can brush longer than 2 minutes for an even more thorough clean. , A red indicator light will blink to indicate that 2 minutes have passed (HX1630 only). 4203.000.5607.2.indd 1 The brushing power of the toothbrush has greatly decreased. The toothbrush doesn’t clean my teeth as well as before. Solution The toothbrush must be recharged. If you normally leave the toothbrush in the charger continuously, you may have to extend the lifetime of the battery as described in chapter ‘Preparing for use’. Replace the brush head. 2 If you exert too much pressure on the toothbrush, you will feel and hear a click when the brush head flexes backwards. As soon as you reduce the pressure, the brush head will return to its normal position. This will protect your gums (Fig. 9) Note:This will probably happen a few times when you first start using the brush. After some time you will have discovered the optimal brushing pressure and the brush head will flex backwards less often. DEUTSCH Allgemeine Beschreibung (Abb. 1) A B C D E 1 Switch on the toothbrush and rinse the brush head under a hot tap (max. 60 cC) (Fig. 10). 2 Switch off the toothbrush. Detach the brush head and rinse the inside of the brush head (Fig. 11). 3 Switch on the toothbrush and rinse the drive shaft under the tap to remove toothpaste residues (Fig. 12). 4 Store the brush head on the brush head storage pin on the charger. 5 Clean the charger with a moist cloth (Fig. 13). Unplug the charger before you start to clean it. Replacement 1 Replace the brush head every 3 months for the best brushing results. Also replace the brush head when the bristles start to bend outwards. You can obtain new brush heads from the shop where you purchased the toothbrush. All round Philips replacement brush heads can be used. , Environment , , Do not throw away the appliance with the normal household waste at the end of its life, but hand it in at an official collection point for recycling. By doing this, you help to preserve the environment (Fig. 14). The built-in rechargeable battery contains substances that may pollute the environment. Always remove the battery before you discard the appliance and hand it in at an official collection point. Dispose of the battery at an official collection point for batteries. If you have trouble removing the battery, you can also take the appliance to a Philips service centre. The staff of this centre will remove the battery for you and will dispose of it in an environmentally safe way. Disposal of the battery Make sure the battery is completely empty when you dispose of it. 1 Let the appliance run until it stops before you remove the battery. 2 Open the handle (Fig. 15) . 3 Use a screwdriver to pry the battery out of the battery holder (Fig. 16). The toothbrush is no longer watertight once the housing of the toothbrush has been open. When you open the housing, your guarantee becomes invalid. Lesen Sie diese Bedienungsanleitung vor dem Gebrauch des Geräts aufmerksam durch und bewahren Sie sie für eine spätere Verwendung auf. , Prüfen Sie vor Inbetriebnahme, ob die Spannungsangabe auf der Unterseite des Ladegeräts mit der örtlichen Netzspannung übereinstimmt. , Halten Sie das Ladegerät von Wasser fern. Stellen Sie es nicht über oder direkt bei einer mit Wasser gefüllten Badewanne bzw. einem Waschbecken ab. Tauchen Sie das Ladegerät nicht in Wasser oder andere Flüssigkeiten. , Benutzen Sie das Ladegerät nicht, wenn es beschädigt ist oder wenn das Netzkabel oder der Netzstecker defekt ist. , Das Kabel des Ladegeräts kann nicht ausgetauscht werden. Ist das Kabel beschädigt, muss das Ladegerät entsorgt werden. , Prüfen Sie vor dem Aufladen der Zahnbürste, ob die Steckdose kontinuierlich Strom führt. Steckdosen in Badezimmerschränken über Waschbecken sowie Rasierer-Steckdosen werden häufig zusammen mit der Raumbeleuchtung ausgeschaltet. , Wenn in den vergangenen 2 Monaten ein chirurgischer Eingriff an Ihren Zähnen oder am Zahnfleisch vorgenommen wurde, sollten Sie vor Benutzung der Zahnbürste Ihren Zahnarzt konsultieren. , Benutzen Sie nur die vom Hersteller für diese Zahnbürste empfohlenen Bürstenköpfe. , Tauschen Sie den Bürstenkopf spätestens nach 3 Monaten aus oder sobald Abnutzungserscheinungen zu erkennen sind, wie z. B. abgeknickte oder zerdrückte Borsten. , Dieses Gerät ist für Benutzer (einschl. Kinder) mit eingeschränkten physischen, sensorischen oder psychischen Fähigkeiten bzw. ohne jegliche Erfahrung oder Vorwissen nur dann geeignet, wenn eine geeignete Aufsicht oder ausführliche Anweisungen zur Benutzung des Geräts sichergestellt sind. , Achten Sie darauf, dass Kinder nicht mit dem Gerät spielen. Elektromagnetische Felder (EMF; Electro Magnetic Fields) Dieses Philips Gerät erfüllt sämtliche Normen bezüglich elektromagnetischer Felder (EMF). Nach aktuellen wissenschaftlichen Erkenntnissen ist das Gerät sicher im Gebrauch, sofern es ordnungsgemäß und entsprechend den Anweisungen in dieser Bedienungsanleitung gehandhabt wird. Troubleshooting If you are unable to solve your problem with the information below, please contact the nearest Philips service centre or the Philips Customer Care Centre in your country. You can also contact us online at www.philips.com. Problem Solution The toothbrush does not work at all, although it has been in the charger overnight. Make sure that the plug of the charger is properly inserted into the wall socket. Make sure the toothbrush is switched off and recharge it for at least 16 hours. The motor of the toothbrush works, but the brush head doesn’t. Das Gerät laden 1 Laden Sie das Gerät vor dem ersten Gebrauch , , , mindestens 16 Stunden lang auf. Achten Sie darauf, dass das Gerät ausgeschaltet ist, wenn Sie mit dem Laden beginnen (Abb. 2). Beim Laden des Akkus leuchtet die grüne Kontrollanzeige auf (nur HX1630). Sie können die Zahnbürste zum kontinuierlichen Nachladen im Ladegerät belassen. Die Lebensdauer des Akkus optimieren Laden Sie die Zahnbürste vor der ersten Benutzung vollständig auf. Laden Sie sie aber nicht nach jeder Anwendung neu auf. Benutzen Sie die Zahnbürste solange ohne Nachladen, bis der Akku leer ist. - Laden Sie den Akku erst wieder auf, wenn der Motor beinahe zum Stillstand kommt. - Wiederholen Sie diesen Vorgang dreimal nacheinander. - Sie können die Lebensdauer des Akkus verlängern, wenn Sie diesen Vorgang alle 6 Monate wiederholen. Das Gerät benutzen Make sure the socket is live (see chapter ‘Important’). Check if the brush head has been properly attached to appliance (see also chapter ‘Using the appliance’). Hinweise zur Zahnpflege Putztechnik 1 Setzen Sie den Bürstenkopf so an die Zähne, dass er die Zahnoberfläche und den Zahnfleischrand bedeckt (Abb. 6). 2 Halten Sie den Bürstenkopf einige Sekunden in dieser Position, und führen Sie ihn dann zum nächsten Zahn (Abb. 7). Der runde Bürstenkopf entfernt die Plaque vom Zahn und unterhalb des Zahnfleischrandes. Die Interdentalbürste, die sich unabhängig von der runden Bürste bewegt, reinigt die Zahnzwischenräume. 3 Führen Sie die Bürste sorgfältig an allen Zähnen entlang (Abb. 8). 1 Um den Bürstenkopf aufzusetzen, setzen Sie ihn in den Bajonettverschluss und sichern Sie ihn mit einer Vierteldrehung im Uhrzeigersinn (Abb. 3). Danach kann der Bürstenkopf nicht mehr durch die Vibrationen gelockert werden. 2 Tragen Sie etwas Zahnpasta auf den Bürstenkopf auf. 3 Halten Sie die Bürste an die Zähne (Abb. 4). 4 Betätigen Sie den Ein-/Ausschalter, um die , Zahnbürste einzuschalten und mit dem Putzen zu beginnen (Abb. 5). Unter “Hinweise zur Zahnpflege” erhalten Sie Informationen zur richtigen Technik sowie zur Mindest-Putzzeit. Garantie und Kundendienst Benötigen Sie weitere Informationen oder treten Probleme auf, wenden Sie sich bitte an Ihren PhilipsHändler oder setzen Sie sich mit einem Philips ServiceCenter in Ihrem Land in Verbindung (Telefonnummer siehe Garantieschrift). Besuchen Sie auch die Philips Website (www.philips.com). Sie können auch direkt die Service-Abteilung von Philips Domestic Appliances and Personal Care BV kontaktieren. Fehlerbehebung Sollten Sie eventuell auftretende Probleme anhand der folgenden Informationen nicht lösen können, so wenden Sie sich bitte an das Philips Service Center in Ihrem Land oder nehmen Sie online über www.philips.com mit uns Kontakt auf. Tipp: Achten Sie darauf, dass alle Zahnflächen – d. h. Innenund Außenflächen sowie Kauflächen und Zahnfleischrand gründlich gereinigt werden. Eine feste Putzroutine verhindert, dass Sie gewisse Bereiche vernachlässigen. Tipp: Zur optimalen Zahnpflege wird ergänzend zur elektrischen Zahnbürste die Verwendung von Zahnseide und Zahnstochern empfohlen. Mindest-Putzzeit Normalerweise sind 2 Minuten ausreichend, um die Zähne gründlich zu putzen. Für eine besonders gründliche Reinigung können Sie die Zähne selbstverständlich auch länger als 2 Minuten putzen. , Nach Ablauf von 2 Minuten blinkt eine rote Kontrollanzeige (nur HX1630). Zahnfleischschutz 1 Die Druckkontrolle (das sog. Gum Protection System) verhindert, dass Sie bei der Zahnpflege mit der Bürste zu stark auf Zähne und Zahnfleisch drücken. 2 Drücken Sie den Bürstenkopf zu stark an, schnellt der Bürstenaufsatz hörbar (“Klick”) und spürbar zurück. So wird Ihr Zahnfleisch vor Beschädigungen geschützt (Abb. 9). Hinweis:Während der Eingewöhnungsphase wird Ihnen das häufiger passieren. Bald aber finden Sie automatisch den richtigen Andruck, und der Bürstenaufsatz wird nur noch selten zurückschnellen. 1 Schalten Sie die Zahnbürste ein und spülen Sie den Bürstenkopf unter fließendem warmen Wasser von max. 60c°C ab (Abb. 10). 2 Schalten Sie die Zahnbürste aus. Nehmen Sie den Bürstenkopf ab und spülen Sie ihn von innen aus (Abb. 11). 3 Schalten Sie die Zahnbürste wieder ein und spülen Sie den Schaft ab, um restliche Zahnpasta zu entfernen (Abb. 12). 4 Stecken Sie den Bürstenkopf zur Aufbewahrung auf den Stift am Ladegerät. 5 Reinigen Sie das Ladegerät mit einem feuchten Tuch (Abb. 13). Ziehen Sie vor dem Reinigen des Ladegeräts den Netzstecker aus der Steckdose. Ersatz 1 Das beste Ergebnis erhalten Sie, wenn Sie den Bürstenkopf alle 3 Monate ersetzen. Ersetzen Sie den Bürstenkopf auch, sobald sich die Borsten nach außen verbiegen. Neue Bürstenköpfe erhalten Sie dort, wo das Gerät gekauft wurde. Sie können universale PHILIPS Ersatz-Bürstenköpfe verwenden. , Umweltschutz , , Werfen Sie das Gerät am Ende der Lebensdauer nicht in den normalen Hausmüll. Bringen Sie es zum Recycling zu einer offiziellen Sammelstelle. Auf diese Weise helfen Sie, die Umwelt zu schonen (Abb. 14). Der integrierte Akku enthält Substanzen, die die Umwelt gefährden können. Entfernen Sie den Akku, bevor Sie das Gerät an einer offiziellen Recyclingstelle abgeben. Geben Sie den gebrauchten Akku bei einer Batteriesammelstelle ab. Falls Sie beim Entfernen des Akkus Probleme haben, können Sie das Gerät auch an ein Philips Service-Center geben. Dort wird der Akku umweltgerecht entsorgt. Den Akku entsorgen Vergewissern Sie sich, dass der Akku ganz leer ist, bevor Sie ihn entsorgen. 1 Lassen Sie vorher den Motor laufen, bis er stillsteht. 2 Öffnen Sie das Handstück (Abb. 15). 3 Nehmen Sie den Akku mithilfe eines Schraubendrehers aus dem Akkuhalter (Abb. 16). Nach dem Öffnen des Gehäuses ist die Zahnbürste nicht mehr wasserdicht. Wenn Sie das Gehäuse öffnen, erlischt Ihre Garantie. Lösung Die Zahnbürste funktioniert nicht, obwohl sie über Nacht aufgeladen wurde. Prüfen Sie, ob der Netzstecker des Ladegeräts fest in der Steckdose steckt. Schalten Sie das Gerät aus, und laden Sie den Akku mindestens 16 Stunden lang auf. Hinweis: Sollte es anfangs doch zu leichten Zahnfleischblutungen kommen, so klingen sie in der Regel nach einigen Tagen ab. Sollten die Beschwerden andauern, konsultieren Sie bitte Ihren Zahnarzt. Reinigung und Aufbewahrung Problem Prüfen Sie, ob die Steckdose kontinuierlich Strom führt (siehe Kapitel “Wichtig”). Hinweis:Wenn Sie die Plaque gründlich entfernt haben, hat das umgebende Zahnfleisch eine hellrote Färbung und liegt fest am Zahn an. Gesundes Zahnfleisch blutet nicht beim Essen oder beim Zähneputzen. Für den Gebrauch vorbereiten Guarantee & service If you need information or if you have a problem, please visit the Philips website at www.philips.com or contact the Philips Customer Care Centre in your country (you find its phone number in the worldwide guarantee leaflet). If there is no Customer Care Centre in your country, go to your local Philips dealer or contact the Service Department of Philips Domestic Appliances and Personal Care BV. Bürstenkopf Handstück Bürstenkopf-Aufbewahrungsstifte Ladestift Ladegerät Wichtig Cleaning and storage molars (Fig. 8). Tip: Make sure you clean all surfaces of the teeth (inside, outside and chewing surface) as well as the gum line properly. A fixed brushing pattern prevents you from skipping certain areas. Problem Der Motor läuft, aber der Bürstenkopf funktioniert nicht. Prüfen Sie, ob der Bürstenkopf korrekt auf dem Handstück angebracht ist (siehe auch Kapitel “Das Gerät benutzen”). Die Putzleistung ist spürbar schwächer geworden. Die Zahnbürste muss aufgeladen werden. Wenn Sie die Zahnbürste normalerweise im Ladegerät aufbewahren, müssen Sie die Lebensdauer des Akkus möglicherweise optimieren. Befolgen Sie dazu die Anweisungen im Kapitel “Für den Gebrauch vorbereiten”. Die Zahnbürste reinigt nicht mehr so gründlich wie vorher. Ersetzen Sie den Bürstenkopf. Español Descripción general (fig. 1) A B C D E Cabezal del cepillo Mango Soportes para cabezales Pivote de carga Cargador Importante Antes de usar el aparato, lea atentamente este manual del usuario y consérvelo por si necesitara consultarlo en el futuro. , Antes de enchufar el aparato, compruebe si el voltaje indicado en la parte inferior del cargador se corresponde con el voltaje de red local. , Mantenga el cargador alejado del agua. No coloque ni guarde el cargador por encima o cerca de agua contenida en bañeras, lavabos, fregaderos, etc. No sumerja el cargador en agua ni en otros líquidos. , No utilice nunca el cargador si está dañado o si el cable o la clavija están dañados. , El cable del cargador no se puede sustituir. Si el cable está dañado, deberá desechar el cargador. , Asegúrese de que el enchufe tenga corriente cuando recargue el cepillo dental. El suministro eléctrico a los enchufes de los armarios o espejos de los cuartos de baño, o a los enchufes para afeitadoras de los cuartos de baño, puede quedar interrumpido al apagar la luz. , Consulte a su dentista antes de utilizar este cepillo dental si ha sufrido cirugía oral o de las encías en los 2 últimos meses. , No utilice otros cabezales que no sean los recomendados por el fabricante. , Sustituya el cabezal del cepillo cada 3 meses o antes si aparecen signos de desgaste, como cerdas aplastadas o curvadas. , Este aparato no debe ser usado por personas (incluidos los niños) con su capacidad físicosensorial o psíquica reducida, ni por quienes no tengan los conocimientos y la experiencia necesarios, a menos que sean supervisados o instruidos acerca del uso del aparato por una persona responsable de su seguridad. , Asegúrese de que los niños no jueguen con este aparato. Campos electromagnéticos (CEM) Este aparato Philips cumple todos los estándares sobre campos electromagnéticos (CEM). Si se utiliza correctamente y de acuerdo con las instrucciones de este manual, el aparato se puede usar de forma segura según los conocimientos científicos disponibles hoy en día. Preparación para su uso Carga del aparato 1 Antes de usar el aparato por vez primera, cárguelo , durante al menos 16 horas. Asegúrese de que el aparato esté apagado cuando comience a cargarlo (fig. 2). , , Cuando la batería se está cargando, el piloto indicador verde se ilumina (sólo modelo HX1630). Puede dejar el cepillo dental en el cargador y dejarlo cargando de manera continua. Cómo optimizar la vida útil de la batería Después de haber cargado el cepillo dental por primera vez, no vuelva a recargarlo entre cepillados. Continúe utilizándolo y vuelva a cargarlo sólo cuando la batería esté descargada. - Recargue el aparato cuando el motor casi deje de funcionar. - Repita este procedimiento tres veces seguidas. - Para prolongar la vida de la batería, repita este procedimiento cada 6 meses. Uso del aparato 1 Para montar el cabezal en el mango del cepillo dental, insértelo en el eje con enganche de bayoneta y gírelo en el sentido de las agujas del reloj un cuarto de vuelta (fig. 3). Esto evita que el cabezal del cepillo se suelte por las vibraciones. Medio ambiente , , Al final de su vida útil, no tire el aparato junto con la basura normal del hogar. Llévelo a un punto de recogida oficial para su reciclado. De esta manera ayudará a conservar el medio ambiente (fig. 14). La batería recargable incorporada contiene sustancias que pueden contaminar el medio ambiente. Quite siempre la batería antes de deshacerse del aparato y de llevarlo a un punto de recogida oficial. Deposite la batería en un lugar de recogida oficial. Si no puede sacar la batería, puede llevar el aparato a un servicio de asistencia técnica de Philips. El personal del servicio de asistencia extraerá la batería y se deshará de ella de forma no perjudicial para el medio ambiente. Cómo extraer la batería Asegúrese de que la batería está completamente descargada cuando se deshaga de ella. 1 Deje que el aparato funcione hasta que se pare antes de extraer la batería. 2 Ponga pasta de dientes en el cabezal del cepillo. 2 Abra el mango (fig. 15). 3 Introduzca el cabezal del cepillo en la boca (fig. 4). 3 Utilice un destornillador para separar la batería del 4 Pulse el botón de encendido/apagado para , encender el cepillo dental y comience a cepillarse los dientes (fig. 5). Para conocer el mejor método de cepillado y el tiempo mínimo recomendado, consulte “Consejos de cepillado”. Consejos de cepillado Método de cepillado 1 Coloque el cabezal del cepillo sobre el diente de modo que cubra la superficie del mismo y la línea de la encía (fig. 6). 2 Mantenga el cabezal del cepillo en esa posición durante unos segundos y luego pase al diente siguiente (fig. 7). El cabezal redondo del cepillo elimina la placa de los dientes y debajo de la línea de las encías. La Punta Interdental limpia entre los dientes moviéndose por separado. 3 Guíe el cabezal del cepillo con cuidado a lo largo de los dientes y las muelas (fig. 8). Consejo: Asegúrese de limpiar bien toda las superficies de los dientes (interior, exterior y de masticación), así como la línea de las encías. Una rutina fija de cepillado evitará que olvide cepillar ciertas zonas. Consejo: Para una higiene dental óptima, utilice hilo dental y palillos de dientes además del cepillo dental eléctrico. Tiempo mínimo de cepillado Un tiempo de cepillado de 2 minutos normalmente es suficiente para limpiarse los dientes correctamente. Si lo desea, puede cepillarse los dientes durante más de 2 minutos para una limpieza más a fondo. , Un piloto indicador rojo parpadeará para indicar que han transcurrido 2 minutos (sólo modelo HX1630). Nota: Si se elimina la placa correctamente, las encías tendrán un color rosa y rodearán los dientes con firmeza. Las encías sanas no sangran cuando come o cuando se cepilla los dientes. Nota: Si sus encías sangran ligeramente las primeras veces que utilice el cepillo dental, normalmente dejarán de hacerlo a los pocos días. Si después de unos días sus encías continúan sangrando al cepillarse los dientes, consulte a su dentista o higienista dental. soporte (fig. 16). El cepillo dental deja de ser hermético una vez que se ha abierto la carcasa del mismo. Si la abre, la garantía queda anulada. Garantía y servicio Si necesita información o tiene algún problema, visite la página Web de Philips en www.philips.com, o póngase en contacto con el Servicio de Atención al Cliente de Philips en su país (hallará el número de teléfono en el folleto de la garantía mundial). Si no hay Servicio de Atención al Cliente de Philips en su país, diríjase a su distribuidor local Philips o póngase en contacto con el Service Department de Philips Domestic Appliances and Personal Care BV. ejerza demasiada presión sobre los dientes y las encías. 2 Si ejerce demasiada presión sobre el cepillo dental, notará y oirá un “clic” cuando el cabezal del cepillo se flexiona hacia atrás. En cuanto reduzca la presión, el cabezal del cepillo volverá a su posición normal. Esto protegerá sus encías (fig. 9). Nota:Probablemente esto sucederá varias veces cuando empiece a utilizar el aparato. Después de algún tiempo habrá descubierto la presión de cepillado óptima y el cabezal del cepillo se flexionará hacia atrás con menos frecuencia. 4203.000.5607.2 1 Guía de resolución de problemas Si no puede resolver el problema con la siguiente información, póngase en contacto con el servicio de asistencia técnica de Philips más cercano o con el Servicio de Atención al cliente de Philips en su país, o bien póngase en contacto con nosotros en www.philips.com. Problema Solución El cepillo dental no funciona aunque ha estado en el cargador durante toda la noche. Asegúrese de que la clavija del cargador está correctamente enchufada a la toma de corriente. Asegúrese de que la toma de corriente está activa (consulte el capítulo “Importante”). Asegúrese de que el cepillo dental está apagado y recárguelo durante al menos 16 horas. El motor del cepillo dental funciona, pero el cabezal del cepillo no. Compruebe si el cabezal del cepillo está colocado correctamente en el aparato (consulte también el capítulo “Uso del aparato”). La potencia de cepillado del cepillo dental ha disminuido considerablemente. Debe recargar el cepillo dental. Si normalmente deja el cepillo dental en el cargador de forma continua, puede que deba ampliar la vida de la batería como se indica en el capítulo “Preparación para su uso”. El cepillo dental ya no limpia los dientes tan eficazmente como antes. Sustituya el cabezal del cepillo. Protección de las Encías 1 El sistema de Protección de las Encías evita que se HX1630, HX1624, HX1622, HX1620 2 3 4 5 6 7 8 9 10 11 12 14 15 13 16 Limpieza y almacenamiento 1 Encienda el cepillo dental y enjuague el cabezal del cepillo bajo el grifo con agua caliente (temperatura máxima de 60 cC). (fig. 10) 2 Apague el cepillo dental. Quite el cabezal del cepillo y enjuáguelo bien por dentro (fig. 11). 3 Encienda el cepillo dental y enjuague el eje motor bajo el grifo para eliminar los restos de pasta dental (fig. 12). 4 Coloque el cabezal del cepillo en su soporte en el cargador. 5 Limpie el cargador con un paño húmedo (fig. 13). Desenchufe el cargador antes de limpiarlo. Sustitución 1 Sustituya el cabezal del cepillo cada 3 meses para obtener los mejores resultados de cepillado. Sustituya también el cabezal del cepillo cuando las cerdas empiecen a doblarse hacia fuera. Puede adquirir cabezales nuevos en el distribuidor donde haya comprado su cepillo dental. Puede usar cualquier cabezal de cepillo redondo de Philips. , 31-05-2007 11:12:53 Français Description générale (fig. 1) A B C D E Tête de brosse Poignée Ergots de fixation pour tête de brosse Broche du chargeur Chargeur Important Lisez attentivement ce mode d’emploi avant d’utiliser l’appareil et conservez-le pour un usage ultérieur. , Avant de brancher l’appareil, vérifiez que la tension indiquée sur la base du chargeur correspond à la tension secteur locale. , Évitez tout contact de l’appareil avec de l’eau ! Ne le placez pas et ne le rangez pas près d’une baignoire, d’un lavabo ou d’un évier. N’immergez en aucun cas le chargeur dans l’eau ou dans tout autre liquide. , N’utilisez jamais le chargeur s’il est endommagé ou si la fiche ou le cordon d’alimentation est abîmé. , Le cordon d’alimentation du chargeur ne peut pas être remplacé séparément. S’il est abîmé, c’est le chargeur qui devra être mis au rebut. , Assurez-vous que la prise de courant est alimentée lorsque vous chargez la brosse à dents. Dans une salle de bain, notez que l’alimentation électrique des prises, notamment celles situées dans les armoires de toilette au-dessus des lavabos ou celles destinées aux rasoirs, peut être coupée lorsque vous éteignez la lumière. , Si vous avez reçu des soins bucco-dentaires, notamment au niveau des gencives, au cours des deux derniers mois, consultez votre dentiste avant d’utiliser cette brosse à dents. , N’utilisez pas d’autres têtes de brosse que celles recommandées par le fabricant. , Remplacez la tête de brosse tous les 3 mois ou plus tôt si vous constatez des signes d’usure (si les poils sont aplatis ou tordus, par exemple). , Cet appareil n’est pas destiné à être utilisé par des personnes (notamment des enfants) dont les capacités sensorielles ou intellectuelles sont réduites, ou par des personnes manquant d’expérience ou de connaissances, à moins que celles-ci ne soient sous surveillance ou qu’elles aient reçu des instructions quant à l’utilisation de l’appareil par une personne responsable de leur sécurité. , Veillez à ce que les enfants ne puissent pas jouer avec l’appareil. Champs électromagnétiques Cet appareil Philips est conforme à toutes les normes relatives aux champs électromagnétiques (CEM). Il répond aux règles de sécurité établies sur la base des connaissances scientifiques actuelles s’il est manipulé correctement et conformément aux instructions de ce mode d’emploi. Avant l’utilisation Charge de l’appareil 1 Chargez l’appareil pendant au moins 16 heures , , , avant la première utilisation. Assurez-vous que l’appareil est éteint avant de le mettre en charge (fig. 2). En cours de charge, le voyant vert est allumé (HX1630 uniquement). La brosse peut être replacée sur le chargeur et laissée en charge. Optimisation de la durée de vie de la batterie Ne chargez pas la brosse à dents entre deux brossages à l’issue du cycle de charge initial. Attendez que la batterie soit vide. - Ne la remettez pas en charge avant que le moteur s’arrête. - Cette procédure doit être suivie trois fois de suite. - Pour prolonger la durée de vie de la batterie, répétez cette opération tous les six mois. Utilisation de l’appareil 1 Pour monter la tête de brosse sur l’appareil, insérez-la dans le logement à baïonnette, puis faites-la pivoter d’un quart de tour dans le sens des aiguilles d’un montre (fig. 3). Ceci évite qu’elle ne se détache sous l’effet des vibrations. 2 Mettez du dentifrice sur la tête de brosse. 3 Placez la tête de brosse dans votre bouche (fig. 4). 4 Appuyez sur le bouton marche/arrêt pour allumer , la brosse, puis lavez-vous les dents (fig. 5). Reportez-vous aux « Suggestions de brossage » pour connaître la durée minimale de brossage et la meilleure méthode. Suggestions de brossage Méthode de brossage 1 Placez la tête de brosse contre vos dents, de telle sorte qu’elle couvre aussi bien la surface des dents que la gencive (fig. 6). 2 Maintenez-la dans cette position quelques secondes, puis passez à la dent suivante (fig. 7). La tête ronde de la tête de brosse ôte la plaque dentaire située sur les dents et sous les gencives. La tête active individuelle permet de nettoyer les espaces interdentaires. 3 Dirigez la brosse soigneusement le long des incisives, des canines et des molaires (fig. 8). Conseil: Assurez-vous que vous nettoyez correctement toute la surface de vos dents (interne, externe et zone de mastication) et de vos gencives. Une méthode routinière de 4203.000.5607.2.indd 2 brossage vous empêchera d’oublier certaines zones. Problème Solution Conseil: Pour une hygiène dentaire optimale, il est recommandé d’utiliser du fil dentaire et des cure-dents en complément de la brosse à dents électrique. La brosse à dents ne fonctionne pas, bien qu’elle ait été chargée pendant la nuit. Assurez-vous que la fiche du chargeur est correctement insérée dans la prise secteur. Durée minimale de brossage Il suffit généralement de 2 minutes pour nettoyer correctement les dents. Vous pouvez toutefois prolonger le brossage pour un nettoyage encore plus en profondeur. , Un voyant rouge clignote pour indiquer que les 2 minutes se sont écoulées (HX1630 uniquement). Vérifiez que la prise secteur est bien alimentée (voir le chapitre « Important »). Assurez-vous que la brosse à dents est arrêtée et rechargezla pendant au moins 16 heures. Remarque: Lorsqu’il n’y a pas de plaque dentaire, les gencives sont roses et enchâssent bien les dents. Des gencives saines ne saignent pas lorsque vous mangez ou que vous vous brossez les dents. Remarque: Il est possible que vos gencives saignent légèrement lors des premières utilisations de la brosse. Ce phénomène cesse au bout de quelques jours. S’il persiste, consultez votre dentiste. Protection des gencives Le moteur de l’appareil fonctionne, mais pas la tête de brosse. Vérifiez que la tête de brosse est bien montée sur l’appareil (voir également le chapitre « Utilisation de l’appareil »). La puissance de brossage a diminué considérablement. La brosse à dents a besoin d’être rechargée. Si vous la laissez continuellement sur le chargeur, suivez les instructions du chapitre « Avant utilisation » pour prolonger la durée de vie de la batterie. 1 Le système de protection des gencives permet de vérifier que la pression exercée sur les dents et les gencives n’est pas trop élevée. 2 Si vous exercez une pression trop forte sur la La brosse à dents ne nettoie plus mes dents aussi bien qu’avant. brosse à dents, vous sentez et entendez un clic, et la tête de brosse se rétracte. Dès que vous réduisez la pression exercée, la tête de brosse revient à sa position normale. Ce système permet de protéger vos gencives (fig. 9). Remarque: Ceci se produira probablement quelques fois lors de la première utilisation de la brosse à dents. Après un certain temps, vous aurez trouvé la pression optimale sur les dents et la tête de brosse se rétractera moins souvent. Nettoyage et rangement 1 Allumez la brosse à dents, puis rincez la tête de brosse sous un filet d’eau chaude (60 cC max.). (fig. 10) 2 Éteignez la brosse à dents. Retirez la tête de brosse, puis rincez sa partie interne (fig. 11). 3 Allumez la brosse à dents, puis rincez l’axe d’entraînement sous le robinet afin de retirer les résidus de dentifrice (fig. 12). 4 Mettez la tête de brosse sur l’ergot prévu à cet effet sur le chargeur. 5 Nettoyez le chargeur avec un chiffon humide (fig. 13). Débranchez systématiquement le chargeur avant de le nettoyer. Remplacement 1 Remplacez la tête de brosse tous les 3 mois pour de meilleurs résultats de brossage. , Remplacez également la tête de brosse si les poils commencent à se tourner vers l’extérieur. Vous trouverez des têtes de brosse neuves dans le magasin où vous avez acheté votre brosse à dents électrique. Toutes les têtes de brosse de rechange rondes de la marque Philips sont compatibles. Environnement , , Lorsqu’il ne fonctionnera plus, ne jetez pas l’appareil avec les ordures ménagères, mais déposez-le à un endroit assigné à cet effet, où il pourra être recyclé.Vous contribuerez ainsi à la protection de l’environnement (fig. 14). La batterie rechargeable intégrée contient des substances qui peuvent nuire à l’environnement. Veillez à toujours retirer la batterie avant de mettre l’appareil au rebut et de le déposer à un endroit assigné à cet effet. Déposez la batterie usagée à un endroit assigné à cet effet. Si vous n’arrivez pas à retirer la batterie, vous pouvez apporter l’appareil dans un Centre Service Agréé Philips qui prendra toute l’opération en charge pour préserver l’environnement. Mise au rebut de la batterie Veillez à ce que la batterie soit totalement déchargée avant de la mettre au rebut. 1 Laissez l’appareil en marche jusqu’à ce qu’il s’arrête tout seul avant de retirer la batterie. 2 Ouvrez la poignée (fig. 15). 3 Munissez-vous d’un tournevis pour extraire la batterie de son logement (fig. 16). La brosse à dents n’est plus étanche dès lors que le boîtier a été ouvert. L’ouverture du boîtier invalide donc de fait la garantie. Garantie et service Si vous souhaitez obtenir des informations supplémentaires ou si vous rencontrez un problème, visitez le site Web de Philips à l’adresse www.philips.com ou contactez le Service Consommateurs Philips de votre pays (vous trouverez le numéro de téléphone correspondant sur le dépliant de garantie internationale). S’il n’existe pas de Service Consommateurs Philips dans votre pays, renseignez-vous auprès de votre revendeur local ou contactez le « Service Department of Philips Domestic Appliances and Personal Care BV ». Dépannage Si vous ne pouvez pas résoudre le problème à l’aide des informations ci-dessous, adressez-vous à un Centre Service Agréé, au Service Consommateurs Philips de votre pays ou contactez-nous en ligne à l’adresse www.philips.com. Changez la tête de brosse. ITALIANO Descrizione generale (fig. 1) A B C D E Testina Impugnatura Perno per la conservazione della testina Pin caricabatterie Caricabatterie Importante Prima di utilizzare l’apparecchio, leggete attentamente il presente manuale e conservatelo per eventuali riferimenti futuri. , Prima di collegare l’apparecchio, controllate che la tensione indicata sulla parte inferiore dell’apparecchio corrisponda a quella locale. , Tenete il caricabatterie lontano dall’acqua! Non appoggiatelo o riponetelo vicino all’acqua contenuta in vasche, lavandini ecc. Non immergete il caricabatterie in acqua o in altre sostanze liquide. , Non utilizzate il caricabatterie nel caso in cui il cavo o la spina siano danneggiati. , Il cavo dell’unità di carica non può essere sostituito. Nel caso fosse danneggiato, l’unità di carica dovrà essere gettata. , Controllate che la presa di corrente funzioni durante la ricarica dello spazzolino. Spesso l’erogazione di corrente alle prese dei bagni, vicino ai lavandini, viene interrotta quando si spegne la luce. , Se nel corso degli ultimi 2 mesi vi siete sottoposti a interventi su denti o gengive, chiedete il parere del vostro dentista prima di utilizzare lo spazzolino. , Utilizzate esclusivamente le testine consigliate dal produttore. , Sostituite la testina al massimo ogni 3 mesi o prima in presenza di segni di usura, ad esempio setole rovinate o piegate. , L’apparecchio non è stato ideato per essere usato da persone (inclusi bambini) con capacità mentali, fisiche o sensoriali ridotte, fatti salvi i casi in cui tali persone abbiano ricevuto assistenza o formazione per l’uso dell’apparecchio da una persona responsabile per la loro sicurezza. , Adottate le precauzioni necessarie per evitare che i bambini giochino con l’apparecchio. Campi elettromagnetici (EMF) Questo apparecchio Philips è conforme a tutti gli standard relativi ai campi elettromagnetici (EMF). Se utilizzato in modo appropriato seguendo le istruzioni contenute nel presente manuale utente, l’apparecchio consente un utilizzo sicuro come confermato dai risultati scientifici attualmente disponibili. Predisposizione dell’apparecchio 4 Premete il pulsante on/off per accendere lo , , , , volta, è necessario ricaricarlo per almeno 16 ore. Prima di ricaricare l’apparecchio, verificate che sia spento (fig. 2). Se la batteria è stata caricata, l’indicatore verde è acceso (solo HX1630). Potete riporre lo spazzolino nell’apposito supporto e lasciarlo continuamente sotto carica. Come ottimizzare la durata della batteria Dopo aver caricato lo spazzolino per la prima volta non ricaricarlo tra le sessioni di utilizzo. Continuate ad usarlo fin quando la batteria non è scarica, quindi caricarlo nuovamente. - Ricaricate l’apparecchio quando il motore si ferma. - Ripetete questa procedure tre volte consecutive. - Per garantire una maggior durata della batteria, ripetete questa operazione ogni 6 mesi. Modalità d’uso dell’apparecchio 1 Per installare la testina sullo spazzolino, inserirlo nel perno e ruotarlo per un quarto di giro in senso orario (fig. 3). In tal modo si evita che la testina si stacchi per le vibrazioni. 2 Mettete un po’ di dentifricio sullo spazzolino. 3 Mettete lo spazzolino all’interno della bocca (fig. 4). ”Consigli per lavarsi i denti” Metodo di pulizia 1 Appoggiate la testina al dente in modo tale da coprire la superficie del dente e il bordo gengivale (fig. 6). 2 Tenete lo spazzolino in questa posizione per alcuni secondi prima di passare al dente successivo (fig. 7). La testina rotonda rimuove la placca dai denti e al di sotto del bordo gengivale. La punta attiva si muove in modo indipendente, per una migliore pulizia interdentale. Garanzia e assistenza Per ulteriori informazioni o eventuali problemi, visitate il sito Web Philips all’indirizzo www.philips.com oppure contattate il Centro Assistenza Clienti Philips locale (il numero di telefono è riportato nell’opuscolo della garanzia). Qualora non fosse disponibile un Centro Assistenza Clienti locale, rivolgetevi al rivenditore autorizzato Philips oppure contattate il Reparto assistenza Philips Domestic Appliances & Personal Care BV. Risoluzione dei guasti Nel caso non riusciste a risolvere il vostro problema mediante la tabella di localizzazione guasti riportata qui sotto, vi preghiamo di contattare il Centro Assistenza Philips più vicino, il Customer Care Centre del vostro paese oppure il nostro sito www.philips.com. 3 Guidate delicatamente lo spazzolino fra i denti, fino in fondo alla bocca (fig. 8). Consiglio:controllate di pulire correttamente tutte le superfici dei denti (all’interno, all’esterno e sopra) e lungo il bordo gengivale. Provate a seguire sempre lo stesso ordine di pulizia, per evitare di saltare qualche zona. Problema Soluzione Lo spazzolino non funziona anche se è rimasto nel caricabatterie per tutta la notte. Accertarsi che la spina del caricabatterie sia inserita correttamente nella presa a muro. Accertarsi che la presa funzioni (vedere capitolo “Importante”). Consiglio:per un’igiene dentale ottimale, vi consigliamo di usare il filo interdentale e lo scovolino in aggiunta allo spazzolino elettrico. Controllate che lo spazzolino sia spento e ricaricatelo per almeno 16 ore. Minor tempo di lavaggio Un tempo di lavaggio di 2 minuti in genere è sufficiente per pulire i denti in modo appropriato. Se si desidera si possono pulire i denti per un periodo di tempo superiore ai 2 minuti, ottenendo una pulizia ancora più a fondo. , L’indicatore rosso lampeggerà per indicare che sono trascorsi 2 minuti (solo HX1630). Il motore dello spazzolino funziona, ma la testina no. La potenza dell’apparecchio si è ridotta notevolmente. Nota: se la placca viene rimossa correttamente, le gengive avranno un colore rosa e circonderanno i denti. Mentre si mangia o si lavano i denti le gengive sane non sanguinano. Nota: le prime volte che si utilizza lo spazzolino le gengive potrebbero sanguinare. Di norma dopo qualche giorno, questo fenomeno non si verifica più. Se le gengive continuano a sanguinare consultate il vostro dentista. Lo spazzolino non lava i denti con la stessa efficacia di sempre. Protezione delle gengive impedisce di esercitare una pressione eccessiva su denti e gengive. 2 Quando esercitate una pressione eccessiva, la testina scatta all’indietro (“clic”). Non appena riducete la pressione, la testina ritorna nella posizione normale. Tutto questo per proteggere le vostre gengive (fig. 9). Nota:questo funzionamento si verificherà diverse volte quando inizierete ad usare lo spazzolino. Con un po’ di pratica imparerete ad applicare la pressione ottimale e la testina scatterà indietro meno spesso. Come pulire e riporre l’apparecchio 1 Accendete lo spazzolino e pulite la testina sotto l’acqua calda corrente (massimo 60 cC). (fig. 10) 2 Spegnete lo spazzolino. Rimuovete la testina e pulite l’interno della testina (fig. 11). 3 Accendete lo spazzolino e pulite l’albero motore sotto l’acqua corrente per rimuovere i residui di dentifricio (fig. 12). 4 Riponete la testina nel perno di conservazione della testina sul caricabatterie. 5 Pulite gli accessori con un panno umido (fig. 13). togliete sempre la spina del caricabatterie dalla presa di corrente prima di pulire l’apparecchio. Sostituzione 1 Per ottenere i migliori risultati, sostituite la testina ogni 3 mesi. Sostituite la testina quando le setole iniziano a piegarsi verso l’esterno. Potete acquistare le testine di ricambio nei negozi dove avete comperato l’apparecchio. È possibile utilizzare qualsiasi testina di ricambio PHILIPS. , Tutela dell’ambiente , , Per contribuire alla tutela dell’ambiente, non smaltite l’apparecchio insieme ai rifiuti domestici, ma consegnatelo a un centro di raccolta ufficiale (fig. 14). La batteria ricaricabile integrata contiene sostanze potenzialmente nocive per l’ambiente. Rimuovete sempre la batteria prima di smaltire l’apparecchio e consegnarlo a un centro di raccolta ufficiale. Smaltite la batteria in un apposito centro di raccolta. In caso di difficoltà durante la rimozione della batteria, consegnate l’apparecchio a un centro di assistenza Philips, che si occuperà della rimozione della batteria e dello smaltimento dell’apparecchio. Smaltimento delle batterie Prima di gettare la batteria accertarsi che sia completamente scarica. 1 Prima di rimuovere la batteria, lasciate l’apparecchio in funzione fino al completo arresto. A B C D E Sostituire la testina. Opzetborstel Handgreep Pinnen voor opzetborstels Pin van de oplader Oplader Belangrijk Lees deze gebruiksaanwijzing zorgvuldig door voordat u het apparaat gaat gebruiken. Bewaar de gebruiksaanwijzing om deze indien nodig te kunnen raadplegen. , Controleer of het voltage aangegeven op de onderkant van de oplader overeenkomt met de plaatselijke netspanning voordat u het apparaat aansluit. , Houd de oplader uit de buurt van water. Plaats de oplader niet in de buurt van of boven een bad, wasbak, gootsteen enz. Dompel de oplader nooit in water of een andere vloeistof. , Gebruik de oplader nooit als deze beschadigd is of als het snoer of de stekker beschadigd is. , Het snoer van de oplader kan niet worden vervangen. Indien het snoer is beschadigd, dient de oplader te worden afgedankt. , Zorg ervoor dat er stroom op het stopcontact staat wanneer u de tandenborstel gaat opladen. Het is mogelijk dat de stroomtoevoer naar stopcontacten in spiegelkastjes boven wastafels of stopcontacten voor scheerapparaten in badkamers wordt afgesloten wanneer het licht in de badkamer wordt uitgedaan. , Raadpleeg uw tandarts voordat u de tandenborstel gebruikt als u in de afgelopen 2 maanden een chirurgische behandeling aan uw mond of uw tandvlees hebt ondergaan. , Gebruik dit apparaat uitsluitend met de door de fabrikant aanbevolen opzetborstels. , Vervang de opzetborstel om de 3 maanden of eerder indien er tekenen van slijtage optreden, zoals verbogen of geknakte borstelharen. , Dit apparaat is niet bedoeld voor gebruik door personen (waaronder kinderen) met verminderde lichamelijke, zintuiglijke of geestelijke vermogens, of die gebrek aan ervaring of kennis hebben, tenzij iemand die verantwoordelijk is voor hun veiligheid toezicht op hen houdt of hen heeft uitgelegd hoe het apparaat gebruikt dient te worden. , Houd toezicht op kinderen om te voorkomen dat ze met het apparaat gaan spelen. Elektromagnetische velden (EMV) Dit Philips-apparaat voldoet aan alle richtlijnen met betrekking tot elektromagnetische velden (EMV). Mits het apparaat op de juiste wijze en volgens de instructies in deze gebruiksaanwijzing wordt gebruikt, is het veilig te gebruiken volgens het nu beschikbare wetenschappelijke bewijs. Klaarmaken voor gebruik Het apparaat opladen 3 Utilizzare un cacciavite per estrarre la batteria dal lo spazzolino non è più impermeabile quando l’ alloggiamento è aperto. Quando si apre l’alloggiamento la garanzia viene invalidata. Lo spazzolino deve essere ricaricato. Lasciando lo spazzolino nel caricabatterie, si prolunga la durata della batteria come descritto nel capitolo “Preparazione all’uso”. Algemene beschrijving (fig. 1) 2 Aprite l’impugnatura (fig. 15). supporto (fig. 16). Accertarsi che la testina sia stata installata correttamente sull’unità (vedere capito “Modalità d’uso dell’apparecchio”). NEDERLANDS 1 Il sistema per la protezione delle gengive vi Ricarica dell’apparecchio 1 Quando l’apparecchio viene utilizzato per la prima spazzolino e iniziate a lavarvi i denti (fig. 5). Per il miglior metodo di pulizia nel minor tempo vedere “Consigli per lavarsi i denti”. 1 Laad het apparaat ten minste 16 uur op voordat u , , het voor het eerst gebruikt. Zorg ervoor dat het apparaat uitgeschakeld is wanneer u het gaat opladen (fig. 2). Wanneer de accu wordt opgeladen, brandt het groene indicatielampje (alleen HX1630). , U kunt de tandenborstel in de oplader laten staan en deze continu laten opladen. De levensduur van de accu optimaliseren Laad de tandenborstel niet op tussen de poetsbeurten nadat u de tandenborstel voor de eerste keer hebt opgeladen. Blijf de tandenborstel gebruiken tot de accu leeg is en laad de tandenborstel pas daarna opnieuw op. - Laad het apparaat op als de motor bijna stopt. - Herhaal deze procedure drie keer achterelkaar. - Herhaal deze procedure elke 6 maanden om de levensduur van de accu te verlengen. om het te laten recyclen. Op die manier levert u een bijdrage aan een schonere leefomgeving (fig. 14). De ingebouwde accu bevat stoffen die schadelijk kunnen zijn voor het milieu.Verwijder altijd de accu voordat u het apparaat afdankt en inlevert op een door de overheid aangewezen inzamelpunt. Lever de accu in op een officieel inzamelpunt voor batterijen. Als u problemen ondervindt bij het verwijderen van de accu, kunt u met het apparaat ook naar een Philips-servicecentrum gaan. Medewerkers van dit centrum verwijderen dan de accu voor u en zorgen ervoor dat deze op milieuvriendelijke wijze wordt verwerkt. , Het apparaat gebruiken 1 Als u de opzetborstel op de tandenborstel wilt bevestigen, plaats dan de opzetborstel in de bajonetsluiting en draai de opzetborstel een kwartslag rechtsom (fig. 3). Zo wordt voorkomen dat de opzetborstel losraakt als gevolg van trillingen. 2 Doe tandpasta op de opzetborstel. De accu verwijderen Zorg ervoor dat de accu helemaal leeg is als u deze inlevert. 1 Laat het apparaat lopen tot het stopt en verwijder vervolgens de accu. 3 Plaats de opzetborstel in uw mond (fig. 4). 2 Open de handgreep (fig. 15). 4 Zet de tandenborstel aan met de aan/uitknop en 3 Gebruik een schroevendraaier om de accu uit de , begin met het poetsen van uw tanden (fig. 5). Zie ‘Poetstips’ voor de beste en snelste manier om uw tanden te poetsen. Poetstips Poetsmethode 1 Plaats de opzetborstel zo tegen de tand dat de borstel zowel het tandoppervlak als de rand van het tandvlees bedekt (fig. 6). 2 Houd de opzetborstel enkele seconden in deze stand en ga dan verder met de volgende tand (fig. 7). De ronde opzetborstel verwijdert plak van de tanden en onder de rand van het tandvlees. De onafhankelijk bewegende Active Tip reinigt tussen de tanden. 3 Beweeg de opzetborstel voorzichtig langs alle tanden en kiezen (fig. 8). Tip: Zorg ervoor dat u alle oppervlakken van uw tanden en kiezen (binnenkant, buitenkant en kauwvlak) en de tandvleesrand goed schoonmaakt. Door een vast poetspatroon te volgen voorkomt u dat u bepaalde gebieden overslaat. Tip:Voor optimale gebitsverzorging is het aan te raden om naast de elektrische tandenborstel ook tandenstokers te gebruiken en te flossen. Minimale poetstijd Een poetstijd van 2 minuten is in het algemeen lang genoeg om uw tanden goed schoon te maken. Als u wilt, kunt u uw tanden langer dan 2 minuten poetsen voor een nog grondigere reiniging. , Een rood indicatielampje gaat knipperen om aan te geven dat er 2 minuten verstreken zijn (alleen HX1630). Opmerking: Als tandplak goed wordt verwijderd, heeft het tandvlees een roze kleur en zal het de tanden stevig omsluiten. Gezond tandvlees bloedt niet als u aan het eten bent of uw tanden aan het poetsen bent. Opmerking: Als uw tandvlees enigszins bloedt wanneer u de tandenborstel de eerste paar keer gebruikt, stopt dit bloeden normaal gesproken na een paar dagen. Raadpleeg uw tandarts of mondhygiënist als uw tandvlees blijft bloeden. Tandvleesbescherming accuhouder te wrikken (fig. 16). De tandenborstel is niet meer waterdicht als u de behuizing van de tandenborstel hebt geopend. Als u de behuizing opent, vervalt de garantie. Garantie & service Als u informatie nodig hebt of als u een probleem hebt, bezoek dan de Philips-website (www.philips.com), of neem contact op met het Philips Customer Care Centre in uw land (u vindt het telefoonnummer in het ‘worldwide guarantee’-vouwblad). Als er geen Customer Care Centre in uw land is, ga dan naar uw Philips-dealer of neem dan contact op met de afdeling Service van Philips Domestic Appliances and Personal Care BV. Problemen oplossen Als u er niet in slaagt uw probleem op te lossen met de onderstaande informatie, neem dan contact op met het dichtstbijzijnde Philips-servicecentrum of met het Philips Customer Care Centre in uw land. U kunt ook online contact met ons opnemen via www.philips.nl. Probleem Oplossing De tandenborstel werkt helemaal niet, hoewel deze de hele nacht in de oplader heeft gestaan. Zorg ervoor dat de stekker van de oplader goed in het stopcontact zit. 2 Als u te veel druk uitoefent op de tandenborstel, hoort en voelt u de opzetborstel naar achteren klikken. Zodra u de druk vermindert, keert de opzetborstel terug naar zijn normale positie. Hierdoor wordt uw tandvlees beschermd (fig. 9). Opmerking: Dit zal waarschijnlijk in het begin enkele keren gebeuren. Na een tijdje zult u echter de optimale poetsdruk hebben ontdekt en zal de opzetborstel minder vaak naar achteren klikken. Schoonmaken en opbergen De tandenborstel moet worden opgeladen. Als u de tandenborstel gewoonlijk continu in de oplader laat staan, is het mogelijk dat u de levensduur van de accu moet verlengen zoals wordt beschreven in hoofdstuk ‘Klaarmaken voor gebruik’. Vervang de opzetborstel. Português Descrição geral (fig. 1) 1 Zet de tandenborstel aan en spoel de opzetborstel af onder de warme kraan (max. 60cC) (fig. 10). 3 Zet de tandborstel aan en spoel de aandrijfas Leia este manual do utilizador com atenção, antes de utilizar o aparelho e guarde-o para uma eventual consulta futura. , Verifique se a voltagem indicada na parte inferior do carregador corresponde à voltagem eléctrica local, antes de ligar o aparelho. , Mantenha o carregador afastado da água. Não o coloque, nem o guarde sobre ou próximo de banheiras, lavatórios, lava-loiças, etc. com água. Nunca mergulhe o carregador em água ou em qualquer outro líquido. , Nunca utilize o carregador se estiver danificado ou se o fio ou ficha estiverem danificados. , O fio do carregador não pode ser substituído. Se o fio estiver danificado, deve desfazer-se do carregador. , Verifique se a tomada tem corrente quando recarregar a escova de dentes. A alimentação eléctrica das tomadas de espelhos sobre os lavatórios ou das tomadas de barbear pode ser desligada quando se apaga a luz. , Se tiver sido submetido a uma cirurgia da boca ou das gengivas nos últimos 2 meses, consulte o seu dentista antes de utilizar a escova de dentes. en spoel de binnenzijde van de opzetborstel schoon (fig. 11). schoon onder de kraan om tandpastaresten te verwijderen (fig. 12). 4 Bewaar de opzetborstel op de pin voor opzetborstels op de oplader. 5 Maak de oplader schoon met een vochtige doek (fig. 13). Haal de stekker uit het stopcontact voordat u de oplader gaat schoonmaken. Vervangen 1 Vervang de opzetborstel elke 3 maanden voor het beste poetsresultaat. Vervang de opzetborstel ook als de borstelharen naar buiten beginnen te buigen. Nieuwe opzetborstels zijn verkrijgbaar bij de winkel waar u de tandenborstel hebt aangeschaft. U kunt alle ronde Philips-opzetborstels gebruiken. , Milieu , Gooi het apparaat aan het einde van zijn levensduur niet weg met het normale huisvuil, maar lever het in op een door de overheid aangewezen inzamelpunt Campos Electromagnéticos - EMF (Electro Magnetic Fields) Este aparelho Philips cumpre todas as normas relacionadas com campos electromagnéticos (EMF). Se for manuseado correctamente e de acordo com as instruções presentes no manual do utilizador, o aparelho proporciona uma utilização segura, como demonstrado pelas provas científicas actualmente disponíveis. Preparação Carga do aparelho 1 Carregue o aparelho durante, pelo menos, 16 horas , , , antes de o utilizar pela primeira vez. Certifique-se de que desligou o aparelho quando começar a carregá-lo (fig. 2). Quando a bateria estiver a ser carregada, a luz indicadora verde está acesa (apenas no modelo HX1630). A escova pode ser deixada no carregador e ficar continuamente em carga. Optimizar a vida útil da bateria Depois de ter carregado a escova de dentes pela primeira vez, não volte a carregá-la entre escovagens. Continue a utilizá-la até a bateria se gastar antes de a carregar novamente. - Recarregue o aparelho quando o motor estiver quase a parar. - Repita este procedimento três vezes de seguida. - Para prolongar a vida útil da bateria, repita este procedimento de 6 em 6 meses. Utilização do aparelho 1 Para montar a cabeça da escova na escova de dentes, introduza-a na patilha de baioneta e rode-a para a direita, um quarto de volta (fig. 3). Assim, evita que a cabeça da escova se desprenda devido à vibração. 4 Prima o botão ligar/desligar para ligar a escova de A B C D E 2 Zet de tandenborstel uit.Verwijder de opzetborstel , Zorg ervoor dat de tandenborstel is uitgeschakeld en laad het apparaat minimaal 16 uur op. De poetskracht van de tandenborstel is sterk afgenomen. De tandenborstel reinigt mijn tanden niet zo goed als eerst het geval was. , 2 Coloque a pasta de dentes sobre a cabeça da Controleer of de opzetborstel goed op het apparaat is bevestigd (zie ook hoofdstuk ‘Het apparaat gebruiken’). te veel druk uitoefent op uw tanden en tandvlees. , Não utilize outras cabeças a não ser as que são recomendadas pelo fabricante. Substitua a cabeça da escova de 3 em 3 meses ou mais cedo no caso de aparecerem sinais de desgaste, como é o caso de cerdas esmagadas ou dobradas. Este aparelho não se destina a ser utilizado por pessoas (incluindo crianças) com sensibilidade física ou capacidades mentais reduzidas, ou com falta de experiência e conhecimentos, a menos que sob a supervisão ou após formação relativa à utilização do aparelho por uma pessoa responsável pela sua segurança. As crianças devem ser vigiadas para assegurar que não brincam com o aparelho. Controleer of er stroom op het stopcontact staat (zie hoofdstuk ‘Belangrijk’). De motor van de tandenborstel werkt wel, maar de opzetborstel werkt niet. 1 Het tandvleesbeschermingssysteem voorkomt dat u , Cabeça da escova Pega Pinos de arrumação da cabeça da escova Pino do carregador Carregador Importante escova. 3 Coloque a cabeça da escova na boca (fig. 4). , dentes e comece a lavar os dentes (fig. 5). Para obter o melhor método de escovagem no mínimo de tempo, consulte ‘Sugestões de escovagem’. Sugestões de escovagem Método de escovagem 1 Encoste a cabeça da escova ao dente de modo a cobrir a superfície do dente, assim como a linha das gengivas (fig. 6). 2 Mantenha a cabeça da escova nesta posição durante alguns segundos e depois passe para o dente seguinte (fig. 7). A cabeça redonda da escova retira a placa bacteriana dos dentes e por baixo da linha das gengivas. A Ponta Activa, que se movimenta separadamente, limpa os espaços interdentários. 3 Guie a cabeça da escova com cuidado ao longo dos dentes e dos molares (fig. 8). Sugestão: Certifique-se de que limpa devidamente todas as superfícies dos dentes (interior, exterior e zona de mastigação), bem como a linha das gengivas. Um padrão de escovagem fixo evita que fiquem algumas zonas por escovar. Sugestão: Para uma higiene oral perfeita, utilize fio dental e palitos orais além da escova eléctrica. Tempo de escovagem mínimo Um tempo de escovagem de 2 minutos é geralmente o suficiente para limpar devidamente os dentes. Se quiser, pode escovar por mais de 2 minutos para uma limpeza ainda mais profunda. , Uma luz indicadora vermelha fica intermitente indicando o fim dos 2 minutos (apenas no modelo HX1630). Nota: Se a placa bacteriana for devidamente removida, as gengivas ficam com um tom rosado e rodeiam com firmeza o dente. Gengivas saudáveis não sangram quando come ou escova os dentes. Nota: Se as suas gengivas sangram ligeiramente nas primeiras vezes que utiliza esta escova de dentes, este sangramento pára normalmente ao fim de alguns dias. Se as suas gengivas continuarem a sangrar, consulte o seu dentista ou higienista oral. Nota:Muito provavelmente, isto sucederá algumas vezes nas primeiras utilizações da escova. Passado algum tempo, já saberá qual a força de escovagem ideal e a cabeça da escova recuará com menos frequência. Limpeza e arrumação 1 Ligue a escova de dentes e enxagúe a cabeça da escova sob água quente da torneira (máx. 60 cC). (fig. 10) 2 Desligue a escova de dentes. Desmonte a cabeça da escova e enxagúe o interior da cabeça da escova (fig. 11). 3 Ligue a escova de dentes e enxagúe o eixo do motor debaixo da torneira para remover partículas de pasta de dentes (fig. 12). 4 Arrume a cabeça da escova no pino de arrumação da cabeça da escova no carregador. 5 Limpe o carregador com um pano húmido (fig. 13). Desligue o carregador da corrente antes de o limpar. Substituição 1 Substitua a cabeça da escova de 3 em 3 meses para melhores resultados ao escovar. Substitua também a cabeça da escova quando as cerdas começarem a dobrar para fora. Pode adquirir novas cabeças da escova na mesma loja onde comprou a escova de dentes. Podem ser utilizadas todas as cabeças da escova de substituição Philips redondas. , Ambiente , , Não deite fora o aparelho junto com o lixo doméstico normal no final da sua vida útil; entregue-o num ponto de recolha oficial para reciclagem. Ao fazê-lo ajuda a preservar o ambiente. (fig. 14). A bateria incorporada recarregável contém substâncias que podem poluir o ambiente. Retire sempre a bateria antes de deitar fora o aparelho e de o entregar num ponto de recolha oficial. Coloque a bateria num ponto de recolha oficial para baterias. Se tiver problemas na remoção da bateria, pode também levar a máquina a um centro de assistência Philips. A equipa deste centro poderá remover a bateria por si e eliminá-la de forma segura para o ambiente. Eliminação da bateria Certifique-se de que a bateria está completamente gasta antes de se desfazer dela. 1 Deixe o aparelho a trabalhar até parar antes de remover a bateria. 2 Abra a pega (fig. 15). 3 Utilize uma chave de parafusos para retirar a bateria do respectivo compartimento (fig. 16). A escova de dentes deixa de ser estanque depois de o corpo da escova de dentes ser aberto. Se abrir o corpo, a garantia torna-se inválida. Garantia e assistência Se precisar de informações ou se tiver algum problema, visite o site da Philips em www.philips.pt ou contacte o Centro de Atendimento ao Cliente Philips do seu país (encontrará o número de telefone no folheto da garantia mundial). Se não existir um Centro de Atendimento ao Cliente no seu país, dirija-se ao distribuidor Philips local ou contacte o Departamento de Assistência da Philips Domestic Appliances and Personal Care BV. Resolução de problemas Se não for capaz de resolver o seu problema com as indicações dadas a seguir, contacte o centro de assistência Philips mais próximo ou o Centro de Atendimento ao Cliente Philips do seu país. Pode também contactar-nos on-line em www.philips.pt. Problema Solução A escova de dentes não trabalha apesar de ter ficado a noite toda colocada no carregador. Certifique-se de que a ficha do carregador está devidamente introduzida na tomada eléctrica. Certifique-se de que a tomada tem corrente (consulte o capítulo ‘Importante’). Verifique se a escova de dentes está desligada e deixea a carregar durante pelo menos 16 horas. O motor da escova de dentes funciona, mas a cabeça da escova não. Verifique se a cabeça da escova foi devidamente colocada no aparelho (consulte também o capítulo ‘Utilização do aparelho’). A potência de escovagem da escova de dentes diminuiu consideravelmente. A escova de dentes tem de ser recarregada. Se deixa normalmente a escova no carregador em contínuo, talvez tenha de prolongar a vida útil da bateria tal como é descrito no capítuclo ‘Preparação’. A escova de dentes já não limpa tão bem os meus dentes. Substitua a cabeça da escova. Protecção das gengivas 1 O sistema de Protecção das Gengivas garante que não será exercida demasiada pressão sobre os dentes e as gengivas. 2 Se fizer demasiada pressão sobre a escova, sentirá e ouvirá um clique quando a cabeça da escova flectir para trás. Assim que reduzir a pressão, a cabeça da escova retorna à sua posição normal. Deste modo, está a proteger as suas gengivas (fig. 9). 31-05-2007 11:12:56-
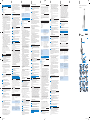 1
1
-
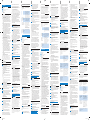 2
2


Philips HX1620/22 Handleiding
- Categorie
- Elektrische tandenborstels
- Type
- Handleiding
in andere talen
- English: Philips HX1620/22 User manual
- italiano: Philips HX1620/22 Manuale utente
- français: Philips HX1620/22 Manuel utilisateur
- español: Philips HX1620/22 Manual de usuario
- Deutsch: Philips HX1620/22 Benutzerhandbuch
- português: Philips HX1620/22 Manual do usuário