Blaupunkt BPA 3022 M Handleiding
- Categorie
- Auto videosystemen
- Type
- Handleiding

Enjoy it.
BPA 3022 M
User Manual
Sicherheitshinweise
Dieses Car-Sound-System wurde nach dem aktuellen Stand der Technik und den
allgemein anerkannten sicherheitstechnischen Regeln hergestellt. Dennoch
kann die Nichtbeachtung der in dieser Bedienungsanleitung enthaltenen
Sicherheitshinweise zu verschiedenen Risiken führen. Lesen Sie diese Anleitung
sorgfältig durch, bevor Sie das Car-Sound-System benutzen. Bewahren Sie die
Anleitung so auf, dass sie jederzeit für alle Benutzer zugänglich ist. Wenn Sie das
Car-Sound-System an Dritte weitergeben, legen Sie bitte diese Anleitung bei.
Beachten Sie außerdem die Hinweise in den Bedienungsanleitungen der an
dieses Car-Sound-System angeschlossenen Geräte.
Allgemeine Sicherheitshinweise
Beachten Sie die folgenden Hinweise, um sich selbst vor Verletzungen zu schützen:
Das Gerät darf weder verändert noch geönet werden.
Bestimmung
Dieses Car-Sound-System ist für den Einbau und Betrieb in Fahrzeugen mit 12 V
Versorgungsspannung konzipiert. Die Leistungsgrenzen des Geräts müssen
beachtet werden. Lassen Sie eventuelle Reparaturen oder Installationsarbeiten
von einem Fachmann durchführen.
Montageanleitung
Sie dürfen das Gerät nur dann selbst einbauen, wenn Sie Erfahrung im Einbau
eines Car-Sound-Systems und Kenntnisse in der Fahrzeugelektronik haben.
Beachten Sie dazu den Schaltplan in dieser Anleitung. Der Einbau des Geräts
darf die Funktion von Airbags, anderen Sicherheitseinrichtungen oder
Bedienelementen nicht behindern oder blockieren.
Konformitätserklärung
Blaupunkt Competence Center Car Multimedia – Evo Sales GmbH erklärt
hiermit, dass dieses Gerät mit den grundlegenden Forderungen und anderen
relevanten Bestimmungen der Richtlinie 2014/53/EU konform ist. Die
Konformitätserklärung nden Sie unter www.blaupunkt.com.
Hinweise zur Reinigung
Löse-, Reinigungs- und Scheuermittel sowie Cockpitreiniger und
Kunststopegemittel können Inhaltsstoe enthalten, die die Oberäche des
Car-Sound-Systems angreifen können. Verwenden Sie zur Reinigung des
Car-Sound-Systems nur ein trockenes oder leicht feuchtes Tuch.
Hinweise zur Entsorgung
Das Altgerät darf nicht mit dem Hausmüll entsorgt werden!
Entsorgen Sie das Gerät, die Fernbedienung und die verbrauchten
Batterien bei einer Sammelstelle für Altgeräte.
Lieferumfang
Im Lieferumfang sind enthalten:
Car-Sound-System BPA 3022 M,
Fernbedienung,
ISO-Anschlüsse,
Montageschrauben,
Bedienungsanleitung.
WICHTIGE INFORMATIONEN ZUR MONTAGE
1. Lesen Sie die Anleitung sorgfältig durch, bevor Sie das Gerät installieren.
2. Achten Sie darauf, dass alle anderen Kabel angeschlossen sind, bevor Sie die
Stromversorgung anschließen.
3. Um einen Kurzschluss zu vermeiden, stellen Sie sicher, dass alle
freiliegenden Drähte isoliert sind.
4. Sobald die Installation abgeschlossen ist, müssen alle Kabel befestigt
werden.
5. Die Anschlüsse ans Car-Sound-System müssen entsprechend dieser
Anleitung vorgenommen werden. Ein falscher Anschluss kann zu Schäden
am Gerät führen.
6. Das Car-Sound-System ist nur für eine 12-V-DC-Installation ausgelegt.
MONTAGE DES GERÄTS
DEMONTAGE DES GERÄTS
1. Demontieren Sie das Gerät.
2. Nehmen Sie den Außenrahmen ab.
Hinweis zu HDMI:
Verwenden Sie ein HDMI-Kabel von guter Qualität.
Die Gesamtlänge (vorne und hinten) sollte 3,65 m nicht überschreiten.
ANSCHLUSS VON LEITUNGEN
1. Das Car-Sound-System darf nur mit einer Spannung von +12 V DC betrieben werden.
2. Schließen Sie die Batterieklemme nur an, wenn das Car-Sound-System vollständig
montiert ist.
3. Stellen Sie sicher, dass das gelbe Kabel an den Pluspol (+) der Batterie angeschlossen ist.
4. Achten Sie beim Auswechseln der Sicherung darauf, dass die Parameter der neuen
Sicherung identisch sind.
5. Durch die Verwendung von hochwertigen Lautsprechern mit einer Impedanz von 4-8
Ohm kann das Gerät seine volle Leistung erbringen.
TASTENLAGE
1. ZONE 1 2. 1 3. ZONE 2
4. 2 5. BT 6. 3 RPT
7. 8. 4 RDM 9.
10. 5 DIR- 11. DIS 12. 6 DIR+
13. LCD 14. AUX-BUCHSE 15. KOPFHÖRERBUCHSE
16. HDMI-BUCHSE 17. RESET 18. DREHKNOPF
19. USB-PORT 20. SRC/MENU
GRUNDLEGENDE BEDIENUNG
Gerät und Stummschaltfunktion ein-/ausschalten
Um das Gerät einzuschalten, drücken Sie den Drehknopf /MUTE. Um die
Stummschaltfunktion ein- oder auszuschalten, drücken Sie kurz auf den Drehknopf,
während das Gerät eingeschaltet ist. Wenn Sie dieser Knopf gedrückt halten, wird das
Gerät ausgeschaltet.
Toneinstellungen und Setup-Menü
Drücken und halten Sie die Taste SRC/MENU gedrückt, um das unten abgebildete Menü
aufzurufen:
BAS->TRE->BAL->EQ (aus/Pop/Rock/Klassik)->LOUD (ein/aus)->CLK HH->CLK
MM->IR (ein/aus) ->CT (indep/sync)->SYG. TON (ein/aus) ->P_VOL (13)->DX (LOC)->STEREO
(MONO)
Drehen Sie an jeder Position den Drehknopf VOL, um sie einzustellen.
INFRAROT (EIN/AUS):
INFRAROT EIN: Das Gerät kann mit der Infrarot-Fernbedienung eingeschaltet werden.
Das System läuft dann mit hohem Stromverbrauch.
INFRAROT AUS: Das Gerät lässt sich nicht mit der Infrarot-Fernbedienung einschalten.
Das System läuft dann mit niedrigen Stromverbrauch.
CT (INDEP/SYNC):
CT INDEP: Die Uhr funktioniert unabhängig.
CT SYNC: Die Uhr wird mit der Zeit des empfangenen RDS-Senders synchronisiert.
Hinweis: Wenn die Uhr im Menü eingestellt wird, wird die CT-Funktion automatisch auf
den INDEP-Modus (unabhängiger Betrieb) eingestellt.
TASTENTON (EIN/AUS): Ermöglicht die Aktivierung/Deaktivierung des Tastentons beim
Drücken der Tasten.
P-VOL: Ermöglicht die Einstellung der Lautstärke beim Einschalten. Wenn die Lautstärke
beim Ausschalten niedriger ist als die P-VOL-Lautstärke, stellt das Gerät die Lautstärke
beim Einschalten auf die Lautstärke beim Ausschalten ein.
Wenn die Lautstärke beim Ausschalten höher als die P-VOL-Lautstärke ist, wird die
Lautstärke beim Einschalten des Geräts auf den P-VOL-Wert zurückgesetzt.
Bluetooth-Lautsprecher suchen
Wenn Sie die Taste BT gedrückt halten, wird „SEARCH...“ angezeigt. Nach kurzer Zeit wird die
Bezeichnung Ihres Bluetooth-Geräts angezeigt. Um das nächste Gerät anzuzeigen, drehen
Sie den Drehknopf VOL. Wenn der Name des gewünschten Bluetooth-Lautsprechers auf
dem LCD-Display angezeigt wird, drücken Sie den Drehknopf VOL, um das Gerät zu
koppeln. Wenn die Kopplung erfolgreich war, wird auf dem Display „BOX ON“ angezeigt.
Wichtiger Hinweis: Trotz zahlreicher Tests mit verschiedenen Bluetooth-Geräten kann
die Kompatibilität mit allen auf dem Markt bendlichen Bluetooth-Geräten nicht
garantiert werden.
Signalübertragung zum Bluetooth-Lautsprecher
Drücken Sie kurz die Taste BT, um die Übertragung/das Signal an den
Bluetooth-Lautsprecher zu beenden. Auf dem Display wird „BOX OFF/ON“ angezeigt.
Hinweis: Obwohl Blaupunkt die Kompatibilität der verschiedenen Bluetooth-Lautsprecher
sorgfältig prüft, kann ein reibungsloser Betrieb nicht mit allen Modellen auf dem Markt
garantiert werden.
Zone 1 und Zone 2 bedienen
Drücken Sie kurz auf die Taste Zone 1 (oder Zone 2), um den Ton von Zone 1 (oder Zone
2) aus-/einzuschalten.
Halten Sie die Taste Zone 1 (oder Zone 2) gedrückt, um den Ton von Zone 1 (oder Zone
2) stummzuschalten. Drücken Sie die Taste erneut, um die Stummschaltung aufzuheben.
Priorität einstellen: Informationen oder Uhrzeit
Drücken Sie kurz die Taste DIS, um die Priorität der Uhrzeit oder der Informationen
einzustellen.
Hinweis: Wenn Sie im UKW-Band RDS-Sender empfangen, drücken Sie kurz die Taste DIS,
um RADIOSENDER/ ZEIT/FREQUENZ anzuzeigen.
Uhrzeit einstellen
Wählen Sie im Menü CLK HH/CLK MM. Drehen Sie den Drehknopf VOL, um die
Stunde/Minute einzustellen.
Kopfhörer bedienen
An der Vorderseite bendet sich eine 3,5-mm-Kopfhörerbuchse. Das System übernimmt
für Kopfhörer die Betriebseinstellungen für Zone 1.
RADIOBEDIENUNG
Radiosender empfangen
Drücken Sie die Taste SRC/MENU, um einen Modus aus FM1->FM2->MW auszuwählen.
Drücken Sie kurz / , um den gewünschten Radiosender zu empfangen. Drücken
und halten Sie / gedrückt, um die Frequenz manuell einzustellen.
Radiosender manuell abspeichern und gespeicherte Radiosender abrufen
Empfangen des gewünschten Radiosenders. Drücken Sie eine der Speichertasten (1-6)
und halten Sie sie 2 Sekunden lang gedrückt. Der aktuelle Radiosender wird im Speicher
unter der entsprechenden Zierntaste abgelegt. Drücken Sie kurz auf die Taste des
voreingestellten Radiosenders (1-6), um direkt das Sendesignal des unter der
zugewiesenen Taste gespeicherten Senders zu hören.
BEDIENDUNG VON DAB
Drücken Sie SRC/MENU, um die Quelle zwischen DAB1 und DAB2 umzuschalten.
Radiosender auswählen
Drücken Sie die Taste / , um den nächsten/vorherigen Radiosender
auszuwählen.
Radiosender manuell abspeichern und gespeicherte Radiosender abrufen
Wenn die Frequenz des gewünschten Radiosenders eingestellt ist. Drücken und halten
Sie eine der Tasten 1 bis 6 2 Sekunden lang gedrückt, um diesen Sender unter der
entsprechenden Nummer zu speichern. Drücken Sie kurz auf die Taste des
voreingestellten Radiosenders (1-6), um direkt das Sendesignal des unter der
zugewiesenen Taste gespeicherten Senders zu hören.
UNTERSTÜTZUNG VON USB-SPEICHERN
Wenn ein USB-Speicher an das Gerät angeschlossen wird, spielt das Gerät automatisch
MP3/WMA-Dateien ab. Wenn bereits ein USB-Speicher an das Gerät angeschlossen ist,
drücken Sie kurz SRC/MENU, bis der USB-Modus-Bildschirm erscheint.
Dateien auswählen
Drücken Sie die Taste / , um zur nächsten/vorherigen Datei zu gelangen. Halten
Sie die Taste / , um vor- oder zurückzuspulen.
Wiedergabe/Pause
Drücken Sie 1 , um die Datei anzuhalten/abzuspielen.
Schleifenwiedergabe
Drücken Sie die Taste 3 RPT, um die Schleifenwiedergabefunktion zu wählen. RPT
ONE/RPT FOLD/RPT ALL (Standard)
RPT ONE: Schleifenwiedergabe einer einzelnen Datei.
RPT FOLD: Schleifenwiedergabe aller Dateien in einem Ordner.
RPT ALL: Schleifenwiedergabe aller Dateien.
RANDOM
Drücken Sie die Taste 4 RDM, um die Zufallswiedergabefunktion ein- oder auszuschalten.
RDM Ein Zufallswiedergabe aller Dateien.
RDM Aus Deaktivieren der Zufallswiedergabefunktion.
Ordnerfunktion +/-
Drücken Sie DIR+/DIR-, um den nächsten/vorherigen Ordner für die Wiedergabe
auszuwählen.
Titel suchen
Durch Drücken und Halten der Taste wird „NUM 0000“ angezeigt. Wählen Sie durch
Drehen des Drehknopfes VOL (oder durch direkte Eingabe der Nummer) die Nummer
aus und drücken Sie dann VOL zur Wiedergabe. Beachten Sie 7/8/9/0 als: BT = 7, = 8,
= 9, DIS = 0.
VERWENDUNG DER BUCHSE AUX IN 1/2
Die Buchse AUX IN 1 an der Vorderseite ist 3,5-mm. Die Buchse AUX IN 2 für RCA bendet
sich auf der Rückseite des Geräts. Durch Drücken der Taste SRC/MENU wird auf den
Modus AUX IN1 (2) umgeschaltet, wenn das Audiosignal an das Gerät angeschlossen ist.
BLUETOOTH-UNTERSTÜTZUNG
Kopplung von Geräten
Wählen Sie auf Ihrem Smartphone Bluetooth und suchen Sie nach Ihrem
Bluetooth-Gerät. In der Liste sollte „BLAUPUNKT“ erscheinen; wählen Sie „BLAUPUNKT“
und geben Sie das Passwort „0000“ ein, wenn Sie zur Eingabe eines Passworts
aufgefordert werden. Nach erfolgreichem Koppeln wird BT auf dem Display angezeigt.
Bluetooth-Audio
Drücken Sie die Taste SRC/MENU, um in den BT MUSIC-Modus zu wechseln. Das Gerät
spielt automatisch den Titel von Ihrem Handy ab. Drücken Sie die Taste , um den
Titel anzuhalten/abzuspielen.
Drücken Sie die Taste / , um den nächsten/vorherigen Titel zu wählen.
HDMI-UNTERSTÜTZUNG
Die vordere HDMI-Buchse wird mit der hinteren HDMI-Buchse verbunden. Dies hat
keinen Einuss auf HDMI-Wiedergabe.
Anschlüsse RCA V-IN und V-OUT
Auf der Rückseite des Geräts ist der V-IN-Anschluss zum V-OUT-Anschluss geführt.
FERNBEDIENUNG
Die Fernbedienung kann verwendet werden,
wenn im Menü die Option IR aktiviert ist.
OFF: Gerät einschalten/ausschalten.
VOL+: Lautstärke erhöhen
VOL-: Lautstärke reduzieren
1 : Stummschaltung Zone 1 einschalten/ausschalten
2 : Stummschaltung Zone 2 einschalten/ausschalten
Für andere Aktionen lesen Sie bitte die obigen Anweisungen.
ALLGEMEINE INFORMATIONEN
Anforderungen an die Stromversorgung : Gleichstrom 12 V, Minuspol mit Masse verbunden
Abmessungen des Montagesockels : 129 (B) x 112 (T) x 65 (H)
Klangeinstellungen
- Tief (bei 100 Hz) : ±10 dB
- Hoch (bei 100 Hz) : ±10 dB
Max. Ausgangsleistung : 4 x 40 W
Stromaufnahme : 10 A (max.)
RADIO FM AM
Frequenzbereich von 87,5 bis 108 MHz von 522 bis 1620 KHz
IF 10,7 MHz 450 KHz
Empndlichkeit 4 µV (S/N = 30 dB) 36 dBµV (S/N = 20 dB)
Trennung der Stereokanäle >25 dB /
PROBLEMBEHEBUNG

Sicherheitshinweise
Dieses Car-Sound-System wurde nach dem aktuellen Stand der Technik und den
allgemein anerkannten sicherheitstechnischen Regeln hergestellt. Dennoch
kann die Nichtbeachtung der in dieser Bedienungsanleitung enthaltenen
Sicherheitshinweise zu verschiedenen Risiken führen. Lesen Sie diese Anleitung
sorgfältig durch, bevor Sie das Car-Sound-System benutzen. Bewahren Sie die
Anleitung so auf, dass sie jederzeit für alle Benutzer zugänglich ist. Wenn Sie das
Car-Sound-System an Dritte weitergeben, legen Sie bitte diese Anleitung bei.
Beachten Sie außerdem die Hinweise in den Bedienungsanleitungen der an
dieses Car-Sound-System angeschlossenen Geräte.
Allgemeine Sicherheitshinweise
Beachten Sie die folgenden Hinweise, um sich selbst vor Verletzungen zu schützen:
Das Gerät darf weder verändert noch geönet werden.
Bestimmung
Dieses Car-Sound-System ist für den Einbau und Betrieb in Fahrzeugen mit 12 V
Versorgungsspannung konzipiert. Die Leistungsgrenzen des Geräts müssen
beachtet werden. Lassen Sie eventuelle Reparaturen oder Installationsarbeiten
von einem Fachmann durchführen.
Montageanleitung
Sie dürfen das Gerät nur dann selbst einbauen, wenn Sie Erfahrung im Einbau
eines Car-Sound-Systems und Kenntnisse in der Fahrzeugelektronik haben.
Beachten Sie dazu den Schaltplan in dieser Anleitung. Der Einbau des Geräts
darf die Funktion von Airbags, anderen Sicherheitseinrichtungen oder
Bedienelementen nicht behindern oder blockieren.
Konformitätserklärung
Blaupunkt Competence Center Car Multimedia – Evo Sales GmbH erklärt
hiermit, dass dieses Gerät mit den grundlegenden Forderungen und anderen
relevanten Bestimmungen der Richtlinie 2014/53/EU konform ist. Die
Konformitätserklärung nden Sie unter www.blaupunkt.com.
Hinweise zur Reinigung
Löse-, Reinigungs- und Scheuermittel sowie Cockpitreiniger und
Kunststopegemittel können Inhaltsstoe enthalten, die die Oberäche des
Car-Sound-Systems angreifen können. Verwenden Sie zur Reinigung des
Car-Sound-Systems nur ein trockenes oder leicht feuchtes Tuch.
Hinweise zur Entsorgung
Das Altgerät darf nicht mit dem Hausmüll entsorgt werden!
Entsorgen Sie das Gerät, die Fernbedienung und die verbrauchten
Batterien bei einer Sammelstelle für Altgeräte.
Lieferumfang
Im Lieferumfang sind enthalten:
Car-Sound-System BPA 3022 M,
Fernbedienung,
ISO-Anschlüsse,
Montageschrauben,
Bedienungsanleitung.
WICHTIGE INFORMATIONEN ZUR MONTAGE
1. Lesen Sie die Anleitung sorgfältig durch, bevor Sie das Gerät installieren.
2. Achten Sie darauf, dass alle anderen Kabel angeschlossen sind, bevor Sie die
Stromversorgung anschließen.
3. Um einen Kurzschluss zu vermeiden, stellen Sie sicher, dass alle
freiliegenden Drähte isoliert sind.
4. Sobald die Installation abgeschlossen ist, müssen alle Kabel befestigt
werden.
5. Die Anschlüsse ans Car-Sound-System müssen entsprechend dieser
Anleitung vorgenommen werden. Ein falscher Anschluss kann zu Schäden
am Gerät führen.
6. Das Car-Sound-System ist nur für eine 12-V-DC-Installation ausgelegt.
ALLGEMEINE INFORMATIONEN
MONTAGE DES GERÄTS
DEMONTAGE DES GERÄTS
1. Demontieren Sie das Gerät.
2. Nehmen Sie den Außenrahmen ab.
Hinweis zu HDMI:
Verwenden Sie ein HDMI-Kabel von guter Qualität.
Die Gesamtlänge (vorne und hinten) sollte 3,65 m nicht überschreiten.
ANSCHLUSS VON LEITUNGEN
1. Das Car-Sound-System darf nur mit einer Spannung von +12 V DC betrieben werden.
2. Schließen Sie die Batterieklemme nur an, wenn das Car-Sound-System vollständig
montiert ist.
3. Stellen Sie sicher, dass das gelbe Kabel an den Pluspol (+) der Batterie angeschlossen ist.
4. Achten Sie beim Auswechseln der Sicherung darauf, dass die Parameter der neuen
Sicherung identisch sind.
5. Durch die Verwendung von hochwertigen Lautsprechern mit einer Impedanz von 4-8
Ohm kann das Gerät seine volle Leistung erbringen.
TASTENLAGE
1. ZONE 1 2. 1 3. ZONE 2
4. 2 5. BT 6. 3 RPT
7. 8. 4 RDM 9.
10. 5 DIR- 11. DIS 12. 6 DIR+
13. LCD 14. AUX-BUCHSE 15. KOPFHÖRERBUCHSE
16. HDMI-BUCHSE 17. RESET 18. DREHKNOPF
19. USB-PORT 20. SRC/MENU
GRUNDLEGENDE BEDIENUNG
Gerät und Stummschaltfunktion ein-/ausschalten
Um das Gerät einzuschalten, drücken Sie den Drehknopf /MUTE. Um die
Stummschaltfunktion ein- oder auszuschalten, drücken Sie kurz auf den Drehknopf,
während das Gerät eingeschaltet ist. Wenn Sie dieser Knopf gedrückt halten, wird das
Gerät ausgeschaltet.
Toneinstellungen und Setup-Menü
Drücken und halten Sie die Taste SRC/MENU gedrückt, um das unten abgebildete Menü
aufzurufen:
BAS->TRE->BAL->EQ (aus/Pop/Rock/Klassik)->LOUD (ein/aus)->CLK HH->CLK
MM->IR (ein/aus) ->CT (indep/sync)->SYG. TON (ein/aus) ->P_VOL (13)->DX (LOC)->STEREO
(MONO)
Drehen Sie an jeder Position den Drehknopf VOL, um sie einzustellen.
INFRAROT (EIN/AUS):
INFRAROT EIN: Das Gerät kann mit der Infrarot-Fernbedienung eingeschaltet werden.
Das System läuft dann mit hohem Stromverbrauch.
INFRAROT AUS: Das Gerät lässt sich nicht mit der Infrarot-Fernbedienung einschalten.
Das System läuft dann mit niedrigen Stromverbrauch.
CT (INDEP/SYNC):
CT INDEP: Die Uhr funktioniert unabhängig.
CT SYNC: Die Uhr wird mit der Zeit des empfangenen RDS-Senders synchronisiert.
Hinweis: Wenn die Uhr im Menü eingestellt wird, wird die CT-Funktion automatisch auf
den INDEP-Modus (unabhängiger Betrieb) eingestellt.
TASTENTON (EIN/AUS): Ermöglicht die Aktivierung/Deaktivierung des Tastentons beim
Drücken der Tasten.
P-VOL: Ermöglicht die Einstellung der Lautstärke beim Einschalten. Wenn die Lautstärke
beim Ausschalten niedriger ist als die P-VOL-Lautstärke, stellt das Gerät die Lautstärke
beim Einschalten auf die Lautstärke beim Ausschalten ein.
Wenn die Lautstärke beim Ausschalten höher als die P-VOL-Lautstärke ist, wird die
Lautstärke beim Einschalten des Geräts auf den P-VOL-Wert zurückgesetzt.
Bluetooth-Lautsprecher suchen
Wenn Sie die Taste BT gedrückt halten, wird „SEARCH...“ angezeigt. Nach kurzer Zeit wird die
Bezeichnung Ihres Bluetooth-Geräts angezeigt. Um das nächste Gerät anzuzeigen, drehen
Sie den Drehknopf VOL. Wenn der Name des gewünschten Bluetooth-Lautsprechers auf
dem LCD-Display angezeigt wird, drücken Sie den Drehknopf VOL, um das Gerät zu
koppeln. Wenn die Kopplung erfolgreich war, wird auf dem Display „BOX ON“ angezeigt.
Wichtiger Hinweis: Trotz zahlreicher Tests mit verschiedenen Bluetooth-Geräten kann
die Kompatibilität mit allen auf dem Markt bendlichen Bluetooth-Geräten nicht
garantiert werden.
Signalübertragung zum Bluetooth-Lautsprecher
Drücken Sie kurz die Taste BT, um die Übertragung/das Signal an den
Bluetooth-Lautsprecher zu beenden. Auf dem Display wird „BOX OFF/ON“ angezeigt.
Hinweis: Obwohl Blaupunkt die Kompatibilität der verschiedenen Bluetooth-Lautsprecher
sorgfältig prüft, kann ein reibungsloser Betrieb nicht mit allen Modellen auf dem Markt
garantiert werden.
Zone 1 und Zone 2 bedienen
Drücken Sie kurz auf die Taste Zone 1 (oder Zone 2), um den Ton von Zone 1 (oder Zone
2) aus-/einzuschalten.
Halten Sie die Taste Zone 1 (oder Zone 2) gedrückt, um den Ton von Zone 1 (oder Zone
2) stummzuschalten. Drücken Sie die Taste erneut, um die Stummschaltung aufzuheben.
Priorität einstellen: Informationen oder Uhrzeit
Drücken Sie kurz die Taste DIS, um die Priorität der Uhrzeit oder der Informationen
einzustellen.
Hinweis: Wenn Sie im UKW-Band RDS-Sender empfangen, drücken Sie kurz die Taste DIS,
um RADIOSENDER/ ZEIT/FREQUENZ anzuzeigen.
Uhrzeit einstellen
Wählen Sie im Menü CLK HH/CLK MM. Drehen Sie den Drehknopf VOL, um die
Stunde/Minute einzustellen.
Kopfhörer bedienen
An der Vorderseite bendet sich eine 3,5-mm-Kopfhörerbuchse. Das System übernimmt
für Kopfhörer die Betriebseinstellungen für Zone 1.
RADIOBEDIENUNG
Radiosender empfangen
Drücken Sie die Taste SRC/MENU, um einen Modus aus FM1->FM2->MW auszuwählen.
Drücken Sie kurz / , um den gewünschten Radiosender zu empfangen. Drücken
und halten Sie / gedrückt, um die Frequenz manuell einzustellen.
Radiosender manuell abspeichern und gespeicherte Radiosender abrufen
Empfangen des gewünschten Radiosenders. Drücken Sie eine der Speichertasten (1-6)
und halten Sie sie 2 Sekunden lang gedrückt. Der aktuelle Radiosender wird im Speicher
unter der entsprechenden Zierntaste abgelegt. Drücken Sie kurz auf die Taste des
voreingestellten Radiosenders (1-6), um direkt das Sendesignal des unter der
zugewiesenen Taste gespeicherten Senders zu hören.
BEDIENDUNG VON DAB
Drücken Sie SRC/MENU, um die Quelle zwischen DAB1 und DAB2 umzuschalten.
Radiosender auswählen
Drücken Sie die Taste / , um den nächsten/vorherigen Radiosender
auszuwählen.
Radiosender manuell abspeichern und gespeicherte Radiosender abrufen
Wenn die Frequenz des gewünschten Radiosenders eingestellt ist. Drücken und halten
Sie eine der Tasten 1 bis 6 2 Sekunden lang gedrückt, um diesen Sender unter der
entsprechenden Nummer zu speichern. Drücken Sie kurz auf die Taste des
voreingestellten Radiosenders (1-6), um direkt das Sendesignal des unter der
zugewiesenen Taste gespeicherten Senders zu hören.
UNTERSTÜTZUNG VON USB-SPEICHERN
Wenn ein USB-Speicher an das Gerät angeschlossen wird, spielt das Gerät automatisch
MP3/WMA-Dateien ab. Wenn bereits ein USB-Speicher an das Gerät angeschlossen ist,
drücken Sie kurz SRC/MENU, bis der USB-Modus-Bildschirm erscheint.
Dateien auswählen
Drücken Sie die Taste / , um zur nächsten/vorherigen Datei zu gelangen. Halten
Sie die Taste / , um vor- oder zurückzuspulen.
Wiedergabe/Pause
Drücken Sie 1 , um die Datei anzuhalten/abzuspielen.
Schleifenwiedergabe
Drücken Sie die Taste 3 RPT, um die Schleifenwiedergabefunktion zu wählen. RPT
ONE/RPT FOLD/RPT ALL (Standard)
RPT ONE: Schleifenwiedergabe einer einzelnen Datei.
RPT FOLD: Schleifenwiedergabe aller Dateien in einem Ordner.
RPT ALL: Schleifenwiedergabe aller Dateien.
RANDOM
Drücken Sie die Taste 4 RDM, um die Zufallswiedergabefunktion ein- oder auszuschalten.
RDM Ein Zufallswiedergabe aller Dateien.
RDM Aus Deaktivieren der Zufallswiedergabefunktion.
Ordnerfunktion +/-
Drücken Sie DIR+/DIR-, um den nächsten/vorherigen Ordner für die Wiedergabe
auszuwählen.
Titel suchen
Durch Drücken und Halten der Taste wird „NUM 0000“ angezeigt. Wählen Sie durch
Drehen des Drehknopfes VOL (oder durch direkte Eingabe der Nummer) die Nummer
aus und drücken Sie dann VOL zur Wiedergabe. Beachten Sie 7/8/9/0 als: BT = 7, = 8,
= 9, DIS = 0.
VERWENDUNG DER BUCHSE AUX IN 1/2
Die Buchse AUX IN 1 an der Vorderseite ist 3,5-mm. Die Buchse AUX IN 2 für RCA bendet
sich auf der Rückseite des Geräts. Durch Drücken der Taste SRC/MENU wird auf den
Modus AUX IN1 (2) umgeschaltet, wenn das Audiosignal an das Gerät angeschlossen ist.
BLUETOOTH-UNTERSTÜTZUNG
Kopplung von Geräten
Wählen Sie auf Ihrem Smartphone Bluetooth und suchen Sie nach Ihrem
Bluetooth-Gerät. In der Liste sollte „BLAUPUNKT“ erscheinen; wählen Sie „BLAUPUNKT“
und geben Sie das Passwort „0000“ ein, wenn Sie zur Eingabe eines Passworts
aufgefordert werden. Nach erfolgreichem Koppeln wird BT auf dem Display angezeigt.
Bluetooth-Audio
Drücken Sie die Taste SRC/MENU, um in den BT MUSIC-Modus zu wechseln. Das Gerät
spielt automatisch den Titel von Ihrem Handy ab. Drücken Sie die Taste , um den
Titel anzuhalten/abzuspielen.
Drücken Sie die Taste / , um den nächsten/vorherigen Titel zu wählen.
HDMI-UNTERSTÜTZUNG
Die vordere HDMI-Buchse wird mit der hinteren HDMI-Buchse verbunden. Dies hat
keinen Einuss auf HDMI-Wiedergabe.
Anschlüsse RCA V-IN und V-OUT
Auf der Rückseite des Geräts ist der V-IN-Anschluss zum V-OUT-Anschluss geführt.
FERNBEDIENUNG
Die Fernbedienung kann verwendet werden,
wenn im Menü die Option IR aktiviert ist.
OFF: Gerät einschalten/ausschalten.
VOL+: Lautstärke erhöhen
VOL-: Lautstärke reduzieren
1 : Stummschaltung Zone 1 einschalten/ausschalten
2 : Stummschaltung Zone 2 einschalten/ausschalten
Für andere Aktionen lesen Sie bitte die obigen Anweisungen.
ALLGEMEINE INFORMATIONEN
Anforderungen an die Stromversorgung : Gleichstrom 12 V, Minuspol mit Masse verbunden
Abmessungen des Montagesockels : 129 (B) x 112 (T) x 65 (H)
Klangeinstellungen
- Tief (bei 100 Hz) : ±10 dB
- Hoch (bei 100 Hz) : ±10 dB
Max. Ausgangsleistung : 4 x 40 W
Stromaufnahme : 10 A (max.)
RADIO FM AM
Frequenzbereich von 87,5 bis 108 MHz von 522 bis 1620 KHz
IF 10,7 MHz 450 KHz
Empndlichkeit 4 µV (S/N = 30 dB) 36 dBµV (S/N = 20 dB)
Trennung der Stereokanäle >25 dB /
PROBLEMBEHEBUNG
DE

Sicherheitshinweise
Dieses Car-Sound-System wurde nach dem aktuellen Stand der Technik und den
allgemein anerkannten sicherheitstechnischen Regeln hergestellt. Dennoch
kann die Nichtbeachtung der in dieser Bedienungsanleitung enthaltenen
Sicherheitshinweise zu verschiedenen Risiken führen. Lesen Sie diese Anleitung
sorgfältig durch, bevor Sie das Car-Sound-System benutzen. Bewahren Sie die
Anleitung so auf, dass sie jederzeit für alle Benutzer zugänglich ist. Wenn Sie das
Car-Sound-System an Dritte weitergeben, legen Sie bitte diese Anleitung bei.
Beachten Sie außerdem die Hinweise in den Bedienungsanleitungen der an
dieses Car-Sound-System angeschlossenen Geräte.
Allgemeine Sicherheitshinweise
Beachten Sie die folgenden Hinweise, um sich selbst vor Verletzungen zu schützen:
Das Gerät darf weder verändert noch geönet werden.
Bestimmung
Dieses Car-Sound-System ist für den Einbau und Betrieb in Fahrzeugen mit 12 V
Versorgungsspannung konzipiert. Die Leistungsgrenzen des Geräts müssen
beachtet werden. Lassen Sie eventuelle Reparaturen oder Installationsarbeiten
von einem Fachmann durchführen.
Montageanleitung
Sie dürfen das Gerät nur dann selbst einbauen, wenn Sie Erfahrung im Einbau
eines Car-Sound-Systems und Kenntnisse in der Fahrzeugelektronik haben.
Beachten Sie dazu den Schaltplan in dieser Anleitung. Der Einbau des Geräts
darf die Funktion von Airbags, anderen Sicherheitseinrichtungen oder
Bedienelementen nicht behindern oder blockieren.
Konformitätserklärung
Blaupunkt Competence Center Car Multimedia – Evo Sales GmbH erklärt
hiermit, dass dieses Gerät mit den grundlegenden Forderungen und anderen
relevanten Bestimmungen der Richtlinie 2014/53/EU konform ist. Die
Konformitätserklärung nden Sie unter www.blaupunkt.com.
Hinweise zur Reinigung
Löse-, Reinigungs- und Scheuermittel sowie Cockpitreiniger und
Kunststopegemittel können Inhaltsstoe enthalten, die die Oberäche des
Car-Sound-Systems angreifen können. Verwenden Sie zur Reinigung des
Car-Sound-Systems nur ein trockenes oder leicht feuchtes Tuch.
Hinweise zur Entsorgung
Das Altgerät darf nicht mit dem Hausmüll entsorgt werden!
Entsorgen Sie das Gerät, die Fernbedienung und die verbrauchten
Batterien bei einer Sammelstelle für Altgeräte.
Lieferumfang
Im Lieferumfang sind enthalten:
Car-Sound-System BPA 3022 M,
Fernbedienung,
ISO-Anschlüsse,
Montageschrauben,
Bedienungsanleitung.
WICHTIGE INFORMATIONEN ZUR MONTAGE
1. Lesen Sie die Anleitung sorgfältig durch, bevor Sie das Gerät installieren.
2. Achten Sie darauf, dass alle anderen Kabel angeschlossen sind, bevor Sie die
Stromversorgung anschließen.
3. Um einen Kurzschluss zu vermeiden, stellen Sie sicher, dass alle
freiliegenden Drähte isoliert sind.
4. Sobald die Installation abgeschlossen ist, müssen alle Kabel befestigt
werden.
5. Die Anschlüsse ans Car-Sound-System müssen entsprechend dieser
Anleitung vorgenommen werden. Ein falscher Anschluss kann zu Schäden
am Gerät führen.
6. Das Car-Sound-System ist nur für eine 12-V-DC-Installation ausgelegt.
MONTAGE DES GERÄTS
DEMONTAGE DES GERÄTS
1. Demontieren Sie das Gerät.
2. Nehmen Sie den Außenrahmen ab.
Hinweis zu HDMI:
Verwenden Sie ein HDMI-Kabel von guter Qualität.
Die Gesamtlänge (vorne und hinten) sollte 3,65 m nicht überschreiten.
ALLGEMEINE INFORMATIONEN
ANSCHLUSS VON LEITUNGEN
1. Das Car-Sound-System darf nur mit einer Spannung von +12 V DC betrieben werden.
2. Schließen Sie die Batterieklemme nur an, wenn das Car-Sound-System vollständig
montiert ist.
3. Stellen Sie sicher, dass das gelbe Kabel an den Pluspol (+) der Batterie angeschlossen ist.
4. Achten Sie beim Auswechseln der Sicherung darauf, dass die Parameter der neuen
Sicherung identisch sind.
5. Durch die Verwendung von hochwertigen Lautsprechern mit einer Impedanz von 4-8
Ohm kann das Gerät seine volle Leistung erbringen.
TASTENLAGE
1. ZONE 1 2. 1 3. ZONE 2
4. 2 5. BT 6. 3 RPT
7. 8. 4 RDM 9.
10. 5 DIR- 11. DIS 12. 6 DIR+
13. LCD 14. AUX-BUCHSE 15. KOPFHÖRERBUCHSE
16. HDMI-BUCHSE 17. RESET 18. DREHKNOPF
19. USB-PORT 20. SRC/MENU
GRUNDLEGENDE BEDIENUNG
Gerät und Stummschaltfunktion ein-/ausschalten
Um das Gerät einzuschalten, drücken Sie den Drehknopf /MUTE. Um die
Stummschaltfunktion ein- oder auszuschalten, drücken Sie kurz auf den Drehknopf,
während das Gerät eingeschaltet ist. Wenn Sie dieser Knopf gedrückt halten, wird das
Gerät ausgeschaltet.
Toneinstellungen und Setup-Menü
Drücken und halten Sie die Taste SRC/MENU gedrückt, um das unten abgebildete Menü
aufzurufen:
BAS->TRE->BAL->EQ (aus/Pop/Rock/Klassik)->LOUD (ein/aus)->CLK HH->CLK
MM->IR (ein/aus) ->CT (indep/sync)->SYG. TON (ein/aus) ->P_VOL (13)->DX (LOC)->STEREO
(MONO)
Drehen Sie an jeder Position den Drehknopf VOL, um sie einzustellen.
INFRAROT (EIN/AUS):
INFRAROT EIN: Das Gerät kann mit der Infrarot-Fernbedienung eingeschaltet werden.
Das System läuft dann mit hohem Stromverbrauch.
INFRAROT AUS: Das Gerät lässt sich nicht mit der Infrarot-Fernbedienung einschalten.
Das System läuft dann mit niedrigen Stromverbrauch.
CT (INDEP/SYNC):
CT INDEP: Die Uhr funktioniert unabhängig.
CT SYNC: Die Uhr wird mit der Zeit des empfangenen RDS-Senders synchronisiert.
Hinweis: Wenn die Uhr im Menü eingestellt wird, wird die CT-Funktion automatisch auf
den INDEP-Modus (unabhängiger Betrieb) eingestellt.
TASTENTON (EIN/AUS): Ermöglicht die Aktivierung/Deaktivierung des Tastentons beim
Drücken der Tasten.
P-VOL: Ermöglicht die Einstellung der Lautstärke beim Einschalten. Wenn die Lautstärke
beim Ausschalten niedriger ist als die P-VOL-Lautstärke, stellt das Gerät die Lautstärke
beim Einschalten auf die Lautstärke beim Ausschalten ein.
Wenn die Lautstärke beim Ausschalten höher als die P-VOL-Lautstärke ist, wird die
Lautstärke beim Einschalten des Geräts auf den P-VOL-Wert zurückgesetzt.
Bluetooth-Lautsprecher suchen
Wenn Sie die Taste BT gedrückt halten, wird „SEARCH...“ angezeigt. Nach kurzer Zeit wird die
Bezeichnung Ihres Bluetooth-Geräts angezeigt. Um das nächste Gerät anzuzeigen, drehen
Sie den Drehknopf VOL. Wenn der Name des gewünschten Bluetooth-Lautsprechers auf
dem LCD-Display angezeigt wird, drücken Sie den Drehknopf VOL, um das Gerät zu
koppeln. Wenn die Kopplung erfolgreich war, wird auf dem Display „BOX ON“ angezeigt.
Wichtiger Hinweis: Trotz zahlreicher Tests mit verschiedenen Bluetooth-Geräten kann
die Kompatibilität mit allen auf dem Markt bendlichen Bluetooth-Geräten nicht
garantiert werden.
Signalübertragung zum Bluetooth-Lautsprecher
Drücken Sie kurz die Taste BT, um die Übertragung/das Signal an den
Bluetooth-Lautsprecher zu beenden. Auf dem Display wird „BOX OFF/ON“ angezeigt.
Hinweis: Obwohl Blaupunkt die Kompatibilität der verschiedenen Bluetooth-Lautsprecher
sorgfältig prüft, kann ein reibungsloser Betrieb nicht mit allen Modellen auf dem Markt
garantiert werden.
Zone 1 und Zone 2 bedienen
Drücken Sie kurz auf die Taste Zone 1 (oder Zone 2), um den Ton von Zone 1 (oder Zone
2) aus-/einzuschalten.
Halten Sie die Taste Zone 1 (oder Zone 2) gedrückt, um den Ton von Zone 1 (oder Zone
2) stummzuschalten. Drücken Sie die Taste erneut, um die Stummschaltung aufzuheben.
Priorität einstellen: Informationen oder Uhrzeit
Drücken Sie kurz die Taste DIS, um die Priorität der Uhrzeit oder der Informationen
einzustellen.
Hinweis: Wenn Sie im UKW-Band RDS-Sender empfangen, drücken Sie kurz die Taste DIS,
um RADIOSENDER/ ZEIT/FREQUENZ anzuzeigen.
Uhrzeit einstellen
Wählen Sie im Menü CLK HH/CLK MM. Drehen Sie den Drehknopf VOL, um die
Stunde/Minute einzustellen.
Kopfhörer bedienen
An der Vorderseite bendet sich eine 3,5-mm-Kopfhörerbuchse. Das System übernimmt
für Kopfhörer die Betriebseinstellungen für Zone 1.
RADIOBEDIENUNG
Radiosender empfangen
Drücken Sie die Taste SRC/MENU, um einen Modus aus FM1->FM2->MW auszuwählen.
Drücken Sie kurz / , um den gewünschten Radiosender zu empfangen. Drücken
und halten Sie / gedrückt, um die Frequenz manuell einzustellen.
Radiosender manuell abspeichern und gespeicherte Radiosender abrufen
Empfangen des gewünschten Radiosenders. Drücken Sie eine der Speichertasten (1-6)
und halten Sie sie 2 Sekunden lang gedrückt. Der aktuelle Radiosender wird im Speicher
unter der entsprechenden Zierntaste abgelegt. Drücken Sie kurz auf die Taste des
voreingestellten Radiosenders (1-6), um direkt das Sendesignal des unter der
zugewiesenen Taste gespeicherten Senders zu hören.
BEDIENDUNG VON DAB
Drücken Sie SRC/MENU, um die Quelle zwischen DAB1 und DAB2 umzuschalten.
Radiosender auswählen
Drücken Sie die Taste / , um den nächsten/vorherigen Radiosender
auszuwählen.
Radiosender manuell abspeichern und gespeicherte Radiosender abrufen
Wenn die Frequenz des gewünschten Radiosenders eingestellt ist. Drücken und halten
Sie eine der Tasten 1 bis 6 2 Sekunden lang gedrückt, um diesen Sender unter der
entsprechenden Nummer zu speichern. Drücken Sie kurz auf die Taste des
voreingestellten Radiosenders (1-6), um direkt das Sendesignal des unter der
zugewiesenen Taste gespeicherten Senders zu hören.
UNTERSTÜTZUNG VON USB-SPEICHERN
Wenn ein USB-Speicher an das Gerät angeschlossen wird, spielt das Gerät automatisch
MP3/WMA-Dateien ab. Wenn bereits ein USB-Speicher an das Gerät angeschlossen ist,
drücken Sie kurz SRC/MENU, bis der USB-Modus-Bildschirm erscheint.
Dateien auswählen
Drücken Sie die Taste / , um zur nächsten/vorherigen Datei zu gelangen. Halten
Sie die Taste / , um vor- oder zurückzuspulen.
Wiedergabe/Pause
Drücken Sie 1 , um die Datei anzuhalten/abzuspielen.
Schleifenwiedergabe
Drücken Sie die Taste 3 RPT, um die Schleifenwiedergabefunktion zu wählen. RPT
ONE/RPT FOLD/RPT ALL (Standard)
RPT ONE: Schleifenwiedergabe einer einzelnen Datei.
RPT FOLD: Schleifenwiedergabe aller Dateien in einem Ordner.
RPT ALL: Schleifenwiedergabe aller Dateien.
RANDOM
Drücken Sie die Taste 4 RDM, um die Zufallswiedergabefunktion ein- oder auszuschalten.
RDM Ein Zufallswiedergabe aller Dateien.
RDM Aus Deaktivieren der Zufallswiedergabefunktion.
Ordnerfunktion +/-
Drücken Sie DIR+/DIR-, um den nächsten/vorherigen Ordner für die Wiedergabe
auszuwählen.
Titel suchen
Durch Drücken und Halten der Taste wird „NUM 0000“ angezeigt. Wählen Sie durch
Drehen des Drehknopfes VOL (oder durch direkte Eingabe der Nummer) die Nummer
aus und drücken Sie dann VOL zur Wiedergabe. Beachten Sie 7/8/9/0 als: BT = 7, = 8,
= 9, DIS = 0.
VERWENDUNG DER BUCHSE AUX IN 1/2
Die Buchse AUX IN 1 an der Vorderseite ist 3,5-mm. Die Buchse AUX IN 2 für RCA bendet
sich auf der Rückseite des Geräts. Durch Drücken der Taste SRC/MENU wird auf den
Modus AUX IN1 (2) umgeschaltet, wenn das Audiosignal an das Gerät angeschlossen ist.
BLUETOOTH-UNTERSTÜTZUNG
Kopplung von Geräten
Wählen Sie auf Ihrem Smartphone Bluetooth und suchen Sie nach Ihrem
Bluetooth-Gerät. In der Liste sollte „BLAUPUNKT“ erscheinen; wählen Sie „BLAUPUNKT“
und geben Sie das Passwort „0000“ ein, wenn Sie zur Eingabe eines Passworts
aufgefordert werden. Nach erfolgreichem Koppeln wird BT auf dem Display angezeigt.
Bluetooth-Audio
Drücken Sie die Taste SRC/MENU, um in den BT MUSIC-Modus zu wechseln. Das Gerät
spielt automatisch den Titel von Ihrem Handy ab. Drücken Sie die Taste , um den
Titel anzuhalten/abzuspielen.
Drücken Sie die Taste / , um den nächsten/vorherigen Titel zu wählen.
HDMI-UNTERSTÜTZUNG
Die vordere HDMI-Buchse wird mit der hinteren HDMI-Buchse verbunden. Dies hat
keinen Einuss auf HDMI-Wiedergabe.
Anschlüsse RCA V-IN und V-OUT
Auf der Rückseite des Geräts ist der V-IN-Anschluss zum V-OUT-Anschluss geführt.
FERNBEDIENUNG
Die Fernbedienung kann verwendet werden,
wenn im Menü die Option IR aktiviert ist.
OFF: Gerät einschalten/ausschalten.
VOL+: Lautstärke erhöhen
VOL-: Lautstärke reduzieren
1 : Stummschaltung Zone 1 einschalten/ausschalten
2 : Stummschaltung Zone 2 einschalten/ausschalten
Für andere Aktionen lesen Sie bitte die obigen Anweisungen.
ALLGEMEINE INFORMATIONEN
Anforderungen an die Stromversorgung : Gleichstrom 12 V, Minuspol mit Masse verbunden
Abmessungen des Montagesockels : 129 (B) x 112 (T) x 65 (H)
Klangeinstellungen
- Tief (bei 100 Hz) : ±10 dB
- Hoch (bei 100 Hz) : ±10 dB
Max. Ausgangsleistung : 4 x 40 W
Stromaufnahme : 10 A (max.)
RADIO FM AM
Frequenzbereich von 87,5 bis 108 MHz von 522 bis 1620 KHz
IF 10,7 MHz 450 KHz
Empndlichkeit 4 µV (S/N = 30 dB) 36 dBµV (S/N = 20 dB)
Trennung der Stereokanäle >25 dB /
PROBLEMBEHEBUNG
DE
Dekorative Abdeckungen
Schrauben
Armaturenbrett
Montage

Sicherheitshinweise
Dieses Car-Sound-System wurde nach dem aktuellen Stand der Technik und den
allgemein anerkannten sicherheitstechnischen Regeln hergestellt. Dennoch
kann die Nichtbeachtung der in dieser Bedienungsanleitung enthaltenen
Sicherheitshinweise zu verschiedenen Risiken führen. Lesen Sie diese Anleitung
sorgfältig durch, bevor Sie das Car-Sound-System benutzen. Bewahren Sie die
Anleitung so auf, dass sie jederzeit für alle Benutzer zugänglich ist. Wenn Sie das
Car-Sound-System an Dritte weitergeben, legen Sie bitte diese Anleitung bei.
Beachten Sie außerdem die Hinweise in den Bedienungsanleitungen der an
dieses Car-Sound-System angeschlossenen Geräte.
Allgemeine Sicherheitshinweise
Beachten Sie die folgenden Hinweise, um sich selbst vor Verletzungen zu schützen:
Das Gerät darf weder verändert noch geönet werden.
Bestimmung
Dieses Car-Sound-System ist für den Einbau und Betrieb in Fahrzeugen mit 12 V
Versorgungsspannung konzipiert. Die Leistungsgrenzen des Geräts müssen
beachtet werden. Lassen Sie eventuelle Reparaturen oder Installationsarbeiten
von einem Fachmann durchführen.
Montageanleitung
Sie dürfen das Gerät nur dann selbst einbauen, wenn Sie Erfahrung im Einbau
eines Car-Sound-Systems und Kenntnisse in der Fahrzeugelektronik haben.
Beachten Sie dazu den Schaltplan in dieser Anleitung. Der Einbau des Geräts
darf die Funktion von Airbags, anderen Sicherheitseinrichtungen oder
Bedienelementen nicht behindern oder blockieren.
Konformitätserklärung
Blaupunkt Competence Center Car Multimedia – Evo Sales GmbH erklärt
hiermit, dass dieses Gerät mit den grundlegenden Forderungen und anderen
relevanten Bestimmungen der Richtlinie 2014/53/EU konform ist. Die
Konformitätserklärung nden Sie unter www.blaupunkt.com.
Hinweise zur Reinigung
Löse-, Reinigungs- und Scheuermittel sowie Cockpitreiniger und
Kunststopegemittel können Inhaltsstoe enthalten, die die Oberäche des
Car-Sound-Systems angreifen können. Verwenden Sie zur Reinigung des
Car-Sound-Systems nur ein trockenes oder leicht feuchtes Tuch.
Hinweise zur Entsorgung
Das Altgerät darf nicht mit dem Hausmüll entsorgt werden!
Entsorgen Sie das Gerät, die Fernbedienung und die verbrauchten
Batterien bei einer Sammelstelle für Altgeräte.
Lieferumfang
Im Lieferumfang sind enthalten:
Car-Sound-System BPA 3022 M,
Fernbedienung,
ISO-Anschlüsse,
Montageschrauben,
Bedienungsanleitung.
WICHTIGE INFORMATIONEN ZUR MONTAGE
1. Lesen Sie die Anleitung sorgfältig durch, bevor Sie das Gerät installieren.
2. Achten Sie darauf, dass alle anderen Kabel angeschlossen sind, bevor Sie die
Stromversorgung anschließen.
3. Um einen Kurzschluss zu vermeiden, stellen Sie sicher, dass alle
freiliegenden Drähte isoliert sind.
4. Sobald die Installation abgeschlossen ist, müssen alle Kabel befestigt
werden.
5. Die Anschlüsse ans Car-Sound-System müssen entsprechend dieser
Anleitung vorgenommen werden. Ein falscher Anschluss kann zu Schäden
am Gerät führen.
6. Das Car-Sound-System ist nur für eine 12-V-DC-Installation ausgelegt.
MONTAGE DES GERÄTS
DEMONTAGE DES GERÄTS
1. Demontieren Sie das Gerät.
2. Nehmen Sie den Außenrahmen ab.
Hinweis zu HDMI:
Verwenden Sie ein HDMI-Kabel von guter Qualität.
Die Gesamtlänge (vorne und hinten) sollte 3,65 m nicht überschreiten.
ANSCHLUSS VON LEITUNGEN
1. Das Car-Sound-System darf nur mit einer Spannung von +12 V DC betrieben werden.
2. Schließen Sie die Batterieklemme nur an, wenn das Car-Sound-System vollständig
montiert ist.
3. Stellen Sie sicher, dass das gelbe Kabel an den Pluspol (+) der Batterie angeschlossen ist.
4. Achten Sie beim Auswechseln der Sicherung darauf, dass die Parameter der neuen
Sicherung identisch sind.
5. Durch die Verwendung von hochwertigen Lautsprechern mit einer Impedanz von 4-8
Ohm kann das Gerät seine volle Leistung erbringen.
ANSCHLUSS VON LEITUNGEN
TASTENLAGE
1. ZONE 1 2. 1 3. ZONE 2
4. 2 5. BT 6. 3 RPT
7. 8. 4 RDM 9.
10. 5 DIR- 11. DIS 12. 6 DIR+
13. LCD 14. AUX-BUCHSE 15. KOPFHÖRERBUCHSE
16. HDMI-BUCHSE 17. RESET 18. DREHKNOPF
19. USB-PORT 20. SRC/MENU
GRUNDLEGENDE BEDIENUNG
Gerät und Stummschaltfunktion ein-/ausschalten
Um das Gerät einzuschalten, drücken Sie den Drehknopf /MUTE. Um die
Stummschaltfunktion ein- oder auszuschalten, drücken Sie kurz auf den Drehknopf,
während das Gerät eingeschaltet ist. Wenn Sie dieser Knopf gedrückt halten, wird das
Gerät ausgeschaltet.
Toneinstellungen und Setup-Menü
Drücken und halten Sie die Taste SRC/MENU gedrückt, um das unten abgebildete Menü
aufzurufen:
BAS->TRE->BAL->EQ (aus/Pop/Rock/Klassik)->LOUD (ein/aus)->CLK HH->CLK
MM->IR (ein/aus) ->CT (indep/sync)->SYG. TON (ein/aus) ->P_VOL (13)->DX (LOC)->STEREO
(MONO)
Drehen Sie an jeder Position den Drehknopf VOL, um sie einzustellen.
INFRAROT (EIN/AUS):
INFRAROT EIN: Das Gerät kann mit der Infrarot-Fernbedienung eingeschaltet werden.
Das System läuft dann mit hohem Stromverbrauch.
INFRAROT AUS: Das Gerät lässt sich nicht mit der Infrarot-Fernbedienung einschalten.
Das System läuft dann mit niedrigen Stromverbrauch.
CT (INDEP/SYNC):
CT INDEP: Die Uhr funktioniert unabhängig.
CT SYNC: Die Uhr wird mit der Zeit des empfangenen RDS-Senders synchronisiert.
Hinweis: Wenn die Uhr im Menü eingestellt wird, wird die CT-Funktion automatisch auf
den INDEP-Modus (unabhängiger Betrieb) eingestellt.
TASTENTON (EIN/AUS): Ermöglicht die Aktivierung/Deaktivierung des Tastentons beim
Drücken der Tasten.
P-VOL: Ermöglicht die Einstellung der Lautstärke beim Einschalten. Wenn die Lautstärke
beim Ausschalten niedriger ist als die P-VOL-Lautstärke, stellt das Gerät die Lautstärke
beim Einschalten auf die Lautstärke beim Ausschalten ein.
Wenn die Lautstärke beim Ausschalten höher als die P-VOL-Lautstärke ist, wird die
Lautstärke beim Einschalten des Geräts auf den P-VOL-Wert zurückgesetzt.
Bluetooth-Lautsprecher suchen
Wenn Sie die Taste BT gedrückt halten, wird „SEARCH...“ angezeigt. Nach kurzer Zeit wird die
Bezeichnung Ihres Bluetooth-Geräts angezeigt. Um das nächste Gerät anzuzeigen, drehen
Sie den Drehknopf VOL. Wenn der Name des gewünschten Bluetooth-Lautsprechers auf
dem LCD-Display angezeigt wird, drücken Sie den Drehknopf VOL, um das Gerät zu
koppeln. Wenn die Kopplung erfolgreich war, wird auf dem Display „BOX ON“ angezeigt.
Wichtiger Hinweis: Trotz zahlreicher Tests mit verschiedenen Bluetooth-Geräten kann
die Kompatibilität mit allen auf dem Markt bendlichen Bluetooth-Geräten nicht
garantiert werden.
Signalübertragung zum Bluetooth-Lautsprecher
Drücken Sie kurz die Taste BT, um die Übertragung/das Signal an den
Bluetooth-Lautsprecher zu beenden. Auf dem Display wird „BOX OFF/ON“ angezeigt.
Hinweis: Obwohl Blaupunkt die Kompatibilität der verschiedenen Bluetooth-Lautsprecher
sorgfältig prüft, kann ein reibungsloser Betrieb nicht mit allen Modellen auf dem Markt
garantiert werden.
Zone 1 und Zone 2 bedienen
Drücken Sie kurz auf die Taste Zone 1 (oder Zone 2), um den Ton von Zone 1 (oder Zone
2) aus-/einzuschalten.
Halten Sie die Taste Zone 1 (oder Zone 2) gedrückt, um den Ton von Zone 1 (oder Zone
2) stummzuschalten. Drücken Sie die Taste erneut, um die Stummschaltung aufzuheben.
Priorität einstellen: Informationen oder Uhrzeit
Drücken Sie kurz die Taste DIS, um die Priorität der Uhrzeit oder der Informationen
einzustellen.
Hinweis: Wenn Sie im UKW-Band RDS-Sender empfangen, drücken Sie kurz die Taste DIS,
um RADIOSENDER/ ZEIT/FREQUENZ anzuzeigen.
Uhrzeit einstellen
Wählen Sie im Menü CLK HH/CLK MM. Drehen Sie den Drehknopf VOL, um die
Stunde/Minute einzustellen.
Kopfhörer bedienen
An der Vorderseite bendet sich eine 3,5-mm-Kopfhörerbuchse. Das System übernimmt
für Kopfhörer die Betriebseinstellungen für Zone 1.
RADIOBEDIENUNG
Radiosender empfangen
Drücken Sie die Taste SRC/MENU, um einen Modus aus FM1->FM2->MW auszuwählen.
Drücken Sie kurz / , um den gewünschten Radiosender zu empfangen. Drücken
und halten Sie / gedrückt, um die Frequenz manuell einzustellen.
Radiosender manuell abspeichern und gespeicherte Radiosender abrufen
Empfangen des gewünschten Radiosenders. Drücken Sie eine der Speichertasten (1-6)
und halten Sie sie 2 Sekunden lang gedrückt. Der aktuelle Radiosender wird im Speicher
unter der entsprechenden Zierntaste abgelegt. Drücken Sie kurz auf die Taste des
voreingestellten Radiosenders (1-6), um direkt das Sendesignal des unter der
zugewiesenen Taste gespeicherten Senders zu hören.
BEDIENDUNG VON DAB
Drücken Sie SRC/MENU, um die Quelle zwischen DAB1 und DAB2 umzuschalten.
Radiosender auswählen
Drücken Sie die Taste / , um den nächsten/vorherigen Radiosender
auszuwählen.
Radiosender manuell abspeichern und gespeicherte Radiosender abrufen
Wenn die Frequenz des gewünschten Radiosenders eingestellt ist. Drücken und halten
Sie eine der Tasten 1 bis 6 2 Sekunden lang gedrückt, um diesen Sender unter der
entsprechenden Nummer zu speichern. Drücken Sie kurz auf die Taste des
voreingestellten Radiosenders (1-6), um direkt das Sendesignal des unter der
zugewiesenen Taste gespeicherten Senders zu hören.
UNTERSTÜTZUNG VON USB-SPEICHERN
Wenn ein USB-Speicher an das Gerät angeschlossen wird, spielt das Gerät automatisch
MP3/WMA-Dateien ab. Wenn bereits ein USB-Speicher an das Gerät angeschlossen ist,
drücken Sie kurz SRC/MENU, bis der USB-Modus-Bildschirm erscheint.
Dateien auswählen
Drücken Sie die Taste / , um zur nächsten/vorherigen Datei zu gelangen. Halten
Sie die Taste / , um vor- oder zurückzuspulen.
Wiedergabe/Pause
Drücken Sie 1 , um die Datei anzuhalten/abzuspielen.
Schleifenwiedergabe
Drücken Sie die Taste 3 RPT, um die Schleifenwiedergabefunktion zu wählen. RPT
ONE/RPT FOLD/RPT ALL (Standard)
RPT ONE: Schleifenwiedergabe einer einzelnen Datei.
RPT FOLD: Schleifenwiedergabe aller Dateien in einem Ordner.
RPT ALL: Schleifenwiedergabe aller Dateien.
RANDOM
Drücken Sie die Taste 4 RDM, um die Zufallswiedergabefunktion ein- oder auszuschalten.
RDM Ein Zufallswiedergabe aller Dateien.
RDM Aus Deaktivieren der Zufallswiedergabefunktion.
Ordnerfunktion +/-
Drücken Sie DIR+/DIR-, um den nächsten/vorherigen Ordner für die Wiedergabe
auszuwählen.
Titel suchen
Durch Drücken und Halten der Taste wird „NUM 0000“ angezeigt. Wählen Sie durch
Drehen des Drehknopfes VOL (oder durch direkte Eingabe der Nummer) die Nummer
aus und drücken Sie dann VOL zur Wiedergabe. Beachten Sie 7/8/9/0 als: BT = 7, = 8,
= 9, DIS = 0.
VERWENDUNG DER BUCHSE AUX IN 1/2
Die Buchse AUX IN 1 an der Vorderseite ist 3,5-mm. Die Buchse AUX IN 2 für RCA bendet
sich auf der Rückseite des Geräts. Durch Drücken der Taste SRC/MENU wird auf den
Modus AUX IN1 (2) umgeschaltet, wenn das Audiosignal an das Gerät angeschlossen ist.
BLUETOOTH-UNTERSTÜTZUNG
Kopplung von Geräten
Wählen Sie auf Ihrem Smartphone Bluetooth und suchen Sie nach Ihrem
Bluetooth-Gerät. In der Liste sollte „BLAUPUNKT“ erscheinen; wählen Sie „BLAUPUNKT“
und geben Sie das Passwort „0000“ ein, wenn Sie zur Eingabe eines Passworts
aufgefordert werden. Nach erfolgreichem Koppeln wird BT auf dem Display angezeigt.
Bluetooth-Audio
Drücken Sie die Taste SRC/MENU, um in den BT MUSIC-Modus zu wechseln. Das Gerät
spielt automatisch den Titel von Ihrem Handy ab. Drücken Sie die Taste , um den
Titel anzuhalten/abzuspielen.
Drücken Sie die Taste / , um den nächsten/vorherigen Titel zu wählen.
HDMI-UNTERSTÜTZUNG
Die vordere HDMI-Buchse wird mit der hinteren HDMI-Buchse verbunden. Dies hat
keinen Einuss auf HDMI-Wiedergabe.
Anschlüsse RCA V-IN und V-OUT
Auf der Rückseite des Geräts ist der V-IN-Anschluss zum V-OUT-Anschluss geführt.
FERNBEDIENUNG
Die Fernbedienung kann verwendet werden,
wenn im Menü die Option IR aktiviert ist.
OFF: Gerät einschalten/ausschalten.
VOL+: Lautstärke erhöhen
VOL-: Lautstärke reduzieren
1 : Stummschaltung Zone 1 einschalten/ausschalten
2 : Stummschaltung Zone 2 einschalten/ausschalten
Für andere Aktionen lesen Sie bitte die obigen Anweisungen.
ALLGEMEINE INFORMATIONEN
Anforderungen an die Stromversorgung : Gleichstrom 12 V, Minuspol mit Masse verbunden
Abmessungen des Montagesockels : 129 (B) x 112 (T) x 65 (H)
Klangeinstellungen
- Tief (bei 100 Hz) : ±10 dB
- Hoch (bei 100 Hz) : ±10 dB
Max. Ausgangsleistung : 4 x 40 W
Stromaufnahme : 10 A (max.)
RADIO FM AM
Frequenzbereich von 87,5 bis 108 MHz von 522 bis 1620 KHz
IF 10,7 MHz 450 KHz
Empndlichkeit 4 µV (S/N = 30 dB) 36 dBµV (S/N = 20 dB)
Trennung der Stereokanäle >25 dB /
PROBLEMBEHEBUNG
DE
Teil A
Teil B
SICHERUNG
Teil A
Teil B
ANTENNE
SYSTEM MIT 4 LAUTSPRECHERN
ZONE 1
ZONE 2
Front-Laut-
sprecher
links
Front-Laut-
sprecher
rechts
Hinterer
Lautspre-
cher links
Hinterer
Lautspre-
cher rechts
(WEISS-SCHWARZ)
(WEISS)
(GRAU-SCHWARZ)
(GRAU)
(GRÜN-SCHWARZ)
(GRÜN)
(VIOLETT-SCHWARZ)
(VIOLETT)
Erdungsleitung (schwarz)
Zubehör/Schalter +12 VA (rot)
Antenneneinspeisung (blau)
DC-Stromversorgung +12 V (gelb)

Sicherheitshinweise
Dieses Car-Sound-System wurde nach dem aktuellen Stand der Technik und den
allgemein anerkannten sicherheitstechnischen Regeln hergestellt. Dennoch
kann die Nichtbeachtung der in dieser Bedienungsanleitung enthaltenen
Sicherheitshinweise zu verschiedenen Risiken führen. Lesen Sie diese Anleitung
sorgfältig durch, bevor Sie das Car-Sound-System benutzen. Bewahren Sie die
Anleitung so auf, dass sie jederzeit für alle Benutzer zugänglich ist. Wenn Sie das
Car-Sound-System an Dritte weitergeben, legen Sie bitte diese Anleitung bei.
Beachten Sie außerdem die Hinweise in den Bedienungsanleitungen der an
dieses Car-Sound-System angeschlossenen Geräte.
Allgemeine Sicherheitshinweise
Beachten Sie die folgenden Hinweise, um sich selbst vor Verletzungen zu schützen:
Das Gerät darf weder verändert noch geönet werden.
Bestimmung
Dieses Car-Sound-System ist für den Einbau und Betrieb in Fahrzeugen mit 12 V
Versorgungsspannung konzipiert. Die Leistungsgrenzen des Geräts müssen
beachtet werden. Lassen Sie eventuelle Reparaturen oder Installationsarbeiten
von einem Fachmann durchführen.
Montageanleitung
Sie dürfen das Gerät nur dann selbst einbauen, wenn Sie Erfahrung im Einbau
eines Car-Sound-Systems und Kenntnisse in der Fahrzeugelektronik haben.
Beachten Sie dazu den Schaltplan in dieser Anleitung. Der Einbau des Geräts
darf die Funktion von Airbags, anderen Sicherheitseinrichtungen oder
Bedienelementen nicht behindern oder blockieren.
Konformitätserklärung
Blaupunkt Competence Center Car Multimedia – Evo Sales GmbH erklärt
hiermit, dass dieses Gerät mit den grundlegenden Forderungen und anderen
relevanten Bestimmungen der Richtlinie 2014/53/EU konform ist. Die
Konformitätserklärung nden Sie unter www.blaupunkt.com.
Hinweise zur Reinigung
Löse-, Reinigungs- und Scheuermittel sowie Cockpitreiniger und
Kunststopegemittel können Inhaltsstoe enthalten, die die Oberäche des
Car-Sound-Systems angreifen können. Verwenden Sie zur Reinigung des
Car-Sound-Systems nur ein trockenes oder leicht feuchtes Tuch.
Hinweise zur Entsorgung
Das Altgerät darf nicht mit dem Hausmüll entsorgt werden!
Entsorgen Sie das Gerät, die Fernbedienung und die verbrauchten
Batterien bei einer Sammelstelle für Altgeräte.
Lieferumfang
Im Lieferumfang sind enthalten:
Car-Sound-System BPA 3022 M,
Fernbedienung,
ISO-Anschlüsse,
Montageschrauben,
Bedienungsanleitung.
WICHTIGE INFORMATIONEN ZUR MONTAGE
1. Lesen Sie die Anleitung sorgfältig durch, bevor Sie das Gerät installieren.
2. Achten Sie darauf, dass alle anderen Kabel angeschlossen sind, bevor Sie die
Stromversorgung anschließen.
3. Um einen Kurzschluss zu vermeiden, stellen Sie sicher, dass alle
freiliegenden Drähte isoliert sind.
4. Sobald die Installation abgeschlossen ist, müssen alle Kabel befestigt
werden.
5. Die Anschlüsse ans Car-Sound-System müssen entsprechend dieser
Anleitung vorgenommen werden. Ein falscher Anschluss kann zu Schäden
am Gerät führen.
6. Das Car-Sound-System ist nur für eine 12-V-DC-Installation ausgelegt.
MONTAGE DES GERÄTS
DEMONTAGE DES GERÄTS
1. Demontieren Sie das Gerät.
2. Nehmen Sie den Außenrahmen ab.
Hinweis zu HDMI:
Verwenden Sie ein HDMI-Kabel von guter Qualität.
Die Gesamtlänge (vorne und hinten) sollte 3,65 m nicht überschreiten.
ANSCHLUSS VON LEITUNGEN
1. Das Car-Sound-System darf nur mit einer Spannung von +12 V DC betrieben werden.
2. Schließen Sie die Batterieklemme nur an, wenn das Car-Sound-System vollständig
montiert ist.
3. Stellen Sie sicher, dass das gelbe Kabel an den Pluspol (+) der Batterie angeschlossen ist.
4. Achten Sie beim Auswechseln der Sicherung darauf, dass die Parameter der neuen
Sicherung identisch sind.
5. Durch die Verwendung von hochwertigen Lautsprechern mit einer Impedanz von 4-8
Ohm kann das Gerät seine volle Leistung erbringen.
BEDIENUNG
TASTENLAGE
1. ZONE 1 2. 1 3. ZONE 2
4. 2 5. BT 6. 3 RPT
7. 8. 4 RDM 9.
10. 5 DIR- 11. DIS 12. 6 DIR+
13. LCD 14. AUX-BUCHSE 15. KOPFHÖRERBUCHSE
16. HDMI-BUCHSE 17. RESET 18. DREHKNOPF
19. USB-PORT 20. SRC/MENU
GRUNDLEGENDE BEDIENUNG
Gerät und Stummschaltfunktion ein-/ausschalten
Um das Gerät einzuschalten, drücken Sie den Drehknopf /MUTE. Um die
Stummschaltfunktion ein- oder auszuschalten, drücken Sie kurz auf den Drehknopf,
während das Gerät eingeschaltet ist. Wenn Sie dieser Knopf gedrückt halten, wird das
Gerät ausgeschaltet.
Toneinstellungen und Setup-Menü
Drücken und halten Sie die Taste SRC/MENU gedrückt, um das unten abgebildete Menü
aufzurufen:
BAS->TRE->BAL->EQ (aus/Pop/Rock/Klassik)->LOUD (ein/aus)->CLK HH->CLK
MM->IR (ein/aus) ->CT (indep/sync)->SYG. TON (ein/aus) ->P_VOL (13)->DX (LOC)->STEREO
(MONO)
Drehen Sie an jeder Position den Drehknopf VOL, um sie einzustellen.
INFRAROT (EIN/AUS):
INFRAROT EIN: Das Gerät kann mit der Infrarot-Fernbedienung eingeschaltet werden.
Das System läuft dann mit hohem Stromverbrauch.
INFRAROT AUS: Das Gerät lässt sich nicht mit der Infrarot-Fernbedienung einschalten.
Das System läuft dann mit niedrigen Stromverbrauch.
CT (INDEP/SYNC):
CT INDEP: Die Uhr funktioniert unabhängig.
CT SYNC: Die Uhr wird mit der Zeit des empfangenen RDS-Senders synchronisiert.
Hinweis: Wenn die Uhr im Menü eingestellt wird, wird die CT-Funktion automatisch auf
den INDEP-Modus (unabhängiger Betrieb) eingestellt.
TASTENTON (EIN/AUS): Ermöglicht die Aktivierung/Deaktivierung des Tastentons beim
Drücken der Tasten.
P-VOL: Ermöglicht die Einstellung der Lautstärke beim Einschalten. Wenn die Lautstärke
beim Ausschalten niedriger ist als die P-VOL-Lautstärke, stellt das Gerät die Lautstärke
beim Einschalten auf die Lautstärke beim Ausschalten ein.
Wenn die Lautstärke beim Ausschalten höher als die P-VOL-Lautstärke ist, wird die
Lautstärke beim Einschalten des Geräts auf den P-VOL-Wert zurückgesetzt.
Bluetooth-Lautsprecher suchen
Wenn Sie die Taste BT gedrückt halten, wird „SEARCH...“ angezeigt. Nach kurzer Zeit wird die
Bezeichnung Ihres Bluetooth-Geräts angezeigt. Um das nächste Gerät anzuzeigen, drehen
Sie den Drehknopf VOL. Wenn der Name des gewünschten Bluetooth-Lautsprechers auf
dem LCD-Display angezeigt wird, drücken Sie den Drehknopf VOL, um das Gerät zu
koppeln. Wenn die Kopplung erfolgreich war, wird auf dem Display „BOX ON“ angezeigt.
Wichtiger Hinweis: Trotz zahlreicher Tests mit verschiedenen Bluetooth-Geräten kann
die Kompatibilität mit allen auf dem Markt bendlichen Bluetooth-Geräten nicht
garantiert werden.
Signalübertragung zum Bluetooth-Lautsprecher
Drücken Sie kurz die Taste BT, um die Übertragung/das Signal an den
Bluetooth-Lautsprecher zu beenden. Auf dem Display wird „BOX OFF/ON“ angezeigt.
Hinweis: Obwohl Blaupunkt die Kompatibilität der verschiedenen Bluetooth-Lautsprecher
sorgfältig prüft, kann ein reibungsloser Betrieb nicht mit allen Modellen auf dem Markt
garantiert werden.
Zone 1 und Zone 2 bedienen
Drücken Sie kurz auf die Taste Zone 1 (oder Zone 2), um den Ton von Zone 1 (oder Zone
2) aus-/einzuschalten.
Halten Sie die Taste Zone 1 (oder Zone 2) gedrückt, um den Ton von Zone 1 (oder Zone
2) stummzuschalten. Drücken Sie die Taste erneut, um die Stummschaltung aufzuheben.
Priorität einstellen: Informationen oder Uhrzeit
Drücken Sie kurz die Taste DIS, um die Priorität der Uhrzeit oder der Informationen
einzustellen.
Hinweis: Wenn Sie im UKW-Band RDS-Sender empfangen, drücken Sie kurz die Taste DIS,
um RADIOSENDER/ ZEIT/FREQUENZ anzuzeigen.
Uhrzeit einstellen
Wählen Sie im Menü CLK HH/CLK MM. Drehen Sie den Drehknopf VOL, um die
Stunde/Minute einzustellen.
Kopfhörer bedienen
An der Vorderseite bendet sich eine 3,5-mm-Kopfhörerbuchse. Das System übernimmt
für Kopfhörer die Betriebseinstellungen für Zone 1.
RADIOBEDIENUNG
Radiosender empfangen
Drücken Sie die Taste SRC/MENU, um einen Modus aus FM1->FM2->MW auszuwählen.
Drücken Sie kurz / , um den gewünschten Radiosender zu empfangen. Drücken
und halten Sie / gedrückt, um die Frequenz manuell einzustellen.
Radiosender manuell abspeichern und gespeicherte Radiosender abrufen
Empfangen des gewünschten Radiosenders. Drücken Sie eine der Speichertasten (1-6)
und halten Sie sie 2 Sekunden lang gedrückt. Der aktuelle Radiosender wird im Speicher
unter der entsprechenden Zierntaste abgelegt. Drücken Sie kurz auf die Taste des
voreingestellten Radiosenders (1-6), um direkt das Sendesignal des unter der
zugewiesenen Taste gespeicherten Senders zu hören.
BEDIENDUNG VON DAB
Drücken Sie SRC/MENU, um die Quelle zwischen DAB1 und DAB2 umzuschalten.
Radiosender auswählen
Drücken Sie die Taste / , um den nächsten/vorherigen Radiosender
auszuwählen.
Radiosender manuell abspeichern und gespeicherte Radiosender abrufen
Wenn die Frequenz des gewünschten Radiosenders eingestellt ist. Drücken und halten
Sie eine der Tasten 1 bis 6 2 Sekunden lang gedrückt, um diesen Sender unter der
entsprechenden Nummer zu speichern. Drücken Sie kurz auf die Taste des
voreingestellten Radiosenders (1-6), um direkt das Sendesignal des unter der
zugewiesenen Taste gespeicherten Senders zu hören.
UNTERSTÜTZUNG VON USB-SPEICHERN
Wenn ein USB-Speicher an das Gerät angeschlossen wird, spielt das Gerät automatisch
MP3/WMA-Dateien ab. Wenn bereits ein USB-Speicher an das Gerät angeschlossen ist,
drücken Sie kurz SRC/MENU, bis der USB-Modus-Bildschirm erscheint.
Dateien auswählen
Drücken Sie die Taste / , um zur nächsten/vorherigen Datei zu gelangen. Halten
Sie die Taste / , um vor- oder zurückzuspulen.
Wiedergabe/Pause
Drücken Sie 1 , um die Datei anzuhalten/abzuspielen.
Schleifenwiedergabe
Drücken Sie die Taste 3 RPT, um die Schleifenwiedergabefunktion zu wählen. RPT
ONE/RPT FOLD/RPT ALL (Standard)
RPT ONE: Schleifenwiedergabe einer einzelnen Datei.
RPT FOLD: Schleifenwiedergabe aller Dateien in einem Ordner.
RPT ALL: Schleifenwiedergabe aller Dateien.
RANDOM
Drücken Sie die Taste 4 RDM, um die Zufallswiedergabefunktion ein- oder auszuschalten.
RDM Ein Zufallswiedergabe aller Dateien.
RDM Aus Deaktivieren der Zufallswiedergabefunktion.
Ordnerfunktion +/-
Drücken Sie DIR+/DIR-, um den nächsten/vorherigen Ordner für die Wiedergabe
auszuwählen.
Titel suchen
Durch Drücken und Halten der Taste wird „NUM 0000“ angezeigt. Wählen Sie durch
Drehen des Drehknopfes VOL (oder durch direkte Eingabe der Nummer) die Nummer
aus und drücken Sie dann VOL zur Wiedergabe. Beachten Sie 7/8/9/0 als: BT = 7, = 8,
= 9, DIS = 0.
VERWENDUNG DER BUCHSE AUX IN 1/2
Die Buchse AUX IN 1 an der Vorderseite ist 3,5-mm. Die Buchse AUX IN 2 für RCA bendet
sich auf der Rückseite des Geräts. Durch Drücken der Taste SRC/MENU wird auf den
Modus AUX IN1 (2) umgeschaltet, wenn das Audiosignal an das Gerät angeschlossen ist.
BLUETOOTH-UNTERSTÜTZUNG
Kopplung von Geräten
Wählen Sie auf Ihrem Smartphone Bluetooth und suchen Sie nach Ihrem
Bluetooth-Gerät. In der Liste sollte „BLAUPUNKT“ erscheinen; wählen Sie „BLAUPUNKT“
und geben Sie das Passwort „0000“ ein, wenn Sie zur Eingabe eines Passworts
aufgefordert werden. Nach erfolgreichem Koppeln wird BT auf dem Display angezeigt.
Bluetooth-Audio
Drücken Sie die Taste SRC/MENU, um in den BT MUSIC-Modus zu wechseln. Das Gerät
spielt automatisch den Titel von Ihrem Handy ab. Drücken Sie die Taste , um den
Titel anzuhalten/abzuspielen.
Drücken Sie die Taste / , um den nächsten/vorherigen Titel zu wählen.
HDMI-UNTERSTÜTZUNG
Die vordere HDMI-Buchse wird mit der hinteren HDMI-Buchse verbunden. Dies hat
keinen Einuss auf HDMI-Wiedergabe.
Anschlüsse RCA V-IN und V-OUT
Auf der Rückseite des Geräts ist der V-IN-Anschluss zum V-OUT-Anschluss geführt.
FERNBEDIENUNG
Die Fernbedienung kann verwendet werden,
wenn im Menü die Option IR aktiviert ist.
OFF: Gerät einschalten/ausschalten.
VOL+: Lautstärke erhöhen
VOL-: Lautstärke reduzieren
1 : Stummschaltung Zone 1 einschalten/ausschalten
2 : Stummschaltung Zone 2 einschalten/ausschalten
Für andere Aktionen lesen Sie bitte die obigen Anweisungen.
ALLGEMEINE INFORMATIONEN
Anforderungen an die Stromversorgung : Gleichstrom 12 V, Minuspol mit Masse verbunden
Abmessungen des Montagesockels : 129 (B) x 112 (T) x 65 (H)
Klangeinstellungen
- Tief (bei 100 Hz) : ±10 dB
- Hoch (bei 100 Hz) : ±10 dB
Max. Ausgangsleistung : 4 x 40 W
Stromaufnahme : 10 A (max.)
RADIO FM AM
Frequenzbereich von 87,5 bis 108 MHz von 522 bis 1620 KHz
IF 10,7 MHz 450 KHz
Empndlichkeit 4 µV (S/N = 30 dB) 36 dBµV (S/N = 20 dB)
Trennung der Stereokanäle >25 dB /
PROBLEMBEHEBUNG
DE

Sicherheitshinweise
Dieses Car-Sound-System wurde nach dem aktuellen Stand der Technik und den
allgemein anerkannten sicherheitstechnischen Regeln hergestellt. Dennoch
kann die Nichtbeachtung der in dieser Bedienungsanleitung enthaltenen
Sicherheitshinweise zu verschiedenen Risiken führen. Lesen Sie diese Anleitung
sorgfältig durch, bevor Sie das Car-Sound-System benutzen. Bewahren Sie die
Anleitung so auf, dass sie jederzeit für alle Benutzer zugänglich ist. Wenn Sie das
Car-Sound-System an Dritte weitergeben, legen Sie bitte diese Anleitung bei.
Beachten Sie außerdem die Hinweise in den Bedienungsanleitungen der an
dieses Car-Sound-System angeschlossenen Geräte.
Allgemeine Sicherheitshinweise
Beachten Sie die folgenden Hinweise, um sich selbst vor Verletzungen zu schützen:
Das Gerät darf weder verändert noch geönet werden.
Bestimmung
Dieses Car-Sound-System ist für den Einbau und Betrieb in Fahrzeugen mit 12 V
Versorgungsspannung konzipiert. Die Leistungsgrenzen des Geräts müssen
beachtet werden. Lassen Sie eventuelle Reparaturen oder Installationsarbeiten
von einem Fachmann durchführen.
Montageanleitung
Sie dürfen das Gerät nur dann selbst einbauen, wenn Sie Erfahrung im Einbau
eines Car-Sound-Systems und Kenntnisse in der Fahrzeugelektronik haben.
Beachten Sie dazu den Schaltplan in dieser Anleitung. Der Einbau des Geräts
darf die Funktion von Airbags, anderen Sicherheitseinrichtungen oder
Bedienelementen nicht behindern oder blockieren.
Konformitätserklärung
Blaupunkt Competence Center Car Multimedia – Evo Sales GmbH erklärt
hiermit, dass dieses Gerät mit den grundlegenden Forderungen und anderen
relevanten Bestimmungen der Richtlinie 2014/53/EU konform ist. Die
Konformitätserklärung nden Sie unter www.blaupunkt.com.
Hinweise zur Reinigung
Löse-, Reinigungs- und Scheuermittel sowie Cockpitreiniger und
Kunststopegemittel können Inhaltsstoe enthalten, die die Oberäche des
Car-Sound-Systems angreifen können. Verwenden Sie zur Reinigung des
Car-Sound-Systems nur ein trockenes oder leicht feuchtes Tuch.
Hinweise zur Entsorgung
Das Altgerät darf nicht mit dem Hausmüll entsorgt werden!
Entsorgen Sie das Gerät, die Fernbedienung und die verbrauchten
Batterien bei einer Sammelstelle für Altgeräte.
Lieferumfang
Im Lieferumfang sind enthalten:
Car-Sound-System BPA 3022 M,
Fernbedienung,
ISO-Anschlüsse,
Montageschrauben,
Bedienungsanleitung.
WICHTIGE INFORMATIONEN ZUR MONTAGE
1. Lesen Sie die Anleitung sorgfältig durch, bevor Sie das Gerät installieren.
2. Achten Sie darauf, dass alle anderen Kabel angeschlossen sind, bevor Sie die
Stromversorgung anschließen.
3. Um einen Kurzschluss zu vermeiden, stellen Sie sicher, dass alle
freiliegenden Drähte isoliert sind.
4. Sobald die Installation abgeschlossen ist, müssen alle Kabel befestigt
werden.
5. Die Anschlüsse ans Car-Sound-System müssen entsprechend dieser
Anleitung vorgenommen werden. Ein falscher Anschluss kann zu Schäden
am Gerät führen.
6. Das Car-Sound-System ist nur für eine 12-V-DC-Installation ausgelegt.
MONTAGE DES GERÄTS
DEMONTAGE DES GERÄTS
1. Demontieren Sie das Gerät.
2. Nehmen Sie den Außenrahmen ab.
Hinweis zu HDMI:
Verwenden Sie ein HDMI-Kabel von guter Qualität.
Die Gesamtlänge (vorne und hinten) sollte 3,65 m nicht überschreiten.
ANSCHLUSS VON LEITUNGEN
1. Das Car-Sound-System darf nur mit einer Spannung von +12 V DC betrieben werden.
2. Schließen Sie die Batterieklemme nur an, wenn das Car-Sound-System vollständig
montiert ist.
3. Stellen Sie sicher, dass das gelbe Kabel an den Pluspol (+) der Batterie angeschlossen ist.
4. Achten Sie beim Auswechseln der Sicherung darauf, dass die Parameter der neuen
Sicherung identisch sind.
5. Durch die Verwendung von hochwertigen Lautsprechern mit einer Impedanz von 4-8
Ohm kann das Gerät seine volle Leistung erbringen.
TASTENLAGE
1. ZONE 1 2. 1 3. ZONE 2
4. 2 5. BT 6. 3 RPT
7. 8. 4 RDM 9.
10. 5 DIR- 11. DIS 12. 6 DIR+
13. LCD 14. AUX-BUCHSE 15. KOPFHÖRERBUCHSE
16. HDMI-BUCHSE 17. RESET 18. DREHKNOPF
19. USB-PORT 20. SRC/MENU
BEDIENUNG
GRUNDLEGENDE BEDIENUNG
Gerät und Stummschaltfunktion ein-/ausschalten
Um das Gerät einzuschalten, drücken Sie den Drehknopf /MUTE. Um die
Stummschaltfunktion ein- oder auszuschalten, drücken Sie kurz auf den Drehknopf,
während das Gerät eingeschaltet ist. Wenn Sie dieser Knopf gedrückt halten, wird das
Gerät ausgeschaltet.
Toneinstellungen und Setup-Menü
Drücken und halten Sie die Taste SRC/MENU gedrückt, um das unten abgebildete Menü
aufzurufen:
BAS->TRE->BAL->EQ (aus/Pop/Rock/Klassik)->LOUD (ein/aus)->CLK HH->CLK
MM->IR (ein/aus) ->CT (indep/sync)->SYG. TON (ein/aus) ->P_VOL (13)->DX (LOC)->STEREO
(MONO)
Drehen Sie an jeder Position den Drehknopf VOL, um sie einzustellen.
INFRAROT (EIN/AUS):
INFRAROT EIN: Das Gerät kann mit der Infrarot-Fernbedienung eingeschaltet werden.
Das System läuft dann mit hohem Stromverbrauch.
INFRAROT AUS: Das Gerät lässt sich nicht mit der Infrarot-Fernbedienung einschalten.
Das System läuft dann mit niedrigen Stromverbrauch.
CT (INDEP/SYNC):
CT INDEP: Die Uhr funktioniert unabhängig.
CT SYNC: Die Uhr wird mit der Zeit des empfangenen RDS-Senders synchronisiert.
Hinweis: Wenn die Uhr im Menü eingestellt wird, wird die CT-Funktion automatisch auf
den INDEP-Modus (unabhängiger Betrieb) eingestellt.
TASTENTON (EIN/AUS): Ermöglicht die Aktivierung/Deaktivierung des Tastentons beim
Drücken der Tasten.
P-VOL: Ermöglicht die Einstellung der Lautstärke beim Einschalten. Wenn die Lautstärke
beim Ausschalten niedriger ist als die P-VOL-Lautstärke, stellt das Gerät die Lautstärke
beim Einschalten auf die Lautstärke beim Ausschalten ein.
Wenn die Lautstärke beim Ausschalten höher als die P-VOL-Lautstärke ist, wird die
Lautstärke beim Einschalten des Geräts auf den P-VOL-Wert zurückgesetzt.
Bluetooth-Lautsprecher suchen
Wenn Sie die Taste BT gedrückt halten, wird „SEARCH...“ angezeigt. Nach kurzer Zeit wird die
Bezeichnung Ihres Bluetooth-Geräts angezeigt. Um das nächste Gerät anzuzeigen, drehen
Sie den Drehknopf VOL. Wenn der Name des gewünschten Bluetooth-Lautsprechers auf
dem LCD-Display angezeigt wird, drücken Sie den Drehknopf VOL, um das Gerät zu
koppeln. Wenn die Kopplung erfolgreich war, wird auf dem Display „BOX ON“ angezeigt.
Wichtiger Hinweis: Trotz zahlreicher Tests mit verschiedenen Bluetooth-Geräten kann
die Kompatibilität mit allen auf dem Markt bendlichen Bluetooth-Geräten nicht
garantiert werden.
Signalübertragung zum Bluetooth-Lautsprecher
Drücken Sie kurz die Taste BT, um die Übertragung/das Signal an den
Bluetooth-Lautsprecher zu beenden. Auf dem Display wird „BOX OFF/ON“ angezeigt.
Hinweis: Obwohl Blaupunkt die Kompatibilität der verschiedenen Bluetooth-Lautsprecher
sorgfältig prüft, kann ein reibungsloser Betrieb nicht mit allen Modellen auf dem Markt
garantiert werden.
Zone 1 und Zone 2 bedienen
Drücken Sie kurz auf die Taste Zone 1 (oder Zone 2), um den Ton von Zone 1 (oder Zone
2) aus-/einzuschalten.
Halten Sie die Taste Zone 1 (oder Zone 2) gedrückt, um den Ton von Zone 1 (oder Zone
2) stummzuschalten. Drücken Sie die Taste erneut, um die Stummschaltung aufzuheben.
Priorität einstellen: Informationen oder Uhrzeit
Drücken Sie kurz die Taste DIS, um die Priorität der Uhrzeit oder der Informationen
einzustellen.
Hinweis: Wenn Sie im UKW-Band RDS-Sender empfangen, drücken Sie kurz die Taste DIS,
um RADIOSENDER/ ZEIT/FREQUENZ anzuzeigen.
Uhrzeit einstellen
Wählen Sie im Menü CLK HH/CLK MM. Drehen Sie den Drehknopf VOL, um die
Stunde/Minute einzustellen.
Kopfhörer bedienen
An der Vorderseite bendet sich eine 3,5-mm-Kopfhörerbuchse. Das System übernimmt
für Kopfhörer die Betriebseinstellungen für Zone 1.
RADIOBEDIENUNG
Radiosender empfangen
Drücken Sie die Taste SRC/MENU, um einen Modus aus FM1->FM2->MW auszuwählen.
Drücken Sie kurz / , um den gewünschten Radiosender zu empfangen. Drücken
und halten Sie / gedrückt, um die Frequenz manuell einzustellen.
Radiosender manuell abspeichern und gespeicherte Radiosender abrufen
Empfangen des gewünschten Radiosenders. Drücken Sie eine der Speichertasten (1-6)
und halten Sie sie 2 Sekunden lang gedrückt. Der aktuelle Radiosender wird im Speicher
unter der entsprechenden Zierntaste abgelegt. Drücken Sie kurz auf die Taste des
voreingestellten Radiosenders (1-6), um direkt das Sendesignal des unter der
zugewiesenen Taste gespeicherten Senders zu hören.
BEDIENDUNG VON DAB
Drücken Sie SRC/MENU, um die Quelle zwischen DAB1 und DAB2 umzuschalten.
Radiosender auswählen
Drücken Sie die Taste / , um den nächsten/vorherigen Radiosender
auszuwählen.
Radiosender manuell abspeichern und gespeicherte Radiosender abrufen
Wenn die Frequenz des gewünschten Radiosenders eingestellt ist. Drücken und halten
Sie eine der Tasten 1 bis 6 2 Sekunden lang gedrückt, um diesen Sender unter der
entsprechenden Nummer zu speichern. Drücken Sie kurz auf die Taste des
voreingestellten Radiosenders (1-6), um direkt das Sendesignal des unter der
zugewiesenen Taste gespeicherten Senders zu hören.
UNTERSTÜTZUNG VON USB-SPEICHERN
Wenn ein USB-Speicher an das Gerät angeschlossen wird, spielt das Gerät automatisch
MP3/WMA-Dateien ab. Wenn bereits ein USB-Speicher an das Gerät angeschlossen ist,
drücken Sie kurz SRC/MENU, bis der USB-Modus-Bildschirm erscheint.
Dateien auswählen
Drücken Sie die Taste / , um zur nächsten/vorherigen Datei zu gelangen. Halten
Sie die Taste / , um vor- oder zurückzuspulen.
Wiedergabe/Pause
Drücken Sie 1 , um die Datei anzuhalten/abzuspielen.
Schleifenwiedergabe
Drücken Sie die Taste 3 RPT, um die Schleifenwiedergabefunktion zu wählen. RPT
ONE/RPT FOLD/RPT ALL (Standard)
RPT ONE: Schleifenwiedergabe einer einzelnen Datei.
RPT FOLD: Schleifenwiedergabe aller Dateien in einem Ordner.
RPT ALL: Schleifenwiedergabe aller Dateien.
RANDOM
Drücken Sie die Taste 4 RDM, um die Zufallswiedergabefunktion ein- oder auszuschalten.
RDM Ein Zufallswiedergabe aller Dateien.
RDM Aus Deaktivieren der Zufallswiedergabefunktion.
Ordnerfunktion +/-
Drücken Sie DIR+/DIR-, um den nächsten/vorherigen Ordner für die Wiedergabe
auszuwählen.
Titel suchen
Durch Drücken und Halten der Taste wird „NUM 0000“ angezeigt. Wählen Sie durch
Drehen des Drehknopfes VOL (oder durch direkte Eingabe der Nummer) die Nummer
aus und drücken Sie dann VOL zur Wiedergabe. Beachten Sie 7/8/9/0 als: BT = 7, = 8,
= 9, DIS = 0.
VERWENDUNG DER BUCHSE AUX IN 1/2
Die Buchse AUX IN 1 an der Vorderseite ist 3,5-mm. Die Buchse AUX IN 2 für RCA bendet
sich auf der Rückseite des Geräts. Durch Drücken der Taste SRC/MENU wird auf den
Modus AUX IN1 (2) umgeschaltet, wenn das Audiosignal an das Gerät angeschlossen ist.
BLUETOOTH-UNTERSTÜTZUNG
Kopplung von Geräten
Wählen Sie auf Ihrem Smartphone Bluetooth und suchen Sie nach Ihrem
Bluetooth-Gerät. In der Liste sollte „BLAUPUNKT“ erscheinen; wählen Sie „BLAUPUNKT“
und geben Sie das Passwort „0000“ ein, wenn Sie zur Eingabe eines Passworts
aufgefordert werden. Nach erfolgreichem Koppeln wird BT auf dem Display angezeigt.
Bluetooth-Audio
Drücken Sie die Taste SRC/MENU, um in den BT MUSIC-Modus zu wechseln. Das Gerät
spielt automatisch den Titel von Ihrem Handy ab. Drücken Sie die Taste , um den
Titel anzuhalten/abzuspielen.
Drücken Sie die Taste / , um den nächsten/vorherigen Titel zu wählen.
HDMI-UNTERSTÜTZUNG
Die vordere HDMI-Buchse wird mit der hinteren HDMI-Buchse verbunden. Dies hat
keinen Einuss auf HDMI-Wiedergabe.
Anschlüsse RCA V-IN und V-OUT
Auf der Rückseite des Geräts ist der V-IN-Anschluss zum V-OUT-Anschluss geführt.
FERNBEDIENUNG
Die Fernbedienung kann verwendet werden,
wenn im Menü die Option IR aktiviert ist.
OFF: Gerät einschalten/ausschalten.
VOL+: Lautstärke erhöhen
VOL-: Lautstärke reduzieren
1 : Stummschaltung Zone 1 einschalten/ausschalten
2 : Stummschaltung Zone 2 einschalten/ausschalten
Für andere Aktionen lesen Sie bitte die obigen Anweisungen.
ALLGEMEINE INFORMATIONEN
Anforderungen an die Stromversorgung : Gleichstrom 12 V, Minuspol mit Masse verbunden
Abmessungen des Montagesockels : 129 (B) x 112 (T) x 65 (H)
Klangeinstellungen
- Tief (bei 100 Hz) : ±10 dB
- Hoch (bei 100 Hz) : ±10 dB
Max. Ausgangsleistung : 4 x 40 W
Stromaufnahme : 10 A (max.)
RADIO FM AM
Frequenzbereich von 87,5 bis 108 MHz von 522 bis 1620 KHz
IF 10,7 MHz 450 KHz
Empndlichkeit 4 µV (S/N = 30 dB) 36 dBµV (S/N = 20 dB)
Trennung der Stereokanäle >25 dB /
PROBLEMBEHEBUNG
DE

Sicherheitshinweise
Dieses Car-Sound-System wurde nach dem aktuellen Stand der Technik und den
allgemein anerkannten sicherheitstechnischen Regeln hergestellt. Dennoch
kann die Nichtbeachtung der in dieser Bedienungsanleitung enthaltenen
Sicherheitshinweise zu verschiedenen Risiken führen. Lesen Sie diese Anleitung
sorgfältig durch, bevor Sie das Car-Sound-System benutzen. Bewahren Sie die
Anleitung so auf, dass sie jederzeit für alle Benutzer zugänglich ist. Wenn Sie das
Car-Sound-System an Dritte weitergeben, legen Sie bitte diese Anleitung bei.
Beachten Sie außerdem die Hinweise in den Bedienungsanleitungen der an
dieses Car-Sound-System angeschlossenen Geräte.
Allgemeine Sicherheitshinweise
Beachten Sie die folgenden Hinweise, um sich selbst vor Verletzungen zu schützen:
Das Gerät darf weder verändert noch geönet werden.
Bestimmung
Dieses Car-Sound-System ist für den Einbau und Betrieb in Fahrzeugen mit 12 V
Versorgungsspannung konzipiert. Die Leistungsgrenzen des Geräts müssen
beachtet werden. Lassen Sie eventuelle Reparaturen oder Installationsarbeiten
von einem Fachmann durchführen.
Montageanleitung
Sie dürfen das Gerät nur dann selbst einbauen, wenn Sie Erfahrung im Einbau
eines Car-Sound-Systems und Kenntnisse in der Fahrzeugelektronik haben.
Beachten Sie dazu den Schaltplan in dieser Anleitung. Der Einbau des Geräts
darf die Funktion von Airbags, anderen Sicherheitseinrichtungen oder
Bedienelementen nicht behindern oder blockieren.
Konformitätserklärung
Blaupunkt Competence Center Car Multimedia – Evo Sales GmbH erklärt
hiermit, dass dieses Gerät mit den grundlegenden Forderungen und anderen
relevanten Bestimmungen der Richtlinie 2014/53/EU konform ist. Die
Konformitätserklärung nden Sie unter www.blaupunkt.com.
Hinweise zur Reinigung
Löse-, Reinigungs- und Scheuermittel sowie Cockpitreiniger und
Kunststopegemittel können Inhaltsstoe enthalten, die die Oberäche des
Car-Sound-Systems angreifen können. Verwenden Sie zur Reinigung des
Car-Sound-Systems nur ein trockenes oder leicht feuchtes Tuch.
Hinweise zur Entsorgung
Das Altgerät darf nicht mit dem Hausmüll entsorgt werden!
Entsorgen Sie das Gerät, die Fernbedienung und die verbrauchten
Batterien bei einer Sammelstelle für Altgeräte.
Lieferumfang
Im Lieferumfang sind enthalten:
Car-Sound-System BPA 3022 M,
Fernbedienung,
ISO-Anschlüsse,
Montageschrauben,
Bedienungsanleitung.
WICHTIGE INFORMATIONEN ZUR MONTAGE
1. Lesen Sie die Anleitung sorgfältig durch, bevor Sie das Gerät installieren.
2. Achten Sie darauf, dass alle anderen Kabel angeschlossen sind, bevor Sie die
Stromversorgung anschließen.
3. Um einen Kurzschluss zu vermeiden, stellen Sie sicher, dass alle
freiliegenden Drähte isoliert sind.
4. Sobald die Installation abgeschlossen ist, müssen alle Kabel befestigt
werden.
5. Die Anschlüsse ans Car-Sound-System müssen entsprechend dieser
Anleitung vorgenommen werden. Ein falscher Anschluss kann zu Schäden
am Gerät führen.
6. Das Car-Sound-System ist nur für eine 12-V-DC-Installation ausgelegt.
MONTAGE DES GERÄTS
DEMONTAGE DES GERÄTS
1. Demontieren Sie das Gerät.
2. Nehmen Sie den Außenrahmen ab.
Hinweis zu HDMI:
Verwenden Sie ein HDMI-Kabel von guter Qualität.
Die Gesamtlänge (vorne und hinten) sollte 3,65 m nicht überschreiten.
ANSCHLUSS VON LEITUNGEN
1. Das Car-Sound-System darf nur mit einer Spannung von +12 V DC betrieben werden.
2. Schließen Sie die Batterieklemme nur an, wenn das Car-Sound-System vollständig
montiert ist.
3. Stellen Sie sicher, dass das gelbe Kabel an den Pluspol (+) der Batterie angeschlossen ist.
4. Achten Sie beim Auswechseln der Sicherung darauf, dass die Parameter der neuen
Sicherung identisch sind.
5. Durch die Verwendung von hochwertigen Lautsprechern mit einer Impedanz von 4-8
Ohm kann das Gerät seine volle Leistung erbringen.
TASTENLAGE
1. ZONE 1 2. 1 3. ZONE 2
4. 2 5. BT 6. 3 RPT
7. 8. 4 RDM 9.
10. 5 DIR- 11. DIS 12. 6 DIR+
13. LCD 14. AUX-BUCHSE 15. KOPFHÖRERBUCHSE
16. HDMI-BUCHSE 17. RESET 18. DREHKNOPF
19. USB-PORT 20. SRC/MENU
GRUNDLEGENDE BEDIENUNG
Gerät und Stummschaltfunktion ein-/ausschalten
Um das Gerät einzuschalten, drücken Sie den Drehknopf /MUTE. Um die
Stummschaltfunktion ein- oder auszuschalten, drücken Sie kurz auf den Drehknopf,
während das Gerät eingeschaltet ist. Wenn Sie dieser Knopf gedrückt halten, wird das
Gerät ausgeschaltet.
Toneinstellungen und Setup-Menü
Drücken und halten Sie die Taste SRC/MENU gedrückt, um das unten abgebildete Menü
aufzurufen:
BAS->TRE->BAL->EQ (aus/Pop/Rock/Klassik)->LOUD (ein/aus)->CLK HH->CLK
MM->IR (ein/aus) ->CT (indep/sync)->SYG. TON (ein/aus) ->P_VOL (13)->DX (LOC)->STEREO
(MONO)
Drehen Sie an jeder Position den Drehknopf VOL, um sie einzustellen.
INFRAROT (EIN/AUS):
INFRAROT EIN: Das Gerät kann mit der Infrarot-Fernbedienung eingeschaltet werden.
Das System läuft dann mit hohem Stromverbrauch.
INFRAROT AUS: Das Gerät lässt sich nicht mit der Infrarot-Fernbedienung einschalten.
Das System läuft dann mit niedrigen Stromverbrauch.
CT (INDEP/SYNC):
CT INDEP: Die Uhr funktioniert unabhängig.
CT SYNC: Die Uhr wird mit der Zeit des empfangenen RDS-Senders synchronisiert.
Hinweis: Wenn die Uhr im Menü eingestellt wird, wird die CT-Funktion automatisch auf
den INDEP-Modus (unabhängiger Betrieb) eingestellt.
TASTENTON (EIN/AUS): Ermöglicht die Aktivierung/Deaktivierung des Tastentons beim
Drücken der Tasten.
P-VOL: Ermöglicht die Einstellung der Lautstärke beim Einschalten. Wenn die Lautstärke
beim Ausschalten niedriger ist als die P-VOL-Lautstärke, stellt das Gerät die Lautstärke
beim Einschalten auf die Lautstärke beim Ausschalten ein.
Wenn die Lautstärke beim Ausschalten höher als die P-VOL-Lautstärke ist, wird die
Lautstärke beim Einschalten des Geräts auf den P-VOL-Wert zurückgesetzt.
Bluetooth-Lautsprecher suchen
Wenn Sie die Taste BT gedrückt halten, wird „SEARCH...“ angezeigt. Nach kurzer Zeit wird die
Bezeichnung Ihres Bluetooth-Geräts angezeigt. Um das nächste Gerät anzuzeigen, drehen
Sie den Drehknopf VOL. Wenn der Name des gewünschten Bluetooth-Lautsprechers auf
dem LCD-Display angezeigt wird, drücken Sie den Drehknopf VOL, um das Gerät zu
koppeln. Wenn die Kopplung erfolgreich war, wird auf dem Display „BOX ON“ angezeigt.
Wichtiger Hinweis: Trotz zahlreicher Tests mit verschiedenen Bluetooth-Geräten kann
die Kompatibilität mit allen auf dem Markt bendlichen Bluetooth-Geräten nicht
garantiert werden.
Signalübertragung zum Bluetooth-Lautsprecher
Drücken Sie kurz die Taste BT, um die Übertragung/das Signal an den
Bluetooth-Lautsprecher zu beenden. Auf dem Display wird „BOX OFF/ON“ angezeigt.
Hinweis: Obwohl Blaupunkt die Kompatibilität der verschiedenen Bluetooth-Lautsprecher
sorgfältig prüft, kann ein reibungsloser Betrieb nicht mit allen Modellen auf dem Markt
garantiert werden.
Zone 1 und Zone 2 bedienen
Drücken Sie kurz auf die Taste Zone 1 (oder Zone 2), um den Ton von Zone 1 (oder Zone
2) aus-/einzuschalten.
Halten Sie die Taste Zone 1 (oder Zone 2) gedrückt, um den Ton von Zone 1 (oder Zone
2) stummzuschalten. Drücken Sie die Taste erneut, um die Stummschaltung aufzuheben.
Priorität einstellen: Informationen oder Uhrzeit
Drücken Sie kurz die Taste DIS, um die Priorität der Uhrzeit oder der Informationen
einzustellen.
Hinweis: Wenn Sie im UKW-Band RDS-Sender empfangen, drücken Sie kurz die Taste DIS,
um RADIOSENDER/ ZEIT/FREQUENZ anzuzeigen.
Uhrzeit einstellen
Wählen Sie im Menü CLK HH/CLK MM. Drehen Sie den Drehknopf VOL, um die
Stunde/Minute einzustellen.
Kopfhörer bedienen
An der Vorderseite bendet sich eine 3,5-mm-Kopfhörerbuchse. Das System übernimmt
für Kopfhörer die Betriebseinstellungen für Zone 1.
RADIOBEDIENUNG
Radiosender empfangen
Drücken Sie die Taste SRC/MENU, um einen Modus aus FM1->FM2->MW auszuwählen.
Drücken Sie kurz / , um den gewünschten Radiosender zu empfangen. Drücken
und halten Sie / gedrückt, um die Frequenz manuell einzustellen.
Radiosender manuell abspeichern und gespeicherte Radiosender abrufen
Empfangen des gewünschten Radiosenders. Drücken Sie eine der Speichertasten (1-6)
und halten Sie sie 2 Sekunden lang gedrückt. Der aktuelle Radiosender wird im Speicher
unter der entsprechenden Zierntaste abgelegt. Drücken Sie kurz auf die Taste des
voreingestellten Radiosenders (1-6), um direkt das Sendesignal des unter der
zugewiesenen Taste gespeicherten Senders zu hören.
BEDIENDUNG VON DAB
Drücken Sie SRC/MENU, um die Quelle zwischen DAB1 und DAB2 umzuschalten.
Radiosender auswählen
Drücken Sie die Taste / , um den nächsten/vorherigen Radiosender
auszuwählen.
BEDIENUNG
Radiosender manuell abspeichern und gespeicherte Radiosender abrufen
Wenn die Frequenz des gewünschten Radiosenders eingestellt ist. Drücken und halten
Sie eine der Tasten 1 bis 6 2 Sekunden lang gedrückt, um diesen Sender unter der
entsprechenden Nummer zu speichern. Drücken Sie kurz auf die Taste des
voreingestellten Radiosenders (1-6), um direkt das Sendesignal des unter der
zugewiesenen Taste gespeicherten Senders zu hören.
UNTERSTÜTZUNG VON USB-SPEICHERN
Wenn ein USB-Speicher an das Gerät angeschlossen wird, spielt das Gerät automatisch
MP3/WMA-Dateien ab. Wenn bereits ein USB-Speicher an das Gerät angeschlossen ist,
drücken Sie kurz SRC/MENU, bis der USB-Modus-Bildschirm erscheint.
Dateien auswählen
Drücken Sie die Taste / , um zur nächsten/vorherigen Datei zu gelangen. Halten
Sie die Taste / , um vor- oder zurückzuspulen.
Wiedergabe/Pause
Drücken Sie 1 , um die Datei anzuhalten/abzuspielen.
Schleifenwiedergabe
Drücken Sie die Taste 3 RPT, um die Schleifenwiedergabefunktion zu wählen. RPT
ONE/RPT FOLD/RPT ALL (Standard)
RPT ONE: Schleifenwiedergabe einer einzelnen Datei.
RPT FOLD: Schleifenwiedergabe aller Dateien in einem Ordner.
RPT ALL: Schleifenwiedergabe aller Dateien.
RANDOM
Drücken Sie die Taste 4 RDM, um die Zufallswiedergabefunktion ein- oder auszuschalten.
RDM Ein Zufallswiedergabe aller Dateien.
RDM Aus Deaktivieren der Zufallswiedergabefunktion.
Ordnerfunktion +/-
Drücken Sie DIR+/DIR-, um den nächsten/vorherigen Ordner für die Wiedergabe
auszuwählen.
Titel suchen
Durch Drücken und Halten der Taste wird „NUM 0000“ angezeigt. Wählen Sie durch
Drehen des Drehknopfes VOL (oder durch direkte Eingabe der Nummer) die Nummer
aus und drücken Sie dann VOL zur Wiedergabe. Beachten Sie 7/8/9/0 als: BT = 7, = 8,
= 9, DIS = 0.
VERWENDUNG DER BUCHSE AUX IN 1/2
Die Buchse AUX IN 1 an der Vorderseite ist 3,5-mm. Die Buchse AUX IN 2 für RCA bendet
sich auf der Rückseite des Geräts. Durch Drücken der Taste SRC/MENU wird auf den
Modus AUX IN1 (2) umgeschaltet, wenn das Audiosignal an das Gerät angeschlossen ist.
BLUETOOTH-UNTERSTÜTZUNG
Kopplung von Geräten
Wählen Sie auf Ihrem Smartphone Bluetooth und suchen Sie nach Ihrem
Bluetooth-Gerät. In der Liste sollte „BLAUPUNKT“ erscheinen; wählen Sie „BLAUPUNKT“
und geben Sie das Passwort „0000“ ein, wenn Sie zur Eingabe eines Passworts
aufgefordert werden. Nach erfolgreichem Koppeln wird BT auf dem Display angezeigt.
Bluetooth-Audio
Drücken Sie die Taste SRC/MENU, um in den BT MUSIC-Modus zu wechseln. Das Gerät
spielt automatisch den Titel von Ihrem Handy ab. Drücken Sie die Taste , um den
Titel anzuhalten/abzuspielen.
Drücken Sie die Taste / , um den nächsten/vorherigen Titel zu wählen.
HDMI-UNTERSTÜTZUNG
Die vordere HDMI-Buchse wird mit der hinteren HDMI-Buchse verbunden. Dies hat
keinen Einuss auf HDMI-Wiedergabe.
Anschlüsse RCA V-IN und V-OUT
Auf der Rückseite des Geräts ist der V-IN-Anschluss zum V-OUT-Anschluss geführt.
FERNBEDIENUNG
Die Fernbedienung kann verwendet werden,
wenn im Menü die Option IR aktiviert ist.
OFF: Gerät einschalten/ausschalten.
VOL+: Lautstärke erhöhen
VOL-: Lautstärke reduzieren
1 : Stummschaltung Zone 1 einschalten/ausschalten
2 : Stummschaltung Zone 2 einschalten/ausschalten
Für andere Aktionen lesen Sie bitte die obigen Anweisungen.
ALLGEMEINE INFORMATIONEN
Anforderungen an die Stromversorgung : Gleichstrom 12 V, Minuspol mit Masse verbunden
Abmessungen des Montagesockels : 129 (B) x 112 (T) x 65 (H)
Klangeinstellungen
- Tief (bei 100 Hz) : ±10 dB
- Hoch (bei 100 Hz) : ±10 dB
Max. Ausgangsleistung : 4 x 40 W
Stromaufnahme : 10 A (max.)
RADIO FM AM
Frequenzbereich von 87,5 bis 108 MHz von 522 bis 1620 KHz
IF 10,7 MHz 450 KHz
Empndlichkeit 4 µV (S/N = 30 dB) 36 dBµV (S/N = 20 dB)
Trennung der Stereokanäle >25 dB /
PROBLEMBEHEBUNG
DE

Safety notes
The car sound system was manufactured according to the state of the art and
established safety guidelines. Even so, dangers may occur if you do not observe
the safety notes in these instructions. Read these instructions carefully and
completely before using the car sound system. Keep the instructions at a
location so that they are always accessible to all users. Always pass on the car
sound system to third parties together with these instructions. In addition,
observe the instructions of the devices used in conjunction with this car sound
system.
General safety notes
Observe the following note to protect yourself against injuries:
Do not modify or open the device.
Use as directed
This sound system is intended for installation and operation in a vehicle with 12
V vehicle system voltage. Observe the output limits of the device. Repairs and
installation, if necessary, should be performed by a specialist.
Installation instructions
You may only install the car sound system yourself if you are experienced in
installing car sound systems and are very familiar with the electrical system of
the vehicle. For this purpose, observe the wiring diagram in these instructions.
Installing the device must not obstruct or block the function of any airbags,
other safety devices or controls.
Declaration of conformity
The Blaupunkt Competence Center Car Multimedia - Evo Sales GmbH declares
that the device complies with the basic requirements and the other relevant
regulations of the directive 2014/53/EU. The declaration of conformity can be
found on the Internet under www.blaupunkt.com.
Cleaning notes
Solvents, cleaning and scouring agents as well as dashboard spray and plastics
care product may contain ingredients that will damage the surface of the car
sound system. Use only a dry or slightly moistened cloth for cleaning the car
sound system.
Disposal notes
Do not dispose of your old unit in the household trash!
Use the return and collection systems available to dis-pose of the old
device, the remote control and exhausted batteries.
Scope of delivery
The scope of delivery includes:
Main unit BPA 3022 M
Remote control
ISO connectors
Installation screws
Operating manual
ATTENTIONS OF INSTALLATION
1. Please read the instruction manual carefully before installing the unit.
2. Make sure to connect other wires before power on the unit.
3. To avoid short circuit. Please make sure all the exposed wires are insulated.
4. Please x all the wires after installation.
5. Please make connection to the player accordingly to this instruction manual.
Wrong connection may cause damage to the unit.
6. This player only t for 12V DC device.
INSTALL THE UNIT
REMOVE THE UNIT
1. Remove the unit
2. Take out the outer trim frame.
HDMI attention:
Please use good quality HDMI cable.
The overall length (front and rear) should not exceed 12 feet.
WIRING CONNECTION
1. This player can only be used by + 12V DC.
2. Do not connect the battery terminal until the player is fully well installed.
3. Please make sure to connect the yellow wire to the positive of the battery (+).
4. When change the fuse please make sure that the specications are same.
5. Using good quality speakers with 4 - 8 ohm can achieve the best eect of the
unit.
LOCATION OF KEYS
1. STREFA 1 2. 1 3. STREFA 2
4. 2 5. BT 6. 3 RPT
7. 8. 4 RDM 9.
10. 5 DIR- 11. DIS 12. 6 DIR+
13. LCD 14. GNIAZDO AUX 15. GNIAZDO SŁUCHAWKOWE
16. GNIAZDO HDMI 17. RESET 18. POKRĘTŁO
19. PORT USB 20. SRC/MENU
BASIC OPERATION
Turn on/o the unit and Mute function
Press /MUTE knob to turn on the unit. When the unit is on. Shortly press this
knob for mute on/o. Press and hold this button to turn o the unit.
Audio and setting menu adjustment
Press and hold SRC/MENU button into the menu as below:
BAS->TRE->BAL->EQ(o/pop/rock/clas)->LOUD(on/o)->CLK HH->CLK
MM->IR(on/o) ->CT(indep/sync)->BEEP(on/o)->P_VOL(13)->DX(LOC)->STE-
REO(MONO)
In each item rotate the VOL knob to set them.
IR (ON/OFF):
IR ON: The unit can be switched on by IR remote control.
The system is in high power consumption status.
IR OFF: The unit can not be switched on by IR remote control.
The system is in low power consumption status.
CT (INDEP/SYNC):
CT INDEP: The clock works independently.
CT SYNC: The clock will be synchronized to the received RDS station’s time.
Note: When the clock was set in the menu, The CT is set to INDEP mode
automatically.
BEEP (ON/OFF): Turn on/o the beep sound when buttons are pressed.
P-VOL: Setting the power on volume. If the volume at switch-o is lower than
the P-VOL, the unit will set the volume to the value of the switch-o volume
when it is switched on.
If the volume at shutdown is greater than the P-VOL, the volume will be restored
to the
P-VOL value when the unit is switched on.
Bluetooth speaker search
Press and hold BT button shows “SEARCH..”. Seconds later shows the Bluetooth
device name. Rotate VOL knob to show next one. When the desired Bluetooth
speaker name was shown on LCD. Press VOL knob to pair. If the pairing is
succeed, it shows BOX ON.
Important note: Despite numerous tests with various Bluetooth devices,
compatibility with all Bluetooth devices available on the market cannot be
guaranteed.
Bluetooth speaker signal transmit operation
Shortly press BT button to stop/transmit the signal to the Bluetooth speaker. It
shows BOX OFF/ON.
Note: Although Blaupunkt checks the compatibility of dierent Bluetooth speakers
with care, a awless function with all models on the market cannot be guaranteed.
Zone 1 and Zone 2 operation
Shortly press Zone 1 (or ZONE 2) button to unable/enable Zone 1 (or ZONE 2)
volume.
Hold Zone 1 (or ZONE 2) button to mute Zone 1 (or ZONE 2) sound. Hold it
again to mute o.
Information or Clock priority
Shortly press DIS button to change the clock priority or information priority.
Note: In FM band, when received a RDS station shortly press DIS button to show
the STATION NAME/CLOCK/FREQUENCY.
Clock setting
In CLK HH/CLK MM item of the menu. Rotate VOL knob to set the hour/minute.
Head phone operation
There is a 3.5 mm head phone jack in the front panel. It is following the zone 1’s
operation.
RADIO OPERATION
Receive a radio station
Press SRC/MENU button to select FM1->FM2->MW mode. Shortly press /
button to receive the desired radio station. Press and hold / button for
manual tuning the frequency.
Manually store station & recall preset station
Receiving a desired station. Press and hold one of the preset buttons (1 - 6) for 2
seconds. The current station is stored into the number button. Shortly press the
preset button (1 - 6) to directly listen the station that saved in the corresponding
preset button.
DAB OPERATION
Press SRC/MENU button switch to DAB1 or DAB2 source.
Selecting station
Press / button to select up/down station.
Manually store station and recall preset station
When received a desired station. Press and hold 1 - 6 button for 2 seconds to
store this station to corresponding number. Shortly press the preset button (1 -
6) to directly listen the station that saved in the corresponding preset button.
USB OPERATION
When an USB driver was inserted to the unit, the unit will play the MP3/WMA le
automatically. If an USB drive is already inserted in the unit, keep pressing
SRC/MENU button shortly until the USB mode display appears.
Select le
Press / button to skip to next/previous le. Hold / button to
fast forward or fast reverse.
Play/Pause
Press 1 button to pause/playing the le.
Repeat function
Press 3 RPT button to select RPT mode: RPT ONE/RPT FOLD/RPT ALL(default)
RPT ONE: Repeat the same le.
RPT FOLD: Repeat all les of the folder.
RPT ALL: Repeat all les.
RANDOM
Press 4 RDM button to choose RDM on/o.
RDM on: Playing all les in random order.
RDM o: Turn o the random function.
Directory+/- function
Press DIR+/DIR- button to select next/previous folder to play.
Search song
Press and hold button shows NUM 0000. Rotating VOL (or directly enter
number) to select the numbers then press VOL to play. Please note the 7/8/9/0
as: BT = 7, = 8, = 9, DIS = 0.
AUX IN 1/2 OPERATION
AUX IN 1 for front panel 3.5 mm jack. AUX IN 2 for RCA in back of the unit.
Pressing SRC/MENU button to switch to AUX IN1 (2) mode when Connecting
the audio signal to the unit .
BLUETOOTH OPERATION
Pairing
On mobile phone, select the Bluetooth item searching the Bluetooth device.
“BLAUPUNKT” should appear in the list, select “BLAUPUNKT” and then input
password “0000” if it needs a password. When successful paired, the BT mark will
be displayed on the display.
Bluetooth Audio
Press SRC/MENU button to switch to BT MUSIC mode. It will play a song of your
mobile phone automatically. Press key to pause/play the song.
Press / button to select next/previous song.
HDMI OPERATION
The front HDMI port is pass through to the rear HDMI port. The HDMI playback is
therefore not aected.
V-IN and V-OUT RCA connector
In the back of the unit the V-IN connector is pass through to the V-OUT
connector.
REMOTE CONTROL
When IR is set to ON in the setting menu.
OFF : The unit can be switched ON and OFF.
VOL+: Volume up
VOL- : Volume down
1 : Zone 1 MUTE ON/OFF
2 : Zone 2 MUTE ON/OFF
Other operation please reference the description above
GENARAL
Power Supply Requirements : DC 12 Volts, Negative Ground
Chassis Dimensions : 129 (W) x 112 (D) x 65 (H)
Tone Controls
- Bass (at 100 Hz) : ±10 dB
- Treble (at 10 kHz) : ±10 dB
Maximum Output Power : 4 x 40 watts
Current Drain : 10 Ampere (max.)
RADIO FM AM
Frequency Coverage 87.5 to 108 MHz 522 to 1620 KHz
IF 10.7 MHz 450 KHz
Sensitivity 4 µV (S/N = 30 dB) 36 dBµV (S/N = 20 dB)
Stereo Separation >25 dB /
TROUBLE SHOOTING
Sicherheitshinweise
Dieses Car-Sound-System wurde nach dem aktuellen Stand der Technik und den
allgemein anerkannten sicherheitstechnischen Regeln hergestellt. Dennoch
kann die Nichtbeachtung der in dieser Bedienungsanleitung enthaltenen
Sicherheitshinweise zu verschiedenen Risiken führen. Lesen Sie diese Anleitung
sorgfältig durch, bevor Sie das Car-Sound-System benutzen. Bewahren Sie die
Anleitung so auf, dass sie jederzeit für alle Benutzer zugänglich ist. Wenn Sie das
Car-Sound-System an Dritte weitergeben, legen Sie bitte diese Anleitung bei.
Beachten Sie außerdem die Hinweise in den Bedienungsanleitungen der an
dieses Car-Sound-System angeschlossenen Geräte.
Allgemeine Sicherheitshinweise
Beachten Sie die folgenden Hinweise, um sich selbst vor Verletzungen zu schützen:
Das Gerät darf weder verändert noch geönet werden.
Bestimmung
Dieses Car-Sound-System ist für den Einbau und Betrieb in Fahrzeugen mit 12 V
Versorgungsspannung konzipiert. Die Leistungsgrenzen des Geräts müssen
beachtet werden. Lassen Sie eventuelle Reparaturen oder Installationsarbeiten
von einem Fachmann durchführen.
Montageanleitung
Sie dürfen das Gerät nur dann selbst einbauen, wenn Sie Erfahrung im Einbau
eines Car-Sound-Systems und Kenntnisse in der Fahrzeugelektronik haben.
Beachten Sie dazu den Schaltplan in dieser Anleitung. Der Einbau des Geräts
darf die Funktion von Airbags, anderen Sicherheitseinrichtungen oder
Bedienelementen nicht behindern oder blockieren.
Konformitätserklärung
Blaupunkt Competence Center Car Multimedia – Evo Sales GmbH erklärt
hiermit, dass dieses Gerät mit den grundlegenden Forderungen und anderen
relevanten Bestimmungen der Richtlinie 2014/53/EU konform ist. Die
Konformitätserklärung nden Sie unter www.blaupunkt.com.
Hinweise zur Reinigung
Löse-, Reinigungs- und Scheuermittel sowie Cockpitreiniger und
Kunststopegemittel können Inhaltsstoe enthalten, die die Oberäche des
Car-Sound-Systems angreifen können. Verwenden Sie zur Reinigung des
Car-Sound-Systems nur ein trockenes oder leicht feuchtes Tuch.
Hinweise zur Entsorgung
Das Altgerät darf nicht mit dem Hausmüll entsorgt werden!
Entsorgen Sie das Gerät, die Fernbedienung und die verbrauchten
Batterien bei einer Sammelstelle für Altgeräte.
Lieferumfang
Im Lieferumfang sind enthalten:
Car-Sound-System BPA 3022 M,
Fernbedienung,
ISO-Anschlüsse,
Montageschrauben,
Bedienungsanleitung.
WICHTIGE INFORMATIONEN ZUR MONTAGE
1. Lesen Sie die Anleitung sorgfältig durch, bevor Sie das Gerät installieren.
2. Achten Sie darauf, dass alle anderen Kabel angeschlossen sind, bevor Sie die
Stromversorgung anschließen.
3. Um einen Kurzschluss zu vermeiden, stellen Sie sicher, dass alle
freiliegenden Drähte isoliert sind.
4. Sobald die Installation abgeschlossen ist, müssen alle Kabel befestigt
werden.
5. Die Anschlüsse ans Car-Sound-System müssen entsprechend dieser
Anleitung vorgenommen werden. Ein falscher Anschluss kann zu Schäden
am Gerät führen.
6. Das Car-Sound-System ist nur für eine 12-V-DC-Installation ausgelegt.
MONTAGE DES GERÄTS
DEMONTAGE DES GERÄTS
1. Demontieren Sie das Gerät.
2. Nehmen Sie den Außenrahmen ab.
Hinweis zu HDMI:
Verwenden Sie ein HDMI-Kabel von guter Qualität.
Die Gesamtlänge (vorne und hinten) sollte 3,65 m nicht überschreiten.
ANSCHLUSS VON LEITUNGEN
1. Das Car-Sound-System darf nur mit einer Spannung von +12 V DC betrieben werden.
2. Schließen Sie die Batterieklemme nur an, wenn das Car-Sound-System vollständig
montiert ist.
3. Stellen Sie sicher, dass das gelbe Kabel an den Pluspol (+) der Batterie angeschlossen ist.
4. Achten Sie beim Auswechseln der Sicherung darauf, dass die Parameter der neuen
Sicherung identisch sind.
5. Durch die Verwendung von hochwertigen Lautsprechern mit einer Impedanz von 4-8
Ohm kann das Gerät seine volle Leistung erbringen.
TASTENLAGE
1. ZONE 1 2. 1 3. ZONE 2
4. 2 5. BT 6. 3 RPT
7. 8. 4 RDM 9.
10. 5 DIR- 11. DIS 12. 6 DIR+
13. LCD 14. AUX-BUCHSE 15. KOPFHÖRERBUCHSE
16. HDMI-BUCHSE 17. RESET 18. DREHKNOPF
19. USB-PORT 20. SRC/MENU
GRUNDLEGENDE BEDIENUNG
Gerät und Stummschaltfunktion ein-/ausschalten
Um das Gerät einzuschalten, drücken Sie den Drehknopf /MUTE. Um die
Stummschaltfunktion ein- oder auszuschalten, drücken Sie kurz auf den Drehknopf,
während das Gerät eingeschaltet ist. Wenn Sie dieser Knopf gedrückt halten, wird das
Gerät ausgeschaltet.
Toneinstellungen und Setup-Menü
Drücken und halten Sie die Taste SRC/MENU gedrückt, um das unten abgebildete Menü
aufzurufen:
BAS->TRE->BAL->EQ (aus/Pop/Rock/Klassik)->LOUD (ein/aus)->CLK HH->CLK
MM->IR (ein/aus) ->CT (indep/sync)->SYG. TON (ein/aus) ->P_VOL (13)->DX (LOC)->STEREO
(MONO)
Drehen Sie an jeder Position den Drehknopf VOL, um sie einzustellen.
INFRAROT (EIN/AUS):
INFRAROT EIN: Das Gerät kann mit der Infrarot-Fernbedienung eingeschaltet werden.
Das System läuft dann mit hohem Stromverbrauch.
INFRAROT AUS: Das Gerät lässt sich nicht mit der Infrarot-Fernbedienung einschalten.
Das System läuft dann mit niedrigen Stromverbrauch.
CT (INDEP/SYNC):
CT INDEP: Die Uhr funktioniert unabhängig.
CT SYNC: Die Uhr wird mit der Zeit des empfangenen RDS-Senders synchronisiert.
Hinweis: Wenn die Uhr im Menü eingestellt wird, wird die CT-Funktion automatisch auf
den INDEP-Modus (unabhängiger Betrieb) eingestellt.
TASTENTON (EIN/AUS): Ermöglicht die Aktivierung/Deaktivierung des Tastentons beim
Drücken der Tasten.
P-VOL: Ermöglicht die Einstellung der Lautstärke beim Einschalten. Wenn die Lautstärke
beim Ausschalten niedriger ist als die P-VOL-Lautstärke, stellt das Gerät die Lautstärke
beim Einschalten auf die Lautstärke beim Ausschalten ein.
Wenn die Lautstärke beim Ausschalten höher als die P-VOL-Lautstärke ist, wird die
Lautstärke beim Einschalten des Geräts auf den P-VOL-Wert zurückgesetzt.
Bluetooth-Lautsprecher suchen
Wenn Sie die Taste BT gedrückt halten, wird „SEARCH...“ angezeigt. Nach kurzer Zeit wird die
Bezeichnung Ihres Bluetooth-Geräts angezeigt. Um das nächste Gerät anzuzeigen, drehen
Sie den Drehknopf VOL. Wenn der Name des gewünschten Bluetooth-Lautsprechers auf
dem LCD-Display angezeigt wird, drücken Sie den Drehknopf VOL, um das Gerät zu
koppeln. Wenn die Kopplung erfolgreich war, wird auf dem Display „BOX ON“ angezeigt.
Wichtiger Hinweis: Trotz zahlreicher Tests mit verschiedenen Bluetooth-Geräten kann
die Kompatibilität mit allen auf dem Markt bendlichen Bluetooth-Geräten nicht
garantiert werden.
Signalübertragung zum Bluetooth-Lautsprecher
Drücken Sie kurz die Taste BT, um die Übertragung/das Signal an den
Bluetooth-Lautsprecher zu beenden. Auf dem Display wird „BOX OFF/ON“ angezeigt.
Hinweis: Obwohl Blaupunkt die Kompatibilität der verschiedenen Bluetooth-Lautsprecher
sorgfältig prüft, kann ein reibungsloser Betrieb nicht mit allen Modellen auf dem Markt
garantiert werden.
Zone 1 und Zone 2 bedienen
Drücken Sie kurz auf die Taste Zone 1 (oder Zone 2), um den Ton von Zone 1 (oder Zone
2) aus-/einzuschalten.
Halten Sie die Taste Zone 1 (oder Zone 2) gedrückt, um den Ton von Zone 1 (oder Zone
2) stummzuschalten. Drücken Sie die Taste erneut, um die Stummschaltung aufzuheben.
Priorität einstellen: Informationen oder Uhrzeit
Drücken Sie kurz die Taste DIS, um die Priorität der Uhrzeit oder der Informationen
einzustellen.
Hinweis: Wenn Sie im UKW-Band RDS-Sender empfangen, drücken Sie kurz die Taste DIS,
um RADIOSENDER/ ZEIT/FREQUENZ anzuzeigen.
Uhrzeit einstellen
Wählen Sie im Menü CLK HH/CLK MM. Drehen Sie den Drehknopf VOL, um die
Stunde/Minute einzustellen.
Kopfhörer bedienen
An der Vorderseite bendet sich eine 3,5-mm-Kopfhörerbuchse. Das System übernimmt
für Kopfhörer die Betriebseinstellungen für Zone 1.
RADIOBEDIENUNG
Radiosender empfangen
Drücken Sie die Taste SRC/MENU, um einen Modus aus FM1->FM2->MW auszuwählen.
Drücken Sie kurz / , um den gewünschten Radiosender zu empfangen. Drücken
und halten Sie / gedrückt, um die Frequenz manuell einzustellen.
Radiosender manuell abspeichern und gespeicherte Radiosender abrufen
Empfangen des gewünschten Radiosenders. Drücken Sie eine der Speichertasten (1-6)
und halten Sie sie 2 Sekunden lang gedrückt. Der aktuelle Radiosender wird im Speicher
unter der entsprechenden Zierntaste abgelegt. Drücken Sie kurz auf die Taste des
voreingestellten Radiosenders (1-6), um direkt das Sendesignal des unter der
zugewiesenen Taste gespeicherten Senders zu hören.
BEDIENDUNG VON DAB
Drücken Sie SRC/MENU, um die Quelle zwischen DAB1 und DAB2 umzuschalten.
Radiosender auswählen
Drücken Sie die Taste / , um den nächsten/vorherigen Radiosender
auszuwählen.
Radiosender manuell abspeichern und gespeicherte Radiosender abrufen
Wenn die Frequenz des gewünschten Radiosenders eingestellt ist. Drücken und halten
Sie eine der Tasten 1 bis 6 2 Sekunden lang gedrückt, um diesen Sender unter der
entsprechenden Nummer zu speichern. Drücken Sie kurz auf die Taste des
voreingestellten Radiosenders (1-6), um direkt das Sendesignal des unter der
zugewiesenen Taste gespeicherten Senders zu hören.
UNTERSTÜTZUNG VON USB-SPEICHERN
Wenn ein USB-Speicher an das Gerät angeschlossen wird, spielt das Gerät automatisch
MP3/WMA-Dateien ab. Wenn bereits ein USB-Speicher an das Gerät angeschlossen ist,
drücken Sie kurz SRC/MENU, bis der USB-Modus-Bildschirm erscheint.
Dateien auswählen
Drücken Sie die Taste / , um zur nächsten/vorherigen Datei zu gelangen. Halten
Sie die Taste / , um vor- oder zurückzuspulen.
Wiedergabe/Pause
Drücken Sie 1 , um die Datei anzuhalten/abzuspielen.
Schleifenwiedergabe
Drücken Sie die Taste 3 RPT, um die Schleifenwiedergabefunktion zu wählen. RPT
ONE/RPT FOLD/RPT ALL (Standard)
RPT ONE: Schleifenwiedergabe einer einzelnen Datei.
RPT FOLD: Schleifenwiedergabe aller Dateien in einem Ordner.
RPT ALL: Schleifenwiedergabe aller Dateien.
RANDOM
Drücken Sie die Taste 4 RDM, um die Zufallswiedergabefunktion ein- oder auszuschalten.
RDM Ein Zufallswiedergabe aller Dateien.
RDM Aus Deaktivieren der Zufallswiedergabefunktion.
Ordnerfunktion +/-
Drücken Sie DIR+/DIR-, um den nächsten/vorherigen Ordner für die Wiedergabe
auszuwählen.
Titel suchen
Durch Drücken und Halten der Taste wird „NUM 0000“ angezeigt. Wählen Sie durch
Drehen des Drehknopfes VOL (oder durch direkte Eingabe der Nummer) die Nummer
aus und drücken Sie dann VOL zur Wiedergabe. Beachten Sie 7/8/9/0 als: BT = 7, = 8,
= 9, DIS = 0.
VERWENDUNG DER BUCHSE AUX IN 1/2
Die Buchse AUX IN 1 an der Vorderseite ist 3,5-mm. Die Buchse AUX IN 2 für RCA bendet
sich auf der Rückseite des Geräts. Durch Drücken der Taste SRC/MENU wird auf den
Modus AUX IN1 (2) umgeschaltet, wenn das Audiosignal an das Gerät angeschlossen ist.
BLUETOOTH-UNTERSTÜTZUNG
Kopplung von Geräten
Wählen Sie auf Ihrem Smartphone Bluetooth und suchen Sie nach Ihrem
Bluetooth-Gerät. In der Liste sollte „BLAUPUNKT“ erscheinen; wählen Sie „BLAUPUNKT“
und geben Sie das Passwort „0000“ ein, wenn Sie zur Eingabe eines Passworts
aufgefordert werden. Nach erfolgreichem Koppeln wird BT auf dem Display angezeigt.
Bluetooth-Audio
Drücken Sie die Taste SRC/MENU, um in den BT MUSIC-Modus zu wechseln. Das Gerät
spielt automatisch den Titel von Ihrem Handy ab. Drücken Sie die Taste , um den
Titel anzuhalten/abzuspielen.
Drücken Sie die Taste / , um den nächsten/vorherigen Titel zu wählen.
HDMI-UNTERSTÜTZUNG
Die vordere HDMI-Buchse wird mit der hinteren HDMI-Buchse verbunden. Dies hat
keinen Einuss auf HDMI-Wiedergabe.
Anschlüsse RCA V-IN und V-OUT
Auf der Rückseite des Geräts ist der V-IN-Anschluss zum V-OUT-Anschluss geführt.
FERNBEDIENUNG
Die Fernbedienung kann verwendet werden,
wenn im Menü die Option IR aktiviert ist.
OFF: Gerät einschalten/ausschalten.
VOL+: Lautstärke erhöhen
VOL-: Lautstärke reduzieren
1 : Stummschaltung Zone 1 einschalten/ausschalten
2 : Stummschaltung Zone 2 einschalten/ausschalten
Für andere Aktionen lesen Sie bitte die obigen Anweisungen.
BEDIENUNG
ALLGEMEINE INFORMATIONEN
Anforderungen an die Stromversorgung : Gleichstrom 12 V, Minuspol mit Masse verbunden
Abmessungen des Montagesockels : 129 (B) x 112 (T) x 65 (H)
Klangeinstellungen
- Tief (bei 100 Hz) : ±10 dB
- Hoch (bei 100 Hz) : ±10 dB
Max. Ausgangsleistung : 4 x 40 W
Stromaufnahme : 10 A (max.)
RADIO FM AM
Frequenzbereich von 87,5 bis 108 MHz von 522 bis 1620 KHz
IF 10,7 MHz 450 KHz
Empndlichkeit 4 µV (S/N = 30 dB) 36 dBµV (S/N = 20 dB)
Trennung der Stereokanäle >25 dB /
PROBLEMBEHEBUNG
DE

Safety notes
The car sound system was manufactured according to the state of the art and
established safety guidelines. Even so, dangers may occur if you do not observe
the safety notes in these instructions. Read these instructions carefully and
completely before using the car sound system. Keep the instructions at a
location so that they are always accessible to all users. Always pass on the car
sound system to third parties together with these instructions. In addition,
observe the instructions of the devices used in conjunction with this car sound
system.
General safety notes
Observe the following note to protect yourself against injuries:
Do not modify or open the device.
Use as directed
This sound system is intended for installation and operation in a vehicle with 12
V vehicle system voltage. Observe the output limits of the device. Repairs and
installation, if necessary, should be performed by a specialist.
Installation instructions
You may only install the car sound system yourself if you are experienced in
installing car sound systems and are very familiar with the electrical system of
the vehicle. For this purpose, observe the wiring diagram in these instructions.
Installing the device must not obstruct or block the function of any airbags,
other safety devices or controls.
Declaration of conformity
The Blaupunkt Competence Center Car Multimedia - Evo Sales GmbH declares
that the device complies with the basic requirements and the other relevant
regulations of the directive 2014/53/EU. The declaration of conformity can be
found on the Internet under www.blaupunkt.com.
Cleaning notes
Solvents, cleaning and scouring agents as well as dashboard spray and plastics
care product may contain ingredients that will damage the surface of the car
sound system. Use only a dry or slightly moistened cloth for cleaning the car
sound system.
Disposal notes
Do not dispose of your old unit in the household trash!
Use the return and collection systems available to dis-pose of the old
device, the remote control and exhausted batteries.
Scope of delivery
The scope of delivery includes:
Main unit BPA 3022 M
Remote control
ISO connectors
Installation screws
Operating manual
ATTENTIONS OF INSTALLATION
1. Please read the instruction manual carefully before installing the unit.
2. Make sure to connect other wires before power on the unit.
3. To avoid short circuit. Please make sure all the exposed wires are insulated.
4. Please x all the wires after installation.
5. Please make connection to the player accordingly to this instruction manual.
Wrong connection may cause damage to the unit.
6. This player only t for 12V DC device.
INSTALL THE UNIT
REMOVE THE UNIT
1. Remove the unit
2. Take out the outer trim frame.
HDMI attention:
Please use good quality HDMI cable.
The overall length (front and rear) should not exceed 12 feet.
WIRING CONNECTION
1. This player can only be used by + 12V DC.
2. Do not connect the battery terminal until the player is fully well installed.
3. Please make sure to connect the yellow wire to the positive of the battery (+).
4. When change the fuse please make sure that the specications are same.
5. Using good quality speakers with 4 - 8 ohm can achieve the best eect of the
unit.
LOCATION OF KEYS
1. STREFA 1 2. 1 3. STREFA 2
4. 2 5. BT 6. 3 RPT
7. 8. 4 RDM 9.
10. 5 DIR- 11. DIS 12. 6 DIR+
13. LCD 14. GNIAZDO AUX 15. GNIAZDO SŁUCHAWKOWE
16. GNIAZDO HDMI 17. RESET 18. POKRĘTŁO
19. PORT USB 20. SRC/MENU
BASIC OPERATION
Turn on/o the unit and Mute function
Press /MUTE knob to turn on the unit. When the unit is on. Shortly press this
knob for mute on/o. Press and hold this button to turn o the unit.
Audio and setting menu adjustment
Press and hold SRC/MENU button into the menu as below:
BAS->TRE->BAL->EQ(o/pop/rock/clas)->LOUD(on/o)->CLK HH->CLK
MM->IR(on/o) ->CT(indep/sync)->BEEP(on/o)->P_VOL(13)->DX(LOC)->STE-
REO(MONO)
In each item rotate the VOL knob to set them.
IR (ON/OFF):
IR ON: The unit can be switched on by IR remote control.
The system is in high power consumption status.
IR OFF: The unit can not be switched on by IR remote control.
The system is in low power consumption status.
CT (INDEP/SYNC):
CT INDEP: The clock works independently.
CT SYNC: The clock will be synchronized to the received RDS station’s time.
Note: When the clock was set in the menu, The CT is set to INDEP mode
automatically.
BEEP (ON/OFF): Turn on/o the beep sound when buttons are pressed.
P-VOL: Setting the power on volume. If the volume at switch-o is lower than
the P-VOL, the unit will set the volume to the value of the switch-o volume
when it is switched on.
If the volume at shutdown is greater than the P-VOL, the volume will be restored
to the
P-VOL value when the unit is switched on.
Bluetooth speaker search
Press and hold BT button shows “SEARCH..”. Seconds later shows the Bluetooth
device name. Rotate VOL knob to show next one. When the desired Bluetooth
speaker name was shown on LCD. Press VOL knob to pair. If the pairing is
succeed, it shows BOX ON.
Important note: Despite numerous tests with various Bluetooth devices,
compatibility with all Bluetooth devices available on the market cannot be
guaranteed.
Bluetooth speaker signal transmit operation
Shortly press BT button to stop/transmit the signal to the Bluetooth speaker. It
shows BOX OFF/ON.
Note: Although Blaupunkt checks the compatibility of dierent Bluetooth speakers
with care, a awless function with all models on the market cannot be guaranteed.
Zone 1 and Zone 2 operation
Shortly press Zone 1 (or ZONE 2) button to unable/enable Zone 1 (or ZONE 2)
volume.
Hold Zone 1 (or ZONE 2) button to mute Zone 1 (or ZONE 2) sound. Hold it
again to mute o.
Information or Clock priority
Shortly press DIS button to change the clock priority or information priority.
Note: In FM band, when received a RDS station shortly press DIS button to show
the STATION NAME/CLOCK/FREQUENCY.
Clock setting
In CLK HH/CLK MM item of the menu. Rotate VOL knob to set the hour/minute.
Head phone operation
There is a 3.5 mm head phone jack in the front panel. It is following the zone 1’s
operation.
RADIO OPERATION
Receive a radio station
Press SRC/MENU button to select FM1->FM2->MW mode. Shortly press /
button to receive the desired radio station. Press and hold / button for
manual tuning the frequency.
Manually store station & recall preset station
Receiving a desired station. Press and hold one of the preset buttons (1 - 6) for 2
seconds. The current station is stored into the number button. Shortly press the
preset button (1 - 6) to directly listen the station that saved in the corresponding
preset button.
DAB OPERATION
Press SRC/MENU button switch to DAB1 or DAB2 source.
Selecting station
Press / button to select up/down station.
Manually store station and recall preset station
When received a desired station. Press and hold 1 - 6 button for 2 seconds to
store this station to corresponding number. Shortly press the preset button (1 -
6) to directly listen the station that saved in the corresponding preset button.
USB OPERATION
When an USB driver was inserted to the unit, the unit will play the MP3/WMA le
automatically. If an USB drive is already inserted in the unit, keep pressing
SRC/MENU button shortly until the USB mode display appears.
Select le
Press / button to skip to next/previous le. Hold / button to
fast forward or fast reverse.
Play/Pause
Press 1 button to pause/playing the le.
Repeat function
Press 3 RPT button to select RPT mode: RPT ONE/RPT FOLD/RPT ALL(default)
RPT ONE: Repeat the same le.
RPT FOLD: Repeat all les of the folder.
RPT ALL: Repeat all les.
RANDOM
Press 4 RDM button to choose RDM on/o.
RDM on: Playing all les in random order.
RDM o: Turn o the random function.
Directory+/- function
Press DIR+/DIR- button to select next/previous folder to play.
Search song
Press and hold button shows NUM 0000. Rotating VOL (or directly enter
number) to select the numbers then press VOL to play. Please note the 7/8/9/0
as: BT = 7, = 8, = 9, DIS = 0.
AUX IN 1/2 OPERATION
AUX IN 1 for front panel 3.5 mm jack. AUX IN 2 for RCA in back of the unit.
Pressing SRC/MENU button to switch to AUX IN1 (2) mode when Connecting
the audio signal to the unit .
BLUETOOTH OPERATION
Pairing
On mobile phone, select the Bluetooth item searching the Bluetooth device.
“BLAUPUNKT” should appear in the list, select “BLAUPUNKT” and then input
password “0000” if it needs a password. When successful paired, the BT mark will
be displayed on the display.
Bluetooth Audio
Press SRC/MENU button to switch to BT MUSIC mode. It will play a song of your
mobile phone automatically. Press key to pause/play the song.
Press / button to select next/previous song.
HDMI OPERATION
The front HDMI port is pass through to the rear HDMI port. The HDMI playback is
therefore not aected.
V-IN and V-OUT RCA connector
In the back of the unit the V-IN connector is pass through to the V-OUT
connector.
REMOTE CONTROL
When IR is set to ON in the setting menu.
OFF : The unit can be switched ON and OFF.
VOL+: Volume up
VOL- : Volume down
1 : Zone 1 MUTE ON/OFF
2 : Zone 2 MUTE ON/OFF
Other operation please reference the description above
GENARAL
Power Supply Requirements : DC 12 Volts, Negative Ground
Chassis Dimensions : 129 (W) x 112 (D) x 65 (H)
Tone Controls
- Bass (at 100 Hz) : ±10 dB
- Treble (at 10 kHz) : ±10 dB
Maximum Output Power : 4 x 40 watts
Current Drain : 10 Ampere (max.)
RADIO FM AM
Frequency Coverage 87.5 to 108 MHz 522 to 1620 KHz
IF 10.7 MHz 450 KHz
Sensitivity 4 µV (S/N = 30 dB) 36 dBµV (S/N = 20 dB)
Stereo Separation >25 dB /
TROUBLE SHOOTING
Sicherheitshinweise
Dieses Car-Sound-System wurde nach dem aktuellen Stand der Technik und den
allgemein anerkannten sicherheitstechnischen Regeln hergestellt. Dennoch
kann die Nichtbeachtung der in dieser Bedienungsanleitung enthaltenen
Sicherheitshinweise zu verschiedenen Risiken führen. Lesen Sie diese Anleitung
sorgfältig durch, bevor Sie das Car-Sound-System benutzen. Bewahren Sie die
Anleitung so auf, dass sie jederzeit für alle Benutzer zugänglich ist. Wenn Sie das
Car-Sound-System an Dritte weitergeben, legen Sie bitte diese Anleitung bei.
Beachten Sie außerdem die Hinweise in den Bedienungsanleitungen der an
dieses Car-Sound-System angeschlossenen Geräte.
Allgemeine Sicherheitshinweise
Beachten Sie die folgenden Hinweise, um sich selbst vor Verletzungen zu schützen:
Das Gerät darf weder verändert noch geönet werden.
Bestimmung
Dieses Car-Sound-System ist für den Einbau und Betrieb in Fahrzeugen mit 12 V
Versorgungsspannung konzipiert. Die Leistungsgrenzen des Geräts müssen
beachtet werden. Lassen Sie eventuelle Reparaturen oder Installationsarbeiten
von einem Fachmann durchführen.
Montageanleitung
Sie dürfen das Gerät nur dann selbst einbauen, wenn Sie Erfahrung im Einbau
eines Car-Sound-Systems und Kenntnisse in der Fahrzeugelektronik haben.
Beachten Sie dazu den Schaltplan in dieser Anleitung. Der Einbau des Geräts
darf die Funktion von Airbags, anderen Sicherheitseinrichtungen oder
Bedienelementen nicht behindern oder blockieren.
Konformitätserklärung
Blaupunkt Competence Center Car Multimedia – Evo Sales GmbH erklärt
hiermit, dass dieses Gerät mit den grundlegenden Forderungen und anderen
relevanten Bestimmungen der Richtlinie 2014/53/EU konform ist. Die
Konformitätserklärung nden Sie unter www.blaupunkt.com.
Hinweise zur Reinigung
Löse-, Reinigungs- und Scheuermittel sowie Cockpitreiniger und
Kunststopegemittel können Inhaltsstoe enthalten, die die Oberäche des
Car-Sound-Systems angreifen können. Verwenden Sie zur Reinigung des
Car-Sound-Systems nur ein trockenes oder leicht feuchtes Tuch.
Hinweise zur Entsorgung
Das Altgerät darf nicht mit dem Hausmüll entsorgt werden!
Entsorgen Sie das Gerät, die Fernbedienung und die verbrauchten
Batterien bei einer Sammelstelle für Altgeräte.
Lieferumfang
Im Lieferumfang sind enthalten:
Car-Sound-System BPA 3022 M,
Fernbedienung,
ISO-Anschlüsse,
Montageschrauben,
Bedienungsanleitung.
WICHTIGE INFORMATIONEN ZUR MONTAGE
1. Lesen Sie die Anleitung sorgfältig durch, bevor Sie das Gerät installieren.
2. Achten Sie darauf, dass alle anderen Kabel angeschlossen sind, bevor Sie die
Stromversorgung anschließen.
3. Um einen Kurzschluss zu vermeiden, stellen Sie sicher, dass alle
freiliegenden Drähte isoliert sind.
4. Sobald die Installation abgeschlossen ist, müssen alle Kabel befestigt
werden.
5. Die Anschlüsse ans Car-Sound-System müssen entsprechend dieser
Anleitung vorgenommen werden. Ein falscher Anschluss kann zu Schäden
am Gerät führen.
6. Das Car-Sound-System ist nur für eine 12-V-DC-Installation ausgelegt.
MONTAGE DES GERÄTS
DEMONTAGE DES GERÄTS
1. Demontieren Sie das Gerät.
2. Nehmen Sie den Außenrahmen ab.
Hinweis zu HDMI:
Verwenden Sie ein HDMI-Kabel von guter Qualität.
Die Gesamtlänge (vorne und hinten) sollte 3,65 m nicht überschreiten.
ANSCHLUSS VON LEITUNGEN
1. Das Car-Sound-System darf nur mit einer Spannung von +12 V DC betrieben werden.
2. Schließen Sie die Batterieklemme nur an, wenn das Car-Sound-System vollständig
montiert ist.
3. Stellen Sie sicher, dass das gelbe Kabel an den Pluspol (+) der Batterie angeschlossen ist.
4. Achten Sie beim Auswechseln der Sicherung darauf, dass die Parameter der neuen
Sicherung identisch sind.
5. Durch die Verwendung von hochwertigen Lautsprechern mit einer Impedanz von 4-8
Ohm kann das Gerät seine volle Leistung erbringen.
TASTENLAGE
1. ZONE 1 2. 1 3. ZONE 2
4. 2 5. BT 6. 3 RPT
7. 8. 4 RDM 9.
10. 5 DIR- 11. DIS 12. 6 DIR+
13. LCD 14. AUX-BUCHSE 15. KOPFHÖRERBUCHSE
16. HDMI-BUCHSE 17. RESET 18. DREHKNOPF
19. USB-PORT 20. SRC/MENU
GRUNDLEGENDE BEDIENUNG
Gerät und Stummschaltfunktion ein-/ausschalten
Um das Gerät einzuschalten, drücken Sie den Drehknopf /MUTE. Um die
Stummschaltfunktion ein- oder auszuschalten, drücken Sie kurz auf den Drehknopf,
während das Gerät eingeschaltet ist. Wenn Sie dieser Knopf gedrückt halten, wird das
Gerät ausgeschaltet.
Toneinstellungen und Setup-Menü
Drücken und halten Sie die Taste SRC/MENU gedrückt, um das unten abgebildete Menü
aufzurufen:
BAS->TRE->BAL->EQ (aus/Pop/Rock/Klassik)->LOUD (ein/aus)->CLK HH->CLK
MM->IR (ein/aus) ->CT (indep/sync)->SYG. TON (ein/aus) ->P_VOL (13)->DX (LOC)->STEREO
(MONO)
Drehen Sie an jeder Position den Drehknopf VOL, um sie einzustellen.
INFRAROT (EIN/AUS):
INFRAROT EIN: Das Gerät kann mit der Infrarot-Fernbedienung eingeschaltet werden.
Das System läuft dann mit hohem Stromverbrauch.
INFRAROT AUS: Das Gerät lässt sich nicht mit der Infrarot-Fernbedienung einschalten.
Das System läuft dann mit niedrigen Stromverbrauch.
CT (INDEP/SYNC):
CT INDEP: Die Uhr funktioniert unabhängig.
CT SYNC: Die Uhr wird mit der Zeit des empfangenen RDS-Senders synchronisiert.
Hinweis: Wenn die Uhr im Menü eingestellt wird, wird die CT-Funktion automatisch auf
den INDEP-Modus (unabhängiger Betrieb) eingestellt.
TASTENTON (EIN/AUS): Ermöglicht die Aktivierung/Deaktivierung des Tastentons beim
Drücken der Tasten.
P-VOL: Ermöglicht die Einstellung der Lautstärke beim Einschalten. Wenn die Lautstärke
beim Ausschalten niedriger ist als die P-VOL-Lautstärke, stellt das Gerät die Lautstärke
beim Einschalten auf die Lautstärke beim Ausschalten ein.
Wenn die Lautstärke beim Ausschalten höher als die P-VOL-Lautstärke ist, wird die
Lautstärke beim Einschalten des Geräts auf den P-VOL-Wert zurückgesetzt.
Bluetooth-Lautsprecher suchen
Wenn Sie die Taste BT gedrückt halten, wird „SEARCH...“ angezeigt. Nach kurzer Zeit wird die
Bezeichnung Ihres Bluetooth-Geräts angezeigt. Um das nächste Gerät anzuzeigen, drehen
Sie den Drehknopf VOL. Wenn der Name des gewünschten Bluetooth-Lautsprechers auf
dem LCD-Display angezeigt wird, drücken Sie den Drehknopf VOL, um das Gerät zu
koppeln. Wenn die Kopplung erfolgreich war, wird auf dem Display „BOX ON“ angezeigt.
Wichtiger Hinweis: Trotz zahlreicher Tests mit verschiedenen Bluetooth-Geräten kann
die Kompatibilität mit allen auf dem Markt bendlichen Bluetooth-Geräten nicht
garantiert werden.
Signalübertragung zum Bluetooth-Lautsprecher
Drücken Sie kurz die Taste BT, um die Übertragung/das Signal an den
Bluetooth-Lautsprecher zu beenden. Auf dem Display wird „BOX OFF/ON“ angezeigt.
Hinweis: Obwohl Blaupunkt die Kompatibilität der verschiedenen Bluetooth-Lautsprecher
sorgfältig prüft, kann ein reibungsloser Betrieb nicht mit allen Modellen auf dem Markt
garantiert werden.
Zone 1 und Zone 2 bedienen
Drücken Sie kurz auf die Taste Zone 1 (oder Zone 2), um den Ton von Zone 1 (oder Zone
2) aus-/einzuschalten.
Halten Sie die Taste Zone 1 (oder Zone 2) gedrückt, um den Ton von Zone 1 (oder Zone
2) stummzuschalten. Drücken Sie die Taste erneut, um die Stummschaltung aufzuheben.
Priorität einstellen: Informationen oder Uhrzeit
Drücken Sie kurz die Taste DIS, um die Priorität der Uhrzeit oder der Informationen
einzustellen.
Hinweis: Wenn Sie im UKW-Band RDS-Sender empfangen, drücken Sie kurz die Taste DIS,
um RADIOSENDER/ ZEIT/FREQUENZ anzuzeigen.
Uhrzeit einstellen
Wählen Sie im Menü CLK HH/CLK MM. Drehen Sie den Drehknopf VOL, um die
Stunde/Minute einzustellen.
Kopfhörer bedienen
An der Vorderseite bendet sich eine 3,5-mm-Kopfhörerbuchse. Das System übernimmt
für Kopfhörer die Betriebseinstellungen für Zone 1.
RADIOBEDIENUNG
Radiosender empfangen
Drücken Sie die Taste SRC/MENU, um einen Modus aus FM1->FM2->MW auszuwählen.
Drücken Sie kurz / , um den gewünschten Radiosender zu empfangen. Drücken
und halten Sie / gedrückt, um die Frequenz manuell einzustellen.
Radiosender manuell abspeichern und gespeicherte Radiosender abrufen
Empfangen des gewünschten Radiosenders. Drücken Sie eine der Speichertasten (1-6)
und halten Sie sie 2 Sekunden lang gedrückt. Der aktuelle Radiosender wird im Speicher
unter der entsprechenden Zierntaste abgelegt. Drücken Sie kurz auf die Taste des
voreingestellten Radiosenders (1-6), um direkt das Sendesignal des unter der
zugewiesenen Taste gespeicherten Senders zu hören.
BEDIENDUNG VON DAB
Drücken Sie SRC/MENU, um die Quelle zwischen DAB1 und DAB2 umzuschalten.
Radiosender auswählen
Drücken Sie die Taste / , um den nächsten/vorherigen Radiosender
auszuwählen.
Radiosender manuell abspeichern und gespeicherte Radiosender abrufen
Wenn die Frequenz des gewünschten Radiosenders eingestellt ist. Drücken und halten
Sie eine der Tasten 1 bis 6 2 Sekunden lang gedrückt, um diesen Sender unter der
entsprechenden Nummer zu speichern. Drücken Sie kurz auf die Taste des
voreingestellten Radiosenders (1-6), um direkt das Sendesignal des unter der
zugewiesenen Taste gespeicherten Senders zu hören.
UNTERSTÜTZUNG VON USB-SPEICHERN
Wenn ein USB-Speicher an das Gerät angeschlossen wird, spielt das Gerät automatisch
MP3/WMA-Dateien ab. Wenn bereits ein USB-Speicher an das Gerät angeschlossen ist,
drücken Sie kurz SRC/MENU, bis der USB-Modus-Bildschirm erscheint.
Dateien auswählen
Drücken Sie die Taste / , um zur nächsten/vorherigen Datei zu gelangen. Halten
Sie die Taste / , um vor- oder zurückzuspulen.
Wiedergabe/Pause
Drücken Sie 1 , um die Datei anzuhalten/abzuspielen.
Schleifenwiedergabe
Drücken Sie die Taste 3 RPT, um die Schleifenwiedergabefunktion zu wählen. RPT
ONE/RPT FOLD/RPT ALL (Standard)
RPT ONE: Schleifenwiedergabe einer einzelnen Datei.
RPT FOLD: Schleifenwiedergabe aller Dateien in einem Ordner.
RPT ALL: Schleifenwiedergabe aller Dateien.
RANDOM
Drücken Sie die Taste 4 RDM, um die Zufallswiedergabefunktion ein- oder auszuschalten.
RDM Ein Zufallswiedergabe aller Dateien.
RDM Aus Deaktivieren der Zufallswiedergabefunktion.
Ordnerfunktion +/-
Drücken Sie DIR+/DIR-, um den nächsten/vorherigen Ordner für die Wiedergabe
auszuwählen.
Titel suchen
Durch Drücken und Halten der Taste wird „NUM 0000“ angezeigt. Wählen Sie durch
Drehen des Drehknopfes VOL (oder durch direkte Eingabe der Nummer) die Nummer
aus und drücken Sie dann VOL zur Wiedergabe. Beachten Sie 7/8/9/0 als: BT = 7, = 8,
= 9, DIS = 0.
VERWENDUNG DER BUCHSE AUX IN 1/2
Die Buchse AUX IN 1 an der Vorderseite ist 3,5-mm. Die Buchse AUX IN 2 für RCA bendet
sich auf der Rückseite des Geräts. Durch Drücken der Taste SRC/MENU wird auf den
Modus AUX IN1 (2) umgeschaltet, wenn das Audiosignal an das Gerät angeschlossen ist.
BLUETOOTH-UNTERSTÜTZUNG
Kopplung von Geräten
Wählen Sie auf Ihrem Smartphone Bluetooth und suchen Sie nach Ihrem
Bluetooth-Gerät. In der Liste sollte „BLAUPUNKT“ erscheinen; wählen Sie „BLAUPUNKT“
und geben Sie das Passwort „0000“ ein, wenn Sie zur Eingabe eines Passworts
aufgefordert werden. Nach erfolgreichem Koppeln wird BT auf dem Display angezeigt.
Bluetooth-Audio
Drücken Sie die Taste SRC/MENU, um in den BT MUSIC-Modus zu wechseln. Das Gerät
spielt automatisch den Titel von Ihrem Handy ab. Drücken Sie die Taste , um den
Titel anzuhalten/abzuspielen.
Drücken Sie die Taste / , um den nächsten/vorherigen Titel zu wählen.
HDMI-UNTERSTÜTZUNG
Die vordere HDMI-Buchse wird mit der hinteren HDMI-Buchse verbunden. Dies hat
keinen Einuss auf HDMI-Wiedergabe.
Anschlüsse RCA V-IN und V-OUT
Auf der Rückseite des Geräts ist der V-IN-Anschluss zum V-OUT-Anschluss geführt.
FERNBEDIENUNG
Die Fernbedienung kann verwendet werden,
wenn im Menü die Option IR aktiviert ist.
OFF: Gerät einschalten/ausschalten.
VOL+: Lautstärke erhöhen
VOL-: Lautstärke reduzieren
1 : Stummschaltung Zone 1 einschalten/ausschalten
2 : Stummschaltung Zone 2 einschalten/ausschalten
Für andere Aktionen lesen Sie bitte die obigen Anweisungen.
ALLGEMEINE INFORMATIONEN
Anforderungen an die Stromversorgung : Gleichstrom 12 V, Minuspol mit Masse verbunden
Abmessungen des Montagesockels : 129 (B) x 112 (T) x 65 (H)
Klangeinstellungen
- Tief (bei 100 Hz) : ±10 dB
- Hoch (bei 100 Hz) : ±10 dB
Max. Ausgangsleistung : 4 x 40 W
Stromaufnahme : 10 A (max.)
RADIO FM AM
Frequenzbereich von 87,5 bis 108 MHz von 522 bis 1620 KHz
IF 10,7 MHz 450 KHz
Empndlichkeit 4 µV (S/N = 30 dB) 36 dBµV (S/N = 20 dB)
Trennung der Stereokanäle >25 dB /
PROBLEMBEHEBUNG
TECHNISCHE DATEN
Problem
Ursache
Lösung
Keine
Stromversorgung
Die Zündung im Auto nicht
eingeschaltet
Drehen Sie den Zündschlüssel in die
Stellung „ACC“, wenn der Strom an einen
Hilfsstromkreis im Fahrzeug angeschlossen
ist und der Motor nicht gestartet wurde.
Defekte Sicherung Sicherung austauschen
Kein Ton
Lautstärke auf Minimum
eingestellt
Stellen Sie die Lautstärke auf den
gewünschten Wert ein.
Die Verkabelung ist nicht
richtig angeschlossen.
Überprüfen Sie die Kabelverbindungen.
Die Tasten zur
Bedienung des
Geräts funktionieren
nicht.
Der eingebaute Mikrocomputer
funktioniert aufgrund von
Störungen nicht richtig.
Drücken Sie die Reset-Taste.
Das Radio
funktioniert nicht.
Die Funktion der
automatischen
Auswahl von
Radiosendern
funktioniert nicht.
Das Antennenkabel ist nicht
angeschlossen.
Schließen Sie das Antennenkabel
sorgfältig an.
Die Signalstärke ist zu
schwach. Wählen Sie den Radiosender
manuell aus.
Keine Möglichkeit
zur Wiedergabe
von Musik aus der
Musik-App Ihres
Telefons.
Das Gerät ist mit einem
anderen Mobiltelefon
gekoppelt.
1
) Schalten Sie Bluetooth auf dem
anderen Mobiltelefon aus.
2
) Beenden Sie die App und starten Sie
sie erneut.
DE

Safety notes
The car sound system was manufactured according to the state of the art and
established safety guidelines. Even so, dangers may occur if you do not observe
the safety notes in these instructions. Read these instructions carefully and
completely before using the car sound system. Keep the instructions at a
location so that they are always accessible to all users. Always pass on the car
sound system to third parties together with these instructions. In addition,
observe the instructions of the devices used in conjunction with this car sound
system.
General safety notes
Observe the following note to protect yourself against injuries:
Do not modify or open the device.
Use as directed
This sound system is intended for installation and operation in a vehicle with 12
V vehicle system voltage. Observe the output limits of the device. Repairs and
installation, if necessary, should be performed by a specialist.
Installation instructions
You may only install the car sound system yourself if you are experienced in
installing car sound systems and are very familiar with the electrical system of
the vehicle. For this purpose, observe the wiring diagram in these instructions.
Installing the device must not obstruct or block the function of any airbags,
other safety devices or controls.
Declaration of conformity
The Blaupunkt Competence Center Car Multimedia - Evo Sales GmbH declares
that the device complies with the basic requirements and the other relevant
regulations of the directive 2014/53/EU. The declaration of conformity can be
found on the Internet under www.blaupunkt.com.
Cleaning notes
Solvents, cleaning and scouring agents as well as dashboard spray and plastics
care product may contain ingredients that will damage the surface of the car
sound system. Use only a dry or slightly moistened cloth for cleaning the car
sound system.
Disposal notes
Do not dispose of your old unit in the household trash!
Use the return and collection systems available to dis-pose of the old
device, the remote control and exhausted batteries.
Scope of delivery
The scope of delivery includes:
Main unit BPA 3022 M
Remote control
ISO connectors
Installation screws
Operating manual
ATTENTIONS OF INSTALLATION
1. Please read the instruction manual carefully before installing the unit.
2. Make sure to connect other wires before power on the unit.
3. To avoid short circuit. Please make sure all the exposed wires are insulated.
4. Please x all the wires after installation.
5. Please make connection to the player accordingly to this instruction manual.
Wrong connection may cause damage to the unit.
6. This player only t for 12V DC device.
GENERAL NOTES
INSTALL THE UNIT
REMOVE THE UNIT
1. Remove the unit
2. Take out the outer trim frame.
HDMI attention:
Please use good quality HDMI cable.
The overall length (front and rear) should not exceed 12 feet.
WIRING CONNECTION
1. This player can only be used by + 12V DC.
2. Do not connect the battery terminal until the player is fully well installed.
3. Please make sure to connect the yellow wire to the positive of the battery (+).
4. When change the fuse please make sure that the specications are same.
5. Using good quality speakers with 4 - 8 ohm can achieve the best eect of the
unit.
LOCATION OF KEYS
1. STREFA 1 2. 1 3. STREFA 2
4. 2 5. BT 6. 3 RPT
7. 8. 4 RDM 9.
10. 5 DIR- 11. DIS 12. 6 DIR+
13. LCD 14. GNIAZDO AUX 15. GNIAZDO SŁUCHAWKOWE
16. GNIAZDO HDMI 17. RESET 18. POKRĘTŁO
19. PORT USB 20. SRC/MENU
BASIC OPERATION
Turn on/o the unit and Mute function
Press /MUTE knob to turn on the unit. When the unit is on. Shortly press this
knob for mute on/o. Press and hold this button to turn o the unit.
Audio and setting menu adjustment
Press and hold SRC/MENU button into the menu as below:
BAS->TRE->BAL->EQ(o/pop/rock/clas)->LOUD(on/o)->CLK HH->CLK
MM->IR(on/o) ->CT(indep/sync)->BEEP(on/o)->P_VOL(13)->DX(LOC)->STE-
REO(MONO)
In each item rotate the VOL knob to set them.
IR (ON/OFF):
IR ON: The unit can be switched on by IR remote control.
The system is in high power consumption status.
IR OFF: The unit can not be switched on by IR remote control.
The system is in low power consumption status.
CT (INDEP/SYNC):
CT INDEP: The clock works independently.
CT SYNC: The clock will be synchronized to the received RDS station’s time.
Note: When the clock was set in the menu, The CT is set to INDEP mode
automatically.
BEEP (ON/OFF): Turn on/o the beep sound when buttons are pressed.
P-VOL: Setting the power on volume. If the volume at switch-o is lower than
the P-VOL, the unit will set the volume to the value of the switch-o volume
when it is switched on.
If the volume at shutdown is greater than the P-VOL, the volume will be restored
to the
P-VOL value when the unit is switched on.
Bluetooth speaker search
Press and hold BT button shows “SEARCH..”. Seconds later shows the Bluetooth
device name. Rotate VOL knob to show next one. When the desired Bluetooth
speaker name was shown on LCD. Press VOL knob to pair. If the pairing is
succeed, it shows BOX ON.
Important note: Despite numerous tests with various Bluetooth devices,
compatibility with all Bluetooth devices available on the market cannot be
guaranteed.
Bluetooth speaker signal transmit operation
Shortly press BT button to stop/transmit the signal to the Bluetooth speaker. It
shows BOX OFF/ON.
Note: Although Blaupunkt checks the compatibility of dierent Bluetooth speakers
with care, a awless function with all models on the market cannot be guaranteed.
Zone 1 and Zone 2 operation
Shortly press Zone 1 (or ZONE 2) button to unable/enable Zone 1 (or ZONE 2)
volume.
Hold Zone 1 (or ZONE 2) button to mute Zone 1 (or ZONE 2) sound. Hold it
again to mute o.
Information or Clock priority
Shortly press DIS button to change the clock priority or information priority.
Note: In FM band, when received a RDS station shortly press DIS button to show
the STATION NAME/CLOCK/FREQUENCY.
Clock setting
In CLK HH/CLK MM item of the menu. Rotate VOL knob to set the hour/minute.
Head phone operation
There is a 3.5 mm head phone jack in the front panel. It is following the zone 1’s
operation.
RADIO OPERATION
Receive a radio station
Press SRC/MENU button to select FM1->FM2->MW mode. Shortly press /
button to receive the desired radio station. Press and hold / button for
manual tuning the frequency.
Manually store station & recall preset station
Receiving a desired station. Press and hold one of the preset buttons (1 - 6) for 2
seconds. The current station is stored into the number button. Shortly press the
preset button (1 - 6) to directly listen the station that saved in the corresponding
preset button.
DAB OPERATION
Press SRC/MENU button switch to DAB1 or DAB2 source.
Selecting station
Press / button to select up/down station.
Manually store station and recall preset station
When received a desired station. Press and hold 1 - 6 button for 2 seconds to
store this station to corresponding number. Shortly press the preset button (1 -
6) to directly listen the station that saved in the corresponding preset button.
USB OPERATION
When an USB driver was inserted to the unit, the unit will play the MP3/WMA le
automatically. If an USB drive is already inserted in the unit, keep pressing
SRC/MENU button shortly until the USB mode display appears.
Select le
Press / button to skip to next/previous le. Hold / button to
fast forward or fast reverse.
Play/Pause
Press 1 button to pause/playing the le.
Repeat function
Press 3 RPT button to select RPT mode: RPT ONE/RPT FOLD/RPT ALL(default)
RPT ONE: Repeat the same le.
RPT FOLD: Repeat all les of the folder.
RPT ALL: Repeat all les.
RANDOM
Press 4 RDM button to choose RDM on/o.
RDM on: Playing all les in random order.
RDM o: Turn o the random function.
Directory+/- function
Press DIR+/DIR- button to select next/previous folder to play.
Search song
Press and hold button shows NUM 0000. Rotating VOL (or directly enter
number) to select the numbers then press VOL to play. Please note the 7/8/9/0
as: BT = 7, = 8, = 9, DIS = 0.
AUX IN 1/2 OPERATION
AUX IN 1 for front panel 3.5 mm jack. AUX IN 2 for RCA in back of the unit.
Pressing SRC/MENU button to switch to AUX IN1 (2) mode when Connecting
the audio signal to the unit .
BLUETOOTH OPERATION
Pairing
On mobile phone, select the Bluetooth item searching the Bluetooth device.
“BLAUPUNKT” should appear in the list, select “BLAUPUNKT” and then input
password “0000” if it needs a password. When successful paired, the BT mark will
be displayed on the display.
Bluetooth Audio
Press SRC/MENU button to switch to BT MUSIC mode. It will play a song of your
mobile phone automatically. Press key to pause/play the song.
Press / button to select next/previous song.
HDMI OPERATION
The front HDMI port is pass through to the rear HDMI port. The HDMI playback is
therefore not aected.
V-IN and V-OUT RCA connector
In the back of the unit the V-IN connector is pass through to the V-OUT
connector.
REMOTE CONTROL
When IR is set to ON in the setting menu.
OFF : The unit can be switched ON and OFF.
VOL+: Volume up
VOL- : Volume down
1 : Zone 1 MUTE ON/OFF
2 : Zone 2 MUTE ON/OFF
Other operation please reference the description above
GENARAL
Power Supply Requirements : DC 12 Volts, Negative Ground
Chassis Dimensions : 129 (W) x 112 (D) x 65 (H)
Tone Controls
- Bass (at 100 Hz) : ±10 dB
- Treble (at 10 kHz) : ±10 dB
Maximum Output Power : 4 x 40 watts
Current Drain : 10 Ampere (max.)
RADIO FM AM
Frequency Coverage 87.5 to 108 MHz 522 to 1620 KHz
IF 10.7 MHz 450 KHz
Sensitivity 4 µV (S/N = 30 dB) 36 dBµV (S/N = 20 dB)
Stereo Separation >25 dB /
TROUBLE SHOOTING
EN
Sicherheitshinweise
Dieses Car-Sound-System wurde nach dem aktuellen Stand der Technik und den
allgemein anerkannten sicherheitstechnischen Regeln hergestellt. Dennoch
kann die Nichtbeachtung der in dieser Bedienungsanleitung enthaltenen
Sicherheitshinweise zu verschiedenen Risiken führen. Lesen Sie diese Anleitung
sorgfältig durch, bevor Sie das Car-Sound-System benutzen. Bewahren Sie die
Anleitung so auf, dass sie jederzeit für alle Benutzer zugänglich ist. Wenn Sie das
Car-Sound-System an Dritte weitergeben, legen Sie bitte diese Anleitung bei.
Beachten Sie außerdem die Hinweise in den Bedienungsanleitungen der an
dieses Car-Sound-System angeschlossenen Geräte.
Allgemeine Sicherheitshinweise
Beachten Sie die folgenden Hinweise, um sich selbst vor Verletzungen zu schützen:
Das Gerät darf weder verändert noch geönet werden.
Bestimmung
Dieses Car-Sound-System ist für den Einbau und Betrieb in Fahrzeugen mit 12 V
Versorgungsspannung konzipiert. Die Leistungsgrenzen des Geräts müssen
beachtet werden. Lassen Sie eventuelle Reparaturen oder Installationsarbeiten
von einem Fachmann durchführen.
Montageanleitung
Sie dürfen das Gerät nur dann selbst einbauen, wenn Sie Erfahrung im Einbau
eines Car-Sound-Systems und Kenntnisse in der Fahrzeugelektronik haben.
Beachten Sie dazu den Schaltplan in dieser Anleitung. Der Einbau des Geräts
darf die Funktion von Airbags, anderen Sicherheitseinrichtungen oder
Bedienelementen nicht behindern oder blockieren.
Konformitätserklärung
Blaupunkt Competence Center Car Multimedia – Evo Sales GmbH erklärt
hiermit, dass dieses Gerät mit den grundlegenden Forderungen und anderen
relevanten Bestimmungen der Richtlinie 2014/53/EU konform ist. Die
Konformitätserklärung nden Sie unter www.blaupunkt.com.
Hinweise zur Reinigung
Löse-, Reinigungs- und Scheuermittel sowie Cockpitreiniger und
Kunststopegemittel können Inhaltsstoe enthalten, die die Oberäche des
Car-Sound-Systems angreifen können. Verwenden Sie zur Reinigung des
Car-Sound-Systems nur ein trockenes oder leicht feuchtes Tuch.
Hinweise zur Entsorgung
Das Altgerät darf nicht mit dem Hausmüll entsorgt werden!
Entsorgen Sie das Gerät, die Fernbedienung und die verbrauchten
Batterien bei einer Sammelstelle für Altgeräte.
Lieferumfang
Im Lieferumfang sind enthalten:
Car-Sound-System BPA 3022 M,
Fernbedienung,
ISO-Anschlüsse,
Montageschrauben,
Bedienungsanleitung.
WICHTIGE INFORMATIONEN ZUR MONTAGE
1. Lesen Sie die Anleitung sorgfältig durch, bevor Sie das Gerät installieren.
2. Achten Sie darauf, dass alle anderen Kabel angeschlossen sind, bevor Sie die
Stromversorgung anschließen.
3. Um einen Kurzschluss zu vermeiden, stellen Sie sicher, dass alle
freiliegenden Drähte isoliert sind.
4. Sobald die Installation abgeschlossen ist, müssen alle Kabel befestigt
werden.
5. Die Anschlüsse ans Car-Sound-System müssen entsprechend dieser
Anleitung vorgenommen werden. Ein falscher Anschluss kann zu Schäden
am Gerät führen.
6. Das Car-Sound-System ist nur für eine 12-V-DC-Installation ausgelegt.
MONTAGE DES GERÄTS
DEMONTAGE DES GERÄTS
1. Demontieren Sie das Gerät.
2. Nehmen Sie den Außenrahmen ab.
Hinweis zu HDMI:
Verwenden Sie ein HDMI-Kabel von guter Qualität.
Die Gesamtlänge (vorne und hinten) sollte 3,65 m nicht überschreiten.
ANSCHLUSS VON LEITUNGEN
1. Das Car-Sound-System darf nur mit einer Spannung von +12 V DC betrieben werden.
2. Schließen Sie die Batterieklemme nur an, wenn das Car-Sound-System vollständig
montiert ist.
3. Stellen Sie sicher, dass das gelbe Kabel an den Pluspol (+) der Batterie angeschlossen ist.
4. Achten Sie beim Auswechseln der Sicherung darauf, dass die Parameter der neuen
Sicherung identisch sind.
5. Durch die Verwendung von hochwertigen Lautsprechern mit einer Impedanz von 4-8
Ohm kann das Gerät seine volle Leistung erbringen.
TASTENLAGE
1. ZONE 1 2. 1 3. ZONE 2
4. 2 5. BT 6. 3 RPT
7. 8. 4 RDM 9.
10. 5 DIR- 11. DIS 12. 6 DIR+
13. LCD 14. AUX-BUCHSE 15. KOPFHÖRERBUCHSE
16. HDMI-BUCHSE 17. RESET 18. DREHKNOPF
19. USB-PORT 20. SRC/MENU
GRUNDLEGENDE BEDIENUNG
Gerät und Stummschaltfunktion ein-/ausschalten
Um das Gerät einzuschalten, drücken Sie den Drehknopf /MUTE. Um die
Stummschaltfunktion ein- oder auszuschalten, drücken Sie kurz auf den Drehknopf,
während das Gerät eingeschaltet ist. Wenn Sie dieser Knopf gedrückt halten, wird das
Gerät ausgeschaltet.
Toneinstellungen und Setup-Menü
Drücken und halten Sie die Taste SRC/MENU gedrückt, um das unten abgebildete Menü
aufzurufen:
BAS->TRE->BAL->EQ (aus/Pop/Rock/Klassik)->LOUD (ein/aus)->CLK HH->CLK
MM->IR (ein/aus) ->CT (indep/sync)->SYG. TON (ein/aus) ->P_VOL (13)->DX (LOC)->STEREO
(MONO)
Drehen Sie an jeder Position den Drehknopf VOL, um sie einzustellen.
INFRAROT (EIN/AUS):
INFRAROT EIN: Das Gerät kann mit der Infrarot-Fernbedienung eingeschaltet werden.
Das System läuft dann mit hohem Stromverbrauch.
INFRAROT AUS: Das Gerät lässt sich nicht mit der Infrarot-Fernbedienung einschalten.
Das System läuft dann mit niedrigen Stromverbrauch.
CT (INDEP/SYNC):
CT INDEP: Die Uhr funktioniert unabhängig.
CT SYNC: Die Uhr wird mit der Zeit des empfangenen RDS-Senders synchronisiert.
Hinweis: Wenn die Uhr im Menü eingestellt wird, wird die CT-Funktion automatisch auf
den INDEP-Modus (unabhängiger Betrieb) eingestellt.
TASTENTON (EIN/AUS): Ermöglicht die Aktivierung/Deaktivierung des Tastentons beim
Drücken der Tasten.
P-VOL: Ermöglicht die Einstellung der Lautstärke beim Einschalten. Wenn die Lautstärke
beim Ausschalten niedriger ist als die P-VOL-Lautstärke, stellt das Gerät die Lautstärke
beim Einschalten auf die Lautstärke beim Ausschalten ein.
Wenn die Lautstärke beim Ausschalten höher als die P-VOL-Lautstärke ist, wird die
Lautstärke beim Einschalten des Geräts auf den P-VOL-Wert zurückgesetzt.
Bluetooth-Lautsprecher suchen
Wenn Sie die Taste BT gedrückt halten, wird „SEARCH...“ angezeigt. Nach kurzer Zeit wird die
Bezeichnung Ihres Bluetooth-Geräts angezeigt. Um das nächste Gerät anzuzeigen, drehen
Sie den Drehknopf VOL. Wenn der Name des gewünschten Bluetooth-Lautsprechers auf
dem LCD-Display angezeigt wird, drücken Sie den Drehknopf VOL, um das Gerät zu
koppeln. Wenn die Kopplung erfolgreich war, wird auf dem Display „BOX ON“ angezeigt.
Wichtiger Hinweis: Trotz zahlreicher Tests mit verschiedenen Bluetooth-Geräten kann
die Kompatibilität mit allen auf dem Markt bendlichen Bluetooth-Geräten nicht
garantiert werden.
Signalübertragung zum Bluetooth-Lautsprecher
Drücken Sie kurz die Taste BT, um die Übertragung/das Signal an den
Bluetooth-Lautsprecher zu beenden. Auf dem Display wird „BOX OFF/ON“ angezeigt.
Hinweis: Obwohl Blaupunkt die Kompatibilität der verschiedenen Bluetooth-Lautsprecher
sorgfältig prüft, kann ein reibungsloser Betrieb nicht mit allen Modellen auf dem Markt
garantiert werden.
Zone 1 und Zone 2 bedienen
Drücken Sie kurz auf die Taste Zone 1 (oder Zone 2), um den Ton von Zone 1 (oder Zone
2) aus-/einzuschalten.
Halten Sie die Taste Zone 1 (oder Zone 2) gedrückt, um den Ton von Zone 1 (oder Zone
2) stummzuschalten. Drücken Sie die Taste erneut, um die Stummschaltung aufzuheben.
Priorität einstellen: Informationen oder Uhrzeit
Drücken Sie kurz die Taste DIS, um die Priorität der Uhrzeit oder der Informationen
einzustellen.
Hinweis: Wenn Sie im UKW-Band RDS-Sender empfangen, drücken Sie kurz die Taste DIS,
um RADIOSENDER/ ZEIT/FREQUENZ anzuzeigen.
Uhrzeit einstellen
Wählen Sie im Menü CLK HH/CLK MM. Drehen Sie den Drehknopf VOL, um die
Stunde/Minute einzustellen.
Kopfhörer bedienen
An der Vorderseite bendet sich eine 3,5-mm-Kopfhörerbuchse. Das System übernimmt
für Kopfhörer die Betriebseinstellungen für Zone 1.
RADIOBEDIENUNG
Radiosender empfangen
Drücken Sie die Taste SRC/MENU, um einen Modus aus FM1->FM2->MW auszuwählen.
Drücken Sie kurz / , um den gewünschten Radiosender zu empfangen. Drücken
und halten Sie / gedrückt, um die Frequenz manuell einzustellen.
Radiosender manuell abspeichern und gespeicherte Radiosender abrufen
Empfangen des gewünschten Radiosenders. Drücken Sie eine der Speichertasten (1-6)
und halten Sie sie 2 Sekunden lang gedrückt. Der aktuelle Radiosender wird im Speicher
unter der entsprechenden Zierntaste abgelegt. Drücken Sie kurz auf die Taste des
voreingestellten Radiosenders (1-6), um direkt das Sendesignal des unter der
zugewiesenen Taste gespeicherten Senders zu hören.
BEDIENDUNG VON DAB
Drücken Sie SRC/MENU, um die Quelle zwischen DAB1 und DAB2 umzuschalten.
Radiosender auswählen
Drücken Sie die Taste / , um den nächsten/vorherigen Radiosender
auszuwählen.
Radiosender manuell abspeichern und gespeicherte Radiosender abrufen
Wenn die Frequenz des gewünschten Radiosenders eingestellt ist. Drücken und halten
Sie eine der Tasten 1 bis 6 2 Sekunden lang gedrückt, um diesen Sender unter der
entsprechenden Nummer zu speichern. Drücken Sie kurz auf die Taste des
voreingestellten Radiosenders (1-6), um direkt das Sendesignal des unter der
zugewiesenen Taste gespeicherten Senders zu hören.
UNTERSTÜTZUNG VON USB-SPEICHERN
Wenn ein USB-Speicher an das Gerät angeschlossen wird, spielt das Gerät automatisch
MP3/WMA-Dateien ab. Wenn bereits ein USB-Speicher an das Gerät angeschlossen ist,
drücken Sie kurz SRC/MENU, bis der USB-Modus-Bildschirm erscheint.
Dateien auswählen
Drücken Sie die Taste / , um zur nächsten/vorherigen Datei zu gelangen. Halten
Sie die Taste / , um vor- oder zurückzuspulen.
Wiedergabe/Pause
Drücken Sie 1 , um die Datei anzuhalten/abzuspielen.
Schleifenwiedergabe
Drücken Sie die Taste 3 RPT, um die Schleifenwiedergabefunktion zu wählen. RPT
ONE/RPT FOLD/RPT ALL (Standard)
RPT ONE: Schleifenwiedergabe einer einzelnen Datei.
RPT FOLD: Schleifenwiedergabe aller Dateien in einem Ordner.
RPT ALL: Schleifenwiedergabe aller Dateien.
RANDOM
Drücken Sie die Taste 4 RDM, um die Zufallswiedergabefunktion ein- oder auszuschalten.
RDM Ein Zufallswiedergabe aller Dateien.
RDM Aus Deaktivieren der Zufallswiedergabefunktion.
Ordnerfunktion +/-
Drücken Sie DIR+/DIR-, um den nächsten/vorherigen Ordner für die Wiedergabe
auszuwählen.
Titel suchen
Durch Drücken und Halten der Taste wird „NUM 0000“ angezeigt. Wählen Sie durch
Drehen des Drehknopfes VOL (oder durch direkte Eingabe der Nummer) die Nummer
aus und drücken Sie dann VOL zur Wiedergabe. Beachten Sie 7/8/9/0 als: BT = 7, = 8,
= 9, DIS = 0.
VERWENDUNG DER BUCHSE AUX IN 1/2
Die Buchse AUX IN 1 an der Vorderseite ist 3,5-mm. Die Buchse AUX IN 2 für RCA bendet
sich auf der Rückseite des Geräts. Durch Drücken der Taste SRC/MENU wird auf den
Modus AUX IN1 (2) umgeschaltet, wenn das Audiosignal an das Gerät angeschlossen ist.
BLUETOOTH-UNTERSTÜTZUNG
Kopplung von Geräten
Wählen Sie auf Ihrem Smartphone Bluetooth und suchen Sie nach Ihrem
Bluetooth-Gerät. In der Liste sollte „BLAUPUNKT“ erscheinen; wählen Sie „BLAUPUNKT“
und geben Sie das Passwort „0000“ ein, wenn Sie zur Eingabe eines Passworts
aufgefordert werden. Nach erfolgreichem Koppeln wird BT auf dem Display angezeigt.
Bluetooth-Audio
Drücken Sie die Taste SRC/MENU, um in den BT MUSIC-Modus zu wechseln. Das Gerät
spielt automatisch den Titel von Ihrem Handy ab. Drücken Sie die Taste , um den
Titel anzuhalten/abzuspielen.
Drücken Sie die Taste / , um den nächsten/vorherigen Titel zu wählen.
HDMI-UNTERSTÜTZUNG
Die vordere HDMI-Buchse wird mit der hinteren HDMI-Buchse verbunden. Dies hat
keinen Einuss auf HDMI-Wiedergabe.
Anschlüsse RCA V-IN und V-OUT
Auf der Rückseite des Geräts ist der V-IN-Anschluss zum V-OUT-Anschluss geführt.
FERNBEDIENUNG
Die Fernbedienung kann verwendet werden,
wenn im Menü die Option IR aktiviert ist.
OFF: Gerät einschalten/ausschalten.
VOL+: Lautstärke erhöhen
VOL-: Lautstärke reduzieren
1 : Stummschaltung Zone 1 einschalten/ausschalten
2 : Stummschaltung Zone 2 einschalten/ausschalten
Für andere Aktionen lesen Sie bitte die obigen Anweisungen.
ALLGEMEINE INFORMATIONEN
Anforderungen an die Stromversorgung : Gleichstrom 12 V, Minuspol mit Masse verbunden
Abmessungen des Montagesockels : 129 (B) x 112 (T) x 65 (H)
Klangeinstellungen
- Tief (bei 100 Hz) : ±10 dB
- Hoch (bei 100 Hz) : ±10 dB
Max. Ausgangsleistung : 4 x 40 W
Stromaufnahme : 10 A (max.)
RADIO FM AM
Frequenzbereich von 87,5 bis 108 MHz von 522 bis 1620 KHz
IF 10,7 MHz 450 KHz
Empndlichkeit 4 µV (S/N = 30 dB) 36 dBµV (S/N = 20 dB)
Trennung der Stereokanäle >25 dB /
PROBLEMBEHEBUNG

Safety notes
The car sound system was manufactured according to the state of the art and
established safety guidelines. Even so, dangers may occur if you do not observe
the safety notes in these instructions. Read these instructions carefully and
completely before using the car sound system. Keep the instructions at a
location so that they are always accessible to all users. Always pass on the car
sound system to third parties together with these instructions. In addition,
observe the instructions of the devices used in conjunction with this car sound
system.
General safety notes
Observe the following note to protect yourself against injuries:
Do not modify or open the device.
Use as directed
This sound system is intended for installation and operation in a vehicle with 12
V vehicle system voltage. Observe the output limits of the device. Repairs and
installation, if necessary, should be performed by a specialist.
Installation instructions
You may only install the car sound system yourself if you are experienced in
installing car sound systems and are very familiar with the electrical system of
the vehicle. For this purpose, observe the wiring diagram in these instructions.
Installing the device must not obstruct or block the function of any airbags,
other safety devices or controls.
Declaration of conformity
The Blaupunkt Competence Center Car Multimedia - Evo Sales GmbH declares
that the device complies with the basic requirements and the other relevant
regulations of the directive 2014/53/EU. The declaration of conformity can be
found on the Internet under www.blaupunkt.com.
Cleaning notes
Solvents, cleaning and scouring agents as well as dashboard spray and plastics
care product may contain ingredients that will damage the surface of the car
sound system. Use only a dry or slightly moistened cloth for cleaning the car
sound system.
Disposal notes
Do not dispose of your old unit in the household trash!
Use the return and collection systems available to dis-pose of the old
device, the remote control and exhausted batteries.
Scope of delivery
The scope of delivery includes:
Main unit BPA 3022 M
Remote control
ISO connectors
Installation screws
Operating manual
ATTENTIONS OF INSTALLATION
1. Please read the instruction manual carefully before installing the unit.
2. Make sure to connect other wires before power on the unit.
3. To avoid short circuit. Please make sure all the exposed wires are insulated.
4. Please x all the wires after installation.
5. Please make connection to the player accordingly to this instruction manual.
Wrong connection may cause damage to the unit.
6. This player only t for 12V DC device.
GENERAL NOTES
INSTALL THE UNIT
REMOVE THE UNIT
1. Remove the unit
2. Take out the outer trim frame.
HDMI attention:
Please use good quality HDMI cable.
The overall length (front and rear) should not exceed 12 feet.
WIRING CONNECTION
1. This player can only be used by + 12V DC.
2. Do not connect the battery terminal until the player is fully well installed.
3. Please make sure to connect the yellow wire to the positive of the battery (+).
4. When change the fuse please make sure that the specications are same.
5. Using good quality speakers with 4 - 8 ohm can achieve the best eect of the
unit.
LOCATION OF KEYS
1. STREFA 1 2. 1 3. STREFA 2
4. 2 5. BT 6. 3 RPT
7. 8. 4 RDM 9.
10. 5 DIR- 11. DIS 12. 6 DIR+
13. LCD 14. GNIAZDO AUX 15. GNIAZDO SŁUCHAWKOWE
16. GNIAZDO HDMI 17. RESET 18. POKRĘTŁO
19. PORT USB 20. SRC/MENU
BASIC OPERATION
Turn on/o the unit and Mute function
Press /MUTE knob to turn on the unit. When the unit is on. Shortly press this
knob for mute on/o. Press and hold this button to turn o the unit.
Audio and setting menu adjustment
Press and hold SRC/MENU button into the menu as below:
BAS->TRE->BAL->EQ(o/pop/rock/clas)->LOUD(on/o)->CLK HH->CLK
MM->IR(on/o) ->CT(indep/sync)->BEEP(on/o)->P_VOL(13)->DX(LOC)->STE-
REO(MONO)
In each item rotate the VOL knob to set them.
IR (ON/OFF):
IR ON: The unit can be switched on by IR remote control.
The system is in high power consumption status.
IR OFF: The unit can not be switched on by IR remote control.
The system is in low power consumption status.
CT (INDEP/SYNC):
CT INDEP: The clock works independently.
CT SYNC: The clock will be synchronized to the received RDS station’s time.
Note: When the clock was set in the menu, The CT is set to INDEP mode
automatically.
BEEP (ON/OFF): Turn on/o the beep sound when buttons are pressed.
P-VOL: Setting the power on volume. If the volume at switch-o is lower than
the P-VOL, the unit will set the volume to the value of the switch-o volume
when it is switched on.
If the volume at shutdown is greater than the P-VOL, the volume will be restored
to the
P-VOL value when the unit is switched on.
Bluetooth speaker search
Press and hold BT button shows “SEARCH..”. Seconds later shows the Bluetooth
device name. Rotate VOL knob to show next one. When the desired Bluetooth
speaker name was shown on LCD. Press VOL knob to pair. If the pairing is
succeed, it shows BOX ON.
Important note: Despite numerous tests with various Bluetooth devices,
compatibility with all Bluetooth devices available on the market cannot be
guaranteed.
Bluetooth speaker signal transmit operation
Shortly press BT button to stop/transmit the signal to the Bluetooth speaker. It
shows BOX OFF/ON.
Note: Although Blaupunkt checks the compatibility of dierent Bluetooth speakers
with care, a awless function with all models on the market cannot be guaranteed.
Zone 1 and Zone 2 operation
Shortly press Zone 1 (or ZONE 2) button to unable/enable Zone 1 (or ZONE 2)
volume.
Hold Zone 1 (or ZONE 2) button to mute Zone 1 (or ZONE 2) sound. Hold it
again to mute o.
Information or Clock priority
Shortly press DIS button to change the clock priority or information priority.
Note: In FM band, when received a RDS station shortly press DIS button to show
the STATION NAME/CLOCK/FREQUENCY.
Clock setting
In CLK HH/CLK MM item of the menu. Rotate VOL knob to set the hour/minute.
Head phone operation
There is a 3.5 mm head phone jack in the front panel. It is following the zone 1’s
operation.
RADIO OPERATION
Receive a radio station
Press SRC/MENU button to select FM1->FM2->MW mode. Shortly press /
button to receive the desired radio station. Press and hold / button for
manual tuning the frequency.
Manually store station & recall preset station
Receiving a desired station. Press and hold one of the preset buttons (1 - 6) for 2
seconds. The current station is stored into the number button. Shortly press the
preset button (1 - 6) to directly listen the station that saved in the corresponding
preset button.
DAB OPERATION
Press SRC/MENU button switch to DAB1 or DAB2 source.
Selecting station
Press / button to select up/down station.
Manually store station and recall preset station
When received a desired station. Press and hold 1 - 6 button for 2 seconds to
store this station to corresponding number. Shortly press the preset button (1 -
6) to directly listen the station that saved in the corresponding preset button.
USB OPERATION
When an USB driver was inserted to the unit, the unit will play the MP3/WMA le
automatically. If an USB drive is already inserted in the unit, keep pressing
SRC/MENU button shortly until the USB mode display appears.
Select le
Press / button to skip to next/previous le. Hold / button to
fast forward or fast reverse.
Play/Pause
Press 1 button to pause/playing the le.
Repeat function
Press 3 RPT button to select RPT mode: RPT ONE/RPT FOLD/RPT ALL(default)
RPT ONE: Repeat the same le.
RPT FOLD: Repeat all les of the folder.
RPT ALL: Repeat all les.
RANDOM
Press 4 RDM button to choose RDM on/o.
RDM on: Playing all les in random order.
RDM o: Turn o the random function.
Directory+/- function
Press DIR+/DIR- button to select next/previous folder to play.
Search song
Press and hold button shows NUM 0000. Rotating VOL (or directly enter
number) to select the numbers then press VOL to play. Please note the 7/8/9/0
as: BT = 7, = 8, = 9, DIS = 0.
AUX IN 1/2 OPERATION
AUX IN 1 for front panel 3.5 mm jack. AUX IN 2 for RCA in back of the unit.
Pressing SRC/MENU button to switch to AUX IN1 (2) mode when Connecting
the audio signal to the unit .
BLUETOOTH OPERATION
Pairing
On mobile phone, select the Bluetooth item searching the Bluetooth device.
“BLAUPUNKT” should appear in the list, select “BLAUPUNKT” and then input
password “0000” if it needs a password. When successful paired, the BT mark will
be displayed on the display.
Bluetooth Audio
Press SRC/MENU button to switch to BT MUSIC mode. It will play a song of your
mobile phone automatically. Press key to pause/play the song.
Press / button to select next/previous song.
HDMI OPERATION
The front HDMI port is pass through to the rear HDMI port. The HDMI playback is
therefore not aected.
V-IN and V-OUT RCA connector
In the back of the unit the V-IN connector is pass through to the V-OUT
connector.
REMOTE CONTROL
When IR is set to ON in the setting menu.
OFF : The unit can be switched ON and OFF.
VOL+: Volume up
VOL- : Volume down
1 : Zone 1 MUTE ON/OFF
2 : Zone 2 MUTE ON/OFF
Other operation please reference the description above
GENARAL
Power Supply Requirements : DC 12 Volts, Negative Ground
Chassis Dimensions : 129 (W) x 112 (D) x 65 (H)
Tone Controls
- Bass (at 100 Hz) : ±10 dB
- Treble (at 10 kHz) : ±10 dB
Maximum Output Power : 4 x 40 watts
Current Drain : 10 Ampere (max.)
RADIO FM AM
Frequency Coverage 87.5 to 108 MHz 522 to 1620 KHz
IF 10.7 MHz 450 KHz
Sensitivity 4 µV (S/N = 30 dB) 36 dBµV (S/N = 20 dB)
Stereo Separation >25 dB /
TROUBLE SHOOTING
EN

Safety notes
The car sound system was manufactured according to the state of the art and
established safety guidelines. Even so, dangers may occur if you do not observe
the safety notes in these instructions. Read these instructions carefully and
completely before using the car sound system. Keep the instructions at a
location so that they are always accessible to all users. Always pass on the car
sound system to third parties together with these instructions. In addition,
observe the instructions of the devices used in conjunction with this car sound
system.
General safety notes
Observe the following note to protect yourself against injuries:
Do not modify or open the device.
Use as directed
This sound system is intended for installation and operation in a vehicle with 12
V vehicle system voltage. Observe the output limits of the device. Repairs and
installation, if necessary, should be performed by a specialist.
Installation instructions
You may only install the car sound system yourself if you are experienced in
installing car sound systems and are very familiar with the electrical system of
the vehicle. For this purpose, observe the wiring diagram in these instructions.
Installing the device must not obstruct or block the function of any airbags,
other safety devices or controls.
Declaration of conformity
The Blaupunkt Competence Center Car Multimedia - Evo Sales GmbH declares
that the device complies with the basic requirements and the other relevant
regulations of the directive 2014/53/EU. The declaration of conformity can be
found on the Internet under www.blaupunkt.com.
Cleaning notes
Solvents, cleaning and scouring agents as well as dashboard spray and plastics
care product may contain ingredients that will damage the surface of the car
sound system. Use only a dry or slightly moistened cloth for cleaning the car
sound system.
Disposal notes
Do not dispose of your old unit in the household trash!
Use the return and collection systems available to dis-pose of the old
device, the remote control and exhausted batteries.
Scope of delivery
The scope of delivery includes:
Main unit BPA 3022 M
Remote control
ISO connectors
Installation screws
Operating manual
ATTENTIONS OF INSTALLATION
1. Please read the instruction manual carefully before installing the unit.
2. Make sure to connect other wires before power on the unit.
3. To avoid short circuit. Please make sure all the exposed wires are insulated.
4. Please x all the wires after installation.
5. Please make connection to the player accordingly to this instruction manual.
Wrong connection may cause damage to the unit.
6. This player only t for 12V DC device.
INSTALL THE UNIT
REMOVE THE UNIT
1. Remove the unit
2. Take out the outer trim frame.
HDMI attention:
Please use good quality HDMI cable.
The overall length (front and rear) should not exceed 12 feet.
GENERAL NOTES
WIRING CONNECTION
1. This player can only be used by + 12V DC.
2. Do not connect the battery terminal until the player is fully well installed.
3. Please make sure to connect the yellow wire to the positive of the battery (+).
4. When change the fuse please make sure that the specications are same.
5. Using good quality speakers with 4 - 8 ohm can achieve the best eect of the
unit.
LOCATION OF KEYS
1. STREFA 1 2. 1 3. STREFA 2
4. 2 5. BT 6. 3 RPT
7. 8. 4 RDM 9.
10. 5 DIR- 11. DIS 12. 6 DIR+
13. LCD 14. GNIAZDO AUX 15. GNIAZDO SŁUCHAWKOWE
16. GNIAZDO HDMI 17. RESET 18. POKRĘTŁO
19. PORT USB 20. SRC/MENU
BASIC OPERATION
Turn on/o the unit and Mute function
Press /MUTE knob to turn on the unit. When the unit is on. Shortly press this
knob for mute on/o. Press and hold this button to turn o the unit.
Audio and setting menu adjustment
Press and hold SRC/MENU button into the menu as below:
BAS->TRE->BAL->EQ(o/pop/rock/clas)->LOUD(on/o)->CLK HH->CLK
MM->IR(on/o) ->CT(indep/sync)->BEEP(on/o)->P_VOL(13)->DX(LOC)->STE-
REO(MONO)
In each item rotate the VOL knob to set them.
IR (ON/OFF):
IR ON: The unit can be switched on by IR remote control.
The system is in high power consumption status.
IR OFF: The unit can not be switched on by IR remote control.
The system is in low power consumption status.
CT (INDEP/SYNC):
CT INDEP: The clock works independently.
CT SYNC: The clock will be synchronized to the received RDS station’s time.
Note: When the clock was set in the menu, The CT is set to INDEP mode
automatically.
BEEP (ON/OFF): Turn on/o the beep sound when buttons are pressed.
P-VOL: Setting the power on volume. If the volume at switch-o is lower than
the P-VOL, the unit will set the volume to the value of the switch-o volume
when it is switched on.
If the volume at shutdown is greater than the P-VOL, the volume will be restored
to the
P-VOL value when the unit is switched on.
Bluetooth speaker search
Press and hold BT button shows “SEARCH..”. Seconds later shows the Bluetooth
device name. Rotate VOL knob to show next one. When the desired Bluetooth
speaker name was shown on LCD. Press VOL knob to pair. If the pairing is
succeed, it shows BOX ON.
Important note: Despite numerous tests with various Bluetooth devices,
compatibility with all Bluetooth devices available on the market cannot be
guaranteed.
Bluetooth speaker signal transmit operation
Shortly press BT button to stop/transmit the signal to the Bluetooth speaker. It
shows BOX OFF/ON.
Note: Although Blaupunkt checks the compatibility of dierent Bluetooth speakers
with care, a awless function with all models on the market cannot be guaranteed.
Zone 1 and Zone 2 operation
Shortly press Zone 1 (or ZONE 2) button to unable/enable Zone 1 (or ZONE 2)
volume.
Hold Zone 1 (or ZONE 2) button to mute Zone 1 (or ZONE 2) sound. Hold it
again to mute o.
Information or Clock priority
Shortly press DIS button to change the clock priority or information priority.
Note: In FM band, when received a RDS station shortly press DIS button to show
the STATION NAME/CLOCK/FREQUENCY.
Clock setting
In CLK HH/CLK MM item of the menu. Rotate VOL knob to set the hour/minute.
Head phone operation
There is a 3.5 mm head phone jack in the front panel. It is following the zone 1’s
operation.
RADIO OPERATION
Receive a radio station
Press SRC/MENU button to select FM1->FM2->MW mode. Shortly press /
button to receive the desired radio station. Press and hold / button for
manual tuning the frequency.
Manually store station & recall preset station
Receiving a desired station. Press and hold one of the preset buttons (1 - 6) for 2
seconds. The current station is stored into the number button. Shortly press the
preset button (1 - 6) to directly listen the station that saved in the corresponding
preset button.
DAB OPERATION
Press SRC/MENU button switch to DAB1 or DAB2 source.
Selecting station
Press / button to select up/down station.
Manually store station and recall preset station
When received a desired station. Press and hold 1 - 6 button for 2 seconds to
store this station to corresponding number. Shortly press the preset button (1 -
6) to directly listen the station that saved in the corresponding preset button.
USB OPERATION
When an USB driver was inserted to the unit, the unit will play the MP3/WMA le
automatically. If an USB drive is already inserted in the unit, keep pressing
SRC/MENU button shortly until the USB mode display appears.
Select le
Press / button to skip to next/previous le. Hold / button to
fast forward or fast reverse.
Play/Pause
Press 1 button to pause/playing the le.
Repeat function
Press 3 RPT button to select RPT mode: RPT ONE/RPT FOLD/RPT ALL(default)
RPT ONE: Repeat the same le.
RPT FOLD: Repeat all les of the folder.
RPT ALL: Repeat all les.
RANDOM
Press 4 RDM button to choose RDM on/o.
RDM on: Playing all les in random order.
RDM o: Turn o the random function.
Directory+/- function
Press DIR+/DIR- button to select next/previous folder to play.
Search song
Press and hold button shows NUM 0000. Rotating VOL (or directly enter
number) to select the numbers then press VOL to play. Please note the 7/8/9/0
as: BT = 7, = 8, = 9, DIS = 0.
AUX IN 1/2 OPERATION
AUX IN 1 for front panel 3.5 mm jack. AUX IN 2 for RCA in back of the unit.
Pressing SRC/MENU button to switch to AUX IN1 (2) mode when Connecting
the audio signal to the unit .
BLUETOOTH OPERATION
Pairing
On mobile phone, select the Bluetooth item searching the Bluetooth device.
“BLAUPUNKT” should appear in the list, select “BLAUPUNKT” and then input
password “0000” if it needs a password. When successful paired, the BT mark will
be displayed on the display.
Bluetooth Audio
Press SRC/MENU button to switch to BT MUSIC mode. It will play a song of your
mobile phone automatically. Press key to pause/play the song.
Press / button to select next/previous song.
HDMI OPERATION
The front HDMI port is pass through to the rear HDMI port. The HDMI playback is
therefore not aected.
V-IN and V-OUT RCA connector
In the back of the unit the V-IN connector is pass through to the V-OUT
connector.
REMOTE CONTROL
When IR is set to ON in the setting menu.
OFF : The unit can be switched ON and OFF.
VOL+: Volume up
VOL- : Volume down
1 : Zone 1 MUTE ON/OFF
2 : Zone 2 MUTE ON/OFF
Other operation please reference the description above
GENARAL
Power Supply Requirements : DC 12 Volts, Negative Ground
Chassis Dimensions : 129 (W) x 112 (D) x 65 (H)
Tone Controls
- Bass (at 100 Hz) : ±10 dB
- Treble (at 10 kHz) : ±10 dB
Maximum Output Power : 4 x 40 watts
Current Drain : 10 Ampere (max.)
RADIO FM AM
Frequency Coverage 87.5 to 108 MHz 522 to 1620 KHz
IF 10.7 MHz 450 KHz
Sensitivity 4 µV (S/N = 30 dB) 36 dBµV (S/N = 20 dB)
Stereo Separation >25 dB /
TROUBLE SHOOTING
EN

Safety notes
The car sound system was manufactured according to the state of the art and
established safety guidelines. Even so, dangers may occur if you do not observe
the safety notes in these instructions. Read these instructions carefully and
completely before using the car sound system. Keep the instructions at a
location so that they are always accessible to all users. Always pass on the car
sound system to third parties together with these instructions. In addition,
observe the instructions of the devices used in conjunction with this car sound
system.
General safety notes
Observe the following note to protect yourself against injuries:
Do not modify or open the device.
Use as directed
This sound system is intended for installation and operation in a vehicle with 12
V vehicle system voltage. Observe the output limits of the device. Repairs and
installation, if necessary, should be performed by a specialist.
Installation instructions
You may only install the car sound system yourself if you are experienced in
installing car sound systems and are very familiar with the electrical system of
the vehicle. For this purpose, observe the wiring diagram in these instructions.
Installing the device must not obstruct or block the function of any airbags,
other safety devices or controls.
Declaration of conformity
The Blaupunkt Competence Center Car Multimedia - Evo Sales GmbH declares
that the device complies with the basic requirements and the other relevant
regulations of the directive 2014/53/EU. The declaration of conformity can be
found on the Internet under www.blaupunkt.com.
Cleaning notes
Solvents, cleaning and scouring agents as well as dashboard spray and plastics
care product may contain ingredients that will damage the surface of the car
sound system. Use only a dry or slightly moistened cloth for cleaning the car
sound system.
Disposal notes
Do not dispose of your old unit in the household trash!
Use the return and collection systems available to dis-pose of the old
device, the remote control and exhausted batteries.
Scope of delivery
The scope of delivery includes:
Main unit BPA 3022 M
Remote control
ISO connectors
Installation screws
Operating manual
ATTENTIONS OF INSTALLATION
1. Please read the instruction manual carefully before installing the unit.
2. Make sure to connect other wires before power on the unit.
3. To avoid short circuit. Please make sure all the exposed wires are insulated.
4. Please x all the wires after installation.
5. Please make connection to the player accordingly to this instruction manual.
Wrong connection may cause damage to the unit.
6. This player only t for 12V DC device.
INSTALL THE UNIT
REMOVE THE UNIT
1. Remove the unit
2. Take out the outer trim frame.
HDMI attention:
Please use good quality HDMI cable.
The overall length (front and rear) should not exceed 12 feet.
WIRING CONNECTION
1. This player can only be used by + 12V DC.
2. Do not connect the battery terminal until the player is fully well installed.
3. Please make sure to connect the yellow wire to the positive of the battery (+).
4. When change the fuse please make sure that the specications are same.
5. Using good quality speakers with 4 - 8 ohm can achieve the best eect of the
unit.
WIRING CONNECTION
LOCATION OF KEYS
1. STREFA 1 2. 1 3. STREFA 2
4. 2 5. BT 6. 3 RPT
7. 8. 4 RDM 9.
10. 5 DIR- 11. DIS 12. 6 DIR+
13. LCD 14. GNIAZDO AUX 15. GNIAZDO SŁUCHAWKOWE
16. GNIAZDO HDMI 17. RESET 18. POKRĘTŁO
19. PORT USB 20. SRC/MENU
BASIC OPERATION
Turn on/o the unit and Mute function
Press /MUTE knob to turn on the unit. When the unit is on. Shortly press this
knob for mute on/o. Press and hold this button to turn o the unit.
Audio and setting menu adjustment
Press and hold SRC/MENU button into the menu as below:
BAS->TRE->BAL->EQ(o/pop/rock/clas)->LOUD(on/o)->CLK HH->CLK
MM->IR(on/o) ->CT(indep/sync)->BEEP(on/o)->P_VOL(13)->DX(LOC)->STE-
REO(MONO)
In each item rotate the VOL knob to set them.
IR (ON/OFF):
IR ON: The unit can be switched on by IR remote control.
The system is in high power consumption status.
IR OFF: The unit can not be switched on by IR remote control.
The system is in low power consumption status.
CT (INDEP/SYNC):
CT INDEP: The clock works independently.
CT SYNC: The clock will be synchronized to the received RDS station’s time.
Note: When the clock was set in the menu, The CT is set to INDEP mode
automatically.
BEEP (ON/OFF): Turn on/o the beep sound when buttons are pressed.
P-VOL: Setting the power on volume. If the volume at switch-o is lower than
the P-VOL, the unit will set the volume to the value of the switch-o volume
when it is switched on.
If the volume at shutdown is greater than the P-VOL, the volume will be restored
to the
P-VOL value when the unit is switched on.
Bluetooth speaker search
Press and hold BT button shows “SEARCH..”. Seconds later shows the Bluetooth
device name. Rotate VOL knob to show next one. When the desired Bluetooth
speaker name was shown on LCD. Press VOL knob to pair. If the pairing is
succeed, it shows BOX ON.
Important note: Despite numerous tests with various Bluetooth devices,
compatibility with all Bluetooth devices available on the market cannot be
guaranteed.
Bluetooth speaker signal transmit operation
Shortly press BT button to stop/transmit the signal to the Bluetooth speaker. It
shows BOX OFF/ON.
Note: Although Blaupunkt checks the compatibility of dierent Bluetooth speakers
with care, a awless function with all models on the market cannot be guaranteed.
Zone 1 and Zone 2 operation
Shortly press Zone 1 (or ZONE 2) button to unable/enable Zone 1 (or ZONE 2)
volume.
Hold Zone 1 (or ZONE 2) button to mute Zone 1 (or ZONE 2) sound. Hold it
again to mute o.
Information or Clock priority
Shortly press DIS button to change the clock priority or information priority.
Note: In FM band, when received a RDS station shortly press DIS button to show
the STATION NAME/CLOCK/FREQUENCY.
Clock setting
In CLK HH/CLK MM item of the menu. Rotate VOL knob to set the hour/minute.
Head phone operation
There is a 3.5 mm head phone jack in the front panel. It is following the zone 1’s
operation.
RADIO OPERATION
Receive a radio station
Press SRC/MENU button to select FM1->FM2->MW mode. Shortly press /
button to receive the desired radio station. Press and hold / button for
manual tuning the frequency.
Manually store station & recall preset station
Receiving a desired station. Press and hold one of the preset buttons (1 - 6) for 2
seconds. The current station is stored into the number button. Shortly press the
preset button (1 - 6) to directly listen the station that saved in the corresponding
preset button.
DAB OPERATION
Press SRC/MENU button switch to DAB1 or DAB2 source.
Selecting station
Press / button to select up/down station.
Manually store station and recall preset station
When received a desired station. Press and hold 1 - 6 button for 2 seconds to
store this station to corresponding number. Shortly press the preset button (1 -
6) to directly listen the station that saved in the corresponding preset button.
USB OPERATION
When an USB driver was inserted to the unit, the unit will play the MP3/WMA le
automatically. If an USB drive is already inserted in the unit, keep pressing
SRC/MENU button shortly until the USB mode display appears.
Select le
Press / button to skip to next/previous le. Hold / button to
fast forward or fast reverse.
Play/Pause
Press 1 button to pause/playing the le.
Repeat function
Press 3 RPT button to select RPT mode: RPT ONE/RPT FOLD/RPT ALL(default)
RPT ONE: Repeat the same le.
RPT FOLD: Repeat all les of the folder.
RPT ALL: Repeat all les.
RANDOM
Press 4 RDM button to choose RDM on/o.
RDM on: Playing all les in random order.
RDM o: Turn o the random function.
Directory+/- function
Press DIR+/DIR- button to select next/previous folder to play.
Search song
Press and hold button shows NUM 0000. Rotating VOL (or directly enter
number) to select the numbers then press VOL to play. Please note the 7/8/9/0
as: BT = 7, = 8, = 9, DIS = 0.
AUX IN 1/2 OPERATION
AUX IN 1 for front panel 3.5 mm jack. AUX IN 2 for RCA in back of the unit.
Pressing SRC/MENU button to switch to AUX IN1 (2) mode when Connecting
the audio signal to the unit .
BLUETOOTH OPERATION
Pairing
On mobile phone, select the Bluetooth item searching the Bluetooth device.
“BLAUPUNKT” should appear in the list, select “BLAUPUNKT” and then input
password “0000” if it needs a password. When successful paired, the BT mark will
be displayed on the display.
Bluetooth Audio
Press SRC/MENU button to switch to BT MUSIC mode. It will play a song of your
mobile phone automatically. Press key to pause/play the song.
Press / button to select next/previous song.
HDMI OPERATION
The front HDMI port is pass through to the rear HDMI port. The HDMI playback is
therefore not aected.
V-IN and V-OUT RCA connector
In the back of the unit the V-IN connector is pass through to the V-OUT
connector.
REMOTE CONTROL
When IR is set to ON in the setting menu.
OFF : The unit can be switched ON and OFF.
VOL+: Volume up
VOL- : Volume down
1 : Zone 1 MUTE ON/OFF
2 : Zone 2 MUTE ON/OFF
Other operation please reference the description above
GENARAL
Power Supply Requirements : DC 12 Volts, Negative Ground
Chassis Dimensions : 129 (W) x 112 (D) x 65 (H)
Tone Controls
- Bass (at 100 Hz) : ±10 dB
- Treble (at 10 kHz) : ±10 dB
Maximum Output Power : 4 x 40 watts
Current Drain : 10 Ampere (max.)
RADIO FM AM
Frequency Coverage 87.5 to 108 MHz 522 to 1620 KHz
IF 10.7 MHz 450 KHz
Sensitivity 4 µV (S/N = 30 dB) 36 dBµV (S/N = 20 dB)
Stereo Separation >25 dB /
TROUBLE SHOOTING
EN

Safety notes
The car sound system was manufactured according to the state of the art and
established safety guidelines. Even so, dangers may occur if you do not observe
the safety notes in these instructions. Read these instructions carefully and
completely before using the car sound system. Keep the instructions at a
location so that they are always accessible to all users. Always pass on the car
sound system to third parties together with these instructions. In addition,
observe the instructions of the devices used in conjunction with this car sound
system.
General safety notes
Observe the following note to protect yourself against injuries:
Do not modify or open the device.
Use as directed
This sound system is intended for installation and operation in a vehicle with 12
V vehicle system voltage. Observe the output limits of the device. Repairs and
installation, if necessary, should be performed by a specialist.
Installation instructions
You may only install the car sound system yourself if you are experienced in
installing car sound systems and are very familiar with the electrical system of
the vehicle. For this purpose, observe the wiring diagram in these instructions.
Installing the device must not obstruct or block the function of any airbags,
other safety devices or controls.
Declaration of conformity
The Blaupunkt Competence Center Car Multimedia - Evo Sales GmbH declares
that the device complies with the basic requirements and the other relevant
regulations of the directive 2014/53/EU. The declaration of conformity can be
found on the Internet under www.blaupunkt.com.
Cleaning notes
Solvents, cleaning and scouring agents as well as dashboard spray and plastics
care product may contain ingredients that will damage the surface of the car
sound system. Use only a dry or slightly moistened cloth for cleaning the car
sound system.
Disposal notes
Do not dispose of your old unit in the household trash!
Use the return and collection systems available to dis-pose of the old
device, the remote control and exhausted batteries.
Scope of delivery
The scope of delivery includes:
Main unit BPA 3022 M
Remote control
ISO connectors
Installation screws
Operating manual
ATTENTIONS OF INSTALLATION
1. Please read the instruction manual carefully before installing the unit.
2. Make sure to connect other wires before power on the unit.
3. To avoid short circuit. Please make sure all the exposed wires are insulated.
4. Please x all the wires after installation.
5. Please make connection to the player accordingly to this instruction manual.
Wrong connection may cause damage to the unit.
6. This player only t for 12V DC device.
INSTALL THE UNIT
REMOVE THE UNIT
1. Remove the unit
2. Take out the outer trim frame.
HDMI attention:
Please use good quality HDMI cable.
The overall length (front and rear) should not exceed 12 feet.
WIRING CONNECTION
1. This player can only be used by + 12V DC.
2. Do not connect the battery terminal until the player is fully well installed.
3. Please make sure to connect the yellow wire to the positive of the battery (+).
4. When change the fuse please make sure that the specications are same.
5. Using good quality speakers with 4 - 8 ohm can achieve the best eect of the
unit.
OPERATION
LOCATION OF KEYS
1. STREFA 1 2. 1 3. STREFA 2
4. 2 5. BT 6. 3 RPT
7. 8. 4 RDM 9.
10. 5 DIR- 11. DIS 12. 6 DIR+
13. LCD 14. GNIAZDO AUX 15. GNIAZDO SŁUCHAWKOWE
16. GNIAZDO HDMI 17. RESET 18. POKRĘTŁO
19. PORT USB 20. SRC/MENU
BASIC OPERATION
Turn on/o the unit and Mute function
Press /MUTE knob to turn on the unit. When the unit is on. Shortly press this
knob for mute on/o. Press and hold this button to turn o the unit.
Audio and setting menu adjustment
Press and hold SRC/MENU button into the menu as below:
BAS->TRE->BAL->EQ(o/pop/rock/clas)->LOUD(on/o)->CLK HH->CLK
MM->IR(on/o) ->CT(indep/sync)->BEEP(on/o)->P_VOL(13)->DX(LOC)->STE-
REO(MONO)
In each item rotate the VOL knob to set them.
IR (ON/OFF):
IR ON: The unit can be switched on by IR remote control.
The system is in high power consumption status.
IR OFF: The unit can not be switched on by IR remote control.
The system is in low power consumption status.
CT (INDEP/SYNC):
CT INDEP: The clock works independently.
CT SYNC: The clock will be synchronized to the received RDS station’s time.
Note: When the clock was set in the menu, The CT is set to INDEP mode
automatically.
BEEP (ON/OFF): Turn on/o the beep sound when buttons are pressed.
P-VOL: Setting the power on volume. If the volume at switch-o is lower than
the P-VOL, the unit will set the volume to the value of the switch-o volume
when it is switched on.
If the volume at shutdown is greater than the P-VOL, the volume will be restored
to the
P-VOL value when the unit is switched on.
Bluetooth speaker search
Press and hold BT button shows “SEARCH..”. Seconds later shows the Bluetooth
device name. Rotate VOL knob to show next one. When the desired Bluetooth
speaker name was shown on LCD. Press VOL knob to pair. If the pairing is
succeed, it shows BOX ON.
Important note: Despite numerous tests with various Bluetooth devices,
compatibility with all Bluetooth devices available on the market cannot be
guaranteed.
Bluetooth speaker signal transmit operation
Shortly press BT button to stop/transmit the signal to the Bluetooth speaker. It
shows BOX OFF/ON.
Note: Although Blaupunkt checks the compatibility of dierent Bluetooth speakers
with care, a awless function with all models on the market cannot be guaranteed.
Zone 1 and Zone 2 operation
Shortly press Zone 1 (or ZONE 2) button to unable/enable Zone 1 (or ZONE 2)
volume.
Hold Zone 1 (or ZONE 2) button to mute Zone 1 (or ZONE 2) sound. Hold it
again to mute o.
Information or Clock priority
Shortly press DIS button to change the clock priority or information priority.
Note: In FM band, when received a RDS station shortly press DIS button to show
the STATION NAME/CLOCK/FREQUENCY.
Clock setting
In CLK HH/CLK MM item of the menu. Rotate VOL knob to set the hour/minute.
Head phone operation
There is a 3.5 mm head phone jack in the front panel. It is following the zone 1’s
operation.
RADIO OPERATION
Receive a radio station
Press SRC/MENU button to select FM1->FM2->MW mode. Shortly press /
button to receive the desired radio station. Press and hold / button for
manual tuning the frequency.
Manually store station & recall preset station
Receiving a desired station. Press and hold one of the preset buttons (1 - 6) for 2
seconds. The current station is stored into the number button. Shortly press the
preset button (1 - 6) to directly listen the station that saved in the corresponding
preset button.
DAB OPERATION
Press SRC/MENU button switch to DAB1 or DAB2 source.
Selecting station
Press / button to select up/down station.
Manually store station and recall preset station
When received a desired station. Press and hold 1 - 6 button for 2 seconds to
store this station to corresponding number. Shortly press the preset button (1 -
6) to directly listen the station that saved in the corresponding preset button.
USB OPERATION
When an USB driver was inserted to the unit, the unit will play the MP3/WMA le
automatically. If an USB drive is already inserted in the unit, keep pressing
SRC/MENU button shortly until the USB mode display appears.
Select le
Press / button to skip to next/previous le. Hold / button to
fast forward or fast reverse.
Play/Pause
Press 1 button to pause/playing the le.
Repeat function
Press 3 RPT button to select RPT mode: RPT ONE/RPT FOLD/RPT ALL(default)
RPT ONE: Repeat the same le.
RPT FOLD: Repeat all les of the folder.
RPT ALL: Repeat all les.
RANDOM
Press 4 RDM button to choose RDM on/o.
RDM on: Playing all les in random order.
RDM o: Turn o the random function.
Directory+/- function
Press DIR+/DIR- button to select next/previous folder to play.
Search song
Press and hold button shows NUM 0000. Rotating VOL (or directly enter
number) to select the numbers then press VOL to play. Please note the 7/8/9/0
as: BT = 7, = 8, = 9, DIS = 0.
AUX IN 1/2 OPERATION
AUX IN 1 for front panel 3.5 mm jack. AUX IN 2 for RCA in back of the unit.
Pressing SRC/MENU button to switch to AUX IN1 (2) mode when Connecting
the audio signal to the unit .
BLUETOOTH OPERATION
Pairing
On mobile phone, select the Bluetooth item searching the Bluetooth device.
“BLAUPUNKT” should appear in the list, select “BLAUPUNKT” and then input
password “0000” if it needs a password. When successful paired, the BT mark will
be displayed on the display.
Bluetooth Audio
Press SRC/MENU button to switch to BT MUSIC mode. It will play a song of your
mobile phone automatically. Press key to pause/play the song.
Press / button to select next/previous song.
HDMI OPERATION
The front HDMI port is pass through to the rear HDMI port. The HDMI playback is
therefore not aected.
V-IN and V-OUT RCA connector
In the back of the unit the V-IN connector is pass through to the V-OUT
connector.
REMOTE CONTROL
When IR is set to ON in the setting menu.
OFF : The unit can be switched ON and OFF.
VOL+: Volume up
VOL- : Volume down
1 : Zone 1 MUTE ON/OFF
2 : Zone 2 MUTE ON/OFF
Other operation please reference the description above
GENARAL
Power Supply Requirements : DC 12 Volts, Negative Ground
Chassis Dimensions : 129 (W) x 112 (D) x 65 (H)
Tone Controls
- Bass (at 100 Hz) : ±10 dB
- Treble (at 10 kHz) : ±10 dB
Maximum Output Power : 4 x 40 watts
Current Drain : 10 Ampere (max.)
RADIO FM AM
Frequency Coverage 87.5 to 108 MHz 522 to 1620 KHz
IF 10.7 MHz 450 KHz
Sensitivity 4 µV (S/N = 30 dB) 36 dBµV (S/N = 20 dB)
Stereo Separation >25 dB /
TROUBLE SHOOTING
EN

Safety notes
The car sound system was manufactured according to the state of the art and
established safety guidelines. Even so, dangers may occur if you do not observe
the safety notes in these instructions. Read these instructions carefully and
completely before using the car sound system. Keep the instructions at a
location so that they are always accessible to all users. Always pass on the car
sound system to third parties together with these instructions. In addition,
observe the instructions of the devices used in conjunction with this car sound
system.
General safety notes
Observe the following note to protect yourself against injuries:
Do not modify or open the device.
Use as directed
This sound system is intended for installation and operation in a vehicle with 12
V vehicle system voltage. Observe the output limits of the device. Repairs and
installation, if necessary, should be performed by a specialist.
Installation instructions
You may only install the car sound system yourself if you are experienced in
installing car sound systems and are very familiar with the electrical system of
the vehicle. For this purpose, observe the wiring diagram in these instructions.
Installing the device must not obstruct or block the function of any airbags,
other safety devices or controls.
Declaration of conformity
The Blaupunkt Competence Center Car Multimedia - Evo Sales GmbH declares
that the device complies with the basic requirements and the other relevant
regulations of the directive 2014/53/EU. The declaration of conformity can be
found on the Internet under www.blaupunkt.com.
Cleaning notes
Solvents, cleaning and scouring agents as well as dashboard spray and plastics
care product may contain ingredients that will damage the surface of the car
sound system. Use only a dry or slightly moistened cloth for cleaning the car
sound system.
Disposal notes
Do not dispose of your old unit in the household trash!
Use the return and collection systems available to dis-pose of the old
device, the remote control and exhausted batteries.
Scope of delivery
The scope of delivery includes:
Main unit BPA 3022 M
Remote control
ISO connectors
Installation screws
Operating manual
ATTENTIONS OF INSTALLATION
1. Please read the instruction manual carefully before installing the unit.
2. Make sure to connect other wires before power on the unit.
3. To avoid short circuit. Please make sure all the exposed wires are insulated.
4. Please x all the wires after installation.
5. Please make connection to the player accordingly to this instruction manual.
Wrong connection may cause damage to the unit.
6. This player only t for 12V DC device.
INSTALL THE UNIT
REMOVE THE UNIT
1. Remove the unit
2. Take out the outer trim frame.
HDMI attention:
Please use good quality HDMI cable.
The overall length (front and rear) should not exceed 12 feet.
WIRING CONNECTION
1. This player can only be used by + 12V DC.
2. Do not connect the battery terminal until the player is fully well installed.
3. Please make sure to connect the yellow wire to the positive of the battery (+).
4. When change the fuse please make sure that the specications are same.
5. Using good quality speakers with 4 - 8 ohm can achieve the best eect of the
unit.
LOCATION OF KEYS
1. STREFA 1 2. 1 3. STREFA 2
4. 2 5. BT 6. 3 RPT
7. 8. 4 RDM 9.
10. 5 DIR- 11. DIS 12. 6 DIR+
13. LCD 14. GNIAZDO AUX 15. GNIAZDO SŁUCHAWKOWE
16. GNIAZDO HDMI 17. RESET 18. POKRĘTŁO
19. PORT USB 20. SRC/MENU
OPERATION
BASIC OPERATION
Turn on/o the unit and Mute function
Press /MUTE knob to turn on the unit. When the unit is on. Shortly press this
knob for mute on/o. Press and hold this button to turn o the unit.
Audio and setting menu adjustment
Press and hold SRC/MENU button into the menu as below:
BAS->TRE->BAL->EQ(o/pop/rock/clas)->LOUD(on/o)->CLK HH->CLK
MM->IR(on/o) ->CT(indep/sync)->BEEP(on/o)->P_VOL(13)->DX(LOC)->STE-
REO(MONO)
In each item rotate the VOL knob to set them.
IR (ON/OFF):
IR ON: The unit can be switched on by IR remote control.
The system is in high power consumption status.
IR OFF: The unit can not be switched on by IR remote control.
The system is in low power consumption status.
CT (INDEP/SYNC):
CT INDEP: The clock works independently.
CT SYNC: The clock will be synchronized to the received RDS station’s time.
Note: When the clock was set in the menu, The CT is set to INDEP mode
automatically.
BEEP (ON/OFF): Turn on/o the beep sound when buttons are pressed.
P-VOL: Setting the power on volume. If the volume at switch-o is lower than
the P-VOL, the unit will set the volume to the value of the switch-o volume
when it is switched on.
If the volume at shutdown is greater than the P-VOL, the volume will be restored
to the
P-VOL value when the unit is switched on.
Bluetooth speaker search
Press and hold BT button shows “SEARCH..”. Seconds later shows the Bluetooth
device name. Rotate VOL knob to show next one. When the desired Bluetooth
speaker name was shown on LCD. Press VOL knob to pair. If the pairing is
succeed, it shows BOX ON.
Important note: Despite numerous tests with various Bluetooth devices,
compatibility with all Bluetooth devices available on the market cannot be
guaranteed.
Bluetooth speaker signal transmit operation
Shortly press BT button to stop/transmit the signal to the Bluetooth speaker. It
shows BOX OFF/ON.
Note: Although Blaupunkt checks the compatibility of dierent Bluetooth speakers
with care, a awless function with all models on the market cannot be guaranteed.
Zone 1 and Zone 2 operation
Shortly press Zone 1 (or ZONE 2) button to unable/enable Zone 1 (or ZONE 2)
volume.
Hold Zone 1 (or ZONE 2) button to mute Zone 1 (or ZONE 2) sound. Hold it
again to mute o.
Information or Clock priority
Shortly press DIS button to change the clock priority or information priority.
Note: In FM band, when received a RDS station shortly press DIS button to show
the STATION NAME/CLOCK/FREQUENCY.
Clock setting
In CLK HH/CLK MM item of the menu. Rotate VOL knob to set the hour/minute.
Head phone operation
There is a 3.5 mm head phone jack in the front panel. It is following the zone 1’s
operation.
RADIO OPERATION
Receive a radio station
Press SRC/MENU button to select FM1->FM2->MW mode. Shortly press /
button to receive the desired radio station. Press and hold / button for
manual tuning the frequency.
Manually store station & recall preset station
Receiving a desired station. Press and hold one of the preset buttons (1 - 6) for 2
seconds. The current station is stored into the number button. Shortly press the
preset button (1 - 6) to directly listen the station that saved in the corresponding
preset button.
DAB OPERATION
Press SRC/MENU button switch to DAB1 or DAB2 source.
Selecting station
Press / button to select up/down station.
Manually store station and recall preset station
When received a desired station. Press and hold 1 - 6 button for 2 seconds to
store this station to corresponding number. Shortly press the preset button (1 -
6) to directly listen the station that saved in the corresponding preset button.
USB OPERATION
When an USB driver was inserted to the unit, the unit will play the MP3/WMA le
automatically. If an USB drive is already inserted in the unit, keep pressing
SRC/MENU button shortly until the USB mode display appears.
Select le
Press / button to skip to next/previous le. Hold / button to
fast forward or fast reverse.
Play/Pause
Press 1 button to pause/playing the le.
Repeat function
Press 3 RPT button to select RPT mode: RPT ONE/RPT FOLD/RPT ALL(default)
RPT ONE: Repeat the same le.
RPT FOLD: Repeat all les of the folder.
RPT ALL: Repeat all les.
RANDOM
Press 4 RDM button to choose RDM on/o.
RDM on: Playing all les in random order.
RDM o: Turn o the random function.
Directory+/- function
Press DIR+/DIR- button to select next/previous folder to play.
Search song
Press and hold button shows NUM 0000. Rotating VOL (or directly enter
number) to select the numbers then press VOL to play. Please note the 7/8/9/0
as: BT = 7, = 8, = 9, DIS = 0.
AUX IN 1/2 OPERATION
AUX IN 1 for front panel 3.5 mm jack. AUX IN 2 for RCA in back of the unit.
Pressing SRC/MENU button to switch to AUX IN1 (2) mode when Connecting
the audio signal to the unit .
BLUETOOTH OPERATION
Pairing
On mobile phone, select the Bluetooth item searching the Bluetooth device.
“BLAUPUNKT” should appear in the list, select “BLAUPUNKT” and then input
password “0000” if it needs a password. When successful paired, the BT mark will
be displayed on the display.
Bluetooth Audio
Press SRC/MENU button to switch to BT MUSIC mode. It will play a song of your
mobile phone automatically. Press key to pause/play the song.
Press / button to select next/previous song.
HDMI OPERATION
The front HDMI port is pass through to the rear HDMI port. The HDMI playback is
therefore not aected.
V-IN and V-OUT RCA connector
In the back of the unit the V-IN connector is pass through to the V-OUT
connector.
REMOTE CONTROL
When IR is set to ON in the setting menu.
OFF : The unit can be switched ON and OFF.
VOL+: Volume up
VOL- : Volume down
1 : Zone 1 MUTE ON/OFF
2 : Zone 2 MUTE ON/OFF
Other operation please reference the description above
GENARAL
Power Supply Requirements : DC 12 Volts, Negative Ground
Chassis Dimensions : 129 (W) x 112 (D) x 65 (H)
Tone Controls
- Bass (at 100 Hz) : ±10 dB
- Treble (at 10 kHz) : ±10 dB
Maximum Output Power : 4 x 40 watts
Current Drain : 10 Ampere (max.)
RADIO FM AM
Frequency Coverage 87.5 to 108 MHz 522 to 1620 KHz
IF 10.7 MHz 450 KHz
Sensitivity 4 µV (S/N = 30 dB) 36 dBµV (S/N = 20 dB)
Stereo Separation >25 dB /
TROUBLE SHOOTING
EN

Safety notes
The car sound system was manufactured according to the state of the art and
established safety guidelines. Even so, dangers may occur if you do not observe
the safety notes in these instructions. Read these instructions carefully and
completely before using the car sound system. Keep the instructions at a
location so that they are always accessible to all users. Always pass on the car
sound system to third parties together with these instructions. In addition,
observe the instructions of the devices used in conjunction with this car sound
system.
General safety notes
Observe the following note to protect yourself against injuries:
Do not modify or open the device.
Use as directed
This sound system is intended for installation and operation in a vehicle with 12
V vehicle system voltage. Observe the output limits of the device. Repairs and
installation, if necessary, should be performed by a specialist.
Installation instructions
You may only install the car sound system yourself if you are experienced in
installing car sound systems and are very familiar with the electrical system of
the vehicle. For this purpose, observe the wiring diagram in these instructions.
Installing the device must not obstruct or block the function of any airbags,
other safety devices or controls.
Declaration of conformity
The Blaupunkt Competence Center Car Multimedia - Evo Sales GmbH declares
that the device complies with the basic requirements and the other relevant
regulations of the directive 2014/53/EU. The declaration of conformity can be
found on the Internet under www.blaupunkt.com.
Cleaning notes
Solvents, cleaning and scouring agents as well as dashboard spray and plastics
care product may contain ingredients that will damage the surface of the car
sound system. Use only a dry or slightly moistened cloth for cleaning the car
sound system.
Disposal notes
Do not dispose of your old unit in the household trash!
Use the return and collection systems available to dis-pose of the old
device, the remote control and exhausted batteries.
Scope of delivery
The scope of delivery includes:
Main unit BPA 3022 M
Remote control
ISO connectors
Installation screws
Operating manual
ATTENTIONS OF INSTALLATION
1. Please read the instruction manual carefully before installing the unit.
2. Make sure to connect other wires before power on the unit.
3. To avoid short circuit. Please make sure all the exposed wires are insulated.
4. Please x all the wires after installation.
5. Please make connection to the player accordingly to this instruction manual.
Wrong connection may cause damage to the unit.
6. This player only t for 12V DC device.
INSTALL THE UNIT
REMOVE THE UNIT
1. Remove the unit
2. Take out the outer trim frame.
HDMI attention:
Please use good quality HDMI cable.
The overall length (front and rear) should not exceed 12 feet.
WIRING CONNECTION
1. This player can only be used by + 12V DC.
2. Do not connect the battery terminal until the player is fully well installed.
3. Please make sure to connect the yellow wire to the positive of the battery (+).
4. When change the fuse please make sure that the specications are same.
5. Using good quality speakers with 4 - 8 ohm can achieve the best eect of the
unit.
LOCATION OF KEYS
1. STREFA 1 2. 1 3. STREFA 2
4. 2 5. BT 6. 3 RPT
7. 8. 4 RDM 9.
10. 5 DIR- 11. DIS 12. 6 DIR+
13. LCD 14. GNIAZDO AUX 15. GNIAZDO SŁUCHAWKOWE
16. GNIAZDO HDMI 17. RESET 18. POKRĘTŁO
19. PORT USB 20. SRC/MENU
BASIC OPERATION
Turn on/o the unit and Mute function
Press /MUTE knob to turn on the unit. When the unit is on. Shortly press this
knob for mute on/o. Press and hold this button to turn o the unit.
Audio and setting menu adjustment
Press and hold SRC/MENU button into the menu as below:
BAS->TRE->BAL->EQ(o/pop/rock/clas)->LOUD(on/o)->CLK HH->CLK
MM->IR(on/o) ->CT(indep/sync)->BEEP(on/o)->P_VOL(13)->DX(LOC)->STE-
REO(MONO)
In each item rotate the VOL knob to set them.
IR (ON/OFF):
IR ON: The unit can be switched on by IR remote control.
The system is in high power consumption status.
IR OFF: The unit can not be switched on by IR remote control.
The system is in low power consumption status.
CT (INDEP/SYNC):
CT INDEP: The clock works independently.
CT SYNC: The clock will be synchronized to the received RDS station’s time.
Note: When the clock was set in the menu, The CT is set to INDEP mode
automatically.
BEEP (ON/OFF): Turn on/o the beep sound when buttons are pressed.
P-VOL: Setting the power on volume. If the volume at switch-o is lower than
the P-VOL, the unit will set the volume to the value of the switch-o volume
when it is switched on.
If the volume at shutdown is greater than the P-VOL, the volume will be restored
to the
P-VOL value when the unit is switched on.
Bluetooth speaker search
Press and hold BT button shows “SEARCH..”. Seconds later shows the Bluetooth
device name. Rotate VOL knob to show next one. When the desired Bluetooth
speaker name was shown on LCD. Press VOL knob to pair. If the pairing is
succeed, it shows BOX ON.
Important note: Despite numerous tests with various Bluetooth devices,
compatibility with all Bluetooth devices available on the market cannot be
guaranteed.
Bluetooth speaker signal transmit operation
Shortly press BT button to stop/transmit the signal to the Bluetooth speaker. It
shows BOX OFF/ON.
Note: Although Blaupunkt checks the compatibility of dierent Bluetooth speakers
with care, a awless function with all models on the market cannot be guaranteed.
Zone 1 and Zone 2 operation
Shortly press Zone 1 (or ZONE 2) button to unable/enable Zone 1 (or ZONE 2)
volume.
Hold Zone 1 (or ZONE 2) button to mute Zone 1 (or ZONE 2) sound. Hold it
again to mute o.
Information or Clock priority
Shortly press DIS button to change the clock priority or information priority.
Note: In FM band, when received a RDS station shortly press DIS button to show
the STATION NAME/CLOCK/FREQUENCY.
Clock setting
In CLK HH/CLK MM item of the menu. Rotate VOL knob to set the hour/minute.
Head phone operation
There is a 3.5 mm head phone jack in the front panel. It is following the zone 1’s
operation.
RADIO OPERATION
Receive a radio station
Press SRC/MENU button to select FM1->FM2->MW mode. Shortly press /
button to receive the desired radio station. Press and hold / button for
manual tuning the frequency.
Manually store station & recall preset station
Receiving a desired station. Press and hold one of the preset buttons (1 - 6) for 2
seconds. The current station is stored into the number button. Shortly press the
preset button (1 - 6) to directly listen the station that saved in the corresponding
preset button.
DAB OPERATION
Press SRC/MENU button switch to DAB1 or DAB2 source.
Selecting station
Press / button to select up/down station.
OPERATION
Manually store station and recall preset station
When received a desired station. Press and hold 1 - 6 button for 2 seconds to
store this station to corresponding number. Shortly press the preset button (1 -
6) to directly listen the station that saved in the corresponding preset button.
USB OPERATION
When an USB driver was inserted to the unit, the unit will play the MP3/WMA le
automatically. If an USB drive is already inserted in the unit, keep pressing
SRC/MENU button shortly until the USB mode display appears.
Select le
Press / button to skip to next/previous le. Hold / button to
fast forward or fast reverse.
Play/Pause
Press 1 button to pause/playing the le.
Repeat function
Press 3 RPT button to select RPT mode: RPT ONE/RPT FOLD/RPT ALL(default)
RPT ONE: Repeat the same le.
RPT FOLD: Repeat all les of the folder.
RPT ALL: Repeat all les.
RANDOM
Press 4 RDM button to choose RDM on/o.
RDM on: Playing all les in random order.
RDM o: Turn o the random function.
Directory+/- function
Press DIR+/DIR- button to select next/previous folder to play.
Search song
Press and hold button shows NUM 0000. Rotating VOL (or directly enter
number) to select the numbers then press VOL to play. Please note the 7/8/9/0
as: BT = 7, = 8, = 9, DIS = 0.
AUX IN 1/2 OPERATION
AUX IN 1 for front panel 3.5 mm jack. AUX IN 2 for RCA in back of the unit.
Pressing SRC/MENU button to switch to AUX IN1 (2) mode when Connecting
the audio signal to the unit .
BLUETOOTH OPERATION
Pairing
On mobile phone, select the Bluetooth item searching the Bluetooth device.
“BLAUPUNKT” should appear in the list, select “BLAUPUNKT” and then input
password “0000” if it needs a password. When successful paired, the BT mark will
be displayed on the display.
Bluetooth Audio
Press SRC/MENU button to switch to BT MUSIC mode. It will play a song of your
mobile phone automatically. Press key to pause/play the song.
Press / button to select next/previous song.
HDMI OPERATION
The front HDMI port is pass through to the rear HDMI port. The HDMI playback is
therefore not aected.
V-IN and V-OUT RCA connector
In the back of the unit the V-IN connector is pass through to the V-OUT
connector.
REMOTE CONTROL
When IR is set to ON in the setting menu.
OFF : The unit can be switched ON and OFF.
VOL+: Volume up
VOL- : Volume down
1 : Zone 1 MUTE ON/OFF
2 : Zone 2 MUTE ON/OFF
Other operation please reference the description above
GENARAL
Power Supply Requirements : DC 12 Volts, Negative Ground
Chassis Dimensions : 129 (W) x 112 (D) x 65 (H)
Tone Controls
- Bass (at 100 Hz) : ±10 dB
- Treble (at 10 kHz) : ±10 dB
Maximum Output Power : 4 x 40 watts
Current Drain : 10 Ampere (max.)
RADIO FM AM
Frequency Coverage 87.5 to 108 MHz 522 to 1620 KHz
IF 10.7 MHz 450 KHz
Sensitivity 4 µV (S/N = 30 dB) 36 dBµV (S/N = 20 dB)
Stereo Separation >25 dB /
TROUBLE SHOOTING
EN

Safety notes
The car sound system was manufactured according to the state of the art and
established safety guidelines. Even so, dangers may occur if you do not observe
the safety notes in these instructions. Read these instructions carefully and
completely before using the car sound system. Keep the instructions at a
location so that they are always accessible to all users. Always pass on the car
sound system to third parties together with these instructions. In addition,
observe the instructions of the devices used in conjunction with this car sound
system.
General safety notes
Observe the following note to protect yourself against injuries:
Do not modify or open the device.
Use as directed
This sound system is intended for installation and operation in a vehicle with 12
V vehicle system voltage. Observe the output limits of the device. Repairs and
installation, if necessary, should be performed by a specialist.
Installation instructions
You may only install the car sound system yourself if you are experienced in
installing car sound systems and are very familiar with the electrical system of
the vehicle. For this purpose, observe the wiring diagram in these instructions.
Installing the device must not obstruct or block the function of any airbags,
other safety devices or controls.
Declaration of conformity
The Blaupunkt Competence Center Car Multimedia - Evo Sales GmbH declares
that the device complies with the basic requirements and the other relevant
regulations of the directive 2014/53/EU. The declaration of conformity can be
found on the Internet under www.blaupunkt.com.
Cleaning notes
Solvents, cleaning and scouring agents as well as dashboard spray and plastics
care product may contain ingredients that will damage the surface of the car
sound system. Use only a dry or slightly moistened cloth for cleaning the car
sound system.
Disposal notes
Do not dispose of your old unit in the household trash!
Use the return and collection systems available to dis-pose of the old
device, the remote control and exhausted batteries.
Scope of delivery
The scope of delivery includes:
Main unit BPA 3022 M
Remote control
ISO connectors
Installation screws
Operating manual
ATTENTIONS OF INSTALLATION
1. Please read the instruction manual carefully before installing the unit.
2. Make sure to connect other wires before power on the unit.
3. To avoid short circuit. Please make sure all the exposed wires are insulated.
4. Please x all the wires after installation.
5. Please make connection to the player accordingly to this instruction manual.
Wrong connection may cause damage to the unit.
6. This player only t for 12V DC device.
INSTALL THE UNIT
REMOVE THE UNIT
1. Remove the unit
2. Take out the outer trim frame.
HDMI attention:
Please use good quality HDMI cable.
The overall length (front and rear) should not exceed 12 feet.
WIRING CONNECTION
1. This player can only be used by + 12V DC.
2. Do not connect the battery terminal until the player is fully well installed.
3. Please make sure to connect the yellow wire to the positive of the battery (+).
4. When change the fuse please make sure that the specications are same.
5. Using good quality speakers with 4 - 8 ohm can achieve the best eect of the
unit.
LOCATION OF KEYS
1. STREFA 1 2. 1 3. STREFA 2
4. 2 5. BT 6. 3 RPT
7. 8. 4 RDM 9.
10. 5 DIR- 11. DIS 12. 6 DIR+
13. LCD 14. GNIAZDO AUX 15. GNIAZDO SŁUCHAWKOWE
16. GNIAZDO HDMI 17. RESET 18. POKRĘTŁO
19. PORT USB 20. SRC/MENU
BASIC OPERATION
Turn on/o the unit and Mute function
Press /MUTE knob to turn on the unit. When the unit is on. Shortly press this
knob for mute on/o. Press and hold this button to turn o the unit.
Audio and setting menu adjustment
Press and hold SRC/MENU button into the menu as below:
BAS->TRE->BAL->EQ(o/pop/rock/clas)->LOUD(on/o)->CLK HH->CLK
MM->IR(on/o) ->CT(indep/sync)->BEEP(on/o)->P_VOL(13)->DX(LOC)->STE-
REO(MONO)
In each item rotate the VOL knob to set them.
IR (ON/OFF):
IR ON: The unit can be switched on by IR remote control.
The system is in high power consumption status.
IR OFF: The unit can not be switched on by IR remote control.
The system is in low power consumption status.
CT (INDEP/SYNC):
CT INDEP: The clock works independently.
CT SYNC: The clock will be synchronized to the received RDS station’s time.
Note: When the clock was set in the menu, The CT is set to INDEP mode
automatically.
BEEP (ON/OFF): Turn on/o the beep sound when buttons are pressed.
P-VOL: Setting the power on volume. If the volume at switch-o is lower than
the P-VOL, the unit will set the volume to the value of the switch-o volume
when it is switched on.
If the volume at shutdown is greater than the P-VOL, the volume will be restored
to the
P-VOL value when the unit is switched on.
Bluetooth speaker search
Press and hold BT button shows “SEARCH..”. Seconds later shows the Bluetooth
device name. Rotate VOL knob to show next one. When the desired Bluetooth
speaker name was shown on LCD. Press VOL knob to pair. If the pairing is
succeed, it shows BOX ON.
Important note: Despite numerous tests with various Bluetooth devices,
compatibility with all Bluetooth devices available on the market cannot be
guaranteed.
Bluetooth speaker signal transmit operation
Shortly press BT button to stop/transmit the signal to the Bluetooth speaker. It
shows BOX OFF/ON.
Note: Although Blaupunkt checks the compatibility of dierent Bluetooth speakers
with care, a awless function with all models on the market cannot be guaranteed.
Zone 1 and Zone 2 operation
Shortly press Zone 1 (or ZONE 2) button to unable/enable Zone 1 (or ZONE 2)
volume.
Hold Zone 1 (or ZONE 2) button to mute Zone 1 (or ZONE 2) sound. Hold it
again to mute o.
Information or Clock priority
Shortly press DIS button to change the clock priority or information priority.
Note: In FM band, when received a RDS station shortly press DIS button to show
the STATION NAME/CLOCK/FREQUENCY.
Clock setting
In CLK HH/CLK MM item of the menu. Rotate VOL knob to set the hour/minute.
Head phone operation
There is a 3.5 mm head phone jack in the front panel. It is following the zone 1’s
operation.
RADIO OPERATION
Receive a radio station
Press SRC/MENU button to select FM1->FM2->MW mode. Shortly press /
button to receive the desired radio station. Press and hold / button for
manual tuning the frequency.
Manually store station & recall preset station
Receiving a desired station. Press and hold one of the preset buttons (1 - 6) for 2
seconds. The current station is stored into the number button. Shortly press the
preset button (1 - 6) to directly listen the station that saved in the corresponding
preset button.
DAB OPERATION
Press SRC/MENU button switch to DAB1 or DAB2 source.
Selecting station
Press / button to select up/down station.
Manually store station and recall preset station
When received a desired station. Press and hold 1 - 6 button for 2 seconds to
store this station to corresponding number. Shortly press the preset button (1 -
6) to directly listen the station that saved in the corresponding preset button.
USB OPERATION
When an USB driver was inserted to the unit, the unit will play the MP3/WMA le
automatically. If an USB drive is already inserted in the unit, keep pressing
SRC/MENU button shortly until the USB mode display appears.
Select le
Press / button to skip to next/previous le. Hold / button to
fast forward or fast reverse.
Play/Pause
Press 1 button to pause/playing the le.
Repeat function
Press 3 RPT button to select RPT mode: RPT ONE/RPT FOLD/RPT ALL(default)
RPT ONE: Repeat the same le.
RPT FOLD: Repeat all les of the folder.
RPT ALL: Repeat all les.
RANDOM
Press 4 RDM button to choose RDM on/o.
RDM on: Playing all les in random order.
RDM o: Turn o the random function.
Directory+/- function
Press DIR+/DIR- button to select next/previous folder to play.
Search song
Press and hold button shows NUM 0000. Rotating VOL (or directly enter
number) to select the numbers then press VOL to play. Please note the 7/8/9/0
as: BT = 7, = 8, = 9, DIS = 0.
AUX IN 1/2 OPERATION
AUX IN 1 for front panel 3.5 mm jack. AUX IN 2 for RCA in back of the unit.
Pressing SRC/MENU button to switch to AUX IN1 (2) mode when Connecting
the audio signal to the unit .
BLUETOOTH OPERATION
Pairing
On mobile phone, select the Bluetooth item searching the Bluetooth device.
“BLAUPUNKT” should appear in the list, select “BLAUPUNKT” and then input
password “0000” if it needs a password. When successful paired, the BT mark will
be displayed on the display.
Bluetooth Audio
Press SRC/MENU button to switch to BT MUSIC mode. It will play a song of your
mobile phone automatically. Press key to pause/play the song.
Press / button to select next/previous song.
HDMI OPERATION
The front HDMI port is pass through to the rear HDMI port. The HDMI playback is
therefore not aected.
V-IN and V-OUT RCA connector
In the back of the unit the V-IN connector is pass through to the V-OUT
connector.
REMOTE CONTROL
When IR is set to ON in the setting menu.
OFF : The unit can be switched ON and OFF.
VOL+: Volume up
VOL- : Volume down
1 : Zone 1 MUTE ON/OFF
2 : Zone 2 MUTE ON/OFF
Other operation please reference the description above
OPERATION
GENARAL
Power Supply Requirements : DC 12 Volts, Negative Ground
Chassis Dimensions : 129 (W) x 112 (D) x 65 (H)
Tone Controls
- Bass (at 100 Hz) : ±10 dB
- Treble (at 10 kHz) : ±10 dB
Maximum Output Power : 4 x 40 watts
Current Drain : 10 Ampere (max.)
RADIO FM AM
Frequency Coverage 87.5 to 108 MHz 522 to 1620 KHz
IF 10.7 MHz 450 KHz
Sensitivity 4 µV (S/N = 30 dB) 36 dBµV (S/N = 20 dB)
Stereo Separation >25 dB /
TROUBLE SHOOTING
EN

Safety notes
The car sound system was manufactured according to the state of the art and
established safety guidelines. Even so, dangers may occur if you do not observe
the safety notes in these instructions. Read these instructions carefully and
completely before using the car sound system. Keep the instructions at a
location so that they are always accessible to all users. Always pass on the car
sound system to third parties together with these instructions. In addition,
observe the instructions of the devices used in conjunction with this car sound
system.
General safety notes
Observe the following note to protect yourself against injuries:
Do not modify or open the device.
Use as directed
This sound system is intended for installation and operation in a vehicle with 12
V vehicle system voltage. Observe the output limits of the device. Repairs and
installation, if necessary, should be performed by a specialist.
Installation instructions
You may only install the car sound system yourself if you are experienced in
installing car sound systems and are very familiar with the electrical system of
the vehicle. For this purpose, observe the wiring diagram in these instructions.
Installing the device must not obstruct or block the function of any airbags,
other safety devices or controls.
Declaration of conformity
The Blaupunkt Competence Center Car Multimedia - Evo Sales GmbH declares
that the device complies with the basic requirements and the other relevant
regulations of the directive 2014/53/EU. The declaration of conformity can be
found on the Internet under www.blaupunkt.com.
Cleaning notes
Solvents, cleaning and scouring agents as well as dashboard spray and plastics
care product may contain ingredients that will damage the surface of the car
sound system. Use only a dry or slightly moistened cloth for cleaning the car
sound system.
Disposal notes
Do not dispose of your old unit in the household trash!
Use the return and collection systems available to dis-pose of the old
device, the remote control and exhausted batteries.
Scope of delivery
The scope of delivery includes:
Main unit BPA 3022 M
Remote control
ISO connectors
Installation screws
Operating manual
ATTENTIONS OF INSTALLATION
1. Please read the instruction manual carefully before installing the unit.
2. Make sure to connect other wires before power on the unit.
3. To avoid short circuit. Please make sure all the exposed wires are insulated.
4. Please x all the wires after installation.
5. Please make connection to the player accordingly to this instruction manual.
Wrong connection may cause damage to the unit.
6. This player only t for 12V DC device.
INSTALL THE UNIT
REMOVE THE UNIT
1. Remove the unit
2. Take out the outer trim frame.
HDMI attention:
Please use good quality HDMI cable.
The overall length (front and rear) should not exceed 12 feet.
WIRING CONNECTION
1. This player can only be used by + 12V DC.
2. Do not connect the battery terminal until the player is fully well installed.
3. Please make sure to connect the yellow wire to the positive of the battery (+).
4. When change the fuse please make sure that the specications are same.
5. Using good quality speakers with 4 - 8 ohm can achieve the best eect of the
unit.
LOCATION OF KEYS
1. STREFA 1 2. 1 3. STREFA 2
4. 2 5. BT 6. 3 RPT
7. 8. 4 RDM 9.
10. 5 DIR- 11. DIS 12. 6 DIR+
13. LCD 14. GNIAZDO AUX 15. GNIAZDO SŁUCHAWKOWE
16. GNIAZDO HDMI 17. RESET 18. POKRĘTŁO
19. PORT USB 20. SRC/MENU
BASIC OPERATION
Turn on/o the unit and Mute function
Press /MUTE knob to turn on the unit. When the unit is on. Shortly press this
knob for mute on/o. Press and hold this button to turn o the unit.
Audio and setting menu adjustment
Press and hold SRC/MENU button into the menu as below:
BAS->TRE->BAL->EQ(o/pop/rock/clas)->LOUD(on/o)->CLK HH->CLK
MM->IR(on/o) ->CT(indep/sync)->BEEP(on/o)->P_VOL(13)->DX(LOC)->STE-
REO(MONO)
In each item rotate the VOL knob to set them.
IR (ON/OFF):
IR ON: The unit can be switched on by IR remote control.
The system is in high power consumption status.
IR OFF: The unit can not be switched on by IR remote control.
The system is in low power consumption status.
CT (INDEP/SYNC):
CT INDEP: The clock works independently.
CT SYNC: The clock will be synchronized to the received RDS station’s time.
Note: When the clock was set in the menu, The CT is set to INDEP mode
automatically.
BEEP (ON/OFF): Turn on/o the beep sound when buttons are pressed.
P-VOL: Setting the power on volume. If the volume at switch-o is lower than
the P-VOL, the unit will set the volume to the value of the switch-o volume
when it is switched on.
If the volume at shutdown is greater than the P-VOL, the volume will be restored
to the
P-VOL value when the unit is switched on.
Bluetooth speaker search
Press and hold BT button shows “SEARCH..”. Seconds later shows the Bluetooth
device name. Rotate VOL knob to show next one. When the desired Bluetooth
speaker name was shown on LCD. Press VOL knob to pair. If the pairing is
succeed, it shows BOX ON.
Important note: Despite numerous tests with various Bluetooth devices,
compatibility with all Bluetooth devices available on the market cannot be
guaranteed.
Bluetooth speaker signal transmit operation
Shortly press BT button to stop/transmit the signal to the Bluetooth speaker. It
shows BOX OFF/ON.
Note: Although Blaupunkt checks the compatibility of dierent Bluetooth speakers
with care, a awless function with all models on the market cannot be guaranteed.
Zone 1 and Zone 2 operation
Shortly press Zone 1 (or ZONE 2) button to unable/enable Zone 1 (or ZONE 2)
volume.
Hold Zone 1 (or ZONE 2) button to mute Zone 1 (or ZONE 2) sound. Hold it
again to mute o.
Information or Clock priority
Shortly press DIS button to change the clock priority or information priority.
Note: In FM band, when received a RDS station shortly press DIS button to show
the STATION NAME/CLOCK/FREQUENCY.
Clock setting
In CLK HH/CLK MM item of the menu. Rotate VOL knob to set the hour/minute.
Head phone operation
There is a 3.5 mm head phone jack in the front panel. It is following the zone 1’s
operation.
RADIO OPERATION
Receive a radio station
Press SRC/MENU button to select FM1->FM2->MW mode. Shortly press /
button to receive the desired radio station. Press and hold / button for
manual tuning the frequency.
Manually store station & recall preset station
Receiving a desired station. Press and hold one of the preset buttons (1 - 6) for 2
seconds. The current station is stored into the number button. Shortly press the
preset button (1 - 6) to directly listen the station that saved in the corresponding
preset button.
DAB OPERATION
Press SRC/MENU button switch to DAB1 or DAB2 source.
Selecting station
Press / button to select up/down station.
Manually store station and recall preset station
When received a desired station. Press and hold 1 - 6 button for 2 seconds to
store this station to corresponding number. Shortly press the preset button (1 -
6) to directly listen the station that saved in the corresponding preset button.
USB OPERATION
When an USB driver was inserted to the unit, the unit will play the MP3/WMA le
automatically. If an USB drive is already inserted in the unit, keep pressing
SRC/MENU button shortly until the USB mode display appears.
Select le
Press / button to skip to next/previous le. Hold / button to
fast forward or fast reverse.
Play/Pause
Press 1 button to pause/playing the le.
Repeat function
Press 3 RPT button to select RPT mode: RPT ONE/RPT FOLD/RPT ALL(default)
RPT ONE: Repeat the same le.
RPT FOLD: Repeat all les of the folder.
RPT ALL: Repeat all les.
RANDOM
Press 4 RDM button to choose RDM on/o.
RDM on: Playing all les in random order.
RDM o: Turn o the random function.
Directory+/- function
Press DIR+/DIR- button to select next/previous folder to play.
Search song
Press and hold button shows NUM 0000. Rotating VOL (or directly enter
number) to select the numbers then press VOL to play. Please note the 7/8/9/0
as: BT = 7, = 8, = 9, DIS = 0.
AUX IN 1/2 OPERATION
AUX IN 1 for front panel 3.5 mm jack. AUX IN 2 for RCA in back of the unit.
Pressing SRC/MENU button to switch to AUX IN1 (2) mode when Connecting
the audio signal to the unit .
BLUETOOTH OPERATION
Pairing
On mobile phone, select the Bluetooth item searching the Bluetooth device.
“BLAUPUNKT” should appear in the list, select “BLAUPUNKT” and then input
password “0000” if it needs a password. When successful paired, the BT mark will
be displayed on the display.
Bluetooth Audio
Press SRC/MENU button to switch to BT MUSIC mode. It will play a song of your
mobile phone automatically. Press key to pause/play the song.
Press / button to select next/previous song.
HDMI OPERATION
The front HDMI port is pass through to the rear HDMI port. The HDMI playback is
therefore not aected.
V-IN and V-OUT RCA connector
In the back of the unit the V-IN connector is pass through to the V-OUT
connector.
REMOTE CONTROL
When IR is set to ON in the setting menu.
OFF : The unit can be switched ON and OFF.
VOL+: Volume up
VOL- : Volume down
1 : Zone 1 MUTE ON/OFF
2 : Zone 2 MUTE ON/OFF
Other operation please reference the description above
GENARAL
Power Supply Requirements : DC 12 Volts, Negative Ground
Chassis Dimensions : 129 (W) x 112 (D) x 65 (H)
Tone Controls
- Bass (at 100 Hz) : ±10 dB
- Treble (at 10 kHz) : ±10 dB
Maximum Output Power : 4 x 40 watts
Current Drain : 10 Ampere (max.)
RADIO FM AM
Frequency Coverage 87.5 to 108 MHz 522 to 1620 KHz
IF 10.7 MHz 450 KHz
Sensitivity 4 µV (S/N = 30 dB) 36 dBµV (S/N = 20 dB)
Stereo Separation >25 dB /
TROUBLE SHOOTING
SPECIFICATION
Symptom
Cause
Solution
No power The car ignition switch is
not on.
If the power supply is connected
to the car accessory circuits, but
the engine is not moving, switch
the ignition key to “ACC”.
The fuse is blown. Replace the fuse.
No sound
Volume is set to minimum. Adjust volume to a desired level.
Wiring is not properly
connected.
Check wiring connection.
The operation
keys do not
work.
The built-in microcomputer
is not operating properly due
to noise.
Press the reset button.
The radio does
not work. The
radio station
automatic
selection does
not work.
The antenna cable is not
connected.
Insert the antenna cable firmly.
The signals are too weak. Select a station manually.
No playback of
the phone music
APP.
Unit is paired with another
mobile phone.
1
) Turn off the Bluetooth function of
another mobile.
2
) Exit APP and turn on APP again.
EN
Indicazioni sulla sicurezza
Questa stazione multimediale è stata prodotta in conformità agli standard
attuali di evoluzione tecnologica e alle norme di sicurezza comunemente
riconosciute. Tuttavia, l’inosservanza delle informazioni sulla sicurezza
contenute nel presente manuale comporta diversi rischi. Prima di utilizzare la
stazione multimediale leggere attentamente il presente manuale per intero.
Conservare il manuale in un luogo accessibile a tutti gli utenti in qualsiasi
momento. In caso di cessione della stazione multimediale a terzi, includere il
presente manuale. Inoltre, bisogna rispettare le indicazioni contenute nei
manuali d’uso dei dispositivi collegati a questa stazione multimediale.
Informazioni generali sulla sicurezza
Osservare le seguenti indicazioni per proteggersi da eventuali lesioni: Non
modicare o aprire il dispositivo.
Uso previsto
La stazione multimediale è progettata per essere installata e utilizzata su veicoli
con impianto di alimentazione con una tensione di 12 V. È necessario rispettare i
limiti di potenza del dispositivo. L’esecuzione di una qualsiasi riparazione e
installazione deve essere adata ad un professionista.
Istruzioni di installazione
È possibile installare il dispositivo da soli se si è esperti nell’installazione di
autoradio e se si ha una conoscenza delle tematiche relative agli impianti
elettrici per automobili. A tal ne consultare lo schema di cablaggio presente in
questo manuale. Il dispositivo deve essere installato in modo da non interferire
o bloccare il funzionamento degli airbag, altri dispositivi di sicurezza e/o
comandi.
Dichiarazione di conformità
Blaupunkt Competence Center Car Multimedia – Evo Sales GmbH dichiara che il
presente dispositivo è conforme ai requisiti essenziali ed alle restanti disposizio-
ni pertinenti della Direttiva 2014/53/UE. La dichiarazione di conformità è
reperibile sul sito www.blaupunkt.com.
Consigli in materia di pulizia
Solventi, detergenti e prodotti abrasivi, così come spray per cruscotti e prodotti
per la cura della plastica, possono contenere sostanze in grado di danneggiare
la supercie della stazione multimediale. Per la pulizia della stazione multimedi-
ale utilizzare solo un panno asciutto o leggermente umido.
Istruzioni per lo smaltimento
Non smaltire il dispositivo usurato insieme ai riuti domestici!
Per smaltire il dispositivo, il telecomando e le batterie consumate,
portarli in un centro di raccolta per apparecchiature usate.
Fornitura
La fornitura include:
stazione multimediale BPA 3022 M,
telecomando,
connettori ISO,
viti di montaggio,
manuale d’uso.
INFORMAZIONI IMPORTANTI SULL’INSTALLAZIONE
1. Leggere attentamente il manuale d’uso prima di installare il dispositivo.
2. Prima di collegare l’alimentazione assicurarsi che tutti gli altri cavi siano
collegati.
3. Per evitare cortocircuiti, assicurarsi che tutti i cavi esposti siano isolati.
4. Una volta completata l’installazione, ssare tutti i cavi.
5. I collegamenti al lettore devono essere eettuati in conformità con il
presente manuale d’uso. Un collegamento errato può causare danni al
dispositivo.
6. Il lettore è progettato per funzionare solo con un impianto a 12 V CC.
INSTALLAZIONE DEL DISPOSITIVO
SMONTAGGIO DEL DISPOSITIVO
1. Smontare il dispositivo.
2. Smontare la cornice esterna di rinitura.
Avvertenze relative al cavo HDM:
Utilizzare un cavo HDMI di buona qualità.
La lunghezza complessiva (fronte e retro) non deve superare i 12 piedi.
COLLEGAMENTO DEI CAVI
1. Il lettore può essere utilizzato solo a +12 V CC.
2. Non collegare il terminale della batteria nché il lettore non sarà completa-
mente installato.
3. Assicurarsi che il cavo giallo sia collegato al polo positivo (+) della batteria.
4. Quando si sostituisce il fusibile, accertarsi che i parametri del nuovo fusibile
siano uguali.
5. Utilizzando gli altoparlanti di buona qualità con un’impedenza di 4-8 ohm si
può ottenere il funzionamento migliore del dispositivo.
POSIZIONE DEI TASTI
1. ZONA 1 2. 1 3. ZONA 2
4. 2 5. BT 6. 3 RPT
7. 8. 4 RDM 9.
10. 5 DIR- 11. DIS 12. 6 DIR+
13. LCD 14. PRESA AUX 15. PRESA PER CUFFIE
16. PRESA HDMI 17. RESET 18. MANOPOLA
19. PORTA USB 20. SRC/MENU
IMPIEGO DI BASE
Accensione/spegnimento del dispositivo e della funzione di silenziamento
Per accendere il dispositivo, premere la manopola / MUTE. Per attivare o disattivare la
funzione di silenziamento, premere brevemente la manopola quando il dispositivo è
acceso. Premere e tenere premuto questo tasto per spegnere il dispositivo.
Impostazioni audio e menu delle impostazioni
Premere e tenere premuto il tasto SCR/MENU per accedere al menu illustrato di
seguito:
BAS->TRE->BAL->EQ (O/pop/rock/class)->LOUD (On/O)->CLK HH->CLK MM->IR
(On/O) ->CT (indep/sync)->SEGN. SUONO. (On/O) )->P_VOL (13)->DX (LOC)->STE-
REO (MONO)
Per ogni posizione, ruotare la manopola VOL per impostarla.
INFRAROSSO (ON/OFF):
INFRAROSSO On: Il dispositivo può essere acceso utilizzando il telecomando a
infrarossi. Il sistema è in modalità di consumo energetico elevato.
INFRAROSSO O: Il dispositivo non può essere acceso utilizzando il telecomando a
infrarossi. Il sistema è in modalità di basso consumo energetico.
CT (INDEP/SYNC):
CT INDEP: L’orologio funziona in modo indipendente.
CT SYNC: L’orologio sarà sincronizzato con l’ora della stazione RDS ricevuta.
Attenzione: Quando si imposta l’orologio nel menu, la funzione CT viene automatica-
mente impostata sulla modalità INDEP (funzionamento indipendente).
SEGNALE ACUSTICO (ON/OFF): Consente di attivare/disattivare il segnale acustico
quando si premono i tasti.
P-VOL: Consente di impostare il volume all’accensione. Se il livello del volume allo
spegnimento è inferiore al livello P-VOL, all’accensione il dispositivo imposterà il
livello del volume sul volume allo spegnimento.
Se il livello del volume allo spegnimento è superiore al livello P-VOL, all’accensione
del dispositivo il volume verrà ripristinato sul livello dei valori P-VOL.
Ricerca di altoparlanti Bluetooth
Tenendo premuto il tasto BT, viene visualizzato il messaggio “SEARCH...” [ricerca].
Successivamente viene visualizzato il nome del dispositivo Bluetooth. Per visualizzare
il dispositivo successivo, ruotare la manopola VOL. Quando il nome dell’altoparlante
Bluetooth desiderato viene visualizzato sul display LCD, premere la manopola VOL
per accoppiare il dispositivo. Se l’accoppiamento sarà riuscito, sul display comparirà il
messaggio “BOX ON”.
Raccomandazione importante: Nonostante i numerosi test eettuati con diversi
dispositivi Bluetooth, non è possibile garantire la compatibilità con tutti i dispositivi
Bluetooth disponibili sul mercato.
Trasmissione del segnale all’altoparlante Bluetooth
Premere brevemente il tasto BT per interrompere il trasferimento/trasmettere il
segnale all’altoparlante Bluetooth. Il display visualizzerà il messaggio “BOX OFF/ON”.
Attenzione: Sebbene Blaupunkt verichi attentamente la compatibilità dei vari
altoparlanti Bluetooth, non è possibile garantire un funzionamento perfetto del
dispositivo con tutti i modelli disponibili sul mercato.
Uso della Zona 1 e della Zona 2
Premere brevemente il tasto Zone 1 (o Zone 2) per spegnere/accendere l’audio della
Zona 1 (o della Zona 2).
Tenere premuto il tasto Zone 1 (o Zone 2) per disattivare l’audio della Zona 1 (o della
Zona 2). Tenere premuto nuovamente il tasto per disattivare il silenziamento.
Priorità delle informazioni o dell’orologio
Premere brevemente il tasto DIS per impostare la priorità dell’orologio o delle
informazioni. Attenzione: Nella banda FM, quando si ricevono stazioni RDS, premere
brevemente il tasto DIS per visualizzare il NOME STAZIONE/OROLOGIO/FREQUENZA.
Impostazioni dell’orologio
Selezionare nel menu la posizione CLK HH/CLK MM. Ruotare la manopola VOL per
impostare l’ora/minuti.
Uso delle cue
Sul pannello frontale è presente un jack per cue da 3,5 mm. Esso riceve le
impostazioni di funzionamento della Zona 1.
USO DELLA RADIO
Ricezione delle stazioni radio
Premere il tasto SRC/MENU per selezionare una modalità tra FM1->FM2->MW.
Premere brevemente il tasto / per ricevere la stazione radio desiderata.
Premere e tenere premuto il tasto / per sintonizzare manualmente la
frequenza.
Memorizzazione manuale della stazione e richiamo delle stazioni memorizzate
Ricezione della stazione desiderata. Premere e tenere premuto per 2 secondi uno dei
tasti di memorizzazione (1–6). La stazione corrente verrà memorizzata su un
determinato tasto numerico. Premere brevemente il tasto della stazione programma-
ta (1–6) per ascoltare direttamente il segnale trasmesso da questa stazione e
memorizzato sul tasto assegnato.
USO DI DAB
Premere il tasto SRC/MENU per commutare la sorgente tra DAB1 o DAB2.
Selezione della stazione
Premere il tasto / per selezionare la stazione successiva/precedente.
Memorizzazione manuale della stazione e richiamo delle stazioni memorizzate
Quando è impostata la frequenza della stazione desiderata, tenere premuto per 2
secondi uno dei tasti da 1 a 6 per memorizzare la stazione sul numero corrisponden-
te. Premere brevemente il tasto della stazione programmata (1–6) per ascoltare
direttamente il segnale trasmesso da questa stazione e memorizzato sul tasto
assegnato.
USO DELLA PORTA USB
Dopo aver collegato al dispositivo una chiavetta USB, il dispositivo riproduce
automaticamente i le MP3/WMA. Se al dispositivo è già stata collegata una chiavetta
USB, premere brevemente il tastoSRC/MENU no a visualizzare la schermata della
modalità USB.
Selezione del le
Premere il tasto / per passare al le successivo/precedente. Premere il tasto
/ per scorrere velocemente in avanti o indietro.
Riproduzione/pausa
Premere il tasto 1 per mettere in pausa/riprodurre un le.
Funzione di riproduzione in loop
Premere il tasto 3 RPT per selezionare la funzione di riproduzione in loop. RPT
ONE/RPT FOLD/RPT ALL (predenito)
RPT ONE: Riproduzione di un singolo le in loop.
RPT FOLD: Riproduzione in loop di tutti i le di una cartella.
RPT ALL: Riproduzione di tutti i le in loop.
RANDOM
Premere il tasto 4 RDM per attivare o disattivare la funzione di riproduzione casuale.
RDM On: Riproduzione casuale di tutti i le.
RDM O: Disattivazione della funzione di riproduzione casuale.
Funzione cartella +/-
Premere il tasto DIR+/DIR- per selezionare la cartella successiva/precedente da
riprodurre.
Ricerca di una canzone
Tenendo premuto il tasto , verrà visualizzato il messaggio “NUM 0000”. Ruotando
la manopola VOL (o inserendo direttamente il numero), selezionare il numero, quindi
premere VOL per riprodurre. Tenere presente che per 7/8/9/0 si intendono:
BT = 7, = 8, = 9, DIS = 0.
UTILIZZO DELLA PRESA AUX 1/2
La presa AUX IN 1 presente sul pannello anteriore è un jack da 3,5 mm. La presa AUX
IN 2 per RCA si trova invece sul retro del dispositivo. Premendo il tasto SRC/MENU si
passa alla modalità AUX IN1 (2) quando il segnale audio è collegato al dispositivo.
UTILIZZO DEL BLUETOOTH
Accoppiamento dei dispositivi
Selezionare sullo smartphone la voce Bluetooth e cercare il dispositivo Bluetooth.
Nell’elenco dovrebbe comparire la voce “BLAUPUNKT”; selezionare “BLAUPUNKT” e se
viene visualizzato un messaggio che richiede l’inserimento della password, inserire
“0000”. Quando l'accoppiamento è correttamente terminato, sul display verrà
visualizzato il simbolo BT.
Audio del Bluetooth
Premere il tasto SRC/MENU per passare alla modalità BT MUSIC. Il dispositivo
riprodurrà automaticamente un brano dal cellulare. Premere il tasto per mettere
in pausa/riprodurre un brano.
Premere il tasto / per selezionare il brano successivo/precedente.
USO DELLA PRESA HDMI
La presa anteriore HDMI va alla presa HDMI posteriore. Questo non incide sulla
riproduzione tramite HDMI.
Connettori RCA V-IN e V-OUT
Sul retro del dispositivo, il connettore V-IN va al connettore V-OUT.
TELECOMANDO
Il telecomando può essere utilizzato quando
l’opzione IR nel menu è impostata su ON.
OFF: Accensione e spegnimento del dispositivo.
VOL+: Aumentare il volume
VOL-: Abbassare il volume
1 : Accensione/spegnimento della
funzione di silenziamento della Zona 1
2 : Accensione/spegnimento della
funzione di silenziamento della Zona 2
Per le altre operazioni, leggere le istruzioni sopra riportate.
INFORMAZIONI GENERALI
Requisiti inerenti all’alimentazione : Corrente continua a 12V, terminale
negativo collegato a massa
Dimensioni della base di montaggio : 129 (largh.) x 112 (prof.) x 65 (alt.)
Impostazioni del tono
- Toni bassi (a 100 Hz) : ±10 dB
- Toni alti (a 100 Hz) : ±10 dB
Potenza massima in uscita : 4 × 40 W
Consumo di corrente : 10 A (max)
RADIO FM AM
Intervallo di frequenza da 87,5 a 108 MHz da 522 a 1620 KHz
IF 10.7 MHz 450 KHz
Sensibilità 4 µV (S/N = 30 dB) 36 dBµV (S/N = 20 dB)
Separazione dei canali stereo >25 dB /
RISOLUZIONE DEI PROBLEMI

Safety notes
The car sound system was manufactured according to the state of the art and
established safety guidelines. Even so, dangers may occur if you do not observe
the safety notes in these instructions. Read these instructions carefully and
completely before using the car sound system. Keep the instructions at a
location so that they are always accessible to all users. Always pass on the car
sound system to third parties together with these instructions. In addition,
observe the instructions of the devices used in conjunction with this car sound
system.
General safety notes
Observe the following note to protect yourself against injuries:
Do not modify or open the device.
Use as directed
This sound system is intended for installation and operation in a vehicle with 12
V vehicle system voltage. Observe the output limits of the device. Repairs and
installation, if necessary, should be performed by a specialist.
Installation instructions
You may only install the car sound system yourself if you are experienced in
installing car sound systems and are very familiar with the electrical system of
the vehicle. For this purpose, observe the wiring diagram in these instructions.
Installing the device must not obstruct or block the function of any airbags,
other safety devices or controls.
Declaration of conformity
The Blaupunkt Competence Center Car Multimedia - Evo Sales GmbH declares
that the device complies with the basic requirements and the other relevant
regulations of the directive 2014/53/EU. The declaration of conformity can be
found on the Internet under www.blaupunkt.com.
Cleaning notes
Solvents, cleaning and scouring agents as well as dashboard spray and plastics
care product may contain ingredients that will damage the surface of the car
sound system. Use only a dry or slightly moistened cloth for cleaning the car
sound system.
Disposal notes
Do not dispose of your old unit in the household trash!
Use the return and collection systems available to dis-pose of the old
device, the remote control and exhausted batteries.
Scope of delivery
The scope of delivery includes:
Main unit BPA 3022 M
Remote control
ISO connectors
Installation screws
Operating manual
ATTENTIONS OF INSTALLATION
1. Please read the instruction manual carefully before installing the unit.
2. Make sure to connect other wires before power on the unit.
3. To avoid short circuit. Please make sure all the exposed wires are insulated.
4. Please x all the wires after installation.
5. Please make connection to the player accordingly to this instruction manual.
Wrong connection may cause damage to the unit.
6. This player only t for 12V DC device.
INSTALL THE UNIT
REMOVE THE UNIT
1. Remove the unit
2. Take out the outer trim frame.
HDMI attention:
Please use good quality HDMI cable.
The overall length (front and rear) should not exceed 12 feet.
WIRING CONNECTION
1. This player can only be used by + 12V DC.
2. Do not connect the battery terminal until the player is fully well installed.
3. Please make sure to connect the yellow wire to the positive of the battery (+).
4. When change the fuse please make sure that the specications are same.
5. Using good quality speakers with 4 - 8 ohm can achieve the best eect of the
unit.
LOCATION OF KEYS
1. STREFA 1 2. 1 3. STREFA 2
4. 2 5. BT 6. 3 RPT
7. 8. 4 RDM 9.
10. 5 DIR- 11. DIS 12. 6 DIR+
13. LCD 14. GNIAZDO AUX 15. GNIAZDO SŁUCHAWKOWE
16. GNIAZDO HDMI 17. RESET 18. POKRĘTŁO
19. PORT USB 20. SRC/MENU
BASIC OPERATION
Turn on/o the unit and Mute function
Press /MUTE knob to turn on the unit. When the unit is on. Shortly press this
knob for mute on/o. Press and hold this button to turn o the unit.
Audio and setting menu adjustment
Press and hold SRC/MENU button into the menu as below:
BAS->TRE->BAL->EQ(o/pop/rock/clas)->LOUD(on/o)->CLK HH->CLK
MM->IR(on/o) ->CT(indep/sync)->BEEP(on/o)->P_VOL(13)->DX(LOC)->STE-
REO(MONO)
In each item rotate the VOL knob to set them.
IR (ON/OFF):
IR ON: The unit can be switched on by IR remote control.
The system is in high power consumption status.
IR OFF: The unit can not be switched on by IR remote control.
The system is in low power consumption status.
CT (INDEP/SYNC):
CT INDEP: The clock works independently.
CT SYNC: The clock will be synchronized to the received RDS station’s time.
Note: When the clock was set in the menu, The CT is set to INDEP mode
automatically.
BEEP (ON/OFF): Turn on/o the beep sound when buttons are pressed.
P-VOL: Setting the power on volume. If the volume at switch-o is lower than
the P-VOL, the unit will set the volume to the value of the switch-o volume
when it is switched on.
If the volume at shutdown is greater than the P-VOL, the volume will be restored
to the
P-VOL value when the unit is switched on.
Bluetooth speaker search
Press and hold BT button shows “SEARCH..”. Seconds later shows the Bluetooth
device name. Rotate VOL knob to show next one. When the desired Bluetooth
speaker name was shown on LCD. Press VOL knob to pair. If the pairing is
succeed, it shows BOX ON.
Important note: Despite numerous tests with various Bluetooth devices,
compatibility with all Bluetooth devices available on the market cannot be
guaranteed.
Bluetooth speaker signal transmit operation
Shortly press BT button to stop/transmit the signal to the Bluetooth speaker. It
shows BOX OFF/ON.
Note: Although Blaupunkt checks the compatibility of dierent Bluetooth speakers
with care, a awless function with all models on the market cannot be guaranteed.
Zone 1 and Zone 2 operation
Shortly press Zone 1 (or ZONE 2) button to unable/enable Zone 1 (or ZONE 2)
volume.
Hold Zone 1 (or ZONE 2) button to mute Zone 1 (or ZONE 2) sound. Hold it
again to mute o.
Information or Clock priority
Shortly press DIS button to change the clock priority or information priority.
Note: In FM band, when received a RDS station shortly press DIS button to show
the STATION NAME/CLOCK/FREQUENCY.
Clock setting
In CLK HH/CLK MM item of the menu. Rotate VOL knob to set the hour/minute.
Head phone operation
There is a 3.5 mm head phone jack in the front panel. It is following the zone 1’s
operation.
RADIO OPERATION
Receive a radio station
Press SRC/MENU button to select FM1->FM2->MW mode. Shortly press /
button to receive the desired radio station. Press and hold / button for
manual tuning the frequency.
Manually store station & recall preset station
Receiving a desired station. Press and hold one of the preset buttons (1 - 6) for 2
seconds. The current station is stored into the number button. Shortly press the
preset button (1 - 6) to directly listen the station that saved in the corresponding
preset button.
DAB OPERATION
Press SRC/MENU button switch to DAB1 or DAB2 source.
Selecting station
Press / button to select up/down station.
Manually store station and recall preset station
When received a desired station. Press and hold 1 - 6 button for 2 seconds to
store this station to corresponding number. Shortly press the preset button (1 -
6) to directly listen the station that saved in the corresponding preset button.
USB OPERATION
When an USB driver was inserted to the unit, the unit will play the MP3/WMA le
automatically. If an USB drive is already inserted in the unit, keep pressing
SRC/MENU button shortly until the USB mode display appears.
Select le
Press / button to skip to next/previous le. Hold / button to
fast forward or fast reverse.
Play/Pause
Press 1 button to pause/playing the le.
Repeat function
Press 3 RPT button to select RPT mode: RPT ONE/RPT FOLD/RPT ALL(default)
RPT ONE: Repeat the same le.
RPT FOLD: Repeat all les of the folder.
RPT ALL: Repeat all les.
RANDOM
Press 4 RDM button to choose RDM on/o.
RDM on: Playing all les in random order.
RDM o: Turn o the random function.
Directory+/- function
Press DIR+/DIR- button to select next/previous folder to play.
Search song
Press and hold button shows NUM 0000. Rotating VOL (or directly enter
number) to select the numbers then press VOL to play. Please note the 7/8/9/0
as: BT = 7, = 8, = 9, DIS = 0.
AUX IN 1/2 OPERATION
AUX IN 1 for front panel 3.5 mm jack. AUX IN 2 for RCA in back of the unit.
Pressing SRC/MENU button to switch to AUX IN1 (2) mode when Connecting
the audio signal to the unit .
BLUETOOTH OPERATION
Pairing
On mobile phone, select the Bluetooth item searching the Bluetooth device.
“BLAUPUNKT” should appear in the list, select “BLAUPUNKT” and then input
password “0000” if it needs a password. When successful paired, the BT mark will
be displayed on the display.
Bluetooth Audio
Press SRC/MENU button to switch to BT MUSIC mode. It will play a song of your
mobile phone automatically. Press key to pause/play the song.
Press / button to select next/previous song.
HDMI OPERATION
The front HDMI port is pass through to the rear HDMI port. The HDMI playback is
therefore not aected.
V-IN and V-OUT RCA connector
In the back of the unit the V-IN connector is pass through to the V-OUT
connector.
REMOTE CONTROL
When IR is set to ON in the setting menu.
OFF : The unit can be switched ON and OFF.
VOL+: Volume up
VOL- : Volume down
1 : Zone 1 MUTE ON/OFF
2 : Zone 2 MUTE ON/OFF
Other operation please reference the description above
GENARAL
Power Supply Requirements : DC 12 Volts, Negative Ground
Chassis Dimensions : 129 (W) x 112 (D) x 65 (H)
Tone Controls
- Bass (at 100 Hz) : ±10 dB
- Treble (at 10 kHz) : ±10 dB
Maximum Output Power : 4 x 40 watts
Current Drain : 10 Ampere (max.)
RADIO FM AM
Frequency Coverage 87.5 to 108 MHz 522 to 1620 KHz
IF 10.7 MHz 450 KHz
Sensitivity 4 µV (S/N = 30 dB) 36 dBµV (S/N = 20 dB)
Stereo Separation >25 dB /
TROUBLE SHOOTING
Indicazioni sulla sicurezza
Questa stazione multimediale è stata prodotta in conformità agli standard
attuali di evoluzione tecnologica e alle norme di sicurezza comunemente
riconosciute. Tuttavia, l’inosservanza delle informazioni sulla sicurezza
contenute nel presente manuale comporta diversi rischi. Prima di utilizzare la
stazione multimediale leggere attentamente il presente manuale per intero.
Conservare il manuale in un luogo accessibile a tutti gli utenti in qualsiasi
momento. In caso di cessione della stazione multimediale a terzi, includere il
presente manuale. Inoltre, bisogna rispettare le indicazioni contenute nei
manuali d’uso dei dispositivi collegati a questa stazione multimediale.
Informazioni generali sulla sicurezza
Osservare le seguenti indicazioni per proteggersi da eventuali lesioni: Non
modicare o aprire il dispositivo.
Uso previsto
La stazione multimediale è progettata per essere installata e utilizzata su veicoli
con impianto di alimentazione con una tensione di 12 V. È necessario rispettare i
limiti di potenza del dispositivo. L’esecuzione di una qualsiasi riparazione e
installazione deve essere adata ad un professionista.
Istruzioni di installazione
È possibile installare il dispositivo da soli se si è esperti nell’installazione di
autoradio e se si ha una conoscenza delle tematiche relative agli impianti
elettrici per automobili. A tal ne consultare lo schema di cablaggio presente in
questo manuale. Il dispositivo deve essere installato in modo da non interferire
o bloccare il funzionamento degli airbag, altri dispositivi di sicurezza e/o
comandi.
Dichiarazione di conformità
Blaupunkt Competence Center Car Multimedia – Evo Sales GmbH dichiara che il
presente dispositivo è conforme ai requisiti essenziali ed alle restanti disposizio-
ni pertinenti della Direttiva 2014/53/UE. La dichiarazione di conformità è
reperibile sul sito www.blaupunkt.com.
Consigli in materia di pulizia
Solventi, detergenti e prodotti abrasivi, così come spray per cruscotti e prodotti
per la cura della plastica, possono contenere sostanze in grado di danneggiare
la supercie della stazione multimediale. Per la pulizia della stazione multimedi-
ale utilizzare solo un panno asciutto o leggermente umido.
Istruzioni per lo smaltimento
Non smaltire il dispositivo usurato insieme ai riuti domestici!
Per smaltire il dispositivo, il telecomando e le batterie consumate,
portarli in un centro di raccolta per apparecchiature usate.
Fornitura
La fornitura include:
stazione multimediale BPA 3022 M,
telecomando,
connettori ISO,
viti di montaggio,
manuale d’uso.
INFORMAZIONI IMPORTANTI SULL’INSTALLAZIONE
1. Leggere attentamente il manuale d’uso prima di installare il dispositivo.
2. Prima di collegare l’alimentazione assicurarsi che tutti gli altri cavi siano
collegati.
3. Per evitare cortocircuiti, assicurarsi che tutti i cavi esposti siano isolati.
4. Una volta completata l’installazione, ssare tutti i cavi.
5. I collegamenti al lettore devono essere eettuati in conformità con il
presente manuale d’uso. Un collegamento errato può causare danni al
dispositivo.
6. Il lettore è progettato per funzionare solo con un impianto a 12 V CC.
INFORMAZIONI GENERALI
INSTALLAZIONE DEL DISPOSITIVO
SMONTAGGIO DEL DISPOSITIVO
1. Smontare il dispositivo.
2. Smontare la cornice esterna di rinitura.
Avvertenze relative al cavo HDM:
Utilizzare un cavo HDMI di buona qualità.
La lunghezza complessiva (fronte e retro) non deve superare i 12 piedi.
COLLEGAMENTO DEI CAVI
1. Il lettore può essere utilizzato solo a +12 V CC.
2. Non collegare il terminale della batteria nché il lettore non sarà completa-
mente installato.
3. Assicurarsi che il cavo giallo sia collegato al polo positivo (+) della batteria.
4. Quando si sostituisce il fusibile, accertarsi che i parametri del nuovo fusibile
siano uguali.
5. Utilizzando gli altoparlanti di buona qualità con un’impedenza di 4-8 ohm si
può ottenere il funzionamento migliore del dispositivo.
POSIZIONE DEI TASTI
1. ZONA 1 2. 1 3. ZONA 2
4. 2 5. BT 6. 3 RPT
7. 8. 4 RDM 9.
10. 5 DIR- 11. DIS 12. 6 DIR+
13. LCD 14. PRESA AUX 15. PRESA PER CUFFIE
16. PRESA HDMI 17. RESET 18. MANOPOLA
19. PORTA USB 20. SRC/MENU
IMPIEGO DI BASE
Accensione/spegnimento del dispositivo e della funzione di silenziamento
Per accendere il dispositivo, premere la manopola / MUTE. Per attivare o disattivare la
funzione di silenziamento, premere brevemente la manopola quando il dispositivo è
acceso. Premere e tenere premuto questo tasto per spegnere il dispositivo.
Impostazioni audio e menu delle impostazioni
Premere e tenere premuto il tasto SCR/MENU per accedere al menu illustrato di
seguito:
BAS->TRE->BAL->EQ (O/pop/rock/class)->LOUD (On/O)->CLK HH->CLK MM->IR
(On/O) ->CT (indep/sync)->SEGN. SUONO. (On/O) )->P_VOL (13)->DX (LOC)->STE-
REO (MONO)
Per ogni posizione, ruotare la manopola VOL per impostarla.
INFRAROSSO (ON/OFF):
INFRAROSSO On: Il dispositivo può essere acceso utilizzando il telecomando a
infrarossi. Il sistema è in modalità di consumo energetico elevato.
INFRAROSSO O: Il dispositivo non può essere acceso utilizzando il telecomando a
infrarossi. Il sistema è in modalità di basso consumo energetico.
CT (INDEP/SYNC):
CT INDEP: L’orologio funziona in modo indipendente.
CT SYNC: L’orologio sarà sincronizzato con l’ora della stazione RDS ricevuta.
Attenzione: Quando si imposta l’orologio nel menu, la funzione CT viene automatica-
mente impostata sulla modalità INDEP (funzionamento indipendente).
SEGNALE ACUSTICO (ON/OFF): Consente di attivare/disattivare il segnale acustico
quando si premono i tasti.
P-VOL: Consente di impostare il volume all’accensione. Se il livello del volume allo
spegnimento è inferiore al livello P-VOL, all’accensione il dispositivo imposterà il
livello del volume sul volume allo spegnimento.
Se il livello del volume allo spegnimento è superiore al livello P-VOL, all’accensione
del dispositivo il volume verrà ripristinato sul livello dei valori P-VOL.
Ricerca di altoparlanti Bluetooth
Tenendo premuto il tasto BT, viene visualizzato il messaggio “SEARCH...” [ricerca].
Successivamente viene visualizzato il nome del dispositivo Bluetooth. Per visualizzare
il dispositivo successivo, ruotare la manopola VOL. Quando il nome dell’altoparlante
Bluetooth desiderato viene visualizzato sul display LCD, premere la manopola VOL
per accoppiare il dispositivo. Se l’accoppiamento sarà riuscito, sul display comparirà il
messaggio “BOX ON”.
Raccomandazione importante: Nonostante i numerosi test eettuati con diversi
dispositivi Bluetooth, non è possibile garantire la compatibilità con tutti i dispositivi
Bluetooth disponibili sul mercato.
Trasmissione del segnale all’altoparlante Bluetooth
Premere brevemente il tasto BT per interrompere il trasferimento/trasmettere il
segnale all’altoparlante Bluetooth. Il display visualizzerà il messaggio “BOX OFF/ON”.
Attenzione: Sebbene Blaupunkt verichi attentamente la compatibilità dei vari
altoparlanti Bluetooth, non è possibile garantire un funzionamento perfetto del
dispositivo con tutti i modelli disponibili sul mercato.
Uso della Zona 1 e della Zona 2
Premere brevemente il tasto Zone 1 (o Zone 2) per spegnere/accendere l’audio della
Zona 1 (o della Zona 2).
Tenere premuto il tasto Zone 1 (o Zone 2) per disattivare l’audio della Zona 1 (o della
Zona 2). Tenere premuto nuovamente il tasto per disattivare il silenziamento.
Priorità delle informazioni o dell’orologio
Premere brevemente il tasto DIS per impostare la priorità dell’orologio o delle
informazioni. Attenzione: Nella banda FM, quando si ricevono stazioni RDS, premere
brevemente il tasto DIS per visualizzare il NOME STAZIONE/OROLOGIO/FREQUENZA.
Impostazioni dell’orologio
Selezionare nel menu la posizione CLK HH/CLK MM. Ruotare la manopola VOL per
impostare l’ora/minuti.
Uso delle cue
Sul pannello frontale è presente un jack per cue da 3,5 mm. Esso riceve le
impostazioni di funzionamento della Zona 1.
USO DELLA RADIO
Ricezione delle stazioni radio
Premere il tasto SRC/MENU per selezionare una modalità tra FM1->FM2->MW.
Premere brevemente il tasto / per ricevere la stazione radio desiderata.
Premere e tenere premuto il tasto / per sintonizzare manualmente la
frequenza.
Memorizzazione manuale della stazione e richiamo delle stazioni memorizzate
Ricezione della stazione desiderata. Premere e tenere premuto per 2 secondi uno dei
tasti di memorizzazione (1–6). La stazione corrente verrà memorizzata su un
determinato tasto numerico. Premere brevemente il tasto della stazione programma-
ta (1–6) per ascoltare direttamente il segnale trasmesso da questa stazione e
memorizzato sul tasto assegnato.
USO DI DAB
Premere il tasto SRC/MENU per commutare la sorgente tra DAB1 o DAB2.
Selezione della stazione
Premere il tasto / per selezionare la stazione successiva/precedente.
Memorizzazione manuale della stazione e richiamo delle stazioni memorizzate
Quando è impostata la frequenza della stazione desiderata, tenere premuto per 2
secondi uno dei tasti da 1 a 6 per memorizzare la stazione sul numero corrisponden-
te. Premere brevemente il tasto della stazione programmata (1–6) per ascoltare
direttamente il segnale trasmesso da questa stazione e memorizzato sul tasto
assegnato.
USO DELLA PORTA USB
Dopo aver collegato al dispositivo una chiavetta USB, il dispositivo riproduce
automaticamente i le MP3/WMA. Se al dispositivo è già stata collegata una chiavetta
USB, premere brevemente il tastoSRC/MENU no a visualizzare la schermata della
modalità USB.
Selezione del le
Premere il tasto / per passare al le successivo/precedente. Premere il tasto
/ per scorrere velocemente in avanti o indietro.
Riproduzione/pausa
Premere il tasto 1 per mettere in pausa/riprodurre un le.
Funzione di riproduzione in loop
Premere il tasto 3 RPT per selezionare la funzione di riproduzione in loop. RPT
ONE/RPT FOLD/RPT ALL (predenito)
RPT ONE: Riproduzione di un singolo le in loop.
RPT FOLD: Riproduzione in loop di tutti i le di una cartella.
RPT ALL: Riproduzione di tutti i le in loop.
RANDOM
Premere il tasto 4 RDM per attivare o disattivare la funzione di riproduzione casuale.
RDM On: Riproduzione casuale di tutti i le.
RDM O: Disattivazione della funzione di riproduzione casuale.
Funzione cartella +/-
Premere il tasto DIR+/DIR- per selezionare la cartella successiva/precedente da
riprodurre.
Ricerca di una canzone
Tenendo premuto il tasto , verrà visualizzato il messaggio “NUM 0000”. Ruotando
la manopola VOL (o inserendo direttamente il numero), selezionare il numero, quindi
premere VOL per riprodurre. Tenere presente che per 7/8/9/0 si intendono:
BT = 7, = 8, = 9, DIS = 0.
UTILIZZO DELLA PRESA AUX 1/2
La presa AUX IN 1 presente sul pannello anteriore è un jack da 3,5 mm. La presa AUX
IN 2 per RCA si trova invece sul retro del dispositivo. Premendo il tasto SRC/MENU si
passa alla modalità AUX IN1 (2) quando il segnale audio è collegato al dispositivo.
UTILIZZO DEL BLUETOOTH
Accoppiamento dei dispositivi
Selezionare sullo smartphone la voce Bluetooth e cercare il dispositivo Bluetooth.
Nell’elenco dovrebbe comparire la voce “BLAUPUNKT”; selezionare “BLAUPUNKT” e se
viene visualizzato un messaggio che richiede l’inserimento della password, inserire
“0000”. Quando l'accoppiamento è correttamente terminato, sul display verrà
visualizzato il simbolo BT.
Audio del Bluetooth
Premere il tasto SRC/MENU per passare alla modalità BT MUSIC. Il dispositivo
riprodurrà automaticamente un brano dal cellulare. Premere il tasto per mettere
in pausa/riprodurre un brano.
Premere il tasto / per selezionare il brano successivo/precedente.
USO DELLA PRESA HDMI
La presa anteriore HDMI va alla presa HDMI posteriore. Questo non incide sulla
riproduzione tramite HDMI.
Connettori RCA V-IN e V-OUT
Sul retro del dispositivo, il connettore V-IN va al connettore V-OUT.
TELECOMANDO
Il telecomando può essere utilizzato quando
l’opzione IR nel menu è impostata su ON.
OFF: Accensione e spegnimento del dispositivo.
VOL+: Aumentare il volume
VOL-: Abbassare il volume
1 : Accensione/spegnimento della
funzione di silenziamento della Zona 1
2 : Accensione/spegnimento della
funzione di silenziamento della Zona 2
Per le altre operazioni, leggere le istruzioni sopra riportate.
INFORMAZIONI GENERALI
Requisiti inerenti all’alimentazione : Corrente continua a 12V, terminale
negativo collegato a massa
Dimensioni della base di montaggio : 129 (largh.) x 112 (prof.) x 65 (alt.)
Impostazioni del tono
- Toni bassi (a 100 Hz) : ±10 dB
- Toni alti (a 100 Hz) : ±10 dB
Potenza massima in uscita : 4 × 40 W
Consumo di corrente : 10 A (max)
RADIO FM AM
Intervallo di frequenza da 87,5 a 108 MHz da 522 a 1620 KHz
IF 10.7 MHz 450 KHz
Sensibilità 4 µV (S/N = 30 dB) 36 dBµV (S/N = 20 dB)
Separazione dei canali stereo >25 dB /
RISOLUZIONE DEI PROBLEMI
IT

Safety notes
The car sound system was manufactured according to the state of the art and
established safety guidelines. Even so, dangers may occur if you do not observe
the safety notes in these instructions. Read these instructions carefully and
completely before using the car sound system. Keep the instructions at a
location so that they are always accessible to all users. Always pass on the car
sound system to third parties together with these instructions. In addition,
observe the instructions of the devices used in conjunction with this car sound
system.
General safety notes
Observe the following note to protect yourself against injuries:
Do not modify or open the device.
Use as directed
This sound system is intended for installation and operation in a vehicle with 12
V vehicle system voltage. Observe the output limits of the device. Repairs and
installation, if necessary, should be performed by a specialist.
Installation instructions
You may only install the car sound system yourself if you are experienced in
installing car sound systems and are very familiar with the electrical system of
the vehicle. For this purpose, observe the wiring diagram in these instructions.
Installing the device must not obstruct or block the function of any airbags,
other safety devices or controls.
Declaration of conformity
The Blaupunkt Competence Center Car Multimedia - Evo Sales GmbH declares
that the device complies with the basic requirements and the other relevant
regulations of the directive 2014/53/EU. The declaration of conformity can be
found on the Internet under www.blaupunkt.com.
Cleaning notes
Solvents, cleaning and scouring agents as well as dashboard spray and plastics
care product may contain ingredients that will damage the surface of the car
sound system. Use only a dry or slightly moistened cloth for cleaning the car
sound system.
Disposal notes
Do not dispose of your old unit in the household trash!
Use the return and collection systems available to dis-pose of the old
device, the remote control and exhausted batteries.
Scope of delivery
The scope of delivery includes:
Main unit BPA 3022 M
Remote control
ISO connectors
Installation screws
Operating manual
ATTENTIONS OF INSTALLATION
1. Please read the instruction manual carefully before installing the unit.
2. Make sure to connect other wires before power on the unit.
3. To avoid short circuit. Please make sure all the exposed wires are insulated.
4. Please x all the wires after installation.
5. Please make connection to the player accordingly to this instruction manual.
Wrong connection may cause damage to the unit.
6. This player only t for 12V DC device.
INSTALL THE UNIT
REMOVE THE UNIT
1. Remove the unit
2. Take out the outer trim frame.
HDMI attention:
Please use good quality HDMI cable.
The overall length (front and rear) should not exceed 12 feet.
WIRING CONNECTION
1. This player can only be used by + 12V DC.
2. Do not connect the battery terminal until the player is fully well installed.
3. Please make sure to connect the yellow wire to the positive of the battery (+).
4. When change the fuse please make sure that the specications are same.
5. Using good quality speakers with 4 - 8 ohm can achieve the best eect of the
unit.
LOCATION OF KEYS
1. STREFA 1 2. 1 3. STREFA 2
4. 2 5. BT 6. 3 RPT
7. 8. 4 RDM 9.
10. 5 DIR- 11. DIS 12. 6 DIR+
13. LCD 14. GNIAZDO AUX 15. GNIAZDO SŁUCHAWKOWE
16. GNIAZDO HDMI 17. RESET 18. POKRĘTŁO
19. PORT USB 20. SRC/MENU
BASIC OPERATION
Turn on/o the unit and Mute function
Press /MUTE knob to turn on the unit. When the unit is on. Shortly press this
knob for mute on/o. Press and hold this button to turn o the unit.
Audio and setting menu adjustment
Press and hold SRC/MENU button into the menu as below:
BAS->TRE->BAL->EQ(o/pop/rock/clas)->LOUD(on/o)->CLK HH->CLK
MM->IR(on/o) ->CT(indep/sync)->BEEP(on/o)->P_VOL(13)->DX(LOC)->STE-
REO(MONO)
In each item rotate the VOL knob to set them.
IR (ON/OFF):
IR ON: The unit can be switched on by IR remote control.
The system is in high power consumption status.
IR OFF: The unit can not be switched on by IR remote control.
The system is in low power consumption status.
CT (INDEP/SYNC):
CT INDEP: The clock works independently.
CT SYNC: The clock will be synchronized to the received RDS station’s time.
Note: When the clock was set in the menu, The CT is set to INDEP mode
automatically.
BEEP (ON/OFF): Turn on/o the beep sound when buttons are pressed.
P-VOL: Setting the power on volume. If the volume at switch-o is lower than
the P-VOL, the unit will set the volume to the value of the switch-o volume
when it is switched on.
If the volume at shutdown is greater than the P-VOL, the volume will be restored
to the
P-VOL value when the unit is switched on.
Bluetooth speaker search
Press and hold BT button shows “SEARCH..”. Seconds later shows the Bluetooth
device name. Rotate VOL knob to show next one. When the desired Bluetooth
speaker name was shown on LCD. Press VOL knob to pair. If the pairing is
succeed, it shows BOX ON.
Important note: Despite numerous tests with various Bluetooth devices,
compatibility with all Bluetooth devices available on the market cannot be
guaranteed.
Bluetooth speaker signal transmit operation
Shortly press BT button to stop/transmit the signal to the Bluetooth speaker. It
shows BOX OFF/ON.
Note: Although Blaupunkt checks the compatibility of dierent Bluetooth speakers
with care, a awless function with all models on the market cannot be guaranteed.
Zone 1 and Zone 2 operation
Shortly press Zone 1 (or ZONE 2) button to unable/enable Zone 1 (or ZONE 2)
volume.
Hold Zone 1 (or ZONE 2) button to mute Zone 1 (or ZONE 2) sound. Hold it
again to mute o.
Information or Clock priority
Shortly press DIS button to change the clock priority or information priority.
Note: In FM band, when received a RDS station shortly press DIS button to show
the STATION NAME/CLOCK/FREQUENCY.
Clock setting
In CLK HH/CLK MM item of the menu. Rotate VOL knob to set the hour/minute.
Head phone operation
There is a 3.5 mm head phone jack in the front panel. It is following the zone 1’s
operation.
RADIO OPERATION
Receive a radio station
Press SRC/MENU button to select FM1->FM2->MW mode. Shortly press /
button to receive the desired radio station. Press and hold / button for
manual tuning the frequency.
Manually store station & recall preset station
Receiving a desired station. Press and hold one of the preset buttons (1 - 6) for 2
seconds. The current station is stored into the number button. Shortly press the
preset button (1 - 6) to directly listen the station that saved in the corresponding
preset button.
DAB OPERATION
Press SRC/MENU button switch to DAB1 or DAB2 source.
Selecting station
Press / button to select up/down station.
Manually store station and recall preset station
When received a desired station. Press and hold 1 - 6 button for 2 seconds to
store this station to corresponding number. Shortly press the preset button (1 -
6) to directly listen the station that saved in the corresponding preset button.
USB OPERATION
When an USB driver was inserted to the unit, the unit will play the MP3/WMA le
automatically. If an USB drive is already inserted in the unit, keep pressing
SRC/MENU button shortly until the USB mode display appears.
Select le
Press / button to skip to next/previous le. Hold / button to
fast forward or fast reverse.
Play/Pause
Press 1 button to pause/playing the le.
Repeat function
Press 3 RPT button to select RPT mode: RPT ONE/RPT FOLD/RPT ALL(default)
RPT ONE: Repeat the same le.
RPT FOLD: Repeat all les of the folder.
RPT ALL: Repeat all les.
RANDOM
Press 4 RDM button to choose RDM on/o.
RDM on: Playing all les in random order.
RDM o: Turn o the random function.
Directory+/- function
Press DIR+/DIR- button to select next/previous folder to play.
Search song
Press and hold button shows NUM 0000. Rotating VOL (or directly enter
number) to select the numbers then press VOL to play. Please note the 7/8/9/0
as: BT = 7, = 8, = 9, DIS = 0.
AUX IN 1/2 OPERATION
AUX IN 1 for front panel 3.5 mm jack. AUX IN 2 for RCA in back of the unit.
Pressing SRC/MENU button to switch to AUX IN1 (2) mode when Connecting
the audio signal to the unit .
BLUETOOTH OPERATION
Pairing
On mobile phone, select the Bluetooth item searching the Bluetooth device.
“BLAUPUNKT” should appear in the list, select “BLAUPUNKT” and then input
password “0000” if it needs a password. When successful paired, the BT mark will
be displayed on the display.
Bluetooth Audio
Press SRC/MENU button to switch to BT MUSIC mode. It will play a song of your
mobile phone automatically. Press key to pause/play the song.
Press / button to select next/previous song.
HDMI OPERATION
The front HDMI port is pass through to the rear HDMI port. The HDMI playback is
therefore not aected.
V-IN and V-OUT RCA connector
In the back of the unit the V-IN connector is pass through to the V-OUT
connector.
REMOTE CONTROL
When IR is set to ON in the setting menu.
OFF : The unit can be switched ON and OFF.
VOL+: Volume up
VOL- : Volume down
1 : Zone 1 MUTE ON/OFF
2 : Zone 2 MUTE ON/OFF
Other operation please reference the description above
GENARAL
Power Supply Requirements : DC 12 Volts, Negative Ground
Chassis Dimensions : 129 (W) x 112 (D) x 65 (H)
Tone Controls
- Bass (at 100 Hz) : ±10 dB
- Treble (at 10 kHz) : ±10 dB
Maximum Output Power : 4 x 40 watts
Current Drain : 10 Ampere (max.)
RADIO FM AM
Frequency Coverage 87.5 to 108 MHz 522 to 1620 KHz
IF 10.7 MHz 450 KHz
Sensitivity 4 µV (S/N = 30 dB) 36 dBµV (S/N = 20 dB)
Stereo Separation >25 dB /
TROUBLE SHOOTING
Indicazioni sulla sicurezza
Questa stazione multimediale è stata prodotta in conformità agli standard
attuali di evoluzione tecnologica e alle norme di sicurezza comunemente
riconosciute. Tuttavia, l’inosservanza delle informazioni sulla sicurezza
contenute nel presente manuale comporta diversi rischi. Prima di utilizzare la
stazione multimediale leggere attentamente il presente manuale per intero.
Conservare il manuale in un luogo accessibile a tutti gli utenti in qualsiasi
momento. In caso di cessione della stazione multimediale a terzi, includere il
presente manuale. Inoltre, bisogna rispettare le indicazioni contenute nei
manuali d’uso dei dispositivi collegati a questa stazione multimediale.
Informazioni generali sulla sicurezza
Osservare le seguenti indicazioni per proteggersi da eventuali lesioni: Non
modicare o aprire il dispositivo.
Uso previsto
La stazione multimediale è progettata per essere installata e utilizzata su veicoli
con impianto di alimentazione con una tensione di 12 V. È necessario rispettare i
limiti di potenza del dispositivo. L’esecuzione di una qualsiasi riparazione e
installazione deve essere adata ad un professionista.
Istruzioni di installazione
È possibile installare il dispositivo da soli se si è esperti nell’installazione di
autoradio e se si ha una conoscenza delle tematiche relative agli impianti
elettrici per automobili. A tal ne consultare lo schema di cablaggio presente in
questo manuale. Il dispositivo deve essere installato in modo da non interferire
o bloccare il funzionamento degli airbag, altri dispositivi di sicurezza e/o
comandi.
Dichiarazione di conformità
Blaupunkt Competence Center Car Multimedia – Evo Sales GmbH dichiara che il
presente dispositivo è conforme ai requisiti essenziali ed alle restanti disposizio-
ni pertinenti della Direttiva 2014/53/UE. La dichiarazione di conformità è
reperibile sul sito www.blaupunkt.com.
Consigli in materia di pulizia
Solventi, detergenti e prodotti abrasivi, così come spray per cruscotti e prodotti
per la cura della plastica, possono contenere sostanze in grado di danneggiare
la supercie della stazione multimediale. Per la pulizia della stazione multimedi-
ale utilizzare solo un panno asciutto o leggermente umido.
Istruzioni per lo smaltimento
Non smaltire il dispositivo usurato insieme ai riuti domestici!
Per smaltire il dispositivo, il telecomando e le batterie consumate,
portarli in un centro di raccolta per apparecchiature usate.
Fornitura
La fornitura include:
stazione multimediale BPA 3022 M,
telecomando,
connettori ISO,
viti di montaggio,
manuale d’uso.
INFORMAZIONI IMPORTANTI SULL’INSTALLAZIONE
1. Leggere attentamente il manuale d’uso prima di installare il dispositivo.
2. Prima di collegare l’alimentazione assicurarsi che tutti gli altri cavi siano
collegati.
3. Per evitare cortocircuiti, assicurarsi che tutti i cavi esposti siano isolati.
4. Una volta completata l’installazione, ssare tutti i cavi.
5. I collegamenti al lettore devono essere eettuati in conformità con il
presente manuale d’uso. Un collegamento errato può causare danni al
dispositivo.
6. Il lettore è progettato per funzionare solo con un impianto a 12 V CC.
INSTALLAZIONE DEL DISPOSITIVO
SMONTAGGIO DEL DISPOSITIVO
1. Smontare il dispositivo.
2. Smontare la cornice esterna di rinitura.
Avvertenze relative al cavo HDM:
Utilizzare un cavo HDMI di buona qualità.
La lunghezza complessiva (fronte e retro) non deve superare i 12 piedi.
INFORMAZIONI GENERALI
COLLEGAMENTO DEI CAVI
1. Il lettore può essere utilizzato solo a +12 V CC.
2. Non collegare il terminale della batteria nché il lettore non sarà completa-
mente installato.
3. Assicurarsi che il cavo giallo sia collegato al polo positivo (+) della batteria.
4. Quando si sostituisce il fusibile, accertarsi che i parametri del nuovo fusibile
siano uguali.
5. Utilizzando gli altoparlanti di buona qualità con un’impedenza di 4-8 ohm si
può ottenere il funzionamento migliore del dispositivo.
POSIZIONE DEI TASTI
1. ZONA 1 2. 1 3. ZONA 2
4. 2 5. BT 6. 3 RPT
7. 8. 4 RDM 9.
10. 5 DIR- 11. DIS 12. 6 DIR+
13. LCD 14. PRESA AUX 15. PRESA PER CUFFIE
16. PRESA HDMI 17. RESET 18. MANOPOLA
19. PORTA USB 20. SRC/MENU
IMPIEGO DI BASE
Accensione/spegnimento del dispositivo e della funzione di silenziamento
Per accendere il dispositivo, premere la manopola / MUTE. Per attivare o disattivare la
funzione di silenziamento, premere brevemente la manopola quando il dispositivo è
acceso. Premere e tenere premuto questo tasto per spegnere il dispositivo.
Impostazioni audio e menu delle impostazioni
Premere e tenere premuto il tasto SCR/MENU per accedere al menu illustrato di
seguito:
BAS->TRE->BAL->EQ (O/pop/rock/class)->LOUD (On/O)->CLK HH->CLK MM->IR
(On/O) ->CT (indep/sync)->SEGN. SUONO. (On/O) )->P_VOL (13)->DX (LOC)->STE-
REO (MONO)
Per ogni posizione, ruotare la manopola VOL per impostarla.
INFRAROSSO (ON/OFF):
INFRAROSSO On: Il dispositivo può essere acceso utilizzando il telecomando a
infrarossi. Il sistema è in modalità di consumo energetico elevato.
INFRAROSSO O: Il dispositivo non può essere acceso utilizzando il telecomando a
infrarossi. Il sistema è in modalità di basso consumo energetico.
CT (INDEP/SYNC):
CT INDEP: L’orologio funziona in modo indipendente.
CT SYNC: L’orologio sarà sincronizzato con l’ora della stazione RDS ricevuta.
Attenzione: Quando si imposta l’orologio nel menu, la funzione CT viene automatica-
mente impostata sulla modalità INDEP (funzionamento indipendente).
SEGNALE ACUSTICO (ON/OFF): Consente di attivare/disattivare il segnale acustico
quando si premono i tasti.
P-VOL: Consente di impostare il volume all’accensione. Se il livello del volume allo
spegnimento è inferiore al livello P-VOL, all’accensione il dispositivo imposterà il
livello del volume sul volume allo spegnimento.
Se il livello del volume allo spegnimento è superiore al livello P-VOL, all’accensione
del dispositivo il volume verrà ripristinato sul livello dei valori P-VOL.
Ricerca di altoparlanti Bluetooth
Tenendo premuto il tasto BT, viene visualizzato il messaggio “SEARCH...” [ricerca].
Successivamente viene visualizzato il nome del dispositivo Bluetooth. Per visualizzare
il dispositivo successivo, ruotare la manopola VOL. Quando il nome dell’altoparlante
Bluetooth desiderato viene visualizzato sul display LCD, premere la manopola VOL
per accoppiare il dispositivo. Se l’accoppiamento sarà riuscito, sul display comparirà il
messaggio “BOX ON”.
Raccomandazione importante: Nonostante i numerosi test eettuati con diversi
dispositivi Bluetooth, non è possibile garantire la compatibilità con tutti i dispositivi
Bluetooth disponibili sul mercato.
Trasmissione del segnale all’altoparlante Bluetooth
Premere brevemente il tasto BT per interrompere il trasferimento/trasmettere il
segnale all’altoparlante Bluetooth. Il display visualizzerà il messaggio “BOX OFF/ON”.
Attenzione: Sebbene Blaupunkt verichi attentamente la compatibilità dei vari
altoparlanti Bluetooth, non è possibile garantire un funzionamento perfetto del
dispositivo con tutti i modelli disponibili sul mercato.
Uso della Zona 1 e della Zona 2
Premere brevemente il tasto Zone 1 (o Zone 2) per spegnere/accendere l’audio della
Zona 1 (o della Zona 2).
Tenere premuto il tasto Zone 1 (o Zone 2) per disattivare l’audio della Zona 1 (o della
Zona 2). Tenere premuto nuovamente il tasto per disattivare il silenziamento.
Priorità delle informazioni o dell’orologio
Premere brevemente il tasto DIS per impostare la priorità dell’orologio o delle
informazioni. Attenzione: Nella banda FM, quando si ricevono stazioni RDS, premere
brevemente il tasto DIS per visualizzare il NOME STAZIONE/OROLOGIO/FREQUENZA.
Impostazioni dell’orologio
Selezionare nel menu la posizione CLK HH/CLK MM. Ruotare la manopola VOL per
impostare l’ora/minuti.
Uso delle cue
Sul pannello frontale è presente un jack per cue da 3,5 mm. Esso riceve le
impostazioni di funzionamento della Zona 1.
USO DELLA RADIO
Ricezione delle stazioni radio
Premere il tasto SRC/MENU per selezionare una modalità tra FM1->FM2->MW.
Premere brevemente il tasto / per ricevere la stazione radio desiderata.
Premere e tenere premuto il tasto / per sintonizzare manualmente la
frequenza.
Memorizzazione manuale della stazione e richiamo delle stazioni memorizzate
Ricezione della stazione desiderata. Premere e tenere premuto per 2 secondi uno dei
tasti di memorizzazione (1–6). La stazione corrente verrà memorizzata su un
determinato tasto numerico. Premere brevemente il tasto della stazione programma-
ta (1–6) per ascoltare direttamente il segnale trasmesso da questa stazione e
memorizzato sul tasto assegnato.
USO DI DAB
Premere il tasto SRC/MENU per commutare la sorgente tra DAB1 o DAB2.
Selezione della stazione
Premere il tasto / per selezionare la stazione successiva/precedente.
Memorizzazione manuale della stazione e richiamo delle stazioni memorizzate
Quando è impostata la frequenza della stazione desiderata, tenere premuto per 2
secondi uno dei tasti da 1 a 6 per memorizzare la stazione sul numero corrisponden-
te. Premere brevemente il tasto della stazione programmata (1–6) per ascoltare
direttamente il segnale trasmesso da questa stazione e memorizzato sul tasto
assegnato.
USO DELLA PORTA USB
Dopo aver collegato al dispositivo una chiavetta USB, il dispositivo riproduce
automaticamente i le MP3/WMA. Se al dispositivo è già stata collegata una chiavetta
USB, premere brevemente il tastoSRC/MENU no a visualizzare la schermata della
modalità USB.
Selezione del le
Premere il tasto / per passare al le successivo/precedente. Premere il tasto
/ per scorrere velocemente in avanti o indietro.
Riproduzione/pausa
Premere il tasto 1 per mettere in pausa/riprodurre un le.
Funzione di riproduzione in loop
Premere il tasto 3 RPT per selezionare la funzione di riproduzione in loop. RPT
ONE/RPT FOLD/RPT ALL (predenito)
RPT ONE: Riproduzione di un singolo le in loop.
RPT FOLD: Riproduzione in loop di tutti i le di una cartella.
RPT ALL: Riproduzione di tutti i le in loop.
RANDOM
Premere il tasto 4 RDM per attivare o disattivare la funzione di riproduzione casuale.
RDM On: Riproduzione casuale di tutti i le.
RDM O: Disattivazione della funzione di riproduzione casuale.
Funzione cartella +/-
Premere il tasto DIR+/DIR- per selezionare la cartella successiva/precedente da
riprodurre.
Ricerca di una canzone
Tenendo premuto il tasto , verrà visualizzato il messaggio “NUM 0000”. Ruotando
la manopola VOL (o inserendo direttamente il numero), selezionare il numero, quindi
premere VOL per riprodurre. Tenere presente che per 7/8/9/0 si intendono:
BT = 7, = 8, = 9, DIS = 0.
UTILIZZO DELLA PRESA AUX 1/2
La presa AUX IN 1 presente sul pannello anteriore è un jack da 3,5 mm. La presa AUX
IN 2 per RCA si trova invece sul retro del dispositivo. Premendo il tasto SRC/MENU si
passa alla modalità AUX IN1 (2) quando il segnale audio è collegato al dispositivo.
UTILIZZO DEL BLUETOOTH
Accoppiamento dei dispositivi
Selezionare sullo smartphone la voce Bluetooth e cercare il dispositivo Bluetooth.
Nell’elenco dovrebbe comparire la voce “BLAUPUNKT”; selezionare “BLAUPUNKT” e se
viene visualizzato un messaggio che richiede l’inserimento della password, inserire
“0000”. Quando l'accoppiamento è correttamente terminato, sul display verrà
visualizzato il simbolo BT.
Audio del Bluetooth
Premere il tasto SRC/MENU per passare alla modalità BT MUSIC. Il dispositivo
riprodurrà automaticamente un brano dal cellulare. Premere il tasto per mettere
in pausa/riprodurre un brano.
Premere il tasto / per selezionare il brano successivo/precedente.
USO DELLA PRESA HDMI
La presa anteriore HDMI va alla presa HDMI posteriore. Questo non incide sulla
riproduzione tramite HDMI.
Connettori RCA V-IN e V-OUT
Sul retro del dispositivo, il connettore V-IN va al connettore V-OUT.
TELECOMANDO
Il telecomando può essere utilizzato quando
l’opzione IR nel menu è impostata su ON.
OFF: Accensione e spegnimento del dispositivo.
VOL+: Aumentare il volume
VOL-: Abbassare il volume
1 : Accensione/spegnimento della
funzione di silenziamento della Zona 1
2 : Accensione/spegnimento della
funzione di silenziamento della Zona 2
Per le altre operazioni, leggere le istruzioni sopra riportate.
INFORMAZIONI GENERALI
Requisiti inerenti all’alimentazione : Corrente continua a 12V, terminale
negativo collegato a massa
Dimensioni della base di montaggio : 129 (largh.) x 112 (prof.) x 65 (alt.)
Impostazioni del tono
- Toni bassi (a 100 Hz) : ±10 dB
- Toni alti (a 100 Hz) : ±10 dB
Potenza massima in uscita : 4 × 40 W
Consumo di corrente : 10 A (max)
RADIO FM AM
Intervallo di frequenza da 87,5 a 108 MHz da 522 a 1620 KHz
IF 10.7 MHz 450 KHz
Sensibilità 4 µV (S/N = 30 dB) 36 dBµV (S/N = 20 dB)
Separazione dei canali stereo >25 dB /
RISOLUZIONE DEI PROBLEMI
IT
INSTALLAZIONE
Cruscotto
Viti
Placche decorative
98,0 × 101,0 mm

Indicazioni sulla sicurezza
Questa stazione multimediale è stata prodotta in conformità agli standard
attuali di evoluzione tecnologica e alle norme di sicurezza comunemente
riconosciute. Tuttavia, l’inosservanza delle informazioni sulla sicurezza
contenute nel presente manuale comporta diversi rischi. Prima di utilizzare la
stazione multimediale leggere attentamente il presente manuale per intero.
Conservare il manuale in un luogo accessibile a tutti gli utenti in qualsiasi
momento. In caso di cessione della stazione multimediale a terzi, includere il
presente manuale. Inoltre, bisogna rispettare le indicazioni contenute nei
manuali d’uso dei dispositivi collegati a questa stazione multimediale.
Informazioni generali sulla sicurezza
Osservare le seguenti indicazioni per proteggersi da eventuali lesioni: Non
modicare o aprire il dispositivo.
Uso previsto
La stazione multimediale è progettata per essere installata e utilizzata su veicoli
con impianto di alimentazione con una tensione di 12 V. È necessario rispettare i
limiti di potenza del dispositivo. L’esecuzione di una qualsiasi riparazione e
installazione deve essere adata ad un professionista.
Istruzioni di installazione
È possibile installare il dispositivo da soli se si è esperti nell’installazione di
autoradio e se si ha una conoscenza delle tematiche relative agli impianti
elettrici per automobili. A tal ne consultare lo schema di cablaggio presente in
questo manuale. Il dispositivo deve essere installato in modo da non interferire
o bloccare il funzionamento degli airbag, altri dispositivi di sicurezza e/o
comandi.
Dichiarazione di conformità
Blaupunkt Competence Center Car Multimedia – Evo Sales GmbH dichiara che il
presente dispositivo è conforme ai requisiti essenziali ed alle restanti disposizio-
ni pertinenti della Direttiva 2014/53/UE. La dichiarazione di conformità è
reperibile sul sito www.blaupunkt.com.
Consigli in materia di pulizia
Solventi, detergenti e prodotti abrasivi, così come spray per cruscotti e prodotti
per la cura della plastica, possono contenere sostanze in grado di danneggiare
la supercie della stazione multimediale. Per la pulizia della stazione multimedi-
ale utilizzare solo un panno asciutto o leggermente umido.
Istruzioni per lo smaltimento
Non smaltire il dispositivo usurato insieme ai riuti domestici!
Per smaltire il dispositivo, il telecomando e le batterie consumate,
portarli in un centro di raccolta per apparecchiature usate.
Fornitura
La fornitura include:
stazione multimediale BPA 3022 M,
telecomando,
connettori ISO,
viti di montaggio,
manuale d’uso.
INFORMAZIONI IMPORTANTI SULL’INSTALLAZIONE
1. Leggere attentamente il manuale d’uso prima di installare il dispositivo.
2. Prima di collegare l’alimentazione assicurarsi che tutti gli altri cavi siano
collegati.
3. Per evitare cortocircuiti, assicurarsi che tutti i cavi esposti siano isolati.
4. Una volta completata l’installazione, ssare tutti i cavi.
5. I collegamenti al lettore devono essere eettuati in conformità con il
presente manuale d’uso. Un collegamento errato può causare danni al
dispositivo.
6. Il lettore è progettato per funzionare solo con un impianto a 12 V CC.
INSTALLAZIONE DEL DISPOSITIVO
SMONTAGGIO DEL DISPOSITIVO
1. Smontare il dispositivo.
2. Smontare la cornice esterna di rinitura.
Avvertenze relative al cavo HDM:
Utilizzare un cavo HDMI di buona qualità.
La lunghezza complessiva (fronte e retro) non deve superare i 12 piedi.
COLLEGAMENTO DEI CAVI
1. Il lettore può essere utilizzato solo a +12 V CC.
2. Non collegare il terminale della batteria nché il lettore non sarà completa-
mente installato.
3. Assicurarsi che il cavo giallo sia collegato al polo positivo (+) della batteria.
4. Quando si sostituisce il fusibile, accertarsi che i parametri del nuovo fusibile
siano uguali.
5. Utilizzando gli altoparlanti di buona qualità con un’impedenza di 4-8 ohm si
può ottenere il funzionamento migliore del dispositivo.
COLLEGAMENTO DEI CAVI
POSIZIONE DEI TASTI
1. ZONA 1 2. 1 3. ZONA 2
4. 2 5. BT 6. 3 RPT
7. 8. 4 RDM 9.
10. 5 DIR- 11. DIS 12. 6 DIR+
13. LCD 14. PRESA AUX 15. PRESA PER CUFFIE
16. PRESA HDMI 17. RESET 18. MANOPOLA
19. PORTA USB 20. SRC/MENU
IMPIEGO DI BASE
Accensione/spegnimento del dispositivo e della funzione di silenziamento
Per accendere il dispositivo, premere la manopola / MUTE. Per attivare o disattivare la
funzione di silenziamento, premere brevemente la manopola quando il dispositivo è
acceso. Premere e tenere premuto questo tasto per spegnere il dispositivo.
Impostazioni audio e menu delle impostazioni
Premere e tenere premuto il tasto SCR/MENU per accedere al menu illustrato di
seguito:
BAS->TRE->BAL->EQ (O/pop/rock/class)->LOUD (On/O)->CLK HH->CLK MM->IR
(On/O) ->CT (indep/sync)->SEGN. SUONO. (On/O) )->P_VOL (13)->DX (LOC)->STE-
REO (MONO)
Per ogni posizione, ruotare la manopola VOL per impostarla.
INFRAROSSO (ON/OFF):
INFRAROSSO On: Il dispositivo può essere acceso utilizzando il telecomando a
infrarossi. Il sistema è in modalità di consumo energetico elevato.
INFRAROSSO O: Il dispositivo non può essere acceso utilizzando il telecomando a
infrarossi. Il sistema è in modalità di basso consumo energetico.
CT (INDEP/SYNC):
CT INDEP: L’orologio funziona in modo indipendente.
CT SYNC: L’orologio sarà sincronizzato con l’ora della stazione RDS ricevuta.
Attenzione: Quando si imposta l’orologio nel menu, la funzione CT viene automatica-
mente impostata sulla modalità INDEP (funzionamento indipendente).
SEGNALE ACUSTICO (ON/OFF): Consente di attivare/disattivare il segnale acustico
quando si premono i tasti.
P-VOL: Consente di impostare il volume all’accensione. Se il livello del volume allo
spegnimento è inferiore al livello P-VOL, all’accensione il dispositivo imposterà il
livello del volume sul volume allo spegnimento.
Se il livello del volume allo spegnimento è superiore al livello P-VOL, all’accensione
del dispositivo il volume verrà ripristinato sul livello dei valori P-VOL.
Ricerca di altoparlanti Bluetooth
Tenendo premuto il tasto BT, viene visualizzato il messaggio “SEARCH...” [ricerca].
Successivamente viene visualizzato il nome del dispositivo Bluetooth. Per visualizzare
il dispositivo successivo, ruotare la manopola VOL. Quando il nome dell’altoparlante
Bluetooth desiderato viene visualizzato sul display LCD, premere la manopola VOL
per accoppiare il dispositivo. Se l’accoppiamento sarà riuscito, sul display comparirà il
messaggio “BOX ON”.
Raccomandazione importante: Nonostante i numerosi test eettuati con diversi
dispositivi Bluetooth, non è possibile garantire la compatibilità con tutti i dispositivi
Bluetooth disponibili sul mercato.
Trasmissione del segnale all’altoparlante Bluetooth
Premere brevemente il tasto BT per interrompere il trasferimento/trasmettere il
segnale all’altoparlante Bluetooth. Il display visualizzerà il messaggio “BOX OFF/ON”.
Attenzione: Sebbene Blaupunkt verichi attentamente la compatibilità dei vari
altoparlanti Bluetooth, non è possibile garantire un funzionamento perfetto del
dispositivo con tutti i modelli disponibili sul mercato.
Uso della Zona 1 e della Zona 2
Premere brevemente il tasto Zone 1 (o Zone 2) per spegnere/accendere l’audio della
Zona 1 (o della Zona 2).
Tenere premuto il tasto Zone 1 (o Zone 2) per disattivare l’audio della Zona 1 (o della
Zona 2). Tenere premuto nuovamente il tasto per disattivare il silenziamento.
Priorità delle informazioni o dell’orologio
Premere brevemente il tasto DIS per impostare la priorità dell’orologio o delle
informazioni. Attenzione: Nella banda FM, quando si ricevono stazioni RDS, premere
brevemente il tasto DIS per visualizzare il NOME STAZIONE/OROLOGIO/FREQUENZA.
Impostazioni dell’orologio
Selezionare nel menu la posizione CLK HH/CLK MM. Ruotare la manopola VOL per
impostare l’ora/minuti.
Uso delle cue
Sul pannello frontale è presente un jack per cue da 3,5 mm. Esso riceve le
impostazioni di funzionamento della Zona 1.
USO DELLA RADIO
Ricezione delle stazioni radio
Premere il tasto SRC/MENU per selezionare una modalità tra FM1->FM2->MW.
Premere brevemente il tasto / per ricevere la stazione radio desiderata.
Premere e tenere premuto il tasto / per sintonizzare manualmente la
frequenza.
Memorizzazione manuale della stazione e richiamo delle stazioni memorizzate
Ricezione della stazione desiderata. Premere e tenere premuto per 2 secondi uno dei
tasti di memorizzazione (1–6). La stazione corrente verrà memorizzata su un
determinato tasto numerico. Premere brevemente il tasto della stazione programma-
ta (1–6) per ascoltare direttamente il segnale trasmesso da questa stazione e
memorizzato sul tasto assegnato.
USO DI DAB
Premere il tasto SRC/MENU per commutare la sorgente tra DAB1 o DAB2.
Selezione della stazione
Premere il tasto / per selezionare la stazione successiva/precedente.
Memorizzazione manuale della stazione e richiamo delle stazioni memorizzate
Quando è impostata la frequenza della stazione desiderata, tenere premuto per 2
secondi uno dei tasti da 1 a 6 per memorizzare la stazione sul numero corrisponden-
te. Premere brevemente il tasto della stazione programmata (1–6) per ascoltare
direttamente il segnale trasmesso da questa stazione e memorizzato sul tasto
assegnato.
USO DELLA PORTA USB
Dopo aver collegato al dispositivo una chiavetta USB, il dispositivo riproduce
automaticamente i le MP3/WMA. Se al dispositivo è già stata collegata una chiavetta
USB, premere brevemente il tastoSRC/MENU no a visualizzare la schermata della
modalità USB.
Selezione del le
Premere il tasto / per passare al le successivo/precedente. Premere il tasto
/ per scorrere velocemente in avanti o indietro.
Riproduzione/pausa
Premere il tasto 1 per mettere in pausa/riprodurre un le.
Funzione di riproduzione in loop
Premere il tasto 3 RPT per selezionare la funzione di riproduzione in loop. RPT
ONE/RPT FOLD/RPT ALL (predenito)
RPT ONE: Riproduzione di un singolo le in loop.
RPT FOLD: Riproduzione in loop di tutti i le di una cartella.
RPT ALL: Riproduzione di tutti i le in loop.
RANDOM
Premere il tasto 4 RDM per attivare o disattivare la funzione di riproduzione casuale.
RDM On: Riproduzione casuale di tutti i le.
RDM O: Disattivazione della funzione di riproduzione casuale.
Funzione cartella +/-
Premere il tasto DIR+/DIR- per selezionare la cartella successiva/precedente da
riprodurre.
Ricerca di una canzone
Tenendo premuto il tasto , verrà visualizzato il messaggio “NUM 0000”. Ruotando
la manopola VOL (o inserendo direttamente il numero), selezionare il numero, quindi
premere VOL per riprodurre. Tenere presente che per 7/8/9/0 si intendono:
BT = 7, = 8, = 9, DIS = 0.
UTILIZZO DELLA PRESA AUX 1/2
La presa AUX IN 1 presente sul pannello anteriore è un jack da 3,5 mm. La presa AUX
IN 2 per RCA si trova invece sul retro del dispositivo. Premendo il tasto SRC/MENU si
passa alla modalità AUX IN1 (2) quando il segnale audio è collegato al dispositivo.
UTILIZZO DEL BLUETOOTH
Accoppiamento dei dispositivi
Selezionare sullo smartphone la voce Bluetooth e cercare il dispositivo Bluetooth.
Nell’elenco dovrebbe comparire la voce “BLAUPUNKT”; selezionare “BLAUPUNKT” e se
viene visualizzato un messaggio che richiede l’inserimento della password, inserire
“0000”. Quando l'accoppiamento è correttamente terminato, sul display verrà
visualizzato il simbolo BT.
Audio del Bluetooth
Premere il tasto SRC/MENU per passare alla modalità BT MUSIC. Il dispositivo
riprodurrà automaticamente un brano dal cellulare. Premere il tasto per mettere
in pausa/riprodurre un brano.
Premere il tasto / per selezionare il brano successivo/precedente.
USO DELLA PRESA HDMI
La presa anteriore HDMI va alla presa HDMI posteriore. Questo non incide sulla
riproduzione tramite HDMI.
Connettori RCA V-IN e V-OUT
Sul retro del dispositivo, il connettore V-IN va al connettore V-OUT.
TELECOMANDO
Il telecomando può essere utilizzato quando
l’opzione IR nel menu è impostata su ON.
OFF: Accensione e spegnimento del dispositivo.
VOL+: Aumentare il volume
VOL-: Abbassare il volume
1 : Accensione/spegnimento della
funzione di silenziamento della Zona 1
2 : Accensione/spegnimento della
funzione di silenziamento della Zona 2
Per le altre operazioni, leggere le istruzioni sopra riportate.
INFORMAZIONI GENERALI
Requisiti inerenti all’alimentazione : Corrente continua a 12V, terminale
negativo collegato a massa
Dimensioni della base di montaggio : 129 (largh.) x 112 (prof.) x 65 (alt.)
Impostazioni del tono
- Toni bassi (a 100 Hz) : ±10 dB
- Toni alti (a 100 Hz) : ±10 dB
Potenza massima in uscita : 4 × 40 W
Consumo di corrente : 10 A (max)
RADIO FM AM
Intervallo di frequenza da 87,5 a 108 MHz da 522 a 1620 KHz
IF 10.7 MHz 450 KHz
Sensibilità 4 µV (S/N = 30 dB) 36 dBµV (S/N = 20 dB)
Separazione dei canali stereo >25 dB /
RISOLUZIONE DEI PROBLEMI
IT
Parte A
Parte B
FUSIBILE
Parte A
Parte B
ANTENNA
RADIO
IMPIANTO A 4 ALTOPARLANTI
(BIANCO-NERO)
(BIANCO)
(GRIGIO-NERO)
(GRIGIO)
(VERDE-NERO)
(VERDE)
(VIOLA-NERO)
(VIOLA)
ZONA 1
ZONA 2
Altoparlant
e anteriore
– sinistro
Altoparlant
e anteriore
– destro
Altoparlante
posteriore –
sinistro
Altoparlante
posteriore –
destro
Przewód uziemiający (czarny)
Akcesorium/przełącznik +12 VA (czerwony)
Zasilanie anteny (niebieski)
Stałe zasilanie +12 V (żółty)

Indicazioni sulla sicurezza
Questa stazione multimediale è stata prodotta in conformità agli standard
attuali di evoluzione tecnologica e alle norme di sicurezza comunemente
riconosciute. Tuttavia, l’inosservanza delle informazioni sulla sicurezza
contenute nel presente manuale comporta diversi rischi. Prima di utilizzare la
stazione multimediale leggere attentamente il presente manuale per intero.
Conservare il manuale in un luogo accessibile a tutti gli utenti in qualsiasi
momento. In caso di cessione della stazione multimediale a terzi, includere il
presente manuale. Inoltre, bisogna rispettare le indicazioni contenute nei
manuali d’uso dei dispositivi collegati a questa stazione multimediale.
Informazioni generali sulla sicurezza
Osservare le seguenti indicazioni per proteggersi da eventuali lesioni: Non
modicare o aprire il dispositivo.
Uso previsto
La stazione multimediale è progettata per essere installata e utilizzata su veicoli
con impianto di alimentazione con una tensione di 12 V. È necessario rispettare i
limiti di potenza del dispositivo. L’esecuzione di una qualsiasi riparazione e
installazione deve essere adata ad un professionista.
Istruzioni di installazione
È possibile installare il dispositivo da soli se si è esperti nell’installazione di
autoradio e se si ha una conoscenza delle tematiche relative agli impianti
elettrici per automobili. A tal ne consultare lo schema di cablaggio presente in
questo manuale. Il dispositivo deve essere installato in modo da non interferire
o bloccare il funzionamento degli airbag, altri dispositivi di sicurezza e/o
comandi.
Dichiarazione di conformità
Blaupunkt Competence Center Car Multimedia – Evo Sales GmbH dichiara che il
presente dispositivo è conforme ai requisiti essenziali ed alle restanti disposizio-
ni pertinenti della Direttiva 2014/53/UE. La dichiarazione di conformità è
reperibile sul sito www.blaupunkt.com.
Consigli in materia di pulizia
Solventi, detergenti e prodotti abrasivi, così come spray per cruscotti e prodotti
per la cura della plastica, possono contenere sostanze in grado di danneggiare
la supercie della stazione multimediale. Per la pulizia della stazione multimedi-
ale utilizzare solo un panno asciutto o leggermente umido.
Istruzioni per lo smaltimento
Non smaltire il dispositivo usurato insieme ai riuti domestici!
Per smaltire il dispositivo, il telecomando e le batterie consumate,
portarli in un centro di raccolta per apparecchiature usate.
Fornitura
La fornitura include:
stazione multimediale BPA 3022 M,
telecomando,
connettori ISO,
viti di montaggio,
manuale d’uso.
INFORMAZIONI IMPORTANTI SULL’INSTALLAZIONE
1. Leggere attentamente il manuale d’uso prima di installare il dispositivo.
2. Prima di collegare l’alimentazione assicurarsi che tutti gli altri cavi siano
collegati.
3. Per evitare cortocircuiti, assicurarsi che tutti i cavi esposti siano isolati.
4. Una volta completata l’installazione, ssare tutti i cavi.
5. I collegamenti al lettore devono essere eettuati in conformità con il
presente manuale d’uso. Un collegamento errato può causare danni al
dispositivo.
6. Il lettore è progettato per funzionare solo con un impianto a 12 V CC.
INSTALLAZIONE DEL DISPOSITIVO
SMONTAGGIO DEL DISPOSITIVO
1. Smontare il dispositivo.
2. Smontare la cornice esterna di rinitura.
Avvertenze relative al cavo HDM:
Utilizzare un cavo HDMI di buona qualità.
La lunghezza complessiva (fronte e retro) non deve superare i 12 piedi.
COLLEGAMENTO DEI CAVI
1. Il lettore può essere utilizzato solo a +12 V CC.
2. Non collegare il terminale della batteria nché il lettore non sarà completa-
mente installato.
3. Assicurarsi che il cavo giallo sia collegato al polo positivo (+) della batteria.
4. Quando si sostituisce il fusibile, accertarsi che i parametri del nuovo fusibile
siano uguali.
5. Utilizzando gli altoparlanti di buona qualità con un’impedenza di 4-8 ohm si
può ottenere il funzionamento migliore del dispositivo.
USO
POSIZIONE DEI TASTI
1. ZONA 1 2. 1 3. ZONA 2
4. 2 5. BT 6. 3 RPT
7. 8. 4 RDM 9.
10. 5 DIR- 11. DIS 12. 6 DIR+
13. LCD 14. PRESA AUX 15. PRESA PER CUFFIE
16. PRESA HDMI 17. RESET 18. MANOPOLA
19. PORTA USB 20. SRC/MENU
IMPIEGO DI BASE
Accensione/spegnimento del dispositivo e della funzione di silenziamento
Per accendere il dispositivo, premere la manopola / MUTE. Per attivare o disattivare la
funzione di silenziamento, premere brevemente la manopola quando il dispositivo è
acceso. Premere e tenere premuto questo tasto per spegnere il dispositivo.
Impostazioni audio e menu delle impostazioni
Premere e tenere premuto il tasto SCR/MENU per accedere al menu illustrato di
seguito:
BAS->TRE->BAL->EQ (O/pop/rock/class)->LOUD (On/O)->CLK HH->CLK MM->IR
(On/O) ->CT (indep/sync)->SEGN. SUONO. (On/O) )->P_VOL (13)->DX (LOC)->STE-
REO (MONO)
Per ogni posizione, ruotare la manopola VOL per impostarla.
INFRAROSSO (ON/OFF):
INFRAROSSO On: Il dispositivo può essere acceso utilizzando il telecomando a
infrarossi. Il sistema è in modalità di consumo energetico elevato.
INFRAROSSO O: Il dispositivo non può essere acceso utilizzando il telecomando a
infrarossi. Il sistema è in modalità di basso consumo energetico.
CT (INDEP/SYNC):
CT INDEP: L’orologio funziona in modo indipendente.
CT SYNC: L’orologio sarà sincronizzato con l’ora della stazione RDS ricevuta.
Attenzione: Quando si imposta l’orologio nel menu, la funzione CT viene automatica-
mente impostata sulla modalità INDEP (funzionamento indipendente).
SEGNALE ACUSTICO (ON/OFF): Consente di attivare/disattivare il segnale acustico
quando si premono i tasti.
P-VOL: Consente di impostare il volume all’accensione. Se il livello del volume allo
spegnimento è inferiore al livello P-VOL, all’accensione il dispositivo imposterà il
livello del volume sul volume allo spegnimento.
Se il livello del volume allo spegnimento è superiore al livello P-VOL, all’accensione
del dispositivo il volume verrà ripristinato sul livello dei valori P-VOL.
Ricerca di altoparlanti Bluetooth
Tenendo premuto il tasto BT, viene visualizzato il messaggio “SEARCH...” [ricerca].
Successivamente viene visualizzato il nome del dispositivo Bluetooth. Per visualizzare
il dispositivo successivo, ruotare la manopola VOL. Quando il nome dell’altoparlante
Bluetooth desiderato viene visualizzato sul display LCD, premere la manopola VOL
per accoppiare il dispositivo. Se l’accoppiamento sarà riuscito, sul display comparirà il
messaggio “BOX ON”.
Raccomandazione importante: Nonostante i numerosi test eettuati con diversi
dispositivi Bluetooth, non è possibile garantire la compatibilità con tutti i dispositivi
Bluetooth disponibili sul mercato.
Trasmissione del segnale all’altoparlante Bluetooth
Premere brevemente il tasto BT per interrompere il trasferimento/trasmettere il
segnale all’altoparlante Bluetooth. Il display visualizzerà il messaggio “BOX OFF/ON”.
Attenzione: Sebbene Blaupunkt verichi attentamente la compatibilità dei vari
altoparlanti Bluetooth, non è possibile garantire un funzionamento perfetto del
dispositivo con tutti i modelli disponibili sul mercato.
Uso della Zona 1 e della Zona 2
Premere brevemente il tasto Zone 1 (o Zone 2) per spegnere/accendere l’audio della
Zona 1 (o della Zona 2).
Tenere premuto il tasto Zone 1 (o Zone 2) per disattivare l’audio della Zona 1 (o della
Zona 2). Tenere premuto nuovamente il tasto per disattivare il silenziamento.
Priorità delle informazioni o dell’orologio
Premere brevemente il tasto DIS per impostare la priorità dell’orologio o delle
informazioni. Attenzione: Nella banda FM, quando si ricevono stazioni RDS, premere
brevemente il tasto DIS per visualizzare il NOME STAZIONE/OROLOGIO/FREQUENZA.
Impostazioni dell’orologio
Selezionare nel menu la posizione CLK HH/CLK MM. Ruotare la manopola VOL per
impostare l’ora/minuti.
Uso delle cue
Sul pannello frontale è presente un jack per cue da 3,5 mm. Esso riceve le
impostazioni di funzionamento della Zona 1.
USO DELLA RADIO
Ricezione delle stazioni radio
Premere il tasto SRC/MENU per selezionare una modalità tra FM1->FM2->MW.
Premere brevemente il tasto / per ricevere la stazione radio desiderata.
Premere e tenere premuto il tasto / per sintonizzare manualmente la
frequenza.
Memorizzazione manuale della stazione e richiamo delle stazioni memorizzate
Ricezione della stazione desiderata. Premere e tenere premuto per 2 secondi uno dei
tasti di memorizzazione (1–6). La stazione corrente verrà memorizzata su un
determinato tasto numerico. Premere brevemente il tasto della stazione programma-
ta (1–6) per ascoltare direttamente il segnale trasmesso da questa stazione e
memorizzato sul tasto assegnato.
USO DI DAB
Premere il tasto SRC/MENU per commutare la sorgente tra DAB1 o DAB2.
Selezione della stazione
Premere il tasto / per selezionare la stazione successiva/precedente.
Memorizzazione manuale della stazione e richiamo delle stazioni memorizzate
Quando è impostata la frequenza della stazione desiderata, tenere premuto per 2
secondi uno dei tasti da 1 a 6 per memorizzare la stazione sul numero corrisponden-
te. Premere brevemente il tasto della stazione programmata (1–6) per ascoltare
direttamente il segnale trasmesso da questa stazione e memorizzato sul tasto
assegnato.
USO DELLA PORTA USB
Dopo aver collegato al dispositivo una chiavetta USB, il dispositivo riproduce
automaticamente i le MP3/WMA. Se al dispositivo è già stata collegata una chiavetta
USB, premere brevemente il tastoSRC/MENU no a visualizzare la schermata della
modalità USB.
Selezione del le
Premere il tasto / per passare al le successivo/precedente. Premere il tasto
/ per scorrere velocemente in avanti o indietro.
Riproduzione/pausa
Premere il tasto 1 per mettere in pausa/riprodurre un le.
Funzione di riproduzione in loop
Premere il tasto 3 RPT per selezionare la funzione di riproduzione in loop. RPT
ONE/RPT FOLD/RPT ALL (predenito)
RPT ONE: Riproduzione di un singolo le in loop.
RPT FOLD: Riproduzione in loop di tutti i le di una cartella.
RPT ALL: Riproduzione di tutti i le in loop.
RANDOM
Premere il tasto 4 RDM per attivare o disattivare la funzione di riproduzione casuale.
RDM On: Riproduzione casuale di tutti i le.
RDM O: Disattivazione della funzione di riproduzione casuale.
Funzione cartella +/-
Premere il tasto DIR+/DIR- per selezionare la cartella successiva/precedente da
riprodurre.
Ricerca di una canzone
Tenendo premuto il tasto , verrà visualizzato il messaggio “NUM 0000”. Ruotando
la manopola VOL (o inserendo direttamente il numero), selezionare il numero, quindi
premere VOL per riprodurre. Tenere presente che per 7/8/9/0 si intendono:
BT = 7, = 8, = 9, DIS = 0.
UTILIZZO DELLA PRESA AUX 1/2
La presa AUX IN 1 presente sul pannello anteriore è un jack da 3,5 mm. La presa AUX
IN 2 per RCA si trova invece sul retro del dispositivo. Premendo il tasto SRC/MENU si
passa alla modalità AUX IN1 (2) quando il segnale audio è collegato al dispositivo.
UTILIZZO DEL BLUETOOTH
Accoppiamento dei dispositivi
Selezionare sullo smartphone la voce Bluetooth e cercare il dispositivo Bluetooth.
Nell’elenco dovrebbe comparire la voce “BLAUPUNKT”; selezionare “BLAUPUNKT” e se
viene visualizzato un messaggio che richiede l’inserimento della password, inserire
“0000”. Quando l'accoppiamento è correttamente terminato, sul display verrà
visualizzato il simbolo BT.
Audio del Bluetooth
Premere il tasto SRC/MENU per passare alla modalità BT MUSIC. Il dispositivo
riprodurrà automaticamente un brano dal cellulare. Premere il tasto per mettere
in pausa/riprodurre un brano.
Premere il tasto / per selezionare il brano successivo/precedente.
USO DELLA PRESA HDMI
La presa anteriore HDMI va alla presa HDMI posteriore. Questo non incide sulla
riproduzione tramite HDMI.
Connettori RCA V-IN e V-OUT
Sul retro del dispositivo, il connettore V-IN va al connettore V-OUT.
TELECOMANDO
Il telecomando può essere utilizzato quando
l’opzione IR nel menu è impostata su ON.
OFF: Accensione e spegnimento del dispositivo.
VOL+: Aumentare il volume
VOL-: Abbassare il volume
1 : Accensione/spegnimento della
funzione di silenziamento della Zona 1
2 : Accensione/spegnimento della
funzione di silenziamento della Zona 2
Per le altre operazioni, leggere le istruzioni sopra riportate.
INFORMAZIONI GENERALI
Requisiti inerenti all’alimentazione : Corrente continua a 12V, terminale
negativo collegato a massa
Dimensioni della base di montaggio : 129 (largh.) x 112 (prof.) x 65 (alt.)
Impostazioni del tono
- Toni bassi (a 100 Hz) : ±10 dB
- Toni alti (a 100 Hz) : ±10 dB
Potenza massima in uscita : 4 × 40 W
Consumo di corrente : 10 A (max)
RADIO FM AM
Intervallo di frequenza da 87,5 a 108 MHz da 522 a 1620 KHz
IF 10.7 MHz 450 KHz
Sensibilità 4 µV (S/N = 30 dB) 36 dBµV (S/N = 20 dB)
Separazione dei canali stereo >25 dB /
RISOLUZIONE DEI PROBLEMI
IT

Indicazioni sulla sicurezza
Questa stazione multimediale è stata prodotta in conformità agli standard
attuali di evoluzione tecnologica e alle norme di sicurezza comunemente
riconosciute. Tuttavia, l’inosservanza delle informazioni sulla sicurezza
contenute nel presente manuale comporta diversi rischi. Prima di utilizzare la
stazione multimediale leggere attentamente il presente manuale per intero.
Conservare il manuale in un luogo accessibile a tutti gli utenti in qualsiasi
momento. In caso di cessione della stazione multimediale a terzi, includere il
presente manuale. Inoltre, bisogna rispettare le indicazioni contenute nei
manuali d’uso dei dispositivi collegati a questa stazione multimediale.
Informazioni generali sulla sicurezza
Osservare le seguenti indicazioni per proteggersi da eventuali lesioni: Non
modicare o aprire il dispositivo.
Uso previsto
La stazione multimediale è progettata per essere installata e utilizzata su veicoli
con impianto di alimentazione con una tensione di 12 V. È necessario rispettare i
limiti di potenza del dispositivo. L’esecuzione di una qualsiasi riparazione e
installazione deve essere adata ad un professionista.
Istruzioni di installazione
È possibile installare il dispositivo da soli se si è esperti nell’installazione di
autoradio e se si ha una conoscenza delle tematiche relative agli impianti
elettrici per automobili. A tal ne consultare lo schema di cablaggio presente in
questo manuale. Il dispositivo deve essere installato in modo da non interferire
o bloccare il funzionamento degli airbag, altri dispositivi di sicurezza e/o
comandi.
Dichiarazione di conformità
Blaupunkt Competence Center Car Multimedia – Evo Sales GmbH dichiara che il
presente dispositivo è conforme ai requisiti essenziali ed alle restanti disposizio-
ni pertinenti della Direttiva 2014/53/UE. La dichiarazione di conformità è
reperibile sul sito www.blaupunkt.com.
Consigli in materia di pulizia
Solventi, detergenti e prodotti abrasivi, così come spray per cruscotti e prodotti
per la cura della plastica, possono contenere sostanze in grado di danneggiare
la supercie della stazione multimediale. Per la pulizia della stazione multimedi-
ale utilizzare solo un panno asciutto o leggermente umido.
Istruzioni per lo smaltimento
Non smaltire il dispositivo usurato insieme ai riuti domestici!
Per smaltire il dispositivo, il telecomando e le batterie consumate,
portarli in un centro di raccolta per apparecchiature usate.
Fornitura
La fornitura include:
stazione multimediale BPA 3022 M,
telecomando,
connettori ISO,
viti di montaggio,
manuale d’uso.
INFORMAZIONI IMPORTANTI SULL’INSTALLAZIONE
1. Leggere attentamente il manuale d’uso prima di installare il dispositivo.
2. Prima di collegare l’alimentazione assicurarsi che tutti gli altri cavi siano
collegati.
3. Per evitare cortocircuiti, assicurarsi che tutti i cavi esposti siano isolati.
4. Una volta completata l’installazione, ssare tutti i cavi.
5. I collegamenti al lettore devono essere eettuati in conformità con il
presente manuale d’uso. Un collegamento errato può causare danni al
dispositivo.
6. Il lettore è progettato per funzionare solo con un impianto a 12 V CC.
INSTALLAZIONE DEL DISPOSITIVO
SMONTAGGIO DEL DISPOSITIVO
1. Smontare il dispositivo.
2. Smontare la cornice esterna di rinitura.
Avvertenze relative al cavo HDM:
Utilizzare un cavo HDMI di buona qualità.
La lunghezza complessiva (fronte e retro) non deve superare i 12 piedi.
COLLEGAMENTO DEI CAVI
1. Il lettore può essere utilizzato solo a +12 V CC.
2. Non collegare il terminale della batteria nché il lettore non sarà completa-
mente installato.
3. Assicurarsi che il cavo giallo sia collegato al polo positivo (+) della batteria.
4. Quando si sostituisce il fusibile, accertarsi che i parametri del nuovo fusibile
siano uguali.
5. Utilizzando gli altoparlanti di buona qualità con un’impedenza di 4-8 ohm si
può ottenere il funzionamento migliore del dispositivo.
POSIZIONE DEI TASTI
1. ZONA 1 2. 1 3. ZONA 2
4. 2 5. BT 6. 3 RPT
7. 8. 4 RDM 9.
10. 5 DIR- 11. DIS 12. 6 DIR+
13. LCD 14. PRESA AUX 15. PRESA PER CUFFIE
16. PRESA HDMI 17. RESET 18. MANOPOLA
19. PORTA USB 20. SRC/MENU
IMPIEGO DI BASE
IMPIEGO DI BASE
Accensione/spegnimento del dispositivo e della funzione di silenziamento
Per accendere il dispositivo, premere la manopola / MUTE. Per attivare o disattivare la
funzione di silenziamento, premere brevemente la manopola quando il dispositivo è
acceso. Premere e tenere premuto questo tasto per spegnere il dispositivo.
Impostazioni audio e menu delle impostazioni
Premere e tenere premuto il tasto SCR/MENU per accedere al menu illustrato di
seguito:
BAS->TRE->BAL->EQ (O/pop/rock/class)->LOUD (On/O)->CLK HH->CLK MM->IR
(On/O) ->CT (indep/sync)->SEGN. SUONO. (On/O) )->P_VOL (13)->DX (LOC)->STE-
REO (MONO)
Per ogni posizione, ruotare la manopola VOL per impostarla.
INFRAROSSO (ON/OFF):
INFRAROSSO On: Il dispositivo può essere acceso utilizzando il telecomando a
infrarossi. Il sistema è in modalità di consumo energetico elevato.
INFRAROSSO O: Il dispositivo non può essere acceso utilizzando il telecomando a
infrarossi. Il sistema è in modalità di basso consumo energetico.
CT (INDEP/SYNC):
CT INDEP: L’orologio funziona in modo indipendente.
CT SYNC: L’orologio sarà sincronizzato con l’ora della stazione RDS ricevuta.
Attenzione: Quando si imposta l’orologio nel menu, la funzione CT viene automatica-
mente impostata sulla modalità INDEP (funzionamento indipendente).
SEGNALE ACUSTICO (ON/OFF): Consente di attivare/disattivare il segnale acustico
quando si premono i tasti.
P-VOL: Consente di impostare il volume all’accensione. Se il livello del volume allo
spegnimento è inferiore al livello P-VOL, all’accensione il dispositivo imposterà il
livello del volume sul volume allo spegnimento.
Se il livello del volume allo spegnimento è superiore al livello P-VOL, all’accensione
del dispositivo il volume verrà ripristinato sul livello dei valori P-VOL.
Ricerca di altoparlanti Bluetooth
Tenendo premuto il tasto BT, viene visualizzato il messaggio “SEARCH...” [ricerca].
Successivamente viene visualizzato il nome del dispositivo Bluetooth. Per visualizzare
il dispositivo successivo, ruotare la manopola VOL. Quando il nome dell’altoparlante
Bluetooth desiderato viene visualizzato sul display LCD, premere la manopola VOL
per accoppiare il dispositivo. Se l’accoppiamento sarà riuscito, sul display comparirà il
messaggio “BOX ON”.
Raccomandazione importante: Nonostante i numerosi test eettuati con diversi
dispositivi Bluetooth, non è possibile garantire la compatibilità con tutti i dispositivi
Bluetooth disponibili sul mercato.
Trasmissione del segnale all’altoparlante Bluetooth
Premere brevemente il tasto BT per interrompere il trasferimento/trasmettere il
segnale all’altoparlante Bluetooth. Il display visualizzerà il messaggio “BOX OFF/ON”.
Attenzione: Sebbene Blaupunkt verichi attentamente la compatibilità dei vari
altoparlanti Bluetooth, non è possibile garantire un funzionamento perfetto del
dispositivo con tutti i modelli disponibili sul mercato.
Uso della Zona 1 e della Zona 2
Premere brevemente il tasto Zone 1 (o Zone 2) per spegnere/accendere l’audio della
Zona 1 (o della Zona 2).
Tenere premuto il tasto Zone 1 (o Zone 2) per disattivare l’audio della Zona 1 (o della
Zona 2). Tenere premuto nuovamente il tasto per disattivare il silenziamento.
Priorità delle informazioni o dell’orologio
Premere brevemente il tasto DIS per impostare la priorità dell’orologio o delle
informazioni. Attenzione: Nella banda FM, quando si ricevono stazioni RDS, premere
brevemente il tasto DIS per visualizzare il NOME STAZIONE/OROLOGIO/FREQUENZA.
Impostazioni dell’orologio
Selezionare nel menu la posizione CLK HH/CLK MM. Ruotare la manopola VOL per
impostare l’ora/minuti.
Uso delle cue
Sul pannello frontale è presente un jack per cue da 3,5 mm. Esso riceve le
impostazioni di funzionamento della Zona 1.
USO DELLA RADIO
Ricezione delle stazioni radio
Premere il tasto SRC/MENU per selezionare una modalità tra FM1->FM2->MW.
Premere brevemente il tasto / per ricevere la stazione radio desiderata.
Premere e tenere premuto il tasto / per sintonizzare manualmente la
frequenza.
Memorizzazione manuale della stazione e richiamo delle stazioni memorizzate
Ricezione della stazione desiderata. Premere e tenere premuto per 2 secondi uno dei
tasti di memorizzazione (1–6). La stazione corrente verrà memorizzata su un
determinato tasto numerico. Premere brevemente il tasto della stazione programma-
ta (1–6) per ascoltare direttamente il segnale trasmesso da questa stazione e
memorizzato sul tasto assegnato.
USO DI DAB
Premere il tasto SRC/MENU per commutare la sorgente tra DAB1 o DAB2.
Selezione della stazione
Premere il tasto / per selezionare la stazione successiva/precedente.
Memorizzazione manuale della stazione e richiamo delle stazioni memorizzate
Quando è impostata la frequenza della stazione desiderata, tenere premuto per 2
secondi uno dei tasti da 1 a 6 per memorizzare la stazione sul numero corrisponden-
te. Premere brevemente il tasto della stazione programmata (1–6) per ascoltare
direttamente il segnale trasmesso da questa stazione e memorizzato sul tasto
assegnato.
USO DELLA PORTA USB
Dopo aver collegato al dispositivo una chiavetta USB, il dispositivo riproduce
automaticamente i le MP3/WMA. Se al dispositivo è già stata collegata una chiavetta
USB, premere brevemente il tastoSRC/MENU no a visualizzare la schermata della
modalità USB.
Selezione del le
Premere il tasto / per passare al le successivo/precedente. Premere il tasto
/ per scorrere velocemente in avanti o indietro.
Riproduzione/pausa
Premere il tasto 1 per mettere in pausa/riprodurre un le.
Funzione di riproduzione in loop
Premere il tasto 3 RPT per selezionare la funzione di riproduzione in loop. RPT
ONE/RPT FOLD/RPT ALL (predenito)
RPT ONE: Riproduzione di un singolo le in loop.
RPT FOLD: Riproduzione in loop di tutti i le di una cartella.
RPT ALL: Riproduzione di tutti i le in loop.
RANDOM
Premere il tasto 4 RDM per attivare o disattivare la funzione di riproduzione casuale.
RDM On: Riproduzione casuale di tutti i le.
RDM O: Disattivazione della funzione di riproduzione casuale.
Funzione cartella +/-
Premere il tasto DIR+/DIR- per selezionare la cartella successiva/precedente da
riprodurre.
Ricerca di una canzone
Tenendo premuto il tasto , verrà visualizzato il messaggio “NUM 0000”. Ruotando
la manopola VOL (o inserendo direttamente il numero), selezionare il numero, quindi
premere VOL per riprodurre. Tenere presente che per 7/8/9/0 si intendono:
BT = 7, = 8, = 9, DIS = 0.
UTILIZZO DELLA PRESA AUX 1/2
La presa AUX IN 1 presente sul pannello anteriore è un jack da 3,5 mm. La presa AUX
IN 2 per RCA si trova invece sul retro del dispositivo. Premendo il tasto SRC/MENU si
passa alla modalità AUX IN1 (2) quando il segnale audio è collegato al dispositivo.
UTILIZZO DEL BLUETOOTH
Accoppiamento dei dispositivi
Selezionare sullo smartphone la voce Bluetooth e cercare il dispositivo Bluetooth.
Nell’elenco dovrebbe comparire la voce “BLAUPUNKT”; selezionare “BLAUPUNKT” e se
viene visualizzato un messaggio che richiede l’inserimento della password, inserire
“0000”. Quando l'accoppiamento è correttamente terminato, sul display verrà
visualizzato il simbolo BT.
Audio del Bluetooth
Premere il tasto SRC/MENU per passare alla modalità BT MUSIC. Il dispositivo
riprodurrà automaticamente un brano dal cellulare. Premere il tasto per mettere
in pausa/riprodurre un brano.
Premere il tasto / per selezionare il brano successivo/precedente.
USO DELLA PRESA HDMI
La presa anteriore HDMI va alla presa HDMI posteriore. Questo non incide sulla
riproduzione tramite HDMI.
Connettori RCA V-IN e V-OUT
Sul retro del dispositivo, il connettore V-IN va al connettore V-OUT.
TELECOMANDO
Il telecomando può essere utilizzato quando
l’opzione IR nel menu è impostata su ON.
OFF: Accensione e spegnimento del dispositivo.
VOL+: Aumentare il volume
VOL-: Abbassare il volume
1 : Accensione/spegnimento della
funzione di silenziamento della Zona 1
2 : Accensione/spegnimento della
funzione di silenziamento della Zona 2
Per le altre operazioni, leggere le istruzioni sopra riportate.
INFORMAZIONI GENERALI
Requisiti inerenti all’alimentazione : Corrente continua a 12V, terminale
negativo collegato a massa
Dimensioni della base di montaggio : 129 (largh.) x 112 (prof.) x 65 (alt.)
Impostazioni del tono
- Toni bassi (a 100 Hz) : ±10 dB
- Toni alti (a 100 Hz) : ±10 dB
Potenza massima in uscita : 4 × 40 W
Consumo di corrente : 10 A (max)
RADIO FM AM
Intervallo di frequenza da 87,5 a 108 MHz da 522 a 1620 KHz
IF 10.7 MHz 450 KHz
Sensibilità 4 µV (S/N = 30 dB) 36 dBµV (S/N = 20 dB)
Separazione dei canali stereo >25 dB /
RISOLUZIONE DEI PROBLEMI
IT

Indicazioni sulla sicurezza
Questa stazione multimediale è stata prodotta in conformità agli standard
attuali di evoluzione tecnologica e alle norme di sicurezza comunemente
riconosciute. Tuttavia, l’inosservanza delle informazioni sulla sicurezza
contenute nel presente manuale comporta diversi rischi. Prima di utilizzare la
stazione multimediale leggere attentamente il presente manuale per intero.
Conservare il manuale in un luogo accessibile a tutti gli utenti in qualsiasi
momento. In caso di cessione della stazione multimediale a terzi, includere il
presente manuale. Inoltre, bisogna rispettare le indicazioni contenute nei
manuali d’uso dei dispositivi collegati a questa stazione multimediale.
Informazioni generali sulla sicurezza
Osservare le seguenti indicazioni per proteggersi da eventuali lesioni: Non
modicare o aprire il dispositivo.
Uso previsto
La stazione multimediale è progettata per essere installata e utilizzata su veicoli
con impianto di alimentazione con una tensione di 12 V. È necessario rispettare i
limiti di potenza del dispositivo. L’esecuzione di una qualsiasi riparazione e
installazione deve essere adata ad un professionista.
Istruzioni di installazione
È possibile installare il dispositivo da soli se si è esperti nell’installazione di
autoradio e se si ha una conoscenza delle tematiche relative agli impianti
elettrici per automobili. A tal ne consultare lo schema di cablaggio presente in
questo manuale. Il dispositivo deve essere installato in modo da non interferire
o bloccare il funzionamento degli airbag, altri dispositivi di sicurezza e/o
comandi.
Dichiarazione di conformità
Blaupunkt Competence Center Car Multimedia – Evo Sales GmbH dichiara che il
presente dispositivo è conforme ai requisiti essenziali ed alle restanti disposizio-
ni pertinenti della Direttiva 2014/53/UE. La dichiarazione di conformità è
reperibile sul sito www.blaupunkt.com.
Consigli in materia di pulizia
Solventi, detergenti e prodotti abrasivi, così come spray per cruscotti e prodotti
per la cura della plastica, possono contenere sostanze in grado di danneggiare
la supercie della stazione multimediale. Per la pulizia della stazione multimedi-
ale utilizzare solo un panno asciutto o leggermente umido.
Istruzioni per lo smaltimento
Non smaltire il dispositivo usurato insieme ai riuti domestici!
Per smaltire il dispositivo, il telecomando e le batterie consumate,
portarli in un centro di raccolta per apparecchiature usate.
Fornitura
La fornitura include:
stazione multimediale BPA 3022 M,
telecomando,
connettori ISO,
viti di montaggio,
manuale d’uso.
INFORMAZIONI IMPORTANTI SULL’INSTALLAZIONE
1. Leggere attentamente il manuale d’uso prima di installare il dispositivo.
2. Prima di collegare l’alimentazione assicurarsi che tutti gli altri cavi siano
collegati.
3. Per evitare cortocircuiti, assicurarsi che tutti i cavi esposti siano isolati.
4. Una volta completata l’installazione, ssare tutti i cavi.
5. I collegamenti al lettore devono essere eettuati in conformità con il
presente manuale d’uso. Un collegamento errato può causare danni al
dispositivo.
6. Il lettore è progettato per funzionare solo con un impianto a 12 V CC.
INSTALLAZIONE DEL DISPOSITIVO
SMONTAGGIO DEL DISPOSITIVO
1. Smontare il dispositivo.
2. Smontare la cornice esterna di rinitura.
Avvertenze relative al cavo HDM:
Utilizzare un cavo HDMI di buona qualità.
La lunghezza complessiva (fronte e retro) non deve superare i 12 piedi.
COLLEGAMENTO DEI CAVI
1. Il lettore può essere utilizzato solo a +12 V CC.
2. Non collegare il terminale della batteria nché il lettore non sarà completa-
mente installato.
3. Assicurarsi che il cavo giallo sia collegato al polo positivo (+) della batteria.
4. Quando si sostituisce il fusibile, accertarsi che i parametri del nuovo fusibile
siano uguali.
5. Utilizzando gli altoparlanti di buona qualità con un’impedenza di 4-8 ohm si
può ottenere il funzionamento migliore del dispositivo.
POSIZIONE DEI TASTI
1. ZONA 1 2. 1 3. ZONA 2
4. 2 5. BT 6. 3 RPT
7. 8. 4 RDM 9.
10. 5 DIR- 11. DIS 12. 6 DIR+
13. LCD 14. PRESA AUX 15. PRESA PER CUFFIE
16. PRESA HDMI 17. RESET 18. MANOPOLA
19. PORTA USB 20. SRC/MENU
IMPIEGO DI BASE
Accensione/spegnimento del dispositivo e della funzione di silenziamento
Per accendere il dispositivo, premere la manopola / MUTE. Per attivare o disattivare la
funzione di silenziamento, premere brevemente la manopola quando il dispositivo è
acceso. Premere e tenere premuto questo tasto per spegnere il dispositivo.
Impostazioni audio e menu delle impostazioni
Premere e tenere premuto il tasto SCR/MENU per accedere al menu illustrato di
seguito:
BAS->TRE->BAL->EQ (O/pop/rock/class)->LOUD (On/O)->CLK HH->CLK MM->IR
(On/O) ->CT (indep/sync)->SEGN. SUONO. (On/O) )->P_VOL (13)->DX (LOC)->STE-
REO (MONO)
Per ogni posizione, ruotare la manopola VOL per impostarla.
INFRAROSSO (ON/OFF):
INFRAROSSO On: Il dispositivo può essere acceso utilizzando il telecomando a
infrarossi. Il sistema è in modalità di consumo energetico elevato.
INFRAROSSO O: Il dispositivo non può essere acceso utilizzando il telecomando a
infrarossi. Il sistema è in modalità di basso consumo energetico.
CT (INDEP/SYNC):
CT INDEP: L’orologio funziona in modo indipendente.
CT SYNC: L’orologio sarà sincronizzato con l’ora della stazione RDS ricevuta.
Attenzione: Quando si imposta l’orologio nel menu, la funzione CT viene automatica-
mente impostata sulla modalità INDEP (funzionamento indipendente).
SEGNALE ACUSTICO (ON/OFF): Consente di attivare/disattivare il segnale acustico
quando si premono i tasti.
P-VOL: Consente di impostare il volume all’accensione. Se il livello del volume allo
spegnimento è inferiore al livello P-VOL, all’accensione il dispositivo imposterà il
livello del volume sul volume allo spegnimento.
Se il livello del volume allo spegnimento è superiore al livello P-VOL, all’accensione
del dispositivo il volume verrà ripristinato sul livello dei valori P-VOL.
Ricerca di altoparlanti Bluetooth
Tenendo premuto il tasto BT, viene visualizzato il messaggio “SEARCH...” [ricerca].
Successivamente viene visualizzato il nome del dispositivo Bluetooth. Per visualizzare
il dispositivo successivo, ruotare la manopola VOL. Quando il nome dell’altoparlante
Bluetooth desiderato viene visualizzato sul display LCD, premere la manopola VOL
per accoppiare il dispositivo. Se l’accoppiamento sarà riuscito, sul display comparirà il
messaggio “BOX ON”.
Raccomandazione importante: Nonostante i numerosi test eettuati con diversi
dispositivi Bluetooth, non è possibile garantire la compatibilità con tutti i dispositivi
Bluetooth disponibili sul mercato.
Trasmissione del segnale all’altoparlante Bluetooth
Premere brevemente il tasto BT per interrompere il trasferimento/trasmettere il
segnale all’altoparlante Bluetooth. Il display visualizzerà il messaggio “BOX OFF/ON”.
Attenzione: Sebbene Blaupunkt verichi attentamente la compatibilità dei vari
altoparlanti Bluetooth, non è possibile garantire un funzionamento perfetto del
dispositivo con tutti i modelli disponibili sul mercato.
Uso della Zona 1 e della Zona 2
Premere brevemente il tasto Zone 1 (o Zone 2) per spegnere/accendere l’audio della
Zona 1 (o della Zona 2).
Tenere premuto il tasto Zone 1 (o Zone 2) per disattivare l’audio della Zona 1 (o della
Zona 2). Tenere premuto nuovamente il tasto per disattivare il silenziamento.
Priorità delle informazioni o dell’orologio
Premere brevemente il tasto DIS per impostare la priorità dell’orologio o delle
informazioni. Attenzione: Nella banda FM, quando si ricevono stazioni RDS, premere
brevemente il tasto DIS per visualizzare il NOME STAZIONE/OROLOGIO/FREQUENZA.
Impostazioni dell’orologio
Selezionare nel menu la posizione CLK HH/CLK MM. Ruotare la manopola VOL per
impostare l’ora/minuti.
Uso delle cue
Sul pannello frontale è presente un jack per cue da 3,5 mm. Esso riceve le
impostazioni di funzionamento della Zona 1.
USO DELLA RADIO
Ricezione delle stazioni radio
Premere il tasto SRC/MENU per selezionare una modalità tra FM1->FM2->MW.
Premere brevemente il tasto / per ricevere la stazione radio desiderata.
Premere e tenere premuto il tasto / per sintonizzare manualmente la
frequenza.
Memorizzazione manuale della stazione e richiamo delle stazioni memorizzate
Ricezione della stazione desiderata. Premere e tenere premuto per 2 secondi uno dei
tasti di memorizzazione (1–6). La stazione corrente verrà memorizzata su un
determinato tasto numerico. Premere brevemente il tasto della stazione programma-
ta (1–6) per ascoltare direttamente il segnale trasmesso da questa stazione e
memorizzato sul tasto assegnato.
USO DI DAB
Premere il tasto SRC/MENU per commutare la sorgente tra DAB1 o DAB2.
Selezione della stazione
Premere il tasto / per selezionare la stazione successiva/precedente.
USO
Memorizzazione manuale della stazione e richiamo delle stazioni memorizzate
Quando è impostata la frequenza della stazione desiderata, tenere premuto per 2
secondi uno dei tasti da 1 a 6 per memorizzare la stazione sul numero corrisponden-
te. Premere brevemente il tasto della stazione programmata (1–6) per ascoltare
direttamente il segnale trasmesso da questa stazione e memorizzato sul tasto
assegnato.
USO DELLA PORTA USB
Dopo aver collegato al dispositivo una chiavetta USB, il dispositivo riproduce
automaticamente i le MP3/WMA. Se al dispositivo è già stata collegata una chiavetta
USB, premere brevemente il tastoSRC/MENU no a visualizzare la schermata della
modalità USB.
Selezione del le
Premere il tasto / per passare al le successivo/precedente. Premere il tasto
/ per scorrere velocemente in avanti o indietro.
Riproduzione/pausa
Premere il tasto 1 per mettere in pausa/riprodurre un le.
Funzione di riproduzione in loop
Premere il tasto 3 RPT per selezionare la funzione di riproduzione in loop. RPT
ONE/RPT FOLD/RPT ALL (predenito)
RPT ONE: Riproduzione di un singolo le in loop.
RPT FOLD: Riproduzione in loop di tutti i le di una cartella.
RPT ALL: Riproduzione di tutti i le in loop.
RANDOM
Premere il tasto 4 RDM per attivare o disattivare la funzione di riproduzione casuale.
RDM On: Riproduzione casuale di tutti i le.
RDM O: Disattivazione della funzione di riproduzione casuale.
Funzione cartella +/-
Premere il tasto DIR+/DIR- per selezionare la cartella successiva/precedente da
riprodurre.
Ricerca di una canzone
Tenendo premuto il tasto , verrà visualizzato il messaggio “NUM 0000”. Ruotando
la manopola VOL (o inserendo direttamente il numero), selezionare il numero, quindi
premere VOL per riprodurre. Tenere presente che per 7/8/9/0 si intendono:
BT = 7, = 8, = 9, DIS = 0.
UTILIZZO DELLA PRESA AUX 1/2
La presa AUX IN 1 presente sul pannello anteriore è un jack da 3,5 mm. La presa AUX
IN 2 per RCA si trova invece sul retro del dispositivo. Premendo il tasto SRC/MENU si
passa alla modalità AUX IN1 (2) quando il segnale audio è collegato al dispositivo.
UTILIZZO DEL BLUETOOTH
Accoppiamento dei dispositivi
Selezionare sullo smartphone la voce Bluetooth e cercare il dispositivo Bluetooth.
Nell’elenco dovrebbe comparire la voce “BLAUPUNKT”; selezionare “BLAUPUNKT” e se
viene visualizzato un messaggio che richiede l’inserimento della password, inserire
“0000”. Quando l'accoppiamento è correttamente terminato, sul display verrà
visualizzato il simbolo BT.
Audio del Bluetooth
Premere il tasto SRC/MENU per passare alla modalità BT MUSIC. Il dispositivo
riprodurrà automaticamente un brano dal cellulare. Premere il tasto per mettere
in pausa/riprodurre un brano.
Premere il tasto / per selezionare il brano successivo/precedente.
USO DELLA PRESA HDMI
La presa anteriore HDMI va alla presa HDMI posteriore. Questo non incide sulla
riproduzione tramite HDMI.
Connettori RCA V-IN e V-OUT
Sul retro del dispositivo, il connettore V-IN va al connettore V-OUT.
TELECOMANDO
Il telecomando può essere utilizzato quando
l’opzione IR nel menu è impostata su ON.
OFF: Accensione e spegnimento del dispositivo.
VOL+: Aumentare il volume
VOL-: Abbassare il volume
1 : Accensione/spegnimento della
funzione di silenziamento della Zona 1
2 : Accensione/spegnimento della
funzione di silenziamento della Zona 2
Per le altre operazioni, leggere le istruzioni sopra riportate.
INFORMAZIONI GENERALI
Requisiti inerenti all’alimentazione : Corrente continua a 12V, terminale
negativo collegato a massa
Dimensioni della base di montaggio : 129 (largh.) x 112 (prof.) x 65 (alt.)
Impostazioni del tono
- Toni bassi (a 100 Hz) : ±10 dB
- Toni alti (a 100 Hz) : ±10 dB
Potenza massima in uscita : 4 × 40 W
Consumo di corrente : 10 A (max)
RADIO FM AM
Intervallo di frequenza da 87,5 a 108 MHz da 522 a 1620 KHz
IF 10.7 MHz 450 KHz
Sensibilità 4 µV (S/N = 30 dB) 36 dBµV (S/N = 20 dB)
Separazione dei canali stereo >25 dB /
RISOLUZIONE DEI PROBLEMI
IT
Informations relatives à la sécurité
Cette station multimédia a été fabriquée selon les normes techniques actuellement
en vigueur et les principes de sécurité généralement reconnus. Néanmoins, le
non-respect des consignes de sécurité contenues dans ce manuel comporte divers
risques. Lisez attentivement l'ensemble du manuel avant d'utiliser la station
multimédia. Conservez le manuel dans un endroit où il est accessible pour tous les
utilisateurs et à tout moment. Si la station multimédia est transmise à un tiers, ce
manuel lui doit être également remis. De plus, suivez les instructions des modes
d'emploi des appareils connectés à cette station.
Consignes générales de sécurité
Respectez les instructions suivantes pour vous protéger des blessures :
Ne pas modier ou ouvrir l'appareil.
Usage prévu
La station multimédia est conçue pour être installée et fonctionner dans des
véhicules avec une tension d'alimentation de 12V. Les limites de puissance de
l'appareil doivent être respectées. Toute réparation et installation doit être eectuée
par un professionnel.
Instructions pour l'installation
Vous ne pouvez installer l'appareil vous-même que si vous êtes expérimenté dans
l'installation d'autoradios et si vous avez des connaissances en électricité automobile.
À cet eet, consultez le schéma de câblage de ce manuel. L'installation de cet appareil
ne doit pas gêner ni bloquer le fonctionnement des airbags, des autres dispositifs de
sécurité ou des dispositifs de contrôle.
Déclaration de conformité
Blaupunkt Competence Center Car Multimedia - Evo Sales GmbH déclare que cet
appareil est conforme aux exigences fondamentales et aux autres dispositions
applicables de la directive 2014/53/UE. La déclaration de conformité peut être
consultée à l'adresse suivante :www.blaupunkt.com.
Instructions concernant le nettoyage
Les solvants, les produits nettoyants et abrasifs, ainsi que les nettoyants de cockpit et
les produits d'entretien des plastiques peuvent contenir des composants qui peuvent
endommager la surface de la station multimédia. Pour nettoyer la station multimédia,
utilisez uniquement un chion sec ou légèrement humide.
Instructions concernant la mise au rebut
Ne jetez pas l'appareil usagé avec les ordures ménagères !
Pour mettre au rebut l'appareil, la télécommande et les piles usagées,
veuillez les apporter à un point de collecte des équipements usagés.
Contenu de l'emballage
Le contenu de l’emballage comprend :
station multimédia BPA 3022 M,
télécommande,
connecteurs ISO,
vis de montage,
manuel d’utilisation.
INFORMATIONS IMPORTANTES CONCERNANT L’INSTALLATION
1. Lisez attentivement ce manuel d'utilisation avant d'installer l'appareil.
2. Avant de brancher l'alimentation électrique, assurez-vous que tous les
autres câbles sont connectés.
3. Pour éviter les court-circuits, assurez-vous que tous les câbles exposés sont
isolés.
4. Une fois l'installation terminée, tous les câbles doivent être sécurisés.
5. Les connexions au lecteur doivent être eectuées conformément à ce
manuel. Une connexion incorrecte peut provoquer l'endommagement de
l'appareil.
6. Le lecteur est conçu pour fonctionner uniquement avec une installation de
12 V DC.
INSTALLATION DE L'APPAREIL
DÉMONTAGE DE L'APPAREIL
1. Démontez l'appareil.
2. Démontez le cadre de nition extérieur.
Remarque concernant le HDMI :
Utilisez un câble HDMI de bonne qualité.
La longueur totale (avant et arrière) ne doit pas dépasser 12 pieds.
CONNEXION DES CÂBLES
1. Le lecteur ne peut être utilisé que sous une tension de +12 V DC.
2. Ne connectez pas la borne de la batterie avant que le lecteur ne soit
complètement installé.
3. Assurez-vous que le l jaune est connecté au pôle positif (+) de la batterie.
4. Lorsque vous remplacez le fusible, assurez-vous que les paramètres du
nouveau fusible sont les mêmes.
5. L’utilisation de haut-parleurs de bonne qualité avec une impédance de 4–8
ohms permettra de tirer le meilleur parti de l’appareil.
EMPLACEMENT DES TOUCHES
1. ZONE 1 2. 1 3. ZONE 2
4. 2 5. BT 6. 3 RPT
7. 8. 4 RDM 9.
10. 5 DIR- 11. DIS 12. 6 DIR+
13. LCD 14. PRISE AUX 15. PRISE POUR CASQUE D'ÉCOUTE
16. PRISE HDMI 17. RESET 18. BOUTON ROTATIF
19. PORT USB 20. SRC/MENU
FONCTIONNEMENT DE BASE
Activation/désactivation de l'appareil et de la fonction de mise en sourdine
Pour allumer l'appareil, appuyez sur le bouton rotatif / MUTE. Pour activer ou désactiver la
fonction de mise en sourdine, appuyez brièvement sur le bouton lorsque l'appareil est
allumé. Appuyez sur ce bouton et maintenez-le enfoncé pour éteindre l’appareil.
Réglage du volume et menu de conguration
Appuyez sur la touche SRC/MENU et maintenez-la enfoncée pour accéder au menu illustré
ci-dessous :
BAS->TRE->BAL->EQ (o/pop/rock/class)->LOUD (on/o)->CLK HH->CLK
MM->IR (on/o) ->CT (indep/sync)->SIGN. BEEP (on/o)->P_VOL (13)->DX (LOC)->STE- REO
(MONO)
À chaque position, tournez le bouton VOL pour la régler.
INFRAROUGE (ON/OFF) :
INFRAROUGE ON : L'appareil peut être mis en marche à l'aide de la télécommande à
infrarouge.
Le système est alors en mode de haute consommation d'énergie.
INFRAROUGE OFF : L'appareil ne peut pas être mis en marche à l'aide de la télécommande
à infrarouge.
Le système est en mode de faible consommation d'énergie.
CT (INDEP/SYNC) :
CT INDEP : L’horloge fonctionne indépendamment.
CT SYNC : L’horloge sera synchronisée avec l’heure de la station RDS réceptionnée.
Remarque : Lorsque l'horloge est réglée dans le menu, la fonction CT est automatiquement
réglée sur le mode INDEP (fonctionnement indépendant).
BEEP (ON/OFF) : Permet d'activer/désactiver le signal sonore lorsque les touches sont
enfoncées.
P-VOL : Permet de régler le volume à la mise en marche. Si le niveau de volume à l'arrêt est
inférieur au niveau P-VOL, l'appareil règle le niveau de volume sur le volume à l'arrêt
lorsqu'il est mis en marche.
Si le niveau de volume à l'arrêt est supérieur au niveau P-VOL, le volume sera réinitialisé sur
les valeurs P-VOL à la mise en marche.
Recherche de haut-parleurs Bluetooth
Après avoir enfoncé la touche BT, l'écran ache « SEARCH... » [recherche]. Un instant plus
tard, le nom de votre appareil Bluetooth s'ache. Pour acher l'appareil suivant, tournez le
bouton VOL. Une fois que le nom du haut-parleur Bluetooth souhaité s'ache sur l'écran
LCD, appuyez sur le bouton VOL pour associer l'appareil. Une fois le jumelage terminé,
l'écran ache le message « BOX ON ».
Consigne importante : Malgré de nombreux tests eectués avec divers dispositifs
Bluetooth, la compatibilité avec tous les dispositifs Bluetooth disponible sur le marché ne
peut être garantie.
Transmission du signal au haut-parleur Bluetooth
Appuyez brièvement sur la touche BT pour arrêter/initier le transfert du signal vers le
haut-parleur Bluetooth. L'écran ache le message « BOX OFF/ON ».
Remarque : Bien que Blaupunkt vérie soigneusement la compatibilité des diérents
haut-parleurs Bluetooth, un fonctionnement sans faille ne peut être garanti avec tous les
modèles du marché.
Fonctionnement des Zones 1 et 2
Appuyez brièvement sur la touche Zone 1 (ou Zone 2) pour activer ou désactiver le son de
la Zone 1 (ou de la Zone 2).
Maintenez la touche Zone 1 (ou Zone 2) enfoncée pour couper le son de la Zone 1 (ou de la
Zone 2). Appuyez à nouveau sur la touche pour rétablir le son.
Priorité des informations ou de l'horloge
Appuyez brièvement sur la touche DIS pour modier la priorité de l’horloge ou la priorité
des informations.
Remarque : En mode FM, lorsque vous recevez des stations RDS, appuyez brièvement sur la
touche DIS pour acher NOM DE STATION/HORLOGE/FRÉQUENCE.
Réglage de l’horloge
Sélectionnez CLK HH/CLK MM dans le menu. Tournez le bouton VOL pour régler les heures /
les minutes.
Fonctionnement du casque d'écoute
Une prise pour casque d'écoute de 3,5 mm se trouve sur le panneau avant. Il adopte les
paramètres de fonctionnement de la Zone 1.
UTILISATION DE LA RADIO
Réception des stations de radio
Appuyez sur la touche SRC/MENU pour sélectionner un mode parmi FM1->FM2->MW.
Appuyez brièvement sur la touche / pour recevoir la station de radio souhaitée.
Maintenez la touche / enfoncée pour régler manuellement la fréquence.
Mémorisation manuelle des stations et accès aux stations mémorisées
Réception de la station souhaitée. Appuyez sur les touches numériques (1-6) et
maintenez-les enfoncées pendant 2 secondes. La station actuelle sera mise en mémoire
pour la touche numérique correspondante. Appuyez brièvement sur la touche de la station
préréglée (1–6) pour écouter directement le signal de diusion de cette station mémorisée
pour la touche assignée.
FONCTIONNEMENT DAB
Appuyez sur la touche SRC/MENU pour basculer la source entre DAB1 et DAB2.
Sélection d'une station
Appuyez sur la touche / pour sélectionner la station suivante/précédente.
Mémorisation manuelle des stations et accès aux stations mémorisées
Lorsque la fréquence de la station souhaitée est réglée, appuyez sur l'une des touches
numérotées de 1 à 6 pendant 2 secondes pour mémoriser cette station sous le numéro
correspondant. Appuyez brièvement sur la touche de la station préréglée (1–6) pour
écouter directement le signal de diusion de cette station mémorisée pour la touche
assignée.
UTILISATION DU PORT USB
Lorsqu'un lecteur USB est connecté à l'appareil, ce dernier lit automatiquement les
chiers MP3/WMA. Si un lecteur USB a déjà été connecté à l'appareil, appuyez
brièvement sur la touche SRC/MENU jusqu'à ce que l'écran du mode USB apparaisse.
Sélection d'un chier
Appuyez sur la touche / pour passer au chier suivant/précédent. Appuyez
sur la touche / pour faire déler rapidement vers l'avant et vers l'arrière.
Lecture/Pause
Appuyez sur la touche 1 pour mettre en pause/lire un chier.
Fonction de lecture en boucle
Appuyez sur la touche 3 RPT pour sélectionner la fonction de lecture en boucle. RPT
ONE/RPT FOLD/RPT ALL (par défaut)
RPT ONE : Lecture en boucle d'un seul chier.
RPT FOLD : Lecture en boucle de tous les chiers d'un dossier.
RPT ALL : Lecture en boucle de tous les chiers.
RANDOM
Appuyez sur la touche 4 RDM pour activer ou désactiver la fonction de lecture aléatoire.
RDM ON : Lecture aléatoire de tous les chiers.
RDM OFF : Fonction de lecture aléatoire.
Fonction dossier +/-
Appuyez sur la touche DIR+/DIR- pour sélectionner le dossier suivant/précédent à lire.
Recherche d'une chanson
Après avoir enfoncé la touche l'écran achera « NUM 0000 ». En tournant le bouton
VOL (ou en saisissant directement un numéro), sélectionnez un numéro, puis appuyez
sur VOL pour lancer la lecture. Veuillez noter que 7/8/9/0 signie : BT = 7, = 8, = 9,
DIS = 0.
UTILISATION DE LA PRISE AUX IN 1/2
Sur le panneau avant, la prise AUX IN 1 est un jack de 3,5 mm. La prise AUX IN 2 pour
RCA est située à l'arrière de l'appareil. En appuyant sur la touche SRC/MENU, on peut
passer en mode AUX IN1 (2) lorsque le signal audio est connecté à l'appareil.
UTILISATION DU BLUETOOTH
Jumelage des appareils
Sélectionnez la position Bluetooth et recherchez le périphérique Bluetooth sur votre
téléphone. La position « BLAUPUNKT » devrait apparaître dans la liste ; sélectionnez
« BLAUPUNKT », puis entrez le mot de passe « 0000 » si un message demandant un mot
de passe s'ache. Une fois le jumelage terminé, l'écran ache « BT ».
Audio Bluetooth
Appuyez sur la touche SRC/MENU pour passer en mode BT MUSIC. L'appareil réproduira
automatiquement la musique de votre téléphone. Appuyez sur la touche pour
mettre en pause/en lecture une piste.
Appuyez sur la touche / pour sélectionner la piste suivante/précédente.
UTILISATION DE LA PRISE HDMI
La prise HDMI avant va vers la prise HDMI arrière. La lecture à l'aide de HDMI n'est pas
aectée.
Connecteurs RCA V-IN et V-OUT
À l'arrière de l'appareil, le connecteur V-IN va vers le connecteur V-OUT.
TÉLÉCOMMANDE
La télécommande peut être utilisée lorsque
l'option IR est activée dans le menu.
OFF: Mise en marche et arrêt de l’appareil.
VOL+ : Augmenter le volume
VOL- : Réduire le volume
1 : Activation/désactivation du mode
sourdine de la Zone 1
2 : Activation/désactivation du mode
sourdine de la Zone 2
Pour les autres opérations, lisez les instructions ci-dessus.
INFORMATIONS GÉNÉRALES
Exigences concernant l’alimentation : 12 V DC, borne négative connectée à la terre
Dimensions de la base de montage :129 (larg.) x 112 (long.) x 65 (ép.)
Paramètres de tonalité
- Basse (à 100 Hz) : ±10 dB
- Haute (à 100 Hz) : ±10 dB
Puissance de sortie maximale : 4 x 40 W
Consommation de courant : 10 A (max.)
RADIO FM AM
Plage de fréquences de 87,5 à 108 MHz de 522 à 1620 KHz
IF 10,7 MHz 450 KHz
Sensibilité 4 µV (S/N = 30 dB) 36 dBuV (S/N = 20 dB)
Séparation des canaux stéréo >25 dB /
RÉSOLUTION DES PROBLÈMES

Indicazioni sulla sicurezza
Questa stazione multimediale è stata prodotta in conformità agli standard
attuali di evoluzione tecnologica e alle norme di sicurezza comunemente
riconosciute. Tuttavia, l’inosservanza delle informazioni sulla sicurezza
contenute nel presente manuale comporta diversi rischi. Prima di utilizzare la
stazione multimediale leggere attentamente il presente manuale per intero.
Conservare il manuale in un luogo accessibile a tutti gli utenti in qualsiasi
momento. In caso di cessione della stazione multimediale a terzi, includere il
presente manuale. Inoltre, bisogna rispettare le indicazioni contenute nei
manuali d’uso dei dispositivi collegati a questa stazione multimediale.
Informazioni generali sulla sicurezza
Osservare le seguenti indicazioni per proteggersi da eventuali lesioni: Non
modicare o aprire il dispositivo.
Uso previsto
La stazione multimediale è progettata per essere installata e utilizzata su veicoli
con impianto di alimentazione con una tensione di 12 V. È necessario rispettare i
limiti di potenza del dispositivo. L’esecuzione di una qualsiasi riparazione e
installazione deve essere adata ad un professionista.
Istruzioni di installazione
È possibile installare il dispositivo da soli se si è esperti nell’installazione di
autoradio e se si ha una conoscenza delle tematiche relative agli impianti
elettrici per automobili. A tal ne consultare lo schema di cablaggio presente in
questo manuale. Il dispositivo deve essere installato in modo da non interferire
o bloccare il funzionamento degli airbag, altri dispositivi di sicurezza e/o
comandi.
Dichiarazione di conformità
Blaupunkt Competence Center Car Multimedia – Evo Sales GmbH dichiara che il
presente dispositivo è conforme ai requisiti essenziali ed alle restanti disposizio-
ni pertinenti della Direttiva 2014/53/UE. La dichiarazione di conformità è
reperibile sul sito www.blaupunkt.com.
Consigli in materia di pulizia
Solventi, detergenti e prodotti abrasivi, così come spray per cruscotti e prodotti
per la cura della plastica, possono contenere sostanze in grado di danneggiare
la supercie della stazione multimediale. Per la pulizia della stazione multimedi-
ale utilizzare solo un panno asciutto o leggermente umido.
Istruzioni per lo smaltimento
Non smaltire il dispositivo usurato insieme ai riuti domestici!
Per smaltire il dispositivo, il telecomando e le batterie consumate,
portarli in un centro di raccolta per apparecchiature usate.
Fornitura
La fornitura include:
stazione multimediale BPA 3022 M,
telecomando,
connettori ISO,
viti di montaggio,
manuale d’uso.
INFORMAZIONI IMPORTANTI SULL’INSTALLAZIONE
1. Leggere attentamente il manuale d’uso prima di installare il dispositivo.
2. Prima di collegare l’alimentazione assicurarsi che tutti gli altri cavi siano
collegati.
3. Per evitare cortocircuiti, assicurarsi che tutti i cavi esposti siano isolati.
4. Una volta completata l’installazione, ssare tutti i cavi.
5. I collegamenti al lettore devono essere eettuati in conformità con il
presente manuale d’uso. Un collegamento errato può causare danni al
dispositivo.
6. Il lettore è progettato per funzionare solo con un impianto a 12 V CC.
INSTALLAZIONE DEL DISPOSITIVO
SMONTAGGIO DEL DISPOSITIVO
1. Smontare il dispositivo.
2. Smontare la cornice esterna di rinitura.
Avvertenze relative al cavo HDM:
Utilizzare un cavo HDMI di buona qualità.
La lunghezza complessiva (fronte e retro) non deve superare i 12 piedi.
COLLEGAMENTO DEI CAVI
1. Il lettore può essere utilizzato solo a +12 V CC.
2. Non collegare il terminale della batteria nché il lettore non sarà completa-
mente installato.
3. Assicurarsi che il cavo giallo sia collegato al polo positivo (+) della batteria.
4. Quando si sostituisce il fusibile, accertarsi che i parametri del nuovo fusibile
siano uguali.
5. Utilizzando gli altoparlanti di buona qualità con un’impedenza di 4-8 ohm si
può ottenere il funzionamento migliore del dispositivo.
POSIZIONE DEI TASTI
1. ZONA 1 2. 1 3. ZONA 2
4. 2 5. BT 6. 3 RPT
7. 8. 4 RDM 9.
10. 5 DIR- 11. DIS 12. 6 DIR+
13. LCD 14. PRESA AUX 15. PRESA PER CUFFIE
16. PRESA HDMI 17. RESET 18. MANOPOLA
19. PORTA USB 20. SRC/MENU
IMPIEGO DI BASE
Accensione/spegnimento del dispositivo e della funzione di silenziamento
Per accendere il dispositivo, premere la manopola / MUTE. Per attivare o disattivare la
funzione di silenziamento, premere brevemente la manopola quando il dispositivo è
acceso. Premere e tenere premuto questo tasto per spegnere il dispositivo.
Impostazioni audio e menu delle impostazioni
Premere e tenere premuto il tasto SCR/MENU per accedere al menu illustrato di
seguito:
BAS->TRE->BAL->EQ (O/pop/rock/class)->LOUD (On/O)->CLK HH->CLK MM->IR
(On/O) ->CT (indep/sync)->SEGN. SUONO. (On/O) )->P_VOL (13)->DX (LOC)->STE-
REO (MONO)
Per ogni posizione, ruotare la manopola VOL per impostarla.
INFRAROSSO (ON/OFF):
INFRAROSSO On: Il dispositivo può essere acceso utilizzando il telecomando a
infrarossi. Il sistema è in modalità di consumo energetico elevato.
INFRAROSSO O: Il dispositivo non può essere acceso utilizzando il telecomando a
infrarossi. Il sistema è in modalità di basso consumo energetico.
CT (INDEP/SYNC):
CT INDEP: L’orologio funziona in modo indipendente.
CT SYNC: L’orologio sarà sincronizzato con l’ora della stazione RDS ricevuta.
Attenzione: Quando si imposta l’orologio nel menu, la funzione CT viene automatica-
mente impostata sulla modalità INDEP (funzionamento indipendente).
SEGNALE ACUSTICO (ON/OFF): Consente di attivare/disattivare il segnale acustico
quando si premono i tasti.
P-VOL: Consente di impostare il volume all’accensione. Se il livello del volume allo
spegnimento è inferiore al livello P-VOL, all’accensione il dispositivo imposterà il
livello del volume sul volume allo spegnimento.
Se il livello del volume allo spegnimento è superiore al livello P-VOL, all’accensione
del dispositivo il volume verrà ripristinato sul livello dei valori P-VOL.
Ricerca di altoparlanti Bluetooth
Tenendo premuto il tasto BT, viene visualizzato il messaggio “SEARCH...” [ricerca].
Successivamente viene visualizzato il nome del dispositivo Bluetooth. Per visualizzare
il dispositivo successivo, ruotare la manopola VOL. Quando il nome dell’altoparlante
Bluetooth desiderato viene visualizzato sul display LCD, premere la manopola VOL
per accoppiare il dispositivo. Se l’accoppiamento sarà riuscito, sul display comparirà il
messaggio “BOX ON”.
Raccomandazione importante: Nonostante i numerosi test eettuati con diversi
dispositivi Bluetooth, non è possibile garantire la compatibilità con tutti i dispositivi
Bluetooth disponibili sul mercato.
Trasmissione del segnale all’altoparlante Bluetooth
Premere brevemente il tasto BT per interrompere il trasferimento/trasmettere il
segnale all’altoparlante Bluetooth. Il display visualizzerà il messaggio “BOX OFF/ON”.
Attenzione: Sebbene Blaupunkt verichi attentamente la compatibilità dei vari
altoparlanti Bluetooth, non è possibile garantire un funzionamento perfetto del
dispositivo con tutti i modelli disponibili sul mercato.
Uso della Zona 1 e della Zona 2
Premere brevemente il tasto Zone 1 (o Zone 2) per spegnere/accendere l’audio della
Zona 1 (o della Zona 2).
Tenere premuto il tasto Zone 1 (o Zone 2) per disattivare l’audio della Zona 1 (o della
Zona 2). Tenere premuto nuovamente il tasto per disattivare il silenziamento.
Priorità delle informazioni o dell’orologio
Premere brevemente il tasto DIS per impostare la priorità dell’orologio o delle
informazioni. Attenzione: Nella banda FM, quando si ricevono stazioni RDS, premere
brevemente il tasto DIS per visualizzare il NOME STAZIONE/OROLOGIO/FREQUENZA.
Impostazioni dell’orologio
Selezionare nel menu la posizione CLK HH/CLK MM. Ruotare la manopola VOL per
impostare l’ora/minuti.
Uso delle cue
Sul pannello frontale è presente un jack per cue da 3,5 mm. Esso riceve le
impostazioni di funzionamento della Zona 1.
USO DELLA RADIO
Ricezione delle stazioni radio
Premere il tasto SRC/MENU per selezionare una modalità tra FM1->FM2->MW.
Premere brevemente il tasto / per ricevere la stazione radio desiderata.
Premere e tenere premuto il tasto / per sintonizzare manualmente la
frequenza.
Memorizzazione manuale della stazione e richiamo delle stazioni memorizzate
Ricezione della stazione desiderata. Premere e tenere premuto per 2 secondi uno dei
tasti di memorizzazione (1–6). La stazione corrente verrà memorizzata su un
determinato tasto numerico. Premere brevemente il tasto della stazione programma-
ta (1–6) per ascoltare direttamente il segnale trasmesso da questa stazione e
memorizzato sul tasto assegnato.
USO DI DAB
Premere il tasto SRC/MENU per commutare la sorgente tra DAB1 o DAB2.
Selezione della stazione
Premere il tasto / per selezionare la stazione successiva/precedente.
Memorizzazione manuale della stazione e richiamo delle stazioni memorizzate
Quando è impostata la frequenza della stazione desiderata, tenere premuto per 2
secondi uno dei tasti da 1 a 6 per memorizzare la stazione sul numero corrisponden-
te. Premere brevemente il tasto della stazione programmata (1–6) per ascoltare
direttamente il segnale trasmesso da questa stazione e memorizzato sul tasto
assegnato.
USO DELLA PORTA USB
Dopo aver collegato al dispositivo una chiavetta USB, il dispositivo riproduce
automaticamente i le MP3/WMA. Se al dispositivo è già stata collegata una chiavetta
USB, premere brevemente il tastoSRC/MENU no a visualizzare la schermata della
modalità USB.
Selezione del le
Premere il tasto / per passare al le successivo/precedente. Premere il tasto
/ per scorrere velocemente in avanti o indietro.
Riproduzione/pausa
Premere il tasto 1 per mettere in pausa/riprodurre un le.
Funzione di riproduzione in loop
Premere il tasto 3 RPT per selezionare la funzione di riproduzione in loop. RPT
ONE/RPT FOLD/RPT ALL (predenito)
RPT ONE: Riproduzione di un singolo le in loop.
RPT FOLD: Riproduzione in loop di tutti i le di una cartella.
RPT ALL: Riproduzione di tutti i le in loop.
RANDOM
Premere il tasto 4 RDM per attivare o disattivare la funzione di riproduzione casuale.
RDM On: Riproduzione casuale di tutti i le.
RDM O: Disattivazione della funzione di riproduzione casuale.
Funzione cartella +/-
Premere il tasto DIR+/DIR- per selezionare la cartella successiva/precedente da
riprodurre.
Ricerca di una canzone
Tenendo premuto il tasto , verrà visualizzato il messaggio “NUM 0000”. Ruotando
la manopola VOL (o inserendo direttamente il numero), selezionare il numero, quindi
premere VOL per riprodurre. Tenere presente che per 7/8/9/0 si intendono:
BT = 7, = 8, = 9, DIS = 0.
UTILIZZO DELLA PRESA AUX 1/2
La presa AUX IN 1 presente sul pannello anteriore è un jack da 3,5 mm. La presa AUX
IN 2 per RCA si trova invece sul retro del dispositivo. Premendo il tasto SRC/MENU si
passa alla modalità AUX IN1 (2) quando il segnale audio è collegato al dispositivo.
UTILIZZO DEL BLUETOOTH
Accoppiamento dei dispositivi
Selezionare sullo smartphone la voce Bluetooth e cercare il dispositivo Bluetooth.
Nell’elenco dovrebbe comparire la voce “BLAUPUNKT”; selezionare “BLAUPUNKT” e se
viene visualizzato un messaggio che richiede l’inserimento della password, inserire
“0000”. Quando l'accoppiamento è correttamente terminato, sul display verrà
visualizzato il simbolo BT.
Audio del Bluetooth
Premere il tasto SRC/MENU per passare alla modalità BT MUSIC. Il dispositivo
riprodurrà automaticamente un brano dal cellulare. Premere il tasto per mettere
in pausa/riprodurre un brano.
Premere il tasto / per selezionare il brano successivo/precedente.
USO DELLA PRESA HDMI
La presa anteriore HDMI va alla presa HDMI posteriore. Questo non incide sulla
riproduzione tramite HDMI.
Connettori RCA V-IN e V-OUT
Sul retro del dispositivo, il connettore V-IN va al connettore V-OUT.
TELECOMANDO
Il telecomando può essere utilizzato quando
l’opzione IR nel menu è impostata su ON.
OFF: Accensione e spegnimento del dispositivo.
VOL+: Aumentare il volume
VOL-: Abbassare il volume
1 : Accensione/spegnimento della
funzione di silenziamento della Zona 1
2 : Accensione/spegnimento della
funzione di silenziamento della Zona 2
Per le altre operazioni, leggere le istruzioni sopra riportate.
OPERATION
INFORMAZIONI GENERALI
Requisiti inerenti all’alimentazione : Corrente continua a 12V, terminale
negativo collegato a massa
Dimensioni della base di montaggio : 129 (largh.) x 112 (prof.) x 65 (alt.)
Impostazioni del tono
- Toni bassi (a 100 Hz) : ±10 dB
- Toni alti (a 100 Hz) : ±10 dB
Potenza massima in uscita : 4 × 40 W
Consumo di corrente : 10 A (max)
RADIO FM AM
Intervallo di frequenza da 87,5 a 108 MHz da 522 a 1620 KHz
IF 10.7 MHz 450 KHz
Sensibilità 4 µV (S/N = 30 dB) 36 dBµV (S/N = 20 dB)
Separazione dei canali stereo >25 dB /
RISOLUZIONE DEI PROBLEMI
IT
Informations relatives à la sécurité
Cette station multimédia a été fabriquée selon les normes techniques actuellement
en vigueur et les principes de sécurité généralement reconnus. Néanmoins, le
non-respect des consignes de sécurité contenues dans ce manuel comporte divers
risques. Lisez attentivement l'ensemble du manuel avant d'utiliser la station
multimédia. Conservez le manuel dans un endroit où il est accessible pour tous les
utilisateurs et à tout moment. Si la station multimédia est transmise à un tiers, ce
manuel lui doit être également remis. De plus, suivez les instructions des modes
d'emploi des appareils connectés à cette station.
Consignes générales de sécurité
Respectez les instructions suivantes pour vous protéger des blessures :
Ne pas modier ou ouvrir l'appareil.
Usage prévu
La station multimédia est conçue pour être installée et fonctionner dans des
véhicules avec une tension d'alimentation de 12V. Les limites de puissance de
l'appareil doivent être respectées. Toute réparation et installation doit être eectuée
par un professionnel.
Instructions pour l'installation
Vous ne pouvez installer l'appareil vous-même que si vous êtes expérimenté dans
l'installation d'autoradios et si vous avez des connaissances en électricité automobile.
À cet eet, consultez le schéma de câblage de ce manuel. L'installation de cet appareil
ne doit pas gêner ni bloquer le fonctionnement des airbags, des autres dispositifs de
sécurité ou des dispositifs de contrôle.
Déclaration de conformité
Blaupunkt Competence Center Car Multimedia - Evo Sales GmbH déclare que cet
appareil est conforme aux exigences fondamentales et aux autres dispositions
applicables de la directive 2014/53/UE. La déclaration de conformité peut être
consultée à l'adresse suivante :www.blaupunkt.com.
Instructions concernant le nettoyage
Les solvants, les produits nettoyants et abrasifs, ainsi que les nettoyants de cockpit et
les produits d'entretien des plastiques peuvent contenir des composants qui peuvent
endommager la surface de la station multimédia. Pour nettoyer la station multimédia,
utilisez uniquement un chion sec ou légèrement humide.
Instructions concernant la mise au rebut
Ne jetez pas l'appareil usagé avec les ordures ménagères !
Pour mettre au rebut l'appareil, la télécommande et les piles usagées,
veuillez les apporter à un point de collecte des équipements usagés.
Contenu de l'emballage
Le contenu de l’emballage comprend :
station multimédia BPA 3022 M,
télécommande,
connecteurs ISO,
vis de montage,
manuel d’utilisation.
INFORMATIONS IMPORTANTES CONCERNANT L’INSTALLATION
1. Lisez attentivement ce manuel d'utilisation avant d'installer l'appareil.
2. Avant de brancher l'alimentation électrique, assurez-vous que tous les
autres câbles sont connectés.
3. Pour éviter les court-circuits, assurez-vous que tous les câbles exposés sont
isolés.
4. Une fois l'installation terminée, tous les câbles doivent être sécurisés.
5. Les connexions au lecteur doivent être eectuées conformément à ce
manuel. Une connexion incorrecte peut provoquer l'endommagement de
l'appareil.
6. Le lecteur est conçu pour fonctionner uniquement avec une installation de
12 V DC.
INSTALLATION DE L'APPAREIL
DÉMONTAGE DE L'APPAREIL
1. Démontez l'appareil.
2. Démontez le cadre de nition extérieur.
Remarque concernant le HDMI :
Utilisez un câble HDMI de bonne qualité.
La longueur totale (avant et arrière) ne doit pas dépasser 12 pieds.
CONNEXION DES CÂBLES
1. Le lecteur ne peut être utilisé que sous une tension de +12 V DC.
2. Ne connectez pas la borne de la batterie avant que le lecteur ne soit
complètement installé.
3. Assurez-vous que le l jaune est connecté au pôle positif (+) de la batterie.
4. Lorsque vous remplacez le fusible, assurez-vous que les paramètres du
nouveau fusible sont les mêmes.
5. L’utilisation de haut-parleurs de bonne qualité avec une impédance de 4–8
ohms permettra de tirer le meilleur parti de l’appareil.
EMPLACEMENT DES TOUCHES
1. ZONE 1 2. 1 3. ZONE 2
4. 2 5. BT 6. 3 RPT
7. 8. 4 RDM 9.
10. 5 DIR- 11. DIS 12. 6 DIR+
13. LCD 14. PRISE AUX 15. PRISE POUR CASQUE D'ÉCOUTE
16. PRISE HDMI 17. RESET 18. BOUTON ROTATIF
19. PORT USB 20. SRC/MENU
FONCTIONNEMENT DE BASE
Activation/désactivation de l'appareil et de la fonction de mise en sourdine
Pour allumer l'appareil, appuyez sur le bouton rotatif / MUTE. Pour activer ou désactiver la
fonction de mise en sourdine, appuyez brièvement sur le bouton lorsque l'appareil est
allumé. Appuyez sur ce bouton et maintenez-le enfoncé pour éteindre l’appareil.
Réglage du volume et menu de conguration
Appuyez sur la touche SRC/MENU et maintenez-la enfoncée pour accéder au menu illustré
ci-dessous :
BAS->TRE->BAL->EQ (o/pop/rock/class)->LOUD (on/o)->CLK HH->CLK
MM->IR (on/o) ->CT (indep/sync)->SIGN. BEEP (on/o)->P_VOL (13)->DX (LOC)->STE- REO
(MONO)
À chaque position, tournez le bouton VOL pour la régler.
INFRAROUGE (ON/OFF) :
INFRAROUGE ON : L'appareil peut être mis en marche à l'aide de la télécommande à
infrarouge.
Le système est alors en mode de haute consommation d'énergie.
INFRAROUGE OFF : L'appareil ne peut pas être mis en marche à l'aide de la télécommande
à infrarouge.
Le système est en mode de faible consommation d'énergie.
CT (INDEP/SYNC) :
CT INDEP : L’horloge fonctionne indépendamment.
CT SYNC : L’horloge sera synchronisée avec l’heure de la station RDS réceptionnée.
Remarque : Lorsque l'horloge est réglée dans le menu, la fonction CT est automatiquement
réglée sur le mode INDEP (fonctionnement indépendant).
BEEP (ON/OFF) : Permet d'activer/désactiver le signal sonore lorsque les touches sont
enfoncées.
P-VOL : Permet de régler le volume à la mise en marche. Si le niveau de volume à l'arrêt est
inférieur au niveau P-VOL, l'appareil règle le niveau de volume sur le volume à l'arrêt
lorsqu'il est mis en marche.
Si le niveau de volume à l'arrêt est supérieur au niveau P-VOL, le volume sera réinitialisé sur
les valeurs P-VOL à la mise en marche.
Recherche de haut-parleurs Bluetooth
Après avoir enfoncé la touche BT, l'écran ache « SEARCH... » [recherche]. Un instant plus
tard, le nom de votre appareil Bluetooth s'ache. Pour acher l'appareil suivant, tournez le
bouton VOL. Une fois que le nom du haut-parleur Bluetooth souhaité s'ache sur l'écran
LCD, appuyez sur le bouton VOL pour associer l'appareil. Une fois le jumelage terminé,
l'écran ache le message « BOX ON ».
Consigne importante : Malgré de nombreux tests eectués avec divers dispositifs
Bluetooth, la compatibilité avec tous les dispositifs Bluetooth disponible sur le marché ne
peut être garantie.
Transmission du signal au haut-parleur Bluetooth
Appuyez brièvement sur la touche BT pour arrêter/initier le transfert du signal vers le
haut-parleur Bluetooth. L'écran ache le message « BOX OFF/ON ».
Remarque : Bien que Blaupunkt vérie soigneusement la compatibilité des diérents
haut-parleurs Bluetooth, un fonctionnement sans faille ne peut être garanti avec tous les
modèles du marché.
Fonctionnement des Zones 1 et 2
Appuyez brièvement sur la touche Zone 1 (ou Zone 2) pour activer ou désactiver le son de
la Zone 1 (ou de la Zone 2).
Maintenez la touche Zone 1 (ou Zone 2) enfoncée pour couper le son de la Zone 1 (ou de la
Zone 2). Appuyez à nouveau sur la touche pour rétablir le son.
Priorité des informations ou de l'horloge
Appuyez brièvement sur la touche DIS pour modier la priorité de l’horloge ou la priorité
des informations.
Remarque : En mode FM, lorsque vous recevez des stations RDS, appuyez brièvement sur la
touche DIS pour acher NOM DE STATION/HORLOGE/FRÉQUENCE.
Réglage de l’horloge
Sélectionnez CLK HH/CLK MM dans le menu. Tournez le bouton VOL pour régler les heures /
les minutes.
Fonctionnement du casque d'écoute
Une prise pour casque d'écoute de 3,5 mm se trouve sur le panneau avant. Il adopte les
paramètres de fonctionnement de la Zone 1.
UTILISATION DE LA RADIO
Réception des stations de radio
Appuyez sur la touche SRC/MENU pour sélectionner un mode parmi FM1->FM2->MW.
Appuyez brièvement sur la touche / pour recevoir la station de radio souhaitée.
Maintenez la touche / enfoncée pour régler manuellement la fréquence.
Mémorisation manuelle des stations et accès aux stations mémorisées
Réception de la station souhaitée. Appuyez sur les touches numériques (1-6) et
maintenez-les enfoncées pendant 2 secondes. La station actuelle sera mise en mémoire
pour la touche numérique correspondante. Appuyez brièvement sur la touche de la station
préréglée (1–6) pour écouter directement le signal de diusion de cette station mémorisée
pour la touche assignée.
FONCTIONNEMENT DAB
Appuyez sur la touche SRC/MENU pour basculer la source entre DAB1 et DAB2.
Sélection d'une station
Appuyez sur la touche / pour sélectionner la station suivante/précédente.
Mémorisation manuelle des stations et accès aux stations mémorisées
Lorsque la fréquence de la station souhaitée est réglée, appuyez sur l'une des touches
numérotées de 1 à 6 pendant 2 secondes pour mémoriser cette station sous le numéro
correspondant. Appuyez brièvement sur la touche de la station préréglée (1–6) pour
écouter directement le signal de diusion de cette station mémorisée pour la touche
assignée.
UTILISATION DU PORT USB
Lorsqu'un lecteur USB est connecté à l'appareil, ce dernier lit automatiquement les
chiers MP3/WMA. Si un lecteur USB a déjà été connecté à l'appareil, appuyez
brièvement sur la touche SRC/MENU jusqu'à ce que l'écran du mode USB apparaisse.
Sélection d'un chier
Appuyez sur la touche / pour passer au chier suivant/précédent. Appuyez
sur la touche / pour faire déler rapidement vers l'avant et vers l'arrière.
Lecture/Pause
Appuyez sur la touche 1 pour mettre en pause/lire un chier.
Fonction de lecture en boucle
Appuyez sur la touche 3 RPT pour sélectionner la fonction de lecture en boucle. RPT
ONE/RPT FOLD/RPT ALL (par défaut)
RPT ONE : Lecture en boucle d'un seul chier.
RPT FOLD : Lecture en boucle de tous les chiers d'un dossier.
RPT ALL : Lecture en boucle de tous les chiers.
RANDOM
Appuyez sur la touche 4 RDM pour activer ou désactiver la fonction de lecture aléatoire.
RDM ON : Lecture aléatoire de tous les chiers.
RDM OFF : Fonction de lecture aléatoire.
Fonction dossier +/-
Appuyez sur la touche DIR+/DIR- pour sélectionner le dossier suivant/précédent à lire.
Recherche d'une chanson
Après avoir enfoncé la touche l'écran achera « NUM 0000 ». En tournant le bouton
VOL (ou en saisissant directement un numéro), sélectionnez un numéro, puis appuyez
sur VOL pour lancer la lecture. Veuillez noter que 7/8/9/0 signie : BT = 7, = 8, = 9,
DIS = 0.
UTILISATION DE LA PRISE AUX IN 1/2
Sur le panneau avant, la prise AUX IN 1 est un jack de 3,5 mm. La prise AUX IN 2 pour
RCA est située à l'arrière de l'appareil. En appuyant sur la touche SRC/MENU, on peut
passer en mode AUX IN1 (2) lorsque le signal audio est connecté à l'appareil.
UTILISATION DU BLUETOOTH
Jumelage des appareils
Sélectionnez la position Bluetooth et recherchez le périphérique Bluetooth sur votre
téléphone. La position « BLAUPUNKT » devrait apparaître dans la liste ; sélectionnez
« BLAUPUNKT », puis entrez le mot de passe « 0000 » si un message demandant un mot
de passe s'ache. Une fois le jumelage terminé, l'écran ache « BT ».
Audio Bluetooth
Appuyez sur la touche SRC/MENU pour passer en mode BT MUSIC. L'appareil réproduira
automatiquement la musique de votre téléphone. Appuyez sur la touche pour
mettre en pause/en lecture une piste.
Appuyez sur la touche / pour sélectionner la piste suivante/précédente.
UTILISATION DE LA PRISE HDMI
La prise HDMI avant va vers la prise HDMI arrière. La lecture à l'aide de HDMI n'est pas
aectée.
Connecteurs RCA V-IN et V-OUT
À l'arrière de l'appareil, le connecteur V-IN va vers le connecteur V-OUT.
TÉLÉCOMMANDE
La télécommande peut être utilisée lorsque
l'option IR est activée dans le menu.
OFF: Mise en marche et arrêt de l’appareil.
VOL+ : Augmenter le volume
VOL- : Réduire le volume
1 : Activation/désactivation du mode
sourdine de la Zone 1
2 : Activation/désactivation du mode
sourdine de la Zone 2
Pour les autres opérations, lisez les instructions ci-dessus.
INFORMATIONS GÉNÉRALES
Exigences concernant l’alimentation : 12 V DC, borne négative connectée à la terre
Dimensions de la base de montage :129 (larg.) x 112 (long.) x 65 (ép.)
Paramètres de tonalité
- Basse (à 100 Hz) : ±10 dB
- Haute (à 100 Hz) : ±10 dB
Puissance de sortie maximale : 4 x 40 W
Consommation de courant : 10 A (max.)
RADIO FM AM
Plage de fréquences de 87,5 à 108 MHz de 522 à 1620 KHz
IF 10,7 MHz 450 KHz
Sensibilité 4 µV (S/N = 30 dB) 36 dBuV (S/N = 20 dB)
Séparation des canaux stéréo >25 dB /
RÉSOLUTION DES PROBLÈMES

Indicazioni sulla sicurezza
Questa stazione multimediale è stata prodotta in conformità agli standard
attuali di evoluzione tecnologica e alle norme di sicurezza comunemente
riconosciute. Tuttavia, l’inosservanza delle informazioni sulla sicurezza
contenute nel presente manuale comporta diversi rischi. Prima di utilizzare la
stazione multimediale leggere attentamente il presente manuale per intero.
Conservare il manuale in un luogo accessibile a tutti gli utenti in qualsiasi
momento. In caso di cessione della stazione multimediale a terzi, includere il
presente manuale. Inoltre, bisogna rispettare le indicazioni contenute nei
manuali d’uso dei dispositivi collegati a questa stazione multimediale.
Informazioni generali sulla sicurezza
Osservare le seguenti indicazioni per proteggersi da eventuali lesioni: Non
modicare o aprire il dispositivo.
Uso previsto
La stazione multimediale è progettata per essere installata e utilizzata su veicoli
con impianto di alimentazione con una tensione di 12 V. È necessario rispettare i
limiti di potenza del dispositivo. L’esecuzione di una qualsiasi riparazione e
installazione deve essere adata ad un professionista.
Istruzioni di installazione
È possibile installare il dispositivo da soli se si è esperti nell’installazione di
autoradio e se si ha una conoscenza delle tematiche relative agli impianti
elettrici per automobili. A tal ne consultare lo schema di cablaggio presente in
questo manuale. Il dispositivo deve essere installato in modo da non interferire
o bloccare il funzionamento degli airbag, altri dispositivi di sicurezza e/o
comandi.
Dichiarazione di conformità
Blaupunkt Competence Center Car Multimedia – Evo Sales GmbH dichiara che il
presente dispositivo è conforme ai requisiti essenziali ed alle restanti disposizio-
ni pertinenti della Direttiva 2014/53/UE. La dichiarazione di conformità è
reperibile sul sito www.blaupunkt.com.
Consigli in materia di pulizia
Solventi, detergenti e prodotti abrasivi, così come spray per cruscotti e prodotti
per la cura della plastica, possono contenere sostanze in grado di danneggiare
la supercie della stazione multimediale. Per la pulizia della stazione multimedi-
ale utilizzare solo un panno asciutto o leggermente umido.
Istruzioni per lo smaltimento
Non smaltire il dispositivo usurato insieme ai riuti domestici!
Per smaltire il dispositivo, il telecomando e le batterie consumate,
portarli in un centro di raccolta per apparecchiature usate.
Fornitura
La fornitura include:
stazione multimediale BPA 3022 M,
telecomando,
connettori ISO,
viti di montaggio,
manuale d’uso.
INFORMAZIONI IMPORTANTI SULL’INSTALLAZIONE
1. Leggere attentamente il manuale d’uso prima di installare il dispositivo.
2. Prima di collegare l’alimentazione assicurarsi che tutti gli altri cavi siano
collegati.
3. Per evitare cortocircuiti, assicurarsi che tutti i cavi esposti siano isolati.
4. Una volta completata l’installazione, ssare tutti i cavi.
5. I collegamenti al lettore devono essere eettuati in conformità con il
presente manuale d’uso. Un collegamento errato può causare danni al
dispositivo.
6. Il lettore è progettato per funzionare solo con un impianto a 12 V CC.
INSTALLAZIONE DEL DISPOSITIVO
SMONTAGGIO DEL DISPOSITIVO
1. Smontare il dispositivo.
2. Smontare la cornice esterna di rinitura.
Avvertenze relative al cavo HDM:
Utilizzare un cavo HDMI di buona qualità.
La lunghezza complessiva (fronte e retro) non deve superare i 12 piedi.
COLLEGAMENTO DEI CAVI
1. Il lettore può essere utilizzato solo a +12 V CC.
2. Non collegare il terminale della batteria nché il lettore non sarà completa-
mente installato.
3. Assicurarsi che il cavo giallo sia collegato al polo positivo (+) della batteria.
4. Quando si sostituisce il fusibile, accertarsi che i parametri del nuovo fusibile
siano uguali.
5. Utilizzando gli altoparlanti di buona qualità con un’impedenza di 4-8 ohm si
può ottenere il funzionamento migliore del dispositivo.
POSIZIONE DEI TASTI
1. ZONA 1 2. 1 3. ZONA 2
4. 2 5. BT 6. 3 RPT
7. 8. 4 RDM 9.
10. 5 DIR- 11. DIS 12. 6 DIR+
13. LCD 14. PRESA AUX 15. PRESA PER CUFFIE
16. PRESA HDMI 17. RESET 18. MANOPOLA
19. PORTA USB 20. SRC/MENU
IMPIEGO DI BASE
Accensione/spegnimento del dispositivo e della funzione di silenziamento
Per accendere il dispositivo, premere la manopola / MUTE. Per attivare o disattivare la
funzione di silenziamento, premere brevemente la manopola quando il dispositivo è
acceso. Premere e tenere premuto questo tasto per spegnere il dispositivo.
Impostazioni audio e menu delle impostazioni
Premere e tenere premuto il tasto SCR/MENU per accedere al menu illustrato di
seguito:
BAS->TRE->BAL->EQ (O/pop/rock/class)->LOUD (On/O)->CLK HH->CLK MM->IR
(On/O) ->CT (indep/sync)->SEGN. SUONO. (On/O) )->P_VOL (13)->DX (LOC)->STE-
REO (MONO)
Per ogni posizione, ruotare la manopola VOL per impostarla.
INFRAROSSO (ON/OFF):
INFRAROSSO On: Il dispositivo può essere acceso utilizzando il telecomando a
infrarossi. Il sistema è in modalità di consumo energetico elevato.
INFRAROSSO O: Il dispositivo non può essere acceso utilizzando il telecomando a
infrarossi. Il sistema è in modalità di basso consumo energetico.
CT (INDEP/SYNC):
CT INDEP: L’orologio funziona in modo indipendente.
CT SYNC: L’orologio sarà sincronizzato con l’ora della stazione RDS ricevuta.
Attenzione: Quando si imposta l’orologio nel menu, la funzione CT viene automatica-
mente impostata sulla modalità INDEP (funzionamento indipendente).
SEGNALE ACUSTICO (ON/OFF): Consente di attivare/disattivare il segnale acustico
quando si premono i tasti.
P-VOL: Consente di impostare il volume all’accensione. Se il livello del volume allo
spegnimento è inferiore al livello P-VOL, all’accensione il dispositivo imposterà il
livello del volume sul volume allo spegnimento.
Se il livello del volume allo spegnimento è superiore al livello P-VOL, all’accensione
del dispositivo il volume verrà ripristinato sul livello dei valori P-VOL.
Ricerca di altoparlanti Bluetooth
Tenendo premuto il tasto BT, viene visualizzato il messaggio “SEARCH...” [ricerca].
Successivamente viene visualizzato il nome del dispositivo Bluetooth. Per visualizzare
il dispositivo successivo, ruotare la manopola VOL. Quando il nome dell’altoparlante
Bluetooth desiderato viene visualizzato sul display LCD, premere la manopola VOL
per accoppiare il dispositivo. Se l’accoppiamento sarà riuscito, sul display comparirà il
messaggio “BOX ON”.
Raccomandazione importante: Nonostante i numerosi test eettuati con diversi
dispositivi Bluetooth, non è possibile garantire la compatibilità con tutti i dispositivi
Bluetooth disponibili sul mercato.
Trasmissione del segnale all’altoparlante Bluetooth
Premere brevemente il tasto BT per interrompere il trasferimento/trasmettere il
segnale all’altoparlante Bluetooth. Il display visualizzerà il messaggio “BOX OFF/ON”.
Attenzione: Sebbene Blaupunkt verichi attentamente la compatibilità dei vari
altoparlanti Bluetooth, non è possibile garantire un funzionamento perfetto del
dispositivo con tutti i modelli disponibili sul mercato.
Uso della Zona 1 e della Zona 2
Premere brevemente il tasto Zone 1 (o Zone 2) per spegnere/accendere l’audio della
Zona 1 (o della Zona 2).
Tenere premuto il tasto Zone 1 (o Zone 2) per disattivare l’audio della Zona 1 (o della
Zona 2). Tenere premuto nuovamente il tasto per disattivare il silenziamento.
Priorità delle informazioni o dell’orologio
Premere brevemente il tasto DIS per impostare la priorità dell’orologio o delle
informazioni. Attenzione: Nella banda FM, quando si ricevono stazioni RDS, premere
brevemente il tasto DIS per visualizzare il NOME STAZIONE/OROLOGIO/FREQUENZA.
Impostazioni dell’orologio
Selezionare nel menu la posizione CLK HH/CLK MM. Ruotare la manopola VOL per
impostare l’ora/minuti.
Uso delle cue
Sul pannello frontale è presente un jack per cue da 3,5 mm. Esso riceve le
impostazioni di funzionamento della Zona 1.
USO DELLA RADIO
Ricezione delle stazioni radio
Premere il tasto SRC/MENU per selezionare una modalità tra FM1->FM2->MW.
Premere brevemente il tasto / per ricevere la stazione radio desiderata.
Premere e tenere premuto il tasto / per sintonizzare manualmente la
frequenza.
Memorizzazione manuale della stazione e richiamo delle stazioni memorizzate
Ricezione della stazione desiderata. Premere e tenere premuto per 2 secondi uno dei
tasti di memorizzazione (1–6). La stazione corrente verrà memorizzata su un
determinato tasto numerico. Premere brevemente il tasto della stazione programma-
ta (1–6) per ascoltare direttamente il segnale trasmesso da questa stazione e
memorizzato sul tasto assegnato.
USO DI DAB
Premere il tasto SRC/MENU per commutare la sorgente tra DAB1 o DAB2.
Selezione della stazione
Premere il tasto / per selezionare la stazione successiva/precedente.
Memorizzazione manuale della stazione e richiamo delle stazioni memorizzate
Quando è impostata la frequenza della stazione desiderata, tenere premuto per 2
secondi uno dei tasti da 1 a 6 per memorizzare la stazione sul numero corrisponden-
te. Premere brevemente il tasto della stazione programmata (1–6) per ascoltare
direttamente il segnale trasmesso da questa stazione e memorizzato sul tasto
assegnato.
USO DELLA PORTA USB
Dopo aver collegato al dispositivo una chiavetta USB, il dispositivo riproduce
automaticamente i le MP3/WMA. Se al dispositivo è già stata collegata una chiavetta
USB, premere brevemente il tastoSRC/MENU no a visualizzare la schermata della
modalità USB.
Selezione del le
Premere il tasto / per passare al le successivo/precedente. Premere il tasto
/ per scorrere velocemente in avanti o indietro.
Riproduzione/pausa
Premere il tasto 1 per mettere in pausa/riprodurre un le.
Funzione di riproduzione in loop
Premere il tasto 3 RPT per selezionare la funzione di riproduzione in loop. RPT
ONE/RPT FOLD/RPT ALL (predenito)
RPT ONE: Riproduzione di un singolo le in loop.
RPT FOLD: Riproduzione in loop di tutti i le di una cartella.
RPT ALL: Riproduzione di tutti i le in loop.
RANDOM
Premere il tasto 4 RDM per attivare o disattivare la funzione di riproduzione casuale.
RDM On: Riproduzione casuale di tutti i le.
RDM O: Disattivazione della funzione di riproduzione casuale.
Funzione cartella +/-
Premere il tasto DIR+/DIR- per selezionare la cartella successiva/precedente da
riprodurre.
Ricerca di una canzone
Tenendo premuto il tasto , verrà visualizzato il messaggio “NUM 0000”. Ruotando
la manopola VOL (o inserendo direttamente il numero), selezionare il numero, quindi
premere VOL per riprodurre. Tenere presente che per 7/8/9/0 si intendono:
BT = 7, = 8, = 9, DIS = 0.
UTILIZZO DELLA PRESA AUX 1/2
La presa AUX IN 1 presente sul pannello anteriore è un jack da 3,5 mm. La presa AUX
IN 2 per RCA si trova invece sul retro del dispositivo. Premendo il tasto SRC/MENU si
passa alla modalità AUX IN1 (2) quando il segnale audio è collegato al dispositivo.
UTILIZZO DEL BLUETOOTH
Accoppiamento dei dispositivi
Selezionare sullo smartphone la voce Bluetooth e cercare il dispositivo Bluetooth.
Nell’elenco dovrebbe comparire la voce “BLAUPUNKT”; selezionare “BLAUPUNKT” e se
viene visualizzato un messaggio che richiede l’inserimento della password, inserire
“0000”. Quando l'accoppiamento è correttamente terminato, sul display verrà
visualizzato il simbolo BT.
Audio del Bluetooth
Premere il tasto SRC/MENU per passare alla modalità BT MUSIC. Il dispositivo
riprodurrà automaticamente un brano dal cellulare. Premere il tasto per mettere
in pausa/riprodurre un brano.
Premere il tasto / per selezionare il brano successivo/precedente.
USO DELLA PRESA HDMI
La presa anteriore HDMI va alla presa HDMI posteriore. Questo non incide sulla
riproduzione tramite HDMI.
Connettori RCA V-IN e V-OUT
Sul retro del dispositivo, il connettore V-IN va al connettore V-OUT.
TELECOMANDO
Il telecomando può essere utilizzato quando
l’opzione IR nel menu è impostata su ON.
OFF: Accensione e spegnimento del dispositivo.
VOL+: Aumentare il volume
VOL-: Abbassare il volume
1 : Accensione/spegnimento della
funzione di silenziamento della Zona 1
2 : Accensione/spegnimento della
funzione di silenziamento della Zona 2
Per le altre operazioni, leggere le istruzioni sopra riportate.
INFORMAZIONI GENERALI
Requisiti inerenti all’alimentazione : Corrente continua a 12V, terminale
negativo collegato a massa
Dimensioni della base di montaggio : 129 (largh.) x 112 (prof.) x 65 (alt.)
Impostazioni del tono
- Toni bassi (a 100 Hz) : ±10 dB
- Toni alti (a 100 Hz) : ±10 dB
Potenza massima in uscita : 4 × 40 W
Consumo di corrente : 10 A (max)
RADIO FM AM
Intervallo di frequenza da 87,5 a 108 MHz da 522 a 1620 KHz
IF 10.7 MHz 450 KHz
Sensibilità 4 µV (S/N = 30 dB) 36 dBµV (S/N = 20 dB)
Separazione dei canali stereo >25 dB /
RISOLUZIONE DEI PROBLEMI
DATI TECNICI
IT
Problema
Causa
Soluzione
Assenza di
alimentazione
L’accensione del veicolo
non è stata inserita.
Se l’alimentazione è stata collegata al
circuito ausiliario del veicolo e il motore
non è acceso, posizionare la chiave
d’accensione in posizione “ACC”.
Fusibile bruciato. Sostituire il fusibile.
Nessun suono
Il volume è regolato al minimo
Impostare il volume audio al livello
desiderato.
Il cablaggio non è collegato
correttamente.
Controllare i collegamenti dei cavi.
I tasti di controllo
del dispositivo
non funzionano.
Il microcomputer interno non
funziona correttamente
a causa di interferenze.
Premere il tasto di reset.
La radio non
funziona. La funzione
di selezione
automatica delle
stazioni radio
non funziona.
Il cavo dell’antenna non
è collegato.
Collegare correttamente il cavo
dell’antenna.
Il segnale è troppo debole. Selezionare la stazione manualmente.
Nessuna possibilità
di riprodurre musica
dall’applicazione
musicale del cellulare.
Il dispositivo è accoppiato
a un altro cellulare.
1) Disattivare il Bluetooth
sull’altro cellulare.
2) Uscire dall’applicazione e riavviarla.
Informations relatives à la sécurité
Cette station multimédia a été fabriquée selon les normes techniques actuellement
en vigueur et les principes de sécurité généralement reconnus. Néanmoins, le
non-respect des consignes de sécurité contenues dans ce manuel comporte divers
risques. Lisez attentivement l'ensemble du manuel avant d'utiliser la station
multimédia. Conservez le manuel dans un endroit où il est accessible pour tous les
utilisateurs et à tout moment. Si la station multimédia est transmise à un tiers, ce
manuel lui doit être également remis. De plus, suivez les instructions des modes
d'emploi des appareils connectés à cette station.
Consignes générales de sécurité
Respectez les instructions suivantes pour vous protéger des blessures :
Ne pas modier ou ouvrir l'appareil.
Usage prévu
La station multimédia est conçue pour être installée et fonctionner dans des
véhicules avec une tension d'alimentation de 12V. Les limites de puissance de
l'appareil doivent être respectées. Toute réparation et installation doit être eectuée
par un professionnel.
Instructions pour l'installation
Vous ne pouvez installer l'appareil vous-même que si vous êtes expérimenté dans
l'installation d'autoradios et si vous avez des connaissances en électricité automobile.
À cet eet, consultez le schéma de câblage de ce manuel. L'installation de cet appareil
ne doit pas gêner ni bloquer le fonctionnement des airbags, des autres dispositifs de
sécurité ou des dispositifs de contrôle.
Déclaration de conformité
Blaupunkt Competence Center Car Multimedia - Evo Sales GmbH déclare que cet
appareil est conforme aux exigences fondamentales et aux autres dispositions
applicables de la directive 2014/53/UE. La déclaration de conformité peut être
consultée à l'adresse suivante :www.blaupunkt.com.
Instructions concernant le nettoyage
Les solvants, les produits nettoyants et abrasifs, ainsi que les nettoyants de cockpit et
les produits d'entretien des plastiques peuvent contenir des composants qui peuvent
endommager la surface de la station multimédia. Pour nettoyer la station multimédia,
utilisez uniquement un chion sec ou légèrement humide.
Instructions concernant la mise au rebut
Ne jetez pas l'appareil usagé avec les ordures ménagères !
Pour mettre au rebut l'appareil, la télécommande et les piles usagées,
veuillez les apporter à un point de collecte des équipements usagés.
Contenu de l'emballage
Le contenu de l’emballage comprend :
station multimédia BPA 3022 M,
télécommande,
connecteurs ISO,
vis de montage,
manuel d’utilisation.
INFORMATIONS IMPORTANTES CONCERNANT L’INSTALLATION
1. Lisez attentivement ce manuel d'utilisation avant d'installer l'appareil.
2. Avant de brancher l'alimentation électrique, assurez-vous que tous les
autres câbles sont connectés.
3. Pour éviter les court-circuits, assurez-vous que tous les câbles exposés sont
isolés.
4. Une fois l'installation terminée, tous les câbles doivent être sécurisés.
5. Les connexions au lecteur doivent être eectuées conformément à ce
manuel. Une connexion incorrecte peut provoquer l'endommagement de
l'appareil.
6. Le lecteur est conçu pour fonctionner uniquement avec une installation de
12 V DC.
INSTALLATION DE L'APPAREIL
DÉMONTAGE DE L'APPAREIL
1. Démontez l'appareil.
2. Démontez le cadre de nition extérieur.
Remarque concernant le HDMI :
Utilisez un câble HDMI de bonne qualité.
La longueur totale (avant et arrière) ne doit pas dépasser 12 pieds.
CONNEXION DES CÂBLES
1. Le lecteur ne peut être utilisé que sous une tension de +12 V DC.
2. Ne connectez pas la borne de la batterie avant que le lecteur ne soit
complètement installé.
3. Assurez-vous que le l jaune est connecté au pôle positif (+) de la batterie.
4. Lorsque vous remplacez le fusible, assurez-vous que les paramètres du
nouveau fusible sont les mêmes.
5. L’utilisation de haut-parleurs de bonne qualité avec une impédance de 4–8
ohms permettra de tirer le meilleur parti de l’appareil.
EMPLACEMENT DES TOUCHES
1. ZONE 1 2. 1 3. ZONE 2
4. 2 5. BT 6. 3 RPT
7. 8. 4 RDM 9.
10. 5 DIR- 11. DIS 12. 6 DIR+
13. LCD 14. PRISE AUX 15. PRISE POUR CASQUE D'ÉCOUTE
16. PRISE HDMI 17. RESET 18. BOUTON ROTATIF
19. PORT USB 20. SRC/MENU
FONCTIONNEMENT DE BASE
Activation/désactivation de l'appareil et de la fonction de mise en sourdine
Pour allumer l'appareil, appuyez sur le bouton rotatif / MUTE. Pour activer ou désactiver la
fonction de mise en sourdine, appuyez brièvement sur le bouton lorsque l'appareil est
allumé. Appuyez sur ce bouton et maintenez-le enfoncé pour éteindre l’appareil.
Réglage du volume et menu de conguration
Appuyez sur la touche SRC/MENU et maintenez-la enfoncée pour accéder au menu illustré
ci-dessous :
BAS->TRE->BAL->EQ (o/pop/rock/class)->LOUD (on/o)->CLK HH->CLK
MM->IR (on/o) ->CT (indep/sync)->SIGN. BEEP (on/o)->P_VOL (13)->DX (LOC)->STE- REO
(MONO)
À chaque position, tournez le bouton VOL pour la régler.
INFRAROUGE (ON/OFF) :
INFRAROUGE ON : L'appareil peut être mis en marche à l'aide de la télécommande à
infrarouge.
Le système est alors en mode de haute consommation d'énergie.
INFRAROUGE OFF : L'appareil ne peut pas être mis en marche à l'aide de la télécommande
à infrarouge.
Le système est en mode de faible consommation d'énergie.
CT (INDEP/SYNC) :
CT INDEP : L’horloge fonctionne indépendamment.
CT SYNC : L’horloge sera synchronisée avec l’heure de la station RDS réceptionnée.
Remarque : Lorsque l'horloge est réglée dans le menu, la fonction CT est automatiquement
réglée sur le mode INDEP (fonctionnement indépendant).
BEEP (ON/OFF) : Permet d'activer/désactiver le signal sonore lorsque les touches sont
enfoncées.
P-VOL : Permet de régler le volume à la mise en marche. Si le niveau de volume à l'arrêt est
inférieur au niveau P-VOL, l'appareil règle le niveau de volume sur le volume à l'arrêt
lorsqu'il est mis en marche.
Si le niveau de volume à l'arrêt est supérieur au niveau P-VOL, le volume sera réinitialisé sur
les valeurs P-VOL à la mise en marche.
Recherche de haut-parleurs Bluetooth
Après avoir enfoncé la touche BT, l'écran ache « SEARCH... » [recherche]. Un instant plus
tard, le nom de votre appareil Bluetooth s'ache. Pour acher l'appareil suivant, tournez le
bouton VOL. Une fois que le nom du haut-parleur Bluetooth souhaité s'ache sur l'écran
LCD, appuyez sur le bouton VOL pour associer l'appareil. Une fois le jumelage terminé,
l'écran ache le message « BOX ON ».
Consigne importante : Malgré de nombreux tests eectués avec divers dispositifs
Bluetooth, la compatibilité avec tous les dispositifs Bluetooth disponible sur le marché ne
peut être garantie.
Transmission du signal au haut-parleur Bluetooth
Appuyez brièvement sur la touche BT pour arrêter/initier le transfert du signal vers le
haut-parleur Bluetooth. L'écran ache le message « BOX OFF/ON ».
Remarque : Bien que Blaupunkt vérie soigneusement la compatibilité des diérents
haut-parleurs Bluetooth, un fonctionnement sans faille ne peut être garanti avec tous les
modèles du marché.
Fonctionnement des Zones 1 et 2
Appuyez brièvement sur la touche Zone 1 (ou Zone 2) pour activer ou désactiver le son de
la Zone 1 (ou de la Zone 2).
Maintenez la touche Zone 1 (ou Zone 2) enfoncée pour couper le son de la Zone 1 (ou de la
Zone 2). Appuyez à nouveau sur la touche pour rétablir le son.
Priorité des informations ou de l'horloge
Appuyez brièvement sur la touche DIS pour modier la priorité de l’horloge ou la priorité
des informations.
Remarque : En mode FM, lorsque vous recevez des stations RDS, appuyez brièvement sur la
touche DIS pour acher NOM DE STATION/HORLOGE/FRÉQUENCE.
Réglage de l’horloge
Sélectionnez CLK HH/CLK MM dans le menu. Tournez le bouton VOL pour régler les heures /
les minutes.
Fonctionnement du casque d'écoute
Une prise pour casque d'écoute de 3,5 mm se trouve sur le panneau avant. Il adopte les
paramètres de fonctionnement de la Zone 1.
UTILISATION DE LA RADIO
Réception des stations de radio
Appuyez sur la touche SRC/MENU pour sélectionner un mode parmi FM1->FM2->MW.
Appuyez brièvement sur la touche / pour recevoir la station de radio souhaitée.
Maintenez la touche / enfoncée pour régler manuellement la fréquence.
Mémorisation manuelle des stations et accès aux stations mémorisées
Réception de la station souhaitée. Appuyez sur les touches numériques (1-6) et
maintenez-les enfoncées pendant 2 secondes. La station actuelle sera mise en mémoire
pour la touche numérique correspondante. Appuyez brièvement sur la touche de la station
préréglée (1–6) pour écouter directement le signal de diusion de cette station mémorisée
pour la touche assignée.
FONCTIONNEMENT DAB
Appuyez sur la touche SRC/MENU pour basculer la source entre DAB1 et DAB2.
Sélection d'une station
Appuyez sur la touche / pour sélectionner la station suivante/précédente.
Mémorisation manuelle des stations et accès aux stations mémorisées
Lorsque la fréquence de la station souhaitée est réglée, appuyez sur l'une des touches
numérotées de 1 à 6 pendant 2 secondes pour mémoriser cette station sous le numéro
correspondant. Appuyez brièvement sur la touche de la station préréglée (1–6) pour
écouter directement le signal de diusion de cette station mémorisée pour la touche
assignée.
UTILISATION DU PORT USB
Lorsqu'un lecteur USB est connecté à l'appareil, ce dernier lit automatiquement les
chiers MP3/WMA. Si un lecteur USB a déjà été connecté à l'appareil, appuyez
brièvement sur la touche SRC/MENU jusqu'à ce que l'écran du mode USB apparaisse.
Sélection d'un chier
Appuyez sur la touche / pour passer au chier suivant/précédent. Appuyez
sur la touche / pour faire déler rapidement vers l'avant et vers l'arrière.
Lecture/Pause
Appuyez sur la touche 1 pour mettre en pause/lire un chier.
Fonction de lecture en boucle
Appuyez sur la touche 3 RPT pour sélectionner la fonction de lecture en boucle. RPT
ONE/RPT FOLD/RPT ALL (par défaut)
RPT ONE : Lecture en boucle d'un seul chier.
RPT FOLD : Lecture en boucle de tous les chiers d'un dossier.
RPT ALL : Lecture en boucle de tous les chiers.
RANDOM
Appuyez sur la touche 4 RDM pour activer ou désactiver la fonction de lecture aléatoire.
RDM ON : Lecture aléatoire de tous les chiers.
RDM OFF : Fonction de lecture aléatoire.
Fonction dossier +/-
Appuyez sur la touche DIR+/DIR- pour sélectionner le dossier suivant/précédent à lire.
Recherche d'une chanson
Après avoir enfoncé la touche l'écran achera « NUM 0000 ». En tournant le bouton
VOL (ou en saisissant directement un numéro), sélectionnez un numéro, puis appuyez
sur VOL pour lancer la lecture. Veuillez noter que 7/8/9/0 signie : BT = 7, = 8, = 9,
DIS = 0.
UTILISATION DE LA PRISE AUX IN 1/2
Sur le panneau avant, la prise AUX IN 1 est un jack de 3,5 mm. La prise AUX IN 2 pour
RCA est située à l'arrière de l'appareil. En appuyant sur la touche SRC/MENU, on peut
passer en mode AUX IN1 (2) lorsque le signal audio est connecté à l'appareil.
UTILISATION DU BLUETOOTH
Jumelage des appareils
Sélectionnez la position Bluetooth et recherchez le périphérique Bluetooth sur votre
téléphone. La position « BLAUPUNKT » devrait apparaître dans la liste ; sélectionnez
« BLAUPUNKT », puis entrez le mot de passe « 0000 » si un message demandant un mot
de passe s'ache. Une fois le jumelage terminé, l'écran ache « BT ».
Audio Bluetooth
Appuyez sur la touche SRC/MENU pour passer en mode BT MUSIC. L'appareil réproduira
automatiquement la musique de votre téléphone. Appuyez sur la touche pour
mettre en pause/en lecture une piste.
Appuyez sur la touche / pour sélectionner la piste suivante/précédente.
UTILISATION DE LA PRISE HDMI
La prise HDMI avant va vers la prise HDMI arrière. La lecture à l'aide de HDMI n'est pas
aectée.
Connecteurs RCA V-IN et V-OUT
À l'arrière de l'appareil, le connecteur V-IN va vers le connecteur V-OUT.
TÉLÉCOMMANDE
La télécommande peut être utilisée lorsque
l'option IR est activée dans le menu.
OFF: Mise en marche et arrêt de l’appareil.
VOL+ : Augmenter le volume
VOL- : Réduire le volume
1 : Activation/désactivation du mode
sourdine de la Zone 1
2 : Activation/désactivation du mode
sourdine de la Zone 2
Pour les autres opérations, lisez les instructions ci-dessus.
INFORMATIONS GÉNÉRALES
Exigences concernant l’alimentation : 12 V DC, borne négative connectée à la terre
Dimensions de la base de montage :129 (larg.) x 112 (long.) x 65 (ép.)
Paramètres de tonalité
- Basse (à 100 Hz) : ±10 dB
- Haute (à 100 Hz) : ±10 dB
Puissance de sortie maximale : 4 x 40 W
Consommation de courant : 10 A (max.)
RADIO FM AM
Plage de fréquences de 87,5 à 108 MHz de 522 à 1620 KHz
IF 10,7 MHz 450 KHz
Sensibilité 4 µV (S/N = 30 dB) 36 dBuV (S/N = 20 dB)
Séparation des canaux stéréo >25 dB /
RÉSOLUTION DES PROBLÈMES

Indicazioni sulla sicurezza
Questa stazione multimediale è stata prodotta in conformità agli standard
attuali di evoluzione tecnologica e alle norme di sicurezza comunemente
riconosciute. Tuttavia, l’inosservanza delle informazioni sulla sicurezza
contenute nel presente manuale comporta diversi rischi. Prima di utilizzare la
stazione multimediale leggere attentamente il presente manuale per intero.
Conservare il manuale in un luogo accessibile a tutti gli utenti in qualsiasi
momento. In caso di cessione della stazione multimediale a terzi, includere il
presente manuale. Inoltre, bisogna rispettare le indicazioni contenute nei
manuali d’uso dei dispositivi collegati a questa stazione multimediale.
Informazioni generali sulla sicurezza
Osservare le seguenti indicazioni per proteggersi da eventuali lesioni: Non
modicare o aprire il dispositivo.
Uso previsto
La stazione multimediale è progettata per essere installata e utilizzata su veicoli
con impianto di alimentazione con una tensione di 12 V. È necessario rispettare i
limiti di potenza del dispositivo. L’esecuzione di una qualsiasi riparazione e
installazione deve essere adata ad un professionista.
Istruzioni di installazione
È possibile installare il dispositivo da soli se si è esperti nell’installazione di
autoradio e se si ha una conoscenza delle tematiche relative agli impianti
elettrici per automobili. A tal ne consultare lo schema di cablaggio presente in
questo manuale. Il dispositivo deve essere installato in modo da non interferire
o bloccare il funzionamento degli airbag, altri dispositivi di sicurezza e/o
comandi.
Dichiarazione di conformità
Blaupunkt Competence Center Car Multimedia – Evo Sales GmbH dichiara che il
presente dispositivo è conforme ai requisiti essenziali ed alle restanti disposizio-
ni pertinenti della Direttiva 2014/53/UE. La dichiarazione di conformità è
reperibile sul sito www.blaupunkt.com.
Consigli in materia di pulizia
Solventi, detergenti e prodotti abrasivi, così come spray per cruscotti e prodotti
per la cura della plastica, possono contenere sostanze in grado di danneggiare
la supercie della stazione multimediale. Per la pulizia della stazione multimedi-
ale utilizzare solo un panno asciutto o leggermente umido.
Istruzioni per lo smaltimento
Non smaltire il dispositivo usurato insieme ai riuti domestici!
Per smaltire il dispositivo, il telecomando e le batterie consumate,
portarli in un centro di raccolta per apparecchiature usate.
Fornitura
La fornitura include:
stazione multimediale BPA 3022 M,
telecomando,
connettori ISO,
viti di montaggio,
manuale d’uso.
INFORMAZIONI IMPORTANTI SULL’INSTALLAZIONE
1. Leggere attentamente il manuale d’uso prima di installare il dispositivo.
2. Prima di collegare l’alimentazione assicurarsi che tutti gli altri cavi siano
collegati.
3. Per evitare cortocircuiti, assicurarsi che tutti i cavi esposti siano isolati.
4. Una volta completata l’installazione, ssare tutti i cavi.
5. I collegamenti al lettore devono essere eettuati in conformità con il
presente manuale d’uso. Un collegamento errato può causare danni al
dispositivo.
6. Il lettore è progettato per funzionare solo con un impianto a 12 V CC.
INSTALLAZIONE DEL DISPOSITIVO
SMONTAGGIO DEL DISPOSITIVO
1. Smontare il dispositivo.
2. Smontare la cornice esterna di rinitura.
Avvertenze relative al cavo HDM:
Utilizzare un cavo HDMI di buona qualità.
La lunghezza complessiva (fronte e retro) non deve superare i 12 piedi.
COLLEGAMENTO DEI CAVI
1. Il lettore può essere utilizzato solo a +12 V CC.
2. Non collegare il terminale della batteria nché il lettore non sarà completa-
mente installato.
3. Assicurarsi che il cavo giallo sia collegato al polo positivo (+) della batteria.
4. Quando si sostituisce il fusibile, accertarsi che i parametri del nuovo fusibile
siano uguali.
5. Utilizzando gli altoparlanti di buona qualità con un’impedenza di 4-8 ohm si
può ottenere il funzionamento migliore del dispositivo.
POSIZIONE DEI TASTI
1. ZONA 1 2. 1 3. ZONA 2
4. 2 5. BT 6. 3 RPT
7. 8. 4 RDM 9.
10. 5 DIR- 11. DIS 12. 6 DIR+
13. LCD 14. PRESA AUX 15. PRESA PER CUFFIE
16. PRESA HDMI 17. RESET 18. MANOPOLA
19. PORTA USB 20. SRC/MENU
IMPIEGO DI BASE
Accensione/spegnimento del dispositivo e della funzione di silenziamento
Per accendere il dispositivo, premere la manopola / MUTE. Per attivare o disattivare la
funzione di silenziamento, premere brevemente la manopola quando il dispositivo è
acceso. Premere e tenere premuto questo tasto per spegnere il dispositivo.
Impostazioni audio e menu delle impostazioni
Premere e tenere premuto il tasto SCR/MENU per accedere al menu illustrato di
seguito:
BAS->TRE->BAL->EQ (O/pop/rock/class)->LOUD (On/O)->CLK HH->CLK MM->IR
(On/O) ->CT (indep/sync)->SEGN. SUONO. (On/O) )->P_VOL (13)->DX (LOC)->STE-
REO (MONO)
Per ogni posizione, ruotare la manopola VOL per impostarla.
INFRAROSSO (ON/OFF):
INFRAROSSO On: Il dispositivo può essere acceso utilizzando il telecomando a
infrarossi. Il sistema è in modalità di consumo energetico elevato.
INFRAROSSO O: Il dispositivo non può essere acceso utilizzando il telecomando a
infrarossi. Il sistema è in modalità di basso consumo energetico.
CT (INDEP/SYNC):
CT INDEP: L’orologio funziona in modo indipendente.
CT SYNC: L’orologio sarà sincronizzato con l’ora della stazione RDS ricevuta.
Attenzione: Quando si imposta l’orologio nel menu, la funzione CT viene automatica-
mente impostata sulla modalità INDEP (funzionamento indipendente).
SEGNALE ACUSTICO (ON/OFF): Consente di attivare/disattivare il segnale acustico
quando si premono i tasti.
P-VOL: Consente di impostare il volume all’accensione. Se il livello del volume allo
spegnimento è inferiore al livello P-VOL, all’accensione il dispositivo imposterà il
livello del volume sul volume allo spegnimento.
Se il livello del volume allo spegnimento è superiore al livello P-VOL, all’accensione
del dispositivo il volume verrà ripristinato sul livello dei valori P-VOL.
Ricerca di altoparlanti Bluetooth
Tenendo premuto il tasto BT, viene visualizzato il messaggio “SEARCH...” [ricerca].
Successivamente viene visualizzato il nome del dispositivo Bluetooth. Per visualizzare
il dispositivo successivo, ruotare la manopola VOL. Quando il nome dell’altoparlante
Bluetooth desiderato viene visualizzato sul display LCD, premere la manopola VOL
per accoppiare il dispositivo. Se l’accoppiamento sarà riuscito, sul display comparirà il
messaggio “BOX ON”.
Raccomandazione importante: Nonostante i numerosi test eettuati con diversi
dispositivi Bluetooth, non è possibile garantire la compatibilità con tutti i dispositivi
Bluetooth disponibili sul mercato.
Trasmissione del segnale all’altoparlante Bluetooth
Premere brevemente il tasto BT per interrompere il trasferimento/trasmettere il
segnale all’altoparlante Bluetooth. Il display visualizzerà il messaggio “BOX OFF/ON”.
Attenzione: Sebbene Blaupunkt verichi attentamente la compatibilità dei vari
altoparlanti Bluetooth, non è possibile garantire un funzionamento perfetto del
dispositivo con tutti i modelli disponibili sul mercato.
Uso della Zona 1 e della Zona 2
Premere brevemente il tasto Zone 1 (o Zone 2) per spegnere/accendere l’audio della
Zona 1 (o della Zona 2).
Tenere premuto il tasto Zone 1 (o Zone 2) per disattivare l’audio della Zona 1 (o della
Zona 2). Tenere premuto nuovamente il tasto per disattivare il silenziamento.
Priorità delle informazioni o dell’orologio
Premere brevemente il tasto DIS per impostare la priorità dell’orologio o delle
informazioni. Attenzione: Nella banda FM, quando si ricevono stazioni RDS, premere
brevemente il tasto DIS per visualizzare il NOME STAZIONE/OROLOGIO/FREQUENZA.
Impostazioni dell’orologio
Selezionare nel menu la posizione CLK HH/CLK MM. Ruotare la manopola VOL per
impostare l’ora/minuti.
Uso delle cue
Sul pannello frontale è presente un jack per cue da 3,5 mm. Esso riceve le
impostazioni di funzionamento della Zona 1.
USO DELLA RADIO
Ricezione delle stazioni radio
Premere il tasto SRC/MENU per selezionare una modalità tra FM1->FM2->MW.
Premere brevemente il tasto / per ricevere la stazione radio desiderata.
Premere e tenere premuto il tasto / per sintonizzare manualmente la
frequenza.
Memorizzazione manuale della stazione e richiamo delle stazioni memorizzate
Ricezione della stazione desiderata. Premere e tenere premuto per 2 secondi uno dei
tasti di memorizzazione (1–6). La stazione corrente verrà memorizzata su un
determinato tasto numerico. Premere brevemente il tasto della stazione programma-
ta (1–6) per ascoltare direttamente il segnale trasmesso da questa stazione e
memorizzato sul tasto assegnato.
USO DI DAB
Premere il tasto SRC/MENU per commutare la sorgente tra DAB1 o DAB2.
Selezione della stazione
Premere il tasto / per selezionare la stazione successiva/precedente.
Memorizzazione manuale della stazione e richiamo delle stazioni memorizzate
Quando è impostata la frequenza della stazione desiderata, tenere premuto per 2
secondi uno dei tasti da 1 a 6 per memorizzare la stazione sul numero corrisponden-
te. Premere brevemente il tasto della stazione programmata (1–6) per ascoltare
direttamente il segnale trasmesso da questa stazione e memorizzato sul tasto
assegnato.
USO DELLA PORTA USB
Dopo aver collegato al dispositivo una chiavetta USB, il dispositivo riproduce
automaticamente i le MP3/WMA. Se al dispositivo è già stata collegata una chiavetta
USB, premere brevemente il tastoSRC/MENU no a visualizzare la schermata della
modalità USB.
Selezione del le
Premere il tasto / per passare al le successivo/precedente. Premere il tasto
/ per scorrere velocemente in avanti o indietro.
Riproduzione/pausa
Premere il tasto 1 per mettere in pausa/riprodurre un le.
Funzione di riproduzione in loop
Premere il tasto 3 RPT per selezionare la funzione di riproduzione in loop. RPT
ONE/RPT FOLD/RPT ALL (predenito)
RPT ONE: Riproduzione di un singolo le in loop.
RPT FOLD: Riproduzione in loop di tutti i le di una cartella.
RPT ALL: Riproduzione di tutti i le in loop.
RANDOM
Premere il tasto 4 RDM per attivare o disattivare la funzione di riproduzione casuale.
RDM On: Riproduzione casuale di tutti i le.
RDM O: Disattivazione della funzione di riproduzione casuale.
Funzione cartella +/-
Premere il tasto DIR+/DIR- per selezionare la cartella successiva/precedente da
riprodurre.
Ricerca di una canzone
Tenendo premuto il tasto , verrà visualizzato il messaggio “NUM 0000”. Ruotando
la manopola VOL (o inserendo direttamente il numero), selezionare il numero, quindi
premere VOL per riprodurre. Tenere presente che per 7/8/9/0 si intendono:
BT = 7, = 8, = 9, DIS = 0.
UTILIZZO DELLA PRESA AUX 1/2
La presa AUX IN 1 presente sul pannello anteriore è un jack da 3,5 mm. La presa AUX
IN 2 per RCA si trova invece sul retro del dispositivo. Premendo il tasto SRC/MENU si
passa alla modalità AUX IN1 (2) quando il segnale audio è collegato al dispositivo.
UTILIZZO DEL BLUETOOTH
Accoppiamento dei dispositivi
Selezionare sullo smartphone la voce Bluetooth e cercare il dispositivo Bluetooth.
Nell’elenco dovrebbe comparire la voce “BLAUPUNKT”; selezionare “BLAUPUNKT” e se
viene visualizzato un messaggio che richiede l’inserimento della password, inserire
“0000”. Quando l'accoppiamento è correttamente terminato, sul display verrà
visualizzato il simbolo BT.
Audio del Bluetooth
Premere il tasto SRC/MENU per passare alla modalità BT MUSIC. Il dispositivo
riprodurrà automaticamente un brano dal cellulare. Premere il tasto per mettere
in pausa/riprodurre un brano.
Premere il tasto / per selezionare il brano successivo/precedente.
USO DELLA PRESA HDMI
La presa anteriore HDMI va alla presa HDMI posteriore. Questo non incide sulla
riproduzione tramite HDMI.
Connettori RCA V-IN e V-OUT
Sul retro del dispositivo, il connettore V-IN va al connettore V-OUT.
TELECOMANDO
Il telecomando può essere utilizzato quando
l’opzione IR nel menu è impostata su ON.
OFF: Accensione e spegnimento del dispositivo.
VOL+: Aumentare il volume
VOL-: Abbassare il volume
1 : Accensione/spegnimento della
funzione di silenziamento della Zona 1
2 : Accensione/spegnimento della
funzione di silenziamento della Zona 2
Per le altre operazioni, leggere le istruzioni sopra riportate.
INFORMAZIONI GENERALI
Requisiti inerenti all’alimentazione : Corrente continua a 12V, terminale
negativo collegato a massa
Dimensioni della base di montaggio : 129 (largh.) x 112 (prof.) x 65 (alt.)
Impostazioni del tono
- Toni bassi (a 100 Hz) : ±10 dB
- Toni alti (a 100 Hz) : ±10 dB
Potenza massima in uscita : 4 × 40 W
Consumo di corrente : 10 A (max)
RADIO FM AM
Intervallo di frequenza da 87,5 a 108 MHz da 522 a 1620 KHz
IF 10.7 MHz 450 KHz
Sensibilità 4 µV (S/N = 30 dB) 36 dBµV (S/N = 20 dB)
Separazione dei canali stereo >25 dB /
RISOLUZIONE DEI PROBLEMI
Informations relatives à la sécurité
Cette station multimédia a été fabriquée selon les normes techniques actuellement
en vigueur et les principes de sécurité généralement reconnus. Néanmoins, le
non-respect des consignes de sécurité contenues dans ce manuel comporte divers
risques. Lisez attentivement l'ensemble du manuel avant d'utiliser la station
multimédia. Conservez le manuel dans un endroit où il est accessible pour tous les
utilisateurs et à tout moment. Si la station multimédia est transmise à un tiers, ce
manuel lui doit être également remis. De plus, suivez les instructions des modes
d'emploi des appareils connectés à cette station.
Consignes générales de sécurité
Respectez les instructions suivantes pour vous protéger des blessures :
Ne pas modier ou ouvrir l'appareil.
Usage prévu
La station multimédia est conçue pour être installée et fonctionner dans des
véhicules avec une tension d'alimentation de 12V. Les limites de puissance de
l'appareil doivent être respectées. Toute réparation et installation doit être eectuée
par un professionnel.
Instructions pour l'installation
Vous ne pouvez installer l'appareil vous-même que si vous êtes expérimenté dans
l'installation d'autoradios et si vous avez des connaissances en électricité automobile.
À cet eet, consultez le schéma de câblage de ce manuel. L'installation de cet appareil
ne doit pas gêner ni bloquer le fonctionnement des airbags, des autres dispositifs de
sécurité ou des dispositifs de contrôle.
Déclaration de conformité
Blaupunkt Competence Center Car Multimedia - Evo Sales GmbH déclare que cet
appareil est conforme aux exigences fondamentales et aux autres dispositions
applicables de la directive 2014/53/UE. La déclaration de conformité peut être
consultée à l'adresse suivante :www.blaupunkt.com.
Instructions concernant le nettoyage
Les solvants, les produits nettoyants et abrasifs, ainsi que les nettoyants de cockpit et
les produits d'entretien des plastiques peuvent contenir des composants qui peuvent
endommager la surface de la station multimédia. Pour nettoyer la station multimédia,
utilisez uniquement un chion sec ou légèrement humide.
Instructions concernant la mise au rebut
Ne jetez pas l'appareil usagé avec les ordures ménagères !
Pour mettre au rebut l'appareil, la télécommande et les piles usagées,
veuillez les apporter à un point de collecte des équipements usagés.
Contenu de l'emballage
Le contenu de l’emballage comprend :
station multimédia BPA 3022 M,
télécommande,
connecteurs ISO,
vis de montage,
manuel d’utilisation.
INFORMATIONS IMPORTANTES CONCERNANT L’INSTALLATION
1. Lisez attentivement ce manuel d'utilisation avant d'installer l'appareil.
2. Avant de brancher l'alimentation électrique, assurez-vous que tous les
autres câbles sont connectés.
3. Pour éviter les court-circuits, assurez-vous que tous les câbles exposés sont
isolés.
4. Une fois l'installation terminée, tous les câbles doivent être sécurisés.
5. Les connexions au lecteur doivent être eectuées conformément à ce
manuel. Une connexion incorrecte peut provoquer l'endommagement de
l'appareil.
6. Le lecteur est conçu pour fonctionner uniquement avec une installation de
12 V DC.
INFORMATIONS GÉNÉRALES
INSTALLATION DE L'APPAREIL
DÉMONTAGE DE L'APPAREIL
1. Démontez l'appareil.
2. Démontez le cadre de nition extérieur.
Remarque concernant le HDMI :
Utilisez un câble HDMI de bonne qualité.
La longueur totale (avant et arrière) ne doit pas dépasser 12 pieds.
CONNEXION DES CÂBLES
1. Le lecteur ne peut être utilisé que sous une tension de +12 V DC.
2. Ne connectez pas la borne de la batterie avant que le lecteur ne soit
complètement installé.
3. Assurez-vous que le l jaune est connecté au pôle positif (+) de la batterie.
4. Lorsque vous remplacez le fusible, assurez-vous que les paramètres du
nouveau fusible sont les mêmes.
5. L’utilisation de haut-parleurs de bonne qualité avec une impédance de 4–8
ohms permettra de tirer le meilleur parti de l’appareil.
EMPLACEMENT DES TOUCHES
1. ZONE 1 2. 1 3. ZONE 2
4. 2 5. BT 6. 3 RPT
7. 8. 4 RDM 9.
10. 5 DIR- 11. DIS 12. 6 DIR+
13. LCD 14. PRISE AUX 15. PRISE POUR CASQUE D'ÉCOUTE
16. PRISE HDMI 17. RESET 18. BOUTON ROTATIF
19. PORT USB 20. SRC/MENU
FONCTIONNEMENT DE BASE
Activation/désactivation de l'appareil et de la fonction de mise en sourdine
Pour allumer l'appareil, appuyez sur le bouton rotatif / MUTE. Pour activer ou désactiver la
fonction de mise en sourdine, appuyez brièvement sur le bouton lorsque l'appareil est
allumé. Appuyez sur ce bouton et maintenez-le enfoncé pour éteindre l’appareil.
Réglage du volume et menu de conguration
Appuyez sur la touche SRC/MENU et maintenez-la enfoncée pour accéder au menu illustré
ci-dessous :
BAS->TRE->BAL->EQ (o/pop/rock/class)->LOUD (on/o)->CLK HH->CLK
MM->IR (on/o) ->CT (indep/sync)->SIGN. BEEP (on/o)->P_VOL (13)->DX (LOC)->STE- REO
(MONO)
À chaque position, tournez le bouton VOL pour la régler.
INFRAROUGE (ON/OFF) :
INFRAROUGE ON : L'appareil peut être mis en marche à l'aide de la télécommande à
infrarouge.
Le système est alors en mode de haute consommation d'énergie.
INFRAROUGE OFF : L'appareil ne peut pas être mis en marche à l'aide de la télécommande
à infrarouge.
Le système est en mode de faible consommation d'énergie.
CT (INDEP/SYNC) :
CT INDEP : L’horloge fonctionne indépendamment.
CT SYNC : L’horloge sera synchronisée avec l’heure de la station RDS réceptionnée.
Remarque : Lorsque l'horloge est réglée dans le menu, la fonction CT est automatiquement
réglée sur le mode INDEP (fonctionnement indépendant).
BEEP (ON/OFF) : Permet d'activer/désactiver le signal sonore lorsque les touches sont
enfoncées.
P-VOL : Permet de régler le volume à la mise en marche. Si le niveau de volume à l'arrêt est
inférieur au niveau P-VOL, l'appareil règle le niveau de volume sur le volume à l'arrêt
lorsqu'il est mis en marche.
Si le niveau de volume à l'arrêt est supérieur au niveau P-VOL, le volume sera réinitialisé sur
les valeurs P-VOL à la mise en marche.
Recherche de haut-parleurs Bluetooth
Après avoir enfoncé la touche BT, l'écran ache « SEARCH... » [recherche]. Un instant plus
tard, le nom de votre appareil Bluetooth s'ache. Pour acher l'appareil suivant, tournez le
bouton VOL. Une fois que le nom du haut-parleur Bluetooth souhaité s'ache sur l'écran
LCD, appuyez sur le bouton VOL pour associer l'appareil. Une fois le jumelage terminé,
l'écran ache le message « BOX ON ».
Consigne importante : Malgré de nombreux tests eectués avec divers dispositifs
Bluetooth, la compatibilité avec tous les dispositifs Bluetooth disponible sur le marché ne
peut être garantie.
Transmission du signal au haut-parleur Bluetooth
Appuyez brièvement sur la touche BT pour arrêter/initier le transfert du signal vers le
haut-parleur Bluetooth. L'écran ache le message « BOX OFF/ON ».
Remarque : Bien que Blaupunkt vérie soigneusement la compatibilité des diérents
haut-parleurs Bluetooth, un fonctionnement sans faille ne peut être garanti avec tous les
modèles du marché.
Fonctionnement des Zones 1 et 2
Appuyez brièvement sur la touche Zone 1 (ou Zone 2) pour activer ou désactiver le son de
la Zone 1 (ou de la Zone 2).
Maintenez la touche Zone 1 (ou Zone 2) enfoncée pour couper le son de la Zone 1 (ou de la
Zone 2). Appuyez à nouveau sur la touche pour rétablir le son.
Priorité des informations ou de l'horloge
Appuyez brièvement sur la touche DIS pour modier la priorité de l’horloge ou la priorité
des informations.
Remarque : En mode FM, lorsque vous recevez des stations RDS, appuyez brièvement sur la
touche DIS pour acher NOM DE STATION/HORLOGE/FRÉQUENCE.
Réglage de l’horloge
Sélectionnez CLK HH/CLK MM dans le menu. Tournez le bouton VOL pour régler les heures /
les minutes.
Fonctionnement du casque d'écoute
Une prise pour casque d'écoute de 3,5 mm se trouve sur le panneau avant. Il adopte les
paramètres de fonctionnement de la Zone 1.
UTILISATION DE LA RADIO
Réception des stations de radio
Appuyez sur la touche SRC/MENU pour sélectionner un mode parmi FM1->FM2->MW.
Appuyez brièvement sur la touche / pour recevoir la station de radio souhaitée.
Maintenez la touche / enfoncée pour régler manuellement la fréquence.
Mémorisation manuelle des stations et accès aux stations mémorisées
Réception de la station souhaitée. Appuyez sur les touches numériques (1-6) et
maintenez-les enfoncées pendant 2 secondes. La station actuelle sera mise en mémoire
pour la touche numérique correspondante. Appuyez brièvement sur la touche de la station
préréglée (1–6) pour écouter directement le signal de diusion de cette station mémorisée
pour la touche assignée.
FONCTIONNEMENT DAB
Appuyez sur la touche SRC/MENU pour basculer la source entre DAB1 et DAB2.
Sélection d'une station
Appuyez sur la touche / pour sélectionner la station suivante/précédente.
Mémorisation manuelle des stations et accès aux stations mémorisées
Lorsque la fréquence de la station souhaitée est réglée, appuyez sur l'une des touches
numérotées de 1 à 6 pendant 2 secondes pour mémoriser cette station sous le numéro
correspondant. Appuyez brièvement sur la touche de la station préréglée (1–6) pour
écouter directement le signal de diusion de cette station mémorisée pour la touche
assignée.
UTILISATION DU PORT USB
Lorsqu'un lecteur USB est connecté à l'appareil, ce dernier lit automatiquement les
chiers MP3/WMA. Si un lecteur USB a déjà été connecté à l'appareil, appuyez
brièvement sur la touche SRC/MENU jusqu'à ce que l'écran du mode USB apparaisse.
Sélection d'un chier
Appuyez sur la touche / pour passer au chier suivant/précédent. Appuyez
sur la touche / pour faire déler rapidement vers l'avant et vers l'arrière.
Lecture/Pause
Appuyez sur la touche 1 pour mettre en pause/lire un chier.
Fonction de lecture en boucle
Appuyez sur la touche 3 RPT pour sélectionner la fonction de lecture en boucle. RPT
ONE/RPT FOLD/RPT ALL (par défaut)
RPT ONE : Lecture en boucle d'un seul chier.
RPT FOLD : Lecture en boucle de tous les chiers d'un dossier.
RPT ALL : Lecture en boucle de tous les chiers.
RANDOM
Appuyez sur la touche 4 RDM pour activer ou désactiver la fonction de lecture aléatoire.
RDM ON : Lecture aléatoire de tous les chiers.
RDM OFF : Fonction de lecture aléatoire.
Fonction dossier +/-
Appuyez sur la touche DIR+/DIR- pour sélectionner le dossier suivant/précédent à lire.
Recherche d'une chanson
Après avoir enfoncé la touche l'écran achera « NUM 0000 ». En tournant le bouton
VOL (ou en saisissant directement un numéro), sélectionnez un numéro, puis appuyez
sur VOL pour lancer la lecture. Veuillez noter que 7/8/9/0 signie : BT = 7, = 8, = 9,
DIS = 0.
UTILISATION DE LA PRISE AUX IN 1/2
Sur le panneau avant, la prise AUX IN 1 est un jack de 3,5 mm. La prise AUX IN 2 pour
RCA est située à l'arrière de l'appareil. En appuyant sur la touche SRC/MENU, on peut
passer en mode AUX IN1 (2) lorsque le signal audio est connecté à l'appareil.
UTILISATION DU BLUETOOTH
Jumelage des appareils
Sélectionnez la position Bluetooth et recherchez le périphérique Bluetooth sur votre
téléphone. La position « BLAUPUNKT » devrait apparaître dans la liste ; sélectionnez
« BLAUPUNKT », puis entrez le mot de passe « 0000 » si un message demandant un mot
de passe s'ache. Une fois le jumelage terminé, l'écran ache « BT ».
Audio Bluetooth
Appuyez sur la touche SRC/MENU pour passer en mode BT MUSIC. L'appareil réproduira
automatiquement la musique de votre téléphone. Appuyez sur la touche pour
mettre en pause/en lecture une piste.
Appuyez sur la touche / pour sélectionner la piste suivante/précédente.
UTILISATION DE LA PRISE HDMI
La prise HDMI avant va vers la prise HDMI arrière. La lecture à l'aide de HDMI n'est pas
aectée.
Connecteurs RCA V-IN et V-OUT
À l'arrière de l'appareil, le connecteur V-IN va vers le connecteur V-OUT.
TÉLÉCOMMANDE
La télécommande peut être utilisée lorsque
l'option IR est activée dans le menu.
OFF: Mise en marche et arrêt de l’appareil.
VOL+ : Augmenter le volume
VOL- : Réduire le volume
1 : Activation/désactivation du mode
sourdine de la Zone 1
2 : Activation/désactivation du mode
sourdine de la Zone 2
Pour les autres opérations, lisez les instructions ci-dessus.
INFORMATIONS GÉNÉRALES
Exigences concernant l’alimentation : 12 V DC, borne négative connectée à la terre
Dimensions de la base de montage :129 (larg.) x 112 (long.) x 65 (ép.)
Paramètres de tonalité
- Basse (à 100 Hz) : ±10 dB
- Haute (à 100 Hz) : ±10 dB
Puissance de sortie maximale : 4 x 40 W
Consommation de courant : 10 A (max.)
RADIO FM AM
Plage de fréquences de 87,5 à 108 MHz de 522 à 1620 KHz
IF 10,7 MHz 450 KHz
Sensibilité 4 µV (S/N = 30 dB) 36 dBuV (S/N = 20 dB)
Séparation des canaux stéréo >25 dB /
RÉSOLUTION DES PROBLÈMES
FR

Informations relatives à la sécurité
Cette station multimédia a été fabriquée selon les normes techniques actuellement
en vigueur et les principes de sécurité généralement reconnus. Néanmoins, le
non-respect des consignes de sécurité contenues dans ce manuel comporte divers
risques. Lisez attentivement l'ensemble du manuel avant d'utiliser la station
multimédia. Conservez le manuel dans un endroit où il est accessible pour tous les
utilisateurs et à tout moment. Si la station multimédia est transmise à un tiers, ce
manuel lui doit être également remis. De plus, suivez les instructions des modes
d'emploi des appareils connectés à cette station.
Consignes générales de sécurité
Respectez les instructions suivantes pour vous protéger des blessures :
Ne pas modier ou ouvrir l'appareil.
Usage prévu
La station multimédia est conçue pour être installée et fonctionner dans des
véhicules avec une tension d'alimentation de 12V. Les limites de puissance de
l'appareil doivent être respectées. Toute réparation et installation doit être eectuée
par un professionnel.
Instructions pour l'installation
Vous ne pouvez installer l'appareil vous-même que si vous êtes expérimenté dans
l'installation d'autoradios et si vous avez des connaissances en électricité automobile.
À cet eet, consultez le schéma de câblage de ce manuel. L'installation de cet appareil
ne doit pas gêner ni bloquer le fonctionnement des airbags, des autres dispositifs de
sécurité ou des dispositifs de contrôle.
Déclaration de conformité
Blaupunkt Competence Center Car Multimedia - Evo Sales GmbH déclare que cet
appareil est conforme aux exigences fondamentales et aux autres dispositions
applicables de la directive 2014/53/UE. La déclaration de conformité peut être
consultée à l'adresse suivante :www.blaupunkt.com.
Instructions concernant le nettoyage
Les solvants, les produits nettoyants et abrasifs, ainsi que les nettoyants de cockpit et
les produits d'entretien des plastiques peuvent contenir des composants qui peuvent
endommager la surface de la station multimédia. Pour nettoyer la station multimédia,
utilisez uniquement un chion sec ou légèrement humide.
Instructions concernant la mise au rebut
Ne jetez pas l'appareil usagé avec les ordures ménagères !
Pour mettre au rebut l'appareil, la télécommande et les piles usagées,
veuillez les apporter à un point de collecte des équipements usagés.
Contenu de l'emballage
Le contenu de l’emballage comprend :
station multimédia BPA 3022 M,
télécommande,
connecteurs ISO,
vis de montage,
manuel d’utilisation.
INFORMATIONS IMPORTANTES CONCERNANT L’INSTALLATION
1. Lisez attentivement ce manuel d'utilisation avant d'installer l'appareil.
2. Avant de brancher l'alimentation électrique, assurez-vous que tous les
autres câbles sont connectés.
3. Pour éviter les court-circuits, assurez-vous que tous les câbles exposés sont
isolés.
4. Une fois l'installation terminée, tous les câbles doivent être sécurisés.
5. Les connexions au lecteur doivent être eectuées conformément à ce
manuel. Une connexion incorrecte peut provoquer l'endommagement de
l'appareil.
6. Le lecteur est conçu pour fonctionner uniquement avec une installation de
12 V DC.
INSTALLATION DE L'APPAREIL
DÉMONTAGE DE L'APPAREIL
1. Démontez l'appareil.
2. Démontez le cadre de nition extérieur.
Remarque concernant le HDMI :
Utilisez un câble HDMI de bonne qualité.
La longueur totale (avant et arrière) ne doit pas dépasser 12 pieds.
INFORMATIONS GÉNÉRALES
CONNEXION DES CÂBLES
1. Le lecteur ne peut être utilisé que sous une tension de +12 V DC.
2. Ne connectez pas la borne de la batterie avant que le lecteur ne soit
complètement installé.
3. Assurez-vous que le l jaune est connecté au pôle positif (+) de la batterie.
4. Lorsque vous remplacez le fusible, assurez-vous que les paramètres du
nouveau fusible sont les mêmes.
5. L’utilisation de haut-parleurs de bonne qualité avec une impédance de 4–8
ohms permettra de tirer le meilleur parti de l’appareil.
EMPLACEMENT DES TOUCHES
1. ZONE 1 2. 1 3. ZONE 2
4. 2 5. BT 6. 3 RPT
7. 8. 4 RDM 9.
10. 5 DIR- 11. DIS 12. 6 DIR+
13. LCD 14. PRISE AUX 15. PRISE POUR CASQUE D'ÉCOUTE
16. PRISE HDMI 17. RESET 18. BOUTON ROTATIF
19. PORT USB 20. SRC/MENU
FONCTIONNEMENT DE BASE
Activation/désactivation de l'appareil et de la fonction de mise en sourdine
Pour allumer l'appareil, appuyez sur le bouton rotatif / MUTE. Pour activer ou désactiver la
fonction de mise en sourdine, appuyez brièvement sur le bouton lorsque l'appareil est
allumé. Appuyez sur ce bouton et maintenez-le enfoncé pour éteindre l’appareil.
Réglage du volume et menu de conguration
Appuyez sur la touche SRC/MENU et maintenez-la enfoncée pour accéder au menu illustré
ci-dessous :
BAS->TRE->BAL->EQ (o/pop/rock/class)->LOUD (on/o)->CLK HH->CLK
MM->IR (on/o) ->CT (indep/sync)->SIGN. BEEP (on/o)->P_VOL (13)->DX (LOC)->STE- REO
(MONO)
À chaque position, tournez le bouton VOL pour la régler.
INFRAROUGE (ON/OFF) :
INFRAROUGE ON : L'appareil peut être mis en marche à l'aide de la télécommande à
infrarouge.
Le système est alors en mode de haute consommation d'énergie.
INFRAROUGE OFF : L'appareil ne peut pas être mis en marche à l'aide de la télécommande
à infrarouge.
Le système est en mode de faible consommation d'énergie.
CT (INDEP/SYNC) :
CT INDEP : L’horloge fonctionne indépendamment.
CT SYNC : L’horloge sera synchronisée avec l’heure de la station RDS réceptionnée.
Remarque : Lorsque l'horloge est réglée dans le menu, la fonction CT est automatiquement
réglée sur le mode INDEP (fonctionnement indépendant).
BEEP (ON/OFF) : Permet d'activer/désactiver le signal sonore lorsque les touches sont
enfoncées.
P-VOL : Permet de régler le volume à la mise en marche. Si le niveau de volume à l'arrêt est
inférieur au niveau P-VOL, l'appareil règle le niveau de volume sur le volume à l'arrêt
lorsqu'il est mis en marche.
Si le niveau de volume à l'arrêt est supérieur au niveau P-VOL, le volume sera réinitialisé sur
les valeurs P-VOL à la mise en marche.
Recherche de haut-parleurs Bluetooth
Après avoir enfoncé la touche BT, l'écran ache « SEARCH... » [recherche]. Un instant plus
tard, le nom de votre appareil Bluetooth s'ache. Pour acher l'appareil suivant, tournez le
bouton VOL. Une fois que le nom du haut-parleur Bluetooth souhaité s'ache sur l'écran
LCD, appuyez sur le bouton VOL pour associer l'appareil. Une fois le jumelage terminé,
l'écran ache le message « BOX ON ».
Consigne importante : Malgré de nombreux tests eectués avec divers dispositifs
Bluetooth, la compatibilité avec tous les dispositifs Bluetooth disponible sur le marché ne
peut être garantie.
Transmission du signal au haut-parleur Bluetooth
Appuyez brièvement sur la touche BT pour arrêter/initier le transfert du signal vers le
haut-parleur Bluetooth. L'écran ache le message « BOX OFF/ON ».
Remarque : Bien que Blaupunkt vérie soigneusement la compatibilité des diérents
haut-parleurs Bluetooth, un fonctionnement sans faille ne peut être garanti avec tous les
modèles du marché.
Fonctionnement des Zones 1 et 2
Appuyez brièvement sur la touche Zone 1 (ou Zone 2) pour activer ou désactiver le son de
la Zone 1 (ou de la Zone 2).
Maintenez la touche Zone 1 (ou Zone 2) enfoncée pour couper le son de la Zone 1 (ou de la
Zone 2). Appuyez à nouveau sur la touche pour rétablir le son.
Priorité des informations ou de l'horloge
Appuyez brièvement sur la touche DIS pour modier la priorité de l’horloge ou la priorité
des informations.
Remarque : En mode FM, lorsque vous recevez des stations RDS, appuyez brièvement sur la
touche DIS pour acher NOM DE STATION/HORLOGE/FRÉQUENCE.
Réglage de l’horloge
Sélectionnez CLK HH/CLK MM dans le menu. Tournez le bouton VOL pour régler les heures /
les minutes.
Fonctionnement du casque d'écoute
Une prise pour casque d'écoute de 3,5 mm se trouve sur le panneau avant. Il adopte les
paramètres de fonctionnement de la Zone 1.
UTILISATION DE LA RADIO
Réception des stations de radio
Appuyez sur la touche SRC/MENU pour sélectionner un mode parmi FM1->FM2->MW.
Appuyez brièvement sur la touche / pour recevoir la station de radio souhaitée.
Maintenez la touche / enfoncée pour régler manuellement la fréquence.
Mémorisation manuelle des stations et accès aux stations mémorisées
Réception de la station souhaitée. Appuyez sur les touches numériques (1-6) et
maintenez-les enfoncées pendant 2 secondes. La station actuelle sera mise en mémoire
pour la touche numérique correspondante. Appuyez brièvement sur la touche de la station
préréglée (1–6) pour écouter directement le signal de diusion de cette station mémorisée
pour la touche assignée.
FONCTIONNEMENT DAB
Appuyez sur la touche SRC/MENU pour basculer la source entre DAB1 et DAB2.
Sélection d'une station
Appuyez sur la touche / pour sélectionner la station suivante/précédente.
Mémorisation manuelle des stations et accès aux stations mémorisées
Lorsque la fréquence de la station souhaitée est réglée, appuyez sur l'une des touches
numérotées de 1 à 6 pendant 2 secondes pour mémoriser cette station sous le numéro
correspondant. Appuyez brièvement sur la touche de la station préréglée (1–6) pour
écouter directement le signal de diusion de cette station mémorisée pour la touche
assignée.
UTILISATION DU PORT USB
Lorsqu'un lecteur USB est connecté à l'appareil, ce dernier lit automatiquement les
chiers MP3/WMA. Si un lecteur USB a déjà été connecté à l'appareil, appuyez
brièvement sur la touche SRC/MENU jusqu'à ce que l'écran du mode USB apparaisse.
Sélection d'un chier
Appuyez sur la touche / pour passer au chier suivant/précédent. Appuyez
sur la touche / pour faire déler rapidement vers l'avant et vers l'arrière.
Lecture/Pause
Appuyez sur la touche 1 pour mettre en pause/lire un chier.
Fonction de lecture en boucle
Appuyez sur la touche 3 RPT pour sélectionner la fonction de lecture en boucle. RPT
ONE/RPT FOLD/RPT ALL (par défaut)
RPT ONE : Lecture en boucle d'un seul chier.
RPT FOLD : Lecture en boucle de tous les chiers d'un dossier.
RPT ALL : Lecture en boucle de tous les chiers.
RANDOM
Appuyez sur la touche 4 RDM pour activer ou désactiver la fonction de lecture aléatoire.
RDM ON : Lecture aléatoire de tous les chiers.
RDM OFF : Fonction de lecture aléatoire.
Fonction dossier +/-
Appuyez sur la touche DIR+/DIR- pour sélectionner le dossier suivant/précédent à lire.
Recherche d'une chanson
Après avoir enfoncé la touche l'écran achera « NUM 0000 ». En tournant le bouton
VOL (ou en saisissant directement un numéro), sélectionnez un numéro, puis appuyez
sur VOL pour lancer la lecture. Veuillez noter que 7/8/9/0 signie : BT = 7, = 8, = 9,
DIS = 0.
UTILISATION DE LA PRISE AUX IN 1/2
Sur le panneau avant, la prise AUX IN 1 est un jack de 3,5 mm. La prise AUX IN 2 pour
RCA est située à l'arrière de l'appareil. En appuyant sur la touche SRC/MENU, on peut
passer en mode AUX IN1 (2) lorsque le signal audio est connecté à l'appareil.
UTILISATION DU BLUETOOTH
Jumelage des appareils
Sélectionnez la position Bluetooth et recherchez le périphérique Bluetooth sur votre
téléphone. La position « BLAUPUNKT » devrait apparaître dans la liste ; sélectionnez
« BLAUPUNKT », puis entrez le mot de passe « 0000 » si un message demandant un mot
de passe s'ache. Une fois le jumelage terminé, l'écran ache « BT ».
Audio Bluetooth
Appuyez sur la touche SRC/MENU pour passer en mode BT MUSIC. L'appareil réproduira
automatiquement la musique de votre téléphone. Appuyez sur la touche pour
mettre en pause/en lecture une piste.
Appuyez sur la touche / pour sélectionner la piste suivante/précédente.
UTILISATION DE LA PRISE HDMI
La prise HDMI avant va vers la prise HDMI arrière. La lecture à l'aide de HDMI n'est pas
aectée.
Connecteurs RCA V-IN et V-OUT
À l'arrière de l'appareil, le connecteur V-IN va vers le connecteur V-OUT.
TÉLÉCOMMANDE
La télécommande peut être utilisée lorsque
l'option IR est activée dans le menu.
OFF: Mise en marche et arrêt de l’appareil.
VOL+ : Augmenter le volume
VOL- : Réduire le volume
1 : Activation/désactivation du mode
sourdine de la Zone 1
2 : Activation/désactivation du mode
sourdine de la Zone 2
Pour les autres opérations, lisez les instructions ci-dessus.
INFORMATIONS GÉNÉRALES
Exigences concernant l’alimentation : 12 V DC, borne négative connectée à la terre
Dimensions de la base de montage :129 (larg.) x 112 (long.) x 65 (ép.)
Paramètres de tonalité
- Basse (à 100 Hz) : ±10 dB
- Haute (à 100 Hz) : ±10 dB
Puissance de sortie maximale : 4 x 40 W
Consommation de courant : 10 A (max.)
RADIO FM AM
Plage de fréquences de 87,5 à 108 MHz de 522 à 1620 KHz
IF 10,7 MHz 450 KHz
Sensibilité 4 µV (S/N = 30 dB) 36 dBuV (S/N = 20 dB)
Séparation des canaux stéréo >25 dB /
RÉSOLUTION DES PROBLÈMES
FR
Panneaux décoratifs
Vis
Tableau de bord
Install
98,0 × 101,0 mm

Informations relatives à la sécurité
Cette station multimédia a été fabriquée selon les normes techniques actuellement
en vigueur et les principes de sécurité généralement reconnus. Néanmoins, le
non-respect des consignes de sécurité contenues dans ce manuel comporte divers
risques. Lisez attentivement l'ensemble du manuel avant d'utiliser la station
multimédia. Conservez le manuel dans un endroit où il est accessible pour tous les
utilisateurs et à tout moment. Si la station multimédia est transmise à un tiers, ce
manuel lui doit être également remis. De plus, suivez les instructions des modes
d'emploi des appareils connectés à cette station.
Consignes générales de sécurité
Respectez les instructions suivantes pour vous protéger des blessures :
Ne pas modier ou ouvrir l'appareil.
Usage prévu
La station multimédia est conçue pour être installée et fonctionner dans des
véhicules avec une tension d'alimentation de 12V. Les limites de puissance de
l'appareil doivent être respectées. Toute réparation et installation doit être eectuée
par un professionnel.
Instructions pour l'installation
Vous ne pouvez installer l'appareil vous-même que si vous êtes expérimenté dans
l'installation d'autoradios et si vous avez des connaissances en électricité automobile.
À cet eet, consultez le schéma de câblage de ce manuel. L'installation de cet appareil
ne doit pas gêner ni bloquer le fonctionnement des airbags, des autres dispositifs de
sécurité ou des dispositifs de contrôle.
Déclaration de conformité
Blaupunkt Competence Center Car Multimedia - Evo Sales GmbH déclare que cet
appareil est conforme aux exigences fondamentales et aux autres dispositions
applicables de la directive 2014/53/UE. La déclaration de conformité peut être
consultée à l'adresse suivante :www.blaupunkt.com.
Instructions concernant le nettoyage
Les solvants, les produits nettoyants et abrasifs, ainsi que les nettoyants de cockpit et
les produits d'entretien des plastiques peuvent contenir des composants qui peuvent
endommager la surface de la station multimédia. Pour nettoyer la station multimédia,
utilisez uniquement un chion sec ou légèrement humide.
Instructions concernant la mise au rebut
Ne jetez pas l'appareil usagé avec les ordures ménagères !
Pour mettre au rebut l'appareil, la télécommande et les piles usagées,
veuillez les apporter à un point de collecte des équipements usagés.
Contenu de l'emballage
Le contenu de l’emballage comprend :
station multimédia BPA 3022 M,
télécommande,
connecteurs ISO,
vis de montage,
manuel d’utilisation.
INFORMATIONS IMPORTANTES CONCERNANT L’INSTALLATION
1. Lisez attentivement ce manuel d'utilisation avant d'installer l'appareil.
2. Avant de brancher l'alimentation électrique, assurez-vous que tous les
autres câbles sont connectés.
3. Pour éviter les court-circuits, assurez-vous que tous les câbles exposés sont
isolés.
4. Une fois l'installation terminée, tous les câbles doivent être sécurisés.
5. Les connexions au lecteur doivent être eectuées conformément à ce
manuel. Une connexion incorrecte peut provoquer l'endommagement de
l'appareil.
6. Le lecteur est conçu pour fonctionner uniquement avec une installation de
12 V DC.
INSTALLATION DE L'APPAREIL
DÉMONTAGE DE L'APPAREIL
1. Démontez l'appareil.
2. Démontez le cadre de nition extérieur.
Remarque concernant le HDMI :
Utilisez un câble HDMI de bonne qualité.
La longueur totale (avant et arrière) ne doit pas dépasser 12 pieds.
CONNEXION DES CÂBLES
1. Le lecteur ne peut être utilisé que sous une tension de +12 V DC.
2. Ne connectez pas la borne de la batterie avant que le lecteur ne soit
complètement installé.
3. Assurez-vous que le l jaune est connecté au pôle positif (+) de la batterie.
4. Lorsque vous remplacez le fusible, assurez-vous que les paramètres du
nouveau fusible sont les mêmes.
5. L’utilisation de haut-parleurs de bonne qualité avec une impédance de 4–8
ohms permettra de tirer le meilleur parti de l’appareil.
CONNEXION DES CÂBLES
EMPLACEMENT DES TOUCHES
1. ZONE 1 2. 1 3. ZONE 2
4. 2 5. BT 6. 3 RPT
7. 8. 4 RDM 9.
10. 5 DIR- 11. DIS 12. 6 DIR+
13. LCD 14. PRISE AUX 15. PRISE POUR CASQUE D'ÉCOUTE
16. PRISE HDMI 17. RESET 18. BOUTON ROTATIF
19. PORT USB 20. SRC/MENU
FONCTIONNEMENT DE BASE
Activation/désactivation de l'appareil et de la fonction de mise en sourdine
Pour allumer l'appareil, appuyez sur le bouton rotatif / MUTE. Pour activer ou désactiver la
fonction de mise en sourdine, appuyez brièvement sur le bouton lorsque l'appareil est
allumé. Appuyez sur ce bouton et maintenez-le enfoncé pour éteindre l’appareil.
Réglage du volume et menu de conguration
Appuyez sur la touche SRC/MENU et maintenez-la enfoncée pour accéder au menu illustré
ci-dessous :
BAS->TRE->BAL->EQ (o/pop/rock/class)->LOUD (on/o)->CLK HH->CLK
MM->IR (on/o) ->CT (indep/sync)->SIGN. BEEP (on/o)->P_VOL (13)->DX (LOC)->STE- REO
(MONO)
À chaque position, tournez le bouton VOL pour la régler.
INFRAROUGE (ON/OFF) :
INFRAROUGE ON : L'appareil peut être mis en marche à l'aide de la télécommande à
infrarouge.
Le système est alors en mode de haute consommation d'énergie.
INFRAROUGE OFF : L'appareil ne peut pas être mis en marche à l'aide de la télécommande
à infrarouge.
Le système est en mode de faible consommation d'énergie.
CT (INDEP/SYNC) :
CT INDEP : L’horloge fonctionne indépendamment.
CT SYNC : L’horloge sera synchronisée avec l’heure de la station RDS réceptionnée.
Remarque : Lorsque l'horloge est réglée dans le menu, la fonction CT est automatiquement
réglée sur le mode INDEP (fonctionnement indépendant).
BEEP (ON/OFF) : Permet d'activer/désactiver le signal sonore lorsque les touches sont
enfoncées.
P-VOL : Permet de régler le volume à la mise en marche. Si le niveau de volume à l'arrêt est
inférieur au niveau P-VOL, l'appareil règle le niveau de volume sur le volume à l'arrêt
lorsqu'il est mis en marche.
Si le niveau de volume à l'arrêt est supérieur au niveau P-VOL, le volume sera réinitialisé sur
les valeurs P-VOL à la mise en marche.
Recherche de haut-parleurs Bluetooth
Après avoir enfoncé la touche BT, l'écran ache « SEARCH... » [recherche]. Un instant plus
tard, le nom de votre appareil Bluetooth s'ache. Pour acher l'appareil suivant, tournez le
bouton VOL. Une fois que le nom du haut-parleur Bluetooth souhaité s'ache sur l'écran
LCD, appuyez sur le bouton VOL pour associer l'appareil. Une fois le jumelage terminé,
l'écran ache le message « BOX ON ».
Consigne importante : Malgré de nombreux tests eectués avec divers dispositifs
Bluetooth, la compatibilité avec tous les dispositifs Bluetooth disponible sur le marché ne
peut être garantie.
Transmission du signal au haut-parleur Bluetooth
Appuyez brièvement sur la touche BT pour arrêter/initier le transfert du signal vers le
haut-parleur Bluetooth. L'écran ache le message « BOX OFF/ON ».
Remarque : Bien que Blaupunkt vérie soigneusement la compatibilité des diérents
haut-parleurs Bluetooth, un fonctionnement sans faille ne peut être garanti avec tous les
modèles du marché.
Fonctionnement des Zones 1 et 2
Appuyez brièvement sur la touche Zone 1 (ou Zone 2) pour activer ou désactiver le son de
la Zone 1 (ou de la Zone 2).
Maintenez la touche Zone 1 (ou Zone 2) enfoncée pour couper le son de la Zone 1 (ou de la
Zone 2). Appuyez à nouveau sur la touche pour rétablir le son.
Priorité des informations ou de l'horloge
Appuyez brièvement sur la touche DIS pour modier la priorité de l’horloge ou la priorité
des informations.
Remarque : En mode FM, lorsque vous recevez des stations RDS, appuyez brièvement sur la
touche DIS pour acher NOM DE STATION/HORLOGE/FRÉQUENCE.
Réglage de l’horloge
Sélectionnez CLK HH/CLK MM dans le menu. Tournez le bouton VOL pour régler les heures /
les minutes.
Fonctionnement du casque d'écoute
Une prise pour casque d'écoute de 3,5 mm se trouve sur le panneau avant. Il adopte les
paramètres de fonctionnement de la Zone 1.
UTILISATION DE LA RADIO
Réception des stations de radio
Appuyez sur la touche SRC/MENU pour sélectionner un mode parmi FM1->FM2->MW.
Appuyez brièvement sur la touche / pour recevoir la station de radio souhaitée.
Maintenez la touche / enfoncée pour régler manuellement la fréquence.
Mémorisation manuelle des stations et accès aux stations mémorisées
Réception de la station souhaitée. Appuyez sur les touches numériques (1-6) et
maintenez-les enfoncées pendant 2 secondes. La station actuelle sera mise en mémoire
pour la touche numérique correspondante. Appuyez brièvement sur la touche de la station
préréglée (1–6) pour écouter directement le signal de diusion de cette station mémorisée
pour la touche assignée.
FONCTIONNEMENT DAB
Appuyez sur la touche SRC/MENU pour basculer la source entre DAB1 et DAB2.
Sélection d'une station
Appuyez sur la touche / pour sélectionner la station suivante/précédente.
Mémorisation manuelle des stations et accès aux stations mémorisées
Lorsque la fréquence de la station souhaitée est réglée, appuyez sur l'une des touches
numérotées de 1 à 6 pendant 2 secondes pour mémoriser cette station sous le numéro
correspondant. Appuyez brièvement sur la touche de la station préréglée (1–6) pour
écouter directement le signal de diusion de cette station mémorisée pour la touche
assignée.
UTILISATION DU PORT USB
Lorsqu'un lecteur USB est connecté à l'appareil, ce dernier lit automatiquement les
chiers MP3/WMA. Si un lecteur USB a déjà été connecté à l'appareil, appuyez
brièvement sur la touche SRC/MENU jusqu'à ce que l'écran du mode USB apparaisse.
Sélection d'un chier
Appuyez sur la touche / pour passer au chier suivant/précédent. Appuyez
sur la touche / pour faire déler rapidement vers l'avant et vers l'arrière.
Lecture/Pause
Appuyez sur la touche 1 pour mettre en pause/lire un chier.
Fonction de lecture en boucle
Appuyez sur la touche 3 RPT pour sélectionner la fonction de lecture en boucle. RPT
ONE/RPT FOLD/RPT ALL (par défaut)
RPT ONE : Lecture en boucle d'un seul chier.
RPT FOLD : Lecture en boucle de tous les chiers d'un dossier.
RPT ALL : Lecture en boucle de tous les chiers.
RANDOM
Appuyez sur la touche 4 RDM pour activer ou désactiver la fonction de lecture aléatoire.
RDM ON : Lecture aléatoire de tous les chiers.
RDM OFF : Fonction de lecture aléatoire.
Fonction dossier +/-
Appuyez sur la touche DIR+/DIR- pour sélectionner le dossier suivant/précédent à lire.
Recherche d'une chanson
Après avoir enfoncé la touche l'écran achera « NUM 0000 ». En tournant le bouton
VOL (ou en saisissant directement un numéro), sélectionnez un numéro, puis appuyez
sur VOL pour lancer la lecture. Veuillez noter que 7/8/9/0 signie : BT = 7, = 8, = 9,
DIS = 0.
UTILISATION DE LA PRISE AUX IN 1/2
Sur le panneau avant, la prise AUX IN 1 est un jack de 3,5 mm. La prise AUX IN 2 pour
RCA est située à l'arrière de l'appareil. En appuyant sur la touche SRC/MENU, on peut
passer en mode AUX IN1 (2) lorsque le signal audio est connecté à l'appareil.
UTILISATION DU BLUETOOTH
Jumelage des appareils
Sélectionnez la position Bluetooth et recherchez le périphérique Bluetooth sur votre
téléphone. La position « BLAUPUNKT » devrait apparaître dans la liste ; sélectionnez
« BLAUPUNKT », puis entrez le mot de passe « 0000 » si un message demandant un mot
de passe s'ache. Une fois le jumelage terminé, l'écran ache « BT ».
Audio Bluetooth
Appuyez sur la touche SRC/MENU pour passer en mode BT MUSIC. L'appareil réproduira
automatiquement la musique de votre téléphone. Appuyez sur la touche pour
mettre en pause/en lecture une piste.
Appuyez sur la touche / pour sélectionner la piste suivante/précédente.
UTILISATION DE LA PRISE HDMI
La prise HDMI avant va vers la prise HDMI arrière. La lecture à l'aide de HDMI n'est pas
aectée.
Connecteurs RCA V-IN et V-OUT
À l'arrière de l'appareil, le connecteur V-IN va vers le connecteur V-OUT.
TÉLÉCOMMANDE
La télécommande peut être utilisée lorsque
l'option IR est activée dans le menu.
OFF: Mise en marche et arrêt de l’appareil.
VOL+ : Augmenter le volume
VOL- : Réduire le volume
1 : Activation/désactivation du mode
sourdine de la Zone 1
2 : Activation/désactivation du mode
sourdine de la Zone 2
Pour les autres opérations, lisez les instructions ci-dessus.
INFORMATIONS GÉNÉRALES
Exigences concernant l’alimentation : 12 V DC, borne négative connectée à la terre
Dimensions de la base de montage :129 (larg.) x 112 (long.) x 65 (ép.)
Paramètres de tonalité
- Basse (à 100 Hz) : ±10 dB
- Haute (à 100 Hz) : ±10 dB
Puissance de sortie maximale : 4 x 40 W
Consommation de courant : 10 A (max.)
RADIO FM AM
Plage de fréquences de 87,5 à 108 MHz de 522 à 1620 KHz
IF 10,7 MHz 450 KHz
Sensibilité 4 µV (S/N = 30 dB) 36 dBuV (S/N = 20 dB)
Séparation des canaux stéréo >25 dB /
RÉSOLUTION DES PROBLÈMES
FR
Partie A
Partie B
FUSIBLE
Partie A
Partie B
ANTENNE
RADIO
SYSTÈME À 4 HAUT-PARLEURS
ZONE 1
ZONE 2
Haut-par-
leur avant
– gauche
Haut-par-
leur avant
– droit
Haut-par-
leur arrière
– gauche
Haut-par-
leur arrière
– droit
(BLANC-NOIR)
(BLANC)
(GRIS-NOIR)
(GRIS)
(VERT-NOIR)
(VERT)
(VIOLET-NOIR)
(VIOLET)
Conducteur de mise à la terre (noir)
Accessoire/commutateur +12 VA (rouge)
Alimentation de l’antenne (bleu)
Alimentation continue +12 V (jaune)

Informations relatives à la sécurité
Cette station multimédia a été fabriquée selon les normes techniques actuellement
en vigueur et les principes de sécurité généralement reconnus. Néanmoins, le
non-respect des consignes de sécurité contenues dans ce manuel comporte divers
risques. Lisez attentivement l'ensemble du manuel avant d'utiliser la station
multimédia. Conservez le manuel dans un endroit où il est accessible pour tous les
utilisateurs et à tout moment. Si la station multimédia est transmise à un tiers, ce
manuel lui doit être également remis. De plus, suivez les instructions des modes
d'emploi des appareils connectés à cette station.
Consignes générales de sécurité
Respectez les instructions suivantes pour vous protéger des blessures :
Ne pas modier ou ouvrir l'appareil.
Usage prévu
La station multimédia est conçue pour être installée et fonctionner dans des
véhicules avec une tension d'alimentation de 12V. Les limites de puissance de
l'appareil doivent être respectées. Toute réparation et installation doit être eectuée
par un professionnel.
Instructions pour l'installation
Vous ne pouvez installer l'appareil vous-même que si vous êtes expérimenté dans
l'installation d'autoradios et si vous avez des connaissances en électricité automobile.
À cet eet, consultez le schéma de câblage de ce manuel. L'installation de cet appareil
ne doit pas gêner ni bloquer le fonctionnement des airbags, des autres dispositifs de
sécurité ou des dispositifs de contrôle.
Déclaration de conformité
Blaupunkt Competence Center Car Multimedia - Evo Sales GmbH déclare que cet
appareil est conforme aux exigences fondamentales et aux autres dispositions
applicables de la directive 2014/53/UE. La déclaration de conformité peut être
consultée à l'adresse suivante :www.blaupunkt.com.
Instructions concernant le nettoyage
Les solvants, les produits nettoyants et abrasifs, ainsi que les nettoyants de cockpit et
les produits d'entretien des plastiques peuvent contenir des composants qui peuvent
endommager la surface de la station multimédia. Pour nettoyer la station multimédia,
utilisez uniquement un chion sec ou légèrement humide.
Instructions concernant la mise au rebut
Ne jetez pas l'appareil usagé avec les ordures ménagères !
Pour mettre au rebut l'appareil, la télécommande et les piles usagées,
veuillez les apporter à un point de collecte des équipements usagés.
Contenu de l'emballage
Le contenu de l’emballage comprend :
station multimédia BPA 3022 M,
télécommande,
connecteurs ISO,
vis de montage,
manuel d’utilisation.
INFORMATIONS IMPORTANTES CONCERNANT L’INSTALLATION
1. Lisez attentivement ce manuel d'utilisation avant d'installer l'appareil.
2. Avant de brancher l'alimentation électrique, assurez-vous que tous les
autres câbles sont connectés.
3. Pour éviter les court-circuits, assurez-vous que tous les câbles exposés sont
isolés.
4. Une fois l'installation terminée, tous les câbles doivent être sécurisés.
5. Les connexions au lecteur doivent être eectuées conformément à ce
manuel. Une connexion incorrecte peut provoquer l'endommagement de
l'appareil.
6. Le lecteur est conçu pour fonctionner uniquement avec une installation de
12 V DC.
INSTALLATION DE L'APPAREIL
DÉMONTAGE DE L'APPAREIL
1. Démontez l'appareil.
2. Démontez le cadre de nition extérieur.
Remarque concernant le HDMI :
Utilisez un câble HDMI de bonne qualité.
La longueur totale (avant et arrière) ne doit pas dépasser 12 pieds.
CONNEXION DES CÂBLES
1. Le lecteur ne peut être utilisé que sous une tension de +12 V DC.
2. Ne connectez pas la borne de la batterie avant que le lecteur ne soit
complètement installé.
3. Assurez-vous que le l jaune est connecté au pôle positif (+) de la batterie.
4. Lorsque vous remplacez le fusible, assurez-vous que les paramètres du
nouveau fusible sont les mêmes.
5. L’utilisation de haut-parleurs de bonne qualité avec une impédance de 4–8
ohms permettra de tirer le meilleur parti de l’appareil.
UTILISATION
EMPLACEMENT DES TOUCHES
1. ZONE 1 2. 1 3. ZONE 2
4. 2 5. BT 6. 3 RPT
7. 8. 4 RDM 9.
10. 5 DIR- 11. DIS 12. 6 DIR+
13. LCD 14. PRISE AUX 15. PRISE POUR CASQUE D'ÉCOUTE
16. PRISE HDMI 17. RESET 18. BOUTON ROTATIF
19. PORT USB 20. SRC/MENU
FONCTIONNEMENT DE BASE
Activation/désactivation de l'appareil et de la fonction de mise en sourdine
Pour allumer l'appareil, appuyez sur le bouton rotatif / MUTE. Pour activer ou désactiver la
fonction de mise en sourdine, appuyez brièvement sur le bouton lorsque l'appareil est
allumé. Appuyez sur ce bouton et maintenez-le enfoncé pour éteindre l’appareil.
Réglage du volume et menu de conguration
Appuyez sur la touche SRC/MENU et maintenez-la enfoncée pour accéder au menu illustré
ci-dessous :
BAS->TRE->BAL->EQ (o/pop/rock/class)->LOUD (on/o)->CLK HH->CLK
MM->IR (on/o) ->CT (indep/sync)->SIGN. BEEP (on/o)->P_VOL (13)->DX (LOC)->STE- REO
(MONO)
À chaque position, tournez le bouton VOL pour la régler.
INFRAROUGE (ON/OFF) :
INFRAROUGE ON : L'appareil peut être mis en marche à l'aide de la télécommande à
infrarouge.
Le système est alors en mode de haute consommation d'énergie.
INFRAROUGE OFF : L'appareil ne peut pas être mis en marche à l'aide de la télécommande
à infrarouge.
Le système est en mode de faible consommation d'énergie.
CT (INDEP/SYNC) :
CT INDEP : L’horloge fonctionne indépendamment.
CT SYNC : L’horloge sera synchronisée avec l’heure de la station RDS réceptionnée.
Remarque : Lorsque l'horloge est réglée dans le menu, la fonction CT est automatiquement
réglée sur le mode INDEP (fonctionnement indépendant).
BEEP (ON/OFF) : Permet d'activer/désactiver le signal sonore lorsque les touches sont
enfoncées.
P-VOL : Permet de régler le volume à la mise en marche. Si le niveau de volume à l'arrêt est
inférieur au niveau P-VOL, l'appareil règle le niveau de volume sur le volume à l'arrêt
lorsqu'il est mis en marche.
Si le niveau de volume à l'arrêt est supérieur au niveau P-VOL, le volume sera réinitialisé sur
les valeurs P-VOL à la mise en marche.
Recherche de haut-parleurs Bluetooth
Après avoir enfoncé la touche BT, l'écran ache « SEARCH... » [recherche]. Un instant plus
tard, le nom de votre appareil Bluetooth s'ache. Pour acher l'appareil suivant, tournez le
bouton VOL. Une fois que le nom du haut-parleur Bluetooth souhaité s'ache sur l'écran
LCD, appuyez sur le bouton VOL pour associer l'appareil. Une fois le jumelage terminé,
l'écran ache le message « BOX ON ».
Consigne importante : Malgré de nombreux tests eectués avec divers dispositifs
Bluetooth, la compatibilité avec tous les dispositifs Bluetooth disponible sur le marché ne
peut être garantie.
Transmission du signal au haut-parleur Bluetooth
Appuyez brièvement sur la touche BT pour arrêter/initier le transfert du signal vers le
haut-parleur Bluetooth. L'écran ache le message « BOX OFF/ON ».
Remarque : Bien que Blaupunkt vérie soigneusement la compatibilité des diérents
haut-parleurs Bluetooth, un fonctionnement sans faille ne peut être garanti avec tous les
modèles du marché.
Fonctionnement des Zones 1 et 2
Appuyez brièvement sur la touche Zone 1 (ou Zone 2) pour activer ou désactiver le son de
la Zone 1 (ou de la Zone 2).
Maintenez la touche Zone 1 (ou Zone 2) enfoncée pour couper le son de la Zone 1 (ou de la
Zone 2). Appuyez à nouveau sur la touche pour rétablir le son.
Priorité des informations ou de l'horloge
Appuyez brièvement sur la touche DIS pour modier la priorité de l’horloge ou la priorité
des informations.
Remarque : En mode FM, lorsque vous recevez des stations RDS, appuyez brièvement sur la
touche DIS pour acher NOM DE STATION/HORLOGE/FRÉQUENCE.
Réglage de l’horloge
Sélectionnez CLK HH/CLK MM dans le menu. Tournez le bouton VOL pour régler les heures /
les minutes.
Fonctionnement du casque d'écoute
Une prise pour casque d'écoute de 3,5 mm se trouve sur le panneau avant. Il adopte les
paramètres de fonctionnement de la Zone 1.
UTILISATION DE LA RADIO
Réception des stations de radio
Appuyez sur la touche SRC/MENU pour sélectionner un mode parmi FM1->FM2->MW.
Appuyez brièvement sur la touche / pour recevoir la station de radio souhaitée.
Maintenez la touche / enfoncée pour régler manuellement la fréquence.
Mémorisation manuelle des stations et accès aux stations mémorisées
Réception de la station souhaitée. Appuyez sur les touches numériques (1-6) et
maintenez-les enfoncées pendant 2 secondes. La station actuelle sera mise en mémoire
pour la touche numérique correspondante. Appuyez brièvement sur la touche de la station
préréglée (1–6) pour écouter directement le signal de diusion de cette station mémorisée
pour la touche assignée.
FONCTIONNEMENT DAB
Appuyez sur la touche SRC/MENU pour basculer la source entre DAB1 et DAB2.
Sélection d'une station
Appuyez sur la touche / pour sélectionner la station suivante/précédente.
Mémorisation manuelle des stations et accès aux stations mémorisées
Lorsque la fréquence de la station souhaitée est réglée, appuyez sur l'une des touches
numérotées de 1 à 6 pendant 2 secondes pour mémoriser cette station sous le numéro
correspondant. Appuyez brièvement sur la touche de la station préréglée (1–6) pour
écouter directement le signal de diusion de cette station mémorisée pour la touche
assignée.
UTILISATION DU PORT USB
Lorsqu'un lecteur USB est connecté à l'appareil, ce dernier lit automatiquement les
chiers MP3/WMA. Si un lecteur USB a déjà été connecté à l'appareil, appuyez
brièvement sur la touche SRC/MENU jusqu'à ce que l'écran du mode USB apparaisse.
Sélection d'un chier
Appuyez sur la touche / pour passer au chier suivant/précédent. Appuyez
sur la touche / pour faire déler rapidement vers l'avant et vers l'arrière.
Lecture/Pause
Appuyez sur la touche 1 pour mettre en pause/lire un chier.
Fonction de lecture en boucle
Appuyez sur la touche 3 RPT pour sélectionner la fonction de lecture en boucle. RPT
ONE/RPT FOLD/RPT ALL (par défaut)
RPT ONE : Lecture en boucle d'un seul chier.
RPT FOLD : Lecture en boucle de tous les chiers d'un dossier.
RPT ALL : Lecture en boucle de tous les chiers.
RANDOM
Appuyez sur la touche 4 RDM pour activer ou désactiver la fonction de lecture aléatoire.
RDM ON : Lecture aléatoire de tous les chiers.
RDM OFF : Fonction de lecture aléatoire.
Fonction dossier +/-
Appuyez sur la touche DIR+/DIR- pour sélectionner le dossier suivant/précédent à lire.
Recherche d'une chanson
Après avoir enfoncé la touche l'écran achera « NUM 0000 ». En tournant le bouton
VOL (ou en saisissant directement un numéro), sélectionnez un numéro, puis appuyez
sur VOL pour lancer la lecture. Veuillez noter que 7/8/9/0 signie : BT = 7, = 8, = 9,
DIS = 0.
UTILISATION DE LA PRISE AUX IN 1/2
Sur le panneau avant, la prise AUX IN 1 est un jack de 3,5 mm. La prise AUX IN 2 pour
RCA est située à l'arrière de l'appareil. En appuyant sur la touche SRC/MENU, on peut
passer en mode AUX IN1 (2) lorsque le signal audio est connecté à l'appareil.
UTILISATION DU BLUETOOTH
Jumelage des appareils
Sélectionnez la position Bluetooth et recherchez le périphérique Bluetooth sur votre
téléphone. La position « BLAUPUNKT » devrait apparaître dans la liste ; sélectionnez
« BLAUPUNKT », puis entrez le mot de passe « 0000 » si un message demandant un mot
de passe s'ache. Une fois le jumelage terminé, l'écran ache « BT ».
Audio Bluetooth
Appuyez sur la touche SRC/MENU pour passer en mode BT MUSIC. L'appareil réproduira
automatiquement la musique de votre téléphone. Appuyez sur la touche pour
mettre en pause/en lecture une piste.
Appuyez sur la touche / pour sélectionner la piste suivante/précédente.
UTILISATION DE LA PRISE HDMI
La prise HDMI avant va vers la prise HDMI arrière. La lecture à l'aide de HDMI n'est pas
aectée.
Connecteurs RCA V-IN et V-OUT
À l'arrière de l'appareil, le connecteur V-IN va vers le connecteur V-OUT.
TÉLÉCOMMANDE
La télécommande peut être utilisée lorsque
l'option IR est activée dans le menu.
OFF: Mise en marche et arrêt de l’appareil.
VOL+ : Augmenter le volume
VOL- : Réduire le volume
1 : Activation/désactivation du mode
sourdine de la Zone 1
2 : Activation/désactivation du mode
sourdine de la Zone 2
Pour les autres opérations, lisez les instructions ci-dessus.
INFORMATIONS GÉNÉRALES
Exigences concernant l’alimentation : 12 V DC, borne négative connectée à la terre
Dimensions de la base de montage :129 (larg.) x 112 (long.) x 65 (ép.)
Paramètres de tonalité
- Basse (à 100 Hz) : ±10 dB
- Haute (à 100 Hz) : ±10 dB
Puissance de sortie maximale : 4 x 40 W
Consommation de courant : 10 A (max.)
RADIO FM AM
Plage de fréquences de 87,5 à 108 MHz de 522 à 1620 KHz
IF 10,7 MHz 450 KHz
Sensibilité 4 µV (S/N = 30 dB) 36 dBuV (S/N = 20 dB)
Séparation des canaux stéréo >25 dB /
RÉSOLUTION DES PROBLÈMES
FR

Informations relatives à la sécurité
Cette station multimédia a été fabriquée selon les normes techniques actuellement
en vigueur et les principes de sécurité généralement reconnus. Néanmoins, le
non-respect des consignes de sécurité contenues dans ce manuel comporte divers
risques. Lisez attentivement l'ensemble du manuel avant d'utiliser la station
multimédia. Conservez le manuel dans un endroit où il est accessible pour tous les
utilisateurs et à tout moment. Si la station multimédia est transmise à un tiers, ce
manuel lui doit être également remis. De plus, suivez les instructions des modes
d'emploi des appareils connectés à cette station.
Consignes générales de sécurité
Respectez les instructions suivantes pour vous protéger des blessures :
Ne pas modier ou ouvrir l'appareil.
Usage prévu
La station multimédia est conçue pour être installée et fonctionner dans des
véhicules avec une tension d'alimentation de 12V. Les limites de puissance de
l'appareil doivent être respectées. Toute réparation et installation doit être eectuée
par un professionnel.
Instructions pour l'installation
Vous ne pouvez installer l'appareil vous-même que si vous êtes expérimenté dans
l'installation d'autoradios et si vous avez des connaissances en électricité automobile.
À cet eet, consultez le schéma de câblage de ce manuel. L'installation de cet appareil
ne doit pas gêner ni bloquer le fonctionnement des airbags, des autres dispositifs de
sécurité ou des dispositifs de contrôle.
Déclaration de conformité
Blaupunkt Competence Center Car Multimedia - Evo Sales GmbH déclare que cet
appareil est conforme aux exigences fondamentales et aux autres dispositions
applicables de la directive 2014/53/UE. La déclaration de conformité peut être
consultée à l'adresse suivante :www.blaupunkt.com.
Instructions concernant le nettoyage
Les solvants, les produits nettoyants et abrasifs, ainsi que les nettoyants de cockpit et
les produits d'entretien des plastiques peuvent contenir des composants qui peuvent
endommager la surface de la station multimédia. Pour nettoyer la station multimédia,
utilisez uniquement un chion sec ou légèrement humide.
Instructions concernant la mise au rebut
Ne jetez pas l'appareil usagé avec les ordures ménagères !
Pour mettre au rebut l'appareil, la télécommande et les piles usagées,
veuillez les apporter à un point de collecte des équipements usagés.
Contenu de l'emballage
Le contenu de l’emballage comprend :
station multimédia BPA 3022 M,
télécommande,
connecteurs ISO,
vis de montage,
manuel d’utilisation.
INFORMATIONS IMPORTANTES CONCERNANT L’INSTALLATION
1. Lisez attentivement ce manuel d'utilisation avant d'installer l'appareil.
2. Avant de brancher l'alimentation électrique, assurez-vous que tous les
autres câbles sont connectés.
3. Pour éviter les court-circuits, assurez-vous que tous les câbles exposés sont
isolés.
4. Une fois l'installation terminée, tous les câbles doivent être sécurisés.
5. Les connexions au lecteur doivent être eectuées conformément à ce
manuel. Une connexion incorrecte peut provoquer l'endommagement de
l'appareil.
6. Le lecteur est conçu pour fonctionner uniquement avec une installation de
12 V DC.
INSTALLATION DE L'APPAREIL
DÉMONTAGE DE L'APPAREIL
1. Démontez l'appareil.
2. Démontez le cadre de nition extérieur.
Remarque concernant le HDMI :
Utilisez un câble HDMI de bonne qualité.
La longueur totale (avant et arrière) ne doit pas dépasser 12 pieds.
CONNEXION DES CÂBLES
1. Le lecteur ne peut être utilisé que sous une tension de +12 V DC.
2. Ne connectez pas la borne de la batterie avant que le lecteur ne soit
complètement installé.
3. Assurez-vous que le l jaune est connecté au pôle positif (+) de la batterie.
4. Lorsque vous remplacez le fusible, assurez-vous que les paramètres du
nouveau fusible sont les mêmes.
5. L’utilisation de haut-parleurs de bonne qualité avec une impédance de 4–8
ohms permettra de tirer le meilleur parti de l’appareil.
EMPLACEMENT DES TOUCHES
1. ZONE 1 2. 1 3. ZONE 2
4. 2 5. BT 6. 3 RPT
7. 8. 4 RDM 9.
10. 5 DIR- 11. DIS 12. 6 DIR+
13. LCD 14. PRISE AUX 15. PRISE POUR CASQUE D'ÉCOUTE
16. PRISE HDMI 17. RESET 18. BOUTON ROTATIF
19. PORT USB 20. SRC/MENU
UTILISATION
FONCTIONNEMENT DE BASE
Activation/désactivation de l'appareil et de la fonction de mise en sourdine
Pour allumer l'appareil, appuyez sur le bouton rotatif / MUTE. Pour activer ou désactiver la
fonction de mise en sourdine, appuyez brièvement sur le bouton lorsque l'appareil est
allumé. Appuyez sur ce bouton et maintenez-le enfoncé pour éteindre l’appareil.
Réglage du volume et menu de conguration
Appuyez sur la touche SRC/MENU et maintenez-la enfoncée pour accéder au menu illustré
ci-dessous :
BAS->TRE->BAL->EQ (o/pop/rock/class)->LOUD (on/o)->CLK HH->CLK
MM->IR (on/o) ->CT (indep/sync)->SIGN. BEEP (on/o)->P_VOL (13)->DX (LOC)->STE- REO
(MONO)
À chaque position, tournez le bouton VOL pour la régler.
INFRAROUGE (ON/OFF) :
INFRAROUGE ON : L'appareil peut être mis en marche à l'aide de la télécommande à
infrarouge.
Le système est alors en mode de haute consommation d'énergie.
INFRAROUGE OFF : L'appareil ne peut pas être mis en marche à l'aide de la télécommande
à infrarouge.
Le système est en mode de faible consommation d'énergie.
CT (INDEP/SYNC) :
CT INDEP : L’horloge fonctionne indépendamment.
CT SYNC : L’horloge sera synchronisée avec l’heure de la station RDS réceptionnée.
Remarque : Lorsque l'horloge est réglée dans le menu, la fonction CT est automatiquement
réglée sur le mode INDEP (fonctionnement indépendant).
BEEP (ON/OFF) : Permet d'activer/désactiver le signal sonore lorsque les touches sont
enfoncées.
P-VOL : Permet de régler le volume à la mise en marche. Si le niveau de volume à l'arrêt est
inférieur au niveau P-VOL, l'appareil règle le niveau de volume sur le volume à l'arrêt
lorsqu'il est mis en marche.
Si le niveau de volume à l'arrêt est supérieur au niveau P-VOL, le volume sera réinitialisé sur
les valeurs P-VOL à la mise en marche.
Recherche de haut-parleurs Bluetooth
Après avoir enfoncé la touche BT, l'écran ache « SEARCH... » [recherche]. Un instant plus
tard, le nom de votre appareil Bluetooth s'ache. Pour acher l'appareil suivant, tournez le
bouton VOL. Une fois que le nom du haut-parleur Bluetooth souhaité s'ache sur l'écran
LCD, appuyez sur le bouton VOL pour associer l'appareil. Une fois le jumelage terminé,
l'écran ache le message « BOX ON ».
Consigne importante : Malgré de nombreux tests eectués avec divers dispositifs
Bluetooth, la compatibilité avec tous les dispositifs Bluetooth disponible sur le marché ne
peut être garantie.
Transmission du signal au haut-parleur Bluetooth
Appuyez brièvement sur la touche BT pour arrêter/initier le transfert du signal vers le
haut-parleur Bluetooth. L'écran ache le message « BOX OFF/ON ».
Remarque : Bien que Blaupunkt vérie soigneusement la compatibilité des diérents
haut-parleurs Bluetooth, un fonctionnement sans faille ne peut être garanti avec tous les
modèles du marché.
Fonctionnement des Zones 1 et 2
Appuyez brièvement sur la touche Zone 1 (ou Zone 2) pour activer ou désactiver le son de
la Zone 1 (ou de la Zone 2).
Maintenez la touche Zone 1 (ou Zone 2) enfoncée pour couper le son de la Zone 1 (ou de la
Zone 2). Appuyez à nouveau sur la touche pour rétablir le son.
Priorité des informations ou de l'horloge
Appuyez brièvement sur la touche DIS pour modier la priorité de l’horloge ou la priorité
des informations.
Remarque : En mode FM, lorsque vous recevez des stations RDS, appuyez brièvement sur la
touche DIS pour acher NOM DE STATION/HORLOGE/FRÉQUENCE.
Réglage de l’horloge
Sélectionnez CLK HH/CLK MM dans le menu. Tournez le bouton VOL pour régler les heures /
les minutes.
Fonctionnement du casque d'écoute
Une prise pour casque d'écoute de 3,5 mm se trouve sur le panneau avant. Il adopte les
paramètres de fonctionnement de la Zone 1.
UTILISATION DE LA RADIO
Réception des stations de radio
Appuyez sur la touche SRC/MENU pour sélectionner un mode parmi FM1->FM2->MW.
Appuyez brièvement sur la touche / pour recevoir la station de radio souhaitée.
Maintenez la touche / enfoncée pour régler manuellement la fréquence.
Mémorisation manuelle des stations et accès aux stations mémorisées
Réception de la station souhaitée. Appuyez sur les touches numériques (1-6) et
maintenez-les enfoncées pendant 2 secondes. La station actuelle sera mise en mémoire
pour la touche numérique correspondante. Appuyez brièvement sur la touche de la station
préréglée (1–6) pour écouter directement le signal de diusion de cette station mémorisée
pour la touche assignée.
FONCTIONNEMENT DAB
Appuyez sur la touche SRC/MENU pour basculer la source entre DAB1 et DAB2.
Sélection d'une station
Appuyez sur la touche / pour sélectionner la station suivante/précédente.
Mémorisation manuelle des stations et accès aux stations mémorisées
Lorsque la fréquence de la station souhaitée est réglée, appuyez sur l'une des touches
numérotées de 1 à 6 pendant 2 secondes pour mémoriser cette station sous le numéro
correspondant. Appuyez brièvement sur la touche de la station préréglée (1–6) pour
écouter directement le signal de diusion de cette station mémorisée pour la touche
assignée.
UTILISATION DU PORT USB
Lorsqu'un lecteur USB est connecté à l'appareil, ce dernier lit automatiquement les
chiers MP3/WMA. Si un lecteur USB a déjà été connecté à l'appareil, appuyez
brièvement sur la touche SRC/MENU jusqu'à ce que l'écran du mode USB apparaisse.
Sélection d'un chier
Appuyez sur la touche / pour passer au chier suivant/précédent. Appuyez
sur la touche / pour faire déler rapidement vers l'avant et vers l'arrière.
Lecture/Pause
Appuyez sur la touche 1 pour mettre en pause/lire un chier.
Fonction de lecture en boucle
Appuyez sur la touche 3 RPT pour sélectionner la fonction de lecture en boucle. RPT
ONE/RPT FOLD/RPT ALL (par défaut)
RPT ONE : Lecture en boucle d'un seul chier.
RPT FOLD : Lecture en boucle de tous les chiers d'un dossier.
RPT ALL : Lecture en boucle de tous les chiers.
RANDOM
Appuyez sur la touche 4 RDM pour activer ou désactiver la fonction de lecture aléatoire.
RDM ON : Lecture aléatoire de tous les chiers.
RDM OFF : Fonction de lecture aléatoire.
Fonction dossier +/-
Appuyez sur la touche DIR+/DIR- pour sélectionner le dossier suivant/précédent à lire.
Recherche d'une chanson
Après avoir enfoncé la touche l'écran achera « NUM 0000 ». En tournant le bouton
VOL (ou en saisissant directement un numéro), sélectionnez un numéro, puis appuyez
sur VOL pour lancer la lecture. Veuillez noter que 7/8/9/0 signie : BT = 7, = 8, = 9,
DIS = 0.
UTILISATION DE LA PRISE AUX IN 1/2
Sur le panneau avant, la prise AUX IN 1 est un jack de 3,5 mm. La prise AUX IN 2 pour
RCA est située à l'arrière de l'appareil. En appuyant sur la touche SRC/MENU, on peut
passer en mode AUX IN1 (2) lorsque le signal audio est connecté à l'appareil.
UTILISATION DU BLUETOOTH
Jumelage des appareils
Sélectionnez la position Bluetooth et recherchez le périphérique Bluetooth sur votre
téléphone. La position « BLAUPUNKT » devrait apparaître dans la liste ; sélectionnez
« BLAUPUNKT », puis entrez le mot de passe « 0000 » si un message demandant un mot
de passe s'ache. Une fois le jumelage terminé, l'écran ache « BT ».
Audio Bluetooth
Appuyez sur la touche SRC/MENU pour passer en mode BT MUSIC. L'appareil réproduira
automatiquement la musique de votre téléphone. Appuyez sur la touche pour
mettre en pause/en lecture une piste.
Appuyez sur la touche / pour sélectionner la piste suivante/précédente.
UTILISATION DE LA PRISE HDMI
La prise HDMI avant va vers la prise HDMI arrière. La lecture à l'aide de HDMI n'est pas
aectée.
Connecteurs RCA V-IN et V-OUT
À l'arrière de l'appareil, le connecteur V-IN va vers le connecteur V-OUT.
TÉLÉCOMMANDE
La télécommande peut être utilisée lorsque
l'option IR est activée dans le menu.
OFF: Mise en marche et arrêt de l’appareil.
VOL+ : Augmenter le volume
VOL- : Réduire le volume
1 : Activation/désactivation du mode
sourdine de la Zone 1
2 : Activation/désactivation du mode
sourdine de la Zone 2
Pour les autres opérations, lisez les instructions ci-dessus.
INFORMATIONS GÉNÉRALES
Exigences concernant l’alimentation : 12 V DC, borne négative connectée à la terre
Dimensions de la base de montage :129 (larg.) x 112 (long.) x 65 (ép.)
Paramètres de tonalité
- Basse (à 100 Hz) : ±10 dB
- Haute (à 100 Hz) : ±10 dB
Puissance de sortie maximale : 4 x 40 W
Consommation de courant : 10 A (max.)
RADIO FM AM
Plage de fréquences de 87,5 à 108 MHz de 522 à 1620 KHz
IF 10,7 MHz 450 KHz
Sensibilité 4 µV (S/N = 30 dB) 36 dBuV (S/N = 20 dB)
Séparation des canaux stéréo >25 dB /
RÉSOLUTION DES PROBLÈMES
FR

Informations relatives à la sécurité
Cette station multimédia a été fabriquée selon les normes techniques actuellement
en vigueur et les principes de sécurité généralement reconnus. Néanmoins, le
non-respect des consignes de sécurité contenues dans ce manuel comporte divers
risques. Lisez attentivement l'ensemble du manuel avant d'utiliser la station
multimédia. Conservez le manuel dans un endroit où il est accessible pour tous les
utilisateurs et à tout moment. Si la station multimédia est transmise à un tiers, ce
manuel lui doit être également remis. De plus, suivez les instructions des modes
d'emploi des appareils connectés à cette station.
Consignes générales de sécurité
Respectez les instructions suivantes pour vous protéger des blessures :
Ne pas modier ou ouvrir l'appareil.
Usage prévu
La station multimédia est conçue pour être installée et fonctionner dans des
véhicules avec une tension d'alimentation de 12V. Les limites de puissance de
l'appareil doivent être respectées. Toute réparation et installation doit être eectuée
par un professionnel.
Instructions pour l'installation
Vous ne pouvez installer l'appareil vous-même que si vous êtes expérimenté dans
l'installation d'autoradios et si vous avez des connaissances en électricité automobile.
À cet eet, consultez le schéma de câblage de ce manuel. L'installation de cet appareil
ne doit pas gêner ni bloquer le fonctionnement des airbags, des autres dispositifs de
sécurité ou des dispositifs de contrôle.
Déclaration de conformité
Blaupunkt Competence Center Car Multimedia - Evo Sales GmbH déclare que cet
appareil est conforme aux exigences fondamentales et aux autres dispositions
applicables de la directive 2014/53/UE. La déclaration de conformité peut être
consultée à l'adresse suivante :www.blaupunkt.com.
Instructions concernant le nettoyage
Les solvants, les produits nettoyants et abrasifs, ainsi que les nettoyants de cockpit et
les produits d'entretien des plastiques peuvent contenir des composants qui peuvent
endommager la surface de la station multimédia. Pour nettoyer la station multimédia,
utilisez uniquement un chion sec ou légèrement humide.
Instructions concernant la mise au rebut
Ne jetez pas l'appareil usagé avec les ordures ménagères !
Pour mettre au rebut l'appareil, la télécommande et les piles usagées,
veuillez les apporter à un point de collecte des équipements usagés.
Contenu de l'emballage
Le contenu de l’emballage comprend :
station multimédia BPA 3022 M,
télécommande,
connecteurs ISO,
vis de montage,
manuel d’utilisation.
INFORMATIONS IMPORTANTES CONCERNANT L’INSTALLATION
1. Lisez attentivement ce manuel d'utilisation avant d'installer l'appareil.
2. Avant de brancher l'alimentation électrique, assurez-vous que tous les
autres câbles sont connectés.
3. Pour éviter les court-circuits, assurez-vous que tous les câbles exposés sont
isolés.
4. Une fois l'installation terminée, tous les câbles doivent être sécurisés.
5. Les connexions au lecteur doivent être eectuées conformément à ce
manuel. Une connexion incorrecte peut provoquer l'endommagement de
l'appareil.
6. Le lecteur est conçu pour fonctionner uniquement avec une installation de
12 V DC.
INSTALLATION DE L'APPAREIL
DÉMONTAGE DE L'APPAREIL
1. Démontez l'appareil.
2. Démontez le cadre de nition extérieur.
Remarque concernant le HDMI :
Utilisez un câble HDMI de bonne qualité.
La longueur totale (avant et arrière) ne doit pas dépasser 12 pieds.
CONNEXION DES CÂBLES
1. Le lecteur ne peut être utilisé que sous une tension de +12 V DC.
2. Ne connectez pas la borne de la batterie avant que le lecteur ne soit
complètement installé.
3. Assurez-vous que le l jaune est connecté au pôle positif (+) de la batterie.
4. Lorsque vous remplacez le fusible, assurez-vous que les paramètres du
nouveau fusible sont les mêmes.
5. L’utilisation de haut-parleurs de bonne qualité avec une impédance de 4–8
ohms permettra de tirer le meilleur parti de l’appareil.
EMPLACEMENT DES TOUCHES
1. ZONE 1 2. 1 3. ZONE 2
4. 2 5. BT 6. 3 RPT
7. 8. 4 RDM 9.
10. 5 DIR- 11. DIS 12. 6 DIR+
13. LCD 14. PRISE AUX 15. PRISE POUR CASQUE D'ÉCOUTE
16. PRISE HDMI 17. RESET 18. BOUTON ROTATIF
19. PORT USB 20. SRC/MENU
FONCTIONNEMENT DE BASE
Activation/désactivation de l'appareil et de la fonction de mise en sourdine
Pour allumer l'appareil, appuyez sur le bouton rotatif / MUTE. Pour activer ou désactiver la
fonction de mise en sourdine, appuyez brièvement sur le bouton lorsque l'appareil est
allumé. Appuyez sur ce bouton et maintenez-le enfoncé pour éteindre l’appareil.
Réglage du volume et menu de conguration
Appuyez sur la touche SRC/MENU et maintenez-la enfoncée pour accéder au menu illustré
ci-dessous :
BAS->TRE->BAL->EQ (o/pop/rock/class)->LOUD (on/o)->CLK HH->CLK
MM->IR (on/o) ->CT (indep/sync)->SIGN. BEEP (on/o)->P_VOL (13)->DX (LOC)->STE- REO
(MONO)
À chaque position, tournez le bouton VOL pour la régler.
INFRAROUGE (ON/OFF) :
INFRAROUGE ON : L'appareil peut être mis en marche à l'aide de la télécommande à
infrarouge.
Le système est alors en mode de haute consommation d'énergie.
INFRAROUGE OFF : L'appareil ne peut pas être mis en marche à l'aide de la télécommande
à infrarouge.
Le système est en mode de faible consommation d'énergie.
CT (INDEP/SYNC) :
CT INDEP : L’horloge fonctionne indépendamment.
CT SYNC : L’horloge sera synchronisée avec l’heure de la station RDS réceptionnée.
Remarque : Lorsque l'horloge est réglée dans le menu, la fonction CT est automatiquement
réglée sur le mode INDEP (fonctionnement indépendant).
BEEP (ON/OFF) : Permet d'activer/désactiver le signal sonore lorsque les touches sont
enfoncées.
P-VOL : Permet de régler le volume à la mise en marche. Si le niveau de volume à l'arrêt est
inférieur au niveau P-VOL, l'appareil règle le niveau de volume sur le volume à l'arrêt
lorsqu'il est mis en marche.
Si le niveau de volume à l'arrêt est supérieur au niveau P-VOL, le volume sera réinitialisé sur
les valeurs P-VOL à la mise en marche.
Recherche de haut-parleurs Bluetooth
Après avoir enfoncé la touche BT, l'écran ache « SEARCH... » [recherche]. Un instant plus
tard, le nom de votre appareil Bluetooth s'ache. Pour acher l'appareil suivant, tournez le
bouton VOL. Une fois que le nom du haut-parleur Bluetooth souhaité s'ache sur l'écran
LCD, appuyez sur le bouton VOL pour associer l'appareil. Une fois le jumelage terminé,
l'écran ache le message « BOX ON ».
Consigne importante : Malgré de nombreux tests eectués avec divers dispositifs
Bluetooth, la compatibilité avec tous les dispositifs Bluetooth disponible sur le marché ne
peut être garantie.
Transmission du signal au haut-parleur Bluetooth
Appuyez brièvement sur la touche BT pour arrêter/initier le transfert du signal vers le
haut-parleur Bluetooth. L'écran ache le message « BOX OFF/ON ».
Remarque : Bien que Blaupunkt vérie soigneusement la compatibilité des diérents
haut-parleurs Bluetooth, un fonctionnement sans faille ne peut être garanti avec tous les
modèles du marché.
Fonctionnement des Zones 1 et 2
Appuyez brièvement sur la touche Zone 1 (ou Zone 2) pour activer ou désactiver le son de
la Zone 1 (ou de la Zone 2).
Maintenez la touche Zone 1 (ou Zone 2) enfoncée pour couper le son de la Zone 1 (ou de la
Zone 2). Appuyez à nouveau sur la touche pour rétablir le son.
Priorité des informations ou de l'horloge
Appuyez brièvement sur la touche DIS pour modier la priorité de l’horloge ou la priorité
des informations.
Remarque : En mode FM, lorsque vous recevez des stations RDS, appuyez brièvement sur la
touche DIS pour acher NOM DE STATION/HORLOGE/FRÉQUENCE.
Réglage de l’horloge
Sélectionnez CLK HH/CLK MM dans le menu. Tournez le bouton VOL pour régler les heures /
les minutes.
Fonctionnement du casque d'écoute
Une prise pour casque d'écoute de 3,5 mm se trouve sur le panneau avant. Il adopte les
paramètres de fonctionnement de la Zone 1.
UTILISATION DE LA RADIO
Réception des stations de radio
Appuyez sur la touche SRC/MENU pour sélectionner un mode parmi FM1->FM2->MW.
Appuyez brièvement sur la touche / pour recevoir la station de radio souhaitée.
Maintenez la touche / enfoncée pour régler manuellement la fréquence.
Mémorisation manuelle des stations et accès aux stations mémorisées
Réception de la station souhaitée. Appuyez sur les touches numériques (1-6) et
maintenez-les enfoncées pendant 2 secondes. La station actuelle sera mise en mémoire
pour la touche numérique correspondante. Appuyez brièvement sur la touche de la station
préréglée (1–6) pour écouter directement le signal de diusion de cette station mémorisée
pour la touche assignée.
FONCTIONNEMENT DAB
Appuyez sur la touche SRC/MENU pour basculer la source entre DAB1 et DAB2.
Sélection d'une station
Appuyez sur la touche / pour sélectionner la station suivante/précédente.
UTILISATION
Mémorisation manuelle des stations et accès aux stations mémorisées
Lorsque la fréquence de la station souhaitée est réglée, appuyez sur l'une des touches
numérotées de 1 à 6 pendant 2 secondes pour mémoriser cette station sous le numéro
correspondant. Appuyez brièvement sur la touche de la station préréglée (1–6) pour
écouter directement le signal de diusion de cette station mémorisée pour la touche
assignée.
UTILISATION DU PORT USB
Lorsqu'un lecteur USB est connecté à l'appareil, ce dernier lit automatiquement les
chiers MP3/WMA. Si un lecteur USB a déjà été connecté à l'appareil, appuyez
brièvement sur la touche SRC/MENU jusqu'à ce que l'écran du mode USB apparaisse.
Sélection d'un chier
Appuyez sur la touche / pour passer au chier suivant/précédent. Appuyez
sur la touche / pour faire déler rapidement vers l'avant et vers l'arrière.
Lecture/Pause
Appuyez sur la touche 1 pour mettre en pause/lire un chier.
Fonction de lecture en boucle
Appuyez sur la touche 3 RPT pour sélectionner la fonction de lecture en boucle. RPT
ONE/RPT FOLD/RPT ALL (par défaut)
RPT ONE : Lecture en boucle d'un seul chier.
RPT FOLD : Lecture en boucle de tous les chiers d'un dossier.
RPT ALL : Lecture en boucle de tous les chiers.
RANDOM
Appuyez sur la touche 4 RDM pour activer ou désactiver la fonction de lecture aléatoire.
RDM ON : Lecture aléatoire de tous les chiers.
RDM OFF : Fonction de lecture aléatoire.
Fonction dossier +/-
Appuyez sur la touche DIR+/DIR- pour sélectionner le dossier suivant/précédent à lire.
Recherche d'une chanson
Après avoir enfoncé la touche l'écran achera « NUM 0000 ». En tournant le bouton
VOL (ou en saisissant directement un numéro), sélectionnez un numéro, puis appuyez
sur VOL pour lancer la lecture. Veuillez noter que 7/8/9/0 signie : BT = 7, = 8, = 9,
DIS = 0.
UTILISATION DE LA PRISE AUX IN 1/2
Sur le panneau avant, la prise AUX IN 1 est un jack de 3,5 mm. La prise AUX IN 2 pour
RCA est située à l'arrière de l'appareil. En appuyant sur la touche SRC/MENU, on peut
passer en mode AUX IN1 (2) lorsque le signal audio est connecté à l'appareil.
UTILISATION DU BLUETOOTH
Jumelage des appareils
Sélectionnez la position Bluetooth et recherchez le périphérique Bluetooth sur votre
téléphone. La position « BLAUPUNKT » devrait apparaître dans la liste ; sélectionnez
« BLAUPUNKT », puis entrez le mot de passe « 0000 » si un message demandant un mot
de passe s'ache. Une fois le jumelage terminé, l'écran ache « BT ».
Audio Bluetooth
Appuyez sur la touche SRC/MENU pour passer en mode BT MUSIC. L'appareil réproduira
automatiquement la musique de votre téléphone. Appuyez sur la touche pour
mettre en pause/en lecture une piste.
Appuyez sur la touche / pour sélectionner la piste suivante/précédente.
UTILISATION DE LA PRISE HDMI
La prise HDMI avant va vers la prise HDMI arrière. La lecture à l'aide de HDMI n'est pas
aectée.
Connecteurs RCA V-IN et V-OUT
À l'arrière de l'appareil, le connecteur V-IN va vers le connecteur V-OUT.
TÉLÉCOMMANDE
La télécommande peut être utilisée lorsque
l'option IR est activée dans le menu.
OFF: Mise en marche et arrêt de l’appareil.
VOL+ : Augmenter le volume
VOL- : Réduire le volume
1 : Activation/désactivation du mode
sourdine de la Zone 1
2 : Activation/désactivation du mode
sourdine de la Zone 2
Pour les autres opérations, lisez les instructions ci-dessus.
INFORMATIONS GÉNÉRALES
Exigences concernant l’alimentation : 12 V DC, borne négative connectée à la terre
Dimensions de la base de montage :129 (larg.) x 112 (long.) x 65 (ép.)
Paramètres de tonalité
- Basse (à 100 Hz) : ±10 dB
- Haute (à 100 Hz) : ±10 dB
Puissance de sortie maximale : 4 x 40 W
Consommation de courant : 10 A (max.)
RADIO FM AM
Plage de fréquences de 87,5 à 108 MHz de 522 à 1620 KHz
IF 10,7 MHz 450 KHz
Sensibilité 4 µV (S/N = 30 dB) 36 dBuV (S/N = 20 dB)
Séparation des canaux stéréo >25 dB /
RÉSOLUTION DES PROBLÈMES
FR

Informations relatives à la sécurité
Cette station multimédia a été fabriquée selon les normes techniques actuellement
en vigueur et les principes de sécurité généralement reconnus. Néanmoins, le
non-respect des consignes de sécurité contenues dans ce manuel comporte divers
risques. Lisez attentivement l'ensemble du manuel avant d'utiliser la station
multimédia. Conservez le manuel dans un endroit où il est accessible pour tous les
utilisateurs et à tout moment. Si la station multimédia est transmise à un tiers, ce
manuel lui doit être également remis. De plus, suivez les instructions des modes
d'emploi des appareils connectés à cette station.
Consignes générales de sécurité
Respectez les instructions suivantes pour vous protéger des blessures :
Ne pas modier ou ouvrir l'appareil.
Usage prévu
La station multimédia est conçue pour être installée et fonctionner dans des
véhicules avec une tension d'alimentation de 12V. Les limites de puissance de
l'appareil doivent être respectées. Toute réparation et installation doit être eectuée
par un professionnel.
Instructions pour l'installation
Vous ne pouvez installer l'appareil vous-même que si vous êtes expérimenté dans
l'installation d'autoradios et si vous avez des connaissances en électricité automobile.
À cet eet, consultez le schéma de câblage de ce manuel. L'installation de cet appareil
ne doit pas gêner ni bloquer le fonctionnement des airbags, des autres dispositifs de
sécurité ou des dispositifs de contrôle.
Déclaration de conformité
Blaupunkt Competence Center Car Multimedia - Evo Sales GmbH déclare que cet
appareil est conforme aux exigences fondamentales et aux autres dispositions
applicables de la directive 2014/53/UE. La déclaration de conformité peut être
consultée à l'adresse suivante :www.blaupunkt.com.
Instructions concernant le nettoyage
Les solvants, les produits nettoyants et abrasifs, ainsi que les nettoyants de cockpit et
les produits d'entretien des plastiques peuvent contenir des composants qui peuvent
endommager la surface de la station multimédia. Pour nettoyer la station multimédia,
utilisez uniquement un chion sec ou légèrement humide.
Instructions concernant la mise au rebut
Ne jetez pas l'appareil usagé avec les ordures ménagères !
Pour mettre au rebut l'appareil, la télécommande et les piles usagées,
veuillez les apporter à un point de collecte des équipements usagés.
Contenu de l'emballage
Le contenu de l’emballage comprend :
station multimédia BPA 3022 M,
télécommande,
connecteurs ISO,
vis de montage,
manuel d’utilisation.
INFORMATIONS IMPORTANTES CONCERNANT L’INSTALLATION
1. Lisez attentivement ce manuel d'utilisation avant d'installer l'appareil.
2. Avant de brancher l'alimentation électrique, assurez-vous que tous les
autres câbles sont connectés.
3. Pour éviter les court-circuits, assurez-vous que tous les câbles exposés sont
isolés.
4. Une fois l'installation terminée, tous les câbles doivent être sécurisés.
5. Les connexions au lecteur doivent être eectuées conformément à ce
manuel. Une connexion incorrecte peut provoquer l'endommagement de
l'appareil.
6. Le lecteur est conçu pour fonctionner uniquement avec une installation de
12 V DC.
INSTALLATION DE L'APPAREIL
DÉMONTAGE DE L'APPAREIL
1. Démontez l'appareil.
2. Démontez le cadre de nition extérieur.
Remarque concernant le HDMI :
Utilisez un câble HDMI de bonne qualité.
La longueur totale (avant et arrière) ne doit pas dépasser 12 pieds.
CONNEXION DES CÂBLES
1. Le lecteur ne peut être utilisé que sous une tension de +12 V DC.
2. Ne connectez pas la borne de la batterie avant que le lecteur ne soit
complètement installé.
3. Assurez-vous que le l jaune est connecté au pôle positif (+) de la batterie.
4. Lorsque vous remplacez le fusible, assurez-vous que les paramètres du
nouveau fusible sont les mêmes.
5. L’utilisation de haut-parleurs de bonne qualité avec une impédance de 4–8
ohms permettra de tirer le meilleur parti de l’appareil.
EMPLACEMENT DES TOUCHES
1. ZONE 1 2. 1 3. ZONE 2
4. 2 5. BT 6. 3 RPT
7. 8. 4 RDM 9.
10. 5 DIR- 11. DIS 12. 6 DIR+
13. LCD 14. PRISE AUX 15. PRISE POUR CASQUE D'ÉCOUTE
16. PRISE HDMI 17. RESET 18. BOUTON ROTATIF
19. PORT USB 20. SRC/MENU
FONCTIONNEMENT DE BASE
Activation/désactivation de l'appareil et de la fonction de mise en sourdine
Pour allumer l'appareil, appuyez sur le bouton rotatif / MUTE. Pour activer ou désactiver la
fonction de mise en sourdine, appuyez brièvement sur le bouton lorsque l'appareil est
allumé. Appuyez sur ce bouton et maintenez-le enfoncé pour éteindre l’appareil.
Réglage du volume et menu de conguration
Appuyez sur la touche SRC/MENU et maintenez-la enfoncée pour accéder au menu illustré
ci-dessous :
BAS->TRE->BAL->EQ (o/pop/rock/class)->LOUD (on/o)->CLK HH->CLK
MM->IR (on/o) ->CT (indep/sync)->SIGN. BEEP (on/o)->P_VOL (13)->DX (LOC)->STE- REO
(MONO)
À chaque position, tournez le bouton VOL pour la régler.
INFRAROUGE (ON/OFF) :
INFRAROUGE ON : L'appareil peut être mis en marche à l'aide de la télécommande à
infrarouge.
Le système est alors en mode de haute consommation d'énergie.
INFRAROUGE OFF : L'appareil ne peut pas être mis en marche à l'aide de la télécommande
à infrarouge.
Le système est en mode de faible consommation d'énergie.
CT (INDEP/SYNC) :
CT INDEP : L’horloge fonctionne indépendamment.
CT SYNC : L’horloge sera synchronisée avec l’heure de la station RDS réceptionnée.
Remarque : Lorsque l'horloge est réglée dans le menu, la fonction CT est automatiquement
réglée sur le mode INDEP (fonctionnement indépendant).
BEEP (ON/OFF) : Permet d'activer/désactiver le signal sonore lorsque les touches sont
enfoncées.
P-VOL : Permet de régler le volume à la mise en marche. Si le niveau de volume à l'arrêt est
inférieur au niveau P-VOL, l'appareil règle le niveau de volume sur le volume à l'arrêt
lorsqu'il est mis en marche.
Si le niveau de volume à l'arrêt est supérieur au niveau P-VOL, le volume sera réinitialisé sur
les valeurs P-VOL à la mise en marche.
Recherche de haut-parleurs Bluetooth
Après avoir enfoncé la touche BT, l'écran ache « SEARCH... » [recherche]. Un instant plus
tard, le nom de votre appareil Bluetooth s'ache. Pour acher l'appareil suivant, tournez le
bouton VOL. Une fois que le nom du haut-parleur Bluetooth souhaité s'ache sur l'écran
LCD, appuyez sur le bouton VOL pour associer l'appareil. Une fois le jumelage terminé,
l'écran ache le message « BOX ON ».
Consigne importante : Malgré de nombreux tests eectués avec divers dispositifs
Bluetooth, la compatibilité avec tous les dispositifs Bluetooth disponible sur le marché ne
peut être garantie.
Transmission du signal au haut-parleur Bluetooth
Appuyez brièvement sur la touche BT pour arrêter/initier le transfert du signal vers le
haut-parleur Bluetooth. L'écran ache le message « BOX OFF/ON ».
Remarque : Bien que Blaupunkt vérie soigneusement la compatibilité des diérents
haut-parleurs Bluetooth, un fonctionnement sans faille ne peut être garanti avec tous les
modèles du marché.
Fonctionnement des Zones 1 et 2
Appuyez brièvement sur la touche Zone 1 (ou Zone 2) pour activer ou désactiver le son de
la Zone 1 (ou de la Zone 2).
Maintenez la touche Zone 1 (ou Zone 2) enfoncée pour couper le son de la Zone 1 (ou de la
Zone 2). Appuyez à nouveau sur la touche pour rétablir le son.
Priorité des informations ou de l'horloge
Appuyez brièvement sur la touche DIS pour modier la priorité de l’horloge ou la priorité
des informations.
Remarque : En mode FM, lorsque vous recevez des stations RDS, appuyez brièvement sur la
touche DIS pour acher NOM DE STATION/HORLOGE/FRÉQUENCE.
Réglage de l’horloge
Sélectionnez CLK HH/CLK MM dans le menu. Tournez le bouton VOL pour régler les heures /
les minutes.
Fonctionnement du casque d'écoute
Une prise pour casque d'écoute de 3,5 mm se trouve sur le panneau avant. Il adopte les
paramètres de fonctionnement de la Zone 1.
UTILISATION DE LA RADIO
Réception des stations de radio
Appuyez sur la touche SRC/MENU pour sélectionner un mode parmi FM1->FM2->MW.
Appuyez brièvement sur la touche / pour recevoir la station de radio souhaitée.
Maintenez la touche / enfoncée pour régler manuellement la fréquence.
Mémorisation manuelle des stations et accès aux stations mémorisées
Réception de la station souhaitée. Appuyez sur les touches numériques (1-6) et
maintenez-les enfoncées pendant 2 secondes. La station actuelle sera mise en mémoire
pour la touche numérique correspondante. Appuyez brièvement sur la touche de la station
préréglée (1–6) pour écouter directement le signal de diusion de cette station mémorisée
pour la touche assignée.
FONCTIONNEMENT DAB
Appuyez sur la touche SRC/MENU pour basculer la source entre DAB1 et DAB2.
Sélection d'une station
Appuyez sur la touche / pour sélectionner la station suivante/précédente.
Mémorisation manuelle des stations et accès aux stations mémorisées
Lorsque la fréquence de la station souhaitée est réglée, appuyez sur l'une des touches
numérotées de 1 à 6 pendant 2 secondes pour mémoriser cette station sous le numéro
correspondant. Appuyez brièvement sur la touche de la station préréglée (1–6) pour
écouter directement le signal de diusion de cette station mémorisée pour la touche
assignée.
UTILISATION DU PORT USB
Lorsqu'un lecteur USB est connecté à l'appareil, ce dernier lit automatiquement les
chiers MP3/WMA. Si un lecteur USB a déjà été connecté à l'appareil, appuyez
brièvement sur la touche SRC/MENU jusqu'à ce que l'écran du mode USB apparaisse.
Sélection d'un chier
Appuyez sur la touche / pour passer au chier suivant/précédent. Appuyez
sur la touche / pour faire déler rapidement vers l'avant et vers l'arrière.
Lecture/Pause
Appuyez sur la touche 1 pour mettre en pause/lire un chier.
Fonction de lecture en boucle
Appuyez sur la touche 3 RPT pour sélectionner la fonction de lecture en boucle. RPT
ONE/RPT FOLD/RPT ALL (par défaut)
RPT ONE : Lecture en boucle d'un seul chier.
RPT FOLD : Lecture en boucle de tous les chiers d'un dossier.
RPT ALL : Lecture en boucle de tous les chiers.
RANDOM
Appuyez sur la touche 4 RDM pour activer ou désactiver la fonction de lecture aléatoire.
RDM ON : Lecture aléatoire de tous les chiers.
RDM OFF : Fonction de lecture aléatoire.
Fonction dossier +/-
Appuyez sur la touche DIR+/DIR- pour sélectionner le dossier suivant/précédent à lire.
Recherche d'une chanson
Après avoir enfoncé la touche l'écran achera « NUM 0000 ». En tournant le bouton
VOL (ou en saisissant directement un numéro), sélectionnez un numéro, puis appuyez
sur VOL pour lancer la lecture. Veuillez noter que 7/8/9/0 signie : BT = 7, = 8, = 9,
DIS = 0.
UTILISATION DE LA PRISE AUX IN 1/2
Sur le panneau avant, la prise AUX IN 1 est un jack de 3,5 mm. La prise AUX IN 2 pour
RCA est située à l'arrière de l'appareil. En appuyant sur la touche SRC/MENU, on peut
passer en mode AUX IN1 (2) lorsque le signal audio est connecté à l'appareil.
UTILISATION DU BLUETOOTH
Jumelage des appareils
Sélectionnez la position Bluetooth et recherchez le périphérique Bluetooth sur votre
téléphone. La position « BLAUPUNKT » devrait apparaître dans la liste ; sélectionnez
« BLAUPUNKT », puis entrez le mot de passe « 0000 » si un message demandant un mot
de passe s'ache. Une fois le jumelage terminé, l'écran ache « BT ».
Audio Bluetooth
Appuyez sur la touche SRC/MENU pour passer en mode BT MUSIC. L'appareil réproduira
automatiquement la musique de votre téléphone. Appuyez sur la touche pour
mettre en pause/en lecture une piste.
Appuyez sur la touche / pour sélectionner la piste suivante/précédente.
UTILISATION DE LA PRISE HDMI
La prise HDMI avant va vers la prise HDMI arrière. La lecture à l'aide de HDMI n'est pas
aectée.
Connecteurs RCA V-IN et V-OUT
À l'arrière de l'appareil, le connecteur V-IN va vers le connecteur V-OUT.
TÉLÉCOMMANDE
La télécommande peut être utilisée lorsque
l'option IR est activée dans le menu.
OFF: Mise en marche et arrêt de l’appareil.
VOL+ : Augmenter le volume
VOL- : Réduire le volume
1 : Activation/désactivation du mode
sourdine de la Zone 1
2 : Activation/désactivation du mode
sourdine de la Zone 2
Pour les autres opérations, lisez les instructions ci-dessus.
UTILISATION
INFORMATIONS GÉNÉRALES
Exigences concernant l’alimentation : 12 V DC, borne négative connectée à la terre
Dimensions de la base de montage :129 (larg.) x 112 (long.) x 65 (ép.)
Paramètres de tonalité
- Basse (à 100 Hz) : ±10 dB
- Haute (à 100 Hz) : ±10 dB
Puissance de sortie maximale : 4 x 40 W
Consommation de courant : 10 A (max.)
RADIO FM AM
Plage de fréquences de 87,5 à 108 MHz de 522 à 1620 KHz
IF 10,7 MHz 450 KHz
Sensibilité 4 µV (S/N = 30 dB) 36 dBuV (S/N = 20 dB)
Séparation des canaux stéréo >25 dB /
RÉSOLUTION DES PROBLÈMES
FR

Wskazówki dotyczące bezpieczeństwa
Niniejszą stację multimedialną wyprodukowano zgodnie z aktualnymi
standardami rozwoju techniki i ogólnie uznanymi zasadami bezpieczeństwa.
Mimo to nieprzestrzeganie zawartych w niniejszej instrukcji wskazówek
dotyczących bezpieczeństwa wiąże się z różnego rodzaju zagrożeniami. Przed
rozpoczęciem użytkowania stacji multimedialnej należy dokładnie przeczytać
całą instrukcję. Przechowywać instrukcję w takim miejscu, aby w każdej chwili
była dostępna dla wszystkich użytkowników. W przypadku przekazania stacji
multimedialnej osobom trzecim należy dołączyć niniejszą instrukcję. Oprócz
tego należy przestrzegać wskazówek zawartych w instrukcjach obsługi
urządzeń podłączonych do tej stacji.
Ogólne wskazówki dotyczące bezpieczeństwa
Należy przestrzegać poniższych wskazówek, aby chronić się przed obrażeniami
ciała: Nie wolno modykować ani otwierać urządzenia.
Przeznaczenie
Stacja multimedialna jest przeznaczona do montażu i obsługi w pojazdach z
instalacją o napięciu 12 V. Należy przestrzegać wartości granicznych mocy
urządzenia. Ewentualne naprawy oraz montaż należy zlecić fachowcowi.
Instrukcja montażu
Urządzenie można zamontować samodzielnie tylko w przypadku dysponowania
doświadczeniem w zakresie montażu radioodtwarzaczy i znajomością
zagadnień elektryki samochodowej. W tym celu należy zapoznać się ze
schematem połączeń zawartym w niniejszej instrukcji. Montaż urządzenia nie
może utrudniać lub blokować działania jakichkolwiek poduszek powietrznych,
innych urządzeń zabezpieczających lub elementów sterowania.
Deklaracja zgodności
Blaupunkt Competence Center Car Multimedia – Evo Sales GmbH oświadcza, że
to urządzenie jest zgodne z wymaganiami podstawowymi oraz pozostałymi
stosownymi postanowieniami Dyrektywy 2014/53/UE. Deklarację zgodności
można znaleźć na stronie internetowej www.blaupunkt.com.
Wskazówki dotyczące czyszczenia
Rozpuszczalniki, środki czyszczące oraz ścierne, jak również aerozole do czyszczenia
kokpitów i środki do pielęgnacji tworzyw sztucznych mogą zawierać składniki, które
mogłyby uszkodzić powierzchnię stacji multimedialnej. Do czyszczenia stacji
tedialnej należy używać wyłącznie suchej lub lekko zwilżonej ściereczki.
Wskazówki dotyczące utylizacji
Nie wolno wyrzucać zużytego urządzenia wraz z odpadami z
gospodarstwa domowego!
Aby zutylizować urządzenie, pilot zdalnego sterowania i zużyte baterie,
należy oddać je do punktu zbiórki zużytego sprzętu.
Zakres dostawy
Zakres dostawy obejmuje:
stację multimedialną BPA 3022 M,
pilot zdalnego sterowania,
złącza ISO,
śruby montażowe,
instrukcję obsługi.
WAŻNE INFORMACJE DOTYCZĄCE MONTAŻU
1. Przed przystąpieniem do montażu urządzenia, należy dokładnie przeczytać
instrukcję obsługi.
2. Przed podłączeniem zasilania należy upewnić się, że wszystkie inne
przewody zostały podłączone.
3. Aby uniknąć zwarcia, należy upewnić się, że wszystkie odsłonięte przewody
zostały zaizolowane.
4. Po zakończeniu montażu należy zamocować wszystkie przewody.
5. Podłączenia do odtwarzacza należy wykonać zgodnie z niniejszą instrukcją
obsługi. Nieprawidłowe podłączenie może spowodować uszkodzenie
urządzenia.
6. Odtwarzacz jest przeznaczony do pracy wyłącznie z instalacją o napięciu 12
V prądu stałego.
MONTAŻ URZĄDZENIA
DEMONTAŻ URZĄDZENIA
1. Zdemontuj urządzenie.
2. Rozmontuj zewnętrzną ramkę wykończeniową.
Uwaga dotycząca HDMI:
Używaj kabla HDMI dobrej jakości.
Długość całkowita (przód i tył) nie powinna przekraczać 12 stóp.
PODŁĄCZENIE PRZEWODÓW
1. Odtwarzacz może być używany tylko przy napięciu +12 V prądu stałego.
2. Nie podłączaj zacisku akumulatora, dopóki odtwarzacz nie zostanie całkowicie
zamontowany.
3. Upewnij się, że żółty przewód jest podłączony do bieguna dodatniego akumula-
tora (+).
4. Przy wymianie bezpiecznika upewnij się, że parametry nowego bezpiecznika są
takie same.
5. Zastosowanie dobrej jakości głośników o impedancji 4–8 omów pozwala uzyskać
najlepsze efekty działania urządzenia.
POŁOŻENIE PRZYCISKÓW
1. STREFA 1 2. 1 3. STREFA 2
4. 2 5. BT 6. 3 RPT
7. 8. 4 RDM 9.
10. 5 DIR- 11. DIS 12. 6 DIR+
13. LCD 14. GNIAZDO AUX 15. GNIAZDO SŁUCHAWKOWE
16. GNIAZDO HDMI 17. RESET 18. POKRĘTŁO
19. PORT USB 20. SRC/MENU
OBSŁUGA PODSTAWOWA
Włączanie/wyłączanie urządzenia i funkcji wyciszania
Aby włączyć urządzenie, naciśnij pokrętło /MUTE. W celu włączenia lub wyłączenia funkcji
wyciszenia, krótko naciśnij pokrętło, gdy urządzenie jest włączone. Naciśnięcie i
przytrzymanie tego przycisku spowoduje wyłączenie urządzenia.
Ustawienia dźwięku i menu ustawień
Naciśnij i przytrzymaj przycisk SRC/MENU, aby przejść do menu przedstawionego poniżej:
BAS->TRE->BAL->EQ (wył./pop/rock/clas)->LOUD (wł./wył.)->CLK HH->CLK MM->IR
(wł./wył.) ->CT (indep/sync)->SYG. DŹW. (wł./wył.) )->P_VOL (13)->DX (LOC)->STE- REO
(MONO)
Przy każdej pozycji obróć pokrętło VOL, aby ją ustawić.
PODCZERWIEŃ (WŁ./WYŁ.):
PODCZERWIEŃ wł.: Urządzenie można włączyć za pomocą pilota zdalnego sterowania na
podczerwień. System wtedy jest w trybie wysokiego zużycia energii.
PODCZERWIEŃ wył.: Urządzenia nie można włączyć za pomocą pilota zdalnego
sterowania na podczerwień. System jest w trybie niskiego zużycia energii.
CT (INDEP/SYNC):
CT INDEP: Zegar działa niezależnie.
CT SYNC: Zegar zostanie zsynchronizowany z czasem odbieranej stacji RDS. Uwaga: W
przypadku gdy zegar został ustawiony w menu, funkcja CT jest automatycznie ustawiana
na tryb INDEP (niezależne działanie).
SYGNAŁ DŹWIĘKOWY (WŁ./WYŁ.): Pozwala na włączanie/wyłączenie sygnału dźwiękowe-
go przy naciśnięciu przycisków.
P-VOL: Pozwala na ustawienie głośności przy włączaniu. Jeśli poziom głośności przy
wyłączaniu jest niższy niż poziom P-VOL, po włączeniu urządzenie ustawi poziom
głośności na głośność przy wyłączaniu.
Jeśli poziom głośności przy wyłączaniu jest wyższy niż poziom P-VOL, głośność zostanie
przywrócona do poziomu
wartości P-VOL przy włączeniu urządzenia.
Wyszukiwanie głośników Bluetooth
Naciśnięcie i przytrzymanie przycisk BT spowoduje wyświetlenie komunikatu „SEARCH...”
[szukanie]. Chwilę później zostanie wyświetlona nazwa urządzenia Bluetooth. Aby
wyświetlić następne urządzenie, obróć pokrętło VOL. Po wyświetleniu na LCD nazwy
żądanego głośnika Bluetooth, naciśnij pokrętło VOL, aby sparować urządzenie. Jeśli
parowanie się powiedzie, na wyświetlaczu pojawi się komunikat „BOX ON”.
Ważna wskazówka: Pomimo licznych testów z różnymi urządzeniami Bluetooth, nie
można zagwarantować zgodności ze wszystkimi urządzeniami Bluetooth dostępnymi na
rynku.
Transmisja sygnału do głośnika Bluetooth
Krótko naciśnij przycisk BT, aby zatrzymać przesyłanie/przesłać sygnał do głośnika
Bluetooth. Na wyświetlaczu pojawi się komunikat „BOX OFF/ON”.
Uwaga: Mimo że rma Blaupunkt dokładnie sprawdza kompatybilność różnych
głośników Bluetooth, nie można zagwarantować bezproblemowego działania urządzenia
ze wszystkimi modelami dostępnymi na rynku.
Obsługa Strefy 1 i Strefy 2
Krótko naciśnij przycisk Zone 1 (lub Zone 2), aby wyłączyć/włączyć dźwięk Strefy 1
(lub Strefy 2).
Przytrzymaj przycisk Zone 1 (lub Zone 2), aby wyciszyć dźwięk Strefy 1 (lub Strefy 2).
Ponowne przytrzymanie przycisku spowoduje wyłączenie wyciszenia.
Priorytet informacji lub zegara
Naciśnij krótko przycisk DIS, aby ustawić priorytet zegara lub priorytet informacji.
Uwaga: W paśmie FM, w przypadku odbierania stacji RDS, krótko naciśnij przycisk
DIS, aby wyświetlić NAZWĘ STACJI/ ZEGAR/CZĘSTOTLIWOŚĆ.
Ustawianie zegara
W menu wybierz pozycję CLK HH/CLK MM. Obróć pokrętło VOL, aby ustawić
godzinę/minuty.
Obsługa słuchawek
Na panelu przednim znajduje się gniazdo słuchawkowe 3,5 mm. Przyjmuje ono
ustawienia działania Strefy 1.
OBSŁUGA RADIA
Odbiór stacji radiowych
Naciśnij przycisk SRC/MENU, aby wybrać tryb spośród FM1->FM2->MW. Krótko
naciśnij przycisk / , aby odbierać żądaną stację radiową. Naciśnij i przytrzy-
maj przycisk / w celu ręcznego dostrojenia częstotliwości.
Ręczne zapisywanie stacji i wywoływanie zapisanych stacji
Odbieranie żądanej stacji. Naciśnij i przytrzymaj jeden z przycisków pamięci (1–6)
przez 2 sekundy. Aktualna stacja zostanie zapisana w pamięci pod danym przycis-
kiem numerycznym. Naciśnij krótko przycisk zaprogramowanej stacji (1–6), aby
słuchać bezpośrednio sygnału nadawanego z tej stacji i zapisanego pod przyporząd-
kowanym przyciskiem.
OBSŁUGA DAB
Naciśnij przycisk SRC/MENU, aby przełączyć źródło między DAB1 lub DAB2.
Wybór stacji
Naciśnij przycisk / , aby wybrać następną/poprzednią stację.
Ręczne zapisywanie stacji i wywoływanie zapisanych stacji
Gdy ustawiono częstotliwość żądanej stacji. Naciśnij i przytrzymaj jeden z przycisków
od 1 do 6 przez 2 sekundy, aby zapisać tę stację pod odpowiednim numerem.
Naciśnij krótko przycisk zaprogramowanej stacji (1–6), aby słuchać bezpośrednio
sygnału nadawanego z tej stacji i zapisanego pod przyporządkowanym przyciskiem.
OBSŁUGA USB
Po podłączeniu do urządzenia dysku USB, urządzenie automatycznie odtworzy pliki
MP3/WMA. Jeżeli dysk USB został już podłączony do urządzenia, naciśnij krótko
przycisk SRC/MENU, aż pojawi się ekran trybu USB.
Wybór pliku
Naciśnij przycisk / , aby przejść do następnego/poprzedniego pliku.
Przytrzymaj przycisk / , aby przewinąć szybko do przodu lub do tyłu.
Odtwarzanie/wstrzymanie
Naciśnij przycisk 1 , aby wstrzymać/odtworzyć plik.
Funkcja odtwarzania w pętli
Naciśnij przycisk 3 RPT, aby wybrać funkcję odtwarzania w pętli. RPT ONE/RPT
FOLD/RPT ALL (domyślnie)
RPT ONE: Odtwarzanie w pętli jednego pliku.
RPT FOLD: Odtwarzanie w pętli wszystkich plików w folderze.
RPT ALL: Odtwarzanie w pętli wszystkich plików.
RANDOM
Naciśnij przycisk 4 RDM, aby włączyć lub wyłączyć funkcję odtwarzania losowego.
RDM wł.: Odtwarzanie losowe wszystkich plików.
RDM wył.: Wyłączenie funkcji odtwarzania losowego.
Funkcja folder +/-
Naciśnij przycisk DIR+/DIR-, aby wybrać następny/poprzedni folder do odtwarzania.
Wyszukiwanie piosenki
Naciśnięcie i przytrzymanie przycisku spowoduje wyświetlenie komunikatu
„NUM 0000”. Obracając pokrętło VOL (lub bezpośrednio wprowadzając numer),
wybierz numer, a następnie naciśnij VOL, aby odtworzyć. Należy zwrócić uwagę na
7/8/9/0 jako: BT = 7, = 8, = 9, DIS = 0.
UŻYWANIE GNIAZDA AUX IN 1/2
Na panelu przednim gniazdo AUX IN 1 jest gniazdem 3,5 mm. Natomiast gniazdo
AUX IN 2 dla RCA znajduje się z tyłu urządzenia. Naciśnięcie przycisku SRC/MENU
spowoduje przełączenie do trybu AUX IN1 (2) po podłączeniu sygnału audio do
urządzenia.
OBSŁUGA BLUETOOTH
Parowanie urządzeń
W smartfonie wybierz pozycję Bluetooth i wyszukaj urządzenie Bluetooth. Na liście
powinna pojawić się pozycja „BLAUPUNKT”; wybierz „BLAUPUNKT”, a następnie
wprowadź hasło „0000”, jeśli zostanie wyświetlony komunikat wymagający
wprowadzenia hasła. Po pomyślnym sparowaniu na wyświetlaczu pojawi się napis BT.
Dźwięk Bluetooth
Naciśnij przycisk SRC/MENU, aby przełączyć się do trybu BT MUSIC. Urządzenie
automatycznie odtworzy utwór z telefonu. Naciśnij przycisk , aby wstrzymać/odt-
worzyć utwór.
Naciśnij przycisk / , aby wybrać następny/poprzedni utwór.
OBSŁUGA HDMI
Przednie gniazdo HDMI przechodzi do tylnego gniazda HDMI. Nie ma to wpływu na
odtwarzanie za pomocą HDMI.
Złącze RCA V-In i V-OUT
W tylnej części urządzenia złącze V-IN przechodzi do złącza V-OUT.
PILOT ZDALNEGO STEROWANIA
Pilota zdalnego sterowania można używać, gdy w menu ustawiono opcję IR na
włączoną.
OFF: Włączanie i wyłączanie urządzenia.
VOL+: Zwiększanie głośności
VOL-: Zmniejszanie głośności
1 : Włączanie/wyłączanie wyciszenia Strefy 1
2 : Włączanie/wyłączanie wyciszenia Strefy 2
W przypadku innych działań należy przeczytać
instrukcje powyżej.
INFORMACJE OGÓLNE
Wymagania dotyczące zasilania : Prąd stały o napięciu 12 V, zacisk ujemny
połączony z masą
Wymiary podstawy montażowej : 129 (szer.) x 112 (gł.) x 65 (wys.)
Ustawienia tonów
- Niskie (przy 100 Hz) : ±10 dB
- Wysokie (przy 100 Hz) : ±10 dB
Maksymalna moc wyjściowa : 4 × 40 W
Pobór prądu : 10 A (maks.)
RADIO FM AM
Zakres częstotliwości od 87,5 do 108 MHz od 522 do 1620 KHz
IF 10.7 MHz 450 KHz
Czułość 4 µV (S/N = 30 dB) 36 dBµV (S/N = 20 dB)
Separacja kanałów stereo >25 dB /
ROZWIĄZYWANIE PROBLEMÓW
Informations relatives à la sécurité
Cette station multimédia a été fabriquée selon les normes techniques actuellement
en vigueur et les principes de sécurité généralement reconnus. Néanmoins, le
non-respect des consignes de sécurité contenues dans ce manuel comporte divers
risques. Lisez attentivement l'ensemble du manuel avant d'utiliser la station
multimédia. Conservez le manuel dans un endroit où il est accessible pour tous les
utilisateurs et à tout moment. Si la station multimédia est transmise à un tiers, ce
manuel lui doit être également remis. De plus, suivez les instructions des modes
d'emploi des appareils connectés à cette station.
Consignes générales de sécurité
Respectez les instructions suivantes pour vous protéger des blessures :
Ne pas modier ou ouvrir l'appareil.
Usage prévu
La station multimédia est conçue pour être installée et fonctionner dans des
véhicules avec une tension d'alimentation de 12V. Les limites de puissance de
l'appareil doivent être respectées. Toute réparation et installation doit être eectuée
par un professionnel.
Instructions pour l'installation
Vous ne pouvez installer l'appareil vous-même que si vous êtes expérimenté dans
l'installation d'autoradios et si vous avez des connaissances en électricité automobile.
À cet eet, consultez le schéma de câblage de ce manuel. L'installation de cet appareil
ne doit pas gêner ni bloquer le fonctionnement des airbags, des autres dispositifs de
sécurité ou des dispositifs de contrôle.
Déclaration de conformité
Blaupunkt Competence Center Car Multimedia - Evo Sales GmbH déclare que cet
appareil est conforme aux exigences fondamentales et aux autres dispositions
applicables de la directive 2014/53/UE. La déclaration de conformité peut être
consultée à l'adresse suivante :www.blaupunkt.com.
Instructions concernant le nettoyage
Les solvants, les produits nettoyants et abrasifs, ainsi que les nettoyants de cockpit et
les produits d'entretien des plastiques peuvent contenir des composants qui peuvent
endommager la surface de la station multimédia. Pour nettoyer la station multimédia,
utilisez uniquement un chion sec ou légèrement humide.
Instructions concernant la mise au rebut
Ne jetez pas l'appareil usagé avec les ordures ménagères !
Pour mettre au rebut l'appareil, la télécommande et les piles usagées,
veuillez les apporter à un point de collecte des équipements usagés.
Contenu de l'emballage
Le contenu de l’emballage comprend :
station multimédia BPA 3022 M,
télécommande,
connecteurs ISO,
vis de montage,
manuel d’utilisation.
INFORMATIONS IMPORTANTES CONCERNANT L’INSTALLATION
1. Lisez attentivement ce manuel d'utilisation avant d'installer l'appareil.
2. Avant de brancher l'alimentation électrique, assurez-vous que tous les
autres câbles sont connectés.
3. Pour éviter les court-circuits, assurez-vous que tous les câbles exposés sont
isolés.
4. Une fois l'installation terminée, tous les câbles doivent être sécurisés.
5. Les connexions au lecteur doivent être eectuées conformément à ce
manuel. Une connexion incorrecte peut provoquer l'endommagement de
l'appareil.
6. Le lecteur est conçu pour fonctionner uniquement avec une installation de
12 V DC.
INSTALLATION DE L'APPAREIL
DÉMONTAGE DE L'APPAREIL
1. Démontez l'appareil.
2. Démontez le cadre de nition extérieur.
Remarque concernant le HDMI :
Utilisez un câble HDMI de bonne qualité.
La longueur totale (avant et arrière) ne doit pas dépasser 12 pieds.
CONNEXION DES CÂBLES
1. Le lecteur ne peut être utilisé que sous une tension de +12 V DC.
2. Ne connectez pas la borne de la batterie avant que le lecteur ne soit
complètement installé.
3. Assurez-vous que le l jaune est connecté au pôle positif (+) de la batterie.
4. Lorsque vous remplacez le fusible, assurez-vous que les paramètres du
nouveau fusible sont les mêmes.
5. L’utilisation de haut-parleurs de bonne qualité avec une impédance de 4–8
ohms permettra de tirer le meilleur parti de l’appareil.
EMPLACEMENT DES TOUCHES
1. ZONE 1 2. 1 3. ZONE 2
4. 2 5. BT 6. 3 RPT
7. 8. 4 RDM 9.
10. 5 DIR- 11. DIS 12. 6 DIR+
13. LCD 14. PRISE AUX 15. PRISE POUR CASQUE D'ÉCOUTE
16. PRISE HDMI 17. RESET 18. BOUTON ROTATIF
19. PORT USB 20. SRC/MENU
FONCTIONNEMENT DE BASE
Activation/désactivation de l'appareil et de la fonction de mise en sourdine
Pour allumer l'appareil, appuyez sur le bouton rotatif / MUTE. Pour activer ou désactiver la
fonction de mise en sourdine, appuyez brièvement sur le bouton lorsque l'appareil est
allumé. Appuyez sur ce bouton et maintenez-le enfoncé pour éteindre l’appareil.
Réglage du volume et menu de conguration
Appuyez sur la touche SRC/MENU et maintenez-la enfoncée pour accéder au menu illustré
ci-dessous :
BAS->TRE->BAL->EQ (o/pop/rock/class)->LOUD (on/o)->CLK HH->CLK
MM->IR (on/o) ->CT (indep/sync)->SIGN. BEEP (on/o)->P_VOL (13)->DX (LOC)->STE- REO
(MONO)
À chaque position, tournez le bouton VOL pour la régler.
INFRAROUGE (ON/OFF) :
INFRAROUGE ON : L'appareil peut être mis en marche à l'aide de la télécommande à
infrarouge.
Le système est alors en mode de haute consommation d'énergie.
INFRAROUGE OFF : L'appareil ne peut pas être mis en marche à l'aide de la télécommande
à infrarouge.
Le système est en mode de faible consommation d'énergie.
CT (INDEP/SYNC) :
CT INDEP : L’horloge fonctionne indépendamment.
CT SYNC : L’horloge sera synchronisée avec l’heure de la station RDS réceptionnée.
Remarque : Lorsque l'horloge est réglée dans le menu, la fonction CT est automatiquement
réglée sur le mode INDEP (fonctionnement indépendant).
BEEP (ON/OFF) : Permet d'activer/désactiver le signal sonore lorsque les touches sont
enfoncées.
P-VOL : Permet de régler le volume à la mise en marche. Si le niveau de volume à l'arrêt est
inférieur au niveau P-VOL, l'appareil règle le niveau de volume sur le volume à l'arrêt
lorsqu'il est mis en marche.
Si le niveau de volume à l'arrêt est supérieur au niveau P-VOL, le volume sera réinitialisé sur
les valeurs P-VOL à la mise en marche.
Recherche de haut-parleurs Bluetooth
Après avoir enfoncé la touche BT, l'écran ache « SEARCH... » [recherche]. Un instant plus
tard, le nom de votre appareil Bluetooth s'ache. Pour acher l'appareil suivant, tournez le
bouton VOL. Une fois que le nom du haut-parleur Bluetooth souhaité s'ache sur l'écran
LCD, appuyez sur le bouton VOL pour associer l'appareil. Une fois le jumelage terminé,
l'écran ache le message « BOX ON ».
Consigne importante : Malgré de nombreux tests eectués avec divers dispositifs
Bluetooth, la compatibilité avec tous les dispositifs Bluetooth disponible sur le marché ne
peut être garantie.
Transmission du signal au haut-parleur Bluetooth
Appuyez brièvement sur la touche BT pour arrêter/initier le transfert du signal vers le
haut-parleur Bluetooth. L'écran ache le message « BOX OFF/ON ».
Remarque : Bien que Blaupunkt vérie soigneusement la compatibilité des diérents
haut-parleurs Bluetooth, un fonctionnement sans faille ne peut être garanti avec tous les
modèles du marché.
Fonctionnement des Zones 1 et 2
Appuyez brièvement sur la touche Zone 1 (ou Zone 2) pour activer ou désactiver le son de
la Zone 1 (ou de la Zone 2).
Maintenez la touche Zone 1 (ou Zone 2) enfoncée pour couper le son de la Zone 1 (ou de la
Zone 2). Appuyez à nouveau sur la touche pour rétablir le son.
Priorité des informations ou de l'horloge
Appuyez brièvement sur la touche DIS pour modier la priorité de l’horloge ou la priorité
des informations.
Remarque : En mode FM, lorsque vous recevez des stations RDS, appuyez brièvement sur la
touche DIS pour acher NOM DE STATION/HORLOGE/FRÉQUENCE.
Réglage de l’horloge
Sélectionnez CLK HH/CLK MM dans le menu. Tournez le bouton VOL pour régler les heures /
les minutes.
Fonctionnement du casque d'écoute
Une prise pour casque d'écoute de 3,5 mm se trouve sur le panneau avant. Il adopte les
paramètres de fonctionnement de la Zone 1.
UTILISATION DE LA RADIO
Réception des stations de radio
Appuyez sur la touche SRC/MENU pour sélectionner un mode parmi FM1->FM2->MW.
Appuyez brièvement sur la touche / pour recevoir la station de radio souhaitée.
Maintenez la touche / enfoncée pour régler manuellement la fréquence.
Mémorisation manuelle des stations et accès aux stations mémorisées
Réception de la station souhaitée. Appuyez sur les touches numériques (1-6) et
maintenez-les enfoncées pendant 2 secondes. La station actuelle sera mise en mémoire
pour la touche numérique correspondante. Appuyez brièvement sur la touche de la station
préréglée (1–6) pour écouter directement le signal de diusion de cette station mémorisée
pour la touche assignée.
FONCTIONNEMENT DAB
Appuyez sur la touche SRC/MENU pour basculer la source entre DAB1 et DAB2.
Sélection d'une station
Appuyez sur la touche / pour sélectionner la station suivante/précédente.
Mémorisation manuelle des stations et accès aux stations mémorisées
Lorsque la fréquence de la station souhaitée est réglée, appuyez sur l'une des touches
numérotées de 1 à 6 pendant 2 secondes pour mémoriser cette station sous le numéro
correspondant. Appuyez brièvement sur la touche de la station préréglée (1–6) pour
écouter directement le signal de diusion de cette station mémorisée pour la touche
assignée.
UTILISATION DU PORT USB
Lorsqu'un lecteur USB est connecté à l'appareil, ce dernier lit automatiquement les
chiers MP3/WMA. Si un lecteur USB a déjà été connecté à l'appareil, appuyez
brièvement sur la touche SRC/MENU jusqu'à ce que l'écran du mode USB apparaisse.
Sélection d'un chier
Appuyez sur la touche / pour passer au chier suivant/précédent. Appuyez
sur la touche / pour faire déler rapidement vers l'avant et vers l'arrière.
Lecture/Pause
Appuyez sur la touche 1 pour mettre en pause/lire un chier.
Fonction de lecture en boucle
Appuyez sur la touche 3 RPT pour sélectionner la fonction de lecture en boucle. RPT
ONE/RPT FOLD/RPT ALL (par défaut)
RPT ONE : Lecture en boucle d'un seul chier.
RPT FOLD : Lecture en boucle de tous les chiers d'un dossier.
RPT ALL : Lecture en boucle de tous les chiers.
RANDOM
Appuyez sur la touche 4 RDM pour activer ou désactiver la fonction de lecture aléatoire.
RDM ON : Lecture aléatoire de tous les chiers.
RDM OFF : Fonction de lecture aléatoire.
Fonction dossier +/-
Appuyez sur la touche DIR+/DIR- pour sélectionner le dossier suivant/précédent à lire.
Recherche d'une chanson
Après avoir enfoncé la touche l'écran achera « NUM 0000 ». En tournant le bouton
VOL (ou en saisissant directement un numéro), sélectionnez un numéro, puis appuyez
sur VOL pour lancer la lecture. Veuillez noter que 7/8/9/0 signie : BT = 7, = 8, = 9,
DIS = 0.
UTILISATION DE LA PRISE AUX IN 1/2
Sur le panneau avant, la prise AUX IN 1 est un jack de 3,5 mm. La prise AUX IN 2 pour
RCA est située à l'arrière de l'appareil. En appuyant sur la touche SRC/MENU, on peut
passer en mode AUX IN1 (2) lorsque le signal audio est connecté à l'appareil.
UTILISATION DU BLUETOOTH
Jumelage des appareils
Sélectionnez la position Bluetooth et recherchez le périphérique Bluetooth sur votre
téléphone. La position « BLAUPUNKT » devrait apparaître dans la liste ; sélectionnez
« BLAUPUNKT », puis entrez le mot de passe « 0000 » si un message demandant un mot
de passe s'ache. Une fois le jumelage terminé, l'écran ache « BT ».
Audio Bluetooth
Appuyez sur la touche SRC/MENU pour passer en mode BT MUSIC. L'appareil réproduira
automatiquement la musique de votre téléphone. Appuyez sur la touche pour
mettre en pause/en lecture une piste.
Appuyez sur la touche / pour sélectionner la piste suivante/précédente.
UTILISATION DE LA PRISE HDMI
La prise HDMI avant va vers la prise HDMI arrière. La lecture à l'aide de HDMI n'est pas
aectée.
Connecteurs RCA V-IN et V-OUT
À l'arrière de l'appareil, le connecteur V-IN va vers le connecteur V-OUT.
TÉLÉCOMMANDE
La télécommande peut être utilisée lorsque
l'option IR est activée dans le menu.
OFF: Mise en marche et arrêt de l’appareil.
VOL+ : Augmenter le volume
VOL- : Réduire le volume
1 : Activation/désactivation du mode
sourdine de la Zone 1
2 : Activation/désactivation du mode
sourdine de la Zone 2
Pour les autres opérations, lisez les instructions ci-dessus.
INFORMATIONS GÉNÉRALES
Exigences concernant l’alimentation : 12 V DC, borne négative connectée à la terre
Dimensions de la base de montage :129 (larg.) x 112 (long.) x 65 (ép.)
Paramètres de tonalité
- Basse (à 100 Hz) : ±10 dB
- Haute (à 100 Hz) : ±10 dB
Puissance de sortie maximale : 4 x 40 W
Consommation de courant : 10 A (max.)
RADIO FM AM
Plage de fréquences de 87,5 à 108 MHz de 522 à 1620 KHz
IF 10,7 MHz 450 KHz
Sensibilité 4 µV (S/N = 30 dB) 36 dBuV (S/N = 20 dB)
Séparation des canaux stéréo >25 dB /
RÉSOLUTION DES PROBLÈMES
CARACTÉRISTIQUES TECHNIQUES
FR
Problème
Cause
Solution
Absence
d’alimentation
électrique
Le contact du véhicule n'a
pas été activé.
Tournez la clé de contact sur la position
« ACC » si l’alimentation a été connectée
au circuit auxiliaire du véhicule et que le
moteur n’a pas été démarré.
Fusible défectueux. Remplacez le fusible.
Absence de son
Volume réglé au minimum Réglez le volume au niveau souhaité.
Le câblage n’est pas
correctement connecté.
Vérifiez les connexions des câbles.
Les boutons de
commande de
l’appareil ne
fonctionnent pas.
Le micro-ordinateur intégré
fonctionne mal en raison
d’interférences.
Appuyez sur la touche reset.
La radio ne
fonctionne pas.
La fonction de
sélection
automatique des
stations ne
fonctionne pas.
Le câble d’antenne n’est pas
connecté.
Connectez le câble d’antenne avec
précaution.
L’intensité du signal est trop
faible.
Sélectionnez la station manuellement.
La reproduction de la
musique à partir de
l'application musicale
de votre téléphone
n'est pas possible.
L'appareil est jumelé avec un
autre téléphone mobile.
1
) Désactivez la fonction Bluetooth
sur l’autre téléphone.
2
) Quittez l'application et relancez-la.

Wskazówki dotyczące bezpieczeństwa
Niniejszą stację multimedialną wyprodukowano zgodnie z aktualnymi
standardami rozwoju techniki i ogólnie uznanymi zasadami bezpieczeństwa.
Mimo to nieprzestrzeganie zawartych w niniejszej instrukcji wskazówek
dotyczących bezpieczeństwa wiąże się z różnego rodzaju zagrożeniami. Przed
rozpoczęciem użytkowania stacji multimedialnej należy dokładnie przeczytać
całą instrukcję. Przechowywać instrukcję w takim miejscu, aby w każdej chwili
była dostępna dla wszystkich użytkowników. W przypadku przekazania stacji
multimedialnej osobom trzecim należy dołączyć niniejszą instrukcję. Oprócz
tego należy przestrzegać wskazówek zawartych w instrukcjach obsługi
urządzeń podłączonych do tej stacji.
Ogólne wskazówki dotyczące bezpieczeństwa
Należy przestrzegać poniższych wskazówek, aby chronić się przed obrażeniami
ciała: Nie wolno modykować ani otwierać urządzenia.
Przeznaczenie
Stacja multimedialna jest przeznaczona do montażu i obsługi w pojazdach z
instalacją o napięciu 12 V. Należy przestrzegać wartości granicznych mocy
urządzenia. Ewentualne naprawy oraz montaż należy zlecić fachowcowi.
Instrukcja montażu
Urządzenie można zamontować samodzielnie tylko w przypadku dysponowania
doświadczeniem w zakresie montażu radioodtwarzaczy i znajomością
zagadnień elektryki samochodowej. W tym celu należy zapoznać się ze
schematem połączeń zawartym w niniejszej instrukcji. Montaż urządzenia nie
może utrudniać lub blokować działania jakichkolwiek poduszek powietrznych,
innych urządzeń zabezpieczających lub elementów sterowania.
Deklaracja zgodności
Blaupunkt Competence Center Car Multimedia – Evo Sales GmbH oświadcza, że
to urządzenie jest zgodne z wymaganiami podstawowymi oraz pozostałymi
stosownymi postanowieniami Dyrektywy 2014/53/UE. Deklarację zgodności
można znaleźć na stronie internetowej www.blaupunkt.com.
Wskazówki dotyczące czyszczenia
Rozpuszczalniki, środki czyszczące oraz ścierne, jak również aerozole do czyszczenia
kokpitów i środki do pielęgnacji tworzyw sztucznych mogą zawierać składniki, które
mogłyby uszkodzić powierzchnię stacji multimedialnej. Do czyszczenia stacji
tedialnej należy używać wyłącznie suchej lub lekko zwilżonej ściereczki.
Wskazówki dotyczące utylizacji
Nie wolno wyrzucać zużytego urządzenia wraz z odpadami z
gospodarstwa domowego!
Aby zutylizować urządzenie, pilot zdalnego sterowania i zużyte baterie,
należy oddać je do punktu zbiórki zużytego sprzętu.
Zakres dostawy
Zakres dostawy obejmuje:
stację multimedialną BPA 3022 M,
pilot zdalnego sterowania,
złącza ISO,
śruby montażowe,
instrukcję obsługi.
WAŻNE INFORMACJE DOTYCZĄCE MONTAŻU
1. Przed przystąpieniem do montażu urządzenia, należy dokładnie przeczytać
instrukcję obsługi.
2. Przed podłączeniem zasilania należy upewnić się, że wszystkie inne
przewody zostały podłączone.
3. Aby uniknąć zwarcia, należy upewnić się, że wszystkie odsłonięte przewody
zostały zaizolowane.
4. Po zakończeniu montażu należy zamocować wszystkie przewody.
5. Podłączenia do odtwarzacza należy wykonać zgodnie z niniejszą instrukcją
obsługi. Nieprawidłowe podłączenie może spowodować uszkodzenie
urządzenia.
6. Odtwarzacz jest przeznaczony do pracy wyłącznie z instalacją o napięciu 12
V prądu stałego.
INFORMACJE OGÓLNE
MONTAŻ URZĄDZENIA
DEMONTAŻ URZĄDZENIA
1. Zdemontuj urządzenie.
2. Rozmontuj zewnętrzną ramkę wykończeniową.
Uwaga dotycząca HDMI:
Używaj kabla HDMI dobrej jakości.
Długość całkowita (przód i tył) nie powinna przekraczać 12 stóp.
PODŁĄCZENIE PRZEWODÓW
1. Odtwarzacz może być używany tylko przy napięciu +12 V prądu stałego.
2. Nie podłączaj zacisku akumulatora, dopóki odtwarzacz nie zostanie całkowicie
zamontowany.
3. Upewnij się, że żółty przewód jest podłączony do bieguna dodatniego akumula-
tora (+).
4. Przy wymianie bezpiecznika upewnij się, że parametry nowego bezpiecznika są
takie same.
5. Zastosowanie dobrej jakości głośników o impedancji 4–8 omów pozwala uzyskać
najlepsze efekty działania urządzenia.
POŁOŻENIE PRZYCISKÓW
1. STREFA 1 2. 1 3. STREFA 2
4. 2 5. BT 6. 3 RPT
7. 8. 4 RDM 9.
10. 5 DIR- 11. DIS 12. 6 DIR+
13. LCD 14. GNIAZDO AUX 15. GNIAZDO SŁUCHAWKOWE
16. GNIAZDO HDMI 17. RESET 18. POKRĘTŁO
19. PORT USB 20. SRC/MENU
OBSŁUGA PODSTAWOWA
Włączanie/wyłączanie urządzenia i funkcji wyciszania
Aby włączyć urządzenie, naciśnij pokrętło /MUTE. W celu włączenia lub wyłączenia funkcji
wyciszenia, krótko naciśnij pokrętło, gdy urządzenie jest włączone. Naciśnięcie i
przytrzymanie tego przycisku spowoduje wyłączenie urządzenia.
Ustawienia dźwięku i menu ustawień
Naciśnij i przytrzymaj przycisk SRC/MENU, aby przejść do menu przedstawionego poniżej:
BAS->TRE->BAL->EQ (wył./pop/rock/clas)->LOUD (wł./wył.)->CLK HH->CLK MM->IR
(wł./wył.) ->CT (indep/sync)->SYG. DŹW. (wł./wył.) )->P_VOL (13)->DX (LOC)->STE- REO
(MONO)
Przy każdej pozycji obróć pokrętło VOL, aby ją ustawić.
PODCZERWIEŃ (WŁ./WYŁ.):
PODCZERWIEŃ wł.: Urządzenie można włączyć za pomocą pilota zdalnego sterowania na
podczerwień. System wtedy jest w trybie wysokiego zużycia energii.
PODCZERWIEŃ wył.: Urządzenia nie można włączyć za pomocą pilota zdalnego
sterowania na podczerwień. System jest w trybie niskiego zużycia energii.
CT (INDEP/SYNC):
CT INDEP: Zegar działa niezależnie.
CT SYNC: Zegar zostanie zsynchronizowany z czasem odbieranej stacji RDS. Uwaga: W
przypadku gdy zegar został ustawiony w menu, funkcja CT jest automatycznie ustawiana
na tryb INDEP (niezależne działanie).
SYGNAŁ DŹWIĘKOWY (WŁ./WYŁ.): Pozwala na włączanie/wyłączenie sygnału dźwiękowe-
go przy naciśnięciu przycisków.
P-VOL: Pozwala na ustawienie głośności przy włączaniu. Jeśli poziom głośności przy
wyłączaniu jest niższy niż poziom P-VOL, po włączeniu urządzenie ustawi poziom
głośności na głośność przy wyłączaniu.
Jeśli poziom głośności przy wyłączaniu jest wyższy niż poziom P-VOL, głośność zostanie
przywrócona do poziomu
wartości P-VOL przy włączeniu urządzenia.
Wyszukiwanie głośników Bluetooth
Naciśnięcie i przytrzymanie przycisk BT spowoduje wyświetlenie komunikatu „SEARCH...”
[szukanie]. Chwilę później zostanie wyświetlona nazwa urządzenia Bluetooth. Aby
wyświetlić następne urządzenie, obróć pokrętło VOL. Po wyświetleniu na LCD nazwy
żądanego głośnika Bluetooth, naciśnij pokrętło VOL, aby sparować urządzenie. Jeśli
parowanie się powiedzie, na wyświetlaczu pojawi się komunikat „BOX ON”.
Ważna wskazówka: Pomimo licznych testów z różnymi urządzeniami Bluetooth, nie
można zagwarantować zgodności ze wszystkimi urządzeniami Bluetooth dostępnymi na
rynku.
Transmisja sygnału do głośnika Bluetooth
Krótko naciśnij przycisk BT, aby zatrzymać przesyłanie/przesłać sygnał do głośnika
Bluetooth. Na wyświetlaczu pojawi się komunikat „BOX OFF/ON”.
Uwaga: Mimo że rma Blaupunkt dokładnie sprawdza kompatybilność różnych
głośników Bluetooth, nie można zagwarantować bezproblemowego działania urządzenia
ze wszystkimi modelami dostępnymi na rynku.
Obsługa Strefy 1 i Strefy 2
Krótko naciśnij przycisk Zone 1 (lub Zone 2), aby wyłączyć/włączyć dźwięk Strefy 1
(lub Strefy 2).
Przytrzymaj przycisk Zone 1 (lub Zone 2), aby wyciszyć dźwięk Strefy 1 (lub Strefy 2).
Ponowne przytrzymanie przycisku spowoduje wyłączenie wyciszenia.
Priorytet informacji lub zegara
Naciśnij krótko przycisk DIS, aby ustawić priorytet zegara lub priorytet informacji.
Uwaga: W paśmie FM, w przypadku odbierania stacji RDS, krótko naciśnij przycisk
DIS, aby wyświetlić NAZWĘ STACJI/ ZEGAR/CZĘSTOTLIWOŚĆ.
Ustawianie zegara
W menu wybierz pozycję CLK HH/CLK MM. Obróć pokrętło VOL, aby ustawić
godzinę/minuty.
Obsługa słuchawek
Na panelu przednim znajduje się gniazdo słuchawkowe 3,5 mm. Przyjmuje ono
ustawienia działania Strefy 1.
OBSŁUGA RADIA
Odbiór stacji radiowych
Naciśnij przycisk SRC/MENU, aby wybrać tryb spośród FM1->FM2->MW. Krótko
naciśnij przycisk / , aby odbierać żądaną stację radiową. Naciśnij i przytrzy-
maj przycisk / w celu ręcznego dostrojenia częstotliwości.
Ręczne zapisywanie stacji i wywoływanie zapisanych stacji
Odbieranie żądanej stacji. Naciśnij i przytrzymaj jeden z przycisków pamięci (1–6)
przez 2 sekundy. Aktualna stacja zostanie zapisana w pamięci pod danym przycis-
kiem numerycznym. Naciśnij krótko przycisk zaprogramowanej stacji (1–6), aby
słuchać bezpośrednio sygnału nadawanego z tej stacji i zapisanego pod przyporząd-
kowanym przyciskiem.
OBSŁUGA DAB
Naciśnij przycisk SRC/MENU, aby przełączyć źródło między DAB1 lub DAB2.
Wybór stacji
Naciśnij przycisk / , aby wybrać następną/poprzednią stację.
Ręczne zapisywanie stacji i wywoływanie zapisanych stacji
Gdy ustawiono częstotliwość żądanej stacji. Naciśnij i przytrzymaj jeden z przycisków
od 1 do 6 przez 2 sekundy, aby zapisać tę stację pod odpowiednim numerem.
Naciśnij krótko przycisk zaprogramowanej stacji (1–6), aby słuchać bezpośrednio
sygnału nadawanego z tej stacji i zapisanego pod przyporządkowanym przyciskiem.
OBSŁUGA USB
Po podłączeniu do urządzenia dysku USB, urządzenie automatycznie odtworzy pliki
MP3/WMA. Jeżeli dysk USB został już podłączony do urządzenia, naciśnij krótko
przycisk SRC/MENU, aż pojawi się ekran trybu USB.
Wybór pliku
Naciśnij przycisk / , aby przejść do następnego/poprzedniego pliku.
Przytrzymaj przycisk / , aby przewinąć szybko do przodu lub do tyłu.
Odtwarzanie/wstrzymanie
Naciśnij przycisk 1 , aby wstrzymać/odtworzyć plik.
Funkcja odtwarzania w pętli
Naciśnij przycisk 3 RPT, aby wybrać funkcję odtwarzania w pętli. RPT ONE/RPT
FOLD/RPT ALL (domyślnie)
RPT ONE: Odtwarzanie w pętli jednego pliku.
RPT FOLD: Odtwarzanie w pętli wszystkich plików w folderze.
RPT ALL: Odtwarzanie w pętli wszystkich plików.
RANDOM
Naciśnij przycisk 4 RDM, aby włączyć lub wyłączyć funkcję odtwarzania losowego.
RDM wł.: Odtwarzanie losowe wszystkich plików.
RDM wył.: Wyłączenie funkcji odtwarzania losowego.
Funkcja folder +/-
Naciśnij przycisk DIR+/DIR-, aby wybrać następny/poprzedni folder do odtwarzania.
Wyszukiwanie piosenki
Naciśnięcie i przytrzymanie przycisku spowoduje wyświetlenie komunikatu
„NUM 0000”. Obracając pokrętło VOL (lub bezpośrednio wprowadzając numer),
wybierz numer, a następnie naciśnij VOL, aby odtworzyć. Należy zwrócić uwagę na
7/8/9/0 jako: BT = 7, = 8, = 9, DIS = 0.
UŻYWANIE GNIAZDA AUX IN 1/2
Na panelu przednim gniazdo AUX IN 1 jest gniazdem 3,5 mm. Natomiast gniazdo
AUX IN 2 dla RCA znajduje się z tyłu urządzenia. Naciśnięcie przycisku SRC/MENU
spowoduje przełączenie do trybu AUX IN1 (2) po podłączeniu sygnału audio do
urządzenia.
OBSŁUGA BLUETOOTH
Parowanie urządzeń
W smartfonie wybierz pozycję Bluetooth i wyszukaj urządzenie Bluetooth. Na liście
powinna pojawić się pozycja „BLAUPUNKT”; wybierz „BLAUPUNKT”, a następnie
wprowadź hasło „0000”, jeśli zostanie wyświetlony komunikat wymagający
wprowadzenia hasła. Po pomyślnym sparowaniu na wyświetlaczu pojawi się napis BT.
Dźwięk Bluetooth
Naciśnij przycisk SRC/MENU, aby przełączyć się do trybu BT MUSIC. Urządzenie
automatycznie odtworzy utwór z telefonu. Naciśnij przycisk , aby wstrzymać/odt-
worzyć utwór.
Naciśnij przycisk / , aby wybrać następny/poprzedni utwór.
OBSŁUGA HDMI
Przednie gniazdo HDMI przechodzi do tylnego gniazda HDMI. Nie ma to wpływu na
odtwarzanie za pomocą HDMI.
Złącze RCA V-In i V-OUT
W tylnej części urządzenia złącze V-IN przechodzi do złącza V-OUT.
PILOT ZDALNEGO STEROWANIA
Pilota zdalnego sterowania można używać, gdy w menu ustawiono opcję IR na
włączoną.
OFF: Włączanie i wyłączanie urządzenia.
VOL+: Zwiększanie głośności
VOL-: Zmniejszanie głośności
1 : Włączanie/wyłączanie wyciszenia Strefy 1
2 : Włączanie/wyłączanie wyciszenia Strefy 2
W przypadku innych działań należy przeczytać
instrukcje powyżej.
INFORMACJE OGÓLNE
Wymagania dotyczące zasilania : Prąd stały o napięciu 12 V, zacisk ujemny
połączony z masą
Wymiary podstawy montażowej : 129 (szer.) x 112 (gł.) x 65 (wys.)
Ustawienia tonów
- Niskie (przy 100 Hz) : ±10 dB
- Wysokie (przy 100 Hz) : ±10 dB
Maksymalna moc wyjściowa : 4 × 40 W
Pobór prądu : 10 A (maks.)
RADIO FM AM
Zakres częstotliwości od 87,5 do 108 MHz od 522 do 1620 KHz
IF 10.7 MHz 450 KHz
Czułość 4 µV (S/N = 30 dB) 36 dBµV (S/N = 20 dB)
Separacja kanałów stereo >25 dB /
ROZWIĄZYWANIE PROBLEMÓW
PL
Informations relatives à la sécurité
Cette station multimédia a été fabriquée selon les normes techniques actuellement
en vigueur et les principes de sécurité généralement reconnus. Néanmoins, le
non-respect des consignes de sécurité contenues dans ce manuel comporte divers
risques. Lisez attentivement l'ensemble du manuel avant d'utiliser la station
multimédia. Conservez le manuel dans un endroit où il est accessible pour tous les
utilisateurs et à tout moment. Si la station multimédia est transmise à un tiers, ce
manuel lui doit être également remis. De plus, suivez les instructions des modes
d'emploi des appareils connectés à cette station.
Consignes générales de sécurité
Respectez les instructions suivantes pour vous protéger des blessures :
Ne pas modier ou ouvrir l'appareil.
Usage prévu
La station multimédia est conçue pour être installée et fonctionner dans des
véhicules avec une tension d'alimentation de 12V. Les limites de puissance de
l'appareil doivent être respectées. Toute réparation et installation doit être eectuée
par un professionnel.
Instructions pour l'installation
Vous ne pouvez installer l'appareil vous-même que si vous êtes expérimenté dans
l'installation d'autoradios et si vous avez des connaissances en électricité automobile.
À cet eet, consultez le schéma de câblage de ce manuel. L'installation de cet appareil
ne doit pas gêner ni bloquer le fonctionnement des airbags, des autres dispositifs de
sécurité ou des dispositifs de contrôle.
Déclaration de conformité
Blaupunkt Competence Center Car Multimedia - Evo Sales GmbH déclare que cet
appareil est conforme aux exigences fondamentales et aux autres dispositions
applicables de la directive 2014/53/UE. La déclaration de conformité peut être
consultée à l'adresse suivante :www.blaupunkt.com.
Instructions concernant le nettoyage
Les solvants, les produits nettoyants et abrasifs, ainsi que les nettoyants de cockpit et
les produits d'entretien des plastiques peuvent contenir des composants qui peuvent
endommager la surface de la station multimédia. Pour nettoyer la station multimédia,
utilisez uniquement un chion sec ou légèrement humide.
Instructions concernant la mise au rebut
Ne jetez pas l'appareil usagé avec les ordures ménagères !
Pour mettre au rebut l'appareil, la télécommande et les piles usagées,
veuillez les apporter à un point de collecte des équipements usagés.
Contenu de l'emballage
Le contenu de l’emballage comprend :
station multimédia BPA 3022 M,
télécommande,
connecteurs ISO,
vis de montage,
manuel d’utilisation.
INFORMATIONS IMPORTANTES CONCERNANT L’INSTALLATION
1. Lisez attentivement ce manuel d'utilisation avant d'installer l'appareil.
2. Avant de brancher l'alimentation électrique, assurez-vous que tous les
autres câbles sont connectés.
3. Pour éviter les court-circuits, assurez-vous que tous les câbles exposés sont
isolés.
4. Une fois l'installation terminée, tous les câbles doivent être sécurisés.
5. Les connexions au lecteur doivent être eectuées conformément à ce
manuel. Une connexion incorrecte peut provoquer l'endommagement de
l'appareil.
6. Le lecteur est conçu pour fonctionner uniquement avec une installation de
12 V DC.
INSTALLATION DE L'APPAREIL
DÉMONTAGE DE L'APPAREIL
1. Démontez l'appareil.
2. Démontez le cadre de nition extérieur.
Remarque concernant le HDMI :
Utilisez un câble HDMI de bonne qualité.
La longueur totale (avant et arrière) ne doit pas dépasser 12 pieds.
CONNEXION DES CÂBLES
1. Le lecteur ne peut être utilisé que sous une tension de +12 V DC.
2. Ne connectez pas la borne de la batterie avant que le lecteur ne soit
complètement installé.
3. Assurez-vous que le l jaune est connecté au pôle positif (+) de la batterie.
4. Lorsque vous remplacez le fusible, assurez-vous que les paramètres du
nouveau fusible sont les mêmes.
5. L’utilisation de haut-parleurs de bonne qualité avec une impédance de 4–8
ohms permettra de tirer le meilleur parti de l’appareil.
EMPLACEMENT DES TOUCHES
1. ZONE 1 2. 1 3. ZONE 2
4. 2 5. BT 6. 3 RPT
7. 8. 4 RDM 9.
10. 5 DIR- 11. DIS 12. 6 DIR+
13. LCD 14. PRISE AUX 15. PRISE POUR CASQUE D'ÉCOUTE
16. PRISE HDMI 17. RESET 18. BOUTON ROTATIF
19. PORT USB 20. SRC/MENU
FONCTIONNEMENT DE BASE
Activation/désactivation de l'appareil et de la fonction de mise en sourdine
Pour allumer l'appareil, appuyez sur le bouton rotatif / MUTE. Pour activer ou désactiver la
fonction de mise en sourdine, appuyez brièvement sur le bouton lorsque l'appareil est
allumé. Appuyez sur ce bouton et maintenez-le enfoncé pour éteindre l’appareil.
Réglage du volume et menu de conguration
Appuyez sur la touche SRC/MENU et maintenez-la enfoncée pour accéder au menu illustré
ci-dessous :
BAS->TRE->BAL->EQ (o/pop/rock/class)->LOUD (on/o)->CLK HH->CLK
MM->IR (on/o) ->CT (indep/sync)->SIGN. BEEP (on/o)->P_VOL (13)->DX (LOC)->STE- REO
(MONO)
À chaque position, tournez le bouton VOL pour la régler.
INFRAROUGE (ON/OFF) :
INFRAROUGE ON : L'appareil peut être mis en marche à l'aide de la télécommande à
infrarouge.
Le système est alors en mode de haute consommation d'énergie.
INFRAROUGE OFF : L'appareil ne peut pas être mis en marche à l'aide de la télécommande
à infrarouge.
Le système est en mode de faible consommation d'énergie.
CT (INDEP/SYNC) :
CT INDEP : L’horloge fonctionne indépendamment.
CT SYNC : L’horloge sera synchronisée avec l’heure de la station RDS réceptionnée.
Remarque : Lorsque l'horloge est réglée dans le menu, la fonction CT est automatiquement
réglée sur le mode INDEP (fonctionnement indépendant).
BEEP (ON/OFF) : Permet d'activer/désactiver le signal sonore lorsque les touches sont
enfoncées.
P-VOL : Permet de régler le volume à la mise en marche. Si le niveau de volume à l'arrêt est
inférieur au niveau P-VOL, l'appareil règle le niveau de volume sur le volume à l'arrêt
lorsqu'il est mis en marche.
Si le niveau de volume à l'arrêt est supérieur au niveau P-VOL, le volume sera réinitialisé sur
les valeurs P-VOL à la mise en marche.
Recherche de haut-parleurs Bluetooth
Après avoir enfoncé la touche BT, l'écran ache « SEARCH... » [recherche]. Un instant plus
tard, le nom de votre appareil Bluetooth s'ache. Pour acher l'appareil suivant, tournez le
bouton VOL. Une fois que le nom du haut-parleur Bluetooth souhaité s'ache sur l'écran
LCD, appuyez sur le bouton VOL pour associer l'appareil. Une fois le jumelage terminé,
l'écran ache le message « BOX ON ».
Consigne importante : Malgré de nombreux tests eectués avec divers dispositifs
Bluetooth, la compatibilité avec tous les dispositifs Bluetooth disponible sur le marché ne
peut être garantie.
Transmission du signal au haut-parleur Bluetooth
Appuyez brièvement sur la touche BT pour arrêter/initier le transfert du signal vers le
haut-parleur Bluetooth. L'écran ache le message « BOX OFF/ON ».
Remarque : Bien que Blaupunkt vérie soigneusement la compatibilité des diérents
haut-parleurs Bluetooth, un fonctionnement sans faille ne peut être garanti avec tous les
modèles du marché.
Fonctionnement des Zones 1 et 2
Appuyez brièvement sur la touche Zone 1 (ou Zone 2) pour activer ou désactiver le son de
la Zone 1 (ou de la Zone 2).
Maintenez la touche Zone 1 (ou Zone 2) enfoncée pour couper le son de la Zone 1 (ou de la
Zone 2). Appuyez à nouveau sur la touche pour rétablir le son.
Priorité des informations ou de l'horloge
Appuyez brièvement sur la touche DIS pour modier la priorité de l’horloge ou la priorité
des informations.
Remarque : En mode FM, lorsque vous recevez des stations RDS, appuyez brièvement sur la
touche DIS pour acher NOM DE STATION/HORLOGE/FRÉQUENCE.
Réglage de l’horloge
Sélectionnez CLK HH/CLK MM dans le menu. Tournez le bouton VOL pour régler les heures /
les minutes.
Fonctionnement du casque d'écoute
Une prise pour casque d'écoute de 3,5 mm se trouve sur le panneau avant. Il adopte les
paramètres de fonctionnement de la Zone 1.
UTILISATION DE LA RADIO
Réception des stations de radio
Appuyez sur la touche SRC/MENU pour sélectionner un mode parmi FM1->FM2->MW.
Appuyez brièvement sur la touche / pour recevoir la station de radio souhaitée.
Maintenez la touche / enfoncée pour régler manuellement la fréquence.
Mémorisation manuelle des stations et accès aux stations mémorisées
Réception de la station souhaitée. Appuyez sur les touches numériques (1-6) et
maintenez-les enfoncées pendant 2 secondes. La station actuelle sera mise en mémoire
pour la touche numérique correspondante. Appuyez brièvement sur la touche de la station
préréglée (1–6) pour écouter directement le signal de diusion de cette station mémorisée
pour la touche assignée.
FONCTIONNEMENT DAB
Appuyez sur la touche SRC/MENU pour basculer la source entre DAB1 et DAB2.
Sélection d'une station
Appuyez sur la touche / pour sélectionner la station suivante/précédente.
Mémorisation manuelle des stations et accès aux stations mémorisées
Lorsque la fréquence de la station souhaitée est réglée, appuyez sur l'une des touches
numérotées de 1 à 6 pendant 2 secondes pour mémoriser cette station sous le numéro
correspondant. Appuyez brièvement sur la touche de la station préréglée (1–6) pour
écouter directement le signal de diusion de cette station mémorisée pour la touche
assignée.
UTILISATION DU PORT USB
Lorsqu'un lecteur USB est connecté à l'appareil, ce dernier lit automatiquement les
chiers MP3/WMA. Si un lecteur USB a déjà été connecté à l'appareil, appuyez
brièvement sur la touche SRC/MENU jusqu'à ce que l'écran du mode USB apparaisse.
Sélection d'un chier
Appuyez sur la touche / pour passer au chier suivant/précédent. Appuyez
sur la touche / pour faire déler rapidement vers l'avant et vers l'arrière.
Lecture/Pause
Appuyez sur la touche 1 pour mettre en pause/lire un chier.
Fonction de lecture en boucle
Appuyez sur la touche 3 RPT pour sélectionner la fonction de lecture en boucle. RPT
ONE/RPT FOLD/RPT ALL (par défaut)
RPT ONE : Lecture en boucle d'un seul chier.
RPT FOLD : Lecture en boucle de tous les chiers d'un dossier.
RPT ALL : Lecture en boucle de tous les chiers.
RANDOM
Appuyez sur la touche 4 RDM pour activer ou désactiver la fonction de lecture aléatoire.
RDM ON : Lecture aléatoire de tous les chiers.
RDM OFF : Fonction de lecture aléatoire.
Fonction dossier +/-
Appuyez sur la touche DIR+/DIR- pour sélectionner le dossier suivant/précédent à lire.
Recherche d'une chanson
Après avoir enfoncé la touche l'écran achera « NUM 0000 ». En tournant le bouton
VOL (ou en saisissant directement un numéro), sélectionnez un numéro, puis appuyez
sur VOL pour lancer la lecture. Veuillez noter que 7/8/9/0 signie : BT = 7, = 8, = 9,
DIS = 0.
UTILISATION DE LA PRISE AUX IN 1/2
Sur le panneau avant, la prise AUX IN 1 est un jack de 3,5 mm. La prise AUX IN 2 pour
RCA est située à l'arrière de l'appareil. En appuyant sur la touche SRC/MENU, on peut
passer en mode AUX IN1 (2) lorsque le signal audio est connecté à l'appareil.
UTILISATION DU BLUETOOTH
Jumelage des appareils
Sélectionnez la position Bluetooth et recherchez le périphérique Bluetooth sur votre
téléphone. La position « BLAUPUNKT » devrait apparaître dans la liste ; sélectionnez
« BLAUPUNKT », puis entrez le mot de passe « 0000 » si un message demandant un mot
de passe s'ache. Une fois le jumelage terminé, l'écran ache « BT ».
Audio Bluetooth
Appuyez sur la touche SRC/MENU pour passer en mode BT MUSIC. L'appareil réproduira
automatiquement la musique de votre téléphone. Appuyez sur la touche pour
mettre en pause/en lecture une piste.
Appuyez sur la touche / pour sélectionner la piste suivante/précédente.
UTILISATION DE LA PRISE HDMI
La prise HDMI avant va vers la prise HDMI arrière. La lecture à l'aide de HDMI n'est pas
aectée.
Connecteurs RCA V-IN et V-OUT
À l'arrière de l'appareil, le connecteur V-IN va vers le connecteur V-OUT.
TÉLÉCOMMANDE
La télécommande peut être utilisée lorsque
l'option IR est activée dans le menu.
OFF: Mise en marche et arrêt de l’appareil.
VOL+ : Augmenter le volume
VOL- : Réduire le volume
1 : Activation/désactivation du mode
sourdine de la Zone 1
2 : Activation/désactivation du mode
sourdine de la Zone 2
Pour les autres opérations, lisez les instructions ci-dessus.
INFORMATIONS GÉNÉRALES
Exigences concernant l’alimentation : 12 V DC, borne négative connectée à la terre
Dimensions de la base de montage :129 (larg.) x 112 (long.) x 65 (ép.)
Paramètres de tonalité
- Basse (à 100 Hz) : ±10 dB
- Haute (à 100 Hz) : ±10 dB
Puissance de sortie maximale : 4 x 40 W
Consommation de courant : 10 A (max.)
RADIO FM AM
Plage de fréquences de 87,5 à 108 MHz de 522 à 1620 KHz
IF 10,7 MHz 450 KHz
Sensibilité 4 µV (S/N = 30 dB) 36 dBuV (S/N = 20 dB)
Séparation des canaux stéréo >25 dB /
RÉSOLUTION DES PROBLÈMES

Wskazówki dotyczące bezpieczeństwa
Niniejszą stację multimedialną wyprodukowano zgodnie z aktualnymi
standardami rozwoju techniki i ogólnie uznanymi zasadami bezpieczeństwa.
Mimo to nieprzestrzeganie zawartych w niniejszej instrukcji wskazówek
dotyczących bezpieczeństwa wiąże się z różnego rodzaju zagrożeniami. Przed
rozpoczęciem użytkowania stacji multimedialnej należy dokładnie przeczytać
całą instrukcję. Przechowywać instrukcję w takim miejscu, aby w każdej chwili
była dostępna dla wszystkich użytkowników. W przypadku przekazania stacji
multimedialnej osobom trzecim należy dołączyć niniejszą instrukcję. Oprócz
tego należy przestrzegać wskazówek zawartych w instrukcjach obsługi
urządzeń podłączonych do tej stacji.
Ogólne wskazówki dotyczące bezpieczeństwa
Należy przestrzegać poniższych wskazówek, aby chronić się przed obrażeniami
ciała: Nie wolno modykować ani otwierać urządzenia.
Przeznaczenie
Stacja multimedialna jest przeznaczona do montażu i obsługi w pojazdach z
instalacją o napięciu 12 V. Należy przestrzegać wartości granicznych mocy
urządzenia. Ewentualne naprawy oraz montaż należy zlecić fachowcowi.
Instrukcja montażu
Urządzenie można zamontować samodzielnie tylko w przypadku dysponowania
doświadczeniem w zakresie montażu radioodtwarzaczy i znajomością
zagadnień elektryki samochodowej. W tym celu należy zapoznać się ze
schematem połączeń zawartym w niniejszej instrukcji. Montaż urządzenia nie
może utrudniać lub blokować działania jakichkolwiek poduszek powietrznych,
innych urządzeń zabezpieczających lub elementów sterowania.
Deklaracja zgodności
Blaupunkt Competence Center Car Multimedia – Evo Sales GmbH oświadcza, że
to urządzenie jest zgodne z wymaganiami podstawowymi oraz pozostałymi
stosownymi postanowieniami Dyrektywy 2014/53/UE. Deklarację zgodności
można znaleźć na stronie internetowej www.blaupunkt.com.
Wskazówki dotyczące czyszczenia
Rozpuszczalniki, środki czyszczące oraz ścierne, jak również aerozole do czyszczenia
kokpitów i środki do pielęgnacji tworzyw sztucznych mogą zawierać składniki, które
mogłyby uszkodzić powierzchnię stacji multimedialnej. Do czyszczenia stacji
tedialnej należy używać wyłącznie suchej lub lekko zwilżonej ściereczki.
Wskazówki dotyczące utylizacji
Nie wolno wyrzucać zużytego urządzenia wraz z odpadami z
gospodarstwa domowego!
Aby zutylizować urządzenie, pilot zdalnego sterowania i zużyte baterie,
należy oddać je do punktu zbiórki zużytego sprzętu.
Zakres dostawy
Zakres dostawy obejmuje:
stację multimedialną BPA 3022 M,
pilot zdalnego sterowania,
złącza ISO,
śruby montażowe,
instrukcję obsługi.
WAŻNE INFORMACJE DOTYCZĄCE MONTAŻU
1. Przed przystąpieniem do montażu urządzenia, należy dokładnie przeczytać
instrukcję obsługi.
2. Przed podłączeniem zasilania należy upewnić się, że wszystkie inne
przewody zostały podłączone.
3. Aby uniknąć zwarcia, należy upewnić się, że wszystkie odsłonięte przewody
zostały zaizolowane.
4. Po zakończeniu montażu należy zamocować wszystkie przewody.
5. Podłączenia do odtwarzacza należy wykonać zgodnie z niniejszą instrukcją
obsługi. Nieprawidłowe podłączenie może spowodować uszkodzenie
urządzenia.
6. Odtwarzacz jest przeznaczony do pracy wyłącznie z instalacją o napięciu 12
V prądu stałego.
MONTAŻ URZĄDZENIA
DEMONTAŻ URZĄDZENIA
1. Zdemontuj urządzenie.
2. Rozmontuj zewnętrzną ramkę wykończeniową.
Uwaga dotycząca HDMI:
Używaj kabla HDMI dobrej jakości.
Długość całkowita (przód i tył) nie powinna przekraczać 12 stóp.
INFORMACJE OGÓLNE
PODŁĄCZENIE PRZEWODÓW
1. Odtwarzacz może być używany tylko przy napięciu +12 V prądu stałego.
2. Nie podłączaj zacisku akumulatora, dopóki odtwarzacz nie zostanie całkowicie
zamontowany.
3. Upewnij się, że żółty przewód jest podłączony do bieguna dodatniego akumula-
tora (+).
4. Przy wymianie bezpiecznika upewnij się, że parametry nowego bezpiecznika są
takie same.
5. Zastosowanie dobrej jakości głośników o impedancji 4–8 omów pozwala uzyskać
najlepsze efekty działania urządzenia.
POŁOŻENIE PRZYCISKÓW
1. STREFA 1 2. 1 3. STREFA 2
4. 2 5. BT 6. 3 RPT
7. 8. 4 RDM 9.
10. 5 DIR- 11. DIS 12. 6 DIR+
13. LCD 14. GNIAZDO AUX 15. GNIAZDO SŁUCHAWKOWE
16. GNIAZDO HDMI 17. RESET 18. POKRĘTŁO
19. PORT USB 20. SRC/MENU
OBSŁUGA PODSTAWOWA
Włączanie/wyłączanie urządzenia i funkcji wyciszania
Aby włączyć urządzenie, naciśnij pokrętło /MUTE. W celu włączenia lub wyłączenia funkcji
wyciszenia, krótko naciśnij pokrętło, gdy urządzenie jest włączone. Naciśnięcie i
przytrzymanie tego przycisku spowoduje wyłączenie urządzenia.
Ustawienia dźwięku i menu ustawień
Naciśnij i przytrzymaj przycisk SRC/MENU, aby przejść do menu przedstawionego poniżej:
BAS->TRE->BAL->EQ (wył./pop/rock/clas)->LOUD (wł./wył.)->CLK HH->CLK MM->IR
(wł./wył.) ->CT (indep/sync)->SYG. DŹW. (wł./wył.) )->P_VOL (13)->DX (LOC)->STE- REO
(MONO)
Przy każdej pozycji obróć pokrętło VOL, aby ją ustawić.
PODCZERWIEŃ (WŁ./WYŁ.):
PODCZERWIEŃ wł.: Urządzenie można włączyć za pomocą pilota zdalnego sterowania na
podczerwień. System wtedy jest w trybie wysokiego zużycia energii.
PODCZERWIEŃ wył.: Urządzenia nie można włączyć za pomocą pilota zdalnego
sterowania na podczerwień. System jest w trybie niskiego zużycia energii.
CT (INDEP/SYNC):
CT INDEP: Zegar działa niezależnie.
CT SYNC: Zegar zostanie zsynchronizowany z czasem odbieranej stacji RDS. Uwaga: W
przypadku gdy zegar został ustawiony w menu, funkcja CT jest automatycznie ustawiana
na tryb INDEP (niezależne działanie).
SYGNAŁ DŹWIĘKOWY (WŁ./WYŁ.): Pozwala na włączanie/wyłączenie sygnału dźwiękowe-
go przy naciśnięciu przycisków.
P-VOL: Pozwala na ustawienie głośności przy włączaniu. Jeśli poziom głośności przy
wyłączaniu jest niższy niż poziom P-VOL, po włączeniu urządzenie ustawi poziom
głośności na głośność przy wyłączaniu.
Jeśli poziom głośności przy wyłączaniu jest wyższy niż poziom P-VOL, głośność zostanie
przywrócona do poziomu
wartości P-VOL przy włączeniu urządzenia.
Wyszukiwanie głośników Bluetooth
Naciśnięcie i przytrzymanie przycisk BT spowoduje wyświetlenie komunikatu „SEARCH...”
[szukanie]. Chwilę później zostanie wyświetlona nazwa urządzenia Bluetooth. Aby
wyświetlić następne urządzenie, obróć pokrętło VOL. Po wyświetleniu na LCD nazwy
żądanego głośnika Bluetooth, naciśnij pokrętło VOL, aby sparować urządzenie. Jeśli
parowanie się powiedzie, na wyświetlaczu pojawi się komunikat „BOX ON”.
Ważna wskazówka: Pomimo licznych testów z różnymi urządzeniami Bluetooth, nie
można zagwarantować zgodności ze wszystkimi urządzeniami Bluetooth dostępnymi na
rynku.
Transmisja sygnału do głośnika Bluetooth
Krótko naciśnij przycisk BT, aby zatrzymać przesyłanie/przesłać sygnał do głośnika
Bluetooth. Na wyświetlaczu pojawi się komunikat „BOX OFF/ON”.
Uwaga: Mimo że rma Blaupunkt dokładnie sprawdza kompatybilność różnych
głośników Bluetooth, nie można zagwarantować bezproblemowego działania urządzenia
ze wszystkimi modelami dostępnymi na rynku.
Obsługa Strefy 1 i Strefy 2
Krótko naciśnij przycisk Zone 1 (lub Zone 2), aby wyłączyć/włączyć dźwięk Strefy 1
(lub Strefy 2).
Przytrzymaj przycisk Zone 1 (lub Zone 2), aby wyciszyć dźwięk Strefy 1 (lub Strefy 2).
Ponowne przytrzymanie przycisku spowoduje wyłączenie wyciszenia.
Priorytet informacji lub zegara
Naciśnij krótko przycisk DIS, aby ustawić priorytet zegara lub priorytet informacji.
Uwaga: W paśmie FM, w przypadku odbierania stacji RDS, krótko naciśnij przycisk
DIS, aby wyświetlić NAZWĘ STACJI/ ZEGAR/CZĘSTOTLIWOŚĆ.
Ustawianie zegara
W menu wybierz pozycję CLK HH/CLK MM. Obróć pokrętło VOL, aby ustawić
godzinę/minuty.
Obsługa słuchawek
Na panelu przednim znajduje się gniazdo słuchawkowe 3,5 mm. Przyjmuje ono
ustawienia działania Strefy 1.
OBSŁUGA RADIA
Odbiór stacji radiowych
Naciśnij przycisk SRC/MENU, aby wybrać tryb spośród FM1->FM2->MW. Krótko
naciśnij przycisk / , aby odbierać żądaną stację radiową. Naciśnij i przytrzy-
maj przycisk / w celu ręcznego dostrojenia częstotliwości.
Ręczne zapisywanie stacji i wywoływanie zapisanych stacji
Odbieranie żądanej stacji. Naciśnij i przytrzymaj jeden z przycisków pamięci (1–6)
przez 2 sekundy. Aktualna stacja zostanie zapisana w pamięci pod danym przycis-
kiem numerycznym. Naciśnij krótko przycisk zaprogramowanej stacji (1–6), aby
słuchać bezpośrednio sygnału nadawanego z tej stacji i zapisanego pod przyporząd-
kowanym przyciskiem.
OBSŁUGA DAB
Naciśnij przycisk SRC/MENU, aby przełączyć źródło między DAB1 lub DAB2.
Wybór stacji
Naciśnij przycisk / , aby wybrać następną/poprzednią stację.
Ręczne zapisywanie stacji i wywoływanie zapisanych stacji
Gdy ustawiono częstotliwość żądanej stacji. Naciśnij i przytrzymaj jeden z przycisków
od 1 do 6 przez 2 sekundy, aby zapisać tę stację pod odpowiednim numerem.
Naciśnij krótko przycisk zaprogramowanej stacji (1–6), aby słuchać bezpośrednio
sygnału nadawanego z tej stacji i zapisanego pod przyporządkowanym przyciskiem.
OBSŁUGA USB
Po podłączeniu do urządzenia dysku USB, urządzenie automatycznie odtworzy pliki
MP3/WMA. Jeżeli dysk USB został już podłączony do urządzenia, naciśnij krótko
przycisk SRC/MENU, aż pojawi się ekran trybu USB.
Wybór pliku
Naciśnij przycisk / , aby przejść do następnego/poprzedniego pliku.
Przytrzymaj przycisk / , aby przewinąć szybko do przodu lub do tyłu.
Odtwarzanie/wstrzymanie
Naciśnij przycisk 1 , aby wstrzymać/odtworzyć plik.
Funkcja odtwarzania w pętli
Naciśnij przycisk 3 RPT, aby wybrać funkcję odtwarzania w pętli. RPT ONE/RPT
FOLD/RPT ALL (domyślnie)
RPT ONE: Odtwarzanie w pętli jednego pliku.
RPT FOLD: Odtwarzanie w pętli wszystkich plików w folderze.
RPT ALL: Odtwarzanie w pętli wszystkich plików.
RANDOM
Naciśnij przycisk 4 RDM, aby włączyć lub wyłączyć funkcję odtwarzania losowego.
RDM wł.: Odtwarzanie losowe wszystkich plików.
RDM wył.: Wyłączenie funkcji odtwarzania losowego.
Funkcja folder +/-
Naciśnij przycisk DIR+/DIR-, aby wybrać następny/poprzedni folder do odtwarzania.
Wyszukiwanie piosenki
Naciśnięcie i przytrzymanie przycisku spowoduje wyświetlenie komunikatu
„NUM 0000”. Obracając pokrętło VOL (lub bezpośrednio wprowadzając numer),
wybierz numer, a następnie naciśnij VOL, aby odtworzyć. Należy zwrócić uwagę na
7/8/9/0 jako: BT = 7, = 8, = 9, DIS = 0.
UŻYWANIE GNIAZDA AUX IN 1/2
Na panelu przednim gniazdo AUX IN 1 jest gniazdem 3,5 mm. Natomiast gniazdo
AUX IN 2 dla RCA znajduje się z tyłu urządzenia. Naciśnięcie przycisku SRC/MENU
spowoduje przełączenie do trybu AUX IN1 (2) po podłączeniu sygnału audio do
urządzenia.
OBSŁUGA BLUETOOTH
Parowanie urządzeń
W smartfonie wybierz pozycję Bluetooth i wyszukaj urządzenie Bluetooth. Na liście
powinna pojawić się pozycja „BLAUPUNKT”; wybierz „BLAUPUNKT”, a następnie
wprowadź hasło „0000”, jeśli zostanie wyświetlony komunikat wymagający
wprowadzenia hasła. Po pomyślnym sparowaniu na wyświetlaczu pojawi się napis BT.
Dźwięk Bluetooth
Naciśnij przycisk SRC/MENU, aby przełączyć się do trybu BT MUSIC. Urządzenie
automatycznie odtworzy utwór z telefonu. Naciśnij przycisk , aby wstrzymać/odt-
worzyć utwór.
Naciśnij przycisk / , aby wybrać następny/poprzedni utwór.
OBSŁUGA HDMI
Przednie gniazdo HDMI przechodzi do tylnego gniazda HDMI. Nie ma to wpływu na
odtwarzanie za pomocą HDMI.
Złącze RCA V-In i V-OUT
W tylnej części urządzenia złącze V-IN przechodzi do złącza V-OUT.
PILOT ZDALNEGO STEROWANIA
Pilota zdalnego sterowania można używać, gdy w menu ustawiono opcję IR na
włączoną.
OFF: Włączanie i wyłączanie urządzenia.
VOL+: Zwiększanie głośności
VOL-: Zmniejszanie głośności
1 : Włączanie/wyłączanie wyciszenia Strefy 1
2 : Włączanie/wyłączanie wyciszenia Strefy 2
W przypadku innych działań należy przeczytać
instrukcje powyżej.
INFORMACJE OGÓLNE
Wymagania dotyczące zasilania : Prąd stały o napięciu 12 V, zacisk ujemny
połączony z masą
Wymiary podstawy montażowej : 129 (szer.) x 112 (gł.) x 65 (wys.)
Ustawienia tonów
- Niskie (przy 100 Hz) : ±10 dB
- Wysokie (przy 100 Hz) : ±10 dB
Maksymalna moc wyjściowa : 4 × 40 W
Pobór prądu : 10 A (maks.)
RADIO FM AM
Zakres częstotliwości od 87,5 do 108 MHz od 522 do 1620 KHz
IF 10.7 MHz 450 KHz
Czułość 4 µV (S/N = 30 dB) 36 dBµV (S/N = 20 dB)
Separacja kanałów stereo >25 dB /
ROZWIĄZYWANIE PROBLEMÓW
PL
MONTAŻ
Deska rozdzielcza
Śruby
Osłony dekoracyjne
Informations relatives à la sécurité
Cette station multimédia a été fabriquée selon les normes techniques actuellement
en vigueur et les principes de sécurité généralement reconnus. Néanmoins, le
non-respect des consignes de sécurité contenues dans ce manuel comporte divers
risques. Lisez attentivement l'ensemble du manuel avant d'utiliser la station
multimédia. Conservez le manuel dans un endroit où il est accessible pour tous les
utilisateurs et à tout moment. Si la station multimédia est transmise à un tiers, ce
manuel lui doit être également remis. De plus, suivez les instructions des modes
d'emploi des appareils connectés à cette station.
Consignes générales de sécurité
Respectez les instructions suivantes pour vous protéger des blessures :
Ne pas modier ou ouvrir l'appareil.
Usage prévu
La station multimédia est conçue pour être installée et fonctionner dans des
véhicules avec une tension d'alimentation de 12V. Les limites de puissance de
l'appareil doivent être respectées. Toute réparation et installation doit être eectuée
par un professionnel.
Instructions pour l'installation
Vous ne pouvez installer l'appareil vous-même que si vous êtes expérimenté dans
l'installation d'autoradios et si vous avez des connaissances en électricité automobile.
À cet eet, consultez le schéma de câblage de ce manuel. L'installation de cet appareil
ne doit pas gêner ni bloquer le fonctionnement des airbags, des autres dispositifs de
sécurité ou des dispositifs de contrôle.
Déclaration de conformité
Blaupunkt Competence Center Car Multimedia - Evo Sales GmbH déclare que cet
appareil est conforme aux exigences fondamentales et aux autres dispositions
applicables de la directive 2014/53/UE. La déclaration de conformité peut être
consultée à l'adresse suivante :www.blaupunkt.com.
Instructions concernant le nettoyage
Les solvants, les produits nettoyants et abrasifs, ainsi que les nettoyants de cockpit et
les produits d'entretien des plastiques peuvent contenir des composants qui peuvent
endommager la surface de la station multimédia. Pour nettoyer la station multimédia,
utilisez uniquement un chion sec ou légèrement humide.
Instructions concernant la mise au rebut
Ne jetez pas l'appareil usagé avec les ordures ménagères !
Pour mettre au rebut l'appareil, la télécommande et les piles usagées,
veuillez les apporter à un point de collecte des équipements usagés.
Contenu de l'emballage
Le contenu de l’emballage comprend :
station multimédia BPA 3022 M,
télécommande,
connecteurs ISO,
vis de montage,
manuel d’utilisation.
INFORMATIONS IMPORTANTES CONCERNANT L’INSTALLATION
1. Lisez attentivement ce manuel d'utilisation avant d'installer l'appareil.
2. Avant de brancher l'alimentation électrique, assurez-vous que tous les
autres câbles sont connectés.
3. Pour éviter les court-circuits, assurez-vous que tous les câbles exposés sont
isolés.
4. Une fois l'installation terminée, tous les câbles doivent être sécurisés.
5. Les connexions au lecteur doivent être eectuées conformément à ce
manuel. Une connexion incorrecte peut provoquer l'endommagement de
l'appareil.
6. Le lecteur est conçu pour fonctionner uniquement avec une installation de
12 V DC.
INSTALLATION DE L'APPAREIL
DÉMONTAGE DE L'APPAREIL
1. Démontez l'appareil.
2. Démontez le cadre de nition extérieur.
Remarque concernant le HDMI :
Utilisez un câble HDMI de bonne qualité.
La longueur totale (avant et arrière) ne doit pas dépasser 12 pieds.
CONNEXION DES CÂBLES
1. Le lecteur ne peut être utilisé que sous une tension de +12 V DC.
2. Ne connectez pas la borne de la batterie avant que le lecteur ne soit
complètement installé.
3. Assurez-vous que le l jaune est connecté au pôle positif (+) de la batterie.
4. Lorsque vous remplacez le fusible, assurez-vous que les paramètres du
nouveau fusible sont les mêmes.
5. L’utilisation de haut-parleurs de bonne qualité avec une impédance de 4–8
ohms permettra de tirer le meilleur parti de l’appareil.
EMPLACEMENT DES TOUCHES
1. ZONE 1 2. 1 3. ZONE 2
4. 2 5. BT 6. 3 RPT
7. 8. 4 RDM 9.
10. 5 DIR- 11. DIS 12. 6 DIR+
13. LCD 14. PRISE AUX 15. PRISE POUR CASQUE D'ÉCOUTE
16. PRISE HDMI 17. RESET 18. BOUTON ROTATIF
19. PORT USB 20. SRC/MENU
FONCTIONNEMENT DE BASE
Activation/désactivation de l'appareil et de la fonction de mise en sourdine
Pour allumer l'appareil, appuyez sur le bouton rotatif / MUTE. Pour activer ou désactiver la
fonction de mise en sourdine, appuyez brièvement sur le bouton lorsque l'appareil est
allumé. Appuyez sur ce bouton et maintenez-le enfoncé pour éteindre l’appareil.
Réglage du volume et menu de conguration
Appuyez sur la touche SRC/MENU et maintenez-la enfoncée pour accéder au menu illustré
ci-dessous :
BAS->TRE->BAL->EQ (o/pop/rock/class)->LOUD (on/o)->CLK HH->CLK
MM->IR (on/o) ->CT (indep/sync)->SIGN. BEEP (on/o)->P_VOL (13)->DX (LOC)->STE- REO
(MONO)
À chaque position, tournez le bouton VOL pour la régler.
INFRAROUGE (ON/OFF) :
INFRAROUGE ON : L'appareil peut être mis en marche à l'aide de la télécommande à
infrarouge.
Le système est alors en mode de haute consommation d'énergie.
INFRAROUGE OFF : L'appareil ne peut pas être mis en marche à l'aide de la télécommande
à infrarouge.
Le système est en mode de faible consommation d'énergie.
CT (INDEP/SYNC) :
CT INDEP : L’horloge fonctionne indépendamment.
CT SYNC : L’horloge sera synchronisée avec l’heure de la station RDS réceptionnée.
Remarque : Lorsque l'horloge est réglée dans le menu, la fonction CT est automatiquement
réglée sur le mode INDEP (fonctionnement indépendant).
BEEP (ON/OFF) : Permet d'activer/désactiver le signal sonore lorsque les touches sont
enfoncées.
P-VOL : Permet de régler le volume à la mise en marche. Si le niveau de volume à l'arrêt est
inférieur au niveau P-VOL, l'appareil règle le niveau de volume sur le volume à l'arrêt
lorsqu'il est mis en marche.
Si le niveau de volume à l'arrêt est supérieur au niveau P-VOL, le volume sera réinitialisé sur
les valeurs P-VOL à la mise en marche.
Recherche de haut-parleurs Bluetooth
Après avoir enfoncé la touche BT, l'écran ache « SEARCH... » [recherche]. Un instant plus
tard, le nom de votre appareil Bluetooth s'ache. Pour acher l'appareil suivant, tournez le
bouton VOL. Une fois que le nom du haut-parleur Bluetooth souhaité s'ache sur l'écran
LCD, appuyez sur le bouton VOL pour associer l'appareil. Une fois le jumelage terminé,
l'écran ache le message « BOX ON ».
Consigne importante : Malgré de nombreux tests eectués avec divers dispositifs
Bluetooth, la compatibilité avec tous les dispositifs Bluetooth disponible sur le marché ne
peut être garantie.
Transmission du signal au haut-parleur Bluetooth
Appuyez brièvement sur la touche BT pour arrêter/initier le transfert du signal vers le
haut-parleur Bluetooth. L'écran ache le message « BOX OFF/ON ».
Remarque : Bien que Blaupunkt vérie soigneusement la compatibilité des diérents
haut-parleurs Bluetooth, un fonctionnement sans faille ne peut être garanti avec tous les
modèles du marché.
Fonctionnement des Zones 1 et 2
Appuyez brièvement sur la touche Zone 1 (ou Zone 2) pour activer ou désactiver le son de
la Zone 1 (ou de la Zone 2).
Maintenez la touche Zone 1 (ou Zone 2) enfoncée pour couper le son de la Zone 1 (ou de la
Zone 2). Appuyez à nouveau sur la touche pour rétablir le son.
Priorité des informations ou de l'horloge
Appuyez brièvement sur la touche DIS pour modier la priorité de l’horloge ou la priorité
des informations.
Remarque : En mode FM, lorsque vous recevez des stations RDS, appuyez brièvement sur la
touche DIS pour acher NOM DE STATION/HORLOGE/FRÉQUENCE.
Réglage de l’horloge
Sélectionnez CLK HH/CLK MM dans le menu. Tournez le bouton VOL pour régler les heures /
les minutes.
Fonctionnement du casque d'écoute
Une prise pour casque d'écoute de 3,5 mm se trouve sur le panneau avant. Il adopte les
paramètres de fonctionnement de la Zone 1.
UTILISATION DE LA RADIO
Réception des stations de radio
Appuyez sur la touche SRC/MENU pour sélectionner un mode parmi FM1->FM2->MW.
Appuyez brièvement sur la touche / pour recevoir la station de radio souhaitée.
Maintenez la touche / enfoncée pour régler manuellement la fréquence.
Mémorisation manuelle des stations et accès aux stations mémorisées
Réception de la station souhaitée. Appuyez sur les touches numériques (1-6) et
maintenez-les enfoncées pendant 2 secondes. La station actuelle sera mise en mémoire
pour la touche numérique correspondante. Appuyez brièvement sur la touche de la station
préréglée (1–6) pour écouter directement le signal de diusion de cette station mémorisée
pour la touche assignée.
FONCTIONNEMENT DAB
Appuyez sur la touche SRC/MENU pour basculer la source entre DAB1 et DAB2.
Sélection d'une station
Appuyez sur la touche / pour sélectionner la station suivante/précédente.
Mémorisation manuelle des stations et accès aux stations mémorisées
Lorsque la fréquence de la station souhaitée est réglée, appuyez sur l'une des touches
numérotées de 1 à 6 pendant 2 secondes pour mémoriser cette station sous le numéro
correspondant. Appuyez brièvement sur la touche de la station préréglée (1–6) pour
écouter directement le signal de diusion de cette station mémorisée pour la touche
assignée.
UTILISATION DU PORT USB
Lorsqu'un lecteur USB est connecté à l'appareil, ce dernier lit automatiquement les
chiers MP3/WMA. Si un lecteur USB a déjà été connecté à l'appareil, appuyez
brièvement sur la touche SRC/MENU jusqu'à ce que l'écran du mode USB apparaisse.
Sélection d'un chier
Appuyez sur la touche / pour passer au chier suivant/précédent. Appuyez
sur la touche / pour faire déler rapidement vers l'avant et vers l'arrière.
Lecture/Pause
Appuyez sur la touche 1 pour mettre en pause/lire un chier.
Fonction de lecture en boucle
Appuyez sur la touche 3 RPT pour sélectionner la fonction de lecture en boucle. RPT
ONE/RPT FOLD/RPT ALL (par défaut)
RPT ONE : Lecture en boucle d'un seul chier.
RPT FOLD : Lecture en boucle de tous les chiers d'un dossier.
RPT ALL : Lecture en boucle de tous les chiers.
RANDOM
Appuyez sur la touche 4 RDM pour activer ou désactiver la fonction de lecture aléatoire.
RDM ON : Lecture aléatoire de tous les chiers.
RDM OFF : Fonction de lecture aléatoire.
Fonction dossier +/-
Appuyez sur la touche DIR+/DIR- pour sélectionner le dossier suivant/précédent à lire.
Recherche d'une chanson
Après avoir enfoncé la touche l'écran achera « NUM 0000 ». En tournant le bouton
VOL (ou en saisissant directement un numéro), sélectionnez un numéro, puis appuyez
sur VOL pour lancer la lecture. Veuillez noter que 7/8/9/0 signie : BT = 7, = 8, = 9,
DIS = 0.
UTILISATION DE LA PRISE AUX IN 1/2
Sur le panneau avant, la prise AUX IN 1 est un jack de 3,5 mm. La prise AUX IN 2 pour
RCA est située à l'arrière de l'appareil. En appuyant sur la touche SRC/MENU, on peut
passer en mode AUX IN1 (2) lorsque le signal audio est connecté à l'appareil.
UTILISATION DU BLUETOOTH
Jumelage des appareils
Sélectionnez la position Bluetooth et recherchez le périphérique Bluetooth sur votre
téléphone. La position « BLAUPUNKT » devrait apparaître dans la liste ; sélectionnez
« BLAUPUNKT », puis entrez le mot de passe « 0000 » si un message demandant un mot
de passe s'ache. Une fois le jumelage terminé, l'écran ache « BT ».
Audio Bluetooth
Appuyez sur la touche SRC/MENU pour passer en mode BT MUSIC. L'appareil réproduira
automatiquement la musique de votre téléphone. Appuyez sur la touche pour
mettre en pause/en lecture une piste.
Appuyez sur la touche / pour sélectionner la piste suivante/précédente.
UTILISATION DE LA PRISE HDMI
La prise HDMI avant va vers la prise HDMI arrière. La lecture à l'aide de HDMI n'est pas
aectée.
Connecteurs RCA V-IN et V-OUT
À l'arrière de l'appareil, le connecteur V-IN va vers le connecteur V-OUT.
TÉLÉCOMMANDE
La télécommande peut être utilisée lorsque
l'option IR est activée dans le menu.
OFF: Mise en marche et arrêt de l’appareil.
VOL+ : Augmenter le volume
VOL- : Réduire le volume
1 : Activation/désactivation du mode
sourdine de la Zone 1
2 : Activation/désactivation du mode
sourdine de la Zone 2
Pour les autres opérations, lisez les instructions ci-dessus.
INFORMATIONS GÉNÉRALES
Exigences concernant l’alimentation : 12 V DC, borne négative connectée à la terre
Dimensions de la base de montage :129 (larg.) x 112 (long.) x 65 (ép.)
Paramètres de tonalité
- Basse (à 100 Hz) : ±10 dB
- Haute (à 100 Hz) : ±10 dB
Puissance de sortie maximale : 4 x 40 W
Consommation de courant : 10 A (max.)
RADIO FM AM
Plage de fréquences de 87,5 à 108 MHz de 522 à 1620 KHz
IF 10,7 MHz 450 KHz
Sensibilité 4 µV (S/N = 30 dB) 36 dBuV (S/N = 20 dB)
Séparation des canaux stéréo >25 dB /
RÉSOLUTION DES PROBLÈMES

Wskazówki dotyczące bezpieczeństwa
Niniejszą stację multimedialną wyprodukowano zgodnie z aktualnymi
standardami rozwoju techniki i ogólnie uznanymi zasadami bezpieczeństwa.
Mimo to nieprzestrzeganie zawartych w niniejszej instrukcji wskazówek
dotyczących bezpieczeństwa wiąże się z różnego rodzaju zagrożeniami. Przed
rozpoczęciem użytkowania stacji multimedialnej należy dokładnie przeczytać
całą instrukcję. Przechowywać instrukcję w takim miejscu, aby w każdej chwili
była dostępna dla wszystkich użytkowników. W przypadku przekazania stacji
multimedialnej osobom trzecim należy dołączyć niniejszą instrukcję. Oprócz
tego należy przestrzegać wskazówek zawartych w instrukcjach obsługi
urządzeń podłączonych do tej stacji.
Ogólne wskazówki dotyczące bezpieczeństwa
Należy przestrzegać poniższych wskazówek, aby chronić się przed obrażeniami
ciała: Nie wolno modykować ani otwierać urządzenia.
Przeznaczenie
Stacja multimedialna jest przeznaczona do montażu i obsługi w pojazdach z
instalacją o napięciu 12 V. Należy przestrzegać wartości granicznych mocy
urządzenia. Ewentualne naprawy oraz montaż należy zlecić fachowcowi.
Instrukcja montażu
Urządzenie można zamontować samodzielnie tylko w przypadku dysponowania
doświadczeniem w zakresie montażu radioodtwarzaczy i znajomością
zagadnień elektryki samochodowej. W tym celu należy zapoznać się ze
schematem połączeń zawartym w niniejszej instrukcji. Montaż urządzenia nie
może utrudniać lub blokować działania jakichkolwiek poduszek powietrznych,
innych urządzeń zabezpieczających lub elementów sterowania.
Deklaracja zgodności
Blaupunkt Competence Center Car Multimedia – Evo Sales GmbH oświadcza, że
to urządzenie jest zgodne z wymaganiami podstawowymi oraz pozostałymi
stosownymi postanowieniami Dyrektywy 2014/53/UE. Deklarację zgodności
można znaleźć na stronie internetowej www.blaupunkt.com.
Wskazówki dotyczące czyszczenia
Rozpuszczalniki, środki czyszczące oraz ścierne, jak również aerozole do czyszczenia
kokpitów i środki do pielęgnacji tworzyw sztucznych mogą zawierać składniki, które
mogłyby uszkodzić powierzchnię stacji multimedialnej. Do czyszczenia stacji
tedialnej należy używać wyłącznie suchej lub lekko zwilżonej ściereczki.
Wskazówki dotyczące utylizacji
Nie wolno wyrzucać zużytego urządzenia wraz z odpadami z
gospodarstwa domowego!
Aby zutylizować urządzenie, pilot zdalnego sterowania i zużyte baterie,
należy oddać je do punktu zbiórki zużytego sprzętu.
Zakres dostawy
Zakres dostawy obejmuje:
stację multimedialną BPA 3022 M,
pilot zdalnego sterowania,
złącza ISO,
śruby montażowe,
instrukcję obsługi.
WAŻNE INFORMACJE DOTYCZĄCE MONTAŻU
1. Przed przystąpieniem do montażu urządzenia, należy dokładnie przeczytać
instrukcję obsługi.
2. Przed podłączeniem zasilania należy upewnić się, że wszystkie inne
przewody zostały podłączone.
3. Aby uniknąć zwarcia, należy upewnić się, że wszystkie odsłonięte przewody
zostały zaizolowane.
4. Po zakończeniu montażu należy zamocować wszystkie przewody.
5. Podłączenia do odtwarzacza należy wykonać zgodnie z niniejszą instrukcją
obsługi. Nieprawidłowe podłączenie może spowodować uszkodzenie
urządzenia.
6. Odtwarzacz jest przeznaczony do pracy wyłącznie z instalacją o napięciu 12
V prądu stałego.
MONTAŻ URZĄDZENIA
DEMONTAŻ URZĄDZENIA
1. Zdemontuj urządzenie.
2. Rozmontuj zewnętrzną ramkę wykończeniową.
Uwaga dotycząca HDMI:
Używaj kabla HDMI dobrej jakości.
Długość całkowita (przód i tył) nie powinna przekraczać 12 stóp.
PODŁĄCZENIE PRZEWODÓW
1. Odtwarzacz może być używany tylko przy napięciu +12 V prądu stałego.
2. Nie podłączaj zacisku akumulatora, dopóki odtwarzacz nie zostanie całkowicie
zamontowany.
3. Upewnij się, że żółty przewód jest podłączony do bieguna dodatniego akumula-
tora (+).
4. Przy wymianie bezpiecznika upewnij się, że parametry nowego bezpiecznika są
takie same.
5. Zastosowanie dobrej jakości głośników o impedancji 4–8 omów pozwala uzyskać
najlepsze efekty działania urządzenia.
PODŁĄCZENIE PRZEWODÓW
POŁOŻENIE PRZYCISKÓW
1. STREFA 1 2. 1 3. STREFA 2
4. 2 5. BT 6. 3 RPT
7. 8. 4 RDM 9.
10. 5 DIR- 11. DIS 12. 6 DIR+
13. LCD 14. GNIAZDO AUX 15. GNIAZDO SŁUCHAWKOWE
16. GNIAZDO HDMI 17. RESET 18. POKRĘTŁO
19. PORT USB 20. SRC/MENU
OBSŁUGA PODSTAWOWA
Włączanie/wyłączanie urządzenia i funkcji wyciszania
Aby włączyć urządzenie, naciśnij pokrętło /MUTE. W celu włączenia lub wyłączenia funkcji
wyciszenia, krótko naciśnij pokrętło, gdy urządzenie jest włączone. Naciśnięcie i
przytrzymanie tego przycisku spowoduje wyłączenie urządzenia.
Ustawienia dźwięku i menu ustawień
Naciśnij i przytrzymaj przycisk SRC/MENU, aby przejść do menu przedstawionego poniżej:
BAS->TRE->BAL->EQ (wył./pop/rock/clas)->LOUD (wł./wył.)->CLK HH->CLK MM->IR
(wł./wył.) ->CT (indep/sync)->SYG. DŹW. (wł./wył.) )->P_VOL (13)->DX (LOC)->STE- REO
(MONO)
Przy każdej pozycji obróć pokrętło VOL, aby ją ustawić.
PODCZERWIEŃ (WŁ./WYŁ.):
PODCZERWIEŃ wł.: Urządzenie można włączyć za pomocą pilota zdalnego sterowania na
podczerwień. System wtedy jest w trybie wysokiego zużycia energii.
PODCZERWIEŃ wył.: Urządzenia nie można włączyć za pomocą pilota zdalnego
sterowania na podczerwień. System jest w trybie niskiego zużycia energii.
CT (INDEP/SYNC):
CT INDEP: Zegar działa niezależnie.
CT SYNC: Zegar zostanie zsynchronizowany z czasem odbieranej stacji RDS. Uwaga: W
przypadku gdy zegar został ustawiony w menu, funkcja CT jest automatycznie ustawiana
na tryb INDEP (niezależne działanie).
SYGNAŁ DŹWIĘKOWY (WŁ./WYŁ.): Pozwala na włączanie/wyłączenie sygnału dźwiękowe-
go przy naciśnięciu przycisków.
P-VOL: Pozwala na ustawienie głośności przy włączaniu. Jeśli poziom głośności przy
wyłączaniu jest niższy niż poziom P-VOL, po włączeniu urządzenie ustawi poziom
głośności na głośność przy wyłączaniu.
Jeśli poziom głośności przy wyłączaniu jest wyższy niż poziom P-VOL, głośność zostanie
przywrócona do poziomu
wartości P-VOL przy włączeniu urządzenia.
Wyszukiwanie głośników Bluetooth
Naciśnięcie i przytrzymanie przycisk BT spowoduje wyświetlenie komunikatu „SEARCH...”
[szukanie]. Chwilę później zostanie wyświetlona nazwa urządzenia Bluetooth. Aby
wyświetlić następne urządzenie, obróć pokrętło VOL. Po wyświetleniu na LCD nazwy
żądanego głośnika Bluetooth, naciśnij pokrętło VOL, aby sparować urządzenie. Jeśli
parowanie się powiedzie, na wyświetlaczu pojawi się komunikat „BOX ON”.
Ważna wskazówka: Pomimo licznych testów z różnymi urządzeniami Bluetooth, nie
można zagwarantować zgodności ze wszystkimi urządzeniami Bluetooth dostępnymi na
rynku.
Transmisja sygnału do głośnika Bluetooth
Krótko naciśnij przycisk BT, aby zatrzymać przesyłanie/przesłać sygnał do głośnika
Bluetooth. Na wyświetlaczu pojawi się komunikat „BOX OFF/ON”.
Uwaga: Mimo że rma Blaupunkt dokładnie sprawdza kompatybilność różnych
głośników Bluetooth, nie można zagwarantować bezproblemowego działania urządzenia
ze wszystkimi modelami dostępnymi na rynku.
Obsługa Strefy 1 i Strefy 2
Krótko naciśnij przycisk Zone 1 (lub Zone 2), aby wyłączyć/włączyć dźwięk Strefy 1
(lub Strefy 2).
Przytrzymaj przycisk Zone 1 (lub Zone 2), aby wyciszyć dźwięk Strefy 1 (lub Strefy 2).
Ponowne przytrzymanie przycisku spowoduje wyłączenie wyciszenia.
Priorytet informacji lub zegara
Naciśnij krótko przycisk DIS, aby ustawić priorytet zegara lub priorytet informacji.
Uwaga: W paśmie FM, w przypadku odbierania stacji RDS, krótko naciśnij przycisk
DIS, aby wyświetlić NAZWĘ STACJI/ ZEGAR/CZĘSTOTLIWOŚĆ.
Ustawianie zegara
W menu wybierz pozycję CLK HH/CLK MM. Obróć pokrętło VOL, aby ustawić
godzinę/minuty.
Obsługa słuchawek
Na panelu przednim znajduje się gniazdo słuchawkowe 3,5 mm. Przyjmuje ono
ustawienia działania Strefy 1.
OBSŁUGA RADIA
Odbiór stacji radiowych
Naciśnij przycisk SRC/MENU, aby wybrać tryb spośród FM1->FM2->MW. Krótko
naciśnij przycisk / , aby odbierać żądaną stację radiową. Naciśnij i przytrzy-
maj przycisk / w celu ręcznego dostrojenia częstotliwości.
Ręczne zapisywanie stacji i wywoływanie zapisanych stacji
Odbieranie żądanej stacji. Naciśnij i przytrzymaj jeden z przycisków pamięci (1–6)
przez 2 sekundy. Aktualna stacja zostanie zapisana w pamięci pod danym przycis-
kiem numerycznym. Naciśnij krótko przycisk zaprogramowanej stacji (1–6), aby
słuchać bezpośrednio sygnału nadawanego z tej stacji i zapisanego pod przyporząd-
kowanym przyciskiem.
OBSŁUGA DAB
Naciśnij przycisk SRC/MENU, aby przełączyć źródło między DAB1 lub DAB2.
Wybór stacji
Naciśnij przycisk / , aby wybrać następną/poprzednią stację.
Ręczne zapisywanie stacji i wywoływanie zapisanych stacji
Gdy ustawiono częstotliwość żądanej stacji. Naciśnij i przytrzymaj jeden z przycisków
od 1 do 6 przez 2 sekundy, aby zapisać tę stację pod odpowiednim numerem.
Naciśnij krótko przycisk zaprogramowanej stacji (1–6), aby słuchać bezpośrednio
sygnału nadawanego z tej stacji i zapisanego pod przyporządkowanym przyciskiem.
OBSŁUGA USB
Po podłączeniu do urządzenia dysku USB, urządzenie automatycznie odtworzy pliki
MP3/WMA. Jeżeli dysk USB został już podłączony do urządzenia, naciśnij krótko
przycisk SRC/MENU, aż pojawi się ekran trybu USB.
Wybór pliku
Naciśnij przycisk / , aby przejść do następnego/poprzedniego pliku.
Przytrzymaj przycisk / , aby przewinąć szybko do przodu lub do tyłu.
Odtwarzanie/wstrzymanie
Naciśnij przycisk 1 , aby wstrzymać/odtworzyć plik.
Funkcja odtwarzania w pętli
Naciśnij przycisk 3 RPT, aby wybrać funkcję odtwarzania w pętli. RPT ONE/RPT
FOLD/RPT ALL (domyślnie)
RPT ONE: Odtwarzanie w pętli jednego pliku.
RPT FOLD: Odtwarzanie w pętli wszystkich plików w folderze.
RPT ALL: Odtwarzanie w pętli wszystkich plików.
RANDOM
Naciśnij przycisk 4 RDM, aby włączyć lub wyłączyć funkcję odtwarzania losowego.
RDM wł.: Odtwarzanie losowe wszystkich plików.
RDM wył.: Wyłączenie funkcji odtwarzania losowego.
Funkcja folder +/-
Naciśnij przycisk DIR+/DIR-, aby wybrać następny/poprzedni folder do odtwarzania.
Wyszukiwanie piosenki
Naciśnięcie i przytrzymanie przycisku spowoduje wyświetlenie komunikatu
„NUM 0000”. Obracając pokrętło VOL (lub bezpośrednio wprowadzając numer),
wybierz numer, a następnie naciśnij VOL, aby odtworzyć. Należy zwrócić uwagę na
7/8/9/0 jako: BT = 7, = 8, = 9, DIS = 0.
UŻYWANIE GNIAZDA AUX IN 1/2
Na panelu przednim gniazdo AUX IN 1 jest gniazdem 3,5 mm. Natomiast gniazdo
AUX IN 2 dla RCA znajduje się z tyłu urządzenia. Naciśnięcie przycisku SRC/MENU
spowoduje przełączenie do trybu AUX IN1 (2) po podłączeniu sygnału audio do
urządzenia.
OBSŁUGA BLUETOOTH
Parowanie urządzeń
W smartfonie wybierz pozycję Bluetooth i wyszukaj urządzenie Bluetooth. Na liście
powinna pojawić się pozycja „BLAUPUNKT”; wybierz „BLAUPUNKT”, a następnie
wprowadź hasło „0000”, jeśli zostanie wyświetlony komunikat wymagający
wprowadzenia hasła. Po pomyślnym sparowaniu na wyświetlaczu pojawi się napis BT.
Dźwięk Bluetooth
Naciśnij przycisk SRC/MENU, aby przełączyć się do trybu BT MUSIC. Urządzenie
automatycznie odtworzy utwór z telefonu. Naciśnij przycisk , aby wstrzymać/odt-
worzyć utwór.
Naciśnij przycisk / , aby wybrać następny/poprzedni utwór.
OBSŁUGA HDMI
Przednie gniazdo HDMI przechodzi do tylnego gniazda HDMI. Nie ma to wpływu na
odtwarzanie za pomocą HDMI.
Złącze RCA V-In i V-OUT
W tylnej części urządzenia złącze V-IN przechodzi do złącza V-OUT.
PILOT ZDALNEGO STEROWANIA
Pilota zdalnego sterowania można używać, gdy w menu ustawiono opcję IR na
włączoną.
OFF: Włączanie i wyłączanie urządzenia.
VOL+: Zwiększanie głośności
VOL-: Zmniejszanie głośności
1 : Włączanie/wyłączanie wyciszenia Strefy 1
2 : Włączanie/wyłączanie wyciszenia Strefy 2
W przypadku innych działań należy przeczytać
instrukcje powyżej.
INFORMACJE OGÓLNE
Wymagania dotyczące zasilania : Prąd stały o napięciu 12 V, zacisk ujemny
połączony z masą
Wymiary podstawy montażowej : 129 (szer.) x 112 (gł.) x 65 (wys.)
Ustawienia tonów
- Niskie (przy 100 Hz) : ±10 dB
- Wysokie (przy 100 Hz) : ±10 dB
Maksymalna moc wyjściowa : 4 × 40 W
Pobór prądu : 10 A (maks.)
RADIO FM AM
Zakres częstotliwości od 87,5 do 108 MHz od 522 do 1620 KHz
IF 10.7 MHz 450 KHz
Czułość 4 µV (S/N = 30 dB) 36 dBµV (S/N = 20 dB)
Separacja kanałów stereo >25 dB /
ROZWIĄZYWANIE PROBLEMÓW
PL
Część A
Część B
BEZPIECZNIK
Część A
Część B
ANTENA
RADIA
SYSTEM 4-GŁOŚNIKOWY
STREFA 1
STREFA 2
Głośnik
przedni –
lewy
Głośnik
przedni –
prawy
Głośnik
tylny – lewy
Głośnik tylny
– prawy
(BIAŁO-CZARNY)
(BIAŁY)
(SZARO-CZARNY)
(SZARY)
(ZIELONO-CZARNY)
(ZIELONY)
(FIOLETOWO-CZARNY)
(FIOLETOWY)
Przewód uziemiający (czarny)
Akcesorium/przełącznik +12 VA (czerwony)
Zasilanie anteny (niebieski)
Stałe zasilanie +12 V (żółty)

Wskazówki dotyczące bezpieczeństwa
Niniejszą stację multimedialną wyprodukowano zgodnie z aktualnymi
standardami rozwoju techniki i ogólnie uznanymi zasadami bezpieczeństwa.
Mimo to nieprzestrzeganie zawartych w niniejszej instrukcji wskazówek
dotyczących bezpieczeństwa wiąże się z różnego rodzaju zagrożeniami. Przed
rozpoczęciem użytkowania stacji multimedialnej należy dokładnie przeczytać
całą instrukcję. Przechowywać instrukcję w takim miejscu, aby w każdej chwili
była dostępna dla wszystkich użytkowników. W przypadku przekazania stacji
multimedialnej osobom trzecim należy dołączyć niniejszą instrukcję. Oprócz
tego należy przestrzegać wskazówek zawartych w instrukcjach obsługi
urządzeń podłączonych do tej stacji.
Ogólne wskazówki dotyczące bezpieczeństwa
Należy przestrzegać poniższych wskazówek, aby chronić się przed obrażeniami
ciała: Nie wolno modykować ani otwierać urządzenia.
Przeznaczenie
Stacja multimedialna jest przeznaczona do montażu i obsługi w pojazdach z
instalacją o napięciu 12 V. Należy przestrzegać wartości granicznych mocy
urządzenia. Ewentualne naprawy oraz montaż należy zlecić fachowcowi.
Instrukcja montażu
Urządzenie można zamontować samodzielnie tylko w przypadku dysponowania
doświadczeniem w zakresie montażu radioodtwarzaczy i znajomością
zagadnień elektryki samochodowej. W tym celu należy zapoznać się ze
schematem połączeń zawartym w niniejszej instrukcji. Montaż urządzenia nie
może utrudniać lub blokować działania jakichkolwiek poduszek powietrznych,
innych urządzeń zabezpieczających lub elementów sterowania.
Deklaracja zgodności
Blaupunkt Competence Center Car Multimedia – Evo Sales GmbH oświadcza, że
to urządzenie jest zgodne z wymaganiami podstawowymi oraz pozostałymi
stosownymi postanowieniami Dyrektywy 2014/53/UE. Deklarację zgodności
można znaleźć na stronie internetowej www.blaupunkt.com.
Wskazówki dotyczące czyszczenia
Rozpuszczalniki, środki czyszczące oraz ścierne, jak również aerozole do czyszczenia
kokpitów i środki do pielęgnacji tworzyw sztucznych mogą zawierać składniki, które
mogłyby uszkodzić powierzchnię stacji multimedialnej. Do czyszczenia stacji
tedialnej należy używać wyłącznie suchej lub lekko zwilżonej ściereczki.
Wskazówki dotyczące utylizacji
Nie wolno wyrzucać zużytego urządzenia wraz z odpadami z
gospodarstwa domowego!
Aby zutylizować urządzenie, pilot zdalnego sterowania i zużyte baterie,
należy oddać je do punktu zbiórki zużytego sprzętu.
Zakres dostawy
Zakres dostawy obejmuje:
stację multimedialną BPA 3022 M,
pilot zdalnego sterowania,
złącza ISO,
śruby montażowe,
instrukcję obsługi.
WAŻNE INFORMACJE DOTYCZĄCE MONTAŻU
1. Przed przystąpieniem do montażu urządzenia, należy dokładnie przeczytać
instrukcję obsługi.
2. Przed podłączeniem zasilania należy upewnić się, że wszystkie inne
przewody zostały podłączone.
3. Aby uniknąć zwarcia, należy upewnić się, że wszystkie odsłonięte przewody
zostały zaizolowane.
4. Po zakończeniu montażu należy zamocować wszystkie przewody.
5. Podłączenia do odtwarzacza należy wykonać zgodnie z niniejszą instrukcją
obsługi. Nieprawidłowe podłączenie może spowodować uszkodzenie
urządzenia.
6. Odtwarzacz jest przeznaczony do pracy wyłącznie z instalacją o napięciu 12
V prądu stałego.
MONTAŻ URZĄDZENIA
DEMONTAŻ URZĄDZENIA
1. Zdemontuj urządzenie.
2. Rozmontuj zewnętrzną ramkę wykończeniową.
Uwaga dotycząca HDMI:
Używaj kabla HDMI dobrej jakości.
Długość całkowita (przód i tył) nie powinna przekraczać 12 stóp.
PODŁĄCZENIE PRZEWODÓW
1. Odtwarzacz może być używany tylko przy napięciu +12 V prądu stałego.
2. Nie podłączaj zacisku akumulatora, dopóki odtwarzacz nie zostanie całkowicie
zamontowany.
3. Upewnij się, że żółty przewód jest podłączony do bieguna dodatniego akumula-
tora (+).
4. Przy wymianie bezpiecznika upewnij się, że parametry nowego bezpiecznika są
takie same.
5. Zastosowanie dobrej jakości głośników o impedancji 4–8 omów pozwala uzyskać
najlepsze efekty działania urządzenia.
OBSŁUGA
POŁOŻENIE PRZYCISKÓW
1. STREFA 1 2. 1 3. STREFA 2
4. 2 5. BT 6. 3 RPT
7. 8. 4 RDM 9.
10. 5 DIR- 11. DIS 12. 6 DIR+
13. LCD 14. GNIAZDO AUX 15. GNIAZDO SŁUCHAWKOWE
16. GNIAZDO HDMI 17. RESET 18. POKRĘTŁO
19. PORT USB 20. SRC/MENU
OBSŁUGA PODSTAWOWA
Włączanie/wyłączanie urządzenia i funkcji wyciszania
Aby włączyć urządzenie, naciśnij pokrętło /MUTE. W celu włączenia lub wyłączenia funkcji
wyciszenia, krótko naciśnij pokrętło, gdy urządzenie jest włączone. Naciśnięcie i
przytrzymanie tego przycisku spowoduje wyłączenie urządzenia.
Ustawienia dźwięku i menu ustawień
Naciśnij i przytrzymaj przycisk SRC/MENU, aby przejść do menu przedstawionego poniżej:
BAS->TRE->BAL->EQ (wył./pop/rock/clas)->LOUD (wł./wył.)->CLK HH->CLK MM->IR
(wł./wył.) ->CT (indep/sync)->SYG. DŹW. (wł./wył.) )->P_VOL (13)->DX (LOC)->STE- REO
(MONO)
Przy każdej pozycji obróć pokrętło VOL, aby ją ustawić.
PODCZERWIEŃ (WŁ./WYŁ.):
PODCZERWIEŃ wł.: Urządzenie można włączyć za pomocą pilota zdalnego sterowania na
podczerwień. System wtedy jest w trybie wysokiego zużycia energii.
PODCZERWIEŃ wył.: Urządzenia nie można włączyć za pomocą pilota zdalnego
sterowania na podczerwień. System jest w trybie niskiego zużycia energii.
CT (INDEP/SYNC):
CT INDEP: Zegar działa niezależnie.
CT SYNC: Zegar zostanie zsynchronizowany z czasem odbieranej stacji RDS. Uwaga: W
przypadku gdy zegar został ustawiony w menu, funkcja CT jest automatycznie ustawiana
na tryb INDEP (niezależne działanie).
SYGNAŁ DŹWIĘKOWY (WŁ./WYŁ.): Pozwala na włączanie/wyłączenie sygnału dźwiękowe-
go przy naciśnięciu przycisków.
P-VOL: Pozwala na ustawienie głośności przy włączaniu. Jeśli poziom głośności przy
wyłączaniu jest niższy niż poziom P-VOL, po włączeniu urządzenie ustawi poziom
głośności na głośność przy wyłączaniu.
Jeśli poziom głośności przy wyłączaniu jest wyższy niż poziom P-VOL, głośność zostanie
przywrócona do poziomu
wartości P-VOL przy włączeniu urządzenia.
Wyszukiwanie głośników Bluetooth
Naciśnięcie i przytrzymanie przycisk BT spowoduje wyświetlenie komunikatu „SEARCH...”
[szukanie]. Chwilę później zostanie wyświetlona nazwa urządzenia Bluetooth. Aby
wyświetlić następne urządzenie, obróć pokrętło VOL. Po wyświetleniu na LCD nazwy
żądanego głośnika Bluetooth, naciśnij pokrętło VOL, aby sparować urządzenie. Jeśli
parowanie się powiedzie, na wyświetlaczu pojawi się komunikat „BOX ON”.
Ważna wskazówka: Pomimo licznych testów z różnymi urządzeniami Bluetooth, nie
można zagwarantować zgodności ze wszystkimi urządzeniami Bluetooth dostępnymi na
rynku.
Transmisja sygnału do głośnika Bluetooth
Krótko naciśnij przycisk BT, aby zatrzymać przesyłanie/przesłać sygnał do głośnika
Bluetooth. Na wyświetlaczu pojawi się komunikat „BOX OFF/ON”.
Uwaga: Mimo że rma Blaupunkt dokładnie sprawdza kompatybilność różnych
głośników Bluetooth, nie można zagwarantować bezproblemowego działania urządzenia
ze wszystkimi modelami dostępnymi na rynku.
Obsługa Strefy 1 i Strefy 2
Krótko naciśnij przycisk Zone 1 (lub Zone 2), aby wyłączyć/włączyć dźwięk Strefy 1
(lub Strefy 2).
Przytrzymaj przycisk Zone 1 (lub Zone 2), aby wyciszyć dźwięk Strefy 1 (lub Strefy 2).
Ponowne przytrzymanie przycisku spowoduje wyłączenie wyciszenia.
Priorytet informacji lub zegara
Naciśnij krótko przycisk DIS, aby ustawić priorytet zegara lub priorytet informacji.
Uwaga: W paśmie FM, w przypadku odbierania stacji RDS, krótko naciśnij przycisk
DIS, aby wyświetlić NAZWĘ STACJI/ ZEGAR/CZĘSTOTLIWOŚĆ.
Ustawianie zegara
W menu wybierz pozycję CLK HH/CLK MM. Obróć pokrętło VOL, aby ustawić
godzinę/minuty.
Obsługa słuchawek
Na panelu przednim znajduje się gniazdo słuchawkowe 3,5 mm. Przyjmuje ono
ustawienia działania Strefy 1.
OBSŁUGA RADIA
Odbiór stacji radiowych
Naciśnij przycisk SRC/MENU, aby wybrać tryb spośród FM1->FM2->MW. Krótko
naciśnij przycisk / , aby odbierać żądaną stację radiową. Naciśnij i przytrzy-
maj przycisk / w celu ręcznego dostrojenia częstotliwości.
Ręczne zapisywanie stacji i wywoływanie zapisanych stacji
Odbieranie żądanej stacji. Naciśnij i przytrzymaj jeden z przycisków pamięci (1–6)
przez 2 sekundy. Aktualna stacja zostanie zapisana w pamięci pod danym przycis-
kiem numerycznym. Naciśnij krótko przycisk zaprogramowanej stacji (1–6), aby
słuchać bezpośrednio sygnału nadawanego z tej stacji i zapisanego pod przyporząd-
kowanym przyciskiem.
OBSŁUGA DAB
Naciśnij przycisk SRC/MENU, aby przełączyć źródło między DAB1 lub DAB2.
Wybór stacji
Naciśnij przycisk / , aby wybrać następną/poprzednią stację.
Ręczne zapisywanie stacji i wywoływanie zapisanych stacji
Gdy ustawiono częstotliwość żądanej stacji. Naciśnij i przytrzymaj jeden z przycisków
od 1 do 6 przez 2 sekundy, aby zapisać tę stację pod odpowiednim numerem.
Naciśnij krótko przycisk zaprogramowanej stacji (1–6), aby słuchać bezpośrednio
sygnału nadawanego z tej stacji i zapisanego pod przyporządkowanym przyciskiem.
OBSŁUGA USB
Po podłączeniu do urządzenia dysku USB, urządzenie automatycznie odtworzy pliki
MP3/WMA. Jeżeli dysk USB został już podłączony do urządzenia, naciśnij krótko
przycisk SRC/MENU, aż pojawi się ekran trybu USB.
Wybór pliku
Naciśnij przycisk / , aby przejść do następnego/poprzedniego pliku.
Przytrzymaj przycisk / , aby przewinąć szybko do przodu lub do tyłu.
Odtwarzanie/wstrzymanie
Naciśnij przycisk 1 , aby wstrzymać/odtworzyć plik.
Funkcja odtwarzania w pętli
Naciśnij przycisk 3 RPT, aby wybrać funkcję odtwarzania w pętli. RPT ONE/RPT
FOLD/RPT ALL (domyślnie)
RPT ONE: Odtwarzanie w pętli jednego pliku.
RPT FOLD: Odtwarzanie w pętli wszystkich plików w folderze.
RPT ALL: Odtwarzanie w pętli wszystkich plików.
RANDOM
Naciśnij przycisk 4 RDM, aby włączyć lub wyłączyć funkcję odtwarzania losowego.
RDM wł.: Odtwarzanie losowe wszystkich plików.
RDM wył.: Wyłączenie funkcji odtwarzania losowego.
Funkcja folder +/-
Naciśnij przycisk DIR+/DIR-, aby wybrać następny/poprzedni folder do odtwarzania.
Wyszukiwanie piosenki
Naciśnięcie i przytrzymanie przycisku spowoduje wyświetlenie komunikatu
„NUM 0000”. Obracając pokrętło VOL (lub bezpośrednio wprowadzając numer),
wybierz numer, a następnie naciśnij VOL, aby odtworzyć. Należy zwrócić uwagę na
7/8/9/0 jako: BT = 7, = 8, = 9, DIS = 0.
UŻYWANIE GNIAZDA AUX IN 1/2
Na panelu przednim gniazdo AUX IN 1 jest gniazdem 3,5 mm. Natomiast gniazdo
AUX IN 2 dla RCA znajduje się z tyłu urządzenia. Naciśnięcie przycisku SRC/MENU
spowoduje przełączenie do trybu AUX IN1 (2) po podłączeniu sygnału audio do
urządzenia.
OBSŁUGA BLUETOOTH
Parowanie urządzeń
W smartfonie wybierz pozycję Bluetooth i wyszukaj urządzenie Bluetooth. Na liście
powinna pojawić się pozycja „BLAUPUNKT”; wybierz „BLAUPUNKT”, a następnie
wprowadź hasło „0000”, jeśli zostanie wyświetlony komunikat wymagający
wprowadzenia hasła. Po pomyślnym sparowaniu na wyświetlaczu pojawi się napis BT.
Dźwięk Bluetooth
Naciśnij przycisk SRC/MENU, aby przełączyć się do trybu BT MUSIC. Urządzenie
automatycznie odtworzy utwór z telefonu. Naciśnij przycisk , aby wstrzymać/odt-
worzyć utwór.
Naciśnij przycisk / , aby wybrać następny/poprzedni utwór.
OBSŁUGA HDMI
Przednie gniazdo HDMI przechodzi do tylnego gniazda HDMI. Nie ma to wpływu na
odtwarzanie za pomocą HDMI.
Złącze RCA V-In i V-OUT
W tylnej części urządzenia złącze V-IN przechodzi do złącza V-OUT.
PILOT ZDALNEGO STEROWANIA
Pilota zdalnego sterowania można używać, gdy w menu ustawiono opcję IR na
włączoną.
OFF: Włączanie i wyłączanie urządzenia.
VOL+: Zwiększanie głośności
VOL-: Zmniejszanie głośności
1 : Włączanie/wyłączanie wyciszenia Strefy 1
2 : Włączanie/wyłączanie wyciszenia Strefy 2
W przypadku innych działań należy przeczytać
instrukcje powyżej.
INFORMACJE OGÓLNE
Wymagania dotyczące zasilania : Prąd stały o napięciu 12 V, zacisk ujemny
połączony z masą
Wymiary podstawy montażowej : 129 (szer.) x 112 (gł.) x 65 (wys.)
Ustawienia tonów
- Niskie (przy 100 Hz) : ±10 dB
- Wysokie (przy 100 Hz) : ±10 dB
Maksymalna moc wyjściowa : 4 × 40 W
Pobór prądu : 10 A (maks.)
RADIO FM AM
Zakres częstotliwości od 87,5 do 108 MHz od 522 do 1620 KHz
IF 10.7 MHz 450 KHz
Czułość 4 µV (S/N = 30 dB) 36 dBµV (S/N = 20 dB)
Separacja kanałów stereo >25 dB /
ROZWIĄZYWANIE PROBLEMÓW
PL

Wskazówki dotyczące bezpieczeństwa
Niniejszą stację multimedialną wyprodukowano zgodnie z aktualnymi
standardami rozwoju techniki i ogólnie uznanymi zasadami bezpieczeństwa.
Mimo to nieprzestrzeganie zawartych w niniejszej instrukcji wskazówek
dotyczących bezpieczeństwa wiąże się z różnego rodzaju zagrożeniami. Przed
rozpoczęciem użytkowania stacji multimedialnej należy dokładnie przeczytać
całą instrukcję. Przechowywać instrukcję w takim miejscu, aby w każdej chwili
była dostępna dla wszystkich użytkowników. W przypadku przekazania stacji
multimedialnej osobom trzecim należy dołączyć niniejszą instrukcję. Oprócz
tego należy przestrzegać wskazówek zawartych w instrukcjach obsługi
urządzeń podłączonych do tej stacji.
Ogólne wskazówki dotyczące bezpieczeństwa
Należy przestrzegać poniższych wskazówek, aby chronić się przed obrażeniami
ciała: Nie wolno modykować ani otwierać urządzenia.
Przeznaczenie
Stacja multimedialna jest przeznaczona do montażu i obsługi w pojazdach z
instalacją o napięciu 12 V. Należy przestrzegać wartości granicznych mocy
urządzenia. Ewentualne naprawy oraz montaż należy zlecić fachowcowi.
Instrukcja montażu
Urządzenie można zamontować samodzielnie tylko w przypadku dysponowania
doświadczeniem w zakresie montażu radioodtwarzaczy i znajomością
zagadnień elektryki samochodowej. W tym celu należy zapoznać się ze
schematem połączeń zawartym w niniejszej instrukcji. Montaż urządzenia nie
może utrudniać lub blokować działania jakichkolwiek poduszek powietrznych,
innych urządzeń zabezpieczających lub elementów sterowania.
Deklaracja zgodności
Blaupunkt Competence Center Car Multimedia – Evo Sales GmbH oświadcza, że
to urządzenie jest zgodne z wymaganiami podstawowymi oraz pozostałymi
stosownymi postanowieniami Dyrektywy 2014/53/UE. Deklarację zgodności
można znaleźć na stronie internetowej www.blaupunkt.com.
Wskazówki dotyczące czyszczenia
Rozpuszczalniki, środki czyszczące oraz ścierne, jak również aerozole do czyszczenia
kokpitów i środki do pielęgnacji tworzyw sztucznych mogą zawierać składniki, które
mogłyby uszkodzić powierzchnię stacji multimedialnej. Do czyszczenia stacji
tedialnej należy używać wyłącznie suchej lub lekko zwilżonej ściereczki.
Wskazówki dotyczące utylizacji
Nie wolno wyrzucać zużytego urządzenia wraz z odpadami z
gospodarstwa domowego!
Aby zutylizować urządzenie, pilot zdalnego sterowania i zużyte baterie,
należy oddać je do punktu zbiórki zużytego sprzętu.
Zakres dostawy
Zakres dostawy obejmuje:
stację multimedialną BPA 3022 M,
pilot zdalnego sterowania,
złącza ISO,
śruby montażowe,
instrukcję obsługi.
WAŻNE INFORMACJE DOTYCZĄCE MONTAŻU
1. Przed przystąpieniem do montażu urządzenia, należy dokładnie przeczytać
instrukcję obsługi.
2. Przed podłączeniem zasilania należy upewnić się, że wszystkie inne
przewody zostały podłączone.
3. Aby uniknąć zwarcia, należy upewnić się, że wszystkie odsłonięte przewody
zostały zaizolowane.
4. Po zakończeniu montażu należy zamocować wszystkie przewody.
5. Podłączenia do odtwarzacza należy wykonać zgodnie z niniejszą instrukcją
obsługi. Nieprawidłowe podłączenie może spowodować uszkodzenie
urządzenia.
6. Odtwarzacz jest przeznaczony do pracy wyłącznie z instalacją o napięciu 12
V prądu stałego.
MONTAŻ URZĄDZENIA
DEMONTAŻ URZĄDZENIA
1. Zdemontuj urządzenie.
2. Rozmontuj zewnętrzną ramkę wykończeniową.
Uwaga dotycząca HDMI:
Używaj kabla HDMI dobrej jakości.
Długość całkowita (przód i tył) nie powinna przekraczać 12 stóp.
PODŁĄCZENIE PRZEWODÓW
1. Odtwarzacz może być używany tylko przy napięciu +12 V prądu stałego.
2. Nie podłączaj zacisku akumulatora, dopóki odtwarzacz nie zostanie całkowicie
zamontowany.
3. Upewnij się, że żółty przewód jest podłączony do bieguna dodatniego akumula-
tora (+).
4. Przy wymianie bezpiecznika upewnij się, że parametry nowego bezpiecznika są
takie same.
5. Zastosowanie dobrej jakości głośników o impedancji 4–8 omów pozwala uzyskać
najlepsze efekty działania urządzenia.
POŁOŻENIE PRZYCISKÓW
1. STREFA 1 2. 1 3. STREFA 2
4. 2 5. BT 6. 3 RPT
7. 8. 4 RDM 9.
10. 5 DIR- 11. DIS 12. 6 DIR+
13. LCD 14. GNIAZDO AUX 15. GNIAZDO SŁUCHAWKOWE
16. GNIAZDO HDMI 17. RESET 18. POKRĘTŁO
19. PORT USB 20. SRC/MENU
OBSŁUGA
OBSŁUGA PODSTAWOWA
Włączanie/wyłączanie urządzenia i funkcji wyciszania
Aby włączyć urządzenie, naciśnij pokrętło /MUTE. W celu włączenia lub wyłączenia funkcji
wyciszenia, krótko naciśnij pokrętło, gdy urządzenie jest włączone. Naciśnięcie i
przytrzymanie tego przycisku spowoduje wyłączenie urządzenia.
Ustawienia dźwięku i menu ustawień
Naciśnij i przytrzymaj przycisk SRC/MENU, aby przejść do menu przedstawionego poniżej:
BAS->TRE->BAL->EQ (wył./pop/rock/clas)->LOUD (wł./wył.)->CLK HH->CLK MM->IR
(wł./wył.) ->CT (indep/sync)->SYG. DŹW. (wł./wył.) )->P_VOL (13)->DX (LOC)->STE- REO
(MONO)
Przy każdej pozycji obróć pokrętło VOL, aby ją ustawić.
PODCZERWIEŃ (WŁ./WYŁ.):
PODCZERWIEŃ wł.: Urządzenie można włączyć za pomocą pilota zdalnego sterowania na
podczerwień. System wtedy jest w trybie wysokiego zużycia energii.
PODCZERWIEŃ wył.: Urządzenia nie można włączyć za pomocą pilota zdalnego
sterowania na podczerwień. System jest w trybie niskiego zużycia energii.
CT (INDEP/SYNC):
CT INDEP: Zegar działa niezależnie.
CT SYNC: Zegar zostanie zsynchronizowany z czasem odbieranej stacji RDS. Uwaga: W
przypadku gdy zegar został ustawiony w menu, funkcja CT jest automatycznie ustawiana
na tryb INDEP (niezależne działanie).
SYGNAŁ DŹWIĘKOWY (WŁ./WYŁ.): Pozwala na włączanie/wyłączenie sygnału dźwiękowe-
go przy naciśnięciu przycisków.
P-VOL: Pozwala na ustawienie głośności przy włączaniu. Jeśli poziom głośności przy
wyłączaniu jest niższy niż poziom P-VOL, po włączeniu urządzenie ustawi poziom
głośności na głośność przy wyłączaniu.
Jeśli poziom głośności przy wyłączaniu jest wyższy niż poziom P-VOL, głośność zostanie
przywrócona do poziomu
wartości P-VOL przy włączeniu urządzenia.
Wyszukiwanie głośników Bluetooth
Naciśnięcie i przytrzymanie przycisk BT spowoduje wyświetlenie komunikatu „SEARCH...”
[szukanie]. Chwilę później zostanie wyświetlona nazwa urządzenia Bluetooth. Aby
wyświetlić następne urządzenie, obróć pokrętło VOL. Po wyświetleniu na LCD nazwy
żądanego głośnika Bluetooth, naciśnij pokrętło VOL, aby sparować urządzenie. Jeśli
parowanie się powiedzie, na wyświetlaczu pojawi się komunikat „BOX ON”.
Ważna wskazówka: Pomimo licznych testów z różnymi urządzeniami Bluetooth, nie
można zagwarantować zgodności ze wszystkimi urządzeniami Bluetooth dostępnymi na
rynku.
Transmisja sygnału do głośnika Bluetooth
Krótko naciśnij przycisk BT, aby zatrzymać przesyłanie/przesłać sygnał do głośnika
Bluetooth. Na wyświetlaczu pojawi się komunikat „BOX OFF/ON”.
Uwaga: Mimo że rma Blaupunkt dokładnie sprawdza kompatybilność różnych
głośników Bluetooth, nie można zagwarantować bezproblemowego działania urządzenia
ze wszystkimi modelami dostępnymi na rynku.
Obsługa Strefy 1 i Strefy 2
Krótko naciśnij przycisk Zone 1 (lub Zone 2), aby wyłączyć/włączyć dźwięk Strefy 1
(lub Strefy 2).
Przytrzymaj przycisk Zone 1 (lub Zone 2), aby wyciszyć dźwięk Strefy 1 (lub Strefy 2).
Ponowne przytrzymanie przycisku spowoduje wyłączenie wyciszenia.
Priorytet informacji lub zegara
Naciśnij krótko przycisk DIS, aby ustawić priorytet zegara lub priorytet informacji.
Uwaga: W paśmie FM, w przypadku odbierania stacji RDS, krótko naciśnij przycisk
DIS, aby wyświetlić NAZWĘ STACJI/ ZEGAR/CZĘSTOTLIWOŚĆ.
Ustawianie zegara
W menu wybierz pozycję CLK HH/CLK MM. Obróć pokrętło VOL, aby ustawić
godzinę/minuty.
Obsługa słuchawek
Na panelu przednim znajduje się gniazdo słuchawkowe 3,5 mm. Przyjmuje ono
ustawienia działania Strefy 1.
OBSŁUGA RADIA
Odbiór stacji radiowych
Naciśnij przycisk SRC/MENU, aby wybrać tryb spośród FM1->FM2->MW. Krótko
naciśnij przycisk / , aby odbierać żądaną stację radiową. Naciśnij i przytrzy-
maj przycisk / w celu ręcznego dostrojenia częstotliwości.
Ręczne zapisywanie stacji i wywoływanie zapisanych stacji
Odbieranie żądanej stacji. Naciśnij i przytrzymaj jeden z przycisków pamięci (1–6)
przez 2 sekundy. Aktualna stacja zostanie zapisana w pamięci pod danym przycis-
kiem numerycznym. Naciśnij krótko przycisk zaprogramowanej stacji (1–6), aby
słuchać bezpośrednio sygnału nadawanego z tej stacji i zapisanego pod przyporząd-
kowanym przyciskiem.
OBSŁUGA DAB
Naciśnij przycisk SRC/MENU, aby przełączyć źródło między DAB1 lub DAB2.
Wybór stacji
Naciśnij przycisk / , aby wybrać następną/poprzednią stację.
Ręczne zapisywanie stacji i wywoływanie zapisanych stacji
Gdy ustawiono częstotliwość żądanej stacji. Naciśnij i przytrzymaj jeden z przycisków
od 1 do 6 przez 2 sekundy, aby zapisać tę stację pod odpowiednim numerem.
Naciśnij krótko przycisk zaprogramowanej stacji (1–6), aby słuchać bezpośrednio
sygnału nadawanego z tej stacji i zapisanego pod przyporządkowanym przyciskiem.
OBSŁUGA USB
Po podłączeniu do urządzenia dysku USB, urządzenie automatycznie odtworzy pliki
MP3/WMA. Jeżeli dysk USB został już podłączony do urządzenia, naciśnij krótko
przycisk SRC/MENU, aż pojawi się ekran trybu USB.
Wybór pliku
Naciśnij przycisk / , aby przejść do następnego/poprzedniego pliku.
Przytrzymaj przycisk / , aby przewinąć szybko do przodu lub do tyłu.
Odtwarzanie/wstrzymanie
Naciśnij przycisk 1 , aby wstrzymać/odtworzyć plik.
Funkcja odtwarzania w pętli
Naciśnij przycisk 3 RPT, aby wybrać funkcję odtwarzania w pętli. RPT ONE/RPT
FOLD/RPT ALL (domyślnie)
RPT ONE: Odtwarzanie w pętli jednego pliku.
RPT FOLD: Odtwarzanie w pętli wszystkich plików w folderze.
RPT ALL: Odtwarzanie w pętli wszystkich plików.
RANDOM
Naciśnij przycisk 4 RDM, aby włączyć lub wyłączyć funkcję odtwarzania losowego.
RDM wł.: Odtwarzanie losowe wszystkich plików.
RDM wył.: Wyłączenie funkcji odtwarzania losowego.
Funkcja folder +/-
Naciśnij przycisk DIR+/DIR-, aby wybrać następny/poprzedni folder do odtwarzania.
Wyszukiwanie piosenki
Naciśnięcie i przytrzymanie przycisku spowoduje wyświetlenie komunikatu
„NUM 0000”. Obracając pokrętło VOL (lub bezpośrednio wprowadzając numer),
wybierz numer, a następnie naciśnij VOL, aby odtworzyć. Należy zwrócić uwagę na
7/8/9/0 jako: BT = 7, = 8, = 9, DIS = 0.
UŻYWANIE GNIAZDA AUX IN 1/2
Na panelu przednim gniazdo AUX IN 1 jest gniazdem 3,5 mm. Natomiast gniazdo
AUX IN 2 dla RCA znajduje się z tyłu urządzenia. Naciśnięcie przycisku SRC/MENU
spowoduje przełączenie do trybu AUX IN1 (2) po podłączeniu sygnału audio do
urządzenia.
OBSŁUGA BLUETOOTH
Parowanie urządzeń
W smartfonie wybierz pozycję Bluetooth i wyszukaj urządzenie Bluetooth. Na liście
powinna pojawić się pozycja „BLAUPUNKT”; wybierz „BLAUPUNKT”, a następnie
wprowadź hasło „0000”, jeśli zostanie wyświetlony komunikat wymagający
wprowadzenia hasła. Po pomyślnym sparowaniu na wyświetlaczu pojawi się napis BT.
Dźwięk Bluetooth
Naciśnij przycisk SRC/MENU, aby przełączyć się do trybu BT MUSIC. Urządzenie
automatycznie odtworzy utwór z telefonu. Naciśnij przycisk , aby wstrzymać/odt-
worzyć utwór.
Naciśnij przycisk / , aby wybrać następny/poprzedni utwór.
OBSŁUGA HDMI
Przednie gniazdo HDMI przechodzi do tylnego gniazda HDMI. Nie ma to wpływu na
odtwarzanie za pomocą HDMI.
Złącze RCA V-In i V-OUT
W tylnej części urządzenia złącze V-IN przechodzi do złącza V-OUT.
PILOT ZDALNEGO STEROWANIA
Pilota zdalnego sterowania można używać, gdy w menu ustawiono opcję IR na
włączoną.
OFF: Włączanie i wyłączanie urządzenia.
VOL+: Zwiększanie głośności
VOL-: Zmniejszanie głośności
1 : Włączanie/wyłączanie wyciszenia Strefy 1
2 : Włączanie/wyłączanie wyciszenia Strefy 2
W przypadku innych działań należy przeczytać
instrukcje powyżej.
INFORMACJE OGÓLNE
Wymagania dotyczące zasilania : Prąd stały o napięciu 12 V, zacisk ujemny
połączony z masą
Wymiary podstawy montażowej : 129 (szer.) x 112 (gł.) x 65 (wys.)
Ustawienia tonów
- Niskie (przy 100 Hz) : ±10 dB
- Wysokie (przy 100 Hz) : ±10 dB
Maksymalna moc wyjściowa : 4 × 40 W
Pobór prądu : 10 A (maks.)
RADIO FM AM
Zakres częstotliwości od 87,5 do 108 MHz od 522 do 1620 KHz
IF 10.7 MHz 450 KHz
Czułość 4 µV (S/N = 30 dB) 36 dBµV (S/N = 20 dB)
Separacja kanałów stereo >25 dB /
ROZWIĄZYWANIE PROBLEMÓW
PL

Wskazówki dotyczące bezpieczeństwa
Niniejszą stację multimedialną wyprodukowano zgodnie z aktualnymi
standardami rozwoju techniki i ogólnie uznanymi zasadami bezpieczeństwa.
Mimo to nieprzestrzeganie zawartych w niniejszej instrukcji wskazówek
dotyczących bezpieczeństwa wiąże się z różnego rodzaju zagrożeniami. Przed
rozpoczęciem użytkowania stacji multimedialnej należy dokładnie przeczytać
całą instrukcję. Przechowywać instrukcję w takim miejscu, aby w każdej chwili
była dostępna dla wszystkich użytkowników. W przypadku przekazania stacji
multimedialnej osobom trzecim należy dołączyć niniejszą instrukcję. Oprócz
tego należy przestrzegać wskazówek zawartych w instrukcjach obsługi
urządzeń podłączonych do tej stacji.
Ogólne wskazówki dotyczące bezpieczeństwa
Należy przestrzegać poniższych wskazówek, aby chronić się przed obrażeniami
ciała: Nie wolno modykować ani otwierać urządzenia.
Przeznaczenie
Stacja multimedialna jest przeznaczona do montażu i obsługi w pojazdach z
instalacją o napięciu 12 V. Należy przestrzegać wartości granicznych mocy
urządzenia. Ewentualne naprawy oraz montaż należy zlecić fachowcowi.
Instrukcja montażu
Urządzenie można zamontować samodzielnie tylko w przypadku dysponowania
doświadczeniem w zakresie montażu radioodtwarzaczy i znajomością
zagadnień elektryki samochodowej. W tym celu należy zapoznać się ze
schematem połączeń zawartym w niniejszej instrukcji. Montaż urządzenia nie
może utrudniać lub blokować działania jakichkolwiek poduszek powietrznych,
innych urządzeń zabezpieczających lub elementów sterowania.
Deklaracja zgodności
Blaupunkt Competence Center Car Multimedia – Evo Sales GmbH oświadcza, że
to urządzenie jest zgodne z wymaganiami podstawowymi oraz pozostałymi
stosownymi postanowieniami Dyrektywy 2014/53/UE. Deklarację zgodności
można znaleźć na stronie internetowej www.blaupunkt.com.
Wskazówki dotyczące czyszczenia
Rozpuszczalniki, środki czyszczące oraz ścierne, jak również aerozole do czyszczenia
kokpitów i środki do pielęgnacji tworzyw sztucznych mogą zawierać składniki, które
mogłyby uszkodzić powierzchnię stacji multimedialnej. Do czyszczenia stacji
tedialnej należy używać wyłącznie suchej lub lekko zwilżonej ściereczki.
Wskazówki dotyczące utylizacji
Nie wolno wyrzucać zużytego urządzenia wraz z odpadami z
gospodarstwa domowego!
Aby zutylizować urządzenie, pilot zdalnego sterowania i zużyte baterie,
należy oddać je do punktu zbiórki zużytego sprzętu.
Zakres dostawy
Zakres dostawy obejmuje:
stację multimedialną BPA 3022 M,
pilot zdalnego sterowania,
złącza ISO,
śruby montażowe,
instrukcję obsługi.
WAŻNE INFORMACJE DOTYCZĄCE MONTAŻU
1. Przed przystąpieniem do montażu urządzenia, należy dokładnie przeczytać
instrukcję obsługi.
2. Przed podłączeniem zasilania należy upewnić się, że wszystkie inne
przewody zostały podłączone.
3. Aby uniknąć zwarcia, należy upewnić się, że wszystkie odsłonięte przewody
zostały zaizolowane.
4. Po zakończeniu montażu należy zamocować wszystkie przewody.
5. Podłączenia do odtwarzacza należy wykonać zgodnie z niniejszą instrukcją
obsługi. Nieprawidłowe podłączenie może spowodować uszkodzenie
urządzenia.
6. Odtwarzacz jest przeznaczony do pracy wyłącznie z instalacją o napięciu 12
V prądu stałego.
MONTAŻ URZĄDZENIA
DEMONTAŻ URZĄDZENIA
1. Zdemontuj urządzenie.
2. Rozmontuj zewnętrzną ramkę wykończeniową.
Uwaga dotycząca HDMI:
Używaj kabla HDMI dobrej jakości.
Długość całkowita (przód i tył) nie powinna przekraczać 12 stóp.
PODŁĄCZENIE PRZEWODÓW
1. Odtwarzacz może być używany tylko przy napięciu +12 V prądu stałego.
2. Nie podłączaj zacisku akumulatora, dopóki odtwarzacz nie zostanie całkowicie
zamontowany.
3. Upewnij się, że żółty przewód jest podłączony do bieguna dodatniego akumula-
tora (+).
4. Przy wymianie bezpiecznika upewnij się, że parametry nowego bezpiecznika są
takie same.
5. Zastosowanie dobrej jakości głośników o impedancji 4–8 omów pozwala uzyskać
najlepsze efekty działania urządzenia.
POŁOŻENIE PRZYCISKÓW
1. STREFA 1 2. 1 3. STREFA 2
4. 2 5. BT 6. 3 RPT
7. 8. 4 RDM 9.
10. 5 DIR- 11. DIS 12. 6 DIR+
13. LCD 14. GNIAZDO AUX 15. GNIAZDO SŁUCHAWKOWE
16. GNIAZDO HDMI 17. RESET 18. POKRĘTŁO
19. PORT USB 20. SRC/MENU
OBSŁUGA PODSTAWOWA
Włączanie/wyłączanie urządzenia i funkcji wyciszania
Aby włączyć urządzenie, naciśnij pokrętło /MUTE. W celu włączenia lub wyłączenia funkcji
wyciszenia, krótko naciśnij pokrętło, gdy urządzenie jest włączone. Naciśnięcie i
przytrzymanie tego przycisku spowoduje wyłączenie urządzenia.
Ustawienia dźwięku i menu ustawień
Naciśnij i przytrzymaj przycisk SRC/MENU, aby przejść do menu przedstawionego poniżej:
BAS->TRE->BAL->EQ (wył./pop/rock/clas)->LOUD (wł./wył.)->CLK HH->CLK MM->IR
(wł./wył.) ->CT (indep/sync)->SYG. DŹW. (wł./wył.) )->P_VOL (13)->DX (LOC)->STE- REO
(MONO)
Przy każdej pozycji obróć pokrętło VOL, aby ją ustawić.
PODCZERWIEŃ (WŁ./WYŁ.):
PODCZERWIEŃ wł.: Urządzenie można włączyć za pomocą pilota zdalnego sterowania na
podczerwień. System wtedy jest w trybie wysokiego zużycia energii.
PODCZERWIEŃ wył.: Urządzenia nie można włączyć za pomocą pilota zdalnego
sterowania na podczerwień. System jest w trybie niskiego zużycia energii.
CT (INDEP/SYNC):
CT INDEP: Zegar działa niezależnie.
CT SYNC: Zegar zostanie zsynchronizowany z czasem odbieranej stacji RDS. Uwaga: W
przypadku gdy zegar został ustawiony w menu, funkcja CT jest automatycznie ustawiana
na tryb INDEP (niezależne działanie).
SYGNAŁ DŹWIĘKOWY (WŁ./WYŁ.): Pozwala na włączanie/wyłączenie sygnału dźwiękowe-
go przy naciśnięciu przycisków.
P-VOL: Pozwala na ustawienie głośności przy włączaniu. Jeśli poziom głośności przy
wyłączaniu jest niższy niż poziom P-VOL, po włączeniu urządzenie ustawi poziom
głośności na głośność przy wyłączaniu.
Jeśli poziom głośności przy wyłączaniu jest wyższy niż poziom P-VOL, głośność zostanie
przywrócona do poziomu
wartości P-VOL przy włączeniu urządzenia.
Wyszukiwanie głośników Bluetooth
Naciśnięcie i przytrzymanie przycisk BT spowoduje wyświetlenie komunikatu „SEARCH...”
[szukanie]. Chwilę później zostanie wyświetlona nazwa urządzenia Bluetooth. Aby
wyświetlić następne urządzenie, obróć pokrętło VOL. Po wyświetleniu na LCD nazwy
żądanego głośnika Bluetooth, naciśnij pokrętło VOL, aby sparować urządzenie. Jeśli
parowanie się powiedzie, na wyświetlaczu pojawi się komunikat „BOX ON”.
Ważna wskazówka: Pomimo licznych testów z różnymi urządzeniami Bluetooth, nie
można zagwarantować zgodności ze wszystkimi urządzeniami Bluetooth dostępnymi na
rynku.
Transmisja sygnału do głośnika Bluetooth
Krótko naciśnij przycisk BT, aby zatrzymać przesyłanie/przesłać sygnał do głośnika
Bluetooth. Na wyświetlaczu pojawi się komunikat „BOX OFF/ON”.
Uwaga: Mimo że rma Blaupunkt dokładnie sprawdza kompatybilność różnych
głośników Bluetooth, nie można zagwarantować bezproblemowego działania urządzenia
ze wszystkimi modelami dostępnymi na rynku.
Obsługa Strefy 1 i Strefy 2
Krótko naciśnij przycisk Zone 1 (lub Zone 2), aby wyłączyć/włączyć dźwięk Strefy 1
(lub Strefy 2).
Przytrzymaj przycisk Zone 1 (lub Zone 2), aby wyciszyć dźwięk Strefy 1 (lub Strefy 2).
Ponowne przytrzymanie przycisku spowoduje wyłączenie wyciszenia.
Priorytet informacji lub zegara
Naciśnij krótko przycisk DIS, aby ustawić priorytet zegara lub priorytet informacji.
Uwaga: W paśmie FM, w przypadku odbierania stacji RDS, krótko naciśnij przycisk
DIS, aby wyświetlić NAZWĘ STACJI/ ZEGAR/CZĘSTOTLIWOŚĆ.
Ustawianie zegara
W menu wybierz pozycję CLK HH/CLK MM. Obróć pokrętło VOL, aby ustawić
godzinę/minuty.
Obsługa słuchawek
Na panelu przednim znajduje się gniazdo słuchawkowe 3,5 mm. Przyjmuje ono
ustawienia działania Strefy 1.
OBSŁUGA RADIA
Odbiór stacji radiowych
Naciśnij przycisk SRC/MENU, aby wybrać tryb spośród FM1->FM2->MW. Krótko
naciśnij przycisk / , aby odbierać żądaną stację radiową. Naciśnij i przytrzy-
maj przycisk / w celu ręcznego dostrojenia częstotliwości.
Ręczne zapisywanie stacji i wywoływanie zapisanych stacji
Odbieranie żądanej stacji. Naciśnij i przytrzymaj jeden z przycisków pamięci (1–6)
przez 2 sekundy. Aktualna stacja zostanie zapisana w pamięci pod danym przycis-
kiem numerycznym. Naciśnij krótko przycisk zaprogramowanej stacji (1–6), aby
słuchać bezpośrednio sygnału nadawanego z tej stacji i zapisanego pod przyporząd-
kowanym przyciskiem.
OBSŁUGA DAB
Naciśnij przycisk SRC/MENU, aby przełączyć źródło między DAB1 lub DAB2.
Wybór stacji
Naciśnij przycisk / , aby wybrać następną/poprzednią stację.
OBSŁUGA
Ręczne zapisywanie stacji i wywoływanie zapisanych stacji
Gdy ustawiono częstotliwość żądanej stacji. Naciśnij i przytrzymaj jeden z przycisków
od 1 do 6 przez 2 sekundy, aby zapisać tę stację pod odpowiednim numerem.
Naciśnij krótko przycisk zaprogramowanej stacji (1–6), aby słuchać bezpośrednio
sygnału nadawanego z tej stacji i zapisanego pod przyporządkowanym przyciskiem.
OBSŁUGA USB
Po podłączeniu do urządzenia dysku USB, urządzenie automatycznie odtworzy pliki
MP3/WMA. Jeżeli dysk USB został już podłączony do urządzenia, naciśnij krótko
przycisk SRC/MENU, aż pojawi się ekran trybu USB.
Wybór pliku
Naciśnij przycisk / , aby przejść do następnego/poprzedniego pliku.
Przytrzymaj przycisk / , aby przewinąć szybko do przodu lub do tyłu.
Odtwarzanie/wstrzymanie
Naciśnij przycisk 1 , aby wstrzymać/odtworzyć plik.
Funkcja odtwarzania w pętli
Naciśnij przycisk 3 RPT, aby wybrać funkcję odtwarzania w pętli. RPT ONE/RPT
FOLD/RPT ALL (domyślnie)
RPT ONE: Odtwarzanie w pętli jednego pliku.
RPT FOLD: Odtwarzanie w pętli wszystkich plików w folderze.
RPT ALL: Odtwarzanie w pętli wszystkich plików.
RANDOM
Naciśnij przycisk 4 RDM, aby włączyć lub wyłączyć funkcję odtwarzania losowego.
RDM wł.: Odtwarzanie losowe wszystkich plików.
RDM wył.: Wyłączenie funkcji odtwarzania losowego.
Funkcja folder +/-
Naciśnij przycisk DIR+/DIR-, aby wybrać następny/poprzedni folder do odtwarzania.
Wyszukiwanie piosenki
Naciśnięcie i przytrzymanie przycisku spowoduje wyświetlenie komunikatu
„NUM 0000”. Obracając pokrętło VOL (lub bezpośrednio wprowadzając numer),
wybierz numer, a następnie naciśnij VOL, aby odtworzyć. Należy zwrócić uwagę na
7/8/9/0 jako: BT = 7, = 8, = 9, DIS = 0.
UŻYWANIE GNIAZDA AUX IN 1/2
Na panelu przednim gniazdo AUX IN 1 jest gniazdem 3,5 mm. Natomiast gniazdo
AUX IN 2 dla RCA znajduje się z tyłu urządzenia. Naciśnięcie przycisku SRC/MENU
spowoduje przełączenie do trybu AUX IN1 (2) po podłączeniu sygnału audio do
urządzenia.
OBSŁUGA BLUETOOTH
Parowanie urządzeń
W smartfonie wybierz pozycję Bluetooth i wyszukaj urządzenie Bluetooth. Na liście
powinna pojawić się pozycja „BLAUPUNKT”; wybierz „BLAUPUNKT”, a następnie
wprowadź hasło „0000”, jeśli zostanie wyświetlony komunikat wymagający
wprowadzenia hasła. Po pomyślnym sparowaniu na wyświetlaczu pojawi się napis BT.
Dźwięk Bluetooth
Naciśnij przycisk SRC/MENU, aby przełączyć się do trybu BT MUSIC. Urządzenie
automatycznie odtworzy utwór z telefonu. Naciśnij przycisk , aby wstrzymać/odt-
worzyć utwór.
Naciśnij przycisk / , aby wybrać następny/poprzedni utwór.
OBSŁUGA HDMI
Przednie gniazdo HDMI przechodzi do tylnego gniazda HDMI. Nie ma to wpływu na
odtwarzanie za pomocą HDMI.
Złącze RCA V-In i V-OUT
W tylnej części urządzenia złącze V-IN przechodzi do złącza V-OUT.
PILOT ZDALNEGO STEROWANIA
Pilota zdalnego sterowania można używać, gdy w menu ustawiono opcję IR na
włączoną.
OFF: Włączanie i wyłączanie urządzenia.
VOL+: Zwiększanie głośności
VOL-: Zmniejszanie głośności
1 : Włączanie/wyłączanie wyciszenia Strefy 1
2 : Włączanie/wyłączanie wyciszenia Strefy 2
W przypadku innych działań należy przeczytać
instrukcje powyżej.
INFORMACJE OGÓLNE
Wymagania dotyczące zasilania : Prąd stały o napięciu 12 V, zacisk ujemny
połączony z masą
Wymiary podstawy montażowej : 129 (szer.) x 112 (gł.) x 65 (wys.)
Ustawienia tonów
- Niskie (przy 100 Hz) : ±10 dB
- Wysokie (przy 100 Hz) : ±10 dB
Maksymalna moc wyjściowa : 4 × 40 W
Pobór prądu : 10 A (maks.)
RADIO FM AM
Zakres częstotliwości od 87,5 do 108 MHz od 522 do 1620 KHz
IF 10.7 MHz 450 KHz
Czułość 4 µV (S/N = 30 dB) 36 dBµV (S/N = 20 dB)
Separacja kanałów stereo >25 dB /
ROZWIĄZYWANIE PROBLEMÓW
PL
Instrucciones de seguridad
El reproductor multimedia se ha fabricado de acuerdo con las normas actuales
de avance tecnológico y los principios de seguridad generalmente reconocidos.
No obstante, el incumplimiento de las instrucciones de seguridad aquí
indicadas supone una serie de riesgos. Lea atentamente todo el manual antes
de utilizar el reproductor multimedia. Guarde el manual en un lugar que esté
accesible para todos los usuarios en todo momento. Si el reproductor multime-
dia se proporciona a un tercero, recuerde incluir también el presente manual.
Además, siga las indicaciones del manual de uso de los dispositivos conectados
a este reproductor.
Indicaciones generales de seguridad
Siga las siguientes instrucciones para evitar lesiones corporales:
No modique ni abra el equipo.
Uso previsto
El reproductor multimedia está diseñado para su incorporación y operación en
vehículos provistos de instalaciones con una tensión de alimentación de 12 V.
Deben respetarse los límites de potencia de la unidad. Cualquier reparación o
instalación debe encargarse a profesionales.
Instrucciones de montaje
Puede instalar el equipo por cuenta propia solo si tiene experiencia en materia
de la instalación de equipos de radio y conocimientos de sistemas eléctricos de
automóviles. Consulte el diagrama de cableado proporcionado en este manual.
La instalación de la unidad no debe impedir ni bloquear el funcionamiento de
ningún airbag, otros dispositivos de seguridad o controles.
Declaración de conformidad
Blaupunkt Competence Center Car Multimedia-Evo Sales GmbH declara que el
presente equipo cumple los requisitos esenciales y otras condiciones de la
directiva 2014/53/UE. La declaración de conformidad está disponible en la
página web www.blaupunkt.com.
Instrucciones de limpieza
Los disolventes, productos de limpieza y agentes abrasivos, así como los aerosoles
de limpieza del salpicadero y los productos para el cuidado de plásticos pueden
incluir componentes que podrían dañar la supercie del reproductor multimedia.
Limpie el reproductor con una bayeta seca o ligeramente humedecida.
Instrucciones de eliminación
¡No deseche el aparato usado con los residuos domésticos!
Para deshacerse del equipo, del mando a distancia y de las pilas usadas,
llévelos a un punto de recogida de equipos usados.
Alcance del suministro
El suministro incluye:
reproductor multimedia BPA 3022 M,
mando a distancia,
conectores ISO,
tornillos de montaje,
manual de uso.
INFORMACIÓN IMPORTANTE RELATIVA A LA INSTALACIÓN
1. Antes de instalar el aparato, lea detenidamente todo el manual de uso.
2. Asegúrese de que todos los demás cables han sido conectados antes de
conectar la fuente de alimentación.
3. Para evitar cortocircuitos, asegúrese de que todos los cables expuestos estén
aislados.
4. Una vez terminada la instalación, je todos los cables.
5. Las conexiones de cableado al reproductor deben realizarse de acuerdo con
las indicaciones del presente manual. Una conexión incorrecta puede
provocar daños en el aparato.
6. El reproductor está diseñado para funcionar solamente con instalaciones de
12 V CC.
INSTALACIÓN DE LA UNIDAD
DESMONTAJE DE UNIDAD
1. Desmonte la unidad.
2. Retire el marco embellecedor exterior.
Nota acerca de cables HDMI:
Utilice un cable HDMI de buena calidad.
La longitud total (en la parte frontal y trasera) no debe superar 12 pies.
CONEXIÓN DE CABLEADO
1. El reproductor puede utilizarse solamente con una tensión de +12 V CC.
2. No conecte el terminal de la batería hasta que el reproductor esté completamen-
te instalado.
3. Asegúrese de que el cable amarillo esté conectado al polo positivo (+) de la batería.
4. Al sustituir el fusible, asegúrese de que los parámetros del fusible nuevo sean los
mismos.
5. El uso de altavoces de buena calidad con una impedancia de 4 a 8 ohmios
permitirá obtener el máximo rendimiento del equipo.
DISTRIBUCIÓN DE LOS BOTONES
1. ZONA 1 2. 1 3. ZONA 2
4. 2 5. BT 6. 3 RPT
7. 8. 4 RDM 9.
10. 5 DIR- 11. DIS 12. 6 DIR+
13. LCD 14. TOMA AUX 15. TOMA DE CONEXIÓN DE
AURICULARES
16. ENTRADA HDMI 17. REINICIO 18. RUEDA DE AJUSTE
19. PUERTO USB 20. SRC/MENU
OPERACIÓN BÁSICA
Encendido/apagado de la unidad y de la función de silencio
Para encender la unidad, pulse el botón /MUTE. Para activar o desactivar la función
de silencio, pulse brevemente la rueda de ajuste mientras la unidad está encendida.
Mantenga pulsado este botón para apagar la unidad.
Ajustes de sonido y menú de conguración
Pulse y mantenga pulsado el botón SCR / MENU para acceder al menú presentado a
continuación:
BAS->TRE->BAL->EQ (apag./pop/rock/clas)->LOUD (enc./apag.)->CLK HH->CLK
MM->IR (enc./apag.) ->CT (indep/sync)->SYG. SONIDO (enc./apag.) )->P_VOL
(13)->DX (LOC)->STE- REO (MONO)
En cada posición, gire la rueda VOL para seleccionarla.
INFRARROJOS (ENC./APAG.):
INFRARROJOS enc.: La unidad se puede encender con el mando a distancia por
infrarrojos. En tal caso, el sistema funciona en modo de alto consumo energético.
INFRARROJOS apag.: La unidad no se puede encender con el mando a distancia por
infrarrojos. El sistema está en modo de bajo consumo energético.
CT (INDEP/SYNC):
CT INDEP: El reloj funciona de forma independiente.
CT SYNC: El reloj se sincronizará con la hora de la emisora RDS recibida.
Nota: Al congurar el reloj en el menú, la función CT se ajusta automáticamente al
modo INDEP (funcionamiento independiente).
SEÑAL ACÚSTICA (enc./apag.): Permite activar/desactivar la señal acústica mediante
la pulsación de los botones.
P-VOL: Permite ajustar el volumen al encender la unidad. Si el nivel de volumen al
apagar la unidad es inferior al nivel P-VOL, al encender el equipo, la unidad ajustará
dicho nivel al volumen de apagado.
Si el nivel de volumen en el momento del apagado de la unidad es superior al nivel
P-VOL, el volumen se restablecerá al valor de P-VOL a la hora de encender el equipo.
Búsqueda de altavoces Bluetooth
Si mantiene pulsado el botón BT, aparecerá el mensaje «SEARCH...» [buscar]. Un
momento después, aparecerá el nombre del dispositivo Bluetooth. Para mostrar el
siguiente dispositivo, gire la rueda VOL. Una vez que el nombre del altavoz Bluetooth
deseado aparezca en la pantalla LCD, pulse el botón VOL para emparejar el
dispositivo. Si el emparejamiento se realiza correctamente, la pantalla mostrará «BOX
ON».
Indicación importante: A pesar de los numerosos ensayos realizados con diversos
dispositivos Bluetooth, no se puede garantizar la compatibilidad con todos los
dispositivos Bluetooth disponibles en el mercado.
Transmisión de la señal al altavoz Bluetooth
Pulse brevemente el botón BT para detener la transferencia o transmitir la señal al
altavoz Bluetooth. En la pantalla aparecerá el mensaje «BOX OFF/ON».
Nota: Aunque Blaupunkt comprueba cuidadosamente la compatibilidad de los distintos
altavoces Bluetooth, no se puede garantizar un funcionamiento infalible con todos los
modelos disponibles en el mercado.
Operación de la Zona 1 y la Zona 2
Pulse brevemente Zone 1 (o Zone 2) para apagar/encender el sonido de la Zona 1 (o
Zona 2).
Mantenga pulsado el botón Zone 1 (o Zone 2) para silenciar el sonido de la Zona 1 (o
Zona 2). Si vuelve a mantener pulsado el botón, se deshabilitará el modo silencio.
Prioridad de la información o del reloj
Pulse brevemente el botón DIS para congurar la prioridad del reloj o de la
información. Nota: En la banda de FM, cuando reciba emisoras RDS, pulse brevemen-
te DIS para mostrar NOMBRE DE EMISORA / RELOJ / FRECUENCIA.
Ajuste del reloj
Seleccione CLK HH/CLK MM en el menú. Gire la rueda VOL para ajustar la hora / los
minutos.
Uso de auriculares
El panel frontal dispone de una toma de conexión de auriculares de 3,5 mm. El panel
adopta los ajustes de funcionamiento de la Zona 1.
USO DE LA MODALIDAD DE RADIO
Recepción de emisoras de radio
Pulse el botón SRC / MENU para seleccionar uno de los siguientes modos:
FM1->FM2->MW. Pulse brevemente el botón / para recibir la emisora de
radio deseada. Mantenga pulsado el botón / para sintonizar manualmente
la frecuencia.
Cómo guardar las emisoras y seleccionar las emisoras guardadas de forma manual
Recepción de la emisora deseada. Pulse y mantenga pulsado uno de los botones de
memoria (de 1 a 6) durante 2 segundos. La emisora actual se guardará en la memoria
bajo determinado botón numérico. Pulse rápidamente el botón de la emisora
programada (de 1 a 6) para escuchar directamente la señal emitida por dicha emisora
y guardada bajo el botón asignado.
USO DE DEVDAB
Pulse el botón SRC / MENU para cambiar la fuente entre DAB1 o DAB2.
Selección de emisora
Pulse el botón / para seleccionar la emisora anterior/siguiente.
Cómo guardar las emisoras y seleccionar las emisoras guardadas de forma manual
Cuando la frecuencia de la emisora deseada esté ajustada, mantenga pulsado uno de
los botones de 1 a 6 durante 2 segundos para guardar esta emisora bajo el número
correspondiente. Pulse rápidamente el botón de la emisora programada (de 1 a 6)
para escuchar directamente la señal emitida por dicha emisora y guardada bajo el
botón asignado.
USO DE USB
Después de conectar la unidad USB al aparato, este reproduce automáticamente
cheros MP3 / WMA. Si ya se ha conectado la unidad USB al aparato, pulse brevemen-
te el botón SRC / MENU hasta que aparezca la pantalla del modo USB.
Selección de chero
Pulse el botón / para pasar al chero siguiente / anterior. Pulse el botón
/ para un avance o retroceso rápido.
Reproducir / Pausa
Pulse el botón 1 para pausar / reproducir un chero.
Repeat function
Pulse el botón 3 RPT para seleccionar la función de reproducción en bucle. RPT
ONE/RPT FOLD/RPT ALL (por defecto)
RPT ONE: Reproducción de un solo chero en bucle.
RPT FOLD: Reproducción de todos los cheros de una carpeta en bucle.
RPT ALL: Reproducción de todos los cheros en bucle.
RANDOM
Pulse el botón 4 RDM para activar o desactivar la función de reproducción aleatoria.
RDM enc.: Reproducción aleatoria de todos los cheros.
RDM apag.: Apagado de la función de reproducción aleatoria.
Función de carpeta +/-
Pulse DIR+ / DIR- para seleccionar la carpeta siguiente / anterior a reproducir.
Buscar canción
Si mantiene pulsado el botón , aparecerá el mensaje «NUM 0000». Girando la
rueda VOL (o introduciendo directamente el número), seleccione el número y, a
continuación, pulse VOL para reproducir la canción. Preste atención a 7/8/9/0 como:
BT = 7, = 8, = 9, DIS = 0.
USO DE LA TOMA AUX IN 1/2
En el panel frontal, la toma AUX IN 1 es una toma de 3,5 mm. La toma AUX IN 2 para
RCA se encuentra en la parte trasera de la unidad. Con la pulsación de SRC / MENU,
accederá al modo AUX IN1 (2) cuando la señal de audio esté conectada a la unidad.
USO DE LA MODALIDAD BLUETOOTH
Cómo vincular dispositivos
Seleccione Bluetooth en su teléfono y busque el dispositivo Bluetooth. En la lista
debería aparecer «BLAUPUNKT»; seleccione «BLAUPUNKT» e introduzca la contraseña
«0000» si aparece una solicitud de introducción de la contraseña. Una vez realizado el
emparejamiento, en la pantalla aparecerá el símbolo BT.
Audio Bluetooth
Pulse el botón SRC / MENU para cambiar al modo BT MUSIC. El aparato reproducirá
automáticamente la canción desde su teléfono. Pulse el botón para pausar /
reproducir una canción.
Pulse el botón / para seleccionar la canción anterior / siguiente.
USO DE HDMI
La entrada HDMI delantera va a la toma HDMI trasera. Esto no afecta a la reproduc-
ción de contenidos a través de HDMI.
Conectores RCA V-IN y V-OUT
En la parte trasera de la unidad, el conector V-IN va al conector V-OUT.
MANDO A DISTANCIA
El mando a distancia se puede utilizar cuando
la opción IR está activada en el menú.
APAGADO (OFF): Encendido y apagado
del aparato.
VOL+: Aumentar el volumen
VOL-: Reducir el volumen
1 : Encendido / apagado del silencio de
la Zona 1
2 : Encendido / apagado del silencio de
la Zona 2
Para otras operaciones, lea las instrucciones anteriores.
INFORMACIÓN GENERAL
Requisitos de alimentación eléctrica : Corriente continua de 12 V, borne negativo
conectado a tierra
Medidas de la base de montaje : 129 (ancho) x 112 (profundo) x 65 (alto)
Ajustes de tono
- Bajos (a 100 Hz) : ±10 dB
- Altos (a 100 Hz) : ±10 dB
Potencia máxima de salida : 4 x 40 watts
Consumo energético : 10 Ampere (max.)
RADIO FM AM
Gama de frecuencias de 87,5 a 108 MHz de 522 a 1620 KHz
IF 10.7 MHz 450 KHz
Sensibilidad 4 µV (S/N = 30 dB) 36 dBµV (S/N = 20 dB)
Separación de los canales estéreo >25 dB /
SOLUCIÓN DE PROBLEMAS

Wskazówki dotyczące bezpieczeństwa
Niniejszą stację multimedialną wyprodukowano zgodnie z aktualnymi
standardami rozwoju techniki i ogólnie uznanymi zasadami bezpieczeństwa.
Mimo to nieprzestrzeganie zawartych w niniejszej instrukcji wskazówek
dotyczących bezpieczeństwa wiąże się z różnego rodzaju zagrożeniami. Przed
rozpoczęciem użytkowania stacji multimedialnej należy dokładnie przeczytać
całą instrukcję. Przechowywać instrukcję w takim miejscu, aby w każdej chwili
była dostępna dla wszystkich użytkowników. W przypadku przekazania stacji
multimedialnej osobom trzecim należy dołączyć niniejszą instrukcję. Oprócz
tego należy przestrzegać wskazówek zawartych w instrukcjach obsługi
urządzeń podłączonych do tej stacji.
Ogólne wskazówki dotyczące bezpieczeństwa
Należy przestrzegać poniższych wskazówek, aby chronić się przed obrażeniami
ciała: Nie wolno modykować ani otwierać urządzenia.
Przeznaczenie
Stacja multimedialna jest przeznaczona do montażu i obsługi w pojazdach z
instalacją o napięciu 12 V. Należy przestrzegać wartości granicznych mocy
urządzenia. Ewentualne naprawy oraz montaż należy zlecić fachowcowi.
Instrukcja montażu
Urządzenie można zamontować samodzielnie tylko w przypadku dysponowania
doświadczeniem w zakresie montażu radioodtwarzaczy i znajomością
zagadnień elektryki samochodowej. W tym celu należy zapoznać się ze
schematem połączeń zawartym w niniejszej instrukcji. Montaż urządzenia nie
może utrudniać lub blokować działania jakichkolwiek poduszek powietrznych,
innych urządzeń zabezpieczających lub elementów sterowania.
Deklaracja zgodności
Blaupunkt Competence Center Car Multimedia – Evo Sales GmbH oświadcza, że
to urządzenie jest zgodne z wymaganiami podstawowymi oraz pozostałymi
stosownymi postanowieniami Dyrektywy 2014/53/UE. Deklarację zgodności
można znaleźć na stronie internetowej www.blaupunkt.com.
Wskazówki dotyczące czyszczenia
Rozpuszczalniki, środki czyszczące oraz ścierne, jak również aerozole do czyszczenia
kokpitów i środki do pielęgnacji tworzyw sztucznych mogą zawierać składniki, które
mogłyby uszkodzić powierzchnię stacji multimedialnej. Do czyszczenia stacji
tedialnej należy używać wyłącznie suchej lub lekko zwilżonej ściereczki.
Wskazówki dotyczące utylizacji
Nie wolno wyrzucać zużytego urządzenia wraz z odpadami z
gospodarstwa domowego!
Aby zutylizować urządzenie, pilot zdalnego sterowania i zużyte baterie,
należy oddać je do punktu zbiórki zużytego sprzętu.
Zakres dostawy
Zakres dostawy obejmuje:
stację multimedialną BPA 3022 M,
pilot zdalnego sterowania,
złącza ISO,
śruby montażowe,
instrukcję obsługi.
WAŻNE INFORMACJE DOTYCZĄCE MONTAŻU
1. Przed przystąpieniem do montażu urządzenia, należy dokładnie przeczytać
instrukcję obsługi.
2. Przed podłączeniem zasilania należy upewnić się, że wszystkie inne
przewody zostały podłączone.
3. Aby uniknąć zwarcia, należy upewnić się, że wszystkie odsłonięte przewody
zostały zaizolowane.
4. Po zakończeniu montażu należy zamocować wszystkie przewody.
5. Podłączenia do odtwarzacza należy wykonać zgodnie z niniejszą instrukcją
obsługi. Nieprawidłowe podłączenie może spowodować uszkodzenie
urządzenia.
6. Odtwarzacz jest przeznaczony do pracy wyłącznie z instalacją o napięciu 12
V prądu stałego.
MONTAŻ URZĄDZENIA
DEMONTAŻ URZĄDZENIA
1. Zdemontuj urządzenie.
2. Rozmontuj zewnętrzną ramkę wykończeniową.
Uwaga dotycząca HDMI:
Używaj kabla HDMI dobrej jakości.
Długość całkowita (przód i tył) nie powinna przekraczać 12 stóp.
PODŁĄCZENIE PRZEWODÓW
1. Odtwarzacz może być używany tylko przy napięciu +12 V prądu stałego.
2. Nie podłączaj zacisku akumulatora, dopóki odtwarzacz nie zostanie całkowicie
zamontowany.
3. Upewnij się, że żółty przewód jest podłączony do bieguna dodatniego akumula-
tora (+).
4. Przy wymianie bezpiecznika upewnij się, że parametry nowego bezpiecznika są
takie same.
5. Zastosowanie dobrej jakości głośników o impedancji 4–8 omów pozwala uzyskać
najlepsze efekty działania urządzenia.
POŁOŻENIE PRZYCISKÓW
1. STREFA 1 2. 1 3. STREFA 2
4. 2 5. BT 6. 3 RPT
7. 8. 4 RDM 9.
10. 5 DIR- 11. DIS 12. 6 DIR+
13. LCD 14. GNIAZDO AUX 15. GNIAZDO SŁUCHAWKOWE
16. GNIAZDO HDMI 17. RESET 18. POKRĘTŁO
19. PORT USB 20. SRC/MENU
OBSŁUGA PODSTAWOWA
Włączanie/wyłączanie urządzenia i funkcji wyciszania
Aby włączyć urządzenie, naciśnij pokrętło /MUTE. W celu włączenia lub wyłączenia funkcji
wyciszenia, krótko naciśnij pokrętło, gdy urządzenie jest włączone. Naciśnięcie i
przytrzymanie tego przycisku spowoduje wyłączenie urządzenia.
Ustawienia dźwięku i menu ustawień
Naciśnij i przytrzymaj przycisk SRC/MENU, aby przejść do menu przedstawionego poniżej:
BAS->TRE->BAL->EQ (wył./pop/rock/clas)->LOUD (wł./wył.)->CLK HH->CLK MM->IR
(wł./wył.) ->CT (indep/sync)->SYG. DŹW. (wł./wył.) )->P_VOL (13)->DX (LOC)->STE- REO
(MONO)
Przy każdej pozycji obróć pokrętło VOL, aby ją ustawić.
PODCZERWIEŃ (WŁ./WYŁ.):
PODCZERWIEŃ wł.: Urządzenie można włączyć za pomocą pilota zdalnego sterowania na
podczerwień. System wtedy jest w trybie wysokiego zużycia energii.
PODCZERWIEŃ wył.: Urządzenia nie można włączyć za pomocą pilota zdalnego
sterowania na podczerwień. System jest w trybie niskiego zużycia energii.
CT (INDEP/SYNC):
CT INDEP: Zegar działa niezależnie.
CT SYNC: Zegar zostanie zsynchronizowany z czasem odbieranej stacji RDS. Uwaga: W
przypadku gdy zegar został ustawiony w menu, funkcja CT jest automatycznie ustawiana
na tryb INDEP (niezależne działanie).
SYGNAŁ DŹWIĘKOWY (WŁ./WYŁ.): Pozwala na włączanie/wyłączenie sygnału dźwiękowe-
go przy naciśnięciu przycisków.
P-VOL: Pozwala na ustawienie głośności przy włączaniu. Jeśli poziom głośności przy
wyłączaniu jest niższy niż poziom P-VOL, po włączeniu urządzenie ustawi poziom
głośności na głośność przy wyłączaniu.
Jeśli poziom głośności przy wyłączaniu jest wyższy niż poziom P-VOL, głośność zostanie
przywrócona do poziomu
wartości P-VOL przy włączeniu urządzenia.
Wyszukiwanie głośników Bluetooth
Naciśnięcie i przytrzymanie przycisk BT spowoduje wyświetlenie komunikatu „SEARCH...”
[szukanie]. Chwilę później zostanie wyświetlona nazwa urządzenia Bluetooth. Aby
wyświetlić następne urządzenie, obróć pokrętło VOL. Po wyświetleniu na LCD nazwy
żądanego głośnika Bluetooth, naciśnij pokrętło VOL, aby sparować urządzenie. Jeśli
parowanie się powiedzie, na wyświetlaczu pojawi się komunikat „BOX ON”.
Ważna wskazówka: Pomimo licznych testów z różnymi urządzeniami Bluetooth, nie
można zagwarantować zgodności ze wszystkimi urządzeniami Bluetooth dostępnymi na
rynku.
Transmisja sygnału do głośnika Bluetooth
Krótko naciśnij przycisk BT, aby zatrzymać przesyłanie/przesłać sygnał do głośnika
Bluetooth. Na wyświetlaczu pojawi się komunikat „BOX OFF/ON”.
Uwaga: Mimo że rma Blaupunkt dokładnie sprawdza kompatybilność różnych
głośników Bluetooth, nie można zagwarantować bezproblemowego działania urządzenia
ze wszystkimi modelami dostępnymi na rynku.
Obsługa Strefy 1 i Strefy 2
Krótko naciśnij przycisk Zone 1 (lub Zone 2), aby wyłączyć/włączyć dźwięk Strefy 1
(lub Strefy 2).
Przytrzymaj przycisk Zone 1 (lub Zone 2), aby wyciszyć dźwięk Strefy 1 (lub Strefy 2).
Ponowne przytrzymanie przycisku spowoduje wyłączenie wyciszenia.
Priorytet informacji lub zegara
Naciśnij krótko przycisk DIS, aby ustawić priorytet zegara lub priorytet informacji.
Uwaga: W paśmie FM, w przypadku odbierania stacji RDS, krótko naciśnij przycisk
DIS, aby wyświetlić NAZWĘ STACJI/ ZEGAR/CZĘSTOTLIWOŚĆ.
Ustawianie zegara
W menu wybierz pozycję CLK HH/CLK MM. Obróć pokrętło VOL, aby ustawić
godzinę/minuty.
Obsługa słuchawek
Na panelu przednim znajduje się gniazdo słuchawkowe 3,5 mm. Przyjmuje ono
ustawienia działania Strefy 1.
OBSŁUGA RADIA
Odbiór stacji radiowych
Naciśnij przycisk SRC/MENU, aby wybrać tryb spośród FM1->FM2->MW. Krótko
naciśnij przycisk / , aby odbierać żądaną stację radiową. Naciśnij i przytrzy-
maj przycisk / w celu ręcznego dostrojenia częstotliwości.
Ręczne zapisywanie stacji i wywoływanie zapisanych stacji
Odbieranie żądanej stacji. Naciśnij i przytrzymaj jeden z przycisków pamięci (1–6)
przez 2 sekundy. Aktualna stacja zostanie zapisana w pamięci pod danym przycis-
kiem numerycznym. Naciśnij krótko przycisk zaprogramowanej stacji (1–6), aby
słuchać bezpośrednio sygnału nadawanego z tej stacji i zapisanego pod przyporząd-
kowanym przyciskiem.
OBSŁUGA DAB
Naciśnij przycisk SRC/MENU, aby przełączyć źródło między DAB1 lub DAB2.
Wybór stacji
Naciśnij przycisk / , aby wybrać następną/poprzednią stację.
Ręczne zapisywanie stacji i wywoływanie zapisanych stacji
Gdy ustawiono częstotliwość żądanej stacji. Naciśnij i przytrzymaj jeden z przycisków
od 1 do 6 przez 2 sekundy, aby zapisać tę stację pod odpowiednim numerem.
Naciśnij krótko przycisk zaprogramowanej stacji (1–6), aby słuchać bezpośrednio
sygnału nadawanego z tej stacji i zapisanego pod przyporządkowanym przyciskiem.
OBSŁUGA USB
Po podłączeniu do urządzenia dysku USB, urządzenie automatycznie odtworzy pliki
MP3/WMA. Jeżeli dysk USB został już podłączony do urządzenia, naciśnij krótko
przycisk SRC/MENU, aż pojawi się ekran trybu USB.
Wybór pliku
Naciśnij przycisk / , aby przejść do następnego/poprzedniego pliku.
Przytrzymaj przycisk / , aby przewinąć szybko do przodu lub do tyłu.
Odtwarzanie/wstrzymanie
Naciśnij przycisk 1 , aby wstrzymać/odtworzyć plik.
Funkcja odtwarzania w pętli
Naciśnij przycisk 3 RPT, aby wybrać funkcję odtwarzania w pętli. RPT ONE/RPT
FOLD/RPT ALL (domyślnie)
RPT ONE: Odtwarzanie w pętli jednego pliku.
RPT FOLD: Odtwarzanie w pętli wszystkich plików w folderze.
RPT ALL: Odtwarzanie w pętli wszystkich plików.
RANDOM
Naciśnij przycisk 4 RDM, aby włączyć lub wyłączyć funkcję odtwarzania losowego.
RDM wł.: Odtwarzanie losowe wszystkich plików.
RDM wył.: Wyłączenie funkcji odtwarzania losowego.
Funkcja folder +/-
Naciśnij przycisk DIR+/DIR-, aby wybrać następny/poprzedni folder do odtwarzania.
Wyszukiwanie piosenki
Naciśnięcie i przytrzymanie przycisku spowoduje wyświetlenie komunikatu
„NUM 0000”. Obracając pokrętło VOL (lub bezpośrednio wprowadzając numer),
wybierz numer, a następnie naciśnij VOL, aby odtworzyć. Należy zwrócić uwagę na
7/8/9/0 jako: BT = 7, = 8, = 9, DIS = 0.
UŻYWANIE GNIAZDA AUX IN 1/2
Na panelu przednim gniazdo AUX IN 1 jest gniazdem 3,5 mm. Natomiast gniazdo
AUX IN 2 dla RCA znajduje się z tyłu urządzenia. Naciśnięcie przycisku SRC/MENU
spowoduje przełączenie do trybu AUX IN1 (2) po podłączeniu sygnału audio do
urządzenia.
OBSŁUGA BLUETOOTH
Parowanie urządzeń
W smartfonie wybierz pozycję Bluetooth i wyszukaj urządzenie Bluetooth. Na liście
powinna pojawić się pozycja „BLAUPUNKT”; wybierz „BLAUPUNKT”, a następnie
wprowadź hasło „0000”, jeśli zostanie wyświetlony komunikat wymagający
wprowadzenia hasła. Po pomyślnym sparowaniu na wyświetlaczu pojawi się napis BT.
Dźwięk Bluetooth
Naciśnij przycisk SRC/MENU, aby przełączyć się do trybu BT MUSIC. Urządzenie
automatycznie odtworzy utwór z telefonu. Naciśnij przycisk , aby wstrzymać/odt-
worzyć utwór.
Naciśnij przycisk / , aby wybrać następny/poprzedni utwór.
OBSŁUGA HDMI
Przednie gniazdo HDMI przechodzi do tylnego gniazda HDMI. Nie ma to wpływu na
odtwarzanie za pomocą HDMI.
Złącze RCA V-In i V-OUT
W tylnej części urządzenia złącze V-IN przechodzi do złącza V-OUT.
PILOT ZDALNEGO STEROWANIA
Pilota zdalnego sterowania można używać, gdy w menu ustawiono opcję IR na
włączoną.
OFF: Włączanie i wyłączanie urządzenia.
VOL+: Zwiększanie głośności
VOL-: Zmniejszanie głośności
1 : Włączanie/wyłączanie wyciszenia Strefy 1
2 : Włączanie/wyłączanie wyciszenia Strefy 2
W przypadku innych działań należy przeczytać
instrukcje powyżej.
OBSŁUGA
INFORMACJE OGÓLNE
Wymagania dotyczące zasilania : Prąd stały o napięciu 12 V, zacisk ujemny
połączony z masą
Wymiary podstawy montażowej : 129 (szer.) x 112 (gł.) x 65 (wys.)
Ustawienia tonów
- Niskie (przy 100 Hz) : ±10 dB
- Wysokie (przy 100 Hz) : ±10 dB
Maksymalna moc wyjściowa : 4 × 40 W
Pobór prądu : 10 A (maks.)
RADIO FM AM
Zakres częstotliwości od 87,5 do 108 MHz od 522 do 1620 KHz
IF 10.7 MHz 450 KHz
Czułość 4 µV (S/N = 30 dB) 36 dBµV (S/N = 20 dB)
Separacja kanałów stereo >25 dB /
ROZWIĄZYWANIE PROBLEMÓW
PL
Instrucciones de seguridad
El reproductor multimedia se ha fabricado de acuerdo con las normas actuales
de avance tecnológico y los principios de seguridad generalmente reconocidos.
No obstante, el incumplimiento de las instrucciones de seguridad aquí
indicadas supone una serie de riesgos. Lea atentamente todo el manual antes
de utilizar el reproductor multimedia. Guarde el manual en un lugar que esté
accesible para todos los usuarios en todo momento. Si el reproductor multime-
dia se proporciona a un tercero, recuerde incluir también el presente manual.
Además, siga las indicaciones del manual de uso de los dispositivos conectados
a este reproductor.
Indicaciones generales de seguridad
Siga las siguientes instrucciones para evitar lesiones corporales:
No modique ni abra el equipo.
Uso previsto
El reproductor multimedia está diseñado para su incorporación y operación en
vehículos provistos de instalaciones con una tensión de alimentación de 12 V.
Deben respetarse los límites de potencia de la unidad. Cualquier reparación o
instalación debe encargarse a profesionales.
Instrucciones de montaje
Puede instalar el equipo por cuenta propia solo si tiene experiencia en materia
de la instalación de equipos de radio y conocimientos de sistemas eléctricos de
automóviles. Consulte el diagrama de cableado proporcionado en este manual.
La instalación de la unidad no debe impedir ni bloquear el funcionamiento de
ningún airbag, otros dispositivos de seguridad o controles.
Declaración de conformidad
Blaupunkt Competence Center Car Multimedia-Evo Sales GmbH declara que el
presente equipo cumple los requisitos esenciales y otras condiciones de la
directiva 2014/53/UE. La declaración de conformidad está disponible en la
página web www.blaupunkt.com.
Instrucciones de limpieza
Los disolventes, productos de limpieza y agentes abrasivos, así como los aerosoles
de limpieza del salpicadero y los productos para el cuidado de plásticos pueden
incluir componentes que podrían dañar la supercie del reproductor multimedia.
Limpie el reproductor con una bayeta seca o ligeramente humedecida.
Instrucciones de eliminación
¡No deseche el aparato usado con los residuos domésticos!
Para deshacerse del equipo, del mando a distancia y de las pilas usadas,
llévelos a un punto de recogida de equipos usados.
Alcance del suministro
El suministro incluye:
reproductor multimedia BPA 3022 M,
mando a distancia,
conectores ISO,
tornillos de montaje,
manual de uso.
INFORMACIÓN IMPORTANTE RELATIVA A LA INSTALACIÓN
1. Antes de instalar el aparato, lea detenidamente todo el manual de uso.
2. Asegúrese de que todos los demás cables han sido conectados antes de
conectar la fuente de alimentación.
3. Para evitar cortocircuitos, asegúrese de que todos los cables expuestos estén
aislados.
4. Una vez terminada la instalación, je todos los cables.
5. Las conexiones de cableado al reproductor deben realizarse de acuerdo con
las indicaciones del presente manual. Una conexión incorrecta puede
provocar daños en el aparato.
6. El reproductor está diseñado para funcionar solamente con instalaciones de
12 V CC.
INSTALACIÓN DE LA UNIDAD
DESMONTAJE DE UNIDAD
1. Desmonte la unidad.
2. Retire el marco embellecedor exterior.
Nota acerca de cables HDMI:
Utilice un cable HDMI de buena calidad.
La longitud total (en la parte frontal y trasera) no debe superar 12 pies.
CONEXIÓN DE CABLEADO
1. El reproductor puede utilizarse solamente con una tensión de +12 V CC.
2. No conecte el terminal de la batería hasta que el reproductor esté completamen-
te instalado.
3. Asegúrese de que el cable amarillo esté conectado al polo positivo (+) de la batería.
4. Al sustituir el fusible, asegúrese de que los parámetros del fusible nuevo sean los
mismos.
5. El uso de altavoces de buena calidad con una impedancia de 4 a 8 ohmios
permitirá obtener el máximo rendimiento del equipo.
DISTRIBUCIÓN DE LOS BOTONES
1. ZONA 1 2. 1 3. ZONA 2
4. 2 5. BT 6. 3 RPT
7. 8. 4 RDM 9.
10. 5 DIR- 11. DIS 12. 6 DIR+
13. LCD 14. TOMA AUX 15. TOMA DE CONEXIÓN DE
AURICULARES
16. ENTRADA HDMI 17. REINICIO 18. RUEDA DE AJUSTE
19. PUERTO USB 20. SRC/MENU
OPERACIÓN BÁSICA
Encendido/apagado de la unidad y de la función de silencio
Para encender la unidad, pulse el botón /MUTE. Para activar o desactivar la función
de silencio, pulse brevemente la rueda de ajuste mientras la unidad está encendida.
Mantenga pulsado este botón para apagar la unidad.
Ajustes de sonido y menú de conguración
Pulse y mantenga pulsado el botón SCR / MENU para acceder al menú presentado a
continuación:
BAS->TRE->BAL->EQ (apag./pop/rock/clas)->LOUD (enc./apag.)->CLK HH->CLK
MM->IR (enc./apag.) ->CT (indep/sync)->SYG. SONIDO (enc./apag.) )->P_VOL
(13)->DX (LOC)->STE- REO (MONO)
En cada posición, gire la rueda VOL para seleccionarla.
INFRARROJOS (ENC./APAG.):
INFRARROJOS enc.: La unidad se puede encender con el mando a distancia por
infrarrojos. En tal caso, el sistema funciona en modo de alto consumo energético.
INFRARROJOS apag.: La unidad no se puede encender con el mando a distancia por
infrarrojos. El sistema está en modo de bajo consumo energético.
CT (INDEP/SYNC):
CT INDEP: El reloj funciona de forma independiente.
CT SYNC: El reloj se sincronizará con la hora de la emisora RDS recibida.
Nota: Al congurar el reloj en el menú, la función CT se ajusta automáticamente al
modo INDEP (funcionamiento independiente).
SEÑAL ACÚSTICA (enc./apag.): Permite activar/desactivar la señal acústica mediante
la pulsación de los botones.
P-VOL: Permite ajustar el volumen al encender la unidad. Si el nivel de volumen al
apagar la unidad es inferior al nivel P-VOL, al encender el equipo, la unidad ajustará
dicho nivel al volumen de apagado.
Si el nivel de volumen en el momento del apagado de la unidad es superior al nivel
P-VOL, el volumen se restablecerá al valor de P-VOL a la hora de encender el equipo.
Búsqueda de altavoces Bluetooth
Si mantiene pulsado el botón BT, aparecerá el mensaje «SEARCH...» [buscar]. Un
momento después, aparecerá el nombre del dispositivo Bluetooth. Para mostrar el
siguiente dispositivo, gire la rueda VOL. Una vez que el nombre del altavoz Bluetooth
deseado aparezca en la pantalla LCD, pulse el botón VOL para emparejar el
dispositivo. Si el emparejamiento se realiza correctamente, la pantalla mostrará «BOX
ON».
Indicación importante: A pesar de los numerosos ensayos realizados con diversos
dispositivos Bluetooth, no se puede garantizar la compatibilidad con todos los
dispositivos Bluetooth disponibles en el mercado.
Transmisión de la señal al altavoz Bluetooth
Pulse brevemente el botón BT para detener la transferencia o transmitir la señal al
altavoz Bluetooth. En la pantalla aparecerá el mensaje «BOX OFF/ON».
Nota: Aunque Blaupunkt comprueba cuidadosamente la compatibilidad de los distintos
altavoces Bluetooth, no se puede garantizar un funcionamiento infalible con todos los
modelos disponibles en el mercado.
Operación de la Zona 1 y la Zona 2
Pulse brevemente Zone 1 (o Zone 2) para apagar/encender el sonido de la Zona 1 (o
Zona 2).
Mantenga pulsado el botón Zone 1 (o Zone 2) para silenciar el sonido de la Zona 1 (o
Zona 2). Si vuelve a mantener pulsado el botón, se deshabilitará el modo silencio.
Prioridad de la información o del reloj
Pulse brevemente el botón DIS para congurar la prioridad del reloj o de la
información. Nota: En la banda de FM, cuando reciba emisoras RDS, pulse brevemen-
te DIS para mostrar NOMBRE DE EMISORA / RELOJ / FRECUENCIA.
Ajuste del reloj
Seleccione CLK HH/CLK MM en el menú. Gire la rueda VOL para ajustar la hora / los
minutos.
Uso de auriculares
El panel frontal dispone de una toma de conexión de auriculares de 3,5 mm. El panel
adopta los ajustes de funcionamiento de la Zona 1.
USO DE LA MODALIDAD DE RADIO
Recepción de emisoras de radio
Pulse el botón SRC / MENU para seleccionar uno de los siguientes modos:
FM1->FM2->MW. Pulse brevemente el botón / para recibir la emisora de
radio deseada. Mantenga pulsado el botón / para sintonizar manualmente
la frecuencia.
Cómo guardar las emisoras y seleccionar las emisoras guardadas de forma manual
Recepción de la emisora deseada. Pulse y mantenga pulsado uno de los botones de
memoria (de 1 a 6) durante 2 segundos. La emisora actual se guardará en la memoria
bajo determinado botón numérico. Pulse rápidamente el botón de la emisora
programada (de 1 a 6) para escuchar directamente la señal emitida por dicha emisora
y guardada bajo el botón asignado.
USO DE DEVDAB
Pulse el botón SRC / MENU para cambiar la fuente entre DAB1 o DAB2.
Selección de emisora
Pulse el botón / para seleccionar la emisora anterior/siguiente.
Cómo guardar las emisoras y seleccionar las emisoras guardadas de forma manual
Cuando la frecuencia de la emisora deseada esté ajustada, mantenga pulsado uno de
los botones de 1 a 6 durante 2 segundos para guardar esta emisora bajo el número
correspondiente. Pulse rápidamente el botón de la emisora programada (de 1 a 6)
para escuchar directamente la señal emitida por dicha emisora y guardada bajo el
botón asignado.
USO DE USB
Después de conectar la unidad USB al aparato, este reproduce automáticamente
cheros MP3 / WMA. Si ya se ha conectado la unidad USB al aparato, pulse brevemen-
te el botón SRC / MENU hasta que aparezca la pantalla del modo USB.
Selección de chero
Pulse el botón / para pasar al chero siguiente / anterior. Pulse el botón
/ para un avance o retroceso rápido.
Reproducir / Pausa
Pulse el botón 1 para pausar / reproducir un chero.
Repeat function
Pulse el botón 3 RPT para seleccionar la función de reproducción en bucle. RPT
ONE/RPT FOLD/RPT ALL (por defecto)
RPT ONE: Reproducción de un solo chero en bucle.
RPT FOLD: Reproducción de todos los cheros de una carpeta en bucle.
RPT ALL: Reproducción de todos los cheros en bucle.
RANDOM
Pulse el botón 4 RDM para activar o desactivar la función de reproducción aleatoria.
RDM enc.: Reproducción aleatoria de todos los cheros.
RDM apag.: Apagado de la función de reproducción aleatoria.
Función de carpeta +/-
Pulse DIR+ / DIR- para seleccionar la carpeta siguiente / anterior a reproducir.
Buscar canción
Si mantiene pulsado el botón , aparecerá el mensaje «NUM 0000». Girando la
rueda VOL (o introduciendo directamente el número), seleccione el número y, a
continuación, pulse VOL para reproducir la canción. Preste atención a 7/8/9/0 como:
BT = 7, = 8, = 9, DIS = 0.
USO DE LA TOMA AUX IN 1/2
En el panel frontal, la toma AUX IN 1 es una toma de 3,5 mm. La toma AUX IN 2 para
RCA se encuentra en la parte trasera de la unidad. Con la pulsación de SRC / MENU,
accederá al modo AUX IN1 (2) cuando la señal de audio esté conectada a la unidad.
USO DE LA MODALIDAD BLUETOOTH
Cómo vincular dispositivos
Seleccione Bluetooth en su teléfono y busque el dispositivo Bluetooth. En la lista
debería aparecer «BLAUPUNKT»; seleccione «BLAUPUNKT» e introduzca la contraseña
«0000» si aparece una solicitud de introducción de la contraseña. Una vez realizado el
emparejamiento, en la pantalla aparecerá el símbolo BT.
Audio Bluetooth
Pulse el botón SRC / MENU para cambiar al modo BT MUSIC. El aparato reproducirá
automáticamente la canción desde su teléfono. Pulse el botón para pausar /
reproducir una canción.
Pulse el botón / para seleccionar la canción anterior / siguiente.
USO DE HDMI
La entrada HDMI delantera va a la toma HDMI trasera. Esto no afecta a la reproduc-
ción de contenidos a través de HDMI.
Conectores RCA V-IN y V-OUT
En la parte trasera de la unidad, el conector V-IN va al conector V-OUT.
MANDO A DISTANCIA
El mando a distancia se puede utilizar cuando
la opción IR está activada en el menú.
APAGADO (OFF): Encendido y apagado
del aparato.
VOL+: Aumentar el volumen
VOL-: Reducir el volumen
1 : Encendido / apagado del silencio de
la Zona 1
2 : Encendido / apagado del silencio de
la Zona 2
Para otras operaciones, lea las instrucciones anteriores.
INFORMACIÓN GENERAL
Requisitos de alimentación eléctrica : Corriente continua de 12 V, borne negativo
conectado a tierra
Medidas de la base de montaje : 129 (ancho) x 112 (profundo) x 65 (alto)
Ajustes de tono
- Bajos (a 100 Hz) : ±10 dB
- Altos (a 100 Hz) : ±10 dB
Potencia máxima de salida : 4 x 40 watts
Consumo energético : 10 Ampere (max.)
RADIO FM AM
Gama de frecuencias de 87,5 a 108 MHz de 522 a 1620 KHz
IF 10.7 MHz 450 KHz
Sensibilidad 4 µV (S/N = 30 dB) 36 dBµV (S/N = 20 dB)
Separación de los canales estéreo >25 dB /
SOLUCIÓN DE PROBLEMAS

Wskazówki dotyczące bezpieczeństwa
Niniejszą stację multimedialną wyprodukowano zgodnie z aktualnymi
standardami rozwoju techniki i ogólnie uznanymi zasadami bezpieczeństwa.
Mimo to nieprzestrzeganie zawartych w niniejszej instrukcji wskazówek
dotyczących bezpieczeństwa wiąże się z różnego rodzaju zagrożeniami. Przed
rozpoczęciem użytkowania stacji multimedialnej należy dokładnie przeczytać
całą instrukcję. Przechowywać instrukcję w takim miejscu, aby w każdej chwili
była dostępna dla wszystkich użytkowników. W przypadku przekazania stacji
multimedialnej osobom trzecim należy dołączyć niniejszą instrukcję. Oprócz
tego należy przestrzegać wskazówek zawartych w instrukcjach obsługi
urządzeń podłączonych do tej stacji.
Ogólne wskazówki dotyczące bezpieczeństwa
Należy przestrzegać poniższych wskazówek, aby chronić się przed obrażeniami
ciała: Nie wolno modykować ani otwierać urządzenia.
Przeznaczenie
Stacja multimedialna jest przeznaczona do montażu i obsługi w pojazdach z
instalacją o napięciu 12 V. Należy przestrzegać wartości granicznych mocy
urządzenia. Ewentualne naprawy oraz montaż należy zlecić fachowcowi.
Instrukcja montażu
Urządzenie można zamontować samodzielnie tylko w przypadku dysponowania
doświadczeniem w zakresie montażu radioodtwarzaczy i znajomością
zagadnień elektryki samochodowej. W tym celu należy zapoznać się ze
schematem połączeń zawartym w niniejszej instrukcji. Montaż urządzenia nie
może utrudniać lub blokować działania jakichkolwiek poduszek powietrznych,
innych urządzeń zabezpieczających lub elementów sterowania.
Deklaracja zgodności
Blaupunkt Competence Center Car Multimedia – Evo Sales GmbH oświadcza, że
to urządzenie jest zgodne z wymaganiami podstawowymi oraz pozostałymi
stosownymi postanowieniami Dyrektywy 2014/53/UE. Deklarację zgodności
można znaleźć na stronie internetowej www.blaupunkt.com.
Wskazówki dotyczące czyszczenia
Rozpuszczalniki, środki czyszczące oraz ścierne, jak również aerozole do czyszczenia
kokpitów i środki do pielęgnacji tworzyw sztucznych mogą zawierać składniki, które
mogłyby uszkodzić powierzchnię stacji multimedialnej. Do czyszczenia stacji
tedialnej należy używać wyłącznie suchej lub lekko zwilżonej ściereczki.
Wskazówki dotyczące utylizacji
Nie wolno wyrzucać zużytego urządzenia wraz z odpadami z
gospodarstwa domowego!
Aby zutylizować urządzenie, pilot zdalnego sterowania i zużyte baterie,
należy oddać je do punktu zbiórki zużytego sprzętu.
Zakres dostawy
Zakres dostawy obejmuje:
stację multimedialną BPA 3022 M,
pilot zdalnego sterowania,
złącza ISO,
śruby montażowe,
instrukcję obsługi.
WAŻNE INFORMACJE DOTYCZĄCE MONTAŻU
1. Przed przystąpieniem do montażu urządzenia, należy dokładnie przeczytać
instrukcję obsługi.
2. Przed podłączeniem zasilania należy upewnić się, że wszystkie inne
przewody zostały podłączone.
3. Aby uniknąć zwarcia, należy upewnić się, że wszystkie odsłonięte przewody
zostały zaizolowane.
4. Po zakończeniu montażu należy zamocować wszystkie przewody.
5. Podłączenia do odtwarzacza należy wykonać zgodnie z niniejszą instrukcją
obsługi. Nieprawidłowe podłączenie może spowodować uszkodzenie
urządzenia.
6. Odtwarzacz jest przeznaczony do pracy wyłącznie z instalacją o napięciu 12
V prądu stałego.
MONTAŻ URZĄDZENIA
DEMONTAŻ URZĄDZENIA
1. Zdemontuj urządzenie.
2. Rozmontuj zewnętrzną ramkę wykończeniową.
Uwaga dotycząca HDMI:
Używaj kabla HDMI dobrej jakości.
Długość całkowita (przód i tył) nie powinna przekraczać 12 stóp.
PODŁĄCZENIE PRZEWODÓW
1. Odtwarzacz może być używany tylko przy napięciu +12 V prądu stałego.
2. Nie podłączaj zacisku akumulatora, dopóki odtwarzacz nie zostanie całkowicie
zamontowany.
3. Upewnij się, że żółty przewód jest podłączony do bieguna dodatniego akumula-
tora (+).
4. Przy wymianie bezpiecznika upewnij się, że parametry nowego bezpiecznika są
takie same.
5. Zastosowanie dobrej jakości głośników o impedancji 4–8 omów pozwala uzyskać
najlepsze efekty działania urządzenia.
POŁOŻENIE PRZYCISKÓW
1. STREFA 1 2. 1 3. STREFA 2
4. 2 5. BT 6. 3 RPT
7. 8. 4 RDM 9.
10. 5 DIR- 11. DIS 12. 6 DIR+
13. LCD 14. GNIAZDO AUX 15. GNIAZDO SŁUCHAWKOWE
16. GNIAZDO HDMI 17. RESET 18. POKRĘTŁO
19. PORT USB 20. SRC/MENU
OBSŁUGA PODSTAWOWA
Włączanie/wyłączanie urządzenia i funkcji wyciszania
Aby włączyć urządzenie, naciśnij pokrętło /MUTE. W celu włączenia lub wyłączenia funkcji
wyciszenia, krótko naciśnij pokrętło, gdy urządzenie jest włączone. Naciśnięcie i
przytrzymanie tego przycisku spowoduje wyłączenie urządzenia.
Ustawienia dźwięku i menu ustawień
Naciśnij i przytrzymaj przycisk SRC/MENU, aby przejść do menu przedstawionego poniżej:
BAS->TRE->BAL->EQ (wył./pop/rock/clas)->LOUD (wł./wył.)->CLK HH->CLK MM->IR
(wł./wył.) ->CT (indep/sync)->SYG. DŹW. (wł./wył.) )->P_VOL (13)->DX (LOC)->STE- REO
(MONO)
Przy każdej pozycji obróć pokrętło VOL, aby ją ustawić.
PODCZERWIEŃ (WŁ./WYŁ.):
PODCZERWIEŃ wł.: Urządzenie można włączyć za pomocą pilota zdalnego sterowania na
podczerwień. System wtedy jest w trybie wysokiego zużycia energii.
PODCZERWIEŃ wył.: Urządzenia nie można włączyć za pomocą pilota zdalnego
sterowania na podczerwień. System jest w trybie niskiego zużycia energii.
CT (INDEP/SYNC):
CT INDEP: Zegar działa niezależnie.
CT SYNC: Zegar zostanie zsynchronizowany z czasem odbieranej stacji RDS. Uwaga: W
przypadku gdy zegar został ustawiony w menu, funkcja CT jest automatycznie ustawiana
na tryb INDEP (niezależne działanie).
SYGNAŁ DŹWIĘKOWY (WŁ./WYŁ.): Pozwala na włączanie/wyłączenie sygnału dźwiękowe-
go przy naciśnięciu przycisków.
P-VOL: Pozwala na ustawienie głośności przy włączaniu. Jeśli poziom głośności przy
wyłączaniu jest niższy niż poziom P-VOL, po włączeniu urządzenie ustawi poziom
głośności na głośność przy wyłączaniu.
Jeśli poziom głośności przy wyłączaniu jest wyższy niż poziom P-VOL, głośność zostanie
przywrócona do poziomu
wartości P-VOL przy włączeniu urządzenia.
Wyszukiwanie głośników Bluetooth
Naciśnięcie i przytrzymanie przycisk BT spowoduje wyświetlenie komunikatu „SEARCH...”
[szukanie]. Chwilę później zostanie wyświetlona nazwa urządzenia Bluetooth. Aby
wyświetlić następne urządzenie, obróć pokrętło VOL. Po wyświetleniu na LCD nazwy
żądanego głośnika Bluetooth, naciśnij pokrętło VOL, aby sparować urządzenie. Jeśli
parowanie się powiedzie, na wyświetlaczu pojawi się komunikat „BOX ON”.
Ważna wskazówka: Pomimo licznych testów z różnymi urządzeniami Bluetooth, nie
można zagwarantować zgodności ze wszystkimi urządzeniami Bluetooth dostępnymi na
rynku.
Transmisja sygnału do głośnika Bluetooth
Krótko naciśnij przycisk BT, aby zatrzymać przesyłanie/przesłać sygnał do głośnika
Bluetooth. Na wyświetlaczu pojawi się komunikat „BOX OFF/ON”.
Uwaga: Mimo że rma Blaupunkt dokładnie sprawdza kompatybilność różnych
głośników Bluetooth, nie można zagwarantować bezproblemowego działania urządzenia
ze wszystkimi modelami dostępnymi na rynku.
Obsługa Strefy 1 i Strefy 2
Krótko naciśnij przycisk Zone 1 (lub Zone 2), aby wyłączyć/włączyć dźwięk Strefy 1
(lub Strefy 2).
Przytrzymaj przycisk Zone 1 (lub Zone 2), aby wyciszyć dźwięk Strefy 1 (lub Strefy 2).
Ponowne przytrzymanie przycisku spowoduje wyłączenie wyciszenia.
Priorytet informacji lub zegara
Naciśnij krótko przycisk DIS, aby ustawić priorytet zegara lub priorytet informacji.
Uwaga: W paśmie FM, w przypadku odbierania stacji RDS, krótko naciśnij przycisk
DIS, aby wyświetlić NAZWĘ STACJI/ ZEGAR/CZĘSTOTLIWOŚĆ.
Ustawianie zegara
W menu wybierz pozycję CLK HH/CLK MM. Obróć pokrętło VOL, aby ustawić
godzinę/minuty.
Obsługa słuchawek
Na panelu przednim znajduje się gniazdo słuchawkowe 3,5 mm. Przyjmuje ono
ustawienia działania Strefy 1.
OBSŁUGA RADIA
Odbiór stacji radiowych
Naciśnij przycisk SRC/MENU, aby wybrać tryb spośród FM1->FM2->MW. Krótko
naciśnij przycisk / , aby odbierać żądaną stację radiową. Naciśnij i przytrzy-
maj przycisk / w celu ręcznego dostrojenia częstotliwości.
Ręczne zapisywanie stacji i wywoływanie zapisanych stacji
Odbieranie żądanej stacji. Naciśnij i przytrzymaj jeden z przycisków pamięci (1–6)
przez 2 sekundy. Aktualna stacja zostanie zapisana w pamięci pod danym przycis-
kiem numerycznym. Naciśnij krótko przycisk zaprogramowanej stacji (1–6), aby
słuchać bezpośrednio sygnału nadawanego z tej stacji i zapisanego pod przyporząd-
kowanym przyciskiem.
OBSŁUGA DAB
Naciśnij przycisk SRC/MENU, aby przełączyć źródło między DAB1 lub DAB2.
Wybór stacji
Naciśnij przycisk / , aby wybrać następną/poprzednią stację.
Ręczne zapisywanie stacji i wywoływanie zapisanych stacji
Gdy ustawiono częstotliwość żądanej stacji. Naciśnij i przytrzymaj jeden z przycisków
od 1 do 6 przez 2 sekundy, aby zapisać tę stację pod odpowiednim numerem.
Naciśnij krótko przycisk zaprogramowanej stacji (1–6), aby słuchać bezpośrednio
sygnału nadawanego z tej stacji i zapisanego pod przyporządkowanym przyciskiem.
OBSŁUGA USB
Po podłączeniu do urządzenia dysku USB, urządzenie automatycznie odtworzy pliki
MP3/WMA. Jeżeli dysk USB został już podłączony do urządzenia, naciśnij krótko
przycisk SRC/MENU, aż pojawi się ekran trybu USB.
Wybór pliku
Naciśnij przycisk / , aby przejść do następnego/poprzedniego pliku.
Przytrzymaj przycisk / , aby przewinąć szybko do przodu lub do tyłu.
Odtwarzanie/wstrzymanie
Naciśnij przycisk 1 , aby wstrzymać/odtworzyć plik.
Funkcja odtwarzania w pętli
Naciśnij przycisk 3 RPT, aby wybrać funkcję odtwarzania w pętli. RPT ONE/RPT
FOLD/RPT ALL (domyślnie)
RPT ONE: Odtwarzanie w pętli jednego pliku.
RPT FOLD: Odtwarzanie w pętli wszystkich plików w folderze.
RPT ALL: Odtwarzanie w pętli wszystkich plików.
RANDOM
Naciśnij przycisk 4 RDM, aby włączyć lub wyłączyć funkcję odtwarzania losowego.
RDM wł.: Odtwarzanie losowe wszystkich plików.
RDM wył.: Wyłączenie funkcji odtwarzania losowego.
Funkcja folder +/-
Naciśnij przycisk DIR+/DIR-, aby wybrać następny/poprzedni folder do odtwarzania.
Wyszukiwanie piosenki
Naciśnięcie i przytrzymanie przycisku spowoduje wyświetlenie komunikatu
„NUM 0000”. Obracając pokrętło VOL (lub bezpośrednio wprowadzając numer),
wybierz numer, a następnie naciśnij VOL, aby odtworzyć. Należy zwrócić uwagę na
7/8/9/0 jako: BT = 7, = 8, = 9, DIS = 0.
UŻYWANIE GNIAZDA AUX IN 1/2
Na panelu przednim gniazdo AUX IN 1 jest gniazdem 3,5 mm. Natomiast gniazdo
AUX IN 2 dla RCA znajduje się z tyłu urządzenia. Naciśnięcie przycisku SRC/MENU
spowoduje przełączenie do trybu AUX IN1 (2) po podłączeniu sygnału audio do
urządzenia.
OBSŁUGA BLUETOOTH
Parowanie urządzeń
W smartfonie wybierz pozycję Bluetooth i wyszukaj urządzenie Bluetooth. Na liście
powinna pojawić się pozycja „BLAUPUNKT”; wybierz „BLAUPUNKT”, a następnie
wprowadź hasło „0000”, jeśli zostanie wyświetlony komunikat wymagający
wprowadzenia hasła. Po pomyślnym sparowaniu na wyświetlaczu pojawi się napis BT.
Dźwięk Bluetooth
Naciśnij przycisk SRC/MENU, aby przełączyć się do trybu BT MUSIC. Urządzenie
automatycznie odtworzy utwór z telefonu. Naciśnij przycisk , aby wstrzymać/odt-
worzyć utwór.
Naciśnij przycisk / , aby wybrać następny/poprzedni utwór.
OBSŁUGA HDMI
Przednie gniazdo HDMI przechodzi do tylnego gniazda HDMI. Nie ma to wpływu na
odtwarzanie za pomocą HDMI.
Złącze RCA V-In i V-OUT
W tylnej części urządzenia złącze V-IN przechodzi do złącza V-OUT.
PILOT ZDALNEGO STEROWANIA
Pilota zdalnego sterowania można używać, gdy w menu ustawiono opcję IR na
włączoną.
OFF: Włączanie i wyłączanie urządzenia.
VOL+: Zwiększanie głośności
VOL-: Zmniejszanie głośności
1 : Włączanie/wyłączanie wyciszenia Strefy 1
2 : Włączanie/wyłączanie wyciszenia Strefy 2
W przypadku innych działań należy przeczytać
instrukcje powyżej.
INFORMACJE OGÓLNE
Wymagania dotyczące zasilania : Prąd stały o napięciu 12 V, zacisk ujemny
połączony z masą
Wymiary podstawy montażowej : 129 (szer.) x 112 (gł.) x 65 (wys.)
Ustawienia tonów
- Niskie (przy 100 Hz) : ±10 dB
- Wysokie (przy 100 Hz) : ±10 dB
Maksymalna moc wyjściowa : 4 × 40 W
Pobór prądu : 10 A (maks.)
RADIO FM AM
Zakres częstotliwości od 87,5 do 108 MHz od 522 do 1620 KHz
IF 10.7 MHz 450 KHz
Czułość 4 µV (S/N = 30 dB) 36 dBµV (S/N = 20 dB)
Separacja kanałów stereo >25 dB /
ROZWIĄZYWANIE PROBLEMÓW
DANE TECHNICZNE
Problem
Przyczyna
Rozwiązanie
Brak zasilania Nie załączono zapłonu
w samochodzie.
Przestaw kluczyk w stacyjce do położenia
„ACC”, jeżeli zasilanie podłączono do
obwodu pomocniczego w pojeździe,
a silnik nie został uruchomiony.
Przepalony bezpiecznik. Wymień bezpiecznik.
Brak dźwięku
Głośność ustawiona na
minimum
Ustaw głośność dźwięku na
pożądanym poziomie.
Okablowanie nie jest
prawidłowo podłączone.
Sprawdź połączenia przewodów.
Przyciski do
obsługi
urządzenia nie
działają.
Wbudowany mikrokomputer
działa nieprawidłowo z
powodu zakłóceń.
Naciśnij przycisk resetowania.
Radio nie działa.
Nie działa
funkcja
automatycznego
wyboru stacji
radiowych.
Nie podłączono przewodu
antenowego.
Podłącz starannie przewód antenowy.
Siła sygnału jest zbyt słaba. Wybierz stację ręcznie.
Brak możliwości
odtwarzania
muzyki z aplikacji
muzycznej telefonu.
Urządzenie jest sparowane
z innym telefonem
komórkowym.
1
) Wyłącz funkcję Bluetooth w innym
telefonie.
2
) Wyjdź z aplikacji i włącz ją ponownie.
PL
Instrucciones de seguridad
El reproductor multimedia se ha fabricado de acuerdo con las normas actuales
de avance tecnológico y los principios de seguridad generalmente reconocidos.
No obstante, el incumplimiento de las instrucciones de seguridad aquí
indicadas supone una serie de riesgos. Lea atentamente todo el manual antes
de utilizar el reproductor multimedia. Guarde el manual en un lugar que esté
accesible para todos los usuarios en todo momento. Si el reproductor multime-
dia se proporciona a un tercero, recuerde incluir también el presente manual.
Además, siga las indicaciones del manual de uso de los dispositivos conectados
a este reproductor.
Indicaciones generales de seguridad
Siga las siguientes instrucciones para evitar lesiones corporales:
No modique ni abra el equipo.
Uso previsto
El reproductor multimedia está diseñado para su incorporación y operación en
vehículos provistos de instalaciones con una tensión de alimentación de 12 V.
Deben respetarse los límites de potencia de la unidad. Cualquier reparación o
instalación debe encargarse a profesionales.
Instrucciones de montaje
Puede instalar el equipo por cuenta propia solo si tiene experiencia en materia
de la instalación de equipos de radio y conocimientos de sistemas eléctricos de
automóviles. Consulte el diagrama de cableado proporcionado en este manual.
La instalación de la unidad no debe impedir ni bloquear el funcionamiento de
ningún airbag, otros dispositivos de seguridad o controles.
Declaración de conformidad
Blaupunkt Competence Center Car Multimedia-Evo Sales GmbH declara que el
presente equipo cumple los requisitos esenciales y otras condiciones de la
directiva 2014/53/UE. La declaración de conformidad está disponible en la
página web www.blaupunkt.com.
Instrucciones de limpieza
Los disolventes, productos de limpieza y agentes abrasivos, así como los aerosoles
de limpieza del salpicadero y los productos para el cuidado de plásticos pueden
incluir componentes que podrían dañar la supercie del reproductor multimedia.
Limpie el reproductor con una bayeta seca o ligeramente humedecida.
Instrucciones de eliminación
¡No deseche el aparato usado con los residuos domésticos!
Para deshacerse del equipo, del mando a distancia y de las pilas usadas,
llévelos a un punto de recogida de equipos usados.
Alcance del suministro
El suministro incluye:
reproductor multimedia BPA 3022 M,
mando a distancia,
conectores ISO,
tornillos de montaje,
manual de uso.
INFORMACIÓN IMPORTANTE RELATIVA A LA INSTALACIÓN
1. Antes de instalar el aparato, lea detenidamente todo el manual de uso.
2. Asegúrese de que todos los demás cables han sido conectados antes de
conectar la fuente de alimentación.
3. Para evitar cortocircuitos, asegúrese de que todos los cables expuestos estén
aislados.
4. Una vez terminada la instalación, je todos los cables.
5. Las conexiones de cableado al reproductor deben realizarse de acuerdo con
las indicaciones del presente manual. Una conexión incorrecta puede
provocar daños en el aparato.
6. El reproductor está diseñado para funcionar solamente con instalaciones de
12 V CC.
INSTALACIÓN DE LA UNIDAD
DESMONTAJE DE UNIDAD
1. Desmonte la unidad.
2. Retire el marco embellecedor exterior.
Nota acerca de cables HDMI:
Utilice un cable HDMI de buena calidad.
La longitud total (en la parte frontal y trasera) no debe superar 12 pies.
CONEXIÓN DE CABLEADO
1. El reproductor puede utilizarse solamente con una tensión de +12 V CC.
2. No conecte el terminal de la batería hasta que el reproductor esté completamen-
te instalado.
3. Asegúrese de que el cable amarillo esté conectado al polo positivo (+) de la batería.
4. Al sustituir el fusible, asegúrese de que los parámetros del fusible nuevo sean los
mismos.
5. El uso de altavoces de buena calidad con una impedancia de 4 a 8 ohmios
permitirá obtener el máximo rendimiento del equipo.
DISTRIBUCIÓN DE LOS BOTONES
1. ZONA 1 2. 1 3. ZONA 2
4. 2 5. BT 6. 3 RPT
7. 8. 4 RDM 9.
10. 5 DIR- 11. DIS 12. 6 DIR+
13. LCD 14. TOMA AUX 15. TOMA DE CONEXIÓN DE
AURICULARES
16. ENTRADA HDMI 17. REINICIO 18. RUEDA DE AJUSTE
19. PUERTO USB 20. SRC/MENU
OPERACIÓN BÁSICA
Encendido/apagado de la unidad y de la función de silencio
Para encender la unidad, pulse el botón /MUTE. Para activar o desactivar la función
de silencio, pulse brevemente la rueda de ajuste mientras la unidad está encendida.
Mantenga pulsado este botón para apagar la unidad.
Ajustes de sonido y menú de conguración
Pulse y mantenga pulsado el botón SCR / MENU para acceder al menú presentado a
continuación:
BAS->TRE->BAL->EQ (apag./pop/rock/clas)->LOUD (enc./apag.)->CLK HH->CLK
MM->IR (enc./apag.) ->CT (indep/sync)->SYG. SONIDO (enc./apag.) )->P_VOL
(13)->DX (LOC)->STE- REO (MONO)
En cada posición, gire la rueda VOL para seleccionarla.
INFRARROJOS (ENC./APAG.):
INFRARROJOS enc.: La unidad se puede encender con el mando a distancia por
infrarrojos. En tal caso, el sistema funciona en modo de alto consumo energético.
INFRARROJOS apag.: La unidad no se puede encender con el mando a distancia por
infrarrojos. El sistema está en modo de bajo consumo energético.
CT (INDEP/SYNC):
CT INDEP: El reloj funciona de forma independiente.
CT SYNC: El reloj se sincronizará con la hora de la emisora RDS recibida.
Nota: Al congurar el reloj en el menú, la función CT se ajusta automáticamente al
modo INDEP (funcionamiento independiente).
SEÑAL ACÚSTICA (enc./apag.): Permite activar/desactivar la señal acústica mediante
la pulsación de los botones.
P-VOL: Permite ajustar el volumen al encender la unidad. Si el nivel de volumen al
apagar la unidad es inferior al nivel P-VOL, al encender el equipo, la unidad ajustará
dicho nivel al volumen de apagado.
Si el nivel de volumen en el momento del apagado de la unidad es superior al nivel
P-VOL, el volumen se restablecerá al valor de P-VOL a la hora de encender el equipo.
Búsqueda de altavoces Bluetooth
Si mantiene pulsado el botón BT, aparecerá el mensaje «SEARCH...» [buscar]. Un
momento después, aparecerá el nombre del dispositivo Bluetooth. Para mostrar el
siguiente dispositivo, gire la rueda VOL. Una vez que el nombre del altavoz Bluetooth
deseado aparezca en la pantalla LCD, pulse el botón VOL para emparejar el
dispositivo. Si el emparejamiento se realiza correctamente, la pantalla mostrará «BOX
ON».
Indicación importante: A pesar de los numerosos ensayos realizados con diversos
dispositivos Bluetooth, no se puede garantizar la compatibilidad con todos los
dispositivos Bluetooth disponibles en el mercado.
Transmisión de la señal al altavoz Bluetooth
Pulse brevemente el botón BT para detener la transferencia o transmitir la señal al
altavoz Bluetooth. En la pantalla aparecerá el mensaje «BOX OFF/ON».
Nota: Aunque Blaupunkt comprueba cuidadosamente la compatibilidad de los distintos
altavoces Bluetooth, no se puede garantizar un funcionamiento infalible con todos los
modelos disponibles en el mercado.
Operación de la Zona 1 y la Zona 2
Pulse brevemente Zone 1 (o Zone 2) para apagar/encender el sonido de la Zona 1 (o
Zona 2).
Mantenga pulsado el botón Zone 1 (o Zone 2) para silenciar el sonido de la Zona 1 (o
Zona 2). Si vuelve a mantener pulsado el botón, se deshabilitará el modo silencio.
Prioridad de la información o del reloj
Pulse brevemente el botón DIS para congurar la prioridad del reloj o de la
información. Nota: En la banda de FM, cuando reciba emisoras RDS, pulse brevemen-
te DIS para mostrar NOMBRE DE EMISORA / RELOJ / FRECUENCIA.
Ajuste del reloj
Seleccione CLK HH/CLK MM en el menú. Gire la rueda VOL para ajustar la hora / los
minutos.
Uso de auriculares
El panel frontal dispone de una toma de conexión de auriculares de 3,5 mm. El panel
adopta los ajustes de funcionamiento de la Zona 1.
USO DE LA MODALIDAD DE RADIO
Recepción de emisoras de radio
Pulse el botón SRC / MENU para seleccionar uno de los siguientes modos:
FM1->FM2->MW. Pulse brevemente el botón / para recibir la emisora de
radio deseada. Mantenga pulsado el botón / para sintonizar manualmente
la frecuencia.
Cómo guardar las emisoras y seleccionar las emisoras guardadas de forma manual
Recepción de la emisora deseada. Pulse y mantenga pulsado uno de los botones de
memoria (de 1 a 6) durante 2 segundos. La emisora actual se guardará en la memoria
bajo determinado botón numérico. Pulse rápidamente el botón de la emisora
programada (de 1 a 6) para escuchar directamente la señal emitida por dicha emisora
y guardada bajo el botón asignado.
USO DE DEVDAB
Pulse el botón SRC / MENU para cambiar la fuente entre DAB1 o DAB2.
Selección de emisora
Pulse el botón / para seleccionar la emisora anterior/siguiente.
Cómo guardar las emisoras y seleccionar las emisoras guardadas de forma manual
Cuando la frecuencia de la emisora deseada esté ajustada, mantenga pulsado uno de
los botones de 1 a 6 durante 2 segundos para guardar esta emisora bajo el número
correspondiente. Pulse rápidamente el botón de la emisora programada (de 1 a 6)
para escuchar directamente la señal emitida por dicha emisora y guardada bajo el
botón asignado.
USO DE USB
Después de conectar la unidad USB al aparato, este reproduce automáticamente
cheros MP3 / WMA. Si ya se ha conectado la unidad USB al aparato, pulse brevemen-
te el botón SRC / MENU hasta que aparezca la pantalla del modo USB.
Selección de chero
Pulse el botón / para pasar al chero siguiente / anterior. Pulse el botón
/ para un avance o retroceso rápido.
Reproducir / Pausa
Pulse el botón 1 para pausar / reproducir un chero.
Repeat function
Pulse el botón 3 RPT para seleccionar la función de reproducción en bucle. RPT
ONE/RPT FOLD/RPT ALL (por defecto)
RPT ONE: Reproducción de un solo chero en bucle.
RPT FOLD: Reproducción de todos los cheros de una carpeta en bucle.
RPT ALL: Reproducción de todos los cheros en bucle.
RANDOM
Pulse el botón 4 RDM para activar o desactivar la función de reproducción aleatoria.
RDM enc.: Reproducción aleatoria de todos los cheros.
RDM apag.: Apagado de la función de reproducción aleatoria.
Función de carpeta +/-
Pulse DIR+ / DIR- para seleccionar la carpeta siguiente / anterior a reproducir.
Buscar canción
Si mantiene pulsado el botón , aparecerá el mensaje «NUM 0000». Girando la
rueda VOL (o introduciendo directamente el número), seleccione el número y, a
continuación, pulse VOL para reproducir la canción. Preste atención a 7/8/9/0 como:
BT = 7, = 8, = 9, DIS = 0.
USO DE LA TOMA AUX IN 1/2
En el panel frontal, la toma AUX IN 1 es una toma de 3,5 mm. La toma AUX IN 2 para
RCA se encuentra en la parte trasera de la unidad. Con la pulsación de SRC / MENU,
accederá al modo AUX IN1 (2) cuando la señal de audio esté conectada a la unidad.
USO DE LA MODALIDAD BLUETOOTH
Cómo vincular dispositivos
Seleccione Bluetooth en su teléfono y busque el dispositivo Bluetooth. En la lista
debería aparecer «BLAUPUNKT»; seleccione «BLAUPUNKT» e introduzca la contraseña
«0000» si aparece una solicitud de introducción de la contraseña. Una vez realizado el
emparejamiento, en la pantalla aparecerá el símbolo BT.
Audio Bluetooth
Pulse el botón SRC / MENU para cambiar al modo BT MUSIC. El aparato reproducirá
automáticamente la canción desde su teléfono. Pulse el botón para pausar /
reproducir una canción.
Pulse el botón / para seleccionar la canción anterior / siguiente.
USO DE HDMI
La entrada HDMI delantera va a la toma HDMI trasera. Esto no afecta a la reproduc-
ción de contenidos a través de HDMI.
Conectores RCA V-IN y V-OUT
En la parte trasera de la unidad, el conector V-IN va al conector V-OUT.
MANDO A DISTANCIA
El mando a distancia se puede utilizar cuando
la opción IR está activada en el menú.
APAGADO (OFF): Encendido y apagado
del aparato.
VOL+: Aumentar el volumen
VOL-: Reducir el volumen
1 : Encendido / apagado del silencio de
la Zona 1
2 : Encendido / apagado del silencio de
la Zona 2
Para otras operaciones, lea las instrucciones anteriores.
INFORMACIÓN GENERAL
Requisitos de alimentación eléctrica : Corriente continua de 12 V, borne negativo
conectado a tierra
Medidas de la base de montaje : 129 (ancho) x 112 (profundo) x 65 (alto)
Ajustes de tono
- Bajos (a 100 Hz) : ±10 dB
- Altos (a 100 Hz) : ±10 dB
Potencia máxima de salida : 4 x 40 watts
Consumo energético : 10 Ampere (max.)
RADIO FM AM
Gama de frecuencias de 87,5 a 108 MHz de 522 a 1620 KHz
IF 10.7 MHz 450 KHz
Sensibilidad 4 µV (S/N = 30 dB) 36 dBµV (S/N = 20 dB)
Separación de los canales estéreo >25 dB /
SOLUCIÓN DE PROBLEMAS

Wskazówki dotyczące bezpieczeństwa
Niniejszą stację multimedialną wyprodukowano zgodnie z aktualnymi
standardami rozwoju techniki i ogólnie uznanymi zasadami bezpieczeństwa.
Mimo to nieprzestrzeganie zawartych w niniejszej instrukcji wskazówek
dotyczących bezpieczeństwa wiąże się z różnego rodzaju zagrożeniami. Przed
rozpoczęciem użytkowania stacji multimedialnej należy dokładnie przeczytać
całą instrukcję. Przechowywać instrukcję w takim miejscu, aby w każdej chwili
była dostępna dla wszystkich użytkowników. W przypadku przekazania stacji
multimedialnej osobom trzecim należy dołączyć niniejszą instrukcję. Oprócz
tego należy przestrzegać wskazówek zawartych w instrukcjach obsługi
urządzeń podłączonych do tej stacji.
Ogólne wskazówki dotyczące bezpieczeństwa
Należy przestrzegać poniższych wskazówek, aby chronić się przed obrażeniami
ciała: Nie wolno modykować ani otwierać urządzenia.
Przeznaczenie
Stacja multimedialna jest przeznaczona do montażu i obsługi w pojazdach z
instalacją o napięciu 12 V. Należy przestrzegać wartości granicznych mocy
urządzenia. Ewentualne naprawy oraz montaż należy zlecić fachowcowi.
Instrukcja montażu
Urządzenie można zamontować samodzielnie tylko w przypadku dysponowania
doświadczeniem w zakresie montażu radioodtwarzaczy i znajomością
zagadnień elektryki samochodowej. W tym celu należy zapoznać się ze
schematem połączeń zawartym w niniejszej instrukcji. Montaż urządzenia nie
może utrudniać lub blokować działania jakichkolwiek poduszek powietrznych,
innych urządzeń zabezpieczających lub elementów sterowania.
Deklaracja zgodności
Blaupunkt Competence Center Car Multimedia – Evo Sales GmbH oświadcza, że
to urządzenie jest zgodne z wymaganiami podstawowymi oraz pozostałymi
stosownymi postanowieniami Dyrektywy 2014/53/UE. Deklarację zgodności
można znaleźć na stronie internetowej www.blaupunkt.com.
Wskazówki dotyczące czyszczenia
Rozpuszczalniki, środki czyszczące oraz ścierne, jak również aerozole do czyszczenia
kokpitów i środki do pielęgnacji tworzyw sztucznych mogą zawierać składniki, które
mogłyby uszkodzić powierzchnię stacji multimedialnej. Do czyszczenia stacji
tedialnej należy używać wyłącznie suchej lub lekko zwilżonej ściereczki.
Wskazówki dotyczące utylizacji
Nie wolno wyrzucać zużytego urządzenia wraz z odpadami z
gospodarstwa domowego!
Aby zutylizować urządzenie, pilot zdalnego sterowania i zużyte baterie,
należy oddać je do punktu zbiórki zużytego sprzętu.
Zakres dostawy
Zakres dostawy obejmuje:
stację multimedialną BPA 3022 M,
pilot zdalnego sterowania,
złącza ISO,
śruby montażowe,
instrukcję obsługi.
WAŻNE INFORMACJE DOTYCZĄCE MONTAŻU
1. Przed przystąpieniem do montażu urządzenia, należy dokładnie przeczytać
instrukcję obsługi.
2. Przed podłączeniem zasilania należy upewnić się, że wszystkie inne
przewody zostały podłączone.
3. Aby uniknąć zwarcia, należy upewnić się, że wszystkie odsłonięte przewody
zostały zaizolowane.
4. Po zakończeniu montażu należy zamocować wszystkie przewody.
5. Podłączenia do odtwarzacza należy wykonać zgodnie z niniejszą instrukcją
obsługi. Nieprawidłowe podłączenie może spowodować uszkodzenie
urządzenia.
6. Odtwarzacz jest przeznaczony do pracy wyłącznie z instalacją o napięciu 12
V prądu stałego.
MONTAŻ URZĄDZENIA
DEMONTAŻ URZĄDZENIA
1. Zdemontuj urządzenie.
2. Rozmontuj zewnętrzną ramkę wykończeniową.
Uwaga dotycząca HDMI:
Używaj kabla HDMI dobrej jakości.
Długość całkowita (przód i tył) nie powinna przekraczać 12 stóp.
PODŁĄCZENIE PRZEWODÓW
1. Odtwarzacz może być używany tylko przy napięciu +12 V prądu stałego.
2. Nie podłączaj zacisku akumulatora, dopóki odtwarzacz nie zostanie całkowicie
zamontowany.
3. Upewnij się, że żółty przewód jest podłączony do bieguna dodatniego akumula-
tora (+).
4. Przy wymianie bezpiecznika upewnij się, że parametry nowego bezpiecznika są
takie same.
5. Zastosowanie dobrej jakości głośników o impedancji 4–8 omów pozwala uzyskać
najlepsze efekty działania urządzenia.
POŁOŻENIE PRZYCISKÓW
1. STREFA 1 2. 1 3. STREFA 2
4. 2 5. BT 6. 3 RPT
7. 8. 4 RDM 9.
10. 5 DIR- 11. DIS 12. 6 DIR+
13. LCD 14. GNIAZDO AUX 15. GNIAZDO SŁUCHAWKOWE
16. GNIAZDO HDMI 17. RESET 18. POKRĘTŁO
19. PORT USB 20. SRC/MENU
OBSŁUGA PODSTAWOWA
Włączanie/wyłączanie urządzenia i funkcji wyciszania
Aby włączyć urządzenie, naciśnij pokrętło /MUTE. W celu włączenia lub wyłączenia funkcji
wyciszenia, krótko naciśnij pokrętło, gdy urządzenie jest włączone. Naciśnięcie i
przytrzymanie tego przycisku spowoduje wyłączenie urządzenia.
Ustawienia dźwięku i menu ustawień
Naciśnij i przytrzymaj przycisk SRC/MENU, aby przejść do menu przedstawionego poniżej:
BAS->TRE->BAL->EQ (wył./pop/rock/clas)->LOUD (wł./wył.)->CLK HH->CLK MM->IR
(wł./wył.) ->CT (indep/sync)->SYG. DŹW. (wł./wył.) )->P_VOL (13)->DX (LOC)->STE- REO
(MONO)
Przy każdej pozycji obróć pokrętło VOL, aby ją ustawić.
PODCZERWIEŃ (WŁ./WYŁ.):
PODCZERWIEŃ wł.: Urządzenie można włączyć za pomocą pilota zdalnego sterowania na
podczerwień. System wtedy jest w trybie wysokiego zużycia energii.
PODCZERWIEŃ wył.: Urządzenia nie można włączyć za pomocą pilota zdalnego
sterowania na podczerwień. System jest w trybie niskiego zużycia energii.
CT (INDEP/SYNC):
CT INDEP: Zegar działa niezależnie.
CT SYNC: Zegar zostanie zsynchronizowany z czasem odbieranej stacji RDS. Uwaga: W
przypadku gdy zegar został ustawiony w menu, funkcja CT jest automatycznie ustawiana
na tryb INDEP (niezależne działanie).
SYGNAŁ DŹWIĘKOWY (WŁ./WYŁ.): Pozwala na włączanie/wyłączenie sygnału dźwiękowe-
go przy naciśnięciu przycisków.
P-VOL: Pozwala na ustawienie głośności przy włączaniu. Jeśli poziom głośności przy
wyłączaniu jest niższy niż poziom P-VOL, po włączeniu urządzenie ustawi poziom
głośności na głośność przy wyłączaniu.
Jeśli poziom głośności przy wyłączaniu jest wyższy niż poziom P-VOL, głośność zostanie
przywrócona do poziomu
wartości P-VOL przy włączeniu urządzenia.
Wyszukiwanie głośników Bluetooth
Naciśnięcie i przytrzymanie przycisk BT spowoduje wyświetlenie komunikatu „SEARCH...”
[szukanie]. Chwilę później zostanie wyświetlona nazwa urządzenia Bluetooth. Aby
wyświetlić następne urządzenie, obróć pokrętło VOL. Po wyświetleniu na LCD nazwy
żądanego głośnika Bluetooth, naciśnij pokrętło VOL, aby sparować urządzenie. Jeśli
parowanie się powiedzie, na wyświetlaczu pojawi się komunikat „BOX ON”.
Ważna wskazówka: Pomimo licznych testów z różnymi urządzeniami Bluetooth, nie
można zagwarantować zgodności ze wszystkimi urządzeniami Bluetooth dostępnymi na
rynku.
Transmisja sygnału do głośnika Bluetooth
Krótko naciśnij przycisk BT, aby zatrzymać przesyłanie/przesłać sygnał do głośnika
Bluetooth. Na wyświetlaczu pojawi się komunikat „BOX OFF/ON”.
Uwaga: Mimo że rma Blaupunkt dokładnie sprawdza kompatybilność różnych
głośników Bluetooth, nie można zagwarantować bezproblemowego działania urządzenia
ze wszystkimi modelami dostępnymi na rynku.
Obsługa Strefy 1 i Strefy 2
Krótko naciśnij przycisk Zone 1 (lub Zone 2), aby wyłączyć/włączyć dźwięk Strefy 1
(lub Strefy 2).
Przytrzymaj przycisk Zone 1 (lub Zone 2), aby wyciszyć dźwięk Strefy 1 (lub Strefy 2).
Ponowne przytrzymanie przycisku spowoduje wyłączenie wyciszenia.
Priorytet informacji lub zegara
Naciśnij krótko przycisk DIS, aby ustawić priorytet zegara lub priorytet informacji.
Uwaga: W paśmie FM, w przypadku odbierania stacji RDS, krótko naciśnij przycisk
DIS, aby wyświetlić NAZWĘ STACJI/ ZEGAR/CZĘSTOTLIWOŚĆ.
Ustawianie zegara
W menu wybierz pozycję CLK HH/CLK MM. Obróć pokrętło VOL, aby ustawić
godzinę/minuty.
Obsługa słuchawek
Na panelu przednim znajduje się gniazdo słuchawkowe 3,5 mm. Przyjmuje ono
ustawienia działania Strefy 1.
OBSŁUGA RADIA
Odbiór stacji radiowych
Naciśnij przycisk SRC/MENU, aby wybrać tryb spośród FM1->FM2->MW. Krótko
naciśnij przycisk / , aby odbierać żądaną stację radiową. Naciśnij i przytrzy-
maj przycisk / w celu ręcznego dostrojenia częstotliwości.
Ręczne zapisywanie stacji i wywoływanie zapisanych stacji
Odbieranie żądanej stacji. Naciśnij i przytrzymaj jeden z przycisków pamięci (1–6)
przez 2 sekundy. Aktualna stacja zostanie zapisana w pamięci pod danym przycis-
kiem numerycznym. Naciśnij krótko przycisk zaprogramowanej stacji (1–6), aby
słuchać bezpośrednio sygnału nadawanego z tej stacji i zapisanego pod przyporząd-
kowanym przyciskiem.
OBSŁUGA DAB
Naciśnij przycisk SRC/MENU, aby przełączyć źródło między DAB1 lub DAB2.
Wybór stacji
Naciśnij przycisk / , aby wybrać następną/poprzednią stację.
Ręczne zapisywanie stacji i wywoływanie zapisanych stacji
Gdy ustawiono częstotliwość żądanej stacji. Naciśnij i przytrzymaj jeden z przycisków
od 1 do 6 przez 2 sekundy, aby zapisać tę stację pod odpowiednim numerem.
Naciśnij krótko przycisk zaprogramowanej stacji (1–6), aby słuchać bezpośrednio
sygnału nadawanego z tej stacji i zapisanego pod przyporządkowanym przyciskiem.
OBSŁUGA USB
Po podłączeniu do urządzenia dysku USB, urządzenie automatycznie odtworzy pliki
MP3/WMA. Jeżeli dysk USB został już podłączony do urządzenia, naciśnij krótko
przycisk SRC/MENU, aż pojawi się ekran trybu USB.
Wybór pliku
Naciśnij przycisk / , aby przejść do następnego/poprzedniego pliku.
Przytrzymaj przycisk / , aby przewinąć szybko do przodu lub do tyłu.
Odtwarzanie/wstrzymanie
Naciśnij przycisk 1 , aby wstrzymać/odtworzyć plik.
Funkcja odtwarzania w pętli
Naciśnij przycisk 3 RPT, aby wybrać funkcję odtwarzania w pętli. RPT ONE/RPT
FOLD/RPT ALL (domyślnie)
RPT ONE: Odtwarzanie w pętli jednego pliku.
RPT FOLD: Odtwarzanie w pętli wszystkich plików w folderze.
RPT ALL: Odtwarzanie w pętli wszystkich plików.
RANDOM
Naciśnij przycisk 4 RDM, aby włączyć lub wyłączyć funkcję odtwarzania losowego.
RDM wł.: Odtwarzanie losowe wszystkich plików.
RDM wył.: Wyłączenie funkcji odtwarzania losowego.
Funkcja folder +/-
Naciśnij przycisk DIR+/DIR-, aby wybrać następny/poprzedni folder do odtwarzania.
Wyszukiwanie piosenki
Naciśnięcie i przytrzymanie przycisku spowoduje wyświetlenie komunikatu
„NUM 0000”. Obracając pokrętło VOL (lub bezpośrednio wprowadzając numer),
wybierz numer, a następnie naciśnij VOL, aby odtworzyć. Należy zwrócić uwagę na
7/8/9/0 jako: BT = 7, = 8, = 9, DIS = 0.
UŻYWANIE GNIAZDA AUX IN 1/2
Na panelu przednim gniazdo AUX IN 1 jest gniazdem 3,5 mm. Natomiast gniazdo
AUX IN 2 dla RCA znajduje się z tyłu urządzenia. Naciśnięcie przycisku SRC/MENU
spowoduje przełączenie do trybu AUX IN1 (2) po podłączeniu sygnału audio do
urządzenia.
OBSŁUGA BLUETOOTH
Parowanie urządzeń
W smartfonie wybierz pozycję Bluetooth i wyszukaj urządzenie Bluetooth. Na liście
powinna pojawić się pozycja „BLAUPUNKT”; wybierz „BLAUPUNKT”, a następnie
wprowadź hasło „0000”, jeśli zostanie wyświetlony komunikat wymagający
wprowadzenia hasła. Po pomyślnym sparowaniu na wyświetlaczu pojawi się napis BT.
Dźwięk Bluetooth
Naciśnij przycisk SRC/MENU, aby przełączyć się do trybu BT MUSIC. Urządzenie
automatycznie odtworzy utwór z telefonu. Naciśnij przycisk , aby wstrzymać/odt-
worzyć utwór.
Naciśnij przycisk / , aby wybrać następny/poprzedni utwór.
OBSŁUGA HDMI
Przednie gniazdo HDMI przechodzi do tylnego gniazda HDMI. Nie ma to wpływu na
odtwarzanie za pomocą HDMI.
Złącze RCA V-In i V-OUT
W tylnej części urządzenia złącze V-IN przechodzi do złącza V-OUT.
PILOT ZDALNEGO STEROWANIA
Pilota zdalnego sterowania można używać, gdy w menu ustawiono opcję IR na
włączoną.
OFF: Włączanie i wyłączanie urządzenia.
VOL+: Zwiększanie głośności
VOL-: Zmniejszanie głośności
1 : Włączanie/wyłączanie wyciszenia Strefy 1
2 : Włączanie/wyłączanie wyciszenia Strefy 2
W przypadku innych działań należy przeczytać
instrukcje powyżej.
INFORMACJE OGÓLNE
Wymagania dotyczące zasilania : Prąd stały o napięciu 12 V, zacisk ujemny
połączony z masą
Wymiary podstawy montażowej : 129 (szer.) x 112 (gł.) x 65 (wys.)
Ustawienia tonów
- Niskie (przy 100 Hz) : ±10 dB
- Wysokie (przy 100 Hz) : ±10 dB
Maksymalna moc wyjściowa : 4 × 40 W
Pobór prądu : 10 A (maks.)
RADIO FM AM
Zakres częstotliwości od 87,5 do 108 MHz od 522 do 1620 KHz
IF 10.7 MHz 450 KHz
Czułość 4 µV (S/N = 30 dB) 36 dBµV (S/N = 20 dB)
Separacja kanałów stereo >25 dB /
ROZWIĄZYWANIE PROBLEMÓW
Instrucciones de seguridad
El reproductor multimedia se ha fabricado de acuerdo con las normas actuales
de avance tecnológico y los principios de seguridad generalmente reconocidos.
No obstante, el incumplimiento de las instrucciones de seguridad aquí
indicadas supone una serie de riesgos. Lea atentamente todo el manual antes
de utilizar el reproductor multimedia. Guarde el manual en un lugar que esté
accesible para todos los usuarios en todo momento. Si el reproductor multime-
dia se proporciona a un tercero, recuerde incluir también el presente manual.
Además, siga las indicaciones del manual de uso de los dispositivos conectados
a este reproductor.
Indicaciones generales de seguridad
Siga las siguientes instrucciones para evitar lesiones corporales:
No modique ni abra el equipo.
Uso previsto
El reproductor multimedia está diseñado para su incorporación y operación en
vehículos provistos de instalaciones con una tensión de alimentación de 12 V.
Deben respetarse los límites de potencia de la unidad. Cualquier reparación o
instalación debe encargarse a profesionales.
Instrucciones de montaje
Puede instalar el equipo por cuenta propia solo si tiene experiencia en materia
de la instalación de equipos de radio y conocimientos de sistemas eléctricos de
automóviles. Consulte el diagrama de cableado proporcionado en este manual.
La instalación de la unidad no debe impedir ni bloquear el funcionamiento de
ningún airbag, otros dispositivos de seguridad o controles.
Declaración de conformidad
Blaupunkt Competence Center Car Multimedia-Evo Sales GmbH declara que el
presente equipo cumple los requisitos esenciales y otras condiciones de la
directiva 2014/53/UE. La declaración de conformidad está disponible en la
página web www.blaupunkt.com.
Instrucciones de limpieza
Los disolventes, productos de limpieza y agentes abrasivos, así como los aerosoles
de limpieza del salpicadero y los productos para el cuidado de plásticos pueden
incluir componentes que podrían dañar la supercie del reproductor multimedia.
Limpie el reproductor con una bayeta seca o ligeramente humedecida.
Instrucciones de eliminación
¡No deseche el aparato usado con los residuos domésticos!
Para deshacerse del equipo, del mando a distancia y de las pilas usadas,
llévelos a un punto de recogida de equipos usados.
Alcance del suministro
El suministro incluye:
reproductor multimedia BPA 3022 M,
mando a distancia,
conectores ISO,
tornillos de montaje,
manual de uso.
INFORMACIÓN IMPORTANTE RELATIVA A LA INSTALACIÓN
1. Antes de instalar el aparato, lea detenidamente todo el manual de uso.
2. Asegúrese de que todos los demás cables han sido conectados antes de
conectar la fuente de alimentación.
3. Para evitar cortocircuitos, asegúrese de que todos los cables expuestos estén
aislados.
4. Una vez terminada la instalación, je todos los cables.
5. Las conexiones de cableado al reproductor deben realizarse de acuerdo con
las indicaciones del presente manual. Una conexión incorrecta puede
provocar daños en el aparato.
6. El reproductor está diseñado para funcionar solamente con instalaciones de
12 V CC.
INFORMACIÓN GENERAL
INSTALACIÓN DE LA UNIDAD
DESMONTAJE DE UNIDAD
1. Desmonte la unidad.
2. Retire el marco embellecedor exterior.
Nota acerca de cables HDMI:
Utilice un cable HDMI de buena calidad.
La longitud total (en la parte frontal y trasera) no debe superar 12 pies.
CONEXIÓN DE CABLEADO
1. El reproductor puede utilizarse solamente con una tensión de +12 V CC.
2. No conecte el terminal de la batería hasta que el reproductor esté completamen-
te instalado.
3. Asegúrese de que el cable amarillo esté conectado al polo positivo (+) de la batería.
4. Al sustituir el fusible, asegúrese de que los parámetros del fusible nuevo sean los
mismos.
5. El uso de altavoces de buena calidad con una impedancia de 4 a 8 ohmios
permitirá obtener el máximo rendimiento del equipo.
DISTRIBUCIÓN DE LOS BOTONES
1. ZONA 1 2. 1 3. ZONA 2
4. 2 5. BT 6. 3 RPT
7. 8. 4 RDM 9.
10. 5 DIR- 11. DIS 12. 6 DIR+
13. LCD 14. TOMA AUX 15. TOMA DE CONEXIÓN DE
AURICULARES
16. ENTRADA HDMI 17. REINICIO 18. RUEDA DE AJUSTE
19. PUERTO USB 20. SRC/MENU
OPERACIÓN BÁSICA
Encendido/apagado de la unidad y de la función de silencio
Para encender la unidad, pulse el botón /MUTE. Para activar o desactivar la función
de silencio, pulse brevemente la rueda de ajuste mientras la unidad está encendida.
Mantenga pulsado este botón para apagar la unidad.
Ajustes de sonido y menú de conguración
Pulse y mantenga pulsado el botón SCR / MENU para acceder al menú presentado a
continuación:
BAS->TRE->BAL->EQ (apag./pop/rock/clas)->LOUD (enc./apag.)->CLK HH->CLK
MM->IR (enc./apag.) ->CT (indep/sync)->SYG. SONIDO (enc./apag.) )->P_VOL
(13)->DX (LOC)->STE- REO (MONO)
En cada posición, gire la rueda VOL para seleccionarla.
INFRARROJOS (ENC./APAG.):
INFRARROJOS enc.: La unidad se puede encender con el mando a distancia por
infrarrojos. En tal caso, el sistema funciona en modo de alto consumo energético.
INFRARROJOS apag.: La unidad no se puede encender con el mando a distancia por
infrarrojos. El sistema está en modo de bajo consumo energético.
CT (INDEP/SYNC):
CT INDEP: El reloj funciona de forma independiente.
CT SYNC: El reloj se sincronizará con la hora de la emisora RDS recibida.
Nota: Al congurar el reloj en el menú, la función CT se ajusta automáticamente al
modo INDEP (funcionamiento independiente).
SEÑAL ACÚSTICA (enc./apag.): Permite activar/desactivar la señal acústica mediante
la pulsación de los botones.
P-VOL: Permite ajustar el volumen al encender la unidad. Si el nivel de volumen al
apagar la unidad es inferior al nivel P-VOL, al encender el equipo, la unidad ajustará
dicho nivel al volumen de apagado.
Si el nivel de volumen en el momento del apagado de la unidad es superior al nivel
P-VOL, el volumen se restablecerá al valor de P-VOL a la hora de encender el equipo.
Búsqueda de altavoces Bluetooth
Si mantiene pulsado el botón BT, aparecerá el mensaje «SEARCH...» [buscar]. Un
momento después, aparecerá el nombre del dispositivo Bluetooth. Para mostrar el
siguiente dispositivo, gire la rueda VOL. Una vez que el nombre del altavoz Bluetooth
deseado aparezca en la pantalla LCD, pulse el botón VOL para emparejar el
dispositivo. Si el emparejamiento se realiza correctamente, la pantalla mostrará «BOX
ON».
Indicación importante: A pesar de los numerosos ensayos realizados con diversos
dispositivos Bluetooth, no se puede garantizar la compatibilidad con todos los
dispositivos Bluetooth disponibles en el mercado.
Transmisión de la señal al altavoz Bluetooth
Pulse brevemente el botón BT para detener la transferencia o transmitir la señal al
altavoz Bluetooth. En la pantalla aparecerá el mensaje «BOX OFF/ON».
Nota: Aunque Blaupunkt comprueba cuidadosamente la compatibilidad de los distintos
altavoces Bluetooth, no se puede garantizar un funcionamiento infalible con todos los
modelos disponibles en el mercado.
Operación de la Zona 1 y la Zona 2
Pulse brevemente Zone 1 (o Zone 2) para apagar/encender el sonido de la Zona 1 (o
Zona 2).
Mantenga pulsado el botón Zone 1 (o Zone 2) para silenciar el sonido de la Zona 1 (o
Zona 2). Si vuelve a mantener pulsado el botón, se deshabilitará el modo silencio.
Prioridad de la información o del reloj
Pulse brevemente el botón DIS para congurar la prioridad del reloj o de la
información. Nota: En la banda de FM, cuando reciba emisoras RDS, pulse brevemen-
te DIS para mostrar NOMBRE DE EMISORA / RELOJ / FRECUENCIA.
Ajuste del reloj
Seleccione CLK HH/CLK MM en el menú. Gire la rueda VOL para ajustar la hora / los
minutos.
Uso de auriculares
El panel frontal dispone de una toma de conexión de auriculares de 3,5 mm. El panel
adopta los ajustes de funcionamiento de la Zona 1.
USO DE LA MODALIDAD DE RADIO
Recepción de emisoras de radio
Pulse el botón SRC / MENU para seleccionar uno de los siguientes modos:
FM1->FM2->MW. Pulse brevemente el botón / para recibir la emisora de
radio deseada. Mantenga pulsado el botón / para sintonizar manualmente
la frecuencia.
Cómo guardar las emisoras y seleccionar las emisoras guardadas de forma manual
Recepción de la emisora deseada. Pulse y mantenga pulsado uno de los botones de
memoria (de 1 a 6) durante 2 segundos. La emisora actual se guardará en la memoria
bajo determinado botón numérico. Pulse rápidamente el botón de la emisora
programada (de 1 a 6) para escuchar directamente la señal emitida por dicha emisora
y guardada bajo el botón asignado.
USO DE DEVDAB
Pulse el botón SRC / MENU para cambiar la fuente entre DAB1 o DAB2.
Selección de emisora
Pulse el botón / para seleccionar la emisora anterior/siguiente.
Cómo guardar las emisoras y seleccionar las emisoras guardadas de forma manual
Cuando la frecuencia de la emisora deseada esté ajustada, mantenga pulsado uno de
los botones de 1 a 6 durante 2 segundos para guardar esta emisora bajo el número
correspondiente. Pulse rápidamente el botón de la emisora programada (de 1 a 6)
para escuchar directamente la señal emitida por dicha emisora y guardada bajo el
botón asignado.
USO DE USB
Después de conectar la unidad USB al aparato, este reproduce automáticamente
cheros MP3 / WMA. Si ya se ha conectado la unidad USB al aparato, pulse brevemen-
te el botón SRC / MENU hasta que aparezca la pantalla del modo USB.
Selección de chero
Pulse el botón / para pasar al chero siguiente / anterior. Pulse el botón
/ para un avance o retroceso rápido.
Reproducir / Pausa
Pulse el botón 1 para pausar / reproducir un chero.
Repeat function
Pulse el botón 3 RPT para seleccionar la función de reproducción en bucle. RPT
ONE/RPT FOLD/RPT ALL (por defecto)
RPT ONE: Reproducción de un solo chero en bucle.
RPT FOLD: Reproducción de todos los cheros de una carpeta en bucle.
RPT ALL: Reproducción de todos los cheros en bucle.
RANDOM
Pulse el botón 4 RDM para activar o desactivar la función de reproducción aleatoria.
RDM enc.: Reproducción aleatoria de todos los cheros.
RDM apag.: Apagado de la función de reproducción aleatoria.
Función de carpeta +/-
Pulse DIR+ / DIR- para seleccionar la carpeta siguiente / anterior a reproducir.
Buscar canción
Si mantiene pulsado el botón , aparecerá el mensaje «NUM 0000». Girando la
rueda VOL (o introduciendo directamente el número), seleccione el número y, a
continuación, pulse VOL para reproducir la canción. Preste atención a 7/8/9/0 como:
BT = 7, = 8, = 9, DIS = 0.
USO DE LA TOMA AUX IN 1/2
En el panel frontal, la toma AUX IN 1 es una toma de 3,5 mm. La toma AUX IN 2 para
RCA se encuentra en la parte trasera de la unidad. Con la pulsación de SRC / MENU,
accederá al modo AUX IN1 (2) cuando la señal de audio esté conectada a la unidad.
USO DE LA MODALIDAD BLUETOOTH
Cómo vincular dispositivos
Seleccione Bluetooth en su teléfono y busque el dispositivo Bluetooth. En la lista
debería aparecer «BLAUPUNKT»; seleccione «BLAUPUNKT» e introduzca la contraseña
«0000» si aparece una solicitud de introducción de la contraseña. Una vez realizado el
emparejamiento, en la pantalla aparecerá el símbolo BT.
Audio Bluetooth
Pulse el botón SRC / MENU para cambiar al modo BT MUSIC. El aparato reproducirá
automáticamente la canción desde su teléfono. Pulse el botón para pausar /
reproducir una canción.
Pulse el botón / para seleccionar la canción anterior / siguiente.
USO DE HDMI
La entrada HDMI delantera va a la toma HDMI trasera. Esto no afecta a la reproduc-
ción de contenidos a través de HDMI.
Conectores RCA V-IN y V-OUT
En la parte trasera de la unidad, el conector V-IN va al conector V-OUT.
MANDO A DISTANCIA
El mando a distancia se puede utilizar cuando
la opción IR está activada en el menú.
APAGADO (OFF): Encendido y apagado
del aparato.
VOL+: Aumentar el volumen
VOL-: Reducir el volumen
1 : Encendido / apagado del silencio de
la Zona 1
2 : Encendido / apagado del silencio de
la Zona 2
Para otras operaciones, lea las instrucciones anteriores.
INFORMACIÓN GENERAL
Requisitos de alimentación eléctrica : Corriente continua de 12 V, borne negativo
conectado a tierra
Medidas de la base de montaje : 129 (ancho) x 112 (profundo) x 65 (alto)
Ajustes de tono
- Bajos (a 100 Hz) : ±10 dB
- Altos (a 100 Hz) : ±10 dB
Potencia máxima de salida : 4 x 40 watts
Consumo energético : 10 Ampere (max.)
RADIO FM AM
Gama de frecuencias de 87,5 a 108 MHz de 522 a 1620 KHz
IF 10.7 MHz 450 KHz
Sensibilidad 4 µV (S/N = 30 dB) 36 dBµV (S/N = 20 dB)
Separación de los canales estéreo >25 dB /
SOLUCIÓN DE PROBLEMAS
ES

Instrucciones de seguridad
El reproductor multimedia se ha fabricado de acuerdo con las normas actuales
de avance tecnológico y los principios de seguridad generalmente reconocidos.
No obstante, el incumplimiento de las instrucciones de seguridad aquí
indicadas supone una serie de riesgos. Lea atentamente todo el manual antes
de utilizar el reproductor multimedia. Guarde el manual en un lugar que esté
accesible para todos los usuarios en todo momento. Si el reproductor multime-
dia se proporciona a un tercero, recuerde incluir también el presente manual.
Además, siga las indicaciones del manual de uso de los dispositivos conectados
a este reproductor.
Indicaciones generales de seguridad
Siga las siguientes instrucciones para evitar lesiones corporales:
No modique ni abra el equipo.
Uso previsto
El reproductor multimedia está diseñado para su incorporación y operación en
vehículos provistos de instalaciones con una tensión de alimentación de 12 V.
Deben respetarse los límites de potencia de la unidad. Cualquier reparación o
instalación debe encargarse a profesionales.
Instrucciones de montaje
Puede instalar el equipo por cuenta propia solo si tiene experiencia en materia
de la instalación de equipos de radio y conocimientos de sistemas eléctricos de
automóviles. Consulte el diagrama de cableado proporcionado en este manual.
La instalación de la unidad no debe impedir ni bloquear el funcionamiento de
ningún airbag, otros dispositivos de seguridad o controles.
Declaración de conformidad
Blaupunkt Competence Center Car Multimedia-Evo Sales GmbH declara que el
presente equipo cumple los requisitos esenciales y otras condiciones de la
directiva 2014/53/UE. La declaración de conformidad está disponible en la
página web www.blaupunkt.com.
Instrucciones de limpieza
Los disolventes, productos de limpieza y agentes abrasivos, así como los aerosoles
de limpieza del salpicadero y los productos para el cuidado de plásticos pueden
incluir componentes que podrían dañar la supercie del reproductor multimedia.
Limpie el reproductor con una bayeta seca o ligeramente humedecida.
Instrucciones de eliminación
¡No deseche el aparato usado con los residuos domésticos!
Para deshacerse del equipo, del mando a distancia y de las pilas usadas,
llévelos a un punto de recogida de equipos usados.
Alcance del suministro
El suministro incluye:
reproductor multimedia BPA 3022 M,
mando a distancia,
conectores ISO,
tornillos de montaje,
manual de uso.
INFORMACIÓN IMPORTANTE RELATIVA A LA INSTALACIÓN
1. Antes de instalar el aparato, lea detenidamente todo el manual de uso.
2. Asegúrese de que todos los demás cables han sido conectados antes de
conectar la fuente de alimentación.
3. Para evitar cortocircuitos, asegúrese de que todos los cables expuestos estén
aislados.
4. Una vez terminada la instalación, je todos los cables.
5. Las conexiones de cableado al reproductor deben realizarse de acuerdo con
las indicaciones del presente manual. Una conexión incorrecta puede
provocar daños en el aparato.
6. El reproductor está diseñado para funcionar solamente con instalaciones de
12 V CC.
INSTALACIÓN DE LA UNIDAD
DESMONTAJE DE UNIDAD
1. Desmonte la unidad.
2. Retire el marco embellecedor exterior.
Nota acerca de cables HDMI:
Utilice un cable HDMI de buena calidad.
La longitud total (en la parte frontal y trasera) no debe superar 12 pies.
INFORMACIÓN GENERAL
CONEXIÓN DE CABLEADO
1. El reproductor puede utilizarse solamente con una tensión de +12 V CC.
2. No conecte el terminal de la batería hasta que el reproductor esté completamen-
te instalado.
3. Asegúrese de que el cable amarillo esté conectado al polo positivo (+) de la batería.
4. Al sustituir el fusible, asegúrese de que los parámetros del fusible nuevo sean los
mismos.
5. El uso de altavoces de buena calidad con una impedancia de 4 a 8 ohmios
permitirá obtener el máximo rendimiento del equipo.
DISTRIBUCIÓN DE LOS BOTONES
1. ZONA 1 2. 1 3. ZONA 2
4. 2 5. BT 6. 3 RPT
7. 8. 4 RDM 9.
10. 5 DIR- 11. DIS 12. 6 DIR+
13. LCD 14. TOMA AUX 15. TOMA DE CONEXIÓN DE
AURICULARES
16. ENTRADA HDMI 17. REINICIO 18. RUEDA DE AJUSTE
19. PUERTO USB 20. SRC/MENU
OPERACIÓN BÁSICA
Encendido/apagado de la unidad y de la función de silencio
Para encender la unidad, pulse el botón /MUTE. Para activar o desactivar la función
de silencio, pulse brevemente la rueda de ajuste mientras la unidad está encendida.
Mantenga pulsado este botón para apagar la unidad.
Ajustes de sonido y menú de conguración
Pulse y mantenga pulsado el botón SCR / MENU para acceder al menú presentado a
continuación:
BAS->TRE->BAL->EQ (apag./pop/rock/clas)->LOUD (enc./apag.)->CLK HH->CLK
MM->IR (enc./apag.) ->CT (indep/sync)->SYG. SONIDO (enc./apag.) )->P_VOL
(13)->DX (LOC)->STE- REO (MONO)
En cada posición, gire la rueda VOL para seleccionarla.
INFRARROJOS (ENC./APAG.):
INFRARROJOS enc.: La unidad se puede encender con el mando a distancia por
infrarrojos. En tal caso, el sistema funciona en modo de alto consumo energético.
INFRARROJOS apag.: La unidad no se puede encender con el mando a distancia por
infrarrojos. El sistema está en modo de bajo consumo energético.
CT (INDEP/SYNC):
CT INDEP: El reloj funciona de forma independiente.
CT SYNC: El reloj se sincronizará con la hora de la emisora RDS recibida.
Nota: Al congurar el reloj en el menú, la función CT se ajusta automáticamente al
modo INDEP (funcionamiento independiente).
SEÑAL ACÚSTICA (enc./apag.): Permite activar/desactivar la señal acústica mediante
la pulsación de los botones.
P-VOL: Permite ajustar el volumen al encender la unidad. Si el nivel de volumen al
apagar la unidad es inferior al nivel P-VOL, al encender el equipo, la unidad ajustará
dicho nivel al volumen de apagado.
Si el nivel de volumen en el momento del apagado de la unidad es superior al nivel
P-VOL, el volumen se restablecerá al valor de P-VOL a la hora de encender el equipo.
Búsqueda de altavoces Bluetooth
Si mantiene pulsado el botón BT, aparecerá el mensaje «SEARCH...» [buscar]. Un
momento después, aparecerá el nombre del dispositivo Bluetooth. Para mostrar el
siguiente dispositivo, gire la rueda VOL. Una vez que el nombre del altavoz Bluetooth
deseado aparezca en la pantalla LCD, pulse el botón VOL para emparejar el
dispositivo. Si el emparejamiento se realiza correctamente, la pantalla mostrará «BOX
ON».
Indicación importante: A pesar de los numerosos ensayos realizados con diversos
dispositivos Bluetooth, no se puede garantizar la compatibilidad con todos los
dispositivos Bluetooth disponibles en el mercado.
Transmisión de la señal al altavoz Bluetooth
Pulse brevemente el botón BT para detener la transferencia o transmitir la señal al
altavoz Bluetooth. En la pantalla aparecerá el mensaje «BOX OFF/ON».
Nota: Aunque Blaupunkt comprueba cuidadosamente la compatibilidad de los distintos
altavoces Bluetooth, no se puede garantizar un funcionamiento infalible con todos los
modelos disponibles en el mercado.
Operación de la Zona 1 y la Zona 2
Pulse brevemente Zone 1 (o Zone 2) para apagar/encender el sonido de la Zona 1 (o
Zona 2).
Mantenga pulsado el botón Zone 1 (o Zone 2) para silenciar el sonido de la Zona 1 (o
Zona 2). Si vuelve a mantener pulsado el botón, se deshabilitará el modo silencio.
Prioridad de la información o del reloj
Pulse brevemente el botón DIS para congurar la prioridad del reloj o de la
información. Nota: En la banda de FM, cuando reciba emisoras RDS, pulse brevemen-
te DIS para mostrar NOMBRE DE EMISORA / RELOJ / FRECUENCIA.
Ajuste del reloj
Seleccione CLK HH/CLK MM en el menú. Gire la rueda VOL para ajustar la hora / los
minutos.
Uso de auriculares
El panel frontal dispone de una toma de conexión de auriculares de 3,5 mm. El panel
adopta los ajustes de funcionamiento de la Zona 1.
USO DE LA MODALIDAD DE RADIO
Recepción de emisoras de radio
Pulse el botón SRC / MENU para seleccionar uno de los siguientes modos:
FM1->FM2->MW. Pulse brevemente el botón / para recibir la emisora de
radio deseada. Mantenga pulsado el botón / para sintonizar manualmente
la frecuencia.
Cómo guardar las emisoras y seleccionar las emisoras guardadas de forma manual
Recepción de la emisora deseada. Pulse y mantenga pulsado uno de los botones de
memoria (de 1 a 6) durante 2 segundos. La emisora actual se guardará en la memoria
bajo determinado botón numérico. Pulse rápidamente el botón de la emisora
programada (de 1 a 6) para escuchar directamente la señal emitida por dicha emisora
y guardada bajo el botón asignado.
USO DE DEVDAB
Pulse el botón SRC / MENU para cambiar la fuente entre DAB1 o DAB2.
Selección de emisora
Pulse el botón / para seleccionar la emisora anterior/siguiente.
Cómo guardar las emisoras y seleccionar las emisoras guardadas de forma manual
Cuando la frecuencia de la emisora deseada esté ajustada, mantenga pulsado uno de
los botones de 1 a 6 durante 2 segundos para guardar esta emisora bajo el número
correspondiente. Pulse rápidamente el botón de la emisora programada (de 1 a 6)
para escuchar directamente la señal emitida por dicha emisora y guardada bajo el
botón asignado.
USO DE USB
Después de conectar la unidad USB al aparato, este reproduce automáticamente
cheros MP3 / WMA. Si ya se ha conectado la unidad USB al aparato, pulse brevemen-
te el botón SRC / MENU hasta que aparezca la pantalla del modo USB.
Selección de chero
Pulse el botón / para pasar al chero siguiente / anterior. Pulse el botón
/ para un avance o retroceso rápido.
Reproducir / Pausa
Pulse el botón 1 para pausar / reproducir un chero.
Repeat function
Pulse el botón 3 RPT para seleccionar la función de reproducción en bucle. RPT
ONE/RPT FOLD/RPT ALL (por defecto)
RPT ONE: Reproducción de un solo chero en bucle.
RPT FOLD: Reproducción de todos los cheros de una carpeta en bucle.
RPT ALL: Reproducción de todos los cheros en bucle.
RANDOM
Pulse el botón 4 RDM para activar o desactivar la función de reproducción aleatoria.
RDM enc.: Reproducción aleatoria de todos los cheros.
RDM apag.: Apagado de la función de reproducción aleatoria.
Función de carpeta +/-
Pulse DIR+ / DIR- para seleccionar la carpeta siguiente / anterior a reproducir.
Buscar canción
Si mantiene pulsado el botón , aparecerá el mensaje «NUM 0000». Girando la
rueda VOL (o introduciendo directamente el número), seleccione el número y, a
continuación, pulse VOL para reproducir la canción. Preste atención a 7/8/9/0 como:
BT = 7, = 8, = 9, DIS = 0.
USO DE LA TOMA AUX IN 1/2
En el panel frontal, la toma AUX IN 1 es una toma de 3,5 mm. La toma AUX IN 2 para
RCA se encuentra en la parte trasera de la unidad. Con la pulsación de SRC / MENU,
accederá al modo AUX IN1 (2) cuando la señal de audio esté conectada a la unidad.
USO DE LA MODALIDAD BLUETOOTH
Cómo vincular dispositivos
Seleccione Bluetooth en su teléfono y busque el dispositivo Bluetooth. En la lista
debería aparecer «BLAUPUNKT»; seleccione «BLAUPUNKT» e introduzca la contraseña
«0000» si aparece una solicitud de introducción de la contraseña. Una vez realizado el
emparejamiento, en la pantalla aparecerá el símbolo BT.
Audio Bluetooth
Pulse el botón SRC / MENU para cambiar al modo BT MUSIC. El aparato reproducirá
automáticamente la canción desde su teléfono. Pulse el botón para pausar /
reproducir una canción.
Pulse el botón / para seleccionar la canción anterior / siguiente.
USO DE HDMI
La entrada HDMI delantera va a la toma HDMI trasera. Esto no afecta a la reproduc-
ción de contenidos a través de HDMI.
Conectores RCA V-IN y V-OUT
En la parte trasera de la unidad, el conector V-IN va al conector V-OUT.
MANDO A DISTANCIA
El mando a distancia se puede utilizar cuando
la opción IR está activada en el menú.
APAGADO (OFF): Encendido y apagado
del aparato.
VOL+: Aumentar el volumen
VOL-: Reducir el volumen
1 : Encendido / apagado del silencio de
la Zona 1
2 : Encendido / apagado del silencio de
la Zona 2
Para otras operaciones, lea las instrucciones anteriores.
INFORMACIÓN GENERAL
Requisitos de alimentación eléctrica : Corriente continua de 12 V, borne negativo
conectado a tierra
Medidas de la base de montaje : 129 (ancho) x 112 (profundo) x 65 (alto)
Ajustes de tono
- Bajos (a 100 Hz) : ±10 dB
- Altos (a 100 Hz) : ±10 dB
Potencia máxima de salida : 4 x 40 watts
Consumo energético : 10 Ampere (max.)
RADIO FM AM
Gama de frecuencias de 87,5 a 108 MHz de 522 a 1620 KHz
IF 10.7 MHz 450 KHz
Sensibilidad 4 µV (S/N = 30 dB) 36 dBµV (S/N = 20 dB)
Separación de los canales estéreo >25 dB /
SOLUCIÓN DE PROBLEMAS
ES
INSTALACIÓN
Salpicadero
Tornillos
Embellecedores

Instrucciones de seguridad
El reproductor multimedia se ha fabricado de acuerdo con las normas actuales
de avance tecnológico y los principios de seguridad generalmente reconocidos.
No obstante, el incumplimiento de las instrucciones de seguridad aquí
indicadas supone una serie de riesgos. Lea atentamente todo el manual antes
de utilizar el reproductor multimedia. Guarde el manual en un lugar que esté
accesible para todos los usuarios en todo momento. Si el reproductor multime-
dia se proporciona a un tercero, recuerde incluir también el presente manual.
Además, siga las indicaciones del manual de uso de los dispositivos conectados
a este reproductor.
Indicaciones generales de seguridad
Siga las siguientes instrucciones para evitar lesiones corporales:
No modique ni abra el equipo.
Uso previsto
El reproductor multimedia está diseñado para su incorporación y operación en
vehículos provistos de instalaciones con una tensión de alimentación de 12 V.
Deben respetarse los límites de potencia de la unidad. Cualquier reparación o
instalación debe encargarse a profesionales.
Instrucciones de montaje
Puede instalar el equipo por cuenta propia solo si tiene experiencia en materia
de la instalación de equipos de radio y conocimientos de sistemas eléctricos de
automóviles. Consulte el diagrama de cableado proporcionado en este manual.
La instalación de la unidad no debe impedir ni bloquear el funcionamiento de
ningún airbag, otros dispositivos de seguridad o controles.
Declaración de conformidad
Blaupunkt Competence Center Car Multimedia-Evo Sales GmbH declara que el
presente equipo cumple los requisitos esenciales y otras condiciones de la
directiva 2014/53/UE. La declaración de conformidad está disponible en la
página web www.blaupunkt.com.
Instrucciones de limpieza
Los disolventes, productos de limpieza y agentes abrasivos, así como los aerosoles
de limpieza del salpicadero y los productos para el cuidado de plásticos pueden
incluir componentes que podrían dañar la supercie del reproductor multimedia.
Limpie el reproductor con una bayeta seca o ligeramente humedecida.
Instrucciones de eliminación
¡No deseche el aparato usado con los residuos domésticos!
Para deshacerse del equipo, del mando a distancia y de las pilas usadas,
llévelos a un punto de recogida de equipos usados.
Alcance del suministro
El suministro incluye:
reproductor multimedia BPA 3022 M,
mando a distancia,
conectores ISO,
tornillos de montaje,
manual de uso.
INFORMACIÓN IMPORTANTE RELATIVA A LA INSTALACIÓN
1. Antes de instalar el aparato, lea detenidamente todo el manual de uso.
2. Asegúrese de que todos los demás cables han sido conectados antes de
conectar la fuente de alimentación.
3. Para evitar cortocircuitos, asegúrese de que todos los cables expuestos estén
aislados.
4. Una vez terminada la instalación, je todos los cables.
5. Las conexiones de cableado al reproductor deben realizarse de acuerdo con
las indicaciones del presente manual. Una conexión incorrecta puede
provocar daños en el aparato.
6. El reproductor está diseñado para funcionar solamente con instalaciones de
12 V CC.
INSTALACIÓN DE LA UNIDAD
DESMONTAJE DE UNIDAD
1. Desmonte la unidad.
2. Retire el marco embellecedor exterior.
Nota acerca de cables HDMI:
Utilice un cable HDMI de buena calidad.
La longitud total (en la parte frontal y trasera) no debe superar 12 pies.
CONEXIÓN DE CABLEADO
1. El reproductor puede utilizarse solamente con una tensión de +12 V CC.
2. No conecte el terminal de la batería hasta que el reproductor esté completamen-
te instalado.
3. Asegúrese de que el cable amarillo esté conectado al polo positivo (+) de la batería.
4. Al sustituir el fusible, asegúrese de que los parámetros del fusible nuevo sean los
mismos.
5. El uso de altavoces de buena calidad con una impedancia de 4 a 8 ohmios
permitirá obtener el máximo rendimiento del equipo.
CONEXIÓN DE CABLEADO
DISTRIBUCIÓN DE LOS BOTONES
1. ZONA 1 2. 1 3. ZONA 2
4. 2 5. BT 6. 3 RPT
7. 8. 4 RDM 9.
10. 5 DIR- 11. DIS 12. 6 DIR+
13. LCD 14. TOMA AUX 15. TOMA DE CONEXIÓN DE
AURICULARES
16. ENTRADA HDMI 17. REINICIO 18. RUEDA DE AJUSTE
19. PUERTO USB 20. SRC/MENU
OPERACIÓN BÁSICA
Encendido/apagado de la unidad y de la función de silencio
Para encender la unidad, pulse el botón /MUTE. Para activar o desactivar la función
de silencio, pulse brevemente la rueda de ajuste mientras la unidad está encendida.
Mantenga pulsado este botón para apagar la unidad.
Ajustes de sonido y menú de conguración
Pulse y mantenga pulsado el botón SCR / MENU para acceder al menú presentado a
continuación:
BAS->TRE->BAL->EQ (apag./pop/rock/clas)->LOUD (enc./apag.)->CLK HH->CLK
MM->IR (enc./apag.) ->CT (indep/sync)->SYG. SONIDO (enc./apag.) )->P_VOL
(13)->DX (LOC)->STE- REO (MONO)
En cada posición, gire la rueda VOL para seleccionarla.
INFRARROJOS (ENC./APAG.):
INFRARROJOS enc.: La unidad se puede encender con el mando a distancia por
infrarrojos. En tal caso, el sistema funciona en modo de alto consumo energético.
INFRARROJOS apag.: La unidad no se puede encender con el mando a distancia por
infrarrojos. El sistema está en modo de bajo consumo energético.
CT (INDEP/SYNC):
CT INDEP: El reloj funciona de forma independiente.
CT SYNC: El reloj se sincronizará con la hora de la emisora RDS recibida.
Nota: Al congurar el reloj en el menú, la función CT se ajusta automáticamente al
modo INDEP (funcionamiento independiente).
SEÑAL ACÚSTICA (enc./apag.): Permite activar/desactivar la señal acústica mediante
la pulsación de los botones.
P-VOL: Permite ajustar el volumen al encender la unidad. Si el nivel de volumen al
apagar la unidad es inferior al nivel P-VOL, al encender el equipo, la unidad ajustará
dicho nivel al volumen de apagado.
Si el nivel de volumen en el momento del apagado de la unidad es superior al nivel
P-VOL, el volumen se restablecerá al valor de P-VOL a la hora de encender el equipo.
Búsqueda de altavoces Bluetooth
Si mantiene pulsado el botón BT, aparecerá el mensaje «SEARCH...» [buscar]. Un
momento después, aparecerá el nombre del dispositivo Bluetooth. Para mostrar el
siguiente dispositivo, gire la rueda VOL. Una vez que el nombre del altavoz Bluetooth
deseado aparezca en la pantalla LCD, pulse el botón VOL para emparejar el
dispositivo. Si el emparejamiento se realiza correctamente, la pantalla mostrará «BOX
ON».
Indicación importante: A pesar de los numerosos ensayos realizados con diversos
dispositivos Bluetooth, no se puede garantizar la compatibilidad con todos los
dispositivos Bluetooth disponibles en el mercado.
Transmisión de la señal al altavoz Bluetooth
Pulse brevemente el botón BT para detener la transferencia o transmitir la señal al
altavoz Bluetooth. En la pantalla aparecerá el mensaje «BOX OFF/ON».
Nota: Aunque Blaupunkt comprueba cuidadosamente la compatibilidad de los distintos
altavoces Bluetooth, no se puede garantizar un funcionamiento infalible con todos los
modelos disponibles en el mercado.
Operación de la Zona 1 y la Zona 2
Pulse brevemente Zone 1 (o Zone 2) para apagar/encender el sonido de la Zona 1 (o
Zona 2).
Mantenga pulsado el botón Zone 1 (o Zone 2) para silenciar el sonido de la Zona 1 (o
Zona 2). Si vuelve a mantener pulsado el botón, se deshabilitará el modo silencio.
Prioridad de la información o del reloj
Pulse brevemente el botón DIS para congurar la prioridad del reloj o de la
información. Nota: En la banda de FM, cuando reciba emisoras RDS, pulse brevemen-
te DIS para mostrar NOMBRE DE EMISORA / RELOJ / FRECUENCIA.
Ajuste del reloj
Seleccione CLK HH/CLK MM en el menú. Gire la rueda VOL para ajustar la hora / los
minutos.
Uso de auriculares
El panel frontal dispone de una toma de conexión de auriculares de 3,5 mm. El panel
adopta los ajustes de funcionamiento de la Zona 1.
USO DE LA MODALIDAD DE RADIO
Recepción de emisoras de radio
Pulse el botón SRC / MENU para seleccionar uno de los siguientes modos:
FM1->FM2->MW. Pulse brevemente el botón / para recibir la emisora de
radio deseada. Mantenga pulsado el botón / para sintonizar manualmente
la frecuencia.
Cómo guardar las emisoras y seleccionar las emisoras guardadas de forma manual
Recepción de la emisora deseada. Pulse y mantenga pulsado uno de los botones de
memoria (de 1 a 6) durante 2 segundos. La emisora actual se guardará en la memoria
bajo determinado botón numérico. Pulse rápidamente el botón de la emisora
programada (de 1 a 6) para escuchar directamente la señal emitida por dicha emisora
y guardada bajo el botón asignado.
USO DE DEVDAB
Pulse el botón SRC / MENU para cambiar la fuente entre DAB1 o DAB2.
Selección de emisora
Pulse el botón / para seleccionar la emisora anterior/siguiente.
Cómo guardar las emisoras y seleccionar las emisoras guardadas de forma manual
Cuando la frecuencia de la emisora deseada esté ajustada, mantenga pulsado uno de
los botones de 1 a 6 durante 2 segundos para guardar esta emisora bajo el número
correspondiente. Pulse rápidamente el botón de la emisora programada (de 1 a 6)
para escuchar directamente la señal emitida por dicha emisora y guardada bajo el
botón asignado.
USO DE USB
Después de conectar la unidad USB al aparato, este reproduce automáticamente
cheros MP3 / WMA. Si ya se ha conectado la unidad USB al aparato, pulse brevemen-
te el botón SRC / MENU hasta que aparezca la pantalla del modo USB.
Selección de chero
Pulse el botón / para pasar al chero siguiente / anterior. Pulse el botón
/ para un avance o retroceso rápido.
Reproducir / Pausa
Pulse el botón 1 para pausar / reproducir un chero.
Repeat function
Pulse el botón 3 RPT para seleccionar la función de reproducción en bucle. RPT
ONE/RPT FOLD/RPT ALL (por defecto)
RPT ONE: Reproducción de un solo chero en bucle.
RPT FOLD: Reproducción de todos los cheros de una carpeta en bucle.
RPT ALL: Reproducción de todos los cheros en bucle.
RANDOM
Pulse el botón 4 RDM para activar o desactivar la función de reproducción aleatoria.
RDM enc.: Reproducción aleatoria de todos los cheros.
RDM apag.: Apagado de la función de reproducción aleatoria.
Función de carpeta +/-
Pulse DIR+ / DIR- para seleccionar la carpeta siguiente / anterior a reproducir.
Buscar canción
Si mantiene pulsado el botón , aparecerá el mensaje «NUM 0000». Girando la
rueda VOL (o introduciendo directamente el número), seleccione el número y, a
continuación, pulse VOL para reproducir la canción. Preste atención a 7/8/9/0 como:
BT = 7, = 8, = 9, DIS = 0.
USO DE LA TOMA AUX IN 1/2
En el panel frontal, la toma AUX IN 1 es una toma de 3,5 mm. La toma AUX IN 2 para
RCA se encuentra en la parte trasera de la unidad. Con la pulsación de SRC / MENU,
accederá al modo AUX IN1 (2) cuando la señal de audio esté conectada a la unidad.
USO DE LA MODALIDAD BLUETOOTH
Cómo vincular dispositivos
Seleccione Bluetooth en su teléfono y busque el dispositivo Bluetooth. En la lista
debería aparecer «BLAUPUNKT»; seleccione «BLAUPUNKT» e introduzca la contraseña
«0000» si aparece una solicitud de introducción de la contraseña. Una vez realizado el
emparejamiento, en la pantalla aparecerá el símbolo BT.
Audio Bluetooth
Pulse el botón SRC / MENU para cambiar al modo BT MUSIC. El aparato reproducirá
automáticamente la canción desde su teléfono. Pulse el botón para pausar /
reproducir una canción.
Pulse el botón / para seleccionar la canción anterior / siguiente.
USO DE HDMI
La entrada HDMI delantera va a la toma HDMI trasera. Esto no afecta a la reproduc-
ción de contenidos a través de HDMI.
Conectores RCA V-IN y V-OUT
En la parte trasera de la unidad, el conector V-IN va al conector V-OUT.
MANDO A DISTANCIA
El mando a distancia se puede utilizar cuando
la opción IR está activada en el menú.
APAGADO (OFF): Encendido y apagado
del aparato.
VOL+: Aumentar el volumen
VOL-: Reducir el volumen
1 : Encendido / apagado del silencio de
la Zona 1
2 : Encendido / apagado del silencio de
la Zona 2
Para otras operaciones, lea las instrucciones anteriores.
INFORMACIÓN GENERAL
Requisitos de alimentación eléctrica : Corriente continua de 12 V, borne negativo
conectado a tierra
Medidas de la base de montaje : 129 (ancho) x 112 (profundo) x 65 (alto)
Ajustes de tono
- Bajos (a 100 Hz) : ±10 dB
- Altos (a 100 Hz) : ±10 dB
Potencia máxima de salida : 4 x 40 watts
Consumo energético : 10 Ampere (max.)
RADIO FM AM
Gama de frecuencias de 87,5 a 108 MHz de 522 a 1620 KHz
IF 10.7 MHz 450 KHz
Sensibilidad 4 µV (S/N = 30 dB) 36 dBµV (S/N = 20 dB)
Separación de los canales estéreo >25 dB /
SOLUCIÓN DE PROBLEMAS
ES
Parte A
Parte B
FUSIBLE
Parte A
Parte B
ANTENA DE
RADIO
SISTEMA DE 4 ALTAVOCES
(BLANCO/NEGRO)
(BLANCO)
(GRIS/NEGRO)
(GRIS)
(VERDE/NEGRO)
(VERDE)
(VIOLETA/NEGRO)
(VIOLETA)
ZONA 1
ZONA 2
Altavoz
frontal
izquierdo
Altavoz
frontal
derecho
Altavoz
trasero
izquierdo
Altavoz
trasero
derecho
Przewód uziemiający (czarny)
Akcesorium/przełącznik +12 VA (czerwony)
Zasilanie anteny (niebieski)
Stałe zasilanie +12 V (żółty)

Instrucciones de seguridad
El reproductor multimedia se ha fabricado de acuerdo con las normas actuales
de avance tecnológico y los principios de seguridad generalmente reconocidos.
No obstante, el incumplimiento de las instrucciones de seguridad aquí
indicadas supone una serie de riesgos. Lea atentamente todo el manual antes
de utilizar el reproductor multimedia. Guarde el manual en un lugar que esté
accesible para todos los usuarios en todo momento. Si el reproductor multime-
dia se proporciona a un tercero, recuerde incluir también el presente manual.
Además, siga las indicaciones del manual de uso de los dispositivos conectados
a este reproductor.
Indicaciones generales de seguridad
Siga las siguientes instrucciones para evitar lesiones corporales:
No modique ni abra el equipo.
Uso previsto
El reproductor multimedia está diseñado para su incorporación y operación en
vehículos provistos de instalaciones con una tensión de alimentación de 12 V.
Deben respetarse los límites de potencia de la unidad. Cualquier reparación o
instalación debe encargarse a profesionales.
Instrucciones de montaje
Puede instalar el equipo por cuenta propia solo si tiene experiencia en materia
de la instalación de equipos de radio y conocimientos de sistemas eléctricos de
automóviles. Consulte el diagrama de cableado proporcionado en este manual.
La instalación de la unidad no debe impedir ni bloquear el funcionamiento de
ningún airbag, otros dispositivos de seguridad o controles.
Declaración de conformidad
Blaupunkt Competence Center Car Multimedia-Evo Sales GmbH declara que el
presente equipo cumple los requisitos esenciales y otras condiciones de la
directiva 2014/53/UE. La declaración de conformidad está disponible en la
página web www.blaupunkt.com.
Instrucciones de limpieza
Los disolventes, productos de limpieza y agentes abrasivos, así como los aerosoles
de limpieza del salpicadero y los productos para el cuidado de plásticos pueden
incluir componentes que podrían dañar la supercie del reproductor multimedia.
Limpie el reproductor con una bayeta seca o ligeramente humedecida.
Instrucciones de eliminación
¡No deseche el aparato usado con los residuos domésticos!
Para deshacerse del equipo, del mando a distancia y de las pilas usadas,
llévelos a un punto de recogida de equipos usados.
Alcance del suministro
El suministro incluye:
reproductor multimedia BPA 3022 M,
mando a distancia,
conectores ISO,
tornillos de montaje,
manual de uso.
INFORMACIÓN IMPORTANTE RELATIVA A LA INSTALACIÓN
1. Antes de instalar el aparato, lea detenidamente todo el manual de uso.
2. Asegúrese de que todos los demás cables han sido conectados antes de
conectar la fuente de alimentación.
3. Para evitar cortocircuitos, asegúrese de que todos los cables expuestos estén
aislados.
4. Una vez terminada la instalación, je todos los cables.
5. Las conexiones de cableado al reproductor deben realizarse de acuerdo con
las indicaciones del presente manual. Una conexión incorrecta puede
provocar daños en el aparato.
6. El reproductor está diseñado para funcionar solamente con instalaciones de
12 V CC.
INSTALACIÓN DE LA UNIDAD
DESMONTAJE DE UNIDAD
1. Desmonte la unidad.
2. Retire el marco embellecedor exterior.
Nota acerca de cables HDMI:
Utilice un cable HDMI de buena calidad.
La longitud total (en la parte frontal y trasera) no debe superar 12 pies.
CONEXIÓN DE CABLEADO
1. El reproductor puede utilizarse solamente con una tensión de +12 V CC.
2. No conecte el terminal de la batería hasta que el reproductor esté completamen-
te instalado.
3. Asegúrese de que el cable amarillo esté conectado al polo positivo (+) de la batería.
4. Al sustituir el fusible, asegúrese de que los parámetros del fusible nuevo sean los
mismos.
5. El uso de altavoces de buena calidad con una impedancia de 4 a 8 ohmios
permitirá obtener el máximo rendimiento del equipo.
OPERACIÓN
DISTRIBUCIÓN DE LOS BOTONES
1. ZONA 1 2. 1 3. ZONA 2
4. 2 5. BT 6. 3 RPT
7. 8. 4 RDM 9.
10. 5 DIR- 11. DIS 12. 6 DIR+
13. LCD 14. TOMA AUX 15. TOMA DE CONEXIÓN DE
AURICULARES
16. ENTRADA HDMI 17. REINICIO 18. RUEDA DE AJUSTE
19. PUERTO USB 20. SRC/MENU
OPERACIÓN BÁSICA
Encendido/apagado de la unidad y de la función de silencio
Para encender la unidad, pulse el botón /MUTE. Para activar o desactivar la función
de silencio, pulse brevemente la rueda de ajuste mientras la unidad está encendida.
Mantenga pulsado este botón para apagar la unidad.
Ajustes de sonido y menú de conguración
Pulse y mantenga pulsado el botón SCR / MENU para acceder al menú presentado a
continuación:
BAS->TRE->BAL->EQ (apag./pop/rock/clas)->LOUD (enc./apag.)->CLK HH->CLK
MM->IR (enc./apag.) ->CT (indep/sync)->SYG. SONIDO (enc./apag.) )->P_VOL
(13)->DX (LOC)->STE- REO (MONO)
En cada posición, gire la rueda VOL para seleccionarla.
INFRARROJOS (ENC./APAG.):
INFRARROJOS enc.: La unidad se puede encender con el mando a distancia por
infrarrojos. En tal caso, el sistema funciona en modo de alto consumo energético.
INFRARROJOS apag.: La unidad no se puede encender con el mando a distancia por
infrarrojos. El sistema está en modo de bajo consumo energético.
CT (INDEP/SYNC):
CT INDEP: El reloj funciona de forma independiente.
CT SYNC: El reloj se sincronizará con la hora de la emisora RDS recibida.
Nota: Al congurar el reloj en el menú, la función CT se ajusta automáticamente al
modo INDEP (funcionamiento independiente).
SEÑAL ACÚSTICA (enc./apag.): Permite activar/desactivar la señal acústica mediante
la pulsación de los botones.
P-VOL: Permite ajustar el volumen al encender la unidad. Si el nivel de volumen al
apagar la unidad es inferior al nivel P-VOL, al encender el equipo, la unidad ajustará
dicho nivel al volumen de apagado.
Si el nivel de volumen en el momento del apagado de la unidad es superior al nivel
P-VOL, el volumen se restablecerá al valor de P-VOL a la hora de encender el equipo.
Búsqueda de altavoces Bluetooth
Si mantiene pulsado el botón BT, aparecerá el mensaje «SEARCH...» [buscar]. Un
momento después, aparecerá el nombre del dispositivo Bluetooth. Para mostrar el
siguiente dispositivo, gire la rueda VOL. Una vez que el nombre del altavoz Bluetooth
deseado aparezca en la pantalla LCD, pulse el botón VOL para emparejar el
dispositivo. Si el emparejamiento se realiza correctamente, la pantalla mostrará «BOX
ON».
Indicación importante: A pesar de los numerosos ensayos realizados con diversos
dispositivos Bluetooth, no se puede garantizar la compatibilidad con todos los
dispositivos Bluetooth disponibles en el mercado.
Transmisión de la señal al altavoz Bluetooth
Pulse brevemente el botón BT para detener la transferencia o transmitir la señal al
altavoz Bluetooth. En la pantalla aparecerá el mensaje «BOX OFF/ON».
Nota: Aunque Blaupunkt comprueba cuidadosamente la compatibilidad de los distintos
altavoces Bluetooth, no se puede garantizar un funcionamiento infalible con todos los
modelos disponibles en el mercado.
Operación de la Zona 1 y la Zona 2
Pulse brevemente Zone 1 (o Zone 2) para apagar/encender el sonido de la Zona 1 (o
Zona 2).
Mantenga pulsado el botón Zone 1 (o Zone 2) para silenciar el sonido de la Zona 1 (o
Zona 2). Si vuelve a mantener pulsado el botón, se deshabilitará el modo silencio.
Prioridad de la información o del reloj
Pulse brevemente el botón DIS para congurar la prioridad del reloj o de la
información. Nota: En la banda de FM, cuando reciba emisoras RDS, pulse brevemen-
te DIS para mostrar NOMBRE DE EMISORA / RELOJ / FRECUENCIA.
Ajuste del reloj
Seleccione CLK HH/CLK MM en el menú. Gire la rueda VOL para ajustar la hora / los
minutos.
Uso de auriculares
El panel frontal dispone de una toma de conexión de auriculares de 3,5 mm. El panel
adopta los ajustes de funcionamiento de la Zona 1.
USO DE LA MODALIDAD DE RADIO
Recepción de emisoras de radio
Pulse el botón SRC / MENU para seleccionar uno de los siguientes modos:
FM1->FM2->MW. Pulse brevemente el botón / para recibir la emisora de
radio deseada. Mantenga pulsado el botón / para sintonizar manualmente
la frecuencia.
Cómo guardar las emisoras y seleccionar las emisoras guardadas de forma manual
Recepción de la emisora deseada. Pulse y mantenga pulsado uno de los botones de
memoria (de 1 a 6) durante 2 segundos. La emisora actual se guardará en la memoria
bajo determinado botón numérico. Pulse rápidamente el botón de la emisora
programada (de 1 a 6) para escuchar directamente la señal emitida por dicha emisora
y guardada bajo el botón asignado.
USO DE DEVDAB
Pulse el botón SRC / MENU para cambiar la fuente entre DAB1 o DAB2.
Selección de emisora
Pulse el botón / para seleccionar la emisora anterior/siguiente.
Cómo guardar las emisoras y seleccionar las emisoras guardadas de forma manual
Cuando la frecuencia de la emisora deseada esté ajustada, mantenga pulsado uno de
los botones de 1 a 6 durante 2 segundos para guardar esta emisora bajo el número
correspondiente. Pulse rápidamente el botón de la emisora programada (de 1 a 6)
para escuchar directamente la señal emitida por dicha emisora y guardada bajo el
botón asignado.
USO DE USB
Después de conectar la unidad USB al aparato, este reproduce automáticamente
cheros MP3 / WMA. Si ya se ha conectado la unidad USB al aparato, pulse brevemen-
te el botón SRC / MENU hasta que aparezca la pantalla del modo USB.
Selección de chero
Pulse el botón / para pasar al chero siguiente / anterior. Pulse el botón
/ para un avance o retroceso rápido.
Reproducir / Pausa
Pulse el botón 1 para pausar / reproducir un chero.
Repeat function
Pulse el botón 3 RPT para seleccionar la función de reproducción en bucle. RPT
ONE/RPT FOLD/RPT ALL (por defecto)
RPT ONE: Reproducción de un solo chero en bucle.
RPT FOLD: Reproducción de todos los cheros de una carpeta en bucle.
RPT ALL: Reproducción de todos los cheros en bucle.
RANDOM
Pulse el botón 4 RDM para activar o desactivar la función de reproducción aleatoria.
RDM enc.: Reproducción aleatoria de todos los cheros.
RDM apag.: Apagado de la función de reproducción aleatoria.
Función de carpeta +/-
Pulse DIR+ / DIR- para seleccionar la carpeta siguiente / anterior a reproducir.
Buscar canción
Si mantiene pulsado el botón , aparecerá el mensaje «NUM 0000». Girando la
rueda VOL (o introduciendo directamente el número), seleccione el número y, a
continuación, pulse VOL para reproducir la canción. Preste atención a 7/8/9/0 como:
BT = 7, = 8, = 9, DIS = 0.
USO DE LA TOMA AUX IN 1/2
En el panel frontal, la toma AUX IN 1 es una toma de 3,5 mm. La toma AUX IN 2 para
RCA se encuentra en la parte trasera de la unidad. Con la pulsación de SRC / MENU,
accederá al modo AUX IN1 (2) cuando la señal de audio esté conectada a la unidad.
USO DE LA MODALIDAD BLUETOOTH
Cómo vincular dispositivos
Seleccione Bluetooth en su teléfono y busque el dispositivo Bluetooth. En la lista
debería aparecer «BLAUPUNKT»; seleccione «BLAUPUNKT» e introduzca la contraseña
«0000» si aparece una solicitud de introducción de la contraseña. Una vez realizado el
emparejamiento, en la pantalla aparecerá el símbolo BT.
Audio Bluetooth
Pulse el botón SRC / MENU para cambiar al modo BT MUSIC. El aparato reproducirá
automáticamente la canción desde su teléfono. Pulse el botón para pausar /
reproducir una canción.
Pulse el botón / para seleccionar la canción anterior / siguiente.
USO DE HDMI
La entrada HDMI delantera va a la toma HDMI trasera. Esto no afecta a la reproduc-
ción de contenidos a través de HDMI.
Conectores RCA V-IN y V-OUT
En la parte trasera de la unidad, el conector V-IN va al conector V-OUT.
MANDO A DISTANCIA
El mando a distancia se puede utilizar cuando
la opción IR está activada en el menú.
APAGADO (OFF): Encendido y apagado
del aparato.
VOL+: Aumentar el volumen
VOL-: Reducir el volumen
1 : Encendido / apagado del silencio de
la Zona 1
2 : Encendido / apagado del silencio de
la Zona 2
Para otras operaciones, lea las instrucciones anteriores.
INFORMACIÓN GENERAL
Requisitos de alimentación eléctrica : Corriente continua de 12 V, borne negativo
conectado a tierra
Medidas de la base de montaje : 129 (ancho) x 112 (profundo) x 65 (alto)
Ajustes de tono
- Bajos (a 100 Hz) : ±10 dB
- Altos (a 100 Hz) : ±10 dB
Potencia máxima de salida : 4 x 40 watts
Consumo energético : 10 Ampere (max.)
RADIO FM AM
Gama de frecuencias de 87,5 a 108 MHz de 522 a 1620 KHz
IF 10.7 MHz 450 KHz
Sensibilidad 4 µV (S/N = 30 dB) 36 dBµV (S/N = 20 dB)
Separación de los canales estéreo >25 dB /
SOLUCIÓN DE PROBLEMAS
ES

Instrucciones de seguridad
El reproductor multimedia se ha fabricado de acuerdo con las normas actuales
de avance tecnológico y los principios de seguridad generalmente reconocidos.
No obstante, el incumplimiento de las instrucciones de seguridad aquí
indicadas supone una serie de riesgos. Lea atentamente todo el manual antes
de utilizar el reproductor multimedia. Guarde el manual en un lugar que esté
accesible para todos los usuarios en todo momento. Si el reproductor multime-
dia se proporciona a un tercero, recuerde incluir también el presente manual.
Además, siga las indicaciones del manual de uso de los dispositivos conectados
a este reproductor.
Indicaciones generales de seguridad
Siga las siguientes instrucciones para evitar lesiones corporales:
No modique ni abra el equipo.
Uso previsto
El reproductor multimedia está diseñado para su incorporación y operación en
vehículos provistos de instalaciones con una tensión de alimentación de 12 V.
Deben respetarse los límites de potencia de la unidad. Cualquier reparación o
instalación debe encargarse a profesionales.
Instrucciones de montaje
Puede instalar el equipo por cuenta propia solo si tiene experiencia en materia
de la instalación de equipos de radio y conocimientos de sistemas eléctricos de
automóviles. Consulte el diagrama de cableado proporcionado en este manual.
La instalación de la unidad no debe impedir ni bloquear el funcionamiento de
ningún airbag, otros dispositivos de seguridad o controles.
Declaración de conformidad
Blaupunkt Competence Center Car Multimedia-Evo Sales GmbH declara que el
presente equipo cumple los requisitos esenciales y otras condiciones de la
directiva 2014/53/UE. La declaración de conformidad está disponible en la
página web www.blaupunkt.com.
Instrucciones de limpieza
Los disolventes, productos de limpieza y agentes abrasivos, así como los aerosoles
de limpieza del salpicadero y los productos para el cuidado de plásticos pueden
incluir componentes que podrían dañar la supercie del reproductor multimedia.
Limpie el reproductor con una bayeta seca o ligeramente humedecida.
Instrucciones de eliminación
¡No deseche el aparato usado con los residuos domésticos!
Para deshacerse del equipo, del mando a distancia y de las pilas usadas,
llévelos a un punto de recogida de equipos usados.
Alcance del suministro
El suministro incluye:
reproductor multimedia BPA 3022 M,
mando a distancia,
conectores ISO,
tornillos de montaje,
manual de uso.
INFORMACIÓN IMPORTANTE RELATIVA A LA INSTALACIÓN
1. Antes de instalar el aparato, lea detenidamente todo el manual de uso.
2. Asegúrese de que todos los demás cables han sido conectados antes de
conectar la fuente de alimentación.
3. Para evitar cortocircuitos, asegúrese de que todos los cables expuestos estén
aislados.
4. Una vez terminada la instalación, je todos los cables.
5. Las conexiones de cableado al reproductor deben realizarse de acuerdo con
las indicaciones del presente manual. Una conexión incorrecta puede
provocar daños en el aparato.
6. El reproductor está diseñado para funcionar solamente con instalaciones de
12 V CC.
INSTALACIÓN DE LA UNIDAD
DESMONTAJE DE UNIDAD
1. Desmonte la unidad.
2. Retire el marco embellecedor exterior.
Nota acerca de cables HDMI:
Utilice un cable HDMI de buena calidad.
La longitud total (en la parte frontal y trasera) no debe superar 12 pies.
CONEXIÓN DE CABLEADO
1. El reproductor puede utilizarse solamente con una tensión de +12 V CC.
2. No conecte el terminal de la batería hasta que el reproductor esté completamen-
te instalado.
3. Asegúrese de que el cable amarillo esté conectado al polo positivo (+) de la batería.
4. Al sustituir el fusible, asegúrese de que los parámetros del fusible nuevo sean los
mismos.
5. El uso de altavoces de buena calidad con una impedancia de 4 a 8 ohmios
permitirá obtener el máximo rendimiento del equipo.
DISTRIBUCIÓN DE LOS BOTONES
1. ZONA 1 2. 1 3. ZONA 2
4. 2 5. BT 6. 3 RPT
7. 8. 4 RDM 9.
10. 5 DIR- 11. DIS 12. 6 DIR+
13. LCD 14. TOMA AUX 15. TOMA DE CONEXIÓN DE
AURICULARES
16. ENTRADA HDMI 17. REINICIO 18. RUEDA DE AJUSTE
19. PUERTO USB 20. SRC/MENU
OPERACIÓN
OPERACIÓN BÁSICA
Encendido/apagado de la unidad y de la función de silencio
Para encender la unidad, pulse el botón /MUTE. Para activar o desactivar la función
de silencio, pulse brevemente la rueda de ajuste mientras la unidad está encendida.
Mantenga pulsado este botón para apagar la unidad.
Ajustes de sonido y menú de conguración
Pulse y mantenga pulsado el botón SCR / MENU para acceder al menú presentado a
continuación:
BAS->TRE->BAL->EQ (apag./pop/rock/clas)->LOUD (enc./apag.)->CLK HH->CLK
MM->IR (enc./apag.) ->CT (indep/sync)->SYG. SONIDO (enc./apag.) )->P_VOL
(13)->DX (LOC)->STE- REO (MONO)
En cada posición, gire la rueda VOL para seleccionarla.
INFRARROJOS (ENC./APAG.):
INFRARROJOS enc.: La unidad se puede encender con el mando a distancia por
infrarrojos. En tal caso, el sistema funciona en modo de alto consumo energético.
INFRARROJOS apag.: La unidad no se puede encender con el mando a distancia por
infrarrojos. El sistema está en modo de bajo consumo energético.
CT (INDEP/SYNC):
CT INDEP: El reloj funciona de forma independiente.
CT SYNC: El reloj se sincronizará con la hora de la emisora RDS recibida.
Nota: Al congurar el reloj en el menú, la función CT se ajusta automáticamente al
modo INDEP (funcionamiento independiente).
SEÑAL ACÚSTICA (enc./apag.): Permite activar/desactivar la señal acústica mediante
la pulsación de los botones.
P-VOL: Permite ajustar el volumen al encender la unidad. Si el nivel de volumen al
apagar la unidad es inferior al nivel P-VOL, al encender el equipo, la unidad ajustará
dicho nivel al volumen de apagado.
Si el nivel de volumen en el momento del apagado de la unidad es superior al nivel
P-VOL, el volumen se restablecerá al valor de P-VOL a la hora de encender el equipo.
Búsqueda de altavoces Bluetooth
Si mantiene pulsado el botón BT, aparecerá el mensaje «SEARCH...» [buscar]. Un
momento después, aparecerá el nombre del dispositivo Bluetooth. Para mostrar el
siguiente dispositivo, gire la rueda VOL. Una vez que el nombre del altavoz Bluetooth
deseado aparezca en la pantalla LCD, pulse el botón VOL para emparejar el
dispositivo. Si el emparejamiento se realiza correctamente, la pantalla mostrará «BOX
ON».
Indicación importante: A pesar de los numerosos ensayos realizados con diversos
dispositivos Bluetooth, no se puede garantizar la compatibilidad con todos los
dispositivos Bluetooth disponibles en el mercado.
Transmisión de la señal al altavoz Bluetooth
Pulse brevemente el botón BT para detener la transferencia o transmitir la señal al
altavoz Bluetooth. En la pantalla aparecerá el mensaje «BOX OFF/ON».
Nota: Aunque Blaupunkt comprueba cuidadosamente la compatibilidad de los distintos
altavoces Bluetooth, no se puede garantizar un funcionamiento infalible con todos los
modelos disponibles en el mercado.
Operación de la Zona 1 y la Zona 2
Pulse brevemente Zone 1 (o Zone 2) para apagar/encender el sonido de la Zona 1 (o
Zona 2).
Mantenga pulsado el botón Zone 1 (o Zone 2) para silenciar el sonido de la Zona 1 (o
Zona 2). Si vuelve a mantener pulsado el botón, se deshabilitará el modo silencio.
Prioridad de la información o del reloj
Pulse brevemente el botón DIS para congurar la prioridad del reloj o de la
información. Nota: En la banda de FM, cuando reciba emisoras RDS, pulse brevemen-
te DIS para mostrar NOMBRE DE EMISORA / RELOJ / FRECUENCIA.
Ajuste del reloj
Seleccione CLK HH/CLK MM en el menú. Gire la rueda VOL para ajustar la hora / los
minutos.
Uso de auriculares
El panel frontal dispone de una toma de conexión de auriculares de 3,5 mm. El panel
adopta los ajustes de funcionamiento de la Zona 1.
USO DE LA MODALIDAD DE RADIO
Recepción de emisoras de radio
Pulse el botón SRC / MENU para seleccionar uno de los siguientes modos:
FM1->FM2->MW. Pulse brevemente el botón / para recibir la emisora de
radio deseada. Mantenga pulsado el botón / para sintonizar manualmente
la frecuencia.
Cómo guardar las emisoras y seleccionar las emisoras guardadas de forma manual
Recepción de la emisora deseada. Pulse y mantenga pulsado uno de los botones de
memoria (de 1 a 6) durante 2 segundos. La emisora actual se guardará en la memoria
bajo determinado botón numérico. Pulse rápidamente el botón de la emisora
programada (de 1 a 6) para escuchar directamente la señal emitida por dicha emisora
y guardada bajo el botón asignado.
USO DE DEVDAB
Pulse el botón SRC / MENU para cambiar la fuente entre DAB1 o DAB2.
Selección de emisora
Pulse el botón / para seleccionar la emisora anterior/siguiente.
Cómo guardar las emisoras y seleccionar las emisoras guardadas de forma manual
Cuando la frecuencia de la emisora deseada esté ajustada, mantenga pulsado uno de
los botones de 1 a 6 durante 2 segundos para guardar esta emisora bajo el número
correspondiente. Pulse rápidamente el botón de la emisora programada (de 1 a 6)
para escuchar directamente la señal emitida por dicha emisora y guardada bajo el
botón asignado.
USO DE USB
Después de conectar la unidad USB al aparato, este reproduce automáticamente
cheros MP3 / WMA. Si ya se ha conectado la unidad USB al aparato, pulse brevemen-
te el botón SRC / MENU hasta que aparezca la pantalla del modo USB.
Selección de chero
Pulse el botón / para pasar al chero siguiente / anterior. Pulse el botón
/ para un avance o retroceso rápido.
Reproducir / Pausa
Pulse el botón 1 para pausar / reproducir un chero.
Repeat function
Pulse el botón 3 RPT para seleccionar la función de reproducción en bucle. RPT
ONE/RPT FOLD/RPT ALL (por defecto)
RPT ONE: Reproducción de un solo chero en bucle.
RPT FOLD: Reproducción de todos los cheros de una carpeta en bucle.
RPT ALL: Reproducción de todos los cheros en bucle.
RANDOM
Pulse el botón 4 RDM para activar o desactivar la función de reproducción aleatoria.
RDM enc.: Reproducción aleatoria de todos los cheros.
RDM apag.: Apagado de la función de reproducción aleatoria.
Función de carpeta +/-
Pulse DIR+ / DIR- para seleccionar la carpeta siguiente / anterior a reproducir.
Buscar canción
Si mantiene pulsado el botón , aparecerá el mensaje «NUM 0000». Girando la
rueda VOL (o introduciendo directamente el número), seleccione el número y, a
continuación, pulse VOL para reproducir la canción. Preste atención a 7/8/9/0 como:
BT = 7, = 8, = 9, DIS = 0.
USO DE LA TOMA AUX IN 1/2
En el panel frontal, la toma AUX IN 1 es una toma de 3,5 mm. La toma AUX IN 2 para
RCA se encuentra en la parte trasera de la unidad. Con la pulsación de SRC / MENU,
accederá al modo AUX IN1 (2) cuando la señal de audio esté conectada a la unidad.
USO DE LA MODALIDAD BLUETOOTH
Cómo vincular dispositivos
Seleccione Bluetooth en su teléfono y busque el dispositivo Bluetooth. En la lista
debería aparecer «BLAUPUNKT»; seleccione «BLAUPUNKT» e introduzca la contraseña
«0000» si aparece una solicitud de introducción de la contraseña. Una vez realizado el
emparejamiento, en la pantalla aparecerá el símbolo BT.
Audio Bluetooth
Pulse el botón SRC / MENU para cambiar al modo BT MUSIC. El aparato reproducirá
automáticamente la canción desde su teléfono. Pulse el botón para pausar /
reproducir una canción.
Pulse el botón / para seleccionar la canción anterior / siguiente.
USO DE HDMI
La entrada HDMI delantera va a la toma HDMI trasera. Esto no afecta a la reproduc-
ción de contenidos a través de HDMI.
Conectores RCA V-IN y V-OUT
En la parte trasera de la unidad, el conector V-IN va al conector V-OUT.
MANDO A DISTANCIA
El mando a distancia se puede utilizar cuando
la opción IR está activada en el menú.
APAGADO (OFF): Encendido y apagado
del aparato.
VOL+: Aumentar el volumen
VOL-: Reducir el volumen
1 : Encendido / apagado del silencio de
la Zona 1
2 : Encendido / apagado del silencio de
la Zona 2
Para otras operaciones, lea las instrucciones anteriores.
INFORMACIÓN GENERAL
Requisitos de alimentación eléctrica : Corriente continua de 12 V, borne negativo
conectado a tierra
Medidas de la base de montaje : 129 (ancho) x 112 (profundo) x 65 (alto)
Ajustes de tono
- Bajos (a 100 Hz) : ±10 dB
- Altos (a 100 Hz) : ±10 dB
Potencia máxima de salida : 4 x 40 watts
Consumo energético : 10 Ampere (max.)
RADIO FM AM
Gama de frecuencias de 87,5 a 108 MHz de 522 a 1620 KHz
IF 10.7 MHz 450 KHz
Sensibilidad 4 µV (S/N = 30 dB) 36 dBµV (S/N = 20 dB)
Separación de los canales estéreo >25 dB /
SOLUCIÓN DE PROBLEMAS
ES

Instrucciones de seguridad
El reproductor multimedia se ha fabricado de acuerdo con las normas actuales
de avance tecnológico y los principios de seguridad generalmente reconocidos.
No obstante, el incumplimiento de las instrucciones de seguridad aquí
indicadas supone una serie de riesgos. Lea atentamente todo el manual antes
de utilizar el reproductor multimedia. Guarde el manual en un lugar que esté
accesible para todos los usuarios en todo momento. Si el reproductor multime-
dia se proporciona a un tercero, recuerde incluir también el presente manual.
Además, siga las indicaciones del manual de uso de los dispositivos conectados
a este reproductor.
Indicaciones generales de seguridad
Siga las siguientes instrucciones para evitar lesiones corporales:
No modique ni abra el equipo.
Uso previsto
El reproductor multimedia está diseñado para su incorporación y operación en
vehículos provistos de instalaciones con una tensión de alimentación de 12 V.
Deben respetarse los límites de potencia de la unidad. Cualquier reparación o
instalación debe encargarse a profesionales.
Instrucciones de montaje
Puede instalar el equipo por cuenta propia solo si tiene experiencia en materia
de la instalación de equipos de radio y conocimientos de sistemas eléctricos de
automóviles. Consulte el diagrama de cableado proporcionado en este manual.
La instalación de la unidad no debe impedir ni bloquear el funcionamiento de
ningún airbag, otros dispositivos de seguridad o controles.
Declaración de conformidad
Blaupunkt Competence Center Car Multimedia-Evo Sales GmbH declara que el
presente equipo cumple los requisitos esenciales y otras condiciones de la
directiva 2014/53/UE. La declaración de conformidad está disponible en la
página web www.blaupunkt.com.
Instrucciones de limpieza
Los disolventes, productos de limpieza y agentes abrasivos, así como los aerosoles
de limpieza del salpicadero y los productos para el cuidado de plásticos pueden
incluir componentes que podrían dañar la supercie del reproductor multimedia.
Limpie el reproductor con una bayeta seca o ligeramente humedecida.
Instrucciones de eliminación
¡No deseche el aparato usado con los residuos domésticos!
Para deshacerse del equipo, del mando a distancia y de las pilas usadas,
llévelos a un punto de recogida de equipos usados.
Alcance del suministro
El suministro incluye:
reproductor multimedia BPA 3022 M,
mando a distancia,
conectores ISO,
tornillos de montaje,
manual de uso.
INFORMACIÓN IMPORTANTE RELATIVA A LA INSTALACIÓN
1. Antes de instalar el aparato, lea detenidamente todo el manual de uso.
2. Asegúrese de que todos los demás cables han sido conectados antes de
conectar la fuente de alimentación.
3. Para evitar cortocircuitos, asegúrese de que todos los cables expuestos estén
aislados.
4. Una vez terminada la instalación, je todos los cables.
5. Las conexiones de cableado al reproductor deben realizarse de acuerdo con
las indicaciones del presente manual. Una conexión incorrecta puede
provocar daños en el aparato.
6. El reproductor está diseñado para funcionar solamente con instalaciones de
12 V CC.
INSTALACIÓN DE LA UNIDAD
DESMONTAJE DE UNIDAD
1. Desmonte la unidad.
2. Retire el marco embellecedor exterior.
Nota acerca de cables HDMI:
Utilice un cable HDMI de buena calidad.
La longitud total (en la parte frontal y trasera) no debe superar 12 pies.
CONEXIÓN DE CABLEADO
1. El reproductor puede utilizarse solamente con una tensión de +12 V CC.
2. No conecte el terminal de la batería hasta que el reproductor esté completamen-
te instalado.
3. Asegúrese de que el cable amarillo esté conectado al polo positivo (+) de la batería.
4. Al sustituir el fusible, asegúrese de que los parámetros del fusible nuevo sean los
mismos.
5. El uso de altavoces de buena calidad con una impedancia de 4 a 8 ohmios
permitirá obtener el máximo rendimiento del equipo.
DISTRIBUCIÓN DE LOS BOTONES
1. ZONA 1 2. 1 3. ZONA 2
4. 2 5. BT 6. 3 RPT
7. 8. 4 RDM 9.
10. 5 DIR- 11. DIS 12. 6 DIR+
13. LCD 14. TOMA AUX 15. TOMA DE CONEXIÓN DE
AURICULARES
16. ENTRADA HDMI 17. REINICIO 18. RUEDA DE AJUSTE
19. PUERTO USB 20. SRC/MENU
OPERACIÓN BÁSICA
Encendido/apagado de la unidad y de la función de silencio
Para encender la unidad, pulse el botón /MUTE. Para activar o desactivar la función
de silencio, pulse brevemente la rueda de ajuste mientras la unidad está encendida.
Mantenga pulsado este botón para apagar la unidad.
Ajustes de sonido y menú de conguración
Pulse y mantenga pulsado el botón SCR / MENU para acceder al menú presentado a
continuación:
BAS->TRE->BAL->EQ (apag./pop/rock/clas)->LOUD (enc./apag.)->CLK HH->CLK
MM->IR (enc./apag.) ->CT (indep/sync)->SYG. SONIDO (enc./apag.) )->P_VOL
(13)->DX (LOC)->STE- REO (MONO)
En cada posición, gire la rueda VOL para seleccionarla.
INFRARROJOS (ENC./APAG.):
INFRARROJOS enc.: La unidad se puede encender con el mando a distancia por
infrarrojos. En tal caso, el sistema funciona en modo de alto consumo energético.
INFRARROJOS apag.: La unidad no se puede encender con el mando a distancia por
infrarrojos. El sistema está en modo de bajo consumo energético.
CT (INDEP/SYNC):
CT INDEP: El reloj funciona de forma independiente.
CT SYNC: El reloj se sincronizará con la hora de la emisora RDS recibida.
Nota: Al congurar el reloj en el menú, la función CT se ajusta automáticamente al
modo INDEP (funcionamiento independiente).
SEÑAL ACÚSTICA (enc./apag.): Permite activar/desactivar la señal acústica mediante
la pulsación de los botones.
P-VOL: Permite ajustar el volumen al encender la unidad. Si el nivel de volumen al
apagar la unidad es inferior al nivel P-VOL, al encender el equipo, la unidad ajustará
dicho nivel al volumen de apagado.
Si el nivel de volumen en el momento del apagado de la unidad es superior al nivel
P-VOL, el volumen se restablecerá al valor de P-VOL a la hora de encender el equipo.
Búsqueda de altavoces Bluetooth
Si mantiene pulsado el botón BT, aparecerá el mensaje «SEARCH...» [buscar]. Un
momento después, aparecerá el nombre del dispositivo Bluetooth. Para mostrar el
siguiente dispositivo, gire la rueda VOL. Una vez que el nombre del altavoz Bluetooth
deseado aparezca en la pantalla LCD, pulse el botón VOL para emparejar el
dispositivo. Si el emparejamiento se realiza correctamente, la pantalla mostrará «BOX
ON».
Indicación importante: A pesar de los numerosos ensayos realizados con diversos
dispositivos Bluetooth, no se puede garantizar la compatibilidad con todos los
dispositivos Bluetooth disponibles en el mercado.
Transmisión de la señal al altavoz Bluetooth
Pulse brevemente el botón BT para detener la transferencia o transmitir la señal al
altavoz Bluetooth. En la pantalla aparecerá el mensaje «BOX OFF/ON».
Nota: Aunque Blaupunkt comprueba cuidadosamente la compatibilidad de los distintos
altavoces Bluetooth, no se puede garantizar un funcionamiento infalible con todos los
modelos disponibles en el mercado.
Operación de la Zona 1 y la Zona 2
Pulse brevemente Zone 1 (o Zone 2) para apagar/encender el sonido de la Zona 1 (o
Zona 2).
Mantenga pulsado el botón Zone 1 (o Zone 2) para silenciar el sonido de la Zona 1 (o
Zona 2). Si vuelve a mantener pulsado el botón, se deshabilitará el modo silencio.
Prioridad de la información o del reloj
Pulse brevemente el botón DIS para congurar la prioridad del reloj o de la
información. Nota: En la banda de FM, cuando reciba emisoras RDS, pulse brevemen-
te DIS para mostrar NOMBRE DE EMISORA / RELOJ / FRECUENCIA.
Ajuste del reloj
Seleccione CLK HH/CLK MM en el menú. Gire la rueda VOL para ajustar la hora / los
minutos.
Uso de auriculares
El panel frontal dispone de una toma de conexión de auriculares de 3,5 mm. El panel
adopta los ajustes de funcionamiento de la Zona 1.
USO DE LA MODALIDAD DE RADIO
Recepción de emisoras de radio
Pulse el botón SRC / MENU para seleccionar uno de los siguientes modos:
FM1->FM2->MW. Pulse brevemente el botón / para recibir la emisora de
radio deseada. Mantenga pulsado el botón / para sintonizar manualmente
la frecuencia.
Cómo guardar las emisoras y seleccionar las emisoras guardadas de forma manual
Recepción de la emisora deseada. Pulse y mantenga pulsado uno de los botones de
memoria (de 1 a 6) durante 2 segundos. La emisora actual se guardará en la memoria
bajo determinado botón numérico. Pulse rápidamente el botón de la emisora
programada (de 1 a 6) para escuchar directamente la señal emitida por dicha emisora
y guardada bajo el botón asignado.
USO DE DEVDAB
Pulse el botón SRC / MENU para cambiar la fuente entre DAB1 o DAB2.
Selección de emisora
Pulse el botón / para seleccionar la emisora anterior/siguiente.
OPERACIÓN
Cómo guardar las emisoras y seleccionar las emisoras guardadas de forma manual
Cuando la frecuencia de la emisora deseada esté ajustada, mantenga pulsado uno de
los botones de 1 a 6 durante 2 segundos para guardar esta emisora bajo el número
correspondiente. Pulse rápidamente el botón de la emisora programada (de 1 a 6)
para escuchar directamente la señal emitida por dicha emisora y guardada bajo el
botón asignado.
USO DE USB
Después de conectar la unidad USB al aparato, este reproduce automáticamente
cheros MP3 / WMA. Si ya se ha conectado la unidad USB al aparato, pulse brevemen-
te el botón SRC / MENU hasta que aparezca la pantalla del modo USB.
Selección de chero
Pulse el botón / para pasar al chero siguiente / anterior. Pulse el botón
/ para un avance o retroceso rápido.
Reproducir / Pausa
Pulse el botón 1 para pausar / reproducir un chero.
Repeat function
Pulse el botón 3 RPT para seleccionar la función de reproducción en bucle. RPT
ONE/RPT FOLD/RPT ALL (por defecto)
RPT ONE: Reproducción de un solo chero en bucle.
RPT FOLD: Reproducción de todos los cheros de una carpeta en bucle.
RPT ALL: Reproducción de todos los cheros en bucle.
RANDOM
Pulse el botón 4 RDM para activar o desactivar la función de reproducción aleatoria.
RDM enc.: Reproducción aleatoria de todos los cheros.
RDM apag.: Apagado de la función de reproducción aleatoria.
Función de carpeta +/-
Pulse DIR+ / DIR- para seleccionar la carpeta siguiente / anterior a reproducir.
Buscar canción
Si mantiene pulsado el botón , aparecerá el mensaje «NUM 0000». Girando la
rueda VOL (o introduciendo directamente el número), seleccione el número y, a
continuación, pulse VOL para reproducir la canción. Preste atención a 7/8/9/0 como:
BT = 7, = 8, = 9, DIS = 0.
USO DE LA TOMA AUX IN 1/2
En el panel frontal, la toma AUX IN 1 es una toma de 3,5 mm. La toma AUX IN 2 para
RCA se encuentra en la parte trasera de la unidad. Con la pulsación de SRC / MENU,
accederá al modo AUX IN1 (2) cuando la señal de audio esté conectada a la unidad.
USO DE LA MODALIDAD BLUETOOTH
Cómo vincular dispositivos
Seleccione Bluetooth en su teléfono y busque el dispositivo Bluetooth. En la lista
debería aparecer «BLAUPUNKT»; seleccione «BLAUPUNKT» e introduzca la contraseña
«0000» si aparece una solicitud de introducción de la contraseña. Una vez realizado el
emparejamiento, en la pantalla aparecerá el símbolo BT.
Audio Bluetooth
Pulse el botón SRC / MENU para cambiar al modo BT MUSIC. El aparato reproducirá
automáticamente la canción desde su teléfono. Pulse el botón para pausar /
reproducir una canción.
Pulse el botón / para seleccionar la canción anterior / siguiente.
USO DE HDMI
La entrada HDMI delantera va a la toma HDMI trasera. Esto no afecta a la reproduc-
ción de contenidos a través de HDMI.
Conectores RCA V-IN y V-OUT
En la parte trasera de la unidad, el conector V-IN va al conector V-OUT.
MANDO A DISTANCIA
El mando a distancia se puede utilizar cuando
la opción IR está activada en el menú.
APAGADO (OFF): Encendido y apagado
del aparato.
VOL+: Aumentar el volumen
VOL-: Reducir el volumen
1 : Encendido / apagado del silencio de
la Zona 1
2 : Encendido / apagado del silencio de
la Zona 2
Para otras operaciones, lea las instrucciones anteriores.
INFORMACIÓN GENERAL
Requisitos de alimentación eléctrica : Corriente continua de 12 V, borne negativo
conectado a tierra
Medidas de la base de montaje : 129 (ancho) x 112 (profundo) x 65 (alto)
Ajustes de tono
- Bajos (a 100 Hz) : ±10 dB
- Altos (a 100 Hz) : ±10 dB
Potencia máxima de salida : 4 x 40 watts
Consumo energético : 10 Ampere (max.)
RADIO FM AM
Gama de frecuencias de 87,5 a 108 MHz de 522 a 1620 KHz
IF 10.7 MHz 450 KHz
Sensibilidad 4 µV (S/N = 30 dB) 36 dBµV (S/N = 20 dB)
Separación de los canales estéreo >25 dB /
SOLUCIÓN DE PROBLEMAS
ES

Instrucciones de seguridad
El reproductor multimedia se ha fabricado de acuerdo con las normas actuales
de avance tecnológico y los principios de seguridad generalmente reconocidos.
No obstante, el incumplimiento de las instrucciones de seguridad aquí
indicadas supone una serie de riesgos. Lea atentamente todo el manual antes
de utilizar el reproductor multimedia. Guarde el manual en un lugar que esté
accesible para todos los usuarios en todo momento. Si el reproductor multime-
dia se proporciona a un tercero, recuerde incluir también el presente manual.
Además, siga las indicaciones del manual de uso de los dispositivos conectados
a este reproductor.
Indicaciones generales de seguridad
Siga las siguientes instrucciones para evitar lesiones corporales:
No modique ni abra el equipo.
Uso previsto
El reproductor multimedia está diseñado para su incorporación y operación en
vehículos provistos de instalaciones con una tensión de alimentación de 12 V.
Deben respetarse los límites de potencia de la unidad. Cualquier reparación o
instalación debe encargarse a profesionales.
Instrucciones de montaje
Puede instalar el equipo por cuenta propia solo si tiene experiencia en materia
de la instalación de equipos de radio y conocimientos de sistemas eléctricos de
automóviles. Consulte el diagrama de cableado proporcionado en este manual.
La instalación de la unidad no debe impedir ni bloquear el funcionamiento de
ningún airbag, otros dispositivos de seguridad o controles.
Declaración de conformidad
Blaupunkt Competence Center Car Multimedia-Evo Sales GmbH declara que el
presente equipo cumple los requisitos esenciales y otras condiciones de la
directiva 2014/53/UE. La declaración de conformidad está disponible en la
página web www.blaupunkt.com.
Instrucciones de limpieza
Los disolventes, productos de limpieza y agentes abrasivos, así como los aerosoles
de limpieza del salpicadero y los productos para el cuidado de plásticos pueden
incluir componentes que podrían dañar la supercie del reproductor multimedia.
Limpie el reproductor con una bayeta seca o ligeramente humedecida.
Instrucciones de eliminación
¡No deseche el aparato usado con los residuos domésticos!
Para deshacerse del equipo, del mando a distancia y de las pilas usadas,
llévelos a un punto de recogida de equipos usados.
Alcance del suministro
El suministro incluye:
reproductor multimedia BPA 3022 M,
mando a distancia,
conectores ISO,
tornillos de montaje,
manual de uso.
INFORMACIÓN IMPORTANTE RELATIVA A LA INSTALACIÓN
1. Antes de instalar el aparato, lea detenidamente todo el manual de uso.
2. Asegúrese de que todos los demás cables han sido conectados antes de
conectar la fuente de alimentación.
3. Para evitar cortocircuitos, asegúrese de que todos los cables expuestos estén
aislados.
4. Una vez terminada la instalación, je todos los cables.
5. Las conexiones de cableado al reproductor deben realizarse de acuerdo con
las indicaciones del presente manual. Una conexión incorrecta puede
provocar daños en el aparato.
6. El reproductor está diseñado para funcionar solamente con instalaciones de
12 V CC.
INSTALACIÓN DE LA UNIDAD
DESMONTAJE DE UNIDAD
1. Desmonte la unidad.
2. Retire el marco embellecedor exterior.
Nota acerca de cables HDMI:
Utilice un cable HDMI de buena calidad.
La longitud total (en la parte frontal y trasera) no debe superar 12 pies.
CONEXIÓN DE CABLEADO
1. El reproductor puede utilizarse solamente con una tensión de +12 V CC.
2. No conecte el terminal de la batería hasta que el reproductor esté completamen-
te instalado.
3. Asegúrese de que el cable amarillo esté conectado al polo positivo (+) de la batería.
4. Al sustituir el fusible, asegúrese de que los parámetros del fusible nuevo sean los
mismos.
5. El uso de altavoces de buena calidad con una impedancia de 4 a 8 ohmios
permitirá obtener el máximo rendimiento del equipo.
DISTRIBUCIÓN DE LOS BOTONES
1. ZONA 1 2. 1 3. ZONA 2
4. 2 5. BT 6. 3 RPT
7. 8. 4 RDM 9.
10. 5 DIR- 11. DIS 12. 6 DIR+
13. LCD 14. TOMA AUX 15. TOMA DE CONEXIÓN DE
AURICULARES
16. ENTRADA HDMI 17. REINICIO 18. RUEDA DE AJUSTE
19. PUERTO USB 20. SRC/MENU
OPERACIÓN BÁSICA
Encendido/apagado de la unidad y de la función de silencio
Para encender la unidad, pulse el botón /MUTE. Para activar o desactivar la función
de silencio, pulse brevemente la rueda de ajuste mientras la unidad está encendida.
Mantenga pulsado este botón para apagar la unidad.
Ajustes de sonido y menú de conguración
Pulse y mantenga pulsado el botón SCR / MENU para acceder al menú presentado a
continuación:
BAS->TRE->BAL->EQ (apag./pop/rock/clas)->LOUD (enc./apag.)->CLK HH->CLK
MM->IR (enc./apag.) ->CT (indep/sync)->SYG. SONIDO (enc./apag.) )->P_VOL
(13)->DX (LOC)->STE- REO (MONO)
En cada posición, gire la rueda VOL para seleccionarla.
INFRARROJOS (ENC./APAG.):
INFRARROJOS enc.: La unidad se puede encender con el mando a distancia por
infrarrojos. En tal caso, el sistema funciona en modo de alto consumo energético.
INFRARROJOS apag.: La unidad no se puede encender con el mando a distancia por
infrarrojos. El sistema está en modo de bajo consumo energético.
CT (INDEP/SYNC):
CT INDEP: El reloj funciona de forma independiente.
CT SYNC: El reloj se sincronizará con la hora de la emisora RDS recibida.
Nota: Al congurar el reloj en el menú, la función CT se ajusta automáticamente al
modo INDEP (funcionamiento independiente).
SEÑAL ACÚSTICA (enc./apag.): Permite activar/desactivar la señal acústica mediante
la pulsación de los botones.
P-VOL: Permite ajustar el volumen al encender la unidad. Si el nivel de volumen al
apagar la unidad es inferior al nivel P-VOL, al encender el equipo, la unidad ajustará
dicho nivel al volumen de apagado.
Si el nivel de volumen en el momento del apagado de la unidad es superior al nivel
P-VOL, el volumen se restablecerá al valor de P-VOL a la hora de encender el equipo.
Búsqueda de altavoces Bluetooth
Si mantiene pulsado el botón BT, aparecerá el mensaje «SEARCH...» [buscar]. Un
momento después, aparecerá el nombre del dispositivo Bluetooth. Para mostrar el
siguiente dispositivo, gire la rueda VOL. Una vez que el nombre del altavoz Bluetooth
deseado aparezca en la pantalla LCD, pulse el botón VOL para emparejar el
dispositivo. Si el emparejamiento se realiza correctamente, la pantalla mostrará «BOX
ON».
Indicación importante: A pesar de los numerosos ensayos realizados con diversos
dispositivos Bluetooth, no se puede garantizar la compatibilidad con todos los
dispositivos Bluetooth disponibles en el mercado.
Transmisión de la señal al altavoz Bluetooth
Pulse brevemente el botón BT para detener la transferencia o transmitir la señal al
altavoz Bluetooth. En la pantalla aparecerá el mensaje «BOX OFF/ON».
Nota: Aunque Blaupunkt comprueba cuidadosamente la compatibilidad de los distintos
altavoces Bluetooth, no se puede garantizar un funcionamiento infalible con todos los
modelos disponibles en el mercado.
Operación de la Zona 1 y la Zona 2
Pulse brevemente Zone 1 (o Zone 2) para apagar/encender el sonido de la Zona 1 (o
Zona 2).
Mantenga pulsado el botón Zone 1 (o Zone 2) para silenciar el sonido de la Zona 1 (o
Zona 2). Si vuelve a mantener pulsado el botón, se deshabilitará el modo silencio.
Prioridad de la información o del reloj
Pulse brevemente el botón DIS para congurar la prioridad del reloj o de la
información. Nota: En la banda de FM, cuando reciba emisoras RDS, pulse brevemen-
te DIS para mostrar NOMBRE DE EMISORA / RELOJ / FRECUENCIA.
Ajuste del reloj
Seleccione CLK HH/CLK MM en el menú. Gire la rueda VOL para ajustar la hora / los
minutos.
Uso de auriculares
El panel frontal dispone de una toma de conexión de auriculares de 3,5 mm. El panel
adopta los ajustes de funcionamiento de la Zona 1.
USO DE LA MODALIDAD DE RADIO
Recepción de emisoras de radio
Pulse el botón SRC / MENU para seleccionar uno de los siguientes modos:
FM1->FM2->MW. Pulse brevemente el botón / para recibir la emisora de
radio deseada. Mantenga pulsado el botón / para sintonizar manualmente
la frecuencia.
Cómo guardar las emisoras y seleccionar las emisoras guardadas de forma manual
Recepción de la emisora deseada. Pulse y mantenga pulsado uno de los botones de
memoria (de 1 a 6) durante 2 segundos. La emisora actual se guardará en la memoria
bajo determinado botón numérico. Pulse rápidamente el botón de la emisora
programada (de 1 a 6) para escuchar directamente la señal emitida por dicha emisora
y guardada bajo el botón asignado.
USO DE DEVDAB
Pulse el botón SRC / MENU para cambiar la fuente entre DAB1 o DAB2.
Selección de emisora
Pulse el botón / para seleccionar la emisora anterior/siguiente.
Cómo guardar las emisoras y seleccionar las emisoras guardadas de forma manual
Cuando la frecuencia de la emisora deseada esté ajustada, mantenga pulsado uno de
los botones de 1 a 6 durante 2 segundos para guardar esta emisora bajo el número
correspondiente. Pulse rápidamente el botón de la emisora programada (de 1 a 6)
para escuchar directamente la señal emitida por dicha emisora y guardada bajo el
botón asignado.
USO DE USB
Después de conectar la unidad USB al aparato, este reproduce automáticamente
cheros MP3 / WMA. Si ya se ha conectado la unidad USB al aparato, pulse brevemen-
te el botón SRC / MENU hasta que aparezca la pantalla del modo USB.
Selección de chero
Pulse el botón / para pasar al chero siguiente / anterior. Pulse el botón
/ para un avance o retroceso rápido.
Reproducir / Pausa
Pulse el botón 1 para pausar / reproducir un chero.
Repeat function
Pulse el botón 3 RPT para seleccionar la función de reproducción en bucle. RPT
ONE/RPT FOLD/RPT ALL (por defecto)
RPT ONE: Reproducción de un solo chero en bucle.
RPT FOLD: Reproducción de todos los cheros de una carpeta en bucle.
RPT ALL: Reproducción de todos los cheros en bucle.
RANDOM
Pulse el botón 4 RDM para activar o desactivar la función de reproducción aleatoria.
RDM enc.: Reproducción aleatoria de todos los cheros.
RDM apag.: Apagado de la función de reproducción aleatoria.
Función de carpeta +/-
Pulse DIR+ / DIR- para seleccionar la carpeta siguiente / anterior a reproducir.
Buscar canción
Si mantiene pulsado el botón , aparecerá el mensaje «NUM 0000». Girando la
rueda VOL (o introduciendo directamente el número), seleccione el número y, a
continuación, pulse VOL para reproducir la canción. Preste atención a 7/8/9/0 como:
BT = 7, = 8, = 9, DIS = 0.
USO DE LA TOMA AUX IN 1/2
En el panel frontal, la toma AUX IN 1 es una toma de 3,5 mm. La toma AUX IN 2 para
RCA se encuentra en la parte trasera de la unidad. Con la pulsación de SRC / MENU,
accederá al modo AUX IN1 (2) cuando la señal de audio esté conectada a la unidad.
USO DE LA MODALIDAD BLUETOOTH
Cómo vincular dispositivos
Seleccione Bluetooth en su teléfono y busque el dispositivo Bluetooth. En la lista
debería aparecer «BLAUPUNKT»; seleccione «BLAUPUNKT» e introduzca la contraseña
«0000» si aparece una solicitud de introducción de la contraseña. Una vez realizado el
emparejamiento, en la pantalla aparecerá el símbolo BT.
Audio Bluetooth
Pulse el botón SRC / MENU para cambiar al modo BT MUSIC. El aparato reproducirá
automáticamente la canción desde su teléfono. Pulse el botón para pausar /
reproducir una canción.
Pulse el botón / para seleccionar la canción anterior / siguiente.
USO DE HDMI
La entrada HDMI delantera va a la toma HDMI trasera. Esto no afecta a la reproduc-
ción de contenidos a través de HDMI.
Conectores RCA V-IN y V-OUT
En la parte trasera de la unidad, el conector V-IN va al conector V-OUT.
MANDO A DISTANCIA
El mando a distancia se puede utilizar cuando
la opción IR está activada en el menú.
APAGADO (OFF): Encendido y apagado
del aparato.
VOL+: Aumentar el volumen
VOL-: Reducir el volumen
1 : Encendido / apagado del silencio de
la Zona 1
2 : Encendido / apagado del silencio de
la Zona 2
Para otras operaciones, lea las instrucciones anteriores.
OPERACIÓN
INFORMACIÓN GENERAL
Requisitos de alimentación eléctrica : Corriente continua de 12 V, borne negativo
conectado a tierra
Medidas de la base de montaje : 129 (ancho) x 112 (profundo) x 65 (alto)
Ajustes de tono
- Bajos (a 100 Hz) : ±10 dB
- Altos (a 100 Hz) : ±10 dB
Potencia máxima de salida : 4 x 40 watts
Consumo energético : 10 Ampere (max.)
RADIO FM AM
Gama de frecuencias de 87,5 a 108 MHz de 522 a 1620 KHz
IF 10.7 MHz 450 KHz
Sensibilidad 4 µV (S/N = 30 dB) 36 dBµV (S/N = 20 dB)
Separación de los canales estéreo >25 dB /
SOLUCIÓN DE PROBLEMAS
ES

Instrucciones de seguridad
El reproductor multimedia se ha fabricado de acuerdo con las normas actuales
de avance tecnológico y los principios de seguridad generalmente reconocidos.
No obstante, el incumplimiento de las instrucciones de seguridad aquí
indicadas supone una serie de riesgos. Lea atentamente todo el manual antes
de utilizar el reproductor multimedia. Guarde el manual en un lugar que esté
accesible para todos los usuarios en todo momento. Si el reproductor multime-
dia se proporciona a un tercero, recuerde incluir también el presente manual.
Además, siga las indicaciones del manual de uso de los dispositivos conectados
a este reproductor.
Indicaciones generales de seguridad
Siga las siguientes instrucciones para evitar lesiones corporales:
No modique ni abra el equipo.
Uso previsto
El reproductor multimedia está diseñado para su incorporación y operación en
vehículos provistos de instalaciones con una tensión de alimentación de 12 V.
Deben respetarse los límites de potencia de la unidad. Cualquier reparación o
instalación debe encargarse a profesionales.
Instrucciones de montaje
Puede instalar el equipo por cuenta propia solo si tiene experiencia en materia
de la instalación de equipos de radio y conocimientos de sistemas eléctricos de
automóviles. Consulte el diagrama de cableado proporcionado en este manual.
La instalación de la unidad no debe impedir ni bloquear el funcionamiento de
ningún airbag, otros dispositivos de seguridad o controles.
Declaración de conformidad
Blaupunkt Competence Center Car Multimedia-Evo Sales GmbH declara que el
presente equipo cumple los requisitos esenciales y otras condiciones de la
directiva 2014/53/UE. La declaración de conformidad está disponible en la
página web www.blaupunkt.com.
Instrucciones de limpieza
Los disolventes, productos de limpieza y agentes abrasivos, así como los aerosoles
de limpieza del salpicadero y los productos para el cuidado de plásticos pueden
incluir componentes que podrían dañar la supercie del reproductor multimedia.
Limpie el reproductor con una bayeta seca o ligeramente humedecida.
Instrucciones de eliminación
¡No deseche el aparato usado con los residuos domésticos!
Para deshacerse del equipo, del mando a distancia y de las pilas usadas,
llévelos a un punto de recogida de equipos usados.
Alcance del suministro
El suministro incluye:
reproductor multimedia BPA 3022 M,
mando a distancia,
conectores ISO,
tornillos de montaje,
manual de uso.
INFORMACIÓN IMPORTANTE RELATIVA A LA INSTALACIÓN
1. Antes de instalar el aparato, lea detenidamente todo el manual de uso.
2. Asegúrese de que todos los demás cables han sido conectados antes de
conectar la fuente de alimentación.
3. Para evitar cortocircuitos, asegúrese de que todos los cables expuestos estén
aislados.
4. Una vez terminada la instalación, je todos los cables.
5. Las conexiones de cableado al reproductor deben realizarse de acuerdo con
las indicaciones del presente manual. Una conexión incorrecta puede
provocar daños en el aparato.
6. El reproductor está diseñado para funcionar solamente con instalaciones de
12 V CC.
INSTALACIÓN DE LA UNIDAD
DESMONTAJE DE UNIDAD
1. Desmonte la unidad.
2. Retire el marco embellecedor exterior.
Nota acerca de cables HDMI:
Utilice un cable HDMI de buena calidad.
La longitud total (en la parte frontal y trasera) no debe superar 12 pies.
CONEXIÓN DE CABLEADO
1. El reproductor puede utilizarse solamente con una tensión de +12 V CC.
2. No conecte el terminal de la batería hasta que el reproductor esté completamen-
te instalado.
3. Asegúrese de que el cable amarillo esté conectado al polo positivo (+) de la batería.
4. Al sustituir el fusible, asegúrese de que los parámetros del fusible nuevo sean los
mismos.
5. El uso de altavoces de buena calidad con una impedancia de 4 a 8 ohmios
permitirá obtener el máximo rendimiento del equipo.
DISTRIBUCIÓN DE LOS BOTONES
1. ZONA 1 2. 1 3. ZONA 2
4. 2 5. BT 6. 3 RPT
7. 8. 4 RDM 9.
10. 5 DIR- 11. DIS 12. 6 DIR+
13. LCD 14. TOMA AUX 15. TOMA DE CONEXIÓN DE
AURICULARES
16. ENTRADA HDMI 17. REINICIO 18. RUEDA DE AJUSTE
19. PUERTO USB 20. SRC/MENU
OPERACIÓN BÁSICA
Encendido/apagado de la unidad y de la función de silencio
Para encender la unidad, pulse el botón /MUTE. Para activar o desactivar la función
de silencio, pulse brevemente la rueda de ajuste mientras la unidad está encendida.
Mantenga pulsado este botón para apagar la unidad.
Ajustes de sonido y menú de conguración
Pulse y mantenga pulsado el botón SCR / MENU para acceder al menú presentado a
continuación:
BAS->TRE->BAL->EQ (apag./pop/rock/clas)->LOUD (enc./apag.)->CLK HH->CLK
MM->IR (enc./apag.) ->CT (indep/sync)->SYG. SONIDO (enc./apag.) )->P_VOL
(13)->DX (LOC)->STE- REO (MONO)
En cada posición, gire la rueda VOL para seleccionarla.
INFRARROJOS (ENC./APAG.):
INFRARROJOS enc.: La unidad se puede encender con el mando a distancia por
infrarrojos. En tal caso, el sistema funciona en modo de alto consumo energético.
INFRARROJOS apag.: La unidad no se puede encender con el mando a distancia por
infrarrojos. El sistema está en modo de bajo consumo energético.
CT (INDEP/SYNC):
CT INDEP: El reloj funciona de forma independiente.
CT SYNC: El reloj se sincronizará con la hora de la emisora RDS recibida.
Nota: Al congurar el reloj en el menú, la función CT se ajusta automáticamente al
modo INDEP (funcionamiento independiente).
SEÑAL ACÚSTICA (enc./apag.): Permite activar/desactivar la señal acústica mediante
la pulsación de los botones.
P-VOL: Permite ajustar el volumen al encender la unidad. Si el nivel de volumen al
apagar la unidad es inferior al nivel P-VOL, al encender el equipo, la unidad ajustará
dicho nivel al volumen de apagado.
Si el nivel de volumen en el momento del apagado de la unidad es superior al nivel
P-VOL, el volumen se restablecerá al valor de P-VOL a la hora de encender el equipo.
Búsqueda de altavoces Bluetooth
Si mantiene pulsado el botón BT, aparecerá el mensaje «SEARCH...» [buscar]. Un
momento después, aparecerá el nombre del dispositivo Bluetooth. Para mostrar el
siguiente dispositivo, gire la rueda VOL. Una vez que el nombre del altavoz Bluetooth
deseado aparezca en la pantalla LCD, pulse el botón VOL para emparejar el
dispositivo. Si el emparejamiento se realiza correctamente, la pantalla mostrará «BOX
ON».
Indicación importante: A pesar de los numerosos ensayos realizados con diversos
dispositivos Bluetooth, no se puede garantizar la compatibilidad con todos los
dispositivos Bluetooth disponibles en el mercado.
Transmisión de la señal al altavoz Bluetooth
Pulse brevemente el botón BT para detener la transferencia o transmitir la señal al
altavoz Bluetooth. En la pantalla aparecerá el mensaje «BOX OFF/ON».
Nota: Aunque Blaupunkt comprueba cuidadosamente la compatibilidad de los distintos
altavoces Bluetooth, no se puede garantizar un funcionamiento infalible con todos los
modelos disponibles en el mercado.
Operación de la Zona 1 y la Zona 2
Pulse brevemente Zone 1 (o Zone 2) para apagar/encender el sonido de la Zona 1 (o
Zona 2).
Mantenga pulsado el botón Zone 1 (o Zone 2) para silenciar el sonido de la Zona 1 (o
Zona 2). Si vuelve a mantener pulsado el botón, se deshabilitará el modo silencio.
Prioridad de la información o del reloj
Pulse brevemente el botón DIS para congurar la prioridad del reloj o de la
información. Nota: En la banda de FM, cuando reciba emisoras RDS, pulse brevemen-
te DIS para mostrar NOMBRE DE EMISORA / RELOJ / FRECUENCIA.
Ajuste del reloj
Seleccione CLK HH/CLK MM en el menú. Gire la rueda VOL para ajustar la hora / los
minutos.
Uso de auriculares
El panel frontal dispone de una toma de conexión de auriculares de 3,5 mm. El panel
adopta los ajustes de funcionamiento de la Zona 1.
USO DE LA MODALIDAD DE RADIO
Recepción de emisoras de radio
Pulse el botón SRC / MENU para seleccionar uno de los siguientes modos:
FM1->FM2->MW. Pulse brevemente el botón / para recibir la emisora de
radio deseada. Mantenga pulsado el botón / para sintonizar manualmente
la frecuencia.
Cómo guardar las emisoras y seleccionar las emisoras guardadas de forma manual
Recepción de la emisora deseada. Pulse y mantenga pulsado uno de los botones de
memoria (de 1 a 6) durante 2 segundos. La emisora actual se guardará en la memoria
bajo determinado botón numérico. Pulse rápidamente el botón de la emisora
programada (de 1 a 6) para escuchar directamente la señal emitida por dicha emisora
y guardada bajo el botón asignado.
USO DE DEVDAB
Pulse el botón SRC / MENU para cambiar la fuente entre DAB1 o DAB2.
Selección de emisora
Pulse el botón / para seleccionar la emisora anterior/siguiente.
Cómo guardar las emisoras y seleccionar las emisoras guardadas de forma manual
Cuando la frecuencia de la emisora deseada esté ajustada, mantenga pulsado uno de
los botones de 1 a 6 durante 2 segundos para guardar esta emisora bajo el número
correspondiente. Pulse rápidamente el botón de la emisora programada (de 1 a 6)
para escuchar directamente la señal emitida por dicha emisora y guardada bajo el
botón asignado.
USO DE USB
Después de conectar la unidad USB al aparato, este reproduce automáticamente
cheros MP3 / WMA. Si ya se ha conectado la unidad USB al aparato, pulse brevemen-
te el botón SRC / MENU hasta que aparezca la pantalla del modo USB.
Selección de chero
Pulse el botón / para pasar al chero siguiente / anterior. Pulse el botón
/ para un avance o retroceso rápido.
Reproducir / Pausa
Pulse el botón 1 para pausar / reproducir un chero.
Repeat function
Pulse el botón 3 RPT para seleccionar la función de reproducción en bucle. RPT
ONE/RPT FOLD/RPT ALL (por defecto)
RPT ONE: Reproducción de un solo chero en bucle.
RPT FOLD: Reproducción de todos los cheros de una carpeta en bucle.
RPT ALL: Reproducción de todos los cheros en bucle.
RANDOM
Pulse el botón 4 RDM para activar o desactivar la función de reproducción aleatoria.
RDM enc.: Reproducción aleatoria de todos los cheros.
RDM apag.: Apagado de la función de reproducción aleatoria.
Función de carpeta +/-
Pulse DIR+ / DIR- para seleccionar la carpeta siguiente / anterior a reproducir.
Buscar canción
Si mantiene pulsado el botón , aparecerá el mensaje «NUM 0000». Girando la
rueda VOL (o introduciendo directamente el número), seleccione el número y, a
continuación, pulse VOL para reproducir la canción. Preste atención a 7/8/9/0 como:
BT = 7, = 8, = 9, DIS = 0.
USO DE LA TOMA AUX IN 1/2
En el panel frontal, la toma AUX IN 1 es una toma de 3,5 mm. La toma AUX IN 2 para
RCA se encuentra en la parte trasera de la unidad. Con la pulsación de SRC / MENU,
accederá al modo AUX IN1 (2) cuando la señal de audio esté conectada a la unidad.
USO DE LA MODALIDAD BLUETOOTH
Cómo vincular dispositivos
Seleccione Bluetooth en su teléfono y busque el dispositivo Bluetooth. En la lista
debería aparecer «BLAUPUNKT»; seleccione «BLAUPUNKT» e introduzca la contraseña
«0000» si aparece una solicitud de introducción de la contraseña. Una vez realizado el
emparejamiento, en la pantalla aparecerá el símbolo BT.
Audio Bluetooth
Pulse el botón SRC / MENU para cambiar al modo BT MUSIC. El aparato reproducirá
automáticamente la canción desde su teléfono. Pulse el botón para pausar /
reproducir una canción.
Pulse el botón / para seleccionar la canción anterior / siguiente.
USO DE HDMI
La entrada HDMI delantera va a la toma HDMI trasera. Esto no afecta a la reproduc-
ción de contenidos a través de HDMI.
Conectores RCA V-IN y V-OUT
En la parte trasera de la unidad, el conector V-IN va al conector V-OUT.
MANDO A DISTANCIA
El mando a distancia se puede utilizar cuando
la opción IR está activada en el menú.
APAGADO (OFF): Encendido y apagado
del aparato.
VOL+: Aumentar el volumen
VOL-: Reducir el volumen
1 : Encendido / apagado del silencio de
la Zona 1
2 : Encendido / apagado del silencio de
la Zona 2
Para otras operaciones, lea las instrucciones anteriores.
INFORMACIÓN GENERAL
Requisitos de alimentación eléctrica : Corriente continua de 12 V, borne negativo
conectado a tierra
Medidas de la base de montaje : 129 (ancho) x 112 (profundo) x 65 (alto)
Ajustes de tono
- Bajos (a 100 Hz) : ±10 dB
- Altos (a 100 Hz) : ±10 dB
Potencia máxima de salida : 4 x 40 watts
Consumo energético : 10 Ampere (max.)
RADIO FM AM
Gama de frecuencias de 87,5 a 108 MHz de 522 a 1620 KHz
IF 10.7 MHz 450 KHz
Sensibilidad 4 µV (S/N = 30 dB) 36 dBµV (S/N = 20 dB)
Separación de los canales estéreo >25 dB /
SOLUCIÓN DE PROBLEMAS
DATOS TÉCNICOS
ES
Problema
Causa
Solución
Ausencia de
alimentación
La ignición del coche no
está encendida.
Gire la llave de la ignición hasta la posición
“ACC”, si la alimentación está conectada
al circuito auxiliar del coche y el motor no
ha sido puesto en marcha.
Fusible quemado. Sustituya el fusible.
Falta de sonido
El volumen está ajustado
al mínimo
Ajuste el volumen de audio al nivel
deseado.
Los cables no están bien
conectados.
Compruebe la conexión de los cables.
Los botones para
manejar el
dispositivo no
funcionan.
El microodenador incorporado
no funciona correctamente
debido a interferencias.
Pulse el botón de reinicio.
La radio no
funciona. No
funciona la función
de selección
automática de
emisoras.
El cable de la antena no está
conectado.
Conecte bien el cable de la antena.
La fuerza de la señal es
demasiado débil.
Seleccione la emisora manualmente.
No se puede
reproducir música
desde la aplicación
de música del teléfono.
El aparato está emparejado
con otro teléfono.
1) Apague la función de Bluetooth en
otro teléfono.
2) Cierre la aplicación y vuelva a iniciarla.
Veiligheidsinstructies
Dit multimediastation is vervaardigd volgens de nieuwste technologische
ontwikkelingen en algemeen erkende veiligheidsbeginselen. Toch kunnen er
gevaren ontstaan wanneer de veiligheidsinstructies in deze gebruiksaanwijzing
niet worden nageleefd. Lees de volledige gebruiksaanwijzing zorgvuldig door
voordat u het multimediastation in gebruik neemt. Bewaar de gebruiksaanwij-
zing op een plaats waar deze te allen tijde toegankelijk is voor alle gebruikers.
Als u het multimediastation aan derden overdraagt, dient u deze gebruiksaan-
wijzing bij te voegen. Neem bovendien de aanwijzingen in de gebruiksaanwij-
zingen van de op dit station aangesloten apparaten in acht.
Algemene veiligheidsinstructies
Neem de volgende aanwijzingen in acht om uzelf tegen persoonlijk letsel te
beschermen: Wijzig of open het apparaat niet.
Beoogd gebruik
Het multimediastation is bedoeld voor installatie en gebruik in voertuigen met
12 V voedingsspanning. Neem de vermogenslimieten van het apparaat in acht.
Laat alle reparaties en de installatie door een vakman uitvoeren.
Montage instructie
Installeer het apparaat alleen zelf als u ervaring heeft met de installatie van
autoradio’s en vertrouwd bent met elektrische autoproblemen. Raadpleeg
hiervoor het aansluitschema in deze gebruiksaanwijzing. De installatie van het
apparaat mag de werking van airbags, andere veiligheids- of bedieningsvoorzi-
eningen niet belemmeren of blokkeren.
Conformiteitsverklaring
Blaupunkt Competence Center Car Multimedia – Evo Sales GmbH verklaart dat
dit apparaat voldoet aan de basisvereisten en de overige relevante bepalingen
van de richtlijn 2014/53/EU. De conformiteitsverklaring is te vinden op de
website www.blaupunkt.com.
Reinigingsinstructies
Oplosmiddelen, reinigingsmiddelen en schuurmiddelen, alsmede reinigings-
sprays voor de cockpit en onderhoudsproducten voor plastic, kunnen
bestanddelen bevatten die het oppervlak van het multimediastation kunnen
beschadigen. Gebruik alleen een droge of licht bevochtigde doek om het
multimediastation te reinigen.
Instructies voor afvoer
Gooi het afgedankte apparaat niet samen met het huisvuil weg!
Om het apparaat, de afstandsbediening en de afgedankte batterijen af te
voeren, dient u ze naar een inzamelpunt voor afgedankte apparatuur te
brengen.
Leveringsomvang
De levering omvat:
BPA 3022 M multimediastation,
afstandsbediening,
ISO-connectoren,
montageschroeven,
gebruiksaanwijzing.
BELANGRIJKE INFORMATIE OVER DE INSTALLATIE
1. Lees de gebruiksaanwijzing zorgvuldig door voordat u het apparaat
installeert.
2. Zorg er vóór het aansluiten van de voeding voor dat alle andere draden zijn
aangesloten.
3. Zorg ervoor dat alle blootliggende draden zijn geïsoleerd om kortsluiting te
voorkomen.
4. Maak na voltooiing van de installatie alle draden vast.
5. Aansluitingen op de speler moeten volgens deze gebruiksaanwijzing
worden gemaakt. Een verkeerde aansluiting kan leiden tot schade aan het
apparaat.
6. De speler is bedoeld om alleen te werken met een 12 V DC-installatie.
MONTAGE VAN HET APPARAAT
DEMONTAGE VAN HET APPARAAT
1. Demonteer het apparaat.
2. Verwijder het buitenste sierframe.
Opmerking voor HDMI:
Gebruik een HDMI-kabel van goede kwaliteit.
De totale lengte (voor en achter) mag niet meer dan 365 cm bedragen.
DRADEN AANSLUITEN
1. De speler mag alleen worden gebruikt met +12 V DC.
2. Sluit de accupool pas aan nadat de speler volledig en correct is geïnstalleerd.
3. Zorg ervoor dat de gele kabel is aangesloten op de pluspool (+) van de accu.
4. Zorg er bij het vervangen van de zekering voor dat de parameters van de
nieuwe zekering dezelfde zijn.
5. Voor optimale prestaties van het apparaat worden luidsprekers van goede
kwaliteit met een impedantie van 4-8 ohm aanbevolen.
PLAATS VAN DE KNOPPEN
1. ZONE 1 2. 1 3. ZONE 2
4. 2 5. BT 6. 3 RPT
7. 8. 4 RDM 9.
10. 5 DIR- 11. DIS 12. 6 DIR+
13. LCD SCHERM 14. AUX AANSLUITING 15. HOOFDTELEFOON AANSLUITING
16. HDMI AANSLUITING 17. RESET 18. DRAAIKNOP
19. USB AANSLUITING 20. SRC/MENU
BASISBEDIENING
Het apparaat en de Mute-functie in-/uitschakelen
Druk op de /MUTE draaiknop om het apparaat in te schakelen. Druk, als het apparaat
aanstaat, kort op de draaiknop om de geluidsdempingsfunctie (MUTE) in- of uit te
schakelen. Druk in en houd de draaiknop ingedrukt om het apparaat uit te schakelen.
Geluidsinstellingen en instelmenu
Druk in en houd de knop SRC/MENU ingedrukt om naar het onderstaande menu te
gaan:
BAS->TRE->BAL->EQ (o/pop/rock/clas)->LOUD (on/o)->CLK HH->CLK MM->IR
(on/o) ->CT (indep/sync)->BEEP (on/o) ->P_VOL (13)->DX (LOC)->STEREO (MONO)
Draai bij elke positie de VOL-knop om deze in te stellen.
IR (ON/OFF):
IR ON: Met IR ON kan het apparaat worden ingeschakeld met de infrarood afstandsbe-
diening. Het systeem staat dan in de modus van hoog energieverbruik.
IR OFF: Met IR OFF kan het apparaat niet worden ingeschakeld met de infrarood
afstandsbediening. Het systeem staat in de modus van laag energieverbruik.
CT (INDEP/SYNC):
CT INDEP: De klok werkt onafhankelijk.
CT SYNC: De klok wordt gesynchroniseerd met de tijd van de ontvangen RDS-zender.
Opmerking: Als de klok handmatig in het menu wordt ingesteld, wordt de CT-functie
(kloktijd) automatisch ingesteld op de INDEP-modus (onafhankelijke werking).
BEEP (ON/OFF): Hiermee wordt de pieptoon in-/uitgeschakeld.
P-VOL (vooraf ingesteld inschakelvolume): Hiermee wordt het inschakelvolume
ingesteld. Als het uitschakelvolume lager is dan het P-VOL niveau, zal het apparaat bij
het inschakelen het volume instellen op het uitschakelvolume.
Als het uitschakelvolume hoger is dan het P-VOL niveau, zal het inschakelvolume bij
het inschakelen van apparaat worden teruggezet naar het ingestelde P-VOL niveau.
Zoeken naar Bluetooth-luidsprekers
Druk in en houd de BT-knop ingedrukt, de melding "SEARCH...” [zoeken] verschijnt.
Even later verschijnt de naam van een gevonden Bluetooth-apparaat. Om het
volgende Bluetooth-apparaat weer te geven, draai de VOL-knop. Wanneer de naam
van de gewenste Bluetooth-luidspreker op het LCD-scherm verschijnt, druk op de
VOL-knop om het apparaat te koppelen. Als het koppelen gelukt is, verschijnt op het
display "BOX ON".
Belangrijke opmerking: Ondanks vele tests met verschillende Bluetooth-apparaten,
kan compatibiliteit met alle op de markt verkrijgbare Bluetooth-apparaten niet
worden gegarandeerd.
Signaaloverdracht naar Bluetooth-luidspreker
Druk kort op de BT-knop om de overdracht van het signaal naar de Bluetooth-luid-
spreker aan/uit te zetten. Op het display verschijnt "BOX OFF/ON".
Opmerking: Ondanks zorgvuldige controle door Blaupunkt van de compatibiliteit met
verschillende Bluetooth-luidsprekers, kan een naadloze werking met alle op de markt
verkrijgbare modellen niet worden gegarandeerd.
Bediening van Zone 1 en Zone 2
Druk kort op de knop Zone 1 (of Zone 2) om het geluid van Zone 1 (of Zone 2) in/uit
te schakelen.
Houd de knop Zone 1 (of Zone 2) ingedrukt om het geluid van Zone 1 (of Zone 2) te
dempen. Druk nogmaals op de knop om het geluidsdemping uit te schakelen.
Prioriteit voor informatie of klok
Druk kort op de DIS-knop om klokprioriteit of informatieprioriteit in te stellen.
Opmerking: Bij ontvangst van een RDS-zender in de FM-band, druk kort op DIS-knop
om STATION NAME/CLOCK/FREQUENCY weer te geven.
Klok instellen
Ga in het menu naar de positie CLK HH/CLK MM. Draai de VOL-knop om uur/minuut
in te stellen.
Hoofdtelefoon gebruiken
Op het frontpaneel bevindt zich een 3,5 mm aansluiting voor een hoofdtelefoon.
Deze neemt de instellingen van Zone 1 over.
RADIO GEBRUIKEN
Een radiozender ontvangen
Druk op de SRC/MENU-knop om FM1->FM2->MW te selecteren. Druk kort op de
knop / om de gewenste radiozender te ontvangen. Houd de knop /
ingedrukt om de frequentie handmatig af te stemmen.
Zenders handmatig opslaan en opgeslagen zenders oproepen
Terwijl de gewenste zender wordt ontvangen, druk in en houd een van de geheugen-
knoppen (1-6) gedurende 2 seconden ingedrukt. De huidige zender wordt onder de
ingedrukte nummerknop opgeslagen. Druk kort op een van de geheugenknoppen
(1-6) om direct naar een onder deze knop opgeslagen zender te luisteren.
DAB GEBRUIKEN
Druk op de SRC/MENU-knop om de bron om te schakelen tussen DAB1 of DAB2.
Een zender kiezen
Druk op de knop / om de volgende/vorige zender te kiezen.
Zenders handmatig opslaan en opgeslagen zenders oproepen
Als de frequentie van de gewenste zender is ingesteld. Houd een van de knoppen 1-6
gedurende 2 seconden ingedrukt om deze zender onder het overeenkomstige
nummer op te slaan. Druk kort op een van de geheugenknoppen (1-6) om direct naar
een onder deze knop opgeslagen zender te luisteren.
USB GEBRUIKEN
Als een USB-stick op het apparaat wordt aangesloten, zal het automatisch MP3/W-
MA-bestanden afspelen. Als er al een USB-stick op het apparaat is aangesloten, blijf kort
op de SRC/MENU te drukken tot het USB-modusscherm verschijnt.
Een bestand kiezen
Druk op de / knop om naar het volgende/vorige bestand te gaan. Houd de
/ knop ingedrukt om snel vooruit of achteruit te gaan.
Afspelen/pauze
Druk op knop om het afspelen van een bestand te onderbreken/hervatten.
In een lus afspelen
Druk op de 3 RPT-knop om het lusafspelen te selecteren. RPT ONE/RPT FOLD/RPT ALL
(standaard)
RPT ONE: In een lus afspelen van hetzelfde bestand.
RPT FOLD: In een lus afspelen van alle bestanden in een map.
RPT ALL: In een lus afspelen van alle bestanden.
RANDOM
Druk op de 4 RDM-knop om de functie van willekeurig afspelen in- of uit te schakelen.
RDM on: Willekeurig afspelen van alle bestanden.
RDM o: Willekeurig afspelen uitschakelen.
Map +/- functie
Druk op de knop DIR+/DIR- om de volgende/vorige map te kiezen en deze af te spelen.
Een liedje opzoeken
Druk in en houd de knop ingedrukt om "NUM 0000” weer te geven. Gebruik de
VOL-draaiknop (of voer het nummer direct in) om het gewenste nummer te selecteren
en druk vervolgens op VOL om het af te spelen. Let op: de cijfers 7/8/9/0 staan onder
de volgende knoppen: BT = 7, = 8, = 9, DIS = 0.
GEBRUIK VAN DE AUX IN 1/2 AANSLUITING
De AUX IN 1 aansluiting op het frontpaneel is een 3,5 mm jack-aansluiting. De AUX IN 2
bevindt zich aan de achterkant en is een RCA-aansluiting. Druk bij het aansluiten van
het audiosignaal op het apparaat op SRC/MENU-knop om over te schakelen naar de
AUX IN 1 (2) modus.
BLUETOOTH GEBRUIKEN
Bluetooth-apparaten koppelen
Schakel de Bluetooth functie op uw smartphone in en zoek naar Bluetooth-appara-
ten. In de lijst moet "BLAUPUNKT" verschijnen; selecteer "BLAUPUNKT" en voer
vervolgens het wachtwoord "0000" in wanneer u erom wordt gevraagd. Als het
koppelen met succes is voltooid, verschijnt het symbool BT op het scherm.
Bluetooth-audio
Druk op de SRC/MENU-knop om over te schakelen naar de BT MUSIC modus. Het
apparaat zal automatisch een liedje van uw smartphone afspelen. Druk op de
knop om het liedje te stoppen/ af te spelen.
Druk op de knop / om het volgende/vorige nummer te kiezen.
HDMI GEBRUIKEN
De voorste HDMI-aansluiting gaat over naar de achterste HDMI-aansluiting. Het
afspelen via HDMI wordt dus niet beïnvloed.
V-IN en V-OUT RCA-aansluiting
Aan de achterkant van het apparaat gaat de V-IN aansluiting over naar de V-OUT
aansluiting.
AFSTANDSBEDIENING
De afstandsbediening kan worden gebruikt
wanneer de IR-optie in het menu is ingeschakeld.
OFF : Het apparaat in-/uitschakelen
VOL+: Volume verhogen
VOL- : Volume verlagen
1 : Zone 1 MUTE in-/uitschakelen
2 : Zone 2 MUTE in-/uitschakelen
Other operation please reference the description above
ALGEMENE INFORMATIE
Vereisten betreende de voeding : 12 V gelijkstroom, minpool verbonden
met de massa
Afmetingen van de montagebasis : 129 (b) x 112 (d) x 65 (h)
Toon instellingen
- Lage tonen (bij 100 Hz) : ±10 dB
- Hoge tonen (bij 100 Hz) : ±10 dB
Maximaal uitgangsvermogen : 4 x 40 watts
Stroomverbruik: :10 A (max.)
RADIO FM AM
Frequentiebereik: 87.5 to 108 MHz 522 to 1620 KHz
IF 10.7 MHz 450 KHz
Gevoeligheid 4 µV (S/N = 30 dB) 36 dBµV (S/N = 20 dB)
Stereokanaalscheiding >25 dB /
PROBLEEMOPLOSSING

Instrucciones de seguridad
El reproductor multimedia se ha fabricado de acuerdo con las normas actuales
de avance tecnológico y los principios de seguridad generalmente reconocidos.
No obstante, el incumplimiento de las instrucciones de seguridad aquí
indicadas supone una serie de riesgos. Lea atentamente todo el manual antes
de utilizar el reproductor multimedia. Guarde el manual en un lugar que esté
accesible para todos los usuarios en todo momento. Si el reproductor multime-
dia se proporciona a un tercero, recuerde incluir también el presente manual.
Además, siga las indicaciones del manual de uso de los dispositivos conectados
a este reproductor.
Indicaciones generales de seguridad
Siga las siguientes instrucciones para evitar lesiones corporales:
No modique ni abra el equipo.
Uso previsto
El reproductor multimedia está diseñado para su incorporación y operación en
vehículos provistos de instalaciones con una tensión de alimentación de 12 V.
Deben respetarse los límites de potencia de la unidad. Cualquier reparación o
instalación debe encargarse a profesionales.
Instrucciones de montaje
Puede instalar el equipo por cuenta propia solo si tiene experiencia en materia
de la instalación de equipos de radio y conocimientos de sistemas eléctricos de
automóviles. Consulte el diagrama de cableado proporcionado en este manual.
La instalación de la unidad no debe impedir ni bloquear el funcionamiento de
ningún airbag, otros dispositivos de seguridad o controles.
Declaración de conformidad
Blaupunkt Competence Center Car Multimedia-Evo Sales GmbH declara que el
presente equipo cumple los requisitos esenciales y otras condiciones de la
directiva 2014/53/UE. La declaración de conformidad está disponible en la
página web www.blaupunkt.com.
Instrucciones de limpieza
Los disolventes, productos de limpieza y agentes abrasivos, así como los aerosoles
de limpieza del salpicadero y los productos para el cuidado de plásticos pueden
incluir componentes que podrían dañar la supercie del reproductor multimedia.
Limpie el reproductor con una bayeta seca o ligeramente humedecida.
Instrucciones de eliminación
¡No deseche el aparato usado con los residuos domésticos!
Para deshacerse del equipo, del mando a distancia y de las pilas usadas,
llévelos a un punto de recogida de equipos usados.
Alcance del suministro
El suministro incluye:
reproductor multimedia BPA 3022 M,
mando a distancia,
conectores ISO,
tornillos de montaje,
manual de uso.
INFORMACIÓN IMPORTANTE RELATIVA A LA INSTALACIÓN
1. Antes de instalar el aparato, lea detenidamente todo el manual de uso.
2. Asegúrese de que todos los demás cables han sido conectados antes de
conectar la fuente de alimentación.
3. Para evitar cortocircuitos, asegúrese de que todos los cables expuestos estén
aislados.
4. Una vez terminada la instalación, je todos los cables.
5. Las conexiones de cableado al reproductor deben realizarse de acuerdo con
las indicaciones del presente manual. Una conexión incorrecta puede
provocar daños en el aparato.
6. El reproductor está diseñado para funcionar solamente con instalaciones de
12 V CC.
INSTALACIÓN DE LA UNIDAD
DESMONTAJE DE UNIDAD
1. Desmonte la unidad.
2. Retire el marco embellecedor exterior.
Nota acerca de cables HDMI:
Utilice un cable HDMI de buena calidad.
La longitud total (en la parte frontal y trasera) no debe superar 12 pies.
CONEXIÓN DE CABLEADO
1. El reproductor puede utilizarse solamente con una tensión de +12 V CC.
2. No conecte el terminal de la batería hasta que el reproductor esté completamen-
te instalado.
3. Asegúrese de que el cable amarillo esté conectado al polo positivo (+) de la batería.
4. Al sustituir el fusible, asegúrese de que los parámetros del fusible nuevo sean los
mismos.
5. El uso de altavoces de buena calidad con una impedancia de 4 a 8 ohmios
permitirá obtener el máximo rendimiento del equipo.
DISTRIBUCIÓN DE LOS BOTONES
1. ZONA 1 2. 1 3. ZONA 2
4. 2 5. BT 6. 3 RPT
7. 8. 4 RDM 9.
10. 5 DIR- 11. DIS 12. 6 DIR+
13. LCD 14. TOMA AUX 15. TOMA DE CONEXIÓN DE
AURICULARES
16. ENTRADA HDMI 17. REINICIO 18. RUEDA DE AJUSTE
19. PUERTO USB 20. SRC/MENU
OPERACIÓN BÁSICA
Encendido/apagado de la unidad y de la función de silencio
Para encender la unidad, pulse el botón /MUTE. Para activar o desactivar la función
de silencio, pulse brevemente la rueda de ajuste mientras la unidad está encendida.
Mantenga pulsado este botón para apagar la unidad.
Ajustes de sonido y menú de conguración
Pulse y mantenga pulsado el botón SCR / MENU para acceder al menú presentado a
continuación:
BAS->TRE->BAL->EQ (apag./pop/rock/clas)->LOUD (enc./apag.)->CLK HH->CLK
MM->IR (enc./apag.) ->CT (indep/sync)->SYG. SONIDO (enc./apag.) )->P_VOL
(13)->DX (LOC)->STE- REO (MONO)
En cada posición, gire la rueda VOL para seleccionarla.
INFRARROJOS (ENC./APAG.):
INFRARROJOS enc.: La unidad se puede encender con el mando a distancia por
infrarrojos. En tal caso, el sistema funciona en modo de alto consumo energético.
INFRARROJOS apag.: La unidad no se puede encender con el mando a distancia por
infrarrojos. El sistema está en modo de bajo consumo energético.
CT (INDEP/SYNC):
CT INDEP: El reloj funciona de forma independiente.
CT SYNC: El reloj se sincronizará con la hora de la emisora RDS recibida.
Nota: Al congurar el reloj en el menú, la función CT se ajusta automáticamente al
modo INDEP (funcionamiento independiente).
SEÑAL ACÚSTICA (enc./apag.): Permite activar/desactivar la señal acústica mediante
la pulsación de los botones.
P-VOL: Permite ajustar el volumen al encender la unidad. Si el nivel de volumen al
apagar la unidad es inferior al nivel P-VOL, al encender el equipo, la unidad ajustará
dicho nivel al volumen de apagado.
Si el nivel de volumen en el momento del apagado de la unidad es superior al nivel
P-VOL, el volumen se restablecerá al valor de P-VOL a la hora de encender el equipo.
Búsqueda de altavoces Bluetooth
Si mantiene pulsado el botón BT, aparecerá el mensaje «SEARCH...» [buscar]. Un
momento después, aparecerá el nombre del dispositivo Bluetooth. Para mostrar el
siguiente dispositivo, gire la rueda VOL. Una vez que el nombre del altavoz Bluetooth
deseado aparezca en la pantalla LCD, pulse el botón VOL para emparejar el
dispositivo. Si el emparejamiento se realiza correctamente, la pantalla mostrará «BOX
ON».
Indicación importante: A pesar de los numerosos ensayos realizados con diversos
dispositivos Bluetooth, no se puede garantizar la compatibilidad con todos los
dispositivos Bluetooth disponibles en el mercado.
Transmisión de la señal al altavoz Bluetooth
Pulse brevemente el botón BT para detener la transferencia o transmitir la señal al
altavoz Bluetooth. En la pantalla aparecerá el mensaje «BOX OFF/ON».
Nota: Aunque Blaupunkt comprueba cuidadosamente la compatibilidad de los distintos
altavoces Bluetooth, no se puede garantizar un funcionamiento infalible con todos los
modelos disponibles en el mercado.
Operación de la Zona 1 y la Zona 2
Pulse brevemente Zone 1 (o Zone 2) para apagar/encender el sonido de la Zona 1 (o
Zona 2).
Mantenga pulsado el botón Zone 1 (o Zone 2) para silenciar el sonido de la Zona 1 (o
Zona 2). Si vuelve a mantener pulsado el botón, se deshabilitará el modo silencio.
Prioridad de la información o del reloj
Pulse brevemente el botón DIS para congurar la prioridad del reloj o de la
información. Nota: En la banda de FM, cuando reciba emisoras RDS, pulse brevemen-
te DIS para mostrar NOMBRE DE EMISORA / RELOJ / FRECUENCIA.
Ajuste del reloj
Seleccione CLK HH/CLK MM en el menú. Gire la rueda VOL para ajustar la hora / los
minutos.
Uso de auriculares
El panel frontal dispone de una toma de conexión de auriculares de 3,5 mm. El panel
adopta los ajustes de funcionamiento de la Zona 1.
USO DE LA MODALIDAD DE RADIO
Recepción de emisoras de radio
Pulse el botón SRC / MENU para seleccionar uno de los siguientes modos:
FM1->FM2->MW. Pulse brevemente el botón / para recibir la emisora de
radio deseada. Mantenga pulsado el botón / para sintonizar manualmente
la frecuencia.
Cómo guardar las emisoras y seleccionar las emisoras guardadas de forma manual
Recepción de la emisora deseada. Pulse y mantenga pulsado uno de los botones de
memoria (de 1 a 6) durante 2 segundos. La emisora actual se guardará en la memoria
bajo determinado botón numérico. Pulse rápidamente el botón de la emisora
programada (de 1 a 6) para escuchar directamente la señal emitida por dicha emisora
y guardada bajo el botón asignado.
USO DE DEVDAB
Pulse el botón SRC / MENU para cambiar la fuente entre DAB1 o DAB2.
Selección de emisora
Pulse el botón / para seleccionar la emisora anterior/siguiente.
Cómo guardar las emisoras y seleccionar las emisoras guardadas de forma manual
Cuando la frecuencia de la emisora deseada esté ajustada, mantenga pulsado uno de
los botones de 1 a 6 durante 2 segundos para guardar esta emisora bajo el número
correspondiente. Pulse rápidamente el botón de la emisora programada (de 1 a 6)
para escuchar directamente la señal emitida por dicha emisora y guardada bajo el
botón asignado.
USO DE USB
Después de conectar la unidad USB al aparato, este reproduce automáticamente
cheros MP3 / WMA. Si ya se ha conectado la unidad USB al aparato, pulse brevemen-
te el botón SRC / MENU hasta que aparezca la pantalla del modo USB.
Selección de chero
Pulse el botón / para pasar al chero siguiente / anterior. Pulse el botón
/ para un avance o retroceso rápido.
Reproducir / Pausa
Pulse el botón 1 para pausar / reproducir un chero.
Repeat function
Pulse el botón 3 RPT para seleccionar la función de reproducción en bucle. RPT
ONE/RPT FOLD/RPT ALL (por defecto)
RPT ONE: Reproducción de un solo chero en bucle.
RPT FOLD: Reproducción de todos los cheros de una carpeta en bucle.
RPT ALL: Reproducción de todos los cheros en bucle.
RANDOM
Pulse el botón 4 RDM para activar o desactivar la función de reproducción aleatoria.
RDM enc.: Reproducción aleatoria de todos los cheros.
RDM apag.: Apagado de la función de reproducción aleatoria.
Función de carpeta +/-
Pulse DIR+ / DIR- para seleccionar la carpeta siguiente / anterior a reproducir.
Buscar canción
Si mantiene pulsado el botón , aparecerá el mensaje «NUM 0000». Girando la
rueda VOL (o introduciendo directamente el número), seleccione el número y, a
continuación, pulse VOL para reproducir la canción. Preste atención a 7/8/9/0 como:
BT = 7, = 8, = 9, DIS = 0.
USO DE LA TOMA AUX IN 1/2
En el panel frontal, la toma AUX IN 1 es una toma de 3,5 mm. La toma AUX IN 2 para
RCA se encuentra en la parte trasera de la unidad. Con la pulsación de SRC / MENU,
accederá al modo AUX IN1 (2) cuando la señal de audio esté conectada a la unidad.
USO DE LA MODALIDAD BLUETOOTH
Cómo vincular dispositivos
Seleccione Bluetooth en su teléfono y busque el dispositivo Bluetooth. En la lista
debería aparecer «BLAUPUNKT»; seleccione «BLAUPUNKT» e introduzca la contraseña
«0000» si aparece una solicitud de introducción de la contraseña. Una vez realizado el
emparejamiento, en la pantalla aparecerá el símbolo BT.
Audio Bluetooth
Pulse el botón SRC / MENU para cambiar al modo BT MUSIC. El aparato reproducirá
automáticamente la canción desde su teléfono. Pulse el botón para pausar /
reproducir una canción.
Pulse el botón / para seleccionar la canción anterior / siguiente.
USO DE HDMI
La entrada HDMI delantera va a la toma HDMI trasera. Esto no afecta a la reproduc-
ción de contenidos a través de HDMI.
Conectores RCA V-IN y V-OUT
En la parte trasera de la unidad, el conector V-IN va al conector V-OUT.
MANDO A DISTANCIA
El mando a distancia se puede utilizar cuando
la opción IR está activada en el menú.
APAGADO (OFF): Encendido y apagado
del aparato.
VOL+: Aumentar el volumen
VOL-: Reducir el volumen
1 : Encendido / apagado del silencio de
la Zona 1
2 : Encendido / apagado del silencio de
la Zona 2
Para otras operaciones, lea las instrucciones anteriores.
INFORMACIÓN GENERAL
Requisitos de alimentación eléctrica : Corriente continua de 12 V, borne negativo
conectado a tierra
Medidas de la base de montaje : 129 (ancho) x 112 (profundo) x 65 (alto)
Ajustes de tono
- Bajos (a 100 Hz) : ±10 dB
- Altos (a 100 Hz) : ±10 dB
Potencia máxima de salida : 4 x 40 watts
Consumo energético : 10 Ampere (max.)
RADIO FM AM
Gama de frecuencias de 87,5 a 108 MHz de 522 a 1620 KHz
IF 10.7 MHz 450 KHz
Sensibilidad 4 µV (S/N = 30 dB) 36 dBµV (S/N = 20 dB)
Separación de los canales estéreo >25 dB /
SOLUCIÓN DE PROBLEMAS
Veiligheidsinstructies
Dit multimediastation is vervaardigd volgens de nieuwste technologische
ontwikkelingen en algemeen erkende veiligheidsbeginselen. Toch kunnen er
gevaren ontstaan wanneer de veiligheidsinstructies in deze gebruiksaanwijzing
niet worden nageleefd. Lees de volledige gebruiksaanwijzing zorgvuldig door
voordat u het multimediastation in gebruik neemt. Bewaar de gebruiksaanwij-
zing op een plaats waar deze te allen tijde toegankelijk is voor alle gebruikers.
Als u het multimediastation aan derden overdraagt, dient u deze gebruiksaan-
wijzing bij te voegen. Neem bovendien de aanwijzingen in de gebruiksaanwij-
zingen van de op dit station aangesloten apparaten in acht.
Algemene veiligheidsinstructies
Neem de volgende aanwijzingen in acht om uzelf tegen persoonlijk letsel te
beschermen: Wijzig of open het apparaat niet.
Beoogd gebruik
Het multimediastation is bedoeld voor installatie en gebruik in voertuigen met
12 V voedingsspanning. Neem de vermogenslimieten van het apparaat in acht.
Laat alle reparaties en de installatie door een vakman uitvoeren.
Montage instructie
Installeer het apparaat alleen zelf als u ervaring heeft met de installatie van
autoradio’s en vertrouwd bent met elektrische autoproblemen. Raadpleeg
hiervoor het aansluitschema in deze gebruiksaanwijzing. De installatie van het
apparaat mag de werking van airbags, andere veiligheids- of bedieningsvoorzi-
eningen niet belemmeren of blokkeren.
Conformiteitsverklaring
Blaupunkt Competence Center Car Multimedia – Evo Sales GmbH verklaart dat
dit apparaat voldoet aan de basisvereisten en de overige relevante bepalingen
van de richtlijn 2014/53/EU. De conformiteitsverklaring is te vinden op de
website www.blaupunkt.com.
Reinigingsinstructies
Oplosmiddelen, reinigingsmiddelen en schuurmiddelen, alsmede reinigings-
sprays voor de cockpit en onderhoudsproducten voor plastic, kunnen
bestanddelen bevatten die het oppervlak van het multimediastation kunnen
beschadigen. Gebruik alleen een droge of licht bevochtigde doek om het
multimediastation te reinigen.
Instructies voor afvoer
Gooi het afgedankte apparaat niet samen met het huisvuil weg!
Om het apparaat, de afstandsbediening en de afgedankte batterijen af te
voeren, dient u ze naar een inzamelpunt voor afgedankte apparatuur te
brengen.
Leveringsomvang
De levering omvat:
BPA 3022 M multimediastation,
afstandsbediening,
ISO-connectoren,
montageschroeven,
gebruiksaanwijzing.
BELANGRIJKE INFORMATIE OVER DE INSTALLATIE
1. Lees de gebruiksaanwijzing zorgvuldig door voordat u het apparaat
installeert.
2. Zorg er vóór het aansluiten van de voeding voor dat alle andere draden zijn
aangesloten.
3. Zorg ervoor dat alle blootliggende draden zijn geïsoleerd om kortsluiting te
voorkomen.
4. Maak na voltooiing van de installatie alle draden vast.
5. Aansluitingen op de speler moeten volgens deze gebruiksaanwijzing
worden gemaakt. Een verkeerde aansluiting kan leiden tot schade aan het
apparaat.
6. De speler is bedoeld om alleen te werken met een 12 V DC-installatie.
ALGEMENE INFORMATIE
MONTAGE VAN HET APPARAAT
DEMONTAGE VAN HET APPARAAT
1. Demonteer het apparaat.
2. Verwijder het buitenste sierframe.
Opmerking voor HDMI:
Gebruik een HDMI-kabel van goede kwaliteit.
De totale lengte (voor en achter) mag niet meer dan 365 cm bedragen.
DRADEN AANSLUITEN
1. De speler mag alleen worden gebruikt met +12 V DC.
2. Sluit de accupool pas aan nadat de speler volledig en correct is geïnstalleerd.
3. Zorg ervoor dat de gele kabel is aangesloten op de pluspool (+) van de accu.
4. Zorg er bij het vervangen van de zekering voor dat de parameters van de
nieuwe zekering dezelfde zijn.
5. Voor optimale prestaties van het apparaat worden luidsprekers van goede
kwaliteit met een impedantie van 4-8 ohm aanbevolen.
PLAATS VAN DE KNOPPEN
1. ZONE 1 2. 1 3. ZONE 2
4. 2 5. BT 6. 3 RPT
7. 8. 4 RDM 9.
10. 5 DIR- 11. DIS 12. 6 DIR+
13. LCD SCHERM 14. AUX AANSLUITING 15. HOOFDTELEFOON AANSLUITING
16. HDMI AANSLUITING 17. RESET 18. DRAAIKNOP
19. USB AANSLUITING 20. SRC/MENU
BASISBEDIENING
Het apparaat en de Mute-functie in-/uitschakelen
Druk op de /MUTE draaiknop om het apparaat in te schakelen. Druk, als het apparaat
aanstaat, kort op de draaiknop om de geluidsdempingsfunctie (MUTE) in- of uit te
schakelen. Druk in en houd de draaiknop ingedrukt om het apparaat uit te schakelen.
Geluidsinstellingen en instelmenu
Druk in en houd de knop SRC/MENU ingedrukt om naar het onderstaande menu te
gaan:
BAS->TRE->BAL->EQ (o/pop/rock/clas)->LOUD (on/o)->CLK HH->CLK MM->IR
(on/o) ->CT (indep/sync)->BEEP (on/o) ->P_VOL (13)->DX (LOC)->STEREO (MONO)
Draai bij elke positie de VOL-knop om deze in te stellen.
IR (ON/OFF):
IR ON: Met IR ON kan het apparaat worden ingeschakeld met de infrarood afstandsbe-
diening. Het systeem staat dan in de modus van hoog energieverbruik.
IR OFF: Met IR OFF kan het apparaat niet worden ingeschakeld met de infrarood
afstandsbediening. Het systeem staat in de modus van laag energieverbruik.
CT (INDEP/SYNC):
CT INDEP: De klok werkt onafhankelijk.
CT SYNC: De klok wordt gesynchroniseerd met de tijd van de ontvangen RDS-zender.
Opmerking: Als de klok handmatig in het menu wordt ingesteld, wordt de CT-functie
(kloktijd) automatisch ingesteld op de INDEP-modus (onafhankelijke werking).
BEEP (ON/OFF): Hiermee wordt de pieptoon in-/uitgeschakeld.
P-VOL (vooraf ingesteld inschakelvolume): Hiermee wordt het inschakelvolume
ingesteld. Als het uitschakelvolume lager is dan het P-VOL niveau, zal het apparaat bij
het inschakelen het volume instellen op het uitschakelvolume.
Als het uitschakelvolume hoger is dan het P-VOL niveau, zal het inschakelvolume bij
het inschakelen van apparaat worden teruggezet naar het ingestelde P-VOL niveau.
Zoeken naar Bluetooth-luidsprekers
Druk in en houd de BT-knop ingedrukt, de melding "SEARCH...” [zoeken] verschijnt.
Even later verschijnt de naam van een gevonden Bluetooth-apparaat. Om het
volgende Bluetooth-apparaat weer te geven, draai de VOL-knop. Wanneer de naam
van de gewenste Bluetooth-luidspreker op het LCD-scherm verschijnt, druk op de
VOL-knop om het apparaat te koppelen. Als het koppelen gelukt is, verschijnt op het
display "BOX ON".
Belangrijke opmerking: Ondanks vele tests met verschillende Bluetooth-apparaten,
kan compatibiliteit met alle op de markt verkrijgbare Bluetooth-apparaten niet
worden gegarandeerd.
Signaaloverdracht naar Bluetooth-luidspreker
Druk kort op de BT-knop om de overdracht van het signaal naar de Bluetooth-luid-
spreker aan/uit te zetten. Op het display verschijnt "BOX OFF/ON".
Opmerking: Ondanks zorgvuldige controle door Blaupunkt van de compatibiliteit met
verschillende Bluetooth-luidsprekers, kan een naadloze werking met alle op de markt
verkrijgbare modellen niet worden gegarandeerd.
Bediening van Zone 1 en Zone 2
Druk kort op de knop Zone 1 (of Zone 2) om het geluid van Zone 1 (of Zone 2) in/uit
te schakelen.
Houd de knop Zone 1 (of Zone 2) ingedrukt om het geluid van Zone 1 (of Zone 2) te
dempen. Druk nogmaals op de knop om het geluidsdemping uit te schakelen.
Prioriteit voor informatie of klok
Druk kort op de DIS-knop om klokprioriteit of informatieprioriteit in te stellen.
Opmerking: Bij ontvangst van een RDS-zender in de FM-band, druk kort op DIS-knop
om STATION NAME/CLOCK/FREQUENCY weer te geven.
Klok instellen
Ga in het menu naar de positie CLK HH/CLK MM. Draai de VOL-knop om uur/minuut
in te stellen.
Hoofdtelefoon gebruiken
Op het frontpaneel bevindt zich een 3,5 mm aansluiting voor een hoofdtelefoon.
Deze neemt de instellingen van Zone 1 over.
RADIO GEBRUIKEN
Een radiozender ontvangen
Druk op de SRC/MENU-knop om FM1->FM2->MW te selecteren. Druk kort op de
knop / om de gewenste radiozender te ontvangen. Houd de knop /
ingedrukt om de frequentie handmatig af te stemmen.
Zenders handmatig opslaan en opgeslagen zenders oproepen
Terwijl de gewenste zender wordt ontvangen, druk in en houd een van de geheugen-
knoppen (1-6) gedurende 2 seconden ingedrukt. De huidige zender wordt onder de
ingedrukte nummerknop opgeslagen. Druk kort op een van de geheugenknoppen
(1-6) om direct naar een onder deze knop opgeslagen zender te luisteren.
DAB GEBRUIKEN
Druk op de SRC/MENU-knop om de bron om te schakelen tussen DAB1 of DAB2.
Een zender kiezen
Druk op de knop / om de volgende/vorige zender te kiezen.
Zenders handmatig opslaan en opgeslagen zenders oproepen
Als de frequentie van de gewenste zender is ingesteld. Houd een van de knoppen 1-6
gedurende 2 seconden ingedrukt om deze zender onder het overeenkomstige
nummer op te slaan. Druk kort op een van de geheugenknoppen (1-6) om direct naar
een onder deze knop opgeslagen zender te luisteren.
USB GEBRUIKEN
Als een USB-stick op het apparaat wordt aangesloten, zal het automatisch MP3/W-
MA-bestanden afspelen. Als er al een USB-stick op het apparaat is aangesloten, blijf kort
op de SRC/MENU te drukken tot het USB-modusscherm verschijnt.
Een bestand kiezen
Druk op de / knop om naar het volgende/vorige bestand te gaan. Houd de
/ knop ingedrukt om snel vooruit of achteruit te gaan.
Afspelen/pauze
Druk op knop om het afspelen van een bestand te onderbreken/hervatten.
In een lus afspelen
Druk op de 3 RPT-knop om het lusafspelen te selecteren. RPT ONE/RPT FOLD/RPT ALL
(standaard)
RPT ONE: In een lus afspelen van hetzelfde bestand.
RPT FOLD: In een lus afspelen van alle bestanden in een map.
RPT ALL: In een lus afspelen van alle bestanden.
RANDOM
Druk op de 4 RDM-knop om de functie van willekeurig afspelen in- of uit te schakelen.
RDM on: Willekeurig afspelen van alle bestanden.
RDM o: Willekeurig afspelen uitschakelen.
Map +/- functie
Druk op de knop DIR+/DIR- om de volgende/vorige map te kiezen en deze af te spelen.
Een liedje opzoeken
Druk in en houd de knop ingedrukt om "NUM 0000” weer te geven. Gebruik de
VOL-draaiknop (of voer het nummer direct in) om het gewenste nummer te selecteren
en druk vervolgens op VOL om het af te spelen. Let op: de cijfers 7/8/9/0 staan onder
de volgende knoppen: BT = 7, = 8, = 9, DIS = 0.
GEBRUIK VAN DE AUX IN 1/2 AANSLUITING
De AUX IN 1 aansluiting op het frontpaneel is een 3,5 mm jack-aansluiting. De AUX IN 2
bevindt zich aan de achterkant en is een RCA-aansluiting. Druk bij het aansluiten van
het audiosignaal op het apparaat op SRC/MENU-knop om over te schakelen naar de
AUX IN 1 (2) modus.
BLUETOOTH GEBRUIKEN
Bluetooth-apparaten koppelen
Schakel de Bluetooth functie op uw smartphone in en zoek naar Bluetooth-appara-
ten. In de lijst moet "BLAUPUNKT" verschijnen; selecteer "BLAUPUNKT" en voer
vervolgens het wachtwoord "0000" in wanneer u erom wordt gevraagd. Als het
koppelen met succes is voltooid, verschijnt het symbool BT op het scherm.
Bluetooth-audio
Druk op de SRC/MENU-knop om over te schakelen naar de BT MUSIC modus. Het
apparaat zal automatisch een liedje van uw smartphone afspelen. Druk op de
knop om het liedje te stoppen/ af te spelen.
Druk op de knop / om het volgende/vorige nummer te kiezen.
HDMI GEBRUIKEN
De voorste HDMI-aansluiting gaat over naar de achterste HDMI-aansluiting. Het
afspelen via HDMI wordt dus niet beïnvloed.
V-IN en V-OUT RCA-aansluiting
Aan de achterkant van het apparaat gaat de V-IN aansluiting over naar de V-OUT
aansluiting.
AFSTANDSBEDIENING
De afstandsbediening kan worden gebruikt
wanneer de IR-optie in het menu is ingeschakeld.
OFF : Het apparaat in-/uitschakelen
VOL+: Volume verhogen
VOL- : Volume verlagen
1 : Zone 1 MUTE in-/uitschakelen
2 : Zone 2 MUTE in-/uitschakelen
Other operation please reference the description above
ALGEMENE INFORMATIE
Vereisten betreende de voeding : 12 V gelijkstroom, minpool verbonden
met de massa
Afmetingen van de montagebasis : 129 (b) x 112 (d) x 65 (h)
Toon instellingen
- Lage tonen (bij 100 Hz) : ±10 dB
- Hoge tonen (bij 100 Hz) : ±10 dB
Maximaal uitgangsvermogen : 4 x 40 watts
Stroomverbruik: :10 A (max.)
RADIO FM AM
Frequentiebereik: 87.5 to 108 MHz 522 to 1620 KHz
IF 10.7 MHz 450 KHz
Gevoeligheid 4 µV (S/N = 30 dB) 36 dBµV (S/N = 20 dB)
Stereokanaalscheiding >25 dB /
PROBLEEMOPLOSSING
NL

Instrucciones de seguridad
El reproductor multimedia se ha fabricado de acuerdo con las normas actuales
de avance tecnológico y los principios de seguridad generalmente reconocidos.
No obstante, el incumplimiento de las instrucciones de seguridad aquí
indicadas supone una serie de riesgos. Lea atentamente todo el manual antes
de utilizar el reproductor multimedia. Guarde el manual en un lugar que esté
accesible para todos los usuarios en todo momento. Si el reproductor multime-
dia se proporciona a un tercero, recuerde incluir también el presente manual.
Además, siga las indicaciones del manual de uso de los dispositivos conectados
a este reproductor.
Indicaciones generales de seguridad
Siga las siguientes instrucciones para evitar lesiones corporales:
No modique ni abra el equipo.
Uso previsto
El reproductor multimedia está diseñado para su incorporación y operación en
vehículos provistos de instalaciones con una tensión de alimentación de 12 V.
Deben respetarse los límites de potencia de la unidad. Cualquier reparación o
instalación debe encargarse a profesionales.
Instrucciones de montaje
Puede instalar el equipo por cuenta propia solo si tiene experiencia en materia
de la instalación de equipos de radio y conocimientos de sistemas eléctricos de
automóviles. Consulte el diagrama de cableado proporcionado en este manual.
La instalación de la unidad no debe impedir ni bloquear el funcionamiento de
ningún airbag, otros dispositivos de seguridad o controles.
Declaración de conformidad
Blaupunkt Competence Center Car Multimedia-Evo Sales GmbH declara que el
presente equipo cumple los requisitos esenciales y otras condiciones de la
directiva 2014/53/UE. La declaración de conformidad está disponible en la
página web www.blaupunkt.com.
Instrucciones de limpieza
Los disolventes, productos de limpieza y agentes abrasivos, así como los aerosoles
de limpieza del salpicadero y los productos para el cuidado de plásticos pueden
incluir componentes que podrían dañar la supercie del reproductor multimedia.
Limpie el reproductor con una bayeta seca o ligeramente humedecida.
Instrucciones de eliminación
¡No deseche el aparato usado con los residuos domésticos!
Para deshacerse del equipo, del mando a distancia y de las pilas usadas,
llévelos a un punto de recogida de equipos usados.
Alcance del suministro
El suministro incluye:
reproductor multimedia BPA 3022 M,
mando a distancia,
conectores ISO,
tornillos de montaje,
manual de uso.
INFORMACIÓN IMPORTANTE RELATIVA A LA INSTALACIÓN
1. Antes de instalar el aparato, lea detenidamente todo el manual de uso.
2. Asegúrese de que todos los demás cables han sido conectados antes de
conectar la fuente de alimentación.
3. Para evitar cortocircuitos, asegúrese de que todos los cables expuestos estén
aislados.
4. Una vez terminada la instalación, je todos los cables.
5. Las conexiones de cableado al reproductor deben realizarse de acuerdo con
las indicaciones del presente manual. Una conexión incorrecta puede
provocar daños en el aparato.
6. El reproductor está diseñado para funcionar solamente con instalaciones de
12 V CC.
INSTALACIÓN DE LA UNIDAD
DESMONTAJE DE UNIDAD
1. Desmonte la unidad.
2. Retire el marco embellecedor exterior.
Nota acerca de cables HDMI:
Utilice un cable HDMI de buena calidad.
La longitud total (en la parte frontal y trasera) no debe superar 12 pies.
CONEXIÓN DE CABLEADO
1. El reproductor puede utilizarse solamente con una tensión de +12 V CC.
2. No conecte el terminal de la batería hasta que el reproductor esté completamen-
te instalado.
3. Asegúrese de que el cable amarillo esté conectado al polo positivo (+) de la batería.
4. Al sustituir el fusible, asegúrese de que los parámetros del fusible nuevo sean los
mismos.
5. El uso de altavoces de buena calidad con una impedancia de 4 a 8 ohmios
permitirá obtener el máximo rendimiento del equipo.
DISTRIBUCIÓN DE LOS BOTONES
1. ZONA 1 2. 1 3. ZONA 2
4. 2 5. BT 6. 3 RPT
7. 8. 4 RDM 9.
10. 5 DIR- 11. DIS 12. 6 DIR+
13. LCD 14. TOMA AUX 15. TOMA DE CONEXIÓN DE
AURICULARES
16. ENTRADA HDMI 17. REINICIO 18. RUEDA DE AJUSTE
19. PUERTO USB 20. SRC/MENU
OPERACIÓN BÁSICA
Encendido/apagado de la unidad y de la función de silencio
Para encender la unidad, pulse el botón /MUTE. Para activar o desactivar la función
de silencio, pulse brevemente la rueda de ajuste mientras la unidad está encendida.
Mantenga pulsado este botón para apagar la unidad.
Ajustes de sonido y menú de conguración
Pulse y mantenga pulsado el botón SCR / MENU para acceder al menú presentado a
continuación:
BAS->TRE->BAL->EQ (apag./pop/rock/clas)->LOUD (enc./apag.)->CLK HH->CLK
MM->IR (enc./apag.) ->CT (indep/sync)->SYG. SONIDO (enc./apag.) )->P_VOL
(13)->DX (LOC)->STE- REO (MONO)
En cada posición, gire la rueda VOL para seleccionarla.
INFRARROJOS (ENC./APAG.):
INFRARROJOS enc.: La unidad se puede encender con el mando a distancia por
infrarrojos. En tal caso, el sistema funciona en modo de alto consumo energético.
INFRARROJOS apag.: La unidad no se puede encender con el mando a distancia por
infrarrojos. El sistema está en modo de bajo consumo energético.
CT (INDEP/SYNC):
CT INDEP: El reloj funciona de forma independiente.
CT SYNC: El reloj se sincronizará con la hora de la emisora RDS recibida.
Nota: Al congurar el reloj en el menú, la función CT se ajusta automáticamente al
modo INDEP (funcionamiento independiente).
SEÑAL ACÚSTICA (enc./apag.): Permite activar/desactivar la señal acústica mediante
la pulsación de los botones.
P-VOL: Permite ajustar el volumen al encender la unidad. Si el nivel de volumen al
apagar la unidad es inferior al nivel P-VOL, al encender el equipo, la unidad ajustará
dicho nivel al volumen de apagado.
Si el nivel de volumen en el momento del apagado de la unidad es superior al nivel
P-VOL, el volumen se restablecerá al valor de P-VOL a la hora de encender el equipo.
Búsqueda de altavoces Bluetooth
Si mantiene pulsado el botón BT, aparecerá el mensaje «SEARCH...» [buscar]. Un
momento después, aparecerá el nombre del dispositivo Bluetooth. Para mostrar el
siguiente dispositivo, gire la rueda VOL. Una vez que el nombre del altavoz Bluetooth
deseado aparezca en la pantalla LCD, pulse el botón VOL para emparejar el
dispositivo. Si el emparejamiento se realiza correctamente, la pantalla mostrará «BOX
ON».
Indicación importante: A pesar de los numerosos ensayos realizados con diversos
dispositivos Bluetooth, no se puede garantizar la compatibilidad con todos los
dispositivos Bluetooth disponibles en el mercado.
Transmisión de la señal al altavoz Bluetooth
Pulse brevemente el botón BT para detener la transferencia o transmitir la señal al
altavoz Bluetooth. En la pantalla aparecerá el mensaje «BOX OFF/ON».
Nota: Aunque Blaupunkt comprueba cuidadosamente la compatibilidad de los distintos
altavoces Bluetooth, no se puede garantizar un funcionamiento infalible con todos los
modelos disponibles en el mercado.
Operación de la Zona 1 y la Zona 2
Pulse brevemente Zone 1 (o Zone 2) para apagar/encender el sonido de la Zona 1 (o
Zona 2).
Mantenga pulsado el botón Zone 1 (o Zone 2) para silenciar el sonido de la Zona 1 (o
Zona 2). Si vuelve a mantener pulsado el botón, se deshabilitará el modo silencio.
Prioridad de la información o del reloj
Pulse brevemente el botón DIS para congurar la prioridad del reloj o de la
información. Nota: En la banda de FM, cuando reciba emisoras RDS, pulse brevemen-
te DIS para mostrar NOMBRE DE EMISORA / RELOJ / FRECUENCIA.
Ajuste del reloj
Seleccione CLK HH/CLK MM en el menú. Gire la rueda VOL para ajustar la hora / los
minutos.
Uso de auriculares
El panel frontal dispone de una toma de conexión de auriculares de 3,5 mm. El panel
adopta los ajustes de funcionamiento de la Zona 1.
USO DE LA MODALIDAD DE RADIO
Recepción de emisoras de radio
Pulse el botón SRC / MENU para seleccionar uno de los siguientes modos:
FM1->FM2->MW. Pulse brevemente el botón / para recibir la emisora de
radio deseada. Mantenga pulsado el botón / para sintonizar manualmente
la frecuencia.
Cómo guardar las emisoras y seleccionar las emisoras guardadas de forma manual
Recepción de la emisora deseada. Pulse y mantenga pulsado uno de los botones de
memoria (de 1 a 6) durante 2 segundos. La emisora actual se guardará en la memoria
bajo determinado botón numérico. Pulse rápidamente el botón de la emisora
programada (de 1 a 6) para escuchar directamente la señal emitida por dicha emisora
y guardada bajo el botón asignado.
USO DE DEVDAB
Pulse el botón SRC / MENU para cambiar la fuente entre DAB1 o DAB2.
Selección de emisora
Pulse el botón / para seleccionar la emisora anterior/siguiente.
Cómo guardar las emisoras y seleccionar las emisoras guardadas de forma manual
Cuando la frecuencia de la emisora deseada esté ajustada, mantenga pulsado uno de
los botones de 1 a 6 durante 2 segundos para guardar esta emisora bajo el número
correspondiente. Pulse rápidamente el botón de la emisora programada (de 1 a 6)
para escuchar directamente la señal emitida por dicha emisora y guardada bajo el
botón asignado.
USO DE USB
Después de conectar la unidad USB al aparato, este reproduce automáticamente
cheros MP3 / WMA. Si ya se ha conectado la unidad USB al aparato, pulse brevemen-
te el botón SRC / MENU hasta que aparezca la pantalla del modo USB.
Selección de chero
Pulse el botón / para pasar al chero siguiente / anterior. Pulse el botón
/ para un avance o retroceso rápido.
Reproducir / Pausa
Pulse el botón 1 para pausar / reproducir un chero.
Repeat function
Pulse el botón 3 RPT para seleccionar la función de reproducción en bucle. RPT
ONE/RPT FOLD/RPT ALL (por defecto)
RPT ONE: Reproducción de un solo chero en bucle.
RPT FOLD: Reproducción de todos los cheros de una carpeta en bucle.
RPT ALL: Reproducción de todos los cheros en bucle.
RANDOM
Pulse el botón 4 RDM para activar o desactivar la función de reproducción aleatoria.
RDM enc.: Reproducción aleatoria de todos los cheros.
RDM apag.: Apagado de la función de reproducción aleatoria.
Función de carpeta +/-
Pulse DIR+ / DIR- para seleccionar la carpeta siguiente / anterior a reproducir.
Buscar canción
Si mantiene pulsado el botón , aparecerá el mensaje «NUM 0000». Girando la
rueda VOL (o introduciendo directamente el número), seleccione el número y, a
continuación, pulse VOL para reproducir la canción. Preste atención a 7/8/9/0 como:
BT = 7, = 8, = 9, DIS = 0.
USO DE LA TOMA AUX IN 1/2
En el panel frontal, la toma AUX IN 1 es una toma de 3,5 mm. La toma AUX IN 2 para
RCA se encuentra en la parte trasera de la unidad. Con la pulsación de SRC / MENU,
accederá al modo AUX IN1 (2) cuando la señal de audio esté conectada a la unidad.
USO DE LA MODALIDAD BLUETOOTH
Cómo vincular dispositivos
Seleccione Bluetooth en su teléfono y busque el dispositivo Bluetooth. En la lista
debería aparecer «BLAUPUNKT»; seleccione «BLAUPUNKT» e introduzca la contraseña
«0000» si aparece una solicitud de introducción de la contraseña. Una vez realizado el
emparejamiento, en la pantalla aparecerá el símbolo BT.
Audio Bluetooth
Pulse el botón SRC / MENU para cambiar al modo BT MUSIC. El aparato reproducirá
automáticamente la canción desde su teléfono. Pulse el botón para pausar /
reproducir una canción.
Pulse el botón / para seleccionar la canción anterior / siguiente.
USO DE HDMI
La entrada HDMI delantera va a la toma HDMI trasera. Esto no afecta a la reproduc-
ción de contenidos a través de HDMI.
Conectores RCA V-IN y V-OUT
En la parte trasera de la unidad, el conector V-IN va al conector V-OUT.
MANDO A DISTANCIA
El mando a distancia se puede utilizar cuando
la opción IR está activada en el menú.
APAGADO (OFF): Encendido y apagado
del aparato.
VOL+: Aumentar el volumen
VOL-: Reducir el volumen
1 : Encendido / apagado del silencio de
la Zona 1
2 : Encendido / apagado del silencio de
la Zona 2
Para otras operaciones, lea las instrucciones anteriores.
INFORMACIÓN GENERAL
Requisitos de alimentación eléctrica : Corriente continua de 12 V, borne negativo
conectado a tierra
Medidas de la base de montaje : 129 (ancho) x 112 (profundo) x 65 (alto)
Ajustes de tono
- Bajos (a 100 Hz) : ±10 dB
- Altos (a 100 Hz) : ±10 dB
Potencia máxima de salida : 4 x 40 watts
Consumo energético : 10 Ampere (max.)
RADIO FM AM
Gama de frecuencias de 87,5 a 108 MHz de 522 a 1620 KHz
IF 10.7 MHz 450 KHz
Sensibilidad 4 µV (S/N = 30 dB) 36 dBµV (S/N = 20 dB)
Separación de los canales estéreo >25 dB /
SOLUCIÓN DE PROBLEMAS
Veiligheidsinstructies
Dit multimediastation is vervaardigd volgens de nieuwste technologische
ontwikkelingen en algemeen erkende veiligheidsbeginselen. Toch kunnen er
gevaren ontstaan wanneer de veiligheidsinstructies in deze gebruiksaanwijzing
niet worden nageleefd. Lees de volledige gebruiksaanwijzing zorgvuldig door
voordat u het multimediastation in gebruik neemt. Bewaar de gebruiksaanwij-
zing op een plaats waar deze te allen tijde toegankelijk is voor alle gebruikers.
Als u het multimediastation aan derden overdraagt, dient u deze gebruiksaan-
wijzing bij te voegen. Neem bovendien de aanwijzingen in de gebruiksaanwij-
zingen van de op dit station aangesloten apparaten in acht.
Algemene veiligheidsinstructies
Neem de volgende aanwijzingen in acht om uzelf tegen persoonlijk letsel te
beschermen: Wijzig of open het apparaat niet.
Beoogd gebruik
Het multimediastation is bedoeld voor installatie en gebruik in voertuigen met
12 V voedingsspanning. Neem de vermogenslimieten van het apparaat in acht.
Laat alle reparaties en de installatie door een vakman uitvoeren.
Montage instructie
Installeer het apparaat alleen zelf als u ervaring heeft met de installatie van
autoradio’s en vertrouwd bent met elektrische autoproblemen. Raadpleeg
hiervoor het aansluitschema in deze gebruiksaanwijzing. De installatie van het
apparaat mag de werking van airbags, andere veiligheids- of bedieningsvoorzi-
eningen niet belemmeren of blokkeren.
Conformiteitsverklaring
Blaupunkt Competence Center Car Multimedia – Evo Sales GmbH verklaart dat
dit apparaat voldoet aan de basisvereisten en de overige relevante bepalingen
van de richtlijn 2014/53/EU. De conformiteitsverklaring is te vinden op de
website www.blaupunkt.com.
Reinigingsinstructies
Oplosmiddelen, reinigingsmiddelen en schuurmiddelen, alsmede reinigings-
sprays voor de cockpit en onderhoudsproducten voor plastic, kunnen
bestanddelen bevatten die het oppervlak van het multimediastation kunnen
beschadigen. Gebruik alleen een droge of licht bevochtigde doek om het
multimediastation te reinigen.
Instructies voor afvoer
Gooi het afgedankte apparaat niet samen met het huisvuil weg!
Om het apparaat, de afstandsbediening en de afgedankte batterijen af te
voeren, dient u ze naar een inzamelpunt voor afgedankte apparatuur te
brengen.
Leveringsomvang
De levering omvat:
BPA 3022 M multimediastation,
afstandsbediening,
ISO-connectoren,
montageschroeven,
gebruiksaanwijzing.
BELANGRIJKE INFORMATIE OVER DE INSTALLATIE
1. Lees de gebruiksaanwijzing zorgvuldig door voordat u het apparaat
installeert.
2. Zorg er vóór het aansluiten van de voeding voor dat alle andere draden zijn
aangesloten.
3. Zorg ervoor dat alle blootliggende draden zijn geïsoleerd om kortsluiting te
voorkomen.
4. Maak na voltooiing van de installatie alle draden vast.
5. Aansluitingen op de speler moeten volgens deze gebruiksaanwijzing
worden gemaakt. Een verkeerde aansluiting kan leiden tot schade aan het
apparaat.
6. De speler is bedoeld om alleen te werken met een 12 V DC-installatie.
MONTAGE VAN HET APPARAAT
DEMONTAGE VAN HET APPARAAT
1. Demonteer het apparaat.
2. Verwijder het buitenste sierframe.
Opmerking voor HDMI:
Gebruik een HDMI-kabel van goede kwaliteit.
De totale lengte (voor en achter) mag niet meer dan 365 cm bedragen.
ALGEMENE INFORMATIE
DRADEN AANSLUITEN
1. De speler mag alleen worden gebruikt met +12 V DC.
2. Sluit de accupool pas aan nadat de speler volledig en correct is geïnstalleerd.
3. Zorg ervoor dat de gele kabel is aangesloten op de pluspool (+) van de accu.
4. Zorg er bij het vervangen van de zekering voor dat de parameters van de
nieuwe zekering dezelfde zijn.
5. Voor optimale prestaties van het apparaat worden luidsprekers van goede
kwaliteit met een impedantie van 4-8 ohm aanbevolen.
PLAATS VAN DE KNOPPEN
1. ZONE 1 2. 1 3. ZONE 2
4. 2 5. BT 6. 3 RPT
7. 8. 4 RDM 9.
10. 5 DIR- 11. DIS 12. 6 DIR+
13. LCD SCHERM 14. AUX AANSLUITING 15. HOOFDTELEFOON AANSLUITING
16. HDMI AANSLUITING 17. RESET 18. DRAAIKNOP
19. USB AANSLUITING 20. SRC/MENU
BASISBEDIENING
Het apparaat en de Mute-functie in-/uitschakelen
Druk op de /MUTE draaiknop om het apparaat in te schakelen. Druk, als het apparaat
aanstaat, kort op de draaiknop om de geluidsdempingsfunctie (MUTE) in- of uit te
schakelen. Druk in en houd de draaiknop ingedrukt om het apparaat uit te schakelen.
Geluidsinstellingen en instelmenu
Druk in en houd de knop SRC/MENU ingedrukt om naar het onderstaande menu te
gaan:
BAS->TRE->BAL->EQ (o/pop/rock/clas)->LOUD (on/o)->CLK HH->CLK MM->IR
(on/o) ->CT (indep/sync)->BEEP (on/o) ->P_VOL (13)->DX (LOC)->STEREO (MONO)
Draai bij elke positie de VOL-knop om deze in te stellen.
IR (ON/OFF):
IR ON: Met IR ON kan het apparaat worden ingeschakeld met de infrarood afstandsbe-
diening. Het systeem staat dan in de modus van hoog energieverbruik.
IR OFF: Met IR OFF kan het apparaat niet worden ingeschakeld met de infrarood
afstandsbediening. Het systeem staat in de modus van laag energieverbruik.
CT (INDEP/SYNC):
CT INDEP: De klok werkt onafhankelijk.
CT SYNC: De klok wordt gesynchroniseerd met de tijd van de ontvangen RDS-zender.
Opmerking: Als de klok handmatig in het menu wordt ingesteld, wordt de CT-functie
(kloktijd) automatisch ingesteld op de INDEP-modus (onafhankelijke werking).
BEEP (ON/OFF): Hiermee wordt de pieptoon in-/uitgeschakeld.
P-VOL (vooraf ingesteld inschakelvolume): Hiermee wordt het inschakelvolume
ingesteld. Als het uitschakelvolume lager is dan het P-VOL niveau, zal het apparaat bij
het inschakelen het volume instellen op het uitschakelvolume.
Als het uitschakelvolume hoger is dan het P-VOL niveau, zal het inschakelvolume bij
het inschakelen van apparaat worden teruggezet naar het ingestelde P-VOL niveau.
Zoeken naar Bluetooth-luidsprekers
Druk in en houd de BT-knop ingedrukt, de melding "SEARCH...” [zoeken] verschijnt.
Even later verschijnt de naam van een gevonden Bluetooth-apparaat. Om het
volgende Bluetooth-apparaat weer te geven, draai de VOL-knop. Wanneer de naam
van de gewenste Bluetooth-luidspreker op het LCD-scherm verschijnt, druk op de
VOL-knop om het apparaat te koppelen. Als het koppelen gelukt is, verschijnt op het
display "BOX ON".
Belangrijke opmerking: Ondanks vele tests met verschillende Bluetooth-apparaten,
kan compatibiliteit met alle op de markt verkrijgbare Bluetooth-apparaten niet
worden gegarandeerd.
Signaaloverdracht naar Bluetooth-luidspreker
Druk kort op de BT-knop om de overdracht van het signaal naar de Bluetooth-luid-
spreker aan/uit te zetten. Op het display verschijnt "BOX OFF/ON".
Opmerking: Ondanks zorgvuldige controle door Blaupunkt van de compatibiliteit met
verschillende Bluetooth-luidsprekers, kan een naadloze werking met alle op de markt
verkrijgbare modellen niet worden gegarandeerd.
Bediening van Zone 1 en Zone 2
Druk kort op de knop Zone 1 (of Zone 2) om het geluid van Zone 1 (of Zone 2) in/uit
te schakelen.
Houd de knop Zone 1 (of Zone 2) ingedrukt om het geluid van Zone 1 (of Zone 2) te
dempen. Druk nogmaals op de knop om het geluidsdemping uit te schakelen.
Prioriteit voor informatie of klok
Druk kort op de DIS-knop om klokprioriteit of informatieprioriteit in te stellen.
Opmerking: Bij ontvangst van een RDS-zender in de FM-band, druk kort op DIS-knop
om STATION NAME/CLOCK/FREQUENCY weer te geven.
Klok instellen
Ga in het menu naar de positie CLK HH/CLK MM. Draai de VOL-knop om uur/minuut
in te stellen.
Hoofdtelefoon gebruiken
Op het frontpaneel bevindt zich een 3,5 mm aansluiting voor een hoofdtelefoon.
Deze neemt de instellingen van Zone 1 over.
RADIO GEBRUIKEN
Een radiozender ontvangen
Druk op de SRC/MENU-knop om FM1->FM2->MW te selecteren. Druk kort op de
knop / om de gewenste radiozender te ontvangen. Houd de knop /
ingedrukt om de frequentie handmatig af te stemmen.
Zenders handmatig opslaan en opgeslagen zenders oproepen
Terwijl de gewenste zender wordt ontvangen, druk in en houd een van de geheugen-
knoppen (1-6) gedurende 2 seconden ingedrukt. De huidige zender wordt onder de
ingedrukte nummerknop opgeslagen. Druk kort op een van de geheugenknoppen
(1-6) om direct naar een onder deze knop opgeslagen zender te luisteren.
DAB GEBRUIKEN
Druk op de SRC/MENU-knop om de bron om te schakelen tussen DAB1 of DAB2.
Een zender kiezen
Druk op de knop / om de volgende/vorige zender te kiezen.
Zenders handmatig opslaan en opgeslagen zenders oproepen
Als de frequentie van de gewenste zender is ingesteld. Houd een van de knoppen 1-6
gedurende 2 seconden ingedrukt om deze zender onder het overeenkomstige
nummer op te slaan. Druk kort op een van de geheugenknoppen (1-6) om direct naar
een onder deze knop opgeslagen zender te luisteren.
USB GEBRUIKEN
Als een USB-stick op het apparaat wordt aangesloten, zal het automatisch MP3/W-
MA-bestanden afspelen. Als er al een USB-stick op het apparaat is aangesloten, blijf kort
op de SRC/MENU te drukken tot het USB-modusscherm verschijnt.
Een bestand kiezen
Druk op de / knop om naar het volgende/vorige bestand te gaan. Houd de
/ knop ingedrukt om snel vooruit of achteruit te gaan.
Afspelen/pauze
Druk op knop om het afspelen van een bestand te onderbreken/hervatten.
In een lus afspelen
Druk op de 3 RPT-knop om het lusafspelen te selecteren. RPT ONE/RPT FOLD/RPT ALL
(standaard)
RPT ONE: In een lus afspelen van hetzelfde bestand.
RPT FOLD: In een lus afspelen van alle bestanden in een map.
RPT ALL: In een lus afspelen van alle bestanden.
RANDOM
Druk op de 4 RDM-knop om de functie van willekeurig afspelen in- of uit te schakelen.
RDM on: Willekeurig afspelen van alle bestanden.
RDM o: Willekeurig afspelen uitschakelen.
Map +/- functie
Druk op de knop DIR+/DIR- om de volgende/vorige map te kiezen en deze af te spelen.
Een liedje opzoeken
Druk in en houd de knop ingedrukt om "NUM 0000” weer te geven. Gebruik de
VOL-draaiknop (of voer het nummer direct in) om het gewenste nummer te selecteren
en druk vervolgens op VOL om het af te spelen. Let op: de cijfers 7/8/9/0 staan onder
de volgende knoppen: BT = 7, = 8, = 9, DIS = 0.
GEBRUIK VAN DE AUX IN 1/2 AANSLUITING
De AUX IN 1 aansluiting op het frontpaneel is een 3,5 mm jack-aansluiting. De AUX IN 2
bevindt zich aan de achterkant en is een RCA-aansluiting. Druk bij het aansluiten van
het audiosignaal op het apparaat op SRC/MENU-knop om over te schakelen naar de
AUX IN 1 (2) modus.
BLUETOOTH GEBRUIKEN
Bluetooth-apparaten koppelen
Schakel de Bluetooth functie op uw smartphone in en zoek naar Bluetooth-appara-
ten. In de lijst moet "BLAUPUNKT" verschijnen; selecteer "BLAUPUNKT" en voer
vervolgens het wachtwoord "0000" in wanneer u erom wordt gevraagd. Als het
koppelen met succes is voltooid, verschijnt het symbool BT op het scherm.
Bluetooth-audio
Druk op de SRC/MENU-knop om over te schakelen naar de BT MUSIC modus. Het
apparaat zal automatisch een liedje van uw smartphone afspelen. Druk op de
knop om het liedje te stoppen/ af te spelen.
Druk op de knop / om het volgende/vorige nummer te kiezen.
HDMI GEBRUIKEN
De voorste HDMI-aansluiting gaat over naar de achterste HDMI-aansluiting. Het
afspelen via HDMI wordt dus niet beïnvloed.
V-IN en V-OUT RCA-aansluiting
Aan de achterkant van het apparaat gaat de V-IN aansluiting over naar de V-OUT
aansluiting.
AFSTANDSBEDIENING
De afstandsbediening kan worden gebruikt
wanneer de IR-optie in het menu is ingeschakeld.
OFF : Het apparaat in-/uitschakelen
VOL+: Volume verhogen
VOL- : Volume verlagen
1 : Zone 1 MUTE in-/uitschakelen
2 : Zone 2 MUTE in-/uitschakelen
Other operation please reference the description above
ALGEMENE INFORMATIE
Vereisten betreende de voeding : 12 V gelijkstroom, minpool verbonden
met de massa
Afmetingen van de montagebasis : 129 (b) x 112 (d) x 65 (h)
Toon instellingen
- Lage tonen (bij 100 Hz) : ±10 dB
- Hoge tonen (bij 100 Hz) : ±10 dB
Maximaal uitgangsvermogen : 4 x 40 watts
Stroomverbruik: :10 A (max.)
RADIO FM AM
Frequentiebereik: 87.5 to 108 MHz 522 to 1620 KHz
IF 10.7 MHz 450 KHz
Gevoeligheid 4 µV (S/N = 30 dB) 36 dBµV (S/N = 20 dB)
Stereokanaalscheiding >25 dB /
PROBLEEMOPLOSSING
NL
MONTAGE
Dashboard
Schroeven
Decoratieve afdekkingen
98, 0 × 101, 0 mm

Veiligheidsinstructies
Dit multimediastation is vervaardigd volgens de nieuwste technologische
ontwikkelingen en algemeen erkende veiligheidsbeginselen. Toch kunnen er
gevaren ontstaan wanneer de veiligheidsinstructies in deze gebruiksaanwijzing
niet worden nageleefd. Lees de volledige gebruiksaanwijzing zorgvuldig door
voordat u het multimediastation in gebruik neemt. Bewaar de gebruiksaanwij-
zing op een plaats waar deze te allen tijde toegankelijk is voor alle gebruikers.
Als u het multimediastation aan derden overdraagt, dient u deze gebruiksaan-
wijzing bij te voegen. Neem bovendien de aanwijzingen in de gebruiksaanwij-
zingen van de op dit station aangesloten apparaten in acht.
Algemene veiligheidsinstructies
Neem de volgende aanwijzingen in acht om uzelf tegen persoonlijk letsel te
beschermen: Wijzig of open het apparaat niet.
Beoogd gebruik
Het multimediastation is bedoeld voor installatie en gebruik in voertuigen met
12 V voedingsspanning. Neem de vermogenslimieten van het apparaat in acht.
Laat alle reparaties en de installatie door een vakman uitvoeren.
Montage instructie
Installeer het apparaat alleen zelf als u ervaring heeft met de installatie van
autoradio’s en vertrouwd bent met elektrische autoproblemen. Raadpleeg
hiervoor het aansluitschema in deze gebruiksaanwijzing. De installatie van het
apparaat mag de werking van airbags, andere veiligheids- of bedieningsvoorzi-
eningen niet belemmeren of blokkeren.
Conformiteitsverklaring
Blaupunkt Competence Center Car Multimedia – Evo Sales GmbH verklaart dat
dit apparaat voldoet aan de basisvereisten en de overige relevante bepalingen
van de richtlijn 2014/53/EU. De conformiteitsverklaring is te vinden op de
website www.blaupunkt.com.
Reinigingsinstructies
Oplosmiddelen, reinigingsmiddelen en schuurmiddelen, alsmede reinigings-
sprays voor de cockpit en onderhoudsproducten voor plastic, kunnen
bestanddelen bevatten die het oppervlak van het multimediastation kunnen
beschadigen. Gebruik alleen een droge of licht bevochtigde doek om het
multimediastation te reinigen.
Instructies voor afvoer
Gooi het afgedankte apparaat niet samen met het huisvuil weg!
Om het apparaat, de afstandsbediening en de afgedankte batterijen af te
voeren, dient u ze naar een inzamelpunt voor afgedankte apparatuur te
brengen.
Leveringsomvang
De levering omvat:
BPA 3022 M multimediastation,
afstandsbediening,
ISO-connectoren,
montageschroeven,
gebruiksaanwijzing.
BELANGRIJKE INFORMATIE OVER DE INSTALLATIE
1. Lees de gebruiksaanwijzing zorgvuldig door voordat u het apparaat
installeert.
2. Zorg er vóór het aansluiten van de voeding voor dat alle andere draden zijn
aangesloten.
3. Zorg ervoor dat alle blootliggende draden zijn geïsoleerd om kortsluiting te
voorkomen.
4. Maak na voltooiing van de installatie alle draden vast.
5. Aansluitingen op de speler moeten volgens deze gebruiksaanwijzing
worden gemaakt. Een verkeerde aansluiting kan leiden tot schade aan het
apparaat.
6. De speler is bedoeld om alleen te werken met een 12 V DC-installatie.
MONTAGE VAN HET APPARAAT
DEMONTAGE VAN HET APPARAAT
1. Demonteer het apparaat.
2. Verwijder het buitenste sierframe.
Opmerking voor HDMI:
Gebruik een HDMI-kabel van goede kwaliteit.
De totale lengte (voor en achter) mag niet meer dan 365 cm bedragen.
DRADEN AANSLUITEN
1. De speler mag alleen worden gebruikt met +12 V DC.
2. Sluit de accupool pas aan nadat de speler volledig en correct is geïnstalleerd.
3. Zorg ervoor dat de gele kabel is aangesloten op de pluspool (+) van de accu.
4. Zorg er bij het vervangen van de zekering voor dat de parameters van de
nieuwe zekering dezelfde zijn.
5. Voor optimale prestaties van het apparaat worden luidsprekers van goede
kwaliteit met een impedantie van 4-8 ohm aanbevolen.
DRADEN AANSLUITEN
PLAATS VAN DE KNOPPEN
1. ZONE 1 2. 1 3. ZONE 2
4. 2 5. BT 6. 3 RPT
7. 8. 4 RDM 9.
10. 5 DIR- 11. DIS 12. 6 DIR+
13. LCD SCHERM 14. AUX AANSLUITING 15. HOOFDTELEFOON AANSLUITING
16. HDMI AANSLUITING 17. RESET 18. DRAAIKNOP
19. USB AANSLUITING 20. SRC/MENU
BASISBEDIENING
Het apparaat en de Mute-functie in-/uitschakelen
Druk op de /MUTE draaiknop om het apparaat in te schakelen. Druk, als het apparaat
aanstaat, kort op de draaiknop om de geluidsdempingsfunctie (MUTE) in- of uit te
schakelen. Druk in en houd de draaiknop ingedrukt om het apparaat uit te schakelen.
Geluidsinstellingen en instelmenu
Druk in en houd de knop SRC/MENU ingedrukt om naar het onderstaande menu te
gaan:
BAS->TRE->BAL->EQ (o/pop/rock/clas)->LOUD (on/o)->CLK HH->CLK MM->IR
(on/o) ->CT (indep/sync)->BEEP (on/o) ->P_VOL (13)->DX (LOC)->STEREO (MONO)
Draai bij elke positie de VOL-knop om deze in te stellen.
IR (ON/OFF):
IR ON: Met IR ON kan het apparaat worden ingeschakeld met de infrarood afstandsbe-
diening. Het systeem staat dan in de modus van hoog energieverbruik.
IR OFF: Met IR OFF kan het apparaat niet worden ingeschakeld met de infrarood
afstandsbediening. Het systeem staat in de modus van laag energieverbruik.
CT (INDEP/SYNC):
CT INDEP: De klok werkt onafhankelijk.
CT SYNC: De klok wordt gesynchroniseerd met de tijd van de ontvangen RDS-zender.
Opmerking: Als de klok handmatig in het menu wordt ingesteld, wordt de CT-functie
(kloktijd) automatisch ingesteld op de INDEP-modus (onafhankelijke werking).
BEEP (ON/OFF): Hiermee wordt de pieptoon in-/uitgeschakeld.
P-VOL (vooraf ingesteld inschakelvolume): Hiermee wordt het inschakelvolume
ingesteld. Als het uitschakelvolume lager is dan het P-VOL niveau, zal het apparaat bij
het inschakelen het volume instellen op het uitschakelvolume.
Als het uitschakelvolume hoger is dan het P-VOL niveau, zal het inschakelvolume bij
het inschakelen van apparaat worden teruggezet naar het ingestelde P-VOL niveau.
Zoeken naar Bluetooth-luidsprekers
Druk in en houd de BT-knop ingedrukt, de melding "SEARCH...” [zoeken] verschijnt.
Even later verschijnt de naam van een gevonden Bluetooth-apparaat. Om het
volgende Bluetooth-apparaat weer te geven, draai de VOL-knop. Wanneer de naam
van de gewenste Bluetooth-luidspreker op het LCD-scherm verschijnt, druk op de
VOL-knop om het apparaat te koppelen. Als het koppelen gelukt is, verschijnt op het
display "BOX ON".
Belangrijke opmerking: Ondanks vele tests met verschillende Bluetooth-apparaten,
kan compatibiliteit met alle op de markt verkrijgbare Bluetooth-apparaten niet
worden gegarandeerd.
Signaaloverdracht naar Bluetooth-luidspreker
Druk kort op de BT-knop om de overdracht van het signaal naar de Bluetooth-luid-
spreker aan/uit te zetten. Op het display verschijnt "BOX OFF/ON".
Opmerking: Ondanks zorgvuldige controle door Blaupunkt van de compatibiliteit met
verschillende Bluetooth-luidsprekers, kan een naadloze werking met alle op de markt
verkrijgbare modellen niet worden gegarandeerd.
Bediening van Zone 1 en Zone 2
Druk kort op de knop Zone 1 (of Zone 2) om het geluid van Zone 1 (of Zone 2) in/uit
te schakelen.
Houd de knop Zone 1 (of Zone 2) ingedrukt om het geluid van Zone 1 (of Zone 2) te
dempen. Druk nogmaals op de knop om het geluidsdemping uit te schakelen.
Prioriteit voor informatie of klok
Druk kort op de DIS-knop om klokprioriteit of informatieprioriteit in te stellen.
Opmerking: Bij ontvangst van een RDS-zender in de FM-band, druk kort op DIS-knop
om STATION NAME/CLOCK/FREQUENCY weer te geven.
Klok instellen
Ga in het menu naar de positie CLK HH/CLK MM. Draai de VOL-knop om uur/minuut
in te stellen.
Hoofdtelefoon gebruiken
Op het frontpaneel bevindt zich een 3,5 mm aansluiting voor een hoofdtelefoon.
Deze neemt de instellingen van Zone 1 over.
RADIO GEBRUIKEN
Een radiozender ontvangen
Druk op de SRC/MENU-knop om FM1->FM2->MW te selecteren. Druk kort op de
knop / om de gewenste radiozender te ontvangen. Houd de knop /
ingedrukt om de frequentie handmatig af te stemmen.
Zenders handmatig opslaan en opgeslagen zenders oproepen
Terwijl de gewenste zender wordt ontvangen, druk in en houd een van de geheugen-
knoppen (1-6) gedurende 2 seconden ingedrukt. De huidige zender wordt onder de
ingedrukte nummerknop opgeslagen. Druk kort op een van de geheugenknoppen
(1-6) om direct naar een onder deze knop opgeslagen zender te luisteren.
DAB GEBRUIKEN
Druk op de SRC/MENU-knop om de bron om te schakelen tussen DAB1 of DAB2.
Een zender kiezen
Druk op de knop / om de volgende/vorige zender te kiezen.
Zenders handmatig opslaan en opgeslagen zenders oproepen
Als de frequentie van de gewenste zender is ingesteld. Houd een van de knoppen 1-6
gedurende 2 seconden ingedrukt om deze zender onder het overeenkomstige
nummer op te slaan. Druk kort op een van de geheugenknoppen (1-6) om direct naar
een onder deze knop opgeslagen zender te luisteren.
USB GEBRUIKEN
Als een USB-stick op het apparaat wordt aangesloten, zal het automatisch MP3/W-
MA-bestanden afspelen. Als er al een USB-stick op het apparaat is aangesloten, blijf kort
op de SRC/MENU te drukken tot het USB-modusscherm verschijnt.
Een bestand kiezen
Druk op de / knop om naar het volgende/vorige bestand te gaan. Houd de
/ knop ingedrukt om snel vooruit of achteruit te gaan.
Afspelen/pauze
Druk op knop om het afspelen van een bestand te onderbreken/hervatten.
In een lus afspelen
Druk op de 3 RPT-knop om het lusafspelen te selecteren. RPT ONE/RPT FOLD/RPT ALL
(standaard)
RPT ONE: In een lus afspelen van hetzelfde bestand.
RPT FOLD: In een lus afspelen van alle bestanden in een map.
RPT ALL: In een lus afspelen van alle bestanden.
RANDOM
Druk op de 4 RDM-knop om de functie van willekeurig afspelen in- of uit te schakelen.
RDM on: Willekeurig afspelen van alle bestanden.
RDM o: Willekeurig afspelen uitschakelen.
Map +/- functie
Druk op de knop DIR+/DIR- om de volgende/vorige map te kiezen en deze af te spelen.
Een liedje opzoeken
Druk in en houd de knop ingedrukt om "NUM 0000” weer te geven. Gebruik de
VOL-draaiknop (of voer het nummer direct in) om het gewenste nummer te selecteren
en druk vervolgens op VOL om het af te spelen. Let op: de cijfers 7/8/9/0 staan onder
de volgende knoppen: BT = 7, = 8, = 9, DIS = 0.
GEBRUIK VAN DE AUX IN 1/2 AANSLUITING
De AUX IN 1 aansluiting op het frontpaneel is een 3,5 mm jack-aansluiting. De AUX IN 2
bevindt zich aan de achterkant en is een RCA-aansluiting. Druk bij het aansluiten van
het audiosignaal op het apparaat op SRC/MENU-knop om over te schakelen naar de
AUX IN 1 (2) modus.
BLUETOOTH GEBRUIKEN
Bluetooth-apparaten koppelen
Schakel de Bluetooth functie op uw smartphone in en zoek naar Bluetooth-appara-
ten. In de lijst moet "BLAUPUNKT" verschijnen; selecteer "BLAUPUNKT" en voer
vervolgens het wachtwoord "0000" in wanneer u erom wordt gevraagd. Als het
koppelen met succes is voltooid, verschijnt het symbool BT op het scherm.
Bluetooth-audio
Druk op de SRC/MENU-knop om over te schakelen naar de BT MUSIC modus. Het
apparaat zal automatisch een liedje van uw smartphone afspelen. Druk op de
knop om het liedje te stoppen/ af te spelen.
Druk op de knop / om het volgende/vorige nummer te kiezen.
HDMI GEBRUIKEN
De voorste HDMI-aansluiting gaat over naar de achterste HDMI-aansluiting. Het
afspelen via HDMI wordt dus niet beïnvloed.
V-IN en V-OUT RCA-aansluiting
Aan de achterkant van het apparaat gaat de V-IN aansluiting over naar de V-OUT
aansluiting.
AFSTANDSBEDIENING
De afstandsbediening kan worden gebruikt
wanneer de IR-optie in het menu is ingeschakeld.
OFF : Het apparaat in-/uitschakelen
VOL+: Volume verhogen
VOL- : Volume verlagen
1 : Zone 1 MUTE in-/uitschakelen
2 : Zone 2 MUTE in-/uitschakelen
Other operation please reference the description above
ALGEMENE INFORMATIE
Vereisten betreende de voeding : 12 V gelijkstroom, minpool verbonden
met de massa
Afmetingen van de montagebasis : 129 (b) x 112 (d) x 65 (h)
Toon instellingen
- Lage tonen (bij 100 Hz) : ±10 dB
- Hoge tonen (bij 100 Hz) : ±10 dB
Maximaal uitgangsvermogen : 4 x 40 watts
Stroomverbruik: :10 A (max.)
RADIO FM AM
Frequentiebereik: 87.5 to 108 MHz 522 to 1620 KHz
IF 10.7 MHz 450 KHz
Gevoeligheid 4 µV (S/N = 30 dB) 36 dBµV (S/N = 20 dB)
Stereokanaalscheiding >25 dB /
PROBLEEMOPLOSSING
NL
Onderdeel A
Onderdeel B
ZEKERING
RADIO-
ANTENNE Onderdeel A
Onderdeel B
HDMI
4-LUIDSPREKERSYSTEEM
(WIT/ZWART)
(WIT)
(GRIJS/ZWART)
(GRIJS)
(GROEN/ZWART)
(GROEN)
(PAARS/ZWART)
(PAARS)
ZONE 1
ZONE 2
Luidspreker
voor-links
Luidspreker
voor-rechts
Luidspreker
achter-links
Luidspreker
achter-rechts
Aarddraad (zwart)
Accessoire/schakelaar +12 VA (rood)
Automatische antenne (blauw)
Voeding +12 V DC (geel)

Veiligheidsinstructies
Dit multimediastation is vervaardigd volgens de nieuwste technologische
ontwikkelingen en algemeen erkende veiligheidsbeginselen. Toch kunnen er
gevaren ontstaan wanneer de veiligheidsinstructies in deze gebruiksaanwijzing
niet worden nageleefd. Lees de volledige gebruiksaanwijzing zorgvuldig door
voordat u het multimediastation in gebruik neemt. Bewaar de gebruiksaanwij-
zing op een plaats waar deze te allen tijde toegankelijk is voor alle gebruikers.
Als u het multimediastation aan derden overdraagt, dient u deze gebruiksaan-
wijzing bij te voegen. Neem bovendien de aanwijzingen in de gebruiksaanwij-
zingen van de op dit station aangesloten apparaten in acht.
Algemene veiligheidsinstructies
Neem de volgende aanwijzingen in acht om uzelf tegen persoonlijk letsel te
beschermen: Wijzig of open het apparaat niet.
Beoogd gebruik
Het multimediastation is bedoeld voor installatie en gebruik in voertuigen met
12 V voedingsspanning. Neem de vermogenslimieten van het apparaat in acht.
Laat alle reparaties en de installatie door een vakman uitvoeren.
Montage instructie
Installeer het apparaat alleen zelf als u ervaring heeft met de installatie van
autoradio’s en vertrouwd bent met elektrische autoproblemen. Raadpleeg
hiervoor het aansluitschema in deze gebruiksaanwijzing. De installatie van het
apparaat mag de werking van airbags, andere veiligheids- of bedieningsvoorzi-
eningen niet belemmeren of blokkeren.
Conformiteitsverklaring
Blaupunkt Competence Center Car Multimedia – Evo Sales GmbH verklaart dat
dit apparaat voldoet aan de basisvereisten en de overige relevante bepalingen
van de richtlijn 2014/53/EU. De conformiteitsverklaring is te vinden op de
website www.blaupunkt.com.
Reinigingsinstructies
Oplosmiddelen, reinigingsmiddelen en schuurmiddelen, alsmede reinigings-
sprays voor de cockpit en onderhoudsproducten voor plastic, kunnen
bestanddelen bevatten die het oppervlak van het multimediastation kunnen
beschadigen. Gebruik alleen een droge of licht bevochtigde doek om het
multimediastation te reinigen.
Instructies voor afvoer
Gooi het afgedankte apparaat niet samen met het huisvuil weg!
Om het apparaat, de afstandsbediening en de afgedankte batterijen af te
voeren, dient u ze naar een inzamelpunt voor afgedankte apparatuur te
brengen.
Leveringsomvang
De levering omvat:
BPA 3022 M multimediastation,
afstandsbediening,
ISO-connectoren,
montageschroeven,
gebruiksaanwijzing.
BELANGRIJKE INFORMATIE OVER DE INSTALLATIE
1. Lees de gebruiksaanwijzing zorgvuldig door voordat u het apparaat
installeert.
2. Zorg er vóór het aansluiten van de voeding voor dat alle andere draden zijn
aangesloten.
3. Zorg ervoor dat alle blootliggende draden zijn geïsoleerd om kortsluiting te
voorkomen.
4. Maak na voltooiing van de installatie alle draden vast.
5. Aansluitingen op de speler moeten volgens deze gebruiksaanwijzing
worden gemaakt. Een verkeerde aansluiting kan leiden tot schade aan het
apparaat.
6. De speler is bedoeld om alleen te werken met een 12 V DC-installatie.
MONTAGE VAN HET APPARAAT
DEMONTAGE VAN HET APPARAAT
1. Demonteer het apparaat.
2. Verwijder het buitenste sierframe.
Opmerking voor HDMI:
Gebruik een HDMI-kabel van goede kwaliteit.
De totale lengte (voor en achter) mag niet meer dan 365 cm bedragen.
DRADEN AANSLUITEN
1. De speler mag alleen worden gebruikt met +12 V DC.
2. Sluit de accupool pas aan nadat de speler volledig en correct is geïnstalleerd.
3. Zorg ervoor dat de gele kabel is aangesloten op de pluspool (+) van de accu.
4. Zorg er bij het vervangen van de zekering voor dat de parameters van de
nieuwe zekering dezelfde zijn.
5. Voor optimale prestaties van het apparaat worden luidsprekers van goede
kwaliteit met een impedantie van 4-8 ohm aanbevolen.
BEDIENING
PLAATS VAN DE KNOPPEN
1. ZONE 1 2. 1 3. ZONE 2
4. 2 5. BT 6. 3 RPT
7. 8. 4 RDM 9.
10. 5 DIR- 11. DIS 12. 6 DIR+
13. LCD SCHERM 14. AUX AANSLUITING 15. HOOFDTELEFOON AANSLUITING
16. HDMI AANSLUITING 17. RESET 18. DRAAIKNOP
19. USB AANSLUITING 20. SRC/MENU
BASISBEDIENING
Het apparaat en de Mute-functie in-/uitschakelen
Druk op de /MUTE draaiknop om het apparaat in te schakelen. Druk, als het apparaat
aanstaat, kort op de draaiknop om de geluidsdempingsfunctie (MUTE) in- of uit te
schakelen. Druk in en houd de draaiknop ingedrukt om het apparaat uit te schakelen.
Geluidsinstellingen en instelmenu
Druk in en houd de knop SRC/MENU ingedrukt om naar het onderstaande menu te
gaan:
BAS->TRE->BAL->EQ (o/pop/rock/clas)->LOUD (on/o)->CLK HH->CLK MM->IR
(on/o) ->CT (indep/sync)->BEEP (on/o) ->P_VOL (13)->DX (LOC)->STEREO (MONO)
Draai bij elke positie de VOL-knop om deze in te stellen.
IR (ON/OFF):
IR ON: Met IR ON kan het apparaat worden ingeschakeld met de infrarood afstandsbe-
diening. Het systeem staat dan in de modus van hoog energieverbruik.
IR OFF: Met IR OFF kan het apparaat niet worden ingeschakeld met de infrarood
afstandsbediening. Het systeem staat in de modus van laag energieverbruik.
CT (INDEP/SYNC):
CT INDEP: De klok werkt onafhankelijk.
CT SYNC: De klok wordt gesynchroniseerd met de tijd van de ontvangen RDS-zender.
Opmerking: Als de klok handmatig in het menu wordt ingesteld, wordt de CT-functie
(kloktijd) automatisch ingesteld op de INDEP-modus (onafhankelijke werking).
BEEP (ON/OFF): Hiermee wordt de pieptoon in-/uitgeschakeld.
P-VOL (vooraf ingesteld inschakelvolume): Hiermee wordt het inschakelvolume
ingesteld. Als het uitschakelvolume lager is dan het P-VOL niveau, zal het apparaat bij
het inschakelen het volume instellen op het uitschakelvolume.
Als het uitschakelvolume hoger is dan het P-VOL niveau, zal het inschakelvolume bij
het inschakelen van apparaat worden teruggezet naar het ingestelde P-VOL niveau.
Zoeken naar Bluetooth-luidsprekers
Druk in en houd de BT-knop ingedrukt, de melding "SEARCH...” [zoeken] verschijnt.
Even later verschijnt de naam van een gevonden Bluetooth-apparaat. Om het
volgende Bluetooth-apparaat weer te geven, draai de VOL-knop. Wanneer de naam
van de gewenste Bluetooth-luidspreker op het LCD-scherm verschijnt, druk op de
VOL-knop om het apparaat te koppelen. Als het koppelen gelukt is, verschijnt op het
display "BOX ON".
Belangrijke opmerking: Ondanks vele tests met verschillende Bluetooth-apparaten,
kan compatibiliteit met alle op de markt verkrijgbare Bluetooth-apparaten niet
worden gegarandeerd.
Signaaloverdracht naar Bluetooth-luidspreker
Druk kort op de BT-knop om de overdracht van het signaal naar de Bluetooth-luid-
spreker aan/uit te zetten. Op het display verschijnt "BOX OFF/ON".
Opmerking: Ondanks zorgvuldige controle door Blaupunkt van de compatibiliteit met
verschillende Bluetooth-luidsprekers, kan een naadloze werking met alle op de markt
verkrijgbare modellen niet worden gegarandeerd.
Bediening van Zone 1 en Zone 2
Druk kort op de knop Zone 1 (of Zone 2) om het geluid van Zone 1 (of Zone 2) in/uit
te schakelen.
Houd de knop Zone 1 (of Zone 2) ingedrukt om het geluid van Zone 1 (of Zone 2) te
dempen. Druk nogmaals op de knop om het geluidsdemping uit te schakelen.
Prioriteit voor informatie of klok
Druk kort op de DIS-knop om klokprioriteit of informatieprioriteit in te stellen.
Opmerking: Bij ontvangst van een RDS-zender in de FM-band, druk kort op DIS-knop
om STATION NAME/CLOCK/FREQUENCY weer te geven.
Klok instellen
Ga in het menu naar de positie CLK HH/CLK MM. Draai de VOL-knop om uur/minuut
in te stellen.
Hoofdtelefoon gebruiken
Op het frontpaneel bevindt zich een 3,5 mm aansluiting voor een hoofdtelefoon.
Deze neemt de instellingen van Zone 1 over.
RADIO GEBRUIKEN
Een radiozender ontvangen
Druk op de SRC/MENU-knop om FM1->FM2->MW te selecteren. Druk kort op de
knop / om de gewenste radiozender te ontvangen. Houd de knop /
ingedrukt om de frequentie handmatig af te stemmen.
Zenders handmatig opslaan en opgeslagen zenders oproepen
Terwijl de gewenste zender wordt ontvangen, druk in en houd een van de geheugen-
knoppen (1-6) gedurende 2 seconden ingedrukt. De huidige zender wordt onder de
ingedrukte nummerknop opgeslagen. Druk kort op een van de geheugenknoppen
(1-6) om direct naar een onder deze knop opgeslagen zender te luisteren.
DAB GEBRUIKEN
Druk op de SRC/MENU-knop om de bron om te schakelen tussen DAB1 of DAB2.
Een zender kiezen
Druk op de knop / om de volgende/vorige zender te kiezen.
Zenders handmatig opslaan en opgeslagen zenders oproepen
Als de frequentie van de gewenste zender is ingesteld. Houd een van de knoppen 1-6
gedurende 2 seconden ingedrukt om deze zender onder het overeenkomstige
nummer op te slaan. Druk kort op een van de geheugenknoppen (1-6) om direct naar
een onder deze knop opgeslagen zender te luisteren.
USB GEBRUIKEN
Als een USB-stick op het apparaat wordt aangesloten, zal het automatisch MP3/W-
MA-bestanden afspelen. Als er al een USB-stick op het apparaat is aangesloten, blijf kort
op de SRC/MENU te drukken tot het USB-modusscherm verschijnt.
Een bestand kiezen
Druk op de / knop om naar het volgende/vorige bestand te gaan. Houd de
/ knop ingedrukt om snel vooruit of achteruit te gaan.
Afspelen/pauze
Druk op knop om het afspelen van een bestand te onderbreken/hervatten.
In een lus afspelen
Druk op de 3 RPT-knop om het lusafspelen te selecteren. RPT ONE/RPT FOLD/RPT ALL
(standaard)
RPT ONE: In een lus afspelen van hetzelfde bestand.
RPT FOLD: In een lus afspelen van alle bestanden in een map.
RPT ALL: In een lus afspelen van alle bestanden.
RANDOM
Druk op de 4 RDM-knop om de functie van willekeurig afspelen in- of uit te schakelen.
RDM on: Willekeurig afspelen van alle bestanden.
RDM o: Willekeurig afspelen uitschakelen.
Map +/- functie
Druk op de knop DIR+/DIR- om de volgende/vorige map te kiezen en deze af te spelen.
Een liedje opzoeken
Druk in en houd de knop ingedrukt om "NUM 0000” weer te geven. Gebruik de
VOL-draaiknop (of voer het nummer direct in) om het gewenste nummer te selecteren
en druk vervolgens op VOL om het af te spelen. Let op: de cijfers 7/8/9/0 staan onder
de volgende knoppen: BT = 7, = 8, = 9, DIS = 0.
GEBRUIK VAN DE AUX IN 1/2 AANSLUITING
De AUX IN 1 aansluiting op het frontpaneel is een 3,5 mm jack-aansluiting. De AUX IN 2
bevindt zich aan de achterkant en is een RCA-aansluiting. Druk bij het aansluiten van
het audiosignaal op het apparaat op SRC/MENU-knop om over te schakelen naar de
AUX IN 1 (2) modus.
BLUETOOTH GEBRUIKEN
Bluetooth-apparaten koppelen
Schakel de Bluetooth functie op uw smartphone in en zoek naar Bluetooth-appara-
ten. In de lijst moet "BLAUPUNKT" verschijnen; selecteer "BLAUPUNKT" en voer
vervolgens het wachtwoord "0000" in wanneer u erom wordt gevraagd. Als het
koppelen met succes is voltooid, verschijnt het symbool BT op het scherm.
Bluetooth-audio
Druk op de SRC/MENU-knop om over te schakelen naar de BT MUSIC modus. Het
apparaat zal automatisch een liedje van uw smartphone afspelen. Druk op de
knop om het liedje te stoppen/ af te spelen.
Druk op de knop / om het volgende/vorige nummer te kiezen.
HDMI GEBRUIKEN
De voorste HDMI-aansluiting gaat over naar de achterste HDMI-aansluiting. Het
afspelen via HDMI wordt dus niet beïnvloed.
V-IN en V-OUT RCA-aansluiting
Aan de achterkant van het apparaat gaat de V-IN aansluiting over naar de V-OUT
aansluiting.
AFSTANDSBEDIENING
De afstandsbediening kan worden gebruikt
wanneer de IR-optie in het menu is ingeschakeld.
OFF : Het apparaat in-/uitschakelen
VOL+: Volume verhogen
VOL- : Volume verlagen
1 : Zone 1 MUTE in-/uitschakelen
2 : Zone 2 MUTE in-/uitschakelen
Other operation please reference the description above
ALGEMENE INFORMATIE
Vereisten betreende de voeding : 12 V gelijkstroom, minpool verbonden
met de massa
Afmetingen van de montagebasis : 129 (b) x 112 (d) x 65 (h)
Toon instellingen
- Lage tonen (bij 100 Hz) : ±10 dB
- Hoge tonen (bij 100 Hz) : ±10 dB
Maximaal uitgangsvermogen : 4 x 40 watts
Stroomverbruik: :10 A (max.)
RADIO FM AM
Frequentiebereik: 87.5 to 108 MHz 522 to 1620 KHz
IF 10.7 MHz 450 KHz
Gevoeligheid 4 µV (S/N = 30 dB) 36 dBµV (S/N = 20 dB)
Stereokanaalscheiding >25 dB /
PROBLEEMOPLOSSING
NL

Veiligheidsinstructies
Dit multimediastation is vervaardigd volgens de nieuwste technologische
ontwikkelingen en algemeen erkende veiligheidsbeginselen. Toch kunnen er
gevaren ontstaan wanneer de veiligheidsinstructies in deze gebruiksaanwijzing
niet worden nageleefd. Lees de volledige gebruiksaanwijzing zorgvuldig door
voordat u het multimediastation in gebruik neemt. Bewaar de gebruiksaanwij-
zing op een plaats waar deze te allen tijde toegankelijk is voor alle gebruikers.
Als u het multimediastation aan derden overdraagt, dient u deze gebruiksaan-
wijzing bij te voegen. Neem bovendien de aanwijzingen in de gebruiksaanwij-
zingen van de op dit station aangesloten apparaten in acht.
Algemene veiligheidsinstructies
Neem de volgende aanwijzingen in acht om uzelf tegen persoonlijk letsel te
beschermen: Wijzig of open het apparaat niet.
Beoogd gebruik
Het multimediastation is bedoeld voor installatie en gebruik in voertuigen met
12 V voedingsspanning. Neem de vermogenslimieten van het apparaat in acht.
Laat alle reparaties en de installatie door een vakman uitvoeren.
Montage instructie
Installeer het apparaat alleen zelf als u ervaring heeft met de installatie van
autoradio’s en vertrouwd bent met elektrische autoproblemen. Raadpleeg
hiervoor het aansluitschema in deze gebruiksaanwijzing. De installatie van het
apparaat mag de werking van airbags, andere veiligheids- of bedieningsvoorzi-
eningen niet belemmeren of blokkeren.
Conformiteitsverklaring
Blaupunkt Competence Center Car Multimedia – Evo Sales GmbH verklaart dat
dit apparaat voldoet aan de basisvereisten en de overige relevante bepalingen
van de richtlijn 2014/53/EU. De conformiteitsverklaring is te vinden op de
website www.blaupunkt.com.
Reinigingsinstructies
Oplosmiddelen, reinigingsmiddelen en schuurmiddelen, alsmede reinigings-
sprays voor de cockpit en onderhoudsproducten voor plastic, kunnen
bestanddelen bevatten die het oppervlak van het multimediastation kunnen
beschadigen. Gebruik alleen een droge of licht bevochtigde doek om het
multimediastation te reinigen.
Instructies voor afvoer
Gooi het afgedankte apparaat niet samen met het huisvuil weg!
Om het apparaat, de afstandsbediening en de afgedankte batterijen af te
voeren, dient u ze naar een inzamelpunt voor afgedankte apparatuur te
brengen.
Leveringsomvang
De levering omvat:
BPA 3022 M multimediastation,
afstandsbediening,
ISO-connectoren,
montageschroeven,
gebruiksaanwijzing.
BELANGRIJKE INFORMATIE OVER DE INSTALLATIE
1. Lees de gebruiksaanwijzing zorgvuldig door voordat u het apparaat
installeert.
2. Zorg er vóór het aansluiten van de voeding voor dat alle andere draden zijn
aangesloten.
3. Zorg ervoor dat alle blootliggende draden zijn geïsoleerd om kortsluiting te
voorkomen.
4. Maak na voltooiing van de installatie alle draden vast.
5. Aansluitingen op de speler moeten volgens deze gebruiksaanwijzing
worden gemaakt. Een verkeerde aansluiting kan leiden tot schade aan het
apparaat.
6. De speler is bedoeld om alleen te werken met een 12 V DC-installatie.
MONTAGE VAN HET APPARAAT
DEMONTAGE VAN HET APPARAAT
1. Demonteer het apparaat.
2. Verwijder het buitenste sierframe.
Opmerking voor HDMI:
Gebruik een HDMI-kabel van goede kwaliteit.
De totale lengte (voor en achter) mag niet meer dan 365 cm bedragen.
DRADEN AANSLUITEN
1. De speler mag alleen worden gebruikt met +12 V DC.
2. Sluit de accupool pas aan nadat de speler volledig en correct is geïnstalleerd.
3. Zorg ervoor dat de gele kabel is aangesloten op de pluspool (+) van de accu.
4. Zorg er bij het vervangen van de zekering voor dat de parameters van de
nieuwe zekering dezelfde zijn.
5. Voor optimale prestaties van het apparaat worden luidsprekers van goede
kwaliteit met een impedantie van 4-8 ohm aanbevolen.
PLAATS VAN DE KNOPPEN
1. ZONE 1 2. 1 3. ZONE 2
4. 2 5. BT 6. 3 RPT
7. 8. 4 RDM 9.
10. 5 DIR- 11. DIS 12. 6 DIR+
13. LCD SCHERM 14. AUX AANSLUITING 15. HOOFDTELEFOON AANSLUITING
16. HDMI AANSLUITING 17. RESET 18. DRAAIKNOP
19. USB AANSLUITING 20. SRC/MENU
BEDIENING
BASISBEDIENING
Het apparaat en de Mute-functie in-/uitschakelen
Druk op de /MUTE draaiknop om het apparaat in te schakelen. Druk, als het apparaat
aanstaat, kort op de draaiknop om de geluidsdempingsfunctie (MUTE) in- of uit te
schakelen. Druk in en houd de draaiknop ingedrukt om het apparaat uit te schakelen.
Geluidsinstellingen en instelmenu
Druk in en houd de knop SRC/MENU ingedrukt om naar het onderstaande menu te
gaan:
BAS->TRE->BAL->EQ (o/pop/rock/clas)->LOUD (on/o)->CLK HH->CLK MM->IR
(on/o) ->CT (indep/sync)->BEEP (on/o) ->P_VOL (13)->DX (LOC)->STEREO (MONO)
Draai bij elke positie de VOL-knop om deze in te stellen.
IR (ON/OFF):
IR ON: Met IR ON kan het apparaat worden ingeschakeld met de infrarood afstandsbe-
diening. Het systeem staat dan in de modus van hoog energieverbruik.
IR OFF: Met IR OFF kan het apparaat niet worden ingeschakeld met de infrarood
afstandsbediening. Het systeem staat in de modus van laag energieverbruik.
CT (INDEP/SYNC):
CT INDEP: De klok werkt onafhankelijk.
CT SYNC: De klok wordt gesynchroniseerd met de tijd van de ontvangen RDS-zender.
Opmerking: Als de klok handmatig in het menu wordt ingesteld, wordt de CT-functie
(kloktijd) automatisch ingesteld op de INDEP-modus (onafhankelijke werking).
BEEP (ON/OFF): Hiermee wordt de pieptoon in-/uitgeschakeld.
P-VOL (vooraf ingesteld inschakelvolume): Hiermee wordt het inschakelvolume
ingesteld. Als het uitschakelvolume lager is dan het P-VOL niveau, zal het apparaat bij
het inschakelen het volume instellen op het uitschakelvolume.
Als het uitschakelvolume hoger is dan het P-VOL niveau, zal het inschakelvolume bij
het inschakelen van apparaat worden teruggezet naar het ingestelde P-VOL niveau.
Zoeken naar Bluetooth-luidsprekers
Druk in en houd de BT-knop ingedrukt, de melding "SEARCH...” [zoeken] verschijnt.
Even later verschijnt de naam van een gevonden Bluetooth-apparaat. Om het
volgende Bluetooth-apparaat weer te geven, draai de VOL-knop. Wanneer de naam
van de gewenste Bluetooth-luidspreker op het LCD-scherm verschijnt, druk op de
VOL-knop om het apparaat te koppelen. Als het koppelen gelukt is, verschijnt op het
display "BOX ON".
Belangrijke opmerking: Ondanks vele tests met verschillende Bluetooth-apparaten,
kan compatibiliteit met alle op de markt verkrijgbare Bluetooth-apparaten niet
worden gegarandeerd.
Signaaloverdracht naar Bluetooth-luidspreker
Druk kort op de BT-knop om de overdracht van het signaal naar de Bluetooth-luid-
spreker aan/uit te zetten. Op het display verschijnt "BOX OFF/ON".
Opmerking: Ondanks zorgvuldige controle door Blaupunkt van de compatibiliteit met
verschillende Bluetooth-luidsprekers, kan een naadloze werking met alle op de markt
verkrijgbare modellen niet worden gegarandeerd.
Bediening van Zone 1 en Zone 2
Druk kort op de knop Zone 1 (of Zone 2) om het geluid van Zone 1 (of Zone 2) in/uit
te schakelen.
Houd de knop Zone 1 (of Zone 2) ingedrukt om het geluid van Zone 1 (of Zone 2) te
dempen. Druk nogmaals op de knop om het geluidsdemping uit te schakelen.
Prioriteit voor informatie of klok
Druk kort op de DIS-knop om klokprioriteit of informatieprioriteit in te stellen.
Opmerking: Bij ontvangst van een RDS-zender in de FM-band, druk kort op DIS-knop
om STATION NAME/CLOCK/FREQUENCY weer te geven.
Klok instellen
Ga in het menu naar de positie CLK HH/CLK MM. Draai de VOL-knop om uur/minuut
in te stellen.
Hoofdtelefoon gebruiken
Op het frontpaneel bevindt zich een 3,5 mm aansluiting voor een hoofdtelefoon.
Deze neemt de instellingen van Zone 1 over.
RADIO GEBRUIKEN
Een radiozender ontvangen
Druk op de SRC/MENU-knop om FM1->FM2->MW te selecteren. Druk kort op de
knop / om de gewenste radiozender te ontvangen. Houd de knop /
ingedrukt om de frequentie handmatig af te stemmen.
Zenders handmatig opslaan en opgeslagen zenders oproepen
Terwijl de gewenste zender wordt ontvangen, druk in en houd een van de geheugen-
knoppen (1-6) gedurende 2 seconden ingedrukt. De huidige zender wordt onder de
ingedrukte nummerknop opgeslagen. Druk kort op een van de geheugenknoppen
(1-6) om direct naar een onder deze knop opgeslagen zender te luisteren.
DAB GEBRUIKEN
Druk op de SRC/MENU-knop om de bron om te schakelen tussen DAB1 of DAB2.
Een zender kiezen
Druk op de knop / om de volgende/vorige zender te kiezen.
Zenders handmatig opslaan en opgeslagen zenders oproepen
Als de frequentie van de gewenste zender is ingesteld. Houd een van de knoppen 1-6
gedurende 2 seconden ingedrukt om deze zender onder het overeenkomstige
nummer op te slaan. Druk kort op een van de geheugenknoppen (1-6) om direct naar
een onder deze knop opgeslagen zender te luisteren.
USB GEBRUIKEN
Als een USB-stick op het apparaat wordt aangesloten, zal het automatisch MP3/W-
MA-bestanden afspelen. Als er al een USB-stick op het apparaat is aangesloten, blijf kort
op de SRC/MENU te drukken tot het USB-modusscherm verschijnt.
Een bestand kiezen
Druk op de / knop om naar het volgende/vorige bestand te gaan. Houd de
/ knop ingedrukt om snel vooruit of achteruit te gaan.
Afspelen/pauze
Druk op knop om het afspelen van een bestand te onderbreken/hervatten.
In een lus afspelen
Druk op de 3 RPT-knop om het lusafspelen te selecteren. RPT ONE/RPT FOLD/RPT ALL
(standaard)
RPT ONE: In een lus afspelen van hetzelfde bestand.
RPT FOLD: In een lus afspelen van alle bestanden in een map.
RPT ALL: In een lus afspelen van alle bestanden.
RANDOM
Druk op de 4 RDM-knop om de functie van willekeurig afspelen in- of uit te schakelen.
RDM on: Willekeurig afspelen van alle bestanden.
RDM o: Willekeurig afspelen uitschakelen.
Map +/- functie
Druk op de knop DIR+/DIR- om de volgende/vorige map te kiezen en deze af te spelen.
Een liedje opzoeken
Druk in en houd de knop ingedrukt om "NUM 0000” weer te geven. Gebruik de
VOL-draaiknop (of voer het nummer direct in) om het gewenste nummer te selecteren
en druk vervolgens op VOL om het af te spelen. Let op: de cijfers 7/8/9/0 staan onder
de volgende knoppen: BT = 7, = 8, = 9, DIS = 0.
GEBRUIK VAN DE AUX IN 1/2 AANSLUITING
De AUX IN 1 aansluiting op het frontpaneel is een 3,5 mm jack-aansluiting. De AUX IN 2
bevindt zich aan de achterkant en is een RCA-aansluiting. Druk bij het aansluiten van
het audiosignaal op het apparaat op SRC/MENU-knop om over te schakelen naar de
AUX IN 1 (2) modus.
BLUETOOTH GEBRUIKEN
Bluetooth-apparaten koppelen
Schakel de Bluetooth functie op uw smartphone in en zoek naar Bluetooth-appara-
ten. In de lijst moet "BLAUPUNKT" verschijnen; selecteer "BLAUPUNKT" en voer
vervolgens het wachtwoord "0000" in wanneer u erom wordt gevraagd. Als het
koppelen met succes is voltooid, verschijnt het symbool BT op het scherm.
Bluetooth-audio
Druk op de SRC/MENU-knop om over te schakelen naar de BT MUSIC modus. Het
apparaat zal automatisch een liedje van uw smartphone afspelen. Druk op de
knop om het liedje te stoppen/ af te spelen.
Druk op de knop / om het volgende/vorige nummer te kiezen.
HDMI GEBRUIKEN
De voorste HDMI-aansluiting gaat over naar de achterste HDMI-aansluiting. Het
afspelen via HDMI wordt dus niet beïnvloed.
V-IN en V-OUT RCA-aansluiting
Aan de achterkant van het apparaat gaat de V-IN aansluiting over naar de V-OUT
aansluiting.
AFSTANDSBEDIENING
De afstandsbediening kan worden gebruikt
wanneer de IR-optie in het menu is ingeschakeld.
OFF : Het apparaat in-/uitschakelen
VOL+: Volume verhogen
VOL- : Volume verlagen
1 : Zone 1 MUTE in-/uitschakelen
2 : Zone 2 MUTE in-/uitschakelen
Other operation please reference the description above
ALGEMENE INFORMATIE
Vereisten betreende de voeding : 12 V gelijkstroom, minpool verbonden
met de massa
Afmetingen van de montagebasis : 129 (b) x 112 (d) x 65 (h)
Toon instellingen
- Lage tonen (bij 100 Hz) : ±10 dB
- Hoge tonen (bij 100 Hz) : ±10 dB
Maximaal uitgangsvermogen : 4 x 40 watts
Stroomverbruik: :10 A (max.)
RADIO FM AM
Frequentiebereik: 87.5 to 108 MHz 522 to 1620 KHz
IF 10.7 MHz 450 KHz
Gevoeligheid 4 µV (S/N = 30 dB) 36 dBµV (S/N = 20 dB)
Stereokanaalscheiding >25 dB /
PROBLEEMOPLOSSING
NL

Veiligheidsinstructies
Dit multimediastation is vervaardigd volgens de nieuwste technologische
ontwikkelingen en algemeen erkende veiligheidsbeginselen. Toch kunnen er
gevaren ontstaan wanneer de veiligheidsinstructies in deze gebruiksaanwijzing
niet worden nageleefd. Lees de volledige gebruiksaanwijzing zorgvuldig door
voordat u het multimediastation in gebruik neemt. Bewaar de gebruiksaanwij-
zing op een plaats waar deze te allen tijde toegankelijk is voor alle gebruikers.
Als u het multimediastation aan derden overdraagt, dient u deze gebruiksaan-
wijzing bij te voegen. Neem bovendien de aanwijzingen in de gebruiksaanwij-
zingen van de op dit station aangesloten apparaten in acht.
Algemene veiligheidsinstructies
Neem de volgende aanwijzingen in acht om uzelf tegen persoonlijk letsel te
beschermen: Wijzig of open het apparaat niet.
Beoogd gebruik
Het multimediastation is bedoeld voor installatie en gebruik in voertuigen met
12 V voedingsspanning. Neem de vermogenslimieten van het apparaat in acht.
Laat alle reparaties en de installatie door een vakman uitvoeren.
Montage instructie
Installeer het apparaat alleen zelf als u ervaring heeft met de installatie van
autoradio’s en vertrouwd bent met elektrische autoproblemen. Raadpleeg
hiervoor het aansluitschema in deze gebruiksaanwijzing. De installatie van het
apparaat mag de werking van airbags, andere veiligheids- of bedieningsvoorzi-
eningen niet belemmeren of blokkeren.
Conformiteitsverklaring
Blaupunkt Competence Center Car Multimedia – Evo Sales GmbH verklaart dat
dit apparaat voldoet aan de basisvereisten en de overige relevante bepalingen
van de richtlijn 2014/53/EU. De conformiteitsverklaring is te vinden op de
website www.blaupunkt.com.
Reinigingsinstructies
Oplosmiddelen, reinigingsmiddelen en schuurmiddelen, alsmede reinigings-
sprays voor de cockpit en onderhoudsproducten voor plastic, kunnen
bestanddelen bevatten die het oppervlak van het multimediastation kunnen
beschadigen. Gebruik alleen een droge of licht bevochtigde doek om het
multimediastation te reinigen.
Instructies voor afvoer
Gooi het afgedankte apparaat niet samen met het huisvuil weg!
Om het apparaat, de afstandsbediening en de afgedankte batterijen af te
voeren, dient u ze naar een inzamelpunt voor afgedankte apparatuur te
brengen.
Leveringsomvang
De levering omvat:
BPA 3022 M multimediastation,
afstandsbediening,
ISO-connectoren,
montageschroeven,
gebruiksaanwijzing.
BELANGRIJKE INFORMATIE OVER DE INSTALLATIE
1. Lees de gebruiksaanwijzing zorgvuldig door voordat u het apparaat
installeert.
2. Zorg er vóór het aansluiten van de voeding voor dat alle andere draden zijn
aangesloten.
3. Zorg ervoor dat alle blootliggende draden zijn geïsoleerd om kortsluiting te
voorkomen.
4. Maak na voltooiing van de installatie alle draden vast.
5. Aansluitingen op de speler moeten volgens deze gebruiksaanwijzing
worden gemaakt. Een verkeerde aansluiting kan leiden tot schade aan het
apparaat.
6. De speler is bedoeld om alleen te werken met een 12 V DC-installatie.
MONTAGE VAN HET APPARAAT
DEMONTAGE VAN HET APPARAAT
1. Demonteer het apparaat.
2. Verwijder het buitenste sierframe.
Opmerking voor HDMI:
Gebruik een HDMI-kabel van goede kwaliteit.
De totale lengte (voor en achter) mag niet meer dan 365 cm bedragen.
DRADEN AANSLUITEN
1. De speler mag alleen worden gebruikt met +12 V DC.
2. Sluit de accupool pas aan nadat de speler volledig en correct is geïnstalleerd.
3. Zorg ervoor dat de gele kabel is aangesloten op de pluspool (+) van de accu.
4. Zorg er bij het vervangen van de zekering voor dat de parameters van de
nieuwe zekering dezelfde zijn.
5. Voor optimale prestaties van het apparaat worden luidsprekers van goede
kwaliteit met een impedantie van 4-8 ohm aanbevolen.
PLAATS VAN DE KNOPPEN
1. ZONE 1 2. 1 3. ZONE 2
4. 2 5. BT 6. 3 RPT
7. 8. 4 RDM 9.
10. 5 DIR- 11. DIS 12. 6 DIR+
13. LCD SCHERM 14. AUX AANSLUITING 15. HOOFDTELEFOON AANSLUITING
16. HDMI AANSLUITING 17. RESET 18. DRAAIKNOP
19. USB AANSLUITING 20. SRC/MENU
BASISBEDIENING
Het apparaat en de Mute-functie in-/uitschakelen
Druk op de /MUTE draaiknop om het apparaat in te schakelen. Druk, als het apparaat
aanstaat, kort op de draaiknop om de geluidsdempingsfunctie (MUTE) in- of uit te
schakelen. Druk in en houd de draaiknop ingedrukt om het apparaat uit te schakelen.
Geluidsinstellingen en instelmenu
Druk in en houd de knop SRC/MENU ingedrukt om naar het onderstaande menu te
gaan:
BAS->TRE->BAL->EQ (o/pop/rock/clas)->LOUD (on/o)->CLK HH->CLK MM->IR
(on/o) ->CT (indep/sync)->BEEP (on/o) ->P_VOL (13)->DX (LOC)->STEREO (MONO)
Draai bij elke positie de VOL-knop om deze in te stellen.
IR (ON/OFF):
IR ON: Met IR ON kan het apparaat worden ingeschakeld met de infrarood afstandsbe-
diening. Het systeem staat dan in de modus van hoog energieverbruik.
IR OFF: Met IR OFF kan het apparaat niet worden ingeschakeld met de infrarood
afstandsbediening. Het systeem staat in de modus van laag energieverbruik.
CT (INDEP/SYNC):
CT INDEP: De klok werkt onafhankelijk.
CT SYNC: De klok wordt gesynchroniseerd met de tijd van de ontvangen RDS-zender.
Opmerking: Als de klok handmatig in het menu wordt ingesteld, wordt de CT-functie
(kloktijd) automatisch ingesteld op de INDEP-modus (onafhankelijke werking).
BEEP (ON/OFF): Hiermee wordt de pieptoon in-/uitgeschakeld.
P-VOL (vooraf ingesteld inschakelvolume): Hiermee wordt het inschakelvolume
ingesteld. Als het uitschakelvolume lager is dan het P-VOL niveau, zal het apparaat bij
het inschakelen het volume instellen op het uitschakelvolume.
Als het uitschakelvolume hoger is dan het P-VOL niveau, zal het inschakelvolume bij
het inschakelen van apparaat worden teruggezet naar het ingestelde P-VOL niveau.
Zoeken naar Bluetooth-luidsprekers
Druk in en houd de BT-knop ingedrukt, de melding "SEARCH...” [zoeken] verschijnt.
Even later verschijnt de naam van een gevonden Bluetooth-apparaat. Om het
volgende Bluetooth-apparaat weer te geven, draai de VOL-knop. Wanneer de naam
van de gewenste Bluetooth-luidspreker op het LCD-scherm verschijnt, druk op de
VOL-knop om het apparaat te koppelen. Als het koppelen gelukt is, verschijnt op het
display "BOX ON".
Belangrijke opmerking: Ondanks vele tests met verschillende Bluetooth-apparaten,
kan compatibiliteit met alle op de markt verkrijgbare Bluetooth-apparaten niet
worden gegarandeerd.
Signaaloverdracht naar Bluetooth-luidspreker
Druk kort op de BT-knop om de overdracht van het signaal naar de Bluetooth-luid-
spreker aan/uit te zetten. Op het display verschijnt "BOX OFF/ON".
Opmerking: Ondanks zorgvuldige controle door Blaupunkt van de compatibiliteit met
verschillende Bluetooth-luidsprekers, kan een naadloze werking met alle op de markt
verkrijgbare modellen niet worden gegarandeerd.
Bediening van Zone 1 en Zone 2
Druk kort op de knop Zone 1 (of Zone 2) om het geluid van Zone 1 (of Zone 2) in/uit
te schakelen.
Houd de knop Zone 1 (of Zone 2) ingedrukt om het geluid van Zone 1 (of Zone 2) te
dempen. Druk nogmaals op de knop om het geluidsdemping uit te schakelen.
Prioriteit voor informatie of klok
Druk kort op de DIS-knop om klokprioriteit of informatieprioriteit in te stellen.
Opmerking: Bij ontvangst van een RDS-zender in de FM-band, druk kort op DIS-knop
om STATION NAME/CLOCK/FREQUENCY weer te geven.
Klok instellen
Ga in het menu naar de positie CLK HH/CLK MM. Draai de VOL-knop om uur/minuut
in te stellen.
Hoofdtelefoon gebruiken
Op het frontpaneel bevindt zich een 3,5 mm aansluiting voor een hoofdtelefoon.
Deze neemt de instellingen van Zone 1 over.
RADIO GEBRUIKEN
Een radiozender ontvangen
Druk op de SRC/MENU-knop om FM1->FM2->MW te selecteren. Druk kort op de
knop / om de gewenste radiozender te ontvangen. Houd de knop /
ingedrukt om de frequentie handmatig af te stemmen.
Zenders handmatig opslaan en opgeslagen zenders oproepen
Terwijl de gewenste zender wordt ontvangen, druk in en houd een van de geheugen-
knoppen (1-6) gedurende 2 seconden ingedrukt. De huidige zender wordt onder de
ingedrukte nummerknop opgeslagen. Druk kort op een van de geheugenknoppen
(1-6) om direct naar een onder deze knop opgeslagen zender te luisteren.
DAB GEBRUIKEN
Druk op de SRC/MENU-knop om de bron om te schakelen tussen DAB1 of DAB2.
Een zender kiezen
Druk op de knop / om de volgende/vorige zender te kiezen.
BEDIENING
Zenders handmatig opslaan en opgeslagen zenders oproepen
Als de frequentie van de gewenste zender is ingesteld. Houd een van de knoppen 1-6
gedurende 2 seconden ingedrukt om deze zender onder het overeenkomstige
nummer op te slaan. Druk kort op een van de geheugenknoppen (1-6) om direct naar
een onder deze knop opgeslagen zender te luisteren.
USB GEBRUIKEN
Als een USB-stick op het apparaat wordt aangesloten, zal het automatisch MP3/W-
MA-bestanden afspelen. Als er al een USB-stick op het apparaat is aangesloten, blijf kort
op de SRC/MENU te drukken tot het USB-modusscherm verschijnt.
Een bestand kiezen
Druk op de / knop om naar het volgende/vorige bestand te gaan. Houd de
/ knop ingedrukt om snel vooruit of achteruit te gaan.
Afspelen/pauze
Druk op knop om het afspelen van een bestand te onderbreken/hervatten.
In een lus afspelen
Druk op de 3 RPT-knop om het lusafspelen te selecteren. RPT ONE/RPT FOLD/RPT ALL
(standaard)
RPT ONE: In een lus afspelen van hetzelfde bestand.
RPT FOLD: In een lus afspelen van alle bestanden in een map.
RPT ALL: In een lus afspelen van alle bestanden.
RANDOM
Druk op de 4 RDM-knop om de functie van willekeurig afspelen in- of uit te schakelen.
RDM on: Willekeurig afspelen van alle bestanden.
RDM o: Willekeurig afspelen uitschakelen.
Map +/- functie
Druk op de knop DIR+/DIR- om de volgende/vorige map te kiezen en deze af te spelen.
Een liedje opzoeken
Druk in en houd de knop ingedrukt om "NUM 0000” weer te geven. Gebruik de
VOL-draaiknop (of voer het nummer direct in) om het gewenste nummer te selecteren
en druk vervolgens op VOL om het af te spelen. Let op: de cijfers 7/8/9/0 staan onder
de volgende knoppen: BT = 7, = 8, = 9, DIS = 0.
GEBRUIK VAN DE AUX IN 1/2 AANSLUITING
De AUX IN 1 aansluiting op het frontpaneel is een 3,5 mm jack-aansluiting. De AUX IN 2
bevindt zich aan de achterkant en is een RCA-aansluiting. Druk bij het aansluiten van
het audiosignaal op het apparaat op SRC/MENU-knop om over te schakelen naar de
AUX IN 1 (2) modus.
BLUETOOTH GEBRUIKEN
Bluetooth-apparaten koppelen
Schakel de Bluetooth functie op uw smartphone in en zoek naar Bluetooth-appara-
ten. In de lijst moet "BLAUPUNKT" verschijnen; selecteer "BLAUPUNKT" en voer
vervolgens het wachtwoord "0000" in wanneer u erom wordt gevraagd. Als het
koppelen met succes is voltooid, verschijnt het symbool BT op het scherm.
Bluetooth-audio
Druk op de SRC/MENU-knop om over te schakelen naar de BT MUSIC modus. Het
apparaat zal automatisch een liedje van uw smartphone afspelen. Druk op de
knop om het liedje te stoppen/ af te spelen.
Druk op de knop / om het volgende/vorige nummer te kiezen.
HDMI GEBRUIKEN
De voorste HDMI-aansluiting gaat over naar de achterste HDMI-aansluiting. Het
afspelen via HDMI wordt dus niet beïnvloed.
V-IN en V-OUT RCA-aansluiting
Aan de achterkant van het apparaat gaat de V-IN aansluiting over naar de V-OUT
aansluiting.
AFSTANDSBEDIENING
De afstandsbediening kan worden gebruikt
wanneer de IR-optie in het menu is ingeschakeld.
OFF : Het apparaat in-/uitschakelen
VOL+: Volume verhogen
VOL- : Volume verlagen
1 : Zone 1 MUTE in-/uitschakelen
2 : Zone 2 MUTE in-/uitschakelen
Other operation please reference the description above
ALGEMENE INFORMATIE
Vereisten betreende de voeding : 12 V gelijkstroom, minpool verbonden
met de massa
Afmetingen van de montagebasis : 129 (b) x 112 (d) x 65 (h)
Toon instellingen
- Lage tonen (bij 100 Hz) : ±10 dB
- Hoge tonen (bij 100 Hz) : ±10 dB
Maximaal uitgangsvermogen : 4 x 40 watts
Stroomverbruik: :10 A (max.)
RADIO FM AM
Frequentiebereik: 87.5 to 108 MHz 522 to 1620 KHz
IF 10.7 MHz 450 KHz
Gevoeligheid 4 µV (S/N = 30 dB) 36 dBµV (S/N = 20 dB)
Stereokanaalscheiding >25 dB /
PROBLEEMOPLOSSING
NL

Veiligheidsinstructies
Dit multimediastation is vervaardigd volgens de nieuwste technologische
ontwikkelingen en algemeen erkende veiligheidsbeginselen. Toch kunnen er
gevaren ontstaan wanneer de veiligheidsinstructies in deze gebruiksaanwijzing
niet worden nageleefd. Lees de volledige gebruiksaanwijzing zorgvuldig door
voordat u het multimediastation in gebruik neemt. Bewaar de gebruiksaanwij-
zing op een plaats waar deze te allen tijde toegankelijk is voor alle gebruikers.
Als u het multimediastation aan derden overdraagt, dient u deze gebruiksaan-
wijzing bij te voegen. Neem bovendien de aanwijzingen in de gebruiksaanwij-
zingen van de op dit station aangesloten apparaten in acht.
Algemene veiligheidsinstructies
Neem de volgende aanwijzingen in acht om uzelf tegen persoonlijk letsel te
beschermen: Wijzig of open het apparaat niet.
Beoogd gebruik
Het multimediastation is bedoeld voor installatie en gebruik in voertuigen met
12 V voedingsspanning. Neem de vermogenslimieten van het apparaat in acht.
Laat alle reparaties en de installatie door een vakman uitvoeren.
Montage instructie
Installeer het apparaat alleen zelf als u ervaring heeft met de installatie van
autoradio’s en vertrouwd bent met elektrische autoproblemen. Raadpleeg
hiervoor het aansluitschema in deze gebruiksaanwijzing. De installatie van het
apparaat mag de werking van airbags, andere veiligheids- of bedieningsvoorzi-
eningen niet belemmeren of blokkeren.
Conformiteitsverklaring
Blaupunkt Competence Center Car Multimedia – Evo Sales GmbH verklaart dat
dit apparaat voldoet aan de basisvereisten en de overige relevante bepalingen
van de richtlijn 2014/53/EU. De conformiteitsverklaring is te vinden op de
website www.blaupunkt.com.
Reinigingsinstructies
Oplosmiddelen, reinigingsmiddelen en schuurmiddelen, alsmede reinigings-
sprays voor de cockpit en onderhoudsproducten voor plastic, kunnen
bestanddelen bevatten die het oppervlak van het multimediastation kunnen
beschadigen. Gebruik alleen een droge of licht bevochtigde doek om het
multimediastation te reinigen.
Instructies voor afvoer
Gooi het afgedankte apparaat niet samen met het huisvuil weg!
Om het apparaat, de afstandsbediening en de afgedankte batterijen af te
voeren, dient u ze naar een inzamelpunt voor afgedankte apparatuur te
brengen.
Leveringsomvang
De levering omvat:
BPA 3022 M multimediastation,
afstandsbediening,
ISO-connectoren,
montageschroeven,
gebruiksaanwijzing.
BELANGRIJKE INFORMATIE OVER DE INSTALLATIE
1. Lees de gebruiksaanwijzing zorgvuldig door voordat u het apparaat
installeert.
2. Zorg er vóór het aansluiten van de voeding voor dat alle andere draden zijn
aangesloten.
3. Zorg ervoor dat alle blootliggende draden zijn geïsoleerd om kortsluiting te
voorkomen.
4. Maak na voltooiing van de installatie alle draden vast.
5. Aansluitingen op de speler moeten volgens deze gebruiksaanwijzing
worden gemaakt. Een verkeerde aansluiting kan leiden tot schade aan het
apparaat.
6. De speler is bedoeld om alleen te werken met een 12 V DC-installatie.
MONTAGE VAN HET APPARAAT
DEMONTAGE VAN HET APPARAAT
1. Demonteer het apparaat.
2. Verwijder het buitenste sierframe.
Opmerking voor HDMI:
Gebruik een HDMI-kabel van goede kwaliteit.
De totale lengte (voor en achter) mag niet meer dan 365 cm bedragen.
DRADEN AANSLUITEN
1. De speler mag alleen worden gebruikt met +12 V DC.
2. Sluit de accupool pas aan nadat de speler volledig en correct is geïnstalleerd.
3. Zorg ervoor dat de gele kabel is aangesloten op de pluspool (+) van de accu.
4. Zorg er bij het vervangen van de zekering voor dat de parameters van de
nieuwe zekering dezelfde zijn.
5. Voor optimale prestaties van het apparaat worden luidsprekers van goede
kwaliteit met een impedantie van 4-8 ohm aanbevolen.
PLAATS VAN DE KNOPPEN
1. ZONE 1 2. 1 3. ZONE 2
4. 2 5. BT 6. 3 RPT
7. 8. 4 RDM 9.
10. 5 DIR- 11. DIS 12. 6 DIR+
13. LCD SCHERM 14. AUX AANSLUITING 15. HOOFDTELEFOON AANSLUITING
16. HDMI AANSLUITING 17. RESET 18. DRAAIKNOP
19. USB AANSLUITING 20. SRC/MENU
BASISBEDIENING
Het apparaat en de Mute-functie in-/uitschakelen
Druk op de /MUTE draaiknop om het apparaat in te schakelen. Druk, als het apparaat
aanstaat, kort op de draaiknop om de geluidsdempingsfunctie (MUTE) in- of uit te
schakelen. Druk in en houd de draaiknop ingedrukt om het apparaat uit te schakelen.
Geluidsinstellingen en instelmenu
Druk in en houd de knop SRC/MENU ingedrukt om naar het onderstaande menu te
gaan:
BAS->TRE->BAL->EQ (o/pop/rock/clas)->LOUD (on/o)->CLK HH->CLK MM->IR
(on/o) ->CT (indep/sync)->BEEP (on/o) ->P_VOL (13)->DX (LOC)->STEREO (MONO)
Draai bij elke positie de VOL-knop om deze in te stellen.
IR (ON/OFF):
IR ON: Met IR ON kan het apparaat worden ingeschakeld met de infrarood afstandsbe-
diening. Het systeem staat dan in de modus van hoog energieverbruik.
IR OFF: Met IR OFF kan het apparaat niet worden ingeschakeld met de infrarood
afstandsbediening. Het systeem staat in de modus van laag energieverbruik.
CT (INDEP/SYNC):
CT INDEP: De klok werkt onafhankelijk.
CT SYNC: De klok wordt gesynchroniseerd met de tijd van de ontvangen RDS-zender.
Opmerking: Als de klok handmatig in het menu wordt ingesteld, wordt de CT-functie
(kloktijd) automatisch ingesteld op de INDEP-modus (onafhankelijke werking).
BEEP (ON/OFF): Hiermee wordt de pieptoon in-/uitgeschakeld.
P-VOL (vooraf ingesteld inschakelvolume): Hiermee wordt het inschakelvolume
ingesteld. Als het uitschakelvolume lager is dan het P-VOL niveau, zal het apparaat bij
het inschakelen het volume instellen op het uitschakelvolume.
Als het uitschakelvolume hoger is dan het P-VOL niveau, zal het inschakelvolume bij
het inschakelen van apparaat worden teruggezet naar het ingestelde P-VOL niveau.
Zoeken naar Bluetooth-luidsprekers
Druk in en houd de BT-knop ingedrukt, de melding "SEARCH...” [zoeken] verschijnt.
Even later verschijnt de naam van een gevonden Bluetooth-apparaat. Om het
volgende Bluetooth-apparaat weer te geven, draai de VOL-knop. Wanneer de naam
van de gewenste Bluetooth-luidspreker op het LCD-scherm verschijnt, druk op de
VOL-knop om het apparaat te koppelen. Als het koppelen gelukt is, verschijnt op het
display "BOX ON".
Belangrijke opmerking: Ondanks vele tests met verschillende Bluetooth-apparaten,
kan compatibiliteit met alle op de markt verkrijgbare Bluetooth-apparaten niet
worden gegarandeerd.
Signaaloverdracht naar Bluetooth-luidspreker
Druk kort op de BT-knop om de overdracht van het signaal naar de Bluetooth-luid-
spreker aan/uit te zetten. Op het display verschijnt "BOX OFF/ON".
Opmerking: Ondanks zorgvuldige controle door Blaupunkt van de compatibiliteit met
verschillende Bluetooth-luidsprekers, kan een naadloze werking met alle op de markt
verkrijgbare modellen niet worden gegarandeerd.
Bediening van Zone 1 en Zone 2
Druk kort op de knop Zone 1 (of Zone 2) om het geluid van Zone 1 (of Zone 2) in/uit
te schakelen.
Houd de knop Zone 1 (of Zone 2) ingedrukt om het geluid van Zone 1 (of Zone 2) te
dempen. Druk nogmaals op de knop om het geluidsdemping uit te schakelen.
Prioriteit voor informatie of klok
Druk kort op de DIS-knop om klokprioriteit of informatieprioriteit in te stellen.
Opmerking: Bij ontvangst van een RDS-zender in de FM-band, druk kort op DIS-knop
om STATION NAME/CLOCK/FREQUENCY weer te geven.
Klok instellen
Ga in het menu naar de positie CLK HH/CLK MM. Draai de VOL-knop om uur/minuut
in te stellen.
Hoofdtelefoon gebruiken
Op het frontpaneel bevindt zich een 3,5 mm aansluiting voor een hoofdtelefoon.
Deze neemt de instellingen van Zone 1 over.
RADIO GEBRUIKEN
Een radiozender ontvangen
Druk op de SRC/MENU-knop om FM1->FM2->MW te selecteren. Druk kort op de
knop / om de gewenste radiozender te ontvangen. Houd de knop /
ingedrukt om de frequentie handmatig af te stemmen.
Zenders handmatig opslaan en opgeslagen zenders oproepen
Terwijl de gewenste zender wordt ontvangen, druk in en houd een van de geheugen-
knoppen (1-6) gedurende 2 seconden ingedrukt. De huidige zender wordt onder de
ingedrukte nummerknop opgeslagen. Druk kort op een van de geheugenknoppen
(1-6) om direct naar een onder deze knop opgeslagen zender te luisteren.
DAB GEBRUIKEN
Druk op de SRC/MENU-knop om de bron om te schakelen tussen DAB1 of DAB2.
Een zender kiezen
Druk op de knop / om de volgende/vorige zender te kiezen.
Zenders handmatig opslaan en opgeslagen zenders oproepen
Als de frequentie van de gewenste zender is ingesteld. Houd een van de knoppen 1-6
gedurende 2 seconden ingedrukt om deze zender onder het overeenkomstige
nummer op te slaan. Druk kort op een van de geheugenknoppen (1-6) om direct naar
een onder deze knop opgeslagen zender te luisteren.
USB GEBRUIKEN
Als een USB-stick op het apparaat wordt aangesloten, zal het automatisch MP3/W-
MA-bestanden afspelen. Als er al een USB-stick op het apparaat is aangesloten, blijf kort
op de SRC/MENU te drukken tot het USB-modusscherm verschijnt.
Een bestand kiezen
Druk op de / knop om naar het volgende/vorige bestand te gaan. Houd de
/ knop ingedrukt om snel vooruit of achteruit te gaan.
Afspelen/pauze
Druk op knop om het afspelen van een bestand te onderbreken/hervatten.
In een lus afspelen
Druk op de 3 RPT-knop om het lusafspelen te selecteren. RPT ONE/RPT FOLD/RPT ALL
(standaard)
RPT ONE: In een lus afspelen van hetzelfde bestand.
RPT FOLD: In een lus afspelen van alle bestanden in een map.
RPT ALL: In een lus afspelen van alle bestanden.
RANDOM
Druk op de 4 RDM-knop om de functie van willekeurig afspelen in- of uit te schakelen.
RDM on: Willekeurig afspelen van alle bestanden.
RDM o: Willekeurig afspelen uitschakelen.
Map +/- functie
Druk op de knop DIR+/DIR- om de volgende/vorige map te kiezen en deze af te spelen.
Een liedje opzoeken
Druk in en houd de knop ingedrukt om "NUM 0000” weer te geven. Gebruik de
VOL-draaiknop (of voer het nummer direct in) om het gewenste nummer te selecteren
en druk vervolgens op VOL om het af te spelen. Let op: de cijfers 7/8/9/0 staan onder
de volgende knoppen: BT = 7, = 8, = 9, DIS = 0.
GEBRUIK VAN DE AUX IN 1/2 AANSLUITING
De AUX IN 1 aansluiting op het frontpaneel is een 3,5 mm jack-aansluiting. De AUX IN 2
bevindt zich aan de achterkant en is een RCA-aansluiting. Druk bij het aansluiten van
het audiosignaal op het apparaat op SRC/MENU-knop om over te schakelen naar de
AUX IN 1 (2) modus.
BLUETOOTH GEBRUIKEN
Bluetooth-apparaten koppelen
Schakel de Bluetooth functie op uw smartphone in en zoek naar Bluetooth-appara-
ten. In de lijst moet "BLAUPUNKT" verschijnen; selecteer "BLAUPUNKT" en voer
vervolgens het wachtwoord "0000" in wanneer u erom wordt gevraagd. Als het
koppelen met succes is voltooid, verschijnt het symbool BT op het scherm.
Bluetooth-audio
Druk op de SRC/MENU-knop om over te schakelen naar de BT MUSIC modus. Het
apparaat zal automatisch een liedje van uw smartphone afspelen. Druk op de
knop om het liedje te stoppen/ af te spelen.
Druk op de knop / om het volgende/vorige nummer te kiezen.
HDMI GEBRUIKEN
De voorste HDMI-aansluiting gaat over naar de achterste HDMI-aansluiting. Het
afspelen via HDMI wordt dus niet beïnvloed.
V-IN en V-OUT RCA-aansluiting
Aan de achterkant van het apparaat gaat de V-IN aansluiting over naar de V-OUT
aansluiting.
AFSTANDSBEDIENING
De afstandsbediening kan worden gebruikt
wanneer de IR-optie in het menu is ingeschakeld.
OFF : Het apparaat in-/uitschakelen
VOL+: Volume verhogen
VOL- : Volume verlagen
1 : Zone 1 MUTE in-/uitschakelen
2 : Zone 2 MUTE in-/uitschakelen
Other operation please reference the description above
BEDIENING
ALGEMENE INFORMATIE
Vereisten betreende de voeding : 12 V gelijkstroom, minpool verbonden
met de massa
Afmetingen van de montagebasis : 129 (b) x 112 (d) x 65 (h)
Toon instellingen
- Lage tonen (bij 100 Hz) : ±10 dB
- Hoge tonen (bij 100 Hz) : ±10 dB
Maximaal uitgangsvermogen : 4 x 40 watts
Stroomverbruik: :10 A (max.)
RADIO FM AM
Frequentiebereik: 87.5 to 108 MHz 522 to 1620 KHz
IF 10.7 MHz 450 KHz
Gevoeligheid 4 µV (S/N = 30 dB) 36 dBµV (S/N = 20 dB)
Stereokanaalscheiding >25 dB /
PROBLEEMOPLOSSING
NL

Veiligheidsinstructies
Dit multimediastation is vervaardigd volgens de nieuwste technologische
ontwikkelingen en algemeen erkende veiligheidsbeginselen. Toch kunnen er
gevaren ontstaan wanneer de veiligheidsinstructies in deze gebruiksaanwijzing
niet worden nageleefd. Lees de volledige gebruiksaanwijzing zorgvuldig door
voordat u het multimediastation in gebruik neemt. Bewaar de gebruiksaanwij-
zing op een plaats waar deze te allen tijde toegankelijk is voor alle gebruikers.
Als u het multimediastation aan derden overdraagt, dient u deze gebruiksaan-
wijzing bij te voegen. Neem bovendien de aanwijzingen in de gebruiksaanwij-
zingen van de op dit station aangesloten apparaten in acht.
Algemene veiligheidsinstructies
Neem de volgende aanwijzingen in acht om uzelf tegen persoonlijk letsel te
beschermen: Wijzig of open het apparaat niet.
Beoogd gebruik
Het multimediastation is bedoeld voor installatie en gebruik in voertuigen met
12 V voedingsspanning. Neem de vermogenslimieten van het apparaat in acht.
Laat alle reparaties en de installatie door een vakman uitvoeren.
Montage instructie
Installeer het apparaat alleen zelf als u ervaring heeft met de installatie van
autoradio’s en vertrouwd bent met elektrische autoproblemen. Raadpleeg
hiervoor het aansluitschema in deze gebruiksaanwijzing. De installatie van het
apparaat mag de werking van airbags, andere veiligheids- of bedieningsvoorzi-
eningen niet belemmeren of blokkeren.
Conformiteitsverklaring
Blaupunkt Competence Center Car Multimedia – Evo Sales GmbH verklaart dat
dit apparaat voldoet aan de basisvereisten en de overige relevante bepalingen
van de richtlijn 2014/53/EU. De conformiteitsverklaring is te vinden op de
website www.blaupunkt.com.
Reinigingsinstructies
Oplosmiddelen, reinigingsmiddelen en schuurmiddelen, alsmede reinigings-
sprays voor de cockpit en onderhoudsproducten voor plastic, kunnen
bestanddelen bevatten die het oppervlak van het multimediastation kunnen
beschadigen. Gebruik alleen een droge of licht bevochtigde doek om het
multimediastation te reinigen.
Instructies voor afvoer
Gooi het afgedankte apparaat niet samen met het huisvuil weg!
Om het apparaat, de afstandsbediening en de afgedankte batterijen af te
voeren, dient u ze naar een inzamelpunt voor afgedankte apparatuur te
brengen.
Leveringsomvang
De levering omvat:
BPA 3022 M multimediastation,
afstandsbediening,
ISO-connectoren,
montageschroeven,
gebruiksaanwijzing.
BELANGRIJKE INFORMATIE OVER DE INSTALLATIE
1. Lees de gebruiksaanwijzing zorgvuldig door voordat u het apparaat
installeert.
2. Zorg er vóór het aansluiten van de voeding voor dat alle andere draden zijn
aangesloten.
3. Zorg ervoor dat alle blootliggende draden zijn geïsoleerd om kortsluiting te
voorkomen.
4. Maak na voltooiing van de installatie alle draden vast.
5. Aansluitingen op de speler moeten volgens deze gebruiksaanwijzing
worden gemaakt. Een verkeerde aansluiting kan leiden tot schade aan het
apparaat.
6. De speler is bedoeld om alleen te werken met een 12 V DC-installatie.
MONTAGE VAN HET APPARAAT
DEMONTAGE VAN HET APPARAAT
1. Demonteer het apparaat.
2. Verwijder het buitenste sierframe.
Opmerking voor HDMI:
Gebruik een HDMI-kabel van goede kwaliteit.
De totale lengte (voor en achter) mag niet meer dan 365 cm bedragen.
DRADEN AANSLUITEN
1. De speler mag alleen worden gebruikt met +12 V DC.
2. Sluit de accupool pas aan nadat de speler volledig en correct is geïnstalleerd.
3. Zorg ervoor dat de gele kabel is aangesloten op de pluspool (+) van de accu.
4. Zorg er bij het vervangen van de zekering voor dat de parameters van de
nieuwe zekering dezelfde zijn.
5. Voor optimale prestaties van het apparaat worden luidsprekers van goede
kwaliteit met een impedantie van 4-8 ohm aanbevolen.
PLAATS VAN DE KNOPPEN
1. ZONE 1 2. 1 3. ZONE 2
4. 2 5. BT 6. 3 RPT
7. 8. 4 RDM 9.
10. 5 DIR- 11. DIS 12. 6 DIR+
13. LCD SCHERM 14. AUX AANSLUITING 15. HOOFDTELEFOON AANSLUITING
16. HDMI AANSLUITING 17. RESET 18. DRAAIKNOP
19. USB AANSLUITING 20. SRC/MENU
BASISBEDIENING
Het apparaat en de Mute-functie in-/uitschakelen
Druk op de /MUTE draaiknop om het apparaat in te schakelen. Druk, als het apparaat
aanstaat, kort op de draaiknop om de geluidsdempingsfunctie (MUTE) in- of uit te
schakelen. Druk in en houd de draaiknop ingedrukt om het apparaat uit te schakelen.
Geluidsinstellingen en instelmenu
Druk in en houd de knop SRC/MENU ingedrukt om naar het onderstaande menu te
gaan:
BAS->TRE->BAL->EQ (o/pop/rock/clas)->LOUD (on/o)->CLK HH->CLK MM->IR
(on/o) ->CT (indep/sync)->BEEP (on/o) ->P_VOL (13)->DX (LOC)->STEREO (MONO)
Draai bij elke positie de VOL-knop om deze in te stellen.
IR (ON/OFF):
IR ON: Met IR ON kan het apparaat worden ingeschakeld met de infrarood afstandsbe-
diening. Het systeem staat dan in de modus van hoog energieverbruik.
IR OFF: Met IR OFF kan het apparaat niet worden ingeschakeld met de infrarood
afstandsbediening. Het systeem staat in de modus van laag energieverbruik.
CT (INDEP/SYNC):
CT INDEP: De klok werkt onafhankelijk.
CT SYNC: De klok wordt gesynchroniseerd met de tijd van de ontvangen RDS-zender.
Opmerking: Als de klok handmatig in het menu wordt ingesteld, wordt de CT-functie
(kloktijd) automatisch ingesteld op de INDEP-modus (onafhankelijke werking).
BEEP (ON/OFF): Hiermee wordt de pieptoon in-/uitgeschakeld.
P-VOL (vooraf ingesteld inschakelvolume): Hiermee wordt het inschakelvolume
ingesteld. Als het uitschakelvolume lager is dan het P-VOL niveau, zal het apparaat bij
het inschakelen het volume instellen op het uitschakelvolume.
Als het uitschakelvolume hoger is dan het P-VOL niveau, zal het inschakelvolume bij
het inschakelen van apparaat worden teruggezet naar het ingestelde P-VOL niveau.
Zoeken naar Bluetooth-luidsprekers
Druk in en houd de BT-knop ingedrukt, de melding "SEARCH...” [zoeken] verschijnt.
Even later verschijnt de naam van een gevonden Bluetooth-apparaat. Om het
volgende Bluetooth-apparaat weer te geven, draai de VOL-knop. Wanneer de naam
van de gewenste Bluetooth-luidspreker op het LCD-scherm verschijnt, druk op de
VOL-knop om het apparaat te koppelen. Als het koppelen gelukt is, verschijnt op het
display "BOX ON".
Belangrijke opmerking: Ondanks vele tests met verschillende Bluetooth-apparaten,
kan compatibiliteit met alle op de markt verkrijgbare Bluetooth-apparaten niet
worden gegarandeerd.
Signaaloverdracht naar Bluetooth-luidspreker
Druk kort op de BT-knop om de overdracht van het signaal naar de Bluetooth-luid-
spreker aan/uit te zetten. Op het display verschijnt "BOX OFF/ON".
Opmerking: Ondanks zorgvuldige controle door Blaupunkt van de compatibiliteit met
verschillende Bluetooth-luidsprekers, kan een naadloze werking met alle op de markt
verkrijgbare modellen niet worden gegarandeerd.
Bediening van Zone 1 en Zone 2
Druk kort op de knop Zone 1 (of Zone 2) om het geluid van Zone 1 (of Zone 2) in/uit
te schakelen.
Houd de knop Zone 1 (of Zone 2) ingedrukt om het geluid van Zone 1 (of Zone 2) te
dempen. Druk nogmaals op de knop om het geluidsdemping uit te schakelen.
Prioriteit voor informatie of klok
Druk kort op de DIS-knop om klokprioriteit of informatieprioriteit in te stellen.
Opmerking: Bij ontvangst van een RDS-zender in de FM-band, druk kort op DIS-knop
om STATION NAME/CLOCK/FREQUENCY weer te geven.
Klok instellen
Ga in het menu naar de positie CLK HH/CLK MM. Draai de VOL-knop om uur/minuut
in te stellen.
Hoofdtelefoon gebruiken
Op het frontpaneel bevindt zich een 3,5 mm aansluiting voor een hoofdtelefoon.
Deze neemt de instellingen van Zone 1 over.
RADIO GEBRUIKEN
Een radiozender ontvangen
Druk op de SRC/MENU-knop om FM1->FM2->MW te selecteren. Druk kort op de
knop / om de gewenste radiozender te ontvangen. Houd de knop /
ingedrukt om de frequentie handmatig af te stemmen.
Zenders handmatig opslaan en opgeslagen zenders oproepen
Terwijl de gewenste zender wordt ontvangen, druk in en houd een van de geheugen-
knoppen (1-6) gedurende 2 seconden ingedrukt. De huidige zender wordt onder de
ingedrukte nummerknop opgeslagen. Druk kort op een van de geheugenknoppen
(1-6) om direct naar een onder deze knop opgeslagen zender te luisteren.
DAB GEBRUIKEN
Druk op de SRC/MENU-knop om de bron om te schakelen tussen DAB1 of DAB2.
Een zender kiezen
Druk op de knop / om de volgende/vorige zender te kiezen.
Zenders handmatig opslaan en opgeslagen zenders oproepen
Als de frequentie van de gewenste zender is ingesteld. Houd een van de knoppen 1-6
gedurende 2 seconden ingedrukt om deze zender onder het overeenkomstige
nummer op te slaan. Druk kort op een van de geheugenknoppen (1-6) om direct naar
een onder deze knop opgeslagen zender te luisteren.
USB GEBRUIKEN
Als een USB-stick op het apparaat wordt aangesloten, zal het automatisch MP3/W-
MA-bestanden afspelen. Als er al een USB-stick op het apparaat is aangesloten, blijf kort
op de SRC/MENU te drukken tot het USB-modusscherm verschijnt.
Een bestand kiezen
Druk op de / knop om naar het volgende/vorige bestand te gaan. Houd de
/ knop ingedrukt om snel vooruit of achteruit te gaan.
Afspelen/pauze
Druk op knop om het afspelen van een bestand te onderbreken/hervatten.
In een lus afspelen
Druk op de 3 RPT-knop om het lusafspelen te selecteren. RPT ONE/RPT FOLD/RPT ALL
(standaard)
RPT ONE: In een lus afspelen van hetzelfde bestand.
RPT FOLD: In een lus afspelen van alle bestanden in een map.
RPT ALL: In een lus afspelen van alle bestanden.
RANDOM
Druk op de 4 RDM-knop om de functie van willekeurig afspelen in- of uit te schakelen.
RDM on: Willekeurig afspelen van alle bestanden.
RDM o: Willekeurig afspelen uitschakelen.
Map +/- functie
Druk op de knop DIR+/DIR- om de volgende/vorige map te kiezen en deze af te spelen.
Een liedje opzoeken
Druk in en houd de knop ingedrukt om "NUM 0000” weer te geven. Gebruik de
VOL-draaiknop (of voer het nummer direct in) om het gewenste nummer te selecteren
en druk vervolgens op VOL om het af te spelen. Let op: de cijfers 7/8/9/0 staan onder
de volgende knoppen: BT = 7, = 8, = 9, DIS = 0.
GEBRUIK VAN DE AUX IN 1/2 AANSLUITING
De AUX IN 1 aansluiting op het frontpaneel is een 3,5 mm jack-aansluiting. De AUX IN 2
bevindt zich aan de achterkant en is een RCA-aansluiting. Druk bij het aansluiten van
het audiosignaal op het apparaat op SRC/MENU-knop om over te schakelen naar de
AUX IN 1 (2) modus.
BLUETOOTH GEBRUIKEN
Bluetooth-apparaten koppelen
Schakel de Bluetooth functie op uw smartphone in en zoek naar Bluetooth-appara-
ten. In de lijst moet "BLAUPUNKT" verschijnen; selecteer "BLAUPUNKT" en voer
vervolgens het wachtwoord "0000" in wanneer u erom wordt gevraagd. Als het
koppelen met succes is voltooid, verschijnt het symbool BT op het scherm.
Bluetooth-audio
Druk op de SRC/MENU-knop om over te schakelen naar de BT MUSIC modus. Het
apparaat zal automatisch een liedje van uw smartphone afspelen. Druk op de
knop om het liedje te stoppen/ af te spelen.
Druk op de knop / om het volgende/vorige nummer te kiezen.
HDMI GEBRUIKEN
De voorste HDMI-aansluiting gaat over naar de achterste HDMI-aansluiting. Het
afspelen via HDMI wordt dus niet beïnvloed.
V-IN en V-OUT RCA-aansluiting
Aan de achterkant van het apparaat gaat de V-IN aansluiting over naar de V-OUT
aansluiting.
AFSTANDSBEDIENING
De afstandsbediening kan worden gebruikt
wanneer de IR-optie in het menu is ingeschakeld.
OFF : Het apparaat in-/uitschakelen
VOL+: Volume verhogen
VOL- : Volume verlagen
1 : Zone 1 MUTE in-/uitschakelen
2 : Zone 2 MUTE in-/uitschakelen
Other operation please reference the description above
ALGEMENE INFORMATIE
Vereisten betreende de voeding : 12 V gelijkstroom, minpool verbonden
met de massa
Afmetingen van de montagebasis : 129 (b) x 112 (d) x 65 (h)
Toon instellingen
- Lage tonen (bij 100 Hz) : ±10 dB
- Hoge tonen (bij 100 Hz) : ±10 dB
Maximaal uitgangsvermogen : 4 x 40 watts
Stroomverbruik: :10 A (max.)
RADIO FM AM
Frequentiebereik: 87.5 to 108 MHz 522 to 1620 KHz
IF 10.7 MHz 450 KHz
Gevoeligheid 4 µV (S/N = 30 dB) 36 dBµV (S/N = 20 dB)
Stereokanaalscheiding >25 dB /
PROBLEEMOPLOSSING
TECHNISCHE GEGEVENS
Probleem
Oorzaak
Oplossing
Geen voeding De ontsteking van het
voertuig is niet
ingeschakeld.
Zet de sleutel in het contactslot in de
stand “ACC” (tussenstand), als de
voeding is aangesloten op het hulpcircuit
van het voertuig en de motor niet draait.
Doorgebrande zekering. Vervang de zekering.
Geen geluid
Het geluidssterkte staat op
het minimum.
Stel het geluidssterkte in op het
gewenste niveau.
De bekabeling is niet
correct aangesloten.
Controleer de kabelaansluitingen.
De bedieningsknoppen
van het apparaat
werken niet.
De ingebouwde
microcomputer werkt niet
correct door ruis.
Druk op de resetknop.
De radio werkt niet.
De automatische
selectie van
radiozenders
werkt niet.
De antennekabel is niet
aangesloten.
Sluit de antennekabel goed aan.
Het signaal is te zwak. Kies handmatig een zender.
Het apparaat is gekoppeld
met een andere mobiele
telefoon.
1
)
Schakel de Bluetooth-functie op de
andere mobiele telefoon uit.
2
) Sluit de app af en start de app opnieuw.
Het afspelen vanuit
de muziek app van
uw mobiele telefoon
werkt niet.
NL

Enjoy it.
DE, EN, IT, FR, PL, ES, NL
Blaupunkt BPA 3022 M
Technische Änderungen, Irrtümer und Druckfehler vorbehalten.
Blaupunkt Competence Center Car Multimedia
Evo-Sales GmbH
Hastenbecker Weg 33
31785 Hameln/ Deutschland
© 2022 Evo-Sales GmbH– alle Rechte vorbehalten.
Dieses Material darf nur für den persönlichen Gebrauch reproduziert,
kopiert oder verteilt werden.
Veiligheidsinstructies
Dit multimediastation is vervaardigd volgens de nieuwste technologische
ontwikkelingen en algemeen erkende veiligheidsbeginselen. Toch kunnen er
gevaren ontstaan wanneer de veiligheidsinstructies in deze gebruiksaanwijzing
niet worden nageleefd. Lees de volledige gebruiksaanwijzing zorgvuldig door
voordat u het multimediastation in gebruik neemt. Bewaar de gebruiksaanwij-
zing op een plaats waar deze te allen tijde toegankelijk is voor alle gebruikers.
Als u het multimediastation aan derden overdraagt, dient u deze gebruiksaan-
wijzing bij te voegen. Neem bovendien de aanwijzingen in de gebruiksaanwij-
zingen van de op dit station aangesloten apparaten in acht.
Algemene veiligheidsinstructies
Neem de volgende aanwijzingen in acht om uzelf tegen persoonlijk letsel te
beschermen: Wijzig of open het apparaat niet.
Beoogd gebruik
Het multimediastation is bedoeld voor installatie en gebruik in voertuigen met
12 V voedingsspanning. Neem de vermogenslimieten van het apparaat in acht.
Laat alle reparaties en de installatie door een vakman uitvoeren.
Montage instructie
Installeer het apparaat alleen zelf als u ervaring heeft met de installatie van
autoradio’s en vertrouwd bent met elektrische autoproblemen. Raadpleeg
hiervoor het aansluitschema in deze gebruiksaanwijzing. De installatie van het
apparaat mag de werking van airbags, andere veiligheids- of bedieningsvoorzi-
eningen niet belemmeren of blokkeren.
Conformiteitsverklaring
Blaupunkt Competence Center Car Multimedia – Evo Sales GmbH verklaart dat
dit apparaat voldoet aan de basisvereisten en de overige relevante bepalingen
van de richtlijn 2014/53/EU. De conformiteitsverklaring is te vinden op de
website www.blaupunkt.com.
Reinigingsinstructies
Oplosmiddelen, reinigingsmiddelen en schuurmiddelen, alsmede reinigings-
sprays voor de cockpit en onderhoudsproducten voor plastic, kunnen
bestanddelen bevatten die het oppervlak van het multimediastation kunnen
beschadigen. Gebruik alleen een droge of licht bevochtigde doek om het
multimediastation te reinigen.
Instructies voor afvoer
Gooi het afgedankte apparaat niet samen met het huisvuil weg!
Om het apparaat, de afstandsbediening en de afgedankte batterijen af te
voeren, dient u ze naar een inzamelpunt voor afgedankte apparatuur te
brengen.
Leveringsomvang
De levering omvat:
BPA 3022 M multimediastation,
afstandsbediening,
ISO-connectoren,
montageschroeven,
gebruiksaanwijzing.
BELANGRIJKE INFORMATIE OVER DE INSTALLATIE
1. Lees de gebruiksaanwijzing zorgvuldig door voordat u het apparaat
installeert.
2. Zorg er vóór het aansluiten van de voeding voor dat alle andere draden zijn
aangesloten.
3. Zorg ervoor dat alle blootliggende draden zijn geïsoleerd om kortsluiting te
voorkomen.
4. Maak na voltooiing van de installatie alle draden vast.
5. Aansluitingen op de speler moeten volgens deze gebruiksaanwijzing
worden gemaakt. Een verkeerde aansluiting kan leiden tot schade aan het
apparaat.
6. De speler is bedoeld om alleen te werken met een 12 V DC-installatie.
MONTAGE VAN HET APPARAAT
DEMONTAGE VAN HET APPARAAT
1. Demonteer het apparaat.
2. Verwijder het buitenste sierframe.
Opmerking voor HDMI:
Gebruik een HDMI-kabel van goede kwaliteit.
De totale lengte (voor en achter) mag niet meer dan 365 cm bedragen.
DRADEN AANSLUITEN
1. De speler mag alleen worden gebruikt met +12 V DC.
2. Sluit de accupool pas aan nadat de speler volledig en correct is geïnstalleerd.
3. Zorg ervoor dat de gele kabel is aangesloten op de pluspool (+) van de accu.
4. Zorg er bij het vervangen van de zekering voor dat de parameters van de
nieuwe zekering dezelfde zijn.
5. Voor optimale prestaties van het apparaat worden luidsprekers van goede
kwaliteit met een impedantie van 4-8 ohm aanbevolen.
PLAATS VAN DE KNOPPEN
1. ZONE 1 2. 1 3. ZONE 2
4. 2 5. BT 6. 3 RPT
7. 8. 4 RDM 9.
10. 5 DIR- 11. DIS 12. 6 DIR+
13. LCD SCHERM 14. AUX AANSLUITING 15. HOOFDTELEFOON AANSLUITING
16. HDMI AANSLUITING 17. RESET 18. DRAAIKNOP
19. USB AANSLUITING 20. SRC/MENU
BASISBEDIENING
Het apparaat en de Mute-functie in-/uitschakelen
Druk op de /MUTE draaiknop om het apparaat in te schakelen. Druk, als het apparaat
aanstaat, kort op de draaiknop om de geluidsdempingsfunctie (MUTE) in- of uit te
schakelen. Druk in en houd de draaiknop ingedrukt om het apparaat uit te schakelen.
Geluidsinstellingen en instelmenu
Druk in en houd de knop SRC/MENU ingedrukt om naar het onderstaande menu te
gaan:
BAS->TRE->BAL->EQ (o/pop/rock/clas)->LOUD (on/o)->CLK HH->CLK MM->IR
(on/o) ->CT (indep/sync)->BEEP (on/o) ->P_VOL (13)->DX (LOC)->STEREO (MONO)
Draai bij elke positie de VOL-knop om deze in te stellen.
IR (ON/OFF):
IR ON: Met IR ON kan het apparaat worden ingeschakeld met de infrarood afstandsbe-
diening. Het systeem staat dan in de modus van hoog energieverbruik.
IR OFF: Met IR OFF kan het apparaat niet worden ingeschakeld met de infrarood
afstandsbediening. Het systeem staat in de modus van laag energieverbruik.
CT (INDEP/SYNC):
CT INDEP: De klok werkt onafhankelijk.
CT SYNC: De klok wordt gesynchroniseerd met de tijd van de ontvangen RDS-zender.
Opmerking: Als de klok handmatig in het menu wordt ingesteld, wordt de CT-functie
(kloktijd) automatisch ingesteld op de INDEP-modus (onafhankelijke werking).
BEEP (ON/OFF): Hiermee wordt de pieptoon in-/uitgeschakeld.
P-VOL (vooraf ingesteld inschakelvolume): Hiermee wordt het inschakelvolume
ingesteld. Als het uitschakelvolume lager is dan het P-VOL niveau, zal het apparaat bij
het inschakelen het volume instellen op het uitschakelvolume.
Als het uitschakelvolume hoger is dan het P-VOL niveau, zal het inschakelvolume bij
het inschakelen van apparaat worden teruggezet naar het ingestelde P-VOL niveau.
Zoeken naar Bluetooth-luidsprekers
Druk in en houd de BT-knop ingedrukt, de melding "SEARCH...” [zoeken] verschijnt.
Even later verschijnt de naam van een gevonden Bluetooth-apparaat. Om het
volgende Bluetooth-apparaat weer te geven, draai de VOL-knop. Wanneer de naam
van de gewenste Bluetooth-luidspreker op het LCD-scherm verschijnt, druk op de
VOL-knop om het apparaat te koppelen. Als het koppelen gelukt is, verschijnt op het
display "BOX ON".
Belangrijke opmerking: Ondanks vele tests met verschillende Bluetooth-apparaten,
kan compatibiliteit met alle op de markt verkrijgbare Bluetooth-apparaten niet
worden gegarandeerd.
Signaaloverdracht naar Bluetooth-luidspreker
Druk kort op de BT-knop om de overdracht van het signaal naar de Bluetooth-luid-
spreker aan/uit te zetten. Op het display verschijnt "BOX OFF/ON".
Opmerking: Ondanks zorgvuldige controle door Blaupunkt van de compatibiliteit met
verschillende Bluetooth-luidsprekers, kan een naadloze werking met alle op de markt
verkrijgbare modellen niet worden gegarandeerd.
Bediening van Zone 1 en Zone 2
Druk kort op de knop Zone 1 (of Zone 2) om het geluid van Zone 1 (of Zone 2) in/uit
te schakelen.
Houd de knop Zone 1 (of Zone 2) ingedrukt om het geluid van Zone 1 (of Zone 2) te
dempen. Druk nogmaals op de knop om het geluidsdemping uit te schakelen.
Prioriteit voor informatie of klok
Druk kort op de DIS-knop om klokprioriteit of informatieprioriteit in te stellen.
Opmerking: Bij ontvangst van een RDS-zender in de FM-band, druk kort op DIS-knop
om STATION NAME/CLOCK/FREQUENCY weer te geven.
Klok instellen
Ga in het menu naar de positie CLK HH/CLK MM. Draai de VOL-knop om uur/minuut
in te stellen.
Hoofdtelefoon gebruiken
Op het frontpaneel bevindt zich een 3,5 mm aansluiting voor een hoofdtelefoon.
Deze neemt de instellingen van Zone 1 over.
RADIO GEBRUIKEN
Een radiozender ontvangen
Druk op de SRC/MENU-knop om FM1->FM2->MW te selecteren. Druk kort op de
knop / om de gewenste radiozender te ontvangen. Houd de knop /
ingedrukt om de frequentie handmatig af te stemmen.
Zenders handmatig opslaan en opgeslagen zenders oproepen
Terwijl de gewenste zender wordt ontvangen, druk in en houd een van de geheugen-
knoppen (1-6) gedurende 2 seconden ingedrukt. De huidige zender wordt onder de
ingedrukte nummerknop opgeslagen. Druk kort op een van de geheugenknoppen
(1-6) om direct naar een onder deze knop opgeslagen zender te luisteren.
DAB GEBRUIKEN
Druk op de SRC/MENU-knop om de bron om te schakelen tussen DAB1 of DAB2.
Een zender kiezen
Druk op de knop / om de volgende/vorige zender te kiezen.
Zenders handmatig opslaan en opgeslagen zenders oproepen
Als de frequentie van de gewenste zender is ingesteld. Houd een van de knoppen 1-6
gedurende 2 seconden ingedrukt om deze zender onder het overeenkomstige
nummer op te slaan. Druk kort op een van de geheugenknoppen (1-6) om direct naar
een onder deze knop opgeslagen zender te luisteren.
USB GEBRUIKEN
Als een USB-stick op het apparaat wordt aangesloten, zal het automatisch MP3/W-
MA-bestanden afspelen. Als er al een USB-stick op het apparaat is aangesloten, blijf kort
op de SRC/MENU te drukken tot het USB-modusscherm verschijnt.
Een bestand kiezen
Druk op de / knop om naar het volgende/vorige bestand te gaan. Houd de
/ knop ingedrukt om snel vooruit of achteruit te gaan.
Afspelen/pauze
Druk op knop om het afspelen van een bestand te onderbreken/hervatten.
In een lus afspelen
Druk op de 3 RPT-knop om het lusafspelen te selecteren. RPT ONE/RPT FOLD/RPT ALL
(standaard)
RPT ONE: In een lus afspelen van hetzelfde bestand.
RPT FOLD: In een lus afspelen van alle bestanden in een map.
RPT ALL: In een lus afspelen van alle bestanden.
RANDOM
Druk op de 4 RDM-knop om de functie van willekeurig afspelen in- of uit te schakelen.
RDM on: Willekeurig afspelen van alle bestanden.
RDM o: Willekeurig afspelen uitschakelen.
Map +/- functie
Druk op de knop DIR+/DIR- om de volgende/vorige map te kiezen en deze af te spelen.
Een liedje opzoeken
Druk in en houd de knop ingedrukt om "NUM 0000” weer te geven. Gebruik de
VOL-draaiknop (of voer het nummer direct in) om het gewenste nummer te selecteren
en druk vervolgens op VOL om het af te spelen. Let op: de cijfers 7/8/9/0 staan onder
de volgende knoppen: BT = 7, = 8, = 9, DIS = 0.
GEBRUIK VAN DE AUX IN 1/2 AANSLUITING
De AUX IN 1 aansluiting op het frontpaneel is een 3,5 mm jack-aansluiting. De AUX IN 2
bevindt zich aan de achterkant en is een RCA-aansluiting. Druk bij het aansluiten van
het audiosignaal op het apparaat op SRC/MENU-knop om over te schakelen naar de
AUX IN 1 (2) modus.
BLUETOOTH GEBRUIKEN
Bluetooth-apparaten koppelen
Schakel de Bluetooth functie op uw smartphone in en zoek naar Bluetooth-appara-
ten. In de lijst moet "BLAUPUNKT" verschijnen; selecteer "BLAUPUNKT" en voer
vervolgens het wachtwoord "0000" in wanneer u erom wordt gevraagd. Als het
koppelen met succes is voltooid, verschijnt het symbool BT op het scherm.
Bluetooth-audio
Druk op de SRC/MENU-knop om over te schakelen naar de BT MUSIC modus. Het
apparaat zal automatisch een liedje van uw smartphone afspelen. Druk op de
knop om het liedje te stoppen/ af te spelen.
Druk op de knop / om het volgende/vorige nummer te kiezen.
HDMI GEBRUIKEN
De voorste HDMI-aansluiting gaat over naar de achterste HDMI-aansluiting. Het
afspelen via HDMI wordt dus niet beïnvloed.
V-IN en V-OUT RCA-aansluiting
Aan de achterkant van het apparaat gaat de V-IN aansluiting over naar de V-OUT
aansluiting.
AFSTANDSBEDIENING
De afstandsbediening kan worden gebruikt
wanneer de IR-optie in het menu is ingeschakeld.
OFF : Het apparaat in-/uitschakelen
VOL+: Volume verhogen
VOL- : Volume verlagen
1 : Zone 1 MUTE in-/uitschakelen
2 : Zone 2 MUTE in-/uitschakelen
Other operation please reference the description above
ALGEMENE INFORMATIE
Vereisten betreende de voeding : 12 V gelijkstroom, minpool verbonden
met de massa
Afmetingen van de montagebasis : 129 (b) x 112 (d) x 65 (h)
Toon instellingen
- Lage tonen (bij 100 Hz) : ±10 dB
- Hoge tonen (bij 100 Hz) : ±10 dB
Maximaal uitgangsvermogen : 4 x 40 watts
Stroomverbruik: :10 A (max.)
RADIO FM AM
Frequentiebereik: 87.5 to 108 MHz 522 to 1620 KHz
IF 10.7 MHz 450 KHz
Gevoeligheid 4 µV (S/N = 30 dB) 36 dBµV (S/N = 20 dB)
Stereokanaalscheiding >25 dB /
PROBLEEMOPLOSSING
-
 1
1
-
 2
2
-
 3
3
-
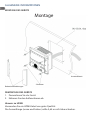 4
4
-
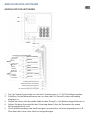 5
5
-
 6
6
-
 7
7
-
 8
8
-
 9
9
-
 10
10
-
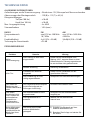 11
11
-
 12
12
-
 13
13
-
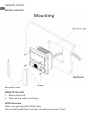 14
14
-
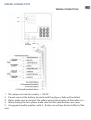 15
15
-
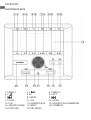 16
16
-
 17
17
-
 18
18
-
 19
19
-
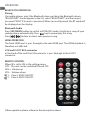 20
20
-
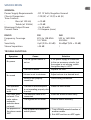 21
21
-
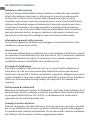 22
22
-
 23
23
-
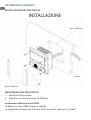 24
24
-
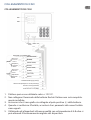 25
25
-
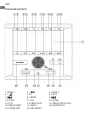 26
26
-
 27
27
-
 28
28
-
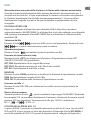 29
29
-
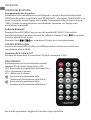 30
30
-
 31
31
-
 32
32
-
 33
33
-
 34
34
-
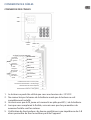 35
35
-
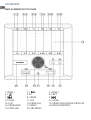 36
36
-
 37
37
-
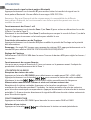 38
38
-
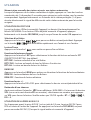 39
39
-
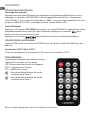 40
40
-
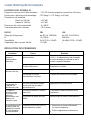 41
41
-
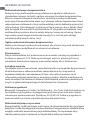 42
42
-
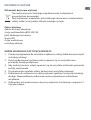 43
43
-
 44
44
-
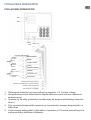 45
45
-
 46
46
-
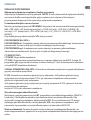 47
47
-
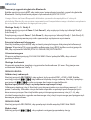 48
48
-
 49
49
-
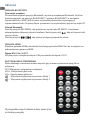 50
50
-
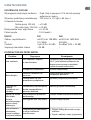 51
51
-
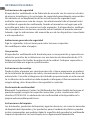 52
52
-
 53
53
-
 54
54
-
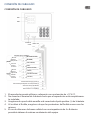 55
55
-
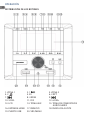 56
56
-
 57
57
-
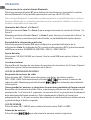 58
58
-
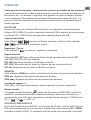 59
59
-
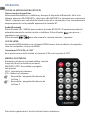 60
60
-
 61
61
-
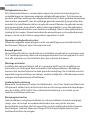 62
62
-
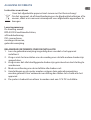 63
63
-
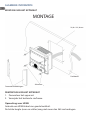 64
64
-
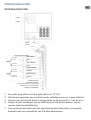 65
65
-
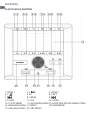 66
66
-
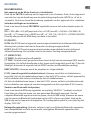 67
67
-
 68
68
-
 69
69
-
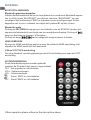 70
70
-
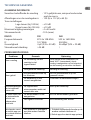 71
71
-
 72
72


Blaupunkt BPA 3022 M Handleiding
- Categorie
- Auto videosystemen
- Type
- Handleiding
in andere talen
- italiano: Blaupunkt BPA 3022 M Manuale utente
- français: Blaupunkt BPA 3022 M Manuel utilisateur
- español: Blaupunkt BPA 3022 M Manual de usuario
- Deutsch: Blaupunkt BPA 3022 M Benutzerhandbuch
- polski: Blaupunkt BPA 3022 M Instrukcja obsługi
