
ARCTIS G 7 88 50 i
Integreerbare diepvrieskast
Integrating Freezer
Congelatore integrabile
Gebruiks- en montageaanwijzing
Operating and Installation instructions
Istruzioni d’uso e montaggio
AEG Hausgeräte GmbH
Postfach 1036
D-90327 Nürnberg
http://www.aeg.hausgeraete.de
2222 314-43

2
Geachte klant,
Lees eerst aandachtig de gebruiksaanwijzing door voordat u uw nieuwe
koelapparaat in gebruik neemt. Hierin staat belangrijke informatie over een
veilig gebruik, over het opstellen en over het onderhoud van het apparaat.
De gebruiksaanwijzing s.v.p. bewaren voor latere naslag. Aan eventuele vol-
gende bezitters van het apparaat doorgeven.
Deze gebruiksaanwijzing is voor meerdere, technisch vergelijkbare modellen
in diverse uitvoeringen bestemd. S.v.p. alleen op de aanwijzingen letten die
op Uw apparaat betrekking hebben.
Met de waarschuwingsdriehoek en/of door signaalwoorden (Waar-
schuwing!, Voorzichtig!, Let op!) wordt de aandacht gevestigd op aanwij-
zingen die belangrijk zijn voor uw veiligheid of voor het juist functioneren
van het apparaat. Hier absoluut op letten.
Na dit symbool wordt uitleg gegeven over de bediening en het prak-tisch
gebruik van het apparaat.
Met het klaverblad worden tips en aanwijzingen voor een econo-mischen
milieuvriendelijk gebruik van het apparaat aangegeven.
Voor eventueel optredende storingen staan in de handleiding aanwijzingen
om deze zelf op te lossen, zie Hoofdstuk "Wat te doen als...". Als deze aanwij-
zingen niet voldoende informatie bieden staat onze klantendienst u te allen
tijde ter beschikking.
Gedrukt op milieuvriendelijk vervaardigd papier
wie ecologisch denkt, handelt ook zo ...

3
Inhoud
Veiligheid . . . . . . . . . . . . . . . . . . . . . . . . . . . . . . . . . . . . . . . . . . . . .4
Weggooien . . . . . . . . . . . . . . . . . . . . . . . . . . . . . . . . . . . . . . . . . . .6
Informatie over de verpakking van het apparaat . . . . . . . . . . . . . . . . .6
Weggooien van oude apparaten . . . . . . . . . . . . . . . . . . . . . . . . . . . . . .6
Transportbescherming verwijderen . . . . . . . . . . . . . . . . . . . . . . . . .6
Opstellen . . . . . . . . . . . . . . . . . . . . . . . . . . . . . . . . . . . . . . . . . . . . .7
Opstelplaats . . . . . . . . . . . . . . . . . . . . . . . . . . . . . . . . . . . . . . . . . . . . . .7
Zorg voor een goede ventilatie rond het apparaat . . . . . . . . . . . . . . . .8
Nismaten . . . . . . . . . . . . . . . . . . . . . . . . . . . . . . . . . . . . . . . . . . . . . . . . .8
Deurdraairichting . . . . . . . . . . . . . . . . . . . . . . . . . . . . . . . . . . . . . . . . . .8
Aanwijzingen voor de geintegreerde inbouw . . . . . . . . . . . . . . . . . . . .9
Elektrische aansluiting . . . . . . . . . . . . . . . . . . . . . . . . . . . . . . . . .12
Voor ingebruikname . . . . . . . . . . . . . . . . . . . . . . . . . . . . . . . . . . .12
Bedienings- en kontroleinrichting . . . . . . . . . . . . . . . . . . . . . . . . .13
Akoestisch temperatuursignaal . . . . . . . . . . . . . . . . . . . . . . . . . . .14
In gebruik nemen en temperatuurregeling . . . . . . . . . . . . . . . . . .14
Invriezen en diepgevroren opslaan . . . . . . . . . . . . . . . . . . . . . . . .15
Symbolen bewaarde producten/ Diepvrieskalender . . . . . . . . . . . .16
Het maken van ijsblokjes . . . . . . . . . . . . . . . . . . . . . . . . . . . . . . . .17
Ontdooien en reinigen . . . . . . . . . . . . . . . . . . . . . . . . . . . . . . . . . .17
Apparaat uitzetten . . . . . . . . . . . . . . . . . . . . . . . . . . . . . . . . . . . .19
Tips om energie te besparen . . . . . . . . . . . . . . . . . . . . . . . . . . . . .19
Wat te doen als . . . . . . . . . . . . . . . . . . . . . . . . . . . . . . . . . . . . . . .19
Hulp bij storingen . . . . . . . . . . . . . . . . . . . . . . . . . . . . . . . . . . . . . . . . .19
Klantenservice . . . . . . . . . . . . . . . . . . . . . . . . . . . . . . . . . . . . . . . . . . .21
Doel, normen, richtlijnen . . . . . . . . . . . . . . . . . . . . . . . . . . . . . . . . . .22
2222 314-43

4
Veiligheid
De veiligheid van onze koelapparaten voldoet aan de Europese en Neder-
landse normen. Desondanks zien wij ons genoodzaakt u met de volgende
veiligheidsaanwijzingen vertrouwd te maken:
Reglementaire toepassing
• Het koelapparaat is voor huishoudelijk gebruik bestemd. Het is geschikt
voor het invriezen en diepgevroren bewaren van levensmiddelen en voor
het maken van ijs. Als het apparaat voor andere doeleinden gebruikt
wordt kan de fabrikant geen verantwoording nemen voor eventuele
schaden.
• Het ombouwen van of veranderingen aan het koelapparaat aanbrengen
is uit veiligheidsoverwegingen niet toegestaan.
• Als het koelapparaat commercieel of voor andere doeleinden dan voor
diepgevroren bewaren en invriezen van levensmiddelen gebruikt wordt,
s.v.p. letten op de hiervoor van kracht zijnde wettelijke bepalingen.
Voordat het apparaat voor de eerste keer in gebruik
genomen wordt
• Controleer het koelapparaat op transportschaden. Een beschadigd appa-
raat in geen geval aansluiten! Wend u in geval van schade tot de leve-
rancier.
Koelmiddelen
Het apparaat bevat in het koelvloeistofcircuit de koelvloeistof Isobutan
(R600a), een natuurlijk, zeer milieuvriendelijk gas, dat echter wel brandbaar
is.
• Bij het transport en het opstellen van het apparaat erop letten dat geen
onderdelen van het koelvloeistofcircuit beschadigd worden.
• Bij beschadiging van het koelvloeistofcircuit:
– open vuur en brandhaarden absoluut vermijden;
– het vertrek waar het apparaat staat goed ventileren.
Veiligheid van kinderen
• Verpakkingsdelen (bijv. foliën, piepschuim) kunnen voor kinderen gevaar-
lijk zijn. Stikgevaar! Verpakkingsmateriaal van kinderen weghouden!
• Oude apparaten voor het weggooien onbruikbaar maken. Stekker uit het
stopcontact trekken, stroomkabel doorknippen, eventueel aanwezige

5
snap– of grendelsloten verwijderen of kapotmaken. Daardoor wordt
voorkomen dat spelende kinderen in het apparaat opgesloten raken (stik-
gevaar!) of in andere levensgevaarlijke situaties terecht komen.
• Kinderen kunnen gevaren die in het omgaan met huishoudelijke appara-
ten schuilen vaak niet herkennen. Zorg daarom voor de nodige toezicht
en laat kinderen niet met het apparaat spelen.
Bij dagelijks gebruik
• Containers met brandbare gassen of vloeistoffen kunnen lek raken door
de inwerking van koude. Explosiegevaar! Leg geen containers met brand-
bare stoffen zoals bijv. spraybussen, aanstekers, navullin-gen van aan-
stekers etc. in het koelapparaat.
• Flessen en blikken mogen niet in het vriesvak. Ze kunnen springen als de
inhoud bevriest – bij koolzuurhoudende inhoud zelfs exploderen! Leg noit
limonades, sappen, bier, wijn, champagne etc. in het vriesvak. Uitzonde-
ring: sterke drank met een zeer hoog alcohol percentage kan in het vrie-
svak gelegd worden.
• Consumptie-ijs en ijsblokjes niet direct vanuit de vriesruimte in de mond
steken. Zeer koud ijs kan aan de lippen of de tong vastvriezen en verwon-
dingen veroorzaken.
• Niet met natte handen aan diepvriesartikelen komen. De handen kunnen
daaraan vastvriezen.
• Geen elektrische apparaten (bijv. elektrische ijsmachines, mixers etc.) in het
koelapparaat gebruiken.
• Voor het schoonmaken het apparaat altijd uitzetten en de stekker uit het
stopcontact trekken of de zekering in de woning uitschakelen c.q. er uit
draaien.
• De stekker altijd aan de stekker zelf uit het stopcontact trekken, nooit aan
het snoer.
Bij storing
• Als er een storing aan het apparaat optreedt eerst in de gebruiks-aanwij-
zing kijken onder “Wat te doen als ...”. Als de daar gegeven aanwijzingen
niet verder helpen zelf niet verder aan het apparaat werken.
• Koelapparaten mogen alleen dooor geschoold personeel gerepareerd wor-
den. Door ondeskundige reparaties kunnen grote gevaren ont-staan.
Wend u zich bij reparaties tot uw vakhandel of tot onze klantendienst.
64
Servizio di assistenza
Se nel caso di un disturbo non si riesca a trovare alcun rimedio in queste
istruzioni per l’uso, Vi preghiamo di rivolgerVi al Vostro rivenditore specia-
lizzato oppure presso il nostro servizio di assistenza. Gli indirizzi rispett.
numeri telefonici sono riportati nel libretto “Condizioni di garanzia / indi-
rizzi del centro di assistenza” allegato.
Una preparazione definita dei pezzi di ricambio può risparmiare delle vie
inutili e tempo. Si prega pertanto di indicare i seguenti dati del Vostro appa-
recchio:
• Descrizione modello
• Numero di produzione (No.P)
• Numero di ultimazione (No.U)
Queste indicazioni sono riportate sulla targa matricola situata nell’interno
dell’apparecchio. Allo scopo di aver rapidamente a portatas di mano tutti i
dati, si consiglia di annotarli qui.
Avvertenza: Una chiamata del servizio di assistenza non giustificata é sog-
getta all’obbligo di risarcimento delle spese anche durante la garanzia.
Disposizioni, Norme, Direttive.
L’apparecchiatura é stato concepito per l’impiego domestico ed é stato pro-
dotto sotto l’osservanza delle norme vigenti per questi tipi di apparecchia-
ture. Nella produzione sono stati inoltre presi i particolari provvedimenti
necessari in conformità alla legge sulla sicurezza degli apparecchi (GSG), le
prescrizione sulla prevenzione degli infortuni per impiianti refrigeranti (VBG
20) e le disposizioni della cooperativa tedesca elettricisti (VDE).Il circuito
refrigerante é stata verificata sull’ermeticità.
Questo apparecchio è conforme alle seguenti direttive CEE:
– 73/23/CEE del 19.2.1973 - Direttiva sulle basse tensioni
– 89/336/CEE del 3.5.1989
(compresa successive modifiche del 92/31/CEE) - Direttiva EMV

6
Weggooien
Informatie over de verpakking van het apparaat
Alle gebruikte grondstoffen zijn milieuvriendelijk! Ze kunnen zonder gevaar
weggegooid of in de vuilverbrandingsoven verbrand worden!
De grondstoffen: de kunststoffen kunnen ook opnieuw gebruikt worden en
worden als volgt gekarakteriseerd:
>PE< voor polyethyleen, bijv. bij de buitenste verpakking en de zakken bin-
nenin.
>PS< voor schuimpolystyrol, bijv. bij de bekledingsdelen, in principe FCKW-
vrij.
De kartonnen delen zijn van oud papier gemaakt en kunnen ook weer bij
het oud-papier gedaan worden.
Weggooien van oude apparaten
Wegens milieuredenen dienen koelapparaten vakkundig ontmanteld te
worden. Dit geldt voor uw huidige apparaat en - als het ook aan vervanging
toe is - ook voor uw nieuwe apparaat.
Waarschuwing! Apparaten die hun tijd gehad hebben onbruikbaar maken
voordat ze weggegooid worden. Stekker er afhalen, netsnoer doorknippen,
eventuele snap- of grendelsloten verwijderen of kapot-maken. Hierdoor
wordt voorkomen dat spelende kinderen in het apparaat opgesloten wor-
den (verstikkingsgevaar!) of in andere levensgevaarlijke situaties terechtko-
men.
Aanwijzingen voor het weggooien:
• Het apparaat mag niet bij het huis- of grofvuil gezet worden.
• Het koelvloeistofcircuit, in het bijzonder de warmtewisselaar aan de ach-
terkant, mag niet beschadigd worden.
• Informatie over afhaaltijden of inzamelplaatsen zijn te verkrijgen bij de
plaatselijke reinigingsdienst of op het gemeentehuis.
Transportbescherming verwijderen
Het apparaat alsmede de onderdelen van het interieur zijn voor het tran-
sport beschermd.
• Alle plakband alsmede bekledingsdelen uit het interieur verwijderen.
63
Disturbo Possibile cause Rimedio
Dopo un certo periodo il
compressore si aziona auto-
maticamente
Ciò é normale, non sussite
alcun distrubo
Dopo aver modificato la rego-
lazione della temperatura il
compressore non interviene
subito
Rumorosità insolita
L’apparecchio é a contatto
con la parete oppure con
altri oggetti
L’apparecchio non é livellato
Un componente installato sul
retro dell’apparecchio p.es. un
tubo, tocca un altro compo-
nente oppure la parete
Piegare eventualmente con
cautela
Allontanare leggermente l’ap-
parecchio
Correggere con i piedini rego-
labili

7
Opstellen
Opstelplaats
Het apparaat in een goed geventileerde en droge ruimte neerzetten.
De omgevingstemperatuur heeft invloed op het stroomverbruik.
Het apparaat daarom
– niet aan directe straling van de zon blootstellen;
– niet bij radiatoren, naast een kachel of andere warmtebronnen plaatsen;
– alleen op een plaats neerzetten waarvan de omgevingstemperatuur ove-
reenkomt met de klimaatcategorie waarvoor het apparaat is ont-worpen.
De klimaatcategorieën staan op het merk- en type-aanduidingsplaatje dat
zich links aan de binnenkant van het apparaat bevindt.
De volgende tabel geeft aan welke omgevingstemperatuur bij welke kli-
maatcategorie behoort:
Als het onvermijdelijk is het apparaat naast een warmtebron te plaat-sen,
aan weerszijden minimaal de volgende afstanden aanhouden:
– tot elektrische kachels 3 cm;
– tot olie- en kolenkachels 30 cm.
Als men zich niet aan deze afstanden kan houden, is een warmte-isolatie-
plaat tussen kachel en koelapparaat aan te bevelen.
Als het koelapparaat naast een ander koel- of diepvriesapparaat staat, is een
afstand van 5 cm aan weerszijden aan te bevelen, zodat zich geen condens
vormt aan de buitenkant van de apparaten.
Klimaatcategorie voor een omgevingstemperatuur van
SN +10 tot +32 °C
N +16 tot +32 °C
ST +18 tot +38 °C
T +18 tot +43 °C
Disturbo Possibile cause Rimedio
L’apparecchio non funziona
L’apparecchio non é inserito Inserire l’apparecchio
La spina non é inserta o allen-
tata.
Inserie la spina nella presa
L’interruttore generale é disin-
serito oppure difettoso
Controllare l’interruttore
eventualmente sostituirlo
La presa di corrente é difetto-
sa.
Difetti alla rete elettrica ven-
gono ripristinati dal elettrici-
sta autorizzato.
62
Avvertenza! Le riparazioni del frigorifero devono essere eseguite unicamen-
te da personale specializzato. Riparazioni improprie possono essere fonte di
gravi pericoli per l’utente. Qualora fosse necessaria una riparazione, siete
pregati di rivolgerVi al Vostro rivenditore autorizzato oppure al nostro ser-
vizio assistenza clienti.
L’apparecchio fa troppo caldo.
Luce spia rossa accesa.
L’apparecchio é installato
accanto a una fonte di calore
La temperatura non é corret-
tamente regolata
Vedi paragrafo “Messa in fun-
zione”
Regolare il termostato su una
posizione più fredda
La porta é rimasta aperta a
lungo
Vedi paragrafo “Installazione”
Nell’arco dell 24 ore sono sta-
te introdotte grandi quantità
di cibo
Aprire la porta solo per il
stretto necessario
L’apparecchio fa troppo fred-
do.
La temperatura é regolata su
un valore troppo freddo
Regolare la manopola su una
posizione più calda
Luce spia verde non si accen-
de, luce spia gialla si accende
con l’accensione della conge-
lazione rapida
Luce verde difettata Chiamare l’assistenza tecnica
Luce spia gialla non si accen-
de con l’accensione della con-
gelazione rapida. L’apparec-
chio funziona
Luce gialla difettata Chiamare l’assistenza tecnica
Forte formazione di brina nel-
l’apparecchio o sulla guarni-
zione della controporta
La guarnizione della contro-
porta non è più ermetica
(eventualmente dopo aver
effettuato la reversibilità della
porta)
Riscaldare con cautela ipunti
non ermetici della guarnizione
con un fon( non superare i
50°C) rimettendo in forma
tirando la guarnizione in modo
che poggi perfettamente

8
Zorg voor een goede ventilatie rond het apparaat
Om veiligheidsredenen moet de
ventilatie zodanig zijn als in Figur
aangegeven.
Attentie: zorg ervoor dat de
ventilatie openingen tijdens
gebruik niet worden afgedekt.
50 mm
min.
200 cm
2
200 cm
2
min.
D567
Nismaten
Hoogte 880mm
Breedte 550 mm
Diepte 560 mm
Deurdraairichting
Het deurscharnier kan van rechts (stand waarin hij wordt afgeleverd) naar
links gewisseld worden als dat voor de opstelplaats nodig is.
Waarschuwing! Bij het wisselen van de deurschnarnieren mag het apparaat
niet op het lichtnet aangesloten zijn. Van te voren de stekker uit het stop-
contact halen.
61
• Non impiegare mai sostanze detergenti graffianti.
1. Togliere i cibi. Avvolgere con più fogli di giornali i surgelati. Riporre il tutto
in un luogo fresco.
2. Spegnere l’apparecchio ed estrarre la spina oppure disinsrire rispett. svitare
il fusibile.
3. Sbrinare il congelatore
4. Pulire l’apparecchio e gli accessori interni con un panno morbido imbevu-
to di acqua calda. Aggiungere eventualmente del comune detergente per
il lavaggio dei piatti.
5. Risciaquare e asciugare strofinando.
I depositi di polvere sul condensatore situato sul lato posteriore dell’appa-
recchio, riducono notevolmente la potenza di raffreddamento ed aumen-
tano quindi il consumo energetico. Pertanto é necessario pulirlo accurata-
mente una volta l’anno con una spazzola oppure un aspirapolvere.
Consigli per il risparmio energetico
• Non installare l’apparecchio vicino a forni, elementi riscaldanti o altre
fonti di calor. Con temperature ambientali elevate il compressore entra in
funzione più spesso e più a lungo.
• Garantire una sufficiente aereazione in entrata e uscita. Non coprire mai
le aperture d’aereazione..
• Non collocare dei cibi caldi nell’apparecchio, lasciarli prima raffreddare.
• Aprire la prota solamente per quanto sia necessario.
• Non regolare una temperatura più fredda di quanto sia necessario..
• Mettere i cibi da scongelare nel comparto refrigerante. Il freddo derivan-
te dal scongelamento aiuta il raffreddamento del comparto refrigerante.
• Mantenere costantemente pulito il condensatore posto sul lato posterio-
re dell’apparecchio.
Che cosa fare, se ...
Rimedio in caso di disturbi
Probabilmente si tratta di un guasto di lieve entità che potrete eliminare da
soli seguendo le seguenti istruzioni. Non effettuare nessun’altra operazio-
ne qualore le informazioni qui riportate non fossero di alcun aiuto per il
caso concreto.

9
Schuif het apparaat in de nis tot de
scharnierlijst (A) met de voorkant van
het plafond aanlijnt.
Aanwijzingen voor de geïntegreerde inbouw
D765
De tochtstrip volgens de teke-
ning op het apparaat aanbren-
gen.
A
D022
Open de deur en druk het apparaat
tegen de zijwand van de nis, aan de
kant waar de scharnieren niet zitten.
Bevestig het apparaat aan de nis met
de vier meegeleverde schroeven.
Bevestig het ventilatierooster (C).
Breng, onder lichte druk, het dekseltje
(D) aan.
D727
C
D
60
Spegnimento dell’apparecchio
Dovesse l’apparecchio essere spento per un lungo periodo:
1. Svuotare lo scomparto refrigerante e congelante cosi come le bacinelle
ghiaccio.
2. Spegnere l’apparecchio.
3. Togliere la spina dalla presa di corrente oppure disinserire la valvola di sicu-
rezza.
4. Sbrinare lo scomparto congelantee pulire (vedi paragrafo “Pulizia e cura”).
5. Lasciare aperte le porte per evitare la formazione di odori sgradevoli.
Pulizia e cura
Per motivi d’igiene si dovrebbe.sempre pulire accuratamente e regolarmen-
te l’interno dell’apparecchio, compresi gli accessori.
Avvertimento!
• Durante la pulizia, l’apparecchio non deve essere collegato alla rete elet-
trica. Pericolo di scosse di corrente! Prima di eseguire i lavori di pulizia, é
necessario disinserire l’apparecchio, estrarre la spina oppure disinserire
rispett. svitare il fusibile.
• Non pulire mai l’apparecchio con delle idropulitrici a vapore. L’umidità
potrebbe penetrare negli elementi di costruzione elettrici, pericolo di scos-
se di corrente! Il vapore bollente può causare dei dannii ai pezzi in mate-
riale sintetico.
• L’apparecchio deve essere asciutto, ancor prima della nuova messa in ser-
vizio.
Attenzione!
• Oli essenziali e sostanze solventi organiche possono intaccare gli elemen-
ti in materiale sintetico, p.es.
– succhi di limone oppure bucce di arancia;;
– burro acido;
– sostanze detergenti contenenti acido di aceto.
Evitare il contatto degli elementi dell’apparecchio con simili sostanze.

10
D726
B
Breng de afdichtstopsels (B) in de
gaten in de deklijsten aan.
Onderdelen A, B, C, D scheiden
zoals u in de tekening ziet.
PR266
A
B
C
D
Geleider (A) tegen de binnenkant
van de kastdeur aan de boven-
en onderkant houden volgens de
tekening en de plaats van de bui-
tenste gaten aangeven. Nadat u
de gaten geboord heeft de gelei-
der met de bijgeleverde schroe-
ven vastzetten.
20 mm
A
50mm
PR166
59
Sbrinamento
Congelatore
Nello scomparto congelatore si forma uno strato di brina, a causa dell’umi-
dità che si sviluppa durante il funzionamento e all’apertura della porta.
Questo deve essere eliminato periodicamente, utilizzando l’apposita palet-
ta raschiabrina.
Uno strato molto spesso di brina nello scomparto congelatore comporta un
consumo maggiore di energia. Perciò é necessario eseguire lo sbrinamento
completo ogniqualvolta si é formato uno strato di 4 mm circa o almeno una
volta l’anno. Inoltre é sempre consigliabile effettuare lo sbrinamento quan-
do l’apparecchio é vuoto o quando il carico é minimo.
Per effettuare un sbrinamento
completo procedere come segue:
1. Togliere i cibi congelati, avvolgerli in parecchi fogli di giornali e riporli in un
luogo fresco.
2. Spegnere l’apparecchiatura e stacca-
re la spina dalla presa di corrente
oppure disinserire o svitare le valvo-
le di sicurezza.
3. Lasciare aperta la porta dello scom-
parto congelatore.
4. Inserire la paletta raschiabrina nel
foro per la raccolta dell’acqua di
sbrinamentento e porre al di sotto
una bacinella.
5. Riportare la manopola del termosta-
to nella posizione desiderata e rein-
serire la spina nella presa.
Avvertenza:
Non impiegare mai utensili metallici per asportare la brina.
Si raccomanda di non utilizzare riscaldatori elettrici o altri mezzi meccani-
ci o artificiali per accelerare il processo di sbrinamento, tranne quelli rac-
comndati in questo libretto.
Un innalzamento della temperatura dei surgelati durante lo sbrinamento
potrebbe ridurne il tempo di conservazione.

11
Afdekking (C) op geleider (A)
vastklikken.
PR33
C
A
De deur van het apparaat en die
van de kast met een hoek van
ongeveer 90° openen. IJzer (B) in
geleider (A) aanbrengen. De deu-
ren samen vasthouden en de
gaten aangeven zoals in de teke-
ning. De ijzers weghalen en
gaten van Ø2 mm. boren op een
afstand van 8 mm. van de bui-
tenrand van de deur.
Plaats het ijzer opnieuw op de
geleider en bevestig het met de
bijgeleverde schroeven.
8mm
PR167
A
B
Voor het rechtstellen van de
kastdeur kunt u gebruik maken
van de langwerpige gaten.
Tenslotte dient u te controleren
of de deur van het apparaat
goed sluit.
PR168
58
Dopo aver raggiunto la temperatura ottimale spegnere la congelazione rapi-
da. La luce spia gialla si spegne.
3. Collocare i prodotti congelati possibilmente in modo separato nei cassetti.
Massa eutettica
L’apparecchio può essere dotata all’interno con una o più massa eutettiche.
In caso di interruzione della corrente o di mal funzionamento dell’apparec-
chiatura la massa eutettica aumenterà di qualche ora la conservzione dei cibi
congelati. Per usufruire nel modo migliore la massa eutettica, quest’ultima
deve essere posta nel cassetto superiore. La massa euttetica può essere usata
anche come elemento raffreddante per la borse termiche.
Calendario di congelamento
• I simboli sui cassetti indicano diversi tipi di prodotti da congelare.
• Le cifre indicano il periodo di immagazzinaggio in mesi per ciascun tipo
di prodotto da congelare.
• Se é valido il valore superiore oppu-
re quello inferiore del periodo di
immagazzinaggio indicato, dipende
dalla qualità dei prodotti alimentari
e dal proprio pretrattamento prima
del congelamento. Per gli alimenti
notevolmente grassi vale sempre il
valore inferiore.
Cubetti di ghiaccio
1. Riempire a 3/4 la bacinella ghiaccio con acqua fredda e riporla nel cassetto
congelatore.
2. Per togliere i cubetti pronti é sufficiente torcere la bacinella o metterla bre-
vemente sooto l’acqua corrente.
Attenzione! Si raccomanda di non usare utensili appuntiti o a spigoli per
staccare la bacinella eventualmente rimasta attaccata. Utilizzare la paletta
raschiabrina in dotazione.

12
Elektrische aansluiting
Voor de elektrische aansluiting is een volgens de voorschriften geïnstalleer-
de beschermcontactdoos vereist.
De contactdoos moet zodanig worden geïnstalleerd, dat de steker altijd uit
de contactdoos kan worden getrokken.
De elektrische zekering dient minstens 10 Ampère te zijn.
Indien het stopcontact bij een ingebouwd apparaat niet meer toegan-kelijk
is, dient een maatregel in de elektrische installatie er voor te zorgen dat het
apparaat van de stroom kan worden afgesloten (bijv. zekering, beveiligings-
schakelaar, aardlekschakelaar of dergelijke met een contactopeningsbreed-
te van minimaal 3 mm).
• Voor ingebruikneming op het merk– en type–aanduidingsplaatje van het
apparaat controleren of de netspanning en stroomsoort over-eenkomen
met de waarden van het lichtnet op de plaats waar het apparaat komt te
staan.
Bijv.: AC 220 ... 240 V 50 Hz of
220 ... 240 V~ 50 Hz
(d.w.z. 220 tot 240 Volt wisselstroom, 50 Hertz)
Het typeplaatje bevindt zich links aan de binnenkant van het apparaat.
Afdekking (D) op geleider (B)
vastklikken.
PR167/1
D
B
Voor ingebruikname
• Het interieur van het apparaat en alle accessoires schoonmaken voor het
eerste gebruik (zie Hoofdstuk “Reiniging en Onderhoud”).
57
Attenzione
• La temperatura nello scomparto congelatore dev’essere di -18°C o infrio-
re prima di introdurre i cibi per la congelazione.
• Attenersi per la congelazione ai quantitativi indicati sulla targa matrico-
la.Il quantitativo per la congelazione é la quantità massima di cibi freschi
che possono essere congelati in 24 ore. Volendo effettuare la congelazio-
ne di cibi freschi per più giorni consecutivi, ridurre il quantitativo riporta-
to sulla targa a 2/3 o 3/4.
• Lasciare raffreddare eventuali cibi caldi prima di congelarli. Il calore por-
ta a una forte formazione di brina ed un elevato consumo energetico.
• Rispettare le date di scadenza indicato sulle confezioni dal produttore dei
surgelati.
• I cibi una volta scongelati non possono venir ricongelati previa cottu-
ra.
• I contentitori di gas infiammabili oppure liquidi mediante l’effetto del
freddo possono perdere la propria ermeticità. Pericolo di espolsione! Non
immagazzinare mai dei contenitori con sostanze infiammabili, come p.es.
bombole spray, accendini e cartucce di rifornimento, ecc. nell’apparecchio
refrigerante.
• Le bottiglie e le lattine non devono essere collocatenella cella di congela-
mento. Queste possono scoppiare non appena si congela il contenuto,
mentre i liquidi contenenti anidride carbonica possono addirittura esplo-
dere! Non collocare mai della limonata, succhi, birra,vino, spumante, ecc.
Ad eccezione: I superalcoolici possono essere immagazzinati nella cella di
congelamento.
• Avvolgere ermeticamente gli alimenti prima della congelazione in modo
da evitare che si asciughino, perdano gli aromi o che i sapori si trasmet-
tano agli altri cibi congelati.
Attenzione! Mai toccare i cibi congelati con le mani bagnate. La pelle
potrebbe rimanere attaccata.
1. Porre gli alimenti impacchettati nei
cassetti . Porre gli alimenti freschi da
congelare come indicato in figura. I
cibi non congelati non devono veni-
re in contatto con la merce già con-
gelata, altrimenti la merce congelata
potrebbe scongelarsi inalcuni punti.
2. Se si vuole congelare la quantità
massima di congelazione si deve atti-
vare 24 ore prima la congelazione
rapida. La luce spia gialla si accende.
D670
9 Kg
7 Kg

13
Bedienings- en kontroleinrichting
A. Snelinvriesschakelaar / Akoestisch temperatuursignaal
B. Aanwijzing voor snel invriezen (geel)
C. Waarschuwingslampje (rood)
D. Lichtnetcontrolelampje (groen)
E. Schakelaar AAN/UIT
F. Temperatuurregelaar
De bedienings- en kontrole-inrichting omvat:
Het groene kontrolelampje (D) brandt als het toestel aan netspanning aan-
gesloten een het Schakelaar AAN/UIT gedrulen worden.
Met de temperatuurregelaar (F) kan de energiezuinigste bewaartempera-
tuur traploos worden ingesteld.
De optimale bewaartemperatuur is -18°C. Op de thermometer kunt u de
temperatuur kontroleren.
Snelvriesschakelaar (A) met geel kontrolelampje (B).Het gele lampje
brandt als de schakelaar (A) is ingeschakeld. Het aggregaat werkt dan kon-
tinu.
Het rood lampje (C) brandt als:
– bij in gebruik nemen van het toestel, als de bewaartemperatuur nog niet
bereikt is
– als de temperatuur niet laag genoeg meer is (storing)
– als grote hoeveelheden nog in te vriezen levensmiddelen in de kast wor-
den gelegd
– als de deur van het toestel te lang open staat.
Attentie: als u de snelvriesschakelaar inschakelt of de temperatuurregelaar
verstelt, kan het voorkomen dat het koelaggregaat van uw diepvrieskast
niet onmidddellijk, maar pas na enige tijd begint te werken. In dit geval is
er geen sprake van een storing.
A B C D E F
56
Messa in servizio e regolazione della temperatura
• Inserire la spina nella presa di corrente.
• Premere l’interruttore Acceso/Spento (E) , la luce spia verde (D) si
accende, l’apparecchiatura é in tensione.
• Girare in senso orario oltre la posizione “0” la manoploa termostato (F)
• La lampada spia rossa (C) si accende, lsi sente l’alarme sonoro.
• Premere l’interruttore della congelazione rapida (A) verso. La luce spia
gialla (B) si accende, l’alarme sonoro si spegne..
• Quando la luce spia (C) si spegne, disattivare la congelazione rapida e
la luce spia gialla (B) si spegne.
Con la manopola termostato si imposta la temperatura di -18°C o tem-
peratura più fredda.
Posizione „0“ significa: stop.
Posizione „1“ significa: Massima temperatura interna (minor freddo).
Posizione „6“ significa: Minima temperatura interna (massimo freddo).
La temperatura interna dipende dai seguenti fattori:
– Temperatura d’ambiente;
– Quantità e temperatura dei alimenti conservati;
– frequenza e durata di apertura delle porte.
Avvertenza!
Controllare regolamente la temperatura di conservazione tramite il termo-
metro e la luce spia rossa (C).
Alarme sonoro
L’apparecchiatura é dotata di un’alarme sonoro. Quando la temperatura inter-
na é troppo elevata si sente l’alarme sonoro e la lampada spia si rossa si illumi-
na. L’alarme sonoro rimane in funzione fino a quando non si premere l’inter-
ruttore della congelazione rapida.
Congelazione e surgelazione
Il vostro congelatore é adatto sia per la conservazione i surgelati che per la
congelazione di cibi freschi.

14
In gebruik nemen en temperatuurregeling
• Steek de steker in de wandkontaktdoos. Schakelaar AAN/UIT (E) druken.
Het groene lampje (D) licht op.
• Temperatuurregelaar (F) naar stand „1“ draaien, het rode lampje (C) gaan
branden, het akoestische signaal blijft hoorbaar het vriesaggregaat werkt
automatisch.
• Bovendien schakelt u de snelvriesschakelaar (A) in, het gele lampje (B) gaat
branden, het koelaggregaat werkt kontinu.
• Pas als het rode lampje (C) niet meer brandt, schakelt u de snelvries-
schakelaar (A) uit, het gele lampje (B) gaat uit.
Stand „1“ betekent: hoogste, warmste binnentemperatuur.
Stand „4“ betekent: laagste, koudste binnentemperatuur. Bij het instellen
van de juiste stand dient u er rekening mee te houden dat de temperatuur
in het apparaat afhankelijk is van:
- de kamertemperatuur;
- de frequentie waarmee de deuren geopend worden;
- de hoeveelheid levensmiddelen in de kast;
- de plaats van het apparaat.portes;
Attentie: kontroleert u regelmatig aan de hand van het rode tempera-
tuurkontrole-lampje (C) en de thermometer of de bewaartemperatuur laag
genoeg is.
Koude-accu
In één van de laden van de vriesruimte bevindt zich twee koude-accus.
Als de stroom uitvalt of bij een storing aan het apparaat verlengt de kou-
de-accu de tijd tot de diepvriesartikelen te warm worden met meerdere
uren.
De koude-accu kunt dit echter alleen optimaal doen als ze in de bovenste
la vooraan boven op de diepvriesartikelen gelegd wordt. De koude-accu kan
tijdelijk ook als koelelement voor koeltassen gebruikt worden.
Akoestisch temperatuursignaal
Als uw diepvrieskast met een akoestisch temperatuursignaal is uit-gerust,
klinkt tegelijk met het oplichten van het rode lampje (C) een akoestisch
signaal, dat aangeeft dat de bewaartemperatuur te hoog resp. te warm is.
Het akoestische signaal blijft hoorbaar, totdat inschakelen van de snelvries-
schakelaar het signaal uitschakelt.
55
Panello di controllo
A. Interruttore congelazione rapida
B. Luce spia della congelazione rapida (gialla)
C. Luce spia d’allarme (rossa)
D. Luce spia di funzionamento (verde)
E. Interruttore acceso/ spento
F. Manopola termostsato
Premere interruttore di acceso/spento (E). La luce spia verde (A) si accen-
de quando l’appparecchiatura é sotto tensione. Girare la manopola termo-
stato verso una posizione numerata. L’apparecchiatura é accesa.
Con la manopola (F) si può scegliere la temperatura più consona per i cibi
surgelati per un risparmio economico.
Quando si attiva l’interruttore della congelazione rapida (A) , l’apparecchio
funziona in continuo. La luce spia gialla (B) si accende.
La luce spia rossa (C) si accende quando:
- nella messa in funzione, quando la temperatura di conservazione non é
stata ancora raggiunta.
- se non si mantiene la temperatura minima di conservzione (malfunziona-
mento)
- nell’inmissione di grandi quantià di cibi freschi
- e quando si lascia la porta troppo aperta
Avvertenza: Se si attiva la congelazione rapida o si gira la manopola ter-
mostato può succedere che il compressore non si avvi subito, ma solo dopo
un po di tempo. Questo rientra nella normalità e non indica alcun difetto.
A B C D E F

15
D670
9 Kg
7 Kg
Invriezenen en diepgevroren opslaan
In uw diepvrieskast kunt u diepvriesprodukten bewaren en verse
levensmiddelen zelf invriezen.
Attentie!
• Voor het invriezen van levensmiddelen dient de temperatuur in de vrie-
sruimte –18 °C of lager te zijn.
• Let op het op het typebordje aangegeven vriesvermogen. Het vries-ver-
mogen is de maximale hoeveelheid verse waren die binnen 24 uur inge-
vroren kunnen worden. Als er gedurende meerdere dagen achter elkaar
ingevroren wordt, neem dan slechts 2/3 tot 3/4 van de hoeveelheid aan-
gegeven op het typebordje. De kwaliteit is beter, als de levensmiddelen
snel tot in de kern bevriezen.
• Warme levensmiddelen voor het invriezen laten afkoelen. De warmte leidt
tot verhoogde ijsvorming en verhoogt het energieverbruik.
• Bij het bewaren van kantenklare diepvriesprodukten dient u zich beslist
aan de door de fabrikant opgegeven bewaartijd te houden.
• Eenmaal ontdooide levensmiddelen zonder verdere verwerking (bereiden
tot panklare gerechten) in geen geval een tweede keer invriezen.
• Containers met brandbare gassen of vloeistoffen kunnen lek raken door
de inwerking van koude. Explosiegevaar! Leg geen containers met brand-
bare stoffen zoals bijv. spraybussen, aanstekers, navullin-gen van aan-
stekers etc. in het vriesapparaat.
• Flessen en blikken mogen niet in de vriesruimte. Ze kunnen springen als
de inhoud bevriest – bij koolzuurhoudende inhoud zelfs exploderen! Leg
noot limonades, sappen, bier, wijn, champagne etc. in de vriesruimte. Uit-
zondering: sterke drank met een zeer hoog alcohol percentage kan in de
vriesruimte gelegd worden.
• Als u de maximale invrieskapaciteit
wilt benutten, moet u 24 uur van
te voren (bij kleinere hoeveelheden
4 tot 6 uur) de snelinvriesschake-
laar inschakelen.
Voorzichtig! Diepvriesartikelen niet
met natte handen aanraken. De han-
den kunnen daaraan vast vriezen.
1. De verpakte levensmiddelen in de
laden leggen. De in te vriezen
levensmiddelen in de korven van
54
Prima della messa in servizio
• Pulire l’interno dell’apparecchio e tutti gli accessori prima di effettuare la
messa in servizio (vedi capitolo “Pulizia e cura”).
Collegamento elettrico
Per effettuare il collegamento eletrrico é necessario impiegare la spina
con contatto di protezionz installata conformemente alle prescrizioni
vigenti. Il fusibile elettrico deve corrispondere ad almeno 10 Ampère. Nel
caso non sia possibile accedere alla presa dopo l’installazione, é necessa-
rio prender un idoneo provvedimento per garantire nell’installazione
elettrica la separazione dalla rete dell’apparecchio (p.es. fusibile, inter-
ruttore LS, interruttore di protezione contro correnti errate oppure simi-
li con una ampiezza di apertura del contatto di almeno 3mm.
• Prima della messa in servizio, verificare se la tensione di collegamento ed
il tipo di corrente riportati sulla targa matricola corrispondono ai valori
della rete elettrica del luogo di installazione..
p.es..: AC 220 ... 240 V 50 Hz oppure
220 ... 240 V~ 50 Hz
(pertanto 220 fino240 Volt corrente alternata, 50 Hertz)
La targa matricola si trova a sinistra nell’interno della cella refrigerante.
Inserire a scatto il coperchietto
(D) sulla guida (B).
PR167/1
D
B

16
het apparaat plaatsen.(zie figuur) Niet bevroren artikelen mogen niet in
aanraking komen met reeds bevroren waren omdat anders de bevroren
artikelen ontdooien kunnen.
2. Wilt U de max. hoeveelheid invriezen,dan dient u de snelvriesschakelaar in
te schakelen
3. Diepvriesartikelen het liefst naar soort apart in de laden leggen.
Symbolen bewaarde producten/Diepvrieska-
lender
• De symbolen op de laden geven de diverse soorten diepvriesproducten
aan.
• De getallen geven voor iedere
soort diepvriesproduct de
opslagtijd in maanden aan. Of de
hoogste of de laagste waarde van
de aangegeven opslagtijd geldt,
hangt af van de kwaliteit van de
levens-middelen en de behande-
ling voorafgaand aan het invrie-
zen. Voor levensmiddelen met
een hoog vetgehalte geldt altijd
de laagste waarde.
53
Aprire la porta dell’apparecchia-
tura e quella del mobile a 90° ca.
Inserire la squadretta (B) nella
guida (A). Tenere insieme la por-
ta dell’apparecchiatura e quella
del mobile e segnare i fori come
indicato in figura.Togliere le
squadrette e fare dei fori di Ø 2
mm a 8 mm dal bordo esterno
della porta. Posizionare nuova-
mente la squadretta sopra le gui-
da e fissare con le viti in dotazio-
ne.
Inserire a scatto il coperchietto
(C) sulla guida (A)
PR33
C
A
8mm
PR167
A
B
Per l’eventuale operazione di alli-
neamento della porta del mobile,
utilizzare il gioco dei fori asolati.
Al termine delle operazioni è
necessario controllare l’esatta
chiusura della porta dell’appa-
recchiatura.
PR168

17
Ontdooien en reinigen
Als het apparaat aanstaat en als de deur geopend wordt, slaat vocht in het
interieur, in het bijzonder op de verdamper, als rijp neer. Deze rijp van tijd tot
tijd met de bijgevoegde plastic schraper verwijderen. In geen geval hiervoor
harde of spitse voorwerpen gebruiken.
Het apparaat dient in ieder geval ontdooid te worden als de rijplaag ca. 4 mm
dik is: echter minimaal eenmaal per jaar. Een geschikt moment voor het ont-
dooien is als het apparaat leeg is of als er nog maar weinig artikelen in liggen.
Elke temperatuurstijging vermindert de houdbaarheid van de diepvrie-
sprodukten. Schakel daarom ca. 12 uur van te voren het toestel op snel-
friezen, om een koudereserve in de diepvriesprodukten te scheppen.
Waarschuwing!
• Geen electrische verwarmingsapparaten en andere mechanische of kun-
stmatige hulpmiddelen gebruiken om het ontdooien te versnellen.
• Geen ontdooisprays gebruiken, deze kunnen gevaarlijk voor de gezondheid
zijn en/of stoffen bevatten die plastic aantasten.
Voorzichtig! Niet met natte handen aan bevroren artikelen komen. De han-
den kunnen daaraan vastvriezen.
1. Bevroren artikelen er uitnemen, in
meerdere lagen krantenpapier wik
kelen en op een koele plaats leggen.
2. Apparaat uitzetten en de stekker uit
het stopcontact halen of de zekering
uitschakelen c.q. er uitdraaien.
3. Alle laden, behalve de onderste, er uit
halen.
4. Steek de kunststofschraper in de ope-
ning onder de vries-ruimte en plaats
AEG27
Het maken van ijsblokjes
1. IJsbakje voor 3/4 met koud water vullen, in de vriesruimte plaatsen en laten
bevriezen.
2. Om de ijsblokjes los te maken het ijsbakje omdraaien of kort onder stromend
water houden.
Attentie! Een eventueel vastgevroren ijsbakje in geen geval met spitse of
scherpe voorwerpen losmaken. Gebruik de bijgevoegde ijsschraper.
52
Appoggiare la guida (A) sulla
parte interna della porta del
mobile sopra e sotto come indi-
cato in figura e segnare la posi-
zione dei fori esterni. Dopo aver
preparato i fori fissare la guida
con le viti in dotazione.
20 mm
A
50mm
PR166
D726
B
Applicare i coperchietti (B) sulle
alette dei coprifuga e nei fori per
le cerniere.
Separare i pezzi A, B, C, D come da
figura
PR266
A
B
C
D

18
daar een schaaltje of teiltje onder.
Tip: Om het ontdooien te versnellen een pan met heet water in het apparaat
zetten en de deur sluiten. Afgevallen stukken ijs voordat ze volledig ont-
dooien verwijderen.
5. Na het ontdooien de vriesruimte plus het interieur grondig schoonmaken.
Waarschuwing!
• Het apparaat mag tijden het schoonmaken niet op het electrici-teitsnet
aangesloten zijn. Gevaar voor schokken! Zet voor het schoonmaken het
apparaat uit en trek de stekker uit het stopcontact of schakel c.q. draai de
zekering er uit.
• Het apparaat nooit met stoomreinigingsapparaten schoonmaken. Er kan
vocht in de electrische onderdelen komen. Gevaar voor schokken! Hete
damp kan kunstoffen onderdelen beschadigen.
• Het apparaat dient droog te zijn voordat het weer in gebruik geno-men
wordt.
Let op!
• Etherische oliën en organische oplosmiddelen kunnen kunststof onderde-
len aantasten, bijv.
– Sap van citroen– of sinaasappelschillen;
–boterzuur;
– Schoonmaakmiddelen die azijnzuren bevatten.
Dergelijke substanties niet in contact brengen met apparaatonder-delen.
• Geen schurende schoonmaakmiddelen gebruiken.
5. Apparaat en interieur met een doek en lauwwarm water schoonmaken. Even-
tueel een beetje normaal afwasmiddel gebruiken.
6. Daarna met schoon water afnemen en droogmaken.
7. Als alles droog is, schakel op snelvriezen. Laat de vriezer tenminste 2 uur leeg
vriezen. Daarna de levensmiddelen terug in de vriezer plaatsen en het appa-
raat weer in bedrijf nemen.
51
Istruzioni per l’incasso
Spingere l’apparecchiatura nel
vano colonna fino a che il copri-
fuga superiore (A) vada in battu-
ta con il mobile.
D765
Incollare il coprifuga come indi-
cato in figura.
A
D022
D727
C
D
Accostare l’apparecchiaturaal
fianco opposto alla cerniera por-
ta. Fissare l’apparecchiatura con
le 4 viti in dotazione. Applicare la
griglia di aerazione (C) e il coper-
chio copricerniera (D) inserendoli
a scatto.

19
Wat te doen als ...
Hulp bij storingen
Het kan bij een storing om kleine defecten gaan die kunt oplossen zelf aan
de hand van de volgende aanwijzingen. Voer zelf geen verdere werk-
zaamheden uit als de volgende informatie in concrete gevallen niet verder
helpt.
Tips om energie te besparen
• Het apparaat niet in de buurt van kachels, verwarmingselementen of
andere warmtebronnen plaatsen. Bij een hoge omgevingstempera-tuur
werkt de compressor vaker en langer.
• Zorgen voor voldoende be- en ontluchting aan de onderkant van het
apparaat. Ventilatieopeningen nooit afdekken.
• Geen warme spijzen in het apparaat zetten. Warme spijzen eerst laten
afkoelen.
• Deur slechts zo lang open laten als nodig is.
• De temperatuur niet lager dan nodig instellen.
• Kontroleer de bewaartemperatuur met behulp van de thermometer.
• Diepvriesartikelen voor het ontdooien in de koelkast leggen. De koude in
de diepvriesartikelen wordt zo voor koeling van de koelkast gebruikt.
• Houd de warmte afgevende verdamper, het metalen rooster aan de ach-
terzijde van het toestel, schoon.
Apparaat uitzetten
Als het apparaat gedurende langere tijd niet gebruikt wordt:
1. Levensmiddelen uit vriesruimte nemen.
2. Apparaat uitzetten, daartoe de temperatuurregelaar op stand “0”
draaien.
3. Stekker uit het stopcontact halen of zekering uitschakelen, er resp. uithalen.
4. Diepvriesruimte ontdooien en grondig reinigen (zie hoofdstuk “Ontdooien
en reinigen”).
5. Deuren daarna open laten om geurvorming te voorkomen.
50
Dimensioni della nicchia
altezza 880 mm
profondità 550 mm
larghezza 560 mm
L’apparecchio refrigerante necessita di aria
Per motivi di sicurezza la ventila-
zione deve essere come indicato in
figura.
Attenzione! mantenere le aper-
ture per la ventilazione libere da
ogni ostruzione..
50 mm
min.
200 cm
2
200 cm
2
min.
D567
Reversibilità della porta
La reversibilità della porta può essere cambiato da destra (condizioni di con-
segna) verso sinistra, nel caso il luogo di installazione ne richiedesse la
necessità.
Avvertimento! Durante la reversibilità, l’aparecchio non deve essere collega-
to alla rete elettrica. Estrarre innanzitutto la spina dalla rete.

20
Storing Mogelijke oorzaken Verhelpen
Apparaat werkt niet, geen con-
trolelampje brandt
Apparaat is niet aangezet. Apparaat aanzetten.
Stekker zit niet in het stopcon-
tact of zit los.
Stekker in stopcontact steken.
Zekering is los of kapot.
Zekering controleren, eventueel
vernieuwen.
Stopcontact is kapot.
Storingen in het lichtnet door
Uw electrovakman laten verhel-
pen.
Apparaat koelt te sterk.
Temperatuur is te laag inge-
steld.
Tenmperatuurregelaar tijdelijk
op een hogere stand zetten.
Klantendienst informeren.Groene lampje defect.
Groene lampje brandt niet, gele
lampje brandt bij ingeschakelde
snelvriesfunctie.
Klantendienst informeren.Gele lampje defect.
Gele lampje brandt niet bij
ingeschakelde snelvriesfunctie,
apparaat werkt.
Waarschuwing! Reparaties aan het koelapparaat mogen alleen door
geschoold personeel uitgevoerd worden. Door ondeskundige reparaties kun-
nen grote gevaren ontstaan voor de gebruiker. Wend u bij reparatie tot onze
klantendienst.
De temperatuur in de vriesruim-
te is niet voldoende, rode
lampje brandt.
Temperatuur is niet juist inge-
steld.
Zie hoofdstuk “Ingebruikname”.
Deur heeft te lang openge-
staan.
Deur slechts zo lang open laten
als nodig is. Snelvriesschakelaar
gebruiken.
In de laatste 24 uur zijn grotere
hoeveelheden warme leven-
smiddelen opgeslagen.
Snelvriesschakelaar gebruiken.
Het apparaat staat naast een
warmtebron.
Zie hoofdstuk “Opstelplaats”.
Storing aan het apparaat
Snelvriesschakelaar aanzetten,
vrieskast gesloten houden,
klantendienst informeren.
Sterke rijpvorming in het appa-
raat, eventueel ook aan de deu-
rafdichting.
Deurafdichting is lek (eventueel
na het verwisselen van de deu-
raanslag).
Op de ondichte plaatsen de
deurafdichting voorzichtig met
een föhn verwarmen (niet heter
dan ca. 50 °C). Tegelijkertijd de
verwarmde deurafdichting met
de hand zo in vorm trekken dat
hij weer helemaal sluit.
49
Nel caso sia inevitabile effettuare l’installazione accanto ad un fonte di calo-
re, é necessario mantenere le seguenti distanze minime:
– dai forni elettrici 3 cm;
– dai forni a nafta e carbone 30 cm.
Nel caso non possano essere mantenute queste distanze, é necessario inseri-
re una piastra di protezione contro il calore tra il forno e l’apparecchio refri-
gerante.
Se l’apparecchio refrigerante è posto accanto ad un altro apparecchio refri-
gerante oppure congelante é necessario mantenere una distanza laterale di 5
cm, allo scopo di evitare che si possa formare della condensa sui lati esterni
degli apparecchi.
Classe climatica per temperature ambientali di
SN +10 fino +32 °C
N +16 fino +32 °C
ST +18 fino +38 °C
T +18 fino +43 °C
Installazione
Luogo d’installazione
L’apparecchio deve essere collocato in un luogo ben aerato ed asciutto.
La temperatura ambientale ha un notevole effetto sul consumo di corrente.
Pertano l’apparecchio dovrebbe
– non essere esposto direttamente ai raggi solari;
– non essere messo accanto ad elementi di calore oppure ad un forno o altre
simili fonti di calore;
– essere messo in un luogo la cui temperatura ambientale corrisponda alla
classe climatica per la quale é stato concepito.
La classe climatica é riportata sulla targhetta matricola situata a sinistra nel-
l’interno della cella refrigerante.
La seguente tabella mostra quali temperature ambiente sono state assegna-
te alle classi climatiche:

21
Klantenservice
Als u vragen hebt waar deze gebruiksaanwijzing geen antwoord op geeft,
kunt u de volgende afdelingen raadplegen:
Consumentenbelangen tel. 0172 - 468 172
(voor algemene, product- of gebruiksinformatie) fax 0172 - 468 155
Storingen / reparaties tel. 0172 - 468 268
(voor bezoek servicetechnicus) fax 0172 - 468 255
Belangrijk!
Houd bij het opgeven van een storing altijd de gegevens van uw toestel
bij de hand. Deze nummers vindt u op het typeplaatje aan de bin-
nenkant van het apparaat en kunt u het beste hieronder en voorop deze
gebruiksaanwijzing noteren.
Modelaanduiding ....................
PNC-nr. ....................
S-nr. ....................
Aan de hand van deze nummers kan onze service-afdeling de juiste
voorbereidingen treffen, zodat de machine bij het eerste bezoek van de
servicetechnicus weer hersteld kan worden. Op deze manier hoeft u sle-
chts één maal thuis te blijven.
De compressor start na enige
tijd automatisch.
Dit is normaal, het betreft geen
storing.
Na het wijzigen van de tempe-
ratuurinstelling start de com-
pressor niet direct.
Ongewone geluiden.
Apparaat komt tegen de muur
of tegen andere voorwerpen
aan.
Apparaat staat niet recht.
Een onderdeel, bijv. een leiding,
aan de achterkant van het
apparaat komt tegen een ander
onderdeel van het apparaat
aan of tegen de muur.
Dit onderdeel voorzichtig weg-
buigen.
Apparaat iets wegtrekken.
Instelvoetjes bijstellen.
Tip: kontroleer regelmatig aan de hand van het rode temperatuur-kon-tro-
lelampje en de thermometer de bewaartemperatuur.
Storing Mogelijke oorzaken Verhelpen
48
Smaltimento
Informazione sull’imballaggio dell’apparecchio
Tutti i materiali di produzione impiegati sono tollerabili perl’ambiente! Que-
sti possono essere depositati senza pericoli oppure smaltiti nell’impianto bru-
ciatore di rifiuti urbani!
Riguardo i materiali di produzione: I materiali sintetici possono essere anche
riciclati e sono contrassegnati nella seguente maniera:
>PE< per politilene, p. es. nell’involucro esterno e nei sacchetti all’interno.
>PS< per polistirolo schiumoso, p.es. nei pezzi di imbottitura, in linea di mas-
sima privi di propellenti.
I pezzi di cartone vengono realizzati con carta riciclata e devono essere rimes-
si nella raccolta della carta vecchia.
Smaltimento di apparecchi vecchi
Per motivi di protezione dell’ambiente é necessario smaltire conformemente
gli apparecchi vecchi.Ciò vale per il Vostro apparecchio finora usato e dopo
che ha terminato di svolgere il suo servizio ed anche per il Vostro apparecchio
nuovo.
Attenzione! Gli apparecchi vecchi che non servono più, devono essere resi
inutilizzabili prima dello smaltimento. Estrarre la spina di rete, spezzare il
cavo di rete, rimuovere oppure distruggere le eventuali chiusure lampo di
bloccaggio. Mediante ciò si evita che si possano chiudere dentro dei bam-
bini che giocano (pericolo di soffocamento!) oppure che possano trovarsi
in altre situazioni pericolose per la vita.
Avvertenze sullo smaltimento :
• L’apparecchio non deve essere smaltito insieme ai rifiuti urbani o ingom-
branti.
• Il circuito refrigerante, in particolare lo scambiatore di calore situato nella
parte inferiore dell’apparecchio, non deve essere danneggiato.
• Le informazioni concernenti i termini del ritiro oppure dei luoghi di raccol-
ta sono accessibili presso l’amministrazione comunale locale.
Rimuovere la sicura del trasporto
L’apparecchio nonché gli accessori interni sono protetti per il traporto
• Rimuovere i nastri adesivi situati ai lati porta
• Rimuovere dall’interno dell’apparecchio tutti i nastri adesivi nonchè i pezzi
di imbottitura.

22
Als u toch voor één van de in deze gebruiksaanwijzing vermelde sto-
ringen of vanwege foutieve bediening de AEG-service afdeling
inschakelt, wordt dit bezoek ook tijdens de garantietermijn niet door
onze garantiebepalingen gedekt.
Elektrische toestellen van AEG voldoen aan de betreffende veiligheids-
bepalingen.
Reparaties aan elektische toestellen mogen alleen door vakmensen wor-
den uitgevoerd. Onvakkundige reparaties kunnen tot aanzienlijke risico’s
voor de gebruiker leiden. Wend u daarom altijd tot de AEG service-
afdeling. Voor reparaties uitgevoerd door anderen kan AEG geen aan-
sprakelijkheid aanvaarden. Alleen originele AEG-onderdelen voldoen
aan alle eisen!
Onze service-afdeling voert reparaties uit overeenkomstig de voorwaar-
den die tussen de Consumentenbond en de VLEHAN (Vereniging Leve-
ranciers Elektrotechnische Huishoudelijke Apparaten Nederland) zijn
overeengekomen.
Doel, normen, richtlijnen
Het koelapparaat is voor huishoudelijk gebruik bestemd en is met in-acht-
neming van de voor deze apparaten geldende normen gemaakt. Bij de
fabricage zijn speciaal die maatregelen genomen die vereist zijn vol-
gens de Duitse wet op de veiligheid van toestellen (GSG), volgens de
Duitse voorschriften ter voorkoming van ongevallen bij koude-
installaties (VBG 20) en volgens de bepalingen van de ver-eniging
van Duitse elektotechnici (VDE). De koudecirculatie is op dichtheid
getest.
Dit apparaat voldoet aan de volgende EG-richtlijnen:
– 73/23/EWG van 19.2.1973 - Laagspanningsrichtlijn0
– 89/336/EWG van 3.5.1989
(met inbegrip van Wijzigingsrichtlijn 92/31/EWG) - EMC-richtlijn
47
cano (pericolo di soffocamento!) oppure che possano trovarsi in altre situa-
zioni pericolose per la vita.
• Molto spesso i bambini non possono rendersi conto dei pericoli a cui sono
esposti durante il maneggio con gli apparecchi domestici. Pertanto è neces-
sario prendere degli idonei provvedimenti di salvaguardia eviatando inoltre
di lasciar giocare i bambini con tali apparecchi!!
Nel servizio quotidiano
• I contentitori di gas infiammabili oppure liquidi mediante l’effetto del fred-
do possono perdere la propria ermeticità. Pericolo di espolsione! Non imma-
gazzinare mai dei contenitori con sostanze infiammabili, come p.es. bom-
bole spray, accendini e cartucce di rifornimento, ecc. nell’apparecchio refri-
gerante.
• Le bottiglie e le lattine non devono essere collocatenella cella di congela-
mento. Queste possono scoppiare non appena si congela il contenuto,
mentre i liquidi contenenti anidride carbonica possono addirittura esplode-
re! Non collocare mai della limonata, succhi, birra,vino, spumante, ecc. Ad
eccezione: I superalcoolici possono essere immagazzinati nella cella di con-
gelamento.
• Non ingoiare i gelati oppure i cubetti di ghiaccio appena estratti dalla cel-
la di congelamento. Il gelato oppure ghiaccio molto freddo si può conge-
lare alla lingua o alle labbra e causare quindi delle ferite.
• Non toccare i prodotti congelati con le mani bagnate. Le mani si potrebbe-
ro congelare sul prodotto.
• Non impiegare mai dei piccoli elettrodomestici (p.es. macchine elettriche da
gelato, mescolatori, ecc.) nell’apparecchio refrigerante.
• Prima di eseguire i lavori di pulizia, é necessario disinserire l’apparecchio,
estrarre la spina oppure disinserire rispett. svitare il fusibile dell’abitazione.
• Estrarre la spina di rete dalla presa tirando sempre dalla parte della spina,
mai dal cavo.
Nel caso di un disturbo
• Se nell’apparecchio dovesse verificarsi per qualche volta un disturbo, si pre-
ga di leggere in queste istruzioni per l’uso sotto “ Che cosa fare, se...”. Nel
caso non siano sufficienti le avvertenze riportate, si prega di non eseguire
ulteriori lavori atunomi di riparazione
• Gli apparecchi refrigeranti devono essere riparati esclusivamente da perso-
ne specializzate. Mediante le riparazioni non appropriate possono crearsi
dei notevoli pericoli. Nel caso della necessità di una riparazione, si prega di
rivolgersi al proprio fornitore oppure presso il nostro servizio di assistenza.

23
Dear customer,
Before placing your new refrigerator/freezer into operation please read
these operating instructions carefully. They contain important information
for safe use, for installation and for care of the appliance.
Please keep these operating instructions for future reference. Pass them on
to possible new owners of the appliance.
These operating instructions are for use with several technically compara-
ble models with varying accessories. Please observe the notes which apply
to your model.
Notes which are important for your safety or for the proper functioning of
the appliance are stressed with a warning triangle and/or with signal words
(Warning!, Caution!, Attention!). Please observe the following carefully.
Supplementary information regarding operation and practical applications
of the appliance appear after this symbol.
Tips and notes concerning economical and environmentally sound use of
the appliance are marked with the flower.
The operating instructions contain instructions for the correction of possi-
ble malfunctions by the user in the section "What to do if ...". If these
instructions should not be sufficient, our customer service department is
always available to you.
Printed on paper manufactured with environmentally sound processes.
who thinks ecologically acts accordingly ...
46
Sicurezza
La sicurezza dei nostri apparecchi é conforme ai regolamenti approvati della
tecnica ed alla legge di sicurezza degli apparecchi. Nonostante ciò, riteniamo
di doverVi facilitare la presa di confidenza con le seguenti avvertenze:
Impiego conforme alla scopo previsto
• L’apparecchio refrigerante é stato stabilito per l’uso domestico. È adatto per
raffreddare, congelare ed la surgelazione di prodotti alimentari nonché per
la preparazione di gelati. Quest’ultimo é adatto per il congelamento e l’im-
magazzinaggio in frigorifero di prodotti alimentari nonchè di gelati.
• Per motivi si sicureza non é consentito in nessun caso apportare delle modi-
fiche o trasformazioni.
• Nel caso si voglia impiegare l’apparecchio refrigerante nell’ambito impren-
ditoriale oppure per scopi differenti dal raffreddamento, congelamento di
prodotti alimentari, si prega di osservare le disposizioni de legge vigenti per
il Vostro settore.
Prima della prima messa in servizio
• Verificare l’apparecchio su eventuali danni causati dal trasporto. Non colle-
gare in nessun caso un apparecchio danneggiato! In caso di danni rivolgersi
al fornitore.
Sostanza refrigerante
L’apparecchio contiene nel circuito refrigerante un gas naturale denominato
Isobutano (R600a), avente una elevata tolleranza per l’ambiente, il quale é
tuttavia infiammabile.
• Osservare durante il trasporto e l’installazione dell’apparecchio che non
venga danneggiato alcun elemento delcircuito refrigerante.
• In caso di danneggiamenti al circuito refrigerante:
– evitare assolutamente fiamme libere e fonti incendianti;
– provvedere ad una buona aerazione del locale in cui si trova l’apparecchio.
Sicurezza dei bambini
• I pezzi di imballaggio (p.es. foglie, polistirolo) possono essere pericolosi per
i bambini. Pericolo di soffocamento! Mantenere il metriale di imballaggio
al di fuori della portata dei bambini!
• Gli apparecchi che non vengono più utilizzati devono essere resi inutilizza-
bili prima dello smaltimento. Estrarre la spina di rete, spezzare il cavo di rete,
rimuovere oppure distruggere le eventuali chiusure lampo di bloccaggio.
Mediante ciò si evita che si possano chiudere dentro dei bambini che gio-

24
Contents
Safety . . . . . . . . . . . . . . . . . . . . . . . . . . . . . . . . . . . . . . . . . . . . . .25
Disposal . . . . . . . . . . . . . . . . . . . . . . . . . . . . . . . . . . . . . . . . . . . . .27
Appliance Packaging Information . . . . . . . . . . . . . . . . . . . . . . . . . . . .27
Disposal of old Appliances . . . . . . . . . . . . . . . . . . . . . . . . . . . . . . . . .27
Remove transport safeguard . . . . . . . . . . . . . . . . . . . . . . . . . . . . .27
Installation . . . . . . . . . . . . . . . . . . . . . . . . . . . . . . . . . . . . . . . . . .28
Installation Location . . . . . . . . . . . . . . . . . . . . . . . . . . . . . . . . . . . . . . .28
Your refrigerator needs air . . . . . . . . . . . . . . . . . . . . . . . . . . . . . . . . . .29
Housing dimensions . . . . . . . . . . . . . . . . . . . . . . . . . . . . . . . . . . . . . . .29
Rehingeing the door . . . . . . . . . . . . . . . . . . . . . . . . . . . . . . . . . . . . . . .29
Instructions for total built-in . . . . . . . . . . . . . . . . . . . . . . . . . . . . . . .30
Electrical Connection . . . . . . . . . . . . . . . . . . . . . . . . . . . . . . . . . . .33
Prior to Initial Start–Up . . . . . . . . . . . . . . . . . . . . . . . . . . . . . . . .33
Operating and indicator panel . . . . . . . . . . . . . . . . . . . . . . . . . . . .34
Audible temperature alarm . . . . . . . . . . . . . . . . . . . . . . . . . . . . .35
Starting up and temperature regulation . . . . . . . . . . . . . . . . . . . .35
Ice pack . . . . . . . . . . . . . . . . . . . . . . . . . . . . . . . . . . . . . . . . . . . . .36
Freezing and storing frozen food . . . . . . . . . . . . . . . . . . . . . . . . .36
Storage goods symbols/Freezing Calendar . . . . . . . . . . . . . . . . . . .37
Preparation of Ice Cubes . . . . . . . . . . . . . . . . . . . . . . . . . . . . . . . .38
Defrosting . . . . . . . . . . . . . . . . . . . . . . . . . . . . . . . . . . . . . . . . . . .38
Switching off the appliance . . . . . . . . . . . . . . . . . . . . . . . . . . . . .39
Cleaning and Care . . . . . . . . . . . . . . . . . . . . . . . . . . . . . . . . . . . . .39
Energy Saving Tips . . . . . . . . . . . . . . . . . . . . . . . . . . . . . . . . . . . .40
What to do if . . . . . . . . . . . . . . . . . . . . . . . . . . . . . . . . . . . . . . . .41
Correcting Malfunctions . . . . . . . . . . . . . . . . . . . . . . . . . . . . . . . . . . . .41
Customer Service . . . . . . . . . . . . . . . . . . . . . . . . . . . . . . . . . . . . . .43
Regulations, Standards, Guidelines . . . . . . . . . . . . . . . . . . . . . . .43
45
Indice
Sicurezza. . . . . . . . . . . . . . . . . . . . . . . . . . . . . . . . . . . . . . . . . . . . .46
Smaltimento . . . . . . . . . . . . . . . . . . . . . . . . . . . . . . . . . . . . . . . . .48
Informazione sull’imballaggio dell’apparecchio . . . . . . . . . . . . . . . . . .48
Smaltimento di apparecchi vecchi . . . . . . . . . . . . . . . . . . . . . . . . . . . .48
Rimuovere la sicura del trasporto . . . . . . . . . . . . . . . . . . . . . . . . .48
Installazione . . . . . . . . . . . . . . . . . . . . . . . . . . . . . . . . . . . . . . . . .49
Luogo di installazione . . . . . . . . . . . . . . . . . . . . . . . . . . . . . . . . . . . . . .49
L’apparecchio necessita d’aria . . . . . . . . . . . . . . . . . . . . . . . . . . . . . . .49
Reversibilità della porta . . . . . . . . . . . . . . . . . . . . . . . . . . . . . . . . . . . .50
Dimensioni della nicchia . . . . . . . . . . . . . . . . . . . . . . . . . . . . . . . . . . . .50
Istruzioni per l’incasso . . . . . . . . . . . . . . . . . . . . . . . . . . . . . . . . . . . . .51
Prima della messa in servizio . . . . . . . . . . . . . . . . . . . . . . . . . . . . .54
Collegamento elettrico . . . . . . . . . . . . . . . . . . . . . . . . . . . . . . . . .54
Panello di controllo . . . . . . . . . . . . . . . . . . . . . . . . . . . . . . . . . . . .55
Messa in servizio e regolazione della temperatura . . . . . . . . . . . .56
Alarme sonoro . . . . . . . . . . . . . . . . . . . . . . . . . . . . . . . . . . . . . . . .56
Congelazione e surgelazione . . . . . . . . . . . . . . . . . . . . . . . . . . . . .56
Massa eutettica . . . . . . . . . . . . . . . . . . . . . . . . . . . . . . . . . . . . . . .58
Calendario di congelamento . . . . . . . . . . . . . . . . . . . . . . . . . . . . . . . . . . .58
Cubetti ghiaccio . . . . . . . . . . . . . . . . . . . . . . . . . . . . . . . . . . . . . .58
Sbrinamento . . . . . . . . . . . . . . . . . . . . . . . . . . . . . . . . . . . . . . . . .59
Spegnimento dell’apparecchio . . . . . . . . . . . . . . . . . . . . . . . . . . . .60
Pulizia e cura . . . . . . . . . . . . . . . . . . . . . . . . . . . . . . . . . . . . . . . . .60
Consigli per il risparmio energetico . . . . . . . . . . . . . . . . . . . . . . . .61
Che cosa fare, se... . . . . . . . . . . . . . . . . . . . . . . . . . . . . . . . . . . . . .61
Rimedio in caso di disturbi . . . . . . . . . . . . . . . . . . . . . . . . . . . . . . . . . .61
Servizio di assistenza . . . . . . . . . . . . . . . . . . . . . . . . . . . . . . . . . . .64
Disposizioni, Norme, Direttive . . . . . . . . . . . . . . . . . . . . . . . . . . . .64

25
Safety
The safety aspects of our refrigerators/freezers comply with accepted tech-
nical standards and the German Appliance Safety Law. Nevertheless, we
consider it our obligation to make you aware of the following safety infor-
mation:
Intended use
• The refrigerator is intended for use in the home. It is suitable for the coo-
ling, freezing and storing of frozen food, as well as for making ice. If the
appliance is used for purposes other than those intended or used incor-
rectly, no liability can be accepted by the manufacturer for any damage
that may be caused.
• Alterations or changes to the freezer are not permitted for reasons of
safety.
• If you use the refrigerator in a commercial application or forpurposes
other than the cooling, freezing or frozen storage of foods,please obser-
ve all valid legal regulations for your application.
Prior to initial start–up
• Check the refrigerator for transport damage. Under no circumstance
should a damaged appliance be plugged in! In the event of damage, please
contact the vendor.
Refrigerant
The refrigerant isobutane (R600a) is contained within the refrigerant circuit
of the appliance, a natural gas with a high level of environmental compa-
tibility, which is nevertheless flammable.
• During transportation and installation of the appliance, be certain that
none of the components of the refrigerant circuit become damaged.
• If the refrigerant circuit should become damaged:
– avoid open flames and sources of ignition;
– thoroughly ventilate the room in which the appliance is situated.
Safety of children
• Packaging (e.g. wraps, polystyrene) can be dangerous for children. There is
a risk of suffocation! Keep packaging material away from children!
• Please make old appliances unusable prior to disposal. Pull out the mains
plug, cut off the mains cable, break or remove spring or boltcatches, if fit-
ted. By doing this you ensure that children cannot lock themselves in the
44
Egregia cliente, Egregio cliente,,
Prima di mettere in servizio il Vostro nuovo apparecchio refrigerante, Vi pre-
ghiamo di leggere attentamente queste istruzioni perl’uso. Queste conten-
gono informazioni importanti per un impiego sicuro, per l’installazione e per
la cura dell’apparecchio.
Conservare sempre le istruzioni perl’uso per sfogliarle eventualmente in
futuro. Trasmettetele all’eventuale futuro proprietario dell’apparecchio.
Avvertenza: Questo libretto é valido per modelli tecnici simili differenziati
solo negli accessori. Ponga attenzione ai riferimenti che riguardano la sua
apparecchiatura
Tramite il triangolo di avvertimento e/ oppure mediante segnali a parole
(Avvertenza!, Precauzione!, Attenzione!), vengono messe in evidenza delle
avvertenze molto importanti per la Vostra sicurezza oppure per la funzio-
nalità del Vostro apparecchio. Pregasi osservare assolutamente..
Dopo questo segno si ottengono delle informazioni molto importanti con-
cernenti il comando e gli impieghi pratici dell’apparecchio..
Mediante il fiore vengono contrassegnati dei consigli e delle avvertenze
importanti concernenti un impiego economico e tollerabile per l’ambiente.
Per la comparsa di eventuali disturbi, nelle istruzioni per l’uso sono riporta-
te delle avvertenze concernenti le riparazioni autonome, vedi capoverso
“Che cosa fare, se...”. Nel caso queste avvertenze non siano sufficienti, il
nostro servizio di assistenza Vi é sempre a completa disposizione.
Stampato su carta tollerabile per l’ambiente
– Chi pensa all’ecologia, tratta anche così ...

26
fridge when playing (there is risk of suffocation!)or get themselves into
other dangerous situations.
• Often children cannot recognise the hazards present in household
appliances. It is therefore important that you ensure adequate supervision
and never let children play with the appliance!
Daily Operation
• Containers with flammable gases or liquids can leak at low temperatures.
There is a risk of an explosion! Do not store any containers with flamma-
ble materials such as, for example, spray cans, fire extinguisher refill car-
tridges etc in the refrigerator/freezer.
• Bottles and cans must not be placed in the freezer compartment. They can
burst when the contents freeze, high carbonate content drinks can even
explode! Never store lemonade, juices, beer, wine, sparkling wine etc. in
the freezer compartment. Exception: high alcohol content spirits can be
stored in the freezer compartment.
• Do not put ice creams or ice cubes in the mouth immediately after remo-
val from the freezer compartment. Very cold ice can freeze to the lips or
tongue and cause injury.
• Do not touch frozen food with wet hands. Your hands could freeze to the
food.
• Do not operate any electrical appliances in the refrigerator/freezer (e.g.
electric ice cream makers, mixers etc.).
• Before cleaning the appliance, always switch off the appliance and unplug
it, or pull the house fuse or switch off the circuit breaker.
• When unplugging always pull the plug from the mains socket, do not pull
on the cable.
In case of malfunction
• If the a malfunction occurs on the appliance, please look first in the "What
to do if ..." section of these instructions. If the information given there
does not help, please do not perform any further repairs yourself.
• Refrigerators/freezers may only be repaired by qualified service engineers.
Improper repairs can give rise to significant hazards. If your appliance
needs repairing, please contact your specialist dealer or our Customer Ser-
vice.
43
Regulations, Standards, Guidelines
This appliance was designed for household use and was manufactured in
accordance with the appropriate standards. The necessary measures in
accordance with appliance safety legislation regulations (GSG), accident
prevention regulations for refrigeration appliances (VBG 20) and the regu-
lations of the German Society of Electrical Engineers (VDE) were observed in
the manufacture of this appliance.
The refrigerant circuit has been checked for leaks.
This appliance is in accordance with the following EU guidelines:
– 73/23/EWG dated 19 February 1973 - low voltage guidelines.
– 89/336/EWG dated 3 May 1989
(including guideline change notice 92/31/EWG) - EMV guideline
Customer Service
If you cannot find the remedy for a malfunction in these operating instruc-
tions, please contact your dealer or our customer service department.
Addresses and telephone numbers are listed in the accompanying booklet
"Guarantee Conditions/Customer Service Locations".
Selective ordering of replacement parts can save unnecessary travel and
costs. For this reason always provide the following appliance information:
This information can be found on the serial plate in the interior at the left
of the appliance.
• Model Name
• Model Number (PNC)
• Serial Number (S-No.)
We recommend that you enter this information here, so that it is handy if
needed.
Note: The customer bears the costs of unjustified customer service calls
even during the guarantee period.

27
Disposal
Appliance Packaging Information
All materials are environmentally sound! They can be dumped or burned at
an incinerating plant without danger!
About the materials: The plastics can be recycled and are identified as fol-
lows:
>PE< for polyethylene, e.g. the outer covering and the bags in the interior.
>PS< for polystyrene foam, e.g. the pads, which are all free of chlorofluo-
rocarbon.
The carton parts are made from recycled paper and should be disposed of
at a waste-paper recycling collection location.
Disposal of old Appliances
For environmental reasons, refrigeration appliances must be disposed of
properly. This applies to your old appliance, and - at the end of its service
life - for your new appliance as well.
Warning! Before disposing of old appliances make them inoperable. Remo-
ve plug from mains, sever the power cable, remove or destroy any snap or
latch closures. This eliminates the danger that playing children lock them-
selves into the appliance (danger of suffocation!) or place themselves into
other life-endangering situations.
Disposal:
• The appliance may not be disposed of with domestic waste or bulky refu-
se.
• The refrigerant circuit, especially the heat exchanger at the back of the
appliance, may not be damaged.
• Information concerning collection schedules or locations can be obtained
from the local disposal authorities or town hall.
Remove transport safeguard
The appliance and the interior fittings are protected for transport.
• Pull off the adhesive tape on the left and right side of the door.
• Remove all adhesive tape and packing pieces from the interior of the
appliance.
42
Important: regularly check on the red temperature pilot lamp and thermo-
meter that the storage temperature is being maintained
Heavy build up of frost, possi-
bly also on the door seal.
Door seal is not air tight (pos-
sibly after changing over the
hinges).
Carefully warm the leaking
sections of the door seal with
a hair dryer (not hotter than
approx. 50 °C). At the same
time shape the warmed door
seal by hand such that it sits
correctly.
The freezer temperature is not
sufficient, red light lights up,
temperature signal sounds
The appliance is near a heat
source.
Please look in the "Installation
location" section.
Disturbance on the appliance
Switch on the fast freeze
switch, keep the freezer clo-
sed, inform your customer
service
Malfunction Possible Cause Remedy
Unusual noises.
The appliance is touching the
wall or other objects.
Appliance is not level.
A component, e.g. a pipe, on
the rear of the appliance is
touching another part of the
appliance or the wall.
The compressor starts after a
period of time.
This is normal, no error has
occurred.
The compressor does not start
immediately after changing
the temperature setting.
If necessary, carefully bend
the component out of the
way.
Move the appliance slightly.
Readjust the feet.

28
If installation next to a source of heat is unavoidable, the following mini-
mum clearances must be maintained at the sides of the appliance:
– for electric cookers 3 cm;
– for oil and coal fired ranges 30 cm.
If these clearances cannot be maintained a heat insulating pad is required
between the cooker and the refrigeration appliance.
If the refrigeration appliance is installed next to another refrigerator or free-
zer a clearance of 5 cm at the sides is required, in order to prevent the for-
mation of condensation on the outside of the appliance.
Installation
Installation Location
The appliance should be set up in a well ventilated, dry room.
Energy use is affected by the ambient temperature. The appliance should
therefore
– not be exposed to direct sunlight;
– not be installed next to radiators, cookers or other sources of heat;
– only be installed at a location whose ambient temperature corresponds to
the climate classification, for which the appliance is designed.
The climate classification can be found on the serial plate, which is located
at the left on the inside of the appliance.
The following table shows which ambient temperature is correct for each
climate classification: each climate classification:
Climate classification for an ambient temperature of
SN +10 bis +32 °C
N +16 bis +32 °C
ST +18 bis +38 °C
T +18 bis +43 °C
41
What to do if ...
Correcting Malfunctions
A malfunction may be caused by only a minor fault that you can rectify
yourself using the following instructions. Do not perform any other work on
the appliance if the following information does not provide assistance in
your specific case.
Warning! Repairs to refrigerators/freezers may only be performed by
qualified service engineers. Improper repairs can give rise to significant
hazards for the user. If your appliance needs repairing, please contact your
specialist dealer or our Customer Service.
Malfunction Possible Cause Remedy
Appliance does not work, no
pilot light is illuminated.
Appliance is not switched on Switch on the appliance.
Mains plug is not plugged in
or is loose.
Insert mains plug.
Fuse has blown or is defective.
Check fuse, replace if neces-
sary.
Socket is defective.
Mains malfunctions are to be
corrected by an electrician.
Green light does not light up,
yellow light lights up when
fast freeze fuction is activa-
ted, appliance is on.
Green light faulty.
Please inform your customer
service
Yellow light does not light up,
when fast freeze fuction is
activated, appliance is on.
Yellow light faulty.
Please inform your customer
service
The freezer temperature is not
sufficient, red light lights up,
temperature signal sounds
Temperature is not properly
adjusted.
Please look in the "Initial Start
Up" section.
Press the fast freeze switch
Door was open for an exten-
ded period.
A large quantity of warm
food was placed in the
appliance within the last 24
hours.
Open the door only as long as
necessary. Press the fast free-
ze switch
Appliance cools too much. Temperature is set too cold.
Turn the temperature regula-
tor to a warmer setting tem-
porarily.

29
Your appliance needs air
For safety reasons, minimum
ventilationmust be as shown Fig.
Attention: keep ventilation ope-
nings clear of obstruction;
50 mm
min.
200 cm
2
200 cm
2
min.
D567
Rehingeing the door
The side at which the door opens can be changed from the right side (fac-
tory adjustment) to the left side, if the installation site requires.
Warning! When changing the side at which the door opens, the appliance
may not be connected to the mains. Remove plug from the mains befo-
rehand.
Housing dimensions
Height 880 mm
Depth 550 mm
Width 560 mm
40
Energy Saving Tips
• Do not install the appliance near cookers, radiators or other sources of
warmth. High ambient temperatures cause longer, more frequent opera-
tion of the compressor.
• Ensure sufficient air circulation and exhaust at the appliance base and at
the back wall of the appliance. Never cover air vent openings.
• Do not place warm foods into the appliance. Allow warm foods to cool
first.
• Only leave door open as long as necessary.
• Do not set temperature any colder than necessary.
• Put frozen food in the fridge to defrost. The cold in the frozen food will
then be used to cool the fridge.
• Keep the heat emitting condenser, the metall grille on the rear wall of
your appliance, always clean.
Do not allow such substances to come into contact with appliance parts.
• Do not use any abrasive cleansers.
1. Remove frozen food and the food from the refrigerator. Wrap frozen food
in several layers of newspaper. Store it in a cool place, well covered.
2. Defrost the freezer compartment prior to cleaning (see "Defrosting" sec-
tion).
3. Switch the appliance off and remove the plug from the mains, or switch off
or turn out the circuit breaker or fuse.
4. Clean the appliance and the interior accessories with a cloth and lukewarm
water. Commercially available dish washing detergents may also be used.
5. After cleaning wipe with fresh water and rub dry.
Accumulation of dust at the condenser increases energy consumption. For
this reason carefully clean the condenser at the back of the appliance once
a year with a soft brush or a vacuum cleaner.

30
Open the door and push the
appliance against the side of the
kitchen unit opposite to that of
appliance hinges.
Fasten the appliance with 4
screws provided in the kit
included with the appliance.
Snap vent grille (C) and hinge
cover (D) into position.
Push appliance into the housing
until stop strip (A) touches the
kitchen unit.
Instructions for total built-in
D765
Apply joint the sealing strip as shown
in figure.
A
D022
D727
C
D
39
Warning!
Never use metal tools to scrape off the frost
Do not use a mechanical device or any artificial means to speed up the
thawing process other than those recommended by the manufacturer.
A temperature rise of the frozen food packs, during defrosting , may shor-
ten their safe storage life.
Switching off the appliance
If the appliance is not going to be used for an extended period:
1. Remove all deep-frozen packages as well as ice trays.
2. Switch off the appliance by turning the temperature regulator to position
"0".
3. Remove the mains plug or switch off or turn out the circuit breaker or fuse.
4. Defrost freezer compartment and clean thoroughly (see section: “Cleaning
and Care”).
5. Leave the door open to avoid the build up of odours.
Cleaning and Care
For hygienic reasons the appliance interior, including interior accessories,
should be cleaned regularly.
Warning!
• The appliance may not be connected to the mains during cleaning. Dan-
ger of electrical shock! Before cleaning switch the appliance offand rem ve
the plug from the mains, or switch off or turn out the circuit breaker or fuse.
• Never clean the appliance with a steam cleaner. Moisture could accumu-
late in electrical components, danger of electrical shock! Hot vapours can
lead to the damage of plastic parts.
• The appliance must be dry before it is placed back into service.
Attention!
• Ethereal oils and organic solvents can attack plastic parts, e.g.
– lemon juice or the juice from orange peals;
– butyric acid;
– cleansers which contain acetic acid.

31
D726
B
Apply covers (B) on joint cover lugs
and into hinge holes.
Separate parts A, B, C, D as shown in
the figure
PR266
A
B
C
D
Place guide (A) on the inside part of
the furniture door, up and down as
shown in the figure and mark the
position of external holes. After
having drilled holes, fix the guide
with the screws supplied.
20 mm
A
50mm
PR166
38
Defrosting
Refrigerator
Frost is automatically eliminated from the evaporator of the refrigerator
compartment every time the motor compressor stops, during normal use.
The defrost water drains out through a trough into a special container at
the back of the appliance, over the motor compressor, where it evaporates.
Freezer
The freezer compartment, however, will become progrssively covered with
frost. This should be removed with the special plastic scraper provided, whe-
never the tickness of the frost exceeds 4 mm. During this operation it is not
necessary to switch off the power supply or to remove the foodstuffs.
However when the ice becomes very thick on the inner liner, complete
defrosting should be carried out as follows:
1. Remove the frozen food from the
freezer, wrap it in several layers of
newspaper and put it in a very
cool place.
2. Switch off the appliance and pull
out the plug, or remove or
unscrew the safety fuses.
3. Leave the freezer compartment
door open.
4. Insert the plastic scraper into the
recess provided under the defrost
water channel and place a collec-
ting basin under it.
5. Once defrosting is completed keep the scraper for future use;
6. Turn the thermostat knob to the required setting or replace the plug in the
power socket.
Preparation of Ice Cubes
1. Fill the ice cube tray 3/4 full with cold water, place it in the freezer com-
partment and leave to freeze.
2. To loosen the frozen cubes, either bend the ice cube tray or hold it under
running water for a few seconds.
Important! Never try to free an ice tray that is frozen to the freezer com-
partment using pointed or sharp edged objects. Use the ice scraper supplied.

32
PR33
C
A
Fix cover (C) on guide (A) until it cli-
ps into place.
Open the appliance door and the fur-
niture door at 90°. Insert the small
square (B) into guide (A). Put
together the appliance door and the
furniture door and mark the holes as
indicated in the figure. Remove the
squares and drill holes with ø 2 mm
at 8 mm from the outer edge of the
door. Place the small square on the
guide again and fix it with the screws
supplied.
8mm
PR167
A
B
PR168
Should the lining up of the furniture
door be necessary, use the clearance
of slots.
At the end of operations, it is neces-
sary to check if the door of the fur-
niture closes properly.
37
Caution! Do not touch frozen food with wet hands. Your hands could free-
ze to the food.
1. Place the packed food in the
drawers. Place food to be frozen
As shown in figure. Unfrozen
food must not touch items
already frozen, otherwise the fro-
zen food could begin to defrost.
2. Press the fast freeze button 24
hours before introducing fresh
food for freezing of fresh food.
The yellow light comes on.
3. Place frozen foods in the drawers
sorted by type, as far as possible.
D670
9 Kg
7 Kg
Storage Goods Symbols/Freezing Calendar
• The symbols on the drawers show different types of frozen goods.
• The numbers indicate storage times
in months for the appropriate
types of frozen goods. Whether
the upper or lower value of the
indicated storage time is valid
depends on the quality of the
foods and pre-treating before
freezing. The lower value applies to
foods with high fat content.

33
PR167/1
D
B
Fix cover (D) on guide (B) until it cli-
ps into place.
Prior to Initial Start–Up
• Please clean the appliance interior and all accessories prior to initial start-
up (see section: “Cleaning and Care”).
Electrical connection
Before initial start-up, refer to the appliance rating plate to ascertain if sup-
ply voltage and current values correspond with those of the mains at the
installation location.
e.g.: AC 220 ... 240 V 50 Hz or
220 ... 240 V~ 50 Hz
(i.e. 220 to 240 volts alternating current, 50 Hertz)
The rating plate is inside the appliance on the left.
A correctly installed, earthed socket is required for the electrical supply. The
supply must have a fuse rating of at least 10 Amps.
If the socket is not accessible once the appliance is built in, the electrical
installation must include suitable means of isolating the appliance from the
mains (e.g. fuse, cut-out, current trip or similar with a minimum contact
separation of 3 mm).
Attention: The mains connection cable may only be replaced by a skilled
electrician. Please contact your dealer or our customer service department
for repairs.
36
Freezing and storing frozen food
You can use your freezer for freezing fresh food yourself.
Important!
• The temperature in the freezer compartment must be –18 °C or colder
before freezing food.
• Please observe the freezing capacity given on the rating plate. The free-
zing capacity is the maximum quantity of fresh food that can be frozen
within a period of 24 hours. If you wish to freeze food several days in a
row, please observe a maximum capacity of only 2/3 to 3/4 of that on the
rating plate. The quality of the food is best preserved when it is frozen
right through to the core as quickly as possible.
• Allow warm food to cool down before freezing. The warmth will cause
increased ice formation and increase the power consumption.
• Please note the maximum storage times specified by the manufacturer.
• Thawed foods which have not been processed further (cooked into meals)
may not under any circumstances be frozen a second time.
• Containers with flammable gases or liquids can leak at low temperatures.
There is a risk of an explosion! Do not store any containers with flamma-
ble materials such as, for example, spray cans, fire extinguisher refill car-
tridges etc in the refrigerator/freezer.
• Bottles and cans must not be placed in the freezer. They can burst when
the contents freeze, high carbonate content drinks can even explode!
Never store lemonade, juices, beer, wine, sparkling wine etc. in the free-
zer. Exception: high alcohol content spirits can be stored in the freezer.
• All foods must be packed air tight prior to freezing, so that they do not
dry out or lose their flavour, and so that no flavour contamination of
other frozen goods occurs.
Ice pack
There is an or more ice packs in one drawer of the freezer.
In the event of a power failure or malfunction, the ice pack will lengthen
the amount of time it takes for the frozen food to become too warm by
several hours. The ice pack can only fulfil this task optimally if it is placed in
the uppermost drawer, at the front, above the frozen food. You can use the
ice pack for cooling cold bags.

34
The green pilot lamp (D), which comes on when the mains voltage is avai-
lable and the ON/OFF knob is pushed. Switch the temperature regulatore to
a number position, the refrigerating unit automatically operates by system
control.
The temperature regulator (F), which can be used for continuously varia-
ble setting of the most energy saving storage temperature for your frozen
food.
The yellow pilot light (B) comes on when the switch (A) has been operated.
The refrigerating unit then operates continuously.
The red temperature pilot-lamp (C) comes on when:
– the appliance has been started up but the storage temperature has not
yet been attained;
– the minimum storage temperature is no longer being maintained (fault);
– excessive amounts of fresh food are placed inside; or
– if the appliance door is open for too long.
Important note: if you operate the fast-freeze switch or adjust the tempe-
rature regulator, it may happen that your appliance’s refrigeration motor
does not start immediately but only after some time. This does not mean
that your appliance has a fault.
Operating and indicator panel
A B C D E F
A Fast feezing knob/Audibletemperature alarm
B Fast feezing light (yellow)
C Alarm light (red)
D Operating light (green)
E ON/OFF knob
F Temperature regulator knob
35
Audible temperature alarm
Your freezer is equipped with an audible temperature alarm, an acoustic
warning sound simultaneously with illumination of the red temperature
pilot lamp, alerting you to the fact that the storage temperature in your
freezer is too high or too warm. The audible warning sounds until is swit-
ched on by operation of the fast-freeze switch.
Starting up and temperature regulation
Please clean the appliance interior and all accessories prior to starting the
appliance. Plug in the appliance at the mains supply.
• Push the ON/OFF knob (E) The green lamp (D) comes on.
• Turn the temperature regulator (F) in the direction of „1“.
• The red lamp (C) comes on, the audible warning sounds , and the refrige-
ration motor starts up.
• Operate the fast-freeze knob (A). The yellow pilot lamp (B) comes on and
the audible warning stops.
• Only when the red lamp (C) has gone out should you reset the fast-free-
ze knob (A) the yellow light (B) goes out.
Setting “0”: Off.
Setting “1”: Hightest temperature, (warmest setting).
Setting “4” (end-stop) : Lowest temperature, (coldest setting).
The exact setting should be chosen keeping in mind that the temperature
inside the appliance depends on:
- the quantity of food stored
- how often the door is opened
- ambient temperature
Important:
Regularly check on the red temperature pilot lamp (C) and the thermome-
ter that the required storage temperature is being maintained.
-
 1
1
-
 2
2
-
 3
3
-
 4
4
-
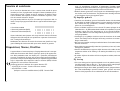 5
5
-
 6
6
-
 7
7
-
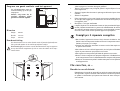 8
8
-
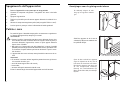 9
9
-
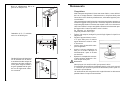 10
10
-
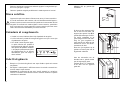 11
11
-
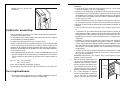 12
12
-
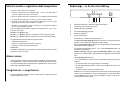 13
13
-
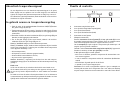 14
14
-
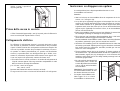 15
15
-
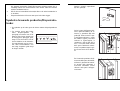 16
16
-
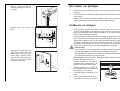 17
17
-
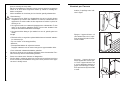 18
18
-
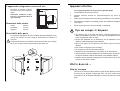 19
19
-
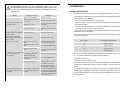 20
20
-
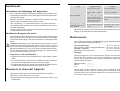 21
21
-
 22
22
-
 23
23
-
 24
24
-
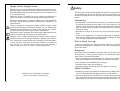 25
25
-
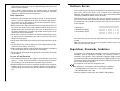 26
26
-
 27
27
-
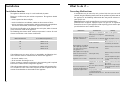 28
28
-
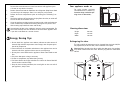 29
29
-
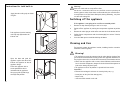 30
30
-
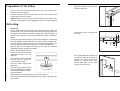 31
31
-
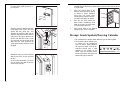 32
32
-
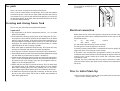 33
33
-
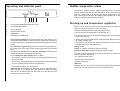 34
34


in andere talen
- English: AEG AG78850I User manual
- italiano: AEG AG78850I Manuale utente
- português: AEG AG78850I Manual do usuário