Whirlpool AKZ 476 IX de handleiding
- Categorie
- Kookplaten
- Type
- de handleiding

Downloaded from www.vandenborre.be
User and maintenance manual
Manuel d’utilisation et d’entretien
Handleiding voor gebruik en onderhoud
AKZ 476

Downloaded from www.vandenborre.be

Downloaded from www.vandenborre.be
GB1
YOUR SAFETY AND THAT OF OTHERS IS PARAMOUNT
This manual and the appliance itself provide important safety warnings, to be read and observed at all times.
All safety warnings give specific details of the potential risk present and indicate how to reduce risk of injury, damage and electric
shock resulting from improper use of the appliance. Carefully observe the following instructions:
- The appliance must be disconnected from the power supply before carrying out any installation work.
- Installation and maintenance must be carried out by a qualified technician, in compliance with the manufacturer’s
instructions and local safety regulations. Do not repair or replace any part of the appliance unless specifically stated in the
user manual.
- Regulations require that the appliance is earthed.
- The power cable must be long enough for connecting the appliance, once fitted in its housing, to the power supply
socket.
- For installation to comply with current safety regulations, an all-pole disconnect switch with minimum contact gap of
3 mm must be utilized.
- Do not use multiple plug adapters or extension leads.
- Do not pull the power supply cable in order to unplug the appliance.
- The electrical components must not be accessible to the user after installation.
- Do not touch the appliance with any wet part of the body and do not operate it when barefoot.
- This appliance is designed solely for use as a domestic appliance for cooking food. No other type of use is permitted
(e.g.: heating rooms). The Manufacturer declines all responsibility for inappropriate use or incorrect setting of the controls.
- The appliance is not intended for use by persons (including children) with any physical, sensory or mental impairment, or
without experience and knowledge of the appliance, unless supervised or previously instructed in its use by those
responsible for their safety.
- The accessible parts of the appliance may become very hot during use. Young children should be kept away from the
appliance and supervised to ensure that they do not play with it.
- During and after use, do not touch the heating elements or interior surfaces of the appliance - risk of burns. Do not allow
the appliance to come into contact with cloths or other flammable materials until all the components have cooled
sufficiently.
- At the end of cooking, exercise caution when opening the appliance door, letting the hot air or steam exit gradually
before accessing the oven. When the appliance door is shut, hot air is vented from the aperture above the control panel.
Do not obstruct the vent apertures.
- Use oven gloves to remove pans and accessories, taking care not to touch the heating elements.
- Do not place flammable materials in or near the appliance: a fire may break out if the appliance is inadvertently switched
on.
- Do not heat or cook sealed jars or containers in the appliance. The pressure that builds up inside might cause the jar to
explode, damaging the appliance.
- Do not use containers made of synthetic materials.
- Overheated oils and fats catch fire easily. Always remain vigilant when cooking foods rich in fat and oil.
- Never leave the appliance unattended during food drying.
- If alcoholic beverages are used when cooking foods (e.g. rum, cognac, wine), remember that alcohol evaporates at high
temperatures. As a result, there is a risk that vapours released by the alcohol may catch fire upon coming into contact with
the electrical heating element.
Scrapping of household appliances
- This appliance is manufactured with recyclable or reusable materials. Dispose of it in accordance with local waste disposal
regulations. Before scrapping, cut off the power supply cable.
- For further information on the treatment, recovery and recycling of household electrical appliances, contact your
competent local authority, the collection service for household waste or the store where you purchased the appliance.
IMPORTANT SAFETY INSTRUCTIONS
This is the danger symbol, pertaining to safety, which alerts users to potential risks to themselves and others.
All safety warnings are preceded by the danger symbol and the following terms:
DANGER
Indicates a hazardous situation which, if not avoided, will cause serious injury.
WARNING
Indicates a hazardous situation which, if not avoided, could cause serious injury.

Downloaded from www.vandenborre.be
GB2
After unpacking the oven, make sure that it has not been damaged during transport and that the oven door closes properly. In
the event of problems, contact the dealer or your nearest After-sales Service. To prevent any damage, only remove the oven
from its polystyrene foam base at the time of installation.
PREPARING THE HOUSING UNIT
• Kitchen units in contact with the oven must be heat resistant (min 90°C).
• Carry out all cabinet cutting work before fitting the oven in the housing and carefully remove all wood chips and sawdust.
• After installation, the bottom of the oven must no longer be accessible.
• For correct appliance operation, do not obstruct the minimum gap between the worktop and the upper edge of the oven.
ELECTRICAL CONNECTION
Make sure the power voltage specified on the appliance dataplate is the same as the mains voltage. The dataplate is on the front
edge of the oven (visible when the door is open).
• Power cable replacement (type H05 RR-F 3 x 1.5 mm
2
) must be carried out by a qualified electrician. Contact an
authorized service centre.
GENERAL RECOMMENDATIONS
Before use:
- Remove cardboard protection pieces, protective film and adhesive labels from accessories.
- Remove the accessories from the oven and heat it at 200° for about an hour to eliminate the smell and fumes from the
insulating materials and protective grease.
During use:
- Do not place heavy objects on the door as they could damage it.
- Do not cling to the door or hang anything from the handle.
- Do not cover the inside of the oven with aluminium foil.
- Never pour water into the inside of a hot oven; this could damage the enamel coating.
- Never drag pots or pans across the bottom of the oven as this could damage the enamel coating.
- Make sure that the electrical cables of other appliances do not touch hot parts of the oven or become trapped in the door.
- Do not expose the oven to atmospheric agents.
Disposal of packing material
The packing material is 100% recyclable and is marked with the recycle symbol ( ). The various parts of the packing must
therefore be disposed of responsibly and in full compliance with local authority regulations governing waste disposal.
Scrapping the product
- This appliance is marked in compliance with European Directive 2002/96/EC, Waste Electrical and Electronic Equipment
(WEEE).
- By ensuring this product is disposed of correctly, you will help prevent potential negative consequences for the
environment and human health, which could otherwise be caused by inappropriate waste handling of this product.
- The symbol on the product or on the accompanying documentation indicates that it should not be treated as
domestic waste but must be taken to an appropriate collection centre for the recycling of electrical and electronic
equipment.
Energy saving
- Only pre-heat the oven if specified in the cooking table or your recipe.
- Use dark lacquered or enamelled baking moulds as they absorb heat far better.
- Switch the oven off 10/15 minutes before the set cooking time. Food requiring prolonged cooking will continue to cook even
once the oven is switched off.
- This oven, which is intended to come into contact with foodstuffs, complies with European Regulation ( ) n.1935/2004
and has been designed, manufactured and sold in conformity with the safety requirements of the “Low Voltage” directive
2006/95/CE (which replaces 73/23/CEE and subsequent amendments), the protection requirements of “EMC” 2004/108/
CE.
INSTALLATION
SAFEGUARDING THE ENVIRONMENT
DECLARATION OF CONFORMITY

Downloaded from www.vandenborre.be
GB3
The oven does not work:
• Check for the presence of mains electrical power and if the oven is connected to the electrical supply.
• Turn off the oven and restart it to see if the fault persists.
The door will not open:
• Turn off the oven and restart it to see if the fault persists.
• Important: during self-cleaning, the oven door will not open. Wait until it unlocks automatically (see paragraph “Cleaning
cycle of ovens with pyrolysis function”).
The electronic programmer does not work:
• If the display shows the letter “ ” followed by a number, contact your nearest After-sales Service. Specify in this case the
number that follows the letter “ ”.
Before calling the After-Sales Service:
1. See if you can solve the problem yourself with the help of the suggestions given in the “Troubleshooting guide“.
2. Switch the appliance off and back on again it to see if the fault persists.
If after the above checks the fault still occurs, get in touch with the nearest After-sales Service.
Always specify:
• a brief description of the fault;
• the type and exact model of the oven;
• the service number (number after the word Service on the rating plate), located on the right hand edge of the oven cavity
(visible when the oven door is open). The service number is also indicated on the guarantee booklet;
• your full address;
• your telephone number.
If any repairs are required, please contact an authorised After-sales Service (to guarantee that original spare parts will be used
and repairs carried out correctly).
Oven exterior
IMPORTANT: do not use corrosive or abrasive detergents. If any of these products accidentally comes into contact with
the appliance, clean immediately with a damp cloth.
• Clean the surfaces with a damp cloth. If it is very dirty, add a few drops of washing up detergent to the water. Finish off
with a dry cloth.
Oven interior
IMPORTANT: do not use abrasive sponges or metallic scrapers or scourers. Over time, these can ruin enamelled surfaces
and the oven door glass.
• After every use, allow the oven to cool then clean it preferably while it is still warm in order to remove built-up dirt and
stains caused by food residues (e.g. food with a high sugar content).
• Use proprietary oven detergents and follow the manufacturer’s instructions to the letter.
• Clean the door glass with a suitable liquid detergent. The oven door can be removed to facilitate cleaning (see
MAINTENANCE).
• The top heating element of the grill (see MAINTENANCE) can be lowered (some models only) to clean the roof of the oven.
N.B.: during prolonged cooking of foods with a high water content (e.g. pizza, vegetables, etc.) condensation may form
on the inside of the door and around the seal. When the oven is cold, dry the inside of the door with a cloth or sponge.
Accessories:
• Soak the accessories in water with washing up detergent immediately after use, handling them with oven gloves if still
hot.
• Food residues can be easily removed using a brush or sponge.
TROUBLESHOOTING GUIDE
AFTER-SALES SERVICE
CLEANING
WARNING
- Never use steam cleaning equipment.
- Only clean the oven when it is cool to the touch.
- Disconnect the appliance from the power supply.

Downloaded from www.vandenborre.be
GB4
Cleaning the rear wall and catalytic side panels of the oven (if present):
IMPORTANT: do not use corrosive or abrasive detergents, coarse brushes, pot scourers or oven sprays which could
damage the catalytic surface and ruin its self-cleaning properties.
• Operate the oven empty with the fan-assisted function at 200°C for about one hour
• Next, leave the appliance to cool down before removing any food residue with a sponge.
Cleaning cycle of ovens with pyrolysis function (if present):
This function burns off spatters produced inside the oven during cooking at a temperature of approx. 500°C. At this high
temperature, the deposits turn into a light ash which can be easily wiped away with a damp cloth, when the oven is cool. Do not
select the pyrolysis function after every use, only when the oven is very dirty or produces smoke or fumes while preheating or
cooking.
• If the oven is installed below a hob, make sure that all burners or electric hotplates are switched off during the self-
cleaning (pyrolysis) function.
• Remove all accessories before running the pyrolysis function.
The appliance is equipped with 2 pyrolysis functions:
1. Energy-saving cycle (PYRO EXPRESS/ECO): which consumes approximately 25% less energy than the standard cycle.
Select it at regular intervals (after cooking meat on 2 or 3 consecutive occasions).
2. Standard cycle (PYRO): which is suitable for cleaning a very dirty oven.
• In any case, after a certain number of uses and depending on how dirty the oven is, a message on the oven display advises
you to run a self-cleaning cycle.
N.B.: during the pyrolysis function, the oven door will not open; it will remain locked until the temperature inside the
oven has returned to an acceptably safe level.
REMOVING THE DOOR
To remove the door:
1. Open the door fully.
2. Lift the catches and push them forwards as far as they will go (Fig. 1).
3. Close the door as far as it will go (A), lift it up (B) and turn it (C) until it is released (D) (Fig. 2).
To refit the door:
1. Insert the hinges in their seats.
2. Open the door fully.
3. Lower the two catches.
4. Close the door.
WARNING
- Do not touch the oven during the pyrolysis cycle.
- Keep children away from the oven during the pyrolysis cycle.
MAINTENANCE
WARNING
- Use protective gloves.
- Ensure the oven is cold before carrying out the following operations.
- Disconnect the appliance from the power supply.
Fig. 1 Fig. 2

Downloaded from www.vandenborre.be
GB5
MOVING THE TOP HEATING ELEMENT (SOME MODELS ONLY)
1. Remove the side accessory holder grilles (Fig. 3).
2. Pull the heating element out a little (Fig. 4) and lower it (Fig. 5).
3. To reposition the heating element, lift it up, pulling it slightly towards you, making sure it comes to rest on the lateral
supports.
REPLACING THE OVEN LAMP
To replace the rear lamp (if present):
1. Disconnect the oven from the power supply.
2. Unscrew the lamp cover (Fig. 6), replace the lamp (see note for lamp type) and screw the lamp cover back on.
3. Reconnect the oven to the power supply.
To replace the side lamp (if present):
1. Disconnect the oven from the power supply.
2. Remove the side accessory holder grilles, if present (Fig. 3).
3. Use a screwdriver to prise off the lamp cover (Fig. 7).
4. Replace the lamp (see note for lamp type) (Fig. 8).
5. Reposition the lamp cover, pushing it on firmly until it snaps into place (Fig. 9).
6. Refit the side accessory holder grilles.
7. Reconnect the oven to the power supply.
N.B.:
- Only use 25-40W/230V type E-14, T300°C incandescent lamps, or 20-40W/230 V type G9, T300°C halogen lamps.
- Lamps are available from our After-sales Service.
IMPORTANT:
- If using halogen lamps, do not handle with bare hands since fingerprints can damage them.
- Do not use the oven until the lamp cover has been repositioned.
Fig. 3 Fig. 4 Fig. 5
Fig. 6 Fig. 7 Fig. 8 Fig. 9

Downloaded from www.vandenborre.be
GB6
FOR ELECTRICAL CONNECTION, SEE THE PARAGRAPH ON INSTALLATION
1. Control panel
2. Upper heating element/grill
3. Cooling fan (not visible)
4. Dataplate (not to be removed)
5. Lamp
6. Circular heating element (not visible)
7. Fan
8. Turnspit (if present)
9. Lower heating element (not visible)
10. Door
11. Position of shelves (the number of shelves is indicated on the front of the oven)
12. Rear wall
N.B.:
- During cooking, the cooling fan may switch on at intervals in order to minimise energy consumption.
- At the end of cooking, after the oven has been switched off, the cooling fan may continue to run for a while.
ACCESSORIES SUPPLIED
A. WIRE SHELF (1): the wire shelf can be used to grill food or as a support for pans, cake tins and other ovenproof cooking
receptacles.
B. DRIP TRAY (1): the drip tray is designed to be positioned under the wire shelf in order to collect fat or as an oven tray for
cooking meat, fish, vegetables, focaccia, etc.
ACCESSORIES NOT SUPPLIED
Other accessories can be purchased separately from the After-sales Service.
INSERTING WIRE SHELVES AND OTHER ACCESSORIES IN THE OVEN
1. Insert the wire shelf horizontally, with the raised part “A” upwards (Fig. 1).
2. The other accessories, like the drip tray and baking tray, are inserted with the raised part on the flat section “B” facing
upwards (Fig. 2).
INSTRUCTIONS FOR OVEN USE
Fig. A Fig. B
Fig. 1 Fig. 2

Downloaded from www.vandenborre.be
GB7
CONTROL PANEL DESCRIPTION
ELECTRONIC PROGRAMMER
1. FUNCTION SELECTOR KNOB: On/off and function selector knob
2. BROWSE KNOB: for browsing the menu and adjusting pre-set values
3. SELECTION/CONFIRMATION BUTTON
N.B.: the display shows for indications regarding this button.
LIST OF FUNCTIONS
Turn the “Functions” knob to any position and the oven switches on: the display shows the functions or the associated
submenus.
The submenus are available and selectable by turning the knob to the functions GRILL, SPECIALS, SETTINGS, BREAD/PIZZA,
AUTOMATIC OVEN CLEANING.
N.B.: for the list and description of functions, see the specific table at page 12.
DESCRIPTION OF DISPLAY
A. Display of heating elements activated during the various cooking functions
B. Time management symbols: timer, cooking time, end of cooking time, time
C. Information regarding selected functions
D. Automatic BREAD/PIZZA function selected
E. Indication of door locked during automatic cleaning cycle (pyro-cleaning)
F. Internal oven temperature
G. Pyrolisis function
H. Browning
I. Special functions: defrost, keep warm, rising
STARTING THE OVEN - SETTING THE TIME
After connecting the oven to the mains power, the time must be set on the clock. The two hour digits flash on the display.
1. Turn the “Browse” knob to display the correct hour.
2. Press the button to confirm; the two minute digits flash on the display.
3. Turn the “Browse” knob to display the correct minutes.
4. Press button to confirm.
To change the time, for example following a power cut, see the next paragraph (SETTINGS).
DISPLAY
1 23
A
B C D
E
I H G F
3
3

Downloaded from www.vandenborre.be
GB8
SELECTING COOKING FUNCTIONS
1. Turn the “Functions” knob to the desired function: the cooking settings are shown on the display.
2. If the values shown are those desired, press . To change them, proceed as indicated below.
SETTING THE TEMPERATURE/OUTPUT OF THE GRILL
To change the temperature or output of the grill, proceed as follows:
1. Turn the “Browse” knob to display the desired value.
2. Press button to confirm.
The oven automatically confirms your selection 10 seconds after the last operation.
FAST PREHEATING
1. Turn the “Functions” knob to the symbol to select the fast preheating function.
2. Confirm by pressing : the settings are shown on the display.
3. If the proposed temperature is that desired, press button . To change the temperature, proceed as described in
previous paragraphs. The message PRE appears on the display. When the set temperature is reached, the corresponding
value (e.g. 200°) and an acoustic signal will sound. At the end of preheating, the oven automatically selects the
conventional function .
At this point food can be placed in the oven for cooking.
4. If you wish to set a different cooking function, turn the “Functions” knob and select the desired function.
SETTING COOKING TIME
This function can be used to cook food for a set length of time, from a minimum of 1 minute to the maximum time allowed by
the selected function, after which the oven switches off automatically.
1. Once the temperature is confirmed, the symbol flashes.
2. Turn the adjustment knob to display the desired cooking time.
3. To confirm the cooking time, press button .
The oven automatically confirms your selection 10 seconds after the last operation.
3
3
3
3
3

Downloaded from www.vandenborre.be
GB9
SETTING END OF COOKING TIME /START DELAYED
IMPORTANT: the start delayed setting is not available for the following functions: FAST PREHEATING, BREAD/PIZZA,
GENTLE CONVECTION BAKE.
N.B.: with this setting, the selected temperature is reached in a more gradual way, so cooking times will be slightly
longer than stated in the cooking table.
The end of cooking time can be set, delaying the start of cooking by up to a maximum of 23 hours and 59 minutes. This can only
be done once cooking time has been set.
After setting cooking time, the display shows the end of cooking time (for example 15:45) and the symbol flashes.
To delay the end of cooking time, and thus also the cooking start time, proceed as follows:
1. Turn the “Browse” knob to display the time you wish cooking to end (for example 16:00).
2. Confirm the selected value by pressing button : the two dots of end of cooking time flash, indicating that the setting
has been made correctly.
3. The oven will automatically delay the start of cooking so as to finish cooking at the set time.
INDICATION OF THE RESIDUAL HEAT INSIDE THE OVEN
If at the end of cooking, or when the oven is switched off, the temperature inside the oven is over 50°C, the display shows the
word HOT and the current temperature. When the residual heat reaches 50°C, the display shows the current time again.
TIMER
This function can be used only with the oven switched off and is useful, for example, for monitoring the cooking time of pasta.
The maximum time which can be set is 23 hours and 59 minutes.
1. With the “Functions” knob at zero, turn the “Browse” knob to display the desired time.
2. Press button to start the countdown. When the set time has elapsed, the display will show “00:00:00” and an acoustic
signal will sound. To mute the acoustic signal, press button (the time of day appears on the display).
SELECTING SPECIAL FUNCTIONS
Turn the “Functions” knob indicator to the symbol to access a submenu containing five special functions.
To browse, select and start one of these functions, proceed as follows:
1. Turn the “Functions” knob to symbol : the display shows “ DEFROST” along with this function’s corresponding symbol.
2. Turn the “Browse” knob to scroll the list of functions; the function names are in English: DEFROST, KEEP WARM, RISING,
SLOW COOKING MEAT, SLOW COOKING FISH.
3. Press button to confirm.
BROWNING
At the end of cooking, with certain functions, the display indicates the possibility of browning. This function can only be used
when cooking time has been set.
At the end of cooking time, the display shows: “PRESS TO BROWN”. Press button , and the oven starts a 5 minute browning
cycle. This function can be selected consecutively a maximum of twice.
3
3
3
3
3

Downloaded from www.vandenborre.be
GB10
BREAD/PIZZA FUNCTION SELECTION
Turn the “Functions” knob indicator to the symbol to access a submenu containing two automatic cooking functions for
“bread” and “pizza”.
Bread
1. Turn the “Functions” knob to symbol : the display shows “BREAD” and AUTO at the side.
2. Press to select the function.
3. Turn the “Browse” knob to set the required temperature (between 180°C and 220°C) and confirm with button .
4. Turn the “Browse” knob to set the required cooking duration and press to start cooking.
Pizza
1. Turn the Functions knob to symbol : the display shows “BREAD”. To select the “PIZZA” function, proceed as follows:
2. Turn the “Browse” knob: “PIZZA” appears on the display.
3. Press to select the function.
4. Turn the “Browse” knob to set the required temperature (between 220°C and 250°C) and confirm with button .
5. Turn the “Browse” knob to set the required cooking duration and press to start cooking.
SETTINGS
Turn the “Functions” knob indicator to the symbol to access a submenu containing four display settings which can be
changed.
Clock
Turn the “Functions” knob to the symbol : the word CLOCK appears on the display. To change the time of day, see the
previous paragraph (SETTING THE TIME).
Eco
With the ECO mode selected (ON), the display switches off when the oven is on standby or 5 minutes after the end of cooking.
In addition, the oven light is switched off during cooking. To view information on the display and switch the light on again,
simply press button or turn a knob.
1. Turn the “Browse” knob to display “ECO.
2. Press to access the setting (ON/OFF).
3. Turn the “Browse” knob to select the desired setting and confirm by pressing button .
Acoustic signal
To activate or deactivate the acoustic signal, proceed as follows:
1. Turn the “Browse” knob to display “SOUND.
2. Press to access the setting (ON/OFF).
3. Turn the “Browse” knob to select the desired setting and confirm by pressing button .
Brightness
To change the display brightness, proceed as follows:
1. Turn the “Browse” knob to display “BRIGHTNESS.
2. Press button : number 1 appears on the display.
3. Turn the “Browse” knob to increase or decrease brightness and confirm by pressing .
3
3
3
3
3
3
3
3
3
3
3
3
3

Downloaded from www.vandenborre.be
GB11
AUTOMATIC OVEN CLEANING
For the description of this function, see the chapter CLEANING and the functions table at page 12.
To activate the oven’s automatic cleaning cycle (pyro-cleaning), proceed as follows:
1. Turn the “Functions” knob to symbol : the word PYRO appears on the display.
2. Press button to confirm your choice and start the pyro-cleaning cycle.
To select ECO pyro-cleaning, turn the “Browse” knob: the word ECO appears bottom right on the display. Press button to start
the shorter programme.
During pyro-cleaning, the oven door is automatically locked and the symbol appears on the display. The door remains locked
at the end of the cleaning cycle: “COOL” appears on the display, indicating the oven is still cooling down. When the oven cools
to a safe temperature, the symbol switches off and the display shows “END”.
N.B.: the automatic door lock control procedure fails to execute properly, the symbol appears on the display. If, on the other
hand, the door remains closed due to a fault in the locking system, and “DOOR LATCHED” appear on the display. In this case,
contact the After-sales Service.
3
3

Downloaded from www.vandenborre.be
GB12
OVEN FUNCTION DESCRIPTION TABLE
FUNCTIONS KNOB
OFF To stop cooking and switch off the oven.
LAMP To switch the oven interior light on/off.
SPECIAL FUNCTIONS
DEFROST
To speed up defrosting of food. Place food on the middle shelf. Leave food in its packaging in
order to prevent it from drying out on the outside.
KEEP WARM
For keeping just-cooked food hot and crisp (e.g: meat, fried food or flans). Place food on the
middle shelf. The function will not activate if the temperature in the oven is above 65°.
RISING
For optimal rising of sweet or savoury dough. To safeguard the quality of proving, the function
will not activate if the temperature in the oven is above 40°C. Place the dough on the 2nd shelf.
The oven does not have to be preheated.
CONVENTIONAL
To cook any kind of dish on one shelf only. Use the 2nd shelf. Preheat the oven before placing
food inside.
CONVECTION BAKE
For baking cakes with liquid filling (sweet or savoury) on a single shelf. This function can also be
used for cooking on two shelves. Switch the position of the dishes to cook food more evenly.
Use the 2nd shelf to cook on one shelf only, and the 1st and 3rd to cook on two shelves. Preheat
the oven before cooking.
GENTLE CONVECTION
BAKE
To cook food requiring medium/low cooking temperatures on a maximum of two shelves. This
function is used to cook gently and slowly on two levels without having to switch the position
of the dishes during the cooking process. Use the 2nd shelf to cook on one shelf only, and the
1st and 4th to cook on two shelves. Preheat the oven before cooking.
GRILL
To grill steak, kebabs and sausages; to cook vegetables au gratin and toast bread. Place food on
the 4th shelf. When grilling meat, use the drip tray to collect the cooking juices. Position it on
the 3rd shelf, adding approx. half a litre of water. The oven does not have to be preheated.
During cooking the oven door must remain closed.
TURBO GRILL
To roast large joints of meat (legs, roast beef, chickens). Position the food on the middle shelves.
Use the drip tray to collect the cooking juices. Position it on the 1st/2nd shelf, adding approx.
half a litre of water. The oven does not have to be preheated. During cooking the oven door
must remain closed. With this function you can also use the turnspit, if provided.
MAXI COOKING
To cook large joints of meat (above 2.5 kg). Use the 1st or 3rd shelves, depending on the size of
the joint. The oven does not have to be preheated. It is advisable to turn the meat over during
cooking for more even browning. It is best to baste the meat every now and again to prevent it
from drying out.
SETTINGS To set the display (time, brightness, buzzer volume, energy saving).
BREAD/PIZZA
To bake different types and sizes of pizza and bread. This function contains two programmes
with predefined settings. Simply indicate the values required (temperature and time) and the
oven will manage the cooking cycle automatically. Place the dough on the 2nd shelf after
preheating the oven.
AUTOMATIC OVEN
CLEANING
To eliminate cooking spatters by means of a cycle at very high temperature (approx. 500°). Two
self-cleaning cycles are available: a complete cycle (PYRO) and a shorter cycle (ECO). It is
advisable to use the complete cycle only in case of a very dirty oven, and the shorter cycle if the
function is used at regular intervals.
FAST PREHEATING To preheat the oven rapidly.

Downloaded from www.vandenborre.be
GB13
COOKING TABLE
Recipe
Function Preheating Shelf
(from bottom)
Temperature
(°C)
Time
(min)
Accessories
Leavened cakes
Yes 2 160-180 30-90 Cake tin on wire shelf
GENTLE
Yes 1-4 160-180 30-90
Shelf 4: cake tin on wire shelf
Shelf 1: cake tin on wire shelf
Filled pies (cheesecake,
strudel, apple pie)
Yes 2 160-200 30-85
Drip tray/ baking tray or cake
tin on wire shelf
Yes 1-3 160-200 35-90
Shelf 3: cake tin on wire shelf
(switch levels halfway through
cooking)
Shelf 1: cake tin on wire shelf
Biscuits/Tartlets
Yes 2 170-180 15-45 Drip tray / baking tray
GENTLE
Yes 1-4 160-170 20-45
Shelf 4: wire shelf
Shelf 1: drip tray / baking tray
Choux buns
Yes 2 180-200 30-40 Drip tray / baking tray
GENTLE
Yes 1-4 180-190 35-45
Shelf 4: oven tray on wire shelf
Shelf 1: drip tray / baking tray
Meringues
Yes 2 90 110-150 Drip tray / baking tray
GENTLE
Yes 1-4 90 130-150
Shelf 4: oven tray on wire shelf
Shelf 1: drip tray / baking tray
Bread / Pizza / Focaccia
Yes 2 190-250 15-50 Drip tray / baking tray
Yes 1-3 190-250 25-45
Shelf 3: oven tray on wire shelf
(switch levels halfway through
cooking)
Shelf 1: drip tray / baking tray
Frozen pizza
Yes 2 250 10-15
Drip tray / baking tray or wire
shelf
Yes 1-3 250 10-20
Shelf 3: oven tray on wire shelf
(switch levels halfway through
cooking)
Shelf 1: drip tray / baking tray
Savoury pies (vegetable
pie, quiche)
Yes 2 180-190 40-55 Cake tin on wire shelf
Yes 1-3 180-190 40-55
Shelf 3: cake tin on wire shelf
(switch levels halfway through
cooking)
Shelf 1: cake tin on wire shelf
Vols-au-vent / Puff
pastry crackers
Yes 2 190-200 20-30 Drip tray / baking tray
GENTLE
Yes 1-4 180-190 20-40
Shelf 4: oven tray on wire shelf
Shelf 1: drip tray / baking tray

Downloaded from www.vandenborre.be
GB14
Lasagne / Baked pasta /
Cannelloni / Flans
Yes 2 190-200 45-55 Oven tray on wire shelf
Lamb / Veal / Beef / Pork
1Kg
Yes 2 190-200 70-100
Drip tray or oven tray on wire
shelf
Chicken / Rabbit / Duck
1Kg
Yes 2 200-230 50-100
Drip tray or oven tray on wire
shelf
Turkey / Goose 3 Kg Yes 1/2 190-200 80-130
Drip tray or oven tray on wire
shelf
Baked fish / en papillote
(fillet, whole)
Yes 2 180-200 40-60
Drip tray or oven tray on wire
shelf
Stuffed vegetables
(tomatoes, courgettes,
aubergines)
Yes 2 180-200 50-60 Oven tray on wire shelf
Toast - 4 High (3) 3-5 Wire shelf
Fish fillets / steaks - 4 Medium (2) 20-35
Shelf 4: wire shelf (turn food
halfway through cooking)
Shelf 3: drip tray with water
Sausages / Kebabs /
Spare ribs / Hamburgers
- 4
Medium - High
(2-3)
15-40
Shelf 4: wire shelf (turn food
halfway through cooking)
Shelf 3: drip tray with water
Roast chicken 1-1.3 Kg
- 2 Medium (2) 50-65
Shelf 2: wire tray (turn food two
thirds of the way through
cooking)
- 2 High (3) 60-80 Shelf 2: Turnspit
Roast Beef rare 1 Kg - 2 Medium (2) 35-45
Oven tray on wire shelf (turn
food two thirds of the way
through cooking if necessary)
Leg of lamb / Shanks - 2 Medium (2) 60-90
Drip tray or oven tray on wire
shelf (turn food two thirds of
the way through cooking if
necessary)
Roast potatoes - 2 Medium (2) 45-55
Drip-tray / baking tray (if
necessary, turn food two thirds
of the way through cooking)
Vegetable gratin - 2 High (3) 10-15 Oven tray on wire shelf
Lasagna & Meat Yes 1-3 200 50-100
Shelf Oven tray on wire shelf
(turn food two thirds of the way
through cooking if necessary)
Shelf 1: drip tray or oven tray on
wire shelf
Meat & Potatoes Yes 1-3 200 45-100
Shelf Oven tray on wire shelf
(turn food two thirds of the way
through cooking if necessary)
Shelf 1: drip tray or oven tray on
wire shelf
Fish & Vegetables
GENTLE
Yes 1-4 180 30-50
Shelf 4: oven tray on wire shelf
Shelf 1: drip tray or oven tray on
wire shelf
Recipe
Function Preheating Shelf
(from bottom)
Temperature
(°C)
Time
(min)
Accessories

Downloaded from www.vandenborre.be
GB15
TESTED RECIPES (in compliance with IEC 60350:99+A1:05 +A2:08 and DIN 3360-12:07:07)
The cooking table advises the ideal function and cooking temperature to ensure the best results with all recipes. For hot air
cooking on a single level, it is advisable to use the second shelf and the same temperature suggested for “CONVECTION BAKE”
cooking on several levels.
When grilling food, leave a space of 3-4 cm at the front to facilitate removal from the oven.
Recipe Function Preheating Shelf
(from bottom)
Temperature
(°C)
Time
(min)
Accessories and notes
IEC 60350:99+A1:05 +A2:08 § 8.4.1
Shortbread
Yes 2 170 15-25 Drip tray / baking tray
Yes 1-3 160 20-30
Shelf 3: baking tray (switch levels
halfway through cooking)
Shelf 1: drip tray
IEC 60350:99+A1:05 +A2:08 § 8.4.2
Small cakes
Yes 2 170 20-30 Drip tray / baking tray
Yes 1-3 160 20-30
Shelf 3: baking tray (switch levels
halfway through cooking)
Shelf 1: drip tray
IEC 60350:99+A1:05 +A2:08 § 8.5.1
Fatless sponge cake Yes 2 170 35-45 Cake tin on wire shelf
IEC 60350:99+A1:05 +A2:08 § 8.5.2
Two apple pies
Yes 2 185 60-75 Cake tin on wire shelf
Yes 1-3 175 65-75
Shelf 3: cake tin on wire shelf (switch
levels halfway through cooking)
Shelf 1: cake tin on wire shelf
IEC 60350:99+A1:05 +A2:08 § 9.1.1
Toast - 4 High (3) 3-5 Wire shelf
IEC 60350:99+A1:05 +A2:08 § 9.2.1
Burgers - 4 High (3) 30-40
Shelf 4: wire shelf (turn food halfway
through cooking)
Shelf 3: drip tray with water
DIN 3360-12:07 § 6.5.2.3
Apple cake, yeast tray cake
Yes 2 180 30-40 Drip tray / baking tray
Yes 1-3 160 50-60
Shelf 3: baking tray (switch levels
halfway through cooking)
Shelf 1: drip tray
DIN 3360-12:07 § 6.6
Roast pork - 2 170 110-150 Shelf 2: wire shelf
DIN 3360-12:07 annex C
Flat cake
Yes 2 170 35-45 Drip tray / baking tray
Yes 1-3 170 40-50
Shelf 3: baking tray (switch levels
halfway through cooking)
Shelf 1: drip tray

Downloaded from www.vandenborre.be
GB16
How to read the cooking table
The table indicates the best function to use for any given food, to be cooked on one or more shelves at the same time. Cooking
times start from the moment food is placed in the oven, excluding pre-heating (where required). Cooking temperatures and
times are purely for guidance and will depend on the amount of food and type of accessory used. Use the lowest recommended
values to begin with and, if the food is not cooked enough, then move on to higher values. Use the accessories supplied and
preferably dark coloured metal cake tins and oven trays. You can also use pans and accessories in pyrex or stoneware, but bear
in mind that cooking times will be slightly longer. To obtain best results, carefully follow the advice given in the cooking table
for the choice of accessories (supplied) to be placed on the various shelves.
Cooking different foods at the same time
Using the “GENTLE CONVECTION BAKE” function, you can cook different foods which require the same cooking temperature at
the same time (for example: fish and vegetables), using different shelves. Remove the food which requires less cooking time and
leave food which requires longer cooking time in the oven.
Desserts
- Cook delicate desserts with the conventional function on one shelf only. Use dark coloured metal cake tins and always
position them on the wire shelf supplied. To cook on more than one shelf, select the forced air function and stagger the
position of the cake tins on the shelves, aiding optimum circulation of the hot air.
- To check whether a raising cake is cooked, insert a wooden toothpick into the centre of the cake. If the toothpick comes
out clean, the cake is ready.
- If using non-stick cake tins, do not butter the edges as the cake may not rise evenly around the edges.
- If the cake “sinks” during cooking, set a lower temperature the next time, perhaps reducing the amount of liquid in the
mixture and mixing more gently.
- For sweets with moist fillings (cheesecake or fruit pies) use the “CONVECTION BAKE” function. If the base of the cake is
soggy, lower the shelf and sprinkle the bottom of the cake with breadcrumbs or biscuit crumbs before adding the filling.
Meat
- Use any kind of oven tray or pyrex dish suited to the size of the piece of meat being cooked. For roast joints, it is best to
add some stock to the bottom of the dish, basting the meat during cooking for added flavour. When the roast is ready, let
it rest in the oven for another 10-15 minutes, or wrap it in aluminium foil.
- When you want to grill meat, choose cuts with an even thickness all over in order to achieve uniform cooking results. Very
thick pieces of meat require longer cooking times. To prevent the meat from burning on the outside, lower the position of
the wire shelf, keeping the food farther away from the grill. Turn the meat two thirds of the way through cooking.
To collect the cooking juices it is advisable to place a drip-tray with half a litre of water directly under the grill on which the meat
is placed. Top-up when necessary.
Turnspit (only in some models)
Use this accessory to evenly roast large pieces of meat and poultry. Place the meat on the turnspit rod, tying it with string if
chicken, and check that it is secure before inserting the rod in the seat located on the front wall of the oven and resting it on the
respective support. To prevent smoke and to collect cooking juices, it is advisable to place a drip-tray with half a litre of water on
the first level. The rod has a plastic handle which must be removed before starting to cook, and used at the end of cooking to
avoid burns when taking the food out of the oven.
Pizza
Lightly grease the trays to ensure the pizza has a crispy base. Scatter the mozzarella over the pizza two thirds of the way through
cooking.
Rising function
It is always best to cover the dough with a damp cloth before placing it in the oven. Dough proving time with this function is
reduced by approximately one third compared to proving at room temperature (20-25°C). Proving time for a 1 Kg batch of pizza
dough is around one hour.
RECOMMENDED USE AND TIPS

Downloaded from www.vandenborre.be
FR17
VOTRE SÉCURITÉ AINSI QUE CELLE D’AUTRUI EST PARTICULIÈREMENT IMPORTANTE
Le présent manuel contient d’importants messages relatifs à la sécurité, qui figurent également sur l’appareil. Nous vous invitons
à les lire soigneusement et à les respecter en toute circonstance.
Tous les messages relatifs à la sécurité spécifient le danger potentiel auquel ils se réfèrent et indiquent comment réduire le
risque de lésions, de dommages et de chocs électriques résultant d’une utilisation non réglementaire de l’appareil. Veuillez
observer scrupuleusement les instructions suivantes :
- Débranchez le four de l’alimentation secteur avant d’entreprendre toute intervention sur celui-ci.
- Les opérations d’installation et d’entretien sont du ressort exclusif d’un technicien spécialisé. Celui-ci est tenu de se
conformer aux instructions du fabricant et aux normes locales en vigueur en matière de sécurité. Pour toute réparation ou
tout remplacement de pièces, procédez uniquement aux opérations spécifiées dans le manuel en utilisant les pièces
expressément indiquées.
- La mise à la terre de l’appareil est obligatoire.
- Le cordon d’alimentation de l’appareil doit être suffisamment long pour permettre le branchement de l’appareil encastré
à la prise du secteur.
- Afin que l’installation soit conforme aux normes locales de sécurité, il est nécessaire de brancher l’appareil au moyen d’un
interrupteur omnipolaire avec une distance d’ouverture des contacts d’au moins 3 mm.
- N’utilisez en aucun cas de prises multiples ou de rallonges.
- Ne tirez jamais sur le cordon d’alimentation pour débrancher l’appareil de la prise secteur.
- Une fois l’installation terminée, l’utilisateur ne devra plus pouvoir accéder aux composants électriques.
- Évitez de toucher l’appareil avec les mains mouillées et ne l’utilisez pas lorsque vous êtes pieds nus.
- Ce four a été conçu uniquement comme appareil ménager destiné à la cuisson des aliments. Toute autre utilisation est
considérée comme impropre (chauffer une pièce, par exemple). Le fabricant décline toute responsabilité en cas de
dommages résultant d’une utilisation impropre ou d’un réglage erroné des commandes.
- Les personnes (y compris les enfants) qui, en raison de leurs capacités physiques, sensorielles ou mentales, de leur
inexpérience ou de leur méconnaissance, ne sont pas en mesure d’utiliser l’appareil en toute sécurité, doivent se servir de
l’appareil uniquement sous la surveillance ou en se conformant aux instructions d’une personne responsable.
- Les parties accessibles du four peuvent atteindre une température élevée quand l’appareil est en service. Veillez à
maintenir les enfants hors de portée de l’appareil. Contrôlez que les enfants ne jouent pas avec l’appareil.
- Veillez à ne pas toucher les résistances ou les surfaces intérieures du four, sous peine d’encourir des brûlures. Évitez de
mettre le four en contact avec des chiffons ou tout matériau inflammable avant que les composants de l’appareil ne
soient suffisamment refroidis.
- En fin de cuisson, soyez particulièrement prudent au moment d’ouvrir la porte. Laissez l’air chaud ou la vapeur s’évacuer
progressivement de l’enceinte de cuisson avant d’accéder à celle-ci. Lorsque la porte est fermée, l’air chaud est convoyé à
travers l’ouverture située au-dessus du bandeau de commande. Évitez d’obstruer les ouvertures de ventilation.
- Munissez-vous de gants pour retirer les plats et les accessoires chauds du four. Veillez à ne pas toucher les résistances.
- Ne placez jamais de produits inflammables à l’intérieur du four ou à proximité de celui-ci. Ces produits risqueraient en
effet de s’enflammer si le four était mis sous tension par inadvertance.
- Évitez de chauffer ou de cuisiner dans le four des aliments contenus dans des récipients hermétiques. La pression qui se
développe à l’intérieur du récipient pourrait le faire exploser et endommager le four.
- N’utilisez en aucun cas de récipients en matière synthétique pour cuire des aliments au four.
- Les graisses et l’huile surchauffées s’enflamment facilement. Surveillez régulièrement la cuisson si vous utilisez une
quantité importante de graisse ou d’huile.
- Ne laissez jamais l’appareil sans surveillance pendant le processus de séchage des aliments.
- Si vous utilisez des boissons alcoolisées (rhum, cognac, vin, par exemple) pour cuisiner des plats, rappelez-vous que
l’alcool s’évapore à des températures élevées. Il se peut, par conséquent, que les vapeurs dégagées par l’alcool
s’enflamment en entrant en contact avec la résistance électrique.
INSTRUCTIONS IMPORTANTES SUR LA SÉCURITÉ
Ceci est le symbole de danger relatif à la sécurité. Il met en garde l’utilisateur et toute autre personne contre les risques
potentiels dérivant de l’utilisation de cet appareil.
Tous les messages relatifs à la sécurité sont précédés du symbole de danger et des termes suivants :
DANGER
Indique une situation dangereuse qui, si elle n’est pas évitée, occasionnera de graves
lésions.
AVERTISSEMENT
Indique une situation dangereuse qui, si elle n’est pas évitée, est susceptible
d’occasionner de graves lésions.

Downloaded from www.vandenborre.be
FR18
Mise au rebut des appareils ménagers usagés
- Cet appareil est fabriqué à partir de matériaux recyclables ou pouvant être réutilisés. Mettez-le au rebut en vous
conformant aux prescriptions locales en matière d’élimination des déchets. Avant de mettre votre appareil au rebut,
rendez-le inutilisable en sectionnant le câble d’alimentation.
- Pour toute information sur le traitement et le recyclage de cet appareil, contactez le service municipal compétent, votre
déchetterie locale ou le magasin où vous l’avez acheté.
Après avoir déballé le four, contrôlez que l’appareil n’a pas été endommagé pendant le transport et que la porte ferme
parfaitement. En cas de problème, contactez votre revendeur ou le Service Après-vente le plus proche. Nous recommandons de
retirer le four de la base en polystyrène uniquement avant de procéder à l’installation, afin d’éviter tout risque
d’endommagement de l’appareil.
PRÉPARATION DU MEUBLE POUR L’ENCASTREMENT
• Les meubles de cuisine adjacents au four doivent résister à la chaleur (min. 90 °C).
• Procédez au découpage complet du meuble avant d’y installer l’appareil et éliminez soigneusement les copeaux et la
sciure de bois.
• On ne doit plus pouvoir accéder à la partie inférieure du four une fois l’installation terminée.
• Afin de garantir le bon fonctionnement de l’appareil, veillez à ne pas obstruer l’ouverture minimale prévue entre le plan
de travail et la partie supérieure du four.
BRANCHEMENT DE L’APPAREIL
Vérifiez que la tension figurant sur la plaque signalétique de l’appareil correspond à celle de votre habitation. La plaque
signalétique se trouve sur le rebord avant du four (visible lorsque la porte est ouverte).
• Le remplacement éventuel du câble d’alimentation (type H05 RR-F 3 x 1,5 mm
2
) doit être effectué uniquement par un
professionnel qualifié. Adressez-vous à un Service Après-vente agréé.
RECOMMANDATIONS GÉNÉRALES
Avant d’utiliser le four pour la première fois :
- Enlevez les protections en carton, les films transparents et les étiquettes autocollantes présentes sur les accessoires.
- Retirez tous les accessoires du four et faites-le chauffer à 200°C pendant une heure environ, afin de faire disparaître les
odeurs et les fumées qui se dégagent du matériau isolant et des graisses de protection.
Pendant l’utilisation :
- Évitez de déposer des objets lourds sur la porte du four sous peine de l’endommager.
- Évitez de prendre appui sur la porte du four ou de suspendre des objets sur la poignée du four.
- Évitez de couvrir l’intérieur du four avec des feuilles d’aluminium.
- Ne versez jamais d’eau dans le four lorsque celui-ci est chaud ; vous risqueriez d’endommager l’émail.
- Évitez de déplacer les ustensiles de cuisson en les traînant sur le fond du four sous peine de rayer le revêtement.
- Veillez à ce que le câble électrique d’autres appareils électroménagers se trouvant à proximité immédiate ne puisse ni
entrer en contact avec les parties chaudes, ni se coincer dans la porte du four.
- Évitez d’exposer le four aux éléments atmosphériques.
Élimination des emballages
Les matériaux d’emballage sont entièrement recyclables comme l’indique le symbole de recyclage ( ). Par conséquent, ne les
jetez jamais dans la nature mais conformez-vous aux réglementations locales en vigueur en matière d’élimination des déchets.
Mise au rebut de l’appareil
- Cet appareil est certifié conforme à la Directive Européenne 2002/96/CE, concernant les Déchets d’Équipements
Électriques et Électroniques (DEEE ou WEEE).
- En procédant correctement à la mise au rebut de cet appareil, vous contribuerez à empêcher toute conséquence nuisible
pour l’environnement et la santé.
- Le symbole apposé sur le produit et sur la documentation qui l’accompagne indique qu’il ne doit pas être jeté avec les
ordures ménagères, mais remis à un centre de collecte spécialisé dans le recyclage des appareils électriques et
électroniques.
Conseils pour économiser l’énergie
- Préchauffez le four uniquement si le tableau de cuisson ou votre recette le précise.
- Utilisez des moules à pâtisserie foncés, laqués noir ou émaillés, car ceux-ci absorbent très bien la chaleur.
- Éteignez le four 10 à 15 minutes avant la fin du temps de cuisson réglé. En cas d’aliments nécessitant un temps de cuisson
relativement long, ceux-ci continueront néanmoins à cuire en utilisant la chaleur résiduelle du four.
INSTALLATION
CONSEILS POUR LA PROTECTION DE L’ENVIRONNEMENT

Downloaded from www.vandenborre.be
FR19
- Ce four, qui est destiné à entrer en contact avec des denrées alimentaires, est conforme au règlement ( ) n° 1935/2004.
Il a été conçu, fabriqué et commercialisé conformément aux exigences de sécurité de la directive « Basse Tension » 2006/
95/CE (qui remplace la directive 73/23/CEE et modifications suivantes) et aux exigences de protection de la directive
« CEM » 2004/108/CE.
Le four ne fonctionne pas :
• Vérifiez qu’il n’y a pas de coupure de courant et que le four est correctement branché.
• Éteignez puis rallumez le four pour voir si le problème a été éliminé.
La porte est bloquée :
• Éteignez puis rallumez le four pour voir si le problème a été éliminé.
• REMARQUE IMPORTANTE : durant la pyrolyse, il n’est pas possible d’ouvrir la porte du four. Attendez que celle-ci se
débloque automatiquement (référez-vous au paragraphe « Cycle de nettoyage des fours dotés de la fonction Pyrolyse »).
Le programmateur électronique ne fonctionne pas :
• Si la lettre « » suivie d’un numéro s’affiche à l’écran, contactez votre Service Après-vente. Spécifiez le numéro qui suit la
lettre « ».
Avant de faire appel au Service Après-vente :
1. Vérifiez d’abord s’il n’est pas possible de remédier par vous-même au défaut en suivant les points décrits au chapitre
« Diagnostic des pannes ».
2. Éteignez puis rallumez le four pour voir si le problème a été éliminé.
Si, après ces contrôles, le problème persiste, adressez-vous à votre Service Après-vente.
Veuillez toujours spécifier :
• une brève description du défaut ;
• le type et le modèle exact du four ;
• les codes service (numéros suivant le mot « Service » sur la plaque signalétique) apparaissant sur le rebord droit de la
cavité du four (visibles lorsque la porte est ouverte). Les codes service sont également indiqués dans le livret de garantie ;
• votre adresse complète ;
• votre numéro de téléphone.
Nous vous invitons à enregistrer votre four sur le site : www.whirlpool.fr, rubrique « enregistrez votre produit » afin d’être
rapidement reconnu et renseigné par l service consommateur en cas de conseil ou de panne.
Si le four doit être réparé, adressez-vous à un Service Après-vente agréé (vous aurez ainsi la garantie que les pièces
défectueuses seront remplacées par des pièces d’origine et que la réparation de votre appareil sera effectuée correctement).
Pour obtenir les coordonnées du Service Après-Vente le plus proche de chez vous, connectez-vous au site www.whirlpool.fr ou
contactez le Service Consommateurs Whirlpool au : 0.892.700.150.
Extérieur du four
REMARQUE IMPORTANTE : n’utilisez en aucun cas de produits corrosifs ou de détergents abrasifs. Si l’un de ces produits
entre en contact avec le four, essuyez-le immédiatement à l’aide d’un chiffon humide.
• Nettoyez les surfaces à l’aide d’un chiffon humide. Si celles-ci sont particulièrement sales, utilisez une solution d’eau
additionnée de quelques gouttes de détergent à vaisselle. Essuyez à l’aide d’un chiffon doux.
DÉCLARATION DE CONFORMITÉ
DIAGNOSTIC DES PANNES
SERVICE APRÈS-VENTE
NETTOYAGE
AVERTISSEMENT
- Pour nettoyer votre appareil, n’utilisez en aucun cas un jet d’eau sous haute
pression ni d’appareil de nettoyage à la vapeur.
- Attendez que le four soit froid avant de procéder à son nettoyage.
- Débranchez l’appareil.

Downloaded from www.vandenborre.be
FR20
Enceinte du four
REMARQUE IMPORTANTE : évitez l’emploi d’éponges abrasives et/ou de pailles de fer. À la longue, celles-ci risquent
d’abîmer les surfaces émaillées et la vitre de la porte.
• Après chaque utilisation, laissez refroidir le four et nettoyez-le, de préférence lorsqu’il est tiède, pour éviter que les résidus
d’aliments ne s’incrustent (aliments à haute teneur en sucre, par exemple).
• Utilisez des produits spéciaux pour fours et respectez les instructions du fabricant.
• Nettoyez la vitre de la porte avec un produit liquide spécifique. Pour faciliter le nettoyage du four, il est possible d’enlever
la porte (référez-vous au chapitre ENTRETIEN).
• Pour nettoyer la partie supérieure du four, il est possible d’abaisser (seulement dans certains modèles) la résistance
supérieure du gril (voir le chapitre ENTRETIEN).
REMARQUE : durant la cuisson prolongée d’aliments à haute teneur en eau (pizzas, légumes, etc.), il se peut que de la
condensation se forme à l’intérieur de la porte et sur le joint. Dès que le four est froid, essuyez à l’aide d’un chiffon ou
d’une éponge.
Accessoires :
• Faites tremper les accessoires dans du détergent à vaisselle après leur utilisation et après refroidissement. S’ils sont encore
chauds, munissez-vous de gants pour les manipuler.
• Utilisez une brosse ou une éponge pour détacher facilement les résidus d’aliments.
Nettoyage de la paroi arrière et des panneaux catalytiques latéraux (s’ils sont fournis) :
REMARQUE IMPORTANTE : ne nettoyez en aucun cas les panneaux catalytiques et la paroi arrière avec des produits
abrasifs, des brosses dures, des éponges pour casseroles ou des bombes pour le nettoyage du four, car ils pourraient
endommager la surface catalytique et lui faire perdre ses propriétés autonettoyantes.
• Faites fonctionner le four à vide à 200°C pendant environ une heure en sélectionnant la fonction Ventilation.
• Une fois ce temps écoulé, faites refroidir l’appareil, puis éliminez les éventuels résidus d’aliments à l’aide d’une éponge.
Cycle de nettoyage des fours dotés de la fonction Pyrolyse (si disponible) :
Cette fonction permet d’éliminer les salissures générées au cours de la cuisson. Les restes de saleté (brûlés à une température
de 500°C environ) sont transformés en dépôts qu’on peut facilement enlever avec une éponge humide une fois que le four est
froid. Il n’est pas nécessaire de procéder à un nettoyage par pyrolyse après chaque cuisson, mais seulement si le degré de
salissure est important, en présence de fumées et d’odeurs désagréables tant en phase de préchauffage qu’en phase de cuisson.
• Si le four est installé sous une table de cuisson, vérifiez que les brûleurs ou les plaques chauffantes sont éteints avant de
lancer le cycle de nettoyage (pyrolyse).
• Les accessoires doivent être enlevés du four avant de lancer un cycle de pyrolyse.
Votre appareil est doté de 2 fonctions pyrolyse :
1. Cycle économique (PYRO EXPRESS/ECO) : la consommation est réduite d’environ 25% par rapport à un cycle de pyrolyse
standard. Il est recommandé d’activer ce cycle de façon régulière (après avoir cuisiné de la viande 2 à 3 fois de suite).
2. Cycle standard (PYRO) : il garantit un nettoyage en profondeur lorsque le four est particulièrement sale.
• Quoiqu’il en soit, après un certain nombre de cuissons, sur base du niveau de salissure, l’afficheur indiquera un message
vous invitant à procéder à un cycle d’autonettoyage.
REMARQUE : pendant le déroulement de la pyrolyse, la porte du four est bloquée et le restera tant que la température
dans l’enceinte du four n’aura pas atteint un niveau de sécurité approprié.
DÉMONTAGE DE LA PORTE
Pour démonter la porte :
1. Ouvrez complètement la porte du four.
2. Soulevez les deux manettes d’arrêt des charnières en les poussant vers l’avant, jusqu’à la butée (Fig. 1).
3. Refermez pratiquement complètement la porte (A), soulevez-la (B) et faites-la pivoter (C) jusqu’à ce qu’elle se décroche (D)
(Fig. 2).
AVERTISSEMENT
- Ne touchez pas le four pendant le cycle de pyrolyse.
- Éloignez les enfants du four pendant le déroulement de cette opération.
ENTRETIEN
AVERTISSEMENT
- Munissez-vous de gants de protection.
- Procédez aux opérations indiquées lorsque l’appareil est froid.
- Veillez à toujours débrancher l’appareil.

Downloaded from www.vandenborre.be
FR21
Pour remonter la porte :
1. Introduisez les charnières dans leur logement respectif.
2. Ouvrez complètement la porte.
3. Abaissez les deux manettes d’arrêt.
4. Fermez la porte du four.
DÉPLACEMENT DE LA RÉSISTANCE SUPÉRIEURE (UNIQUEMENT SUR CERTAINS MODÈLES)
1. Déposez les grilles porte-accessoires latérales (Fig. 3).
2. Dégagez légèrement la résistance (Fig. 4) et abaissez-la (Fig. 5).
3. Pour remettre la résistance en place, soulevez-la en la tirant légèrement vers vous. Vérifiez qu’elle repose sur les supports
latéraux prévus à cet effet.
REMPLACEMENT DE L’AMPOULE
Pour remplacer l’ampoule arrière (si présente) :
1. Débranchez le four.
2. Dévissez le capot de l’ampoule (Fig. 6), remplacez l’ampoule brûlée par une ampoule neuve (voir Remarque pour
connaître le type), puis revissez le capot de l’ampoule.
3. Rebranchez le four.
Pour remplacer l’ampoule latérale (si présente) :
1. Débranchez le four.
2. Déposez les grilles porte-accessoires latérales, si elles sont présentes (Fig. 3).
3. À l’aide d’un tournevis à tête plate que vous utiliserez pour faire levier vers l’extérieur, dégagez le capot de l’ampoule
(Fig. 7).
4. Remplacez l’ampoule brûlée par une ampoule neuve (voir Remarque pour connaître le type) (Fig. 8).
5. Réinstallez le capot de l’ampoule en le poussant contre la paroi, de façon à l’accrocher correctement (Fig. 9).
6. Remontez les grilles porte-accessoires latérales.
7. Rebranchez le four.
REMARQUE :
- Utilisez uniquement des ampoules à incandescence de 25-40W/230V type E-14, T300°C, ou des ampoules halogènes de
20-40W/230 V type G9, T300°C.
- Ces ampoules sont disponibles auprès de nos Services Après-vente ou sur le site d’accessoires www.feel-at-home.fr.
REMARQUE IMPORTANTE :
- Si vous utilisez des ampoules halogènes, évitez de les manipuler à mains nues, car vos empreintes digitales
risqueraient de les abîmer.
- Avant de faire fonctionner le four, contrôlez que le capot de l’ampoule a été remis en place.
Fig. 1 Fig. 2
Fig. 3 Fig. 4 Fig. 5
Fig. 6 Fig. 7 Fig. 8 Fig. 9

Downloaded from www.vandenborre.be
FR22
POUR LE BRANCHEMENT ÉLECTRIQUE, CONSULTEZ LA PARTIE RELATIVE À L’INSTALLATION
1. Bandeau de commandes
2. Résistance supérieure/gril
3. Ventilateur (non visible)
4. Plaque signalétique (à ne pas enlever)
5. Éclairage
6. Résistance circulaire (non visible)
7. Ventilateur
8. Tournebroche (si présent)
9. Résistance inférieure (non visible)
10. Porte
11. Position des plaques (le nombre de gradins est indiqué sur le devant du four)
12. Paroi
REMARQUE :
- Pendant la cuisson, il est possible que le ventilateur de refroidissement se mette en marche par intermittence pour réduire
la consommation d’énergie.
- À la fin de la cuisson, après l’arrêt du four, le ventilateur de refroidissement peut continuer de fonctionner pendant un
certain temps.
ACCESSOIRES FOURNIS
A. GRILLE (1) : à utiliser pour la cuisson d’aliments ou comme support pour casseroles, moules à gâteau ou autre récipient
approprié à la cuisson au four.
B. LÈCHEFRITE (1) : à utiliser, positionnée sous la grille, pour récolter les jus ou comme plaque pour cuire la viande, le
poisson, les légumes, les fougasses etc.
ACCESSOIRES NON FOURNIS
Il est possible d’acheter séparément d’autres accessoires auprès de votre revendeur - distributeur de pièces détachées.
INTRODUCTION DE GRILLES ET AUTRES ACCESSOIRES À L’INTÉRIEUR DU FOUR
1. Insérez la grille horizontalement, avec la partie rehaussée « A » orientée vers le haut (Fig. 1).
2. Pour les autres accessoires, comme le lèchefrite ou la plaque à pâtisserie, l’introduction se fait à l’aide de la saillie se
trouvant sur la partie plane « B » orientée vers le haut (Fig. 2).
INSTRUCTIONS POUR L’UTILISATION DU FOUR
Fig. A Fig. B
Fig. 1 Fig. 2

Downloaded from www.vandenborre.be
FR23
DESCRIPTION DU BANDEAU DE COMMANDE
PROGRAMMATEUR ÉLECTRONIQUE
1. BOUTON FONCTIONS : allumage/extinction et sélection des fonctions
2. BOUTON NAVIGATION : navigation dans le menu, réglage valeurs pré-introduites
3. TOUCHE DE SÉLECTION/CONFIRMATION
REMARQUE : pour les indications relatives à cette touche, s’affichera à l’écran.
LISTE DES FONCTIONS
En tournant le bouton « Fonctions » dans une position quelconque, le four s’active : l’afficheur visualise les fonctions ou les sous-
menus associés à chacune d’elles.
Les sous-menus sont disponibles et sélectionnables en positionnant le bouton sur les fonctions GRIL, FONCTIONS SPÉCIALES,
RÉGLAGES, PAIN/PIZZA, NETTOYAGE AUTOMATIQUE.
REMARQUE : pour la liste et la description des fonctions, se référer au tableau spécifique page 28.
DESCRIPTION DE L’AFFICHAGE
A. Visualisation des éléments chauffants actifs pour les différentes fonctions
B. Symboles pour la gestion du temps : minuterie, durée de cuisson, heure de fin cuisson, heure courante
C. Informations relatives aux fonctions choisies
D. Fonction automatique PAIN/PIZZA sélectionnée
E. Indication porte four fermée durant le cycle de nettoyage automatique (pyrolyse)
F. Température intérieure four
G. Fonction Pyrolyse
H. Dorage
I. Fonctions spéciales : décongélation, maintien au chaud, levage de la pâte
ACTIVATION DU FOUR - RÉGLAGE DE L’HEURE
Après avoir branché le four au réseau électrique, il est nécessaire d’introduire l’heure courante. Les deux chiffres relatifs à l’heure
clignoteront sur l’afficheur.
1. Tournez le bouton « Navigation » pour afficher l’heure correcte.
2. Appuyez sur la touche pour confirmer ; les deux chiffres relatifs aux minutes clignoteront sur l’afficheur.
3. Tournez le bouton « Navigation » pour afficher les minutes correctes.
4. Appuyez sur la touche pour confirmer.
Pour modifier l’heure courante, par exemple à la suite d’une interruption de l’alimentation électrique, voir le paragraphe suivant
(RÉGLAGES).
AFFICHEUR
1 23
A
B C D
E
I H G F
3
3

Downloaded from www.vandenborre.be
FR24
SÉLECTION DES FONCTIONS DE CUISSON
1. Tournez le bouton « Fonctions » sur la fonction choisie : les paramètres de cuisson s’affichent.
2. Si les paramètres proposés correspondent à ceux qui sont désirés, appuyez sur la touche . Pour les modifier, procédez
comme indiqué ci-dessous.
PARAMÉTRAGE DE LA TEMPÉRATURE/PUISSANCE DU GRIL
Pour modifier la température ou la puissance du gril, il est nécessaire de procéder comme suit :
1. Tournez le bouton « Navigation » pour afficher la valeur désirée.
2. Appuyez sur la touche pour confirmer.
Le four confirme automatiquement la sélection 10 secondes après la dernière opération.
PRÉCHAUFFAGE RAPIDE
1. Sélectionnez la fonction Préchauffage rapide en tournant le bouton « Fonctions » en face du symbole .
2. Confirmez avec la touche : les paramètres s’affichent.
3. Si la température proposée correspond à celle qui est désirée, appuyez sur la touche . Pour la modifier, procédez
comme indiqué dans les paragraphes précédents. Le message PRE apparaît sur l’écran. Dès que la température réglée est
atteinte, le message sera remplacé par la valeur correspondante (par ex. 200°) accompagnée d’un signal sonore. À la fin de
la phase de préchauffage, le four sélectionne automatiquement la convection naturelle .
À ce stade, introduisez le plat à cuire.
4. Si vous désirez programmer une fonction de cuisson différente, tournez le bouton « Fonctions » et sélectionnez la
fonction désirée.
RÉGLAGE DE LA DURÉE DE CUISSON
Cette fonction permet de cuire pendant un temps défini, d’un minimum de 1 minute jusqu’au temps maximum permis par la
fonction sélectionnée. Quand la durée de cuisson est écoulée, le four s’éteint automatiquement.
1. Après avoir confirmé la température, le symbole clignote.
2. Tournez le bouton Réglage afin de visualiser le temps de cuisson désiré.
3. Confirmez la durée de cuisson avec la touche .
Le four confirme automatiquement la sélection 10 secondes après la dernière opération.
RÉGLAGE DE L’HEURE DE FIN CUISSON / DÉPART RETARDÉ
REMARQUE IMPORTANTE : le réglage du Départ différé n’est pas disponible avec les fonctions suivantes :
PRÉCHAUFFAGE RAPIDE, PAIN/PIZZA, CONVECTION FORCÉE DÉLICATE.
REMARQUE : lorsque vous effectuez ce réglage, la température sélectionnée sera atteinte progressivement, c’est
pourquoi la durée de cuisson sera légèrement plus longue que celle figurant dans le tableau de cuisson.
Vous pouvez programmer l’heure de fin cuisson désirée en retardant l’allumage du four de 23 heures et 59 minutes maximum
à partir de l’heure actuelle. Ceci n’est possible qu’après avoir programmé une durée de cuisson.
Après avoir introduit la durée de la cuisson, l’afficheur visualise l’heure de fin cuisson (par exemple 15:45) et le symbole
clignote.
3
3
3
3
3

Downloaded from www.vandenborre.be
FR25
Pour retarder la fin de la cuisson, en retardant l’allumage du four, procédez comme suit :
1. Tournez le bouton « Navigation » jusqu’à la visualisation de l’heure à laquelle vous désirez terminer la cuisson (par
exemple 16:00).
2. Confirmez la valeur choisie avec la touche : les deux points de l’heure de fin de cuisson clignotent pour indiquer que le
paramétrage a été effectué correctement.
3. Le four retardera le départ automatiquement de manière à terminer la cuisson à l’heure choisie.
INDICATION DE LA CHALEUR RÉSIDUELLE À L’INTÉRIEUR DU FOUR
À la fin de chaque cuisson, ou à l’extinction du four, si la température à l’intérieur de l’enceinte de cuisson est supérieure à 50°C,
l’afficheur visualise le message HOT avec la température instantanée. Lorsque la chaleur résiduelle atteint 50°C, l’affichage
visualise l’heure.
MINUTEUR
Cette fonction ne peut être utilisée qu’à four éteint et elle est utile, par exemple, pour contrôler le temps de cuisson des pâtes.
La durée maximum pouvant être introduite est de 23 heures et 59 minutes.
1. Avec le bouton « Fonctions » sur le zéro, tournez le bouton « Navigation » jusqu’à l’affichage de la durée désirée.
2. Appuyez sur la touche pour lancer le compte à rebours. À la fin du temps programmé, l’afficheur visualise « 00:00:00 »
accompagné d’un signal sonore. Pour l’interrompre, appuyez sur la touche (l’heure courante apparaît sur l’afficheur).
SÉLECTION DES FONCTIONS SPÉCIALES
En positionnant l’indicateur du bouton « Fonctions » en face du symbole , on accède à un sous-menu contenant trois
fonctions spéciales.
Pour sélectionner et lancer l’une de ces fonctions, procédez comme suit :
1. Tournez le bouton « Fonctions » sur le symbole : l’afficheur visualise « DEFROST » et le symbole correspondant
associé à cette fonction.
2. Tournez le bouton « Navigation » pour dérouler la liste des fonctions ; leurs noms sont en anglais : DEFROST
(décongélation), KEEP WARM (maintien au chaud), RISING (levage), MEAT SLOW COOKING (cuisson lente de la viande),
FISH SLOW COOKING (cuisson lente du poisson).
3. Appuyez sur la touche pour confirmer.
DORAGE
À la fin de la cuisson, pour les fonctions qui le permettent, l’afficheur propose de dorer davantage votre plat. Cette fonction ne
peut être activée que si vous avez entré une durée de cuisson.
Une fois la durée de cuisson écoulée, l’afficheur montre : « PRESS TO BROWN » (appuyez pour dorer). En appuyant sur la
touche , le four lance la phase de « Dorage » pendant 5 minutes. Cette fonction ne peut être effectuée que deux fois.
SÉLECTION FONCTION PAIN/PIZZA
En positionnant l’indicateur du bouton « Fonctions » en face du symbole , on accède à un sous-menu contenant deux
fonctions automatiques de cuisson pour « pain » et « pizza ».
3
3
3
3
3

Downloaded from www.vandenborre.be
FR26
Pain
1. Tournez le bouton « Fonctions » sur le symbole : l’afficheur visualise « BREAD » (pain) avec à côté AUTO.
2. Appuyez sur pour sélectionner la fonction.
3. Tournez le bouton « Navigation » pour introduire la température désirée (entre 180°C et 220°C) et confirmez avec la
touche .
4. Tournez le bouton « Navigation » pour introduire la durée de cuisson désirée et appuyez sur pour lancer la cuisson.
Pizzas
1. Tournez le bouton « Fonctions » sur le symbole : l’afficheur visualise « BREAD » (pain). Pour sélectionnez la fonction
« PIZZA », procédez comme suit :
2. Tournez le bouton « Navigation : « PIZZA » s’affiche à l’écran.
3. Appuyez sur pour sélectionner la fonction.
4. Tournez le bouton « Navigation » pour introduire la température désirée (entre 220°C et 250°C) et confirmez avec la
touche .
5. Tournez le bouton « Navigation » pour introduire la durée de cuisson désirée et appuyez sur pour lancer la cuisson.
RÉGLAGES
En positionnant l’indicateur du bouton « Fonctions » en face du symbole , on accède à un sous-menu contenant quatre
réglages de l’afficheur, qu’il est possible de modifier.
Horloge
Tournez le bouton « Fonctions » à la hauteur du symbole : le message CLOCK (horloge) apparaît sur l’afficheur. Pour
modifier l’heure, se référer au paragraphe précédent (RÉGLAGE HEURE COURANTE).
Eco
Avec le mode ECO actif (ON), l’afficheur s’éteint lorsque le four est en standby ou bien lorsque les 5 minutes à compter de la fin
de la cuisson se sont écoulées. En outre, l’éclairage intérieur est désactivé pendant la cuisson. Pour visualiser les informations sur
l’afficheur et rallumer l’éclairage, il suffit d’appuyer sur la touche ou de tourner l’un des boutons.
1. Tournez le bouton « Navigation » jusqu’à la visualisation de « ECO ».
2. Appuyez sur la touche pour accéder aux réglages (ON/OFF).
3. Tournez le bouton « Navigation » pour sélectionner le réglage désiré et confirmez avec la touche .
Signal sonore
Pour activer ou désactiver le signal sonore, procédez comme suit :
1. Tournez le bouton « Navigation » jusqu’à ce que l’inscription « SOUND » s’affiche.
2. Appuyez sur la touche pour accéder aux réglages (ON/OFF).
3. Tournez le bouton « Navigation » pour sélectionner le réglage désiré et confirmez avec la touche .
Luminosité
Pour modifier la luminosité de l’écran, procédez comme suit :
1. Tournez le bouton « Navigation » jusqu’à ce que l’inscription « BRIGHTENESS » s’affiche.
2. Appuyez sur la touche : le numéro 1 apparaît sur l’écran.
3. Tournez le bouton « Navigation » pour augmenter ou diminuer la luminosité et confirmez avec la touche .
NETTOYAGE AUTOMATIQUE DU FOUR
Pour la description de cette fonction, voir le chapitre NETTOYAGE et le tableau des fonctions page 28.
Pour lancer le cycle de nettoyage automatique du four (pyrolyse), procédez de la façon suivante :
1. Tournez le bouton « Fonctions » sur le symbole : le message PYRO s’affiche.
3
3
3
3
3
3
3
3
3
3
3
3
3

Downloaded from www.vandenborre.be
FR27
2. Appuyez sur la touche pour confirmer le choix et lancer le cycle de pyrolyse.
Pour sélectionner la pyrolyse ECO, tournez le bouton « Navigation » : ECO apparaît se trouve en bas à droite de l’affichage.
Appuyez sur la touche et lancez le programme réduit.
Durant la pyrolyse, la porte du four est automatiquement bloquée et le symbole s’affiche. La porte reste bloquée également
à la fin du cycle de nettoyage : le message « COOL » apparaît sur l’affichage pour indiquer la phase de refroidissement du four.
Une fois la température de sécurité atteinte, le symbole disparaît et l’affichage indique « END ».
REMARQUE : si la procédure automatique de contrôle du blocage de porte n’est pas faite correctement, l’afficheur visualise le
symbole . Si par contre la porte reste fermée pour cause d’une panne du système de blocage, l’afficheur indique le
symbole accompagné de l’indication « DOOR LATCHED » (porte bloquée). Le cas échéant, contactez le Service Après-vente.
3
3

Downloaded from www.vandenborre.be
FR28
TABLEAU DESCRIPTIF DES FONCTIONS DU FOUR
BOUTON FONCTIONS
OFF Pour interrompre la cuisson et éteindre le four.
LAMPE Pour allumer/éteindre la lumière à l’intérieur du four.
FONCTIONS SPÉCIALES
DÉCONGÉLATION
Pour accélérer la décongélation des aliments. Placez l’aliment sur le gradin central. Laissez-le
dans son emballage pour empêcher que la surface ne se déshydrate.
MAINTIEN AU
CHAUD
Pour conserver les aliments cuits chauds et croustillants (ex. : viandes, fritures, flans). Placez
l’aliment sur le gradin central. La fonction ne s’active pas si la température de l’enceinte de
cuisson est supérieure à 65°.
LEVAGE DE LA PÂTE
Pour obtenir un levage optimal des pâtons salés ou sucrés. Afin de préserver la qualité du
levage, la fonction ne s’active que si la température du foyer est supérieure à 40°C. Placez la
pâte sur le 2e gradin. Il n’est pas nécessaire de préchauffer le four.
CONVECTION
NATURELLE
Pour cuire n’importe quel type de plat sur un seul gradin. Utilisez le 2e gradin. Préchauffer le
four avant d’y introduire les aliments.
CONVECTION FORCÉE
Pour cuire les gâteaux avec farce liquide (salés ou sucrés) sur un unique gradin. Cette fonction
est idéale également pour les cuissons sur deux gradins. Inverser la position des aliments à mi-
cuisson pour obtenir un résultat plus homogène. Utilisez le 2e gradin pour les cuissons sur un
seul gradin, le 1er et le 4e pour les cuissons sur deux gradins. Préchauffez le four avant d’y
introduire les aliments.
CONVECTION FORCÉE
DÉLICATE
Pour cuire simultanément, sur deux gradins, des aliments nécessitant des températures de
cuisson moyenne/basse. La fonction permet de cuire délicatement et progressivement sur deux
gradins sans devoir inverser la position des aliments pendant la cuisson. Utilisez le 2e gradin
pour les cuissons sur un seul gradin, le 1er et le 4ème pour les cuissons sur deux gradins.
Préchauffez le four avant d’y introduire les aliments.
GRIL
Pour cuire les entrecôtes, les brochettes, les saucisses ; faire gratiner les légumes ou dorer le
pain. Nous suggérons de positionner le plat sur le 4e gradin. Pour cuire les viandes, nous
conseillons d’utiliser une lèchefrite pour récolter le jus de cuisson. La placer sur le 3e gradin en
ajoutant environ un demi-litre d’eau. Il n’est pas nécessaire de préchauffer le four. Pendant la
cuisson, la porte du four doit rester fermée.
TURBO GRIL
Pour griller les gros morceaux de viande (cuisseaux, rosbifs, poulets). Placez-les sur les gradins
centraux. Nous conseillons d’utiliser une lèchefrite pour récolter le jus de cuisson. Les placer sur
le 1er/2e gradin en ajoutant environ un demi-litre d’eau. Il n’est pas nécessaire de préchauffer le
four. Pendant la cuisson, la porte du four doit rester fermée. Avec cette fonction, il est possible
d’utiliser le tournebroche (lorsque cet accessoire est présent).
CUISSON GROSSE
PIÈCE
Pour cuire les gros morceaux de viande (supérieurs à 2,5 kg). Utilisez le 1er ou le 2ème gradin
selon les dimensions de la viande. Il n’est pas nécessaire de préchauffer le four. Il est conseillé de
retourner la viande pendant la cuisson pour obtenir un brunissage homogène des deux côtés.
Mouillez la viande avec son jus de temps à autre, vous éviterez ainsi qu’elle ne soit trop sèche en
fin de cuisson.
RÉGLAGES Pour régler l’afficheur (horloge, luminosité, volume du signal sonore, économie d’énergie).
PIZZAS/PAIN
Pour cuire différents types et formats de pizzas et de pain. Deux programmes sont présents
dans cette fonction ; leurs paramétrages sont prédéfinis. Il suffira d’indiquer les valeurs
demandées (température et durée) et le four gèrera automatiquement le cycle de cuisson
optimal. Positionner la pâte sur le 2e niveau après préchauffage.
NETTOYAGE
AUTOMATIQUE
Pour éliminer les salissures engendrées au cours de la cuisson au moyen d’un cycle à très haute
température (environ 500°). Il est possible de sélectionner parmi deux cycles de nettoyage
automatique : un cycle complet (PYRO) et un cycle réduit (ECO). Nous suggérons d’utiliser le
cycle complet uniquement en cas de four très sale et le cycle réduit si l’on utilise la fonction à
des intervalles réguliers.
PRÉCHAUFFAGE
RAPIDE
Pour préchauffer le four rapidement.

Downloaded from www.vandenborre.be
FR29
TABLEAU DE CUISSON
Recette
Fonction Préchauffage Gradin (en
partant du bas)
Température
(°C)
Durée
(min)
Accessoires
Gâteaux levés
Oui 2 160-180 30-90 Moule à gâteau sur grille
DÉLICATE
Oui 1-4 160-180 30-90
Grad. 4 : moule à gâteau sur grille
Grad. 1: moule à gâteau sur grille
Tourtes fourrées (tarte
au fromage blanc,
strudel aux pommes,
tarte aux fruits)
Oui 2 160-200 30-85
Lèchefrite / plaque à pâtisserie
ou moule à gâteaux sur grille
Oui 1-3 160-200 35-90
Grad. 3 : moule à gâteau sur grille
(inverser les gradins à mi-
cuisson)
Grad. 1: moule à gâteau sur grille
Biscuits/Tartelettes
Oui 2 170-180 15-45 Lèchefrite / plaque à pâtisserie
DÉLICATE
Oui 1-4 160-170 20-45
Grad. 4 : grille
Grad. 1 : lèchefrite/plaque à
pâtisserie
Choux ronds
Oui 2 180-200 30-40 Lèchefrite / plaque à pâtisserie
DÉLICATE
Oui 1-4 180-190 35-45
Grad. 4 : plaque sur grille
Grad. 1 : lèchefrite/plaque à
pâtisserie
Meringues
Oui 2 90 110-150 Lèchefrite / plaque à pâtisserie
DÉLICATE
Oui 1-4 90 130-150
Grad. 4 : plaque sur grille
Grad. 1 : lèchefrite/plaque à
pâtisserie
Pain / Pizza / Fougasse
Oui 2 190-250 15-50 Lèchefrite / plaque à pâtisserie
Oui 1-3 190-250 25-45
Grad. 3 : plaque sur grille
(inverser les gradins à mi-
cuisson)
Grad. 1 : lèchefrite/plaque à
pâtisserie
Pizzas surgelées
Oui 2 250 10-15
Lèchefrite / plaque à pâtisserie
ou grille
Oui 1-3 250 10-20
Grad. 3 : plaque sur grille
(inverser les gradins à mi-
cuisson)
Grad. 1 : lèchefrite/plaque à
pâtisserie
Tourtes (Tourtes aux
légumes, quiches)
Oui 2 180-190 40-55 Moule à gâteau sur grille
Oui 1-3 180-190 40-55
Grad. 3 : moule à gâteau sur grille
(inverser les gradins à mi-
cuisson)
Grad. 1: moule à gâteau sur grille

Downloaded from www.vandenborre.be
FR30
Vol-au-vent/Feuilletés
Oui 2 190-200 20-30 Lèchefrite / plaque à pâtisserie
DÉLICATE
Oui 1-4 180-190 20-40
Grad. 4 : plaque sur grille
Grad. 1 : lèchefrite/plaque à
pâtisserie
Lasagnes/Pâtes au four/
Cannellonis/Flans
Oui 2 190-200 45-55 Plaque sur grille
Agneau / Veau / Bœuf /
Porc 1 kg
Oui 2 190-200 70-100 Lèchefrite ou plaque sur grille
Poulet / Lapin / Canard
1kg
Oui 2 200-230 50-100 Lèchefrite ou plaque sur grille
Dinde / Oie 3 kg Oui 1/2 190-200 80-130 Lèchefrite ou plaque sur grille
Poisson au four/en
papillote (filet, entier)
Oui 2 180-200 40-60 Lèchefrite ou plaque sur grille
Légumes farcis
(tomates, courgettes,
aubergines)
Oui 2 180-200 50-60 Plaque sur grille
Pain grillé - 4 Haut (3) 3-5 Grille
Filets / darnes de
poisson
- 4 Moyen (2) 20-35
Grad. 4 : grille (tourner l’aliment à
mi-cuisson)
Grad. 3 : lèchefrite avec eau
Saucisses / Brochettes /
Pointes de porc /
Hamburger
- 4
Moyen - Haut
(2-3)
15-40
Grad. 4 : grille (tourner l’aliment à
mi-cuisson)
Grad. 3 : lèchefrite avec eau
Poulet rôti 1-1,3 Kg
- 2 Moyen (2) 50-65
Grad. 2 : grille (tourner l’aliment
après 2/3 de la cuisson)
- 2 Haut (3) 60-80 Grad. 2 : tournebroche
Rosbif saignant 1 Kg - 2 Moyen (2) 35-45
Plaque sur grille (tourner
l’aliment après 2/3 de la cuisson
si nécessaire)
Gigot d’agneau / Jarret - 2 Moyen (2) 60-90
Lèchefrite ou plaque sur grille
(tourner l’aliment après 2/3 de la
cuisson si nécessaire)
Pommes de terre
sautées
- 2 Moyen (2) 45-55
Lèchefrite / plaque à pâtisserie
(tourner l’aliment aux 2/3 de la
cuisson si nécessaire)
Légumes gratinés - 2 Haut (3) 10-15 Plaque sur grille
Lasagnes & Viande Oui 1-3 200 50-100
Grad. 3 : Plaque sur grille (tourner
l’aliment après 2/3 de la cuisson
si nécessaire)
Grad. 1: lèchefrite ou plaque sur
grille
Viande & Pommes de
terre
Oui 1-3 200 45-100
Grad. 3 : Plaque sur grille (tourner
l’aliment après 2/3 de la cuisson
si nécessaire)
Grad. 1: lèchefrite ou plaque sur
grille
Poissons & Légumes
DÉLICATE
Oui 1-4 180 30-50
Grad. 4 : plaque sur grille
Grad. 1: lèchefrite ou plaque sur
grille
Recette
Fonction Préchauffage Gradin (en
partant du bas)
Température
(°C)
Durée
(min)
Accessoires

Downloaded from www.vandenborre.be
FR31
RECETTES TESTÉES conformément à la norme IEC 60350:99+A1:05 +A2:08 et DIN 3360-12:07:07
Le tableau de cuisson suggère les fonctions et les températures idéales pour obtenir les meilleurs résultats pour chaque recette.
Si l’on désire effectuer une cuisson avec la fonction « Convection forcée » sur un unique gradin, il est conseillé d’utiliser le
deuxième gradin et la température suggérée pour la fonction « CONVECTION FORCÉE » sur plusieurs gradins.
Pour griller, il est conseillé de laisser 3-4 cm libres à partir du bord frontal de la grille pour faciliter l’extraction.
Recette Fonction Préchauffage Gradin
(en partant du bas)
Temp.
(°C)
Durée
(min)
Accessoires et remarques
IEC 60350:99+A1:05 +A2:08 § 8.4.1
Biscuits de pâte brisée
(Shortbread)
Oui 2 170 15-25 Lèchefrite / plaque à pâtisserie
Oui 1-3 160 20-30
Grad. 3 : plaque à pâtisserie
(inverser les gradins à mi-cuisson)
Grad. 1: lèchefrite
IEC 60350:99+A1:05 +A2:08 § 8.4.2
Viennoiserie (Small cakes)
Oui 2 170 20-30 Lèchefrite / plaque à pâtisserie
Oui 1-3 160 20-30
Grad. 3 : plaque à pâtisserie
(inverser les gradins à mi-cuisson)
Grad. 1: lèchefrite
IEC 60350:99+A1:05 +A2:08 § 8.5.1
Génoise sans matières grasses
(Fatless sponge cake)
Oui 2 170 35-45 Moule à gâteau sur grille
IEC 60350:99+A1:05 +A2:08 § 8.5.2
2 tartes aux pommes
(Two apple pies)
Oui 2 185 60-75 Moule à gâteau sur grille
Oui 1-3 175 65-75
Grad. 3 : moule à gâteau sur grille
(inverser les gradins à mi-cuisson)
Grad. 1: moule à gâteau sur grille
IEC 60350:99+A1:05 +A2:08 § 9.1.1
Croque-monsieur (Toast) - 4 Haut (3) 3-5 Grille
IEC 60350:99+A1:05 +A2:08 § 9.2.1
Hamburgers (Burgers) - 4 Haut (3) 30-40
Grad. 4 : grille (tourner l’aliment à
mi-cuisson)
Grad. 3 : lèchefrite avec eau
DIN 3360-12:07 § 6.5.2.3
Tarte aux pommes, tarte sur
plaque (Apple cake, yeast tray
cake)
Oui 2 180 30-40 Lèchefrite / plaque à pâtisserie
Oui 1-3 160 50-60
Grad. 3 : plaque à pâtisserie
(inverser les gradins à mi-cuisson)
Grad. 1: lèchefrite
DIN 3360-12:07 § 6.6
Rôti de porc (Roast Pork) - 2 170 110-150 Grad. 2: grille
DIN 3360-12:07 annexe C
Gâteau plat (Flat cake)
Oui 2 170 35-45 Lèchefrite / plaque à pâtisserie
Oui 1-3 170 40-50
Grad. 3 : plaque à pâtisserie
(inverser les gradins à mi-cuisson)
Grad. 1: lèchefrite

Downloaded from www.vandenborre.be
FR32
Comment lire le tableau de cuisson
Le tableau indique la meilleure fonction à utiliser pour un aliment déterminé, à cuire sur un ou plusieurs gradins simultanément.
Les temps de cuisson commencent au moment de l’introduction du plat dans le four et ne tiennent pas compte du préchauffage
(lorsque demandé). Les températures et les durées de cuisson sont indicatives et dépendent de la quantité à cuire et du type
d’accessoire. Au départ, utilisez les valeurs conseillées les plus basses et, si le résultat de la cuisson n’est pas satisfaisant, passez
à des valeurs plus élevées. Nous conseillons d’utiliser les accessoires fournis et des moules ou plats si possible en métal foncé. Il
est également possible d’utiliser des casseroles et accessoires en pyrex ou en céramique ; les temps de cuisson augmenteront
légèrement. Pour obtenir de meilleurs résultats, suivez attentivement les conseils présentés dans le tableau de cuisson pour le
choix des accessoires à positionner sur les diffrents gradins.
Cuisson simultanée d’aliments différents
En utilisant la fonction « CONVECTION FORCÉE DÉLICATE », il est possible de cuire simultanément plusieurs aliments différents
(par exemple : poisson et légumes) nécessitant la même température, sur différents gradins. Extrayez les aliments nécessitant
des temps de cuisson inférieurs et laissez la cuisson continuer pour ceux dont les temps sont plus longs.
Desserts
- Cuisez la pâtisserie sur un seul gradin avec la convection naturelle. Utilisez des moules à gâteau en métal foncé et placez-
les toujours sur la grille fournie. Pour la cuisson sur plusieurs gradins, sélectionnez la fonction avec air forcé et disposez les
moules décalés sur les grilles, de manière à favoriser la circulation de l’air.
- Pour comprendre si le gâteau est cuit, introduisez un cure-dent dans la partie la plus haute (généralement le centre) du
gâteau. Si le cure-dent reste sec, le gâteau est cuit.
- Si vous utilisez des moules anti-adhérents, ne beurrez pas les bords ; le gâteau pourrait ne pas lever de manière
homogène sur le pourtour.
- Si le gâteau se « dégonfle » durant la cuisson, la fois suivante utilisez une température inférieure ; vous pouvez également
réduire la quantité de liquide et mélanger plus délicatement la pâte.
- La pâtisserie avec farce juteuse (gâteaux au fromage ou avec des fruits) requiert la fonction « CONVECTION FORCÉE ». Si le
fond de la tarte est trop humide, placez-le sur un gradin inférieur et saupoudrez la base avec de la chapelure, de la
semoule ou des biscuits émiettés avant de la garnir.
Viandes
- Utilisez n’importe quel type de plat adapté à la taille de la viande à cuire. Pour les rôtis, ajoutez de préférence du bouillon
sur le fond du plat et mouillez la viande durant la cuisson pour la rendre plus savoureuse. Lorsque le rôti est cuit, laissez-le
reposer dans le four pendant 10-15 min ou bien enveloppez-le dans du papier d’aluminium.
- Si vous désirez griller la viande, pour obtenir une cuisson uniforme, choisissez des morceaux de la même épaisseur. Les
tranches de viande très épaisses nécessitent un temps de cuisson supérieur. Pour éviter de les brûler, éloignez-les du gril
en plaçant la grille sur un gradin inférieur. Tournez la viande après 2/3 de la cuisson.
Nous conseillons d’utiliser une lèchefrite avec un demi-litre d’eau, directement sous la grille sur laquelle vous avez positionné la
viande à griller, pour recueillir le jus de cuisson. Ajoutez de l’eau si nécessaire.
Tournebroche (disponible uniquement sur certains modèles)
Cet accessoire sert à griller de gros morceaux de viande et des volailles de façon uniforme. Enfilez la viande sur le tournebroche,
fixez-la avec une ficelle de cuisine s’il s’agit d’un poulet et vérifiez qu’il ne bouge pas avant d’installer la broche dans son
logement sur la paroi frontale du four, puis posez-la sur son support. Pour éviter la formation de fumée et recueillir les jus de
cuisson, nous conseillons de placer une lèchefrite sur le premier gradin avec un demi-litre d’eau. La broche est dotée d’une
poignée en plastique qu’il faut enlever avant de commencer la cuisson et qu’il faut replacer en fin de cuisson pour sortir la viande
du four sans se brûler.
Pizzas
Graissez légèrement les plats pour obtenir une pizza croustillante également sur le fond. Distribuez la mozzarella sur la pizza
après 2/3 de la cuisson.
Fonction levage de la pâte
Il est conseillé de couvrir la pâte avec un torchon humide avant de la mettre au four. Les temps de levage dans cette fonction
diminuent d’environ un tiers par rapport aux temps de levage à température ambiante (20-25°C). Le temps de levage pour 1 k g
de pâte à pizza est d’environ une heure.
CONSEILS POUR L’UTILISATION ET SUGGESTIONS

Downloaded from www.vandenborre.be
NL33
UW EIGEN VEILIGHEID EN DIE VAN ANDEREN IS ZEER BELANGRIJK
Deze handleiding en het apparaat zelf zijn voorzien van belangrijke veiligheidsaanwijzingen, die te allen tijde moeten worden
gelezen en opgevolgd.
Alle veiligheidsberichten geven het mogelijke gevaar aan en geven aan hoe het risico op letsel, schade en elektrische schokken
voortvloeiend uit het onjuiste gebruik van het apparaat beperkt kan worden. Houd u strikt aan de volgende instructies:
- Het apparaat moet worden losgekoppeld van het elektriciteitsnet voordat u installatiewerkzaamheden uitvoert.
- Installatie en onderhoud moeten worden uitgevoerd door een gespecialiseerd monteur, volgens de instructies van de
fabrikant en in overeenstemming met de plaatselijke veiligheidsvoorschriften. Repareer of vervang geen enkel onderdeel
van het apparaat, behalve als dit expliciet aangegeven wordt in de gebruikshandleiding.
- Aarding van het apparaat is wettelijk verplicht.
- De voedingskabel van het apparaat moet lang genoeg zijn om het apparaat vanuit de inbouwpositie in het meubel te
kunnen aansluiten op het stopcontact van de netvoeding.
- Om ervoor te zorgen dat de installatie voldoet aan de geldende veiligheidsvoorschriften, is er een omnipolaire schakelaar
met een afstand van minstens 3 mm. tussen de contacten nodig.
- Gebruik voor de aansluiting geen meervoudige contactdozen of verlengsnoeren.
- Trek niet aan de voedingskabel om de stekker uit het stopcontact te halen.
- Als de installatie voltooid is, mogen de elektrische onderdelen niet meer toegankelijk zijn voor de gebruiker.
- Raak het apparaat niet aan met vochtige lichaamsdelen en gebruik het niet als u op blote voeten loopt.
- Het apparaat is uitsluitend bestemd voor huishoudelijk gebruik en alleen voor het bereiden van voedsel. Elk ander
gebruik is verboden (bijv. het verwarmen van de ruimte). De fabrikant aanvaardt geen enkele aansprakelijkheid voor
schade die het gevolg is van oneigenlijk gebruik of een foute instelling van de bedieningsknoppen.
- Het gebruik van het apparaat is niet toegestaan aan personen (waaronder kinderen) met beperkte lichamelijke,
zintuiglijke of verstandelijke vermogens, of met weinig ervaring of kennis van het apparaat, tenzij ze instructies met
betrekking tot het gebruik van het apparaat hebben gehad van personen die verantwoordelijk zijn voor hun veiligheid.
- De toegankelijke onderdelen kunnen zeer heet worden tijdens het gebruik. Kinderen moeten op afstand worden
gehouden en in de gaten gehouden worden, zodat ze niet met het apparaat gaan spelen.
- Raak de verwarmingselementen of de binnenkant van de oven tijdens en na het gebruik niet aan, omdat dit letsel kan
veroorzaken. Vermijd contact met doeken of andere brandbaar materiaal tot alle onderdelen van het apparaat voldoende
zijn afgekoeld.
- Open de deur van het apparaat voorzichtig op het eind van de bereiding, en laat de warme lucht of de damp geleidelijk
ontsnappen voordat u het gerecht uit de oven haalt. Als de deur van het apparaat gesloten is, komt de warme lucht naar
buiten door de opening boven het bedieningspaneel. Blokkeer de ventilatieopeningen nooit.
- Gebruik ovenhandschoenen om schalen en accessoires uit de oven te halen, en let erop dat u de verwarmingselementen
niet aanraakt.
- Plaats geen brandbaar materiaal in het apparaat of in de buurt ervan. Het apparaat kan in brand vliegen als het per
ongeluk wordt ingeschakeld.
- Verwarm of bereid geen voedsel in gesloten potten of blikken in het apparaat. De druk in het blik of de pot kan door de
warmte hoog oplopen, waardoor het explodeert en het apparaat beschadigt.
- Gebruik geen schalen of houders van synthetisch materiaal.
- Oververhit vet of oververhitte olie vat gemakkelijk vlam. Houd de bereiding van gerechten met veel vet of olie in de
gaten.
- Laat het apparaat nooit onbewaakt achter tijdens het droogproces van gerechten.
- Als u voor het roosteren van vlees, of bakken van taarten alcoholische dranken toevoegt (bijv. rum, cognac, wijn) moet u
er rekening mee houden dat alcohol bij hoge temperaturen verdampt. De alcoholdamp kan vlam vatten wanneer deze in
contact komt met het elektrische verwarmingselement.
Afvalverwerking van huishoudelijke apparaten
- Dit product is vervaardigd van recyclebaar of herbruikbaar materiaal. Volg bij het afdanken de plaatselijke voorschriften
voor afvalverwerking. Knip het netsnoer door zodat het apparaat niet meer op het elektriciteitsnet kan worden
aangesloten.
- Voor meer informatie over de behandeling, terugwinning en recycling van elektrische huishoudelijke apparaten kunt u
contact opnemen met het gemeentehuis, uw afvalophaaldienst of de winkel waar u het product hebt aangeschaft.
BELANGRIJKE VEILIGHEIDSINSTRUCTIES
Dit is het waarschuwingssymbool waarmee mogelijke risico’s voor de gebruiker en voor anderen worden aangegeven.
Alle veiligheidsberichten worden voorafgegaan door het waarschuwingssymbool en door de volgende termen:
GEVAAR
Duidt op een gevaarlijke situatie die ernstig letsel veroorzaakt.
WAARSCHUWING
Duidt op een gevaarlijke situatie die ernstig letsel kan veroorzaken.

Downloaded from www.vandenborre.be
NL34
Controleer na het uitpakken van de oven of het apparaat tijdens het transport geen beschadigingen heeft opgelopen en of de
ovendeur goed sluit. Neem in geval van twijfel contact op met uw leverancier of de klantenservice. Om eventuele schade te
voorkomen wordt geadviseerd om de oven pas voor de installatie van de piepschuim bodem te halen.
GEREEDMAKING VAN HET MEUBEL VOOR INBOUW VAN DE OVEN
• De keukenkastjes naast de oven moeten tegen hitte bestand zijn (min. 90 °C).
• Voer eerst alle zaagwerkzaamheden uit voordat u de oven plaatst, en verwijder nauwgezet alle spaanders en zaagresten.
• Het onderste gedeelte van de oven mag niet meer toegankelijk zijn na de installatie.
• Voor een correcte werking van het product mag de minimale opening tussen het werkblad en de bovenkant van de oven
niet geblokkeerd worden.
AANSLUITING OP HET ELEKTRICITEITSNET
Controleer of de elektrische spanning die aangegeven staat op het typeplaatje van het product overeenkomt met de
voedingsspanning van uw woning. Het typeplaatje bevindt zich op de voorrand van de oven (zichtbaar wanneer de ovendeur
openstaat).
• Eventuele vervangingen van de voedingskabel (type H05 RR-F 3 x 1,5 mm
2
) mogen uitsluitend worden uitgevoerd door
erkende technici. Wend u tot erkende servicecentra.
ALGEMENE AANBEVELINGEN
Voor het gebruik:
- Verwijder de kartonnen beschermingen, transparante folie en stickers van de accessoires.
- Haal de accessoires uit de oven en verwarm hem ongeveer een uur lang op 200°C om de geur van het isolatiemateriaal en
de beschermende vetlaag te verwijderen.
Tijdens het gebruik:
- Leg geen zware voorwerpen op de deur, omdat deze de deur kunnen beschadigen.
- Steun niet op de deur en hang geen voorwerpen aan de handgreep.
- Bedenk de binnenkant van de oven niet met aluminiumfolie.
- Giet nooit water in de warme oven; de lak kan beschadigd raken.
- Schuif niet met pannen of schalen over de bodem van de oven, omdat dit krassen op de lak kan geven.
- Zorg ervoor dat de elektrische kabels van andere apparatuur niet in contact komen met hete onderdelen van de oven en
niet vast komen te zitten tussen de ovendeur.
- Stel de oven niet bloot aan weersinvloeden.
Verwerking van de verpakking
Het verpakkingsmateriaal is 100% recyclebaar, zoals aangegeven wordt door het recyclingsymbool ( ). De diverse onderdelen
van de verpakking mogen daarom niet bij het gewone huisvuil worden weggegooid, maar moeten worden afgevoerd volgens
de plaatselijke voorschriften.
Afvalverwerking van het product
- Dit apparaat is voorzien van het merkteken volgens de Europese Richtlijn 2002/96/EG inzake Afgedankte Elektrische en
Elektronische Apparatuur (AEEA).
- Door ervoor te zorgen dat dit product correct wordt afgedankt helpt de gebruiker mogelijke negatieve effecten op het
milieu en de gezondheid te voorkomen.
- Het symbool op het product, of op de bijbehorende documentatie geeft aan dat dit product niet moet worden
behandeld als huisvuil, maar moet worden afgeleverd op een geschikt inzamelpunt voor de recycling van elektrische en
elektronische apparatuur.
Energiebesparing
- Verwarm de oven alleen voor als dit speciaal wordt vermeld in de bereidingstabel of in het recept.
- Gebruik donkere, zwart gelakte of geëmailleerde bakvormen, omdat deze de warmte beter opnemen.
- Schakel de oven 10/15 voor het einde van de ingestelde bereidingstijd uit. Gerechten die lang in de oven moeten staan,
blijven dan nog doorgaren.
INSTALLATIE
MILIEUTIPS

Downloaded from www.vandenborre.be
NL35
- Dit apparaat is bedoeld om in aanraking te komen met voedingsmiddelen en is in overeenstemming met de richtlijn ( )
n.1935/2004 en is ontworpen, vervaardigd en op de markt gebracht in overeenstemming met de veiligheidsvoorschriften
van de “Laagspanningsrichtlijn” 2006/95/EG (die 73/23/EEG en daaropvolgende amendementen vervangt), de
beschermingsvoorschriften van de “EMC” 2004/108/CE.
De oven werkt niet:
• Controleer of het elektriciteitsnet spanning heeft en of de oven is aangesloten.
• Zet de oven uit en weer aan, om te controleren of het probleem verdwenen is.
De deur is geblokkeerd:
• Zet de oven uit en weer aan, om te controleren of het probleem verdwenen is.
• Belangrijk: tijdens de zelfreinigingscyclus blijft de deur geblokkeerd. Wacht tot de deur automatisch ontgrendeld wordt
(zie de paragraaf “Reinigingscyclus van de oven met de pyrolysefunctie”).
De elektronische programmeerfunctie werkt niet:
• Als op het display een “ ” met een cijfer verschijnt, neem dan contact op met de dichtstbijzijnde Klantenservice.
Specificeer in dat geval het nummer dat volgt op de letter “ ”.
Voordat u contact opneemt met de Klantenservice:
1. Controleer of het niet mogelijk is het probleem zelf op te lossen aan de hand van punten die beschreven worden in “Het
opsporen van storingen”.
2. Het apparaat aan- en uitzetten om te controleren of het probleem is opgelost.
Als na het uitvoeren van deze controles de storing nog steeds aanwezig is, contact opnemen met de dichtstbijzijnde
Klantenservice.
Vermeld altijd:
•de aard van de storing;
• het type en het exacte model van de oven;
• het servicenummer (dat is het nummer na het woord Service op het typeplaatje) op de rechter binnenrand van de
ovenruimte (zichtbaar als de deur open is). Het servicenummer bevindt zich ook op het garantieboekje;
• uw volledige adres;
• uw telefoonnummer.
Wend u tot een erkend servicecentrum als reparatie noodzakelijk is (alleen dan heeft u zekerheid dat originele
vervangingsonderdelen worden gebruikt en de reparatie correct wordt uitgevoerd).
Buitenkant van de oven
BELANGRIJK: gebruik geen bijtende of schurende reinigingsmiddelen. Als een dergelijk product per ongeluk in contact
komt met het apparaat, verwijder het dan onmiddellijk met een vochtig doekje.
• Reinig de oppervlakken met een vochtig doekje. Als de buitenkant zeer vuil is, voeg dan een paar druppels afwasmiddel
toe aan het water. Afdrogen met een droge doek.
VERKLARING VAN OVEREENSTEMMING
OPSPOREN VAN STORINGEN
KLANTENSERVICE
REINIGING
WAARSCHUWING
- Gebruik nooit stoomreinigers.
- Maak het apparaat schoon als het afgekoeld is.
- Koppel het apparaat los van de netvoeding.

Downloaded from www.vandenborre.be
NL36
Binnenkant van de oven
BELANGRIJK: gebruik geen schuursponsjes, sponsjes van staalwol of metalen schrapers. Hierdoor kunnen de gelakte
oppervlakken en het glas van de deur op den duur beschadigd raken.
• Laat de oven na elk gebruik afkoelen en reinig het apparaat bij voorkeur als het nog lauw is om aangekoekte etensresten
(bijv. voedsel met veel suiker) makkelijker te kunnen verwijderen.
• Gebruik speciale ovenreinigingsmiddelen en houd u aan de aanwijzingen van de fabrikant.
• Reinig het glas van de deur met een speciaal vloeibaar glasreinigingsmiddel. Om de deur gemakkelijker te kunnen
reinigen kunt u deze verwijderen (zie ONDERHOUD).
• Het bovenste verwarmingselement van de grill (zie ONDERHOUD) kan omlaag worden gezet (alleen bij bepaalde
modellen) om de bovenkant van de ovenruimte te kunnen reinigen.
OPMERKING: tijdens het langdurig bakken van gerechten die veel water bevatten (bijv. pizza, groenten etc.) kan er
condens worden gevormd op de deur en op de afdichting. Neem de condens af met een doek of een spons als de oven
afgekoeld is.
Accessoires:
• Laat de accessoires na gebruik weken in water met afwasmiddel. Pak ze vast met handschoenen als ze nog heet zijn.
• Voedselresten kunnen met een afwasborstel of met een sponsje worden verwijderd.
Reiniging van de achterwand en de katalytische zijpanelen (indien aanwezig):
BELANGRIJK: gebruik geen bijtende of schurende reinigingsmiddelen, ruwe borstels, pannensponsjes of ovensprays
die het katalytische oppervlak zouden kunnen beschadigen, waardoor dit zijn zelfreinigende eigenschappen verliest.
• Laat de oven ongeveer een uur leeg werken op een temperatuur van 200°C, met de geventileerde functie.
• Laat het apparaat afkoelen en gebruik een spons om eventuele etensresten te verwijderen.
Reinigingscyclus met pyrolysefunctie (indien aanwezig):
Met deze functie kunt u vuil dat tijdens de bereiding is ontstaan verwijderen. De vuilresten worden verbrand (bij een
temperatuur van ongeveer 500°C) waarbij aanslag ontstaat die makkelijk met een vochtige spons verwijderd kan worden nadat
de oven is afgekoeld. Gebruik de pyrolysefunctie niet na elke bereiding in de oven, maar alleen als de oven zeer vuil is of als er
vieze geuren zijn tijdens het voorverwarmen of het bereiden.
• Als de oven onder een kookplaat geïnstalleerd is, dient u zich ervan te verzekeren dat de branders of elektrische platen
tijdens de zelfreiniging (pyrolyse) uit staan.
• De accessoires moeten uit het apparaat worden gehaald voordat u de pyrolysefunctie inschakelt.
Het apparaat is uitgerust met 2 pyrolytische functies:
1. Zuinige cyclus (PYRO EXPRESS/ECO): vermindert het verbruik met ongeveer 25% ten opzichte van de standaard
pyrolytische cyclus. Schakel deze functie met regelmatige intervallen in (nadat u minimaal 2-3 keer achter elkaar vlees
heeft gebraden in de oven).
2. Standaardcyclus (PYRO): garandeert een grondige reiniging als de oven zeer vuil is.
• In ieder geval wordt geadviseerd om na een bepaald aantal bereidingen en op basis van de hoeveelheid vuil, een
zelfreinigingscyclus uit te voeren. Dit wordt aangegeven door een bericht op het display.
OPMERKING: tijdens de pyrolysefunctie blijft de deur van de oven geblokkeerd en kan deze niet geopend worden tot
de temperatuur binnenin de ovenruimte een veilig niveau heeft bereikt.
VERWIJDEREN VAN DE DEUR
De deur verwijderen:
1. Open de deur helemaal.
2. Til de twee vergrendelingen van de scharnieren omhoog en naar voren tot ze niet verder kunnen (Fig. 1).
3. Sluit de deur tot de blokkering (A), til hem op (B) en draai hem (C) tot de deur loshaakt (D) (Fig. 2).
WAARSCHUWING
- Raak de oven niet aan tijdens de pyrolysecyclus.
- Houd de kinderen uit de buurt van de oven tijdens de pyrolysecyclus
ONDERHOUD
WAARSCHUWING
- Draag beschermende handschoenen.
- Voer de aangegeven werkzaamheden uit als het apparaat afgekoeld is.
- Koppel het apparaat los van de netvoeding.

Downloaded from www.vandenborre.be
NL37
De deur weer terugplaatsen:
1. Plaats de scharnieren in de zittingen.
2. Open de deur helemaal.
3. Duw de twee vergrendelingen omlaag.
4. Sluit de deur.
OMLAAGBRENGEN VAN HET BOVENSTE VERWARMINGSELEMENT
(ALLEEN BIJ BEPAALDE MODELLEN)
1. Verwijder de zijroosters (Fig. 3).
2. Trek het verwarmingselement voorzichtig naar buiten (Fig. 4) en breng het omlaag (Fig. 5).
3. Om het verwarmingselement terug te plaatsen tilt u het op, trekt u het voorzichtig naar u toe en legt u het op de daarvoor
bestemde zittingen aan de zijkant.
VERVANGEN VAN HET LAMPJE
Vervangen van het lampje aan de achterkant (indien aanwezig):
1. Koppel de oven los van de netvoeding.
2. Draai het beschermkapje los (Fig. 6), vervang het lampje (zie de opmerking voor het type lampje) en draai het
beschermkapje weer vast.
3. Sluit de oven weer aan op de netvoeding.
Vervangen van het lampje aan de zijkant (indien aanwezig):
1. Koppel de oven los van de netvoeding.
2. Verwijder de zijroosters, indien aanwezig (Fig. 3).
3. Duw het beschermkapje met een platte schroevendraaier naar buiten en verwijder het (Fig. 7).
4. Het lampje vervangen (zie voor het type de opmerking) (Fig. 8).
5. Plaats het beschermkapje terug en duw het tegen de wand om het op de juiste manier te bevestigen (Fig. 9).
6. Monteer de zijroosters weer.
7. Sluit de oven weer aan op de netvoeding.
OPMERKING:
- Gebruik alleen gloeilampen van 25-40W/230V type E-14, T300°C, of halogeenlampen van 20-40W/230 V type G9, T300°C.
- De lampjes zijn verkrijgbaar bij de Klantenservice.
BELANGRIJK:
- Raak halogeenlampjes niet met blote handen aan om te voorkomen dat ze beschadigd worden door uw
vingerafdrukken.
- Gebruik de oven niet voordat het beschermkapje is teruggeplaatst.
Fig. 1 Fig. 2
Fig. 3 Fig. 4 Fig. 5
Fig. 6 Fig. 7 Fig. 8 Fig. 9

Downloaded from www.vandenborre.be
NL38
RAADPLEEG VOOR DE ELEKTRISCHE AANSLUITING HET HOOFDSTUK OVER DE INSTALLATIE
1. Bedieningspaneel
2. Bovenste verwarmingselement/grill
3. Koelventilator (niet zichtbaar)
4. Typeplaatje (verwijder dit nooit)
5. Ovenlampje
6. Circulair verwarmingselement (niet zichtbaar)
7. Ventilator
8. Draaispit (indien bijgeleverd)
9. Onderste verwarmingselement (niet zichtbaar)
10. Deur
11. Positie van de roosters (de steunhoogte staat aangegeven op de voorkant van de oven)
12. Schot
OPMERKING:
- Tijdens de bereiding kan de koelventilator afwisselend ingeschakeld worden om het energieverbruik te verminderen.
- Na afloop van de bereiding, nadat de oven is uitgeschakeld, kan de koelventilator nog een tijdje blijven werken.
BIJGELEVERDE ACCESSOIRES
A. ROOSTER (1): kan gebruikt worden om voedsel op te grillen of als draagrooster voor pannen, bak- en cakevormen en
ovenvaste schalen.
B. OPVANGBAK (1): is bedoeld om vet op te vangen wanneer hij onder het rooster wordt geplaatst, of als bakplaat voor het
bereiden van vlees, vis, groenten, focaccia enz.
NIET-BIJGELEVERDE ACCESSOIRES
Bij de Klantenservice kunt u apart andere accessoires aanschaffen.
PLAATSEN VAN DE ROOSTERS EN ANDERE ACCESSOIRES IN DE OVEN
1. Schuif het rooster horizontaal in de oven, met het verhoogde gedeelte “A” omhoog gericht (Fig. 1).
2. Voor de andere accessoires, zoals de opvangbak en de bakplaat, geldt dat ze geplaatst moeten worden met het
uitstekende deel op het vlakke deel “B” omhoog gericht (Fig. 2).
INSTRUCTIES VOOR HET GEBRUIK VAN DE OVEN
Fig. A Fig. B
Fig. 1 Fig. 2

Downloaded from www.vandenborre.be
NL39
BESCHRIJVING BEDIENINGSPANEEL
ELEKTRONISCHE PROGRAMMEERFUNCTIE
1. FUNCTIEKNOP: in-/uitschakelen en selecteren van functies
2. NAVIGATIEKNOP: navigatie door de menu’s, regeling van te voren ingestelde waarden
3. SELECTIE-/BEVESTIGINGSTOETS
OPMERKING: op het display verschijnt voor de aanwijzingen met betrekking tot deze toets.
OVERZICHT FUNCTIES
Als de knop “Functies” in willekeurig welke stand gezet wordt, wordt de oven ingeschakeld: op het display worden de
bijbehorende functies of submenu’s weergegeven.
De submenu’s zijn beschikbaar en kunnen gekozen worden door de knop op de functies GRILL, SPECIALE FUNCTIES,
INSTELLINGEN, BROOD/PIZZA, AUTOMATISCHE REINIGING te zetten.
OPMERKING: zie voor het overzicht en de beschrijving van de functies de specifieke tabel op pagina 44.
BESCHRIJVING DISPLAY
A. Weergave van de actieve verwarmingselementen voor de verschillende functies
B. Symbolen met betrekking tot de regeling van de tijd: timer, bereidingsduur, tijdstip einde bereiding, huidig tijdstip
C. Informatie met betrekking tot de voorgekozen functies
D. Automatische functie BROOD/PIZZA gekozen
E. Indicatie ovendeur gesloten tijdens de automatische reinigingscyclus (pyrolyse)
F. Binnentemperatuur oven
G. Pyrolysefunctie
H. Bruin korstje geven
I. Speciale functies: Ontdooien, Warmhouden, Rijzen
INSCHAKELING VAN DE OVEN - INSTELLING HUIDIG TIJDSTIP
Nadat de oven is aangesloten op het elektriciteitsnet, moet het huidige tijdstip worden ingesteld. Op het display knipperen de
twee cijfers die het uur aangeven.
1. Draai de knop “Navigatie” tot het juiste uur wordt weergegeven.
2. Druk op de toets om te bevestigen; op het display knipperen de twee cijfers van de minuten.
3. Draai de knop “Navigatie” tot de juiste minuten worden weergegeven.
4. Druk op de toets om te bevestigen.
Zie, om het huidige tijdstip te wijzigen, bijvoorbeeld na een stroomuitval, de volgende paragraaf (INSTELLINGEN).
DISPLAY
1 23
A
B C D
E
I H G F
3
3

Downloaded from www.vandenborre.be
NL40
KEUZE VAN DE BEREIDINGSFUNCTIES
1. Draai de knop “Functies” op de gewenste stand: de bereidingsinstellingen verschijnen op het display.
2. Als de voorgestelde parameters overeenkomen met de gewenste instellingen, drukt u op de toets . Om ze te wijzigen
gaat u te werk zoals hierna is beschreven.
INSTELLEN VAN DE TEMPERATUUR/GRILLVERMOGEN
Ga als volgt te werk om de temperatuur of het grillvermogen te wijzigen:
1. Draai de knop “Navigatie” tot de gewenste waarde wordt weergegeven.
2. Druk op de toets om te bevestigen.
De oven bevestigt de keuze automatisch nadat er 10 seconden zijn verstreken na de laatste handeling.
SNEL VOORVERWARMEN
1. Kies de functie Snel voorverwarmen door de knop “Functies” op het symbool te zetten.
2. Bevestig met de toets : de instellingen verschijnen op het display.
3. Als de temperatuur overeenkomt met de gewenste temperatuur, druk dan op de toets . Om de instelling te wijzigen
gaat u te werk zoals beschreven in de vorige paragrafen. Op het display verschijnt de melding PRE. Als de ingestelde
temperatuur bereikt is, dan wordt de melding vervangen door de bijbehorende waarde (bijv. 200°) vergezeld van een
geluidssignaal. Na afloop van de voorverwarmingsfase selecteert de oven automatisch de statische functie .
Zet het gerecht in de oven.
4. Als u een andere bereidingsfunctie wilt instellen, draai dan aan de knop “Functies” en selecteer de gewenste functie.
INSTELLING VAN DE BEREIDINGSDUUR
Met deze functie kunt u gerechten gedurende een ingestelde tijd bereiden, van minimaal 1 minuut tot de maximale tijd van de
geselecteerde functie, waarna de oven automatisch uitgeschakeld wordt.
1. Nadat u de temperatuur bevestigd heeft, gaat het symbool knipperen.
2. Draai aan de knop Instelling tot de gewenste bereidingsduur wordt weergegeven.
3. Bevestig de bereidingsduur door op de toets te drukken.
De oven bevestigt de keuze automatisch nadat er 10 seconden zijn verstreken na de laatste handeling.
3
3
3
3
3

Downloaded from www.vandenborre.be
NL41
INSTELLEN VAN HET TIJDSTIP EINDE BEREIDING / UITGESTELDE START
BELANGRIJK: de instelling uitgestelde start is niet beschikbaar voor de volgende functies: SNEL VOORVERWARMEN,
BROOD/PIZZA, HETELUCHT GELEIDELIJK.
OPMERKING: met deze instelling wordt de gekozen temperatuur meer geleidelijk bereikt, daarom worden de
bereidingstijden iets langer ten opzichte van de tijden die in de bereidingstabel zijn vermeld.
U kunt de gewenste eindtijd instellen en het starten van de oven met maximaal 23 uur en 59 minuten uitstellen, te beginnen
vanaf het huidige tijdstip. Dit is alleen mogelijk na het instellen van een bereidingsduur.
Na het instellen van de bereidingsduur verschijnt de tijd waarop de bereiding eindigt op het display (bijvoorbeeld 15:45) en gaat
het symbool knipperen.
Om het einde van de bereiding uit te stellen en daarmee ook het starten van de oven, gaat u als volgt te werk:
1. Draai aan de knop “Navigatie” tot het tijdstip waarop u de bereiding wilt beëindigen (bijvoorbeeld 16:00) wordt
weergegeven.
2. Bevestigd de gekozen waarde door op de toets te drukken: de twee puntjes van het uur van het tijdstip einde
bereiding knipperen, om aan te geven dat de instelling correct is uitgevoerd.
3. De oven zal automatisch later gestart worden om de bereiding op het ingestelde tijdstip te voltooien.
INDICATIE VAN DE RESTWARMTE BINNENIN DE OVEN
Na afloop van elke bereiding, of na het uitschakelen van de oven, verschijnt, als de temperatuur in de oven hoger dan 50 °C is,
op het display de melding HOT met de temperatuur van dat moment. Als de restwarmte onder de 50 °C daalt, verschijnt het
tijdstip van de dag weer op het display.
KOOKWEKKER
Deze functie kan alleen gebruikt worden als de oven uitstaat en is bijvoorbeeld handig om de kooktijd van pasta in te stellen.
De maximale tijd die ingesteld kan worden is 23 uur en 59 minuten.
1. Met de knop “Functies” op nul, draait u de knop “Navigatie” tot de gewenste tijdsduur wordt weergegeven.
2. Druk op toets om het aftellen te starten. Als de ingestelde tijd is verstreken, verschijnt “0:00” op het display en klinkt er
een geluidssignaal. Om het aftellen te onderbreken, op de toets drukken (op het display verschijnt het huidige
tijdstip).
SELECTIE SPECIALE FUNCTIES
Door de wijzer van de knop “Functies” ter hoogte van het symbool te zetten, opent u een submenu dat vijf speciale functies
bevat.
Om een van deze functies nader te bekijken, te selecteren of te starten, gaat u als volgt te werk:
1. Draai de knop “Functies” op het symbool : op het display wordt “DEFROST” en het symbool dat bij deze functie hoort
weergegeven.
2. Draai aan de knop “Navigatie” om de lijst met functies te doorlopen; hun naam is in het Engels vermeld: DEFROST
(ontdooien), KEEP WARM (warmhouden), RISING (rijzen), MEAT SLOW COOKING (slow cooking vlees), FISH SLOW
COOKING (slow cooking vis).
3. Druk op de toets om te bevestigen.
3
3
3
3

Downloaded from www.vandenborre.be
NL42
EEN BRUIN KORSTJE GEVEN
Na afloop van de bereiding wordt, voor de functies waarbij dat kan, op het display de mogelijkheid weergegeven om uw gerecht
een bruin korstje te geven. Deze functie kan alleen geactiveerd worden als u een bereidingstijd hebt ingesteld.
Als de bereidingstijd is afgelopen, verschijnt op het display: “PRESS TO TO BROWN” (druk op om een bruin korstje te geven).
Door op de toets te drukken, start de oven een bruiningsfase voor de duur van 5 minuten. Deze functie kan slechts tweemaal
geactiveerd worden.
SELECTIE FUNCTIE BROOD/PIZZA
Door de wijzer van de knop “Functies” ter hoogte van het symbool te zetten, opent u een submenu dat twee automatische
bereidingsfuncties bevat voor “brood” en “pizza”.
Brood
1. Draai de knop “Functies” op het symbool : op het display wordt “BREAD” (brood) weergegeven met hiernaast de
melding AUTO.
2. Druk op om de functie te selecteren.
3. Draai aan de knop “Navigatie” om de gewenste temperatuur (tussen 180 °C en 220 °C) in te stellen en bevestig deze met
de toets .
4. Draai aan de knop “Navigatie” om de gewenste bereidingstijd in te stellen en druk op om de bereiding te starten.
Pizza
1. Draai de knop “Functies” op het symbool : op het display wordt “BREAD” (brood) weergegeven. Om de functie
“PIZZA” te selecteren, gaat u als volgt te werk:
2. Draai aan de knop “Navigatie”: “PIZZA” verschijnt op het display.
3. Druk op om de functie te selecteren.
4. Draai aan de knop “Navigatie” om de gewenste temperatuur (tussen 220 °C en 250 °C) in te stellen en bevestig deze met
de toets .
5. Draai aan de knop “Navigatie” om de gewenste bereidingstijd in te stellen en druk op om de bereiding te starten.
INSTELLINGEN
Door de wijzer van de knop “Functies” ter hoogte van het symbool te zetten opent u een submenu met vier instellingen
van het display die gewijzigd kunnen worden.
Klok
Draai de knop “Functies” ter hoogte van het symbool : het opschrift CLOCK (klok) verschijnt op het display. Zie, om het
tijdstip te wijzigen, de vorige paragraaf (INSTELLING VAN HET HUIDIGE TIJDSTIP).
Eco
Als de ECO-functie actief is (ON) gaat het display uit wanneer de oven in stand-by staat of wanneer er 5 minuten verstreken zijn
na afloop van de bereiding. Ook wordt het ovenlampje uitgeschakeld tijdens de bereiding. Om de informatie op het display
weer te geven en het lampje weer in te schakelen, hoeft u alleen maar op toets te drukken of aan een van de knoppen te
draaien.
1. Draai de knop “Navigatie” tot “ECO” wordt weergegeven.
2. Druk op toets om toegang te krijgen tot de instellingen (ON/OFF).
3. Draai aan de knop “Navigatie” om de gewenste instelling te selecteren en bevestig dit met de toets .
3
3
3
3
3
3
3
3
3
3

Downloaded from www.vandenborre.be
NL43
Geluidssignaal
Om het geluidssignaal te activeren of deactiveren, gaat u als volgt te werk:
1. Draai de knop “Navigatie” tot “SOUND” wordt weergegeven.
2. Druk op toets om toegang te krijgen tot de instellingen (ON/OFF).
3. Draai aan de knop “Navigatie” om de gewenste instelling te selecteren en bevestig dit met de toets .
Helderheid
Om de helderheid van het scherm te veranderen, gaat u als volgt te werk:
1. Draai de knop “Navigatie” tot “BRIGHTNESS” wordt weergegeven.
2. Druk op de toets : het cijfer 1 verschijnt op het display.
3. Draai aan de knop “Navigatie” om de helderheid te verminderen of te vermeerderen en bevestig dit met de toets .
AUTOMATISCHE REINIGING VAN DE OVEN
Zie voor de beschrijving van de functie, het hoofdstuk REINIGING en de functietabel op pagina 44.
Om de automatische reinigingscyclus van de oven (pyrolyse) te starten, gaat u als volgt te werk:
1. Draai de knop “Functies” op het symbool : het opschrift PYRO verschijnt op het display.
2. Druk op de toets om uw keuze te bevestigen en de pyrolysecyclus te starten.
Om de ECO-pyrolyse te selecteren, aan de knop “Navigatie” draaien: op het display verschijnt rechtsonder het opschrift ECO.
Druk op de toets en start het verkorte programma.
Tijdens de pyrolyse wordt de deur van de oven automatisch vergrendeld en verschijnt het symbool op het display. De deur
blijft vergrendeld, ook na afloop van de reinigingscyclus: het opschrift “COOL” verschijnt op het display om de afkoelingsfase
van de oven aan te geven. Als de veiligheidstemperatuur is bereikt, verdwijnt het symbool en verschijnt “END” op het display.
OPMERKING: als de procedure voor de controle van het automatisch vergrendelen van de deur niet correct werkt, verschijnt
het symbool op het display. Als echter de deur gesloten blijft vanwege een defect van het vergrendelingssysteem, verschijnt
op het display het symbool samen met de tekst “DOOR LATCHED” (deur vergrendeld). Neem in dat geval contact op met de
Klantenservice.
3
3
3
3
3
3

Downloaded from www.vandenborre.be
NL44
TABEL BESCHRIJVING FUNCTIES
FUNCTIEKNOP
OFF Om de bereiding te onderbreken en de oven uit te schakelen.
LAMP Om het lampje in de oven in/uit te schakelen.
SPECIALE FUNCTIES
ONTDOOIEN
Voor het versnellen van het ontdooien van voedsel. Plaats het voedsel op de middelste
steunhoogte. Laat het voedsel in de verpakking zitten zodat het niet uitdroogt.
WARMHOUDEN
Voor het warm en krokant houden van zojuist bereide gerechten (bv. vlees, gefrituurde
gerechten of ovenschotels) Plaats het voedsel op de middelste steunhoogte. De functie kan
niet ingeschakeld worden als de temperatuur in de oven hoger dan 65 °C is.
RIJZEN
Voor het optimaal laten rijzen van zoet of hartig deeg. Om de kwaliteit van het rijzen te
behouden kan de functie niet geactiveerd worden als de temperatuur in de oven hoger dan
40°C is. Zet het gerecht op de 2e steunhoogte. De oven hoeft niet voorverwarmd te worden.
CONVENTIONEEL
Voor het bereiden van gerechten op één steunhoogte. Gebruik de tweede steunhoogte.
Verwarm de oven voor alvorens de te bereiden gerechten erin te plaatsen.
TURBO HETE LUCHT
Voor het bereiden van taarten met een vloeibare vulling (hartig of zoet) op één steunhoogte.
Deze functie kan ook worden gebruikt voor bereidingen op twee steunhoogtes. Verwissel de
gerechten tijdens de bereiding van plaats om een gelijkmatiger bakresultaat te krijgen. Gebruik
de tweede steunhoogte voor bereidingen op één plaat en de eerste en derde steunhoogte
voor bereidingen op twee platen. Verwarm de oven eerst voor.
HETELUCHT
GELEIDELIJK
Voor het bereiden van verschillende gerechten op maximaal twee steunhoogtes die een
gemiddelde / lage bereidingstemperatuur vereisen. Met deze functie kunt u gerechten
voorzichtig en langzaam bereiden op twee steunhoogtes, zonder dat u ze van plaats hoeft te
verwisselen tijdens de bereiding. Gebruik de tweede steunhoogte voor bereidingen op één
plaat en de eerste en vierde steunhoogte voor bereidingen op twee steunhoogtes. Verwarm de
oven eerst voor.
GRILL
Voor het grillen van karbonades, spiezen, worstjes, het gratineren van groente of het roosteren
van brood. Zet het gerecht op de vierde steunhoogte. Voor het grillen van vlees wordt
geadviseerd de opvangbak te gebruiken om het braadvet op te vangen. Plaats de opvangbak
op de derde steunhoogte en giet er ongeveer een halve liter water in. De oven hoeft niet
voorverwarmd te worden. Tijdens de bereiding moet de deur van de oven dicht blijven.
TURBO GRILL
Voor het grillen van grote stukken vlees (lamsbouten, rosbief, hele kip). Zet het vlees op de
middelste steunhoogtes. Geadviseerd wordt de opvangbak te gebruiken om het braadvet op te
vangen. Plaats de opvangbak op de eerste of tweede steunhoogte en giet er ongeveer een
halve liter water in. De oven hoeft niet voorverwarmd te worden. Tijdens de bereiding moet de
deur van de oven dicht blijven. Met deze functie kunt u het draaispit gebruiken, als u dit hebt.
MAXI COOKING
Voor het braden van grote stukken vlees (meer dan 2,5 kg). Gebruik de eerste of de tweede
steunhoogte, afhankelijk van de grootte van het vlees. De oven hoeft niet voorverwarmd te
worden. Aanbevolen wordt om het vlees tijdens de bereiding om te keren om een gelijkmatige
bruining aan beide kanten te verkrijgen. Het verdient de voorkeur het vlees zo nu en dan
vochtig te maken om het niet te erg te laten uitdrogen.
INSTELLINGEN
Voor het instellen van het display (tijd, helderheid, volume van het geluidssignaal,
energiebesparing).
BROOD/PIZZA
Voor het bakken van verschillende soorten en formaten brood en pizza. Binnen deze functie
zijn er twee programma’s waarvan de instellingen van te voren zijn vastgesteld. U hoeft alleen
de vereiste waarden (temperatuur en tijd) aan te geven, dan zorgt de oven automatisch voor
een optimale bereidingscyclus. Plaats het deeg op de tweede steunhoogte, nadat u de oven
hebt voorverwarmd.
AUTOMATISCHE
REINIGING
Om het vuil dat ontstaan is tijdens de bereiding te verwijderen met behulp van een cyclus op
hele hoge temperatuur (ongeveer 500°). Er kunnen twee zelfreigingscycli geselecteerd worden:
een volledige cyclus (PYRO) en een verkorte cyclus (ECO). Wij adviseren u de gereduceerde
cyclus te gebruiken als u deze functie regelmatig gebruikt en de complete cyclus alleen in het
geval dat de oven erg vuil is.
SNEL
VOORVERWARMEN
Om de oven snel voor te verwarmen.

Downloaded from www.vandenborre.be
NL45
BEREIDINGSTABEL
Recept
Functie Voorver-
warmen
Steunhoogte
(van onder)
Temperatuur
(°C)
Tijd
(min)
Accessoires
Luchtig gebak
Ja 2 160-180 30-90 Taartvorm op rooster
VOORZICHTIG
Ja 1-4 160-180 30-90
Niv. 4: taartvorm op rooster
Niv. 1: taartvorm op rooster
Gevulde taarten
(cheesecake, strudel,
appeltaart)
Ja 2 160-200 30-85
Opvangbak / bakplaat of taartvorm
op rooster
Ja 1-3 160-200 35-90
Niv. 3: taartvorm op rooster (verwissel
de steunhoogtes halverwege de
bereidingstijd)
Niv. 1: taartvorm op rooster
Koekjes/taartjes
Ja 2 170-180 15-45 Opvangbak / bakplaat
VOORZICHTIG
Ja 1-4 160-170 20-45
Niv. 4: rooster
Niv. 1: opvangbak / bakplaat
Soesjes
Ja 2 180-200 30-40 Opvangbak / bakplaat
VOORZICHTIG
Ja 1-4 180-190 35-45
Niv. 4: ovenschaal op rooster
Niv. 1: opvangbak / bakplaat
Meringues
Ja 2 90 110-150 Opvangbak / bakplaat
VOORZICHTIG
Ja 1-4 90 130-150
Niv. 4: ovenschaal op rooster
Niv. 1: opvangbak / bakplaat
Brood / pizza / focaccia
Ja 2 190-250 15-50 Opvangbak / bakplaat
Ja 1-3 190-250 25-45
Niv. 3: ovenschaal op rooster
(verwissel de steunhoogtes
halverwege de bereidingstijd)
Niv. 1: opvangbak / bakplaat
Diepvriespizza’s
Ja 2 250 10-15 Opvangbak/bakplaat of rooster
Ja 1-3 250 10-20
Niv. 3: ovenschaal op rooster
(verwissel de steunhoogtes
halverwege de bereidingstijd)
Niv. 1: opvangbak / bakplaat
Hartige taarten
(groentetaart, quiche)
Ja 2 180-190 40-55 Taartvorm op rooster
Ja 1-3 180-190 40-55
Niv. 3: taartvorm op rooster (verwissel
de steunhoogtes halverwege de
bereidingstijd)
Niv. 1: taartvorm op rooster
Pasteitjes /
bladerdeeghapjes
Ja 2 190-200 20-30 Opvangbak / bakplaat
VOORZICHTIG
Ja 1-4 180-190 20-40
Niv. 4: ovenschaal op rooster
Niv. 1: opvangbak / bakplaat

Downloaded from www.vandenborre.be
NL46
Lasagne / pasta uit de
oven / cannelloni /
ovenschotels
Ja 2 190-200 45-55 Ovenschaal op rooster
Lamsvlees / kalfsvlees /
rundvlees /
varkensvlees 1kg
Ja 2 190-200 70-100 Opvangbak of ovenschaal op rooster
Kip / konijn / eend 1kg Ja 2 200-230 50-100 Opvangbak of ovenschaal op rooster
Kalkoen / Gans 3kg Ja 1/2 190-200 80-130 Opvangbak of ovenschaal op rooster
Vis uit de oven / in folie
(filet, heel)
Ja 2 180-200 40-60 Opvangbak of ovenschaal op rooster
Gevulde groenten
(tomaten, courgettes,
aubergines)
Ja 2 180-200 50-60 Ovenschaal op rooster
Geroosterd brood - 4 Hoog (3) 3-5 Rooster
Visfilet / moten vis - 4
Gemiddeld
(2)
20-35
Niv. 4: rooster (draai het voedsel
halverwege de bereidingstijd om)
Niv. 3: opvangbak met water
Worstjes / spiezen /
spareribs / hamburgers
- 4
Gemiddeld-
Hoog (2-3)
15-40
Steunhoogte 4: rooster (draai het
voedsel halverwege de bereidingstijd
om)
Niv. 3: opvangbak met water
Gebraden kip 1-1,3 kg
- 2
Gemiddeld
(2)
50-65
Niv. 2: rooster (draai het voedsel na
tweederde van de bereidingstijd om)
- 2 Hoog (3) 60-80 Niv. 2: draaispit
Rosbief rosé 1kg - 2
Gemiddeld
(2)
35-45
Ovenschaal op rooster (draai het
voedsel indien nodig na tweederde
van de bereidingstijd om)
Lamsbout / schenkel - 2
Gemiddeld
(2)
60-90
Opvangbak of ovenschaal op rooster
(draai het voedsel indien nodig na
tweederde van de bereidingstijd om)
Aardappelen uit de
oven
- 2
Gemiddeld
(2)
45-55
Opvangbak / bakplaat (draai het
voedsel indien nodig na tweederde
van de bereidingstijd om)
Gegratineerde
groenten
- 2 Hoog (3) 10-15 Ovenschaal op rooster
Lasagne en vlees Ja 1-3 200 50-100
Niv. 3: ovenschaal op rooster (draai
het voedsel indien nodig na
tweederde van de bereidingstijd om)
Niv. 1: opvangbak of ovenschaal op
rooster
Vlees en aardappelen Ja 1-3 200 45-100
Niv. 3: ovenschaal op rooster (draai
het voedsel indien nodig na
tweederde van de bereidingstijd om)
Niv. 1: opvangbak of ovenschaal op
rooster
Vis en groente
VOORZICHTIG
Ja 1-4 180 30-50
Niv. 4: ovenschaal op rooster
Niv. 1: opvangbak of ovenschaal op
rooster
Recept
Functie Voorver-
warmen
Steunhoogte
(van onder)
Temperatuur
(°C)
Tijd
(min)
Accessoires

Downloaded from www.vandenborre.be
NL47
GETESTE RECEPTEN in overeenstemming met de norm IEC 60350:99+A1:05 +A2:08 en DIN 3360-12:07:07
In de bereidingstabel worden de ideale functies en temperaturen gegeven voor de beste resultaten voor elk type recept. Als u
een gerecht wilt bereiden met de geventileerde functie op één steunhoogte, wordt geadviseerd de tweede steunhoogte te
gebruiken en dezelfde temperatuur als voor “TURBO HETE LUCHT” op meerdere niveaus.
Laat bij grillen 3-4 cm van de voorste rand van het rooster vrij om dit na afloop van de bereiding makkelijker eruit te kunnen
halen.
Recept Functie Voorver-
warmen
Steunhoogte
(van onder)
Temperatuur
(°C)
Tijd
(min)
Accessoires en opmerkingen
IEC 60350:99+A1:05 +A2:08 § 8.4.1
Koekjes van kruimeldeeg
(shortbread)
Ja 2 170 15-25 Opvangbak / bakplaat
Ja 1-3 160 20-30
Niv. 3: bakplaat (verwissel de steunhoogtes
halverwege de bereidingstijd)
Niv. 1 opvangbak
IEC 60350:99+A1:05 +A2:08 § 8.4.2
Kleine cakejes (Small cakes)
Ja 2 170 20-30 Opvangbak / bakplaat
Ja 1-3 160 20-30
Niv. 3: bakplaat (verwissel de steunhoogtes
halverwege de bereidingstijd)
Niv. 1 opvangbak
IEC 60350:99+A1:05 +A2:08 § 8.5.1
Cake zonder vet (Fatless
sponge cake)
Ja 2 170 35-45 Taartvorm op rooster
IEC 60350:99+A1:05 +A2:08 § 8.5.2
2 appeltaarten (Two apple
pies)
Ja 2 185 60-75 Taartvorm op rooster
Ja 1-3 175 65-75
Niv. 3: taartvorm op rooster (verwissel de
steunhoogtes halverwege de
bereidingstijd)
Niv. 1: taartvorm op rooster
IEC 60350:99+A1:05 +A2:08 § 9.1.1
Toast - 4 Hoog (3) 3-5 Rooster
IEC 60350:99+A1:05 +A2:08 § 9.2.1
Burgers - 4 Hoog (3) 30-40
Niv. 4: rooster (draai het voedsel
halverwege de bereidingstijd om)
Niv. 3: opvangbak met water
DIN 3360-12:07 § 6.5.2.3
Appeltaart, vruchtenvlaai
(Apple cake, yeast tray
cake)
Ja 2 180 30-40 Opvangbak / bakplaat
Ja 1-3 160 50-60
Niv. 3: bakplaat (verwissel de steunhoogtes
halverwege de bereidingstijd)
Niv. 1 opvangbak
DIN 3360-12:07 § 6.6
Varkensbraadstuk (Roast
Pork)
- 2 170 110-150 Niv. 2: rooster
DIN 3360-12:07 annex C
Platte taart (Flat cake)
Ja 2 170 35-45 Opvangbak / bakplaat
Ja 1-3 170 40-50
Niv. 3: bakplaat (verwissel de steunhoogtes
halverwege de bereidingstijd)
Niv. 1 opvangbak

Downloaded from www.vandenborre.be
NL48
Lezen van de bereidingstabel
De tabel geeft aan welke functie het best gebruikt kan worden voor een bepaald gerecht, dat op één of meerdere steunhoogtes
tegelijk kan worden bereid. De bereidingstijden gelden vanaf het moment dat het gerecht in de oven wordt gezet, zonder de
voorverwarmingstijd (indien nodig). De temperaturen en de bereidingstijden zijn indicatief en hangen af van de hoeveelheid
voedsel en het type schaal. Gebruik eerst de laagste aanbevolen waarden. Als de bereiding niet naar wens is, kunt u hogere
waarden gebruiken. Geadviseerd wordt om de bijgeleverde accessoires te gebruiken en indien mogelijk taartvormen of
ovenschalen van donker metaal. U kunt ook pannen of vuurvaste of aardewerk schalen gebruiken; de bereidingstijden zijn dan
iets langer. Volg voor de beste resultaten zorgvuldig de aanwijzingen in de bereidingstabel met betrekking tot de bijgeleverde
schalen en de verschillende steunhoogtes.
Het tegelijkertijd bereiden van verschillende gerechten
Met de functie “HETELUCHT GELEIDELIJK” kunt u gelijktijdige verschillende gerechten bereiden (bijvoorbeeld: vis en groenten)
die dezelfde temperatuur vereisen, op verschillende steunhoogtes. Haal de gerechten die klaar zijn uit de oven en laat de
gerechten die meer tijd nodig hebben in de oven staan.
Gebak
- Bak fijn gebak met de statische functie op één niveau. Gebruik taartvormen van zwart metaal en zet deze altijd op het
bijgeleverde rooster. Voor bereiding op meerdere steunhoogtes selecteert u de functie met ventilatie en zet u de
taartvormen in zigzagvorm op de roosters, zodat de lucht goed kan circuleren.
- Om te controleren of de taart gaar is steekt u een satéprikker in het dikste gedeelte van de taart. Als de prikker er droog
uitkomt, is de taart klaar.
- Als u taartvormen met antiaanbaklaag gebruikt, vet dan niet de randen in, omdat de taart dan mogelijk niet goed rijst aan
de zijkanten.
- Als het gebak “inzakt” tijdens het bakken, gebruik dan de volgende keer een lagere temperatuur, verminder bijvoorbeeld
de hoeveelheid vocht of meng het beslag voorzichtiger.
- Bij taarten met een vochtige vulling (kaastaarten of vruchtentaarten) moet de functie “TURBO HETE LUCHT” worden
gebruikt. Als de bodem van de taart te vochtig blijft, zet de taart dan op een lager niveau en bestrooi de bodem met
paneermeel of verkruimelde koekjes voordat u de vulling erin schenkt.
Vlees
- U kunt elke soort schaal gebruiken die geschikt is voor de afmetingen van het vlees. Schenk bij gebraden vlees bij
voorkeur wat bouillon in de schaal, waardoor het vlees tijdens de bereiding vochtig wordt gehouden en meer smaak
krijgt. Laat het gebraden vlees na afloop van de bereiding 10-15 min. in de oven rusten, of dek het af met aluminiumfolie.
- Als u stukken vlees wilt grillen, kies dan stukken met een gelijke dikte, zodat het vlees gelijkmatig gaar wordt. Zeer dikke
stukken vlees hebben een langere bereidingstijd. Zet het rooster op een lagere steunhoogte om te voorkomen dat de
korst verbrandt. Draai het vlees om na tweederde van de bereidingstijd.
Geadviseerd wordt om een opvangbak met een halve liter water direct onder het rooster te plaatsen waarop u het vlees heeft
gelegd, om het bakvet op te vangen. Vul indien nodig bij met water tijdens het grillen.
Draaispit (alleen bij bepaalde modellen)
Dit accessoire dient voor het gelijkmatig grillen van grote stukken vlees en gevogelte. Steek het vlees aan het spit. Zet kip vast
met keukentouw en controleer of het vlees goed vastzit voordat u het spit in de houder aan de voorwand van de oven steekt en
op de steun legt. Om vorming van dampen te voorkomen en bakvet op te vangen, adviseren wij om een opvangbak met een
halve liter water op de eerste steunhoogte te plaatsen. Het spit is voorzien van een plastic handvat dat verwijderd moet worden
voordat de bereiding begint. Het handvat dient om het vlees na afloop van de bereiding uit de oven de halen zonder uw handen
te branden.
Pizza
Vet de pizzavorm licht in voor een knapperige bodem. Verdeel na tweederde van de bereidingstijd de mozzarella over de pizza.
Rijsfunctie
Dek het deeg altijd af met een vochtige doek voordat u het in de oven legt. Deze functie verkort de rijstijd met ongeveer
eenderde, vergeleken met rijzen op kamertemperatuur (20-25°C). De rijstijd bij een hoeveelheid pizzadeeg van 1 kg is ongeveer
één uur.
GEBRUIKSADVIEZEN EN -SUGGESTIES

Downloaded from www.vandenborre.be

Downloaded from www.vandenborre.be
Printed in Italy
08/2011
5019 310 01347
Whirlpool is a registered trademark of Whirlpool, USA
GB FR NL
-
 1
1
-
 2
2
-
 3
3
-
 4
4
-
 5
5
-
 6
6
-
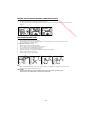 7
7
-
 8
8
-
 9
9
-
 10
10
-
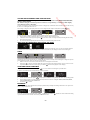 11
11
-
 12
12
-
 13
13
-
 14
14
-
 15
15
-
 16
16
-
 17
17
-
 18
18
-
 19
19
-
 20
20
-
 21
21
-
 22
22
-
 23
23
-
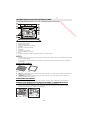 24
24
-
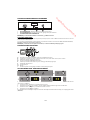 25
25
-
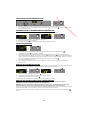 26
26
-
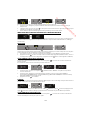 27
27
-
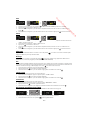 28
28
-
 29
29
-
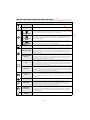 30
30
-
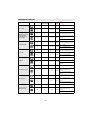 31
31
-
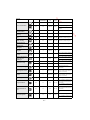 32
32
-
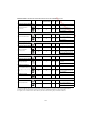 33
33
-
 34
34
-
 35
35
-
 36
36
-
 37
37
-
 38
38
-
 39
39
-
 40
40
-
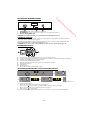 41
41
-
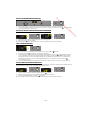 42
42
-
 43
43
-
 44
44
-
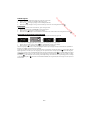 45
45
-
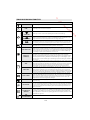 46
46
-
 47
47
-
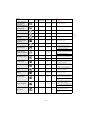 48
48
-
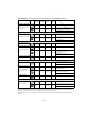 49
49
-
 50
50
-
 51
51
-
 52
52


Whirlpool AKZ 476 IX de handleiding
- Categorie
- Kookplaten
- Type
- de handleiding
in andere talen
Gerelateerde papieren
-
Whirlpool AKPM 777/IX Gebruikershandleiding
-
-
-
-
Whirlpool AKZ 520/IX de handleiding
-
-
-
Whirlpool AKZM 755/IX Gebruikershandleiding
-
-