Gemini XGA Professional Amplifier Handleiding
- Categorie
- Muzikale uitrusting
- Type
- Handleiding

1
XGA PROFESSIONAL AMPLIFIER
USER MANUAL

2
INDEX
INTRODUCTION
Congratulations on purchasing a Gemini XGA Series professional
amplifier! This state-of-the-art power amplifier includes the latest
features and is backed by a one year limited warranty. Prior to use, we
suggest that you carefully read all the instructions. With the proper care
& maintenance, your unit will provide years of reliable, uninterrupted
service. All Gemini products are backed by a 1-year limited warranty*.
PREPARING FOR FIRST USE
Please ensure that you find these accessories included with your XGA Series amplifier:
(1) XGA Amplifier
(1) Power Cable
(1) User Manual
(1) Warranty Card

3
PRECAUTIONS
1. All operating instructions should be read before using this equipment.
2. To reduce the risk of electrical shock, do not open the unit. There are NO USER REPLACEABLE PARTS
INSIDE. Please refer servicing to a qualified Gemini service technician. Do not attempt to return this
equipment to your dealer.
3. Do not expose this unit to direct sunlight or to a heat source such as a radiator or stove.
4. This unit should be cleaned only with a damp cloth. Avoid solvents or other cleaning detergents.
5. When moving this equipment, it should be placed in its original carton and packaging. This will reduce
the risk of damage during transit.
6. DO NOT EXPOSE THIS UNIT TO WATER OR HEAT.
7. DO NOT USE CLEANING PRODUCTS OR LUBRICANTS ON THE CONTROLS OR SWITCHES.
PLEASE READ CAREFULLY BEFORE PROCEEDING
Always follow the basic precautions listed below to avoid the possibility of serious injury or even death
from electrical shock, short-circuiting, damages, fire, or other hazards.
• READ INSTRUCTIONS - All the safety and operating instructions should be read before the product is
operated.
• RETAIN INSTRUCTIONS - The safety and operating instructions should be retained for future reference
All the safety and operating instructions should be read before the product is operated.
• HEED WARNINGS - All warnings on the product and in the operating instructions should be adhered to.
• FOLLOW INSTRUCTIONS - All operating and use instructions should be followed.
• CLEANING - The product should be cleaned only with a polishing cloth or a soft dry cloth. Never clean
with furniture wax, benzine, insecticides or other volatile liquids since they may corrode the cabinet.
• WATER AND MOISTURE - Do not use this product near water, for example, near a bathtub, wash bowl,
kitchen sink, or laundry tub; in a wet basement; or near a swimming pool; and the like.
• DO NOT OPEN - Do not open the device or attempt to disassemble the internal parts or modify them in
any way. The device contains no user- serviceable parts. If it should appear to be malfunctioning,
discontinue use immediately and have it inspected by qualified GEMINI service personnel.
• REPLACEMENT PARTS - When replacement parts are required, be sure the service technician has used
replacement parts specified by the manufacturer or have the same characteristics as the original part.
Unauthorized substitutions may result in fire, electric shock, or other hazards.
• VENTILATION - The XGA amplifier should be situated so that its location or position does not interfere
with its proper ventilation. For example, the Component should not be situated on a bed, sofa, rug, or
similar surface that may block any ventilation openings, or placed in a built-in installation such as a
bookcase or cabinet that may impede the flow of air through ventilation openings
• CONNECTIONS - Before connecting the device to other devices, turn off the power for all devices.
Before turning the power on or off for all devices, set all volume levels to minimum.
- Use only speaker cables for connecting speakers to the speaker jacks. Use of other types of cables may
result in fire.
- Be sure to observe the amplifier’s rated load impedance, particularly when connecting speakers in
parallel. Connecting an impedance load outside the amplifier’s rated range can damage the amplifier.

4
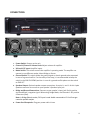
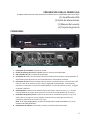
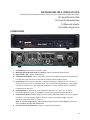
CONNECTIONS
1. Power Switch: Powers on the unit.
2. Channel 1/Channel 2 Volume Knob: Adjusts volume of amplifier.
3. XLR and 1/4” Input: Amplifier inputs.
4. Mode Switch: This switch controls the amplifier’s operating mode. The amplifier can
operate in two different modes; Mono Bridge or Stereo.
5. Ground Switch: This switch allows the ground signal or chassis ground to be separated
in case of a ground conflict. For the safety of the amp, it is recommended to keep the
switch in the GND FLOATING position. In case of a ground conflict please set the switch
to GND LIFT.
6. Speakon Output: Optional speaker output connections. Use pins 1+ and 1- of this 4-pole
Speakon connector to connect to your speaker’s Speakon input jack.
7. Bridge and Ground Connections: Connect to your speaker’s input jack. Red is positive
signal and Black is negative signal. When using Bridge Mode, use Channels 1 & 2 positive
connectors (Red).
Note: In Bridge (Mono) mode, CH2 input is used. Audio connected to CH 1 will not get
routed to speaker output.
8. Power Cord Receptacle: Plug your power cable in here

5
Register your product online at: www.geminisound.com/register
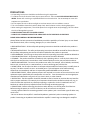
WARRANTY AND REPAIR
All Gemini products are designed and manufactured to the highest standards in the industry.
With proper care and maintenance, your product will provide years of reliable service.
LIMITED WARRANTY
A. Gemini guarantees its products to be free from defects in materials and workmanship for
One (1) year from the original purchase date. Exceptions: Laser assemblies on CD Players,
cartridges, and crossfaders are covered for 90 days.
B. This limited warranty does not cover damage or failure caused by abuse, misuse, abnormal
use, faulty installation, improper maintenance or any repairs other than those provided by an
authorized Gemini Service Center.
C. There are no obligations of liability on the part of Gemini for consequential damages arising
out of or in connection with the use or performance of the product or other indirect damages
with respect to loss of property, revenues, of profit, or costs of removal, installa- tion, or
reinstallation. All implied warranties for Gemini, including implied warranties for fitness, are
limited in duration to One (1) year from
the original date of purchase, unless otherwise mandated by local statutes.
RETURN/REPAIR
A. In the U.S.A., please call our helpful Custom- er Service Representatives at (732) 346-0061,
and they will be happy to give you a Return Authorization Number (RA#) and the address of an
authorized service center closest to you.
B. After receiving an RA#, include a copy of the original sales receipt, with defective prod-
uct and a description of the defect. Send by insured freight to: Gemini and use the address
provided by your customer service representa- tive. Your RA# must be written on the outside of
the package, or processing will be delayed indefinitely!
C. Service covered under warranty will be paid for by Gemini and returned to you. For non-
warrantied products, Gemini will repair your unit after payment is received. Repair charges do
not include return freight. Freight charges will be added to the repair charges.
D. On warranty service, you pay for shipping to Gemini, we pay for return shipping within the
continental United States. Alaska, Hawaii, Puerto Rico, Canada, Bahamas, and the Virgin Islands
will be charged for freight.
E. Please allow 2-3 weeks for return of your product.
Under normal circumstances your product will spend no more than 10 working days at Gemini.
We are not responsible for shipping times.
Gemini Worldwide Headquarters
458 Florida Grove Rd
Perth Amboy, NJ 08861
USA
(732) 346-0061

6
PREPARACIÓN PARA EL PRIMER USO
Asegúrese de encontrar estos accesorios incluidos con su amplificador de la serie XGA:
(1) Amplificador XGA
(1) Cable de alimentación
(1) Manual del usuario
(1) Tarjeta de garantía
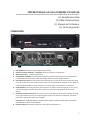
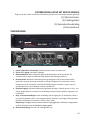
CONEXIONES
1. Interruptor de encendido: Enciende la unidad.
2. Perilla de volumen del canal 1 / canal 2: ajusta el volumen del amplificador.
3. XLR y Entrada de 1/4": Entradas de amplificador.
4. Interruptor de modo: este interruptor controla el modo de funcionamiento del amplificador. El
amplificador puede funcionar en dos modos diferentes; Puente Mono o Estéreo.
5. Interruptor de tierra: Este interruptor permite separar la señal de tierra o la toma de tierra del
chasis en caso de un conflicto de tierra. Para la seguridad del amplificador, se recomienda
mantener el interruptor en la posición GND FLOATING. En caso de conflicto en tierra, configure
el cambio a GND LIFT.
6. Salida Speakon: Conexiones de salida de altavoz opcionales. Utilice los pines 1+ y 1- de este
conector Speakon de 4 polos para conectarse a la toma de entrada Speakon de su altavoz.
7. Conexiones de puente y tierra: Conéctese al conector de entrada de su altavoz. El rojo es la
señal positiva y el negro es la señal negativa. Cuando utilice el modo puente, utilice los
conectores positivos de los canales 1 y 2 (rojo).
Nota: En el modo Bridge (Mono), se utiliza la entrada CH2. El audio conectado a CH 1 no se
enrutará a la salida del altavoz.
8. Receptáculo de cable de alimentación: Conecte su cable de alimentación aquí

7
PRÉPARATION EN VUE DE LA PREMIÈRE UTILISATION
Assurez-vous de trouver ces accessoires inclus avec votre amplificateur de la série XGA :
(1) Amplificateur XGA
(1) Câble d’alimentation
(1) Manuel de l’utilisateur
(1) Carte de garantie
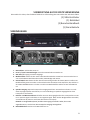
CONNEXIONS
1. Interrupteur d’alimentation: Met l’appareil sous tension.
2. Bouton de volume Channel 1 / Channel 2: Ajuste le volume de l’amplificateur.
3. XLR et entrée 1/4 « : entrées amplificateur.
4. Commutateur de mode: Ce commutateur contrôle le mode de fonctionnement de l’amplificateur.
L’amplificateur peut fonctionner dans deux modes différents; Mono Bridge ou Stéréo.
5. Interrupteur à la terre: Cet interrupteur permet de séparer le signal de terre ou la masse du châssis
en cas de conflit au sol. Pour la sécurité de l’ampli, il est recommandé de maintenir l’interrupteur en
position GND FLOATING. En cas de conflit au sol, veuillez régler le commutateur sur GND LIFT.
6. Sortie Speakon: Connexions de sortie de haut-parleur en option. Utilisez les broches 1+ et 1- de ce
connecteur Speakon à 4 pôles pour vous connecter à la prise d’entrée Speakon de votre haut-
parleur.
7. Connexions de pont et de terre : connectez-vous à la prise d’entrée de votre haut-parleur. Le rouge
est un signal positif et le noir est un signal négatif. Lorsque vous utilisez le mode Pont, utilisez les
connecteurs positifs des canaux 1 et 2 (rouge).
Remarque : En mode Pont (Mono), l’entrée CH2 est utilisée. L’audio connecté à CH 1 ne sera pas
acheminé vers la sortie du haut-parleur.
8. Prise de cordon d’alimentation: Branchez votre câble d’alimentation ici

8
VORBEREITUNG AUF DIE ERSTE VERWENDUNG
Bitte stellen Sie sicher, dass Sie dieses Zubehör im Lieferumfang Ihres Verstärkers der XGA-Serie finden:
(1) XGA-Verstärker
(1) Netzkabel
(1) Benutzerhandbuch
(1) Garantiekarte
VERBINDUNGEN
1. Netzschalter: Schaltet das Gerät ein.
2. Kanal 1 / Kanal 2 Lautstärkeregler: Passt die Lautstärke des Verstärkers an.
3. XLR und 1/4" Eingang: Verstärkereingänge.
4. Modusschalter: Dieser Schalter steuert den Betriebsmodus des Verstärkers. Der Verstärker kann in
zwei verschiedenen Modi betrieben werden; Mono Bridge oder Stereo.
5. Ground Switch: Mit diesem Schalter kann das Ground-Signal oder die Chassis-Masse im Falle eines
Bodenkonflikts getrennt werden. Für die Sicherheit des Verstärkers wird empfohlen, den Schalter in
der GND FLOATING-Position zu halten. Im Falle eines Bodenkonflikts stellen Sie bitte auf GND LIFT
um.
6. Speakon-Ausgang: Optionale Lautsprecherausgangsanschlüsse. Verwenden Sie die Pins 1+ und 1-
dieses 4-poligen Speakon-Anschlusses, um eine Verbindung zur Speakon-Eingangsbuchse Ihres
Lautsprechers herzustellen.
7. Brücken- und Masseanschlüsse: Schließen Sie sie an die Eingangsbuchse Ihres Lautsprechers an. Rot
ist ein positives Signal und Schwarz ist ein negatives Signal. Wenn Sie den Bridge-Modus verwenden,
verwenden Sie die positiven Anschlüsse der Kanäle 1 und 2 (Rot).
Hinweis: Im Bridge-Modus (Mono) wird der CH2-Eingang verwendet. Audio, das an CH 1
angeschlossen ist, wird nicht an den Lautsprecherausgang weitergeleitet.
8. Netzkabelbuchse: Stecken Sie Ihr Netzkabel hier ein

9
PREPARAZIONE PER IL PRIMO UTILIZZO
Assicurati di trovare questi accessori inclusi con il tuo amplificatore della serie XGA:
(1) Amplificatore XGA
(1) Cavo di alimentazione
(1) Manuale utente
(1) Scheda di garanzia
CONNESSIONI
1. Interruttore di alimentazione: accende l'unità.
2. Manopola del volume del canale 1 / canale 2: regola il volume dell'amplificatore.
3. Ingresso XLR e 1/4": ingressi amplificatore.
4. Interruttore di modalità: questo interruttore controlla la modalità operativa dell'amplificatore.
L'amplificatore può funzionare in due diverse modalità; Mono Bridge o Stereo.
5. Interruttore di terra: questo interruttore consente di separare il segnale di terra o la messa a
terra dello chassis in caso di conflitto di terra. Per la sicurezza dell'amplificatore, si consiglia di
mantenere l'interruttore in posizione GND FLOATING. In caso di conflitto di terra, impostare
l'interruttore su GND LIFT.
6. Uscita Speakon: connessioni di uscita altoparlanti opzionali. Usa i pin 1+ e 1- di questo
connettore Speakon a 4 poli per collegarti al jack di ingresso Speakon dell'altoparlante.
7. Connessioni a ponte e a terra: collega al jack di ingresso dell'altoparlante. Il rosso è un segnale
positivo e il nero è un segnale negativo. Quando si utilizza la modalità Bridge, utilizzare i
connettori positivi dei canali 1 e 2 (rosso).
Nota: in modalità Bridge (Mono), viene utilizzato l'ingresso CH2. L'audio collegato a CH 1 non
verrà instradato all'uscita dell'altoparlante.
8. Presa del cavo di alimentazione: collega il cavo di alimentazione qui

10
VOORBEREIDING VOOR HET EERSTE GEBRUIK
Zorg ervoor dat u deze accessoires vindt die bij uw XGA-serie versterker worden geleverd:
(1) XGA Versterker
(1) Voedingskabel
(1) Gebruikershandleiding
(1) Garantiekaart
VERBINDINGEN
1. Aan/uit-schakelaar: schakelt het apparaat in.
2. Kanaal 1/kanaals 2 volumeknop: past het volume van de versterker aan.
3. XLR en 1/4" Ingang: Versterker ingangen.
4. Modusschakelaar: Deze schakelaar regelt de bedrijfsmodus van de versterker. De
versterker kan in twee verschillende modi werken; Mono Bridge of Stereo.
5. Ground Switch: Met deze schakelaar kan het grondsignaal of de chassisaarde worden
gescheiden in geval van een grondconflict. Voor de veiligheid van de versterker wordt
aanbevolen om de schakelaar in de GND FLOATING-positie te houden. In geval van een
grondconflict kunt u de schakelaar instellen op GND LIFT.
6. Speakon-uitgang: Optionele luidsprekeruitgangsaansluitingen. Gebruik pinnen 1+ en 1- van
deze 4-polige Speakon-connector om verbinding te maken met de Speakon-ingang van uw
luidspreker.
7. Brug- en massaverbindingen: maak verbinding met de ingang van uw luidspreker. Rood is
een positief signaal en zwart is een negatief signaal. Wanneer u de bridge-modus gebruikt,
gebruikt u de positieve connectoren kanaal 1 en 2 (rood).
Opmerking: In bridge (mono) modus wordt CH2-ingang gebruikt. Audio die is aangesloten
op CH 1 wordt niet naar de luidsprekeruitgang geleid.
8. Netsnoeraansluiting: sluit hier uw voedingskabel aan
-
 1
1
-
 2
2
-
 3
3
-
 4
4
-
 5
5
-
 6
6
-
 7
7
-
 8
8
-
 9
9
-
 10
10


Gemini XGA Professional Amplifier Handleiding
- Categorie
- Muzikale uitrusting
- Type
- Handleiding
in andere talen
Andere documenten
-
JBSYSTEMS D2-1500 de handleiding
-
Alto APX2000 Snelstartgids
-
HQ-Power VPA2300MB Handleiding
-
 HQ Power QUBIC VPA2900MB Handleiding
-
 EHQ POWER VPA600MB Handleiding
-
 JBSYSTEMS AMP 400.2 de handleiding
-
IMG Stage Line STA-162 Handleiding
-
-
JBSYSTEMS LIGHT AX de handleiding
-
JB systems VX700 Handleiding


