Vermeiren Jazz S50 Handleiding
- Categorie
- Kinderwagens
- Type
- Handleiding

VERMEIREN
Jazz S50
U S E R M A N U A L
M A N U E L D ' U T I L I S A T I O N
G E B R U I K S A A N W I J Z I N G
G E B R A U C H S A N W E I S U N G
M A N U A L E D I I S T R U Z I O N I
M A N U A L D E I N S T R U C C I O N E S
I N S T R U K C J A O B S
Ł
U G I
N Á V O D K O B S L U Z E

Instrukcje dla wyspecjalizowanego
All rights reserved, including translation.
No part of this manual may be reproduced in any form what so
ever (print, photocopy, microfilm or any other process) without
written permission of the publisher, or processed, duplicated or
distributed by using electronic systems.
Tous droits réservés, y compris la traduction.
Aucune partie de ce manuel ne peut être reproduite, sous
quelque forme que ce soit (imprimée, photocopie, microfilm ou
tout autre procédé) sans l'autorisation écrite du publicateur, ni
traitée, dupliquée ou distribuée à l'aide de systèmes
électroniques.
Alle rechten, inclusief vertaling, voorbehouden.
Niets uit deze handleiding mag geheel of gedeeltelijk in enige
vorm (druk, fotokopie, microfilm of ieder ander procedé) zonder
de schriftelijke toelating van de uitgever worden
gereproduceerd of met behulp van elektronische systemen
worden verwerkt, gekopieerd of verspreid.
Alle Rechte, auch an der Übersetzung, vorbehalten.
Kein Teil der Gebrauchsanweisung darf in irgendeiner Form
(Druck, Fotokopie, Mikrofilm oder einem anderen Verfahren)
ohne schriftliche Genehmigung des Herausgebers
reproduziert oder unter Verwendung elektronischer Systeme
verarbeitet, vervielfältigt oder verbreitet werden.
Tutti i diritti riservati (anche sulla traduzione).
Il presente manuale non può essere riprodotto, neppure
parzialmente, con alcun mezzo (stampa, fotocopia, microfilm o
altro procedimento) senza l’autorizzazione scritta della casa
produttrice, né elaborato, duplicato o distribuito con l’ausilio di
sistemi elettronici.
Todos los derechos reservados, incluidos los de la
traducción.
Se prohíbe la reproducción total o parcial del presente manual
de cualquier forma (impresión, fotocopia, microfilm o cualquier
otro procedimiento), así como la edición, copia o distribución
empleando sistemas electrónicos, sin el permiso escrito del
editor.
Wszelkie prawa zastrzeżone, łącznie z tłumaczeniem.
Żadna część niniejszej instrukcji nie może być powielana w
jakiejkolwiek formie (drukowanej, fotokopii, mikrofilmu ani
innej) bez pisemnej zgody wydawcy, nie może być również
przetwarzana, kopiowana ani rozprowadzana za pomocą
systemów elektronicznych.
Všechna práva vyhrazena, včetně překladu.
Šíření jakékoliv části tohoto katalogu jakýmkoliv způsobem
(tisk, kopie, mikrofilm nebo jiný způsob) bez písemného
souhlasu vydavatele, nebo zpracování, duplikace či distribuce
prostřednictvím elektronických systémů je zakázáno.
EN
Instructions for specialist dealer
This instruction manual is part and parcel of the
product and must accompany every product
sold.
Version: I, 2020-09
FR
Instructions pour les distributeurs
Ce manuel d'instructions fait partie du produit et
doit accompagner chaque produit vendu.
Version : I, 2020-09
NL
Instructies voor de vakhandelaar
Deze handleiding is deel van het product en
dient bij iedere product te worden geleverd.
Versie: I, 2020-09
DE
Hinweise für den Fachhändler
Diese Gebrauchsanweisung ist Bestand-teil des
Produkts und ist bei jeder Produkts
auszuhändigen.
Version: I, 2020-09
IT
Istruzioni per il rivenditore
Il presente Manuale di istruzioni è parte
integrante del prodotto e deve essere fornito
assieme alla prodotto.
Versione: I, 2020-09
ES
Instrucciones destinadas a los distribuidores
especializados
El presente manual de instrucciones es parte
integrante del producto y se debe adjuntar a
todas las producto que se vendan.
Versión: I, 2020-09
PL
sprzedawcy
Niniejsza instrukcja obsługi jest nieodłączną
częścią produktu i musi być dołączona do
każdego sprzedawanego produktu.
Wersja: J, 2020-09
CS
Pokyny pro specializovaného prodejce
Tento návod k obsluze je součástí dodávky a
musí být součástí každého prodaného
produktu.
Verze: I, 2010-09
Basic UDI: 5415174 122106Jazz S50 BF
Multi version: I, 2020-09

Language index
English
Français
Nederlands
Deutch
Italiano
Español
Polski
Czech
User manual
Manuel d'utilisation
Gebruiksaanwijzing
Bedienungshandbuch
Manuale di istruzioni
Manual de instrucciones
Instrukcja obsługi
Návod k obsluze

This page is intentionally left blank

Jazz S50
2020-09
Contents
1
EN
NL
Contents
Contents ..................................................................................................................... 1
Preface........................................................................................................................ 2
1 Your product .................................................................................................. 3
1.1 Accessories ................................................................................................... 3
2 Before use ..................................................................................................... 4
2.1 Intended use ................................................................................................. 4
2.2 Explanation of symbols ................................................................................. 4
2.3 General safety instructions ............................................................................ 4
2.4 Transport ....................................................................................................... 5
2.5 Folding/Unfolding the wheelchair .................................................................. 7
2.6 Mounting/Taking off the rear wheels (if available) ......................................... 7
2.7 Storage ......................................................................................................... 7
3 Using your wheelchair .................................................................................. 8
3.1 Mounting or removing of the footrests ........................................................... 8
3.2 Operating the brakes ..................................................................................... 8
3.3 Mounting or removing the armrests............................................................... 8
3.4 Transfer in and out the wheelchair .............................................................. 10
3.5 Riding the wheelchair .................................................................................. 10
4 Installation and adjustment........................................................................ 11
4.1 Tools ............................................................................................................ 11
4.2 Manner of delivery....................................................................................... 11
4.3 Adjusting the footrests ................................................................................. 11
4.4 Adjust the brakes ........................................................................................ 12
4.5 Pneumatic tyre changing ............................................................................. 12
5 Maintenance ................................................................................................ 14
5.1 Points of maintenance ................................................................................. 14
5.2 Maintenance instructions ............................................................................ 14
5.3 Troubleshooting .......................................................................................... 15
5.4 Expected lifespan ........................................................................................ 15
5.5 Reuse .......................................................................................................... 15
5.6 End of use ................................................................................................... 15
6 Technical specifications ............................................................................. 16

Jazz S50
2020-09
Preface
2
EN
NL
Preface
Congratulations! You are now owner of a Vermeiren wheelchair!
This wheelchair is made by qualified and committed personnel. It is designed and produced
according to high quality standards, guarded by Vermeiren.
Please read this manual carefully; it will help you to get familiar with the operation, capabilities
and limitations of your wheelchair. If you still have questions after reading this manual, do not
hesitate to contact your specialist dealer. He/she will be glad to help you.
Important note
To ensure your safety, and to prolong the lifetime of your product, please take good care of it and
have it checked and serviced on a regular basis.
This manual reflects the latest product developments. Vermeiren has the right to implement
changes to this type of product without any obligation to adapt or replace similar products
previously delivered.
Pictures are used to clarify the instructions in this manual. Details of the depicted product may
deviate from your product.
Information available
On our website http://www.vermeiren.com/ you will always find the most recent version of the
information in this manual. Please consult this website regularly for possible updates.
Visually impaired people can download the electronic version of this manual and have it read out
by means of a text-to-speech software application.
User manual For user and specialist dealer
Installation instructions For specialist dealer
Service manual for wheelchairs For specialist dealer
EC declaration of conformity

Jazz S50
2020-09
Your product
3
EN
NL
1 Your product
1.1 Accessories
The following accessories are available for the Jazz S50:
Travel wheels (B86)
Armrests (B05)
Contact your specialist dealer about other accessories. He will gladly advise you.
1 = Cross
2 = Handgrips
3 = Backrests
4 = Arm pads
5 = Armrests
6 = Driving wheels (rear wheels)
7 = Hand rims
8 = Brakes
9 = Tip cap
10 = Steering wheels (front wheels)
11 = Footrests
12 = Footplates
13 = Seat
14 = Location identification plate
3
4
5
11
13
14
2
9
7
6
8
1
12
10

Jazz S50
2020-09
Before use
4
EN
NL
2 Before use
2.1 Intended use
In this paragraph a brief description of the intended use of your wheelchair is given. Additionally,
relevant warnings are added to the instructions in the other paragraphs. In this way we would
like to make you aware of the possible misuse that may appear.
Indications and contraindications: The user can propel the wheelchair by himself or have the
wheelchair pushed by an attendant. The wheelchair is intended for people with walking
difficulties or no walking abilities. The different types of fittings and accessories, and the
modular construction allow full use by aged persons and persons disabled by paralysis, loss
of limbs (leg amputation), limb defects or deformations, stiff or damaged joints, heart
insufficiencies and poor blood circulation, balance disturbances, cachexia (decrease in
muscle).
The wheelchair is suited for indoor and outdoor use.
The wheelchair is designed to transport one (1) person with a maximum weight of 130 kg. It is
not designed for transportation of goods or objects, nor for any use other than previously
described.
Only use accessories and spare parts approved by Vermeiren.
Please read all technical details and limits of your wheelchair in chapter 6.
The warranty of this product is based on normal use and maintenance as described in this
manual. Damage to your product caused by improper use or lack of maintenance will cause
the warranty to lapse.
2.2 Explanation of symbols
Maximum weight of the user in kg
Indoor/outdoor use
Maximum safe slope in ° (degrees).
Type designation
2.3 General safety instructions
Do not use your wheelchair if you are under influence of alcohol, medicines or other substances
that may influence your riding abilities.
Be aware that some parts of your wheelchair may get very hot or cold due to ambient
temperature, solar radiation or heating devices. Be careful when touching. Wear protective
clothing if the weather is cold. When going outdoors, riding gloves can be used to improve the
grip on the hand rims.
Do not modify your wheelchair in any way.
To prevent injury and/or damage to your wheelchair, make sure that no objects and/or body
parts are caught in the spokes of the driving wheels.
Be aware that your wheelchair may interfere with some types of anti-theft systems, depending on
the settings used. This may cause the shop's alarm to go off.

Jazz S50
2020-09
Before use
5
EN
NL
2.4 Transport
2.4.1 Moving out of the way
The best way to move the wheelchair is to make use of the wheels and roll the wheelchair.
If this is not possible (e.g. when the rear wheels are taken off for transportation in a car), firmly
grasp the frame on the front and the handgrips. Do not use the foot- or armrests or the wheels to
grasp the wheelchair.
2.4.2 Transport by vehicle, as luggage
Risk of injury
Make sure that that the wheelchair is properly secured to avoid injury to the passengers during
collision or sudden braking.
NEVER use the same seatbelt to attach the wheelchair and passenger.
1. Fold the wheelchair to its most compact size according to the instructions in § 2.5.
2. Store the wheelchair and its wheels in the luggage compartment or behind the passenger seat.
If luggage and passenger compartments are NOT separated or enclosed, fasten the
wheelchair frame securely to the vehicle.
2.4.3 Transport by vehicle, as seat for user
Risk of injuries or damage
The wheelchair has passed the crash of ISO 7176-19: 2008 and, as such, has been designed
and tested for use only as forward-facing seat in a motor vehicle.
The wheelchair's pelvic belt alone is not suited as an occupant restraint belt.
The wheelchair is tested using the four-point strap-tie system and a 3-point occupant-restraint
system. Whenever feasible, use the seat of the vehicle and store the wheelchair in the cargo
area.
Steps to secure the wheelchair in a motor vehicle:
1. Check that the vehicle is equipped with a suitable wheelchair tie down and occupant-
restraint system, conform ISO 10542.
2. Check that the components of the wheelchair tie down and occupant restraint system are
not frayed, contaminated, damaged or broken.
3. If equipped with an adjustable seat and/or back tilt, make sure that the wheelchair user is
sitting as upright as possible. If the user's condition prevents this, a risk assessment should
be done to evaluate the user's safety during transit.
4. Remove all mounted accessories such as trays and respiratory equipment, and secure them
in a safe place.
5. Position the wheelchair facing forward in the travelling direction, centrally between the tie-
down rails mounted in the floor of the vehicle.
6. Mount the front securement straps according to the instructions of the strap-system
manufacturer at the indicated place (figure 1). This place is marked on the wheelchair with
a symbol (figure 2).
7. Roll back the wheelchair until the front straps are tight.
8. Apply the wheelchair brake.
9. Mount the back securement straps according to the instructions of the strap-system
manufacturer at the indicated place (figure 1). This place is marked on the wheelchair with
a symbol (figure 2).
WARNING
WARNING

Jazz S50
2020-09
Before use
6
EN
NL
Figure 1 Figure 2
Steps to secure the wheelchair user:
1. Remove both arm rests.
2. If present, attach the wheelchair's pelvic belt.
3. Attach the occupant restraint belts according to the instructions of the strap-system
manufacturer.
4. Wear the pelvic belt low across the front of the pelvis, so that the angle of the pelvic belt is
within the preferred zone of 30° to 75° to the horizontal, similar to that shown below.
5. A steeper (greater) angle within the preferred zone is desirable.
6. Adjust the belt tightly according to the instructions of the strap-system manufacturer,
consistent with the user's comfort.
7. Ensure that the restraint belt connects in a straight line to the anchor point in the vehicle and
that no bends in the belt are visible, for instance at the axle of the rear wheel.
8. Install the arm rests, if desired. make sure that belts are not twisted or held away from the
body by wheelchair components such as arm rests or wheels.
PELVIC RESTRAINTS SHOULD MAKE FULL
CONTACT ACROSS THE FRONT OF THE BODY
NEAR THE JUNCTION OF THE THIGH AND
PELVIS
RESTRAINTS SHOULD NOT BE HELD
AWAY FROM BODY BY WHEELCHAIR
COMPONENTS SUCH AS ARMRESTS OR
WHEELS

Jazz S50
2020-09
Before use
7
EN
NL
2.5 Folding/Unfolding the wheelchair
Chance of pinching – Do not place fingers between the components of the
wheelchair.
To fold:
1. Fold or remove the footplates (see § 3.1).
2. Take the seat on the front side and backside and pull it up.
3. Push the handgrips to fold up the wheelchair further.
To unfold:
1. Position yourself behind the wheelchair.
2. Use the handgrips to open the wheelchair as much as possible.
3. Position yourself at the front of the wheelchair.
4. Push both seating tubes down until they are fixed in position.
2.6 Mounting/Taking off the rear wheels (if available)
To remove the rear wheels
1. Press and hold button (1) while sliding the wheel axle out of the
hole of the frame.
2. Repeat this for the other wheel and place the wheelchair gently
on the rear frame tubes.
To install the rear wheels
1. Take one of the rear wheels and lift the wheelchair on one side.
2. Press and hold button (1) while sliding the wheel into the axle
bushy.
3. Release the button to lock the wheel. Make sure it clicks into
place.
4. Repeat this for the other wheel.
5. Ensure that both wheels are firmly secured.
2.7 Storage
Make sure that your wheelchair is stored in a dry environment to prevent mould from
growing and the upholstery from being damaged, see also chapter 6.
CAUTION

Jazz S50
2020-09
Using your wheelchair
8
EN
NL
3 Using your wheelchair
Risk of injuries and/or damage
First read previous chapters and inform yourself about the intended use. Do NOT use your
wheelchair unless you have read and fully understood all instructions.
In case of doubts or questions, do not hesitate to contact your local specialist dealer,
your care
provider or technical adviser to help you with this.
Make sure that your hands, clothes, belts, buckles or jewellery don’t get caught by wheels or
other moving parts, during use or adjustment.
3.1 Mounting or removing of the footrests
Risk of injury
Check that the footrests are securely locked in place before use.
Keep objects away from the footrests swing range while mounting or removing the footrests.
The mounting of the footrests is done as follows:
1. Hold the footrest sideways at the outside of the wheelchair
frame and mount the tube hood (1) into the frame.
2. Swing the footrest inwards until it clicks in position.
3. Swing the footplate downwards.
To take off the footrests:
1. Pull lever (2).
2. Swing the footrest to the outside of the wheelchair until it comes
loose from the guidance.
3. Pull the footrest from tube hood (1).
3.2 Operating the brakes
Risk of injury
The brakes are not used to slow down the wheelchair during movements. Use the brake only
to prevent the wheelchair from unintended movements.
Good operation of the brakes is influenced by wear and contamination of the tires (water, oil,
mud, …). Check the condition of the tires before each use.
The brakes are adjustable and can wear. Check the operation of the brakes before each use.
Make sure the wheelchair is on a flat horizontal surface before releasing the brakes. Never
release both brakes simultaneously.
To apply the brakes:
1. Push the brake lever (1) forward until you feel a distinctive
click.
To release the brakes:
1. Release one brake by pulling the lever (1) backwards.
2. Hold the hand rim of the released wheel with your hand.
3. Release the second brake by pulling the lever backwards.
3.3 Mounting or removing the armrests
Risk of injury
Check that the armrests are securely locked in place before use.
Keep fingers and clothes away from the bottom side of the armrest.
CAUTION
CAUTION
WARNING
WARNING

Jazz S50
2020-09
Using your wheelchair
9
EN
NL
1. Mount the rear tube of the armrest in tube hood (1) (Fig A).
2. Make sure the armrest is mounted very well.
3. Fold the armrest forward.
4. Pull the lever (2) on tube hood (3) upwards (Fig B).
5. Click the front tube of the armrest (4) in tube hood (3) (Fig B).
To open and remove the armrest:
1. Pull lever (2) and pull the front of the armrest (1) upwards (Fig C).
2. Fold the armrest backwards.
3. To remove the armrest, pull the rear of the armrest from tube hood (3) (Fig D).
A
B
C
D

Jazz S50
2020-09
Using your wheelchair
10
EN
NL
3.4 Transfer in and out the wheelchair
Risk of injury and/or damage
In case you cannot perform the transfer in a safe manner,
ask someone to assist you.
Do not stand on the footplates.
1. Position the wheelchair as close as possible to the chair,
couch or bed to/from you wish to transfer.
2. Check both brakes from the wheelchair are in the on position.
3. Fold the footplates upwards to prevent standing on them.
4. If the transfer is on the side of the wheelchair, fold the
armrest on that side upwards (see § 3.3).
5. Transfer to/from the wheelchair.
3.4.1 Correct position in the wheelchair
Some recommendations for a comfortable use of the wheelchair:
Position your backside as close as possible to the backrest.
Make sure your upper legs are horizontal. If needed, adjust the length of the footrests
(see § 4.3).
3.5 Riding the wheelchair
Risk of injuries and damage
Before every usage, make sure that:
o parking brakes are working properly.
o tires are in good condition, see §5.
Prevent your fingers from being caught by the wheel spokes.
Do not operate the hand rims with wet hands.
Prevent entrapment of your hands on the hand rims when you pass small passages.
Do NOT drive on slopes, obstacles, steps or kerbs larger than specified in §6.
When you stop on a (small) slope, use your brakes.
Make sure all four wheels touch the ground while riding up or down a slope.
Take slopes as slow as possible.
Always stay on the pavement when riding on public roads.
Pay attention if the road has holes or gaps that may cause entrapment of the wheels.
Avoid stones and other objects that may block the wheels.
Make sure that the footplates do not touch ground while taking an obstacle.
Do not use your wheelchair on an escalator.
If available, wear your safety belt.
Always keep the swing range of the footplate in mind to prevent bystanders from being injured
or objects from being damaged.
If you don’t have enough experience riding your wheelchair, ask assistance of an attendant.
Keep your arms away from the wheels and keep your feet on the footplate.
Stairs should always be negotiated with the help of two attendants.
Never try to use stairs that are not appropriate for wheelchairs.
3.5.1 Riding your wheelchair:
1. Release the brakes.
2. Take both hand rims at their highest position.
3. Lean forward and push the hand rims forward until your arms are straight.
4. Move your hands back to the top of the hand rims and repeat the movement.
CAUTION
WARNING

Jazz S50
2020-09
Installation and adjustment
11
EN
NL
4 Installation and adjustment
The instructions in this chapter are for the specialist dealer.
The Vermeiren Jazz S50 has been designed as wheelchair with a minimum of adjustments. There
is no need for extra stock of spare parts.
To find a service facility or specialist dealer near you, contact the nearest Vermeiren facility.
Risk of injuries and damage
Use only the settings described in this manual.
Variation of allowed adjustments can still change the stability of your wheelchair (tilt back or
sideways).
4.1 Tools
To set up the wheelchair the following tools are needed.
Wrench set n° 7 to n° 22
Allen key set n° 3 to n° 8
Screwdriver Phillips head
4.2 Manner of delivery
The Vermeiren Jazz S50 shall be delivered with:
1 frame with armrests, rear and front wheels (seat height of 500 mm)
1 pair footrests
Tools
Manual
Accessories (optional)
Tyre pump
4.3 Adjusting the footrests
Risk of damage – Avoid that the footrests make any contact with the ground.
Keep a minimum distance from 60 mm above the ground.
Adjust the length of the footrests as follow:
1. Remove the screw (1).
2. Adjust the length of the footrest to a comfortable length.
3. Tighten the screw (1) properly.
WARNING
CAUTION

Jazz S50
2020-09
Installation and adjustment
12
EN
NL
4.4 Adjust the brakes
Risk of injury – Brakes may only be adjusted by your specialist dealer.
1. Install the wheels according to § 2.6.
2. Disconnect the brakes by pulling lever (1) backwards (Fig A).
3. Loosen bolt (2) so the brake mechanism can slide over the frame (3) (Fig B).
4. Pull the brake mechanism over the frame (3) to the desired position (Fig B). The adjustment
of the brakes shall be in the range of the marked dashes (4) on the brake mechanism.
5. Retighten the bolt (2) (Fig B).
6. Check working of the brakes.
7. If necessary repeat the above steps until the brakes are adjusted well.
4.5 Pneumatic tyre changing
Risk of injury and/or damage
If handled improperly, the rim might be damaged. Rather let an expert perform these activities.
When mounting a tyre, make sure no objects or body parts are pinched between the tyre and
the rim.
When inflating the tyres, always check that the pressure is correct. The correct pressure is
given on the tyre walls.
Use only inflating equipment which complies with regulations and indicates the pressure in bar,
or use the supplied air pump. We do not accept any liability for damage caused by inflating
equipment not supplied by the manufacturer.
Always make sure that the wheels are sufficiently inflated, since it could affect the
driving behaviour.
We do not accept any liability for wheels not supplied by the manufacturer.
Only an expert can guarantee correct assembly. Work not done by your specialist
dealer, would void the warranty of claims.
If you want to change the tyres or inner tubes, you should note the following:
1. Let all the air out of the inner tube.
2. Insert a tyre lever between the tyre and the rim.
3. Slowly and gently push the tyre lever downwards. This will pull the tyre over the edge of the
rim.
4. Then move the lever along the rim, the tyre will jump out.
5. Now carefully remove the tyre from the rim and then remove the tube.
Before replacing the tyre, check the rim bed and the inside wall of the tyre for foreign matter and
clean these properly if necessary. Check the condition of the rim bed, especially around the
position of the air valve.
A
B
WARNING
CAUTION

Jazz S50
2020-09
Installation and adjustment
13
EN
NL
Please use only genuine original replacement parts. We do not accept any liability for damage
caused by non-genuine parts. Kindly contact your specialist dealer.
Place the rim belt in position over the air valve before inserting it into the rim.
Then the rim belt can be pulled over easily. Check that all spoke heads are
covered (a rim belt is not required in the case of a plastic rim).
Push the tyre over the edge of the rim, starting behind the air valve. Inflate the
tube slightly until it is round, and place it inside the tyre.
If the tube fits snugly inside the tyre without any folds (in the case of folds: let
out some air), then the upper side of the tyre can be pressed lightly onto the rim
with both hands, starting at the air valve.
Check all around on both sides that the tube is not pinched between the rim and the edge of the
tyre. Lightly push the air valve inwards and pull it out again to make sure that the tyre is positioned
properly in the region of the air valve.
To ensure that the wheel inflated correctly, admit only so much air initially that the tyre can still be
easily pushed inwards by using your thumbs. If the check-lines are equidistant from the edge of
the rim on both sides of the tyre, then the tyre is centred properly. If not - let out the air and position
the tyre afresh.
Now the tyre can be inflated to its full operating pressure (note the maximum!!) and the valve cap
should be replaced.

Jazz S50
2020-09
Maintenance
14
EN
NL
5 Maintenance
5.1 Points of maintenance
Risk of injuries and damage
Repairs and replacements may only be undertaken by trained persons and only genuine
replacement parts of Vermeiren should be used.
The service frequency depends on the frequency and intensity of use. Contact your dealer
to agree to a common timetable for inspection/maintenance/repair.
Before each use
Inspect the following points:
All parts: Present and undamaged or unworn.
All parts: Clean, see § 5.2.2.
Wheels, backrest, seat, calf rests, arm rests, footplate: Well secured.
Condition of wheels/tyres, see § 5.2.1;
Condition of frame parts: No deformation, instability, weakness or loose connections
Seat, backrest, arm pads, calf pads and head rest (if applied): No excessive wear (like
dented spots, damage or tears).
Brakes: Undamaged and functioning
Contact your specialist dealer for possible repairs or part replacements.
Yearly or more often
Have your wheelchair inspected and serviced by your specialist dealer, at least once a year, or
more often. The minimum maintenance frequency depends on use and should therefore be
commonly agreed on with your specialist dealer.
5.2 Maintenance instructions
5.2.1 Wheels and tyres
Proper working of the brakes depends on the state of the tyres, and can change due to
wear and contamination (water, oil, mud, …).
Keep your wheels free of wires, hair, sand and fibres.
Check the profile of the tyres. If the tread depth is less than 1 mm, the tyres need to be replaced.
Contact your specialist dealer for this matter.
Inflate each pneumatic tyre to the correct pressure (see pressure indication on the tyres).
5.2.2 Cleaning
Risk of damage by moisture
Never use a hose or high
-
pressure cleaner to clean the wheelchair.
Wipe all rigid parts of the wheelchair with a damp cloth (not drenched).
If necessary, use a mild soap, suitable for varnishes and synthetics.
The upholstery can be cleaned with lukewarm water and a mild soap. Do not use abrasive
cleaning agents to clean.
CAUTION
CAUTION

Jazz S50
2020-09
Maintenance
15
EN
NL
5.2.3 Disinfection
Risk of damage
Disinfections may only be
undertaken by trained persons. Consult your specialist dealer.
5.3 Troubleshooting
Even if you use your wheelchair properly, a technical problem may occur. If this is the case,
contact your local specialist dealer.
Risk of injuries and damage to the wheelchair
NEVER attempt to repair the wheelchair yourself.
The following symptoms may indicate a serious problem. Therefore always contact your specialist
dealer if you spot any of the following deviations:
Strange sound;
Uneven tread wear on one of the tyres;
Jerky movements;
Wheelchair deflects to one side;
Damaged or broken wheel assemblies.
5.4 Expected lifespan
The average lifespan of your wheelchair is 5 years. Depending on the frequency of use, driving
circumstances and maintenance, the lifespan of your wheelchair will increase of decrease.
5.5 Reuse
Before each reuse, have the wheelchair disinfected, inspected and serviced according to the
instructions in §5.1 and §5.2.
5.6 End of use
At end of life, you need to dispose your wheelchair according to the local environmental
legislation. The best way to do so, is to disassemble the wheelchair to facilitate the transport of
recyclable parts.
CAUTION
WARNING

Jazz S50
2020-09
Technical specifications
16
EN
NL
6 Technical specifications
The technical details below are only valid for this wheelchair, at standard settings and optimal
ambient conditions. Take these details into account during use.
The values are no longer applicable if your wheelchair has been modified, damaged or suffers
from severe wear.
Table 1: Technical specifications
Make
Vermeiren
Type
Manual wheelchair
Model
Jazz S50
Description
Jazz S50 Kids
Jazz S50
Maximum occupant mass 60 kg 130 kg
Overall length with footrest 914 mm 1120 mm
Effective seat width 330 mm
370 mm
390 mm
420 mm
440 mm
460 mm
480 mm
500 mm
Overall width (depends on the seat width)
518 mm
558 mm
565 mm
595 mm
615 mm
635 mm
655 mm
675 mm
Folded length without footrest 707 mm 825 mm
Folded width 299 mm 290 mm
Folded height 915 mm 935 mm
Total mass 15,20 kg 16,60 kg
Mass of heaviest part 7,50 kg 8,05 kg
Masses of parts that can be dismantled or
removed
Footrests: 1,80 kg; Armrests: 1,80 kg;
Rear wheels:
4,95 kg
Static stability downhill 15°
Static stability uphill 10°
Static stability sideways 15°
Effective seat depth 325 mm 450 mm
Seat surface height at front edge 457 mm 500 mm
Seat angle 5°
Backrest height 360 mm 420 mm
Backrest angle 0°
Distance between footrest and seat 317 - 366 mm 370 – 440 mm
Angle between seat and footrest 6° 7°
Distance between armrest and seat 211 mm 220 mm
Front location of armrest structure 235 mm 310 mm
Hand rim diameter 495 mm 535 mm
Horizontal location of axle (deflection) 10 mm
Minimum turning diameter 990 mm 1190 mm

Jazz S50
2020-09
Technical specifications
17
EN
NL
Diameter Rear wheels 22" 24" (optional 12”)
Tyre pressure, rear (driving) wheels Max. 3.5 bar
Diameter Steering wheels 150 mm 200 mm
Tyre pressure, front (steering) wheels Max. 2.5 bar
Storage and use temperature + 5 °C - + 41 °C
Storage and use humidity 30% - 70%
We reserve the right to introduce technical changes. Measurement tolerance ± 15 mm / 1,5 kg / 1,5°


Jazz S50
2020-09
Table des matières
1
EN
FR
NL
Table des matières
Table des matières..................................................................................................... 1
Préface........................................................................................................................ 2
1 Votre produit .................................................................................................. 3
1.1 Accessoires ................................................................................................... 3
2 Avant l’utilisation .......................................................................................... 4
2.1 Utilisation prévue........................................................................................... 4
2.2 Explication des symboles .............................................................................. 4
2.3 Instructions générales de sécurité................................................................. 4
2.4 Transport ....................................................................................................... 5
2.5 Pliage/Dépliage du fauteuil roulant................................................................ 7
2.6 Montage/Retrait des roues arrière (s'il y en a) .............................................. 7
2.7 Entreposage .................................................................................................. 7
3 Utilisation ...................................................................................................... 8
3.1 Placer ou enlever les repose-pieds ............................................................... 8
3.2 Utilisation des freins ...................................................................................... 8
3.3 Montage ou retrait des accoudoirs ................................................................ 9
3.4 Transfert dans et hors du fauteuil roulant .................................................... 10
3.5 Déplacements avec le fauteuil roulant ........................................................ 10
4 Installation et réglage ................................................................................. 12
4.1 Outils ........................................................................................................... 12
4.2 Mode de livraison ........................................................................................ 12
4.3 Réglage des repose-pieds .......................................................................... 12
4.4 Réglages des freins .................................................................................... 13
4.5 Changement des pneus à air ...................................................................... 13
5 Entretien ...................................................................................................... 15
5.1 Points d’entretien ........................................................................................ 15
5.2 Instructions d’entretien ................................................................................ 15
5.3 Résolution des problèmes ........................................................................... 16
5.4 Durée de vie attendue ................................................................................. 16
5.5 Réutilisation ................................................................................................ 16
5.6 Mise au rebut .............................................................................................. 16
6 Spécifications techniques .......................................................................... 17

Jazz S50
2020-09
Préface
2
EN
FR
NL
Préface
Félicitations ! Vous êtes à présent l’heureux propriétaire d'un fauteuil roulant Vermeiren !
Ce fauteuil roulant a été fabriqué par un personnel qualifié et responsable. Il est conçu et produit
conformément aux normes de qualité élevées, appliquées par Vermeiren.
Veuillez lire attentivement ce manuel. Vous pourrez ainsi vous familiariser avec le
fonctionnement, les capacités et les limites de votre fauteuil roulant. Si vous avez encore des
questions après la lecture de ce manuel, n’hésitez pas à prendre contact avec votre commerçant
spécialisé. Il vous aidera volontiers.
Remarque importante
Pour assurer votre sécurité et prolonger la durée de vie de votre produit, prenez-en grand soin et
faites-le contrôler ou entretenir régulièrement.
Ce manuel est le reflet des derniers développements du produit. Vermeiren a le droit d’apporter
des modifications à ce type de produit sans être tenu d'adapter ou de remplacer des produits
similaires fournis précédemment.
Les images sont fournies afin de clarifier les instructions de ce manuel. Les détails du produit
illustré peuvent diverger de votre produit.
Informations disponibles
Sur notre site Internet http://www.vermeiren.com/, vous trouverez toujours la dernière version
des informations décrites dans le présent manuel. Veuillez consulter régulièrement ce site
Internet pour connaître les éventuelles mises à jour.
Les personnes malvoyantes peuvent télécharger la version électronique de ce manuel et la lire
au moyen d'une application de texte-parole.
Manuel d'utilisation
Pour l'utilisateur et le revendeur spécialisé
Instructions d'installation
Pour le revendeur spécialisé
Manuel d'entretien des fauteuils roulants
Pour le revendeur spécialisé
Déclaration de conformité CE

Jazz S50
2020-09
Votre produit
3
EN
FR
NL
1 Votre produit
1.1 Accessoires
Les accessoires suivants sont disponibles pour le Jazz S50 :
Roues à batons (B86)
Accoudoirs (B05)
Contactez votre revendeur spécialisé pour les autres accessoires. Il vous conseillera avec plaisir.
1 = Croisillon
2 = Poignées de poussée
3 = Dossier
4 = Manchettes
5 = Accoudoirs
6 = Roues motrices (roues arrière)
7 = Mains-courantes
8 = Freins
9 = Monte trottoir supplémentaire
10 = Roues directrices (roues avant)
11 = Repose-pieds
12 = Palettes
13 = Assise
14 = L'emplacement de la plaque
d'identification
3
4
5
11
13
14
2
9
7
6
8
1
12
10

Jazz S50
2020-09
Avant l’utilisation
4
EN
FR
NL
2 Avant l’utilisation
2.1 Utilisation prévue
Ce paragraphe vous donne une brève description de l'usage prévu de votre fauteuil roulant.
Des avertissements pertinents ont également été ajoutés aux instructions dans les autres
paragraphes. Nous aimerions ainsi attirer votre attention sur un usage inapproprié éventuel qui
pourrait survenir.
Indications et contre-indications : L'utilisateur peut lui-même faire avancer le fauteuil roulant ou
se faire pousser par une autre personne. Le fauteuil roulant est destiné aux personnes qui ont
des difficultés à marcher ou sont dans l'impossibilité de marcher. Les différents types
d'équipements et d'accessoires et la construction modulaire permettent une utilisation
complète par les personnes gériatriques et des personnes souffrant des handicaps suivants :
paralysie, de la perte de membres (amputation des jambes), déficience ou malformation de
membres, de contractions ou d'affections articulatoires, insuffisances cardiaques et mauvaise
circulation sanguine, troubles de l'équilibre, cachexie (perte musculaire).
Le fauteuil roulant est destiné à une utilisation en intérieur et en extérieur.
Le fauteuil roulant est destiné au transport d'une seule personne d’ un poids maximum de 130
kg. Il n'est pas destiné au transport de marchandises ou d'objets, ni à tout autre usage que
celui décrit précédemment.
Utilisez uniquement des accessoires et des pièces de rechange approuvés par Vermeiren.
Consultez également les détails techniques et les limites de votre fauteuil au chapitre 6.
La garantie sur ce produit est basée sur une utilisation et un entretien normaux, tels que décrits
dans le présent manuel. Les dommages à votre produit dus à un usage inapproprié ou à un
manque d’entretien auront pour effet d’annuler la garantie.
2.2 Explication des symboles
Poids maximum de l'utilisateur en kg
Usage à l’intérieur/extérieur
Déclivité sûre maximale en ° (degrés).
Indication du type
2.3 Instructions générales de sécurité
N'utilisez pas votre fauteuil roulant si vous êtes sous l'influence de l’alcool, de médicaments
ou d’autres substances qui peuvent influencer vos capacités de conduite.
N'oubliez pas que certaines parties de votre fauteuil roulant peuvent devenir très chaudes ou
très froides en fonction de la température ambiante, des rayons du soleil ou des dispositifs de
chauffage. Faites donc attention lorsque vous les touchez. Portez des vêtements de protection
s'il fait froid. Lorsque vous sortez, des gants peuvent être utilisés pour améliorer la prise sur
les mains courantes.
Ne modifiez en aucun cas votre fauteuil roulant.
Lorsque vous utilisez les roues motrices, veillez à ce qu’aucun objet et/ou partie du corps ne
puisse prendre dans les rayons, sous peine de blessures et/ou de dégâts à votre fauteuil
roulant.

Jazz S50
2020-09
Avant l’utilisation
5
EN
FR
NL
Sachez que votre fauteuil roulant peut interférer avec certains types de systèmes antivol, selon
les paramètres utilisés. Cela peut déclencher l'alarme du magasin.
2.4 Transport
2.4.1 Dégagement de l’espace
Le meilleur moyen de déplacer le fauteuil roulant consiste à le faire rouler sur ses roues.
Si cela n'est pas (par exemple en cas de retrait des roues arrière pour le transport dans une
voiture), saisir fermement le cadre à l'avant et les poignées. Ne pas saisir le fauteuil roulant par
les repose-pieds ni par les accoudoirs.
2.4.2 Transport par véhicule, comme bagages
Risque de lésion
Vérifiez que le fauteuil roulant est bien fixé. Vous évitez ainsi des blessures des passagers en
cas de collision ou de freinage brutal.
N'utilisez JAMAIS la même ceinture pour le fauteuil roulant et le passager.
1. Pliez le fauteuil roulant dans ses dimensions les plus compactes selon les instructions in §2.5.
2. Entreposez le fauteuil roulant et ses roues dans le compartiment des bagages ou derrière le
siège passager. Si le coffre n'est PAS séparé de l'habitacle du véhicule ou fermé, fixez
fermement le fauteuil roulant dans le véhicule.
2.4.3 Utilisation du fauteuil roulant comme siège dans un véhicule
Risque de blessures et/ou de dommages
Le fauteuil roulant a passé le crash test ISO 7176-19 : 2008, et donc a été conçu et testé
uniquement pour une utilisation en tant que passager du véhicule.
AVERTISSEMENT : La ceinture pelvienne seule n’est pas adaptée pour être utilisée comme
ceinture de sécurité pour tout autre passager.
Le fauteuil est testé avec 4 points d’attache et une ceinture 3 points. Dès que possible, utilisez le
siège du véhicule et emportez votre fauteuil dans le coffre.
Etapes pour fixer le fauteuil dans un véhicule:
1. Vérifiez que le véhicule est équipé d’un système d’accroches pour fauteuils roulant, ISO
10542.
2. Vérifiez que les systèmes d’accroche sont en bon état de fonctionnement (Ne pas utiliser si
les points d’accroches sont endommagés).
3. Si le fauteuil a une assise ou un dossier réglable, faites en sorte que l’utilisateur soit le plus
droit possible dans son fauteuil. Si l’état de santé de l’utilisateur empêche ceci, une
évaluation des risques et nécessaire pour évaluer la sécurité de l’utilisateur pendant le
transport.
4. Retirez du fauteuil les accessoires tels que tablette, équipement respiratoire et sécurisez
les pour le transport.
5. Dans la voiture, positionnez le fauteuil roulant face à la route et centré entre les points
d’accroche.
6. Fixez les sangles avant de sécurité comme indiqué par le fabricant (figure 1). Les points
d’accroches sont indiqués sur le fauteuil roulant par un symbole (figure 2).
7. Reculez le fauteuil de façon à ce que les sangles avant soient tendues.
8. Actionnez les freins du fauteuil roulant.
9. Fixez les sangles arrière de sécurité comme indiqué par le fabricant (figure 1). Les points
d’accroches sont indiqués sur le fauteuil roulant par un symbole (figure 2).
AVERTISSEMENT
AVERTISSEMENT

Jazz S50
2020-09
Avant l’utilisation
6
EN
FR
NL
Etapes pour sécuriser l’utilisateur du fauteuil roulant :
1. Retirez les deux accoudoirs.
2. Si le fauteuil a une ceinture de sécurité, bouclez la.
3. Attachez l’utilisateur du fauteuil comme indiqué par le fabricant des sangles de sécurité.
4. Portez la ceinture de sécurité du bassin de façon à ce qu’elle soit positionnée comme sur le
dessin ci-dessous, dans une zone de 30 à 75° par rapport à l’horizontal.
5. Pour le confort du patient, préférez le plus grand angle de la zone hachurée (préférez
l'angle de 75° à l'angle des 30°).
6. Ajustez la ceinture de sécurité comme indiqué par le fabricant pour que celle-ci soit tendue
tout en gardant le confort de l’utilisateur.
7. Assurez-vous que les ceintures soient correctement fixées sans être pliées ou torsadées.
8. Vous pouvez installer à nouveau les accoudoirs si cela est nécessaire. Assurez-vous que
les ceintures ne sont pas coincées pas certaines parties du fauteuil comme les accoudoirs,
les roues, etc.
Figure 1
Figure 2
La ceinture pelvienne doit avoir un
contact parfait avec le devant du corps
de l'utilisateur.
Les ceintures ne doivent pas être
éloignées du corps par les parties
comme les accoudoirs ou les roues.

Jazz S50
2020-09
Avant l’utilisation
7
EN
FR
NL
2.5 Pliage/Dépliage du fauteuil roulant
Risque de coincement - N'insérez pas les doigts entre les éléments du
fauteuil roulant.
Pour plier le fauteuil roulant :
1. Pliez ou retirez les repose-pieds (voir § 2.4).
2. Saisissez l'avant et l'arrière du siège et tirez vers le haut.
3. Appuyez sur les poignées pour continuer à plier le fauteuil roulant.
Pour déplier de fauteuil roulant :
1. Placez-vous derrière le fauteuil roulant.
2. Utilisez les poignées pour ouvrir le fauteuil roulant autant que possible.
3. Placez-vous à l'avant du fauteuil roulant.
4. Poussez sur les deux tubes de l'assise vers le bas jusqu'à ce qu'ils soient fixés à leur
place.
2.6 Montage/Retrait des roues arrière (s'il y en a)
Pour retirer les roues arrière
1. Enfoncez et maintenez le bouton (1) en faisant glisser l’axe de la roue dans le trou du cadre.
2. Répétez cette opération pour l’autre roue et posez
délicatement le fauteuil roulant sur les tubes de cadre arrière.
Pour installer les roues arrière
1. Saisissez l'une des roues arrière et soulevez le fauteuil
roulant sur un côté.
2. Enfoncez et maintenez le bouton (1) en faisant glisser la roue
sur l’axe.
3. Relâchez le bouton pour bloquer la roue. Assurez-vous
qu’elle se clipse en place.
4. Répétez cette opération pour l’autre roue.
5. Assurez-vous que les deux roues sont fermement bloquées.
2.7 Entreposage
Assurez
-
vous que votre fauteuil roulant est entreposé dans un environnement sec pour
éviter la formation de moisissure et l’endommagement du rembourrage, voir également le
chapitre 6.
ATTENTION

Jazz S50
2020-09
Utilisation
8
EN
FR
NL
3 Utilisation
Risque de blessures et/ou de dommages
Lisez d'abord les chapitres précédents et informez-
vous à propos de l'usage visé. N’utilisez
PAS votre fauteuil roulant sans avoir d'abord lu et bien compris toutes les instructions.
En cas de doutes ou de questions, n’hésitez pas à prendre contact avec votre revendeur local,
votre prestataire de soins ou votre conseiller technique qui pourra vous aider.
Assurez-vous que vos mains, vêtements, ceintures, boucles ou bijoux
ne puissent pas se
coincer dans les roues ou dans d'autres parties mobiles pendant l’utilisation ou le réglage.
3.1 Placer ou enlever les repose-pieds
Risque de blessures
Vérifiez que les repose-pieds sont fermement installés avant d'utiliser le fauteuil roulant.
Ne pas placer d'objets au niveau de la partie amovible du repose-pied pendant montez ou
enlevez les repose-pieds.
L'installation des repose-pieds se fait de la manière suivante :
1. Mettez le repose-pied latéralement vers l'extérieur du cadre et
montez le repose-pied avec l'embout (1) dans le cadre.
2. Basculez les repose-pieds vers l'intérieur jusqu'à ce qu'il se
bloque en position.
3. Tournez la palette vers le bas.
Vous devez procéder de la manière suivante pour enlever les
repose-pieds :
1. Tirez le levier (2).
2. Basculez le repose-pied vers l'extérieur du fauteuil roulant
jusqu'à ce qu'il soit libéré du guide.
3. Tirez le repose-pied hors du logement de tube (1).
3.2 Utilisation des freins
Risque de blessures
Les freins n'ont pas pour but de ralentir le fauteuil roulant lors de déplacements. Ne les utilisez
que pour éviter des mouvements non souhaités.
L'usure et la contamination des roues (eau, huile, boue, ...) influencent de le bon
fonctionnement des freins. Vérifiez l'état des roues avant chaque utilisation.
les freins sont réglables et sont sujets à l'usure. Vérifiez leur fonctionnement avant chaque
utilisation.
Vérifiez que le fauteuil roulant se trouve sur une surface horizontale plane avant de relâcher
les freins. Ne relâchez jamais les deux freins en même temps.
Pour actionner les freins :
1. Appuyez les leviers des freins vers l'avant jusqu'à ce
que vous ressentiez un clic clair.
Pour relâcher les freins :
1. Désactivez d'abord un frein en tirant le levier (1) vers
l'arrière.
2. Maintenez avec votre main la main-courante de la roue
relâchée.
3. Relâchez le deuxième frein en tirant la poignée vers
l'arrière.
ATTENTION
ATTENTION
AVERTISSEMENT

Jazz S50
2020-09
Utilisation
9
EN
FR
NL
3.3 Montage ou retrait des accoudoirs
Risque de blessures
Vérifiez que les accoudoirs sont fermement installés avant d'utiliser le fauteuil roulant.
Éloignez vos doigts et les vêtements de la partie inférieure de l'accoudoir.
1. Montez le tube arrière de l'accoudoir dans le logement de tube (1) (Fig. A).
2. Vérifiez que l'accoudoir est parfaitement installé.
3. Pliez l'accoudoir vers l'avant.
4. Tirez le levier (2) sur le logement de tube (3) vers le haut (Fig. B).
5. Verrouillez le tube avant de l'accoudoir (1) dans le logement de tube (3) (Fig. B).
Pour ouvrir et retirer l'accoudoir:
1. Tirez sur le levier (2) et tirez l'avant de l'accoudoir (1) vers le haut (Fig. C).
2. Pliez l'accoudoir vers l'arrière.
3. Pour retirer l'accoudoir, tirez l'arrière du repose-bras hors du logement de tube (3) (Fig. D).
A
B
C
D
AVERTISSEMENT

Jazz S50
2020-09
Utilisation
10
EN
FR
NL
3.4 Transfert dans et hors du fauteuil roulant
Risque de blessures et/ou dommages
Si vous ne pouvez pas réaliser le transfert en toute sécurité,
demandez à quelqu'un de vous aider.
Ne vous levez pas sur les palettes.
1. Placez le fauteuil roulant aussi près que possible de la
chaise, du canapé ou du lit concerné par le transfert.
2. Vérifiez que les freins du fauteuil roulant sont actionnés.
3. Pliez les palettes vers le haut pour éviter de prendre appui
sur elles.
4. Si le transfert est réalisé sur le côté du fauteuil roulant,
rabattez l'accoudoir de ce côté vers le haut (voir § 3.3).
5. Procédez au transfert vers/depuis le fauteuil roulant.
3.4.1 Position correcte du fauteuil roulant
Recommandations pour une utilisation confortable du fauteuil roulant :
Placez votre dos aussi proche que possible du dossier.
Assurez-vous que vos cuisses soient horizontales. Réglez la longueur des repose-pieds
si nécessaire (voir § 4.3).
3.5 Déplacements avec le fauteuil roulant
Risque de blessures et de dommages
Avant tout usage, assurez-vous que :
o les freins de stationnement fonctionnent correctement.
o les pneus sont en bon état, voir § Error! Reference source not found..
Faites attention de ne pas vous coincer les doigts dans les rayons des roues.
Ne tenez pas les poignées avec des mains mouillées.
Faites attention de ne pas vous coincer les mains sur les m
ains courantes lorsque vous roulez
dans des passages étroits
Ne roulez PAS sur des pentes, obstacles, marches ou bordures plus larges que la dimension
décrite au § Error! Reference source not found..
Lorsque vous vous arrêtez sur une (petite) pente, utilisez vos freins.
Assurez-
vous que les quatre roues touchent le sol lorsque vous montez ou descendez une
pente.
Abordez les pentes aussi lentement que possible.
Restez toujours sur le trottoir lorsque vous roulez sur la voie publique.
Faites attention s’il y a des trous ou des fissures dans la route qui peuvent coincer les roues.
Évitez les pierres et autres objets pouvant bloquer les roues.
Assurez-vous que les palettes repose-
pieds ne touchent pas le sol lorsque vous abordez un
obstacle.
N’utilisez pas votre fauteuil roulant sur un escalier mécanique.
Si disponible, portez votre ceinture de sécurité.
Tenez toujours compte de l’amplitude de la palette repose-
pied pour ne pas blesser les
personnes ou endommager les objets aux alentours.
Si vous n’avez pas suffisamment d’expérience dans la conduite de votre fauteuil roulant,
demandez l’aide d'un accompagnateur. Gardez vos mains à l’écart d
es roues et laissez vos
pieds sur la palette repose-pieds.
Les escaliers doivent toujours être franchis à l’aide de deux accompagnateurs.
N’essayez jamais d’emprunter des escaliers qui ne sont pas appropriés pour les fauteuils
roulants.
ATTENTION
ATTENTION

Jazz S50
2020-09
Utilisation
11
EN
FR
NL
3.5.1 Rouler avec votre fauteuil roulant :
1. Relâchez les freins.
2. Saisissez les deux mains courantes à leur position la plus élevée.
3. Penchez-vous en avant et poussez les mains courantes vers l’avant jusqu’à ce que vos bras
soient tendus.
4. Repassez vos mains vers le haut des mains courantes et répétez le mouvement.

Jazz S50
2020-09
Installation et réglage
12
EN
FR
NL
4 Installation et réglage
Les instructions de ce chapitre sont destinées au distributeur.
Le Jazz S50 est conçu comme fauteuil roulant avec un minimum de réglages. Il n'est pas
nécessaire de stocker des pièces de rechange.
Pour trouver un service d'entretien ou un revendeur spécialisé près de chez vous, contactez
l'établissement Vermeiren le plus proche.
Risque de blessures et de dommages
N'utilisez que les réglages décrits dans ce manuel.
Des variations des réglages autorisés peuvent influencer la stabilité de votre fauteuil roulant
(le faire basculer vers l'arrière ou sur le côté)
4.1 Outils
Les outils suivants sont requis pour le montage du fauteuil roulant.
Jeu de clés de 7 à 22
Jeu de clés Allen de 3 à 8
Tournevis à tête Phillips
4.2 Mode de livraison
Le produit Vermeiren Jazz S50 est livré de la manière suivante :
1 châssis avec des accoudoirs, des roues avant et arrière (hauteur d'assise à 500 mm)
1 paire de repose-pieds
Outils
Mode d’emploi
Accessoires (en option)
Pompe pour les roues
4.3 Réglage des repose-pieds
Risque de dommage, évitez tout contact entre les repose-pieds et le sol.
Conservez une distance minimale de 60 mm au-dessus du sol.
Réglez la longueur des repose-pieds de la manière suivante :
1. Enlevez la vis (1).
2. Réglez la longueur du repose-pied pour une assise
confortable.
3. Serrez à nouveau bien la vis (1).
AVERTISSEMENT
ATTENTION

Jazz S50
2020-09
Installation et réglage
13
EN
FR
NL
4.4 Réglages des freins
Danger de lésion - Faites régler les freins par un commerçant spécialisé
et agréé.
1. Montez les roues comme cela est décrit au § 2.6.
2. Détachez les freins en tirant le levier (1) vers l'arrière (Fig A).
3. Déboulonnez le boulon (2) qui tout seul en sorte que le mécanisme de freinage puisse glisser
sur le conduit de la structure (3) (Fig B).
4. Tirez le mécanisme de freinage sur le conduit de la structure (3) vers la position souhaitée
(Fig B). Le réglage des freins est dans la gamme des lignes marquées (4) sur le mécanisme
de frein.
5. Serrez le boulon (2) correctement (Fig B).
6. Contrôlez le fonctionnement des freins.
7. Si nécessaire, répétez les étapes mentionnées ci-dessus jusqu'au réglage correct des freins.
4.5 Changement des pneus à air
Risque de blessures et/ou de dommages
Dans le cas d'une mauvaise utilisation, la jante peut être endommagée. Nous vous conseillons
de faire appel à un expert pour cette procédure.
Lors du montage d'une roue, veillez à ce qu'aucun objet et aucune partie du corps ne puisse
se retrouver coincé entre la roue et la jante.
Faites toujours attention à la pression de remplissage correcte lorsque vous pompez les roues.
Vous pouvez lire cette valeur sur la roue.
N'utilisez que des pompes conformes à la législation et indiquant la pression en bars, ou
utilisez la pompe à air fournie. Nous n'accordons pas de garantie sur les pompes qui ne sont
pas fournies par le fabricant.
Veillez toujours à ce que les roues soient suffisamment gonflées, ce facteur influe sur
les performances de roulage.
Nous n’offrons aucune garantie pour les roues qui ne proviennent pas du fabricant.
Un montage correct peut uniquement être garanti dans le magasin spécialisé. En cas
de travaux qui ne sont pas réalisés par le commerce spécialisé, la garantie est échue.
Si vous voulez changer les pneus extérieurs ou les pneus intérieurs, vous trouverez quelques
conseils ci-dessous :
1. Laissez sortir l'air du pneu intérieur.
2. Glissez un démonte-pneu entre le pneu extérieur et la jante.
3. Poussez lentement le démonte-pneus et prudemment vers le bas. Ce faisant, le pneu
extérieur est tiré du bord de la jante.
4. Déplacez le démonte-pneus le long du bord de la jante, le pneu extérieur saute de la jante.
5. Enlevez maintenant prudemment le pneu extérieur et le pneu intérieur de la jante.
A
B
AVERTISSEMENT
AVERTISSEMENT

Jazz S50
2020-09
Installation et réglage
14
EN
FR
NL
Contrôlez le lit de la jante et l'intérieur du pneu pour voir s'il y a des objets étrangers et nettoyez-
les si nécessaires. Contrôlez l'état du lit de la jante, surtout à proximité de l'ouverture de
ventilation.
Utilisez uniquement des pièces de rechange originelles. La garantie ne s'applique pas aux
dommages qui sont causés par des pièces de rechange qui ne sont pas originelles. Contactez
votre revendeur.
Faites glisser le ruban de jante au-dessus de la valve et insérez cette dernière
dans la jante. Vous pouvez maintenant placer le ruban de jante sans problème.
Vérifiez que toutes les têtes des rayons sont couvertes (si les jantes sont en
plastique, aucun ruban n'est utilisé).
Prenez le pneu extérieur et appuyez-le sur le bord de la jante en commençant
derrière la valve. Pompez légèrement le pneu intérieur jusqu'à ce qu'il adopte
une forme ronde et mettez-le dans le pneu.
Une fois que le pneu intérieur s'insère bien dans le pneu extérieur et sans pli
(laissez sortir un peu d'air, le cas échéant), placez délicatement et à l'aide de
vos deux mains la partie supérieure du pneu extérieur sur la jante, de nouveau
en commençant au niveau de la valve.
Contrôlez autour et des deux côtés si le pneu intérieur n'est pas coincé entre le bourrelet et la
jante. Glissez à nouveau légèrement la valve pour la remettre en place et tirez dessus afin que
le pneu soit bien positionné à proximité de la valve.
Pour pomper correctement le pneu, vous pompez d'abord de l'air jusqu'à ce que vous puissiez
encore bien appuyer sur le pneu avec le pouce. Lorsque la ligne de contrôle indique des deux
côtés du pneu la même distance par rapport au bord de la jante, le pneu est correctement centré.
Lorsque ce n'est pas le cas, vous devez laisser à nouveau de l'air et aligner de nouveau le pneu.
Pompez maintenant le pneu jusqu'à la pression d'utilisation maximale (attention à la pression de
remplissage !) et remettez le capuchon sur la valve.

Jazz S50
2020-09
Entretien
15
EN
FR
NL
5 Entretien
5.1 Points d’entretien
Risque de blessures et de dommages
Les réparations et les remplacements ne peuvent être réalisés que par des personnes formées,
et seules des pièces de remplacement d'origine de Vermeiren peuvent être utilisées.
La fréquence d'entretien dépend de la fréquence et de l'intensité de l'utilisation. Prenez
contact avec votre commerçant pour convenir d'un rendez-
vous pour une inspection/un
entretien/une réparation.
Avant chaque utilisation
Inspectez les points suivants :
Toutes les pièces : Présentes et sans dommage ni usure.
Toutes les pièces : Propres, voir § 5.2.2.
Roues, dossier, siège, repose-jambes, accoudoirs, palette repose-pieds : Bien serrés.
État des roues/pneus, voir § 5.2.1.
État des pièces du cadre : Pas de déformation, d'instabilité, de faiblesse ou de
connexions desserrées.
Siège, dossier, manchettes, repose-jambes et appuie-tête (si applicable) : Pas d'usure
excessive (bosses, dommages ou déchirures).
Freins : Non endommagés et fonctionnant
Contactez votre commerçant spécialisé pour les réparations et les remplacements de pièces
éventuels.
Chaque année ou plus souvent
Faites inspecter et entretenir votre fauteuil roulant par votre revendeur spécialisé au moins une
fois par an, ou plus. La fréquence d’entretien minimale dépend de l’usage et doit être déterminée
de commun accord avec votre commerçant spécialisé.
5.2 Instructions d’entretien
5.2.1 Roues et pneus
Un fonctionnement correct des freins dépend de l’état des pneus, qui peut changer en
raison de l’usure et de la contamination (eau, huile, boue…).
Éliminez les fils, cheveux, le sable et les fibres de vos roues.
Vérifiez le profil des pneus. Si la profondeur de la sculpture est inférieure à 1 mm, les pneus
doivent être remplacés. Prenez contact avec votre revendeur spécialisé à ce propos.
Gonflez chaque pneu à la pression adéquate (cf. les indications de pression sur les pneus).
5.2.2 Nettoyage
Risque de dommages dus à l'humidité
N'utilisez jamais un tuyau ou un nettoyeur à haute pression pour nettoyer le fauteuil roulant.
Essuyez toutes les parties rigides du fauteuil roulant avec un chiffon humide (pas détrempé).
Si nécessaire, utilisez un savon doux, approprié pour les laques et les synthétiques.
Le rembourrage peut être nettoyé à l’eau tiède additionnée de savon doux. N'utilisez pas de
produits de nettoyage abrasifs.
ATTENTION
ATTENTION

Jazz S50
2020-09
Entretien
16
EN
FR
NL
5.2.3 Désinfection
Risque de dommages
La désinfection ne peut être réalisée que par des personnes qualifiées. Renseignez-
vous
auprès de votre revendeur spécialisé à cet égard.
5.3 Résolution des problèmes
Même si vous utilisez votre fauteuil roulant de façon appropriée, les problèmes techniques ne
sont pas exclus. Dans ce cas, contactez votre local revendeur spécialisé.
Risque de blessures et de dommages au fauteuil roulant
N'essayez
JAMAIS de réparer le fauteuil roulant vous
-
même.
Les symptômes suivants peuvent indiquer un problème grave. Par conséquent, prenez toujours
contact avec votre revendeur spécialisé si vous détectez l’une des anomalies suivantes :
Bruit anormal ;
Usure inégale sur la sculpture de l’un des pneus ;
Mouvements saccadés ;
Le fauteuil roulant dévie d’un côté ;
Ensembles de roues endommagés ou cassés.
5.4 Durée de vie attendue
La durée de vie moyenne de votre fauteuil roulant est de 5 ans. Elle augmentera ou diminuera
suivant la fréquence d'utilisation, les conditions de conduite et l’entretien.
5.5 Réutilisation
Avant chaque réutilisation, faites désinfecter, inspecter et entretenir le fauteuil roulant
conformément aux instructions du §5.1 et du §5.2.
5.6 Mise au rebut
À la fin de sa durée de vie, votre fauteuil roulant doit être évacué conformément à la législation
environnementale locale. Il est recommandé de démonter le fauteuil roulant afin de faciliter le
transport des matériaux recyclables.
ATTENTION
AVERTISSEMENT

Jazz S50
2020-09
Spécifications techniques
17
EN
FR
NL
6 Spécifications techniques
Les détails techniques ci-dessous concernent uniquement ce fauteuil roulant, avec des réglages
standard et dans des conditions ambiantes optimales. Veuillez tenir compte de ces détails
pendant l’utilisation.
Les valeurs ne sont plus valables si votre fauteuil roulant a été modifié, endommagé ou présente
une usure sérieuse.
Tableau 1 : Caractéristiques techniques
Marque
Vermeiren
Type
Fauteuil roulant manuel
Modèle
Jazz S50
Description
Jazz S50 Kids
Jazz S50
Poids max. du patient 60 kg 130 kg
Longueur totale avec repose-pied 914 mm 1120 mm
Largeur d'assise efficace 330 mm
370 mm
390 mm
420 mm
440 mm
460 mm
480 mm
500 mm
Largeur totale (en fonction de la largeur
d'assise)
518 mm
558 mm
565 mm
595 mm
615 mm
635 mm
655 mm
675 mm
Longueur plié sans repose-pied 707 mm 825 mm
Largeur pliée 299 mm 290 mm
Hauteur plié 915 mm 935 mm
Masse totale 15,20 kg 16,60 kg
Masse de la partie la plus lourde 7,50 kg 8,05 kg
Des masses de pièces qui peuvent être
démontés ou retirées
Repose-pieds : 1,80 kg; Accoudoirs: 1,80 kg; Roues arrières:
4,95 kg
Stabilité statique en descente 15°
Stabilité statique en montée 10°
Stabilité statique latérale 15°
Profondeur d'assise efficace 325 mm 450 mm
Hauteur de la surface d'assise sur le bord
avant
457 mm 500 mm
Angle du plan d'assise 5°
Hauteur du dossier 360 mm 420 mm
Angle du dossier 0°
Distance entre le repose-pied et le siège 317 - 366 mm 370 mm - 440 mm
Angle entre le repose-pied et le siège 6° 7°
Distance entre l'accoudoir et le siège 211 mm 220 mm
Emplacement avant de la structure de
l'accoudoir
235 mm 310 mm
Diamètre de la main-courante 495 mm 535 mm

Jazz S50
2020-09
Spécifications techniques
18
EN
FR
NL
Emplacement horizontal de l'essieu (flèche) 10 mm
Diamètre de braquage minimum 990 mm 1190 mm
Diamètre des roues arrières 22" 24" (en option 12")
Pression des pneus, roues arrière (motrices)
Max. 3,5 bars
Diamètre des roues directrices 150 mm 200 mm
Pression des pneus, roues avant
(directrices)
Max. 2,5 bars
Température de stockage et d'utilisation + 5 °C - + 41 °C
Humidité de stockage et d'utilisation 30% - 70%
Nous nous réservons le droit d’apporter des modifications techniques.
Tolérance de mesures ± 15 mm / 1,5 kg /1,5 °.

Jazz S50
2020-09
Inhoudsopgave
1
NL
Inhoudsopgave
Inhoudsopgave .......................................................................................................... 1
Voorwoord .................................................................................................................. 2
1 Uw product .................................................................................................... 3
1.1 Accessoires ................................................................................................... 3
2 Voor gebruik .................................................................................................. 4
2.1 Beoogd gebruik ............................................................................................. 4
2.2 Gebruikte symbolen ...................................................................................... 4
2.3 Algemene veiligheidsmaatregelen ................................................................ 4
2.4 Transport ....................................................................................................... 5
2.5 De rolstoel opvouwen/ontvouwen ................................................................. 7
2.6 De achterwielen monteren/verwijderen (indien beschikbaar) ........................ 7
2.7 Opslag ........................................................................................................... 7
3 Uw rolstoel gebruiken .................................................................................. 8
3.1 De voetsteunen plaatsen of verwijderen ....................................................... 8
3.2 Bedienen van de remmen ............................................................................. 8
3.3 Plaatsen of verwijderen van de armsteunen ................................................. 9
3.4 Transfer in en uit de rolstoel ........................................................................ 10
3.5 Rijden met de rolstoel ................................................................................. 10
4 Montage en instellingen ............................................................................. 12
4.1 Gereedschap .............................................................................................. 12
4.2 Leveringsomvang ........................................................................................ 12
4.3 Instellen van de voetsteunen ...................................................................... 12
4.4 Afstellen van de remmen ............................................................................ 13
4.5 Veranderen van de luchtbanden ................................................................. 13
5 Onderhoud .................................................................................................. 15
5.1 Tijdstippen voor onderhoud ......................................................................... 15
5.2 Onderhoudsinstructies ................................................................................ 15
5.3 Probleemoplossing...................................................................................... 16
5.4 Verwachte levensduur ................................................................................. 16
5.5 Hergebruik .................................................................................................. 16
5.6 Beëindiging van gebruik .............................................................................. 16
6 Technische specificaties ............................................................................ 17

Jazz S50
2020-09
Voorwoord
2
NL
Voorwoord
Proficiat! U bent eigenaar van een Vermeiren-rolstoel!
Deze rolstoel werd vervaardigd door gekwalificeerd en toegewijd personeel. Hij werd ontworpen
en geproduceerd volgens hoge kwaliteitsnormen, bewaakt door Vermeiren.
Lees deze handleiding zorgvuldig door: het zal u helpen om vertrouwd te raken met de bediening,
mogelijkheden en beperkingen van uw rolstoel. Als u hierna nog vragen heeft, aarzel dan niet om
contact op te nemen met uw vakhandelaar. Hij/Zij zal u met plezier verder helpen.
Belangrijke opmerking
Om uw veiligheid te garanderen, en om de levensduur van uw product te verlengen, raden we u
aan om er goed zorg voor te dragen en om regelmatig nazicht en onderhoud te laten uitvoeren.
Deze handleiding houdt rekening met de recentste productontwikkelingen. De Firma Vermeiren
behoudt zich het recht voor om wijzigingen aan dit type product door te voeren zonder verplicht
te zijn om voordien geleverde producten aan te passen of te vervangen.
Afbeeldingen van het product worden gebruikt om de instructies in deze handleiding te
verduidelijken. Details van het afgebeelde product kunnen afwijken van uw aangekochte product.
Beschikbare informatie
Op onze website http://www.vermeiren.com/ kan u steeds de meest recente versie terugvinden
van de informatie in deze handleiding. Contacteer deze website regelmatig voor mogelijke
updates.
Mensen met een visuele beperking kunnen de elektronische versie van deze handleiding
downloaden en laten voorlezen door een tekst-naar-spraak programma.
Gebruiksaanwijzing Voor de gebruiker en vakhandelaar
Installatiehandleiding Voor de vakhandelaar
Onderhoudshandleiding voor rolstoelen Voor de vakhandelaar
EC-conformiteitsverklaring

Jazz S50
2020-09
Uw product
3
NL
1 Uw product
1.1 Accessoires
Volgende accessoires zijn beschikbaar voor de Jazz S50:
Reiswielen (B86)
Armsteunen (B05)
Neem contact op met de vakhandelaar voor meer informatie over andere accessoires. Hij geeft
u graag advies.
1 = Kruis
2 = Handgrepen
3 = Rug
4 = Armleggers
5 = Armsteunen
6 = Aandrijfwielen (achterwielen)
7 = Grijphoepels
8 = Remmen
9 = Trapdop
10 = Stuurwielen (voorwielen)
11 = Voetsteunen
12 = Voetplaten
13 = Zit
14 = Locatie identificatieplaat
3
4
5
11
13
14
2
9
7
6
8
1
12
10

Jazz S50
2020-09
Voor gebruik
4
NL
2 Voor gebruik
2.1 Beoogd gebruik
In dit hoofdstuk wordt kort beschreven wat het beoogde gebruik van uw rolstoel inhoudt.
Bijkomende relevante waarschuwingen worden gegeven bij de instructies in andere
hoofdstukken. Op deze manier proberen we u te waarschuwen voor mogelijk verkeerd gebruik.
Indicaties en contra-indicaties: De gebruiker kan de rolstoel zelf voortbewegen of laten duwen
door een begeleider. De rolstoel is bedoeld voor mensen die moeilijk of niet kunnen lopen. De
verschillende soorten onderdelen en accessoires, en de modulaire constructie, zorgen ervoor
dat de elektrische rolstoel ten volle kan worden gebruikt door geriatrische personen of mensen
die invalide zijn omwille van: verlamming, verlies van ledematen (beenamputatie), defect of
aandoeningen van ledematen, contracturen of gewrichtsaandoeningen, hart- en
bloedsomloopinsufficiëntie, evenwichtsstoornissen, cachexie (afname van het spierweefsel).
De rolstoel kan zowel binnenshuis als buiten gebruikt worden.
De rolstoel is ontworpen voor het transport van 1 persoon met een maximum gewicht van 130
kg. Het is niet bedoeld om goederen of objecten te vervoeren, noch voor enig ander gebruik
dan hiervoor beschreven.
Gebruik enkel accessoires en reserveonderdelen die werden goedgekeurd door Vermeiren.
Lees eerst alle technische details en limieten van uw rolstoel in hoofdstuk 6.
De garantie op dit product is gebaseerd op normaal gebruik en onderhoud zoals beschreven
in deze handleiding. De garantie vervalt bij schade die werd veroorzaakt door verkeerd gebruik
of gebrek aan onderhoud
2.2 Gebruikte symbolen
Maximum gewicht van de gebruiker in kg
Gebruik voor binnen en buiten
Maximale veilige helling in ° (graden)
Type aanduiding
2.3 Algemene veiligheidsmaatregelen
Gebruik de rolstoel niet indien u onder invloed bent van alcohol, medicijnen of andere
substanties die uw rijvermogen verminderen.
Houd er rekening mee dat sommige onderdelen van uw rolstoel zeer warm of koud kunnen
worden door omgevingstemperatuur, de zon of verwarmingstoestellen. Wees daarom
voorzichtig bij het aanraken. Draag beschermende kleding bij koud weer. Bij buitengebruik
kunnen rijhandschoenen de grip op de aandrijfhoepels verbeteren.
Wijzig uw rolstoel op geen enkele manier
Let erop dat bij het gebruik van de aandrijfwielen geen voorwerpen en/of lichaamsdelen tussen
de spaken terechtkomen. Dit kan immers letsel en/of schade aan de rolstoel veroorzaken.
Houd er rekening mee dat uw rolstoel, afhankelijk van de gebruikte instelling, bij sommige
diefstalsystemen interferentie kan geven. Hierdoor kan het winkelalarm in werking gesteld
worden.

Jazz S50
2020-09
Voor gebruik
5
NL
2.4 Transport
2.4.1 Uit de weg zetten
De beste manier om de rolstoel te dragen is om gebruik te maken van de wielen en zo de rolstoel
verder te rollen.
Als dit niet mogelijk is (bv. wanneer de achterwielen verwijderd zijn voor transport in de auto),
grijp de rolstoel stevig vast aan de voorzijde van het frame en de handgrepen. Gebruik de voet-,
armsteunen of de wielen niet om de rolstoel vast te nemen.
2.4.2 Transport per voertuig, als bagage
Gevaar voor letsel
Zorg ervoor dat de rolstoel voldoende vastgemaakt is, om verwonding van de inzittenden
tijdens aanrijding of plots remmen te voorkomen.
Gebruik voor het vastmaken van de rolstoel en de passagiers NOOIT dezelfde gordel.
1. Vouw de rolstoel tot zijn meest compacte formaat volgens de instructies in §2.5.
2. Bewaar de rolstoel en zijn wielen in het bagagecompartiment of achter de passagiersstoel. Als
de bagage- en passagierscompartimenten NIET van elkaar gescheiden zijn, bevestig dan het
frame van de rolstoel stevig aan het voertuig.
2.4.3 Gebruik van de rolstoel als zit in een motorvoertuig
Gevaar voor letsel en/of beschadiging
De rolstoel heeft de crashtest volgens ISO 7176-19: 2008 doorstaan en is zodanig ontworpen
en getest om alleen te worden gebruikt als een naar voren gerichte zit in een motorvoertuig.
Gebruik de bekkengordel van de rolstoel niet als riem voor inzittenden, deze is hiervoor niet
geschikt.
De rolstoel is getest met een vierpunts rolstoelvastzetsysteem en een driepunts-
veiligheidssysteem voor inzittenden. Probeer zoveel mogelijk gebruik te maken van de zetel van
het voertuig en de rolstoel te bewaren in de laadruimte.
Procedure om de rolstoel vast te maken aan het voertuig:
1. Controleer of het voertuig is uitgerust met een geschikt rolstoelvastzetsysteem en een
veiligheidssysteem voor inzittenden volgens ISO 10542.
2. Controleer dat de onderdelen van het rolstoelvastzetsysteem en het veiligheids-systeem
voor inzittenden niet versleten, vervuild, beschadigd of gebroken zijn.
3. Indien uitgerust met een verstelbare zit en/of een kantelbare rug, controleer of de
rolstoelgebruiker zo recht mogelijk zit. Als de toestand van de gebruiker dit niet toe laat,
moet een risicoanalyse worden uitgevoerd om de veiligheid van de gebruiker tijdens
transport te evalueren.
4. Verwijder alle gemonteerde accessoires zoals dienbladen en beademingsapparatuur en zet
ze op een veilige plaats.
5. Positioneer de rolstoel naar voren in de rijrichting, centraal tussen de vastzet rails die zijn
vastgemaakt in de vloer van het voertuig.
6. Maak de voorste veiligheidsgordels vast volgens de instructies van het op de aangegeven
plaats riem-systeem van de fabrikant (Figuur 1). Deze plaats is gemarkeerd op de rolstoel
door een symbool (Figuur 2).
7. Rol de rolstoel naar achteren tot de voorste gordels strak zijn.
8. Zet de remmen van de rolstoel aan.
9. Maak de achterste veiligheidsgordels vast volgens de instructies van het op de aangegeven
plaats riem-systeem van de fabrikant (Figuur 1). Deze plaats is gemarkeerd op de rolstoel
door een symbool (Figuur 2).
WAARSCHUWING
WAARSCHUWING

Jazz S50
2020-09
Voor gebruik
6
NL
Figuur 1 Figuur 2
Procedure om de rolstoelgebruiker vast te maken:
1. Verwijder beide armsteunen.
2. Indien aanwezig, bevestig de rolstoel bekkengordel.
3. Bevestig het veiligheidssysteem voor inzittenden volgens de instructies van het riem-
systeem van de fabrikant.
4. Draag de bekkengordel laag over de voorkant van de bekken, zodat de hoek van de
bekkengordel binnen de gewenste zone van 30° tot 75° met de horizontale is, analoog zoals
hieronder aangeven.
5. Een steilere (grotere) hoek binnen de gewenste zone is wenselijk.
6. Trek de riem strak aan volgens de instructies van het riem-systeem van de fabrikant en in
overeenstemming met het comfort van de gebruiker.
7. Zorg ervoor dat de veiligheidsriem verbonden wordt in een rechte lijn aan het ankerpunt van
het voertuig en dat er geen bochten in de riem zichtbaar zijn, bijvoorbeeld op de as van het
achterwiel.
8. Installeer de armleuningen indien gewenst. Zorg ervoor dat de gordels niet gedraaid zijn of
weggehouden worden van het lichaam door rolstoel onderdelen zoals armsteunen of wielen.
DE BEKKENGORDEL MOET VOLLEDIG
CONTACT MAKEN MET DE VOORKANT VAN
HET LICHAAM VLAKBIJ DE KRUISING VAN DE
DIJ EN HET BEKKEN.
GORDELS MOGEN NIET WEGGEHOUDEN
WORDEN VAN HET LICHAAM DOOR
ROLSTOEL ONDERDELEN ZOALS
ARMSTEUNEN OF WIELEN.

Jazz S50
2020-09
Voor gebruik
7
NL
2.5 De rolstoel opvouwen/ontvouwen
Kans op klemmen - Houd uw vingers niet tussen de onderdelen van
de rolstoel.
Om op te vouwen:
1. Klap de voetplaten omhoog, of verwijder ze (zie § 3.1).
2. Neem de zit aan de voor- en achterzijde vast en trek deze naar boven.
3. Druk op de handgrepen om de rolstoel verder in te klappen.
Om te ontvouwen:
1. Ga aan de achterzijde van de rolstoel staan.
2. Gebruik de handgrepen om de rolstoel zo ver mogelijk te openen.
3. Ga aan de voorzijde van de rolstoel staan.
4. Duw beide buizen waaraan de zit bevestigd is verder naar beneden.
2.6 De achterwielen monteren/verwijderen (indien beschikbaar)
Om de achterwielen te verwijderen
1. Duw op de knop (1) en blijf vasthouden terwijl u de wielas uit de bevestiging schuift.
2. Herhaal dit voor het andere wiel en plaats de rolstoel
voorzichtig op de achterste buizen van het frame.
Om de achterwielen te monteren
1. Neem een van de wielen en plaats de rolstoel op één zijde.
2. Duw op de knop (1) en blijf vasthouden terwijl u de wielas in
de bevestiging schuift.
3. Laat de knop los om het wiel te vergrendelen. Zorg ervoor
dat het wiel op zijn plaats klikt.
4. Herhaal dit voor het tweede wiel.
5. Zorg ervoor dat beide wielen stevig werden vastgezet.
2.7 Opslag
Zorg ervoor dat uw rolstoel droog wordt bewaard om schimmel of schade aan de bekleding
te voorkomen, zie hoofdstuk 6.
VOORZICHTIG

Jazz S50
2020-09
Uw rolstoel gebruiken
8
NL
3 Uw rolstoel gebruiken
Gevaar voor letsel en/of beschadiging
Lees eerst de voorgaande hoofdstukken en informeer uzelf over het beoogde gebruik. Gebruik
uw rolstoel NIET voordat u alle instructies gelezen en begrepen heeft.
Als u nog vragen heeft of als u ergens aan twijfelt, aarzel dan
niet om contact op te nemen met
uw lokale vakhandelaar, zorgverlener, of technisch adviseur om u te helpen
Houd tijdens gebruik en verstelling uw vingers, gespen, kledij en juwelen uit de buurt van de
wielen of bewegende onderdelen.
3.1 De voetsteunen plaatsen of verwijderen
Gevaar voor letsel
Controleer dat de voetsteunen goed zijn vastgemaakt alvorens de rolstoel te gebruiken.
Plaats geen voorwerpen in het draaibereik van de voetsteun tijdens het monteren of
verwijderen van de voetsteunen.
Het plaatsen van de voetsteunen gaat als volgt:
1. Houd de voetsteun zijdelings aan de buitenkant van het frame
van de rolstoel en monteer de voetsteun met de dop (1) in het
frame.
2. Zwenk de voetsteun naar binnen tot deze vastklikt.
3. Draai de voetplaat naar beneden.
Om de voetsteunen te verwijderen gaat u als volgt te werk:
1. Trek aan hendel (2).
2. Draai de voetsteun naar buiten tot deze uit de geleiding komt.
3. Trek de voetsteun omhoog uit dop (1).
3.2 Bedienen van de remmen
Gevaar voor letsel
De remmen dienen niet om af te remmen tijdens het rijden. Gebruik de rem enkel om te
vermijden dat de rolstoel in stilstaande positie wegrolt.
De werking van de remmen wordt beïnvloed door slijtage en vervuiling van de banden (water,
olie, slijk, ...). Controleer voor elk gebruik de staat van de banden.
De remmen zijn instelbaar en kunnen verouderen. Controleer voor elk gebruik de goede
werking van de remmen.
Zorg ervoor dat alvorens de remmen los te zetten, de rolstoel vlak staat. Los nooit beide
remmen tegelijk.
Om de remmen in te schakelen:
1. Druk de hendels van de remmen (1) naar voren tot u een
duidelijke klik voelt.
Om de remmen uit te schakelen:
1. Zet eerst één rem los door de hendel (1) naar achteren te
trekken.
2. Houd het ongeremde wiel, met uw hand, vast aan de
grijphoepel.
3. Los de andere rem door de hendel naar achteren te
trekken.
VOORZICHTIG
VOORZICHTIG
WAARSCHUWING

Jazz S50
2020-09
Uw rolstoel gebruiken
9
NL
3.3 Plaatsen of verwijderen van de armsteunen
Gevaar voor letsel
Controleer of de armsteunen goed zijn vastgemaakt voor de rolstoel te gebruiken.
Houd uw vingers en kledij uit de buurt van de onderzijde van de armsteun.
1. Plaats de achterzijde van de armsteun in de houder (1) (Fig A).
2. Zorg ervoor dat de armsteun goed bevestigd is.
3. Klap de armsteun naar voren.
4. Trek de hendel (2) bevestigd op de houder (3) omhoog (Fig B).
5. Plaats de voorzijde van de armsteun (4) in de houder (3) tot deze vastklikt (Fig B).
Voor het openen en verwijderen van de armsteun gaat u als volgt te werk:
1. Trek aan de hendel (2) en trek de voorzijde van de armsteun (1) omhoog (Fig C).
2. Klap de armsteun naar achteren.
3. Als u de armsteun wilt verwijderen, trek de achterzijde van de armsteun uit dop (3) (Fig D).
A
B
C
D
WAARSCHUWING

Jazz S50
2020-09
Uw rolstoel gebruiken
10
NL
3.4 Transfer in en uit de rolstoel
Gevaar voor letsel en/of schade
Indien u de transfer niet veilig op eigen kracht kan uitvoeren,
vraag dan hulp.
Kans op kantelen van de rolstoel - Niet op de voetplaten gaan
staan.
1. Plaats de rolstoel zo dicht mogelijk bij de stoel, zetel of bed
van/naar waar u zich wilt verplaatsen.
2. Zorg dat beide remmen van de rolstoel aan staan.
3. Vouw de voetplaten naar boven zodat u er niet op gaat staan.
4. Indien u zich langs de zijkant in of uit de rolstoel wilt
verplaatsen, klap dan de armsteun aan die zijde omhoog
(zie § 3.3).
5. Verplaats u van of naar de rolstoel.
3.4.1 Correcte positie in de rolstoel
Enkele aanbevelingen om comfortabel van uw rolstoel gebruik te maken:
Plaats uw zitvlak zo dicht mogelijk bij de rug.
Zorg dat uw bovenbenen horizontaal zijn. Stel eventueel de lengte van de voetsteunen bij
(zie § 4.3).
3.5 Rijden met de rolstoel
Gevaar voor letsel of beschadiging
Voor gebruik, zorg ervoor dat:
o de parkeerremmen goed werken.
o de remmen in goede staat zijn, §Error! Reference source not found..
Vermijd dat uw vingers gekneld raken tussen de wielspaken.
Bedien de aandrijfhoepels niet met natte handen.
Vermijd dat uw handen gekneld raken tussen de aandrijfhoepels wanneer u door smalle
doorgangen rijdt.
Rijd NIET op hellingen, hindernissen, treden of stoepranden die groter zijn dan beschreven in
hoofdstuk 6.
Wanneer u stopt op een (kleine) helling, gebruik dan de remmen.
Zorg ervoor dat alle vier wielen de grond raken wanneer u op of af een helling rijdt.
Neem hellingen zo traag mogelijk.
Blijf altijd op het voetpad wanneer u op de openbare weg rijdt.
Pas op als de weg gaten of spleten heeft waardoor de wielen kunnen vastlopen.
Vermijd stenen en andere objecten die de wielen kunnen blokkeren.
Zorg ervoor dat de voetplaten de grond niet raken bij het nemen van een obstakel.
Gebruik uw rolstoel niet op roltrappen.
Indien beschikbaar, bevestig uw veiligheidsgordel.
Houd steeds rekening met de draaicirkel van de voetplaat om te voorkomen dat voorbijgangers
verwond raken, of dat objecten beschadigd raken.
Indien u niet voldoende ervaring heeft om met uw rolstoel te rijden, vraag dan hulp aan een
begeleider. Houd dan uw armen uit de buurt van de wielen, en uw voeten op de voetplaat.
Trappen mogen enkel genomen worden met behulp van twee begeleiders.
Neem g
een trappen die ongepast zijn voor rolstoelen.
VOORZICHTIG
VOORZICHTIG

Jazz S50
2020-09
Uw rolstoel gebruiken
11
NL
3.5.1 Rijden met uw rolstoel:
1. Zet de remmen los.
2. Neem de aandrijfhoepels aan de bovenzijde vast.
3. Leun voorwaarts en duw de hoepels naar voor tot uw armen gestrekt zijn.
4. Neem de aandrijfhoepels weer aan de bovenzijde vast en herhaal de beweging.

Jazz S50
2020-09
Montage en instellingen
12
NL
4 Montage en instellingen
De in dit hoofdstuk beschreven instructies zijn bestemd voor de vakhandelaar.
De Vermeiren Jazz S50 is ontworpen als rolstoel met een minimum aan afstellingen. Zo is er
geen extra voorraad nodig van vervangonderdelen.
Om een servicepunt of vakhandelaar in uw buurt te vinden, neemt u contact op met de
dichtstbijzijnde Vermeiren faciliteit.
Gevaar voor letsel of beschadiging
Gebruik enkel de instellingen beschreven in deze handleiding.
Variaties van de toelaatbare instellingen kunnen de stabiliteit van uw rolstoel beïnvloeden
(naar achteren of op zij kantelen).
4.1 Gereedschap
Om uw rolstoel op te bouwen is het volgende gereedschap nodig:
Steek-/ringsleutel set n° 7 tot n° 22
Inbussleutel set n° 3 tot n° 8
Kruiskopschroevendraaier
4.2 Leveringsomvang
Het Vermeiren Jazz S50 model wordt als volgt geleverd:
1 frame met armsteunen, achter- en voorwielen (zithoogte van 500 mm)
1 paar voetsteunen
Gereedschap
Handleiding
Accessoires (optioneel)
Pomp voor de banden
4.3 Instellen van de voetsteunen
Zorg ervoor dat de voetsteunen niet over de grond slepen. Houd een
minimum afstand van 60 mm tot de grond aan.
Stel de lengte van de voetsteunen als volgt in:
1. Verwijder de schroef (1).
2. Stel de lengte van de voetsteun op een comfortabele lengte in.
3. Draai de schroef (1) goed vast.
WAARSCHUWING
WAARSCHUWING

Jazz S50
2020-09
Montage en instellingen
13
NL
4.4 Afstellen van de remmen
Gevaar voor letsel – Laat de remmen afstellen door een erkend
vakhandelaar.
1. Monteer de wielen zoals beschreven in § 2.6.
2. Zet de remmen los door hendel (1) naar achteren te trekken (Fig A).
3. Maak de bout (2) los om het remmechanisme over het frame (3) te schuiven (Fig B).
4. Schuif het remmechanisme over het frame (3) tot de gewenste positie (Fig B). Het verstellen
van de remmen is in het bereik van de gemarkeerde streepjes (4) op het remmechanisme.
5. Maak schroef (2) terug goed vast (Fig B).
6. Controleer de werking van de remmen.
7. Indien nodig herhaal voorgaande stappen tot de remmen goed afgesteld staan.
4.5 Veranderen van de luchtbanden
Kans op schade
Bij verkeerd gebruik kan de velg worden beschadigd. Laat deze procedure bij voorkeur
uitvoeren door een expert.
Bij het monteren van een wiel, zorg ervoor dat geen voorwerpen of lichaams-onderdelen
tussen het wiel en velg geklemd raken.
Let bij het oppompen van de banden steeds op de correcte vuldruk. Deze waarde kunt u
aflezen op de band.
Gebruik enkel pompen die conform de wetgeving zijn en de druk in bar aangeven gebruik de
meegeleverde luchtpomp. Op pompen die niet door de fabrikant zijn geleverd, geven wij geen
garantie.
Let erop dat er altijd voldoende lucht in de wielen zit. Dit heeft immers invloed op de
rijprestaties.
Voor wielen die niet door de fabrikant zijn geleverd, geven wij geen garantie.
Een correcte montage kan alleen worden gegarandeerd in de vakhandel. Bij
werkzaamheden die niet zijn uitgevoerd door de vakhandelaar, vervalt de garantie.
Wanneer u de buitenbanden of binnenbanden wilt wisselen, vindt u hieronder enkele tips:
1. Laat alle lucht uit de binnenband.
2. Schuif een bandenlichter tussen de buitenband en de velg.
3. Duw de bandenlichter langzaam en voorzichtig naar beneden. Daardoor wordt de
buitenband over de velgrand getrokken.
4. Beweeg de bandenlichter nu langs de rand van de velg, de buitenband springt uit de velg.
5. Neem de buitenband en binnenband nu voorzichtig van de velg weg.
Controleer het velgbed en de binnenkant van de band op vreemde voorwerpen en reinig indien
nodig. Controleer de toestand van het velgbed, vooral in de buurt van de ventielopening.
A
B
WAARSCHUWING
WAARSCHUWING

Jazz S50
2020-09
Montage en instellingen
14
NL
Gebruik alleen originele wisselstukken. De garantie geldt niet voor schade die wordt veroorzaakt
door niet originele wisselstukken. Neem contact op met de vakhandelaar.
Schuif het velglint over het ventiel en steek deze dan in de velg. Nu kunt u het
velglint zonder problemen aanbrengen. Controleer of alle spaakkoppen zijn
bedekt (bij kunststof velgen wordt geen velglint gebruikt).
Neem de buitenband en druk deze beginnend achter het ventiel over de
velgrand. Pomp de binnenband lichtjes op tot hij een ronde vorm aanneemt en
leg deze in de band.
Als de binnenband mooi in de buitenband past zonder plooien (laat een beetje
lucht uit als er plooien zijn), dan plaatst u voorzichtig en met beide handen de
bovenkant van de buitenband op de velg, weerom te beginnen aan het ventiel.
Controleer rondom en aan beide zijden of de binnenband niet tussen de bandhiel en velg is
geklemd. Schuif het ventiel lichtjes terug en trek het weer uit zodat de band goed is gepositioneerd
in de buurt van het ventiel.
Om de band correct op te pompen pompt u eerst lucht tot de band nog goed met de duim kan
worden ingedrukt. Wanneer de controlelijn aan weerszijden van de band dezelfde afstand tot de
velgrand aangeeft, is de band correct gecentreerd. Wanneer dit niet het geval is, dient u de lucht
weer af te laten en de band opnieuw uit te lijnen.
Pomp de band nu op tot de maximale bedrijfsdruk (let op de vuldruk!) en draai de kap op het
ventiel.

Jazz S50
2020-09
Onderhoud
15
NL
5 Onderhoud
5.1 Tijdstippen voor onderhoud
Gevaar voor letsel of beschadiging
Reparaties en vervangingen mogen enkel uitgevoerd worden door opgeleid personeel, en enkel
originele onderdelen van Vermeiren mogen hierbij gebruikt worden.
De onderhoudsfrequentie hangt af van de frequentie en intensiteit van
gebruik. Neem
contact op met uw vakhandelaar om een tijdschema vast te leggen voor
nazicht/onderhoud/reparatie.
Voor ieder gebruik
Kijk de volgende punten na:
Alle onderdelen: aanwezig en niet beschadigd of versleten.
Alle onderdelen: schoon, zie § 5.2.2.
Wielen, rugsteun, zit, kuitsteunen, armsteunen, voetplaat: stevig bevestigd.
Staat van de wielen, zie § 5.2.1.
Staat van de frameonderdelen: geen vervorming, instabiliteit, zwakte of losse
verbindingen.
Zit, rugsteun, armleggers, kuitsteunen en hoofdsteun (indien van toepassing): geen
overmatige slijtage (bijv. gedeukte plekken, schade of scheuren).
Remmen: onbeschadigd en werkend
Contacteer uw vakhandelaar voor eventuele reparaties of vervanging van onderdelen.
Jaarlijks of vaker
Laat uw rolstoel nakijken en onderhouden door uw vakhandelaar, ten minste één keer per jaar of
vaker. De minimale onderhoudsfrequentie is afhankelijk van het gebruik en moet daarom
besproken worden met uw vakhandelaar.
5.2 Onderhoudsinstructies
5.2.1 Wielen en banden
De goede werk
ing van de remmen hangt af van de staat van de banden, die onderhevig
zijn aan slijtage en verontreiniging (water, olie, modder,...).
Houd de wielen vrij van draden, haar, zand en vezels.
Kijk het profiel van de banden na. Als de profieldiepte minder dan 1 mm bedraagt, moeten de
banden vervangen worden. Contacteer hiervoor uw vakhandelaar.
Pomp de banden op volgens de correcte spanning (zie drukindicatie op de banden).
5.2.2 Schoonmaak
Gevaar voor beschadiging door vocht
Gebruik nooit een tuinslang of
hogedrukreiniger om de rolstoel schoon te maken.
Veeg alle harde onderdelen van de rolstoel schoon met een vochtig doek (niet doorweekt).
Indien nodig, gebruik een milde zeep die geschikt is voor vernis en synthetische materialen.
De bekleding kan schoon worden gemaakt met lauw water en een milde zeep. Gebruik geen
agressieve schoonmaakmiddelen.
VOORZICHTIG
VOORZICHTIG

Jazz S50
2020-09
Onderhoud
16
NL
5.2.3 Ontsmetting
Gevaar voor beschadiging
Ontsmetting mag enkel worden uitgevoerd door getraind personeel. Neem contact op met uw
vakhandelaar.
5.3 Probleemoplossing
Ook wanneer u de rolstoel correct gebruikt, is het toch mogelijk dat er een technisch probleem
optreedt. Neem in dat geval contact op met uw vakhandelaar.
Gevaar voor letsel of beschadiging aan de rolstoel
Probeer NOOIT zelf uw rolstoel te
repareren.
De volgende tekenen kunnen wijzen op een ernstig probleem. Neem daarom steeds contact op
met uw vakhandelaar als u een van de volgende afwijkingen opmerkt:
Vreemde geluiden;
Oneven bandenslijtage op een van de banden;
Schokkerige bewegingen;
De rolstoel buigt af naar één kant;
Beschadigde of kapotte wielmontages;
5.4 Verwachte levensduur
De gemiddelde levensduur van uw rolstoel is 5 jaar. De levensduur zal toenemen of afnemen
afhankelijk van de gebruiksfrequentie, rijomstandigheden en onderhoud.
5.5 Hergebruik
Voor ieder hergebruik moet de rolstoel ontsmet, geïnspecteerd en onderhouden worden volgens
de instructies in §5.1 en §5.2.
5.6 Beëindiging van gebruik
Op het einde van de levensduur moet u de rolstoel vernietigen volgens de lokale milieuwetgeving.
De beste manier om dit te doen, is de rolstoel te demonteren om het vervoer van de recycleerbare
onderdelen te vergemakkelijken.
VOORZICHTIG
WAARSCHUWING

Jazz S50
2020-09
Technische specificaties
17
NL
6 Technische specificaties
Onderstaande technische gegevens zijn enkel geldig voor deze rolstoel, met standaard
instellingen en optimale omgevingscondities. Houd bij gebruik rekening met deze details.
Deze waarden zijn niet meer van toepassing als uw rolstoel werd gewijzigd, of wanneer hij
beschadigd of ernstig versleten is.
Tabel 1: Technische specificaties
Merk
Vermeiren
Type
Manuele rolstoel
Model
Jazz S50
Beschrijving
Jazz S50 Kids
Jazz S50
Maximale massa gebruiker 60 kg 130 kg
Totale lengte inclusief voetsteun 914 mm 1120 mm
Effectieve zitbreedte 330 mm
370 mm
390 mm
420 mm
440 mm
460 mm
480 mm
500 mm
Totale breedte (afhankelijk van de
zitbreedte)
518 mm
558 mm
565 mm
595 mm
615 mm
635 mm
655 mm
675 mm
Lengte dichtgevouwen zonder voetsteun 707 mm 825 mm
Breedte dichtgevouwen 299 mm 290 mm
Hoogte dichtgevouwen 915 mm 935 mm
Totaal gewicht 15,20 kg 16,60 kg
Gewicht zwaarste onderdeel 7,50 kg 8,05 kg
Massa van onderdelen die kunnen
worden gedemonteerd of verwijderd
Voetsteunen: 1,80 kg; Armsteunen: 1,80 kg; Achterwielen: 4,95 kg
Statische stabiliteit bergaf 15°
Statische stabiliteit bergop 10°
Statische stabiliteit zijwaarts 15°
Effectieve zitdiepte 325 mm 450 mm
Zithoogte aan voorzijde 457 mm 500 mm
Zithoek 5°
Rughoogte 360 mm 420 mm
Rughoek 0°
Afstand tussen zit en voetsteun 317 - 366 mm 370 - 440 mm
Hoek tussen zit en voetsteun 6° 7°
Afstand tussen armsteun en zit 211 mm 220 mm
Afstand voorzijde armsteun 235 mm 310 mm
Diameter aandrijfhoepel 495 mm 535 mm
Horizontale afstand van de as (uitwijking) 10 mm
Minimale draaicirkel 990 mm 1190 mm

Jazz S50
2020-09
Technische specificaties
18
NL
Diameter achterwielen 22" 24" (optioneel 12")
Bandendruk, achter (aandrijf)wielen Max. 3,5 bar
Diameter stuurwielen 150 mm 200 mm
Bandendruk, voor (stuur)wielen Max. 2,5 bar
Opslag en gebruikstemperatuur + 5 °C - + 41 °C
Opslag en gebruiksluchtvochtigheid 30% - 70%
We behouden ons het recht voor om technische wijzigingen te introduceren.
Meettolerantie ± 15 mm / 1,5 kg / 1,5°

Jazz S50
2020-09
Inhalt
1
EN
NL
DE
Inhalt
Inhalt ........................................................................................................................ 1
Vorwort ....................................................................................................................... 2
1 Ihr Produkt ..................................................................................................... 3
1.1 Zubehör ......................................................................................................... 3
2 Vor der Benutzung ........................................................................................ 4
2.1 Bestimmungsgemäße Verwendung .............................................................. 4
2.2 Zeichenerklärung .......................................................................................... 4
2.3 Allgemeine Sicherheitshinweise .................................................................... 4
2.4 Transport ....................................................................................................... 5
2.5 Zusammenklappen/Auseinanderklappen des Rollstuhls ............................... 7
2.6 Montieren/Abnehmen der Hinterräder (sofern vorhanden) ............................ 7
2.7 Lagerung ....................................................................................................... 8
3 Verwendung .................................................................................................. 9
3.1 An- oder Abbauen der Fußauflagen .............................................................. 9
3.2 Betätigen der Bremsen ................................................................................. 9
3.3 An-/Abbauender Armlehnen ........................................................................ 10
3.4 Setzen in den Rollstuhl ............................................................................... 11
3.5 Fahren mit dem Rollstuhl ............................................................................ 11
4 Zusammenbau und Einstellung ................................................................. 13
4.1 Werkzeuge .................................................................................................. 13
4.2 Lieferumfang ............................................................................................... 13
4.3 Einstellen der Fußauflagen ......................................................................... 13
4.4 Einstellen der Bremsen ............................................................................... 14
4.5 Wechseln der Luftreifen .............................................................................. 14
5 Wartung ....................................................................................................... 16
5.1 Wartungspunkte .......................................................................................... 16
5.2 Wartungshinweise ....................................................................................... 16
5.3 Störungsbeseitigung ................................................................................... 17
5.4 Voraussichtliche Nutzungsdauer ................................................................. 17
5.5 Wiedereinsatz ............................................................................................. 17
5.6 Nutzungsende ............................................................................................. 17
6 Technische Daten ....................................................................................... 18

Jazz S50
2020-09
Vorwort
2
EN
NL
EN
NL
DE
Vorwort
Herzlichen Glückwunsch! Sie sind nun Besitzer eines Vermeiren-Rollstuhls!
Dieser Rollstuhl wurde von versierten und engagierten Mitarbeitern gefertigt. Es entspricht
hinsichtlich Konstruktion und Fertigung den hohen Qualitätsstandards von Vermeiren.
Lesen Sie dieses Handbuch daher bitte aufmerksam durch, um sich mit der Bedienung, den
Fähigkeiten und Beschränkungen Ihres Rollstuhls vertraut zu machen. Sollten Sie nach der
Lektüre dieses Handbuchs noch Fragen haben, können Sie sich jederzeit an Ihren Fachhändler
wenden. Er wird Ihnen gerne in dieser Angelegenheit weiterhelfen.
Wichtiger Hinweis
Um Ihre Sicherheit zu gewährleisten und die Nutzungsdauer Ihres Produkts zu verlängern, sollten
Sie es gut behandeln und regelmäßig überprüfen und/oder warten lassen.
Dieses Handbuch enthält die neuesten Produktentwicklungen. Vermeiren behält sich das Recht
vor, Veränderungen an dieser Art von Produkt vorzunehmen, ohne eine Verpflichtung
einzugehen, ähnliche bereits ausgelieferte Produkte anzupassen oder auszutauschen.
Die Abbildungen dienen zur Verdeutlichung der Anweisungen in diesem Handbuch. Das gezeigte
Produkt kann in Details von Ihrem Produkt abweichen.
Verfügbare Informationen
Auf unserer Webseite http://www.vermeiren.com/ finden Sie stets die aktuellste Version der in
diesem Handbuch beschriebenen Informationen. Informieren Sie sich bitte regelmäßig auf dieser
Website nach eventuell verfügbaren Aktualisierungen.
Sehbehinderte Menschen können sich die elektronische Version dieses Handbuchs
herunterladen und mit Hilfe einer Sprachsyntheselösung („Text-to-Speech-Software“) vorlesen
lassen.
Benutzerhandbuch Für Anwender und Fachhändler
Installationsanweisungen Für Fachhändler
Servicehandbuch für Rollstühle Für Fachhändler
EG-Konformitätserklärung

Jazz S50
2020-09
Ihr Produkt
3
EN
NL
DE
1 Ihr Produkt
1.1 Zubehör
Für den Jazz S50 ist das folgende Zubehör erhältlich:
Reiserollen (B86)
Armlehnen (B05)
Für weiteres Zubehör setzen Sie sich mit Ihrem Fachhändler in Verbindung. Er berät Sie gern.
1 = Schere
2 = Handgriffe
3 = Rücken
4 = Armpolster
5 = Armlehnen
6 = Antriebsräder (Hinterräder)
7 = Greifreifen
8 = Bremsen
9 = Kipphilfe
10 = Lenkräder (Vorderräder)
11 = Fußauflagen
12 = Fussplatte
13 = Sitz
14 = Typenschild
3
4
5
11
13
14
2
9
7
6
8
1
12
10

Jazz S50
2020-09
Vor der Benutzung
4
EN
NL
EN
NL
DE
2 Vor der Benutzung
2.1 Bestimmungsgemäße Verwendung
Dieser Abschnitt enthält eine kurze Beschreibung der vorgesehenen Benutzung Ihres Rollstuhls.
Darüber hinaus enthalten die Anweisungen in den anderen Abschnitten zusätzliche
Warnhinweise. Auf diese Weise wollen wir Sie auf die Möglichkeit einer unsachgemäßen
Benutzung hinweisen.
Indikationen und Kontraindikationen: Der Rollstuhlfahrer kann den Rollstuhl entweder selbst
antreiben oder von einer zweiten Person geschoben werden. Der Rollstuhl ist ausschließlich
für den Transport von gehbehinderten oder gehunfähigen Menschen vorgesehen. Die
Ausstattungsvarianten erlauben den Einsatz des Rollstuhls für ältere Menschen und bei
Gehbehinderung/Gehunfähigkeit aufgrund von: Lähmungen, Gliedmaßenverlust
(Beinamputation), Gliedmaßendefekt oder -deformation, Gelenkkontrakturen oder -schäden,
Herzkrankheiten oder schwachem Blutkreislauf, Gleichgewichtsstörungen, Kachexie
(Muskelschwund).
Der Rollstuhl kann sowohl im Innen- als auch im Außenbereich eingesetzt werden.
In dem Rollstuhl kann eine Person transportiert werden mit einem Gewicht von maximal 130
kg. Er ist nicht dafür vorgesehen, Sachen oder Objekte zu transportieren oder zu anderen
Zwecken als zuvor beschrieben benutzt zu werden.
Verwenden Sie ausschließlich von Vermeiren genehmigte Zubehör- oder Ersatzteile.
Sehen Sie sich auch die technischen Daten und die Einschränkungen Ihres Rollstuhls in
Abschnitt 6 an.
Die Garantie für dieses Produkt beruht auf dessen normaler Benutzung und Wartung wie in
diesem Handbuch beschrieben. Schäden an Ihrem Produkt, die auf unsachgemäße Benutzung
oder mangelnde Wartung zurückzuführen sind, führen zum Erlöschen der Garantie.
2.2 Zeichenerklärung
Maximalgewicht des Benutzers (in kg)
Außen/Innenbenutzung
Maximale Neigungssicherheit in ° (Grad).
Typbezeichnung
2.3 Allgemeine Sicherheitshinweise
Benutzen Sie Ihren Rollstuhl nicht, wenn Sie unter dem Einfluss von Alkohol, Medikamenten
oder anderen Substanzen stehen, die Ihre Fahrtüchtigkeit beeinträchtigen könnten.
Beachten Sie, dass bestimmte Teile dieses Rollstuhls infolge der Umgebungstemperatur,
Sonneneinstrahlung, Heizkörpern usw. sehr warm oder sehr kalt werden können. Seien Sie
daher vorsichtig beim Berühren. Tragen Sie bei kaltem Wetter Schutzbekleidung. Wenn Sie
sich im Freien aufhalten, können Reithandschuhe verwendet werden, um den Griff an den
Handrändern zu verbessern.
Nehmen Sie keinerlei Veränderungen an Ihrem Rollstuhl vor.
Achten Sie darauf, dass bei Nutzung der Antriebsräder keine Gegenstände und/oder
Körperteile in die Speichen hineinragen, da sonst Verletzungen und/oder Beschädigungen an
Ihrem Rollstuhl auftreten können.

Jazz S50
2020-09
Vor der Benutzung
5
EN
NL
DE
Bitte beachten sie, dass Ihr Rollstuhl je nach den verwendeten Einstellungen einige Arten von
Diebstahlsicherungssystemen beeinträchtigen kann. Dies kann dazu führen, dass der
Sicherungsalarm des Shops ausgelöst wird.
2.4 Transport
2.4.1 Beiseiteschaffen
Am besten lässt sich der Rollstuhl transportieren, indem die Räder verwendet und der Rollstuhl
geschoben wird. Sollte dies nicht möglich sein (beispielsweise wenn die Hinterräder für den
Transport in einem Auto abgenommen wurden), greifen Sie den Rahmen fest an der Vorderseite
und an den Handgriffen. Greifen Sie den Rollstuhl nicht an den Fußauflagen, Armlehnen oder
den Rädern.
2.4.2 Transport in einem Fahrzeug (als Gepäck)
Verletzungsgefahr
Achten Sie darauf, den Rollstuhl ordnungsgemäß zu befestigen. So vermeiden Sie
Verletzungen der Fahrzeuginsassen bei einer Kollision oder einem plötzlichen Bremsmanöver.
Verwenden Sie zum Sichern des Rollstuhls und des Fahrzeuginsassens NIEMALS den
gleichen Sicherheitsgurt.
1. Falten Sie den Rollstuhl gemäß den Anweisungen in Kapitel 2.5 auf die kleinste Größe.
2. Bewahren Sie den Rollstuhl und seine Räder im Gepäckraum oder hinter dem Beifahrersitz
auf. Falls Gepäckraum und Fahrgastzelle NICHT voneinander getrennt sind, muss der
Rahmen des Rollstuhls sicher am Fahrzeug befestigt werden.
2.4.3 Nutzung des Rollstuhls als Sitz in einem PKW
Gefahr von Verletzungen und/oder Beschädigungen
Der Rollstuhl hat den Crash-Test gemäß ISO 7176-19: 2008 bestanden und ist konstruiert und
ausgelegt zur Nutzung als Sitz in einem PKW nur in Blickrichtung nach vorne.
Ein Rollstuhlrückhaltegurt ist nicht als Sicherheitsgurt zu verwenden.
Der Rollstuhl wurde getestet unter Verwendung eines 5-Punkt Rückhaltegurtsystems (Rollstuhl)
und eines 3-Punkt-Sicherheitsgurtes (Nutzer). Grundsätzlich ist, wenn möglich, bevorzugt ein
vorhandener PKW-Sitz zu verwenden und der Rollstuhl sicher im Gepäckraum zu verstauen.
Sicheres Verzurren des Rollstuhls innerhalb des PKW´s:
1. Prüfen Sie, ob der PKW mit einem PKW-Gurtsystem und einem Sicherheitsgurt gemäß ISO
10542 ausgestattet ist.
2. Prüfen Sie, dass alle Komponenten des PKW-Gurtsystems (Rollstuhl) und des
Sicherheitsgurtes (Nutzer) nicht ausgefranst, verschmutzt, beschädigt oder geknickt sind.
3. Ist der Rollstuhl mit verstellbaren Sitz-/Rückensystemen ausgestattet, sind diese in eine
Position zu bringen, die den Nutzer in eine möglichst aufrechte Sitzposition bringt. Lässt
der Zustand des Nutzers dies nicht zu, sind die Risiken die den Transport in einer anderen
Position zur Folge haben, festzustellen und zu bewerten.
4. Entfernen Sie alle angebauten Teile und Zubehörteile, wie z.B. Körbe, Taschen,
Beatmungsequipement, usw., und verstauen Sie diese gesondert sicher im Gepäckraum.
5. Positionieren Sie den Rollstuhl in Vorwärtsrichtung mittig zwischen den Schienen des PKW-
Gurtsystems, die im Boden des PKW´s eingebaut sind.
6. Montieren Sie die vorderen Gurte des Rollstuhl-Gurtsystems gemäß den Angaben des
jeweiligen Herstellers an den angegebenen Positionen am Rollstuhl (Abb. 1). Diese Stellen
sind am Rollstuhl mit einem Symbol markiert (Abb. 2).
7. Ziehen Sie den Rollstuhl soweit nach hinten, bis die vorderen Gurte gespannt sind.
8. Betätigen Sie nun die Bremsen des Rollstuhls.
WARNUNG
WARNUNG

Jazz S50
2020-09
Vor der Benutzung
6
EN
NL
EN
NL
DE
9. Montieren Sie die hinteren Gurte des Rollstuhl-Gurtsystems gemäß den Angaben des
jeweiligen Herstellers an den angegebenen Positionen am Rollstuhl (Abb. 1). Diese Stellen
sind am Rollstuhl mit einem Symbol markiert (Abb. 2).
Abb. 1 Abb. 2
Sicheres Anschnallen des Nutzers:
1. Entfernen Sie beide Armlehnen des Rollstuhls.
2. Wenn vorhanden, legen Sie den Rollstuhlgurt an.
3. Legen Sie den Sicherheitsgurt des PKW´s an gemäß den Angaben des jeweiligen
Herstellers.
4. Legen Sie den Gurt so über dem vorderen Becken des Nutzers an, dass der Gurtriemen in
einem Winkel zwischen 30° und 75° Grad zur Horizontalen liegt (siehe auch nachfolgende
Zeichnung).
5. Je größer (steiler) der Winkel des Gurtriemens innerhalb der markierten Fläche, desto
besseren Halt kann das Gurtsystem bieten.
6. Legen Sie den Gurt stramm gemäß den Angaben des jeweiligen Herstellers an, ohne den
Nutzer zu verletzen oder zu behindern.
7. Stellen Sie sicher, dass die Gurte in einer direkten Linie zur Gurtaufhängung des PKW´s
angebracht werden und dass keine Knicke und Verdrehungen in den Riemen sichtbar sind,
zum Beispiel durch die Hinterradachse.
8. Die Armlehnen können angebracht werden. Stellen Sie sicher, dass die Gurte nicht verdreht
sind und der Gurt stramm am Körper des Nutzers liegt. Bauteile des Rollstuhls (Armlehnen,
Räder usw.) dürfen den Gurt nicht vom Körper des Nutzers ferngehalten.

Jazz S50
2020-09
Vor der Benutzung
7
EN
NL
DE
2.5 Zusammenklappen/Auseinanderklappen des Rollstuhls
Klemmgefahr! Achten Sie darauf, dass Ihre Finger nicht zwischen die
Rollstuhlkomponenten gelangen.
So falten Sie den Rollstuhl zusammen:
1. Klappen Sie die Fußplatten hoch, oder entfernen Sie die Fußauflagen (siehe § 3.1).
2. Fassen Sie den Sitz an der Vorder- und Hinterseite an, und ziehen Sie ihn nach oben.
3. Drucken Sie gegen die Handgriffe, um den Rollstuhl weiter zusammenzuklappen.
So entfalten Sie den Rollstuhl:
1. Stellen Sie sich auf die Rückseite der Rollstuhl.
2. Nutzen Sie die Schiebegriffe, um den Rollstuhl so weit wie möglich zu öffnen.
3. Stellen Sie sich auf die Vorderseite der Rollstuhl.
4. Drücken Sie die beiden Holme, an denen der Sitz befestigt ist, weiter nach unten.
2.6 Montieren/Abnehmen der Hinterräder (sofern vorhanden)
So entfernen Sie die Hinterräder
1. Halten Sie die Taste (1) gedrückt, während Sie die Radachse aus dem Loch im Rahmen
schieben.
2. Wiederholen Sie dies für das andere Rad und setzen Sie den
Rollstuhl vorsichtig auf die hinteren Rahmenrohre.
So montieren Sie die Hinterräder
1. Nehmen Sie eines der Hinterräder und heben Sie den
Rollstuhl an einer Seite an.
2. Halten Sie die Taste (1) gedrückt, während Sie das Rad
vollständig auf die Achse schieben.
3. Lassen Sie die Taste los, um das Rad zu verriegeln. Stellen
Sie sicher, dass es einrastet.
4. Wiederholen Sie dies für das andere Rad.
5. Stellen Sie sicher, dass beide Räder fest sitzen.
VORSICHT
Gurte sollen kompletten Kontakt über den
Brustkorb haben bis zum seitlichen Becken
und Oberschenkel
Bauteile des Rollstuhls dürfen den Gurt
nicht vom Körper des Nutzers fernhalten
(z.B. Armlehnen, Räder usw.

Jazz S50
2020-09
Vor der Benutzung
8
EN
NL
EN
NL
DE
2.7 Lagerung
Stellen Sie sicher, dass Ihr Rollstuhl in einer trockenen Umgebung gelagert wird, um
Schimmelbildung und die Beschädigung der Polsterung zu vermeiden, siehe auch Kapitel
6.

Jazz S50
2020-09
Verwendung
9
EN
NL
DE
3 Verwendung
Gefahr von Verletzungen und/oder Beschädigungen
Lesen Sie bitte zunächst die vorhergehenden Abschnitte, um sich über die
Benutzungsbedingungen zu informieren. Benutzen Sie den Rollstuhl NICHT, bevor Sie alle
Anweisungen aufmerksam gelesen und vollständig verstanden haben.
Bei Zweifeln oder Fragen wende
n Sie sich bitte zwecks Hilfe an Ihren Fachhändler,
Pflegedienst oder Fachberater.
Stellen Sie sicher, dass Ihre Hände, Kleidung, Gürtel, Schnallen oder Schmuck während des
Gebrauchs oder der Einstellung nicht von Rädern oder anderen beweglichen Teilen
ei
ngeklemmt werden.
3.1 An- oder Abbauen der Fußauflagen
Verletzungsgefahr
Achten Sie darauf, dass die Fußauflagen vor Gebrauch des Rollstuhls fest arretiert sind.
Halten Sie Objekte vom Schwenkbereich der Fußauflagen fern während des an- oder
Abbauens der Fußauflagen.
Die Fußauflagen werden wie folgt montiert:
1. Halten Sie die Fußauflage seitlich an die Außenseite des
Rollstuhlrahmens und stecken Sie den Zapfen (1) in den
Rahmen.
2. Drehen Sie sie Fußauflagen nach innen bis diese einrasten.
3. Schwenken Sie die Fußplatte nach unten.
So bauen Sie die Fußauflagen ab:
1. Ziehen Sie am Hebel (2).
2. Schwenken Sie die Fußauflage an die Außenseite des Rollstuhls,
bis sie sich aus der Führung löst.
3. Ziehen Sie die Fußauflage mit dem Zapfen aus dem Rahmen (1).
3.2 Betätigen der Bremsen
Verletzungsgefahr
Die Bremsen dienen nicht dazu, die Bewegung des Rollstuhls abzubremsen. Sie dienen
ausschließlich dazu, unbeabsichtigte Bewegungen des Rollstuhls zu verhindern.
Die ordnungsgemäße Funktion der Bremsen kann durch Verschleiß oder Schmutz (auch
Wasser, Öl, Schlamm usw.) beeinträchtigt werden. Überprüfen Sie daher vor jeder
Rollstuhlnutzung den Zustand der Reifen.
Die Bremsen sind einstellbar und können verschleißen. Überprüfen Sie daher vor jeder
Rollstuhlnutzung den Zustand der Bremsen.
Achten Sie darauf, dass der Rollstuhl auf einer flachen, horizontalen Fläche steht, bevor Sie
die Bremsen lösen. Lösen Sie niemals beide Bremsen gleichzeitig.
So betätigen Sie die Bremsen:
1. Drücken Sie die Bremshebel (1) nach vorn, bis sie ein
deutliches Klicken fühlen.
So lösen Sie die Bremsen:
1. Lösen Sie eine Bremse, indem Sie den Bremshebel (1)
nach hinten ziehen.
2. Fassen Sie den Greifreifen des Rads mit der gelösten
Bremse mit Ihrer Hand.
3. Lösen Sie die zweite Bremse, indem Sie den Bremshebel
(1) nach hinten ziehen.
VORSICHT
VORSICHT
WARNUNG

Jazz S50
2020-09
Verwendung
10
EN
NL
EN
NL
DE
3.3 An-/Abbauender Armlehnen
Verletzungsgefahr
Achten Sie darauf, dass die Armlehnen vor Gebrauch des Rollstuhls fest arretiert sind.
Halten Sie Ihre Finger oder Kleidungsstücke fern von der Unterseite der Armlehne.
1. Schieben Sie das hintere Rohr der Armlehne in die Rohraufnahme (1) (Abb. A).
2. Stellen Sie sicher, dass die Armlehne korrekt eingehangen sind.
3. Klappen Sie den Armlehne nach vorne.
4. Ziehen Sie den Hebel (2) am vordern Armlehnenende (3) nach unten (Abb. B).
5. Schieben Sie das vordere Rohr der Armlehne (4) in die Rohraufnahme (3) (Abb B).
So entriegeln Sie eine Armlehne und bauen sie ab:
1. Ziehen Sie den Hebel (2) und ziehen Sie die Vorderseite der Armlehne (1) nach oben (Abb
C).
2. Klappen Sie die Armlehne nach hinten.
3. Zum Abbauen der Armlehne, ziehen den hinteren Teil der Armlehne aus der Aufnahme (3)
(Abb D).
A
B
C
D
WARNUNG

Jazz S50
2020-09
Verwendung
11
EN
NL
DE
3.4 Setzen in den Rollstuhl
Gefahr von Personen- und/oder Sachschäden
Falls Sie sich nicht allein sicher in den Rollstuhl oder aus diesem heraus umsetzen können,
bitten Sie jemanden um Hilfe.
Stellen Sie sich nicht auf die Fußplatten.
1. Positionieren Sie den Rollstuhl so nah wie möglich an den
Stuhl, die Couch oder das Bett, zu dem bzw. von dem das
Umsetzen vorgenommen werden soll.
2. Achten Sie darauf, dass beide Bremsen des Rollstuhls
betätigt sind.
3. Klappen Sie die Fußplatten nach oben, damit Sie sich nicht
versehentlich darauf stellen.
4. Wenn Sie sich von der Seite in den Rollstuhl setzen, klappen
Sie die Armlehne an der entsprechenden Seite nach oben
(Siehe § 3.3).
5. Setzen Sie sich in den Rollstuhl.
3.4.1 Prüfen Sie, ob die Sitzposition korrekt ist
Einige Empfehlungen für die komfortable Verwendung des Rollstuhls:
Setzen Sie sich möglichst weit nach hinten, so dass Ihr Rücken an der Rückenlehne
anliegt.
Achten Sie darauf, dass Ihre Oberschenkel möglichst horizontal stehen. Gegebenenfalls
müssen Sie die Länge des Fußauflagen einstellen (siehe § 4.3).
3.5 Fahren mit dem Rollstuhl
Gefahr von Verletzungen und Schäden
Achten Sie vor jeder Benutzung auf Folgendes:
o Feststellbremsen funktionieren einwandfrei.
o Reifen sind in gutem Zustand, siehe Kapitel 5.
Verhindern Sie, dass Ihre Finger von den Radspeichen erfasst werden.
Fassen Sie die Greifringe nicht mit nassen Händen an.
Verhindern Sie das Einklemmen Ihrer Hände an den Greifringen, wenn Sie schmale Passagen
passieren.
Fahren Sie NICHT auf Steigungen, Hindernissen, Stufen oder Bordsteinen, die größer sind als
in Kapitel 6 angegeben.
Wenn Sie auf einem (kleinen) Hang stehen bleiben, benutzen Sie die Bremsen.
Achten Sie bei Bergauf- oder -abfahrten darauf, dass alle vier Räder Bodenkontakt haben.
Fahren Sie auf Gefällen so langsam wie möglich.
Bleiben Sie auf öffentlichen Straßen immer auf der Straße.
Achten Sie darauf, wenn die Straße Löcher oder Lücken auf
weist, die zum Einschluss der
Räder führen können.
Vermeiden Sie Steine und andere Gegenstände, die die Räder blockieren könnten.
Stellen Sie sicher, dass die Fußplatten nicht den Boden berühren, wenn Sie ein Hindernis
nehmen.
Verwenden Sie Ihren Rollstuhl nicht auf einer Rolltreppe.
Falls vorhanden, tragen Sie Ihren Sicherheitsgurt.
Berücksichtigen Sie stets den Schwenkbereich der Fußplatte, um keine Passanten zu
verletzen oder Gegenstände zu beschädigen.
Wenn Sie nicht genug Erfahrung mit dem Rollstuhl ha
ben, wenden Sie sich an einen Begleiter.
Halten Sie Ihre Arme von den Rädern fern und halten Sie die Füße auf der Fußplatte.
VORSICHT
WARNUNG

Jazz S50
2020-09
Verwendung
12
EN
NL
EN
NL
DE
Treppen sollten immer mit Hilfe von zwei Begleitpersonen verhandelt werden.
Versuchen Sie niemals Treppen zu benutzen, die nicht für Rollstühle geeignet sind.
3.5.1 Ihren Rollstuhl fahren:
1. Lösen Sie die Bremsen.
2. Bringen Sie beide Greifring in die höchste Position.
3. Lehnen Sie sich nach vorne und drücken Sie die Greifringe nach vorne, bis Ihre Arme gerade
sind.
4. Bewegen Sie Ihre Hände zurück an die Oberseite der Greifringe und wiederholen Sie die
Bewegung.

Jazz S50
2020-09
Zusammenbau und Einstellung
13
EN
NL
DE
4 Zusammenbau und Einstellung
Die Anweisungen in diesem Kapitel richten sich an den Fachhändler.
Der Vermeiren Jazz S50 wurde so konzipiert, nur ein Minimum an Ersatzteilen erfordert. Daher
ist es nicht erforderlich, dass ein spezieller Vorrat an Ersatzteilen angelegt wird.
Um einen Fachhändler in Ihrer Nähe zu finden, stehen Ihnen unsere Niederlassungen gerne zur
Verfügung.
Gefahr von Verletzungen und Schäden
Nutzen Sie das Produkt nur gemäß den technischen Vor- und Angaben dieser
Gebrauchsanweisung.
Änderungen an den zulässigen Einstellungen können die Stabilität des Rollstuhls verändern
(Kippen nach hinten oder zur Seite).
4.1 Werkzeuge
Für die Montage der Rollstuhl und für Einstellungen werden die folgenden Werkzeuge benötigt:
Schraubenschlüsselsatz Größe 7 bis 22
Inbusschlüsselsatz Größe 3 bis 8
Kreuzschlitzschraubendreher
4.2 Lieferumfang
Im Lieferumfang der Jazz S50 von Vermeiren ist Folgendes enthalten:
1 Rahmen mit Armlehnen, Hinterrädern und Vorderrädern (Sitzhöhe von 500 mm)
1 Paar Fußauflagen
Werkzeuge
Gebrauchsanweisung
Zubehör (optional)
Pumpe
4.3 Einstellen der Fußauflagen
Risiko der Beschädigung – Achten Sie darauf, dass die Fußauflagen den
Boden nicht berührt. Achten Sie auf einen Abstand von mindestens 60 mm
zwischen der Fußauflage und dem Boden.
So stellen Sie die Länge des Fußauflagen ein:
1. Entfernen Sie die Schraube (1).
2. Stellen Sie die Fußauflage auf eine angenehme Länge ein.
3. Setzen Sie die Schraube (1) wieder ein und ziehen diese
handfest an.
WARNUNG
WARNUNG

Jazz S50
2020-09
Zusammenbau und Einstellung
14
EN
NL
EN
NL
DE
4.4 Einstellen der Bremsen
Verletzungsgefahr – Bremsen dürfen nur vom Fachhändler eingestellt
werden.
1. Bauen Sie die Räder gemäß den Anweisungen in § 2.6 an.
2. Lösen Sie die Bremsen, indem Sie den Hebel (1) nach hinten ziehen (Abb A).
3. Lösen Sie die Bolzen (2) so dass der Bremsmechanismus über das Rahmenrohr (3)
geschoben werden kann (Abb. B).
4. Ziehen Sie den Bremsmechanismus über die Rahmenrohr (3) in die gewünschte Position
(Abb. B). Das Einstellen der Bremsen machen Sie in der Reichweite von den markierten
Strichen auf dem Bremsmechanismus.
5. Ziehen Sie die Bolzen (2) von Hand fest (Abb. B).
6. Prüfen Sie die ordnungsgemäße Funktion der Bremsen.
7. Wiederholen Sie die oben stehenden Schritte gegebenenfalls, bis die Bremsen korrekt
eingestellt sind.
4.5 Wechseln der Luftreifen
Gefahr von Personen- und/oder Sachschäden
Bei unsachgemäßer Handhabung können Schäden an der Felge entstehen. Lassen Sie diese
Tätigkeiten vorzugsweise vom Fachhandel durchführen.
Stellen Sie beim Aufziehen eines Reifens sicher, dass keine Gegenstände oder Körperteile
zwischen Reifen und Felge eingeklemmt werden.
Achten Sie bei der Befüllung der Reifen immer auf den korrekten Fülldruck. Diesen können
Sie seitlich am Reifen ablesen.
Verwenden Sie ausschließlich vorschriftsmäßige Reifenfüllvorrichtungen, die den Druck in bar
anzeigen. Alternativ können Sie die mitgelieferte Luftpumpe verwenden. Schäden durch
Verwendung nicht vom Hersteller gelieferter Luftfülleinrichtungen, unterliegen nicht der
Garantie.
Stellen Sie stets sicher, dass die Reifen über einen ausreichenden Luftdruck verfügen.
Für Räder, die nicht vom Hersteller stammen, übernehmen wir keine Garantie.
Eine sachgerechte Montage ist nur durch den Fachmann gewährleistet. Bei
Arbeiten, die nicht vom Fachmann ausgeführt werden, entfällt der Garantieanspruch.
Sollten Sie die Reifen oder Schläuche auswechseln wollen, beachten Sie bitte Folgendes:
1. Lassen Sie die Luft komplett aus dem Schlauch.
2. Führen Sie einen Reifenheber zwischen Reifen und Felge ein.
3. Drücken Sie den Reifenheber langsam und vorsichtig nach unten. Dadurch wird der Reifen
über den Felgenrand gezogen.
4. Wenn Sie danach mit dem Reifenheber an der Felge entlangfahren, springt der Reifen aus
der Felge.
A
B
WARNUNG
WARNUNG

Jazz S50
2020-09
Zusammenbau und Einstellung
15
EN
NL
DE
5. Nun können Sie den Reifen von der Felge abnehmen und dann den Schlauch entfernen.
Prüfen Sie das Felgenbett und die Reifeninnenwand auf Fremdkörper und reinigen Sie diese
gegebenenfalls gründlich. Überprüfen Sie den Zustand des Felgenbetts, besonders an der
Ventilöffnung.
Verwenden Sie bitte nur Originalersatzteile. Für Beschädigungen kann keine Gewährleistung
übernommen werden, wenn diese durch Ersatzteile hervorgerufen wurden, die keine
Originalersatzteile sind. Setzen Sie sich mit Ihrem Fachhändler in Verbindung.
Schieben Sie das Felgenband über das Schlauchventil und stecken Sie dieses
dann in die Felge. Jetzt lässt sich das Felgenband mühelos aufziehen.
Überprüfen Sie, ob alle Speichenköpfe abgedeckt sind (Bei Verwendung von
Kunststofffelgen wird kein Felgenband eingesetzt).
Nehmen Sie nun den Reifen und drücken Sie diesen hinter dem Ventil
beginnend über den Felgenrand. Pumpen Sie den Schlauch etwas auf, bis er
eine runde Form annimmt, und drücken Sie ihn unter den Reifen.
Wenn der Schlauch problemlos und ohne Einknickungen in den Reifen passt
(falls Einknickungen auftreten: lassen Sie etwas Luft aus dem Schlauch ab),
können Sie die obere Seite des Reifens mit beiden Händen leicht auf die Felge
drücken. Beginnen Sie dabei am Luftventil.
Vergewissern Sie sich, dass der Schlauch rundherum und an beiden Seiten nicht zwischen
Reifenwulst und Felge eingeklemmt ist. Schieben Sie das Ventil leicht nach innen und ziehen Sie
es wieder heraus, damit der Reifen im Ventilbereich gut sitzt.
Füllen Sie beim Aufpumpen erst soviel Luft ein, dass sich der Reifen noch gut mit dem Daumen
eindrücken lässt. Weist die Kontrolllinie auf beiden Reifenseiten den gleichen Abstand zum
Felgenrand auf, sitzt der Reifen zentrisch. Wenn nicht, lassen Sie die Luft wieder ab und richten
Sie den Reifen neu aus.
Pumpen Sie nun den Reifen bis zum maximalen Betriebsdruck auf (Fülldruck beachten!) und
drehen Sie die Staubkappe auf das Ventil.

Jazz S50
2020-09
Wartung
16
EN
NL
EN
NL
DE
5 Wartung
5.1 Wartungspunkte
Gefahr von Verletzungen und Schäden
Reparaturen und Teileaustausch dürfen nur von geschultem Personal durchgeführt werden und
es dürfen nur Originalersatzteile von Vermeiren verwendet werden.
Die Wartungshäufigkeit hängt von der Häufigkeit und Intensität der Nutzung ab. Wenden
Sie sich an Ihren Händler, um einen allgemeinen Zeitplan
für
Inspektion/Wartung/Reparatur zu vereinbaren.
Vor jeder Benutzung
Kontrollieren Sie folgende Punkte:
Alle Komponenten: Vorhanden und nicht beschädigt oder verschlissen sind.
Alle Komponenten: Reinigung, siehe Kapitel 5.2.2.
Räder, Rückenlehne, Sitz, Wadenlehnen, Armlehnen, Fußplatte: Sind korrekt
gesichert.
Zustand der Räder/Reifen (siehe Kapitel 5.2.1).
Zustand der Rahmenteile: Keine Deformation, Instabilität, Schwachstelle oder lose
Verbindungen.
Sitz, Rückenlehne, Armpolster, Wadenpolster und Kopfstütze (falls vorhanden): Kein
übermäßiger Verschleiß (wie Eindellungen, Beschädigungen oder Risse).
Bremsen: Unbeschädigt und funktionsfähig.
Wenden Sie sich wegen etwaiger Reparaturen oder Ersatzteile an Ihren Fachhändler.
Jährlich oder häufiger
Lassen Sie Ihren Rollstuhl mindestens einmal pro Jahr oder häufiger von Ihrem Fachhändler
inspizieren und warten. Die minimale Wartungshäufigkeit ist von der Benutzung abhängig und
sollte daher zusammen mit Ihrem Fachhändler abgesprochen werden.
5.2 Wartungshinweise
5.2.1 Räder und Reifen
Die korrekte Funktionsweise der Bremsen ist vom Zustand der Reifen abhängig und kann
sich infolge von Verschleiß und Verunreinigung (Wasser, Öl, Matsch usw.) verändern.
Achten Sie darauf, dass keine Drähte, Haare, Sand oder Fasern an den Rädern anhaften.
Überprüfen Sie regelmäßig das Reifenprofil. Wenn die Profiltiefe weniger als 1 mm beträgt, muss
der Reifen ausgetauscht werden. Wenden Sie sich diesbezüglich bitte an Ihren Fachhändler.
Pumpen Sie jeden Reifen mit dem korrekten Druck auf (siehe Angabe auf dem Reifen).
5.2.2 Reinigung
Beschädigungsgefahr durch Feuchtigkeit
Benutzen Sie keinesfalls einen Wasserschlauch oder Hochdruckreiniger, um den Rollstuhl zu
reinigen.
Wischen Sie alle festen Teile des Rollstuhls mit einem feuchten (nicht durchnässten) Tuch ab.
Benutzen Sie ggf. eine milde Seife, die für Lacke und Kunststoffe geeignet ist.
Die Polsterung kann mit lauwarmem Wasser und einer milden Seife gereinigt werden. Verwenden
Sie keine scheuernden Reinigungsmittel.
VORSICHT
VORSICHT

Jazz S50
2020-09
Wartung
17
EN
NL
DE
5.2.3 Desinfektion
Beschädigungsgefahr
Eine Desinfektion darf nur von dafür geschultem Personal durchgeführt werden. Wenden Sie
sich hierfür an Ihren Fachhändler.
5.3 Störungsbeseitigung
Auch bei ordnungsgemäßer Benutzung Ihres Rollstuhls kann ein technisches Problem auftreten.
In diesem Fall wenden Sie sich bitte an Ihren Fachhändler.
Gefahr von Verletzungen und Schäden am Rollstuhl.
Versuchen Sie NIEMALS,
Ihren Rollstuhl selbst zu reparieren.
Die nachstehend genannten Symptome können auf ein ernsthaftes Problem hindeuten. Sie
sollten sich daher stets an Ihren Fachhändler wenden, wenn eine der folgenden Situationen
eintritt:
Ungewöhnliche Geräusche
Ungleichmäßige Abnutzung an einem der Reifen
Ruckartige Bewegungen
Rollstuhl zieht zu einer Seite
Beschädigte oder gebrochene Radeinheiten
5.4 Voraussichtliche Nutzungsdauer
Die durchschnittliche Nutzungsdauer Ihres Rollstuhls beträgt 5 Jahre. Je nach
Nutzungshäufigkeit, Betriebsbedingungen und Wartung kann die Nutzungsdauer Ihres Rollstuhls
länger oder kürzer sein.
5.5 Wiedereinsatz
Lassen Sie den Rollstuhl vor jedem Wiedereinsatz gemäß den Anweisungen in §5.1 und §5.2
desinfizieren, inspizieren und warten.
5.6 Nutzungsende
Am Ende seiner Nutzungsdauer muss Ihr Rollstuhl gemäß den geltenden Umweltvorschriften
entsorgt werden. Dazu wird er im besten Fall zerlegt, um den Transport wiederverwertbarer Teile
zu erleichtern.
VORSICHT
WARNUNG

Jazz S50
2020-09
Technische Daten
18
EN
NL
EN
NL
DE
6 Technische Daten
Die nachstehenden technischen Daten gelten für diesen Rollstuhl nur bei Standardeinstellungen
und optimalen Umgebungsbedingungen. Berücksichtigen Sie diese Details bei der Benutzung.
Die Werte gelten nicht mehr, falls Ihr Rollstuhl modifiziert wurde, beschädigt ist oder starke
Verschleißerscheinungen aufweist.
Tabelle 1: Technische Daten
Hersteller
Vermeiren
Typ
Manueller Rollstuhl
Modell
Jazz S50
Beschreibung
Jazz S50 Kids
Jazz S50
Max. zulässiges Gewicht des Rollstuhlfahrers 60 kg 130 kg
Gesamtlänge mit Fußauflagen 914 mm 1120 mm
Effektive Sitzbreite 330 mm
370 mm
390 mm
420 mm
440 mm
460 mm
480 mm
500 mm
Gesamtbreite (abhängig von der Sitzbreite) 518 mm
558 mm
565 mm
595 mm
615 mm
635 mm
655 mm
675 mm
Länge zusammengeklappt (ohne Fußauflage) 707 mm 825 mm
Breite zusammengeklappt 299 mm 290 mm
Höhe zusammengeklappt 915 mm 935 mm
Gesamtgewicht 15,20 kg 16,60 kg
Gewicht des schwersten Teils 7,50 kg 8,05 kg
Gewichte von Teilen, die demontierbar oder
abnehmbar sind
Fußauflagen: 1,80 kg; Armlehnen: 1,80 kg; Hinterräder: 4,95
kg
Statische Stabilität, bergab 15°
Statische Stabilität, bergauf 10°
Statische Stabilität, seitwärts 15°
Effektive Sitztiefe 325 mm 450 mm
Höhe der Sitzoberfläche an der Vorderkante 457 mm 500 mm
Sitzwinkel 5°
Rückenlehnenhöhe 360 mm 420 mm
Rückenlehnenwinkel 0°
Abstand zwischen Fußauflagen und Sitz 317 - 366 mm 370 - 440 mm
Winkel zwischen Sitz und Fußauflagen 6° 7°
Abstand zwischen Armlehne und Sitz 211 mm 220 mm
Länge der Armlehne zur Unterfahrbarkeit 235 mm 310 mm
Greifreifendurchmesser 495 mm 535 mm
Horizontale Lage der Achse (Deflektion) 10 mm
Kleinster Wendekreis 990 mm 1190 mm

Jazz S50
2020-09
Technische Daten
19
EN
NL
DE
Durchmesser der Hinterräder 22" 24" (optional 12“)
Reifendruck, Hinterräder (Antriebsräder), max. 3,5 bar
Durchmesser der Lenkräder 150 mm 200 mm
Reifenfülldruck Lenkräder (vorn) max. 2,5 bar
Temperaturbereich für Lagerung und Nutzung 5 °C
+41 °C
Luftfeuchtigkeitsbereich für Lagerung und
Nutzung
30%
70%
Technische Änderungen vorbehalten. Messtoleranzen ± 15 mm / 1,5 kg / 1,5°


Jazz S50
2020-09
Indice
1
EN
NL
IT
Indice
Indice ........................................................................................................................ 1
Premessa.................................................................................................................... 2
1 Il prodotto ...................................................................................................... 3
1.1 Accessori ...................................................................................................... 3
2 Prima dell’uso ............................................................................................... 4
2.1 Uso previsto .................................................................................................. 4
2.2 Significato dei simboli .................................................................................... 4
2.3 Istruzioni generali di sicurezza ...................................................................... 4
2.4 Trasporto ....................................................................................................... 5
2.5 Chiusura - apertura della carrozzina ............................................................. 7
2.6 (S)montaggio delle ruote posteriori (se disponibile) ...................................... 7
2.7 Magazzinaggio .............................................................................................. 7
3 Utilizzo ........................................................................................................... 8
3.1 Montaggio o rimozione della pedana ............................................................ 8
3.2 Utilizzo dei freni ............................................................................................. 8
3.3 Montaggio o rimozione dei braccioli .............................................................. 9
3.4 Trasferimento della carrozzina all'interno e all'esterno ................................ 10
3.5 Posizione corretta della carrozzina ............................................................. 10
3.6 Spostamenti della carrozzina ...................................................................... 10
4 Installazione e regolazione ....................................................................... 12
4.1 Attrezzi ........................................................................................................ 12
4.2 Modalità di consegna .................................................................................. 12
4.3 Regolazione dei poggiapiedi ....................................................................... 12
4.4 Regolazione dei freni .................................................................................. 13
4.5 Cambio degli pneumatici ............................................................................. 13
5 Manutenzione .............................................................................................. 15
5.1 Punti di manutenzione ................................................................................. 15
5.2 Istruzioni per la manutenzione .................................................................... 15
5.3 Soluzione dei problemi di funzionamento .................................................... 16
5.4 Durata prevista ............................................................................................ 16
5.5 Utilizzi successivi ........................................................................................ 16
5.6 Fine vita ...................................................................................................... 16
6 Specifiche tecniche .................................................................................... 17

Jazz S50
2020-09
Premessa
2
EN
NL
IT
Premessa
Congratulazioni! Ora possiede una carrozzina Vermeiren!
Questa carrozzina è realizzata da personale qualificato e competente. Essa è progettata e
prodotta secondo gli elevati standard di qualità garantiti da Vermeiren.
Leggere attentamente questo manuale, in quanto aiuta a familiarizzarsi con il funzionamento, le
prestazioni e le limitazioni della carrozzina. Per eventuali ulteriori domande successive alla lettura
di questo manuale, rivolgersi al proprio rivenditore specializzato, che sarà lieto di fornire un
supporto.
Nota importante
Per garantire la propria sicurezza e prolungare la durata del prodotto, trattarlo con cura e farlo
controllare e/o sottoporlo a manutenzione con regolarità.
Questo manuale rispecchia gli sviluppi più recenti del prodotto. Vermeiren si riserva il diritto di
introdurre modifiche di questo tipo di prodotto senza alcun obbligo di adattare o sostituire i prodotti
analoghi consegnati in precedenza.
Le immagini vengono utilizzate per chiarire le istruzioni contenute nel manuale. I dettagli del
prodotto raffigurato possono essere diversi da quelli del prodotto in uso.
Informazioni disponibili
Sul sito Web di Vermeiren, all'indirizzo http://www.vermeiren.com/, è sempre disponibile la
versione più recente delle informazioni contenute in questo manuale. Visitare con regolarità tale
sito per verificare l’esistenza di eventuali aggiornamenti.
Le persone ipovedenti possono scaricare la versione elettronica di questo manuale e farlo leggere
da un software applicativo di sintesi vocale.
Manuale di istruzioni Per l'utente e il rivenditore specializzato
Istruzioni di installazione Per il rivenditore specializzato
Manuale di assistenza per le carrozzine Per il rivenditore specializzato
Dichiarazione di conformità CE

Jazz S50
2020-09
Il prodotto
3
EN
NL
IT
1 Il prodotto
1.1 Accessori
Per il modello Jazz S50 sono disponibili i seguenti accessori:
Ruote da viaggio (B86)
Braccioli (B05)
Per informazioni su ulteriori accessori, rivolgersi al rivenditore specializzato che saprà consigliare
la soluzione migliore in base alle esigenze.
1 = Crociera
2 = Impugnature
3 = Schienale
4 = Imbottitura dei braccioli
5 = Braccioli
6 = Ruote motrici (ruote posteriori)
7 = Corrimano
8 = Freni
9 = Leva di ribaltamento
10 = Ruote direttrici (ruote anteriori)
11 = Pedane
12 = Appoggiapiedi
13 = Sedile
14 = Posizione della targhetta di
identificazione
3
4
5
11
13
14
2
9
7
6
8
1
12
10

Jazz S50
2020-09
Prima dell’uso
4
EN
NL
IT
2 Prima dell’uso
2.1 Uso previsto
Questo paragrafo fornisce una breve descrizione dell’uso previsto della carrozzina. Gli altri
paragrafi aggiungono inoltre alle istruzioni ulteriori avvertenze di rilievo. Vermeiren desidera in
tal modo portare all’attenzione dell’utente gli eventuali usi errati che possono presentarsi.
Indicazioni e controindicazioni: L'occupante può controllare direttamente il movimento della
carrozzina oppure farsi spingere da un accompagnatore. La carrozzina è destinata a persone
con difficoltà motorie o incapacità di deambulazione. Le diverse versioni di allestimento degli
accessori e la concezione modulare consentono l’utilizzo della carrozzina per usi geriatrici e
da parte di persone con impossibilità/difficoltà di deambulazione in seguito a: paralisi,
amputazione di arti inferiori, difetti o deformazioni degli arti inferiori, contratture o lesioni
articolari, insufficienza cardiaca e cardiocircolatoria, disturbi dell'equilibrio, cachessia
(deterioramento della massa muscolare).
La carrozzina può essere utilizzata sia all'interno che in spazi esterni.
La carrozzina è destinata al trasporto di una sola persona di peso non superiore a 130 kg.
Essa non è viceversa progettata per il trasporto di merci od oggetti, né per qualunque uso
diverso da quello descritto in precedenza.
Utilizzare esclusivamente accessori e ricambi approvati da Vermeiren.
Leggere tutte le informazioni tecniche di dettaglio e le limitazioni della carrozzina, riportate nel
capitolo 6.
La garanzia del prodotto presuppone un uso e una manutenzione normali del medesimo, come
descritti in questo manuale. I danni al prodotto dovuti a uso improprio o manutenzione carente
causano la decadenza della garanzia.
2.2 Significato dei simboli
Peso massimo dell’utente, in kg
Uso al coperto / all’aperto
Pendenza massima di sicurezza, in ° (gradi).
Indicazione del modello
2.3 Istruzioni generali di sicurezza
Non utilizzare la carrozzina se si è sotto l’effetto di alcool, farmaci o altre sostanze in grado di
influire sulle proprie capacità di manovra.
Non dimenticare che alcune parti della carrozzina possono diventare molto calde o fredde a
causa della temperatura ambiente, della radiazione solare o di dispositivi di riscaldamento.
Prestare attenzione quando si tocca la console. In condizioni climatiche fredde, indossare
indumenti protettivi. In caso di uso all'aperto, è possibile utilizzare guanti da equitazione per
migliorare la presa sui corrimani.
Non modificare in alcun modo la carrozzina.
Verificare che nessun oggetto o parte del corpo finisca tra i raggi delle ruote motrici onde
evitare lesioni e/o danni alla sedia a rotelle.
Tieni presente che il tuo carrozzina potrebbe interferire con qualche sistema di antifurto, a
seconda delle impostazioni utilizzate ciò potrebbe fra scattare l’allarme del negozio.

Jazz S50
2020-09
Prima dell’uso
5
EN
NL
IT
2.4 Trasporto
2.4.1 Spostamento
Il modo migliore per trasportare la carrozzina è facendola scorrere usufruendo delle ruote.
Se ciò non è possibile (per es. quando le ruote posteriori sono state tolte per il trasporto in
auto), afferrare saldamente il telaio dalla parte anteriore e dalle impugnature. Non utilizzare la
parte inferiore, i braccioli o le ruote per afferrare la carrozzina.
2.4.2 Trasporto su veicoli, come bagaglio
Rischio di lesioni
Controllare che la carrozzina sia fissata in modo adeguato, per evitare lesioni ai passeggeri in
caso di collisioni o frenate brusche.
NON utilizzare la stessa cintura di sicurezza per il passeggero e per la carrozzina.
1. Ripiegare la carrozzina fino alle dimensioni più compatte, attenendosi alle istruzioni fornite nel
§2.5.
2. Riporre la carrozzina e le sue ruote nel bagagliaio o dietro il sedile del passeggero. Se il
bagagliaio e l'abitacolo NON sono separati o chiusi, assicurare saldamente il telaio della
carrozzina al veicolo.
2.4.3 Uso della carrozzina quale sedile su un'autovettura
Rischio di lesioni e danni
La carrozzina ha passato il test dell’ISO 7176-19: 2008 e, per questo, è stata disegnata e
testata per essere utilizzata quale sedile su un’autovettura, rivolti in direzione di marcia.
La cintura pelvica della carrozzina non è da utilizzarsi come da cintura di sicurezza.
La carrozzina è testata utilizzando un sistema tirante a quattro punti e un sistema di contenimento
per il paziente a tre punti. Quando pero’ possibile, usare il sedile del veicolo e porre la carrozzina
dietro il sedile o nel bagagliaio.
Istruzioni per fissare la carrozzina quale sedile in un’autovettura:
1. Controllare che il veicolo sia dotato di un sistema di fissaggio per carrozzina e di cinture di
sicurezza, conforme alla legge ISO 10542.
2. Controllare che i componenti del sistema di fissaggio per carrozzine e le cinture di sicurezza
non siano danneggiati, rotti, sfilacciati o rovinati.
3. Se dotata di un sedile regolabile e/o schienale reclinabile, assicurarsi che l’utilizzatore della
carrozzina sia seduto in posizione il più eretta possibile. Se le condizioni del paziente non
lo consentono, bisognerebbe valutare i rischi per evitare pericoli per il paziente durante il
trasporto.
4. Rimuovere tutti gli accessori montati come ad esempio equipaggiamenti respiratori o vassoi,
e riporli in un posto sicuro.
5. Posizionare la carrozzina nella stessa direzione di marcia, in centro ai binari montati sul
pavimento del veicolo, fissando la carrozzina.
6. Montare le cinture di sicurezza anteriori seguendo le istruzioni del costruttore del sistema di
passanti, fino al punto indicato (figura 1). Questo punto è segnato con un simbolo (figura 2).
7. Tirare la carrozzina finché le cinture anteriori non sono tese.
8. Applicare i freni della carrozzina.
9. Montare le cinture di sicurezza posteriori seguendo le istruzioni del costruttore del sistema
di passanti, fino al punto indicato (figura 1). Questo punto è segnato con un simbolo (figura
2).
AVVERTENZA
AVVERTENZA

Jazz S50
2020-09
Prima dell’uso
6
EN
NL
IT
Figura 1 Figure 2
Istruzioni per la sicurezza del paziente:
1. Rimuovere entrambi i braccioli.
2. Se presente, allacciare la cintura pelvica della carrozzina.
3. Allacciare la cinture di sicurezza del paziente seguendo le istruzioni del costruttore del
sistema di passanti.
4. Indossare la cintura pelvica da una parte all’altra del bacino, in modo che l’angolo della
cintura sia entro la zona dai 30° ai 75° dal piano orizzontale, come mostrato in figura.
5. È preferibile raggiungere un angolo maggiore per la zona indicata.
6. Stringere la cintura come da istruzioni del costruttore del sistema di passanti, secondo il
comfort del paziente.
7. Assicurarsi che la cintura di sicurezza sia attaccata in linea retta al punto di ancoraggio nel
veicolo e che nessuna piega sia visibile nella cintura, ad esempio nell’asse della ruota
posteriore.
8. Installare i braccioli, se desiderati. Assicurarsi che le cinture non siano attorcigliate o
costrette lontano dal corpo a causa di componenti della carrozzina come braccioli o ruote.
LA CINTURA PELVICA DEVE ESSERE
BEN FISSATA AL CORPO NELLA PARTE
FRONTALE
LE CINTURE DI SICUREZZA DEVONO
ESSERE BEN FISSATE AL CORPO (NON AI
BRACCIOLI O RUOTE)

Jazz S50
2020-09
Prima dell’uso
7
EN
NL
IT
2.5 Chiusura - apertura della carrozzina
Possibilità di pizzicamento - Non infilare le dita tra i componenti della
carrozzina.
Chiusura della carrozzina:
1. Ripiegare o rimuovere le pedane (vedere la sezione § 3.1).
2. Afferrare il sedile dalla parte anteriore e dallo schienale e tirarlo verso l'alto.
3. Premere sulle impugnature per piegare ulteriormente la carrozzina.
Apertura della carrozzina:
1. Posizionarsi dietro la carrozzina.
2. Utilizzare le impugnature per aprire la carrozzina il più possibile.
3. Posizionarsi davanti alla carrozzina.
4. Premere entrambi i profilati tubolari della seduta verso il basso fino a quando non risultano
fissati nella posizione corretta.
2.6 (S)montaggio delle ruote posteriori (se disponibile)
Rimozione delle ruote posteriori
1. Tenere premuto il pulsante (1) facendo fuoriuscire allo stesso tempo l'assale della ruota dal
foro del telaio.
2. Ripetere l'operazione per l'altra ruota e appoggiare
delicatamente la carrozzina sui tubi del telaio posteriore.
Installazione delle ruote posteriori
1. Prelevare una delle ruote posteriori e sollevare un lato della
carrozzina.
2. Tenere premuto il pulsante (1) inserendo allo stesso tempo la
ruota nella boccola dell'assale.
3. Rilasciare il pulsante per bloccare la ruota. Accertarsi che la
ruota si inserisca con un clic nella posizione corretta.
4. Ripetere l’operazione per l’altra ruota.
5. Accertarsi che entrambe le ruote siano fissate saldamente.
2.7 Magazzinaggio
Avere cura di immagazzinare la carrozzina in un ambiente asciutto, per evitare la
formazione di muffa o danni alla selleria; vedere inoltre il capitolo 6.
ATTENZIONE

Jazz S50
2020-09
Utilizzo
8
EN
NL
IT
3 Utilizzo
Rischio di lesioni e/o danni
Leggere anzitutto il capitolo precedente per familiarizzarsi con l’uso previsto. NON utilizzare la
carrozzina senza avere letto e compreso a fondo tutte le istruzioni.
In caso di dubbi o domande, non esitare a rivolgersi al proprio rivenditore specializza
to di zona,
al proprio fornitore di cure sanitarie o a un consulente tecnico per un aiuto al riguardo
Accertarsi che durante l'uso o la regolazione mani, indumenti, cinture, fibbie o gioielli non si
impiglino nelle ruote o in altri componenti in movimento.
3.1 Montaggio o rimozione della pedana
Rischio di lesioni
Prima dell'uso, verificare che i pedana siano bloccati saldamente nella posizione corretta.
Tenere qualsiasi oggetto lontano dalla pedane durante l’installazione o la rimozione delle
stesse.
Montare i pedana nel modo seguente:
1. Reggere la pedana lateralmente dalla parte esterna del telaio
della carrozzina e inserire la chiusura del profilato tubolare (1)
nel telaio.
2. Ruotare la pedana verso l'interno fino a quando non scatta nella
posizione corretta.
3. Ruotare la pedana verso il basso.
Per rimuovere la pedane:
1. Tirare l'impugnatura (2).
2. Ruotare la pedana verso l'esterno della carrozzina finché non
si sgancia dalla guida.
3. Sfilare la pedana dalla chiusura del profilato tubolare (1).
3.2 Utilizzo dei freni
Rischio di lesioni
Non utilizzare i freni per rallentare la carrozzina durante la marcia, utilizzarli solo per prevenire
movimenti indesiderati della carrozzina.
Sull'adeguato funzionamento dei freni incidono l'usura e la mancanza di pulizia delle ruote, ad
esempio presenza di acqua, olio o fango. Verificare le condizioni delle ruote prima di ogni
utilizzo.
I freni sono regolabili e possono usurarsi. Verificare il funzionamento dei freni prima di ogni
utilizzo.
Accertarsi che la carrozzina sia su una superficie piana prima di rilasciare i freni. Non rilasciare
mai entrambi i freni contemporaneamente.
Per frenare:
1. Spingere le impugnature dei freni in avanti (1) fino a
sentire un clic distinto.
Per rilasciare i freni:
1. Rilasciare un freno tirando l'impugnatura (1) all'indietro.
2. Reggere il corrimano della ruota di rilascio con la mano.
3. Rilasciare l'altro freno tirando le impugnature all'indietro.
ATTENZIONE
ATTENZIONE
ATTENZIONE

Jazz S50
2020-09
Utilizzo
9
EN
NL
IT
3.3 Montaggio o rimozione dei braccioli
Rischio di lesioni
Prima dell'uso, verificare che i braccioli siano bloccati saldamente nella posizione corretta.
Tenere dita, indumenti lontano dalla parte inferiore del braccioli.
1. Montare il tubo posteriore del bracciolo sul coperchio del tubo (1) (Fig A).
2. Accertarsi che il bracciolo sia montato correttamente.
3. Piegare in avanti il bracciolo.
4. Tirare la leva (2) sul coperchio del tubo (3) verso l'alto (Fig B).
5. Far scattare il tubo anteriore del bracciolo (4) sul coperchio del tubo (3) (Fig B).
Per aprire e rimuovere il bracciolo:
1. Tirare la leva (2) e tirare la parte anteriore del braccioli (1) verso l'alto (Fig C).
2. Piegare all'indietro il bracciolo.
3. Per rimuovere il braccioli, tirare la parte posteriore del braccioli dal coperchio del tubo (3)
(Fig D).
A
B
C
D
ATTENZIONE

Jazz S50
2020-09
Utilizzo
10
EN
NL
IT
3.4 Trasferimento della carrozzina all'interno e all'esterno
Rischio di lesioni e/o danni
Nel caso in cui non si riesca a eseguire il trasferimento in modo sicuro, chiedere assistenza.
Non stare in piedi sui poggiapiedi.
1. Posizionare la carrozzina il più vicino possibile alla sedia,
alla poltrona o al letto verso il quale si desidera trasferire
il paziente.
2. Verificare che entrambi i freni della carrozzina siano
attivati.
3. Ripiegare le pedane verso l'alto per evitarne l'utilizzo
come punto di appoggio.
4. Se il trasferimento avviene dalla parte laterale della
carrozzina, ripiegare il braccioli che si trova da quel lato
verso l'alto (vedere § 3.3).
5. Trasferimento da/verso la carrozzina.
3.5 Posizione corretta della carrozzina
Alcuni consigli per un utilizzo confortevole della carrozzina:
Posizionare la parte posteriore il più vicino possibile allo schienale.
Accertarsi che le cosce siano in posizione orizzontale, se necessario regolare la lunghezza
dei poggiapiedi (vedere § 4.3).
3.6 Spostamenti della carrozzina
Rischio di lesioni e danni
Prima di ogni utilizzo, verificare che:
o i freni di parcheggio funzionino correttamente.
o gli pneumatici siano in buone condizioni; vedere il §
Error! Reference source not
found..
Avere cura di evitare che le dita restino impigliate nei raggi delle ruote.
Non azionare i corrimani con le mani bagnate.
Quando si attraversano passaggi stretti, prestare attenzione a non schiacciarsi le mani sui
corrimani.
NON effettuare spostamenti su superfici inclinate, ostacoli, gradini o
cordoli di dimensioni
superiori a quelle specificate nel § Error! Reference source not found..
Quando ci si ferma su una superficie (poco) inclinata, utilizzare i freni.
Quando si
procede in salita o in discesa su superfici inclinate, accertarsi che tutte e quattro le
ruote siano a contatto con il suolo.
Affrontare le superfici alla minima velocità possibile.
Quando si percorrono strade pubbliche, rimanere sempre sul marciapiede.
Prestare attenzione quando si procede su strade con buche o fessure in cui le ruote possano
incastrarsi.
Evitare sassi o altri oggetti in grado di bloccare le ruote.
Quando si affronta un ostacolo, accertarsi che le pedane non tocchino terra.
Non utilizzare la carrozzina sulle scale mobili.
Se disponibile, indossare la cintura di sicurezza.
Tenere sempre conto del raggio di rotazione della pedana, per evitare di causare lesioni alle
persone o danni materiali.
Se non si possiede sufficiente esperienza di us
o della carrozzina, chiedere aiuto a un
assistente. Tenere le braccia lontane dalle ruote e i piedi sulla pedana.
Le scale devono sempre essere affrontate con l'aiuto di due assistenti.
ATTENZIONE
ATTENZIONE

Jazz S50
2020-09
Utilizzo
11
EN
NL
IT
Non tentare mai di utilizzare scale inadatte alle carrozzine.
3.6.1 Uso della carrozzina:
1. Rilasciare i freni.
2. Afferrare entrambi i corrimani nel punto più alto.
3. Inclinare il busto n avanti e spingere in avanti i corrimani, fino a quando le braccia sono distese.
4. Riportare le mani nel punto più alto dei corrimani e ripetere il movimento.

Jazz S50
2020-09
Installazione e regolazione
12
EN
NL
IT
4 Installazione e regolazione
Le istruzioni contenute nel presente capitolo sono destinate al rivenditore.
La carrozzina Vermeiren Jazz S50 è stata progettata come carrozzina con un numero minimo di
regolazioni. Non è necessario un altro set di parti di ricambio.
Per individuare il centro assistenza o il rivenditore specializzato più vicino, contattare il centro
Vermeiren.
Rischio di lesioni e danni
Utilizzare solo le regolazioni descritte in questo manuale.
La modifica delle regolazioni consentite può determinare una variazione nella stabilità della
carrozzina (ribaltamento all'indietro o laterale).
4.1 Attrezzi
Per montare la carrozzina sono necessari i seguenti strumenti.
Set di chiavi dal n° 7 al n° 22
Set di chiavi a brugola dal n° 3 al n° 8
Cacciavite a stella
4.2 Modalità di consegna
La carrozzina Vermeiren Jazz S50 può essere distribuita con:
1 telaio con braccioli, ruote anteriori e posteriori (altezza del sedile 500 mm)
1 coppia di poggiapiedi
Attrezzi
Manuale
Accessori (facoltativo)
Pompa per pneumatici
4.3 Regolazione dei poggiapiedi
Rischio di danneggiamento - Evitare che i poggiapiedi siano a contatto con
il suolo. Tenere una distanza minima di 60 mm dal suolo.
È possibile regolare la lunghezza delle pedane attendendosi alle
seguenti istruzioni:
1. Rimuovere la vite (1).
2. Regolare il poggiapiedi a un'altezza confortevole per il paziente.
3. Serrare la vite (1) in modo adeguato.
AVVERTENZA
ATTENZIONE

Jazz S50
2020-09
Installazione e regolazione
13
EN
NL
IT
4.4 Regolazione dei freni
Rischio di lesione. I freni devono essere regolati solo dal rivenditore
specializzato.
1. Installare le ruote in base alle indicazioni della sezione § 2.6.
2. Sganciare i freni tirando la leva (1) all'indietro (Fig A).
3. Allentare il bullone (2) in modo che il meccanismo del freno possa scorrere oltre del telaio (3)
(Fig B).
4. Tirare il meccanismo del freno lungo il telaio (3) fino a raggiungere la posizione desiderata
(Fig B). La regolazione dei freni deve essere nel range dei trattini contrassegnati (4) sul
meccanismo del freno.
5. Serrare nuovamente il bullone (2) (Fig B).
6. Verificare il funzionamento dei freni.
7. Se necessario, ripetere i passaggi precedenti fino a ottenere una regolazione appropriata.
4.5 Cambio degli pneumatici
Rischio di lesioni e/o danni
Se maneggiato in modo scorretto, il cerchione della ruota potrebbe danneggiarsi. Lasciare che
un esperto esegui questa manovra.
Durante il montaggio dello pneumatico, assicurarsi che nessun oggetto o parte del corpo sia
tra il cerchio e lo pneumatico stesso.
Durante il gonfiaggio, verificare sempre che la pressione sia corretta. Il valore appropriato è
indicato sul fianco dello pneumatico.
Utilizzare solo apparecchiature adeguate e conformi alle normative ed indicare la pressione in
bar, oppure utilizzare la pompa dell’aria in dotazione. La garanzia decade in caso di danni
provocati dall’utilizzo di apparecchiature di gonfiaggio fornite da terze parti.
Assicurarsi sempre che le ruote siano sufficientemente gonfie al fine di evitare fastidi
durante la guida.
La garanzia decade in caso di uso di ruote di altre marche.
Il montaggio corretto può essere garantito solo da personale esperto. La garanzia
decade in caso di montaggio improprio e non effettuato dal rivenditore specializzato.
In caso di mancata sostituzione delle ruote o della camera d'aria, osservare le seguenti
precauzioni:
1. Sgonfiare completamente la camera d'aria.
2. Inserire l'attrezzo smontagomme tra il cerchione e il copertone.
3. Premere lentamente e delicatamente lo smontagomme verso il basso. In questo modo, il
copertone fuoriesce dal cerchione.
4. Fare scorrere l’attrezzo lungo il cerchione, il copertone fuoriesce completamente dal
cerchione.
5. Rimuovere quindi con delicatezza il copertone e quindi la camera d’aria.
A
B
AVVERTENZA
AVVERTENZA

Jazz S50
2020-09
Installazione e regolazione
14
EN
NL
IT
Verificare che sulla superficie del cerchione e sulla parete interna del copertone non siano
presenti corpi estranei e se necessario, pulire accuratamente. Verificare lo stato della superficie
del cerchione, soprattutto in corrispondenza del foro della valvola.
Utilizzare esclusivamente ricambi originali. La casa costruttrice declina ogni e qualsiasi
responsabilità per danni derivanti dall’utilizzo di rampe non idonee. Contattare il rivenditore
specializzato.
Posizionare la camera d’aria sopra la valvola prima di inserirla nel cerchione.
Verificare che tutte le teste dei raggi siano coperte.
Spingere il copertone lungo il bordo del cerchione, partendo dalla valvola.
Gonfiare leggermente la camera d’aria in modo che prenda forma circolare e
inserirla nel copertone.
Quando la camera d’aria è stata inserita completamente e uniformemente nel
copertone (se non è uniforme, sfiatare un po’ d’aria), spingere delicatamente la
parte superiore del copertone, iniziando dalla valvola, agendo delicatamente
con entrambe le mani.
Controllare entrambi i lati per accertarsi che la camera d'aria non rimanga impigliata tra il
cerchione e il bordo del copertone. Spingere delicatamente la valvola verso l’interno e tirala
nuovamente verso l'esterno in modo da trovare la posizione ideale per il copertone attorno alla
valvola.
Per accertarsi che la ruota sia gonfiata correttamente, inizialmente immettere solo una piccola
quantità d'aria in modo che sia possibile spingere facilmente il copertone verso l'interno con le
dita. Se le linee di controllo sono equidistanti dal bordo del cerchione sui due lati del copertone,
significa che il copertone è centrato correttamente. In caso contrario, far uscire l’aria e ripetere
l’operazione.
A questo punto, è possibile gonfiare lo pneumatico con la pressione massima prestando
attenzione a non superare il limite di gonfiaggio. Al termine dell'operazione richiudere la valvola.

Jazz S50
2020-09
Manutenzione
15
EN
NL
IT
5 Manutenzione
5.1 Punti di manutenzione
Rischio di lesioni e danni
Riparazioni e sostituzioni devono essere eseguite esclusivamente da personale con
un’opportuna formazione e utilizzando unicamente ricambi originali Vermeiren.
La frequenza dell'assistenza dipende dalla frequenza e dall’intensità dell’uso. Concordare
con il proprio rivenditore un calendario comune per le
attività di ispezione / manutenzione
/ riparazione.
Prima di ciascun utilizzo
Verificare i seguenti punti:
Tutti i componenti: presenza, integrità e assenza di usura.
Tutti i componenti: pulizia, vedere il § 5.2.2.
Ruote, schienale, sedile, poggiapolpacci, braccioli e pedana: fissaggio corretto.
Condizioni delle ruote / degli pneumatici: vedere il § 5.2.1;
Condizioni dei componenti del telaio: assenza di deformazioni, instabilità, punti deboli
o raccordi allentati
Sedile, schienale, poggiatesta (se presente) e imbottiture di braccioli e poggiapolpacci:
assenza di usura eccessiva (come ammaccature, danni o lacerazioni).
Freni: integri e funzionanti
Rivolgersi al proprio rivenditore specializzato per le riparazioni o i ricambi eventualmente
necessari.
Annualmente o con maggiore frequenza
Almeno una volta all’anno, o con maggiore frequenza, richiedere al proprio rivenditore
specializzato un intervento di ispezione e manutenzione della carrozzina. La frequenza minima
di manutenzione dipende dall’uso, e deve pertanto essere concordata con il proprio
concessionario autorizzato.
5.2 Istruzioni per la manutenzione
5.2.1 Ruote e pneumatici
Il funzionamento corretto dei freni dipende dallo stato degli pneumatici, e può variare a
seconda dell'usura e dell'eventuale contaminazione (acqua, olio, fango e così via).
Tenere pulite le ruote da fili, capelli, sabbia e fibre.
Verificare il profilo degli pneumatici. Se la profondità del battistrada è inferiore a 1 mm, occorre
sostituire gli pneumatici. A tale scopo, rivolgersi al proprio rivenditore specializzato.
Gonfiare ciascuno pneumatico alla pressione corretta (facendo riferimento all'indicazione
riportata sul medesimo).
5.2.2 Pulizia
Rischio di danni da umidità
Non pulire la carrozzina con manichette o pulitrici ad alta pressione.
Strofinare tutti i componenti rigidi della carrozzina con un panno umido (non zuppo). Se
necessario, utilizzare un detergente delicato, adatto per smalti e materiali sintetici.
È possibile pulire la selleria con acqua tiepida e un detergente delicato. Non utilizzare detergenti
abrasivi per la pulizia.
ATTENZIONE
ATTENZIONE

Jazz S50
2020-09
Manutenzione
16
EN
NL
IT
5.2.3 Disinfezione
Rischio di danni
La disinfezione deve essere eseguita esclusivamente da personale con un’opportuna
formazione. Consultare il proprio rivenditore specializzato.
5.3 Soluzione dei problemi di funzionamento
Anche se si utilizza la carrozzina nel modo corretto, è comunque possibile che si verifichi un
problema tecnico. In tal caso, rivolgersi al rivenditore specializzato della propria zona.
Rischio di lesioni e di danni alla carrozzina
NON
tentare MAI di riparare personalmente la carrozzina.
I sintomi indicati di seguito possono segnalare un problema grave. Rivolgersi pertanto sempre al
proprio rivenditore specializzato se si rileva una qualunque delle seguenti anomalie:
Rumori strani;
Usura irregolare del battistrada di uno pneumatico;
Movimenti a scatti;
Tendenza della carrozzina a deviare lateralmente;
Gruppi ruota danneggiati o spezzati.
5.4 Durata prevista
La carrozzina ha una durata media prevista di 5 anni. Tale valore aumenta o diminuisce a
seconda della frequenza di utilizzo, delle condizioni di guida e della manutenzione.
5.5 Utilizzi successivi
Prima di ogni utilizzo successivo, fare disinfettare, ispezionare e sottoporre a manutenzione la
carrozzina secondo le istruzioni dei §5.1 e §5.2 .
5.6 Fine vita
A fine vita, occorre smaltire la carrozzina conformemente alla legislazione ambientale locale. Il
modo migliore per farlo consiste nello smontare la carrozzina per agevolare il trasporto dei
componenti riciclabili.
ATTENZIONE
AVVERTENZA

Jazz S50
2020-09
Specifiche tecniche
17
EN
NL
IT
6 Specifiche tecniche
I dettagli tecnici riportati di seguito sono validi soltanto per la carrozzina oggetto del manuale, con
le impostazioni standard e in condizioni ambiente ottimali. Durante l’uso, tenere conto di questi
dati di dettaglio.
I valori indicati non sono più validi se la carrozzina ha subito modifiche o danni, oppure presenta
un livello elevato di usura.
Tabella 1: Specifiche tecniche
Produttore
Vermeiren
Tipo
Carrozzina manuale
Modello
Jazz S50
Descrizione
Jazz S50 Kids
Jazz S50
Peso massimo dell'occupante 60 kg 130 kg
Lunghezza complessiva con bracciolo 914 mm 1120 mm
Larghezza effettiva del sedile 330 mm
370 mm
390 mm
420 mm
440 mm
460 mm
480 mm
500 mm
Larghezza complessiva (in base alla
larghezza del sedile)
518 mm
558 mm
565 mm
595 mm
615 mm
635 mm
655 mm
675 mm
Lunghezza ripiegata senza bracciolo 707 mm 825 mm
Larghezza ripiegata 299 mm 290 mm
Altezza ripiegata 915 mm 935 mm
Peso totale 15,20 kg 16,60 kg
Massa della parte più pesante 7,50 kg 8,05 kg
Peso delle parti smontabili o rimovibili Poggiapiedi: 1,80 kg; Braccioli: 1,80 kg
Ruote posteriori:
4,95 kg
Stabilità statica in discesa 15°
Stabilità statica in salita 10°
Stabilità statica laterale 15°
Profondità effettiva del sedile 325 mm 450 mm
Altezza della superficie del sedile
all'estremità anteriore
457 mm 500 mm
Inclinazione del sedile 5°
Altezza dello schienale 360 mm 420 mm
Inclinazione dello schienale 0°
Distanza tra poggiapiedi e sedile 317 - 366 mm 370 - 440 mm
Angolazione tra sedile e poggiapiedi 6° 7°
Distanza tra braccioli e sedile 211 mm 220 mm
Posizione anteriore della struttura del
bracciolo
235 mm 310 mm
Diametro dei corrimano 495 mm 535 mm

Jazz S50
2020-09
Specifiche tecniche
18
EN
NL
IT
Posizione orizzontale dell'asse (deflessione) 10 mm
Diametro di sterzata minimo 990 mm 1190 mm
Diametro delle ruote posteriori 22" 24" (opzionale 12")
Pressione di gonfiaggio pneumatici, ruote
motrici/posteriori
Max. 3,5 bar
Diametro delle ruote direttrici 150 mm 200 mm
Pressione di gonfiaggio pneumatici, ruote
anteriori (direttrici)
Max. 2,5 bar
Temperatura per utilizzo e conservazione + 5 °C - + 41 °C
Umidità per utilizzo e conservazione 30% - 70%
La casa produttrice si riserva il diritto di apportare modifiche tecniche.
Tolleranza misurazioni ± 15 mm / 1,5 kg / 1,5° .

EN
NL
ES
Jazz S50
2020-09
Índice
1
Índice
Índice ........................................................................................................................ 1
Introducción ............................................................................................................... 2
1 Su producto ................................................................................................... 3
1.1 ...................................................................................................................... 3
1.2 Accesorios .................................................................................................... 3
2 Ante de su uso .............................................................................................. 4
2.1 Uso previsto .................................................................................................. 4
2.2 Explicación de los símbolos .......................................................................... 4
2.3 Instrucciones generales de seguridad ........................................................... 4
2.4 Transporte ..................................................................................................... 5
2.5 Plegado/Despliegue de la silla de ruedas ..................................................... 7
2.6 Montaje/Extracción de las ruedas traseras (si están disponibles) ................. 7
2.7 Almacenamiento ........................................................................................... 7
3 Utilizar la silla de ruedas .............................................................................. 8
3.1 Montaje y desmontaje de los reposapiés ...................................................... 8
3.2 Accionamiento de los frenos ......................................................................... 8
3.3 Montaje y desmontaje de los reposabrazos .................................................. 9
3.4 Traslado a la silla de ruedas y desde esta .................................................. 10
3.5 Conducción de la silla de ruedas ................................................................ 10
4 Instalación y ajuste ..................................................................................... 12
4.1 Herramientas .............................................................................................. 12
4.2 Forma de suministro ................................................................................... 12
4.3 Ajuste de los reposapiés ............................................................................. 12
4.4 Ajuste de los frenos ..................................................................................... 13
4.5 Cambio de las ruedas neumáticas .............................................................. 13
5 Mantenimiento............................................................................................. 15
5.1 Puntos de mantenimiento ........................................................................... 15
5.2 Instrucciones de mantenimiento ................................................................. 15
5.3 Resolución de problemas ............................................................................ 16
5.4 Vida útil prevista .......................................................................................... 16
5.5 Reutilizar ..................................................................................................... 16
5.6 Fin de vida útil ............................................................................................. 16
6 Especificaciones técnicas ......................................................................... 17

EN
NL
ES
Jazz S50
2020-09
Introducción
2
Introducción
¡Felicidades! Es usted el propietario de una silla de ruedas Vermeiren.
Esta silla de ruedas ha sido fabricada por personal experto y cualificado. Se ha diseñado y
fabricado según los más altos estándares de calidad implementados por Vermeiren.
Lea este manual detenidamente. Le ayudará a familiarizarse con el manejo, las capacidades y
limitaciones de su silla de ruedas. Si todavía tiene alguna duda después de leer este manual,
contacte con su distribuidor especializado, estará encantado de ayudarle.
Nota importante
Para garantizar su seguridad y prolongar la vida útil de su producto, cuídelo bien y asegúrese de
realizar revisiones y el mantenimiento correspondiente de manera regular.
Este manual refleja los desarrollos más recientes del producto. Vermeiren se reserva el derecho
a implementar cambios en este tipo de producto sin que ello suponga obligación alguna de
adaptar o cambiar productos similares previamente entregados.
Las imágenes se facilitan para clarificar las instrucciones contenidas en este manual. Los detalles
del producto mostrado pueden variar con respecto a su producto.
Información disponible
En nuestro sitio web http://www.vermeiren.com/ siempre encontrará la versión más reciente de
la información en este manual. Consulte este sitio web de manera regular para estar al tanto de
posibles actualizaciones.
Las personas con discapacidad visual pueden descargarse la versión electrónica del manual y
utilizar un software de síntesis de voz para poder oír su contenido.
Manual de instrucciones Para el usuario y el distribuidor especializado
Instrucciones de instalación Para el distribuidor especializado
Manual de mantenimiento para sillas de ruedas
Para el distribuidor especializado
Declaración CE de conformidad

EN
NL
ES
Jazz S50
2020-09
Su producto
3
1 Su producto
1.1
1.2 Accesorios
La Jazz S50 cuenta con los siguientes accesorios:
Ruedas de transporte (B86)
Reposabrazos (B05)
Si busca otros accesorios, póngase en contacto con su distribuidor especializado. Estará
encantado de aconsejarle.
1 = Cruceta
2 = Asideros
3 = Respaldo
4 = Almohadillas del reposabrazos
5 = Reposabrazos
6 = Ruedas de tracción
(ruedas traseras)
7 = Aros de propulsión
8 = Frenos
9 = Tapón
10 = Ruedas de dirección
(ruedas delanteras)
11 = Reposapiés
12 = Paleta
13 = Asiento
14 = Placa de identificación de
ubicaciones
3
4
5
11
13
14
2
9
7
6
8
1
12
10

EN
NL
ES
Jazz S50
2020-09
Ante de su uso
4
2 Ante de su uso
2.1 Uso previsto
Este párrafo describe brevemente el uso previsto de la silla de ruedas. También se incluyen
avisos pertinentes a las instrucciones en otros párrafos. De esta manera se pretende avisar al
usuario de un eventual mal uso de la silla.
Indicaciones y contraindicaciones: El usuario puede propulsar él mismo la silla de ruedas o
disponer de un acompañante que la empuje. La silla de ruedas está diseñada para personas
con movilidad reducida o nula. Los diferentes tipos de accesorios y su construcción modular
permiten que sea usada plenamente por ancianos así como por personas discapacitadas
debido a: parálisis, pérdida de miembros (amputación de piernas), deformaciones o defectos
en los miembros, articulaciones anquilosadas o dañadas, insuficiencias cardíacas o
circulatorias, problemas de equilibrio, caquexia (atrofia muscular).
La silla de ruedas puede ser usada en interiores y/o exteriores.
La silla de ruedas está diseñada para transportar 1 persona con un peso máximo de 130 kg.
No está diseñada para transportar mercancías u objetos, o para otros usos que no sean los
descritos anteriormente.
Utilizar sólo accesorios y piezas de repuesto aprobadas por Vermeiren.
Consulte todos los datos técnicos y las limitaciones de la silla de ruedas en el capítulo 6.
La garantía de este producto se basa en el uso y mantenimiento normales descritos en este
manual. La garantía se invalida si el producto sufre cualquier daño causado por un uso
indebido o falta de mantenimiento.
2.2 Explicación de los símbolos
Peso máximo del usuario en kg
Uso en interior/exterior
Pendiente máxima segura en ° (grados).
Tipo de modelo
2.3 Instrucciones generales de seguridad
No utilizar la silla de ruedas si ha consumido alcohol, medicamentos u otras sustancias que
afecten la capacidad de conducir.
Téngase en cuenta que ciertas partes de la silla de ruedas pueden llegar a calentarse o
enfriarse demasiado a causa de la temperatura ambiente, la luz del sol o la calefacción.
Téngase cuidado al tocar la silla de ruedas. Llevar ropa protectora cuando haga frío. Cuando
salga al exterior, puede utilizar guantes protectores para mejorar el agarre de los aros
propulsores.
No modificar esta silla de ruedas de ningún modo.
Para evitar lesiones o daños en su silla de ruedas, asegúrese de que no haya objetos ni
ninguna parte del cuerpo atrapados en los radios de las ruedas de tracción.
Tenga en cuenta que su silla de ruedas puede interferir con algunos tipos de sistemas antirrobo,
según la configuración utilizada. Esto puede hacer que se active la alarma de la tienda.

EN
NL
ES
Jazz S50
2020-09
Ante de su uso
5
2.4 Transporte
2.4.1 Retirar del camino
La mejor forma de transportar la silla es empujarla y utilizar las ruedas.
Si no es posible (porque haya que levantar las ruedas traseras para cargarla en un coche, por
ejemplo), cójala por el armazón delantero y por los asideros. No la agarre por los reposabrazos,
reposapiés ni por las ruedas.
2.4.2 Transporte mediante vehículo como equipaje
Riesgo de lesiones
Compruebe que la silla de ruedas está fijada correctamente para evitar cualquier daño a los
pasajeros en caso de colisión o frenado brusco.
No utilice NUNCA el mismo cinturón de seguridad para fijar la silla de ruedas y el pasajero.
1. Plegar la silla de ruedas hasta reducirla a su tamaño más compacto siguiendo las instrucciones
del apartado 2.5.
2. Guardar la silla de ruedas y sus ruedas en el maletero o detrás del asiento del pasajero. Si el
maletero y los asientos del coche NO están separados o cerrados, fijar bien el bastidor de la
silla de ruedas al vehículo.
2.4.3 Uso de la silla de ruedas como asiento en un vehículo de motor
Riesgo de lesiones y daños
La silla de ruedas ha superado con éxito la prueba de choque de la norma ISO 7176-19: 2008
como tal, ha sido diseñado y probado para usarlo solo como silla de cara al frente en un
vehículo de motor.
El cinturón pélvico de la silla de ruedas solo no es adecuado para un cinturón de sujeción del
ocupante.
La silla se prueba mediante el sistema de cinturón de cuatro puntos y un sistema de restricción
para los ocupantes de 3 puntos. Siempre que sea posible, utilice el asiento del vehículo y guarde
la silla en la zona de carga.
Medidas de seguridad para la silla en un vehículo:
1. Compruebe que el vehículo está equipado adecuadamente para amarrar una silla de ruedas
y el sistema de retención para los ocupantes de acuerdo con la norma ISO 10542.
2. Compruebe que los raíles de amarre para la silla y el sistema de retención para los
ocupantes, no están desgastados, contaminados, dañados o rotos.
3. Si está equipado con un asiento ajustable y/o inclinable, asegúrese de que el usuario está
sentado lo más derecho posible. Si la condición del usuario impide esto, se deberá hacer
una valoración del riesgo, para evaluar la seguridad del usuario durante el trayecto.
4. Retire todos los accesorios montados tales como bandejas y equipos respiratorios, y
colóquelos en un lugar seguro.
5. Coloque la silla de caras a la dirección del viaje, céntrico entre los raíles de amarre
montados en el suelo del vehículo.
6. Monte las correas de sujeción frontal de acuerdo a las instrucciones del fabricante del
sistema de la correa en el lugar indicado (Figura 1). Este lugar está marcado en la silla de
ruedas con un símbolo (Figura 2).
7. Retroceda la silla hasta que las correas frontales estén apretadas.
8. Aplicar el freno de la silla de ruedas.
9. Monte las correas de sujeción traseras de acuerdo con las instrucciones del fabricante del
sistema de correas en el lugar indicado (Figura 1). Este lugar está marcado en la silla de
ruedas con un símbolo (Figura 2).
PRECAUCIÓN
PRECAUCIÓN

EN
NL
ES
Jazz S50
2020-09
Ante de su uso
6
Figura 1 Figura 2
Medidas para asegurar el usuario de la silla de ruedas:
1. Retire los dos reposabrazos.
2. Si está presente ate el cinturón pélvico de la silla.
3. Ate los cinturones de sujeción del ocupante de acuerdo a las instrucciones del fabricante
del sistema de correas.
4. Lleve el cinturón pélvico bajo a través de la parte delantera de la pelvis, de tal modo que el
ángulo del cinturón pélvico está dentro de la zona preferencial de 30º a 75º respecto al
horizontal, similar a lo mostrado abajo.
5. Un ángulo más pronunciado (mayor) dentro de la zona preferente es lo aconsejable.
6. Ajuste el cinturón asegurándolo bien de acuerdo a las inclinaciones del fabricante del
sistema de correas, en consonancia a la comodidad del usuario.
7. Asegúrese que el cinturón de sujeción conecta en una línea recta al punto de anclaje en el
vehículo y que no haya dobleces visibles, por ejemplo en el eje de la rueda trasera.
8. Instale los reposacabezas, si lo desea. Asegúrese que los cinturones no están retorcidos o
apartados del cuerpo por los componentes de la silla como los reposabrazos o las ruedas.
Las sujecciones pelvicas tendrian que
estar en pieno contacto a traves de la
parte delantera del cuerpo cerca de la
union del musio y la pelvis
La sujecciones no tendrian que
mantenerse lejos del cuerpo por
los componentes de la silla como
los reposacabezas o la ruedas
Las sujecciones pelvicas tendrian que estar en
pieno contacto a traves de la parte delantera del
cuerpo cerca de la union del musio y la pelvis
La sujecciones no tendrian que mantenerse
lejos del cuerpo por los componentes de la
silla como los reposacabezas o la ruedas

EN
NL
ES
Jazz S50
2020-09
Ante de su uso
7
2.5 Plegado/Despliegue de la silla de ruedas
Peligro de pillarse los dedos: no coloque los dedos entre los componentes
de la silla de ruedas.
Para plegar la silla de ruedas:
1. Pliegue o retire las paletas (véase el apartado 2.4).
2. Sujete el asiento por la parte delantera y trasera y tire de él hacia arriba.
3. Empuje las empuñaduras para plegar aún más la silla de ruedas.
Desplegar la silla de ruedas:
1. Sitúese detrás de la silla de ruedas.
2. Use las empuñaduras para abrir la silla de ruedas tanto como le sea posible.
3. Sitúese delante de la silla de ruedas.
4. Empuje los dos tubos del asiento hacia abajo hasta que queden fijados en su posición.
2.6 Montaje/Extracción de las ruedas traseras (si están disponibles)
Desmontar las ruedas traseras
1. Mantener pulsado el botón (1) a medida que se saca el eje de la rueda del orificio del
bastidor.
2. Repetir el proceso en la otra rueda y apoyar la silla con
cuidado sobre los tubos traseros del bastidor.
Para montar las ruedas traseras
1. Tomar una de las ruedas traseras y levantar la silla por uno
de los lados.
2. Mantener pulsado el botón (1) a medida que se introduce la
rueda en el eje hasta el tope.
3. Soltar el botón para bloquear la rueda. Asegurarse de que
hace clic para saber que la rueda se ha bloqueado.
4. Repetir este proceso con la otra rueda.
5. Asegurarse de que ambas ruedas estén bien fijadas.
2.7 Almacenamiento
Asegurarse de que la silla de ruedas se almacena en un luga
r seco para evitar la aparición
de moho y que se dañe la tapicería; ver también el apartado 6.
PRECAUCIÓN

EN
NL
ES
Jazz S50
2020-09
Utilizar la silla de ruedas
8
3 Utilizar la silla de ruedas
Riesgo de lesiones y daños
Leer antes los capítulos anteriores e informarse sobre el uso previsto. NO utilizar la silla de
ruedas si no se han leído detenidamente y entendido completamente todas las instrucciones.
En caso de tener dudas o preguntas, contacte con su distribuidor esp
ecializado local,
proveedor de cuidados o asesor técnico para recibir asesoramiento.
Asegurarse de que las ruedas u otras piezas en movimiento no pinzan por accidente sus
manos, ropa, cinturones, hebillas o joyas durante el uso o el ajuste.
3.1 Montaje y desmontaje de los reposapiés
Riesgo de lesiones
Compruebe que los reposapiés están bloqueados en su lugar antes de usarlos.
Mantenga los objetos lejos de la oscilación del reposapiés durante el montaje o el desmontaje
de éstos.
El montaje de los reposapiés se realiza del modo siguiente:
1. Mantenga el reposapiés en posición vertical por la parte
externa del armazón de la silla de ruedas e inserte el capuchón
del tubo (1) en el armazón.
2. Gire el reposapiés hacia el interior hasta que encaje en su
posición con un clic.
3. Gire la paleta hacia abajo.
Para retirar los reposapiés:
1. Tire del asa (2).
2. Gire el reposapiés hacia la parte externa de la silla de ruedas
hasta que se afloje de la guía.
3. Saque el reposapiés del capuchón del tubo (1).
3.2 Accionamiento de los frenos
Riesgo de lesiones
Los frenos no se utilizan para reducir la velocidad de la silla de ruedas durante los
movimientos. Utilice los frenos solo para evitar que la silla de ruedas realice movimientos no
deseados.
El buen funcionamiento de los frenos depende de su desgaste y de las sustancias presentes
en ellas (agua, aceite, barro, etc.). Compruebe las condiciones de las ruedas antes de
utilizarlas.
Los frenos se pueden ajustar y pueden desgastarse. Compruebe el funcionamiento de los
frenos antes de cada uso.
Asegúrese de que la silla de ruedas se encuentre en una superficie horizontal plana antes
de soltar los frenos. Nunca suelte ambos frenos a la vez.
Para accionar los frenos:
1. Empuje las palancas del freno (1) hacia delante hasta
que oiga un clic.
Para soltar los frenos:
1. Tire de la palanca (1) hacia atrás para soltar un freno.
2. Sujete el aro de propulsión de la rueda que haya soltado.
3. Tire de la palanca del segundo freno hacia atrás.
PRECAUCIÓN
PRECAUCIÓN
PRECAUCIÓN

EN
NL
ES
Jazz S50
2020-09
Utilizar la silla de ruedas
9
3.3 Montaje y desmontaje de los reposabrazos
Riesgo de lesiones
Compruebe que los reposabrazos están bloqueados en su lugar antes de usarlos.
Mantenga los dedos y la ropa alejados de la parte inferior del reposabrazos.
1. Monte el tubo posterior del reposabrazos en el capuchón del tubo (1) (Fig. A).
2. Asegúrese de que el reposabrazos está montado correctamente.
3. Pliegue el reposabrazos hacia delante.
4. Tire hacia arriba de la palanca (2) del capuchón del tubo (3) (Fig. B).
5. Inserte, hasta oír un clic, el tubo frontal del reposabrazos (4) en el capuchón del tubo (3)
(Fig. B).
Para abrir y retirar el reposabrazos:
1. Tire la palanca (2) y tire de la parte delantera del reposabrazos (1) hacia arriba (Fig. C).
2. Pliegue el reposabrazos hacia atrás.
3. Para retirar el reposabrazos, extraiga la parte posterior del reposabrazos del capuchón del
tubo (3) (Fig. D).
A
B
C
D
PRECAUCIÓN

EN
NL
ES
Jazz S50
2020-09
Utilizar la silla de ruedas
10
3.4 Traslado a la silla de ruedas y desde esta
Riesgo de lesiones y daños
En caso de que no pueda realizar el traslado de forma segura, pida a alguien que le ayude.
No se ponga de pie en los reposapiés.
1. Coloque la silla de ruedas lo más cerca posible de la silla,
el sillón o la cama desde la que desea trasladarse o a la
que desee ir.
2. Compruebe que los dos frenos de la silla de ruedas estén
accionados.
3. Pliegue las paletas del reposapiés hacia arriba para evitar
ponerse de pie en ellos.
4. Si el traslado se realiza por el lateral de la silla de ruedas,
pliegue el reposabrazos de ese lado hacia arriba. (Véase
el apartado 3.3).
5. Traslado a/desde la silla de ruedas.
3.4.1 Posición correcta en la silla de ruedas
Algunas recomendaciones para un uso confortable de la silla de ruedas:
Coloque la espalda lo más cerca posible del respaldo.
Asegúrese de que la parte superior de las piernas se encuentre en posición horizontal. En
caso necesario, ajuste la longitud de los reposapiés (véase el apartado 4.3).
3.5 Conducción de la silla de ruedas
Riesgo de lesiones y daños
Antes de cada uso, asegurarse de que:
o los frenos de estacionamiento funcionan adecuadamente.
o los neumáticos están en buen estado, ver apartado Error!
Reference source not
found..
Tener cuidado de no pillarse los dedos con los radios de las ruedas.
No manipular los aros propulsores con las manos mojadas.
Tener cuidado de no pillarse las manos con los aros propulsores cuando esté atravesando
espacios muy estrechos.
NO conducir en pendientes o sobre obstáculos, escalones o bordillos que excedan las
dimensiones que se detallan en el apartado Error! Reference source not found..
Cuando se detenga en una pendiente (no muy inclinada), utilizar los frenos.
Asegurarse de que las cuatro ruedas están en contacto con el suelo cuando se esté subiendo
o bajando una pendiente.
A la hora de conducir en zonas de pendiente, hacerlo lo más despacio posible.
Permanecer siempre en la zona pavimentada cuando se circule por vías públicas.
Prestar atención a la carretera para detectar baches o grietas en los que puedan quedar
atrapadas las ruedas.
Evitar las piedras u otros objetos que puedan bloquear las ruedas.
Asegurarse de que los reposapiés no chocan contra el suelo cuando esté atravesando un
obstáculo.
No utilizar la silla de ruedas en escaleras mecánicas.
Si se dispone de él, abrocharse el cinturón de seguridad.
Téngase siempre en cuenta el alcance d
e giro del reposapiés para evitar lesionar a otras
personas o dañar objetos.
PRECAUCIÓN
PRECAUCIÓN

EN
NL
ES
Jazz S50
2020-09
Utilizar la silla de ruedas
11
Si no se tiene suficiente experiencia manejando la silla de ruedas, pedir ayuda a un auxiliar.
Mantener los brazos alejados de las ruedas y los pies sobre el reposapiés.
A la hora de atravesar escaleras, se debe contar siempre con la ayuda de dos auxiliares.
No tratar nunca de utilizar escaleras que no estén diseñadas para sillas de ruedas.
3.5.1 Conducir la silla de ruedas:
1. Soltar los frenos.
2. Agarrar ambos aros propulsores desde el punto más alto.
3. Inclinarse hacia adelante y empujar los aros propulsores hacia adelante hasta que sus brazos
queden rectos.
4. Mover las manos de nuevo hacia la parte más alta de los aros y repetir el movimiento.

EN
NL
ES
Jazz S50
2020-09
Instalación y ajuste
12
4 Instalación y ajuste
Este capítulo contiene instrucciones destinadas a los distribuidores especializados.
La Jazz S50 de Vermeiren es una silla de ruedas que ha sido diseñada para necesitar un ajuste
mínimo. No es necesario disponer de un stock extra de piezas de repuesto.
Para encontrar un centro de servicio o un distribuidor especializado cerca de usted, póngase en
contacto con el centro Vermeiren más próximo.
Riesgo de lesiones y daños
Riesgo por ajustes peligrosos; utilice únicamente los ajustes indicados en este manual.
Realizar ajustes en la silla puede hacer variar su estabilidad (inclinaciones hacia atrás o hacia
los lados).
4.1 Herramientas
Para montar la silla de ruedas, necesita las siguientes herramientas.
Juego de llaves inglesas del 7 al 22
Juego de llaves Allen del 3 al 8
Destornillador con cabeza Phillips
4.2 Forma de suministro
La silla Vermeiren Jazz S50 se entrega con:
1 chasis con reposabrazos, ruedas delanteras y traseras (altura del asiento de 500 mm)
1 par de reposapiernas
Herramientas
Manual
Accesorios (opcional)
Bomba de aire para las ruedas
4.3 Ajuste de los reposapiés
Riesgo de desperfectos: evite que los reposapiés entren en contacto con
el suelo. Mantenga una distancia mínima de 60 mm por encima del suelo.
Ajuste la longitud de los reposapiés de la siguiente manera:
1. Saque el tornillo (1).
2. Ajuste la longitud del reposapiés a la medida que le resulte
cómoda.
3. Apriete el tornillo (1) correctamente.
PRECAUCIÓN
PRECAUCIÓN

EN
NL
ES
Jazz S50
2020-09
Instalación y ajuste
13
4.4 Ajuste de los frenos
Riesgo de lesiones: sólo su distribuidor especializado puede ajustar los
frenos.
1. Monte las ruedas según se indica en el apartado 2.6.
2. Para desconectar los frenos, tire de la palanca (1) hacia atrás (Fig. A).
3. Afloje los pernos (2) para que el mecanismo del freno pueda deslizarse por el chasis (3)
(Fig. B).
4. Deslice el mecanismo del freno por el chasis (3) hasta la posición que desee (Fig. B). El
ajuste de los frenos debe de estar dentro de la distancia marcada (4) en el mecanismo de
los frenos.
5. Vuelva a apretar el perno (2) (Fig. B).
6. Verifique el funcionamiento de los frenos.
7. Si es necesario repita los pasos anteriores hasta que los frenos estén correctamente
ajustados.
4.5 Cambio de las ruedas neumáticas
Riesgo de legiones y daños
La llanta puede dañarse si no se maneja correctamente. Mejor que un experto realice estas
actividades.
Al montar un neumático, asegúrese de que no haya objetos o partes del cuerpo atrapados
entre el neumático y la llanta.
Cuando hinche las ruedas, compruebe siempre que la presión sea la correcta. La presión
correcta se indica en la pared de los neumáticos.
Utilizar sólo equipos de inflado que cumplan con las regulaciones e que indique la presión en
bares, o utilice la bomba de aire suministrada. No aceptamos responsabilidad alguna por
daños causados al usar equipos de inflado no suministradas por el fabricante.
Asegúrese siempre de que las ruedas están suficientemente infladas, ya que podría
afectar a la conducción.
No ofrecemos ningún tipo de garantía para las ruedas no suministradas por el
fabricante.
Solo un experto puede garantizar un montaje correcto. Si nuestro distribuidor
especializado no realiza todo el montaje, se invalida la garantía.
Si desea cambiar los neumáticos o las cámaras, deberá tener en cuenta lo siguiente:
1. Deshinche la cámara totalmente.
2. Inserte un desmontador de neumáticos entre el neumático y la llanta.
3. Empuje el desmontador hacia abajo lentamente y con cuidado. Así se pasará el
neumático por el borde de la llanta.
A
B
PRECAUCIÓN
PRECAUCIÓN

EN
NL
ES
Jazz S50
2020-09
Instalación y ajuste
14
4. Mueva el desmontador de neumáticos por la llanta y saldrá el neumático.
5. A continuación, retire cuidadosamente el neumático de la llanta y, luego, la cámara.
Compruebe que no haya cuerpos extraños en el fondo de la llanta ni la superficie del neumático
y límpielos si es necesario. Compruebe el estado del fondo de la llanta, en especial alrededor de
la válvula.
Use únicamente piezas de repuesto originales. No asumimos ningún tipo de responsabilidad por
los daños y lesiones que se produzcan por la utilización de partes que no sean originales.
Póngase en contacto con su distribuidor especializado.
Coloque el fondo de la llanta en posición por encima de la válvula de aire antes
de insertarlo en la llanta. A continuación, el fondo de la llanta se puede colocar
por encima fácilmente. Compruebe que todos los extremos de los radios están
cubiertos (el fondo de la llanta no es necesario en el caso que la llanta sea de
plástico).
Presione el neumático sobre la llanta, empezando por detrás de la válvula.
Hinche la cámara ligeramente hasta que empiece a redondearse y colóquela
dentro del neumático.
Cuando la cámara se encuentre dentro de la rueda sin arrugarse (si presenta
arrugas, deje salir un poco de aire), se puede montar la parte superior de la
rueda con facilidad presionando con ambas manos empezando de nuevo por
la válvula.
Compruebe por todos lados que la cámara no esté atrapada entre la llanta y el borde del
neumático. Empuje ligeramente la válvula hacia adentro y tire de ella hacia afuera para garantizar
que el neumático quede bien colocado alrededor de la válvula.
Para comprobar que la rueda esté bien colocada, inicialmente solo hínchela lo suficiente para
que se pueda presionar hacia dentro con los pulgares. Si las líneas de comprobación son
equidistantes del borde de la llanta en ambos lados del neumático, el neumático está bien
centrado. Si no es ese el caso, deshinche el neumático y repita el proceso.
A continuación, el neumático puede hincharse hasta la presión de funcionamiento total (tenga en
cuenta el máximo!!) y puede volver a poner el capuchón de la válvula.

EN
NL
ES
Jazz S50
2020-09
Mantenimiento
15
5 Mantenimiento
5.1 Puntos de mantenimiento
Riesgo de lesiones y daños
Cualquier reparación o cambios sólo pueden llevarse a cabo por personal debidamente
cualificado y sólo pueden utilizarse piezas de recambio Vermeiren originales.
La frecuencia de los
mantenimientos depende de la frecuencia e intensidad de uso.
Póngase en contacto con su distribuidor para acordar un horario común para realizar
inspecciones, mantenimientos y reparaciones.
Antes de cada uso
Inspeccionar los siguientes aspectos:
Todas las piezas: Presentes y sin daños o desgastes.
Todas las piezas: Limpieza, ver apartado 5.2.2.
Ruedas, respaldo, asiento, soportes para pantorrillas, reposabrazos, reposapiés: Bien
asegurados.
Estado de las ruedas/los neumáticos, ver apartado 5.2.1;
Estado de las piezas del bastidor: Sin deformaciones, inestabilidad, debilidad o conexiones
sueltas
Asiento, respaldo, almohadillas para los brazos y para las pantorrillas, reposacabezas (si
corresponde): Sin desgaste excesivo (como abolladuras, daños o grietas).
Frenos: Sin deterioro y en buen estado de funcionamiento
Póngase en contacto con el distribuidor especializado para posibles reparaciones o sustitución
de piezas.
Anualmente o más regularmente
La silla de ruedas debe superar una inspección y una sesión de mantenimiento realizados por el
distribuidor especializado por lo menos una vez al año, o con mayor frecuencia. La frecuencia
mínima de mantenimiento depende del uso y debe, por tanto, acordarse mutuamente con el
distribuidor especializado.
5.2 Instrucciones de mantenimiento
5.2.1 Ruedas y neumáticos
El correcto funcionamiento de los frenos depende del estado de los neumáticos y puede
cambiar debido al desgaste o la suciedad (agua, aceite, barro…).
Mantener las ruedas libres de cables, pelos, arena y fibras.
Comprobar el perfil de los neumáticos. Si la profundidad del dibujo es inferior a 1 mm, deben
sustituirse los neumáticos. Ponerse en contacto con su distribuidor especializado a este respecto.
Hinchar cada neumático hasta alcanzar la presión correcta (ver la indicación de presión en los
neumáticos).
5.2.2 Limpieza
Riesgo de daños por humedad
No utilizar nunca una manguera o un limpiador a alta
presión para limpiar la silla de ruedas.
Limpiar todas las piezas rígidas de la silla de ruedas con un paño húmedo (no empapado).
Si fuera necesario, utilizar un jabón suave que sea apto para limpiar superficies barnizadas y
sintéticas.
PRECAUCIÓN
PRECAUCIÓN

EN
NL
ES
Jazz S50
2020-09
Mantenimiento
16
La tapicería puede limpiarse con agua templada y jabón suave. No utilizar productos de limpieza
abrasivos.
5.2.3 Desinfección
Riesgo de daños
La desin
fección sólo puede llevarla a cabo personal debidamente cualificado. Consultar con
su distribuidor especializado al respecto.
5.3 Resolución de problemas
Aunque se utilice la silla de ruedas de la manera indicada, a veces pueden surgir problemas
técnicos. En ese caso, póngase en contacto con su distribuidor especializado.
Riesgo de lesiones y daños a la silla de ruedas
No intentar NUNCA reparar la
silla de ruedas por cuenta propia.
Los siguientes signos pueden ser indicadores de un problema grave. Se recomienda, por tanto,
ponerse en contacto con su distribuidor especializado si nota los siguientes problemas:
Ruidos extraños;
Desgaste desigual de la banda de uno de los neumáticos;
Movimientos bruscos;
La silla de ruedas se desvía a un lado;
Ensamblajes de las ruedas dañados o rotos.
5.4 Vida útil prevista
La vida útil media de la silla de ruedas es de 5 años. La vida útil aumentará o disminuirá
dependiendo de la frecuencia de uso, las circunstancias de conducción y el mantenimiento.
5.5 Reutilizar
Antes de reutilizar la silla de ruedas, desinfectarla, inspeccionarla y hacer que pase por un
mantenimiento según las instrucciones en el §5.1 y el §5.2.
5.6 Fin de vida útil
Al final de la vida útil, deberá desechar la silla de ruedas siguiendo las leyes medioambientales
de su localidad. Para transportar materiales reciclables de la silla de ruedas de manera más
cómoda, se recomienda que se desmonte primero.
PRECAUCIÓN
AVISO

EN
NL
ES
Jazz S50
2020-09
Especificaciones técnicas
17
6 Especificaciones técnicas
Los datos técnicos expuestos a continuación son sólo válidos para esta silla de ruedas, con
configuración estándar y en condiciones ambientales óptimas. Tener en cuenta estos datos
durante la utilización de la silla para ducha.
Los valores aquí expuestos dejarán de ser aplicables si la silla de ruedas ha sido modificada, se
ha dañado, o sufre de un desgaste intenso.
Tabla 1: Especificaciones Técnicas
Fabricante
Vermeiren
Tipo
Silla de ruedas manual
Modelo
Jazz S50
Peso máximo del ocupante
130 kg
Descripción
Jazz S50 Kids
Jazz S50
Peso máximo del ocupante 60 kg 130 kg
Longitud total con reposapiés 914 mm 1120 mm
Anchura útil del asiento 330 mm
370 mm
390 mm
420 mm
440 mm
460 mm
480 mm
500 mm
Anchura total (depende de la anchura del
asiento)
518 mm
558 mm
565 mm
595 mm
615 mm
635 mm
655 mm
675 mm
Longitud plegada sin reposapiés 707 mm 825 mm
Anchura plegada 299 mm 290 mm
Altura plegada 915 mm 935 mm
Peso total 15,20 kg 16,60 kg
Peso de la parte más pesada 7,50 kg 8,05 kg
Peso de las partes que pueden
desmontarse o quitarse.
Reposapiés: 1,80 kg; Reposabrazos: 1,80 kg; Ruedas traseras:
4,95 kg
Estabilidad estática en pendientes
descendentes
15°
Estabilidad estática en pendientes
ascendentes
10°
Estabilidad estática lateral 15°
Profundidad útil del asiento 325 mm 450 mm
Altura de la superficie del asiento en la parte
delantera
457 mm 500 mm
Ángulo del asiento 5°
Altura del respaldo 360 mm 420 mm
Ángulo del respaldo 0°
Distancia entre el reposapiés y el asiento 317 - 366 mm 370 - 440 mm
Ángulo entre el asiento y el reposapiés 6° 7°
Distancia entre el reposabrazos y el asiento 211 mm 220 mm

EN
NL
ES
Jazz S50
2020-09
Especificaciones técnicas
18
Ubicación delantera del armazón del
reposabrazo
235 mm 310 mm
Diámetro del aro de propulsión 495 mm 535 mm
Ubicación horizontal del eje (deflexión) 10 mm
Diámetro de giro mínimo 990 mm 1190 mm
Diámetro de ruedas traseras 22" 24" (opcional 12”)
Presión de los neumáticos, ruedas traseras
(de tracción)
Máx. 3,5 bares
Diámetro de ruedas dirección 150 mm 200 mm
Presión de los neumáticos, ruedas
delanteras (de dirección)
Máx. 2,5 bares
Temperatura de almacenamiento y de uso + 5 °C - + 41 °C
Humedad de almacenamiento y de uso 30% - 70%
Nos reservamos el derecho a aplicar modificaciones técnicas.
Tolerancia de la medida ± 15
mm/1,5
kg/ 1,5°.

Jazz S50
2020-09
Spis treści
2
EN
NL
PL
Spis treści
Spis treści .................................................................................................................. 2
Wstęp ........................................................................................................................ 3
1 Państwa produkt ........................................................................................... 4
1.1 Akcesoria ...................................................................................................... 4
2 Opis produktu ............................................................................................... 5
2.1 Przewidziane zastosowanie .......................................................................... 5
2.2 Objaśnienie symboli ...................................................................................... 5
2.3 Ogólne instrukcje bezpieczeństwa ................................................................ 5
2.4 Transport ....................................................................................................... 6
2.5 Składanie / rozkładanie wózka inwalidzkiego ................................................ 8
2.6 (De)Montaż tylnych kół (jeśli jest dostępny) .................................................. 8
2.7 Przechowywanie ........................................................................................... 8
3 Sposób użycia ............................................................................................... 9
3.1 Montaż i demontaż podnóżków ..................................................................... 9
3.2 Obsługa hamulców........................................................................................ 9
3.3 Montaż i demontaż podłokietników ............................................................. 10
3.4 Wsiadanie i zsiadanie z wózka inwalidzkiego ............................................. 10
3.5 Jazda na wózku inwalidzkim ....................................................................... 11
4 Montaż i regulacja ....................................................................................... 12
4.1 Narzędzia .................................................................................................... 12
4.2 Sposób dostawy .......................................................................................... 12
4.3 Regulacja podnóżków ................................................................................. 12
4.4 Regulacja hamulców ................................................................................... 13
4.5 Wymiana opon ............................................................................................ 13
5 Konserwacja ................................................................................................ 15
5.1 Punkty konserwacji ..................................................................................... 15
5.2 Instrukcje konserwacji ................................................................................. 15
5.3 Rozwiązywania problemów ......................................................................... 16
5.4 Spodziewana trwałość ................................................................................ 16
5.5 Ponowne użycie .......................................................................................... 16
5.6 Zakończenie użytkowania ........................................................................... 16
6 Parametry techniczne ................................................................................. 17

Jazz S50
2020-09
Wstęp
3
EN
NL
PL
Wstęp
Gratulacje! Stali się Państwo posiadaczem wózka inwalidzkiego Vermeiren!
Ten wózek inwalidzki został wykonany przez wykwalifikowany i zaangażowany personel. Został
on zaprojektowany i wyprodukowany według wysokiej jakości standardów stosowanych przez
firmę Vermeiren.
Proszę starannie zapoznać się z niniejsza instrukcją; pomoże ona Państwu zapoznać się z
eksploatacją, możliwościami i ograniczeniami swojego wózka. Jeżeli wciąż mają Państwo pytania
po przeczytaniu niniejszej instrukcji, proszę niezwłocznie skontaktować się ze swoim
specjalistycznym dystrybutorem. Chętnie on Państwu pomoże.
Ważna informacja
Aby zagwarantować bezpieczeństwo i wydłużyć okres eksploatacji swojego produktu proszę o
niego dbać oraz regularnie kontrolować i serwisować.
Niniejsza instrukcja odzwierciedla najnowszy stan rozwoju produktu. Firma Vermeiren jest
uprawniona do wdrażania zmian tego typu produktu bez zobowiązań do dostosowywania lub
wymiany podobnych produktów dostarczonych wcześniej.
Ilustracje służą objaśnieniu wskazówek w niniejszej instrukcji. Szczegóły odnośnie
przedstawionego produktu mogą różnić się od Państwa produktu.
Dostępne informacje
Na naszej stronie internetowej http://www.vermeiren.com/ można zawsze znaleźć najnowszą
wersję informacji. Proszę regularnie sprawdzać tę stronę internetową pod kątem ewentualnych
aktualizacji.
Osoby niewidome lub niedowidzące mogą pobrać elektroniczną wersję niniejszej instrukcji i
odsłuchać ją przez aplikację programową syntezatora mowy.
Instrukcja obsługi Dla użytkownika i specjalistycznego dystrybutora
Instrukcja instalacji Dla specjalistycznego dystrybutora
Instrukcja serwisowa dla wózków inwalidzkich
Dla specjalistycznego dystrybutora
Deklaracja zgodności WE

Jazz S50
2020-09
Państwa produkt
4
EN
NL
PL
Państwa produkt
1.1 Akcesoria
Dla modeli Jazz S50 dostępne są następujące akcesoria:
Koła jezdne (B86)
Podłokietniki (B05)
W przypadku pytań na temat innych akcesoriów prosimy o kontakt ze specjalistą ds. sprzedaży.
Z chęcią udzieli wszelkich wyjaśnień.
1 = Krzyżak
2 = Uchwyty
3 = Oparcie
4 = Podpórki
5 = Podłokietniki
6 = Koła napędowe (tylnie)
7 = Obręcze
8 = Hamulce
9 = Zaślepka
10 = Koła skrętne (przednie)
11 = Podnóżki
12 = Płyta podnóżka
13 = Siedzisko
14 = Płytka określająca położenie
3
4
5
11
13
14
2
9
7
6
8
1
12
10

Jazz S50
2020-09
Opis produktu
5
EN
NL
PL
Opis produktu
2.1 Przewidziane zastosowanie
W niniejszej sekcji przedstawiono krótki opis przewidzianego zastosowania wózka
inwalidzkiego. W pozostałych sekcjach instrukcje zostały opatrzone istotnymi ostrzeżeniami. W
ten sposób chcemy zwrócić uwagę użytkowników na możliwość nieprawidłowej eksploatacji
produktu.
Wskazania i przeciwwskazania: Użytkownik może napędzać wózek samodzielnie lub może
być popychany przez opiekuna. Wózek inwalidzki jest przeznaczony dla osób o ograniczonej
zdolności lub braku zdolności chodzenia. Wiele rodzajów mocowań i akcesoriów, a także
modułowa konstrukcja, umożliwiają pełne użytkowanie wózka przez osoby starsze oraz osoby
dotknięte niepełnosprawnością z powodu: paraliżu; utraty kończyn (amputacji nóg);
uszkodzenia lub deformacji kończyn; sztywnych lub uszkodzonych stawów; niewydolności
serca i słabego krążenia krwi; zaburzeń równowagi; kacheksji (ubytków masy mięśniowej).
Wózek przeznaczony jest do użycia wewnątrz jak i na zewnątrz budynków.
Wózek inwalidzki jest zaprojektowany do transportu jednej osoby ważącej maksymalnie 130
kg. Nie jest przeznaczony do transportu towarów, przedmiotów ani innego wykorzystania niż
wcześniej opisane.
Używać wyłącznie akcesoriów i części zapasowych zatwierdzonych przez Vermeiren.
Należy się zapoznać ze wszystkimi danymi technicznymi i ograniczeniami wózka, które
wskazano w rozdziale 0.
Gwarancja na produkt jest udzielona przy założeniu normalnego użytkowania i konserwacji,
opisanych w niniejszej instrukcji. Uszkodzenie produktu spowodowane nieprawidłową
eksploatacją lub brakiem konserwacji spowoduje unieważnienie gwarancji.
2.2 Objaśnienie symboli
Maksymalna masa użytkownika w kg
Do użytku na zewnątrz/w pomieszczeniach
Maksymalne bezpieczne nachylenie terenu w ° (stopniach).
Oznaczenie typu
2.3 Ogólne instrukcje bezpieczeństwa
Nie korzystać z wózka inwalidzkiego będąc pod wpływem alkoholu, leków lub innych substancji
mogących wpływać na zgodności do jazdy.
Należy pamiętać, że niektóre części wózka mogą się mocno rozgrzewać lub ochładzać pod
wpływem temperatury zewnętrznej, promieniowania słonecznego lub urządzeń grzewczych.
Zachować ostrożność podczas dotykania. Nosić odzież ochronną podczas chłodnej pogody.
Będąc na zewnątrz można założyć rękawice do jazdy, poprawiając chwytność obręczy
napędowej.
Nie dokonywać żadnych modyfikacji wózka inwalidzkiego.
By zapobiec urazom i/lub uszkodzeniom wózka należy upewnić się, że żadne przedmioty i/lub
części ciała nie utknęły w szprychach kół jezdnych.
Korzystając z wózka inwalidzkiego musisz być świadomym, że w zależności od użytych ustawień
może on kolidować z niektórymi systemami antykradzieżowymi. Może to spowodować
uruchomienie alarmu w sklepie.

Jazz S50
2020-09
Opis produktu
6
EN
NL
PL
2.4 Transport
2.4.1 Przesuwanie na bok
Najlepszym sposobem przenoszenia wózka inwalidzkiego jest prowadzenie go z wykorzystaniem
jego kół.
Jeśli nie jest to możliwe (np. w przypadku demontażu tylnych kół w celach transportu wózka w
samochodzie), należy mocno chwycić wózek za ramę z przodu oraz za uchwyty. Nie należy
podnosić wózka, chwytając za podnóżek, oparcia boczne lub koła.
2.4.2 Transport w pojeździe jako bagaż
Ryzyko urazu
Upewnij się, że wózek inwalidzki jest prawidłowo umocowany. Pozwoli to zapobiec urazom
pasażerów podczas kolizji lub gwałtownego hamowania.
NIGDY nie używaj jednego pasa bezpieczeństwa do zabezpieczenia pasażera i wózka
inwalidzkiego.
1. Złożyć wózek inwalidzki do najbardziej kompaktowej wielkości zgodnie z instrukcją w § 2.5.
2. Umieścić wózek inwalidzki i jego koła w przedziale bagażowym lub za siedzeniem pasażera.
Jeżeli bagaż i przedział pasażera NIE są oddzielone lub zamknięte, przymocować bezpiecznie
ramę wózka inwalidzkiego do pojazdu.
2.4.3 Transport w pojeździe jako siedzisko dla użytkownika
Ryzyko obrażeń lub uszkodzeń
Wózek przeszedł test zderzeniowy wg normy ISO 7176-19: 2008 i jako taki został
zaprojektowany i przetestowany do użycia wyłącznie przodem do kierunku jazdy w pojazdach
silnikowych.
Sam pas biodrowy nie nadaje się jako pas zabezpieczający pasażerów.
Wózek inwalidzki jest przetestowany przy użyciu czterech punktów mocujących i z 3-punktowym
system mocowania pasażera. Gdy jest to możliwe, należy użyć siedzeń pojazdu a wózek
przewozić w przestrzeni ładunkowej pojazdu.
Czynności, aby zabezpieczyć wózek w pojeździe:
1. Sprawdź, czy pojazd jest wyposażony w odpowiedni system przytrzymujący wózek i
pasażera, zgodnie z normą ISO 10542.
2. Sprawdź, czy elementy wózka i urządzenie przytrzymujące, nie są postrzępione, skażone,
uszkodzone.
3. Jeśli wózek wyposażony jest w regulowany fotel i/lub oparcie, upewnij się, że ww. elementy
są ustawione w pozycji pionowej a pasażer w wózku inwalidzkim siedzi w pozycji pionowej.
Jeśli stan pasażera nie pozwala na takie ułożenie, należy ocenić ryzyko, aby zapewnić
bezpieczeństwo pasażera podczas transportu.
4. Usuń wszystkie zamontowane akcesoria takie jak stoliki, respirator itp. i przymocuj je w
bezpiecznym miejscu.
5. Wózek ustawić do przodu w kierunku jazdy, centralnie między szynami mocującymi
zamontowanymi w podłodze pojazdu.
6. W pierwszej kolejności zamontuj pasy mocujące z przodu wózka zgodnie z instrukcją
producenta systemu mocującego we wskazane miejsce (Rysunek 1). Miejsce mocowania
jest zaznaczone na wózku inwalidzkim z symbolem (Rysunek 2).
7. Wycofaj wózek do momentu aż pasy z przodu się napną.
8. Załącz hamulec w wózku inwalidzkim.
9. Następnie zamontuj pasy mocujące na tylnej ramie wózka we wskazanym miejscu zgodnie
z instrukcją producenta systemu pasów (Rysunek 1). Miejsce jest zaznaczone na wózku
inwalidzkim z symbolem (Rysunek 2).
UWAGA
UWAGA

Jazz S50
2020-09
Opis produktu
7
EN
NL
PL
Rysunku 1 Rysunku 2
Kroki w celu zapewnienia bezpieczeństwa użytkownikowi wózka inwalidzkiego:
1. Wyjmij oba podłokietniki.
2. Jeśli występuje, dołącz wózka pas biodrowy.
3. Dołącz pasy zabezpieczające pasażera zgodnie z instrukcją producenta pasów.
4. Pas biodrowy, powinien być tak zamontowany, aby kąt pasa znajdował się w strefie 30 ° do
75 ° do poziomu, tak jak pokazano poniżej.
5. Preferowany jest większy kąt zapięcia.
6. Dostosuj naciąg pasa ściśle według instrukcji producenta pasów tak, aby zapewnić komfort
użytkownika.
7. Upewnij się, że taśmy przytrzymujące łączą się w linii prostej do punktu zakotwiczenia w
samochodzie i nie się nigdzie blokowane na przykład na osi tylnego koła.
8. Zainstaluj podłokietniki, upewnij się, że pasy nie są skręcone i przechodzą z dala od
ruchomych elementów wózka inwalidzkiego, takich jak podłokietniki czy koła.
Pasy nie mogą przechodzić przez
części wózka na jak podłokietnik czy
koła.
Pasy nie mogą przechodzić przez
części wózka na jak podłokietnik
czy koła

Jazz S50
2020-09
Opis produktu
8
EN
NL
PL
2.5 Składanie / rozkładanie wózka inwalidzkiego
Ryzyko przytrzaśnięcia – Trzymaj palce w bezpiecznej odległości od
ruchomych części wózka inwalidzkiego.
Rozkładanie wózka inwalidzkiego:
1. Stań za wózkiem inwalidzkim.
2. Trzymając za uchwyty, maksymalnie rozłóż wózek.
3. Stań przed wózkiem inwalidzkim.
4. Dociśnij obie rurki siedziska w dół, aż zostaną zablokowane na pozycjach.
Składanie wózka inwalidzkiego:
1. Złóż lub wymontuj płyty podnóżków (patrz § 3.1).
2. Chwyć siedzenie za przód i oparcie, a następnie pociągnij w górę.
3. Naciśnij uchwyty, aby kontynuować składanie.
2.6 (De)Montaż tylnych kół (jeśli jest dostępny)
Sposób demontażu tylnych kół
1. Nacisnąć i przytrzymać przycisk (1) wysuwając oś koła z otworu ramy.
2. Powtórzyć czynność dla drugiego koła i umieścić wózek
inwalidzki delikatnie na tylnych rurach ramy.
Sposób instalacji tylnych kół
1. Wziąć jedno z tylnych kół i podnieść wózek inwalidzki z jednej
strony.
2. Nacisnąć i przytrzymać przycisk (1) wsuwając koło na oś.
3. Zwolnić przycisk, aby zablokować koło. Upewnić się, że
zatrzasnęło się z kliknięciem.
4. Powtórzyć tę czynność dla drugiego koła.
5. Upewnić się, że oba są mocno dokręcone.
2.7 Przechowywanie
Wózek
inwalidzki powinien być przechowywany w suchym środowisku, aby zapobiec
tworzeniu się na nim pleśni i uszkodzeniu tapicerki, patrz też rozdział 0.
UWAGA

Jazz S50
2020-09
Sposób użycia
9
EN
NL
PL
Sposób użycia
Ryzyko obrażeń i / lub uszkodzeń
Zacząć od przeczytania poprzednich rozdziałów i zaznajomienia się z przewidzianym
zastosowaniem. NIE używać wózka, dopóki wszystkie instrukcje nie zostaną przeczytane i
zrozumiane.
W razie wątpliwości i pytań prosimy o kontakt z lokalnym wyspecjalizowanym
sprzedawcą,
opiekunem lub doradcą technicznym, który udzieli pomocy.
Upewnić się, że ręce, odzież, pasy, sprzączki lub biżuteria nie zablokują się w kołach lub innych
ruchomych częściach podczas użytkowania lub regulacji.
3.1 Montaż i demontaż podnóżków
Ryzyko zranienia
Przed użyciem sprawdź prawidłowe zapięcie podnóżków.
Trzymaj wszelkie przedmioty w bezpiecznej odległości od osi
obrotu podnóżków podczas zapinania i odpinania.
Aby zamontować podnóżki:
1. Przytrzymaj podnóżek w poprzek po zewnętrznej stronie ramy
wózka inwalidzkiego i zamontuj rurkę (1) w ramie.
2. Obróć podnóżek do wewnątrz, aż wskoczy na miejsce.
3. Obróć płytę podnóżka w dół.
Aby zdemontować podnóżki:
1. Pociągnij za uchwyt (2).
2. Obróć podnóżek na zewnątrz wózka inwalidzkiego, aż do jego
zwolnienia z szyny.
3. Wyciągnij rurkę podnóżka z ramy (1).
3.2 Obsługa hamulców
Ryzyko zranienia
Hamulce nie służą do spowalniania wózka inwalidzkiego w trakcie ruchu. Należy ich używać
wyłącznie, aby nie dopuścić do niepożądanych ruchów wózka.
Na prawidłową pracę hamulców wpływ ma zużycie oraz zanieczyszczenie ogumienia (woda,
olej, błoto, ...). Należy sprawdzać stan ogumienia przed każdym użyciem.
Hamulce są regulowane i mogą ulec zużyciu. Należy sprawdzać stan hamulców przed każdym
użyciem.
Przed zwolnieniem hamulców upewnij się, że wózek inwalidzki znajduje się na płaskiej,
poziomej powierzchni. Nigdy nie zwalniaj obu hamulców jednocześnie.
Aby zaciągnąć hamulec:
1. Popchnij dźwignie hamulców w przód, aż da się słyszeć
wyraźne kliknięcie.
Aby zwolnić hamulce:
1. Zwolnij jeden hamulec, pociągając dźwignię w tył.
2. Przytrzymaj dłonią obręcz zwolnionego koła.
3. Zwolnij drugi hamulec, pociągając dźwignię w tył.
UWAGA
UWAGA
UWAGA

Jazz S50
2020-09
Sposób użycia
10
EN
NL
PL
3.3 Montaż i demontaż podłokietników
Ryzyko zranienia
Przed użyciem wózka upewnij sie, że podłokietniki sa prawidłowo zapięte.
Trzymaj palce i odzież z dala od dolnej części podłokietnika.
1. Zamontuj tylną rurkę podłokietnika w ramie (1) (rys. A).
2. Upewnij się, że podłokietnik jest prawidłowo zamocowany.
3. Pochyl podłokietnik w przód.
4. Wyciągnij dźwignię (2) z ramy (3) do góry (rys. B).
5. Zamocuj przednią rurkę podłokietnika (4) w ramie (3) (rys. B).
Aby rozłożyć i zdemontować podłokietnik:
1. Naciśnij dźwignię (2) i pociągnij przód podłokietnika (1) w górę (rys. C).
2. Odchyl podłokietnik w tył.
3. Aby wymontować podłokietnik, wyciągnij tylną część podłokietnika z ramy (3) (rys. D).
3.4 Wsiadanie i zsiadanie z wózka inwalidzkiego
Ryzyko odniesienia obrażeń i/lub uszkodzenia
Jeśli nie można samemu bezpiecznie wsiąść lub zsiąść z wózka inwalidzkiego, należy poprosić
kogoś o pomoc.
Nie wolno stawać na płytach podnóżka.
C
D
UWAGA
UWAGA
A
B

Jazz S50
2020-09
Sposób użycia
11
EN
NL
PL
1. Ustaw wózek jak najbliżej krzesła, kanapy lub łóżka na/z
którego przenosi się użytkownik.
2. Upewnij się, że oba hamulce wózka inwalidzkiego są
zaciągnięte.
3. Odchyl płyty podnóżka w górę, uniemożliwiając stanięcie na
nich.
4. Jeśli przemieszczanie zachodzi w poprzek wózka, odchyl
podłokietnik po tej stronie wózka w górę (patrz § 2.6).
5. Wsiądź na/zsiądź z wózka inwalidzkiego.
3.4.1 Prawidłowa pozycja na wózku inwalidzkim
Zalecenia dotyczące wygodnego korzystania z wózka inwalidzkiego:
Ułóż plecy tak blisko oparcia, jak to możliwe.
Upewnij się, że uda ułożone są w poziomie. W razie potrzeby dostosuj długość podnóżków
(patrz § 4.3).
3.5 Jazda na wózku inwalidzkim
Ryzyko obrażeń i uszkodzeń
Przed każdym użyciem należy się upewnić, że:
o hamulce postojowe działają prawidłowo,
o opony są w dobrym stanie, patrz §0.
Uważać, aby nie włożyć palców do szprych koła.
Nie obsługiwać obręczy napędowej mokrymi rękami.
Uważać zablokowanie rąk na obręczy napędowej przejeżdżając przez wąskie przejścia.
NIE przejeżdżać po stromych nachyleniach, przeszkodach, stopniach lub krawężnikach
większych, niż określono w §0.
Zatrzymując się na (małym) nachyleniu należy użyć hamulców.
Upewnić się, że wszystkie cztery koła dotykają podłoża podczas jazdy w górę i w dół po
nachyleniu.
Nachylenia pokonywać jak najwolniej.
Jeżdżąc po drogach publicznych należy zawsze korzystać z chodnika.
Zwracać uwagę, czy na drodze nie ma dziur ani szczelin, w których koła mogą zostać
uwięzione.
Unikać kamieni i innych obiektów, które mogą zablokować koła.
Upewnić się, że płyty podnóżka nie dotykają podłoża podczas pokonywania przeszkody.
Nie korzystać z wózka inwalidzkiego w windzie.
Jeżeli to możliwe, zapinać pas bezpieczeństwa.
Należy zawsze zwracać uwagę na zakres obrotu płyty podnóżka, aby nie spowodować
obrażeń ciała osób w pobliżu czy uszkodzenia przedmiotów.
W przypadku braku doświadczenia w poruszaniu się wózkiem inwalidzkim należy poprosić o
pomoc drugiej osoby. Odsunąć ręce od kół, a stopy położyć na płycie podnóżka.
Stopnie należy pokonywać zawsze przy pomocy dwóch pomocników.
Nie próbować korzystać ze schodów, które nie są przystosowane do wózków inwalidzkich.
3.5.1 Jazda wózkiem inwalidzkim:
1. Zwolnić hamulce.
2. Chwycić obie obręcze napędowe w najwyższym punkcie.
3. Pochylić się do przodu i popchnąć obręcze napędowe do przodu do momentu wyprostowania
rąk.
4. Przemieścić ręce ponownie na górną część obręczy napędowych i powtórzyć ruch.
UWAGA

Jazz S50
2020-09
Montaż i regulacja
12
EN
NL
PL
Montaż i regulacja
Instrukcje zawarte w niniejszym rozdziale są przeznaczone dla wyspecjalizowanego
sprzedawcy.
Model Vermeiren Jazz S50 został zaprojektowany jako wózek inwalidzki z minimalną liczbą
regulacji. Nie jest wymagany zapas dodatkowych części zamiennych.
Informacje na temat najbliższych punktów usługowych lub przedstawicieli otrzymać można w
najbliższym biurze Vermeiren.
Ryzyko obrażeń i uszkodzeń
Należy używać wyłącznie zakresów opisanych w niniejszej instrukcji.
Modyfikacja w ramach dopuszczalnego stopnia regulacji może prowadzić do zmiany
stabilności wózka inwalidzkiego (może powodować przechylenie w tył lub na bok).
4.1 Narzędzia
Do regulacji ustawień wózka inwalidzkiego wymagane są następujące narzędzia.
Zestaw kluczy nr 7 - 22
Zestaw kluczy imbusowych nr 3 - 8
Wkrętak krzyżakowy
4.2 Sposób dostawy
Dostarczany wózek Vermeiren Jazz S50 będzie zawierał:
1 ramę z podłokietnikami, tylnymi i przednimi kołami (wysokość siedzenia 500 mm);
1 parę podnóżków;
klucz imbusowy;
instrukcję obsługi;
akcesoria. (opcjonalne)
pompkę
4.3 Regulacja podnóżków
Ryzyko uszkodzenia – należy unikać kontaktu podnóżków z podłożem.
Zachowaj minimalny odstęp 60 mm od podłoża.
Ustaw długość podnóżków zgodnie z poniższą instrukcją:
1. Odkręć nakrętkę (1).
2. Ustaw podnóżki na wygodną długość.
3. Odpowiednio dokręć śrubę (1).
UWAGA
UWAGA

Jazz S50
2020-09
Montaż i regulacja
13
EN
NL
PL
4.4 Regulacja hamulców
Ryzyko urazu – regulacji hamulców może dokonywać wyłącznie
wyspecjalizowany sprzedawca.
1. Zamontuj koła zgodnie z § 2.6.
2. Odłącz hamulce, pociągając dźwignię (1) w tył (rys. A).
3. Poluzuj śruby (2), aby umożliwić ruch mechanizmu hamulcowego po szynie (3) (rys. B).
4. Przesuń mechanizm hamulcowy na szynie (3) do żądanej pozycji (rys. B). Regulacja
hamulca powinna odbywać się w zakresie znacznika (4) umieszczonego na mechanizmie
hamulca.
5. Dokręć śruby (2) (rys. B).
6. Sprawdź pracę hamulców.
7. W razie potrzeby powtórz powyższe czynności aż do poprawnego wyregulowania
hamulców.
4.5 Wymiana opon
Ryzyko odniesienia obrażeń i/lub uszkodzenia
W przypadku niewłaściwej obsługi można uszkodzić obręcz. Lepiej będzie powierzyć te
czynności ekspertowi.
W czasie montażu opony należy upewnić się, że żadne przedmioty lub części ciała nie są
wciśnięte pomiędzy oponę a poręcz,
W czasie pompowania opon należy zawsze sprawdzać czy poziom ciśnienia jest prawidłowy.
Właściwe ciśnienie jest podane na ściankach opony.
Należy korzystać jedynie ze sprzętu, który odpowiada przepisom i pokazuje ciśnienie w
jednostkach bar, bądź użyć dołączonej pompki do pompowania. Nie przyjmiemy żadnych
roszczeń w stosunku do uszkodzeń spowodowanych użyciem sprzętu do pompowania
niepochodzącego od producenta.
Zawsze upewnij się , że koła są wystarczająco napompowane, gdyż ma to
bezpośredni wpływ na prowadzenie wózka.
Nie ponosimy żadnej odpowiedzialności za koła nie dostarczone przez producenta.
W dętce nie może znajdować się powietrze przed jej zdjęciem.
Jeśli chcecie wymienić opony lub dętki zwróćcie uwagę na następujące czynności:
1. Spuść całkowicie powietrze z dętki.
2. Włóż płaski klucz pomiędzy oponę a obręcz koła.
3. Powoli i delikatnie przechyl klucz do dołu , pozwoli to ściągnąć brzeg opony poza krawędź
obręczy.
4. Następnie przesuń klucz po obwodzie obręczy , aż cały brzeg opony zeskoczy z obręczy.
5. Teraz ostrożnie ściągnij oponę z obręczy koła i wyciągnij dętkę.
A
B
UWAGA
UWAGA

Jazz S50
2020-09
Montaż i regulacja
14
EN
NL
PL
Sprawdzić podłoże obręczy oraz stronę wewnętrzną opony czy nie znajdują się tam jakieś ciała
obce a następnie je usunąć. Sprawdzić stan podłoża obręczy, szczególnie w okolicy zaworu
powietrza.
Należy używać wyłącznie oryginalnych części zamiennych. Nie przyjmiemy żadnych roszczeń
dotyczących uszkodzeń części nieoryginalnych. Prosimy o skontaktowanie się z waszym
specjalistycznym dealerem.
Należy umieścić taśmę poręczy w pozycji nad zaworem powietrza przed
wprowadzeniem go w obręcz. Wówczas taśma będzie się łatwo naciągać.
Upewnić się, że główki szprych są zakryte (taśma
poręczy nie jest niezbędna przy plastikowych obręczach).
Należy wepchnąć oponę na krawędź obręczy, zaczynając poza zaworem
powietrza. Nieznacznie napełnić dętkę powietrzem do uzyskania okrągłego
kształtu a następnie umieścić ją wewnątrz opony.
Jeśli dętka jest dobrze dopasowana do opony bez zagięć (w przypadku zagięć:
wypuścić trochę powietrza) górna strona opony może być delikatnie
naciągnięta obiema rękami na krawędź obręczy poczynając od zaworu
powietrza.
Należy sprawdzić z obu stron czy dętka nie jest wciśnięta pomiędzy poręczą a brzegiem opony.
Nieznacznie wcisnąć zawór powietrza, następnie ponownie wyciągnąć by upewnić się, że opona
jest właściwie usytuowana w miejscu zaworu powietrza.
Dla upewnienia się czy koło jest właściwie napompowane należy wprowadzić jedynie tyle
powietrza by można było z łatwością wpychać oponę do środka używając kciuków. Jeśli linie
kontrolne są jednakowo odległe od krawędzi poręczy po obu stronach opony wówczas jest ona
usytuowana właściwie. Jeśli nie – należy wypuścić powietrze i usytuować oponę jeszcze raz.
Teraz opona może być napompowana do poziomu jej ciśnienia eksploatacyjnego (należy zwrócić
uwagę na poziom maksymalny) a kapturek zaworu włożyć na swoje miejsce.

Jazz S50
2020-09
Konserwacja
15
EN
NL
PL
Konserwacja
5.1 Punkty konserwacji
Ryzyko obrażeń i uszkodzeń
Naprawy i wymiana części mogą być przeprowadzane tylko przez przeszkolone osoby i wolno
korzystać z oryginalnych części zamiennych Vermeiren.
Częstotliwość serwisowania zależy od częstotliwości i
intensywności użytkowania.
Skontaktować się z dystrybutorem celem uzgodnienia harmonogramu inspekcji /
konserwacji / naprawy.
Przed każdym użyciem
Przejrzeć następujące punkty:
Wszystkie części: Obecne, nie uszkodzone i nie zużyte.
Wszystkie części: Wyczyścić, patrz § 5.2.2.
Koła, oparcie, siedzisko, podparcie łydki, podłokietnik, płyta podnóżka: Dobrze
zabezpieczone.
Stan kół/opon, patrz § 5.2.1;
Stan części ramy: Brak deformacji, niestabilność, słabe lub luźne połączenia
Siedzenie, oparcie, podpórki ramion, podpórki łydek i oparcia (jeżeli dotyczy): Brak
nadmiernego zużycia (punkty wgnieceń, uszkodzenia lub rozerwania).
Hamulce: Nieuszkodzone i sprawne
Skontaktować się ze specjalistycznym dystrybutorem pod kątem ewentualnych napraw lub
wymiany.
Raz w roku lub częściej
Co najmniej raz w roku lub częściej zlecać kontrolę i serwisowanie wózka inwalidzkiego
wykwalifikowanemu dystrybutorowi. Minimalna częstotliwość konserwacji jest uzależniona od
użytkowania i należy ją uzgodnić z wykwalifikowanym dystrybutorem.
5.2 Instrukcje konserwacji
5.2.1 Koła i opony
Odpowiednie działanie hamulców jest uzależnione od stanu opon i może się zmieniać ze
względu na zużycie i
zanieczyszczenie (woda, olej, błoto, ...)
Usuwać z kół druty, włosy, piasek i włókna.
Sprawdzić profil opon. Jeżeli głębokość bieżnika jest mniejsza, niż 1 mm, opony należy wymienić.
W tej sprawie należy skontaktować się ze specjalistycznym dystrybutorem.
Napompować każdą pneumatyczną oponę odpowiednim ciśnieniem (patrz informacja odnośnie
ciśnienia na oponach).
5.2.2 Czyszczenie
Ryzyko uszkodzenia przez wilgoć.
Do czyszczenia wózka inwalidzkiego nie wolno nigdy stosować węża ani myjki
ciśnieniowej.
Wytrzeć wszystkie sztywne części wózka wilgotną szmatką (nie wykręconą).
W razie konieczności użyć łagodnego mydła, odpowiedniego do lakierów i materiałów
syntetycznych. Tapicerkę można czyścić letnią wodą i łagodnym mydłem. Do czyszczenia nie
używać szorstkich środków czyszczących.
UWAGA
UWAGA

Jazz S50
2020-09
Konserwacja
16
EN
NL
PL
5.2.3 Dezynfekcja
Ryzyko uszkodzenia
Dezynfekcja może być przeprowadzana tylko przez przeszkolone osoby. Skonsultować się ze
specjalistycznym dystrybutorem.
5.3 Rozwiązywania problemów
Nawet w przypadku prawidłowego korzystania z wózka może wystąpić problem techniczny. W
takim przypadku należy skontaktować się z lokalnym specjalistycznym dystrybutorem.
Ryzyko obrażeń i uszkodzenia wózka inwalidzkiego
NIGDY nie próbować
naprawiać wózka samodzielnie.
Poniższe symptomy mogą oznaczać poważny problem. Dlatego też w przypadku zauważenia
poniższych niezgodności należy zawsze skontaktować się ze specjalistycznym dystrybutorem.
Dziwne dźwięki;
Nierównomierne zużycie bieżnika opon;
Szarpane ruchy;
Wózek inwalidzki ściąga na jedną stronę;
Uszkodzone lub pęknięte zespoły koła.
5.4 Spodziewana trwałość
Przeciętna trwałość wózka inwalidzkiego wynosi 5 lat. W zależności od częstotliwości
użytkowania, warunków jazdy i konserwacji, trwałość wózka może się wydłużyć lub skrócić.
5.5 Ponowne użycie
Przed każdym ponownym użyciem wózek należy zdezynfekować, skontrolować i poddać
konserwacji zgodnie z instrukcjami w §5.1 i §5.2.
5.6 Zakończenie użytkowania
Po zakończeniu okresu użytkowania należy poddać wózek utylizacji, zgodnie z lokalnymi
przepisami ochrony środowiska. Najlepszym sposobem jest demontaż wózka inwalidzkiego, aby
ułatwić transport części poddawanych utylizacji.
UWAGA
OSTRZEŻENIE

Jazz S50
2020-09
Parametry techniczne
17
EN
NL
PL
Parametry techniczne
Poniższe szczegóły techniczne dotyczą tylko wózka inwalidzkiego przy standardowych
ustawieniach i optymalnych warunkach otoczenia. Podczas użytkowania należy wziąć pod uwagę
te szczegóły. Wartości nie mają już zastosowania, gdy wózek inwalidzki został zmodyfikowany,
uszkodzony lub jest poważnie zużyty.
Tabela 1: Dane techniczne
Producent
Vermeiren
Typ
Ręczny wózek inwalidzki
Model
Jazz S50
Opis
Jazz S50 Kids
Jazz S50
Maksymalna waga użytkownika 60 kg 130 kg
Długość całkowita z podnóżkiem 914 mm 1120 mm
Szerokość użytkowa siedziska 330 mm
370 mm
390 mm
420 mm
440 mm
460 mm
480 mm
500 mm
Szerokość całkowita (zależy od
szerokości siedziska)
518 mm
558 mm
565 mm
595 mm
615 mm
635 mm
655 mm
675 mm
Długość po złożeniu 707 mm 825 mm
Szerokość po złożeniu 299 mm 290 mm
Wysokość po złożeniu 915 mm 935 mm
Waga całkowita 15,20 kg 16,60 kg
Waga najcięższej części 7,50 kg 8,05 kg
Waga części, które mogą być
demontowane lub usunięte
Podnóżki: 1,80 kg; Oparcia na dłonie: 1,80 kg; Koła napędowe
(tylnie):
4,95 kg
Stabilność statyczna z górki 15°
Stabilność statyczna pod górkę 10°
Stabilność statyczna w poprzek 15°
Głębokość użytkowa siedziska 325 mm 450 mm
Wysokość przedniej krawędzi siedziska 457 mm 500 mm
Pochylenie siedziska 5°
Wysokość oparcia 360 mm 420 mm
Kąt nachylenia oparcia 0°
Odległość siedziska od podnóżka 317 - 366 mm 370 - 440 mm
Kąt pomiędzy siedziskiem a podnóżkiem 6° 7°
Odległość siedziska od podłokietnika 211 mm 220 mm
Przednia pozycja podłokietnika 235 mm 310 mm
Średnica obręczy 495 mm 535 mm
Pozycja osi w poziomie (odchył) 10 mm
Minimalny promień skrętu 990 mm 1190 mm
Średnica kół tylnich 22" 24" (opcjonalne 12")

Jazz S50
2020-09
Parametry techniczne
18
EN
NL
PL
Ciśnienie w oponach, koła tylne
(napędowe)
Maksymalnie 3,5 bara
Średnica kół skrętnych 150 mm 200 mm
Ciśnienie w oponach, koła skrętne Maksymalnie 2,5 bara
Temperatura przechowywania i
użytkowania
+ 5 °C - + 41 °C
Wilgotność powietrza do przechowywania
i użytkowania
30% - 70%
Producent zastrzega sobie prawo do wprowadzania zmian parametrów technicznych.
Tolerancja
pomiarów ± 15 mm /1,5 kg / 1,5°


Jazz S50
2020-09
Obsah
1
EN
NL
PL
CS
Obsah
Obsah ........................................................................................................................ 1
Úvod ........................................................................................................................ 2
1 Tento výrobek ................................................................................................ 3
1.1 Příslušenství ................................................................................................. 3
2 Před použitím ................................................................................................ 4
2.1 Určené použití ............................................................................................... 4
2.2 Vysvětlivky symbolů ...................................................................................... 4
2.3 Obecné bezpečnostní pokyny ....................................................................... 4
2.4 Přeprava ....................................................................................................... 5
2.5 Složení/rozložení invalidního vozíku ............................................................. 7
2.6 Nasazení/demontáž zadních kol (jsou-li k dispozici) ..................................... 7
2.7 Skladování .................................................................................................... 7
3 Použití invalidního vozíku ............................................................................ 8
3.1 Montáž a demontáž nožních opěrek ............................................................. 8
3.2 Obsluha brzd ................................................................................................. 8
3.3 Montáž a demontáž loketních opěrek ........................................................... 8
3.4 Přesun do invalidního vozíku a z něj ............................................................. 9
3.5 Jízda v invalidním vozíku ............................................................................ 10
4 Instalace a seřízení ..................................................................................... 11
4.1 Nástroje ....................................................................................................... 11
4.2 Způsob dodání ............................................................................................ 11
4.3 Seřízení nožních opěrek ............................................................................. 11
4.4 Seřízení brzd ............................................................................................... 12
4.5 Výměna pneumatiky .................................................................................... 12
5 Údržba .......................................................................................................... 14
5.1 Body údržby ................................................................................................ 14
5.2 Pokyny k údržbě.......................................................................................... 14
5.3 Řešení problémů ......................................................................................... 15
5.4 Očekávaná životnost ................................................................................... 15
5.5 Znovupoužití výrobku .................................................................................. 15
5.6 Konec používání ......................................................................................... 15
6 Technické údaje .......................................................................................... 16

Jazz S50
2020-09
Úvod
2
EN
NL
PL
CS
Úvod
Blahopřejeme! Nyní jste vlastníkem invalidního vozíku Vermeiren!
Tento invalidní vozík byl vyroben pečlivými pracovníky s kvalifikací. Navíc byl navržen a vyroben
podle vysokých standardů kvality, nad nimiž dohlíží společnost Vermeiren.
Řádně si tento návod přečtěte; pomůže vám seznámit se s provozem, schopnostmi a omezeními
tohoto invalidního vozíku. Máte-li po přečtení tohoto návodu nějaké dotazy, obraťte se bez obav
na svého odborného prodejce. Rád vám pomůže.
Důležitá poznámka
Aby byla zajištěna vaše bezpečnost a prodloužena životnost tohoto výrobku, věnujte mu řádnou
péči a nechávejte jej pravidelně kontrolovat a opravovat.
V tomto návodu se odráží nejnovější vývoj výrobku. Společnost Vermeiren má právo provádět
změny tohoto typu výrobku, aniž by měla povinnost upravit či nahradit podobné výrobky, které již
byly dodány.
Obrázky slouží k objasnění pokynů v tomto návodu. Detaily výrobku na obrázcích se mohou od
daného výrobku lišit.
Dostupné informace
Nejnovější verzi informací tohoto návodu vždy naleznete na našich webových stránkách
http://www.vermeiren.com/. Tyto webové stránky pravidelně navštěvujte pro případné
aktualizace.
Osoby se zrakovým postižením si mohou stáhnout elektronickou verzi tohoto návodu, kterou jim
může přečíst softwarová aplikace text-to-speech.
Návod k obsluze Pro uživatele a odborného prodejce
Návod k instalaci Pro odborného prodejce
Servisní příručka pro invalidní vozíky Pro odborného prodejce
Prohlášení o shodě (ES)

Jazz S50
2020-09
Tento výrobek
3
EN
NL
PL
CS
1 Tento výrobek
1.1 Příslušenství
Pro Jazz S50 je k dispozici následující příslušenství:
Cestovní kola (B86)
Loketní opěrky (B05)
Pro ostatní příslušenství se obraťte na svého odborného prodejce. Velmi rád vám poradí.
1 = Kříž
2 = Rukojeti
3 = Opěradlo
4 = Čalounění
5 = Loketní opěrky
6 = Hnací kola (zadní kola)
7 = Ruční ráfky
8 = Brzdy
9 = Koncové víčko
10 = Řídicí kola (přední kola)
11 = Nožní opěrky
12 = Stupátko
13 = Sedadlo
14 = Umístění identifikačního štítku
3
4
5
11
13
14
2
9
7
6
8
1
12
10

Jazz S50
2020-09
Před použitím
4
EN
NL
PL
CS
2 Před použitím
2.1 Určené použití
V tomto odstavci je uveden stručný popis zamýšleného použití tohoto invalidního vozíku. Dále
jsou k pokynům v dalších odstavcích přidána příslušná upozornění. Tímto způsobem chceme
upozornit na případné chybné použití, k němuž může dojít.
Indikace a kontraindikace: Uživatel může invalidní vozík pohánět vlastníma rukama, nebo se
nechat tlačit asistentem. Invalidní vozík je navržen a vyroben jako transportní pomůcka pro
osoby s obtížemi chůze nebo bez schopnosti chůze. Různé typy montáže a příslušenství a
modulární konstrukce umožňují plné využití také pro zestárlé osoby a osobami
s následujícími postiženími: ochrnutí, ztráta končetin (amputace nohou), vady nebo
deformace končetin, ztuhlé či poškozené klouby, srdeční nedostatečnosti a špatný krevní
oběh, narušování rovnováhy, kachexie (snížení svalové hmoty).
Invalidní vozík je určen pro osoby s potížemi při chůzi nebo s nemožností chůze.
Invalidní vozík je konstruován pro přepravu 1 osoby o max. hmotnosti 130 kg. Není určen pro
přepravu zboží či předmětů ani pro jakýkoli jiný účel, než je popsán výše.
Používejte pouze příslušenství a náhradní díly schválené společností Vermeiren.
Přečtěte si všechny technické detaily a omezení tohoto invalidního vozíku v kapitole 5.
Záruka tohoto výrobku je založena na běžném použití a údržbě, jak je to popsáno v tomto
návodu. V případě poškození výrobku způsobeného nesprávným použitím či absencí údržby
tato záruka zanikne
2.2 Vysvětlivky symbolů
Max. hmotnost uživatele v kg
Domácí/venkovní použití
Max. bezpečný sklon ve ° (stupních).
Typové označení
2.3 Obecné bezpečnostní pokyny
Tento invalidní vozík nepoužívejte, jste-li pod vlivem alkoholu, léků či jiných látek, které by
mohly ovlivnit vaše schopnosti jízdy v něm.
Mějte na paměti, že určité části invalidního vozíku mohou být velmi teplé nebo studené vlivem
okolní teploty, slunečního záření či topných těles. Při dotýkání buďte opatrní. Při chladném
počasí používejte ochranný oděv. Při jízdě venku je možné používat speciální rukavice, které
zlepšují úchop ručních ráfků.
Tento invalidní vozík žádným způsobem neupravujte.
Pro prevenci zranění anebo poškození invalidního vozíku zajistěte, aby nedošlo k zachycení
jakýchkoli předmětů anebo částí těla mezi paprsky hnacích kol.
Berte na vědomí, že vaše invalidní vozík může v závislosti na použitém nastavení ovlivňovat
některé typy systémů proti krádeži. To může zapříčinit spuštění alarmu v obchodu.

Jazz S50
2020-09
Před použitím
5
EN
NL
PL
CS
2.4 Přeprava
2.4.1 Přenášení invalidního vozíku
Nejlepší způsob pro přenášení invalidního vozíku je využít jeho odbrzděných kol k pohybu.
Není-li to možné (např. když jsou vyjmuta zadní kola kvůli přepravě ve vozidle), pevně uchopte
rukojeti a rám přední části vozíku. K uchopení invalidního vozíku nepoužívejte nožní či loketní
opěrky ani kola.
2.4.2 Přeprava vozidlem jako zavazadlo
Riziko zranění
Zajistěte řádné upevnění invalidního vozíku, aby nemohlo dojít ke zranění cestujících při
nehodě či náhlém brzdění.
NIKDY nepoužívejte ten samý bezpečnostní pás k upevnění invalidního vozíku i cestujícího.
1. Složte invalidní vozík do nejkompaktnější velikosti podle pokynů v odst. 2.4.
2. Uložte invalidní vozík a jeho kola do zavazadlového prostoru nebo za sedadlo spolujezdce.
Pokud NENÍ zavazadlový prostor zcela uzavřen či oddělen od cestujících, řádně připoutejte
rám invalidního vozíku k vozidlu
2.4.3 Použití invalidního vozíku jako sedadla v motorovém vozidle
Riziko zranění anebo poškození
Invalidní vozík prošel crashtesty podle ISO 7176-19: 2008 a jako takový byl navržen a testován
pro použití jako sedadlo v motorových vozidlech umístěné pouze ve směru jízdy.
Samotný pánevní pás invalidního vozíku není vhodný jako zádržný systém pro cestující.
Invalidní vozík je testován pomocí čtyřbodového upínacího systému a tříbodového zádržného
systému. Kdykoliv je to možné, použijte sedadlo vozidla a invalidní vozík uložte do úložného
prostoru.
Postup zajištění invalidního vozíku v motorovém vozidle:
1. Ověřte, že je vozidlo vybaveno vhodným upínacím systémem pro invalidní vozík a zádržným
systémem pro cestující v souladu s ISO 10542.
2. Ověřte, že jsou komponenty invalidního vozíku připoutány a zádržný systém pro cestující
není opotřeben, znečištěn, poškozen ani rozbit.
3. Disponuje-li invalidní vozík funkcí naklonění sedadla anebo opěradla, ověřte, že uživatel
invalidního vozíku sedí v max. vzpřímené poloze. Pokud to stav uživatele neumožňuje, mělo
by být provedeno posouzení rizik za účelem hodnocení bezpečnosti uživatele během
přepravy.
4. Odeberte veškeré příslušenství, jako jsou podnosy a respirační vybavení, a zajistěte je na
bezpečném místě.
5. Invalidní vozík umístěte ve směru jízdy a centrálně mezi zádržné kolejnice připevněné
k podlaze vozidla.
6. Zapněte přední bezpečnostní popruhy na vyznačeném místě podle pokynů výrobce
pásového systému (obr. 1). Toto místo je na invalidním vozíku označeno symbolem (obr. 2).
7. Popojeďte invalidním vozíkem dozadu, dokud se přední popruhy nenapnou.
8. Zaktivujte brzdu invalidního vozíku.
9. Zapněte zadní bezpečnostní popruhy na vyznačeném místě podle pokynů výrobce
pásového systému (obr. 1). Toto místo je na invalidním vozíku označeno symbolem (obr. 2).
VAROVÁNÍ
VAROVÁNÍ

Jazz S50
2020-09
Před použitím
6
EN
NL
PL
CS
Obr. 1 Obr. 2
Postup zabezpečení uživatele invalidního vozíku:
1. Odeberte obě loketní opěrky.
2. Máte-li k dispozici pánevní pás k invalidnímu vozíku, připevněte jej.
3. Upevněte pásy zádržného systému pro cestujícího podle pokynů výrobce pásového
systému.
4. Pánevní vás mějte nasazen nízko přes přední část pánve tak, aby tady byl úhel pánevního
pásu v preferované zóně 30° až 75° od horizontální roviny, viz obr. níže.
5. V preferované zóně je žádoucí strmější (vyšší) úhel.
6. Nastavte pás pevně podle pokynů výrobce pásového systému a v souladu s pohodlím
uživatele.
7. Ověřte, že je zádržný pás připojen přímo ke kotevnímu bodu vozidla a že na něm nejsou
vidět žádné záhyby, např. u osy zadního kola.
8. V případě potřeby nainstalujte loketní opěrky. Ověřte, že pásy nejsou překroucené nebo
mimo hmotu částí invalidního vozíku, jako jsou loketní opěrky či kola.
PÁNEVNÍ PÁSY BY MĚLY BÝT ZCELA
V KONTAKTU S PŘEDNÍ ČÁSTÍ TĚLA POBLÍŽ
SPOJENÍ STEHNA A PÁNVE
ZÁDRŽNÉ PÁSY BY NEMĚLY BÝT DRŽENY
OD TĚLA KOMPONENTAMI INVALIDNÍHO
VOZÍKU, JAKO JSOU LOKETNÍ OPĚRKY
NEBO KOLA

Jazz S50
2020-09
Před použitím
7
EN
NL
PL
CS
2.5 Složení/rozložení invalidního vozíku
Nebezpečí skřípnutí – Nedávejte prsty mezi součásti tohoto invalidního
vozíku.
Složení:
1. Sklopte či odeberte nožní desky (viz odst. 3.1).
2. Uchopte sedadlo za přední i zadní stranu a vytáhněte jej nahoru.
3. Zatlačte na rukojeti, abyste invalidní vozík složili více.
Rozložení:
1. Postavte se za invalidní vozík.
2. Pomocí rukojetí invalidní vozík co nejvíce rozevřete.
3. Postavte se před invalidní vozík.
4. Zatlačte dolů obě sedadlové trubky, dokud se nezaaretují na místě.
2.6 Nasazení/demontáž zadních kol (jsou-li k dispozici)
Demontáž zadních kol
1. Stiskněte a přidržte tlačítko (1) a zároveň vysuňte osu kola ven z otvoru rámu.
2. Opakujte postup pro druhé kolo a jemně umístěte invalidní
vozík na zadní trubky rámu.
Montáž zadních kol
1. Uchopte jedno ze zadních kol a zvedněte invalidní vozík na
jedné straně.
2. Stiskněte a přidržte tlačítko (1) a zároveň zasuňte kolo do
pouzdra osy.
3. Uvolněním tlačítka kolo uzamkněte. Dbejte na to, aby
zaskočilo na místo.
4. Postup zopakujte pro druhé kolo.
5. Ujistěte se, že jsou obě kola bezpečně upevněná.
2.7 Skladování
Dbejte na to, aby byl invalidní vozík uložen v suchém prostředí, aby na něm nemohly růst
plísně a nepoškodilo se čalounění, viz též kapitola Error! Reference source not found..
POZOR

Jazz S50
2020-09
Použití invalidního vozíku
8
EN
NL
PL
CS
3 Použití invalidního vozíku
Riziko zranění anebo poškození
Nejprve si přečtěte předchozí kapitoly a seznamte se se zamýšleným použitím. Invalidní vozík
NIKDY nepoužívejte, dokud si nepřečtete a plně neporozumíte všem pokynům.
V případě pochybností či dotazů bez obav požádejte svého místního odborného prodejce,
poskytovatele péče nebo technického poradce, aby vám pomohl.
Zajistěte, aby během použití nebo nastavení nedošlo k
zachycení rukou, oděvů, pásků, přezek
či šperků v kolech nebo jiných pohyblivých součástech.
3.1 Montáž a demontáž nožních opěrek
Riziko zranění
Před použitím ověřte, že jsou nožní opěrky bezpečně zajištěny.
Při montáži či demontáži nožních opěrek udržujte předměty mimo dosah jejich otáčení.
Postup montáže nožních opěrek je následující:
1. Podržte nožní opěrku bočně z vnější strany rámu invalidního
vozíku a zavěste držák trubky (1) do rámu.
2. Otočte nožní opěrku dovnitř, dokud se nezaaretuje na místě.
3. Sklopte nožní desku dolů.
Postup demontáže nožních opěrek:
1. Vytáhněte páku (2).
2. Vyklopte nožní opěrku na vnější stranu invalidního vozíku, až
se uvolní z vodítka.
3. Vytáhněte nožní opěrku z držáku trubky (1).
3.2 Obsluha brzd
Riziko zranění
Brzdy nejsou určeny ke zpomalení invalidního vozíku během jízdy. Slouží pouze k tomu, aby
nedošlo k nechtěným pohybům.
Správnou funkci brzd ovlivňuje opotřebení a znečištění pneumatik (voda, olej, bláto atd.). Před
každým použitím zkontrolujte stav pneumatik.
Brzdy jsou seřiditelné a mohou se opotřebovat. Před každým použitím zkontrolujte stav brzd.
Před uvolněním brzdy ověřte, že je invalidní vozík na rovném vodorovném povrchu. Nikdy
neuvolňujte obě brzdy současně.
Aktivace brzd:
1. Zatlačte brzdové páky (1) dopředu, dokud neucítíte
výrazné cvaknutí.
Deaktivace brzd:
1. Uvolněte jednu brzdu zatažením za páku (1) dozadu.
2. Držte ruční ráfek uvolněného kola jednou rukou.
3. Uvolněte druhou brzdu zatažením za páku dozadu.
3.3 Montáž a demontáž loketních opěrek
Riziko zranění
Před použitím ověřte, že jsou loketní opěrky řádně zajištěny.
UPOZORNĚNÍ
POZOR
VAROVÁNÍ
VAROVÁNÍ

Jazz S50
2020-09
Použití invalidního vozíku
9
EN
NL
PL
CS
Udržujte prsty a oděvy mimo dolní stranu loketní opěrky.
1. Nasaďte zadní trubku loketní opěrky do držáku trubky (1) (Obr. A).
2. Zajistěte, že je loketní opěrka řádně upevněna.
3. Složte loketní opěrku dopředu.
4. Vytáhněte páku (2) na držáku trubky (3) nahoru (Obr. B).
5. Nasaďte přední trubku loketní opěrky (4) do držáku trubky (3) (Obr. B).
Otevření a odebrání loketní opěrky:
1. Vytáhněte páku (2) a vytáhněte přední část loketní opěrky (1) nahoru (Obr. C).
2. Složte loketní opěrku dozadu.
3. Pro odebrání loketní opěrky vytáhněte její zadní část z držáku trubky (3) (Obr. D).
3.4 Přesun do invalidního vozíku a z něj
Riziko zranění anebo poškození
A
B
C
D
VAROVÁNÍ

Jazz S50
2020-09
Použití invalidního vozíku
10
EN
NL
PL
CS
Nemůžete-li přesun provést bezpečně, požádejte někoho o
asistenci.
Nestůjte na nožních deskách.
1. Umístěte invalidní vozík co nejblíže k židli, pohovce či posteli,
kde se chcete přesunout na vozík nebo z něj.
2. Ověřte, že jsou obě brzdy invalidního vozíku v poloze jejich
aktivace.
3. Sklopte nožní desky nahoru, aby se na nich nedalo stát.
4. Provádíte-li přesun po straně invalidního vozíku, odklopte
loketní opěrku na dané straně nahoru (viz odst. 3.3).
5. Proveďte přesun na invalidní vozík nebo z něj.
3.4.1 Správná poloha v invalidním vozíku
Doporučení pro komfortní použití invalidního vozíku:
Zajistěte polohu zad co nejblíže k opěradlu.
Ověřte, že máte stehna v horizontální poloze. V případě potřeby upravte délku nožních
opěrek (viz odst. 4.3).
3.5 Jízda v invalidním vozíku
Riziko zranění a poškození
Před každým použitím ověřte, že:
o parkovací brzdy správně fungují;
o pneumatiky jsou v dobrém stavu, viz odst. Error! Reference source not found..
Nedopusťte, aby se do drátů výpletu kola zachytily vaše prsty.
Nepoužívejte ruční ráfky, máte-li mokré ruce.
Při průjezdu úzkými průchody se chraňte před skřípnutím rukou na ručních ráfcích.
NEJEZDĚTE na svazích, přes překážky, schody nebo obrubníky větší, než je předepsáno v
odst. Error! Reference source not found..
Když zastavíte na (mírném) svahu, použijte brzdy.
Během jízdy dolů ze svahu dbejte na to, aby se všechna čtyři kola dotýkala země.
Na svazích jezděte co nejpomaleji.
Při jízdě po veřejných komunikacích zůstávejte vždy na chodníku.
Dávejte pozor, zda na silnici nejsou díry nebo spáry, které by mohly způsobit skřípnutí kol.
Vyhýbejte se kamenům a jiným předmětům, které mohou zablokovat kola.
Při přejíždění překážky dávejte pozor, aby se stupátka nedotkla země.
Tento invalidní vozík nepoužívejte na eskalátoru.
Je-li k dispozici bezpečnostní pás, připoutejte se.
Abyste nezranili osoby stojící okolo nebo nepoškodili předměty, myslete vždy na rozsah
pohybu stupátka.
Nemáte-li dostatek zkušeností s
jízdou na svém invalidním vozíku, požádejte doprovod
o asistenci. Nesahejte rukama na kola a nohy nechte spočívat na stupátku.
Schody musejí být vždy zvládány za asistence dvou osob doprovodu.
Nikdy nezkoušejte používat schody, které nejsou vhodné pro invalidní vozíky.
3.5.1 Jízda na invalidním vozíku:
1. Odbrzděte brzdy.
2. Uchopte oba ruční ráfky v jejich nejvyšším místě.
3. Nakloňte se dopředu a tlačte ruční ráfky dopředu, dokud se vaše paže nenarovnají.
4. Přemístěte ruce zpět na nejvyšší místo ručních ráfků a opakujte pohyb.
UPOZORNĚNÍ

Jazz S50
2020-09
Instalace a seřízení
11
EN
NL
PL
CS
4 Instalace a seřízení
Pokyny v této kapitole jsou určeny pro odborné prodejce.
Výrobek Vermeiren Jazz S50 byl navržen jako invalidní vozík s minimálním seřizováním.
Dodatečné zásoby náhradních dílů nejsou třeba.
Chcete-li najít servisní středisko či odborného prodejce ve svém okolí, kontaktujte nejbližší
pobočku společnosti Vermeiren.
Riziko zranění a poškození
Používejte pouze nastavení uvedená v tomto návodu.
Variace povolených nastavení může změnit stabilitu invalidního vozíku (naklonění dozadu či
do stran).
4.1 Nástroje
Pro sestavení invalidního vozíku jsou potřeba tyto nástroje:
Sada maticových klíčů ve velikostech 7 až 22
Sada inbusových klíčů ve velikostech 3 až 8
Křížový šroubovák
4.2 Způsob dodání
Balení výrobku Vermeiren Jazz S50 obsahuje:
1 rám s loketními opěrkami, zadní a přední kola (výška sedadla 500 mm)
1 pár nožních opěrek
Nástroje
Návod
Příslušenství (volitelné).
Hustilka
4.3 Seřízení nožních opěrek
4.3.1 Délka nožních opěrek
Nebezpečí poškození – zajistěte, aby se nožní opěrky nedotýkaly země.
Udržujte minimální vzdálenost 60 mm nad zemí.
Postup nastavení úhlu nožních opěrek:
1. Odšroubujte šroub (1).
2. Nastavte požadovanou délku nožní opěrky.
3. Šroub (1) řádně utáhněte.
VAROVÁNÍ
POZOR

Jazz S50
2020-09
Instalace a seřízení
12
EN
NL
PL
CS
4.4 Seřízení brzd
Nebezpečí zranění – seřízení brzd smí provádět pouze odborný prodejce.
1. Nainstalujte kola podle odst. 2.6.
2. Odpojte brzdy zatažením páky (1) dozadu (Obr. A).
3. Povolte šroub (2), aby šel brzdový mechanismus posunout na rámu (3) (Obr. B).
4. Posuňte brzdový mechanismus na rámu (3) do požadované polohy (Obr. B). Seřízení brzd
musí být v rozsahu vyznačeném čárkami (4) na brzdovém mechanismu.
5. Znovu utáhněte šroub (2) (Obr. B).
6. Zkontrolujte funkci brzd.
7. V případě potřeby zopakujte postup výše, dokud nebudou brzdy správně seřízeny.
4.5 Výměna pneumatiky
Riziko zranění anebo poškození
Při nesprávné manipulaci může dojít k poškození ráfku. Výkon těchto činností raději přenechte
odborníkovi.
Při montáži pneumatiky zajistěte, aby se neskříply mezi ní a ráfek žádné předměty ani části
těla.
Při huštění pneumatik vždy kontrolujte, zda mají správný tlak. Správný tlak je uveden na
bočnicích pneumatik.
Používejte pouze hustící zařízení, které splňuje příslušné předpisy a ukazuje tlak v barech,
nebo použijte dodanou hustilku. Neneseme žádnou odpovědnost za poškození způsobené
hustícím zařízením, které nebylo dodáno výrobcem.
Vždy ověřte, že jsou kola dostatečně nahuštěná, jinak by mohla negativně ovlivnit jízdu
a řízení.
Neneseme žádnou odpovědnost za kola, která nebyla dodána výrobcem.
Správné sestavení může zaručit pouze odborník. Pokud tuto činnost nevykoná
odborný prodejce, propadne nárok na záruku.
Chcete-li vyměnit pneumatiky či duše, mějte na paměti tyto věci:
1. Vypusťte veškerý vzduch z duše.
2. Mezi pneumatiku a ráfek vložte vhodnou páku.
3. Pomalu a jemně zatlačte touto pákou dolů. Tím dojde k přetažení pneumatiky přes okraj
ráfku.
4. Pak posunem páky podél ráfku přetáhněte celou pneumatiku.
5. Nyní opatrně sejměte pneumatiku z ráfku a potom vyjměte duši.
Před nasazením pneumatiky ověřte, zda lůžko ráfku a vnitřní stěna pneumatiky neobsahují
nečistoty – ty případně řádně vyčistěte. Zkontrolujte stav lůžka ráfku, zejména kolem ventilku.
A
B
VAROVÁNÍ
POZOR

Jazz S50
2020-09
Instalace a seřízení
13
EN
NL
PL
CS
Používejte pouze pravé originální náhradní díly. Neneseme žádnou odpovědnost za poškození
způsobené neoriginálními díly. Obraťte se na svého odborného prodejce.
Před nasazením ráfkové pásky na ráfek zarovnejte otvory pro ventilek. Pak lze
pásku snadno přetáhnout na ráfek. Ověřte, že jsou zakryty všechny matičky
drátů (není potřeba v případě plastového ráfku).
Počínaje otvorem pro ventilek přetáhněte pneumatiku přes okraj ráfku. Duši
trochu nafoukněte, aby měla tvar, a vložte ji do pneumatiky.
Vejde-li se duše řádně do pneumatiky, aniž by došlo k záhybům (v případě
záhybů upusťte trochu vzduchu), lze počínaje u ventilku lehce přetáhnout horní
stranu pneumatiky oběma rukama na ráfek.
Po celém obvodu na obou stranách ověřte, že není duše skřípnuta mezi ráfkem a okrajem
pneumatiky. Lehce zatlačte ventilek směrem dovnitř a znovu jej vytáhněte pro ověření, že je
pneumatika v oblasti ventilku správně umístěna.
Pro zajištění správného nahuštění kola zpočátku nahustěte tolik vzduchu, aby bylo možné
pneumatiku ještě lehce stisknout palcem směrem dovnitř. Jsou-li kontrolní linky po obou stranách
pneumatiky ve stejné vzdálenosti od ráfku, je pneumatika správně vycentrována. Jinak vypusťte
vzduch a umístěte pneumatiku znovu.
Nyní lze pneumatiku nahustit na plný provozní tlak (viz max. hodnota!!) a nasadit čepičku na
ventilek.

Jazz S50
2020-09
Údržba
14
EN
NL
PL
CS
5 Údržba
5.1 Body údržby
Riziko zranění a poškození
Opravy a výměny smějí provádět pouze vyškolené osoby. Přitom je třeba používat pouze
originální náhradní díly společnosti Vermeiren.
Servisní intervaly závisejí na intenzitě a frekvenci
používání. Požádejte svého prodejce o
společnou dohodu na rozvrhu kontrol/údržby/oprav.
Před každým použitím
Zkontrolujte následující body:
Všechny části: Přítomné a nepoškozené či neopotřebené.
Všechny části: Čisté, viz odst. 5.2.2.
Kola, opěradlo, sedadlo, lýtkové opěrky, loketní opěrky, nožní deska: Dobré zajištění.
Stav kol/pneumatik, viz odst. 5.2.1;
Stav součástí rámu: Žádná deformace, nestabilita, zeslabení nebo uvolněné spoje
Sedadlo, opěradlo, loketní čalounění, lýtkové čalounění a opěrka hlavy (v případě použití):
Bez nadměrného opotřebení (např. promáčknutá místa, poškození nebo roztržení).
Brzdy: Nepoškozené a plně funkční
Pro případné opravy či výměny částí se obraťte na svého odborného prodejce.
Ročně nebo častěji
Tento invalidní vozík nechte u odborného prodejce ke kontrole a provedení servisu alespoň
jednou ročně nebo častěji. Minimální četnost údržby závisí na používání, a proto by měla být
společně dohodnuta s vaším odborným prodejcem.
5.2 Pokyny k údržbě
5.2.1 Kola a pneumatiky
Správná funkce brzd závisí na stavu pneumatik, který se může měnit kvůli opotřebení či
znečištění (voda, olej, bláto atd.).
Udržujte kola bez drátů, vlasů, písku a vláken.
Zkontrolujte vzorek na pneumatikách. Je-li hloubka dezénu menší než 1 mm, musí být
pneumatiky vyměněny. Obraťte se v této věci na svého odborného prodejce.
Nahustěte pneumatiky na správný tlak (viz indikace tlaku na pneumatikách).
5.2.2 Čištění
Riziko poškození vlhkostí
K
čištění invalidního vozíku nikdy nepoužívejte hadici ani vysokotlaký čistič.
Otřete všechny pevné části invalidního vozíku vlhkým (nikoli mokrým) hadříkem.
V případě potřeby použijte jemné mýdlo vhodné na laky a syntetické barvy.
Čalounění lze vyčistit vlažnou vodou a jemným mýdlem. K čištění nepoužívejte abrazivní čisticí
prostředky.
5.2.3 Dezinfekce
Riziko poškození
Dezinfekci mohou provádět pouze kvalifikované osoby. Poraďte se se svým prodejcem.
POZOR
POZOR
POZOR

Jazz S50
2020-09
Údržba
15
EN
NL
PL
CS
5.3 Řešení problémů
I když tento invalidní vozík používáte správně, může se vyskytnout technický problém. V tomto
případě se obraťte na místního odborného prodejce.
Riziko zranění a poškození invalidního vozíku
NIKDY nezkoušejte opravit invalidní vozík sami.
Následující příznaky mohou znamenat vážný problém. Proto se vždy obraťte na svého odborného
prodejce, když zaznamenáte některou z následujících odchylek:
divný zvuk;
nerovnoměrné opotřebení dezénu na jedné z pneumatik;
trhavé pohyby;
invalidní vozík se naklání na jednu stranu;
poškozené či rozbité sestavy kol.
5.4 Očekávaná životnost
Průměrná životnost tohoto invalidního vozíku je 5 let. V závislosti na četnosti použití, jízdních
podmínkách a údržbě se životnost tohoto invalidního vozíku prodlouží nebo zkrátí.
5.5 Znovupoužití výrobku
Před každým dalším použitím nechte invalidní vozík dezinfikovat, zkontrolovat a provést servis
podle pokynů v odst. 5.1 a odst. 5.2.
5.6 Konec používání
Po skončení životnosti musí být invalidní vozík zlikvidován podle místní legislativy pro životní
prostředí. Nejlepším způsobem likvidace je rozebrání invalidního vozíku pro usnadnění přepravy
recyklovatelných součástí.
VAROVÁNÍ

Jazz S50
2020-09
Technické údaje
16
EN
NL
PL
CS
6 Technické údaje
Technické údaje uvedené níže platí pouze pro tento invalidní vozík při standardních nastaveních
a optimálních podmínkách okolí. Během používání berte tyto údaje v úvahu.
Pokud byl tento invalidní vozík upraven, poškozen nebo došlo k jeho velkému opotřebení,
nebudou tyto hodnoty platné.
Tabulka 1: Technické údaje
Značka
Vermeiren
Typ
Ruční invalidní vozík
Model
Jazz S50
Popis
Jazz S50 Kids
Jazz S50
Max. hmotnost uživatele 60 kg 130 kg
Celková délka s nožní opěrkou 914 mm 1120 mm
Efektivní šířka sedadla 330 mm
370 mm
390 mm
420 mm
440 mm
460 mm
480 mm
500 mm
Celková šířka (závisí na šířce
sedadla)
518 mm
558 mm
565 mm
595 mm
615 mm
635 mm
655 mm
675 mm
Složená délka bez nožní opěrky 707 mm 825 mm
Složená šířka 299 mm 290 mm
Složená výška 915 mm 935 mm
Celková hmotnost 15,20 kg 16,60 kg
Hmotnost nejtěžší části 7,50 kg 8,05 kg
Hmotnosti částí, které lze
demontovat či odebrat
Nožní opěrky: 1,80 kg; Loketní opěrky: 1,80 kg;
Zadní kola:
4,95 kg
Statická stabilita, svah dolů 15°
Statická stabilita, svah nahoru 10°
Statická stabilita, do stran 15°
Efektivní hloubka sedadla 325 mm 450 mm
Výška plochy sedadla u předního
okraje
457 mm 500 mm
Úhel sedadla 5°
Výška opěradla 360 mm 420 mm
Úhel opěradla 0°
Vzdálenost mezi nožní opěrkou a
sedadlem
317 - 366 mm 370 - 440 mm
Úhel mezi sedadlem a nožní
opěrkou
6° 7°
Vzdálenost mezi loketní opěrkou a
sedadlem
211 mm 220 mm
Přední poloha konstrukce loketní
opěrky
235 mm 310 mm

Jazz S50
2020-09
Technické údaje
17
EN
NL
PL
CS
Průměr ručního ráfku 495 mm 535 mm
Horizontální poloha osy (vychýlení) 10 mm
Min. průměr otáčení 990 mm 1190 mm
Průměr zadních kol 22" 24" (volitelně 12")
Tlak pneumatik, zadní (hnací) kola Max. 3,5 baru
Průměr řídicích kol 150 mm 200 mm
Tlak pneumatik, přední (řídicí) kola Max. 2,5 baru
Teplota skladování a používání +5 °C - +41 °C
Vlhkost skladování a používání 30 % - 70 %
Vyhrazujeme si právo na zavádění technických změn. Tolerance měření ±15 mm / 1,5 kg / 1,5°


Service registration form
Service registration form
This product (name): ……………………………………..
was inspected (I), serviced (S), repaired (R) or disinfected (D):
By (stamp):
Ki
nd of work: I / S / R / D
Date:
By (stamp):
Ki
nd of work: I / S / R / D
Date:
By (stamp):
Ki
nd of work: I / S / R / D
Date:
By (stamp):
Kind of work: I / S / R / D
Date:
By (stamp):
Kind of work: I / S / R / D
Date:
By (stamp):
Kind of work: I / S / R / D
Date:
By (stamp):
Kind of work: I / S / R / D
Date:
By (stamp):
Kind of work: I / S / R / D
Date:
By (stamp):
Kind of work: I / S / R / D
Date:
By (stamp):
Ki
nd of work: I / S / R / D
Date:
By (stamp):
Ki
nd of work: I / S / R / D
Date:
By (stamp):
Ki
nd of work: I / S / R / D
Date:
By (stamp):
Kind of work: I / S / R / D
Date:
By (stamp):
Kind of work: I / S / R / D
Date:
By (stamp):
Kind of work: I / S / R / D
Date:

-
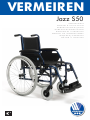 1
1
-
 2
2
-
 3
3
-
 4
4
-
 5
5
-
 6
6
-
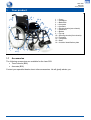 7
7
-
 8
8
-
 9
9
-
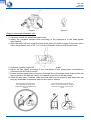 10
10
-
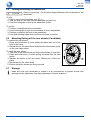 11
11
-
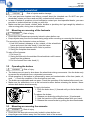 12
12
-
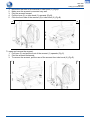 13
13
-
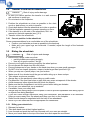 14
14
-
 15
15
-
 16
16
-
 17
17
-
 18
18
-
 19
19
-
 20
20
-
 21
21
-
 22
22
-
 23
23
-
 24
24
-
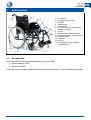 25
25
-
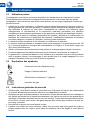 26
26
-
 27
27
-
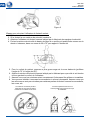 28
28
-
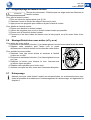 29
29
-
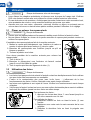 30
30
-
 31
31
-
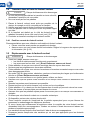 32
32
-
 33
33
-
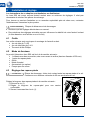 34
34
-
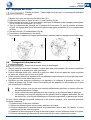 35
35
-
 36
36
-
 37
37
-
 38
38
-
 39
39
-
 40
40
-
 41
41
-
 42
42
-
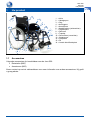 43
43
-
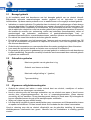 44
44
-
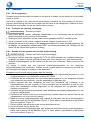 45
45
-
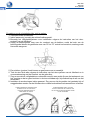 46
46
-
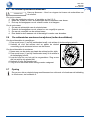 47
47
-
 48
48
-
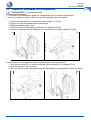 49
49
-
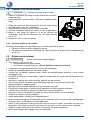 50
50
-
 51
51
-
 52
52
-
 53
53
-
 54
54
-
 55
55
-
 56
56
-
 57
57
-
 58
58
-
 59
59
-
 60
60
-
 61
61
-
 62
62
-
 63
63
-
 64
64
-
 65
65
-
 66
66
-
 67
67
-
 68
68
-
 69
69
-
 70
70
-
 71
71
-
 72
72
-
 73
73
-
 74
74
-
 75
75
-
 76
76
-
 77
77
-
 78
78
-
 79
79
-
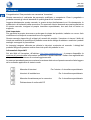 80
80
-
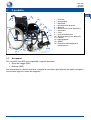 81
81
-
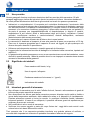 82
82
-
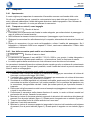 83
83
-
 84
84
-
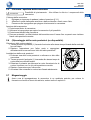 85
85
-
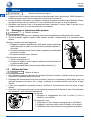 86
86
-
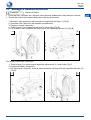 87
87
-
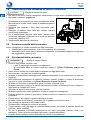 88
88
-
 89
89
-
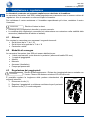 90
90
-
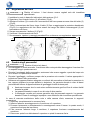 91
91
-
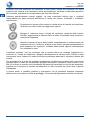 92
92
-
 93
93
-
 94
94
-
 95
95
-
 96
96
-
 97
97
-
 98
98
-
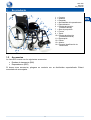 99
99
-
 100
100
-
 101
101
-
 102
102
-
 103
103
-
 104
104
-
 105
105
-
 106
106
-
 107
107
-
 108
108
-
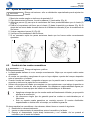 109
109
-
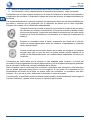 110
110
-
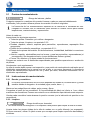 111
111
-
 112
112
-
 113
113
-
 114
114
-
 115
115
-
 116
116
-
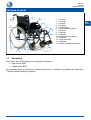 117
117
-
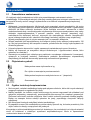 118
118
-
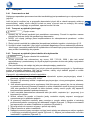 119
119
-
 120
120
-
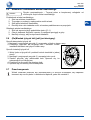 121
121
-
 122
122
-
 123
123
-
 124
124
-
 125
125
-
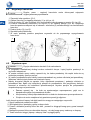 126
126
-
 127
127
-
 128
128
-
 129
129
-
 130
130
-
 131
131
-
 132
132
-
 133
133
-
 134
134
-
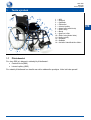 135
135
-
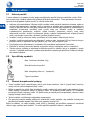 136
136
-
 137
137
-
 138
138
-
 139
139
-
 140
140
-
 141
141
-
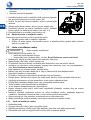 142
142
-
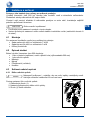 143
143
-
 144
144
-
 145
145
-
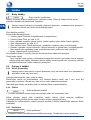 146
146
-
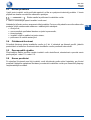 147
147
-
 148
148
-
 149
149
-
 150
150
-
 151
151
-
 152
152


Vermeiren Jazz S50 Handleiding
- Categorie
- Kinderwagens
- Type
- Handleiding
in andere talen
- italiano: Vermeiren Jazz S50 Manuale utente
- français: Vermeiren Jazz S50 Manuel utilisateur
- español: Vermeiren Jazz S50 Manual de usuario
- Deutsch: Vermeiren Jazz S50 Benutzerhandbuch
- polski: Vermeiren Jazz S50 Instrukcja obsługi