Lenco SCD-550 Handleiding
- Categorie
- CD spelers
- Type
- Handleiding
Deze handleiding is ook geschikt voor

Model: SCD-650
USER MANUAL
CD/USB/MP3 Player with FM Radio/Aux In & Mic In
HANDLEIDING
CD/USB/MP3-speler met FM-radio/Aux-ingang & Mic-ingang
BENUTZERHANDBUCH
CD/USB/MP3 Player mit FM Radio/Aux-In & Mikrofoneingang
MODE D'EMPLOI
Lecteur CD/USB/MP3 avec radio FM/entrée aux. et entrée micro
MANUAL DEL USUARIO
Reproductor de CD/USB/MP3 con radio FM/entrada auxiliar y entrada de
micrófono

Index
English ................................................................................................................................................................................ 3
Nederlands ........................................................................................................................................................................ 13
Deutsch ............................................................................................................................................................................. 25
Français ............................................................................................................................................................................ 37
Español ............................................................................................................................................................................. 49
Version 1.0

3
English
CD/USB/MP3 Player with FM Radio/Aux In & Mic In
WARNING
CLASS 1 LASER PRODUCT
EN
EN
CLASS 1 LASER PRODUCT
APPAREIL Á LASER DE CLASSE 1
PRODUCTO LASER DE CLASE 1
CLASS 1 LASER PRODUCT
APPAREIL Á LASER DE CLASSE 1
PRODUCTO LASER DE CLASE 1
CAUTION
CAUTION
INVISIBLE LASER RADIATION WHEN OPEN AND
INTERLOCKS DEFEATED. AVOID EXPOSURE TO
BEAM
INVISIBLE LASER RADIATION WHEN OPEN AND
INTERLOCKS DEFEATED. AVOID EXPOSURE TO
BEAM
This product contains a low power laser device.
This product contains a low power laser device.
Warning: Do not touch the lens.
DO NOT THROW BATTERIES IN FIRE!
1. SAFETY INSTRUCTIONS
IMPORTANT SAFETY INSTRUCTIONS - READ CAREFULLY BEFORE USE.
CAUTION
RISK OF ELECTRICAL SHOCK
DO NOT OPEN
CAUTION: TO PREVENT AN ELECTRICAL SHOCK, DO NOT REMOVE ANY COVER SCREWS.
THERE ARE NO USER SERVICEABLE PARTS INSIDE. REQUEST A QUALIFIED SERVICE
PERSON TO PERFORM SERVICING.
This symbol indicates that there are important operating maintenance instructions in the user
manual accompanying this tablet.
This symbol indicates that dangerous voltage is present within this tablet, constituting a risk of
electric shock or personal injury.
Keep these instructions in mind:
1. Do not use this device near water.
2. Clean only with a slightly damp cloth.
3. Do not cover or block any ventilation opening. When placing the device on a shelf, leave 5 cm (2”)
free space around the whole device.
4. Install in accordance with the supplied user manual.

4
5. Don’t step on or pinch the power adaptor. Be very careful, particularly near the plugs and the cable’s
exit point. Do not place heavy items on the power adaptor, which may damage it. Keep the entire
device out of children’s reach! When playing with the power cable, they can seriously injure
themselves.
6. Unplug this device during lightning storms or when unused for a long period.
7. Keep the device away from heat sources such as radiators, heaters, stoves, candles and other
heat-generating products.
8. Avoid using the device near strong magnetic fields.
9. ESD can disturb normal usage of this device. If so, simply reset and restart the device following the
instruction manual. During file transmission, please handle with care and operate in a static-free
environment.
10. WARNING! NEVER INSERT AN OBJECT INTO THE PRODUCT THROUGH THE VENTS OR
OPENINGS. HIGH VOLTAGE FLOWS THROUGH THE PRODUCT AND INSERTING AN OBJECT
CAN CAUSE ELECTRIC SHOCK AND/OR SHORT CIRCUIT INTERNAL PARTS. FOR THE SAME
REASON, DO NOT SPILL WATER OR LIQUID ON THE PRODUCT.
11. Do NOT use in wet or moist areas such as bathrooms, steamy kitchens or near swimming pools.
12. Do not use this device when condensation may occur.
13. Although this device is manufactured with the utmost care and checked several times before leaving
the factory, it is still possible that problems may occur, as with all electrical appliances. If you notice
smoke, an excessive build-up of heat or any other unexpected phenomena, you should disconnect
the plug from the main power socket immediately.
14. This device must be well ventilated at all times!
15. This device must operate on a power source as specified on the specification label. If you are not
sure of the type of power supply used in your home, consult your dealer or local power company.
16. The socket outlet must be installed near the equipment and must be easily accessible.
17. Do not overload AC outlets or extension cords. Overloading can cause fire or electric shocks.
18. Devices with Class 1 construction should be connected to a main socket outlet with a protective
earthed connection.
19. Devices with Class 2 construction do not require an earthed connection.
20. Keep away from rodents. Rodents enjoy biting on power cords.
21. Always hold the plug when pulling it out of the main supply socket. Do not pull the power cord. This
can cause a short circuit.
22. Avoid placing the device on any surfaces that may be subject to vibrations or shocks.
23. To clean the device, use a soft dry cloth. Do NOT use solvents or petrol based fluids. To remove
severe stains, you may use a damp cloth with dilute detergent.
24. The supplier is not responsible for damage or lost data caused by malfunction, misuse, modification
of the device or battery replacement.
25. Do not interrupt the connection when the device is formatting or transferring files. Otherwise, data
may be corrupted or lost.
26. The USB memory stick should be plugged into the unit directly. Don’t use a USB extension cable
because it can cause interference resulting in a failure of data transfer.
27. The apparatus shall not be exposed to dripping or splashing and make sure that no objects filled with
liquids, such as vases, shall be placed on or near the apparatus.

5
28. To completely disconnect the power input, the mains plug of the apparatus shall be disconnected
from the mains, as the disconnect device is the mains plug of this apparatus.
29. The mains plug of the apparatus should not be obstructed OR should be easily accessible during its
intended use.
30. The battery shall not be exposed to excessive heat such as sunshine, fire or the like.
31. A minimum distance of 10 cm around the apparatus is needed for sufficient ventilation.
32. The ventilation should not be impeded by covering the ventilation openings with items such as
newspapers, table-cloths, curtains etc.
33. No naked flame sources such as lighted candles should be placed on the apparatus.
34. Attention should be drawn to the environmental aspects of battery disposal.
35. The apparatus can only be used in moderate climates, extremely cold and warm environments
should be avoided.
36. The rating label has been marked on the bottom panel of the apparatus.
37. This device is not intended for use by people (including children) with physical, sensory or mental
disabilities, or a lack of experience and knowledge, unless they’re under supervision or have received
instructions about the correct use of the device by the person who is responsible for their safety.
38. This product is intended for household use only and not for commercial or industrial use.
39. Make sure the unit is adjusted to a stable position. Damage caused by using this product in an
unstable position or by failure to follow any other warning or precaution contained within this user
manual will not be covered by warranty.
40. Never remove the casing of this apparatus.
41. Never place this apparatus on other electrical equipment.
42. Do not use or store this product in a place where it is subject to direct sunlight, heat, excessive dust
or vibration.
43. Do not clean this product with water or other liquids.
44. Do not block or cover the slots and holes in the product.
45. Do not allow children access to plastic bags.
46. Please check that the voltage on the type plate of your appliance corresponds with your house
electricity supply (type plate is located on the back of the unit).
47. Only use attachments/accessories specified by the manufacturer.
48. Refer all servicing to qualified service personnel. Servicing is required when the apparatus has been
damaged in any way, such as the power supply cord or the plug, when liquid has been spilled or
objects have fallen into the apparatus, when the apparatus has been exposed to rain or moisture,
does not operate normally, or has been dropped.
49. Do not use a damaged power cord or plug or a loose outlet. Doing so may result in fire or electric shock.
WARNING: Prolonged exposure to loud sounds from personal music players may lead to
temporary or permanent hearing loss.
Precautions for use
Installation
• Unpack all parts and remove protective material.
• Do not connect the unit to the mains before checking the main voltage and before all other
connections have been made.
• Do not cover any vents and make sure that there is a space of several centimeters around the unit
for ventilation.

6
2. LOCATION OF CONTROLS
EN
EN
STOP
STOP
PLAY/MODE
PLAY/MODE
ALBUM
ALBUM
PLAY/PAUSE (USB)
PLAY/PAUSE (USB)
NEXT
NEXT

7
PREVIOUS
PREVIOUS
DOOR OPEN
DOOR OPEN
POWER INDICATOR
POWER INDICATOR
FM STEREO INDICATOR
FM STEREO INDICATOR
LCD DISPLAY
LCD DISPLAY
USB JACK
USB JACK
MIC IN JACK
MIC IN JACK
MIC VOLUME CONTROL
MIC VOLUME CONTROL
FUNCTION SWITCH
FUNCTION SWITCH
VOLUME CONTROL
VOLUME CONTROL
TUNING CONTROL
TUNING CONTROL
LIGHT ON/OFF SWITCH
LIGHT ON/OFF SWITCH
EN
EN
AUX IN JACK
AUX IN JACK
HEADPHONE OUT JACK
HEADPHONE OUT JACK
TELESCOPIC ANTENNA
TELESCOPIC ANTENNA
BATTERY COMPARTMENT
BATTERY COMPARTMENT
AC~IN
AC~IN
Caution:
Usage of controls or adjustments or performance of procedures other than those specified herein may
result in hazardous radiation exposure. This unit should not be adjusted or repaired by anyone except
qualified service personnel.
Important:
Since movement of the cd mechanism and the sensitive circuitry may cause interference to the radio
tuner nearby, switch this unit off while operating other radio devices.
Due to the complexity of MCU control, please unplug the main power supply of the unit if the unit
stops working during operation! This is not a malfunctioning of the system!

8
3. CONNECTING TO THE POWER SUPPLY
1. Connect the end of the detachable power cord to the unit rear panel AC~IN jack and the other end to
the AC outlet.
2. When you first plug the unit into the mains, the unit is OFF mode. The POWER INDICATOR LED is
off.
3. Slide the FUNCTION switch to different modes of operation to turn on the unit. The POWER
INDICATOR LED will light up. The LCD display will turn on when it is in CD/USB/AUX in models. In
FM modes, the LCD display is off.
4. DC CONNECTION
For DC operation, firstly remove the AC plug from the AC outlet and disconnect the AC cord from the
AC~IN jack. Then insert 6 pcs size C (UM-2) batteries into the battery compartment.
Since the unit will draw little power consumption even in OFF mode, it is suggested to uninstall the
battery when it is not used for a long time.
EN
EN
UM2 (LR14) C SIZE 1.5V X 6 PCS
UM2 (LR14) C SIZE 1.5V X 6 PCS
‘C’ SIZE, UM-2 1.5V
‘C’ SIZE, UM-2 1.5V
5. BASIC OPERATION
Slide the FUNCTION switch to select from “CD/USB/AUX” modes of CD playback/USB playback or AUX
in. Switch to “FM MONO” for FM radio mono mode and “FM STEREO” for FM radio stereo mode. To turn
off, slide it to the “OFF” position.
Volume Control
Turn the VOLUME CONTROL to change the sound loudness.
Adjusting the Telescopic Antenna
The antenna should be extended to ensure a good FM reception. Alter the antenna position for the best
reception.
6. RADIO OPERATION
1. Slide the FUNCTION switch to “FM MONO” or “FM STEREO” as desired, the POWER Indicator will
illuminate.
2. Turn the TUNING CONTROL to your desired radio station.
Always keep the antenna fully extended for best performance. Try to put your unit near an open window
until you get the best reception.

9
Note:
- When you set to “FM STEREO” mode and if you tune to a FM stereo station with good reception, the
FM STEREO INDICATOR will turn on.
7. CD/USB OPERATION
Loading and Playing CD Disc
Open the CD door. Install a disc with the CD graphic side facing up. Close the CD door.
After reading the disc the total number of tracks will be shown on the display. It will play the first track
automatically.
USB Device Playback (MP3 file only)
Insert a USB device into the USB socket. Press and hold the PLAY/PAUSE button to change it to USB
mode.
After reading the total files/folders number will be shown on the display. The unit will play the first track
automatically.
Play/Pause Control
To pause playback press the PLAY/PAUSE button once. Press the PLAY/PAUSE button again to resume
playback.
Stop Control
To stop playback press the STOP button.
ALBUM Select (MP3 file only)
During MP3 playback or in stop mode press the ALBUM button to change the album (folder).
Use the NEXT or PREVIOUS button to select your desired track to play. Press the PLAY button to start
playback the track.
Skip Track
During playback press the NEXT or PREVIOUS buttons to skip to the next or previous tracks.
Note:
- If no disc or the CD cannot be read the display will show “no”.
High-Speed Music Search
During playback press & hold the NEXT or PREVIOUS buttons to start high-speed skipping. When you
release the button it will resume normal speed playback.
Repeat Play/Random Play
CD Disc mode
During playback press the MODE button once, the display shows “REP”. The current track will be played
repeatedly.
When pressing the MODE button a second time, the display shows “REP ALL”. All tracks will be played
repeatedly.
When pressing the MODE button a third time, the display shows “RAND”. All tracks will be played in
random sequence.
When pressing the MODE button a fourth time, the unit will resume to normal playback.

10
MP3 Disc or MP3 USB mode
During playback press the MODE button once, the display shows “REP”. The current track will be played
repeatedly.
When pressing the MODE button a second time, the display shows “REP ALBUM”. All tracks in the
current folder will be played repeatedly.
When pressing the MODE button a third time, the display shows “REP ALL”. All tracks will be played
repeatedly.
When pressing the MODE button a fourth time, the display shows “RAND”. All tracks will be played in
random sequence.
When pressing the MODE button a fifth time, the unit will resume to normal playback.
Note:
- For MP3 playback, there is a limitation of 99 folders with a maximum of 999 files the unit could
support.
Programmed Playback
This unit can be programmed to play any sequence of up to 20 tracks.
1. In stop mode press the MODE button. “P01” is shown.
2. Press the NEXT or PREVIOUS button to select correct folder (available for MP3 tracks only).
3. Press the NEXT or PREVIOUS button to select the desired track.
4. Press the MODE button to save the desired track.
5. Repeat steps 2-4 to program up to 20 tracks on a CD (99 tracks in MP3)
6. Press the PLAY/PAUSE button to play according to the programmed track.
7. To clear program play press the STOP button twice or change to another mode.
8. During program play you can also do the “Repeat One” or “Repeat All” operation. But during program
play, random play is not supported.
8. MICROPHONE IN (KARAOKE)
The unit provides a feature of mixing the microphone input to the played sound. The MIC In jack is
located at the unit front panel.
1. Plug in the microphone into the MIC In jack.
2. Adjust the microphone volume by tuning the MIC VOLUME CONTROL located at the front panel.
9. AUX IN
This allows you to connect an external player’s sound through your unit.
1. Plug a 3.5mm audio cable (not included) into your external player’s line out and the other end into
the AUX IN jack at the rear of the unit.
2. The unit will automatically enter AUX mode.
3. Start your external player to play music. The unit will output the sound.
4. To return to another mode, disconnect the audio cable from the unit.

11
EN
EN
Smartphone or MP3 player
Smartphone or MP3 player
Line Out
Line Out
or
or
10. LED LIGHT SHOW
The LED LIGHT SHOW at the speaker of the unit is created automatically based on the music source
being played.
1. To turn on the LED LIGHT SHOW slide the LIGHT switch to the ON position.
2. To turn off the LED LIGHT SHOW slide the LIGHT switch to the OFF position.
Note:
- If the brightness is too high, turn on the room lights or turn off the LED LIGHT SHOW.
11. TECHNICAL SPECIFICATIONS
FM Frequency Range
87.5 - 108MHz
Maximum Number of MP3 Folder/File Support
Limitation of 99 folders with a maximum of 999 files
AC Power Input
AC 230V~50Hz 18W
Batteries Operation
6 x UM2 (C Size)
Speaker Output Power
2 x 1.8W
Aux In
3.5mm stereo jack
Headphone Out
3.5mm stereo jack
Mic In
3.5mm jack
Dimension
241 (L) x 215 (D) x 120 (H) mm
Weight
1.5kg
Note:
Due to continuing improvements, technical specifications are subject to change without notice.
12. ENERGY SAVING
Due to ErP stage two requirement and protect the environment, the unit will switch to the standby mode
automatically once no music has been playing over 15 minutes.
To reactivate the unit, slide the FUNCTION switch to OFF and then slide to another.

12
13. GUARANTEE
Lenco offers service and warranty in accordance with the European law, which means that in case of
repairs (both during and after the warranty period) you should contact your local dealer.
Important note: It is not possible to send products that need repairs to Lenco directly.
Important note: If this unit is opened or accessed by a non-official service center in any way, the
warranty expires.
This device is not suitable for professional use. In case of professional use, all warranty obligations of
the manufacturer will be voided.
14. DISCLAIMER
Updates to Firmware and/or hardware components are made regularly. Therefore some of the
instruction, specifications and pictures in this documentation may differ slightly from your particular
situation. All items described in this guide are for illustration purposes only and may not apply to
particular situation. No legal right or entitlements may be obtained from the description made in this
manual.
15. DISPOSAL OF THE OLD DEVICE
This symbol indicates that the relevant electrical product or battery should not be disposed
of as general household waste in Europe. To ensure the correct waste treatment of the
product and battery, please dispose them in accordance to any applicable local laws of
requirement for disposal of electrical equipment or batteries.
In so doing, you will help to conserve natural resources and improve standards of
environmental protection in treatment and disposal of electrical waste (Waste Electrical and
Electronic Equipment Directive).
16. CE MARKING
Products with the CE marking comply with the EMC Directive (2014/30/EU) and the Low
Voltage Directive (2014/35/EU) issued by the Commission of the European Community.
Hereby, Lenco Benelux BV, Thermiekstraat 1a, 6361 HB Nuth, The Netherlands, declares that this
product is in compliance with the essential requirements.
The declaration of conformity may be consulted via techdoc@lenco.com
17. SERVICE
For more information and helpdesk support, please visit www.lenco.com Lenco Benelux BV, Thermiekstraat
1a, 6361 HB, The Netherlands.

13
Nederlands
CD/USB/MP3-speler met FM-radio/Aux-ingang & Mic-ingang
WAARSCHUWING
KLASSE 1 LASERPRODUCT
EN
NL
CLASS 1 LASER PRODUCT
APPAREIL Á LASER DE CLASSE 1
PRODUCTO LASER DE CLASE 1
CLASS 1 LASER PRODUCT
APPAREIL Á LASER DE CLASSE 1
PRODUCTO LASER DE CLASE 1
CAUTION
LET OP
INVISIBLE LASER RADIATION WHEN OPEN AND
INTERLOCKS DEFEATED. AVOID EXPOSURE TO
BEAM
ONZICHTBARE STRALING WANNEER OPEN EN
BEVEILIGING NIET INTACT. VERMIJD
BLOOTSTELLING AAN DE BUNDEL
This product contains a low power laser device.
Dit product bevat een laser met laag vermogen.
Waarschuwing: Raak de lens niet aan.
GOOI BATTERIJEN NIET IN OPEN VUUR!
1. VEILIGHEIDSINSTRUCTIES
BELANGRIJKE VEILIGHEIDSAANWIJZINGEN - LEES ZE VOOR HET GEBRUIK ZORGVULDIG
DOOR.
LET OP
RISICO OP ELEKTRISCHE SCHOK
OPEN HET APPARAAT NIET
LET OP: VERWIJDER GEEN VAN DE SCHROEVEN VAN DE BEHUIZING, OM ELEKTRISCHE
SCHOKKEN TE VOORKOMEN. GEEN INTERNE ONDERDELEN DIE U ZELF KUNT REPAREREN.
VRAAG EEN GEKWALIFICEERDE ONDERHOUDSPERSOON HET APPARAAT TE REPAREREN.
Dit symbool betekent dat de gebruikshandleiding meegeleverd met dit product belangrijke
onderhoud- en gebruiksaanwijzingen bevat.
Dit symbool betekent dat er gevaarlijke spanning aanwezig is binnenin het product die krachtig
genoeg kan zijn om een risico op elektrische schok of persoonlijk letsel te vormen.
Houd rekening met de volgende instructies:
1. Gebruik dit apparaat niet in de buurt van water.
2. Reinig het uitsluitend met een licht vochtige doek.
3. Blokkeer of bedek geen van de ventilatieopeningen. Wanneer u het apparaat op een schap plaatst,
dient u 5 cm (2”) vrije ruimte rondom het gehele apparaat te behouden.
4. Installeer het product volgens de meegeleverde gebruikshandleiding.

14
5. Nooit op de stroomadapter stappen of deze indrukken. Ben voornamelijk voorzichtig in de buurt van
de stekkers en het punt waar de kabel uit het apparaat komt. Plaats geen zware voorwerpen op de
stroomadapter, om beschadiging ervan te voorkomen. Houd het gehele apparaat buiten bereik van
kinderen! Wanneer kinderen met de voedingskabel spelen, kunnen zij ernstig letsel oplopen.
6. Haal de stekker uit het stopcontact tijdens onweer of wanneer voor langere tijd niet gebruikt.
7. Houd het apparaat uit de buurt van hittebronnen, zoals radiateurs, verwarmingen, kachels, kaarsen
en andere hittegenererende producten.
8. Gebruik dit apparaat niet in de buurt van krachtige magnetische velden.
9. ESD kan het normale gebruik van dit apparaten aantasten. U hoeft het apparaat in dit geval slechts
terug te stellen en opnieuw te starten volgens de gebruikshandleiding. Ben a.u.b. voorzichtig tijdens
bestandsoverdracht en gebruik het product in een omgeving zonder statische interferentie.
10. WAARSCHUWING! STEEK NOOIT EEN VOORWERP IN HET PRODUCT VIA DE
VENTILATIEOPENINGEN OF ANDERE OPENINGEN. ER IS HOGE SPANNING AANWEZIG IN
HET PRODUCT EN INGESTOKEN VOORWERPEN KUNNEN ELEKTRISCHE SCHOKKEN EN/OF
KORTSLUITING VAN DE INTERNE ONDERDELEN VEROORZAKEN. MORS OM DEZELFDE
REDEN GEEN WATER OF VLOEISTOF OP HET PRODUCT.
11. Gebruik het toestel NIET in vochtige ruimtes, zoals badkamers, stomerige keukens of in de buurt
van zwembaden.
12. Gebruik dit apparaat niet wanneer condensatie kan optreden.
13. Al is dit apparaat met grote zorg gefabriceerd en verschillende keren geïnspecteerd voordat het de
fabriek verlaat, het is nog steeds mogelijk dat er problemen optreden, zoals met alle elektrische
apparaten. Als u rook, een overmatige hitteontwikkeling of enig ander onverwacht verschijnsel, moet
u onmiddellijk de stekker van het netsnoer uit het stopcontact halen.
14. Dit apparaat moet te allen tijde goed worden geventileerd!
15. Dit apparaat moet op een voedingsbron werken zoals gespecificeerd op het specificatieplaatje. Als u
twijfelt over het type voeding gebruikt in uw huis, raadpleeg dan a.u.b. uw dealer of plaatselijk
energiebedrijf.
16. Het stopcontact moet in de buurt van de apparatuur zijn geïnstalleerd en eenvoudig te bereiken zijn.
17. Laat AC-stopcontacten of verlengsnoeren nooit overbelast raken. Overbelasting kan tot brand of
elektrische schokken leiden.
18. Apparaten met een Klasse 1 structuur dienen te worden aangesloten op een stopcontact met een
beschermende aardverbinding.
19. Apparaten met een Klasse 2 structuur vereisen geen aardverbinding.
20. Houd ze uit de buurt van knaagdieren. Knaagdieren knauwen graag aan voedingskabels.
21. Houd altijd de stekker vast wanneer u deze uit het stopcontact trekt. Trek nooit aan de
voedingskabel. Dit kan tot een kortsluiting leiden.
22. Vermijd om het toestel te plaatsen op een ondergrond die blootgesteld kan worden aan trillingen of
schokken.
23. Gebruik een zacht, droog doekje om het apparaat te reinigen. Gebruik GEEN oplosmiddelen of op
benzine gebaseerde vloeistoffen. U kunt een vochtig doekje met verdund schoonmaakmiddel
gebruiken om hardnekkige vlekken te verwijderen.
24. De leverancier is niet verantwoordelijk voor schade of verloren gegevens veroorzaakt door storing,
misbruik, modificatie van het apparaat of batterijvervanging.
25. Onderbreek nooit de verbinding wanneer het apparaat formatteert of bestanden overdraagt. De
gegevens kunnen anders corrupt of verloren raken.

15
26. De USB-geheugenstick dient direct in het apparaat te worden gestoken. Gebruik geen
USB-verlengkabel, omdat deze interferentie kan veroorzaken waardoor de gegevensoverdracht
mislukt.
27. Stel het apparaat nooit bloot aan druppels of spetters en zorg ervoor geen met vloeistof gevulde
voorwerpen, zoals een vaas, op of in de buurt van het apparaat te plaatsen.
28. “Om de verbinding met de stroomaansluiting volledig te verbreken, moet de stekker van het
apparaat uit het stopcontact worden gehaald”, omdat de stekker van het apparaat de
hoofdschakelaar is.
29. De netstekker van het apparaat niet dient te worden geblokkeerd OF dient eenvoudig bereikbaar te
zijn tijdens het beoogde gebruik ervan.
30. Batterijen mogen niet aan overmatige hitte, zoals zonlicht, open vuur e.d., worden blootgesteld.
31. Zorg voor een minimale vrije ruimte van 10 cm rondom het apparaat voor voldoende ventilatie.
32. De ventilatie mag niet worden gehinderd door het bedekken van de ventilatieopeningen met
voorwerpen zoals kranten, tafelkleden, gordijnen etc.
33. Plaats geen bronnen met een open vlam, zoals brandende kaarsen, op het apparaat.
34. Aandacht voor het milieu is nodig bij het verwijderen van de batterijen.
35. Het apparaat dient uitsluitend te worden gebruikt in een gematigd gebruik, extreem koude en warme
omgevingen dienen te worden vermeden.
36. Het nominale specificatielabel is te vinden op het onderpaneel van het apparaat.
37. Dit apparaat is niet bedoeld voor gebruik door personen (inclusief kinderen) met een lichamelijke,
zintuiglijke of verstandelijke beperking of met een gebrek aan kennis en ervaring, tenzij zij onder
toezicht staan of instructies over het juiste gebruik van het apparaat hebben gekregen van de
persoon die verantwoordelijk is voor hun veiligheid.
38. Dit product is alleen voor huishoudelijk gebruik bedoeld en niet voor commercieel of industrieel
gebruik.
39. Verzeker u ervan dat het apparaat in een stabiele positie staat opgesteld. Schade, veroorzaakt door
het gebruik van dit product in een onstabiele positie, of door het niet naleven van waarschuwingen of
voorzorgsmaatregelen genoemd in deze handleiding, valt niet onder de garantie.
40. Verwijder nooit de behuizing van dit apparaat.
41. Plaats dit apparaat nooit op andere elektrische apparatuur.
42. Dit product niet gebruiken of opslaan op plaatsen waar het wordt blootgesteld aan direct zonlicht,
hitte, buitensporig veel stof of trillingen.
43. Reinig dit product niet met water of andere vloeistoffen.
44. Bedek of blokkeer de gleuven en de gaten in het product niet.
45. Geef kinderen geen gelegenheid in aanraking met plastic zakken te komen.
46. Controleer of de spanning op het specificatieplaatje van uw apparaat overeenkomt met het lichtnet
in uw huis (specificatieplaatje is te vinden op de achterzijde van het apparaat).
47. Gebruik uitsluitend uitbreidingen/accessoirs gespecificeerd door de fabrikant.
48. Laat alle reparaties over aan gekwalificeerd onderhoudspersoneel. Onderhoud is vereist als het
toestel hoe dan ook is beschadigd, zoals bijvoorbeeld het netsnoer of de stekker, wanneer er
vloeistof of een voorwerp in het apparaat is terechtgekomen, wanneer het apparaat is blootgesteld
aan regen of vocht, als het niet normaal werkt of is gevallen.
49. Gebruik nooit een beschadigde voedingskabel of stekker of een los stopcontact. Dit vormt namelijk
een risico op brand of elektrische schokken.

16
WAARSCHUWING: Langdurige blootstelling aan luid geluid van persoonlijke muziekspelers
kan leiden tot tijdelijke of permanente gehoorbeschadiging.
Voorzorgsmaatregelen voor gebruik
Installatie
• Pak alle onderdelen uit en verwijder de beschermende materialen.
• Sluit het apparaat niet aan op het stopcontact voordat u de netspanning hebt gecontroleerd en alle
andere verbindingen tot stand hebt gebracht.
• Bedek geen van de ventilatieopeningen en zorg voor enkele centimeters vrije ruimte rondom het
apparaat voor ventilatie.

17
2. PLAATS VAN DE BEDIENINGSORGANEN
EN
NL
STOP
STOP
PLAY/MODE
AFSPELEN/MODUS
ALBUM
ALBUM
PLAY/PAUSE (USB)
AFSPELEN/PAUZE (USB)
NEXT
VOLGENDE

18
PREVIOUS
VORIGE
DOOR OPEN
KLEPJE OPEN
POWER INDICATOR
INDICATIELAMPJE AAN/UIT
FM STEREO INDICATOR
INDICATIELAMPJE FM-STEREO
LCD DISPLAY
LCD-SCHERM
USB JACK
USB-AANSLUITING
MIC IN JACK
MIC-INGANG
MIC VOLUME CONTROL
MIC VOLUMEREGELING
FUNCTION SWITCH
FUNCTIESCHAKELAAR
VOLUME CONTROL
VOLUMEREGELING
TUNING CONTROL
AFSTEMKNOP
LIGHT ON/OFF SWITCH
LICHT AAN/UITSCHAKELAAR
EN
NL
AUX IN JACK
AUX-INGANG
HEADPHONE OUT JACK
HOOFDTELEFOONUITGANG
TELESCOPIC ANTENNA
TELESCOPISCHE ANTENNE
BATTERY COMPARTMENT
BATTERIJVAK
AC~IN
AC~IN
Let op:
Gebruik van bedieningen of afstellingen of uitvoer van procedures anders dan gespecificeerd in deze
documentatie kan leiden tot blootstelling aan schadelijke straling. Dit apparaat dient uitsluitend te
worden aangepast of gerepareerd door gekwalificeerd onderhoudspersoneel.
Belangrijk:
Omdat de beweging van het CD-mechanisme en de gevoelige schakelingen interferentie kan veroorzaken
in radiotuners in de buurt, dient u dit apparaat uit te schakelen terwijl u andere radioapparatuur gebruikt.
Wegens de complexiteit van MCU-bediening, dient u de stekker uit het stopcontact te halen als
het apparaat tijdens gebruik stopt met werken! Dit duidt niet op een storing van het systeem!

19
3. AANSLUITING OP DE VOEDING
1. Sluit het ene uiteinde van de afneembare voedingskabel aan op de ingang AC~IN op het
achterpaneel van het apparaat en het andere uiteinde op het AC stopcontact.
2. Wanneer u het apparaat voor het eerst aansluit op het stopcontact, zal deze UIT zijn geschakeld. De
AAN/UITINDICATOR zal zijn uitgeschakeld.
3. Schuif de FUNCTIESCHAKELAAR naar verschillende gebruiksmodi om het apparaat in te
schakelen. De AAN/UITINDICATOR zal oplichten. De LCD-display zal inschakelen wanneer u de
modus CD/USB/AUX selecteert. De LCD-display blijft uitgeschakeld wanneer de FM-modus wordt
geselecteerd.
4. DC-AANSLUITING
Om het apparaat op DC-voeding te gebruiken, dient u eerst de AC stekker uit het AC stopcontact te
trekken en de AC voedingskabel los te koppelen van de ingang AC~IN. Plaats vervolgens 6 stuks type C
(UM-2) batterijen in de batterijhouder.
Omdat het apparaat zelfs wanneer uitgeschakeld een kleine hoeveelheid stroom verbruikt, raden wij u
aan de batterijen te verwijderen wanneer voor langere tijd niet gebruikt.
EN
NL
UM2 (LR14) C SIZE 1.5V X 6 PCS
UM2 (LR14) TYPE C 1,5V X 6 STUKS
‘C’ SIZE, UM-2 1.5V
TYPE C, UM-2 1,5V
5. ALGEMENE BEDIENING
Schuif de FUNCTIESCHAKELAAR naar de modi “CD/USB/AUX” voor het afspelen van CD, USB of AUX.
Selecteer “FM MONO” voor de mono FM-radiomodus of “FM STEREO” voor de stere FM-radiomodus.
Schuif de schakelaar naar de stand “OFF” om het apparaat uit te schakelen.
Volumeregeling
Draai de VOLUMEREGELING om het volumeniveau aan te passen.
De telescopische antenne aanpassen
Trek de antenne volledig uit voor de beste FM-ontvangst. U kunt de antennepositie aanpassen om de
ontvangst te verbeteren.
6. RADIOBEDIENING
1. Schuif de FUNCTIESCHAKELAAR naar de gewenste stand “FM MONO” of “FM STEREO” en de
AAN/UITINDICATOR zal oplichten.
2. Draai de TUNERREGELING naar het gewenste radiostation.

20
Houd de antenne altijd volledig uitgetrokken voor de beste prestaties. Probeer het apparaat in de buurt
van een open raam te plaatsen totdat u de beste ontvangst krijgt.
Opmerking:
- Wanneer u de modus “FM STEREO” selecteert en afstemt op een FM-radiostation met goede
ontvangst, dan zal de indicator FM STEREO oplichten.
7. BEDIENING CD/USB
CD’s laden en afspelen
Open het CD-klepje. Plaats een disk met de bedrukte zijde omhoog gericht. Sluit het Cd-klepje.
Nadat de disk is ingelezen, zal het totale aantal tracks op de display worden weergegeven. Het apparaat
zal automatisch de eerste track afspelen.
USB-apparaat afspelen (alleen MP3-bestanden)
Sluit een USB-apparaat aan op de USB-ingang. Houd de toets AFSPELEN/PAUZE ingedrukt om de
USB-modus te selecteren.
Nadat het apparaat is ingelezen zal het totale aantal bestanden/folders op de display worden
weergegeven. Het apparaat zal automatisch de eerste track afspelen.
Afspelen/pauzeren
Druk eenmaal op de toets AFSPELEN/PAUZE om het afspelen te pauzeren. Druk nogmaals op de toets
AFSPELEN/PAUZE om het afspelen te hervatten.
Stoppen
Druk om het afspelen te stoppen op de STOP-toets.
ALBUM selecteren (alleen MP3-bestanden)
Druk tijdens MP3-weergave of in gestopte modus op de toets ALBUM om het album (folder) te
veranderen.
Gebruik de toets VOLGENDE of VORIGE om de track te selecteren die u wilt afspelen. Druk op de toets
AFSPELEN om het afspelen van de track te starten.
Tracks overslaan
Druk tijdens het afspelen op de toets VOLGENDE of VORIGE om de volgende of vorige track te
selecteren.
Opmerking:
- De display zal “no” (nee) weergeven als er geen disk is geladen of als de CD niet kan worden
gelezen.
Spoelen
Houd tijdens het afspelen de toets VOLGENDE of VORIGE ingedrukt om vooruit of terug te spoelen.
Zodra u de toets loslaat, zal de normale afspeelmodus worden hervat.
Herhalend/willekeurig afspelen
CD-modus
Druk tijdens het afspelen eenmaal op de toets MODE en de display zal “REP” (herhalen) weergeven. De
huidige track zal herhalend worden afgespeeld.

21
Als u een tweede keer op de toets MODE drukt, zal de display “REP ALL” (alles herhalen) weergeven.
Alle tracks zulllen nu worden herhaald.
Als u een derde keer op de toets MODE drukt, zal de display “RAND” (willekeurig) tonen. Alle tracks
zullen nu in een willekeurige volgorde worden afgespeeld.
Als u een vierde keer op de toets MODE drukt, zal het apparaat de normale afspeelmodus hervatten.
MP3-diskmodus of MP3 USB-modus
Druk tijdens het afspelen eenmaal op de toets MODE en de display zal “REP” (herhalen) weergeven. De
huidige track zal herhalend worden afgespeeld.
Als u een tweede keer op de toets MODE drukt, zal de display “REP ALBUM” (album herhalen)
weergeven. Alle tracks in de huidige folder zullen nu herhaald worden afgespeeld.
Wanneer u een derde keer op de toets MODE drukt, zal de display “REP ALL” (alles herhalen)
weergeven. Alle tracks zulllen nu worden herhaald.
Wanneer u een vierde keer op de toets MODE drukt, zal de display “RAND” (willekeurig) tonen. Alle
tracks zullen nu in een willekeurige volgorde worden afgespeeld.
Als u een vijfde keer op de toets MODE drukt, zal het apparaat de normale afspeelmodus hervatten.
Opmerking:
- Dit apparaat kan voor de MP3-weergave 99 folders ondersteunen met een maximum van
999 bestanden.
Geprogrammeerd afspelen
Dit apparaat kan worden geprogrammeerd om tot op 20 tracks in elke gewenste volgorde af te spelen.
1. Druk in gestopte modus op de toets MODE. “P01” zal worden weergegeven.
2. Druk op de toets VOLGENDE of VORIGE om de gewenste folder te selecteren (alleen beschikbaar
voor MP3-tracks).
3. Druk op de toets VOLGENDE of VORIGE om de gewenste track te selecteren.
4. Druk op de toet MODE om de gewenste track op te slaan.
5. Herhaal stappen 2-4 om tot op 20 tracks van een CD te programmeren (of 99 MP3-tracks).
6. Druk op de toets AFSPELEN/PAUZE om de geprogrammeerde tracks af te spelen.
7. Druk tweemaal op de toets STOP of selecteer een andere modus om de programmering te wissen.
8. U kunt tijdens het geprogrammeerd afspelen ook de functies “Repeat One” (Herhaal één) of “Repeat
One” (Herhaal alles) gebruiken. De willekeurige afspeelfunctie wordt tijdens het geprogrammeerd
afspelen echter niet ondersteund.
8. MICROFOONINGANG (KARAOKE)
Dit apparaat biedt de mogelijkheid de microfooningang te mixen met de afgespeelde audio. De ingang
MIC In is te vinden op het voorpaneel.
1. Steek de microfoon in de ingang MIC In.
2. Pas het microfoonvolume aan via de MIC VOLUMEREGELING op het voorpaneel.
9. AUX IN
U kunt een externe speler op deze ingang aansluiten om het geluid daarvan via uw apparaat af te
spelen.

22
1. Sluit een 3,5mm audiokabel (niet inbegrepen) aan op de lijnuitgang van uw externe speler en steek
het andere uiteinde in de AUX-ingang op de achterzijde van het apparaat.
2. Het apparaat zal automatische de AUX-modus openen.
3. Start uw externe speler om muziek af te spelen. De muziek zal via het apparaat worden afgespeeld.
4. Koppel de audiokabel los van het apparaat om van modus te wisselen.
EN
NL
Smartphone or MP3 player
Smartphone or MP3-speler
Line Out
LIJNUITGANG
or
of
10. LED-LICHTSHOW
De LED-LICHTSHOW bij de luidspreker van het apparaat wordt automatisch gecreëerd op basis van de
muziekbron die wordt afgespeeld.
1. Schuif de schakelaar LIGHT naar positie ON om de LED-LICHTSHOW in te schakelen.
2. Schuif de schakelaar LIGHT naar positie OFF om de LED-LICHTSHOW uit te schakelen.
Opmerking:
- Als het helderheidniveau te hoog is, kunt u de kamerverlichting inschakelen of de LED-LICHTSHOW
uitschakelen.
11. TECHNISCHE SPECIFICATIES
FM-frequentiebereik
87.5 - 108MHz
Maximum ondersteund aantal MP3-folders/bestanden
Maximaal 99 folders met maximaal
999 bestanden
AC-voedingsingang
AC 230V~50Hz 18W
Batterijvoeding
6 x UM2 (type C)
Uitgangsvermogen van luidspreker
2 X 1,8W
Aux in
3,5 mm stereo aansluiting
Hoofdtelefoonuitgang
3,5 mm stereo aansluiting
Mic rofooningang
3,5mm aansluiting
Afmetingen
241(L) x 215(D) x 120(H) mm
Gewicht
1,5 kg
Opmerking:
Wegens onafgebroken productverbeteringen kunnen de technische specificaties zonder voorafgaande
kennisgeving worden gewijzigd.

23
12. ENERGIEBESPARING
Wegens de vereisten van ErP fase twee en de bescherming van ons milieu, zal het apparaat
automatisch op stand-by schakelen als er voor 15 minuten geen muziek wordt afgespeeld.
Schuif de FUNCTIESCHAKELAAR naar positie OFF en vervolgens naar een andere stand om het
apparaat weer te activeren.
13. GARANTIE
Lenco biedt service en garantie aan overeenkomstig met de Europese wetgeving. Dit houdt in dat u, in
het geval van reparaties (zowel tijdens als na de garantieperiode), uw lokale handelaar moet
contacteren.
Belangrijke opmerking: Het is niet mogelijk om producten die gerepareerd moeten worden direct naar
Lenco te sturen.
Belangrijke opmerking: De garantie verloopt als een onofficieel servicecenter het apparaat op wat voor
manier dan ook heeft geopend, of er toegang toe heeft gekregen.
Het apparaat is niet geschikt voor professioneel gebruik. In het geval van professioneel gebruik worden
alle garantieverplichtingen van de fabrikant nietig verklaard.
14. DISCLAIMER
Er worden regelmatig updates in de firmware en/of hardwarecomponenten gemaakt. Daardoor kunnen
gedeelten van de instructie, de specificaties en afbeeldingen in deze documentatie enigszins verschillen
van uw eigen situatie. Alle onderwerpen die staan beschreven in deze handleiding zijn bedoeld als
illustratie en zijn niet van toepassing op specifieke situaties. Aan de beschrijving in dit document kunnen
geen rechten worden ontleend.
15. VERWIJDEREN VAN HET OUDE APPARAAT
Dit symbool geeft aan dat het betreffende elektrische product of de batterij niet moet worden
verwijderd als algemeen huishoudelijk afval in Europa. Zorg voor een juiste afvalverwerking
door het product en de batterij in overeenstemming met alle van toepassing zijnde lokale
wetten voor het verwijderen van elektrische apparatuur of batterijen te verwijderen.
Als u dit doet, helpt u de natuurlijke hulpbronnen te behouden en de standaard van
milieubescherming te verbeteren bij de behandeling en verwijdering van elektrisch afval
(Afgedankte Elektrische en Elektronische Apparatuur).
16. CE-MARKERING
Producten met een CE keurmerk houden zich aan de EMC richtlijn (2014/30/EU) en de
Richtlijn voor Lage Voltage (2014/35/EU) uitgegeven door de Europese Commissie.
Hierbij verklaart Lenco Benelux BV, Thermiekstraat 1a, 6361 HB Nuth, Nederland, dat dit product
voldoet aan de essentiële eisen.
De conformiteitsverklaring kan worden geraadpleegd op techdoc@lenco.com

24
17. SERVICE
Voor meer informatie en ondersteuning van de helpdesk, kunt u terecht op www.lenco.com; Lenco
Benelux BV, Thermiekstraat 1a, 6361 HB Nuth, Nederland.

25
Deutsch
CD/USB/MP3 Player mit FM Radio/Aux-In & Mikrofoneingang
ACHTUNG
LASER-GERÄT DER KLASSE 1
EN
DE
CLASS 1 LASER PRODUCT
APPAREIL Á LASER DE CLASSE 1
PRODUCTO LASER DE CLASE 1
CLASS 1 LASER PRODUCT
APPAREIL Á LASER DE CLASSE 1
PRODUCTO LASER DE CLASE 1
CAUTION
ACHTUNG
INVISIBLE LASER RADIATION WHEN OPEN AND
INTERLOCKS DEFEATED. AVOID EXPOSURE TO
BEAM
IUNSICHTBARE LASERSTRAHLUNG BEI
ENTRIEGELTEM ODER OFFENEM GERÄT.
SCHUTZ VOR UNGEWOLLTER STRAHLUNG
This product contains a low power laser device.
Dieses Gerät enthält eine Kleinleistungslasereinheit.
Achtung: berühren sie niemals die linse.
WERFEN SIE DIE BATTERIEN NICHT INS FEUER!
1. SICHERHEITSANWEISUNGEN
WICHTIGE SICHERHEITSHINWEISE – BITTE VOR DER BENUTZUNG SORGFÄLTIG LESEN.
ACHTUNG
GEFAHR VON ELEKTRISCHEM SCHOCK
NICHT ÖFFNEN
ACHTUNG: ENTFERNEN SIE NIEMALS EINE DER GEHÄUSESCHRAUBEN, UM DER GEFAHR
EINES ELEKTRISCHEN SCHOCKS VORZUBEUGEN. ES BEFINDEN SICH KEINE DURCH DEN
ANWENDER WARTBAREN TEILE IM INNEREN DES GERÄTS. SETZEN SIE SICH FÜR
SERVICELEISTUNGEN MIT EINEM QUALIFIZIERTEN FACHMANN IN VERBINDUNG.
Dieses Symbol weist auf wichtige Bedienungs- und Wartungshinweise des Geräts für den
Anwender in dieser Bedienungsanleitung hin.
Dieses Symbol weist auf gefährliche Spannung innerhalb des Geräts hin, die zu elektrischem
Schocks oder körperlichen Verletzungen führen können.
Befolgen Sie immer folgende Anweisungen:
1. Benutzen Sie das Gerät nicht in der Nähe von Wasser.
2. Benutzen Sie zur Reinigung ein nur leicht befeuchtetes Tuch.
3. Bedecken oder blockieren Sie keine der Lüftungsschlitze. Wenn Sie das Gerät auf ein Regal stellen,
lassen Sie um das gesamte Gerät 5 cm (2”) freien Platz.
4. Stellen Sie das Gerät entsprechend den Anweisungen der mitgelieferten Bedienungsanleitung auf.

26
5. Treten Sie nicht auf das Netzteil und klemmen Sie es auch nicht ein. Seien Sie im näheren Bereich
des Steckers und der Herausführungen des Kabels besonders vorsichtig. Stellen Sie keine
schweren Gegenstände auf das Netzteil, weil es dadurch beschädigt werden könnte. Halten Sie das
gesamte Gerät außerhalb der Reichweite von Kindern! Durch Spielen mit dem Netzkabel können sie
sich ernsthafte Verletzungen zuziehen.
6. Trennen Sie das Gerät während eines Gewitters oder bei längerer Nichtbenutzung vom Netz.
7. Halten Sie das Gerät von Hitzequellen wie Radiatoren, Heizern, Öfen, Kerzen oder anderen
hitzeerzeugenden Gegenständen fern.
8. Meiden Sie bei der Nutzung des Produkts die Nähe starker Magnetfelder.
9. Elektrostatische Entladungen (ESD) könnten die normale Benutzung dieses Geräts beeinträchtigen.
Sollte dies geschehen, führen Sie einfach einen Reset aus und starten Sie dann das Gerät
entsprechend den Anweisungen dieser Bedienungsanleitung neu. Gehen Sie besonders bei
Datenübertragungen mit dem Gerät vorsichtig um und führen Sie diese nur in einer antielektrostatischen
Umgebung aus.
10. ACHTUNG! STECKEN SIE NIEMALS IRGENDWELCHE GEGENSTÄNDE IN DIE
LÜFTUNGSSCHLITZE ODER ANDERE ÖFFNUNGEN. DAS GERÄT STEHT UNTER
HOCHSPANNUNG UND DAS HINEINSTECKEN EINES GEGENSTANDES KANN ZU
ELEKTRISCHEM SCHOCK UND/ODER KURZSCHLUSS INTERNER BAUTEILE FÜHREN.
GIESSEN SIE AUS OBENGENANNTEN GRUND AUCH NIEMALS WASSER ODER ANDERE
FLÜSSIGKEITEN AUF DAS GERÄT.
11. Benutzen Sie das Gerät NICHT in nasser oder feuchter Umgebung wie dem Bad, einer Dampfküche
oder in der Nähe eines Schwimmbeckens.
12. Benutzen Sie das Gerät nicht bei Kondensationsgefahr.
13. Obwohl dieses Gerät unter größter Sorgfalt und vor Auslieferung mehrmals überprüft wurde, können
trotzdem wie bei jedem anderen elektrischen Gerät auch Probleme auftauchen. Trennen Sie das
Gerät im Falle einer Rauchentwicklung, starker Hitzeentwicklung oder jeden anderen unnatürlichen
Erscheinung sofort vom Netz.
14. Es ist jederzeit für ausreichend Kühlung des Geräts zu sorgen!
15. Dieses Gerät ist durch eine Stromquelle wie auf dem Typenschild angegeben zu betreiben. Halten
Sie bei Unsicherheiten über die Art Ihrer Stromversorgung in Ihrer Wohnung Rücksprache mit Ihrem
Händler oder Ihrer Stromzuliefererfirma.
16. Die Wandsteckdose muss sich in der Nähe des Geräts befinden und einfach zu erreichen sein.
17. Überlasten Sie die Netzsteckdosen oder Verlängerungskabel nicht. Eine Überlastung kann zu Brand
oder elektrischem Schock führen.
18. Geräte der Schutzklasse 1 sind an eine Netzsteckdose mit Schutzleiter anzuschließen.
19. Geräte der Schutzklasse 2 benötigen keinen Schutzleiteranschluss.
20. Halten Sie Nagetiere vom Gerät fern. Nagetiere lieben es, am Netzkabel zu nagen.
21. Halten Sie den Netzstecker in der Hand, wenn Sie ihn aus der Netzsteckdose ziehen. Ziehen Sie ihn
nicht durch Zerren am Kabel heraus. Das kann zu einem Kurzschluss führen.
22. Vermeiden Sie es, das Gerät auf Oberflächen aufzustellen, die zu Schwingungen oder Stoß neigen.
23. Benutzen Sie zur Reinigung ein nur leicht befeuchtetes Tuch. Benutzen Sie NIEMALS Lösungsmittel
oder Flüssigkeiten auf Ölbasis. Benutzen Sie zum Entfernen hartnäckiger Flecken ein feuchtes Tuch
mit mildem Reinigungsmittel.
24. Der Hersteller haftet nicht für Schäden oder Verluste durch Fehlfunktion, Zweckentfremdung oder
Modifikation des Geräts oder durch Wechseln der Batterien.

27
25. Unterbrechen Sie die Verbindung nicht während einer Formatierung oder einer Datenübertragung.
Bei Unterbrechung drohen Datenverlust und Datenbeschädigung.
26. USB-Sticks sind direkt mit dem Gerät zu verbinden. Benutzen Sie keine USB-Verlängerungskabel,
weil es der Grund von Störungen mit darauffolgenden Fehlern in der Datenübertragung sein kann.
27. Das Gerät darf keinem Spritz- oder Tropfwasser ausgesetzt werden. Stellen Sie sicher, dass keine
mit Wasser gefüllten Gegenstände wie beispielsweise Vasen auf oder in der Nähe des Geräts
platziert werden.
28. Um das Gerät vollständig vom Netz zu trennen, muss der Netzstecker des Gerätes vom Stromnetz
getrennt werden, wobei die zu trennende Einheit den Netzstecker des Gerätes bezeichnet.
29. Der Netzstecker des Geräts darf nicht zugestellt werden ODER muss für eine Notfallbedienung
einfach zu erreichen sein.
30. Die Batterie darf keiner extremen Hitze wie z.B. Sonnenschein, Feuer o.ä. ausgesetzt werden.
31. Für eine ausreichende Belüftung muss ein Mindestabstand von 10 cm rund um das Gerät
eingehalten werden.
32. Die Ventilation darf nicht durch Abdecken der Ventilationsöffnungen durch Gegenstände wie
Zeitungen, Tischdecken, Gardinen o.ä. behindert werden.
33. Stellen Sie kein offenes Feuer, wie z.B. angezündete Kerzen, auf das Gerät.
34. Bei der Batterieentsorgung sind die Entsorgungsvorschriften einzuhalten.
35. Das Gerät kann nur bei gemäßigtem Klima verwendet werden. Extrem warme und kalte
Umgebungen sind zu meiden.
36. Das Typenschild befindet sich an der Unterseite des Geräts.
37. Dieses Gerät ist nicht zur Benutzung durch Personen (auch Kinder) mit physischen, sensorischen
oder mentalen Beeinträchtigungen oder ohne ausreichender Erfahrung vorgesehen, es sei denn, sie
werden durch eine verantwortliche Person beaufsichtigt oder wurden in die ordnungsgemäße
Bedienung des Gerätes durch eine für ihre Sicherheit verantwortlichen Person eingewiesen.
38. Dieses Produkt ist nur für den Hausgebrauch und nicht für gewerbliche oder industrielle Zwecke
bestimmt.
39. Stellen Sie sicher, dass das Gerät in einer stabilen Position aufgestellt ist. Schäden, die durch
Verwendung dieses Produkts in einer instabilen Position oder durch Nichtbeachtung der anderen in
diesem Handbuch enthaltener Warnungen und Vorwarnung entstehen, werden nicht durch die
Garantie abgedeckt.
40. Entfernen Sie niemals das Gehäuse dieses Geräts.
41. Stellen Sie dieses Gerät niemals auf andere elektrische Geräte.
42. Verwenden oder bewahren Sie dieses Produkt nicht an Orten auf, in denen es direkter
Sonneneinstrahlung, Hitze, übermäßigem Staub oder Vibration ausgesetzt ist.
43. Reinigen Sie dieses Produkt nicht mit Wasser oder anderen Flüssigkeiten.
44. Blockieren Sie nicht die Schlitze und Öffnungen in dieses Produkts.
45. Ermöglichen Sie Kindern nicht den Zugriff auf Plastiktüten.
46. Vergewissern Sie sich, dass die Spannungsangaben auf dem Typenschild des Geräts mit der
Spannungsversorgung in Ihrem Haushalt übereinstimmen (Das Typenschild befindet sich an der
Rückseite des Geräts).
47. Benutzen Sie nur vom Hersteller empfohlene Erweiterungen/Zubehörteile.

28
48. Sprechen Sie alle Eingriffe mit qualifiziertem Fachpersonal ab. Eingriffe werden notwendig, wenn
das Gerät in irgendeiner Weise beschädigt wurde, beispielsweise am Netzkabel oder am
Netzstecker oder wenn Flüssigkeit in das Gerät gelangt ist bzw. Gegenstände in das Gerät gefallen
sind, das Gerät Regen oder Feuchtigkeit ausgesetzt war, es heruntergefallen ist oder nicht
ordnungsgemäß funktioniert.
49. Verwenden Sie weder ein beschädigtes Netzkabel noch einen beschädigten Stecker oder eine
lockere Steckdose. Es besteht Brand- und Stromschlaggefahr.
ACHTUNG: Längeres Hören lauter Töne aus einem Musikgerät kann zum zeitweiligen
oder permanenten Hörverlust führen.
Vorsichtsmaßnahmen beim Gebrauch
Aufbau
• Packen Sie alle Teile aus und entfernen Sie danach die Schutzmaterialien.
• Schließen Sie das Gerät nicht eher an das Netz an, bevor Sie die Netzspannung überprüft haben
und alle anderen notwendigen Verbindungen hergestellt sind-
• Bedecken Sie die Lüftungsschlitze nicht und vergewissern Sie sich, dass um das Gerät herum
einige cm Platz für die Kühlung gelassen wurden.

29
2. LAGE DER BEDIENELEMENTE
EN
DE
STOP
STOPP
PLAY/MODE
WIEDERGABE/MODUS
ALBUM
ALBUM
PLAY/PAUSE (USB)
WIEDERGABE/PAUSE (USB)
NEXT
NÄCHSTER

30
PREVIOUS
VORHERIGER
DOOR OPEN
CD-FACH ÖFFNEN
POWER INDICATOR
POWER-LED
FM STEREO INDICATOR
FM STEREO-BETRIEBSANZEIGE-LED
LCD DISPLAY
LCD-DISPLAY
USB JACK
USB-BUCHSE
MIC IN JACK
MIKROFON EINGANGSBUCHSE
MIC VOLUME CONTROL
MIKROFON LAUTSTÄRKEREGLER
FUNCTION SWITCH
FUNKTIONSWAHLSCHALTER
VOLUME CONTROL
LAUTSTÄRKEREGLER
TUNING CONTROL
FREQUENZEINSTELLRAD
LIGHT ON/OFF SWITCH
EIN-/AUSSCHALTER FÜR LICHT
EN
DE
AUX IN JACK
AUX IN-BUCHSE
HEADPHONE OUT JACK
KOPFHÖRER-AUSGANGSBUCHSE
TELESCOPIC ANTENNA
TELESKOPANTENNE
BATTERY COMPARTMENT
BATTERIEFACH
AC~IN
STOMVERSORGUNGSEINGANG
ACHTUNG:
Die zweckentfremdete Bedienung, Benutzung oder Einstellung der Prozeduren kann zu gefährlichen
Unfällen durch Strahlen führen. Dieses Gerät darf außer von qualifizierten Fachleuten von niemand
anderem repariert oder eingestellt werden.
Wichtig:
Die Bewegung des CD-Mechanismus und die sensible Schaltungselektronik kann durch benachbarte
Radiotuner gestört werden. Schalten Sie deshalb diese Geräte aus, wenn Sie dieses Gerät einschalten.
Trennen Sie bitte das Gerät wegen der Komplexität seiner MCU-Ansteuereinheit vom Netz, wenn
das Gerät während der Nutzung nicht mehr reagiert! Es handelt sich hierbei um keine
Fehlfunktion des Geräts!

31
3. ANSCHLIESSEN DER STROMVERSORGUNG
1. Verbinden Sie ein Ende des abnehmbaren Netzkabels mit dem Stromversorgungseingang auf der
Rückseite des Gerätes und das andere Ende mit einer Steckdose.
2. Wenn Sie das Gerät zum ersten Mal an die Stromversorgung anschließen befindet sich das Gerät
im Modus AUS. Die LED der STOMVERSORGUNGSANZEIGE ist aus.
3. Schieben Sie den FUNKTIONSWAHL-Schalter in verschiedene Betriebsarten, um das Gerät
einzuschalten. Die LED der STOMVERSORGUNG leuchtet auf. Das LCD-Display schaltet sich in
den Modi CD/USB/AUX ein. Im FM-Modus bleibt das LCD-Display aus.
4. DC-VERBINDUNG
Für den Gleichstrombetrieb entfernen Sie zunächst den Netzstecker aus der Steckdose und trennen das
Netzkabel von dem Stromversorgungseingang. Legen Sie dann sechs C-Batterien C (UM-2) in das
Batteriefach ein.
Da das Gerät auch in ausgeschaltetem Zustand etwas Strom verbraucht wird empfohlen, die Batterien
bei längerem Nichtgebrauch des Gerätes zu entfernen.
EN
DE
UM2 (LR14) C SIZE 1.5V X 6 PCS
UM2 (LR14) GRÖSSE C 1,5V X 6 STK.
‘C’ SIZE, UM-2 1.5V
UM-2 GRÖSSE C 1,5V
5. GRUNDLEGENDE BEDIENUNG
Schieben Sie den FUNKTIONSWAHLSCHALTER in dem Modus „CD/USB/AUX” für die Wiedergabe
von CDs, einem USB-Gerät oder AUX-IN. Schieben Sie ihn auf „FM MONO“ für die
FM-Monowiedergabe und auf „FM STEREO“ für die FM-Stereowiedergabe. Zum Ausschalten, schieben
Sie den Schalter in die Stellung „OFF“ (Aus).
Lautstärkeregler
Drehen Sie den Lautstärkeregler, um die Tonlautstärke zu ändern.
Einstellen der Teleskop-Antenne
Um einen guten UKW-Empfang zu gewährleisten, sollte die Antenne vollständig ausgezogen werden.
Passen Sie die Antennenposition für optimalen Empfang an.
6. BEDIENUNG DES RADIOS
1. Schieben Sie den FUNKTIONSWAHLSCHALTER he nach Wunsch auf „FM MONO” oder „FM
STEREO” und die LED für die LED der STROMVERSORGUNG leuchtet auf.
2. Drehen Sie das FREQUENZEINSTELLRAD auf den gewünschten Radiosender.

32
Um die beste Leistung zu erzielen, die Antenne immer vollständig ausziehen. Stellen Sie Ihr Gerät in die
Nähe eines offenen Fensters, bis Sie den besten Empfang bekommen.
Hinweis:
- Wenn Sie das Gerät in den Modus „FM STEREO” eingestellt haben und eine FM-Stereosender mit
einem guten Empfang einstellen, leuchtet die ANZEIGE FM STEREO auf.
7. CD/USB-BETRIEB
Einlegen und Abspielen einer CD
Öffnen Sie das CD-Fach. Legen Sie eine CD mit der Schrift nach oben zeigend ein. Schließen Sie den
Deckel des CD-Faches.
Nachdem die CD eingelesen wurde, wird auf dem Display die Anzahl der Titel angezeigt. Der erste Titel
wird automatisch abgespielt.
Wiedergabe über ein USB-Gerät (nur MP3-Datei)
Stecken Sie ein USB-Gerät in den USB-Slot. Halten Sie die Taste WIEDERGABE/PAUSE gedrückt, um
in den USB-Modus zu wechseln.
Nachdem die alle Dateien/Ordner gelesen wurden, wird die Anzahl auf dem Display angezeigt. Das
Gerät gibt den ersten Titel automatisch wieder.
Wiedergabe/Pause
Um die Wiedergabe zu unterbrechen, drücken Sie einmal die Taste WIEDERGABE/PAUSE. Um mit der
Wiedergabe fortzufahren, drücken Sie die Taste WIEDERGABE/PAUSE erneut.
Stopp
Um die Wiedergabe anzuhalten, drücken Sie die Taste STOPP.
ALBUM auswählen (nur MP3-Datei)
Drücken Sie während der MP3 Wiedergabe oder im Stopp-Modus die Taste ALBUM, um das Album (den
Ordner) zu wechseln.
Verwenden Sie die Taste NÄCHSTER oder VORHERIGER, um den gewünschten Titel für die
Wiedergabe auszuwählen. Drücken Sie die Taste WIEDERGABE, um die Wiedergabe des Titels zu
beginnen.
TITEL ÜBERSPRINGEN
Drücken Sie während der Wiedergabe die Taste NÄCHSTER oder VORHERIGER, um zum nächsten
oder vorherigen Titel zu springen.
Hinweis:
- Wenn ein Datenträger oder eine CD nicht gelesen werden können, wird auf dem Display „No“ (Nein)
angezeigt.
Schnelle Musiksuche
Halten Sie während der Wiedergabe die Taste NÄCHSTER oder VORHERIGER gedrückt, um die
schnelle Musiksuche auszuführen. Wenn Sie die Taste loslassen wird die Wiedergabe mit normaler
Geschwindigkeit fortgesetzt.

33
Wiedergabe wiederholen/Zufällige Wiedergabe
CD/Disc-Modus:
Wird während der Wiedergabe die Taste MODE einmal gedrückt, wird auf dem Display „REP”
(Wiederholen) angezeigt. Der aktuelle Titel wird wiederholt abgespielt.
Wenn Sie die Taste MODE ein zweites Mal drücken, erscheint auf dem Display „REP ALL”. (Alle
wiederholen) Alle Titel werden wiederholt abgespielt.
Wenn Sie die Taste MODE ein drittes Mal drücken, wird auf dem Display „RAND” (Zufällig) angezeigt.
Alle Titel werden in einer zufälligen Reihenfolge wiedergegeben.
Wenn Sie die Taste MODE ein viertes Mal drücken, kehrt das Gerät zur normalen Wiedergabe zurück.
MP3-CD oder MP3 USB Modus
Wird während der Wiedergabe die Taste MODE einmal gedrückt, wird auf dem Display
„REP”(Wiederholen) angezeigt. Der aktuelle Titel wird wiederholt abgespielt.
Wenn Sie die Taste MODE ein zweites Mal drücken, erscheint auf dem Display „REP ALBUM”. (Album
wiederholen) Alle Titel des aktuellen Ordners werden wiederholt abgespielt.
Wenn Sie die Taste MODE ein drittes Mal drücken, erscheint auf dem Display „REP ALL”. (Alle
wiederholen) Alle Titel werden wiederholt abgespielt.
Wenn Sie die Taste MODE ein viertes Mal drücken, wird auf dem Display „RAND” (Zufällig) angezeigt.
Alle Titel werden in einer zufälligen Reihenfolge wiedergegeben.
Wenn Sie die Taste MODE ein fünftes Mal drücken, kehrt das Gerät zur normalen Wiedergabe zurück.
Hinweis:
- Für die MP3-Wiedergabe gibt es eine Beschränkung auf 99 Ordner mit maximal 999 Dateien, die
das Gerät unterstützen kann.
Programmierte Wiedergabe
Das Gerät kann programmiert werden, um eine programmierte Folge von bis zu 20 Titeln wiederzugeben.
1. Drücken Sie im Stopp-Modus die Taste MODE. Auf dem Display wird „P01” angezeigt.
2. Drücken Sie die Taste NÄCHSTER oder VORHERIGER, um den richtigen Ordner auszuwählen (nur
für MP3-Titel verfügbar).
3. Drücken Sie die Taste NÄCHSTER oder VORHERIGER, um den gewünschten Titel auszuwählen.
4. Drücken Sie die Taste MODE, um den gewünschten Titel zu speichern.
5. Wiederholen Sie die Schritte 2-4, um bis zu 20 Titel einer CD (99 MP3-Titel) zu programmieren.
6. Drücken Sie die Taste WIEDERGABE/PAUSE, um die Wiedergabe der programmierten Titel zu
beginnen.
7. Um die programmierte Wiedergabe zu löschen, drücken Sie zweimal die Taste STOPP oder
wechseln Sie in einen anderen Modus.
8. Sie können während der programmierten Wiedergabe die Funktionen „Repeat One“ (Einen Titel
wiederholen) und „Repeat All“ (Alle Titel wiederholen) ausführen. Während der programmierten
Wiedergabe wird die zufällige Wiedergabe nicht unterstützt.
8. MIKROFON EINGANG (KARAOKE)
Das Gerät bietet die Karaoke-Funktion, bei der der Mikrofoneingang mit der abgespielten Musik
zusammengemischt wird. Der Mikrofoneingang befindet sich an der Vorderseite des Gerätes.
1. Stecken Sie das Mikrofon in die Mikrofon-Eingangsbuchse.
2. Passen Sie die Lautstärke des Mikrofons mithilfe des MIKROFON LAUTSTÄRKEREGLERS an der
Vorderseite des Gerätes an.

34
9. AUX IN
Ermöglicht die Wiedergabe des Tons eines externen Players durch das Gerät.
1. Schließen Sie ein 3,5 mm Audiokabel (nicht im Lieferumfang enthalten) an die Line-Out-Buchse des
externen Players an und das andere Ende an die AUX-IN-Buchse auf der Rückseite des Gerätes.
2. Das Gerät wechselt automatisch in den AUX-Modus.
3. Starten Sie den externen Player, um die Musikwiedergabe zu beginnen. Das Gerät gibt den Ton aus.
4. Um in einen anderen Modus zurückzukehren, trennen Sie das Audiokabel von dem Gerät.
EN
DE
Smartphone or MP3 player
Smartphone oder MP3-Player
Line Out
Line Out
or
oder
10. LED LICHTSHOW
Die LED-LICHTSHOW an dem Lautsprecher des Gerätes wird automatisch je nach wiedergegebener
Musikquelle erstellt.
1. Um die LED-LICHTSHOW einzuschalten, den Schalter LICHT in die Stellung ON (An) schieben.
2. Um die LED-LICHTSHOW auszuschalten, den Schalter LICHT in die Stellung OFF (Aus) schieben.
Hinweis:
- Wenn die Helligkeit zu hoch ist, schalten Sie das Raumlicht ein oder schalten Sie die LED-LICHTSHOW
aus.
11. TECHNISCHE SPEZIFIKATIONEN
FM Frequenzbereich
87.5 – 108 MHz
Maximale Anzahl unterstützter MP3 Ordner/Dateien
Begrenzung auf 99 Ordner mit maximal
999 Dateien
AC-Stromversorgung
AC 230 V~50 Hz 18 W
Batteriebetrieb
6 x UM2 (Größe C)
Lautsprecher-Ausgangsleistung
2 x 1,8 W
AUX IN
3,5 mm Stereobuchse
Kopfhörerausgang
3,5 mm Stereobuchse
Mikrofoneingang
3,5 mm Buchse
Abmessungen
241 mm (L) x 215 mm (B) x 120 mm (H)
Gewicht
1,5 kg

35
Hinweis:
Aufgrund fortlaufender Verbesserungen können sich technische Spezifikationen ohne vorherige
Ankündigung ändern.
12. ENERGIESPAREN
Der ErP-Richtlinie 2009/125/EG Ökodesign-Richtlinie) (nur EU) folgend schaltet das Gerät automatisch
in den Standby-Modus, wenn für 15 Minuten keine Musik wiedergegeben wurde.
Um das Gerät wieder zu aktivieren, den FUNKTIONSWAHLSCHALTER auf OFF (Aus) und wieder
zurück schieben.
13. GARANTIE
Lenco bietet Leistungen und Garantien im Einklang mit Europäischem Recht. Im Falle von Reparaturen
(sowohl während als auch nach Ablauf der Garantiezeit) sollten Sie deshalb Ihren Einzelhändler
kontaktieren.
Wichtiger Hinweis: Es ist nicht möglich, Geräte für Reparaturen direkt an Lenco zu schicken.
Wichtiger Hinweis: Falls dieses Gerät von einem nicht autorisierten Kundendienst geöffnet oder darauf
zugegriffen wird, erlischt die Garantie.
Dieses Gerät ist nicht für professionelle Zwecke geeignet. Falls das Gerät für professionelle Zwecke
eingesetzt wird, erlöschen alle Garantieverpflichtungen seitens des Herstellers.
14. HAFTUNGSAUSSCHLUSS
Aktualisierungen der Firmware und/oder Hardware-Komponenten werden regelmäßig durchgeführt.
Daher können einige der Anweisungen, Spezifikationen und Abbildungen in dieser Dokumentation von
Ihrer individuellen Situation abweichen. Alle in diesem Handbuch beschriebenen Elemente dienen nur
zur Illustration und treffen auf Ihre individuelle Situation möglicherweise nicht zu. Aus der in diesem
Handbuch getätigten Beschreibung können keine Rechtsansprüche oder Leistungsanforderungen
geltend gemacht werden.
15. ENTSORGUNG DES ALTGERÄTS
Dieses Symbol zeigt an, dass das entsprechende Produkt oder dessen Batterie in Europa
nicht mit dem normalen Hausmüll entsorgt werden darf. Um die ordnungsgemäße
Abfallbehandlung des Produkts und dessen Batterie zu gewährleisten, müssen diese im
Einklang mit allen anwendbaren örtlichen Vorschriften zur Entsorgung von Elektrogeräten
und Batterien entsorgt werden.
Dabei helfen Sie, natürliche Ressourcen zu schonen und Umweltschutzstandards zur
Verwertung und Entsorgung von Altgeräten aufrecht zu halten (Waste Electrical and
Electronic Equipment Directive).

36
16. CE-KENNZEICHEN
Produkte mit der CE Kennzeichnung entsprechen der EMV-Richtlinie (2014/30/EU) und
der Niederspannungsrichtlinie (2014/35/EU), herausgegeben von der Kommission der
Europäischen Gemeinschaft.
Lenco Benelux BV, Thermiekstraat 1a, 6361 HB Nuth, Die Niederlande, erklärt hiermit, dass dieses
Produkt den grundlegenden Anforderungen.
Die Konformitätserklärung ist erhältlich unter tech[email protected]m
17. SERVICE
Bitte besuchen Sie für unseren Helpdesk-Support und weitere Informationen unsere Homepage unter:
www.lenco.com Lenco Benelux BV; Thermiekstraat 1a, 6361 HB, The Netherlands.

37
Français
Lecteur CD/USB/MP3 avec radio FM/entrée aux. et entrée micro
AVERTISSEMENT
PRODUIT LASER DE CLASSE 1
EN
FR
CLASS 1 LASER PRODUCT
APPAREIL Á LASER DE CLASSE 1
PRODUCTO LASER DE CLASE 1
CLASS 1 LASER PRODUCT
APPAREIL Á LASER DE CLASSE 1
PRODUCTO LASER DE CLASE 1
CAUTION
ATTENTION
INVISIBLE LASER RADIATION WHEN OPEN
AND INTERLOCKS DEFEATED. AVOID
EXPOSURE TO BEAM
RAYONNEMENT LASER INVISIBLE EN CAS
D’OUVERTURE ET DE DÉVERROUILLAGE. ÉVITER
D’ÊTRE EXPOSÉ AU FAISCEAU
This product contains a low power laser device.
Ce produit contient un dispositif laser à faible puissance.
Avertissement : Ne touchez pas la tête de lecture.
NE JETEZ PAS LES PILES AU FEU !
1. PRÉCAUTIONS D'EMPLOI
CONSIGNES DE SÉCURITÉ IMPORTANTES : LISEZ-LES ATTENTIVEMENT AVANT UTILISATION.
ATTENTION
RISQUE DE DÉCHARGE ÉLECTRIQUE
NE PAS OUVRIR
ATTENTION : POUR ÉVITER TOUTE DÉCHARGE ÉLECTRIQUE, NE RETIREZ AUCUNE VIS DU
COUVERCLE. AUCUNE PIÈCE CONTENUE À L’INTÉRIEUR NE PEUT ÊTRE RÉPARÉE PAR
L’UTILISATEUR. DEMANDEZ À UN TECHNICIEN QUALIFIÉ D’EFFECTUER LES RÉPARATIONS.
Ce symbole indique que des instructions importantes relatives à l’entretien et au fonctionnement
sont contenues dans le mode d’emploi accompagnant cette tablette.
Ce symbole indique que la tension à l’intérieur de cette tablette est dangereuse et présente un
risque de décharge électrique ou de blessure.
Gardez ces instructions à l’esprit :
1. N’utilisez pas cet appareil près de l’eau.
2. Nettoyez-le uniquement avec un chiffon doux légèrement humide.
3. Ne couvrez ni ne bloquez les orifices d’aérations. Lorsque vous placez l’appareil sur une étagère,
laissez 5 cm d’espace libre tout autour de l’appareil.
4. Installez-le conformément au mode d’emploi fourni.

38
5. Ne marchez pas sur l’adaptateur secteur ou ne le coincez pas. Faites très attention, en particulier
près des fiches et du point de sortie du câble. Ne placez pas d’objets lourds sur l’adaptateur secteur,
car ils pourraient l’endommager. Gardez l’appareil hors de portée des enfants ! Ils pourraient
sérieusement se blesser s’ils jouent avec le câble d’alimentation.
6. Débranchez cet appareil pendant les orages ou lorsqu’il est inutilisé sur une longue période.
7. Gardez l’appareil à l’écart des sources de chaleur comme les radiateurs, chauffages, fours, bougies
et autres produits générant de la chaleur.
8. Évitez d’utiliser l’appareil à proximité de champs magnétiques puissants.
9. Des DES peuvent perturber le fonctionnement normal de ce dispositif. Quand cela se passe, il suffit
de réinitialiser et de redémarrer l’appareil en suivant le manuel d’instructions. Pendant le transfert du
fichier, manipulez l'appareil avec précaution et faites-le fonctionner dans un environnement sans
électricité statique.
10. AVERTISSEMENT ! N’INSÉREZ JAMAIS D’OBJET DANS L’APPAREIL À TRAVERS LES FENTES
OU LES ORIFICES. UNE HAUTE TENSION CIRCULE DANS L’APPAREIL ET L’INSERTION D’UN
OBJET PEUT PROVOQUER UNE DÉCHARGE ÉLECTRIQUE ET/OU UN COURT-CIRCUIT DES
PIÈCES À L’INTÉRIEUR. POUR LA MÊME RAISON, NE VERSEZ NI EAU NI LIQUIDE SUR
L’APPAREIL.
11. Ne l’utilisez PAS dans des endroits humides tels qu’une salle de bain, une cuisine pleine de vapeur
ou à proximité d’une piscine.
12. N’utilisez pas cet appareil lorsque de la condensation est possible.
13. Bien que ce dispositif soit fabriqué avec le plus grand soin et contrôlé à plusieurs reprises avant de
quitter l’usine, il est toujours possible que des problèmes se produisent, comme avec tous les
appareils électriques. Si l’appareil émet de la fumée, une accumulation de chaleur excessive ou un
phénomène inattendu, débranchez immédiatement la fiche d’alimentation du secteur.
14. Cet appareil doit être bien aéré à tout moment !
15. Cet appareil doit fonctionner avec la source d’alimentation indiquée sur l’étiquette des spécifications.
Si vous n’êtes pas sûr du type d’alimentation utilisé chez vous, consultez votre revendeur ou le
fournisseur d’électricité local.
16. La prise de courant doit être installée près de l’appareil et doit être facilement accessible.
17. Ne surchargez pas les prises de courant ou les rallonges. Une surcharge peut provoquer un
incendie ou des décharges électriques.
18. Les appareils à la norme de construction de classe 1 doivent être branchés à une prise de courant
disposant d’une connexion protectrice à la terre.
19. Les appareils à la norme de construction de classe 2 ne nécessitent pas de connexion à la terre.
20. Tenez-le à l'abri des rongeurs. Les rongeurs adorent mordre les cordons d’alimentation.
21. Tirez toujours sur la fiche pour débrancher le cordon de la prise secteur. Ne tirez pas sur le cordon
d’alimentation. Cela pourrait provoquer un court-circuit.
22. Évitez de placer l’appareil sur des surfaces sujettes aux vibrations ou aux chocs.
23. Pour nettoyer l’appareil, servez-vous d’un chiffon doux et sec. N’utilisez PAS de solvant ni d’autre
liquide à base de pétrole. Pour enlever les taches importantes, vous pouvez vous servir d’un chiffon
humide imbibé avec une solution de détergent diluée.
24. Le fournisseur n’est pas responsable des dommages ou pertes de données causés par un
dysfonctionnement, une utilisation abusive, une modification de l’appareil ou un remplacement des
piles.
25. N’interrompez pas la connexion lorsque l’appareil formate ou transfère des fichiers. Sinon, les
données pourraient être endommagées ou perdues.

39
26. La clé USB doit être branchée directement sur l’appareil. N’utilisez pas de câble d’extension USB,
car il peut être la source d’interférences faisant échouer le transfert de données.
27. L’appareil ne doit pas être exposé aux fuites et aux éclaboussures et assurez-vous qu’aucun objet
rempli de liquides, comme des vases, ne soit placé sur ou près de l’appareil.
28. Pour que l’alimentation soit parfaitement déconnectée, la fiche d’alimentation de l’appareil doit être
débranchée de la prise secteur.
29. La prise secteur de l’appareil ne doit pas être entravée OU elle doit être facilement accessible
lorsque son utilisation est prévue.
30. Les piles ne doivent pas être exposées à une chaleur excessive telle que la lumière du soleil, des
flammes, etc.
31. Pour une ventilation suffisante, il faut laisser un espace de 10 cm autour de l’appareil.
32. L’aération ne doit pas être bloquée en obstruant les orifices d’aération avec des objets tels que des
journaux, des nappes, des rideaux, etc.
33. Ne posez pas de source de flamme nue, comme une bougie allumée, sur l’appareil.
34. Veuillez considérer les questions environnementales lors de la mise au rebut des piles.
35. L’appareil ne peut être utilisé que dans des climats tempérés, des environnements extrêmement
froids ou chauds doivent être évités.
36. La plaque signalétique se situe sous l’appareil.
37. Cet appareil n’est pas destiné à être utilisé par des personnes (enfants compris) souffrant de
handicaps physiques, sensoriels ou mentaux, ou manquant d’expérience et de connaissances, sauf
si elles sont sous surveillance ou ont reçu des instructions sur l’utilisation correcte de l’appareil par la
personne qui est responsable de leur sécurité.
38. Cet appareil est réservé à un usage privé, et non pas à un usage commercial ni industriel.
39. Vérifiez que l’appareil est en position stable. La garantie ne couvre pas les dégâts occasionnés par
l’utilisation de cet appareil en position instable ou par la non-observation de tout autre avertissement
ou précaution contenus dans ce mode d’emploi.
40. Ne retirez jamais le boîtier de l’appareil.
41. Ne placez jamais cet appareil sur un autre appareil électrique.
42. N’utilisez et ne rangez pas ce produit au soleil, à la chaleur, à la poussière ou à des vibrations
excessives.
43. N’utilisez pas d’eau ou d’autres liquides pour nettoyer ce produit.
44. Ne bloquez ni ne recouvrez les fentes et orifices de ce produit.
45. Ne laissez pas les sacs en plastique à la portée des enfants.
46. Vérifiez que la tension figurant sur la plaque signalétique de votre appareil correspond à celle de
votre secteur (la plaque signalétique se situe à l’arrière de l’appareil).
47. Utilisez uniquement les accessoires recommandés par le fabricant.
48. Confiez l’entretien et les réparations à un personnel qualifié. Une réparation est nécessaire lorsque
l’appareil a été endommagé d’une quelconque façon telle qu’un cordon d’alimentation ou une prise
endommagés, lorsqu’un liquide a été renversé ou des objets ont été introduits dans l’appareil,
lorsque l’appareil a été exposé à la pluie ou à l’humidité, lorsqu’il ne fonctionne pas correctement ou
lorsque l’appareil est tombé.
49. N’utilisez pas un cordon ou une fiche d’alimentation endommagé ni une prise desserrée. Vous
risqueriez de causer un incendie ou une décharge électrique.

40
AVERTISSEMENT : Une exposition prolongée aux sons puissants des lecteurs
personnels de musique peut entrainer une perte temporaire ou permanente de l’ouïe.
Précautions d’emploi
Installation
• Déballez toutes les pièces et enlevez le matériau de protection.
• Ne branchez pas l’appareil sur le secteur sans avoir vérifié la tension du secteur et sans avoir
effectué tous les autres branchements.
• Ne couvrez pas les orifices de ventilation et assurez-vous qu’un espace de plusieurs centimètres est
présent autour de l’appareil aux fins de l’aération.

41
2. EMPLACEMENT DES BOUTONS
EN
FR
STOP
ARRÊT
PLAY/MODE
LECTURE/MODE
ALBUM
ALBUM
PLAY/PAUSE (USB)
LECTURE/PAUSE (USB)
NEXT
SUIVANT

42
PREVIOUS
PRÉCÉDENT
DOOR OPEN
PORTE OUVERTE
POWER INDICATOR
TÉMOIN D’ALIMENTATION
FM STEREO INDICATOR
INDICATEUR FM STÉRÉO
LCD DISPLAY
ÉCRAN LCD
USB JACK
Port USB
MIC IN JACK
PRISE D'ENTRÉE MICRO
MIC VOLUME CONTROL
RÉGLAGE DU VOLUME DU MICRO
FUNCTION SWITCH
CHANGEMENT DE FONCTION
VOLUME CONTROL
RÉGLAGE DU VOLUME
TUNING CONTROL
MOLETTE DE RÉGLAGE
LIGHT ON/OFF SWITCH
INTERRUPTEUR ALLUMER/ÉTEINDRE LA LUMIÈRE
EN
FR
AUX IN JACK
PRISE D'ENTRÉE AUX
HEADPHONE OUT JACK
PRISE DE SORTIE CASQUE
TELESCOPIC ANTENNA
ANTENNE TÉLESCOPIQUE
BATTERY COMPARTMENT
COMPARTIMENT À PILES
AC~IN
ENTRÉE CA
Attention :
L’utilisation de commandes ou de réglages ou l’exécution de procédures autres que ceux spécifiés dans
ce manuel peut entraîner une exposition à des rayonnements dangereux. Cet appareil ne doit pas être
réglé ou réparé par quiconque d’autre que du personnel qualifié.
Important :
Puisque le mouvement du mécanisme du cd et les circuits sensibles peuvent interférer avec le
syntoniseur radio à proximité, éteignez cet appareil lorsque vous utilisez d’autres appareils radio.

43
En raison de la complexité des commandes MCU, veuillez débrancher l’appareil du secteur s’il
s’arrête pendant son fonctionnement ! Il ne s’agit pas d’un mauvais fonctionnement du
système !
3. BRANCHEMENT À L'ALIMENTATION ÉLECTRIQUE
1. Branchez l’extrémité du cordon d'alimentation amovible à la prise d’entrée CA sur le panneau arrière
de l’appareil et l’autre extrémité à la prise secteur.
2. Quand vous branchez l’appareil au secteur pour la première, l'appareil est désactivé. La LED
D’INDICATION D’ALIMENTATION est éteinte.
3. Réglez le sélecteur FONCTION sur différents modes de fonctionnement pour mettre en marche
l'appareil. La LED D’INDICATION D’ALIMENTATION s'allume. L’écran LCD s'allume quand l'appareil
est en mode CD/USB/AUX . En mode FM, l’écran LCD est éteint.
4. BRANCHEMENT CC
Pour un fonctionnement CC, débranchez d'abord la fiche CA de la prise secteur et débranchez le cordon
d'alimentation CA de la prise d’entrée CA. Installez ensuite 6 piles de taille C (UM-2) dans le compartiment
à piles.
Étant donné que l'appareil consomme un peu d'énergie même quand il est éteint, il est suggéré
d’enlever les piles si vous n’utilisez pas l'appareil pendant longtemps.
EN
FR
UM2 (LR14) C SIZE 1.5V X 6 PCS
6 PILES DE 1,5 V UM2 (LR14) DE TAILLE C
‘C’ SIZE, UM-2 1.5V
1,5 V UM-2 DE TAILLE C
5. FONCTIONNEMENT DE BASE
Réglez le sélecteur FONCTION du mode « CD/USB/AUX » de lecteur CD/USB ou entrée AUX en mode
« FM MONO » pour le mode mono radio FM et « FM STEREO » pour le mode stéréo radio FM. Pour
éteindre l’appareil, réglez le sélecteur en position « OFF » (désactivé).
Réglage du Volume
Réglez RÉGLAGE DU VOLUME pour changer le niveau d'intensité acoustique.
Ajustement de l’antenne télescopique
L’antenne doit être déployée pour assurer une bonne réception FM. Orientez l'antenne autrement afin
d'améliorer la réception.
6. UTILISATION DE LA RADIO
1. Réglez le sélecteur FONCTION sur « FM MONO » ou « FM STEREO » à votre convenance,
l’indicateur ALIMENTATION s'allumera.

44
2. Réglez la molette SYNTONISATION pour régler la fréquence de la station de radio souhaitée.
L'antenne doit toujours rester entièrement déployée pour une meilleure performance. Essayez de
rapprocher l'appareil d'une fenêtre ouverte jusqu'à obtenir une bonne réception.
Remarque :
- Quand vous passez en mode « FM STEREO » et syntonisez une station de radio stéréo FM avec
une bonne réception, l’indicateur FM STEREO s'allumera.
7. FONCTIONNALITÉS CD/USB
Charger et lire un disque CD
Ouvrez la porte CD. Installez un CD avec la face imprimée vers le haut. Fermez la porte du
compartiment à CD.
Une fois que le disque a été analysé, le nombre de pistes s’affichera à l'écran. L'appareil lira
automatiquement la première piste.
Lecteur USB (fichier MP3 uniquement)
Insérez un dispositif USB dans le connecteur USB. Maintenez enfoncé le bouton LECTURE/PAUSE
pour passer en mode USB.
Une fois que le disque a été analysé, le nombre total de fichiers/dossiers s’affichera à l'écran. L'appareil
lira automatiquement la première piste.
Commande Lecture/pause
Pour mettre la lecture en pause, appuyez une fois sur le bouton LECTURE/PAUSE. Rappuyez sur le
bouton LECTURE/PAUSE pour reprendre la lecture.
Commande Arrêt
Pour arrêter la lecture, appuyez sur le bouton ARRÊT.
Sélection d’ALBUM (fichier MP3 uniquement)
En cours de lecture MP3 ou en mode Arrêt, appuyez sur le bouton ALBUM pour changer l’album
(dossier).
Utilisez les boutons SUIVANT ou PRÉCÉDENT pour sélectionner une option. Appuyez sur le bouton
LECTURE pour lancer la lecture.
Changement de piste
En cours de lecture, appuyez sur les boutons SUIVANT ou PRÉCÉDENT pour passer à la piste suivante
ou à la piste précédente.
Remarque :
- S’il n’y a pas de disque ou si le CD est illisible, « no » (néant) s'affiche.
Recherche de musique rapide
En cours de lecture, maintenez enfoncé les boutons SUIVANT ou PRÉCÉDENT pour lancer une
recherche rapide. Quand vous relâchez le bouton, la lecture à vitesse normale reprend.

45
Lecture répétée/lecture aléatoire
Mode Disque CD
En cours de lecture, appuyez une fois sur le bouton MODE, « REP » (répéter) s'affichera. La piste en
cours se lira en boucle.
Quand vous appuyez une deuxième fois sur le bouton MODE, « REP ALL » (tout répéter) s'affichera.
Toutes les pistes se liront en boucle.
Quand vous appuyez une troisième fois sur le bouton MODE, « RAND » (aléatoire) s'affichera. Toutes
les pistes se liront dans un ordre aléatoire.
Quand vous appuyez une quatrième fois sur le bouton MODE, l’appareil reprendra la lecture normale.
Mode Disque MP3 ou USB MP3
En cours de lecture, appuyez une fois sur le bouton MODE, « REP » (répéter) s'affichera. La piste en
cours se lira en boucle.
Quand vous appuyez une deuxième fois sur le bouton MODE, « REP ALBUM » (répéter l'album)
s'affichera. Toutes les pistes dans le dossier en cours se liront en boucle.
Quand vous appuyez une troisième fois sur le bouton MODE, « REP ALL » (tout répéter) s'affichera.
Toutes les pistes se liront en boucle.
Quand vous appuyez une quatrième fois sur le bouton MODE, « RAND » (aléatoire) s'affichera. Toutes
les pistes se liront dans un ordre aléatoire.
Quand vous appuyez une cinquième fois sur le bouton MODE, l’appareil reprendra la lecture normale.
Remarque :
- Pour la lecture MP3, l’appareil prend en charge au maximum 99 dossiers et 999 fichiers.
Lecture programmée
Cet appareil peut être programmé pour lire n’importe quelle séquence allant jusqu’à 20 pistes.
1. En mode arrêt, appuyez sur le bouton MODE. « P01 » s’affiche.
2. Appuyez sur les boutons SUIVANT ou PRÉCÉDENT pour sélectionner un dossier (disponible
uniquement pour les pistes MP3).
3. Appuyez sur les boutons SUIVANT ou PRÉCÉDENT pour sélectionner une piste.
4. Appuyez sur le bouton MODE pour sauvegarder la piste voulue.
5. Recommencez les étapes 2 à 4 pour programmer jusqu'à 20 pistes sur un CD (99 pistes en MP3).
6. Appuyez sur le bouton LECTURE/PAUSE pour commencer la lecture dans l'ordre programmé.
7. Pour effacer la lecture programmée, appuyez deux fois sur le bouton ARRÊT ou changez de mode.
8. Lors de la lecture programmée, vous pouvez également utiliser la fonctionnalité « Repeat One »
(répéter une piste) ou « Repeat All » (répéter tout). Mais en cours de lecture programmée, la lecture
aléatoire n’est pas prise en charge.
8. ENTRÉE DE MICROPHONE (KARAOKÉ)
L’appareil fournit une fonctionnalité de mixage de l’entrée du microphone pour le son lu. La prise MIC IN
(ENTRÉE MICRO) se situe en façade de l'appareil.
1. Branchez le microphone dans la prise MIC IN.
2. Réglez le volume du microphone en tournant la molette RÉGLAGE DU MICRO située en façade.

46
9. Entrée auxiliaire
Elle vous permet de brancher le son d’un lecteur externe à votre appareil.
1. Branchez un câble audio de 3,5 mm (non inclus) à la sortie de ligne de votre lecteur externe et
l’autre extrémité dans la prise ENTRÉE AUX à l’arrière de l’appareil.
2. L'appareil passera automatiquement en mode AUX.
3. Lancez la lecture de musique sur votre lecteur externe. L'appareil produira le son.
4. Pour revenir à un autre mode, débranchez le câble audio de l'appareil.
EN
FR
Smartphone or MP3 player
Smartphone ou Lecteur MP3
Line Out
SORTIE DE LIGNE
or
ou
10. JEUX DE LUMIÈRES À LED
Le JEU DE LUMIÈRES À LED sur l’enceinte de l’appareil se crée automatiquement selon la source
musicale lue.
1. Pour activer le JEU DE LUMIÈRES À LED, réglez le sélecteur LUMIÈRES en position ON (activé).
2. Pour désactiver le JEU DE LUMIÈRES À LED, réglez le sélecteur LUMIÈRES en position OFF
(désactivé).
Remarque :
- Si la luminosité est trop forte, allumez les éclairages de la pièce ou éteignez le JEU DE LUMIÈRES
À LED.
11. CARACTÉRISTIQUES TECHNIQUES
Plage de fréquence FM
de 87.5 à 108 MHz
Nombre maximal de dossiers/fichiers MP3 pris en charge
Limitation de 99 dossiers et 999 fichiers
Entrée d’alimentation CA
CA 230V~50Hz 18W
Fonctionnement sur piles
6 piles UM2 (taille C)
Puissance de sortie de l’enceinte
2 X 1,8 W
Entrée auxiliaire
Prise jack stéréo de 3,5 mm
Sortie casque
Prise jack stéréo de 3,5 mm
Entrée micro
Prise de 3,5 mm
Dimensions
241 (L) x 215 (P) x 120 (H) mm
Poids
1,5 kg

47
Remarque :
Du fait des améliorations continues, les caractéristiques sont sujettes à modification sans préavis.
12. ÉCONOMIE D’ÉNERGIE
En raison de l’exigence en deux étapes de l’ErP et des mesures de protection de l’environnement,
l’appareil passe en mode veille automatiquement quand aucune musique n’a été jouée pendant plus de
15 minutes.
Pour réactiver l'appareil, réglez le sélecteur FONCTION sur OFF (désactivé), puis réglez-le sur une
autre fonction.
13. GARANTIE
Lenco propose un service et une garantie conformément à la législation européenne, ce qui signifie
qu’en cas de besoin de réparation (aussi bien pendant et après la période de garantie), vous pouvez
contacter votre revendeur le plus proche.
Remarque importante : Il n’est pas possible de renvoyer l’appareil pour réparation directement à
Lenco.
Remarque importante : Si l’unité est ouverte ou modifiée de quelque manière par un réparateur non
agréé, la garantie serait caduque.
Cet appareil ne convient pas à une utilisation professionnelle. En cas d’utilisation professionnelle, les
obligations de garantie du fabricant seront annulées.
14. AVIS DE NON RESPONSABILITÉ
Des mises à jour du logiciel et/ou des composants informatiques sont régulièrement effectuées. Il se
peut donc que certaines instructions, caractéristiques et images présentes dans ce document diffèrent
légèrement de votre configuration spécifique. Tous les articles décrits dans ce guide ne sont fournis
uniquement qu’à des fins d’illustration et peuvent ne pas s’appliquer à une configuration spécifique.
Aucun droit légal ne peut être obtenu depuis les informations contenues dans ce manuel.
15. MISE AU REBUT DE L'APPAREIL USAGÉ
Ce symbole indique que le produit électrique concerné ou la batterie ne doivent pas être
jetés parmi les autres déchets ménagers en Europe. Pour garantir un traitement correct du
déchet de la batterie ou de l’appareil, veuillez les mettre au rebut conformément aux
règlements locaux en vigueur relatifs aux appareils électriques et autres batteries.
En agissant de la sorte, vous contribuerez à la préservation des ressources naturelles et à
l’amélioration des niveaux de protection environnementale concernant le traitement et la
destruction des déchets électriques (directive sur les déchets des équipements électriques
et électroniques).

48
16. MARQUAGE CE
Les produits avec la marque CE sont conformes à la directive CEM (2014/30/EU) et à la
directive basse tension (2014/35/EU) émises par la commission de la communauté
européenne.
Par la présente, Lenco Benelux BV, Thermiekstraat 1a, 6361 HB Nuth, Pays-Bas, déclare que ce produit
est conforme aux exigences principales et autres clauses applicables.
La déclaration de conformité peut être consultée au lien : [email protected]om
17. SERVICE APRÈS-VENTE
Pour plus d’information et contacter l’assistance technique, veuillez visitez le site www.lenco.com Lenco
Benelux BV ; Thermiekstraat 1a, 6361 HB, Pays-Bas.

49
Español
Reproductor de CD/USB/MP3 con radio FM/entrada auxiliar y entrada de micrófono
ADVERTENCIA
PRODUCTO LÁSER DE CLASE 1
EN
ES
CLASS 1 LASER PRODUCT
APPAREIL Á LASER DE CLASSE 1
PRODUCTO LASER DE CLASE 1
CLASS 1 LASER PRODUCT
APPAREIL Á LASER DE CLASSE 1
PRODUCTO LASER DE CLASE 1
CAUTION
PRECAUCIÓN
INVISIBLE LASER RADIATION WHEN OPEN AND
INTERLOCKS DEFEATED. AVOID EXPOSURE TO
BEAM
RADIACIÓN DE LÁSER INVISIBLE AL ABRIRLO Y
DESACTIVAR LOS BLOQUEOS. EVITE LA
EXPOSICIÓN A ESTE HAZ
This product contains a low power laser device.
Este producto contiene un dispositivo láser de baja
potencia.
Advertencia: No toque la lente.
¡NO ARROJE LAS BATERÍAS AL FUEGO!
1. INSTRUCCIONES DE SEGURIDAD
INSTRUCCIONES IMPORTANTES DE SEGURIDAD – LÉALAS DETENIDAMENTE ANTES DEL
USO.
PRECAUCIÓN
RIESGO DE DESCARGA ELÉCTRICA
NO ABRIR
¡PRECAUCIÓN! PARA EVITAR UNA DESCARGA ELÉCTRICA N, RETIRE NINGÚN TORNILLO
DE LA TAPA. NO HAY PIEZAS UTILIZABLES POR EL USUARIO EN SU INTERIOR. SOLICITE A
UNA PERSONA DE MANTENIMIENTO CUALIFICADA QUE REALICE LAS OPERACIONES DE
MANETNIMIENTO.
Este símbolo indica que hay instrucciones de mantenimiento operativo en el manual de usuario
que se adjunta con esta tableta.
Este símbolo indica que hay tensión peligrosa en el interior de la tableta, que constituye un
riesgo de descarga eléctrica o lesiones personales.
Tenga estas instrucciones en mente:
1. No use este dispositivo cerca del agua.
2. Límpielo únicamente con un paño ligeramente humedecido.
3. No cubra o bloquee ninguna apertura de ventilación. Cuando coloque el dispositivo en una
estantería, deje 5 cm (2”) de espacio libre alrededor de todo el dispositivo.

50
4. Instálelo conforme al manual de usuario que se adjunta.
5. No pise o pince el adaptador de alimentación. Tenga mucho cuidado, en especial cerca de las
tomas y el punto de salida del cable. No coloque objetos pesados en el adaptador de alimentación,
ya que pueden dañarlo. ¡Mantenga el dispositivo fuera del alcance de los niños! Si juegan con el
cable de alimentación, puede sufrir lesiones graves.
6. Desconecte el dispositivo durante tormentas eléctricas o cuando no vaya a usarse durante periodos
prolongados de tiempo.
7. Mantenga el dispositivo alejado de fuentes de calor como radiadores, calentadores, hornos, velas u
otros productos que generen calor.
8. Evite usar el dispositivo cerca de campos magnéticos fuertes.
9. Una descarga electroestática puede entorpecer el uso normal de este dispositivo. En tal caso,
simplemente reinícielo siguiendo el manual de instrucciones. Durante la transmisión de archivos,
por favor manéjelo con cuidado opérelo en un entorno libre de electricidad estática.
10. ¡ADVERTENCIA! NUNCA INSERTE UN OBJETO EN EL PRODUCTO A TRAVÉS DE LAS
VENTILACIONES O APERTURAS. ALTO VOLTAJE FLUYE AS TRAVÉS DEL PRODUCTO E
INSERTAR UN OBJETO PUEDE PROVOCAR UNA DESCARGA ELÉCTRICA Y/O UN
CORTOCIRCUITO DE SUS COMPONENTES INTERNOS. POR EL MISMO MOTIVO, NO
DERRAME AGUA O LÍQUIDOS EN EL PRODUCTO.
11. No lo utilice en zonas húmedas, como cuartos de baño, cocinas en las que se forme vapor ni cerca
de piscinas.
12. No use este dispositivo cuando se pueda producir condensación.
13. Aunque este dispositivo está fabricado con el máximo cuidado y comprobado varias veces antes de
salir de fábrica, todavía es posible que se puedan producir problemas, al igual que con todos los
aparatos eléctricos. Si observa la aparición de humo, una acumulación excesiva de calor o cualquier
otro fenómeno inesperado, deberá desconectar inmediatamente el enchufe de la toma de corriente.
14. ¡El dispositivo debe estar bien ventilado en todo momento!
15. Este dispositivo debe funcionar con una fuente de alimentación que se especifica en la etiqueta de
especificaciones. Si no está seguro del tipo de alimentación que se usa en su hogar, consulte con el
distribuidor o una compañía eléctrica local.
16. La salida de la toma debe instalarse cerca del equipo y debe ser fácilmente accesible.
17. No sobrecargue las tomas CA o los cables de extensión. La sobrecarga puede provocar un incendio
o una descarga eléctrica.
18. Los dispositivos con construcción Clase 1 deben estar conectados a una toma de corriente con una
conexión a tierra protegida.
19. Los dispositivos con construcción Clase 2 no requieren una conexión a tierra.
20. Manténgalo alejado de los roedores. Los roedores disfrutan mordiendo cables de alimentación.
21. Sujete siempre el enchufe cuando los extraiga de la toma de corriente. No tire del cable de
alimentación. Esto puede provocar un cortocircuito.
22. Evite colocar la unidad sobre superficies sometidas a vibraciones o impactos.
23. Para limpiar el dispositivo use un paño seco y suave. No utilice líquidos disolventes ni con base de
petróleo. Para eliminar manchas difíciles, puede usar un paño húmedo con detergente diluido.
24. El proveedor no asume ninguna responsabilidad por daños o datos perdidos provocados por un
funcionamiento incorrecto, uso incorrecto, modificación del dispositivo o sustitución de la batería.
25. No interrumpa la conexión cuando el dispositivo esté formateando o transfiriendo archivos. En caso
contrario, los datos se pueden estropear o perder.

51
26. La memoria USB debe conectarse a la unidad directamente. No use un cable de extensión USB ya
que puede causar interferencias provocando un fallo en la transferencia de datos.
27. El aparato no debe exponerse a goteos o salpicaduras y asegúrese de que ningún objeto lleno de
líquido, como jarrones, se colocan sobre o cerca del aparato.
28. Para desconectar completamente la entrada de alimentación, el enchufe del aparato deberá
desconectarse de la alimentación, ya que el dispositivo de desconexión es el enchufe del aparato.
29. El enchufe de alimentación del aparato no debe estar obstruido O se puede acceder al mismo
fácilmente durante su uso previsto.
30. La batería no debe exponerse a un calor excesivo, como la luz solar, fuego o similares.
31. Es necesaria una distancia mínima de 10 cm alrededor del aparato para una ventilación suficiente.
32. No debe impedirse la ventilación cubriendo las aperturas con objetos como periódicos, manteles,
cortinas, etc.
33. No deben colocarse fuentes de llama, como velas encendidas, sobre este aparato.
34. Debe prestarse atención a los aspectos medioambientales sobre la eliminación de baterías.
35. El aparato solo debe usarse en climas moderados o extremadamente fríos y deben evitarse los
entornos calurosos.
36. La placa identificativa está marcada en el panel inferior del aparato.
37. Este aparato no está diseñado para su uso por personas (incluyendo niños) con discapacidades
físicas, sensoriales o mentales o con falta de experiencia o conocimientos, salvo que estén bajo la
supervisión o hayan recibido formación sobre el uso correcto del dispositivo por parte de una
persona responsable de su seguridad.
38. Este producto está destinado únicamente al uso doméstico y no al uso comercial ni al industrial.
39. Asegúrese de que la unidad esté fijada en una posición estable. Los daños provocados por utilizar
este producto en una posición inestable o por no seguir cualquier otra advertencia o precaución
incluida en este manual de usuario no estarán cubiertos por la garantía.
40. No retire nunca la carcasa de este aparato.
41. Nunca coloque el aparato sobre otro equipo eléctrico.
42. No utilice ni guarde el producto en lugares expuestos a la luz solar directa, a altas temperaturas, a la
vibración ni en ambientes excesivamente polvorientos.
43. No limpie el producto con agua ni con otros líquidos.
44. No obstruya ni cubra las ranuras u orificios presentes en el producto.
45. Mantenga las bolsas de plástico fuera del alcance de los niños.
46. Compruebe que el voltaje en la placa de características del aparato se corresponde con el
suministro eléctrico de su hogar (la placa de características se encuentra en la parte posterior de la
unidad).
47. Use únicamente los dispositivos/accesorios especificados por el fabricante.
48. Remita todas las reparaciones al personal cualificado. La reparación es necesaria cuando el
aparato presente cualquier tipo de daño, como el cable de alimentación o el enchufe, cuando se
haya derramado líquido o hayan caído objetos sobre el aparato, o cuando el aparato se haya visto
expuesto a la lluvia o humedad, o no funcione normalmente o se haya caído.
49. No utilice un cable de alimentación o enchufe deteriorado o una toma suelta. Si lo hace, podría
provocar un incendio o una descarga eléctrica.

52
ADVERTENCIA: La exposición prolongada a sonidos fuertes de reproductores
personales de música puede provocar pérdida de audición temporal o permanente.
Precauciones de uso
Instalación
• Desembale todas las piezas y retire el material protector.
• No conecte la unidad a la corriente eléctrica antes de comprobar la tensión de la corriente y antes
de que se hayan hecho todas las demás conexiones.
• No cubra ninguna ventilación y asegúrese de que hay un espacio de varios centímetros alrededor
de la unidad para su ventilación.

53
2. SITUACIÓN DE LOS CONTROLES
EN
ES
STOP
DETENER
PLAY/MODE
REPRODUCIR/MODO
ALBUM
ÁLBUM
PLAY/PAUSE (USB)
REPRODUCIR/PAUSAR (USB)
NEXT
SIGUIENTE

54
PREVIOUS
ANTERIOR
DOOR OPEN
ABRIR TAPA
POWER INDICATOR
INDICADOR DE ENCENDIDO
FM STEREO INDICATOR
INDICADOR DE FM ESTÉREO
LCD DISPLAY
PANTALLA LCD
USB JACK
PUERTO USB
MIC IN JACK
CONECTOR DE ENTRADA DE MICRÓFONO
MIC VOLUME CONTROL
CONTROL DE VOLUMEN DE MICRÓFONO
FUNCTION SWITCH
CAMBIAR FUNCIÓN
VOLUME CONTROL
CONTROL DE VOLUMEN
TUNING CONTROL
CONTROL DE SINTONIZACIÓN
LIGHT ON/OFF SWITCH
INTERRUPTOR ENCENDIDO/APAGADO DE LUZ
EN
ES
AUX IN JACK
CONECTOR DE ENTRADA AUXILIAR
HEADPHONE OUT JACK
CONECTOR DE SALIDA DE AURICULARES
TELESCOPIC ANTENNA
ANTENA TELESCÓPICA
BATTERY COMPARTMENT
COMPARTIMENTO PARA LAS PILAS
AC~IN
ENTRADA DE CORRIENTE
Precaución:
El uso de los controles o ajustes o el funcionamiento de los procedimientos excepto a aquellos
especificados aquí pueden provocar una exposición peligrosa a la radiación. Esta unidad no debe
ajustarse o repararse por ninguna persona salvo personal de servicio cualificado.
Importante:
Como el movimiento del mecanismo del CD y los circuitos sensible pueden causar interferencias a la
radio cercana, apague esta unidad mientras opera otros dispositivos de radio.

55
Debido a la complejidad del control MCU, por favor, desconecte la alimentación de la unidad si la
unidad deja de funcionar durante la operación. ¡Esto no constituye un mal funcionamiento del
sistema!
3. CONEXIÓN A LA CORRIENTE ELÉCTRICA
1. Conecte el extremo del cable eléctrico extraíble a la entrada de corriente del panel trasero de la
unidad y el otro extremo a la toma eléctrica.
2. Cuando conecte por primera vez la unidad a la corriente estará en modo apagado. El LED indicador
POWER estará apagado.
3. Deslice el interruptor FUNCIÓN a los diferentes modos de funcionamiento para encender la unidad.
El LED indicador POWER se iluminará. La pantalla LCD se encenderá cuando esté en los modos
CD/USB/AUX. En modo FM, la pantalla LCD estará apagada.
4. CONEXIÓN CC
Para utilizarlo con CC, retire primero el conector de CA de la toma de CA y desconecte el cable de CA
del conector de entrada de corriente. A continuación, inserte 6 pilas de tamaño C (UM-2) en el
compartimento de las pilas.
Debido a que la unidad consume un poco de energía incluso en modo apagado, se recomienda retirar
las pilas cuando no se vaya a utilizar durante un largo periodo.
EN
ES
UM2 (LR14) C SIZE 1.5V X 6 PCS
6 pilas de 1,5 V TAMAÑO C UM2 (LR14)
‘C’ SIZE, UM-2 1.5V
1,5 V TAMAÑO C UM-2
5. OPERACIONES BÁSICAS
Deslice el interruptor FUNCIÓN para elegir los modos “CD/USB/AUX” de reproducción de CD, USB o de
entrada auxiliar. Cambie a “FM MONO” para usar el modo de radio FM mono y “FM STEREO” para el
modo de radio FM estéreo. Para apagarla, deslícelo a la posición “OFF”.
Control de volumen
Gire el control VOLUME para cambiar el nivel de sonido.
Ajuste de la antena telescópica
La antena debe estar desplegada para garantizar una buena recepción FM. Cambie la posición de la
antena para conseguir la mejor recepción.
6. FUNCIONAMIENTO DE LA RADIO
1. Deslice el interruptor FUNCIÓN a “FM MONO” o “FM STEREO” según desee y el indicador POWER

56
se iluminará.
2. Gire la rueda TUNING CONTROL hasta encontrar la emisora de radio deseada.
Mantenga siempre la antena completamente desplegada para conseguir el mejor rendimiento. Intente
colocar la unidad cerca de una ventana abierta hasta que consiga la mejor recepción.
Nota:
- Cuando utilice el modo “FM STEREO” y, si sintoniza una emisora FM estéreo con buena recepción,
el indicador FM STEREO se iluminará.
7. FUNCIONAMIENTO DE CD/USB
Carga y reproducción de discos CD
Abra la tapa del CD. Introduzca un disco con el lado impreso del CD hacia arriba. Cierre la puerta del
CD.
Cuando lea el disco, la pantalla mostrará el número total de pistas. Reproducirá automáticamente la
primera pista.
Reproducción del dispositivo USB (solo archivos MP3)
Inserte un dispositivo USB en el puerto USB. Mantenga pulsado el botón REPRODUCIR/PAUSAR para
cambiar al modo USB.
Cuando lea los archivos y carpetas, la pantalla mostrará el número total de pistas. La unidad
reproducirá automáticamente la primera pista.
Control de reproducción/pausa
Para pausar la reproducción, pulse una vez el botón REPRODUCIR/PAUSAR. Pulse otra vez el botón
REPRODUCIR/PAUSAR para reanudar la reproducción.
Control de parada
Para detener la reproducción, pulse el botón PARAR.
Selección de ÁLBUM (solo archivos MP3)
Durante la reproducción de MP3 o cuando esté parada, pulse el botón ALBUM para cambiar de álbum
(carpeta).
Utilice los botones SIGUIENTE o ANTERIOR para seleccionar la pista que desea reproducir. Pulse el
botón REPRODUCIR para empezar a reproducir la pista.
Saltar pista
Durante la reproducción, pulse los botones SIGUIENTE o ANTERIOR para saltar a la pista siguiente o
anterior.
Nota:
- Si no hay ningún disco o no se puede leer el CD, la pantalla mostrará “no”.
Búsqueda de música a alta velocidad
Durante la reproducción, mantenga pulsado los botones SIGUIENTE o ANTERIOR para empezar a
saltar pistas rápidamente. Cuando suelte el botón, se reanudará la reproducción a velocidad normal.
Repetir reproducción/Reproducción aleatoria
Modo de disco CD
Durante la reproducción, pulse una vez el botón MODE y la pantalla mostrará “REP” (Repetir). La pista

57
actual se reproducirá repetidamente.
Cuando pulse por segunda vez el botón MODE, la pantalla mostrará “REP ALL”(Repetir todo). Todas las
pistas se reproducirán repetidamente.
Cuando pulse por tercera vez el botón MODE, la pantalla mostrará “RAND” (aleatoria). Todas las pistas
se reproducirán en orden aleatorio.
Cuando pulse por cuarta vez el botón MODE, la unidad reanudará la reproducción normal.
Modo de disco MP3 o USB MP3
Durante la reproducción, pulse una vez el botón MODE y la pantalla mostrará “REP” (Repetir). La pista
actual se reproducirá repetidamente.
Cuando pulse por segunda vez el botón MODE, la pantalla mostrará “REP ALBUM”(Repetir álbum).
Todas las pistas de la carpeta actual se reproducirán repetidamente.
Cuando pulse por tercera vez el botón MODE, la pantalla mostrará “REP ALL” (Repetir todo). Todas las
pistas se reproducirán repetidamente.
Cuando pulse por cuarta vez el botón MODE, la pantalla mostrará “RAND”(aleatoria). Todas las pistas
se reproducirán en orden aleatorio.
Cuando pulse por quinta vez el botón MODE, la unidad reanudará la reproducción normal.
Nota:
- La unidad tiene un límite de reproducción de MP3 de 99 carpetas con un máximo de 999 archivos.
Reproducción programada
Es posible programar la unidad para reproducir una secuencia de hasta 20 pistas.
1. Cuando la reproducción esté parada, pulse el botón MODE. Se mostrará “P01”.
2. Pulse los botones SIGUIENTE o ANTERIOR para elegir la carpeta correcta (solo disponible para
pistas MP3).
3. Pulse los botones SIGUIENTE y ANTERIOR para seleccionar la pista deseada.
4. Pulse el botón MODE para guardar la pista deseada.
5. Repita los pasos 2-4 para programar hasta 20 pistas en un CD (99 pistas de MP3)
6. Pulse el botón REPRODUCIR/PAUSAR para reproducir las pistas programadas.
7. Para borrar la reproducción programada, pulse dos veces el botón PARAR o cambie a otro modo.
8. Durante la reproducción programada, también puede utilizar las funciones “Repeat One” (Repetir
una) o “Repeat All” (Repetir todo). Sin embargo, durante la reproducción programada no se puede
usar la reproducción aleatoria.
8. ENTRADA DE MICRÓFONO (KARAOKE)
La unidad dispone de una función para mezclar la entrada de micrófono con el sonido reproducido. El
conector MIC IN se encuentra en el panel frontal de la unidad.
1. Conecte el micrófono en el conector MIC IN.
2. Ajuste el volumen del micrófono girando el control MIC VOLUME del panel frontal.
9. AUX IN
Esto le permitirá conectar el sonido de un reproductor externo mediante la unidad.
1. Conecte un cable de audio de 3,5 mm (no incluido) a la salida de línea del reproductor externo y el
otro extremo al conector AUX IN de la parte trasera de la unidad.

58
2. La unidad pasará automáticamente al modo AUX.
3. Empiece a reproducir música con el reproductor externo. La unidad reproducirá el sonido.
4. Para cambiar a otro modo, desconecte el cable de audio de la unidad.
EN
ES
Smartphone or MP3 player
Smartphone o Reproductor MP3
Line Out
SALIDA DE LÍNEA
or
o
10. INDICADOR DE LUZ LED
El INDICADOR DE LUZ LED del altavoz de la unidad se crea automáticamente según la fuente de
música que se esté reproduciendo.
1. Para encender el INDICADOR DE LUZ LED, deslice el interruptor LIGHT a la posición ON.
2. Para apagar el INDICADOR DE LUZ LED, deslice el interruptor LIGHT a la posición OFF.
Nota:
- Si el brillo es demasiado alto, encienda las luces de la sala o apague el INDICADOR DE LUZ LED.
11. ESPECIFICACIONES TÉCNICAS
Frecuencia FM Rango
87.5-108 MHz
Número máximo de archivos MP3/carpetas compatibles
Límite de 99 carpetas con un máximo de
999 archivos
Entrada de corriente CA
230 V CC-50 Hz, 18 W
Funcionamiento con pilas
6 pilas UM2 (tamaño C)
Potencia de salida del altavoz
2 x 1,8 W
Entrada AUX
Clavija estéreo de 3,5 mm
Salida de auriculares
Clavija estéreo de 3,5 mm
Entrada de micrófono
Conector de 3,5 mm
Dimensiones
241 (L) x 215 (P) x 120 (Al) mm
Peso
1,5 kg
Nota:
Debido a las mejoras continuas, las especificaciones técnicas están sujetas a cambios sin previo aviso.
12. AHORRO DE ENERGÍA
Debido a la exigencias del ErP fase dos y para proteger el medioambiente, la unidad cambiará al modo
en espera automáticamente una vez que no se haya reproducido música durante 15 minutos.

59
Para volver a activar la unidad, deslice el interruptor FUNCIÓN a la posición OFF y luego deslícelo a
otra posición.
13. GARANTÍA
Lenco ofrece servicio y garantía en cumplimiento con las leyes de la Unión Europea, lo cual implica que,
en caso de que su producto precise ser reparado (tanto durante como después del periodo de garantía),
deberá contactar directamente con su distribuidor.
Nota importante: No es posible enviar sus reparaciones directamente a Lenco.
Nota importante: Si la unidad es abierta por un centro de servicio no oficial, la garantía quedará
anulada.
Este aparato no es adecuado para el uso profesional. En caso de darle un uso profesional, todas las
obligaciones de garantía del fabricante quedarán anuladas.
14. AVISO LEGAL
Regularmente se llevan a cabo actualizaciones en el Firmware y en los componentes del hardware. Por
esta razón, algunas de las instrucciones, especificaciones e imágenes incluidas en este documento
pueden diferir ligeramente respecto a su situación particular. Todos los elementos descritos en esta guía
tienen un objetivo de mera ilustración, y pueden no ser de aplicación en su situación particular. No se
puede obtener ningún derecho ni derecho legal a partir de la descripción hecha en este manual.
15. ELIMINACIÓN DE UN DISPOSITIVO USADO
Este símbolo indica que no deberá deshacerse del producto eléctrico o batería en cuestión
junto con los residuos domésticos, en el ámbito de la UE. Para garantizar un tratamiento
residual correcto del producto y su batería, por favor, elimínelos cumpliendo con las leyes
locales aplicables sobre requisitos para el desechado de equipos eléctricos y baterías.
De hacerlo, ayudará a conservar recursos naturales y mejorar los estándares de protección
medioambiental en el tratamiento y eliminación de residuos eléctricos (Directiva sobre la
Eliminación de Equipos Eléctricos y Electrónicos).
16. MARCA CE
Los productos con la marca CE cumplen con la Directiva EMC (2014/30/EU) y con la
Directiva de Bajas Tensiones (2014/35/EU) emitida por la Comisión de la Unión
Europea.
Por la presente, Lenco Benelux BV, Thermiekstraat 1a, 6361 HB Nuth, Países Bajos, declara que este
producto cumple con las exigencias esenciales y otras provisiones relevantes.
La declaración de conformidad puede consultarse en techdoc@lenco.com
17. SERVICIO
Para obtener más información y soporte virtual, por favor visite la página web www.lenco.com Lenco
Benelux BV; Thermiekstraat 1a, 6361 HB, Países Bajos.
-
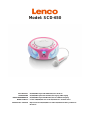 1
1
-
 2
2
-
 3
3
-
 4
4
-
 5
5
-
 6
6
-
 7
7
-
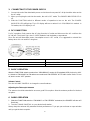 8
8
-
 9
9
-
 10
10
-
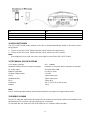 11
11
-
 12
12
-
 13
13
-
 14
14
-
 15
15
-
 16
16
-
 17
17
-
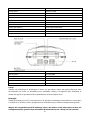 18
18
-
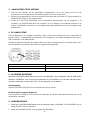 19
19
-
 20
20
-
 21
21
-
 22
22
-
 23
23
-
 24
24
-
 25
25
-
 26
26
-
 27
27
-
 28
28
-
 29
29
-
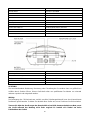 30
30
-
 31
31
-
 32
32
-
 33
33
-
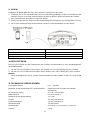 34
34
-
 35
35
-
 36
36
-
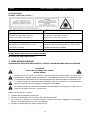 37
37
-
 38
38
-
 39
39
-
 40
40
-
 41
41
-
 42
42
-
 43
43
-
 44
44
-
 45
45
-
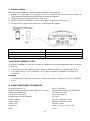 46
46
-
 47
47
-
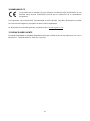 48
48
-
 49
49
-
 50
50
-
 51
51
-
 52
52
-
 53
53
-
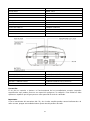 54
54
-
 55
55
-
 56
56
-
 57
57
-
 58
58
-
 59
59


Lenco SCD-550 Handleiding
- Categorie
- CD spelers
- Type
- Handleiding
- Deze handleiding is ook geschikt voor
in andere talen
- français: Lenco SCD-550 Manuel utilisateur
- español: Lenco SCD-550 Manual de usuario
- Deutsch: Lenco SCD-550 Benutzerhandbuch
Gerelateerde papieren
-
Lenco SCD-650BU de handleiding
-
Lenco CD-200 de handleiding
-
-
-
-
Lenco SCD-430RD de handleiding
-
-
Lenco SCD-620 Handleiding
-
-