
PMP Series Mixer Amplifier
Ref. nr.: 954.010, 954.012, 954.014, 954.016
INSTRUCTION MANUAL
GEBRUIKSAANWIJZING
BEDIENUNGSANLEITUNG
MANUAL DE INSTRUCCIONES
MANUEL D'INSTRUCTIONS
INSTRUKCJA OBSŁUGI
NÁVOD K POUŽITÍ
V1.0

2

3
ENGLISH
Congratulations to the purchase of this Power Dynamics product. Please read this manual thoroughly prior to using the unit in
order to benefit fully from all features.
Read the manual prior to using the unit. Follow the instructions in order not to invalidate the warranty. Take all precautions to
avoid fire and/or electrical shock. Repairs must only be carried out by a qualified technician in order to avoid electrical shock.
Keep the manual for future reference.
- Prior to using the unit, please ask advice from a
specialist. When the unit is switched on for the first time,
some smell may occur. This is normal and will disappear
after a while.
- The unit contains voltage carrying parts. Therefore, do
NOT open the housing.
- Do not place metal objects or pour liquids into the unit
This may cause electrical shock and malfunction.
- Do not place the unit near heat sources such as
radiators, etc. Do not place the unit on a vibrating
surface. Do not cover the ventilation holes.
- The unit is not suitable for continuous use.
- Be careful with the mains lead and do not damage it. A
faulty or damaged mains lead can cause electrical shock
and malfunction.
- When unplugging the unit from a mains outlet, always
pull the plug, never the lead.
- Do not plug or unplug the unit with wet hands.
- If the plug and/or the mains lead are damaged, they
need to be replaced by a qualified technician.
- If the unit is damaged to such an extent that internal
parts are visible, do NOT plug the unit into a mains outlet
and DO NOT switch the unit on. Contact your dealer. Do
NOT connect the unit to a rheostat or dimmer.
- To avoid fire and shock hazard, do not expose the unit to
rain and moisture.
- All repairs should be carried out by a qualified technician
only.
- Connect the unit to an earthed mains outlet (220-
240Vac/50Hz) protected by a 10-16A fuse.
- During a thunderstorm or if the unit will not be used for a
longer period of time, unplug it from the mains. The rule
is: Unplug it from the mains when not in use.
- If the unit has not been used for a longer period of time,
condensation may occur. Let the unit reach room
temperature before you switch it on.
- For use in humid rooms or outdoors: refer to the
installation guidelines for safe assembly.
- To prevent accidents in companies, you must follow the
applicable guidelines and follow the instructions.
- Do not repeatedly switch the fixture on and off. This
shortens the lifetime.
- Keep the unit out of the reach of children. Do not leave
the unit unattended.
- Do not use cleaning sprays to clean switches. The
residues of these sprays cause deposits of dust and
grease. In case of malfunction, always seek advice from
a specialist.
- Do not force the controls.
- This unit is with speaker inside which can cause
magnetic field. Keep this unit at least 60cm away from
computer or TV.
- If this product has a built-in lead-acid rechargeable
battery: Please recharge the battery every 3 months if
you are not going to use the product for a long period of
time. Otherwise, the battery may be permanently
damaged.
- If the battery is damaged, please replace with same
specifications battery. And dispose the damaged battery
environment friendly.
- If the unit has fallen, always have it checked by a
qualified technician before you switch the unit on again.
- Do not use chemicals to clean the unit. They damage the
varnish. Only clean the unit with a dry cloth.
- Keep away from electronic equipment that may cause
interference.
- Only use original spares for repairs, otherwise serious
damage and/or dangerous radiation may occur.
- Switch the unit off prior to unplugging it from the mains
and/or other equipment. Unplug all leads and cables
prior to moving the unit.
- Make sure that the mains lead cannot be damaged when
people walk on it. Check the mains lead before every use
for damages and faults!
- The mains voltage is 220-240Vac/50Hz. Check if power
outlet match. If you travel, make sure that the mains
voltage of the country is suitable for this unit.
- Keep the original packing material so that you can
transport the unit in safe conditions.
This mark attracts the attention of the user to high voltages that are present inside the housing and that are of sufficient
magnitude to cause a shock hazard.
This mark attracts the attention of the user to important instructions that are contained in the manual and that he should
read and adhere to.
The unit has been certified CE. It is prohibited to make any changes to the unit. They would invalidate the CE certificate and
their guarantee!
NOTE: To make sure that the unit will function normally, it must be used in rooms with a temperature between 5°C/41°F and
35°C/95°F.
Electric products must not be put into household waste. Please bring them to a recycling centre. Ask your local
authorities or your dealer about the way to proceed. The specifications are typical. The actual values can slightly
change from one unit to the other. Specifications can be changed without prior notice.
Do not attempt to make any repairs yourself. This would invalid your warranty. Do not make any changes to the unit. This would also invalid
your warranty. The warranty is not applicable in case of accidents or damages caused by inappropriate use or disrespect of the warnings
contained in this manual. Power Dynamics cannot be held responsible for personal injuries caused by a disrespect of the safety
recommendations and warnings. This is also applicable to all damages in whatever form.

4
UNPACKING INSTRUCTION
CAUTION! Carefully unpack the box upon receipt. Check the contents to ensure that all parts are present and have been
received in good condition. Notify the shipper immediately and retain packaging material if any parts appear damaged from
shipping or the package itself shows signs of mishandling. Save the package and all packaging materials. If the product must be
returned, it is important that the product is returned in the original factory box and packaging. If the device has been exposed to
drastic temperature fluctuation (e.g. after transportation), do not switch it on immediately. The arising condensation water might
damage your device. Leave the device switched off until it has reached room temperature.
POWERSUPPLY
The label on the back/under side of the product indicates the mains voltage to which it must be connected. Check that the mains
voltage corresponds to this. Any other voltage than the one indicated may cause irreparable damage to the unit. The unit must
also be connected directly to the mains voltage and no dimmer or adjustable power supply may be used.
Always connect the device to a protected circuit (circuit breaker or fuse). Make sure the device has an appropriate
electrical ground to avoid the risk of electrocution or fire.
FRONT PANEL
1. ZONE SELECT
Press to (de)select separate zones, or press ALL ZONES to (de)select all zones at once.
2. ZONE VOLUME
Rotate to adjust the volume level per zone.
3. STATUS INDICATORS
LED status indicators (power, level, protect).
4. CHANNEL VOLUME
Rotate to adjust the volume level per channel.
5. AUX CONTROLS
Press the button to select AUX (A or B) and media (M) sources. Rotate the knob to adjust the AUX/MEDIA volume level.
6. BASS
Rotate to adjust the bass level.
7. TREBLE
Rotate to adjust the treble level.
8. MASTER VOLUME
Rotate to adjust the master (main) volume.
9. POWER ON/OFF
Press to turn the device on/off.
MEDIA PLAYER FRONT
A. STATUS/MODE INDICATORS
LED status and source (mode) indicators (power, WiFi/USB, BT, AUX).
B. MODE
Press to change operating modes.
C. PLAY/PAUSE
Press to start/resume or pause playback.
D. PREVIOUS
Press to change to previous track.
E. NEXT
Press to skip to next track.
F. AUX INPUT
3.5mm input jack for auxiliary input.
G. USB
USB input socket.
MEDIA PLAYER REAR
H. OUTPUT
Stereo line output connector block.
I. LAN
RJ45 input connector for cabled internet radio function.
J. WIFI ANTENNA
Connector for installing a WiFi antenna.
K. BT ANTENNA
Connector for installing a BT antenna.

5
REAR PANEL
1. AC IN AND FUSE HOLDER
Socket for plugging in the supplied power cord. For instructions on how to change the fuse, see “REPLACING THE FUSE”.
2. SPEAKER OUTPUT
Speaker output terminal for connecting speakers (individual zones (100V) and 100V, 70V, 4 Ohm).
3. EMERGENCY MESSAGE
Terminal to enable the recording or playback of an emergency message.
4. EXTERNAL EVACUATION
Terminal to enable an external evacuation message, with options of muting and bypassing individual zones.
5. CHIME
Chime enable dip switches and level knob. If a chime on channel 2 is desired, set the channel 2 dip switch to “enable”
position. Adjust the chime level by rotating the knob.
6. VOX
VOX enable dip switches and level knob. VOX (voice-operated exchange) provides the option to enable a channel when
voice input (above a certain threshold) is detected. Set the dip switch(es) to “enable” position to make use of this function.
7. LINK- AND REC OUTPUT
RCA connectors for link- and rec output.
8. AUX INPUT
RCA connectors for AUX A- and B input (left and right).
9. REMOTE MIC
Remote microphone input connector (RJ45).
10. CHANNEL INPUT AND INPUT SELECTORS
Balanced line/mic input for channel input 1-4, including pre-announcement chime possibility.
The inputs are equipped with line, phantom power and microphone setting switches.
Phantom power: set the input switch to PH to supply DC +48V phantom power to accommodate the use of a condenser
microphone.
REPLACING THE FUSE
If the fuse is defective, replace the fuse with a fuse of the same type and value. Before replacing the fuse, unplug mains lead.
Procedure:
Step 1: Open the fuse holder on the rear panel with a fitting screwdriver.
Step 2: Remove the old fuse from the fuse holder.
Step 3: Install the new fuse in the fuse holder.
Step 4: Replace the fuse holder in the housing.
CONNECTING WITH BT
Connecting your BT-device to the amplifier, follow below steps:
1. Turn on BT on your smartphone or tablet.
2. Press the MODE button until the BT LED is illuminated.
3. Search for “MPlayer A” in the BT menu of the smartphone or tablet.
4. Connect with “MPlayer A”.
WIFI
Download the latest version of the LEGACY Player app via Apple store or Google play. Here you will also find the latest features
and explanations on how to use them.
Legacy Player Apple Store Legacy Player Google Play

6
SPEAKER TERMINALS
These terminals are offering a low voltage output of 4Ω (minimum load). A 100V commercial output is also available.
Please note that one wire only should be connected to COM screw and one wire to the selected impedance or voltage.
ATTENTION: Multiple combinations cannot be done at the output level.
Two different types of connections are provided. The low impedance section: 4Ω (minimum load) is designed for a small amount
of speakers to be connected to your amplifier. The 100V section is especially designed for a multiple speaker distribution. When
using the 100V output, speakers have to be equipped with a 100V transformer. The maximum amount of speakers to be placed
on your distribution line is in relation to the power allocated to each speaker. The total wattage set on the secondary side of the
transformers on your speaker line must not exceed the maximum RMS output power of the device. Failure to respect this may
cause permanent damage to the amplifier.
OPERATION STEPS
• When all connections to the amplifier are made, turn all rotary controls down and switch on the power (the power LED will
illuminate). Turn BASS and TREBLE controls to the 12 o’clock position (pointing straight up) and turn MASTER rotary
control up part way for testing.
• Ensure a signal is being fed to one of the inputs and gradually increase the volume control for that channel until the output
is heard through the speakers. Turn up the MASTER to the maximum required volume level and reduce the channel
volume control if necessary.
Note: The initial test can be made using the built-in USB audio player. The output of the amplifier is represented on the
level meter LEDs and care should be taken that the CLIP LED is not (constantly) lit during use. Illumination of this LED
may be indicating distortion or clipping of the output signal and the MASTER/MAIN VOLUME should be turned down.
• If a microphone is connected, make sure it is switched on and if it requires phantom power, make sure this feature is
enabled. Gradually increase its volume control whilst speaking into the microphone until the required volume level is
reached. The microphone should not be able to “hear” (detect) the speakers, which can cause feedback (squealing or
howling noise).
In addition to channel and MASTER volume controls, there are BASS and TREBLE EQ controls to adjust the tone of the overall
output. At the 12 o’clock position, these controls are applying no effect to the signal (no boost or cut). Rotating the BASS control
clockwise boosts the low frequencies in the audio, whilst rotating it anticlockwise will cut these low frequencies. Likewise,
rotating the TREBLE control clockwise boosts the high frequencies in the audio, whilst rotating it anticlockwise will cut these
high frequencies. Adjust these EQ controls to suit the type of audio signal or compensate for the room acoustics.
• Normally, playback will start automatically when a USB stick is inserted in the corresponding slot. If not, select USB by
pressing MODE to initiate the USB mode manually. Press PLAY / PAUSE to start playback. Press PREVIOUS and/or
NEXT to change tracks.
100V LINE SYSTEM
For 100V line systems, connect the amplifier to the first speaker in the system using double-insulated speaker wire which has
adequate current rating to handle the total output of the amplifier.
Connect the “100V” output terminal to the positive (+) connection of the speaker and “COM” output to the negative (-)
connection of the speaker. Connect further speakers in parallel to the first speaker with all positive terminals and connected
together and all negative terminals connected together as shown below.
A 100V line speaker system can comprise of many speakers connected together. The determining factor for how many
speakers can be used on a single amplifier is the power rating. For most purposes, it is advised to connect as many speakers
as needed with a combined wattage of no more than 90% of the amplifier’s output power rating.
The terminals of a 100V speaker are connected to a transformer and in some cases, this transformer may be “tapped” for
different power ratings. These tapings can be used to adjust the wattage (and output volume) of each speaker in the system to
help achieve the ideal total power of the system for the amplifier.

7
NEDERLANDS
Hartelijk dank voor de aanschaf van dit Power Dynamics product. Neemt u a.u.b. een paar momenten de tijd om deze
handleiding zorgvuldig te lezen, aangezien wij graag willen dat u onze producten snel en volledig gebruikt.
Lees deze handleiding eerst door alvorens het product te gebruiken. Volg de instructies op anders zou de garantie wel eens
kunnen vervallen. Neem ook altijd alle veiligheidsmaatregelen om brand en/of een elektrische schok te voorkomen. Tevens is
het ook raadzaam om reparaties / modificaties e.d. over te laten aan gekwalificeerd personeel om een elektrische schok te
voorkomen. Bewaar deze handleiding ook voor toekomstig gebruik.
- Bewaar de verpakking zodat u indien het apparaat defect is,
dit in de originele verpakking kunt opsturen om
beschadigingen te voorkomen.
- Voordat het apparaat in werking wordt gesteld, altijd eerst
een deskundige raadplegen. Bij het voor de eerste keer
inschakelen kan een bepaalde reuk optreden. Dit is normaal
en verdwijnt na een poos.
- In het apparaat bevinden zich onder spanning staande
onderdelen; open daarom NOOIT dit apparaat.
- Plaats geen metalen objecten en mors geen vloeistof in het
effect. Dit kan leiden tot elektrische schokken of defecten.
- Toestel niet opstellen in de buurt van warmtebronnen zoals
radiatoren etc. en niet op een vibrerende onder- grond
plaatsen. Dek ventilatieopeningen nooit af.
- Het apparaat is niet geschikt voor continu gebruik.
- Wees voorzichtig met het netsnoer en beschadig deze niet.
Als het snoer kapot of beschadigd is, kan dit leiden tot
elektrische schokken of defecten.
- Als u de stekker uit het stopcontact neemt, trek dan niet aan
het snoer, maar aan de stekker.
- Om brand of elektrische schok te voorkomen, dient u dit
apparaat niet bloot te stellen aan regen of vocht.
- Verwijder of plaats een stekker nooit met natte handen resp.
uit en in het stopcontact.
- Indien zowel de stekker en/of netsnoer als snoeringang in het
apparaat beschadigd zijn dient dit door een vakman hersteld
te worden.
- Indien het apparaat zo beschadigd is dat inwendige
(onder)delen zichtbaar zijn mag de stekker NOOIT in het
stopcontact worden geplaatst en het apparaat NOOIT
worden ingeschakeld. Neem in dit geval contact op met de
dealer.
- Sluit het apparaat nooit op een dimmer aan.
- Reparatie aan het apparaat dient te geschieden door een
vakman of een deskundige.
- Sluit het apparaat alleen aan op een 220-240VAC / 50Hz
(geaard) stopcontact, verbonden met een 10-16A
meterkastgroep.
- Bij onweer altijd de stekker uit het stopcontact halen, zo ook
wanneer het apparaat voor een langere tijd niet gebruikt
wordt. Stelregel: Bij geen gebruik stekker verwijderen.
- Als u het apparaat lang niet gebruikt heeft en het weer wil
gebruiken kan er condens ontstaan; laat het apparaat eerst
op kamertemperatuur komen alvorens het weer in werking
te stellen.
- Bij gebruik in vochtige ruimten of buiten: raadpleeg de
installatierichtlijnen voor een veilige montage.
- Om ongevallen in bedrijven te voorkomen moet rekening
worden gehouden met de daarvoor geldende richtlijnen en
moeten de aanwijzingen/waarschuwingen worden gevolgd.
- Het apparaat buiten bereik van kinderen houden.
Bovendien mag het apparaat nooit onbeheerd gelaten
worden.
- Gebruik geen schoonmaakspray om de schakelaars te
reinigen. Restanten van deze spray zorgen ervoor dat
smeer en stof ophopen. Raadpleeg bij storing te allen tijde
een deskundige.
- Gebruik geen overmatige kracht bij het bedienen van het
apparaat.
- Dit apparaat kan magnetisch veld veroorzaken. Houd dit
apparaat ten minste 60 cm afstand van de computer of tv.
- Indien dit apparaat beschikt over een loodaccu, dient deze
tenminste elke 3 maanden opgeladen te worden indien
deze voor een langere periode niet wordt gebruikt anders
bestaat de kans dat de accu permanent beschadigd.
- Bij een ongeval met dit product altijd eerst een des-
kundige raadplegen alvorens opnieuw te gebruiken.
- Tracht het apparaat niet schoon te maken met chemische
oplossingen. Dit kan de lak beschadigen. Gebruik een
droge doek om schoon te maken.
- Blijf uit de buurt van elektronische apparatuur die
bromstoringen zouden kunnen veroorzaken.
- Bij reparatie dienen altijd originele onderdelen te worden
gebruikt om onherstelbare beschadigingen en/of
ontoelaatbare straling te voorkomen.
- Schakel eerst het toestel uit voordat u het netsnoer
verwijdert. Verwijder netsnoer en aansluitsnoeren voordat u
dit product gaat verplaatsen.
- Zorg ervoor dat het netsnoer niet beschadigd/defect kan
raken wanneer mensen erover heen lopen. Het netsnoer
vóór ieder gebruik controleren op breuken/defecten!
- In Nederland/België is de netspanning 220-240Vac/50Hz.
Indien u reist (en u neemt het apparaat mee) informeer dan
naar de netspanning in het land waar u verblijft.
Deze markering wordt weergegeven om u erop attent te maken dat een levensgevaarlijke spanning in het product
aanwezig is en dat bij aanraking van deze delen een elektrische schok wordt verkregen.
Deze instructiemarkering wordt weergegeven om u erop te wijzen dat de instructie zeer belangrijk is om te lezen en/of op
te volgen.
OPMERKING: Om zeker te zijn van een correcte werking, dient u dit apparaat in een ruimte te gebruiken waar de temperatuur
tussen de 5°C/41°F en 35°C/95°F ligt.
Raadpleeg eventueel www.wecycle.nl en/of www.vrom.nl v.w.b. het afdanken van elektronische apparaten in het kader van de
WEEE-regeling. Vele artikelen kunnen worden gerecycled, gooi ze daarom niet bij het huisvuil maar lever ze in bij een gemeentelijk
depot of uw dealer. Lever ook afgedankte batterijen in bij uw gemeentelijk depot of bij de dealer, zie www.stibat.nl
Alle (defecte) artikelen dienen gedurende de garantieperiode altijd retour te worden gezonden in de originele verpakking. Voer zelf geen
reparaties uit aan het toestel; in élk geval vervalt de totale garantie. Ook mag het toestel niet eigenmachtig worden gemodificeerd, ook in dit
geval vervalt de totale garantie. Ook vervalt de garantie bij ongevallen en beschadigingen in élke vorm t.g.v. onoordeelkundig gebruik en
het niet in achtnemen van het gestelde in deze gebruiksaanwijzing. Tevens aanvaardt Power Dynamics geen enkele aansprakelijkheid in
geval van persoonlijke ongelukken als gevolg van het niet naleven van veiligheidsinstructies en waarschuwingen . Dit geldt ook voor
gevolgschade in wélke vorm dan ook.

8
UITPAKKEN
LET OP! Pak na ontvangst de doos zorgvuldig uit. Controleer of alle onderdelen aanwezig- en in goede staat ontvangen zijn. Bij
transportschade of bij het ontbreken van onderdelen onmiddellijk de verkopende partij inlichten. Bewaar de verpakking en het
verpakkingsmateriaal. Indien het product moet worden teruggestuurd, is het belangrijk dat het product in originele verpakking
wordt geretourneerd. Schakel het apparaat niet onmiddellijk in als het apparaat is blootgesteld aan drastische
temperatuurverschillen (bv. na het transport). De ontstane condensatie kan het apparaat beschadigen. Zorg ervoor dat het
apparaat eerst op kamertemperatuur komt alvorens het aan te sluiten.
AANSLUITSPANNING
Op het label aan de achterzijde/onderzijde van het product staat aangegeven op welke netspanning deze moet worden
aangesloten. Controleer of de netspanning hiermee overeenkomt. Bij alle andere netspanningen dan aangegeven kan het
apparaat onherstelbaar worden beschadigd. Tevens moet het apparaat direct op de netspanning worden aangesloten en mag
géén dimmer of regelbare voeding worden gebruikt.
Sluit het apparaat altijd aan op een beschermd circuit (aardlekschakelaar of zekering). Zorg ervoor dat het apparaat
voldoende elektrisch is geaard om het risico op elektrocutie of brand te vermijden.
VOORPANEEL
1. ZONE SELECT
Indrukken om afzonderlijke zones te (de)selecteren. Druk op ALL ZONES om alle zones tegelijk te (de)selecteren.
2. ZONE VOLUME
Draaien om het volumeniveau per zone aan te passen.
3. STATUSINDICATOREN
LED-statusindicatoren (voeding, niveau, protect).
4. KANAALVOLUME
Draaien om het volumeniveau per kanaal aan te passen.
5. AUX-REGELAARS
Indrukken om AUX (A of B) en media (M) bronnen te selecteren. Draaiknop gebruiken om het volumeniveau van
AUX/MEDIA aan te passen.
6. BASS
Draaien om de lage tonen aan te passen.
7. TREBLE
Draaien om de hoge tonen aan te passen.
8. HOOFDVOLUME
Draaien om het hoofdvolume aan te passen.
9. AAN/UIT
Indrukken om het apparaat aan-/uit te zetten.
MEDIASPELER VOORKANT
A. STATUS/MODUSINDICATOREN
LED-status en bron (modus) indicatoren (voeding, WiFi/USB, BT, AUX).
B. MODE
Indrukken om van afspeelmodus te wisselen.
C. AFSPELEN/PAUZEREN
Indrukken om het afspelen te starten/hervatten of pauzeren.
D. VORIGE
Indrukken om naar het vorige nummer te gaan.
E. VOLGENDE
Indrukken om naar het volgende nummer te gaan.
F. AUX
3,5mm aux-ingangsaansluiting.
G. USB
USB-ingangsaansluiting.
MEDIASPELER ACHTERKANT
H. UITGANG
Stereo-lijnuitgang aansluitblok.
I. LAN
RJ45-ingang voor bekabelde internetradiofunctie.
J. WIFI-ANTENNE
Aansluiting voor het installeren van een WiFi-antenne.
K. BT ANTENNE
Aansluiting voor het installeren van een BT-antenne.

9
ACHTERPANEEL
1. STROOMINGANG EN ZEKERINGHOUDER
Aansluiting voor het bijgeleverde netsnoer. Zie "VERVANGEN ZEKERING" voor instructies over het vervangen van de
zekering.
2. LUIDSPREKERUITGANG
Luidsprekeruitgang voor het aansluiten van luidsprekers (afzonderlijke zones (100V) en 100V, 70V, 4 Ohm).
3. EMERGENCY (NOODBERICHT)
Terminal voor het opnemen of afspelen van een noodbericht.
4. EVACUATIE (EXTERN)
Terminal om een extern evacuatiebericht in te schakelen, met opties om individuele zones te dempen en te overbruggen.
5. CHIME
Dipswitches voor het inschakelen van een gong en corresponderende niveauknop. Als een gong op kanaal 2 gewenst is, zet
u de dipschakelaar voor kanaal 2 in de stand "enable". Stel het niveau in door aan de knop te draaien.
6. VOX
VOX-inschakeldipschakelaars en niveauknop. VOX (voice-operated exchange) biedt de optie om een kanaal in te schakelen
wanneer spraakinvoer (boven een bepaalde drempel) wordt gedetecteerd. Zet de dipswitch(s) in de stand "enable" om
gebruik te maken van deze functie.
7. LINK- EN REC UITGANG
Link- en REC RCA uitgangsaansluitingen.
8. AUX INGANG
RCA ingangsaansluitingen voor AUX A en B (links en rechts).
9. REMOTE MIC
RJ45 ingang voor het aansluiten van een extern microfoonstation.
10. KANAALINGANG EN INGANGSKEUZESCHAKELAARS
Gebalanceerde lijn/microfooningang voor kanaalingang 1-4, inclusief de mogelijkheid voor het instellen van een
vooraankondiging. De ingangen zijn voorzien van lijn-, fantoomvoeding- en microfooninstellingsschakelaars.
Fantoomvoeding: zet de ingangsschakelaar op PH om DC +48V fantoomvoeding te leveren voor het gebruik van een
condensatormicrofoon.
VERVANGEN ZEKERING
Indien de zekering defect is, dient u de zekering te vervangen door een zekering van hetzelfde type en waarde. Voor het
vervangen van de zekering, schakel eerst de stroom uit en volg de onderstaande stappen. Procedure:
Stap 1: Open de zekeringhouder op het achter paneel met een passende platte schroevendraaier.
Stap 2: Verwijder de oude zekering uit de zekeringhouder.
Stap 3: Installeer de nieuwe zekering in de zekeringhouder.
Stap 4: Plaats de zekeringhouder in de behuizing.
BT-VERBINDING
Volg onderstaande stappen om je BT-apparaat aan te sluiten op de versterker:
1. Zet BT aan op je smartphone of tablet.
2. Druk op MODE totdat de BT LED oplicht.
3. Zoek naar "MPlayer A" in het BT-menu van de smartphone of tablet.
4. Maak verbinding met "MPlayer A".
WIFI
Download de laatste versie van de LEGACY Player app via Apple store of Google play. Hier vind je ook de nieuwste functies en
uitleg over het gebruik ervan.
Legacy Player Apple Store Legacy Player Google Play

10
LUIDSPREKERAANSLUITINGEN
Deze terminals bieden een laagspanningsuitgang van 4Ω (minimumbelasting). Een commerciële uitgang van 100V is ook
beschikbaar.
Let op: sluit één draad aan op de COM-schroef en één draad op de geselecteerde impedantie of spanning.
ATTENTIE: Combinaties zijn niet mogelijk op het uitgangsniveau.
Er zijn twee verschillende soorten aansluitingen. De lage impedantie sectie: 4Ω (minimumbelasting) is ontworpen om een klein
aantal luidsprekers aan te sluiten op je versterker. De 100V sectie is speciaal ontworpen voor een verdeling van meerdere
luidsprekers. Als je de 100V uitgang gebruikt, moeten de luidsprekers voorzien zijn van een 100V transformator. Het maximale
aantal luidsprekers dat op je distributielijn kan worden geplaatst, staat in verhouding tot het vermogen dat aan elke luidspreker
wordt toegewezen. Het totale wattage dat is ingesteld op de secundaire zijde van de transformatoren op je luidsprekerlijn mag
het maximale RMS-uitgangsvermogen van het apparaat niet overschrijden. Als u dit niet respecteert, kan dit permanente
schade aan de versterker veroorzaken.
BEDIENINGSSTAPPEN
• Wanneer alle aansluitingen op de versterker gemaakt zijn, draai je alle draaiknoppen naar beneden en schakel je de
voeding in (de voedings-LED zal oplichten). Zet de regelaars BASS en TREBLE in de “12 uur” stand (recht omhoog) en
draai de HOOFDVOLUME-regelaar een stukje omhoog om te testen.
• Zorg ervoor dat een signaal wordt toegevoerd aan een van de ingangen en verhoog geleidelijk de volumeregelaar voor dat
kanaal tot de output hoorbaar is via de luidsprekers. Zet de HOOFDVOLUME-regelaar op het maximaal vereiste
volumeniveau en verlaag de volumeregelaar van het kanaal indien nodig.
Opmerking: De initiële test kan worden uitgevoerd met de ingebouwde USB-audiospeler. De output van de versterker
wordt weergegeven op de niveaumeter-LED's en zorg ervoor dat de CLIP LED niet (constant) brandt tijdens het gebruik.
Als deze LED brandt, kan dit duiden op vervorming of clipping van het uitgangssignaal en moet de HOOFDVOLUME-
regelaar lager worden gezet.
• Als er een microfoon is aangesloten, zorg er dan voor dat deze is ingeschakeld en als deze fantoomvoeding nodig heeft,
zorg er dan voor dat deze functie is ingeschakeld. Verhoog geleidelijk de volumeregelaar terwijl u in de microfoon spreekt
totdat het gewenste volumeniveau is bereikt. De microfoon mag de luidsprekers niet kunnen "horen" (detecteren), wat kan
resulteren in een piepend, gierend of jankend geluid.
Naast de kanaal- en hoofdvolumeregelaar zijn er de BASS en TREBLE EQ-regelaars om de toon van de algemene uitvoer aan
te passen. In de stand 12 uur hebben deze regelaars geen effect op het signaal (geen boost of cut). Door de BASS-regelaar
met de klok mee te draaien worden de lage frequenties in het geluid versterkt, terwijl door de regelaar tegen de klok in te
draaien deze lage frequenties worden verzwakt. Op dezelfde manier versterkt rechtsom draaien van de TREBLE-regelaar de
hoge frequenties in het geluid, terwijl linksom draaien deze hoge frequenties verlaagt. Pas deze EQ-regelaars aan het type
audiosignaal aan of compenseer de akoestiek in de kamer.
• Normaal gezien start het afspelen automatisch wanneer een USB-stick in de overeenkomstige sleuf wordt gestoken. Is dit
niet het geval, selecteer dan USB door op MODE te drukken om de USB-modus handmatig te starten. Druk op
AFSPELEN/PAUZEREN om het afspelen te starten. Druk op VORIGE en/of VOLGENDE om van nummer te veranderen.
100V LIJNSYSTEEM
Voor 100V lijnsystemen sluit u de versterker aan op de eerste luidspreker in het systeem met dubbel geïsoleerde
luidsprekerkabel die voldoende stroomsterkte heeft om het totale uitgangsvermogen van de versterker aan te kunnen.
Sluit de uitgang "100V" aan op de positieve (+) aansluiting van de luidspreker en de uitgang "COM" op de negatieve (-)
aansluiting van de luidspreker. Sluit andere luidsprekers parallel aan op de eerste luidspreker, waarbij alle positieve
aansluitingen op elkaar zijn aangesloten en alle negatieve aansluitingen op elkaar zijn aangesloten, zoals hieronder
weergegeven.
Een 100V lijnluidsprekersysteem kan bestaan uit veel luidsprekers die op elkaar zijn aangesloten. De bepalende factor voor het
aantal luidsprekers dat op één versterker kan worden gebruikt, is het vermogen. Voor de meeste doeleinden wordt geadviseerd
om zoveel luidsprekers als nodig aan te sluiten met een gezamenlijk wattage van niet meer dan 90% van het uitgangsvermogen
van de versterker.
De aansluitingen van een 100V luidspreker zijn verbonden met een transformator en in sommige gevallen kan deze
transformator "getapt" zijn voor verschillende vermogens. Deze aftakkingen kunnen worden gebruikt om het wattage (en het
uitgangsvolume) van elke luidspreker in het systeem aan te passen om het ideale totale vermogen van het systeem voor de
versterker te bereiken.

11
DEUTSCH
Vielen Dank für den Kauf dieses Power Dynamics gerat. Nehmen Sie sich einen Augenblick Zeit, um diese Anleitung sorgfältig
durchzulesen, damit sie die Möglichkeiten, die unser Produkt bietet, sofort voll ausnutzen können.
Lesen Sie erst die Anleitung vollständig vor der ersten Inbetriebnahme durch. Befolgen Sie die Anweisung, da sonst jeglicher
Garantieanspruch verfällt. Treffen Sie stets alle Sicherheits-Vorkehrungen um Feuer und/oder Stromschlag zu vermeiden.
Reparaturen dürfen nur von qualifiziertem Fachpersonal ausgeführt werden, um Stromschlag zu vermeiden. Bewahren Sie
diese Anleitung für spätere Bezugnahme auf.
- Bewahren Sie die Verpackung auf, um das Gerät im
Bedarfsfall sicher transportieren zu können.
- Bevor das Gerät in Betrieb genommen wird, muss es erst
von einem Fachmann überprüft werden. Bei der ersten
Benutzung kann etwas Geruch auftreten. Das ist normal und
verschwindet nach einer Weile
- Das Gerät enthält unter Spannung stehende Teile. Daher
NIEMALS das Gehäuse öffnen.
- Keine Metallgegenstände oder Flüssigkeiten ins Gerät
dringen lassen. Sie können zu Stromschlag und Defekten
führen.
- Gerät nicht in der Nähe von Wärmequellen wie Heizkörpern
aufstellen. Nicht auf eine vibrierende Oberfläche stellen.
Niemals die Belüftungsschlitze abdecken.
- Das Gerät ist nicht für Dauerbetrieb geeignet.
- Gehen Sie vorsichtig mit dem Netzkabel um und
beschädigen Sie es nicht. Eine beschädigte Netzschnur kann
zu Stromschlag und Defekten führen.
- Wenn Sie das Gerät vom Netz trennen, immer am Stecker
ziehen, niemals an der Schnur.
- Um Feuer und Stromschlag zu vermeiden, das Gerät vor
Regen und Feuchtigkeit schützen.
- Den Stecker nie mit nassen Händen in eine Netzsteckdose
stecken oder abziehen.
- Wenn sowohl der Stecker und/oder die Netzschnur bzw. der
Kabeleintritt ins Gerät beschädigt sind, müssen sie von
einem Fachmann repariert werden.
- Wenn das Gerät so beschädigt ist, dass Innenteile sichtbar
sind, darf der Stecker NICHT in eine Steckdose gesteckt
werden und das Gerät darf NICHT eingeschaltet werden.
Wenden Sie sich in dem Fall an Ihren Fachhändler. Das
Gerät darf nicht an einen Dimmer angeschlossen werden.
- Reparaturen dürfen nur von einem Fachmann oder
Sachverständigen ausgeführt werden.
- Das Gerät nur an eine geerdete 10-16A Netzsteckdose mit
220-240V AC/50Hz Spannung anschließen.
- Bei Gewitter oder längerem Nichtgebrauch den Netzstecker
abziehen. Die Regel gilt: Bei Nichtgebrauch Netzstecker
abziehen.
- Wenn das Gerät längere Zeit nicht benutzt wurde, kann sich
Kondenswasser gebildet haben. Lassen Sie das Gerät erst
auf Zimmertemperatur kommen, bevor Sie es einschalten.
- Bei Verwendung in Feuchträumen oder im Freien:
Beachten Sie die Installationsrichtlinien für eine sichere
Montage.
- Um Unfällen in der Öffentlichkeit vorzubeugen, müssen die
geltenden Richtlinien beachtet und die
Anweisungen/Warnungen befolgt werden.
- Niemals das Gerät kurz hintereinander ein- und
ausschalten. Dadurch verkürzt sich die Lebensdauer
erheblich.
- Das Gerät außerhalb der Reichweite von Kindern halten.
Das Gerät niemals unbeaufsichtigt lassen.
- Die Regler nicht mit Reinigungssprays reinigen. Diese
hinterlassen Rückstände, die zu Staub- und
Fettansammlungen führen. Bei Störungen immer einen
Fachmann um Rat fragen.
- Das Gerät nur mit sauberen Händen bedienen.
- Das Gerät nicht mit Gewalt bedienen.
- Wenn dieses Gerät eine Blei-Säure-Batterie hat, soll dies
jede 3 Monate zumindest wieder aufgeladen werden, wenn
es nicht für eine längere Zeit nicht benutzt wird, sonst ist es
möglich, dass die Batterie dauerhaft beschädigt.
- Nach einem Unfall mit dem Gerät immer erst einen
Fachmann um Rat fragen, bevor Sie es wieder einschalten.
- Keine chemischen Reinigungsmittel benutzen, die den
Lack beschädigen. Das Gerät nur mit einem trockenen
Tuch abwischen.
- Nicht in der Nähe von elektronischen Geräten benutzen,
die Brummstörungen verursachen können.
- Bei Reparaturen nur die Original-Ersatzteile verwenden,
um starke Schäden und/oder gefährliche Strahlungen zu
vermeiden.
- Bevor Sie das Netz- und/oder Anschlusskabel abziehen,
erst das Gerät ausschalten. Netz- und Anschlusskabel
abziehen, bevor Sie das Gerät umstellen.
- Sorgen Sie dafür, dass das Netzkabel nicht beschädigt
werden kann, wenn Menschen darüber laufen. Das
Netzkabel vor jedem Einsatz auf Brüche/Schadstellen
überprüfen.
- In Deutschland beträgt die Netzspannung 220-240V AC /
50Hz. Wenn Sie das Gerät auf Reisen mitnehmen, prüfen
Sie, ob die örtliche Netzspannung den Anforderungen des
Geräts entspricht.
Dieses Zeichen weist den Benutzer darauf hin, dass lebensgefährliche Spannungen im Gerät anliegen, die bei
Berührung einen Stromschlag verursachen.
Dieses Zeichen lenkt die Aufmerksamkeit des Benutzers auf wichtige Hinweise in der Anleitung hin, die unbedingt
eingehalten werden müssen.
HINWEIS: Um einen einwandfreien Betrieb zu gewährleisten, muss die Raumtemperatur zwischen 5° und 35°C.
liegen.
Tronios BV Registrierungsnummer : DE51181017 (ElektroG).
Dieses Produkt darf am Ende seiner Lebensdauer nicht über den normalen Haushaltsabfall entsorgt werden, sondern muss an einem
Sammelpunkt für das Recycling abgegeben werden. Hiermit leisten Sie einen wichtigen Beitrag zum Schutze unserer Umwelt.
Tronios BV Registrierungsnummer : 21003000 (BatterieG).
Lithiumbatterien und Akkupacks sollten nur im entladenen Zustand in die Altbatteriesammelgefäße bei Handel und bei öffentlich-rechtlichen
Entsorgungsträgern gegeben werden. Bei nicht vollständig entladenen Batterien Vorsorge gegen Kurzschluss treffen durch Isolieren der Pole
mit Klebestreifen. Der Endnutzer ist zur Rückgabe von Altbatterien gesetzlich verpflichtet.
Reparieren Sie das Gerät niemals selbst und nehmen Sie niemals eigenmächtig Veränderungen am Gerät vor. Sie verlieren dadurch den
Garantieanspruch. Der Garantieanspruch verfällt ebenfalls bei Unfällen und Schäden in jeglicher Form, die durch unsachgemäßen
Gebrauch und Nichtbeachtung der Warnungen und Sicherheitshinweise in dieser Anleitung entstanden sind. Power Dynamics ist in
keinem Fall verantwortlich für persönliche Schäden in Folge von Nichtbeachtung der Sicherheitsvorschriften und Warnungen. Dies gilt
auch für Folgeschäden jeglicher Form.

12
AUSPACKEN
Packen Sie das Gerät sofort nach Empfang aus und prüfen Sie den Inhalt. Wenn Teile fehlen oder beschädigt sind,
benachrichtigen Sie sofort den Spediteur und bewahren Sie die Verpackung auf. Falls ein Gerät ins Werk zurückgeschickt
werden muss, ist es wichtig, dass es in der Originalverpackung versandt wird. Das Gerät darf nicht in Betrieb genommen
werden, nachdem es von einem kalten in einen warmen Raum gebracht wurde. Das dabei entstehende Kondenswasser kann
unter Umständen Ihr Gerät zerstören. Lassen Sie das Gerät so lange ausgeschaltet, bis es Zimmertemperatur erreicht hat!
NETZANSCHLUSS
Die benötigte Versorgungsspannung steht auf dem Typenschild auf der Rückseite des Geräts. Die angegebenen Stromwerte
entsprechen einem Durchschnittswert bei normalem Betrieb. Alle Geräte müssen direkt ans Netz angeschlossen werden und
dürfen nicht über Dimmerpacks geschaltet werden. Bevor Sie eine Spannung anlegen, prüfen Sie, ob der Wert der zulässigen
Spannung entspricht.
Verbinden Sie immer das Gerät an einem geschützten Schaltkreis (Leistungsschalter oder Sicherung). Stellen Sie sicher,
das Gerät ist elektrisch geerdet, um das Risiko eines Stromschlags oder Feuer zu vermeiden.
VORDERSEITE
1. ZONE SELECT
Drücken, um einzelne Zonen auszuwählen/abzuwählen. Drücken Sie ALLE ZONEN, um alle Zonen auf einmal
auszuwählen/abzuwählen.
2. ZONE LAUTSTÄRKE
Drehen, um den Lautstärkepegel pro Zone einzustellen.
3. STATUSINDIKATOREN
LED-Statusanzeigen (Strom, Pegel, Protekt).
4. KANALLAUTSTÄRKE
Drehen, um den Lautstärkepegel pro Kanal einzustellen.
5. AUX REGELN
Drücken Sie diese Taste, um die AUX- (A oder B) und Medienquellen (M) auszuwählen.
Verwenden Sie den Drehknopf, um den AUX/MEDIA-Lautstärkepegel einzustellen.
6. BASS
Drehen zum Einstellen der Bässe.
7. TREBLE
Drehen zum Einstellen der Höhen.
8. HAUPTLAUTSTÄRKE
Drehen, um die Hauptlautstärke einzustellen.
9. EIN/AUS
Drücken, um das Gerät ein-/auszuschalten.
MEDIASPIELER VORDERSEITE
A. STATUS/MODUSINDIKATOREN
LED-Status- und Quellen- (Modus-) Anzeigen (Strom, WiFi/USB, BT, AUX).
B. MODE
Drücken, um den Wiedergabemodus zu wechseln.
C. ABSPIELEN/PAUSIEREN
Drücken, um die Wiedergabe zu starten/fortzusetzen oder zu unterbrechen.
D. VORHERIGE
Drücken, um zum vorherigen Titel zu wechseln.
E. NÄCHSTE
Drücken, um zum nächsten Titel zu wechseln.
F. AUX
3,5-mm-Hilfseingangsbuchse.
G. USB
USB-Eingangsanschluss.
MEDIASPIELER RÜCKSEITE
H. AUSGANG
Stereo-Line-Ausgangsklemme.
I. LAN
RJ45-Eingang für kabelgebundene Internet-Radiofunktion.
J. WIFI-ANTENNE
Anschluss für die Installation einer WiFi-Antenne.
K. BT ANTENNE
Anschluss für die Installation einer BT-Antenne.

13
RÜCKSEITE
1. NETZANSCHLUSS UND SICHERUNGSHALTER
Anschluss für das mitgelieferte Netzkabel. Siehe "Sicherungswechsel" für Anweisungen zum Auswechseln der Sicherung.
2. LAUTSPRECHERAUSGANG
Lautsprecherausgangsbuchse zum Anschluss von Lautsprechern (einzelne Zonen (100V) und 100V, 70V, 4 Ohm).
3. EMERGENCY (NOTFALLMELDUNG)
Terminal zur Aufzeichnung oder Wiedergabe einer Notfallmeldung.
4. EVAKUIERUNG (EXTERN)
Terminal zur Aktivierung der externen Evakuierungsmeldung, mit Optionen zur Stummschaltung und Übersteuerung
einzelner Zonen.
5. CHIME
Dip-Schalter zum Aktivieren eines Gongs und entsprechende Pegel-Taste. Wenn ein Gong auf Kanal 2 gewünscht wird,
stellen Sie den Dip-Schalter für Kanal 2 auf die Position "enable". Stellen Sie den Pegel durch Drehen des Knopfes.
6. VOX
VOX-Aktivierungs-Dip-Schalter und Pegelknopf. VOX (voice-operated exchange) bietet die Möglichkeit, einen Kanal zu
aktivieren, wenn ein Spracheingang (oberhalb eines bestimmten Schwellenwerts) erkannt wird. Stellen Sie den/die DIP-
Schalter auf die Position "enable", um diese Funktion zu nutzen.
7. LINK- UND REC-AUSGANG
Link- und REC-Cinch-Ausgangsanschlüsse.
8. AUX EINGANG
RCA-Eingangsbuchsen für AUX A und B (links und rechts).
9. REMOTE MIC
RJ45-Eingang zum Anschluss einer externen Sprechstelle.
10. KANALEINGANG UND EINGANGSWAHLSCHALTER
Symmetrischer Line-/Mikrofoneingang für die Kanaleingänge 1-4, einschließlich der Möglichkeit, eine Vorankündigung
einzustellen. Die Eingänge sind mit Schaltern für Line, Phantomspeisung und Mikrofoneinstellung ausgestattet.
Phantomspeisung: Stellen Sie den Eingangsschalter auf PH, um eine DC +48V Phantomspeisung für die Verwendung eines
Kondensatormikrofons bereitzustellen.
SICHERUNGSWECHSEL
Wenn die Feinsicherung des Gerätes defekt ist, darf diese nur durch eine Sicherung gleichen Typs ersetzt werden. Vor dem
Sicherungswechsel ist das Gerät allpolig von der Netzspannung zu trennen (Netzsteckerziehen). Vorgehensweise:
Schritt 1: Öffnen Sie den Sicherungshalter an der Geräterückseite mit einem passenden Schraubendreher.
Schritt 2: Entfernen Sie die defekte Sicherung aus dem Sicherungshalter.
Schritt 3: Setzen Sie die neue Sicherung in den Sicherungshalter ein.
Schritt 4: Setzen Sie den Sicherungshalter wieder im Gehäuse ein.
VERBINDEN MIT BT
Führen Sie die folgenden Schritte aus, um Ihr BT-Gerät mit dem Verstärker zu verbinden:
1. Schalten Sie BT auf Ihrem Smartphone oder Tablet ein.
2. Drücken Sie MODE, bis die BT-LED aufleuchtet.
3. Suchen Sie im BT-Menü des Smartphones oder Tablets nach "MPlayer A".
4. Verbinden Sie Mit "MPlayer A".
WIFI
Laden Sie die neueste Version der LEGACY Player App über den Apple Store oder Google Play herunter. Hier finden Sie auch
die neuesten Funktionen und Erklärungen zu deren Verwendung.
Legacy Player Apple Store Legacy Player Google Play

14
LAUTSPRECHER-ANSCHLÜSSE
Diese Klemmen bieten einen Niederspannungsausgang von 4Ω (Mindestlast). Ein 100-V-Ausgang ist ebenfalls verfügbar.
Hinweis: Schließen Sie einen Draht an die COM-Schraube und einen Draht an die ausgewählte Impedanz oder Spannung an.
ACHTUNG: Kombinationen sind in der Ausgangsebene nicht möglich.
Es gibt zwei verschiedene Arten von Anschlüssen. Der Abschnitt mit niedriger Impedanz: 4Ω (Mindestlast) ist für den Anschluss
einer kleinen Anzahl von Lautsprechern an Ihren Verstärker vorgesehen. Der 100-V-Teil ist speziell für die Verteilung mehrerer
Lautsprecher ausgelegt. Wenn Sie den 100-V-Ausgang verwenden, müssen die Lautsprecher mit einem 100-V-Übertrager
ausgestattet sein. Die maximale Anzahl von Lautsprechern, die an Ihre Verteilerleitung angeschlossen werden können, ist
proportional zu der jedem Lautsprecher zugewiesenen Wattleistung. Die auf der Sekundärseite der Transformatoren Ihrer
Lautsprecherleitung eingestellte Gesamtwattzahl darf die maximale RMS-Ausgangsleistung des Geräts nicht überschreiten. Bei
Nichtbeachtung kann der Verstärker dauerhaft beschädigt werden.
BEDIENUNGSSCHRITTE
• Wenn alle Verbindungen zum Verstärker hergestellt sind, drehen Sie alle Regler herunter und schalten Sie die
Stromversorgung ein (die Power-LED leuchtet auf). Drehen Sie die BASS- und TREBLE-Regler auf die "12-Uhr"-Position
(gerade nach oben) und drehen Sie den HAUPTLAUTSTÄRKE-Regler leicht auf, um zu testen.
• Vergewissern Sie sich, dass ein Signal an einem der Eingänge anliegt, und erhöhen Sie den Lautstärkeregler für diesen
Kanal allmählich, bis der Ausgang über die Lautsprecher hörbar ist. Stellen Sie den HAUPTLAUTSTÄRKE-Regler auf den
maximalen Lautstärkepegel ein und verringern Sie die Kanallautstärkeregelung, falls erforderlich.
Hinweis: Der erste Test kann mit dem eingebauten USB-Audio-Player durchgeführt werden. Die Ausgangsleistung des
Verstärkers wird auf den Pegelanzeige-LEDs angezeigt. Stellen Sie sicher, dass die CLIP-LED während des Betriebs nicht
(ständig) leuchtet. Wenn diese LED leuchtet, kann dies auf eine Verzerrung oder Übersteuerung des Ausgangssignals
hinweisen und der HAUPTLAUTSTÄRKE-Regler sollte niedriger eingestellt werden.
• Wenn ein Mikrofon angeschlossen ist, vergewissern Sie sich, dass es eingeschaltet ist, und wenn es Phantomspeisung
benötigt, stellen Sie sicher, dass diese eingeschaltet ist. Erhöhen Sie den Lautstärkeregler allmählich, während Sie in das
Mikrofon sprechen, bis der gewünschte Lautstärkepegel erreicht ist. Das Mikrofon sollte nicht in der Lage sein, die
Lautsprecher zu "hören" (zu erkennen), was zu einem quietschenden, heulenden oder wimmernden Ton führen kann.
Neben den Kanal- und Master-Lautstärkereglern gibt es die BASS- und TREBLE-EQ-Regler, mit denen der Klang des
Gesamtausgangs eingestellt werden kann. In der 12-Uhr-Stellung haben diese Regler keinen Einfluss auf das Signal (keine
Anhebung oder Absenkung). Durch Drehen des BASS-Reglers im Uhrzeigersinn werden die tiefen Frequenzen im Klang
angehoben, während durch Drehen gegen den Uhrzeigersinn diese tiefen Frequenzen abgeschwächt werden. In ähnlicher
Weise werden durch Drehen des TREBLE-Reglers im Uhrzeigersinn die hohen Frequenzen im Klang angehoben, während
durch Drehen gegen den Uhrzeigersinn diese hohen Frequenzen abgesenkt werden. Passen Sie diese EQ-Regler an den Typ
des Audiosignals an oder kompensieren Sie die Raumakustik.
• Normalerweise beginnt die Wiedergabe automatisch, wenn ein USB-Stick in den entsprechenden Steckplatz eingesteckt
wird. Sollte dies nicht der Fall sein, wählen Sie USB, indem Sie MODE drücken, um den USB-Modus manuell zu starten.
Drücken Sie ABSPIELEN/PAUSIEREN, um die Wiedergabe zu starten. Drücken Sie VORHERIGE und/oder NÄCHSTE,
um die Titel zu wechseln.
100V
Bei 100-Volt-Leitungssystemen schließen Sie den Verstärker an den ersten Lautsprecher im System mit einem doppelt
isolierten Lautsprecherkabel an, das eine für die Gesamtausgangsleistung des Verstärkers ausreichende Amperezahl aufweist.
Verbinden Sie den "100V"-Ausgang mit dem positiven (+) Anschluss des Lautsprechers und den "COM"-Ausgang mit dem
negativen (-) Anschluss des Lautsprechers. Schließen Sie weitere Lautsprecher parallel zum ersten Lautsprecher an, wobei alle
positiven Anschlüsse zusammen und alle negativen Anschlüsse zusammen angeschlossen werden, wie unten gezeigt.
Ein 100V-Lautsprechersystem kann aus vielen miteinander verbundenen Lautsprechern bestehen. Der entscheidende Faktor
für die Anzahl der Lautsprecher, die an einem Verstärker verwendet werden können, ist die Leistung. Für die meisten Zwecke
wird empfohlen, so viele Lautsprecher wie nötig anzuschließen, deren Gesamtleistung nicht mehr als 90% der
Verstärkerausgangsleistung beträgt.
Die Klemmen eines 100-V-Lautsprechers sind mit einem Transformator verbunden, und in einigen Fällen kann dieser
Transformator für verschiedene Leistungsstufen "angezapft" werden. Diese Anzapfungen können verwendet werden, um die
Wattzahl (und die Ausgangslautstärke) jedes Lautsprechers im System anzupassen, um die ideale Gesamtsystemleistung für
den Verstärker zu erreichen.

15
ESPAÑOL
Felicitaciones a la compra de este producto Power Dynamics. Por favor lea atentamente este manual antes de usar el aparato
para disfrutar al completo de sus prestaciones.
Seguir las instrucciones le permite no invalidar la garantía. Tome todas las precauciones para evitar que se produzca fuego o
una descarga eléctrica. Las reparaciones solo deben llevarse a cabo por técnicos cualificados para evitar descargas eléctricas.
Guarde el manual para futuras consultas.
Antes de usar el aparato, por favor pida consejo a un profesional. Cuando el aparato se enciende por primera vez, suele
sentirse cierto olor. Esto es normal y desaparece al poco tiempo.
- Este aparato contiene piezas que llevan voltaje. Por lo
tanto NO abra la carcasa.
- No coloque objetos metálicos o vierta líquidos dentro del
aparato Podría producir descargas eléctricas y fallos en
el funcionamiento.
- No coloque el aparato cerca de fuentes de calor tipo
radiadores, etc. No coloque el aparato en superficies
vibratorias. No tape los agujeros de ventilación.
- Este aparato no está preparado para un uso continuado.
- Tenga cuidado con el cable de alimentación y no lo
dañe. Un daño o defecto en el cable de alimentación
puede producir una descarga eléctrica o fallo en el
funcionamiento.
- Cuando desconecte el aparato de la toma de corriente,
siempre tire de la clavija, nunca del cable.
- No enchufe o desenchufe el aparato con las manos
mojadas.
- Si la clavija y/o el cable de alimentación están dañados,
necesitan reemplazarse por un técnico cualificado.
- Si el aparato está dañado de modo que puedan verse
sus partes internas, NO conecte el aparato a la toma de
corriente y NO lo encienda. Contacte con su distribuidor.
NO conecte el aparato a un reostato o dimmer.
- Para evitar un fuego o peligro de descarga, no exponga
el aparato a la lluvia y a la humedad.
- Todas las reparaciones deben llevarse a cabo
exclusivamente por técnicos cualificados.
- Conecte el aparato a una toma de corriente con toma de
tierra (220-240Vca/50Hz) protegida por un fusible de 10-
16A.
- Durante una tormenta o si el aparato no va a usarse
durante un periodo largo de tiempo, desconéctelo de la
toma de corriente. La regla es: Desconéctelo si no lo va
a usar.
- Si el aparato no se ha usado en mucho tiempo puede
producirse condensación. Deje el aparato a temperatura
ambiente antes de encenderlo.
- Para su uso en ambientes húmedos o al aire libre:
consulte las directrices de instalación para un montaje
seguro.
- Para prevenir accidentes en las empresas, debe seguir
las directrices aplicables y seguir las instrucciones.
- No lo apague y encienda repetidamente. Esto acorta su
tiempo de vida.
- Mantenga el aparato fuera del alcance de los niños. No
deje el aparato sin vigilancia.
- No utilice sprays limpiadores para limpiar los
interruptores. Los residuos de estos sprays producen
depósitos de polvo y grasa. En caso de mal
funcionamiento, siempre consulte a un profesional.
- No fuerce los controles.
- Si el aparato se ha caído, siempre haga que lo verifique
un técnico cualificado antes de encenderlo otra vez.
- NO utilice productos químicos para limpiar el aparato.
Dañan el barniz. Tan solo límpielo con un trapo seco.
- Manténgalo lejos de equipos electrónicos ya que pueden
producir interferencias.
- Si este producto incorpora una batería recargable con
base ácida, por favor recarge bateria cada 3 meses si no
va a usar la unidad por un tiempo prolongado. En caso
contrario la batería podría dañarse.
- Solo utilice recambios originales para las reparaciones,
de otro modo pueden producirse daños serios y/o
radiaciones peligrosas.
- Apague el aparato antes de desconectarlo de la toma de
corriente y/o de otros equipos. Desconecte todos los
cables y conexiones antes de mover el aparato.
- Asegúrese de que el cable de alimentación no puede
dañarse cuando la gente lo pise. Compruebe el cable de
alimentación antes de cada uso por si hay daños o
defectos.
- El voltaje de funcionamiento es 220-240Vca/50Hz.
Compruebe que la toma de corriente coincide. Si tiene
que viajar, asegúrese de que el voltaje del país es el
adecuado para este aparato.
- Guarde el embalaje original para poder transportar el
aparato en condiciones seguras.
Esta señal advierte al usuario de la presencia de alto voltaje en el interior de la carcasa y que es de la suficiente
magnitud como para producir una descarga eléctrica.
Esta señal advierte al usuario de que el manual contiene instrucciones importantes que han de leerse y seguirse al pie
de la letra.
NOTA: Para asegurarse de que el aparato funcione correctamente, debe usarse en ambientes a una temperatura de entre
5°C/41°F y 35°C/95°F.
Los productos electrónicos no pueden tirarse a la basura normal. Por favor lleve este producto a un centro de reciclaje. Pregunte a la
autoridad local en caso de duda. Las especificaciones son generales. Los valores actuales pueden variar de una unidad a otra. Las
especificaciones pueden variar sin previo aviso.
Nunca intente reparar usted mismo este equipo. Esta manipulación anulará la garantía. No realice cambios en la unidad. Esta
manipulación anulará la garantía. Esta garantía no es aplicable en caso de accidente o daños ocasionados por uso indebido del aparato
o mal uso del mismo. Power Dynamics no se hace responsable de daños personales causados por el no seguimiento de las normas e
instrucciones de este manual. Esto es aplicable también a los daños de cualquier tipo.

16
INSTRUCCIONES DE DESEMBALAJE
ATENCIÓN! Inmediatamente después de recibir un dispositivo, desempaque cuidadosamente la caja de cartón, compruebe el
contenido para asegurarse de que todas las partes están presentes, y se han recibido en buenas condiciones. Notifique
inmediatamente al transportista y conserve el material de embalaje para la inspección por si aparecen daños causados por el
transporte o el propio envase muestra signos de mal manejo. Guarde el paquete y todos los materiales de embalaje. En el caso
de que deba ser devuelto a la fábrica, es importante que el aparato sea devuelto en la caja de la fábrica y embalaje originales.
Si el aparato ha estado expuesto a grandes cambios de temperatura (tras el transporte), no lo enchufe inmediatamente. La
condensación de agua producida podría dañar su aparato. Deje el dispositivo apagado hasta que se haya alcanzado la
temperatura ambiente.
FUENTE DE ALIMENTACIÓN
En la etiqueta de la parte trasera del controlador se indica el tipo de fuente de alimentación que debe ser conectado.
Compruebe que la tensión de red corresponda a esto, todos los otros voltajes a la especificada, puede causar efectos
irreparable. El producto también debe estar conectado directamente a la red para ser utilizado. No en ninguna fuente de
alimentación o dimmer ajustable.
Conecte siempre el producto a un circuito protegido (disyuntor o fusible). Asegúrese de que el producto tiene una toma
de tierra adecuada para evitar el riesgo de electrocución o incendio.
PANEL FRONTAL
1. ZONE SELECT
Pulse para (des)seleccionar zonas separadas, o pulse ALL ZONES para (des)seleccionar todas las zonas a la vez.
2. VOLUMEN DE ZONA
Gíralo para ajustar el nivel de volumen por zona.
3. INDICADORES DE ESTADO
Indicadores LED de estado (alimentación, nivel, protección).
4. VOLUMEN DEL CANAL
Gíralo para ajustar el nivel de volumen por canal.
5. CONTROLES AUXILIARES
Pulse el botón para seleccionar las fuentes AUX (A o B) y multimedia (M).
Gire el botón para ajustar el nivel de volumen AUX/MEDIA.
6. BASS
Gíralo para ajustar el nivel de graves.
7. TREBLE
Gire para ajustar el nivel de agudos.
8. VOLUMEN PRINCIPAL
Gíralo para ajustar el volumen principal.
9. ENCENDIDO/APAGADO
Pulsar para encender/apagar el aparato.
FRONTAL DEL REPRODUCTOR MULTIMEDIA
A. INDICADORES DE ESTADO/MODO
Indicadores LED de estado y fuente (modo) (alimentación, WiFi/USB, BT, AUX).
B. MODE
Pulse para cambiar los modos de funcionamiento.
C. REPRODUCIR/PAUSAR
Pulse para iniciar/reanudar o pausar la reproducción.
D. ANTERIOR
Pulse para pasar a la pista anterior.
E. SIGUIENTE
Pulse para saltar a la pista siguiente.
F. ENTRADA AUX
Toma de entrada de 3,5 mm para entrada auxiliar.
G. USB
Toma de entrada USB.

17
TRASERA DEL REPRODUCTOR MULTIMEDIA
H. SALIDA
Bloque de conectores de salida de línea estéreo.
I. LAN
Conector de entrada RJ45 para función de radio por Internet por cable.
J. ANTENA WIFI
Conector para instalar una antena WiFi.
K. ANTENA BT
Conector para instalar una antena BT.
PANEL TRASERO
1. TOMA DE CORRIENTE Y PORTAFUSIBLES
Toma para enchufar el cable de alimentación suministrado. Para obtener instrucciones sobre cómo cambiar el fusible,
consulte "CAMBIANDO EL FUSIBLE".
2. SALIDA DE ALTAVOZ
Terminal de salida de altavoces para conectar altavoces (zonas individuales (100V) y 100 V, 70 V, 4 ohmios).
3. MENSAJE DE EMERGENCIA
Terminal para permitir la grabación o reproducción de un mensaje de emergencia.
4. EVACUACIÓN EXTERNA
Terminal para activar un mensaje de evacuación externo, con opciones de silenciamiento y anulación de zonas individuales.
5. CHIME
Interruptores DIP de activación del timbre y mando de nivel. Si desea un timbre en el canal 2, coloque el interruptor DIP del
canal 2 en la posición "enable". Ajuste el nivel del timbre girando el mando.
6. VOX
Interruptores DIP de habilitación de VOX y mando de nivel. VOX (voice-operated exchange) ofrece la posibilidad de habilitar
un canal cuando se detecta una entrada de voz (por encima de un determinado umbral). Para utilizar esta función, coloque
los interruptores DIP en la posición "enable".
7. SALIDA LINK- Y REC
Conectores RCA para salida de enlace y grabación.
8. ENTRADA AUX
Conectores RCA para entrada AUX A y B (izquierda y derecha).
9. MICRÓFONO REMOTO
Conector de entrada de micrófono remoto (RJ45).
10. ENTRADA DE CANAL Y SELECTORES DE ENTRADA
Entrada de línea/micrófono balanceada para las entradas de los canales 1-4, con posibilidad de timbre previo.
Las entradas están equipadas con interruptores de ajuste de línea, alimentación phantom y micrófono.
Alimentación phantom: coloque el interruptor de entrada en PH para suministrar alimentación phantom DC +48V para
acomodar el uso de un micrófono de condensador.
CAMBIANDO EL FUSIBLE
Si el fusible está defectuoso, reemplace el fusible por un fusible del mismo tipo y valor. Antes de sustituir el fusible, desconectar
de la corriente. Procedimiento:
Paso 1: Abra el portafusibles del panel trasero con un destornillador adecuado.
Paso 2: Retire el fusible viejo del portafusibles.
Paso 3: Instale el fusible nuevo en el portafusibles.
Paso 4: Vuelva a colocar el portafusibles en la caja.
CONECTAR A BT
Para conectar su dispositivo BT al amplificador, siga estos pasos:
1. Enciende BT en tu smartphone o tablet.
2. Pulse el botón MODE hasta que se ilumine el LED BT.
3. Busque "MPlayer A" en el menú BT del smartphone o tableta.
4. Conectar con "MPlayer A".
WIFI
Descarga la última versión de la aplicación LEGACY Player a través de Apple store o Google play. Aquí también encontrarás
las últimas funciones y explicaciones sobre cómo utilizarlas.

18
Legacy Player Apple Store Legacy Player Google Play
TERMINALES DE ALTAVOZ
Estos terminales ofrecen una salida de baja tensión de 4Ω (carga mínima). También está disponible una salida comercial de
100V. Tenga en cuenta que sólo debe conectarse un cable al tornillo COM y un cable a la impedancia o tensión seleccionada.
ATENCIÓN: No se pueden realizar combinaciones múltiples en el nivel de salida.
Se proporcionan dos tipos de conexiones diferentes. La sección de baja impedancia 4Ω (carga mínima) está diseñada para
conectar una pequeña cantidad de altavoces a su amplificador. La sección de 100 V está especialmente diseñada para la
distribución de varios altavoces. Cuando se utiliza la salida de 100V, los altavoces tienen que estar equipados con un
transformador de 100V. La cantidad máxima de altavoces que se pueden colocar en la línea de distribución está en relación
con la potencia asignada a cada altavoz. La potencia total fijada en el secundario de los transformadores de su línea de
altavoces no debe superar la potencia de salida RMS máxima del aparato. El incumplimiento de esta norma puede provocar
daños permanentes en el amplificador.
PASOS DE LA OPERACIÓN
• Una vez realizadas todas las conexiones al amplificador, baje todos los controles giratorios y conecte la alimentación (el
LED de alimentación se iluminará). Gire los controles de GRAVES y AGUDOS a la posición de las 12 en punto
(apuntando directamente hacia arriba) y gire el control giratorio VOLUMEN PRINCIPAL parcialmente hacia arriba para la
prueba.
• Asegúrese de que se está enviando una señal a una de las entradas y aumente gradualmente el control de volumen de
ese canal hasta que la salida se oiga a través de los altavoces. Suba el VOLUMEN PRINCIPAL al máximo nivel de
volumen requerido y reduzca el control de volumen del canal si es necesario.
Nota: La prueba inicial puede realizarse utilizando el reproductor de audio USB incorporado. La salida del amplificador se
representa en los LEDs del medidor de nivel y se debe tener cuidado de que el LED CLIP no esté (constantemente)
encendido durante el uso. La iluminación de este LED puede estar indicando distorsión o recorte de la señal de salida y el
VOLUMEN PRINCIPAL debe bajarse.
• Si hay un micrófono conectado, asegúrese de que está encendido y, si requiere alimentación phantom, asegúrese de que
esta función está activada. Aumente gradualmente su control de volumen mientras habla por el micrófono hasta alcanzar
el nivel de volumen deseado. El micrófono no debe ser capaz de "oír" (detectar) los altavoces, lo que puede causar
retroalimentación (chirridos o aullidos).
Además de los controles de volumen de canal y VOLUMEN PRINCIPAL, hay controles BASS y TREBLE EQ para ajustar el
tono de la salida general. En la posición de las 12 en punto, estos controles no aplican ningún efecto a la señal (ni realce ni
corte). Girando el control de GRAVES en el sentido de las agujas del reloj se realzan las frecuencias bajas del audio, mientras
que girándolo en sentido contrario a las agujas del reloj se cortan estas frecuencias bajas. Del mismo modo, girar el control
TREBLE en el sentido de las agujas del reloj aumenta las frecuencias altas en el audio, mientras que girarlo en sentido
contrario cortará estas frecuencias altas. Ajuste estos controles de ecualización para adaptarlos al tipo de señal de audio o
compensar la acústica de la sala.
• Normalmente, la reproducción se iniciará automáticamente cuando se inserte una memoria USB en la ranura
correspondiente. Si no es así, seleccione USB pulsando MODE para iniciar el modo USB manualmente. Pulse
REPRODUCIR/PAUSAR para iniciar la reproducción. Pulse ANTERIOR y/o SIGUIENTE para cambiar de pista.
SISTEMA DE LÍNEA DE 100 V
Para sistemas de línea de 100 V, conecte el amplificador al primer altavoz del sistema utilizando un cable de altavoz con
aislamiento doble que tenga una capacidad de corriente adecuada para soportar la salida total del amplificador.
Conecte el terminal de salida "100V" a la conexión positiva (+) del altavoz y la salida "COM" a la conexión negativa (-) del
altavoz. Conecte más altavoces en paralelo al primer altavoz con todos los terminales positivos y conectados juntos y todos los
terminales negativos conectados juntos como se muestra a continuación.
Un sistema de altavoces de línea de 100 V puede constar de muchos altavoces conectados entre sí. El factor determinante
para saber cuántos altavoces se pueden utilizar con un mismo amplificador es la potencia nominal. En la mayoría de los casos,
se aconseja conectar tantos altavoces como sea necesario con una potencia combinada no superior al 90% de la potencia
nominal de salida del amplificador.
Los terminales de un altavoz de 100 V están conectados
a un transformador y, en algunos casos, este
transformador puede estar "derivado" para diferentes
potencias. Estas derivaciones se pueden utilizar para
ajustar la potencia (y el volumen de salida) de cada
altavoz del sistema para ayudar a conseguir la potencia
total ideal del sistema para el amplificador.

19
FRANÇAIS
Nous vous remercions d’avoir acheté un produit Power Dynamics. Veuillez lire la présente notice avant l’utilisation afin de
pouvoir en profiter pleinement.
Veuillez lire la notice avant toute utilisation. Respectez impérativement les instructions afin de continuer à bénéficier de la
garantie. Prenez toutes les précautions nécessaires pour éviter tout incendie ou décharge électrique. Seul un technicien
spécialisé peut effectuer les réparations. Nous vous conseillons de conserver la présente notice pour pouvoir vous y reporter
ultérieurement.
- Avant d’utiliser l’appareil, prenez conseil auprès d’un
spécialiste. Lors de la première mise sous tension, il est
possible qu’une odeur soit perceptible. C’est normal,
l’odeur disparaîtra peu de temps après.
- L’appareil contient des composants porteurs de tension.
N’OUVREZ JAMAIS le boîtier.
- Ne placez pas des objets métalliques ou du liquide sur
l’appareil, cela pourrait causer des décharges électriques
et dysfonctionnements.
- Ne placez pas l’appareil à proximité de sources de
chaleur, par exemple radiateur. Ne positionnez pas
l’appareil sur une surface vibrante. N’obturez pas les
ouïes de ventilation.
- L’appareil n’est pas conçu pour une utilisation en
continu.
- Faites attention au cordon secteur, il ne doit pas être
endommagé.
- Lorsque vous débranchez l’appareil de la prise secteur,
tenez-le par la prise, ne tirez jamais sur le cordon.
- Ne branchez pas et ne débranchez pas l’appareil avec
les mains mouillées.
- Seul un technicien spécialisé peut remplacer la fiche
secteur et / ou le cordon secteur.
- Si l’appareil est endommagé et donc les éléments
internes sont visibles, ne branchez pas l’appareil, NE
L’ALLUMEZ PAS. Contactez votre revendeur. NE
BRANCHEZ PAS l’appareil à un rhéostat ou un dimmer.
- Pour éviter tout risque d’incendie ou de décharge
électrique, n’exposez pas l’appareil à la pluie ou à
l’humidité.
- Seul un technicien habilité et spécialisé peut effectuer les
réparations
- Branchez l’appareil à une prise secteur 220-240 Vac/50
Hz avec terre, avec un fusible 10-16 A.
- Pendant un orage ou en cas de non-utilisation prolongée
de l’appareil, débranchez l’appareil du secteur.
- En cas de non-utilisation prolongée de l’appareil, de la
condensation peut être créée. Avant de l’allumer, laissez
l’appareil atteindre la température ambiante.
- Pour utilisation dans des pièces humides ou à l'extérieur:
se référer aux directives d'installation pour un montage
sûr.
- Afin d’éviter tout accident en entreprise, vous devez
respecter les conseils et instructions.
- N’allumez pas et n’éteignez pas l’appareil de manière
répétée. Cela réduit sa durée de vie.
- Conservez l’appareil hors de la portée des enfants. Ne
laissez pas l’appareil sans surveillance.
- N’utilisez pas d’aérosols pour nettoyer les interrupteurs.
Les résidus créent des dépôts et de la graisse. En cas
de dysfonctionnement, demandez conseil à un
spécialiste.
- Ne forcez pas les réglages.
- L’appareil contient un haut-parleur pouvant engendrer
des champs magnétiques. Tenez cet appareil à 60 cm
au moins d’un téléviseur ou ordinateur.
- Si le produit comprend un accumulateur intégré plomb-
acide, rechargez l'accumulateur tous les 3 mois en cas
de non-utilisation prolongée de l'appareil. Sinon,
l'accumulateur pourrait être endommagé de manière
permanente.
- Si l’accumulateur est endommagé, remplacez-le par un
accumulateur de même type et déposez l’ancien
accumulateur dans un container de recyclage adapté.
- Si l’appareil est tombé, faites-le toujours vérifier par un
technicien avant de le rallumer.
- Pour nettoyer l’appareil, n’utilisez pas de produits
chimiques qui abîment le revêtement, utilisez
uniquement un tissu sec.
- Tenez toujours l’appareil éloigné de tout équipement
électrique pouvant causer des interférences.
- Pour toute réparation, il faut impérativement utiliser des
pièces d’origine, sinon il y a risque de dommages graves
et / ou de radiations dangereuses.
- Eteignez toujours l’appareil avant de le débrancher du
secteur et de tout autre appareil. Débranchez tous les
cordons avant de déplacer l’appareil.
- Assurez-vous que le cordon secteur n’est pas abîmé si
des personnes viennent à marcher dessus. Avant toute
utilisation, vérifiez son état.
- La tension d’alimentation est de 220-240Vac/50 Hz.
Vérifiez la compatibilité. Si vous voyagez, vérifiez que la
tension d’alimentation du pays est compatible avec
l’appareil.
- Conservez l’emballage d’origine pour pouvoir transporter
l’appareil en toute sécurité.
Ce symbole doit attirer l’attention de l’utilisateur sur les tensions élevées présentes dans le boîtier de l’appareil, pouvant
engendrer une décharge électrique.
Ce symbole doit attirer l’attention de l’utilisateur sur des instructions importantes détaillées dans la notice, elles doivent
être lues et respectées.
Cet appareil porte le symbole CE. Il est interdit d’effectuer toute modification sur l’appareil. La certification CE et la garantie
deviendraient caduques !
NOTE: Pour un fonctionnement normal de l’appareil, il doit être utilisé en intérieur avec une plage de température maximale
autorisée entre 5°C/41°F et 35°C/95°F.
Ne jetez pas les produits électriques dans la poubelle domestique. Déposez-les dans une décharge. Demandez conseil aux autorisés
ou à votre revendeur. Données techniques réservées. Les valeurs actuelles peuvent varier d’un produit à l’autre. Tout droit de
modification réservé sans notification préalable.
N’essayez pas de réparer l’appareil vous-même. Vous perdriez tout droit à la garantie. Ne faites aucune modification sur l’appareil. Vous
perdriez tout droit à la garantie La garantie deviendrait également caduque en cas d’accidents ou dommages causes par une utilisation
inappropriée de l’appareil ou un non respect des consignes présentes dans cette notice. Power Dynamics ne pourrait être tenu
responsable en cas de dommages matériels ou corporels causés par un non respect des consignes de sécurité et avertissements. Cela est
également valable pour tous les dommages quelle que soit la forme.

20
DEBALLAGE
ATTENTION ! Immédiatement après réception, vérifiez le contenu du carton et assurez-vous que tous les éléments sont bien
présents et en bon état. Si besoin, faites les réserves nécessaires si le matériel ou les cartons sont endommagés. SI l’appareil
doit être retourné, faites-le dans l’emballage d’origine. Si l’appareil a été exposé à des fluctuations importantes de températures
(par exemple après le transport), ne l’allumez pas immédiatement. De la condensation peut survenir. Laissez l’appareil éteint le
temps qu’il atteigne la température ambiante.
ALIMENTATION
Vous trouvez sur l’étiquette à l’arrière de l’appareil, le type d’alimentation à utiliser. Vérifiez que la tension d’alimentation
corresponde à celle mentionnée. Toute autre alimentation peut endommager l’appareil. Reliez l’appareil au secteur, il est prêt à
être utilisé. En aucun cas, vous ne devez utiliser de dimmer ou d’alimentation réglable.
Connectez toujours l'appareil à un circuit protégé (disjoncteur ou fusible). Assurez-vous que l'appareil soit correctement
relié à la terre afin d'éviter tout risque d'électrocution ou d'incendie.
PANNEAU FRONTAL
1. ZONE SELECT
Appuyez pour (dé)sélectionner des zones distinctes, ou appuyez sur ALL ZONES pour (dé)sélectionner toutes les zones à
la fois.
2. VOLUME DE ZONE
Tourner pour régler le niveau de volume par zone.
3. INDICATEURS D'ÉTAT
Indicateurs d'état LED (puissance, niveau, protection).
4. VOLUME DU CANAL
Tourner pour régler le niveau de volume par canal.
5. COMMANDES AUX
Appuyez pour sélectionner les sources AUX (A ou B) et MEDIA (M).
Tournez le bouton pour régler le niveau de volume AUX/MEDIA.
6. BASS
Tourner pour régler le niveau des basses.
7. TREBLE
Tourner pour régler le niveau des aigus.
8. VOLUME PRINCIPAL
Tourner pour régler le volume général (principal).
9. MARCHE/ARRÊT DE L'ALIMENTATION
Appuyez sur cette touche pour allumer/éteindre l'appareil.
FACE AVANT DU LECTEUR MULTIMEDIA
A. INDICATEURS D'ÉTAT/DE MODE
Indicateurs LED d'état et de source (mode) (alimentation, WiFi/USB, BT, AUX).
B. MODE
Appuyer pour changer de mode de fonctionnement.
C. LECTURE/PAUSE
Appuyer pour démarrer/reprendre ou mettre en pause la lecture.
D. PRÉCÉDENT
Appuyer sur pour passer à la piste précédente.
E. SUIVANT
Appuyer pour passer à la piste suivante.
F. ENTRÉE AUXILIAIRE
Prise d'entrée 3,5 mm pour entrée auxiliaire.
G. USB
Prise d'entrée USB.
L’ARRIÈRE DU LECTEUR MULTIMÉDIA
H. SORTIE
Bloc de connecteurs de la sortie ligne stéréo.
I. LAN
Connecteur d'entrée RJ45 pour la fonction radio internet câblée.
J. ANTENNE WIFI
Connecteur pour l'installation d'une antenne WiFi.
K. ANTENNE BT
Connecteur pour l'installation d'une antenne BT.

21
PANNEAU ARRIÈRE
1. ENTRÉE AC ET PORTE-FUSIBLE
Prise pour brancher le cordon d'alimentation fourni. Pour savoir comment remplacer le fusible, voir "REMPLACMENT DU
FUSIBLE".
2. SORTIE HAUT-PARLEUR
Borne de sortie haut-parleur pour connecter des haut-parleurs (zones individuelles (100V) et 100V, 70V, 4 Ohm).
3. MESSAGE D'URGENCE
Terminal permettant l'enregistrement ou la lecture d'un message d'urgence.
4. ÉVACUATION EXTERNE
Terminal permettant d'activer un message d'évacuation externe, avec des options de mise en sourdine et de contournement
de zones individuelles.
5. CHIME
Dip switches d'activation du carillon et bouton de niveau. Si un carillon est souhaité sur le canal 2, placez le commutateur
dip du canal 2 en position "enable". Réglez le niveau du carillon en tournant le bouton.
6. VOX
Commutateurs dip et bouton de niveau pour l'activation de VOX. La fonction VOX (Voice-operated exchange) permet
d'activer un canal lorsqu'une entrée vocale (au-dessus d'un certain seuil) est détectée. Réglez le(s) commutateur(s) dip en
position "enable" pour utiliser cette fonction.
7. SORTIE LINK- ET REC
Connecteurs RCA pour la sortie link- et rec.
8. ENTRÉE AUXILIAIRE
Connecteurs RCA pour l'entrée AUX A- et B (gauche et droite).
9. REMOTE MIC
Connecteur d'entrée du microphone à distance (RJ45).
10. ENTRÉE DES CANAUX ET SÉLECTEURS D'ENTRÉE
Entrée ligne/micro symétrique pour les entrées des canaux 1 à 4, avec possibilité de carillon de pré-annonce.
Les entrées sont équipées de commutateurs de réglage de ligne, d'alimentation fantôme et de microphone.
Alimentation fantôme : réglez le commutateur d'entrée sur PH pour fournir une alimentation fantôme DC +48V afin de
permettre l'utilisation d'un microphone à condensateur.
REMPLACEMENT DU FUSIBLE
Si le fusible est défectueux, il faut le remplacer par un fusible de même type et de même valeur. Avant de le remplacer, veillez à
débrancher l’appareil. Procédure:
Etape 1: Ouvrez le porte-fusible sur le panneau arrière avec un petit tournevis.
Etape 2: Retirez l’ancien fusible.
Etape 3: Placez le nouveau fusible dans le porte-fusible.
Etape 4: Remettez le porte-fusible dans le boîtier.
CONNEXION AVEC BT
Pour connecter votre appareil BT à l'amplificateur, procédez comme suit:
1. Activez BT sur votre smartphone ou votre tablette.
2. Appuyez sur la touche MODE jusqu'à ce que la LED BT s'allume.
3. Recherchez "MPlayer A" dans le menu BT du smartphone ou de la tablette.
4. Connexion avec le "MPlayer A".
WIFI
Téléchargez la dernière version de l'application LEGACY Player via l'Apple Store ou Google Play. Vous y trouverez également
les dernières fonctionnalités et des explications sur leur utilisation.
Legacy Player Apple Store Legacy Player Google Play

22
BORNES DU HAUT-PARLEUR
Ces bornes offrent une sortie basse tension de 4Ω (charge minimale). Une sortie commerciale de 100V est également
disponible. Veuillez noter qu'un seul fil doit être connecté à la vis COM et un fil à l'impédance ou à la tension sélectionnée.
ATTENTION : Il n'est pas possible d'effectuer des combinaisons multiples au niveau de la sortie.
Deux types de connexions sont prévus. La section basse impédance : 4Ω (charge minimale) est conçue pour un petit nombre
de haut-parleurs à connecter à votre amplificateur. La section 100V est spécialement conçue pour la distribution de plusieurs
enceintes. Lors de l'utilisation de la sortie 100V, les enceintes doivent être équipées d'un transformateur 100V. Le nombre
maximum d'enceintes à placer sur votre ligne de distribution est en relation avec la puissance allouée à chaque enceinte. La
puissance totale réglée sur le côté secondaire des transformateurs de votre ligne de distribution ne doit pas dépasser la
puissance de sortie RMS maximale de l'appareil. Le non-respect de cette règle peut entraîner des dommages permanents à
l'amplificateur.
ÉTAPES DE L'OPÉRATION
• Lorsque toutes les connexions à l'amplificateur sont effectuées, abaissez toutes les commandes rotatives et mettez
l'appareil sous tension (le témoin d'alimentation s'allume). Tournez les commandes BASS et TREBLE en position 12
heures (pointant vers le haut) et tournez la commande rotative VOLUME PRINCIPAL à moitié vers le haut pour le test.
• Assurez-vous qu'un signal est envoyé à l'une des entrées et augmentez progressivement le contrôle du volume de ce
canal jusqu'à ce que la sortie soit entendue dans les haut-parleurs. Augmentez le VOLUME PRINCIPAL jusqu'au niveau
de volume maximum requis et réduisez le contrôle de volume du canal si nécessaire.
Remarque : le test initial peut être effectué à l'aide du lecteur audio USB intégré. La sortie de l'amplificateur est
représentée sur les DEL de l'indicateur de niveau et il faut veiller à ce que la DEL CLIP ne soit pas (constamment) allumée
pendant l'utilisation. L'allumage de cette LED peut indiquer une distorsion ou un écrêtage du signal de sortie et le
VOLUME PRINCIPAL doit être baissé.
• Si un microphone est connecté, assurez-vous qu'il est allumé et, s'il nécessite une alimentation fantôme, assurez-vous que
cette fonction est activée. Augmentez progressivement le volume tout en parlant dans le microphone jusqu'à ce que le
niveau de volume requis soit atteint. Le microphone ne doit pas pouvoir "entendre" (détecter) les haut-parleurs, ce qui peut
provoquer un effet Larsen (grincement ou hurlement).
Outre les commandes de volume des canaux et VOLUME PRINCIPAL, les commandes BASS et TREBLE EQ permettent de
régler la tonalité de la sortie globale. En position 12 heures, ces commandes n'ont aucun effet sur le signal (pas d'accentuation
ni de réduction). En tournant la commande BASS dans le sens des aiguilles d'une montre, vous augmentez les basses
fréquences du signal audio, tandis qu'en la tournant dans le sens inverse des aiguilles d'une montre, vous les réduisez. De
même, la rotation de la commande TREBLE dans le sens des aiguilles d'une montre augmente les hautes fréquences de
l'audio, tandis que la rotation dans le sens inverse des aiguilles d'une montre réduit ces hautes fréquences. Réglez ces
commandes d'égalisation en fonction du type de signal audio ou pour compenser l'acoustique de la pièce.
• Normalement, la lecture démarre automatiquement lorsqu'une clé USB est insérée dans l'emplacement correspondant. Si
ce n'est pas le cas, sélectionnez USB en appuyant sur MODE pour lancer manuellement le mode USB. Appuyez sur
LECTURE/PAUSE pour démarrer la lecture. Appuyez sur PRÉCÉDENT et/ou SUIVANT pour changer de piste.
SYSTÈME DE LIGNE 100V
Pour les systèmes de ligne de 100 V, connectez l'amplificateur au premier haut-parleur du système à l'aide d'un câble de haut-
parleur à double isolation dont l'intensité nominale est suffisante pour supporter la sortie totale de l'amplificateur.
Connectez la borne de sortie "100V" à la connexion positive (+) de l'enceinte et la sortie "COM" à la connexion négative (-) de
l'enceinte. Connectez d'autres enceintes en parallèle à la première enceinte avec toutes les bornes positives connectées
ensemble et toutes les bornes négatives connectées ensemble comme indiqué ci-dessous.
Un système de haut-parleurs de ligne 100V peut comprendre de nombreux haut-parleurs connectés ensemble. Le facteur
déterminant du nombre de haut-parleurs pouvant être utilisés sur un seul amplificateur est la puissance nominale. Dans la
plupart des cas, il est conseillé de connecter autant de haut-parleurs que nécessaire avec une puissance combinée ne
dépassant pas 90 % de la puissance nominale de sortie de l'amplificateur.
Les bornes d'un haut-parleur de 100 V sont connectées à un transformateur et, dans certains cas, ce transformateur peut être
"taraudé" pour différentes puissances nominales. Ces réglages peuvent être utilisés pour ajuster la puissance (et le volume de
sortie) de chaque haut-parleur du système afin d'atteindre la puissance totale idéale du système pour l'amplificateur.

23
POLSKI
Gratulujemy zakupu urządzenia marki Power Dynamics. Proszę o przeczytanie instrukcji przed użyciem urządzenia, aby jak
najlepiej móc wykorzystać jego możliwości.
Przeczytaj tę instrukcję przed pierwszym użyciem urządzenia. Postępuj zgodnie z instrukcją, aby nie utracić gwarancji. Zwróć
uwagę na wszystkie ostrzeżenia, aby uniknąć pożaru lub/oraz porażenia prądem. Naprawy mogą być przeprowadzane jedynie
przez autoryzowany serwis. Zatrzymaj tę instrukcję na wypadek potrzeby w przyszłości.
- Przed użyciem skonsultuj się ze specjalistą. Podczas
pierwszego użycia urządzenie może wydzielić
specyficzny zapach. To zupełnie normalne, zniknie po
chwili.
- Urządzenie posiada podzespoły przewodzące prąd. Nie
otwieraj obudowy urządzenia.
- Nie umieszczaj metalowych obiektów ani płynów w
urządzeniu. Może to spowodować porażenie prądem lub
uszkodzenie sprzętu.
- Nie umieszczaj w pobliżu takich źródeł ciepła jak grzejnik
itd. Nie umieszczaj urządzenia na wibrującej
powierzchni. Nie zasłaniaj kanałów wentylacyjnych.
- Urządzenie nie jest przeznaczone do ciągłej pracy.
- Pamiętaj, aby nie uszkodzić przewodu zasilającego.
Uszkodzony przewód zasilający może spowodować
porażenie prądem lub uszkodzenie sprzętu.
- Podczas wyjmowania wtyczki z gniazdka zawsze ciągnij
za wtyczkę, nie za kabel.
- Nie wtykaj kabla mając mokre dłonie.
- Jeśli wtyczka lub/oraz kabel zasilający jest uszkodzony,
musi być wymieniony przez wykwalifikowaną osobę.
- Jeśli urządzenie jest uszkodzone na tyle, że widoczne są
części wewnętrzne, nie podłączaj sprzętu do gniazdka,
ani go nie uruchamiaj. Skontaktuj się z dystrybutorem.
Nie podłączaj urządzenia do opornika bądź dimmera.
- Aby uniknąć porażenia prądem, nie wystawiaj
urządzenia na działanie warunków atmosferycznych ani
na wilgoć.
- Sprzęt może być naprawiany tylko w autoryzowanym
serwisie.
- Podłączaj urządzenie do uziemionego źródła zasilania
(220-240Vac/50Hz) z bezpiecznikiem 10-16A.
- Podczas burzy lub w sytuacjach, gdy urządzenie nie jest
używane przez dłuższy czas, odłącz je od gniazdka.
Zasada brzmi: odłącz sprzęt od gniazdka, gdy go nie
używasz.
- Jeśli urządzenie nie było używane przez dłuższy czas,
może wystąpić kondensacja. Pozwól na to, aby sprzęt
osiągnął temperaturę pokojową.
- Do stosowania w wilgotnych pomieszczeniach lub na
zewnątrz: patrz wytyczne montażowe dotyczące
bezpiecznego montażu.
- Podczas użytkowania znacznie wzrasta temperatura
obudowy. Nie dotykaj jej w czasie pracy, bądź
natychmiast po wyłączeniu urządzenia.
- Aby uniknąć wypadków w pracy, wykonuj polecenia
zawarte w tej instrukcji.
- Zabezpiecz urządzenie dodatkowym łańcuchem
bezpieczeństwa. Używaj wysokiej jakości haków.
Upewnij się, że nikt nie stoi w pobliżu okolicy montażu.
Montuj sprzęt w odległości co najmniej 50cm od
materiałów łatwopalnych i zachowuj co najmniej 1m
wolnej przestrzeni z każdej strony, aby zapewnić
odpowiednie chłodzenie
- Urządzenie posiada diody LED wysokiej mocy. Nie patrz
bezpośrednio na diody, aby nie uszkodzić wzroku.
- Nie włączaj i wyłączaj urządzenia co chwilę. Skraca to
jego żywotność.
- Trzymaj z dala od dzieci. Nie zostawiaj sprzętu bez
opieki.
- Nie używaj spray’ów do czyszczenia przełączników. To
powoduje osiadanie się kurzu oraz tłuszczu. W
przypadku usterki zasięgnij rady u specjalisty. Obsługuj
urządzenie mając czyste ręce.
- Nie naciskaj przycisków z zbyt dużą siłą.
- Jeśli urządzenie upadnie, przed kolejnym włączeniem
zawsze musi być sprawdzone przez wykwalifikowanego
technika.
- Nie używaj chemikaliów do czyszczenia obudowy.
Niszczą one lakier. Dokonuj czyszczenia za pomocą
suchej szmatki.
- Trzymaj z dala od innej elektroniki, która może
spowodować zakłócenia.
- Podczas serwisu używaj tylko oryginalnych części. W
innym przypadku może nastąpić poważne uszkodzenie
sprzętu, lub niebezpieczne promieniowanie.
- Wyłącz urządzenie przed wyciągnięciem kabla
zasilającego. Odłącz wszystkie kable przed
przenoszeniem sprzętu.
- Upewnij się, że nikt nie uszkodzi kabla zasilającego.
Sprawdź przed każdym użyciem, czy kabel zasilający nie
nosi znamion uszkodzenia.
- Urządzenie może pracować przy napięciu 220-
240Vac/50Hz. Jeśli podróżujesz ze sprzętem, sprawdź,
czy możesz je bezpiecznie podłączyć do prądu.
- Zachowaj oryginalny karton, aby móc transportować
urządzenie w bezpiecznych warunkach.
Ten znak zwraca uwagę użytkownika na wysokie napięcie, które jest obecne w środku obudowy urządzenia. Napięcie
jest wystarczające, aby porazić użytkownika.
Ten znak zwraca uwagę użytkownika do ważnych informacji, które znajdują się w instrukcji. Informacje te powinny być
przeczytane oraz uwzględnione w codziennym użytkowaniu
Urządzenie posiada certyfikat CE. Nie wolno wprowadzać żadnych zmian w urządzeniu. Każda modyfikacja sprzętu spowoduje
utratę certyfikatu CE oraz gwarancji!
UWAGA: Urządzenie może funkcjonować w pomieszczeniach o temperaturze pomiędzy 5°C/41°F oraz 35°C/95°F.
WAŻNA INFORMACJA: Urządzenia elektryczne muszą być składowane w miejscach do tego przeznaczonych.
Sprawdź, gdzie w Twojej okolicy znajduje się najbliższe centrum recyklingu. Specyfikacja techniczna poszczególnych
urządzeniach może się nieznacznie różnić. Specyfikacja może ulec zmian bez powiadomień.
Nie próbuj dokonywać żadnych napraw samodzielnie, to spowoduje unieważnienie gwarancji. Gwarancja nie dotyczy uszkodzeń
spowodowanych niewłaściwym użytkowaniem sprzętu, niezgodnie z instrukcją. Power Dynamics nie jest odpowiedzialny za
uszczerbek na zdrowiu oraz kontuzje spowodowane niestosowaniem się do zaleceń bezpieczeństwa. Dotyczy to wszelakich
uszkodzeń.

24
INSTRUKCJA ROZPAKOWYWANIA
OSTRZEŻENIE! Natychmiast po odbiorze urządzenia, ostrożnie otwórz karton ochronny, oraz sprawdź zawartość i stan
techniczny przedmiotu. Niezwłocznie powiadom kuriera oraz zachowaj opakowanie zewnętrzne do kontroli, jeśli jakikolwiek
element zawartości wygląda na zniszczony w transporcie lub nosi objawy złego traktowania paczki. W takim wypadku należy
niezwłocznie odesłać sprzęt do producenta. Sprzęt należy wysłać w oryginalnym opakowaniu. Jeśli urządzenie było wystawione
na działanie niskich temperatur (np. podczas transportu), nie uruchamiaj go od razu. Powstające zjawisko kondensacji widy
może uszkodzić urządzenie. Pozostaw urządzenie wyłączone, dopóki nie osiągnie temperatury pokojowej.
ZASILANIE
Na naklejce z tyłu urządzenia znajduje się oznaczenie dotyczące rodzaju zasilania. Sprawdź, czy napięcie w gniazdku zgadza
się z wymaganym przez producenta. Złe napięcie może spowodować nienaprawialne uszkodzenie urządzenia.
Zawsze podłączaj urządzenie do zabezpieczonego obwodu elektrycznego (za pomocą bezpiecznika lub wyłącznika
instalacyjnego). Upewnij się, że urządzenie jest uziemione, aby uniknąć pożaru lub śmiertelnego porażenia prądem.
PANEL PRZEDNI
1. ZONE SELECT (STREFY)
Naciśnij przycisk , aby (de)wybrać oddzielne strefy, lub naciśnij przycisk ALL ZONES, aby (de)wybrać wszystkie strefy
jednocześnie.
2. GŁOŚNOŚĆ ZONE (STREFY)
Obróć, aby dostosować poziom głośności dla każdej strefy.
3. WSKAŹNIKI STANU
Wskaźniki stanu LED (zasilanie, poziom, ochrona).
4. GŁOŚNOŚĆ KANAŁU
Obróć, aby dostosować poziom głośności dla każdego kanału.
5. PRZYCISKI AUX
Naciśnij przycisk , aby wybrać źródła AUX (A lub B) i multimediów (M).
Obróć pokrętło, aby wyregulować poziom głośności AUX/MEDIA.
6. BASS
Obróć, aby dostosować poziom basów.
7. TREBLE
Obróć, aby wyregulować poziom wysokich tonów.
8. GŁOŚNOŚĆ GŁÓWNA
Obróć, aby wyregulować głośność główną.
9. WŁĄCZANIE/WYŁĄCZANIE ZASILANIA
Naciśnij, aby włączyć/wyłączyć urządzenie.
PRZÓD ODTWARZACZA MULTIMEDIALNEGO
A. WSKAŹNIKI STANU/TRYBU
Wskaźniki LED stanu i źródła (trybu) (zasilanie, WiFi/USB, BT, AUX).
B. MODE
Naciśnij, aby zmienić tryb pracy.
C. ODTWARZANIE/PAUZA
Naciśnij, aby rozpocząć/wznowić lub wstrzymać odtwarzanie.
D. POPRZEDNIE
Naciśnij, aby przejść do poprzedniej ścieżki.
E. NASTĘPNY
Naciśnij, aby przejść do następnego utworu.
F. WEJŚCIE DODATKOWE
Gniazdo wejściowe 3,5 mm dla wejścia pomocniczego.
G. USB
Gniazdo wejściowe USB.
TYŁ ODTWARZACZA MULTIMEDIALNEGO
H. WYJŚCIE
Blok złączy wyjścia liniowego stereo.
I. LAN
Złącze wejściowe RJ45 dla funkcji przewodowego radia internetowego.
J. ANTENA WIFI
Złącze do instalacji anteny WiFi.
K. ANTENA BT
Złącze do instalacji anteny BT.

25
PANEL TYLNY
1. WEJŚCIE AC I UCHWYT BEZPIECZNIKA
Gniazdo do podłączenia dostarczonego przewodu zasilającego. Instrukcje dotyczące wymiany bezpiecznika znajdują się w
części "WYMIANA BEZPIECZNIKA".
2. WYJŚCIE GŁOŚNIKOWE
Zacisk wyjścia głośnikowego do podłączenia głośników (poszczególne strefy (100V) i 100 V, 70 V, 4 Ohm).
3. KOMUNIKAT ALARMOWY
Terminal umożliwiający nagrywanie lub odtwarzanie wiadomości alarmowej.
4. EWAKUACJA ZEWNĘTRZNA
Terminal do włączania zewnętrznego komunikatu ewakuacyjnego, z opcjami wyciszania i pomijania poszczególnych stref.
5. CHIME
Przełączniki DIP włączenia gongu i pokrętło poziomu. Jeśli wymagany jest gong na kanale 2, należy ustawić przełącznik dip
switch kanału 2 w pozycji "enable". Wyreguluj poziom dzwonka, obracając pokrętło.
6. VOX
Przełączniki VOX i pokrętło poziomu. VOX (voice-operated exchange) zapewnia opcję włączenia kanału po wykryciu wejścia
głosowego (powyżej określonego progu). Aby skorzystać z tej funkcji, należy ustawić przełączniki DIP w pozycji "enable".
7. WYJŚCIE LINK- I REC
Złącza RCA dla wyjścia Link i Rec.
8. WEJŚCIE DODATKOWE
Złącza RCA dla wejścia AUX A- i B (lewe i prawe).
9. REMOTE MIC
Złącze wejściowe zdalnego mikrofonu (RJ45).
10. WEJŚCIE KANAŁU I SELEKTORY WEJŚĆ
Zbalansowane wejście liniowe/mikrofonowe dla kanałów wejściowych 1-4, w tym możliwość gongu przed ogłoszeniem.
Wejścia są wyposażone w przełączniki ustawień linii, zasilania phantom i mikrofonu.
Zasilanie fantomowe: ustaw przełącznik wejścia w pozycji PH, aby dostarczyć zasilanie fantomowe DC +48V w celu
umożliwienia korzystania z mikrofonu pojemnościowego.
WYMIANA BEZPIECZNIKA
Jeśli bezpiecznik jest niesprawny, wymień go na nowy egzemplarz tego samego typu i wartości. Przed wymianą bezpiecznika
wyciągnij kabel zasilający z gniazda. Instrukcja:
Krok 1: Otwórz śrubokrętem zasłonkę bezpiecznika na tylnym panelu.
Krok 2: Wyciągnij bezpiecznik.
Krok 3: Włóż nowy bezpiecznik w obudowę.
Krok 4: Zasłoń obudowę bezpiecznika oryginalnym plastikiem.
POŁĄCZENIE Z BT
Aby podłączyć urządzenie BT do wzmacniacza, wykonaj następujące czynności:
1. Włącz BT na smartfonie lub tablecie.
2. Naciskaj przycisk MODE, aż zaświeci się dioda LED BT.
3. Wyszukaj "MPlayer A" w menu BT smartfona lub tabletu.
4. Połącz z "MPlayer A".
WIFI
Pobierz najnowszą wersję aplikacji LEGACY Player ze sklepu Apple lub Google Play. Tutaj znajdziesz również najnowsze
funkcje i wyjaśnienia, jak z nich korzystać.
Legacy Player Apple Store Legacy Player Google Play

26
ZACISKI GŁOŚNIKOWE
Terminale te oferują wyjście niskonapięciowe 4Ω (minimalne obciążenie). Dostępne jest również wyjście komercyjne 100V.
Należy pamiętać, że tylko jeden przewód powinien być podłączony do śruby COM i jeden przewód do wybranej impedancji lub
napięcia.
UWAGA: Nie można wykonać wielu kombinacji na poziomie wyjścia.
Dostępne są dwa różne typy połączeń. Sekcja o niskiej impedancji: 4Ω (minimalne obciążenie) jest przeznaczona dla niewielkiej
ilości głośników podłączanych do wzmacniacza. Sekcja 100V jest specjalnie zaprojektowana do dystrybucji wielu głośników. W
przypadku korzystania z wyjścia 100V, głośniki muszą być wyposażone w transformator 100V. Maksymalna liczba głośników,
które można umieścić na linii dystrybucyjnej, zależy od mocy przypisanej do każdego głośnika. Całkowita moc ustawiona po
stronie wtórnej transformatorów na linii głośnikowej nie może przekraczać maksymalnej mocy wyjściowej RMS urządzenia.
Nieprzestrzeganie tego zalecenia może spowodować trwałe uszkodzenie wzmacniacza.
KROKI DZIAŁANIA
• Po wykonaniu wszystkich połączeń ze wzmacniaczem, obróć wszystkie pokrętła w dół i włącz zasilanie (dioda LED
zasilania zaświeci się). Przekręć pokrętła BASS i TREBLE do pozycji godziny 12 (skierowane prosto w górę) i przekręć
pokrętło GŁOŚNOŚĆ GŁÓWNA częściowo w górę w celu przetestowania.
• Upewnij się, że sygnał jest doprowadzany do jednego z wejść i stopniowo zwiększaj regulator głośności dla tego kanału,
aż wyjście będzie słyszalne przez głośniki. Zwiększ GŁOŚNOŚĆ GŁÓWNA do maksymalnego wymaganego poziomu
głośności i w razie potrzeby zmniejsz regulację głośności kanału.
Uwaga: Wstępny test można przeprowadzić przy użyciu wbudowanego odtwarzacza audio USB. Wyjście wzmacniacza
jest reprezentowane przez diody LED miernika poziomu i należy uważać, aby dioda LED CLIP nie świeciła się (stale)
podczas użytkowania. Podświetlenie tej diody LED może wskazywać na zniekształcenia lub przesterowanie sygnału
wyjściowego i należy zmniejszyć głośność GŁOŚNOŚĆ GŁÓWNA.
• Jeśli podłączony jest mikrofon, upewnij się, że jest on włączony, a jeśli wymaga zasilania fantomowego, upewnij się, że
funkcja ta jest włączona. Stopniowo zwiększaj regulację głośności podczas mówienia do mikrofonu, aż do osiągnięcia
wymaganego poziomu głośności. Mikrofon nie powinien być w stanie "usłyszeć" (wykryć) głośników, co może spowodować
sprzężenie zwrotne (piszczenie lub wycie).
Oprócz regulatorów głośności kanału i GŁOŚNOŚĆ GŁÓWNA, dostępne są regulatory BASS i TREBLE EQ do regulacji
brzmienia całego sygnału wyjściowego. W pozycji na godzinie 12, regulatory te nie mają żadnego wpływu na sygnał (brak
podbicia lub odcięcia). Obracanie pokrętła BASS zgodnie z ruchem wskazówek zegara powoduje podbicie niskich
częstotliwości w dźwięku, natomiast obracanie go w kierunku przeciwnym do ruchu wskazówek zegara powoduje obcięcie tych
niskich częstotliwości. Podobnie, obracanie pokrętła TREBLE zgodnie z ruchem wskazówek zegara wzmacnia wysokie
częstotliwości w dźwięku, podczas gdy obracanie go w kierunku przeciwnym do ruchu wskazówek zegara spowoduje obcięcie
tych wysokich częstotliwości. Wyreguluj te elementy sterujące korektora, aby dopasować je do typu sygnału audio lub
skompensować akustykę pomieszczenia.
• Zazwyczaj odtwarzanie rozpocznie się automatycznie po włożeniu pamięci USB do odpowiedniego gniazda. Jeśli tak się
nie stanie, wybierz USB, naciskając MODE, aby ręcznie uruchomić tryb USB. Naciśnij ODTWARZANIE/PAUZA, aby
rozpocząć odtwarzanie. Naciśnij POPRZEDNI i/lub NASTĘPNY, aby zmienić ścieżkę.
SYSTEM LINIOWY 100 V
W przypadku systemów liniowych 100 V należy podłączyć wzmacniacz do pierwszego głośnika w systemie za pomocą
podwójnie izolowanego przewodu głośnikowego, który ma odpowiednią obciążalność prądową, aby obsłużyć całkowitą moc
wyjściową wzmacniacza.
Podłącz zacisk wyjściowy "100V" do dodatniego (+) złącza głośnika, a wyjście "COM" do ujemnego (-) złącza głośnika. Podłącz
kolejne głośniki równolegle do pierwszego głośnika, łącząc ze sobą wszystkie zaciski dodatnie i wszystkie zaciski ujemne, jak
pokazano poniżej.
System głośników liniowych 100 V może składać się z wielu połączonych ze sobą głośników. Czynnikiem decydującym o tym,
ile głośników może być używanych z jednym wzmacniaczem, jest jego moc znamionowa. W większości przypadków zaleca się
podłączenie tylu głośników, ile potrzeba, o łącznej mocy nie większej niż 90% mocy wyjściowej wzmacniacza.
Zaciski głośnika 100 V są podłączone do transformatora, a w niektórych przypadkach transformator ten może być "gwintowany"
dla różnych mocy znamionowych. Te odczepy mogą być wykorzystane do regulacji mocy (i głośności wyjściowej) każdego
głośnika w systemie, aby pomóc osiągnąć idealną całkowitą moc systemu dla wzmacniacza.

27
ČESKY
Gratulujeme ke koupi tohoto produktu Power Dynamics. Před použitím výrobku si pečlivě přečtěte tento návod, abyste mohli
plně využívat všechny jeho funkce.
Před použitím přístroje si přečtěte tuto příručku. Postupujte podle pokynů, aby nedošlo ke zneplatnění záruky. Přijměte veškerá
preventivní opatření, abyste zabránili požáru nebo úrazu elektrickým proudem. Opravy smí provádět pouze kvalifikovaný
technik, aby nedošlo k úrazu elektrickým proudem. Návod si uschovejte pro budoucí použití.
- Před použitím přístroje se poraďte s prodávajícím. Při
prvním zapnutí jednotky může dojít k zápachu. To je
normální a po chvíli to zmizí.
- Přístroj obsahuje části pod napětím. Proto neotvírejte
jeho kryt.
- Neumisťujte do přístroje kovové předměty a nelijte na ni
tekutiny. Mohlo by dojít k úrazu elektrickým proudem a
poruše.
- Neumisťujte jednotku do blízkosti zdrojů tepla, jako jsou
radiátory apod.
- Neumisťujte jednotku na vibrující povrch. Nezakrývejte
ventilační otvory.
- Jednotka není vhodná pro trvalé používání.
- S napájecím kabelem buďte opatrní a nepoškozujte jej.
Vadný nebo poškozený napájecí kabel může způsobit
úraz elektrickým proudem, nebo poruchu.
- Při odpojování zařízení od zásuvky vždy tahejte za
zástrčku, nikdy ne za kabel.
- Nezapojujte a neodpojujte přístroj mokrýma rukama.
- Pokud je poškozena zástrčka a / nebo napájecí kabel,
musí být opraveny kvalifikovaným technikem.
- Pokud je jednotka poškozena do takové míry, že jsou
vidět vnitřní části, NEZAPOJUJTE jednotku do zásuvky
ani ji NEZAPÍNEJTE. Kontaktujte svého prodejce.
NEPŘIPOJUJTE jednotku k reostatu nebo stmívači.
- Aby nedošlo k požáru, nebo úrazu elektrickým proudem,
nevystavujte jednotku dešti a vlhkosti.
- Všechny opravy musí provádět pouze kvalifikovaný
technik.
- Připojte přístroj k uzemněné síťové zásuvce (220 - 240
V, střídavý / 50 Hz) chráněné pojistkou 10 - 16 A.
- Během bouřky nebo pokud nebudete jednotku delší dobu
používat, odpojte ji od elektrické sítě. Pokud zařízení
nepoužíváte, odpojte jej od elektrické sítě.
- Pokud jednotku nebudete delší dobu používat, může
dojít ke kondenzaci vlhkosti. Než přístroj zapnete,
nechejte jej dosáhnout pokojovou teplotu. Nikdy
nepoužívejte jednotku ve vlhkých místnostech nebo
venku.
- Abyste předešli nehodám na veřejnosti, musíte
postupovat podle příslušných pokynů a instrukcí.
- Zařízení opakovaně nezapínejte a nevypínejte. Tím se
zkracuje jeho životnost.
- Uchovávejte jednotku mimo dosah dětí. Nenechávejte
jednotku bez dozoru.
- K čištění spínačů nepoužívejte čisticí spreje. Zbytky
těchto sprejů způsobují, že se na spínačích usazuje
prach a mastnota. V případě poruchy vždy vyhledejte
radu od odborníka.
- Na ovládací prvky netlačte silou.
- Tato jednotka má uvnitř reproduktor, který může způsobit
magnetické pole. Udržujte proto toto zařízení ve
vzdálenosti alespoň 60 cm od počítače nebo televize.
- Pokud má tato jednotka vestavěnou dobíjecí baterii, tak ji
dobijte alespoň 1x za 3 měsíce. Jinak může dojít k
poškození baterie.
- Pokud je baterie poškozená, vyměňte ji za baterii se
stejnými specifikacemi. Poškozenou baterii zlikvidujte
ekologicky.
- Pokud Vám přístroj upadnul, nechte ho před opětovným
zapnutím zkontrolovat kvalifikovaným technikem.
- K čištění jednotky nepoužívejte chemikálie. Poškozují
lak. Jednotku čistěte pouze suchým hadříkem.
- Uchovávejte mimo dosah elektronických zařízení, která
mohou způsobovat rušení.
- K opravám používejte pouze originální náhradní díly,
jinak může dojít k vážnému poškození nebo
nebezpečnému záření.
- Před odpojením od sítě nebo od jiného zařízení přístroj
vypněte. Před přemisťováním přístroje odpojte všechny
napájecí i jiné kabely.
- Zajistěte, aby nemohlo dojít k poškození síťového
kabelu, když po něm lidé kráčí. Před každým použitím
zkontrolujte přívodní kabel, zda není poškozený nebo
vadný!
- Síťové napětí je 220 – 240 V, AC / 50Hz. Zkontrolujte,
zda se napětí v zásuvce shoduje. Pokud cestujete,
zkontrolujte, zda je v dané zemi pro tuto jednotku vhodné
síťové napětí.
- Uschovejte originální obalový materiál, abyste mohli
jednotku v případě potřeby přepravit v bezpečných
podmínkách.
Tento znak upozorňuje uživatele na vysokému napětí, které je uvnitř přístroje a které je dostatečně velké, aby způsobilo
nebezpečí úrazu elektrickým proudem.
Tento znak upozorňuje uživatele na důležité pokyny obsažené v této příručce, kterou by si měl před používáním přečíst
a dodržovat.
Jednotka má certifikát CE. Na jednotce je zakázáno provádět jakékoli změny. Certifikát CE by tím pozbyl platnost a zboží by
přišlo o záruku!
POZNÁMKA: Aby bylo zajištěno, že jednotka bude fungovat normálně, musí být používána v místnostech s teplotou mezi 5 °C
a 35 °C.
Elektrické výrobky se nesmí ukládat do domácího odpadu. Přineste je, prosím, do recyklačního centra. Zeptejte se
místních úřadů nebo prodejce na postup. Specifikace jsou typické. Skutečné hodnoty se mohou z jedné jednotky na
druhou mírně změnit. Specifikace lze změnit bez předchozího upozornění.
Nepokoušejte se sami provádět žádné opravy. To by zneplatnilo vaši záruku. Na jednotce neprovádějte žádné změny. Tím by také zanikla
vaše záruka. Záruka se nevztahuje na nehody nebo škody způsobené nevhodným použitím nebo nerespektováním varování obsažených v
této příručce. Power Dynamics nemůže nést odpovědnost za zranění osob způsobená nerespektováním bezpečnostních doporučení a
varování. To platí také pro všechny škody v jakékoli formě.

28
POKYNY PO VYBALENÍ
POZOR! Ihned po obdržení produktu pečlivě vybalte krabici, zkontrolujte obsah, zda jsou všechny součásti přítomny a zda jsou
v bezvadném stavu. Okamžitě informujte přepravce i prodejce a uschovejte obal ke kontrole, pokud se objeví nějaké známky
poškození, nebo pokud obal samotný vykazuje známky nesprávné manipulace. Ponechte si veškerý původní balicí materiál. V
případě, že produkt bude muset být vrácen do továrny, je důležité, aby byl vrácen a zabalen v původní krabici.
Pokud bylo zařízení vystaveno drastickým výkyvům teploty (např. v rámci přepravy), nezapínejte jej okamžitě. Vznikající
kondenzovaná voda může poškodit vaše zařízení. Nechejte zařízení vypnuté, dokud nedosáhne pokojové teploty.
NAPÁJENÍ
Štítek na zadní/spodní straně výrobku udává síťové napětí, ke kterému musí být výrobek připojen. Zkontrolujte, zda síťové
napětí odpovídá tomuto napětí. Jiné než uvedené napětí může způsobit neopravitelné poškození přístroje. Přístroj musí být
také připojen přímo k síťovému napětí a nesmí být použit žádný stmívač nebo nastavitelný zdroj napájení.
Přístroj vždy připojujte k chráněnému obvodu (jistič nebo pojistka). Ujistěte se, že má zařízení vhodné elektrické
uzemnění, abyste předešli riziku úrazu elektrickým proudem nebo požáru.
PŘEDNÍ PANEL
1. ZONE SELECT
Stisknutím tlačítka (de)vyberete jednotlivé zóny nebo stisknutím tlačítka ALL ZONES (de)vyberete všechny zóny najednou.
2. HLASITOST ZONE (ZÓNOVÁ)
Otáčením nastavte úroveň hlasitosti pro jednotlivé zóny.
3. STAVOVÉ INDIKÁTORY
Indikátory stavu LED (napájení, úroveň, ochrana).
4. HLASITOST KANÁLU
Otáčením nastavte úroveň hlasitosti pro každý kanál.
5. OVLADAČE AUX
Stisknutím tlačítka vyberte zdroje AUX (A nebo B) a média (M).
Otáčením knoflíku nastavte úroveň hlasitosti AUX/MEDIA.
6. BASS
Otáčením nastavte úroveň basů.
7. TREBLE
Otáčením nastavte úroveň vysokých tónů.
8. HLASITOST MASTER
Otáčením nastavte hlavní (hlavní) hlasitost.
9. ZAPNUTÍ/VYPNUTÍ NAPÁJENÍ
Stisknutím zapnete/vypnete zařízení.
PŘEDNÍ STRANA PŘEHRÁVAČE MÉDIÍ
A. INDIKÁTORY STAVU/REŽIMU
Indikátory LED stavu a zdroje (režimu) (napájení, WiFi/USB, BT, AUX).
B. MODE
Stisknutím změníte provozní režimy.
C. PŘEHRÁT/PAUZA
Stisknutím spustíte/obnovíte nebo pozastavíte přehrávání.
D. PŘEDCHOZÍ
Stisknutím přepnete na předchozí skladbu.
E. DALŠÍ
Stisknutím přejdete na další skladbu.
F. VSTUP AUX INPUT
3,5mm vstupní konektor pro přídavný vstup.
G. USB
Vstupní zásuvka USB.
ZADNÍ STRANA PŘEHRÁVAČE MÉDIÍ
H. VÝSTUP
Blok konektorů stereofonního linkového výstupu.
I. LAN
Vstupní konektor RJ45 pro funkci kabelového internetového rádia.
J. ANTÉNA WIFI
Konektor pro instalaci antény WiFi.
K. ANTÉNA BT
Konektor pro instalaci antény BT.

29
ZADNÍ PANEL
1. VSTUP STŘÍDAVÉHO PROUDU A DRŽÁK POJISTEK
Zásuvka pro připojení dodaného napájecího kabelu. Pokyny k výměně pojistky naleznete v části "VÝMĚNA POJISTKY".
2. VÝSTUP REPRODUKTORU
Výstupní svorka reproduktorů pro připojení reproduktorů (jednotlivé zóny (100V) a 100 V, 70 V, 4 Ohm).
3. NOUZOVÁ ZPRÁVA
Terminál umožňující nahrávání nebo přehrávání tísňové zprávy.
4. VNĚJŠÍ EVAKUACE
Terminál pro aktivaci externího evakuačního hlášení s možností ztlumení a obcházení jednotlivých zón.
5. CHIME
Přepínače pro povolení zvonění a knoflík úrovně. Pokud je požadován gong na kanálu 2, nastavte přepínač kanálů 2 do
polohy "enable". Otáčením knoflíku nastavte úroveň zvonění.
6. VOX
Přepínače VOX a knoflík úrovně. VOX (hlasová ústředna) poskytuje možnost povolit kanál, když je detekován hlasový vstup
(nad určitou prahovou hodnotou). Chcete-li tuto funkci využívat, nastavte dip přepínač(e) do polohy "enable" (povolit).
7. VÝSTUP LINK- A REC
Konektory RCA pro linkový a záznamový výstup.
8. VSTUP AUX
Konektory RCA pro vstup AUX A a B (levý a pravý).
9. VZDÁLENÝ MIKROFON
Vstupní konektor pro vzdálený mikrofon (RJ45).
10. VSTUPY KANÁLŮ A VOLIČE VSTUPŮ
Vyvážený linkový/mikrofonní vstup pro kanálový vstup 1-4, včetně možnosti předozadního gongu.
Vstupy jsou vybaveny přepínači pro nastavení linkového a fantomového napájení a mikrofonu.
Fantomové napájení: nastavte přepínač vstupu do polohy PH pro napájení fantomovým napětím DC +48V pro použití
kondenzátorového mikrofonu.
VÝMĚNA POJISTKY
Pokud je pojistka vadná, vyměňte ji za pojistku stejného typu a hodnoty. Před výměnou pojistky odpojte napájecí kabel.
Postup:
Krok 1: Otevřete držák pojistky na zadním panelu pomocí montážního šroubováku.
Krok 2: Vyjměte starou pojistku z držáku pojistky.
Krok 3: Nainstalujte novou pojistku do držáku pojistky.
Krok 4: Vyměňte držák pojistky v krytu.
PŘIPOJENÍ K BT
Připojení zařízení BT k zesilovači proveďte podle následujících kroků:
1. Zapněte BT na svém smartphonu nebo tabletu.
2. Stiskněte tlačítko MODE, dokud se nerozsvítí kontrolka BT.
3. V nabídce BT smartphonu nebo tabletu vyhledejte položku "MPlayer A".
4. Připojte se k "MPlayer A".
STAŽENÍ A INSTALACE APLIKACE WIIM LEGACY PLAYER
Stáhněte si nejnovější verzi aplikace LEGACY Player prostřednictvím obchodu Apple Store nebo Google play. Zde také najdete
nejnovější funkce a vysvětlení, jak je používat.
Legacy Player Apple Store Legacy Player Google Play

30
REPRODUKTOROVÉ SVORKY
Tyto svorky nabízejí nízké výstupní napětí 4Ω (minimální zatížení). K dispozici je také komerční výstup 100 V.
Upozorňujeme, že ke šroubu COM by měl být připojen pouze jeden vodič a jeden vodič ke zvolené impedanci nebo napětí.
POZOR: Na výstupní úrovni nelze provádět vícenásobné kombinace.
K dispozici jsou dva různé typy připojení. Nízkoimpedanční část: 4Ω (minimální zatížení) je určena pro připojení malého
množství reproduktorů k zesilovači. Sekce 100 V je určena zejména pro rozvod více reproduktorů. Při použití 100V výstupu
musí být reproduktory vybaveny 100V transformátorem. Maximální množství reproduktorů, které lze umístit na vaši distribuční
linku, souvisí s výkonem přiděleným jednotlivým reproduktorům. Celkový výkon nastavený na sekundární straně transformátorů
na vaší reproduktorové lince nesmí překročit maximální efektivní výstupní výkon zařízení. Nerespektování tohoto požadavku
může způsobit trvalé poškození zesilovače.
KROKY OPERACE
• Po provedení všech připojení k zesilovači otočte všechny otočné ovladače dolů a zapněte napájení (rozsvítí se kontrolka
napájení). Otočte ovladače BASS a TREBLE do polohy 12 hodin (směřují přímo nahoru) a otočte otočný ovladač
HLASITOST MASTER částečně nahoru pro testování.
• Ujistěte se, že je na jeden ze vstupů přiváděn signál, a postupně zvyšujte ovládání hlasitosti pro daný kanál, dokud
nebude přes reproduktory slyšet výstup. Zesilte ovladač HLASITOST MASTER na maximální požadovanou úroveň
hlasitosti a v případě potřeby snižte ovládání hlasitosti kanálu.
Poznámka: Úvodní test lze provést pomocí vestavěného USB audio přehrávače. Výstup zesilovače je znázorněn na
kontrolkách měřiče úrovně a je třeba dbát na to, aby kontrolka CLIP během používání (trvale) nesvítila. Rozsvícení této
LED diody může signalizovat zkreslení nebo oříznutí výstupního signálu a je třeba snížit HLASITOST MASTER.
• Pokud je připojen mikrofon, zkontrolujte, zda je zapnutý, a pokud vyžaduje fantomové napájení, zkontrolujte, zda je tato
funkce povolena. Při mluvení do mikrofonu postupně zvyšujte jeho ovládání hlasitosti, dokud nedosáhnete požadované
úrovně hlasitosti. Mikrofon by neměl "slyšet" (detekovat) reproduktory, což může způsobit zpětnou vazbu (pískání nebo
kvílení).
Kromě ovladačů hlasitosti kanálu a HLASITOST MASTER jsou k dispozici ovladače BASS a TREBLE EQ, které upravují tón
celkového výstupu. V poloze 12 hodin tyto ovladače neuplatňují na signál žádný účinek (žádné zesílení nebo snížení).
Otáčením ovladače BASS ve směru hodinových ručiček se zesilují nízké frekvence zvuku, zatímco otáčením proti směru
hodinových ručiček se tyto nízké frekvence snižují. Podobně otáčením ovladače TREBLE ve směru hodinových ručiček se
zesilují vysoké frekvence zvuku, zatímco otáčením proti směru hodinových ručiček se tyto vysoké frekvence snižují. Nastavte
tyto ovladače EQ podle typu zvukového signálu nebo kompenzujte akustiku místnosti.
• Za normálních okolností se přehrávání spustí automaticky po vložení paměťového zařízení USB do příslušného slotu.
Pokud tomu tak není, vyberte USB stisknutím tlačítka MODE a spusťte režim USB ručně. Stisknutím tlačítka
PŘEHRÁT/PAUZA spustíte přehrávání. Stisknutím PŘEDCHOZÍ a/nebo DALŠÍ můžete měnit skladby.
SYSTÉM VEDENÍ 100 V
U 100V linkových systémů připojte zesilovač k prvnímu reproduktoru v systému pomocí reproduktorového vodiče s dvojitou
izolací, který má dostatečnou proudovou zatížitelnost pro celkový výkon zesilovače.
Připojte výstupní svorku "100V" ke kladnému (+) připojení reproduktoru a výstup "COM" k zápornému (-) připojení reproduktoru.
Připojte další reproduktory paralelně k prvnímu reproduktoru se všemi kladnými svorkami a spojenými dohromady a se všemi
zápornými svorkami spojenými dohromady, jak je znázorněno níže.
100V linkový reproduktorový systém se může skládat z mnoha reproduktorů spojených dohromady. Rozhodujícím faktorem pro
to, kolik reproduktorů lze použít na jeden zesilovač, je jmenovitý výkon. Pro většinu účelů se doporučuje připojit tolik
reproduktorů, kolik je potřeba, s kombinovaným výkonem nejvýše 90 % jmenovitého výstupního výkonu zesilovače.
Svorky 100V reproduktoru jsou připojeny k transformátoru a v některých případech může být tento transformátor "odbočen" pro
různé výkony. Tyto odbočky lze použít k úpravě výkonu (a výstupní hlasitosti) jednotlivých reproduktorů v systému, aby bylo
možné dosáhnout ideálního celkového výkonu systému pro daný zesilovač.

31
TECHNICAL SPECIFICATION / TECHNISCHE SPECIFICATIE / TECHNISCHE
DATEN / ESPECIFICACIONES TÉCNICAS / SPÉCIFICATIONS TECHNIQUES /
SPECYFIKACJA TECHNICZNA / TECHNICKÁ SPECIFIKACE
The specifications are typical. The actual values can slightly change from one unit to the other. Specifications can be changed
without prior notice.
The products referred to in this manual conform to the European Community Directives to which they are subject:
PMP130
PMP240
PMP360
PMP480
Ref. nr.
954.010
954.012
954.014
954.016
Playback options
BT streaming, USB, Internet radio, WiFi play, RJ45 ethernet play, Line input, Microphone (input)
Output power: RMS
130W
240W
360W
480W
Impedance
70V, 100V
Frequency response
65Hz-18KHz
Signal-to-noise ratio
>80dB
Power supply
100-240VAC 50/60Hz
THD
<1%
Dimensions (L x W x H)
370 x 482 x 90mm
Weight (kg)
9,30
10,50
12,00
13,00
European Union
United Kingdom
Tronios B.V.,
Bedrijvenpark Twente Noord 18,
7602KR Almelo, The Netherlands
Tronios Ltd.,
130 Harley Street,
London W1G 7JU, United Kingdom
2014/35/EU
S.I. 2016:1101
2014/30/EU
S.I. 2016:1091
2011/65/EC
S.I. 2012:3032
2014/53/EU
S.I. 2017:1206

32
Specifications and design are subject to change without prior notice.
www.tronios.com
Copyright © 2023 by TRONIOS the Netherlands
-
 1
1
-
 2
2
-
 3
3
-
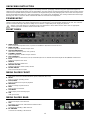 4
4
-
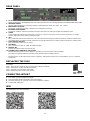 5
5
-
 6
6
-
 7
7
-
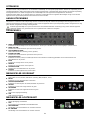 8
8
-
 9
9
-
 10
10
-
 11
11
-
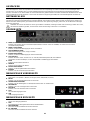 12
12
-
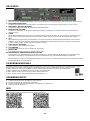 13
13
-
 14
14
-
 15
15
-
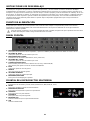 16
16
-
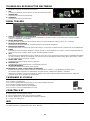 17
17
-
 18
18
-
 19
19
-
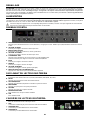 20
20
-
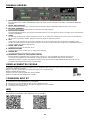 21
21
-
 22
22
-
 23
23
-
 24
24
-
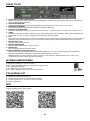 25
25
-
 26
26
-
 27
27
-
 28
28
-
 29
29
-
 30
30
-
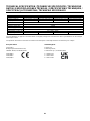 31
31
-
 32
32


Power Dynamics PMP480 de handleiding
- Categorie
- Auto audio versterkers
- Type
- de handleiding


