
Bedienungsanleitung
Instruction manual
Mode d’emploi
Instrucciones de uso
Gebruiksaanwijzing
Istruzioni per l'uso
Instruction manuals
www.tfa-dostmann.de/en/service/downloads/instruction-manuals
Kat. Nr. 60.2550
Kat. Nr. 60.2552
TFA_No. 60.2550_Anleitung_02_23 21.02.2023 15:04 Uhr Seite 1

B8
B 10
B 9
B6 B 7
Fig. 1
A1
A4
C 2
A6
B 1A 2
A 3
A 5
C 3
A 7
B 2
C 4
B 3 B 4 B 5 C 1
3
Fig. 2
2
TFA_No. 60.2550_Anleitung_02_23 21.02.2023 15:04 Uhr Seite 2

Funkwecker
54
• Ansteigender oder konstant lauter Weckton zur Wahl
• Schlummerfunktion
• Anzeige der Innentemperatur
• Anzeige von Wochentag und Datum
• Automatische Hintergrundbeleuchtung mit Lichtsensor
• Intuitive Bedienung mit geräuschlosen Tasten
4. Zu Ihrer Sicherheit
• Das Produkt ist ausschließlich für den oben beschriebenen Einsatz-
bereich geeignet. Verwenden Sie das Produkt nicht anders, als in
dieser Anleitung dargestellt wird.
• Das eigenmächtige Reparieren, Umbauen oder Verändern des Gerä-
tes ist nicht gestattet.
Vorsicht!
Verletzungsgefahr:
• Halten Sie das Gerät und die Batterien außerhalb der Reichweite von
Kindern.
• Kleinteile können von Kindern (unter drei Jahren) verschluckt wer-
den.
Funkwecker
Vielen Dank, dass Sie sich für dieses Gerät aus dem Hause TFA ent-
schieden haben.
1. Bevor Sie mit dem Gerät arbeiten
•Lesen Sie sich bitte die Bedienungsanleitung genau durch.
•Durch die Beachtung der Bedienungsanleitung vermeiden Sie
auch Beschädigungen des Geräts und die Gefährdung Ihrer gesetz-
lichen Mängelrechte durch Fehlgebrauch.
•Für Schäden, die aus Nichtbeachtung dieser Bedienungsanleitung
verursacht werden, übernehmen wir keine Haftung. Ebenso haften
wir nicht für inkorrekte Messwerte und Folgen, die sich aus sol-
chen ergeben können.
•Beachten Sie besonders die Sicherheitshinweise!
•Bewahren Sie diese Anleitung gut auf!
2. Lieferumfang
• Funkwecker
• Bedienungsanleitung
3. Einsatzbereich und alle Vorteile Ihres neuen Gerätes
• Funkuhr mit höchster Genauigkeit
• Mit Zeitzone und manueller Einstellmöglichkeit
• Zwei Alarmzeiten mit verschiedenen Wecktönen
TFA_No. 60.2550_Anleitung_02_23 21.02.2023 15:04 Uhr Seite 3

76
Funkwecker
Funkwecker
A 3: Wochentag, Datum A 4: Uhrzeit, Sekunden
A 5: DCF-Symbol (aktiviert) A 6: Alarmzeit 1 (aktiviert)
A 7: Alarmzeit 2 (aktiviert)
B: Tasten (Fig. 1-2):
B 1: SNOOZE/LIGHT Taste
B 2: Taste
B 3: – Taste
B 4: + Taste
B 5: Taste
B 6: Alarmzeit 1 ON/OFF Schiebeschalter
B 7: Alarmzeit 2 ON/OFF Schiebeschalter
B 8: AUTO LIGHT ON/OFF Schiebeschalter
B 9: SET Taste
B 10: ALARM / ALARM Schiebeschalter
C: Gehäuse (Fig. 1-2):
C 1: Batteriefach
C 2: Farbmarke Alarmzeit 1 AN/AUS
C 3: Farbmarke Alarmzeit 2 AN/AUS
C 4: Lichtsensor
• Batterien enthalten gesundheitsschädliche Säuren und können bei
Verschlucken lebensgefährlich sein. Wurde eine Batterie verschluckt,
kann dies innerhalb von 2 Stunden zu schweren inneren Verätzungen
und zum Tode führen. Wenn Sie vermuten, eine Batterie könnte ver-
schluckt oder anderweitig in den Körper gelangt sein, nehmen Sie
sofort medizinische Hilfe in Anspruch.
• Batterien nicht ins Feuer werfen, kurzschließen, auseinandernehmen
oder aufladen. Explosionsgefahr!
• Um ein Auslaufen der Batterien zu vermeiden, sollten schwache Bat-
terien möglichst schnell ausgetauscht werden.
• Sollte eine Batterie ausgelaufen sein, vermeiden Sie Kontakt mit
Haut, Augen und Schleimhäuten. Spülen Sie ggf. umgehend die
betroffenen Stellen mit Wasser und suchen Sie einen Arzt auf.
Wichtige Hinweise zur Produktsicherheit!
• Setzen Sie das Gerät keinen extremen Temperaturen, Vibrationen
und Erschütterungen aus.
• Vor Feuchtigkeit schützen.
5. Bestandteile
A: Display (Fig. 1):
A 1: Temperatur A 2: Symbol für Auto-Light (aktiviert)
TFA_No. 60.2550_Anleitung_02_23 21.02.2023 15:04 Uhr Seite 4

98
Funkwecker
Funkwecker
• Falls die Funkuhr kein DCF-Signal empfangen kann (z. B. wegen Stö-
rungen, Übertragungsdistanz, etc.), kann die Zeit manuell eingestellt
werden. Die Uhr arbeitet dann wie eine normale Quarz-Uhr (siehe:
Manuelle Einstellungen).
Empfang der Funkzeit
Die Zeitübertragung erfolgt von einer Cäsium Atom-Funkuhr, die von
der Physikalisch Technischen Bundesanstalt in Braunschweig betrieben
wird. Die Abweichung beträgt weniger als 1 Sekunde in einer Million
Jahren. Die Zeit ist kodiert und wird von Mainflingen in der Nähe von
Frankfurt am Main durch ein DCF-77 (77.5 kHz) Frequenzsignal übertra-
gen mit einer Reichweite von ca. 1.500 km. Ihre Funkuhr empfängt das
Signal, wandelt es um und zeigt immer die exakte Zeit an. Auch die
Umstellung von Sommer- und Winterzeit erfolgt automatisch. Während
der Sommerzeit erscheint DST im Display. Der Empfang hängt haupt-
sächlich von der geographischen Lage ab. Im Normalfall sollten inner-
halb des Radius von 1.500 km ausgehend von Frankfurt bei der Über-
tragung keine Probleme auftauchen.
Bitte beachten Sie folgende Hinweise:
• Es wird empfohlen, einen Abstand von mindestens 1,5 – 2 Metern zu
eventuell störenden Geräten wie Computerbildschirmen und Fern-
sehgeräten einzuhalten.
6. Inbetriebnahme
• Öffnen Sie das Batteriefach und legen Sie die drei Batterien 1,5 V AA
ein. Achten Sie auf die richtige Polarität beim Einlegen der Batterien.
• Schließen Sie das Batteriefach wieder.
• Ein kurzer Signalton ertönt und es werden alle LCD Segmente kurz
angezeigt.
• Die Uhr versucht nun, das Funksignal zu empfangen und das DCF-
Empfangszeichen blinkt. Wenn das Funksignal nach 3-8 Minuten
empfangen wurde, werden die funkgesteuerte Zeit, das Datum und
das DCF-Empfangszeichen ständig im Display angezeigt.
• Der DCF-Signalempfang findet täglich um 3:00 Uhr morgens statt.
Ist der Empfang um 3:00 Uhr nicht erfolgreich, so finden um 4:00
und um 5:00 Uhr früh weitere Empfangsversuche statt.
• Sie können die Initialisierung auch manuell starten:
• Halten Sie die –Taste für drei Sekunden gedrückt.
• Das DCF-Empfangszeichen blinkt.
• Zum Beenden des DCF-Empfangsversuchs halten Sie die –Taste
noch einmal für drei Sekunden gedrückt. Das DCF-Empfangszeichen
verschwindet.
• Es gibt drei verschiedene Empfangssymbole:
blinkt - Empfang aktiv
bleibt stehen - Empfang erfolgreich
kein Symbol - Kein Empfang/Empfang wurde deaktiviert
TFA_No. 60.2550_Anleitung_02_23 21.02.2023 15:04 Uhr Seite 5

1110
Funkwecker
Funkwecker
• Drücken Sie die – oder +Taste, wenn Sie den DCF-Funkempfang
deaktivieren wollen (OFF).
• Bestätigen Sie die Eingabe mit der SET Taste.
• Bei aktiviertem DCF-Funkempfang (ON) können Sie nach der Bestäti-
gung mit der SET Taste die Zeitzone (TZ erscheint im Display und 0
Voreinstellung blinkt) einstellen.
• Drücken Sie die – oder +Taste, um die Zeitzone einzustellen (+9/-9).
• Die Zeitzoneneinstellung wird benötigt, wenn das DCF-Funksignal
empfangen werden kann, die Zeitzone sich aber von der DCF-Funk-
zeit unterscheidet (z. B. +1=eine Stunde später).
• Bestätigen Sie die Eingabe mit der SET Taste.
• Drücken Sie die SET Taste noch einmal und Sie können nun nachein-
ander die Stunden, die Minuten, das Jahr, den Monat, den Tag, die
Temperatureinheit (Voreinstellung: °C), die Sprache für den Wochen-
tag (Voreinstellung: Deutsch) und den Tastenton (Voreinstellung:
OFF) ansteuern und mit der – oder +Taste einstellen.
• Bestätigen Sie die Eingaben mit der SET Taste.
• Bei erfolgreichem Empfang des DCF-Funksignals und, wenn der DCF-
Funkempfang (ON) aktiviert ist, wird die manuell eingestellte Zeit über-
schrieben.
• In Stahlbetonbauten (Kellern, Aufbauten) ist das empfangene Signal
natürlicherweise schwächer. In Extremfällen wird empfohlen, das
Gerät in Fensternähe zu platzieren und/oder durch Drehen das Funk-
signal besser zu empfangen.
• Nachts sind die atmosphärischen Störungen meist geringer und ein
Empfang ist in den meisten Fällen möglich. Ein einziger Empfang pro
Tag genügt, um die Genauigkeit zu gewährleisten und Abweichungen
unter 1 Sekunde zu halten.
7. Bedienung
• Halten Sie die –oder +Taste im Einstellmodus gedrückt, gelangen
Sie in den Schnelllauf.
• Das Gerät verlässt automatisch den Einstellmodus, wenn länger als
15 Sekunden keine Taste gedrückt wird.
• Bei aktiviertem Tastenton wird jede Tastenbedienung mit einem Piep-
Ton quittiert.
7.1 Manuelle Einstellungen
• Halten Sie die SET Taste auf der Rückseite im Normalmodus für drei
Sekunden gedrückt.
• dcF erscheint im Display und ON (Voreinstellung) blinkt. Standardge-
mäß ist der DCF-Empfang aktiviert und nach erfolgreichem Empfang
des DCF-Signals ist keine manuelle Einstellung erforderlich.
TFA_No. 60.2550_Anleitung_02_23 21.02.2023 15:04 Uhr Seite 6

1312
Funkwecker
Funkwecker
8.1 Einstellung der ersten Alarmzeit
• Drücken Sie die Taste im Normalmodus.
• 7:00 (Voreinstellung) oder die zuletzt eingestellte Alarmzeit erscheint
im Display.
• Die Stundenanzeige blinkt.
• Stellen Sie mit der – oder +Taste die Stunden ein.
• Bestätigen Sie die Eingabe mit der Taste.
• Die Minutenanzeige blinkt und Sie können nun mit der – oder +Taste
die Minuten einstellen.
• Bestätigen Sie die Eingabe mit der Taste.
• Auf dem Display erscheint die eingestellte Alarmzeit.
• Um die Alarm-Funktion zu aktivieren, schieben Sie den Alarmzeit 1
ON/OFF Schiebeschalter nach oben (ON). Gleichzeitig wird das Käst-
chen farbig markiert und um die eingestellte Alarmzeit erscheint ein
Rahmen mit dem Alarm-Symbol:
• Die erste Alarmzeit ist aktiviert.
• Wenn die eingestellte Alarmzeit erreicht ist, beginnt der Wecker zu
klingeln.
7.1.1 Einstellung der Temperatureinheit
• Drücken Sie die – oder +Taste, um von Celsius (°C) auf Fahrenheit
(°F) als Temperatureinheit zu wechseln.
• Bestätigen Sie die Eingabe mit der SET Taste.
• Wurde Fahrenheit eingestellt, wird automatisch auch die Uhrzeit im
12 Stundenformat angezeigt. AM oder PM erscheint im Display. Das
Datumsformat ändert sich in Monat/Tag.
7.1.2 Einstellung der Sprachauswahl für den Wochentag
• Stellen Sie die gewünschte Sprache für den Wochentag mit der –
oder +Taste ein: Deutsch (D), Englisch (EN), Französisch (FR), Spa-
nisch (ES), Italienisch (IT) oder Niederländisch (NL).
• Bestätigen Sie die Eingabe mit der SET Taste.
7.1.3 Einstellung des Tastentons
• Standardgemäß ist der Tastenton (beep) deaktiviert (OFF)
• Drücken Sie die – oder +Taste, wenn Sie den Tastenton einschalten
wollen (ON).
• Bestätigen Sie die Eingabe mit der SET Taste.
8. Alarm
• Der Wecker verfügt über zwei Weckalarme mit unterschiedlichen
Alarmtönen.
TFA_No. 60.2550_Anleitung_02_23 21.02.2023 15:04 Uhr Seite 7

1514
Funkwecker
Funkwecker
8.3 Einstellung des Alarmtons
• Mit dem Schiebeschalter ALARM / ALARM auf der Rückseite können
Sie den kontant lauten oder ansteigenden Weckton wählen.
9. Beleuchtung
• Drücken Sie die SNOOZE/LIGHT Taste.
• Die Hintergrundbeleuchtung wird für 5 Sekunden aktiviert und blen-
det sanft aus.
• Das Gerät verfügt über einen Lichtsensor und schaltet die Beleuch-
tung bei Dunkelheit automatisch an.
• Mit dem AUTO LIGHT ON/OFF Schiebeschalter auf der Rückseite kön-
nen Sie die automatische Hintergrundbeleuchtung an- oder aus-
schalten.
• Im Display erscheint oder verschwindet .
•Achtung: Während eines DCF-Signalempfangs wird die Beleuch-
tung kurzzeitig deaktiviert bzw. lässt sich nicht aktivieren.
10. Pflege und Wartung
• Reinigen Sie das Gerät mit einem weichen, leicht feuchten Tuch.
Keine Scheuer- oder Lösungsmittel verwenden!
• Entfernen Sie die Batterien, wenn Sie das Gerät längere Zeit nicht
verwenden.
• Bewahren Sie Ihr Gerät an einem trockenen Platz auf.
• Das Alarmsymbol blinkt und die Hintergrundbeleuchtung schaltet
sich für 5 Sekunden an.
• Drücken Sie auf eine beliebige Taste und der Alarm wird beendet.
• Wird der Alarm nicht beendet, schaltet sich der Alarmton automa-
tisch nach ein paar Minuten aus.
• Das Alarmsymbol bleibt im Display stehen und der Weckalarm akti-
viert sich erneut zur gleichen Alarmzeit wieder.
• Wenn der Wecker klingelt, drücken Sie die SNOOZE/LIGHT Taste, um
die Snooze-Funktion zu aktivieren.
• Ist die Snooze-Funktion aktiviert, blinkt zZ auf dem Display.
• Der Alarm wird für die Dauer von 5 Minuten unterbrochen.
• Schieben Sie den Alarmzeit 1 ON/OFF Schiebeschalter nach unten
(OFF), um die Alarm-Funktion auszuschalten.
• Das Alarm-Symbol und die Farbmarke verschwinden.
8.2 Einstellung der zweiten Alarmzeit
• Drücken Sie die Taste im Normalmodus.
• 7:00 (Voreinstellung) oder die zuletzt eingestellte Alarmzeit erscheint
im Display.
• Sie können nun auf die gleiche Weise die zweite Alarmzeit einstellen.
• Zum Aktivieren/Deaktivieren der zweiten Alarmzeit schieben Sie den
Alarmzeit 2 ON/OFF Schiebeschalter nach oben (ON)/unten (OFF).
TFA_No. 60.2550_Anleitung_02_23 21.02.2023 15:04 Uhr Seite 8

1716
Funkwecker
Funkwecker
Keine Beleuchtung ➜Schiebeschalter AUTO LIGHT auf
ON stellen
(siehe Punkt: Beleuchtung)
➜ Uhr befindet sich im DCF-Signal-
empfangsmodus
Beleuchtung flackert ➜Batterien wechseln
Unkorrekte Anzeige ➜Batterien wechseln
Wenn Ihr Gerät trotz dieser Maßnahmen immer noch nicht funktioniert,
wenden Sie sich an den Händler, bei dem Sie das Produkt gekauft haben.
12. Entsorgung
Dieses Produkt und die Verpackung wurden unter Verwendung hoch-
wertiger Materialien und Bestandteile hergestellt, die recycelt und wie-
derverwendet werden können. Dies verringert den Abfall und schont die
Umwelt.
Entsorgen Sie die Verpackung umweltgerecht über die eingerichteten
Sammelsysteme.
Entsorgung des Elektrogeräts
Entnehmen Sie nicht festverbaute Batterien und Akkus aus
dem Gerät und entsorgen Sie diese getrennt.
10.1 Batteriewechsel
• Sobald das Batteriesymbol erscheint, wechseln Sie bitte die
Batterien.
• Öffnen Sie das Batteriefach und legen Sie drei neue Batterien 1,5 V
AA polrichtig ein.
• Schließen Sie das Batteriefach wieder.
11. Fehlerbeseitigung
Problem Lösung
Keine Anzeige ➜ Batterien polrichtig einlegen
➜ Batterien wechseln
Kein DCF Empfang ➜ DCF-Funkempfang im Einstellmodus
einschalten (ON)
➜–Taste für drei Sekunden gedrückt
halten, um Empfangsversuch auszulösen
➜ Anderen Aufstellort für das Gerät wählen
➜ Empfangsversuch in der Nacht abwarten
➜ Beseitigen der Störquellen
➜ Neuinbetriebnahme des Gerätes
gemäß Anleitung
➜ Uhrzeit manuell einstellen
TFA_No. 60.2550_Anleitung_02_23 21.02.2023 15:04 Uhr Seite 9

1918
Funkwecker
Funkwecker
13. Technische Daten
Spannungsversorgung: Batterien 3 x 1,5 V AA
Messbereich Temperatur: -10°C…+50°C (+14°F…+122°F)
°C/°F umschaltbar
Gehäusemaße: 95 x 41 x 96 mm
Gewicht: 161 g (nur das Gerät)
Diese Anleitung oder Auszüge daraus dürfen nur mit Zustimmung von TFA Dost-
mann veröffentlicht werden. Die technischen Daten entsprechen dem Stand bei
Drucklegung und können ohne vorherige Benachrichtigung geändert werden.
Die neuesten technischen Daten und Informationen zu Ihrem Produkt finden Sie
auf unserer Homepage unter Eingabe der Artikel-Nummer in das Suchfeld.
EU-KONFORMITÄTSERKLÄRUNG
Hiermit erklärt TFA Dostmann, dass der Funkanlagentyp 60.2550 und 60.2552 der
Richtlinie 2014/53/EU entspricht. Der vollständige Text der EU-Konformitätserklä-
rung ist unter der folgenden Internetadresse verfügbar:
www.tfa-dostmann.de/service/downloads/ce
www.tfa-dostmann.de
E-Mail: [email protected]
TFA Dostmann GmbH & Co.KG
Zum Ottersberg 12, 97877 Wertheim, Deutschland 02/23
Dieses Gerät ist entsprechend der EU-Richtlinie über die Ent-
sorgung von Elektro- und Elektronik-Altgeräten (WEEE)
gekennzeichnet.
Dieses Produkt darf nicht mit dem Hausmüll entsorgt werden.
Der Nutzer ist verpflichtet, das Altgerät zur umweltgerechten
Entsorgung bei einer ausgewiesenen Annahmestelle für die
Entsorgung von Elektro- und Elektronikgeräten abzugeben. Die
Rückgabe ist unentgeltlich. Beachten Sie die aktuell geltenden
Vorschriften!
Entsorgung der Batterien
Batterien und Akkus dürfen keinesfalls in den Hausmüll. Sie
enthalten Schadstoffe, die bei unsachgemäßer Entsorgung der
Umwelt und der Gesundheit Schaden zufügen können. Als
Verbraucher sind Sie gesetzlich verpflichtet, gebrauchte Batte-
rien und Akkus zur umweltgerechten Entsorgung beim Handel
oder entsprechenden Sammelstellen gemäß nationalen oder
lokalen Bestimmungen abzugeben. Die Rückgabe ist unent-
geltlich.
Die Bezeichnungen für enthaltene Schadstoffe sind:
Cd=Cadmium, Hg=Quecksilber, Pb=Blei.
TFA_No. 60.2550_Anleitung_02_23 21.02.2023 15:04 Uhr Seite 10

2120
Radio-controlled alarm clock
Radio-controlled alarm clock
• Choice of ascending or continuously loud alarm tone
• Snooze function
• Indication of indoor temperature
• Indication of weekday and date
• Automatic backlight with light sensor
• Intuitive operation with silent keys
4. For your safety
• This product is exclusively intended for the range of application
described above. It should only be used as described within these
instructions.
• Unauthorized repairs, modifications or changes to the product are
prohibited.
Caution!
Risk of injury:
• Keep this device and the batteries out of reach of children.
• Small parts can be swallowed by children (under three years old).
• Batteries contain harmful acids and may be hazardous if swallowed.
If a battery is swallowed, this can lead to serious internal burns and
death within two hours. If you suspect a battery could have been
swallowed or otherwise caught in the body, seek medical help imme-
diately.
Thank you for choosing this instrument from TFA.
1. Before you use this product
•Please make sure you read the instruction manual carefully.
•Following and respecting the instructions in your manual will pre-
vent damage to your instrument and loss of your statutory rights
arising from defects due to incorrect use.
•We shall not be liable for any damage occurring as a result of non-
following of these instructions. Likewise, we take no responsibili-
ty for any incorrect readings or for any consequences resulting
from them.
•Please pay particular attention to the safety notices!
•Please keep this instruction manual safe for future reference.
2. Delivery contents
• Radio-controlled alarm clock
• Instruction manual
3. Range of operation and all the benefits of your new instrument at
a glance
• Highest precision radio-controlled clock
• With time zone and manual setting option
• Two separate alarms with different alarm sounds
TFA_No. 60.2550_Anleitung_02_23 21.02.2023 15:04 Uhr Seite 11

2322
Radio-controlled alarm clock
Radio-controlled alarm clock
B: Buttons (Fig. 1-2):
B 1: SNOOZE/LIGHT button
B 2: button
B 3: – button
B 4: + button
B 5: button
B 6: Alarm time 1 ON/OFF switch
B 7: Alarm time 2 ON/OFF switch
B 8: AUTO LIGHT ON/OFF switch
B 9: SET button
B 10: ALARM / ALARM switch
C: Housing (Fig. 1-2):
C 1: Battery compartment
C 2: Colour mark for alarm time 1 ON / OFF
C 3: Colour mark for alarm time 2 ON / OFF
C 4: Light sensor
6. Getting started
• Open the battery compartment and insert the three AA 1.5 V batteries.
Make sure the polarities are correct.
• Close the battery compartment again.
• Batteries must not be thrown into a fire, short-circuited, taken apart
or recharged. Risk of explosion!
• Low batteries should be changed as soon as possible to prevent
damage caused by leaking.
• Avoid contact with skin, eyes and mucous membranes when han-
dling leaking batteries. In case of contact, immediately rinse the
affected areas with water and consult a doctor.
Important information on product safety!
• Do not expose your product to extreme temperatures, vibrations or
shocks.
• Protect it from moisture.
5. Elements
A: Display (Fig. 1):
A 1: Temperature
A 2: Symbol for Auto-Light (activated)
A 3: Day of the week, date
A 4: Time, seconds
A 5: DCF symbol (activated)
A 6: Alarm time 1 (activated)
A 7: Alarm time 2 (activated)
TFA_No. 60.2550_Anleitung_02_23 21.02.2023 15:04 Uhr Seite 12

2524
Radio-controlled alarm clock
Radio-controlled alarm clock
Radio-controlled time reception
The time base for the radio-controlled time is a caesium atomic clock
operated by the Physikalisch Technische Bundesanstalt in Braun-
schweig. It has a time deviation of less than one second in one million
years. The time is coded and transmitted from Mainflingen near Frank-
furt via frequency signal DCF-77 (77.5 kHz) and has a transmitting
range of approximately 1.500 km. Changeover from summer time to
winter time is automatic. In Daylight Saving Time, DST is shown on the
LCD. The quality of the reception depends mainly on the geographic
location. Normally there should be no reception problems within a
1.500 km radius around Frankfurt.
Please take note of the following:
• The recommended distance to any interfering sources like computer
screens or TV sets is at least 1.5 - 2 meters.
• Inside concrete rooms reinforced with steel (e.g. basements, super-
structures), the received signal is naturally weakened. In extreme
cases, please place the unit close to a window to improve the recep-
tion.
• During nighttime, the atmospheric interference is usually less severe,
and reception is possible in most cases. A single daily reception is
adequate to keep the accuracy deviation under 1 second.
• The device will alert you with a beep and all LCD segments will be
displayed for a short moment.
• The clock will now scan the DCF frequency signal and the DCF sym-
bol will be flashing on the LCD. When the time code is success-
fully received after 3-8 minutes, the radio-controlled time, the date
and the DCF symbol are steadily displayed on the LCD.
• The DCF reception always takes place at 3:00 o'clock in the morning.
If the reception is not successfully received at this time, further
attempts will happen at 4:00 and 5:00 o'clock respectively.
• You can also start the initialization manually.
• Press and hold the –button for three seconds.
• The DCF symbol will be flashing.
• To end the reception, press and hold the –button for three seconds
again. The DCF symbol disappears.
• There are three different reception symbols:
flashing - reception is active
solid - reception is good
no symbol - no reception/reception is deactivated
• If the clock cannot detect the DCF-signal (e.g. due to interferences,
transmitting distance, etc.), the time can be set manually. The clock
will then work as a normal quartz clock. (See: Manual settings).
TFA_No. 60.2550_Anleitung_02_23 21.02.2023 15:04 Uhr Seite 13

2726
Radio-controlled alarm clock
Radio-controlled alarm clock
• Confirm the setting with the SET button.
• Press the SET button to make the settings in the following sequence:
the hours, the minutes, the year, the month, the day, the temperature
unit (default °C), the day-of-week language (default German), and
the button tone (default OFF). Press the – or +button to adjust it.
• Confirm the setting with the SET button.
• After a successful reception of the DCF signal, and if the DCF recep-
tion is activated (ON), the manually set time will be overwritten.
7.1.1 Setting of the temperature unit
• Press the – or +button to toggle between Celsius (°C) or Fahrenheit
(°F) as temperature unit to select.
• Confirm the setting with the SET button.
• If Fahrenheit is set, the time is automatically displayed in the 12-
hour format. AM or PM appears on the display. The date format
changes to month / day.
7.1.2 Setting of the day-of-week language
• Adjust the desired day-of-week language with the – or +button: Ger-
man (D), English (EN), French (FR), Spanish (ES), Italian (IT) or
Dutch (NL).
• Confirm the setting with the SET button.
7. Operation
• Press and hold –or +button in the setting mode for fast mode.
• The instrument will automatically quit the setting mode if no button
is pressed within 15 seconds.
• If the button tone is enabled, each button operation is acknowledged
with a beep.
7.1 Manual settings
• Press and hold the SET button at the back in normal mode for three
seconds.
• dcF appears on the display and ON (default) will be flashing. If the
DCF reception is activated and after successful reception of the DCF
signal no manual adjustment is necessary.
• Press the – or +button if you want to deactivate the DCF reception
(OFF).
• Confirm the setting with the SET button.
• If the DCF reception is enabled (ON), you can set the time zone after
confirmation with the SET button (TZ appears on the display and 0
default will be flashing).
• Press the – or +button to adjust the time zone (-9/+9).
• The time zone correction is needed for countries where the DCF sig-
nal can be received but the time zone is different from the DCF time
(e.g. +1=one hour later).
TFA_No. 60.2550_Anleitung_02_23 21.02.2023 15:04 Uhr Seite 14

2928
Radio-controlled alarm clock
Radio-controlled alarm clock
• The first alarm time is now activated.
• When the adjusted alarm time is reached, the alarm will ring.
• The alarm symbol will be flashing and the backlight will be activated
for 5 seconds.
• Press any button to stop the alarm.
• If the alarm is not stopped manually, the alarm will automatically
turn off after a few minutes.
• The alarm symbol remains on the display and the alarm time will be
reactivated at the same time
• When the alarm rings, press the SNOOZE/LIGHT button to activate the
snooze function.
• Once the snooze function is activated, zZ will be flashing on the dis-
play.
• The alarm will be interrupted for 5 minutes.
• Slide the alarm time 1 ON/OFF switch downwards (OFF) to deacti-
vate the alarm function.
• The alarm symbol and the colour mark disappear.
8.2 Setting of the second alarm time
• Press the button in normal mode.
• 7:00 (default), or the last adjusted alarm time, appears on the dis-
play.
7.1.3 Setting of the button tone
• Normally, the button tone (beep) is disabled (OFF).
• Press the – or +button to activate the button tone (ON).
• Confirm the setting with the SET button.
8. Alarm
• The alarm clock has two separate alarms with different alarm tones.
8.1 Setting of the first alarm time
• Press the button in normal mode.
• 7:00 (default) or the last adjusted alarm time, appears on the display.
• The hour digits flash.
• Press the – or +button to adjust the hours.
• Confirm the setting with the button.
• The minute digits will be flashing. Press the – or +button to adjust
the minutes.
• Confirm the setting with the button.
• The adjusted alarm time appears on the display.
• To activate the alarm function, move the switch alarm time 1 ON/OFF
upwards (ON). At the same time, the box is highlighted in colour and
a frame with the alarm symbol appears around the alarm time:
TFA_No. 60.2550_Anleitung_02_23 21.02.2023 15:04 Uhr Seite 15

3130
Radio-controlled alarm clock
Radio-controlled alarm clock
• Remove the batteries if you do not use the product for a long period
of time.
• Store the instrument in a dry place.
10.1 Battery replacement
• Change the batteries when the battery symbol appears on the
display.
• Open the battery compartment and insert three new AA 1.5 V batteries.
Ensure the battery polarities are correct
• Close the battery compartment again.
11. Troubleshooting
Problem Solution
No display ➜ Ensure that the batteries polarities are
correct
➜ Change the batteries
No DCF reception ➜ Activate (ON) the DCF reception in the
setting mode
➜ Press the –button for 3 seconds and
start the reception manually
➜ Choose another place for your product
• Set the alarm time for the second alarm in the same way as the first
one.
• To activate/deactivate the second alarm function, move the switch
alarm time 2 ON/OFF up (ON)/down (OFF).
8.3 Setting the alarm tone
• You can select either continuously loud or ascending alarm tone with
the slide switch ALARM / ALARM found on the back of the unit.
9. Backlight
• Press the SNOOZE/LIGHT button.
• The backlight turns on for 5 seconds and fades gently.
• The device is provided with a light sensor to turn on the light auto-
matically when dark.
• Use the AUTO LIGHT ON/OFFF switch at the back to activate or deac-
tivate the automatic backlight.
• appears or disappears on the display.
•Note: During a DCF signal reception, the backlight is temporarily
disabled or cannot be activated.
10. Care and maintenance
• Clean your instrument with a soft damp cloth. Do not use solvents or
scouring agents.
TFA_No. 60.2550_Anleitung_02_23 21.02.2023 15:04 Uhr Seite 16

3332
Radio-controlled alarm clock
Radio-controlled alarm clock
Disposal of the electrical device
Remove non-permanently installed batteries and rechargeable
batteries from the device and dispose of them separately.
This product is labelled in accordance with the EU Waste Elec-
trical and Electronic Equipment Directive (WEEE).
This product must not be disposed of in ordinary household
waste. As a consumer, you are required to take end-of-life
devices to a designated collection point for the disposal of
electrical and electronic equipment, in order to ensure envi-
ronmentally-compatible disposal. The return service is free of
charge. Observe the current regulations in place!
Disposal of the batteries
Never dispose of empty batteries and rechargeable batteries
with ordinary household waste. They contain pollutants which,
if improperly disposed of, can harm the environment and
human health. As a consumer, you are required by law to take
them to your retail store or to an appropriate collection site
depending on national or local regulations in order to protect
the environment. The return service is free of charge.
The symbols for the contained heavy metals are:
Cd=cadmium, Hg=mercury, Pb=lead.
➜ Wait for attempted reception during
the night
➜ Check if there is any source of interference
➜ Restart the device according to this
instruction manual
➜ Manual setting of the clock
No backlight ➜Set the AUTO LIGHT switch to ON
(see: backlight)
➜ Clock is in the DCF signal reception mode
Flickering backlight ➜Change the batteries
Incorrect display ➜Change the batteries
If your device fails to work despite these measures, contact the supplier
from whom you purchased this product.
12. Waste disposal
This product and its packaging have been manufactured using high-
grade materials and components which can be recycled and reused.
This reduces waste and protects the environment.
Dispose of the packaging in an environmentally friendly manner using
the collection systems that have been set up.
TFA_No. 60.2550_Anleitung_02_23 21.02.2023 15:04 Uhr Seite 17

3534
Radio-controlled alarm clock
Réveil radio-piloté
Nous vous remercions d'avoir choisi l'appareil de la Société TFA.
1. Avant d'utiliser votre appareil
•Veuillez lire attentivement le mode d'emploi.
•En respectant ce mode d'emploi, vous éviterez d'endommager
votre appareil et de perdre vos droits légaux en cas de défaut si
celui-ci résulte d’une utilisation non-conforme.
•Nous n'assumons aucune responsabilité pour des dommages qui
auraient été causés par le non-respect du présent mode d'emploi.
De même, nous n’assumons aucune responsabilité pour des rele-
vés incorrects et les conséquences qu’ils pourraient engendrer.
•Suivez bien toutes les consignes de sécurité !
•Conservez soigneusement le mode d'emploi !
2. Contenu de la livraison
• Réveil radio-piloté
• Mode d'emploi
3. Aperçu du domaine d'utilisation et tous les avantages de votre
nouvel appareil
• Horloge radio-pilotée de grande précision
• Avec fuseau horaire et option de réglage manuel
13. Specifications
Power consumption: Batteries 3 x AA 1.5 V
Temperature -10°C ... 50°C (14°F... 122°F)
measuring range: °C/°F-reversible
Housing dimension: 95 x 41 x 96 mm
Weight: 161 g (instrument only)
No part of this manual may be reproduced without written consent of TFA Dost-
mann. The technical data are correct at the time of going to print and may change
without prior notice. The latest technical data and information about this product
can be found in our homepage by simply entering the product number in the
search box.
EU Declaration of conformity
Hereby, TFA Dostmann declares that the radio equipment type 60.2550 and
60.2552 is in compliance with Directive 2014/53/EU. The full text of the EU decla-
ration of conformity is available at the following Internet address:
www.tfa-dostmann.de/service/downloads/ce
www.tfa-dostmann.de
E-Mail: [email protected]
TFA Dostmann GmbH & Co.KG
Zum Ottersberg 12, 97877 Wertheim, Germany 02/23
TFA_No. 60.2550_Anleitung_02_23 21.02.2023 15:04 Uhr Seite 18

3736
Réveil radio-piloté
Réveil radio-piloté
• Les piles contiennent des acides nocifs pour la santé et peuvent être
mortelles dans le cas d’une ingestion. Si une pile a été avalée, elle
peut entraîner des brûlures internes graves ainsi que la mort dans
l’espace de 2 heures. Si vous craignez qu’une pile ait pu être avalée
ou ingérée d’une autre manière, quelle qu’elle soit, contactez immé-
diatement un médecin d’urgence.
• Ne jetez jamais de piles dans le feu, ne les court-circuitez pas, ne les
démontez pas et ne les rechargez pas. Risque d'explosion !
• Une pile faible doit être remplacée le plus rapidement possible afin
d'éviter toute fuite.
• Évitez tout contact de la peau, des yeux et des muqueuses avec le
liquide des piles. En cas de contact, rincez immédiatement les zones
concernées à l’eau et consultez un médecin.
Conseils importants de sécurité du produit !
• Évitez d’exposer l’appareil à des températures extrêmes, à des vibra-
tions ou à des chocs.
• Protégez-le contre l'humidité.
5. Composants
A : Écran (Fig. 1) :
A 1 : Température
• Deux horaires d'alarme avec tonalités différentes
• Volume sonore du réveil constant ou augmentant
• Fonction snooze
• Affichage de la température intérieure
• Affichage du jour de la semaine et de la date
• Éclairage automatique via capteur de lumière
• Utilisation intuitive avec touches silencieuses
4. Pour votre sécurité
• L'appareil est destiné uniquement à l'utilisation décrite ci-dessus. Ne
l'utilisez jamais à d'autres fins que celles décrites dans le présent
mode d'emploi.
• Vous ne devez en aucun cas réparer, démonter ou modifier l'appareil
par vous-même.
Attention !
Danger de blessure :
• Placez votre appareil et les piles hors de la portée des enfants.
• Les petites pièces peuvent être avalées par les enfants (de moins de
trois ans).
TFA_No. 60.2550_Anleitung_02_23 21.02.2023 15:04 Uhr Seite 19

3938
Réveil radio-piloté
Réveil radio-piloté
6. Mise en service
• Ouvrez le compartiment à piles et insérez les trois piles 1,5 V AA.
Contrôlez la bonne polarité des piles avant de les insérer.
• Refermez le compartiment à piles.
• Un signal sonore se fait entendre et tous les segments LCD s'allu-
ment.
• L’horloge cherche le signal radio et le symbole de réception DCF
clignote. En cas de réception correcte, (après 3-8 minutes) l’heure
radio s’affiche, la date et le symbole restent affichés en continu.
• La réception du signal DCF a lieu à 3 h 00 du matin. Au cas où la
réception à 3 h 00 du matin n'aurait pas de succès, un nouvel essai de
réception sera effectué à 4 h 00 et à 5 h 00 jusqu'à ce qu'il réussisse.
• Si aucune réception n'est possible, vous pouvez activer manuelle-
ment la réception de l’heure radio.
• Maintenez la touche –appuyée pendant trois secondes.
• Le symbole de réception DCF clignote.
• Pour mettre fin à la réception, maintenez encore une fois la touche –
appuyée. Le symbole de réception DCF disparaît.
• Il y a 3 symboles de réception différents :
clignote – réception active
reste en arrêt – réception réussie
pas de symbole – pas de réception/réception désactivée
A 2 : Symbole pour Auto-Light (est activé)
A 3 : Jour de la semaine, date
A 4: Horloge, secondes
A 5 : Symbole de réception DCF (est activée)
A 6 : Heure d’alarme 1 (est activée)
A 7 : Heure d’alarme 2 (est activée)
B : Touches (Fig. 1-2):
B 1 : Touche SNOOZE/LIGHT
B 2 : Touche
B 3 : Touche –
B 4 : Touche +
B 5 : Touche
B 6 : Interrupteur heure d'alarme 1 ON/OFF
B 7 : Interrupteur heure d'alarme 2 ON/OFF
B 8 : Interrupteur AUTO LIGHT ON/OFF
B 9 : Touche SET
B 10 : Interrupteur ALARM / ALARM
C : Boîtier (Fig. 1-2) :
C 1 : Compartiment à piles
C 2 : Marque de couleur pour l'heure d'alarme 1 ON / OFF
C 3 : Marque de couleur pour l'heure d'alarme 2 ON / OFF
C 4 : Senseur de lumière
TFA_No. 60.2550_Anleitung_02_23 21.02.2023 15:04 Uhr Seite 20

4140
Réveil radio-piloté
Réveil radio-piloté
• Dans les bâtiments en béton armé (caves, greniers aménagés), le
signal reçu est affaibli. Dans les cas extrêmes, nous vous conseillons
de placer l’appareil près d’une fenêtre de manière à améliorer la
réception du signal radio.
• La nuit, les perturbations s’affaiblissent en règle générale et la récep-
tion est possible dans la plupart des cas. Un seul signal par jour suf-
fit pour garantir la précision de l’affichage de l’heure, et pour mainte-
nir d’éventuels écarts en dessous d' 1 seconde.
7. Utilisation
• Maintenez la touche –ou +appuyée en mode de réglage pour accé-
der au défilement rapide.
• L'appareil quitte automatiquement le mode de programmation si
aucune touche n’est appuyée pendant 15 secondes.
• Chaque opération est signalée par un bip sonore si la tonalité de la
touche est activée.
7.1 Réglages manuels
• Maintenez la touche SET au verso appuyée pendant trois secondes
en mode normal.
• dcF apparaît sur l'écran et ON (par défaut) clignote. Par défaut, la
réception DCF est activée et après une réception réussie du signal
DCF, aucun réglage manuel n’est nécessaire.
• Si votre réveil radio-piloté ne peut pas recevoir le signal DCF (par
exemple en raison de la présence de perturbations, d’une distance de
transmission excessive etc.), vous pouvez procéder à un paramétra-
ge manuel. L’horloge fonctionne comme une horloge à quartz nor-
male (voir Réglages manuels).
Réception de l'heure radio
La transmission de l’heure radio-pilotée s’effectue via une horloge ato-
mique au césium, exploitée par la Physikalisch Technische Bundesans-
talt de Braunschweig (Institut Fédéral Physico-Technique de Braun-
schweig). L’écart de précision de cette horloge est d' 1 seconde pour
un million d’années. L’heure est diffusée à partir de Mainflingen, près
de Francfort sur le Main, avec à un signal DCF-77 (77,5 kHz), d'une
portée d’environ 1500 km. Le passage de l'heure d'hiver à l'heure d'été
et vice-et-versa s'effectue également en mode automatique. Pendant
l’heure d’été, « DST » apparaît à l'écran. La réception est essentielle-
ment en fonction de votre position géographique. En règle générale,
dans un rayon de 1500 km autour de Francfort, aucun problème de
transmission ne devrait apparaître.
Nous vous prions de respecter les consignes suivantes :
• Nous vous recommandons de respecter une distance de 1,5 - 2 m
entre l'appareil et d’éventuelles sources de signaux parasites,
comme les écrans d'ordinateurs et les postes de télévision.
TFA_No. 60.2550_Anleitung_02_23 21.02.2023 15:04 Uhr Seite 21

4342
Réveil radio-piloté
Réveil radio-piloté
• Validez au moyen de la touche SET.
• Si l’unité de température est réglée en Fahrenheit, l’heure est auto-
matiquement affichée au format 12 heures. L’écran affiche AM ou
PM. La date s’affiche au format mois/jour.
7.1.2 Réglage de la langue pour les jours de la semaine
•
Réglez la langue désirée utilisant la touche –ou + : allemand (D), anglais
(EN), français (FR), espagnol (ES), italien (IT) ou néerlandais (NL).
• Validez au moyen de la touche SET.
7.1.3 Réglage de la tonalité de la touche
• Par défaut, la tonalité de la touche (beep) est désactivée (OFF).
• Appuyez sur la touche –ou +pour activer (ON) la tonalité de la touche.
• Validez au moyen de la touche SET.
8. Alarme
• Le réveil dispose de deux alarmes avec différentes tonalités d'alarme.
8.1 Réglage de la première heure d'alarme
• Appuyez sur la touche en mode normal.
• 7:00 (par défaut) ou l'heure d'alarme réglée précédemment apparait
sur l'affichage.
• Appuyez sur la touche –ou +si vous souhaitez désactiver la récep-
tion radio DCF (OFF).
• Validez au moyen de la touche SET.
• Si la réception radio DST est activée (ON) et si l'entrée est confirmée,
réglez avec la touche SET le fuseau horaire (TZ apparaît sur l'écran et
0 par défaut clignote)
• Appuyez sur la touche –ou +pour régler le fuseau horaire (-9/+9).
• Vous avez la possibilité d'utiliser un autre fuseau horaire si votre
réveil radio-piloté peut recevoir le signal DCF mais l'heure de votre
fuseau horaire est différente de l’heure DCF (par exemple : +1 = une
heure plus tard).
• Validez au moyen de la touche SET.
• Appuyez sur la touche SET, vous pouvez alors ajuster les heures, les
minutes, l'année, le mois, le jour, l'unité de température (°C par
défaut), la langue pour les jours de la semaine (allemand par défaut)
et la tonalité (OFF par défaut). Vous pouvez régler ces valeurs à l'aide
des touches –ou +.
• Validez au moyen de la touche SET.
• Lorsque la réception du signal DCF est réussie et la réception DCF
est activée (ON), l'heure ajustée manuellement sera remplacée.
7.1.1 Réglage de l'unité de température
• Appuyez sur la touche –ou +pour passer de Celsius (°C) à Fahren-
heit (°F) comme unité de température.
TFA_No. 60.2550_Anleitung_02_23 21.02.2023 15:04 Uhr Seite 22

4544
Réveil radio-piloté
Réveil radio-piloté
• Lorsque le réveil sonne, appuyez sur la touche SNOOZE/LIGHT pour
activer la fonction de répétition.
• Si la fonction de répétition est activée, le symbole de répétition zZ
clignote.
• L’alarme s'interrompt pendant 5 minutes.
• Poussez l'interrupteur heure d'alarme 1 ON/OFF vers le bas (OFF)
pour éteindre l'alarme.
• Le symbole d'alarme et la marque de couleur disparaissent.
8.2 Réglage de la deuxième heure d'alarme
• Appuyez sur la touche en mode normal.
• 7:00 (par défaut) ou l'heure d'alarme réglée précédemment apparais-
sent sur l'affichage.
• Procédez de même pour le paramétrage de la deuxième heure d'alar-
me.
• Pour activer/désactiver l'heure de la deuxième alarme, poussez l'in-
terrupteur heure d'alarme 2 ON/OFF vers le haut (ON)/ vers le bas
(OFF).
8.3 Réglage du niveau sonore de l’alarme
• L'interrupteur ALARM / ALARM au dos de l’appareil permet de régler
si le niveau sonore de l’alarme du réveil augmente ou si elle demeure
constante.
• L'indication de l'heure clignote.
• Réglez l'heure avec la touche –ou +.
• Validez au moyen de la touche .
• L’indicateur des minutes clignote et vous pouvez régler les minutes
avec la touche –ou +.
• Validez au moyen de la touche .
• L'heure d'alarme apparaît sur l’écran.
• Pour activer l'alarme, poussez l'interrupteur heure d'alarme 1 ON/
OFF vers le haut (ON). En même temps, la case est mis en évidence
en couleur et l'heure de réveil est entourée par un cadre avec le sym-
bole d’alarme :
• L’heure d’alarme est activée.
• Lorsque l'heure d'alarme fixée est atteinte, le réveil commence à
sonner.
• Le symbole d'alarme clignote sur l'écran et l'éclairage de fond est
activé pendant 5 secondes.
• Appuyez sur une touche de votre choix, pour arrêter l’alarme.
• Si l'alarme n'est pas arrêtée, elle s'arrêtera automatiquement après
quelques minutes.
• Le symbole de l'alarme reste sur l'écran et elle reste active pour
l'heure de réveil suivant.
TFA_No. 60.2550_Anleitung_02_23 21.02.2023 15:04 Uhr Seite 23

4746
Réveil radio-piloté
Réveil radio-piloté
• Ouvrez le compartiment à piles et insérez trois nouvelle piles 1,5 V
AA, en respectant la polarité +/-.
• Refermez le compartiment à piles.
11. Dépannage
Problème Solution
Aucun affichage ➜Contrôlez la bonne polarité des piles
➜Changez les piles
Pas de réception DCF ➜Activez la réception radio DCF en
mode de réglage (ON)
➜Maintenez la touche –appuyée et
démarrez manuellement la réception
➜Choisissez une autre position pour
votre l'appareil
➜Attendez la réception du signal de
nuit
➜Éliminez les éventuelles sources de
parasites
➜Remettez l'appareil en service confor-
mément aux instructions
➜Réglez l'heure manuellement
9. Éclairage de fond
• Appuyez sur la touche SNOOZE/LIGHT.
• L’éclairage de fond est activé pour 5 secondes et s’éteint progressi-
vement.
• L'appareil est équipé d’un détecteur de lumière et l'éclairage s’allume
automatiquement dès qu'il commence à faire sombre.
• Avec l'interrupteur AUTO LIGHT ON/OFF au verso, vous pouvez acti-
ver/désactiver l'éclairage de fond automatique.
• apparaît ou disparaît de l'écran.
•Remarque : Au cours d'une réception du signal DCF, l'éclairage
est temporairement désactivé ou ne peut pas être activé.
10. Entretien et maintenance
• Pour le nettoyage de l'appareil, utilisez un chiffon doux et humide.
N’utilisez pas de solvants ou d’agents abrasifs !
• Retirez les piles si vous n'utilisez pas votre appareil pendant une
durée prolongée.
• Conservez votre appareil dans un endroit sec.
10.1 Remplacement des piles
• Si le symbole de la pile apparaît sur l'écran, changez les piles.
TFA_No. 60.2550_Anleitung_02_23 21.02.2023 15:04 Uhr Seite 24

4948
Réveil radio-piloté
Réveil radio-piloté
Mise au rebut de l'appareil électrique
Retirez de l'appareil les piles et les batteries rechargeables qui
ne sont pas installées de façon permanente et jetez-les séparé-
ment.
Cet appareil est conforme aux normes de l'UE relatives au trai-
tement des déchets électriques et électroniques (WEEE).
L'appareil usagé ne doit pas être jeté dans les ordures ména-
gères. L’utilisateur s’engage, pour le respect de l’environne-
ment, à déposer l’appareil usagé dans un centre de traitement
agréé pour les déchets électriques et électroniques. Respectez
les réglementations en vigueur !
Élimination des piles
Les piles et les batteries rechargeables ne doivent pas être
jetées dans les détritus ménagers. Elles contiennent des pol-
luants qui peuvent nuire à l'environnement et à la santé si elles
sont éliminées de manière inappropriée. En tant qu'utilisateur,
vous avez l'obligation légale de rapporter les piles et les batte-
ries rechargeables usagées à votre revendeur ou de les dépo-
ser dans une déchetterie proche de votre domicile conformé-
ment à la réglementation nationale et locale. La collecte est
gratuite.
Les métaux lourds sont désignés comme suit :
Cd = cadmium, Hg = mercure, Pb = plomb.
Aucun éclairage de fond ➜ Mettez l’interrupteur AUTO LIGHT
ON/OFF sur ON (voir : Éclairage de
fond)
Éclairage scintille ➜ Changez les piles
Affichage incorrecte ➜ Changez les piles
Si votre appareil ne fonctionne toujours pas malgré ces mesures,
adressez-vous au vendeur auquel vous avez acheté votre appareil.
12. Traitement des déchets
Ce produit et son emballage ont été fabriqués avec des matériaux de
haute qualité qui peuvent être recyclés et réutilisés. Cela permet de
réduire les déchets et de protéger l’environnement.
Éliminez les emballages de manière respectueuse de l'environnement
par le biais des systèmes de collecte établis.
TFA_No. 60.2550_Anleitung_02_23 21.02.2023 15:04 Uhr Seite 25

5150
Réveil radio-piloté
Orologio sveglia radiocontrollato
Vi ringraziamo per aver scelto l'apparecchio della TFA.
1. Prima di utilizzare l'apparecchio
•Leggete attentamente le istruzioni per l'uso.
•Seguendo le istruzioni per l'uso, eviterete anche di danneggiare il
prodotto e di pregiudicare, a causa di un utilizzo scorretto, i diritti
di consumatore che vi spettano per legge.
•Decliniamo ogni responsabilità per i danni derivanti dal mancato
rispetto delle presenti istruzioni per l'uso. Allo stesso modo, non
siamo responsabili per eventuali misurazioni errate e per le con-
seguenze che ne possono derivare.
•Prestate particolare attenzione alle misure di sicurezza!
•Conservate con cura queste istruzioni per l'uso.
2. La consegna include
• Orologio sveglia radiocontrollato
• Istruzioni per l'uso
3.
Utilizzi e vantaggi del vostro nuovo apparecchio
• Orologio radiocontrollato della massima precisione
• Fuso orario e possibilità di impostarlo
• Due allarmi con suoni differenti
• Tono di allarme a scelta crescente o costante
• Funzione snooze
13. Caractéristiques techniques
Alimentation Piles 3 x 1,5 V AA
Plage de mesure de -10°C à 50°C (de 14°F à 122 °F)
température °C/°F commutable
Mesure de boîtier 95 x 41 x 96 mm
Poids 161 g (appareil seulement)
La reproduction, même partielle, du présent mode d'emploi est strictement inter-
dite sans l'accord explicite de TFA Dostmann. Les caractéristiques techniques de
ce produit ont été actualisées au moment de l'impression et peuvent être modi-
fiées sans avis préalable.
Les dernières données techniques et les informations concernant votre produit
peuvent être consultées en entrant le numéro de l'article sur notre site Internet.
Déclaration UE de conformité
Le soussigné, TFA Dostmann, déclare que l'équipement radioélectrique du type
60.2550 et 60.2552 est conforme à la directive 2014/53/UE. Le texte complet de la
déclaration UE de conformité est disponible à l'adresse Internet suivante :
www.tfa-dostmann.de/service/downloads/ce
www.tfa-dostmann.de
E-Mail : [email protected]
TFA Dostmann GmbH & Co.KG
Zum Ottersberg 12, 97877 Wertheim, Allemagne 02/23
TFA_No. 60.2550_Anleitung_02_23 21.02.2023 15:04 Uhr Seite 26

5352
Orologio sveglia radiocontrollato
Orologio sveglia radiocontrollato
• Sostituire quanto prima le batterie esauste, in modo da evitare perdite.
• Evitare il contatto del liquido delle batterie con la pelle, gli occhi e le
mucose. In casi di contatto, sciacquare subito la zona interessata
con acqua e consultare un medico.
Avvertenze sulla sicurezza del prodotto!
• Non esporre l'apparecchio a temperature estreme, vibrazioni e urti.
• Proteggere dall’umidità.
5. Componenti
A: Display (Fig. 1):
A 1: Temperatura
A 2: Simbolo Auto-Light (attivato)
A 3: Giorno della settimana, data
A 4: Orologio, secondi
A 5: Simbolo della ricezione del segnale DCF (attivata)
A 6: Allarme 1 (attivato)
A 7: Allarme 2 (attivato)
B: Tasti (Fig. 1-2):
B 1: Tasto SNOOZE/LIGHT
B 2: Tasto
B 3: Tasto –
• Indicazione della temperatura interna
• Indicazione della data e del giorno della settimana
• Retroilluminazione automatica al buio con sensore luminoso
• Utilizzo intuitivo con tasti silenziosi
4. Per la vostra sicurezza
• Il prodotto è adatto esclusivamente agli utilizzi di cui sopra. Non uti-
lizzate il prodotto in maniera diversa da quanto descritto in queste
istruzioni.
• Non sono consentite riparazioni, alterazioni o modifiche non autoriz-
zate del dispositivo.
Avvertenza!
Pericolo di lesioni:
• Tenere il dispositivo e le batterie lontano dalla portata dei bambini.
• Le piccole parti possono essere ingerite dai bambini (sotto i tre anni)
• Le batterie contengono acidi nocivi per la salute. Se ingerite, le batte-
rie possono essere mortali. Se una batteria venisse ingerita, potreb-
be causare gravi ustioni interne e portare alla morte nel giro di due
ore. Se si sospetta che una batteria sia stata ingerita o inserita nel
corpo in altra maniera, consultare immediatamente un medico.
• Non gettare le batterie nel fuoco, non polarizzarle in maniera scorretta,
non smontarle e non cercare di ricaricarle. Pericolo di esplosione!
TFA_No. 60.2550_Anleitung_02_23 21.02.2023 15:04 Uhr Seite 27

5554
Orologio sveglia radiocontrollato
Orologio sveglia radiocontrollato
• La ricezione del segnale DCF avverrà alle 3.00 del mattino. Se la rice-
zione non è avvenuta con successo alle 3.00, verranno eseguiti altri
tentativi alle 4.00 e 5.00.
• È possibile avviare l'inizializzazione manuale.
• Tenere premuto per tre secondi il tasto –.
• Il simbolo della ricezione del segnale DCF inizia a lampeggiare.
• Per terminare il tentativo di ricezione DCF tenere premuto nuova-
mente per tre secondi il tasto –. Il simbolo della ricezione del segnale
scompare.
• Ci sono tre differenti simboli di ricezione:
lampeggiante – Ricezione attiva
acceso – Ricezione buona
Nessun simbolo – Nessuna ricezione/ricezione spenta
• Nel caso in cui l’orologio non riesca a ricevere il segnale DCF (a
causa di guasti, della distanza di trasmissione, ecc.), l'ora può essere
impostata manualmente. L'orologio funziona come un normale oro-
logio al quarzo (vedi: Impostazioni manuali).
Informazioni sull'ora radiocontrollata DCF
L'ora viene trasmessa da un orologio atomico al cesio gestito dal Physi-
kalisch Technische Bundesanstalt di Braunschweig. La deviazione è infe-
riore a 1 secondo in un milione di anni.
B 4: Tasto +
B 5: Tasto
B 6: Commutatore Allarme 1 ON/OFF
B 7: Commutatore Allarme 2 ON/OFF
B 8: Commutatore AUTO LIGHT ON/OFF
B 9: Tasto SET
B 10: Commutatore ALARM / ALARM
C: Struttura esterna (Fig. 1-2):
C 1: Vano batteria
C 2: Marchio colorato per l'allarme 1 ON/OFF
C 3: Marchio colorato per l'allarme 2 ON/OFF
C 4: Sensore luminoso
6. Messa in funzione
• Aprire il vano batteria e inserire le tre batterie nuove tipo AA da 1,5 V.
Accertarsi di aver rispettato la corretta polarità.
• Richiudere il vano batteria.
• Verrà emesso un breve segnale acustico e tutti i segmenti dell'LCD
appariranno contemporaneamente.
• L'orologio inizia a ricevere il segnale radio e il simbolo della ricezione
del segnale DCF inizia a lampeggiare. Se il codice dell'ora è stato
ricevuto entro 3-8 minuti, viene visualizzata l'ora radiocontrollata e
apparirà il simbolo della ricezione del segnale DCF.
TFA_No. 60.2550_Anleitung_02_23 21.02.2023 15:04 Uhr Seite 28

5756
Orologio sveglia radiocontrollato
Orologio sveglia radiocontrollato
• L'apparecchio esce automaticamente dalla modalità impostazione se
non si preme alcun tasto per più di 15 secondi.
• Se il tono dei tasti è abilitato, ogni operazione chiave viene ricono-
sciuta con un segnale acustico.
7.1 Impostazioni manuali
• Tenere premuto per tre secondi il tasto SET sul retro del dispositivo
nella modalità normale.
• Sul display appare dcF e ON (predefinito) lampeggia. La ricezione
DCF è attiva per impostazione predefinita. Dopo l'avvenuta ricezione
del segnale DCF non è necessaria alcuna regolazione manuale.
• Premere il tasto –o +se si desidera disattivare la ricezione radio
DCF (OFF).
• Confermare con il tasto SET.
• Se la ricezione radio DCF è attivata, è possibile impostare il fuso ora-
rio dopo aver premuto il tasto SET. TZ appare sul display e 0 (prede-
finito) lampeggia.
• Premere il tasto –o +per impostare il fuso orario (+9/-9).
• Il fuso orario viene utilizzato dove può essere ricevuto il segnale DCF
ma il fuso orario differisce da quello tedesco (ad esempio, +1 =
un'ora dopo).
• Confermare con il tasto SET.
L'ora è codificata e trasmessa da Mainflingen vicino Francoforte con un
segnale a frequenza DCF - 77 (77,5 kHz) entro un raggio di 1.500 km.
Anche il passaggio tra ora solare e ora legale è automatico. Durante il
periodo estivo il simbolo DCF appare sul display. La qualità della rice-
zione dipende molto dalla posizione geografica. In circostanze normali e
in assenza di problemi di ricezione dovrebbe avvenire entro il raggio di
1.500 km da Francoforte.
Rispettate le norme elencate qui di seguito:
• La distanza raccomandata da qualsiasi fonte di interferenza come
monitor di computer o televisori deve essere di almeno 1.5 - 2m.
• All'interno di strutture in cemento armato (seminterrati, sovrastrut-
ture) la ricezione del segnale è naturalmente più debole. In casi
estremi si consiglia di sistemare l'unità vicino ad una finestra per
ottenere una migliore ricezione del segnale.
• Durante le ore notturne, le interferenze dovute ad agenti atmosferici
sono normalmente meno influenti e la ricezione è possibile nella
maggior parte dei casi. Una singola ricezione giornaliera è sufficiente
a garantire la precisione e a mantenere la deviazione al di sotto di un
secondo.
7. Uso
• Tenere premuto il tasto –o +in modalità impostazione per procedere
velocemente.
TFA_No. 60.2550_Anleitung_02_23 21.02.2023 15:04 Uhr Seite 29

5958
Orologio sveglia radiocontrollato
Orologio sveglia radiocontrollato
7.1.3 Impostazione dei toni tasto
• Per impostazione predefinita, il suono dei tasti (beep) è disattivato
(OFF).
• Per attivare (ON) il suono dei tasti premere il tasto –o +.
• Confermare con il tasto SET.
8. Allarme
• La sveglia ha due allarmi con differenti toni di allarme.
8.1 Impostazione dell’ora di allarme 1
• Premere il tasto nella modalità normale.
• Sul display viene visualizzato 7:00 (predefinito) o l'ultima ora di
allarme impostata.
• L’indicazione dell’ora inizia a lampeggiare.
• Impostare con il tasto – o +le ore.
• Confermare con il tasto .
• L'indicazione dei minuti inizia a lampeggiare. Inserire i minuti con il
tasto – o +.
• Confermare con il tasto .
• Sul display viene visualizzata l'ora di allarme.
• Premendo il tasto SET è possibile modificare uno dopo l'altro le
impostazioni delle ore, dei minuti, dell'anno, del mese, del giorno,
della visualizzazione della temperatura (predefinito: °C), della lingua
del giorno della settimana (predefinito: tedesco), e il tono dei tasti
(predefinito: OFF), impostare con il tasto –o +.
• Confermare con il tasto SET.
• Dopo che la ricezione del segnale radio DCF è avvenuta con successo
e il segnale DCF è attivato (ON), l'ora impostata in modo manuale
viene sostituita.
7.1.1 Impostazione della visualizzazione della temperatura
• Con il tasto –o +è possibile scegliere fra la visualizzazione della
temperatura in °C (gradi Celsius) o °F (gradi Fahrenheit).
• Confermare con il tasto SET.
• In caso di selezione di gradi Fahrenheit, il formato dell’ora è imposta-
to automaticamente su 12 ore. AM o PM vengono visualizzati sul
display. Il formato della data cambia in Mese/Giorno.
7.1.2 Impostazione della lingua del giorno della settimana
• Impostate con il tasto –o + la lingua desiderata: Tedesco (D), Inglese
(EN), Francese (FR), Spagnolo (ES), Italiano (IT) o Olandese (NE).
• Confermare con il tasto SET.
TFA_No. 60.2550_Anleitung_02_23 21.02.2023 15:04 Uhr Seite 30

6160
Orologio sveglia radiocontrollato
Orologio sveglia radiocontrollato
• Per disattivare la funzione sveglia spingere l'interruttore allarme 1
ON/OFF verso il basso (OFF).
• Il simbolo della sveglia e il marchio di colore scompaiono.
8.2 Impostazione dell’ora di allarme 2
• Premere il tasto nella modalità normale.
• Sul display viene visualizzato 7:00 (predefinito) o l'ultima ora di
allarme impostata.
• Impostare l'orario della sveglia nello stesso modo.
• Per attivare/disattivare la funzione sveglia spingere l'interruttore
allarme 2 ON/OFF verso l'alto (ON) / verso il basso (OFF).
8.3 Impostazione del tono di allarme
• Tramite il commutatore ALARM / ALARM sul retro potete scegliere tra
tono di allarme crescente o costantemente alto.
9. Illuminazione
• Premere il tasto SNOOZE/LIGHT.
• La retroilluminazione si accende per 5 secondi, e svanisce lentamente.
• Il dispositivo dispone di un sensore luminoso che attiva automatica-
mente l'illuminazione in caso di oscurità.
• Con l'interruttore AUTO LIGHT ON/OFF posto sul retro, è possibile
attivare e disattivare l'illuminazione automatica.
• Per attivare la funzione sveglia spingere l'interruttore allarme 1
ON/OFF verso l'alto (ON). Contemporaneamente, il marchio colorato
viene visualizzato e l’ora di allarme impostata viene visualizzata in
una cornice con l'icona di allarme:
• Il primo allarme è attivato.
• Quando l'orario di allarme inserito viene raggiunto, la sveglia comin-
cia a suonare.
• Il simbolo della sveglia inizia a lampeggiare e l'illuminazione si
accende per 5 secondi.
• Per arrestare l’allarme, premere un tasto qualunque.
• Se il suono della sveglia non viene interrotto, il segnale si disattiva
automaticamente dopo pochi minuti e si riattiva nuovamente alla
stessa ora di sveglia.
• Il simbolo della sveglia resta fisso sul display e la sveglia resta impo-
stata sullo stesso orario.
• Quando suona la sveglia innestare la funzione snooze con il tasto
SNOOZE/LIGHT.
• Quando la funzione snooze è attivata, zZ inizia a lampeggiare sul
display.
• Il suono della sveglia verrà interrotto per 5 minuti.
TFA_No. 60.2550_Anleitung_02_23 21.02.2023 15:04 Uhr Seite 31

6362
Orologio sveglia radiocontrollato
Orologio sveglia radiocontrollato
➜ Cambiare le batterie
Nessuna ricezione DCF ➜ Attivare la ricezione radio DCF (ON)
nella modalità d’impostazione
➜ Tenere premuto il tasto –per tre
secondi per avviare il tentativo di
ricezione manuale
➜ Cercare nuove posizioni per il dispo-
sitivo
➜ Attendere il tentativo notturno di
ricezione
➜ Eliminare fonti d’interferenza
➜ Riavviare il dispositivo secondo le
istruzioni
➜ Inserire l'ora manualmente
Nessuna illuminazione ➜ Spingere l'interruttore AUTO LIGHT
ON/OFF verso ON (Vedi: Illuminazione)
➜ L'orologio si trova nella modalità di
ricezione del segnale DCF
Illuminazione sfarfalla ➜ Cambiare le batterie
Indicazione non corretta ➜ Cambiare le batterie
• Sul display appare o scompare il simbolo .
•Nota: Durante una ricezione del segnale DCF, l'illuminazione è
temporaneamente disattivata o non può essere attivata.
10. Cura e manutenzione
• Per pulire l'apparecchio utilizzare solo un panno morbido legger-
mente inumidito. Non usare solventi o prodotti abrasivi.
• Rimuovere le batterie se non si utilizza l'apparecchio per un periodo
prolungato.
• Collocare il dispositivo in un luogo asciutto.
10.1 Sostituzione delle batterie
• Cambiare le batterie se il simbolo della batteria appare sul
display.
• Aprire il vano batteria e inserire tre batterie nuove tipo 1,5 V AA,
rispettando le corrette polarità.
• Richiudere il vano batteria.
11. Guasti
Problema Risoluzione del problema
Nessuna indicazione ➜ Inserire le batterie rispettando le
corrette polarità
TFA_No. 60.2550_Anleitung_02_23 21.02.2023 15:04 Uhr Seite 32

6564
Orologio sveglia radiocontrollato
Orologio sveglia radiocontrollato
Smaltimento delle batterie
È assolutamente vietato gettare le batterie e le batterie ricari-
cabili tra i rifiuti domestici. Contengono sostanze tossiche che
possono danneggiare l'ambiente e la salute se smaltite in
modo improprio. In qualità di consumatori, siete tenuti per
legge a smaltire le batterie usate presso i punti vendita o con-
segnarle presso altri enti preposti al riciclaggio in conformità
alle vigenti disposizioni nazionali o locali, ai fini di uno smalti-
mento ecologico. La restituzione è gratuita.
Le sigle dei metalli pesanti contenuti sono:
Cd=cadmio, Hg=mercurio, Pb=piombo
13. Dati tecnici
Alimentazione Batterie 3 x AA da 1,5 V
Campo di misura
temperatura -10°C…50°C (14°F…122°F)
commutabile in °C/°F
Dimensioni esterne 95 x 41 x 96 mm
Peso 161 g (solo apparecchio)
Qualora il vostro apparecchio continui a non funzionare nonostante
queste procedure, rivolgetevi al rivenditore presso il quale lo avete
acquistato.
12. Smaltimento
Questo prodotto e il suo imballaggio sono stati realizzati utilizzando
materiali e componenti di alta qualità che possono essere riciclati e riu-
tilizzati. Questo riduce i rifiuti e protegge l'ambiente.
Smaltire gli imballaggi in modo ecologico attraverso i sistemi di raccol-
ta in vigore.
Smaltimento del dispositivo elettrico
Rimuovere dal dispositivo le batterie estraibili e le batterie
ricaricabili estraibili e smaltirle separatamente.
Questo apparecchio è contrassegnato in conformità alla Diret-
tiva UE sullo smaltimento delle apparecchiature elettriche ed
elettroniche (WEEE).
Questo prodotto non deve essere smaltito insieme ai rifiuti
domestici. Il consumatore è tenuto a consegnare il vecchio
apparecchio presso un punto di raccolta per lo smaltimento di
apparecchiature elettriche ed elettroniche ai fini di uno smalti-
mento ecologico. La restituzione è gratuita. Osservare i regola-
menti in vigore!
TFA_No. 60.2550_Anleitung_02_23 21.02.2023 15:04 Uhr Seite 33

6766
Orologio sveglia radiocontrollato
Radiografische wekker
Hartelijk dank dat u voor dit apparaat van TFA hebt gekozen.
1. Voordat u met het apparaat gaat werken
•Lees de gebruiksaanwijzing aandachtig door.
•Door rekening te houden met wat er in de handleiding staat, ver-
mijdt u ook beschadigingen van het product en riskeert u niet dat
uw wettelijke rechten door verkeerd gebruik niet meer gelden.
•Voor schade die wordt veroorzaakt doordat u geen rekening houdt
met de handleiding aanvaarden wij geen aansprakelijkheid. Ook
zijn wij niet verantwoordelijk voor verkeerde metingen en de
mogelijke gevolgen die daaruit voortvloeien.
•Volg met name de veiligheidsinstructies op!
•Deze gebruiksaanwijzing goed bewaren a.u.b.!
2. Levering
• Radiografische wekker
• Gebruiksaanwijzing
3. Toepassing en alle voordelen van uw nieuwe apparaat in één oog-
opslag
• Radiografische klok met hoge precisie
• Met tijdzone en handmatige tijdsinstelling mogelijk
È vietata la pubblicazione delle presenti istruzioni o di parti di esse senza una pre-
cedente autorizzazione della TFA Dostmann. I dati tecnici corrispondono allo stato
del prodotto al momento della stampa e possono cambiare senza preavviso.
È possibile trovare dati tecnici e informazioni aggiornate sul prodotto inserendo il
numero di articolo sul nostro sito.
Dichiarazione di conformità UE
Il fabbricante, TFA Dostmann, dichiara che il tipo di apparecchiatura radio
60.2550 e 60.2552 è conforme alla direttiva 2014/53/UE. Il testo completo della
dichiarazione di conformità UE è disponibile al seguente indirizzo Internet:
www.tfa-dostmann.de/service/downloads/ce
www.tfa-dostmann.de
E-Mail: [email protected]
TFA Dostmann GmbH & Co.KG
Zum Ottersberg 12, 97877 Wertheim, Germania 02/23
TFA_No. 60.2550_Anleitung_02_23 21.02.2023 15:04 Uhr Seite 34

6968
Radiografische wekker
Radiografische wekker
• Batterijen bevatten zuren die de gezondheid schaden. Het inslikken
van batterijen kan levensgevaarlijk zijn. Als een batterij wordt inge-
slikt, kan dit binnen 2 uur tot ernstige interne brandwonden en tot
fataal letsel leiden. Als u denkt dat de batterijen zijn ingeslikt of in
een willekeurig lichaamsdeel terecht zijn gekomen, dient u onmiddel-
lijk medische hulp te zoeken.
• Batterijen niet in het vuur gooien, niet kortsluiten, niet uit elkaar
halen of opladen. Explosiegevaar!
• Zwakke batterijen moeten zo snel mogelijk worden vervangen om
lekkage van de batterijen te voorkomen.
• Als een batterij heeft gelekt, vermijd dan contact met de huid, ogen
en slijmvliezen. Spoel in geval van contact met batterijzuur de desbe-
treffende plekken onmiddellijk af met water en raadpleeg een arts.
Belangrijke informatie over de productveiligheid!
• Stel het apparaat niet bloot aan extreme temperaturen, trillingen en
schokken.
• Tegen vocht beschermen.
5. Onderdelen
A: Display (Fig. 1):
A 1: Temperatuur
• Twee alarmen met verschillend alarm geluiden
• Stijgende of constant luidende wektoon ter keuze
• Snooze functie
• Weergave van de binnentemperatuur
• Weergave van de weekdag en de datum
• Automatische achtergrondverlichting met lichtsensor
• Intuïtieve bediening met geluidloze toetsen
4. Voor uw veiligheid
• Het product is uitsluitend geschikt voor de hierboven beschreven
doeleinden. Gebruik het product niet anders dan in deze handleiding
is aangegeven.
• Het eigenmachtig repareren, verbouwen of veranderen van het appa-
raat is niet toegestaan.
Voorzichtig!
Kans op letsel:
• Houd het apparaat en de batterijen buiten de reikwijdte van kinderen.
• Het apparaat bevat kleine onderdelen, die door kinderen (jonger dan
drie jaren) ingeslikt kunnen worden.
TFA_No. 60.2550_Anleitung_02_23 21.02.2023 15:04 Uhr Seite 35

7170
Radiografische wekker
Radiografische wekker
6. Inbedrijfstelling
• Maak het batterijvak open en plaats er de drie batterijen 1,5 V AA in.
Let op de juiste polariteit bij het plaatsen van de batterijen.
• Sluit het batterijvak weer.
• U hoort een kort signaal en alle segmenten van het scherm verschij-
nen kort.
• Het apparaat probeert nu het tijdsignaal te ontvangen en het DCF-
ontvangstsymbool knippert. Bij succesvol ontvangst (na 3 à 8
minuten) verschijnt de radiografische tijd, de datum en het DCF-ont-
vangstsymbool permanent op het display.
• Het DCF-Signaal wordt dagelijks om 3:00 uur ontvangen. Is de ont-
vangst om 3:00 uur niet geslaagd, zo zal opnieuw om 4.00 tot 5:00
uur een ontvangstpoging gedaan worden.
• U kunt u de initiatie ook handmatig starten.
• Druk op de –toets en houdt deze drie seconden lang ingedrukt.
• Het DCF-ontvangstsymbool knippert.
• Voor het eindigen van het DCF-ontvangst, drukt men nog een keer op
de –toets en houdt deze drie seconden lang ingedrukt. Het DCF-ont-
vangstsymbool verdwijnt.
• Er zijn 3 verschillende ontvangstsymbolen:
knippert - ontvangst is actief
blijft staan - ontvangst goed
Geen symbool - geen ontvangst/ontvangst gedeactiveerd
A 2: Symbool voor Auto-Light (geactiveerd)
A 3: Weekdag, datum
A 4: Tijd, seconden
A 5: DCF-symbool (geactiveerd)
A 6: Alarmtijd 1 (geactiveerd)
A 7: Alarmtijd 2 (geactiveerd)
B: Toetsen (Fig. 1-2):
B 1: SNOOZE/LIGHT toets
B 2: toets
B 3: – toets
B 4: + toets
B 5: toets
B 6: Alarmtijd1 ON/OFF schuifschakelaar
B 7: Alarmtijd 2 ON/OFF schuifschakelaar
B 8: AUTO LIGHT ON/OFF schuifschakelaar
B 9: SET toets
B 10: ALARM / ALARM schuifschakelaar
C: Behuizing (Fig. 1-2):
C 1: Batterijvak
C 2: Kleurmarkering voor de wektijd 1 ON / OFF
C 3: Kleurmarkering voor de wektijd 2 ON / OFF
C 4: Lichtsensor
TFA_No. 60.2550_Anleitung_02_23 21.02.2023 15:04 Uhr Seite 36

7372
Radiografische wekker
Radiografische wekker
• 's Nachts zijn atmosferische storingen over het algemeen minder
ernstig en is ontvangst in de meeste gevallen wel mogelijk. Een enke-
le ontvangst per dag is voldoende om de tijdsafwijking onder
1 seconde te houden.
7. Bediening
• Houdt de –of +toets in de overeenkomstige instelmodus ingedrukt
en u komt in de snelloop.
• Het apparaat verlaat automatisch de instelmodus, als er langer dan
15 seconden geen toets wordt ingedrukt.
• Wanneer de toets toon geactiveerd is, wordt elke toetsbediening met
een pieptoon bevestigd.
7.1 Handmatige instellingen
• Druk op de SET toets op de achterkant en houdt deze drie seconden
ingedrukt.
• dcF verschijnt op het display en ON (standaardinstelling) knippert.
Normaal is de standaard DCF-ontvangst ingeschakeld en na een suc-
cesvolle ontvangst van het DCF-signaal is een handmatige aanpas-
sing niet nodig.
• Druk op de – of +toets, als u het DCF radio-ontvangst (OFF) wilt uit-
schakelen
• Als de klok geen DCF-signaal ontvangt (wegens storingen, afstand,
enz.), kunt u de tijd ook handmatig instellen. De klok werkt dan als
een gewone kwartsklok (zie: Handmatige instellingen).
Ontvangst van het tijdsignaal DCF
De tijdbasis voor de radiografische tijd is een cesium-atoomklok van
het Physikalisch Technische Bundesanstalt Braunschweig. Met een
afwijking van minder dan 1 seconde in een miljoen jaar. De tijd is ge-
codeerd en wordt vanuit Mainflingen in de buurt van Frankfurt aan de
Main door een DCF-77 (77,5 kHz) frequentiesignaal uitgezonden met
een bereik van ongeveer 1500 km. Zelfs de overgang van zomer- naar
wintertijd gebeurt automatisch. Gedurende de zomertijd verschijnt DST
op het display. De kwaliteit van de ontvangst hangt in belangrijke mate
af van de geografische ligging. Normaliter zouden er binnen een straal
van 1.500 km rondom Frankfurt geen ontvangstproblemen mogen zijn.
Let alstublieft op het volgende:
• De afstand van mogelijke storingsbronnen zoals computerbeeld-
schermen of tv-toestellen dient tenminste 1,5 à 2 meter te zijn.
• In ruimten met gewapend beton (kelders, torenflats) wordt het sig-
naal uiteraard verzwakt ontvangen. In extreme gevallen, plaatst u het
apparaat in de buurt van een raam en / of u draait het apparaat om
een beter ontvangst te verkrijgen.
TFA_No. 60.2550_Anleitung_02_23 21.02.2023 15:04 Uhr Seite 37

7574
Radiografische wekker
Radiografische wekker
• Wordt Fahrenheit ingesteld, wordt automatisch ook de tijd in 12
urenformaat aangetoond. AM of PM verschijnt in het display. Het
datumformaat verandert in maand/dag.
7.1.2 Instelling van de taalinstelling voor de weekdag
• Stel de gewenste taalinstelling voor de weekdag met de – of +toets
in: Duits (D), Engels (EN), Frans (FR), Spaans (ES), Italiaans (IT) of
Nederlands (NL).
• Bevestig met de SET toets.
7.1.3 Instelling van de toetstoon
• Standaard is dat de toetstoon (beep) is uitgeschakeld (OFF).
• Druk op de – of +toets om de toetstoon in te schakelen (ON).
• Bevestig met de SET toets.
8. Alarm
• De wekker heeft twee alarmen met verschillende alarmsignalen.
8.1 Instelling van de eerste alarmtijd
• Druk op de toets in de normaal-modus.
• 7:00 (standaardinstelling) of de laatst ingestelde wektijd verschijnt
op het display.
• De uur aanduiding knippert.
• Bevestig met de SET toets.
• Als de DCF radio-ontvangst ingeschakeld is (ON), kunt u na de
bevestiging op de SET toets de tijdzone instellen (TZ verschijnt op de
display en 0 standaardinstelling knippert).
• Druk op de – of +toets en U kunt de tijdzone (-9/+9) instellen.
• Instellen van een correctie voor de tijdzone is vereist wanneer het
DCF-signaal wel kan worden ontvangen, maar de tijdzone van de
DCF tijd afwijkt (bijvoorbeeld, +1 = één uur later).
• Bevestig met de SET toets.
• Druk op de SET toets en U kunt met de - of + toets het uur, de minu-
ten, het jaar, de maand, de dag, de weergave van de temperaturen
(standaardinstelling:°C), de taalinstelling voor de weekdagen (stan-
daardinstelling: duits), en de toetstoon (standaardinstelling:OFF)
instellen.
• Bevestig de instelling met de SET toets.
• Is de ontvangst van het DCF signaal geslaagd en wanneer de DCF-
ontvangst (ON) is geactiveerd, wordt de handmatig ingestelde tijd
overschreven.
7.1.1 Instelling van de temperatuur
• Druk op de – of +toets om te schakelen tussen Celsius (° C) of Fah-
renheit (° F) als temperatuur eenheid.
• Bevestig met de SET toets.
TFA_No. 60.2550_Anleitung_02_23 21.02.2023 15:04 Uhr Seite 38

7776
Radiografische wekker
Radiografische wekker
• Wanneer de wekker klingelt, drukt men op de SNOOZE/LIGHT toets
om de snooze functie te activeren.
• Indien de snooze-functie geactiveerd is, knippert zZ in het display.
• Het weksignaal wordt voor 5 minuten onderbroken.
• Om het apparaat uit te schakelen, schuif de alarmtijd 1 ON/OFF
schakelaar naar beneden (OFF), om de alarm functie uit te schakelen.
• Het alarmsymbool en de kleurmarkiering verdwijnen.
8.2 Instelling van de tweede alarmtijd
• Druk op de toets in de normaal-modus.
• 7:00 (standaardinstelling) of de laatst ingestelde wektijd verschijnt
op het display.
• Stel eventueel op dezelfde manier de tweede wektijd in.
• Voor het activeren/deactiveren van het tweede alarm, schuift men de
alarmtijd 2 ON/OFF schakelaar naar boven (ON)/beneden (OFF).
8.3 Instelling van de alarmtoon
• Met de schuifschakelaar ALARM / ALARMop de achterkant kunt u de
constante geluiden of steigende wektonen uitkiezen.
9. Verlichting
• Druk op de SNOOZE/LIGHT toets.
• Stel het uur met de – of +toets in.
• Bevestig de instelling met de toets
• De minutenweergave begint te knipperen en u kunt met de – of +
toets de minuten instellen.
• Bevestig met de toets.
• Het ingestelde alarm tijd verschijnt op het display.
• Voor het activeren van het alarm, schuift men de alarmtijd 1 ON/OFF
schakelaar naar boven (ON). Tegelijkertijd wordt het vakje gemar-
keerd in kleur en rond de wektijd verschijnt een frame, met het alarm
symbool:
• De alarmfunctie voor de eerste wektijd is geactiveerd.
• Wanneer de ingestelde wektijd is bereikt begint de wekker te rinke-
len.
• Het alarm symbool knippert en de achtergrondverlichting gaat voor
5 seconden aan.
• Druk op een willekeurige toets en het alarm zal stoppen.
• Als het alarm niet wordt beëindigd, zal de alarmtoon zich na een paar
minuten automatisch uitschakelen.
• Het alarmsymbool blijft staan en activeert zich vanzelf weer op
dezelfde wektijd.
TFA_No. 60.2550_Anleitung_02_23 21.02.2023 15:04 Uhr Seite 39

7978
Radiografische wekker
Radiografische wekker
11. Storingswijzer
Probleem Oplossing
Geen indicatie ➜ Batterijen in de juiste poolrichting
plaatsen
➜ Vervang de batterijen
Geen DCF ontvangst ➜ Activeer de DCF radio-ontvangst in de
instelling (ON)
➜ Druk op de –toets en houdt deze
ingedrukt en start de initiatie hand-
matig
➜ Zoek een nieuwe opstellingsplaats
voor het apparaat
➜ Ontvangstpoging in de nacht afwach-
ten
➜ Verwijder stoorbronnen
➜ Apparaat opnieuw volgens de hand-
leiding in bedrijf stellen
➜ De tijd manueel instellen
Geen verlichting ➜ Zet de AUTO LIGHT ON/OFF schuif-
schakelaar op ON (zie: Verlichting)
• De achtergrond verlichting gaat voor 5 seconden aan en gaat daarna
zachtjes uit.
• Het apparaat beschikt over een lichtsensor en de verlichting schakelt
automatisch aan in het donker.
• Met de schuifschakelaar AUTO LIGHT ON/OFF aan de achterkant zet u
de automatische verlichting nu aan (ON) of af (OFF).
• verschijnt op/verdwijnt van het display.
•Opmerking: Tijdens de ontvangst van een DCF-signaal wordt de
verlichting tijdelijk uitgeschakeld of kan niet worden geactiveerd.
10. Schoonmaken en onderhoud
• Maak het apparaat met een zachte, enigszins vochtige doek schoon.
Geen schuur- of oplosmiddelen gebruiken!
• Verwijder de batterijen, als u het apparaat langere tijd niet gebruikt.
• Bewaar het apparaat op een droge plaats.
10.1 Batterijwissel
• Vervang de batterijen als het batterijsymbool op het display ver-
schijnt.
• Maak het batterijvak open en plaats er drie nieuwe batterijen 1,5 V AA
in.
• Sluit het batterijvak weer.
TFA_No. 60.2550_Anleitung_02_23 21.02.2023 15:04 Uhr Seite 40

8180
Radiografische wekker
Radiografische wekker
Dit product mag niet met het huisvuil worden weggegooid. De
gebruiker is verplicht om de apparatuur in te leveren bij een als
zodanig erkende inleverpunt voor het afvoeren van afgedankte
elektrische en elektronische apparatuur om een milieuvriende-
lijk afvoeren te garanderen. Inleveren is gratis. Neem de gel-
dende voorschriften in acht!
Afvoeren van batterijen
Batterijen en accu's mogen niet met het huisvuil worden weg-
gegooid. Zij bevatten schadelijke stoffen die schadelijk kunnen
zijn voor het milieu en de gezondheid indien zij op onjuiste
wijze worden afgevoerd. Als consument bent u wettelijk ver-
plicht om gebruikte batterijen en accu's bij uw verkoper in te
leveren of naar de daarvoor bestemde inleverpunten volgens
de nationale of lokale bepalingen te brengen om een milieu-
vriendelijk afvoeren te garanderen. Inleveren is gratis.
De benamingen van de zware metalen zijn:
Cd=cadmium, Hg=kwik, Pb=lood
13. Technische gegevens
Spanningsvoorziening: Batterijen 3 x 1,5 V AA
➜ De klok is in de DCF signaal ont-
vangstmodus
Verlichting flakkert ➜ Vervang de batterijen
Geen correcte weergave ➜ Vervang de batterijen
Neem contact op met de verkoper bij wie u dit product gekocht heeft als
uw apparaat ondanks deze maatregelen nog steeds niet werkt.
12. Afvoeren
Dit product en de verpakking zijn vervaardigd van hoogwaardige mate-
rialen en onderdelen, die kunnen worden gerecycled en hergebruikt. Dit
vermindert afval en spaart het milieu.
Voer de verpakking op milieuvriendelijke wijze af via de daarvoor
bestemde inzamelsystemen.
Afvoeren van het elektrisch apparaat
Verwijder niet vast ingebouwde batterijen en accu’s uit het
apparaat en voer die gescheiden af.
Dit apparaat is gemarkeerd in overeenstemming met de EU-
richtlijn (WEEE) betreffende afgedankte elektrische en elektro-
nische apparatuur.
TFA_No. 60.2550_Anleitung_02_23 21.02.2023 15:04 Uhr Seite 41

8382
Radiografische wekker
Reloj despertador radiocontrolado
Muchas gracias por haber adquirido este dispositivo de TFA.
1. Antes de utilizar el dispositivo
•Lea detenidamente las instrucciones de uso.
•Si sigue las instrucciones de uso, evitará que se produzcan daños
en el dispositivo y no comprometerá a sus derechos por vicios,
previstos legalmente debido a un uso incorrecto.
•No asumimos responsabilidad alguna por los daños originados
por el incumplimiento de estas instrucciones de uso. Del mismo
modo, no nos hacemos responsables por cualquier lectura in-
correcta y de las consecuencias que pueden derivarse de tales.
•Tenga en cuenta ante todo las advertencias de seguridad.
•Guarde estas instrucciones de uso en un sitio seguro.
2. Entrega
• Reloj despertador radiocontrolado
• Instrucciones de uso
3. Ámbito de aplicación y ventajas de su nuevo dispositivo
• Reloj radiocontrolado con alta precisión
• Con zona horaria y posibilidad de ajuste manual
• Dos horas de alarmas con diferentes sonidos de alarma
• Se puede seleccionar un sonido de alarma ascendente o alto
Meetbereik - temperatuur -10 °C… 50 °C (14 °F …122 °F)
C/°F- omschakelbaar
Afmetingen behuizing: 95 x 41 x 96 mm
Gewicht: 161 g (alleen het apparaat)
Deze gebruiksaanwijzing of gedeelten eruit mogen alleen met toestemming van
TFA Dostmann worden gepubliceerd. De technische gegevens van dit apparaat
zijn actueel bij het ter perse gaan en kunnen zonder voorafgaande informatie wor-
den gewijzigd.
De nieuwste technische gegevens en informatie over uw product kunt u vinden
door het invoeren van het artikelnummer op onze homepage.
EU-conformiteitsverklaring
Hierbij verklaar ik, TFA Dostmann, dat het type radioapparatuur 60.2550 en
60.2552 conform is met Richtlijn 2014/53/EU. De volledige tekst van de EU-con-
formiteitsverklaring kan worden geraadpleegd op het volgende internetadres:
www.tfa-dostmann.de/service/downloads/ce
www.tfa-dostmann.de
E-Mail: [email protected]
TFA Dostmann GmbH & Co.KG
Zum Ottersberg 12, 97877 Wertheim, Duitsland 02/23
TFA_No. 60.2550_Anleitung_02_23 21.02.2023 15:04 Uhr Seite 42

8584
Reloj despertador radiocontrolado
Reloj despertador radiocontrolado
• No tire las pilas al fuego, no las cortocircuite, desmonte ni recargue.
¡Riesgo de explosión!
• Las pilas con un estado de carga bajo deben cambiarse lo antes
posible para evitar fugas.
• Evite el contacto del líquido de las pilas con la piel, ojos y mucosas.
En caso de contacto, enjuague la zona afectada con agua y acuda al
médico sin pérdida de tiempo.
¡Advertencias importantes
sobre la seguridad del producto!
• No exponga el dispositivo a temperaturas extremas, vibraciones ni
sacudidas extremas.
• Protegerlo de la humedad.
5. Componentes
A: Pantalla (Fig. 1):
A 1: Temperatura
A 2: Simbolo de Auto-Light (activado)
A 3: Dia de la semana y fecha
A 4: Hora, segundos
A 5: Símbolo de recepción DCF (activada)
A 6: Hora de alarma 1 (activada)
A 7: Hora de alarma 2 (activada)
• Función snooze
• Indicación de la temperatura interna
• Indicación del día de la semana y fecha
• Iluminación de fondo automática con sensor de luz
• Manejo intuitivo con teclas silenciosas
4. Para su seguridad
• El producto solo es adecuado para el ámbito de aplicación descrito
anteriormente. No emplee el dispositivo de modo distinto al especifi-
cado en estas instrucciones.
• No está permitido realizar reparaciones, transformaciones o modifi-
caciones por cuenta propia en el dispositivo.
¡Precaución!
Riesgo de lesiones:
• Mantenga el dispositivo y las pilas fuera del alcance de los niños.
• Las piezas pequeñas pueden ser tragadas por los niños (menores de
tres años).
• Las pilas contienen ácidos nocivos para la salud y pueden ser peli-
grosas si se ingieren. Si se ingiere una pila le puede causar dentro de
2 horas, quemaduras internas y llegar a la muerte. Si sospecha que
se ha ingerido una pila o ha entrado en el cuerpo de otro modo, bus-
que inmediatamente ayuda médica.
TFA_No. 60.2550_Anleitung_02_23 21.02.2023 15:04 Uhr Seite 43

8786
Reloj despertador radiocontrolado
Reloj despertador radiocontrolado
• Se emite una señal acústica corta y todos los segmentos se mues-
tran brevemente.
• El reloj está tratando de recibir la señal de radio y el símbolo de
recepción DCF parpadea. Una vez que se ha recibido el código de
horario después 3 - 8 minutos se muestra la hora controlada por
radio y el símbolo de recepción DCF aparece constantemente en la
pantalla.
• La recepción de la señal DCF se llevará a cabo diariamente a las 3.00
de la mañana. Si la recepción del reloj a las 3.00 no tiene éxito, se
llevará a 4.00 cabo hasta las 5.00 de la mañana nuevos intentos de
recepción.
• Puede comenzar la inicialización manualmente.
• Mantenga pulsada la tecla –durante tres segundos.
• El símbolo de recepción DCF parpadea.
• Para finalizar la recepción mantenga pulsada la tecla –durante tres
segundos. El símbolo de recepción DCF desaparece.
• Hay tres tipos de símbolos recibidos:
parpadea - recepción está activa.
se mantiene - recepción con éxito
ningún símbolo - No hay recepción/ recepción está desactivada
B: Teclas (Fig. 1-2):
B 1: Tecla SNOOZE/LIGHT
B 2: Tecla
B 3: Tecla –
B 4: Tecla+
B 5: Tecla
B 6: Interruptor deslizante Alarma 1 ON/OFF
B 7: Interruptor deslizante Alarma 2 ON/OFF
B 8: Interruptor deslizante AUTO LIGHT ON/OFF
B 9: Tecla SET
B 10: Interruptor deslizante ALARM / ALARM
C: Cuerpo (Fig. 1-2):
C 1: Compartimiento de las pilas
C 2: Marca de color para la hora de alarma 1 ON / OFF
C 3: Marca de color para la hora de alarma 2 ON / OFF
C 4: Sensor de luz
6. Puesta en marcha
• Abra el compartimiento de las pilas e introduzca las tres pilas 1,5 V
AA. Asegúrese que las pilas estén colocadas con la polaridad correcta.
• Cierre de nuevo el compartimiento de las pilas.
TFA_No. 60.2550_Anleitung_02_23 21.02.2023 15:04 Uhr Seite 44

8988
Reloj despertador radiocontrolado
Reloj despertador radiocontrolado
• En construcciones de hormigón armado (sótanos, superestructuras),
la señal recibida es evidentemente más débil. En casos extremos se
aconseja de emplazar el dispositivo cerca de una ventana para obte-
ner una mejor recepción.
• Por las noches las perturbaciones atmosféricas suelen ser reducidas
y se dispone de recepción en la mayoría de los casos. Si además se
recibe como mínimo una vez al día, es suficiente para garantizar la
precisión y mantener desviaciones inferiores a 1 segundo.
7. Manejo
• Mantenga pulsada la tecla –o +en el modo de ajuste, accederá a la
pasada rápida.
• El dispositivo sale automáticamente del modo de ajuste si no se pre-
siona la tecla durante 15 segundos.
• Cuando está el tono de la tecla activado, cada operación clave se
confirma con un pitido.
7.1 Ajustes manuales
• Mantenga pulsada la tecla SET en la parte posterior durante tres
segundos en el modo normal.
• En la pantalla aparece dcF y ON (nivel preseleccionado) parpadea. De
manera predeterminada, la recepción DCF está activada y después de
la recepción exitosa de la señal DCF no es necesario un ajuste
manual.
• Si su reloj radiocontrolado no es capaz de recibir la señal DCF (p. ej,
debido a interferencias, distancia de transmisión, etc.), puede ajus-
tar la hora manualmente. El símbolo de la recepción DCF desaparece
y el reloj funciona como un reloj normal de cuarzo (véase Ajuste
manuales).
Recepción de la hora controlada por radio
La transmisión de la hora se realiza por medio de un reloj atómico de
cesio radiocontrolado a través de, por el instituto técnico físico de
Braunschweig. La desviación es menor a 1 segundo en un millón de
años. La hora viene codificada y es transmitida desde Mainflingen en
las proximidades de Frankfurt am Main por una señal de frecuencia
DCF-77 (77,5 kHz) con un alcance de aprox. 1.500 km. Incluso el cam-
bio de la hora de verano e invierno se produce automáticamente.
Durante el tiempo de verano aparece DST en la pantalla. La recepción
depende básicamente de la situación geográfica. Generalmente éste
debería funcionar de forma óptima en un radio de 1.500 km en torno a
Frankfurt.
Siga por favor las indicaciones siguientes
• Es recomendable mantener una distancia de como mínimo 1,5 –
2 metros de posibles aparatos perturbadores tales como pantallas de
ordenadores y televisores.
TFA_No. 60.2550_Anleitung_02_23 21.02.2023 15:04 Uhr Seite 45

9190
Reloj despertador radiocontrolado
Reloj despertador radiocontrolado
• Confirme la entrada con la tecla SET.
• Cuando se ajusta Fahrenheit, la hora también se muestra automáti-
camente en el formato de 12 horas. En la pantalla aparece AM o PM.
El formato de fecha cambia a mes/dia.
7.1.2 Ajuste del idioma para el día de la semana
• Ajuste con la tecla – o + el idioma para el día de la semana deseada:
alemán (D), inglés (EN), francés (FR), español (ES), italiano (IT) u
holandés (NL).
• Confirme la entrada con la tecla SET.
7.1.3 Ajuste del tono de la tecla
• Por norma el tono de la tecla (beep) está desactivado (OFF).
• Pulse la tecla – o +para encender el tono de la tecla (ON).
• Confirme la entrada con la tecla SET.
8. Alarma
• El despertador tiene dos alarmas con diferentes tonos.
8.1 Ajuste manual de la primera alarma
• Pulse la tecla en el modo normal.
• 7:00 (nivel preseleccionado) o la indicación de la última hora de la
alarma se muestra en la pantalla.
• Pulsa la tecla – o +, si desea desactivar la recepción de radio DCF
(OFF).
• Confirme la entrada con la tecla SET.
• Si la recepción de radio DCF está activada (ON) se puede confirmar
con la tecla SET y puede ajustar la zona horaria (en la pantalla apare-
ce TZ y 0 {preseleccionado} parpadea).
• Pulse la tecla – o +para ajustar la zona horaria (-9/+9).
• El ajuste de la zona horaria es necesaria cuando se pueda recibir la
señal DCF, la zona horaria es diferente de la hora DCF (por ejemplo:
+1 = una hora más tarde).
• Confirme la entrada con la tecla SET.
• Pulse otra vez la tecla SET y puede sucesivamente dirigir la hora, los
minutos, el año, el mes, el día, la visualización de la temperatura
(preseleccionado: °C), el idioma para el día de la semana (preselec-
cionado: alemán) y el tono de la tecla (preseleccionado: OFF), se
puede ajustar con la tecla – o +.
• Confirme la entrada con la tecla SET.
• Si la recepción de la señal de radio para la hora es exitosa y la
señal DCF está activada (ON) el tiempo ajustado manualmente se
sobrescribe.
7.1.1 Ajuste la unidad de la temperatura
• Pulse la tecla – o +para cambiar de Celsius (°C) a Fahrenheit (°F)
como unidad de la temperatura.
TFA_No. 60.2550_Anleitung_02_23 21.02.2023 15:04 Uhr Seite 46

9392
Reloj despertador radiocontrolado
Reloj despertador radiocontrolado
• Cuando suena el despertador, pulse la tecla SNOOZE/LIGHT para acti-
var la función de snooze.
• Si la función de snooze se encuentra activada, zZ parpadea.
• El sonido de la alarma se interrumpe durante 5 minutos.
• Para desactivar la función de la alarma, deslice el interruptor desli-
zante de la hora de la alarma 1 ON/OFF hacia abajo (OFF).
• El símbolo de la alarma y la marca de color desaparecen en la pan-
talla.
8.2 Ajuste de la segunda alarma
• Pulse la tecla en el modo normal.
• 7:00 (nivel preseleccionado) o la indicación de la última hora de la
alarma se muestra en la pantalla.
• Introduzca del mismo modo la segunda alarma.
• Para activar/desactivar la función de la segunda alarma, deslice el
interruptor deslizante de la hora de alarma 2 ON/OFF hacia arriba
(ON)/abajo (OFF).
8.3 Ajuste del sonido de alarma
• Utilice el interruptor deslizante de ALARM / ALARM en la parte trasera
para seleccionar el sonido de la alarma continuo o ascendente.
• La indicación de la hora parpadea en la pantalla.
• Ajuste las horas con la tecla – o +.
• Confirme la entrada con la tecla .
• La pantalla del minuto parpadea y con la tecla – o +puede ajustar los
minutos.
• Confirme la entrada con la tecla .
• En la pantalla aparece la hora de la primera alarma.
• Para activar la función de la alarma, deslice el interruptor deslizante
de la hora de la alarma 1 ON/OFF hacia arriba (ON). Al mismo tiem-
po, el cuadrito se resalta en color y alrededor de la hora de la alarma
aparece un marco con el símbolo de la alarma:
• La primera alarma está activada.
• Cuando llegue la hora de la alarma, el despertador comienza a sonar.
• El símbolo de la alarma parpadea y la iluminación del fondo se activa
durante 5 segundos.
• Pulse cualquier tecla y la función de la alarma se termina.
• Si no se termina la alarma, el tono de alarma se apaga automática-
mente después de unos minutos.
• El símbolo de la alarma se queda y la alarma se activa de nuevo a la
misma hora.
TFA_No. 60.2550_Anleitung_02_23 21.02.2023 15:04 Uhr Seite 47

9594
Reloj despertador radiocontrolado
Reloj despertador radiocontrolado
• Abra el compartimiento de las pilas e introduzca tres pilas nuevas
1,5 V AA. Asegúrese que las pilas estén colocadas con la polaridad
correcta.
• Cierre de nuevo el compartimiento de las pilas.
11. Averías
Problema Solución
Ninguna indicación ➜ Asegúrese que las pilas estén colo-
cadas con la polaridad correcta
➜ Cambiar las pilas
Ninguna recepción de DCF ➜ Activar la recepción de la señal radio
DCF en el modo de ajuste (ON)
➜ Mantenga pulsada la tecla –durante
tres segundos y pruebe la recepción
manualmente
➜ Elegir otro lugar para el dispositivo
➜ Intentar la recepción de noche
➜ Elimine las fuentes de interferencia
➜ Vuelva a la puesta en marcha del dis-
positivo de acuerdo a las instrucciones
➜ Ajustar la hora manualmente
9. Iluminación
• Pulse la tecla SNOOZE/LIGHT.
• La iluminación de fondo se activa durante 5 segundos, apagándose
suavemente.
• El dispositivo dispone de un sensor de luz y conecta la iluminación
automáticamente.
• Con el interruptor AUTO LIGHT ON/OFF en la parte posterior puede
activar o desactivar la iluminación automática.
• El símbolo aparece/desaparece de la pantalla.
•Nota: Durante una recepción de la señal DCF, la iluminación se
desactiva temporalmente o no se puede activar.
10. Cuidado y mantenimiento
• Limpie el dispositivo con un paño suave, ligeramente humedecido.
¡No utilice medio abrasivo ni disolventes!
• Extraiga las pilas si no va a usar el dispositivo por un largo período
de tiempo.
• Mantenga el dispositivo en un lugar seco.
10.1 Cambio de las pilas
• En cuando aparezca en la pantalla el símbolo de la pila , cambie
las pilas.
TFA_No. 60.2550_Anleitung_02_23 21.02.2023 15:04 Uhr Seite 48

9796
Reloj despertador radiocontrolado
Reloj despertador radiocontrolado
Este dispositivo está identificado conforme a la Directiva de la
UE sobre residuos de aparatos eléctricos y electrónicos
(WEEE).
No deseche este producto junto con la basura doméstica. El
usuario está obligado a llevar el dispositivo usado a un punto
de recogida de aparatos eléctricos y electrónicos acreditado
para que sea eliminado de manera respetuosa con el medio
ambiente. La devolución es gratuita. Tenga en cuenta las nor-
mas vigentes actuales.
Eliminación de las pilas
Las pilas y baterías no pueden desecharse en ningún caso
junto con la basura doméstica. Contienen contaminantes que
pueden perjudicar el medio ambiente y la salud si se eliminan
de forma inadecuada. Como consumidor, está obligado legal-
mente a depositar las pilas y baterías usadas de manera respe-
tuosa con el medio ambiente en el comercio especializado o
bien en los centros de recogida y reciclaje previstos para ello
según el reglamento nacional o local. La devolución es gra-
tuita.
Las denominaciones de los metales pesados que contienen
son: Cd=cadmio, Hg=mercurio, Pb=plomo.
Ninguna iluminación: ➜ Ajustar el interruptor AUTO LIGHT
ON/OFF en la posición ON
(ver: Iluminación)
➜ El reloj se encuentra en el modo de
recepción de la señal DCF
Iluminación centellea ➜ Cambiar las pilas
Indicación incorrecta ➜ Cambiar las pilas
Si a pesar de haber seguido estos pasos, el dispositivo no funciona,
diríjase al establecimiento donde adquirió el producto.
12. Eliminación
Este producto y su embalaje han sido fabricados con materiales y com-
ponentes de alta calidad que pueden ser reciclados y reutilizados. Así
se reducen los residuos y se protege el medio ambiente.
Eliminar el embalaje de una forma respetuosa con el medio ambiente a
través de los sistemas de recogida establecidos.
Eliminación de los dispositivos eléctricos
Retire las pilas y baterías recargables que no están instaladas
de forma permanente y deséchelas por separado del producto.
TFA_No. 60.2550_Anleitung_02_23 21.02.2023 15:04 Uhr Seite 49

98
Reloj despertador radiocontrolado
13. Datos técnicos
Alimentación de tensión: Pilas 3 x 1,5 V AA
Gama de medición -10 ... 50°C (14 ... 122°F)
temperatura: °C/°F- reversible
Dimensiónes de cuerpo: 95 x 41 x 96 mm
Peso: 161 g (solo dispositivo)
Estas instrucciones o extractos de las mismas no pueden ser publicados sin la
autorización de la TFA Dostmann. Los datos técnicos de este producto correspon-
den al estado en el momento de la impresión y pueden ser modificados sin previo
aviso. Los actuales datos técnicos e informaciones sobre su producto los puede
encontrar bajo el número de artículo en nuestra página web.
Declaración UE de conformidad
Por la presente, TFA Dostmann declara que el tipo de equipo radioeléctrico
60.2550 y 60.2552 es conforme con la Directiva 2014/53/UE. El texto completo de
la declaración UE de conformidad está disponible en la dirección Internet siguien-
te: www.tfa-dostmann.de/service/downloads/ce
www.tfa-dostmann.de
E-Mail: [email protected]
TFA Dostmann GmbH & Co.KG
Zum Ottersberg 12, 97877 Wertheim, Alemania 02/23
TFA_No. 60.2550_Anleitung_02_23 21.02.2023 15:04 Uhr Seite 50
-
 1
1
-
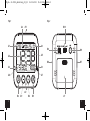 2
2
-
 3
3
-
 4
4
-
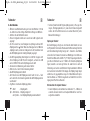 5
5
-
 6
6
-
 7
7
-
 8
8
-
 9
9
-
 10
10
-
 11
11
-
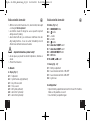 12
12
-
 13
13
-
 14
14
-
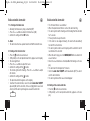 15
15
-
 16
16
-
 17
17
-
 18
18
-
 19
19
-
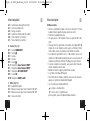 20
20
-
 21
21
-
 22
22
-
 23
23
-
 24
24
-
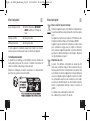 25
25
-
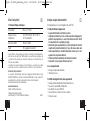 26
26
-
 27
27
-
 28
28
-
 29
29
-
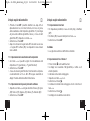 30
30
-
 31
31
-
 32
32
-
 33
33
-
 34
34
-
 35
35
-
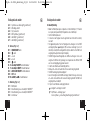 36
36
-
 37
37
-
 38
38
-
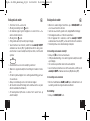 39
39
-
 40
40
-
 41
41
-
 42
42
-
 43
43
-
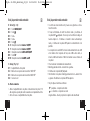 44
44
-
 45
45
-
 46
46
-
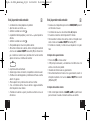 47
47
-
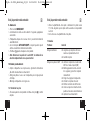 48
48
-
 49
49
-
 50
50


in andere talen
- English: TFA 60.2550 User manual
- italiano: TFA 60.2550 Manuale utente
- français: TFA 60.2550 Manuel utilisateur
- español: TFA 60.2550 Manual de usuario
- Deutsch: TFA 60.2550 Benutzerhandbuch
Gerelateerde papieren
-
TFA Digital Radio-Controlled Alarm Clock with Temperature BINGO Handleiding
-
-
-
-
-
-
-
-
-