
300 SERIES
300ICW4, 300ICW6, 300ICW8
Manuel d’utilisation / User Manual / Gebrauchsanleitung / Manuale d’uso / Manual de uso / Manual de utilização
Handleiding / Руководство по эксплуатации / 使用手册 / 사용 설명서 / 取扱説明書 /
Français : page 8
Anglais : page 12
Deutsch : seite 16
Italiano : pagina 20
Español : página 24
Português : página 28
Nederlands : pagina 32
Русский: стр. 36
简体中文 : page 40
한국어:第44页
日本語 : ページ 48


3
300 SERIES
Manuel d’utilisation / User manual
54
32
1
A

4
10
8 9
6 7
300 SERIES
Manuel d’utilisation / User manual

5
B
"-" Position "0" Position "+" Position
-3 dB 0 dB +3 dB
Ajustement du niveau du Tweeter
(sur 300ICW6 et 300ICW8 uniquement).
Commutateur positionné à l’arrière du produit.
Tweeter level adjustment
(300ICW6 and 300ICW8 models only).
Switch positioned at the rear of the product.
C
300 SERIES
Manuel d’utilisation / User manual

6
F
D E
G
300 SERIES
Manuel d’utilisation / User manual

7
300ICW4 300ICW6 300ICW8
Type
2 voies 2 voies 2 voies
Sensibilité (2,83 V/1 m)
88 dB 89 dB 89 dB
Bande passante (+/-3 dB)
80 Hz - 28 kHz 65 Hz - 28 kHz 48 Hz - 28 kHz
Coupure basse (-6 dB)
72 Hz 45 Hz 35 Hz
Impédance nominale
8 Ohms 8 Ohms 8 Ohms
Impédance minimale
4,5 Ohms 4,8 Ohms 4,5 Ohms
Puissance ampli recommandée
25 - 100 W 25 - 130 W 25 - 150 W
Dimensions (Ø x Profondeur)
192 x 100 mm 247 x 108 mm 302 x 130 mm
Diamètre d'encastrement
165 mm 216 mm 264 mm
Profondeur d'encastrement
95 mm 105 mm 130 mm
Poids net (avec grille)
1,3 kg 2,4 kg 3,2 kg
Dimensions carton (L x P x H)
260 x 260 x 250 mm 310 x 310 x 270 mm 375 x 375 x 310 mm
Poids total en carton
2,3 kg 3,9 kg 5,1 kg
300ICW4 300ICW6 300ICW8
Type
2 ways 2 ways 2 ways
Sensitivity (2.83V/1m)
88dB 89dB 89dB
Frequency response (+/-3dB)
80Hz - 28kHz 65Hz - 28kHz 48Hz - 28kHz
Low frequency point (-6dB)
72Hz 45Hz 35Hz
Nominal impedance
8 Ohms 8 Ohms 8 Ohms
Minimal impedance
4.5 Ohms 4.8 Ohms 4.5 Ohms
Recommended amplifier power
25 - 100W 25 - 130W 25 - 150W
Dimensions (Ø/Depth)
7
9⁄16
x 3
15⁄16
"
(192 x 100mm)
9
23⁄32
x 4
1⁄4
"
(247 x 108mm)
11
57/64
x 5
1/8
"
(302 x 130mm)
Cut-Out diameter
6
1⁄2
" (165mm) 8
1⁄2
" (216mm) 10
25⁄64
" (264mm)
Depth behind surface
3
45⁄64
" (95mm) 4
9⁄64
" (105mm) 5
1/8
" (130mm)
Net weight (with grill)
2.6lbs - (1.3kg) 5.3lbs - (2.4kg) 7.05lbs - (3.2kg)
Box dimensions (W x D x H)
10
15/64
x 10
15/64
x 9
27/ 3 2
"
(260 x 260 x 250mm)
12
13/64
x 12
13/64
x 10
5/8
"
(310 x 310 x 270mm)
14
49/64
x 14
49/64
x 12
13/64
"
(375 x 375 x 310 mm)
Total weight in box
5.07lbs - (2.3kg) 8.6lbs - (3.9kg) 11.24lbs - (5.1kg)
300 SERIES
Manuel d’utilisation / User manual

300 SERIES
Manuel d'utilisation
Français
Contenu de l’emballage
• 1 x enceinte 300ICW de la gamme 300 Series
• 1 x cadre de montage
• 1 x grille circulaire
• 1 x grille carrée
• 1 x masque de protection à utiliser pour peinture mur/plafond
• 1 x manuel d’utilisation détaillé + QuickStart
• 1 x gabarit de découpe
Tweeter TNV2 à dôme inversé en alliage aluminium / magnésium : le tweeter développé pour ces produits
utilise la technologie du dôme inversé exclusive à Focal, permettant un transfert optimal de l’énergie et une
directivité limitée. L’alliage aluminium / magnésium du dôme garantit des performances exceptionnelles en
matière de rigidité et d’amortissement, pour un aigu à la fois doux et dynamique
Haut-parleurs à membrane Flax (Lin) : toutes les membranes des haut-parleurs de la gamme 300 Series
sont fabriquées avec la technologie sandwich Flax. Le Flax (Lin) est un écotextile aux propriétés structurelles
étonnantes : léger, rigide et bien amorti, pour une plus grande neutralité des timbres et une meilleure
définition.
Grille de protection à attache magnétique : facilité de mise en place, meilleure intégration.
Filtre à phase optimisée OPC
®
: optimisation de la phase pour une image sonore précise, stable et naturelle.
Utilisable en milieu humide : insensible à l’humidité, utilisation possible dans salle de bains, cuisine…
Kit de montage optionnel.
Dans un but d'évolution, Focal-JMlab se réserve le droit de modifier les spécifications techniques de ses produits sans préavis. Images non contractuelles.
2
1
3
4
5
300 SERIES
300 ICW 4, 300 ICW 6, 300 ICW 8
Manuel d'utilisation / User manual
Français : page 7
Anglais : page 11
Deutsch : seite 15
Italiano : pagina 19
Español : página 23
Português : página 27
Nederlands : pagina 31
Русский: стр. 35
简体中文
: page 39
한국어:第43页
日本人
:
ページ
47
Pour validation de la garantie Focal-JMlab,
il est maintenant possible d’enregistrer son produit en ligne : www.focal.com/garantie

9
300 SERIES
Manuel d'utilisation
Période de rodage
Les haut-parleurs utilisés dans les enceintes de la gamme Intégration 300 Series sont des éléments mécaniques
complexes qui exigent une période d’adaptation pour fonctionner au mieux de leurs possibilités et s’adapter
aux conditions de température et d’humidité de votre environnement. Cette période de rodage varie selon les
conditions rencontrées et peut se prolonger sur quelques semaines. Pour accélérer cette opération, nous vous
conseillons de faire fonctionner vos enceintes une vingtaine d’heures consécutives. Une fois les caractéristiques
de l’enceinte totalement stabilisées, vous pourrez profiter intégralement des performances de vos enceintes
Intégration 300 Series.
Câblage avant l’installation
Vous ne pourrez envisager le montage de vos enceintes qu’après la pose des câbles. Assurez-vous de laisser
suffisamment de longueur de câble pour pouvoir connecter facilement votre produit (environ 50 cm). Nous
vous conseillons d’utiliser du câble avec un repère de manière à respecter la polarité des haut-parleurs (+/-).
Choisissez des câbles de qualité et de section appropriées à la longueur : votre revendeur saura vous conseiller.
Choix de l’amplificateur
Ce n’est pas l’excès de puissance d’un amplificateur qui risque de détériorer l’enceinte et les haut-parleurs,
mais au contraire un défaut de puissance. En effet si le volume est trop élevé, l’amplificateur sature et génère
des signaux parasites qui risquent de détruire le tweeter. La capacité dynamique et la définition des enceintes
Intégration 300 Series sont suffisamment élevées pour mettre en évidence les qualités et défauts des
amplificateurs qui leur seront associés. Votre revendeur saura aiguiller votre choix, en fonction de vos goûts
et de votre budget.
Installation
Construction existante
• Avant d’installer les enceintes, assurez-vous que les emplacements correspondants dans le plafond/mur sont
libres de toute obstruction comme le passage d’un conduit d’aération, ou de tout câble risquant d’interférer
avec l’installation. Utilisez les outils appropriés pour vous aider dans la détermination des endroits adéquats.
• Assurez-vous qu’il y a suffisamment d’espace à l’intérieur du plafond/mur pour pouvoir installer le produit.
• En utilisant le gabarit de découpe fourni, tracez une ligne sur le plafond/mur existant. Découpez alors en
suivant le tracé avec un outil approprié pour pratiquer une ouverture circulaire dans le plafond/mur (fig. A).
Nouvelle construction
• Utilisez le kit de montage optionnel spécifique
• Câblez les enceintes avant de les installer
Conditions de garantie
En cas de problème, adressez-vous à votre revendeur Focal.
La garantie pour la France sur tout matériel Focal est de 2 ans non transmissible en cas de revente, à partir
de la date d’achat. En cas de matériel défectueux, celui-ci doit être expédié à vos frais, dans son emballage
d’origine auprès du revendeur, lequel analysera le matériel et déterminera la nature de la panne. Si celui-ci est
sous garantie, le matériel vous sera rendu ou remplacé en “franco de port”. Dans le cas contraire, un devis de
réparation vous sera proposé.
La garantie ne couvre pas les dommages résultant d’une mauvaise utilisation ou d’un branchement incorrect
(bobines mobiles brûlées par exemple...).
En dehors de la France, le matériel Focal est couvert par une garantie dont les conditions sont fixées localement
par le distributeur officiel Focal de chaque pays, en accord avec les lois en vigueur sur le territoire concerné.

10
Pose de l’enceinte
Les produits 300ICW de la gamme 300 Series comprennent un cadre de montage, une enceinte 300ICW,
des grilles magnétiques circulaires et carrées. La mise en place des produits 300ICW de la gamme 300
Series ne nécessite aucun outil !
1. Faites pivoter la patte de fixation jusqu’à ce qu’elle se clipse sur le cadre de montage de manière à pouvoir
passer le cadre de montage au travers de l’ouverture. (fig. 1)
2. Avec une main, insérez le cadre de montage dans l’ouverture du plafond/mur de manière à ce qu’il soit
bien plaqué contre le plafond/mur. (fig. 2)
3. Pour verrouiller le cadre de montage, placez votre autre main au travers de l’ouverture et avec 2 doigts,
faites pivoter la patte de fixation à l’opposé de sa position initiale. (fig. 3)
4. Poussez alors la patte vers le bas jusqu’à la butée (fig. 4).
5. Pour finir relâchez la patte et assurez-vous qu’elle est bien fixée. Vérifiez également que la patte ne repose
pas sur le câble d’enceinte. (fig. 5)
Note 1 : répéter l'opération pour les autres pattes de fixation.
Note 2 : pour déverrouiller la patte de fixation : en utilisant 2 doigts, faites pivoter vers l’extérieur la patte de
fixation, poussez-la vers le haut puis relâchez-la.
6. Connectez le câble d’enceinte, préalablement dénudé, aux bornes à ressorts de l’enceinte. Il est impératif que
la polarité de connexion de chaque enceinte soit correcte : le câble connecté à la borne “+“ de l'amplificateur
doit être relié à la borne rouge sur l’enceinte. De même, le câble connecté à la borne “-“ de l'amplificateur doit
être relié à la borne noire. Si cette condition n’est pas respectée, l’image stéréo et la perception du grave se
dégraderont considérablement. (fig. 6)
7. L’enceinte peut maintenant être assemblée sur le cadre de montage. Pour ce faire, positionnez les flèches
rouges de l’enceinte en face des zones avec le cadenas ouvert du cadre de montage. (fig. 8)
Note : en utilisation In-Ceiling, l’enceinte peut être solidement fixée au plafond à l'aide d'une élingue (non
fournie) qui peut-être accrochée à l'aide du crochet dédié situé à l'arrière du produit. (fig. 6)
8. Insérez l’enceinte dans le cadre de montage (fig. 7) jusqu'à la butée, et à l'aide des poignées rouges,
tournez l'enceinte de manière à ce que les repères soient situées entre 2 zones de cadenas ouverts. (fig. 9)
9. La grille, carrée ou circulaire, peut maintenant être mise en place. La grille est maintenue en place magné-
tiquement sur le cadre de montage, vous avez juste besoin de l’aligner avec le bord du cadre de montage.
(fig. 10)
300 SERIES
Manuel d’utilisation

11
Réglage du tweeter (300ICW6 et 300ICW8)
Le niveau du tweeter peut être ajusté grâce à l’interrupteur situé sur l’arrière de l’enceinte comme indiqué
(fig. B).
Orientation du tweeter (300ICW6 et 300ICW8)
Le tweeter peut-être articulé sur ±20° et orienté à 360 °: dirigez-le vers la zone d’écoute pour une précision
accrue des aigus et de l’image stéréo (fig. C).
Placement des enceintes principales en utilisation In-Wall
Vos enceintes Intégration 300 Series ont été étudiées pour restituer le plus fidèlement possible toutes
les formes de musique stéréo ou programmes home-cinéma. Il convient d’observer quelques règles sim-
ples pour optimiser leurs performances, garantir un bon équilibre tonal et une image sonore réaliste. Les
enceintes devront être placées de façon symétrique face à la zone d’écoute, de manière à former idéalement
un triangle équilatéral avec celle-ci.
Il est néanmoins possible de faire varier ces distances pour trouver le compromis idéal en fonction des condi-
tions d’aménagement particulières (fig. D).
Les enceintes devront être placées à la même hauteur et sur un même plan horizontal. Idéalement, le tweeter
sera placé au niveau des oreilles de l’auditeur au point d’écoute habituel (fig. E).
Placement des enceintes centrale et surround
La complexité des bandes sonores des films permet aujourd’hui d’obtenir une très grande diversité d’effets
surround. Le choix du placement des enceintes est donc déterminant pour l’obtention d’un espace tridimen-
sionnel réaliste. L’objectif visé est d’obtenir des sons suffisamment diffus et difficiles à localiser, par le respect
de quelques règles de base (fig. F).
L’enceinte centrale doit être placée à proximité de l’écran pour une restitution réaliste des dialogues
(fig.Fa). Si un écran de projection micro-perforé est utilisé (transparent acoustiquement), on pourra prévoir
l’implantation de l’enceinte centrale derrière cet écran.
Si vous utilisez les produits 300ICW de la gamme 300 Series comme enceintes In-Wall, placez les enceintes
surround suffisamment en hauteur, au-dessus des oreilles des auditeurs. Évitez de placer les enceintes sur-
round trop en arrière de la zone d’écoute, car la perception s’en trouvera dégradée. Privilégiez un placement
sur les murs latéraux, de part et d’autre de la zone d’écoute ou très légèrement en arrière de celle-ci pour
obtenir des effets sonores plus enveloppants (fig. Fb, Fd).
Si vous utilisez les produits 300ICW de la gamme 300 Series comme enceintes In-Ceiling, placez-les suf-
fisamment écartées de chaque côté de la zone d’écoute, ou très légèrement en arrière de celle-ci (fig. Fc).
Pour les systèmes multicanaux 6.1 ou 7.1 il est possible de combiner les enceintes 300 Series comme enceintes
In-Wall ou In-ceiling.
Précautions particulières
L’entretien des enceintes d'intégration 300 Series se limite à un dépoussiérage à l’aide d’un chiffon sec. Si
l’enceinte est tâchée, nous vous recommandons simplement l’utilisation d’un chiffon humide.
Ne jamais utiliser de solvants, détergents, alcools ou produits corrosifs, grattoirs ou ustensiles récurants pour
nettoyer la surface de l’enceinte. Éviter la proximité d’une source de chaleur.
Peinture
Si vous le désirez, la grille de vos produits 300ICW peut être peinte de manière à harmoniser votre produit
avec votre environnement. Nous vous conseillons en premier lieu de retirer la grille du produit et de la pein-
dre à l’aide d’un pistolet à peinture. La peinture utilisée peut être de même nature que la peinture murale.
(fig. G)
Si vous désirez peindre le plafond/mur sans démonter votre produit 300ICW nous vous conseillons d’utiliser
le masque de protection fourni. Sa fixation sur le cadre de montage est magnétique. (fig. G)
300 SERIES
Manuel d'utilisation

300 SERIES
User manual
English
Package contents
• 1 x 300ICW loudspeaker from the 300 Series range
• 1 x mounting frame
• 1 x circular grille
• 1 x square grille
• 1 x protective screen to use when painting walls/ceilings
• 1 x complete user manual + QuickStart
• 1 x cut-out template
Aluminum/Magnesium alloy inverted dome TNV2 tweeter: the tweeter developed for these products uses
Focal’s exclusive inverted dome technology, allowing for optimal energy transfer and limited directivity. The
dome's Aluminum/Magnesium alloy guarantees outstanding stiffness and damping to provide a soft and
dynamic treble.
Flax speaker driver cones: all the speaker driver cones of the 300 Series range are made using Flax sandwich
technology. Flax is an eco-textile with astounding structural properties: it is light, rigid and well damped for
providing greater neutrality of the timbre and better definition.
Magnetically attached protective grille: easy to fit and improved integration.
OPC
®
(Optimum Phase Crossover): optimisation of the phase for a more accurate, a more stable and a more
natural sound image.
Usable in humid environments: resistant to humidity, the loudspeakers can be installed in bathrooms,
kitchens...
Optional mounting kit.
2
1
3
4
5
Please validate your Focal-JMlab warranty,
it is now possible to register your product online: www.focal.com/warranty
Our policy of continual product improvement means that Focal-JMlab reserves the right to modify the technical specifications of its products without notice. Product may vary from images.
300 SERIES
300 ICW 4, 300 ICW 6, 300 ICW 8
Manuel d'utilisation / User manual
Français : page 7
Anglais : page 11
Deutsch : seite 15
Italiano : pagina 19
Español : página 23
Português : página 27
Nederlands : pagina 31
Русский: стр. 35
简体中文
: page 39
한국어:第43页
日本人
:
ページ
47

13
300 SERIES
User manual
Breaking-in your loudspeakers
The speaker drivers used in the Integration 300 Series loudspeakers are complex mechanical assemblies
which need a break-in period to operate at their best and to become acclimatised to the temperature
and humidity of your environment. This break-in period varies depending on the conditions in question
and may take several weeks. To reduce this time, we recommend operating your loudspeakers for about
20consecutive hours. Once the loudspeakers' characteristics have totally stabilised you will be able to enjoy
your Integration 300 Series loudspeakers’ performance to the full.
Pre-installation wiring
You can only install your loudspeakers once you have wired them up. Make sure you leave enough room
to allow you to wire up your loudspeakers with ease (approximately 20"/ 50cm). We recommend using a
cable with a marker in order to ensure the polarities of the speaker drivers are respected (+/-). Choose good
quality cables with a cross-section appropriate to their length: your retailer will be able to advise you.
Choosing an amplifier
It is not an excess of amplifier power that can damage your loudspeakers and drivers but a lack of power.
Moreover, if the volume is turned too high, the amplifier saturates and generates parasite signals that may
destroy the tweeter. The dynamic capacity and definition of Integration 300 Series loudspeakers are high
enough to reveal the strengths and weaknesses of whatever amplifier is connected. Your retailer will be able
to guide your choice to suit your tastes and budget.
Installation
Existing installation
• Before installing your loudspeakers, make sure that there is nothing obstructing the ceiling/wall, such as
air vents, and make sure that no cables will interfere with the installation. Use the appropriate tools to help
you determine the correct location.
• Make sure there is enough space to install your product in the ceiling/wall.
• Trace the supplied cut-out template on the ceiling/wall. Cut along the trace using an appropriate tool to
make a circular hole in the ceiling/wall (fig. A).
New installation
• Use the specific optional mounting kit
• Wire the loudspeakers before carrying out the installation
Conditions of guarantee
All Focal loudspeakers are covered by guarantee drawn up by the official Focal distributor in your country.
Your distributor can provide all details concerning the conditions of guarantee. Guarantee cover extends at
least to that granted by the legal guarantee in force in the country where the original purchase invoice was
issued.

14
Mounting the loudspeaker
300ICW products of the 300 Series include a mounting frame, a 300ICW loudspeaker and both circular
and square magnetic grilles. No tools are required to mount the 300ICW loudspeakers of the 300Series
range.
1. Pivot the mounting bracket until it clips onto the mounting frame so that the mounting frame can be
pushed through the opening (fig. 1).
2. With one hand, insert the mounting frame into the opening in the ceiling/wall, making sure it rests
flush against the ceiling/wall (fig. 2).
3. To fasten the mounting frame to the ceiling/wall, insert your other hand into the opening, and use two
fingers to pivot the mounting bracket to the opposite side to its initial position (fig. 3)
4. Push the mounting bracket down until it reaches the stop (fig. 4).
5. Finally, release the mounting bracket making sure it is securely in place. Also make sure the mounting
bracket isn’t resting on the loudspeaker cable (fig. 5).
Note 1: repeat the operation for the other mounting brackets.
Note 2: to unlock the mounting bracket: use two fingers to pivot the mounting bracket towards the
outside, pull upwards and release.
6. Connect the previously stripped loudspeaker wires to the spring loaded terminals on the loudspeaker. It is
essential to connect the loudspeakers respecting the correct polarity: the cable connected to the "+"
terminal on the amplifier must be connected to the red terminal on the loudspeaker. Likewise, the
cable connected to the "-" terminal on the amplifier must be connected to the black terminal on the
loudspeaker. Stereo image and bass perception would be seriously compromised if these conditions
were not respected (fig. 6).
7. The loudspeakers are now ready to be assembled to the mounting frame. In order to do this, posi-
tion the red arrows on the loudspeaker in line with the open padlocks on the mounting frame (fig. 8).
Note: if you plan to use your product as in-ceiling loudspeakers, the loudspeaker can be securely fas-
tened to the ceiling using a safety sling (not supplied) which fastens to the hook on the rear of
the product (fig. 6).
8. Insert the loudspeaker into the mounting frame (fig. 7) until the stop, then pivot the loudspeaker
using the red handles so that the markers are positioned between two open padlocks (fig. 9).
9. The circular or square grilles can now be mounted to the loudspeaker. The grille is held to the mount-
ing frame magnetically, all you need to do is simply line them up (fig. 10).
300 SERIES
User manual

15
Setting the tweeter (300ICW6 and 300ICW8)
The tweeter can be set using the switch at the rear of the loudspeaker as shown in the diagram (fig. B).
Orienting the tweeter (300ICW6 and 300ICW8)
The tweeter can be tilted +/- 20° and can be pivoted 360°: direct the tweeter towards the listening area for
maximum precision of the treble and of the stereo image (fig. C).
In-wall position of the main loudspeakers.
Your Integration 300 Series loudspeakers have been designed to deliver the most faithful sound
reproduction, whether they are used for stereo music or home cinema. Nonetheless, some simple rules
should be followed to optimise their performance and to guarantee good tonal balance and a realistic sound
image. The loudspeakers should be positioned symmetrically, facing the listening area, ideally forming an
equilateral triangle with it.
However, it is possible to vary these distances to find an ideal compromise according to the particular dis-
position of the room (fig. D).
The loudspeakers should be positioned at the same height, in the same horizontal plane. Ideally, the tweeter
should be positioned at the same height as the listener's ears when in the normal listening area (fig. E).
Position of surround and central loudspeakers
The sophistication of film soundtracks means that a very broad range of surround-sound effects can be
achieved nowadays. The choice of positioning for surround-sound loudspeakers is crucial for achieving
a realistic 3D sound-space. The aim is to apply some basic rules to achieve sounds that are sufficiently
diffused and difficult to locate (fig. F).
The centre loudspeaker must be positioned near the screen for realistic reproduction of dialogue (fig. Fa).
If you’re using a micro-perforated projection screen (acoustically transparent), you can consider placing a
centre loudspeaker behind it.
If you plan to use the 300ICW products from the 300 Series range as in-wall loudspeakers, place the sur-
round loudspeakers high enough up, above the listeners’ ears. Do not place surround-sound loudspeakers
too far behind the listening area, as this degrades sound perception. Aim for a placement along the side
walls, on either side of the listening area or ever so slightly behind the listening area to achieve more envel-
oping sound effects (fig. Fb, Fd).
If you plan to use the 300ICW products from the 300 Series range as in-ceiling loudspeakers, place them
far enough apart on each side of the listening area, or ever so slightly behind the listening area (fig. Fc).
For 6.1 or 7.1 surround-sound systems, you can use a combination of loudspeakers from the 300 Series as
both in-wall or in-ceiling loudspeakers.
Special precautions
The only maintenance required for the Integration 300 Series loudspeakers is dusting with a dry cloth. If the
loudspeaker is dirty, we recommend simply cleaning it with a damp cloth.
Never use solvents, detergents, alcohol-based or corrosive products, scrapers or scourers to clean the loud-
speaker surface. Keep the loudspeakers away from sources of heat.
Painting
If you wish to do so, you can paint the grilles of your 300ICW products so they blend in with your interior.
We recommend first removing the grille from the product and then painting it using a paint spraying device.
You can use the same type of paint as the wall paint (fig. G).
If you want to paint the ceiling/wall without removing your 300ICW product, we have supplied a protective
screen.
The screen fastens to the mounting frame magnetically (fig. G).
300 SERIES
User manual

300 SERIES
Gebrauchsanleitung
Deutsch
Verpackungsinhalt
• 1 x Lautsprecher 300ICW des Sortiments 300 Series
• 1 x Befestigungsrahmen
• 1 x Rundgitter
• 1 x Quadratgitter
• 1 x Schutzmaske für den Wand-/Deckenanstrich
• 1 x detaillierte Gebrauchsanleitung + QuickStart
• 1 x Schnittschablone
Hochtöner TNV2 mit Inverskalotte aus Aluminium-Magnesium-Legierung: Der für diese Produkte
entwickelte Hochtöner nutzt die Technologie der Inverskalotte, eine Focal-Innovation, die eine optimale
Energieübertragung und Richtcharakteristik ermöglicht. Die Aluminium-Magnesium-Legierung der
Hochtonkalotte garantiert außergewöhnliche Steifigkeit und Dämpfung, um sowohl eine verzerrungsfreie als
auch dynamische Höhenwiedergabe zu erreichen.
Lautsprecher mit Flachsmembran: Alle Membranen der Lautsprecher des Sortiments Series 300 werden mit
der Flachs-Sandwichtechnologie hergestellt. Flachs ist ein Ökotextil mit erstaunlichen Struktureigenschaften:
leicht und fest mit hoher innerer Dämpfung, um eine größere Neutralität der Klangfarben und eine bessere
Definition zu erreichen.
Optimierter OPC
®
-Phasenfilter: Phasenoptimierung für ein präzises, stabiles und natürliches Klangbild.
In feuchter Umgebung verwendbar: Unempfindlich gegenüber Feuchtigkeit, Verwendung im Bad,
in der Küche usw. möglich.
Optionaler Montagesatz.
2
1
3
4
5
Zur Bestätigung Ihrer Focal-JMlab-Garantie,
sie können Ihr Produkt jetzt online registrieren: www.focal.com/warranty
Mit dem Ziel der Weiterentwicklung der Produkte behält sich Focal-JMlab das Recht vor, die technischen Spezifikationen seiner Produkte ohne Vorankündigung zu verändern. Bilder haben
keinen vertraglichen Charakter.
300 SERIES
300 ICW 4, 300 ICW 6, 300 ICW 8
Manuel d'utilisation / User manual
Français : page 7
Anglais : page 11
Deutsch : seite 15
Italiano : pagina 19
Español : página 23
Português : página 27
Nederlands : pagina 31
Русский: стр. 35
简体中文
: page 39
한국어:第43页
日本人
:
ページ
47

17
300 SERIES
Gebrauchsanleitung
Einspielzeit
Die in den Series-300-Modellen verwendeten Lautsprecherchassis sind komplexe mechanische Bauteile, die
eine gewisse Zeit benötigen, um sich an die Temperatur- und Feuchtigkeitsbedingungen Ihres Hörraums
anzupassen und optimale Performance zu bieten. Die Einspielzeit hängt von verschiedenen Faktoren ab und
kann mehrere Wochen betragen. Um den Vorgang zu beschleunigen, empfehlen wir, etwa zwanzig Stunden
am Stück Musik über die Lautsprecher laufen zu lassen. Nachdem sich die mechanischen Eigenschaften
der Chassis vollständig stabilisiert haben, können Sie das gesamte klangliche Potenzial Ihrer Series-300-
Lautsprecher genießen.
Verkabelung
Die Lautsprecher können erst nach Anschluss der Lautsprecherkabel installiert werden. Vergewissern Sie
sich, dass Sie eine ausreichende Kabellänge überstehen lassen, um Ihr Produkt anschließen zu können (etwa
50 cm). Die korrekte Polarität (+/−) lässt sich beim Verkabeln am einfachsten herstellen, wenn Sie ein Kabel
mit entsprechender Markierung verwenden. Wählen Sie Qualitätskabel mit einem für die Länge geeigneten
Querschnitt: Ihr Händler wird Sie beraten können.
Wahl des Verstärkers
Ihre Lautsprecher können eher durch zu schwache als durch zu starke Verstärker beschädigt werden. Wenn
eine zu hohe Lautstärke gewählt wird, erreicht der Verstärker den Sättigungsbereich und erzeugt Störsignale,
die den Hochtöner beschädigen können. Die dynamische Kapazität und das Auflösungsvermögen der
Series-300-Lautsprecher sind groß genug, um die Qualitäten oder Fehler jedes angeschlossenen Verstärkers
aufzuzeigen. Ihr Händler wird Ihnen bei der Wahl eines passenden Verstärkers behilflich sein.
Installation
Bestehende Konstruktion
• Bevor Sie die Lautsprecher installieren, vergewissern Sie sich, dass die Decke/Wand frei von Hindernissen
wie einer Entlüftungsleitung oder Kabeln ist. Verwenden Sie entsprechende Werkzeuge, um einen
geeigneten Installationsort zu bestimmen.
• Vergewissern Sie sich, dass ausreichend Platz im Inneren der Decke/Wand besteht, um das Produkt
installieren zu können.
• Ziehen Sie mit der mitgelieferten Schnittschablone eine Linie auf der bestehenden Decke/Wand. Schneiden
Sie dann mit einem geeigneten Werkzeug entlang der gezogenen Linie, um eine runde Öffnung in die
Decke/Wand zu bringen (Abb. A).
Neue Konstruktion
• Verwenden Sie den optionalen Montagesatz.
• Verkabeln Sie die Lautsprecher, bevor Sie sie installieren.
Garantiebedingungen
Alle Focal-Produkte werden von einer Garantie abgedeckt, die von der offiziellen Focal-Vertriebsgesellschaft
Ihres Landes ausgearbeitet wurde. Diese kann Ihnen weiterführende Informationen zu den
Garantiebedingungen zur Verfügung stellen. Die Garantie umfasst mindestens die Bedingungen, die vom
Gesetzgeber des Landes, in dem der Original-Kaufbeleg ausgestellt wurde, eingeräumt werden.

18
Installation des Lautsprechers
Die Produkte 300ICW des Sortiments Series 300 umfassen einen Befestigungsrahmen, einen Lautsprecher
300ICW sowie magnetische Rund- und Quadratgitter. Die Installation der Produkte 300ICW des Sortiments
Series 300 erfordert kein Werkzeug!
1. Klappen Sie eine Befestigungslaschen des Befestigungsrahmens nach vorn, bis sie einrasten, sodass der
Befestigungsrahmen durch die Installationsöffnung geführt werden kann (Abb. 1).
2. Führen Sie den Befestigungsrahmen so in die Öffnung der Decke/Wand ein, dass er eng angedrückt wird
(Abb. 2), und halten Sie ihn mit einer Hand fest.
3. Um den Befestigungsrahmen zu verriegeln, lösen Sie eine der Befestigungslaschen und drücken Sie sie
wieder nach innen zur Ausgangsposition (Abb. 3).
4. Drücken Sie dann die Lasche bis zum Anschlag nach unten (Abb. 4).
5. Lassen Sie die Lasche los und vergewissern Sie sich, dass sie richtig befestigt ist. Überprüfen Sie auch,
dass das Lautsprecherkabel nicht abgequetscht wird (Abb. 5).
Hinweis 1: Wiederholen Sie den Vorgang für die anderen Befestigungslaschen.
Hinweis 2: Um die Befestigungslasche zu entriegeln, klappen Sie sie nach außen, drücken Sie sie nach oben
und lassen Sie sie dann los.
6. Schließen Sie das zuvor freigelegte Lautsprecherkabel an die Federanschlüsse der Lautsprecher an.
Achten Sie unbedingt sowohl lautsprecher- als auch verstärkerseitig auf die korrekte Polarität: Die
mit „+“ markierte Buchse muss mit dem Pluspol, die mit „−“ markierte Buchse mit dem Minuspol des
Verstärkerausgangs verbunden werden. Bei inkorrekter Polarität werden sowohl Stereoabbildung als auch
Basswiedergabe erheblich beeinträchtigt (Abb. 6)
7. Der Lautsprecher kann nun in den Befestigungsrahmen montiert werden. Richten Sie dazu die roten Pfeile
am Lautsprecher und die Schlosssymbole am Befestigungsrahmen zueinander aus (Abb. 8).
Hinweis: Beim Deckeneinbau kann der Lautsprecher mit einer Schlinge (nicht mitgeliefert), die mit dem
entsprechenden Haken an der Rückseite des Produkts eingehängt werden kann, fest an der Decke
angebracht werden (Abb. 6).
8. Führen Sie den Lautsprecher bis zum Anschlag in den Befestigungsrahmen ein (Abb. 7) und drehen Sie
ihn mithilfe der roten Griffe so, dass sich die Markierungen zwischen zwei Schlosssymbolen befinden
(Abb. 9).
9. Das Rund- oder Quadratgitter kann jetzt angebracht werden. Das Gitter wird magnetisch am
Befestigungsrahmen festgehalten; Sie müssen es nur an der Kante des Befestigungsrahmens ausrichten
(Abb. 10).
300 SERIES
Gebrauchsanleitung

19
Einstellung des Hochtöners (300ICW6 und 300ICW8)
Der Hochtönerpegel kann mit dem Schalter eingestellt werden, der sich auf der Rückseite des Lautsprechers
befindet (Abb. B).
Ausrichtung des Hochtöners (300ICW6 und 300ICW8)
Der Hochtöner kann um ±20° geneigt und auf 360° ausgerichtet werden: Richten Sie ihn auf den Hörbereich,
um eine größere Präzision der Höhen und des Stereobildes zu erhalten (Abb. C).
Platzierung der Hauptlautsprecher beim Wandeinbau
Ihre Lautsprecher wurden für höchstmögliche Klangtreue bei der Wiedergabe aller Arten von Musik und
Heimkinoton entwickelt. Wir empfehlen jedoch die Beachtung folgender Regeln, um tonale Balance und
ein realistisches Klangbild zu gewährleisten. Die Lautsprecher sollten symmetrisch zum Hörplatz installiert
werden und idealerweise ein gleichseitiges Dreieck mit diesem bilden.
Wenn die Einrichtung es nicht zulässt, kann von diesem Ideal abgewichen werden (Abb. D). Die Lautsprecher
sollten vertikal und horizontal gleich ausgerichtet sein. Idealerweise befindet sich der Hochtöner auf
derselben Höhe wie die Ohren des Zuhörers (Abb. E).
Platzierung des Center-Lautsprechers und der Surround-Lautsprecher
Die Komplexität von Filmtonspuren ermöglicht es heute, eine große Vielfalt an Surround-Effekten zu erzielen.
Für einen realistischen, dreidimensionalen Raumklang ist die Lautsprecherplatzierung entscheidend (Abb.
F).
Der Center-Lautsprecher muss in der Nähe des Bildschirms platziert werden, um eine realistische Wiedergabe
der Dialoge zu erreichen (Abb. Fa). Wenn eine mikroperforierte (akustisch transparente) Projektionsleinwand
verwendet wird, kann der Center-Lautsprecher hinter der Leinwand platziert werden.
Wenn Sie die Produkte 300ICW des Sortiments Series 300 als Wandeinbau-Lautsprecher verwenden,
installieren Sie die Surround-Lautsprecher in ausreichender Höhe über den Ohren der Zuhörer. Vermeiden
Sie es, die Surround-Lautsprecher zu weit hinten zu installieren, da die Wahrnehmung dadurch beeinträchtigt
wird. Bevorzugen Sie eine Platzierung an den Seitenwänden neben den Zuhörern oder direkt hinter ihnen,
um ausgeprägte Klangeffekte zu erzielen (Abb. Fb, Fd).
Wenn Sie die Produkte 300ICW des Sortiments Series 300 als Deckeneinbau-Lautsprecher verwenden,
installieren Sie sie in ausreichender Entfernung zueinander und direkt hinter den Zuhörern (Abb. Fc).
In 6.1- oder 7.1-Multikanal-Systemen können die Lautsprecher der Series 300 als Wandeinbau- oder
Deckeneinbau-Lautsprecher kombiniert werden.
Besondere Vorsichtsmaßnahmen
Die Pflege der SERIE-300-Lautsprecher beschränkt sich auf gelegentliches Abstauben mit einem trockenen
Tuch. Flecken am Lautsprechergehäuse sollten mit einem feuchten Tuch entfernt werden.
Verwenden Sie niemals Lösungs- bzw. Reinigungsmittel, Alkohole, Ätzmittel, Schaber oder Schleifmittel, um
die Oberfläche des Gehäuses zu reinigen. Halten Sie die Lautsprecher von Wärmequellen fern.
Lack
Wenn Sie möchten, kann das Gitter Ihrer Produkte 300ICW so lackiert werden, dass es zu Ihrer Umgebung
passt. Wir empfehlen Ihnen, zuerst das Gitter vom Produkt zu entfernen und es mit einem Farbsprüher zu
lackieren. Der verwendete Lack kann von derselben Art sein wie der Wandanstrich (Abb. G).
Wenn Sie die Decke/Wand streichen möchten, ohne Ihr Produkt 300ICW abzumontieren, empfehlen wir
Ihnen, die mitgelieferte Schutzmaske zu verwenden. Die Befestigung am Befestigungsrahmen erfolgt
magnetisch (Abb. G).
300 SERIES
Gebrauchsanleitung

300 SERIES
Manuale d’uso
Italiano
Contenuto dell’imballo
• 1 x diffusore 300ICW della gamma 300 Series
• 1 x telaio di montaggio
• 1 x griglia circolare
• 1 x griglia quadrata
• 1 x mascherina di protezione da utilizzare per pittura parete/soffitto
• 1 x manuale d’uso dettagliato + QuickStart
• 1 x sagoma fustellata
Diffusore TNV2 a cupola invertita in lega alluminio / magnesio: il diffusore sviluppato per questo prodotto
utilizza la tecnologia della cupola invertita esclusiva di Focal, che permette un trasferimento ottimale
dell’energia e una direttività limitata. La lega alluminio / magnesio della cupola garantisce delle prestazioni
eccezionali in materia di rigidità e di smorzamento, per suoni acuti dolci e dinamici al tempo stesso.
Altoparlanti a membrana in Flax (Lino): tutte le membrane degli altoparlanti della gamma 300 Series
sono fabbricate con la tecnologia sandwich Flax. Il Flax (Lino) è un eco-tessuto dalle strabilianti proprietà
strutturali: leggero, rigido e ben smorzato, per una più grande neutralità dei timbri e per una migliore
definizione.
Griglia di protezione ad attacco magnetico: facilita il posizionamento, migliore integrazione.
Filtro a fase ottimizzato OPC
®
: ottimizzazione della fase per un’immagine sonora precisa, stabile e naturale.
Utilizzabile in ambienti umidi: insensibile all’umidità, utilizzo possibile in bagno, cucina…
Kit di montaggio opzionale.
2
1
3
4
5
Per validare la garanzia Focal-JMlab
adesso è possibile registrare il prodotto on-line su: www.focal.com/warranty
Con lo scopo di migliorarsi, Focal-JMlab si riserva il diritto di modificare le specifiche tecniche dei suoi prodotti senza preavviso. Immagini non
contrattuali.
300 SERIES
300 ICW 4, 300 ICW 6, 300 ICW 8
Manuel d'utilisation / User manual
Français : page 7
Anglais : page 11
Deutsch : seite 15
Italiano : pagina 19
Español : página 23
Português : página 27
Nederlands : pagina 31
Русский: стр. 35
简体中文
: page 39
한국어:第43页
日本人
:
ページ
47

21
300 SERIES
Manuale d’uso
Periodo di rodaggio
Gli altoparlanti utilizzati nei diffusori della gamma Integration 300 Series sono degli elementi meccanici
complessi che esigono un periodo di adattamento per funzionare al meglio delle loro possibilità e per adattarsi
alle condizioni di temperatura e di umidità del vostro ambiente. Questo periodo di rodaggio varia a seconda
delle condizioni e può prolungarsi per qualche settimana. Per accelerare questa operazione, vi consigliamo
di far funzionare i vostri diffusori per una ventina di ore consecutive. Una volta che le caratteristiche del
diffusore si saranno completamente stabilizzate, potrete godere appieno delle prestazioni dei vostri diffusori
Integration 300 Series.
Cablaggio prima dell’installazione
Sarà possibile montare gli amplificatori solo dopo aver posizionato i cavi. Assicuratevi di lasciare una
lunghezza sufficiente dei cavi per poter collegare facilmente il vostro prodotto (50 cm circa). Vi consigliamo
di utilizzare dei cavi con una fase che rispetti la polarità degli altoparlanti (+/-). Scegliete dei cavi di qualità
e di sezione appropriata alla lunghezza: il vostro rivenditore vi saprà consigliare.
Scelta dell’amplificatore
Non è l’eccesso di potenza di un amplificatore che rischia di deteriorare il diffusore e gli altoparlanti, ma al
contrario una mancanza di potenza. Infatti, se il volume è troppo alto, l’amplificatore satura e genera dei
segnali parassiti che rischiano di distruggere il diffusore. La capacità dinamica e la definizione dei diffusori
Integration 300 Series sono sufficientemente elevate da evidenziare le qualità e i difetti degli amplificatori
a loro collegati. Il vostro rivenditore saprà guidare la vostra scelta, in funzione dei vostri gusti e del vostro
budget.
Istallazione
Impianto esistente
• Prima d’installare i diffusori, assicuratevi che le corrispondenti posizioni nel soffitto/muro siano libere da
ostruzioni come il passaggio di un condotto d’areazione, o di qualsiasi cavo che possa interferire con
l’impianto. Utilizzate gli strumenti idonei che vi supportino nella determinazione dei luoghi adeguati.
• Assicuratevi che ci sia spazio sufficiente all’interno del soffitto/muro per poter istallare il prodotto.
• Utilizzando la sagoma fustellata fornita, tracciate una linea sul soffitto/muro esistente. Tagliate
quindi seguendo la traccia con uno strumento idoneo per praticare un’apertura circolare nel
soffitto/muro (fig. A).
Nuovo impianto
• Utilizzate il kit di montaggio opzionale specifico
• Cablate i diffusori prima di installarli
Condizioni di garanzia
Tutti gli altoparlanti Focal sono coperti da garanzia emessa dal distributore ufficiale Focal del tuo paese.
Il tuo distributore potrà fornirti tutti i dettagli relativi alle condizioni di garanzia. La copertura della garanzia
comprende quanto concesso dalla garanzia legale in forza nel paese in cui è stata emessa la fattura
d’acquisto originale.

22
Posa del diffusore
I prodotti 300ICW della gamma 300 Series comprendono un telaio di montaggio, un diffusore 300ICW, delle
griglie magnetiche circolari e quadrate. Il posizionamento dei prodotti 300ICW della gamma 300 Series non
necessita di alcun strumento!
1. Fate ruotare l’attacco per il fissaggio fino a quando scatta nel telaio di montaggio in maniera da poter
passare il telaio di montaggio attraverso l’apertura. (fig. 1)
2. Con una mano, inserite il telaio di montaggio nell’apertura del soffitto/muro in maniera che sia ben
premuto contro il soffitto/muro. (fig. 2)
3. Per bloccare il telaio di montaggio, posizionate la mano attraverso l’apertura e con 2 dita fate ruotare
l’attacco per il fissaggio nel lato opposto rispetto a quello iniziale. (fig. 3)
4. Spingete quindi l’attacco verso il basso fino all’arresto. (fig. 4)
5. Quindi rilasciate l’attacco e assicuratevi che sia ben fissato. Verificate inoltre che l’attacco non si appoggi
sul cavo del diffusore. (fig. 5)
Nota 1: ripetere l’operazione per gli altri attacchi per il fissaggio.
Nota 2: per sbloccare l’attacco per il fissaggio: utilizzando 2 dita far ruotare verso l’esterno l’attacco per il
fissaggio, spingetelo verso l’alto quindi rilasciatelo.
6. Collegate il cavo del diffusore, già spellato, ai morsetti a molla del diffusore. Sarà necessario che la polarità
di connessione di ogni diffusore sia corretta: il cavo connesso al morsetto "+" dell'amplificatore deve
essere collegato al morsetto rosso sull’amplificatore. Allo stesso modo, il cavo collegato al morsetto "-"
dell’amplificatore deve essere collegato al morsetto nero. Se questa condizione non viene rispettata,
l’immagine stereo e la percezione dei bassi peggiorerà considerevolmente. (fig. 6)
7. Il diffusore adesso può essere assemblato sul telaio di montaggio. Per fare questo, posizionate le frecce
rosse del diffusore di fronte alle zone con il lucchetto aperto del telaio di montaggio. (fig. 8)
Nota: in utilizzo In-Ceiling, il diffusore può essere solidamente fissato al soffitto grazie ad una imbragatura
(non fornita) che può essere attaccata con il gancio apposito che si trova nella parte posteriore del prodotto.
(fig. 6)
8. Inserite il diffusore nel telaio di montaggio (fig. 7) fino alla battuta, e grazie alle maniglie rosse girate il
diffusore in modo che i perni si trovino tra 2 zone con i lucchetti aperti. (fig. 9)
9. La griglia, quadrata o circolare, adesso può essere posizionata. La griglia è mantenuta in posizione
magneticamente sul telaio di montaggio, avrete solo bisogno di allinearla con il bordo del telaio di
montaggio. (fig. 10)
300 SERIES
Manuale d’uso

23
Regolazione del diffusore (300ICW6 e 300ICW8)
Il livello del diffusore può essere regolato grazie all’interruttore che si trova nella parte posteriore del prodotto
come indicato. (fig. B)
Orientamento del diffusore (300ICW6, 300ICW8)
Il diffusore si può snodare di ±20° e orientare a 360°: giratelo verso la zona d’ascolto per una maggior
precisione dei suoni acuti e dell’immagine stereo (fig. C).
Posizionamento dei diffusori principali in utilizzo In-Wall
I vostri diffusori Integration 300 Series sono stati studiati per restituire il più fedelmente possibile tutte le
forme di musica stereo o programmi home-cinema. Sarà opportuno osservare qualche semplice regola per
ottimizzarne le prestazioni, garantire un buon equilibrio tonale e un’immagine sonora realistica. I diffusori
dovranno essere posizionati simmetricamente rispetto alla zona d’ascolto, in maniera da formare idealmente
un triangolo equilatero con questa.
Tuttavia è possibile far variare queste distanze per trovare il compromesso ideale in funzione delle condizioni
di arredamento particolari (fig. D).
I diffusori dovranno essere posizionati alla stessa altezza su uno stesso piano orizzontale. Idealmente, il
diffusore sarà posizionato a livello dell’orecchio dell’ascoltatore nel punto abituale di ascolto (fig. E).
Posizionamento dei diffusori centrale e surround
La complessità delle colonne sonore dei film permette oggi di ottenere un’enorme diversità di effetti surround.
La scelta della posizione dei diffusori è quindi determinante per ottenere uno spazio tridimensionale realistico.
L’obiettivo è quello di ottenere suoni sufficientemente diffusi e difficili da localizzare, rispettando poche
semplici regole di base (fig. F).
Il centrale deve essere posizionato in prossimità dello schermo per una restituzione realistica dei dialoghi
(fig. Fa). Se uno schermo di proiezione micro perforato viene utilizzato (acusticamente trasparente), si potrà
prevedere il posizionamento del centrale dietro questo schermo.
Se utilizzate i prodotti 300ICW della gamma 300 Series come diffusori In-Wall, posizionate i diffusori surround
sufficientemente in alto, al di sopra delle orecchie dell’ascoltatore. Evitate di posizionare i diffusori surround
troppo indietro rispetto alla zona d’ascolto poiché la percezione perderebbe qualità. Privilegiate una posizione
sui muri laterali, da una parte e dall’altra della zona d’ascolto, o leggermente indietro rispetto a questi per
ottenere degli effetti sonori più avvolgenti (fig. Fb, Fd).
Se utilizzate i prodotti 300ICW della gamma 300 Series come diffusori In-Ceiling, posizionateli sufficientemente
lontani da ogni lato della zona d’ascolto, o leggermente indietro rispetto a questa (fig. Fc).
Per il sistema multicanale 6.1 o 7.1 è possibile combinare i diffusori 300 Series come diffusori In-Wall o In-Ceiling.
Precauzioni particolari
L’unica manutenzione di cui avranno bisogno i diffusori Integration 300 Series sarà quella di essere spolverati
con un panno asciutto. Se il diffusore è macchiato, vi consigliamo semplicemente l’utilizzo di un panno umido.
Non utilizzare mai solventi, detergenti, alcool o prodotti corrosivi o abrasivi per pulire la superficie del diffusore.
Evitare la vicinanza con le fonti di calore.
Verniciatura
Se lo desiderate la griglia dei prodotti 300ICW può essere dipinta in maniera da armonizzare il vostro prodotto
con l’ambiente. Vi consigliamo in primo luogo di togliere la griglia dal prodotto e dipingerla con una pistola per
verniciatura. La vernice utilizzata può essere anche la stessa che si utilizza per i muri. (fig. G)
Se desiderate dipingere il soffitto/muro senza smontare il prodotto 300ICW vi consigliamo di utilizzare la
maschera di protezione fornita. Il fissaggio sul telaio di montaggio è magnetico. (fig. G)
300 SERIES
Manuale d’uso

300 SERIES
Manual de uso
Español
Contenido del envase
• 1 x altavoz 300ICW de la gama 300 Series
• 1 x marco de montaje
• 1 x rejilla circular
• 1 x rejilla cuadrada
• 1 x protección para la pintura (muro/techo)
• 1 x manual de utilización detallado + guía de inicio rápido
• 1 x patrón de corte
Tweeter TNV2 con cúpula invertida fabricado en aleación de aluminio/magnesio: el tweeter desarrollado
para estos productos está realizado con la tecnología de la cúpula invertida, exclusiva de Focal, que permite
una óptima transmisión de la energía y una directividad limitada. La aleación de aluminio/magnesio de la
cúpula garantiza un resultado excepcional en materia de rigidez y amortiguamiento, para agudos suaves y
dinámicos a la vez.
Altavoces con membrana Flax (lino): todas las membranas de los altavoces de la gama 300 Series están
fabricados con la tecnología sándwich Flax. El Flax (lino) es un ecotextil con propiedades estructurales
sorprendentes: ligero, rígido y bien amortizado, para un timbre más neutral y una mejor definición.
Rejilla de protección con enganche magnético: facilidad de colocación, mejor integración.
Filtro con fase optimizada OPC
®
: optimización de la fase para una imagen sonora precisa, estable y natural.
Utilizable en medio húmedo: resistente a la humedad, puede utilizarse en salas de baño, cocinas etc.
Kit de montaje opcional.
2
1
3
4
5
Para validar la garantía Focal-JMab,
ahora también puede registrar su producto en línea: www.focal.com/warranty
Focal-JMlab se reserva el derecho a modificar las especificaciones técnicas de sus productos sin previo aviso con fines de desarrollo. Imágenes no vinculantes legalmente.
300 SERIES
300 ICW 4, 300 ICW 6, 300 ICW 8
Manuel d'utilisation / User manual
Français : page 7
Anglais : page 11
Deutsch : seite 15
Italiano : pagina 19
Español : página 23
Português : página 27
Nederlands : pagina 31
Русский: стр. 35
简体中文
: page 39
한국어:第43页
日本人
:
ページ
47

25
300 SERIES
Manual de uso
Periodo de rodaje
Los altavoces utilizados en los altavoces de la gama Intégration 300 Series son elementos mecánicos
complejos que exigen un periodo de adaptación para alcanzar el máximo de sus posibilidades y adaptarse
a las condiciones de temperatura y de humedad del ambiente. Este periodo de rodaje varía según las
condiciones presentes y puede prolongarse durante algunas semanas. Para acelerar esta operación,
recomendamos hacer funcionar los altavoces durante veinte horas consecutivas. Una vez estabilizadas las
características del bafle, los altavoces 300 Series, se podrán aprovechar al máximo
Cableado antes de la instalación
Solo se podrá proceder al montaje de los altavoces después de la colocación de los cables. Debe asegurarse
de dejar suficiente largo de cable para poder conectar fácilmente el producto (alrededor de 50 cm).
Recomendamos utilizar cables marcados, para respetar la polaridad de los altavoces (+/-). Elegir cables de
calidad, con una sección acorde al largo: el vendedor puede ofrecerle un asesoramiento adecuado.
Elección del amplificador
No es el exceso de potencia de un amplificador lo que puede deteriorar el bafle y los altavoces, sino la falta de
potencia. En efecto, si el volumen está demasiado alto, el amplificador se satura y genera señales parásitos que
podrían destruir el tweeter. La capacidad dinámica y la definición de los altavoces Intégration 300 Series son
suficientemente elevadas para poner en evidencia las cualidades y los defectos de los amplificadores asociados.
El vendedor puede orientarle en la elección, en función de los gustos y del presupuesto.
Instalación
Construcción existente
• Antes de instalar los altavoces, verifique que en los emplazamientos correspondientes en el techo/muro
no haya ninguna obstrucción, como el pasaje de un conducto de ventilación, ni ningún cable que pueda
interferir con la instalación. Utilizar herramientas apropiadas para determinar la ubicación adecuada.
• Verificar que haya suficiente espacio en el interior del techo/muro para instalar el producto.
• Utilizando el patrón de corte provisto, trazar una línea en el techo/muro existente. Luego, cortar siguiendo
el trazado con una herramienta adecuada para practicar una abertura circular en el techo/muro (fig. A).
Nueva construcción
• Utilizar el kit de montaje opcional específico
• Colocar los cables en los altavoces antes de instalarlos
Condiciones de la garantía
Todos los altavoces Focal están cubiertos por una garantía preparada por el distribuidor oficial de Focal en
su país.
Su distribuidor le proporcionará todos los detalles acerca de las condiciones de la garantía. La extensión
de la garantía cubre al menos todo lo contemplado por una garantía legal en vigor en el país en el cual se
expidió la factura oficial de compra.

26
Colocación del bafle
Los productos 300ICW de la gama 300 Series incluyen un marco de montaje, un bafle 300ICW, rejillas
magnéticas circulares y cuadradas. ¡La instalación de los productos 300ICW de la gama 300 Series no
requiere ninguna herramienta!
1. Haga girar la pata de fijación hasta engancharla en el marco de montaje, De modo que pueda pasar el
marco de montaje a través de la abertura. (fig. 1)
2. Con una mano, inserte el marco de montaje en la abertura del techo/muro, de manera que quede bien
adosado contra el techo/muro. (fig. 2)
3. Para trabar el marco de montaje, pase la otra mano a través de la abertura y, con dos dedos, haga girar la
patilla de fijación en sentido contrario a la posición inicial. (fig. 3)
4. Luego, colocar la patilla hacia abajo, hasta el tope (fig. 4).
5. Para terminar, soltar la patilla y asegurarse de que esté bien fijada. Verifique también que la patilla no se
apoye sobre el cable del bafle. (fig. 5)
Nota 1 : repita la operación para las demás patillas de fijación.
Nota 2 : para destrabar la patilla de fijación: haga girar con dos dedos la patilla de fijación hacia el exterior,
empújela hacia arriba y sueltela.
6. Conecte el cable del bafle, pelado previamente, a los terminales con resorte del bafle. Es imprescindible
que la polaridad de conexión de cada bafle sea la correcta: el cable conectado al terminal "+" del
amplificador debe estar unido al terminal rojo del bafle. Del mismo modo, el cable conectado al terminal
"-" del amplificador debe estar unido al terminal negro. Si no se respeta esta condición, la imagen estéreo
y la percepción de los graves disminuirán considerablemente. (fig. 6)
7. Ahora, se puede armar el bafle en el marco de montaje. Para ello, ubicar las flechas rojas del bafle frente a
las zonas del marco de montaje donde aparece el candado abierto. (fig. 8)
Nota: para una utilización In-Ceiling (techo), se puede fijar sólidamente el bafle al techo mediante una correa
(no provista), enganchada en un gancho específico en la parte trasera del producto. (fig. 6)
8. Insertar el bafle en el marco de montaje (fig. 7) hasta el tope y, utilizando las manillas rojas, girar el bafle
de modo que las marcas se encuentren entre dos zonas con candados abiertos. (fig. 9)
9. Ahora, ya puede colocarse la rejilla, cuadrada o circular. La rejilla se mantiene en su sitio magnéticamente
en el marco de montaje, basta con alinearla con el borde del marco de montaje. (fig. 10)
300 SERIES
Manual de uso

27
Ajuste del tweeter (300ICW6 y 300ICW8)
El nivel del tweeter puede ajustarse gracias al interruptor situado en la parte trasera del bafle, como se indica (fig. B).
Orientación del tweeter (300ICW6, 300ICW8)
El tweeter puede articularse a ±20° y orientarse a 360°: dirigirlo hacia la zona de escucha para una mayor
precisión de los agudos y de la imagen estéreo (fig. C).
Ubicación de los altavoces principales para una utilización In-Wall (muro)
Los altavoces Intégration 300 Series han sido estudiados para reproducir lo más fielmente posible todo tipo
de música estéreo o de programas de cine en casa. Conviene tener en cuenta algunas reglas sencillas para
optimizar su rendimiento, garantizar un buen equilibrio tonal y una imagen sonora realista. Los altavoces
deberán colocarse de manera simétrica frente a la zona de escucha, de modo de formar idealmente un
triángulo equilátero con esta.
Sin embargo, se pueden variar estas distancias para hallar la ubicación ideal, en función de condiciones de
disposición particulares (fig. D).
Los altavoces deberán colocarse a la misma altura y sobre un mismo plano horizontal. Idealmente, el tweeter
se colocará a nivel de los oídos del auditor en el punto de escucha habitual (fig. E).
Ubicación de los altavoces central y surround
Actualmente, la complejidad de las bandas sonoras de las películas permite obtener una gran diversidad de
efectos surround. Por lo tanto, la elección de la ubicación de los altavoces es determinante para la obtención
de un espacio tridimensional realista. El objetivo es obtener sonidos suficientemente difusos y difíciles de
localizar, respetando algunas reglas de base (fig. F).
El bafle central debe estar ubicado cerca de la pantalla, para una reproducción realista de los diálogos (fig.Fa).
Si se utiliza una pantalla de proyección microperforada (transparente acústicamente), se podrá prever la
implantación del bafle central detrás de esta pantalla.
Si se utilizan los productos 300ICW de la gama 300 Series como altavoces In-Wall (muro), coloque los
altavoces surround suficientemente altos, por encima de los oídos de los auditores. Evitar colocar los altavoces
surround muy atrás, con respecto a la zona de escucha, ya que afectaría la percepción. Procure ubicarlos sobre
los muros laterales, a ambos lados de la zona de escucha, o muy ligeramente detrás de esta, para obtener
efectos sonoros más envolventes (fig. Fb, Fd).
Si se utilizan los productos 300ICW de la gama 300 Series como altavoces In-Ceiling (techo), ubíquelos
suficientemente separados sobre cada lado de la zona de escucha, o muy ligeramente detrás de esta (fig. Fc).
Para los sistemas multicanales 6.1 o 7.1 se pueden combinar los altavoces 300 Series como altavoces In-Wall
(muro) o In-Ceiling (techo).
Precauciones particulares
El mantenimiento de los altavoces de integración 300 Series se limita a desempolvarlos con un trapo seco. Si
el bafle está manchado, recomendamos utilizar simplemente un trapo húmedo.
Nunca utilizar solventes, detergentes, alcohol o productos corrosivos, rascadores o utensilios abrasivos para
limpiar la superficie del bafle. Evitar acercarlo a una fuente de calor.
Pintura
Si se desea, la rejilla de los productos 300ICW puede pintarse, para armonizar el producto con el ambiente.
Recomendamos retirar primero la rejilla del producto y pintarla mediante una pistola de pintura. Se puede
utilizar el mismo tipo de pintura que para los muros (fig. G)
Si se desea pintar el techo/muro sin desmontar el producto 300ICW, recomendamos utilizar la protección
provista. Se fija en el marco de montaje magnéticamente (fig. G)
300 SERIES
Manual de uso

300 SERIES
Manual de utilização
Português
Conteúdo da embalagem
• 1 x coluna 300ICW da 300 Series
• 1 x estrutura de montagem
• 1 x grelha circular
• 1 x grelha quadrada
• 1 x máscara de proteção a utilizar para pintar a parede/teto
• 1 x manual de instruções detalhado + QuickStart (início rápido)
• 1 x modelo de corte
Tweeter TNV2 de cúpula invertida em liga de alumínio/magnésio: o tweeter desenvolvido para estes
produtos utiliza a tecnologia da cúpula invertida exclusiva da Focal, permitindo uma transferência de
energia ótima e uma diretividade ilimitada. A liga de alumínio/magnésio da cúpula garante um desempenho
excecional em termos de rigidez e amortecimento, para agudos ao mesmo tempo suaves e dinâmicos.
Colunas com membrana Flax (Linho): todas as membranas das colunas da gama Series 300 são fabricadas
com a tecnologia sandwich Flax. O Flax (Linho) é um ecotêxtil com propriedades estruturais surpreendentes:
leve, rígido e bem amortecido, para uma maior neutralidade dos timbres e uma melhor definição.
Grelha de proteção com fixação magnética: facilidade de instalação, melhor integração.
Filtro de fase otimizada OPC
®
: otimização da fase para uma imagem sonora precisa, estável e natural.
Utilizável em ambientes húmidos: insensível à humidade, pode ser utilizado na casa de banho, na cozinha…
Kit de montagem opcional.
2
1
3
4
5
Para validar a garantia Focal-JMlab,
agora é possível registar um produto online: www.focal.com/warranty
Com o objetivo de evoluir, a Focal-JMlab reserva-se o direito de alterar as especificações técnicas dos seus produtos sem aviso prévio. Imagens não contratuais.
300 SERIES
300 ICW 4, 300 ICW 6, 300 ICW 8
Manuel d'utilisation / User manual
Français : page 7
Anglais : page 11
Deutsch : seite 15
Italiano : pagina 19
Español : página 23
Português : página 27
Nederlands : pagina 31
Русский: стр. 35
简体中文
: page 39
한국어:第43页
日本人
:
ページ
47

29
300 SERIES
Manual de utilização
Período de rodagem
Os altifalantes utilizados nas colunas da gama Intégration 300 Series são elementos mecânicos
complexos que exigem um período de adaptação para funcionarem no melhor das suas possibilidades,
e para se adaptarem às condições de temperatura e humidade do seu meio ambiente. Este
período de rodagem varia consoante as condições encontradas e pode prolongar-se por algumas
semanas. Para acelerar esta operação, recomendamos-lhe que deixe as suas colunas funcionarem
durante vinte horas consecutivas. Assim que as características da coluna estiverem completamente
estabilizadas, poderá desfrutar plenamente do desempenho das suas colunas de Integração da
300 Series
Cablagem antes da instalação
Só poderá considerar a montagem das suas colunas depois da colocação dos cabos. Não se esqueça
de deixar um comprimento de cabo suficiente para ligar facilmente o seu produto (cerca de 50 cm).
Aconselhamos a utilização de cabos com marcações de referência, de modo a respeitar a polaridade dos
altifalantes (+/-). Escolha cabos de qualidade e de secção adequada ao comprimento: o seu revendedor
saberá aconselhá-lo.
Escolha do amplificador
Não é o excesso de potência de um amplificador que pode danificar a coluna e os altifalantes, mas, pelo
contrário, a falta de potência. Com efeito, se o volume for demasiado elevado, o amplificador satura e
gera sinais parasitas que poderiam destruir o tweeter. A capacidade dinâmica e a definição das colunas
de Integração da 300 Series são suficientemente elevados para realçar as qualidades e os defeitos dos
amplificadores que lhes estão associados. O seu revendedor saberá orientar a sua escolha, em função dos
seus gostos e do seu orçamento.
Instalação
Construção existente
• Antes de instalar as colunas, certifique-se de que os locais de colocação correspondentes no teto/parede
não têm quaisquer obstruções, como a passagem de uma conduta de ventilação, ou de qualquer cabo que
possa interferir com a instalação. Utilize as ferramentas apropriadas para o ajudar a determinar os locais
adequados.
• Certifique-se de que há espaço suficiente no interior do teto/parede para poder instalar o produto.
• Utilizando o modelo de corte fornecido, trace uma linha no teto/parede existente. Em seguida, corte ao
longo do contorno com uma ferramenta adequada para fazer uma abertura circular no teto/parede (fig.A).
Construção nova
• Utilize o kit de montagem específico opcional
• Coloque os cabos nas colunas antes de as instalar
Condições de garantia
Todas as colunas Focal estão cobertas pela garantia elaborada pelo distribuidor oficial da Focal no seu país.
O seu distribuidor pode fornecer-lhe todas as informações relativas às condições da garantia. A cobertura
da garantia abrange pelo menos o concedido pela garantia legal em vigor no país onde a fatura de compra
original foi emitida.

30
Posicionar a coluna
Os produtos 300ICW da 300 Series incluem uma estrutura de montagem, uma coluna 300ICW e grelhas
magnéticas circulares e quadradas. A instalação dos produtos 300ICW da 300 Series não necessita de
ferramentas!
1. Faça rodar a base de fixação até encaixar na estrutura de montagem, de modo a passar a estrutura de
montagem através da abertura. (fig. 1)
2. Com uma mão, insira a estrutura de montagem na abertura do teto/parede, de forma a aderir bem contra
o teto/parede. (fig. 2)
3. Para fixar a armação de montagem, coloque a outra mão através da abertura e, com dois dedos, rode o
suporte de fixação no sentido oposto ao da posição inicial. (fig. 3)
4. Depois, empurre o suporte para baixo até ao batente (fig. 4).
5. Para terminar, solte o suporte e verifique se está bem fixo. Verifique também se o suporte não está assente
sobre o cabo da coluna. (fig. 5)
Nota 1: repita o procedimento para os outros suportes de fixação.
Nota 2: para desbloquear o suporte de fixação: com 2 dedos, rode o suporte de fixação para o exterior,
empurre-o para cima e depois solte-o.
6. Ligue o cabo do altifalante, com a ponta previamente descarnada, aos bornes de mola da coluna. É
imperativo que a polaridade da ligação de cada coluna esteja correta: o cabo ligado ao borne "+" do
amplificador deve ser ligado ao borne vermelho na coluna. De igual modo, o cabo ligado ao borne "-“ do
amplificador deve ser ligado ao borne preto. Se esta condição não for respeitada, a imagem estéreo e a
perceção dos graves irão degradar-se significativamente. (fig. 6)
7. A coluna pode, agora, ser montada na estrutura de montagem. Para tal, posicione as setas vermelhas da
coluna em frente às zonas com o cadeado aberto da estrutura de montagem. (fig. 8)
Nota: na utilização em Teto, a coluna pode ser solidamente fixa ao teto com uma linga (não fornecida) que
poderá ser pendurada, utilizando o gancho dedicado situado na parte de trás do produto. (fig. 6)
8. Insira a coluna na estrutura de montagem (fig. 7) até ao batente e, utilizando as pegas vermelhas, vire a
coluna de modo a que as marcações fiquem localizadas entre 2 zonas de cadeado aberto. (fig. 9)
9. A grelha, quadrada ou circular, já pode ser instalada. A grelha é mantida em posição magneticamente na
estrutura de montagem, e só tem de a alinhar com o rebordo da estrutura de montagem. (fig. 10)
300 SERIES
Manual de utilização

31
Regulação do tweeter (300ICW6 e 300ICW8)
O nível do tweeter pode ser ajustado através do interruptor situado na parte traseira da coluna, conforme
indicado (fig. B).
Orientação do tweeter (300ICW6, 300ICW8)
O tweeter pode ser articulado a ±20° e orientado a 360°: oriente-o para a área de audição para obter uma
precisão fiel dos agudos e da imagem estéreo (fig. C).
Colocação das colunas principais na utilização em Parede
As suas colunas de Integração da 300 Series foram concebidas para reproduzir o mais fielmente possível
todas as formas de música estéreo ou programas cinema em casa. É conveniente observar algumas regras
simples para otimizar o seu desempenho, garantir um bom equilíbrio tonal e uma imagem sonora realista.
As colunas devem ser colocadas simetricamente face à área de audição, de modo a formar idealmente um
triângulo equilátero com esta área.
No entanto, é possível variar estas distâncias para encontrar o compromisso ideal, de acordo com as
condições particulares da disposição do espaço (fig. D).
As colunas devem ser colocadas à mesma altura e no mesmo plano horizontal. Idealmente, o tweeter será
colocado ao nível dos ouvidos do ouvinte no ponto de audição habitual (fig. E).
Localização das colunas central e surround
A complexidade das bandas sonoras dos filmes permite, atualmente, uma grande diversidade de efeitos
de som surround. A escolha da colocação das colunas é, portanto, determinante para a obtenção de
um espaço tridimensional realista. O objetivo visado é obter sons suficientemente difusos e difíceis de
localizar, respeitando algumas regras de base (fig. F). A coluna central deve ser colocada perto do ecrã
para uma reprodução realista dos diálogos (fig. Fa). Se for utilizado um ecrã de projeção microperfurado
(acusticamente transparente), podemos prever a localização da coluna central por trás desse ecrã.
Se utilizar os produtos 300ICW da gama 300 Series como colunas de Parede, coloque as colunas surround a
uma altura suficiente acima dos ouvidos dos ouvintes. Evite colocar as colunas surround muito atrás da área
de audição, porque a perceção ficará degradada. Prefira uma colocação nas paredes laterais, de ambos os
lados da área de audição ou muito ligeiramente para trás desta, para obter efeitos sonoros mais envolventes
(fig. Fb, Fd).
Se utilizar os produtos 300ICW da 300 Series como colunas de Teto, coloque-as suficientemente separadas
de cada lado da área de audição, ou muito ligeiramente atrás desta (fig. Fc).
Para os sistemas de multicanais 6.1 ou 7.1, é possível combinar as colunas Series 300 como colunas de Parede ou
de Teto.
Precauções especiais
Para a manutenção das colunas de integração da Series 300 basta a limpar o pó com um pano seco. Se a
coluna estiver manchada, recomendamos que utilize simplesmente um pano húmido.
Nunca utilize solventes, detergentes, álcool ou produtos corrosivos, raspadores ou outros utensílios para
limpar a superfície da coluna. Evite a proximidade de qualquer fonte de calor.
Pintura
Se o desejar, a grelha dos seus produtos 300ICW pode ser pintada de modo a harmonizar o produto com
o seu ambiente. Recomendamos que primeiro remova a grelha do produto e a pinte com uma pistola de
pintura. A tinta utilizada pode ser de natureza semelhante à usada na parede. (fig. G)
Se desejar pintar o teto/parede sem desmontar o produto 300ICW, recomendamos a utilização da máscara
de proteção fornecida. A sua fixação na estrutura de montagem é magnética. (fig. G)
300 SERIES
Manual de utilização

300 SERIES
Handleiding
Nederlands
Inhoud van de verpakking
• 1 x 300ICW luidspreker uit de 300 Series
• 1 x montageraam
• 1 x cirkelvormig rooster
• 1 x vierkant rooster
• 1 x beschermingshoes voor het verven van de muur/het plafond
• 1 x gedetailleerde gebruikshandleiding + QuickStart
• 1 x snijmal
TNV2 tweeter met omgekeerde koepel met aluminium-magnesiumlegering: de voor deze producten
ontwikkelde tweeter maakt gebruik van de exclusieve omgekeerde koepeltechnologie van Focal,
die een optimale energie-overdracht en een beperkt richtingseffect mogelijk maakt. De aluminium-
magnesiumlegering van de koepel garandeert buitengewone prestaties op het gebied stijfheid en demping,
voor hoge tonen die zowel soepel als dynamisch klinken.
Luidsprekers met Flax (vlas) membraan: alle membranen van de luidsprekers uit de 300 Series zijn
gefabriceerd met de Flax sandwich-technologie. Flax (vlas) is een ecologisch textiel met buitengewone
eigenschappen: licht, onbuigzaam en goed dempend, voor een grotere neutraliteit van de toonkleuren en
een betere definitie.
Beschermingsrooster met magnetische bevestiging: eenvoudig aan te brengen, mooiere integratie.
Optimale fase scheidingsfilter OPC
®
: optimalisatie van de fase voor een accuraat, stabiel en natuurlijk
geluidsbeeld.
Te gebruiken in een vochtige omgeving: niet gevoelig voor vocht, te gebruiken in de badkamer, keuken …
Optionele montagekit.
2
1
3
4
5
Voor garantie validatie Focal -JMlab,
Het is nu mogelijk om het product online te registreren: www.focal.com/warranty
Voor toekomstige ontwikkeling, behoudt Focal-JMlab zich het recht voor om de technische specificaties van haar producten te wijzigen zonder voorafgaande kennisgeving. Afbeeldingen zijn
niet-contractueel.
300 SERIES
300 ICW 4, 300 ICW 6, 300 ICW 8
Manuel d'utilisation / User manual
Français : page 7
Anglais : page 11
Deutsch : seite 15
Italiano : pagina 19
Español : página 23
Português : página 27
Nederlands : pagina 31
Русский: стр. 35
简体中文
: page 39
한국어:第43页
日本人
:
ページ
47

33
300 SERIES
Handleiding
Proefdraaiperiode
De gebruikte luidsprekers uit de Intégration 300 Series zijn complexe mechanische elementen die een
aanpassingsperiode nodig hebben. Dit om zo goed mogelijk te kunnen presteren en zich aan te kunnen
passen aan de temperatuur en vochtigheidsgraad van de omgeving. Deze inspeelperiode is afhankelijk van
de omstandigheden en kan enkele weken duren. Om dit proces sneller te laten verlopen, raden wij u aan
uw luidsprekers gedurende een twintigtal opeenvolgende uren aan te zetten. Zodra de eigenschappen van
de luidspreker volkomen gestabiliseerd zijn, kunt u volledig genieten van de prestaties van uw Intégration
300Series-luidsprekers.
Bekabeling voor de installatie
U kunt uw luidsprekers pas inbouwen als u de kabels heeft aangesloten. Zorg ervoor dat u genoeg kabel
overlaat om uw product eenvoudig aan te sluiten (circa 50 cm). Wij adviseren u een kabel te gebruiken met
een herkenningsteken, zodat u rekening kunt houden met de polariteit van de luidsprekers (+/-). Kies voor
kwaliteitskabels in de gewenste lengte: uw verkoper kan u adviseren
Kiezen van de versterker
Niet door overmaat aan vermogen van een versterker riskeert u de luidsprekers te beschadigen, maar juist
met een tekort aan vermogen. Als het volume te hoog is, absorbeert en genereert de versterker storende
geluiden die de tweeter kunnen beschadigen. De dynamische capaciteit en de definitie van de luidsprekers
van de Intégration 300 Series zijn hoog genoeg om de kwaliteiten en gebreken van de eraan gekoppelde
versterkers naar voren te laten komen. Uw verkoper kan u helpen met uw keuze, afhankelijk van uw smaak
en budget.
Installatie
Bestaande constructie
• Verzeker u voor het installeren van de luidsprekers ervan dat de bevestigingsplaatsen in het plafond/de
muur vrij zijn van obstructies, zoals een luchtkoker of een kabel die een nadelige werking op de installatie
kan hebben. Gebruik de passende middelen om vast te stellen welke plaatsen geschikt zijn.
• Verzeker u ervan dat er genoeg ruimte in het plafond/de muur is om het product te kunnen installeren.
• Teken met gebruikmaking van de meegeleverde snijmal een lijn op het plafond/de muur. Volg vervolgens
deze lijn met een daarvoor geschikt gereedschap en zaag of snijd een ronde opening in het plafond/de
muur (fig. A).
Nieuwe constructie
• Gebruik de optionele, speciale montagekit
• Bekabel alvorens de luidsprekers vooraf aan montage
Garantievoorwaarden
Alle Focal-luidsprekers zijn gedekt door een garantie die is bepaald door de officiële Focal-distributeur in
uw land.
Uw distributeur kan alle details over de garantievoorwaarden verstrekken. De garantie dekt ten minste
de juridisch bepaalde garanties die van kracht zijn in het land waar de oorspronkelijke aankoopfactuur is
afgegeven

34
Plaatsing van de luidspreker
De 300ICW-producten van de 300 Series bestaan uit een montageraam, een luidspreker 300ICW en
cirkelvormige en vierkante magnetische roosters. De 300ICW-producten van de 300 Series kunnen zonder
gereedschap worden geplaatst!
1. Draai de bevestigingshaak totdat deze zich vastklemt op het montageraam, zodat u het montageraam
door de opening kunt doen (fig. 1).
2. Schuif het montageraam met één hand in de opening van het plafond/de muur, zodanig dat deze goed
tegen het plafond/de muur aan blijft zitten (fig. 2).
3. Om het montageraam vast te zetten, steekt u uw andere hand door de opening en draait u de
bevestigingshaak met 2 vingers tegenovergesteld aan de uiteindelijke positie (fig. 3).
4. Druk vervolgens de haak naar beneden tot aan de pal (fig. 4).
5. Laat vervolgens de haak los en verzeker u ervan dat deze goed vastzit. Controleer ook of de haak niet op
de kabel van de luidsprekerkorf rust (fig. 5).
Noot 1: herhaal deze handeling voor de andere bevestigingshaken.
Noot 2: om de bevestigingshaak weer los te maken: draai de bevestigingshaak met 2 vingers naar buiten,
duw deze naar boven en laat de haak vervolgens los.
6. Verbind de vooraf blootgelegde kabel met de veerklemmen van de luidspreker. Het is absoluut noodzakelijk
dat de polariteit van elke luidspreker juist is: de kabel die verbonden is met de klem “+“ van de versterker
dient verbonden te worden met de rode klem op de luidspreker. Op dezelfde wijze dient de kabel die
verbonden is met de klem “-“ van de versterker verbonden te worden met de zwarte klem. Als niet aan
deze voorwaarde is voldaan, zullen het stereogeluid en de waarneming van de lage tonen aanzienlijk
verslechteren (fig. 6).
7. De luidspreker kan nu aan het montageraam worden bevestigd. Plaats hiertoe de rode pijlen van de
luidsprekerkorf tegenover de delen met de geopende sluiting van het montageraam (fig. 8).
Noot: bij het gebruik van In-Ceiling kan de luidspreker vast aan het plafond worden bevestigd met behulp
van een strop (niet meegeleverd), die kan worden vastgemaakt met behulp van een speciale haak die
zich aan de achterzijde van het product bevindt (fig. 6).
8. Schuif de luidsprekerkorf in het montageraam (fig. 7) tot aan de lager en draai de luidsprekerkorf met
behulp van de rode pijlen zodanig dat de herkenningstekens zich tussen 2 delen met geopende sluitingen
bevinden (fig. 9).
9. Het vierkante of cirkelvormige rooster kan nu worden aangebracht. Het rooster blijft met magnetische
kracht aan het montageraam bevestigd en u hoeft het enkel in lijn te brengen met de rand van het
montageraam (fig. 10).
300 SERIES
Handleiding

35
Afstellen van de tweeter (300ICW6 en 300ICW8)
Het niveau van de tweeter kan worden aangepast met behulp van de schakelaar die zich aan de achterzijde van
de luidspreker bevindt (fig. B).
Oriëntatie van de tweeter (300ICW6, 300ICW8)
De tweeter kan ± 20° naar voren worden bewogen en geeft 360° rondom geluid af: richt de tweeter in de richting
van de luisterlocatie voor een grotere precisie van de hoge tonen en het stereogeluid (fig. C).
Plaatsing van de hoofdluidsprekerboxen met gebruikmaking van In-Wall
Uw Intégration 300 Series-luidsprekers zijn zodanig gefabriceerd dat ze alle vormen van stereomuziek en
homecinemaprogramma’s zo nauwkeurig mogelijk weergeven. U hoeft slecht enkele eenvoudige voorschriften in
acht te nemen om hun prestaties te optimaliseren en een goed geluidsevenwicht en een realistisch geluidsbeeld
te garanderen. De luidsprekers dienen op symmetrische wijze ten opzichte van de luisterlocatie te worden
geplaatst, waarbij ze idealiter een gelijkzijdige driehoek met deze locatie vormen.
Het is evenwel mogelijk om deze afstanden te laten variëren, teneinde de ideale opstelling te vinden voor een
specifieke inrichting (fig. D).
De luidsprekers dienen op dezelfde hoogte te worden geplaatst en op eenzelfde horizontaal vlak. Idealiter wordt
de tweeter ter hoogte van de oren van de luisteraar geplaatst op de plek waar gewoonlijk wordt geluisterd (fig.E).
Plaatsing van de midden (center) en de surround-luidsprekers
De meervoudige geluidskanalen van films maakt het tegenwoordig mogelijk een zeer grote verscheidenheid aan
surround-effecten te verkrijgen. De keuze van de locatie van de luidsprekers is bepalend voor het verkrijgen van
een realistische driedimensionale geluidsomgeving. Het beoogde doel is om geluiden te verkrijgen die voldoende
worden verspreid en ruimtelijk klinken. Dit door enkele basisregels in acht te nemen (fig. F).
De midden-luidspreker dient in de nabijheid van het scherm te worden geplaatst voor een realistische weergave
van de dialogen (fig. Fa). Als gebruik wordt gemaakt van een microgeperforeerd scherm (akoestisch transparant),
kan worden gekozen voor plaatsing van de midden-luidspreker achter dit scherm.
Als u van de 300ICW-producten van de 300 Series In-Wall luidsprekers gebruikt, plaats dan de surround-
luidsprekers, op voldoende hoogte, boven de oren van de luisteraars. Zorg ervoor dat u de surround-luidsprekers
niet te ver achter de luisterlocatie plaatst, want dan zal de waarneming verslechteren. Plaats ze bij voorkeur op
zijmuren, aan weerskanten van de luisterlocatie of een heel klein beetje achter deze locatie voor het verkrijgen
van meer omhullende geluidseffecten (fig. Fb, Fd).
Als u van de 300ICW-producten van de 300 Series In-Ceiling luidsprekers gebruikt, plaats deze dan voldoende
ver van elke zijde van de geluidslocatie, of een heel klein beetje achter deze locatie (fig. Fc).
Voor de systemen met meerdere kanalen 6.1 en 7.1 is het mogelijk om de luidsprekers van de 300 Series te
combineren als In-Wall of In-Ceiling luidsprekers.
Specifieke voorzorgsmaatregelen
Het onderhoud van de inbouwluidsprekers van de 300 Series beperkt zich tot het stofvrij maken met behulp
van een droge doek. Als er zich vlekken op de luidspreker bevinden, raden wij u aan eenvoudig een vochtige
doek te gebruiken. Gebruik nooit oplosmiddelen, schoonmaakmiddelen, alcohol, bijtende producten, een krabber
of reinigingsapparaten om het oppervlak van de luidspreker te reinigen. Niet in de buurt van een warmtebron
plaatsen.
Verven (Spuiten!)
Indien u dit wenst, kan het rooster van uw 300ICW-producten in elke gewenst kleur worden geverfd. Wij raden
u aan allereerst het rooster van het product af te halen en deze vervolgens met behulp van een verfpistool of
spuitbus te verven. Gebruik geen kwast, daar deze de perforatie zal dicht schilderen. De gebruikte verf mag
dezelfde samenstelling hebben als de muurverf, let daarbij wel op de viscositeit, niet te dik (fig. G).
Indien u het plafond/de muur wilt verven zonder uw 300ICW-product te verwijderen, raden wij u aan de meegeleverde
beschermingshoes te gebruiken. Deze blijft op magnetische wijze aan het montageraam bevestigd (fig. G).
300 SERIES
Handleiding

300 SERIES
Руководство по эксплуатации
Русский
Содержимое упаковки
• 1 акустическая колонка 300ICW серии 300 Series
• 1 монтажная рамка
• 1 круглая сетка
• 1 квадратная сетка
• 1 защитная маска для использования во время покраски стены/потолка
• 1 подробное руководство по эксплуатации + краткое руководство
• 1 шаблон для резки
Диффузор TNV2 с вогнутым куполом из алюминиево-магниевого сплава: в этих диффузорах используется
технология вогнутого купола, являющаяся эксклюзивной собственностью Focal. Она обеспечивает оптимальную
передачу энергии и ограничение акустической направленности. Использование алюминиево-магниевого сплава
гарантирует наличие уникальных характеристик в плане прочности, смягчения высоких частот для получения
мягкого и энергичного звучания.
Динамики с мембраной Flax (изо льна): все мембраны динамиков серии 300 Series выполнены по технологии
«сэндвича» Flax. Экологически чистая льняная ткань имеет удивительные структурные свойства: она легкая,
прочная, хорошо смягчает нагрузку, добавляет нейтральности тембрам и четкости звучанию.
Защитная сетка с магнитом: простота установки, улучшенное крепление.
Фильтр с оптимизированной фазой OPC
®
: оптимизация фазы для получения четкого, стабильного и
естественного звучания.
Может использоваться во влажной среде: хорошая влагоустойчивость, возможность использования в ванной
комнате, на кухне и т. д.
Монтажный комплект по выбору.
2
1
3
4
5
Для подтверждения гарантии Focal-JMlab,
еперь продукт можно зарегистрировать на сайте www.focal.com/warranty
Компания Focal-JMlab оставляет за собой право на внесение изменений в технические характеристики своих изделий без предварительного уведомления. Изображения только
для ознакомления.
300 SERIES
300 ICW 4, 300 ICW 6, 300 ICW 8
Manuel d'utilisation / User manual
Français : page 7
Anglais : page 11
Deutsch : seite 15
Italiano : pagina 19
Español : página 23
Português : página 27
Nederlands : pagina 31
Русский: стр. 35
简体中文
: page 39
한국어:第43页
日本人
:
ページ
47

37
300 SERIES
Руководство по эксплуатации
Период приработки
Динамики, используемые в акустических колонках серии Integration 300 Series — это сложные механические
элементы, которые требуют определенного адаптационного периода, чтобы работать на максимуме своих
возможностей и приспособиться к температурно-влажностным условиям вашей обстановки. Этот период варьируется
в зависимости от определенных условий и может затянуться на несколько недель. Для ускорения этой процедуры
мы рекомендуем дать поработать вашим колонкам около двадцати часов подряд. После полной стабилизации
рабочих характеристик колонок вы сможете в полной мере насладиться всеми качествами акустических колонок
Integration 300 Series.
Прокладка электропроводки перед установкой
Приступать к установке акустических колонок можно только после прокладки электропроводки. Убедитесь, что
длины кабеля достаточно для подключения колонок (около 50 см). Мы рекомендуем использовать кабель с метками
для соблюдения полярности динамиков (+/-). Выбирайте качественные кабели с соответствующим сечением и
нужной длины: за помощью обращайтесь к вашему дилеру.
Выбор усилителя
Причиной выхода из строя колонок и динамиков может стать не избыток мощности усилителя, а, наоборот, ее
недостаток. Действительно, если уровень громкости слишком высокий, усилитель начинает работать в режиме
насыщения и возникают шумы, которые могут привести к повреждению высокочастотного динамика. Динамическая
емкость и разрешающая способность акустических колонок Integration 300 Series достаточно высоки, чтобы выявить
достоинства и недостатки усилителей, которые будут к ней подключены. В зависимости от предпочтений и бюджета
подобрать нужный усилитель вам поможет ваш дилер.
Установка
Существующая конструкция
• Перед установкой акустических колонок убедитесь, что в соответствующих местах установки (на потолке/стене)
нет никаких помех (например, вентиляционных каналов) или кабелей, которые могут препятствовать установке.
Для определения подходящих мест используйте соответствующие инструменты.
• Убедитесь в наличии достаточного пространства для установки колонок внутри потолка/стены.
• С помощью прилагающегося шаблона для резки начертите линию на потолке/стене. После этого с помощью
соответствующего инструмента вырежьте круглое отверстие по линии, начерченной на потолке/стене (рис. А).
Новая конструкция
• Используйте специальный монтажный комплект по выбору.
• Подсоедините акустические колонки перед установкой.
Условия гарантии
На все мониторы Focal распространяется действие гарантии, оформленной официальным дистрибьютором
компании Focal в вашей стране.
Подробная информация, касающаяся условий гарантии, предоставляется дистрибьютором. Минимальный
гарантийный срок соответствует сроку действующих правовых гарантий в стране, в которой оформлен оригинальный
счет за приобретенные товары.

38
Монтаж акустической колонки
В комплект изделий 300ICW серии 300 Series входят монтажная рамка, акустическая колонка 300ICW, а также круглые
и квадратные магнитные сетки. Установка изделий 300ICW серии 300 Series не требует никаких инструментов.
1. Поверните фиксирующую лапку так, чтобы она закрепилась на монтажной рамке и чтобы монтажная рамка
проходила в отверстие (рис. 1).
2. Одной рукой установите монтажную рамку в отверстие в потолке/стене так, чтобы она хорошо прижималась к
потолку/стене (рис. 2).
3. Чтобы зафиксировать монтажную рамку, двумя пальцами другой руки через отверстие поверните фиксирующую
лапку в положение, противоположное первоначальному (рис. 3).
4. После этого надавите на лапку до упора (рис. 4).
5. Для завершения операции отпустите лапку и убедитесь, что она хорошо зафиксирована. Убедитесь также в том,
что лапка не упирается в кабель акустической колонки (рис. 5).
Примечание 1. Повторите те же действия с остальными фиксирующими лапками.
Примечание 2. Чтобы разблокировать фиксирующую лапку, двумя пальцами поверните ее наружу, подтолкните
вверх, затем отпустите.
6. Подсоедините кабель акустической колонки, предварительно сняв с него оболочку, к пружинным зажимам
колонки. Обязательно соблюдайте полярность каждой колонки: кабель, соединенный с зажимом «+» усилителя,
должен соединяться с зажимом красного цвета на колонке. Точно так же, кабель, соединенный с зажимом «-»
усилителя, должен соединяться с зажимом черного цвета. Если это условие не соблюдается, стереофонический
образ и восприятие низких частот может в значительной степени ухудшиться (рис. 6).
7. Теперь можно приступить к установке акустической колонки на монтажную рамку. Для этого расположите красные
стрелки на акустической колонке напротив открытых замков монтажной рамки (рис. 8).
Примечание. При установке на потолке колонку можно прочно зафиксировать с помощью подвесного устройства (не
поставляется в комплекте), которое может быть прикреплено с помощью крюка, расположенного на
задней стенке изделия (рис. 6).
8. Вставьте колонку в монтажную рамку (рис. 7) до упора и поверните красные ручки на колонке так, чтобы метки
расположились между двумя открытыми замками (рис. 9).
9. После этого можно установить круглую или квадратную сетку. Сетка удерживается на монтажной рамке с помощью
магнита, и вам нужно только выровнять ее по краю монтажной рамки (рис. 10).
300 SERIES
Руководство по эксплуатации

39
Настройка диффузора (300ICW6 и 300ICW8)
Уровень диффузора можно настроить с помощью переключателя, расположенного на задней стенке колонки (рис. В).
Выбор направления диффузора (300ICW6 и 300ICW8)
Диффузор можно устанавливать под углом ±20° и поворачивать на 360°: направьте его на зону прослушивания для
большей четкости высоких частот и получения стереофонического образа (рис. C).
Расположение основных колонок при настенной установке
Колонки Integration 300 Series рассчитаны на воссоздание как можно более реалистичного звучания всех форм
музыки или программ домашнего кинотеатра. Следует соблюдать несколько простых правил, чтобы оптимизировать
их характеристики и обеспечить хороший тональный баланс и реалистичный звуковой образ. Колонки должны
располагаться симметрично, формируя по отношению к зонам прослушивания идеальный равнобедренный
треугольник.
В то же время можно изменять расстояния, чтобы выбрать их идеальное расположение в зависимости от особых
условий планировки помещений (рис. D).
Колонки должны быть расположены на одинаковой высоте и в одной горизонтальной плоскости. В идеале диффузор
должен находиться на уровне головы слушателя в обычной точке прослушивания (рис. Е).
Расположение центральных и дополнительных колонок
Сложность саундтреков фильмов позволяет в настоящее время получить очень разнообразные
дополнительные эффекты. Поэтому выбор места расположения колонок имеет решающее значение для
реалистичного ощущения трехмерного пространства. Главной задачей является получение достаточно пространного
и сложно локализируемого звучания, для чего необходимо соблюдать несколько базовых правил (рис. F).
Центральная колонка должна располагаться рядом с экраном для реалистичного воспроизведения диалогов
(рис. Fa). Если используется микроперфорированный защитный экран (акустически прозрачный), центральную
колонку можно расположить сзади такого экрана.
При настенной установке колонок 300ICW серии 300 Series дополнительные колонки можно расположить на уровне
головы слушателя. Избегайте размещения дополнительных колонок слишком далеко позади зоны прослушивания:
восприятие звука будет хуже. Для получения обволакивающих звуковых эффектов предпочтительно размещать
колонки на боковых стенах с обеих сторон от зоны прослушивания или слегка позади нее (рис. Fb, Fd).
При размещении колонок 300ICW серии 300 Series на потолке устанавливайте их на достаточном расстоянии с обеих
сторон от зоны прослушивания или слегка позади нее (рис. Fc).
Для многоканальных систем 6.1 или 7.1 возможно комбинированное использование колонок 300 Series
на стенах и потолке.
Особые меры предосторожности
Техническое обслуживание колонок 300 Series ограничивается их очисткой от пыли с помощью сухой ткани. Для
удаления появившихся пятен на колонке рекомендуется использовать влажную ткань.
Никогда не используйте растворители, моющие и чистящие средства, спиртосодержащие или едкие вещества, а
также абразивные материалы для очистки поверхности колонок.
Избегайте их расположения вблизи источников тепла.
Покраска
Если хотите, вы можете покрасить сетки колонок 300ICW, чтобы их цвет гармонировал с окружающей обстановкой.
Мы рекомендуем сначала снять сетку и после этого покрасить ее с помощью покрасочного пистолета. Можно
использовать ту же краску, что и для покраски стен (рис. G).
Если вы хотите покрасить потолок/стену, не демонтируя колонки 300ICW, рекомендуем использовать поставляемую
в комплекте защитную маску.
Она крепится на монтажную рамку с помощью магнита (рис. G).
300 SERIES
Руководство по эксплуатации

300 SERIES
使用手册
简体中文
包装内容
• 1 个 300 Series 系列 300ICW 音箱
• 1 个安装架
• 1 个圆形网罩
• 1 个方形网罩
• 1 个用于粉刷墙壁/天花板的防护罩
• 1 本详细的使用手册 + 快速入门
• 1 个切割模板
TNV2 铝/镁合金倒圆顶高音单元:此产品的高音单元采用 Focal 的独家倒圆顶技术,能够确保最佳的能量传递,并
降低声音方向性。铝/镁合金圆顶提供了卓越的刚度和阻尼性能,表现柔和而动感十足的高音。
采用 Flax(亚麻)振膜制成的扬声器:300 Series 系列音箱的所有振膜都是采用 Flax 三明治夹层技术制成。Flax(
亚麻)是一种具有惊人结构特性的环保面料:轻盈、坚硬、减震性极佳,真实重现原有音色,展现更清晰的音质。
磁性网罩安装简便,可以更好地与音箱合为一体。
OPC
(优化相位交叉):优化相位,打造精确、稳定、自然的声场。
适用于潮湿环境:不受湿度的影响,可以在浴室、厨房等环境中使用。
可选安装套件。
2
1
3
4
5
请于10天内寄回随附的产品质保书,使Focal-JMlab质保生效。
您现在可以在线注册产品:www.focal.com/warranty
为了使产品日益完善,Focal-JMlab保留其随时修改产品技术规格的权利,恕不另行通知。图片不具合同效力。
300 SERIES
300 ICW 4, 300 ICW 6, 300 ICW 8
Manuel d'utilisation / User manual
Français : page 7
Anglais : page 11
Deutsch : seite 15
Italiano : pagina 19
Español : página 23
Português : página 27
Nederlands : pagina 31
Русский: стр. 35
简体中文
: page 39
한국어:第43页
日本人
:
ページ
47

41
300 SERIES
使用手册
音箱磨合期
Integration 300 Series 系列的音箱内所使用的扬声器都是相当复杂的机械装置,需要一段适应期方能适应环境的
温度和湿度,以发挥其最佳性能。磨合期的长短取决于音箱遇到的情况,有时候甚至可能持续数周。若要缩短磨合
期,建议让音箱连续运行 20 个小时。等到音箱特性完全稳定下来后,就可以尽情享受 Integration 300 Series 音箱
的最佳性能。
安装前的接线
请务必先把电缆接好,再组装音箱。请务必留下足够长度的电缆(约 20" / 50 厘米),方便轻松连接产品。建议使
用带有标记的电缆,方便连接扬声器的极性 (+/-)。请向您的经销商咨询,以选择长度及截面相符的优质电缆。
选择放大器
放大器的功率过大并不会损坏音箱和扬声器;相反地,放大器功率不足才会对它们造成损坏。因为,音量过大时,
放大器会处于饱合状态,并产生可能摧毁高音单元的杂散信号。Integration 300 Series 音箱有优异的乐音强弱表现
和清晰度,足以突出连接于音箱的放大器的质量和缺陷。经销商可以根据您的品味和预算帮助选择所需的音箱。
安装
安装于现有结构
• 安装音箱前,请先确保天花板/墙壁板上的安装位置没有任何阻碍(例如没有通风孔),也没有会干扰安装的电
缆。请使用适当的工具来帮助确定合适的位置。
• 请确保天花板/墙壁内有足够的空间可以安装本产品。
• 使用随附的切割模板,在现有的天花板/墙壁上画一条线。然后使用适当的工具,沿着天花板/墙壁上的线,裁切
出一个圆形开口(图 A)。
全新安装
• 使用专用的选配安装套件
• 安装音箱前,请先接上电缆
保修条件
Focal通过您所在国家的官方经销商,为您提供所有扬声器的质保服务。
您的经销商能够为您提供保修条件的所有详细信息。保修范围至少包括开具原始发票的所在国家的有效法律的保修规
定。

42
安装音箱
300 Series 系列的 ICW 300 产品包括一个安装架、一个 ICW 300 音箱以及圆形及方形磁性网罩。不需要任何工具,
即可安装 300 Series 系列的 300ICW 产品!
1. 旋转固定耳,使其卡在安装架中,让安装架能够通过开口(图 1)。
2. 用一只手把安装架插入天花板/墙壁的开口里,使其贴合于天花板/墙壁上(图 2)。
3. 另一只手穿过开口,用两根手指把固定耳转到原位置的对面,以锁定安装架(图 3)。
4. 然后把固定耳向下推到挡块(图 4)。
5. 最后,松开固定耳,检查它是否已经固定好,并确定它的下面没有音箱电缆(图 5)。
注 1: 重复此步骤,安装其他固定耳。
注 2: 松开固定耳时,请用两根手指向外旋转,将其向上推,然后松开。
6. 连接音箱电缆之前,请先剥离电缆外周的绝缘层,然后将其连接到音箱的簧片端上。请务必正确连接每个音箱的
极性:连接到放大器“+”端的电缆必须连接到音箱上的红色端。同样地,连接到放大器“-”端的电缆必须连接
到黑色端。如果未遵循这一条件,则会严重损害立体音效及重音品质(图 6)。
7. 现在,可以把音箱装配在安装架上。安装时,请将音箱上的红色箭头对齐安装架上打开的扣锁区域(图 8)。
注意:采用“吊顶内装式”安装时,可以使用吊环(未附)挂住产品背面的专用挂钩,把音箱牢牢地固地在天花
板上(图 6)。
8. 将音箱置入安装架(图 7)内的挡块上,使用红色手柄旋转音箱,使标记位于两个打开的扣锁区域之间(图 9)。
9. 现在,可以安装方形或圆形网罩了。磁性网罩会自行吸附在安装架上,只需要将其对准安装架的边缘即可(图 10)。
300 SERIES
使用手册

43
调节高音单元(300ICW6 及 300ICW8)
可以使用音箱背后的切换装置调节高音单元的音量,如图所示(图 B)。
高音单元的方向(300ICW6 及 300ICW8)
高音单元可以转动 ±20°,使其旋转 360°:将它转向聆听区域,以提高高音和立体音的精确度(图 C)。
“入墙式”主音箱安装法
Integration 300 Series 音箱的设计旨在尽可能地让各种形式的立体音效或家庭影院的原音重现。应遵循一些简单的
规则来优化其性能,并确保良好的音调平衡和逼真的音效。放置音箱时,音箱必须面对聆听区域,与其两侧等距,
并与其形成一个等边三角形。
可以根据室内摆设的实际状况改变这些距离,以找到最好的折衷办法(图 D)。
音箱必须放置在同一水平面的相同高度上。理想情况下,在听者平常的聆听位置上,高音单元应该放在与听者耳朵
等高的地方(图 E)。
中置音箱及环绕音箱
今天,电影配乐的复杂性能够打造非常多元的环绕声效。选择合适的音箱位置是获得逼真三维音场的关键。遵循以
下几个基本规则,即能充分地漫射声音,使其难以定于特定的方位(图 F)
。中央音箱应放在靠近屏幕的地方,以再现逼真的对话(图 Fa)。如果使用微孔投影屏幕(使声音穿透),可以把
中央音箱放置于屏幕的正后方。
如果把 300 Series 系列的 300ICW 产品安装为入墙式音箱,请将环绕音箱放置于高于听者耳朵的足够高度上。请勿
将环绕音箱放置于聆听区过于后面的地方,因为这会减损它的音效。最好是将它安装在侧壁上、收听区域的两侧或
稍后面的地方,以取得更好的环场音效(图 Fb、Fd)。
如果把 300 Series 系列的 300ICW 产品安装为吊顶内装式音箱,请把它们安装于聆听区域的两侧,或稍微后面
(图 Fc)的区域。
6.1 或 7.1 多声道系统也可以使用 300 Series 系列的音箱,将其安装为入墙式或吊顶内装式音箱。
特别注意事项
维护 Integration 300 Series 音箱时,只能使用除尘干布擦拭。如果音箱被弄脏了,建议仅使用湿布擦拭。
切勿使用溶剂、清洁剂、酒精、腐蚀性产品、刮刀或一般器皿来清洁音箱表面。
避免让音箱靠近热源。
油漆
可以视需要把 300ICW 产品随附的网罩漆成与其周围环境相协调的颜色。建议先从产品上取下网罩,然后用喷漆枪
为它上色。可以使用与墙壁油漆相似的油漆(图 G)。
如果不想取下 300ICW 产品,而想直接在天花板/墙壁上涂漆,建议使用所提供的防护罩。
安装架上的固定装置具有磁性(图 G)。
300 SERIES
使用手册

300 SERIES
사용 설명서
한국어
내용물
• 300 Series 제품군의 300ICW 스피커 1개
• 조립 프레임 1개
• 원형 그릴 1개
• 사각형 그릴 1개
• 벽/천장 도장 시 사용하는 보호 커버 1개
• 세부 사용설명서 + QuickStart 1개
• 절단 형판 1개
TNV2 알루미늄/마그네슘 합금 역방향-돔 트위터: 이러한 제품을 개발된 트위터에는 Focal사의 고유 기술인 역방향-
돔 테크놀로지가 사용되어 에너지 전송 및 지향성 제한이 최적화되어 있습니다. 돔에 알루미늄/마그네슘 합금을
사용하였으므로 강성과 감쇠 성능이 탁월하여, 고음에서 부드럽고 다이내믹한 음향을 즐기실 수 있습니다.
Flax 콘형 스피커 드라이버(speaker driver cone): 300 Series 제품군의 모든 콘형 스피커 드라이버는 Flax 샌드위치
테크놀로지로 제작되었습니다. Flax는 놀랄 만한 구조적 속성을 지닌 친환경적 섬유입니다: 이 소재는 가볍고 견고하며
감쇠 성능이 우수하므로, 음색의 중립성이 우수해지고 선명도가 개선됩니다.
자기 부착형 보호 그릴: 용이한 장착 및 뛰어난 통합성.
OPC
©
(Optimum Phase Crossover): 보다 더 정확한하고 안정적이며 자연스러운 음상(sound image)을 위한 위상의
최적화.
습한 환경에서 사용 가능: 습기에 대한 저항력이 강하므로 목욕탕, 부엌 등에서 스피커를 사용할 수 있습니다.
조립 세트 선택 가능.
2
1
3
4
5
Focal-JMlab의 개런티 유효화를 위해,
이제 웹사이트에서 제품의 온라인 저장 등록도 가능합니다 : www.focal.com/warranty
발전을 목적으로, Focal-JMlab 은 소비자 공지 없이, 자사 제품들의 기술적 특성들 변경 권리를 보유합니다. 법적 효력 없는 이미지.
300 SERIES
300 ICW 4, 300 ICW 6, 300 ICW 8
Manuel d'utilisation / User manual
Français : page 7
Anglais : page 11
Deutsch : seite 15
Italiano : pagina 19
Español : página 23
Português : página 27
Nederlands : pagina 31
Русский: стр. 35
简体中文
: page 39
한국어:第43页
日本人
:
ページ
47

45
300 SERIES
사용 설명서
스피커 길들이기
300 Series 통합 스피커에 사용된 스피커 드라이버는 복합적인 메카닉으로 구성되어 환경의 습도와 온도 조건에
적응하여, 기기가 최상의 작동을 하려면 일정 기간의 시험 기간을 필요로 합니다. 이 시험 기간은 상황에 따라
달라지지만, 몇 주가 걸릴 수도 있습니다. 이 기간의 감소를 위해, 스피커를 쉬지 않고 20시간 동안 작동시키실 것을
권장합니다. 300 Series 통합 스피커의 스피커의 모든 특성이 완전히 안정되면 스피커의 최고 성능을 완벽하게 즐기실
수 있습니다.
설치 이전 배선
배선이 부설된 후에 스피커들의 조립을 시작하십시오. 제품을 쉽게 접속할 수 있도록 충분한 길이로 (약 50cm)
케이블을 준비하십시오. 스피커들의 극성을 (+/-) 존중할 수 있도록 표시된 케이블을 사용하실 것을 권장합니다.
적정한 길이의 사용처에 알맞은 고품질의 케이블을 선택하십시오: 판매자가 적합한 조언을 제공할 것입니다.
엠프의 선택
엠프의 파워 남용이 스피커의 질을 파괴하는 것이 아니고, 그 반대로, 파워 상의 결점으로, 스피커의 질이 손상됩니다.
볼륨이 너무 강할 경우, 엠프가 포화 상태가 되어 트위터를 파괴할 수 있는 잡음들을 생성하게 합니다. 300 Series
통합 스피커의 뛰어난 용량과 고정밀도는 이 스피커와 함께 사용하게 될 엠프의 장점과 단점들을 충분히 강조하게 될
것입니다. 판매자가 고객의 취향과 예산에 맞는 최상의 선택을 하실 수 있도록 도와드릴 것입니다.
설치
기존의 설치
• 스피커를 설치하기 전, 천장/벽 등의 원하시는 장소가 환기 덕트, 또는 스피커 설치를 방해할 여러 종류의 케이블
등, 모든 장애물로부터 벗어난 장소임을 확인하십시오. 이상적인 장소들을 선택할 수 있도록 적절한 도구들을
사용하십시오.
• 제품의 설치를 위해, 천장/벽 내부에 충분한 공간이 확보되어 있는가를 확인하십시오
• 제공된 절단 형판을 이용하여, 이미 존재하는 천장/벽에 하나의 선을 그으십시오. 천장/벽에 원형의 입구를 만들기
위해 적합한 도구로 선을 따라 절단하십시오 (그림. A).
새로운 설치
• 선택용 조립 세트를 이용하십시오
• 설치 이전 스피커들을 배선하십시오.
개런티 조건
모든 Focal 스피커들의 개런티 보장은 고객 국가의 지정Focal공식 대리사가 작성한 개런티의 내용에 따라 보장됩니다.
공식 대리사는 고객에게 개런티 조건의 세부내용을 제공해야 합니다. 개런티는 제품 구입 국가의 현행 법적 허용
개런티 보장에 따라 보장됩니다.

46
스피커 설치
300 Series의 300ICW 제품에는 조립 프레임, 300ICW 스피커, 원형과 정사각형의 자기 그릴이 있습니다. 300 Series
제품군의 300ICW 제품들 설치에는 어떤 도구도 필요치 않습니다!
1. 입구를 통해 조립 프레임을 통과시킬 수 있도록, 고정발을 조립용 프레임에 고정하기 위해, 고정발이 찰칵 소리를
내며 맞물릴 때까지 돌려주십시오. (그림. 1)
2. 한손으로, 천장/벽에 프레임이 고정될 수 있도록 조립 프레임을 천장/벽의 입구 안에 밀어 넣어 주십시오. (그림. 2)
3. 조립 프레임을 잠그기 위해서, 다른 한 손을 출구에 넣어 두 개의 손가락으로, 고정발을 원래 위치의 반대 방향으로
돌려주십시오. (그림. 3)
4. 발을 아래쪽으로 축까지 밀어주십시오. (그림. 4).
5. 마지막으로, 고정 발에 손을 떼고, 고정발이 제대로 고정되어 있는가를 확인해 주십시오. 또, 고정발이 스피커
케이블에 닿지 않는가도 확인해 주십시오. (그림. 5)
주 1: 다른 고정발의 고정을 위해, 같은 동작을 반복해 주십시오.
주 2: 고정발을 풀기 위해서는: 두 개의 손가락을 사용하여, 고정발을 바깥쪽으로 돌려주십시오, 위쪽으로 밀어준
후, 손을 떼십시오.
6. 미리 벗겨진 케이블을 스피커의 스프링 표지에 접속하십시오. 각 스피커를 적합한 극성에 연결하는 것이 매우
중요합니다: 앰프의 “+“ 표지에 접속된 케이블은 스피커의 적색 표시에 연결되어야 합니다. 마찬가지로, 앰프의 “-“
표지에 접속된 케이블은 검정색 표시에 연결되어야 합니다. 만약, 이 조건이 존중되지 않은 경우, 스테레오의 이미지와
저음의 감지가 확연히 손상될 것입니다. (그림. 6)
7. 스피커는 이제 조립 프레임에 조립될 수 있습니다. 조립을 위해, 스피커의 적색 화살표를 조립 프레임의 자물쇠를
연 상태로, 조립 구역 정면에 위치하십시오. (그림. 8)
주: In-Ceiling을 사용하면, 스피커는 로프(제공되지 않음)의 도움으로 천장에 단단히 고정될 수 있습니다. 로프는 이를
목적으로 제품의 뒤쪽에 설치된 고리에 고정될 수 있습니다. (그림. 6)
8. 스피커를 조립용 프레임에 축까지 삽입하십시오 (그림. 7), 그 다음에 붉은 손잡이의 도움으로, 표지가 열린 자물쇠의
2개의 구역 사이에 위치하도록, 스피커를 돌려주십시오. (그림. 9)
9. 원형, 사각형의 그릴도 이제 설치가 가능합니다. 그릴이 이제 조립용 프레임에 자기로 고정되었으므로, 이제 조립
프레임의 테에 정렬시켜 주시기만 하면 됩니다. (그림. 10)
300 SERIES
사용 설명서

47
트위터 조절 (300ICW6 과 300ICW8)
트위터의 수준은 그림에 표시된 것처럼 (그림. B) 스피커 뒷면의 스위치로 조절될 수 있습니다.
트위터의 방향 (300ICW6, 300ICW8)
트위터는 ±20°의 경사로 조정할 수 있으며 360° 회전할 수 있습니다: 고음과 스테레오 음상의 정밀성 증가를 위해
트위터를 청취 존으로 향하게 하십시오 (그림. C).
In-Wall을 이용한 주 스피커들의 위치설정
고객의 300 Series 스피커는 모든 류의 스테레오 뮤직들 또는 홈-시네마 프로그램들을 가장 현실적으로 재생할 수
있도록 설계되었습니다. 스피커들의 성능을 최적화하고, 음의 알맞은 밸런스와 생생한 이미지를 제공할 수 있도록 몇
가지의 단순한 규정을 지켜주십시오. 스피커들은 청취존을 마주하고 대칭으로, 청취존과 정삼각형을 이룰 수 있도록,
설치되어야 합니다.
각자의 내부 조건에 알맞은 거리로 설정할 수도 있습니다 (그림. D).
스피커들은 동일한 높이로 수평으로 설치되어야 합니다. 이상적으로, 트위터는 일상 청취 존의 청취자의 귀와 동일한
수준에 위치되어야 합니다 (그림. E).
중앙 스피커의 위치와 서라운드 사운드
오늘날, 사운드 트랙의 복합성은 매우 다양한 서라운드 효과를 획득하게 합니다. 그러므로 스피커의 위치 선택은
현실적 삼차원 공간의 획득에 결정적입니다. 목표는 몇몇의 기본 규정의 존중으로, 위치측정이 어려운 확산된 음들을
획득하는 데 있습니다 (그림. F).
중앙 스피커는 대화의 현실적 재생을 위해 스크린 가까이에 설치되어야 합니다 (그림. Fa). 만약, 마이크로 다공
스크린이 사용된 경우 (음향의 투명성), 중앙 스피커의 설치 장소를 스크린 뒤로 잡을 수 있습니다.
고객께서, 300 Series 제품군의 300ICW 제품을 In-Wall 용 스피커로 이용하는 경우, 서라운드 스피커를 청취자의
귀보다 높은 수준의 위치로, 꽤 높은 위치에 설치하십시오. 서라운드 스피커를 청취존의 너무 뒤쪽으로 설치하는 것을
피해주십시오. 이는, 음의 감지가 강등될 수 있기 때문입니다. 청취존을 기준으로 벽 양면의 설치를 선호하십시오,
아니면, 보다 부드럽게 감싸는 음향효과를 얻기 위해 청취존의 약간 뒤쪽으로 스피커들을 설치하십시오. (그림. Fb,
Fd).
고객께서, 300 Series 걈의 300ICW 제품을 In-Ceiling 용 스피커로 이용하는 경우, 스피커들을 각각 청취존의
양쪽으로부터 각각 적당히 넓은 위치로 또는, 아주 약간만 뒤쪽으로 설치해주십시오 (그림. Fc).
6.1 또는 7.1 의 다중채널 시스템에서는, 300 Series 스피커들을 In-Wall 또는 In-ceiling 용의 스피커로 사용하실 수
있습니다.
특별 주의 사항
300 Series 스피커의 관리는 마른 천을 이용한 먼지 제거 만으로 충분합니다. 스피커에 얼룩이 졌을 땐, 젖은 천의
사용 만을 권장합니다.
스피커의 표면에 절대 세제, 용제, 알코올 또는 부식제, 긁는 기능을 가진 도구들을 사용하지 마십시오. 모든 화기
근처에 두지 마십시오.
페인트
고객이 원하는 경우, 고객의 환경과 조화를 위해, 300ICW 제품에 페인트칠이 가능합니다. 먼저, 제품의 틀을 분리하실
것을 권장합니다. 그 다음 단계로 페인트용 스프레이를 이용하여 칠을 하십시오. 제품에 사용하시는 페인트는 벽에
사용한 페인트와 동일한 것을 사용하셔도 됩니다. (그림. G)
만약 고객께서, 300ICW를 분해하지 않고 천장/벽에 페인트 칠을 원하시는 경우엔, 제공된 커버를 제품에 덮은 후,
페인트 칠을 하실 것을 권장합니다. 마스크는 조립 틀에 자기로 고정됩니다. (그림. G)
300 SERIES
사용 설명서

300 SERIES
取扱説明書
日本語
パッケージの内容
• 300 Seriesシリーズ300ICWスピーカー×1
• 取付けフレーム×1
• 円形グリル×1
• 正方形グリル×1
• 壁または天井塗装の際に使用する保護カバー×1
• 取扱説明書+QuickStart×1
• カット用テンプレート×1
アルミニウム‐マグネシウム合金の逆ドームツイーターTNV2:これらの製品のために開発さ¬¬¬れたこのツィー
ターは、フォーカル社独自の逆ドーム技術を使用し、最適なエネルギー伝達と指向性を実現します。アルミニウ
ムとマグネシウム合金のドームは、柔らかく、ダイナミックな高音を発生し、優れた剛性および減衰性を保証し
ます。
Flax振動版(リネン)を採用したラウドスピーカー:300 Seriesシリーズのスピーカーの振動版は、Flaxサンド
イッチ構造の技術を使い製造されています。Flax(リネン)は、よりニュートラルな音色および高い精細度を実
現する、軽量、剛性、優れた減衰といった驚くべき構造的特性を持つエコテキスタイルです。
マグネットアタッチメント付きグリル:取付けが簡単でデザインを損ないません。
OPC
(オプティマム・フェーズ・クロスオーバー):位相を最適化し、より正確で安定した自然なサウンドイメ
ージを提供します。
湿度の高い環境でも使用可能。湿気の影響を受けないため、バスルーム、キッチンにも設置することができます。
マウントキットはオプション品です。
2
1
3
4
5
Focal-JMlabの保証を有効にするには、
現在、製品のオンライン登録が可能になりました:www.focal.com/warranty
Focal-JMlabの発展のため、予告なしに製品の技術仕様を変更する権利を有します。写真はイメージです。
300 SERIES
300 ICW 4, 300 ICW 6, 300 ICW 8
Manuel d'utilisation / User manual
Français : page 7
Anglais : page 11
Deutsch : seite 15
Italiano : pagina 19
Español : página 23
Português : página 27
Nederlands : pagina 31
Русский: стр. 35
简体中文
: page 39
한국어:第43页
日本人
:
ページ
47

49
300 SERIES
取扱説明書
スピーカーのエージング
Intégration 300 Seriesシリーズのスピーカーに使用されているスピーカードライバは、最大限に機能を発揮す
るためには、環境の温度や湿度に適応するために、調整期間を必要とします。このエージング期間はそれぞれ環
境によって変化し、数週間必要なこともあります。この期間を短縮するために、スピーカーを約20時間連続で慣
らすことをお勧めします。スピーカーの特性が完全に安定したら、Intégration 300 Seriesモデルのスピーカー
の性能のすべてをお楽しみいただけます。
インストール前の配線
スピーカーを設置する前にケーブルの配線を行ってください。製品を接続するために十分なケーブルの長さを残
すようにしてください(約50cm)。スピーカードライバの極性(+/-)に合せやすい目印付きのケーブルを使用
することをお勧めします。長さに合わせ適切に切断された上質なケーブルをお選びください。専門的なアドバイ
スは販売店にお尋ねください。
アンプの選択
スピーカーとドライバに損傷を与える原因の多くは余剰電力ではなく、逆に電力不足によるものです。確か
に、音量が大きすぎる場合、アンプが飽和し、ツイーターを破壊する可能性があるスプリアス信号を発生しま
す。Intégration 300 Seriesモデルのスピーカーは、接続されるアンプの特徴をより表現できるスピーカーで
す。
お客様の好みやご予算に応じた最適な製品は販売店へお尋ねください。
設置
既存建築物への設置
• スピーカーを取り付ける前に、通気口等の天井または壁の設置場所をふさがないよう、また、ケーブルが設置
を妨がないよう確認してください。適切な場所を決定する際には専用の工具を使用してください。
• 製品を設置する際に天井または壁の内部に十分な空間があることを確認してください。
• 付属のカット用テンプレートを使用し、天井または既存の壁に線を引いてください。天井または壁(図A)に
円形の開口部を作成するため、適切な工具を使用し、線に沿ってカットします。
新たな建築物への設置
• オプションの専用取付キットを使用してください。
• 設置する前に、スピーカーの配線を行ってください。
製品保証条件
Focal社のすべてのラウドスピーカーは、お住まいの国のFocal正規代理店が定めた保証によりカバーされています。
お近くの販売店にて保証条件に関する詳細をご提供することができます。保証のカバーは、少なくとも請求書の原
本が発行された国の法的保証が付与したものに及びます。

50
スピーカーの取り付け
300 Seriesシリーズの300ICW製品には、取付けフレーム、300ICWスピーカー、円形および正方形グリルが含
まれています。300 Seriesシリーズの300ICW製品の取り付けは工具を必要としません。
1. 開口部を介して取付フレームを通せるように、取付フレームに填まるまで取付ブラケットを回転させます(図1)
2. 天井または壁に押し付け、収まるように、片手で天井または壁の開口部に取付フレームを挿入します。(図2)
3. 取付フレームを天井または壁で締めるには、開口部にもう一方の手を入れ、2本の指で元の位置と反対方向
に取付ブラケットを回転させます。(図3)
4. 次に固定位置(図4)までブラケットを押してください。
5. 最後にブラケットを放し、固定されているか確認してください。また、スピーカーケーブルがブラケットの
下敷きになっていないことを確認します。(図5)
注1: 他の取付ブラケットに関しても同じ手順を繰り返します。
注2: 取付ブラケットのロックを解除するには2本の指で取付ブラケットを外側に回転させ、引き上げてから放
してください。
6. 前もってスピーカーケーブルの芯出しをしておき、スピーカーのバネ端子に接続します。アンプの「+」端
子に接続されたケーブルは、スピーカーの赤い端子に繋げる必要があります。このように、各スピーカーの
接続極性が正しいことが重要です。同様に、アンプの「-」端子に接続されたケーブルは、スピーカーの黒
い端子に接続する必要があります。この条件が守られない場合、逆相となりステレオイメージと低音再生が
大幅に劣化します。(図6)
7. この段階でスピーカーを取付フレームに組み立てることができます。まず、取付フレームの南京錠のロック
が解除された箇所にスピーカー上の赤い矢印を合わせます。(図8)
注: スピーカーを天吊りで使用する場合、製品の背面にある専用フックに取り付けることができるスリング(付
属品に含まれていない)を使用し、天井にしっかり固定することができます。(図6)
8. スピーカーを取付フレームの固定位置まで挿入します(図7)。赤いハンドルでスピーカーを回し、ロックが
解除された2つの南京錠の間に印が位置するようにします。(図9)
9. 正方形または円形グリルを取り付けます。グリルは、取付けフレームにマグネットで取付けされます。取付
けフレームの端に位置合わせをしてください。(図10)
300 SERIES
取扱説明書

51
ツィーターの調整(300ICW6および300ICW8)
図(図B)のようにツイーターレベルは、スピーカーの背面にあるスイッチで調整することができます。
ツィーターの向き(300ICW6、300ICW8)
ツィーターは傾き±20°、回転360 °の調整がききます。ステレオイメージと高音の精度向上のために、ツイ
ーターはリスニングエリアに向けてください。(図C)
インウォールでのメインスピーカーの設置
お買い上げのIntégration 300 Seriesのスピーカーは、ステレオ音楽やホームシアタープログラムといったほと
んどの音楽形式をできるだけ忠実に再現するように設計されています。ただし、スピーカーのパフォーマンスを
最適化、適切な音調バランスをとリアルなサウンドイメージを確実にするためにいくつかの簡単なルールに従う
必要があります。スピーカーは、リスニングエリアに対称的に直面しながら、理想としては正三角形を形成する
ように配置する必要があります。しかし空間のレイアウトの特定の条件(図D)に応じて、理想的な中間位置を
見つけながら設置するにあたって、これらの距離を変化させることができます。
スピーカーは同一水平面上の同じ高さに配置する必要があります。理想的には、ツイーターは通常のリスニング
ポイント(図E)に配置された際は、聴取者の耳の高さに配置されます。
サラウンドとセンタースピーカーの配置
現代では、映画のサウンドトラックの発達によって、非常に広い範囲のサラウンド効果を実現することが可能で
す。その中で、スピーカーの配置方法は、リアルなな3Dサウンドスペースを実現するうえで重要です。
いくつかの基本的なルール(図F)に従うことで、十分に拡散し、見つけることが困難な音を再生することがで
きます。リアルな台詞を再現(図FA)するにはセンタースピーカーは画面近接に配置する必要があります。サ
ウンドスクリーンが使用される場合には、スクリーンの後部にセンタースピーカーの設置を検討することも可能
です。
インウォールスピーカーとして300 Seriesシリーズの300ICW製品を使用する場合は、サラウンドスピーカーを
聴取者の耳の高さよりも十分上に配置します。音の認識が劣化するため、リスニングエリアから離れすぎた後方
にサラウンドスピーカーを配置しないでください。リスニングエリアの両側の側壁設置か、または少しその背後
を選ぶことにより包み込む効果音(図FB、FD)が得られます。
インシーリングスピーカーとして300 Seriesシリーズの300ICW製品を使用する場合は、リスニングエリアの各
側に十分離れて配置するか、または少しその背後(図Fc)を選びます。
マルチチャンネルシステム6.1または7.1の場合、インウォールまたはインシーリングスピーカーと300 Series
シリーズを組み合わせることが可能です。
特別な注意事項
Intégration 300 Seriesのスピーカーのお手入れ方法は、乾いた布でやさしくからぶきしてください。スピーカ
ーに汚れがついている場合、ぬれた布でやさしくふき取ってください。
スピーカーの表面を清掃する際、溶剤や洗剤、アルコールや腐食性物質、スクレーパーや研磨器具などを使用し
ないでください。 熱源の近くに設置しないでください。
塗装
希望する場合、お買い上げの製品をインテリアと調和させるために300ICW製品のグリルを塗装することができ
ます。まず、製品のグリルを外してから塗装ガンで塗料を塗ることをお勧めします。その際、使用する塗料は壁
塗料と同じものでもかまいません。 (図G)
300ICW製品を取り外すことなく天井または壁を塗装する場合、付属品の保護カバーの使用をお勧めします。
スクリーンは取付けフレームにマグネットで取付けできます。 (図G)
300 SERIES
取扱説明書

52
Series300ICW3003001
1
1
1
1
1
1
TNV2
Series300
®
OPC
2
1
3
4
5
300 SERIES
300 ICW 4, 300 ICW 6, 300 ICW 8
Manuel d'utilisation / User manual
Français : page 7
Anglais : page 11
Deutsch : seite 15
Italiano : pagina 19
Español : página 23
Português : página 27
Nederlands : pagina 31
Русский: стр. 35
简体中文
: page 39
한국어:第43页
日本人
:
ページ
47
www.focal.com/warranty :
300 SERIES

53
Series300
20
Series300
50
Series300
300 SERIES

54
300ICW300ICWSeries300300ICW
Series300
1 1
22
33
44
5 5
1
2 2
6
6
87
6
78
9
109
300 SERIES

55
300ICW6
300ICW8300ICW6
36020
Series300
Series300300ICW
Series300300ICW
Series300
Series300
300ICW
300ICW
300 SERIES

56
Your Focal-JMlab product was developed and manufactured with high-quality materials and components
which can be recycled and/or re-used. This symbol indicates that electrical and electronic equipment must
be disposed of separately from normal garbage at the end of its operational lifetime.Please dispose of this
product by bringing it to your local collection point or recycling centre for such equipment. This will help to
protect the environment in which we all live.
Ihr Focal-JMlab-Produkt wurde mit hochwertigen Materialien und Komponenten entworfen und hergestellt, die
recycelbar sind und wieder verwendet werden können. Dieses Symbol bedeutet, dass elektrische und elektro-
nische. Geräte am Ende ihrer Nutzungsdauer vom Hausmüll getrennt entsorgt werden müssen. Bitte entsorgen
Sie dieses Gerät bei Ihrer örtlichen kommunalen Sammelstelle oder im Recycling Centre. Bitte helfen Sie mit,
die Umwelt in der wir leben, zu erhalten.
D
EN
Votre produit Focal-JMlab a été conçu et fabriqué avec des matériaux et composants de haute qualité, suscep-
tibles d’être recyclés et réutilisés. Ce symbole signifie que les appareils électriques et électroniques, lorsqu’ils
sont arrivés en fin de vie, doivent être éliminés séparément des ordures ménagères. Veuillez rapporter cet
appareil à la déchetterie communale ou à un centre de recyclage. Vous contribuez ainsi à la préservation de
l’environnement.
FR
FIN
Tämä Focal-JMlab-tuote on suunniteltu ja valmistettu korkealaatuisista materiaaleista ja komponenteista, joita
voidaan kierrättää ja käyttää uudelleen. Tämä symboli tarkoittaa, että sähkölaitteet ja elektroniset laitteet
tulee hävittää erillään kotitalousjätteestä, kun niitä ei enää käytetä. Jätä tämä laite paikkakuntasi kunnalliseen
keräyspisteeseen tai kierrätyskeskukseen. Auta meitä säästämään luontoa, jossa elämme.
RU
Продукция Focal-JMlab была разработана и произведена из материалов высокого качества, а также компонентов,
которые могут быть переработаны и/или использованы повторно. Этот символ означает, что электрические и
электронные части в конце эксплуатационного периода продукта должны быть утилизированы отдельно от
бытового мусора. Пожалуйста, утилизируйте этот продукт в специально предназначенных и оборудованных
для этого местах. Это поможет защитить окружающую среду, в которой мы все живем.
NL
Uw Focal-JMlab-Product is ontworpen voor en gebouwd uit hoogwaardige materialen en componenten die
gerecycled kunnen worden en dus geschikt zijn voor hergebruik. Dit symbool betekent, dat elektrische en
elektronische apparatuur aan het einde van zijn levensduur gescheiden van het huisvuil apart moet worden
ingeleverd. Breng dit apparaat naar een van de plaatselijke verzamelpunten of naar een kringloopwinkel. Help
s.v.p. mee, het milieu waarin we leve te beschermen.
O seu produto Focal-Jmlab foi concebido e fabricado, utilizando materiais e componentes de alta qualidade
que, podem ser reciclados e reutilizados. Este símbolo significa que, no fim da sua vida útil, equipamentos
eléctricos e electrónicos devem ser eliminados separadamente dos resíduos sólidos domésticos. Por favor,
entregue este equipamento ao respectivo ecoponto local ou comunal ou ao centro de reciclagem competente.
Por favor, ajude-nos a preservar o meio ambiente em que vivemos.
P
SE
Teie Focal-JMlab toode on välja töötatud ning toodetud kõrgkvaliteetsest materjalist ning osades, mida on
võimalik ümber töödelda ning/või korduvkasutada. Antud märgis näitab, et elektri- ja elektroonikaseadmeid
peab nende kasutusaja lõppemisel kõrvaldama lahus muudest jäätmetest. Palun viige toode kõrvaldamiseks
teie kohalikku jäätmete kogumiskohta või antud seadme ümbertöötamiskeskusesse. See aitab kaitsta meid
ümbritsevat keskkonda.
Il vostro prodotto Focal-JMlab è stato progettato e realizzato con materiali e componenti pregiati che possono
essere riciclati e riutilizzati. Questo simbolo signifi ca che gli apparecchi elettrici ed elettronici devono essere
smaltiti separatamente dai rifi uti domestici alla fine del loro utilizzo. Vi preghiamo di smaltire questo appa-
recchio negli appositi punti di raccolta locali o nei centri preposti al riciclaggio. Contribuite anche voi a tutelare
l’ambiente nel quale viviamo.
I
Su producto Focal-JMlab ha sido concebido y fabricado con materiales y componentes de alta calidad, que
pueden ser reciclados y reutilizados. Este símbolo signifi ca que los aparatos eléctricos y electrónicos, al final
de su vida útil, deberán ser separados de los residuos domésticos y reciclados. Rogamos llevar este aparato al
punto de recogida de su municipio o a un centro de reciclaje. Por favor, contribuya Vd. también en la conserva-
ción del ambiente en que vivimos.
E
300 SERIES
Environnement / Environment

57
Az Ön által vásárolt Focal-JMlab termék kiváló minőségű, újrahasznosítható és/vagy újra felhasználható anyagok és
komponensek felhasználásával készült. Ez a szimbólum azt jelzi, hogy az elektromos és elektronikus készüléket a
normális hulladéktól elkülönítetten kell kidobni, amikor élettartama végére ért. A termék kidobásakor kérjük, vigye
azt a helyi gyűjtőponthoz, vagy az ilyen készülékek számára fenntartott újrahasznosító központba! Ezzel hozzájárul-
hat környezetünk megóvásához, amelyben mindannyian élünk.
H
GR
LV
Šis Focal-Jmlab produkts ir izstradats un ražots, izmantojot augstas kvalitates materialus un komponentus,
kurus var otrreizeji parstradat un/vai lietot atkartoti. Šis simbols norada, ka elektriskas un elektroniskas ierices
pec to kalpošanas laika beigam jalikvide atseviški no parastajiem atkritumiem. Ludzu, likvidejiet šo produktu, tikai
nododot vieteja savakšanas punkta vai parstrades centra, kas paredzeti šadai technikai. Šadi jus palidzesiet aizsar-
gat vidi, kura mes visi dzivojam.
SLO
Vaš Focal-JMlab proizvod je zasnovan in izdelan iz visoko kakovostnih materialov in komponent, ki so obnovljive
in jih je mogoce ponovno uporabiti. Ta simbol pomeni, da je potrebno električhe in elektronske naprave po izteku
njihove uporabne dobe, odvesti ločeno od gospodinjjskih odpadkov. Naprošamo vas, da napravo oddate na vašem
lokalnem komunalmen zbirnem mestu ali v reciklaznem centru. Naprošamo vas za sodelovanje pri pomoči ohranjan-
ja našega življenjskega prostora.
CZ
Váš vỷrobek Focal-JMlab byl navržen a vyroben z vysoce kvalitních materiálů a komponent, ktéré lze recyklovat
a znovu použit. Tento symbol znamena, že se elektrické a elektronicke přístroje po uplynutí své životnosti musejí
likvidovat odděleně od domácího odpadu. Odevzdejte proto prosim tento přístroj k likvidaci v místně příslušném
komunálním sběrném dvoře nebo k recyklaci v příslušnem recyklačnim středisku. Pomozte nám prosím při ochraně
životního prostředí.
LT
Jūsų Focal-JMlab gaminys buvo sukurtas ir pagamintas panaudojant aukštos kokybès medžiagas ir komponentus,
kuriuos galima perdirbti ir/arba panaudoti pakartotinai. Šis simbolis nurodo, kad elektroninius įtaisus, pasibaigus jų
eksploatavimo laikotarpiui, reikia utilizuoti atskirai nuo įprastinių buitinių atliekų. Jeigu šio gaminio tarnavimo laikas
baigesi, tai prašome perduoti jį specialių atliekų surinkimo arba perdirbimo omonei. Tai padès apsaugoti aplinką,
kurioje mes visi gyvename.
SK
Váš výrobok Focal-JMlab bol navrhnutý a vyrobený z vysoko kvalitných materiálov a komponentov, ktoré je možné
recyklovat' a znovu použit'. Tento symbol znamená, že sa elektrické a elektronické pristroje po uplynutí svojej
životnosti musia likvidovat' oddelene od domáceho odpadu. Odovzdajte preto prosim tento prístroj k likvidácii v
miestne príslušnom komunalnom zbernom dvore alebo k recyklácii v prislušnom recyklačnom stredisku. Pomôžte
nám prosím pri ochrane životného prostredia.
SE
Focal-JMlabs produkter har konstruerats och tillverkats av högkvalitativa material och komponenter som
kan återvinnas och återanvändas. Symbolen innebär att uttjänade elektriska och elektroniska apparater
måste tas om hand separerat från hushållsavfallet. Lämna apparaten på kommunens insamlingsställen
eller återvinningscentraler. Hjälp oss att skydda vår miljö.
DK
Deres Focal-JMlab-produkt er designet og fremstillet med materialer og komponenter af høj kvalitet, som kan
recycles og genbruges. Dette symbol betyder, at elektriske og elektroniske apparater skal bortskaes adskilt
fra det almindelige husholdningsaald, når de ikke længere bruges. Aflever dette apparat på Deres lokale kom-
munale genbrugsstation eller på genbrugscentret. Hjælp med at passe på det miljø, vi lever i.
PL
Produkt Focal-JMlab został zaprojektowany i wykonany z materiałów i elementów wysokiej jakości, nadających
się do recyklingu i ponownego wykorzystania. Symbol ten oznacza, że sprzęt elektryczny i elektroniczny należy
utylizować po zakończeniu użytkowania odrębnie od odpadów domowych. Sprzęt należy utylizować w komunalnym
punkcie zbiórki lub w punkcie recyklingu. Pomóżcie i Wy chronić środowisko, w którym żyjemy.
300 SERIES
Environnement / Environment


Focal-JMlab
®
- BP 374 - 108, rue de l'Avenir - 42353 La Talaudière cedex - France - www.focal.com
Tel. (+33) 04 77 43 57 00 - Fax (+33) 04 77 43 57 04 - SCAA-180523/3 - CODO1423
-
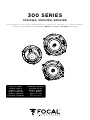 1
1
-
 2
2
-
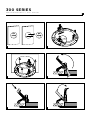 3
3
-
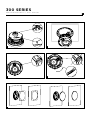 4
4
-
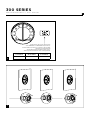 5
5
-
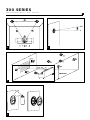 6
6
-
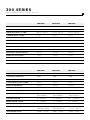 7
7
-
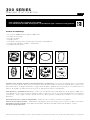 8
8
-
 9
9
-
 10
10
-
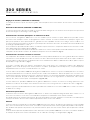 11
11
-
 12
12
-
 13
13
-
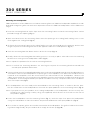 14
14
-
 15
15
-
 16
16
-
 17
17
-
 18
18
-
 19
19
-
 20
20
-
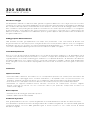 21
21
-
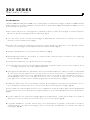 22
22
-
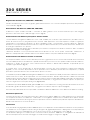 23
23
-
 24
24
-
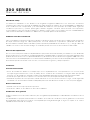 25
25
-
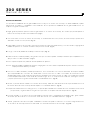 26
26
-
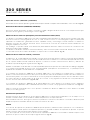 27
27
-
 28
28
-
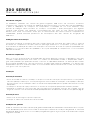 29
29
-
 30
30
-
 31
31
-
 32
32
-
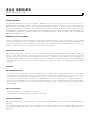 33
33
-
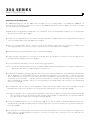 34
34
-
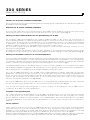 35
35
-
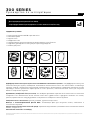 36
36
-
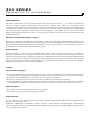 37
37
-
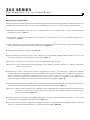 38
38
-
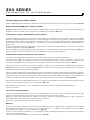 39
39
-
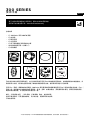 40
40
-
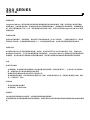 41
41
-
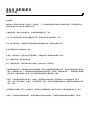 42
42
-
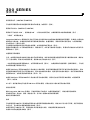 43
43
-
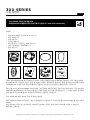 44
44
-
 45
45
-
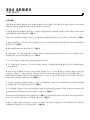 46
46
-
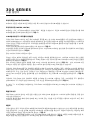 47
47
-
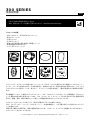 48
48
-
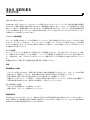 49
49
-
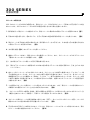 50
50
-
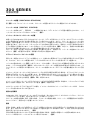 51
51
-
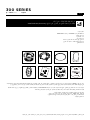 52
52
-
 53
53
-
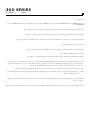 54
54
-
 55
55
-
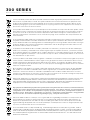 56
56
-
 57
57
-
 58
58
-
 59
59
-
 60
60


Focal 300ICW8 Handleiding
- Type
- Handleiding
- Deze handleiding is ook geschikt voor
in andere talen
- italiano: Focal 300ICW8 Manuale utente
- français: Focal 300ICW8 Manuel utilisateur
- español: Focal 300ICW8 Manual de usuario
- Deutsch: Focal 300ICW8 Benutzerhandbuch
- português: Focal 300ICW8 Manual do usuário
- 日本語: Focal 300ICW8 ユーザーマニュアル
Gerelateerde papieren
-
Focal 300 ICW4 de handleiding
-
Focal 300ICLCR5 Handleiding
-
Focal 1000 IWLCR UTOPIA Handleiding
-
Focal 1000 ICA6 Handleiding
-
Focal 100 ICW5 Handleiding
-
-
Focal 100 OD8 Handleiding
-
Focal CHORUS OD706VCHORUS OD706V de handleiding
-
Focal Kanta N°2 Handleiding
-
Focal ICU570 Handleiding
