
Dimensions/Dimensions/Dimensiones/Abmessungen/Dimensioni/Afmetingen
Specifications
Dimensions 98 × 46 × 98 mm (w/h/
d) (3
7
/8 × 1
13
/16 × 3
7
/8 in)
Mass Approx. 185 g (6.5 oz)
Supplied accessories Parts for installation and
connections (1 set)
Design and specifications are subject to change
without notice.
Caractéristiques techniques
Dimensions 98 × 46 × 98 mm ( l × h ×
p) (3
7
/8 × 1
13
/16 × 3
7
/8 po)
Poids Environ 185 g (6,5 oz)
Accessoires fournis Composants destinés à
l’installation et aux
raccordements (1 jeu)
La conception et les spécifications sont sujettes à
modification sans préavis.
Especificaciones
Dimensiones 98 × 46 × 98 mm (an/al/
prf)
Peso Aprox. 185 g
Accesorios suministrados
Componentes para
instalación y conexiones
(1 juego)
Diseño y especificaciones sujetos a cambio sin previo
aviso.
Technische Daten
Abmessungen
98 × 46 × 98 mm (B/H/T)
Gewicht ca. 185 g
Mitgeliefertes Zubehör Montageteile und
Anschlusszubehör
(1 Satz)
Änderungen, die dem technischen Fortschritt
dienen, bleiben vorbehalten.
Caratteristiche tecniche
Dimensioni 98 × 46 × 98 mm (l/a/p)
Peso Circa 185 g
Accessori in dotazione Elementi per
installazione e
collegamenti (1 set)
Il design e le caratteristiche tecniche sono soggetti a
modifiche senza preavviso.
Technische gegevens
Afmetingen 98 × 46 × 98 mm (b/h/
d)
Gewicht Ongeveer 185 g
Bijgeleverde accessoires
Onderdelen voor
installatie en
aansluitingen (1 set)
Ontwerp en specificaties kunnen zonder
voorafgaande kennisgeving worden gewijzigd.
Features
With this remote commander, you can control
your master unit equipment easily.
Use this remote commander with master units
equipped with the special input jack for the
remote commander and the Sony Bus system
control.
Caractéristiques
Cette télécommande vous permet de commander
votre appareil principal en toute simplicité.
Utilisez cette télécommande avec des appareils
principaux dotés d’une prise d’entrée spéciale
pour la télécommande et la commande du
système de bus Sony.
Características
El control remoto permite controlar fácilmente el
equipo de la unidad maestra.
Utilice el control remoto con unidades maestras
equipadas con una toma de entrada especial
para el control remoto y el control del sistema
Bus de Sony.
Caution
Do not spray high-pressure washing water, etc.,
directly on this remote commander.
Précaution
Ne pulvérisez pas d’eau de lavage sous pression,
etc., directement sur cette télécommande.
Precaucione
No rocíe el control remoto directamente con
agua a presión, etc.
Merkmale und Funktionen
Mit dieser Fernbedienung können Sie Ihre
Hauptgeräte bequem steuern.
Verwenden Sie diese Fernbedienung für
Hauptgeräte, die mit einer speziellen
Fernbedienungs-Eingangsbuchse und der Bus-
Systemsteuerung von Sony ausgestattet sind.
Caratteristiche
Con il presente telecomando, è possibile
controllare l’unità principale in modo semplice.
Utilizzare questo telecomando con unità
principali dotate di presa di ingresso speciale per
telecomando e sistema di controllo Bus Sony.
Kenmerken
Met deze afstandsbediening kunt u uw
hoofdeenheid eenvoudig bedienen.
Gebruik deze afstandsbediening voor
hoofdeenheden die zijn uitgerust met de
speciale ingang voor de afstandsbediening en de
Sony BUS-systeemregelaar.
Vorsicht
Achten Sie darauf, dass kein Waschwasser usw.
mit hohem Druck direkt auf die Fernbedienung
spritzt.
Attenzione
Non utilizzare sistemi di pulizia ad acqua
compressa e simili direttamente sul telecomando.
Let op
Spuit geen water onder hoge druk, enzovoort,
rechtstreeks op de afstandsbediening.
Unit: mm (in)/Unité : mm (po)/Unidad: mm/
Einheit: mm/Unità: mm/Eenheid: mm
For the customers in the USA
WARNING
This equipment has been tested and found to comply with the limits for a Class B digital device, pursuant to
Part 15 of the FCC Rules. These limits are designed to provide reasonable protection against harmful
interference in a residential installation. This equipment generates, uses, and can radiate radio frequency
energy and, if not installed and used in accordance with the instructions, may cause harmful interference to
radio communications. However, there is no guarantee that interference will not occur in a particular
installation. If this equipment does cause harmful interference to radio or television reception, which can be
determined by turning the equipment off and on, the user is encouraged to try to correct the interference by one
or more of the following measures:
— Reorient or relocate the receiving antenna.
— Increase the separation between the equipment and receiver.
— Connect the equipment into an outlet on a circuit different from that to which the receiver is connected.
— Consult the dealer or an experienced radio/TV technician for help.
This device complies with Part 15 of the FCC Rules. Operation is subject to the following two conditions: (1)
This device may not cause harmful interference, and (2) this device must accept any interference received,
including interference that may cause undesired operation.
You are cautioned that any changes or modifications not expressly approved in this manual could void your
authority to operate this equipment.
Operating Instructions
Mode d’emploi
Manual de instrucciones
Bedienungsanleitung
Istruzioni per l’uso
Gebruiksaanwijzing
Marine Remote
Commander
RM-X60M
4-123-134-11 (1)
©2008 Sony Corporation Printed in Thailand
Owner’s Record
The model and serial numbers are located on the bottom of the unit.
Record the serial number in the space provided below.
Refer to these numbers whenever you call upon your Sony dealer regarding this product.
Model No. RM-X60M Serial No.
Source
Source
Fuente
Tonquelle
Sorgente
Bron
Tuner
Récepteur
Sintonizador
Tuner
Sintonizzatore
Tuner
Tape
Cassette
Cinta
Kassette
Nastro
Cassette
CD/USB/iPod
AUX (Audio)
Volume
Volume
Volumen
Lautstärke
Volume
Volume
Source information (8)
Informations sur la source (8)
Información de la fuente (8)
Tonquellenanzeige (8)
Informazioni sulla sorgente (8)
Brongegevens (8)
FM, AM (MW/SW/LW)
TAPE
CD, USB, IPD
AUX
VOL
Mode information (9)
Informations sur le mode (9)
Información del modo (9)
Modusanzeige ( (9)
Informazioni sul modo (9)
Modusinformatie (9)
Frequency
Fréquence
Frequencia
Frequenz
Frequenza
Frequentie
• FWD (Forward)/(Avance)/(Avance)/(vorwärts)/
(avanti)/(Volgende)
• REV (Reverse)/(Retour)/(Retroceso)/(rückwärts)/
(indietro)/(Vorige)
• FF (Fast-forward)/(Avance rapide)/
(Avance rápido)/(Vorwärtsspulen)/
(avanzamento rapido)/(Snel vooruitspoelen)
• REW (rewind)/(Retour)/(Rebobinado)/
(Zurückspulen)/(riavvolgimento rapido)/
(Terugspoelen)
Track number/Elapsed playing time, Clock, etc.
Numéro de plage/temps de lecture écoulé, horloge,
etc.
Número de pista/tiempo de reproducción
transcurrido, reloj, etc.
Titelnummer/Verstrichene Spieldauer, Uhrzeit usw.
Numero del brano/tempo di riproduzione
trascorso, orologio e così via
Tracknummer/verstreken speelduur, klok,
enzovoort
– – – –
Volume level
Niveau de volume
Nivel de volumen
Lautstärkepegel
Livello di volume
Volumeniveau
Verwijdering van oude elektrische en
elektronische apparaten (Toepasbaar in
de Europese Unie en andere Europese
landen met gescheiden ophaalsystemen)
Het symbool op het product of op de
verpakking wijst erop dat dit product niet als
huishoudelijk afval mag worden behandeld.
Het moet echter naar een plaats worden gebracht waar
elektrische en elektronische apparatuur wordt gerecycled.
Als u ervoor zorgt dat dit product op de correcte manier
wordt verwijderd, voorkomt u voor mens en milieu
negatieve gevolgen die zich zouden kunnen voordoen in
geval van verkeerde afvalbehandeling. De recycling van
materialen draagt bij tot het vrijwaren van natuurlijke
bronnen. Voor meer details in verband met het recyclen
van dit product, neemt u contact op met de gemeentelijke
instanties, het bedrijf of de dienst belast met de
verwijdering van huishoudafval of de winkel waar u het
product hebt gekocht.
Tratamiento de los equipos eléctricos y
electrónicos al final de su vida útil
(aplicable en la Unión Europea y en
países europeos con sistemas de
recogida selectiva de residuos)
Este símbolo en el equipo o el embalaje
indica que el presente producto no puede
ser tratado como residuos domésticos normales, sino que
debe entregarse en el correspondiente punto de recogida
de equipos eléctricos y electrónicos. Al asegurarse de que
este producto se desecha correctamente, Ud. ayuda a
prevenir las consecuencias negativas para el medio
ambiente y la salud humana que podrían derivarse de la
incorrecta manipulación en el momento de deshacerse de
este producto. El reciclaje de materials ayuda a conservar
los recursos naturales. Para recibir información detallada
sobre el reciclaje de este producto, póngase en contacto
con el ayuntamiento, el punto de recogida más cercano o
el establecimiento donde ha adquirido el producto.
Trattamento del dispositivo elettrico od
elettronico a fine vita (applicabile in tutti
i paesi dell’Unione Europea e in altri
paesi europei con sistema di raccolta
differenziata)
Questo simbolo sul prodotto o sulla
confezione indica che il prodotto non deve
essere considerato come un normale rifiuto domestico, ma
deve invece essere consegnato ad un punto di raccolta
appropriato per il riciclo di apparecchi elettrici ed
elettronici. Assicurandovi che questo prodotto sia smaltito
correttamente, voi contribuirete a prevenire potenziali
conseguenze negative per l’ambiente e per la salute che
potrebbero altrimenti essere causate dal suo smaltimento
inadeguato. Il riciclaggio dei materiali aiuta a conservare
le risorse naturali. Per informazioni più dettagliate circa il
riciclaggio di questo prodotto, potete contattare l’ufficio
comunale, il servizio locale di smaltimento rifiuti oppure il
negozio dove l’avete acquistato.
Traitement des appareils électriques et
électroniques en fin de vie (Applicable
dans les pays de l’Union Européenne et
aux autres pays européens disposant
de systèmes de collecte sélective)
Ce symbole, apposé sur le produit ou sur son
emballage, indique que ce produit ne doit
pas être traité avec les déchets ménagers. Il doit être remis
à un point de collecte approprié pour le recyclage des
équipements électriques et électroniques. En s’assurant
que ce produit est bien mis au rebut de manière
appropriée, vous aiderez à prévenir les conséquences
négatives potentielles pour l’environnement et la santé
humaine. Le recyclage des matériaux aidera à préserver
les ressources naturelles. Pour toute information
supplémentaire au sujet du recyclage de ce produit, vous
pouvez contacter votre municipalité, votre déchetterie ou
le magasin où vous avez acheté le produit.
Disposal of Old Electrical & Electronic
Equipment (Applicable in the European
Union and other European countries
with separate collection systems)
This symbol on the product or on its
packaging indicates that this product shall
not be treated as household waste. Instead
it shall be handed over to the applicable collection
point for the recycling of electrical and electronic
equipment. By ensuring this product is disposed of
correctly, you will help prevent potential negative
consequences for the environment and human health,
which could otherwise be caused by inappropriate
waste handling of this product. The recycling of
materials will help to conserve natural resources. For
more detailed information about recycling of this
product, please contact your local Civic Office, your
household waste disposal service or the shop where
you purchased the product.
Entsorgung von gebrauchten elektrischen
und elektronischen Geräten (anzuwenden
in den Ländern der Europäischen Union
und anderen europäischen Ländern mit
einem separaten Sammelsystem für diese
Geräte)
Das Symbol auf dem Produkt oder seiner
Verpackung weist darauf hin, dass dieses Produkt nicht
als normaler Haushaltsabfall zu behandeln ist, sondern
an einer Annahmestelle für das Recycling von
elektrischen und elektronischen Geräten abgegeben
werden muss. Durch Ihren Beitrag zum korrekten
Entsorgen dieses Produkts schützen Sie die Umwelt und
die Gesundheit Ihrer Mitmenschen. Umwelt und
Gesundheit werden durch falsches Entsorgen gefährdet.
Materialrecycling hilft, den Verbrauch von Rohstoffen
zu verringern. Weitere Informationen über das
Recycling dieses Produkts erhalten Sie von Ihrer
Gemeinde, den kommunalen Entsorgungsbetrieben oder
dem Geschäft, in dem Sie das Produkt gekauft haben.
Notice for customers: the following information is
only applicable to equipment sold in countries
applying EU Directives
The manufacturer of this product is Sony Corporation,
1-7-1 Konan, Minato-ku, Tokyo, Japan. The Authorized
Representative for EMC and product safety is Sony
Deutschland GmbH, Hedelfinger Strasse 61, 70327
Stuttgart, Germany. For any service or guarantee
matters please refer to the addresses given in separate
service or guarantee documents.
Avis à l’intention des clients : les informations
suivantes s’appliquent uniquement aux appareils
vendus dans des pays qui appliquent les directives
de l’Union Européenne
Le fabriquant de ce produit est Sony Corporation, 1-7-1
Konan, Minato-ku, Tokyo, Japon. Le représentant agréé
en matière de normes CEM et de sécurité des produits est
Sony Deutschland GmbH, Hedelfinger Strasse 61, 70327
Stuttgart, Allemagne. Pour toute demande d’entretien ou
de garantie, veuillez écrire aux adresses spécifiées dans
les documents d’entretien ou de garantie séparés.
Aviso para los clientes: la información siguiente
resulta de aplicación solo a los equipos
comercializados en países afectados por las
directivas de la UE
El fabricante de este producto es Sony Corporation, 1-7-
1 Konan, Minato-ku, Tokio, Japón. El representante
autorizado para EMC y la seguridad de productos es
Sony Deutschland GmbH, Hedelfinger Strasse 61,
70327 Stuttgart, Alemania. Para cualquier servicio o
tema relacionado con la garantía, utilice la dirección
que encontrará en los documentos adjuntos de servicio
o de garantía.
Hinweis für Kunden: Die folgenden Informationen
gelten nur für Geräte, die in Ländern verkauft
werden, in denen EU-Richtlinien gelten
Der Hersteller dieses Produkts ist Sony Corporation, 1-7-
1 Konan, Minato-ku, Tokio, Japan. Autorisierter
Vertreter für EMV und Produktsicherheit ist Sony
Deutschland GmbH, Hedelfinger Straße 61, 70327
Stuttgart, Deutschland. Kontaktadressen für
Kundendienst oder Garantieansprüche finden Sie in den
separaten Kundendienst- oder Garantiedokumenten.
Avviso per i clienti: le seguenti informazioni
riguardano esclusivamente gli apparecchi venduti
in paesi in cui sono applicate le direttive UE
Il presente prodotto è fabbricato da Sony Corporation,
1-7-1 Konan, Minato-ku, Tokyo, Giappone. Il
Rappresentante autorizzato per la direttiva EMC e la
sicurezza del prodotto è Sony Deutschland GmbH,
Hedelfinger Strasse 61, 70327 Stuttgart, Germania. Per
qualsiasi questione riguardante l’assistenza o la
garanzia, rivolgersi agli indirizzi che si trovano nei
documenti di assistenza o di garanzia.
Opmerking voor klanten: de volgende informatie is
enkel van toepassing voor apparaten die verkocht
worden in landen die de EU-richtlijnen in acht nemen
De fabrikant van dit apparaat is Sony Corporation, 1-7-
1 Konan, Minato-ku, Tokio, Japan. De geautoriseerde
vertegenwoordiger voor EMC en productveiligheid is
Sony Deutschland GmbH, Hedelfinger Strasse 61,
70327 Stuttgart, Duitsland. Voor onderhouds- of
garantiekwesties kunt u de adressen gebruiken die in
de afzonderlijke onderhouds- of garantiedocumenten
worden vermeld.
If you have any questions about this product, you
may call; Sony Customer Information Services
Center 1-800-222-7669 or http://www.sony.com/
For Customers in Russia
Произведено в Taилaнде
Изготовитель: Сони Корпорейшн
1-7-1 Koнaн, Mинато-ку, Токио, Япония
Lage und Funktion der Teile und Bedienelemente
Die folgenden Tasten (mit Ausnahme der Taste SOURCE und MODE) haben die gleiche Funktion wie die
entsprechenden Tasten am Hauptgerät bzw. auf der schnurlosen Fernbedienung.
Näheres zu den Funktionen der einzelnen Tasten und Regler finden Sie in der Bedienungsanleitung zum
jeweiligen Sony-Hauptgerät.
1 Tasten VOLUME (Lautstärke) +/–
Einstellen der Lautstärke.
2 Taste SOURCE
Einschalten bzw. Wechseln der Tonquelle
(Radio/CD/USB/IPD/AUX/SAT*
1
).
3 Taste MUTING
Stummschalten des Tons. Zum Beenden der
Funktion drücken Sie die Taste erneut.
4 Taste OFF
Ausschalten bzw. Stoppen der Tonquelle.
5 Taste MODE*
2
Auswählen des Radiofrequenzbereichs,
Auswählen des SAT-Tunerfrequenzbereichs
(Modus)*
1
bzw. Auswählen des Geräts*
3
.
6 Tasten SEEK (–/+)/AMS (.m/M>)*
2
CD/USB/IPD:
Überspringen von Titeln (drücken),
Überspringen mehrerer Titel hintereinander
(drücken, dann innerhalb von 1 Sekunde erneut
drücken und gedrückt halten) bzw. Rückwärts-/
Vorwärtssuchen in einem Titel (gedrückt halten).
Radio:
Automatisches Einstellen von Sendern (drücken)
bzw. manuelle Sendersuche (gedrückt halten).
7 Taste GP*
4
/ALBM*
5
+/–*
2
*
6
Überspringen von Gruppen/Alben (drücken)
bzw. Überspringen mehrerer Gruppen/Alben
hintereinander (gedrückt halten).
Auswählen gespeicherter Sender.
8 Tonquellenanzeige*
7
9 Modusanzeige*
7
*
1
Wenn ein SAT-Tuner angeschlossen ist (nur USA).
*
2
Mit dieser Fernbedienung lässt sich auch ein
Kassettenspieler bedienen.
Weitere Informationen dazu schlagen Sie bitte in
der Bedienungsanleitung zum Hauptgerät nach.
*
3
Wenn ein CD-Wechsler angeschlossen ist.
*
4
Bei Wiedergabe einer ATRAC-CD.
*
5
Bei Wiedergabe einer MP3-/WMA-/AAC-Datei.
*
6
Wenn ein Wechsler angeschlossen ist,
funktionieren die Tasten anders. Schlagen Sie dazu
in der Bedienungsanleitung zum Hauptgerät nach.
*
7
Welche Informationen im Display angezeigt
werden, hängt vom angeschlossenen Gerät bzw.
der ausgewählten Tonquelle ab.
Mit dieser Fernbedienung sind unter anderem
folgende Hauptgeräte kompatibel:
CDX-HS70MW/MS, CDX-HR70MW/MS, CDX-H905IP/
HR905IP, CDX-M50IP/MR50IP, CDX-M30, CDX-
H910UI/HR910UI und CDX-M60UI/MR60UI
Wenn Sie ein anderes Hauptgerät als die oben
genannten verwenden, lesen Sie bitte die folgenden
„Hinweise zur Anzeige“.
Hinweise zur Anzeige
• Die Uhrzeit wird je nach angeschlossenem
Hauptgerät möglicherweise nicht angezeigt.
• Bestimmte Disc-Informationen, Listen von
Radiosendern usw. werden möglicherweise nicht
angezeigt.
Einige Zeichen können nicht angezeigt werden.
Im Display angezeigte Informationen laufen nicht
automatisch durch.
• Wenn diese Fernbedienung an einen DVD-Player
usw. angeschlossen ist, können keine Disc-
Informationen angezeigt werden.
Location and function of controls
The following buttons (except the SOURCE and MODE button) share the same functions as those on the
master unit or the wireless remote commander.
For more information about the functions of each button or control, refer to the operating instructions of your
Sony master unit equipment.
1 VOLUME +/– buttons
To adjust volume.
2 SOURCE button
To power on; change the source (Radio/CD/
USB/IPD/AUX/SAT*
1
).
3 MUTING button
To muting the sound. To cancel, press again.
4 OFF button
To power off; stop the source.
5 MODE*
2
button
To select the radio band/select the SAT tuner
band (mode)*
1
/select the unit*
3
.
6 SEEK (–/+)/AMS (.m/M>)*
2
buttons
CD/USB/IPD:
To skip tracks (press); skip tracks continuously
(press, then press again within about 1 second
and hold); reverse/fastforward a track (press and
hold).
Radio:
To tune in stations automatically (press); find a
station manually (press and hold).
7 GP*
4
/ALBM*
5
+/– button*
2
*
6
To skip groups/albums (press); skip groups/
albums continuously (press and hold).
To select the preset stations.
8 Source information*
7
9 Mode information*
7
*
1
When a SAT tuner is connected.(USA only)
*
2
A Cassette player can also be operated with this
remote commander.
For more information, refer to the operating
instructions of master unit.
*
3
When a CD changer is connected.
*
4
When an ATRAC CD is played.
*
5
When an MP3/WMA/AAC is played.
*
6
If a changer is connected, the operation is
different. See the operating instructions of the
master unit.
*
7
Display items differ, depending on the connected
device or selected source.
Master units compatible with this remote
commander include the following models:
CDX-HS70MW/MS, CDX-HR70MW/MS, CDX-H905IP/
HR905IP, CDX-M50IP/MR50IP, CDX-M30, CDX-
H910UI/HR910UI and CDX-M60UI/MR60UI
When using a master unit other than the above,
please read the following “Notes on display.”
Notes on display
• The clock display may not appear depending on the
connected master unit.
• Some disc information, radio station lists, etc., may
not be displayed.
Some characters cannot be displayed.
Display items do not scroll.
• If this remote commander is connected to a DVD
player, etc., disc information cannot be displayed.
Emplacement et fonction des commandes
Les touches suivantes (à l’exception des touches SOURCE et MODE) ont les mêmes fonctions que celles de
l’appareil principal ou de la télécommande sans fil.
Pour obtenir davantage d’informations sur les fonctions de chaque touche ou commande, consultez le mode
d’emploi de votre appareil principal Sony.
1 Touches VOLUME +/–
Réglage du niveau du volume.
2 Touche SOURCE
Mise sous tension ; changement de la source
(Radio/CD/USB/IPD/AUX/SAT*
1
).
3 Touche MUTING
Atténuation du son. Appuyez de nouveau sur
cette touche pour annuler.
4 Touche OFF
Mise hors tension de l’appareil ; arrêt de la
source.
5 Touche MODE*
2
Sélection de la bande radio/sélection de la bande
récepteur SAT (mode)*
1
/sélection de l’appareil*
3
.
6 Touches SEEK (–/+)/AMS (.m/M>)*
2
CD/USB/IPD :
Saut de plages (appuyez) ; saut de plages en
continu (appuyez, puis appuyez à nouveau dans
un delai d’environ 1 seconde et maintenez la
touche enfoncée) ; retour/avance rapide dans
une plage (appuyez sur la touche et maintenez-la
enfoncée).
Radio :
Réglage automatique des stations (appuyez) ;
recherche manuelle d’une station (appuyez sur la
touche et maintenez-la enfoncée).
7 Touche GP*
4
/ALBM*
5
+/–*
2
*
6
Saut de groupes/d’album (appuyez) ; saut de
plusieurs groupes/albums de suite (appuyez sur
la touche et maintenez-la enfoncée).
Sélection des stations préréglées.
8 Informations sur la source*
7
9 Informations sur le mode*
7
*
1
Lorsqu’un récepteur SAT est raccordé.
(États-Unis uniquement)
*
2
Cette télécommande permet également de
commander un lecteur de cassette.
Pour de plus amples informations, reportez-vous
également au mode d’emploi de l’appareil
principal.
*
3
Lorsqu’un changeur CD est raccordé.
*
4
Lors de la lecture d’un CD ATRAC.
*
5
Lors de la lecture d’un disque MP3/WMA/AAC.
*
6
Si un changeur est raccordé, le fonctionnement est
différent. À ce sujet, reportez-vous au mode
d’emploi de l’appareil principal.
*
7
Les rubriques d’affichage varient selon l’appareil
raccordé ou la source sélectionnée.
Les appareils principaux compatibles avec cette
télécommande comprennent les modèles suivants :
CDX-HS70MW/MS, CDX-HR70MW/MS, CDX-H905IP/
HR905IP, CDX-M50IP/MR50IP, CDX-M30, CDX-
H910UI/HR910UI et CDX-M60UI/MR60UI
Si vous utilisez un appareil principal autre que ceux
mentionnés ci-dessus, reportez-vous au paragraphe
suivant « Remarques sur l’affichage ».
Remarques sur l’affichage
• Il est possible que l’affichage de l’horloge
n’apparaisse pas selon l’appareil principal raccordé.
• Certaines informations sur le disque, les listes de
station de radio, etc., peuvent ne pas s’afficher.
Il est possible que certains caractères ne s’affichent
pas non plus.
Les rubriques d’affichage ne défilent pas.
• Si cette télécommande est raccordée à un lecteur
de DVD, etc., les informations sur le disque ne
peuvent pas s’afficher.
Individuazione e funzione dei comandi
I seguenti tasti (ad eccezione dei tasti SOURCE e MODE) hanno le stesse funzioni dei tasti presenti sull’unità
principale o sul telecomando senza fili.
Per ulteriori informazioni sulle funzioni di ogni tasto o comando, consultare le istruzioni per l’uso dell’unità
principale Sony.
1 Tasti VOLUME +/–
Per regolare il volume.
2 Tasto SOURCE
Per attivare l’alimentazione; per cambiare la
sorgente (Radio/CD/USB/IPD/AUX/SAT*
1
).
3 Tasto MUTING
Per disattivare l’audio. Per annullare
l’impostazione, premere di nuovo il tasto.
4 Tasto OFF
Per disattivare l’alimentazione; per arrestare la
riproduzione della sorgente.
5 Tasto MODE*
2
Per selezionare la banda radio/selezionare la
banda di sintonizzazione SAT (modo)*
1
/
selezionare l’unità*
3
.
6 Tasti SEEK (–/+)/AMS (.m/M>)*
2
CD/USB/IPD:
Per saltare i brani (premere); per saltare i brani in
modo continuo (premere, quindi premere di
nuovo entro 1 secondo e tenere premuto); per
fare retrocedere o fare avanzare rapidamente un
brano (tenere premuto).
Radio:
Per sintonizzare le stazioni in modo automatico
(premere); per ricercare una stazione
manualmente (tenere premuto).
7 Tasto GP*
4
/ALBM*
5
+/–*
2
*
6
Per saltare gruppi/album (premere); per saltare
gruppi/album in modo continuo (tenere
premuto).
Per selezionare le stazioni preselezionate
8 Informazioni sulla sorgente*
7
9 Informazioni sul modo*
7
*
1
Se è collegato un sintonizzatore SAT
(solo Stati Uniti).
*
2
Mediante il presente telecomando, è inoltre
possibile controllare un lettore di cassette.
Per ulteriori informazioni, consultare le istruzioni
per l’uso dell’unità principale.
*
3
Se è collegato un cambia CD.
*
4
Se viene riprodotto un CD ATRAC.
*
5
Se viene riprodotto un file MP3/WMA/AAC.
*
6
Se è collegato un cambia dischi, il funzionamento è
diverso. Consultare le istruzioni per l’uso dell’unità
principale.
*
7
Le voci visualizzate variano in base al dispositivo
collegato o alla sorgente selezionata.
Tra le unità principali compatibili con il presente
telecomando sono inclusi i seguenti modelli:
CDX-HS70MW/MS, CDX-HR70MW/MS, CDX-H905IP/
HR905IP, CDX-M50IP/MR50IP, CDX-M30, CDX-
H910UI/HR910UI e CDX-M60UI/MR60UI
Se viene utilizzata un’unità principale diversa da
quelle indicate sopra, leggere le seguenti “Note sulla
visualizzazione”.
Note sulla visualizzazione
•A seconda dell’unità principale collegata, è
possibile che l’orologio non venga visualizzato.
•È possibile che alcune informazioni sui dischi, alcuni
elenchi di stazioni radio e così via non vengano
visualizzati.
Alcuni caratteri non possono essere visualizzati.
Le voci del display non scorrono.
• Se il presente telecomando è collegato ad un
lettore DVD o simili, non è possibile visualizzare le
informazioni sul disco.
*
1
Als een SAT-tuner is aangesloten
(alleen voor de Verenigde Staten).
*
2
Met deze afstandsbediening kan ook een
cassettedeck worden bediend.
Raadpleeg de gebruiksaanwijzing bij de
hoofdeenheid voor meer informatie.
*
3
Als een CD-wisselaar is aangesloten.
*
4
Bij het afspelen van een ATRAC CD.
*
5
Bij het afspelen van een MP3-WMA-AAC-bestand.
*
6
Als een wisselaar is aangesloten, is de werking
anders. Raadpleeg de gebruiksaanwijzing bij de
hoofdeenheid.
*
7
Welke items worden weergegeven, is afhankelijk
van het aangesloten apparaat of de geselecteerde
bron.
Voorbeelden van hoofdeenheden die compatibel zijn
met deze afstandsbediening, zijn de volgende
modellen:
CDX-HS70MW/MS, CDX-HR70MW/MS, CDX-H905IP/
HR905IP, CDX-M50IP/MR50IP, CDX-M30, CDX-
H910UI/HR910UI en CDX-M60UI/MR60UI
Als u een andere hoofdeenheid gebruikt dan de
hoofdeenheden die hierboven worden vermeld,
moet u het volgende gedeelte "Opmerkingen over
het display" doorlezen.
Opmerkingen over het display
• De klokweergave wordt wellicht niet weergegeven
afhankelijk van de aangesloten hoofdeenheid.
• Sommige discinformatie, radiozenderlijsten,
enzovoort, worden wellicht niet weergegeven.
Sommige tekens kunnen niet worden
weergegeven.
Displayitems rollen niet.
• Als deze afstandbediening is aangesloten op een
DVD-speler, enzovoort, kan de discinformatie niet
worden weergegeven.
Bedieningselementen
De volgende toetsen (behalve SOURCE en MODE) hebben dezelfde functies als die op de hoofdeenheid of de
draadloze afstandsbediening.
Raadpleeg de gebruiksaanwijzing van uw Sony-hoofdeenheid voor meer informatie over de functies van
elke toets of regelaar.
1 VOLUME +/– toetsen
Het volume aanpassen.
2 SOURCE toets
Inschakelen; de bron wijzigen (Radio/CD/USB/
IPD/AUX/SAT*
1
).
3 MUTING toets
Het geluid dempen. Druk nogmaals op de toets
om te annuleren.
4 OFF toets
Het apparaat uitschakelen; de bron stoppen.
5 MODE*
2
toets
De radioband selecteren/de SAT-tunerband
(modus) selecteren*
1
/het apparaat selecteren*
3
.
6 SEEK (–/+)/AMS (.m/M>)*
2
toetsen
CD/USB/IPD:
Tracks overslaan (indrukken); tracks blijven
overslaan (indrukken, vervolgens binnen 1
seconde nogmaals indrukken en vasthouden);
een track snel terug-/ vooruitspoelen (ingedrukt
houden).
Radio:
Automatisch afstemmen op zenders (indrukken);
handmatig zoeken naar zenders (ingedrukt
houden).
7 GP*
4
/ALBM*
5
+/– toets*
2
*
6
Groepen/albums overslaan (indrukken);
groepen/albums blijven overslaan (ingedrukt
houden).
De voorkeurzenders selecteren.
8 Brongegevens*
7
9 Modusinformatie*
7
Ubicación y función de los controles
Los siguientes botones (a excepción de los botones SOURCE y MODE) tienen las mismas funciones que los
de la unidad maestra o el control remoto inalámbrico.
Para obtener más información acerca de las funciones de cada botón o control, consulte el manual de
instrucciones del equipo de la unidad maestra de Sony.
1 Botones VOLUME +/–
Para ajustar el volumen.
2 Botón SOURCE
Para encender la unidad o cambiar la fuente
(Radio/CD/USB/IPD/AUX/SAT*
1
).
3 Botón MUTING
Para atenuar el sonido. Para cancelar esta
función, vuelva a presionarlo.
4 Botón OFF
Para apagar la unidad o detener la fuente.
5 MODE*
2
button
Para seleccionar la banda de radio, seleccionar la
banda (modo)*
1
del sintonizador SAT o
seleccionar la unidad*
3
.
6 Botones SEEK (–/+)/AMS (.m/M>)*
2
CD/USB/IPD:
Para omitir pistas (presionar); para omitir pistas
en forma continua (presionar y volver a
presionar dentro de 1 segundo y mantener); para
retroceder o avanzar una pista rápidamente
(mantener presionado).
Radio:
Para sintonizar emisoras en forma automática
(presionar); para localizar una emisora en forma
manual (mantener presionado).
7 Botón GP*
4
/ALBM*
5
+/–*
2
*
6
Para omitir grupos/álbumes (presionar); para
omitir grupos/álbumes en forma continua
(mantener presionado).
Para seleccionar las emisoras almacenadas en
memoria.
8 Información de la fuente*
7
9 Información del modo*
7
*
1
Si se conectó un sintonizador SAT
(sólo en EE. UU.).
*
2
También es posible operar un reproductor de
casetes con este control remoto.
Para obtener más información, consulte el manual
de instrucciones de la unidad maestra.
*
3
Si se conectó un cambiador de CD.
*
4
Cuando se reproduce un CD de ATRAC.
*
5
Cuando se reproduce un archivo MP3/WMA/AAC.
*
6
Si se conectó un cambiador, la operación es
diferente; consulte el manual de instrucciones de
la unidad maestra.
*
7
Los elementos de la pantalla varían en función del
dispositivo conectado o de la fuente seleccionada.
Las unidades maestras compatibles con el control
remoto incluyen los siguientes modelos:
CDX-HS70MW/MS, CDX-HR70MW/MS, CDX-H905IP/
HR905IP, CDX-M50IP/MR50IP, CDX-M30, CDX-
H910UI/HR910UI y CDX-M60UI/MR60UI
Cuando utilice una unidad maestra distinta de las
mencionadas, lea las siguientes “Notas sobre la
pantalla”.
Notas sobre la pantalla
• Es posible que la pantalla del reloj no aparezca en
función de la unidad maestra conectada.
• Es posible que no se muestre determinada
información del disco, listas de emisoras de radio,
etc.
Algunos caracteres no pueden mostrarse.
Los elementos de la pantalla no se desplazan.
• Si el control remoto está conectado a un
reproductor de DVD, etc., la información de disco
no podrá mostrarse.
MASTER UNIT
CHANGER COMMANDER/
DISPLAY
98 (3
7
/8)
23
(
29
/
32
)
23
(
29
/
32
)
100
(4)
80 (3
1
/4)
38
(1
1
/2)
59
(2
3
/
8
)
50 (2)
25 (1)
500 (20
1
/
8
)

Installation
Notes
• Choose a mounting location carefully so that the
remote commander:
— will not interfere with driving the motorboat.
— is easy to operate and the display is easy to see.
— will not constabtly get wet or dirty from sea
water, rain, dust, etc.
— is not subject to high temperatures, such as
from direct sunlight.
• Be sure to use only the supplied mounting
hardware for a safe and secure installation.
• When installing the remote commander, be sure
not to damage electrical cables, etc., on the other
side of the mounting surface.
Notes on waterproof performance
• This remote commander conforms to IEC60529
IPX6*
1
and IPX7*
2
, and can be used in places
exposed to splashing water or underwater up to
depths of 1 m (3 ft 3
1
/
4
in).
*
1
Water shall not enter the interior even when
exposed to direct jet streams of water (normal
temperature fresh water) from any direction.
*
2
Water shall not seep into the interior even
when left submerged in normal temperature
fresh water at a depth of 1 m (3 ft 3
1
/
4
in) in a
stationary condition for approximately 30
minutes.
• Do not use this remote commander in the
following places:
places where the remote commander might be
subject to high water pressure, hot springs or
bathtubs, etc.
Installation
Remarques
• Choisissez soigneusement l’emplacement de
montage de façon à ce que la télécommande :
— ne gêne pas la conduite du bateau à moteur.
— soit facile à utiliser et que l’affichage soit
visible.
— ne soit pas exposée en permanence à l’humidité
ou aux souillures dues à l’eau de mer, la pluie, la
poussière, etc. .
— ne soit pas soumise à des températures très
élevées, comme à la lumière directe du soleil.
• Veillez à utiliser uniquement le matériel de
montage fourni afin de permettre une installation
fiable en toute sécurité.
• Lorsque vous installez la télécommande, veillez à
ne pas endommager les câbles électriques, etc.,
situés de l’autre côté de la surface de montage.
Remarques sur l’étanchéité de l’appareil
• Cette télécommande est conforme aux normes
IEC60529 IPX6*
1
et IPX7*
2
, et elle peut être utilisée
dans des endroits exposés à des éclaboussures ou
sous l’eau à une profondeur maximale de 1 m (3 pi
3
1
/
4
po).
*
1
L’eau ne doit pas pénétrer dans l’appareil même
en cas d’exposition directe à des projections de
jets d’eau (eau douce à température normale)
de quelque direction que ce soit.
*
2
L’eau ne doit pas s’infiltrer dans l’appareil
même s’il est immergé dans une eau douce à
température normale à une profondeur de 1 m
(3 pi 3
1
/
4
po) en position stationnaire pendant
environ 30 minutes.
• N’utilisez pas cette télécommande dans les
endroits suivants :
les endroits où la télécommande serait soumise à
une pression d’eau élevée, à proximité de sources
chaudes ou de baignoires, etc.
Instalación
Notas
• Elija cuidadosamente la ubicación de instalación de
modo que el control remoto:
— no interfiera en el manejo de la lancha motora.
— resulte fácil de controlar y la pantalla pueda
verse fácilmente.
— no se moje o manche constantemente debido al
agua del mar, la lluvia, el polvo, etc.
— no esté sujeto a altas temperaturas como, por
ejemplo, bajo la luz solar directa.
• Asegúrese de utilizar únicamente la ferretería de
montaje suministrada para garantizar una
instalación segura y sin peligro.
• Al instalar el control remoto, asegúrese de no
dañar los cables eléctricos, etc., que se encuentren
del otro lado de la superficie de montaje.
Notas sobre impermeabilidad
• El control remoto cumple con las normas IEC60529
IPX6*
1
e IPX7*
2
, y puede utilizarse en lugares
expuestos a las salpicaduras de agua o en lugares
sumergibles de hasta 1 metro de profundidad.
*
1
No entrará agua en el interior incluso si se
expone a chorros directos de agua dulce a
temperatura normal desde cualquier dirección.
*
2
No se filtrará agua en el interior incluso si se
sumerge en agua dulce a temperatura normal a
una profundidad de 1 metro en estado inmóvil
durante aproximadamente 30 minutos.
• No utilice el control remoto:
en lugares donde el control remoto pueda estar
sujeto a una alta presión de agua, en manantiales
termales o en bañeras, etc.
Connections/Connexions/Conexiones/Anschlüsse/Collegamenti/Aansluitingen
MASTER UNIT
CHANGER COMMANDER/
DISPLAY
CD changer
Changeur de CD
Cambiador de CD
CD-Wechsler
Cambia CD
CD-wisselaar
7
56
Not supplied (supplied with CD changer)
Non fourni (fourni avec le changeur de CD)
No suministrado (suministrado con el cambiador de CD)
Nicht mitgeliefert (mit dem CD-Wechsler geliefert)
Non in dotazione (in dotazione con il cambia CD)
Niet bijgeleverd (geleverd met de CD-wisselaar)
Master unit with Sony BUS system
Appareil principal doté d’un système de BUS Sony
Unidad maestra con sistema BUS de Sony
Hauptgerät mit Sony-BUS-System
Unità principale con sistema BUS Sony
Hoofdeenheid met Sony BUS-systeem
When finished making all the connections, press the RESET button of the master unit.
Notes
• Be sure all the cords, connection plugs, and the divide box are located and fixed in position so that they are not
subjected to high temperatures, vibration, sea water, rain, dust, etc.
• When you connect the remote commander to the master unit and other units (CD changer etc.), refer also to the
Installation/Connections manual of the master unit and other units.
Lorsque vous avez terminé tous les raccordements, appuyez sur la touche RESET de l’appareil principal.
Remarques
• Veillez à ce que tous les câbles, les fiches des connexions et le boîtier de dérivation soient situés et fixés dans une
position qui ne soit pas soumise à des températures élevées, à des vibrations, à l’eau de mer, à la pluie, à la poussière,
etc.
• Lorsque vous raccordez la télécommande à l’appareil principal et à d’autres appareils (changeurs CD, etc.), reportez-
vous également au guide Installation/Connexions de l’appareil principal et des autres appareils.
Una vez que haya realizado todas las conexiones, presione el botón RESET de la unidad maestra.
Notas
• Asegúrese de que todos los cables, las clavijas de conexión y la caja de división están situados y fijados en una
ubicación en la que no estén expuestos a altas temperaturas, vibraciones, agua marina, lluvia, polvo, etc.
• Cuando conecte el control remoto a la unidad maestra y a otras unidades (cambiador de CD, etc.), consulte también el
manual de instalación/conexiones de la unidad maestra y otras unidades.
Drücken Sie die Taste RESET am Hauptgerät, nachdem Sie alle Anschlüsse vorgenommen haben.
Hinweise
• Achten Sie darauf, alle Kabel, Verbindungsstecker und den Teiler so zu verlegen und zu fixieren, dass sie vor hohen
Temperaturen, Vibrationen, Wasser, Regen, Staub usw. geschützt sind.
• Weitere Informationen zum Anschließen der Fernbedienung zum Steuern des Hauptgeräts und anderer Geräte (CD-
Wechsler usw.) finden Sie auch in der Installations-/Anschlussanleitung zu dem jeweiligen Gerät.
Una volta completati tutti i collegamenti, premere il tasto RESET dell’unità principale.
Note
• Accertarsi che tutti i cavi, le spine di collegamento e la divide box siano posizionati e fissati in luoghi non soggetti a
temperature elevate, vibrazioni, acqua di mare, pioggia, polvere e così via.
• Quando il telecomando viene collegato all’unità principale e ad altri apparecchi (cambia CD, e così via), consultare
inoltre il manuale di installazione/dei collegamenti dell’unità principale e degli altri apparecchi.
Als alle aansluitingen zijn gemaakt, drukt u op RESET op de hoofdeenheid.
Opmerkingen
• Zorg ervoor dat alle snoeren, stekkers en de verdeeldoos op een plaats zijn vastgemaakt waar ze niet worden
blootgesteld aan hoge temperaturen, trillingen, zeewater, regen, stof enzovoort.
• Als u de afstandsbediening aansluit op de hoofdeenheid en andere apparaten (CD-wisselaars, enzovoort), moet u ook
de gebruiksaanwijzing voor installatie/aansluitingen van de hoofdeenheid en andere apparaten raadplegen.
Master unit
Appareil principal
Unidad maestra
Hauptgerät
Unità principale
Hoofdeenheid
After connecting, bundle up the connecting cords of the remote commander with other connecting cords of the audio
equipment by attaching the supplied clamp 9. Be sure to leave some slack in the connecting cord between the plug and the
clamp as illustrated.
Une fois les raccordements effectués, regroupez les câbles de raccordement de la télécommande avec les autres câbles de
raccordement de l’équipement audio à l’aide du collier 9 fourni. Faites en sorte que les câbles de raccordement restent lâches
entre la fiche et le collier, ainsi qu’il est illustré.
Una vez realizada la conexión, agrupe los cables de conexión del control remoto con otros cables de conexión del equipo de
audio colocando la abrazadera suministrada 9. Asegúrese de dejar cierta holgura en el cable de conexión entre la clavija y la
abrazadera tal y como se muestra en la ilustración.
Nachdem Sie die Anschlüsse vorgenommen haben, bündeln Sie die Verbindungskabel der Fernbedienung und der Audiogeräte
mithilfe des mitgelieferten Kabelbinders 9. Lassen Sie das Verbindungskabel zwischen dem Stecker und dem Kabelbinder
unbedingt etwas durchhängen, wie in der Abbildung gezeigt.
A collegamento completato, unire i cavi di collegamento del telecomando con gli altri cavi di collegamento dell’apparecchiatura
audio utilizzando l’apposito fermo 9 in dotazione. Accertarsi di lasciare lievemente allentato il cavo di collegamento tra la
spina e il fermo, come illustrato.
Nadat u de afstandsbediening hebt aangesloten, bevestigt u de bijgeleverde klem 9 om de aansluitsnoeren van de
afstandsbediening met de andere aansluitsnoeren van de audioapparatuur te bundelen. Zorg ervoor dat het aansluitsnoer
tussen de stekker en de klem enigszins slap hangt, zoals in de afbeelding wordt weergegeven.
9
Parts list/Liste des pièces/Lista de las piezas/Teileliste/Lista delle parti/Onderdelenlijst
9
Installation
Hinweise
• Wählen Sie die Montagestelle sorgfältig so aus,
dass die Fernbedienung:
— beim Fahren des Motorboots nicht hinderlich
ist.
— leicht zu bedienen ist und die Anzeige gut
abgelesen werden kann.
— nicht ständig Nässe und Schmutz durch Wasser,
Regen, Staub usw. ausgesetzt ist.
— vor hohen Temperaturen und direktem
Sonnenlicht geschützt ist.
• Verwenden Sie ausschließlich die mitgelieferten
Montageteile. Nur mit diesen Teilen lässt sich das
Gerät sicher montieren.
• Achten Sie bei der Montage der Fernbedienung
darauf, keine Stromleitungen usw. an der
Rückseite der Montagefläche zu beschädigen.
Hinweise zum Wasserschutz
• Diese Fernbedienung entspricht IEC60529 IPX6*
1
und IPX7*
2
und kann an Orten eingesetzt werden,
die Spritzwasser ausgesetzt sind, sowie unter
Wasser bis zu einer Tiefe von 1 m.
*
1
In das Innere dringt auch dann kein Wasser ein,
wenn ein Wasserstrahl (Süßwasser mäßiger
Temperatur) aus beliebiger Richtung auf das
Gehäuse trifft.
*
2
In das Innere sickert kein Wasser ein, wenn sich
die Fernbedienung etwa 30 Minuten lang
unbewegt in einer Wassertiefe von 1 m
(Süßwasser mäßiger Temperatur) befindet.
• Verwenden Sie die Fernbedienung nicht an
folgenden Orten:
Orten, an denen sie hohem Wasserdruck
ausgesetzt sein könnte. Verwenden Sie sie auch
nicht in heißen Quellen oder Badewannen usw.
Installazione
Note
• Scegliere la posizione di montaggio in modo
appropriato, in modo che il telecomando:
— non interferisca con le operazioni di guida.
— sia semplice da utilizzare e il display facilmente
visibile.
— non sia costantemente soggetto a sporcizia o
acqua di mare, pioggia, polvere e così via.
— non sia soggetto a temperature elevate, ad
esempio se esposto alla luce solare diretta.
• Per un’installazione sicura, accertarsi di utilizzare
solo il materiale di installazione in dotazione.
• Durante l’installazione del telecomando, prestare
attenzione a non danneggiare cavi elettrici e così
via presenti sull’altro lato della superficie di
montaggio.
Note sulla resistenza all’acqua
• Il presente telecomando è conforme con IEC60529
IPX6*
1
e IPX7*
2
e può essere utilizzato in luoghi
esposti a spruzzi d’acqua oppure sott’acqua fino
ad una profondità di 1 m.
*
1
L’acqua non deve penetrare all’interno anche se
il telecomando è esposto a getti d’acqua
(temperatura normale) provenienti da qualsiasi
direzione.
*
2
L’acqua non deve penetrare all’interno anche se
il telecomando viene immerso in acqua a
temperatura normale ad una profondità di 1 m
in una posizione fissa per circa 30 minuti.
• Non utilizzare il presente telecomando nei luoghi
riportati di seguito:
dove il telecomando è soggetto ad acqua
compressa, sorgenti termali o vasche da bagno e
così via.
Montage
Opmerkingen
• Kies de plaats waar u de afstandsbediening wilt
installeren zorgvuldig zodat deze:
— de bestuurder van de motorboot niet hindert.
— eenvoudig te bedienen is en het display
gemakkelijk te zien is.
— niet voortdurend nat of vies wordt door
zeewater, regen, stof, enzovoort.
— niet wordt blootgesteld aan hoge
temperaturen, zoals van direct zonlicht.
• Gebruik alleen de bijgeleverde
installatieonderdelen om het apparaat veilig en
stevig te monteren.
• Beschadig tijdens het plaatsen van de
afstandsbediening geen elektrische kabels,
enzovoort, aan de andere kant van de plaats waar
u de afstandsbediening monteert.
Opmerkingen over waterdichtheid
• Deze afstandsbediening voldoet aan IEC60529
IPX6*
1
en IPX7*
2
, en kan worden gebruikt op
plaatsen waar deze wordt blootgesteld aan
opspattend water en onder water tot een diepte
van 1 m.
*
1
Er komt geen water in het apparaat terecht,
zelfs niet wanneer het apparaat wordt
blootgesteld aan directe waterstralen (zoet
water met een normale temperatuur) uit een
willekeurige richting.
*
2
Er komt geen water in het apparaat terecht,
zelfs niet als het apparaat ongeveer 30 minuten
stil onder water blijft liggen op een diepte van
1 m in zoet water met een normale
temperatuur.
• Gebruik deze afstandsbediening niet op de
volgende plaatsen:
plaatsen waar de afstandsbediening kan worden
blootgesteld aan hoge waterdruk,
heetwaterbronnen of badkuipen, enzovoort.
Unit: mm (in)
Unité : mm (po)
Unidad: mm
Einheit: mm
Unità: mm
Eenheid: mm
1
Make the mounting hole as follows.
Effectuez le trou de montage de la façon suivante.
Perfore el orificio de montaje del modo siguiente.
Nehmen Sie die Montagebohrung wie folgt vor.
Praticare il foro di montaggio come indicato.
Maak als volgt het gat voor de installatie.
3
2
3
4
8
2
4
4
44
1
1
1
81 (3
1
/4)
0
A
B
Uses bolt 1 depending on the mounting location, and fasten them in the way of either A or B.
Utilisez le boulon 1 en fonction de l’emplacement de montage et serrez de la façon A ou B.
Utilice pernos 1 en función de la ubicación de montaje y apriételos en la dirección A o B.
Bringen Sie Schraube 1 je nach Montageposition an und ziehen Sie sie wie in Abbildung A oder B erläutert an.
Utilizzare il bullone 1 a seconda della posizione di installazione, quindi serrare verso A o B.
Gebruik bout 1 op de juiste manier voor de installatieplaats en draai deze vast op manier A of B.
Insert bolt 1 in the slot as shown, and turn it anticlockwise until it is secure.
Then tighten the nut 4 fully clockwise.
Insérez le boulon 1 dans la fente, ainsi qu’il est illustré, puis tournez-le dans le sens anti-horaire
jusqu’à ce qu’il soit correctement fixé.
Serrez ensuite l’écrou 4 à fond dans le sens horaire.
Inserte el perno 1 en la ranura tal y como se muestra en la ilustración y gírelo hacia la izquierda
hasta que quede fijado.
A continuación, apriete la tuerca 4 completamente hacia la derecha.
Setzen Sie Schraube 1 wie gezeigt in die Auskerbung ein und ziehen Sie sie gegen den
Uhrzeigersinn fest an.
Ziehen Sie dann die Mutter 4 im Uhrzeigersinn fest an.
Inserire il bullone 1 come illustrato, quindi ruotarlo in senso antiorario finché non è in posizione
salda.
Quindi, serrare completamente il dado 4 in senso orario.
Plaats bout 1 in de sleuf op de manier die wordt weergegeven en draai deze linksom tot de bout
goed vastzit.
Draai de moer 4 volledig naar rechts.
Insert bolt 1 in the slot as shown, and turn it clockwise until it is secure.
Then tighten the nut 4 fully clockwise.
Insérez le boulon 1 dans la fente, ainsi qu’il est illustré, puis tournez-le dans le sens horaire
jusqu’à ce qu’il soit correctement fixé.
Serrez ensuite l’écrou 4 à fond dans le sens horaire.
Inserte el perno 1 en la ranura tal y como se muestra en la ilustración y gírelo hacia la derecha
hasta que quede fijado.
A continuación, apriete la tuerca 4 completamente hacia la derecha.
Setzen Sie Schraube 1 wie gezeigt in die Auskerbung ein und ziehen Sie sie im Uhrzeigersinn fest
an.
Ziehen Sie dann die Mutter 4 im Uhrzeigersinn fest an.
Inserire il bullone 1 come illustrato, quindi ruotarlo in senso orario finché non è in posizione
salda.
Quindi, serrare completamente il dado 4 in senso orario.
Plaats bout 1 in de sleuf op de manier die wordt weergegeven en draai deze rechtsom tot de
bout goed vast zit.
Draai de moer 4 volledig naar rechts.
To prevent plug from falling off/Pour éviter que la fiche ne tombe/Para evitar que la clavija se caiga/
So verhindern Sie, dass sich der Stecker löst/Per evitare che la spina si stacchi/Voorkomen dat de stekker losraakt
Master unit
Appareil principal
Unidad maestra
Hauptgerät
Unità principale
Hoofdeenheid
5
5 m 5 m
6
1
M4 × 45
(× 2)
M4
(× 2)
23
M4
(× 2)
4
M4
(× 6)
7 8 9 0
Documenttranscriptie
With this remote commander, you can control your master unit equipment easily. Use this remote commander with master units equipped with the special input jack for the remote commander and the Sony Bus system control. Mit dieser Fernbedienung können Sie Ihre Hauptgeräte bequem steuern. Verwenden Sie diese Fernbedienung für Hauptgeräte, die mit einer speziellen Fernbedienungs-Eingangsbuchse und der BusSystemsteuerung von Sony ausgestattet sind. Dimensions Caractéristiques Caratteristiche Cette télécommande vous permet de commander votre appareil principal en toute simplicité. Utilisez cette télécommande avec des appareils principaux dotés d’une prise d’entrée spéciale pour la télécommande et la commande du système de bus Sony. Con il presente telecomando, è possibile controllare l’unità principale in modo semplice. Utilizzare questo telecomando con unità principali dotate di presa di ingresso speciale per telecomando e sistema di controllo Bus Sony. 1 VOLUME +/– buttons To adjust volume. 2 SOURCE button To power on; change the source (Radio/CD/ USB/IPD/AUX/SAT*1). 3 MUTING button To muting the sound. To cancel, press again. 4 OFF button To power off; stop the source. 5 MODE*2 button To select the radio band/select the SAT tuner band (mode)*1/select the unit*3. 6 SEEK (–/+)/AMS (.m/M>)*2 buttons CD/USB/IPD: To skip tracks (press); skip tracks continuously (press, then press again within about 1 second and hold); reverse/fastforward a track (press and hold). Radio: To tune in stations automatically (press); find a station manually (press and hold). 7 GP*4/ALBM*5 +/– button*2*6 To skip groups/albums (press); skip groups/ albums continuously (press and hold). To select the preset stations. 8 Source information*7 9 Mode information*7 *1 When a SAT tuner is connected.(USA only) *2 A Cassette player can also be operated with this remote commander. For more information, refer to the operating instructions of master unit. 3 * When a CD changer is connected. 4 * When an ATRAC CD is played. *5 When an MP3/WMA/AAC is played. *6 If a changer is connected, the operation is different. See the operating instructions of the master unit. 7 * Display items differ, depending on the connected device or selected source. Master units compatible with this remote commander include the following models: CDX-HS70MW/MS, CDX-HR70MW/MS, CDX-H905IP/ HR905IP, CDX-M50IP/MR50IP, CDX-M30, CDXH910UI/HR910UI and CDX-M60UI/MR60UI When using a master unit other than the above, please read the following “Notes on display.” Notes on display • The clock display may not appear depending on the connected master unit. • Some disc information, radio station lists, etc., may not be displayed. Some characters cannot be displayed. Display items do not scroll. • If this remote commander is connected to a DVD player, etc., disc information cannot be displayed. 1 Tasten VOLUME (Lautstärke) +/– Einstellen der Lautstärke. 2 Taste SOURCE Einschalten bzw. Wechseln der Tonquelle (Radio/CD/USB/IPD/AUX/SAT*1). 3 Taste MUTING Stummschalten des Tons. Zum Beenden der Funktion drücken Sie die Taste erneut. 4 Taste OFF Ausschalten bzw. Stoppen der Tonquelle. 5 Taste MODE*2 Auswählen des Radiofrequenzbereichs, Auswählen des SAT-Tunerfrequenzbereichs (Modus)*1 bzw. Auswählen des Geräts*3. 6 Tasten SEEK (–/+)/AMS (.m/M>)*2 CD/USB/IPD: Überspringen von Titeln (drücken), Überspringen mehrerer Titel hintereinander (drücken, dann innerhalb von 1 Sekunde erneut drücken und gedrückt halten) bzw. Rückwärts-/ Vorwärtssuchen in einem Titel (gedrückt halten). Radio: Automatisches Einstellen von Sendern (drücken) bzw. manuelle Sendersuche (gedrückt halten). 7 Taste GP*4/ALBM*5 +/–*2*6 Überspringen von Gruppen/Alben (drücken) bzw. Überspringen mehrerer Gruppen/Alben hintereinander (gedrückt halten). Auswählen gespeicherter Sender. 8 Tonquellenanzeige*7 9 Modusanzeige*7 *1 Wenn ein SAT-Tuner angeschlossen ist (nur USA). *2 Mit dieser Fernbedienung lässt sich auch ein Kassettenspieler bedienen. Weitere Informationen dazu schlagen Sie bitte in der Bedienungsanleitung zum Hauptgerät nach. 3 * Wenn ein CD-Wechsler angeschlossen ist. 4 * Bei Wiedergabe einer ATRAC-CD. *5 Bei Wiedergabe einer MP3-/WMA-/AAC-Datei. *6 Wenn ein Wechsler angeschlossen ist, funktionieren die Tasten anders. Schlagen Sie dazu in der Bedienungsanleitung zum Hauptgerät nach. 7 * Welche Informationen im Display angezeigt werden, hängt vom angeschlossenen Gerät bzw. der ausgewählten Tonquelle ab. Mit dieser Fernbedienung sind unter anderem folgende Hauptgeräte kompatibel: CDX-HS70MW/MS, CDX-HR70MW/MS, CDX-H905IP/ HR905IP, CDX-M50IP/MR50IP, CDX-M30, CDXH910UI/HR910UI und CDX-M60UI/MR60UI Wenn Sie ein anderes Hauptgerät als die oben genannten verwenden, lesen Sie bitte die folgenden „Hinweise zur Anzeige“. Hinweise zur Anzeige • Die Uhrzeit wird je nach angeschlossenem Hauptgerät möglicherweise nicht angezeigt. • Bestimmte Disc-Informationen, Listen von Radiosendern usw. werden möglicherweise nicht angezeigt. Einige Zeichen können nicht angezeigt werden. Im Display angezeigte Informationen laufen nicht automatisch durch. • Wenn diese Fernbedienung an einen DVD-Player usw. angeschlossen ist, können keine DiscInformationen angezeigt werden. Emplacement et fonction des commandes Individuazione e funzione dei comandi Les touches suivantes (à l’exception des touches SOURCE et MODE) ont les mêmes fonctions que celles de l’appareil principal ou de la télécommande sans fil. Pour obtenir davantage d’informations sur les fonctions de chaque touche ou commande, consultez le mode d’emploi de votre appareil principal Sony. I seguenti tasti (ad eccezione dei tasti SOURCE e MODE) hanno le stesse funzioni dei tasti presenti sull’unità principale o sul telecomando senza fili. Per ulteriori informazioni sulle funzioni di ogni tasto o comando, consultare le istruzioni per l’uso dell’unità principale Sony. 1 Touches VOLUME +/– Réglage du niveau du volume. 2 Touche SOURCE Mise sous tension ; changement de la source (Radio/CD/USB/IPD/AUX/SAT*1). 3 Touche MUTING Atténuation du son. Appuyez de nouveau sur cette touche pour annuler. 4 Touche OFF Mise hors tension de l’appareil ; arrêt de la source. 5 Touche MODE*2 Sélection de la bande radio/sélection de la bande récepteur SAT (mode)*1/sélection de l’appareil*3. 6 Touches SEEK (–/+)/AMS (.m/M>)*2 CD/USB/IPD : Saut de plages (appuyez) ; saut de plages en continu (appuyez, puis appuyez à nouveau dans un delai d’environ 1 seconde et maintenez la touche enfoncée) ; retour/avance rapide dans une plage (appuyez sur la touche et maintenez-la enfoncée). Radio : Réglage automatique des stations (appuyez) ; recherche manuelle d’une station (appuyez sur la touche et maintenez-la enfoncée). 7 Touche GP*4/ALBM*5 +/–*2*6 Saut de groupes/d’album (appuyez) ; saut de plusieurs groupes/albums de suite (appuyez sur la touche et maintenez-la enfoncée). Sélection des stations préréglées. 8 Informations sur la source*7 9 Informations sur le mode*7 *1 Lorsqu’un récepteur SAT est raccordé. (États-Unis uniquement) *2 Cette télécommande permet également de commander un lecteur de cassette. Pour de plus amples informations, reportez-vous également au mode d’emploi de l’appareil principal. 3 * Lorsqu’un changeur CD est raccordé. 4 * Lors de la lecture d’un CD ATRAC. *5 Lors de la lecture d’un disque MP3/WMA/AAC. *6 Si un changeur est raccordé, le fonctionnement est différent. À ce sujet, reportez-vous au mode d’emploi de l’appareil principal. 7 * Les rubriques d’affichage varient selon l’appareil raccordé ou la source sélectionnée. Les appareils principaux compatibles avec cette télécommande comprennent les modèles suivants : CDX-HS70MW/MS, CDX-HR70MW/MS, CDX-H905IP/ HR905IP, CDX-M50IP/MR50IP, CDX-M30, CDXH910UI/HR910UI et CDX-M60UI/MR60UI Si vous utilisez un appareil principal autre que ceux mentionnés ci-dessus, reportez-vous au paragraphe suivant « Remarques sur l’affichage ». Remarques sur l’affichage • Il est possible que l’affichage de l’horloge n’apparaisse pas selon l’appareil principal raccordé. • Certaines informations sur le disque, les listes de station de radio, etc., peuvent ne pas s’afficher. Il est possible que certains caractères ne s’affichent pas non plus. Les rubriques d’affichage ne défilent pas. • Si cette télécommande est raccordée à un lecteur de DVD, etc., les informations sur le disque ne peuvent pas s’afficher. 1 Tasti VOLUME +/– Per regolare il volume. 2 Tasto SOURCE Per attivare l’alimentazione; per cambiare la sorgente (Radio/CD/USB/IPD/AUX/SAT*1). 3 Tasto MUTING Per disattivare l’audio. Per annullare l’impostazione, premere di nuovo il tasto. 4 Tasto OFF Per disattivare l’alimentazione; per arrestare la riproduzione della sorgente. 5 Tasto MODE*2 Per selezionare la banda radio/selezionare la banda di sintonizzazione SAT (modo)*1/ selezionare l’unità*3. 6 Tasti SEEK (–/+)/AMS (.m/M>)*2 CD/USB/IPD: Per saltare i brani (premere); per saltare i brani in modo continuo (premere, quindi premere di nuovo entro 1 secondo e tenere premuto); per fare retrocedere o fare avanzare rapidamente un brano (tenere premuto). Radio: Per sintonizzare le stazioni in modo automatico (premere); per ricercare una stazione manualmente (tenere premuto). 7 Tasto GP*4/ALBM*5 +/–*2*6 Per saltare gruppi/album (premere); per saltare gruppi/album in modo continuo (tenere premuto). Per selezionare le stazioni preselezionate 8 Informazioni sulla sorgente*7 9 Informazioni sul modo*7 *1 Se è collegato un sintonizzatore SAT (solo Stati Uniti). *2 Mediante il presente telecomando, è inoltre possibile controllare un lettore di cassette. Per ulteriori informazioni, consultare le istruzioni per l’uso dell’unità principale. 3 * Se è collegato un cambia CD. 4 * Se viene riprodotto un CD ATRAC. *5 Se viene riprodotto un file MP3/WMA/AAC. *6 Se è collegato un cambia dischi, il funzionamento è diverso. Consultare le istruzioni per l’uso dell’unità principale. 7 * Le voci visualizzate variano in base al dispositivo collegato o alla sorgente selezionata. CDX-HS70MW/MS, CDX-HR70MW/MS, CDX-H905IP/ HR905IP, CDX-M50IP/MR50IP, CDX-M30, CDXH910UI/HR910UI y CDX-M60UI/MR60UI Cuando utilice una unidad maestra distinta de las mencionadas, lea las siguientes “Notas sobre la pantalla”. Notas sobre la pantalla • Es posible que la pantalla del reloj no aparezca en función de la unidad maestra conectada. • Es posible que no se muestre determinada información del disco, listas de emisoras de radio, etc. Algunos caracteres no pueden mostrarse. Los elementos de la pantalla no se desplazan. • Si el control remoto está conectado a un reproductor de DVD, etc., la información de disco no podrá mostrarse. Caution Vorsicht Do not spray high-pressure washing water, etc., directly on this remote commander. Achten Sie darauf, dass kein Waschwasser usw. mit hohem Druck direkt auf die Fernbedienung spritzt. Précaution Attenzione Ne pulvérisez pas d’eau de lavage sous pression, etc., directement sur cette télécommande. Non utilizzare sistemi di pulizia ad acqua compressa e simili direttamente sul telecomando. Precaucione Let op No rocíe el control remoto directamente con agua a presión, etc. Spuit geen water onder hoge druk, enzovoort, rechtstreeks op de afstandsbediening. Note sulla visualizzazione • A seconda dell’unità principale collegata, è possibile che l’orologio non venga visualizzato. • È possibile che alcune informazioni sui dischi, alcuni elenchi di stazioni radio e così via non vengano visualizzati. Alcuni caratteri non possono essere visualizzati. Le voci del display non scorrono. • Se il presente telecomando è collegato ad un lettore DVD o simili, non è possibile visualizzare le informazioni sul disco. De volgende toetsen (behalve SOURCE en MODE) hebben dezelfde functies als die op de hoofdeenheid of de draadloze afstandsbediening. Raadpleeg de gebruiksaanwijzing van uw Sony-hoofdeenheid voor meer informatie over de functies van elke toets of regelaar. Las unidades maestras compatibles con el control remoto incluyen los siguientes modelos: Met deze afstandsbediening kunt u uw hoofdeenheid eenvoudig bedienen. Gebruik deze afstandsbediening voor hoofdeenheden die zijn uitgerust met de speciale ingang voor de afstandsbediening en de Sony BUS-systeemregelaar. Se viene utilizzata un’unità principale diversa da quelle indicate sopra, leggere le seguenti “Note sulla visualizzazione”. Los siguientes botones (a excepción de los botones SOURCE y MODE) tienen las mismas funciones que los de la unidad maestra o el control remoto inalámbrico. Para obtener más información acerca de las funciones de cada botón o control, consulte el manual de instrucciones del equipo de la unidad maestra de Sony. 1 VOLUME +/– toetsen Het volume aanpassen. 2 SOURCE toets Inschakelen; de bron wijzigen (Radio/CD/USB/ IPD/AUX/SAT*1). 3 MUTING toets Het geluid dempen. Druk nogmaals op de toets om te annuleren. 4 OFF toets Het apparaat uitschakelen; de bron stoppen. 5 MODE*2 toets De radioband selecteren/de SAT-tunerband (modus) selecteren*1/het apparaat selecteren*3. 6 SEEK (–/+)/AMS (.m/M>)*2 toetsen CD/USB/IPD: Tracks overslaan (indrukken); tracks blijven overslaan (indrukken, vervolgens binnen 1 seconde nogmaals indrukken en vasthouden); een track snel terug-/ vooruitspoelen (ingedrukt houden). Radio: Automatisch afstemmen op zenders (indrukken); handmatig zoeken naar zenders (ingedrukt houden). 7 GP*4/ALBM*5 +/– toets*2*6 Groepen/albums overslaan (indrukken); groepen/albums blijven overslaan (ingedrukt houden). De voorkeurzenders selecteren. 8 Brongegevens*7 9 Modusinformatie*7 El control remoto permite controlar fácilmente el equipo de la unidad maestra. Utilice el control remoto con unidades maestras equipadas con una toma de entrada especial para el control remoto y el control del sistema Bus de Sony. CDX-HS70MW/MS, CDX-HR70MW/MS, CDX-H905IP/ HR905IP, CDX-M50IP/MR50IP, CDX-M30, CDXH910UI/HR910UI e CDX-M60UI/MR60UI Bedieningselementen *1 Si se conectó un sintonizador SAT (sólo en EE. UU.). *2 También es posible operar un reproductor de casetes con este control remoto. Para obtener más información, consulte el manual de instrucciones de la unidad maestra. *3 Si se conectó un cambiador de CD. *4 Cuando se reproduce un CD de ATRAC. *5 Cuando se reproduce un archivo MP3/WMA/AAC. *6 Si se conectó un cambiador, la operación es diferente; consulte el manual de instrucciones de la unidad maestra. *7 Los elementos de la pantalla varían en función del dispositivo conectado o de la fuente seleccionada. Kenmerken Tra le unità principali compatibili con il presente telecomando sono inclusi i seguenti modelli: Ubicación y función de los controles 1 Botones VOLUME +/– Para ajustar el volumen. 2 Botón SOURCE Para encender la unidad o cambiar la fuente (Radio/CD/USB/IPD/AUX/SAT*1). 3 Botón MUTING Para atenuar el sonido. Para cancelar esta función, vuelva a presionarlo. 4 Botón OFF Para apagar la unidad o detener la fuente. 5 MODE*2 button Para seleccionar la banda de radio, seleccionar la banda (modo)*1 del sintonizador SAT o seleccionar la unidad*3. 6 Botones SEEK (–/+)/AMS (.m/M>)*2 CD/USB/IPD: Para omitir pistas (presionar); para omitir pistas en forma continua (presionar y volver a presionar dentro de 1 segundo y mantener); para retroceder o avanzar una pista rápidamente (mantener presionado). Radio: Para sintonizar emisoras en forma automática (presionar); para localizar una emisora en forma manual (mantener presionado). 7 Botón GP*4/ALBM*5 +/–*2*6 Para omitir grupos/álbumes (presionar); para omitir grupos/álbumes en forma continua (mantener presionado). Para seleccionar las emisoras almacenadas en memoria. 8 Información de la fuente*7 9 Información del modo*7 Características *1 Als een SAT-tuner is aangesloten (alleen voor de Verenigde Staten). *2 Met deze afstandsbediening kan ook een cassettedeck worden bediend. Raadpleeg de gebruiksaanwijzing bij de hoofdeenheid voor meer informatie. *3 Als een CD-wisselaar is aangesloten. *4 Bij het afspelen van een ATRAC CD. *5 Bij het afspelen van een MP3-WMA-AAC-bestand. *6 Als een wisselaar is aangesloten, is de werking anders. Raadpleeg de gebruiksaanwijzing bij de hoofdeenheid. *7 Welke items worden weergegeven, is afhankelijk van het aangesloten apparaat of de geselecteerde bron. Voorbeelden van hoofdeenheden die compatibel zijn met deze afstandsbediening, zijn de volgende modellen: Source Source Fuente Tonquelle Sorgente Bron Source information (8) Informations sur la source (8) Información de la fuente (8) Tonquellenanzeige (8) Informazioni sulla sorgente (8) Brongegevens (8) Mode information (9) Informations sur le mode (9) Información del modo (9) Modusanzeige ( (9) Informazioni sul modo (9) Modusinformatie (9) Tuner Récepteur Sintonizador Tuner Sintonizzatore Tuner FM, AM (MW/SW/LW) Frequency Fréquence Frequencia Frequenz Frequenza Frequentie Tape Cassette Cinta Kassette Nastro Cassette TAPE CD/USB/iPod CD, USB, IPD CDX-HS70MW/MS, CDX-HR70MW/MS, CDX-H905IP/ HR905IP, CDX-M50IP/MR50IP, CDX-M30, CDXH910UI/HR910UI en CDX-M60UI/MR60UI Als u een andere hoofdeenheid gebruikt dan de hoofdeenheden die hierboven worden vermeld, moet u het volgende gedeelte "Opmerkingen over het display" doorlezen. Opmerkingen over het display • De klokweergave wordt wellicht niet weergegeven afhankelijk van de aangesloten hoofdeenheid. • Sommige discinformatie, radiozenderlijsten, enzovoort, worden wellicht niet weergegeven. Sommige tekens kunnen niet worden weergegeven. Displayitems rollen niet. • Als deze afstandbediening is aangesloten op een DVD-speler, enzovoort, kan de discinformatie niet worden weergegeven. • FWD (Forward)/(Avance)/(Avance)/(vorwärts)/ (avanti)/(Volgende) • REV (Reverse)/(Retour)/(Retroceso)/(rückwärts)/ (indietro)/(Vorige) • FF (Fast-forward)/(Avance rapide)/ (Avance rápido)/(Vorwärtsspulen)/ (avanzamento rapido)/(Snel vooruitspoelen) • REW (rewind)/(Retour)/(Rebobinado)/ (Zurückspulen)/(riavvolgimento rapido)/ (Terugspoelen) Track number/Elapsed playing time, Clock, etc. Numéro de plage/temps de lecture écoulé, horloge, etc. Número de pista/tiempo de reproducción transcurrido, reloj, etc. Titelnummer/Verstrichene Spieldauer, Uhrzeit usw. Numero del brano/tempo di riproduzione trascorso, orologio e così via Tracknummer/verstreken speelduur, klok, enzovoort AUX (Audio) AUX –––– Volume Volume Volumen Lautstärke VOL Volume level Niveau de volume Nivel de volumen Lautstärkepegel Volume Volume Livello di volume Volumeniveau Mass Supplied accessories 98 × 46 × 98 mm (w/h/ d) (3 7/8 × 1 13/16 × 3 7/8 in) Approx. 185 g (6.5 oz) Parts for installation and connections (1 set) Abmessungen 98 × 46 × 98 mm (B/H/T) Gewicht ca. 185 g Mitgeliefertes Zubehör Montageteile und Anschlusszubehör (1 Satz) Design and specifications are subject to change without notice. Änderungen, die dem technischen Fortschritt dienen, bleiben vorbehalten. Caractéristiques techniques Caratteristiche tecniche 98 × 46 × 98 mm ( l × h × p) (3 7/8 × 1 13/16 × 3 7/8 po) Environ 185 g (6,5 oz) Composants destinés à l’installation et aux raccordements (1 jeu) Dimensioni 98 × 46 × 98 mm (l/a/p) Peso Circa 185 g Accessori in dotazione Elementi per installazione e collegamenti (1 set) Dimensions Poids Accessoires fournis La conception et les spécifications sont sujettes à modification sans préavis. Il design e le caratteristiche tecniche sono soggetti a modifiche senza preavviso. Especificaciones Technische gegevens 98 × 46 × 98 mm (an/al/ prf) Peso Aprox. 185 g Accesorios suministrados Componentes para instalación y conexiones (1 juego) Afmetingen Diseño y especificaciones sujetos a cambio sin previo aviso. Ontwerp en specificaties kunnen zonder voorafgaande kennisgeving worden gewijzigd. Notice for customers: the following information is only applicable to equipment sold in countries applying EU Directives The manufacturer of this product is Sony Corporation, 1-7-1 Konan, Minato-ku, Tokyo, Japan. The Authorized Representative for EMC and product safety is Sony Deutschland GmbH, Hedelfinger Strasse 61, 70327 Stuttgart, Germany. For any service or guarantee matters please refer to the addresses given in separate service or guarantee documents. Hinweis für Kunden: Die folgenden Informationen gelten nur für Geräte, die in Ländern verkauft werden, in denen EU-Richtlinien gelten Der Hersteller dieses Produkts ist Sony Corporation, 1-71 Konan, Minato-ku, Tokio, Japan. Autorisierter Vertreter für EMV und Produktsicherheit ist Sony Deutschland GmbH, Hedelfinger Straße 61, 70327 Stuttgart, Deutschland. Kontaktadressen für Kundendienst oder Garantieansprüche finden Sie in den separaten Kundendienst- oder Garantiedokumenten. Avis à l’intention des clients : les informations suivantes s’appliquent uniquement aux appareils vendus dans des pays qui appliquent les directives de l’Union Européenne Le fabriquant de ce produit est Sony Corporation, 1-7-1 Konan, Minato-ku, Tokyo, Japon. Le représentant agréé en matière de normes CEM et de sécurité des produits est Sony Deutschland GmbH, Hedelfinger Strasse 61, 70327 Stuttgart, Allemagne. Pour toute demande d’entretien ou de garantie, veuillez écrire aux adresses spécifiées dans les documents d’entretien ou de garantie séparés. Avviso per i clienti: le seguenti informazioni riguardano esclusivamente gli apparecchi venduti in paesi in cui sono applicate le direttive UE Il presente prodotto è fabbricato da Sony Corporation, 1-7-1 Konan, Minato-ku, Tokyo, Giappone. Il Rappresentante autorizzato per la direttiva EMC e la sicurezza del prodotto è Sony Deutschland GmbH, Hedelfinger Strasse 61, 70327 Stuttgart, Germania. Per qualsiasi questione riguardante l’assistenza o la garanzia, rivolgersi agli indirizzi che si trovano nei documenti di assistenza o di garanzia. Aviso para los clientes: la información siguiente resulta de aplicación solo a los equipos comercializados en países afectados por las directivas de la UE El fabricante de este producto es Sony Corporation, 1-71 Konan, Minato-ku, Tokio, Japón. El representante autorizado para EMC y la seguridad de productos es Sony Deutschland GmbH, Hedelfinger Strasse 61, 70327 Stuttgart, Alemania. Para cualquier servicio o tema relacionado con la garantía, utilice la dirección que encontrará en los documentos adjuntos de servicio o de garantía. Opmerking voor klanten: de volgende informatie is enkel van toepassing voor apparaten die verkocht worden in landen die de EU-richtlijnen in acht nemen De fabrikant van dit apparaat is Sony Corporation, 1-71 Konan, Minato-ku, Tokio, Japan. De geautoriseerde vertegenwoordiger voor EMC en productveiligheid is Sony Deutschland GmbH, Hedelfinger Strasse 61, 70327 Stuttgart, Duitsland. Voor onderhouds- of garantiekwesties kunt u de adressen gebruiken die in de afzonderlijke onderhouds- of garantiedocumenten worden vermeld. Disposal of Old Electrical & Electronic Equipment (Applicable in the European Union and other European countries with separate collection systems) This symbol on the product or on its packaging indicates that this product shall not be treated as household waste. Instead it shall be handed over to the applicable collection point for the recycling of electrical and electronic equipment. By ensuring this product is disposed of correctly, you will help prevent potential negative consequences for the environment and human health, which could otherwise be caused by inappropriate waste handling of this product. The recycling of materials will help to conserve natural resources. For more detailed information about recycling of this product, please contact your local Civic Office, your household waste disposal service or the shop where you purchased the product. Entsorgung von gebrauchten elektrischen und elektronischen Geräten (anzuwenden in den Ländern der Europäischen Union und anderen europäischen Ländern mit einem separaten Sammelsystem für diese Geräte) Das Symbol auf dem Produkt oder seiner Verpackung weist darauf hin, dass dieses Produkt nicht als normaler Haushaltsabfall zu behandeln ist, sondern an einer Annahmestelle für das Recycling von elektrischen und elektronischen Geräten abgegeben werden muss. Durch Ihren Beitrag zum korrekten Entsorgen dieses Produkts schützen Sie die Umwelt und die Gesundheit Ihrer Mitmenschen. Umwelt und Gesundheit werden durch falsches Entsorgen gefährdet. Materialrecycling hilft, den Verbrauch von Rohstoffen zu verringern. Weitere Informationen über das Recycling dieses Produkts erhalten Sie von Ihrer Gemeinde, den kommunalen Entsorgungsbetrieben oder dem Geschäft, in dem Sie das Produkt gekauft haben. Traitement des appareils électriques et électroniques en fin de vie (Applicable dans les pays de l’Union Européenne et aux autres pays européens disposant de systèmes de collecte sélective) Ce symbole, apposé sur le produit ou sur son emballage, indique que ce produit ne doit pas être traité avec les déchets ménagers. Il doit être remis à un point de collecte approprié pour le recyclage des équipements électriques et électroniques. En s’assurant que ce produit est bien mis au rebut de manière appropriée, vous aiderez à prévenir les conséquences négatives potentielles pour l’environnement et la santé humaine. Le recyclage des matériaux aidera à préserver les ressources naturelles. Pour toute information supplémentaire au sujet du recyclage de ce produit, vous pouvez contacter votre municipalité, votre déchetterie ou le magasin où vous avez acheté le produit. Trattamento del dispositivo elettrico od elettronico a fine vita (applicabile in tutti i paesi dell’Unione Europea e in altri paesi europei con sistema di raccolta differenziata) Questo simbolo sul prodotto o sulla confezione indica che il prodotto non deve essere considerato come un normale rifiuto domestico, ma deve invece essere consegnato ad un punto di raccolta appropriato per il riciclo di apparecchi elettrici ed elettronici. Assicurandovi che questo prodotto sia smaltito correttamente, voi contribuirete a prevenire potenziali conseguenze negative per l’ambiente e per la salute che potrebbero altrimenti essere causate dal suo smaltimento inadeguato. Il riciclaggio dei materiali aiuta a conservare le risorse naturali. Per informazioni più dettagliate circa il riciclaggio di questo prodotto, potete contattare l’ufficio comunale, il servizio locale di smaltimento rifiuti oppure il negozio dove l’avete acquistato. Tratamiento de los equipos eléctricos y electrónicos al final de su vida útil (aplicable en la Unión Europea y en países europeos con sistemas de recogida selectiva de residuos) Este símbolo en el equipo o el embalaje indica que el presente producto no puede ser tratado como residuos domésticos normales, sino que debe entregarse en el correspondiente punto de recogida de equipos eléctricos y electrónicos. Al asegurarse de que este producto se desecha correctamente, Ud. ayuda a prevenir las consecuencias negativas para el medio ambiente y la salud humana que podrían derivarse de la incorrecta manipulación en el momento de deshacerse de este producto. El reciclaje de materials ayuda a conservar los recursos naturales. Para recibir información detallada sobre el reciclaje de este producto, póngase en contacto con el ayuntamiento, el punto de recogida más cercano o el establecimiento donde ha adquirido el producto. Verwijdering van oude elektrische en elektronische apparaten (Toepasbaar in de Europese Unie en andere Europese landen met gescheiden ophaalsystemen) Het symbool op het product of op de verpakking wijst erop dat dit product niet als huishoudelijk afval mag worden behandeld. Het moet echter naar een plaats worden gebracht waar elektrische en elektronische apparatuur wordt gerecycled. Als u ervoor zorgt dat dit product op de correcte manier wordt verwijderd, voorkomt u voor mens en milieu negatieve gevolgen die zich zouden kunnen voordoen in geval van verkeerde afvalbehandeling. De recycling van materialen draagt bij tot het vrijwaren van natuurlijke bronnen. Voor meer details in verband met het recyclen van dit product, neemt u contact op met de gemeentelijke instanties, het bedrijf of de dienst belast met de verwijdering van huishoudafval of de winkel waar u het product hebt gekocht. Dimensiones Gewicht Bijgeleverde accessoires Marine Remote Commander 98 × 46 × 98 mm (b/h/ d) Ongeveer 185 g Onderdelen voor installatie en aansluitingen (1 set) Operating Instructions Mode d’emploi Manual de instrucciones Bedienungsanleitung Istruzioni per l’uso Gebruiksaanwijzing Owner’s Record The model and serial numbers are located on the bottom of the unit. Record the serial number in the space provided below. Refer to these numbers whenever you call upon your Sony dealer regarding this product. Model No. RM-X60M Serial No. RM-X60M ©2008 Sony Corporation Printed in Thailand Dimensions/Dimensions/Dimensiones/Abmessungen/Dimensioni/Afmetingen 98 (3 7/8) 50 (2) 59 (2 3/8 ) Die folgenden Tasten (mit Ausnahme der Taste SOURCE und MODE) haben die gleiche Funktion wie die entsprechenden Tasten am Hauptgerät bzw. auf der schnurlosen Fernbedienung. Näheres zu den Funktionen der einzelnen Tasten und Regler finden Sie in der Bedienungsanleitung zum jeweiligen Sony-Hauptgerät. 38 (1 1/2) 80 (3 1/4) CHANGER 25 (1) COMMANDER/ DISPLAY 500 (20 1/8 ) The following buttons (except the SOURCE and MODE button) share the same functions as those on the master unit or the wireless remote commander. For more information about the functions of each button or control, refer to the operating instructions of your Sony master unit equipment. 4-123-134-11 (1) Technische Daten 23 Specifications 23 Merkmale und Funktionen (29/32) (29/32) Features 100 (4) Lage und Funktion der Teile und Bedienelemente MASTER UNIT Location and function of controls Unit: mm (in)/Unité : mm (po)/Unidad: mm/ Einheit: mm/Unità: mm/Eenheid: mm For the customers in the USA WARNING This equipment has been tested and found to comply with the limits for a Class B digital device, pursuant to Part 15 of the FCC Rules. These limits are designed to provide reasonable protection against harmful interference in a residential installation. This equipment generates, uses, and can radiate radio frequency energy and, if not installed and used in accordance with the instructions, may cause harmful interference to radio communications. However, there is no guarantee that interference will not occur in a particular installation. If this equipment does cause harmful interference to radio or television reception, which can be determined by turning the equipment off and on, the user is encouraged to try to correct the interference by one or more of the following measures: — Reorient or relocate the receiving antenna. — Increase the separation between the equipment and receiver. — Connect the equipment into an outlet on a circuit different from that to which the receiver is connected. — Consult the dealer or an experienced radio/TV technician for help. This device complies with Part 15 of the FCC Rules. Operation is subject to the following two conditions: (1) This device may not cause harmful interference, and (2) this device must accept any interference received, including interference that may cause undesired operation. You are cautioned that any changes or modifications not expressly approved in this manual could void your authority to operate this equipment. If you have any questions about this product, you may call; Sony Customer Information Services Center 1-800-222-7669 or http://www.sony.com/ For Customers in Russia Произведено в Taилaнде Изготовитель: Сони Корпорейшн 1-7-1 Koнaн, Mинато-ку, Токио, Япония Installation Parts list/Liste des pièces/Lista de las piezas/Teileliste/Lista delle parti/Onderdelenlijst 1 Notes • Choose a mounting location carefully so that the remote commander: — will not interfere with driving the motorboat. — is easy to operate and the display is easy to see. — will not constabtly get wet or dirty from sea water, rain, dust, etc. — is not subject to high temperatures, such as from direct sunlight. • Be sure to use only the supplied mounting hardware for a safe and secure installation. • When installing the remote commander, be sure not to damage electrical cables, etc., on the other side of the mounting surface. Notes on waterproof performance • This remote commander conforms to IEC60529 IPX6*1 and IPX7*2, and can be used in places exposed to splashing water or underwater up to depths of 1 m (3 ft 3 1/4 in). *1 Water shall not enter the interior even when exposed to direct jet streams of water (normal temperature fresh water) from any direction. *2 Water shall not seep into the interior even when left submerged in normal temperature fresh water at a depth of 1 m (3 ft 3 1/4 in) in a stationary condition for approximately 30 minutes. • Do not use this remote commander in the following places: places where the remote commander might be subject to high water pressure, hot springs or bathtubs, etc. Hinweise • Wählen Sie die Montagestelle sorgfältig so aus, dass die Fernbedienung: — beim Fahren des Motorboots nicht hinderlich ist. — leicht zu bedienen ist und die Anzeige gut abgelesen werden kann. — nicht ständig Nässe und Schmutz durch Wasser, Regen, Staub usw. ausgesetzt ist. — vor hohen Temperaturen und direktem Sonnenlicht geschützt ist. • Verwenden Sie ausschließlich die mitgelieferten Montageteile. Nur mit diesen Teilen lässt sich das Gerät sicher montieren. • Achten Sie bei der Montage der Fernbedienung darauf, keine Stromleitungen usw. an der Rückseite der Montagefläche zu beschädigen. Hinweise zum Wasserschutz • Diese Fernbedienung entspricht IEC60529 IPX6*1 und IPX7*2 und kann an Orten eingesetzt werden, die Spritzwasser ausgesetzt sind, sowie unter Wasser bis zu einer Tiefe von 1 m. *1 In das Innere dringt auch dann kein Wasser ein, wenn ein Wasserstrahl (Süßwasser mäßiger Temperatur) aus beliebiger Richtung auf das Gehäuse trifft. *2 In das Innere sickert kein Wasser ein, wenn sich die Fernbedienung etwa 30 Minuten lang unbewegt in einer Wassertiefe von 1 m (Süßwasser mäßiger Temperatur) befindet. • Verwenden Sie die Fernbedienung nicht an folgenden Orten: Orten, an denen sie hohem Wasserdruck ausgesetzt sein könnte. Verwenden Sie sie auch nicht in heißen Quellen oder Badewannen usw. Installation Installazione Remarques Note • Scegliere la posizione di montaggio in modo appropriato, in modo che il telecomando: — non interferisca con le operazioni di guida. — sia semplice da utilizzare e il display facilmente visibile. — non sia costantemente soggetto a sporcizia o acqua di mare, pioggia, polvere e così via. — non sia soggetto a temperature elevate, ad esempio se esposto alla luce solare diretta. • Per un’installazione sicura, accertarsi di utilizzare solo il materiale di installazione in dotazione. • Durante l’installazione del telecomando, prestare attenzione a non danneggiare cavi elettrici e così via presenti sull’altro lato della superficie di montaggio. • Choisissez soigneusement l’emplacement de montage de façon à ce que la télécommande : — ne gêne pas la conduite du bateau à moteur. — soit facile à utiliser et que l’affichage soit visible. — ne soit pas exposée en permanence à l’humidité ou aux souillures dues à l’eau de mer, la pluie, la poussière, etc. . — ne soit pas soumise à des températures très élevées, comme à la lumière directe du soleil. • Veillez à utiliser uniquement le matériel de montage fourni afin de permettre une installation fiable en toute sécurité. • Lorsque vous installez la télécommande, veillez à ne pas endommager les câbles électriques, etc., situés de l’autre côté de la surface de montage. Remarques sur l’étanchéité de l’appareil • Cette télécommande est conforme aux normes IEC60529 IPX6*1 et IPX7*2, et elle peut être utilisée dans des endroits exposés à des éclaboussures ou sous l’eau à une profondeur maximale de 1 m (3 pi 3 1/4 po). *1 L’eau ne doit pas pénétrer dans l’appareil même en cas d’exposition directe à des projections de jets d’eau (eau douce à température normale) de quelque direction que ce soit. *2 L’eau ne doit pas s’infiltrer dans l’appareil même s’il est immergé dans une eau douce à température normale à une profondeur de 1 m (3 pi 3 1/4 po) en position stationnaire pendant environ 30 minutes. • N’utilisez pas cette télécommande dans les endroits suivants : les endroits où la télécommande serait soumise à une pression d’eau élevée, à proximité de sources chaudes ou de baignoires, etc. 2 M4 × 45 (× 2) 1 3 M4 (× 2) 4 M4 (× 2) 5 M4 (× 6) 5m Notas • Elija cuidadosamente la ubicación de instalación de modo que el control remoto: — no interfiera en el manejo de la lancha motora. — resulte fácil de controlar y la pantalla pueda verse fácilmente. — no se moje o manche constantemente debido al agua del mar, la lluvia, el polvo, etc. — no esté sujeto a altas temperaturas como, por ejemplo, bajo la luz solar directa. • Asegúrese de utilizar únicamente la ferretería de montaje suministrada para garantizar una instalación segura y sin peligro. • Al instalar el control remoto, asegúrese de no dañar los cables eléctricos, etc., que se encuentren del otro lado de la superficie de montaje. Opmerkingen • Kies de plaats waar u de afstandsbediening wilt installeren zorgvuldig zodat deze: — de bestuurder van de motorboot niet hindert. — eenvoudig te bedienen is en het display gemakkelijk te zien is. — niet voortdurend nat of vies wordt door zeewater, regen, stof, enzovoort. — niet wordt blootgesteld aan hoge temperaturen, zoals van direct zonlicht. • Gebruik alleen de bijgeleverde installatieonderdelen om het apparaat veilig en stevig te monteren. • Beschadig tijdens het plaatsen van de afstandsbediening geen elektrische kabels, enzovoort, aan de andere kant van de plaats waar u de afstandsbediening monteert. Notas sobre impermeabilidad • El control remoto cumple con las normas IEC60529 IPX6*1 e IPX7*2, y puede utilizarse en lugares expuestos a las salpicaduras de agua o en lugares sumergibles de hasta 1 metro de profundidad. *1 No entrará agua en el interior incluso si se expone a chorros directos de agua dulce a temperatura normal desde cualquier dirección. *2 No se filtrará agua en el interior incluso si se sumerge en agua dulce a temperatura normal a una profundidad de 1 metro en estado inmóvil durante aproximadamente 30 minutos. • No utilice el control remoto: en lugares donde el control remoto pueda estar sujeto a una alta presión de agua, en manantiales termales o en bañeras, etc. Opmerkingen over waterdichtheid • Deze afstandsbediening voldoet aan IEC60529 IPX6*1 en IPX7*2, en kan worden gebruikt op plaatsen waar deze wordt blootgesteld aan opspattend water en onder water tot een diepte van 1 m. *1 Er komt geen water in het apparaat terecht, zelfs niet wanneer het apparaat wordt blootgesteld aan directe waterstralen (zoet water met een normale temperatuur) uit een willekeurige richting. *2 Er komt geen water in het apparaat terecht, zelfs niet als het apparaat ongeveer 30 minuten stil onder water blijft liggen op een diepte van 1 m in zoet water met een normale temperatuur. • Gebruik deze afstandsbediening niet op de volgende plaatsen: plaatsen waar de afstandsbediening kan worden blootgesteld aan hoge waterdruk, heetwaterbronnen of badkuipen, enzovoort. 9 0 5m Make the mounting hole as follows. Effectuez le trou de montage de la façon suivante. Perfore el orificio de montaje del modo siguiente. Nehmen Sie die Montagebohrung wie folgt vor. Praticare il foro di montaggio come indicato. Maak als volgt het gat voor de installatie. When finished making all the connections, press the RESET button of the master unit. CD changer Changeur de CD Cambiador de CD CD-Wechsler Cambia CD CD-wisselaar Unit: mm (in) Unité : mm (po) Unidad: mm Einheit: mm Unità: mm Eenheid: mm 81 (3 1/4) Notes • Be sure all the cords, connection plugs, and the divide box are located and fixed in position so that they are not subjected to high temperatures, vibration, sea water, rain, dust, etc. • When you connect the remote commander to the master unit and other units (CD changer etc.), refer also to the Installation/Connections manual of the master unit and other units. Lorsque vous avez terminé tous les raccordements, appuyez sur la touche RESET de l’appareil principal. Remarques • Veillez à ce que tous les câbles, les fiches des connexions et le boîtier de dérivation soient situés et fixés dans une position qui ne soit pas soumise à des températures élevées, à des vibrations, à l’eau de mer, à la pluie, à la poussière, etc. • Lorsque vous raccordez la télécommande à l’appareil principal et à d’autres appareils (changeurs CD, etc.), reportezvous également au guide Installation/Connexions de l’appareil principal et des autres appareils. 5 2 Uses bolt 1 depending on the mounting location, and fasten them in the way of either A or B. Utilisez le boulon 1 en fonction de l’emplacement de montage et serrez de la façon A ou B. Utilice pernos 1 en función de la ubicación de montaje y apriételos en la dirección A o B. Bringen Sie Schraube 1 je nach Montageposition an und ziehen Sie sie wie in Abbildung A oder B erläutert an. Utilizzare il bullone 1 a seconda della posizione di installazione, quindi serrare verso A o B. Gebruik bout 1 op de juiste manier voor de installatieplaats en draai deze vast op manier A of B. A 1 CHANGER COMMANDER/ DISPLAY Not supplied (supplied with CD changer) Non fourni (fourni avec le changeur de CD) No suministrado (suministrado con el cambiador de CD) Nicht mitgeliefert (mit dem CD-Wechsler geliefert) Non in dotazione (in dotazione con il cambia CD) Niet bijgeleverd (geleverd met de CD-wisselaar) Hinweise • Achten Sie darauf, alle Kabel, Verbindungsstecker und den Teiler so zu verlegen und zu fixieren, dass sie vor hohen Temperaturen, Vibrationen, Wasser, Regen, Staub usw. geschützt sind. • Weitere Informationen zum Anschließen der Fernbedienung zum Steuern des Hauptgeräts und anderer Geräte (CDWechsler usw.) finden Sie auch in der Installations-/Anschlussanleitung zu dem jeweiligen Gerät. Note • Accertarsi che tutti i cavi, le spine di collegamento e la divide box siano posizionati e fissati in luoghi non soggetti a temperature elevate, vibrazioni, acqua di mare, pioggia, polvere e così via. • Quando il telecomando viene collegato all’unità principale e ad altri apparecchi (cambia CD, e così via), consultare inoltre il manuale di installazione/dei collegamenti dell’unità principale e degli altri apparecchi. Insert bolt 1 in the slot as shown, and turn it anticlockwise until it is secure. Then tighten the nut 4 fully clockwise. Als alle aansluitingen zijn gemaakt, drukt u op RESET op de hoofdeenheid. Insérez le boulon 1 dans la fente, ainsi qu’il est illustré, puis tournez-le dans le sens anti-horaire jusqu’à ce qu’il soit correctement fixé. Serrez ensuite l’écrou 4 à fond dans le sens horaire. Opmerkingen • Zorg ervoor dat alle snoeren, stekkers en de verdeeldoos op een plaats zijn vastgemaakt waar ze niet worden blootgesteld aan hoge temperaturen, trillingen, zeewater, regen, stof enzovoort. • Als u de afstandsbediening aansluit op de hoofdeenheid en andere apparaten (CD-wisselaars, enzovoort), moet u ook de gebruiksaanwijzing voor installatie/aansluitingen van de hoofdeenheid en andere apparaten raadplegen. Setzen Sie Schraube 1 wie gezeigt in die Auskerbung ein und ziehen Sie sie gegen den Uhrzeigersinn fest an. Ziehen Sie dann die Mutter 4 im Uhrzeigersinn fest an. Inserire il bullone 1 come illustrato, quindi ruotarlo in senso antiorario finché non è in posizione salda. Quindi, serrare completamente il dado 4 in senso orario. 4 Drücken Sie die Taste RESET am Hauptgerät, nachdem Sie alle Anschlüsse vorgenommen haben. Una volta completati tutti i collegamenti, premere il tasto RESET dell’unità principale. Inserte el perno 1 en la ranura tal y como se muestra en la ilustración y gírelo hacia la izquierda hasta que quede fijado. A continuación, apriete la tuerca 4 completamente hacia la derecha. 4 Notas • Asegúrese de que todos los cables, las clavijas de conexión y la caja de división están situados y fijados en una ubicación en la que no estén expuestos a altas temperaturas, vibraciones, agua marina, lluvia, polvo, etc. • Cuando conecte el control remoto a la unidad maestra y a otras unidades (cambiador de CD, etc.), consulte también el manual de instalación/conexiones de la unidad maestra y otras unidades. 6 7 Master unit with Sony BUS system Appareil principal doté d’un système de BUS Sony Unidad maestra con sistema BUS de Sony Hauptgerät mit Sony-BUS-System Unità principale con sistema BUS Sony Hoofdeenheid met Sony BUS-systeem Plaats bout 1 in de sleuf op de manier die wordt weergegeven en draai deze linksom tot de bout goed vastzit. Draai de moer 4 volledig naar rechts. 4 1 B 1 Insert bolt 1 in the slot as shown, and turn it clockwise until it is secure. Then tighten the nut 4 fully clockwise. Insérez le boulon 1 dans la fente, ainsi qu’il est illustré, puis tournez-le dans le sens horaire jusqu’à ce qu’il soit correctement fixé. Serrez ensuite l’écrou 4 à fond dans le sens horaire. 4 Montage 8 Una vez que haya realizado todas las conexiones, presione el botón RESET de la unidad maestra. Note sulla resistenza all’acqua • Il presente telecomando è conforme con IEC60529 IPX6*1 e IPX7*2 e può essere utilizzato in luoghi esposti a spruzzi d’acqua oppure sott’acqua fino ad una profondità di 1 m. *1 L’acqua non deve penetrare all’interno anche se il telecomando è esposto a getti d’acqua (temperatura normale) provenienti da qualsiasi direzione. *2 L’acqua non deve penetrare all’interno anche se il telecomando viene immerso in acqua a temperatura normale ad una profondità di 1 m in una posizione fissa per circa 30 minuti. • Non utilizzare il presente telecomando nei luoghi riportati di seguito: dove il telecomando è soggetto ad acqua compressa, sorgenti termali o vasche da bagno e così via. Instalación Connections/Connexions/Conexiones/Anschlüsse/Collegamenti/Aansluitingen 7 6 MASTER UNIT Installation Inserte el perno 1 en la ranura tal y como se muestra en la ilustración y gírelo hacia la derecha hasta que quede fijado. A continuación, apriete la tuerca 4 completamente hacia la derecha. To prevent plug from falling off/Pour éviter que la fiche ne tombe/Para evitar que la clavija se caiga/ So verhindern Sie, dass sich der Stecker löst/Per evitare che la spina si stacchi/Voorkomen dat de stekker losraakt Master unit Appareil principal Unidad maestra Hauptgerät Unità principale Hoofdeenheid Setzen Sie Schraube 1 wie gezeigt in die Auskerbung ein und ziehen Sie sie im Uhrzeigersinn fest an. Ziehen Sie dann die Mutter 4 im Uhrzeigersinn fest an. Inserire il bullone 1 come illustrato, quindi ruotarlo in senso orario finché non è in posizione salda. Quindi, serrare completamente il dado 4 in senso orario. After connecting, bundle up the connecting cords of the remote commander with other connecting cords of the audio equipment by attaching the supplied clamp 9. Be sure to leave some slack in the connecting cord between the plug and the clamp as illustrated. Une fois les raccordements effectués, regroupez les câbles de raccordement de la télécommande avec les autres câbles de raccordement de l’équipement audio à l’aide du collier 9 fourni. Faites en sorte que les câbles de raccordement restent lâches entre la fiche et le collier, ainsi qu’il est illustré. 9 Una vez realizada la conexión, agrupe los cables de conexión del control remoto con otros cables de conexión del equipo de audio colocando la abrazadera suministrada 9. Asegúrese de dejar cierta holgura en el cable de conexión entre la clavija y la abrazadera tal y como se muestra en la ilustración. Plaats bout 1 in de sleuf op de manier die wordt weergegeven en draai deze rechtsom tot de bout goed vast zit. Draai de moer 4 volledig naar rechts. Nachdem Sie die Anschlüsse vorgenommen haben, bündeln Sie die Verbindungskabel der Fernbedienung und der Audiogeräte mithilfe des mitgelieferten Kabelbinders 9. Lassen Sie das Verbindungskabel zwischen dem Stecker und dem Kabelbinder unbedingt etwas durchhängen, wie in der Abbildung gezeigt. A collegamento completato, unire i cavi di collegamento del telecomando con gli altri cavi di collegamento dell’apparecchiatura audio utilizzando l’apposito fermo 9 in dotazione. Accertarsi di lasciare lievemente allentato il cavo di collegamento tra la spina e il fermo, come illustrato. Master unit Appareil principal Unidad maestra Hauptgerät Unità principale Hoofdeenheid 3 9 0 8 2 3 4 Nadat u de afstandsbediening hebt aangesloten, bevestigt u de bijgeleverde klem 9 om de aansluitsnoeren van de afstandsbediening met de andere aansluitsnoeren van de audioapparatuur te bundelen. Zorg ervoor dat het aansluitsnoer tussen de stekker en de klem enigszins slap hangt, zoals in de afbeelding wordt weergegeven.-
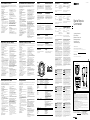 1
1
-
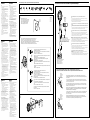 2
2


Sony RM-X60M - Marine Remote Commander de handleiding
- Type
- de handleiding
- Deze handleiding is ook geschikt voor
in andere talen
- English: Sony RM-X60M - Marine Remote Commander Owner's manual
- italiano: Sony RM-X60M - Marine Remote Commander Manuale del proprietario
- français: Sony RM-X60M - Marine Remote Commander Le manuel du propriétaire
- español: Sony RM-X60M - Marine Remote Commander El manual del propietario
- Deutsch: Sony RM-X60M - Marine Remote Commander Bedienungsanleitung