
MONITOR SPEAKER
MS40DR
Owner’s Manual
Bedienungsanleitung
Mode d’emploi
English
Français Deutsch
JA
ZH
FR
DE
EN

2
MS40DR Owner’s Manual
PRODUCT SAFETY MARKINGS: Yamaha electronic
products may have either labels similar to the graphics
shown below or molded/stamped facsimiles of these graph-
ics on the enclosure. The explanation of these graphics
appears on this page. Please observe all cautions indicated
on this page and those indicated in the safety instruction sec-
tion.
The exclamation point within the equi-
lateral triangle is intended to alert the
user to the presence of important operat-
ing and maintenance (servicing) instruc-
tions in the literature accompanying the
product.
The lightning flash with arrowhead sym-
bol, within the equilateral triangle, is
intended to alert the user to the presence
of uninsulated “dangerous voltage”
within the product’s enclosure that may
be of sufficient magnitude to constitute a
risk of electrical shock.
IMPORTANT NOTICE: All Yamaha electronic products
are tested and approved by an independent safety testing
laboratory in order that you may be sure that when it is prop-
erly installed and used in its normal and customary manner,
all foreseeable risks have been eliminated. DO NOT modify
this unit or commission others to do so unless specifically
authorized by Yamaha. Product performance and/or safety
standards may be diminished. Claims filed under the
expressed warranty may be denied if the unit is/has been
modified. Implied warranties may also be affected.
SPECIFICATIONS SUBJECT TO CHANGE: The
information contained in this manual is believed to be cor-
rect at the time of printing. However, Yamaha reserves the
right to change or modify any of the specifications without
notice or obligation to update existing units.
ENVIRONMENTAL ISSUES: Yamaha strives to produce
products that are both user safe and environmentally
friendly. We sincerely believe that our products and the pro-
duction methods used to produce them, meet these goals. In
keeping with both the letter and the spirit of the law, we
want you to be aware of the following:
Battery Notice: This product MAY contain a small non-
rechargeable battery which (if applicable) is soldered in
place. The average life span of this type of battery is approx-
imately five years. When replacement becomes necessary,
contact a qualified service representative to perform the
replacement.
Warning: Do not attempt to recharge, disassemble, or incin-
erate this type of battery. Keep all batteries away from chil-
dren. Dispose of used batteries promptly and as regulated by
applicable laws. Note: In some areas, the servicer is required
by law to return the defective parts. However, you do have
the option of having the servicer dispose of these parts for
you.
Disposal Notice: Should this product become damaged
beyond repair, or for some reason its useful life is consid-
ered to be at an end, please observe all local, state, and fed-
eral regulations that relate to the disposal of products that
contain lead, batteries, plastics, etc.
NOTICE: Service charges incurred due to lack of knowl-
edge relating to how a function or effect works (when the
unit is operating as designed) are not covered by the manu-
facturer’s warranty, and are therefore the owners responsi-
bility. Please study this manual carefully and consult your
dealer before requesting service.
NAME PLATE LOCATION: The graphic below indicates
the location of the name plate. The model number, serial
number, power requirements, etc., are located on this plate.
You should record the model number, serial number, and the
date of purchase in the spaces provided below and retain this
manual as a permanent record of your purchase.
Model
Serial No.
Purchase Date
CAUTION
RISK OF ELECTRIC SHOCK
DO NOT OPEN
CAUTION: TO REDUCE THE RISK OF ELECTRIC SHOCK.
DO NOT REMOVE COVER (OR BACK).
NO USER-SERVICEABLE PARTS INSIDE.
REFER SERVICING TO QUALIFIED SERVICE PERSONNEL.
SPECIAL MESSAGE SECTION
92-469- 1 (rear)

MS40DR Owner’s Manual
3
The above warning is located on the top/bottom/rear/side of the
unit.
Explanation of Graphical Symbols
The lightning flash with arrowhead symbol
within an equilateral triangle is intended to alert
the user to the presence of uninsulated
“dangerous voltage” within the product’s
enclosure that may be of sufficient magnitude to
constitute a risk of electric shock to persons.
The exclamation point within an equilateral
triangle is intended to alert the user to the
presence of important operating and
maintenance (servicing) instructions in the
literature accompanying the product.
IMPORTANT SAFETY INSTRUCTIONS
1 Read these instructions.
2 Keep these instructions.
3 Heed all warnings.
4 Follow all instructions.
5 Do not use this apparatus near water.
6 Clean only with dry cloth.
7 Do not block any ventilation openings. Install in
accordance with the manufacturer’s instructions.
8 Do not install near any heat sources such as radiators,
heat registers, stoves, or other apparatus (including
amplifiers) that produce heat.
9 Do not defeat the safety purpose of the polarized or
grounding-type plug. A polarized plug has two blades
with one wider than the other. A grounding type plug
has two blades and a third grounding prong. The wide
blade or the third prong are provided for your safety. If
the provided plug does not fit into your outlet, consult
an electrician for replacement of the obsolete outlet.
10 Protect the power cord from being walked on or pinched
particularly at plugs, convenience receptacles, and the
point where they exit from the apparatus.
11 Only use attachments/accessories specified by the
manufacturer.
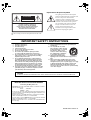
12 Use only with the cart, stand,
tripod, bracket, or table specified
by the manufacturer, or sold with
the apparatus. When a cart is
used, use caution when moving
the cart/apparatus combination
to avoid injury from tip-over.
13 Unplug this apparatus during
lightning storms or when unused for long periods of
time.
14 Refer all servicing to qualified service personnel.
Servicing is required when the apparatus has been
damag ed in any way, such as power-supply cord or plug
is damaged, liquid has been spilled or objects have
fallen into the apparatus, the apparatus has been
exposed to rain or moisture, does not operate normally,
or has been dropped.
(UL60065_03)
CAUTION: TO REDUCE THE RISK OF
ELECTRIC SHOCK, DO NOT REMOVE
COVER (OR BACK). NO USER-SERVICEABLE
PARTS INSIDE. REFER SERVICING TO
QUALIFIED SERVICE PERSONNEL.
CAUTION
RISK OF ELECTRIC SHOCK
DO NOT OPEN
WARNING
TO REDUCE THE RISK OF FIRE OR ELECTRIC SHOCK, DO NOT EXPOSE THIS APPARATUS TO RAIN OR MOISTURE.
IMPORTANT NOTICE FOR THE UNITED KINGDOM
Connecting the Plug and Cord
IMPORTANT. The wires in this mains lead are coloured in accordance
with the following code:
BLUE : NEUTRAL
BROWN : LIVE
As the colours of the wires in the mains lead of this apparatus may not
correspond with the coloured makings identifying the terminals in your
plug proceed as follows:
The wire which is coloured BLUE must be connected to the terminal
which is marked with the letter N or coloured BLACK.
The wire which is coloured BROWN must be connected to the terminal
which is marked with the letter L or coloured RED.
Making sure that neither core is connected to the earth terminal of the
three pin plug.
• This applies only to products distributed by Yamaha Music U.K. Ltd. (2 wires)

4
MS40DR Owner’s Manual
PRECAUTIONS
PLEASE READ CAREFULLY BEFORE PROCEEDING
* Please keep this manual in a safe place for future reference.
WARNING
Always follow the basic precautions listed below to avoid the possibility of serious injury or even death from electrical
shock, short-circuiting, damages, fire or other hazards. These precautions include, but are not limited to, the following:
• Do not place the power cord near heat sources such as heaters or
radiators, and do not excessively bend or otherwise damage the
cord, place heavy objects on it, or place it in a position where
anyone could walk on, trip over, or roll anything over it.
• Only use the voltage specified as correct for the instrument. The
required voltage is printed on the name plate of the instrument.
• Check the electric plug periodically and remove any dirt or dust
which may have accumulated on it.
• This instrument contains no user-serviceable parts. Do not attempt
to disassemble or modify the internal components in any way. If it
should appear to be malfunctioning, discontinue use immediately
and have it inspected by qualified Yamaha service personnel.
• Do not expose the instrument to rain, use it near water or in damp or
wet conditions, or place on it any containers (such as vases, bottles
or glasses) containing liquids which might spill into any openings.
If any liquid such as water seeps into the instrument, turn off the
power immediately and unplug the power cord from the AC outlet.
Then have the instrument inspected by qualified Yamaha service
personnel.
• Never insert or remove an electric plug with wet hands.
• Do not put burning items, such as candles, on the unit.
A burning item may fall over and cause a fire.
• When one of the following problems occur, immediately turn off the
power switch and disconnect the electric plug from the outlet. Then
have the device inspected by Yamaha service personnel.
• The power cord or plug becomes frayed or damaged.
• It emits unusual smells or smoke.
• Some object has been dropped into the instrument.
• There is a sudden loss of sound during use of the instrument.
CAUTION
Always follow the basic precautions listed below to avoid the possibility of physical injury to you or others, or damage
to the instrument or other property. These precautions include, but are not limited to, the following:
• Do not connect the instrument to an electrical outlet using a
multiple-connector. Doing so can result in lower sound quality, or
possibly cause overheating in the outlet.
• When removing the electric plug from the instrument or an outlet,
always hold the plug itself and not the cord. Pulling by the cord can
damage it.
• Remove the electric plug from the outlet when the instrument is not
to be used for extended periods of time, or during electrical storms.
• Do not place the instrument in an unstable position where it might
accidentally fall over.
• Before moving the instrument, remove all connected cables.
• When setting up the product, make sure that the AC outlet you are
using is easily accessible. If some trouble or malfunction occurs,
immediately turn off the power switch and disconnect the plug from
the outlet. Even when the power switch is turned off, electricity is
still flowing to the product at the minimum level. When you are not
using the product for a long time, make sure to unplug the power
cord from the wall AC outlet.
• Use only the stand/rack specified for the instrument. When attaching
the stand or rack, use the provided screws only. Failure to do so
could cause damage to the internal components or result in the
instrument falling over.
• Make sure to place the subwoofer unit away from walls or other
objects leaving space of at least 20cm (about 8 inches) above and
10cm (4 inches) on all sides. (The unit has a built in amplifier and
generates heat.) Also make sure not to lay the unit on any surface
with the rear panel facing down.
Power supply/Power cord
Do not open
Water warning
Fire warning
If you notice any abnormality
Power supply/Power cord
Location
(7)-1
1/2

MS40DR Owner’s Manual
5
• Before connecting the instrument to other electronic components,
turn off the power for all components. Before turning the power on
or off for all components, set all volume levels to minimum.
• Be sure to set the volumes of all components at their minimum
levels and gradually raise the volume controls while playing the
instrument to set the desired listening level.
• Do not rest your weight on, or place heavy objects on the
instrument, and do not use excessive force on the buttons, switches
or connectors.
• Do not use the instrument/device or headphones for a long period of
time at a high or uncomfortable volume level, since this can cause
permanent hearing loss. If you experience any hearing loss or
ringing in the ears, consult a physician.
Always turn the power off when the instrument is not in use.
NOTICE
To avoid the possibility of damage to the product, data or other property, follow the notices below.
Handling and Maintenance
• Do not use the instrument in the vicinity of a TV, radio, stereo equipment, mobile phone, or other electric devices. Otherwise, the instrument, TV,
or radio may generate noise.
• Do not expose the instrument to excessive dust or vibrations, or extreme cold or heat (such as in direct sunlight, near a heater, or in a car during
the day) to prevent the possibility of panel disfiguration or damage to the internal components.
• Do not place vinyl, plastic or rubber objects on the instrument, since this might discolor the panel or keyboard.
• When cleaning the instrument, use a soft, dry or slightly damp cloth. Do not use paint thinners, solvents, cleaning fluids, or chemical-
impregnated wiping cloths.
• During extreme changes in temperature or humidity, condensation may occur and water may collect on the surface of the instrument. If water is
left, the wooden parts may absorb the water and be damaged. Make sure to wipe any water off immediately with a soft cloth.
Information
About this manual
• The illustrations as shown in this manual are for instructional purposes only, and may appear somewhat different from those on your instrument.
• The company names and product names in this manual are the trademarks or registered trademarks of their respective companies.
Connections
Handling caution
Yamaha cannot be held responsible for damage caused by improper use or modifications to the instrument, or data that is lost or destroyed.
(7)-1
2/2

6
MS40DR Owner’s Manual
Thank you for purchasing the Yamaha MS40DR Monitor Speaker system.
Before using the speakers, we ask that you thoroughly read this Owner’s Manual
to use the product in a safe manner.
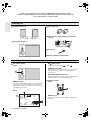
Satellite speakers (2)
Subwoofer speaker (1)
Pipe clamps (2)
RCA pin/8-pin - RCA pin/phone combination
cable (1)
Hex key (1)
Owner’s Manual (this document)
Subwoofer speaker
[Front]
q BASS control
Use this control to adjust the volume of the subwoofer. For
best results, set this to the midway position or slightly
higher. Turn it clockwise to increase the volume and coun-
terclockwise to decrease it.
[Rear]
w Power switch
Press to turn the power ON ( ) or OFF ( ).
e MASTER VOLUME
This dial controls the master volume. Turn the dial clock-
wise to increase the volume or counter-clockwise to
decrease it.
r TO DTX / SATELLITE SP jack
This jack is used to connect the subwoofer speaker to the
satellite speakers and the drum trigger module.
Satellite speaker
[Rear]
t INPUT jack
This jack is used to connect the satellite speaker to the
subwoofer.
Packing List
Controls & Connectors

MS40DR Owner’s Manual
7
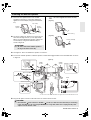
1.
First insert the speaker mount of the satellite
speaker into the hole q of the pipe clamp, then
tighten the screw firmly by using the included hex
key.
2.
As shown in Figure A, slowly insert one leg of your
drum rack through the hole w of the pipe clamp.
When you finish adjusting the position, tighten the
screw firmly by using the included hex key as
shown in Figure B.
• Be sure to tighten the screws securely.
3.
See Figure C. Place the Subwoofer speaker on a flat floor.
4.
Connect the satellite speakers, subwoofer speaker, and the drum trigger module via the included cable as shown
in Figure C.
5.
Plug the AC power cord into an AC wall socket or another electrical outlet.
Installing the Monitor Speaker
CAUTION
• Be sure to attach the satellite speaker to
the leg of the drum rack slowly.
Hex key
(included)
Pipe clamp
q
Speaker mount
Satellite
speaker
Hex key (included)
Drum rack leg
[Figure A]
[Figure B]
w
CAUTION
• Even when the power switch is in the OFF () position, a small amount of electricity is still flowing
to the unit. When you are not using the MS40DR for a long time, make sure to unplug the AC power
adaptor from the wall AC outlet.
Satellite
speaker
Drum trigger module
Subwoofer speaker
Satellite
speaker
Red
White
Red
Red
White
Red
White
White
[Figure C]
OUTPUT L/MONO
OUTPUT R
* For the stereo audio cables, red indicates the right channel, and white indicates the left.

8
MS40DR Owner’s Manual
* Specifications and descriptions in this Owner’s Manual are for information purposes only. Yamaha Corp. reserves the
right to change or modify products or specifications at any time without prior notice. Since specifications, equipment or
options may not be the same in every locale, please check with your Yamaha dealer.
Troubleshooting
No sound comes from the
speakers or subwoofer.
The AC power cord is not properly plugged
into the wall outlet.
Insert the AC power cord firmly into the wall
outlet.
The main power switch on the subwoofer is
set to OFF.
Set the main power switch to ON.
Connections are faulty or incomplete. Make sure the connections are secure, or use
a different cable.
The volume is set too low. Turn the MASTER VOLUME to the right to
increase the volume.
Turn the subwoofer BASS control to the right to
increase the volume.
The volume of your drum trigger module is
set too low.
Raise the volume of your drum trigger module.
Sound is distorted. The MASTER VOLUME dial is set too high. Turn the MASTER VOLUME to the left to
decrease the volume.
The BASS control dial is set too high. Turn the BASS control to the left to decrease
the volume of the Subwoofer speaker.
The levels of the mid and low frequency
ranges in the Master EQ settings of your
drum trigger module are set too high.
Adjust the Master EQ settings of your drum
trigger module. For details, refer to the Owner’s
Manual that came with your drum trigger mod-
ule.
Noise occurs in the sound. Connections are faulty or incomplete. Make sure the connections are secure, or use
a different cable.
The speakers produce a
“pop” sound whenever the
power is turned ON or OFF.
The instrument’s power is turned ON before
the Subwoofer’s power is turned ON.
First, turn the subwoofer’s power ON, then turn
the instrument’s power ON.
Specifications
Output power Satellite speakers 20W + 20W (1kHz, 20W/4Ω)
Subwoofer 40W
Frequency response Satellite speakers / Subwoofer
speaker
32Hz – 20kHz
Speaker unit Satellite speakers Tweeter: 1.9 cm (3/4") dome, magnetic shielding
Midrange: 8 cm (3") cone, magnetic shielding
Subwoofer 16 cm (6.5") cone, magnetic shielding
Power consumption 65W
Power supply U.S.A. and Canada models: AC 120 V, 60 Hz
Australia model: AC 240 V, 50 Hz
U.K. and Europe models: AC 220-230 V, 50-60 Hz
Dimensions (W x H x D) Satellite speakers 97 x 159 x 178 mm
Subwoofer 350 x 210 x 321 mm
Weight Satellite speakers 0.7kg x 2
Subwoofer 7.4kg
Accessories Pipe clamps (2), hex key (1), RCA pin/8-pin - RCA pin/phone combination cable (1),
Owner’s Manual (this document)
Documenttranscriptie
English Deutsch MONITOR SPEAKER 日本語 Français MS40DR Owner’s Manual Bedienungsanleitung Mode d’emploi EN DE 取扱説明書 FR ZH JA SPECIAL MESSAGE SECTION PRODUCT SAFETY MARKINGS: Yamaha electronic products may have either labels similar to the graphics shown below or molded/stamped facsimiles of these graphics on the enclosure. The explanation of these graphics appears on this page. Please observe all cautions indicated on this page and those indicated in the safety instruction section. CAUTION RISK OF ELECTRIC SHOCK DO NOT OPEN CAUTION: TO REDUCE THE RISK OF ELECTRIC SHOCK. DO NOT REMOVE COVER (OR BACK). NO USER-SERVICEABLE PARTS INSIDE. REFER SERVICING TO QUALIFIED SERVICE PERSONNEL. The exclamation point within the equilateral triangle is intended to alert the user to the presence of important operating and maintenance (servicing) instructions in the literature accompanying the product. The lightning flash with arrowhead symbol, within the equilateral triangle, is intended to alert the user to the presence of uninsulated “dangerous voltage” within the product’s enclosure that may be of sufficient magnitude to constitute a risk of electrical shock. IMPORTANT NOTICE: All Yamaha electronic products are tested and approved by an independent safety testing laboratory in order that you may be sure that when it is properly installed and used in its normal and customary manner, all foreseeable risks have been eliminated. DO NOT modify this unit or commission others to do so unless specifically authorized by Yamaha. Product performance and/or safety standards may be diminished. Claims filed under the expressed warranty may be denied if the unit is/has been modified. Implied warranties may also be affected. SPECIFICATIONS SUBJECT TO CHANGE: The information contained in this manual is believed to be correct at the time of printing. However, Yamaha reserves the right to change or modify any of the specifications without notice or obligation to update existing units. ENVIRONMENTAL ISSUES: Yamaha strives to produce products that are both user safe and environmentally friendly. We sincerely believe that our products and the production methods used to produce them, meet these goals. In keeping with both the letter and the spirit of the law, we want you to be aware of the following: Battery Notice: This product MAY contain a small nonrechargeable battery which (if applicable) is soldered in place. The average life span of this type of battery is approximately five years. When replacement becomes necessary, contact a qualified service representative to perform the replacement. Warning: Do not attempt to recharge, disassemble, or incinerate this type of battery. Keep all batteries away from children. Dispose of used batteries promptly and as regulated by applicable laws. Note: In some areas, the servicer is required by law to return the defective parts. However, you do have the option of having the servicer dispose of these parts for you. Disposal Notice: Should this product become damaged beyond repair, or for some reason its useful life is considered to be at an end, please observe all local, state, and federal regulations that relate to the disposal of products that contain lead, batteries, plastics, etc. NOTICE: Service charges incurred due to lack of knowledge relating to how a function or effect works (when the unit is operating as designed) are not covered by the manufacturer’s warranty, and are therefore the owners responsibility. Please study this manual carefully and consult your dealer before requesting service. NAME PLATE LOCATION: The graphic below indicates the location of the name plate. The model number, serial number, power requirements, etc., are located on this plate. You should record the model number, serial number, and the date of purchase in the spaces provided below and retain this manual as a permanent record of your purchase. Model Serial No. Purchase Date 92-469- 1 (rear) 2 MS40DR Owner’s Manual Explanation of Graphical Symbols The lightning flash with arrowhead symbol within an equilateral triangle is intended to alert the user to the presence of uninsulated “dangerous voltage” within the product’s enclosure that may be of sufficient magnitude to constitute a risk of electric shock to persons. C AU TION RISK OF ELECTRIC SHOCK DO NOT OPEN The exclamation point within an equilateral triangle is intended to alert the user to the presence of important operating and maintenance (servicing) instructions in the literature accompanying the product. CAUTION: TO REDUCE THE RISK OF ELECTRIC SHOCK, DO NOT REMOVE COVER (OR BACK). NO USER-SERVICEABLE PARTS INSIDE. REFER SERVICING TO QUALIFIED SERVICE PERSONNEL. The above warning is located on the top/bottom/rear/side of the unit. IMPORTANT SAFETY INSTRUCTIONS 1 2 3 4 5 6 7 8 9 10 Read these instructions. Keep these instructions. Heed all warnings. Follow all instructions. Do not use this apparatus near water. Clean only with dry cloth. Do not block any ventilation openings. Install in accordance with the manufacturer’s instructions. Do not install near any heat sources such as radiators, heat registers, stoves, or other apparatus (including amplifiers) that produce heat. Do not defeat the safety purpose of the polarized or grounding-type plug. A polarized plug has two blades with one wider than the other. A grounding type plug has two blades and a third grounding prong. The wide blade or the third prong are provided for your safety. If the provided plug does not fit into your outlet, consult an electrician for replacement of the obsolete outlet. Protect the power cord from being walked on or pinched particularly at plugs, convenience receptacles, and the point where they exit from the apparatus. 11 12 13 14 Only use attachments/accessories specified by the manufacturer. Use only with the cart, stand, tripod, bracket, or table specified by the manufacturer, or sold with the apparatus. When a cart is used, use caution when moving the cart/apparatus combination to avoid injury from tip-over. Unplug this apparatus during lightning storms or when unused for long periods of time. Refer all servicing to qualified service personnel. Servicing is required when the apparatus has been damaged in any way, such as power-supply cord or plug is damaged, liquid has been spilled or objects have fallen into the apparatus, the apparatus has been exposed to rain or moisture, does not operate normally, or has been dropped. WARNING TO REDUCE THE RISK OF FIRE OR ELECTRIC SHOCK, DO NOT EXPOSE THIS APPARATUS TO RAIN OR MOISTURE. (UL60065_03) IMPORTANT NOTICE FOR THE UNITED KINGDOM Connecting the Plug and Cord IMPORTANT. The wires in this mains lead are coloured in accordance with the following code: BLUE : NEUTRAL BROWN : LIVE As the colours of the wires in the mains lead of this apparatus may not correspond with the coloured makings identifying the terminals in your plug proceed as follows: The wire which is coloured BLUE must be connected to the terminal which is marked with the letter N or coloured BLACK. The wire which is coloured BROWN must be connected to the terminal which is marked with the letter L or coloured RED. Making sure that neither core is connected to the earth terminal of the three pin plug. • This applies only to products distributed by Yamaha Music U.K. Ltd. (2 wires) MS40DR Owner’s Manual 3 PRECAUTIONS PLEASE READ CAREFULLY BEFORE PROCEEDING * Please keep this manual in a safe place for future reference. WARNING Always follow the basic precautions listed below to avoid the possibility of serious injury or even death from electrical shock, short-circuiting, damages, fire or other hazards. These precautions include, but are not limited to, the following: Power supply/Power cord Water warning • Do not expose the instrument to rain, use it near water or in damp or wet conditions, or place on it any containers (such as vases, bottles or glasses) containing liquids which might spill into any openings. If any liquid such as water seeps into the instrument, turn off the power immediately and unplug the power cord from the AC outlet. Then have the instrument inspected by qualified Yamaha service personnel. • Do not place the power cord near heat sources such as heaters or radiators, and do not excessively bend or otherwise damage the cord, place heavy objects on it, or place it in a position where anyone could walk on, trip over, or roll anything over it. • Only use the voltage specified as correct for the instrument. The required voltage is printed on the name plate of the instrument. • Check the electric plug periodically and remove any dirt or dust which may have accumulated on it. • Never insert or remove an electric plug with wet hands. Fire warning Do not open • This instrument contains no user-serviceable parts. Do not attempt to disassemble or modify the internal components in any way. If it should appear to be malfunctioning, discontinue use immediately and have it inspected by qualified Yamaha service personnel. • Do not put burning items, such as candles, on the unit. A burning item may fall over and cause a fire. If you notice any abnormality • When one of the following problems occur, immediately turn off the power switch and disconnect the electric plug from the outlet. Then have the device inspected by Yamaha service personnel. • The power cord or plug becomes frayed or damaged. • It emits unusual smells or smoke. • Some object has been dropped into the instrument. • There is a sudden loss of sound during use of the instrument. CAUTION Always follow the basic precautions listed below to avoid the possibility of physical injury to you or others, or damage to the instrument or other property. These precautions include, but are not limited to, the following: Power supply/Power cord • Do not connect the instrument to an electrical outlet using a multiple-connector. Doing so can result in lower sound quality, or possibly cause overheating in the outlet. • When removing the electric plug from the instrument or an outlet, always hold the plug itself and not the cord. Pulling by the cord can damage it. • Remove the electric plug from the outlet when the instrument is not to be used for extended periods of time, or during electrical storms. Location • Make sure to place the subwoofer unit away from walls or other objects leaving space of at least 20cm (about 8 inches) above and 10cm (4 inches) on all sides. (The unit has a built in amplifier and generates heat.) Also make sure not to lay the unit on any surface with the rear panel facing down. • Do not place the instrument in an unstable position where it might accidentally fall over. • Before moving the instrument, remove all connected cables. (7)-1 4 MS40DR Owner’s Manual • When setting up the product, make sure that the AC outlet you are using is easily accessible. If some trouble or malfunction occurs, immediately turn off the power switch and disconnect the plug from the outlet. Even when the power switch is turned off, electricity is still flowing to the product at the minimum level. When you are not using the product for a long time, make sure to unplug the power cord from the wall AC outlet. • Use only the stand/rack specified for the instrument. When attaching the stand or rack, use the provided screws only. Failure to do so could cause damage to the internal components or result in the instrument falling over. 1/2 Connections Handling caution • Before connecting the instrument to other electronic components, turn off the power for all components. Before turning the power on or off for all components, set all volume levels to minimum. • Do not rest your weight on, or place heavy objects on the instrument, and do not use excessive force on the buttons, switches or connectors. • Be sure to set the volumes of all components at their minimum levels and gradually raise the volume controls while playing the instrument to set the desired listening level. • Do not use the instrument/device or headphones for a long period of time at a high or uncomfortable volume level, since this can cause permanent hearing loss. If you experience any hearing loss or ringing in the ears, consult a physician. Yamaha cannot be held responsible for damage caused by improper use or modifications to the instrument, or data that is lost or destroyed. Always turn the power off when the instrument is not in use. NOTICE To avoid the possibility of damage to the product, data or other property, follow the notices below. Handling and Maintenance • Do not use the instrument in the vicinity of a TV, radio, stereo equipment, mobile phone, or other electric devices. Otherwise, the instrument, TV, or radio may generate noise. • Do not expose the instrument to excessive dust or vibrations, or extreme cold or heat (such as in direct sunlight, near a heater, or in a car during the day) to prevent the possibility of panel disfiguration or damage to the internal components. • Do not place vinyl, plastic or rubber objects on the instrument, since this might discolor the panel or keyboard. • When cleaning the instrument, use a soft, dry or slightly damp cloth. Do not use paint thinners, solvents, cleaning fluids, or chemicalimpregnated wiping cloths. • During extreme changes in temperature or humidity, condensation may occur and water may collect on the surface of the instrument. If water is left, the wooden parts may absorb the water and be damaged. Make sure to wipe any water off immediately with a soft cloth. Information About this manual • The illustrations as shown in this manual are for instructional purposes only, and may appear somewhat different from those on your instrument. • The company names and product names in this manual are the trademarks or registered trademarks of their respective companies. (7)-1 2/2 MS40DR Owner’s Manual 5 Thank you for purchasing the Yamaha MS40DR Monitor Speaker system. Before using the speakers, we ask that you thoroughly read this Owner’s Manual to use the product in a safe manner. Packing List Satellite speakers (2) Pipe clamps (2) RCA pin/8-pin - RCA pin/phone combination cable (1) Subwoofer speaker (1) Hex key (1) Owner’s Manual (this document) Controls & Connectors Subwoofer speaker [Front] w Power switch Press to turn the power ON ( ) or OFF ( ). e MASTER VOLUME This dial controls the master volume. Turn the dial clockwise to increase the volume or counter-clockwise to decrease it. r TO DTX / SATELLITE SP jack This jack is used to connect the subwoofer speaker to the satellite speakers and the drum trigger module. q BASS control Satellite speaker [Rear] Use this control to adjust the volume of the subwoofer. For best results, set this to the midway position or slightly higher. Turn it clockwise to increase the volume and counterclockwise to decrease it. [Rear] t INPUT jack This jack is used to connect the satellite speaker to the subwoofer. 6 MS40DR Owner’s Manual Installing the Monitor Speaker 1. First insert the speaker mount of the satellite • Be sure to tighten the screws securely. speaker into the hole q of the pipe clamp, then tighten the screw firmly by using the included hex key. [Figure A] Pipe clamp q Satellite speaker Hex key (included) w Drum rack leg Speaker mount 2. As shown in Figure A, slowly insert one leg of your [Figure B] drum rack through the hole w of the pipe clamp. When you finish adjusting the position, tighten the screw firmly by using the included hex key as shown in Figure B. Hex key (included) CAUTION • Be sure to attach the satellite speaker to the leg of the drum rack slowly. 3. See Figure C. Place the Subwoofer speaker on a flat floor. 4. Connect the satellite speakers, subwoofer speaker, and the drum trigger module via the included cable as shown in Figure C. [Figure C] Satellite speaker Satellite speaker White Red Drum trigger module OUTPUT L/MONO White OUTPUT R White Red Subwoofer speaker Red Red White * For the stereo audio cables, red indicates the right channel, and white indicates the left. 5. Plug the AC power cord into an AC wall socket or another electrical outlet. CAUTION • Even when the power switch is in the OFF ( ) position, a small amount of electricity is still flowing to the unit. When you are not using the MS40DR for a long time, make sure to unplug the AC power adaptor from the wall AC outlet. MS40DR Owner’s Manual 7 Troubleshooting No sound comes from the speakers or subwoofer. The AC power cord is not properly plugged into the wall outlet. Insert the AC power cord firmly into the wall outlet. The main power switch on the subwoofer is set to OFF. Set the main power switch to ON. Connections are faulty or incomplete. Make sure the connections are secure, or use a different cable. The volume is set too low. Turn the MASTER VOLUME to the right to increase the volume. Turn the subwoofer BASS control to the right to increase the volume. The volume of your drum trigger module is set too low. Raise the volume of your drum trigger module. The MASTER VOLUME dial is set too high. Turn the MASTER VOLUME to the left to decrease the volume. The BASS control dial is set too high. Turn the BASS control to the left to decrease the volume of the Subwoofer speaker. The levels of the mid and low frequency ranges in the Master EQ settings of your drum trigger module are set too high. Adjust the Master EQ settings of your drum trigger module. For details, refer to the Owner’s Manual that came with your drum trigger module. Noise occurs in the sound. Connections are faulty or incomplete. Make sure the connections are secure, or use a different cable. The speakers produce a “pop” sound whenever the power is turned ON or OFF. The instrument’s power is turned ON before the Subwoofer’s power is turned ON. First, turn the subwoofer’s power ON, then turn the instrument’s power ON. Sound is distorted. Specifications Output power Satellite speakers 20W + 20W (1kHz, 20W/4Ω) Subwoofer 40W Frequency response Satellite speakers / Subwoofer speaker 32Hz – 20kHz Speaker unit Satellite speakers Tweeter: 1.9 cm (3/4") dome, magnetic shielding Midrange: 8 cm (3") cone, magnetic shielding Subwoofer 16 cm (6.5") cone, magnetic shielding Power consumption 65W Power supply U.S.A. and Canada models: AC 120 V, 60 Hz Australia model: AC 240 V, 50 Hz U.K. and Europe models: AC 220-230 V, 50-60 Hz Dimensions (W x H x D) Weight Accessories Satellite speakers 97 x 159 x 178 mm Subwoofer 350 x 210 x 321 mm Satellite speakers 0.7kg x 2 Subwoofer 7.4kg Pipe clamps (2), hex key (1), RCA pin/8-pin - RCA pin/phone combination cable (1), Owner’s Manual (this document) * Specifications and descriptions in this Owner’s Manual are for information purposes only. Yamaha Corp. reserves the right to change or modify products or specifications at any time without prior notice. Since specifications, equipment or options may not be the same in every locale, please check with your Yamaha dealer. 8 MS40DR Owner’s Manual-
 1
1
-
 2
2
-
 3
3
-
 4
4
-
 5
5
-
 6
6
-
 7
7
-
 8
8


in andere talen
- English: Yamaha MS40DR User manual
- italiano: Yamaha MS40DR Manuale utente
- русский: Yamaha MS40DR Руководство пользователя
- français: Yamaha MS40DR Manuel utilisateur
- español: Yamaha MS40DR Manual de usuario
- Deutsch: Yamaha MS40DR Benutzerhandbuch
- português: Yamaha MS40DR Manual do usuário
- dansk: Yamaha MS40DR Brugermanual
- suomi: Yamaha MS40DR Ohjekirja
- čeština: Yamaha MS40DR Uživatelský manuál
- svenska: Yamaha MS40DR Användarmanual
- Türkçe: Yamaha MS40DR Kullanım kılavuzu
- polski: Yamaha MS40DR Instrukcja obsługi
- română: Yamaha MS40DR Manual de utilizare